
Decade Maple Satin - Battery Pearl Sports - Free user manual and instructions
Find the device manual for free Decade Maple Satin Pearl Sports in PDF.


| Product Type | Acoustic Drum Set |
| Brand | Pearl |
| Model | Decade Maple Satin |
| Shell Material | Maple |
| Finish | Satin |
| Configuration | 5-piece: Bass Drum, Snare Drum, Two Tom Toms, Floor Tom |
| Bass Drum Size | 22" x 18" (typical) |
| Snare Drum Size | 14" x 5.5" (typical) |
| Tom Toms Size | 10" x 7" and 12" x 8" (typical) |
| Floor Tom Size | 16" x 16" (typical) |
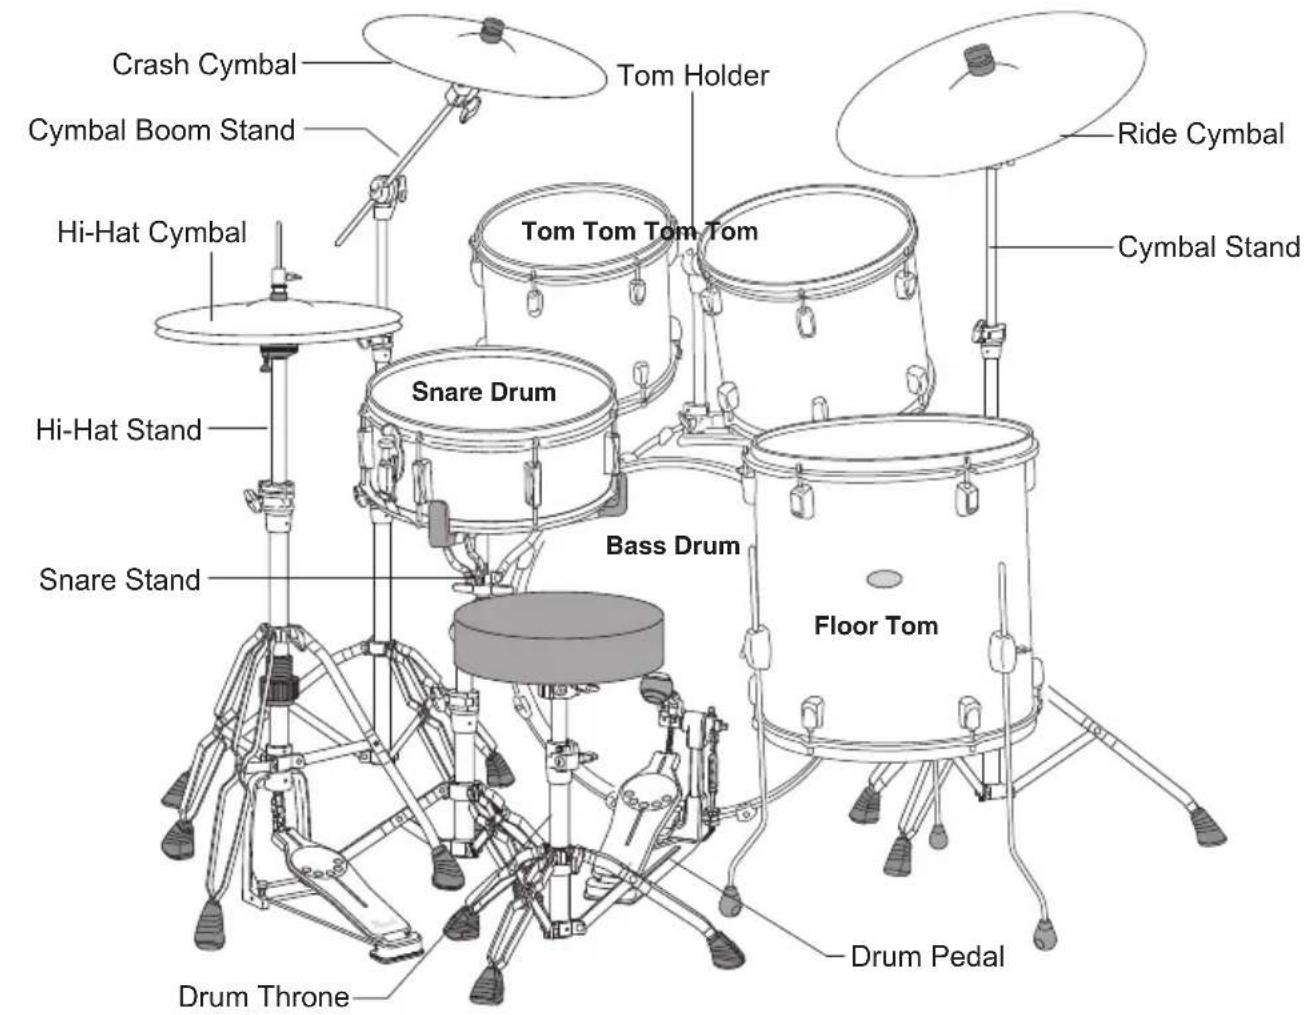
| Hardware Included | Cymbal Stands (2), Boom Stand, Hi-Hat Stand, Snare Stand, Drum Throne, Bass Drum Pedal, Tom Holders |
| Hoop Type | Bass Drum: Wood hoops with hoop protector; Toms/Snare: Steel hoops |
| Mounting System | TH-900 or TH-701 Tom Holders with StopLock |
| Features | Adjustable bass drum spurs with spike tips, floor tom legs with wing bolts, cymbal tilter with reversible nut |
| Tuning | Crisscross pattern tension adjustment, recommended 20-30mm from rim tap zone |
| Safety Precautions | Spike tips are sharp; use only on thick carpet to prevent floor damage |
| Maintenance | Wipe with dry cloth; ensure all bolts and nuts are tight before playing |
| Replacement Parts | Drum heads, tension rods, hoops, felts, cymbal nuts available from Pearl |
| Warranty | Refer to Pearl warranty policy |
Frequently Asked Questions - Decade Maple Satin Pearl Sports
User questions about Decade Maple Satin Pearl Sports
0 question about this device. Answer the ones you know or ask your own.
Ask a new question about this device
Download the instructions for your Battery in PDF format for free! Find your manual Decade Maple Satin - Pearl Sports and take your electronic device back in hand. On this page are published all the documents necessary for the use of your device. Decade Maple Satin by Pearl Sports.
USER MANUAL Decade Maple Satin Pearl Sports
Congratulations on your purchase! To get optimum performance from your Pearl drum set, please read this Instruction Manual first before playing.
Bass Drum Assembly
The Bass Drum is packed with the Shell, Bass Drum Hoops, Heads and Parts unassembled. Please follow the instructions below to assemble the Bass Drum.
- Place the Shell on a clean, solid surface with the front side (the side with the Bass Drum Spurs attached) facing upwards. Put the Front Head with Pearl Logo on the Shell then attach the Bass Drum Hoop with flat side down on the Rim of the Head (Fig.1).
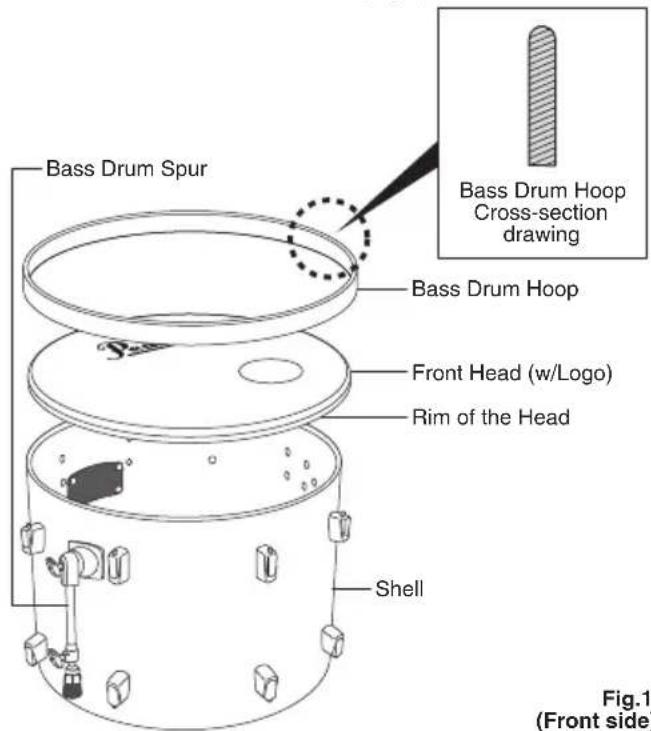
Note The Bass Drum Hoop without the Hoop Protector (Fig.4) is used on the front side.
- Pass a Tension Rod through a Hook, and hook it on the Bass Drum Hoop above a Lug. Finger tighten the Tension Rod into the Lug and do the same with the rest of the Tension Rods/Hooks on this side of the drum (Fig.2). Using a Tuning Key, tighten the Tension Rod until secure (Refer to the "Basic Tuning" section at the end of this manual).
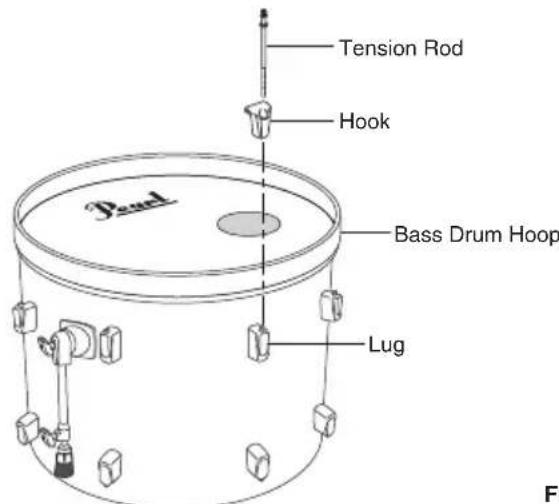
Fig.2
- Turn the Shell over to the batter side and place the other Head and Bass Drum Hoop on the Shell. The batter side Bass Drum Hoop has a Hoop Protector (Fig.4) where the Pedal is to be attached. Position the Bass Drum Hoop so that the Hoop Protector is on the opposite side of the Tom Holder Bracket. Attach the Tension Rods/Hooks in the same way as the front side (Fig.3).
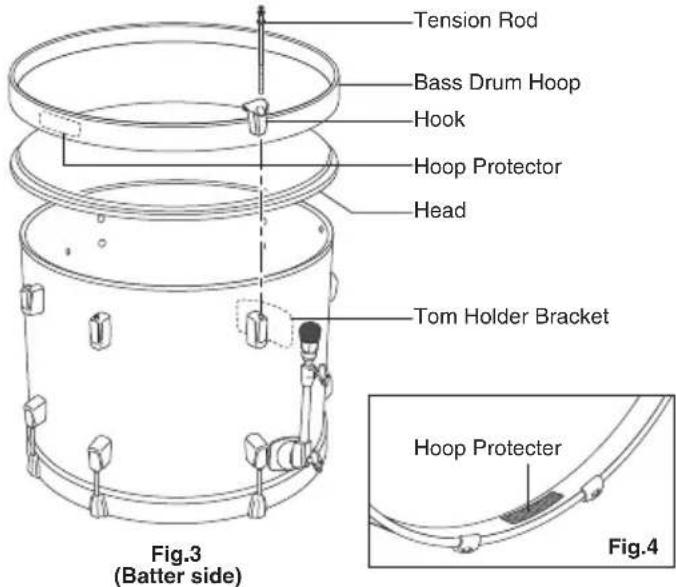
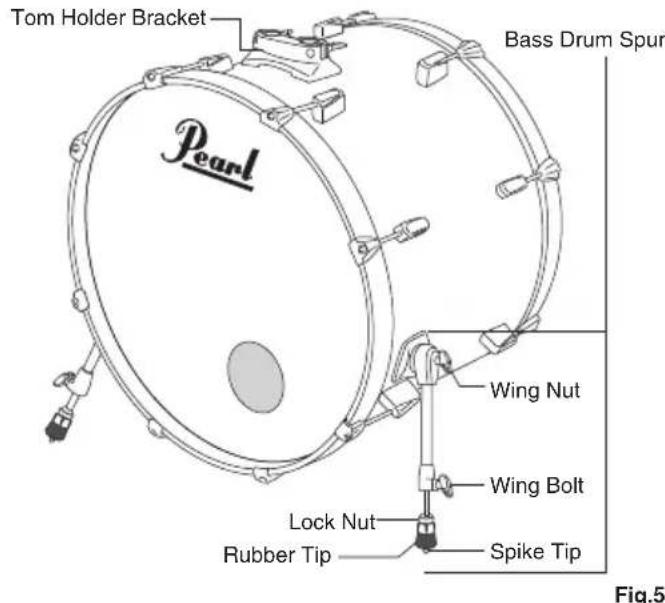
- Position the Bass Drum with the Tom Holder Bracket facing upwards. Loosen the Wing Nut on the Bass Drum Spur and rotate it to the position shown. Tighten the Wing Nut to secure. Loosen the Wing Bolt and extend the Spurs so that the front of the Bass Drum is about an inch off the floor. Make sure that the Spurs on both sides are equal in length, and tighten the Wing Bolts. The Bass Drum Spurs have Spike Tips (for added slip resistance) that can be exposed by turning the Lock Nut and Rubber Tip clockwise (Fig.5).
CAUTION
The Spike Tips are sharp. Be careful not to hurt yourself or others when using them. Use the Spike Tips only on thick carpeted surfaces to prevent damage to the flooring underneath
Floor Tom Assembly
The Floor Tom is packed with the Shell, Steel Hoops, Heads and Floor Tom Legs unassembled. Please follow the assembly instructions below to assemble the Floor Tom.
* The EXPORT Floor Toms are packed with the Heads and Hoops assembled. Please proceed to step 4.
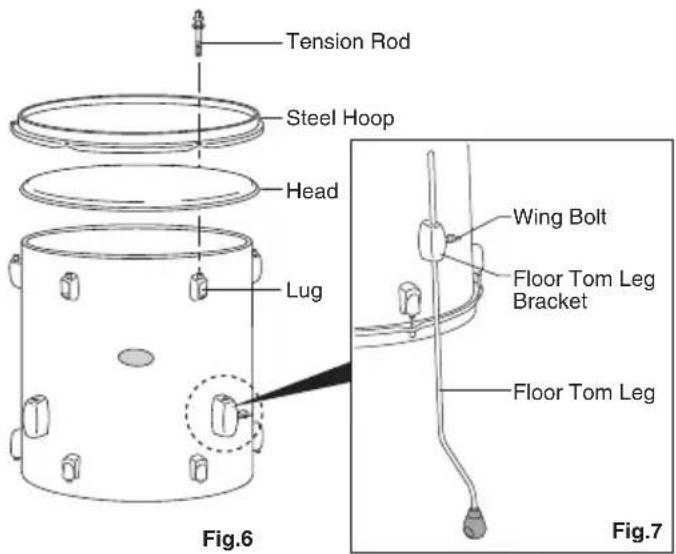
- Place the Shell on a clean, solid surface with the batter side facing upwards as shown in Fig.6. Put the Head on the Shell followed by the Steel Hoop.
Note For Decade Maple, use the Thicker Head for the batter side.
- Line up the ears of the Steel Hoop over the Lugs and insert the Tension Rods through the ears. Finger tighten them into all the Lugs on this side of the drum. Using a Tuning Key, tighten the Tension Rods until secure (Refer to the "Basic Tuning" section at the end of this manual) (Fig. 6).
- Turn the drum over and attach the other Head and Steel Hoop with the remaining Tension Rods.
- Attach the Floor Tom Legs to the Floor Tom Leg Brackets and set the height and angle to your preference. Tighten the Wing Bolt to secure position (Fig.6, 7).
Tom Tom Setting
Insert the long ends of the Tom Holders into the Tom Holder Bracket on the Bass Drum as shown (Fig.8) and tighten the Wing Nuts on the Tom Holder Bracket. Next, loosen the Key Bolts on the TH-900l Tom Holders using a Tuning Key or loosen the Wing Nuts on the TH-70l Tom Holders. Adjust the angle of the Tom Holders so you can attach the Tom Toms easily then retighten the Key Bolts/Wing Nuts (Fig.9). Attach the Tom Toms to the other end of the Tom Holders and tighten the Wing Nuts on the mounts on the Tom Toms.
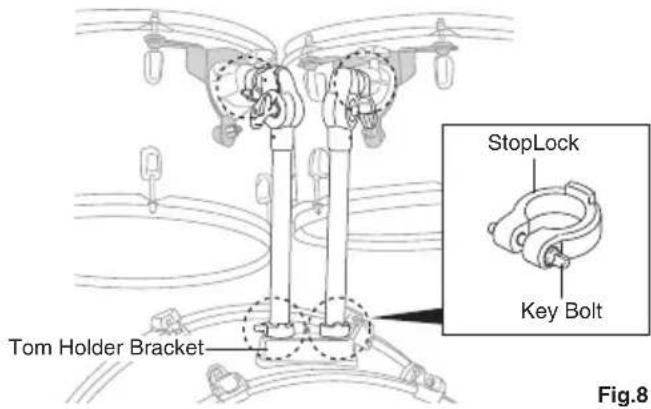
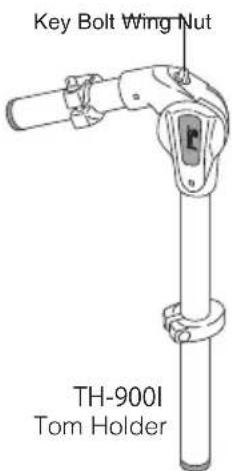
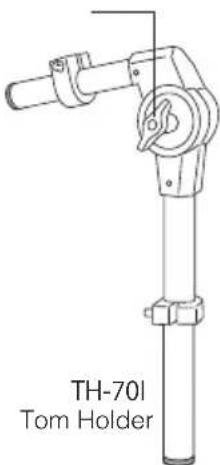
Fig.9
Note The Tom Holders are equipped with StopLocks that keep the drums from slipping or rotating and to memorize position settings for quick and repeatable set-ups. When the position of the Tom Toms are set, place each StopLock into the slots in the Tom Holder Bracket and the mounts on the Tom Toms to retain these settings (refer to the Set-Up Example illustration on the first page of this manual).
Cymbal / Boom Stand Assembly
Open the legs of the Stand Base to form a stable tripod and tighten the Wing Bolt. Insert the Center Tube Assembly into the Die-Cast Joint of the Stand Base and tighten the Wing Nut/Wing Bolt*. Next, insert the Upper Tube Assembly into the Die-Cast Joint of the Center Tube Assembly and tighten the Wing Nut/Wing Bolt*. The Boom Arm of the Boom/Cymbal Stand is housed in the Upper Tube. Loosen the Wing Nut on the Boom Gear and adjust the angle and length of the Boom Arm to your preference (Fig. 10). Refer to the Reversible Nut Assembly (Fig.11) and attach the cymbal and adjust the angle of the Tilter to your liking. Secure all Wing Bolts and Wing Nuts before playing.
* The 930 series stands are equipped with Wing Nuts on the Die-Cast Joints, and the 830 series stands are equipped with Wing Bolts.
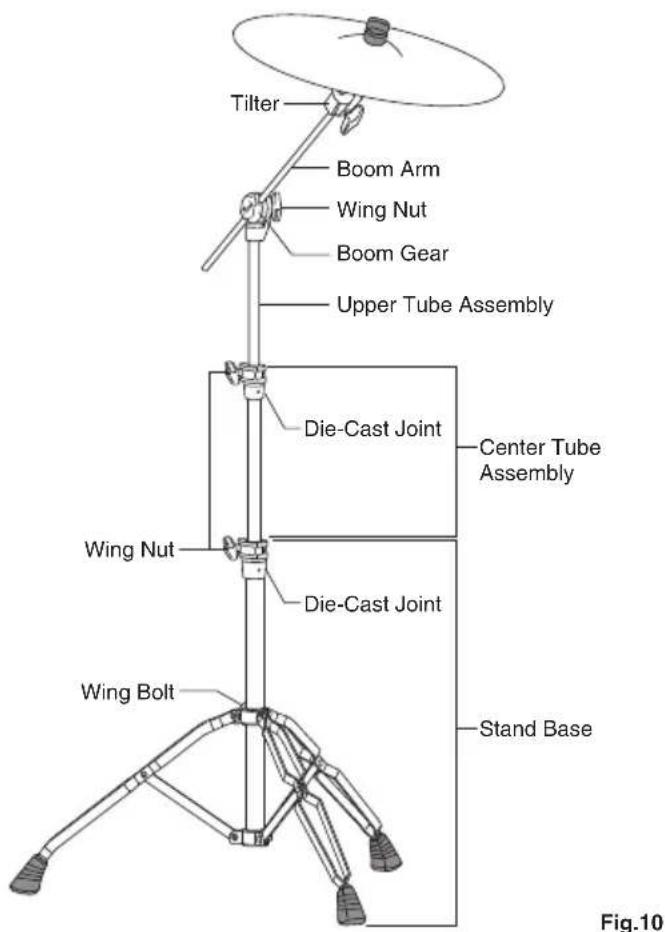
Setting the Cymbal / Boom Stand Reversible Nut Assembly
Unscrew the Reversible Nut from the Cymbal Post and remove it along with the Upper Felt Washer. Place the cymbal over the Cymbal Post and rest it on the Lower Felt Washer. Place the Upper Felt Washer on the Cymbal, followed by the Reversible Nut as shown (Fig. 11).
![graph TD A["Reversible Nut"] --> B["Upper Felt Washer"] B --> C["Cymbial Post"] C --> D["Lower Felt Washer"]](/content/2026/05/819475/images/4c6fb6d90dd4005516de7f8f419b25b4930b8c1dbece8dac5780b23b406af569.jpg)
Fig.11
Tip
The Reversible Nut can be set right-side up to allow the cymbal freedom of motion (Fig.12-A), or upside-down to restrict the motion of the cymbal for a tighter sound (Fig.12-B). Crash the cymbal with a glancing blow to minimize breakage especially when the cymbal is tight.
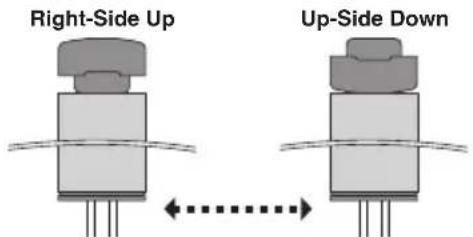
Fig.12-A Fig.12-B
Setting the Snare Drum
Open the legs of the Stand Base to form a stable tripod and tighten the Wing Bolt. Loosen the Wing Nut on the Tilter of the Basket Assembly and adjust the angle of the Basket as shown (Fig.13). Insert the Basket Assembly into the Die-Cast Joint of the Stand Base and tighten the Wing Nut/Wing Bolt*. Open the Basket and adjust the Butterfly Nut as needed to accommodate the Snare Drum. Place the Snare Drum into the Basket with the strainer positioned where it can be conveniently operated with your left hand, and tighten the Butterfly Nut to hold the Snare Drum securely (do not overtighten).
* The S-930 Snare Stand is equipped with a Wing Nut on the Die-Cast Joint, and the S-830 Snare Stand is equipped with a Wing Bolt.
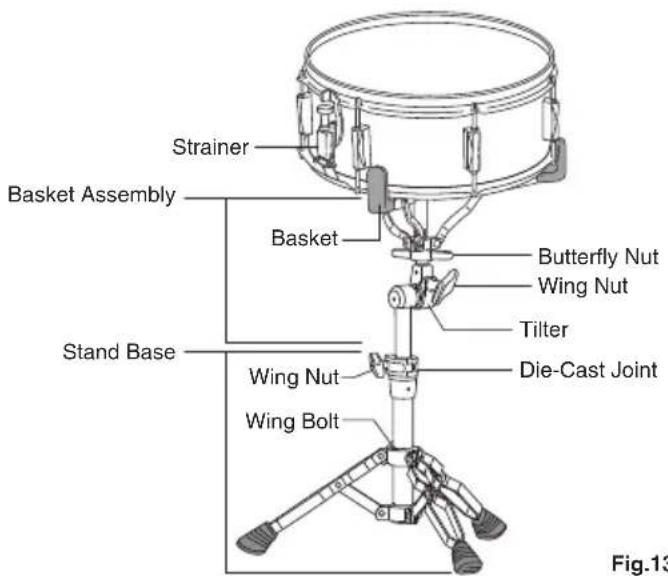
Basic Tuning
Gradually tighten the Tension Bolts using a crisscross pattern as shown. Tap the Head at each Tension Rod in a zone between 20mm and 30mm from the rim as shown below and listen to the pitches. Adjust the tuning as needed to achieve uniform pitch all around the Head.
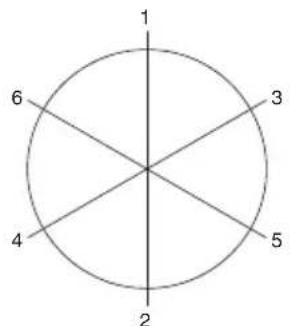
6 / Tension Rods
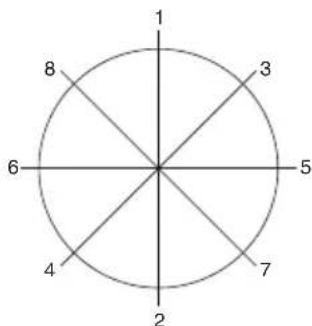
8 / Tension Rods
Note
There are three ways to tune the top and bottom heads: tune both heads to the same pitch, tune the bottom head tighter than the top, or tune the bottom head looser than the top. Experiment to find the tuning method that works best for you.
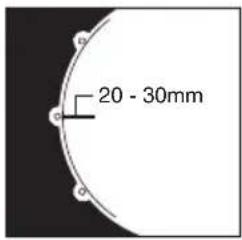
Tuning Points
You can control excessive "ring" with after-market drum heads or muffling devices. A simple and effective way to muffle your Bass Drum is to put a blanket inside. Additionally, many drummers like to port the front Bass Drum Head for a more controlled sound.

CAUTION
Make sure that all Wing Bolts, Wing Nuts, Bolts and Screws on the Stands and the Drums are tight before playing on your drum set.
For Pedal and Hi-Hat Stand assembly, refer to the individual manuals (included).
Please refer to the Set-Up Example on the cover page of this manual to see the completed kit.


Brand : Pearl Sports
Model : Decade Maple Satin
Category : Battery