Big Boss Gas Smoker - Grill Hark - Free user manual and instructions
Find the device manual for free Big Boss Gas Smoker Hark in PDF.


| Product Type | Gas Smoker |
| Model | Big Boss Gas Smoker (HK0535) |
| Brand | Hark |
| Overall Dimensions | 80.2 cm (W) x 52.2 cm (D) x 145 cm (H) |
| Fuel Type | Universal LPG (Propane) |
| Total Gas Consumption | 22.0 MJ/h |
| Number of Burners | 2 |
| Burner Output (each) | 11.0 MJ/h |
| Gas Pressure | 2.75 kPa |
| Injector Size | 0.92 mm |
| Number of Cooking Grates | 6 |
| Adjustable Grate Positions | 12 |
| Temperature Gauge | Yes, on front door |
| Water Bowl | Included, capacity up to 2.5 cm from rim |
| Wood Chip Box | Included, with lid |
| Ignition System | Push-button electronic; match lighting backup |
| Safety Features | Flame failure device, leak test required before each use |
| Materials | Steel body with heat-resistant paint finish |
| Warranty | 12 months from purchase date |
| Usage Location | Outdoor use only |
| Assembly Required | Yes (tools not included, two persons recommended) |
| Storage | Cover when not in use, store gas cylinder outdoors |
Frequently Asked Questions - Big Boss Gas Smoker Hark
User questions about Big Boss Gas Smoker Hark
0 question about this device. Answer the ones you know or ask your own.
Ask a new question about this device
Download the instructions for your Grill in PDF format for free! Find your manual Big Boss Gas Smoker - Hark and take your electronic device back in hand. On this page are published all the documents necessary for the use of your device. Big Boss Gas Smoker by Hark.
USER MANUAL Big Boss Gas Smoker Hark
natural_image
Line drawing of a two-tiered industrial stove or boiler unit with control panel and fan (no text or symbols)Owner's Manual
ASSEMBLY, CARE & SAFETY INSTRUCTIONS
Item No. HK0535
HARK BIG BOSS GAS SMOKER Warranty Details
The product is guaranteed to be free from defects in workmanship and parts for a period of 12 months from the date of purchase. Defects that occur within this warranty period, under normal use and care, will be repaired, replaced or refunded at our discretion.
Exposure of the product to the elements should be minimised. Once the unit has cooled and is cleaned, store the product under cover. Polyester / vinyl barbecue covers are an optional accessory that are recommended and can be purchased from your local HARK retail dealer.
- This warranty does not cover units that have been altered or modified.
- This warranty does not cover unauthorised repairs during the warranty period.
- This warranty does not cover damage due to normal wear and tear, misuse, abuse, accidents or improper maintenance.
- This warranty does not cover surface scratches, dents, chips, corrosion, discolouring caused by heat or heat damage or caused by abrasive or chemical cleaners.
- This warranty does not cover corrosion or rust caused by exposure to the elements, grease fires, insects, weather or hail. (Rust can be removed by a scrub pad and then the surface coated with cooking oil or touched up with high heat resistant paint).
CONDITIONS OF WARRANTY
- The appliance is delivered to the HARK distributor's service department or authorised service agent and freight charges both ways are paid by the owner. No liability is accepted for loss or damage during transit.
- The appliance is installed by a qualified person and operated and maintained in accordance with the instructions supplied. Repairs or service must be carried out by an authorised person.
• Installation must conform to the applicable Gas, Electrical and Building standards laid down by the local codes for your country or region. - No alterations or repairs have been carried out without obtaining the distributors prior consent. Such repair or any replacement does not extend the warranty period.
• Proof of purchase together must be provided to verify purchase date and establish the warranty period. Only the original purchaser is covered under this warranty. - The warranty period is calculated from the date of purchase only.
- Parts installed from other manufacturers' products will void this warranty.
The benefits conferred by this warranty are in addition to all rights and remedies in respect of the product that the consumer has under the Competition and Consumer Act 2010 and similar state and territory laws.
Our goods come with guarantees that cannot be excluded under the Australian Consumer Law. You are entitled to a replacement or refund for a major failure and for compensation for any other reasonably foreseeable loss or damage. You are also entitled to have the goods repaired or replaced if the goods fail to be of acceptable quality and the failure does not amount to a major failure.
READ ALL SAFEGUARDS AND INSTRUCTIONS THOROUGHLY!
YOUR SAFETY IS VERY IMPORTANT – FAILURE TO FOLLOW PROPER PROCEDURES AND SAFEGUARDS MAY RESULT IN PROPERTY DAMAGE OR PERSONAL INJURY.
| ⚠️ DANGER DANGER | ⚠️ ⚠️ |
| - This smoker is for OUTDOOR USE ONLY.- Never operate this smoker unattended.- The use of alcohol, prescription or non prescription drugs may impair the consumer’s ability to properly assemble or safely operate the smoker.- Never operate this smoker within 7.5m (25 feet) of any flammable liquids.- Use this smoker only on a level, stable noncombustible surface like brick, concrete or dirt. Do not use smoker on or around any surface that will burn or melt like wooden decks, dry grass, leaves, wood rails, vinyl, or plastic.- Never operate this smoker under any overhead roof covering, awning or overhang. Never use inside an enclosed area such as screen patios, garages, buildings and tents. Keep a minimum clearance of 100cm from all sides of the smoker to all overhead construction and 100cm from any walls or rails.- Never use in or on recreational vehicles and/or boats.- Never use this product for anything other than its intended purposes. Never use this smoker as a heater.- Do not use or store flammable materials in or near this appliance.- Smoker is HOT while in use and after use.- Keep children and pets away from the smoker at all times.- Do not spray aerosoles in the vicinity of this appliance while it is in operation.- Do not modify this appliance and do not use unauthorised spare parts.- Do not place articles on or against this appliance. | - Avoid touching hot surfaces. Always wear protective gloves or mitts when operating the smoker.- Do not allow anyone to conduct activities around the smoker during or following its use until the unit has cooled. The smoker is hot during operation and remains hot for a period of time following its use.- Never move the smoker when it is in use. Allow the smoker to cool below 100°F (38°C) before moving or storing it.- Always wear shoes and protective clothing during operation of this smoker.- Accessory attachments and cookware not supplied with this smoker are not recommended for use.- Perform a leak test before each use of the smoker. (See page 18).- Keep the gas supply hose away from any heated surfaces.- Never attach a gas cylinder, move or alter fittings when the smoker is hot or in use.- Do not attempt to disconnect any gas fitting while the smoker is in operation.- Never use a gas cylinder if it appears to have dents, gouges, bulges, fire damage, erosion, leak age, excessive rust, or other forms of visible external damage. The cylinder may be hazardous and should be checked by a liquid propane supplier.- Before each use, inspect gas hose for any signs of damage and check all nuts and bolts to be sure that they are tight and secure.- When lighting your smoker, do not cover the burners or restrict airflow from the burners. An explosion could occur.- When lighting your smoker, always have both doors open. |

OUTDOOR USE ONLY

SAVE AND FILE THESE INSTRUCTIONS FOR FUTURE REFERENCE
IF A BURNER DOES NOT IGNITE, TURN OFF THE CONTROL KNOB AND GAS AND WAIT 5 MINUTES BEFORE TRYING TO LIGHT IT AGAIN. IF A BURNER GOES OUT DURING OPERATION, FIRST TURN THE CONTROL KNOB OFF, THEN THE GAS CYLINDER OFF.
READ ALL SAFEGUARDS AND INSTRUCTIONS THOROUGHLY!
YOUR SAFETY IS VERY IMPORTANT – FAILURE TO FOLLOW PROPER PROCEDURES AND SAFEGUARDS MAY RESULT IN PROPERTY DAMAGE OR PERSONAL INJURY.
| DANGER DANGER | ! |
| Keep clear of the smoker hose. Tripping over the smoker hose may result in the spilling of HOT grease or water, causing personal injury or property damage.In the event of an oil/grease fire, immediately turn off gas supply and call the fire Department. Do not attempt to extinguish a fire with water. A type BC or ABC fire extinguisher may in some cases contain the fire.Keep your hands, hair and face away from the burner flame. Do not lean over or in to the smoker when lighting the burners. This smoker has an open flame. Be careful of loose hair and clothing during operation, which could catch fire.After use, always turn the control valve OFF first, then the gas cylinder valve OFF. | Always allow the hot water from the water bowl to cool completely below 100°F (38C) before moving to avoid the possibility of severe burns.Never use glassware, plastic, or ceramic cookware in this smoker.Always disconnect the gas cylinder from your smoker when not in use.Do not store a spare LP-gas cylinder under or near the smoker.Gas cylinders must be stored outdoors, out of reach of children, and must not be stored in a building, garage, or any other enclosed area.If you smell, hear or see gas escaping, immediately get away from the gas cylinder and call the Fire Department. |

WARNING

DO NOT SPRAY AEROSOLS IN THE VICINITY OF THIS APPLIANCE WHILE IT IS IN OPERATION. DO NOT USE OR STORE FLAMMABLE MATERIALS IN OR NEAR THIS APPLIANCE. DO NOT PLACE ARTICLES ON OR AGAINST THIS APPLIANCE. DO NOT MODIFY THIS APPLIANCE.
USE CAUTION AND COMMON SENSE WHEN OPERATING YOUR SMOKER.
SAVE THESE INSTRUCTIONS
A. HARDWAREPACK
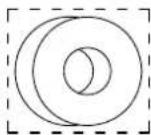
EE
M6 Flat Washer 2PCS
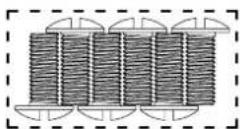
BB
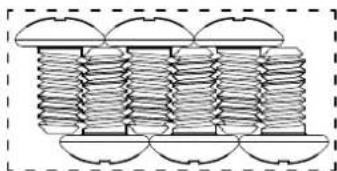
M4X10 Screw 6PCS
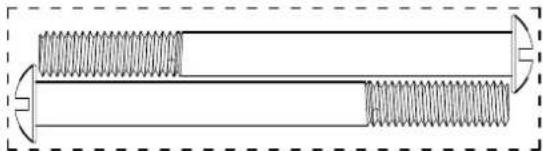
FF
M6x65 Screw 2PCS
natural_image
Technical line drawing of a mechanical bolt with threaded shafts and flanges (no text or symbols)CC
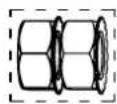
M6 Cap Nuts 4PCS
DD
M6 KEPS Nuts 2PCS
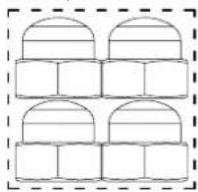
Extra Hardware
natural_image
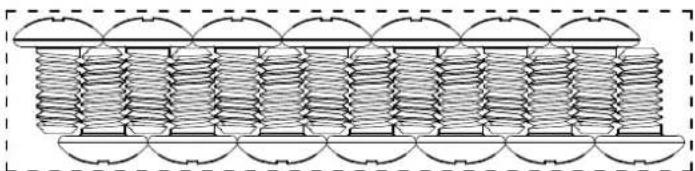
Diagram of coiled spring components with no text or symbolsAA
M6x12 Screw 42PCS
natural_image
Diagram of a coiled spring or coil assembly with repeating loops and mounting holes (no text or symbols)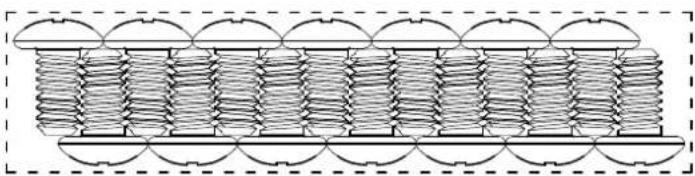
natural_image
Diagram of a coiled spring structure with repeating circular elements, enclosed in a dashed border (no text or symbols)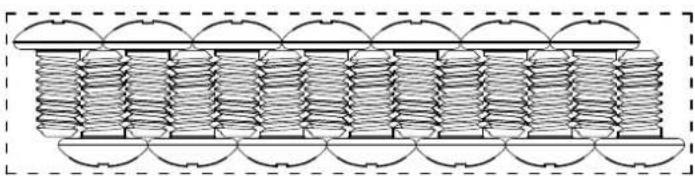
natural_image
Diagram of a coiled spring or coil assembly with repeating circular elements, no text or symbols presentB. PARTS LIST
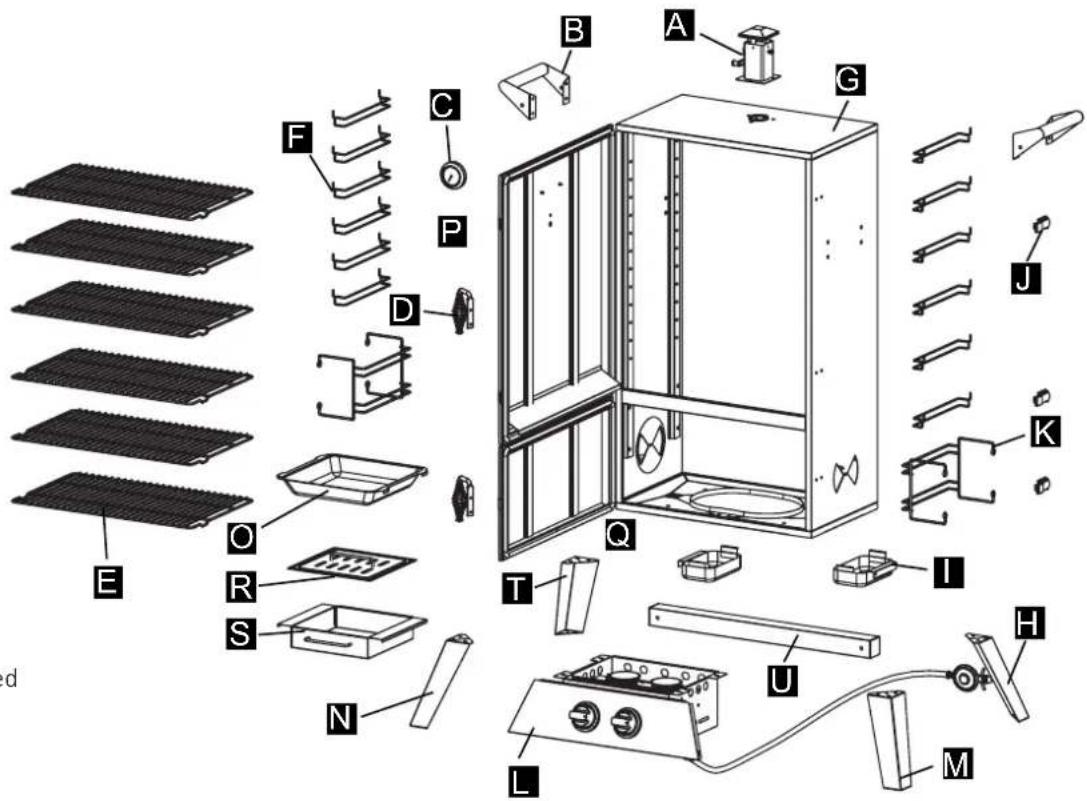
Read all safeguards and assembly instructions before assembling and operating your smoker.
Before assembling your new smoker, unpack all parts from the box. Carefully remove all packing material
and layout all the parts for easy access and identification. Do not discard the carton or packaging until your
smoker is fully assembled and operating to your satisfaction.
text_image
Exploded view diagram of a refrigerator with labeled parts including drawer, tray, door, and control panelProduct Dimensions: 80.2cm(w) x 52.2cm(d) x 145cm(h)
In order to properly assemble your smoker, you will only need two tools (tools not included):
- Philips head screwdriver
- shifter or 3/8" & 7/16" wrench
Be sure to have a friend help. The smoker is heavy and must be moved around during assembly and before use.
To use your smoker immediately after assembly, have an LP gas cylinder filled by an authorised LP dealer or cylinder exchange center.
Also, be sure to have your choice of flavouring wood readily available. (LP gas cylinder and flavouring wood are not included).
For further assistance, including missing or damaged parts, call 1300 799 787.
| Primary Components | ||||||
| Item D | Description Qty Item Descripition Qty | |||||
| A Smoker | Stack Assembly 1 L Burner & Control | Unit 1 | ||||
| B Side Handle | 2 M Front Leg-Right 1 | |||||
| C | Temperature Gauge | 1 | N | Front Leg-Left | 1 | |
| D Door Handle | 20 | Water BowlUpper Door | 1 | |||
| E Cooking Grate | 6 P | 1 | ||||
| F | Cooking Grate Support | 12 | Q | Lower Door | 1 | |
| G | Smoker Body | 1 | R | Wood Chip Box Lid | 1 | |
| H | Back Leg-Right | 1 | S | Wood Chip Box | 1 | |
| I | Grease Cup | 2 | T | Back Leg-Left | 1 | |
| J | Door Latch | 3 | U | Back Support Pipe | 1 | |
| K Support Bracket | 2 | |||||
C. ASSEMBLY INSTRUCTIONS
WARNING
DO NOT HANDLE SMOKER BY THE CROSS BAR ON SMOKER CABINET. DO NOT LIFT OR MOVE USING THIS CROSS BAR.
text_image
AA N T M G H
text_image
AA L G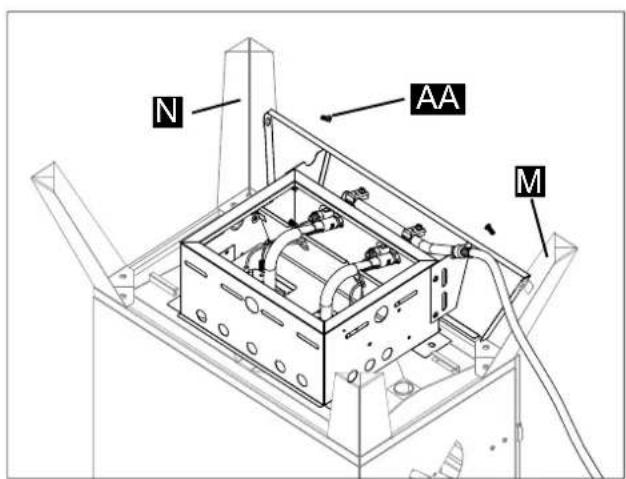
text_image
N AA MSTEP 1
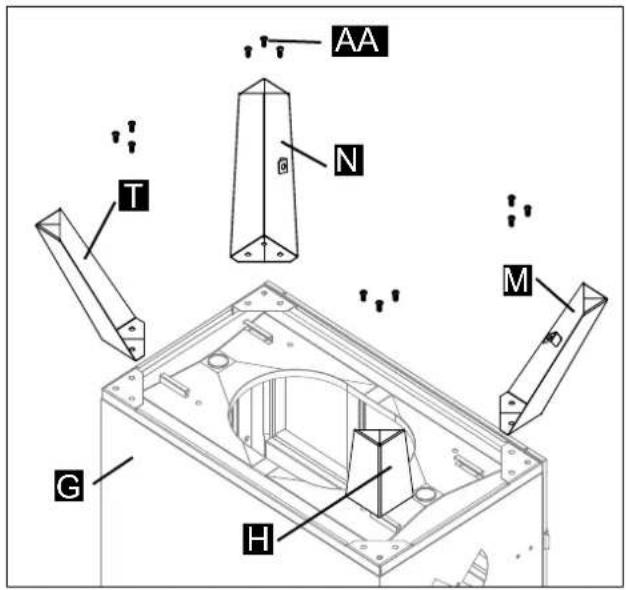
Locate: Rear Leg-Right (H), Rear Leg-Left (T), Front Leg-Right (M), Front Leg-Left (N), Smoker Body(G), twelve M6x12 screws (AA)
Note: The doors are attached to the Smoker Body.
Tools needed: Philips head screwdriver
Procedure:
- CAUTION: Remove the Upper (P) and Lower (Q) Doors before beginning assembly.
- Attach Rear Leg-Right (H) & Rear Leg-Left (T)& Front Leg-Right (M) & Front Leg-Left (N) to the Smoker Body (G) using twelve M6x12 screws (AA).
STEP 2
Locate: Burner & Control Unit (L), six M6x12 screws (AA)
Tools needed: Philips head screwdriver
Procedure:
- Turn the Burner & Control Unit (L) upside down and place it on the bottom of the Smoker Body (G). Align the four bottom mounting holes on the Burner & Control Unit (L) with the holes on the Smoker Body (G). Secure with four M6x12 screws (AA). Tighten screws.
Note: The control knob should be on the same side as the door.
- Align the mounting holes on the side of the control panel with the front legs and secure with two M6x12 screws (AA). Tighten screws.
text_image
AA A G DRINKS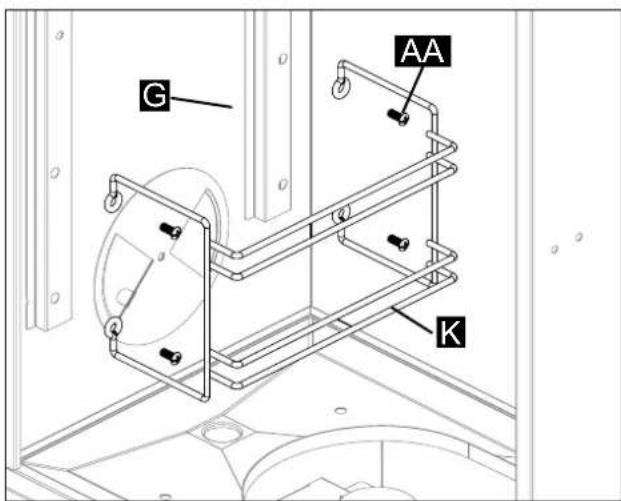
text_image
G AA K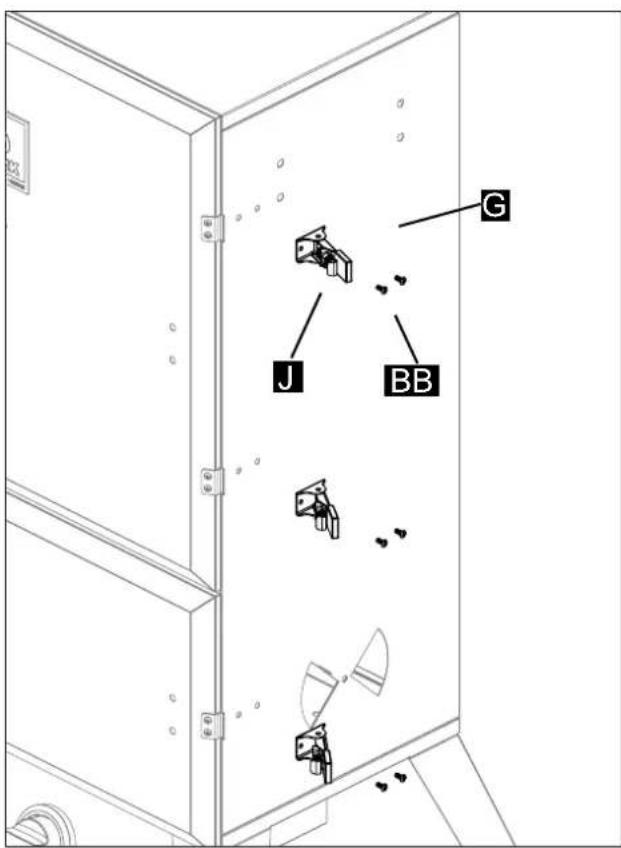
text_image
G J BBSTEP 3
CAUTION: This unit is HEAVY! Do not attempt this step without assistance!
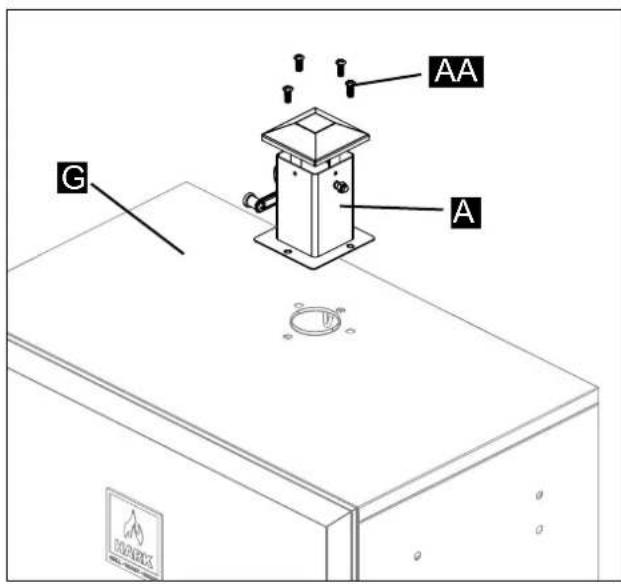
Locate: Smoker Stack (A), four M6x12 screws (AA)
Tools needed: Philips head screwdriver
Procedure:
- With the assistance of a helper, stand the unit upright on its legs on a firm and level surface. (Make sure that the legs are attached). Place the Upper (P) and Lower (Q) Doors back onto the hinges of the Smoker Body (G) and close the doors. Position the square Smoke Stack (A) with control arm to the left as shown. Using four screws (AA), attach square Smoke Stack (A) to the top of Smoker Body (G). Securely tighten with a Phillips screwdriver.
STEP 4
Locate: Two Support Brackets (K),
eight M6x12 screws (AA)
Tools needed: Philips head screwdriver
Procedure:
- Attach Support Bracket (K) to Smoker Body (G) using four M6x12 screws (AA). Repeat for remaining Bracket (K).
STEP 5
Locate: Three Door Latches(J),
six M4x10 screws(BB)
Tools needed: Philips head screwdriver
Procedure:
- Attach the three Door Latches (J) to Smoker Body (G) using two M4x10 screws (BB).
text_image
G B AA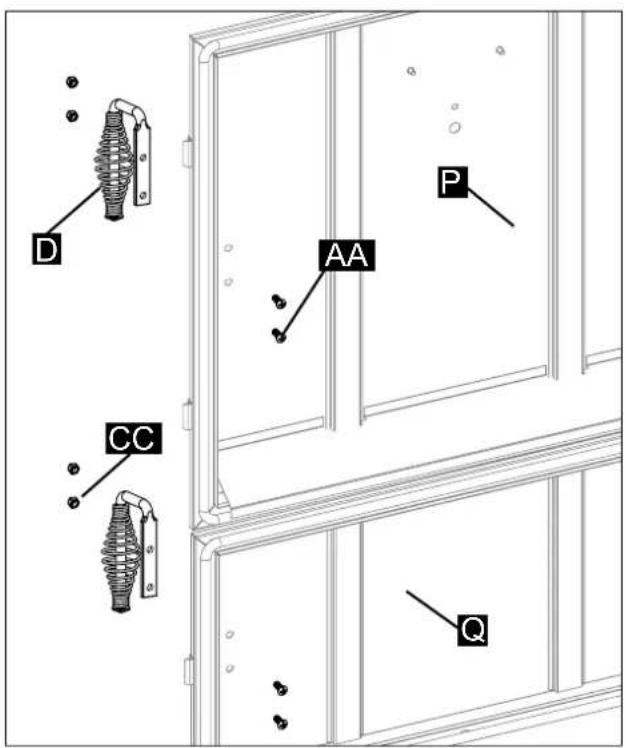
text_image
D P AA CC Q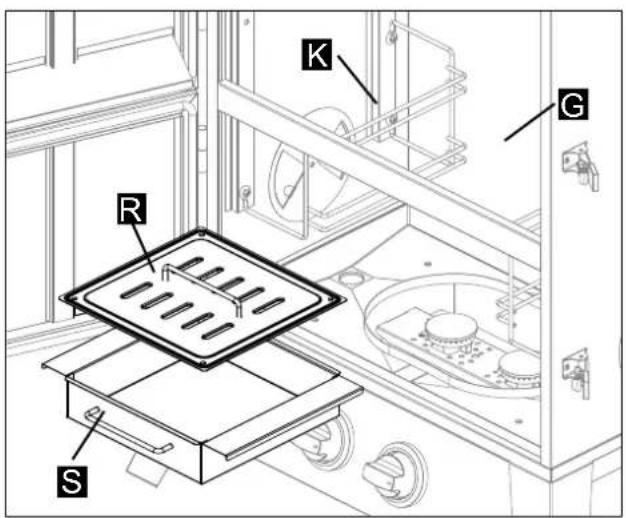
text_image
K G R SSTEP 6
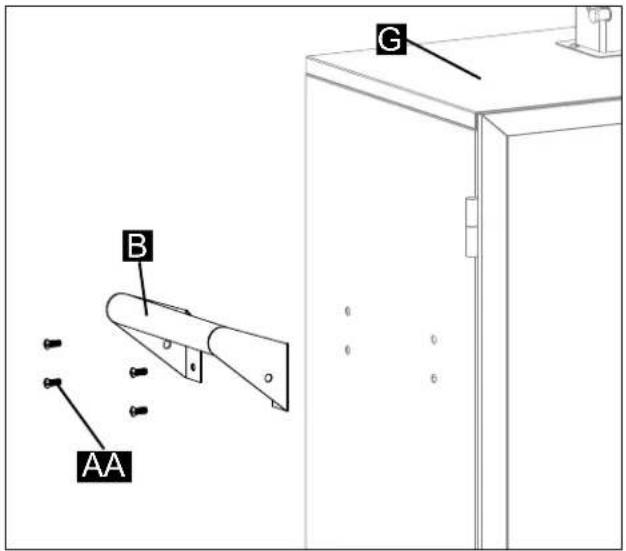
Locate: Two Side Handles (B),
eight M6x12 screws(AA)
Tools needed: Philips head screwdriver
Procedure:
- Attach Side Handle (B) to Smoker Body (G) using four M6x12 screws (AA).
- Repeat on other side.
STEP 7
Locate: Two Door Handles (D), four M6x12
screws(AA), four M6 nuts (CC)
Tools needed: Philips head screwdriver and wrench or plier
Procedure:
- Attach Door Handle (D) to Upper Door (P) using two M6x12 screws (AA) and two M6 nuts (CC).
- Repeat for Lower Door (Q).
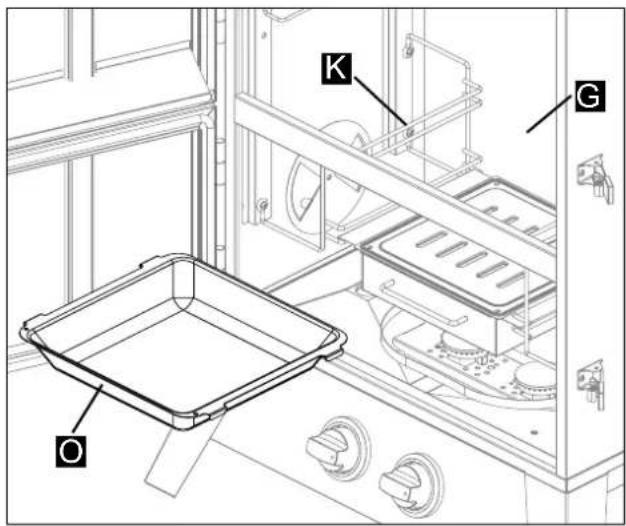
STEP 8
Locate: Wood Chip Box Lid (R), Wood Chip Box (S)
Tools needed: None
Procedure:
- Place the Wood Chip Box Lid (R) directly onto the Wood Chip Box (S) and slide the Wood Chip Box onto the Bottom Support Bracket (K) located on the inside of the Smoker Body (G).
text_image
K G O
CAUTION
The water bowl and wood chip box must be inserted over the burner during operation. This is to protect the burner from falling particles, grease drippings and accidental spill over from the water bowl.
text_image
G F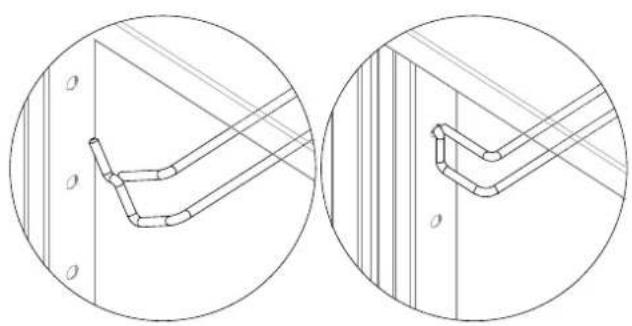
natural_image
Two circular diagrams showing mechanical joint configurations with diagonal lines and labeled points (no text or symbols present)STEP 9
Locate: Water Bowl (0)
Tools needed: None
Procedure:
- Slide the Water Bowl (O) onto the Upper Support Bracket (K) inside the Smoker Body (G).
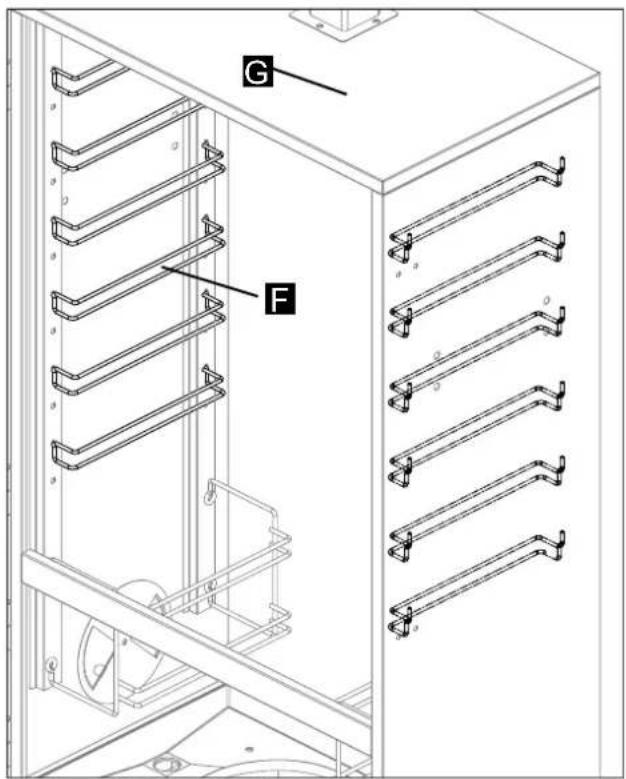
STEP 10
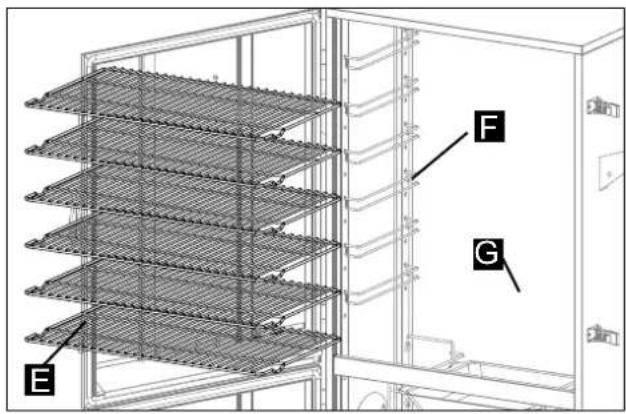
Locate: Twelve Cooking Grate Supports (F)
Tools needed: None
Procedure:
- Insert the Cooking Grate Supports (F) into the corresponding holes inside the Smoker Body (G) starting from the bottom up.
Note: There are 12 possible positions to install the Cooking Grates. Each cooking grate can be adjusted to your desired position.
text_image
E F G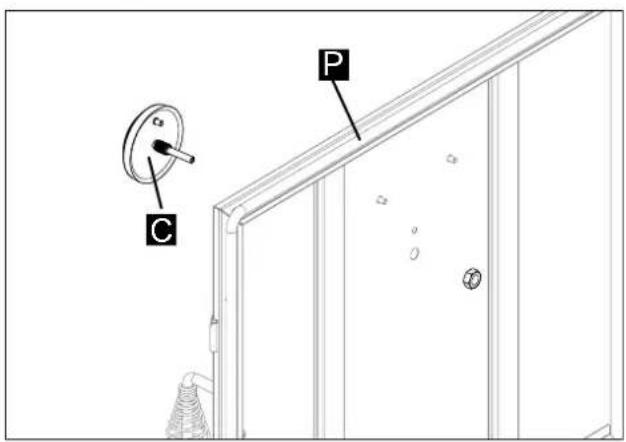
text_image
A B C P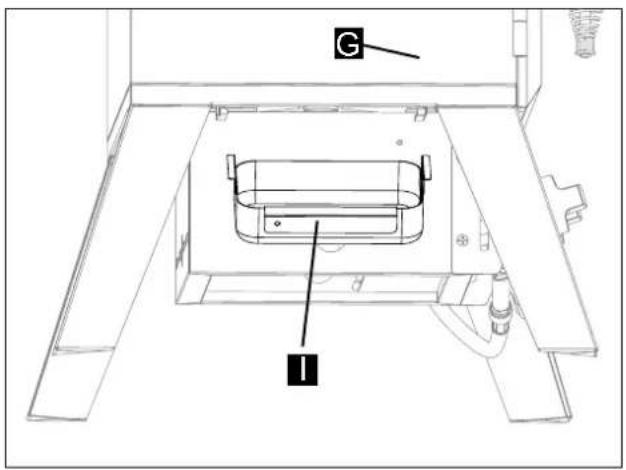
text_image
G I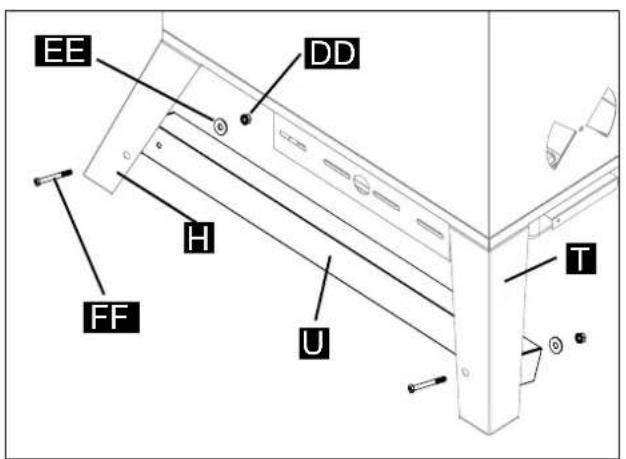
text_image
EE DD H FF U TSTEP 11
Locate: Six Cooking Grates (E)
Tools needed: None
Procedure:
- Slide the Cooking Grates (E) onto the Grate Supports (F) inside the Smoker Body (G).
STEP 12
Locate: Temperature Gauge (C)
Tools needed: Wrench or Plier
Procedure:
- First, Remove the pre-assembled nut from the Temperature Gauge (C). Insert the probe of the Temperature Gauge through hole of the Upper Door (P) from the outside. Secure with nut from inside panel. Tighten with wrench. Do not overtighten.
STEP 13
Locate: Grease Cup (I)
Tools needed: None
Procedure:
- Slide the Grease Cup (I) onto the Grease Cup Support of the Smoker Body (G) bottom.
- Repeat on the other side.
STEP 14
Locate: Back Support Pipe (U), two M6x65 screws (FF), two washers (EE), two nuts (DD)
Tools needed: Philips head screwdriver and wrench or plier
Procedure:
- Attach the Back Support Pipe (U) to Rear Legs using two M6x65 screws (FF), two washers (EE) and two nuts (DD).
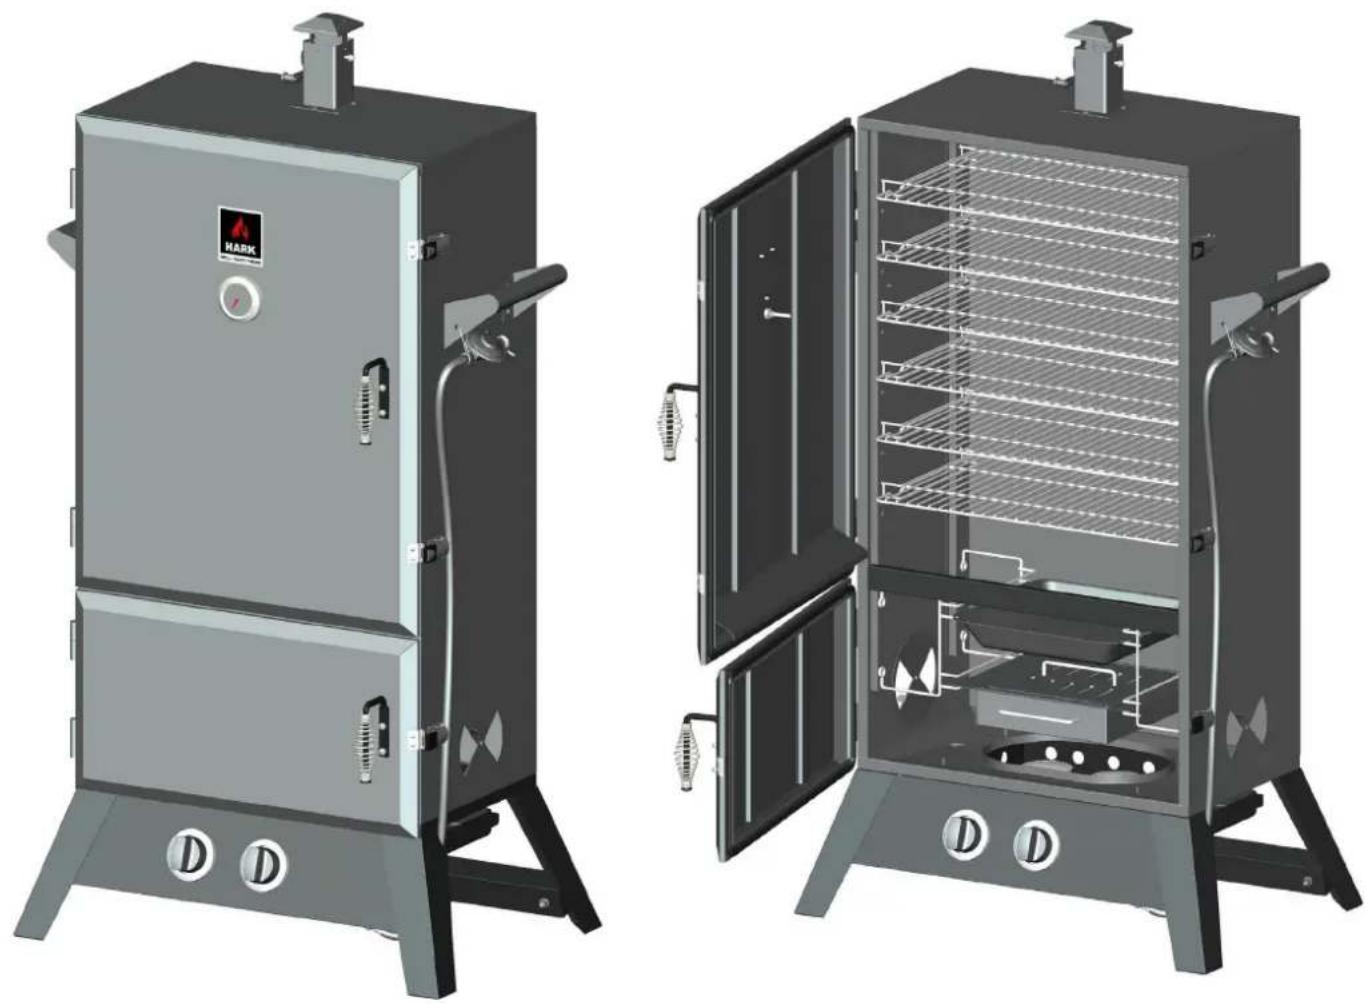
Assembly of your smoker is now complete. The following image shows how the assembled unit should look.
natural_image
Two identical industrial cookers with control panel and side arm, shown from different angles (no text or symbols visible)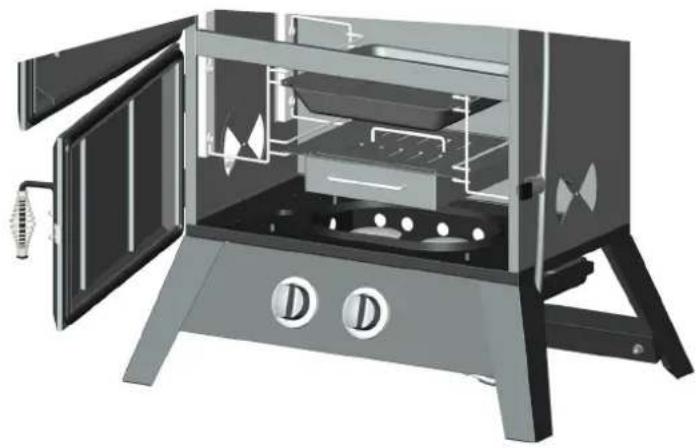
natural_image
3D cutaway illustration of a portable stove with open doors and internal compartments (no text or symbols)IMPORTANT
THE WATER BOWL AND WOOD CHIP BOX MUST BE INSTALLED IN THE UNIT DURING USE. EVEN IF YOU ARE NOT USING SMOKING CHIPS OR WATER, THESE MUST BE INSTALLED IN THE CORRECT POSITION TO STOP GREASE DRIPPINGS FROM FALLING ON THE BURNER.
D. THE GAS SYSTEM

DANGER

ALL INSTRUCTIONS AND SAFEGUARDS
MUST BE FOLLOWED TO PREVENT FIRE, PROPERTY DAMAGE, OR PERSONAL INJURY.
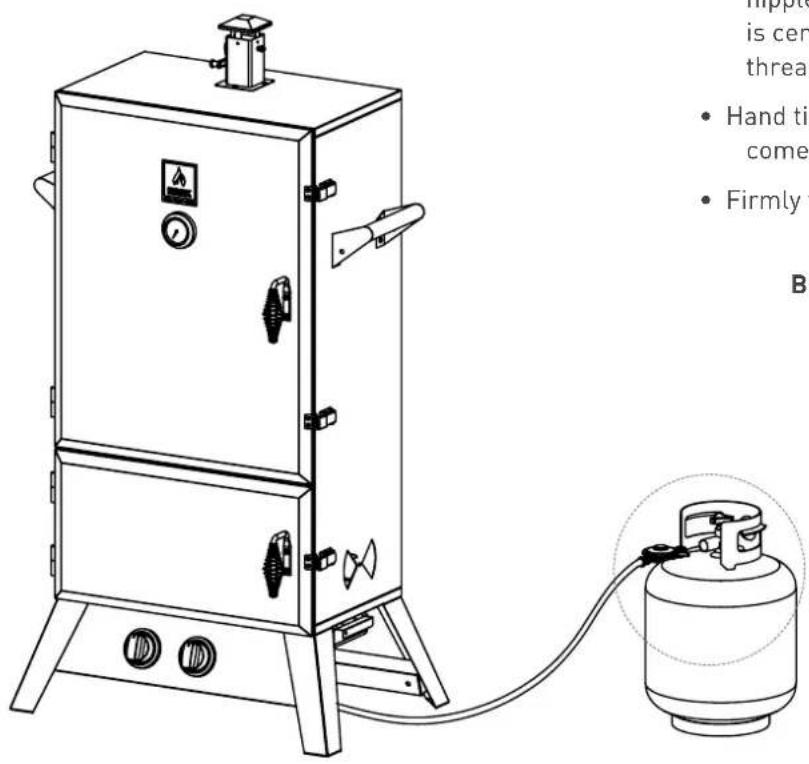
This smoker is designed for universal liquid propane gas (ULPG) use only. Gas bottles with a "POL" low pressure connection are to be used with this smoker. Suitable regulators must have an outlet pressure of 2.75 kPa. You must have the proper regulator and bottle in order for the smoker to operate safely and efficiently. Ensure that a 100% universal propane refillable gas (ULPG) cylinder currently certified to Australian Standard AS2030.1:2009 is used. Do not use disposable gas cylinders. Please note the hose and regulator supplied with this smoker are of an approved type and are specifically designed for use with your smoker.
text_image
Technical line drawing of a portable gas stove with control panel and gas cylinder, accompanied by descriptive text in Chinese.CONNECTING THE HOSE AND REGULATOR TO THE GAS BOTTLE
- This appliance is not intended to be connected to household or consumer piping.
- Only use the hose and regulator assembly supplied with this appliance for direct connection to the gas cylinder – DO NOT USE ADAPTORS.
- Check the gas hose for any damage or signs of abrasion before each use.
- Keep the hose clear of sharp edges and hot surfaces.
- Avoid twisting or kinking the flexible hose.
- If damaged, do not use the hose and replace it immediately. If there is any doubt, contact the customer service line on 1300 799 787.
- Check the gas cylinder control knob is in the off position. To turn off it should be turned clockwise to a full stop.
- Check the control knob on the smoker is in the off position.
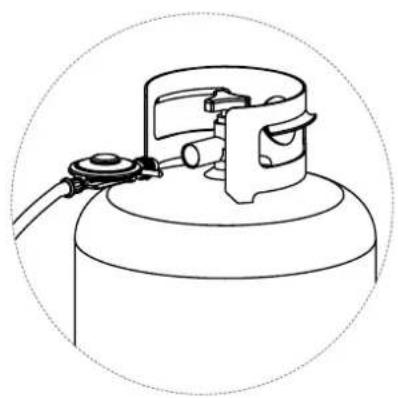
- Hold the regulator in one hand and insert the nipple into the gas bottle outlet. Be sure the nipple is centered in the outlet. Use care not to cross thread the connection.
- Hand tighten the coupling nut anti clockwise until it comes to a firm stop.
- Firmly tighten by hand only. Do not use tools.
BE SURE TO CHECK FOR LEAKS AT ALL
CONNECTIONS
natural_image
Technical line drawing of a mechanical device with a cylindrical base and internal components (no text or symbols)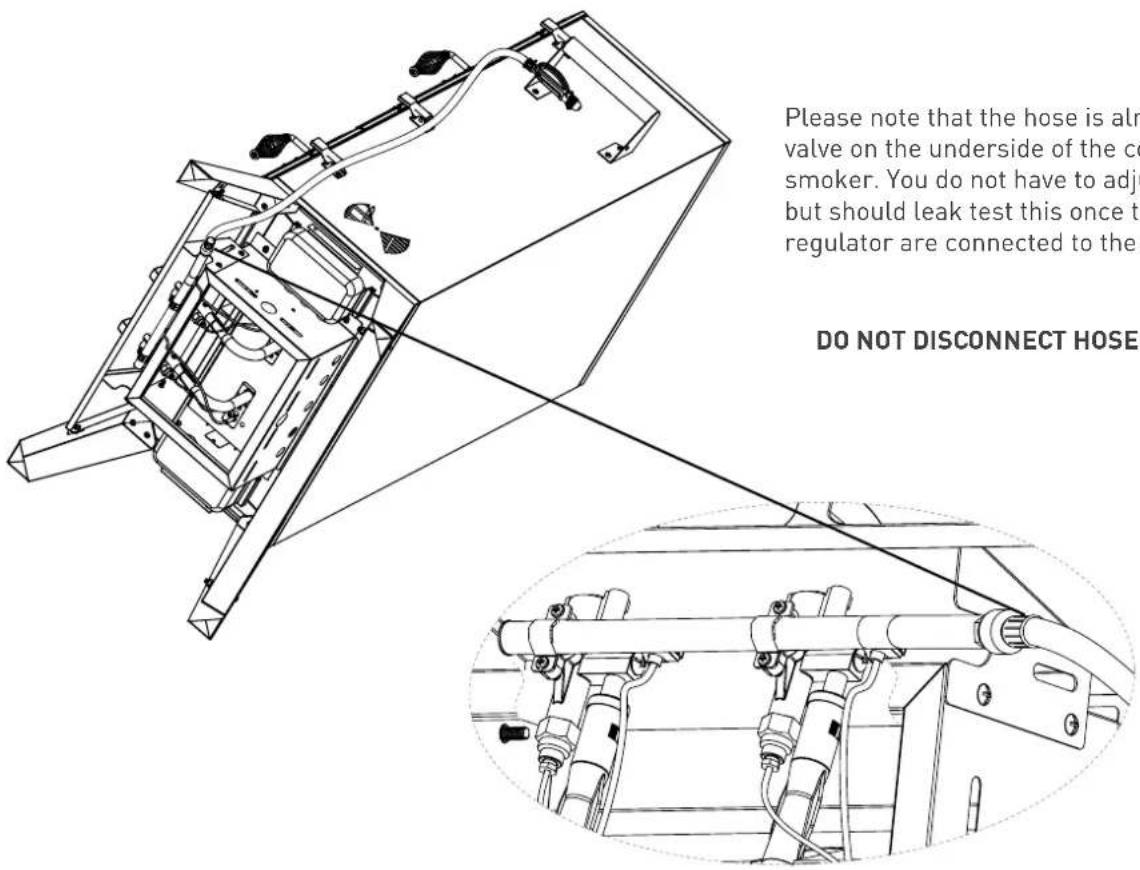
text_image
Please note that the hose is aln valve on the underside of the co smoker. You do not have to adj but should leak test this once t regulator are connected to the DO NOT DISCONNECT HOSE
FOR STORAGE AND CYLINDER EXCHANGE, DISCONNECT THE CYLINDER ONLY.
DO NOT DISCONNECT HOSE FROM APPLIANCE.
— If you need a replacement hose and regulator or have any queries on the gas system, please call our Customer Service line on 1300 799 787.
LEAK TESTING
Open the gas control valve on the cylinder. Check for leaks by brushing a solution 1/2 water and 1/2 soap over all gas system joints, including all valve connections, hose connections and regulator connections. DO NOT USE AN OPEN FLAME to test for leaks at anytime. If bubbles form over any of the joints, there is a leak. Turn off the gas supply and re-tighten all joints. If bubbles form again, do not use the smoker. Please contact customer service line on 1300 799 787. Check for leaks annually or whenever the gas cylinder is refilled.
E. OPERATION: BEFORE USE
PRE-USE PROCEDURES:
Prior to cooking in your smoker, it is important to "season" your smoker. Seasoning seals the paint and interior of the smoker to enhance flavouring, durability and overall performance. This is also referred to as the "breaking-in" process.
To season your smoker, simply place woodchips into the wood chip box and water in the water bowl and fire up your smoker. Burn at a low temperature (with no food inside) for 45-60 minutes. Once this is complete, let the smoker cool and clean out the used water and ash from the wood chips box. Once this process is complete, the interior of your smoker will have a fine coat of residue that will help protect your smoker.
ADDING WATER:
To add water prior to cooking, simply remove the water bowl and fill it with water – up to 1" (2.5cm) below the rim. Then place the bowl back onto the rack.
To add water whilst the smoker is in operation, DO NOT pull out the water bowl beyond the rack. Instead using protective mitts and a watering can or cup, add water directly to the bowl.
To obtain extra flavour, you can add herbs or marinade to the water in the water bowl.
For easy cleaning, you can line the water bowl with aluminium foil before each use.
CAUTION: The water bowl will get very hot during use. Avoid handling it and always use protective mitts when handling any hot components.
ADDING WOOD:
To add wood prior to cooking, simply remove the wood chip box, take off the lid and add your choice of flavoured hardwood chips. The amount and type of wood you use is up to you. Never use treated wood. Once you have added the wood chips, place the lid back onto the top of the box and place the box inside the smoker.
To add wood chips whilst the smoker is in use, use protective mitts and long tongs or pliers to remove the
box lid. Then add more wood chips without removing the box. It is not recommended you remove the wood chip box whilst smoking is in operation.
WARNING: Do not use or treated woods with this smoker.
CAUTION: The wood chip box and lid get very hot during use. Avoid handling them and always use protective mitts when handling any hot components.
USING FLAVOURED WOOD:
- Small hardwood chips work best with this smoker.
- Use dry hardwoods such as hickory, pecan, apple, cherry or mesquite.
- Hardwood pellets can be used.
- Most fruit or nut tree woods produce excellent smoke flavour.
- Do no use resinous woods such as pine or plywood. These will produce unpleasant flavours.
- Most smoke flavouring takes place within the first hour of smoking. Less is often more and no more wood chips maybe required after this first hour.
- Experiment with different types and quantities of wood chips, depending on what meats or fish you are smoking. Different woods can also be mixed together.
- To produce more smoke and to prevent fast burning, pre-soak the wood chips in a separate bowl of water for at least 20 minutes prior to smoking. Or, wrap the chips in perforated aluminium foil.
WARNING: Wood pellets must never be soaked in water.
- Check all connections for leaks using the leak test as explained on page 15.
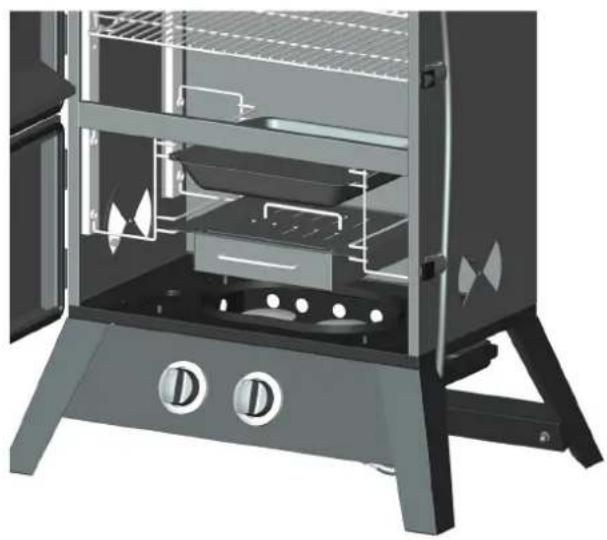
- Open the smoker door.
text_image
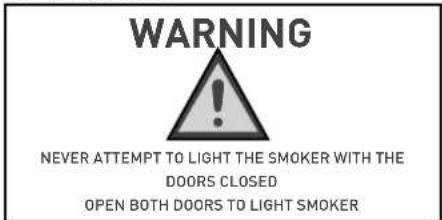
WARNING NEVER ATTEMPT TO LIGHT THE SMOKER WITH THE DOORS CLOSED OPEN BOTH DOORS TO LIGHT SMOKER- Be sure the burner control knobs is in the "OFF" position.
- Open the LP cylinder valve 1-1/2 turns by turning counterclockwise.
- To light the unit with the push-button ignition, push in and turn one burner control knob counter-clockwise to the HIGH/LIGHT setting. Then repeat for the other burner.
Please Note: You must keep the control knobs pushed in to allow the burner to initially light.
- Immediately push the igniter button to click it several times (you should see a small spark jumping from the end of the electrode rod to the side of the burner). If a burner does not light within 3 to 5 seconds, turn the burner control knob OFF and wait 5 minutes before repeating the steps again. If burner still fails to light, try match lighting the smoker using the instructions below.
- Once both burners are lit, close the door to allow heat to accumulate. The dampers can then be adjusted to the desired setting to allow proper air flow and combustion. Damper adjustment tips are listed on the next page.
To match light the burners, repeat steps 1 through 5 of the igniter lighting system above and continue with the following procedure:
Remove the wood chip box and its rack from inside the smoker. Quickly turn one control knob to the light position.
Strike a paper match and drop it into the burn chamber, next to the burner. Repeat for the other burner.
If the burner does not light within 4 or 5 seconds, turn the control knob OFF, wait for 5 minutes, and repeat the process.
If the burner flame is accidentally extinguished, turn the control knob OFF, wait for 5 minutes before opening the door, and repeat the lighting procedure.
natural_image
Interior view of a portable stove or oven with open doors, shelves, and control knobs (no visible text or symbols)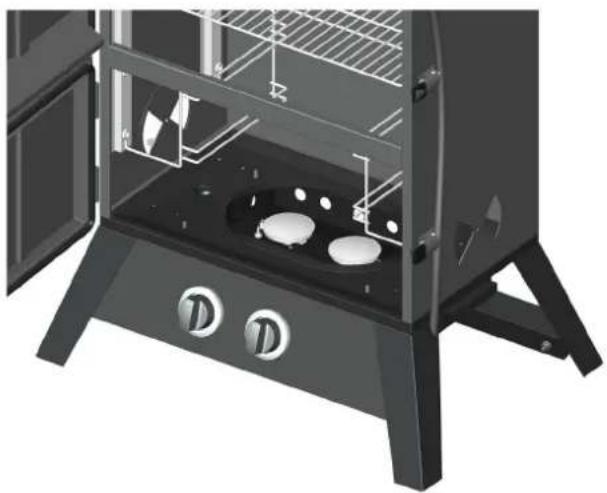
natural_image
3D illustration of a portable stove interior with open doors, grilles, and circular cutouts (no text or symbols)
CAUTION
The water bowl and wood chip box must be inserted over the burner during operation. This is to protect the burner from falling particles, grease drippings and accidental spill over from the water bowl.
G. OPERATION: COOKING
DAMPER ADJUSTMENTS
Temperature maintenance is best controlled by different damper adjustments. The key to effective smoking is to watch your temperature gauge on the door and adjust the damper accordingly.
Opening the dampers helps to exhaust both the heat and smoke. This will make the smoker run cooler. Closing the dampers will make the smoker run hotter.
WARNING: THE DAMPERS SHOULD NEVER BE FULLY CLOSED.
COOKING INSTRUCTIONS
IMPORTANT: Before each use, inspect and leak test the hose and the connection to the LP gas cylinder. If there is evidence of abrasion, wear, cuts or leaks, the hose must be replaced before the smoker is used. Refer to the “leak test” instructions in the LP Tank connection portion of this manual.
- Fill the wood chip box with flavouring wood chips and place the box inside the smoker as instructed in the assembly section of this manual. Refer to the section that explains flavouring wood for recommended use of flavouring wood.
- Place the water bowl inside the smoker in the lowest rack position as explained in the assembly section of this manual. Carefully fill the water bowl with water or marinade up to 1 inch(2.5cm) below the rim. A full bowl will last for approximately 1.5 - 2 hours. Do not overfill or allow water to overflow from the water bowl.
- Insert or adjust the cooking grids into the desired rack positions. For better access to the food with tongs or spatulas, make sure the grid wires run front to back as explained in the assembly section of this manual.
- You are now ready to light the burners. Refer to the Lighting Procedure on the previous pages of this manual.
WARNING

BE CAREFUL WHEN HANDLING THE COOKING RACKS IF THE SMOKER HAS BEEN IN OPERATION THEY WILL BE HOT. USE A PROTECTIVE GLOVE OR MITT.
BE CAREFUL NOT TO EXTEND THE COOKING RACKS FULLY WHEN THE SMOKER IS IN OPERATION.
THE COOKING RACKS SHOULD ONLY BE REMOVED FULLY WHEN THE SMOKER HAS BEEN TURNED OFF AND HAS COOLED FOR THE CLEANING PROCESS
- The heat from the burners will allow the wood chips to burn, causing the flavouring smoke to accumulate. Adjust the dampers to control the heat.
- Important - wait until you see the first signs of smoke to add your food to the smoker. If your food is added as soon as you start to heat the wood chips, the food may seal and reduce the amount of smoke flavour.
- Smoking for 2 to 3 hours at the ideal constant cooking temperature of 225^ to 250^ (110°C to 120°C) will get the best results. This temperature is according to the temperature gauge mounted on the front of the smoker. For more tender and heavily smoked meat, a lower temperature may be preferred. If time is critical, a higher temperature range is recommended.
- Check the water level periodically and add water if low. For best results and to retain heat, avoid opening door of the smoker while in use. When the door must be opened, only open it briefly. The smoker will quickly resume cooking temperature after the door is closed.
- Always use a meat probe thermometer to ensure food is fully cooked before removing it from the smoker.
- After each use, and after the smoker is cooled, carefully remove the water bowl from the smoker, empty the water, and clean the water bowl.
WARNING: The smoker can become very hot while in use. Do not touch any portion of the smoker except for the door handle and burner control knob. It is always best to use protective mitts.
- Turn each burner control knob off by pushing in and rotating clockwise at a time. The burner flame should then go out.
- Turn off the LP cylinder valve by turning the knob clockwise until it stops.
- Follow all warnings and safety precautions before removing meat from smoker or preparing the unit for storage.
I. AFTER USE SAFETY AND MAINTENANCE

WARNING

- Use caution when lifting and moving the smoker to avoid strains or back injury. 2 people are recommended to lift or move the smoker.
- DO NOT store the smoker near gasoline or other combustible liquids or where combustible vapour may be present. Keep the area around the smoker clear and free of combustible materials and vapors.
- DO NOT store this smoker in an area accessible to children or pets. Store the smoker in a dry, protected location.
- DO NOT allow anyone to conduct activities around the smoker following use until it has cooled. It is hot during operation and remains hot for a period of time following use.
This smoker becomes extremely hot. Allow the smoker to cool completely before handling. If you must handle the smoker whilst it is hot, ALWAYS wear protective mitts or heat resistant gloves. Allow the smoker to cool before cleaning the racks, water bowl and wood chip box.
CARE AND MAINTENANCE TO BE PERFORMED AFTER EACH USE:
CAUTION: All care and maintenance procedures are to be performed only when the smoker is turned off and fully cooled.
- Clean the water bowl and cooking grids with hot, soapy water. Rinse and dry thoroughly. You may prefer to coat the water bowl and cooking grids lightly with cooking oil or cooking spray.
- Frequently check and clean the venturi and the burners for insects and insect nests. A clogged tube can lead to fire outside the smoker. Also make sure the smoker does not have any foreign objects obstructing the flow of combustion and ventilation of air.
- To clean the inside and outside of the smoker cabinet, simply use damp cloth. Spray washing with a water hose is not recommended. All moisture should be wiped away and not allowed to stand inside or on top of the smoker.
- Once cleaned, you may prefer to lightly coat the interior of the smoker cabinet with cooking oil or cooking spray. If rust is present on the exterior surface of the smoker, clean the area with steel wool or emery cloth and coat with cooking oil or touch up with heat resistant paint.
- NEVER apply additional paint to the interior of the smoker. If rust is present on the interior of the smoker, clean it thoroughly with steel wool or emery cloth and lightly coat the area with cooking oil or cooking spray to help minimise recurring rust.
- When an LP tank is not connected, and to help prevent dirt or other foreign particles from clogging the regulator, hang the end of the regulator hose from the side handle.
- To protect your smoker from weather, always keep your smoker covered while not in use. PVC protective covers are available and can be purchased as an optional accessory.
- The smoker may be stored indoors only if the gas cylinder is disconnected and removed.
DO NOT MODIFY THE SMOKER OR USE UNAUTHORISED PARTS.
ANY SERVICING SHALL BE CARRIED OUT BY AUTHORISED HARK PERSONNEL.
WE RECOMMEND HAVING YOUR GAS SMOKER CHECKED BY AN AUTHORISED HARK SERVICE AGENT EVERY 3 YEARS.
J. TROUBLE SHOOTING
| PROBLEM POSSIBLE CAUSE PREVENTION/ CURE | ||
| Burner will not light No gas flow Check LG Gas cylinder is full. Replace gas cylinder. | ||
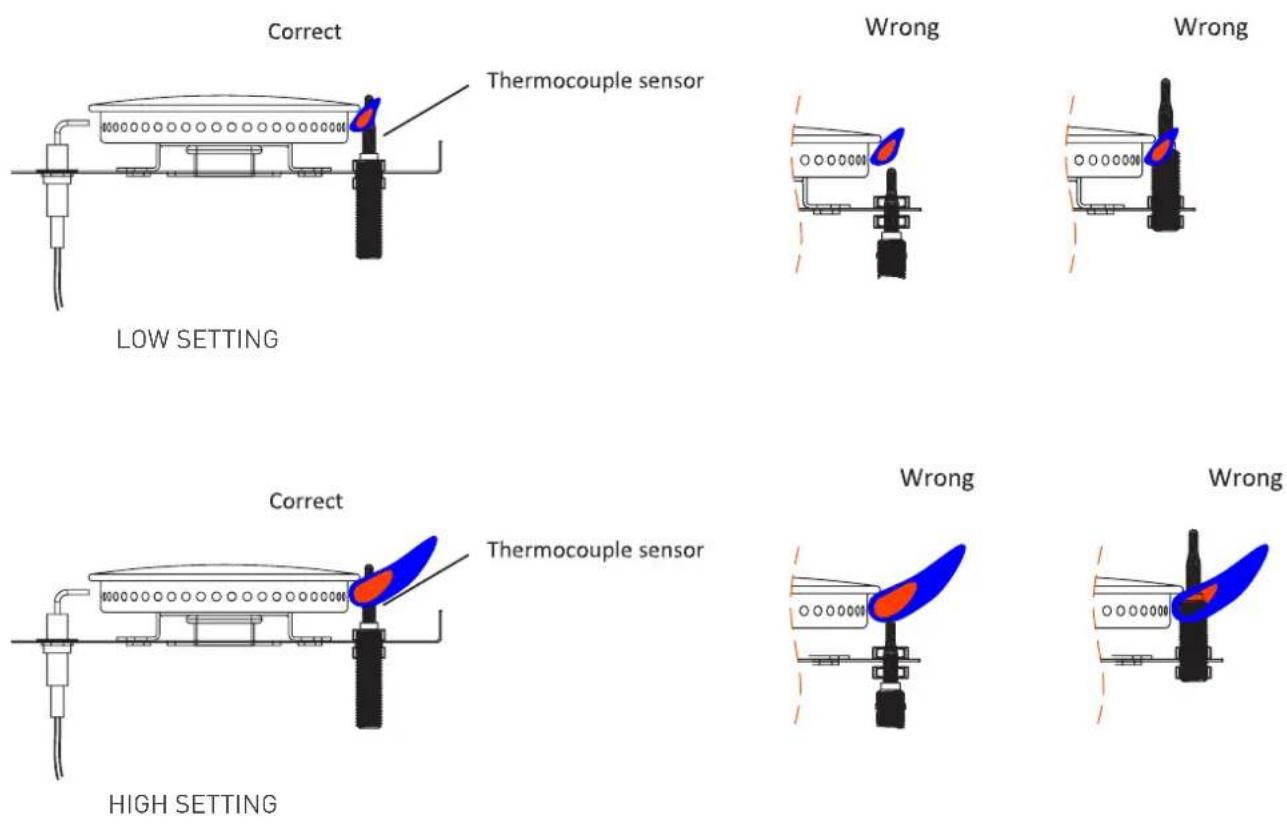
CORRECT POSITION OF THE FFD SENSOR
The FFD Sensor is already factory fitted in the correct position on both burners and should not need adjusting. The sensor needs to be in the flame at all times.
Please see the correct position of this sensor.
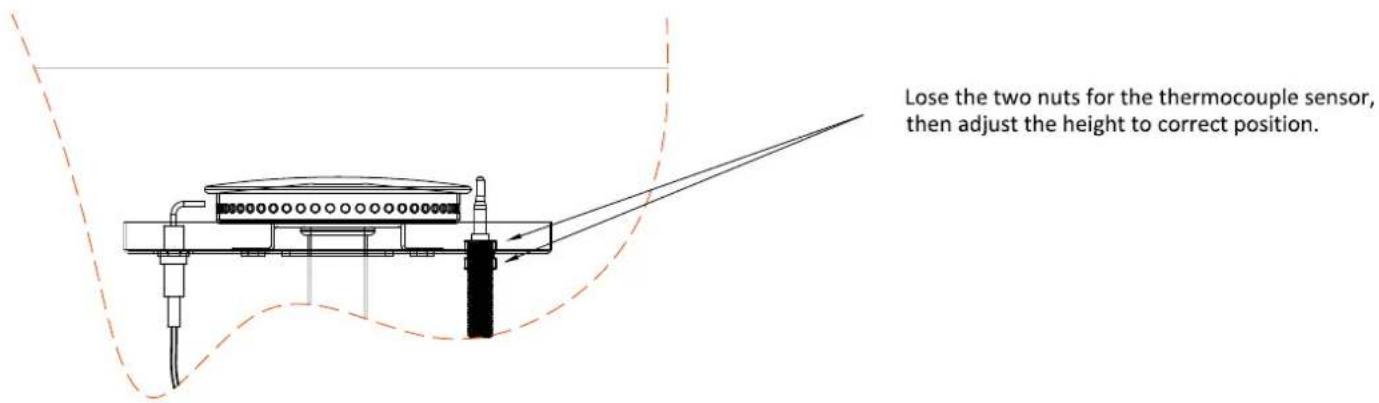
ADJUSTING SENSOR
If the flame in the burner is going out after you light the unit you may have to slightly adjust the position of the sensor. This is easily done by loosening the two nuts on either side and moving the sensor up or down and then retightening to fix in place.
text_image
Lose the two nuts for the thermocouple sensor, then adjust the height to correct position.Please note when you initially light the unit, you will need to push the control knob in and turn anti-clockwise but continue pushing the control knob which will release the gas for it to ignite.
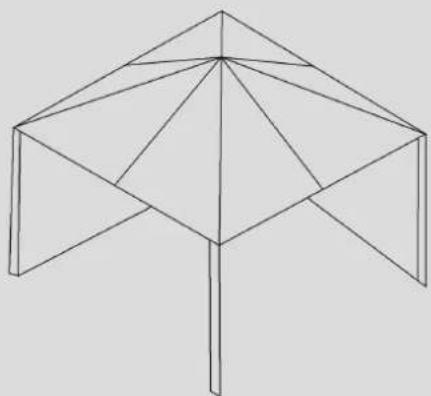
Diagrammatical Representation of "OUTDOOR AREAS"
THIS APPLIANCE SHALL ONLY BE USED IN AN ABOVE GROUND OPEN-AIR SITUATION WITH NATURAL VENTILATION, WITHOUT STAGNANT AREAS, WHERE GAS LEAKAGE AND PRODUCTS OF COMBUSTION ARE RAPIDLY DISPERSED BY WIND AND NATURAL CONVECTION. THIS SMOKER IS NOT DESIGNED FOR MARINE USE.
ANY ENCLOSURE IN WHICH THE APPLIANCE IS USED SHALL COMPLY WITH ONE OF THE FOLLOWING:
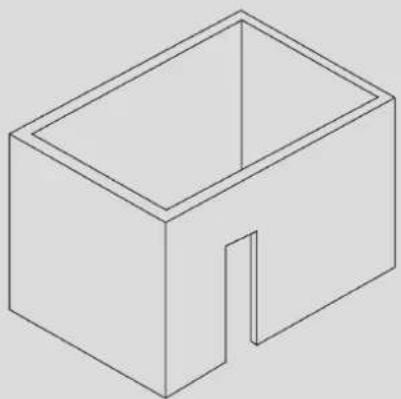
— An enclosure with walls on all sides, but at least one permanent opening at ground level and no overhead cover (refer to example 1).
— Within a partial enclosure that includes an overhead cover and more than two walls
Figure 1 Outdoor Area, Example 1
natural_image
Isometric line drawing of a rectangular box with a cutout and an open top (no text or symbols)
natural_image
Blank rectangular frame with no text, symbols, or markings(Refer to example 2).
Figure 2 Outdoor Area, Example 2
natural_image
Line drawing of a geometric structure resembling a tent or umbrella, with no text or symbols present.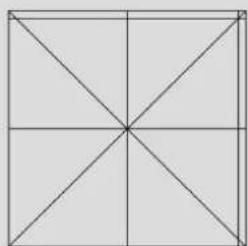
natural_image
Geometric diagram of a square divided into four equal triangles by diagonals (no text or symbols)— Within a partial enclosure that includes an overhead cover and more than two walls, the following shall apply:
a) at least 25% of the total wall area is completely open, and
b) at least 30% of the remaining wall area is open and unrestricted
(Refer to examples 3, 4 and 5).
Figure 3 Outdoor Area, Example 3
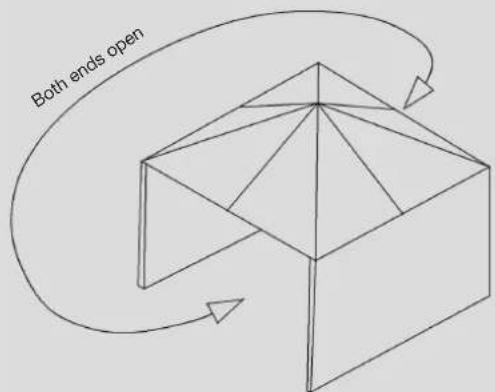
text_image
Both ends open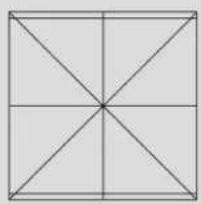
natural_image
Geometric diagram of a square divided into eight equal triangles by diagonals (no text or symbols)Figure 4 Outdoor Area, Example 4
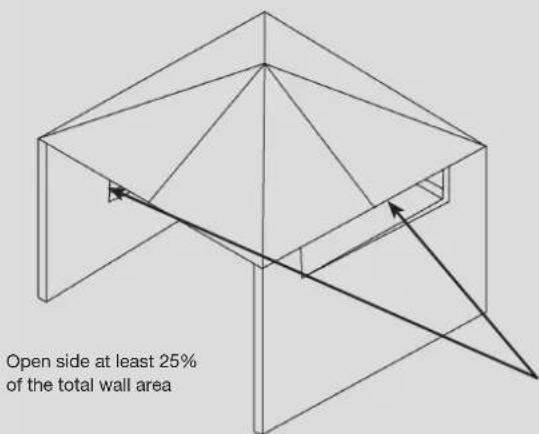
text_image
Open side at least 25% of the total wall area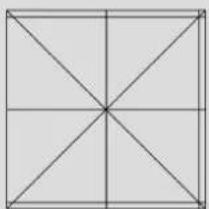
natural_image
Geometric diagram of a square divided into eight equal triangles by diagonals (no text or symbols)30% or more in total of the remaining wall area is open and unrestricted
Figure 5 Outdoor Area, Example 5
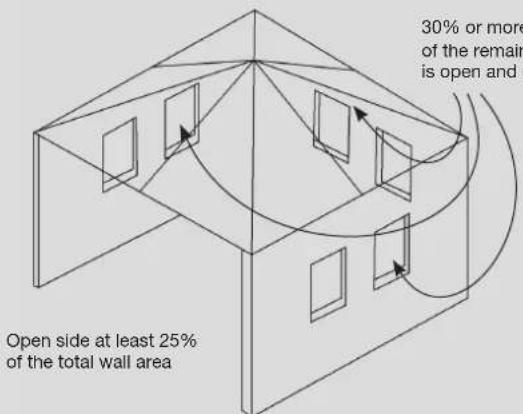
text_image
Open side at least 25% of the total wall area 30% or more of the remain is open and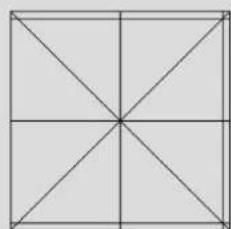
natural_image
Geometric diagram of a square divided into eight equal triangles by diagonals (no text or symbols)
- PLEASE KEEP THE DOORS OPEN WHEN LIGHTING.
• FOR OUTDOOR USE ONLY.
REPLACEMENT PARTS
This appliance must not be modified in any way and only authorised spare parts are to be used.
This will protect your warranty coverage for parts replaced under warranty.
AFTER SALES SERVICE
Servicing must be carried out by Hark Enterprises' authorized personnel.
For all enquiries regarding servicing or spare parts, please call 1300 799 787.
If you believe that your Smoker is not performing properly, please call our customer support line on 1300 799 787 for any queries.
TECHNICAL INFORMATION
| Model SAI | No. Injector (m) | mm) Pressure (k) | Pa) Inp/Burn (MJ/h) | Total (MJ/h) | |
| HK0535 SAI | -400258 2 x 0 | .92 2.75 11.0 22.0 | |||
| Total nominal gas consumption: 22.0MJ/h | |||||
| Gas Type: Universal LPG | |||||
| Minimum clearance of BBQ to combustible surfaces is 100cm at the rear, sides and overhead. | |||||
| Made in China. Dongguan Kingsun Enterprises Co., Ltd. | |||||
This product is manufactured by:
Dongguan Kingsun Enterprises Co., Ltd.
Z2, Xicheng Area 2, Shiyong Village
Hengli Town, Dongguan City
Guangdong Province, China. 523465
Made in China
Imported by:
Hark Enterprises Pty Ltd
Unit 11, 41-49 Norcal Rd
Nunawading, VIC, 3131
Local Call: 1300 799 787 (Excl. mobiles)
Phone: (03) 9873 2711
Fax: (03) 9873 2788
Email: service@hark.com.au
Web: www.hark.com.au
After Sales Support
Telephone: 1300 799 787
(03) 9873 2711
Email: service@hark.com.au

YEAR
WARRANTY

HARK
Hark Enterprises Pty Ltd
Unit 11, 41-49 Norcal Rd, Nunawading, VIC 3131
T: 1300 799 787
E: service@hark.com.au
W: www.hark.com.au