PixelPro ZN-BT662XE - Security Camera Ganz - Free user manual and instructions
Find the device manual for free PixelPro ZN-BT662XE Ganz in PDF.


User questions about PixelPro ZN-BT662XE Ganz
0 question about this device. Answer the ones you know or ask your own.
Ask a new question about this device
Download the instructions for your Security Camera in PDF format for free! Find your manual PixelPro ZN-BT662XE - Ganz and take your electronic device back in hand. On this page are published all the documents necessary for the use of your device. PixelPro ZN-BT662XE by Ganz.
USER MANUAL PixelPro ZN-BT662XE Ganz
This symbol is intended to alert the user to the presence of un-insulated “dangerous voltage” within the product’s enclosure that may be of sufficient magnitude to consult a risk of electric shock to persons.

This symbol is intended to alert the user to the presence of important opera ng and maintenance (servicing) instruc ons in the literature accompanying the appliance.
Table of Contents
- FEATURES ....4
- PACKAGE CONTENTS ....5
- PART NAMES ....6
- INSTALLATION 8
4.1. Installa on Template 9
4.2. Adjus ng LED op ons and lens focus 10
4.3. Se ng the Image A ribute.... 10
- CABLE CONNECTIONS ...... 11
- CONFIGURATION .... 14
6.1.Set up network environment 14
6.2. View video on web page 14
6.2.1. View video using IPAdmin Tool 14
6.2.2.View video using IP address 16
6.3. Reset.... 16
6.3. Reset.... 16
6.4. Factory Default....16
APPENDIX (A): SPECIFICATIONS....17
Summary 17
Electrical Characteris cs 18
Environment Condi on 18
Environment Condi on 18
APPENDIX (B): DIMENSIONS.... 19
APPENDIX (C): HEXADECIMAL-DECIMAL CONVERSION TABLE....20
REVISION HISTORY 20
1. FEATURES
Camera
- Indoor/Outdoor IR Bullet IP Camera
• 1/2.7" 1080p CMOS
• ICR type true day & night
• ONVIF Support (End of Aug)
Streaming
- Dual streaming mode (such as different codec/resolu on/bit rate and so on.)
- Burnt-in text supported
- Unicast/Mul cast supported
Video/Audio
• Video compression: H.264/MJPEG, 25/30FPS@1080p(PAL/NTSC)
- Analog video out for external monitors
• Video Mo on Detec on supported
Network
• RTSP/ HTTP protocol supported
• 10/100 Base-T Ethernet
Additional Features
- OSD for camera control supported
- SDK (So ware Development Kit) provided
• ZNS presence (Included as basic)
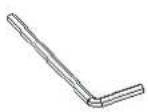
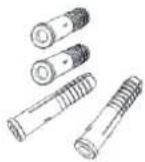
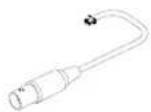
2. PACKAGE CONTENTS
Unpack carefully and handle the equipment with care. The packaging contains:
Camera
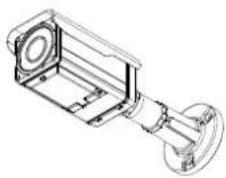
natural_image
Technical line drawing of a mechanical component with no visible text or symbolsHex wrench driver
Quick installaon Guide

Screw anchors
Video out cable
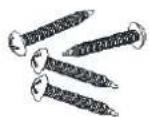
Screws
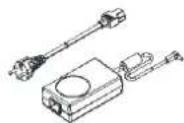
DC power adaptor
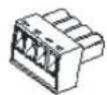
Terminal block

The above contents are subject to change without prior no ce.
3. PART NAMES
text_image
Technical diagram of a mechanical device with numbered components for identification* Models herein and their appearance are subject to change without any prior no ce.
text_image
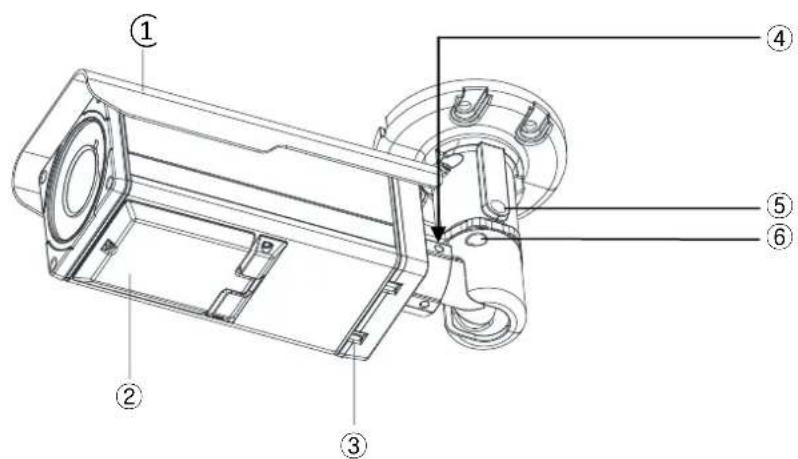
DCBA ⑦ ⑧ ⑨ ⑩ ⑪① Sunshield
Posi on the sunshield to prevent direct sunshine.
② Control panel
Open the control panel to control LEDs, OSD menus, and the extra video output. You can also find the reset button on the control panel. To learn how to reset your device, refer to 6.3. Reset.
③ Venlaon hole
The ven la on holes help to reduce the temperature difference between inside and outside and prevent water from being condensate.
④ Joint for 3 axis
Use this part to adjust the camera to the desired position. Refer to 4. Installaon for more details.
⑤ Panning joint
Use this part for panning adjustment. Refer to 4. Installaon for more details.
⑥ Tilng adjustment
Use this part for 1 ng adjustment. Refer to 4. Installaon for more details.
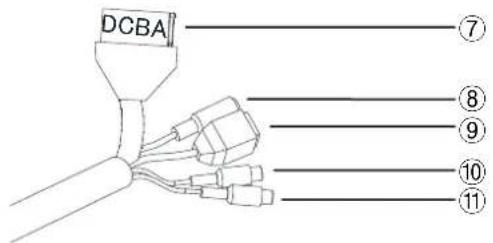
⑦ 4 Pin Connector
A: DO,- B: DO+, C: DI+, D: DI-
⑧ Power Adaptor Connector
The camera needs DC 12V for power supply.
⑨ Network Port
Use this RJ45 LAN connector for connec ng the camera to network.
⑩ Audio In
Connect to the audio input device such as a mike.
⑪ Audio Out
Connect to the audio output device such as the amplifier speaker.
4. INSTALLATION
1) Place the installa on template that is provided in the package on the desired posi on of installa on.
2) Drill four holes on the template and insert anchor blocks into the holes. Fasten the camera with screws.
3) Make sure the cables are properly connected to the camera.
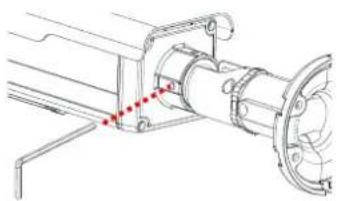
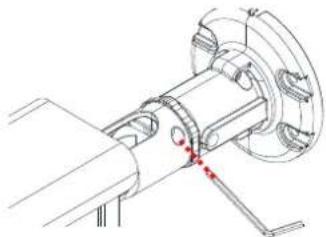
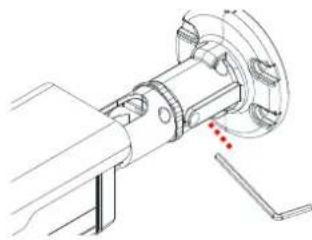
4) Adjust the camera to the desired angle by unscrew the joints by referring to the following pictures.
natural_image
Technical line drawing of a mechanical assembly with no visible text or symbolsAdjust this joint to install it on the wall
natural_image
Technical line drawing of a mechanical assembly with no visible text or symbolsTiling adjustment
natural_image
Technical line drawing of a mechanical assembly with no visible text or symbolsPanning adjustment

The camera may fall o the ceiling even a er the proper installa on and moun ng. To prevent any accident, make sure the ceiling is rm and stable enough to support the camera. If any reinforcement is needed, consult with your safety personnel and proceed with the installa on.
4.1. Installation Template
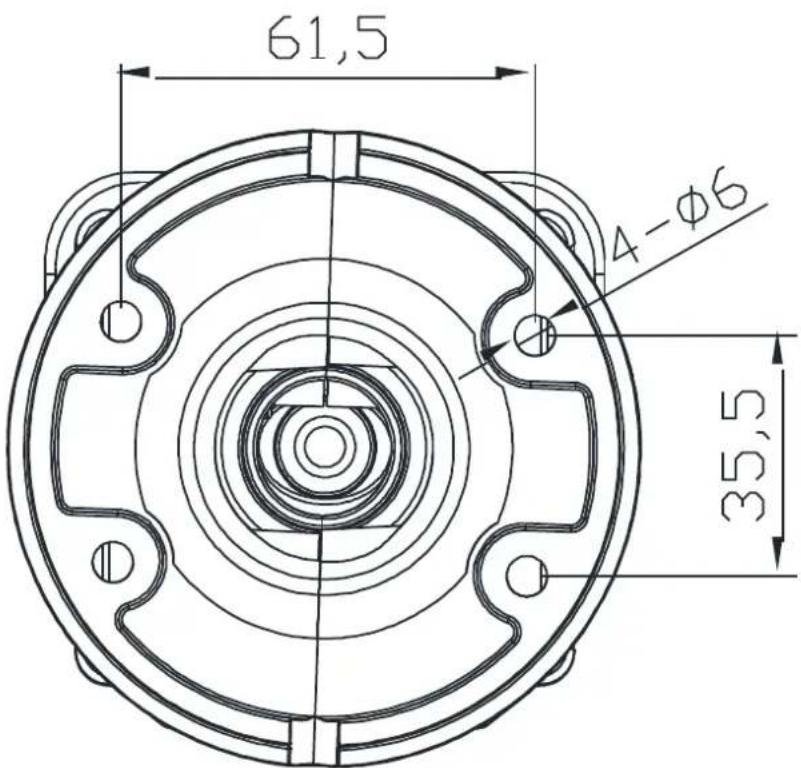
text_image
61,5 4-φ6 35,5(Unit: mm)
4.2. Adjusting LED options and lens focus
Adjust the zoom and focus of the lens with the lever of ① and ② on the following picture.

text_image
TELE FARAF WIDENEAR NT/PAL VOUT RESETTELE/WIDE: Uses for zoom
FAR/NEAR: Uses for focus
AF: Auto focus
NT/PAL: NTSC, PAL bu on
Vout: Uses only for installa on
4.3. Setting the Image Attribute
You can set the image a ribute of camera through the webpage.
The menu of image a ribute can be seen under Setup > Video & Audio > Camera. Brightness, contrast, satura on and sharpness can be adjusted.
5. CABLE CONNECTIONS
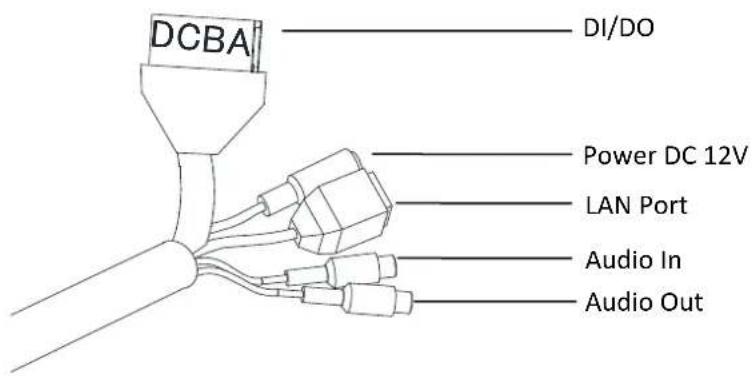
text_image
DCBA DI/DO Power DC 12V LAN Port Audio In Audio OutDI/DO Connection
A: DO-, B: DO+, C: DI+, D: DI-
Sensor (DI) conncon
The camera provides 1 channel D/I. It can be connected to either a voltage type sensor or a relay type sensor as the following gures. It can be selected by so ware.
Input voltage range: 0VDC minimum to 5VDC maximum, Max 50mA Input voltage threshold: 1.5V

Do not exceed the maximum input voltage or relay rate.
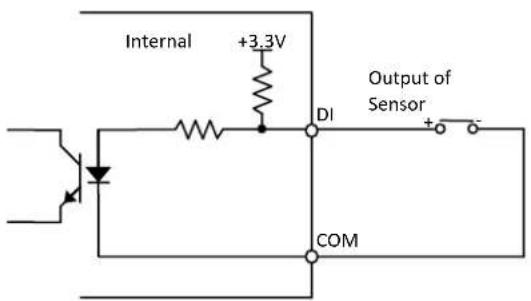
text_image
Internal +3.3V DI Output of Sensor + - COMRelay Type
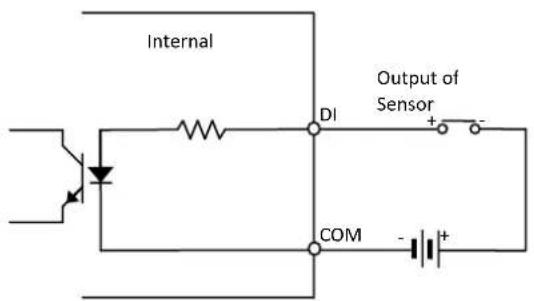
text_image
Internal DI Output of Sensor + - COM - +Voltage Type
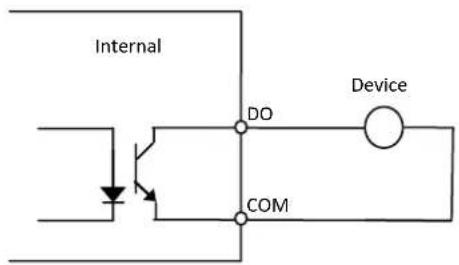
Alarm (DO) conncon
Only the relay type is supported.
Relay Ra ng: Max 24VDC 50mA

Do not exceed the maximum relay range.
text_image
Internal DO Device COMRelay Type
Power Connection
A 12 DC power connector is required for this device.
Network Connection
This is a RJ45 LAN connector for 10/100 Base-T Ethernet. Connect a LAN cable.
Audio Input/Output Connection
Connect the audio input device such as a mike to the audio input port and the audio output device such as the amplifier speaker to the audio output port.
Audio Input : Linein, 1.43Vp-p(M in 1.35Vp-p, max 1.49 Vp-p), 39 KΩ
Audio Output : Lineout, 46mW Power, 16 Ω

Do not connect the speaker without amplifier.
6. CONFIGURATION
6.1. Set up network environment
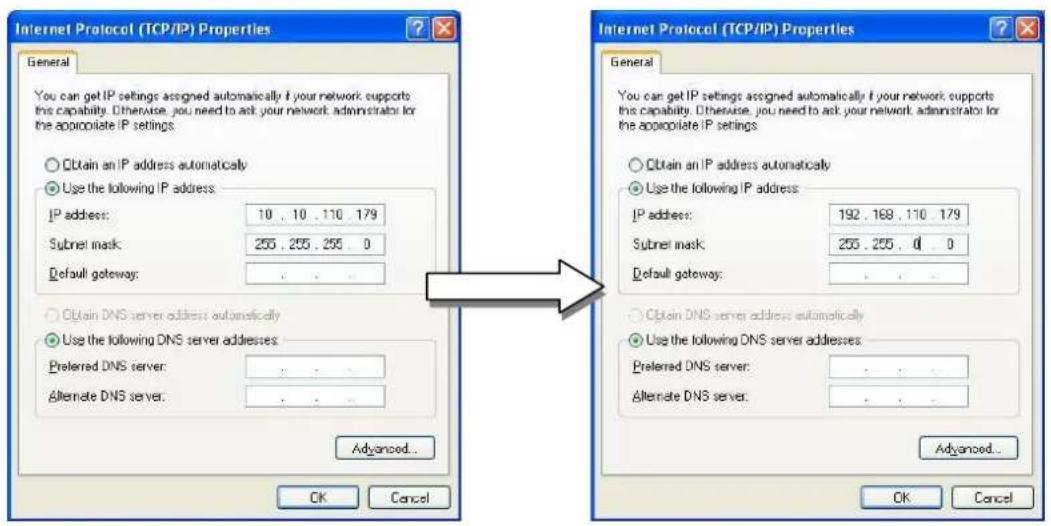
The default IP address of your IP device is 192.168.XXX.XXX. You can and the available IP address from the MAC address of your device. Please make sure the device and your PC are on the same network segment before running the installation. If the network segment between your PC and the device is different, change your PC's settings as below.
IP address : 192.168.xxx.xxx
Subnet mask: 255.255.0.0
text_image
Internet Protocol (TCP/IP) Properties General You can get IP settings assigned automatically if your network supports this capability. Otherwise, you need to ask your network administrator for the appropriate IP settings Obtain an IP address automatically Use the following IP address: IP address: 10 . 10 . 110 . 179 Subnet mask: 255 . 255 . 255 . 0 Default gateway: . Obtain DNS server address automatically Use the following DNS server addresses: Preferred DNS server: . Alternate DNS server: . Advanced... OK Cancel Internet Protocol (TCP/IP) Properties General You can get IP settings assigned automatically if your network supports this capability. Otherwise, you need to ask your network administrator for the appropriate IP settings Obtain an IP address automatically Use the following IP address: IP address: 192 . 168 . 110 . 179 Subnet mask: 255 . 255 . 0 . 0 Default gateway: . Obtain DNS server address automatically Use the following DNS server addresses: Preferred DNS server: . Alternate DNS server: . Advanced... OK Cancel6.2. View video on web page
View the live video on a web page using your IP device and its IP address. You can use the IPAdminTool or enter the IP address on the web page.
6.2.1. View video using IPAdmin Tool
IPAdminTool automatically searches all activated network encoders and IP cameras and shows the product name, IP address, MAC address and etc. IPAdminTool is provided with SDK at the following SDK path.
{SDK root}\BIN\TOOLS\AdminTool\
To use the IPAdminTool and view the live video on a web page:
- Start IPAdminTool. Names and info of currently ac vated devices appear as a list.
- Right-click on the desired device and select Web view.
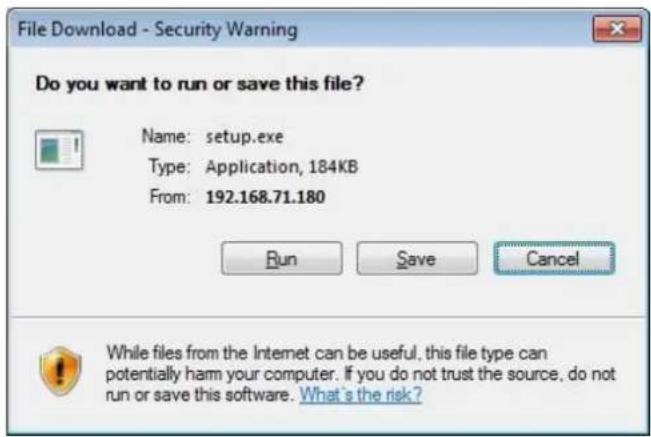
- Click pop-up blocked and install the Ac veX setup.exe by clicking the Run or Save bu on. You need to install the Ac veX for displaying the images.
text_image
File Download - Security Warning Do you want to run or save this file? Name: setup.exe Type: Application, 184KB From: 192.168.71.180 Run Save Cancel While files from the Internet can be useful, this file type can potentially harm your computer. If you do not trust the source, do not run or save this software. What's the risk?- Follow the instructions of the dialog boxes and complete the installation. Then the live video is displayed on the main page of the web browser.
- If the live video is not displayed with the message said, "This soware requires the Microso XML Parser V6 or higher. Please download MSXML6 from the Microso website to connue. Error code: Can not create XMLDOMDocument.", please download and install the relevant MSXML.

If the Ac veX setup.exe le fails to be installed successfully, close all of the Internet Explorer windows and go to Program Files > AxInstall folder on your computer. Then, run Uninstall.exe and try to perform the steps 1 to 4 above again.
6.2.2. View video using IP address
View the live video on a web page using your IP device and its IP address. To have the correct IP address ready and use it on a web page:
- Convert a MAC address to an IP address or check the IP address on the IPAdminTool. Refer to Appendix (D): Hexadecimal-Decimal Conversion Table.
(The MAC address is a ached on the side or bo om of the device.)
MAC address = 00-13-23-01-14-B1 → IP address = 192.168.20.177
the Hexadecimal number to Decimal number.
-
Open a web browser and enter the IP address of the device.
-
Click pop-up blocked and install the Ac veX setup.exe by clicking the Run or Save button. You need to install the Ac veX for displaying the images.
-
Follow the instructions of the dialog boxes and complete the installation. Then the live video is displayed on the main page of the web browser.
6.3. Reset
-
While the device is in use, press the Reset button.
-
Wait for the system to reboot.
6.4. Factory Default
-
Press reset bu on and hold.
-
Release the Reset button on a 5 seconds until LED blinks.
-
Wait for the system to reboot.
The factory default se ngs can be inferred as follows:
IP address: 192.168.xx.yy
Network mask: 255.255.0.0
Gateway: 192.168.0.1
User ID: root
Password: pass
APPENDIX (A): SPECIFICATIONS
Summary
| Camera Module | |
| Image Sensor | OV2715 CMOS |
| E ec ve Pixels | 768 x 494 (NTSC) /752 x 582 (PAL) |
| TV System Horizontal Resolu on | NTSC / PAL TBD |
| Zoom | X16 Digital Zoom |
| White Balance | ATW / AWC / Manual / Outdoor / Indoor |
| Scanning System | 2:1 Interlace |
| Sync System | Internal |
| Min. Illumina on | TBD |
| Lens | 3.0 – 9.0mm Vari-Focal F1.2 Motorized Focus & Zoom |
| Focus | Motorized |
| Iris | Auto |
| Day & Night | COLOR / B/W / AUTO |
| Shu er Speed | 1/60s ~ 1/120,000s |
| S / N Ra o | 52 dB (AGC o ) |
| AGC | Low / High / O (Selectable) |
| BLC | BLC / HLC / O |
| DNR | On/O (1~32 Level Adjustable) |
| Video | |
| Compression | H.264, MPEG-4, MJPEG Selectable per Stream |
| Number of Streams | Dual stream, Con gurable |
| Resolu on | 1920x1080, 1280x720, 800x450, 480x270, 320x180 |
| Compression FPS | 25/30 fps @ D1 (PAL/NTSC) |
| De-interlacing | Supported (DSP) |
| Mo on Detec on | Supported |
| Burnt-in Text(digital) | Supported (DSP) |
| Analog Video Output | PAL/NTSC (Auto o ) |
| Audio | |
| Input / Output | 1/1 |
| Compression | PCM, G.711 |
| Func on | |
| IR Range | Internal Use: 30M External Use: 20M |
| Network | 10/100 Base-T |
| Power over Ethernet | 802.3af (Normal) |
| DI / DO | 1 / 1 ch |
| RS-232C/RS-485 | Not available |
| Protocol | TCP/IP, UDP/IP, HTTP, RTSP, RTCP, RTP/UDP, RTP/TCP, SNTP, mDNS, UPnP, SMTP, SOCK, IGMP, DHCP, FTP, DDNS, SSL v2/v3, IEEE 802.1X, SSH, SNMP v2/v3 |
| Local Storage | Not available |
Electrical Characteristics
| Poser source | DC 12V |
| Power consump on | 1200mA (Heater ON) |
| Analog Video Output | 1 Vp-p, 75Ω, Composite |
| Audio Input | Linein, 1.43Vp-p(Min 1.35Vp-p, max 1.49 Vp-p), 39 KΩ |
| Audio Output | Lineout, 46mW Power, 16 Ω |
| Sensor(D/I) | Max 50mA@5VDC, TTL level 4.5V threshold |
| Alarm(D/O) | Max 500mA@24VAC or 1A@12VDCOn-state resistance: 50 Ω (max con nuous) |
Environment Condition
| Operang Temperature | Operang RangeDC12V : -40°C ~ 50°C (-40°F ~ 122°F)PoE : 0 °C ~ 50 °C (32°F ~ 122°F)Cold StartDC12V : -20°C (-4°F)PoE: 0 °C (32°F) |
| Operang Humidity | Up to 85% RH |
Environment Condition
| Dimensions | 83mm x 82mm x 194mm (Without bracket) |
| Color | Ivory |
| Weight | Net: 1.5Kg |
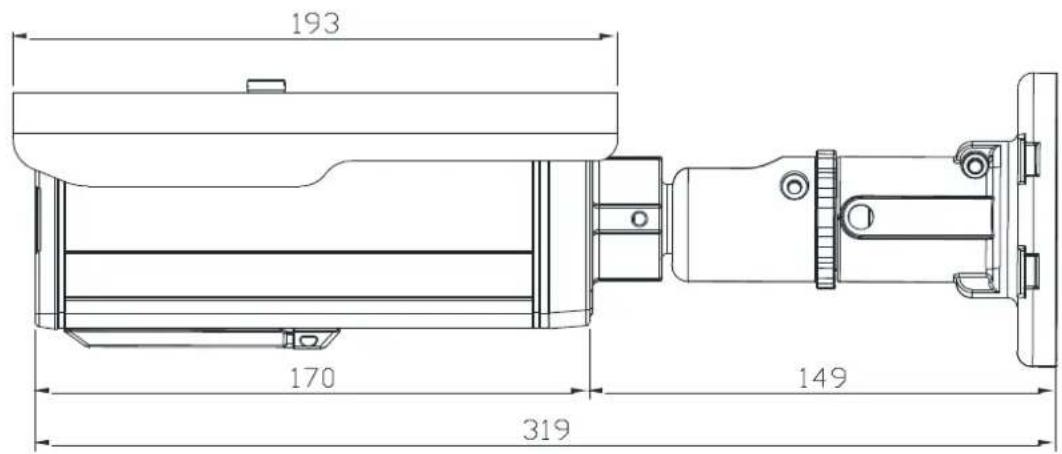
APPENDIX (B): DIMENSIONS
text_image
193 170 319 149(Unit: mm)
APPENDIX (C): HEXADECIMAL-DECIMAL CONVERSION TABLE
Refer to the following table when you convert the MAC address of your device to IP address.
| Hex | Dec | Hex | Dec | Hex | Dec | Hex | Dec | Hex | Dec | Hex | Dec | Hex | Dec |
| 00 | 0 | 25 | 37 | 4A | 74 | 6F | 111 | 94 | 148 | B9 | 185 | DE | 222 |
| 01 | 1 | 26 | 38 | 4B | 75 | 70 | 112 | 95 | 149 | BA | 186 | DF | 223 |
| 02 | 2 | 27 | 39 | 4C | 76 | 71 | 113 | 96 | 150 | BB | 187 | E0 | 224 |
| 03 | 3 | 28 | 40 | 4D | 77 | 72 | 114 | 97 | 151 | BC | 188 | E1 | 225 |
| 04 | 4 | 29 | 41 | 4E | 78 | 73 | 115 | 98 | 152 | BD | 189 | E2 | 226 |
| 05 | 5 | 2A | 42 | 4F | 79 | 74 | 116 | 99 | 153 | BE | 190 | E3 | 227 |
| 06 | 6 | 2B | 43 | 50 | 80 | 75 | 117 | 9A | 154 | BF | 191 | E4 | 228 |
| 07 | 7 | 2C | 44 | 51 | 81 | 76 | 118 | 9B | 155 | C0 | 192 | E5 | 229 |
| 08 | 8 | 2D | 45 | 52 | 82 | 77 | 119 | 9C | 156 | C1 | 193 | E6 | 230 |
| 09 | 9 | 2E | 46 | 53 | 83 | 78 | 120 | 9D | 157 | C2 | 194 | E7 | 231 |
| 0A | 10 | 2F | 47 | 54 | 84 | 79 | 121 | 9E | 158 | C3 | 195 | E8 | 232 |
| 0B | 11 | 30 | 48 | 55 | 85 | 7A | 122 | 9F | 159 | C4 | 196 | E9 | 233 |
| 0C | 12 | 31 | 49 | 56 | 86 | 7B | 123 | A0 | 160 | C5 | 197 | EA | 234 |
| 0D | 13 | 32 | 50 | 57 | 87 | 7C | 124 | A1 | 161 | C6 | 198 | EB | 235 |
| 0E | 14 | 33 | 51 | 58 | 88 | 7D | 125 | A2 | 162 | C7 | 199 | EC | 236 |
| 0F | 15 | 34 | 52 | 59 | 89 | 7E | 126 | A3 | 163 | C8 | 200 | ED | 237 |
| 10 | 16 | 35 | 53 | 5A | 90 | 7F | 127 | A4 | 164 | C9 | 201 | EE | 238 |
| 11 | 17 | 36 | 54 | 5B | 91 | 80 | 128 | A5 | 165 | CA | 202 | EF | 239 |
| 12 | 18 | 37 | 55 | 5C | 92 | 81 | 129 | A6 | 166 | CB | 203 | F0 | 240 |
| 13 | 19 | 38 | 56 | 5D | 93 | 82 | 130 | A7 | 167 | CC | 204 | F1 | 241 |
| 14 | 20 | 39 | 57 | 5E | 94 | 83 | 131 | A8 | 168 | CD | 205 | F2 | 242 |
| 15 | 21 | 3A | 58 | 5F | 95 | 84 | 132 | A9 | 169 | CE | 206 | F3 | 243 |
| 16 | 22 | 3B | 59 | 60 | 96 | 85 | 133 | AA | 170 | CF | 207 | F4 | 244 |
| 17 | 23 | 3C | 60 | 61 | 97 | 86 | 134 | AB | 171 | D0 | 208 | F5 | 245 |
| 18 | 24 | 3D | 61 | 62 | 98 | 87 | 135 | AC | 172 | D1 | 209 | F6 | 246 |
| 19 | 25 | 3E | 62 | 63 | 99 | 88 | 136 | AD | 173 | D2 | 210 | F7 | 247 |
| 1A | 26 | 3F | 63 | 64 | 100 | 89 | 137 | AE | 174 | D3 | 211 | F8 | 248 |
| 1B | 27 | 40 | 64 | 65 | 101 | 8A | 138 | AF | 175 | D4 | 212 | F9 | 249 |
| 1C | 28 | 41 | 65 | 66 | 102 | 8B | 139 | B0 | 176 | D5 | 213 | FA | 250 |
| 1D | 29 | 42 | 66 | 67 | 103 | 8C | 140 | B1 | 177 | D6 | 214 | FB | 251 |
| 1E | 30 | 43 | 67 | 68 | 104 | 8D | 141 | B2 | 178 | D7 | 215 | FC | 252 |
| 1F | 31 | 44 | 68 | 69 | 105 | 8E | 142 | B3 | 179 | D8 | 216 | FD | 253 |
| 20 | 32 | 45 | 69 | 6A | 106 | 8F | 143 | B4 | 180 | D9 | 217 | FE | 254 |
| 21 | 33 | 46 | 70 | 6B | 107 | 90 | 144 | B5 | 181 | DA | 218 | FF | 255 |
| 22 | 34 | 47 | 71 | 6C | 108 | 91 | 145 | B6 | 182 | DB | 219 | ||
| 23 | 35 | 48 | 72 | 6D | 109 | 92 | 146 | B7 | 183 | DC | 220 | ||
| 24 | 36 | 49 | 73 | 6E | 110 | 93 | 147 | B8 | 184 | DD | 221 |
REVISION HISTORY
| MAN# | DATE(M/D/Y) | Comments |
| D1A.01 | 04/20/2012 | Preliminary version |
| 01A.01 | 05/02/2012 | Power consump on revise |