NeVio EHN1320 - Security Camera EverFocus - Free user manual and instructions
Find the device manual for free NeVio EHN1320 EverFocus in PDF.


User questions about NeVio EHN1320 EverFocus
0 question about this device. Answer the ones you know or ask your own.
Ask a new question about this device
Download the instructions for your Security Camera in PDF format for free! Find your manual NeVio EHN1320 - EverFocus and take your electronic device back in hand. On this page are published all the documents necessary for the use of your device. NeVio EHN1320 by EverFocus.
USER MANUAL NeVio EHN1320 EverFocus
EHN Series Mini Rugged IP Dome Camera
Full HD, WDR, IP67, IK10, EN50155
User's Manual
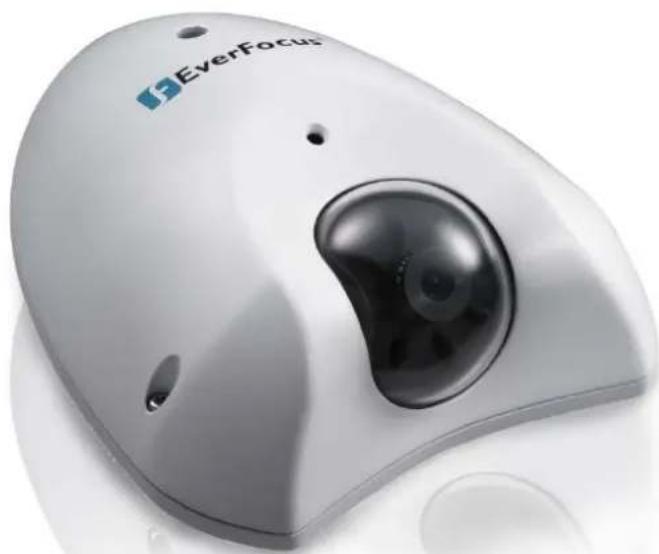
natural_image
White medical device with 'EverFocus' logo and circular lens (no visible text or symbols beyond branding)
EverFocus®
Copyright © EverFocus Electronics Corp,
Release Date: August, 2013

EverFocus®
Copyright © 2013 EverFocus Electronics Corp.
All rights reserved. No part of the contents of this manual may be reproduced or transmitted in any form or by any means without written permission of the EverFocus Electronics Corporation.
EverFocus
12F, No.79, Sec. 1, Shin-Tai Wu Road,
Hsi-Chih, Taipei, Taiwan
TEL: +886 2 2698 2334
FAX: +886 2 2698 2380
www.everfocus.com.tw
August, 2013
About this document
All the safety and operating instructions should be read and followed before the unit is operated. This manual should be retained for future reference. The information in this manual was current when published. The manufacturer reserves the right to revise and improve its products. All specifications are therefore subject to change without notice.
Regulatory Notices
FCC Notice "Declaration of Conformity Information"
This equipment has been tested and found to comply with the limits for a Class
A digital device, pursuant to part 15 of the FCC Rules. These limits are designed to provide reasonable protection against harmful interference in a residential installation. This equipment generates, uses and can radiate radio frequency energy and, if not installed and used in accordance with the instructions, may cause harmful interference to radio communications. However, there is no guarantee that interference will not occur in a particular installation. If this equipment does cause harmful interference to radio or television reception, which can be determined by turning the equipment off and on, the user is encouraged to try to correct the interference by one or more of the following measures:
- Reorient or relocate the receiving antenna.
- Increase the separation between the equipment and receiver.
- Connect the equipment into an outlet on a circuit different from that to which the receiver is connected.
- Consult the dealer or an experienced radio/TV technician for help.
Warning: Changes or modifications made to this equipment, not expressly approved by EverFocus or parties authorized by EverFocus could void the user's authority to operate the equipment.
This device complies with part 15 of the FCC Rules. Operation is subject to the following two conditions:
(1) This device may not cause harmful interference, and
(2) This device must accept any interference received, including interference that may cause undesired operation.
EverFocus Electronics Corp.
12F, No. 79, Sec. 1, Shin-Tai Wu Rd., Hsi-Chi,
Taipei Hsien, Taiwan, R.O.C.
EHN Series cameras comply with CE and FCC.
Precautions
- Do not install the camera near electric or magnetic fields.
Install the camera away from TV/radio transmitters, magnets, electric motors, transformers and audio speakers since the electromagnetic fields generated from these devices may distort the video image or otherwise interfere with camera operation.
- Never disassemble the camera beyond the recommendations in this manual nor introduce materials other than those recommended herein.
Improper disassembly or introduction of corrosive materials may result in equipment failure or other damage.
- Try to avoid facing the camera toward the sun.
In some circumstances, direct sunlight may cause permanent damage to the sensor and/or internal circuits, as well as creating unbalanced illumination beyond the capability of the camera to compensate.
- Keep the power cord away from water and other liquids and never touch the power cord with wet hands.
Touching a wet power cord with your hands or touching the power cord with wet hands may result in electric shock.
- Never install the camera in areas exposed to oil, gas or solvents.
Oil, gas or solvents may result in equipment failure, electric shock or, in extreme cases, fire.
- Cleaning
For cameras with interchangeable lenses, do not touch the surface of the sensor directly with the hands. Use lens tissue or a cotton tipped applicator and ethanol to clean the sensor and the camera lens. Use a damp soft cloth to remove any dirt from the camera body. Please do not use complex solvents, corrosive or abrasive agents for cleaning of any part of the camera.
- Do not operate the camera beyond the specified temperature, humidity or power source ratings.
This camera is suitable for outdoor operation only. Use the camera at temperatures within -40°C\~55°C/-40°F\~131°F (DC Power) or -20°C\~55°C/-4°F\~131°F (PoE), and humidity between 20% and 85%; this device is not rated as submersible. The input power source is 10-36VDC/PoE. Be sure to connect the proper + / - polarity and voltage, as incorrect polarity or too high a voltage will likely cause the camera to fail, and such damage is not covered by the warranty. The use of properly fused or Class 2 power limited type supplies is highly recommended.
- Mounting
Use care in selecting a solid mounting surface which will support the weight of the camera plus any wind, snow, ice or other loading, and securely attach the camera to the mounting surface using screws and anchors which will properly support the camera. If necessary (e.g. when mounting to drop ceilings) use a safety wire to provide additional support for the camera.
Contents
- Introduction.... 1
- Physical Description .... 2
2.1 Dimensions....3
2.2 Packing List....3
- Features....4
- Installation 5
4.1 Basic Installation ....5
- Accessing the User Interface 8
5.1 Checking the Dynamic IP Address....8
5.2 Settings for Microsoft Internet Explorer....10
5.3 Connecting the Camera to the Network....12
5.4 Live View Window....14
- Playback.... 17
6.1 Remote Playback Using Playback Page....17
6.2 Setting Up the Playback Function ....19
6.2.1 Inserting / Removing the SD Card....19
6.2.2 Testing the Playback Function....20
6.3 Playing Back Using ARV Viewer....22
- Settings.... 23
7.1 System Settings 24
7.1.1 Network 24
7.1.2 Date / Time 30
7.1.3 Storage....31
7.1.4 Display and Overlay 33
7.1.5 System Maintenance....34
7.1.6 System Information....37
7.1.7 User....38
7.1.8 Black/White List 40
7.2 Camera Settings 41
7.2.1 Streaming and Audio 41
7.2.2 Camera....44
7.2.3 Schedule....46
7.2.4 Image 47
7.3 Event Settings....48
7.3.1 Event Wizard 48
7.3.2 Event 49
7.3.3 Notification 53
7.4 Link to Smart Phone App ....56
- Upgrading Firmware Using IP Utility 57
- Specifications 59
- Troubleshooting 61
1. Introduction
The small form-factor rugged dome, EHN series mini rugged IP dome, comes with three models, 1.3 MP, 2 MP and 3 MP, providing up to 15 fps at 2048 x 1536 viewing resolution. Video compression formats including H.264, MPEG4 and MJPEG are all supported. Equipped with a vandal-proof (IK10) and weather-proof (IP67) housing, the cameras meet a wide variety of needs for outdoor surveillance.
The EHN series mini IP dome features the Wide Dynamic Range (WDR) function, which can provide clear images even under back light circumstances where intensity of illumination can vary excessively. The DNR (Digital Noise Reduction) function is designed for reducing the noises in the images, allowing the camera to better distinguish between real motion and image noise, and thus results in a possibility to store more video evidence on the connected storage devices.
A built-in micro SDHC card slot and Power over Ethernet (IEEE802.3af) features are also provided. You can power the camera over the network or by connecting the camera to a 10-36 VDC power supply. Since the EHN series mini IP dome conforms to ONVIF / PSIA for compatibility with other network video devices, it interoperates with a wide variety of hardware and software systems. You can also use EverFocus Mobile Applications to remotely view the live views of the cameras through your handheld devices; or use EverFocus CMS to remotely manage multiple IP devices connected on the network. The EHN series mini rugged IP dome is the ideal solution for your mobile surveillance needs.
The EHN Series Mini Rugged IP Dome Models
| Model Name | Megapixel | Fixed Lens (Selectable) |
| EHN1120 1.3 MP | 2.8mm, 3.6mm, 6mm, 8mm | |
| EHN1220 | 2 MP | |
| EHN1320 3 MP |
System Requirement
Before installing, please check that your computer meets the following system requirements.
• Operating System: Microsoft Windows XP / Vista (32-bit) / 7 (32-bit)
• Microsoft Internet Explorer 7 or above
Note: For using the Internet Explorer, some settings are required. Please refer to 5.2 Settings for Microsoft Internet Explorer.
2. Physical Description
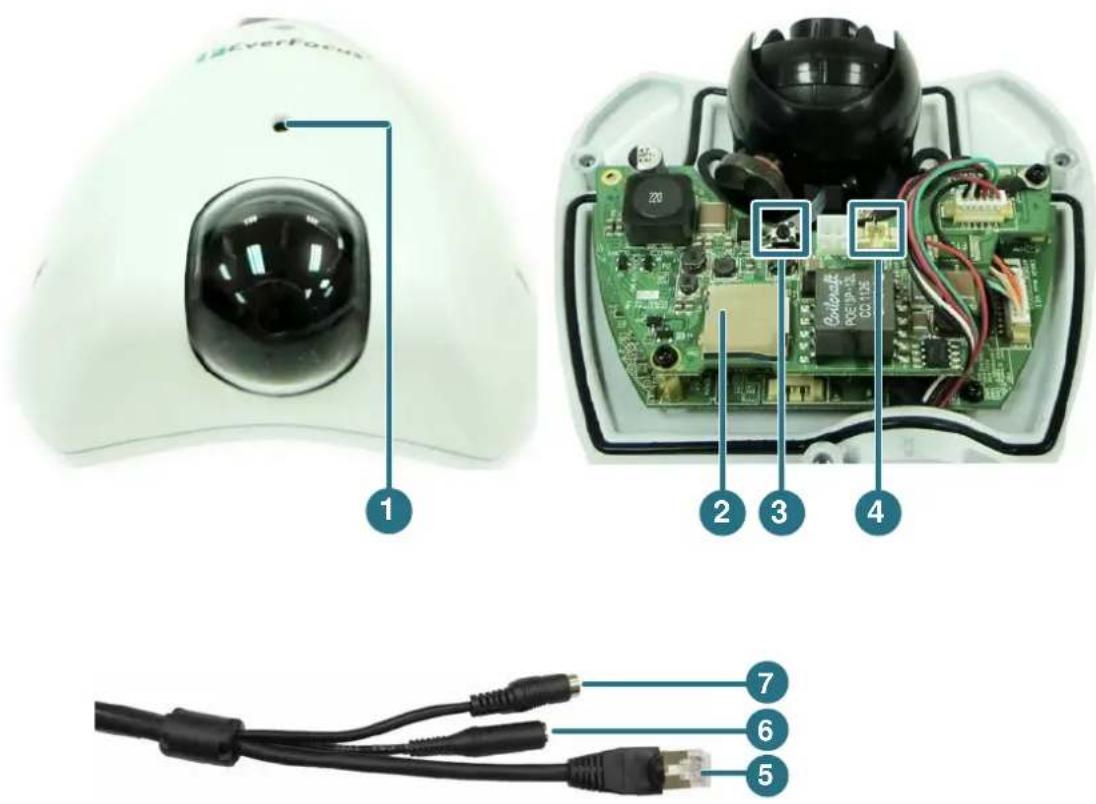
| No. | Item Name Descriptions | |
| 1 | Microphone | One built-in microphone. |
| 2 | Micro SD / SDHC Slot | For inserting a micro SD / SDHC card. |
| 3 | Reset Button | Resets all configurations to the factory default settings. |
| 4 | Video Test-Out Connector | Connects to a handheld monitor for adjusting camera angles using the supplied Video Test-Out Cable. |
| 5 | LAN / PoE Cable | Connects to a 10/100 Ethernet or PoE. |
| 6 | Power Cable | Connects to a 10-36 VDC power. |
| 7 | Audio Cable | A Line-in cable for connecting to the audio input device. |
2.1 Dimensions
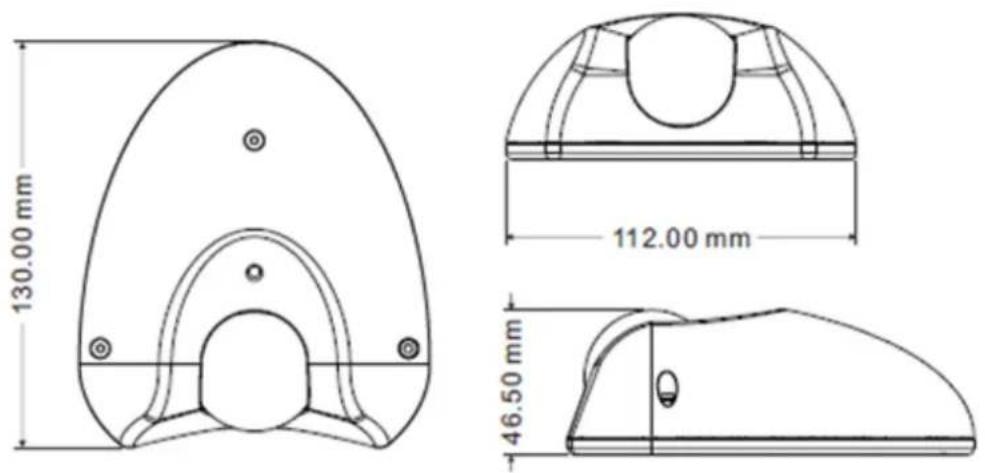
2.2 Packing List
Please check that there is no missing item in the package before installing.
- Camera x 1 -
- Long Screw x 4 (with 4 Anchors) - for thick surface installation
- Set Screw x 4 (with 4 Nuts) - for thin surface installation
• Video Test-Out Cable x 1 • - RJ-45 connector x 1
Power Pigtail Cable x 1 Torx Screwdriver x 1 - Mounting Template x 1 Software CD x 1
- Quick Installation Guide x 1 Desiccant Bag x 1
Note:
- Equipment configurations and supplied accessories vary by country. Please consult your local EverFocus office or agents for more information. Please also keep the shipping carton for possible future use.
- Contact the shipper if any items appear to have been damaged in the shipping process.
3. Features
- 1/2.7" progressive scan CMOS (for EHN1120 / 1220) 1/3" progressive scan CMOS (for EHN1320)
- Quad streams from H.264, MPEG4 or MJPEG*
- Up to 30 fps at 1920 × 1080 Supports 15 fps at 2048 x 1536 (only for EHN1320)
• Hallway Display (9:16)
• Vandal-proof (IK10)
• Weather-proof (IP67-rated)
• EN50155 compliance for rolling stock applications
• Built-in micro SD / SDHC card slot
• Electronic Day / Night
• 3-axis mechanism (pan / tilt / rotate)
• Built-in microphone - BNC video output for simplified on-site installation and verification
• Wide Dynamic Range (WDR)
• Digital Slow Shutter (DSS)
• 2D / 3D Dynamic Noise Reduction (DNR) - Motion Detection
• 10x Digital Zoom - Privacy Mask
- Anti-tampering
- Endurable to low environment temperatures (-40°C \~ 55°C / -40°F \~ 131°F)
• 10-36 VDC / PoE
• Multi-languages on Web interface - ONVIF / PSIA compliant
• Supports EverFocus CMS and Mobile Applications (iOS / Android)
* Only EHN1220/1320 models support MPEG4. EHN1120 do not support MPEG4.
4. Installation
4.1 Basic Installation
Please follow the steps below to mount the camera to the wall / ceiling.
- Paste the supplied mounting template onto a desired location on the wall / ceiling. Drill the three cross marks and insert the supplied three Anchors into the holes. Note that the camera lens should point to the arrow direction.
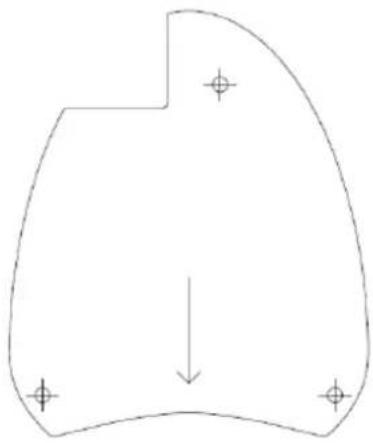
natural_image
Simple line drawing of a symmetrical shape with four corner marks and a downward arrow (no text or symbols)Note: Drill another hole on the upper-left corner of the template only if you want to run the cables through the wall / ceiling.
- Unscrew the three screws to remove the cover.
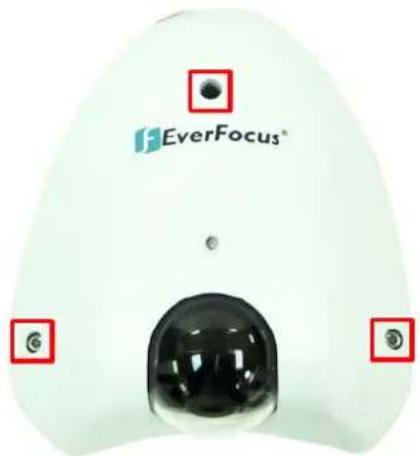
text_image
EverFocus®- Attach and then screw the camera to the wall / ceiling using the supplied three Long Screws.
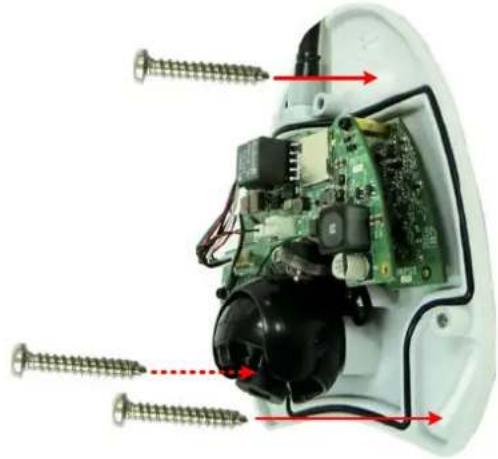
natural_image
Internal view of an electronic device with exposed circuit board and screws, no text or symbols visible- Thread the cables.
a. From the side cut of the camera case: remove the plug from the camera case first.
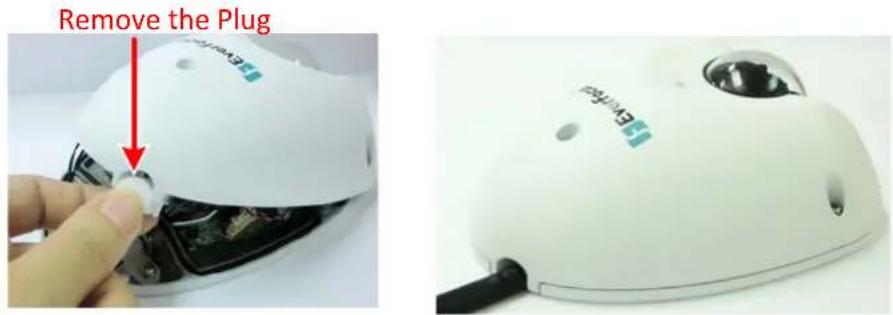
text_image
Remove the Plug EVE13 EVE13b. Through the wall / ceiling: run the cables through the hole on the wall / ceiling.
-
Connect the network, power or audio cables to the camera.
-
Optionally insert a micro SD / SDHC card to the card slot. See No.2 in 2. Physical Description.
-
Access the camera live view. See 5.1 Checking the Dynamic IP Address. Or using the supplied Video Test-Out cable to connect a monitor to the Video Test-Out connector (see No.4 in 2. Physical Description) of the camera for adjusting camera angles.
Note: Do Not adjust camera focus yourself as it has already been adjusted (with the dome cover on) in the factory. It is normal to see the blurry image on the live view when the camera is connected to a monitor without the dome cover on. The live view image will be focused once the dome cover has been put back to the camera.
Pan Adjustment: Loosen the screw and pan the camera by ±25^ .
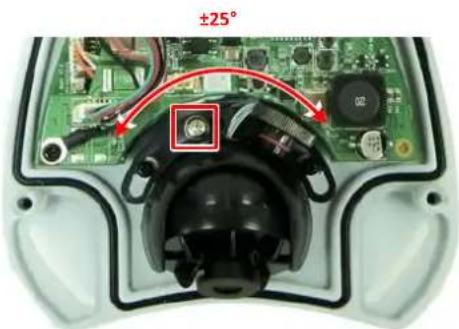
natural_image
Close-up of a robotic hand panel with exposed circuit board and mechanical components, no visible text or symbolsTilt Adjustment: Loosen the screw and tilt the camera by 90°.
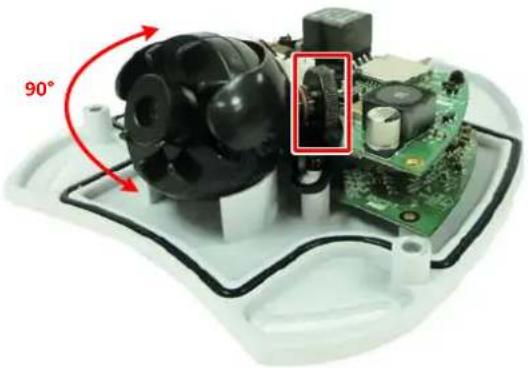
natural_image
Close-up of an electronic device with a 90-degree angle indicator and internal components (no readable text or symbols)Rotational Adjustment: Loosen the screw and rotate the camera by ±90^ .
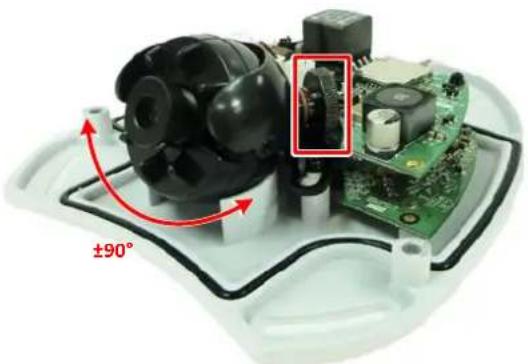
natural_image
Close-up of a mechanical device with visible components and a 90-degree angle标注 (no text or symbols on the main subject)- Remove the used desiccant bag from the camera and then stick the supplied Desiccant Bag on the inner side of the cover.
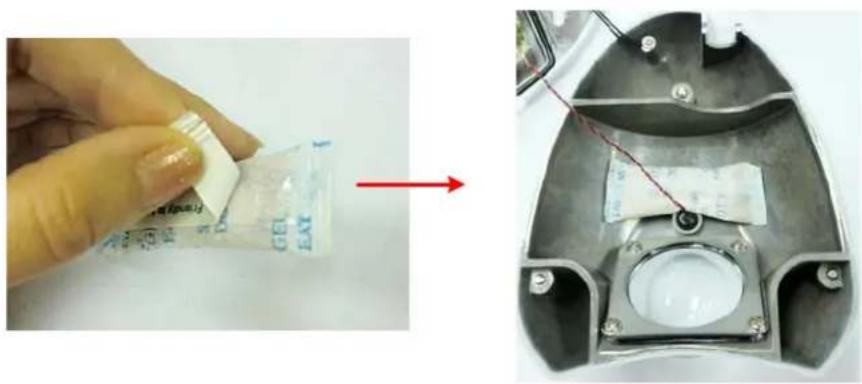
text_image
GEL EATNote: It is highly recommended to replace the desiccant bag every time when you open the camera.
- Secure the cover back to the camera.
5. Accessing the User Interface
This section explains how to access the Web interface of the camera for configuration.
5.1 Checking the Dynamic IP Address
You can look up the IP address and access the Web interface of the camera using the IP Utility (IPU) software included in the software CD. Please connect the IP camera in the same LAN of your computer.

- Install and then start the IPU program IPU. The following dialog box appears.
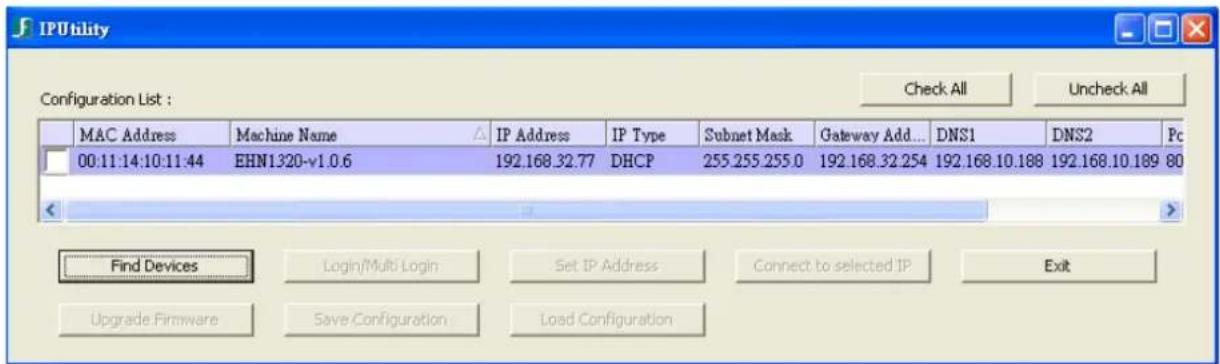
text_image
IPUtility Configuration List : Check All Uncheck All MAC Address Machine Name IP Address IP Type Subnet Mask Gateway Add... DNS1 DNS2 Pc 00:11:14:10:11:44 EHN1320-v1.0.6 192.168.32.77 DHCP 255.255.255.0 192.168.32.254 192.168.10.188 192.168.10.189 80 Find Devices Login/Multi Login Set IP Address Connect to selected IP Exit Upgrade Firmware Save Configuration Load Configuration- IPU will automatically search the cameras connected in the LAN. The default network values of the cameras will be displayed. By default, the network protocol of the camera is DHCP.
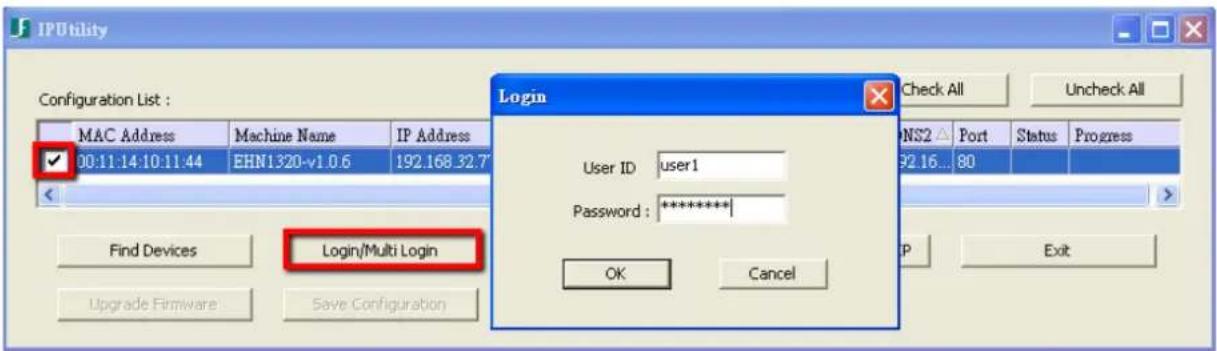
- To configure the network settings, select a camera and then click Login/Multi Login to log in.
text_image
IPUtility Configuration List : MAC Address Machine Name IP Address 00:11:14:10:11:44 EHN1320-v1.0.6 192.168_32.7 Login User ID : user1 Password : ********** OK Cancel Find Devices Upgrade Firmware Save Configuration Login/Multi Login Check All Uncheck All NS2 △ Port Status Progress 92.16... 80 P Exit- Type the user ID and password. Click OK.
Note:
- The default user ID is user1 and the default password is 11111111.
-
If you select more than one camera that has the same user ID / password, you will be able to log in several cameras at once.
-
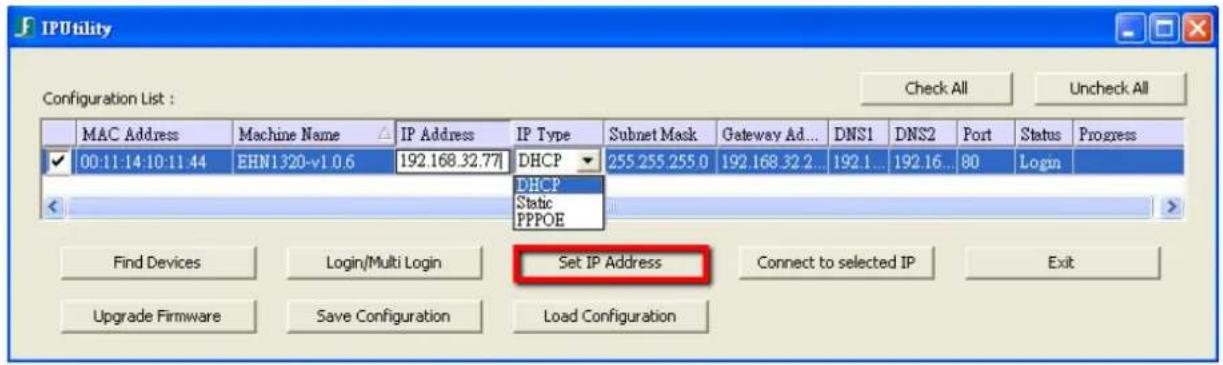
To change the IP settings, double-click the values in the column and type the numbers or select an option. Click Set IP Address to save the settings.
text_image
IPUtility Configuration List : Check All Uncheck All MAC Address Machine Name IP Address IP Type Subnet Mask Gateway Ad... DNS1 DNS2 Port Status Progress 00:11:14:10:11.44 EHN1320-v1.0.6 192.168.32.77 DHCP 255.255.255.0 192.168.32.2... 192.1... 192.16... 80 Login DHCP Static PPPOE Find Devices Login/Multi Login Set IP Address Connect to selected IP Exit Upgrade Firmware Save Configuration Load ConfigurationNote: Most networks support DHCP protocol, but if you are unsure of your network protocol, please consult your IP administrator for network configuration details.
- To access the camera, highlight the camera and click Connect to Selected IP. The Internet Explorer window pops up.
- Type the user ID and password to log in. The Live View window of the camera appears.
Note: You might be required to download ActiveX, which is required to view the camera feed. If asked, click "Yes". For more details on setting up the Microsoft Internet Explorer, please refer to 5.2 Settings for Microsoft Internet Explorer.
5.2 Settings for Microsoft Internet Explorer
To enable Remote Live View, Firmware Upgrade and ActiveX Prompt on Internet Explorer, some settings have to be complete. Please follow the steps below:
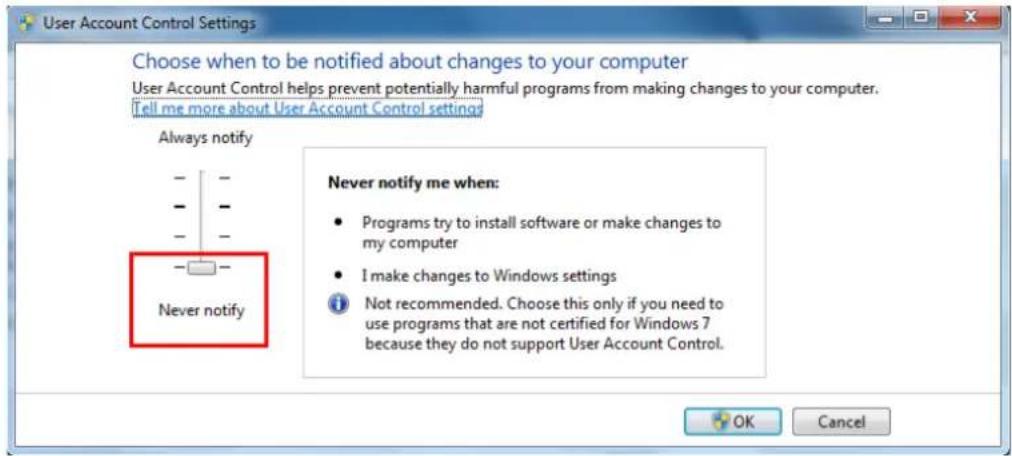
- On the computer, click Start > Control Panel > System and Security > Action Center (click Change User Account Control Settings), the User Account Control Settings window appears. Adjust the slide bar to Never Notify and then click OK. Restart your computer if requested.
text_image
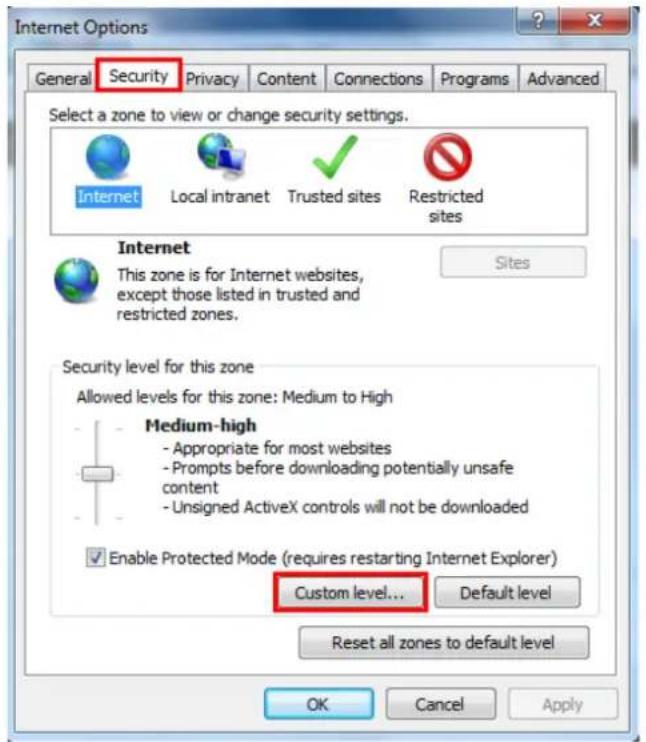
User Account Control Settings Choose when to be notified about changes to your computer User Account Control helps prevent potentially harmful programs from making changes to your computer. Tell me more about User Account Control settings Always notify Never notify Never notify me when: • Programs try to install software or make changes to my computer • I make changes to Windows settings i Not recommended. Choose this only if you need to use programs that are not certified for Windows 7 because they do not support User Account Control.- Open the Internet Explore, click Tools > Internet Options > Security Tab > Custom Level, the Security Settings windows appears.
text_image
Internet Options General Security Privacy Content Connections Programs Advanced Select a zone to view or change security settings. Internet Local intranet Trusted sites Restricted sites Internet This zone is for Internet websites, except those listed in trusted and restricted zones. Sites Security level for this zone Allowed levels for this zone: Medium to High Medium-high - Appropriate for most websites - Prompts before downloading potentially unsafe content - Unsigned ActiveX controls will not be downloaded Enable Protected Mode (requires restarting Internet Explorer) Custom level... Default level Reset all zones to default level OK Cancel Apply- In the Download unsigned ActiveX controls field, select Prompt. In the Include local directory path when uploading files to a server field, select Enable. Click OK.
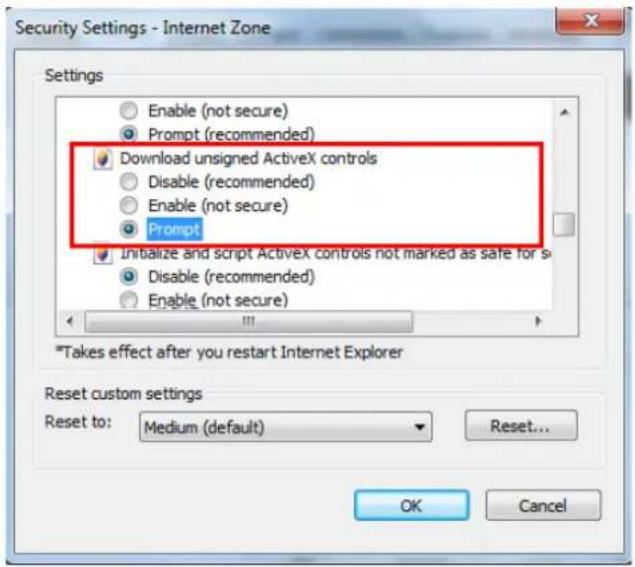
text_image
Security Settings - Internet Zone Settings Enable (not secure) Prompt (recommended) Download unsigned ActiveX controls Disable (recommended) Enable (not secure) Prompt Initialize and script ActiveX controls not marked as safe for s Disable (recommended) Enable (not secure) *Takes effect after you restart Internet Explorer Reset custom settings Reset to: Medium (default) Reset... OK Cancel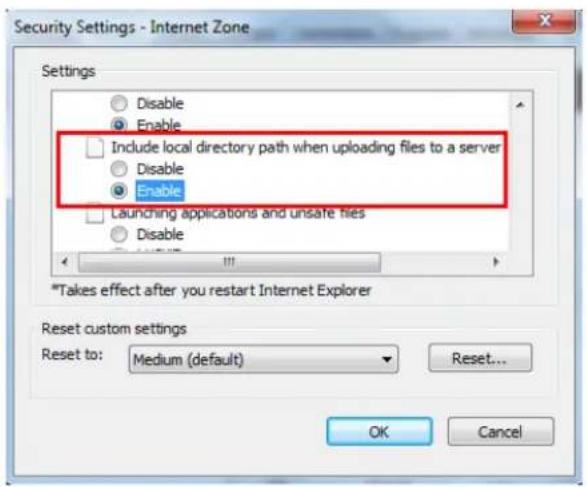
text_image
Security Settings - Internet Zone Settings Disable Enable Include local directory path when uploading files to a server Disable Enable Launching applications and unsafe files Disable *Takes effect after you restart Internet Explorer Reset custom settings Reset to: Medium (default) Reset... OK Cancel- In the Internet Options window, click the Advanced tab and then disable Enable memory protection to help mitigate online attacks. Click OK.
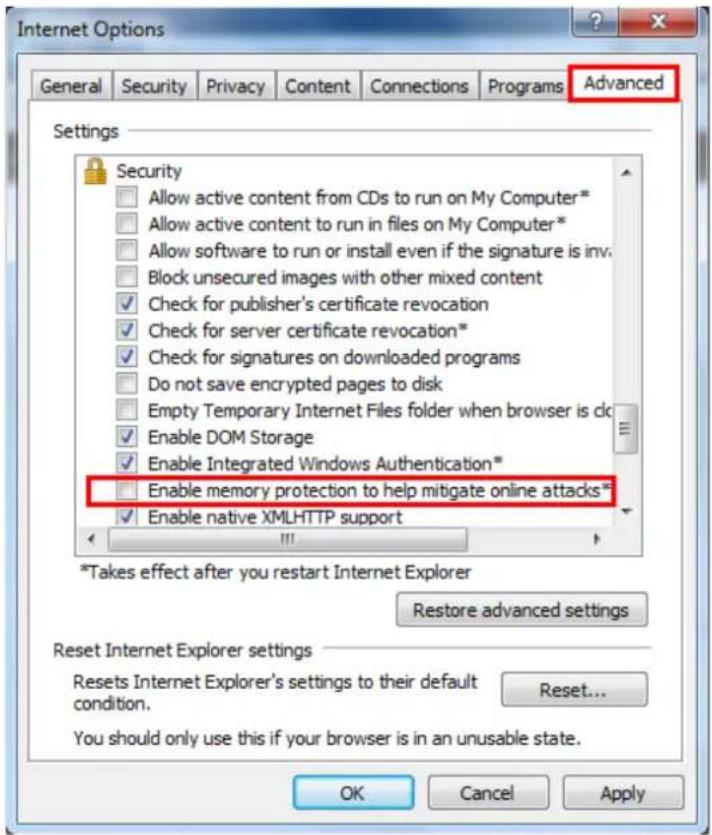
text_image
Internet Options General Security Privacy Content Connections Programs Advanced Settings Security Allow active content from CDs to run on My Computer* Allow active content to run in files on My Computer* Allow software to run or install even if the signature is inv Block unsecured images with other mixed content Check for publisher's certificate revocation Check for server certificate revocation* Check for signatures on downloaded programs Do not save encrypted pages to disk Empty Temporary Internet Files folder when browser is clc Enable DOM Storage Enable Integrated Windows Authentication* Enable memory protection to help mitigate online attacks* Enable native XMLHTTP support *Takes effect after you restart Internet Explorer Restore advanced settings Reset Internet Explorer settings Resets Internet Explorer's settings to their default condition. Reset... You should only use this if your browser is in an unusable state. OK Cancel Apply5.3 Connecting the Camera to the Network
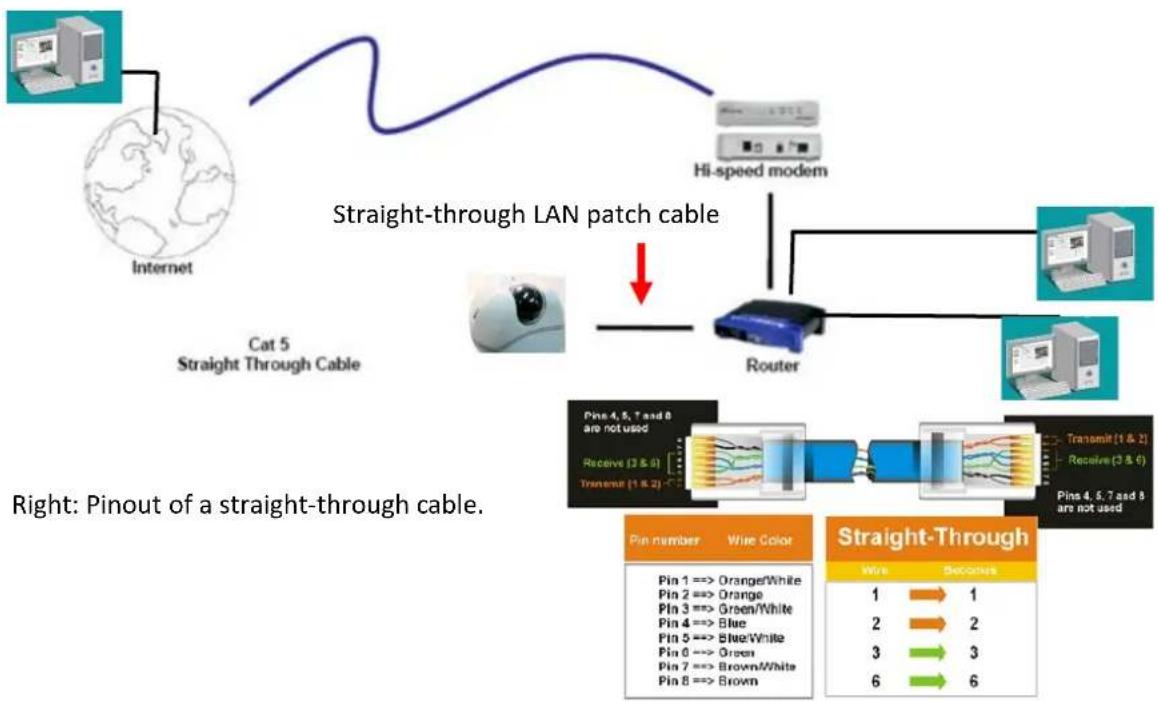
There are three methods to connect the IP camera to the network: Router or LAN Connection, Direct High-Speed Connection and One-to-One Connection.
Router or LAN connection
This is the most common connection in which the IP camera is connected to a router and allows multiple users on and off site to see the IP camera on a LAN/WAN (Internet). The camera must be assigned an IP address that is compatible with its LAN. By setting up port forwarding on the router, you can remotely access the cameras from outside of the LAN via the Internet. To remotely access the Web interface of the IP camera, please refer to 7.1.1 Network (DDNS) in the User's Manual. To set up port forwarding, please consult the manual of the router.
Router or LAN Connection
flowchart
graph TD
    A["Internet"] --> B["Straight-through LAN patch cable"]
    B --> C["Cat 5 Straight Through Cable"]
    C --> D["Router"]
    D --> E["Wi-Fi Modem"]
    E --> F["Wi-Fi Modem"]
    F --> G["Wi-Fi Modem"]
    G --> H["Wi-Fi Modem"]
    H --> I["Wi-Fi Modem"]
    I --> J["Wi-Fi Modem"]
    J --> K["Wi-Fi Modem"]
    K --> L["Wi-Fi Modem"]
    L --> M["Wi-Fi Modem"]
    M --> N["Wi-Fi Modem"]
    N --> O["Wi-Fi Modem"]
    O --> P["Wi-Fi Modem"]
    P --> Q["Wi-Fi Modem"]
    Q --> R["Wi-Fi Modem"]
    R --> S["Wi-Fi Modem"]
    S --> T["Wi-Fi Modem"]
    T --> U["Wi-Fi Modem"]
    U --> V["Wi-Fi Modem"]
    V --> W["Wi-Fi Modem"]
    W --> X["Wi-Fi Modem"]
    X --> Y["Wi-Fi Modem"]
    Y --> Z["Wi-Fi Modem"]
    Z --> AA["Wi-Fi Modem"]
    AA --> AB["Wi-Fi Modem"]
    AB --> AC["Wi-Fi Modem"]
    AC --> AD["Wi-Fi Modem"]
    AD --> AE["Wi-Fi Modem"]
    AE --> AF["Wi-Fi Modem"]
    AF --> AG["Wi-Fi Modem"]
    AG --> AH["Wi-Fi Modem"]
    AH --> AI["Wi-Fi Modem"]
    AI --> AJ["Wi-Fi Modem"]
    AJ --> AK["Wi-Fi Modem"]
    AK --> AL["Wi-Fi Modem"]
    AL --> AM["Wi-Fi Modem"]
    AM --> AN["Wi-Fi Modem"]
    AN --> AO["Wi-Fi Modem"]
    AO --> AP["Wi-Fi Modem"]
    AP --> AQ["Wi-Fi Modem"]
    AQ --> AR["Wi-Fi Modem"]
    AR --> AS["Wi-Fi Modem"]
    AS --> AT["Wi-Fi Modem"]
    AT --> AU["Wi-Fi Modem"]
    AU --> AV["Wi-Fi Modem"]
    AV --> AW["Wi-Fi Modem"]
    AW --> AX["Wi-Fi Modem"]
    AX --> AY["Wi-Fi Modem"]
    AY --> AZ["Wi-Fi Modem"]
    AZ --> BA["Wi-Fi Modem"]
    BA --> BB["Wi-Fi Modem"]
    BB --> BC["Wi-Fi Modem"]
    BC --> BD["Wi-Fi Modem"]
    BD --> BE["Wi-Fi Modem"]
    BE --> BF["Wi-Fi Modem"]
    BF --> BG["Wi-Fi Modem"]
    BG --> BH["Wi-Fi Modem"]
    BH --> BI["Wi-Fi Modem"]
    BI --> BJ["Wi-Fi Modem"]
    BJ --> BK["Wi-Fi Modem"]
    BK --> BL["Wi-Fi Modem"]
    BL --> BM["Wi-Fi Modem"]
    BM --> BN["Wi-Fi Modem"]
    BN --> BO["Wi-Fi Modem"]
    BO --> BP["Wi-Fi Modem"]
    BP --> BQ["Wi-Fi Modem"]
    BQ --> BR["Wi-Fi Modem"]
    BR --> BS["Wi-Fi Modem"]
    BS --> BT["Wi-Fi Modem"]
    BT --> BU["Wi-Fi Modem"]
    BU --> BV["Wi-Fi Modem"]
    BV --> BW["Wi-Fi Modem"]
    BW --> BX["Wi-Fi Modem"]
    BX --> BY["Wi-Fi Modem"]
    BY --> BZ["Wi-Fi Modem"]
    BZ --> CA["Wi-Fi Modem"]
    CA --> CB["Wi-Fi Modem"]
    CB --> CC["Wi-Fi Modem"]
    CC --> CD["Wi-Fi Modem"]
    CD --> CE["Wi-Fi Modem"]
    CE --> CF["Wi-Fi Modem"]
    CF --> CG["Wi-Fi Modem"]
    CG --> CH["Wi-Fi Modem"]
    CH --> CI["Wi-Fi Modem"]
    CI --> CJ["Wi-Fi Modem"]
    CJ --> CK["Wi-Fi Modem"]
    CK --> CR["Wi-Fi Modem"]
    CR --> CS["Wi-Fi Modem"]
    CS --> CT["Wi-Fi Modem"]
    CT --> CU["Wi-Fi Modem"]
    CU --> CV["Wi-Fi Modem"]
    CV --> CW["Wi-Fi Modem"]
Direct High-Speed Connection
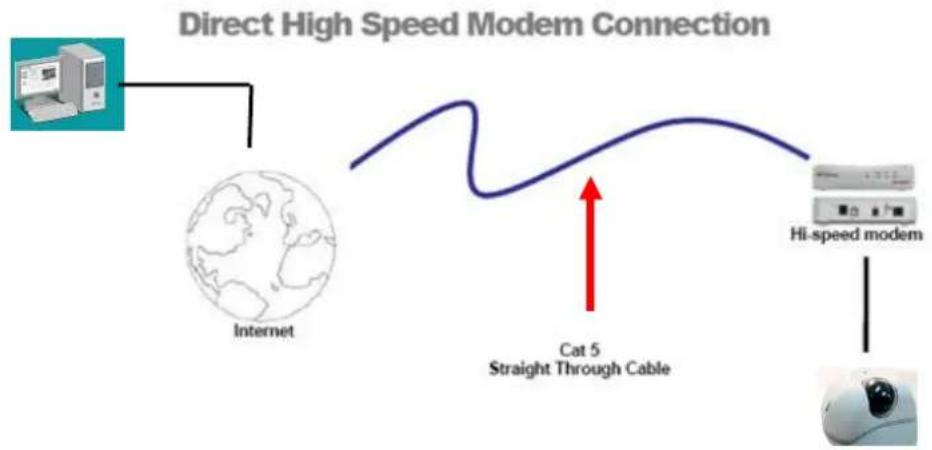
In a Direct High-Speed Connection, the camera connects directly to a modem without the need for a router. You need to set the static or dynamic WAN IP address assigned by your ISP (Internet Service Provider) in the camera's configuration web pages. To access the camera, just type
"http://xxx.xxx.xxx.xxx", where xxx.xxx.xxx.xxx is the IP address given by your ISP. If you have a dynamic IP address, this connection may require that you use DDNS for a reliable connection. Please refer to 7.1.1 Network (DDNS) in the User's Manual.
flowchart
graph LR
    A["Internet"] --> B["Cat 5 Straight Through Cable"]
    B --> C["Hi-speed modem"]
    D["Computer"] --> A
    E["Camera"] --> C
One-to-One Connection (Directly from PC to IP Camera)
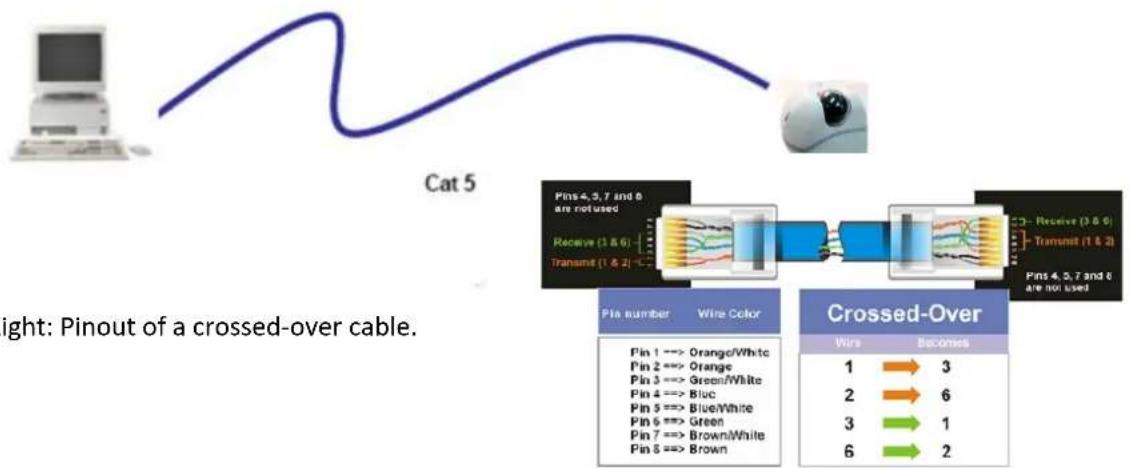
You can connect directly without using a switch, router or modem. However, only the PC connected to the camera will be able to view the IP camera. You will also have to manually assign a compatible IP address to both the computer and the IP camera. Unless the PC has another network connection, the IP camera will be the only network device visible to the PC. See the diagram below:
Simple One to One Connection
flowchart
graph LR
    A["Computer"] --> B["Cat 5"]
    B --> C["Pins 4, 5, 7 and 8 are not used"]
    B --> D["Receive (1 & 6)"]
    B --> E["Transmit (1 & 2)"]
    C --> F["Pin number Wire Color"]
    D --> F
    E --> F
    F --> G["Pin 1 ==> Orange/White"]
    F --> H["Pin 2 ==> Orange"]
    F --> I["Pin 3 ==> Green/White"]
    F --> J["Pin 4 ==> Blue"]
    F --> K["Pin 5 ==> Blue/White"]
    F --> L["Pin 6 ==> Green"]
    F --> M["Pin 7 ==> Brown/White"]
    F --> N["Pin 8 ==> Brown"]
    G --> O["Crossed-Over"]
    H --> O
    I --> O
    J --> O
    K --> O
    L --> O
    M --> O
    N --> O
    O --> P["Wire Becomes"]
    P --> Q["1 → 3"]
    P --> R["2 → 6"]
    P --> S["3 → 1"]
    P --> T["6 → 2"]
Right: Pinout of a crossed-over cable.
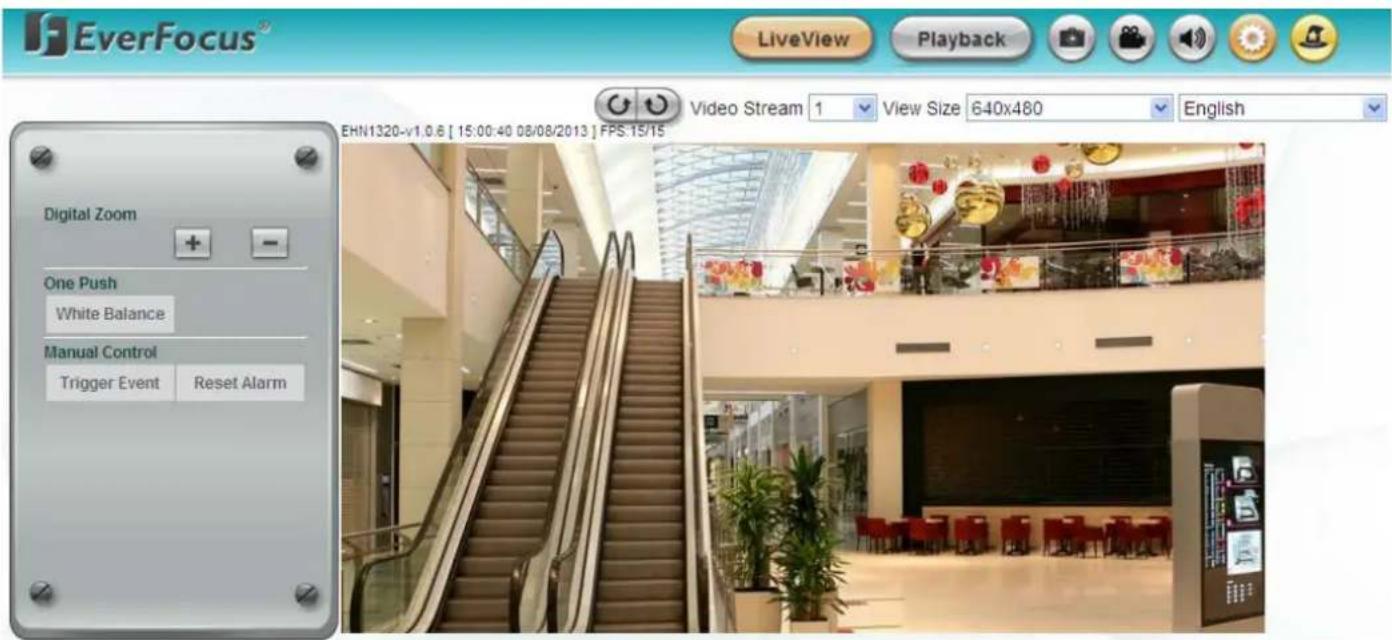
5.4 Live View Window
text_image
EverFocus® LiveView Playback Video Stream 1 View Size 640x480 English EHN1320-v1.0.6 [ 15:00:40 08/08/2013 ] FPS:15/15 Digital Zoom One Push White Balance Manual Control Trigger Event Reset Alarm-
Click the button to display the Live View window. If you experience video feed lag time (if connected via Internet), you can reduce the resolution or limit the number of streams. See 7.2.1 Streaming and Audio.
-
Click the button to play back the recorded data directly from the on-camera Micro SD / SDHC card (for this function to become active, you have to insert a Micro SD / SDHC card in the Micro SD / SDHC card slot on the camera. See 6.2 Setting up the Playback Function).
3. Snapshot

Click the Snapshot button to take a snapshot. By default, the snapshot will be saved at C:\EverFocus. To change the location, see Record to Local in 7.1.3 Storage.
4. Record

Click the Record button to start / stop recording. By default, the video recordings will be saved at C:\EverFocus. To change the location, see Record to Local in 7.1.3 Storage. To change the source video stream and recording format, see Recording and Snapshot Settings in 7.1.3 Storage. To configure the Schedule Record setting, see Schedule Settings in 7.3.2 Event.
5. Audio

Click the Audio button to switch on/off the speaker function for listening to the audio from the camera. To activate the Audio function, the Enable Audio must be selected. See Audio Settings in 7.2.1 Streaming and Audio.
-
Click the Setting button to enter the Settings page (see 7. Settings).
-
Click the Wizard button to enter the Setup Wizard.
-
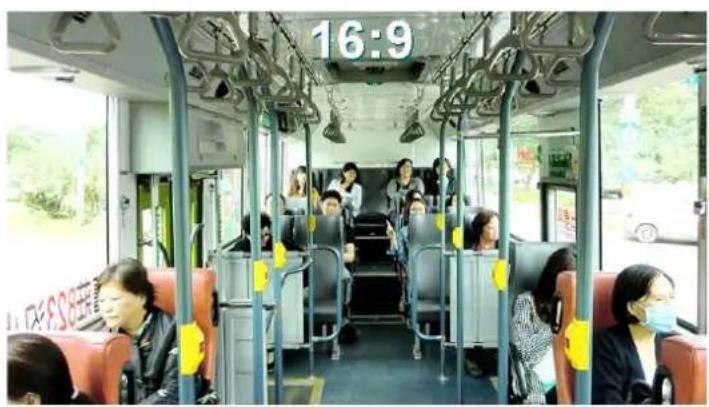
Hallway Display (9:16): Click the Rotate button to rotate the live image. This function allows users to monitor vertically-oriented areas such as hallway, corridors and aisles. It's recommended to select a 16:9 View Size (e.g. 1920x1080 / 1024x768) to achieve the best display effect.
natural_image
Interior view of a public bus with passengers seated and standing, no visible text or signage9. Video Stream
Select the Video Stream (Stream 1, Stream 2, Stream 3 or Stream 4) that will be displayed in the video box on the bottom. Stream 2, Stream 3 and Stream 4 are only selectable if you have enabled the stream. The default setting is Stream 1 only. See 7.2.1 Streaming and Audio.
10. View Size
Use this to select the appropriate view size and shape of the video box on the bottom. A smaller size might increase transmission speed and video quality.
11. Language
Click the Language drop-down list to select the desired language.
12. Digital Zoom
Click 📋 to zoom in / out the camera view up to 10x. Clicking on a magnified image will re-center the image around that point.
13. One Push
The One Push button can be displayed on the live view window by enabling the Show One Push Buttons function in the Live View Layout Settings (see 7.1.4 Display and Overlay). For the
White Balance
button to work, select One Push from the White Balance Mode drop-down list (see
7.2.4 Image. Once this is done, clicking the White Balance button on the Live View Window will instruct the camera to adjust the white balance settings, and these settings will be active until the button is pushed again. This is like a “semi-automatic” way to adjust white balance to suit the user, if the Auto or Manual mode does not give the result the user wants.
14. Manual Control
Click the Trigger Event button to trigger an event directly from the Live View window. If you have configured an event (in the Event List) that will trigger a reaction (like a recording) when a Manual Trigger event occurs, clicking this button will trigger that reaction. You can select what that reaction will be. You can, for instance, set the camera to record the audio/video feed to the SD card on board the camera. You can then click on the Playback button to open the Playback page and search for and play all such recordings that had been stored on the card. Such event actions will be effective once they have been configured in the Event List (see 7.3.2 Event).
Click the Reset Alarm button to reset the alarm output remotely.
15. Status Display (info line that can be placed above video box or at bottom of page)
This shows the name of the camera that is currently active or being configured, current date/time and current frame rate. You can activate these info displays in the Overlay Text Settings (see 7.1.4 Display and Overlay).
16. Event signal icons (above video screen)
When an alarm or motion event is triggered, a signal icon will appear at the top right of the Live View window to alert the user.
Alarm event icon: When an alarm is triggered, this icon appears.
Motion detection icons : The colors of these motion event icons correspond to the colors of the motion trigger areas you have configured in the Motion Settings (see 7.3.2 Event).
Recording icon 📄 : When the camera is recording to a PC-based folder, this icon appears.
6. Playback
You can remotely play back the recordings stored in the on-camera micro SD card on the Web interface, or play back the recordings stored in the computer using the ARV Viewer included in the software CD.
Playback is designed as a quick way to check recent recordings that were triggered by Events that were configured to "Record to SD Card" in the Event Management (see 7.3.2 Event).
Note: Note that the Playback page is only accessible once the on-camera SD card is inserted and active.
6.1 Remote Playback Using Playback Page
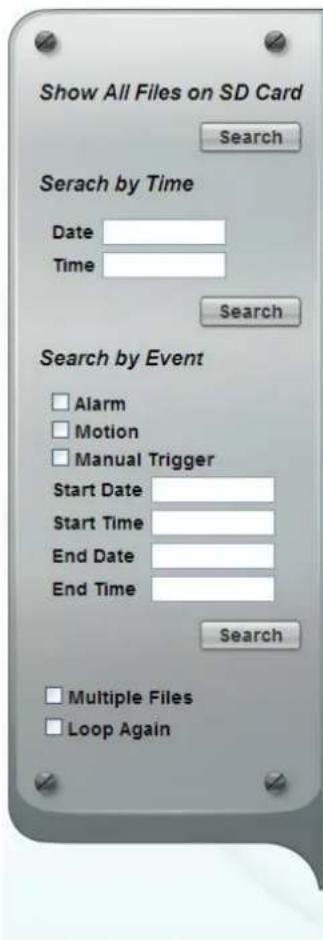
On the Live View Window, click the Playback button to open the Playback page.
text_image
Show All Files on SD Card Search Serach by Time Date Time Search Search by Event Alarm Motion Manual Trigger Start Date Start Time End Date End Time Search Multiple Files Loop Again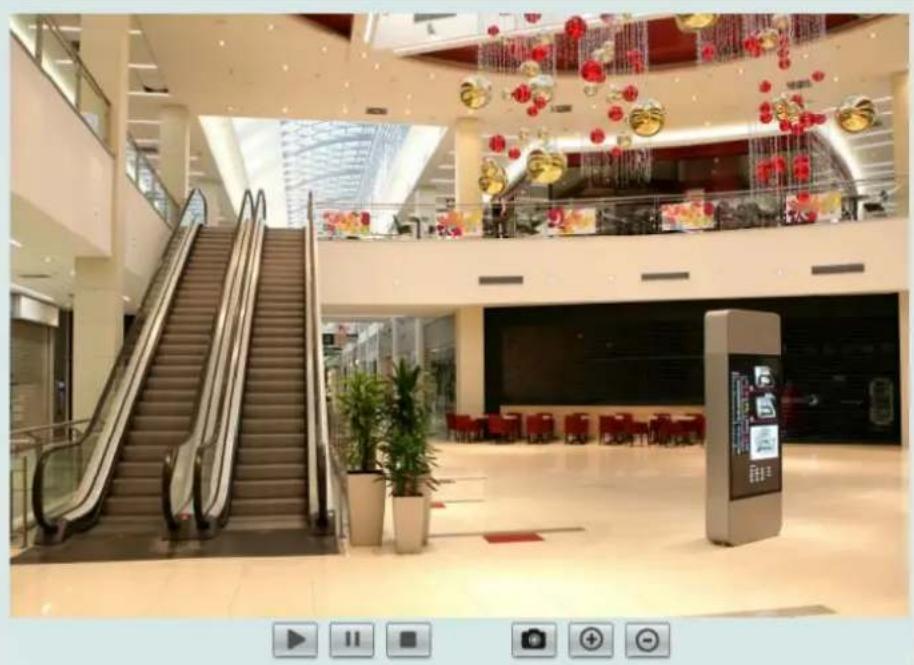
natural_image
Interior view of a modern multi-level hotel lobby with escalators, decorated ceiling lights, and a digital kiosk (no visible text or signage)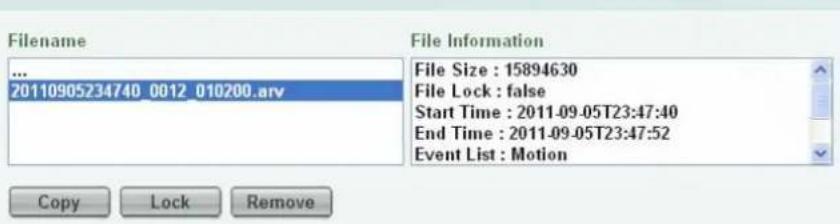
text_image
Filename ... 20110905234740 0012_010200.arv File Information File Size : 15894630 File Lock : false Start Time : 2011-09-05T23:47:40 End Time : 2011-09-05T23:47:52 Event List : Motion Copy Lock RemoveSearch by File: Click the Search button to search for all recording files on the on-camera SD card. Search results will be displayed in the Filename area.
Search by Time: Click the Date / Time column and select the date and time from which you want to search until the present moment. Click Search to get your search results, which will be displayed in the Filename area.
Search by Event: Select the type of Event recordings you want to search for (Alarm, Motion, Manual Trigger) and then click the Start Date / Time; End Date / Time column to select the Start Time date/time and the End Time date/time of your search. Click Search to get your search results, which will be displayed in the Filename area.
Multiple Files: Check this box if you want the video player to play all the files in the selected folder. The files will be displayed in the Filename area.
Loop Again: Check this box if you want the video player to play the selected file over and over again.
Play: Once you have opened the file's folder and have clicked on the file to highlight it, its details will be displayed in the File Information area. You can now click Play ▶ to play that specific file.
Pause: Click 11 to pause playing back.
Stop: Click □ to stop playing back.
Snapshot: Click to take a snapshot.
Zoom Out: Click ☑ to zoom out.
Filename: This area will display a list of search results (recording files and folders). Folders (named with the recorded date) will be displayed first. Click on the folder and click on each subfolder until the recording files (.arv) in that folder is listed.
File Information: Click a file on the Filename list, the selected file information will be listed.
Copy: Click to copy the selected file to the computer-based folder of your choice. A browsing box will open so that you can search for the folder of your choice. You can use the ARV Viewer to play back the recordings recorded in your computer. For details on ARV Viewer, see 6.3 Playing Back Using ARV Viewer.
Lock: Click to lock the selected file. This will protect that file from being overwritten during any overwrite procedure. The file will thus be saved on the micro SD card indefinitely. However, the file will still be deleted if the micro SD card is ever formatted.
Remove: Click to delete the selected file.
6.2 Setting Up the Playback Function
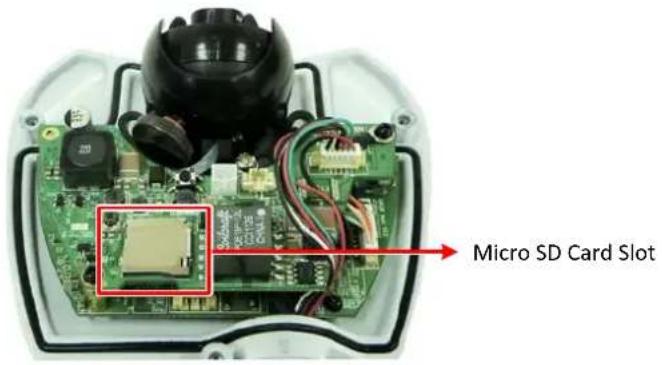
Note that the Playback function will not be activated until the user has inserted a micro SD card in the camera's micro SD card slot. The card may also have to be formatted in the Secure Digital Card field (see 7.1.3 Storage).
text_image
Micro SD Card Slot6.2.1 Inserting / Removing the SD Card
- To insert the SD card: Remove the camera cover and insert the SD card into the SD card slot before powering on the camera.
- To remove the SD card: Click the Remove button (System Settings > Storage > Secure Digital Card) when the camera is powered on, the SD card information "SD card is not mounted" will display and the Remove button will change to Attach, and then you may remove the SD card. If you want to insert the SD card again, insert the SD card and then click the Attach button.
After inserting the SD card into the SD card slot, the Playback button on the Live View page should be activated. If not, do the following:
- Click the Remove button, pull the card out and re-insert it.
- Click the Format button to format the card. NOTE: All data on the disk will be deleted if the Format button is clicked.
6.2.2 Testing the Playback Function
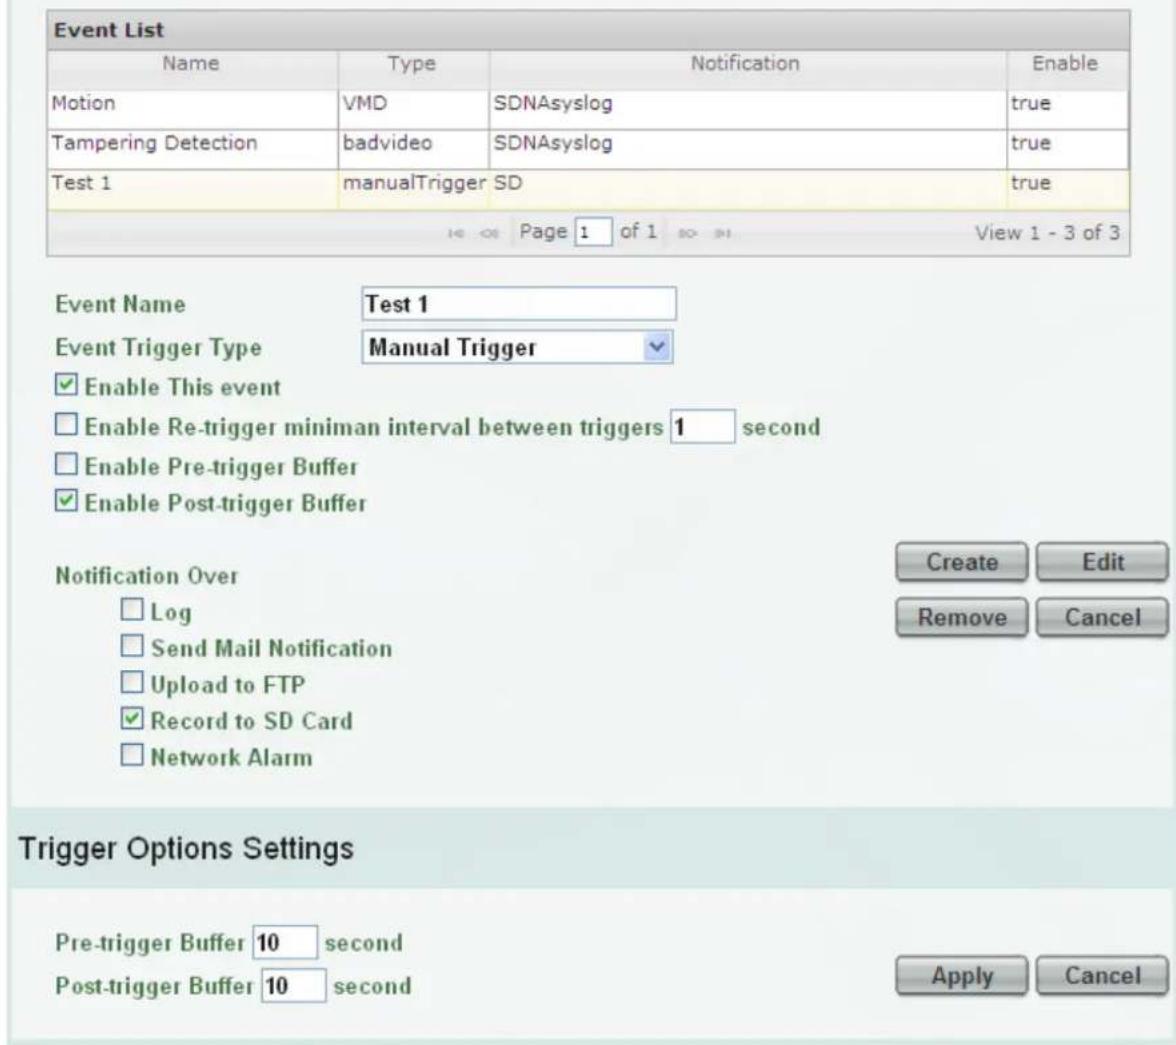
- To test the Playback function (this is not required), set up a "Manual Trigger" Recording Event by clicking Event Settings > Event.
Event Management
text_image
Event List Name Type Notification Enable Motion VMD SDNAsyslog true Tampering Detection.badvideo SDNAsyslog true Test 1(manualTrigger SD true View 1 - 3 of 3 Event Name Test 1 Event Trigger Type Manual Trigger ✓ Enable This event □ Enable Re-trigger miniman interval between triggers 1 second □ Enable Pre-trigger Buffer ✓ Enable Post-trigger Buffer Notification Over □ Log □ Send Mail Notification □ Upload to FTP ✓ Record to SD Card □ Network Alarm Create Edit Remove Cancel Trigger Options Settings Pre-trigger Buffer 10 second Post-trigger Buffer 10 second Apply Cancel- Give the event a name, like "Test 1".
- In the "Event Triggered Type" field, click on Manual Trigger.
- Below this, check "Enable This Event", "Enable Post-trigger Buffer", and "Record to SD Card".
- To save your settings, click the Create button, and the Event will be listed in the Event List.
- Look at the "Post-trigger Buffer" at the bottom to make sure the buffer time is set to 10 seconds. Click the Apply button.
- Click theLiveView button to go back to the Live View page.
-
Get ready to click the Trigger Event button on the Live View page. Before you do, see if you can find something in the view screen that will give you a visual time marker. For instance, if you can get your hand in front of the camera's lens, get ready to count down on your fingers.
-
Click the Trigger Event button and slowly count down on your fingers in front of the lens (if you are able to do so – if not, try to find visual cues on the view screen that will help you to mark the moment you pushed the trigger). The recording period will be as long as the buffer time you selected – the default period is 10 seconds.
- Click the Playback button to open the Playback page.
- There are different ways to search for recording files on the camera's micro SD card (i.e. the Playback memory). For a recent recording like your test event, simply click the "Search" button under the "Show All Files on SD Card" header.
- If the micro SD card is active and formatted correctly, the recording folder's name (the recording day's date) will appear in the Filename area. Click on this folder to open it. If there are sub-folders, click on the bottom one (the most recent would be at the bottom) until you can click on a file that cannot open to another sub-level and shows data in the File Information area to the right. This would be the file of the most recent recording event.
- To play this file, click the Play button below the video box. The test footage you have recorded should start playing. Play time should be 10 seconds if you left the Post-trigger Buffer as 10 seconds.
6.3 Playing Back Using ARV Viewer
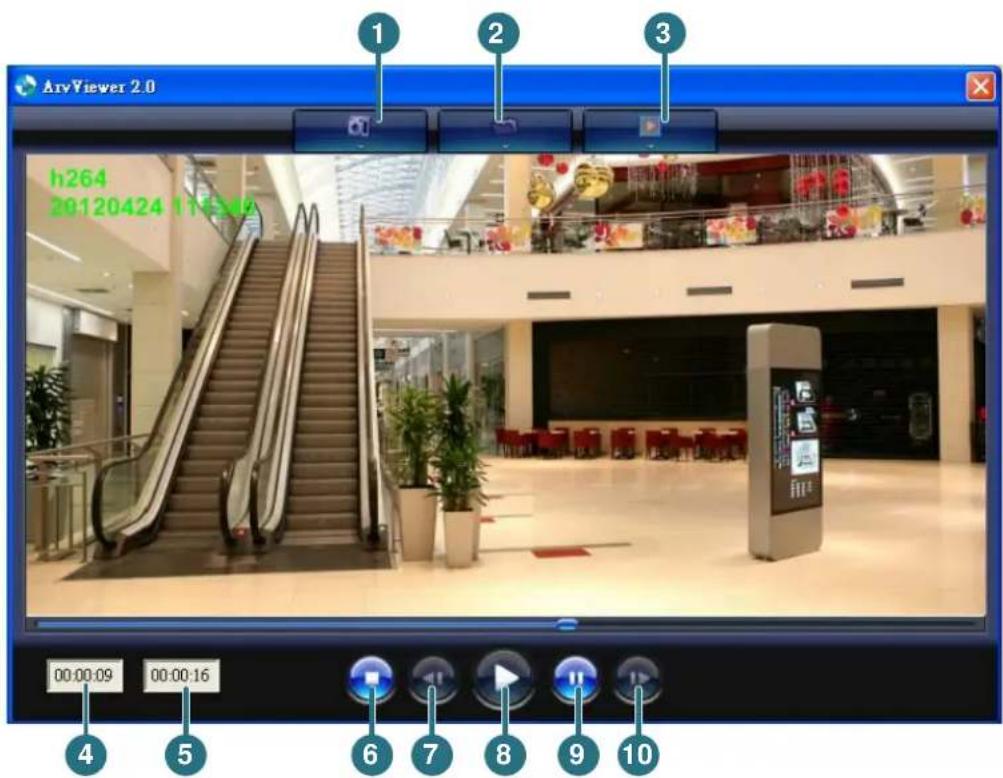
You can play back the recordings stored in the computer using the ARV Viewer included in the software CD. To store the recordings in the computer, please refer to Copy in 6.1 Remote Playback using Playback Page.
text_image
ArvViewer 2.0 h264 20120424 11:53:16 00:00:09 00:00:16 4 5 6 7 8 9 10| No. | Item Name | Descriptions |
| 1 | Snapshot | Click to take and save a snapshot. |
| 2 | Load File | Click to load the recordings for playing back. |
| 3 | Convert ARV to AVI | Convert the recording from ARV format to AVI format. |
| 4 | Playback Time | Display the playback time. |
| 5 | Total Time of Recording | Display the total time of the recording. |
| 6 | Stop | Click to stop playing the recording. |
| 7 | Step Reverse | Click to display the previous frame. |
| 8 | Play | Click to play back the recording. |
| 9 | Pause | Click to pause the recording. |
| 10 | Step Forward | Click to display the next frame. |
7. Settings
Click the Setting button

on the Live View Window to enter the setting submenu. There are two tabs:
Basic and Advanced on the left-side bar. You can set up the basic camera settings in the Basic tab. To further set up comprehensive camera settings, click the Advanced tab, which includes all the settings to be configured. The chapters below describe the detailed information of the Advanced tab.

EverFocus®
LiveView
Playback


Basic / Advanced

System Settings
Network
Date/Time
Storage
Display and Overlay
System Maintenance
System Information
User
Black/White List
Camera Settings
Streaming and Audio
Camera
Schedule
Event Settings
Event Wizard
Link to Smart Phone App
IP Settings
IPv4
IP Mode
DHCP Static IP PPPoE
IP Address
192.168.12.189
Subnet Mask
255.255.255.0
Gateway
192.168.12.1
Primary DNS
192.168.10.188
Secondary DNS
192.168.10.189
Username
The Ground Truth image displays a single, solid horizontal line. According to Rule 2 (UNDERSCORE & LINE RULES), this is a stylistic or background line, not a placeholder underscore. Therefore, the OCR result must ignore it and output nothing or only meaningful text. The provided OCR content is "____", which consists of four underscores. This is an incorrect interpretation of the line as a placeholder, violating the rule that stylistic lines must be ignored. The OCR has hallucinated underscores where none should exist based on the GT's visual context. Hence, the OCR result is inconsistent with the Ground Truth.
Password
IPv6
IP Address
fe80:0:0:0:211:14ff:fe11:220b
Gateway
fe80:0:0:0:0:0:0
Primary DNS
0:0:0:0:0:0:0
Port Settings
HTTP Poll
80
HTTPS Port
RTSP Port
554

Enable UPnP Port Forwarding
Apply
Cancel
Apply
Cancel
7.1 System Settings
7.1.1 Network
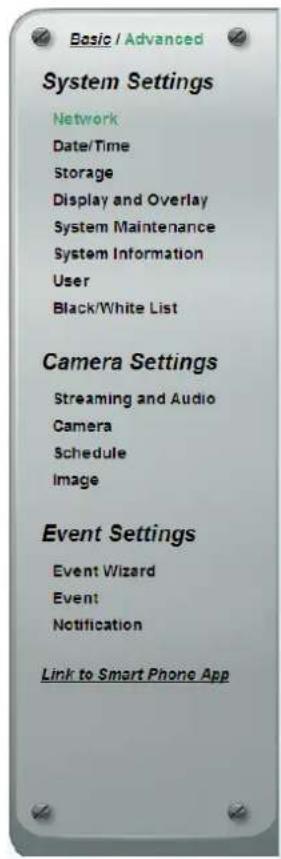
text_image
Basic / Advanced System Settings Network Date/Time Storage Display and Overlay System Maintenance System Information User Black/White List Camera Settings Streaming and Audio Camera Schedule Image Event Settings Event Wizard Event Notification Link to Smart Phone AppProtocol Settings
Apply Cancel
IP Settings
IPv1
text_image
IP Mode DHCP Static IP PPPoE IP Address 192.168.32.109 Subnet Mask 255.255.255.0 Gateway Primary DNS 192.168.10.188 Secondary Username PasswordApply Cancel
IPv6

Port Settings
Apply Cancel
Multicast Settings
Multicast IP 239.238.144.152
Time to Live 5
Apply Cancel
DDNS Settings
Register

Apply Cancel
HTTPS Settings
Create Carticated Mode
○ Self-signed Certicated ○ Certificate Request
Apply Cancel
Property Information
Property Remove
Browse Upload
Property Remove
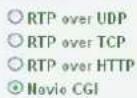
【Protocol Settings】This function can only be set up in the Advanced tab. You can transmit the data stream from the IP cameras using the RTSP (Real Time Streaming Protocol) on the network. The RTSP is a protocol that allows you to access video streams by using the compatible media players. Click Apply to apply the changes or Cancel to cancel the changes and return to the previous settings.
■ RTP over UDP: The RTSP protocol uses UDP for camera data stream transmission.
■ RTP over TCP: The RTSP protocol uses TCP for camera data stream transmission.
■ RTP over HTTP: The RTSP protocol uses HTTP for camera data stream transmission.
- Nevio CGI: This is EverFocus' protocol designed for EverFocus' IP devices. Select this protocol for camera data stream transmission.
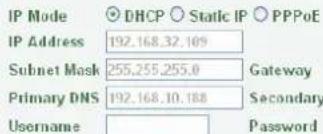
【IP Settings】Enter the IPv4 / IPv6 details in this area, which applies to your system. Click Apply to apply the changes or Cancel to cancel the changes and return to the previous settings.
■ IPv4:
IP Mode: Refer to the network administrator for these settings of the server. Default: DHCP.
- DHCP: This setting lets the system use an automatically assigned (dynamic) IP address. This address can change under certain circumstances. For instance, when the camera's network switch/hub has to be rebooted. Do not assign to the DHCP server the same IP addresses used for the other network cameras and PCs with unique IP addresses.
- Static IP: The user can manually set the Static IP address. This type of address is stable and cannot change, but the user has to make sure there are no address conflicts with other network-connected devices.
- PPPoE: This is a DSL-connection application. The ISP will ask the user to input a username and password. Contact your ISP for these details.
Note: If PPPoE is selected as the IP type, the supplied IP Utility program will not be able to detect the device.
IP address: When DHCP is not used, the user needs to manually enter the IP address of the camera. Do not enter an IP address that is already used for your computer or other network cameras.
Subnet Mask: This field is used to set the subnet mask for your network, so that the IP camera will be recognized within the network. Example: 255.255.255.0. When DHCP is selected, the DHCP server will assign this value automatically.
Gateway: This field is used to set the gateway for your network so that the IP camera will be recognized within the network. When DHCP is selected, the DHCP server will assign this value automatically.
Primary DNS: Enter the IP address of the DNS server if this is provided by an ISP.
Secondary DNS: If your ISP provided you with a secondary DNS address, please enter it here.
Username: Enter the account's username (used only for PPPoE).
Password: Used only for PPPoE.
■ IPv6: Enter the IPv6 details in this area, if this applies to your system.
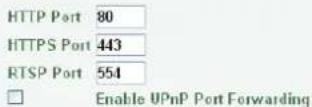
【Port Settings】Enter the HTTP, HTTPS and RTSP port numbers. Check the Enable UPnP Port Forwarding box to enable the UPnP function. Click Apply to apply the changes or Cancel to cancel the changes and return to the previous settings.
Promoted by the UPnP Forum (Universal Plug and Play), the UPnP is a networking architecture providing compatibility among networked devices listed in the networked device table. Enable the UPnP function means you can directly connect the cameras listed in the networked device table by clicking on them.
Note:
- For the UPnP function to work, an UPnP-enabled router is required.
- The UPnP function may fail owing to the compatibility between the camera and the router.
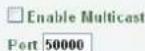
【Multicast Settings】This function can only be set up in the Advanced tab. Enable if required, fill in the setting options and click Apply to save.
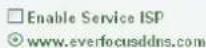
【DDNS Settings】This function can only be set up in the Advanced tab. DDNS (Dynamic Domain Name System) is a service used to map a domain name to the dynamic IP address of a network device. You can set up the DDNS service for remote access to the IP camera. DDNS assigns a domain name (URL) to the IP camera, so that the user does not need to go through the trouble of checking if the IP address assigned by DHCP Server has changed. Once the IP is changed, the IP camera will automatically update the information to the DDNS to ensure it is always available for remote access. Before enabling the following DDNS function, user should have applied for a host name from the DDS service provider's website. We support these four DDNS server providers: www.everfocusddns.com, www.sitelutions.com, www.dyndns.com, and www.no-ip.com
Note: We highly recommend that you use xxxx.everfocusddns.com for the simplicity of setting up your IP cameras.
■ Enable Service ISP: Check this box to enable the DDNS function. You can either apply for a host name from EverFocus or other DDNS server providers.
- From EverFocus: If you choose the EverFocus DDNS server, you can obtain a free host name from EverFocus. To obtain a free host name from EverFocus, type a desired host name in the textbox, click the Register / Update button, and then click the Apply button.
- From other DDNS server providers: To obtain a domain name from one of the three DDNS server providers, you have to register your name with the provider first, and then select the provider and fill in the required information. Please refer to the specific DDNS company's website for further information.
Record ID: Type the record ID if provided by the DDNS server provider.
FQDN: Type the fully qualified domain name applied from the DDNS server provider. For example, xxxx.dyndns.com
Username / Password: Type the login account of your DDNS server provider.
Click Apply to apply the changes or Cancel to cancel the changes and return to the previous settings.
Note:
-
In order to support the full functionality of the camera, you must open the port numbers (80, 554, 443) on the router for remote access to the IP camera. This function is available on most routers in the market and is often known as "Port Forwarding". To set up Port Forwarding, please consult the manual of the router.
-
In certain router models, it is possible that you will not be able to access the camera using DDNS while inside the router's network. Please try using a PC located outside of your router's network.
Default Ports on All EverFocus IP Cameras:
HTTP: 80
RTSP: 554
HTTPS: 443
【HTTPS Settings】This function can only be set up in the Advanced tab. Hypertext Transfer Protocol Secure (HTTPS) is a combination of the Hypertext Transfer Protocol and the SSL/TLS protocol that provides encrypted communication and secure identification of a network web server. Before using the HTTPS function for communication with the IP camera, a Certificate must be created first. There are two ways to create and install a certificate: Self-Signed Certificated and Certificate Request.
Self-Signed Certificated
Please note that even though self-signed certificates are free and offer some protection, true security is only implemented after the installation of a signed certificate issued by a certificate authority.
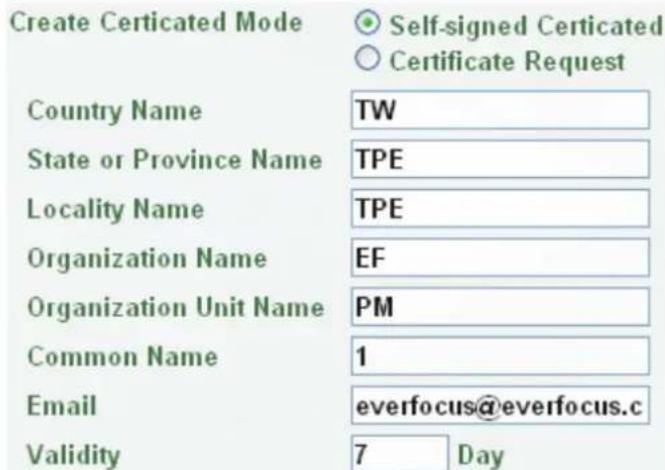
- Select Self-Signed Certificated and fill in the following information.
text_image
Create Certicated Mode Self-signed Certicated Certificate Request Country Name TW State or Province Name TPE Locality Name TPE Organization Name EF Organization Unit Name PM Common Name 1 Email everfocus@everfocus.c Validity 7 Day- Click the Apply button. The subject line will be displayed in the Install Certificated Info field.
Install Certicated Info
C=TW,ST=TPE,L=TPE,O=EF,OU=PM,CN=1
Property
Remove
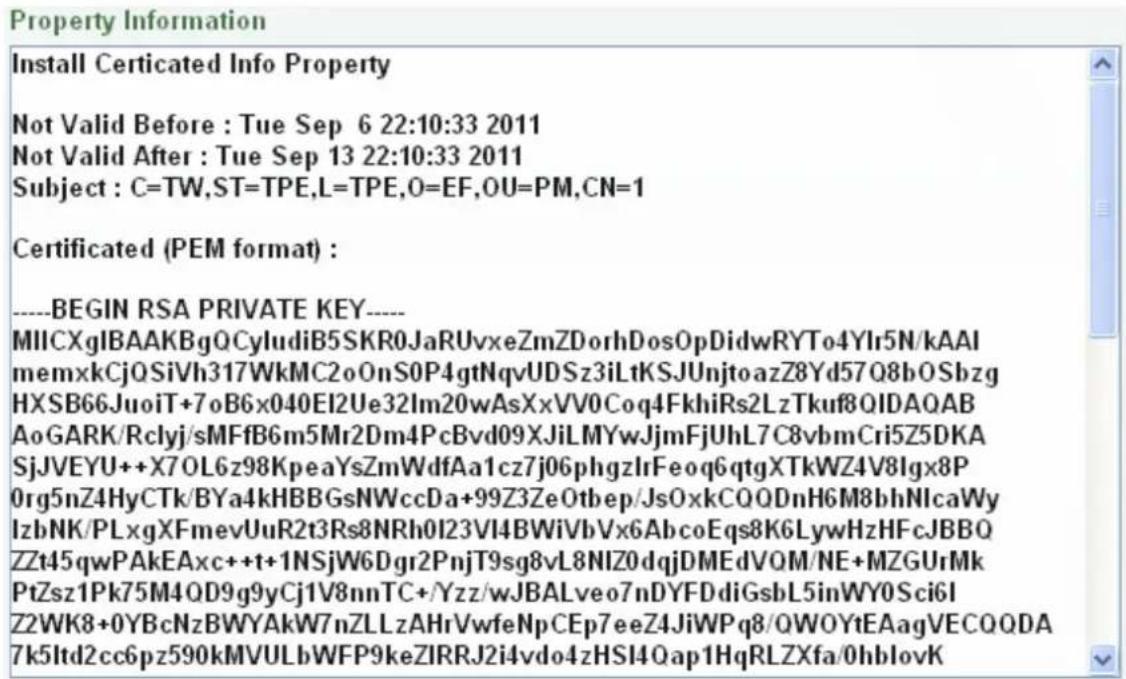
- Click the Property button, a pop-up window appears to display the details of the certificate.
text_image
Install Certicated Info Property Not Valid Before : Tue Sep 6 22:10:33 2011 Not Valid After : Tue Sep 13 22:10:33 2011 Subject : C=TW,ST=TPE,L=TPE,O=EF,OU=PM,CN=1 Certificated (PEM format) : ----BEGIN RSA PRIVATE KEY---- MIICXgIBAAKBgQCyludiB5SKR0JaRUvxeZmZDorhDosOpDidwRYTo4Ylr5N/kAAI memxkCjQSiVh317WkMC2oOnS0P4gtNqvUDSz3iLtKSJUnjtoazZ8Yd57Q8bOSbzg HXSB66JuoiT+7oB6x040EI2Ue32Im20wAsXxVV0Coq4FkhiRs2LzTkuf8QIDAQAB AoGARK/Rclyj/sMFfB6m5Mr2Dm4PcBvd09XJiLMYwJjmFjUhL7C8vbmCri5Z5DKA SjJVEYU++X7OL6z98KpeaYsZmWdfAa1cz7j06phgzlrFeoq6qtgXTkWZ4V8lgx8P 0rg5nZ4HyCTk/BYa4kHBBGsNWccDa+99Z3ZeOtbep/JsOxkCQQDnH6M8bhNIcaWy IzbNK/PLxgXFmevUuR2t3Rs8NRh0l23VI4BWiVbVx6AbcoEqs8K6LywHzHFcJBBQ ZZt45qwPAkEAxc++t+1NSjW6Dgr2PnjT9sg8vL8NIZ0dqjDMEdVQM/NE+MZGUrMk PtZsz1Pk75M4QD9g9yCj1V8nnTC+/Yzz/wJBALveo7nDYFDdiGsbL5inWY0Sci6I ZZWK8+0YBcNzBWYAKW7nZLLzAHrVwfeNpCEp7eeZ4JiWPq8/QWOYtEAagVECQQDA 7k5ltd2cc6pz590kMVULbWFP9keZIRRJ2i4vdo4zHSI4Qap1HqRLZXfa/0hblovK- To optionally create and install other certificates, remove the existing one by clicking the Remove button to erase the certificate.
- On the Web page, change the address from "http://" to https:// in the address bar and press Enter on the keyboard. Some Security Alert dialogs will pop up. Click OK or Yes to enable HTTPS.
Create Certificate Request
You can apply for an official certificate from an issuing Certificate Authority.
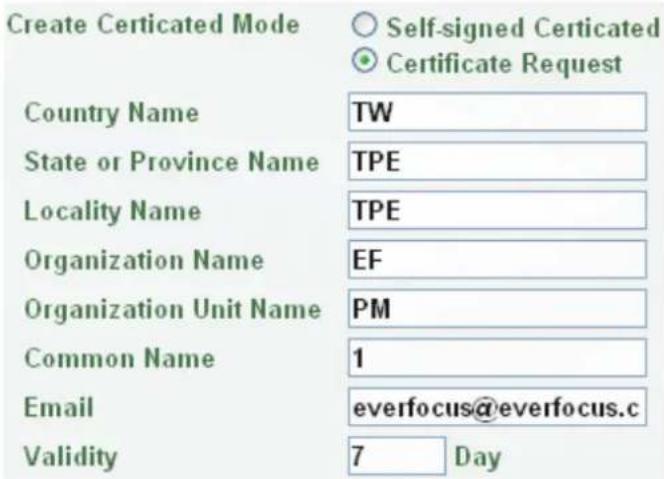
- Select Certificate Request and fill in the following information.
text_image
Create Certicated Mode Self-signed Certicated Certificate Request Country Name TW State or Province Name TPE Locality Name TPE Organization Name EF Organization Unit Name PM Common Name 1 Email everfocus@everfocus.c Validity 7 Day- Type the required Certificate information and then click the Apply button. The subject line will be displayed in the Created Request field
Created Request
C=TW,ST=TPE,L=TPE,O=EF,OU=PM,CN=1
Property
Remove
- Click the Property button, a pop-up window appears to display the details of the certificate.
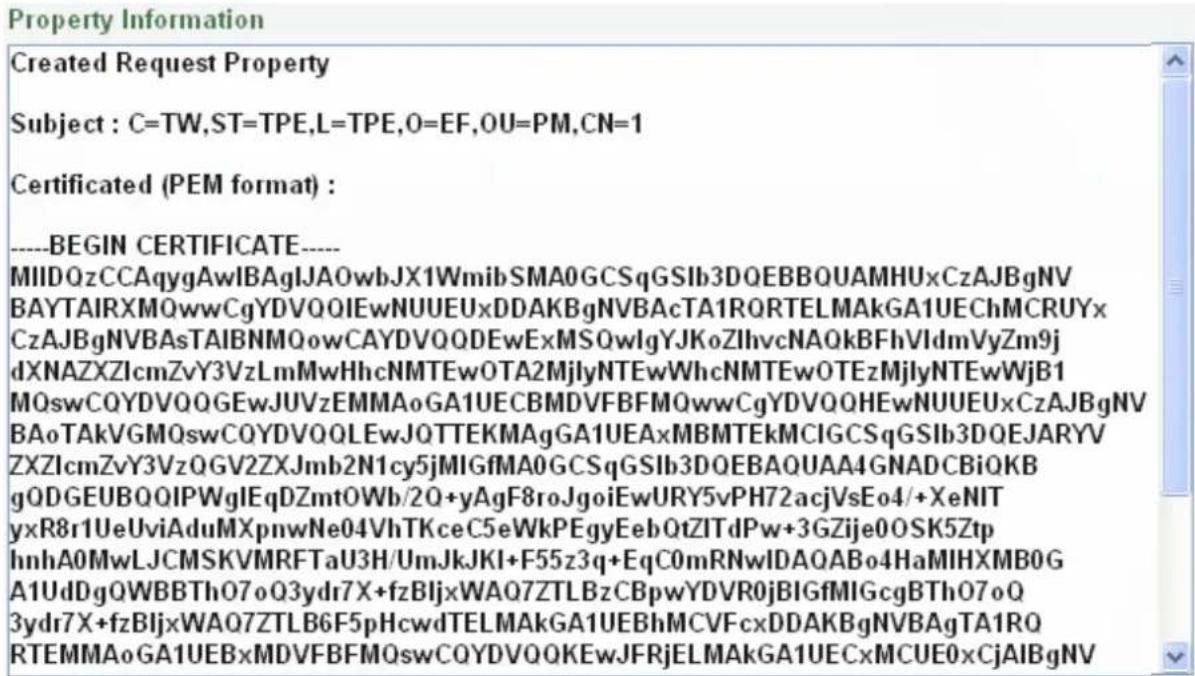
text_image
Created Request Property Subject : C=TW,ST=TPE,L=TPE,O=EF,OU=PM,CN=1 Certificated (PEM format) : ----BEGIN CERTIFICATE---- MIIDQzCCAqygAwIBAgIJAOwbJX1WmibSMA0GCSqGSIb3DQEBBQUAMHUxCzAJBgNV BAYTAIRXM0wwCgYDVQQIEwNUUEUxDDAKBgNVBAcTA1RQRTELMAkGA1UEChMCRUYx CzAJBgNVBAsTAIBNMQowCAYDVQQDEwExMSQwlgYJKoZlhvcNAQkBFBhVIdmVyZm9j dXNAZXZIcmZvY3VzLmMwHhcNMTEwOTA2MjlyNTEwWhcNMTEwOTEzMjlyNTEwWjb1 MQswCQYDVQQGEwJUVzEMMAoGA1UECBMDVFBFMQwwCgYDVQQHEwNUUEUxCzAJBgNV BAoTAKVGMQswCQYDVQQLEwJQTTEKMAgGA1UEAxMBMTEkMCIGCSqGSIb3DQEJARYV ZXZIcmZvY3VzQGV2ZXJmb2N1cy5jMIGfMA0GCSqGSIb3DQEBAQUAA4GNADCBiQKB gQDGEUBQQIPWglEqDZmtOWb/2Q+yAgF8roJgoiEwURY5vPH72acjVsEo4/+XeNIT yxR8r1UeUviAduMXpnwNe04VhTKceC5eWkPEgyEebQtZITdPw+3GZije0OSK5Ztp hnhA0MwLJCMSKVMRFTaU3H/UmJkJKI+F55z3q+EqC0mRNwIDAQABo4HaMIHXMB0G A1UdDgQWBBTh07oQ3ydr7X+fzBIjxWA07ZTLBzCBpwYDVR0jBIGfMIGcgBTh07oQ 3ydr7X+fzBIjxWA07ZTLB6F5pHcwdTELMAkGA1UEBhMCVFcxDDAKBgNVBAgTA1RQ RTEMMAoGA1UEBxMDVFBFMQswCQYDVQQKEwJFRjELMAkGA1UECxMCUE0xCjAIBgNV- To optionally create and install other certificates or request, remove the existing one by clicking the Remove button to erase the certificate or request.
- Copy the contents of the Certificate request (in PEM format) and paste it to the certificate request field on the Web page of the 3^rd -party certification authority such as Symantec VeriSign. Wait for the certificate authority to issue an SSL/TLS certificate and then download the issued certificate on your computer.
- In the Install Signed Certificated field, click the Browse button to search for the issued certificate, and then click the Upload button to import the certificate. Once the certificate has been uploaded, this field will show the subject line of the certificate.
7.1.2 Date / Time
You can set up the system's time on this page.
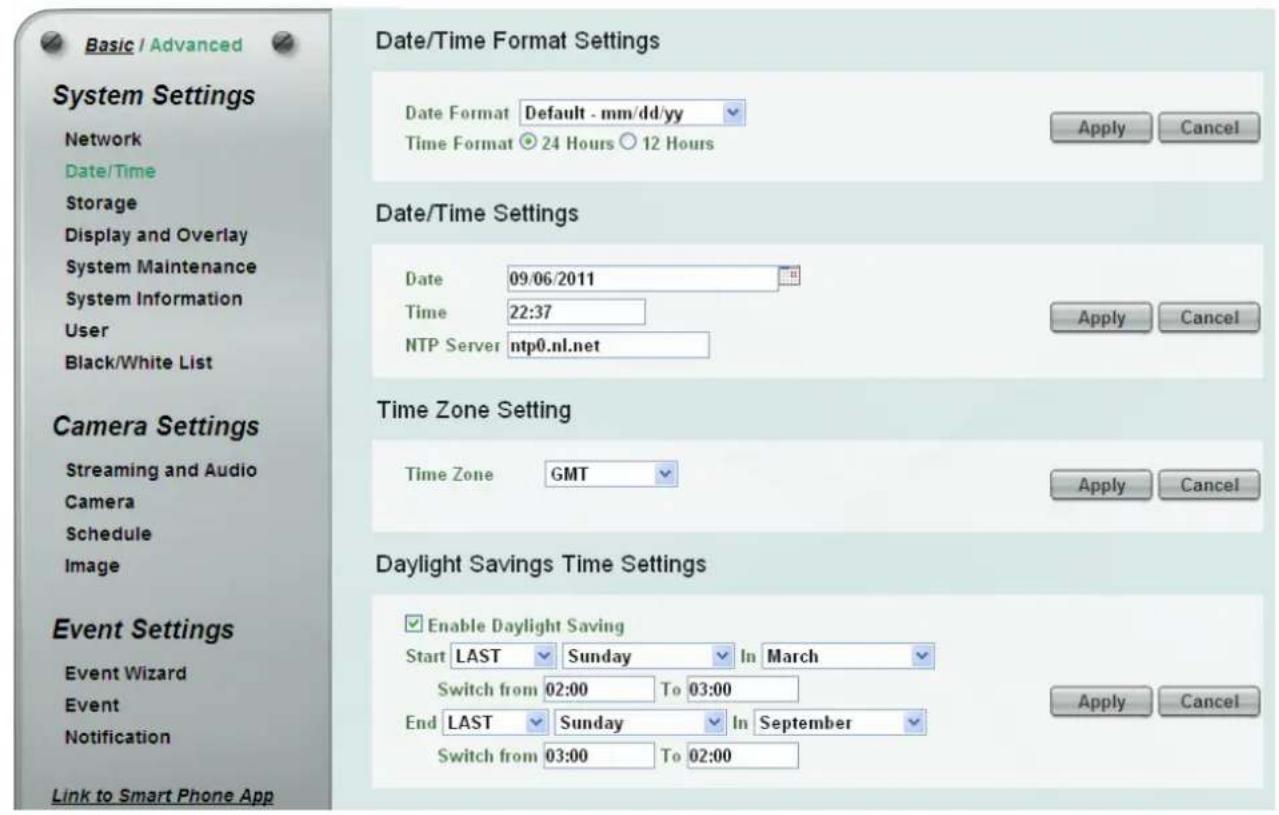
text_image
Basic / Advanced System Settings Network Date/Time Storage Display and Overlay System Maintenance System Information User Black/White List Camera Settings Streaming and Audio Camera Schedule Image Event Settings Event Wizard Event Notification Link to Smart Phone App Date/Time Format Settings Date Format Default - mm/dd/yy Time Format 24 Hours 12 Hours Apply Cancel Date/Time Settings Date 09:06/2011 Time 22:37 NTP Server ntp0.nl.net Apply Cancel Time Zone Setting Time Zone GMT Apply Cancel Daylight Savings Time Settings Enable Daylight Saving Start LAST Sunday In March Switch from 02:00 To 03:00 End LAST Sunday In September Switch from 03:00 To 02:00 Apply Cancel【Date/Time Format Settings】Select the desired Date / Time format and then click the Apply button.
【Date/Time Settings】
■ Manual: Set the date/time if you won't be using an NTP server to update the date/time. Click Apply to save the setting.
■ NTP: Enter the Network Time Protocol server, if applicable. The camera's time will be automatically adjusted by synchronizing with the NTP server. Click Apply to save the setting.
【Time Zone Setting】Set the time zone of the camera's location. Click Apply to apply the changes or Cancel to cancel the changes and return to the previous settings.
【Daylight Savings Time Settings】Click Enable Daylight Saving to enable this schedule, and select the dates when the region's daylight saving period begins and ends. Click Apply to apply the changes or Cancel to cancel the changes and return to the previous settings.
7.1.3 Storage
You can configure the recording path / format, source video stream and SD card settings on this page.
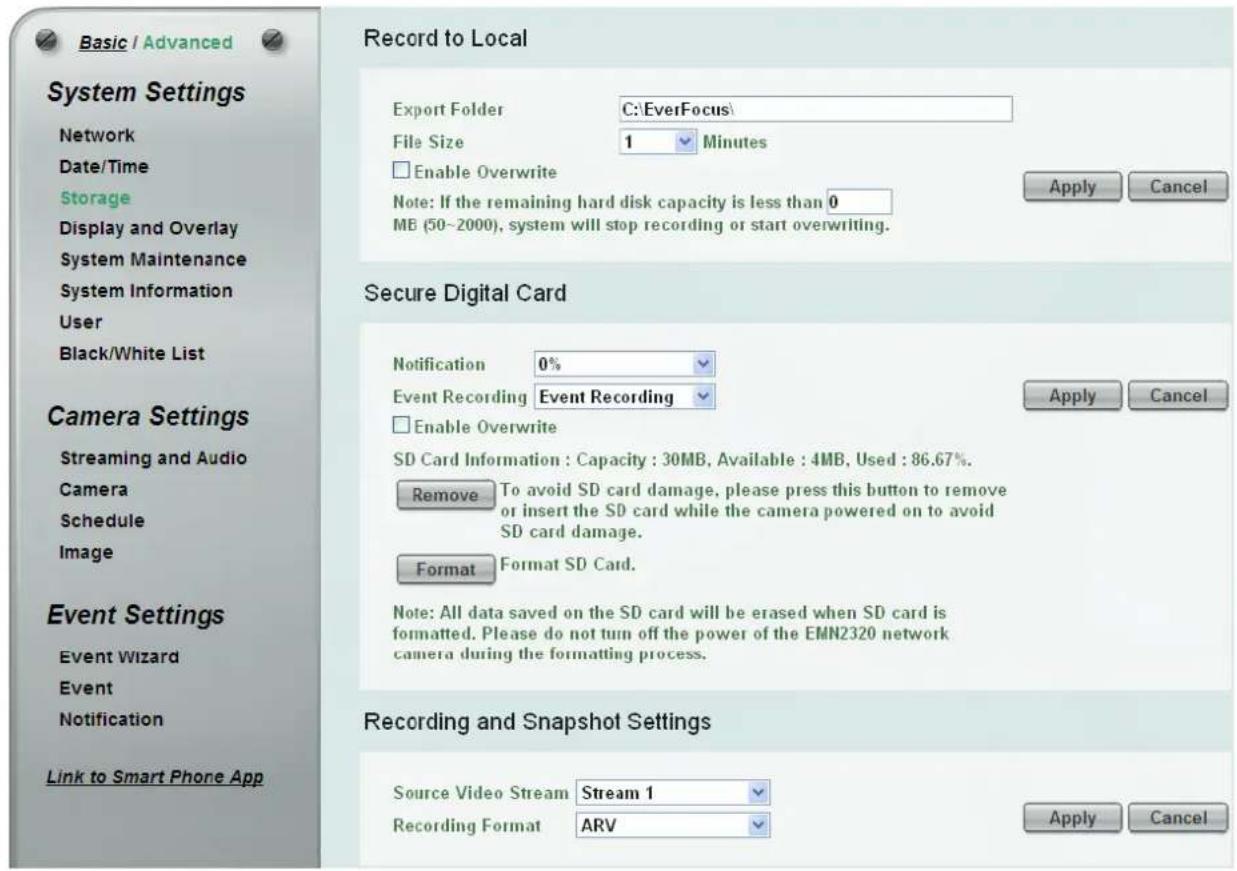
text_image
Basic / Advanced Record to Local System Settings Network Date/Time Storage Display and Overlay System Maintenance System Information User Black/White List Camera Settings Streaming and Audio Camera Schedule Image Event Settings Event Wizard Event Notification Link to Smart Phone App Export Folder C:\EverFocus\ File Size 1 Minutes Enable Overwrite Note: If the remaining hard disk capacity is less than 0 MB (50-2000), system will stop recording or start overwriting. Apply Cancel Secure Digital Card Notification 0% Event Recording Event Recording Enable Overwrite SD Card Information : Capacity : 30MB, Available : 4MB, Used : 86.67%. Remove To avoid SD card damage, please press this button to remove or insert the SD card while the camera powered on to avoid SD card damage. Format Format SD Card. Note: All data saved on the SD card will be erased when SD card is formatted. Please do not turn off the power of the EMN2320 network camera during the formatting process. Recording and Snapshot Settings Source Video Stream Stream 1 Recording Format ARV Apply Cancel【Record to Local】This function can only be set up in the Advanced tab. You can configure the storage path for storing the recordings / snapshot on your PC.
■ Export Folder: Type the storage path for storing the recordings / snapshot.
■ File size: The user can limit the size of each recorded file here (in minutes). When a single recording file exceeds the time you set, the system will create a new file to save that data to.
■ Enable Overwrite: Check the box for overwriting recording/snapshot file when the disk storage capacity is full. The user can set the storage capacity limitation in the in-sentence box below the Enable Overwrite setting: "If the remaining hard disk capacity is less than ____ MB (50\~2000), ..."
Click Apply to apply the changes or Cancel to cancel the changes and return to the previous settings.
■ Notification: Select the percentage of storage space that should be left on the card before the camera notifies you of the impending storage shortage or overwrite. The notification will be sent out through the E-mail (Event Settings > Notification > SMTP (Email) Settings).
■ Event Recording: Select the location where you want the camera to send the impending storage shortage text notification to.
- FTP Back Up Only: Select to send the impending storage shortage text notification to the FTP server entered in the FTP Repository Settings (see 7.3.3 Notification).
- Event Recording: Select to send the impending storage shortage text notification to the checked locations in the Event Management (see 7.3.2 Event).
text_image
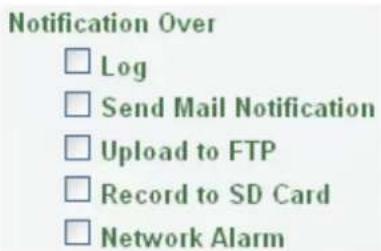
Notification Over □ Log □ Send Mail Notification □ Upload to FTP □ Record to SD Card □ Network Alarm■ Enable Overwrite: Check the box if you want the card to start writing over recorded footage when its memory is full. Uncheck the box if you want the card to stop recording new footage when its memory is full.
■ SD Card Information: If a SD card has been inserted to the card slot of the camera, the SD card information will be displayed in this field.
■ Remove: Click before removing the card from the system (6.2.1 Inserting / Removing the SD Card).
■ Format: Click to format the card. All data saved on the SD card will be removed if the card is formatted (6.2.1 Inserting / Removing the SD Card).
Click Apply to apply the changes or Cancel to cancel the changes and return to the previous settings.
【Recording and Snapshot Settings】Select the desired video stream and recording format. The video stream can be configured in 7.2.1 Streaming and Audio. Click Apply to apply the changes or Cancel to cancel the changes and return to the previous settings.
7.1.4 Display and Overlay
You can configure the recording path / format, source video stream and SD card settings on this page.
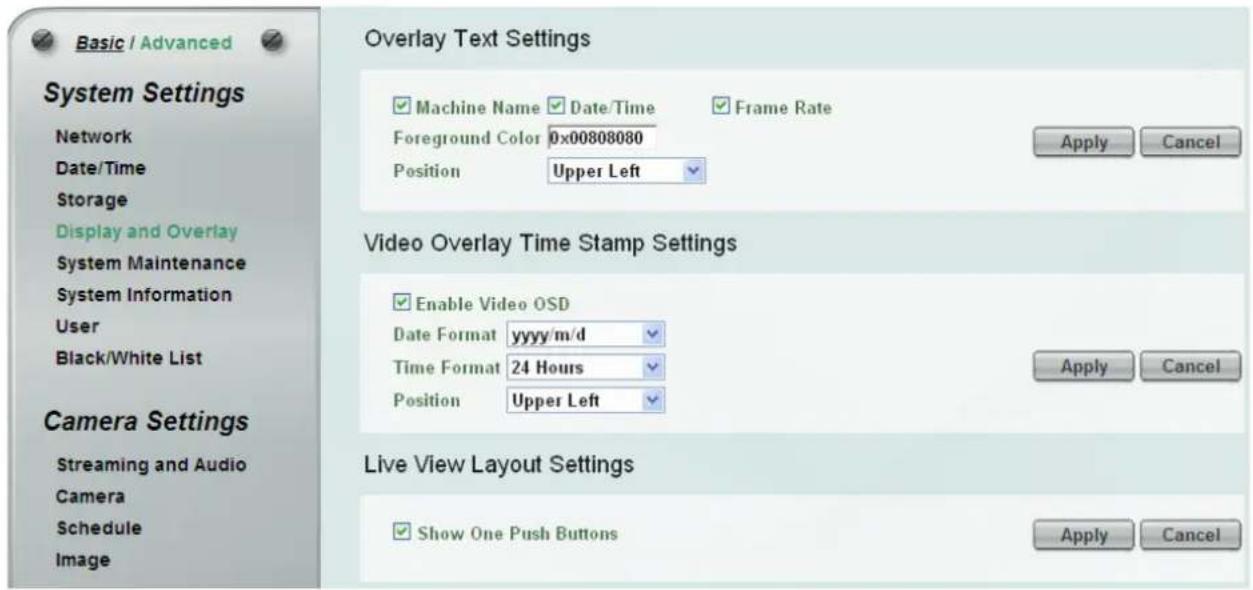
text_image
Basic / Advanced System Settings Network Date/Time Storage Display and Overlay System Maintenance System Information User Black/White List Camera Settings Streaming and Audio Camera Schedule Image Overlay Text Settings Machine Name Date/Time Frame Rate Foreground Color 0x00808080 Position Upper Left Apply Cancel Video Overlay Time Stamp Settings Enable Video OSD Date Format yyyy/m/d Time Format 24 Hours Position Upper Left Apply Cancel Live View Layout Settings Show One Push Buttons Apply Cancel【Overlay Text Settings】Check the boxes to display the information on the Live View Page. To change the foreground color of the text, directly click on the box and then select a color. Select a position where you want the information to be displayed on the Live Window. Click Apply to apply the changes or Cancel to cancel the changes and return to the previous settings.
【Video Overlay Time Stamp Settings】Check the Enable Video OSD box to enable displaying time/day information on the live view window. Select the desired Date/Time format and the position where you want the time/day information to be displayed on the Live View window. Click Apply to apply the changes or Cancel to cancel the changes and return to the previous settings.
【Live View Layout Settings】Check the box if you want to show the One Push button on the Live View Page. Uncheck this box to hide the button. Click Apply to apply the changes or Cancel to cancel the changes and return to the previous settings.
7.1.5 System Maintenance
You can configure the recording path / format, source video stream and SD card settings on this page.
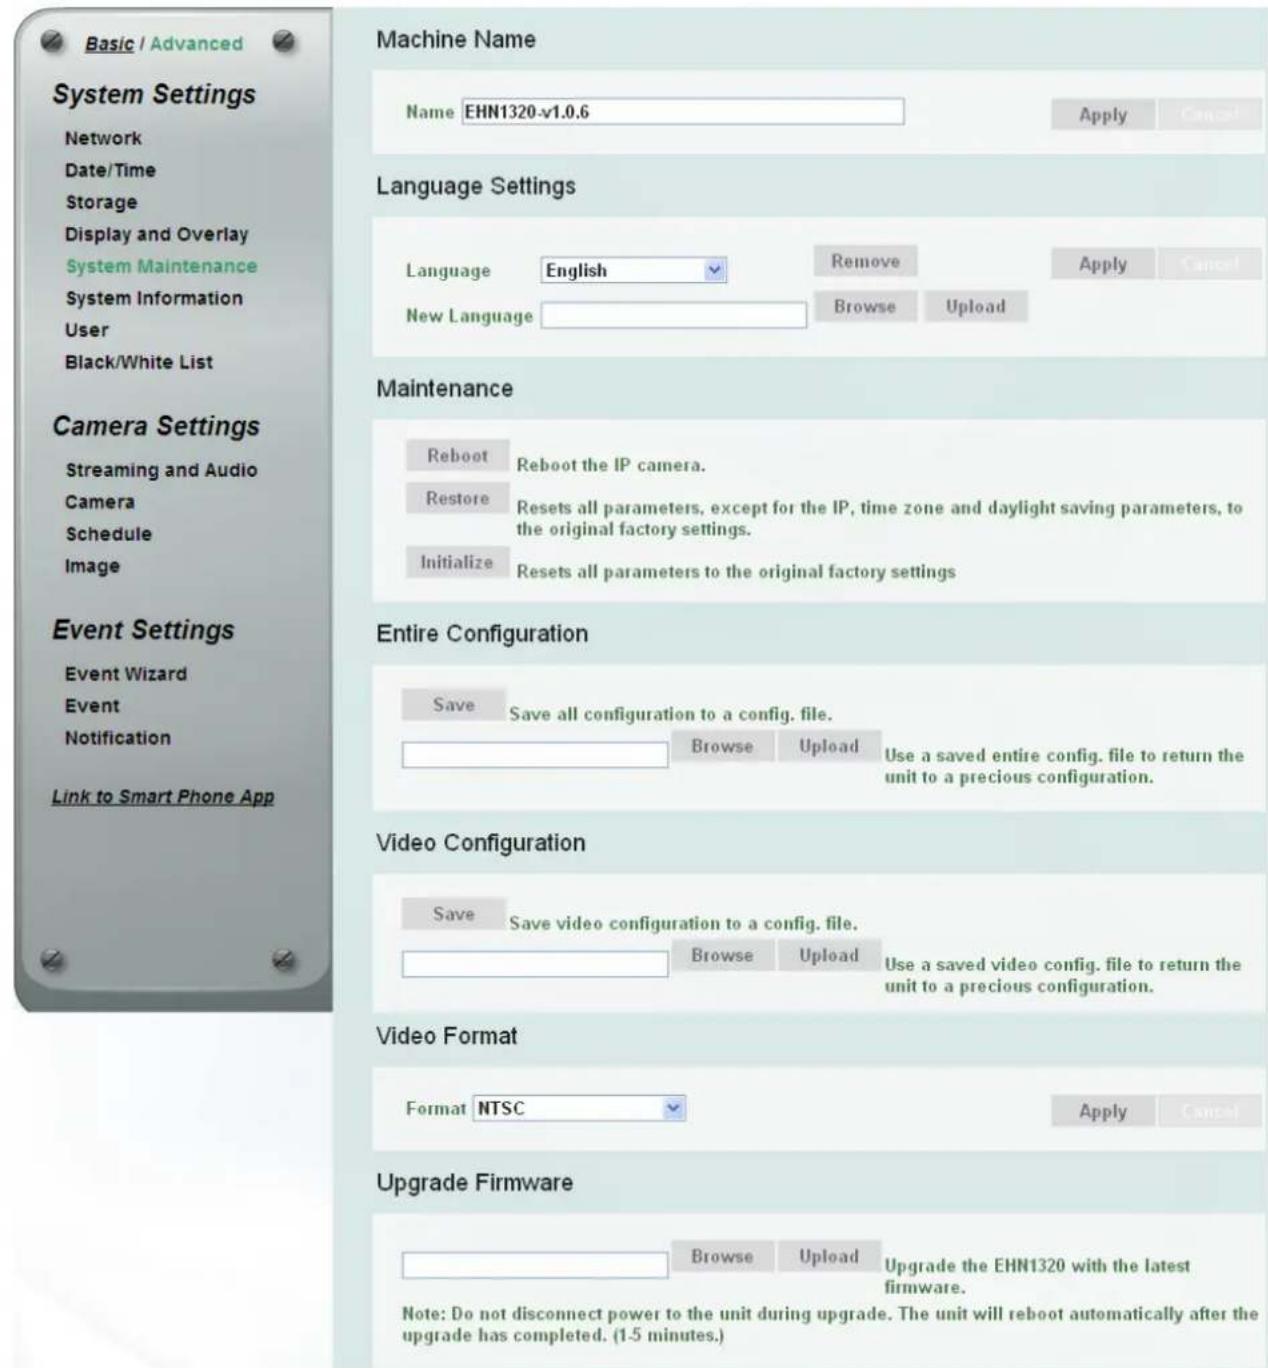
text_image
Basic / Advanced System Settings Network Date/Time Storage Display and Overlay System Maintenance System Information User Black/White List Camera Settings Streaming and Audio Camera Schedule Image Event Settings Event Wizard Event Notification Link to Smart Phone App Machine Name Name EHN1320-v1.0.6 Language Settings Language English Remove Apply Cancel New Language Browse Upload Maintenance Reboot Reboot the IP camera. Restore Resets all parameters, except for the IP, time zone and daylight saving parameters, to the original factory settings. Initialize Resets all parameters to the original factory settings Entire Configuration Save Save all configuration to a config. file. Browse Upload Use a saved entire config. file to return the unit to a precious configuration. Video Configuration Save Save video configuration to a config. file. Browse Upload Use a saved video config. file to return the unit to a precious configuration. Video Format Format NTSC Apply Cancel Upgrade Firmware Browse Upload Upgrade the EHN1320 with the latest firmware. Note: Do not disconnect power to the unit during upgrade. The unit will reboot automatically after the upgrade has completed. (1-5 minutes.)【Machine Name】C If required, enter a new name for the machine. This name will be visible in the Machine Name field of the IP Utility software, which is included in the software CD. Click Apply to apply the changes or Cancel to cancel the changes and return to the previous settings.
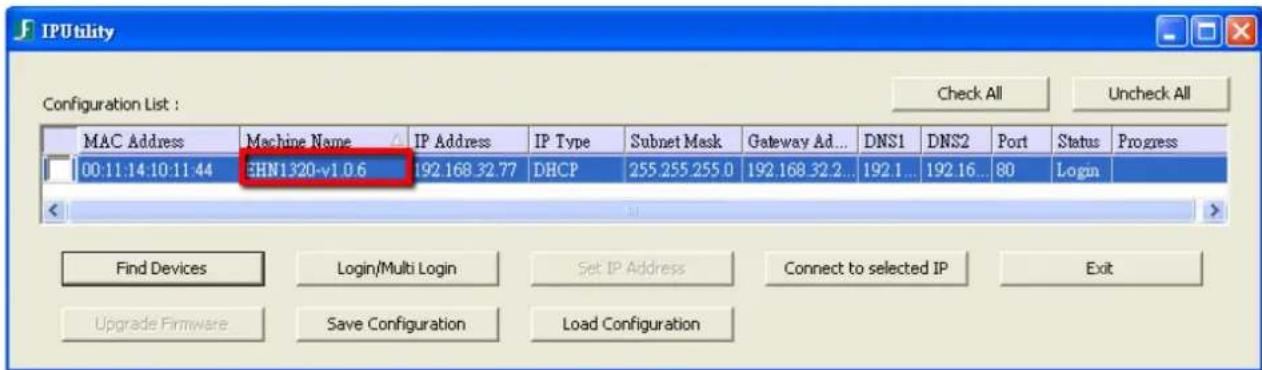
text_image
IPUtility Configuration List : Check All Uncheck All MAC Address Machine Name IP Address IP Type Subnet Mask Gateway Ad... DNS1 DNS2 Port Status Progress 00:11:14:10:11:44 EHN1320-v1.0.6 192.168.32.77 DHCP 255.255.255.0 192.168.32.2... 192.1... 192.16... 80 Login Find Devices Login/Multi Login Set IP Address Connect to selected IP Exit Upgrade Firmware Save ConfigurationLoad Configuration【Language Settings】Select the language to be displayed on the Web interface of the IP camera. The default language is English.
To add a new language not listed in the current Language list, click the Browse button to locate the new language file (.evb) on your computer and then click the Upload button. Updated language files might be available on the manufacturer's website. Contact your vendor if required.
Click Apply to apply the changes or Cancel to cancel the changes and return to the previous settings.
Note: Uploading a new language file will cause the system to reboot automatically. Please create a new network connection to the IP camera when the reboot is complete.
【Maintenance】
■ Reboot: Click to reboot the unit without changing any of the settings. Use this function if the unit is not behaving as expected.
■ Restore: Click to restart and reset most of the current settings to their factory default values. The only settings that will not be changed to default are: IP Settings and DDNS Settings.
■ Initialize: This function can only be set up in the Advanced tab. This button should be used with caution. Clicking this button will return all of the camera's settings, including the IP address, to the factory default values. The camera will then have to be reconfigured.
- Save: To make a backup file of the machine's current configurations, click this button to save all the configurations to a configuration file. This will enable the user to reload these configuration settings if the settings are changed and there is unexpected behavior.
- Upload: This function can only be set up in the Advanced tab. To load a previously saved configuration, click the Browse button to locate the saved configuration file (see above) and then click the Upload button. The system's settings will be restored to the saved configuration.
- Save: To make a backup file of the machine's video configurations, click this button to save the video configurations to a configuration file. This will enable the user to reload these configuration settings if the settings are changed and there is unexpected behavior.
- Upload: This function can only be set up in the Advanced tab. To load a previously saved video configuration, click the Browse button to locate the saved configuration file (see above) and then click the Upload button. The system's settings will be restored to the saved video configuration.
【Video Format】Select NTSC or PAL for your local scanning system. Click Apply to save the setting.
【Upgrade Firmware】This function can only be set up in the Advanced tab. Click the Browse button to find a previously prepared firmware upgrade file. Click the Upload button to install the new firmware.
Note:
- Do not disconnect power to the unit during the upgrade sequence. The unit will reboot automatically after the upgrade has completed (1-5 minutes).
- During the upgrade process, all event recording actions will be stopped. Event recording actions will resume after the camera is rebooted.
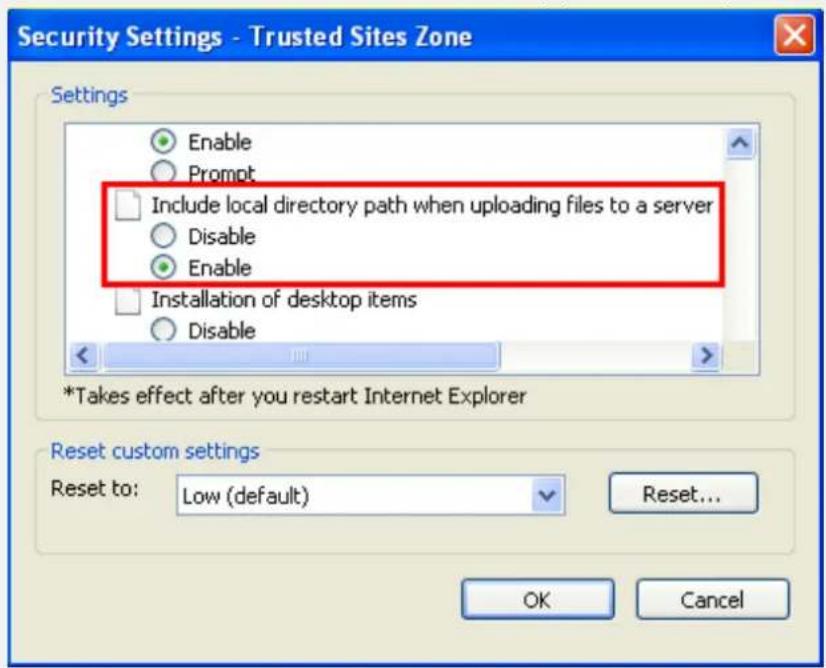
- If the "File Error, Please re-login!!" warning message appears when upgrading the firmware, please try the following instructions:
a. Go to Internet Explorer > Tools > Internet Option > Security > Custom.
b. Find and enable the Include local directory path when uploading files to a server.
text_image
Security Settings - Trusted Sites Zone Settings Enable Prompt Include local directory path when uploading files to a server Disable Enable Installation of desktop items Disable *Takes effect after you restart Internet Explorer Reset custom settings Reset to: Low (default) Reset... OK Cancel7.1.6 System Information
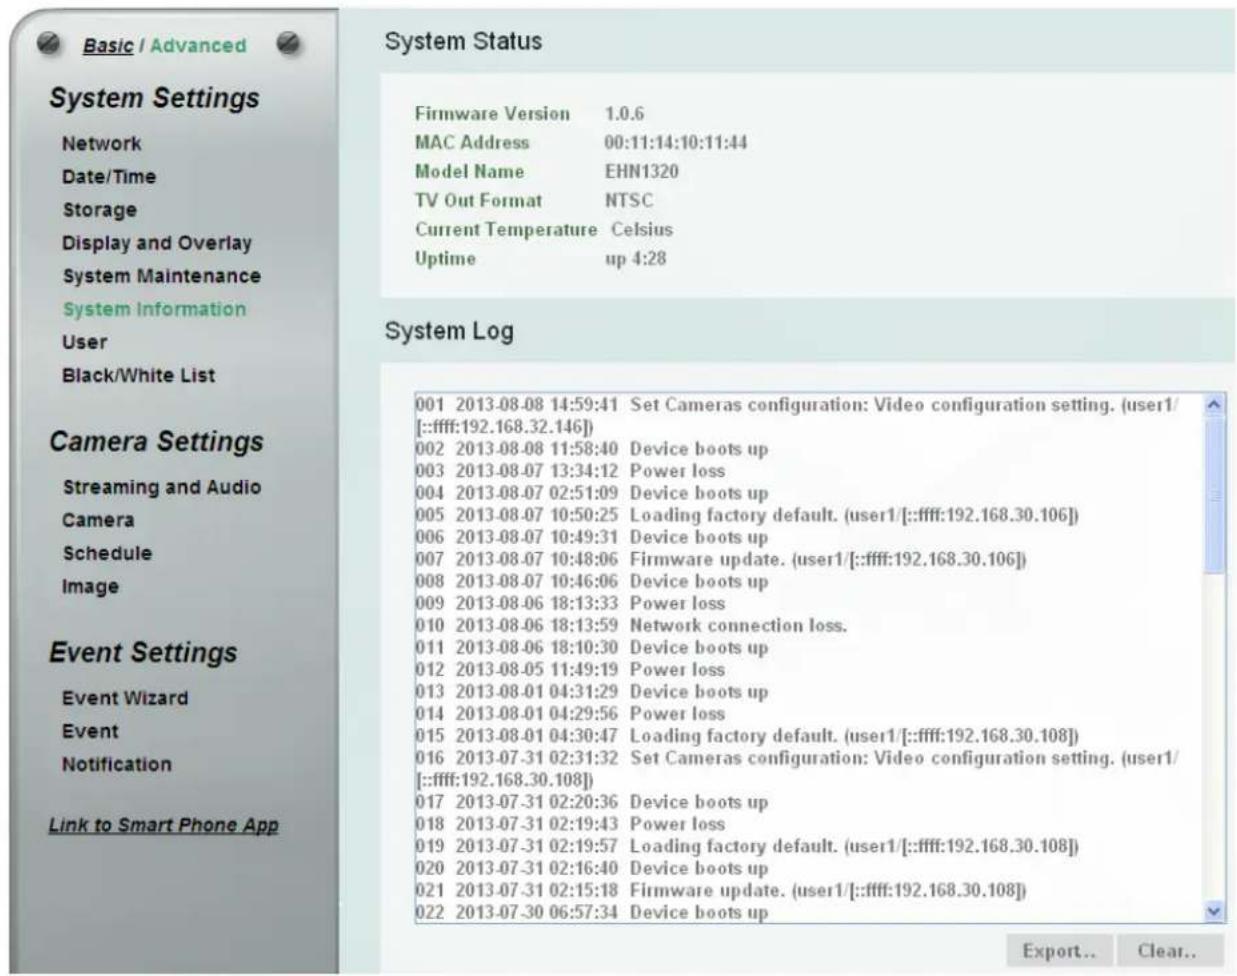
You can see the system information and log information displayed on this page.
text_image
Basic / Advanced System Settings Network Date/Time Storage Display and Overlay System Maintenance System Information User Black/White List Camera Settings Streaming and Audio Camera Schedule Image Event Settings Event Wizard Event Notification Link to Smart Phone App System Status Firmware Version 1.0.6 MAC Address 00:11:14:10:11:44 Model Name EHN1320 TV Out Format NTSC Current Temperature Celsius Uptime up 4:28 System Log 001 2013-08-08 14:59:41 Set Cameras configuration: Video configuration setting. (user1/ [::ffff:192.168.32.146]) 002 2013-08-08 11:58:40 Device boots up 003 2013-08-07 13:34:12 Power loss 004 2013-08-07 02:51:09 Device boots up 005 2013-08-07 10:50:25 Loading factory default. (user1/[:ffff:192.168.30.106]) 006 2013-08-07 10:49:31 Device boots up 007 2013-08-07 10:48:06 Firmware update. (user1/[:ffff:192.168.30.106]) 008 2013-08-07 10:46:06 Device boots up 009 2013-08-06 18:13:33 Power loss 010 2013-08-06 18:13:59 Network connection loss. 011 2013-08-06 18:10:30 Device boots up 012 2013-08-05 11:49:19 Power loss 013 2013-08-01 04:31:29 Device boots up 014 2013-08-01 04:29:56 Power loss 015 2013-08-01 04:30:47 Loading factory default. (user1/[:ffff:192.168.30.108]) 016 2013-07-31 02:31:32 Set Cameras configuration: Video configuration setting. (user1/ [::ffff:192.168.30.108]) 017 2013-07-31 02:20:36 Device boots up 018 2013-07-31 02:19:43 Power loss 019 2013-07-31 02:19:57 Loading factory default. (user1/[:ffff:192.168.30.108]) 020 2013-07-31 02:16:40 Device boots up 021 2013-07-31 02:15:18 Firmware update. (user1/[:ffff:192.168.30.108]) 022 2013-07-30 06:57:34 Device boots up Export... Clear...【System Status】Displayed the system information. The values cannot be changed on this page. The Uptime represents the period since the camera has been powered on. For example, up 1 day 2:36 represents the camera has been powered on for one day, 2 hours and 36 minutes.
【System Log】Displayed the sequence number, date, time and event messages of the log event. The log will display the last 256 log events. Click the Export Log button to export the system log event list into a ".txt" file and select the location where the exported log file will be saved to. Click the Clear Log to erase all the log data from the SD card. The system will be required to reboot after clicking the Clear Log button.
7.1.7 User
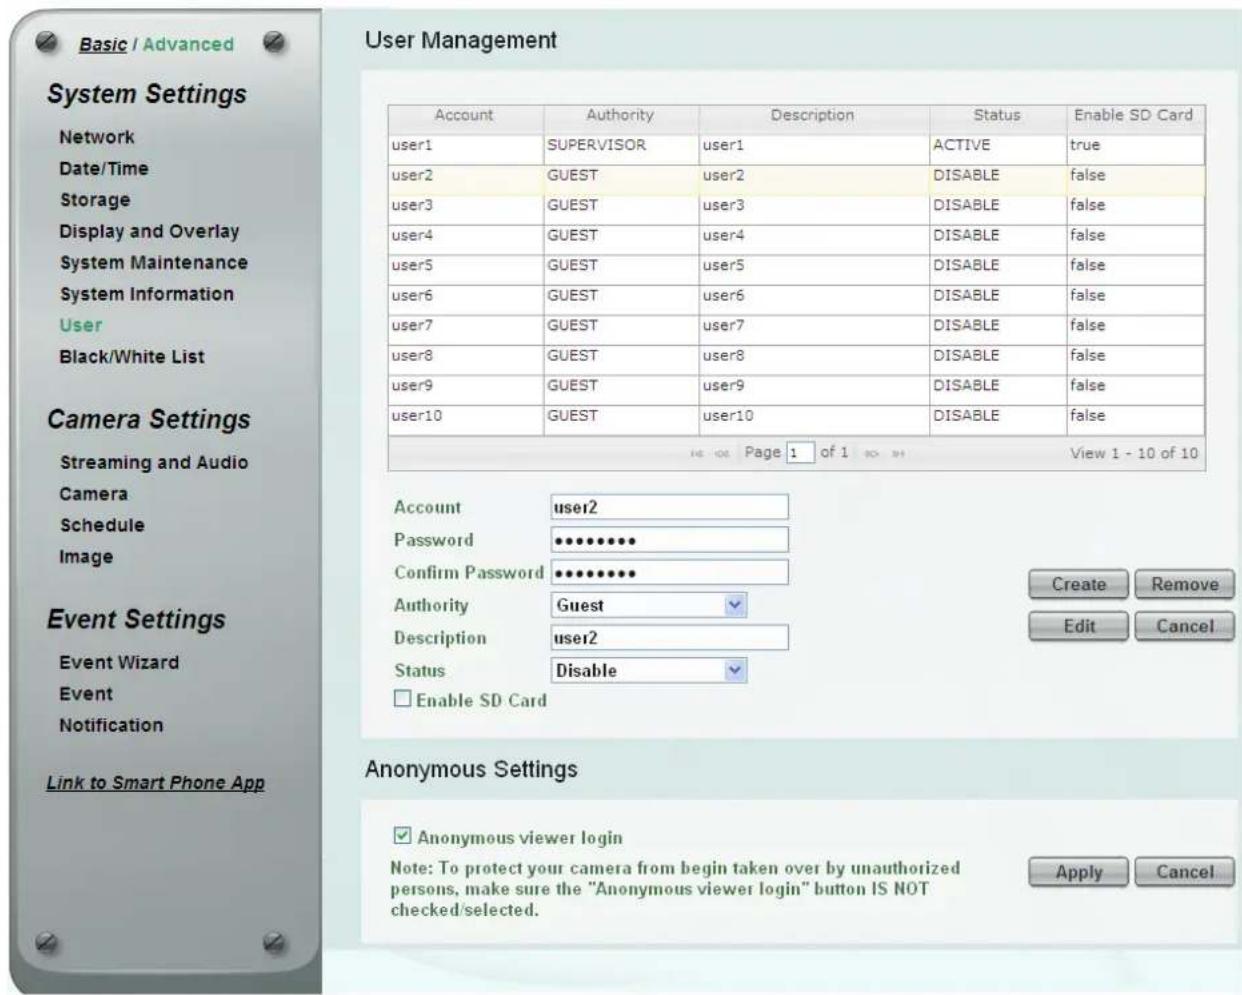
The system administrator can create up to ten user accounts on this page.
text_image
Basic / Advanced System Settings Network Date/Time Storage Display and Overlay System Maintenance System Information User Black/White List Camera Settings Streaming and Audio Camera Schedule Image Event Settings Event Wizard Event Notification Link to Smart Phone App User Management Account Authority Description Status_Enable SD Card user1 SUPERVISOR(user1 ACTIVE Grids user2 GUEST(user2 DISABLE Grids user3 GUEST(user3 DISABLE Grids user4 GUEST(user4 DISABLE Grids user5 GUEST(user5 DISABLE Grids user6 GUEST(user6 DISABLE Grids user7 GUEST(user7 DISABLE Grids user8 GUEST(user8 DISABLE Grids user9 GUEST(user9 DISABLE Grids user10 GUEST(user10 DISABLE Grids View 1 - 10 of 10 Account User2 Password********** Confirm Password ********** Authority Guest Description user2 Status Disable Enable SD Card Create Remove Edit Cancel Anonymous Settings Anonymous viewer login Note: To protect your camera from begin taken over by unauthorized persons, make sure the "Anonymous viewer login" button IS NOT checked/selected. Apply Cancel【User Management】The system has automatically created ten user accounts.
To set up an user account:
- Highlight a user account and its information will be displayed in the field below the account list.
- Revise the account name, password and description. Select an authority level for the user account.
- Supervisor / Administrator: The only difference between a supervisor and administrator is that a supervisor can edit an administrator's account and password, but an administrator cannot edit the supervisor's account and password. The supervisor and administrators all have unrestricted access to the Setting submenus and can determine the registration of all other users.
- User: A user can not only view the live view but also view/configure the below camera settings.
| View Configure | |
| System Settings | |
| Network Network > Protocol Settings | |
| Date/Time | Date/Time > Date/Time Format Settings |
| Storage > Record to Local | Storage > Record to Local |
| Display and Overlay > Overlay Text Settings | Display and Overlay > Overlay Text Settings |
| Display and Overlay > Video Overlay Time Stamp Settings | Display and Overlay > Video Overlay Time Stamp Settings |
| System Maintenance > Language Settings | System Maintenance > Language Settings |
| System Information | System Information > Export Log |
| Camera Settings | |
| Streaming and Audio - | |
| Camera - | |
| Schedule - | |
| Image - | |
- Guest: The lowest level of access, which only allows the user access to the live view page.
- Select Active or Disable to active or disable the user account.
- Check the Enable SD Card box to allow the user to access the SD card playback function.
- Click the Edit button to save the changes.
Create: The button is only activated when the number of list is less than ten. Enter the account information and click the Create button, the new account will be listed in the account list.
Remove: Highlight an account and then click the Remove button to remove the highlighted account.
Edit: Highlight an account and enter the account information in the boxes below the account list. Click the Edit button and the account will be edited.
Cancel : Click the button to cancel the changes and return to the previous settings.
【Anonymous Settings】Check the box to allow the unauthorized persons to log in the camera. Click Apply to apply the changes or Cancel to cancel the changes and return to the previous settings.
7.1.8 Black/White List
Use this page to specify IP addresses that are allowed / denied to access this camera. By default, any IP address can access the camera.
Note: The Allowed IP addresses only become relevant when the Denied items contain a Network or Range, and the supervisor wants to allow one or more IP addresses within that excluded range or network. In such a scenario, the user would enter the excluded range or network for the Denied items, and enter the exceptions for the Allowed items.

text_image
Basic / Advanced System Settings Network Date/Time Storage Display and Overlay System Maintenance System Information User Black/White List Black/White Management Permiss Mask IPv4 Address IPv4 From IPv4 End IPv6 Address IPv6 From IPv6 Er deny 192.168.12.170 192.168.12.180 allow 192.168.12.175 192.168.12.175 View 1 - 2 of 2 IP Type IPv4 Permission Type Allow Rule Single IP Address From . . . . . . Create Remove Edit Cancel■ IP Type: Select IPv4 or IPv6 from the drop-down list.
- Permission Type: Select Deny to deny the IP addresses configured below from accessing the camera. The Allow option is only relevant if you’ve set up at least one Deny item configured with Network or Range network rule from the Rule drop-down list.
■ Rule: Select a network rule and then fill in the IP information in the below boxes.
• Single: Type a single IP address in the IP Address field below.
• Network: Type the IP address and subnet mask in the field below.
• Range: Type a range for the IP addresses.
Create: Set up the IP information and click the Create button, the created IP information will be listed in the Black/White list.
Remove: Highlight an item in the list and then click the Remove button to remove the highlighted item.
Edit: Highlight an item in the list and set up the IP information in the boxes below the Black/White list. Click the Edit button and the item will be edited.
Cancel : Click the button to cancel the changes and return to the previous settings.
7.2 Camera Settings
You can configure camera related settings, such as video / audio, region of interest and privacy mask.
7.2.1 Streaming and Audio
text_image
Basic / Advanced System Settings Network Date/Time Storage Display and Overlay System Maintenance System Information User Black/White List Camera Settings Streaming and Audio Camera Schedule Image Event Settings Event Wizard Event Notification Link to Smart Phone AppStream Settings
Streaming Preview
Stream 1
Bit Rate

Stream 2
Bit Rate

Stream 3
Bit Rate

Stream
Bit Rate

Region of Interest Settings
○ ROI Draw Tool
text_image
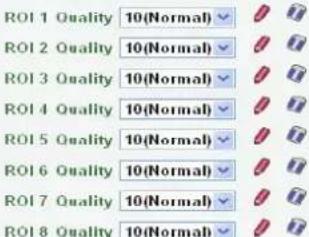
ROI 1 Quality 10(Normal) ROI 2 Quality 10(Normal) ROI 3 Quality 10(Normal) ROI 4 Quality 10(Normal) ROI 5 Quality 10(Normal) ROI 6 Quality 10(Normal) ROI 7 Quality 10(Normal) ROI 8 Quality 10(Normal)Privacy Mask Settings
Privacy Mask Draw Tool
text_image
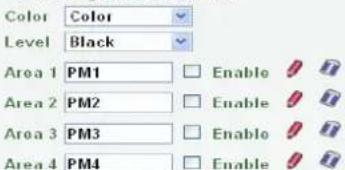
Color Color Level Black Area 1 PM1 Enable Area 2 PM2 Enable Area 3 PM3 Enable Area 4 PM4 EnableAudio Settings
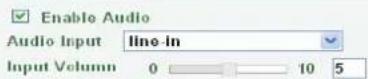
text_image
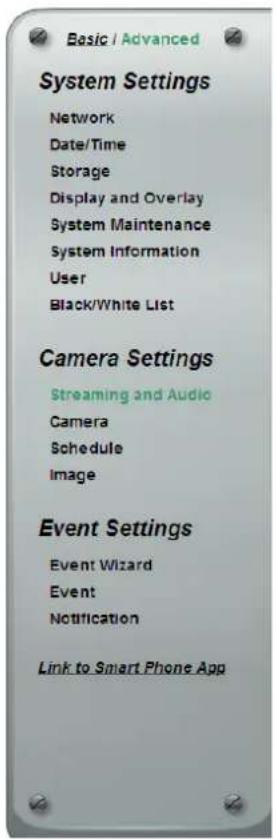
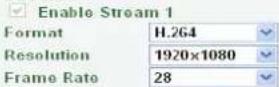
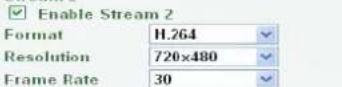
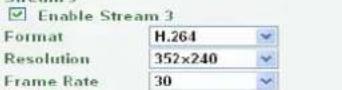
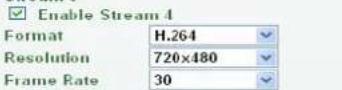
Apply Cancel【Stream Settings】This IP camera can output three video streams simultaneously. For each of these streams, the user can set the compression format, resolution, bit rate, and frame rate individually. Stream 1 is always enabled for live view. To enable Stream 2, Stream3 and/or Stream 4, check the Enable Stream 2 / Enable Stream 3 / Enable Stream 4 box.
Note: If you connect to the camera via the Internet and experience a delay (lag time) in the video feed, try to reduce the number of streams and the quality and resolution of the streams – but keep the frame rate at its maximum.
Format: Select the encoding format – H.264, MJPEG or MPEG4.
Resolution: Select the most suitable resolution for your needs.
Frame Rate: This function can only be set up in the Advanced tab. Select from 1 to 30 fps. Note that the maximum frame rate is 15 fps if the selected resolution is higher than 1920 x 1080.
Bit Rate: This function can only be set up in the Advanced tab. If required, select whether you want the stream to stream a Constant Bit Rate or a Variable Bit Rate, and set the values of whichever option you choose.
Click Apply to apply the changes or Cancel to cancel the changes and return to the previous settings.
【Region of Interest Settings】This function can only be set up in the Advanced tab. The Region of Interest (ROI) function allows users to set up multiple regions within an image with better quality and less distortion than the rest of the image. You can also use this function together with the Digital Zoom function on the Live View window to get a better image result. Up to eight ROIs can be configured in this field.
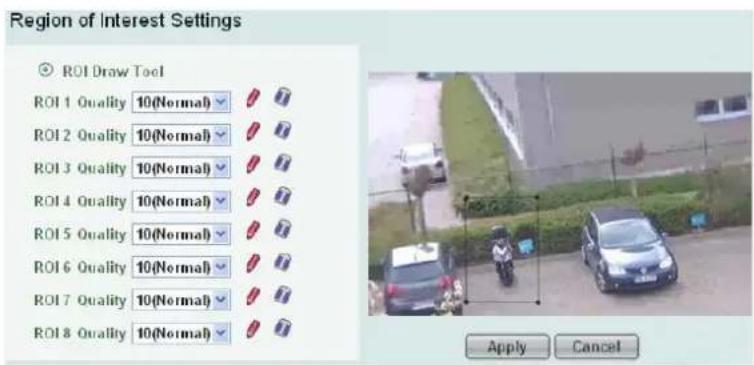
text_image
Region of Interest Settings ROI Draw Tool ROI 1 Quality 10(Normal) ROI 2 Quality 10(Normal) ROI 3 Quality 10(Normal) ROI 4 Quality 10(Normal) ROI 5 Quality 10(Normal) ROI 6 Quality 10(Normal) ROI 7 Quality 10(Normal) ROI 8 Quality 10(Normal) Apply CancelTo set up an ROI region:
- Enabled the ROI Draw Tool and click the Draw button
- On the left-side live image, move the cursor to the position where you want the ROI rectangle to start and then click. Move the cursor to the position (diagonally opposing corner) where you want the ROI rectangle to end and then click.
- Select a quality value for the ROI from the Quality drop-down list.
- Click the Apply button to apply the settings, or click the Cancel button to reset without saving the settings.
【Privacy Mask Settings】This function can only be set up in the Advanced tab. The Privacy Mask can block out sensitive areas from view, covering the areas with colored or black and white boxes in both live view and recorded clips. This feature is useful when users' don't want the sensitive information visible. Up to four Privacy Masks can be configured.
Privacy Mask Settings
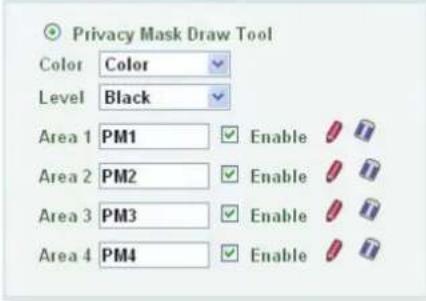
text_image
Privacy Mask Draw Tool Color Color Level Black Area 1 PM1 Enable Area 2 PM2 Enable Area 3 PM3 Enable Area 4 PM4 Enable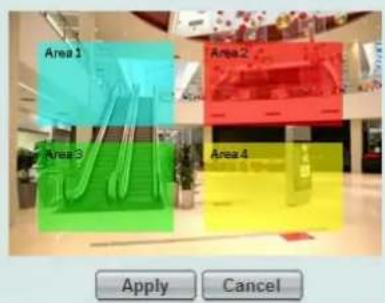
text_image
Area 1 Area 2 Area 3 Area 4 Apply CancelTo set up a Privacy Mask:
- Enabled the Privacy Mask Draw Tool.
- From the Color drop-down list, select Color to make the masks appear as colored rectangles on the screen; or select B/W to make the masks appear as gray rectangles on the screen.
- Select a color if you select Color from the color drop-down list. Select a level of grayness if you select B/W from the color drop-down list.
- Check the Enable box to enable the configured privacy mask.
- Click the Draw button and move the cursor on the left-side live image.
- Move the cursor to the position where you want the mask rectangle to start and then click. Move the cursor to the position (diagonally opposing corner) where you want the mask rectangle to end and then click.
- Click the Apply button to apply the settings, or click the Cancel button to reset without saving the settings.
【Audio Settings】The camera can transmit audio to your computer if you have connected an external microphone / line-in audio device to its audio Input. Check the Enable Audio box to enable the camera's audio input function. Select an audio input type from the Audio Input drop-down list and then adjust the audio input volume.
Click Apply to apply the changes or Cancel to cancel the changes and return to the previous settings.
7.2.2 Camera
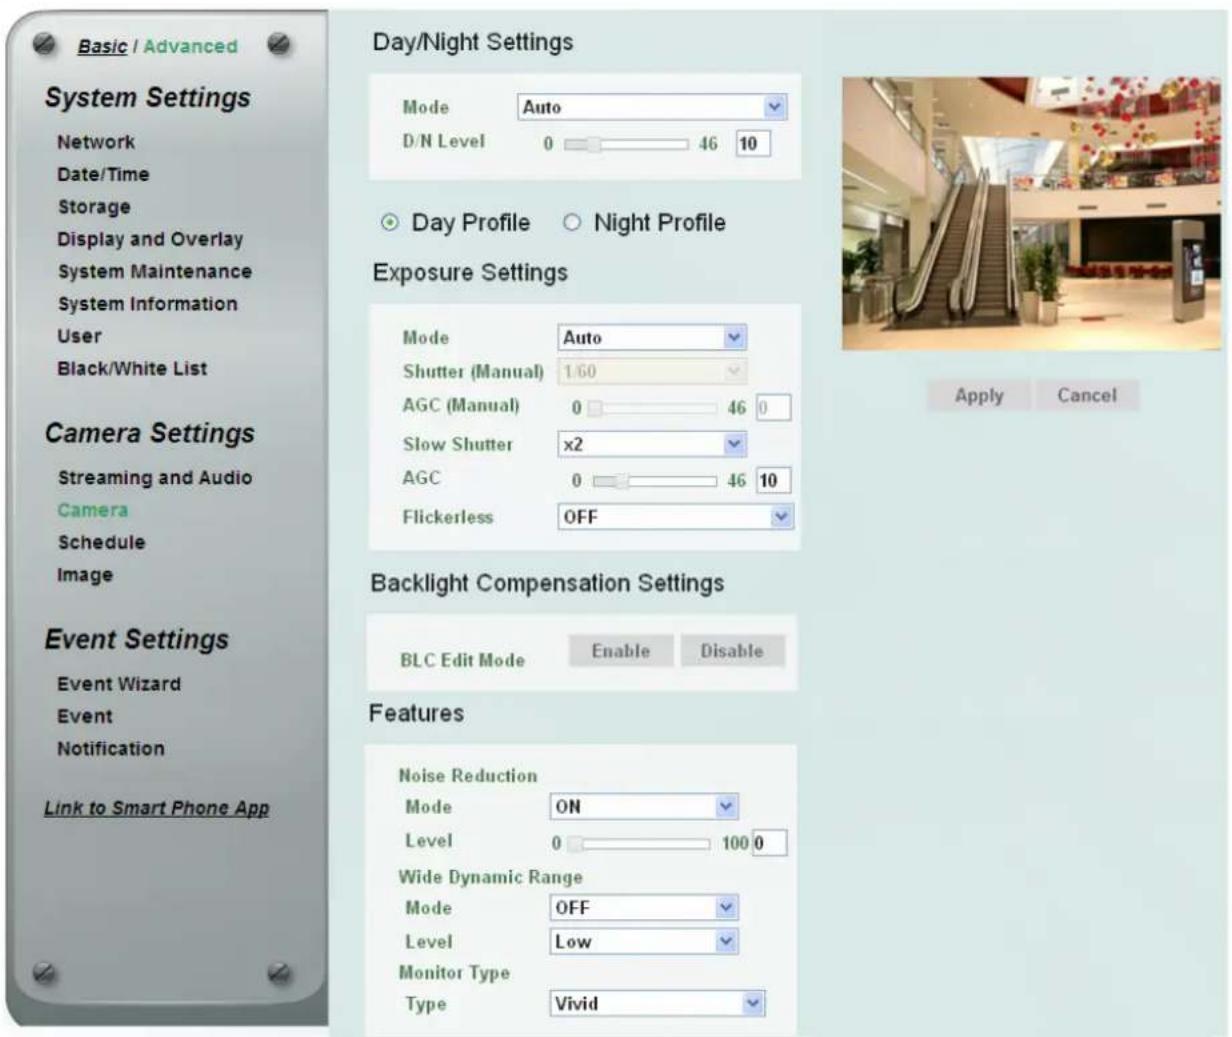
text_image
Basic / Advanced System Settings Network Date/Time Storage Display and Overlay System Maintenance System Information User Black/White List Camera Settings Streaming and Audio Camera Schedule Image Event Settings Event Wizard Event Notification Link to Smart Phone App Day/Night Settings Mode Auto D/N Level 0 46 10 Day Profile Night Profile Exposure Settings Mode Auto Shutter (Manual) 1.60 AGC (Manual) 0 46 0 Slow Shutter x2 AGC 0 46 10 Flickerless OFF Backlight Compensation Settings BLC Edit Mode Enable Disable Features Noise Reduction Mode ON Level 0 100 0 Wide Dynamic Range Mode OFF Level Low Monitor Type Type Vivid■ Mode: Select a mode from the drop-down list.
- Auto: Select to let the camera automatically switch to Night mode (black and white images) when the light levels fall to a specified level, and back to Day mode (color images) when the light levels rise to a specified level.
• Day: Select to keep the camera in Day mode (color images), even in nighttime.
• Night: Select to keep the camera in Night mode (black and white images, even in daytime. - Schedule: Select to let the camera to switch to Day mode or Night mode based on the day and night schedule settings (see 7.2.3 Schedule).
■ D/N Level: The value represents the AGC level. Adjust the level for the camera to switch between Day mode and Night mode based on the configured value. Note that the level should be less than the AGC configured in the Exposure Settings field. For example, if you configure 10 for the AGC, and 14 for the D/N level, the D/N level will be inactivated as the AGC has set up between 0 and 10.
Click Apply to apply the changes or Cancel to cancel the changes and return to the previous settings.
Day Profile/ Night Profile: Select Day Profile to configure the following settings for daytime and select Night Profile to configure the following settings for nighttime. Click the Apply button to save the settings.
【Exposure Settings】This function can only be set up in the Advanced tab. This setting is used to adapt to the amount or type of light used by the camera. Click Apply to apply the changes or Cancel to cancel the changes and return to the previous settings.
■ Mode: Select a mode from the drop-down list.
- Auto: Selecting Auto for the camera to automatically adjust the Shutter based on the measured light level.
- ALC (Shutter Priority): Selecting ALC (Automatic Light Control) allows the camera circuitry to either take bright spots more into consideration (peak), bringing out detail in bright areas, or less into consideration (average) bringing out detail in shadows.
- Manual: Select this option to manually set up the Shutter (Manual) and AGC (Manual) values.
■ Shutter (Manual): The function is only activated if you select ALC or Manual in the Mode field. If enabled, this setting lets you set the shutter speed yourself (measured in fractions of a second).
■ AGC (Manual): The function is only activated if you select Manual in the Mode field. Set the Auto Gain Control limit here. The lower the AGC level, the lower the video signal and the noise.
■ Slow Shutter: The function is only activated if you select Auto in the Mode field.
■ AGC: The function is only activated if you select Auto or ALC in the Mode field. Set the Auto Gain Control limit here. The lower the AGC level, the lower the video signal and the noise.
■ Flickerless: The function is only activated if you select Auto in the Mode field. Choose between OFF, 50HZ, 60HZ, 50HZ (High Luminance) or 60HZ (High Luminance).
【Backlight Compensation Settings】This function is useful when the background of the subject is very bright and the subject itself is dark. Click Apply to apply the changes or Cancel to cancel the changes and return to the previous settings.
■ BLC Edit Mode: Click the Enable button, the BLC grids appear on the image. Click on the grids to enable / disable the BLC function. The selected grids (in green) will be applied with the BLC function.
【Features】This function can only be set up in the Advanced tab. Click Apply to apply the changes or Cancel to cancel the changes and return to the previous settings.
- Noise Reduction (NR): This limits the amount of digital “video noise” that is usually found in any video stream, and helps to reduce file size. Select ON / OFF to enable / disable the Noise Reduction function. Slide the Level bar to set up the level. The higher the level, the more the reduction.
■ Wide Dynamic Range (WDR): The WDR function provides clearer images when both of the very bright and dark areas simultaneously appear on the camera view. There are three value options: OFF, ON and Auto. Note that when WDR is ON, some parts of the image may appear solarized. This is normal for WDR, and is not a camera malfunction.
■ Monitor Type: Users can use this field to optimize video quality of the monitor.
7.2.3 Schedule
The Schedule setup page is designed for users to configure the daytime and nighttime of each day. The Schedule setting is only functional if you select Schedule from the D/N Mode drop-down list on the Camera setup page.
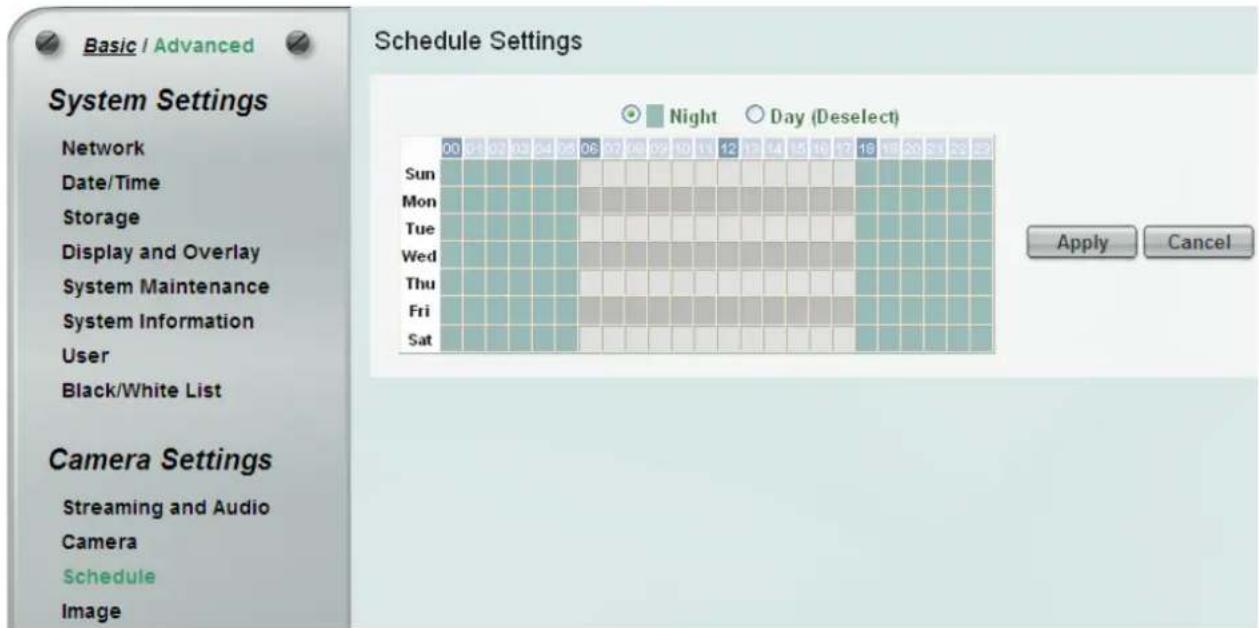
text_image
Basic / Advanced Schedule Settings System Settings Network Date/Time Storage Display and Overlay System Maintenance System Information User Black/White List Camera Settings Streaming and Audio Camera Schedule Image 00 01 02 03 04 05 06 07 08 09 10 11 12 13 14 15 16 17 18 19 Sun Mon Tue Wed Thu Fri Sat Night Day (Deselect) Apply CancelSelect Night and then move the cursor on the desired time square, click and drag the cursor over the time squares to configure them to the Night mode (blue color). Select Day and then move the cursor on the desired time square, click on the time squares to configure them to the Day mode (gray color).
Click Apply to apply the changes or Cancel to cancel the changes and return to the previous settings.
7.2.4 Image
This function can only be set up in the Advanced tab.
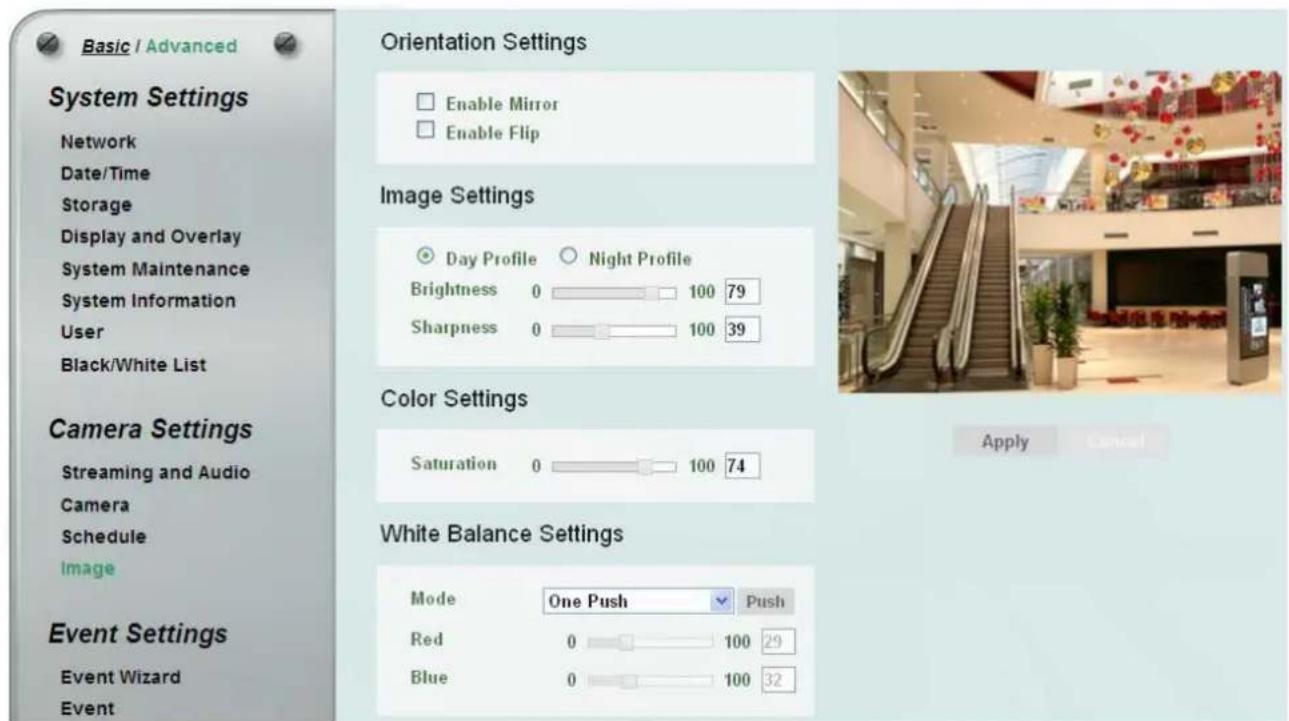
text_image
Basic / Advanced System Settings Network Date/Time Storage Display and Overlay System Maintenance System Information User Black/White List Camera Settings Streaming and Audio Camera Schedule Image Event Settings Event Wizard Event Orientation Settings Enable Mirror Enable Flip Image Settings Day Profile Night Profile Brightness 0 100 79 Sharpness 0 100 39 Color Settings Saturation 0 100 74 White Balance Settings Mode One Push Push Red 0 100 29 Blue 0 100 32 Apply Cancel【Orientation Settings】
■ Enable Mirror: Check the box to enable the mirror function. The image will be rotated horizontally around a vertical axis.
■ Enable Flip: Check the box to enable the flip function. The image will be rotated vertically around a horizontal axis.
【Image Settings】Select Day Profile or Night Profile and then adjust the slide bars below to configure the brightness and sharpness for daytime or nighttime.
【Color Settings】Slide the bar to adjust the saturation.
【White Balance Settings】Select a mode that delivers the best image quality for the camera's light environment.
■ Auto: Select to let the camera automatically adjust the White Balance. In the Auto mode the camera computes the white balance value output using color information from the entire screen. It outputs the proper value using the color temperature radiating from a black subject based on a range of value from 3000 to 7500K.
■ Manual: Select to adjust the Red and Blue values yourself in the fields below this field.
■ One Push: Select to enable the One Push button on the Live View window. This will allow you to force the camera to readjust the white balance every time you push the One Push button.
7.3 Event Settings
You can set up the Motion Detection event or Tampering Detection event to automatically notify the users when an event occurs. You can also set up a schedule to automatically record the videos when an event occurs.
7.3.1 Event Wizard
The Event Wizard allows users to easily configure the event settings. Follow the on-screen instructions to complete the event settings.
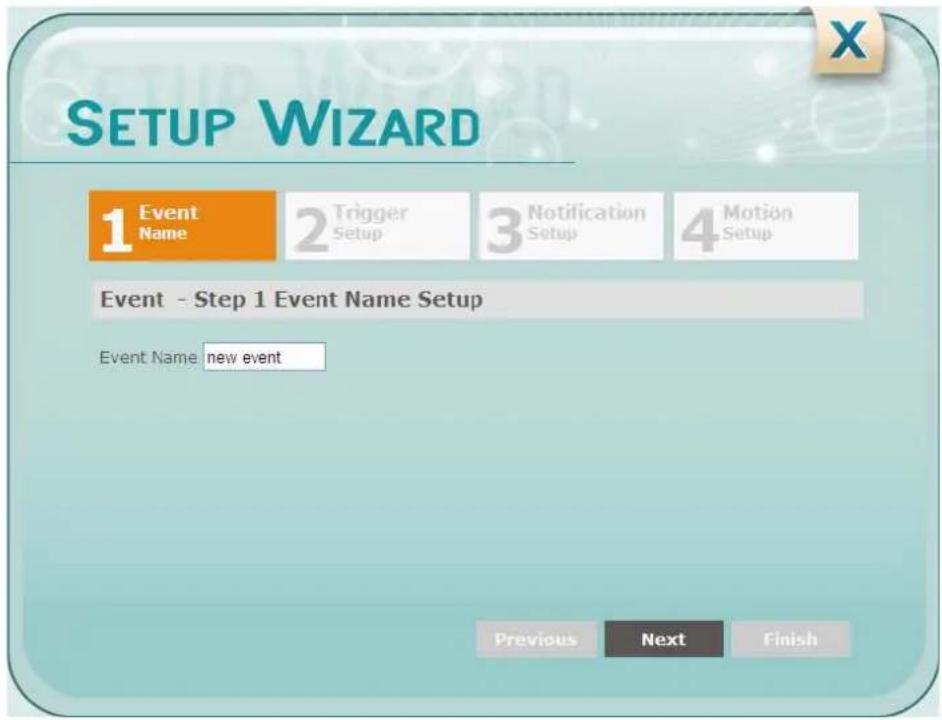
text_image
SETUP WIZARD 1 Event Name 2 Trigger Setup 3 Notification Setup 4 Motion Setup Event - Step 1 Event Name Setup Event Name: new event Previous Next Finish7.3.2 Event
This function can only be set up in the Advanced tab. Except the Event Wizard, you can also configure the event settings along with the Recording Schedule on this page.
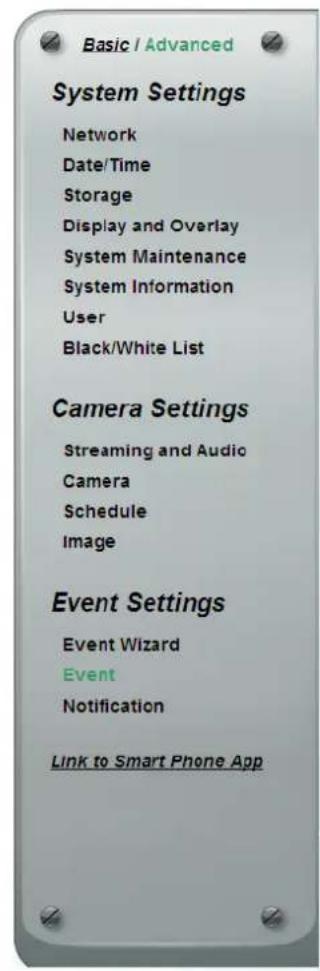
text_image
Basic / Advanced System Settings Network Date/Time Storage Display and Overlay System Maintenance System Information User Black/White List Camera Settings Streaming and Audio Camera Schedule Image Event Settings Event Wizard Event Notification Link to Smart Phone AppEvent Management
| Event List | |||
| Name | Type | Notification | Enable |
| motion | VMD | syslog,SD,NA | true |
| Taipei | SR | syslog,FTP,SD | true |
| EF | bedvideo | syslog,email,FTP,SD | true |
| View 1 - 3 of 3 | |||
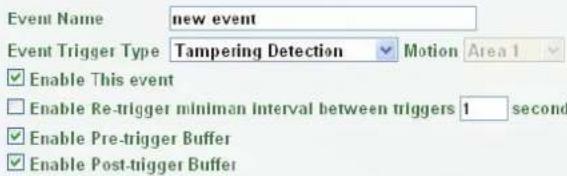
text_image
Event Name new event Event Trigger Type Tampering Detection Motion Area 1 Enable This event Enable Re-trigger miniman interval between triggers 1 second Enable Pre-trigger Buffer Enable Post-trigger BufferNotification Over
Log
□ Send Mail Notification
Upload to FTP
Record to SD Card
Network Alarm
| Create | Remove |
| Edit | Cancel |
Trigger Options Settings
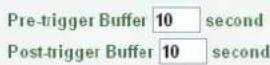

Schedule Settings
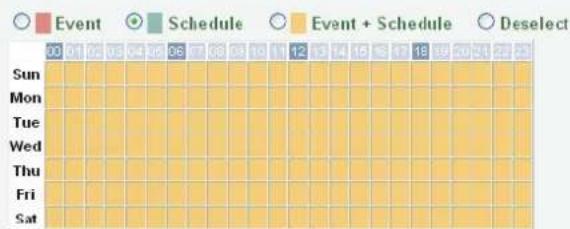
other
| Day | Event | Schedule | Event + Schedule | Deselect | |---|---|---|---|---| | Sun | 00 | 01 | 02 | 03 | | Mon | 00 | 01 | 02 | 03 | | Tue | 00 | 01 | 02 | 03 | | Wed | 00 | 01 | 02 | 03 | | Thu | 00 | 01 | 02 | 03 | | Fri | 00 | 01 | 02 | 03 | | Sat | 00 | 01 | 02 | 03 | The chart displays a grid layout with color-coded circles: red for Event, green for Schedule, yellow for Event + Schedule, and white for Deselect. The values in the table represent the count of occurrences for each day.
Motion Settings
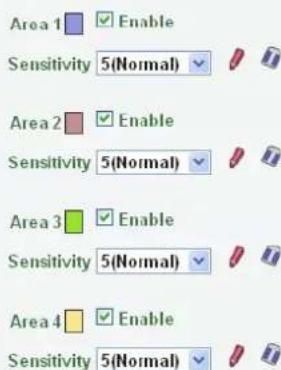
text_image
Area 1 Enable Sensitivity 5(Normal) Area 2 Enable Sensitivity 5(Normal) Area 3 Enable Sensitivity 5(Normal) Area 4 Enable Sensitivity 5(Normal)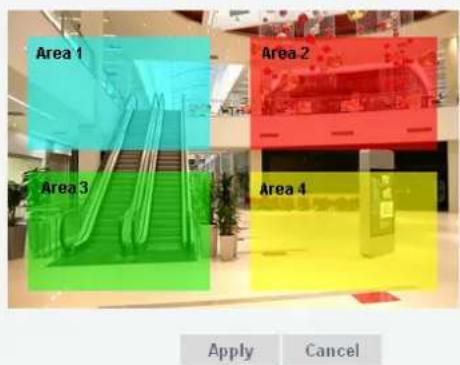
text_image
Area 1 Area 2 Area 3 Area 4 Apply Cancel【Event Management】 You can set up the events such as Motion Detection or Tampering Detection to automatically notify the users when an event occurs.
Event Name: Type an event name.
■ Event Trigger Type: Select an event for the to-be-specified-below reaction/s.
- Manual Trigger: Select this option if you want to manually trigger the alarm by clicking the Trigger Event button on the Live View Page.
- Motion Detection: Select this option to trigger the to-be-specified-below reaction/s when motion events occur. You have to pre-configure the Motion Settings for this function to work.
- Schedule Recording: Select this option if you want the Schedule Recording periods configured in the Schedule Settings to activate this event. In this scenario, a preconfigured event reaction like a log entry will list the start and end times of each period. Actual recording will only be triggered if the event is preconfigured to do so.
- Tampering Detection: Select this option if you want the camera's tampering detection sensor to trigger the to-be-specified-below reaction/s.
■ Enable This Event: Check the box to activate the event.
■ Enable Re-trigger minimum interval between triggers xx second: Check the box to set a minimum time after the event is triggered before the event can be triggered again.
■ Enable Pre-trigger Buffer: Check the box if you want the Event reaction (as selected in the "Notification Over" field below) to be the activation of the video recording function, and if you want the recording to include the video feed from the time period (configurable in the Schedule Settings field) just before the Event trigger occurred.
■ Enable Post-trigger Buffer: Check the box if you want the Event reaction (as selected in the Notification Over field) to be the activation of the video recording function, and if you want the recording to include the video feed from a time period (configurable in the Schedule Settings field) just after the Event trigger occurred.
Notification Over: Select the desired notification types from the following items.
- Log: Check the box if you want the camera to list the event's details in its log if the event is triggered.
- Send Mail Notification: Check the box if you want the camera to send an email text notification and one image file to the email address entered in the SMTP Settings field (see 7.3.3 Notification).
■ Upload to FTP: Check the box if you want the camera to upload the recordings to the FTP server entered in the FTP Repository Settings (see 7.3.3 Notification).
■ Record to SD Card: Check the box if you want the camera to start recording its video feed (when the event occurs) on an on-camera SD Card (if such a card has been inserted).
Note: The recording will only be as long as the combined Pre- and Post-trigger Buffers, so make sure you enable at least one of these buffers, especially the Post-trigger Buffer.
■ Network Alarm: Check the box if you want the camera to send a network alarm signal (when the event occurs) to the CMS servers. Note that you have to configure the Network Alarm Settings for this function to work (see 7.3.3 Notification).
Create: Set up the Event information and click the Create button, the created Event information will be listed in the Event List.
Remove: Highlight an item in the Event List and then click the Remove button to remove the highlighted item.
Edit: Highlight an item in the Event List and edit the Event information on the left-side. Click the Edit button and the item will be edited.
Cancel : Click the button to cancel the changes and return to the previous settings.
【Trigger Options Settings】
■ Pre-trigger Buffer: Select the duration for the buffer. This will determine the amount of footage (length of time) before the event trigger moment that will be included in an event-triggered video recording, if that buffer and video recording has been enabled in the Event Management field.
Enable Pre-trigger Buffer
■ Post-trigger Buffer: Select the duration for the buffer. This will determine the amount of footage (length of time) after the event trigger moment that will be included in an event-triggered video recording, if that buffer and video recording has been enabled in the Event Management field.
√ Enable Post-trigger Buffer
Click Apply to apply the changes or Cancel to cancel the changes and return to the previous settings.
【Schedule Settings】Users can configure the recording schedule here. Select the desired recording types among the options below. Click and drag the cursor on the time block, which will be applied with the selected recording type.
■ Event Recording (Red): Select for the camera to activate all the Event Recording set up in the Event Management field (Event Trigger Type), except the Schedule Recording.
■ Schedule Recording (Green): Select for the camera to activate only the Schedule Recording setup in the Event Management field (Event Trigger Type).
■ Event + Schedule (Yellow): Select for the camera to active both of the configured Event and Schedule Recordings.
■ Deselect (Grey): Select for the camera to stop recording.
Click Apply to apply the changes or Cancel to cancel the changes and return to the previous settings.
【Motion Settings】Use this page to configure up to four areas in which motion will be detected. When a motion is detected by the camera, the motion detection icon 📄 🐃 🐃 🐃 will appear at the top right corner on the Live page to alert the user. This function can also be linked with correctly configured Events to trigger Event reactions like the activation of video recording periods, snapshots, etc.
To set up the Motion area:
- Check the Enable box to enable the selected area.
- Select a sensitivity value of the motion detection sensor function.
- Click the Draw button and move the cursor on the left-side live image.
- Move the cursor to the position where you want the motion rectangle to start and then click. Move the cursor to the position (diagonally opposing corner) where you want the motion rectangle to end and then click.
- Click the Apply button to apply the settings, or click the Cancel button to reset without saving the settings.
7.3.3 Notification
This function can only be set up in the Advanced tab.
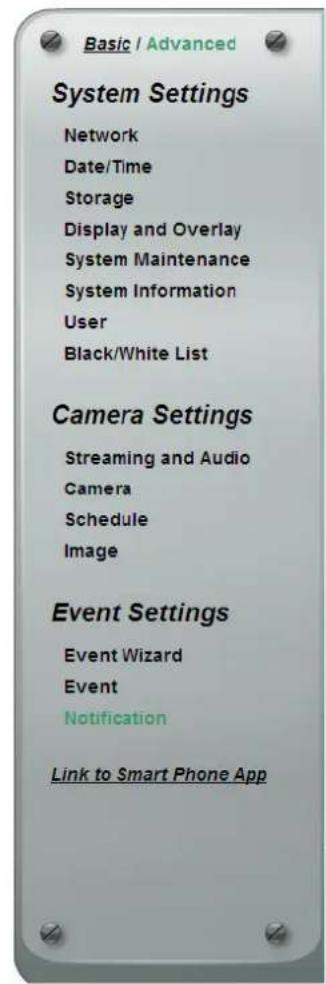
text_image
Basic / Advanced System Settings Network Date/Time Storage Display and Overlay System Maintenance System Information User Black/White List Camera Settings Streaming and Audio Camera Schedule Image Event Settings Event Wizard Event Notification Link to Smart Phone AppSMTP (Email) Settings
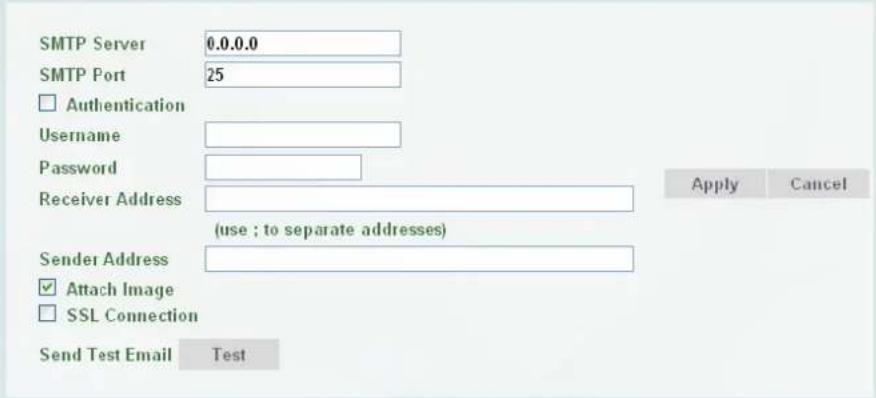
text_image
SMTP Server 0.0.0.0 SMTP Port 25 Authentication Username Password Receiver Address (use ; to separate addresses) Apply Cancel Sender Address Attach Image SSL Connection Send Test Email TestFTP Repository Settings
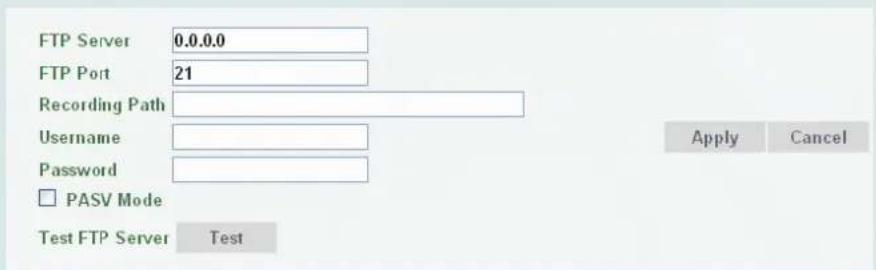
text_image
FTP Server 0.0.0.0 FTP Port 21 Recording Path Username Password □ PASV Mode Test FTP Server Test Apply CancelSNMP Settings
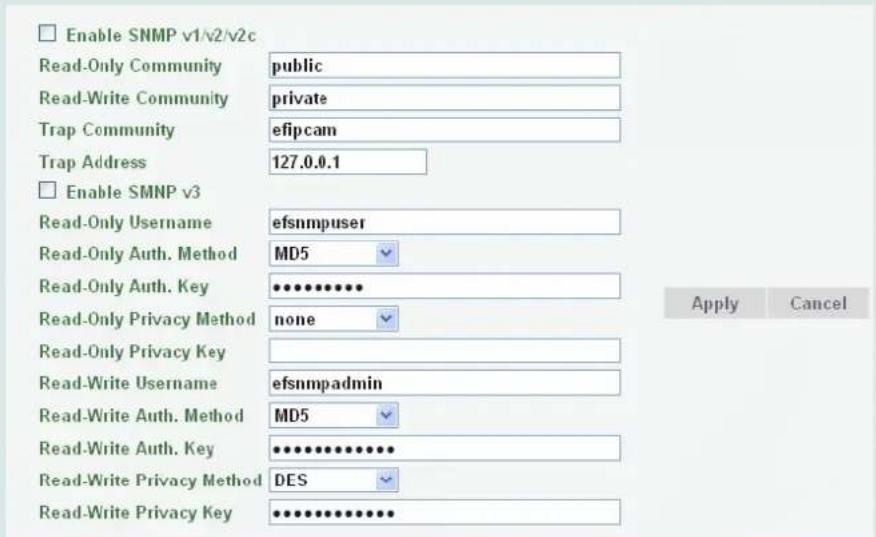
text_image
Enable SNMP v1/v2/v2c Read-Only Community public Read-Write Community private Trap Community efp cam Trap Address 127.0.0.1 Enable SMNP v3 Read-Only Username efsnmpuser Read-Only Auth. Method MD5 Read-Only Auth. Key •••••••••• Read-Only Privacy Method none Read-Only Privacy Key Read-Write Username efsnmpadmin Read-Write Auth. Method MD5 Read-Write Auth. Key •••••••••••• Read-Write Privacy Method DES Read-Write Privacy Key •••••••••••• Apply CancelNetwork Alarm Settings

text_image
Protocol UDP Unique ID 0000000001 Server 2 0.0.0.0 Port No 1600 Server 1 0.0.0.0 Server 3 0.0.0.0 Apply Cancel【SMTP (Email) Settings】This area is for configuring the mail server that is used to send e-mail text notifications and one image file from the camera to predefined addresses via SMTP. Note that to enable e-mail notification function, you have to check the Send Mail Notification box in the Event Management field (see 7.3.2 Event).
■ SMTP Server: Enter the IP address or the host name of the SMTP server used to send e-mails.
■ SMTP Port: Enter the port number for SMTP. The default is 25.
■ Authentication: Check the box if the SMTP server requires authentication (user/password).
- Username: Input the user's login ID if the SMTP server requires authentication.
- Password: Input the user's login password if the SMTP server requires authentication.
- Receiver Address: Input the e-mail addresses for receiving an e-mail message when events occur. Please use “;” to separate multiple addresses.
- Sender Address: Input the sender's e-mail address, so that the receiver can recognize the sender when an event message is received.
- Attach Image: Check the box if you want to attach an image when events occur.
- SSL Connection: Check the box to enable the SSL function. Enable this function means you can access the camera through the SSL protocol that provides communication security over the Internet.
■ Send Test Email: Click the Test button to send a testing email to the assigned address.
Click Apply to apply the changes or Cancel to cancel the changes and return to the previous settings.
【FTP Repository Settings】This area is for configuring the FTP server that is used to send alarm recordings from the camera to the preconfigured FTP server. Note that to enable uploading recordings to the FTP server function, you have to check the Upload to FTP box in the Event Management field (see 7.3.2 Event).
text_image
Notification Over □ Log □ Send Mail Notification ✓ Upload to FTP■ FTP Server: Enter the IP address or the host name of the FTP server.
■ FTP Port: Enter the port number for the FTP server. Default is 21.
■ Recording Path: Assign the recording path.
■ Username: Set FTP User's name.
■ Password: Set FTP password.
■ PASV mode: Check the box to enable Passive mode. Passive mode is normally enabled. If a connection cannot be established, uncheck "PASV Mode".
■ Test FTP Server: Click the Test button to send a testing file to the assigned FTP server.
Click Apply to apply the changes or Cancel to cancel the changes and return to the previous settings.
【SNMP Settings】The default values for SNMP v1/v2/v2c and SNMP v3 are already filled in. Click either of the Enable buttons to enable either of the two. Make your changes as desired. Click on the Trap Address field to enter the digits, if required.
Click Apply to apply the changes or Cancel to cancel the changes and return to the previous settings.
【Network Alarm Settings】This function works with EverFocus CMS software. The camera can send a network alarm signal (when the event occurs) to the CMS servers. To establish the connection between the camera and CMS servers, the protocol and port number should match with each other. For more details, please refer to the CMS user's manual. Note that to enable the Network Alarm function, you have to check the Network Alarm box in the Event Management field (see 7.3.2 Event).
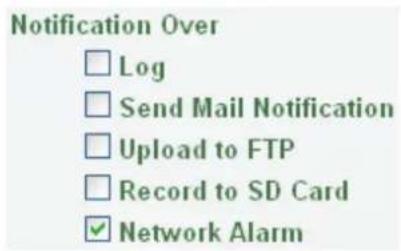
text_image
Notification Over □ Log □ Send Mail Notification □ Upload to FTP □ Record to SD Card ✓ Network AlarmClick Apply to apply the changes or Cancel to cancel the changes and return to the previous settings.
7.4 Link to Smart Phone App
You can access camera live view or take a snapshot via your smart phone. This page is designed for users to download the mobile app to your mobile phone by scanning the QR code.
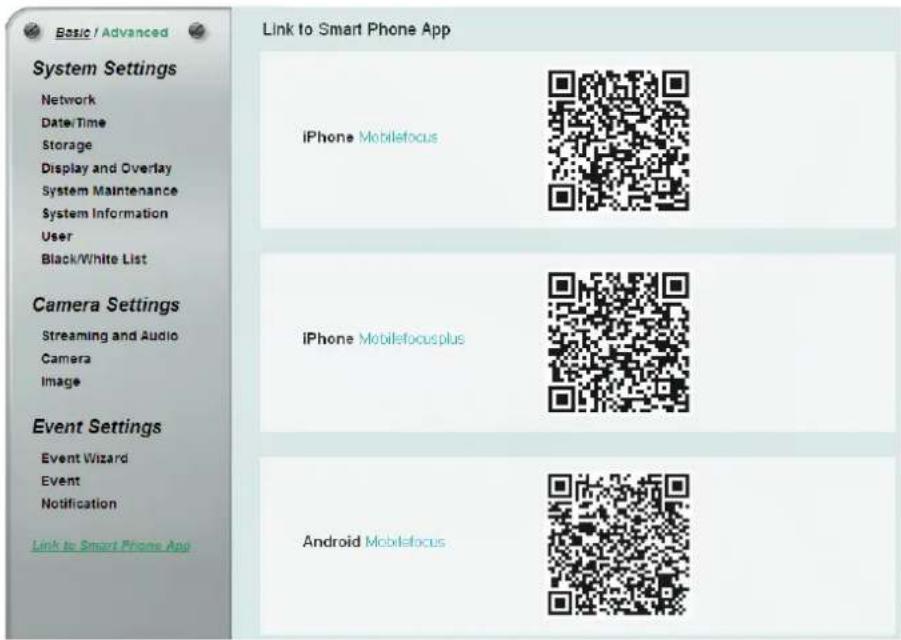
text_image
Link to Smart Phone App System Settings Network DateTime Storage Display and Overlay System Maintenance System Information User Black/White List Camera Settings Streaming and Audio Camera Image Event Settings Event Wizard Event Notification Link to Smart Phone App iPhone Mobilefocus iPhone Mobilefocusplus Android MobilefocusMobileFocus
for iPhone
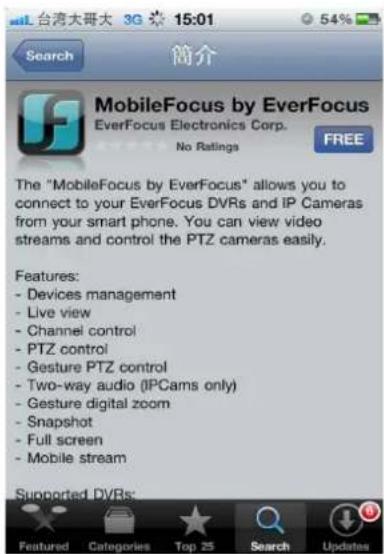
text_image
台湾大哥大 3G 15:01 54% Search 简介 MobileFocus by EverFocus EverFocus Electronics Corp. No Ratings FREE The "MobileFocus by EverFocus" allows you to connect to your EverFocus DVRs and IP Cameras from your smart phone. You can view video streams and control the PTZ cameras easily. Features: - Devices management - Live view - Channel control - PTZ control - Gesture PTZ control - Two-way audio (IPCams only) - Gesture digital zoom - Snapshot - Full screen - Mobile stream Supported DVRs:MobileFocusPlus
for iPhone
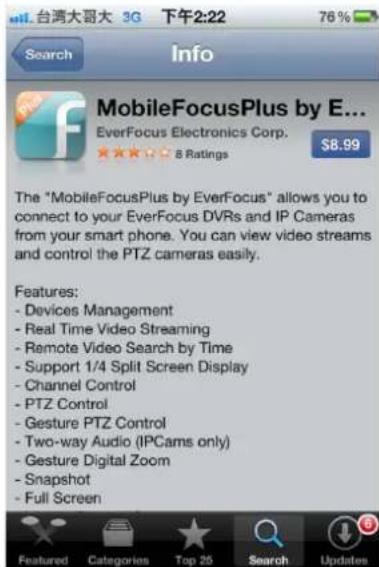
text_image
台湾大哥大 3G 下午2:22 76% Search Info MobileFocusPlus by E... EverFocus Electronics Corp. 8 Ratings $8.99 The "MobileFocusPlus by EverFocus" allows you to connect to your EverFocus DVRs and IP Cameras from your smart phone. You can view video streams and control the PTZ cameras easily. Features: - Devices Management - Real Time Video Streaming - Remote Video Search by Time - Support 1/4 Split Screen Display - Channel Control - PTZ Control - Gesture PTZ Control - Two-way Audio (IPCams only) - Gesture Digital Zoom - Snapshot - Full ScreenMobileFocus
for Android-based smart phone
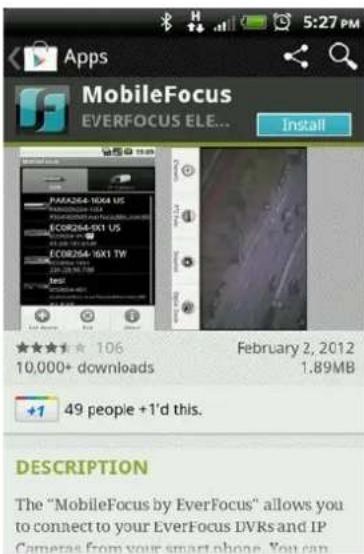
text_image
Apps MobileFocus EVERFOCUS ELE... Install PARA264-16X4 US ECOR264-5X1 US ECOR264-5X1 TW Juni 106 10,000+ downloads February 2, 2012 1.89MB +1 49 people +1'd this. DESCRIPTION The "MobileFocus by EverFocus" allows you to connect to your EverFocus DVRs and IP Cameras from your smart phone. You can8. Upgrading Firmware Using IP Utility
You can upgrade the Firmware using the IP Utility software included in the software CD.

- Install and then start the IP Utility. The following dialog box appears.
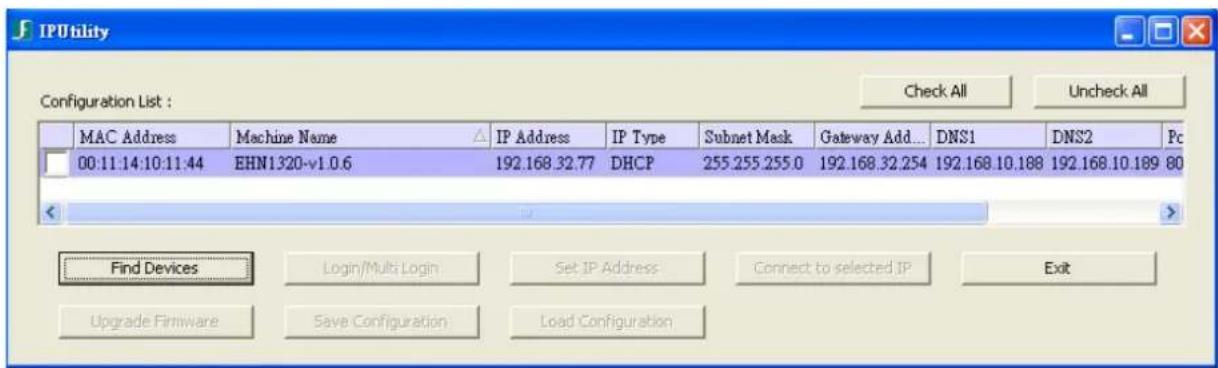
text_image
IPUtility Configuration List : Check All Uncheck All MAC Address Machine Name IP Address IP Type Subnet Mask Gateway Add... DNS1 DNS2 Pc 00:11:14:10:11:44 EHN1320-v1.0.6 192.168.32.77 DHCP 255.255.255.0 192.168.32.254 192.168.10.188 192.168.10.189 80 Find Devices Login/Multi Login Set IP Address Connect to selected IP Exit Upgrade Firmware Save Configuration Load Configuration- IPU will automatically search the cameras connected in the LAN. The default network values of the cameras will be displayed. By default, the network protocol of the camera is DHCP.
- Select a camera and click Login/Multi Login to log in the camera.
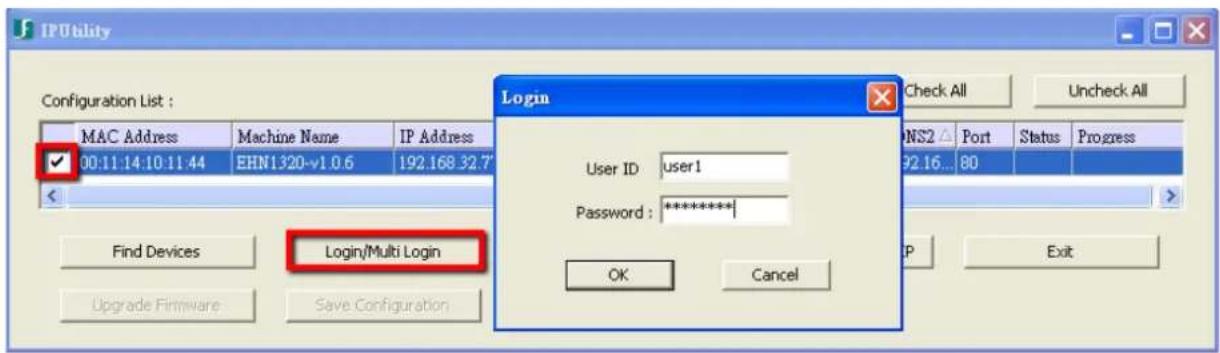
text_image
IPUtility Configuration List : MAC Address Machine Name IP Address 00:11:14:10:11:44 EHN1320-v1 0.6 192.168.32.7 Login User ID: user1 Password: ********** OK Cancel Find Devices Login/Multi Login Upgrade Firmware Save Configuration Check All Uncheck All NS2 Port Status Progress 92.16... 80 P Exit- Type the user ID and password. Click OK.
Note:
- The default user ID is user1 and the default password is 11111111.
- If you select more than one camera that has the same user ID / password, you will be able to log in several cameras at once.
-
Up to 10 cameras can be simultaneously upgraded to the latest firmware. If you connect the cameras to a PoE switch, please make sure the Power Consumption of the PoE switch is sufficient.
-
Select the camera and then click Upgrade Firmware. A browsing window appears.
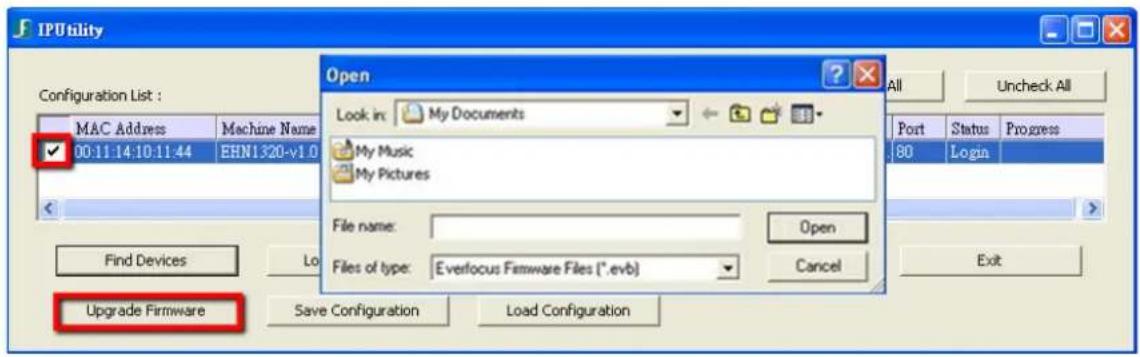
text_image
IPU Utility Configuration List : MAC Address Machine Name 00:11:14:10:11:44 EHN1320-v1.0 Open Look in: My Documents My Music My Pictures File name: Open Files of type: Everfocus Firmware Files (*.evb) Cancel Find Devices Lo Upgrade Firmware Save Configuration Load Configuration All Uncheck All Port Status Progress 80 Login Exit- Select the firmware file (.evb) and then click Open. The IP Utility will automatically upgrade the firmware.
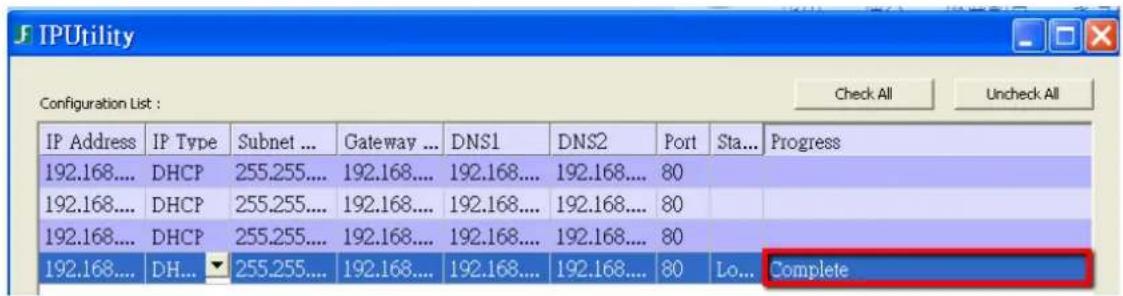
text_image
IP Utility Configuration List : Check All Uncheck All IP Address IP Type Subnet ... Gateway ... DNS1 DNS2 Port Sta... Progress 192.168.... DHCP 255.255.... 192.168.... 192.168.... 192.168.... 80 192.168.... DHCP 255.255.... 192.168.... 192.168.... 192.168.... 80 192.168.... DHCP 255.255.... 192.168.... 192.168.... 192.168.... 80 192.168.... DH...▼ 255.255.... 192.168.... 192.168.... 192.168.... 80 Lo... CompleteThe camera will reboot once the update is complete. Click Find Devices, the new firmware version should be displayed in the last part of the Machine Name.
- Specifications
| Model EHN1120 | EHN1220 | EHN1320 | ||
| System Information | ||||
| CPU | Multimedia SoC (System-on-Chip) | |||
| Flash 32 MB | ||||
| RAM 512 MB | ||||
| Camera | ||||
| Image Sensor | 1/2.7" Progressive | 1/2.7" Progressive | 1/3" Progressive CMOS | |
| Megapixel | 1.3 MP | 2 MP | 3 MP | |
| Max. Resolution | 1280 x 1024 | 1920 x 1080 | 2048 x 1536 | |
| Min. Illumination | Color: 0.5 LuxB/W: 0.1 Lux | Color: 0.5 LuxB/W: 0.1 Lux | Color: 0.3 LuxB/W: 0.1 Lux | |
| Electronic Shutter | 4 ~ 1/15,000 sec. | 4 ~ 1/15,000 sec. | 4 ~ 1/25,000 sec. | |
| Scanning System | NTSC / PAL | |||
| WDR | Yes | |||
| Digital Zoom | 10x | |||
| Image Settings | Compression, Brightness, Sharpness, Contrast, Saturation, Hue, White Balance, Exposure Control, Backlight Compensation, Rotation, Mirroring of images, Text and Image Overlay, Auto Gain Control, Auto White Balance | |||
| Event Trigger | Manual Trigger, Motion Detection, Tamper Detection | |||
| Notification | E-mail notification, FTP uploading, record video to PC and network alarm | |||
| Lens | ||||
| Lens Type | Fixed-focal | |||
| Focal Length (Selectable) | 2.8 mm / 3.6 mm / 6 mm / 8 mm | |||
| Aperture | F1.8 (f = 2.8 mm / 3.6 mm / 6 mm)F1.6 (f = 8 mm) | |||
| Day / Night | Electronic D/N | |||
| Video | ||||
| Video Compression | H.264 and MJPEG | H.264, MPEG4 and MJPEG | ||
| Resolution | NTSC | 2048 x 1536, 1920 x 1200 (for EHN1320 only)1920 x 1080 (for EHN1320/1220 only), 1280 x 1024,1280 x 720 (for EHN1320/1220 only), 1024 x 768, 720 x 480, 704 x 480,640 x 480, 352 x 240, 320 x 240, 160 x 128 | ||
| PAL | 2048 x 1536, 1920 x 1200 (for EHN1320 only)1920 x 1080 (for EHN1320/1220 only), 1280 x 1024,1280 x 720 (for EHN1320/1220 only), 1024x 768, 720 x 576, 704 x 576,640 x 480, 352 x 288, 320 x 240, 160 x 128 | |||
| Frame Rate | 30 fps at 1280 x 1024 | 30 fps at 1920 x 1080 | 15 fps at 2048 x 1536 | |
| S/N Ratio Above 48dB | ||||
| Audio | ||||
| Audio Capability Audio input | ||||
| Audio Compression | G.711, GSM-AMR, AAC | |||
| Interface | Internal microphone / Line-In | |||
| Effective Range 5 meters | ||||
| Network | ||||
| Interface | 10 / 100 Base-T Ethernet, LAN / PoE Cable | |||
| Supported Protocols | TCP/IP, IPV6, UDP, ICMP, DHCP, NTP, DNS, DDNS, SMTP, SNMP, FTP, HTTP, HTTPS, PPPoE, UPnP, Bonjour, RTP, RTSP, RTCP, IGMP, ARP, ONVIF, PSIA | |||
| Mechanical | ||||
| Memory Card | One built-in micro SD / SDHC card slot | |||
| Video Test-Out Connector | One built-in DIP connector | |||
| LAN / PoE Cable | Connects to a 10 / 100 Base-T Ethernet or PoE | |||
| Power Cable | 10-36 VDC input | |||
| Audio Cable | Line-in cable | |||
| Camera Angle Adjustment | Pan | -25° ~ 25° | ||
| Tilt | 0° ~ 90° | |||
| Rotate | -90° ~ 90° | |||
| General | ||||
| Power Source | 10-36 VDC / PoE (IEEE802.3af) | |||
| Power Consumption | 7.5W (10-36 VDC)4.8W (PoE) | 7.5W (10-36 VDC)6.2W (PoE) | 7.5W (10-36 VDC)5.9W (PoE) | |
| Operating Temperature | -40°C ~ 55°C / -40°F ~ 131°F (DC Power)-20°C ~ 55°C / -4°F ~ 131°F (PoE) | |||
| Humidity | 20% ~ 80% (no condensation) | |||
| Safety | CE, FCC, EN50155 | |||
| Vandal-Proof | IK10 | |||
| Weather-Proof | IP67-rated | |||
| Dimensions (L x W x H) | 130 x 112 x 46.5 mm / 5.12" x 4.41" x 1.83" | |||
| Weight | 300 g / 0.66 lbs | |||
| Language | Czech, Dutch, English, French, German, Japanese, Polish, Portuguese, Russian, Simplified Chinese, Spanish, Traditional Chinese | |||
10. Troubleshooting
Error messages pop up
When these error messages pop up, follow the steps below to fix the problem.
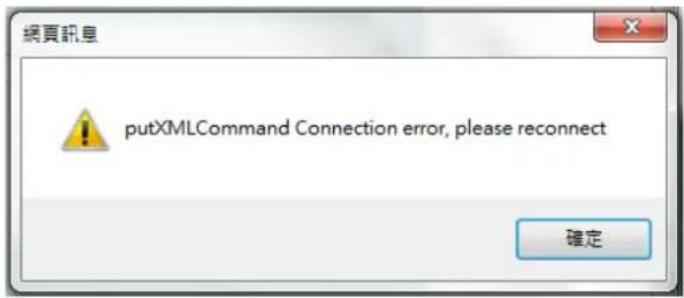
text_image
網頁訊息 putXMLCommand Connection error, please reconnect 確定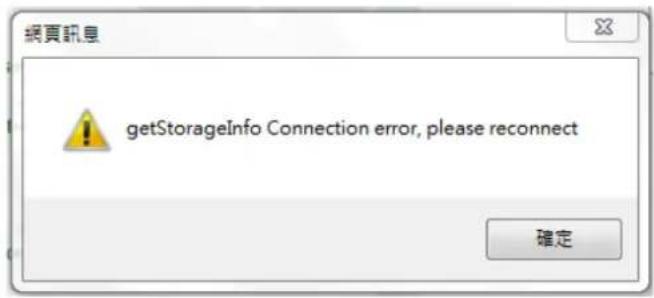
text_image
網頁訊息 getStorageInfo Connection error, please reconnect 確定- To enter the Registry Editor of your computer: Click Start and type "regedit" in the Search Program and Files field.
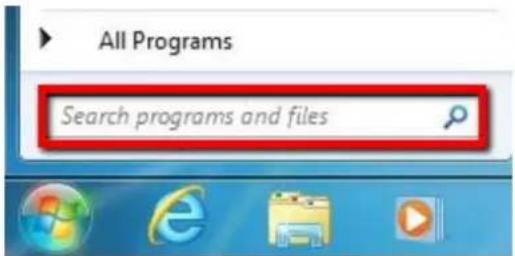
text_image
All Programs Search programs and files- Click the Enter button, the Registry Editor window appears.
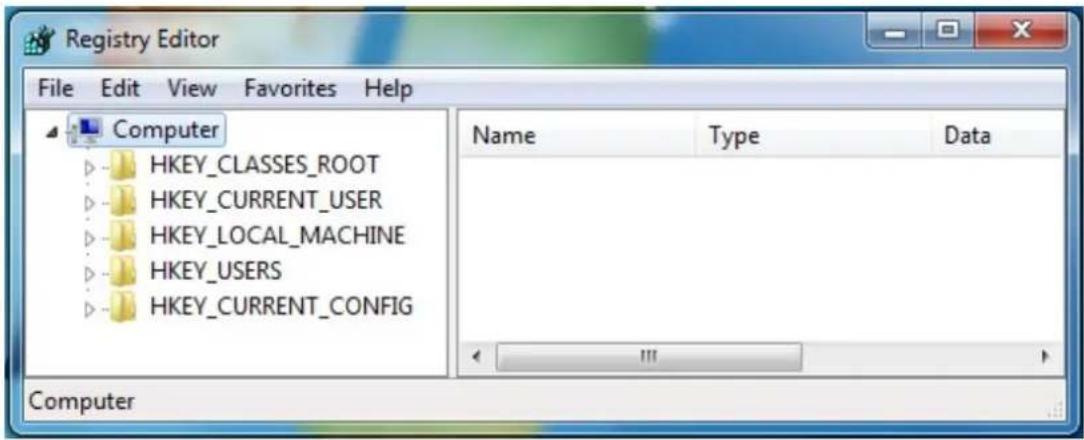
text_image
Registry Editor File Edit View Favorites Help Computer HKEY_CLASSES_ROOT HKEY_CURRENT_USER HKEY_LOCAL_MACHINE HKEY_USERS HKEY_CURRENT_CONFIG Name Type Data Computer3. Find the KeepAlive Timeout Dword by following the path:
\HKEY_CURRENT_USER\Software\Microsoft\Windows\CurrentVersion\Internet Settings
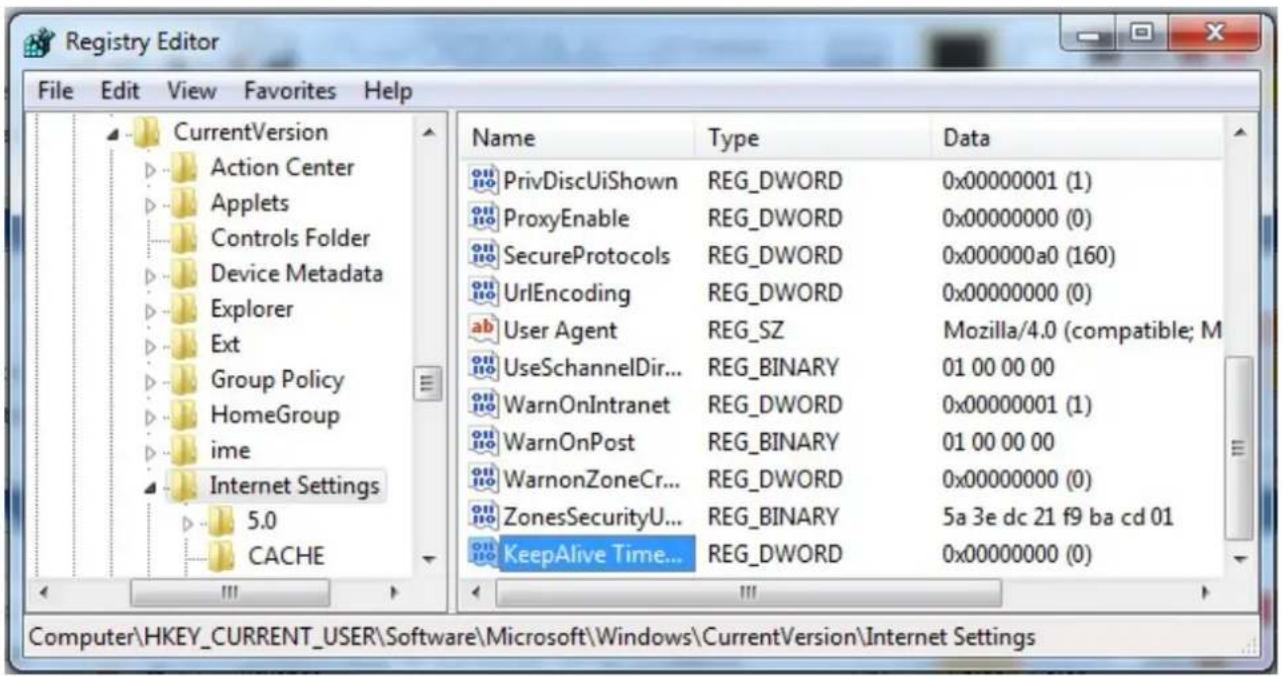
text_image
Registry Editor File Edit View Favorites Help CurrentVersion Action Center Applets Controls Folder Device Metadata Explorer Ext Group Policy HomeGroup ime Internet Settings 5.0 CACHE Name Type Data PrivDiscUiShown REG_DWORD 0x00000001 (1) ProxyEnable REG_DWORD 0x00000000 (0) SecureProtocols REG_DWORD 0x000000a0 (160) UrlEncoding REG_DWORD 0x00000000 (0) ab User Agent REG_SZ Mozilla/4.0 (compatible; M UseSchannelDir... REG_BINARY 01 00 00 00 WarnOnIntranet REG_DWORD 0x00000001 (1) WarnOnPost REG_BINARY 01 00 00 00 WarnonZoneCr... REG_DWORD 0x00000000 (0) ZonesSecurityU... REG_BINARY 5a 3e dc 21 f9 ba cd 01 KeepAlive Time... REG_DWORD 0x00000000 (0) Computer\HKEY_CURRENT_USER\Software\Microsoft\Windows\CurrentVersion\Internet Settings4. Double-click KeepAlive Timeout and this window appears.
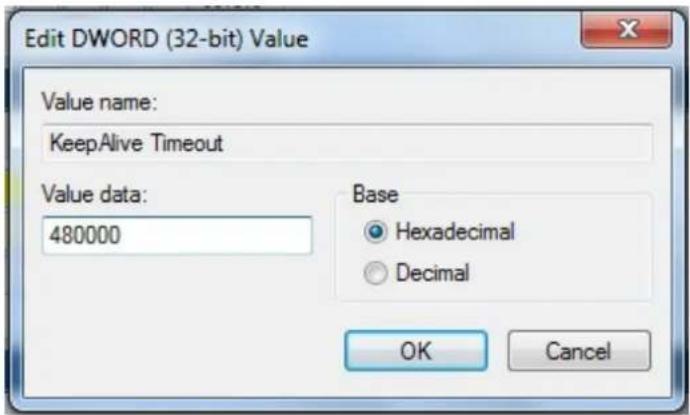
text_image
Edit DWORD (32-bit) Value Value name: KeepAlive Timeout Value data: 480000 Base Hexadecimal Decimal OK Cancel5. Change the Value data to 480000 and click OK.
EverFocus Electronics Corp.
EverFocus Taiwan:
12F, No.79, Sec. 1, Shin-Tai Wu Road,
Hsi-Chih, Taipei, Taiwan
TEL: +886 2 2698 2334
FAX: +886 2 2698 2380
www.everfocus.com.tw
marketing@everfocus.com.tw
EverFocus China - Beijing:
Room 609, Technology Trade Building,
Shangdi Information Industry Base,
Haidian District, Beijing 100085, China
TEL: +86 10 6297 3336\~39
FAX: +86 10 6297 1423
www.everfocus.com.cn
marketing@everfocus.com.cn
EverFocus USA - California:
1801 Highland Avenue, Unit A, Duarte, CA 91010, USA
TEL: +1 626 844 8888
FAX: +1 626 844 8838
www.everfocus.com
sales@everfocus.com
EverFocus Japan:
5F, Kinshicho City Building, 2-13-4 Koto-Bashi, Sumida-Ku,
Tokyo, 130-0022, Japan
TEL: +81 3 5625 8188
FAX: +81 3 5625 8189
www.everfocus.co.jp
info@everfocus.co.jp
EverFocus India:
Suite 803, Housefin Bhavan, C-21,
Bandra Kurla Complex, Bandra (East),
Mumbai 400051, India
TEL: +91 22 6128 8700
FAX: +91 22 6128 8705
www.everfocus.in
sales@everfocus.in

Your EverFocus product is designed and manufactured with high quality materials and components which can be recycled and reused.
This symbol means that electrical and electronic equipment, at their end-of-life, should be disposed of separately from your household waste. Please, dispose of this equipment at your local community waste collection/recycling centre.
In the European Union there are separate collection systems for used electrical and electronic product. Please, help us to conserve the environment we live in!
4F, No. 2, D4 Building, Wan Yelong
Industrial Park, Tangtou Road, Shiyan,
Baoan, Shenzhen, Guangdong 518101, China
TEL: +86 755 2765 1313
FAX: +86 755 2765 0337
www.everfocus.com.cn
marketing@everfocus.com.cn
EverFocus USA - New York:
415 Oser Avenue, Unit S, Hauppauge, NY 11788, USA
TEL: +1 631 436 5070
FAX: +1 631 436 5027
www.everfocus.com
sales@everfocus.com
EverFocus Europe - UK:
Unit 12, Spitfire Business Park,
Hawker Road, Croydon Surrey, CR0 4WD, UK
TEL: +44 20 8649 9757 / +44 845 430 9999
FAX: +44 20 8649 9907
www.everfocusuk.co.uk
salesuk@everfocus.com

EverFocus®
P/N: 4605PH1120B010A