Bullet YCBLB3 - Security Camera Y-cam - Free user manual and instructions
Find the device manual for free Bullet YCBLB3 Y-cam in PDF.


User questions about Bullet YCBLB3 Y-cam
0 question about this device. Answer the ones you know or ask your own.
Ask a new question about this device
Download the instructions for your Security Camera in PDF format for free! Find your manual Bullet YCBLB3 - Y-cam and take your electronic device back in hand. On this page are published all the documents necessary for the use of your device. Bullet YCBLB3 by Y-cam.
USER MANUAL Bullet YCBLB3 Y-cam
natural_image
Exterior view of three Y-ray security cameras (no visible text or symbols on the devices themselves)User Manual - English
This manual applies to the following Y-cam products:
| S Range | SD Range | Bullet Range | Dome Range |
| Y-cam White S YCW004Y-cam White S POE YCWP04Y-cam Black S YCB004Y-cam Knight S YCK004 | Y-cam White SD YCW003Y-cam Black SD YCB003Y-cam Black SD POE YCBP03Y-cam Knight SD YCK003 | Y-cam Bullet White YCBL03Y-cam Bullet Black YCBLB3 | Y-cam EyeBall YCEB03 |
Features and operaons listed in this manual depend on the specic model. Each cameras model name can be found on the reverse of the camera.
Please read this manual carefully before aempng to install or operate this product. Please retain this manual for your future reference. This User Manual is a work-in-progress and is constantly being updated. You are invited to check the website regularly for updated versions.
TABLE OF CONTENTS
1.0 INTRODUCTION ....5
1.1 APPROVAL INFORMATION 5
1.2 RESTRICTIONS....6
1.3 POWER SUPPLY 6
1.4 MAINTENANCE....7
1.5 RECOMMENDATIONS....7
1.6 MINIMUM SYSTEM REQUIREMENTS....8
1.7 EU ENVIRONMENTAL PROTECTION....8
2.0 EXPLORING YOUR Y-CAM....9
2.1 Y-CAM S RANGE AND SD RANGE AT A GLANCE 9
2.2 Y-CAM BULLET RANGE AT A GLANCE 10
2.3 Y-CAM EYEBALL AT A GLANCE 11
2.4 Y-CAM BREAKOUT BOX AT A GLANCE 12
2.5 MICROSD CARD INFORMATION AND INSTALLATION 13
2.51 MICROSD CARD INSTALLATION FOR SD RANGE 14
2.52 MICROSD CARD INSTALLATION FOR Y-CAM BULLET 14
2.53 MICROSD CARD INSTALLATION FOR Y-CAM EYEBALL 15
3.0 INSTALLATION 16
4.0 Y-CAM SOFTWARE INSTALLATION 17
4.1 Y-CAM SOFTWARE INSTALLATION FOR WINDOWS....17
4.2 Y-CAM SOFTWARE INSTALLATION FOR MAC 19
4.3 FINDING YOUR CAMERA WITH Y-CAM SETUP....20
5.0 WELCOME TO YOUR Y-CAM! 21
5.1 LIVE VIEW (USING INTERNET EXPLORER)....22
5.2 LIVE VIEW (USING FIREFOX, SAFARI AND OTHER BROWSERS)....24
6.0 Y-CAM SETTINGS....25
6.1 QUICK SETUP WITH THE WIZARD....27
6.2 SYSTEM PAGE 28
6.3 SUPPORT PAGE 29
6.4 REBOOT 30
6.5 CAMERA MENU....31
6.5.1 CAMERA SETUP....31
6.5.2 STREAM SETUP....33
6.5.3 OSD SETUP....35
6.5.4 NIGHT VISION SETUP....36
6.6 NETWORK MENU 37
6.6.1 WIRELESS SETUP....37
6.6.1.1 INFRASTRUCTURE WIRELESS SETUP OPTIONS....38
6.6.1.2 ADHOC WIRELESS SETUP OPTIONS 39
6.6.2 TCP/IP SETUP 40
6.6.3 PPPoE SETUP 41
6.6.4 DDNS SETUP 42
6.6.5 UPNP SETUP 43
6.6.6 VIEWING YOUR CAMERA EXTERNALLY USING DDNS 44
6.6.7 VIEWING YOUR CAMERA EXTERNALLY USING A STATIC IP 44
6.6.8 PORT FORWARDING IF UPNP IS NOT AVAILABLE....45
6.7 ALARM MENU 46
6.7.1 DIGITAL I/O SETUP 46
6.7.2 MOTION DETECTION 49
6.7.2.1 MOTION DETECTION USING INTERNET EXPLORER 49
6.7.2.2 MOTION DETECTION USING OTHER BROWSERS....50
6.7.3 SCHEDULE SETUP 51
6.7.4 ALARM MANAGEMENT - FTP 52
6.7.5 ALARM MANAGEMENT - EMAIL 53
6.7.6 PERIODIC SENDING - FTP 54
6.7.7 PERIODIC SENDING - EMAIL....55
6.7.8 BUFFER MANAGEMENT....56
6.8 ALARM SERVER 57
6.8.1 FTP SERVER 57
6.8.2 E-MAIL SERVERS....58
6.8.3 Y-CAM & COMMON EMAIL SERVER SETTINGS....59
6.9 STORAGE....60
6.9.1 STORAGE SETUP....60
6.9.2 RECORD ON ALARM....61
6.9.3 SNAPSHOT ON ALARM 62
6.9.4 CONTINUOUS RECORD 63
6.9.5 SNAPSHOT AT INTERVAL 64
6.9.6 FTP SENDING....65
6.9.7 BROWSE STORAGE 66
6.10 TOOLS MENU 67
6.10.1 SYSTEM IDENTITY....67
6.10.2 USER MANAGEMENT....68
6.10.3 DATE & TIME....69
6.10.4 BACKUP AND RESET 70
6.10.5 FIRMWARE UPGRADE 71
7.0 ADVANCED SETTINGS....73
7.1 MANUALLY ENTERING TCP/IP SETTINGS FOR A CAMERA....73
7.2 PROXY SERVER SETTING....75
7.3 ENABLING ACTIVE X IN INTERNET EXPLORER....76
7.4 RECOVERING FROM A FAILED FIRMWARE UPDATE USING WINDOWS 77
7.5 CONNECTING YOUR Y-CAM DIRECTLY TO A COMPUTER....79
7.6 USING THIRD PARTY SOFTWARE....80
7.7 ALTERNATIVE METHODS OF ACCESSING THE VIDEO STREAM....80
7.8 VIEWING YOUR Y-CAM ON A MOBILE PHONE 81
7.8.1 USING THE /MOBILE EXTENSION....81
7.8.2 USING THE /IPHONE EXTENSION....81
7.8.3 USING OUR FREE SMARTPHONE APPS 81
7.8.4 TROUBLESHOOTING WITH MOBILE DEVICES 81
8.0 TROUBLESHOOTING....82
9.0 GLOSSARY OF TERMS....84
1.0 INTRODUCTION
Thank you for purchasing a Y-cam internet video camera.
Please read the following instrucons carefully before aempng to install or use the camera.
The Y-cam can be accessed remotely, and controlled from any PC/laptop over an Intranet or the Internet via a web browser. The user friendly installaon procedure and intuitive web-based interface allows easy integraon with your home or business network or Wi-Fi. The Y-cam also comes with moon detecon soware that can generate alarm triggers via e-mail and by uploading images straight to a website.
Noce
This product may cause interference with other wireless equipment that operate at 2.4GHz ISM band. In the event of interference please turn o one of the devices or move it to a safe distance.
Product Assurance
This 2.4GHz wireless camera meets wireless frequency security standards and recommended indexes during operaon. These standards and indexes are cercated by the academic organizaon as illustrated in the following paragraphs.
1.1 Approval Informaon
All our products meet the requirements for approval by FCC and CE, and are authorized to bear the FCC and CE mark.
FCC : This equipment has been tested and found to comply with the limits for a Class B digital device, pursuant to Part 15 of the FCC rules. These limits are designed to provide reasonable protecon against harmful interference in a residential installaon this equipment generates, uses and can radiate radio frequency energy and, if not installed and used in accordance with the instrucons, may cause harmful interference to radio communicaons. However, there is no guarantee that interference will not occur in a parcular installaon. If this equipment does cause harmful interference to radio or television recepon, which can be determined by turning the equipment o and on, the user is encouraged to try to correct the interference by one or more of the following measures:
-Reorient or relocate the receiving antenna.
-Increase the separaon between the equipment and the receiver.
-Connect the equipment into an outlet on a circuit dierent from that to which the receiver is connected.
-Consult the dealer or an experienced radio/TV technician for help.
This device complies with Part 15 of the FCC Rules. Operaon is subject to the following two conditions:
(1) This device may not cause harmful interference
(2) This device must accept any interference received, including interference that may cause undesired operaon Changes and modicaon not expressly approved by the manufacturer or registrant of this equipment can void your authority to operate this equipment under Federal Communicaons Commission rules.
CE : This product complies with standards including Low Voltage Device Direcve 73/23/EEC; EMC Direcve 89/336/EEC and R&TTE Direcve 1999/5/EC. It passed the subject tests by the authority concerned and is authorized to bear CE mark.
1.2 Restricons
- DO NOT use this product to violate one's privacy. Monitoring one's advies without consent is illegal and this product is not designed and manufactured for such purpose.
- DO NOT put this product near any medical equipment. Radio waves might potentially cause breakdown of electrical medical equipment.
- This product should be placed at least 1 foot away from any heart pacemaker. Radio waves might potentially influence a heart pacemaker.
- DO NOT use this product for any illegal advies. It is the user's responsibility to ensure that the usage of this camera is of a legal nature.
1.3 Power Supply
This product conforms to the following approvals:

UL Mark
American power supply authentication

SAA Mark
Australia power supply authentication

GS Mark
German power supply authentication

CE Mark
European Union power supply authentication
PSE Mark
Japan power supply authentication

CCC Mark
China power supply authentication
When using the power adapter, make sure your power rang is compatible with that of the device to avoid potential damage.

Please note: Y-cam Power Supplies are not interchangeable. The Power Adaptor supplied with your Y-cam should not be used with other models of Y-cam, and may cause product failure for other products. Always check the voltage of the Power Supply you are using with the corresponding model.
1.4 Maintenance
- Ensure that the Y-cam and its power source have sucient venlaon;
- Do not shake strike or drop the product;
- Keep the camera dry and dustless and avoid exposing it to direct sunlight;
- Do not place the product near any magnec objects;
- Avoid pung the product in places where there is constant change in temperature and humidity;
- Keep the product away from heat sources;
- Do not use the camera near aggressive chemicals;
- Do not use this camera near water (unless the camera is specified as waterproof);
- Do not use the camera in the places which are enclosed by metal. The surrounding metal may shield the electromagnec waves, and result in failure of signal reception;
- Please follow your local government environment protecon policies;
- Please turn o the power when le unused;
- Do not disassemble or aempt to repair the camera; doing so might cause damage to the product and will invalidate warranty.

Applies to products: YCB004, YCK004, YCB003, YCBP03, YCK003, YCBL03, YCBLB3
Please note: Infrared LEDs produce heat. Do not place any objects within 10cm of the LEDs or allow any object to come in contact with the dome covering the LEDs.
1.5 Recommendaons
- New rmware versions are released periodically and they provide new features, improvement to existing features, xes to known issues or bugs etc. It is strongly recommended that you upgrade to the latest rmware version available for your Y-cam product before set-up begins (as sengs may be lost). To ensure that you have the most recent rmware, please visit http://www.y-cam.com
- New versions of the soware available on the Setup CD may also be available, to ensure that you have the most recent versions, please visit http://www.y-cam.com
- It is recommended that Y-cam products are not installed near microwave ovens or DECT phones (cordless phones) as these devices tend to interfere with the Wi-Fi signal.
1.6 Minimum System Requirements
A PC or Mac is required for the initial setup of a Y-cam only and once the camera is congured, a Y-cam can be used independently without being connected to a computer.
Network requirements:
• Network Connecon: 10/100 Mbps Ethernet
- Wireless router (if wireless connectivity required)
• Broadband Connection: Minimum 128kb/s upload speed (if internet access to your Y-cam is required)
PC Requirements:
• Processor: Intel Pentium III, 800MHz or Higher (Penum IV, 2GHz or higher recommended)
• Memory (RAM): 128Mb (256Mb or higher recommended).
• Operang System: Windows 2000, XP, Vista, Windows 7
• Web Browser: Internet Explorer Version 5.5 or above, Mozilla Firefox, Google Chrome.
- Plug-ins: Quickme (for non-IE browsers)
Mac Requirements:
- Processor: 800MHz - PowerPC G4 or Intel.
• Memory (RAM): 128Mb (256Mb or higher recommended).
• Operang System: Mac OSX 10.4 Tiger.
• Web Browser: Safari, Mozilla Firefox, Google Chrome and most other browsers - Plug-ins: Quickme
1.7 EU Environmental Protecon
Waste electrical products should not be disposed of with household waste. Please recycle where facilities exist. Check with your Local Authority or retailer for recycling advice.
2.0 EXPLORING YOUR Y-CAM
2.1 Y-cam S Range and SD Range at a glance
Applies to products: YCW004, YCWP04, YCB004, YCK004, YCW003, YCB003, YCBP03, YCK003
Front
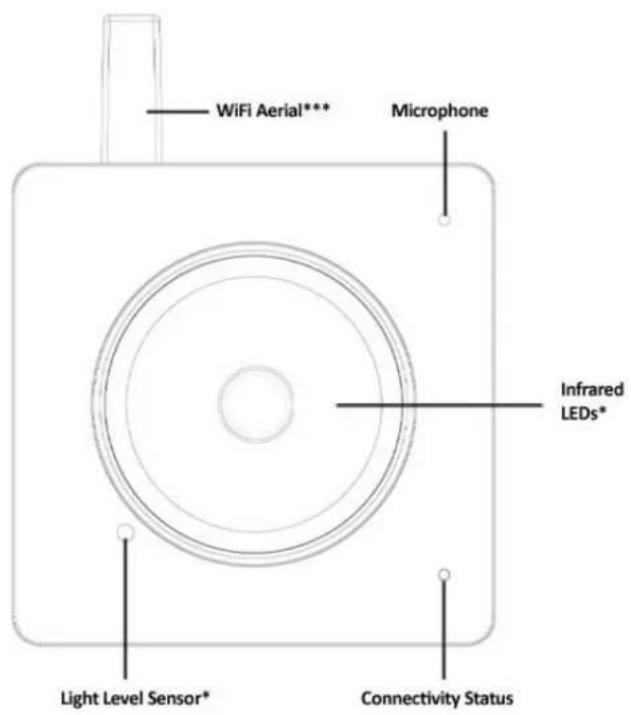
text_image
WiFi Aerial*** Microphone Infrared LEDs* Light Level Sensor* Connectivity StatusReverse
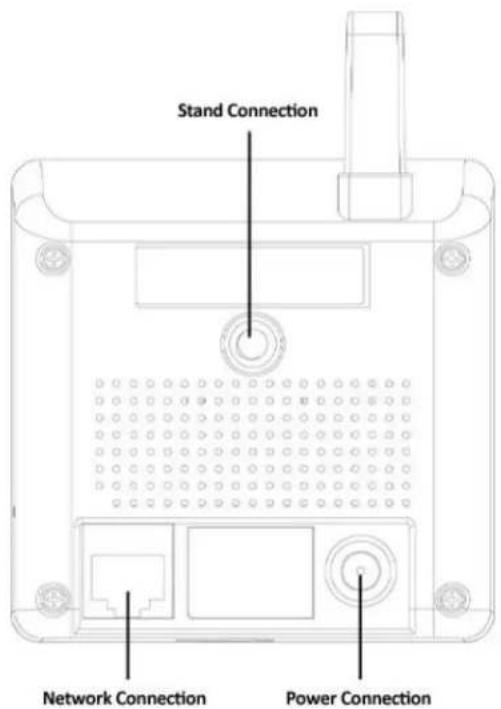
text_image
Stand Connection Network Connection Power ConnectionUnderneath

text_image
microSD Memory Card Slot*** - not available on White S YCW004, White S POE YCWP04, or White SD YCW003
** - not available on S range
*** - not available on White S POE YCWP04 and Black SD POE YCBW03
2.2 Y-cam Bullet Range at a glance
Applies to products: YCBL03, YCBLB3
Bullet Overview
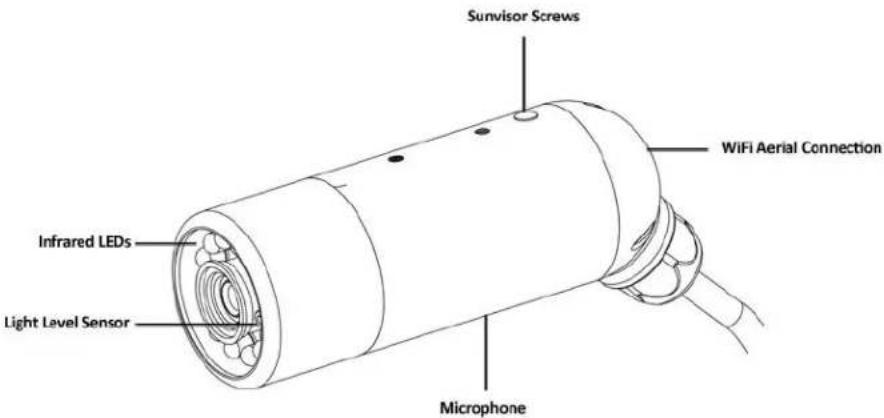
text_image
Sunvisor Screws WiFi Aerial Connection Infrared LEDs Light Level Sensor Microphone
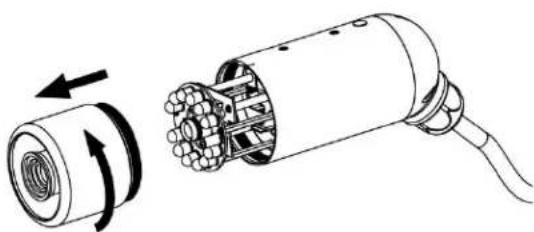
Please note: The status LED on the Bullet is inside the camera. To access the led unscrew the front part of the camera and li this carefully from the lens array. Be careful not to break the lens or infrared LEDs. The status LED of the camera will be visible.

Please note: To reset your Y-cam Bullet back to factory default sengs, you will need to press the reset buon. This is located inside the Bullet and you will need to remove the front part of the camera. Be careful not to break the lens or infrared LEDs. The reset buon is located just above the microSD slot.
natural_image
Technical illustration of a cylindrical mechanical component with internal components and directional arrows indicating rotation (no text or symbols)2.3 Y-cam EyeBall at a glance
Applies to products: YCEB03
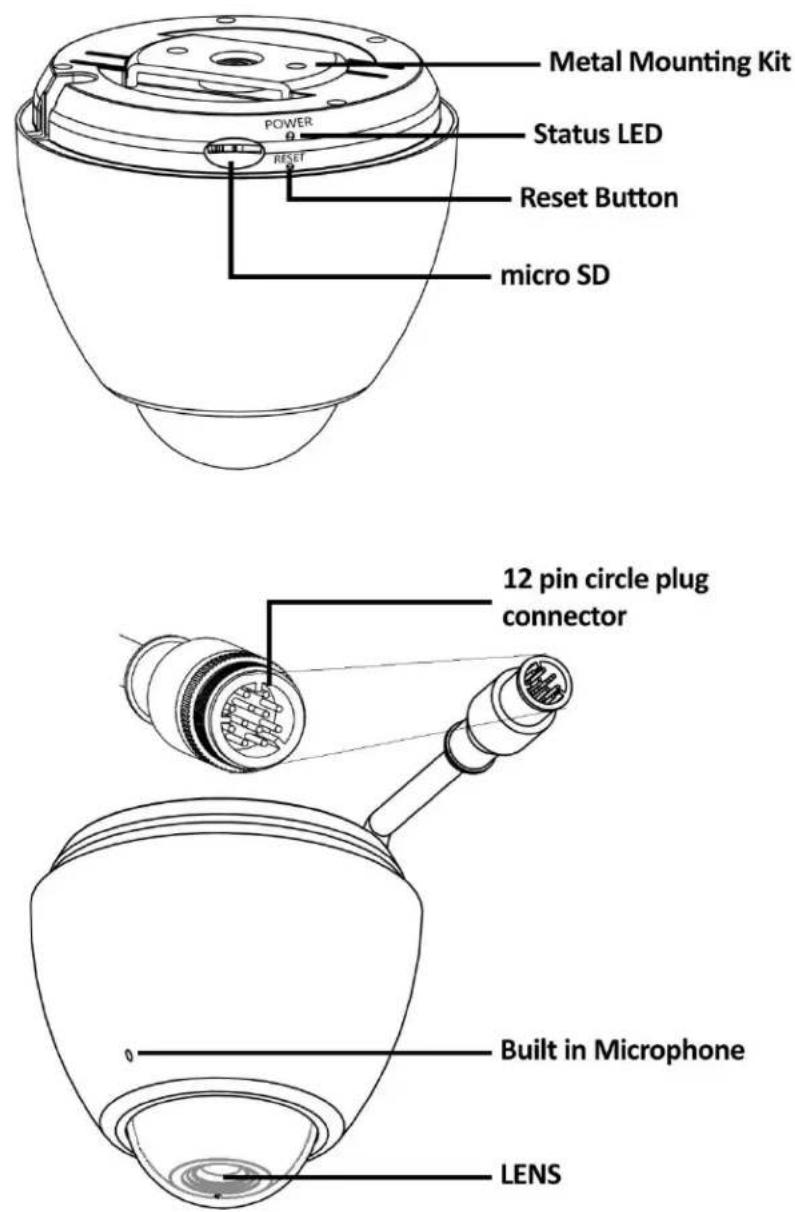

Please note: Pressing and releasing the reset buon on the side of the EyeBall will perform a reset. The reset buon should not be pressed for more than 4 seconds as this will put the camera into rmware dump mode. This will require the camera to be recovered before it can be used.
2.4 Y-cam Breakout Box at a glance
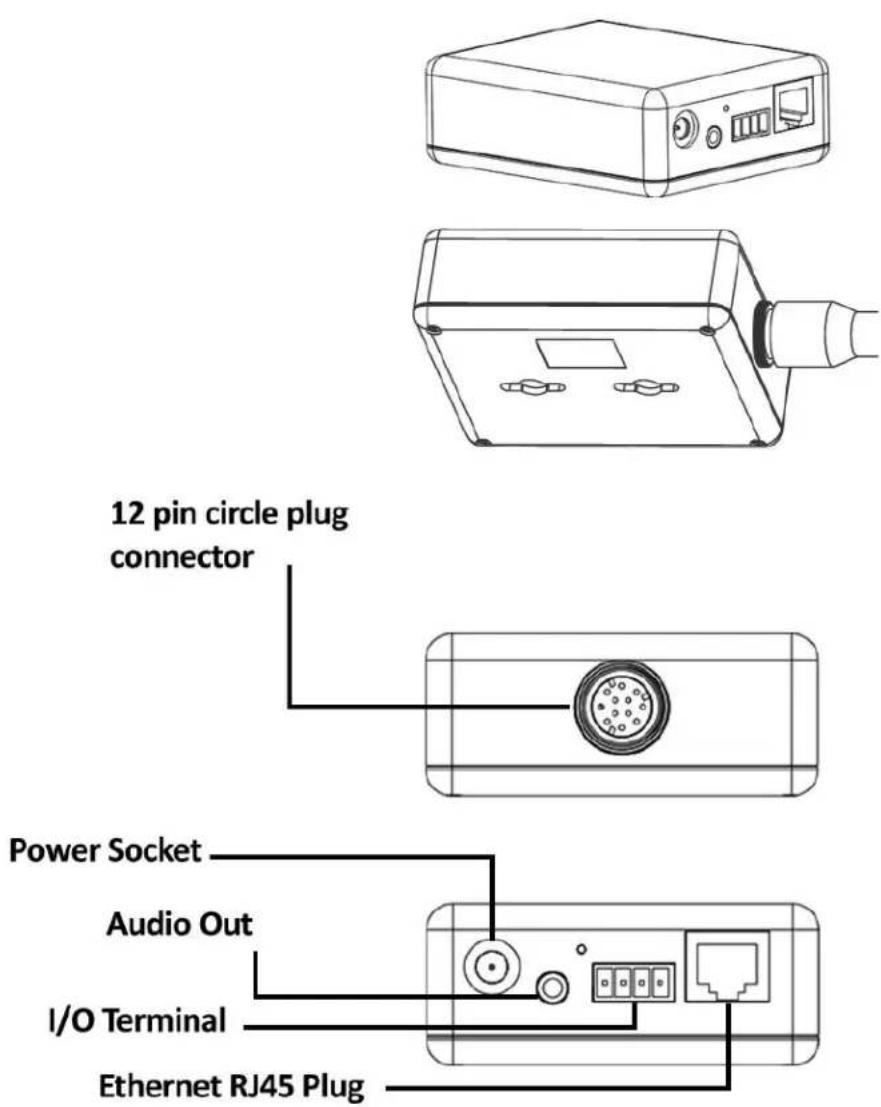
Applies to products: YCBL03, YCBLB3, YCEB03
Please note: The Y-cam Breakout Box is not waterproof, and if used outdoors should be sealed in a waterproof juncon box or other suitable container.
text_image
12 pin circle plug connector Power Socket Audio Out I/O Terminal Ethernet RJ45 Plug2.5 microSD Card Informaon and Installaon
Applies to products: YCW003, YCB003, YCBP03, YCK003, YCBL03, YCBLB3, YCEB03
Adding a microSD to your Y-cam will allow you to record footage and moon alerts direct to memory card for future review.

Please note: It is advised to insert the microSD card before any other setup begins as the card will not be recognized if inserted once the Y-cam is turned on. Every me the card is re-inserted, you will need to turn the power o and then on again for the card to be recognized.
If you do not have a microSD card, but plan to add one later, this is ne. When inserng the card, remember to turn the power o from the camera, insert the card, and then power it back on.
The Y-cam socially supports microSD memory cards with capacities ranging from 16Mb to 8GB, including those labeled "SDHC".
You are advised to format the microSD card through your computer (with FAT32 le system) before installaon.
microSD Important Notes and Informaon
1) There is a limit to the number of rewrites possible on any MicroSD memory card. If you notice the card becoming slow or sluggish aer a reasonable usage, you will probably need to replace the microSD memory card. You should try to avoid purchasing second-hand memory cards.
2) If the card is not recognized by the Y-cam, try formang the microSD card via your computer and then trying it again in the camera.
3) Images may not be recorded or read correctly if an unsupported MicroSD memory card is used with the Y-cam.
4) Carefully read the User guide, precautions on use, and any other informaon that was supplied with the memory card when purchased.
5) Do not use a memory card containing data recorded by another device as this may result in the Y-cam not functioning correctly.
6) Do not modify, overwrite the data, or change the folder names of the MicroSD memory card. It may result in the Y-cam not functioning correctly.
7) Always turn the power o to your camera before removing the microSD memory card.
8) Y-cam Soluons Ltd cannot be held liable for any loss of data or product misuse.
2.51 microSD card installaon for SD Range
The microSD memory card slot can be found on the boom of the Y-cam. The card can only be inserted into the camera with the golden pins of the microSD card facing the front of the camera. The SD card should not be forced into the SD card slot as this may damage the Y-cam.
Underneath

text_image
microSD Memory Card Slot2.52 microSD card installaon for Y-cam Bullet
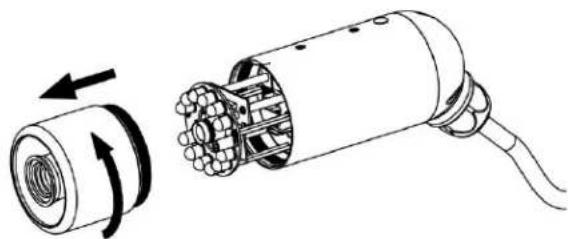
Inserng a microSD card into the Y-cam Bullet requires you to remove the front secon of the camera. For this reason, it is advised not to do this once the camera has been mounted in a wall or in a non-easily accessible place.
Unscrew the front part of the camera and li this carefully from the lens array. Be careful not to break the lens or infrared LEDs.
The microSD card slot is situated behind the lens.
The card can only be inserted into the camera with the golden pins of the microSD card facing towards the reset buon. The SD card should not be forced into the SD card slot as this may damage the Y-cam.
natural_image
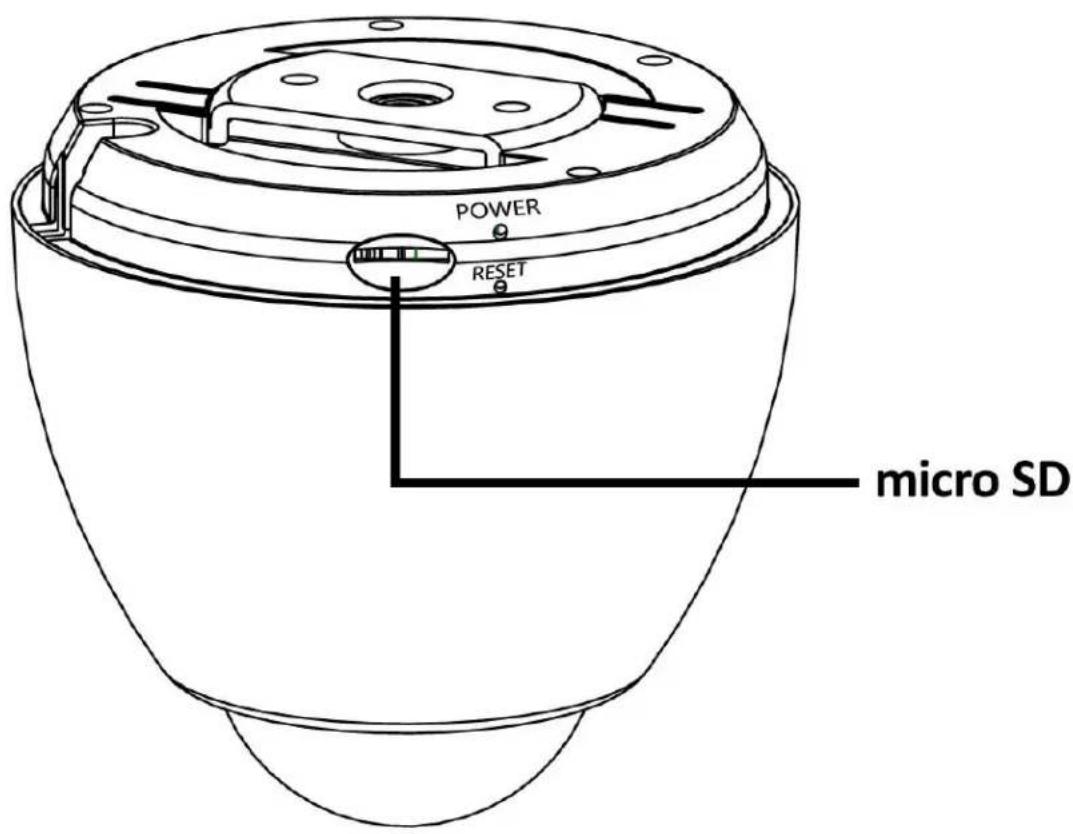
Technical illustration of a motor or electric motor assembly showing rotor and housing components (no text or symbols)2.53 microSD card installaon for Y-cam EyeBall
The microSD memory card slot can be found on the inner rim of the Y-cam. The card can only be inserted into the camera with the golden pins of the microSD card facing towards the lens of the camera.
text_image
POWER RESET micro SD3.0 INSTALLATION
For initial setup, you need to connect the Y-cam directly to your router or switch with a network cable. You cannot connect wirelessly to the camera without rst seng it up via a network cable.
You should connect the Y-cam directly in to your internet router (normally supplied by your broadband provider) or a network switch or hub (that is connected to your computers network).

flowchart
graph LR
    A["Camera"] --> B["Ethernet Cable"]
    B --> C["Broadband Router"]
    C --> D["Ethernet Cable or Wi-Fi"]
    D --> E["Computer"]
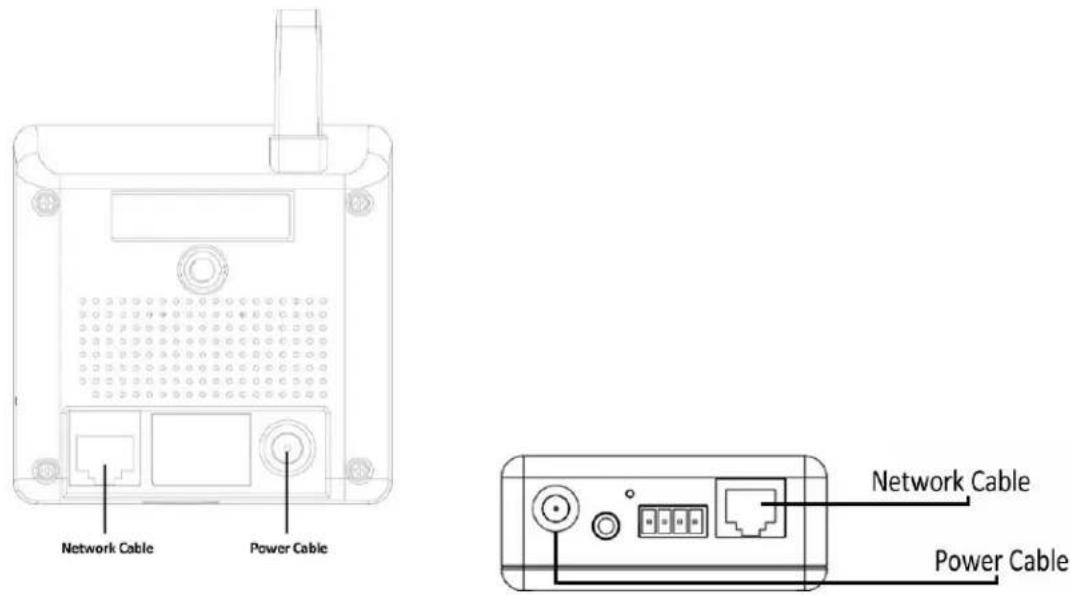
Using the standard Ethernet network cable, plug this in to the network conneccon socket on the Y-cam at one end, and plug the other end in to a spare port on your router/switch.
Using the Power Adaptor (supplied), plug one end in to the Power Connecon socket on the Y-cam. Plug the other end in to an electrical socket and turn the power on.
The Connecvity Status LEDs will light up*. Your router/switch will then begin to communicate with the camera.
Reverse
text_image
Network Cable Power Cable Network Cable Power CableYou can now proceed to the Soware Installaon secon.
* - The Y-cam Bullets Status LED is located inside the camera behind the lens and infrared LEDs
4.0 Y-CAM SOFTWARE INSTALLATION
We're now going to run the Setup CD provided in the Y-cam box. This will install a ulity called Y-cam Setup soware on your computer. This is for PC and Mac. Y-cam Setup soware searches your local network and displays any cameras it nds. It's very useful if you ever forget the address of you camera or in this case, when you rst install it.
4.1 Y-cam Soware Installaon for Windows
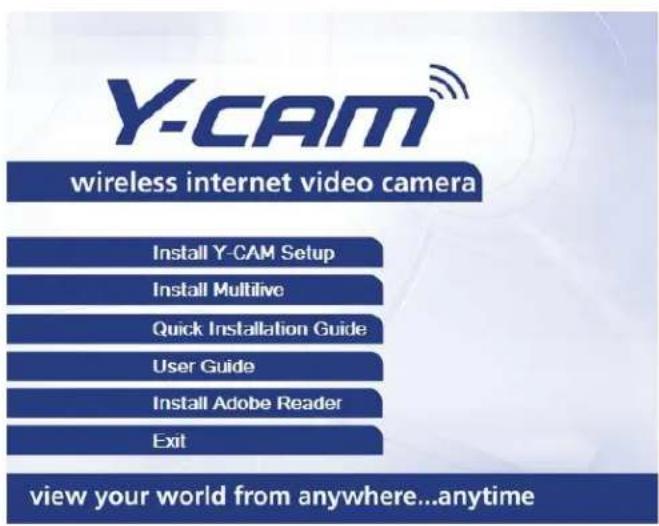
- Insert the Setup CD into your CD drive and the installaon screen should appear automacally.
If it doesn't, navigate to your CD drive on your computer and then run "Autorun.exe"
text_image
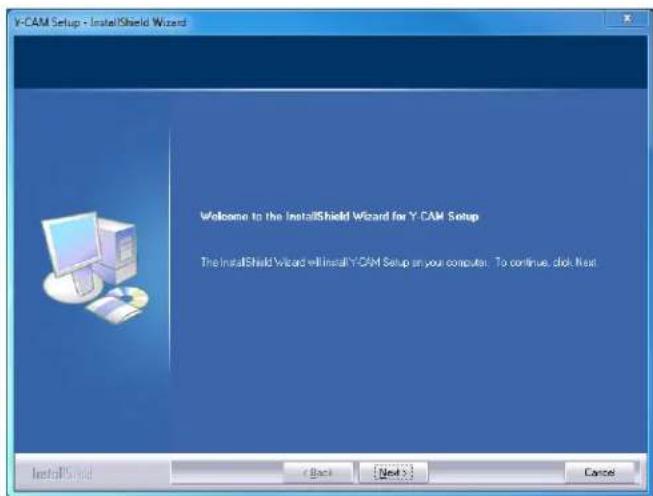
Y-CAM® wireless internet video camera Install Y-CAM Setup Install Multilive Quick Installation Guide User Guide Install Adobe Reader Exit view your world from anywhere...anytime- Click on "Install Y-cam Setup" and the following screen will be displayed. Click "Next".
text_image
Y-CAM Setup - InstallShield Wizard Welcome to the InstallShield Wizard for Y-CAM Setup The InstallShield Wizard will install Y-CAM Setup on your computer. To continue, click Next InstallShield < Back Next > Cancel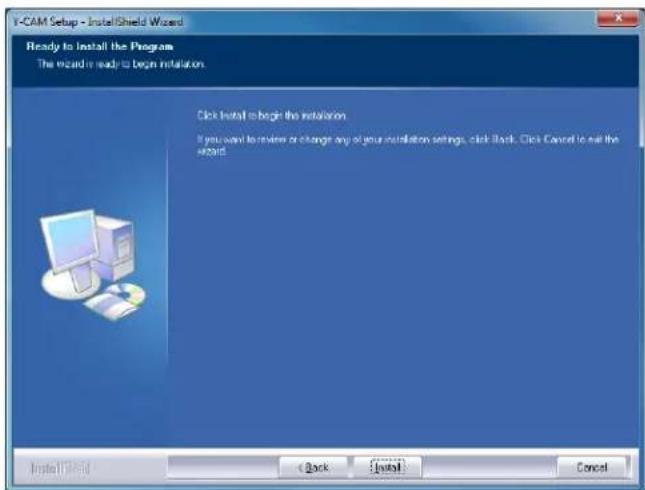
text_image
I-CAM Setup - InstallShield Wizard Ready to Install the Program The wizard is ready to begin installation. Click Install to begin the installation. If you want to review or change any of your installation settings, click Back. Click Cancel to exit the Wizard. Install OK Cancel- If you want to change the default folder click "Change" to replace otherwise click "Next"
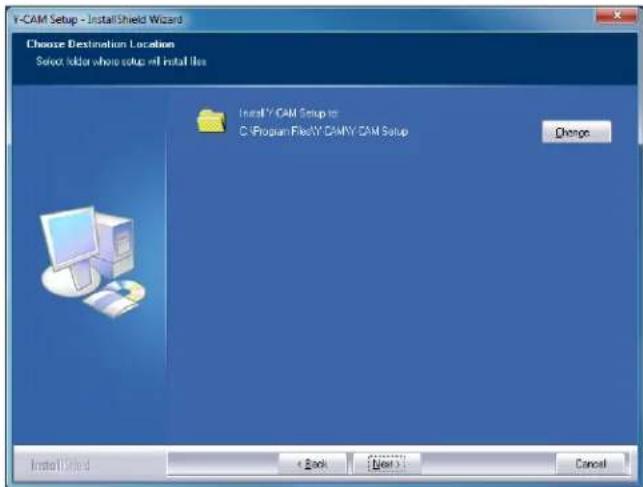
text_image
I-CAM Setup - InstallShield Wizard Choose Destination Location Select folder where setup will install files Install Y CAM Setup to C:\Program Files\I-CAMY.CAM Setup Change Install Closed < Back [ ] User 1 Cancel- Click "Install" to install the Y-cam Setup utility.
text_image
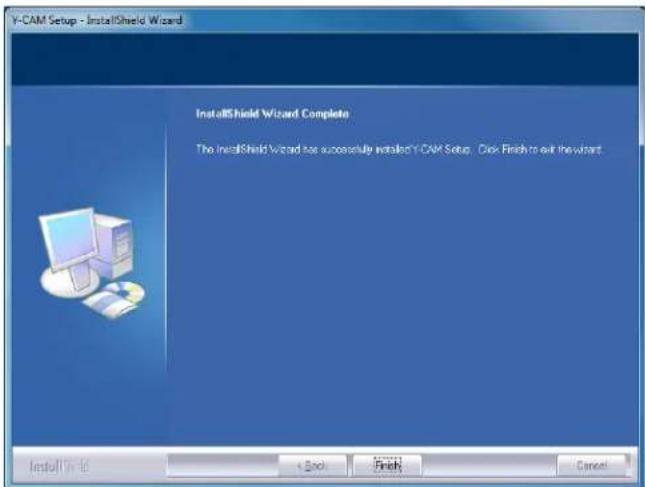
Y-CAM Setup - InstallShield Wizard InstallShield Wizard Complete The InstallShield Wizard has successfully installed Y-CAM Setup. Click Finish to exit the wizard. InstallShield Wizard- Click Finish to end the installaon. You should now nd a Y-cam icon on your Desktop.
4.2 Y-cam Soware Installaon for Mac
- Insert the Y-cam Setup CD into your CD drive.
- Browse to the disk and open the Mac directory. Inside is the Y-cam Setup.
- Move this le to your Desktop (or place of choosing) and double-click on Y-cam.app to run the program. Note: If you get a warning saying "Do you want the applicaon 'Y-CAM.app' to accept incoming network connnecons?" Click "Allow"
Below are OS specific procedures to allow the Y-cam Setup soware to search for cameras on the network.
Please Note: Leaving ports open can expose you to malicious aacks from the internet or other computers around you. Please make sure you revert the sengs back to their current state aer following any of the below procedures and seng up your cameras.
OSX 10.4 (Tiger)
- Click on "System Preferences"
- Click on "Sharing" in the Internet and Network secon.
- Select "Firewall" tab then click "Advanced"
- Make sure the check box next to "Block UDP Trac" is un-cked then click "Ok"
- Quit System Preferences and test the Y-cam Setup software again.
OSX 10.5 (Leopard)
- Click on "System Preferences"
- Click on "Security" in the "Personal" secon
- Select the "Firewall" tab
- Select "Allow all incoming connecons"
- Close the window and wait for a few seconds (around 30 seconds) for the system to update the adapter sengs then run Y-cam setup.
OSX 10.6 (Snow Leopard)
- Click on "System Preferences"
- Click on "Security" in the "Personal" secon
- Select the "Firewall" tab then click on "Advanced"
- Select "Automacally allow signed soware to receive incoming connecons"
- Click on the “+” button and locate and select the Y-cam Setup program then click “Add”. You should now “Y-cam – Allow incoming connecons” in the table.
- Close the window and wait for a few seconds (around 30 seconds) for the system to update the adapter sengs.
- Close any versions of the Y-cam Setup that are running and then run the program again.
4.3 Finding your Camera with Y-cam Setup
Now you have your camera aached and the soware ready, you are ready to nd your camera on your network.
Double-click the Y-cam icon on your Desktop to launch the Y-cam Setup program.
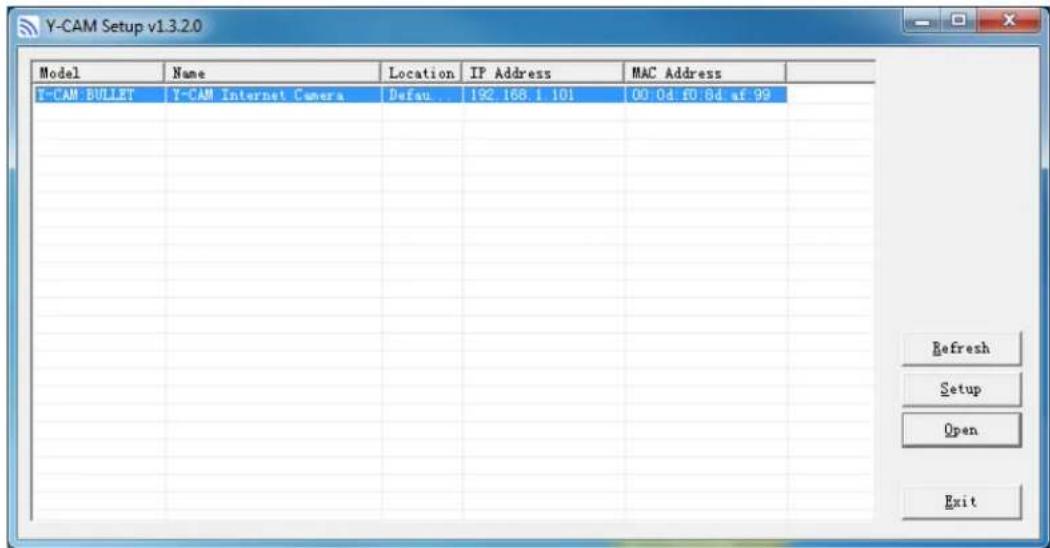
The Y-cam Setup ulity should automatically nd your camera if it is correctly connected (See image below).
text_image
Y-CAM Setup v1.3.2.0 Model Name Location IP Address MAC Address Y-CAM BULLET Y-CAM Internet Camera Defau.. 192.168.1 101 00.0d.f0.8d af 99 Refresh Setup Open ExitSomemes the program may take a few minutes to nd your camera, so if your camera isn't displayed, wait a few moments and then click "Refresh" to search for cameras again.
[Refresh] – Searches your local network for cameras
[Setup] - Select the required camera and click Setup to congregate the network sengs for the camera
[Open] - Select the required camera and click Open to access the camera via a web browser
[Exit] - Click Exit to close the Y-cam Setup window.
Anyme you lose the IP address of your Y-cam camera, you can run the Setup soware to easily nd it again.
Once your camera is displayed, either chose "Open" to open the camera.

Please note: Y-cam Setup will only detect cameras that are on the same network as your computer. Ensure the camera is plugged in to the same router/network switch that your computer is connected to.
5.0 WELCOME TO YOUR Y-CAM!
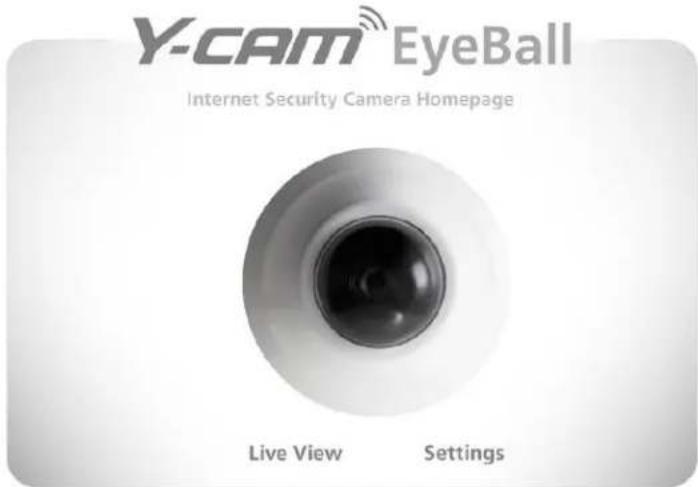
Once you have used the Y-cam Setup Soware to nd your camera and opened your selected camera, you will be greeted with the Y-cam Homepage for your camera (which should look something like the below screenshot depending on your model)
text_image
Y-CAM EyeBall Internet Security Camera Homepage Live View SettingsWireless Internet Security Cameras
www.y-cam.com
"Live View" - lets you view live video transmied by the camera. "Sengs" - allows you to setup your camera with its various sengs.
The address in the web browsers address bar should look something like hp://192.168.1.50 – this is your cameras internal IP address.

Accessing this homepage is a common way to access the camera when you are using it on your local network, so it may be worth wring down the address that is displayed in your web browsers address bar or bookmarking it (Ctrl+D) so you can come back later. Of course, you can run Y-cam Setup at anytime to nd it again, but it may save you me to bookmark it.
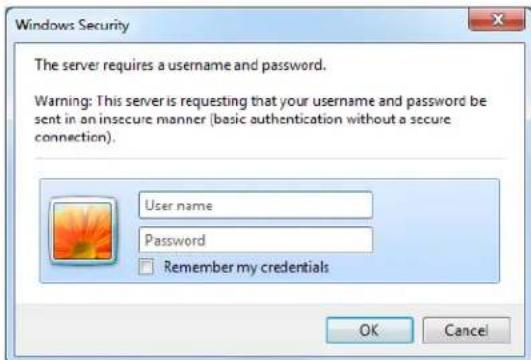
Clicking either "Live View" or "Sengs" will bring up a Login panel, similar to the below screenshot:
text_image
Windows Security The server requires a username and password. Warning: This server is requesting that your username and password be sent in an insecure manner (basic authentication without a secure connection). User name Password Remember my credentials OK CancelThe default username and password for a Y-cam is:
Username: admin
Password: 1234
This is login is case sensitive, so should be entered exactly as they are above. It is recommended you change your password as soon as you are logged in - to avoid unauthorised access to the camera. Make a note of the password somewhere safe, as the only way to reset the password is to reset the cameras, so all sengs will be lost.

Please note: The password can be any mixture of lower and uppercase alpha-numeric characters. Extended characters are not permied.
5.1 Live View (using Internet Explorer)
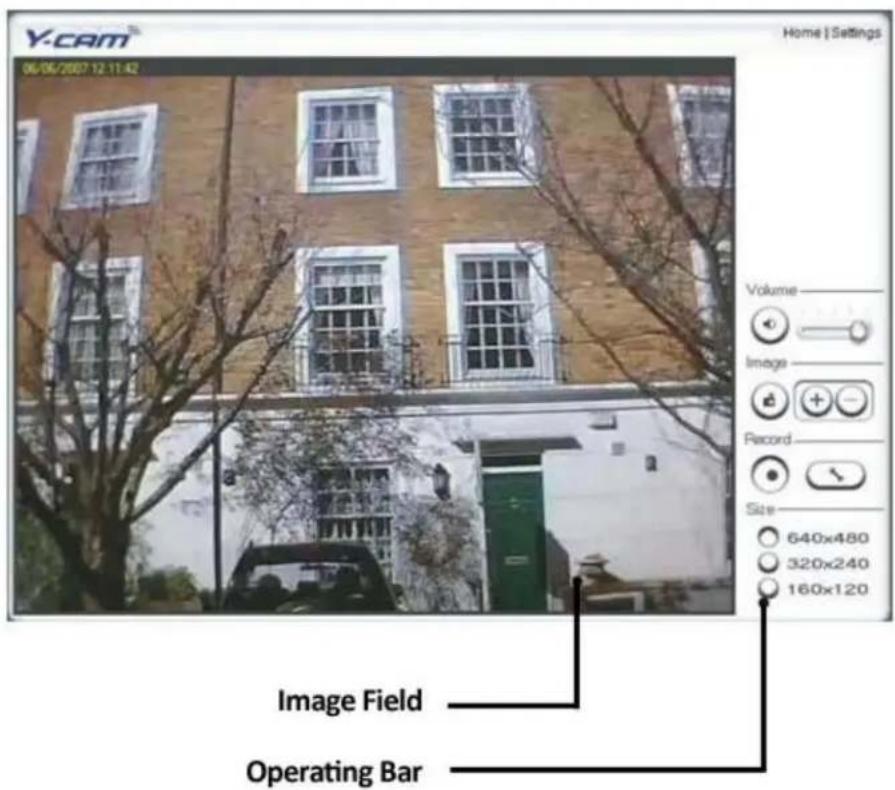
Upon vericaon of the username and password, the camera image will load. Please note that when using the camera for the rst me, you will be prompted to install an AcveX Control. Please follow the on-screen instrucons to download and install this control. You will then view the following screen:
text_image
Y-CAM 06/06/2007 12:11:42 Home | Settings Volume Image Record Size 640x480 320x240 160x120 Image Field Operating BarThe two links at the top of the screen are Home and Sengs.
Home – takes you back to your Y-cam Homepage.
Sengs – will take you to the cameras internal sengs.
Please view the next page for an explanaon of the Operang Bar sengs.
Explanaon of Operang Bar
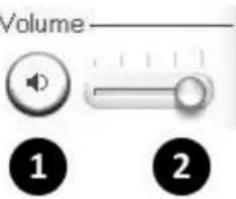 | 1) Mute. Click the Mute buon to mute the audio.2) Slide the slide block horizontally to adjust volume. | |
 | 3) Snapshot. Press the Snapshot buon to capture a sll image of the camera view. Click Save to store the snapshot on your computer, the le is automacally assigned the data & me of the snapshot. Press Cancel to exit.4) Zoom. Click on the "+" buon and the cursor turns to a magnier. Move the magnier to the desired locaon and click on an image area. Press the "-" buon to return to the normal view. | |
 | 5) Recording: Press the Record buon to record from the Live View to your local hard disk.6) Recording opons: Click this buon to set the recoding parameters. You can set record path, video le size and select whether to start recording automacally when moon is detected and the length of the recording in seconds. | |
 | 7) Image size: There are three Image Size opons:[640x480][320x240][160x120]Please note that this only changes the image size being viewed within Internet Explorer, not the image size the camera is transming and/or recording. This opon is useful if you are using a low resoluon device to view the camera. To change the transming/recording image size please refer to the Stream Setup in Camera Sengs. | |
 | Applies to products: YCBL03, YCBLB3, YCEB038) Audio Upload: Press and release to start sending audio from your computer's microphone to the camera speakers. Press and release to stop sending audio. |
5.2 Live View (using Firefox, Safari and other browsers)
Upon vericaon of the username and password, the camera image will begin to load.
QuickTime or your media program may ask you to re-enter your login username and password at this point. This is common on most systems.
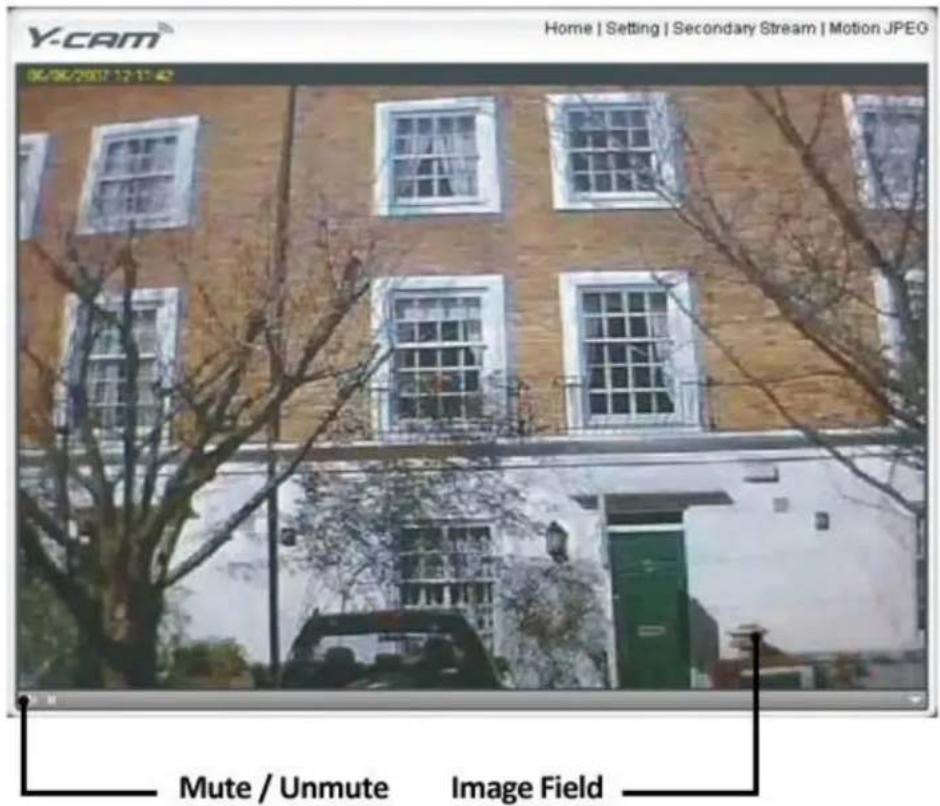
text_image
Y-CAM Home | Setting | Secondary Stream | Motion JPEG 06/06/2007 12:11:42 Mute / Unmute Image Field
Please note: You need to have QuickTime Pro Installed on your system to record videos directly from the web browser if you are using a program other than Internet Explorer.
The links at the top of the screen are Home, Sengs, Secondary Stream and Moon JPEG.
Home – takes you back to your Y-cam Homepage.
Sengs – will take you to the cameras internal sengs.
Secondary Stream – This is set via your sengs, and is useful if you need a lower resolution stream for certain devices (e.g some mobiles and soware)
Moon JPEG – This is a connuous moon JPEG stream – without any audio.
6.0 Y-CAM SETTINGS
You can now view your camera live, but this is only on your local network, so you can now rene and customise the sengs of the Y-cam. This enre next secon deals with the Y-cam Sengs menu.
To connue with Y-cam customisaon, access your Y-cam's Sengs page by clicking on the "Sengs" word from your Live View, or click on the word "Setngs" from the Y-cam Homepage.
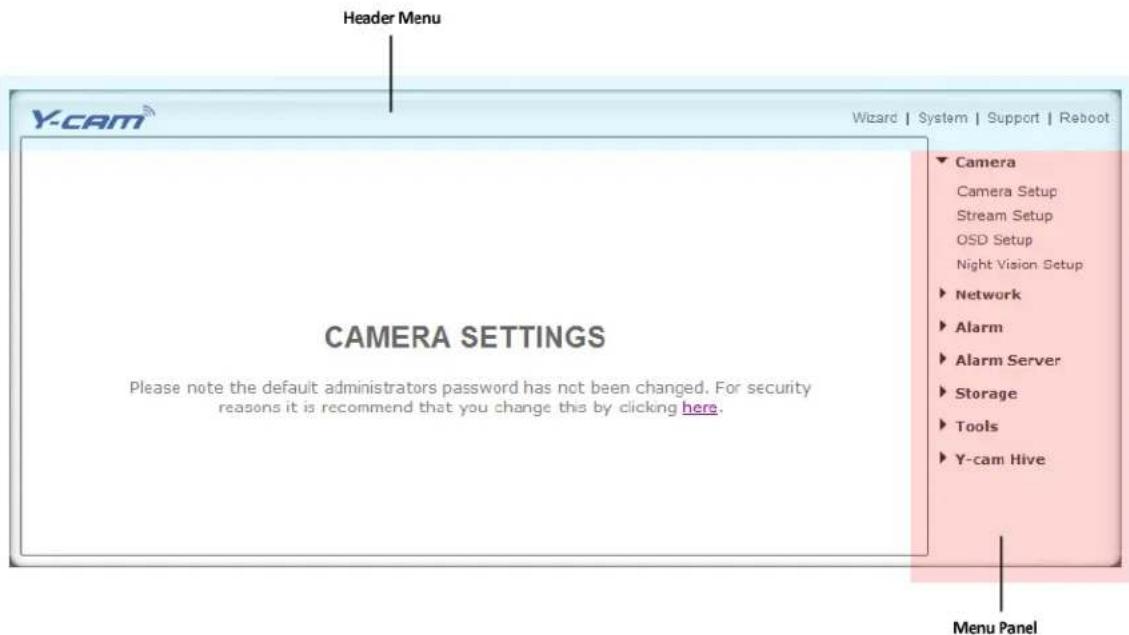
text_image
Header Menu Y-cam® Wizard | System | Support | Reboot CAMERA SETTINGS Please note the default administrators password has not been changed. For security reasons it is recommend that you change this by clicking here. Camera Camera Setup Stream Setup OSD Setup Night Vision Setup Network Alarm Alarm Server Storage Tools Y-cam Hive Menu PanelThis is the default Sengs screen. The Menu Panel contains a range of dropdown seconds which expand and contract depending on selecon.

Please note: If you are installing the camera for the rst me or aer a reset to factory defaults, you are advised to change the cameras default password as per the message displayed.
Changing the cameras default password is highly recommended to stop unauthorised access to your camera.
CAMERA SETTINGS
Please note the default administrators password has not been changed. For security reasons it is recommend that you change this by clicking here.
Click the link displayed to access the Administrator Password eding page.
Edit user
User name:
Password:
Re-type password:
admin
●●●●
●●●●
Save
Delete
Back
The Administrator username is always "admin" in lowercase.
Choose a password that is memorable only to you – avoid passwords that are easy to guess, such as “password” “admin” “123456” “ycam” or your personal details.

Please note: Keep this password safe. The only way to recover from a lost password is to reset the camera back to its default sengs, and this will wipe all other sengs.
Once you have typed your password twice, click Save. The system will then ask you to login again. You should then see the following screen:
* User modified successfully!
Camera user list
| No. | User name | Group |
| 1 | admin | Administrators |
Add
Allow anonymous access
Apply
6.1 Quick Setup with the Wizard
To make the setup process slightly quicker for users, we have created a Setup Wizard which takes you through common opons to geng your Y-cam setup wirelessly and with your custom sengs.
From the Sengs screen, click on "Wizard" in the Header Menu.
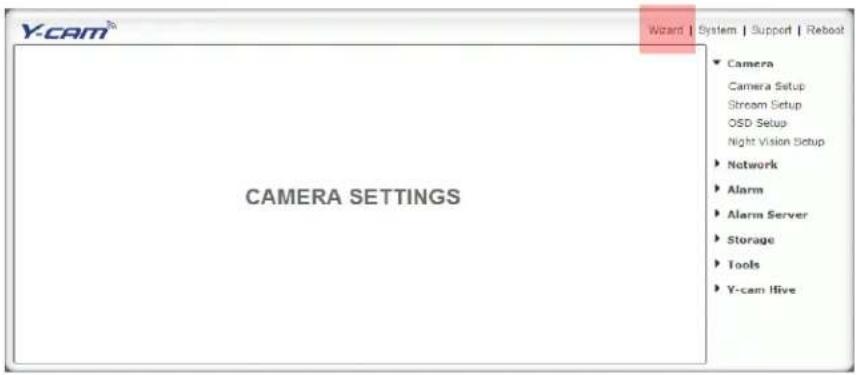
text_image
Y-CAM® Wizard | System | Support | Reboot CAMERA SETTINGS Camera Camera Setup Stream Setup OSD Setup Night Vision Setup Network Alarm Alarm Server Storage Tools Y-cam HiveThe Wizard will launch in a new window. Follow the simple instrucons on the screen and enter the required details, clicking next to proceed through each step.
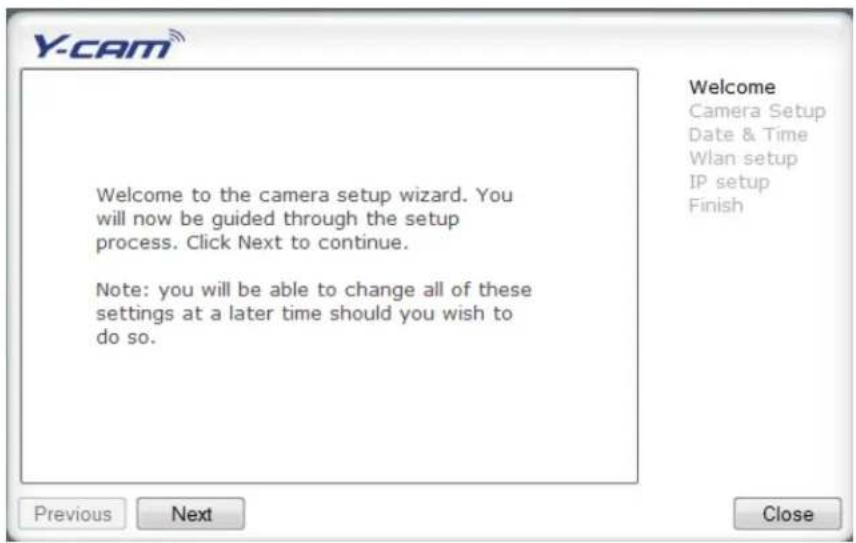
text_image
Y-CAM Welcome to the camera setup wizard. You will now be guided through the setup process. Click Next to continue. Note: you will be able to change all of these settings at a later time should you wish to do so. Previous Next Close Welcome Camera Setup Date & Time Wlan setup IP setup FinishWith this Wizard, you will be able to set the:
- Name of Camera
• Quality of Picture you wish to view - Time Zone
- System Time
- Wi-Fi Setup
- TCP/IP Setup
This should help you get your camera setup and working very quickly at a basic level.
6.2 System Page
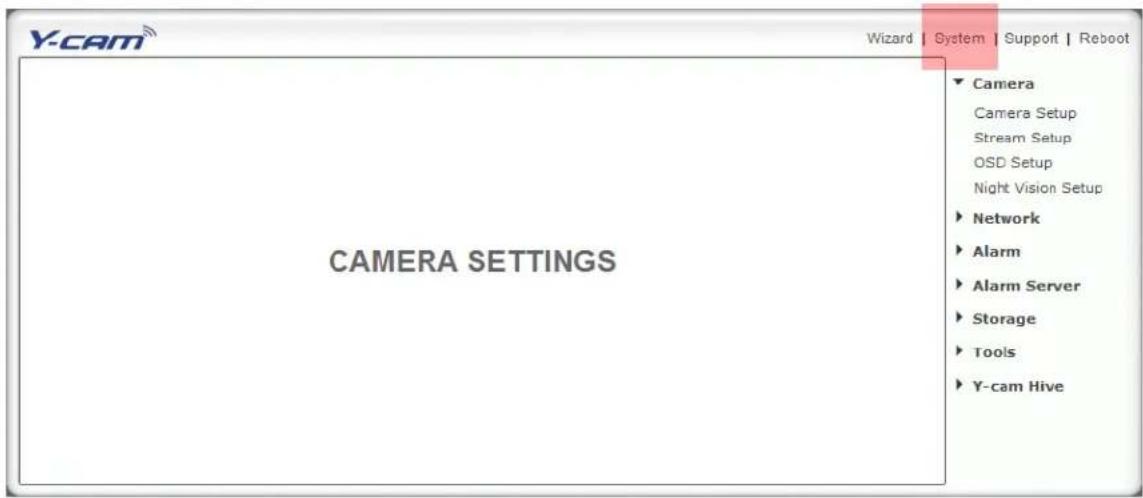
From within the Sengs menu, clicking on "System" at the top right will list the system informaon of your Y-cam.
text_image
Y-CAM Wizard | System | Support | Reboot CAMERA SETTINGS Camera Camera Setup Stream Setup OSD Setup Night Vision Setup Network Alarm Alarm Server Storage Tools Y-cam HiveThis screen is one of the most useful in the Y-cam Sengs. This screen lists informaon you may need if you want connect to your camera from other systems. It's a great way to check if your camera has all the details needed to operate correctly.
System information
| System | |
| Model: | Y-CAM:BULLET |
| System up time: | 0 Days 18:50:00 |
| BIOS/Loader version: | 2.1 (build 0001) |
| Firmware version: | 4.21 (build 20101016) |
| ActiveX Control version: | 1,2,6,0 |
| MAC address: | 00:0d:f0:63:6f:95 (000DF0636F95) |
| Wireless | |
| Status: | No connection |
| Ethernet | |
| Status: | connected |
| Mode: | Dynamic |
| IP address: | 192.168.1.3 |
| Subnet mask: | 255.255.255.0 |
| Default gateway: | 192.168.1.1 |
| PPPoE | |
| Status: | No connection |
| DNS Server | |
| Primary DNS IP address: | 192.168.1.1 |
| Secondary DNS IP address: | |
| DDNS | |
| Status: | Success |
| Host name: | ycam.dtdns.net |
| external IP address: | 82.44.126.170 |
| UPNP port forwarding | |
| Status: | Success |
| Gateway external IP address: | 82.44.126.170 |
| Gateway external port: | 8150 |
| Internet URL: | http://ycam.dtdns.net:8150 |
| Internet Connection | |
| Status: | connected |
| Storage | |
| Current storage: | SD card |
| Status: | Not ready |
| Current users | |
| No user is active | |
Firmware Version – Your current rmware version. Check the y-cam.com website to see if there are updates for your model.
Wireless – The current status and strength of your wireless conneccon if in use.
IP address – The internal IP address of your camera so you can access it on your local network.
DNS Servers – If this opon is empty, it may prevent your camera from sending email alerts. Enter the DNS in the TCP/IP menu if needed.
DDNS – If you do not have a stac IP address, a DDNS service helps you access your camera easily from outside your network. This conrms the DDNS is acve or not.
UPNP – If your router has UPNP and it has successfully worked with your camera, this will tell you here. This saves you forwarding any ports.
Internet URL – This is the external address and Port of the camera.
Storage – Lets you know if storage is available on SD card or NAS drive.
6.3 Support Page
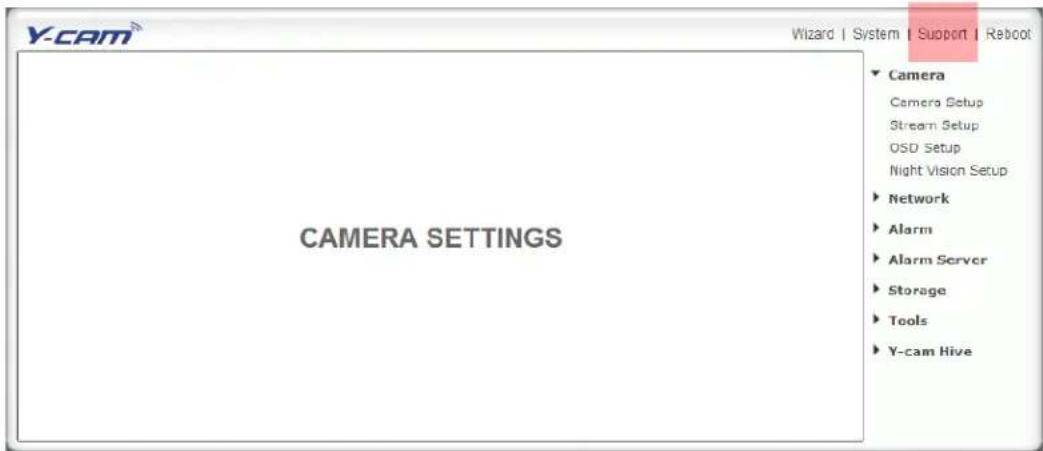
Click Support to see current support informaon.
text_image
Y-CAM CAMERA SETTINGS Wizard | System | Support | Reboot Camera Camera Setup Stream Setup OSD Setup Night Vision Setup Network Alarm Alarm Server Storage Tools Y-cam HiveIf you are having problems with your Y-cam do not worry, there is plenty of help available.

Speak to your place of purchase, they should oer free aer sales advice and support.

Free Technical Support is available for your Y-cam product at:
hp://support.y-cam.com
Our Support Centre oers help by cket support as well as a Knowledge Base of common problems and advanced sengs.

Free Technical Support is available for your Y-cam product by email:
helpdesk@y-cam.com

Connect & discuss Y-cam with other Y-cam users:
hp://y-cam.com/forum
You can even connect with us via Twier and Facebook, we are happy to help:

hp://facebook.com/ycamsoluons hp://twier.com/ycamsoluons
6.4 Reboot
Click Reboot in the Header Menu to access the Camera Reboot page.

text_image
Y-CAM Wizard | System | Support | Reboot CAMERA SETTINGS Camera Camera Setup Stream Setup OSD Setup Night Vision Setup Network Alarm Alarm Server Storage Tools Y-cam Hive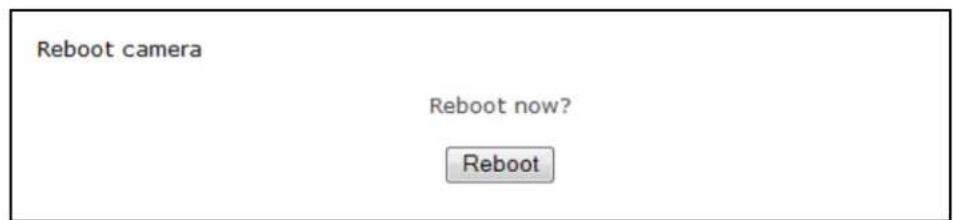
text_image
Reboot camera Reboot now? RebootClick Reboot to restart the Y-cam. Reboong the camera will retain all the sengs and conguraons.
A reboot is normally necessary when you insert a microSD card into the camera.
6.5 Camera Menu
The Camera menu is located on the right of the Sengs screen. When you click on the word "Camera", a sub-menu of camera setup opons will be displayed.
▼ Camera
Camera Setup
Stream Setup
OSD Setup
Night Vision Setup
Please note: The Night Vision Setup opon will not be available on all models.
6.5.1 Camera Setup
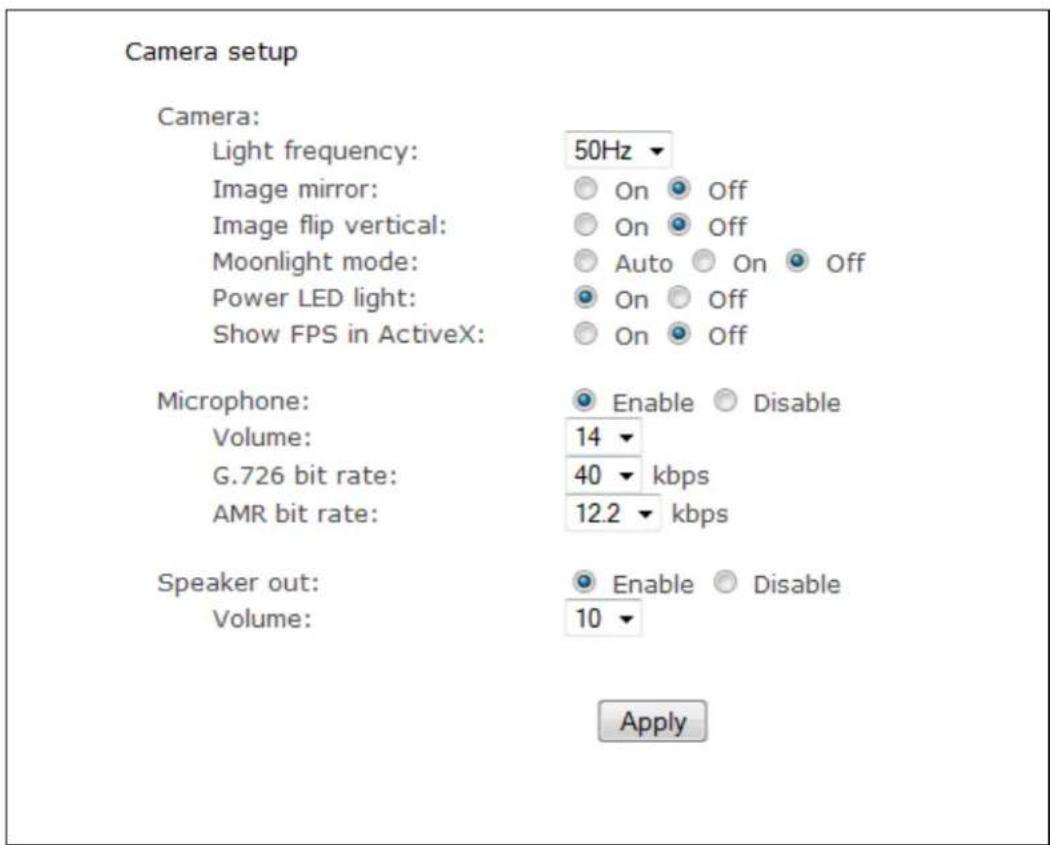
For most users, many of these sengs can be le as default.
text_image
Camera setup Camera: Light frequency: 50Hz Image mirror: On Off Image flip vertical: On Off Moonlight mode: Auto On Off Power LED light: On Off Show FPS in ActiveX: On Off Microphone: Enable Disable Volume: 14 G.726 bit rate: 40 kbps AMR bit rate: 12.2 kbps Speaker out: Enable Disable Volume: 10 ApplyCamera Seng Opons
[Light Frequency] Two opons: 50Hz & 60Hz. This should be set according to the mains frequency of the country the camera is being used in. For UK this would be 50Hz. For the USA this would be 60Khz.
[Image mirror] Displays a mirrored view of the video.
[Image ip vercal] Display video upside down – useful if you have installed the camera upside down.
[Moonlight Mode] Turns Moonlight mode on or o or set it to automac. The Moonlight feature superimposes frames in order to brighten the image being viewed. This is also known as frame integraon. In “Auto” the camera uses the front Light Level Sensor to detect the amount of light available to the camera. Should the light level below, the camera would automacally turn this feature on.
[Power LED light] Turns o the Y-cam front LED on or o during normal operaon.
[Show FPS in ActiveX] Show the Frames Per Second being transmied by your camera within the live feed of AcveX (visible in Internet Explorer only)
Microphone / Audio Seng Opons
[Microphone] Enables or disables the built-in microphone.
[Volume] Adjusts the sensitivity of the microphone from 0\~14 where 0 is the lowest.
[G.726 bit rate] Four opons: 16, 24, 32, 40(kbps). Determines the quality of the audio being transmied. The most commonly used mode is 32 Kbit/s.
[AMR bit rate] Determines the quality of the audio being transmitted to mobile phones using 3GPP.
Applies to products: YCBL03, YCBLB3, YCEB03
[Speaker Out] Enables or disables the Audio Upload.
[Volume] Adjusts the output level of the Speaker Out from 0\~14 where 0 is the lowest.
Note: Higher bit rates are useful in noisy conditions but consume more bandwidth. Lower bit rates provide reasonable quality for voice frequencies and are less demanding on your internet conncon.
Once you have set your required sengs, click Apply.
6.5.2 Stream Setup
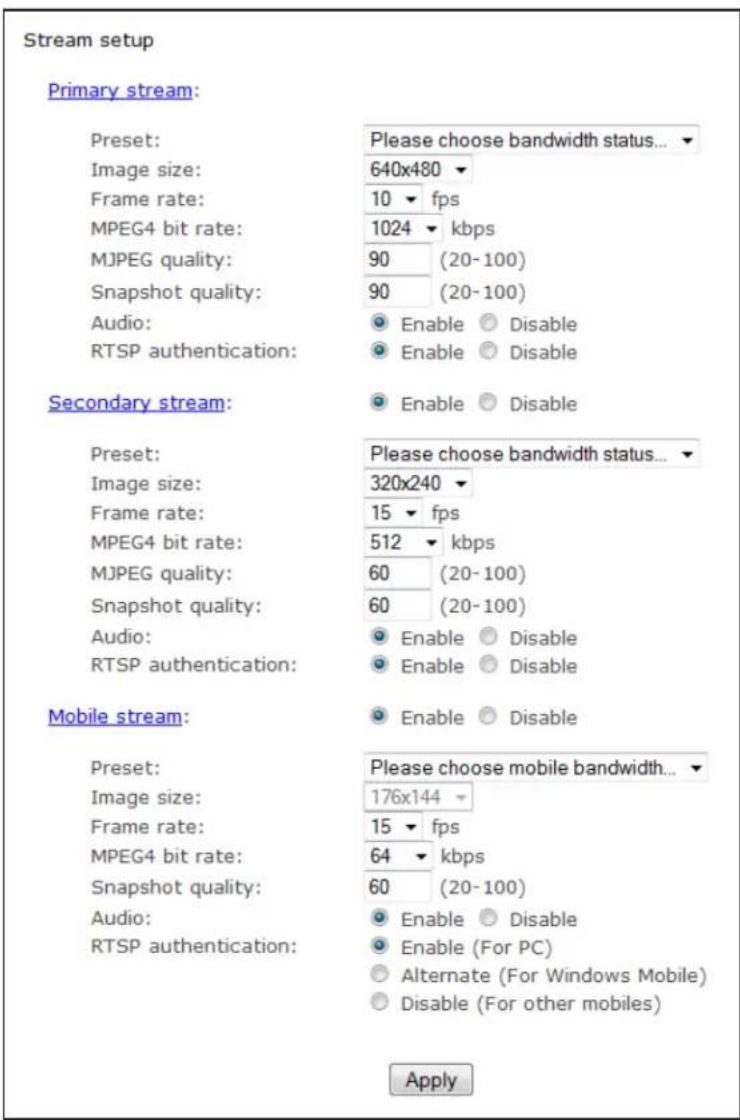
Click on Stream Setup under the Camera Menu to change the streaming sengs for your camera. This is useful if you require a certain size of video stream, a certain quality, or dierent streams for dierent devices (such as laptop or mobile phone).
Default sengs will normally suce for most users.
text_image
Stream setup Primary stream: Preset: Please choose bandwidth status... Image size: 640x480 Frame rate: 10 fps MPEG4 bit rate: 1024 kbps MJPEG quality: 90 (20-100) Snapshot quality: 90 (20-100) Audio: Enable Disable RTSP authentication: Enable Disable Secondary stream: Enable Disable Preset: Please choose bandwidth status... Image size: 320x240 Frame rate: 15 fps MPEG4 bit rate: 512 kbps MJPEG quality: 60 (20-100) Snapshot quality: 60 (20-100) Audio: Enable Disable RTSP authentication: Enable Disable Mobile stream: Enable Disable Preset: Please choose mobile bandwidth... Image size: 176x144 Frame rate: 15 fps MPEG4 bit rate: 64 kbps Snapshot quality: 60 (20-100) Audio: Enable Disable RTSP authentication: Enable (For PC) Alternate (For Windows Mobile) Disable (For other mobiles) ApplyThere are 3 video streams available. You can congure sengs for the primary and an oponal secondary video stream. Conguring a secondary stream is useful for providing a video stream that is at a lower resolution than the primary stream to third-party devices or soware. Some devices and soware require lower resolution.
The Mobile stream is similar to the rst two streams but is purely for mobile viewing and has a xed resoluon.
Stream Seng Opons
[Preset] There are ve pre-programmed stream proles for quick set-up. Please choose the one according to your bandwidth.
[Image size] Three image resoluons available: 640 x 480(VGA), 320 x 240(QVGA), 160 x 120. The mobile stream has a xed image size of 176x144.
[Frame rate] Twelve opons: 1/2/3/4/5/6/8/10/15/20/25/30 frames per second (fps). The frame rate is automatically determined by the camera and this depends on the network bandwidth available at the me. This frame rate seng imposes the maximum frame rate that the camera will transmit.
[MPEG4 Bitrate] Eight opons: 64, 128, 256, 512, 768, 1024, 1536, 2048 (kbps). The above three sengs determine the image quality, however higher bitrates require greater bandwidth. Please select the appropriate sengs according to your conncon speed and network trac. If you are experiencing jerky video it may be necessary to decrease the bitrate. For the Mobile Stream, the bitrates are listed a lot lower but retain the same principle.
[MJPEG Quality] This sets the quality of the video when viewing the camera using Moon JPEG (without audio). It can be from 20 to 100 where 100 is the best quality.
[Snapshot Quality] The quality of the snapshot saved using Live View page (Internet Explorer only). It also aects the quality of the snapshot to be uploaded to an FTP Server. It can be from 20 to 100 where 100 is the best quality.
[Audio] Enable or disable the audio of the associated stream.
[RTSP authencaon] Enable or disable MPEG4 RTSP authencaon. RealPlayer can be used to view the live stream from the Y-cam, but RealPlayer does not support authencaon, so the authencaon of MPEG4 RTSP should be disabled. This however may expose the camera to unauthorised access. QuickTime Player, on the other hand, supports authencaon and can be used to view the live stream.

Clicking on the name of the stream will display the various paths to the parcular video stream.
6.5.3 OSD Setup
Click on OSD Setup under the Camera Menu to change the on-screen display parameters of the camera.
On Screen Display Setup
OSD display:
Enable Disable
Transparent:
Enable Disable
Display date and time
◎ Display system name
◎ Display the text below
○ Display the text below with date and time
YCAM Internet Camera
Apply
On Screen Display Seng Opons
[OSD] Enable or Disable the On Screen Display.
[Transparent] Select whether OSD should have a transparent or solid background.
OSD Opons
[Display date and me] Sets the OSD to display the Date and Time of the camera. Please note that this funcon will simply display the date and me that has been programmed in the camera and therefore the me and date may be incorrect unless the camera is synchronized to a me and date server on the internet. This is accessible under the Tools menu and will be covered in more detail in the manual.
[Display system name] Set the OSD to display the System Name of the camera. The system name can be modified from the System Identity page, accessible under the Tools menu, and will be covered in more detail in the manual.
[Display the text below] Set the OSD to display specific text. Use the text eld to input the desired text.
[Display the text below with date and me] Set the OSD to display specific text with date and me. Use the text eld to input the desired text (Maximum of 6 characters).
Once you have set your required sengs, click "Apply" to save them.
6.5.4 Night Vision Setup
Applies to products: YCB004, YCK004, YCB003, YCBP03, YCK003, YCBL03, YCBLB3
The Y-cam uses infrared LEDs to provide high levels of light in dark environments. The intelligent photosensitive components can automatically turn on the infrared LEDs in low light conditions or you can manually turn them on.
Click on Night Vision Setup under the tle Camera to change the sengs for your camera.
Night Vision setup
Infrared LED control:
Black and white mode:
IR cut filter control:

Auto

On

Off

Auto

On

Off

Auto

On

Off
Apply
[Infrared LED Control] "Auto" switches on the IR LEDs automacally when there isn't enough light to produce a good quality image. "On" turns the IR LEDs on permanently and ignores the light level in the room (resulting in a Black & White mode). When "O" is selected the IR LEDs are kept in the o state even if the light level of the room is too dark to produce a good quality image. This may be useful if the LEDs are reecng o a nearby surface and obstrucng your view.
[Black and white mode] “Auto” switches the video from colour to monochrome when the IR LEDs are turned on. “On” switches the video to monochrome irrelevant of the status of the IR LEDs. “O” forces the Y-cam to stay in colour mode even when the IR LEDs are on.
Available on products: YCBL03, YCBLB3
[IR cut Iter control] IR is present naturally in day light, this can cause discolouration of images where the greens can look purplish. The IR cut Iter blocks these IR lights from coming back onto the lens of camera, and this gives a true day image.
However, if the IR cut Iter is on during night, the night vision will not work. It is recommended to leave the IR cut Iter control to Auto at all mes, to achieve best results from the camera.
Select [Auto] - [On] - [O]
6.6 Network Menu
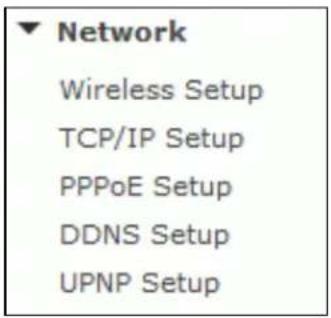
The Network menu is located on the right of the Sengs screen. When you click on the word "Network", a sub-menu of network setup opons will be displayed.
text_image
Network Wireless Setup TCP/IP Setup PPPoE Setup DDNS Setup UPNP Setup6.6.1 Wireless Setup
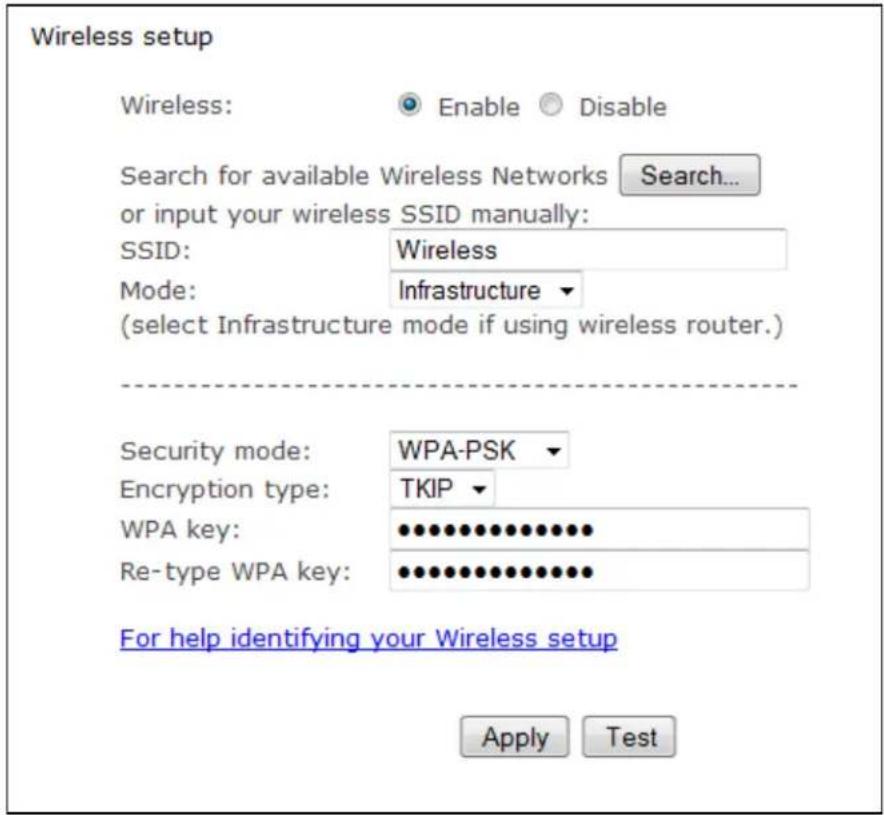
The Y-cam can connect to any wireless network through standard Wi-Fi connexons.
text_image
Wireless setup Wireless: Enable Disable Search for available Wireless Networks Search... or input your wireless SSID manually: SSID: Wireless Mode: Infrastructure (select Infrastructure mode if using wireless router.) Security mode: WPA-PSK Encryption type: TKIP WPA key: ••••••••••••••••• Re-type WPA key: ••••••••••••••••• For help identifying your Wireless setup Apply TestWireless Setup Opons
[Wireless] - Enable or Disable the Wi-Fi adaptor.
[Search] – Click the Search buon for the Y-cam to scan for available Wi-Fi networks to connect to.
A new screen will display all the wireless networks found. Select the desired network, and click Apply.
The Y-cam will automacally choose the best opons for connecng to the network.
You then need to enter your Wi-Fi password.
If your network is not listed, try reposioning your Y-cam nearer to the wireless device.
If you need to, you can enter your Wi-Fi network details manually; instrucons on how to do this are below:
[SSID] Type the ID of the wireless network you want to connect to or an easier opon is to click “Search” and all available Wireless Networks in range will be displayed. If your network isn’t listed, move the camera closer to your wireless router or access point.
[Mode] Infrastructure mode or Adhoc mode:
Adhoc Mode: Select Adhoc mode when you want to connect the camera wirelessly directly to your computer. Infrastructure Mode: Select Infrastructure mode when the camera is connected via an access point or router.
If you have connected your camera to your network via a router or switch, you will need the sengs for "Infrastructure" setup. If you have connected your camera directly to a computer, you will need the next secon for "Adhoc" setup.
6.6.1.1 Infrastructure Wireless Setup Opons
[Security mode] Select the type of security mode that your wireless network is using. None (i.e o), WEP64, WEP128, WPA-PSK or WPA2-PSK
Whichever you are using, you will need to enter the sengs to connect to your router. Each mode has default sengs, which should suit most installaons.
Any "key" it requires is the password you use to access your Wi-Fi / Wireless Connecon. You need to enter this twice so it matches.
Security Mode Opons
[Authencaon] Select the type of authencaon that your router requires.
[Key type] Select the WEP/WPA key type. Either in hexadecimal (Hex) or ASCII characters. Note: Most routers provide WEP keys in Hex format.
[Encrypon type] Select either TKIP or AES for your default encrypon seng.
[WEP/WPA key] Type the encrypon key that matches that of your router. You will need to enter this twice.
Once you have entered your sengs, click "Apply" to save them. If you have entered dierent keys when retyping them or the key doesn't match the length or type of characters required by the encrypon type, the camera will nofy you.
Once the correct sengs are saved, click on "Test" to test the sengs. The test will take a few moments to run, and if your conncon can successfully send and receive data, you will get a "success" message.
Note: The sengs you enter to connect to your Wi-Fi / Wireless access point or router need to be correct. Please contact the provider of the Wireless router or access point, or consult the equipments manual on how to verify or modify these sengs.
6.6.1.2 Adhoc Wireless Setup Opons
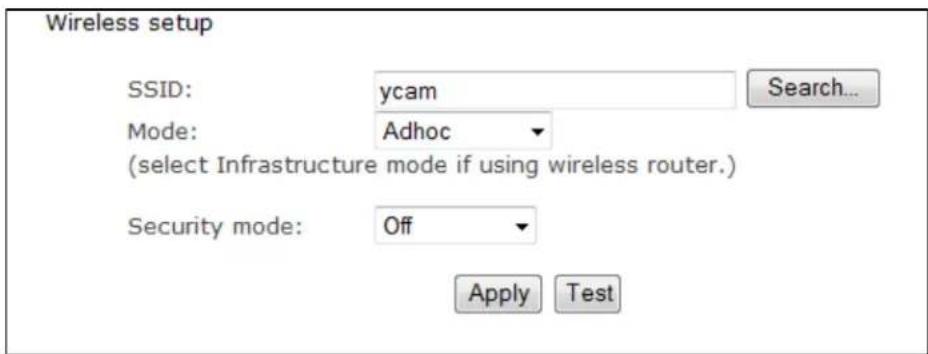
If you want to make a direct wireless conncon from your camera to your computer, you will need to setup the Y-cam in "Adhoc" mode.
text_image
Wireless setup SSID: ycam Search... Mode: Adhoc (select Infrastructure mode if using wireless router.) Security mode: Off Apply TestIn order to view the Y-cam directly from your computer you rst need to conjure the wireless device in your computer according to the Y-cam sengs above.
Once "Adhoc" has been selected, select a "Security Mode" and type in a conneccon key, click "Apply".
6.6.2 TCP/IP Setup
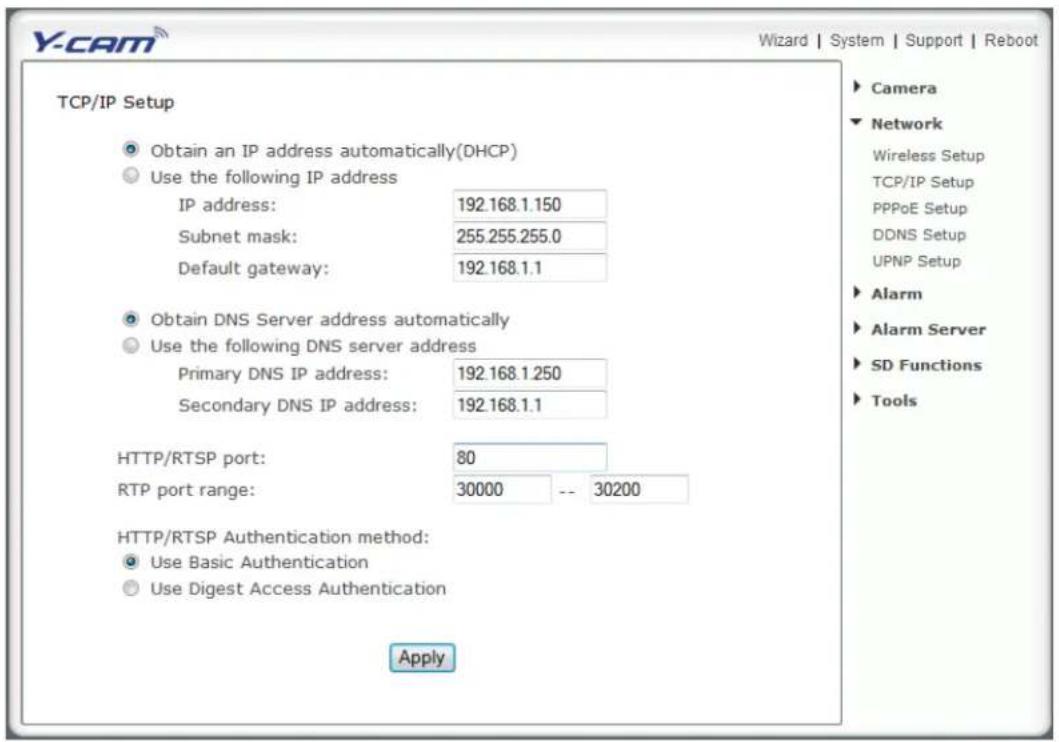
The Y-cam is setup to obtain an IP address automacally (DHCP) from your Network by default, so these sengs should not be needed by most users. Should you wish to assign the IP address manually, use this page to enter the address details.
text_image
Y-CAM Wizard | System | Support | Reboot TCP/IP Setup Obtain an IP address automatically(DHCP) Use the following IP address IP address: 192.168.1.150 Subnet mask: 255.255.255.0 Default gateway: 192.168.1.1 Obtain DNS Server address automatically Use the following DNS server address Primary DNS IP address: 192.168.1.250 Secondary DNS IP address: 192.168.1.1 HTTP/RTSP port: 80 RTP port range: 30000 -- 30200 HTTP/RTSP Authentication method: Use Basic Authentication Use Digest Access Authentication Apply Camera Network Wireless Setup TCP/IP Setup PPPoE Setup DDNS Setup UPNP Setup Alarm Alarm Server SD Functions Tools ApplyIf your network supports a DHCP server (e.g. router) select this opon to have the IP address is assigned automacally. If you select Obtain an IP address automacally you should select Obtain a DNS Server address automacally.
[Obtain an IP address automacally (DHCP)]
[Use the following IP address] Select this opon when a xed IP is required.
[IP address] Type the IP address of your camera (Required)
[Subnet mask] Type the subnet mask (Required)
[Default gateway] Type the default gateway (Required)
[Primary DNS IP address] Type the IP address of the primary DNS server (Required)
[Secondary DNS IP address] Type the IP address of the secondary DNS server, if necessary (Oponal)
HTTP port number : The default HTTP port number is 80.
[RTSP port range] In order to view video over RTSP the router should be setup to forward a port in the range 30000 to 30100 to the camera's IP address using UDP with an internal port in the range of 30000 to 30100. Refer to your router manual for further details.
[HTTP/RTSP Authencaon method] The "basic" authencaon scheme is based on the model that the client must authenticate itself with a user-ID and a password. Digest Access is a more secure login method as the username and password are encrypted before being sent over the internet, however not all systems support Digest Access Authencaon.
6.6.3 PPPoE Setup
Not available on: YCEB03
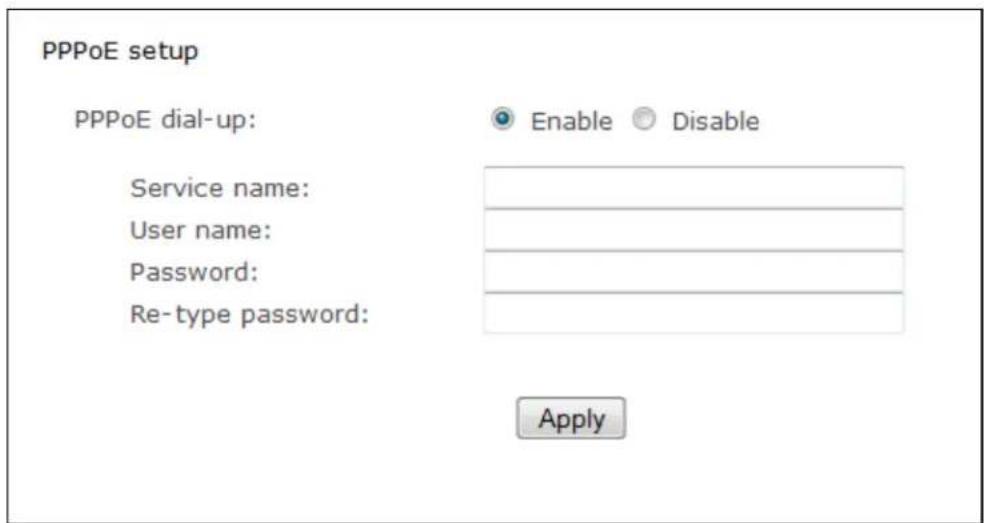
The Y-cam can be installed without a computer on the network. Some XDSL services use PPPoE (Point-to-Point Protocol over Ethernet).
text_image
PPPoE setup PPPoE dial-up: Service name: User name: Password: Re-type password: Enable Disable Apply[PPPoE dial-up] Enable or disable for PPPoE conneccon
[Service name] Enter your ISP name or class of services that are congured on the PPPoE service. This eld may be le empty.
[User name] Type your user name
[Password] Type your password
[Re-type password] Re-conrm password.
Click "Apply" to conrm your sengs.
6.6.4 DDNS Setup
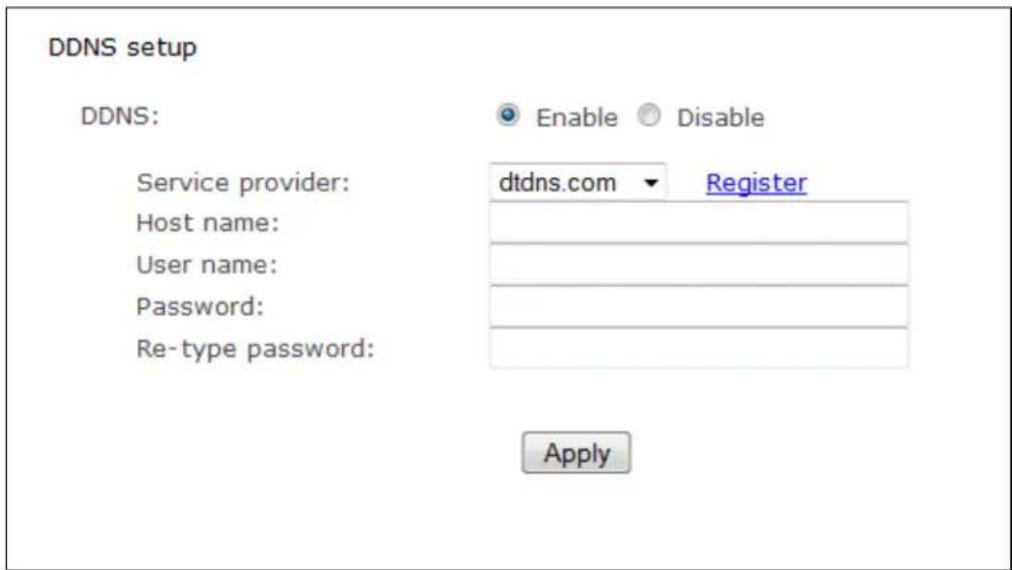
If you have a broadband conneccon that gives you a dynamic IP address (very common), you should set up a DDNS account so the camera will auto update with a web service every me your IP address changes.
This is also one of the easiest ways to view your camera online from anywhere in the World, so is a highly recommended step.
Dynamic DNS (DDNS) is simply a way of using a stac hostname to connect to a dynamic IP address. When connected to your ISP, you are assigned a temporary IP address. DDNS services keep track of your IP address and route your Domain name to that address when you wish to connect to the camera from a remote locaon.
text_image
DDNS setup DDNS: Enable Disable Service provider: dtdns.com Register Host name: User name: Password: Re-type password: Apply[DDNS] Enable or disable DDNS conncon. Click "Enable" for the rest of the opons to appear.
[Service Provider] Select a provider from the drop down list then click "Register". This will take you to the service provider's website where you can register your own personal host name. Please follow the instructions on the provider's site, and then return to this page to enter the details.
[Host Name] Enter the host name you have registered. (E.g. yourname.dtdns.net)
[User Name] Enter the user name for the account you registered with the service provider.
[Password] Enter the password for the account you registered with the service provider.
[Re-type password] Re-conrm the password.
Now you have setup an easily accessible external address for your camera, you now need to setup and conrm an external port for your camera. This is covered in the UPnP secon.

If you have only just registered your DDNS account, it may take a while until you account is acvated and fully registered on the internet. Some of the DDNS services listed oer free and paying services. A free account is more than adequate for a Y-cam to use.
6.6.5 UPnP Setup
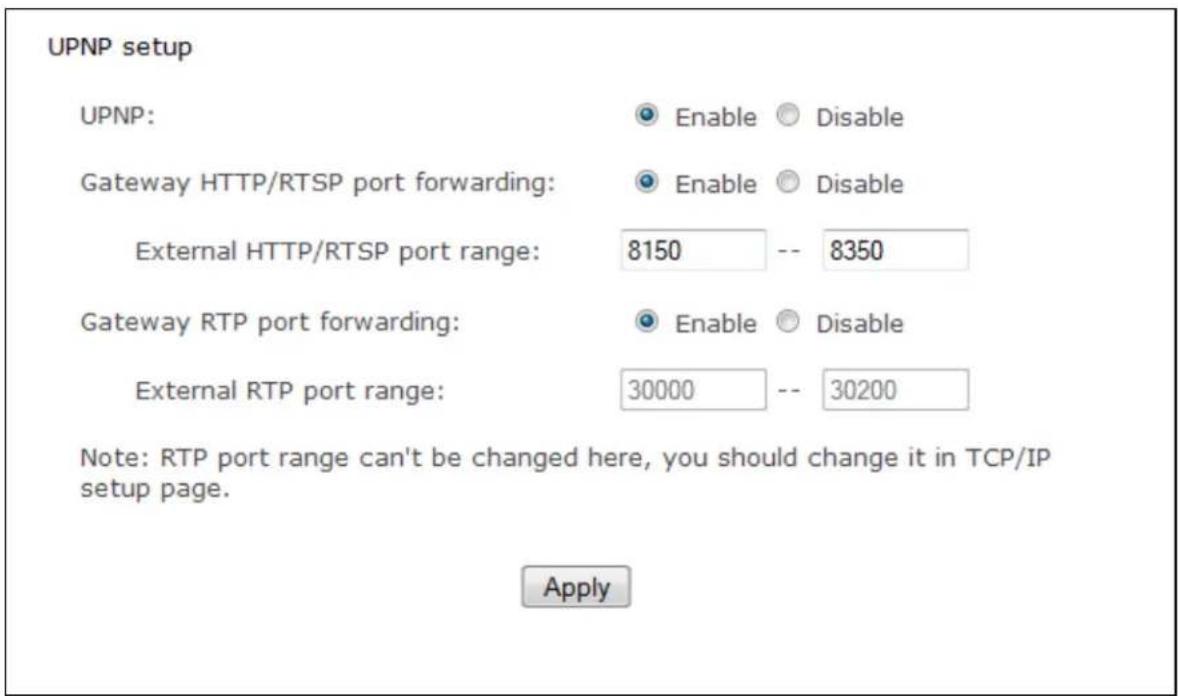
Y-cam supports UPnP (Universal Plug and Play) which is enabled by default.
This allows your camera to easily talk to your router.
text_image
UPNP setup UPNP: Enable Disable Gateway HTTP/RTSP port forwarding: Enable Disable External HTTP/RTSP port range: 8150 -- 8350 Gateway RTP port forwarding: Enable Disable External RTP port range: 30000 -- 30200 Note: RTP port range can't be changed here, you should change it in TCP/IP setup page. Apply[UPnP] Enable or disable the UPnP funcon.
We recommend you to have UPnP enabled. For most users of Y-cam, the rest of the sengs can be le as the default sengs.
Gateway HTTP/RTSP port forwarding:
If this is enabled, the camera will automatically add a port forwarding rule to your router via UPnP protocol. Please note that not all routers support this funcon. Refer to your router manual for further details.
External HTTP/RTSP port range:
By default, this port range is 8150 – 8350. The ports are assigned in order, so if you only have one camera aached to your system, the chosen port will be 8150 for the rst camera, 8151 for the second, and so on. Every camera will remember its port, and it will automatically use this port (if sll available) whenever it is powered on.
Gateway RTP port forwarding:
Used when viewing the feed through a VLC player. Should be le enabled.
External RTP port range:
The RTP port range can't be changed here - you should change it from the TCP/IP setup page.
Aer you have changed any sengs, click "Apply" to save the sengs.
6.6.6 Viewing your camera externally using DDNS
If you have setup your DDNS account, and UPNP is enabled, you should be able to view your camera externally.
To get your cameras external address, visit the Y-cam Sengs System page, and it will be listed under “Internet URL”.
Open any internet browser on your computer, and type this Internet URL. Aer a few moments, your Camera Homepage should be displayed. You can then login to view your camera or change your sengs as normal.

Please note: Some ISPs disable the ability to view your camera via an external address from the same network as your camera. This will give you a Page Not Found error in your web browser. If this is the case, try to connect to your camera via your DDNS address from a mobile phone, or from another internet conncon.
The external address using DDNS is made up of two parts – your DDNS account address and the port you opened via UPnP or manually.
For example: DDNS Host name account: hp://yourname.dtdns.com Port: 8150
So with the above informaon, your camera would have the address of: hp://yourname.dtdns.com:8150
Open any internet browser on your computer, and type your own DDNS account name, followed by :8150 (that's a colon, followed by 8150). Aer a few moments, your Camera Homepage should be displayed. You can then login to view your camera or change your sengs as normal.
To conrm your own external camera address, stay within the Sengs menu, and click on "System" at the top right of the screen. This will list various sengs of your camera. Under UPNP Port Forwarding, it should list your cameras hostname and port.

Please note: If you have only just registered your DDNS account and/or Host Name, it may take a while unl you account is acvated and registered on the internet.
6.6.7 Viewing your camera externally using a stac IP
This is possible if your broadband conncon uses a stac IP address to deliver the internet to your house.
In this case, your camera will be available at, for example:
hp://IPADDRESS:PORTNUMBER (Example: hp://86.123.123.123:8150)
You can nd your external IP address by vising hp://www.myipaddress.com
6.6.8 Port forwarding if UPNP is not available
If you are not using UPNP or UPNP is disabled on your router, you will need to open a port on your router so that you can access your Y-cam from the internet..
If you are unsure if UPNP is working on your camera, visit your Y-cam Sengs System page. Under UPNP port forwarding it will labelled as "Success", "Failed" or "Disabled".
| Status: | Disable |
| UPNP port forwarding | |
| Status: | Success |
| Gateway external IP address: | |
| Gateway external port: | 8191 |
| Internet URL: | http://' :8191 |
Firewall security features built into some routers may prevent the camera's UPNP from conguring your router. Your router connects to the Internet over a series of "ports" and somemes the default ports used by the Y-cam are blocked from access over the Internet, therefore, these ports need to be made accessible.
This is achieved using the Port Forwarding funcon on your router. The ports used by the camera must be opened through the router for remote access to your Y-cam. Check your router's user manual for specic instrucons on how to open and route ports on you router or you can nd instrucons for how to do this for your specic router on the following website:
hp://www.pororward.com/
- Visit www.pororward.com
- Scroll down to select your router model number
- Skip the adversement.
- Select Y-cam IP Wireless camera.
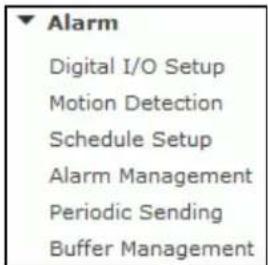
6.7 Alarm Menu
The Alarm menu is located on the right of the Sengs screen. When you click on the word "Alarm", a sub-menu of alarm setup opons will be displayed.
text_image
Alarm Digital I/O Setup Motion Detection Schedule Setup Alarm Management Periodic Sending Buffer Management6.7.1 Digital I/O Setup
Applies to products: YCBL03, YCBLB3, YCEB03
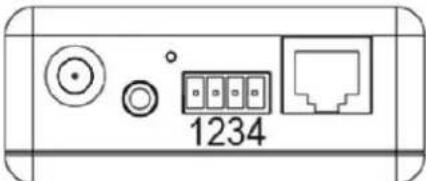
This menu refers to the Digital I/O found on the Y-cam Breakout Box.
The 4-pin I/O terminal connector provides the interface to: 1 digital input, 1 digital output, auxiliary power and GND (ground)
natural_image
Diagram of a device rear panel with ports and indicators (no text or symbols)4- GND: Ground
3- DI: Digital Input
2- DO: Digital Output
1- 12V: Power, 12V DC
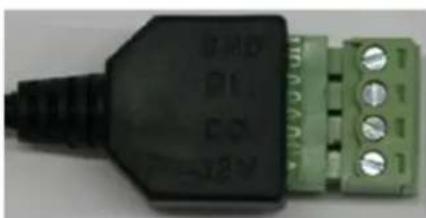
Some versions of the Y-cam Bullet may be supplied with the aached Digital I/O connector:
natural_image
Close-up of a black and green electrical connector with terminal pins (no visible text or symbols)GND: Ground
DI : Digital Input
DO : Digital Output
12V : Power, 12V DC
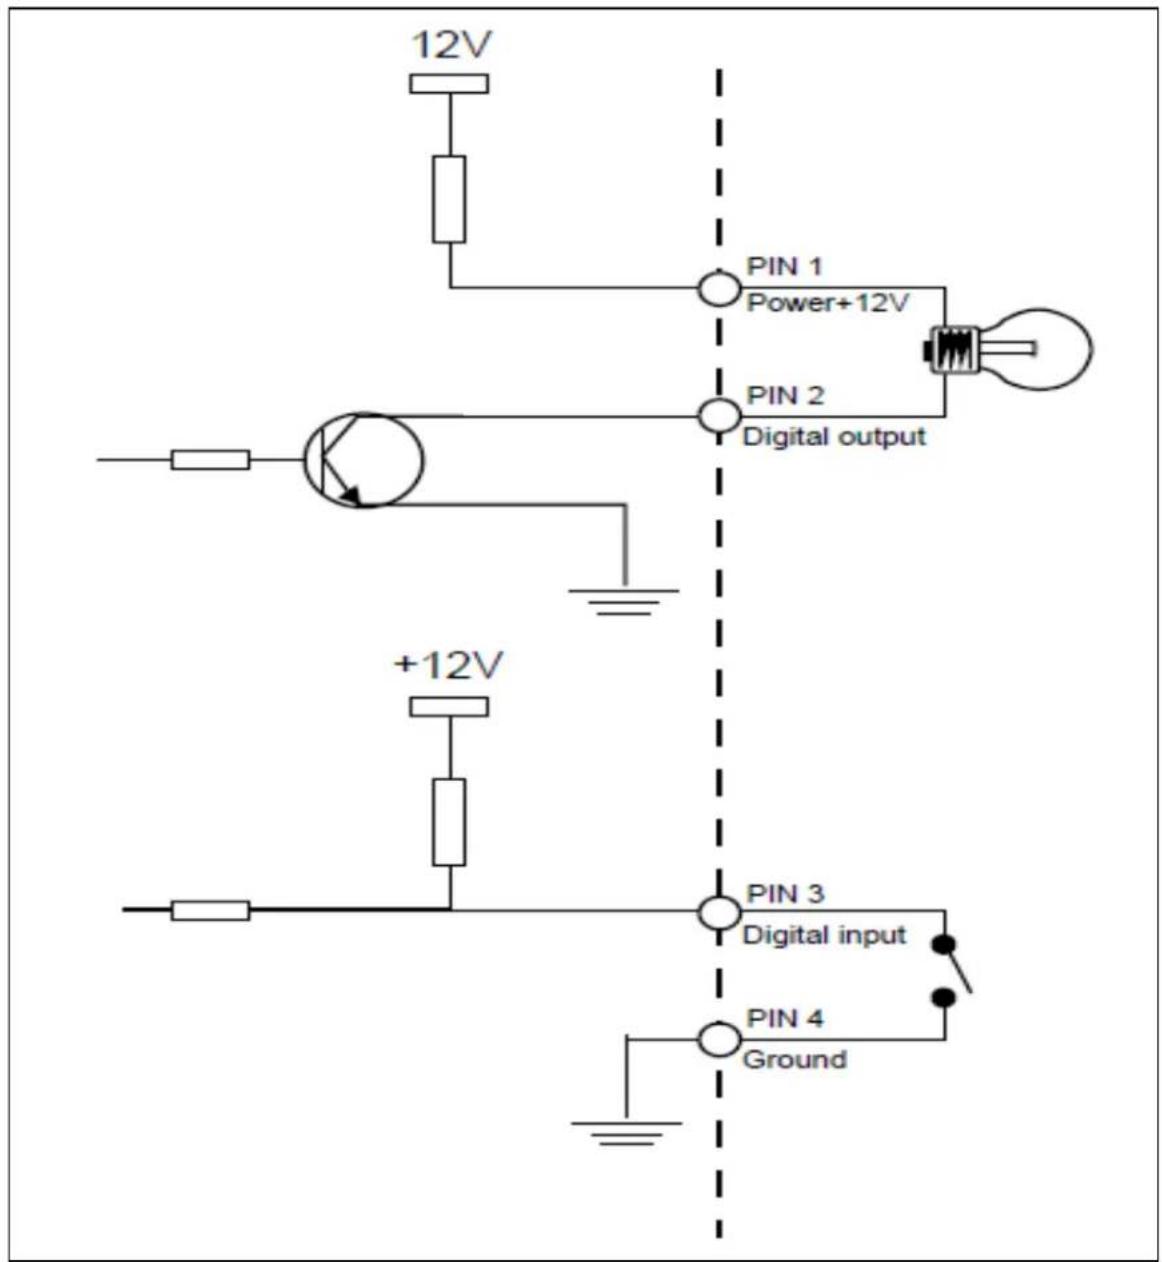
| Pin | Funcon | Descripon |
| 4 | GND | Common Ground |
| 3 | Digital Input | Connect to GND to acvate, or deacvate by soware seng. |
| 2 | Digital Output | With a maximum load of 1A and maximum voltage of 60VDC, this output uses an open-collector NPN Darlington transistor with the emier connected to the GND pin. If used with an external relay a diode must be connected in parallel with the load for protecon against voltage transients. |
| 1 | Auxiliary DC Power | 12V DC max. Electrically connected in parallel with the connector for the PS-L power adapter, this pin provides an auxiliary connector for power to the unit. This pin can also be used to power auxiliary equipment, max 40mA. |
Wiring Diagram
text_image
12V PIN 1 Power+12V PIN 2 Digital output +12V PIN 3 Digital input PIN 4 GroundDigital I/O setup
Digital input:
Digital input's active state is:

Enable

Disable

Low

High
Digital output:
Digital output's active state is:

Enable

Disable

Open

Grounded
Apply
Digital I/O Sengs
[Digital Input] - Enable or Disable the digital input
[Digital input's acve state is] Low for acve low, or High for acve high
[Digital Output] - Enable or Disable the digital output
[Digital outputs acve state is] Open to switch o the transistor when moon is detected or Grounded to switch on the transistor when moon is detected.
Once you have edited the sengs you need, click "Apply" to save the sengs.
6.7.2 Moon Detecon
Moon Detecon can trigger an alarm that sends images via e-mail or FTP (File Transfer Protocol). You can set up to four dierent Moon Detecon windows.
6.7.2.1 Moon Detecon using Internet Explorer
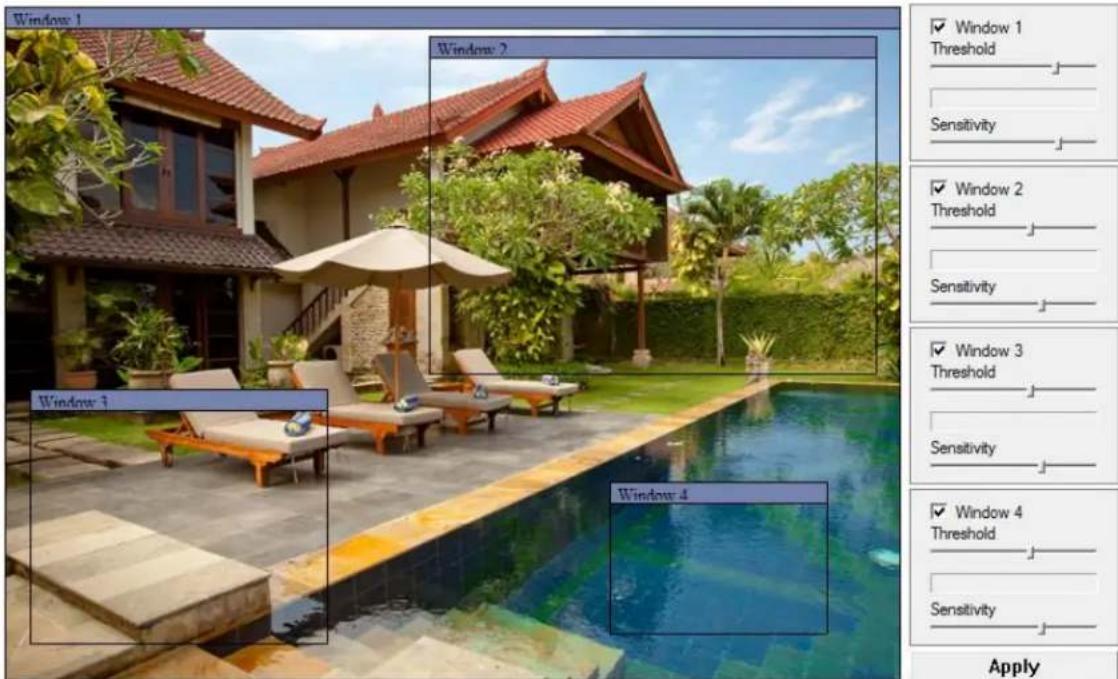
Moon detecon threshold and sensitivity can be adjusted. Understanding how threshold and sensitivity interact will help you adjust the moon detecon feature to suit your needs.
text_image
Window 1 Window 2 Window 3 Window 4 Apply[Window] Check this box to enable the window.
[Threshold] Determines at what point the alarm is triggered. A lower threshold means less moon is needed to trigger the alarm. A higher threshold means more moon is needed to trigger the alarm. Threshold is indicated by the blue bar when moon is detected.
[Sensitivity] Determines how easily the camera detects moon. Lower sensitivity means the camera is less likely to detect moon. Higher sensitivity means the camera is more likely to detect moon.
Note: Sliding the Sensitivity bar to the left will decrease the sensitivity of the moon detecon i.e. 'More' movement is required to trigger the alarm. The best way to congregate these settings is to adjust the sengs and have someone walk in front of the camera until your feel you are geng the required results. This trial and error method make take quite long to get right but it's the best way to obtain good results.

Please note: Moon detecon in Internet Explorer uses the AcveX plug-in. You will need to install or enable this plug-in if you do not have it. To check you have AcveX enabled visit http://www.pcpitstop.com/testax.asp
6.7.2.2 Moon Detecon using other browsers
text_image
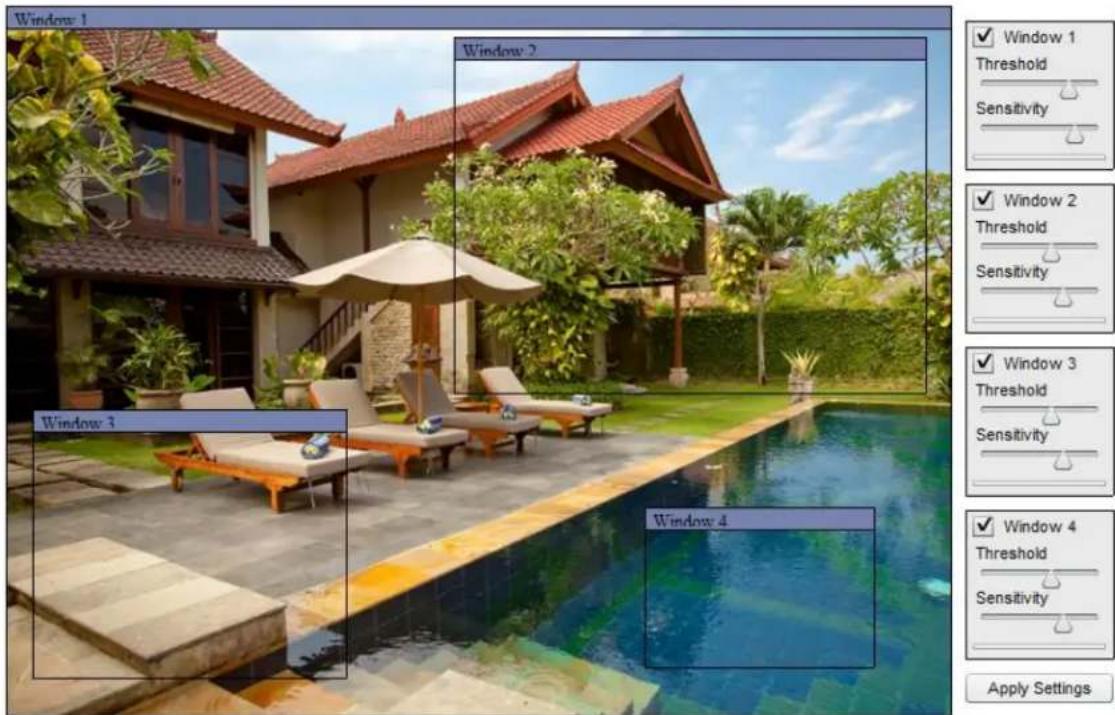
Window 1 Window 2 Window 3 Window 4 ✓ Window 1 Threshold Sensitivity ✓ Window 2 Threshold Sensitivity ✓ Window 3 Threshold Sensitivity ✓ Window 4 Threshold Sensitivity Apply Settings[Window] Check this box to enable the window.
[Threshold] Determines at what point the alarm is triggered. A lower threshold means less moon is needed to trigger the alarm. A higher threshold means more moon is needed to trigger the alarm. Threshold is indicated by the blue bar when moon is detected.
[Sensitivity] Determines how easily the camera detects moon. Lower sensitivity means the camera is less likely to detect moon. Higher sensitivity means the camera is more likely to detect moon.
Note: Sliding the Sensitivity bar to the le will decrease the sensitivity of the moon detecon i.e. 'More' movement is required to trigger the alarm. The best way to conjure these sengs is to adjust the sengs and have someone walk in front of the camera unl your feel you are geng the required results. This trial and error method make take quite long to get right but it's the best way to obtain good results.

Please note: Moon detecon in other browsers uses the Adobe Flash plug-in. You will need to install the Flash plug-in if you do not have it. To check you have the latest version of Flash, visit hp://updateash.org
6.7.3 Schedule Setup
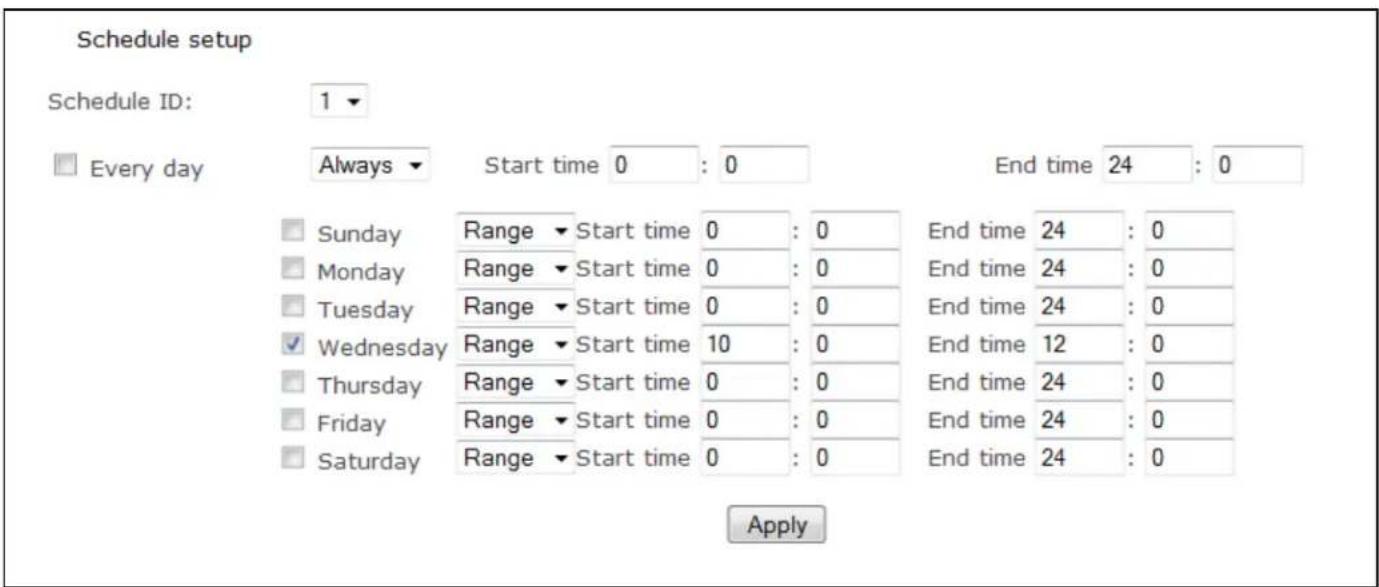
The alarm that the moon detecon triggers can be set to be acve or inacve at certain mes of the week.
By default, the schedule is set to be "acve" at all mes "always".
However you can set the schedule not to trigger alarms at certain mes (useful for instance if you don't want alarms to go o while your oce is open from 9am unl 5.30pm). You can set up to 4 schedules, and you can use these to send alarms to dierent places – such as emails, FTP or SD card.
text_image
Schedule setup Schedule ID: 1 Every day Always Start time 0 : 0 End time 24 : 0 Sunday Range Start time 0 : 0 End time 24 : 0 Monday Range Start time 0 : 0 End time 24 : 0 Tuesday Range Start time 0 : 0 End time 24 : 0 Wednesday Range Start time 10 : 0 End time 12 : 0 Thursday Range Start time 0 : 0 End time 24 : 0 Friday Range Start time 0 : 0 End time 24 : 0 Saturday Range Start time 0 : 0 End time 24 : 0 ApplySchedule Setup Opons
[Schedule ID] Select the ID, you can save up to four schedules and use them for dierent purposes.
[Everyday] Acvate the alarm daily on specied mes. Un-cking this box will display the days of the week. (See screenshot)
[Always] Alarm is always acvated.
[Range] Acvates the alarm on specied mes.
[Except] Deacvates the alarm during me specied.
[Start me] Start me of the alarm.
[End me] End me of the alarm.
Click "Apply" to conrm your sengs once nished.
6.7.4 Alarm Management - FTP
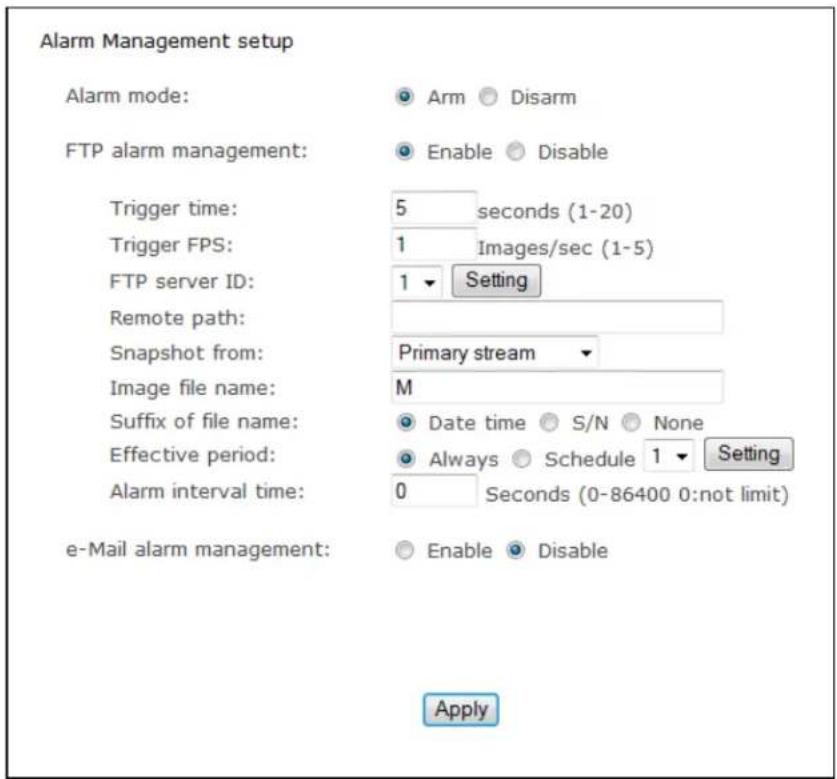
The Y-cam can upload an image to an FTP server or send an email upon receiving an alarm from the moon detecom window. This page will cover how to upload to an FTP.
text_image
Alarm Management setup Alarm mode: Arm Disarm FTP alarm management: Enable Disable Trigger time: 5 seconds (1-20) Trigger FPS: 1 Images/sec (1-5) FTP server ID: 1 Setting Remote path: Snapshot from: Primary stream Image file name: M Suffix of file name: Date time S/N None Effective period: Always Schedule 1 Setting Alarm interval time: 0 Seconds (0-86400 0:not limit) e-Mail alarm management: Enable Disable Apply[Alarm Mode] Acvates or deacvates the moon detecon alarm.
[FTP Alarm Management] Enable/Disable uploading of images on moon detecon to an FTP Server.
[Trigger Time] The number of seconds that the camera should keep sending images aer moon stops.
[Trigger FPS] The number of frames per seconds that the camera should keep sending images at when an alarm is triggered.
[FTP Server ID] Select the FTP Server number from the list (set under Alarm Server)
[Remote path] Path where to save the image le to the FTP server.
[Snapshot From] Select the stream from which it should get the snapshot.
[Image le name] A name for the Image.
[Sux of le name] Image le name sux can be either date and me or a sequence number
Eecve Period:
[Always] Always trigger the alarm upon moon detecon
[Schedule] Trigger the alarm according to the schedule
[Alarm interval me] Number of seconds for which the camera should stop uploading images aer sending the rst set. This funcon is used to stop the camera from sending mulple alerts for the same alarm. Seng the me to 0 disables this feature.
Click "Apply" to conrm your sengs.
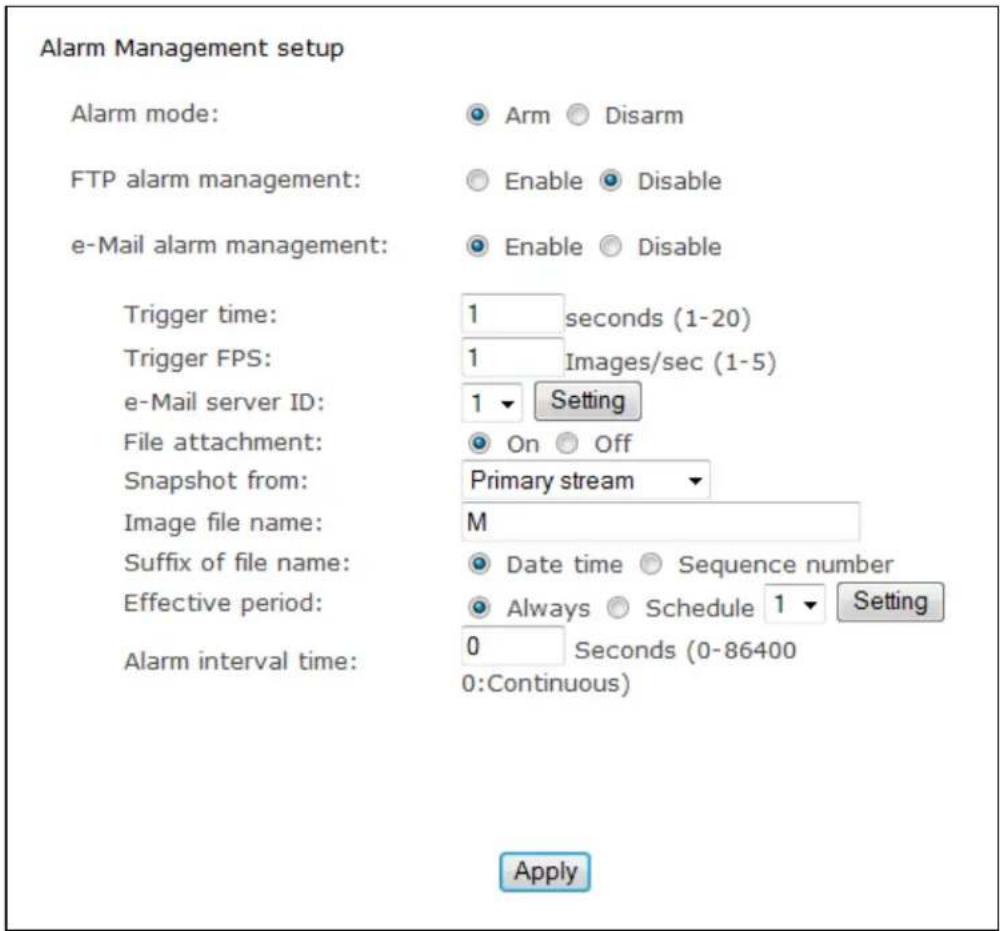
6.7.5 Alarm Management - Email
The Y-cam can also be congured to send an email when the Moon Detecon alarm is triggered.
text_image
Alarm Management setup Alarm mode: Arm Disarm FTP alarm management: Enable Disable e-Mail alarm management: Enable Disable Trigger time: 1 seconds (1-20) Trigger FPS: 1 Images/sec (1-5) e-Mail server ID: 1 Setting File attachment: On Off Snapshot from: Primary stream Image file name: M Suffix of file name: Date time Sequence number Effective period: Always Schedule 1 Setting Alarm interval time: 0 Seconds (0-86400 0:Continuous) Apply[Email Alarm Management] Enable/Disable sending of e-mails on moon detecon.
[Trigger Time] The number of seconds that the camera should keep sending images aer moon stops.
[Trigger FPS] The number of frames per seconds that the camera should keep sending images at when an alarm is triggered.
[e-Mail Server ID] Select the e-mail server number from the list (set under Alarm Server).
[File aachment] Select if you would like a snapshot of the camera view aached to the e-mail.
[Snapshot From] Select the stream from which it should get the snapshot.
[Image le name] Any name for the Image.
[Sux of le name] Image le name sux can be either date and me or a sequence number.
Eecve Period: [Always] Always trigger the alarm upon moon detecon.
[Schedule] Trigger the alarm according to the schedule.
[Alarm interval me] Number of seconds for which the camera should stop sending e-mail alerts aer the rst set. Seng the me to 0 disables this feature.
Click Apply to conrm your sengs.
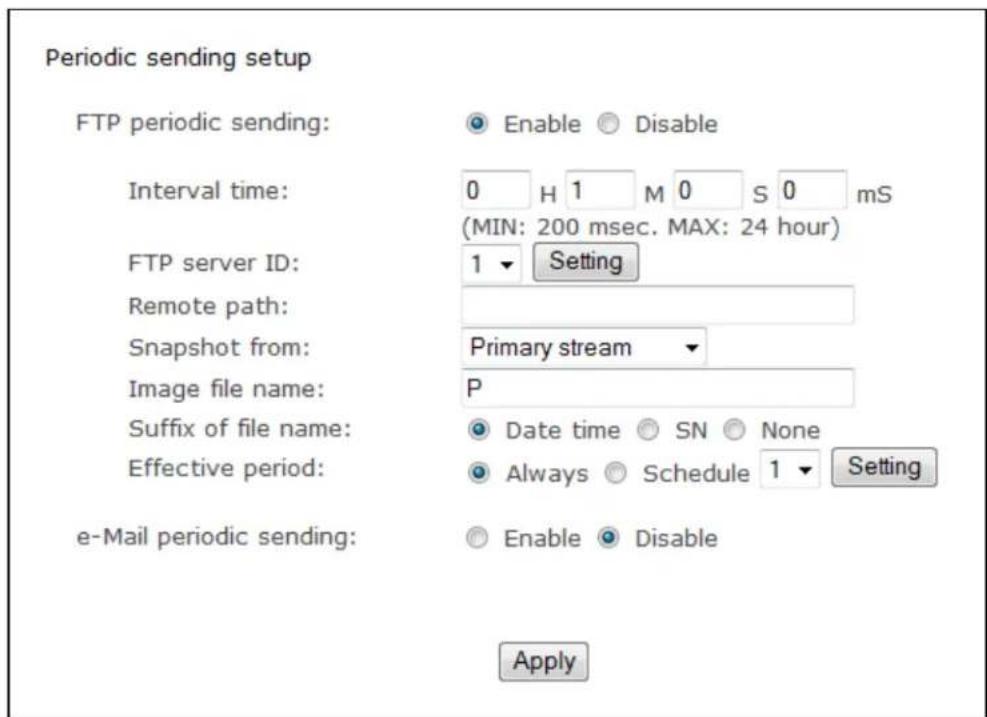
6.7.6 Periodic Sending - FTP
The Y-cam can upload an image to an FTP server at specific me intervals.
text_image
Periodic sending setup FTP periodic sending: Enable Disable Interval time: 0 H 1 M 0 S 0 mS (MIN: 200 msec. MAX: 24 hour) FTP server ID: 1 Setting Remote path: Snapshot from: Primary stream Image file name: P Suffix of file name: Date time SN None Effective period: Always Schedule 1 Setting e-Mail periodic sending: Enable Disable Apply[FTP Periodic Sending] Enable/Disable uploading of images at periodic intervals to an FTP server.
[Interval Time] Time interval between uploads.
[FTP Server ID] Select the FTP Server number from the list (set under Alarm Server)
[Remote path] Path where to save the image le on the FTP server.
[Snapshot From] Select the stream from which it should get the snapshot.
[Image le name] A name for the Image.
[Sux of le name] Image le name sux can be either a date and me, a number sequence or null.
Eecve Period:
[Always] Always trigger the alarm upon moon detecon.
[Schedule] Trigger the alarm according to the schedule.
Click Apply to conrm your sengs.
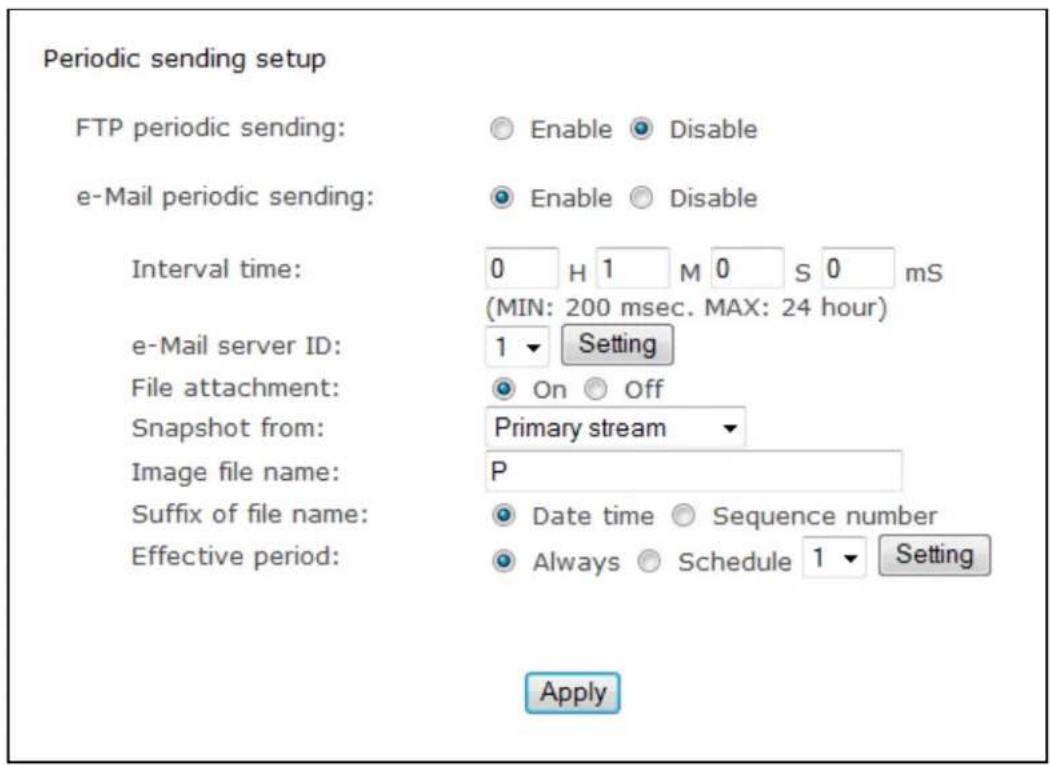
6.7.7 Periodic Sending - Email
The Y-cam can be congured to send an E-mail at specific me intervals.
text_image
Periodic sending setup FTP periodic sending: Enable Disable e-Mail periodic sending: Enable Disable Interval time: 0 H 1 M 0 S 0 mS (MIN: 200 msec. MAX: 24 hour) e-Mail server ID: Setting File attachment: On Off Snapshot from: Primary stream Image file name: P Suffix of file name: Date time Sequence number Effective period: Always Schedule 1 Setting Apply[Email Periodic Sending] Enable/Disable sending of e-mails at periodic intervals
[Interval Time] Time interval between e-mails.
[e-Mail Server ID] Select the e-mail server number from the list (set under Alarm Server)
[File aachment] Select if you would like a snapshot of the camera view aached to the e-mail.
[Snapshot From] Select the stream from which it should get the snapshot.
[Image le name] A name for the Image.
[Sux of le name] Image le name sux can be either date and me or a sequence number.
[Eecve Period:
[Always] Always trigger the alarm upon moon detecon.
[Schedule] Trigger the alarm according to the schedule.
Click Apply to conrm your sengs
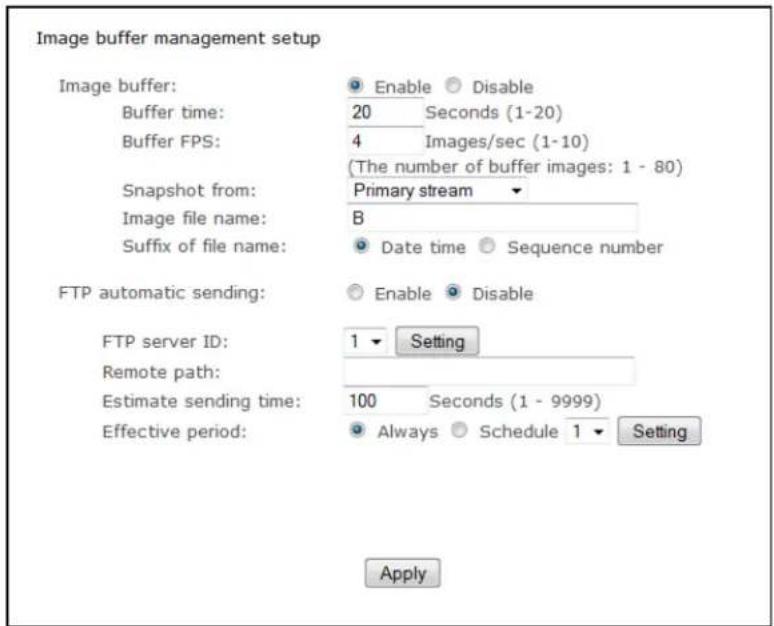
6.7.8 Buer Management
This funcon is very useful when checking to see what happened immediately before and/or aer a trigger. Images are stored internally in the camera from the me immediately preceding the trigger.
For example, by seng the buer me to 20 seconds, when moon is detected, the footage recorded will start 20 seconds prior to the movement being detected, and will stop 20 seconds later.
text_image
Image buffer management setup Image buffer: Enable Disable Buffer time: 20 Seconds (1-20) Buffer FPS: 4 Images/sec (1-10) (The number of buffer images: 1 - 80) Snapshot from: Primary stream Image file name: B Suffix of file name: Date time Sequence number FTP automatic sending: Enable Disable FTP server ID: 1 Setting Remote path: Estimate sending time: 100 Seconds (1 - 9999) Effective period: Always Schedule 1 Setting Apply[Image Buer] Enable/Disable buering.
[Buer Time] The duraon for which alarm should be triggered, specied in seconds. Enter how many seconds you want to include.
[Buer FPS] Frames per second while the moon is triggered it can be any value from 1 to 10 images.
[Snapshot From] Select the stream from which it should get the snapshot.
[Image le name] A name for the Image.
[Sux of le name] Image le name sux can be either date and me or a sequence number.
[FTP automac Sending] Enable this, if you want to upload all the images present in buer to an FTP Server.
[FTP Server ID] Select the FTP Server number from the list (set under Alarm Server)
[Remote path] Path where to save the image le on the FTP server.
[Esmate Sending me] The esmated me that each image will take to upload (this depends on your bandwidth)
Eecve Period:
[Always] Always trigger the alarm upon moon detecon
[Schedule] Trigger the alarm according to the schedule
Click Apply to conrm your sengs.
Note: The maximum length of the combined pre-/post-buer is 160. e.g. if the buer me is 20 and FPS is 4, the camera will upload 160 images on to the FTP Server, 80 images pre moon and 80 images post moon.
6.8 Alarm Server
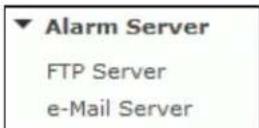
The Alarm Server menu is located on the right of the Sengs screen. When you click on the word "Alarm Server", a sub-menu of alarm server setup opons will be displayed.
6.8.1 FTP Server
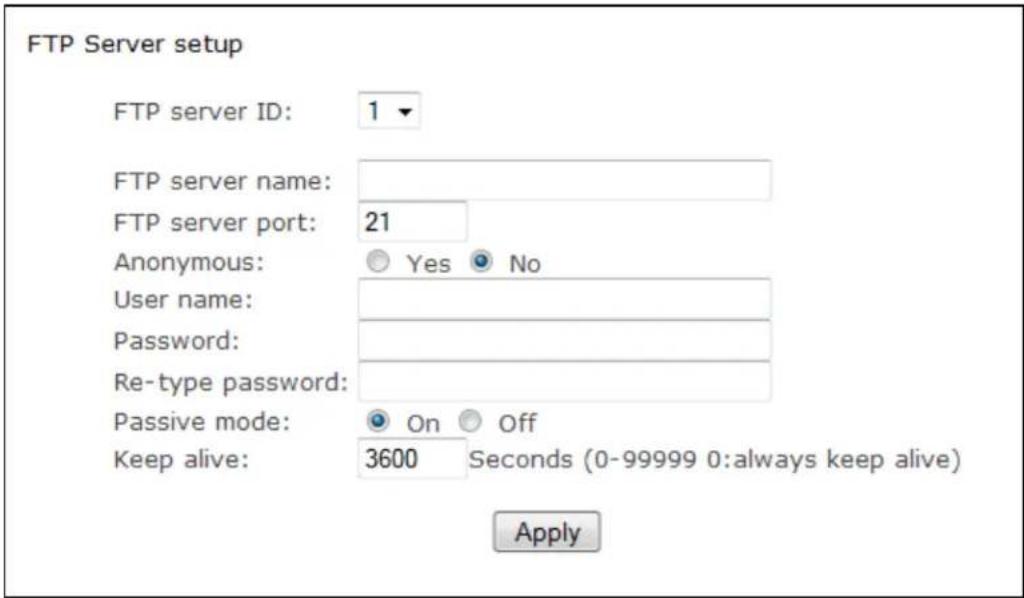
The Y-cam can upload an image to an FTP server upon receiving an alarm from the moon detecon window or at specific me intervals. FTP is a commonly used protocol for exchanging les over any network or the internet and there are a number of FTP providers which will allow you to upload the images free of charge. FTP could also be used to upload the images to a NAS drive.
text_image
FTP Server setup FTP server ID: 1 FTP server name: FTP server port: 21 Anonymous: Yes No User name: Password: Re-type password: Passive mode: On Off Keep alive: 3600 Seconds (0-99999 0:always keep alive) ApplyThe Y-cam can be congured with 4 dierent FTP servers. These servers can be individually connected to either upload on moon detecon or upload periodically. These funcons are available under the Alarm menu.
[FTP Server ID] Select the ID of the FTP server. You can connect to up to four FTP Servers.
[FTP server name] Type the name or IP address of the FTP server.
[FTP server port] The port number of the FTP server (default is 21).
[Anonymous] Enable or disable anonymous login.
[User name] Type your FTP user name (Required if Anonymous set to "No")
[Password] Type your FTP password (Required if Anonymous set to "No")
[Re-type password] Re-type your password (Required if Anonymous set to "No")
[Passive mode] Switch passive mode on or o. Required on some FTP servers (Depends on your FTP server sengs)
[Keep Alive] Time period for which camera should be connected to the FTP server. The camera will keep the conneccon with the server for the specied number of seconds aer the last upload.
Click Apply to conrm your sengs.
6.8.2 E-mail Servers
The Y-cam can be congured to send an E-mail when the Moon Detecon alarm is triggered or aer specied intervals.
The Y-cam can be congured with 4 dierent E-mail servers. These servers can be individually connected to either send on moon detecon or send periodically. These funcons are available under the Alarm menu.
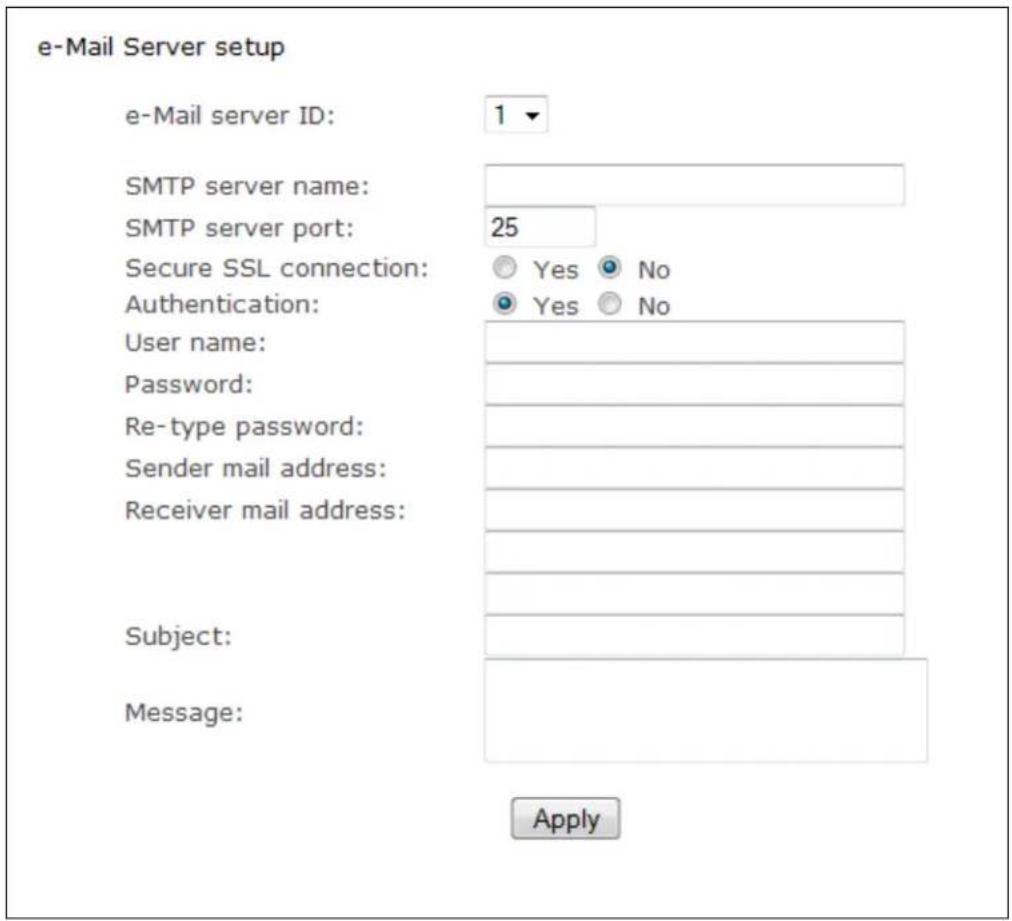
text_image
e-Mail Server setup e-Mail server ID: 1 SMTP server name: SMTP server port: 25 Secure SSL connection: Yes No Authentication: Yes No User name: Password: Re-type password: Sender mail address: Receiver mail address: Subject: Message: Apply[e-Mail server ID] Select the email server ID. You can set up to four email servers.
[SMTP server name] Type the name or IP address of the SMTP server you want to use for sending the e-Mails. Please note that some networks do not allow e-mail relaying. Check with your system administrator or Internet service provider for more details.
[SMTP server port] The port number of the e-mail server (default is 25).
[Secure SSL Connecon] Select whether your SMPT server requires an SSL conncon.
[Authencaon] Select whether authencaon is required by the SMTP server.
[User name] & [Password] Type the user name and password of the e-mail account you wish to use. This eld is required if your SMTP server requires authencaon.
[Re-type password] Re-type the password.
[Sender e-mail address] Type the e-mail address of the account you are using to send the e-mail. This will be the address the emails come from.
[Receiver e-mail address] Type the recipients' e-mail addresses for who you want the emails to be sent to. Up to 3 addresses can be entered.
[Subject] Subject of the e-mail that is sent. Entering a relevant subject will help identify the alarm beer. i.e “Garage Alarm”
[Message] Type the text you wish to appear in the e-mail. e.g. This is to nofy you that your alarm has been triggered.
Notes:
Email sengs can be obtained from your e-mail service provider. An SMTP email account is required – these are very common if you use POP3 email and some IMAP servers. A true IMAP server will not work.
Some ISPs won't let you use any other SMTP server other than their own (Brish Telecom BT are a good example of this).
6.8.3 Y-cam & Common Email Server Sengs
Some email server sengs to use your Y-cam with popular email providers:
gmail.com
SMTP server name: smtp.gmail.com
SMTP server port: 465
Secure SSL: Yes
Authencaon: Yes
Username: YourUserName@gmail.com
Password: xxxxxxx
gmx.com
SMTP server name: smtp.gmx.com
SMTP server port: 587
Secure SSL: No
Authencaon: Yes
Username: YourUserName@gmx.net
Password: xxxxxxx
a.net
SMTP server name: smtp.a.yahoo.com
SMTP server port: 25
Secure SSL: No
Authencaon: Yes
Username: YourUserName@a.net
Password: xxxxxxx
comcast.net
SMTP server name: smtp.comcast.com
SMTP server port: 587
Secure SSL: No
Authencaon: Yes
Username: YourUserName@comcast.net
Password: xxxxxxx

Please note: The most common reason for Email Alerts not being sent is that the cameras Primary DNS IP Address is not set. You can check this on your Y-cam Sengs System page. If it is empty, you can set it on the TCP/IP sengs page, set to your Default Gateway address and this should solve the problem.
6.9 Storage
The Storage menu is located on the right of the Sengs screen. When you click on the words "Storage", a sub-menu of opons will be displayed.
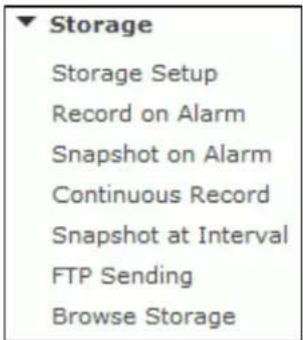
text_image
Storage Storage Setup Record on Alarm Snapshot on Alarm Continuous Record Snapshot at Interval FTP Sending Browse Storage6.9.1 Storage Setup
The Y-cam can record video direct to virtually an NAS drive or to its internal microSD memory card.
This page will cover how to setup your Y-cam to record to a NAS drive.
Storage setup
Storage select:
NAS SD card
NAS remote path:
//192.168.1.139/photo
(Example: //192.168.168.50/ipcam_files)
Authorization:
Yes No
User name:
admin
Password:
●●●●●
Re-type password:
●●●●●
Apply
[Storage Select] Select whether you want to record on NAS or microSD card.
[NAS remote path] Address & Path where to save the les on NAS Drive (up to a maximum of 2 directory levels).
[Authorizaon1] Select whether authencaon is required by the NAS Drive.
[User name] & [Password] Type the user name and password of the NAS Drive. This eld is required if your NAS Drive requires authencaon.
Click "Apply" to conrm your sengs.
6.9.2 Record on Alarm
Record on alarm records footage to your storage device upon detecon of moon trigger.
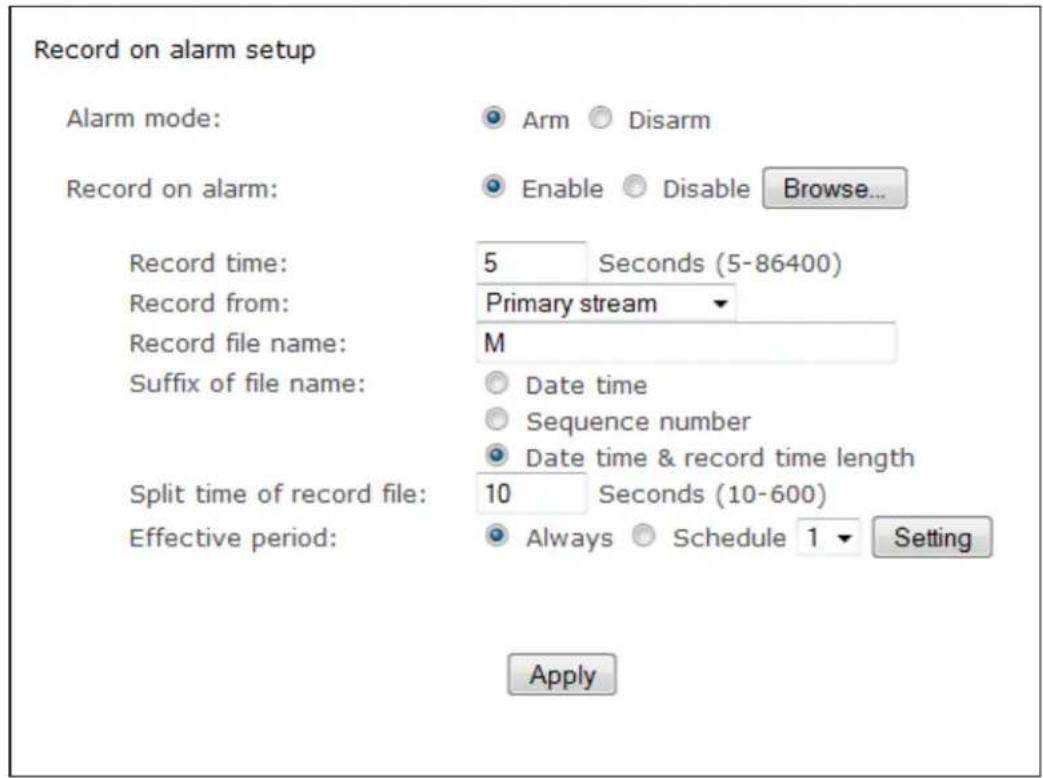
text_image
Record on alarm setup Alarm mode: Arm Disarm Record on alarm: Enable Disable Browse... Record time: 5 Seconds (5-86400) Record from: Primary stream Record file name: M Suffix of file name: Date time Sequence number Date time & record time length Split time of record file: 10 Seconds (10-600) Effective period: Always Schedule 1 Setting Apply[Alarm Mode] Acvate/ Deacvates the moon detecon alarm.
[Record on Alarm] Enable/Disable recording videos upon moon detecon.
[Record Time] The number of seconds that the camera should keep recording video aer moon stops. If there is any moon within this me the camera will keep recording until there is no moon for the duraon of this parameter. It can be from 5 seconds to 24 hours.
[Record From] Select the stream from which it should record.
[Record le name] A name for the video le.
[Sux of le name] Image le name sux can be either date and me, a sequence number or Date & me with the record me length.
[Split Time of Record le] This species the maximum duraon of one le. If the recording goes on for longer than this parameter the camera will split the video into a number of les.
Eecve Period:
[Always] Always trigger the alarm upon moon detecon
[Schedule] Trigger the alarm according to the schedule.
Click Apply to conrm your sengs.
Note: If you are using the Y-cam with a microSD or NAS drive and it's not connected to network you should change the Wireless mode to "Adhoc" otherwise the camera will connuously try to nd a local network and may auto-reboot itself.
6.9.3 Snapshot on Alarm
Snapshot on alarm records a JPG snapshot to your storage device upon detecon of moon trigger.
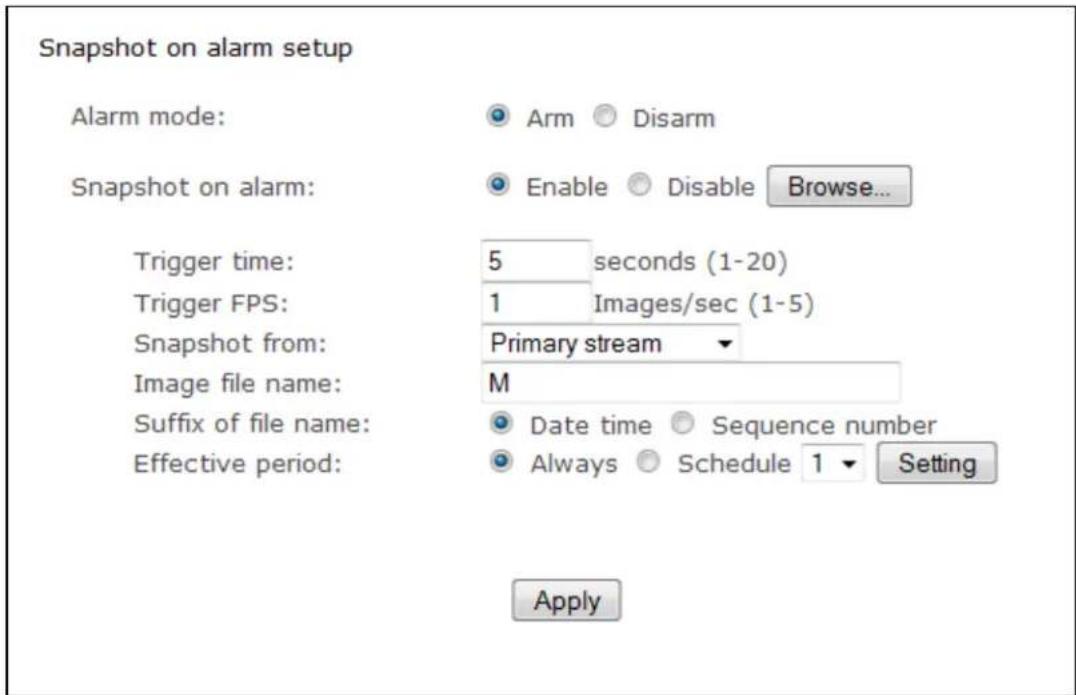
text_image
Snapshot on alarm setup Alarm mode: Arm Disarm Snapshot on alarm: Enable Disable Browse... Trigger time: 5 seconds (1-20) Trigger FPS: 1 Images/sec (1-5) Snapshot from: Primary stream Image file name: M Suffix of file name: Date time Sequence number Effective period: Always Schedule 1 Setting Apply[Alarm Mode] Acvate/ Deacvates the moon detecon alarm.
[Snapshot on Alarm] Enable/Disable saving snapshots on storage if moon detecon is triggered.
[Trigger Time] The number of seconds that the camera should keep saving images when moon stops.
[Trigger FPS] The number of frames per seconds that the camera should keep saving images when an alarm is triggered.
[Snapshot From] Select the stream from which it should get the snapshot.
[Image le name] A name for the Image.
[Sux of le name] Image le name sux can be either date and me or a sequence number.
Eecve Period:
[Always] Always trigger the alarm upon moon detecon
[Schedule] Trigger the alarm according to the schedule.
Click Apply to conrm your sengs.
6.9.4 Connuous Record
Connuously records footage to your storage device
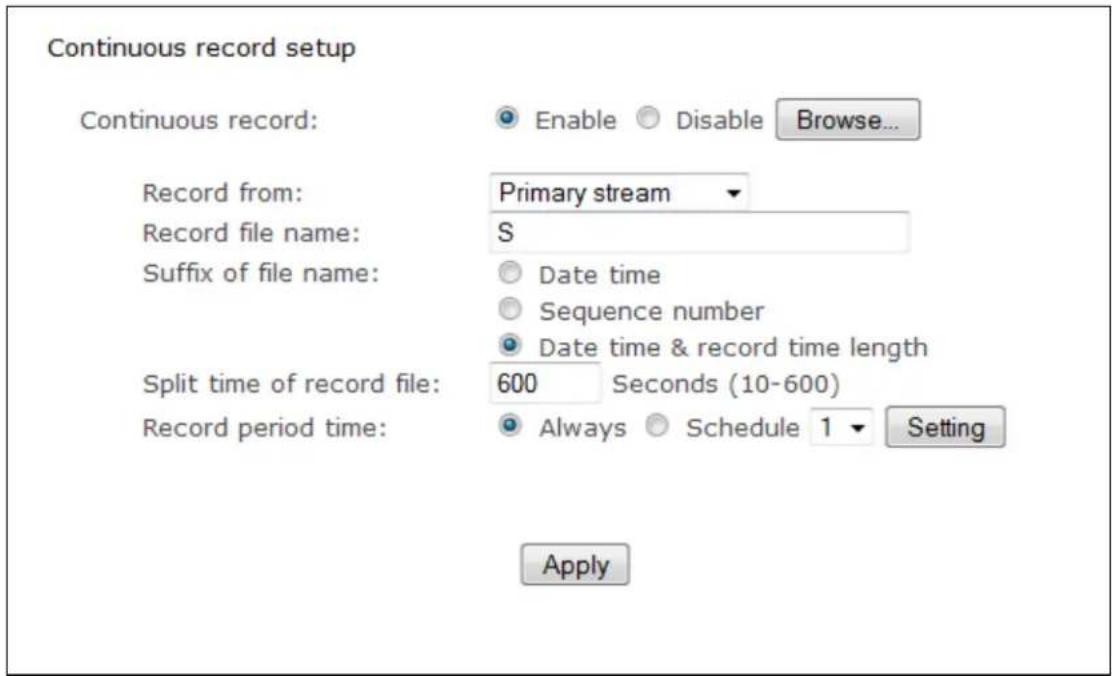
text_image
Continuous record setup Continuous record: Enable Disable Browse... Record from: Primary stream Record file name: S Suffix of file name: Date time Sequence number Date time & record time length Split time of record file: 600 Seconds (10-600) Record period time: Always Schedule 1 Setting Apply[Connnuous Record] Enable/Disable saving video to your storage device.
[Record From] Select the stream from which it should record the video.
[Record le name] A name for the video le.
[Sux of le name] Video le name sux can either be date & me, a sequence number or date & me with record me length.
[Split Time of Record le] This species the maximum duraon of one le. When the recording me exceeds this parameter the camera will split the video into a number of les.
Eecve Period:
[Always] Always trigger the alarm upon moon detecon
[Schedule] Trigger the alarm according to the schedule.
Click Apply to conrm your sengs
6.9.5 Snapshot at Interval
Snapshot at interval records a JPG snapshot to your storage device at a set interval.

text_image
Snapshot at interval setup Snapshot at interval: Enable Disable Browse... Interval time: 0 H 1 M 0 S 0 mS (MIN: 200 msec. MAX: 24 hour) Snapshot from: Primary stream Image file name: P Suffix of file name: Date time Sequence number Effective period: Always Schedule 1 Setting Apply[Snapshot at interval] Enable/Disable saving a snapshot on your storage device at periodic intervals.
[Interval Time] Time interval between snapshots.
[Snapshot From] Select the stream from which it should get the snapshot.
[Image le name] A name for the Image.
[Sux of le name] Image le name sux can be either date and me or a sequence number.
Eecve Period:
[Always] Always trigger the alarm upon moon detecon
[Schedule] Trigger the alarm according to the schedule.
Click Apply to conrm your sengs
6.9.6 FTP Sending
Congures the camera to automacally upload the contents of your storage device onto an FTP Server.
Useful if you want to make an osite backup, or transfer les to another network connected storage device such as a NAS drive.

text_image
Storage File FTP Sending FTP Sending: Enable Disable FTP server ID: 1 Setting Remote path: Sending period: Always Schedule 1 Setting File period: All files Schedule 1 Setting FTP upload bandwidth: 64 Kb/sec (1-999999) Apply[FTP Sending] Enable/Disable uploading the contents of your storage to an FTP Server.
[FTP Server ID] Select the FTP Server number from the list.
[Remote path] Path where to save the image le once uploaded to the FTP server.
[Sending Period] Select where the les should be uploaded to the FTP Server.
[Always] Upload the contents of MicroSD onto FTP Server when a le is present.
[Schedule] Upload the les according to the schedule
File Period:
[All les] When uploading to FTP send all les.
[Schedule] upload only les that were recorded within the me frame specied by the schedule.
[FTP Upload Bandwidth] Available bandwidth to be used to upload the contents onto the FTP Server.
Click Apply to conrm your sengs
Note: Depending on the conditions of network and the FTP server, there may be occasions when les will not transfer. In such an event, this camera is able to make backup data on the storage device and send them later on.
6.9.7 Browse Storage
Clicking on Browse Storage will take you to the following screen where you can view or download the contents of the storage drive.
| □ | File name | Size(bytes) |
| □ | M 2010-01-06 14-12-59 20.mov | 2582524 |
| □ | M 2010-01-06 14-13-20 3.mov | 317552 |
| □ | M 2010-01-06 14-13-35 20.mov | 2994040 |
| □ | M 2010-01-06 14-13-56 20.mov | 2618562 |
| □ | M 2010-01-06 14-14-17 1.mov | 155500 |
| □ | M 2010-01-06 14-14-26 19.mov | 2225884 |
| □ | M 2010-01-06 14-14-56 18.mov | 2429039 |
| □ | M 2010-01-06 14-15-17 5.mov | 594391 |
| □ | M 2010-01-06 14-15-23 17.mov | 2360635 |
| □ | M 2010-01-06 14-15-41 5.mov | 669047 |
| □ | M 2010-01-06 14-15-48 20.mov | 2681667 |
[Record on Alarm] Enables you to view and delete all the videos which were recorded upon moon detecon
[Snapshot on Alarm] Enables you to view and delete snapshots which were recorded upon moon detecon.
[Connnuous Record] Enables you to view and delete all the videos recorded according to the connnuous record schedule.
[Snapshot at Interval] Enables you to view and delete all the snapshots which were recorded on periodical basis.
6.10 Tools Menu
The Tools menu is located on the right of the Sengs screen. When you click on the word "Tools", a sub-menu of setup opons will be displayed.
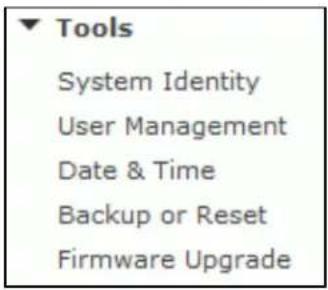
text_image
Tools System Identity User Management Date & Time Backup or Reset Firmware Upgrade6.10.1 System Identity
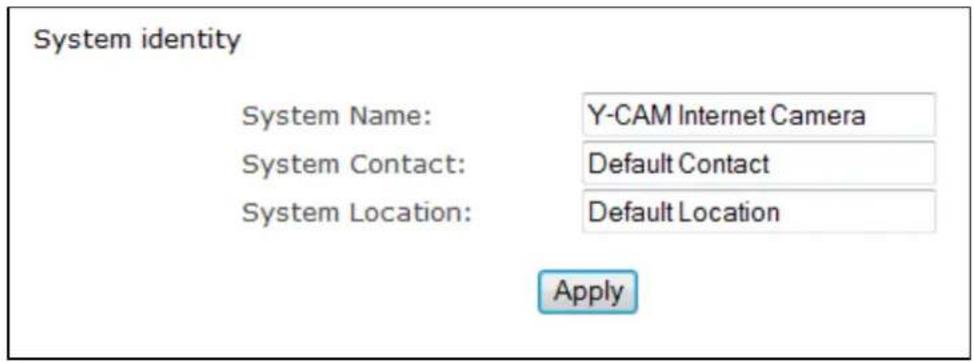
text_image
System identity System Name: Y-CAM Internet Camera System Contact: Default Contact System Location: Default Location Apply[System Name] Type a name to easily identify the Y-cam.
[System Contact] Type the contact name of the administrator of the Y-cam. This is useful in large organisaons.
[System Location] Type the locaon of the Y-cam. Useful when using a mul-camera viewer program.
Tip: The informaon you ll in can be displayed on the camera. It can help to disnguish dierent cameras on the network.
6.10.2 User Management
Allows you to add or remove users who can view your camera. Useful if you want to allow others to view your camera, without having full admin rights.
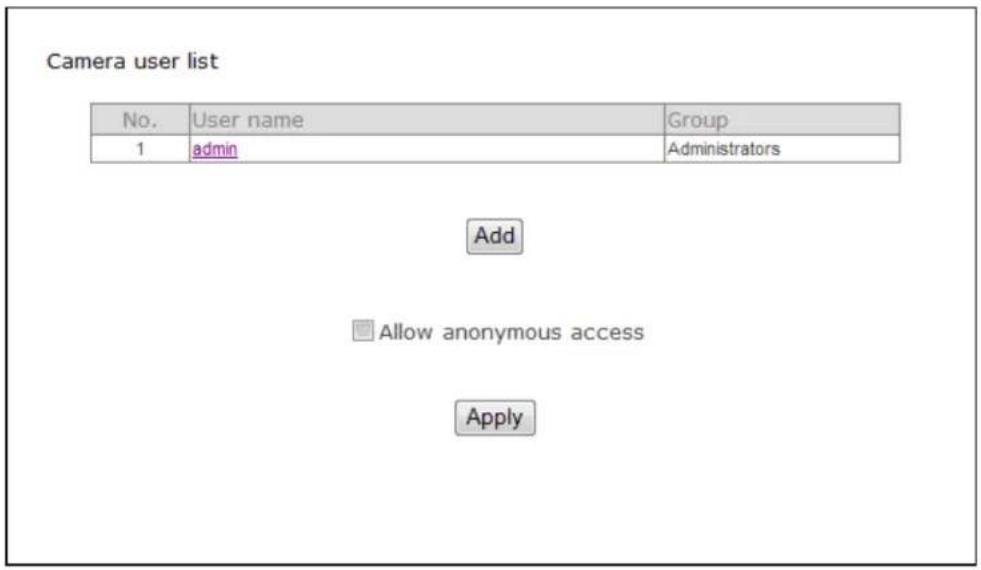
text_image
Camera user list No. User name Group 1 admin Administrators Add Allow anonymous access Apply[Add] Up to 64 users (including the admin) can be created.
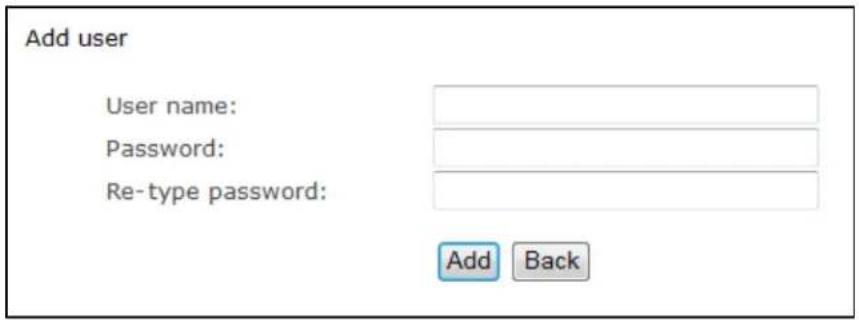
text_image
Add user User name: Password: Re-type password: Add BackAdding users: Click Add on the Camera User List page, then ll in a username and password (twice) and then click Add.
To edit a user's password: Click on the user name then enter the new password for that user twice and click Save. To delete a user: Click on the user name then click Delete.
Note: A maximum of 16 users are allowed to access the camera simultaneously. As the number of simultaneous users increases, the overall performance will decrease. This is dependent on the network bandwidth, not the camera.
[Allow anonymous access] - if you wish to share video with other users, without prompting them for a user name and password. This will allow the user free access to view the "Live View" page, whereas access to the Sengs page will sill be prohibited.
6.10.3 Date & Time
Allows you to set the date and me - used for the mestamp of any les created by the camera.
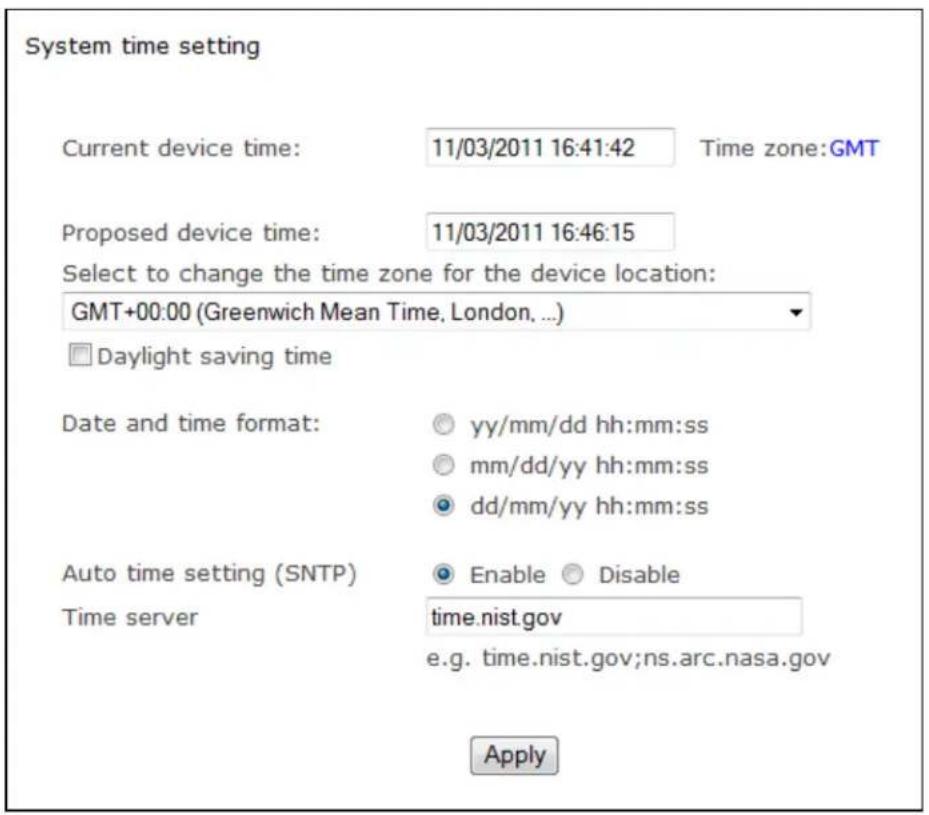
text_image
System time setting Current device time: 11/03/2011 16:41:42 Time zone:GMT Proposed device time: 11/03/2011 16:46:15 Select to change the time zone for the device location: GMT+00:00 (Greenwich Mean Time, London, ...) Daylight saving time Date and time format: yy/mm/dd hh:mm:ss mm/dd/yy hh:mm:ss dd/mm/yy hh:mm:ss Auto time setting (SNTP) Enable Disable Time server time.nist.gov e.g. time.nist.gov;ns.arc.nasa.gov Apply[Current device me] Internal me of the Y-cam
[Proposed device me] PC system me. On clicking Apply the internal me of the Y-cam will be changed to this me.
[Select to change the me zone for the device locaon] Choose your me zone.
[Daylight saving me] ck the box to enable daylight saving me.
[Date and Time format] Select the format of the date and me.
[Auto me seng (SNTP)] Enable or disable the auto me seng to update to the server below.
[Time server] Type the SNTP server name. There are suggestions included.
Note:
-
If the SNTP server is not found the Y-cam's me will be synchronized with the PC me.
-
The Y-cam keeps track of the me even when power is disconnected.
Click Apply to conrm your sengs.
6.10.4 Backup and Reset
Allows you to reset the camera to factory defaults, allows you to backup the conguraon in case of accidental reset and allows you to restore sengs from a backup.
Backup or reset settings
Click Reset to erase the camera's configuration and restore the factory defaults.
Reset
Click Backup to save the camera's configuration to a file.
Backup
Restore the camera's configuration from a previously backed-up file.
Browse..
Restore
[Reset] Click Reset to initialize the Y-cam to default factory sengs. All users and sengs will be lost, requiring you to reconfigure the camera.
[Backup] Click Backup to backup the current conguraon of the Y-cam for future reference. Once you have your camera setup as you require, this is recommended.
To restore a backup le:
[Browse...] Click Browse... to search for a backup conguraon you wish to upload to the camera, then click Restore.
Note: Do not turn o the power during the Restore funcon since this might corrupt the camera's rmware
6.10.5 Firmware Upgrade
From me to me a new rmware may be released for your model of Y-cam.
To check for updates, consult the Y-cam website at hp://www.y-cam.com
We do recommend you update to the latest rmware for your camera whenever we release one to take advantage of new features and bug xes. However, this is a serious process and can damage your camera if not done correctly.
If your rmware is several versions out of date, upgrading straight to the latest one is perfectly ne, you do not need to install each and every update.
Once you have downloaded the latest rmware, store it in a place that is easily to get to. The rmware is in a ZIP le, which is a compressed le format. You will need to move or copy the le from this compressed folder (some versions of Windows will allow you to do this, but if not, you will need a program like WinZIP or WinRAR to unzip the le to a standard folder). This is very important as the rmware will not update properly if it's le in the compressed state.
It is recommended you reboot your computer before aempng this operaon and then close ALL programs that may interfere with the process. Interrupon to this process will result in your camera being un-useable.

Please note: You may want to backup your sengs before the upgrade. You may also want to make a note of your sengs before upgrade. The backup/restore conguraon may not work between rmware upgrades, so always make a note before starng
Firmware upgrade
Warning:
Upgrading the camera to a new firmware will erase your current configuration.
Current firmware version is: 4.21 (build 20101210)
Click continue to proceed.
Continue
Back
Click Connue if you want to install a new rmware.
Select Browse... and locate the le you have uncompressed from the ZIP le.
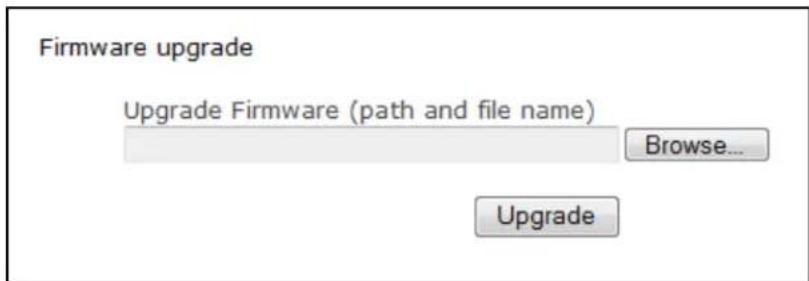
text_image
Firmware upgrade Upgrade Firmware (path and file name) Browse... UpgradeOnce you have located the le and selected it, click Upgrade.
When you click upgrade, the process will start. This can take 5-10 minutes. Don't perform any other acons on your computer while you are doing this upgrade.
Aer the upgrade completes, you will be prompted to reboot the camera, and aer this your latest rmware will be recorded.
If the update hasn't worked aer 15-20 minutes, reset the camera via the side buon on the camera.
If you camera is unresponsive, you will need to contact either your place of purchase or Y-cam directly. Your dealer or Y-cam Soluons Ltd reserves the right to charge for any repair aributable to faulty upgrading by the user.
7.0 ADVANCED SETTINGS
7.1 Manually entering TCP/IP Sengs for a Camera
In most cases, this is not required as the router will assign the correct sengs to the camera. It is however useful if you want to setup the TCP/IP sengs of the camera before you connect to it, if DHCP is disabled across your network, or if you have subnet network problems.
Assigning an IP address to the Camera with Y-cam Setup utility
- Launch Y-cam Setup to detect the camera on your local network.
- Select a camera, click on "Setup" and the following setup interface will pop up.
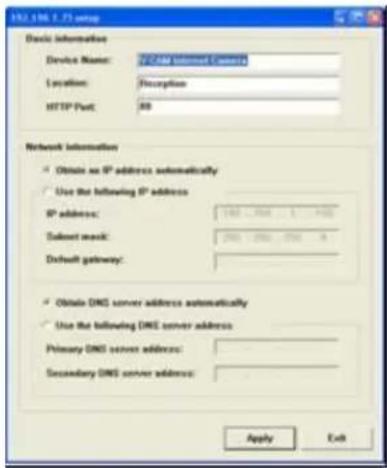
text_image
192.196.7.73 setup Basic information Device Name: 1000M Internet Command Location: Description HTTP Port: 80 Network information Obtute as IP address automatically Use the following IP address IP address: 100 - 200 - 3 - 400 Subset mask: 200 - 250 - 350 - 4 Default gateway: Obtute DNS server address automatically Use the following DNS server address Primary DNS server address: Secondary DNS server address: Apply Exit-
Enter a unique name for the camera, the locaon (oponal) and leave the default port number as 80. "Obtain an IP address automacally" and "Obtain DNS server address automacally" are selected by default, if you are condent enough to enter your own sengs, you can do so by selecng "Use the following IP address" and follow the guidelines on the next page.
-
To obtain the IP addresses specific to your network, click "Start" then "Run" and type "cmd" in the text box and click "Ok". This will bring up the MS-DOS prompt. In this window type "ipcong/all" and press enter. A screen similar to the one below will be displayed.
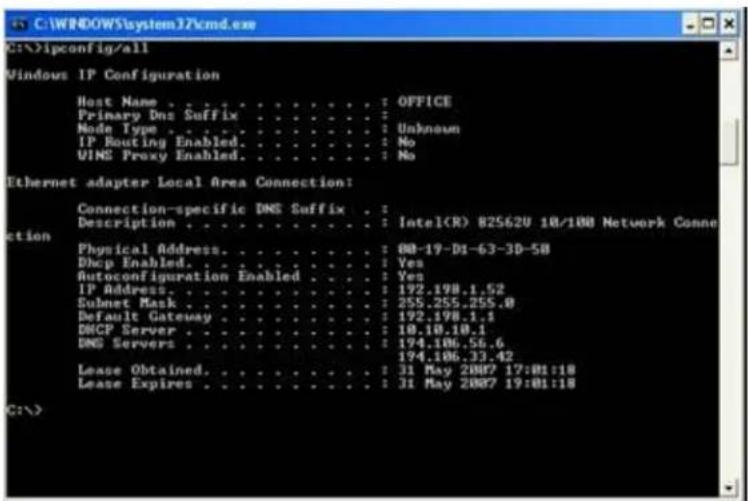
text_image
C:\>ipconfig/all Windows IP Configuration Host Name . . . . . . . . . . . . : OFFICE Primary Dns Suffix . . . . . . . . : Node Type . . . . . . . . . . : Unknown IP Routing Enabled. . . . . . . . : No VINE Proxy Enabled. . . . . . . : No Ethernet adapter Local Area Connection: Connection-specific DNS Suffix . : Description . . . . . . . . . : Intel(R) 82562U 10/100 Network Conne tion Physical Address. . . . . . . . : 00-19-D1-63-3D-50 Dump Enabled. . . . . : Yes Autoconfiguration Enabled . . : Yes IP Address. . . . . . . . : 192.198.1.52 Subset Mask. . . . . . . : 255.255.255.0 Default Gateway. . . . . . : 192.198.1.1 DHCP Server. . . . . . : 10.10.10.1 DNS Servers. . . . . : 194.106.56.6 Lease Obtained. . . . . : 31 May 2007 17:01:18 Lease Expires. . . : 31 May 2007 19:01:18 C:\>- Take note of the following:
a. IP Address
b. Subnet Mask
c. Default Gateway
d. DNS Servers (Both numbers with the rst being the primary DNS server and the second being the secondary DNS server)
- Enter the details noted in step 6 into the relevant elds in the setup.
Note: The default IP address of the camera is 192.168.1.150. This can be changed to any IP address on your IP range. For example if the IP address of your PC is 192.168.1.52 then the IP address of your camera should be unique and on the same subnet, i.e. 192.168.1.X where X is any number between 1 and 255 except 52. Ensure the IP address you chose is not the same as other devices on your network as this will result in conict and may cause the device to not work properly.
- Once you've entered the details click "Apply" then "Exit".
7.2 Proxy Server Seng
A proxy server may prevent you from connecng to the Y-cam in some corporate environments.
If your computer uses a proxy server, the easiest way to check is via Internet Explorer conneccon sengs.
Note: A proxy server is generally used to maintain security on a network when connected to the internet. The proxy server may cause lack of image quality and delays in refresh intervals. Consult your network administrator for further details.
Start Internet Explorer.
Select [Tools] -> [Internet Opons...] -> [Connecons] tab and click [LAN Sengs].
Verify that the Use a proxy server check box is not checked.
When not checked, click [Cancel]. Your proxy server sengs should not cause any problems.
If it is checked, click [Advanced...]
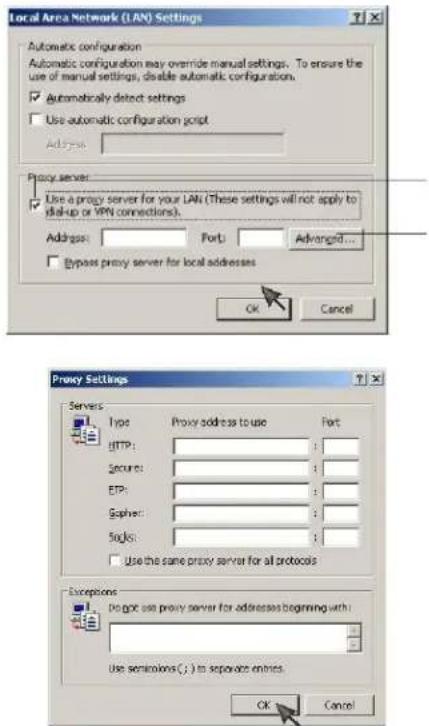
text_image
Local Area Network (LAN) Settings Automatic configuration Automatic configuration may override manual settings. To ensure the use of manual settings, disable automatic configuration. ✓ Automatically detect settings ☐ Use automatic configuration script Address: Proxy server: ✓ Use a proxy server for your LAN (These settings will not apply to dial-up or VPN connections). Address: Port: Advanced... ☐ Eypass proxy server for local addresses OK Cancel Proxy Settings Servers Type Proxy address to use Port HTTP: Secure: EP: Gopher: Single: Use the same proxy server for all protocols Exceptions Do pct use proxy server for addresses beginning with: Use semicronics(); to separate entries. OK CancelUnder excepons, enter the IP address of your Y-cam into the Do not use proxy server for addresses beginning with data eld.
Click [OK] on all of the opened windows to conrm all sengs.
7.3 Enabling Acve X in Internet Explorer
Your browser must have Acve X enabled to view the camera in Internet Explorer. To acvate this, do the following:
1) Open a new Internet Explorer window.
2) From the menu bar, select Tools, and then select Internet opons...
3) From the Internet Opons window, select the Security tab.
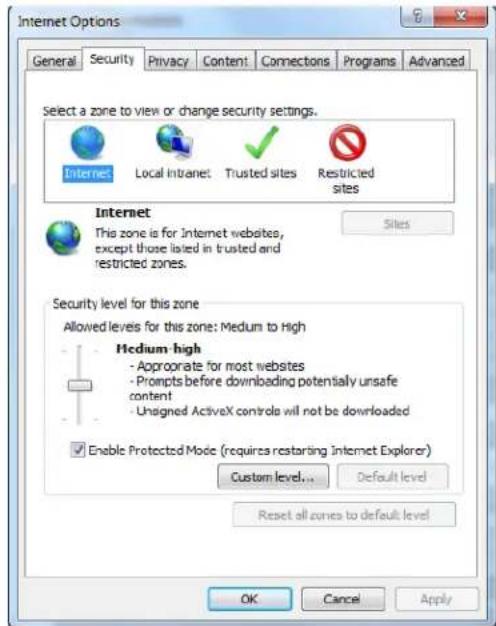
text_image
Internet Options General Security Privacy Content Connections Programs Advanced Select a zone to view or change security settings. Internet Local Intranet Trusted sites Restricted sites Internet This zone is for Internet websites, except those listed in trusted and restricted zones. Security level for this zone Allowed levels for this zone: Medium to High Medium high - Appropriate for most websites - Prompts before downloading potentially unsafe content - Unsigned ActiveX controls will not be downloaded Enable Protected Mode (requires restarting Internet Explorer) Custom level... Default level Reset all zones to default level OK Cancel Apply4) Click on the Custom Level... buon.
5) Scroll down to the secon labelled ActiveX controls and plug-ins. Select the opon buons so that they match the window below and then click OK to exit the window.
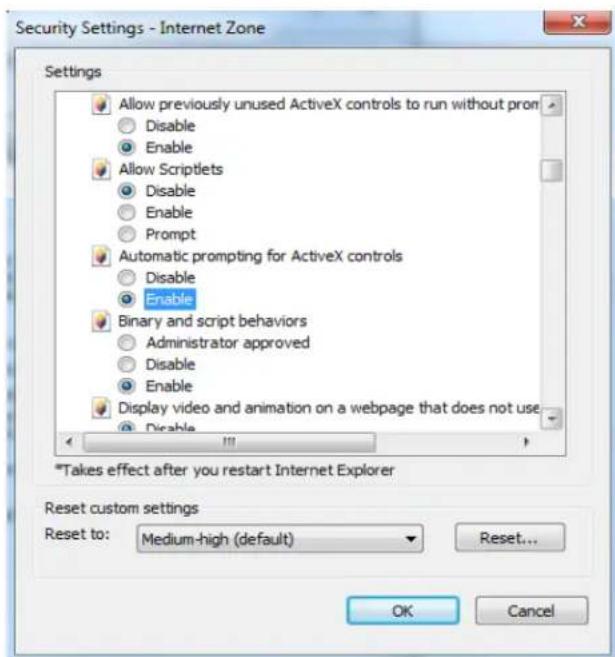
text_image
Security Settings - Internet Zone Settings Allow previously unused ActiveX controls to run without pron Disable Enable Allow Scriptlets Disable Enable Prompt Automatic prompting for ActiveX controls Disable Enable Binary and script behaviors Administrator approved Disable Enable Display video and animation on a webpage that does not use Disable *Takes effect after you restart Internet Explorer Reset custom settings Reset to: Medium-high (default) Reset... OK Cancel7.4 Recovering from a failed Firmware update using Windows
If you have tried to install a new rmware on your camera, and the procedure has failed, your camera may be unresponsive. If the rmware update failed, and your cameras BIOS loader has become corrupted, your cameras LED will be ashing green when turned on.
If this has happened, we advise you to get in contact with your cameras reseller or Y-cam directly who may be able to x the camera.
There is a procedure you can try yourself, however it is quite advanced, so should only be aempted by those with a solid understanding of TCP/IP and running commands from the DOS command prompt.
For this procedure, you will need a Crossover Network Cable. This is not a standard network cable as provided in the box with your Y-cam. A Crossover Network Cable ips the transmit and receive pairs of wires in the cable, allowing your computer to talk to the Y-cam directly.
Procedure:
- Download the correct new rmware for your camera from hp://www.y-cam.com and save this to your hard disk.
- Unzip (uncompress) the rmware to a directory on your PC. Copy the rmware .MFW le to an easy to access place, such as C:\rmware.
- Write down the full name of the rmware .MFW lename.
- Connect the camera via the Crossover Cable directly to your computer.
- Open Network Setngs, and make a note of your current TCP/IP Sengs.
- Now change them to the following:
IP Address: 192.168.168.100
Subnet Mask: 255.255.255.0
Default Gateway: 192.168.168.1 - Click OK to save these sengs.
- Open an MS-DOS Command Prompt, or choose "Run" from the start menu and type "cmd.exe".
- Change the path in the command prompt to the locaon of the camera rmware (as in step 2) e.g. C:\rmware and then leave this window open.
- Power o the camera, wait 5 seconds, push down on the reset buon on the side of the camera, and with the reset buon sll pressed down, power on the camera again.
- Release the reset buon. The Green LED should start flashing indicang that the camera is in the Firmware Dump Mode.
-
Go back to your Command Prompt window on your PC.
-
Type this command in to the prompt: "tp -i 192.168.168.1 put YOUR_FIRMWARE_NAME.mfw"
- You will need to replace YOUR_FIRMWARE_NAME.mfw with the name of the rmware you downloaded (step 3)
- Press Enter aer typing the command.
- The camera's green LED will stop ashing. This means the rmware is being loaded.
- Please wait until the LED starts flashing again – this means the rmware has nished installing.
- Turn the power o to the camera.
- Unplug the crossover cable.
- Restore your TCP/IP Sengs to their previous state (as in step 5)
Your camera should now be restored to its factory default sengs and be working again – you can proceed to the start of the manual and setup your camera as normal.
7.5 Connecng your Y-cam directly to a Computer
You can also connect the Y-cam directly to a computer. Please note that in this mode you will not be able to view your Y-cam from anywhere else apart from the computer you are currently using.
Connect one end of the network cable in to the Y-cam Network Connecon socket, and plug the other end in to a spare network port on your computer.
Connect the included power adapter to the power port on the camera and the other end into an electrical socket. Do not turn the power on at this me.
You must then assign your computer an IP address so it can talk easily to the camera.
On a PC :
- Open the Control Panel and double click on "Network Connecons" then right click on your "Local Area Network" conncon, and click Properes. Be sure to select the Network icon that corresponds to where you have plugged the Y-cam in to – so this would not be listed as a Wireless, Wi-Fi or Bluetooth Network.
- Select "Internet Protocol (TCP/IP)" then click Properes.
- Take note of your current TCP/IP Sengs and then click on "Use the following IP sengs"
- In the "IP Address" Field type in the number 192.168.1.20
- In the "Subnet Mask" type in 255.255.255.0
- In the "Default Gateway" type 192.168.1.150 (The camera will automatically assign itself this IP address when no DHCP server is present)
- Leave DNS server sengs blank.
- Click "OK" then "Close" to apply these sengs.
- Turn the power on to the Y-cam.
- The Connecvity Status indicator on the front of the camera will light up.
You can now proceed to the Soware Installaon secon.
On a Mac :
-
Open "System Preferences" from the dock, and then select "Network" to edit your network settings. As the Y-cam is connected to your Mac using a cable we must choose the "Built-in-Ethernet" opon. Select "Built-in Ethernet" and click the "Congure" buon. Make a note of your current TCP/IP Sengs.
-
Select "Manually" from the IPv4 drop-down box at the top of the dialog, and then enter these sengs: IP Address : 192.168.1.20
Subnet Mask : 255.255.255.0
Router/Default Gateway : 192.168.1.150
DNS Servers: Leave blank, not important at this stage.
Search domains: Oponal, leave blank, not important.
-
The click "Apply Now".
-
Turn the power on to the Y-cam.
-
The Connecvity Status indicator on the front of the camera will light up.
You can now proceed to the Soware Installaon secon.
7.6 Using Third Party Soware
Any soware that supports generic MJPEG cameras should work with Y-cam IP cameras.
In order to use the Y-cams with soware that supports adding a generic MJPEG camera, please use the path of your camera with "/stream.jpg" on the end of it. This will instruct the soware to extract the Moon JPEG video stream from the specied path in the Y-cam. All current Y-cam models support this method.
7.7 Alternate methods of accessing the video stream
You can also access video/images from the network camera in the following ways:
- Moon JPEG server push - hp://
: /stream.jpg - Sll JPEG images in a browser - http://
: /snapshot.jpg - MJPEG via RTSP - rtsp://
: /live_mjpeg.sdp - MPEG4 via RTSP - rtsp://
: /live_mpeg4.sdp
| RTSP MPEG4 stream: | rtsp://:/live_mpeg4.sdp |
| RTSP MJPEG stream: | rtsp://:/live_mjpeg.sdp |
| HTTP MPEG4 stream: | hp://:/stream.av |
| HTTP MJPEG stream: | hp://:/stream.jpg |
| HTTP snapshot image: | hp://:/snapshot.jpg |
For further details please click on the links in the "Stream Setup" page of the camera sengs by the name of "Primary Stream", "Secondary Stream" and "Mobile Stream".
7.8 Viewing your Y-cam on a Mobile Phone
Y-cam is dedicated to providing easy to use IP cameras. In view of this we have made some changes to the way users can view their cameras from a mobile phone.
1) View your camera via the specially designed /mobile extension
2) View your cameras live stream on your iPhone via /iphone extension
3) Use our free mobile apps available for popular smartphones
For some mobile phones you can simply access the standard web address of your camera and it will work ne
7.8.1 Using the /mobile extension
The easiest way to access the camera from any mobile phone is to visit hp://
You may be prompted for the cameras username and password depending on the sengs of your camera. Once logged in, you should see the following screen:
text_image
Picture live 3GPP stream live Setting[Picture Live] – provides an automacally refreshing snapshot, which can be viewed on virtually any handset.
[3GPP Stream Live] - this will open the mobile stream of the Y-cam, and will try to play it on your cameras media player.
[Sengs] - allows you to setup both the 3GPP stream and the Picture Live view. Please note that you need the admin password to make any changes to these sengs.
7.8.2 Using the /iphone extension
If you are using an iPhone, you can now access the MJPEG stream compatible with iPhone by pung "/iphone" on the end of your cameras address -hp://
7.8.3 Using our free smartphone apps
Y-cam has developed free smartphone apps for iPhone, Android, Symbian and BlackBerry. These are available as free downloads from the Y-cam website http://www.y-cam.com and also from the associated devices App stores.
7.8.4 Troubleshoong with Mobile Devices
If you can't view the camera from your mobile phone, please try accessing some of the demo cameras on the main Y-cam website hp://www.y-cam.com. If these work, your camera may not be properly congured.
Most mobile phones use Real Player for video streaming. As Real Player cannot handle Authencaon, you will need to Disable Authencaon from the Sengs page via the mobile login.
8.0 TROUBLESHOOTING
| Problem | Cause and Remedy |
| I forgot the IP address of the Y-cam | 1. Use the Y-cam Setup program. |
| I forgot my password to access the Sengs menu | 1. You will need to press the RESET buon.Note: all conguraon sengs will be lost. |
| Wi-Fi connecvity doesn’t work. | 1. Signal strength is weak. Relocate the camera nearer to your router or remove the obstacles between the two.2. Make sure your wireless network SSID and Encrypon sengs are identical to your networks.3. Check for any interference from other equipment. |
| The picture viewing interface does not appear. | 1. Check that your Internet Explorer sengs allow you to download and install AcveX controls.2. Maximum 16 users are allowed to access the camera simultaneously through the network.3. Network trac may prevent the viewing interface from appearing quickly. Wait for a while.4. Refresh the page. |
| The colour of the picture is strange. | 1. Conrm the colour seng of PC is 16 bits or more.2. Idenfy which Y-cam model you have, Infrared versions of the camera somemes have shades of colour spectrum alter the images the camera displays due to the Infrared LEDs. |
| Unreadable characters are displayed. | 1. Set the Encoding or the Character Set of the selected language on the web browser |
| I cannot see the controls of the Live Feed as the pictures goes over them | 1. Reset your browsers Zoom seng or text size seng – pressing Ctrl and “0” (zero) at the same me should do this.2. Try to nd sengs that reset your page zoom or text zoom. |
| The moon detecon feature does not send e-mail alerts. | 1. Check the e-mail alert feature is properly congured2. The SMTP server that the IP camera uses to send the e-mail may be ltering e-mail to prevent spam from being sent from your server. Try using a dierent SMTP server or contact your ISP to see if SMTP access is being blocked.3. Your Primary DNS IP Address may not be set |
| The power LED is ashing green and the camera is inaccessible | 1. A rmware upgrade has been interrupted or the rmware has otherwise been damaged. Please contact your place of purchase or Y-cam Technical Support |
| Moon Detecon triggers unexpectedly | 1. Moon detecon is based on changes in pixel in the image. This means that if there are sudden changes in the lightng, moon detecon may be triggered mistakenly. Lower the sensitivity seng to avoid problems. |
| What do the changes to the LED light mean? | Amber - Steady for conncon to a 10/100 M bit/s network.Amber - Flashes for network acvity.Green - Steady for conncon to a wireless network.Green - Flashes for network acvity. |
If your Y-cam is not working properly, these suggestions might help you identify the problem. If the problem persists check the support secon on hp://www.y-cam.com/
9.0 GLOSSARY OF TERMS
Adhoc Mode: A wireless network system in which devices communicate directly with each other, without the use of a wireless router.
DDNS: DDNS is a method of keeping a domain name linked to a dynamic IP address with your Network Camera. You can set up your DDNS service and the device will automatically update your DDNS server each me it alter a dierent IP address.
DHCP: Dynamic Host Conguraon Protocol is a set of rules used by communicaons devices such as a computer, router or network adapter to allow the device to request and obtain an IP address from a server which has a list of addresses available for assignment.
Firmware: The rmware is the soware in your Y-cam that makes the hardware functional and allows you to use the many features of your wireless IP Camera
FTP: File Transfer Protocol. Network cameras equipped with an embedded operang system, such as Linux, can use FTP to send images to a website.
Gateway Address: IP address of the gateway through which the IP camera is connected
IEEE 802.11b/g: The speciaons developed by the IEEE for wireless network technology. It provides 11 Mbps transmission in the 2.4GHz band usage.
Infrastructure Mode: One of the wireless network system in which devices communicate with each other by rst going through the wireless router.
IP Address: The unique 32 bit number assigned to each computer connected to the Internet. IP numbers are used by the TCP/IP protocol to route packets of data to their desnaons.
JPEG: A standard image format, used widely for photographs, also known as JPG.
Network Camera: A stand-alone device which allows users to view live, full moon video from anywhere on a computer network, even over the Internet, using a standard web browser.
Primary DNS: IP address of the primary DNS server, if congured for the IP camera
Subnet Mask: Subnet mask of the LAN to which the IP camera is connected
TCP/IP: The collecon of "protocols" underlying the functioning of the Internet. Each computer connected to the Internet is idened by a unique IP Address.
Time server: A me server consists of a computer networking device that reads the actual me from a reference clock and distributes this informaon to its clients using a computer network.
UPnP: Universal Plug and Play is architecture for pervasive peer-to-peer network connectivity of intelligent appliances and wireless devices.
WEP: Wireless Equivalent Privacy. A security protocol for wireless network dened in the IEEE 802.11b/g standard. WEP aims to provide security by encrypng data over radio waves so that it is protected as it is transmied from one end point to another.