
L2K1500 - Video projector Christie - Free user manual and instructions
Find the device manual for free L2K1500 Christie in PDF.


User questions about L2K1500 Christie
0 question about this device. Answer the ones you know or ask your own.
Ask a new question about this device
Download the instructions for your Video projector in PDF format for free! Find your manual L2K1500 - Christie and take your electronic device back in hand. On this page are published all the documents necessary for the use of your device. L2K1500 by Christie.
USER MANUAL L2K1500 Christie
Network Set-up & Operation
USER MANUAL
020-000389-01
Network Set-up and Operation
Wired Setting
Projector Set-up and Operation
natural_image
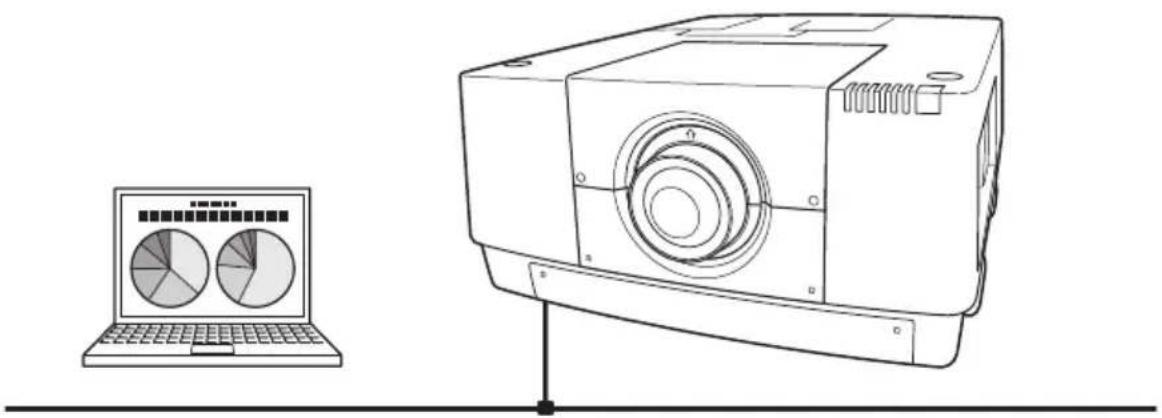
Line drawing of a projector with two pie charts displayed on a laptop (no text or symbols)This is the manual for the Network function.
Read this manual thoroughly to operate the Network function.
First, read the user's manual of the projector to understand the basic operation of the projector and the safety instructions.
The safety instructions in the user's manuals should be followed strictly.
User Manual
for L2K1500
Federal Communications Commission Notice
This equipment has been tested and found to comply with the limits for a Class A digital device, pursuant to Part 15 of FCC Rules. These limits are designed to provide reasonable protection against harmful interference when the equipment is operated in a commercial environment. This equipment generates, uses, and can radiate radio frequency energy and, if not installed and used in accordance with the instruction manual, may cause harmful interference to radio communications. Operation of this equipment in a residential area is likely to cause harmful interference in which case the user will be required to correct the interference at his own expense.
Do not make any changes or modifications to the equipment unless otherwise specified in the instructions. If such changes or modifications should be made, you could be required to stop operation of the equipment.
WARNING
This is a Class A product. In a domestic environment this product may cause radio interference in which case the user may be required to take adequate measures.
CAUTION IN USING THE PROJECTOR VIA NETWORKS
- When you find a problem with the projector, remove the power cable immediately and inspect the unit. Using the projector with failure may cause fire or other accidents.
- If you remotely use the projector via networks, carry out a safety check regularly and take particular care to its environment. Incorrect installation may cause fire or other accidents.
CAUTION!N USING NETWORK FUNCTION
- We assume no responsibility for the loss or damage of data, or damage of the computer caused by using this projector. Making back-up copies of valuable data in your computer is recommended.
Compliance 2
Safety instructions....3
Table of contents 4
Chapter 1 Preparation ....5
Features......6
Required operating environment for computers....7
Network specifications of the projector....7
Flow of installation....9
Notice about installing Software CD-ROM....9
Chapter 2 Setup Procedures....11
Connecting to the LAN line 12
Network configuration....12
Network PIN code 14
Network information....14
Network factory default 15
Wired LAN factory default settings....15
Chapter 3 Basic Setting and Operation 17
Login the setting page of the projector....18
[1] Enter the IP address.... 18
[2] Login 18
[3] Display of main setting page....19
How to use the setting page 20
Initial setting....22
Network PIN code setting 23
PJLink and password setting....23
Network configuration....24
E-mail setting....25
Examples: Type and contents of alert mail 28
SNMP setting....29
Chapter 4 Controlling the Projector 31
Power control and status check....32
Control....34
Input 34
System....35
Image adjustment....36
PC adjustment....37
Setting up the projector 38
Screen setting 38
Lens adjustment 39
Setting 1....40
Setting 2....41
Setting 3....42
Setting 4....43
Information....44
Information 1 44
Information 2 45
Network 45
Chapter 5 Appendix ...... 47
Examples of connection....48
Use of telnet....50
Web browser setting....52
Examples: OS/Browsers 53
Q&A 57
Chapter 1
Preparation
1
Describes features and operating environment of this projector.
Features
Web Management function (p.31)
With this function, you can monitor projector functions such as power status, lamp status, input mode, signal condition, lamp-use time, etc. through the network by using the web browser installed on your computer.
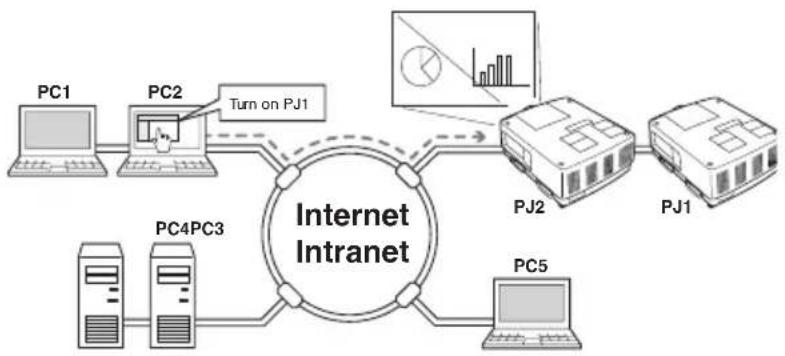
flowchart
graph TD
    PC1["PC1"] --> PC2["PC2"]
    PC2 -->|Turn on PJ1| InternetIntranet["Internet Intranet"]
    InternetIntranet --> PJ2["PJ2"]
    InternetIntranet --> PJ1["PJ1"]
    InternetIntranet --> PC5["PC5"]
    InternetIntranet --> PC4PC3["PC4PC3"]
    InternetIntranet --> PC4PC3
    InternetIntranet --> PC4PC3
    InternetIntranet --> PC4PC3
    InternetIntranet --> PC4PC3
    InternetIntranet --> PC4PC3
    InternetIntranet --> PC4PC3
    InternetIntranet --> PC4PC3
    InternetIntranet --> PC4PC3
    InternetIntranet --> PC4PC3
    InternetIntranet --> PC4PC3
</details>
<h1 id="e-mail-alert-function-p25">E-Mail Alert function (p.25)</h1>
The projector sends messages to the registered e-mail addresses when a lamp abnormality or power failure occurs with the projector. This message describes how to solve the cause of the problems. You can take efficient action for quick recovery.

<details>
<summary>flowchart</summary>
```mermaid
graph LR
PC1["PC1"] --> PC2["PC2"]
PC2 --> InternetIntranet["Internet Intranet"]
PC4["PC4PC3"] --> InternetIntranet
InternetIntranet --> PC5["PC5"]
PC5 --> PJ1["PJ1"]
PJ1 --> PJ2["PJ2"]
PJ2 --> PC5
PC5 -->|You've got Mail| PJ2
SNMP Agent function (p.29)
To send the information of the projector to the SNMP manager. Enables you to manage the projector condition with the supplied SNMP manager software.
SNMP Manager function
A function to manage the condition of projectors in the network by using the SNMP protocol. The managing computer needs to provide an SNMP managing software. Refer to the owner's manual of the "PJ Network Manager" supplied separately for further details.
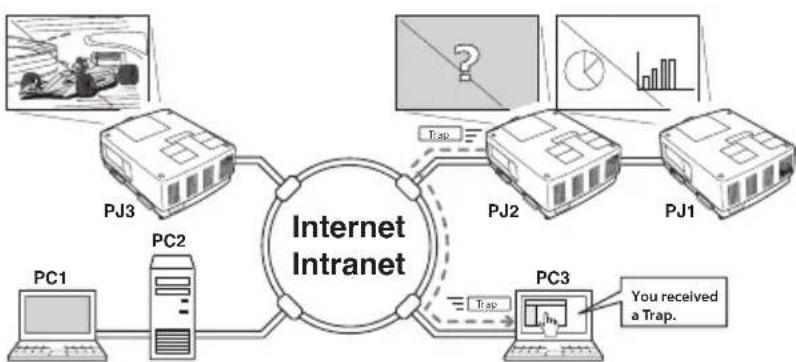
flowchart
graph TD
    PC1["PC1"] --> PC2["PC2"]
    PC2 --> PC3["PC3"]
    PC3 -->|Trap| PC2
    PC3 -->|Trap| PJ1["PJ1"]
    PJ1 --> PJ2["PJ2"]
    PJ2 -->|Trap| PJ3["PJ3"]
    PJ3 --> InternetIntranet["Internet Intranet"]
    InternetIntranet -->|Trap| PJ2
    InternetIntranet -->|Trap| PJ1
    InternetIntranet -->|Trap| PC3
Required operating environment for computers
When operating the projector via networks, computers should meet the operating environment below.
| Operating System | Windows 2000, Windows XP (32bit version), Windows Vista (32bit version), Windows 7 (32bit version)Mac OS X v 10.4 or 10.5 | |
| Computer environment | Recommended CPU | Windows: Pentium III 900MHz or moreMacintosh : 800 MHz PowerPC G4 or faster,or 1.8 GHz Intel Core Processor or faster |
| Memory | Windows : 64MB (Minimum)/ 128MB or more (Recommended)128MB or more for Windows XP1GB or more for Windows Vista or Windows 7Macintosh : 256MB or more (512MB is recommended) | |
| Free disk space | 100MB or more | |
| Drive equipment | CD-ROM drive | |
| Display settings | Support one of following resolutions; VGA (640 x 480), SVGA(800 x 600), XGA(1,024 x 768) Number of colors: Either of 16 bit (65,536 color 24/32 bit (16.77 million colors)) | |
| Network card | The computer must provide a 10Base-T or 100Base-TX network card. | |
| Web Browser* | Internet Explorer version 6.0, 7.0 or 8.0Netscape Navigator version 7.1 or 9.0Safari 3.1* Used to control and set up the projector. The layout of pages in the browser may slightly differ from each type of application or operating system you use. | |
| Recommended Internet Mailer* | - Microsoft Outlook - Microsoft Outlook Express- Netscape Mail* Required the internet e-mail application software to receive an e-mail alert sent from this projector. If you do not use the function E-mail Alert, this application is not required. | |
Network specifications of the projector
LAN Terminal
| Data communication standards 10/100/1000Base-T compatible | |
| Physical layer 10Base-T | |
| Protocol TCP/IP | |
Cabling Between the Projector and a Hub or computer ^*1
Use an appropriate cable when connecting the projector and a hub or computer.
| Connection Ethernet cable type Max. cable length | |
| Projector - Hub STP straight-through category 5*2 cable 100m (328feet) | |
| Projector - Computer STP crossover category 5*2 cable 100m (328feet) |
*1 There may be other limitations depending on your network environment or LAN specification. Please consult your network administrator for further details.
*2 Cable category indicates cable quality.
Notice
Expression/Abbreviation
The OS of the computer and the Web browser described in this manual are Windows XP Professional and Internet Explorer 6.0. In case of another OS or Web browser, some instruction procedures may differ from the actual operation depending on your computer environment.
Use of this manual
This manual does not provide the detailed description of basic operation and functions for computer, web browser, projector and network. For instructions about each piece of equipment or application software, please refer to the respective manual.
Trademarks
Ethernet is a registered trademark of Xerox Corporation. Microsoft, Windows, Windows NT, Windows XP, Windows Vista and Windows 7 are registered trademarks of Microsoft Corporation in the United States and other countries. Internet Explorer is a registered trademark of Microsoft Corporation. Netscape Navigator and Netscape Communicator are trademarks or registered trademarks of Netscape Communications Corporation. JavaScript is a registered trademark of Sun Microsystems, Inc.
Macintosh is a registered trademark of Apple, Inc. in the USA and other countries. PowerPC is a registered trademark of IBM Corporation. Intel Core is a registered trademark of Intel Corporation in the USA and other countries.
Other product or brand names in this manual are registered trademarks or trademarks of their respective owners.
* Unauthorized use of a part or whole of the contents in this manual is prohibited.
* The contents of this manual are subject to change without notice.
Flow of installation
To use the projector via the networks, follow the setup procedures below.
STEP 1 Connect the LAN and set the configuration.

Decide depending on the LAN environment.
→ "2. Setup Procedures" (pp.11–16).
Detailed LAN configurations need to be done with a browser later.
First, complete the Wired LAN connection between computers and projectors, then start browser configurations.
→ "3. Basic setting and operation" (pp.17–30).
STEP 2 Network Configuration has completed.

Follow each chapter to operate the projector.
■ Operate and manage the projector → "4. Controlling the projector" (pp.31-46)
→ "Power Control and status check" (p.32)
→ "Control" (pp.34-36)
→ "PC adjustment" (p.37)
→ "Setting up the projector" (pp.38-43)
→ "Projector information" (pp.44-46)
STEP 3 Install the Software on computers.
Install the software recorded in CD-ROM on each computer which will be operated. Refer to the owner's manual of PJ Network Manager.
Notice about installing Software CD-ROM
It is available for controlling and setting of the projector by using the web browser without installing any software. So it is not required to install the software into your computer. For PJ Network Manager function, it is required to install the software. Please see the owner's manual of "PJ Network Manager Function".
Chapter 2
Setup Procedures
Describes how to configure the network.

text_image
2Setting procedures and contents differ depending on the LAN installation location. When installing, consult your system administrator to set up the LAN appropriately.
Connecting to the LAN line
Connect the LAN cable to the LAN connection terminal of the projector.
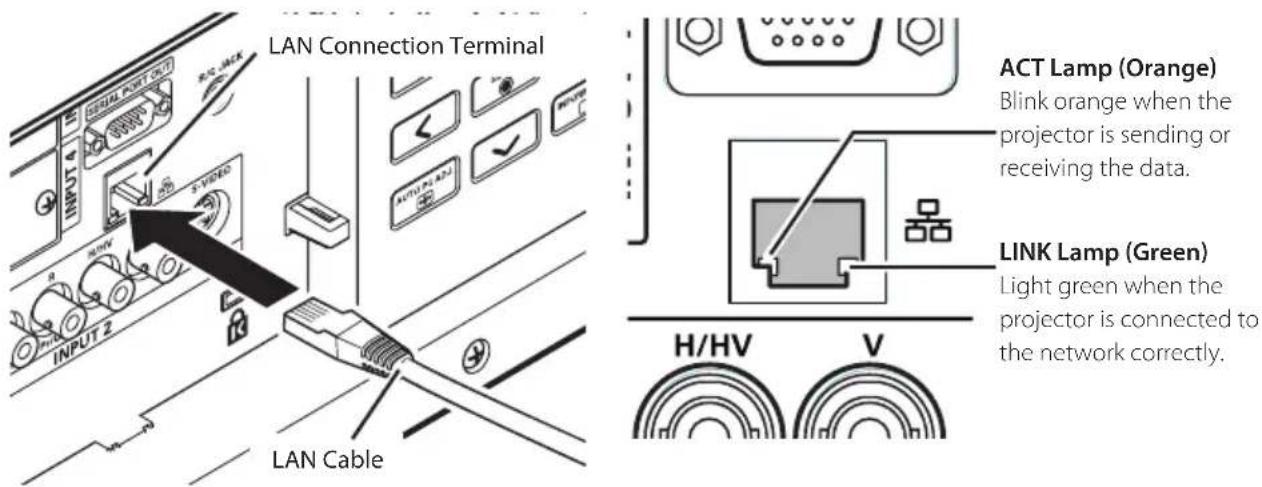
text_image
LAN Connection Terminal ACT Lamp (Orange) Blink orange when the projector is sending or receiving the data. LINK Lamp (Green) Light green when the projector is connected to the network correctly. H/HV V LAN Cable* Please use a shielded LAN cable.
Network configuration
Set the Wired LAN network through the projector menu. Detailed network settings will be made with browser. Refer to "3. Basic setting and operation" (p.17-30). First, complete the settings described in this chapter before performing steps in "3. Basic setting and operation."
Setting Procedure
- Select "Network" in the Network menu, and press Point ▶ or SELECT button.
- Select "On" with the Point ▲▼ buttons, and the press SELECT button. Then the Menu will disappear, the "Please wait..." message will appear, and switching operation will start. Switching will take a while and the projector's LINK/ACT Lamp will be on or blink, and after completing the operation, the "Please wait..." message will disappear.
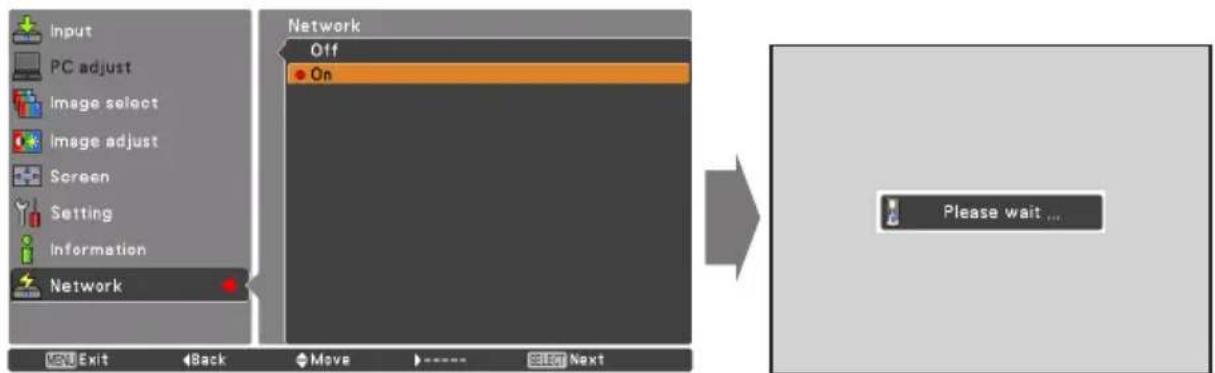
text_image
Input PC adjust Image select Image adjust Screen Setting Information Network Network Off On Exit Back Move - - - - - Next Please wait ...- Select "Network setting" in the Network menu and press SELECT button, and then the LAN setting screen will appear and selected LAN settings will be displayed. Adjust each item to the setting environment. Consult your system administrator about the detailed settings.
Press SELECT button in a row where you want to adjust, and adjust the figures with the Point ▲▼ buttons and move among the items with the Point ◀▶ buttons, and then press SELECT button to fix. Move to the next row with the Point ▲▼ buttons to adjust.
- After completing all the settings, select "Set" and press SELECT button. Now, all procedures have been done. To cancel the adjusted settings, select "Cancel" and press SELECT button.
You can confirm the LAN settings you have made from "Network information" (p.14). In such cases that the LAN cannot be connected, see this screen.
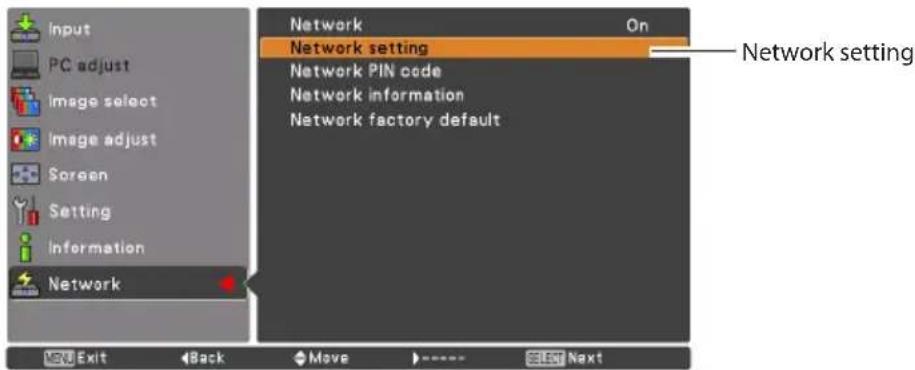
text_image
Input PC adjust Image select Image adjust Screen Setting Information Network Network setting On Network PIN code Network information Network factory default Network setting Exit Back Move Select NextDHCP: On
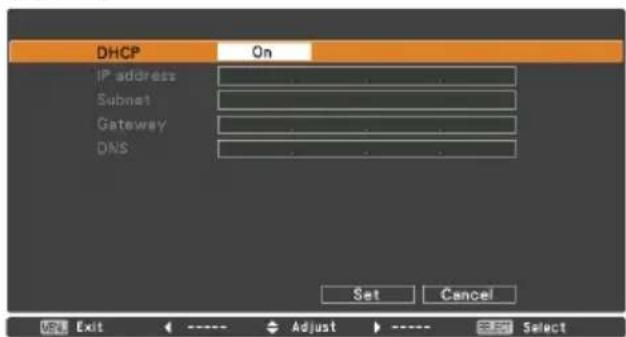
text_image
DHCP On IP address Subnet Gateway DNS Set Cancel Exit ← ---- ▶ Adjust → ---- SelectDHCP: Off
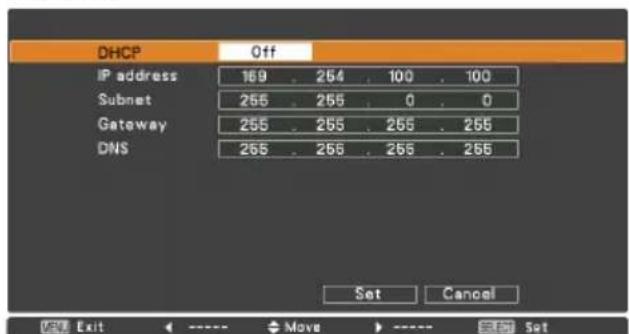
text_image
DHCP Off IP address 169 . 264 . 100 . 100 Subnet 255 . 265 . 0 . 0 Gateway 255 . 265 . 265 . 266 DNS 265 . 266 . 266 . 266 Set Cancel Exit <---- Move > ---- Set* The numerical value is a setting example.
Item Description
DHCP....Sets DHCP function On or Off. When you setup the network setting manually, select "Off". When it is set On, IP address, Subnet, Gateway and DNS are automatically set according to your network environment *^1 .
IP address ....Sets IP address of the projector
Subnet ....Sets Subnet mask. Normally sets 255.255.255.0
Gateway ^*2 .....Sets IP address of the default gateway (Router)
DNS ^*3 Sets IP address of the DNS server.
Network PIN code
The Network PIN code is to restrict the access to the projector through the network. After setting the Network PIN code, you need to enter it to operate the projector via the networks.
- Select "Network PIN code" in the Network menu, and press SELECT button.
The Network PIN code screen will appear.
- Set the Network PIN code.
Set the figures with the Point ▲▼ buttons and move to the next items with the Point ◀▶ buttons. Select "Set" and press SELECT button to set. To cancel the preset Network PIN code, select "Cancel". When you do not want to set the Network PIN code, set "0000". It is recommended to set the Network PIN code if you use the projector via the networks. The Network PIN code can be set also through the networks. See "3. Basic setting and operation" → "Initial setting" → "Network PIN code setting" (p.23).
* You can also enter the Network PIN code with the number buttons on the remote control.
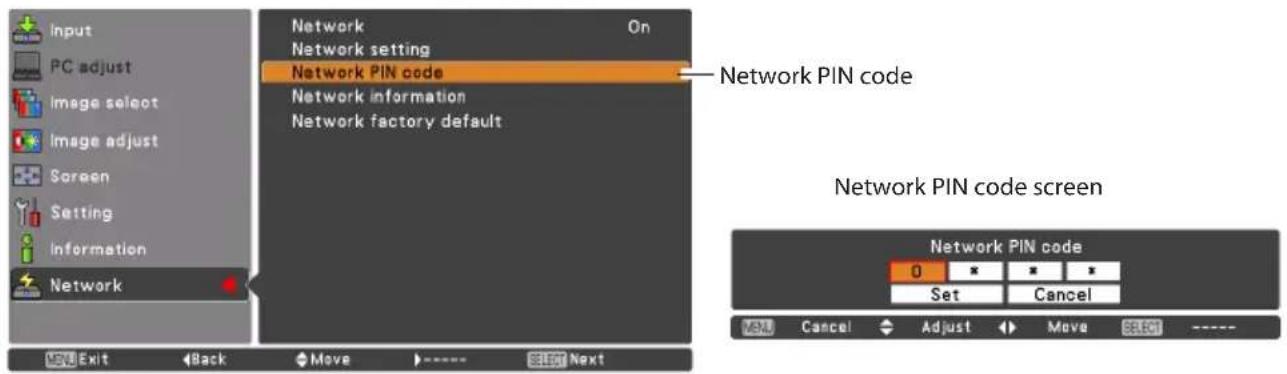
text_image
Input PC adjust Image select Image adjust Screen Setting Information Network Network setting Network PIN code Network information Network factory default Network PIN code On Network PIN code screen Network PIN code 0 * * * Set Cancel Cancel Adjust Move SELECT ----Network information
Select "Network information" in the Network menu and press Point ▶ or SELECT button to show LAN setting environment of the currently selected projector. (The description below is an example and different from what will be shown.)
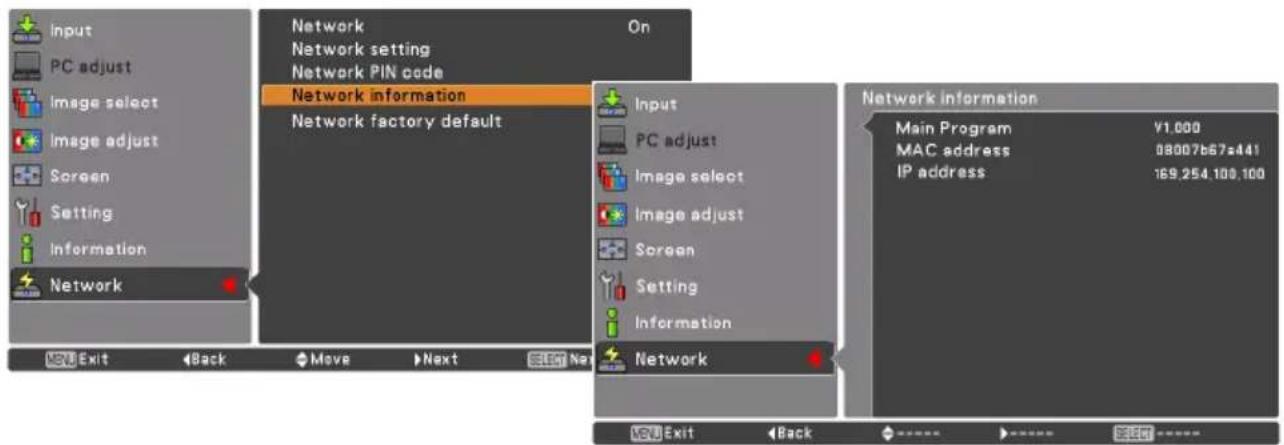
text_image
Input PC adjust Image select Image adjust Screen Setting Information Network Network Network setting Network PIN code Network information Network factory default On Input PC adjust Image select Image adjust Screen Setting Information Network Network information Main Program ¥1,000 MAC address 08007b67s441 IP address 169.254.100.100* The numerical value is a setting example.
Network factory default
- Select "Network factory default" in the Network menu and press SELECT button.
- A confirmation box appears and select "Yes" and then press SELECT button.
- Another confirmation box appears and select "Yes" and then press SELECT button.
- All the wired LAN settings will go back to the factory default settings. For details, refer to "Wired LAN factory default settings" as shown in the table below.
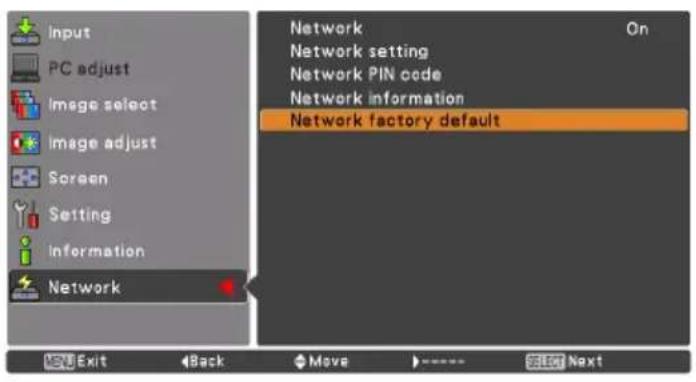
text_image
Input PC adjust Image select Image adjust Screen Setting Information Network Network On Network setting Network PIN code Network information Network factory default NEW Exit Back Move ---- Select Next
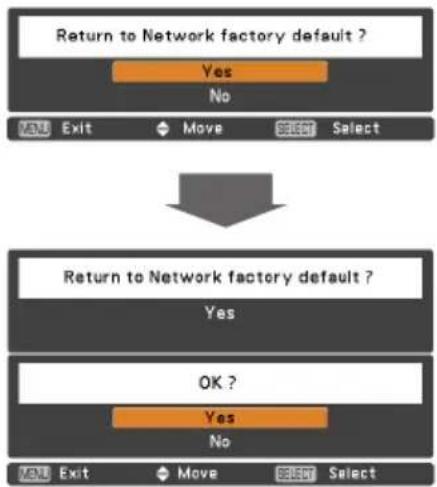
flowchart
graph TD
    A["Return to Network factory default ?"] --> B{Yes}
    A --> C{No}
    B --> D["Exit"]
    C --> E["Move"]
    D --> F["Select"]
    E --> G["Select"]
    H["Return to Network factory default ?"] --> I{Yes}
    H --> J{OK ?}
    I --> K{Yes}
    I --> L{No}
    J --> M["OK"]
    J --> N["No"]
Wired LAN factory default settings
| Parameter Settings | |
| DHCP Off | |
| IP ADDRESS 169.254.100.100 | |
| SUBNET MASK 255.255.0.0 | |
| GATEWAY ADDRESS 255.255.255.255 | |
| DNS ADDRESS 255.255.255.255 | |
Chapter 3
Basic Setting and Operation
Describes basic operations and settings for controlling the projector by using the web browser. It is required that computer and projector is connected to the network and the network address is properly configured.

text_image
3Login the setting page of the projector
[1] Enter the IP address
Launch the web browser installed in your computer, enter the IP address into the "Address" on the browser and then press "Enter" key.
Enter the address that you configured in item "Network configuration" (p.12).
![Christie L2K1500 - [1] Enter the IP address - 1](/content/2026/05/819150/images/e1445fcdcc6818ee9eec8d872620b7b5ce3f8adbf6675b2dd71045c8130dd6c0.jpg)
text_image
Network - Microsoft Internet Explorer File Edit View Favorites Tools Help Back Search Address http://192.168.1.201/ http://192.168.1.201/ Amazon.co.jp Yahoo! JAPAN News (147)* The numerical value is a setting example.
[2] Login
If the setting page has set the password, the authentication window will appear. In this case type "user" onto the User Name text area and the login Network PIN code onto the Password text area and then click OK (Log in) button.
* The entering User Name must be "user" and it can not be changed.
[Note]
When accessing the projector for the first time or the Network PIN code "0000" is set, the auto-login will be performed and the next main setting page is displayed.
![Christie L2K1500 - [2] Login - 1](/content/2026/05/819150/images/029b5af43be1f315a21bed4958d34e6575cdec05f3cd0fb978fb5d3c0d6bdf6d.jpg)
text_image
Connect to 192.168.1.201 id = user User name: user Password: ***** Remember my password OK Cancel![Christie L2K1500 - [2] Login - 2](/content/2026/05/819150/images/e0bc1643f633f5817f09a7d3645309807d9549d814579987a4a50586f737bc46.jpg)
text_image
To view this page, you need to log in to area "id = user" on 192.168.1.201. Your password will be sent in the clear. Name: user Password: ***** Remember this password in my keychain Cancel Log In[3] Display of main setting page
The following main setting page will be displayed according to your display mode selection. Perform various kinds of settings through this page. Click on the menus to display the control and setting pages.
Main setting page in the display
![Christie L2K1500 - [3] Display of main setting page - 1](/content/2026/05/819150/images/2f3c4faff80436c1f036534995be7755ebe47c253d79b9980210516c965ea1b6.jpg)
text_image
Control Input / System / Image adj. Contrast 32 Set Brightness 32 Set Color 32 Set Tint 32 Set Color temp --- Set White balance Red 32 Set Green 32 Set Blue 32 Set Offset Red 32 Set Green 32 Set Blue 32 Set Auto picture control --- Set Advanced color Auto Set Sharpness 16 Set Gamma 3 Set Noise reduction ON Set Progressive ON Set Reset Reset Store Image1 Store Load image mode Dynamic Load Sub menu tab Switches the sub menu tab. Main menu For selection of control and setting items of the projector. Setting page Displays the control and setting items according to the selected menu.How to use the setting page
To control and set up the projector, use the setting menus on the web browser. Describes the basic operation and procedures commonly used on this manual.
Example of the setting page
The setting menu appears when clicking the sub menu tab.
* Each item has a valid setting range respectively.
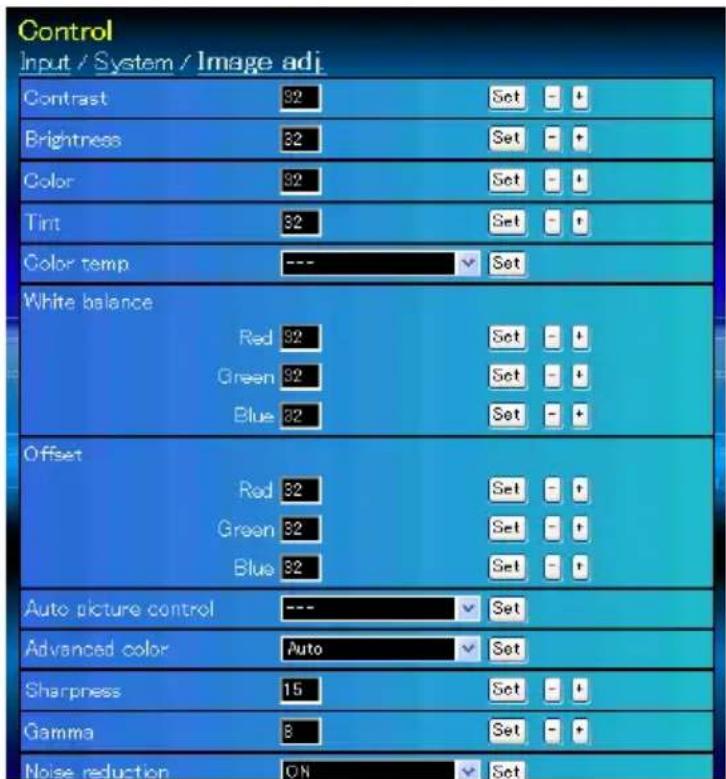
text_image
Control Input / System / Image adj. Contrast 92 Set - + Brightness 32 Set - + Color 92 Set - + Tint 32 Set - + Color temp --- Set White balance Red 92 Set - + Green 92 Set - + Blue 32 Set - + Offset Red 32 Set - + Green 32 Set - + Blue 32 Set - + Auto picture control --- Set Advanced color Auto Set Sharpness 15 Set - + Gamma 8 Set - + Noise reduction ON SetTypes of setting
Text box setting
Enter a number or text and then click Set button.
or
Change a value with - or + button.
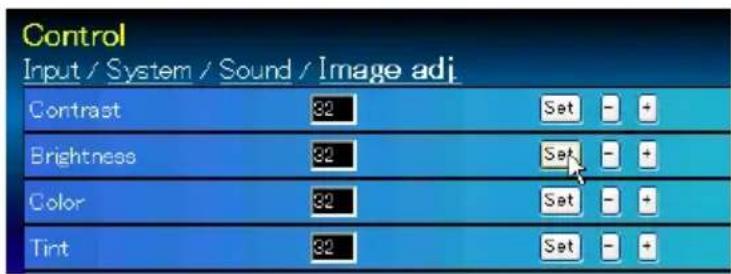
text_image
Control Input / System / Sound / Image adj. Contrast Set - + Brightness Set - + Color Set - + Tint Set - +Pull-down menu setting
Select an item with pull-down menu button and then click Set button.
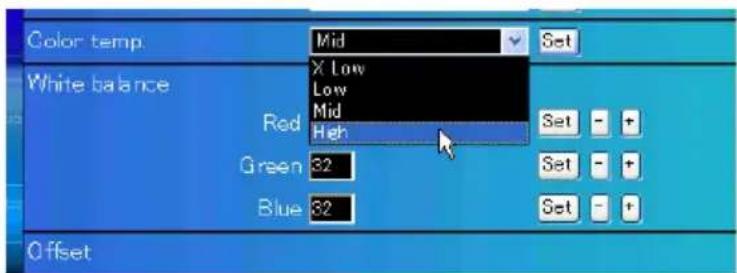
text_image
Color temp Mid Set White balance X Low Low Mid Red High Set - + Green 32 Set - + Blue 32 Set - + OffsetThe value in the text box indicates current value.
Each item has a valid setting range. The setting value exceeding this becomes invalid. Some control items can not be used depending on the selecting input mode or functions of the projector you use. In this case, the values of those items are indicated with "---".
Radio button setting
Select an item by selecting a radio button.
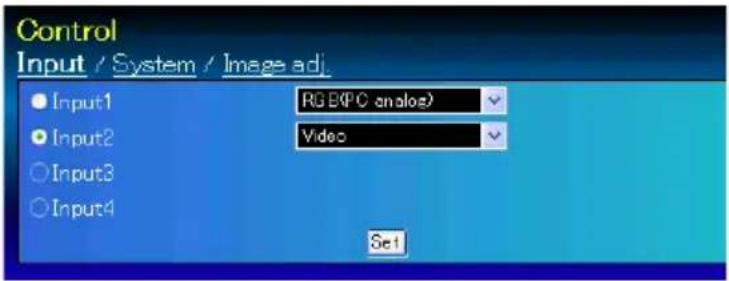
text_image
Control Input / System / Image adj. Input1 RG EKPC analog2 Input2 Video Input3 Input4 Set1Check box setting
Select items by ticking on check boxes.
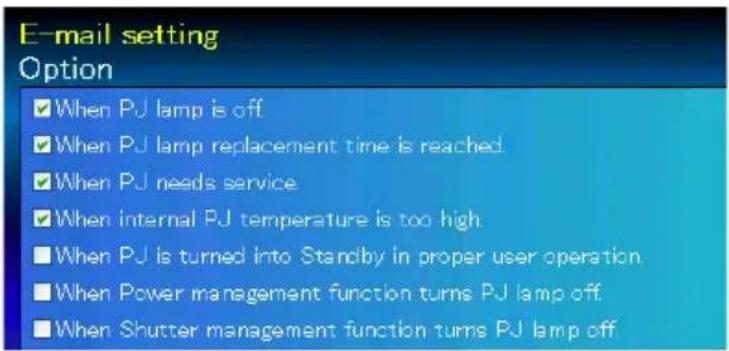
text_image
E-mail setting Option ✓ When PJ lamp is off ✓ When PJ lamp replacement time is reached. ✓ When PJ needs service ✓ When internal PJ temperature is too high. ■ When PJ is turned into Standby in proper user operation. ■ When Power management function turns PJ lamp off. ■ When Shutter management function turns PJ lamp off
natural_image
Blue glossy circular icon with a white camera and gear symbol (no text or numbers)Initial setting
After installing the projector, perform the following basic initial setting. Click Initial Setting on the main menu to display the initial setting page.
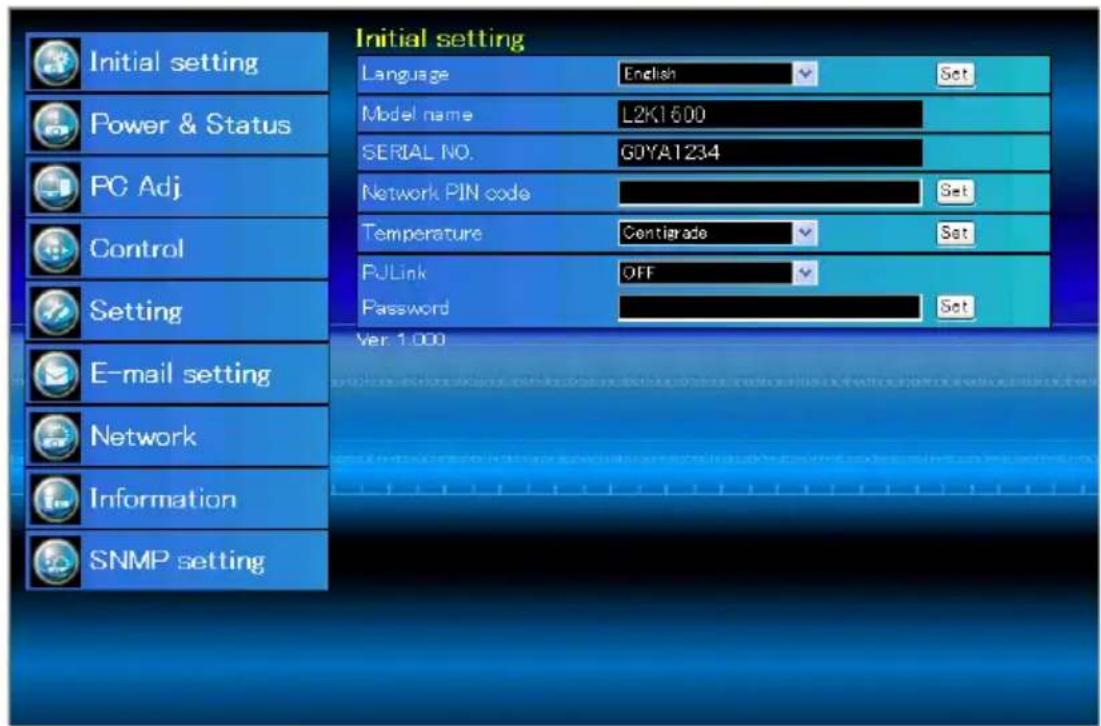
text_image
Initial setting Language English Set Model name L2K1600 SERIAL NO.GOYA1234 Network PIN code Set Temperature Certigrade Set PJLink OFF Password Set E-mail setting Network Information SNMP setting Ver 1.000* The serial number in the figure is used for an example.
Item Description
Language ...... Switches display language on the setting page. (Japanese, English)
Model name ..... Indicates the model name of the projector
SERIAL NO. .....Indicates the serial number of the projector
Network PIN code ..... Sets the Network PIN code to login the setting page (p.23)
Temperature ..... Switches display temperature unit. (Centigrade, Fahrenheit)
PJLink ...... Switches PJLink password authentication. (ON, OFF)(p.23)
Password ...... Password for PJLink function(1-2)
Network PIN code setting
This is to set the Network PIN code to restrict the access from an unauthorized person through the network.
Enter a 4-digit number as the Network PIN code onto the text box and click Set button.
The projector begins restarting and it takes about 10 seconds. Close (Quit) the web browser and access to the login page again in 10 seconds. This is to perform the login authentication firmly.

text_image
Initial setting Language English Set Model name L2K1500 SERIAL NO GOYA1234 Network PIN code 1234 Set Temperature Centigrade Set PJLink OFFThe default Network PIN code [0000] means no Network PIN code is set.
When you connect the projector to the network, it is recommended to set a new Network PIN code. Only a four-digit number is valid for the Network PIN code.
PJLink and password setting
This is to set the PJLink password authentication on or off. If set "ON" with the PJLink pull-down menu, the password must be required. Enter a password* onto the text box and click Set button.
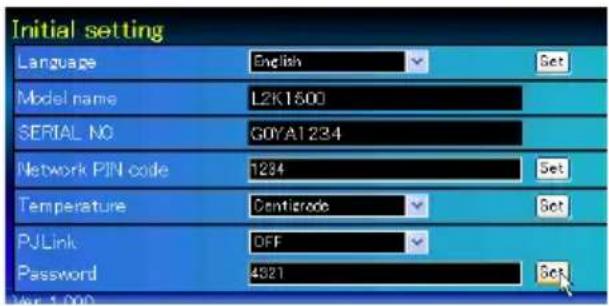
text_image
Initial setting Language English Set Model name L2K1500 SERIAL NO G0YA1234 Network PIN code 1234 Set Temperature Cantisode Set PJLink DFF Password 4321 Set1 to 32 alphanumeric characters can be used for the password.
What's PJLink?
The projectors equipped with PJLink function can be used together on the same network, regardless of model or brand, for centralized control and monitoring. This standard was established by the Japan Business Machine and Information System Industries Association (JBMIA). Please visit the Website at http://pjlink.jbmia.or.jp/english/.
PJLink Notice
The projector is compliant with PJLink Standard Class 1 of JBMIA, and it supports all commands defined by PJLink Class 1 and is verified conformance with PJLink Standard Class 1.
| Projector Input PJLink Input Parameter | |||
| Input 1 RGB (PC analog) RGB 1 11 | |||
| RGB (Scart) RGB 2 12 | |||
| RGB (PC digital) DIGITAL 1 31 | |||
| RGB (AV HDCP) | DIGITAL 2 32 | ||
| HDMI | DIGITAL 3 33 | ||
| INPUT 1 | AUX 1 | ||
| Input 2 Video | VIDEO 1 | 21 | |
| Y, Pb/Cb, Pr/Cr | VIDEO 2 | 22 | |
| RGB | RGB 3 13 | ||
| S-video | VIDEO 5 | 25 | |
| INPUT 2 | AUX 2 | 47 | |
| Input 3 INPUT 3 | AUX 3 | 48 | |
| Input 4 INPUT 4 | AUX 4 | 49 | |

natural_image
Blue glossy circular icon with a white camera symbol and a dotted arc (no text or symbols)Network configuration
Click Network on the main menu. The following setting page is displayed. The IP Address, Subnet Mask, Default Gateway, DNS (Domain Name Server) and projector name are set up on this menu.
The IP address and Subnet Mask have been configured already in chapter "Installation". If you want to change them or configure default gateway or DNS, perform them in this page. If you change them, the projector begins restarting and it takes about 10 seconds. Close (Quit) the web browser and access to the login page again in 10 seconds.
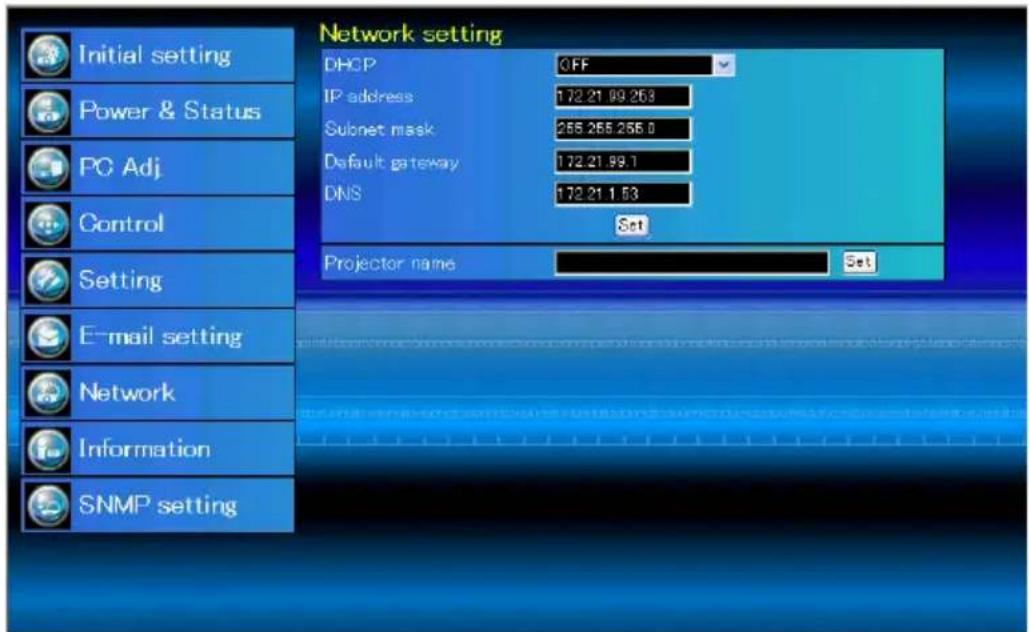
text_image
Network setting Initial setting Power & Status PC Adj Control Setting E-mail setting Network Information SNMP setting DHCP OFF IP address: 172.21.99.263 Subnet mask: 255.255.255.0 Default gateway: 172.21.99.1 DNS: 172.21.1.53 Set Projector name Set* The numerical value is a setting example.
Item Description
DHCP ....Sets DHCP configuration (ON/OFF).
IP address ....Sets IP address of the projector
Subnet mask .....Sets Subnet mask. Normally sets 255.255.255.0
Default gateway ^*1 .....Sets IP address of the default gateway (Router)
DNS ^*2 Sets IP address of the DNS server. Must be set when using the e-mail function
Projector name ^*3 . Sets name of the projector. (64 characters maximum)
You must use the number specified by your administrator. The address must be entered as a group with four numbers split by a dot like [192.168.001.101].

natural_image
Blue glossy button with a white envelope icon (no text or symbols)E-mail setting
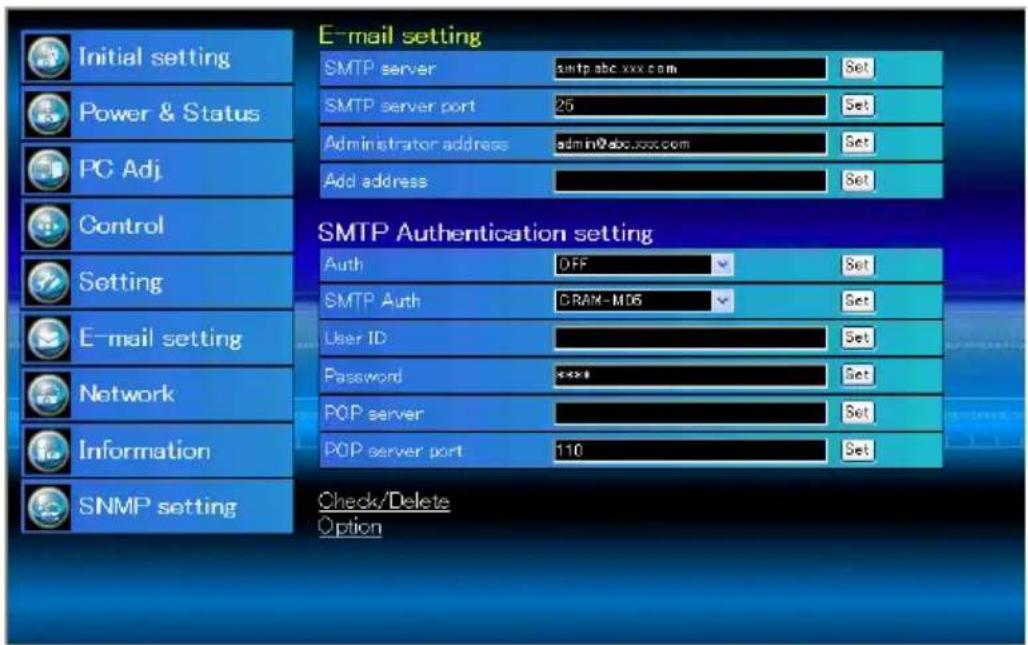
This projector has an E-mail function which can send an alert message to users or an administrator if it detects an abnormality on the projector or run out of the life span of the lamp. Click E-mail Setting on the main
menu and follow the below steps.
text_image
E-mail setting SMTP server smtp.abc.xxx.com Set Power & Status SMTP server port 25 Set PC Adj. Administrator address admin@abc.xxx.com Set Add address Set Control SMTP Authentication setting Auth DFF Set Setting SMTP Auth DRAM-M06 Set E-mail setting User ID Set Network Password **** Set POP server Set Information POP server port 110 Set SNMP setting Check/Delete OptionItem Description
SMTP server ....Enter server name or IP address of the SMTP server. (up to 60 characters)
SMTP server port......Enter Port number of the SMTP server. (from 1 to 65535)
Administrator address ...Enter e-mail address of administrator.
Add address ......Enter e-mail address of the user to send mail when the projector has an abnormality.
SMTP Authentication setting
Auth ....Sets authentication setting option. (OFF, SMTP Auth, POP before SMTP)
SMTP Auth....Sets user authentication setting option when selecting "SMTP Auth" in above column. (CRAM-MD5, LOGIN, PLAIN)
User ID ...... Enter SMTP user ID (up to 63 characters)
Password .... Enter SMTP password. (up to 63 characters)
POP server ....Enter server name or IP address of the POP server. (up to 60 characters)
POP server port .... Enter Port number of the POP server. (from 1 to 65535)
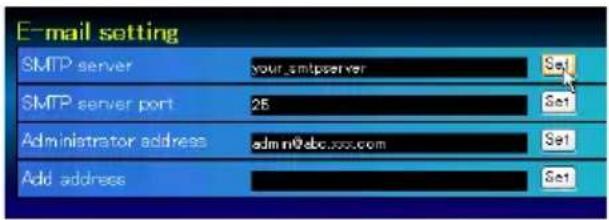
1 Setting SMTP server and administrator address
Enter the server name or IP address of the SMTP server ^*1 , the port number of the SMTP server and administrator address and click Set button. The administrator address is set to "Reply-To" address of the message sent from the projector.
text_image
E-mail setting SMTP server your.smtpserver SMTP server port 25 Administrator address admin@abc.xxx.com Add address*1 The SMTP server is a server for sending e-mail. Please contact your network administrator to have this SMTP server address.
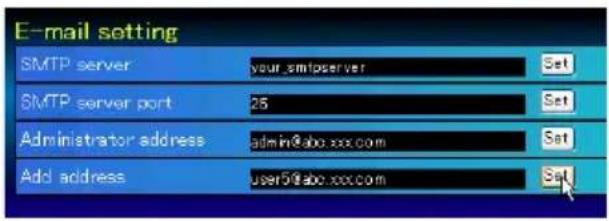
2 Registering and deleting E-mail addresses
Enter the e-mail address onto "Add e-mail address" and click Set button.
text_image
E-mail setting SMTP server your.smtpserver Set SMTP server port 25 Set Administrator address admin@abc.xxx.com Set Add address user5@abc.xxx.com SetCheck / Delete
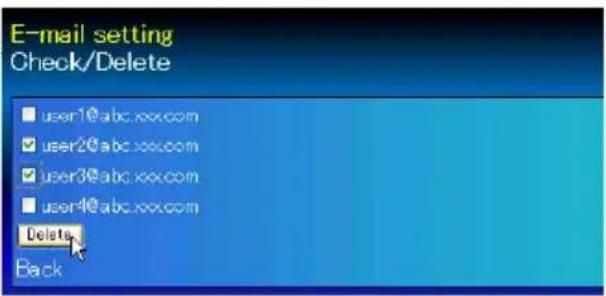
To check the registered addresses, click Check/Delete sub menu tab. The addresses are listed as the figure on the right.
text_image
E-mail setting Check/Delete user1@abc.xxx.com user2@abc.xxx.com user3@abc.xxx.com user4@abc.xxx.com Delete BackUp to 10 E-mail addresses can be registered.
To delete the registered addresses, check the address you want to delete and click Delete button.
3 Setting SMTP authentication
Set the SMTP authentication concerned and click Set button. Please contact your network administrator in details.
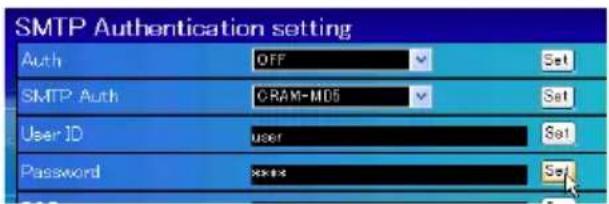
text_image
SMTP Authentication setting Auth OFF Set SMTP Auth CRAM-M05 Set User ID user Set Password xxxxx SetIf the projector sends an alert message due to the abnormality on the projector but the SMTP server is down in some other reason, the message will not be sent. In this case, the message "Unable to connect to server." will be displayed on the setting page. To clear this message, set up SMTP server address again.
To use the E-Mail function, it must be set the DNS address on the Network setting page correctly.
You cannot use this E-mail function if the DNS server and SMTP server cannot be used in your network environment.
The projector does not send message to the address set in "Administrator address" text box. If you want to send e-mails to the administrator address, enter the administrator address into "Add address" text box.
4 Setting POP server
When "POP before SMTP" is selected at "Auth" of "SMTP Authentication setting", enter "POP server* 2" and "POP server port" and click Set button.
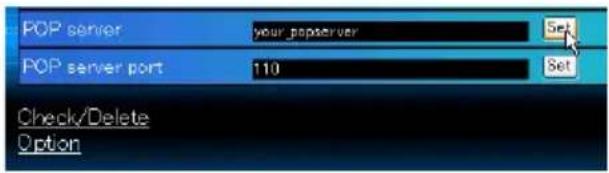
text_image
POP server your_popserver POP server port 110 Check/Delete Option*2 The POP server is a server for receiving e-mail. Please contact your network administrator to have this POP server address.
Error message for sending alert mail
When the projector has an abnormality, an alert message will be sent to the registered E-mail address.
If the SMTP server is missing or the authentication is not completed because of input error in E-mail address setting or SMTP authentication setting when sending alert e-mail, the error message will be displayed. Please check the respective settings.
Error message for missing SMTP server
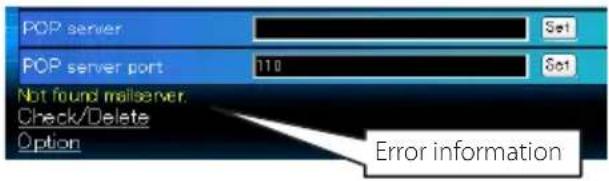
text_image
POP server POP server port 110 Not found mailserver. Check/Delete Option Set Set Error informationError message for authentication problem
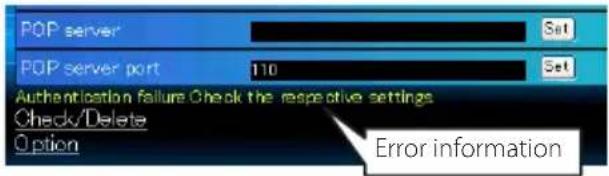
text_image
POP server POP server port 110 Authentication failure Check the respective settings Check/Delete Option Set Set Error information5 Option selection for sending alert mail
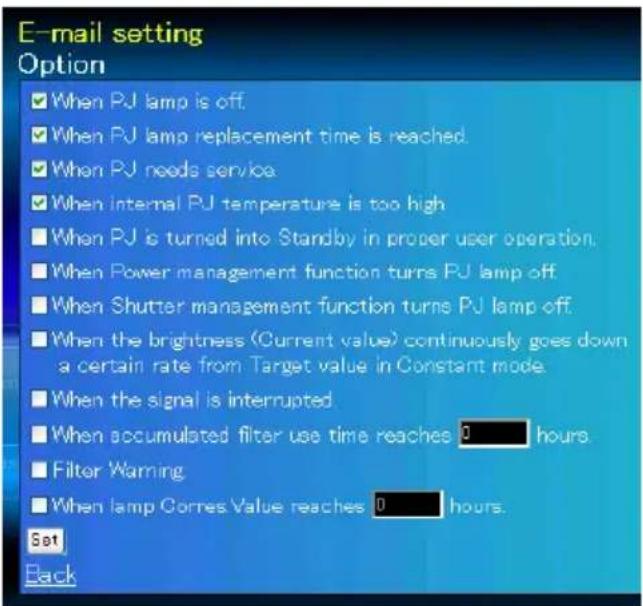
Click Option sub menu tab. Check the condition items under which alert mail will be sent and click Set button.
Please refer to item "Examples :Type and contents of alert mail" described on the next page.
Option
text_image
E-mail setting Option ✓ When PJ lamp is off. ✓ When PJ lamp replacement time is reached. ✓ When PJ needs service ✓ When Internal PJ temperature is too high ■ When PJ is turned into Standby in proper user operation. ■ When Power management function turns PJ lamp off ■ When Shutter management function turns PJ lamp off. ■ When the brightness (Current value) continuously goes down a certain rate from Target value in Constant mode. ■ When the signal is interrupted ■ When accumulated filter use time reaches 0 hours. ■ Filter Warning ■ When lamp Corres Value reaches 0 hours. Set BackExamples: Type and contents of alert mail
When the projector has an abnormality, the following alert messages are sent to the registered E-mail address according to your selected condition. Administrator or user can take an efficient action quickly by receiving this message. This is very useful to maintain and service the projector.
The following are examples of received messages.
● When internal PJ temperature is too high:
TITLE: Message from projector
Projector Model Name: model name
TCP/IP: 192.168.1.201 Projector Name: Proj05
It sends you following message.
flowchart
graph TD
    A[" "] --> B["E-mail Header"]
* The projector lamp is turned off, because internal temperature goes over the safety limit. Wait for the completion of the cooling process and make sure the projector has been turned into Standby. Then turn the projector on again. If the Indicator continues flashing, check the air filter for dust accumulation.
● When PJ needs service:
* Maintenance requirement from Projector is detected.
Check up LED status of projector and consult with the dealer.
AD, 3.3V OK
KS, 3.3V OK
MAIN, 3.3V NG

The projector lamp was turned off, because the projector power circuit failed.
Unplug the AC power cord and plug it, and then turn on the projector once again to verify operation. If the problem still persists, unplug the AC power cord and ask servicing to a qualified service personnel with the error information.
● When PJ lamp replacement time is reached:
* The projector lamp 1 has reached replacement time.
Lamp 1 ON 2000 h
Lamp 2 ON 1800 h
Replace it with a new lamp immediately and reset the lamp counter. If the projector is used without resetting the lamp counter, the alert mail is sent to users in every power-on of the projector. This alert mail will not be sent when unchecking the mail sending condition "When PJ lamp replacement time is reached".
- When the brightness (Current value) continuously goes down a certain rate from Target value in Constant mode:
* The brightness (Current value) continuously goes down a certain rate from the value in Constant mode. Check the lamp status and replace the lamp, or decrease Target value in Constant mode.
This alert mail will be sent when "Lamp mode" is set to "Constant mode".

natural_image
Blue circular icon with a white camera symbol and a plus sign, no text or numbers present.SNMP setting
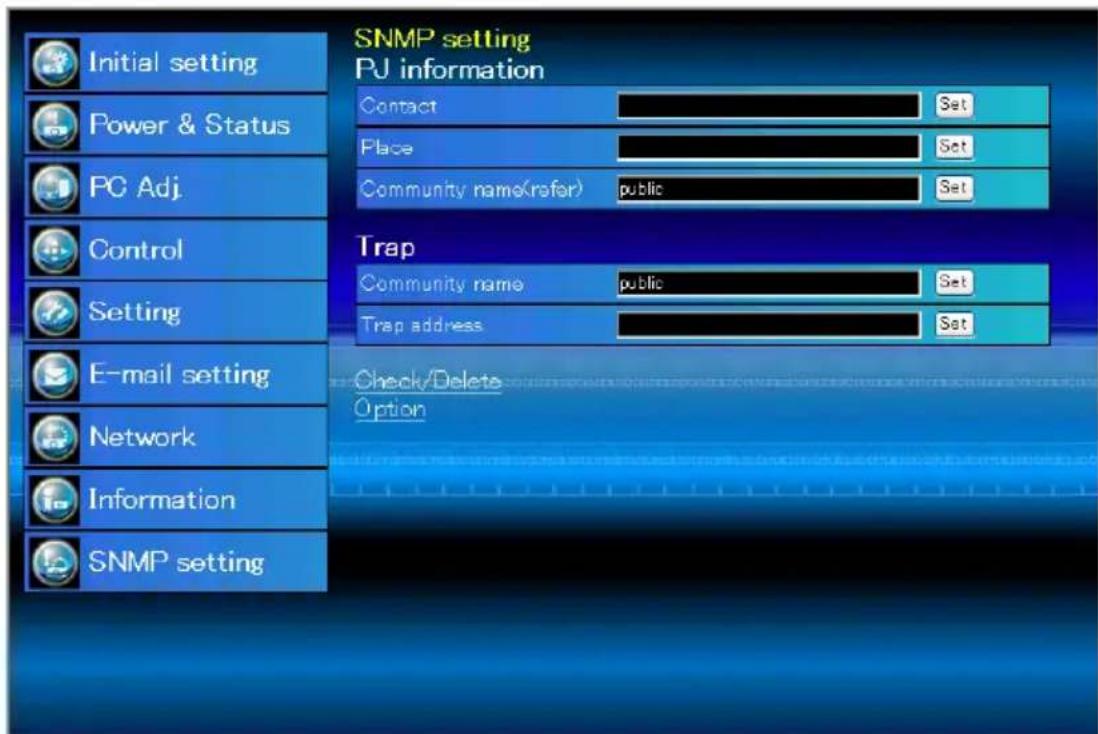
This projector provides a SNMP (Simple Network Management Protocol) agent function. The SNMP consists of a manager and agents. The group which communicates information each other with SNMP is called "Community". There are two access modes in a community, Refer (read only) and Set (read-write). This projector allows to use Refer (read only) only. The SNMP message informs the projector status called "Trap" to an administrator. Click SNMP Setting on the main menu and set up each item.
text_image
Initial setting Power & Status PC Adj. Control Setting E-mail setting Network Information SNMP setting SNMP setting PJ information Contact Set Place Set Community name(refer) public Set Trap Community name public Set Trap address Set Check/Delete OptionPJ information
Item Description
Contact....Enter user name of the projector etc. (optional)
Place....Enter place of the projector (optional)
Community name(refer).....Enter community name (read only). Default name is "public".
Trap
Item Description
Community name......Enter community name to send "Trap". Default name is "public".
Trap address....Enter IP address of the SNMP manager computer to receive "Trap".
Trap check/delete
Check and delete the trap address
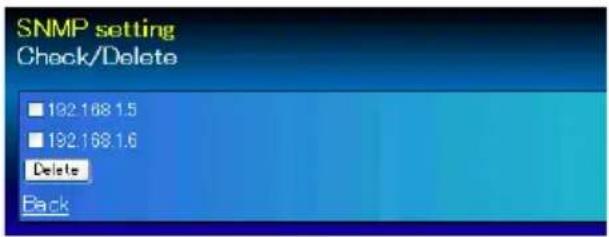
Checking the registered trap address and deleting the address.
To delete the address, tick check box in front of the IP address and click Delete button.
text_image
SNMP setting Check/Delete 192.168.1.5 192.168.1.6 Delete BackUp to 10 trap addresses can be registered.
Trap option
Trap option setting
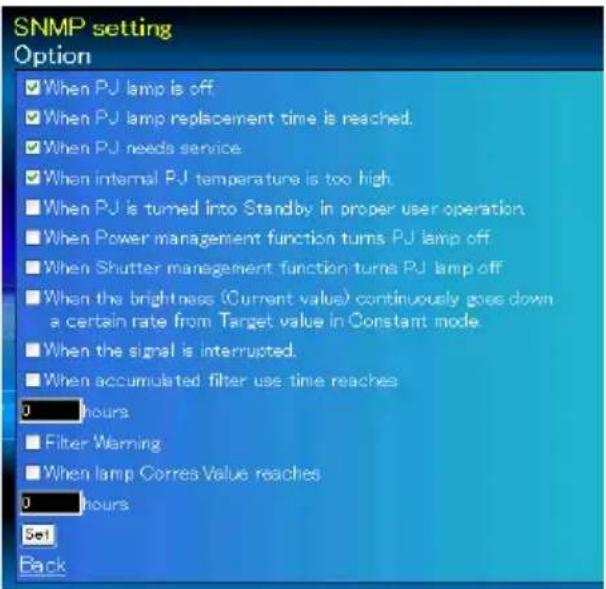
Tick check boxes in front of the condition item to send the trap.
Click Set button if you tick or un-tick the check box on a page.
text_image
SNMP setting Option ✓ When PJ lamp is off. ✓ When PJ lamp replacement time is reached. ✓ When PJ needs service. ✓ When internal PJ temperature is too high. ■ When PJ is turned into Standby in proper user operation. ■ When Power management function turns PJ lamp off. ■ When Shutter management function turns PJ lamp off. ■ When the brightness (Current value) continuously goes down a certain rate from Target value in Constant mode. ■ When the signal is interrupted. ■ When accumulated filter use time reaches 0 hours ■ Filter Warning ■ When lamp Corres Value reaches 0 hours Set! Back"When PJ lamp is off" signifies the lamp goes out without user operation. "When PJ is turned into Standby in proper user operation" signifies that the projector is turned on by using the web browser and then it is turned into standby with ON/STANDBY button on the side control or the remote control.
Up to 99,999 hours can be set for the time setting.
Chapter 4
Controlling the Projector
Describes controlling and setting of the projector by using the web browser.

text_image
4
natural_image
Blue glossy circular icon with a white camera symbol and exclamation mark (no text or numbers)Power control and status check
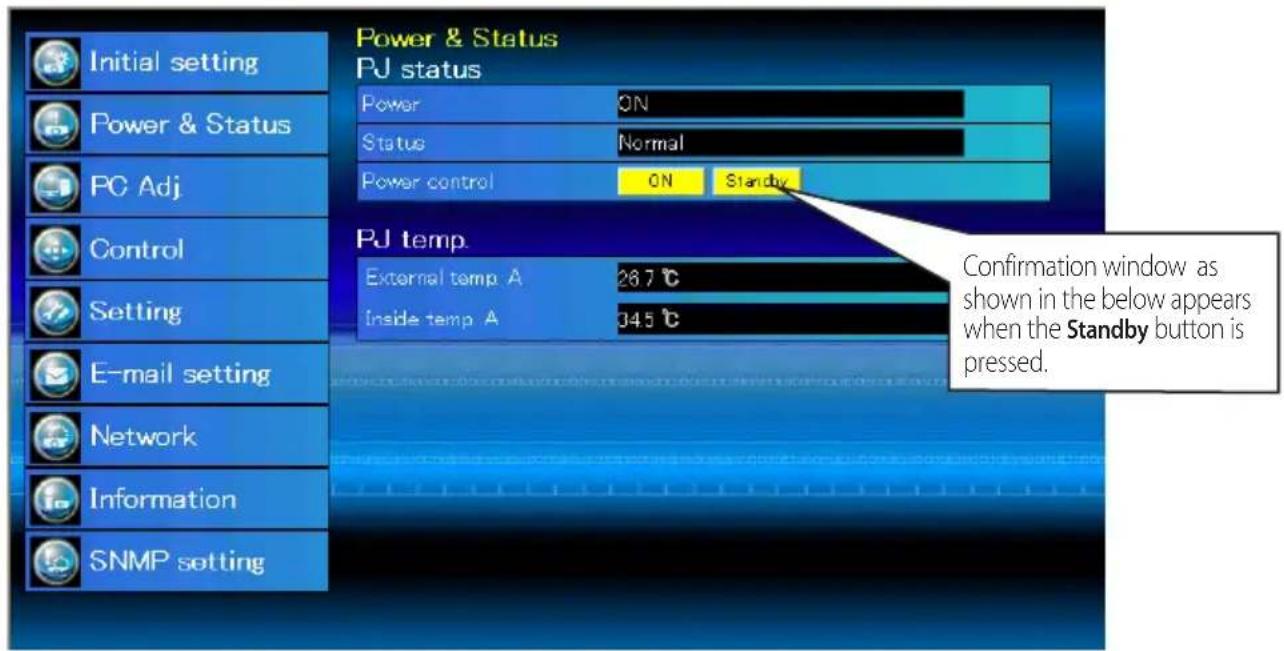
Click Power & Status on the main menu. The control page will be displayed.
By clicking ON or Standby button on the page, the power of the projector can be controlled.
text_image
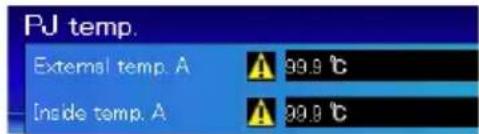
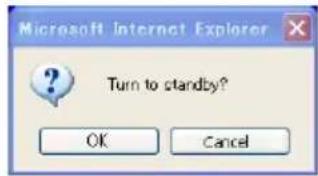
Initial setting Power & Status PJ status Power ON Status Normal Power control ON Standby Control Setting E-mail setting Network Information SNMP setting PJ temp. External temp A 28.7 °C Inside temp A 34.5 °C Confirmation window as shown in the below appears when the Standby button is pressed.Warning temperature icon
text_image
PJ temp. External temp. A 99.9 °C Inside temp. A 99.9 °CPopup confirmation window
text_image
Microsoft Internet Explorer Turn to standby? OK CancelItem Description
PJ status
Power ......Displays the status of the lamp. (ON, OFF, On starting up, On cooling down, Service in need)
Status ......Displays the status of the projector's power. (Refer to next page.)
Power control ......Controls the projector power by clicking the "ON" or "Standby" button.
PJ temp.
External temp. A ..Displays the surrounding temperature of the intake vent. inside temp. A ..... Displays the temperature inside of the projector.
* The warning icon will appear if the temperature exceeds a specified value. Check if there is no object to obstruct the airflow around the intake or exhaust vent. It might be airfilter clogged. Replace the airfilter with new one.
* The temperature unit can be set either Centigrade or Fahrenheit in the item "Initial Setting". (p.22)
The projector cannot be turned on while the projector is on cooling down.
The web browser checks and updates the projector's condition every 30 seconds automatically.
About projector condition
Status Description
Normal.... Projector is operating normally.
Power management in operation...... Power management is operating
Shutter management in operation ..... Shutter management is operating
Lamp failure .... Lamp failure is occurring
Abnormal temperature .... The temperature of the projector became too high
Standby after Abnormal Temp...... Projector detects abnormal temp. and sets into standby mode.
Power failure ......Power failure has occurred inside the projector. Projector is turned off. Unplug the AC cord and ask servicing to a qualified service personnel.
When a security (PIN code lock) has been set on the projector, you also cannot control it through the network. To control the projector through the network temporarily, execute "PJ lock suspend" command to unlock the security. "PJ lock suspend" is on setting sub menu [3] on Setting main menu. (p.42)

natural_image
Blue circular button with a white four-pointed star and arrow symbol (no text or numbers)Control
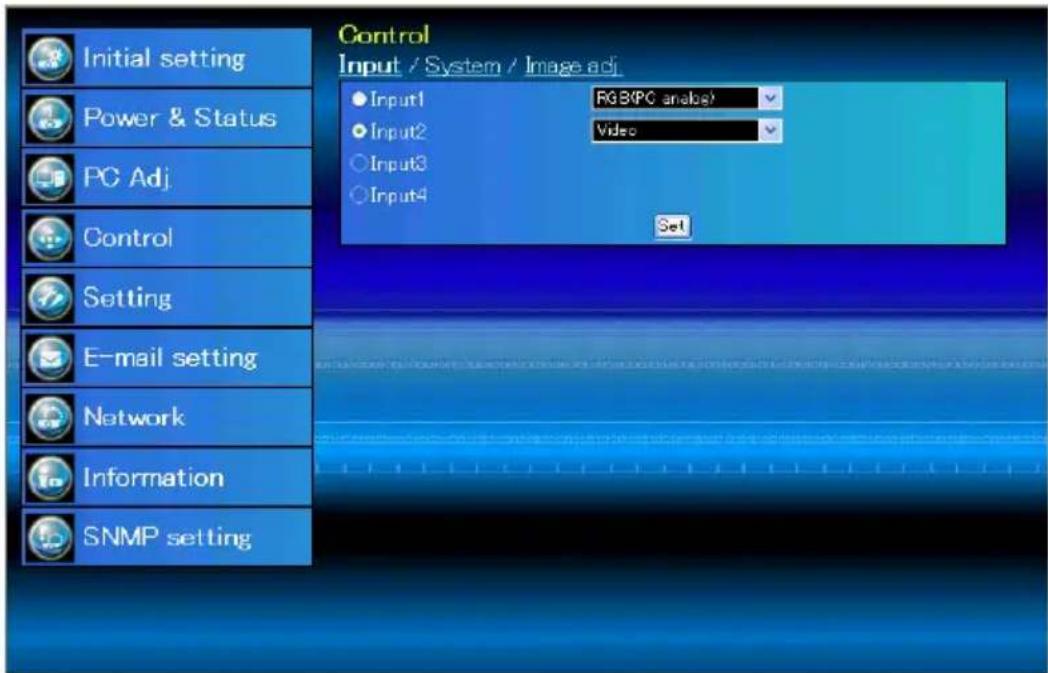
Click Control on the main menu. The setting method differs depending on the contents of the page. Click on the page number to change pages and select desired setting items.
Please see the owner's manual of the projector to have the further information of each control item.
text_image
Control Input / System / Image adj. ● Input1 RG B(PC analog) ● Input2 Video ○ Input3 ○ Input4 Set Initial setting Power & Status PC Adj Control Setting E-mail setting Network Information SNMP settingInput
This function is to select the input mode and source mode of the projector. Click Set button after selecting the input and source mode.
Item Description
Input ...... Selects input mode of the projector.
Source ...... Selects signal source of the input.
Input1: RGB(PC analog)
RGB(PC Scart)
RGB(PC digital)
RGB(AV HDCP)
HDMI
Input2: Video
Y, Pb/Cb, Pr/Cr
RGB
S-video
The control page displays valid control items depending on the selected input mode, signal or functions of the projector you use, therefore, there may be different controls between the described items and actual control items on the page display. For further information, refer to the projector's owner's manual.
When the projector is in standby, all the controlling items are inactive.
System
This function is to select the system of signal input to the projector. The available system mode are listed on the pull-down menu button according to the input signal. Select a system and then click Set button.
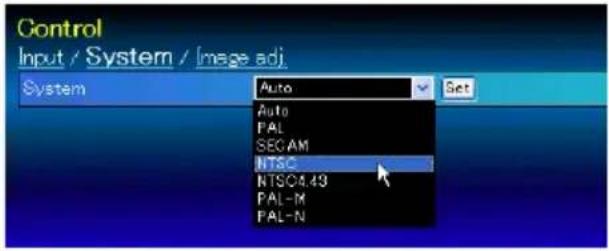
text_image
Control Input / System / [image adj. System Auto Set Auto PAL SEGAM NTSC NTSC4.49 PAL-M PAL-NAvailable selection at the RGB(PC analog) input Item Description
XGA1......It automatically switches to the proper computer system of the input signal.
* The computer system modes (VGA, SVGA, XGA. SXGA, UXGA, WXGA...) which meet the input signal are listed.
Available selection at the RGB(PC digital)/RGB(AV HDCP)/HDMI input Item Description
D-XGA......It automatically switches to the proper computer system of the input signal.
* The computer system modes (D-VGA, D-SVGA, D-XGA. D-SXGA1...) which meet the input signal are listed.
D-480p ...... It automatically switches to the proper scanning system of the input signal.
* The selectable scanning systems are D-480p, D-575p, D-720p, D-1035i, D-1080i and D-1080p.
Available selection at the Video/S-video/Scart input Item Description
AUTO......It automatically switches to the proper color system of the input signal.
* The selectable color systems are PAL, SECAM, NTSC, NTSC4.43, PAL-M and PAL-N.
* AUTO is fixed at the Scart input.
Available selection at the Component input Item Description
AUTO......It automatically switches to the proper scanning system of the input signal.
* The selectable scanning systems are 480i, 575i, 480p, 575p, 720p, 1035i, 1080i and 1080p.
Image adjustment
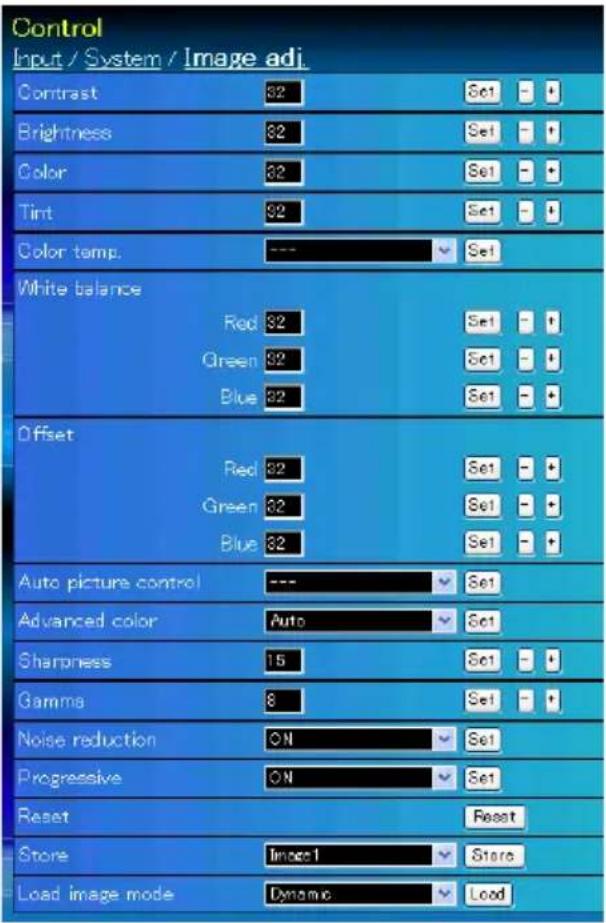
This function is to adjust the projected picture image and save the image mode. To store the adjusted value, click Store button, and to load the adjusted value, click Load button.
Item Description
| Contrast | Adjusts picture contrast. (0~63) |
| Brightness | Adjusts picture brightness. (0~63) |
| Color | Adjusts picture color saturation. (0~63) |
| Tint | Adjusts picture hue. (0~63) |
| Color temp. | Sets a color temperature mode. (X Low, Low, Mid, High, Adj.) |
White Balance
| Red, Green, Blue ...... | Adjusts each white balance respectively. (0~63) |
* When changing the value of the white balance, the color temp. indicates "Adj."
Offset
| Red, Green, Blue ...... | Adjusts each offset respectively. (0~63) |
Auto picture control ..... Sets auto picture control level. (OFF, L1, L2)
Advanced color ....Applies improved color adjustment with yellow light controller. (Auto, OFF)
Sharpness .... Adjusts picture sharpness.
(0\~31)
Gamma ....Adjusts brightness of darker part of the picture. (0\~ 15)
Noise reduction ...... Switches noise reduction mode (ON, OFF)
Progressive .... Switches progressive mode (OFF, ON, Film)
Reset....Resets the Image adjustment to previous levels.
Store....Stores the Image adjustment values. Select an item [Image1 - Image10] from the pull-down menu and click Store button.
Load Image mode ...... Loads the Image mode. Select an image mode from the pull-down menu and click Load button. There may not be available mode depending on the input mode as shown in the table left.
| Input source | |
| Image mode | Video Computer |
| Standard √ √ | |
| Cinema √ | * |
| Real * √ | |
| Dynamic | √ √ |
| Image1 - 10 | √ √ |
text_image
Control Input / System / Image adj. Contrast 82 Set - + Brightness 82 Set - + Color 82 Set - + Tint 92 Set - + Color temp. --- Set White balance Red 82 Set - + Green 82 Set - + Blue 82 Set - + Offset Red 82 Set - + Green 82 Set - + Blue 82 Set - + Auto picture control --- Set Advanced color Auto Set Sharpness 15 Set - + Gamma 8 Set - + Noise reduction ON Set Progressive ON Set Reset Reset Store Image1 Store Load image mode Dynamic Load* When Edge blending is set to "ON", Auto picture control and Advanced color are disable.
* When Color matching is set to "ON", Auto picture control, Advanced color, Color temp., White balance and Offset are disable.
The mark "√" means that the available image mode in the selected input source. The error message appears when selecting the disabled image mode indicated with "*".

natural_image
Blue circular icon with white computer monitor and tower symbol (no text or numbers)PC adjustment
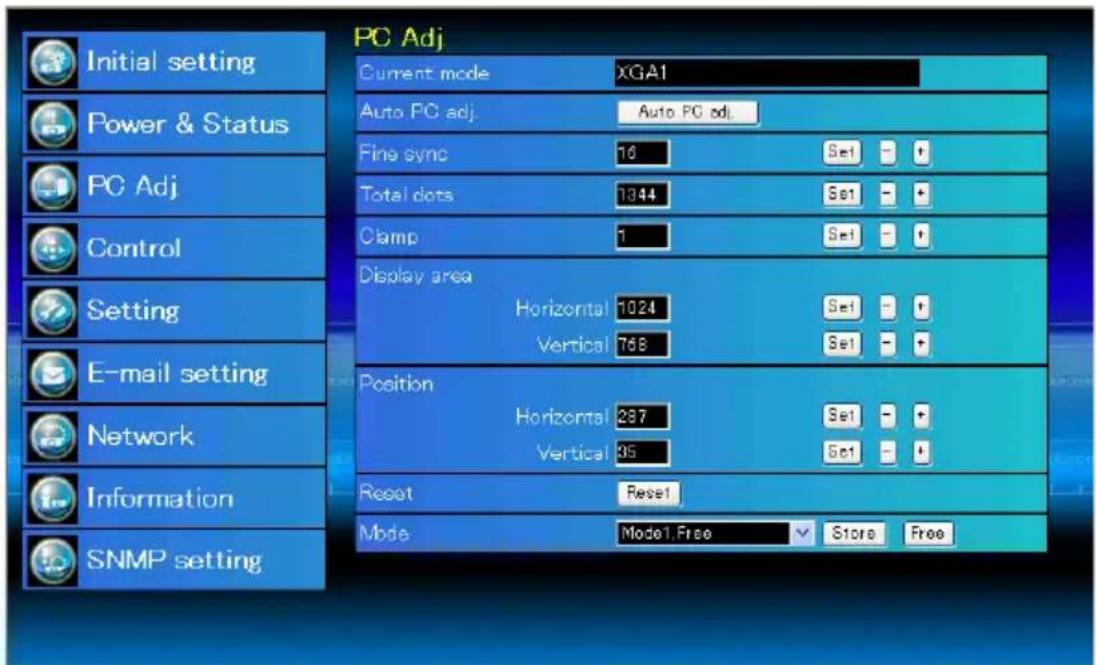
Click PC Adj. on the main menu. This function is to adjust the signal from the computer connected to the projector to obtain the proper picture image on the screen.
text_image
PC Adj Current mode XGA1 Auto PC adj. Auto PC adj. Fine sync 10 Sel - + Total dots 1344 Sel - + Clamp 1 Sel - + Display area Horizontal 1024 Sel - + Vertical 768 Sel - + Position Horizontal 297 Sel - + Vertical 35 Sel - + Reset Reset Mode Mode1.Free Store Free Initial setting Power & Status PC Adj Control Setting E-mail setting Network Information SNMP settingItem Description
Current mode .....Displays a current mode like VGA, SVGA, XGA. SXGA, UXGA, WXGA, etc. or Mode1 - Mode10 which are the customized mode created by using the "Mode Store" function described below.
Auto PC adj..... Performs automatic adjustment.
Fine sync .... Performs Fine Sync adjustment. (0 \~ 31)
Total dots .... Adjust the number of total dots in the horizontal period.
Clamp....Adjusts the phase of the clamp.
Display area
Horizontal ....Adjusts the image area horizontally.
Vertical ....Adjusts the image area vertically.
Position
Horizontal ..... Adjusts the horizontal position of the screen.
Vertical ....Adjusts the vertical position of the screen.
Reset.... Resets the PC adjustments to the previous levels.
Mode Store......Stores the PC adjustment values. Select a mode no. [Mode1 - Mode10] from the pull-down menu.
Mode Free......Clear the PC adjustment values. Select a mode no. [Mode1 - Mode10] from the pull-down menu.

natural_image
Blue glossy button with white wrench and screwdriver icons (no text or symbols)Setting up the projector
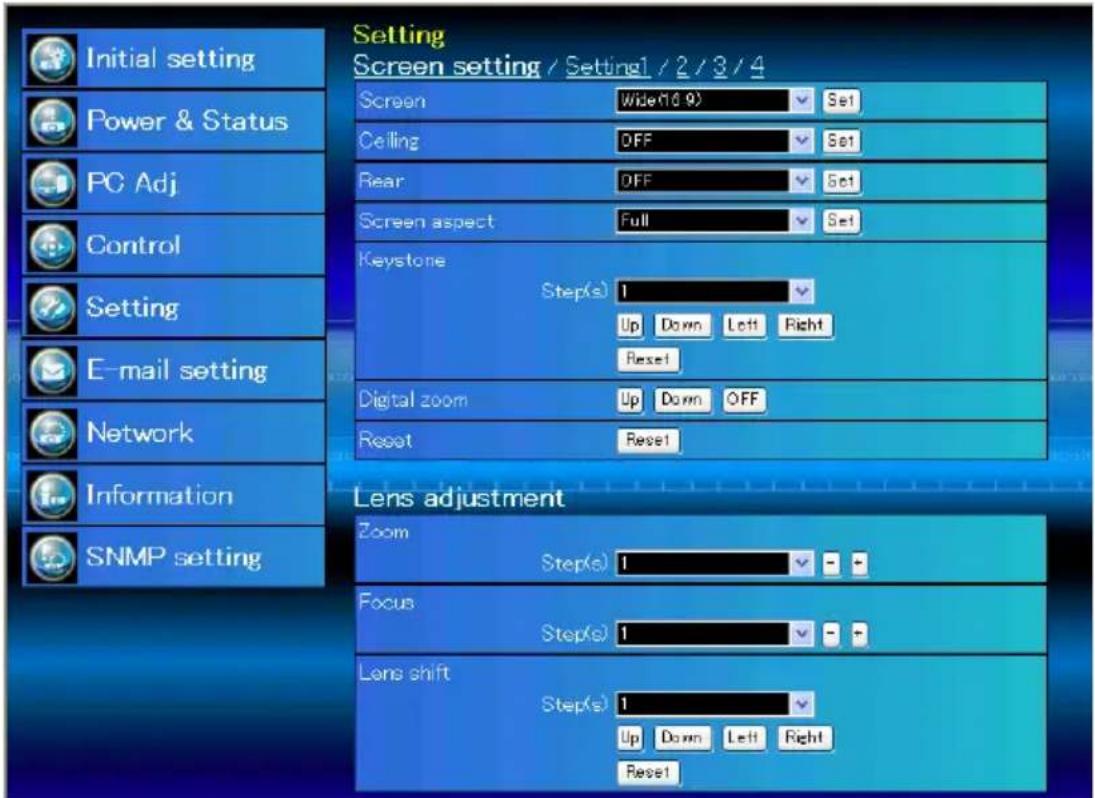
Click Setting on the main menu. This function is to set up the projector. Select the sub menu [Screen setting] or [Setting] and then set up each setting.
text_image
Setting Screen setting / Setting1 / 2 / 3 / 4 Initial setting Power & Status PC Adj Control Setting E-mail setting Network Information SNMP setting Screen Wide(10.9) Set Ceiling OFF Set1 Rear OFF Set1 Screen aspect Full Set1 Keystone Step(s) 1 Up Down Left Right Reset Digital zoom Up Down OFF Reset Reset Lens adjustment Zoom Step(s) 1 Focus Step(s) 1 Lens shift Step(s) 1 Up Down Left Right ResetScreen setting
This function is to adjust the screen mode or the lens functions of the projector.
Item Description
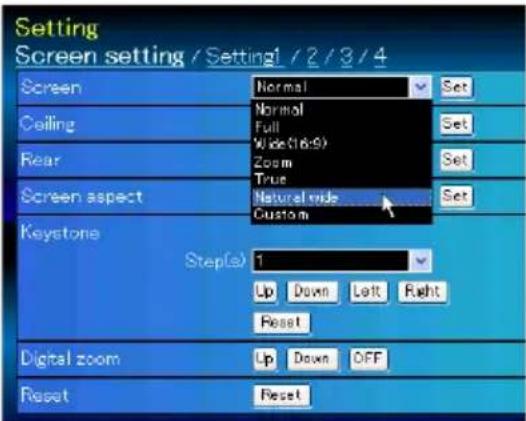
Screen ...... Switches the screen mode. (Normal, Full, Wide(16:9), Zoom, True, Natural wide, Custom)
Ceiling .... Sets the image top/bottom and left/right reversed. (ON, OFF)
Rear .... Sets the image left/right reversed. (ON, OFF)
* See the next page for the description of other functions.
text_image
Setting Screen setting / Setting1 / 2/3/4 Screen Normal Set Ceiling Normal Full Set Rear Wide (18:9) Zoom Set Screen aspect True Natural ride Set Keystone Step(s) 1 Up Down Left Right Reset Digital zoom Up Down OFF Reset ResetContinue from the previous page.
Item Description
Screen aspect .... Sets the aspect ratio to fit the screen. (Full, 16:9, 16:10, 4:3)
* Full is for flexible aspect ratio.
* Some Screen settings are limited depending on the Screen aspect as shown in the below table.
Keystone...... Corrects the keystone distortion of the projected image on the screen by pressing the Up/Down/Left/Right buttons. Click Reset to reset the keystone correction.
Digital zoom ..... Adjusts the image zoom in and out at computer input mode. Click OFF to return the image to its normal size.
Reset...... Resets the settings of Screen, Ceiling, Rear, Screen aspect, Keystone and Digital zoom.
text_image
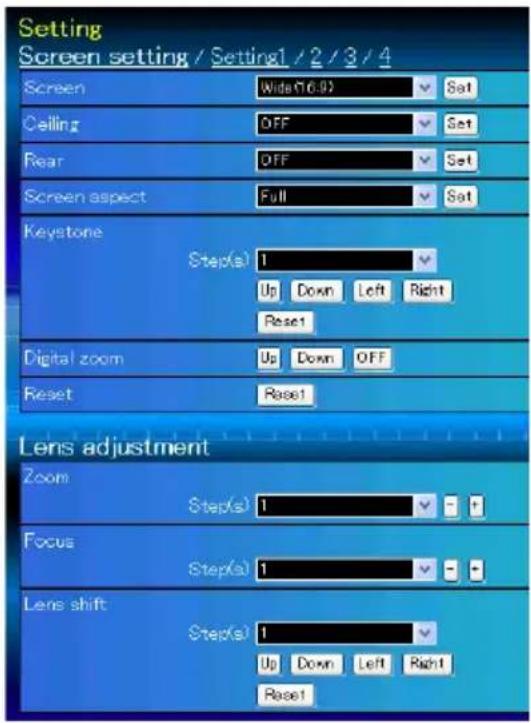
Setting Screen setting / Setting1 / 2 / 3 / 4 Screen Wide(76.9) Set Ceiling OFF Set Rear OFF Set Screen aspect Full Set Keystone Step(s) 1 Up Down Left Right Reset1 Digital zoom Up Down OFF Reset Reset1 Lens adjustment Zoom Step(s) 1 - + - Focus Step(s) 1 - + - Lens shift Step(s) 1 Up Down Left Right Reset1Lens adjustment
Item Description
Zoom ....Adjusts the image zoom in and out.
Focus .... Adjusts the focus of the image.
Lens shift......Positions to the desired point by pressing the Up/Down/Left/Right buttons. Click Reset to return to the center position.
* Step(s)....Sets the effective steps (1-20 steps) by one pressing the +/- or Up/Down/Left/Right buttons to adjust them quickly.
| Screen Aspect Full or 16:10 16:9 4:3 | ||||||
| Input source Input source Input source | ||||||
| Screen mode | Video | PC | Video | PC | Video | PC |
| Normal | √ | √ | √ | √ | √ | √ |
| Full | √ | √ | √ | √ | √ | √ |
| Wide(16:9) | √ | √ | *1 | *1 | *3 | √ |
| Zoom | √ | √ | √ | √ | √ | √ |
| True | *1 | √ | *1 | √ | *1 | √ |
| Natural wide | *2 | *1 | *2 | *1 | *1 | *1 |
| Custom | √ | √ | √ | √ | √ | √ |
The mark "√" means that the available screen mode in the selected input source system.
*1 The error message appears when selecting the disabled screen mode indicated with "*1".
*2 Natural wide cannot be selected when 720p, 1035i, 1080i, 1080p or 2K is selected in AV system menu.
*3 Wide(16:9) can be selected when the video signal is 2K.
Setting 1
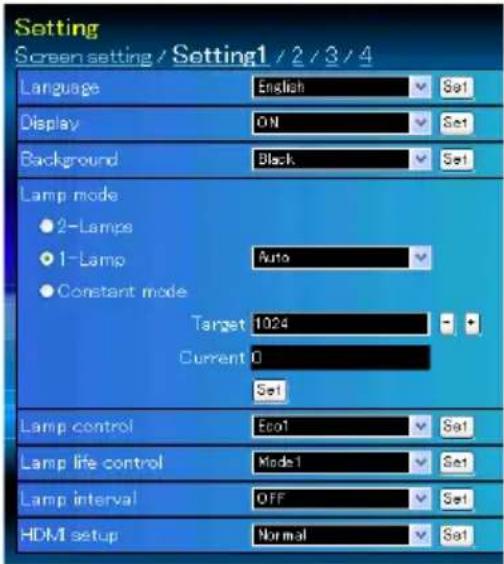
Item Description
Language .... Sets the language display of projector's on-screen display menu.
Display .... Switches on or off the on-screen menu display on the screen. (ON, Countdown off, OFF)
Countdown off ..... Displays input image instead the countdown during the startup.
Background ...... Sets the screen background when no signal input. (Blue, User, Black)
Lamp mode ...... Switches the lamp mode. {2-Lamps mode, 1-Lamp mode (Auto, Lamp1, Lamp2), Constant mode}
* Auto ..... Automatically selects a lamp with shorter cumulative use time.
Constant mode ..... Sets the desired Target brightness (up to 1024) to keep the brightness with modulating the lamp(s) or switching the lamp mode. The current brightness is shown in the Current box.
text_image
Setting Screen setting / Setting1 / 2 / 3 / 4 Language English Set1 Display ON Set1 Background Black Set1 Lamp mode ● 2-Lamps ● 1-Lamp Auto ● Constant mode Target 1024 Current 0 Set1 Lamp control Eco1 Set1 Lamp life control Mode1 Set1 Lamp interval OFF Set1 HDMI setup Normal Set1Lamp control ..... Selects lamp control mode. (Auto, Normal, Eco1, Eco2)
* When constant mode is selected in "Lamp mode", this function is disable.
Lamp life control ... Selects lamp life control mode (Mode1, Mode2) when the total use time exceeds the recommended total hours of use.
Lamp interval.....Sets the interval period of switching two lamps. (OFF, 24H, 200H, 500H, 1000H, 2000H)
* OFF ..... The lamp switching function is disable.
* When constant mode is selected in "Lamp mode", this function is disable.
HDMI setup ......Sets the digital RGB image level according to the HDMI source. (Normal, Enhanced)
Setting 2
Item Description
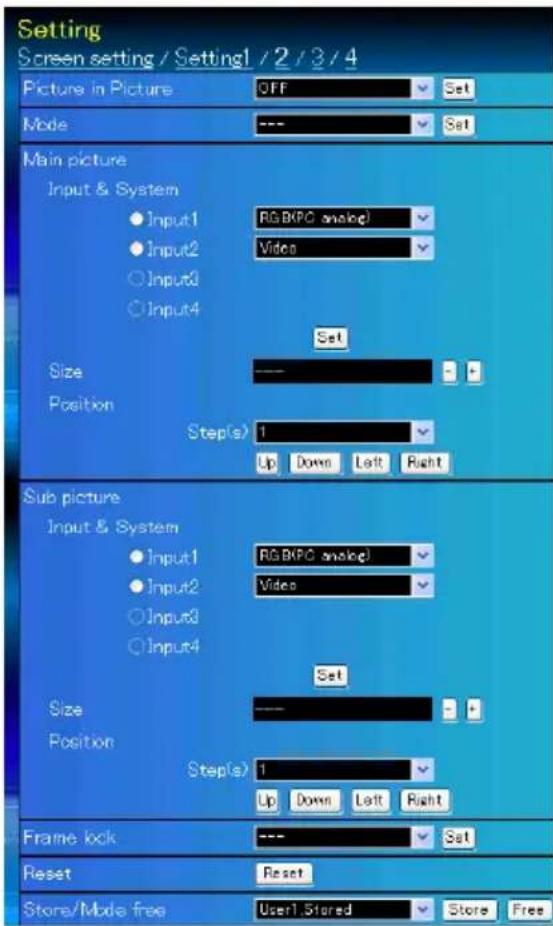
Picture in Picture ... Selects the Picture in Picture mode which has been preset in the setting menu of the projector. (OFF, User1 - User5)
* The additional display items as follows:
Free .....No mode is stored.
Stored ...The mode is already stored.
Adj. .....The mode is not yet stored.
Mode ...... Selects the Picture in Picture mode. (P in P, P by P)
Main picture ..... Selects the input and signal source. Adjusts the size and position of the main picture.
Sub picture ...... Selects the input and signal source. Adjusts the size and position of the sub picture.
Frame lock ...... Selects the frame lock to main or sub picture. (Main picture, Sub picture)
Reset...... Resets the settings of Picture in Picture mode.
Store ....Stores the adjustment values. Select a mode no. [User1 - User5] from the pull-down menu.
Mode Free .... Clear the adjustment values. Select a mode no. [User1 - User5] from the pull-down menu.
text_image
Setting Screen setting / Setting1 / 2 / 3 / 4 Picture in Picture OFF Set Mode --- Set Main picture Input & System ● Input1 RGBKPC audio ● Input2 Video ○ Input3 ○ Input4 Set Size --- - # Position Step(s) 1 Up Down Left Right Sub picture Input & System ● Input1 RGBKPC audio ● Input2 Video ○ Input3 ○ Input4 Set Size --- - # Position Step(s) 1 Up Down Left Right Frame kick --- Set Reset Reset Store/Mode free User1 Stored Store Free* Step(s)....Sets the effective steps (1-20 steps) by one pressing the +/- or Up/Down/Left/Right buttons to adjust them quickly.
Setting 3
Item Description
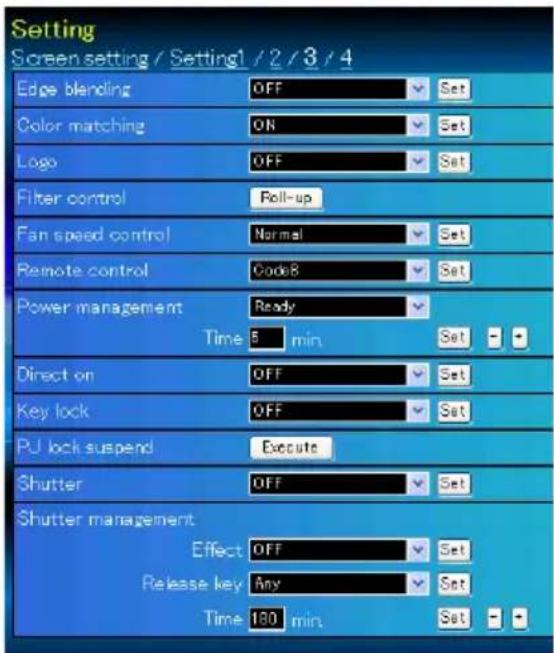
| Edge blending ...... Sets the seamless overlapping for multi-screen. (ON, OFF) |
| Color matching .. Corrects the details of color for multi-screen. (ON, OFF) |
| Logo ...... Sets on or off the logo display on the screen during the startup. (User, Default, OFF) |
| Filter control ...... Scroll the filter. Click "Roll-up", a confirmation display appears, and then click "OK", the filter will be scrolled. |
| Fan speed control ... Sets the running speed for the cooling fans. (Normal, Max) |
| Remote control.... Selects the remote control code. (Code1 - Code8) |
| Power management ... Sets into the selected power management mode (OFF, Ready, Shut down) if the input signal is interrupted and no control key is pressed for the specified period of time. |
* The specified time can be set 1 to 30 min.
Direct on.....Sets the power-on mode when the AC cord is connected to the outlet.
Key lock......Sets the prohibition of controls either Projector or Remote control. (OFF, Projector, Remote control)
PJ lock suspend... When the projector has a security of PIN code lock, disable this function temporarily by pressing Execute button.
Setting procedure
- Turn off the projector, disconnect AC cord from the outlet and then connect AC cord again.
- Access this page with the web browser.
- Click Execute button on the PJ lock suspend.
Shutter .... Sets the shutter operation. (ON: close, OFF: open)
Shutter management ... Sets the shutter management operation.
Effect....Sets the effect to fade in or out at opening or closing the shutter. (OFF, L1, L2)
Release key ..... Sets available keys to release the shutter. (Any, SHUTTER)
Time....Sets the specified period of time when the projector shuts down after the projector is left with the shutter closed.
* The specified time can be set 5 to 480 min.
text_image
Setting Screen setting / Setting1 / 2 / 3 / 4 Edge blending OFF Set Color matching ON Set Logo OFF Set Filter control Poll-up Fan speed control Normal Set Remote control Code8 Set Power management Ready Time 5 min Set - - Direct on OFF Set Key lock OFF Set PJ lock suspend Execute Shutter OFF Set Shutter management Effect OFF Set Release key Any Set Time 180 min Set - -Setting 4
Item Description
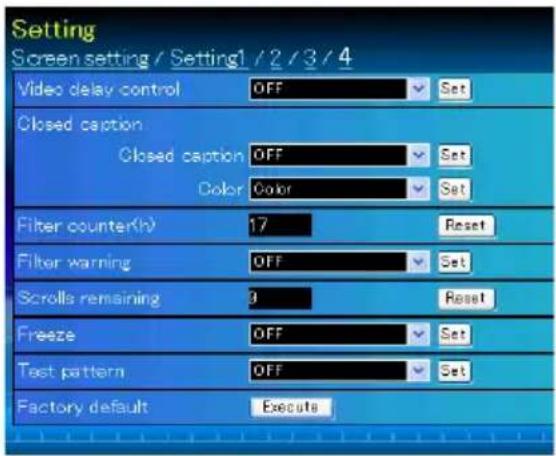
Video delay control ... Sets the digital processing of the image faster. (OFF, Low, Mid, High)
Closed caption. Sets the closed caption function.
Closed caption ... Sets the closed caption mode. (OFF, CC1, CC2, CC3, CC4)
Color .... Sets the color of the contents. (Color, White)
Filter counter(h) ... Displays the filter counter. Reset the time after filter cartridge replacement. Click "Reset", a confirmation display appears, and then click "OK", the time will be reset.
* Do not reset the Filter counter when the filter cartridge is not replaced.
text_image
Setting Screen setting / Setting1 / 2 / 3 / 4 Video delay control OFF Set Closed caption Closed caption OFF Set Color Color Set Filter counter(√) 17 Reset Filter warning OFF Set Scrolls remaining 0 Reset Freeze OFF Set Test pattern OFF Set Factory default ExecuteFilter warning.....Sets the time to indicate the filter warning message on the screen. (OFF, 400H, 700H, 1000H)
Scrolls remaining... Displays the scrolls remaining of the filter. Reset the scroll counter after filter cartridge replacement. Click "Reset", a confirmation display appears, and then click "OK", the time will be reset.
* Do not reset the Scrolls remaining when the filter cartridge is not replaced.
Freeze .... Sets the image to freeze mode. (ON, OFF)
Test pattern......Sets the preset image of the projector. (OFF, Color, Gradation1 - Gradation4, All white, All black, Cross)
Factory default... Sets all of the projector control items to the factory default setting except the following items.
User Logo, Logo PIN code lock, PIN code lock, Lamp Corres. Value, Filter counter, PJ time, Network PIN code, Network setting
* This function is not effective for the settings of Network address settings, e-mail settings, etc.

natural_image
Blue glossy circular icon with a white lowercase 'i' and a camera symbol (no text or numbers)Information
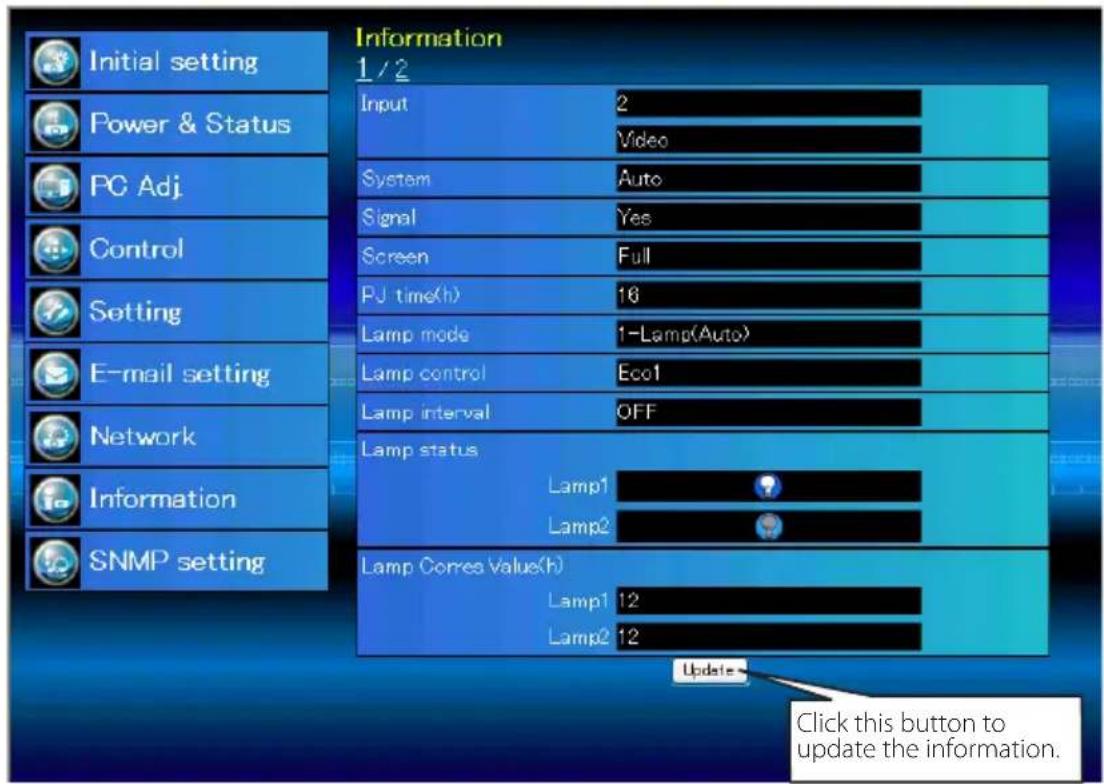
This page is to display the basic information of the projector status. Click Information on the main menu.
text_image
Initial setting Power & Status PC Adj. Control Setting E-mail setting Network Information SNMP setting Information 1/2 Input 2 Video System Auto Signal Yes Screen Full PJ time(h) 16 Lamp mode 1-Lamp(Auto) Lamp control Eco1 Lamp interval OFF Lamp status Lamp1 Lamp2 Lamp Corres Value(h) Lamp1 12 Lamp2 12 Update Click this button to update the information.Information 1
Items Description
Input ......Displays selected input and source.
System ......Displays selected signal system.
Signal ......Input signal status (Yes, No)
Screen ......Displays screen mode.
PJ time(h) ...... Displays the accumulated use time of the projector.
Lamp mode ......Displays the current "Lamp mode".
Lamp control ......Displays the current "Lamp control".
Lamp interval ......Displays the current "Lamp interval".
Lamp status .... Displays the status of the 2 lamps with an icon. Refer to the table on page 46.
Lamp Corres. Value(h) ..... Displays the use time (Corresponding value) of the 2 lamps.
* When PIP mode is active, displays Input, System, and Screen to "PIP mode".
Information 2
Item Description
| Power management .... | Displays the power management status. |
| Security .... | Displays the security (Key lock and PIN code lock) status. |
| Shutter .... | Displays the shutter status. (OFF: open, ON: close) |
| Shutter management .... | Displays the shutter management (Effect, Release key, Time) status. |
| Remote control.... | Displays the remote control code. |
| Filter time(h) .... | Displays the accumulated use time of the filter. |
| Filter condition.... | Displays filter status with an icon. Refer to the table as shown in the next page. |
| Option control No.... | Displays the option control number for purchasing suitable optional terminal boards. |
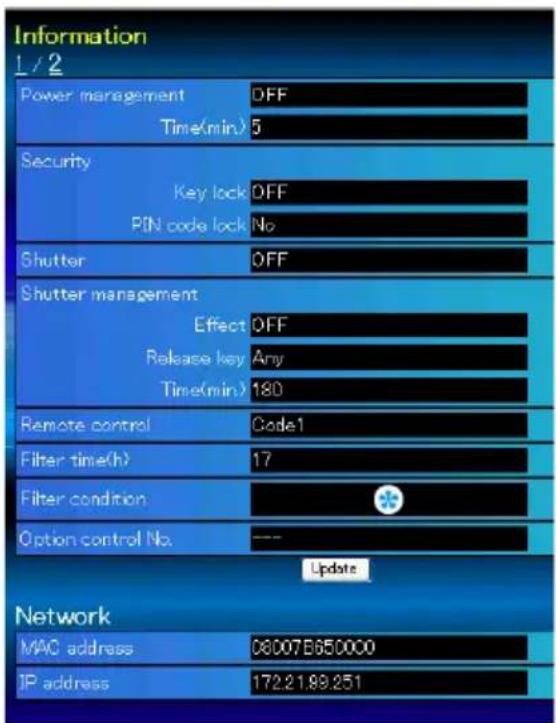
text_image
Information 1/2 Power management OFF Time(min) 5 Security Key lock OFF PIN code lock No Shutter OFF Shutter management Effect OFF Release key Any Time(min) 180 Remote control Code1 Filter time(h) 17 Filter condition * Option control No. --- Update Network MAC address 08007B650000 IP address 172.21.89.251Network
Items Description
MAC address....Displays MAC address of the projector. IP address ....Displays the IP address of the projector.
Indication of the lamp status
| Icon display/background Status | ||
 | White/Blue | Lamp on (Normal) |
| [T7WO] | White/Red | Lamp on (Lamp is being used over a specified use time, replace lamp immediately) |
| [SCCH] | Gray/Blue | Lamp off (Normal) |
| [KSX6] | Gray/Red | Lamp off (Lamp is being used over a specified use time, replace lamp immediately) |
| [KDB6] | Red/Blue with X | Lamp failure (Lamp failure, check lamp condition) |
| [2CX3] | Red/Red with X | Lamp failure (Lamp failure and lamp is being used over a specified use time, replace lamp immediately) |
Indication of the filter status
| Icon display/background Status | |
 Blue Blue | Good condition. |
 Yellow/Gray Yellow/Gray | Filter is almost clogged. |
 Red/Gray Red/Gray | Filter is clogged. Replace a filter with new one.* When the projector cannot decode the return from the filter cartridge, this icon also appears. |
Chapter 5 Appendix
5
Connection examples
Use of telnet
Web browser setting
Q & A
Examples of connection
Peer-To-Peer connection
Connecting the projector (PJ01) to the control computer (PC05) directly.
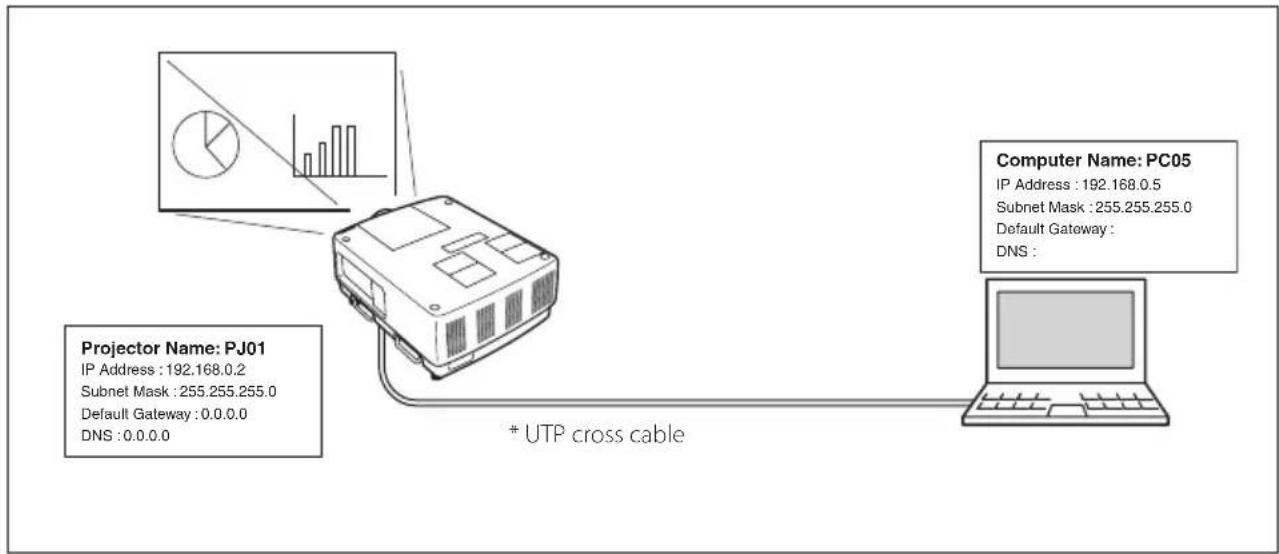
text_image
Projector Name: PJ01 IP Address : 192.168.0.2 Subnet Mask : 255.255.255.0 Default Gateway : 0.0.0.0 DNS : 0.0.0.0 * UTP cross cable Computer Name: PC05 IP Address : 192.168.0.5 Subnet Mask : 255.255.255.0 Default Gateway : DNS :Connecting the projector (PJ01) to the control computer (PC05) via the hub.
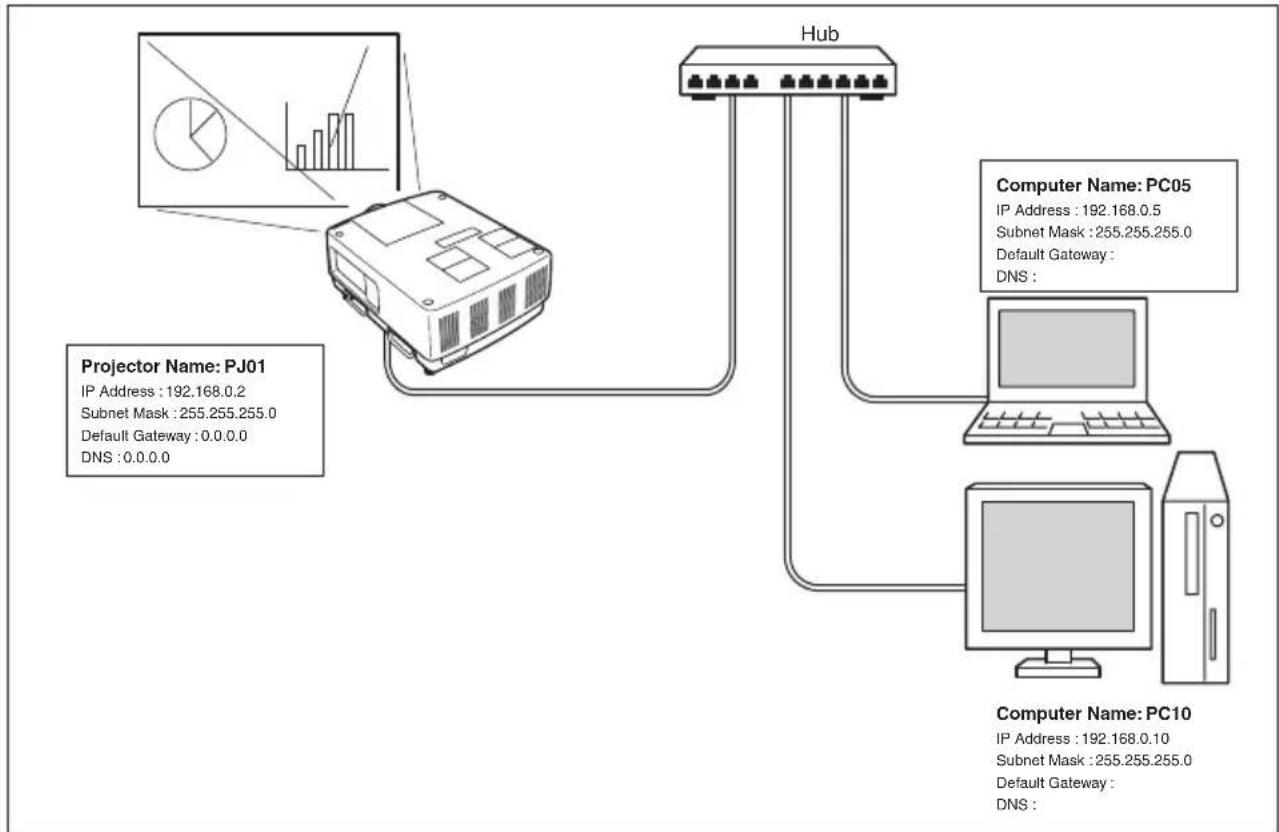
flowchart
graph TD
    A["Projector Name: PJ01\nIP Address : 192.168.0.2\nSubnet Mask : 255.255.255.0\nDefault Gateway : 0.0.0.0\nDNS : 0.0.0.0"] --> B["Hub"]
    B --> C["Computer Name: PC05\nIP Address : 192.168.0.5\nSubnet Mask : 255.255.255.0\nDefault Gateway : DNS :"]
    B --> D["Computer Name: PC10\nIP Address : 192.168.0.10\nSubnet Mask : 255.255.255.0\nDefault Gateway : DNS :"]
When the projector is connected to the computer directly without hub, the UTP cross cable should be used.
The gateway (Router) installed in the network
Connecting the projector (PJ01) to the control computer (PC05) via the gateway.
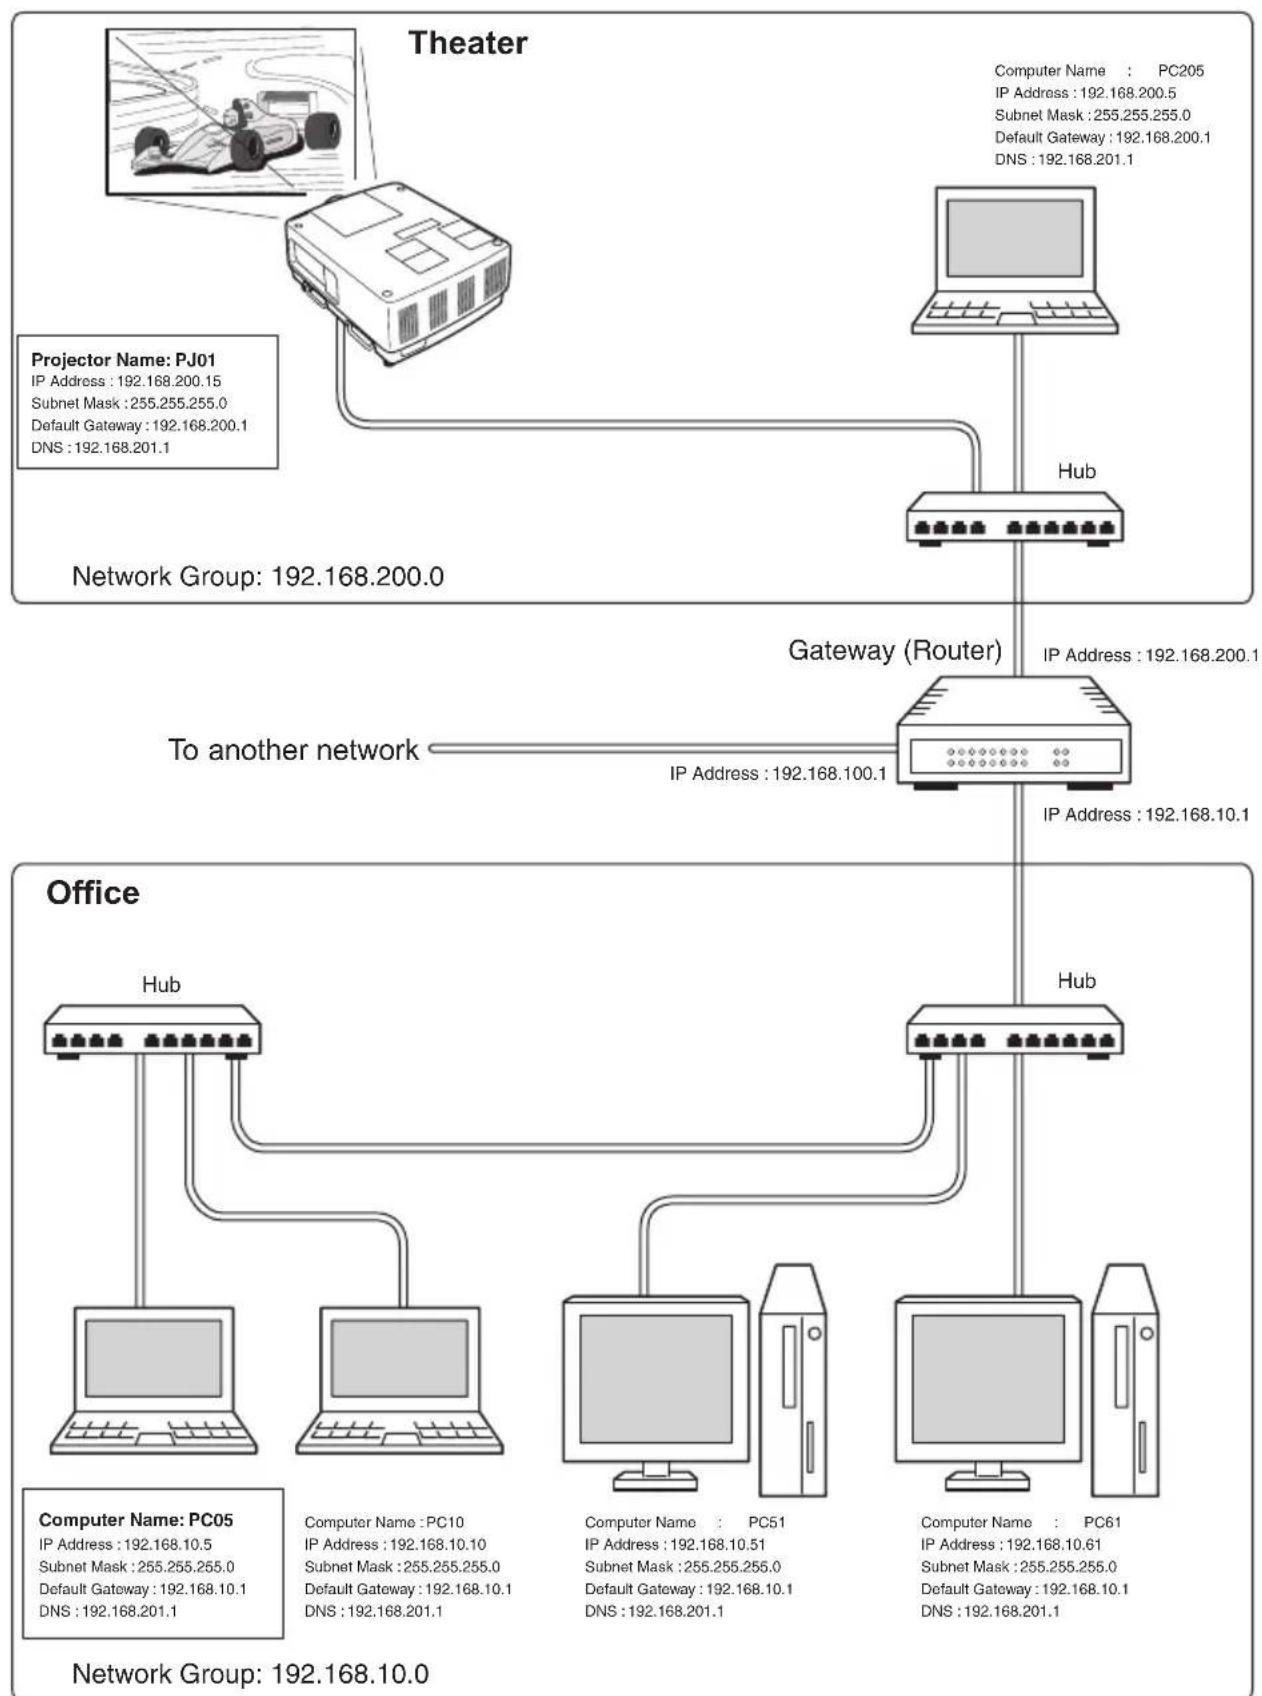
flowchart
graph TD
    A["Theater"] --> B["Hub"]
    B --> C["Gateway (Router)"]
    C --> D["Office"]
    subgraph Theater
        E["Projector Name: PJ01"]
        E --> F["IP Address: 192.168.200.15"]
        E --> G["Subnet Mask: 255.255.255.0"]
        E --> H["Default Gateway: 192.168.200.1"]
        E --> I["DNS: 192.168.201.1"]
    end
    subgraph Gateway
        J["To another network"]
        K["Computer Name: PC05"]
        L["Computer Name: PC10"]
        M["Computer Name: PC51"]
        N["Computer Name: PC61"]
        O["Subnet Mask: 255.255.255.0"]
        P["Subnet Mask: 255.255.255.0"]
        Q["Subnet Mask: 255.255.255.0"]
        R["Subnet Mask: 255.255.255.0"]
        S["Subnet Mask: 255.255.255.0"]
        T["Subnet Mask: 255.255.255.0"]
        U["Subnet Mask: 255.255.255.0"]
        V["Subnet Mask: 255.255.255.0"]
        W["Subnet Mask: 255.255.255.0"]
        X["Subnet Mask: 255.255.255.0"]
        Y["Subnet Mask: 255.255.255.0"]
        Z["Subnet Mask: 255.255.255.0"]
        AA["Subnet Mask: 255.255.255.0"]
        AB["Subnet Mask: 255.255.255.0"]
        AC["Subnet Mask: 255.255.255.0"]
        AD["Subnet Mask: 255.255.255.0"]
        AE["Subnet Mask: 255.255.255.0"]
        AF["Subnet Mask: 255.255.255.0"]
        AG["Subnet Mask: 255.255.255.0"]
        AH["Subnet Mask: 255.255.255.0"]
        AI["Subnet Mask: 255.255.255.0"]
        AJ["Subnet Mask: 255.255.255.0"]
        AK["Subnet Mask: 255.255.255.0"]
        AL["Subnet Mask: 255.255.255.0"]
        AM["Subnet Mask: 255.255.255.0"]
        AN["Subnet Mask: 255.255.255.0"]
        AO["Subnet Mask: 255.255.255.0"]
        AP["Subnet Mask: 255.255.255.0"]
        AQ["Subnet Mask: 255.255.255.0"]
        AR["Subnet Mask: 255.255.255.0"]
        AS["Subnet Mask: 255.255.201.1"]
    end
Use of telnet
You can control the projector by using the telnet application ^4 installed on your computer. Normally, the telnet application is available on your computer.
* The telnet 10000 port is used to control the projector.
Control
(For example, in case of using the telnet application of Windows XP Professional.)
- Select Run... submenu from Start menu on the computer. Type "telnet" onto the Open text area on the displayed window and press OK button.
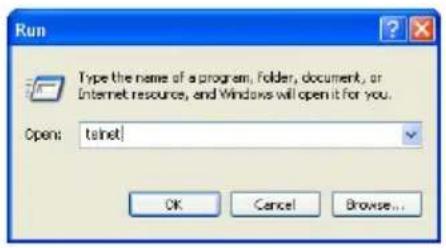
text_image
Run Type the name of a program, Folder, document, or Internet resource, and Windows will open it for you. Open: tainet OK Cancel Browse...(For example, in case of using the telnet application of Mac OS X v 10.4)
- Select Terminal from Applications ->Utilities.
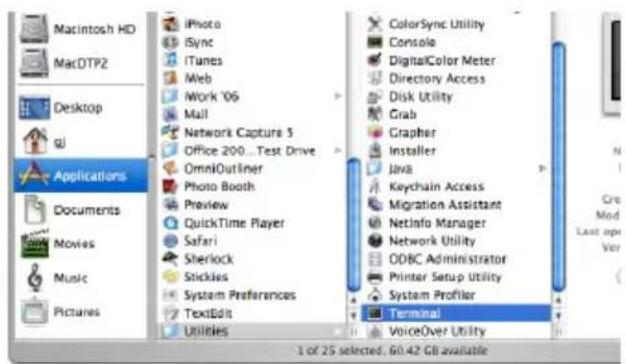
text_image
Macintosh HD MacDTP2 Desktop gj Applications Documents Movies Music Pictures iPhoto Sync iTunes Web Work '06 Mail Network Capture 5 Office 200...Test Drive OmniOutliner Photo Booth Preview QuickTime Player Safari Sherlock Stickles System Preferences TextEdit Utilities ColorSync Utility Console DigitalColor Meter Directory Access Disk Utility Grab Grapher Installer Java Keychain Access Migration Assistant NetInfo Manager Network Utility ODBC Administrator Printer Setup Utility System Profiler Terminal VoiceOver Utility 1 of 25 selected, 60.42 GB availableType as below on the displayed window.
telnet [return]
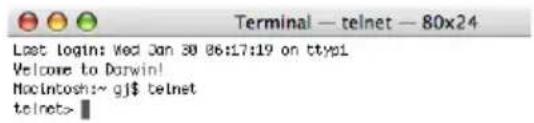
text_image
Terminal — telnet — 80x24 Last login: Wed Jan 30 06:17:19 on ttyp1 Welcome to Darwin! Macintosh:~ gj$ telnet telnet>- The telnet application will start and the following window will be displayed. Type as below to connect the projector.
open 192.168.1.201 10000 [return]
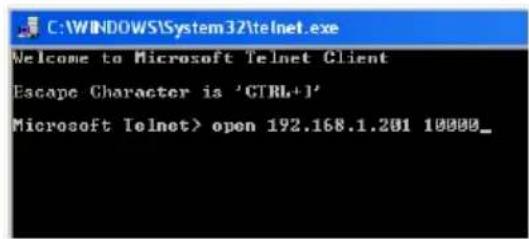
text_image
C:\WINDOWS\System32\telnet.exe Welcome to Microsoft Telnet Client Escape Character is 'CTRL+1' Microsoft Telnet> open 192.168.1.201 10000_* Use the IP address assigned to the projector.
text_image
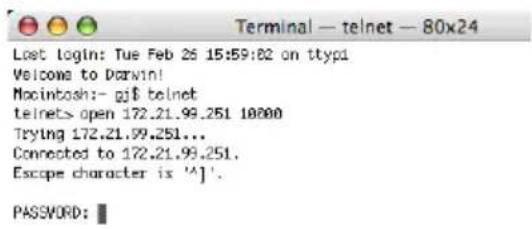
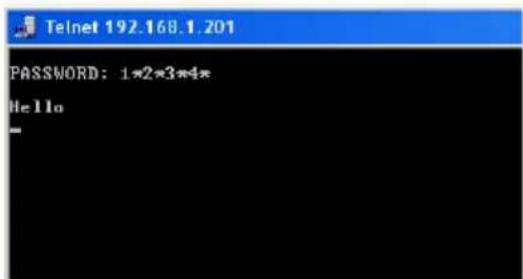
Terminal — telnet — 80x24 Lost login: Tue Feb 25 15:59:62 on ttyp1 Welcome to Darwin! Macintosh:- gj$ telnet telnets> open 172.21.99.251 10000 Trying 172.21.99.251... Connected to 172.21.99.251. Escape character is '^']'. PASSWORD:- When communication is established correctly, the word "PASSWORD:" appears on the window. Type the login password (Network PIN code *) for the projector and then press "Enter" key on the keyboard. If you do not set up the Network PIN code, just press "Enter" key.
When the word "Hello" is replied, login has been succeeded.
* The password "1234" is used for the example.
text_image
Telnet 192.168.1.201 PASSWORD: 1*2*3*4* Hello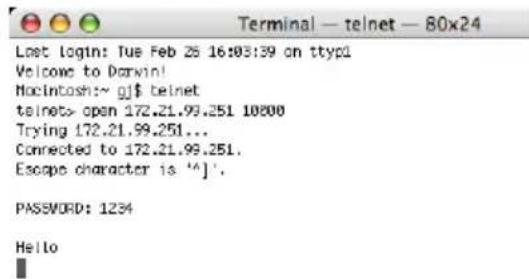
text_image
Lost login: Tue Feb 25 16:03:39 on ttyp1 Welcome to Darwin! Macintosh:~ gj$ telnet telnet> open 172.21.99.251 10800 Trying 172.21.99.251... Connected to 172.21.99.251. Escape character is "^"]'. PASSWORD: 1234 Hello- Type the commands, refer to below table, to control the projector and then press "Enter" key for termination. For example, type "C00" which is a command to turn on the projector, and press "Enter" key. Confirm the projector is turning on.
* Enter with ASCII 64-byte capital characters and one-byte characters.
To disconnect the communication, press "Ctrl" key and "] "key at the same time, type "close" and then press "Enter" key on the Keyboard.
close [return]
The table below shows the typical command lists for controlling this projector and please consult your local dealer for further information of another commands.
Command list table
| Command Function |
| C00 Power on |
| C01 Power off |
| C05 Input 1 |
| C06 Input 2 |
| C07 Input 3 |
| C08 Input 4 |
| C1C Menu display on |
| C1D Menu display off |
*1 Further instructions about the telnet application, please see the on-line guide on your computer.
*2 The password is a Network PIN code decided item "Network PIN code setting" (pp.14, 23). If the authentication of the entered password is failed 4 times continuously, the communication will be disconnected automatically. Please try again for the connection.
If the password or any command is not entered for more than 30 seconds, the communication will be disconnected automatically. Please try again for the connection.
Web browser setting
This projector is designed to be set up and controlled from an Internet web browser. Depending on the preference settings of the web browser, some control functions may not be available. Please make sure that the following functions are set up properly in the web browser.
Active Script/JavaScript enable
There are some control items used with the JavaScript function in the setting pages. If the web browser is set not to use this JavaScript function, it may not control the projector properly. In this case, the warning message "Make sure JavaScript is ON." will be displayed on the top of the page. To enable the JavaScript, please see further instructions on the next page.
Proxy setting
In some cases, your web browser is set up to use the proxy server for the internet or intranet connection. In this case, when you install this projector into the local network, you should set up the proxy setting of web browser preference correctly. Especially when connecting the projector and computer with a UTP cross cable directly, or when the network does not provide the proxy server, make sure that "not use proxy server" is set up in your web browser preference. Please see item "Examples: OS/Browsers" in the next page for further setting up procedure.
Examples: OS/Browsers
Windows XP Professional
Internet Explorer v.6.0
ActiveScript setting
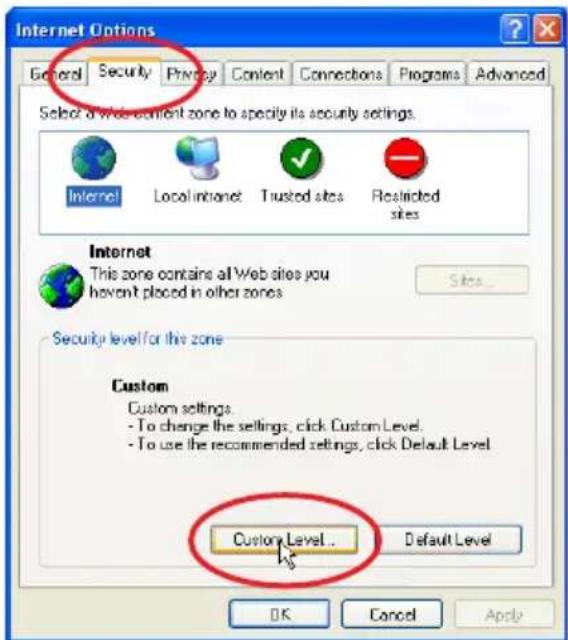
Select Internet Options from Tools menu on the web browser and then select Security tab and click Customize Level... button. On the security setting window, scroll down and find the Scripting item, make sure that "Enable" is selected in item Active Scripting.
text_image
Internet Options General Security Privacy Content Connections Programs Advanced Select a Web content zone to specify its security settings. Internet Local internet Trusted sites Restricted sites Internet This zone contains all Web sites you haven't placed in other zones Security level for this zone Custom Custom settings. - To change the settings, click Custom Level. - To use the recommended settings, click Default Level Custom Level... Default Level OK Cancel Apply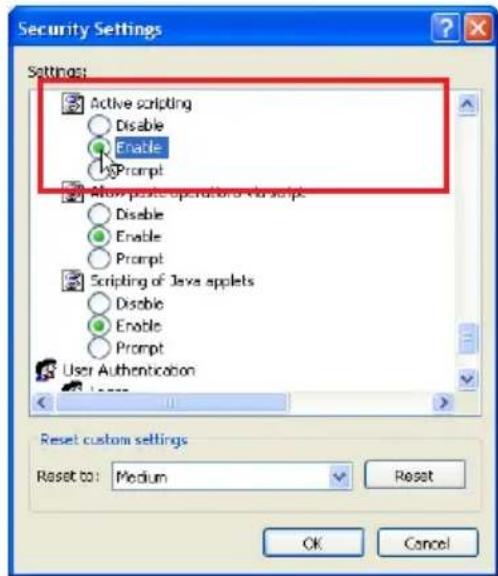
text_image
Security Settings Settings: Active scripting Disable Enable Prompt Allow paste operations to script Disable Enable Prompt Scripting of Java applets Disable Enable Prompt User Authentication Reset custom settings Reset to: Medium Reset OK CancelProxy setting
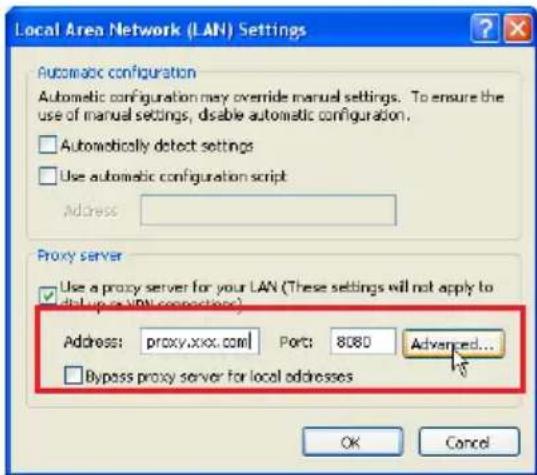
Select Internet Options from Tools menu on the web browser and then select Connection tab and click LAN Settings button. Properly set up your web browser's the proxy server settings according to the local area network environment to which the projector is connected.
- Using proxy server
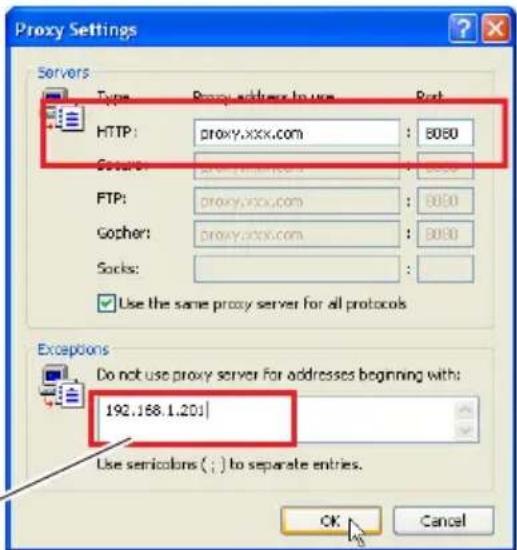
To use an external internet connection from the local area network, check the item Use a proxy server and enter the proxy server address and port correctly in the proxy settings window. For further instruction please consult your network administrator.
- Not using proxy server
Uncheck the item Use a proxy server.
If you connect the projector to the computer directly with UTP cross cable, this must be unchecked.
text_image
Local Area Network (LAN) Settings Automatic configuration Automatic configuration may override manual settings. To ensure the use of manual settings, disable automatic configuration. □ Automatically detect settings □ Use automatic configuration script Address: Proxy server Use a proxy server for your LAN (These settings will not apply to dial-up or VPN connections) Address: proxy.xxx.com Port: 8080 Advanced... □ Bypass proxy server for local addresses OK CancelTo designate proxy settings that will not use the proxy server when accessing the projector installed in the local area network, enter the IP address or domain name here.
text_image
Proxy Settings Servers Type Proxy address to use RsR HTTP: proxy.xxx.com 8080 Gopher: proxy.xxx.com 8080 FTP: proxy.xxx.com 8080 Gopher: proxy.xxx.com 8080 Socks: ✓ Use the same proxy server for all protocols Exceptions Do not use proxy server for addresses beginning with: 192.168.1.201 Use semicolons ( ; ) to separate entries. OK CancelNetscape Navigator v.7.1
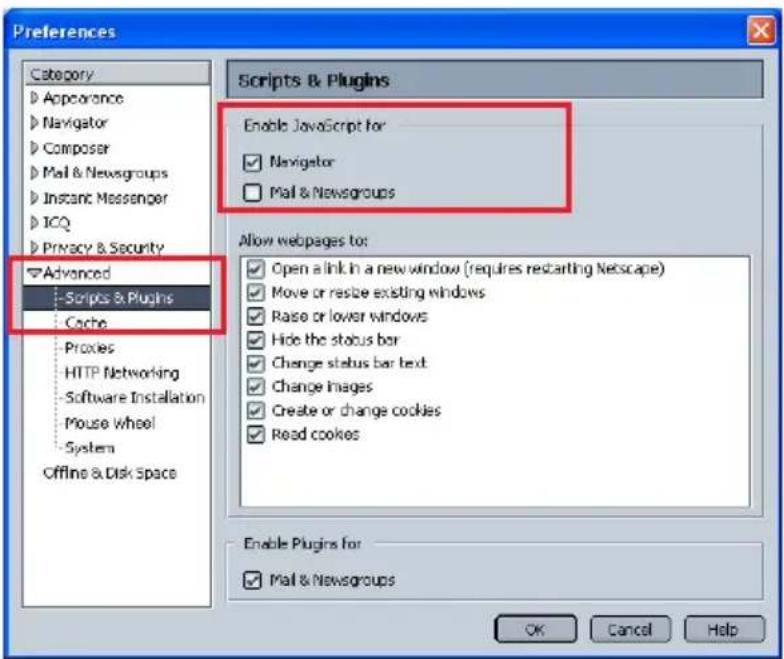
JavaScript Setting
Select Preference from Edit menu on the web browser and then select the item Advanced/Scripts & Plugins in the Category column. Make sure that the Enable JavaScript for Navigator is checked.
text_image
Preferences Category Appearance Navigator Composer Mail & Newsgroups Instant Messenger ICQ Privacy & Security Advanced Scripts & Plugins Cache Proxies HTTP Networking Software Installation Mouse Wheel System Offline & Disk Space Scripts & Plugins Enable JavaScript for Navigator Mail & Newsgroups Allow webpages to: Open a link in a new window (requires restarting Netscape) Move or restore existing windows Raise or lower windows Hide the status bar Change status bar text Change images Create or change cookies Read cookies Enable Plugins for Mail & Newsgroups OK Cancel HelpProxy setting
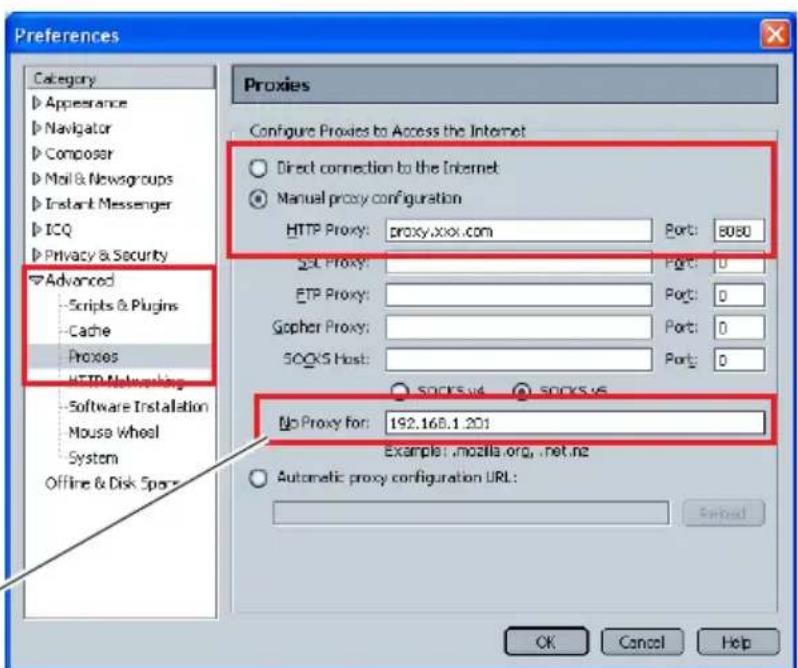
Select Preference from Edit menu on the web browser and then select the item Advanced/Proxies in the Category column. Properly set up your web browser's the proxy server settings according to the local area network environment to which the projector is connected.
- Using proxy server
When you use an external internet connection from the local area network, select the item Manual proxy configuration. Enter the proxy server address and port number correctly on HTTP Proxy item. For further instruction please consult your network administrator.
- Not using proxy server
Select the item Direct connection to the Internet in the proxy setting window.
If you connect the projector to the computer directly with UTP cross cable, this must be selected.
To designate proxy settings that will not use the proxy server when accessing the projector installed in the local area network, enter the IP address or domain name here.
text_image
Preferences Category Appearance Navigator Composer Mail & Newsgroups Instant Messenger ICQ Privacy & Security Advanced Scripts & Plugins Cache Proxies HTTP Modeling Software Installation Mouse Wheel System Offline & Disk Spots Proxies Configure Proxies to Access the Internet Direct connection to the Internet Manual proxy configuration HTTP Proxy: proxy.xxxi.com Port: 8080 SQL Proxy: Port: 0 ETP Proxy: Port: 0 Gopher Proxy: Port: 0 SOOKS Host: Port: 0 SOOKS v4 SOOKS v5 No Proxy for: 192.168.1.201 Example: .mozilla.org, .net.ne Automatic proxy configuration URL: OK Cancel HelpL2K1500 Network User Manual 020-000389-01 Rev.1 (05-2011)
MAC OS X v 10.4
Safari v.3.2.1
JavaScript enable setting
Select Preferences... from Safari on the web browser and then select Security tab and check Enable JavaScript.
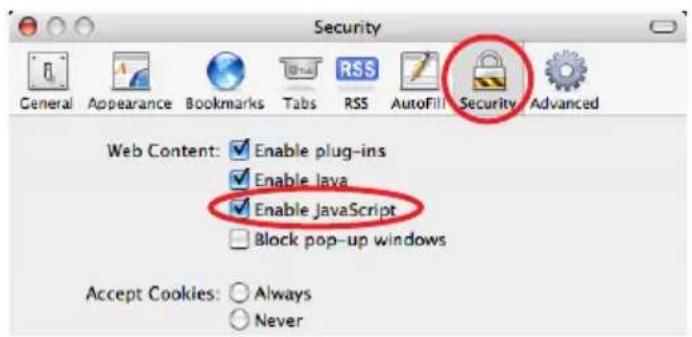
text_image
Security General Appearance Bookmarks Tabs RSS AutoFill Security Advanced Web Content: ✓ Enable plug-ins ✓ Enable java ✓ Enable JavaScript Block pop-up windows Accept Cookies: ○ Always ○ NeverProxy setting
1 Open Preferences... from Safari menu on the web browser Safari. The preference menu appears.
2 Select Advanced icon and then click Proxies: Change Settings ....
3 Select Proxies tab and properly set up your web browser Safari's the proxy server settings according to the local area network environment to which the projector is connected.
- Using proxy server
To use an external internet connection from the local area network, check the items Web Proxy (HTTP) and Secure Web Proxy (HTTPS) of Select a proxy server to configure window and enter the proxy server address and port correctly in Web Proxy Server window. For further instruction please consult your network administrator.
- Not using proxy server
Uncheck the items Web Proxy (HTTP) and Secure Web Proxy (HTTPS) of Select a proxy server to configure.
If you connect the projector to the computer directly with UTP cross cable, they must be unchecked.
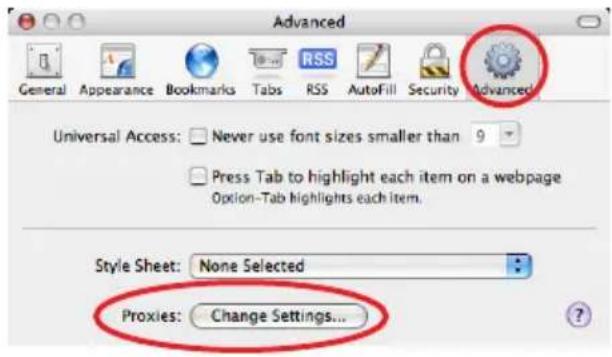
text_image
Advanced General Appearance Bookmarks Tabs RSS AutoFill Security Advanced Universal Access: Never use font sizes smaller than 9 Press Tab to highlight each item on a webpage Option-Tab highlights each item. Style Sheet: None Selected Proxies: Change Settings...To designate proxy settings that will not use the proxy server when accessing the projector installed in the local area network, enter the IP address or domain name here.
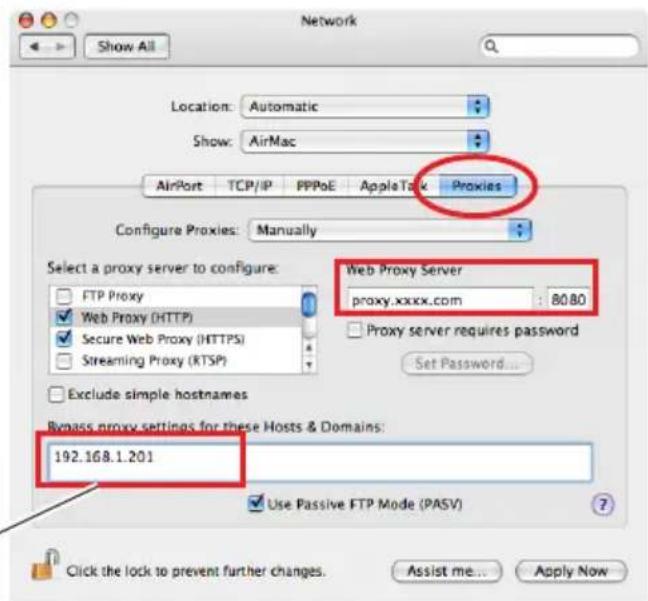
text_image
Network Show All Location: Automatic Show: AirMac AirPort TCP/IP PPPoE AppleTask Proxies Configure Proxies: Manually Select a proxy server to configure: FTP Proxy Web Proxy (HTTP) Secure Web Proxy (HTTPS) Streaming Proxy (RTSP) Web Proxy Server proxy.xxxx.com : 80.80 Proxy server requires password Set Password... Exclude simple hostnames Bypass proxy settings for these Hosts & Domains: 192.168.1.201 Use Passive FTP Mode (PASV) Click the lock to prevent further changes. Assist me... Apply NowQ&A
Installation/Access
Q
Why doesn't the setting page appear in my web browser?
A
Following causes are possible. Please check them.
- The projector does not connect to the network.
Check LED indicators status (p.12).
- Check the connection of LAN cable if the LINK Lamp does not light green.
- Check the network configuration of the projector if the ACT Lamp does not blink orange.
- Wrong network configuration of the computer.
Check the network configuration of the computer.
-
The proxy setting of the web browser is not set correctly (p.54).
-
The computer does not provide TCP/IP protocol.
Q
How can I restrict access from the computer.
A
-
Please use the password authentication function on the login page (p.23).
-
Please use the IP filtering function provided with the gateway (router) to restrict the accessing from the computer. For further information please consult your network administrator.
Q
Can I access the projector installed on the company's local area network from a remote location?
A
There are some ways to access to the projector in the LAN, but you must consult your network administrator for security reason.
Use of modem
(Connect to the company's network from your home or some other places by using modem.)
Use of private line
(Connect to the company's network from the branch office or maintenance office by using private line.)
Use of internet
(Connect to the company's network from your home, branch office or some other places by using the internet.)

We use the DHCP/BOOTP server to assign the IP address. Is it possible to use the projector in this network environment?

Possible. This projector supports the DHCP/BOOTP server. To use this projector in this network environment, set it up so that the DHCP/BOOTP server does not assign the IP address configured to this projector for another device on the network. Please consult your network administrator (pp.13, 24).

How can I install several projectors?

Install and configure network one by one to avoid the IP address collision each other. To configure the IP address please see item "Network configuration" (pp.12-13, 24).
Password/Login

What should I do when I forget the IP address of the projector?

You can check the IP address in the "Network information" menu.

What should I do when I forget the password (Network PIN code)?

Please set the new network PIN code in the "Network PIN code" menu.

Can I register the setting page as a web browser "Favorites" or "Bookmarks"?

Please add "Login" page to your "Favorites" or "Bookmarks". Do not add the specified setting page because it will not be able to perform the password authentication correctly.
Operation

Why can't I change the controls in the setting page with web browser?

Please make sure the projector is turned on. If it is in the standby mode, the setting is not effective to the projector. To control the projector with a web browser, the projector must be in the powered-on condition.

Why does it sometimes take a lot of time to complete the page display?

The display speed of the page depends on the network environment in which both the projector and computer are placed. It may take much time to complete the page display if network traffic is heavy. Please consult your network administrator.

How many numbers of the E-mail address can I register in the E-mail setting page.

You can register up to 10 addresses.

Why am I not receiving E-mail alert messages?

Make sure that the registered E-mail address and SMTP server address are correct. If the SMTP server is located in your LAN (Local Area Network), the address should be set to the SMTP server in your LAN. The SMTP server located outside of your LAN may not be available for security reason. For further information please contact your network administrator (p.25).
Others

What are the rules for IP address assignment?
A
If the network is constructed with TCP/IP protocol, a unique IP address is required for each piece of network equipment. The following are basic rules of the assignment.
Rule1
Do not configure the same IP address to the network equipment in the same network group. Each piece of equipment must be assigned a unique IP address.
If the IP address is set [192.168.x.x], the Subnet Mask should be set [255.255.255.0] for example.
Rule2
The start address [xxx.xxx.xxx.0] and the last address [xxx.xxx.xxx.255] of the IP address must not be assigned to any other equipment. These address numbers are reserved.
Rule3
The IP address must correlate to a network number. If network numbers are different between the equipment, they cannot establish communications each other. In this case, the router is placed in the networks to make the routing.

Can I control the projector by using the telnet application?

Possible. Please refer to the item "Use of telnet" (p.50 - 51).

What is the MAC address assigned to the projector?

The MAC address is displayed in "Network information" menu of the projector (p.14) and in "Information" menu through the web browser (p.45).

Can I update the firmware of the projector.
A
It is possible to update the firmware through the network. It is required to have a special tool for the updating. For further information please consult your local dealer. The version number of the firmware is indicated on the lower part of the "Initial setting" page.
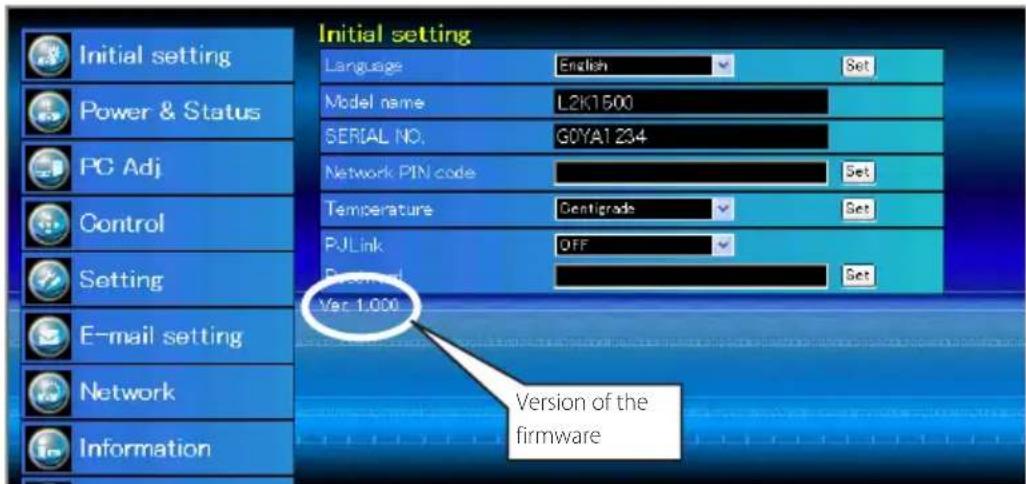
text_image
Initial setting Language English Set Model name L2K1500 SERIAL NO.GDYA1234 Network PIN code Set Temperature Centigrade Set PJLink OFF E-mail setting Set Var 1.000 Version of the firmwareCHKISTIE®
Americas
USA
Representative Office
Mobile: 5699 436 6555
Europe, Middle East & Africa
United Kingdom
Branch Office
Christie Digital Systems Canada, Inc.
ViewPoint
200 Ashville Way
Wokingham
Berkshire, U.K.
RG41 2PL
PH: +44 (0) 118 977 8000
FX: +44 (0) 118 977 8100
sales-europe@christiedigital.com
France
Representative Office
Christie Digital Systems Canada, Inc.
Bâtiment D-Hall 4
Parc Louis Roche
96/114 Avenue Louis Roche
F-92230 Gennevilliers
France
PH: +33 10)1 41 21 44 04
FX: +33 (0)1 41 21 00 36
sales-france@christiedigital.com
Germany
Representative Office
Christie Digital Systems Canada, Inc.
Willicher Damm 129
D-41066
Mönchengladbach
PH: +49 2161 664540
FX: +49 2161 664546
sales-germany@christiedigital.com
Eastern Europe
Representative Office
Christie Digital Systems Canada, Inc.
Regus Bank Centre
Szabadsag ter 7
H-1054 Budapest
Hungary
PH: +36 (0)1 47 48 100
FX: +36 (0)1 47 48 452
sales-europe@christiedigital.com
Middle East
Representative Office
Christie Digital Systems Canada, Inc.
C/O Emirates Group Security
Building,
C Block, Room 207,208, 209
Airport Free Zone
PO Box 293762
Dubai UAE
PH: +971 (0) 4 299 7575
Christie Authorized Reseller
Antonio Abad
Polígono Industrial Ventorro Del
Cano
Christie Authorized Reseller
Angelo Tacca
Via Garibaldi, 88
20024 Garbagnate Milanese (MI)
PH: +39 02 9902 1161
FX: +39 02 9902 2641
Africa
Representative Office
Christie Digital Systems Canada, Inc.
4 Patricia Road
Gillitts
KwaZulu Natal
3610
Republic of South Africa
PH: +27 (0) 317 671 347
# 05-02 Biz Tech Centre
Singapore, 389842
PH: +65 6877-8737
FX: +65 6877-8747
sales-singapore@christiedigital.com
China - Beijing
Representative Office
Representative Office
Room 1109-1116 Shartex Plaza
No. 88 Zun Yi South Road
Shanghai 200336
PH: +86 21 6278 7708
FX: +86 21 6278 5816
sales-china@christiedigital.com
Japan
Representative Office
Representative Office
6F, ILSIN Building, 15-15
Yeouido-dong,
Yeongdeungpo-gu, Seoul,
150-872 South Korea
PH:+82 2 702 1601
FX: +82 2 702 1602
India
Representative Office
Unit No. 03, Navigator Building
International Technology Park
Whitefield Road
Bangalore 500 Ubb
India
PH: (080) 41468941 - 48
FX: (080) 41468949
Corporate offices Worldwide offices
USA – Cypress
ph:714-236-8610
Canada – Kitchener
ph: 519-744-8005
United Kingdom
ph: +44 118 977 8000
Germany
ph: +49 2161 664540
France
ph: +33 (0) 1 41 21 44 04
Hungary/Eastern Europe
ph: +36 (0) 1 47 48 100
Singapore
ph: +65 6877 8737
Shanghai
ph: +86 21 6278 7708
Beijing
ph: +86 10 6561 0240
Korea
ph: +82 2 702 1601
Japan
ph: +81 3 3599 7481