
Navig8r NAVC-818SHD - Dash cam Laser - Free user manual and instructions
Find the device manual for free Navig8r NAVC-818SHD Laser in PDF.


| Product Type | Dash Cam |
| Brand | Laser |
| Model | Navig8r NAVC-818SHD |
| Dimensions (approx.) | 6.5 x 4.5 x 3.0 cm |
| Weight (approx.) | 60 g |
| Power Supply | 5V DC via USB car charger |
| Battery | Built-in rechargeable lithium-ion |
| Video Resolution | Full HD 1920x1080p at 30fps |
| Lens Angle | 120° wide angle |
| Storage | MicroSD card up to 32 GB (Class 10 recommended) |
| Loop Recording | Yes, with G-sensor for event protection |
| G-Sensor | Built-in, automatically locks footage on impact |
| Night Vision | Yes, with infrared LEDs |
| Display | 2.7 inch TFT LCD |
| Mounting | Suction cup mount for windshield |
| Maintenance | Clean lens with a soft, dry cloth; format SD card regularly |
| Safety | Use only the supplied charger; do not expose to extreme temperatures |
| Spare Parts Availability | Replacement mounts and chargers available from manufacturer |
| Repairability | Battery replacement by service center recommended |
| General Information | Designed for continuous recording while driving; includes user manual |
Frequently Asked Questions - Navig8r NAVC-818SHD Laser
User questions about Navig8r NAVC-818SHD Laser
0 question about this device. Answer the ones you know or ask your own.
Ask a new question about this device
Download the instructions for your Dash cam in PDF format for free! Find your manual Navig8r NAVC-818SHD - Laser and take your electronic device back in hand. On this page are published all the documents necessary for the use of your device. Navig8r NAVC-818SHD by Laser.
USER MANUAL Navig8r NAVC-818SHD Laser
1296p Super HD In Car DVR
CRASH CAM™
With GPS Tracking and Camera Alerts

natural_image
Black navigation camera with visible lens, head-mounted sensor, and front-mounted screen (no text or symbols on main body)![NAVC-818SHD NAVIG[8]R MENU OK](/content/2026/05/818994/images/758c06cff45f5c2c786595ee0f1f1a4cbaacef91236f85d40fa42781748664f7.jpg)
TABLE OF CONTENTS
| Important safety instructions and precautions 3 | |
| What's in the box 3 | |
| Micro SD card requirements | 3 |
| Camera button and hardware overview | 4 |
| What do the buttons do? | 5 |
| On screen display 6 | |
| What do the led indictors mean? 7 | |
| Quick reference guide | 8 |
| Operating the NAVCAM-818SHD for the first time 9 | |
| Power ON/OFF (Auto ON/OFF) | 9 |
| About GPS signal reception | 9 |
| Auto record when turned on 9 | |
| Recording files 9 | |
| Playing back a recorded file 10 | |
| Deleting a file | 10 |
| Auto bump file record (g sensor) - saving recording video files | 10 |
| Taking a still picture 10 | |
| Other shortcuts from the main screen 10 | |
| Playback on TV (With HDMI) | 11 |
| USB Connection | 11 |
| User settings | 11 |
| Tracking software – quick guide | 13 |
| The GPS software - overview | 14 |
| FAQ | 15 |
| Product specifications | 16 |
| Feature explanations | 17 |
IMPORTANT SAFETY INSTRUCTIONS AND PRECAUTIONS
- Read all instructions carefully before use.
- Retain manuals for future reference.
- Use this product only in the manner described.
- Only use a water-dampened soft-cloth to clean the surface of this product.
- The following will damage this product: any liquid such as water or moisture, extreme heat; cold; humidity, dusty or sandy environments.
- The NAVCAM-818SHD is designed to be mounted on a vehicle windscreen, as high as possible, to ensure a maximum viewpoint. Please ensure that any attached cables are secured and will not cause the device to fall.
- There are no user serviceable parts in this product.
- Un-authorized attempts to dismantle or repair this product will void product warranty
WHAT'S IN THE BOX
1) NAVCAM-818SHD
2) This user manual
3) Micro USB Charge and data transfer cable
4) CD disc to install the tracking and review software on a Windows® PC
MICRO SD CARD REQUIREMENTS
The NAVCAM-818SHD requires a Micro SD card (not included) to record video/image content. For optimal performance, we recommend using a Class 10 micro SD card UHS 3 (minimum) to ensure fast data transfer rates
Note: Some “Extreme Speed” class 10 UHS 2 cards will not work correctly with the NAVCAM-818SHD. Other low speed cards are not recommended and the user many experience constant intermittent faults.
CAMERA BUTTON AND HARDWARE OVERVIEW

| 1 | Menu / Return | 7 | Mini HDMI Out |
| 2 | Playback / UP / Map shortcut button | 8 | Reset button |
| 3 | Snap / Down / Preserve fil button | 9 | Power ON / OFF button |
| 4 | Record / OK | 10 | Micro SD slot |
| 5 | Mount Socket | 11 | Lens |
| 6 Micro USB Charging Port | |||
WHAT DO THE BUTTONS DO?
| Function | Button | What does it do? | |
| Menu and Settings options |  | When recording, press to enter settingsWhen video preview, press to enter/exit settingsWhen video playback, press to return to preview interface. | |
| Press for Map (GPS connection required) |  | When recording with GPS connection, press to show the mapPress to select next menu/video/image | |
| SOS / DOWN: |  | When recording, press to preserve the video recording file.Press to select next menu/video/imageIn video preview, press to take a shooting. | |
| Recording/OK: |  | Press to start/stop recording.In Setting Menu, press to confirm settingsWhen video preview, press to confirm playing selected video/imagesWhen video playback, press to stop playback. | |
| Power Switch | Press and hold to turn the unit ON and OFF. | ||
| Reset | Press and hold to reset the device. | ||
ON SCREEN DISPLAY
| HOME SCREEN (IN RECORD MODE) | |
| 1 | Resolution |
| 2 | Power/Battery/Charging |
| 3 | Micro SD Card Inserted |
| 4 | GPS Signal Status |
| 5 | Current Date and Time |
| 6 | Menu Settings |
| 7 | Navigation Map |
| 8 | Emergency file save |
| 9 | Record |
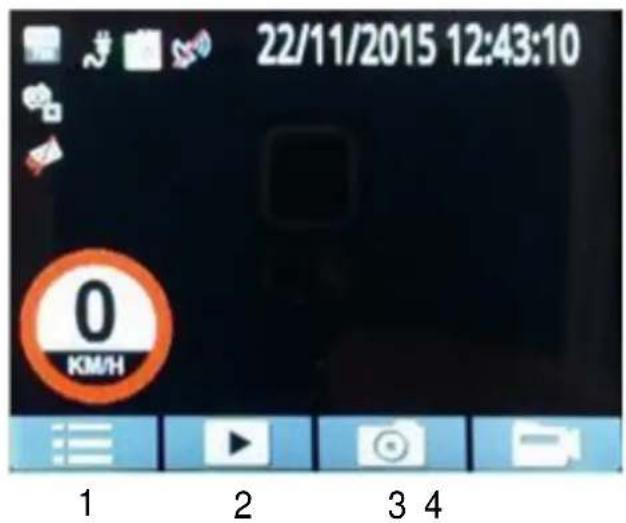
| PLAYBACK SCREEN (RECORDING STOPPED) | |
| 1 | Menu Settings (Press to Toggle thru) |
| 2 | Playback recorded files |
| 3 | Take Photo (DSC) |
| 4 | Take Video (Crashcam) |
| MENU SCREEN(PRESS MENU FROM PLAYBACK SCREEN) | |
| 1 | User Settings |
| 2 | File Edit options (Delete) |
| 3 | Menu Settings (Press to Toggle thru) |
| 4 | Scroll up through options |
| 5 | Scroll down through options |
| 6 | Confirm selection |


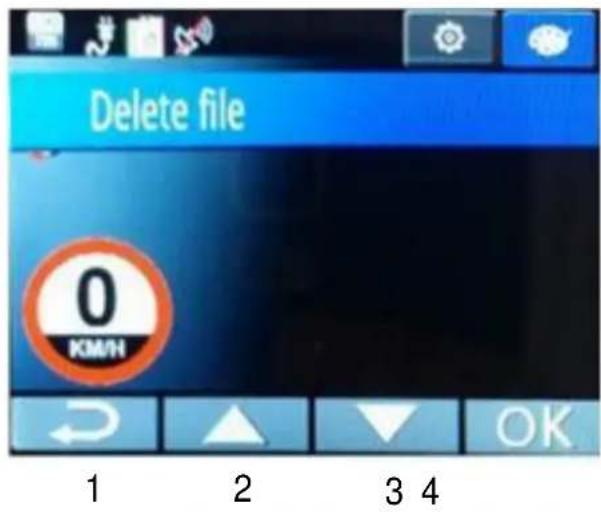
| DELETE FILES(PRESS MENU A SECOND TIME) | |
| 1 | Return to main screen |
| 2 | Scroll up through options |
| 3 | Scroll down through options |
| 4 | Confirm selection |
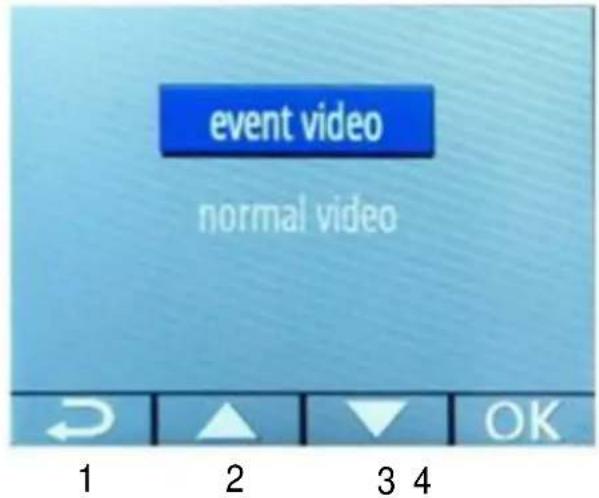
| PLAYBACK SCREEN(PRESS PLAY FROM THE MENU SCREEN) | |
| 1 | Return to main screen |
| 2 | Scroll up through options |
| 3 | Scroll down through options |
| 4 | Confirm selection |
WHAT DO THE LED INDICTORS MEAN?
| ICON Definition | |
| Flashing Blue dot | Video is Recording |
| Satellite icon | GPS location fixed and tracking |
| Satellite icon (with strike Through) | GPS location not found (eg. If indoors) |
| Red LED (Light) | Device is charging |
| Blue LED (Light) Device is ON |
QUICK REFERENCE GUIDE
| Feature | Function | Description | How to use |
 | Super High Definition (1296p) | View your recorded video and digital photos in super high definition resolution | Go to the settings menu and select SHD from the resolutions option. |
 | Speed Camera and School Zone alerts | Audible and visual alerts to remind you when travelling through school zones and near speed cameras | When entering these zones, you will automatically be prompted with visual and audio (optional) warnings |
 | GPS Display for Navigation | Watch your progress using the onscreen real time using the onscreen GPS guided map | Press the UP ARROW button to view maps, once you are connected to GPS Satellites |
 | GPS Tracking | Plot your route on Google Earth using our easy to use GPS viewer software | When connected to GPS Satellites, tracking your GPS co-ordinates automatically when recording video. |
 | 165° Wide angle lens | Capture even more details and more vehicles around you | The wide angle lens is standard with this model, so there is no need to turn this feature off and on. |
 | HDMI A/V output | Watch your Videos simply by plugging your crash-cam into your TV via HDMI | Simply connect a Mini HDMI to HDMI cable to your Crash-Cam and TV |
OPERATING THE NAVCAM-818SHD FOR THE FIRST TIME
Connect a USB car charger to the car's 12v (or trucks 24v) Cigarette lighter socket and the other end to the Micro USB port on the NAVCAM-818SHD.
Insert a Micro SD card into the Micro SD slot and turn the device on. When the ignition is turned on, the NAVCAM-818SHD will turn on.
POWER ON/OFF (AUTO ON/OFF)
When connected to power, the NAVCAM-818SHD will turn ON or OFF automatically when the car's ignition is turned ON or OFF. If the NAVCAM-818SHD does not turn off immediately it means the device is completing the file save process before turning off (usually only a few seconds).
To turn the NAVCAM-818SHD ON, press and hold the power button on the side of the device to ON. To turn off, press and hold the power button again.
If power is “constant on” (in some European vehicles), then the NAVCAM-818SHD will need to be turned ON/OFF manually using the power switch.
ABOUT GPS SIGNAL RECEPTION
For convenience, your NAVCAM-818SHD will automatically connect to GPS satellites when in range. Just like all PND (Portable Navigation Devices) this may take a few minutes (especially the first time). The signal can also be affected by driving through tunnels for example. The GPS connection however will reconnect when the GPS satellites come back into range.
Until GPS is re-connected, the following features may not be displayed properly:
- The navigation map screen
- Driving speed display
- Safety alerts such as Red Light, Speed Cameras, School Zones etc.
- Tracking details used by the GPS Player such as speed, longitude, Latitude and Date and Time.
Note: Schools zones by default are set to 8 – 9:30am and 2:30 – 4pm 40KpH and cannot be changed with this model.
AUTO RECORD WHEN TURNED ON
When the NAVCAM-818SHD is turned on (via the auto on feature) the device will automatically begin recording. To stop recording, press the OK button or turn the device OFF using the power button.
RECORDING FILES
Turn on the NAVCAM-818SHD. Recording should start automatically, if not press the Video Camera button. When recording has started, a RED dot will appear on the screen (next to the timer) as well
as a FLASHING BLUE LED indicator at the top right hand side of the unit. The screen will also display a count up timer for the recording at the top.
The recorded files are saved to the memory or micro SD Card. Recording can be stopped, by either pressing the OK button or by turning the car ignition off (stopping power to the device)
The NAVCAM-818SHD supports cycle recording. It will overwrite the oldest video files with new ones. Depending on the size of the memory card and the speed rating of the card, there may be as much as a 3 second pause whilst old files are selected and overwriting begins with newer files. This pause time will not be recorded.
PLAYING BACK A RECORDED FILE
From the main screen (and while not recording), press the PLAY (Up arrow) button, then select the source folder of the file ie. (Event or Normal Video). Then, select the video you wish to view using the up and down arrow keys and the OK button to confirm.
DELETING A FILE
From the main screen (and while not recording), press Menu button two times to enter the file deleting menu. Select whether you would like to delete from your delete-protected files (Event Video) or from your normal files (Normal Video). Continue using the arrow keys and the OK button to delete one or all files from the folder.
Note: Once files are deleted you cannot get them back.
AUTO BUMP FILE RECORD (G SENSOR) - SAVING RECORDING VIDEO FILES
Due to the “cycle recording” nature of this technology, older recorded files will be overwritten (depending on the chosen resolution settings and the memory capacity of the memory card). Alternately the G sensor will trigger an auto save lock if it senses a bump (sensitivity is selectable via the user settings), so that the file being recorded is not overwritten in the cycle record process. Such files will be saved to the folder called EVENT.
TAKING A STILL PICTURE
While not in record mode, press the CAMERA button. A “shutter” noise will then be heard to let you know the image has been taken. The image will be saved to the memory card in the folder called NORMAL.
OTHER SHORTCUTS FROM THE MAIN SCREEN
Preserve file: Press the arrow down button to preserve a file from being overwritten.
PLAYBACK ON TV (WITH HDMI)
Connect the NAVCAM-818SHD to a HDMI equipped TV or AV monitor with a mini-HMDI to HDMI cable. Turn on the NAVCAM-818SHD and select PLAY.
USB CONNECTION
Connect the NAVCAM-818SHD to a Windows PC with a Micro USB to USB cable. The screen will then display “USB Connecting...” The unit is now connected.
Find the device Under "My computer" or "Windows Explorer" find the newly connected drive. Recorded files and images are recorded in the NORMAL folder, while preserved files are recorded in the EVENT folder. Files can be played back using Windows Media player, VLC or a compatible .MOV media player or an image viewer (for images).
USER SETTINGS
From the main screen, press the MENU button, then using a combination of the arrow keys and the OK button to confirm your choice, select settings from the following options list:
| Feature Options Description | ||
| Video Resolution | 2560x1080 30fps 21:9,2304x1296 30fps 16:9,1920x1080 45fps 16:9,1920x1080 30fps 16:9,1920x1080 30fps 16:9,1280x720 60fps 16:9,1280x720 30fps 16:9 | Change the resolution of recorded files (Note: Higher Resolution files take up more storage space) |
| Recycle record | Off /1 Minute /3 Minutes /5 Minutes | Select the length of each recorded file |
| Motion Detection On | /Off | When power is connected, begin recording when motion is detected. |
| Park Mode On /Off | When the car is turned off, begin recording if an impact is detected. | |
| Image Quality | S.Fine, Fine, Normal | Increase or decrease the image quality. |
| Microphone Setup On | /Off | Record the sounds/voices from inside your car whilst recording |
| Stamp Setting Date /Time /Driver ID | Select on/off to add a time-stamp to the recorded video | |
| Driver ID Setting | [Enter your own number plate details] | Stamp your own number plate details onto video recordings |
| G Sensor Setting Off /High /Medium /Low | Adjust the level of impact required to preserve recorded incident files. | |
| WB (White Balance) | Auto /Incandescent /Sunny /Cloudy /Fluorescent | Adjust lighting to your environment using these pre-set settings |
| EV Bias | -2.0/-1.7/-1.3/-1.0/-0.7/-0.3/0/0.3/0.7/1.0/1.3/1.7/2.0/ | Fill light according to different light source intensity in different environment. |
| Language | English /Simplified Chinese /Chinese /Russian | Select between various languages for the LCD readout |
| Time Setup [Set the date and time] | Press UP/Down button to set properly, press OK to save your setting and exit. | |
| Beep Sound Setting | On /Off | Switch button sound ON or OFF |
| Auto Power Off Setting | Off /1 Minute /3 Minutes /5 Minutes | If no buttons have been pressed and if no recording is taking place, the unit can be shut off automatically after set periods of time. |
| Backlight Off Setting On /Off | Turn the screen light on or off according to your driving situation | |
| Card Volume | [Display storage space details] | Show the memory card remaining capacity |
| Format | Yes /No | Format SD card (Note: Permanently erases all data on card. Note: the unit cannot be used until formatting is complete, which usually takes about 20seconds depending on the size of your card.) |
| Default Setting Yes /No | Reset all settings back to factory default settings | |
| Driver Time Warning | Off /1 /2 /3 /4 Hours | Set a timer to remind you to take regular breaks while driving |
| Map Direction | North Up /Track Up | Orientate the map view to suit you |
| Zoom Level 50 /100 /200 /400 Meters | Get a closer look at maps by for easier reading | |
| DN (Day / Night) Mode | Auto /Day /Night Mode | Adjust the screen backlighting for easier viewing |
| Map Mode | 2D /3D | Increase the maps detail for easier viewing |
| Version Info | [Display build info of device] | Display the firmware version number |
| Satellite info | [Display Satellite info] | Check satellite status. 3 to 5 satellites are required for a positive location fix |
TRACKING SOFTWARE – QUICK GUIDE
INSTALLING THE SOFTWARE
Install the software disc and select an installation (or view the user manual)
![NAVIG8R - NAVC-818SHD NAVIG [8] R (for WIN32bit) Install GPS Player Software (for WIN64bit) Install GPS Player Software Install Playback viewer (Apple Quick Time) Browse CD Visit Our Web Site View User Manual View FAQ's Exit Install GPS Player Software For 32 or 64bit Windows O/S Install Video Player Software View User Manual REMEMBER to read the manual before the first use NAVC-818SHD CRASH CAM](/content/2026/05/818994/images/d4b599f9709a8b43798b2bc6b24ac0ac8be91c6a8da1e9901882d1acea75468c.jpg)
Click next and follow the prompts


THE GPS SOFTWARE - OVERVIEW
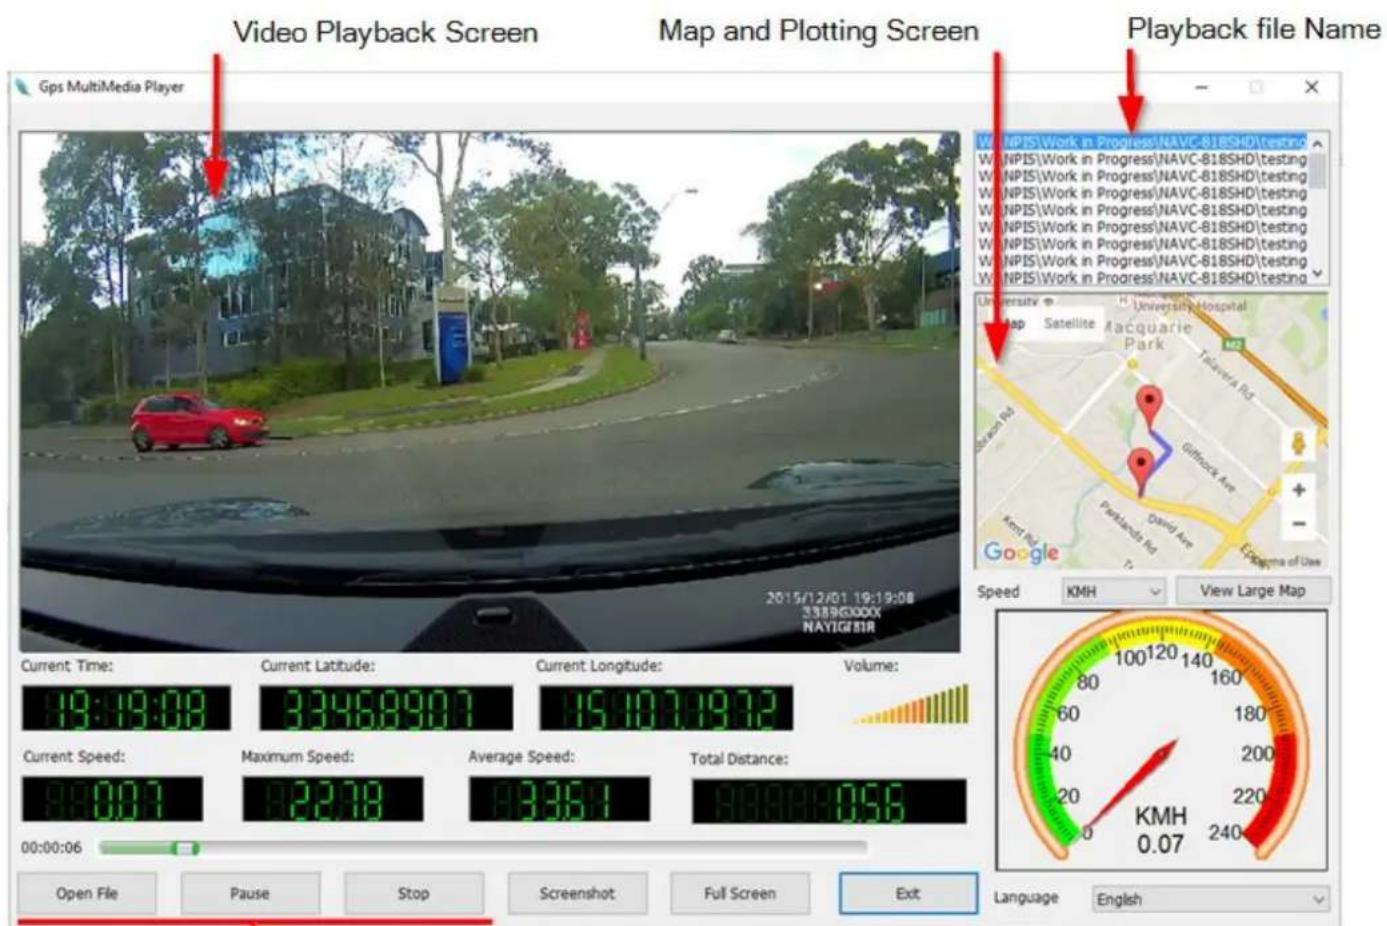
Select a File for Playback, Pause and Stop
Note: Save file and playback direct from your PC for best streaming rate
FAQ
| Fault | Suggestion |
| The device has frozen / stopped working. | Check the speed of your memory card. We recommend class 10 for faster transfer rates, especially If the record file size is bigger (say 15 min recording increments at 1080Full HD). Alternately, check the car's internal temperature. The device will enter standby mode if the ambient vehicle temperature is below 0 or above 30 degrees C. |
| The device will not start recording, or stop recording or has other intermittent faults | Most common cause of intermittent faults is an under rated SD card. We recommend a class 10 card for this device as recording at 4K resolution requires a superior speed card. |
| The speaker warning sounds are a little loud. Can you turn them off? | Yes. Just go the user settings screen and select speaker. Then turn the speaker to OFF. |
| Device does not turn off | If in vehicle: check that the 12V socket is not still powered (on) when the key is removed (as with some European cars). Wait 10 seconds for file finalization / closure. Disconnect power lead to device |
| Cant playback the .MOV video files | Upgrade your windows media player version or use an alternate media player such as VLC media player |
| My video/pictures of an incident are NOT there | Check the capacity of your memory card, the files may have been overwritten in the record cycle process. If the Bump file record feature did not automatically preserve the footage, then be sure to manually save the footage next time by pressing the |
| The date/time is incorrect | Reset the date / time in the settings menu. Otherwise check that the time settings have been updated automatically via the GPS connection. If the battery runs completely flat, then the date/time will need to be reset.Don't forget to manually adjust the settings for your time zone in the user settings menu. |
| Standard Time Zones Daylight Savings Time Zones QLD +10 +10 NSW +10 +11 ACT +10 +11 VIC +10 +11 TAS +10 +11 SA +9.3 +10.3 WA +8 +8 | |
| Can't see the device in my computer | Check the USB cable connection to the device and USB port. Try another USB port, possibly directly to the PC/notebook (rather than through a USB hub) |
| No Video displayed on TV | Check the cable connections on the NAVCAM-818SHD and that playback mode is selected |
PRODUCT SPECIFICATIONS
| LCD Screen | 2.0" TFT Colour LCD Display showing forward video image and Menu settings as well as playback for recorded video |
| Video Resolution | 2560* 1080 @ 30fps 21:9 / 2340* 1296 @ 30fps 16:9 / 1920* 1080P 45fps 16:9 / HDR 1920* 1080P 30fps 16:9 / 1280* 720 60fps 16:9 / 1280 * 720 30fps 16:9 |
| USB Port | For Power or sync with a PC (USB2.0) |
| TV Standard | PAL or NTSC – via HDMI output |
| Built-in Speaker / Microphone | Yes / Yes |
| AV Output Options | HDMI |
| Auto Recording on power-up | Yes. Recording starts on ignition power (Charging socket) |
| Date / Time stamp | Supported – on video and on photos (Auto update via GPS) |
| GPS location and Speed stamp | Supported – on video |
| Power off auto save | Yes. Current file will auto save when power is turned off. |
| Auto power on/off | Yes – when ignition turned on / off (1, 3, 5 Minutes) |
| Lens | High quality 6 glass lens elements with low dispersion coatings. Low light capable with minimal edge distortion. |
| Photo Resolution | 4MP (2688 x 1512 pixels) |
| File preservation | Yes. One touch “SOS” button |
| Auto Bump Record | Yes. Adjustable sensitivity (low/medium/high) |
| Photo mode | Single shot whilst video recording. |
| Lens Viewing angle | 165 degree wide angle |
| Cycle recording times | 1, 3 or 5 Minutes |
| File Format | Image: JPG Video : .MOV (MPEG) using H.264 video compression |
| Micro SD Memory Card | Class 6 or 10 UHS3 or above recommended. Max capacity 64GB |
| Language System | English |
| System support | Windows XP2/Vista/Windows 7/ Windows 8 (tbc) |
FEATURE EXPLANATIONS
| Feature | Description | Example |
| GPS Tracking | Location and speed information is recorded along with video for later review on PC software | When playing back your video on the PC software you can see where you were on Google Maps as well as other data |
| Auto Bump Record | Automatically protects the current video file so it's not overwritten in the loop record. | When an incident (hit) occurs the video of the incident will be protected for a later review. |
| 165 0 wide viewing angle | Allows a wider field of view to be recorded | Capture 3 lanes of traffic or more detail on the sides (say at an intersection) |
| HDMI Video (TV) Output | For AV output to a TV | Connect directly to a HDMI equipped TV for playback from the Crashcam |
| Driver fatigue reminder | Reminds the driver to have a break after a (user set) period of continuous driving. | Ideal for long journeys |
| Time Stamp | The time and date is stamped on the video | On Video playback (with or without software), you can see the time and date |
| Loop record | Set in 1 or 3 or 5 min increments | Depending on the size of your memory card, the oldest files are overwritten with new ones |
| Auto On/Off | Device turns on or off with the car | So you can set and forget. Whenever you're driving, you're recording. |
| Designed for Low light | Better clarity and detail in the dark (when compared to IR LED assist devices) | Whether at night time, in a car park or a tunnel, superior lens quality and image processor will result in clearer video |
For further product information please visit our product web page at www.laserco.com.au or email support@laserco.com.au
Please note: As continual improvements are made to this product, slight operational differences may occur. For the most up-to-date user manual, please visit our web site.
Warranty Against Defects
Laser Corporation Pty Ltd (“Laser”) warrants your new product to be free from defects in materials and workmanship for 12 months, from the date of purchase, provided that the product is used in accordance with accompanying recommendations or instructions where provided. The benefit of this warranty is in addition to your rights under the Australian Consumer Law and to other rights and remedies of the consumer under a law in relation to the goods or services to which the warranty relates.
Through a network of retailers and resellers, Laser will provide you with your choice of a refund, repair or exchange (where possible) for this product if it becomes defective within the warranty period. This warranty will no longer apply where the defect is a result of alteration, accident, misuse, abuse, normal wear and tear, neglect or improper storage.
Please retain your receipt as proof of purchase
How to make a product warranty claim:
Step 1: Find your receipt which proves the date of purchase. Where the date of purchase cannot be verified, your place of purchase or Laser will make an assessment based on the date of manufacture, the condition of the Laser Product and the type of defect.
Step 2a): Contact your place of purchase. They will assess the nature of the fault and refund or replace the product as per their store refund or warranty policy.
Step 2b): If your place of purchase cannot be contacted, then you can contact Laser. Customer Service with details of your defective Laser Product: Phone: (02) 9870 3388; or Email:
service@laserco.com.au or online www.laserco.com.au/warranty (click on “Consumers (End Users)”). Our business address is at 1/6-8 Byfield Street, North Ryde, NSW 2113
Step 3: Laser will issue you with a Return Authorisation (RA) number within 48 hours. When requested, send us the defective Product and a copy of your receipt. Laser will cover the cost of the return delivery.
Step 4: Wait for us to contact you. Once we have received your defective Laser Product for inspection, we will inform you of our assessment of your claim within 7 days. When we contact you, we will firstly let you know whether you have a valid claim under this Warranty, and if so, we will inform you whether your defective Laser Product will be replaced or repaired, together with the number of days you can expect to wait to receive your replaced or repaired Laser Product.
Our goods come with guarantees that cannot be excluded under the Australian Consumer Law. You are entitled to a replacement or refund for a major failure and compensation for any other reasonably foreseeable loss or damage. You are also entitled to have the goods repaired or replaced if the goods fail to be of acceptable quality and the failure does not amount to a major failure.
- 1296p Super HD In Car DVR
- CRASH CAM™
- With GPS Tracking and Camera Alerts
- IMPORTANT SAFETY INSTRUCTIONS AND PRECAUTIONS
- WHAT'S IN THE BOX
- MICRO SD CARD REQUIREMENTS
- ON SCREEN DISPLAY
- OPERATING THE NAVCAM-818SHD FOR THE FIRST TIME
- POWER ON/OFF (AUTO ON/OFF)
- ABOUT GPS SIGNAL RECEPTION
- AUTO RECORD WHEN TURNED ON
- RECORDING FILES
- PLAYING BACK A RECORDED FILE
- DELETING A FILE
- AUTO BUMP FILE RECORD (G SENSOR) - SAVING RECORDING VIDEO FILES
- TAKING A STILL PICTURE
- OTHER SHORTCUTS FROM THE MAIN SCREEN
- PLAYBACK ON TV (WITH HDMI)
- USB CONNECTION
- USER SETTINGS
- TRACKING SOFTWARE – QUICK GUIDE
- INSTALLING THE SOFTWARE
- THE GPS SOFTWARE - OVERVIEW
- Warranty Against Defects
Brand : Laser
Model : Navig8r NAVC-818SHD
Category : Dash cam