
DVP3260K - DVD player PHILIPS - Free user manual and instructions
Find the device manual for free DVP3260K PHILIPS in PDF.


User questions about DVP3260K PHILIPS
0 question about this device. Answer the ones you know or ask your own.
Ask a new question about this device
Download the instructions for your DVD player in PDF format for free! Find your manual DVP3260K - PHILIPS and take your electronic device back in hand. On this page are published all the documents necessary for the use of your device. DVP3260K by PHILIPS.
USER MANUAL DVP3260K PHILIPS
Register your product and get support at
www.philips.com/welcome
DVP3260K
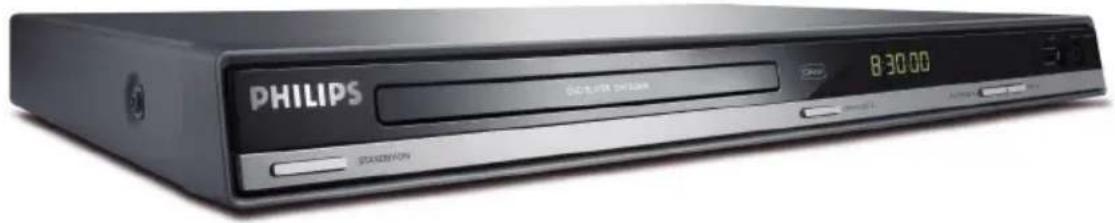
text_image
PHILIPS B:30:00 STATUS/POSEN DVD Video Player 6
ZH_TW DVD 播放機
48
MS_MY Pemain Video DVD 90
PHILIPS
| 部件名称Name of the Parts | 有毒有害物质或元素Hazardous/Toxic Substance | |||||
| 铅(Pb, Lead) | 汞(Hg, Mercury) | 镉(Cd, Cadmium) | 六价铬(Chromium 6+) | 多溴联苯(PBB) | 多溴二苯醚(PBDE) | |
| Housing外壳 | O O O | O O O | ||||
| DVD loaderDVD 光盒 | X O O | O O O | ||||
| PWBs电路板组件 | X | O | O O O | O | ||
| Accessories(Remote control & cables)附件(遥控器,电源线,连接线) | X O O | O O O | ||||
| Batteries in Remote Control(ZnC)遥控器电池 | X | O | O O O | O | ||
O: Indicates that this toxic or hazardous substance contained in all of the homogeneous materials for this part is below the limit requirement in SJ/T11363 - 2006.
X: Indicates that this toxic or hazardous substance contained in at least one of the homogeneous materials used for this part is above the limit requirement in SJ/T11363 - 2006.

环使用期限 Environmental Protection Use Period
This logo refers to the period (10 years) during which the toxic or hazardous substances or elements contained in electronic information products will not leak or mutate so that the use of these [substances or elements] will not result in any severe environmental pollution, any bodily injury or damage to any assets.
电池标识 Battery labeling logo

环使用期限 Environmental Protection Use Period
This logo refers to the period (5 years) during which the toxic or hazardous substances or elements contained in the battery will not leak or mutate so that the use of these [substances or elements] will not result in any severe environmental pollution, any bodily injury or damage to any assets.
LASER
Type Semiconductor laser
InGaAlP (DVD)
AlGaAs (CD)
Wave length 658 nm (DVD)
790 nm (CD)
Output Power 7.0 mW (DVD)
10.0 mW (VCD/CD)
Beam divergence 60 degrees
Due to the inconsistency of disc formats provided by various disc manufacturers, your DVD system/player/recorder may require a playability enhancement or upgrade. As DVD technology advances, these enhancement will become common and will be easy to complete.
Go to www.philips.com/support for software upgrade.
'CONSUMERS SHOULD NOTE THAT NOT ALL HIGH DEFINITION TELEVISION SETS ARE FULLY COMPATIBLE WITH THIS PRODUCT AND MAY CAUSE ARTIFACTS TO BE DISPLAYED IN THE PICTURE. IN CASE OF 525 OR 625 PROGRESSIVE SCAN PICTURE PROBLEMS, IT IS RECOMMENDED THAT THE USER SWITCH THE CONNECTION TO THE 'STANDARD DEFINITION' OUTPUT. IF THERE ARE QUESTIONS REGARDING OUR TV SET COMPATIBILITY WITH THIS MODEL 525p AND 625p DVD PLAYER, PLEASE CONTACT OUR CUSTOMER SERVICE CENTER.'
The apparatus shall not be exposed to dripping or splashing and that no objects filled with liquids, such as vases, shall be placed on apparatus.
ATTENTION!
For Customer Use:
Read carefully the information located at the bottom or rear of your DVD Video player and enter below the Serial No. Retain this information for future reference.
Model No. DVP3260K
Serial No. ____
Laser Safety
This unit employs a laser. Due to possible eye injury, only a qualified service person should remove the cover or attempt to service this device.
NOTE:
Pictures shown maybe different between countries.
CAUTION:
WARNING LOCATION: ON THE BACKPLATE OF THE SET
NEVER MAKE OR CHANGE CONNECTIONS WITH THE POWER SWITCHED ON.
Where the MAINS plug or an appliance coupler is used as the disconnect device, the disconnect device shall remain readily operable.
通过此网站注册您的产品并获得支持:
www.philips.com/welcome
This product incorporates copyright protection technology that is protected by method claims of certain U.S. patents and other intellectual property rights owned by Macrovision Corporation and other rights owners. Use of this copyright protection technology must be authorized by Macrovision Corporation, and is intended for home and other limited viewing uses only unless otherwise authorized by Macrovision Corporation. Reserve engineering or disassembly is prohibited.
| Abkhazian | 6566 | |
| Afar | 6565 | |
| Afrikaans | 6570 | |
| Amharic | 6577 | |
| Arabic | 6582 | |
| Armenian | 7289 | |
| Assamese | 6583 | |
| Avestan | 6569 | |
| Aymara | 6589 | |
| Azerbaijani | 6590 | |
| Bahasa Melayu | 7783 | |
| Bashkir | 6665 | |
| Belarusian | 6669 | |
| Bengali | 6678 | |
| Bihari | 6672 | |
| Bislama | 6673 | |
| Bokmål, Norwegian | 7866 | |
| Bosanski | 6683 | |
| Brezhoneg | 6682 | |
| Bulgarian | 6671 | |
| Burmese | 7789 | |
| Castellano, Español | 6983 | |
| Catalán | 6765 | |
| Chamorro | 6772 | |
| Chechen | 6769 | |
| Chewa; Chichewa; Nyanja | 7889 | |
| 中文 | 9072 | |
| Chuang; Zhuang | 9065 | |
| Church Slavic; Slavonic | 6785 | |
| Chuvash | 6786 | |
| Corsican | 6779 | |
| Česky | 6783 | |
| Dansk | 6865 | |
| Deutsch | 6869 | |
| Dzongkha | 6890 | |
| English | 6978 | |
| Esperanto | 6979 | |
| Estonian | 6984 | |
| Euskara | 6985 | |
| Ελληνικά | 6976 | |
| Faroese | 7079 | |
| Français | 7082 | |
| Frysk | 7089 | |
| Fijian | 7074 | |
| Gaelic; Scottish Gaelic | 7168 | |
| Gallegan | 7176 | |
| Georgian | 7565 | |
| Gikuyu; Kikuyu | 7573 | |
| Guarani | 7178 | |
| Gujarati | 7185 | |
| Hausa | 7265 | |
| Herero | 7290 | |
| Hindi | 7273 | |
| Hiri Motu | 7279 | |
| Hrwatski | 6779 | |
| Ido | 7379 | |
| Interlingua (International) | 7365 | |
| Interlingue | 7365 | |
| Inuktitut | 7385 |
| Inupiaq | 7375 | |
| Irish | 7165 | |
| Íslenska | 7383 | |
| Italiano | 7384 | |
| Ivrit | 7269 | |
| Japanese | 7465 | |
| Javanese | 7486 | |
| Kalaallisut | 7576 | |
| Kannada | 7578 | |
| Kashmiri | 7583 | |
| Kazakh | 7575 | |
| Kernewek | 7587 | |
| Khmer | 7577 | |
| Kinyarwanda | 8287 | |
| Kirghiz | 7589 | |
| Komi | 7586 | |
| Korean | 7579 | |
| Kuanyama; Kwanyama | 7574 | |
| Kurdish | 7585 | |
| Lao | 7679 | |
| Latina | 7665 | |
| Latvian | 7686 | |
| Letzeburgesch; | 7666 | |
| Limburgan; Limburger | 7673 | |
| Lingala | 7678 | |
| Lithuanian | 7684 | |
| Luxembourgish; | 7666 | |
| Macedonian | 7775 | |
| Malagasy | 7771 | |
| Magyar | 7285 | |
| Malayalam | 7776 | |
| Maltese | 7784 | |
| Manx | 7186 | |
| Maori | 7773 | |
| Marathi | 7782 | |
| Marshallese | 7772 | |
| Moldavian | 7779 | |
| Mongolian | 7778 | |
| Nauru | 7865 | |
| Navaho; Navajo | 7886 | |
| Ndebele, North | 7868 | |
| Ndebele, South | 7882 | |
| Ndonga | 7871 | |
| Nederlands | 7876 | |
| Nepali | 7869 | |
| Norsk | 7879 | |
| Northern Sami | 8369 | |
| North Ndebele | 7868 | |
| Norwegian Nynorsk; | 7878 | |
| Occitan; Provencal | 7967 | |
| Old Bulgarian; Old Slavonic | 6785 | |
| Oriya | 7982 | |
| Oromo | 7977 | |
| Ossetian; Ossetic | 7983 | |
| Pali | 8073 | |
| Panjabi | 8065 | |
| Persian | 7065 | |
| Polski | 8076 | |
| Português | 8084 |
| Pushto | 8083 | |
| Russian | 8285 | |
| Quechua | 8185 | |
| Raeto-Romance | 8277 | |
| Romanian | 8279 | |
| Rundi | 8278 | |
| Samoan | 8377 | |
| Sango | 8371 | |
| Sanskrit | 8365 | |
| Sardinian | 8367 | |
| Serbian | 8382 | |
| Shona | 8378 | |
| Shqip | 8381 | |
| Sindhi | 8368 | |
| Sinhalese | 8373 | |
| Slovensky | 8373 | |
| Slovenian | 8376 | |
| Somali | 8379 | |
| Sotho; Southern | 8384 | |
| South Ndebele | 7882 | |
| Sundanese | 8385 | |
| Suomi | 7073 | |
| Swahili | 8387 | |
| Swati | 8383 | |
| Svenska | 8386 | |
| Tagalog | 8476 | |
| Tahitian | 8489 | |
| Tajik | 8471 | |
| Tamil | 8465 | |
| Tatar | 8484 | |
| Telugu | 8469 | |
| Thai | 8472 | |
| Tibetan | 6679 | |
| Tigrinya | 8473 | |
| Tonga (Tonga Islands) | 8479 | |
| Tsonga | 8483 | |
| Tswana | 8478 | |
| Türkçe | 8482 | |
| Turkmen | 8475 | |
| Twi | 8487 | |
| Uighur | 8571 | |
| Ukrainian | 8575 | |
| Urdu | 8582 | |
| Uzbek | 8590 | |
| Vietnamese | 8673 | |
| Volapuk | 8679 | |
| Walloon | 8765 | |
| Welsh | 6789 | |
| Wolof | 8779 | |
| Xhosa | 8872 | |
| Yiddish | 8973 | |
| Yoruba | 8979 | |
| Zulu | 9085 | |
Manufactured under license from Dolby Laboratories. Dolby and the double-D symbol are trademarks of Dolby Laboratories.
Windows Media and the Windows logo are trademarks, or registered trademarks of Microsoft Corporation in the United States and/or other countries.

DivX, DivX Certified and associated logos are trademarks of DivX, Inc. and are used under license.

The USB-IF Logos are trademarks of Universal Serial Bus Implementers Forum, Inc.
English 6
中文(繁體) 48
Bahasa Melayu 90
Table of contents
General
General Information 8
Setup precautions....8
Copyright notice 8
Accessories supplied 8
Cleaning discs 8
About recycling....8
Product Overview
Your DVD Player....9
Remote Control....10-12
Using the remote control....12
Connections
Basic Connections ...... 13-14
Step 1: Connecting to television....13
Option I: Using Composite Video jacks (CVBS)....13
Option 2: Using Component Video jacks (Y Pb Pr)....13
Step 2: Connecting the power cord....14
Optional Connections....15
Connecting to an Analog Stereo System....15
Connecting to a Digital AV Amplifier/Receiver....15
Basic Setup
Getting Started....16-18
Finding the correct viewing channel 16
Setting language preferences....16-17
On-screen display (OSD) language 16
Audio, Subtitle and Disc Menu language for DVD playback 17
Setting up Progressive Scan feature....18
Disc Playback
Disc Operations....19-29
Playable discs....19
Region codes for DVD discs 19
Playing a disc 20
Basic playback controls....20
Other playback features for video discs 21-22
Using the Disc Menu....21
Changing sound track language 22
Changing subtitle language 22
Zooming....22
Playback Control (VCD/SVCD) 22
Using Display menu options 23-25
Selecting title/chapter/track....23
Switching camera angles 23
Searching by time 24
Viewing playing time....24
Preview function (VCD/SVCD/DVD)....24
Selecting various repeat functions 25
Repeating a specific section (A-B).... 25
Special Audio CD feature 26
Playing a DivX® disc ....26
Playing a JPEG photo disc (slide show) 27
Preview function....27
Zooming....27
Flip/Rotate picture....27
Playing a MP3/ WMA disc 28
Playing music and photo files simultaneously....29
Karaoke Operation 30
Playing a Karaoke disc 30
Using the Karaoke Menu option.... 30
USB Playback
USB Operation 31
Create MP3
Create MP3 files....32
Creating audio CD to MP3 format....32
Setup Options
Setup Menu Options.... 33-39
Accessing the setup menu....33
General Setup Page 34
Audio Setup Page 35-36
Video Setup Page 37
Preference Page 38-39
Others
Software upgrade 40
Installing the latest software....40
Troubleshooting....41-43
Frequently Asked Questions (USB) 44
Specifications 45
Glossary....46-47
General Information
WARNING!
This unit does not contain any user-serviceable parts. Please leave all maintenance work to qualified personnel.
Setup precautions
Finding a suitable location
- Place this unit on a flat, hard and stable surface. Never place the unit on a carpet.
- Never place this unit on top of other equipment that might heat it up (e.g., receiver or amplifier).
- Never put anything under this unit (e.g., CDs, magazines).
- Install this unit near the AC outlet where the AC power plug can be easily reached.
Space for ventilation
- Place this unit in a location with adequate ventilation to prevent internal heat build up. Allow at least 10 cm (4") clearance from the rear and the top of this unit and 5 cm (2") from the left and right to prevent overheating.
Avoid high temperature, moisture, water and dust
- This unit must not be exposed to dripping or splashing.
- Never place any object or items that can damage this unit (e.g., liquid filled objects, lighted candles).
Copyright notice
The making of unauthorized copies of copy-protected material, including computer programmes, files, broadcasts and sound recordings, may be an infringement of copyrights and constitute a criminal offence. This unit should not be used for such purposes.
Accessories supplied
- I remote control with batteries
- I audio/video cables (yellow/white/red)
- I power cable
Cleaning discs
CAUTION!
Risk of damage to discs! Never use solvents such as benzene, thinner, cleaners available commercially, or anti-static sprays intended for discs.
- Wipe the disc with a micro fibre cleaning cloth from the center to the edge in a straight line movement.
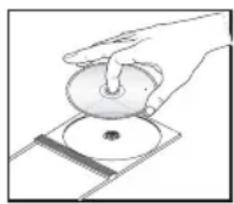
natural_image
Illustration of a hand pressing down on a circular object on a base, with no visible text or symbols.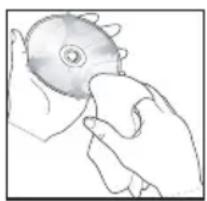
natural_image
Illustration of a hand holding a CD or DVD disc (no text or symbols visible)About recycling
This user manual is printed on non-polluting paper. This unit contains a large number of materials that can be recycled. If you are disposing an old equipment, please take it to a recycling center. Please observe the local regulations regarding disposal of packaging materials, exhausted batteries and old equipment.
text_image
PHILIPS FUNCTIONS FUNCTIONS FUNCTIONS FUNCTIONS FUNCTIONS FUNCTIONS FUNCTIONS FUNCTIONS FUNCTIONS FUNCTIONS FUNCTIONS FUNCTIONS FUNCTIONS FUNCTIONS FUNCTIONS FUNCTIONS FUNCTIONS FUNCTIONS FUNCTIONS FUNCTIONS FUNCTIONS FUNCTIONS FUNCTIONS FUNCTIONS FUNCTIONS FUNCTIONS FUNCTIONS FUNCTIONS FUNCTIONS FUNCTIONS FUNCTIONS FUNCTIONS FUNCTIONS FUNCTIONS
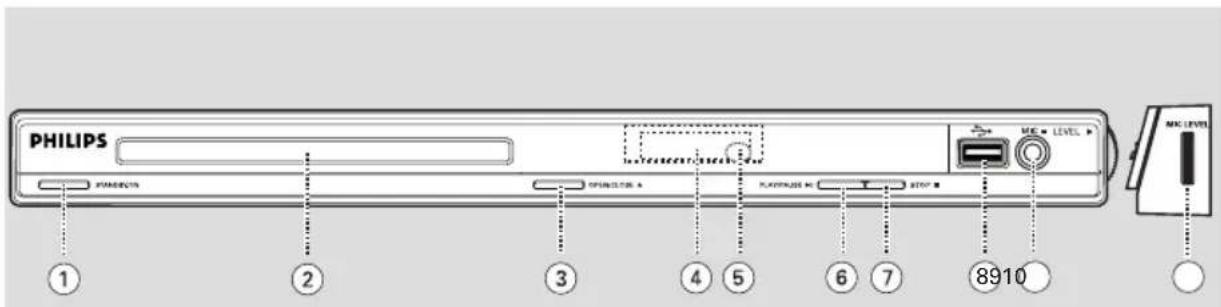
① STANDBY-ON
- Turns on this unit or turns off to normal standby mode.
② Disc tray
③ OPEN/CLOSE ▲
- Opens/closes the disc tray.
④ Display panel
- Shows information about the current status of the unit.
⑤ IR Sensor
- Point the remote control towards this sensor.
⑥ PLAY/PAUSE ▶II
- Starts/pauses playback.
⑦ STOP ■
- Stops playback.
⑧ (USB) jack
- Input for USB flash drive or digital camera.
* Not all brands and models of digital cameras are supported.
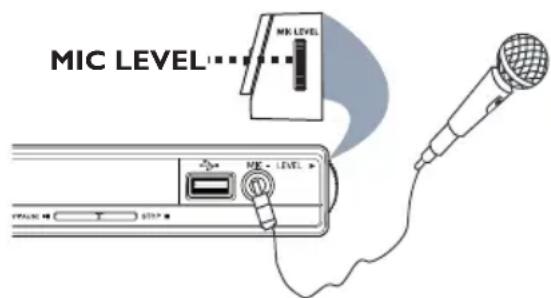
⑨ MIC
- For microphone connection.
⑩ MIC LEVEL
- Microphone volume control.
text_image
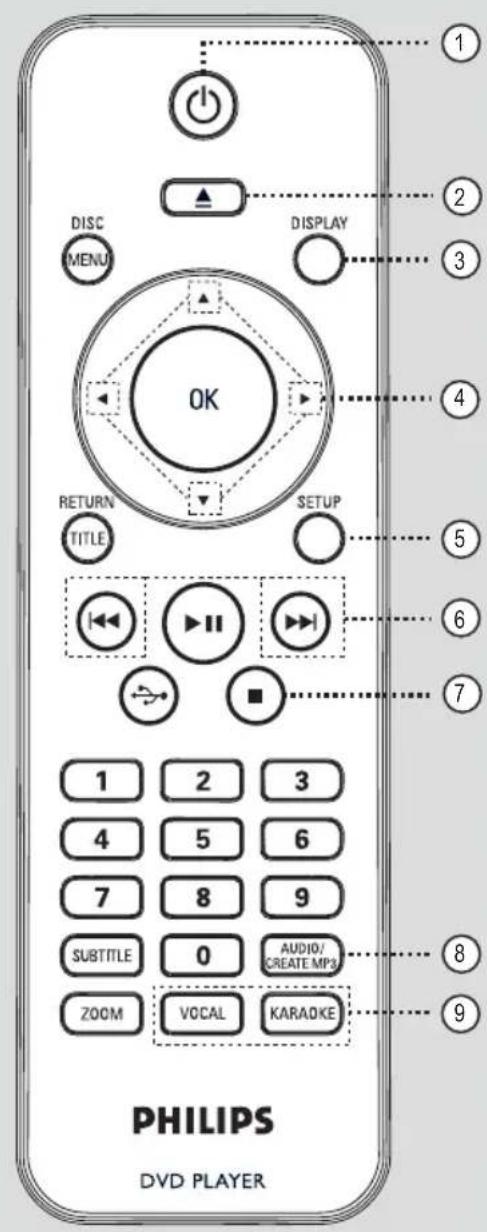
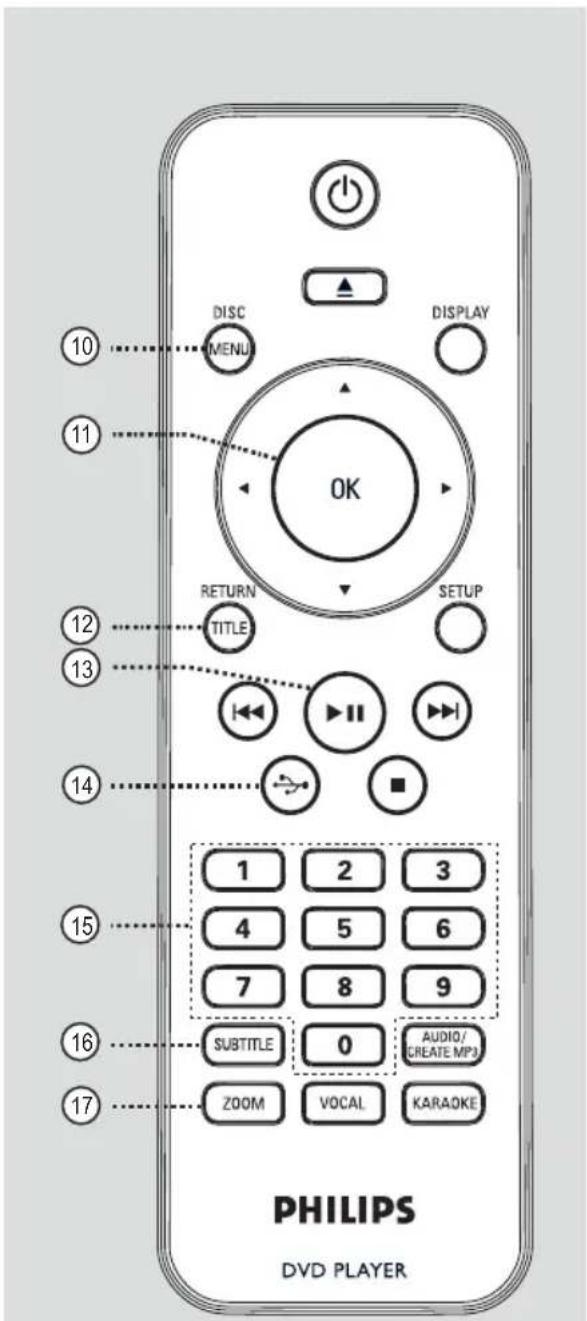
DISC MENU OK RETURN TITLE DISPLAY SETUP 1 2 3 4 5 6 7 8 9 SUBTITLE 0 AUDIO/ CREATE MP3 ZOOM VOCAL KARADOKE PHILIPS DVD PLAYER① ⏻ (Standby-On)
- Turns on this unit or turns off to normal standby mode.
② ▲ (Open/Close)
- Opens/closes the disc tray.
③ DISPLAY
– Displays the current status or disc information.
④ ▲▼◀ ▶
- ▲▼: Cursor buttons for moving up/down or press up/down for a slow backward or forward search.
- ◀: Cursor buttons for moving to the left/right or press left/right for fast backward or forward search.
⑤ SETUP
- Enters or exits the disc setup menu.
⑥ ◀◀/▶▶I (Previous/Next)
- Skips to the previous or next title/chapter/track.
- Press and hold this button for fast backward or forward search.
⑦ ■ (Stop)
- Stops playback.
⑧ AUDIO/CREATE MP3
– Selects an audio language or channel.
- Access create MP3 menu.
⑨ VOCAL
- Choose audio channel or karaoke method.
KARAOKE
- Toggles between 'MIC', 'Vol', 'Echo', 'Key' or 'Karaoke Scoring'.
⑩ DISC MENU
- Enters or exits disc contents menu.
- For VCD 2.0 and SVCD, turns on or off the playback control mode.
⑪ OK
– Confirms an entry or selection.
⑫ RETURN/TITLE
– Returns to the previous menu or shows title menu.
⑬ ▶ II (Play/Pause)
- Starts or pauses playback.
⑭ (USB)
- Switches to USB mode and shows the content of the USB device.
⑮ Numeric keypad 0-9
– Selects a track or title number of the disc.
⑯ SUBTITLE
– Selects a DVD subtitle language.
⑰ ZOOM
- Zoom the picture on the TV.
text_image
DISC MENU DISPLAY OK RETURN TITLE SETUP 1 2 3 4 5 6 7 8 9 SUBTITLE 0 AUDIO/ CREATE MP3 ZOOM VOCAL KARAOKE PHILIPS DVD PLAYERRemote Control (continued)
Using the remote control
natural_image
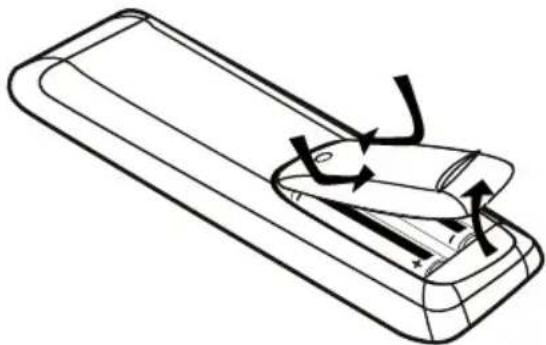
Line drawing of a mechanical component with directional arrows indicating motion (no text or symbols)① Open the battery compartment.
② Insert two batteries type R03 or AAA, following the indications (+ -) inside the compartment.
③ Close the cover.
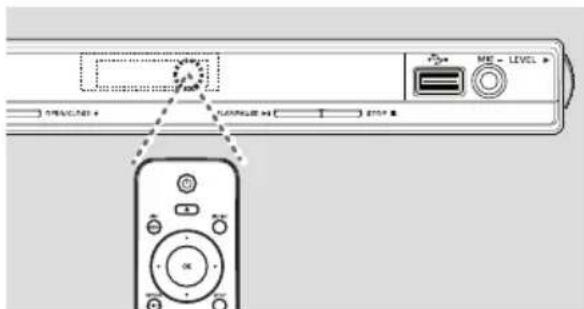
4 Point the remote control directly at the remote sensor (IR) on the front panel.
text_image
Diagram showing remote control interface with labeled ports and a dashed line pointing to a remote device.Note:
Never place any objects between the remote control and this unit while operating.
5 Select the desired function (for example ▶II).
CAUTION!
- Remove batteries if they are exhausted or if the remote control is not to be used for a long time.
- Never mix batteries (old and new or carbon and alkaline, etc.).
- Batteries contain chemical substances; they should be disposed of properly.
text_image
ANT 75 Ω °F COMPONENT VIDEO IN V (Pr/Cr) U (Pb/Cb) S-VIDEO IN AUDIO IN L Y VIDEO IN R TV Video (yellow cable) Audio (red/white cables) TV OUT Pb DIGITAL OUT L Y COMPONENT VIDEO OUT Pr COAGAL R AUDIO OUTStep I: Connecting to television
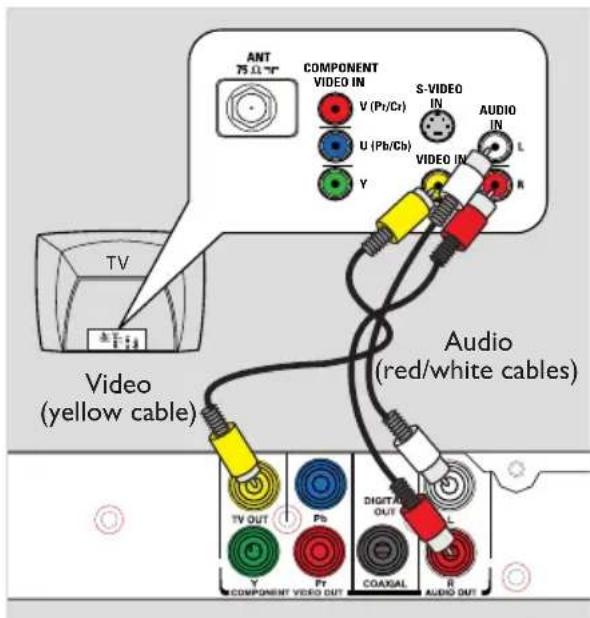
This connection enables you to view the video playback from this unit.
You only need to choose one of the options below to make the video connection.
You can connect this unit to a TV through the composite video cable which provides good picture quality.
- Connect the audio/video cables (supplied) from the TV OUT and AUDIO OUT L/R jacks on this unit to the video input jack (yellow) and audio input jacks (red/white) on your TV.
text_image
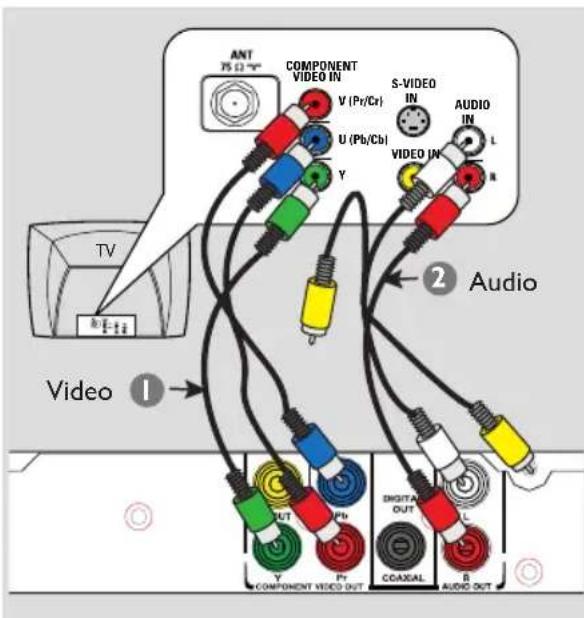
ANT 75 Ω COMPONENT VIDEO IN V (Pt/Cr) U (Pb/Cb) S-VIDEO IN AUDIO IN L VIDEO IN R TV Audio Video ① OUTPUT PB DIGITAL OUT L Y Pt COASAL B COMPONENT VIDEO OUT AUDIO OUTOption 2: Using Component Video jacks (Y Pb Pr)
You can connect this unit to a TV through the component video cables which provides superior picture quality. The progressive scan video quality is only available when using Y Pb Pr connection and a progressive scan TV is required.
1 Connect the component video cables (red/blue/green - not supplied) from the Y Pb Pr jacks on this unit to the corresponding component video input jacks (or labeled as Y Pb/Cb Pr/Cr or YUV) on your TV.
2 Connect the audio/video cables (supplied) from the AUDIO OUT L/R jacks on this unit to the audio input jacks (red/white) on your TV. Leave the yellow video cable disconnected.
3 Proceed to 'Getting Started - Setting up Progressive Scan feature' for detailed progressive feature setup.
text_image
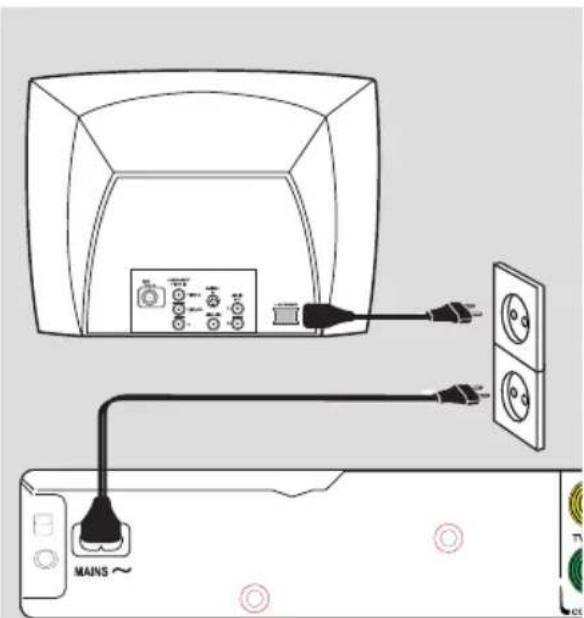
Diagram showing connection between a TV case and a server via cable, with labels for main switch and power outlet.Step 2: Connecting the power cord
After everything is connected properly, plug the AC power cord into the power outlet.
Never make or change any connections with the power turned on.
Helpful Hint:
- Refer to the type plate at the rear or bottom of the product for identification and supply ratings.
Optional Connections
text_image
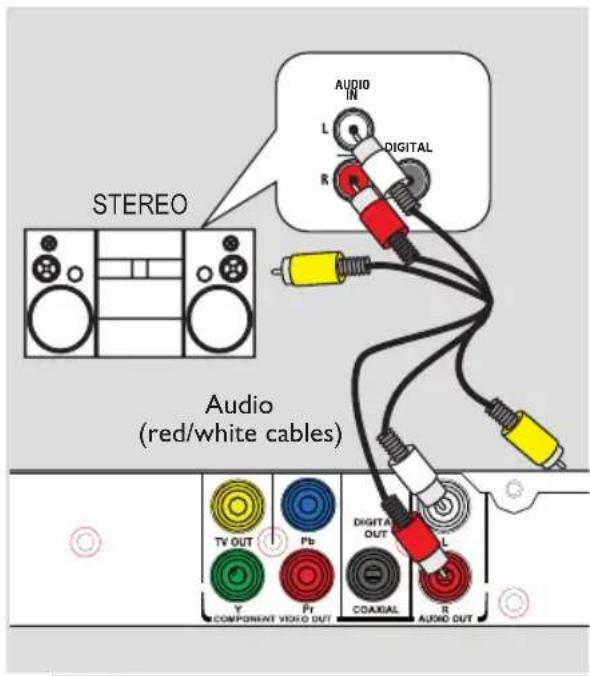
STEREO AUDIO IN L DIGITAL R Audio (red/white cables) TV OUT Pb DIGITAL OUT L Y Pt COAXIAL R COMPONENT VIDEO OUT AUDIO OUTConnecting to an Analog Stereo System
You can connect this unit to a two channel stereo system (e.g. mini system, analog receiver) in order to enjoy stereo sound output.
1 Connect the audio/video cables (supplied) from the AUDIO OUT L/R jacks on this unit to the audio input jacks (red/white) on your connecting device. Leave the yellow video cable disconnected.
② For video connection, see 'Basic Connections - Step I: Connecting to television' for details.
Helpful Hint: - See 'Setup Menu Options - Audio Setup Page' for optimum audio settings.
text_image
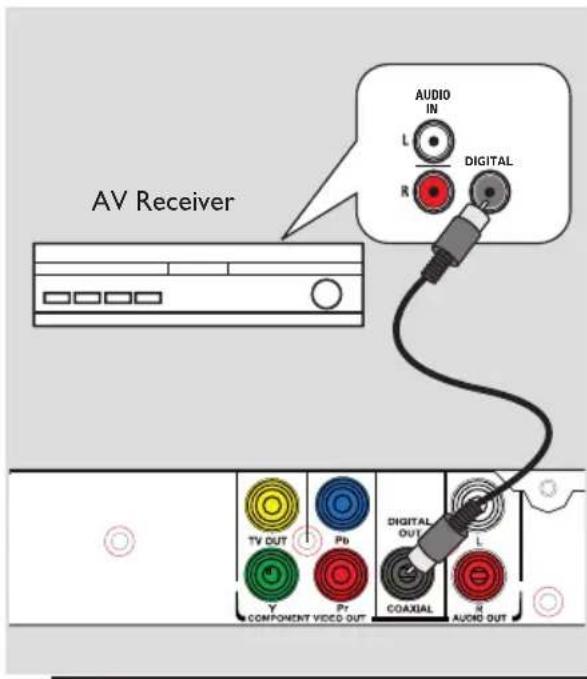
AV Receiver AUDIO IN L DIGITAL R TV OUT Pb DIGITAL OUT Y Pr COAXIAL R COMPONENT VIDEO OUT AUDIO OUTConnecting to a Digital AV Amplifier/Receiver
You can connect this unit to an AV amplifier/receiver in order to enjoy quality sound.
1 Connect a coaxial cable (not supplied) from the COAXIAL DIGITAL OUT jack on this unit to the digital coaxial input jack of the connected device.
② For video connection, see 'Basic Connections - Step 1: Connecting to television' for details.
Helpful Hint: - You have to set the appropriate Digital Audio Output setting. Otherwise, no sound or interference may occur. See 'Setup Menu Options - Audio Setup Page > Digital Audio Setup' for details.
Getting Started
Finding the correct viewing channel
1 Press ⏻ to turn on this unit.
② Turn on the TV and switch it to the correct video-in channel. You should see the blue DVD background screen.
→ You may go to the lowest channel on your TV, then press the Channel Down button on your TV's remote control until you see the Video In channel.
→ You may press → button repeatedly on your TV's remote control.
→ Usually this channel is between the lowest and highest channels and may be called FRONT, A/V IN, VIDEO, etc..
→ Refer to your TV user manual on how to select the correct input on your TV.
3 If you are using external device, (such as audio system or receiver), turn it on and select the appropriate input source for this unit output. Refer to the device user's manual for detail.
Setting language preferences
The language options are different depending on your country or region. It may not correspond to the illustrations shown on the user manual.
On-screen display (OSD) language
Select this to change the language of the On screen display menu of this unit. The menu language will remain once you have set it.
1 Press SETUP on the remote control. → { General Setup Page } appears.
② Use ▲▼ keys to select { OSD Language } in the menu and press ▶.
| General Setup Page | |
| Disc Lock | ENGLISH |
| OSD Language | 中文(繁體) |
| Sleep | 한국어 |
| Volume | Java |
| Auto Standby Melayu | |
| DivX(R) VOD Code | |
3 Select a language and press OK to confirm.
Audio, Subtitle and Disc Menu language for DVD playback
You can select your preferred language settings for DVD playback. If the selected language is not available on the disc, the disc's default language is used instead.
① Press ■ twice to stop playback (if any), then press SETUP.
② Press ▶ repeatedly to select { Preference Page }.
③ Use ▲▼ keys to select one of the options below and press ▶.
| Preference Page | |
| Audio | English |
| Subtitle | Chinese |
| Disc Menu | French |
| Parental | Spanish |
| PBC | Portuguese |
| Mp3/Jpeg Nav | Polish |
| Password Italian | |
{Audio}
Select this to change disc sound track language.
{ Subtitle }
Select this to change the subtitle language.
{Disc Menu}
Select this to change the language of the disc menu.
4 Use ▲▼ keys to select a language and press OK to confirm.
If the language you want is not in the list, then select { Others }, then use the numeric keypad 0-9 on the remote to enter the 4-digit language code 'XXXX' (see 'Language Code') and press OK.
⑤ Repeat steps ③ - ④ for other language settings.
Setting up Progressive Scan feature
(for Progressive Scan TV only)
The progressive scan displays twice the number of frames per second than interlaced scanning (ordinary normal TV system). With nearly double the number of lines, progressive scan offers higher picture resolution and quality.
Before you start...
- Ensure that you have connected this unit to a progressive scan TV using the Y Pb Pr connection (see 'Option 2: Using Component Video jacks (Y Pb Pr)').
① Turn on the TV to the correct viewing channel for this unit.
→ Make sure that the TVs progressive scan mode is turned off (or set to interlaced mode). Refer to your TVs user manual.
② Turn on this unit and press SETUP on the remote control.
③ Press ▶ repeatedly to select { Video Setup Page }.
4 Use ▲▼ keys to select { Progressive } > { On } in the menu and press OK to confirm.
| Video Setup Page | |
| TV Type | |
| TV Display | |
| Progressive | On |
| Picture Setting | Off |
⑤ Read the notification message on the TV and confirm your action by selecting the {OK} in the menu and press OK.
There will be no picture on your TV at this state until you have turned on the progressive scan mode on your TV.
6 Turn on your TV progressive scan mode, refer to your TVs user manual.
→ A message appears on the TV.
7 Confirm your action by selecting the { OK } in the menu and press OK.
→ The setup is now completed and you can start to enjoy the high quality picture.
If no picture is displayed
1 Press ▲ to open the disc tray.
2 Press numeric keypad 'I' on the remote control.
Helpful Hints:
- If a blank/distorted screen appears, wait for 15 seconds for the auto recovery. - There are some progressive scan TVs that are not fully compatible with this unit, resulting in an unnatural picture when playing back a DVD VIDEO disc in the progressive scan mode. In such a case, turn off the progressive scan feature on this unit and your TV.
playable discs







This unit plays:
– Digital Versatile Discs (DVDs)
- Video CDs (VCDs)
– Super Video CDs (SVCDs)
- Finalized DVD Recordable (DVD±R), DVD Rewritable (DVD±RW)
- Audio Compact Discs (CDs)
- MP3/ WMA discs
- The file extension has to be '.mp3', '.wma'
- JPEG/ISO format
– Maximum 14 characters display.
– Supported bit-rate;
32 - 320 kbps (MP3)
64 - 192 kbps (WMA)
- Picture files (Kodak, JPEG) on CD-R(W)/DVD+R(W)
- The file extension has to be '.JPG' and not '.JPEG.'
- JPEG/ISO format
- It can only display DCF-standard still pictures or JPEG pictures.
- DivX® files on CD-R(W)/ DVD+R(W)
- The file extensions has to be '.AVI,' or '.MPG.'
- DivX® Certified
- Q-pel accurate motion compensation
- Global Motion Compensation (GMC) playback
Region codes for DVD discs
DVD discs and players are designed with regional restrictions. Before playing a disc, make sure the disc is for the same region as your unit. The region code for this unit is indicated at the rear panel.
| Region | Discs that can be played |
| U.S.A. and Canada regions | |
| U.K and Europe regions | |
| Asia Pacific, Taiwan, Korea | |
| Australia, New Zealand, Latin America | |
| Russia and India regions | |
| China, Calcos Islands, Walls and Futuna Islands |
Helpful Hints:
- Maximum 10 sessions for CD and 10 multi border for DVD are supported.
- For DVD-R and DVD-RW multi border, only finalized discs are supported.
Disc Operations (continued)
Notes:
- If the inhibit icon ⏻appears on TV when a button is pressed, it means the function is not available on the current disc or at the current time.
- Never put any objects other than discs in the disc tray. Doing so may cause the unit to malfunction.
Playing a disc
1 Press ⏻ to turn on this unit.
2 Turn on the TV to the correct viewing channel for this unit.
3 Press ▲ to open the disc tray.
4 Load a disc into the disc tray and press ▲.
→ Make sure the disc label is facing towards you.
5 Playback starts automatically.
→ If not, press ▶II.
→ See the following pages for more playback options and features.
Helpful Hints:
— Never close the disc tray manually.
- If you are having trouble playing a certain disc, remove the disc and try a different one. Improperly formatted discs cannot be played on this unit.
- Some discs cannot be played on this unit due to the configuration and characteristics of the disc, or due to the condition of recording and authoring software that was used.
Basic playback controls
Pausing playback
During playback, press ▶II.
→ To resume playback, press ▶II.
Selecting another track/chapter/title
- Press ◀◀◀ / ▶▶▶ or use the numeric keypad 0-9 to enter a track/chapter/title number.
→ If the repeat track mode is active, press ◀◀◀ again to replay the same track/chapter/title.
Searching backward/forward (not applicable for JPEG)
- Press and hold ◀◀◀ / ▶▶▶.
→ While searching, press ◀ /▶ repeatedly to select different search speed (2X, 4X, 8X, 16X, 32X).
→ To resume normal playback, press ▶II .
Playing in slow motion mode (not applicable for CD/WMA/MP3/JPEG)
- During playback, press ▲/▼ to start slow motion play.
→ Sound will be muted. Press ▲/▼ repeatedly to select different play speed (1/2, 1/4, 1/8, 1/16).
Note: Slow backward motion playback is only possible for DVD.
→ To resume normal playback, press ▶II.
Stopping playback
- Press ■.
Helpful Hints:
- For video disc, playback always resumes from the point where it was last stopped even if the disc was ejected or the unit is in standby mode. To start playback from the beginning, press ◀◀◀ while the message 'Play from the start, press -PREV-' appears on the TV.
- Screen saver starts automatically if the disc playback is stopped or paused for about 5 minutes.
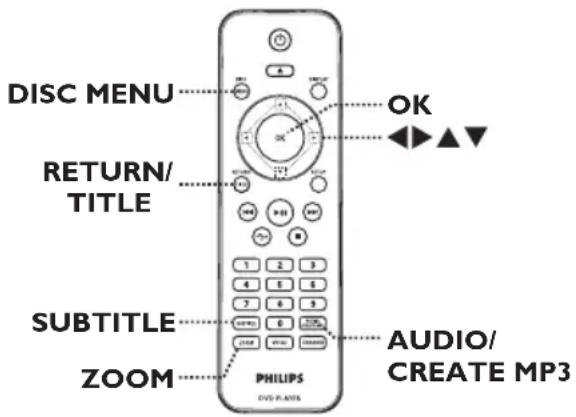
Other playback features for video discs
text_image
DISC MENU RETURN/ TITLE SUBTITLE ZOOM PHILIPS DVD P. RATES OK AUDIO/ CREATE MP3Note:
The operating features described here might not be possible for certain discs. Always refer to the instructions supplied with the discs.
Using the Disc Menu
Depending on the disc, a menu may appear on the TV once you load in the disc.
To select a playback feature or item
- Use ▲▼◀▶ keys or numeric keypad 0-9 on the remote control, then press OK to start playback.
To access or remove the menu
- Press DISC MENU on the remote control.
Changing sound track language
This operation works only on DVDs with multiple sound track languages, or VCDs/SVCDs with multiple audio channels.
For DVD
- Press AUDIO/CREATE MP3
repeatedly to select the available audio languages.
For VCD/SVCD
- Press AUDIO/CREATE MP3
repeatedly to select the available audio channels provided by the disc.
Changing subtitle language
This operation works only on DVDs with multiple subtitle languages. You can change to your desired language during playback.
- Press SUBTITLE repeatedly to select different subtitle languages.
Zooming
This option allows you to zoom and to pan through the picture on the TV.
1 During playback, press ZOOM repeatedly to select a different zoom factor.
→ Playback continues.
② Use ▲▼◀▶ keys to pan through the enlarged picture.
3 Press ZOOM repeatedly to return to the original size.
Playback Control (VCD/SVCD)
Playback Control (PBC) playback allows you to play VCDs/SVCDs interactively, following the menu on the display.
For VCDs with PBC feature (version 2.0 only) and SVCDs
- Press DISC MENU to turn on or off the PBC mode.
→ If the PBC mode is turned on, the PBC menu (if available) appears on the TV.
→ If the PBC mode is turned off, it skips the PBC menu and playback from the first track.
- If the PBC mode is turned on, pressing RETURN/TITLE during playback will return to the PBC menu.
Helpful Hint:
- You cannot use numeric keypad 0-9 to select track if PBC mode is on.
Using Display menu options
This unit can display the disc playback information (for example, title or chapter number, elapsed playing time, audio/subtitle language), a number of operations can be done without interrupting disc playback.
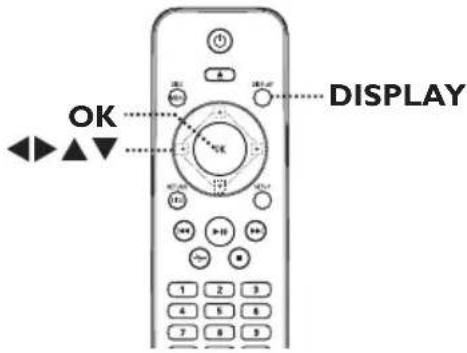
text_image
OK DISPLAY1 During playback, press DISPLAY on the remote control.
→ The available disc information appears on the TV.
(DVD)
| MENU | ||
| Title | 01/01 | |
| Chapter | 01/01 | |
| Audio | 5.1CH | Others |
| Subtitle | Off | |
| Bitrate 61 T###H###psed 0:48:59 | ||
(VCD/SVCD)
| MENU | |
| Track | 01/21 |
| Disc Time | 1:12:32 |
| Track Time | 0:02:29 |
| Repeat ab Off | |
| Bitrate 61 10000000000000000000000000000000000000000000000000000000000000000000000000000000000000000000000000000 | |
② Use ▲▼ keys to view the information and press OK to access.
③ Use the numeric keypad 0-9 to input the number/time or use ▲▼ keys to make the selection.
4 Press OK to confirm.
→ Playback changes according to the chosen time or to the selected title/chapter/track.
Selecting title/chapter/track
This option allows you to skip to a specific title/chapter/track in the current disc.
1 Move to { Title } / { Chapter } or { Track } option in the display menu and press ▶.
2 Use the numeric keypad 0-9 to input the valid number.
→ Playback skips to the selected operation.
Switching camera angles
This option is only available on DVDs that contain sequences recorded from different camera angles. This allows you to view the picture from different angles.
1 Move to { Angle } in the display menu and press ▶.
2 Use the numeric keypad 0-9 to input a valid number.
→ Playback changes to the selected angle.
Searching by time
This option allows you to skip to a specific point in the current disc.
① Move to { TT Time / CH Time / Disc Time / Track Time } in the display menu and press ▶.
② Use the numeric keypad 0-9 to enter the time where playback should start (eg. 0:34:27).
→ Playback skips to the selected time.
Viewing playing time
It shows the remaining/elapsed time display of the current disc.
① Move to { Time Disp } in the display menu and press ▶.
→ The information and display are differ depending on the disc type.
For DVD
| Display Descriptions | |
| Title/Chapter Elapsed | Title or Chapter elapsed playing time. |
| Title/Chapter Remain | Title or Chapter remaining playing time. |
For VCD/SVCD
| Display Descriptions | |
| Total/Single Elapsed | Disc or Track elapsed playing time. |
| Total/Single Remain | Disc or Track remaining playing time. |
Preview function (VCD/SVCD/DVD)
This function allows you to preview the contents of a VCD/SVCD/DVD disc.
1 Move to {Preview} in the display menu and press ▶.
→ The preview menu appears.
(DVD)
Select Digest Type:
Title Digest
Chapter Digest
Title Interval
Chapter Interval
(VCD/SVCD)
Select Digest Type:
Track Digest
Disc Interval
Track Interval
2 Use ▲▼ keys to select one of the preview type and press OK.
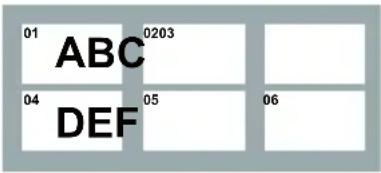
→ Thumbnail pictures of each segment appear on the TV.
text_image
01 ABC 0203 04 DEF 05 06- To go to the previous or next page, press ◀◀◀/▶▶.
③ Use ▲▼◀▶ keys to select a thumbnail picture and press OK to start playback from there.
Selecting various repeat functions
This function allows you to select the different repeat play options.
For DVD/VCD/SVCD
1 Move to { Repeat } in the display menu and press ▶.
DVD
→ Chapter (repeat current chapter)
→ Title (repeat current title)
→ All (repeat entire disc)
→ Off (exit repeat mode)
VCD/SVCD
→ Track (repeat current track)
→ All (repeat entire disc)
→ Off (exit repeat mode)
For Audio CD
① Press DISPLAY repeatedly to select { Off }, then press ◀/ ▶ to select the following repeat mode.
→ Track (repeat current track)
→ All (repeat entire disc)
→ Off (exit repeat mode)
For MP3/WMA/JPEG/DivX®
In stop mode, press DISPLAY repeatedly to select the following repeat mode.
→ Single (repeat current file once)
→ Repeat One (repeat current file)
→ Repeat Folder (repeat all files in the current folder)
→ Folder (repeat all files in a folder)
Repeating a specific section (A-B)
1 Move to { Repeat ab } in the display menu.
2 Press OK at the start point.
3 Press OK again to end the section.
→ The section will now repeat continuously.
4 Press OK again to resume normal playback.
Helpful Hints:
- The marked section for repeat playback is only possible within the same chapter/track.
Disc Operations (continued)
Special Audio CD feature
It is a time search option for audio CD playback. Playback skips to the time you input, within the disc or track.
1 During playback, press DISPLAY repeatedly to toggle between different input options.
| Display Descriptions | |
| Disc Go To Time | search within the disc. |
| Track Go To Time | search within a track. |
| Select Track Select | a track number. |
② Use the numeric keypad 0-9 to enter the time where playback should start (minutes:seconds).
→ Playback skips to the selected time.
Playing a DivX® disc
This unit supports the playback of DivX movies which you can copy from your computer onto a recordable disc. See 'Setup Menu Options - { General Setup Page > DivX(R) VOD Code }' for details.
1 Load a DivX disc.
② Use ▲▼ keys to select the file you want to play.
③ Press OK to start playback.
During playback:
- If the DivX disc has multilingual subtitles, you can press SUBTITLE on the remote control to change the subtitle language.
- If the DivX disc has different audio tracks, you can press AUDIO/CREATE MP3 on the remote control to change the audio stream.
Helpful Hints:
- Subtitle files with the following file name extensions (.srt, .smi, .sub, .ssa, .txt) are supported but do not appear on the file navigation menu.
- The subtitle file name (.sub) has to be saved under the same file name as the movie (.avi) in the same folder.
Playing a JPEG photo disc (slide show)
Before you start ...
Turn on your TV to the correct Video In channel. See 'Finding the correct viewing channel' for details.
- Load a photo CD (Kodak Picture CD/ JPEG).
→ The picture menu appears on the TV.
→ For Kodak disc, the slide show begins automatically.
Press ▶II to start the slide-show playback.
During slide-show playback:
- Press ▶II to pause or resume playback.
- Press ◀◀◀ / ▶▶▶ to play another file in the folder.
Helpful Hints:
- It may require longer time to display the disc content due to the large number of songs/pictures compiled into one disc.
Supported file format:
- The file extension has to be ‘*.JPG’ and not ‘*.JPEG’.
- This unit can only display digital camera pictures according to the JPEG-EXIF format, typically used by almost all digital cameras. It cannot display Motion JPEG, or pictures in formats other than JPEG, or sound clips associated with pictures.
Preview function
1 During playback, press DISPLAY.
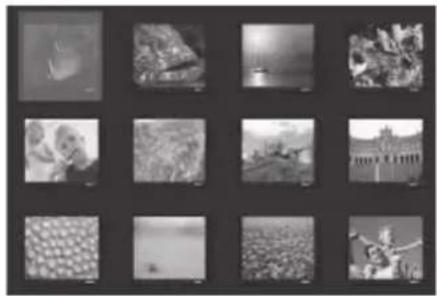
→ 12 thumbnail pictures will be displayed on the TV.
natural_image
Grid of 12 grayscale images showing various scenes including animals, landscapes, and urban areas (no text or symbols)2 Press ◀◀◀ / ▶▶▶ to display pictures on the previous/next page.
③ Use ▲▼◀▶ keys to select one of the pictures and press OK to start playback.
4 Press DISC MENU to return to Picture CD menu.
Zooming
1 During playback, press ZOOM repeatedly to select a different a zoom factor.
② Use ▲▼◀ ▶ keys to pan through the enlarged image.
Flip/Rotate picture
- During playback, use ▲▼◀ ▶ keys to rotate/flip the picture on the TV.
| Action Remote | control |
| flip the picture vertically. | ▲ |
| flip the picture horizontally. | ▼ |
| rotate the picture counter-clockwise. | ◀ |
| rotate the picture clockwise. | ▶ |
Disc Operations (continued)
Playing a MP3/ WMA disc
This unit can playback most of the MP3 and WMA files recorded on a recordable disc or commercial CD.
Before you start ...
Turn on your TV to the correct Video In channel. See 'Finding the correct viewing channel' for details.
1 Load a MP3/WMA disc.
→ The disc reading time may exceed 30 seconds due to the complexity of the directory/file configuration.
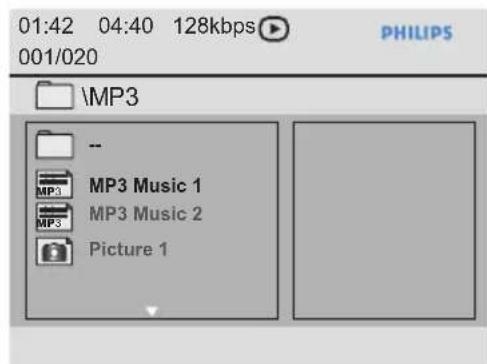
→ The disc menu appears on the TV.
text_image
01:42 04:40 128kbps 001/020 \MP3 -- MP3 Music 1 MP3 Music 2 Picture 1② Use ▲▼ keys to select a desired folder and press OK to open the folder.
③ Use ▲▼ keys to select a file and press OK to start playback.
→ Playback starts from the selected file and continues through the end of the folder.
During playback:
- Press ◀◀◀/▶▶▶ to playback another file in the current folder.
- Press ◀ / ▶ repeatedly to fast backward/forward search on the file.
- To select another folder from current disc, use ▲▼ keys to navigate back to the root menu.
4 To stop playback, press ■.
Helpful Hints:
- You can set to display or skip the folders when you load a MP3/JPEG disc. Press SETUP, then go to { Preference Page > Mp3/ Jpeg Nav }.
- It is normal to experience an occasional 'skip' while listening to your MP3/WMA disc due to poor clarity of digital contents during internet downloading.
Playing music and photo files simultaneously
You can create a musical slideshow playback if the disc contains both the MP3/WMA music and JPEG photo files.
1 Load a disc that contains both MP3/WMA and JPEG files.
② Use ▲▼ keys to select a MP3/WMA file from the disc menu and press OK to start playback.
③ During MP3/WMA playback, use ▲▼ keys to select a JPEG file from the disc menu and press OK.
→ Slideshow begins and continues till the end of the photo folder or album.
4 To stop simultaneous playback, press ■ twice.
Helpful Hints:
- Some files on Kodak or JPEG disc may be distorted during playback due to the configuration and characteristics of the disc. - During simultaneous playback, fast forward / backward or slow forward / backward is not available.
Playing a Karaoke disc
Before you start...
Turn on your TV to the correct Video In channel. Press AV, VIDEO, SELECT or button on your TV's remote control until you see the blue DVD background.
text_image
MIC LEVEL PPALC → T → STOP → MK LEVEL1 Connect a microphone (not supplied) to the MIC jack on the front panel of this unit.
② Load a karaoke disc.
- If the disc menu appears, use ▲▼◀▶ keys to make your selection and press OK to start playback.
3 Press KARAOKE on the remote control repeatedly to select { MIC ON/OFF }.
→ Use ◀▶ keys to turn the microphone { ON } or { OFF }.
4 Adjust the microphone volume up or down by using MIC LEVEL on the side panel of the unit.
5 Press VOCAL repeatedly to toggle between various audio modes.
→ You can turn off the vocal or change the audio mode of the karaoke disc.
→ Start enjoying the karaoke.
Helpful Hint:
- Before connecting the microphone, set the microphone volume to the minimum level to prevent howling.
Using the Karaoke Menu option
1 Press KARAOKE on the remote control repeatedly to access the karaoke menu.
{ MIC }
- Use ◀▶ keys to turn the microphone { ON } or { OFF }.
{Vol}
- Use ◀▶ keys to adjust the vocal level between 0 \~ 20. Select {0} for the lowest tone and {20} for the highest tone.
{ Echo }
- Use ◀▶ keys to adjust the echo level between 0 \~ 20.
{Key}
- Use ◀▶ keys to adjust the pitch level between -16 \~ +16 that match your voice.
{ Karaoke Scoring }
- Use ◀▶ keys to select scoring ranks: { Off }, { Basic }, { Intermediate } or { Advance }.
Note: If you score 30 points and above at the end of the song, a karaoke score will appear on the TV. Press OK to exit the scoring and resume karaoke session.
Helpful Hint:
- Karaoke score function is only available for DVD and VCD discs.
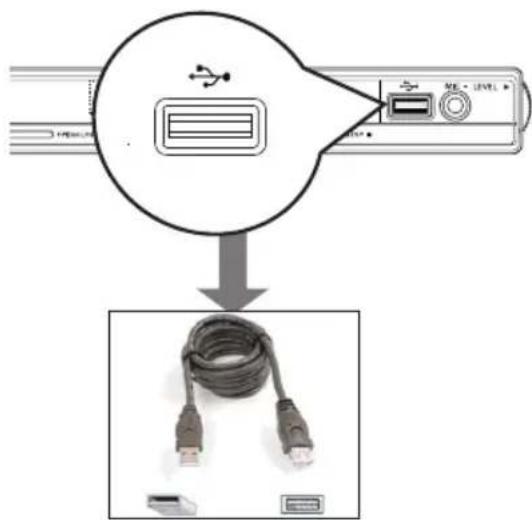
You can play or view the data files (JPEG, MP3, WMA or DivX®) in the USB flash drive. However, editing or copying the data file is not possible.
text_image
Diagram showing USB cable installation process with labeled ports and connection icon1 Connect the USB flash drive directly to the jack on this unit.
2 A message appears on the TV when the device is detected.
3 Press on the remote control to access the data in the drive.
4 Use ▲▼ keys to select a desired file and press OK to start playback.
For more playback information, see 'Playing a DivX® disc', 'Playing a JPEG photo disc (slide show)' or 'Playing a MP3/WMA disc' for details.
5 Press ■ to stop playback.
6 Press on the remote control to exit from the menu and switch to disc mode.
→ You can remove the USB device now.
Helpful Hints:
- The USB jack does not support the connection of other USB devices except to a USB flash drive.
- The unit can only support up to a maximum of 300 folders and 648 files.
- When the USB device does not fit into the USB jack, a USB extension cable (not supplied) is required.
- Copy-protected files are not playable.
Creating audio CD to MP3 format
This feature allows you to convert audio tracks from an audio CD into MP3 format. The created MP3 files are saved in your USB device.
1 Connect the USB flash drive directly to the jack on this unit.
② Load an audio CD.
3 During playback, press AUDIO/CREATE MP3 on the remote control.
4 Read the message on the TV and confirm your action by selecting { YES } in the menu, then press OK.
→ The Create MP3 menu appears.
→ If the USB device is full, a warning message will be displayed.
| Create MP3 | |||
| OPTIONS | TRACK | ||
| Speed | Normal | Track01 | 04:14 |
| Bitrate | 128kbps | Track02 | 04:17 |
| CRT ID3 | Yes | Track03 | 03:58 |
| Device | USB 1 | Track04 | 04:51 |
| Track05 | 03:53 | ||
| SUMMARY | Track06 | 04:09 | |
| Selected | 0 | Track07 | 04:38 |
| Total Time | 00:00 | ||
| Start Exit | Select all | Deselect all | |
5 Define your requirements for creating MP3 files in the { OPTIONS } menu, then press OK.
{Speed}
Select the creating speed.
| { Normal } | Normal speed.Note: You are able to hear the playback while creating the audio tracks. |
| { Fast } | Fast speed. |
{ Bitrate }
Select a creating bitrate. Default setting is 128 kbps.
{ CRT ID3 }
Create ID3 information.
| { Yes } ID3 information is included in the MP3 file. |
| { No } No ID3 information. |
{ Device }
The created MP3 files will save in this USB device.
6 Move to the { TRACK } menu and use ▲▼ keys to select the track that you want to create, then press OK.
- To select all tracks, move to { Select all } in the menu and press OK.
- To deselect all tracks, move to { Deselect all } in the menu and press OK.
7 To start creating the tracks, move to { Start } in the menu and press OK.
→ The creating process menu appears.
→ If the USB device is full, a warning message will be displayed.
→ A new folder is created automatically in the USB device to store all the new MP3 files.
Note: If you press one of the buttons on the front panel or remote control (STANDBY-ON, STOP ■, OPEN/CLOSE ▲, ⏻, ▲, ■, AUDIO/CREATE MP3 or OK) during creating process, a message 'Do you want to stop Creating MP3 now?' appears on the TV screen. Select { Cancel } to continue creating process.
8 To exit the menu, move to { Exit } in the menu and press OK.
Helpful Hints:
- DTS CD and copy-protected CD cannot be created to MP3 format. - Write protected or password protected USB device cannot be used to store the MP3 files.
Setup Menu Options
Accessing the setup menu
You can change the settings in this unit to suit your particular requirements.
text_image
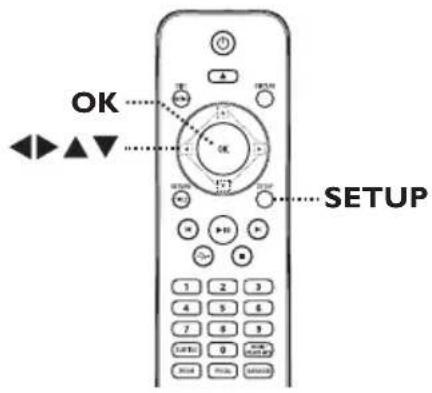
OK SETUP1 Press SETUP on the remote control. → The setup menu appears.
2 Use ◀▶ keys to select one of the setup menu options and press OK.
- If you are not able to access the { Preference Page }, press SETUP to exit the menu. Then, press ■ twice before you press the SETUP again.
③ Use ▲▼ keys to select a setup option and press ▶ to access.
4 Select the setting you wish to change and press OK to confirm and go back to the previously selected item.
→ Instructions and explanations of the options are provided in the following pages. → If the option in the menu is grayed out, that means the setting is not available or cannot be changed in the current state.
5 To exit, press SETUP.
text_image
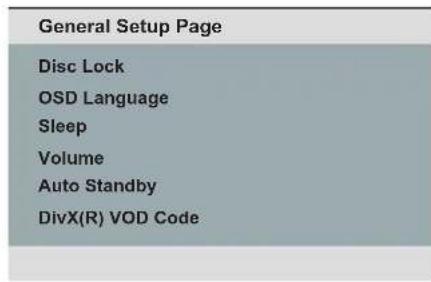
General Setup Page Disc Lock OSD Language Sleep Volume Auto Standby DivX(R) VOD CodeSee 'General Setup Page' on this chapter.
text_image
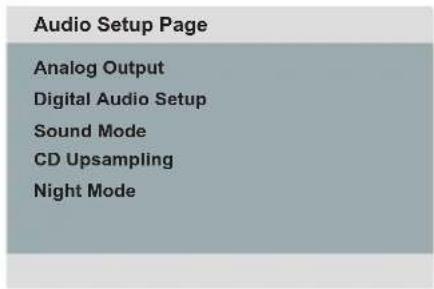
Audio Setup Page Analog Output Digital Audio Setup Sound Mode CD Upsampling Night ModeSee 'Audio Setup Page' on this chapter.
text_image
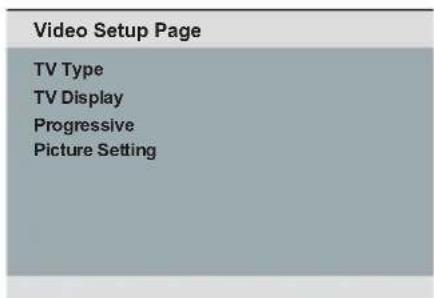
Video Setup Page TV Type TV Display Progressive Picture SettingSee 'Video Setup Page' on this chapter.
text_image
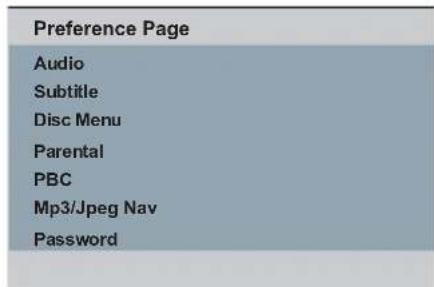
Preference Page Audio Subtitle Disc Menu Parental PBC Mp3/Jpeg Nav PasswordSee 'Preference Page' on this chapter.
General Setup Page (underlined options are the factory default settings)
Disc Lock
Not all discs are rated or coded by the disc maker. You can prevent play of specific discs with the disc lock function. Up to 20 discs can be locked.
{Lock} - To block the playback of the current disc. Subsequent access to a locked disc requires a six-digit password. The default password is '136900' (see {Preference Page - Password}).
{Unlock} - All discs can be played.
OSD Language
Select the menu language for this unit's on-screen display.
Sleep
The sleep timer enables this unit to switch to standby mode automatically after the selected a preset time.
{ 15/30/45/60 Mins }— Select the preset minutes for switching this unit to standby mode automatically.
{Off} - Turn off the sleep mode.
Volume
This feature allows you to adjust the volume level.
Use ◀▶ keys to set the volume level between 0 \~ 20.
Auto Standby
Select this to switch this unit to standby mode when it is not in use for a period of time.
{On} - Switch to low power standby mode when playback has stopped or paused for more than 15 minutes.
{ Off } - Switch off the auto standby mode.
DivX(R) VOD Code
Philips provides you with the DivX® VOD (Video On Demand) registration code that allows you to rent or purchase videos from DivX® VOD service at http://www.divx.com/vod. All the downloaded videos from DivX® VOD can only be played back on this unit.
Press ▶ to see the registration code and press OK to exit.
Audio Setup Page (underlined options are the factory default settings)
Analog Output
This setting is only required if you have connected the audio output of this unit to a stereo device or TV using the analog output jack.
{ LT/RT } - The connected device has a built-in Dolby Pro Logic decoder. It can deliver the surround sound through the two speakers.
{ Stereo } - The connected device can only output stereo audio through two speakers.
{ V SURR } – For virtual surround sound effects.
Digital Audio Setup
This setting is only required if you have connected the audio output of this unit to an amplifier/receiver using the digital output jack.
{ Digital Output } - { SPDIF Off } Disable digital audio output. Select this if you are using the analog audio jacks to connect this unit to a TV or Stereo system.
{All} The connected device supports multi- channel audio formats. The digital audio format will be output as on disc.
{ PCM Only } The connected device does not support multi-channel formats. All audio signals are downmixed to PCM format (2-channel).
{ LPCM Output } - { 48 K } Select this to play disc recorded at sampling rate of 48 kHz.
{96 K} Enable 96 kHz output on digital audio if the amplifier/receiver is compatible with high sampling rate audio (88.2 / 96 kHz). However, if the sound output is distorted or there is no sound, change the setting to '48 K'.
Note: LPCM Output can only be selected when { PCM Only } is activated. The higher the sampling rate, the better the sound quality.
Audio Setup Page (underlined options are the factory default settings)
Sound Mode
Select the type of preset digital sound effect that can match the disc's content or optimize the sound of the musical style you are playing.
{3D} - It provides a virtual surround sound experience through the left and right audio channels. Available options are: {Off}, {Living Room}, {Hall}, {Arena} and {Church}.
{Movie Mode} - Movie sound effects. Available options are: {Off}, {Sci-Fi}, {Action}, {Drama} and {Concert} effect.
{Music Mode} - Musical sound effects. Available options are: {Off}, {Digital}, {Rock}, {Classic} and {Jazz}.
CD Upsampling
This feature enables you to convert the music CD to a higher sampling rate using sophisticated digital signal processing for better sound quality. If you have activated the CD upsampling, this unit automatically switches to stereo mode.
{Off} - Disable CD-upsampling function.
{ 88.2 kHz (X2) } – Convert the sampling rate of the CDs to twice as high as the original rate.
{ 176.4 kHz (X4) } – Convert the sampling rate of the CDs to four times as high as the original rate.
Note: CD upsampling is only possible when playback the music CD in stereo mode.
Night Mode
This mode optimizes playback of sound at low volume. High volume outputs will be softened and low volume outputs will be enhanced to an audible level. This feature is only applicable for DVD video discs with Dolby Digital mode.
{ On } - Turn on night mode.
{Off} - Turn off night mode. Select this to
enjoy the surround sound with its full dynamic range.
Video Setup Page (underlined options are the factory default settings)
TV Type
Select the color system that matches the connected TV. It enables playback of a different type of disc (PAL or NTSC disc) on this unit.
{PAL} - For PAL-system TV.
{ Multi } - For TV that is compatible with both PAL and NTSC.
{ NTSC } - For NTSC-system TV.
TV Display
The picture shape can be adjusted to fit your TV.
{4:3 Pan Scan} - For a full-height
picture with the sides trimmed.
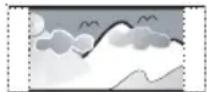
{ 4:3 Letter Box } – For a 'wide-screen'
display with black bars on the top and bottom.
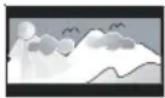
{16:9} - For wide-screen TV
(frame ratio 16:9).
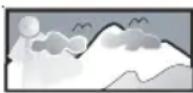
Progressive
Before enabling the progressive scan feature, you must ensure that your TV can accept progressive signals (a progressive scan TV is required) and that you have connected this unit to your TV using the Y Pb Pr. See ‘Getting Started - Setting up Progressive Scan feature’ for details.
{ On } - Turn on progressive scan mode.
Read the instructions on the TV and
confirm your action by pressing OK on the remote control.
{Off} - Turn off progressive scan mode.
Picture Setting
This unit provides three predefined sets of picture color settings and one personal setting which you can define yourself.
{Standard} - Original color setting.
{ Vivid } - Vibrant color setting.
{Cool} - Soft color setting.
{ Personal } - Select this to personalize the picture
Personal Picture Setup
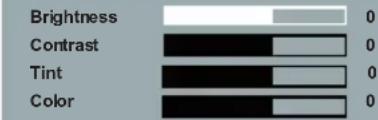
bar
| Category | Value 1 | Value 2 | |---|---|---| | Brightness | 0 | 0 | | Contrast | 0 | 0 | | Tint | 0 | 0 | | Color | 0 | 0 |color setting. Use the ◀▶ keys to adjust to the setting that best suits your personal preference and press OK to confirm. For an average setting, select {0}.
Preference Page (underlined options are the factory default settings)
Audio
Select the preferred audio language for DVD playback.
Subtitle
Select the preferred subtitle language for DVD playback.
Disc Menu
Select the preferred disc menu language for DVD playback.
Note: If the selected audio/subtitle/disc menu language is not available on the DVD, the disc's default language will be used instead.
Parental
This is to prohibit viewing of discs that had exceeded the limits you set. It works only on the DVDs with parental level assigned to the complete disc or to certain scenes on the disc.
I) Use ▲▼ keys to select a rating level from 1 to 8 and press OK.
2) Use the numeric keypad 0-9 on the remote control to enter your six-digit password and press OK.
Notes:
- The ratings are country-dependent ('I' is considered material that is least offensive and '8' is most offensive). To disable parental controls and allow all discs to play, select '8'.
- Some DVDs are not encoded with a rating though the movie rating may be printed on the disc cover. The rating level feature does not prohibit playback of such discs. VCD, SVCD and CD have no level indication, so parental control has no effect on these type of discs.
– DVDs that are rated higher than the level you selected will not be played unless you enter the same six-digit password.
PBC
Play Back Control feature is applicable for VCD/SVCD only. It allows you to play Video CDs (2.0) interactively, following the menu on the display.
{On} - The index menu (if available) appears on the TV when you load a VCD/SVCD.
{ Off } - The VCD/SVCD skips the index menu and playback directly from the beginning.
Preference Page (underlined options are the factory default settings)
Mp3/Jpeg Nav
Mp3/Jpeg Navigator can only be set if the disc is recorded with a menu. It allows you to select different display menus for easy navigation.
{ Without Menu } - Display all the files contained in the MP3/Picture disc.
{With Menu} - Display the folder menu of the MP3/Picture disc.
Note: This feature is not available for USB mode.
Password
The password is used for Disc Lock and Parental control. The default password is '136900'.
To change the password:
I) Press OK twice to access the change password menu.
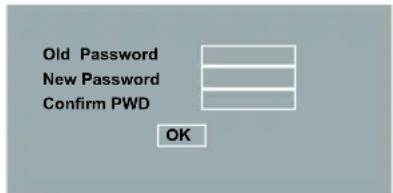
text_image
Old Password New Password Confirm PWD OK2) Use the numeric keypad 0-9 on the remote control to enter your existing six-digit password at { Old Password }.
Note: When doing this for the first time or if you forget your existing password, enter '136900'.
3) Enter the new six-digit password at { New Password }.
4) Enter the new six-digit password again at { Confirm PWD }.
5) Press OK to confirm and exit the menu.
DivX Subtitle
Select the font type that supports the recorded DivX subtitle.
{ Standard } - Display a standard list of Roman subtitle fonts provided by this unit.
Default
This feature enables you to reset all the setup menu options and your personal settings to the factory defaults, except your password for the Disc Lock and Parental control.
Press OK to confirm the default reset.
Installing the latest software
Philips provides software upgrades to make sure that this unit is compatible with the newest formats. To check the updates, compare the current software version of this unit with the latest software version available at the Philips website.
1 Press ▲ to open the disc tray.
2 Press numeric keypad '55' on the remote control.
③ Write down the file name.
4 Go to www.philips.com/support to check the latest software version available for this unit.
5 If the latest software version is higher than the software version of this unit, download it and store onto a CD-R.
6 Load the CD-R to this unit for upgrade operation.
Note: Never unplug or turn off this unit during the upgrade.
7 Once complete, this unit will restart automatically.
WARNING
Under no circumstances should you try to repair this unit yourself, as this invalidates the warranty. Do not open this unit as there is a risk of electric shock.
If a fault occurs, first check the points listed below before taking this unit for repair. If you are unable to remedy a problem by following these hints, consult your dealer or Philips for help.
Problem Solution
| No power. | - Press STANDBY-ON on the unit to turn on the power.- Ensure that the AC outlet has power.- Disconnect the power cord from the power outlet for a few minutes. Reconnect the power cord and try to operate again as usual. |
| No picture. | - Refer to your TVs manual for correct Video In channel selection. Change the TV channel until you see the DVD screen.- If this happens when you turn on the progressive scan feature, wait for 15 seconds for the auto recovery or switch back to the default mode as below:1) Press ▲ on this unit.2) Press numeric keypad ‘I’ on the remote control.- If this happens after you set the color system, wait for 15 seconds for the auto recovery or switch back to the default TV color system:1) Press ▲ on this unit.2) Press numeric keypad ‘3’ on the remote control. |
| Completely distorted picture or black/white picture. | - Check the video connection.- Ensure that the disc is compatible with this unit.- Sometimes a small amount of picture distortion may appear. This is not a malfunction.- The disc is dirty. Clean the disc. |
| No sound or distorted sound. | - Check the audio connections to the connected audio device.- Make sure that the connected audio device is turned on to the correct input source.- Set the digital output setting correctly, based on the device you connected to this unit. See ‘Audio Setup Page – Digital Audio Setup’ for details. |
Troubleshooting (continued)
Problem Solution
The remote control does not function properly.
The unit does not start playback.
The buttons on the unit do not work.
The aspect ratio of the screen cannot be changed even though you have set the TV display.
Cannot activate some features such as Angles, Subtitles, or multi-language Audio.
Not able to select some items in the setup/system menu.
- Aim the remote control directly at the sensor on the front of this unit (not towards the TV).
- Remove any obstacles between this unit and the remote control.
- Batteries are weak, replace the batteries.
- Check the polarities of the batteries are as indicated on the remote control (± signs).
- Load a readable disc with the playback side facing inwards. The DVD±R/DVD-RW/CD-R must be finalised.
- Make sure the disc is not scratched or warped. Check if the disc is defective by trying another disc.
- The disc is of a different region code.
- You may need to enter the password in order to unlock the disc for playback.
- Moisture may have condensed inside this unit. Remove the disc and leave this unit turned on for about an hour.
- There is a technical problem. Disconnect this unit from the power outlet for 10 seconds and reconnect again.
- The aspect ratio is fixed on the DVD disc.
- Depending on the TV, it may not be possible to change the aspect ratio.
- The features may not be available on the DVD.
- Changing the language for the sound or subtitle is prohibited on this DVD.
- Press ■ twice before selecting the disc setup menu.
- Depending on the disc availability, some menu items cannot be selected.
Problem Solution
Picture freezes momentarily during playback.
Unable to select Progressive Scan on/off.
No sound during DivX movies playback.
An DivX movie does not repeat.
Certain DivX files do not play or are skipped.
The contents of the USB flash drive cannot be read.
Slow operation of the USB flash drive.
- Check the disc for fingerprint/scratches and clean with a soft cloth wiping from center to edge.
- Check that the video output of this unit is connected using the Component Video (Y Pb Pr) jacks.
- The audio codec may not be supported by this unit.
- Check that file size of the movie does not exceed the file size of the disc during downloading.
- Check that the DivX movie download is a complete file.
- Make sure the file name extension is correct. You can check this using a computer with CD-ROM.
- The unit is designed to playback DVD, VCD, SVCD, CD audio, MP3, WMA and DivX discs only. Other digital audio formats such as liquid audio, RM (RealMedia), WAV or non-audio files like '.doc', '.txt', '.pdf' are not supported.
- Try to play the problem DivX files on a computer. If they do not work, the source file appears to be corrupted.
- Try to download the file again from a different source, or if you have created the file yourself, save it with the correct settings.
- The USB flash drive format is not compatible with the system.
- Drive is formatted with a different file system which is not supported by this unit (e.g., NTFS).
- Large file size or high memory USB flash drive takes longer time to read and display on the TV.
Frequently Asked Questions (USB)
Why does it take so long to display the contents on my USB device?
- This could be due to the large numbers of files (>500 files/folders) or size of the files (>1MB.)
- There could be other non-supported files in the device that the system is trying to read/display.
What if non-supported devices (e.g. USB mouse, keyboards) are plugged into the unit?
- The device may cause the unit to be unstable. Remove the non-supported device and unplug the power cord. Wait for a few minutes before reconnecting the power cord and power on the unit again.
What happens when I plug in a USB HDD?
- HDD is not supported as the large storage capacity makes navigation very difficult. Transfer the music files (mp3) and photos (jpg) into a USB flash drive.
Why does the unit fail to detect my USB portable music player?
- The portable music player may require propriety software that is bundled with the unit in order to access the contents (eg. playlist.) The unit can only support mass storage class device, but not Media Transfer Protocol (MTP) class.
What types of file does the unit support?
- We support only FAT16 and FAT32, not NTFS.
Why does the file name appear to be different from what was displayed on my computer (e.g. from "Good Bye. jpg" to "Good\_B\~I.jpg")?
- The length of the file name is restricted by the file system of the device (FAT16), which only supports eight (8) characters.
- The computer may be able to display the full file name as the operating system can convert the file system.
Is simultaneous USB and Disc playback possible?
- This is not possible due to memory limitation. In addition, a different user interface will be needed in order to function and in order to be simple enough to use.
Why can't I rotate the pictures in my device?
- In order to rotate the pictures in the USB device, the picture must contain EXIF information, stored by most digital cameras. This EXIF information may have been removed when you edit or copy the picture from other devices using editing programs.
Why can't the unit play some of my music files, photos or movies?
- The music files may not be playable because of different formats and encoding bit-rates. Similarly, the photos may be of low resolution or too high resolution for the unit to support.
TV STANDARD
(PAL/50Hz) (NTSC/60Hz)
Number of lines 625 525
Playback Multistandard (PAL/NTSC)
VIDEO PERFORMANCE
Video DAC 12 bit, 108 MHz
Y Pb Pr 0.7 Vpp \~ 75 ohm
Video Output | Vpp \~ 75 ohm
VIDEO FORMAT
Digital MPEG 2 for DVD, SVCD
Compression MPEG I for VCD
DivX®
DVD 50 Hz 60 Hz
Horiz. resolution 720 pixels 720 pixels
Vertical resolution 576 lines 480 lines
VCD 50 Hz 60 Hz
Horiz. resolution 352 pixels 352 pixels
Vertical resolution 288 lines 240 lines
AUDIO FORMAT
| Digital | MPEG/ AC-3/ PCM | compressed Digital |
| 16, 20, 24 bits | ||
| fs, 44.1, 48, 96 kHz | ||
| MP3 (ISO 9660) | 96, 112, 128, 256 kbps & variable bit rate | |
| fs, 32, 44.1, 48 kHz |
Analog Sound Stereo
Dolby Surround compatible downmix from Dolby
Digital multi-channel sound
AUDIO PERFORMANCE
| DA Converter | 24 bit, 192 kHz | |
| DVD | fs 96 kHz | 4 Hz - 44 kHz |
| fs 48 kHz | 4 Hz - 22 kHz | |
| SVCD | fs 48 kHz | 4 Hz - 22 kHz |
| fs 44.1kHz | 4 Hz - 20 kHz | |
| CD/VCD | fs 44.1kHz | 4 Hz - 20 kHz |
| Signal-Noise (1kHz) | >90 dB | |
| Dynamic range(1kHz) | >80 dB | |
| Crosstalk (1kHz) | >70 dB | |
| Distortion/noise (1kHz) | >65 dB | |
| MPEG MP3 | MPEG Audio L3 | |
CONNECTIONS
| Y Pb Pr Output | Cinch 3x |
| Video Output | Cinch (yellow) |
| Audio Output(L+R) | Cinch (white/red) |
| Digital Output | I coaxial |
| IEC60958 for CDDA / LPCM | |
| IEC61937 for MPEG I/2, Dolby Digital |
CABINET
| Dimensions (w x h x d) | 360 x 37x 209 mm |
| Weight | Approximately 2 kg |
POWER CONSUMPTION
| Power Supply Rating | 110 V – 240 V;50/60 Hz |
| Power consumption | < 10 W |
| Power consumption in Standby mode | < 1 W |
Specifications are subject to change without prior notice.
Glossary
Analog audio: Sound that has not been turned into numbers. Analog sound is available when you use the AUDIO LEFT/RIGHT jacks. These red and white jacks send audio through two channels, the left and right.
Aspect ratio: Aspect ratio refers to the length to height ratio of TV. The ratio of a standard TV is 4:3, while the ratio of a high-definition or wide TV is 16:9. The letter box allows you to enjoy a picture with a wider perspective on a standard 4:3 screen.
AUDIO OUT jacks: Jacks on the back of this unit that send audio to another system (TV, Stereo, etc.).
Bit Rate: The amount of data used to hold a given length of music; measured in kilobits per second, or kbps. Or, the speed at which you record. Generally, the higher the bit rate, or the higher the recording speed, the better the sound quality. However, higher bit rates use more space on a disc.
Chapter: Sections of a picture or a music piece on a DVD that are smaller than titles. A title is composed of several chapters. Each chapter is assigned a chapter number enabling you to locate the chapter you want.
CVBS: Composite video (or Composite Video Blanking and Sync). A single video signal commonly used in most consumer video products.
Disc Menu: A screen display prepared for allowing a selection of images, sounds, subtitles, multi-angles, etc., recorded on a DVD.
DivX: The DivX code is a patent-pending, MPEG-4 based video compression technology, developed by DivX Networks, Inc., that can shrink digital video to sizes small enough to be transported over the internet, while maintaining high visual quality.
Dolby Digital: A surround sound system developed by Dolby Laboratories containing up to six channels of digital audio (front left and right, surround left and right, center and subwoofer).
JPEG: A very common digital still picture format. A still-picture data compression system proposed by the Joint Photographic Expert Group, which features small decrease in image quality in spite of its high compression ratio. Files are recognized by their file extension 'JPG or JPEG'.
MP3: A file format with a sound data compression system. 'MP3' is the abbreviation of Motion Picture Experts Group I (or MPEG-I) Audio Layer3. By using the MP3 format, one CD-R or CD-RW can contain about 10 times more data than a regular CD.
Parental Control: A function of the DVD to limit playback of the disc by the age of the users according to the limitation level in each country. The limitation varies from disc to disc; when it is activated, playback will be prohibited if the software's level is higher than the user-set level.
PBC: Playback Control. A system of navigating a Video CD/Super VCD through on-screen menus recorded onto the disc. You can enjoy interactive playback and searching.
PCM (Pulse Code Modulation): A system for converting analog sound signal to digital signal for later processing, with no data compression used in conversion.
Progressive Scan: The progressive scan displays twice the number of frames per second than in an ordinary TV system. It offers higher picture resolution and quality.
Region code: A system allowing discs to be played only in the region designated. This unit will only play discs that have compatible region codes. You can find the region code of your unit by looking at the product label. Some discs are compatible with more than one region (or ALL regions).
Title: The longest section of a movie or music feature on DVD. Each title is assigned a title number, enabling you to locate the title you want.
TV OUT jack: Jack on the back of this unit that sends out video signals to the TV.
WMA: Windows Media™ Audio. Refers to an audio compression technology developed by Microsoft Corporation. WMA data can be encoded by using Windows Media Player version 9 or Windows Media Player for Windows XP. Files are recognized by their file extension 'WMA'.