
R700T - Gps ASUS - Free user manual and instructions
Find the device manual for free R700T ASUS in PDF.

| Product Type | GPS Navigation Device |
| Brand | ASUS |
| Model | R700T |
| Display | Touchscreen (color) |
| Navigation Software | ASUS GO (Simple and Advanced modes) |
| Map Data Provider | Whereis® and Tele Atlas |
| GPS Receiver | Built-in |
| Power Source | Vehicle DC adapter (included) |
| Battery | Rechargeable internal battery |
| Route Calculation Modes | Fast, Short, Economical, Easy |
| Points of Interest (POI) | Preloaded and user-defined |
| Speed Camera Alerts | Yes (user can add locations) |
| Track Logging | Yes (record GPS path) |
| Voice Guidance | Turn-by-turn voice instructions |
| Safety Mode | Disables operation while driving >10 km/h |
| Day/Night Color Schemes | Automatic switching based on time and position |
| Map Views | 2D (top-down) and 3D (perspective) |
| Cleaning Instructions | Wipe screen and body with a soft, dry cloth |
| Language Support | Multiple languages (user selectable) |
Frequently Asked Questions - R700T ASUS
User questions about R700T ASUS
0 question about this device. Answer the ones you know or ask your own.
Ask a new question about this device
Download the instructions for your Gps in PDF format for free! Find your manual R700T - ASUS and take your electronic device back in hand. On this page are published all the documents necessary for the use of your device. R700T by ASUS.
USER MANUAL R700T ASUS
Navigation software for ASUS R700
UK English
December 2007, ver. 1.0
Copyright note
The product and the information contained herein is subject to change without prior notification.
This manual may not, in whole or in part, be reproduced or transmitted in any form either electronically or mechanically, including photocopying and recording, without the express written consent of Asus.
© 2007 - Asus
Whereis® map data is © 2006 Telstra Corporation Limited and its licensors
Data Source © 2006 Tele Atlas N.V.
Austria: © BEV, GZ 1368/2003
Denmark: © DAV
France: © IGN France
Great Britain: Ordnance Survey data with permission of Her Majesty's Stationery Office © Crown Copyright
Italy: © Geonext/DeAgostini
Northern © Ordnance Survey of Northern Ireland
Ireland:
Norway: © Norwegian Mapping Authority, Public Roads Administration / Mapsolutions
Switzerland: © Swisstopo
The Netherlands: Topografische ondergrond
All rights reserved.
Thank you for choosing ASUS GO as your door-to-door in-car navigator. Read the Quick Start Guide first and start using ASUS GO right away. This document is the detailed description of the software. You can easily discover ASUS GO while you are using it; however, we still recommend that you read this manual to understand the screens and the features of ASUS GO.
Table of contents
1 Warnings and safety information....6
2 Getting started with ASUS GO 7
2.1 Simple and Advanced modes....8
2.2 Hardware buttons....9
2.3 Buttons and other controls on the screens....9
2.4 Using the map....9
2.4.1 Checking the details of a map location....9
2.4.2 Manipulating the map....10
2.4.3 Switching between the 2D and 3D modes....11
2.4.4 Status information on the map (GPS, battery, etc.)....11
2.4.5 Using the Cursor 12
2.5 Using keyboards....12
2.6 ASUS GO concepts....13
2.6.1 Smart Zoom 13
2.6.2 Current GPS position and Lock-On-Road 13
2.6.3 Selected location on the map (Cursor) 14
2.6.4 Return to GPS position....14
2.6.5 Daylight and night colour schemes....15
2.6.6 Route calculation and recalculation....15
2.6.7 Itinerary....15
2.6.8 Track Logs....15
2.6.9 Simulation....16
2.6.10 Speed Cameras....16
2.6.11 Speed limit warnings ...... 16
2.6.12 POI (Points of Interest)....16
3 Navigating with ASUS GO 17
3.1 Selecting the destination of a simple route....17
3.1.1 Selecting the Cursor as the destination....17
3.1.2 Entering an address or part of an address....18
3.1.2.1 Entering an address....18
3.1.2.2 Tips on entering addresses quickly....19
3.1.2.3 Selecting an intersection as the destination.... 20
3.1.2.4 Selecting a city centre as the destination.... 21
3.1.2.5 Entering an address with a postal code.... 22
3.1.3 Selecting the destination from your Favourites 23
3.1.4 Selecting the destination from the POIs 23
3.1.5 Selecting the destination or a waypoint from the History 24
3.1.6 Selecting the destination by entering its coordinates 24
3.2 Creating a multi-point route....25
3.3 Watching the simulation of a route....25
3.4 Pausing the active route....26
3.5 Deleting the active route....26
3.6 Using track logs....26
3.7 Saving a route....27
3.8 Loading a saved route....27
4 Reference book (Advanced mode)....28
4.1 Map....28
4.1.1 Buttons on the map....30
4.1.1.1 Zooming, tilting and rotating buttons....30
4.1.1.2 Map view buttons....30
4.1.2 Objects on the map....30
4.1.2.1 Streets and roads....30
4.1.2.2 3D object types....30
4.1.3 Elements of the active route....31
4.2 Find menu....32
4.3 Route menu....32
4.4 Settings menu .... 33
4.4.1 Visual settings....33
4.4.2 Sound settings....34
4.4.3 Regional settings....34
4.4.4 Route....35
4.4.4.1 Route Calculation Method ...... 35
4.4.4.2 Vehicles and Road Types used in route calculation....35
4.4.5 Warnings ....36
5 Glossary 37
1 Warnings and safety information
ASUS GO is a navigation system that helps you find your way to your destination with its built-in GPS receiver. ASUS GO does not transmit your GPS position; others cannot track you.
It is important that you look at the display only when it is safe to do so. If you are the driver of the vehicle, we recommend that you operate ASUS GO before you start your journey. Plan the route before your departure and stop if you need to change something in the route.
ASUS GO has a Safety Mode: if you turn on Safety Mode, you cannot change anything in ASUS GO while the vehicle is moving at a speed of 10 km/h (6 mph) or higher. Unless only passengers operate ASUS GO, we strongly encourage you to turn on Safety Mode.
You have to obey the traffic signs and follow the road geometry. If you deviate from the route that ASUS GO recommended, ASUS GO changes the instructions accordingly.
Never place ASUS R700 where it obstructs the driver's view, where it is in the deployment zone of an airbag or where it might cause injuries in an accident.
For more information, consult the End User Licence Agreement.
2 Getting started with ASUS GO
ASUS GO is optimised for in-car use. You can use it easily by tapping the screen buttons and the map with your fingertips.
ASUS GO can plan routes throughout the whole installed map set; you do not need to change maps or switch to a poorly detailed general map to navigate between map segments or countries.
| Tasks Instructions | |
| Using a stylus You do not need | d a stylus to use ASUS GO. Tap the buttons and the map with your fingertips. |
| Tapping and tapping&holding a button | You do not need to double-tap the screen and usually you do not need to grab the screen either. A single tap is usually enough.You need to tap&hold the screen only in the following cases:Moving the handle on a sliderMoving the mapZooming, tilting or rotating the mapDeleting several characters in the text entry field on keyboardsFor more information, see page 10. |
| Finding information about the buttons and features of ASUS GO | For information about the buttons and controls, see page 9. For information about each menu, see page 28. |
The initial screen of ASUS GO
ASUS GO starts by displaying the Navigation menu in Simple mode.
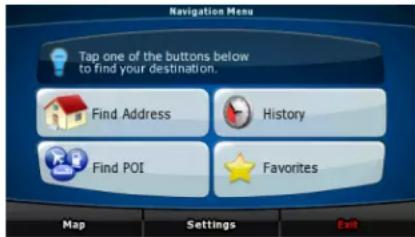

Find Address
The fastest way to find your destination and start navigating is tapping the button. You can select your destination in the following ways (not all of them are available in Simple mode):
- Use the selected location on the map (the Cursor) (page 17).
- Enter a full address or a part of an address, for example a street name without a house number or the names of two intersecting streets (page 18).
- Enter an address with postal code (page 22). This way you do not need to select the name of the settlement and the search for street names might be faster as well.
• Use a coordinate (page 24) - Use a saved location:
• a Favourite (page 23)
- a POI (page 23)
• the History of previously set destinations and waypoints (page 24)
2.1 Simple and Advanced modes
The application starts in Simple mode, but you have the possibility to choose between the two user modes:
- Simple mode: you have easy access to the most important navigation functions and the basic settings only.
- Advanced mode: you have access to the full functionality of ASUS GO.
To switch from Simple mode to Advanced mode from the startup screen (Navigation Menu), tap
Settings
Advanced Mode
To switch from Advanced mode to Simple mode from the startup screen (Navigation Menu), tap

Simple Mode
The features and settings available in each mode are as follows:
| Type of action | Available in Simple mode | Available in Advanced mode | Explanation |
| Navigating to a selected map point Yes | Yes See page 17 | ||
| Navigating to a street address Yes | Yes See page 18 | ||
| Navigating to an incomplete address | Yes | Yes | See page 18 |
| Navigating to an intersection Yes Yes | See page 20 | ||
| Navigating to recent destinations (History) | Yes | Yes | See |
| Navigating to Favourites Yes Yes | see page 23 | ||
| Navigating to a POI Yes Yes | see page 23 | ||
| Navigating to coordinates No Yes Se | see page 24 | ||
| Creating a multi-point route | No | Yes | See page 25 |
| Saving a map point as a Favourite destination | Yes | Yes | |
| Saving a map point as a POI | No Yes | ||
| Saving a map point as a location of a Road Safety Camera | No | Yes | |
| Mark a map point with a Pin | No Yes | ||
| Saving the active route | No | Yes | See page 27 |
| Saving track logs | No Yes | ||
| Visual settings | Only background picture | Yes | See |
| Sound settings Only master volume Yes See page 34 | |||
| Route settings No Yes See page 32 | |||
| Regional settings Only language selection | Yes | See | |
| Warnings | No | Yes |
page
See
2.2 Hardware buttons
You can use ASUS GO mostly by tapping the touch screen. The device has only one hardware button, the Power on/off button.
You can turn on or off ASUS R700 at any time. When ASUS R700 is switched off, ASUS GO does not calculate your GPS position and it does not update the route or the driving instructions.
2.3 Buttons and other controls on the screens
When you are using ASUS GO, you usually tap buttons on the touch screen.
You only need to confirm selections or changes in ASUS GO if the application needs to restart or it has to perform a major reconfiguration. Otherwise, ASUS GO saves your selections and applies the new settings without confirmation steps.
2.4 Using the map
2.4.1 Checking the details of a map location
You can check the details of a location (address, coordinate, nearby POIs) by tapping the location on the screen. The Cursor (red dot with radiating red circles) appears.
The address of the location is displayed at the bottom of the map. During navigation, this line shows the current street and house number information.

Tap Cursor to open theCursor menu. Now tap coordinate and the list of nearby POIs.

dress, the
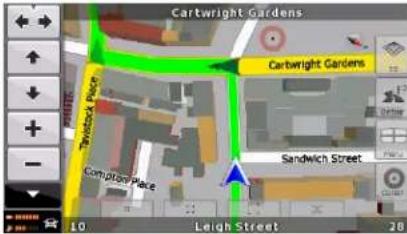
2.4.2 Manipulating the map
You can change how the map looks:
- You can tilt it, rotate it or scale it to best suit your needs while you are creating, planning or following a route.
- You can customise which icons and buttons are visible.
Position markers on the map:

- Current GPS position:
(page 13)
- Selected location (Cursor):

(page 14)
| Action Button(s) Description | ||
| Moving the map with drag&drop | No buttons You can move the map into any direction: tap and hold the map, and move your finger to the direction into which you want to move the map. | |
| Zooming in and out |  | Changes how much of the map ASUS GO displays on the screen.ASUS GO uses high-quality vector maps that let you see the map at various zoom levels, always with optimised content. It always displays street names and other text with the same font size, never upside-down, and you only see the streets and objects that you need. |
| Viewing modes | 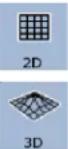 | Gives you the following map perspectives in ASUS GO:classic top-down view (2D)perspective view (3D) |
| Tilting up and down |  | Change the vertical view angle of the map in 3D mode. |
| Zoom presets |  | Tap one of the preset buttons to set the zoom level to a predefined value. These buttons are available in 2D mode. |
| Tilt presets |  | Tap one of the preset buttons to set the tilt (and zoom) level to a predefined value. These buttons are available in 3D mode. |
| Rotating left and right |  | Changes the horizontal view angle of the map in 3D mode.When GPS position is available, ASUS GO always rotates the map so its top faces your direction of travel (Track-Up orientation). You can turn away from Track-Up with these buttons. |
| Smart Zoom |  | If you enable Smart Zoom, ASUS GO can automatically rotate, scale and tilt the map and give you the optimal view:When you are approaching a turn, ASUS GO zooms in and raises the view angle to let you easily recognise your manoeuvre at the next junction.• If the next turn is at a distance, ASUS GO zooms out and lowers the view angle to show you the road in front of you. |
2.4.3 Switching between the 2D and 3D modes
You can switch between the 2D and 3D modes as follows:
| With the 2D/3D switch buttons | 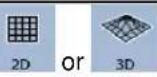 | Tap them to switch between the two modes.The value always shows the mode the button switches to: If you are in 2D mode,you can see the  button and you need to tap it to switch to 3D mode. button and you need to tap it to switch to 3D mode. |
2.4.4 Status information on the map (GPS, battery, etc.)
The following icons show status information on the map in ASUS GO:
| Icon Status for More information | ||
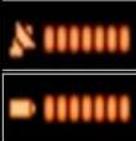 | GPS position quality | |
| Battery | ||
 | Orientation | |
 | Vehicle type | |
2.4.5 Using the Cursor
You can perform the following actions with the location that you selected on the map (with the Cursor):
• In the active route, use it as:
- the start point by replacing the current GPS position (available in Advanced mode only)
- the destination by replacing the previous destination
- a via point (an intermediate point of the route or waypoint) preceding the destination (available in Advanced mode only)
- the destination while keeping the previous destination as a via point (available in Advanced mode only)
- Save it as one of the following:
• POI (available in Advanced mode only)
- Favourite
• speed camera (available in Advanced mode only)
- Push a Pin in the map at the given location (available in Advanced mode only)
- List the POIs near it
2.5 Using keyboards
You only need to enter letters or numbers in ASUS GO when you cannot avoid it. You can type with your fingertips on the full-screen keyboards and you can switch between various keyboard layouts, for example ABC, QWERTY, or numerical.
| Tasks Instructions | ||
| Switching to another keyboard type, for example from a QWERTY Latin keyboard to an alphabetical Latin keyboard. | Tap the  | |
| ASUS GO remembers your last keyboard choice and offers it the next time you need to enter data. | ||
| Correcting your entry on the keyboard | Remove the unneeded character(s): tap the [xZTC] button. Hold the button to delete the entire input string. | |
| Entering a space, for example between a surname and a family name or in multi-word street names | Tap the  button. button. | |
| Finalising the keyboard entry | Tap the  button. button. | |
2.6 ASUS GO concepts
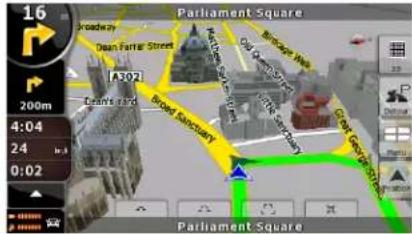
2.6.1 Smart Zoom
Smart Zoom is a lot more than just a usual automatic zoom:
- While following a route calculated by ASUS GO: when approaching a turn, it will zoom in and raise the view angle to let you easily recognise your manoeuvre at the next junction. If the next turn is at a distance, it will zoom out and lower the view angle to be flat so you can see the road in front of you.
- While driving without an active route in ASUS GO: Smart Zoom will zoom in if you drive slowly and zoom out to the limit set here when you drive at high speed.
2.6.2 Current GPS position and Lock-On-Road
ASUS GO uses the following position markers on the map:
- Current GPS position:

When your GPS position is available, the ASUS GO icon marks your current position with the icon on the map and points to the direction of your heading. If you are
driving on a two-way road, appears on the side of the road on which you are driving, that is, on the right in Germany and on the left in the U.K.
- Selected location (Cursor):

(page 14)
The selected map location is marked with the radiating red dot on the map.
Lock-On-Road
ASUS GO puts the icon on the road or to your exact GPS position that might be off the road depending on the selection that you made for navigation preferences (page 35).
• If you chose a vehicle, the

icon is on the road on which you are driving.
• If you chose pedestrian, the

icon is at your exact GPS position.
2.6.3 Selected location on the map (Cursor)
If you tap the map, the Cursor appears at the selected point on the map. ASUS GO displays the Cursor with a red dot and radiating red circles to make it visible at all zoom levels, even when it is in the background of a 3D map view.

When the Cursor is set, tap Cursor. The Cursor menu appears and you can use the Cursor as one of the following:
• the starting point of a route (tap

- a via point in a route (tap

• the destination of a route (tap


if there is no active route, or tap
if a route already exists)
You can save the location of the Cursor as:
- a Favourite, tap

- a speed camera, tap

- a POI, tap

• a map marker Pin (page 12), tap

2.6.4 Return to GPS position
When the Cursor on the map is not at your GPS position, the button is visible. Tap it to move the displayed map segment to the GPS position.

Note!
Even if you move the map while you are driving, ASUS GO continues navigating if there is an active route: it plays the voice instructions and displays the turn preview icons according to your actual GPS position.

2.6.5 Daylight and night colour schemes
ASUS GO uses different skins (colour schemes) during the day and during the night.
- Daylight colours are similar to paper road maps.
- The night colour schemes use dark colours for large objects to keep the average brightness of the screen low.
ASUS GO offers several daytime and night colour schemes. It can also switch automatically between the daytime and the night scheme based on the current date and GPS position a few minutes before sunrise, when the sky has already turned bright, and a few minutes after sunset, before it becomes dark.
2.6.6 Route calculation and recalculation
ASUS GO calculates the route based on your preferences:
• route calculation method (page 35)
• vehicle and road types (page 35)
ASUS GO automatically recalculates the route if you deviate from the proposed itinerary.
2.6.7 Itinerary
The list of the nearest route events, the driving instructions.
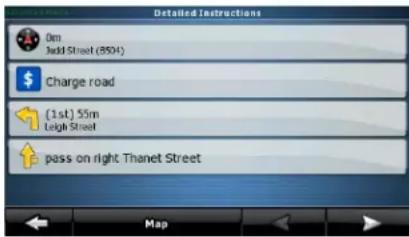
When you are on the map, you can display the itinerary in one of the following ways:
- On the Cockpit screen tap the area between the Turn preview and the Travel data.
- In Advanced mode, tap the following buttons:


Itinerary
2.6.8 Track Logs
ASUS GO can log the track that you drive (page 26).
The track log is a recording of how your GPS position changed and it is independent of the route ASUS GO calculated.
2.6.9 Simulation
A simulation drives you through the route, following the driving instructions (page 25).
You can use it, for example, to see which bridge ASUS GO planned for the route; if you do not want to take that bridge, you can avoid it.
2.6.10 Speed Cameras
A speed camera is a special POI. ASUS GO is not shipped with a built-in database of speed cameras, but you can add speed cameras by marking their positions on the map.
2.6.11 Speed limit warnings
Maps sometimes contain information about the speed limits of the road segments. This information may not be available for your region (ask your local dealer) or may not be fully correct for all roads in the map.
You can configure ASUS GO to warn you if you exceed the current limit.
2.6.12 POI (Points of Interest)
A point of interest (POI) is a location that someone might find useful or interesting. ASUS GO is delivered with thousands of POIs and you can also create your own POIs in the application.
POI icons are quite large so you can easily recognise the symbol. The icons are also semi-transparent: they do not cover the streets and intersections behind them.
3 Navigating with ASUS GO
You can set up your route in ASUS GO in several ways:
- if you need a simple route (a route with only one destination, without any intermediate via points), you can select the destination and start navigating to it right away
- you can plan a multi-point route (available in Advanced mode only)
- you can also plan a route independently of your current GPS position or even without GPS reception (available in Advanced mode only)
3.1 Selecting the destination of a simple route
ASUS GO offers you several ways of choosing your destination and waypoints:
• Use the selected location on the map (the Cursor) (page 17).
- Enter a full address or a part of an address, for example a street name without a house number or the names of two intersecting streets (page 18).
- Enter an address with postal code (page 22). This way you do not need to select the name of the settlement and the search for street names might be faster as well.
- Use a coordinate (page 24)
- Use a saved location:
• a Favourite (page 23)
- a POI (page 23)
• the History of previously set destinations and waypoints (page 24)

If you are going to use a route later, save it before you start navigating.
3.1.1 Selecting the Cursor as the destination
- Find your destination on the map: move the map, tilt it, etc. as needed (page 10).
- Tap the location that you want to select as your destination.

-
Tap Cursor to open the Cursor menu.
-
The map appears with the selected point in the middle. Tap Navigate to (Simple
mode) or

automatically calculated, and you can start navigating.

Navigate To

If you know that you will use a destination later, save it as a POI.
3.1.2 Entering an address or part of an address
If you know at least a part of the address, it is the quickest way to select the destination of the route. You can find an address by entering:
- the exact address, including house number
• the centre of a settlement
• an intersection
• the midpoint of a street
• any of the above, starting the search with the postal code (page 22)
3.1.2.1 Entering an address
The procedure is explained starting from the Navigation menu.

(Simple mode), or


-
Tap the following buttons: (Advanced mode).
-
By default, ASUS GO proposes the country/state and settlement where you are. If needed, tap the button with the name of the country/state, and select a different one from the list.
3.

To select the settlement from the list of recently used ones, tap the button.

To change the settlement:
- Tap the button with the name of the settlement, or if you have changed the
country/state, tap

- Start entering the settlement name on the keyboard.
- Get to the hit list:
- After entering a couple of characters, the hits that match the string appear in a list.
- Tap the Button button to open the hit list before it appears automatically.
-
Pick the settlement from the list.
-
Enter the street name:
-
Tap
-
Start entering the street name on the keyboard.
-
Get to the hit list:
-
Start entering the street name on the keyboard.
-
Get to the hit list:
-
After entering a couple of characters, the hits that match the string appear in a list.

-
Pick the street from the list.
-
Enter the house number:
-
Tap
-
Enter the house number on the keyboard.
-
Tap


button to finish entering the address.

Navigate To
- The map appears with the selected point in the middle. Tap Navigate 10 (Simple
mode) or

Set as Destination
(Advanced mode) from the Cursor menu. The route is then you can start navigating.

Tap the button after a couple of letters; ASUS GO lists the items that contain the character set.
3.1.2.2 Tips on entering addresses quickly
- When you are entering the name of a settlement or a street, ASUS GO only displays those characters that appear in possible search results. The other characters are greyed out.
-
You can speed up finding an intersection:
-
Search first for the street with a less common or less usual name; fewer letters are enough to find it.
- If one of the streets is shorter, search for that one first. You can then find the second one faster.
- You can search for both the type and the name of a road. If the same word appears in several names, for example in the name of streets, roads and avenues, you can obtain the result faster if you enter the first letter of the street type: For example, enter Pi A to obtain Pine Avenue and skip all Pine Streets and Pickwick Roads.
- You can also search in postal codes. This is useful when a street name is common and it is used in several districts of a city.
3.1.2.3 Selecting an intersection as the destination
The procedure is explained starting from the Navigation menu.

(Simple mode), or


-
Tap the following buttons: (Advanced mode).
-
By default, ASUS GO proposes the country/state and settlement where you are. If needed, tap the button with the name of the country/state, and select a different one from the list.
3.

To select the settlement from the list of recently used ones, tap the button.

To change the settlement:
- Tap the button with the name of the settlement, or if you have changed the
-
Start entering the settlement name on the keyboard.
-
Get to the hit list:
- After entering a couple of characters, the hits that match the string appear in a list.
- Tap the automatically.
button to open the hit list before it appears
-
Pick the settlement from the list.
-
Enter the street name:
-
Tap
-
Start entering the street name on the keyboard.
-
Get to the hit list:
- After entering a couple of characters, the hits that match the string appear in a list.
- Tap the automatically.
button to open the hit list before it appears
- Pick the street from the list.

- Tap
th button.
Start entering the name of the intersecting street on the keyboard.
-
Tap the other street in the list.
-
The map appears with the selected point in the middle. Tap Navigate to (Simple
Set as Destination mode) or (Advanced mode) from the Cursor menu. The route is then automatically calculated, and you can start navigating.
3.1.2.4 Selecting a city centre as the destination
The City Centre is not the geometric centre of the settlement but an arbitrary point the map creators have chosen. In towns and villages, it is usually the most important intersection; in larger cities, it is an important intersection.
The procedure is explained starting from the Navigation menu.

(Simple mode), or


-
Tap the following buttons: (Advanced mode).
-
By default, ASUS GO proposes the country/state and settlement where you are. If needed, tap the button with the name of the country/state, and select a different one from the list.
3.

To select the settlement from the list of recently used ones, tap the button.

To change the settlement:
- Tap the button with the name of the settlement, or if you have changed the
country/state, tap
-
Start entering the settlement name on the keyboard.
-
Get to the hit list:
- After entering a couple of characters, the hits that match the string appear in a list.
- Tap the bone button to open the hit list before it appears automatically.
- Pick the settlement from the list.
City Centre
-
Tap th city centre button.
-
The map appears with the selected point in the middle. Tap Navigate to (Simple
Set as Destination mode) or (Advanced mode) from the Cursor menu. The route is then automatically calculated, and you can start navigating.
3.1.2.5 Entering an address with a postal code
The procedure is explained starting from the Navigation menu.

(Simple mode), or


-
Tap the following buttons: (Advanced mode).
-
By default, ASUS GO proposes the country/state and settlement where you are. If needed, tap the button with the name of the country/state, and select a different one from the list.
-
Tap the button with the name of the settlement, and enter the postal code:
-
Start entering the code on the keyboard.
-
Get to the hit list:
• After entering a couple of numbers, the hits that are a match appear in a list.
- Tap the Button button to open the hit list before it appears automatically.
-
Pick the settlement from the list.
-
Enter the street name:
-
Tap
- Start entering the street name on the keyboard.
- Get to the hit list:
- After entering a couple of characters, the hits that match the string appear in a list.
- Tap the Button button to open the hit list before it appears automatically.
-
Pick the street from the list.
-
Enter the house number:
-
Tap
-
Enter the house number on the keyboard.
-
Tap
thBone button to finish entering the address.
- The map appears with the selected point in the middle. Tap

Navigate To

(Advanced mode) from the Cursor menu. The route is then ou can start navigating.
3.1.3 Selecting the destination from your Favourites
You can select as your destination a location that you have already saved as a Favourite.
The procedure is explained starting from the Navigation menu.


- Tap the following buttons: (Advanced mode).
(Simple mode) or
-
Tap the Favourite that you want to set as your destination.
-
The map appears with the selected point in the middle. Tap


mode) or (Advanced mode) from the Cursor menu. The route is then automatically calculated, and you can start navigating.
3.1.4 Selecting the destination from the POIs
You can select your destination from the POIs included with ASUS GO or from the ones you have previously created.
The procedure is explained starting from the Navigation menu.


- Tap the following buttons: (Advanced mode).
(Simple mode), or
-
Select the area around which the POIs should be searched.
-
Select the POI category to narrow the search further. If you do not want to narrow the
search further, tap the button.
- [optional] Sort the result list:
• alphabetically with the

button

button
- by the distance from your current position with the
-
Tap the POI.
-
The map appears with the selected point in the middle. Tap


(Advanced mode) from the Cursor menu. The route is then you can start navigating.
3.1.5 Selecting the destination or a waypoint from the History
The destinations that you have set earlier appear in the History.
The procedure is explained starting from the Navigation menu.


- Tap the following buttons:
(Simple mode), or

(Advanced mode).
-
If necessary, turn the page to see earlier destinations with the arrow buttons.
-
Tap the desired item.
-
The map appears with the selected point in the middle. Tap Navigate to (Simple


mode) or (Advanced mode) from the Cursor menu. The route is then automatically calculated, and you can start navigating.
3.1.6 Selecting the destination by entering its coordinates
(available in Advanced mode only)
The procedure is explained starting from the Navigation menu.


- Tap the following buttons:
Coordinate Display Format
-
(optional) Tap to change the format of the displayed coordinates.
-
Tap the latitude or longitude value to change the coordinates:
-
Select the coordinate system: tap WGS84 or UTM.
-
Enter the coordinate values:
• In WGS84: the latitude (N or S) and the longitude (E or W)
• In UTM: the number and the letter of the zone, and the X Y coordinates
-
Tap th Bone button.
-
The map appears with the selected point in the middle. Tap Navigate to (Simple
Set as Destination mode) or (Advanced mode) from the Cursor menu. The route is then automatically calculated, and you can start navigating.
Done

3.2 Creating a multi-point route
(available in Advanced mode only)
- Multi-point routes are extended from single routes, so a route must be active first.
- Select another point as you did in the previous sections. This will be the additional destination in the route.
- The map appears with the selected point in the middle, and the Cursor menu opens automatically.
More Options...
-
Tap to open the full Cursor menu with the additional functions.
-
Now add the new point to the existing route:
-
Tap insert as via to add the point as an intermediate destination preceding the final destination of the route.
-
Tap continue to add the point as a new final destination demoting the previous one to the last intermediate destination.
-
[optional] To add more points to the route, repeat the above steps as many times as you like.
Every time a new point is added, the route is recalculated automatically, and you can start navigating right away.
3.3 Watching the simulation of a route
(available in Advanced mode only)
The procedure is explained starting from the Cockpit screen.
-
Tap the following buttons:
-
The Route menu appears. There are two ways of running the route simulation:
-
Tap Fly Over to run the simulation at high speed to give you a quick overview of the route.
-
Tap Simulate to run the simulation at normal speed and with voice guidance instructions announced. This option is for demonstration purposes, or for checking difficult parts of the route in advance.
-
The simulation can be aborted any time by tapping the Stop button.

3.4 Pausing the active route
You do not need to pause the active route: when you start driving again, ASUS GO restarts the voice instructions from your position.
3.5 Deleting the active route
(available in Advanced mode only)
The procedure is explained starting from the Cockpit screen.
- Tap the following buttons:

3.6 Using track logs
ASUS GO can record the track (how your GPS position changed) that you drive.

You do not need to select a destination and create a route for this; you can also record your driving path while cruising.
(available in Advanced mode only)
The procedure is explained starting from the Cockpit screen.
Recording the travelled path (creating a Track Log)
-
Start driving.
-
Tap the following buttons:

- Start the recording: tap the

button.
You return to the map and you can continue driving.
Viewing a Track Log on the map
- Tap the following buttons:

- Tap the log and then tap the

button.
Changing the colour of a Track Log


-
Tap the following buttons:
-
Tap the log and then tap the button.
3.7 Saving a route
(available in Advanced mode only)
When you save a route, ASUS GO only saves the waypoints:
- If you updated your map since you first saved the route, ASUS GO calculates the driving instructions according to the latest available map information.
- ASUS GO deletes the information about the legs and waypoints that you already left behind during navigation. If you want to save the route, that is, the waypoints, you need to save it before ASUS GO starts navigating.

If you have a simple route or if you want to save only the destination from a multi-point route, save the destination as a POI.
Saving a multi-point route
The procedure is explained starting from the Cockpit screen.


-
Tap the following buttons:
-
Enter a name for the saved route, and then tap

3.8 Loading a saved route
(available in Advanced mode only)
The procedure is explained starting from the Cockpit screen.


-
Tap the following buttons:
-
Tap the route you wish to navigate.
-
You need to confirm whether you want to stop navigating from the current GPS position (to use the start point of the loaded route as the start point), or keep on navigating to the destination(s) in the route from the GPS position.
-
The map appears, the route is automatically calculated, and you can start navigating.
4 Reference book (Advanced mode)
ASUS GO starts with the Navigation menu. From there you can access the following screens:
| Screen | Button Description | |
| Map |  | The map. |
| Find |  Find Find | Setting the destination (for example from an address or a POI) or using the search engine of ASUS GO. |
| My Data |  | Managing user data, such as saved point (POI, Favourites, Pins), History items, Saved Routes, and Track logs. |
| Route |  | Managing the active route (obtain information about it, change or delete it) or plan a route without GPS reception. |
| Settings |  | Managing the navigation settings, for example the language settings or the settings of the map display. |
| About |  | This screen has no navigation feature. It merely provides information about the maps and licenses included with your navigation system. |
4.1 Map
ASUS GO is primarily intended for land navigation. That is why maps in ASUS GO look similar to paper road maps. However, ASUS GO provides much more than regular paper maps: you can customise the look and the content of the map.
The most important and most often used screen of ASUS GO is the Map screen. The figures below show what can appear on the map; usually only a couple of them are visible at the same time.
| Symbol Name Action | ||
 | Next route event Opens Route Information screen | |
 | Second upcoming route event Opens Itinerary | |
 | Zoom in, zoom out Scale the map | |
 | Current GPS position (on nearest n/a road) | |
 | Cursor (selected map location) n/a | |
 | Map view modes Switches between 2D and 3D map modes | |
 | Tilt up, tilt down Tilt the 3D map | |
 | Rotate left, rotate right Rotate the 3D map left or right | |
B  Current street n/a Current street n/a | ||
G  active route n/a active route n/a | ||
 | Trip data Opens Trip Data screen | |
 | Menu | Opens the Menu |
 | Map orientation n/a | |
 | Return to GPS position | Moves the map back to the current GPS position |
 | Battery status Opens Cockpit Status screen | |
 | GPS position quality | Opens Cockpit Status screen |
 | Vehicle used in route calculation | Opens Cockpit Status screen |
T  ct street n/a ct street n/a | ||
 | Cursor menu | Opens the Cursor menu |
4.1.1 Buttons on the map
4.1.1.1 Zooming, tilting and rotating buttons
These buttons appear when you tap the map.
| Button Description | Available in which map view modes | ||
| + | - | Zooms the map in/out. | In all modes. |
| ↑ | ↓ | Tilts the map up/down. | Only in 3D mode. |
| ← | → | Rotates the map left/right. | Only in 2D and 3D modes, not in Overview mode. |
4.1.1.2 Map view buttons
The button of the non-active map view is always visible on the map. Tap it to switch to another view.
| Button | Name | Description |
| 2D | 2D view (top-down) | |
| 3D | 3D view (perspective) |
.1.2 Objects on the map
4.1.2.1 Streets and roads
ASUS GO shows the streets in a way that is similar to how the paper road maps show them. They have similar colours and their width also corresponds to their importance: you can easily tell a motorway from a small street.
4.1.2.2 3D object types
To enable or disable 3D visualisation on the map, tap the following buttons:

ASUS GO supports the following 3D object types:
| Type Description | |
| 3D landmarks Tourist attractions and well-known buildings. | |
| Elevation model Hills and mountains. | |
| Elevated roads Complex intersections and bridges are elevated. | |
| 3D buildings Realistic buildings can be seen on the map. | |
| 3D terrain Terrain is illustrated by colours. |
4.1.3 Elements of the active route
ASUS GO shows the route in the following way:
| Symbol | Name Description | |
 | Current GPS position (corrected) | Your GPS position on the map, put on the nearest road. |
 | Start point The first point of the route.If GPS positioning is available, your GPS position is the start point of the route. If GPS positioning is not available, ASUS GO takes the first point as the starting point.When you are using a saved route, ASUS GO asks you if you want to use your GPS position or the first point in the saved route as the start point. | |
 | Via point | A via point is an intermediate destination. |
 | Destination (end point) The last point of the route, the final destination. | |
| Route colour The route always stands out with its colour on the map, both in daylight and in night colour mode, both in 2D and in 3D mode. The active leg of the route is always in a brighter shade than the inactive (upcoming) legs. | ||
| Active leg | The section of the route on which you are driving.If you have not added any waypoints (your route only has a start point and the destination), the entire route is the active leg. If you added waypoints, the active leg is the part of the route from your current location to the next waypoint. | |
| Inactive legs | The future sections of the route; each of them becomes active when you reach the waypoint at its beginning. | |
| Streets and roads that are excluded from the navigation | You can choose whether you want to use or avoid certain road types (page 35). However, when ASUSGO cannot avoid such roads, the route will include them and it will show them in a colour that is different from the route colour. | |
| Two-way and multi-lane streets or roadsOne-way streets | ASUS GO displays the route line on the driving side on two-way streets/roads and on the axis of one-way streets/roads.If you zoom in and the street line is wide enough, small arrows show the direction of the street. | |
4.2 Find menu
Select the destination of your route:
| Button Name Description Instructions | |||
 Find Address Find Address | Address | If you know at least a part of the address, this is the quickest way to find the location. | page 18 |
 Favourites Favourites | Favourites | You can select as your destination a location that you have already saved as a Favourite. | page 23 |
 Find POI Find POI | POIs You can select your destination from the thousands of POIs included with ASUS GO or from the ones you have previously created. | page 23 | |
 History History | History The | destinations that you have already entered in ASUS GO are available in the History list. | page 24 |
 Find Coordinate Find Coordinate | Coordinates You can select your destination by entering its coordinates. | page 24 | |
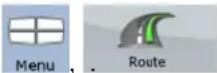
4.3 Route menu
Tap
from the main menu:
| Button Description | |
 Delete Route Delete Route | Erase the active route with all its route points (start point, waypoints and destination). If you later decide that you need the same route, you will have to rebuild it from scratch. |
| [6626] Edit Route | You can modify the route: you can add or remove route points, and change their order. |
| Fly Over | You can run a demonstration of the route at high speed or at normal speed. |
 | |
 | You can browse the driving instructions that ASUS GO follows during navigation. You can exclude manoeuvres or streets to adjust the route to your preferences. |
 | Opens a screen with useful route and travel data. |
 | You can save the active route for later use. |
 | You can load a previously saved route for navigation. |
 | Opens the Route settings screen with controls to modify the vehicle, the road types used for route calculation, or the route calculation method.. |
4.4 Settings menu
To configure the ASUS GO settings, tap the

4.4.1 Visual settings
Visual settings determine the way ASUS GO appears on the screen:
| Name | Description |
| 3D settings | Configures which 3D objects are visible on the map:3D Landmarks (tourist sights and well-known buildings)Elevated RoadsBuildingsTerrain Details |
| Map colour | Configures whether switching between daylight and night colour mode is enabled for the map.Configures which skin (colour scheme) is selected for the modes. |
Name Description
Menu settings
- Button animation.
- User selectable background picture.
Smart Zoom
Configures whether Smart Zoom (page 13) is enabled. Related settings:
• Minimum and maximum zoom levels
• Automatic restore for Smart Zoom
- Automatic zooming function when the map returns after find, based on the type of object searched for
Overview
Configures whether the automatic Overview mode (page 13) is enabled. Related settings:
• Minimum distance of the next route event to trigger the Overview mode.
- The initial zoom level Overview mode starts with.
4.4.2 Sound settings
You can adjust the volume of ASUS GO sounds.
4.4.3 Regional settings
Regional settings let you personalise the application to fit your local needs of language and data formats.
Name Description
Program
Selects the language of the text on the buttons and in the menus.
Language
ASUS GO restarts when you change the language.
Voice Profile
Selects the language and the profile of the voice instructions.
Distance
Distances in ASUS GO can be displayed in various international formats.
Units
Date and
Sets the format of the date and time.
Time Format
ASUS GO might not support all of the listed units in some voice guidance languages. If you select a measurement unit that is not supported by the chosen voice guidance language, you will see a warning message.
Time and
Sets the time zone.
Time Zone
You can also make ASUS GO automatically use the time zone of the GPS position.
4.4.4 Route
There are various settings that influence the way routes are calculated.
4.4.4.1 Route Calculation Method
The following route planning types exist in this application:
| Option Description | |
| Fast | Gives the quickest possible route if you can travel at or near the speed limit on all roads. Usually the best selection for fast and normal cars. |
| Short | Gives a route that has the smallest total distance of all possible routes between the waypoints. Usually practical for pedestrians, cyclists or slow vehicles. |
| Economical | Combines the benefits of Fast and Short: ASUS GO calculates as if it were calculating the Fast route, but it takes other roads to save petrol. |
| Easy | Results in a route with fewer turns. With this option, you can make ASUS GO to take, for example, the motorway instead of series of smaller roads or streets. |
4.4.4.2 Vehicles and Road Types used in route calculation
Route calculation can be based for the following vehicle types:
- Car
- Taxi
- Bus
- Lorry
• Emergency vehicles - Bicycle
- Pedestrian
For each vehicle type (page 35), you can set whether ASUS GO should include the following road types when it is calculating a route:

Note!
When you exclude a road type, you set only a preference. ASUS GO will still include such roads in the routes when it cannot plan a route to your destination in any other way.
| Type Description | |
| Motorways You | u might need to avoid motorways when you are driving a slow car or you are towing another vehicle. |
| Unpaved roads | ASUS GO excludes unpaved roads by default: unpaved roads can be in a bad condition and usually you cannot reach the speed limit on them. |
| Toll roads By | default ASUS GO includes toll roads (pay roads where you can purchase a pass or vignette to use the road for a longer period of time) in the routes. If youdisable toll roads, ASUS GO plans the best toll-free route. |
| Charge roads | Charge roads are pay roads where there is a per-use charge. They can be enabled or disabled separately from toll roads. |
| U-turns ASUS | GO can exclude manoeuvres that would include a U-turn. Turning back on dual carriageways does not count as a U-turn. |
| Permit needed | You might need a permit or permission from the owners to use certain roads or to enter certain areas. ASUS GO excludes these roads from the route calculation by default. |
| Ferries | ASUS GO includes ferries in a planned route by default. However, a map does not necessarily contain information about the accessibility of temporary ferries. You might also need to pay a fare on ferries. |
| Cross-border planning | In some cases the route calculated according to your other navigation and route preferences would lead through another country. If you wish to always stay within the same country, turn this option off. |
4.4.5 Warnings
When you tap
Settings

Warnings
manage the following settings for the map:
| Name Description | |
| Warn When Speeding | Shows the current settings for speed limit warnings:whether an audible warning is given when you exceed the speed limitthe tolerance of the warning relative to the speed limit |
| Speed Camera Warning | Shows the current settings for the speed camera warnings:audiblevisible |
| Warn If Too Fast For A Pedestrian | If route calculation is still in pedestrian mode, but you are driving again, the application will warn you if you reach a speed that is too fast for a pedestrian. |
| Safety Mode | Shows whether Safety Mode is on. |
5 Glossary
2D/3D GPS reception
The GPS receiver uses satellite signals to calculate its (your) position and need at least four signals to give a three-dimensional position, including elevation. Because the satellites are moving and because objects can block the signals, your GPS device might not receive four signals. If three satellites are available, the receiver can calculate the GPS position but the accuracy is lower and the GPS device does not give you elevation data: only 2D reception is feasible.
Active route
The instructions used in the ongoing navigation. You can save and load routes in ASUS GO, but at most one route is active at any give time, and it is always active until you delete it, reach your destination or you shut down ASUS GO.
City Centre
The City Centre is not the geometric centre of the settlement but an arbitrary point the map creators have chosen. In towns and villages, it is usually the most important intersection; in larger cities, it is an important intersection.
GPS accuracy
Several factors have an impact on the deviation between your real position and the one given by the GPS device. For example, signal delay in the ionosphere or reflecting objects near the GPS device have a different and varying impact on how accurately the GPS device can calculate your position.
Map
ASUS GO works with digital maps which are not simply the computerised versions of traditional paper maps. Similarly to the paper road maps, the 2D mode of digital maps show you streets and roads. In 3D mode, you can also see the height differences, for example valleys and mountains, or buildings.
Digital maps, however, differ from paper maps in that you can use them interactively: you can zoom in and out (increase or decrease the scale), you can tilt them up and down, turn them left and right. In GPS-supported navigation, digital maps facilitate route planning.
Route
Can contain one or more via points. The last via point is the destination and the route is cut into different legs (from one via point to another).
Scheme
ASUS GO comes with different colour schemes for the map for the daylight or night use. Schemes are custom graphic settings for the map and they can have different colours for streets, blocks or surface waters in 2D and 3D modes, and they display shades or shadows in different ways in 3D mode.
One daytime scheme and one night-time scheme is always selected. ASUS GO uses them when it switches from day to night and back.
Speed Camera
A special POI type. ASUS GO is shipped with a built-in database of fixed and mobile speed cameras but you can also mark the position of a speed camera on the map.
You can configure ASUS GO to warn you when you approach a speed camera.
- Copyright note
- Table of contents
- Warnings and safety information....6
- Getting started with ASUS GO 7
- Navigating with ASUS GO 17
- Reference book (Advanced mode)....28
- Glossary 37
- Warnings and safety information
- Getting started with ASUS GO
- The initial screen of ASUS GO
- Simple and Advanced modes
- Settings
- Advanced Mode
- Simple Mode
- Hardware buttons
- Buttons and other controls on the screens
- Using the map
- Checking the details of a map location
- Manipulating the map
- Switching between the 2D and 3D modes
- Status information on the map (GPS, battery, etc.)
- Using the Cursor
- Using keyboards
- ASUS GO concepts
- Smart Zoom
- Current GPS position and Lock-On-Road
- Lock-On-Road
- Selected location on the map (Cursor)
- Return to GPS position
- Daylight and night colour schemes
- Route calculation and recalculation
- Itinerary
- Track Logs
- Simulation
- Speed Cameras
- Speed limit warnings
- POI (Points of Interest)
- Navigating with ASUS GO
- Selecting the destination of a simple route
- Selecting the Cursor as the destination
- Entering an address or part of an address
- Entering an address
- Navigate To
- Set as Destination
- Tips on entering addresses quickly
- Selecting an intersection as the destination
- Selecting a city centre as the destination
- Entering an address with a postal code
- Selecting the destination from your Favourites
- Selecting the destination from the POIs
- Selecting the destination or a waypoint from the History
- Selecting the destination by entering its coordinates
- Coordinate Display Format
- Done
- Creating a multi-point route
- More Options...
- Watching the simulation of a route
- Pausing the active route
- Deleting the active route
- Using track logs
- Recording the travelled path (creating a Track Log)
- Viewing a Track Log on the map
- Changing the colour of a Track Log
- Saving a route
- Saving a multi-point route
- Loading a saved route
- Reference book (Advanced mode)
- Map
- Buttons on the map
- Zooming, tilting and rotating buttons
- Map view buttons
- .1.2 Objects on the map
- Streets and roads
- 3D object types
- Elements of the active route
- Find menu
- Route menu
- Settings menu
- Visual settings
- Name Description
- Menu settings
- Smart Zoom
- Overview
- Sound settings
- Regional settings
- Program
- Language
- Voice Profile
- Distance
- Units
- Date and
- Time Format
- Time and
- Time Zone
- Route
- Route Calculation Method
- Vehicles and Road Types used in route calculation
- Warnings
- Glossary
- 2D/3D GPS reception
- Active route
- City Centre
- GPS accuracy
- Map
- Route
- Scheme
- Speed Camera
Brand : ASUS
Model : R700T
Category : Gps