
AL1717F - Screen ACER - Free user manual and instructions
Find the device manual for free AL1717F ACER in PDF.


User questions about AL1717F ACER
0 question about this device. Answer the ones you know or ask your own.
Ask a new question about this device
Download the instructions for your Screen in PDF format for free! Find your manual AL1717F - ACER and take your electronic device back in hand. On this page are published all the documents necessary for the use of your device. AL1717F by ACER.
USER MANUAL AL1717F ACER
Special notes on LCD monitors....1
Introduction 2
Features 2
Unpacking 3
Attaching/Removing the base 4
Screen position adjustment....4
Connecting the power cord....5
Safety precaution 5
Cleaning your monitor 5
Preset modes 6
Power saving 7
DDC 7
Installation....8
User controls....9
Troubleshooting 13
Specification....14
SPECIAL NOTES ON LCD MONITORS
The following symptoms are normal with LCD monitor and do not indicate a problem.
NOTES
- Due to the nature of the fluorescent light, the screen may flicker during initial use. Turn off the Power Switch and then turn it on again to make sure the flicker disappears.
- You may find slightly uneven brightness on the screen depending on the desktop pattern you use.
- The LCD screen has effective pixels of 99.99% or more. It may include blemishes of 0.01% or less such as a missing pixel or a pixel lit all of the time.
- Due to the nature of the LCD screen, an afterimage of the previous screen may remain after switching the image, when the same image is displayed for hours. In this case, the screen is recovered slowly by changing the image or turning off the Power Switch for hours.
INTRODUCTION
Congratulations for purchasing model AL1717, a high performance 17-inch color TFT LCD monitor. The AL1717 monitor provides flicker-free and color images at optional resolutions. Through this user guide, we will introduce you step-by-step all the features, functions and technical specifications of the LCD monitor. Surely you will have a refreshing experience working with the monitor.
FEATURES
The AL1717 is a 17-inch TFT LCD monitor that is intelligent, microprocessor-based and ergonomically designed display, compatible with most analog RGB (Red, Green, Blue) display standards, including PS/V, PS/2, optional for Apple Macintosh Centris, Quadra, and Macintosh II family signals. The LCD monitor is capable of displaying crisp and vibrant color graphics with VGA, SVGA, XGA, SXGA (non-interlaced), and most Macintosh compatible color video cards.
- The monitor is able to properly function even in case of upgrade video cards or software because of the wide auto-scanning compatibility range without requiring to buy a new monitor.
- The internal microprocessor digitally controls auto-scanning. For horizontal scan frequencies between 30 KHz and 81 KHz, and vertical scan frequencies between 55 Hz and 76 Hz. In each frequency mode, the microprocessor-based circuitry allows the monitor to function at the precision-of a fixed frequency.
- The resident memory allows for storing factory default settings and also additional user adjustment parameters.
- The maximum resolution achievable is SXGA (1280 x 1024), best suited for Windows applications
- The compact and sleek cabinet design saves lot of your desk space and makes your desk look neat and tidy.
- The monitor is also compliant with the most stringent environmental scheme of TCO 99. In this scheme, no environmental harmful substances are used during the entire manufacturing process.
UNPACKING
Please check the following items are present when you unpack the box, and save the packing materials in case you will need to ship or transport the monitor in future.
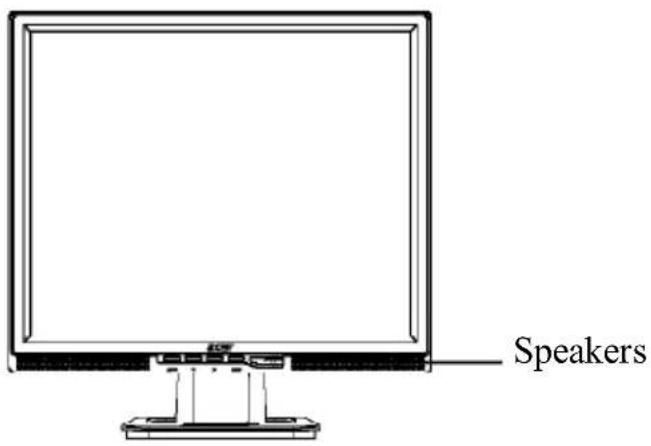
- LCD Monitor
text_image
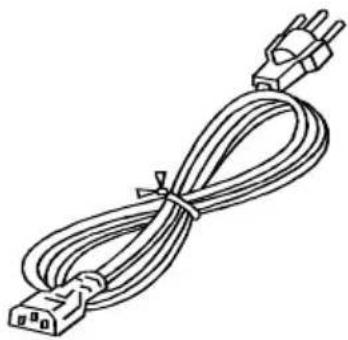
Speakers- AC Power Cord
natural_image
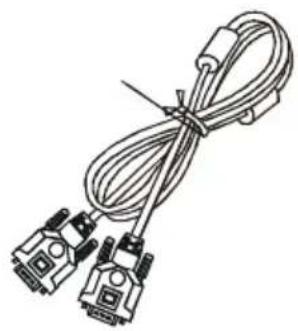
Line drawing of a coiled electrical plug with three terminal connectors (no text or symbols)• 15-pin D-Sub Cable
natural_image
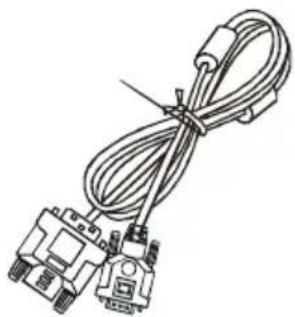
Coiled cable with two connectors and connectors tied at the end (no text or symbols visible)• DVI Cable (Only Dual-Input Model)
natural_image
Line drawing of a cable with connectors and connectors, no text or symbols present- Audio Cable
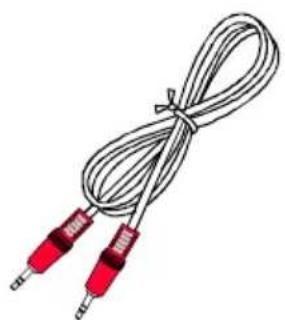
natural_image
Coiled audio amplifier with two red connectors (no text or symbols visible)- User Manual
text_image
iGCT LCS Monitor © 2018 Copyright © 2019 © 2020 © 2021 © 2022 © 2023 © 2024- Quick Start Guide
text_image
AL1717 LCD Monitor Quick Start Guide 2021Attaching / Removing the Base
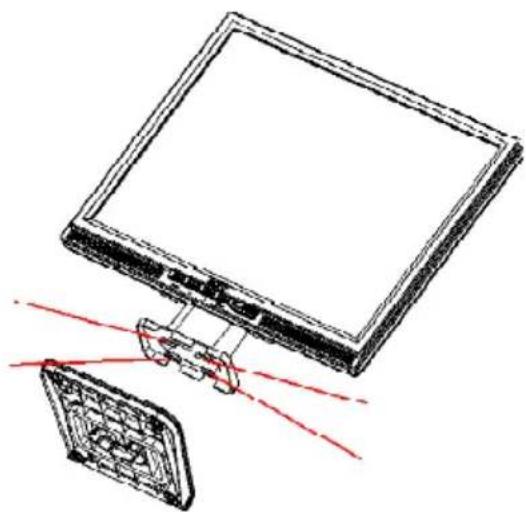
Install:
Align the four hooks on the bottom of the monitor with the corresponding slots on the bottom of the base.
Remove:
Depress the four hooks as indicated first before removing the base and follow the arrow direction to remove it.
natural_image
Diagram of a computer monitor connected to a small screen with red laser lines (no text or symbols)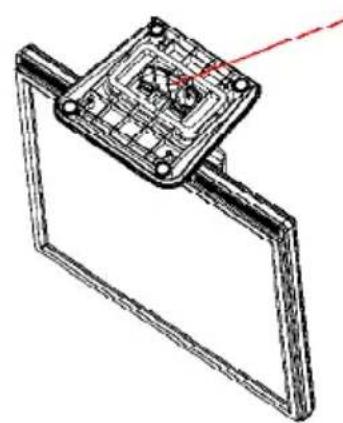
natural_image
Technical line drawing of a mechanical component with a grid-like top and mounting bracket (no text or symbols)SCREEN POSITION ADJUSTMENT
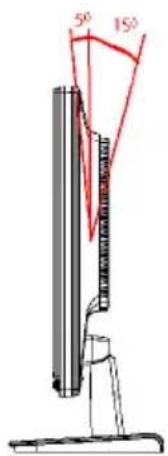
In order to optimize the best viewing position, you can adjust the tilt of the monitor by using both of your hands to hold the edges of the monitor as shown in the figure below.
The monitor can be adjusted to 15 degrees up or 5 degrees down as indicated by arrow below.
text_image
5° 15°E4
- Check first to make sure that the power cord you use is the correct type required for your area.
- This monitor has a universal power supply that allows operation in either 100/120V AC or 220/240 V AC voltage area. No user-adjustment is required.
- Plug one end of the power cord to the AC Inlet, plug another end to a proper AC outlet.
- For unit using at 120 VAC: Use a UL Listed Cord Set, Type SVT wire and plug rated 10 A/125 V.
- For unit using at 220/240 V AC (outside of U.S.): Use a Cord Set consisting of H05VV-F cord and plug rated 10 A, 250 V. The cord set should have the appropriate safety approvals for the country in which the equipment will be installed.
SAFETY PRECAUTION
- Avoid placing the monitor, or any other heavy object, on the power cord to avoid damage to the cable.
- Do not expose the monitor to rain, excessive moisture, or dust.
- Do not cover the ventilation slots or openings of the monitor. Always put the monitor in a place where there is adequate ventilation.
- Avoid placing the monitor against a bright background or where sunlight or other light sources may reflect on the face of the monitor. Place the monitor just below eye level.
- Handle with care when transporting the monitor.
• Refrain from giving shock or scratch to the screen, as screen is fragile. - LAMP Disposal LAMP(S) INSIDE THIS PRODUCT CONTAIN MERCURY AND MUST BE RECYCLED OR DISPOSED OF ACCORDING TO LOCAL, STATE OR FEDERAL LAWS. FOR MORE INFORMATION, CONTACT THE ELECTRONIC INDUSTRIES ALLIANCE AT WWW.EIAE.ORG. FOR LAMP SPECIFIC DISPOSAL INFORMATION CHECK WWW.LAMPRECYCLE.ORG.
CLEANING YOUR MONITOR
Please carefully follow the below guidelines when cleaning the monitor.
• Always unplug the monitor before cleaning.
- Use a soft cloth to wipe the screen and cabinet front and sides.
- Apply a small quantity of alcohol to a soft cloth to clean the monitor screen, if requires more than dusting.

PRESET MODES
To reduce the need for adjustment for different modes, the monitor has default setting modes that are most commonly used as given in the table below. For optimum adjustment, the user is suggested to perform the Auto Setup under Windows “Full Screen” pattern. If the mode in use does not match one of the defaults, the user can store their preferred modes in the user modes. The monitor is capable of storing up to 9 user modes. The only condition to store as a user mode is the new display information must have 1 KHz difference for horizontal frequency or 1 Hz for vertical frequency or the sync signal polarities are different from the default modes.
| Mode | Resolution | H. Freq. (KHz) | Band Width (MHz) | Polarity | ||||
| H | V | |||||||
| 1 | VGA | 720 x 400 | 70 | Hz | 31.47 | 28.322 | - | + |
| 2 | VGA | 640 x 480 | 60 | Hz | 31.47 | 25.175 | - | - |
| 3 | MAC | 640 x 480 | 66 | Hz | 35.00 | 32.24 | - | - |
| 4 | VESA | 640 x 480 | 72 | Hz | 37.86 | 31.5 | - | - |
| 5 | VESA | 640 x 480 | 75 | Hz | 37.50 | 31.5 | - | - |
| 6 | VESA | 800 x 600 | 56 | Hz | 35.16 | 36 | + | + |
| 7 | VESA | 800 x 600 | 60 | Hz | 37.88 | 40 | + | + |
| 8 | VESA | 800 x 600 | 75 | Hz | 46.88 | 49.5 | + | + |
| 9 | VESA | 800 x 600 | 72 | Hz | 48.08 | 50 | + | + |
| 10 | MAC | 832 x 624 | 75 | Hz | 49.72 | 57.283 | - | - |
| 11 | VESA | 1024 x 768 | 60 | Hz | 48.36 | 65 | - | - |
| 12 | VESA | 1024 x 768 | 70 | Hz | 56.48 | 75 | - | - |
| 13 | VESA | 1024 x 768 | 75 | Hz | 60.02 | 78.75 | + | + |
| 14 | VESA | 1280 x 1024 | 60 | Hz | 64 | 108 | + | + |
| 15 | VESA | 1280 x 1024 | 75 | Hz | 80 | 135 | + | + |
| 16 | VESA | 1152 x 864 | 75 | Hz | 67.5 | 108 | + | + |
| 17 | VESA | 1280 x 960 | 60 | Hz | 60 | 108 | + | + |
POWER SAVING
The monitor will be driven into “Power Saving” mode by the control signal from the display controller, as indicated by the amber-color power LED.
| State | Power Consumption | LED Light |
| ON | Normal | Green |
| Active OFF | < 3 W | Amber |
The power saving states will be kept until a control signal has been detected or the keyboard or mouse is activated. The recovery time from Active OFF state back to ON state is around 3 seconds.
DDC
To make your installation easier, the monitor is able to Plug and Play with your system if your system also supports DDC protocol. The DDC (Display Data Channel) is a communication protocol through which the monitor automatically informs the host system about its capabilities, for example, supported resolutions and corresponding timing. The monitor supports DDC2B standard.
INSTALLATION
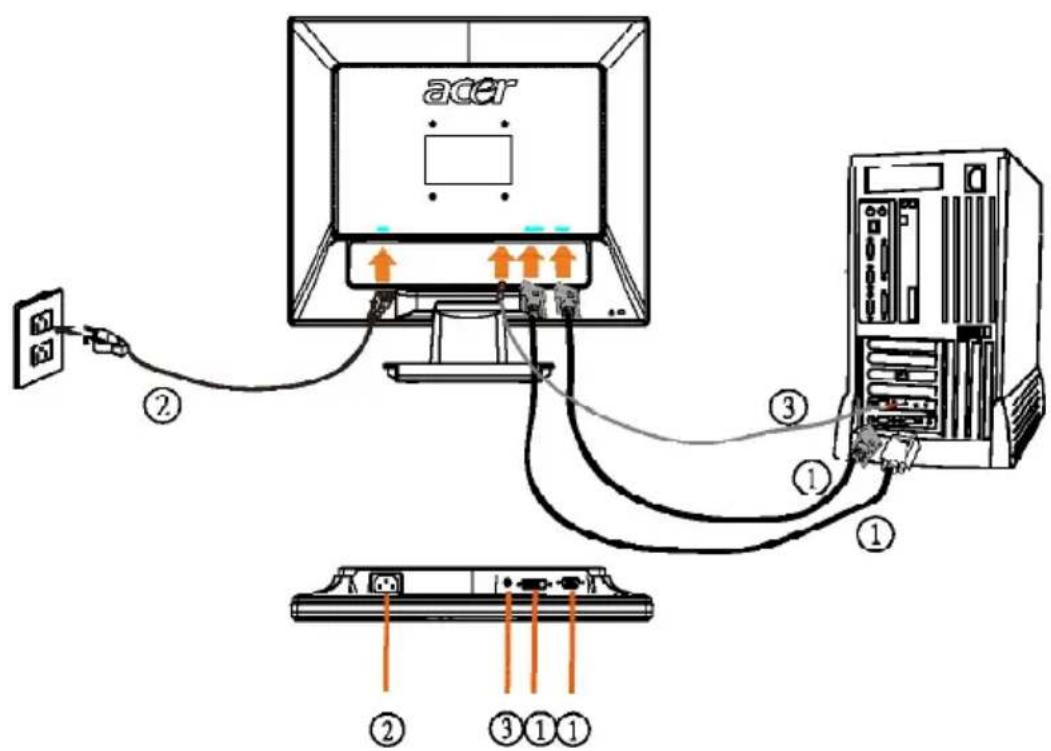
To install the monitor to your host system, please follow the steps as given below:
Steps
- Connect Video Cable
a. Make sure both the monitor and computer are powered-OFF.
b. Connect the video cable to the computer.
c. (only Dual-Input Model) Connect one end of the 24-pin DVI cable to the back of the monitor and connect the other end to the computer's port.)
- Connect power cord
Connect the power cord to the monitor, then to a properly grounded AC outlet.
-
Connect the Audio Cable.
-
Power-ON Monitor and Computer
Power-ON the monitor first, then power-ON the computer.
This sequence is very important.
- If the monitor still does not function properly, please refer to the troubleshooting section to diagnose the problem.
text_image
acer ② ③ ① ① ② ③①①USER CONTROLS
text_image
AUTO < > MENU 3 4 5 6 1 2Front Panel Controls
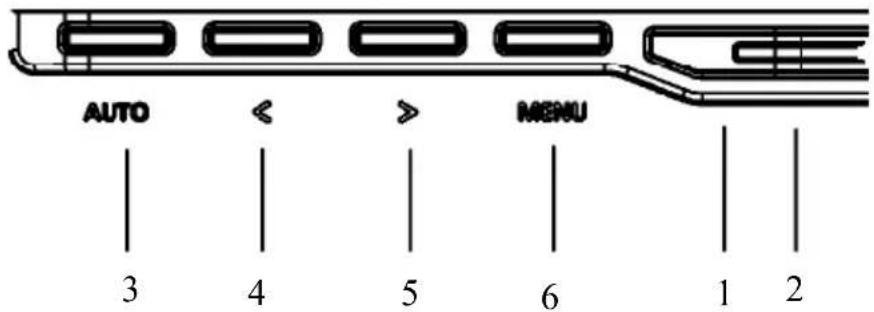
- Power Switch:
To turn ON or OFF the power.
- Power LED:
Lights up to indicate the power is turned ON.
- Auto Adjust button / Exit:
1) When OSD menu is in active status, this button will act as EXIT-KEY (EXIT OSD menu).
2) When OSD menu is in off status, press this button for 2 seconds to activate the Auto Adjustment function.
The Auto Adjustment function is used to set the HPos, VPos, Clock and Focus.
- < / Volume
Activates the volume control when the OSD is OFF or navigate through adjustment icons when OSD is ON or adjust a function when function is activated.
- > / Volume
Activates the volume control when the OSD is OFF or navigate through adjustment icons when OSD is ON or adjust a function when function is activated.
- MENU/ENTER:
Activate OSD menu when OSD is OFF or activate/de-activate adjustment function when OSD is ON or Exit OSD menu when in Volume Adjust OSD status.
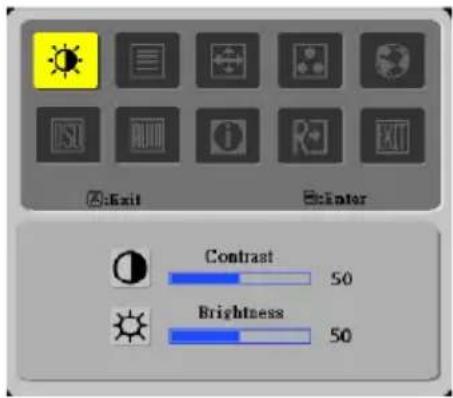
HOW TO ADJUST A SETTING
- Press the MENU-button to activate the OSD window.
- Press < or > to select the desired function.
- Press the MENU-button to select the function that you want to adjust.
- Press < or > to change the settings of the current function.
- To exit and save, select the exit function. If you want to adjust any other function, repeat steps 2-4.
text_image
Exit Enter Contrast 50 Brightness 50ADJUSTING THE PICTURE
The descriptions for function control LEDS
| Main Menu Icon | Sub Menu Icon | Sub Menu Item | Description |
 |  | Contrast | Adjusts the contrast between the foreground and background of the screen image. |
 | Brightness | Adjusts the background brightness of the screen image. | |
 |  | Focus | Adjusts picture Focus.(available in Analog mode only) |
 | Clock | Adjusts picture Clock.(available in Analog mode only) | |
 |  | H. Position | Adjust the horizontal position.(available in Analog mode only) |
 | V. Position | Adjust the vertical position.(available in Analog mode only) | |
 | N/A | Warm | Set the color temperature to warm white. |
| N/A | Cool | Set the color temperature to cool white. | |
 | User /Red | Adjusts Red/Green/Blue intensity. | |
 | User/Green | ||
 | User/Blue | ||
 | N/A | English | Multi-language selection. |
| N/A | 繁體中文 | ||
| N/A | Deutsch | ||
| N/A | Francais | ||
| N/A | Espanol | ||
| N/A | Italiano | ||
| N/A | 简体中文 | ||
| N/A | 日本語 | ||
 | H. Position | Adjust the horizontal position of the OSD. | |
 | V. Position | Adjust the vertical position of the OSD. | |
 | OSD Timeout | Adjust the OSD timeout. | |
 (Only Analog Input Model) (Only Analog Input Model) | N/A | Auto Config | Auto Adjust the H/V Position, Focus and Clock of picture. |
 (Only Dual Input Model) (Only Dual Input Model) | N/A | Analog | Select input signal from analog (D-Sub) |
| N/A | Digital | Select input signal from digital (DVI) | |
 | N/A | Information | Show the resolution, H/V frequency and input port of current input timing. |
 | N/A Reset | Clear each old status of Auto-configuration and set the color temperature to Cool. | |
 | N/A | Exit | Save user adjustment and OSD disappear. |
TROUBLESHOOTING
Before sending your LCD monitor for servicing, please check the troubleshooting list below to see if you can self-diagnose the problem.
| Problems | Current Status | Remedy |
| No Picture | LED ON | Using OSD, adjust brightness and contrast to maximum or reset to their default settings. |
| LED OFF | Check the power switch. | |
| Check if AC power cord is properly connected to the monitor. | ||
| LED displays amber color | Check if video signal cable is properly connected at the back of monitor. | |
| Check if the power of computer system is ON. | ||
| Abnormal Picture | Unstable Picture | Check if the specification of graphics adapter and monitor is in compliance which may be causing the input signal frequency mismatch. |
| Display is missing, center shift, or too small or too large in display size | Using OSD, adjust RESOLUTION, CLOCK, CLOCK-PHASE, H-POSITION and V-POSITION with non-standard signals. | |
| Using OSD, in case of missing full-screen image, please select other resolution or other vertical refresh timing. | ||
| Wait for a few seconds after adjusting the size of the image before changing or disconnecting the signal cable or powering OFF the monitor. | ||
| Abnormal Sound | No sound, or sound level is too low | Check the audio cable with the host PC is connected. |
| Check if the volume setup of the host PC is in minimum position and try to raise the volume level. |
SPECIFICATION
| LCD Panel | Driving system | TFT Color LCD |
| Size | 43.2cm(17.0") | |
| Pixel pitch | 0.264mm(H)x 0.264mm(V) | |
| Brightness | 300cd/m2 (Typical) | |
| Contrast | 500:1(Typical) | |
| Viewable angle | 150° (H) 135° (V) | |
| Response time | 12 ms (Typical) | |
| Video | R,G,B Analog Interface | |
| H-Frequency | 30KHz - 81KHz | |
| V-Frequency | 55-76Hz | |
| Display Colors | 16.2M Colors | |
| Dot Clock | 135MHz | |
| Max. Resolution | 1280 x 1024 @75Hz | |
| Plug & Play | VESA DDC/DDC2B | |
| EPA ENERGY STAR | ON Mode < 45W | - |
| OFF Mode | ≤3W | |
| Input Connector | D-Sub 15pin | |
| DVI-D 24pin (Only Dual-Input Model) | ||
| Input Video Signal | Analog:0.7Vp-p(standard), 75 OHM, Positive | |
| Digital signal (Only Dual-Input Model) | ||
| Maximum Screen Size | Horizontal : 337.92mmVertical : 270.336mm | |
| Power Source | 100~240VAC,50~60Hz | |
| Environmental Considerations | Operating Temp: 5 ^ to 35 ^ CStorage Temp.: -20 ^ to 60 ^ COperating Humidity: 10% to 85% | |
| Dimensions | 380(W) x 377(H) x 159(D)mm | |
| Weight (N. W.) | 4kg Unit (net) | |
| External Controls: | Switch | Auto Adjust Key>/ Volume<VolumePower ButtonvMENU/ Exit |
| Functions | ContrastBrightnessFocusClockH.PositionV.PositionLanguageAuto configuration (only Analog input model)Input signal Selection (only Dual input model)(Warm) Color(Cool) ColorRGB Color temperatureResetOSD position . timeoutDisplay informationExit | |
| Power Consumption ( Maximum ) | 45 Watts | |
| Audio Output | Rated Power 1W (Per channel) | |
| Regulatory Compliance | CUL, FCC, VCCI, CCC, MPR II, CE,TUV/GS, TCO'99, UL, ISO13406-2, PCT | |
* All specifications are subject to change without notice.