EBD935F - Security Camera EverFocus - Free user manual and instructions
Find the device manual for free EBD935F EverFocus in PDF.


User questions about EBD935F EverFocus
0 question about this device. Answer the ones you know or ask your own.
Ask a new question about this device
Download the instructions for your Security Camera in PDF format for free! Find your manual EBD935F - EverFocus and take your electronic device back in hand. On this page are published all the documents necessary for the use of your device. EBD935F by EverFocus.
USER MANUAL EBD935F EverFocus
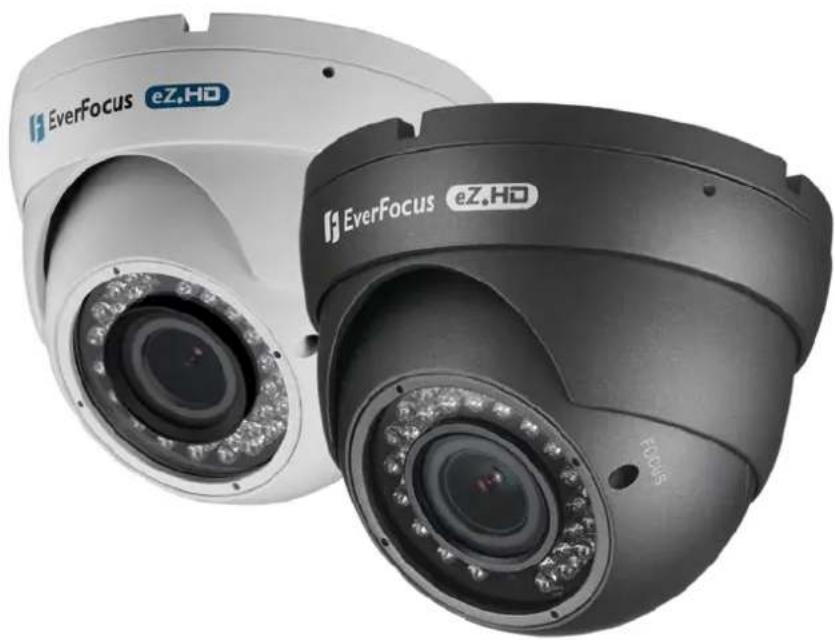
EBD935F eZ.HD Series
1080p Full High Definition
True Day/Night Outdoor IR Ball Camera
User's Manual
natural_image
Exterior view of two EverFocus eZ.HD surveillance cameras (no text or symbols visible on the camera body)EverFocus
Copyright © EverFocus Electronics Corp.
Release Date: February 2016
Precautions
- Do not install the camera near electric or magnetic fields. Install the camera away from TV/radio transmitters, magnets, electric motors, transformers and audio speakers since the electromagnetic fields generated from these devices may distort the video image or otherwise interfere with camera operation.
- Never disassemble the camera beyond the recommendations in this manual nor introduce materials other than those recommended herein. Improper disassembly or introduction of corrosive materials may result in equipment failure or other damage.
- Try to avoid facing the camera toward the sun. In some circumstances, direct sunlight may cause permanent damage to the sensor and/or internal circuits, as well as creating unbalanced illumination beyond the capability of the camera to compensate.
- Keep the power cable away from water and other liquids and never touch the power cord with wet hands. Touching a wet power cord with your hands or touching the power cord with wet hands may result in electric shock.
- Never install the camera in areas exposed to oil, gas or solvents. Oil, gas or solvents may result in equipment failure, electric shock or, in extreme cases, fire.
- Cleaning. For cameras with interchangeable lenses, do not touch the surface of the sensor directly with the hands. Use lens tissue or a cotton tipped applicator and ethanol to clean the sensor and the camera lens. Use a damp soft cloth to remove any dirt from the camera body. Please do not use complex solvents, corrosive or abrasive agents for cleaning of any part of the camera.
- Do not operate the camera beyond the specified temperature, humidity or power source ratings. This camera is suitable for indoor operation only. Use the camera at temperatures within -10°C\~50°C (14°F\~122°F) and humidity less than 80%; this device is not rated as submersible. The input power source is 12VDC. Be sure to connect the proper +/ - polarity and voltage, as incorrect polarity or too high a voltage will likely cause the camera to fail, and such damage is not covered by the warranty.
- Mounting. Use care in selecting a solid mounting surface which will support the weight of the camera plus any wind, snow, ice or other loading, and securely attach the camera to the mounting surface using screws and anchors which will properly support the camera. If necessary (e.g. when mounting to drop ceilings) use a safety wire to provide additional support for the camera.
Safety Notice
Federal Communication Commission Interference Statement
This equipment has been tested and found to comply with the limits for a Class A digital device, pursuant to Part 15 of the FCC Rules. These limits are designed to provide reasonable protection against harmful interference in a residential installation. This equipment generates uses and can radiate radio frequency energy and, if not installed and used in accordance with the instructions, may cause harmful interference to radio communications. However, there is no guarantee that interference will not occur in a particular installation. If this equipment does cause harmful interference to radio or television reception, which can be determined by turning the equipment off and on, the user is encouraged to try to correct the interference by one of the following measures:
- Reorient or relocate the receiving antenna.
- Increase the separation between the equipment and receiver.
- Connect the equipment into an outlet on a circuit different from that to which the receiver is connected.
- Consult the dealer or an experienced radio/TV technician for help.
FCC Caution: Any changes or modifications not expressly approved by the party responsible for compliance could void the user's authority to operate this equipment.
This device complies with Part 15 of the FCC Rules. Operation is subject to the following two conditions: (1) This device may not cause harmful interference, and (2) this device must accept any interference received, including interference that may cause undesired operation.

ATTENTION! This is a class A product which may cause radio interference in a domestic environment; in this case, the user may be urged to take adequate measures.

This Product is RoHS compliant.

WEEE
Your EverFocus product is designed and manufactured with high quality materials and components which can be recycled and reused. This symbol means that electrical and electronic equipment, at their end-of-life, should be disposed of separately from your household waste. Please, dispose of this equipment at your local community waste collection/recycling centre. In the European Union there are separate collection systems for used electrical and electronic product.
Please, help us to conserve the environment we live in!
Contents
1. Introduction......5
1.1 Packing List ....5
1.2 Features....5
2. Cable Description.... 6
3. Installation 7
3.1 Installation and Adjustment ....7
4. Configuration in the OSD Menu....12
5. Specifications....16
1. Introduction
The EverFocus eZ.HD Series EBD935F ball camera is equipped with a 1/2.9" SONY 2.24M pixels CMOS sensor and providing resolution of 1080p. Featured with the Digital Wide Dynamic Range (D-WDR) function, the camera can provide clear images even under back light circumstances where intensity of illumination can vary excessively.
The EBD935F comes with 36 IR LEDs, supporting up to 30m (\~100ft.) IR distance in night vision. The camera can work in both indoor and outdoor environments. The IP66-rating and vandal proof housing make it suitable for outdoor use. The EBD935F supports both NTSC and PAL scanning systems, which can be switched via OSD.
1.1 Packing List
- Camera Body x 1
- User Manual x 1
• DC Power Pigtail Cable x 1 - Zoom / Focus Screw x 1
- Rubber Plug x 2
-
Warning Paper x 1
-
Mounting Screw x 4
- Plastic Anchor x 4
- Hexagon Wrench x 1
- Set Screw x 3
- Template Plate x 1
1.2 Features
- 1080p full HD with high flexibility and performance for astounding image
- 1/2.9" Sony 2.24M pixels CMOS sensor, delivering amazing high sensitivity
- Vari-focal 2.8\~12mm DC Iris lens to captures the desired field of view
- Extended IR range of up to 30M/100ft. with 36 LEDs (depending on scene IR reflectivity)
- D-WDR to improve the visibility under high contrast scene
- 3D Noise Reduction ensures less blurry moving subjects, vivid and high SN ratio images even under low light environments
- Supports 1080p, 720p & 960H analog signal output, which can be easily switched using OSD Joystick
- The flexible angle viewing with its 3 Axis rotation design allows wall or ceiling mounting
- Special design, easy installation and operation
- eZ.Controller function: Control camera OSD settings and PTZ operation directly from DVR end
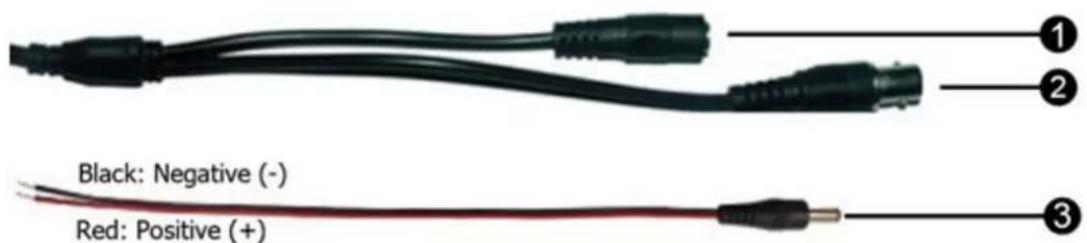
2. Cable Description
text_image
Black: Negative (-) Red: Positive (+)| No. | Name Descriptions | |
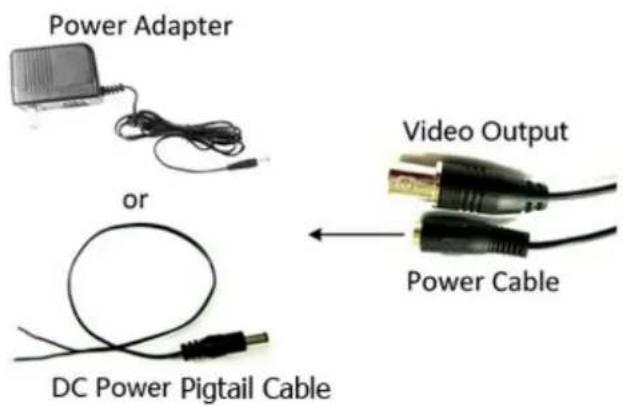
| 1 | Power Cable | Connects to a 12VDC power source. |
| 2 | Video Output | 1080p, 720p and 960H output, using a 75 Ohm BNC-type coaxial cable. |
| 3 | DC Power Pigtail Cable | Optional power pigtail cable. The red wire is positive (+); while the black wire is negative (-). |
3. Installation
3.1 Installation and Adjustment
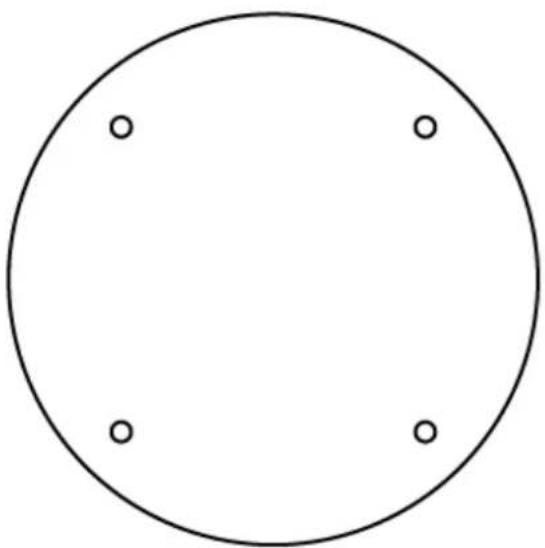
- For Ceiling Mount / Wall Mount users: Stick the Template Plate on the position where you want to attach the camera.
natural_image
Simple geometric diagram showing a circle with four evenly spaced dots at the center (no text or labels)- Drill four holes according to the supplied Template Plate, and insert the supplied Plastic Anchors into the holes.
If you wish to run the wires through the wall / ceiling, drill an additional hole in the middle of Template Plate.

natural_image
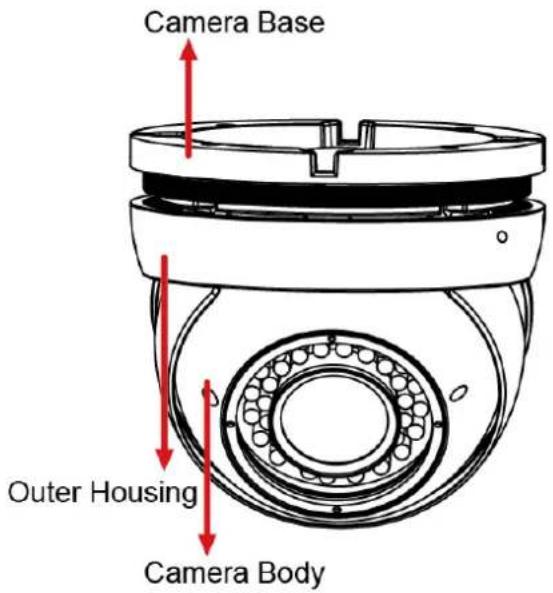
Diagram of a mechanical component with multiple cylindrical parts and alignment lines, enclosed in an oval boundary (no text or symbols)- Unscrew the outer housing by twisting it counterclockwise and then remove the outer housing from the camera base.
text_image
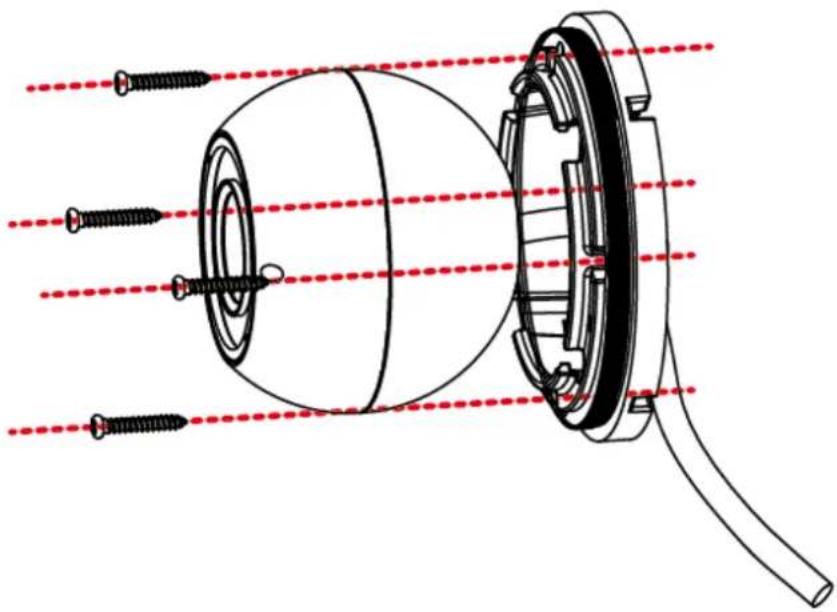
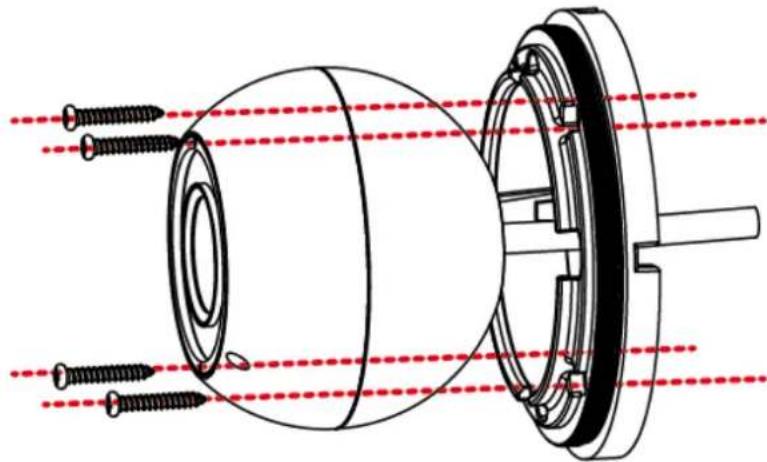
Camera Base Outer Housing Camera Body- Screw the base plate to the wall or ceiling with supplied four Screws and Hexagon Wrench.
a. If you want to wire the cables from the side cut of the camera base, attach the camera body to the base plate and run the cables through the camera base first, then screw the camera base to the ceiling / wall.
natural_image
Technical diagram of a mechanical assembly with screw fasteners and concentric rings (no text or labels)b. If you want to wire the cables through the wall, attach and screw the camera base to the ceiling / wall. Then attach the camera body to the base plate.
natural_image
Technical diagram of a mechanical assembly with screws and concentric rings, no text or symbols present- Connect the camera to the 12V DC power source using the supplied DC Power Pigtail Cable or power adapter.
text_image
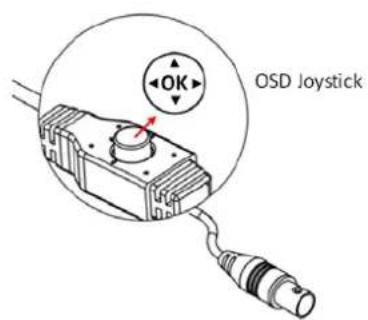
Power Adapter or DC Power Pigtail Cable Video Output Power Cable- Connect the camera to an AHD DVR using the video output cable for viewing the video image while adjusting camera angles. To configure camera settings using the OSD Menu Joystick.
text_image
OK OSD Joystick- Push the Joystick up / down to select among menu items.
- Push the Joystick left / right to adjust the level of the selected item.
- Press the Joystick to enter the submenu or exit the OSD Setup Menu.
Note: The function button is using to control direction, and also to switch video format and video output. Please follow the detailed instruction as below to switch the camera to:
Switch between 1080p and 720p (Default, 1080p): Press Upward for 5 Seconds
Switch from HD (1080p / 720p) to 960H: Press Left for 5 Seconds
Switch from 960H to HD (1080p / 720p): Press Right for 5 Seconds
Switch between NTSC and PAL: Press Downward for 5 Seconds
- Screw back the outer housing and adjust the camera angle simultaneously.
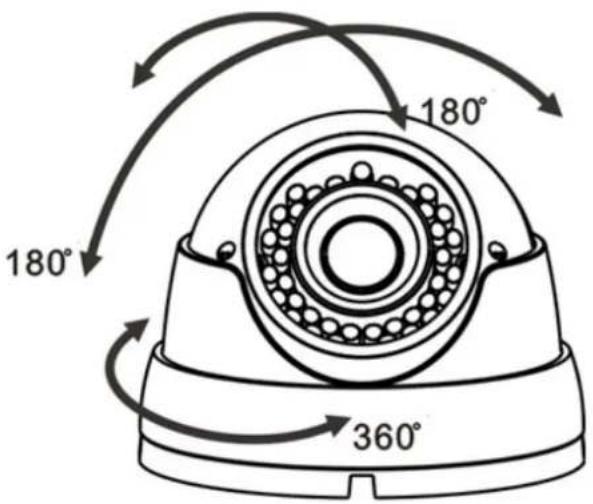
text_image
180° 180° 360°- Adjust the Zoom / Focus using the Zoom / Focus screws, then secure it with supplied two Rubber Plugs.
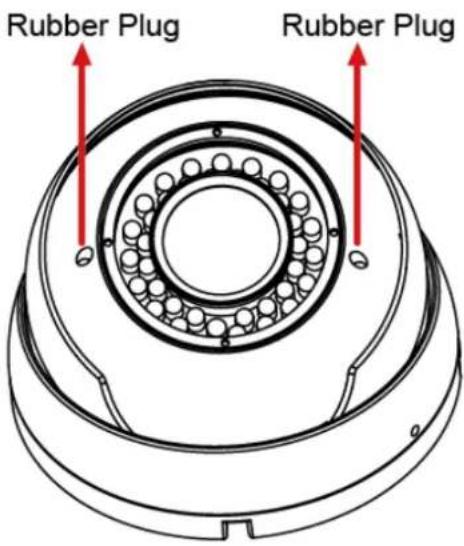
text_image
Rubber Plug Rubber Plug- Screw the two set screws by using the supplied Hexagon Wrench.
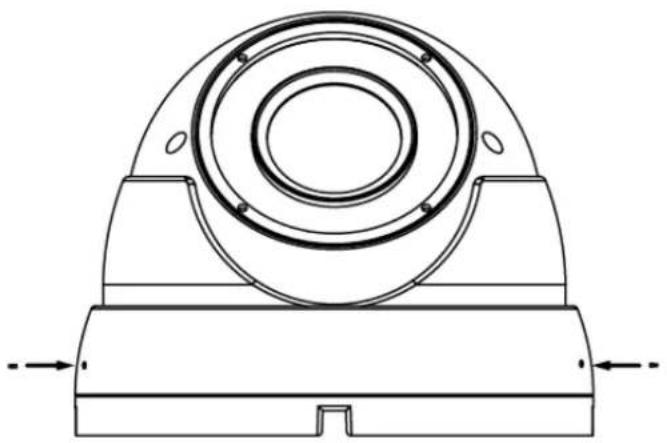
natural_image
Technical line drawing of a mechanical component with concentric rings and base plate (no text or symbols)4. Configuration in the OSD Menu
You can use the Joystick on the rear panel of the camera to configure camera settings in the OSD menu. For details on the OSD menu structure as below:
| No. | Main | Sub Menu | Sub Menu / Function | |||
| 1 Lens | DC | Mode | Indoor | |||
| Outdoor | Min Shu. | NTSC: 1/30 | ||||
| PAL: 1/25 | ||||||
| Max. Shu. | NTSC: 1/60,FLK,1/240,1/480,1/1000,1/2000,1/5000,1/10000, 1/50000 | |||||
| PAL: 1/50,FLK,1/200,1/400,1/1000,1/2000*,1/5000,1/10000, 1/50000 | ||||||
| Iris Speed 0 | -15 | |||||
| Manual | ||||||
| 2 Exposure | Shutter | NTSC: 1/30, 1/60, FLK, 1/240, 1/480, 1/1000, 1/2000, 1/5000, 1/101/50000, X2, X4, X6, X8, X10, X15, X20, X25, X30, Auto | ||||
| PAL: 1/25, 1/50, FLK, 1/200, 1/400, 1/1000, 1/2000, 1/5000, 1/101/50000, X2, X4, X6, X8, X10, X15, X20, X25, X30, Auto | ||||||
| AGC 0-15 | ||||||
| Sens-up | Off | |||||
| Auto | Sens-up | X2, X4, X6, X8, X10, X15, X20, X25, X30 | ||||
| Brightness | 1-100 | |||||
| D-WDR | Off | |||||
| On Level 0-8 | ||||||
| Auto | ||||||
| Defog | Off | |||||
| Auto | Pos/Size | Position, Size, ↑, ↓, →, ← | ||||
| Gradation | 0-2 | |||||
| Default | ||||||
| 3 | Backlight | Off | ||||
| BLC | Level Middle, | High, Low | ||||
| Area | Position, Size, ↑, ↓, →, ← | |||||
| Default | ||||||
| HSBLC | Select Area1, | Area2, Area3, Area4 | ||||
| Display | Off | |||||
| On | Position, Size, ↑, ↓, →, ← | |||||
| Black Mask On/Off | ||||||
| Level 0-100 | ||||||
| Model | All Day | |||||
| Night | AGC Level | 0-255 | ||||
| Default | ||||||
| 4 | White Balance | ATW | ||||
| AWC→SET | ||||||
| Indoor | ||||||
| Outdoor | ||||||
| Manual | Blue 1-500 | |||||
| Red 0-100 | ||||||
| AWB | ||||||
| 5 | Day & Night | Ext | D→N(Delay) | 0-60 | ||
| N→D(Delay) | 0-60 | |||||
| Auto | D→N(AGC) | 1-255 | ||||
| D→N(Delay) | 0-60 | |||||
| N→D(AGC) | 1-255 | |||||
| N→D(Delay) | 0-60 | |||||
| Color | ||||||
| B/W | Burst Off/On | |||||
| IR Smart | Off | |||||
| On | Level 0-15 | |||||
| Area | Position, Size, ↑, ↓, →, ← | |||||
| IR PWM | Off | |||||
| 0-100 | ||||||
| 6 NR | 2DNR Middle | e/Low/Off/High | ||||
| 3DNR Middle | e/Low/Off/High | |||||
| 7 Special | Cam Title | Off | ||||
| On | 0123456789ABCDEFGHIJKLMNOPQRSTUVWXYZ→←↑↓()^-_-■/=&:~,. | |||||
| D-effect | Freeze | Off/On | ||||
| Mirror | Off, Mirror, V-flip, Rotate | |||||
| Neg. Image Off/On | ||||||
| Motion | Off | |||||
| On | Select Area1,Area2,Area3,Area4 | |||||
| Display | On | Position, Size, ↑, ↓, →, ← | ||||
| Off | ||||||
| Sensitivity | 0-100 | |||||
| Color Green, Blue, White, Red | ||||||
| Trans | 1.00,0.75,0.50, 0.25 | |||||
| Alarm | View Type | Off, Block, Outline, All | ||||
| OSD View On | /Off | |||||
| Alarm Out On | /Off | |||||
| Time 1-15 | ||||||
| Default | ||||||
| Privacy | Off | |||||
| On | Select Area1,Area2,Area3,Area4 | |||||
| Display | Off | |||||
| Color | Position, Size, ↑, ↓, →, ← | |||||
| Mosaic | Position, Size, ↑, ↓, →, ← | |||||
| Inv | Position, Size, ↑, ↓, →, ← | |||||
| Color | White, Black, Red, Blue, CYAN, Yellow, Green | |||||
| Trans | 1.00,0.75,0.50, 0.25 | |||||
| Default | ||||||
| Language | ENG/CHN1/CHN2/GER/FRA/ITA/SPA/POL/RUS/POR/NED/TUR | |||||
| Defect | Live DPC | Off | ||||
| On | AGC level | 0-255 | ||||
| Level 0-100 | ||||||
| White DPC | Off | |||||
| On | Pos/Size | Position, Size, ↑, ↓, →, ← | ||||
| Start | Close the iris then press | |||||
| DPC View | Off/On | |||||
| Level 0-60 | ||||||
| AGC | 0-14 | |||||
| Sens-up | x2, x4, x6, x8,x10, x15, x20, x25, x30 | |||||
| Black DPC | Off | |||||
| On | Pos/Siz | Position, Size, ↑, ↓, →, ← | ||||
| Start Press Enter | Enter | |||||
| DPC View Off/On | /On | |||||
| Level 0-255 | ||||||
| RS485 | CAM ID 0-255 | |||||
| ID Display Off/On | ||||||
| Baud Rate | 2400,4800,9600,19200 ,38400 | |||||
| 8 Adjust | Sharpness | Off | ||||
| Auto | Level 0-10 | |||||
| Start AGC 0-255 | ||||||
| End AGC 0-255 | ||||||
| Monitor | CRT | Blue Gain 0-100 | ||||
| Red Gain 0-255 | ||||||
| LCD | Gamma | User,0.45,0.50,0.55,0.60,0.65,0.70,0.75,0.80,0.85,0.90,0.95,1.00 | ||||
| Blue Gain 0-100 | ||||||
| Red Gain 0-100 | ||||||
| LSC Off/On | ||||||
| Video. Out | PAL/NTSC | |||||
| 9 AF | AF Mode | Semi. | ||||
| Auto | ||||||
| Manual | ||||||
| One Shot AF | ||||||
| TDN AF | On | |||||
| Off | ||||||
| Lens Init. | ||||||
| 10 | Exit | Save& END /Reset/Not Saved | ||||
- Specifications
| P/N EBD935F | |
| Pickup Device | 1/2.9" SONY 2.24M pixels CMOS |
| Video Format | NTSC and PAL( can be switched via OSD) |
| Picture Elements | 1920 (H)*1080 (V) |
| Scanning System | Progressive Scan |
| Sensitivity 0 lux with IR on | |
| S/N Ratio | Over 48dB (AGC off) |
| Electronic Shutter | AUTO, Manual (X30~1/ 50000), FLK |
| Gamma Correction 0.45 | |
| Lens Type | DC Iris 2.8-12mm, F1.4 |
| BLC | OFF/HSBLC/BLC Selectable |
| AGC 0~15 Levels | |
| White Balance | ATW/AWC-SET/INDOOR/OUTDOOR/MANUAL/AWB |
| Sync Mode Internal | |
| Day/Night | Ext, Auto, Color, B/W |
| UTC Function | Supported |
| IR LED /Distance | 36 Units. Up to 30m/100ft. (depending on scene IR reflectivity) |
| OSD Languages | 12-Language |
| DNR | 2DNR/3DNR, Off |
| DEFOG | Off/Auto |
| D-WDR | On/Off/Auto |
| Sens-up | Off/On(x30~x2) |
| Mirror | Off, Mirror, V-flip, Rotate |
| Motion Detection | Off/On for 4 selectable zones |
| Privacy Mask | Off/On for 4 selectable zones |
| Environment | IP66 Weather Resistant |
| Power Source 12VDC | |
| Power Consumption | 3.5w max. |
| Operating Temperature | -10°C~50°C / 14°F~122°F |
| Humidity | Less than 80% |
| Dimensions | 120 x 95mm/ 4.72" x 3.74" |
| Weight | 740g / 1.63lbs. |
| Certifications | CE / FCC / RoHs |
Specifications and designs are subject to change for improving the functionality of this product without notice.
EverFocus Electronics Corp.
EverFocus Taiwan:
12F-1, No.79, Sec. 1, Shin-Tai Wu Road, Hsi-Chih, New Taipei City, Taiwan
TEL: +886 2 2698 2334
FAX: +886 2 2698 3943
www.everfocus.com.tw
marketing@everfocus.com.tw
EverFocus Europe - Germany:
Albert-Einstein-Strasse 1, D-46446
Emmerich, Germany
TEL: +49 2822 93940
FAX: +49 2822 939495
www.everfocus.de
sales@everfocus.de
EverFocus China - Beijing:
Room 609, Technology Trade Building, Shangdi Information Industry Base, Haidian District, Beijing 100085, China
TEL: +86 10 6297 3336\~39
FAX: +86 10 6297 1423
www.everfocus.com.cn
marketing@everfocus.com.cn
EverFocus China - Shenzhen:
4F, No. 2, D4 Building, Wan Yelong Industrial Park, Tangtou Road, Shiyan, Baoan, Shenzhen, Guangdong 518101, China
TEL: +86 755 2765 1313
FAX: +86 755 2765 0337
www.everfocus.com.cn
marketing@everfocus.com.cn
EverFocus USA - California:
1801 Highland Avenue, Unit A, Duarte, CA 91010, USA
TEL: +1 626 844 8888
FAX: +1 626 844 8838
www.everfocus.com
sales@everfocus.com
EverFocus Japan:
3F Kuramochi, Buildingll 2-2-3 Koto-Bashi, Sumida-Ku Tokyo, 130-0022, Japan
TEL: +81 3 5625 8188
FAX: +81 3 5625 8189
www.everfocus.co.jp
info@everfocus.co.jp

Your EverFocus product is designed and manufactured with high quality materials and components which can be recycled and reused.
This symbol means that electrical and electronic equipment, at their end-of-life, should be disposed of separately from your household waste.
Please, dispose of this equipment at your local community waste
collection/recycling centre. In the European Union there are separate collection systems for used electrical and electronic product. Please, help us to conserve the environment we live inl