EHD150 - Security Camera EverFocus - Free user manual and instructions
Find the device manual for free EHD150 EverFocus in PDF.


User questions about EHD150 EverFocus
0 question about this device. Answer the ones you know or ask your own.
Ask a new question about this device
Download the instructions for your Security Camera in PDF format for free! Find your manual EHD150 - EverFocus and take your electronic device back in hand. On this page are published all the documents necessary for the use of your device. EHD150 by EverFocus.
USER MANUAL EHD150 EverFocus
1/3" B/W Rugged Dome Camera
Operation Instructions
Model No. EHD150
Please read this manual first for correct installation and operation. This manual should be retained for future reference. The information in this manual was current when published. The manufacturer reserves the right to revise and improve its products. All specifications are therefore subject to change without notice.
PRECAUTIONS
- Do not install the camera near electric or magnetic fields.
Install the camera away from TV, radio transmitter, magnet, electric motor, transformer, audio speakers since the magnetic fields generate from above devices will distort the video images.
- Never disassemble the camera nor put impurities in it.
Disassembly or impurities may result in trouble or fire.
- Never face the camera toward the sun.
Direct sunlight or severe ray may cause fatal damage to sensor and internal circuit.
- Keep the power cord away from water and liquid.
Touching the wet power cord may result in electric shock.
- Never install the camera in areas exposed to water, oil or gas.
Water, oil or gas may result in failure, electric shock or fire.
6. Cleaning
Do not touch the surface of sensor by hand directly. Use a soft cloth to remove the dirt from the camera body. Use lens tissue or a cotton swab and ethanol to clean the sensor and the camera lens.
7. Do not operate the camera beyond the specified temperature, humidity or power source ratings.
Use the camera at temperatures within -46^ 50^ ; -50.8^ 122^ and humidity between 20% 80% . The input power source is 12VDC+/-10% , 24VAC+/-10% .
PREFACE
The most technically advanced EHD150 is the newest vandal-resistant B/W Rugged Dome Camera from EverFocus Electronics. The B/W Rugged Dome Camera can withstand a blow from a 10-pound sledgehammer and has a built-in heater that allows for operation in low temperatures. It is perfect for all high-profile crime-prone applications such as building entrances, retail stores, and shopping malls. The extremely EHD150 is unquestionably one of the world's toughest cameras and is your best choice for vandal resistance.
FEATURES
- Designed with advanced digital signal processing circuitry for high image quality.
- The high sensitivity of 0.06 lux/F=1.6 is achieved by high -resolution 1/3" interline transfer CCD.
- DC12V or AC24V switches automatically power supply; Line Lock for AC24V.
● S/N Ratio reaches 48 dB or more. - Both board lens and vari-focal lens (3.6 \~ 9mm, 9\~22mm) are available.
- Compact size: 130(W) x 130 (D) x 98.9mm(H) / 5.2" (W) x 5.2" (D) x 3.95" (H)
- Polycarbonate base withstand the impact of a 10 pounds sledgehammer, smoke color or clear as option.
- Unique security screw locked
- Operating temperature -46 +50 deg Celsius.
● Heater triggered when temperature less than 10 deg Celsius.
INSTALLATION
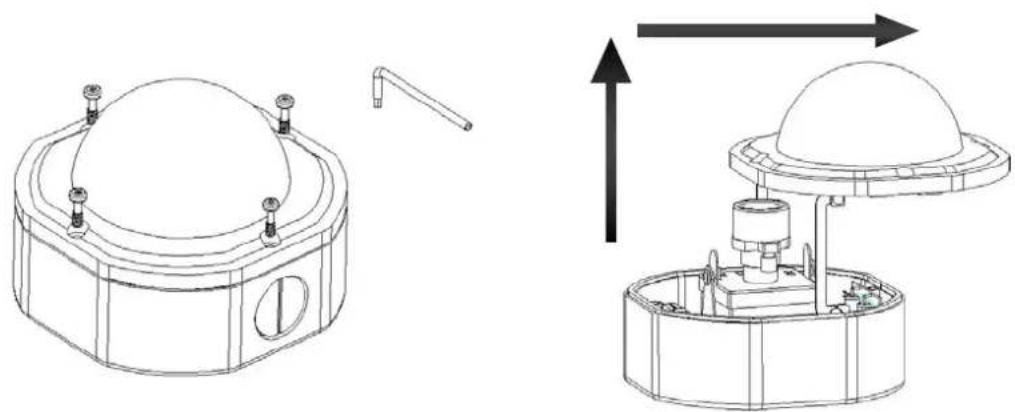
- Loosen the 4 fix screws on the housing cover by using the attached wrench (Figure 1).
Carefully uncap the housing cover as the direction shown below (Figure 2), please pay attention not to damage the lens. To remove the housing cover, push the hinges to the bottom of the bracket, the hinges can be easily removed from the bracket.
natural_image
Technical line drawing of a mechanical assembly with two views: top shows a dome-like component, bottom shows a dome-shaped component with internal components and directional arrows (no text or symbols)Figure 1 Figure 2
- Remove the camera.
text_image
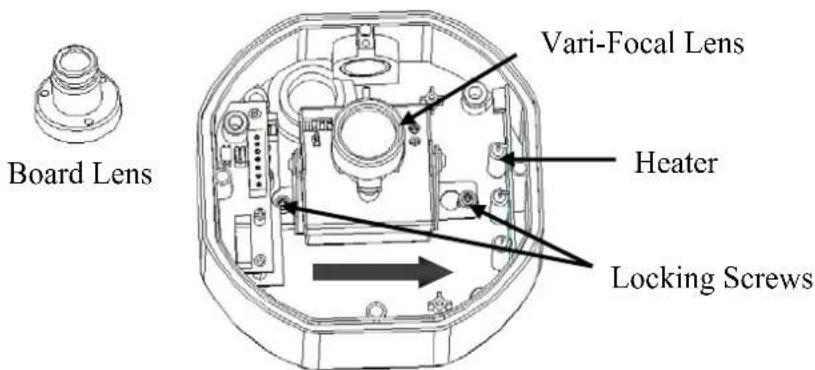
Board Lens Vari-Focal Lens Heater Locking ScrewsFigure 3
To remove the camera, first unplug the wire connection on the back of the camera.
Then loosen the 2 locking screws on the camera base, push the camera base to the right (toward heater direction, as shown in Figure 3), remove the camera from the mounting base. Reinstall the camera and the cable while the base mounting is completed.
- Mounting the base.
text_image
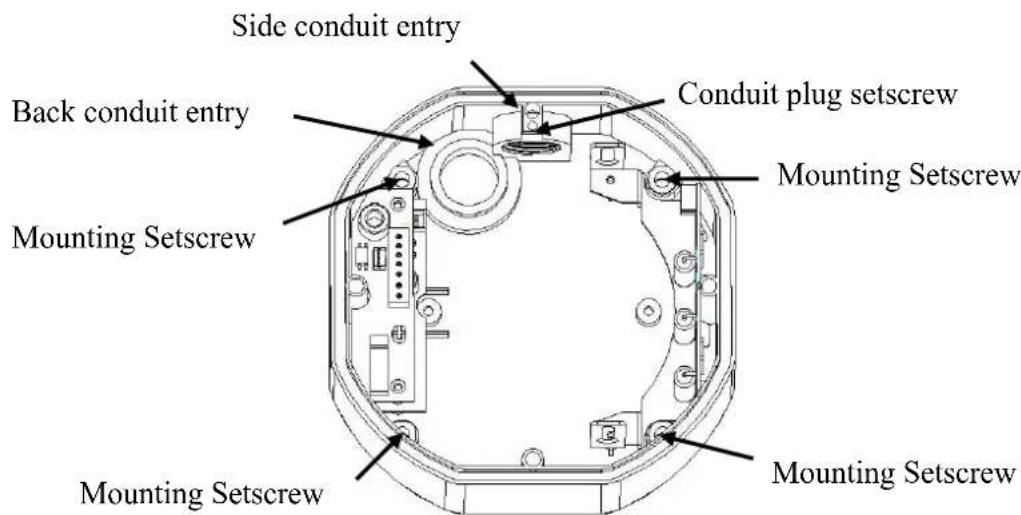
Side conduit entry Back conduit entry Mounting Setscrew Conduit plug setscrew Mounting Setscrew Mounting SetscrewFigure 4
Attach the base to the wall or ceiling, fix the base by the 4 setscrews attached in the accessory pack. The dome is weighted 1.7kg, please make sure if the mounting is strengthened enough to support it, if not, please reinforce the mounting according to the environment.
Note: The diameter of the screw hole is 4.7mm .
text_image
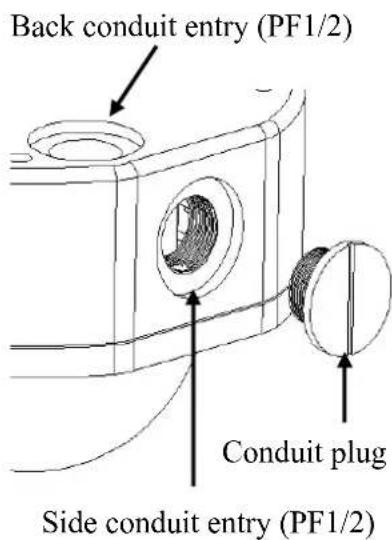
Back conduit entry (PF1/2) Conduit plug Side conduit entry (PF1/2)The camera comes with a conduit plug pre-installed in the PF 1/2 conduit entry on the side. The screw can be removed and installed in the back conduit entry. Loosen the conduit plug setscrew (as shown in Figure 5) before removing the conduit plug.
Figure 5
Caution: To prevent moisture leaking into the housing, apply an appropriate gasket
or sealant around the conduit connection.
4. Re-assemble Camera
- If mounting COLOR RUGGED DOME CAMERA on the wall, please to aim the "Wall" in line with the triangle "▲" marked on the lead frame. (factory
default)
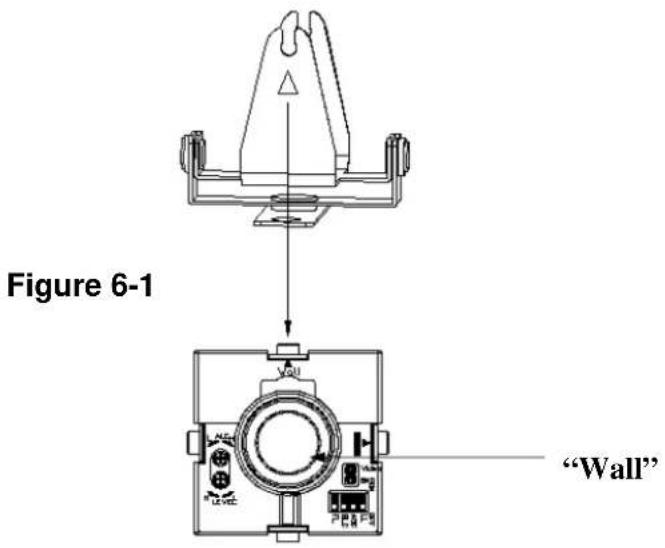
text_image
Figure 6-1 "Wall"- If mounting COLOR RUGGED DOME CAMERA on the ceiling, please to aim the "Ceiling" in line with the triangle "▲" marked on the lead frame.
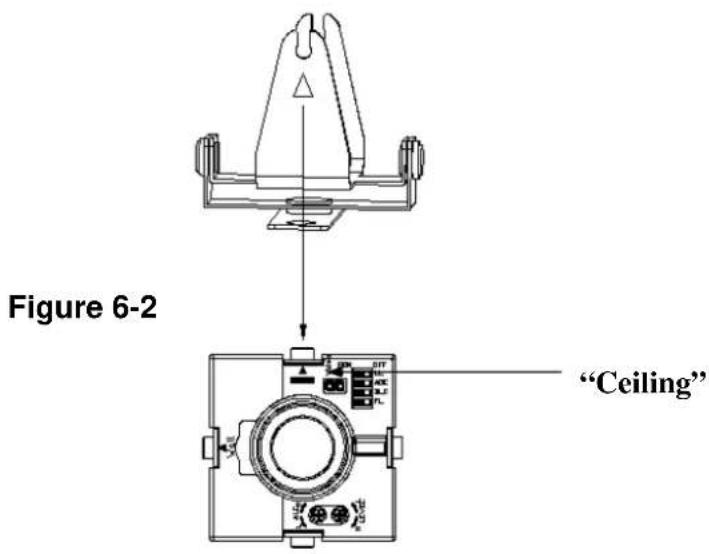
text_image
Figure 6-2 "Ceiling"5. Wire Connection
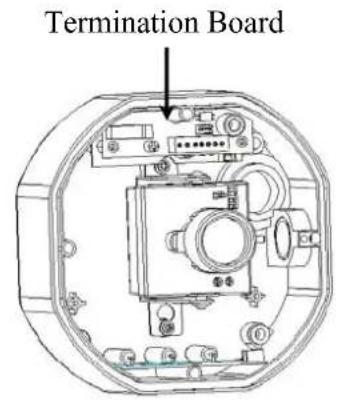
text_image
Termination Board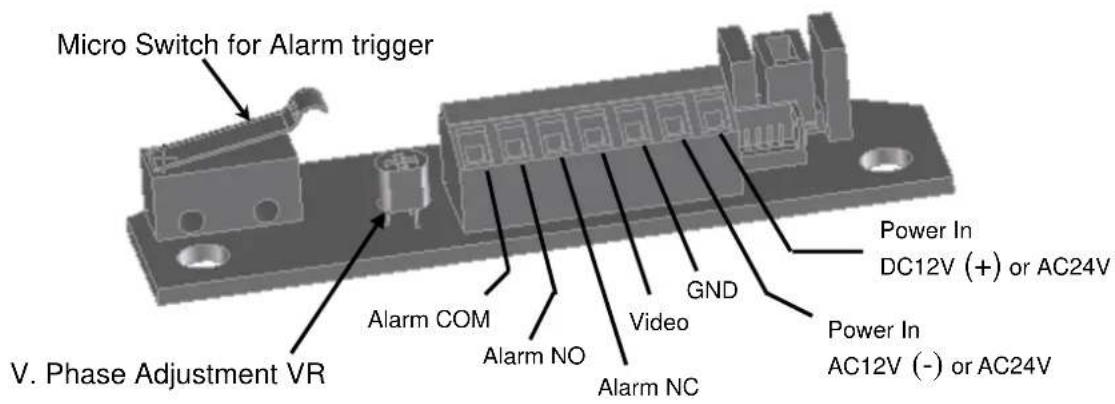
text_image
Micro Switch for Alarm trigger V. Phase Adjustment VR Alarm COM Alarm NO Video GND Alarm NC Power In DC12V (+) or AC24V Power In AC12V (-) or AC24VFigure 7
Connect the power supply cable (AC24V/DC12V), video output and alarm output to the proper connectors shown as Figure 7.
The V. Phase adjustment screw is located on the termination board. The vertical phase may require adjustment to synchronize the vertical phase of the camera with other camera in the system when it is to be used in the line-lock sync mode. Make the adjustment when the vertical phase of the camera does not match with other cameras.
6. View Angel Adjustment
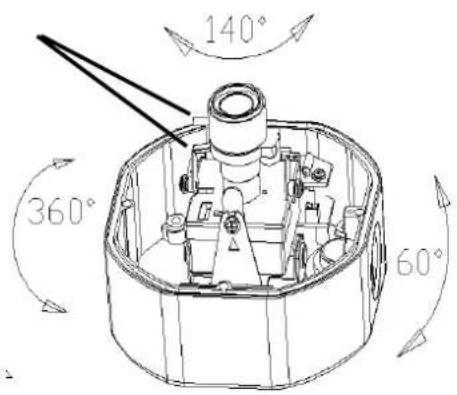
The camera can be rotated 360^ horizontally, 140^ vertical and 60^ 3^ rd axis view angles (as shown in Figure 8). Adjust the proper camera view angel as needed. If a vari-focal lens is used, you may adjust the focus and zoom of the lens to bring the object in focus. Be sure to loosen the locking screws on the lens before you do the adjustments.
Lens fixing Screws
text_image
140° 360° 60°Figure 8
DIP SWITCH FUNCTION
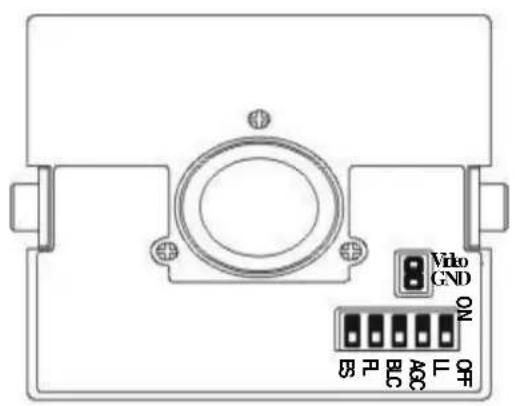
text_image
Vido GND ON AC F OFFBoard Lens
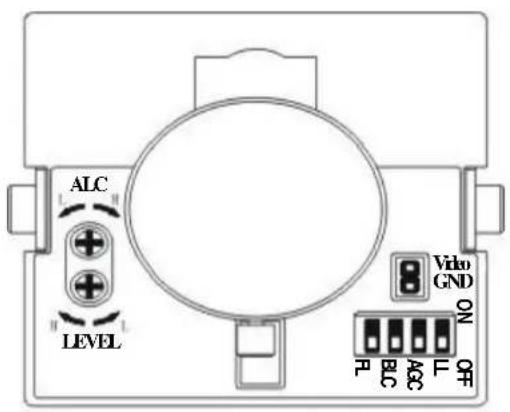
text_image
ALC LEVEL Vibo GND ON FL BL AG F OFFVari-Focal
LL (Line-Lock) Off/On
To select the sync mode between Internal Sync.(LL off) and Line-Lock (LL on).
Set the line-lock off, the camera will synchronize to the internal time base. Set the line-lock on, the camera's vertical synchronization can be driven by the AC signal in the power lines.
Note: Line-Lock sync mode operation is possible only when used with an AC power source; it's not possible with a DC power source.
The default setting is ON.
AGC (Automatic Gain Control) Off/On
AGC ON: The sensitivity increases automatically when light is low.
AGC OFF: A-low-noise picture is obtained under a low light condition.
The default setting is ON.
BLC (Back Light Compensation) On/Off
When BLC is turned on, the AGC, ES and IRIS operating point is determined by averaging over the center area instead of entire field-of-view, so that a dimly-lit foreground object at center area can be clearly distinguished from brightly-lit backgrounds.
BLC should not be used unless it is needed to compensate for back-lit.
The default setting is Off.
FL (Flickerless Function) On/Off
When picture flicker fiercely, turn FL on, then the camera will stabilize the speed of electronic shutter at 1/100(NTSC) or 1/120(PAL) automatically, and reduce the flicker immediately.
The default setting is Off.
ES (Electronic Shutter) Off/On
ES ON: The camera continuously adjusts the shutter speed from 1/60 (NTSC), 1/50 (PAL) second to 1/100,000 second according to the luminance conditions of the scene.
ES OFF: The shutter speed is fixed at 1/60 (NTSC), 1/50 (PAL) second.
Set ES OFF, when auto iris lens is used or flicker is observed under a very bright fluorescent lamp. Otherwise, turn ES on for optimum performance. The default setting is ON.
SPECIFICATIONS
| Pickup Device 1/3” SONY | interline transfer CCD |
| Picture Element NTSC :768 | (H) × 494(V)PAL: 752(H)×582(V) |
| Horizontal Resolution 560 TV lines | |
| Sensitivity 0.06 lux / F=1.6 | |
| S/N Ratio Over 48dB(AGC off) | |
| Weatherproof Ratings IP66 | |
| Electronic Shutter 1/60(1/50)~1/100,000 (Board lens only) | |
| IRIS Control Auto (vari-focal lens only) | |
| Auto Gain Control On/Off switch | |
| Back Light Comp. On/Off switch | |
| Line Lock On/Off switch for 24VAC | |
| Gamma Correction 0.45 | |
| Video Output 1.0Vp-p,75ohm | |
| Power Source 12VDC+/-10%, 24VAC+/-10% | |
| Power Consumption 5W Max. (15W when heater active; thermostatically controlled) | |
| Sync. Mode | Internal Sync. /Line lock (Only AC24V) |
| Dimensions | 130 (W) x 130 (D) x 98.9 (H) mm / 5.2" (W) x 5.2" (D) x 3.95" (H) |
| Lens | Board lens f=3.6, F=2.0Vari-focal f=3.6~9mm, F=1.6Vari-focal f=9~22mm, F=1.6*Lens models and availability vary in different regions |
| Heater Auto Activated Temperature | 10°C, Heater optional |
| Operating Temperature | -46°C ~ 50°C ; -50.8°F~122°F( 20% ~ 80% humidity) |
| Weight | 1.7kg ; 3.7 lbs |
| Certifications | FCC/CE |
EverFocus Electronics Corp.
Head Office:
12F, No.79 Sec. 1 Shin-Tai Wu Road,
Hsi-Chih, Taipei, Taiwan
TEL: +886-2-26982334
FAX: +886-2-26982380
www.everfocus.com.tw
USA L.A. Office:
1801 Highland Ave. Unit A
Duarte, CA 91010, U.S.A.
TEL: +1-626-844-8888
FAX: +1-626-844-8838
www.everfocus.com
USA N.Y. Office:
415 Oser Avenue Unit S
Hauppauge, NY 11788
TEL: 631-436-5070
FAX: 631-436-5027
www.everfocus.com
Europe Office:
D-46446 Emmerich, Germany
TEL: 49-2822-9394-0
www.everfocus.de
China Office:
Room 609, Technology Trade Building,
Shangdi Information Industry Base, Haidian
District, Beijing, China 10085
TEL: +86-10-62973336/37/38/39
FAX: +86-10-62971423
www.everfocus.com.cn
Japan Office:
1809 WBG MARIBU East 18F,
2-6 Nakase.Mihama-ku.
Chiba city 261-7118, Japan
TEL: +81-43-212-8188
FAX: +81-43-297-0081
www.everfocus.com

Your EverFocus product is designed and manufactured with high quality materials and components which can be recycled and reused.
This symbol means that electrical and electronic equipment, at their end-of-life, should be disposed of separately from your household waste.
Please, dispose of this equipment at your local community waste collection/recycling centre.
In the European Union there are separate collection systems for used electrical and electronic product.
Please, help us to conserve the environment we live in!