
Color LaserJet 3600N - Printer HP - Free user manual and instructions
Find the device manual for free Color LaserJet 3600N HP in PDF.


User questions about Color LaserJet 3600N HP
0 question about this device. Answer the ones you know or ask your own.
Ask a new question about this device
Download the instructions for your Printer in PDF format for free! Find your manual Color LaserJet 3600N - HP and take your electronic device back in hand. On this page are published all the documents necessary for the use of your device. Color LaserJet 3600N by HP.
USER MANUAL Color LaserJet 3600N HP
HP Color LaserJet 3000/3600/3800 Series printers User Guide

text_image
+hp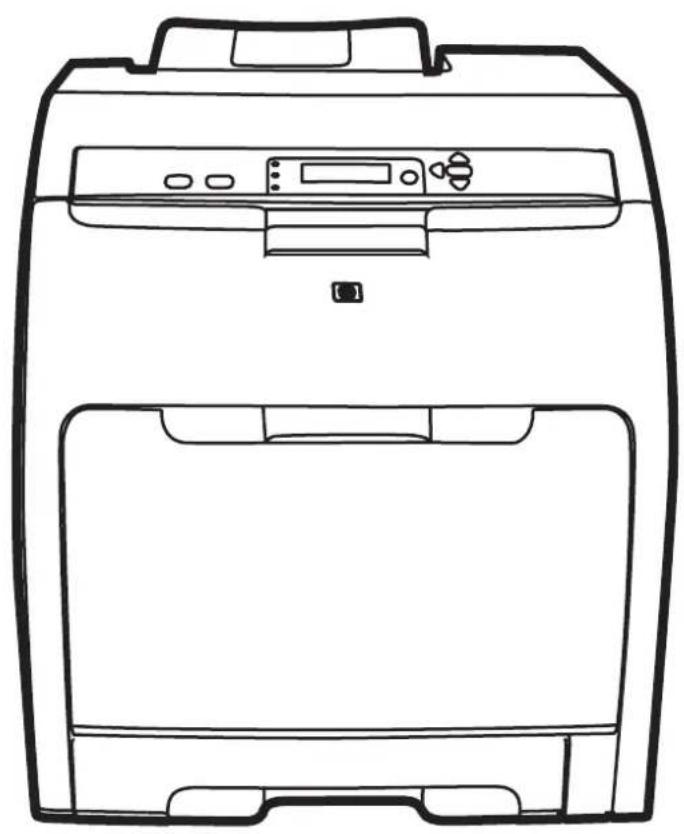
natural_image
Line drawing of a front view of a rectangular electronic device with control panel and display (no text or symbols)HP Color LaserJet 3000, 3600, and 3800 Series printers
User Guide
Copyright and License
© 2006 Copyright Hewlett-Packard Development Company, L.P.
Reproduction, adaptation, or translation without prior written permission is prohibited, except as allowed under the copyright laws.
The information contained herein is subject to change without notice.
The only warranties for HP products and services are set forth in the express warranty statements accompanying such products and services. Nothing herein should be construed as constituting an additional warranty. HP shall not be liable for technical or editorial errors or omissions contained herein.
Part number: Q5982-90971
Edition 1, 7/2006
Trademark Credits
Adobe® is a trademark of Adobe Systems Incorporated.
Arial® is a U.S. registered trademark of the Monotype Corporation.
CorelDRAW™ is a trademark or registered trademark of Corel Corporation or Corel Corporation Limited.
Microsoft® is a U.S. registered trademark of the Microsoft Corporation.
Windows® and MS Windows®, are U.S. registered trademarks of Microsoft Corp.
Netscape Navigator is a U.S. trademark of Netscape Communications Corporation.
Opera ^™ is a trademark of Opera Software ASA.
PANTONE® is Pantone, Inc's check-standard trademark for color.
PostScript® is a trademark of Adobe Systems Incorporated.
UNIX® is a registered trademark of The Open Group.
Energy Star® and the Energy Star® logo are U.S. registered marks of the United States Environmental Protection Agency.

HP Customer Care
Online Services
For 24-hour access to updated HP printer-specific software, product information, and support information using an Internet connection, go to the appropriate Web site.
HP Color LaserJet 3000 Series printer: www.hp.com/support/clj3000
HP Color LaserJet 3600 Series printer: www.hp.com/support/clj3600
HP Color LaserJet 3800 Series printer: www.hp.com/support/clj3800
Go to www.hp.com/support/net_printing for information about the HP Jetdirect external print server.
HP Instant Support Professional Edition (ISPE) is a suite of Web-based troubleshooting tools for desktop computing and printing products. Go to instantsupport.hp.com.
Telephone support
HP provides free telephone support during the warranty period. For the telephone number for your country/region, see the flyer that shipped with the printer, or visit www.hp.com/support/callcenters. Before calling HP, have the following information ready: the product name and serial number, the date of purchase, and a description of the problem.
Software utilities, drivers, and electronic information
HP Color LaserJet 3000 Series printer: www.hp.com/go/clj3000_software
HP Color LaserJet 3600 Series printer: www.hp.com/go/clj3600 software
HP Color LaserJet 3800 Series printer: www.hp.com/go/clj3800 software
The Web page for the drivers is in English, but you can download the drivers themselves in several languages.
HP direct ordering for accessories or supplies
United States: www.hp.com/sbso/product/supplies.
• Canada: www.hp.ca/catalog/supplies
• Europe: www.hp.com/supplies
• Asia-Pacific: www.hp.com/paper/
To order genuine HP parts or accessories, go to the HP Parts Store at www.hp.com/buy/parts (U.S. and Canada only), or call 1-800-538-8787 (U.S.) or 1-800-387-3154 (Canada).
HP service information
To locate HP-Authorized Dealers, call 1-800-243-9816 (U.S.) or 1-800-387-3867 (Canada).
Outside the United States and Canada, call the customer support number for your country/region. See the flyer that shipped in the box with the printer.
HP service agreements
Call 1-800-835-4747 (U.S.) or 1-800-268-1221 (Canada).
For extended service, call 1-800-446-0522.
The HP Easy Printer Care Software
To check the printer status and settings and view troubleshooting information and online documentation, use the HP Easy Printer Care Software. You must have performed a complete software installation in order to use the HP Easy Printer Care Software. See Using the HP Easy Printer Care Software.
HP support and information for Macintosh computers
Go to www.hp.com/go/macosx for Macintosh OS X support information and HP subscription service for driver updates.
Go to www.hp.com/go/mac-connect for products that are designed specifically for the Macintosh user.
Table of contents
1 Printer basics
Quick access to printer information 2
Printers at a glance 3
HP Color LaserJet 3000 Series printer 3
HP Color LaserJet 3600 Series printer 4
HP Color LaserJet 3800 Series printer 4
Features at a glance 5
Walkaround 7
Printer software 9
HP Color LaserJet 3000 Series printer and HP Color LaserJet 3800 Series printer drivers ...... 9
HP Color LaserJet 3600 Series printer drivers 9
Additional drivers 10
Opening the printer drivers 11
Software for networks 11
HP Web Jetadmin 12
UNIX 12
Linux 12
Utilities 12
HP Easy Printer Care Software 12
Embedded Web server 12
Features 13
Other components and utilities 13
Print-media specifications 14
Supported media types 14
Supported media sizes 15
2 Control panel
Control-panel overview 18
Control-panel indicator lights 19
Display 19
Using the control-panel menus 21
To use the menus 21
Retrieve Job menu 22
Information menu 23
Paper Handling menu 24
Configure Device menu 25
Printing sub-menu 25
Print Quality sub-menu 27
System Setup sub-menu 28
I/O sub-menu 31
Resets sub-menu 31
Diagnostics menu 33
Changing printer control-panel configuration settings 34
Tray Behavior menu options 34
To set the Use Requested Tray feature 34
To set the Manually Feed Prompt feature 35
To set the PS Defer Media feature 35
To set the Use Another Tray feature 35
To set the Size/Type Prompt feature 35
To set the Duplex Blank Pages feature 36
Sleep Delay and Sleep Mode features 36
To set the Sleep Delay feature 36
To disable or enable the Sleep Mode feature 37
Display Brightness feature 37
To set the Display Brightness feature 37
Personality feature 37
To set the Personality feature 37
ClearableWarnings feature 38
To set the Clearable Warnings feature 38
Auto Continue feature 38
To set the Auto Continue feature 38
Replace Supplies feature 39
To set the Replace Supplies feature 39
Jam Recovery feature 39
To set the Jam Recovery feature 39
Language feature 40
To select a language 40
Using the printer control panel in shared environments 41
3 I/O configuration
USB configuration 44
Connecting the USB cable 44
Network configuration 45
Manually configuring TCP/IP parameters from the printer control panel 45
Setting an IP address 45
Setting the subnet mask 45
Setting the default gateway 46
Disabling network protocols (optional) 46
To disable IPX/SPX 47
To disable AppleTalk 47
To disable DLC/LLC 47
Enhanced I/O (EIO) configuration 48
HP Jetdirect EIO print servers 48
4 Printing tasks
Controlling print jobs 50
Source 50
Type and Size 50
Priority for print settings 50
Gaining access to printer driver settings 51
Selecting print media 52
Paper to avoid 52
Paper that can damage the printer 52
Configuring trays 54
Configuring size 54
Configuring type 54
Configuring tray 1 for custom paper 54
Configuring tray 2 or tray 3 for custom paper 55
Printing from tray 1 (multipurpose tray) 56
Loading paper into tray 1 57
Printing envelopes from tray 1 59
To load envelopes into tray 1 59
Printing envelopes 60
Printing from tray 2 and tray 3 61
Loading tray 2 61
Loading tray 3 64
Automatic media type sensing (auto sense mode) 67
Tray 1 sensing 67
Tray 2 or tray 3 sensing 68
Using features in the Windows printer driver 69
Creating and using quick sets 69
Using watermarks 70
Resizing documents 70
Setting a custom paper size from the printer driver 70
Using different paper and printing covers 71
Printing a blank first page 71
Printing multiple pages on one sheet of paper 71
Setting the color options 72
Using the HP Digital Imaging Options dialog box 72
Using the Services tab 73
Using features in the Macintosh printer driver 74
Creating and using presets in Mac OS X 74
Printing a cover page 74
Printing multiple pages on one sheet of paper 75
Setting the color options 75
Printing on special media 76
Transparencies 76
Glossy paper 76
Colored paper 76
Envelopes 77
Labels 77
Heavy paper 77
HP LaserJet Tough paper 78
Preprinted forms and letterhead 78
Recycled paper 78
Using 2-sided (duplex) printing .... 79
Automatic 2-sided printing .... 79
Control-panel settings for automatic 2-sided printing 80
To turn 2-sided printing on or off from the control panel 80
Options for binding 2-sided printing jobs 80
Manual 2-sided printing 80
Managing special printing situations 82
Printing a different first page 82
Printing on custom-size media 82
Stopping a print request 82
To stop the current print job from the printer control panel 82
To stop the current print job from the software program 82
Managing stored jobs 84
Managing memory 85
5 Managing the printer
Using printer information pages 88
Configuring e-mail alerts 90
Using the embedded Web server 91
To access the embedded Web server by using a network connection 91
Embedded Web server sections 91
Using the HP Easy Printer Care Software 94
Supported operating systems 94
To use the HP Easy Printer Care Software 94
HP Easy Printer Care Software sections 94
Using the HP Printer Utility for Macintosh 96
Opening the HP Printer Utility 96
HP Printer Utility features 96
6 Color
Using color 100
HP ImageREt 100
Media selection 100
Color options 100
Standard red-green-blue (sRGB) 100
Printing in four colors (CMYK) 101
CMYK ink-set emulation (PostScript only) 101
Managing color 102
Print in Grayscale 102
Automatic or manual color adjustment 102
Manual color options 102
Restricting color printing 103
Matching colors 105
Sample book color matching 105
Printing color samples 105
7 Maintenance
Managing supplies 108
Supplies life 108
Approximate print-cartridge replacement intervals 108
Checking the print-cartridge life 108
Print-cartridge storage 109
HP print cartridges 110
Non-HP print cartridges 110
Print-cartridge authentication 110
HP fraud hotline and Web site 110
Replacing supplies and parts 111
Supply replacement guidelines .... 111
Changing print cartridges 111
To change the print cartridge 112
Cleaning the printer 115
To clean the printer using the printer control panel 115
8 Problem solving
Basic troubleshooting checklist 118
Factors that affect printer performance 118
Control-panel message types 119
Control-panel messages 120
Jams 136
Jam recovery 136
Common causes of jams 138
Clearing jams 139
Paper-handling problems 149
Troubleshooting-information pages 154
Printer response problems 155
Printer control-panel problems 158
Color-printing problems 159
Incorrect printer output 161
Printer output problems 161
Guidelines for printing with different fonts 162
Macintosh problems 163
Solving problems with Mac OS V9.x 163
Solving problems with Mac OS X 165
Software program problems 168
Print-quality troubleshooting 169
Print-quality problems associated with media 169
Overhead transparency defects 169
Print-quality problems associated with the environment 170
Print quality problems associated with jams 170
Print-quality problems associated with toner buildup inside the printer 170
Print-quality-troubleshooting pages 170
Calibrating the printer 171
Appendix A Supplies and accessories
Parts and supplies 174
Ordering by using the embedded Web server 176
Appendix B Service and support
Hewlett-Packard limited warranty statement 178
Print cartridge limited warranty statement 179
HP maintenance agreements 180
On-site service agreements 180
Next-day on-site service 180
Weekly (volume) on-site service 180
Extended warranty 180
Repacking the printer 181
Appendix C Printer specifications
Physical specifications 183
Electrical specifications 184
Power-consumption specifications 185
Acoustic specifications 186
Operating-environment specifications 187
Appendix D Regulatory information
FCC regulations 190
Environmental product stewardship program 191
Protecting the environment 191
Power consumption 191
Toner consumption 191
Paper use 191
Plastics 191
HP LaserJet printing supplies 191
HP printing supplies returns and recycling program information 192
Paper 192
Material restrictions 192
Disposal of waste equipment by users in private households in the European Union .... 193
Material Safety Data Sheet (MSDS) 193
Extended warranty 193
For more information 193
Declaration of conformity (HP Color LaserJet 3000 series) 194
Declaration of conformity (HP Color LaserJet 3600 series and HP Color LaserJet 3800 series) .... 195
Safety statements 196
Laser safety 196
Canadian DOC regulations 196
EMI statement (Korea) 196
VCCI statement (Japan) 196
Power cord statement (Japan) 196
Laser statement for Finland 197
Appendix E Working with memory
Printer memory 199
Installing memory DIMMs 200
To install memory and font DIMMs 200
Enabling memory 202
To enable memory for Windows 202
Checking DIMM installation 203
To check DIMM installation 203
Glossary 205
Index 207
1 Printer basics
This chapter contains basic information about the printer features:
• Quick access to printer information
- Printers at a glance
- Features at a glance
Walkaround
Printer software
• Print-media specifications
Quick access to printer information
Several references are available for use with this printer.
HP Color LaserJet 3000 Series printer: www.hp.com/support/clj3000.
HP Color LaserJet 3600 Series printer: www.hp.com/support/clj3600.
HP Color LaserJet 3800 Series printer: www.hp.com/support/clj3800.
The following table lists available printer guides and the type of information that they include.
Table 1-1 Printer guides
| Guide Description | |
| Getting started guide | Provides step-by-step instructions for installing and setting up the printer. |
| HP Jetdirect Embedded Print Server Administrator's Guide | Provides instructions to configure and troubleshoot the HP Jetdirect print server. |
| Accessory and consumable installation guides | Provide step-by-step instructions for installing the accessories and supplies. (These guides are supplied with the optional printer accessories and supplies.) |
| User guide | Provides detailed information for using and troubleshooting the printer. Available on the printer CD. |
| Online Help | Provides information about options that are available in the printer drivers. To view a Help file, open the online Help through the printer driver. |
Printers at a glance
The HP Color LaserJet 3000, 3600, and 3800 Series printers are available in the configurations described below.
HP Color LaserJet 3000 Series printer
Table 1-2 HP Color LaserJet 3000 Series printer configurations
| HP Color LaserJet 3000 printer HP Color LaserJet 3000n printer | HP Color LaserJet 3000dn printer | HP Color LaserJet 3000dtn printer | |
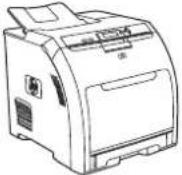 | 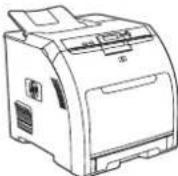 | 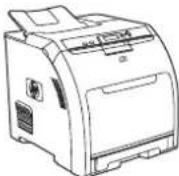 | 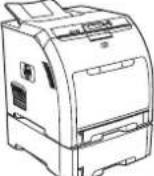 |
| • Prints up to 30 pages-per-minute (ppm) on letter-size media or 29 ppm on A4-size media in monochrome (black and white) and 15 ppm in color.• 100-sheet multipurpose tray (tray 1) and 250-sheet input tray (tray 2)• Hi-Speed universal serial bus (USB) 2.0 port and enhanced input/output (EIO) slot• 64 megabytes (MB) of random access memory (RAM) | HP Color LaserJet 3000 printer, plus:• 128 MB RAM• HP Jetdirect full-featured embedded print server to connect to 10Base-T/100Base-TX networks | HP Color LaserJet 3000 printer, plus:• 256 MB RAM• HP Jetdirect full-featured embedded print server to connect to 10Base-T/100Base-TX networks• Automatic 2-sided (duplex) printing | HP Color LaserJet 3000 printer, plus:• 256 MB RAM• HP Jetdirect full-featured embedded print server to connect to 10Base-T/100Base-TX networks• Automatic 2-sided (duplex) printing• 500-sheet input tray (tray 3) |
HP Color LaserJet 3600 Series printer
Table 1-3 HP Color LaserJet 3600 Series printer configurations
| HP Color LaserJet 3600 printer | HP Color LaserJet 3600n printer | HP Color LaserJet 3600dn printer |
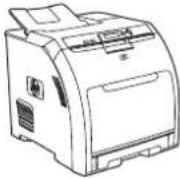 | 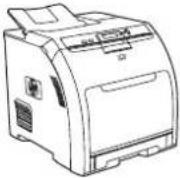 | 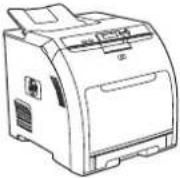 |
| 17 ppm print speed100-sheet multipurpose tray(tray 1) and 250-sheet input tray(tray 2)Hi-Speed USB 2.0 port64 MB RAM | HP Color LaserJet 3600 printer, plus:HP Jetdirect value-featured embedded print server to connect to 10Base-T/100Base-TX networks | HP Color LaserJet 3600 printer, plus:128 MB RAMAutomatic 2-sided (duplex) printingHP Jetdirect value-featured embedded print server to connect to 10Base-T/100Base-TX networks |
HP Color LaserJet 3800 Series printer
Table 1-4 HP Color LaserJet 3800 Series printer configurations
| HP Color LaserJet 3800 printer HP Color LaserJet 3800n printer | HP Color LaserJet 3800dn printer | HP Color LaserJet 3800dtn printer | |
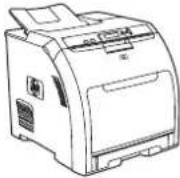 | 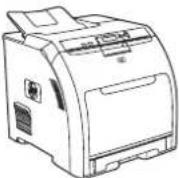 | 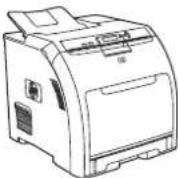 | 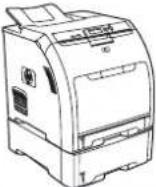 |
| 22 ppm (letter-size) or 21 ppm (A4) print speed | HP Color LaserJet 3800 printer, plus: | HP Color LaserJet 3800 printer, plus: | HP Color LaserJet 3800 printer, plus: |
| 100-sheet multipurpose tray (tray 1) and 250-sheet input tray (tray 2) | 160 MB RAM | 288 MB RAM | 288 MB RAM |
| Hi-Speed USB 2.0 port and EIO slot | HP Jetdirect full-featured embedded print server to connect to 10Base-T/100Base-TX networks | Automatic 2-sided (duplex) printing | Automatic 2-sided (duplex) printing |
| 96 megabytes (MB) of random access memory (RAM) | HP Jetdirect full-featured embedded print server to connect to 10Base-T/100Base-TX networks | HP Jetdirect full-featured embedded print server to connect to 10Base-T/100Base-TX networks | |
| 500-sheet input tray (tray 3). | |||
Features at a glance
Table 1-5 Features
| Feature HP Color LaserJet 3000 Series printer | HP Color LaserJet 3600 Series printer | HP Color LaserJet 3800 Series printer | |
| Performance | 533 MHz processor | 360 MHz processor | 533 MHz processor |
| User interface | Graphic displayControl-panel helpHP Easy Printer Care Software (a Web-based status and troubleshooting tool)Windows and Macintosh printer driversEmbedded Web server to gain access to support and to order supplies (administrator tool for network-connected models only) | Graphic displayControl-panel helpHP Easy Printer Care Software (a Web-based status and troubleshooting tool)Windows and Macintosh printer drivers | Graphic displayControl-panel helpHP Easy Printer Care Software (a Web-based status and troubleshooting tool)Windows and Macintosh printer driversEmbedded Web server to gain access to support and to order supplies (administrator tool for network-connected models only) |
| Printer drivers | HP PCL 5cHP PCL 6PostScript® 3 emulation | HP JetReady 4.2 | HP PCL 5cHP PCL 6PostScript 3 emulation |
| Storage features | Fonts, forms, and other macrosJob retention | None | Fonts, forms, and other macrosJob retention |
| Fonts | 80 internal fonts available for both PCL and PostScript 3 emulation80 printer-matching screen fonts in TrueType format available with the software solution | None | 80 internal fonts available for both PCL and PostScript 3 emulation80 printer-matching screen fonts in TrueType format available with the software solution |
| Accessories | Optional 500-sheet input tray (tray 3) (standard on the HP Color LaserJet 3000dtn printer)Dual inline memory modules (DIMM) | Optional 500-sheet input tray (tray 3) | Optional 500-sheet input tray (tray 3) (standard on the HP Color LaserJet 3800dtn printer)Dual inline memory modules (DIMM) |
| Connectivity | Hi-Speed USB 2.0 cable interfaceHP Jetdirect full-featured embedded print server (standard on the HP Color LaserJet 3000n, 3000dn, and 3000dtn printers)HP Web Jetadmin software (standard on the HP Color LaserJet 3000n, 3000dn, and 3000dtn printers)Enhanced input/output (EIO) slot | Hi-Speed USB 2.0 cable interfaceHP Jetdirect value-featured embedded print server (standard on the HP Color LaserJet 3600n and 3600dn printers)HP Web Jetadmin software (standard on the HP Color LaserJet 3600n and 3600dn printers) | Hi-Speed USB 2.0 cable interfaceHP Jetdirect full-featured embedded print server (standard on the HP Color LaserJet 3800n, 3800dn, and 3800dtn printers)HP Web Jetadmin software (standard on the HP Color LaserJet 3800n, 3800dn, and 3800dtn printers)Enhanced input/output (EIO) slot |
| Environmental features | Sleep Mode setting | ||
| High content of recyclable components and materials | |||
| Energy Star® qualified | |||
| Supplies | Supplies status page contains information about toner level, page count, and estimated pages remaining. | ||
| No-shake cartridge design | |||
| Printer checks for authentic HP print cartridges at cartridge installation. | |||
| Internet-enabled supply-ordering capabilities (using HP Easy Printer Care Software) | |||
| Accessibility | The online user guide is compatible with text screen-readers. | ||
| Print cartridges can be installed and removed by using one hand. | |||
| All doors and covers can be opened by using one hand. | |||
| Media can be loaded in tray 1 by using one hand. | |||
Walkaround
The following illustrations identify the locations and names of key printer components.
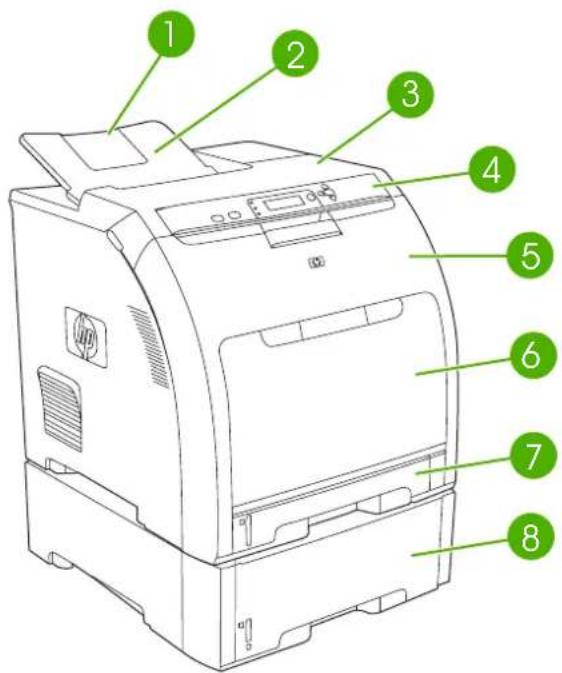
text_image
Diagram of a HP printer with numbered parts labeled 1 through 8Figure 1-1 Front view (shown with optional 500-sheet paper feeder)
1 Output bin extender
2 Output bin
3 Top cover
4 Printer control panel
5 Front door
6 Tray 1 (holds 100 sheets of standard paper)
7 Tray 2 (holds 250 sheets of standard paper)
8 Tray 3 (optional; holds 500 sheets of standard paper)
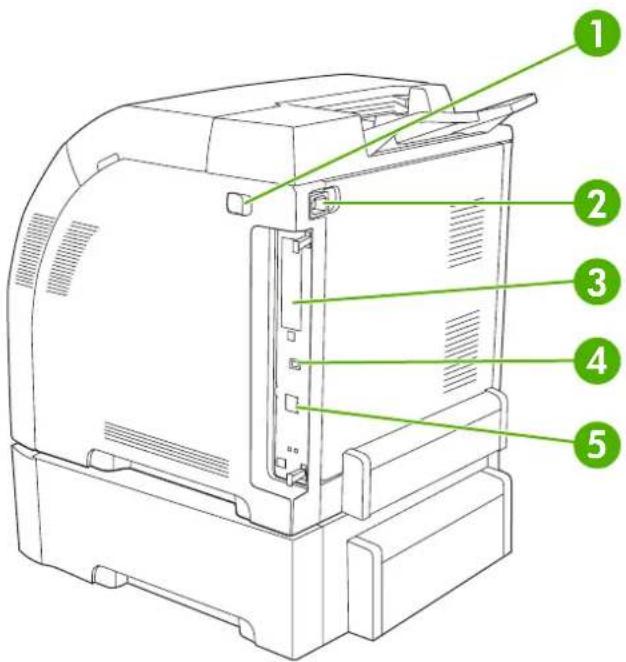
text_image
Technical diagram of a printer with numbered parts labeled 1 to 5Figure 1-2 Back and side view
| 1 On/off switch | |
| 2 Power connection | |
| 3 | EIO slot (available on the HP Color LaserJet 3000 and 3800 Series printers) |
| 4 Hi-Speed USB 2.0 port | |
| 5 | Network port (available on the HP Color LaserJet 3000n, 3000dn, 3000dtn, 3600n, 3600dn, 3800n, 3800dn, and 3800dtn printers) |
Printer software
The printing-system software is included with the printer. See the getting started guide for installation instructions.
The printing system includes software for end users and network administrators, and printer drivers for access to the printer features and communication with the computer.

NOTE For a list of the network environments that the network-administrator software components support, see Network configuration.
For a list of printer drivers and updated HP printer software for the HP Color LaserJet 3000 Series printer, go to www.hp.com/go/clj3000_software. For the HP Color LaserJet 3600 Series printer, go to www.hp.com/go/clj3600_software. For the HP Color LaserJet 3800 Series printer, go to www.hp.com/go/clj3800_software.
HP Color LaserJet 3000 Series printer and HP Color LaserJet 3800 Series printer drivers
The HP Color LaserJet 3000 and 3800 Series printers use the PCL 5c, PCL 6, and PostScript 3 emulation PDL drivers.

NOTE For Windows 2000, Windows XP, and Windows Server 2003, the HP Color LaserJet 3000 and 3800 Series printers include a monochrome PCL 6 driver that can be installed for users who will be printing only black-and-white print jobs.
Table 1-6 Printer drivers for the HP Color LaserJet 3000 and 3800 Series printers
| Operating system1 | PCL 5c PCL 6 | 2 | PS 3 emulation |
| Windows 98, Windows Me | √ | √ | √ |
| Windows 20003 | √ | √ | √ |
| Windows XP (32-bit)4 | √ | √ | √ |
| Windows Server 2003 (32-bit) | √ | √ | √ |
| Windows Server 2003 (64-bit) | √ | √ | √ |
| Mac OS v9.1 and later, and OS X v10.2 and later | √ |
1 Not all printer features are available from all drivers or operating systems.
^2 The HP Color LaserJet 3000 and 3800 Series printers include both a monochrome and color PCL 6 driver for Windows 2000, Windows XP, and Windows Server 2003 users.
3 For Windows 2000 and Windows XP (32-bit and 64-bit), download the PCL 5 driver from www.hp.com/go/clj3000_software or www.hp.com/go/clj3800_software.
For Windows XP (64-bit), download the PCL 6 driver from www.hp.com/go/clj3000_software or www.hp.com/go/clj3800_software.
HP Color LaserJet 3600 Series printer drivers
The HP Color LaserJet 3600 Series printer uses the HP JetReady 4.2 Page Description Language (PDL), a host-based printer language. HP JetReady 4.2 uses the combined power of the computer and
the printer to render the printed page in a Windows or Macintosh system environment. HP JetReady 4.2 transfers the prerendered pages from the host computer to the printer and communicates instructions to the printer about how to convert the pages to data that can be printed.
The HP JetReady 4.2 PDL driver is available on the installation CD for the following operating systems:
• Windows 98, Windows Millenium Edition (Me)
Windows 2000
• Windows XP (32-bit and 64-bit)
• Windows Server 2003 (32-bit and 64-bit)
• Macintosh OS X v10.2 and later

NOTE Not all printer features are available from all drivers or operating systems.
If your system did not automatically check the Internet for the latest drivers during software installation, download them from www.hp.com/go/clj3600_software.
Additional drivers
The following drivers are not included on the CD, but are available from www.hp.com/go/clj3000_software or www.hp.com/go/clj3800_software. These drivers are for the HP Color LaserJet 3000 and 3800 Series printers only.
- UNIX® model scripts
Linux drivers
OS/2 PS and PCL printer driver

NOTE The OS/2 drivers are available from IBM and are packaged with OS/2. They are not available for Traditional Chinese, Simplified Chinese, Korean, and Japanese languages.
Opening the printer drivers
| Operating System To change the settings for all print jobs until the software program is closed | To change the default settings for all print jobs | To change the product configuration settings | |
| Windows 98 and Me | 1. On the File menu in the software program, click Print.2. Select the driver, and then click Properties.The steps can vary; this procedure is most common. | 1. Click Start, click Settings, and then click Printers.2. Right-click the driver icon, and then select Properties. | 1. Click Start, click Settings, and then click Printers.2. Right-click the driver icon, and then select Properties.3. Click the Configure tab. |
| Windows 2000, XP, and Server 2003 | 1. On the File menu in the software program, click Print.2. Select the driver, and then click Properties or Preferences.The steps can vary; this procedure is most common. | 1. Click Start, click Settings, and then click Printers or Printers and Faxes.2. Right-click the driver icon, and then select Printing Preferences. | 1. Click Start, click Settings, and then click Printers or Printers and Faxes.2. Right-click the driver icon, and then select Properties.3. Click the Device Settings tab. |
| Mac OS 9.1 or later (HP Color LaserJet 3000 and 3800 Series printers only) | 1. On the File menu, click Print.2. Change the settings that you want on the various pop-up menus. | 1. On the File menu, click Print.2. As you change settings on the pop-up menu, click Save Settings. | 1. Click the desktop printer icon.2. From the Printing menu, click Change Setup. |
| Mac OS X V10.2 and V10.3 | 1. On the File menu, click Print.2. Change the settings that you want on the various pop-up menus. | 1. On the File menu, click Print.2. Change the settings that you want on the various pop-up menus.3. On the Presets pop-up menu, click Save as and type a name for the preset.These settings are saved in the Presets menu. To use the new settings, you must select the saved preset option every time you open a program and print. | 1. In the Finder, on the Go menu, click Applications.2. Open Utilities, and then open Print Center (Mac OS X V10.2) or Printer Setup Utility (Mac OS X V10.3).3. Click on the print queue.4. On the Printers menu, click Show Info.5. Click the Installable Options menu. NOTE Configuration settings might not be available in Classic mode. NOTE Configuration settings might not be available in Classic mode. |
Software for networks
For a summary of available HP network installation and configuration software solutions, see the HP Jetdirect Embedded Print Server Administrator's Guide. You can find this guide on the printer CD.
HP Web Jetadmin
HP Web Jetadmin is a browser-based management tool for HP Jetdirect-connected printers within your intranet, and it should be installed only on the network administrator's computer.
To download a current version of HP Web Jetadmin and for the latest list of supported host systems, visit www.hp.com/go/webjetadmin.
When installed on a host server, any client can gain access to HP Web Jetadmin by using a supported Web browser (such as Microsoft Internet Explorer 4.x or Netscape Navigator 4.x or later) by navigating to the HP Web Jetadmin host.
UNIX
For HP-UX and Solaris networks, go to www.hp.com/support/net_printing to download the HP Jetdirect printer installer for UNIX.

NOTE The HP Color LaserJet 3600 Series printer does not support UNIX printing.
Linux
For information, go to www.hp.com/go/linuxprinting.
Utilities
The HP Color LaserJet 3000, 3600, and 3800 Series printers are equipped with several utilities that make it easy to monitor and manage the printer on a network.
HP Easy Printer Care Software
The HP Easy Printer Care Software is a software program that you can use for the following tasks:
- Checking the printer status
• Checking the supplies status - Setting up alerts
• Viewing printer documentation
• Gaining access to troubleshooting and maintenance tools
You can view the HP Easy Printer Care Software when the printer is directly connected to your computer or when it is connected to a network. Perform a complete software installation in order to use the HP Easy Printer Care Software.
Embedded Web server

NOTE The HP Color LaserJet 3600 Series printer embedded Web server provides network configuration and status information only.
The printers are equipped with an embedded Web server, which allows access to information about printer and network activities. This information appears in a Web browser, such as Microsoft Internet Explorer or Netscape Navigator.
The embedded Web server resides on the printer. It is not loaded on a network server.
The embedded Web server provides an interface to the printer that anyone who has a network-connected computer and a standard Web browser can use. No special software is installed or configured, but you must have a supported Web browser on your computer. To gain access to the embedded Web server, type the IP address for the printer in the address line of the browser. (To find the IP address, print a configuration page. For more information about printing a configuration page, see Using printer information pages.)
Features
Use the HP embedded Web server for the following tasks:
• View printer status information
• Determine the remaining life on all supplies and order new ones
• View and change tray configurations
• View and change the printer control panel menu configuration
• View and print internal pages
- Set up e-mail notification for certain printer and supplies events
• Add or customize links to other Web sites
- Select the language in which to display the embedded Web server pages
• View and change network configuration
• Control access to color printing features (HP Color LaserJet 3000 Series printer only)
• View support content that is printer-specific and specific to the current printer state
For a complete explanation of the features and functionality of the embedded Web server, see Using the embedded Web server.
Other components and utilities
Several software programs are available for Windows and Macintosh users.
Windows Macintosh OS
| Software installer — automates the printing system installation | PostScript Printer Description files (PPDs) — for use with the Apple PostScript drivers that come with the Mac OS |
| Online Web registration | The HP Printer Utility—allows you to change printer settings from a Mac. This utility is supported for Mac OS X v10.2 and v10.3. |
Print-media specifications
For optimum results, HP recommends using HP media that is designed for HP Color LaserJet printers. Use media with a weight between 75 g/m^2 to 120 g/m^2 (20 to 32 lb bond). Although the printer supports media with weights between 60 g/m^2 to 220 g/m^2 (16 to 58 lb bond), using lighter or heavier media could impact the paper-jam rate and the optimal print-quality performance.
Always use the correct media-type setting in the printer driver, and configure the trays for the correct media type. HP recommends testing any paper before buying it in large quantities.
Supported media types
Table 1-7 Tray 1 media types
| Type | Dimensions | Weight or thickness | Capacity ^1 |
| Plain Minimum: 76 x 127 mm (3 x 5 in) | 60 to 163 g/m ^2 (16 to 43 lb bond) | 100 sheets | |
| Glossy paper HP Color LaserJet 3600 and 3800 m ^2 (8.5 x 14 in) | 220 g/m ^2 (20 to 58 lb bond) | 60 sheets | |
| HP Color LaserJet 3000: 75 to 120 g/m ^2 (20 to 32 lb bond) | |||
| Transparencies ^2 | 0.12 to 0.13 mm thick (4.7 to 5 mils thick) | 60 sheets | |
| Envelopes | 60 to 90 g/m ^2 (16 to 24 lb bond) | 10 envelopes | |
| Labels | 75 to 163 g/m ^2 (20 to 43 lb bond) | 60 sheets | |
| Cardstock | 163 to 220 g/m ^2 (43 to 58 lb cover) | 60 sheets | |
Capacity can vary depending on media weight and thickness and environmental conditions. Smoothness should be 100 to 250 (Sheffield). For ordering information, see Supplies and accessories.
^2 Use only transparencies that are designed for use with HP Color LaserJet printers. This printer can detect transparencies that were not designed for use with HP Color LaserJet printers. For more information, see Print Quality sub-menu.
Table 1-8 Tray 2 and tray 3 media types
| Type | Dimensions | Weight or thickness | Tray 2 capacity1 | Tray 3 capacity1 |
| Plain Minimum: 148 x 210 mm (5.83 x 8.27 in) | 60 to 120 g/m2(16 to 32 lb bond) | 250 sheets 500 sheets | ||
| Glossy paper | Maximum: 215.9 x 355.6 mm (8.5 x 14 in) | 106 to 120 g/m2(28 to 32 lb bond) | 100 sheets 200 sheets | |
| Transparencies2 | 0.12 to 0.13 mm thick (4.7 to 5 mils thick) | 50 sheets 100 sheets | ||
| Labels | 75 to 163 g/m2(20 to 43 lb bond) | 50 sheets 100 sheets | ||
The printer supports a wide range of standard and custom sizes of print media. Capacity can vary depending on media weight and thickness and environmental conditions. Smoothness should be 100 to 250 (Sheffield). For ordering information, see Supplies and accessories.
^2 Use only transparencies that are designed for use with HP Color LaserJet printers. This printer can detect transparencies that were not designed for use with HP Color LaserJet printers. For more information, see Print Quality sub-menu.
Supported media sizes
Table 1-9 Supported media sizes
| Input tray | Letter | Legal | A4 | A5 | 8.5 x 13 | Executive (JIS) | B5 (JIS) Custom Statement Envelope | 1 | |||
| Tray 1 |  | [DX80] |  | [3TDS] |  | [ZHXY] |  |  |  |  | |
| Tray 2, tray 3 | [24HY] | [ATY2] | [H083] |  |  |  |  |  | |||
1 Supported envelope sizes are #10, Monarch, C5, DL, and B5.
Table 1-10 Automatic 2-sided printing ^1
| Media size Dimensions Weight and thickness | |
| Letter 216 x 279 mm (8.5 x 11 in) | 60 to 120 g/m ^2 (16 to 32 lb bond) |
| Legal 216 x 356 mm (8.5 x 14 in) | |
| A4 210 x 297 mm (8.3 x 11.7 in) | |
| 8.5 x 13 216 x 330 mm (8.5 x 13 in) | |
1 Automatic 2-sided printing on weights heavier than those shown can produce unexpected results.

NOTE Automatic 2-sided (duplex) printing is available with the HP Color LaserJet 3000dn, 3000dtn, 3600dn, 3800dn, and 3800dtn printers.
Manual 2-sided printing. Most of the supported media sizes and types listed for printing from tray 1 can be manually duplexed. See Using 2-sided (duplex) printing for more information.
2 Control panel
This chapter contains information about the printer control panel, which provides controls for printer functions and communicates information about the printer and print jobs.
• Control-panel overview
• Using the control-panel menus
- Retrieve Job menu
• Information menu
• Paper Handling menu
- Configure Device menu
• Diagnostics menu
• Changing printer control-panel configuration settings
• Using the printer control panel in shared environments
Control-panel overview
The control panel provides controls for printer functions and shows messages about the printer, print jobs, and supplies status.
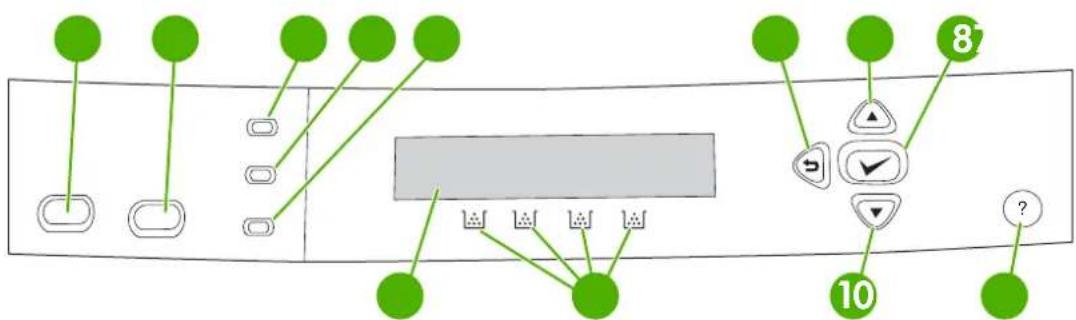
text_image
Diagram of a device control panel with labeled buttons and indicator lights, showing green circular markers and numbered labels 8' and 10'.Figure 2-1 Control panel buttons and lights
| Number Button or light Function | ||
| 1 | Stop button | Halts the current job, presents a choice to resume or cancel the current print job, clears media from the printer, and clears any continuable errors that are associated with the halted job. If the printer is not printing a job, pressing Stop pauses the printer. |
| 2 | Menu button | Opens and closes menus. |
| 3 | Ready light | Indicates that the printer is online or offline. See Control-panel indicator lights. |
| 4 | Data light | Indicates whether or not the printer is receiving data. See Control-panel indicator lights. |
| 5 | Attention light | Indicates that a critical error has occurred. See Control-panel indicator lights. |
| 6 | Back arrow (→) button | Navigates backward in nested menus. |
| 7 | Up arrow (▲) button | Navigates menus and text, and increases the values of numerical items in the display. |
| 8 | Select (√) button | Makes selections, resumes printing after continuable errors, and overrides a non-HP print cartridge. |
| 9 | Help (?) button | Provides detailed information about printer messages or menus. |
| 10 | Down arrow (√) button | Navigates menus and text, and decreases the values of numerical items in the display. |
| 11 | Supplies gauge | Shows the print cartridge-consumption levels. See Display. |
| 12 | Display | Shows status information, menus, help information, and error messages. See Display. |
The printer communicates through the display and the lights on the lower part of the control panel. The display shows status information, as well as menus, help information, and error messages. The Ready, Data, and Attention lights provide at-a-glance information about the printer state.
You can perform most routine printing tasks from the computer through the printer driver or any software program. Use the control panel to access printer features not supported by the printer driver or software program. Any changes that you make from the computer will override the printer control-panel settings. For information about using the printer driver, see Printer software.
Control-panel indicator lights
| Indicator On Off Flashing | |||
| Ready(green) | Printer is online (can accept and process data). | Printer is offline (paused), or is turned off. | Printer is attempting to stop printing and go offline. This usually results from a user's request to pause the current job. |
| Data(green) | Processed data is present in the printer, but more data is needed to complete the job, or the job is paused or waiting for errors to be cleared. | Printer is not processing or receiving data. | Printer is processing and receiving data. |
| Attention(amber) | A critical error has occurred.Printer requires attention. | No conditions exist that require attention. | An error has occurred. Printer requires attention. |
Display
The printer display gives you complete, timely information about the printer and print jobs. Graphics illustrate levels of supplies. Menus provide access to printer functions and detailed information.
The top-level screen on the display has two areas: message/prompt and supplies gauge.
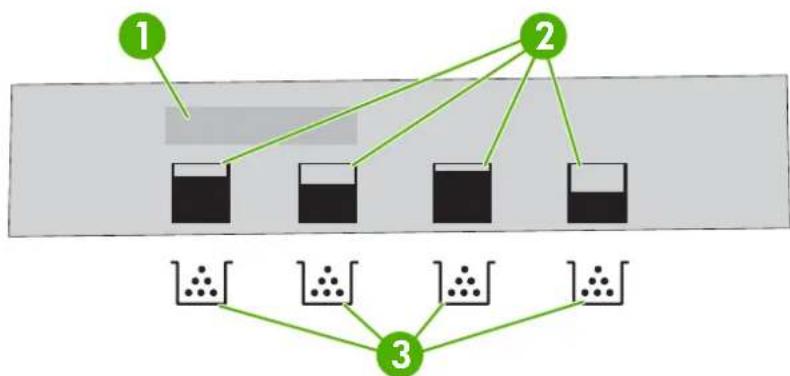
flowchart
graph TD
    A["1"] --> B["Bar 1"]
    C["2"] --> D["Bar 2"]
    E["3"] --> F["Bar 3"]
Figure 2-2 Printer display
1 Message/prompt area
2 Supplies gauge
3 Print cartridge colors from left to right: black, yellow, cyan, and magenta
The message and prompt areas of the display alert you to the state of the printer and tell you how to respond.
The supplies gauge shows the consumption levels of print cartridges (black, cyan, magenta, and yellow). When a non-HP print cartridge is installed, a ? might appear instead of the consumption level. The supplies gauge appears whenever the printer shows the Ready state, and whenever the printer shows a warning or error message concerning a cartridge.
Using the control-panel menus
To gain access to the control-panel menus, complete the steps below.
To use the menus
- Press Menu.
- Press ▲ or ▼ to navigate the listings.
- Press √ to select the appropriate option.
- Press → to return to the previous level.
- Press Menu to exit the menu.
- Press ? to see additional information about a menu.
The main menus are shown in the table below.
| Main menus | RETRIEVE JOB (HP Color LaserJet 3000 and 3800 Series printers only) |
| INFORMATION | |
| PAPER HANDLING | |
| CONFIGURE DEVICE | |
| DIAGNOSTICS | |
| SERVICE |
Retrieve Job menu

NOTE This feature is available for the HP Color LaserJet 3000 and 3800 Series printers only.
NOTE This menu appears only if the printer has a hard disk installed.
Use the RETRIEVE JOB menu to print or delete stored jobs from the control panel.
| Menu item Value Description | |
| ALL PRIVATE JOBSappears if you have more than one stored job protected by a personal identification number (PIN). | |
For more information about stored jobs, see Managing stored jobs.
Information menu
Use the INFORMATION menu to gain access to and print specific printer information.
| Sub-menu Description | |
| PRINT MENU MAP | Prints the control-panel menu map, which shows the layout and current settings of the control-panel menu items. See Using printer information pages. |
| PRINT CONFIGURATION Prints the printer configuration page. | |
| PRINT SUPPLIES STATUS PAGE | Prints information about toner level, page count, and estimated pages remaining. |
| SUPPLIES STATUS Shows the supplies status in a scrollable list. | |
| PRINT USAGE PAGE(HP Color LaserJet 3000 and 3800 Series printers only) | Prints a count of all media sizes that have passed through the printer; lists whether they were one-sided (simplex), 2-sided (duplex), monochrome (black and white), or color; and reports the page count. |
| PRINT COLOR USAGE JOB LOG(HP Color LaserJet 3000 and 3800 Series printers only) | Prints a report that shows the user name, application name and color usage information on a job-by-job basis. |
| PRINT DEMO Prints a demonstration page. | |
| PRINT RGB SAMPLES Prints an RGB color palette that can be used for color matching. | |
| PRINT CMYK SAMPLES(HP Color LaserJet 3000 and 3800 Series printers only) | Prints a CMYK color palette that can be used for color matching. |
| PRINT FILE DIRECTORY(HP Color LaserJet 3000 and 3800 Series printers only) | Prints the names and directory of files stored in the printer. |
| PRINT PCL FONT LIST(HP Color LaserJet 3000 and 3800 Series printers only) | Prints the available PCL fonts. |
| PRINT PS FONT LIST(HP Color LaserJet 3000 and 3800 Series printers only) | Prints the available PS (emulated PostScript) fonts. |
Paper Handling menu
Use the PAPER HANDLING menu to configure trays by size and type.

NOTE To configure the trays correctly, use this menu before you print for the first time.
| Menu item Value Description | ||
| TRAY 1 SIZE A list of available sizes appears. | Configures the paper size for tray 1. The default is ANY SIZE. See Supported media sizes for a complete list of available sizes. | |
| TRAY 1 TYPE A list of available types appears. | Configures the paper type for tray 1. The default is ANY TYPE. See Supported media sizes for a complete list of available types. | |
| TRAY 2 SIZE TRAY 3 SIZE | A list of available sizes appears. | Configures the paper size for tray 2 or tray 3. The default size is letter or A4, depending on the country/region. See Supported media sizes for a complete list of available sizes. |
| TRAY 2 TYPE TRAY 3 TYPE | A list of available types appears. | Configures the paper type for tray 2 or tray 3. The default is PLAIN. See Supported media sizes for a complete list of available types. |
Configure Device menu
Use the CONFIGURE DEVICE menu to change or reset the default print settings, to adjust the print quality, and to change the system configuration and I/O options. The five CONFIGURE DEVICE submenus are described in the sections below.
Printing sub-menu
These settings affect only jobs that do not have identified properties. Most jobs identify all of the properties and override the values that are set from this menu. This menu can also be used to set the default paper size and type.
| Menu item Values Description | ||
| COPIES | 1-32,000 | Sets the default number of copies. The default number of copies is 1. |
| DEFAULT PAPER SIZE | A list of available sizes appears. | Sets the default paper size. |
| DEFAULT CUSTOM PAPER SIZE | UNIT OF MEASUREX DIMENSIONY DIMENSION | Sets the default size for any custom job without dimensions. Available for tray 1. |
| DUPLEX(HP Color LaserJet 3000dn, 3000dtn, 3600dn, 3800dn, and 3800dtn printers only) | OFFON | Enables or disables the duplex function (automatic 2-sided printing).The default is OFF. You can override this setting in the printer driver. |
| DUPLEX BINDING(HP Color LaserJet 3000dn, 3000dtn, 3600dn, 3800dn, and 3800dtn printers only) | LONG EDGESHORT EDGE | Defines whether a duplex job will be flipped on the long edge or the short edge. You can override this setting in the printer driver. |
| OVERRIDE A4/LETTER | NOYES | Sets the printer to print an A4 job on letter-size paper when no A4 paper is loaded, or to print a letter-size job on A4 when no letter-size paper is loaded. The default is NO. |
| MANUAL FEED OFF | ON | The default is OFF. Setting it to ON makes MANUAL FEED the default for jobs that do not select a tray. You can override this setting in the printer driver. |
| COURIER FONT(HP Color LaserJet 3000 and 3800 Series printers only). | REGULARDARK | Selects a version of the Courier font. The default is REGULAR. |
| WIDE A4(HP Color LaserJet 3000 and 3800 Series printers only) | NOYES | Sets the printable area of A4 paper so that eighty 10-pitch characters can be printed on a single line. The default is NO. |
| PRINT PS ERRORS(HP Color LaserJet 3000 and 3800 Series printers only) | OFFON | Select ON to print emulated PostScript (PS) error pages. The default is OFF. |
| PRINT PDF ERRORS (HP Color LaserJet 3000 and 3800 Series printers only) | OFF | Select ON to print portable document format (PDF) error pages. The default is OFF. |
| ON | ||
| PCL FORM LENGTH | Configures settings for the printer control language. | |
| ORIENTATION | FORM LENGTH sets the number of lines per page. The default is 60. | |
| (HP Color LaserJet 3000 and 3800 Series printers only) | ORIENTATION determines long-edge versus short-edge page layout. The default is PORTRAIT. | |
| FONT SOURCE | FONT SOURCE selects the source of the font used on the printer control panel. The default is INTERNAL. FONT NUMBER is the number of the font you select. If this font is a contour font, use FONT PITCH to set the pitch of a fixed-space font. The default is 10.00. | |
| (HP Color LaserJet 3000 and 3800 Series printers only) | FONT POINT SIZE sets the size of fixed-space fonts. The default font is 12 points. | |
| FONT NUMBER | SYMBOL SET sets the symbol set used by the printer control panel. The default is PC-8. | |
| (HP Color LaserJet 3000 and 3800 Series printers only) | APPEND CR TO LF sets whether a carriage return is appended to each line feed in a backward-compatible PCL job. The default is NO. | |
| FONT PITCH | SUPPRESS BLANK PAGES sets whether jobs using PCL that include blank form feeds will automatically suppress the blank pages. YES indicates that form feeds will be ignored if the page is blank. | |
| (HP Color LaserJet 3000 and 3800 Series printers only) | The PCL5 MEDIA SOURCE MAPPING command selects an input tray by a number that maps to the various available trays. | |
| FONT POINT SIZE | ||
| (HP Color LaserJet 3000 and 3800 Series printers only) | ||
| SYMBOL SET | ||
| APPEND CR TO LF | ||
| SUPPRESS BLANK PAGES | ||
| (HP Color LaserJet 3000 and 3800 Series printers only) | ||
| MEDIA SOURCE MAPPING | ||
| (HP Color LaserJet 3000 and 3800 Series printers only) | ||
Print Quality sub-menu
Use this menu to adjust all aspects of print quality, including calibration, registration, and color half tone settings.
| Menu item Values Description | ||
| ADJUST COLOR HIGHLIGHTS | Modifies the half tone settings for each color. The default for each color is 0. | |
| MIDTONES | ||
| SHADOWS | ||
| RESTORE COLOR VALUES | ||
| SET REGISTRATION PRINT TEST PAGE | Shifts the margin alignment to center the image on the page from top to bottom, and left to right. You can also align the image that is printed on the front with the image that is printed on the back. | |
| SOURCE | ||
| ADJUST TRAY 1 | ||
| ADJUST TRAY 2 | ||
| ADJUST TRAY 3 | ||
| AUTO SENSE MODE TRAY 1 SENSING | If a tray is configured to PLAIN or ANY SIZE, and the print job does not specify the media type, the printer will adjust the print quality for the type of print media it senses. The default for tray 1 is FULL SENSING, which senses transparencies, glossy paper, and tough paper. | |
| TRAY >1 SENSING | ||
| PRINT MODES A list of media types appears. When you select a type, a list of available modes appears. | Associates each media type with a specific print mode. | |
| OPTIMIZE A list of parameters appears. | Optimizes certain parameters for all jobs rather than (or in addition to) optimizing by paper type. | |
| EDGE CONTROL | OFF | Controls how edges are printed. |
| (HP Color LaserJet 3000 and 3800 Series printers only) | LIGHT | |
| NORMAL | ||
| MAXIMUM | ||
| QUICK CALIBRATE NOW | Performs a limited printer calibration. | |
| FULL CALIBRATE NOW | Performs all printer calibrations to optimize print quality. | |
| DELAY CALIBRATION AT WAKE/POWER-ON | NO | Prints before the calibration process after turning on the printer or bringing it out of sleep mode. |
| YES | ||
| (HP Color LaserJet 3000 and 3800 Series printers only) | ||
| CREATE CLEANING PAGE | Prints a cleaning page to be used for cleaning the printer. This page contains instructions for processing the cleaning page. See Cleaning the printer for more information. | |
| (HP Color LaserJet 3000, 3000n, 3600, | ||
| Menu item Values Description | |
| 3600n, 3800, and 3800n printers only) | |
| PROCESS CLEANING PAGE | For duplexing printers, this command creates and processes the cleaning page. For non-duplexing printers, after the cleaning page is loaded in tray 1, this menu item processes the cleaning page that was created by theCREATE CLEANING PAGEcommand. The cleaning process takes a few moments. SeeCleaning the printerfor more information. |
System Setup sub-menu
Use the SYSTEM SETUP menu to make changes to default settings for general printer configuration, such as date/time, printer personality (language), and jam recovery. See Changing printer control-panel configuration settings for more information.
| Menu item Values Description | |||
| DATE/TIME DATE | Sets the time and date on the printer. | ||
| DATE FORMAT | |||
| TIME | |||
| TIME FORMAT | |||
| JOB STORAGE LIMIT(HP Color LaserJet 3000 and 3800 Series printers only) | 1-100 Limits the number of stored jobs that can be saved to the printer. | ||
| JOB HELD TIMEOUT(HP Color LaserJet 3000 and 3800 Series printers only) | OFF | Sets the amount of time that a stored job can remain on the printer before it is automatically deleted. The default is OFF. | |
| 1 HOUR | |||
| 4 HOURS | |||
| 1 DAY | |||
| 1 WEEK | |||
| SHOW ADDRESS AUTO | OFF | Select AUTO to show the printer IP address on the printer control panel, alternating with the Ready message. The default is OFF.This menu item appears only if the printer is connected to a network. | |
| RESTRICT COLOR USE(HP Color LaserJet 3000 and 3800 Series printers only) | DISABLE COLOR | Disables or restricts color use. The default is ENABLE COLOR. To use the COLOR IF ALLOWED setting, set up user permissions by using the embedded Web server.See Using the embedded Web server. | |
| ENABLE COLOR | |||
| COLOR IF ALLOWED | |||
| COLOR/BLACK MIX AUTO | Establishes how the printer switches from color to monochrome (black and white) mode for maximum performance and print cartridge life. | ||
| MOSTLY COLOR PAGES | |||
| MOSTLY BLACK PAGES | AUTO will reset the printer to the factory default setting. The default is AUTO.SelectMOSTLY COLOR PAGESif nearly all of your print jobs are color with high page coverage.SelectMOSTLY BLACK PAGESif you print mostly monochrome print jobs, or a combination of color and monochrome print jobs. | ||
| TRAY BEHAVIOR USE REQUESTED TRAY | Specifies settings for the tray selection behavior. (Use this setting to configure the trays to behave like trays in some previous HP printers.) | ||
| The default forUSE REQUESTED TRAYis EXCLUSIVELY. | |||
| SLEEP DELAY 1 MINUTE | Reduces power consumption when the printer has been inactive for an extended period. | ||
| 15 MINUTES | Sets the length of time the printer remains inactive before going into sleep mode. The default is30 MINUTES. | ||
| 30 MINUTES | |||
| 45 MINUTES | SeeSleep Delay and Sleep Mode featuresfor more information. | ||
| 60 MINUTES | |||
| 90 MINUTES | |||
| 2 HOURS | |||
| 4 HOURS | |||
| WAKE TIME MONDAY | Sets a “wake-up” time for the printer to warm up and calibrate each day. The default for each day isOFF. If you set a wake time, HP recommends setting an extended sleep delay time period, so that the printer will not return to sleep mode soon after waking. | ||
| OPTIMUM SPEED/ENERGY USAGE (HP Color LaserJet 3000 and 3800 Series printers only) | FASTER FIRST PAGE SAVE ENERGY | Affects print speed by defining whether the fuser cools between jobs. When FASTER FIRST PAGE is selected, the fuser does not cool, and printing is faster. When SAVE ENERGY is selected, the fuser cools between jobs. The default is FASTER FIRST PAGE. | |
| DISPLAY BRIGHTNESS | 1–10 | Adjusts the brightness of the printer control panel. The default is 5. See Display Brightness feature. | |
| PERSONALITY (HP Color LaserJet 3000 and 3800 Series printers only) | AUTO PCL PDF PS | Sets the default personality to automatic switching, PCL, PDF, or PostScript emulation. The default is AUTO. See Personality feature for more information. | |
| CLEARABLE WARNINGS (HP Color LaserJet 3000 and 3800 Series printers only) | JOB ON | Sets the amount of time that a clearable warning appears on the printer control panel. The default is JOB, which appears until the end of the job that generated the warning. ON appears until the √ is pressed. See Clearable Warnings feature for more information. | |
| AUTO CONTINUE OFF | ON | Determines printer behavior when the system generates an auto-continuable error. The default is ON. ON automatically continues printing after 10 seconds. OFF pauses printing. Press √ to continue printing. See Auto Continue feature for more information. | |
| REPLACE SUPPLIES STOP AT LOW | STOP AT OUT OVERRIDE AT OUT | Sets low or out supplies operating options. The default is STOP AT OUT. STOP AT LOW pauses printing when a low supply is reported. Press √ to continue printing. OVERRIDE AT OUT allows the printer to continue printing even after some supplies have run out. See Replace Supplies feature for more information. | |
| ORDER AT | 0–100 | The user can set the percent remaining at which the ORDER AT message is displayed. The default percentage is 15. | |
| COLOR SUPPLY OUT STOP | AUTOCONTINUE BLACK | Sets the printer behavior when a color print cartridge is empty. When the printer is set to AUTOCONTINUE BLACK, the printer continues printing using black toner only. The default is STOP. | |
| JAM RECOVERY AUTO | OFF ON | Sets whether the printer will attempt to reprint pages after a jam. The default is AUTO. See Jam Recovery feature for more information. | |
| RAM DISK | AUTO | Determines how the RAM disk feature is configured.Select AUTO to allow the printer to determine the optimal RAM disk size based on the amount of available memory.OFF disables the RAM disk, but a minimal RAM disk is still available. The default is AUTO. | |
| (HP Color LaserJet 3000 and 3800 Series printers only) | OFF | ||
| LANGUAGE A list of available languages appears. | Sets the default control-panel language.SeeLanguage featurefor more information. | ||
I/O sub-menu
Use the I/O menu to configure the printer input/output options.
See Network configuration.
| Menu item Values Description | ||
| I/O TIMEOUT 5–300 Selects the I/O timeout in seconds. | ||
| PAGE BUFFERING(HP Color LaserJet 3600 Series printer only) | OFFON | Sets whether the printer should maximize performance or minimize engine wear while waiting for information to be transferred. Select ON if the printer uses USB or Ethernet 10Base-T. The default is OFF. |
| PARALLEL INPUT(HP Color LaserJet 3000 and 3800 Series printers only) | HIGH SPEEDADVANCEDFUNCTIONS | Sets speed and other options for an optional parallel connection. |
| EMBEDDED JETDIRECT Possible values are: | Configures the HP Jetdirect embedded print server. | |
| TCP/IPIPX/SPX |  NOTE For the HP Color LaserJet 3600 Series printer, the only available network protocol is TCP/IP. NOTE For the HP Color LaserJet 3600 Series printer, the only available network protocol is TCP/IP. | |
| APPLETALKDLC/LLCSECURE WEBDIAGNOSTICSRRESET SECURITYLINK SPEED | ||
| EIO 1 JETDIRECT(HP Color LaserJet 3000 and 3800 Series printers only) | Values vary, depending on the product in the EIO slot. | See the documentation that came with the EIO device. |
Resets sub-menu
Use the RESETS menu to reset factory settings and to disable and enable sleep mode.
| Menu item Values Description | |
| RESTORE FACTORY SETTINGS | None Clears the page buffer, removes all perishable personality data, resets the printing environment, and returns all default settings to factory defaults. This menu does not restore HP Jetdirect network settings to factory default values. |
| SLEEP MODE OFF | Enables and disables sleep mode. The default is ON. |
| ON | |
Diagnostics menu
Use the DIAGNOSTICS menu to run tests that can help identify and solve problems with the printer.
| Menu item Description | |
| PRINT EVENT LOG | Prints an event log that shows the last 50 entries in the printer event log, starting with the most recent. |
| SHOW EVENT LOG | Shows the last 50 printer events on the control-panel display, starting with the most recent. |
| PQ TROUBLESHOOTING | Prints a series of print-quality assessment pages that help troubleshoot many print-quality problems. |
| PRINT DIAGNOSTICS PAGE | Prints the diagnostics page. |
| DISABLE CARTRIDGE CHECK | Prints with one or more cartridges removed so that you can diagnose print cartridge-related problems. |
| PAPER PATH SENSORS | Shows the values of the sensors. Values are updated as media passes each sensor. Jobs can be initiated from the control panel or sent from the computer. |
| PAPER PATH TEST | Tests the printer paper-handling features, such as the configuration of the trays. |
| MANUAL SENSOR TEST | Allows a service representative to test the paper-path sensors and switches for correct operation. |
| COMPONENT TEST | Activates individual parts independently to isolate noise, leaking, and other hardware issues. |
| PRINT/STOP TEST | Isolates print-quality issues more accurately by stopping the printer in mid-print cycle. Stopping the printer in mid-print cycle causes a jam that might need to be removed manually. Only a service representative should perform this test. |
Changing printer control-panel configuration settings
Use the printer control panel to make changes to default printer configuration settings, such as tray size and type, sleep delay time, printer personality (language), and jam recovery.
You can also gain access to the printer control panel from a computer by using the Settings page of the embedded Web server. The computer shows the same information as the control panel. For more information, see Using the embedded Web server.

CAUTION Configuration settings seldom need to be changed. Hewlett-Packard Company recommends that only the system administrator change configuration settings.
Tray Behavior menu options
The TRAY BEHAVIOR menu provides the following user-defined options:
- USE REQUESTED TRAY: Select EXCLUSIVELY (the default value) to ensure that the printer will not automatically select another tray when you indicate that a specific tray should be used. Select FIRST to allow the printer to pull from a second tray if the specified tray is empty or contains a different media type or size.
MANUALLY FEED PROMPT: If you select ALWAYS (the default value), the system always generates a prompt before pulling from the multipurpose tray. If you select UNLESS LOADED, the system generates the prompt only if the multipurpose tray is empty or if it is configured for a different type or size. - PS DEFER MEDIA: If you select ENABLED (the default value), the printer uses HP's paper-selection process. Select DISABLED to allow the printer to use the Adobe paper-selection process.
- USE ANOTHER TRAY. If you select ENABLED (the default value), the printer prompts users to use another tray when the selected tray is unavailable. If you select DISABLED, the printer does not prompt the user.
- SIZE/TYPE PROMPT. If you select DISPLAY (the default value), the printer prompts users to confirm the media size or type loaded in the tray immediately after the tray has been loaded. If you select DO NOT DISPLAY, the printer does not prompt the user.
- DUPLEX BLANK PAGES. If you select AUTO (the default value), the printer might not flip pages in the duplexer for blank pages, which enhances printer performance. If you select YES, the printer duplexer flips each page.
To set the Use Requested Tray feature
-
Press Menu.
-
Press ▼ to highlight CONFIGURE DEVICE, and then press √.
-
Press ▼ to highlight SYSTEM SETUP, and then press √.
-
Press ▼ to highlight TRAY BEHAVIOR, and then press √.
-
Press √ to select USE REQUESTED TRAY.
-
Press ▲ or ▼ to select EXCLUSIVELY or FIRST.
-
Press √ to save the selected behavior, and then press Menu to return to the Ready state.
To set the Manually Feed Prompt feature
- Press Menu.
- Press ▼ to highlight CONFIGURE DEVICE, and then press √.
- Press ▼ to highlight SYSTEM SETUP, and then press √.
- Press ▼ to highlight TRAY BEHAVIOR, and then press √.
- Press ▼ to highlight MANUALLY FEED PROMPT, and then press √.
- Press ▲ or ▼ to select ALWAYS or UNLESS LOADED.
- Press √ to save the selected behavior, and then press Menu to return to the Ready state.
To set the PS Defer Media feature
- Press Menu.
- Press ▼ to highlight CONFIGURE DEVICE, and then press √.
- Press ▼ to highlight SYSTEM SETUP, and then press √.
- Press ▼ to highlight TRAY BEHAVIOR, and then press √.
- Press ▼ to highlight PS DEFER MEDIA, and then press √.
- Press ▲ or ▼ to select ENABLED or DISABLED.
- Press √ to save the selected behavior, and then press Menu to return to the Ready state.
To set the Use Another Tray feature
- Press Menu.
- Press ▼ to highlight CONFIGURE DEVICE, and then press √.
- Press ▼ to highlight SYSTEM SETUP, and then press √.
- Press ▼ to highlight TRAY BEHAVIOR, and then press √.
- Press ▼ to highlight USE ANOTHER TRAY, and then press √.
- Press ▲ or ▼ to select ENABLED or DISABLED.
- Press √ to save the selected behavior, and then press Menu to return to the Ready state.
To set the Size/Type Prompt feature
- Press Menu.
- Press ▼ to highlight CONFIGURE DEVICE, and then press √.
- Press ▼ to highlight SYSTEM SETUP, and then press √.
- Press ▼ to highlight TRAY BEHAVIOR, and then press √.
-
Press ▼ to highlight SIZE/TYPE PROMPT, and then press √.
-
Press ▲ or ▼ to select DISPLAY or DO NOT DISPLAY.
- Press √ to save the selected behavior, and then press Menu to return to the Ready state.
To set the Duplex Blank Pages feature
- Press Menu.
- Press ▼ to highlight CONFIGURE DEVICE, and then press √.
- Press ▼ to highlight SYSTEM SETUP, and then press √.
- Press ▼ to highlight TRAY BEHAVIOR, and then press √.
- Press ▼ to highlight DUPLEX BLANK PAGES, and then press √.
- Press ▲ or ▼ to select AUTO or YES.
- Press √ to save the selected behavior, and then press Menu to return to the Ready state.
Sleep Delay and Sleep Mode features
The SLEEP DELAY feature determines how long the printer must be inactive before it switches to sleep mode to reduce power consumption. You can set the length of time before the printer goes into sleep mode to one of the following settings:
1 MINUTE
15 MINUTES
• 30 MINUTES (the default setting)
45 MINUTES
60 MINUTES
90 MINUTES
2 HOURS
4 HOURS

NOTE The printer display appears dimmed when the printer is in sleep mode. Sleep mode does not affect printer warm-up time, unless the printer is in sleep mode for more than 8 hours.
To set the Sleep Delay feature
- Press Menu.
- Press ▼ to highlight CONFIGURE DEVICE, and then press √.
- Press ▼ to highlight SYSTEM SETUP, and then press √.
- Press ▼ to highlight SLEEP DELAY, and then press √.
- Press ▲ or ▼ to select the appropriate time period, and then press √ to set the selected time period.
- Press Menu to return to the Ready state.
To disable or enable the Sleep Mode feature
- Press Menu.
- Press ▼ to highlight CONFIGURE DEVICE, and then press √.
- Press ▼ to highlight RESETS, and then press √.
- Press ▼ to highlight SLEEP MODE, and then press √.
- Press ▲ or ▼ to select ON or OFF, and then press √ to set the selection.
- Press Menu to return to the Ready state.
Display Brightness feature
Change the brightness of the control-panel display by using the DISPLAY BRIGHTNESS option.
To set the Display Brightness feature
- Press Menu.
- Press ▼ to highlight CONFIGURE DEVICE, and then press √.
- Press ▼ to highlight SYSTEM SETUP, and then press √.
- Press ▼ to highlight DISPLAY BRIGHTNESS, and then press √.
- Press ▲ or ▼ to select the appropriate setting, and then press √ to set the selection.
- Press Menu to return to the Ready state.
Personality feature

NOTE This feature is available for the HP Color LaserJet 3000 and 3800 Series printers only.
This printer features automatic personality (printer language) switching.
- AUTO: Configures the printer to automatically detect the type of print job and configure its personality to accommodate that job.
• PCL: Configures the printer to use Printer Control Language.
• PDF: Configures the printer to use portable document format.
• PS: Configures the printer to use PostScript emulation.
To set the Personality feature
- Press Menu.
- Press ▼ to highlight CONFIGURE DEVICE, and then press √.
- Press ▼ to highlight SYSTEM SETUP, and then press √.
-
Press ▼ to highlight PERSONALITY, and then press √.
-
Press ▲ or ▼ to select the appropriate personality, and then press √ to set the personality.
- Press Menu to return to the Ready state.
Clearable Warnings feature

NOTE This feature is available for the HP Color LaserJet 3000 and 3800 Series printers only.
Use this feature to determine the display time of control-panel clearable warnings by selecting ON or JOB. The default value is JOB.
• ON: Clearable warnings appear until you press √.
• JOB: Clearable warnings appear until the end of the job for which they were generated.
To set the Clearable Warnings feature
- Press Menu.
- Press ▼ to highlight CONFIGURE DEVICE, and then press √.
- Press ▼ to highlight SYSTEM SETUP, and then press √.
- Press ▼ to highlight CLEARABLE WARNINGS, and then press √.
- Press ▲ or ▼ to select the appropriate setting, and then press √ to set the selection.
- Press Menu to return to the Ready state.
Auto Continue feature
Use this feature to determine printer behavior when the system generates an auto-continuable error. ON is the default setting.
- ON: An error message appears for ten seconds before automatically continuing to print.
• OFF: Any time the printer shows an error message, the print job pauses until you press √.
To set the Auto Continue feature
- Press Menu.
- Press ▼ to highlight CONFIGURE DEVICE, and then press √.
- Press ▼ to highlight SYSTEM SETUP, and then press √.
- Press ▼ to highlight AUTO CONTINUE, and then press √.
- Press ▲ or ▼ to select the appropriate setting, and then press √ to set the selection.
- Press Menu to return to the Ready state.
Replace Supplies feature
The printer has three options for low or exhausted supplies status:
- STOP AT OUT (the default setting): The printer continues printing while a print cartridge is low. When the cartridge is out, the printer cannot print.
- STOP AT LOW: The printer pauses until you replace the low cartridge.
• OVERRIDE AT OUT: The printer continues printing even after some supplies have run out.
To set the Replace Supplies feature
- Press Menu.
- Press ▼ to highlight CONFIGURE DEVICE, and then press √.
- Press ▼ to highlight SYSTEM SETUP, and then press √.
- Press ▼ to highlight REPLACE SUPPLIES, and then press √.
- Press ▲ or ▼ to select the appropriate setting, and then press √ to set the selection.
- If you select OVERRIDE AT OUT and then press √, a warning message appears. To accept the override, select YES, USE OVERRIDE and press √, and then set the page limit for the override and press √.
- Press Menu to return to the Ready state.
Jam Recovery feature
Use this option to configure the printer response to jams, including how it handles the pages involved. AUTO is the default value.
• AUTO: The printer automatically turns jam recovery on when sufficient memory is available.
- ON: The printer reprints any page involved in a jam. Additional memory is allocated to store the last few pages printed. This might cause overall printer performance to suffer.
- OFF: The printer does not reprint any page that was involved in a paper jam. Because no memory is used to store the most recent pages, performance is optimal.
To set the Jam Recovery feature
- Press Menu.
- Press ▼ to highlight CONFIGURE DEVICE, and then press √.
- Press ▼ to highlight SYSTEM SETUP, and then press √.
- Press ▼ to highlight JAM RECOVERY, and then press √.
- Press ▲ or ▼ to select the appropriate setting, and then press √ to set the selection.
- Press Menu to return to the Ready state.
Language feature
The option to set the default language might appear when the printer is turned on for the first time, depending on the country/region in which you purchased the printer. As you scroll through the available options, the list appears in the language that is highlighted. When the list appears in the appropriate language, press √ to set the language. You can also change the language at any time by performing the following procedure.
To select a language
- Press Menu.
- Press ▼ to highlight CONFIGURE DEVICE, and then press √.
- Press ▼ to highlight SYSTEM SETUP, and then press √.
- Press ▼ to highlight LANGUAGE, and then press √.
- Press ▲ or ▼ to select the appropriate language, and then press √ to set the selection.
- Press Menu to return to the Ready state.
Using the printer control panel in shared environments
If your printer is shared with other users, adhere to the following guidelines to ensure successful printer operation:
- Consult your system administrator before making changes to control-panel settings. Changing control-panel settings could affect other print jobs.
- Coordinate with other users before changing the default printer font or downloading soft fonts. Coordinating these operations conserves memory and avoids unexpected printer output.
- Be aware that switching printer personalities, such as switching emulated PostScript to PCL, affects the printed output for other users.

NOTE Your network operating system might automatically protect each user's print job from the effects of other print jobs. Consult your system administrator for more information.
3 I/O configuration
This chapter describes how to configure certain network parameters on the printer.
USB configuration
• Network configuration
USB configuration
All printer models support USB connections. The USB port is on the right side of the printer.
Connecting the USB cable
Plug the USB cable into the printer. Plug the other end of the USB cable into the computer.
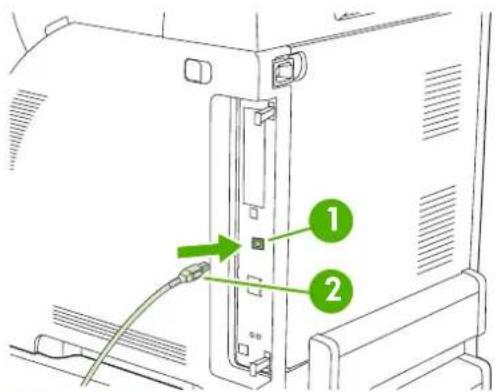
text_image
Diagram showing cable connection between a device with labeled parts 1 and 2, indicating a cable or connector assembly.Figure 3-1 USB port connection
1 USB port
2 USB connector
Network configuration
You might need to configure certain network parameters on the printer. You can configure these parameters from the printer control panel, the embedded Web server, or for most networks, from the HP Web Jetadmin software.

NOTE For more information about using the embedded Web server, see Using the embedded Web server.
For a complete list of supported networks and for instructions on configuring network parameters from software, see the HP Jetdirect Embedded Print Server Administrator's Guide. The guide comes with printers in which an HP Jetdirect embedded print server is installed.
Manually configuring TCP/IP parameters from the printer control panel
Use manual configuration to set an IP address, subnet mask, and default gateway.
Setting an IP address
-
Press Menu.
-
Press ▼ to highlight CONFIGURE DEVICE, and then press √.
-
Press ▼ to highlight I/O, and then press √.
-
Press ▼ to highlight EMBEDDED JETDIRECT, and then press √
-
Press ▼ to highlight TCP/IP, and then press √
-
Press √ to select CONFIG METHOD.
-
Press ▼ to highlight MANUAL, and then press √.
-
Press ▼ to highlight MANUAL SETTINGS, and then press √.
-
Press ▼ to highlight IP Address:, and then press √.
-
Press the ▲ or ▼ arrow to increase or decrease the number for the first byte of the IP address.
-
Press √ to move to the next set of numbers. (Press *to move to the previous set of numbers.)

NOTE To cycle through the numbers faster, hold down the arrow button.
-
Repeat steps 10 and 11 until the correct IP address is entered, and then press √ to save the setting.
-
Press Menu to return to the Ready state.
Setting the subnet mask
-
Press Menu.
-
Press ▼ to highlight CONFIGURE DEVICE, and then press √.
-
Press ▼ to highlight I/O, and then press √.
-
Press ▼ to highlight EMBEDDED JETDIRECT, and then press √.
- Press ▼ to highlight TCP/IP, and then press √.
- Press √ to select CONFIG METHOD.
- Press ▼ to highlight MANUAL, and then press √.
- Press ▼ to highlight MANUAL SETTINGS, and then press √.
- Press ▼ to highlight SUBNET MASK, and then press √.
- Press the ▲ or ▼ arrow to increase or decrease the number for the first byte of the subnet mask.
- Press √ to move to the next set of numbers. (Press ↩ to move to the previous set of numbers.)
- Repeat steps 10 and 11 until the correct subnet mask is entered, and then press √ to save the subnet mask.
- Press Menu to return to the Ready state.
Setting the default gateway
- Press Menu.
- Press ▼ to highlight CONFIGURE DEVICE, and then press √.
- Press ▼ to highlight I/O, and then press √.
- Press ▼ to highlight EMBEDDED JETDIRECT, and then press √.
- Press ▼ to highlight TCP/IP, and then press √.
- Press √ to select CONFIG METHOD.
- Press ▼ to highlight MANUAL, and then press √.
- Press ▼ to highlight MANUAL SETTINGS, and then press √.
- Press ▼ to highlight DEFAULT GATEWAY, and then press √.
- Press the ▲ or ▼arrow to increase or decrease the number for the first byte of the default gateway.
- Press √ to move to the next set of numbers. (Press ↩ to move to the previous set of numbers.)
- Repeat steps 10 and 11 until the correct default gateway is entered, and then press √ to save the default gateway.
- Press Menu to return to the Ready state.
Disabling network protocols (optional)
By factory default, all supported network protocols are enabled. Disabling unused protocols has the following benefits:
• Decreases printer-generated network traffic
• Prevents unauthorized users from printing to the printer
• Provides only pertinent information on the configuration page
- Allows the printer control panel to display protocol-specific error and warning messages
To disable IPX/SPX

NOTE Do not disable this protocol in Windows-based systems that print to the printer using IPX/SPX.
- Press Menu.
- Press ▼ to highlight CONFIGURE DEVICE, and then press √.
- Press ▼ to highlight I/O, and then press √.
- Press ▼ to highlight EMBEDDED JETDIRECT, and then press √
- Press ▼ to highlight IPX/SPX, and then press √
- Press √ to select ENABLE.
- Press ▼ to highlight OFF, and then press √.
- Press Menu to return to the Ready state.
To disable AppleTalk
-
Press Menu.
-
Press ▼ to highlight CONFIGURE DEVICE, and then press √.
-
Press ▼ to highlight I/O, and then press √.
-
Press ▼ to highlight EMBEDDED JETDIRECT, and then press √
-
Press ▼ to highlight APPLETALK, and then press √
-
Press √ to select ENABLE.
-
Press ▼ to highlight OFF, and then press √.
-
Press Menu to return to the Ready state.
To disable DLC/LLC
- Press Menu.
- Press ▼ to highlight CONFIGURE DEVICE, and then press √.
- Press ▼ to highlight I/O, and then press √.
- Press ▼ to highlight EMBEDDED JETDIRECT, and then press √
- Press ▼ to highlight DLC/LLC, and then press √.
- Press √ to select ENABLE.
- Press ▼ to highlight OFF, and then press √.
- Press Menu to return to the Ready state.
Enhanced I/O (EIO) configuration

NOTE This feature is available for the HP Color LaserJet 3000 and 3800 Series printers only.
If you are adding a print server to a base model (HP Color LaserJet 3000 or HP Color LaserJet 3800), additional printer memory might be required.
The enhanced input/output (EIO) slot holds compatible accessory devices, such as the HP Jetdirect print server network cards or other devices. Plugging an EIO network card into the slot increases the number of network interfaces available to the printer.
HP Jetdirect EIO print servers
HP Jetdirect print servers (network cards) can be installed in EIO slots. These cards support multiple network protocols and operating systems. HP Jetdirect print servers facilitate network management by allowing you to connect a printer directly to your network at any location. HP Jetdirect print servers also support the Simple Network Management Protocol (SNMP), which provides network managers with remote printer management and troubleshooting through the HP Web Jetadmin software.

NOTE Configure the card either through the control panel, the printer installation software, or with HP Web Jetadmin software. Refer to the HP Jetdirect print server documentation for more information.
4 Printing tasks
This chapter describes how to perform basic printing tasks:
• Controlling print jobs
- Selecting print media
- Configuring trays
• Automatic media type sensing (auto sense mode)
• Using features in the Windows printer driver
• Using features in the Macintosh printer driver
• Printing on special media
• Using 2-sided (duplex) printing
• Managing special printing situations
• Managing stored jobs
• Managing memory
Controlling print jobs
In Windows, three settings affect how the printer driver pulls media when you send a print job. The Source, Type, and Size settings appear in the Page Setup, Print, or Print Properties dialog boxes in most software programs. If you do not change these settings, the printer automatically uses the default printer settings to select a tray.

CAUTION Make printer setup changes through the software program or the printer driver whenever possible, because changes that you make at the control panel become default settings for subsequent print jobs. Settings selected in the software or the printer driver override control-panel settings.
Source
Print by Source to specify a tray from which the printer will pull media. The printer tries to print from this tray, no matter what type or size is loaded in it. If you select a tray that is configured for a type or size that does not match your print job, the job does not proceed until you load the tray with the correct type or size. If you load the tray correctly, the printer begins printing. If you press √, you can select another tray.

NOTE If you have difficulties printing by Source, see Priority for print settings.
Type and Size
Print by Type or Size when you want to pull media from the first tray that is loaded with the type or size that you select. Selecting media by type rather than source is similar to locking out trays and helps protect special media from accidental use. For example, if a tray is configured for letterhead, and you specify that the driver print on plain paper, the printer will not pull media from that tray, but will pull paper from a tray that has plain paper loaded and is configured for plain paper.

NOTE Selecting the Any setting negates the tray lock-out function.
Selecting media by type and size results in significantly better print quality for heavy paper, glossy paper, and overhead transparencies. Using the wrong setting can result in unsatisfactory print quality. Always print by Type for special print media, such as labels or transparencies. Always print by Size for envelopes.
- If you want to print by Type or Size and the trays have not been configured for a certain type or size, load the media into tray 1. Then, in the printer driver, select the Type or Size in the Page Setup, Print, or Print Properties dialog box.
- If you often print on a certain type or size of media, the printer administrator (for a network printer) or you (for a local printer) can configure a tray for that type or size. Then, when you select that type or size as you print a job, the printer pulls from the tray configured for that type or size. See Configuring trays.
- When you close tray 2 or optional tray 3, a message might appear prompting you to select a Type or Size for the tray. If the tray is already configured correctly, press → to return to the Ready state.
Priority for print settings
Changes to print settings are prioritized depending on where the changes are made:

NOTE The names of commands and dialog boxes might vary depending on your software program.
- Page Setup dialog box: Click Page Setup or a similar command on the File menu of the program you are working in to open this dialog box. Settings changed here override settings changed anywhere else.
- Print dialog box: Click Print, Print Setup, or a similar command on the File menu of the program you are working in to open this dialog box. Settings changed in the Print dialog box have a lower priority and do not override changes made in the Page Setup dialog box.
- Printer Properties dialog box (printer driver): Click Properties in the Print dialog box to open the printer driver. Settings changed in the Printer Properties dialog box do not override settings anywhere else in the printing software.
- Default printer driver settings: The default printer driver settings determine the settings used in all print jobs, unless settings are changed in the Page Setup, Print, or Printer Properties dialog boxes.
- Printer control panel settings: Settings changed at the printer control panel have a lower priority than changes made anywhere else.
Gaining access to printer driver settings
| Operating System | Temporarily change settings for print jobs | Permanently change default settings ^1 |
| Windows 98, 2000, Me, and XP | From the File menu, click Print. Select the printer, and then click Properties. (The steps can vary; this procedure is most common.) | Click Start, point to Settings, and then click Printers or Printers and Faxes. Right-click the printer icon and select Printing Preferences. |
| Macintosh OS 9.1 | On the File menu, click Print. Change settings on the various pop-up menus. | On the File menu, click Print. After you change settings on the pop-up menu, click Save Settings. |
| Macintosh OS X | On the File menu, click Print. Change settings on the various pop-up menus. | On the File menu, click Print. Change settings on the various pop-up menus, and then, on the main pop-up menu, click Save Custom Settings to save them as the Custom option. To use the new settings, you must select the Custom option every time you open a program and print. |
1 Because access to default printer settings can be restricted, the settings might be unavailable.
Selecting print media
You can use many types of paper and other print media with this printer.
Before purchasing any paper or specialized forms in quantity, verify that your paper supplier has obtained and understands the print-media requirements that are specified in the HP LaserJet Printer Family Print Media Specification Guide.
See Supplies and accessories to order the HP LaserJet Printer Family Print Media Specification Guide. To download a copy of the guide, go to www.hp.com/support/clj3000 for the HP Color LaserJet 3000 Series printer, www.hp.com/support/clj3600 for the HP Color LaserJet 3600 Series printer, or www.hp.com/support/clj3800 for the HP Color LaserJet 3800 Series printer. Select Manuals.
It is possible that paper could meet all of the guidelines in this chapter or the HP LaserJet Printer Family Print Media Specification Guide and still not print satisfactorily. This can result from abnormal characteristics of the printing environment or other variables over which HP has no control (for example, extremes in temperature and humidity).
Hewlett-Packard Company recommends testing any paper before buying it in large quantities.

CAUTION Using paper that does not conform to the specifications listed here or in the print media guide can cause problems that require service. This service is not covered by the Hewlett-Packard warranty or service agreements.
Paper to avoid
The printer can handle many types of paper. Using paper that does not meet specifications will cause lower print quality and increase the chance of jams.
• Do not use paper that is too rough.
- Do not use paper, other than standard 3-hole punched paper, that contains cutouts or perforations.
• Do not use multipart forms.
- Do not use paper that has already been printed on, or that has been fed through a photocopier.
- Do not use paper that contains a watermark if you are printing solid patterns.
Paper that can damage the printer
In rare circumstances, paper can damage the printer. The following paper must be avoided to prevent possible damage to the printer:
• Do not use paper with staples attached.
- Do not use transparencies that are designed for Inkjet printers or other low temperature printers, or for monochrome printing. Use only transparencies that are specified for use with HP Color LaserJet printers.
• Do not use photo paper that is intended for Inkjet printers.
- Do not use paper that is embossed or coated, or any media that produces hazardous emissions, or that melts, offsets, or discolors when exposed to 190^ (374°F) for 0.1 second. Also, do not use letterhead paper that is made with dyes or inks that cannot withstand that temperature.
To order HP Color LaserJet printing supplies:
• www.hp.com/go/ljsupplies in the U.S.
• www.hp.com/ghp/buyonline.html worldwide
Configuring trays
You can configure the printer trays by type and size. Load different media in the printer trays and then request media by type or size in the software program.

NOTE If you have used previous HP Color LaserJet printers, you might be accustomed to configuring tray 1 to first mode or cassette mode. To mimic the settings for first mode, configure tray 1 for ANY SIZE and ANY TYPE. The printer will pull paper from tray 1 first (if paper is loaded in that tray) when the print job does not specify another tray. This setting is recommended if you use different types or sizes of paper in tray 1. To mimic the settings from cassette mode, set either the size or type for tray 1 to a setting other than ANY SIZE or ANY TYPE. This setting is recommended if you are using the same size and type of paper in tray 1.
NOTE If you use 2-sided printing, be sure that the media meets the specifications for duplex printing. See Print-media specifications.
The following instructions are for configuring the trays at the printer control panel. You can also configure the trays from your computer through the embedded Web server. See Using the embedded Web server.
Configuring size
- Press Menu.
- Press ▼ to highlight PAPER HANDLING, and then press √.
- Press ▼ to highlight TRAY 1 SIZE, TRAY 2 SIZE, or TRAY 3 SIZE, and then press √.
- Press ▼ or ▲ to highlight the appropriate size, and then press . √
- Press Menu to return to the Ready state.
Configuring type
- Press Menu.
- Press ▼ to highlight PAPER HANDLING, and then press √.
- Press ▼ to highlight TRAY 1 TYPE, TRAY 2 TYPE, or TRAY 3 TYPE, and then press √.
- Press ▼ or ▲ highlight the desired paper type, and then press . √
- Press Menu to return to the Ready state.
Configuring tray 1 for custom paper
Use the ANY SIZE size setting when the selected media does not exactly match the size of the paper specified in the document you are printing. If no source tray is specified, the printer looks first for paper that exactly matches the document, and then it looks for and prints from a tray set to ANY SIZE or ANY TYPE.
Use the ANY CUSTOM setting when you want to be able to print a number of custom sizes from the tray without defining a set size for each job. Use the CUSTOM setting when you want to print a specific print size from a particular tray. When you print a custom job, the printer looks for an exact size match. If it does not find an exact match to the custom size specified, it looks for a tray set to ANY CUSTOM. Finally, the printer looks for and uses media from a tray set to ANY SIZE.
There are three steps to set up custom paper. When all are completed, the display returns to the PAPER HANDLING menu. After a custom size is set for a tray, the printer retains the setting until you change it in the control panel.
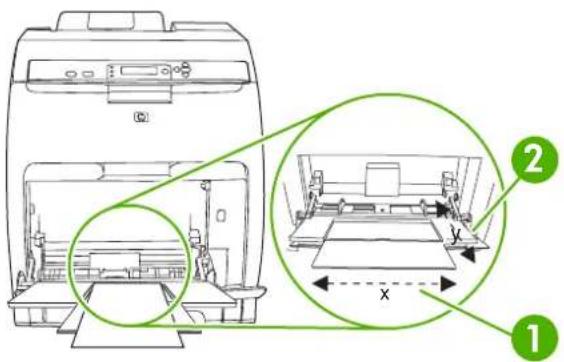
text_image
Technical diagram of a printer with labeled parts and zoomed-in views, showing internal components and coordinate axes.1 X dimension
2 Y dimension
Unit of measure
-
Press ▼ to highlight UNIT OF MEASURE, and then press √.
-
Press ▲ or ▼ highlight the correct measurement, and then press . √
X dimension
The X dimension is the width of the page as it feeds into the printer.
-
Press ▼ to highlight X DIMENSION, and then press √.
-
Press ▲ or ▼ to highlight the correct value, and then press . √
Y dimension
The Y dimension is the length of the page as it feeds into the printer.
-
Press ▼ to highlight Y DIMENSION, and then press √.
-
Press ▲ or ▼ highlight the correct value, and then press . √
Configuring tray 2 or tray 3 for custom paper
The printer automatically detects many sizes of paper, but you can also configure trays for custom paper sizes. You must specify the following parameters:
• Unit of measure (millimeters or inches)
• X dimension (the width of the page as it feeds into the printer)
• Y dimension (the length of the page as it feeds into the printer)
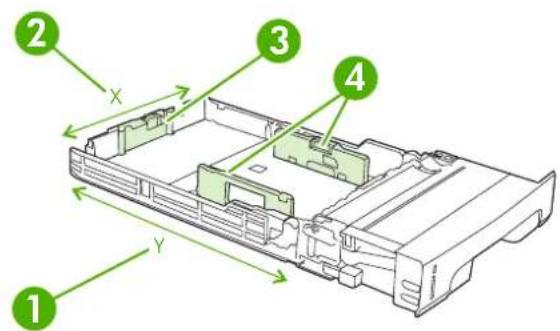
text_image
Diagram of a device chassis with numbered components and directional arrows indicating X and Y axes.1 Page length (Y dimension)
2 Page width (X dimension)
3 Media length guides
4 Media width guides
Use the following procedure to configure a tray for a custom size. Once a custom size is set for a tray, it will be retained until the media length guides are reset.
Setting a custom size in tray 2 or tray 3
- Open the tray and place the media face-up in the tray.
- Set the media length guides to the appropriate non-standard position and close the tray.
-
When the tray configuration message appears, press √.
-
Press ▲ to change ANY CUSTOM to CUSTOM, and then press √.
-
Press ▲ or ▼ to highlight the correct unit (either millimeters or inches), and then press √.
After the unit of measure is set properly, set the X dimension as follows:
- Press ▲ or ▼ highlight the correct value, and then press . √
If the value entered is outside the valid range, Invalid value appears for two seconds. The control-panel display prompts you to enter another value.
After the X dimension is set properly, set the Y dimension as follows:
- Press ▲ or ▼ highlight the correct value, and then press . √
If the value entered is outside the valid range, Invalid value appears for two seconds. The control-panel display prompts you to enter another value. The printer shows a message indicating the dimensions for the custom size.
Printing from tray 1 (multipurpose tray)
Tray 1 is a multipurpose tray that holds up to 100 sheets of paper or 10 envelopes. It provides a convenient way to print envelopes, transparencies, custom-size paper, or other types of paper without having to unload the other trays.
Loading paper into tray 1

CAUTION Avoid adding print media to tray 1 while the printer is printing, or jams can occur.
- Open tray 1.

NOTE If printing on special media, such as envelopes, use tray 1. See Printing envelopes from tray 1 for more information.
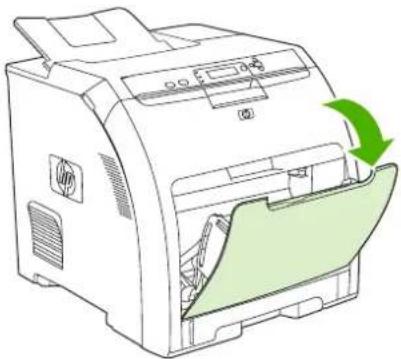
natural_image
Illustration of a printer with a green arrow indicating the process (no text or symbols present)- Slide the output bin extension out from the bin.
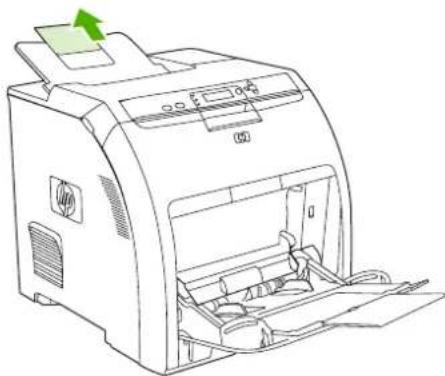
natural_image
Line drawing of a HP printer with paper feed and paper holder (no text or symbols)- Slide out the tray extender and, if necessary, open the additional tray extender.
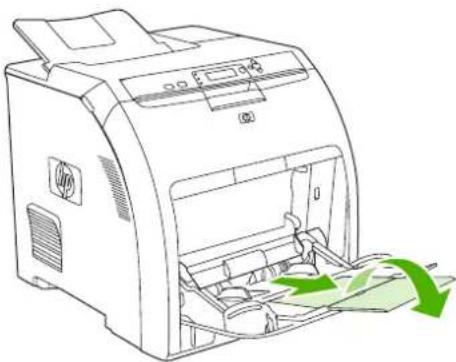
natural_image
Line drawing of a printer with green paper feed and paper roll, no text or symbols present- Slide the width guides slightly wider than the print media.
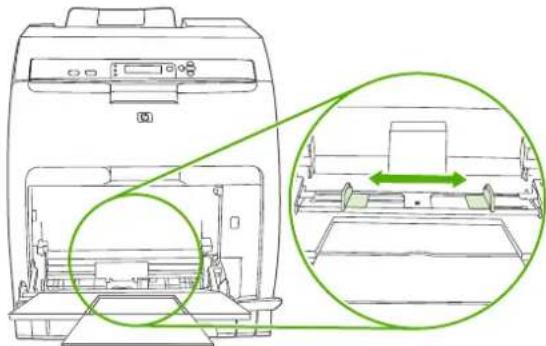
natural_image
Technical line drawing of a printer with internal components and a magnified inset showing a printer's side view (no text or symbols)- Place print media into the tray with the side to be printed down, and the top, short edge in first.

natural_image
Diagram of a printer with an open base and green arrow indicating upward motion (no text or symbols)
NOTE If you are printing on two sides, see Using 2-sided (duplex) printing for loading instructions.
- Slide the paper width guides inward until they lightly touch the print media stack on both sides without bending it. Make sure that the media fits under the tabs on the width guides.
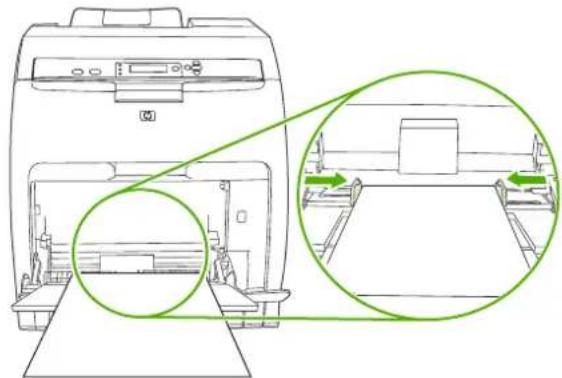
natural_image
Technical line drawing of a printer with two green circular insets showing internal components (no text or symbols)
CAUTION Wait for the printer to finish printing before closing tray 1 (optional). Closing the tray before the printer finishes can cause jams.
Printing envelopes from tray 1
Many types of envelopes can be printed from tray 1. Up to 10 envelopes can be stacked in the tray. Printing performance depends on the construction of the envelope.
In the software, set margins at least 15 mm (0.6 in) from the edge of the envelope.

CAUTION Envelopes that contain clasps, snaps, windows, coated linings, exposed self-stick adhesives, or other synthetic materials can severely damage the printer. To avoid jams and possible printer damage, never try to print on both sides of an envelope. Before you load envelopes, make sure that they are flat, undamaged, and not stuck together. Do not use envelopes that contain pressure-sensitive adhesive. To avoid jams, do not remove or insert envelopes during printing.
To load envelopes into tray 1
- Open tray 1.
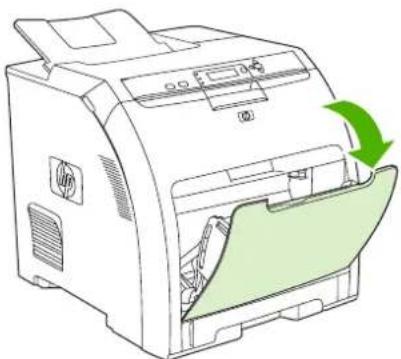
natural_image
Line drawing of a printer with a green arrow indicating the process (no text or symbols present)- Slide out the tray extender and, if necessary, open the additional tray extender.
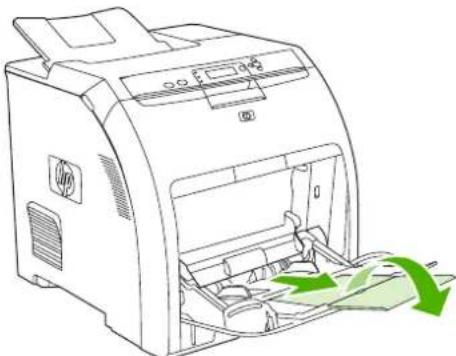
natural_image
Line drawing of a printer with a green arrow indicating compression or disassembly (no text or symbols present)- Set the paper-width guides.
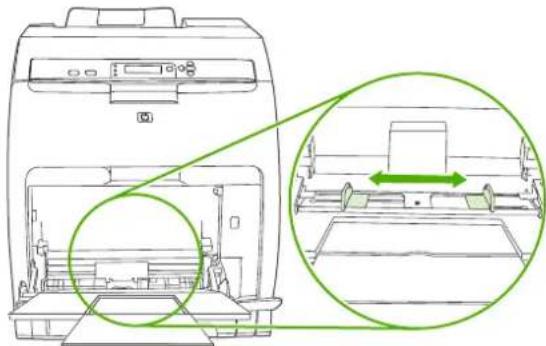
natural_image
Technical line drawing of a printer with internal components and a magnified inset showing the printer's internal structure (no text or symbols)- Load as many as 10 envelopes in the center of tray 1 with the side to be printed on facing down, with the stamp area farthest from the printer, and the short edge toward the printer. Slide the envelopes into the printer as far as they will go without forcing them.
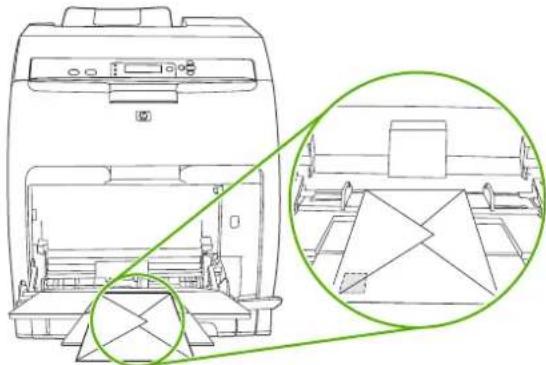
natural_image
Line drawing of a printer with internal components and a magnified inset showing internal geometric shapes (no text or symbols)- Adjust the guides to touch the envelope stack without bending the envelopes. Make sure that the envelopes fit under the tabs on the guides.
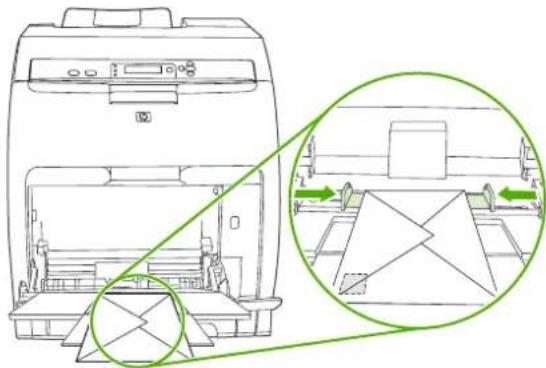
natural_image
Technical line drawing of a printer with internal components and a magnified inset showing internal structure (no text or symbols)Printing envelopes
-
If tray 1 is configured for a specific size, use the printer control panel to set the paper size for tray 1 to match the envelope size that you are printing.
-
Specify tray 1 in the software program.
-
If your software does not automatically format an envelope, specify Landscape for page orientation in the software program. Use the guidelines in the table that follows to set margins for return and destination addresses on Commercial #10 or DL envelopes.

NOTE For envelopes of other sizes, adjust the margin settings appropriately.
- Click Print in the software program or printer driver.
Address type Left margin Top margin
Return 15 mm (0.6 in) 15 mm (0.6 in)
Destination 102 mm (4.0 in) 51 mm (2.0 in)
Printing from tray 2 and tray 3
Tray 2 holds up to 250 sheets of standard paper, while optional tray 3 holds up to 500 sheets of standard paper. Tray 2 and tray 3 adjust for many sizes. Tray 3 is installed underneath tray 2. When tray 3 is installed, the printer detects it and lists tray 3 as a choice in the control panel CONFIGURE DEVICE menu.

CAUTION The paper path for tray 3 passes through tray 2. If either tray 2 or tray 3 is partially pulled out or removed, media from tray 3 cannot feed into the printer. This causes the printer to jam.
Loading tray 2

CAUTION To avoid jams, never open or remove a tray during printing.
- Pull tray 2 out of the printer and remove any media.
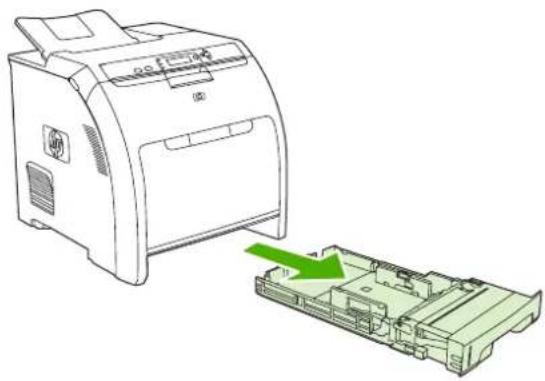
natural_image
Diagram of a printer with a green arrow indicating the process, showing internal components (no text or symbols present)- Slide the output bin extension out from the bin.
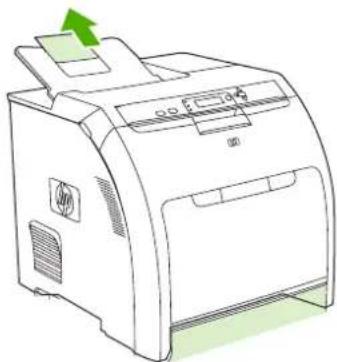
natural_image
Line drawing of a HP printer with paper feed and green arrow indicating paper direction (no text or symbols on the device itself)- Adjust the length guide until the arrow points to the size that you are loading.
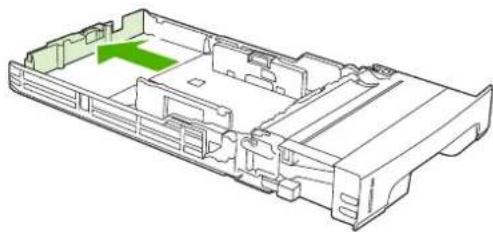
natural_image
Technical line drawing of a battery pack assembly with no visible text or symbols- Move the side width guides until the arrow on the right width guide points to the size that you are loading.
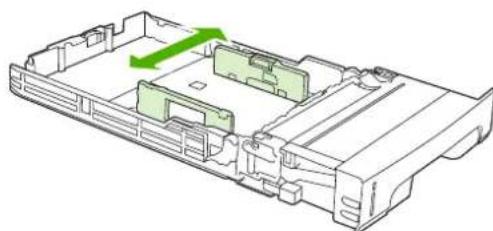
natural_image
Technical line drawing of a battery pack with green directional arrows indicating internal components (no text or symbols)- Load the media into the tray. If this is special paper such as letterhead, load it face-up with the top edge toward the front of the tray.

NOTE If you are duplex printing, see Using 2-sided (duplex) printing for loading instructions.
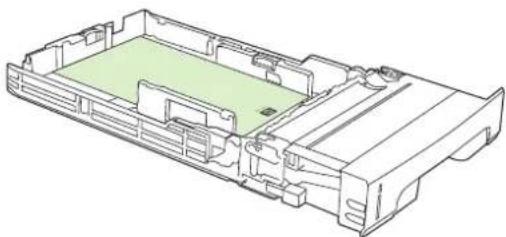
natural_image
Technical line drawing of a battery pack assembly (no text or symbols)- Make sure that the stack of media is flat and that the media is below the height tabs.
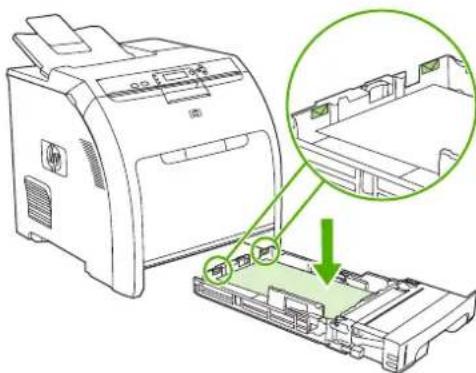
text_image
Diagram showing printer assembly process with magnified view of internal components and Chinese labels- Slide the tray back into the printer.
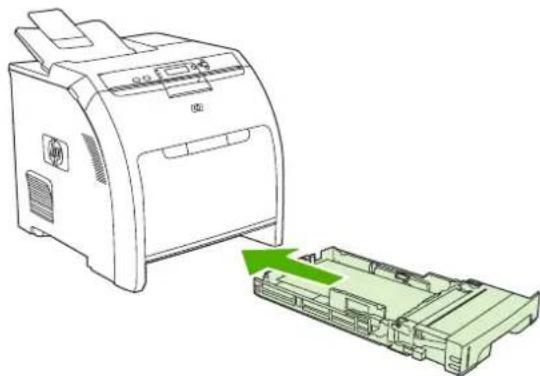
natural_image
Line drawing of a printer with a green arrow indicating the process, showing no text or symbols on the device itself.Loading tray 3
- Pull the tray out of the printer and remove any media.
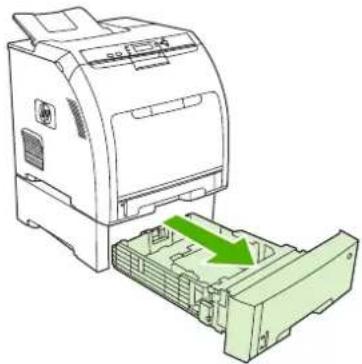
natural_image
Diagram of a printer with a green arrow indicating a process or operation, showing internal components (no text or symbols present)- Raise the output bin extension.
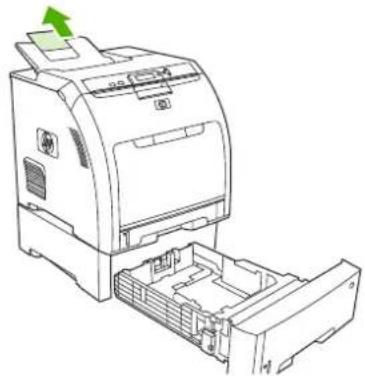
natural_image
Line drawing of a printer with a green arrow indicating the paper's edge, showing internal components and casing (no text or symbols)- Adjust the length guide until the arrow points to the size that you are loading.
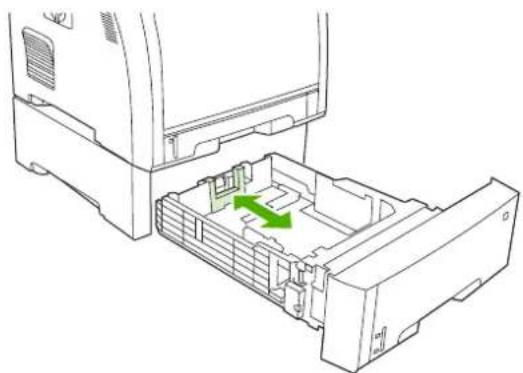
natural_image
Technical line drawing of a device's internal structure showing a green directional arrow indicating movement or flow (no text or symbols present)- Move the side width guides until the arrow on the right width guide points to the size that you are loading.
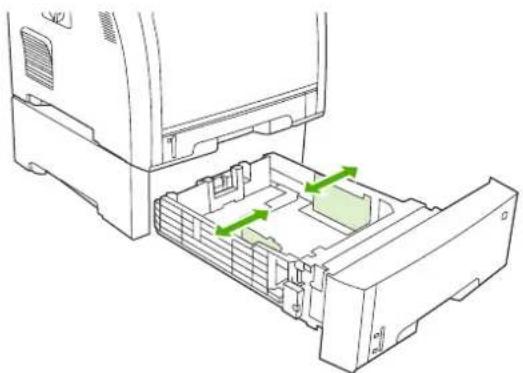
natural_image
Technical line drawing of a computer chassis with green directional arrows indicating internal components (no text or symbols)- Load the media into the tray. If this is special paper, such as letterhead, load it face-up with the top edge toward the front of the tray.

NOTE If you are duplex printing, see Using 2-sided (duplex) printing for loading instructions.
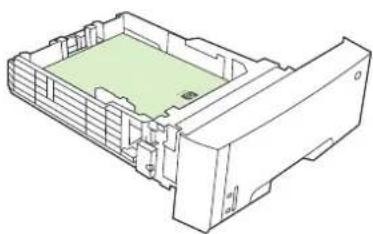
natural_image
Isometric line drawing of a mechanical housing or enclosure with internal components (no text or symbols)- Make sure that the stack of media is flat in the tray at all four corners, and keep it below the height tabs.
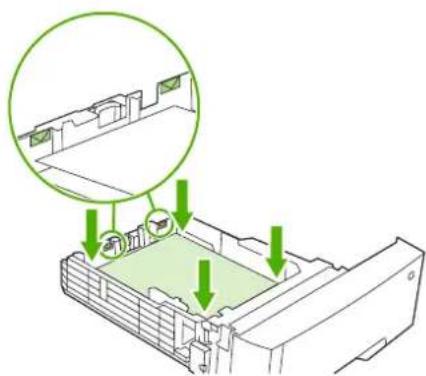
text_image
Technical diagram showing a mechanical assembly with green arrows indicating parts of a component, including a magnified inset view.- Slide the tray back into the printer.
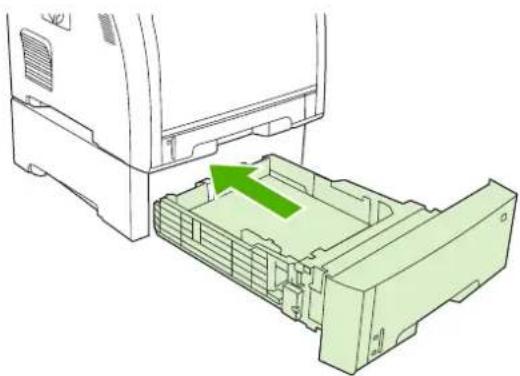
natural_image
Diagram of a printer's internal structure showing a green arrow pointing to the inner casing (no text or symbols present)Automatic media type sensing (auto sense mode)
The HP Color LaserJet 3000 and 3800 Series printers can automatically classify media into one of the following categories:
- Plain
- Transparency
Glossy
• Extra-heavy glossy
Glossy film - Heavy
Light
The automatic media type sensor functions only when that tray is configured to Any Type Plain. Configuring a tray to any other type, such as Bond or Glossy, deactivates the media sensor in that tray.

NOTE Get optimal performance with the automatic media sensing feature when using original HP media designed for use in HP color LaserJet printers.
Tray 1 sensing
Full sensing (default)
• The printer stops at each page to sense media type.
• This is the best mode for using mixed media in a single print job.
Expanded sensing
• Each time the printer begins a print job, it stops the first page to sense the type.
- The printer assumes that the second and all subsequent pages are of the same media type as the first page.
This is the second-fastest mode, and is useful for using stacks of the same media type.
Transparency
- The printer does not stop any pages for sensing but distinguishes between transparencies (Transparency mode) and paper (Normal mode).
• This is the fastest mode and is useful for high-volume printing in Normal mode.
Tray 2 or tray 3 sensing
Expanded sensing
- The printer stops the first five pages fed from each paper tray to sense the type and averages the five results.
- The printer assumes that the sixth and all subsequent pages are of the same media type, until the printer is turned off or goes into sleep mode, or until the tray is opened.
Transparency only (default)
- The printer does not stop any pages for sensing but distinguishes between transparencies (Transparency mode) and paper (Normal mode).
This is the fastest mode and is useful for high-volume printing in Normal mode.
Using features in the Windows printer driver
When you print from a software program, many of the product features are available from the printer driver. For complete information about the features that are available in the printer driver, see the printer-driver Help. The following features are described in this section:
- Creating and using quick sets
• Using watermarks
• Resizing documents - Setting a custom paper size from the printer driver
• Using different paper and printing covers
• Printing a blank first page
• Printing multiple pages on one sheet of paper - Setting the color options
• Using the HP Digital Imaging Options dialog box
• Using the Services tab

NOTE Settings in the printer driver and software program generally override control-panel settings. Software-program settings generally override printer-driver settings.
Creating and using quick sets
Use quick sets to save the current driver settings for reuse. Quick sets are available on most printer-driver tabs. You can save up to 25 Print Task Quick Sets.
To create a quick set
- Open the printer driver (see Opening the printer drivers).
- Select the print settings that you want to use.
- In the Print Task Quick Sets box, type a name for the quick set.
- Click Save.
To use quick sets
- Open the printer driver (see Opening the printer drivers).
- Select the quick set that you want to use from the Print Task Quick Sets drop-down list.
- Click OK.

NOTE To use printer-driver default settings, select Default Print Settings from the Print Task Quick Sets drop-down list.
Using watermarks
A watermark is a notice, such as "Confidential," that is printed in the background of each page of a document.
- Open the printer driver (see Opening the printer drivers).
- From the Effects tab, click the Watermarks drop-down list.
- Click the watermark that you want to use. To create a new watermark, click Edit.
- If you want the watermark to appear only on the first page of the document, click First Page Only.
- Click OK.
To remove the watermark, click (none) in the Watermarks drop-down list.
Resizing documents
Use the document resizing options to scale a document to a percentage of its normal size. You can also choose to print a document on a different size paper, with or without scaling.
To reduce or enlarge a document
- Open the printer driver (see Opening the printer drivers).
-
On the Effects tab, next to % of Normal Size, type the percentage by which you want to reduce or enlarge your document.
You can also use the scroll bar to adjust the percentage. -
Click OK.
To print a document onto a different paper size
- Open the printer driver (see Opening the printer drivers).
- On the Effects tab, click Print Document On.
- Select the paper size to print on.
- To print the document without scaling it to fit, make sure that the Scale to Fit option is not selected.
- Click OK.
Setting a custom paper size from the printer driver
- Open the printer driver (see Opening the printer drivers).
- On the Paper or Paper/Quality tab, click Custom.
- On the Custom Paper Size window, type the name of the custom paper size.
- Type the paper-size length and width. If you type a size that is too small or too large, the driver adjusts the size to the minimum or maximum size that is allowed.
-
If necessary, click the button to change the unit of measure between millimeters and inches.
-
Click Save.
- Click Close. The name that you saved appears in the paper-size list for future use.
Using different paper and printing covers
Follow these instructions for printing a first page that is different from other pages in the print job.
- Open the printer driver (see Opening the printer drivers).
- On the Paper or Paper/Quality tab, select the appropriate paper for the first page of the print job.
- Click Use Different Paper/Covers.
- In the list box, click the pages or covers that you want to print on different paper.
- To print front or back covers, you must also select Add Blank or Preprinted Cover.
- Select the appropriate paper type or source for the other pages of the print job.

NOTE The paper size must be the same for all pages of the print job.
Printing a blank first page
- Open the printer driver (see Opening the printer drivers).
- On the Paper or Paper/Quality tab, click Use Different Paper/Covers.
- In the list box, click Front Cover.
- Click Add Blank or Preprinted Cover.
Printing multiple pages on one sheet of paper
You can print more than one page on a single sheet of paper.
- Open the printer driver (see Opening the printer drivers).
- Click the Finishing tab.
- In the section for Document Options, select the number of pages that you want to print on each sheet (1, 2, 4, 6, 9, or 16).
- If the number of pages is greater than 1, select the correct options for Print Page Borders and Page Order.
- Click OK. The product is now set to print the number of pages per sheet that you have selected.
Setting the color options
Options on the Color tab control how colors are interpreted and printed from software programs. You can choose either Automatic or Manual color options.
- Select Automatic to optimize the color and halftone settings for text, graphics, and photographs. The Automatic setting provides additional color options for programs and operating systems that support color-management systems. This setting is recommended for printing all color documents.
- Select Manual to adjust the color and halftone settings for text, graphics, and photographs. If you are using a PCL driver, you can adjust the RGB data. If you are using the PS driver, you can adjust RGB or CMYK data.
To set the color options
- Open the printer driver (see Opening the printer drivers).
- Click the Color tab.
- In the Color Options area, select the option that you want to use.
- If you selected Manual, click Settings to open the Color Settings dialog box. Adjust the individual settings for text, graphics, and photographs. You can also adjust the general printing settings. Click OK.
- In the Color Themes area, select the RGB Color option that you want to use.
- Click OK.
Using the HP Digital Imaging Options dialog box
Use HP Digital Imaging Options to print better-quality photos and images.

NOTE HP Digital Imaging Options are available for Windows 2000, Windows XP, and Windows Server 2003.
The following options are available on the HP Digital Imaging Options dialog box:
- Contrast Enhancement: Enhance colors and contrast for washed-out photos. Click Automatic to allow the printer software to brighten areas of photos that need adjustment.
- Digital Flash: Adjust the exposure in dark areas of photos to bring out detail. Click Automatic to allow the printer software to balance lightness and darkness.
- SmartFocus: Enhance the image quality and clarity of low resolution images such as those downloaded from the Internet. Click On to allow the printer software to sharpen details in the image.
- Sharpness: Adjust the image sharpness to your preference. Click Automatic to allow the printer software to set the level of sharpening for the image.
- Smoothing: Soften an image. Click Automatic to allow the printer software to set the level of smoothing for the image.
Opening the HP Digital Imaging Options dialog box
- Open the Printer Properties dialog box.
- Click the Paper/Quality tab, and then click the HP Digital Imaging button.

NOTE If you installed the HP Image Zone software, you can use it to edit and further enhance digital photos.
Using the Services tab

NOTE The Services tab is not available for Windows 9x.
If the product is connected to a network, use the Services tab to obtain product and supply-status information. Click the Device and Supplies status icon to open the Device Status page of the HP Embedded Web Server. This page shows the current status of the product, the percentage of life remaining for each supply, and information for ordering supplies.
Using features in the Macintosh printer driver
When you print from a software program, many of the printer features are available from the printer driver. For complete information about the features that are available in the printer driver, see the printer-driver Help. The following features are described in this section:
- Creating and using presets in Mac OS X
• Printing a cover page
• Printing multiple pages on one sheet of paper - Setting the color options

NOTE Settings in the printer driver and software program generally override control-panel settings. Software-program settings generally override printer-driver settings.
Creating and using presets in Mac OS X
Use presets to save the current printer driver settings for reuse.
To create a preset
- Open the printer driver (see Opening the printer drivers).
- Select the print settings.
- In the Presets box, click Save As..., and type a name for the preset.
- Click OK.
To use presets
- Open the printer driver (see Opening the printer drivers).
- In the Presets menu, select the preset that you want to use.

NOTE To use printer-driver default settings, select the Standard preset.
Printing a cover page
You can print a separate cover page for your document that includes a message (such as "Confidential").
- Open the printer driver (see Opening the printer drivers).
- On the Cover Page or Paper/Quality pop-up menu, select whether to print the cover page Before Document or After Document.
- If you are using Mac OS X, in the Cover Page Type pop-up menu, select the message that you want to print on the cover page.

NOTE To print a blank cover page, select Standard as the Cover Page Type.
Printing multiple pages on one sheet of paper
You can print more than one page on a single sheet of paper. This feature provides a cost-effective way to print draft pages.
- Open the printer driver (see Opening the printer drivers).
- Click the Layout pop-up menu.
- Next to Pages per Sheet, select the number of pages that you want to print on each sheet (1, 2, 4, 6, 9, or 16).
- Next to Layout Direction, select the order and placement of the pages on the sheet.
- Next to Borders, select the type of border to print around each page on the sheet.
Setting the color options
Use the Color Options pop-up menu to control how colors are interpreted and printed from software programs.
- Open the printer driver (see Opening the printer drivers).
- Open the Color Options pop-up menu.
- If you are using Mac OS X, click Show Advanced Options.
- Adjust the individual settings for text, graphics, and photographs.
Printing on special media
Use these guidelines when printing on special types of media.
Transparencies
- Handle transparencies using the edges. Oils from your fingers deposited on the transparency can cause print quality problems.
- Use only overhead transparencies recommended for use in this printer. Hewlett-Packard recommends using HP Color LaserJet Transparencies with this printer. HP products are designed to work together for optimum printing results.
- In either the software program or the printer driver, select TRANSPARENCY as the media type, or print from a tray that is configured for transparencies.

CAUTION Transparencies not designed for LaserJet printing will melt in the printer, causing damage to the printer. Do not use transparencies designed for monochrome printing.
Glossy paper
- In either the software application or the driver, select GLOSSY as the media type, or print from a tray that is configured for glossy paper.
- HP Color LaserJet 3600 and 3800 Series printers: Select GLOSSY for media weights up to 120 g/m² (32 lb bond). Select Heavy Glossy for media weights up to 163 g/m² (43 lb bond). Select Extra Heavy Glossy for media weights up to 220 g/m² (58 lb bond).
- HP Color LaserJet 3000 Series printer: Select GLOSSY for media weights up to 120 g/m ^4 (32 lb bond).
- Because this affects all print jobs, it is important to return the printer to its original settings once the job has printed. See Configuring trays for more information.

NOTE Hewlett-Packard recommends using HP Color LaserJet Soft Gloss paper with this printer. HP products are designed to work together for optimum printing results. If HP Color LaserJet Soft Gloss paper is not used with this printer, print quality may be compromised.
Colored paper
Colored paper should be of the same high quality as white xerographic paper.
- Pigments used must be able to withstand the printer's fusing temperature of 190^ (374°F) for 0.1 second without deterioration.
- Do not use paper with a colored coating that was added after the paper was produced.
- The printer creates colors by printing patterns of dots, overlaying and varying their spacing to produce various colors. Varying the shade or color of the paper will affect the shades of the printed colors.
Envelopes

NOTE Envelopes can be printed only from tray 1. Set the tray media size to the specific envelope size. See Printing envelopes from tray 1.
Adhere to the following guidelines to help ensure proper printing on envelopes and to help prevent printer jams:
• Do not load more than 10 envelopes into tray 1.
• The weight rating of envelopes should not exceed 90 g/m^2 (24 lb bond).
• Envelopes should be flat.
• Do not use envelopes with windows or clasps.
• Envelopes must not be wrinkled, nicked, or otherwise damaged.
Envelopes with peel-off adhesive strips must use adhesives that can withstand the heat and pressures of the printer's fusing process.
- Envelopes should be loaded face-down with the top of the envelope to the left, and the short edge feeding into the printer first.

NOTE In high humidity environments, envelopes should be printed long-edge first to prevent them from sealing during printing. For long-edge printing, envelopes should be loaded long edge first, face down. See Printing envelopes from tray 1.
Labels

NOTE In either the application or the printer driver, select Labels as the media type, or configure tray 1 for labels. See Configuring trays.
- Verify that the labels' adhesive material can tolerate temperatures of 190^ (374°F) for 0.1 second.
- Verify that there is no exposed adhesive material between the labels. Exposed areas can cause labels to peel off during printing, which can cause paper jams. Exposed adhesive can also cause damage to printer components.
Do not re-feed a sheet of labels. - Verify that labels lie flat.
Do not use labels that are wrinkled, bubbled, or otherwise damaged.
Heavy paper
• Any tray will print most heavy media that does not exceed 105 g/m ^2 (28 lb bond).
• Use cardstock (135 g/m ^2 to 220 g/m ^2 (36 to 58 lb bond)) only in tray 1.
In either the software application or the printer driver, select Heavy (106 g/m² to 163 g/m² (28 to 43 lb bond)) or Cardstock (135 g/m² to 220 g/m² (36 to 58 lb bond)) as the media type, or print from a tray that is configured for heavy paper. Because this setting affects all print jobs, it is important to return the printer back to its original settings once the job has printed. See Configuring trays.

CAUTION In general, do not use paper that is heavier than the media specification recommended for this printer. Doing so can cause misfeeds, paper jams, reduced print quality, and excessive mechanical wear. However, some heavier media, such as HP Cover Stock, can be safely used.
HP LaserJet Tough paper
- Use only HP LaserJet Tough paper with this printer. HP products are designed to work together for optimum printing results.
- Handle HP LaserJet Tough paper using the edges. Oils from your fingers deposited on HP LaserJet Tough paper can cause print quality problems.
- In either the software application or the printer driver, select Tough Paper as the media type, or print from a tray that is configured for HP LaserJet Tough paper.

CAUTION Transparent media that are not designed for LaserJet printing will melt in the printer, causing damage to the printer.
Preprinted forms and letterhead
- Forms and letterhead must be printed with heat-resistant inks that will not melt, vaporize, or release hazardous emissions when subjected to the printer's fusing temperature of approximately 190^ (374°F) or 0.1 second.
• Inks must be nonflammable and should not adversely affect any printer rollers. - Forms and letterhead should be sealed in a moisture-proof wrapping to prevent changes during storage.
- Before loading preprinted paper, verify that the ink on the paper is dry. During the fusing process, wet ink can come off of preprinted paper.
- When 2-sided (duplex) printing, load preprinted forms and letterhead into tray 2 and tray 3 face-down with the top edge at the back of the tray. To load preprinted forms and letterhead into tray 1, load them face-up with the bottom edge feeding in first.
- When 1-sided (simplex) printing, load preprinted forms and letterhead into tray 2 or tray 3 face-up with the top edge of the page at the front of the tray. To load preprinted forms and letterhead into tray 1, place them in the tray with the side to be printed face-down with the bottom edge feeding in first.
Recycled paper
This printer supports the use of recycled paper. Recycled paper must meet the same specifications as standard paper. See the HP LaserJet Printer Family Print Media Specification Guide. Hewlett-Packard recommends that recycled paper contain no more than 5 percent ground wood.
Using 2-sided (duplex) printing

NOTE Two-sided printing is available for the HP Color LaserJet 3000dn, 3000dtn, 3600dn, 3800dn, and 3800dtn printers.
The printer can print on both sides of the paper. If the printer is not equipped with automatic 2-sided printing, see Manual 2-sided printing.
Automatic 2-sided printing

NOTE You must specify automatic 2-sided printing options in your software program or in the printer driver as well in order to print on both sides of the page.
Perform the following steps to use automatic 2-sided printing:
- Verify that the printer driver is configured for 2-sided printing. (For instructions, see the online Help for the printer driver.)
- Select the appropriate 2-sided printing options in the printer driver software, including page and binding orientation.
- For certain media types, including transparencies, labels, cardstock, and glossy film, 2-sided printing is not supported.
For best results, avoid 2-sided printing on rough-textured, heavy-weight paper. - When using 2-sided printing, load pre-printed forms and letterhead into tray 1 face-up with the bottom edge of the page feeding first. Load preprinted forms and letterhead into tray 2 and tray 3 face-down with the top edge at the back of the tray.
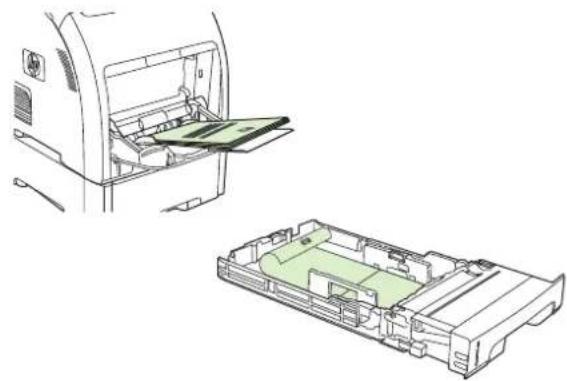
natural_image
Technical line drawing of a printer's internal structure showing the open panel and green internal compartments (no text or symbols)
NOTE Loading pre-printed forms and letterhead for 2-sided printing is different than loading for 1-sided printing.

NOTE When duplexing, the printer prints on the first side of the page and then moves the page into the output bin momentarily. The printer then pulls the page back into the printer to print the second side of the page. Make sure that the page is complete before taking a page from the output bin. Pulling a page from the bin while the printer is trying to pull the page back into the printer can cause a jam.
Control-panel settings for automatic 2-sided printing
Many software programs include 2-sided printing settings. If your software program or printer driver does not include 2-sided printing options, you can adjust these settings through the control panel. The factory default setting is OFF.

CAUTION Do not use 2-sided printing when printing on labels, transparencies, or glossy paper. Serious damage to the printer can result.
To turn 2-sided printing on or off from the control panel

NOTE Changing settings for 2-sided printing from the printer control panel affects all print jobs. Whenever possible, change settings for 2-sided printing in your software program or printer driver.
To select 2-sided printing from the printer driver, the driver must be configured correctly. For instructions, see the online Help for the printer driver.
- Press Menu.
- Press ▼ to highlight CONFIGURE DEVICE, and then press √.
- Press √ to select PRINTING.
- Press ▼ to highlight DUPLEX, and then press √.
- Press ▲ or ▼ to select ON to turn on 2-sided printing or OFF to turn off 2-sided printing, and then press √.
- Press Menu to return to the Ready state.
Options for binding 2-sided printing jobs
Before printing a 2-sided document, use the printer driver to specify the edge on which you will bind your finished document. Long-edge or book binding is the conventional layout used for books. Short-edge or tablet binding is the typical calendar binding.

NOTE The default setting is to bind on the long edge for pages in portrait orientation. To change to short-edge binding, select the Flip Pages Up check box.
Manual 2-sided printing
To print a duplexed document on media other than the supported sizes or weights (see Print-media specifications), or if your printer does not support automatic 2-sided printing, go to the printer and reinsert the paper manually after the first side has printed.

NOTE Damaged or reused media can cause jams and should not be used.
To manually print on two sides (duplex)
- For tray 1, load letterhead paper face-up, with the bottom edge feeding first.
For tray 2 (250-sheet tray) or tray 3 (500-sheet tray), load letterhead paper face-down, with the top edge at the back of the tray.
-
Open the printer driver.
-
Select the appropriate size and type.
-
On the Finishing tab, select Print on Both Sides (Manually).
-
Click OK.
-
Go to the printer. When the MANUAL FEED prompt appears, remove any blank paper from tray 1. Remove the printed stack from the output bin and insert the stack with the printed side up, bottom edge feeding first. You must print the second side from tray 1.
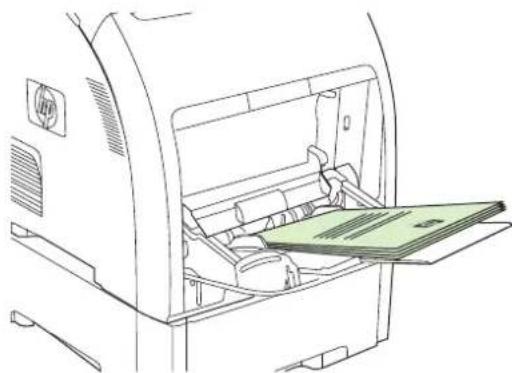
natural_image
Line drawing of a printer's internal structure with a green paper sheet being inserted (no text or symbols)
NOTE Do not discard any blank sheets from the printed stack.
- If prompted by a message at the control panel, press √.

NOTE If total sheets exceed the tray 1 capacity for manual duplex jobs, feed the top 100 sheets first and press √. When prompted, feed the next 100 sheets and press √ Repeat as necessary until all of the sheets from the printed stack have been loaded into tray 1.
Managing special printing situations
Printing a different first page
Use the following procedure to print the first page of a document on a different media type than the rest of the document. For example, you can print the first page of a document on letterhead paper and the rest on plain paper.
- From your software program or printer driver, specify a tray for the first page and another tray for the remaining pages.
- Load the special media into the tray that you specified in step 1.
- Load the media for the remaining pages of the document into another tray.
- Print the document.
You can also print on different media by using the printer control panel or printer driver to set the types of media that are loaded in the trays and then selecting the first and remaining pages by media type.
Printing on custom-size media
The printer supports single-sided printing and manual duplexing on custom-size media. Tray 1 supports media sizes from 76 x 127 mm (3 x 5 inches) to 216 x 356 mm (8.5 x 14 inches). Tray 2 and tray 3 support media sizes from 148 x 210 mm (5.83 x 8.27 inches) to 215.9 x 355.6 mm (8.5 x 14 inches).
When printing on custom-size media, if tray 1 is configured in the printer control panel as TRAY X TYPE=ANY TYPE and TRAY X SIZE=ANY, the printer will print on whatever media is loaded in the tray.
Some software programs and printer drivers allow you to specify custom media-size dimensions. Be sure to set the correct media size in both the page setup and print dialog boxes. If your software does not allow this, specify the custom media-size dimensions in the PAPER HANDLING control-panel menu. See Paper Handling menu for more information.
If your software program requires you to calculate margins for custom-size media, see the online Help for that program.
Stopping a print request
You can stop a print request by using the printer control panel or using your software program. For instructions on how to stop a print request from a computer on a network, see the online Help for the specific network software.

NOTE It can take some time for all printing to clear after you have canceled a print job.
To stop the current print job from the printer control panel
- Press Stop on the printer control panel.
- Press ▼ to highlight Cancel Current Job, and then press √ to cancel the job.
If the print job is too far into the printing process, you might not have the option to cancel it.
To stop the current print job from the software program
A dialog box will appear briefly on the screen, giving you the option to cancel the print job.
If several requests have been sent to the printer through your software, they might be waiting in a print queue (for example, in Windows Print Manager). See the software documentation for specific instructions about canceling a print request from the computer.
If a print job is waiting in a print queue (computer memory) or print spooler (Windows 98, 2000, XP, or Me), delete the print job there.
For Windows 98 or Windows Me, click Start, click Settings, and then click Printers. For Windows 2000 and Windows XP, click Start and then click Printers. Double-click the HP Color LaserJet 3000, 3600, or 3800 printer icon to open the print spooler. Select the print job that you want to cancel, and then press Delete. If the print job is not cancelled, you might need to shut down and restart the computer.
Managing stored jobs

NOTE This feature is available for the HP Color LaserJet 3000 and 3800 Series printers only.
NOTE This feature is available only for printers with installed hard drives.
To store print jobs on the printer, use the Job Storage tab in the printer driver Properties dialog box. After a job is stored, you can print it or delete it from the printer control panel.
To print a stored job
-
Press Menu.
-
Press ▼ to highlight RETRIEVE JOB, and then press √.
A list of users appears. If no jobs are stored, then the message NO STORED JOBS appears.
- Press ▼ to highlight your user name, and then press √
- If you have more than one stored job that is protected by a personal identification number (PIN), the ALL PRIVATE JOBS menu item appears. If you want to print one of the PIN-protected jobs, highlight ALL PRIVATE JOBS, and then press √.
-
Press ▼ to highlight the correct print job, and then press √
-
Press ▼ to highlight PRINT, and then press √.
• If the job is not PIN-protected, go to step 7.
-
If prompted, provide a PIN by pressing ▲ or ▼ to change the number. Press after you have specified each number of the four-digit PIN.
-
Press ▲ and ▼ to specify the number of copies, and then press √ to print the job.
To delete a stored job
-
Press Menu.
-
Press ▼ to highlight RETRIEVE JOB, and then press √.
A list of users appears. If there are no stored jobs, then the message NO STORED JOBS appears.
- Press ▼ to highlight your user name, and then press √
- If you have more than one stored job that is PIN-protected, the ALL PRIVATE JOBS menu item appears. If you want to delete one of the PIN-protected jobs, highlight ALL PRIVATE JOBS, and then press √.
-
Press ▼ to highlight the correct print job, and then press √
-
Press ▼ to highlight DELETE, and then press √.
If the job is not PIN-protected, the printer deletes the job.
- If prompted, provide a PIN by pressing ▲ or ▼ to change the number. Press after you have specified each number of the four-digit PIN.
The printer deletes the job after you set the fourth PIN digit and press √.
Managing memory
The HP Color LaserJet 3000 and 3800 Series printers support up to 512 MB of memory. You can add additional memory by installing a dual inline memory module (DIMM) in the DIMM slot, which accepts 128, 256, or 512 MB of RAM. For information about installing memory, see Working with memory.
The printer uses 200-pin, nonparity, synchronous DRAM memory modules. Extended data output (EDO) DIMMs are not supported.

NOTE If memory problems occur when you are printing complex graphics, you can make more memory available by removing downloaded fonts, style sheets, and macros from printer memory. Reducing the complexity of a print job from within an application can help avoid memory problems.
NOTE Be sure to update the printer configuration in the printer driver after adding memory. See Enabling memory.
5 Managing the printer
This chapter describes how to manage the printer:
• Using printer information pages
- Configuring e-mail alerts
• Using the embedded Web server
• Using the HP Easy Printer Care Software
• Using the HP Printer Utility for Macintosh
Using printer information pages
From the printer control panel, you can print pages that give details about the printer and its current configuration. The table below provides the procedures for printing the information pages.

NOTE Printer information pages for the HP Color LaserJet 3600 Series printer are available in English only.
| Page description How to print the page | |
| Menu map | 1. Press Menu. |
| Shows the control-panel menus and available settings. | 2. Press ▼ to highlight INFORMATION, and then press √.3. If PRINT MENU MAP is not highlighted, press ▲ or ▼ until it is highlighted, and then press √.The content of the menu map varies, depending on the options currently installed in the printer.For a complete list of control panel menus and possible values, see Using the control-panel menus. |
| Configuration page | 1. Press Menu. |
| Shows printer settings and installed accessories. | 2. Press ▼ to highlight INFORMATION, and then press √.3. Press ▼ to highlight PRINT CONFIGURATION, and then press √. NOTE If the printer contains an HP Jetdirect print server or an optional hard disk drive, an additional configuration page prints that provides information about those devices. NOTE If the printer contains an HP Jetdirect print server or an optional hard disk drive, an additional configuration page prints that provides information about those devices. |
| Supplies status page | 1. Press Menu. |
| Shows print-cartridge toner levels. | 2. Press ▼ to highlight INFORMATION, and then press √.3. Press ▼ to highlight PRINT SUPPLIES STATUS PAGE, and then press √. NOTE If you are using non-HP supplies, the supplies status page might not show the remaining life for those supplies. For more information, see Non-HP print cartridges. NOTE If you are using non-HP supplies, the supplies status page might not show the remaining life for those supplies. For more information, see Non-HP print cartridges. |
| Usage page (HP Color LaserJet 3000 and 3800 Series printers only) | 1. Press Menu. |
| Shows a page count for each size of paper printed, the number of one-sided (simplexed) or two-sided (duplexed) pages, and the average percentage of coverage for each color. | 2. Press ▼ to highlight INFORMATION, and then press √.3. Press ▼ to highlight PRINT USAGE PAGE, and then press √. |
| Demo page | 1. Press Menu. |
| Shows a color photograph that allows you to check print quality. | 2. Press ▼ to highlight INFORMATION, and then press √.3. Press ▼ to highlight PRINT DEMO, and then press √. |
| Color usage log | 1. Press Menu. |
| Shows color use statistics for the printer. | 2. Press ▼ to highlight INFORMATION, and then press √. |
| 3. Press ▼ to highlight PRINT COLOR USAGE JOB LOG, and then press √. | |
| File directory (HP Color LaserJet 3000 and 3800 Series printers only) | 1. Press Menu. |
| Shows information for all installed mass storage devices. | 2. Press ▼ to highlight INFORMATION, and then press √. |
| 3. Press ▼ to highlight PRINT FILE DIRECTORY, and then press √. | |
| NOTE This option does not appear if no mass storage devices are installed. | |
| PCL or PS font list (HP Color LaserJet 3000 and 3800 Series printers only) | 1. Press Menu. |
| Shows which fonts are currently installed in the printer. | 2. Press ▼ to highlight INFORMATION, and then press √. |
| 3. Press ▼ to highlight PRINT PCL FONT LIST or PRINT PS FONT LIST, and then press √. | |
| NOTE The font lists also show which fonts are resident on an optional hard disk accessory or flash DIMM. | |
Configuring e-mail alerts

NOTE If your host software does not support e-mail, this feature might not be available on the HP Color LaserJet 3600 Series printer.
You can use HP Web Jetadmin or the embedded Web server to configure the system to alert you of problems with the printer. The alerts take the form of e-mail messages to the e-mail account(s) that you specify.
You can configure the following:
• The printer(s) you want to monitor
- The alerts you want to receive (for example, alerts for paper jams, paper out, supplies status, and cover open)
• The e-mail account(s) to which the alerts should be forwarded
Software Information location
| HP Web Jetadmin | See HP Web Jetadmin for general information about HP Web Jetadmin.See the HP Web Jetadmin Help system for details on alerts and how to set them up. |
| Embedded Web server | See Using the embedded Web server for general information about the embedded Web server.See the embedded Web server Help system for details on alerts and how to set them up. |
Using the embedded Web server

NOTE The HP Color LaserJet 3600 Series printer embedded Web server provides network configuration and status information only.
NOTE When the printer is directly connected to a computer, use the HP Easy Printer Care Software to view the printer status.
• View printer control status information
- Set the type of paper loaded in each tray
• Determine the remaining life on all supplies and order new ones
• View and change tray configurations
• View and change the printer control panel menu configuration
• View and print internal pages
• Receive notification of printer and supplies events
• View and change network configuration
• View support content that is specific to the current state of the printer
- Restrict access to color printing features (HP Color LaserJet 3000 Series printer only)
When the printer is connected to the network, the embedded Web server is automatically available. You can open the embedded Web server from Windows 95 and later.
Use the embedded Web server to view printer and network status and to manage printing functions from your computer instead of from the printer control panel.
To use the embedded Web server, you must have Microsoft Internet Explorer 4 and later or Netscape Navigator 4 and later. The embedded Web server works when the printer is connected to an IP-based network. The embedded Web server does not support IPX-based or AppleTalk printer connections. You do not need Internet access to open and use the embedded Web server.
To access the embedded Web server by using a network connection
- In a supported Web browser on your computer, type the IP address for the printer in the address/URL field. (To find the IP address, print a configuration page. See Using printer information pages.)

NOTE After you open the URL, you can bookmark it so that you can return to it quickly in the future.
- The embedded Web server has three tabs that contain settings and information about the printer: the Information tab, the Settings tab, and the Networking tab. Click the tab that you want to view.
See the following section for more information about each tab.
Embedded Web server sections
The table below describes the basic screens of the embedded Web server.
| Tab or section Description | |
| Information tabProvides printer, status, and configuration information. | Device Status: Shows the printer status and shows the life remaining of HP supplies, with 0% indicating that a supply is empty. The page also shows the type and size of print paper set for each tray. To change the default settings, click Change Settings.Configuration Page: Shows the information found on the printer configuration page.Supplies Status: Shows the life remaining of HP supplies, with 0 percent indicating that a supply is empty. This page also provides supplies part numbers. To order new supplies, click Order Supplies in the Other Links area on the left side of the window.Event log: Shows a list of all printer events and errors.Usage page: Shows a summary of the number of pages the printer has printed, grouped by size and type.Diagnostics Page: Provides information about printer calibration, color density, and other parameters.Device Information: Shows the printer network name, address, and model information. To change these entries, click Device Information on the Settings tab.Control Panel: Shows messages from the printer control panel, such as Ready or Sleep mode on.Color Usage Job Log: Shows user color print jobs on a job-by-job basis.Print: Allows you to send print jobs to the printer. |
| Settings tabProvides the ability to configure the printer from your computer. | Configure Device: Allows you to configure printer settings. This page contains the traditional menus found on printers using a control-panel display.E-mail Server: Network only. Used in conjunction with the Alerts page to set up incoming and outgoing e-mail, as well as to set e-mail alerts.Alerts: Network only. Allows you to set up to receive e-mail alerts for various printer and supplies events.AutoSend: Allows you to configure the printer to send automated e-mails regarding printer configuration and supplies to specific e-mail addresses.Security: Allows you to set a password that must be entered to gain access to the Settings and Networking tabs. Enable and disable certain features of the embedded Web server.Edit Other Links: Allows you to add or customize a link to another Web site. This link is displayed in the Other Links area on all embedded Web server pages.Device Information: Allows you to name the printer and assign an asset number to it. Enter the name and e-mail address for the primary contact who will receive information about the printer.Language: Allows you to determine the language in which to display the embedded Web server information.Date & Time: Allows time synchronization with a network time server.Wake Time: Allows you to set or edit a wake time for the printer.Restrict Color: Allows you to set user color print job restrictions. |
| Networking tabProvides the ability to change network settings from your computer. | Network administrators can use this tab to control network-related settings for the printer when it is connected to an IP-based network. This tab does not appear if the printer is directly connected to a computer, or if the printer is connected to a network using anything other than an HP Jetdirect print server. |
 NOTE The Networking tab can be password-protected. NOTE The Networking tab can be password-protected. | |
| Other linksContains links that connect you to the Internet. | HP Instant SupportTM: Connects you to the HP Web site to help you find solutions. This service analyzes your printer error log and configuration information to provide diagnostic and support information specific to your printer.Order Supplies: Connects to the HP Web site, in which you can order genuine HP supplies, such as print cartridges and paper.Product Support: Connects to the support site for the printer, from which you can search for help regarding general topics. |
 NOTE You must have Internet access in order to use any of these links. If you use a dial-up connection and did not connect when you first opened the embedded Web server, you must connect before you can visit these Web sites. Connecting might require that you close the embedded Web server and reopen it. NOTE You must have Internet access in order to use any of these links. If you use a dial-up connection and did not connect when you first opened the embedded Web server, you must connect before you can visit these Web sites. Connecting might require that you close the embedded Web server and reopen it. | |
Using the HP Easy Printer Care Software
The HP Easy Printer Care Software is an application that you can use for the following tasks:
- Check the printer status.
- Check supplies status.
- Set up alerts.
• Gain access to troubleshooting and maintenance tools.
You can use the HP Easy Printer Care Software when the printer is directly connected to your computer or when it is connected to a network. You must perform a complete software installation to use the HP Easy Printer Care Software.

NOTE You do not have to have Internet access to open and use the HP Easy Printer Care Software. However, if you click a Web-based link, you must have Internet access to go to the site associated with the link.
Supported operating systems
The HP Easy Printer Care Software is supported for Windows 2000 and Windows XP.
To use the HP Easy Printer Care Software
Use one of the following methods to open HP Easy Printer Care Software:
- On the Start menu, select Programs, select HP, and then select HP Easy Printer Care Software.
- In the Windows system tray (in the lower righthand corner of the desktop), double-click the HP Easy Printer Care Software icon.
• Double-click the desktop icon.
HP Easy Printer Care Software sections
The HP Easy Printer Care Software contains the sections described in the table below.
| Section Description | |
| Overview tabContains basic status information for the printer. | Devices list: Shows the printers that you can select.Device Status section: Shows printer status information. This section will indicate printer alert conditions, such as an empty print cartridge. It also shows device-identification information, control-panel messages, and print-cartridge levels. After you correct a problem with the printer, click thebutton to update the section.Supplies Status section: Shows detailed supplies status, such as the percentage of toner remaining in the print cartridges and the status of the media that is loaded in each tray.Supplies Details link: Opens the supplies status page to view more detailed information about printer supplies, ordering information, and recycling information. |
| Section Description | ||
| Support tabProvides help information and links. | Provides device information, including alerts for items needing attention.Provides links to troubleshooting information and tools.Provides links to the HP Web site for registration, support, and for ordering supplies.[WKAS6] | NOTE If you use a dial-up connection and did not connect to the Internet when you first opened the HP Easy Printer Care Software, you must connect before you can visit these Web sites. |
| Supplies Ordering windowProvides access to online or e-mail supplies ordering. | Ordering list: Shows the supplies that you can order for each printer. If you want to order a certain item, click the Order check box for that item in the supplies list.Shop Online for Supplies button: Opens the HP supplies Web site in a new browser window. If you have checked the Order check box for any items, the information about those items can be transferred to the Web site.Print Shopping List button: Prints the information for the supplies that have the Order check box selected.Email Shopping List button: Creates a text list of items that have the Order check box selected. The list can be copied into an e-mail message that you send to your supplier. | |
| Alert Settings windowAllows you to configure the printer to automatically notify you of printer issues. | Alerts on or off: Activates or deactivates the alerts feature for a certain printer.When alerts appear: Sets when you want alerts to appear—either when you are printing to that particular printer, or anytime there is a printer event.Alert event type: Sets whether you want alerts for only critical errors, or for any error, including continuable errors.Notification type: Sets what type of alert should appear (pop-up message or system tray alert, and e-mail message). | |
| Device List tabShows information about each printer in the Devices list. | Printer information, including printer name, make, and modelAn icon (if the View as drop-down box is set to Tiles, which is the default setting)Any current alerts for the printerIf you click a printer in the list, the HP Easy Printer Care Software opens the Overview tab for that printer.Device List tab information includes the following: | |
| Find Other Printers windowAllows you to add more printers to your printer list. | Clicking the Find Other Printers link in the Devices list opens the Find Other Printers window. The Find Other Printers window provides a utility that detects other network printers so that you can add them to the Devices list and then monitor those printers from your computer. | |
Using the HP Printer Utility for Macintosh
Use the HP Printer Utility to configure and maintain a printer from a Mac OS X V10.2 or V10.3 computer.
Opening the HP Printer Utility
To open the HP Printer Utility in Mac OS X V10.2
- Open the Finder, and then click Applications.
- Click Library, and then click Printers.
- Click hp, and then click Utilities.
- Double-click HP Printer Selector to open the HP Printer Selector.
- Select the printer that you want to configure, and then click Utility.
To open the HP Printer Utility in Mac OS X V10.3
- In the Dock, click the Printer Setup Utility icon.

NOTE If the Printer Setup Utility icon does not appear in the Dock, open the Finder, click Applications, click Utilities, and then double-click Printer Setup Utility.
- Select the printer that you want to configure, and then click Utility.
HP Printer Utility features
The HP Printer Utility consists of pages that you open by clicking in the Configuration Settings list. The following table describes the tasks that you can perform from these pages.
| Item Description | |
| Color Cleaning Prints a cleaning page. | |
| Configuration Page Prints a configuration page. | |
| Supplies Status | Shows the printer supplies status and provides links for online supplies-ordering. |
| HP Support | Provides access to technical assistance, online supplies ordering, online registration, and recycling and return information. |
| File Upload Transfers files from the computer to the printer. | |
| Upload Fonts Transfers font files from the computer to the printer. | |
| Firmware Update Transfers updated firmware files from the computer to the printer. | |
| Duplex Mode Turns on the automatic two-sided printing mode. | |
| Economode Toner Density | Turns on the Economode setting to conserve toner, or adjusts toner density. |
| Resolution Changes the resolution settings, including the REt setting. | |
| Lock Resources | Locks or unlocks storage devices, such as a hard disk. |
| Stored Jobs | Manages print jobs that are stored on the printer hard disk. |
| Trays Configuration | Changes the default printer tray settings. |
Item Description
IP Settings
Changes the printer network settings and provides access to the embedded Web server.
Additional Settings Provides access to the embedded Web server.
E-mail Alerts Configures the printer to send e-mail notices for certain events.
6 Color
This chapter describes how to produce the best possible color printing:
• Using color
- Managing color
- Matching colors
Using color
The HP Color LaserJet 3000, 3600, and 3800 Series printers provide automatic color features that generate excellent color results. Carefully designed and tested color tables provide smooth, accurate color rendition of all printable colors.
The printers also provide sophisticated tools for the experienced professional.
HP ImageREt
HP ImageREt is a technology that provides the best color print quality without having to change printer driver settings or make trade-offs between print quality, performance, and memory. ImageREt produces photorealistic images.
Depending on your printer, the following HP ImageREt versions offer trapping technologies, control over dot placement, and more precise control of the toner quality in a dot.
HP ImageREt 2400 (HP Color LaserJet 3000 Series printer) produces a 600x600 dpi print resolution that provides 2400-dpi laser-class quality with millions of smooth colors.
HP ImageREt 3600 (HP Color LaserJet 3600 and 3800 Series printers) produces a 600x600 dpi print resolution that provides 3600-dpi laser-class quality with millions of smooth colors.
Media selection
For the best color and image quality, select the appropriate media type from the software printer menu or from the printer control panel. See Selecting print media.
Color options
Color options automatically provide optimal color output. These options use object tagging, which provides optimal color and halftone settings for different objects (text, graphics, and photos) on a page. The printer driver determines which objects appear on a page and uses halftone and color settings that provide the best print quality for each object.
In the Windows environment, the Automatic and Manual color options are on the Color tab in the printer driver.
Standard red-green-blue (sRGB)
Standard red-green-blue (sRGB) is a worldwide color standard that HP and Microsoft developed as a common color language for monitors, input devices (scanners and digital cameras), and output devices (printers and plotters). It is the default color space used for HP products, Microsoft operating systems, the World Wide Web, and most office software. The sRGB standard represents the typical Windows monitor and is the convergence standard for high-definition television.

NOTE Factors such as the type of monitor you use and the room lighting can affect the appearance of colors on your screen. For more information, see Matching colors.
The latest versions of Adobe PhotoShop ^® , CorelDRAW, Microsoft Office, and many other programs use sRGB to communicate color. Because it is the default color space in Microsoft operating systems, sRGB has been adopted broadly. When programs and devices use sRGB to exchange color information, typical users experience greatly improved color matching.
The sRGB standard improves your ability to match colors between the printer, the computer monitor, and other input devices automatically, and eliminates the need to become a color expert.
Printing in four colors (CMYK)

NOTE This feature is available for the HP Color LaserJet 3000 and 3800 Series printers only.
Cyan, magenta, yellow, and black (CMYK) are the inks that a printing press uses in four-color printing. Graphic arts (printing and publishing) environments typically use CMYK data files to provide rich, saturated colors for text and graphics. The printer uses the PS printer driver to accept CMYK colors.
CMYK ink-set emulation (PostScript only)
The HP Color LaserJet 3000 and 3800 Series printers use CMYK color rendering to emulate several standard offset-press ink sets:
- Default CMYK+: This selection is good for general-purpose rendering of CMYK data. It is designed to render photographs well while providing rich, saturated colors for text and graphics.
- Specifications for Web Offset Publications (SWOP): This selection replicates the common ink standard in the U.S. and other locations.
• Euroscale: This selection replicates the common ink standard in Europe and other locations. - Dainippon Ink and Chemical (DIC): This selection replicates the common ink standard in Japan and other locations.
- Device: This selection turns off emulation. Color must be managed in the software program or operating system in order to render photographs correctly.
Managing color
Setting color options to Automatic typically produces the best possible print quality for color documents. However, you sometimes might want to print a color document in grayscale (black and white) or change one of the printer color options.
- In Windows, use the settings on the Color tab in the printer driver to print in grayscale or change the color options.
- When using a Macintosh computer, use the Color Matching pop-up menu in the Print dialog box to print in grayscale or change the color options.
Print in Grayscale
Select the Print in Grayscale option from the printer driver to print a color document in black and white. This option is useful for printing color documents that will be photocopied or faxed.
When Print in Grayscale is selected, the printer uses the monochrome mode, which reduces wear on the color cartridges.
Automatic or manual color adjustment
The Automatic color adjustment option optimizes the neutral-gray color treatment, halftones, and edge enhancements for each element in a document. For more information, see your printer driver online Help.

NOTE Automatic is the default setting and is recommended for printing all color documents.
Use the Manual color adjustment option to adjust the neutral-gray color treatment, halftones, and edge enhancements for text, graphics, and photographs. To gain access to the manual color options, from the Color tab, select Manual, and then select Settings.
Manual color options
Use manual color adjustment to adjust the Color (or Color Map) and Halftoning options individually for text, graphics, and photographs.

NOTE In programs that convert text or graphics to raster images, the Photographs settings also control text and graphics.
Table 6-1 Manual color options
| Setting description Setting options | |
| HalftoneHalftone options (available for the HP Color LaserJet 3000 and 3800 Series printers only) affect the color output resolution and clarity. | Smooth provides better results for large, solid-filled print areas and enhances photographs by smoothing color gradations. Select this option when uniform and smooth area fills are the top priority.Detail is useful for text and graphics that require sharp distinctions among lines or colors, or images that contain a pattern or a high level of detail. Select this option when sharp edges and details are the top priority. |
| Neutral GraysThe Neutral Grays setting (available for the HP Color LaserJet 3000 and 3800 Series printers only)determines the method for creating gray colors used in text, graphics, and photographs. | Black Only generates neutral colors (grays and black) by using only black toner. This guarantees neutral colors without a color cast.4-Color generates neutral colors (grays and black) by combining all four toner colors. This method produces smoother gradients and transitions to other colors, and it produces the darkest black. |
| Edge ControlThe Edge Control setting determines how edges are rendered. Edge control has two components:adaptive halftoning and trapping. Adaptive halftoning increases edge sharpness. Trapping reduces the effect of color-plane misregistration by overlapping the edges of adjacent objects slightly. | HP Color LaserJet 3000 and 3800 Series printers:Maximum is the most aggressive trapping setting. Adaptive halftoning is on.Normal is the default trapping setting. Trapping is at a medium level and adaptive halftoning is on.Light sets trapping at a minimal level, and adaptive halftoning is on.Off turns off both trapping and adaptive halftoning. |
| HP Color LaserJet 3600 Series printer:Maximum is the most aggressive trapping setting.Normal sets the trapping at a medium level.Light sets trapping at a minimal level.Off is the default trapping setting. Trapping is turned off. | |
| RGB Color (HP Color LaserJet 3000 and 3800 Series printers only) | Default (sRGB) instructs the printer to interpret RGB color as sRGB. The sRGB standard is the accepted standard of Microsoft and the World Wide Web Consortium (http://www.w3.org).Image optimization (sRGB) (HP Color LaserJet 3800 Series printer only) instructs the printer to use the best color matching for rendering sRGB images. Select this option to print raster objects, such as .BMP, .TIF, or .GIF files.Adobe RGB (1998) (HP Color LaserJet 3800 Series printer only) instructs the printer to use the best color matching for documents or images that are in the Adobe RGB color space that some digital cameras and high-end graphics programs create. When printing with Adobe RGB from a professional software program, turn off the color management in the program and allow the printer software to manage the color space.None instructs the printer to print RGB data in raw device mode. You must manage color in the program in which you are working or in the operating system in order to render photographs correctly when this option is selected.Custom Profile instructs the printer to use a custom input profile to more accurately predict and control color output. Download custom profiles from www.hp.com. |
Restricting color printing

NOTE This feature is available for the HP Color LaserJet 3000 and 3800 Series printers only.
The HP Color LaserJet 3000 and 3800 Series printers include a RESTRICT COLOR USE setting for networked printers. A network administrator can use the setting to restrict user access to the color printing features in order to conserve color toner. If you are unable to print in color, see your network administrator.
- Press Menu.
- Press ▼ to select PRINT QUALITY, and then press √.
- Press ▼ to select SYSTEM SETUP, and then press √.
- Press ▼ to select RESTRICT COLOR USE, and then press √.
-
Press ▼ to select one of the following options:
-
DISABLE COLOR: This setting denies the printer color capabilities to all users.
- ENABLE COLOR: This is the default setting, which allows all users to use the printer color capabilities.
-
COLOR IF ALLOWED: This setting allows the network administrator to allow color use for select users. Use the embedded Web server to designate users who can print in color.
-
Press √ to save the setting.
The network administrator can monitor color usage for a specific HP Color LaserJet 3000 Series printer by printing a color usage job log. See Using printer information pages.

NOTE For the HP Color LaserJet 3600 Series printer, the network administrator can deny access to color printing through the Driver Management and Control (DMC) program.
Matching colors
The process of matching printer output color to your computer screen is complex, because printers and computer monitors use different methods of producing color. Monitors display colors by using light pixels that use an RGB (red, green, blue) color process, but printers print colors by using a CMYK (cyan, magenta, yellow, and black) process.
Several factors can influence your ability to match printed colors to those on your monitor:
- Print media
• Printer colorants (inks or toners, for example)
• Printing process (inkjet, press, or laser technology, for example)
• Overhead lighting
• Personal differences in perception of color - Software programs
Printer drivers
• Computer operating systems
Monitors
• Video cards and drivers
• Operating environment (humidity, for example)
Keep these factors in mind when colors on your screen do not perfectly match your printed colors.
For most users, the best method for matching colors is to print sRGB colors.
Sample book color matching

NOTE This feature is available for the HP Color LaserJet 3000 and 3800 Series printers only.
The process for matching printer output to preprinted sample books and standard color references is complex. In general, you can obtain a reasonably good match to a sample book if cyan, magenta, yellow, and black inks are used in the sample book. These are usually referred to as process-color sample books.
Some sample books are created from spot colors, which are specially created colorants. Many of these spot colors are outside the printer gamut (color range). Most spot color sample books have companion process sample books that provide CMYK approximations.
Most process sample books have a note about what process standards were used to print the sample book: SWOP, EURO, or DIC. In most cases, for optimal color matching, select the corresponding ink emulation from the printer menu. If you cannot identify the process standard, use SWOP ink emulation.
Printing color samples
To use the color samples, select the color sample that is the closest match to the desired color. Use the sample's color value in your program to describe the object that you wish to match. Colors can vary depending on paper type and the software program used.
Use the following procedure to print color samples from the printer control panel:
-
Press Menu.
-
Press ▼ to highlight INFORMATION, and then press √.
-
Press ▼ to highlight PRINT CMYK SAMPLES (HP Color LaserJet 3000 and 3800 Series printers only) or PRINT RGB SAMPLES, and then press √.
7 Maintenance
This chapter describes ways to maintain your printer. The following topics are covered:
• Managing supplies
• Replacing supplies and parts
- Cleaning the printer
Managing supplies
Using, storing, and monitoring print cartridges can help ensure quality printer output.
Supplies life
The life of the print cartridge depends on usage patterns and the amount of toner that print jobs require. For example, when printing text at 5 percent coverage, an HP print cartridge lasts an average of 4,000 or 6,000 pages, depending on the printer model. (A typical business letter is about 5 percent coverage.)
Cartridge life expectancy is reduced by frequently printing many 1- or 2-page jobs, heavy coverage, and automatic duplexing. At any time, you can verify the life expectancy by checking the print cartridge life. See Checking the print-cartridge life for more information.
Approximate print-cartridge replacement intervals
The following table lists the estimated replacement intervals for print cartridges and the control-panel messages that indicate when to replace each item.
| Printer Page count Approximate time period | ||
| HP Color LaserJet 3000 Series printer 6,500 pages2 (black) 6 months | ||
| 3,500 pages (color) | ||
| HP Color LaserJet 3600 Series printer | 6,000 pages (black) | 4 months |
| 4,000 pages (color) | ||
| HP Color LaserJet 3800 Series printer | 6,000 pages (black) | 6 months |
| 6,000 pages (color) | ||
1 Approximate life is based on 1,500 pages per month.
2 Approximate average A4-/letter-size page count based on approximately 5% coverage of individual colors.
To order supplies online, go to one of the following Web sites:
• www.hp.com/support/clj3000
• www.hp.com/support/clj3600
www.hp.com/support/clj3800
Checking the print-cartridge life
You can check the print-cartridge life using the printer control panel, the embedded Web server, printer software, HP Easy Printer Care Software, or HP Web Jetadmin software. Check the supplies gauge on the printer control panel for approximate supply levels.
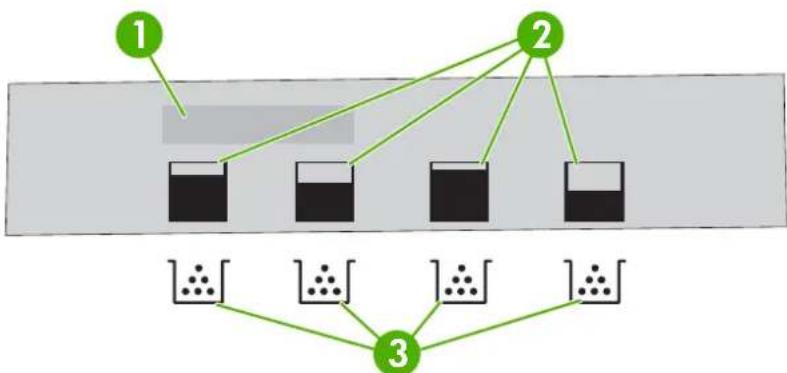
flowchart
graph TD
    A["1"] --> B["Bar with solid black liquid"]
    C["2"] --> D["Bar with solid black liquid"]
    E["3"] --> F["Bar with solid black liquid"]
    B --> G["Beaker with solid dots"]
    D --> H["Beaker with solid dots"]
    F --> I["Beaker with solid dots"]
Figure 7-1 Printer display
1 Message/Prompt area
2 Supplies gauge
3 Print cartridge colors from left to right: black, yellow, cyan, and magenta
For more precise levels, follow the instructions in the table below to print a supplies status page.
| Device Procedure | |
| Printer control panel | 1. Press Menu.2. Press ▼ to highlight INFORMATION, and then press √.3. Press ▼ to highlight PRINT SUPPLIES STATUS PAGE, and then press √ to print the supplies status page. |
| HP Easy Printer Care Software | In the Overview tab, in the Supplies Status section, click Supplies Details to open the supplies status page. |
| Embedded Web server (HP Color LaserJet 3000 and 3800 Series printers only) | 1. In your browser, enter the IP address for the printer home page and press Enter to open the printer status page. See Using the embedded Web server.2. On the left side of the screen, click Supplies Status to open the supplies status page. NOTE The IP address is found on the printer Jetdirect page, which is printed with the configuration page. See Using printer information pages. NOTE The IP address is found on the printer Jetdirect page, which is printed with the configuration page. See Using printer information pages. |
| HP Web Jetadmin | In HP Web Jetadmin, select the printer device. The device status page shows print cartridge information. |
Print-cartridge storage
Do not remove the print cartridge from its package until you are ready to use it.

CAUTION To prevent damage to the print cartridge, do not expose it to light for more than a few minutes, and do not touch the surface of the roller.
HP print cartridges
When you use a genuine new HP print cartridge, you can obtain the following supplies information:
• Percentage of supplies remaining
• Estimated number of pages remaining
• Number of pages printed
Non-HP print cartridges
Hewlett-Packard Company cannot recommend use of non-HP print cartridges, either new or remanufactured. Because they are not genuine HP products, HP cannot influence their design or control their quality. Service or repair that is required as a result of using a non-HP print cartridge will not be covered under the printer warranty.
If you use a non-HP print cartridge, HP cannot ensure the accuracy of certain features.
If the non-HP print cartridge was sold to you as a genuine HP product, see HP fraud hotline and Web site.
Print-cartridge authentication
The printer automatically authenticates the print cartridges when the cartridges are inserted into the printer. During authentication, the printer will let you know whether a cartridge is a genuine HP print cartridge.
If the printer control panel message states that this is not a genuine HP print cartridge and you believe you purchased an HP print cartridge, see HP fraud hotline and Web site.
HP fraud hotline and Web site
Call the HP fraud hotline (1-877-219-3183, toll-free in North America) or go to www.hp.com/go/anticounterfeit when you install an HP print cartridge and the printer message says the cartridge is non-HP. HP will help determine if the product is genuine and take steps to resolve the problem.
Your print cartridge might not be a genuine HP print cartridge if you notice the following:
• You are experiencing a high number of problems with the print cartridge.
- The cartridge does not look like it usually does (for example, the orange pull tab is missing, or the packaging differs from HP packaging).
Replacing supplies and parts
Carefully follow the guidelines in this section when replacing printer supplies.
Supply replacement guidelines
To facilitate the replacement of supplies, keep the following guidelines in mind when setting up the printer.
- Sufficient space is required above and in the front of the printer for removing supplies.
• The printer should be located on a flat, sturdy surface.
For instructions on installing supplies, see the installation guides provided with each supply item or see more information at the following Web sites: .
HP Color LaserJet 3000 Series printer: www.hp.com/support/clj3000
HP Color LaserJet 3600 Series printer: www.hp.com/support/clj3600
HP Color LaserJet 3800 Series printer: www.hp.com/support/clj3800

CAUTION Hewlett-Packard recommends the use of HP products in this printer. Use of non-HP products may cause problems requiring service that is not covered by the HP warranty or service agreements.
Changing print cartridges
When a print cartridge approaches the end of useful life, the control panel displays a message recommending that you order a replacement. The printer can continue to print using the current print cartridge until the control panel displays a message instructing you to replace the cartridge.
The printer uses four colors and has a different print cartridge for each color: black (K), cyan (C), magenta (M), and yellow (Y).
Replace a print cartridge when the printer control panel displays a REPLACE

NOTE If all of the print cartridges wear out at the same time and you are printing mostly monochrome (black and white), you should change the print mode to MOSTLY BLACK PAGES. See System Setup sub-menu for more information.
To change the print cartridge
- Open the front door.
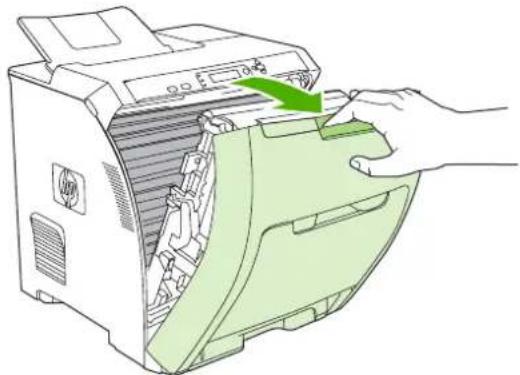
natural_image
Illustration of a printer's internal structure with a hand inserting a green arrow (no text or symbols)
CAUTION Do not place anything on the transfer unit and do not touch the transfer unit, which is located on the inside of the front door.
- Remove the used print cartridge from the printer.

natural_image
Technical line drawing of a printer internal structure with a green arrow indicating a component (no text or symbols present)- Remove the new print cartridge from the bag. Place the used print cartridge in the bag for recycling.
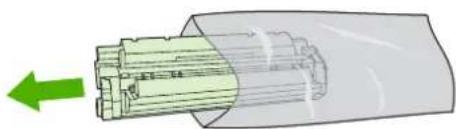
natural_image
Cross-sectional diagram of a mechanical component with green arrows indicating direction (no text or symbols)- Grasp both sides of the print cartridge and distribute the toner by gently rocking the print cartridge from side to side.

CAUTION Do not touch the shutter or the surface of the roller.
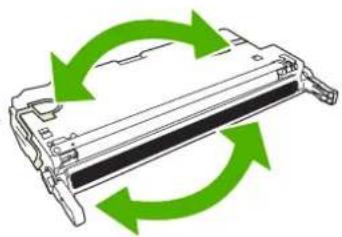
natural_image
Diagram of a mechanical component with green circular arrows indicating rotation or cycle (no text or symbols)- Remove the orange shipping locks and the shipping tape attached to the left shipping lock from the new print cartridge. Discard the shipping tape and shipping locks according to local regulations.
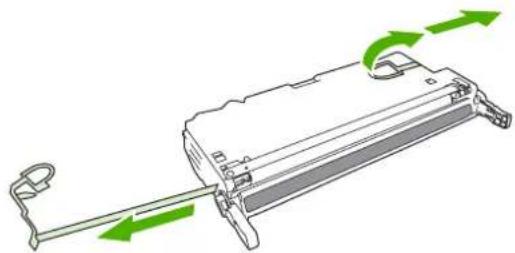
natural_image
Diagram of a mechanical device with green directional arrows indicating motion or force (no text or symbols)- Align the print cartridge with the tracks inside the printer, and using the handles, insert the print cartridge until it is firmly seated.
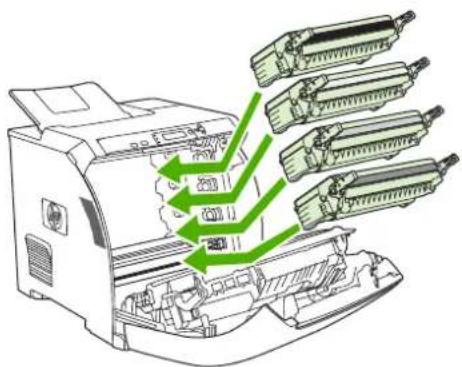
text_image
Diagram illustrating a printer's internal structure with green arrows indicating assembly or processing flow, showing components like paper and printer parts.- Firmly close the front door.
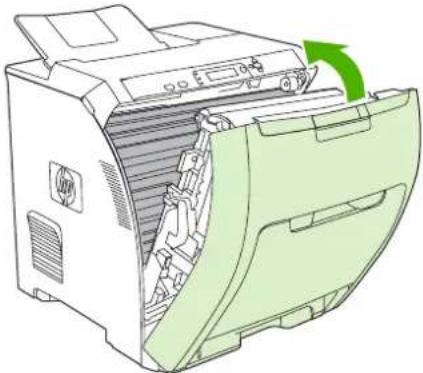
natural_image
Illustration of a printer with green paper feeding into a slot, showing internal structure and a green arrow indicating rotation (no text or symbols)After a short time, the control panel should display Ready.
- Installation is complete. Place the used print cartridge in the box in which the new cartridge arrived. See the enclosed recycling guide for recycling instructions.
- If you are using a non-HP print cartridge, check the printer control panel for further instructions.
For additional help, see the Web sites listed in Supply replacement guidelines.
Cleaning the printer
During the printing process, paper, toner, and dust particles can accumulate inside the printer. Over time, this buildup can cause print-quality problems, such as toner specks or smearing. This printer has a cleaning mode that can correct and prevent these types of problems.
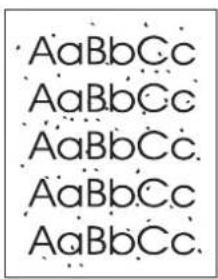
text_image
AaBbCc AaBbCc AaBbCc AaBbCc AaBbCc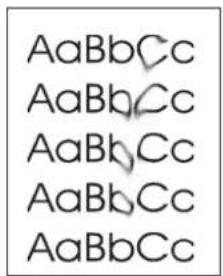
text_image
AaBbCc AaBbCc AaBbCc AaBbCc AaBbCcTo clean the printer using the printer control panel
- Press Menu.
- Press ▼ to highlight CONFIGURE DEVICE, and then press √.
- Press ▼ to highlight PRINT QUALITY, and then press √.

NOTE If your printer has an automatic duplexer (HP Color LaserJet 3000dn, 3000dtn, 3600dn, 3800dn, and 3800dtn printers), go to step 7.
- Press ▼ to highlight CREATE CLEANING PAGE, and then press √.
- Remove all paper from tray 1.
- Remove the cleaning page and load it face-down in tray 1.

NOTE If you are not still in the menus, navigate to PRINT QUALITY using the above instructions.
- At the printer control panel, press ▼ to highlight PROCESS CLEANING PAGE, and then press √.
8 Problem solving
This chapter describes what to do if problems arise with your printer.
• Basic troubleshooting checklist
• Control-panel message types
• Control-panel messages
Jams
• Common causes of jams
- Clearing jams
• Paper-handling problems
• Troubleshooting-information pages
• Printer response problems
• Printer control-panel problems
• Color-printing problems
- Incorrect printer output
• Macintosh problems
• Software program problems
• Print-quality troubleshooting
Basic troubleshooting checklist
If you are experiencing problems with the printer, use the following checklist to identify the cause of the problem:
• Is the printer connected to power?
Is the printer on?
• Is the printer in the Ready state?
Are all necessary cables connected?
• Do any messages appear on the control panel?
• Are genuine HP supplies installed?
- Were recently replaced print cartridges installed correctly, and was the pull tab on the cartridge removed?
For additional information about installation and setup, see the printer getting started guide.
If you cannot find solutions to printer problems in this guide, go to the appropriate Web site:
HP Color LaserJet 3000 Series printer: www.hp.com/support/clj3000
HP Color LaserJet 3600 Series printer: www.hp.com/support/clj3600
HP Color LaserJet 3800 Series printer: www.hp.com/support/clj3800
Factors that affect printer performance
Several factors affect the time it takes to print a job:
• Maximum printer speed, measured in pages per minute (ppm)
The use of special paper (such as transparencies, heavy paper, and custom-size paper)
• Printer processing and download time
• The complexity and size of graphics
• The speed of the computer you are using
The USB connection
• The printer I/O configuration
• The amount of printer memory installed
• The network operating system and configuration (if applicable)
• Printer personality (HP JetReady, PCL, or PS)

NOTE Although additional printer memory can resolve memory problems, improve how the printer handles complex graphics, and improve download times, it will not increase maximum printer speed (ppm).
Control-panel message types
Four types of control-panel messages can indicate the status of or problems with the printer.
| Message type Description | |
| Status messages | Status messages reflect the current state of the printer. They inform you of normal printer operation and require no interaction to clear them. They change as the state of the printer changes. Whenever the printer is ready, not busy, and has no pending warning messages, the status message Ready appears if the printer is online. |
| Warning messages | Warning messages inform you of data and print errors. These messages typically alternate with the Ready or status messages and remain until the √ button is pressed. Some warning messages are clearable. If CLEARABLE WARNINGS is set to JOB on the printer CONFIGURE DEVICE menu, the next print job clears these messages. |
| Error messages | Error messages communicate that some action must be performed, such as adding paper or clearing a jam.Some error messages are auto-continuable. If AUTO CONTINUE=ON is set on the menus, the printer will continue normal operation after an auto-continuable error message appears for 10 seconds. NOTE Pressing any button during the 10-second auto-continuable error message overrides the auto-continue feature, and the button function takes precedence. For example, pressing the Stop button pauses printing and offers the option to cancel the print job. NOTE Pressing any button during the 10-second auto-continuable error message overrides the auto-continue feature, and the button function takes precedence. For example, pressing the Stop button pauses printing and offers the option to cancel the print job. |
| Critical-error messages | Critical error messages inform you of a device failure. Some of these messages can be cleared by turning the printer off and then on. These messages are not affected by the AUTO CONTINUE setting. If a critical error persists, service is required. |
The following table lists and describes control-panel messages.
Control-panel messages
Control panel message Description Recommended action
| 10.32.YY UNAUTHORIZED SUPPLYUnauthorized supply in usealternates withFor help press ? | A new, non-HP supply has been installed.This message appears until an HP supply is installed or you press √. | If you believe you purchased an HP supply,please go towww.hp.com/go/anticounterfeit.Service or repairs required as a result of usingnon-HP supplies are not covered underHP warranty.To continue printing, press √. The firstpending print job will be cancelled. |
| 10.94.YY REMOVE SHIPPING LOCKS FROM ALL CARTRIDGES | At least one print cartridge still has a shippinglock attached. | 1.Remove all the print cartridges andcheck for orange shipping locks on eachend of each cartridge. Remove anyshipping locks that remain.2.Reinstall the print cartridges. |
| 10.XX.YY SUPPLY MEMORY ERRORFor help press ? | The printer cannot read or write to at least oneprint cartridge memory tag, or at least onememory tag is missing. | 1.Open the front door.2.Remove the print cartridges, and thenreinstall them.3.Close the front door.4.Turn the printer off and then on.5.If the error persists, contact HP Support. |
| 11.XX INTERNAL CLOCK ERRORalternates withTo continue press √ | The printer's internal clock is not workingcorrectly. Printing can continue, but you areprompted to set the date and time each timeyou turn the printer on. | Contact HP support. |
| 13.XX.YY DUPLEX JAM INSIDE FRONT DOORalternates withFor help press ? | A jam has occurred inside the front door. Open the front door and clear the jam.SeeClearing jams.If the message persists after clearing allpages and exiting Help, contact HP Support. | |
| 13.XX.YY DUPLEX PATH JAM FRONT DOORalternates withFor help press ? | A jam has occurred in the duplex output areainside the front door. | Open the front door and clear the jam.SeeClearing jams.If the message persists after clearing allpages and exiting Help, contact HP Support. |
| 13.XX.YY FUSER JAM INSIDE TOP COVERalternates withFor help press ? | A jam has occurred in the fuser. Open the top cover and clear the jam.△CAUTIONThe fuser is hot. Wait10 minutes for it to cool.SeeClearing jams.If the message persists after clearing allpages and exiting Help, contact HP Support. | |
| 13.XX.YY JAM IN TRAY 1alternates with | A page is jammed in the multipurpose tray. | Clear the jam, and then press √.SeeClearing jams. |
| Control panel message Description Recommended action | ||
| Clear jam then press √ | If the message persists after clearing all pages, contact HP Support. | |
| 13.XX.YY JAM IN TRAY 2 | A page is jammed in tray 2. | Remove tray 2, clear the jam, and then reinstall tray 2.See Clearing jams.If the message persists after clearing all pages, contact HP Support. |
| 13.XX.YY JAM IN TRAY Xalternates withClear jam then press √ | A page is jammed in tray 1 or tray 3. | Clear the jam, and then press √orSee Clearing jams.If the message persists after clearing all pages and exiting Help, contact HP Support. |
| 13.XX.YY JAM INSIDE FRONT DOORalternates withFor help press ? | A jam has occurred inside the front door. | Press ?for help.orSee Clearing jams.If the message persists after clearing all pages and exiting Help, contact HP Support. |
| 13.XX.YY JAM INSIDE TOP COVERalternates withFor help press ? | A page is jammed underneath the front cover. | Open the front door and remove any jammed media. |
| 20 INSUFFICIENT MEMORYalternates withFor help press ?To continue press √ | The printer has received more data from the computer than fits in available memory. | 1. Press √ to continue printing.[HWZZ]NOTE Data will be lost.2. Reduce the complexity of the print job to avoid this error.3. Adding memory to the printer may allow printing of more complex pages. |
| 22 EIO X BUFFER OVERFLOWalternates withTo continue press √ | For the HP Color LaserJet 3000 and 3800 Series printers only with an EIO device.The printer EIO card in slot X has overflowed its I/O buffer during a busy state. | 1. Press √ to continue printing. NOTE Data will be lost.2. If the message persists, contact HP Support. NOTE Data will be lost.2. If the message persists, contact HP Support. |
| 22 EMBEDDED I/O BUFFER OVERFLOW HP Color LaserJet 3600 and 3800 Series printers only.The embedded HP Jetdirect print server buffer has overflowed during a busy state. | 1. Press √ to continue printing. NOTE A loss of data will occur.2. If the message persists, contact HP Support. NOTE A loss of data will occur.2. If the message persists, contact HP Support. | |
| 22 PARALLEL I/O BUFFER OVERFLOWalternates withTo continue press √ | For the HP Color LaserJet 3000 and 3800 Series printers only.The printer parallel buffer has overflowed during a busy state. | 1. Press √ to continue printing. NOTE Data will be lost. NOTE Data will be lost. |
| 2. If the message persists after exiting Help, contact HP Support. | ||
| 22 SERIAL I/O BUFFER OVERFLOWalternates withTo continue press √ | For the HP Color LaserJet 3000 and 3800 Series printers only with an EIO device.The printer serial buffer has overflowed during a busy state. | 1. Press √ to continue printing. NOTE Data will be lost. NOTE Data will be lost. |
| 2. If the message persists, contact HP Support. | ||
| 22 USB I/O BUFFER OVERFLOWalternates withTo continue press √ | The printer's USB buffer has overflowed during a busy state. | 1. Press √ to continue printing. NOTE Data will be lost. NOTE Data will be lost. |
| 2. If the message persists, contact HP Support. | ||
| 40 BAD SERIAL TRANSMISSIONalternates withTo continue press √ | For the HP Color LaserJet 3000 and 3800 Series printers only.A serial data error (parity, framing, or line overrun) has occurred while the printer was receiving data. | 1. Press √ to continue printing. NOTE Data will be lost. NOTE Data will be lost. |
| 2. If the message persists, contact HP Support. | ||
| 40 EIO X BAD TRANSMISSIONalternates withTo continue press √ | For the HP Color LaserJet 3000 and 3800 Series printers only with an EIO device.A connection with the card in the EIO slot has broken. | 1. Press √ to continue printing. NOTE Data will be lost. NOTE Data will be lost. |
| 2. If the message persists, contact HP Support. | ||
| 40 EMBEDDED I/O BAD TRANSMISSIONalternates withTo continue press √ | The connection with the HP Jetdirect embedded print server has broken. | Press √ to continue printing. |
| 41.3 UNEXPECTED SIZE IN TRAY Xalternates withLOAD TRAY X | Media is loaded that is longer or shorter in the feed direction than the size configured for the tray. | 1. Press √ to print from a different tray.2. To print from the current tray, load the tray with the size and type indicated.Ensure that all trays are configured correctly before printing again. SeeConfiguring traysfor more information. |
| 41.5 UNEXPECTED TYPE IN TRAY Xalternates withLOAD TRAY X | The printer senses a different media type than what is configured in the tray. | 1. Press √ to print from a different tray.2. To print from the current tray, load the tray with the size and type indicated.Ensure that all trays are configured correctly before printing again. SeeConfiguring traysfor more information. |
| 41.X ERRORalternates withTo continue press √ | A printer error has occurred. 1. | Press √ to continue or press ? for more information.2. If the message persists after exiting help, turn the printer off and then on.3. If the message persists, contact HP Support. |
| 49.XXXXX ERRORalternates withTo continue turn off then on | A critical firmware error has occurred. | 1. Turn the printer off and then on.2. If the message persists, contact HP Support. |
| 50.X FUSER ERRORFor help press ? | A fuser error has occurred. 1. Turn the printer off. | 2. Verify the fuser is installed correctly and fully seated.3. Turn on the printer.4. If the message persists, contact HP Support. |
| 51.XY ERRORalternates withTo continue turn off then on | A printer error has occurred. 1. | Press √ to continue.2. If the message persists, turn the printer off and then on.3. If the message persists, contact HP Support. |
| 52.XY ERRORalternates withTo continue turn off then on | A printer error has occurred. 1. | Press √ to continue.2. If the message persists, turn the printer off and then on.3. If the message persists, contact HP Support. |
| 53.10.01 ERROR UNSUPPORTED RAM | The memory DIMM is not a supported DIMM. | Install a supported DIMM. SeeWorking with memory. |
| 54.XX ERROR | A printer command error has occurred. | 1. Turn the printer off and then on.2. If the message persists, contact HP support. |
| 57.XX PRINTER ERRORalternates withTo continue turn off then on | A printer fan error has occurred. | 1. Turn the printer off and then on.2. If the message persists, contact HP Support. |
| 59.XY ERRORalternates withTo continue turn off then on | A printer motor error has occurred. | 1. Turn the printer off and then on.2. If the message persists, contact HP Support. |
Control panel message Description Recommended action
 | NOTE This message might also appear if the transfer unit is missing or incorrectly installed. Ensure that the transfer unit is correctly installed. | ||
| 62 NO SYSTEM | No system was found. | 1. | Turn the printer off and then on. |
| 2. | If the message persists, contact HP Support. | ||
| 64 ERRORFor help press ?alternates withTo continue turn off then on | For the HP Color LaserJet 3600 Series printers only.A scan buffer error has occurred. | 1. | Turn the printer off and then on. |
| 2. | If the message persists, contact HP Support. | ||
| 68.X PERMANENT STORAGE FULLalternates withTo continue press √ | A non-volatile storage device is full. Press √ to clear the message. Printing can continue, but unexpected behavior could result.X Description1 Removable disk (flash or hard)0 Onboard NVRAM | 1. | Press √ to continue. |
| 2. | For 68.0 errors, turn the printer off and then on. | ||
| 3. | If a 68.0 error persists, contact HP Support. | ||
| 4. | For 68.1 errors, use the HP Web Jetadmin software to delete files from the disk drive. | ||
| 5. | For 68.1 errors that persist, contact HP Support. | ||
| 68.X PERMANENT STORAGE WRITE FAILalternates withTo continue press √ | A non-volatile storage device is full. Press √ to clear the message. Printing can continue, but unexpected behavior could result.X Description0 Onboard NVRAM1 Removable disk | 1. | Press √ to continue. |
| 2. | If the problem persists, contact HP Support. | ||
| 68.X STORAGE ERROR SETTINGS CHANGEDalternates withTo continue press √ | One or more printer settings that were saved in the non-volatile storage device are invalid and have been reset to the factory default. Press √ to clear the message. Printing can continue, but unexpected behavior could result. | 1. | Press √ to continue. |
| 2. | Turn the printer off and then on. | ||
| 3. | If the message persists, contact HP Support. | ||
| 79.XXXX ERRORalternates withTo continue turn off then on | For the HP Color LaserJet 3000 and 3800 Series printers only.A critical hardware error has occurred. | 1. | Turn the printer off and then on. |
| 2. | If the problem persists, contact HP Support. | ||
| 8X.YYYY EIO ERROR For the HP Color LaserJet 3000 and 3800 Series printers only.The EIO accessory card has encountered a critical error. | 1. | Turn the printer off and then on. | |
| 2. | If the problem persists, contact HP Support. | ||
| Control panel message Description Recommended action | ||
| 8X.YYYY EMBEDDED JETDIRECT ERROR The HP Jetdirect embedded print server has encountered a critical error. | 1. Turn the printer off and then on.2. If the problem persists, contact HP Support. | |
| The printer has an internal clock that tracks the date and time. You are prompted to set the correct date and time the first time you turn on the printer. | Press ▶to change the date and time. | |
| To change press √ | Press Stop to skip this step. You can set the date and time later by using the SYSTEM SETUP menu. | |
| To skip, press STOP | If the prompt appears each time you turn on the printer, the clock is not working correctly. Contact HP support. | |
| Access Denied MENUS LOCKED The printer administrator has enabled the control-panel security mechanism. You cannot modify control-panel settings in this circumstance. The message disappears after a few seconds, and the printer returns to Ready or BUSY state. | Contact the printer administrator to change settings. | |
| ACTION NOT CURRENTLY AVAILABLE ON TRAY Xalternates withTray size cannot be ANY SIZE/ANY CUSTOM | You are trying to set duplex registration for a tray that is configured for ANY SIZE or ANY CUSTOM. Duplex registration is not available when the tray size is set to either of these settings. | Change the size setting for the tray. |
| BAD DUPLEXER CONNECTIONalternates withTo continue turn off then on | The duplexer is not installed correctly. Turn the printer off and then on to continue. | |
| Calibrating... | The printer is calibrating. | No action necessary. |
| Canceling...The printer is in the process of canceling a job. The message appears while the job is stopped, the paper path is flushed, and any remaining incoming data on the active data channel is received and discarded. | No action necessary. | |
| Checking paper path The engine is turning the rollers to check for possible jams. | No action necessary. | |
| Checking printer | The engine is performing an internal test. | No action necessary. |
| CHOSEN PERSONALITY NOT AVAILABLEalternates withTo continue press √ | The printer encountered a request for a personality that did not exist in the printer. The job is cancelled and no pages are printed. | 1. Press √ to continue.2. Try a different driver. NOTE For the HP Color LaserJet 3600 Series printers, you must use the driver that was specifically designed for these printers. NOTE For the HP Color LaserJet 3600 Series printers, you must use the driver that was specifically designed for these printers. |
| CLEANING DISK X% COMPLETEalternates withDO NOT POWER OFF | The memory disk is being cleaned. This process might take up to an hour. During this time, no jobs can be printed. | Do not turn off the printer. Wait for the process to complete.The printer automatically restarts at the end of the cleaning process. |
Control panel message Description Recommended action
| Cleaning... | The printer is processing the cleaning page. | No action necessary. |
| Clearing event log This message appears while the event log is cleared. The printer then returns to the SERVICE menu. | No action necessary. | |
| Clearing paper path The printer jammed or detected misplaced media. The printer is attempting to eject these pages automatically. | No action necessary. | |
| CLOSE TOP COVER AND FRONT DOOR The top cover and front door need to be closed. | Close the top cover and front door. | |
| CODE CRC ERROR An error has occurred during a firmware upgrade. | 1. Reinstall the firmware.2. If the problem persists, contact HP Support. | |
| COLOR RFU FAILED An error has occurred during a firmware upgrade. | 1. Reinstall the firmware.2. If the problem persists, contact HP Support. | |
| Creating...CLEANING PAGE The printer is generating a cleaning page.The printer returns to the Ready state after the cleaning page is printed. | 1. Load the cleaning page into tray 1.2. Press Menu.3. Select PRINT QUALITY, and then press √.4. Select PROCESS CLEANING PAGE, and then press √. | |
| DATA RECEIVEDalternates withReady | The printer received data and is waiting for a form feed. When the printer receives another file, the message disappears.The printer is paused. | If the printer is waiting for a form feed, press √ to continue.If the printer is paused, press Stop to continue. |
| Event Log Empty SHOW EVENT LOG was selected from the control panel, and the event log is empty. | No action necessary. | |
| Genuine HP supplies installed A new HP cartridge has been installed. The printer returns to the Ready state after approximately 10 seconds. | No action necessary. | |
| GENUINE HP SUPPLIES DESIGNED FORalternates withReady | This genuine HP supply was not designed for this printer and is not supported. The printer can print with this supply, but print quality might be affected. | Replace this supply with a genuine HP supply that is designed for this printer. |
| Incorrect | The PIN number is incorrect. | Contact the network administrator. |
| INCORRECTCARTRIDGEalternates withFor help press? | A color cartridge is installed in an incorrect slot. | Press ? for help.orSee Changing print cartridges for more information. |
| INCORRECT SUPPLIESFor status press √ | Two or more print cartridges are installed in an incorrect slot. | Press √ and then press ? for help.or |
| Control panel message Description Recommended action | ||
| SeeReplacing supplies and partsfor more information. | ||
| INFLATE FAILURE An error has occurred during a firmware upgrade. | 1. Reinstall the firmware.2. If the problem persists, contact HP Support. | |
| Initializing This message appears when the printer is turned on and begins initialization. | No action necessary. | |
| Initializing permanent storage This message appears when the printer is turned on to show that permanent storage is being initialized. | No action necessary. | |
| INSERT OR CLOSE TRAY XX A tray is open and the printer is trying to print from another tray. | Close the tray indicated so that printing can continue. | |
| INSTALLCARTRIDGEalternates withFor help press ? | The cartridge is either not installed or not correctly installed in the printer. | Press? for help.orSeeChanging print cartridgesfor more information. |
| INSTALL FUSERFor help press ? | The fuser is either not installed or not correctly installed in the printer. | Press? for help.orContact HP Customer Support or your authorized HP service provider. |
| INSTALL SUPPLIESFor status press √ | Two or more cartridges are missing. Install the missing cartridges. | |
| INSUFFICIENT MEMORY TO LOAD FONTS/DATA | This message alternates with the name of the storage device. The storage device does not have enough memory to load the fonts or other data. | Press√to continue printing without using the data.To solve the problem, increase the amount of memory for the device. Press? for more information. |
| LOAD TRAY X<SIZE>alternates withFor help press ? | Tray X is either empty or configured for a type and size other than that specified in the job. No other tray is available. | Press? for help.orSeeConfiguring traysfor more information. |
| LOAD TRAY X<SIZE>alternates withTo use another tray press √ | Tray X is either empty or configured for a type and size other than that specified in the job. | Press? for help.orPress√to print from another tray. SeeConfiguring traysfor more information. |
| Loading program Xalternates with | Programs and fonts can be stored on the printer file system and are loaded into RAM when the printer is turned on. The number X | No action necessary. |
| DO NOT POWER OFF specifies a sequence number indicating the current program being loaded. For the HP Color LaserJet 3000 and 3800 Series printers only. | ||
| MANUALLY FEED <TYPE> <SIZE> alternates with For help press ? | Tray 1 is empty and no other tray is available. | Load media into tray 1, and press ↗to continue. Press ? for help. or See Configuring trays for more information. |
| MANUALLY FEED <TYPE> <SIZE> alternates with To continue press ↙ | Media is in tray 1, but the print job requires a specific type and size that is not currently available. | Press ↗to print from the tray. or Press ? for help. or See Configuring trays for more information. |
| MANUALLY FEED <TYPE> <SIZE> alternates with To use another tray press ↙ | No media is in tray 1, and a print job requires a specific type and size that is available in another tray. | Press ↗to print from another tray. See Configuring trays for more information. or Press ? for help. |
| MANUALLY FEED OUTPUT STACK alternates with Then press ↙ to print second sides | The first side of a manual 2-sided print job has been printed and the printer is paused until for the output stack is reinserted. | Take the printed stack out of the output bin and reinsert it in tray 1 to print the second side of the 2-sided print job. Press ↘ to continue. See Manual 2-sided printing for more information. |
| MEM TEST FAILURE REPLACE DIMM 1 | The memory DIMM has failed. | Install a supported memory DIMM. See Working with memory. |
| Moving solenoid alternates with To exit press STOP key | The printer is testing a solenoid. No action necessary. | |
| NON HP SUPPLY IN USE alternates with Ready | The printer has detected that a non-HP supply is currently installed but (override) was pressed. | If you believe you purchased an HP supply, go to www.hp.com/go/anticounterfeit. Service or repairs that are required as a result of using non-HP supplies are not covered under HP warranty. |
| NON HP SUPPLY INSTALLED alternates with For help press ? | A new, non-HP supply has been installed. This message appears until an HP supply is installed or you press ↙. | If you believe you purchased an HP supply, go to www.hp.com/go/anticounterfeit. Service or repairs that are required as a result of using non-HP supplies are not covered under HP warranty. To continue printing, press ↙. |
| ORDERCARTRIDGEalternates withReady | The identified print cartridge is nearing the end of its useful life. The printer is ready and will print for the estimated number of pages indicated. | Order the identified print cartridge. Printing will continue until REPLACECARTRIDGEappears. NOTE Estimated pages remaining is based upon historical page coverage with this supply.SeeSupplies and accessoriesfor more information.[BHGC]NOTE To prevent this message from appearing, in the SYSTEM SETUP menu, set ORDER AT to 0%. NOTE Estimated pages remaining is based upon historical page coverage with this supply.SeeSupplies and accessoriesfor more information.[BHGC]NOTE To prevent this message from appearing, in the SYSTEM SETUP menu, set ORDER AT to 0%. |
| ORDER SUPPLIESalternates withReady | More than one supply item is low.1. | Press √ to identify which supplies should be ordered.2. Order the supplies. Printing can continue until REPLACE SUPPLIES appears.orPress ? for help.SeeSupplies and accessoriesfor more information. |
| PAPER PATH JAM FRONT DOORalternates withFor help press? | A page is jammed in the paper path. Open the front door and remove any jammed media. | |
| Pausedalternates withTo return to Ready press the STOP key | The printer has paused. | PressStopto resume printing. |
| Performing upgrade | A firmware upgrade is in process. | No action necessary. Do not turn off the printer. |
| Performing... PAPER PATH TEST | The printer is performing a paper-path test. | No action necessary. |
| PRINTING STOPPEDTo continue press√ | This message appears when a Print/Stop test runs and the time expires. | Press √to continue printing. |
| Printing... CONFIGURATION The printer is generating the configuration page. The printer will return to theReadystate when the page has printed. | No action necessary. | |
| Printing... DEMO PAGE The printer is generating the demo page. The printer will return to theReadystate when the page has printed. | No action necessary. | |
| Printing... DIAGNOSTICS PAGE The printer is generating the diagnostics page. The printer will return to theReadystate when the page has printed. | No action necessary. | |
| Printing... EVENT LOG The printer is generating the event log page.The printer will return to the Ready state when the page has printed.For the HP Color LaserJet 3000 and 3800 Series printers only. | No action necessary. | |
| Printing... FILE DIRECTORY For the HP Color LaserJet 3000 and 3800 Series printers only.The printer is generating the mass storage directory page. The printer will return to the Ready state when the page has printed. | No action necessary. | |
| Printing... FONT LIST The printer is generating either the PCL or PS personality typeface list. The printer will return to the Ready state when the page has printed.For the HP Color LaserJet 3000 and 3800 Series printers only. | No action necessary. | |
| Printing... MENU MAP The printer is generating the printer menu map. The printer will return to the Ready state when the page has printed. | No action necessary. | |
| Printing... PQ troubleshooting The printer is generating the print quality troubleshooting pages. The printer will return to the Ready state when the pages are printed. | Follow the instructions on the printed pages. | |
| Printing... REGISTRATION PAGE The printer is generating the registration page. The printer will return to the SET REGISTRATION menu when the page has printed. | Follow the instructions on the printed pages. | |
| Printing... RGB SAMPLES The printer is generating the RGB samples page. The printer will return to the Ready state when the page has printed. | No action necessary. | |
| Printing... SUPPLIES STATUS The printer is generating the supplies status page. The printer will return to the Ready state when the page has printed. | No action necessary. | |
| Printing... USAGE PAGE For the HP Color LaserJet 3000 and 3800 Series printers only.The printer is generating the usage page. The printer will return to the online Ready state when the page has printed. | No action necessary. | |
| PROCESSING DUPLEX JOBalternates with | During duplex printing, the paper emerges for a short time before it is pulled back into the printer. | Do not pick up pages until they come to rest in the output bin. |
| Do not grab paper until job completes | ||
| Processing... The printer is currently processing a job but is not yet picking pages. When the media begins to move, this message is replaced by a message that indicates which tray the job is being printed from. | No action necessary. | |
| Processing... from trayThe printer is actively processing a job from the designated tray. | No action necessary. | |
| RAM DISK DEVICE FAILUREalternates withReadyTo clear press √ | For the HP Color LaserJet 3000 and 3800 Series printers only.The RAM disk has failed. | 1. Printing can continue for jobs that do not require the RAM disk.2. To remove this message from the display, press √. |
| RAM DISK FILE OPERATION FAILEDalternates withReadyTo clear press √ | For the HP Color LaserJet 3000 and 3800 Series printers only.The printer received a PJL file system command that attempted to perform an illogical operation (for example, to download a file to a non-existent directory). | 1. Printing can continue.2. To remove this message from the display, press √.3. If the message reappears, there might be a problem with the software program. |
| RAM DISK FILE SYSTEM IS FULLalternates withReadyTo clear press √ | For the HP Color LaserJet 3000 and 3800 Series printers only.The printer received a PJL file system command to store something on the file system, but the file system is full. | 1. Use HP Web Jetadmin software to delete files from the RAM disk memory and try again.2. To remove this message from the display, press √.SeeHP Web Jetadminfor more information. |
| RAM DISK IS WRITE PROTECTEDalternates withReadyTo clear press √ | For the HP Color LaserJet 3000 and 3800 Series printers only.The file system is protected and no new files can be written to it. | 1. To enable writing to the RAM disk memory, use HP Web Jetadmin to turn off write protection.2. To remove this message from the display, press √.SeeHP Web Jetadminfor more information. |
| RAM DISK X Initializingalternates withDO NOT POWER OFF | For the HP Color LaserJet 3000 and 3800 Series printers only.The new RAM disk installed in slot X is initializing. | No action necessary. |
| Receiving upgrade | A firmware upgrade is in progress. | Do not turn the printer off until the printer returns to Ready. |
| REMOVE ALL PRINT CARTRIDGESalternates withTo exit press STOP key | The printer is performing a component test. Remove all print cartridges. | After diagnostics are complete, reinstall all print cartridges. |
| REMOVE AT LEAST ONE PRINT CARTRIDGEalternates withTo exit press STOP key | The printer is performing a disable cartridge check or component test. | Remove one print cartridge.After the test is complete, reinstall the print cartridge. |
| REPLACECARTRIDGEalternates withFor help press ? | The print cartridge has reached its end of life. Printing will not continue until the cartridge is replaced. | Press ? for help.SeeChanging print cartridges orReplacing supplies and partsfor more information.SeeSupplies and accessoriesfor more information. |
| REPLACECARTRIDGEalternates withTo continue press √. | The print cartridge is nearing the end of its useful life and the REPLACE SUPPLIES setting in SYSTEM SETUP is set to STOP AT LOW. To override, press √. | 1. Order the print cartridge.2. Press √ to continue.orPress ? for help.SeeSupplies and accessoriesfor more information. |
| REPLACE SUPPLIESalternates withFor status press √ | At least two print cartridges are out and need to be replaced. | 1. Press √ to identify which supplies should be replaced.2. Press ? for help.SeeReplacing supplies and partsfor more information.SeeSupplies and accessoriesfor more information. |
| REPLACE SUPPLIESalternates withTo continue press √ | More than one supply item is low, and the REPLACE SUPPLIES setting in SYSTEM SETUP is set to STOP AT LOW. | 1. Press Menu and navigate to the SUPPLIES STATUS menu in order to identify which supplies should be ordered.2. Order the supplies.3. Press √ to continue printing.SeeSupplies and accessoriesfor more information. |
| REPLACE SUPPLIESOverride in usealternates withReady | At least one print cartridge is out, but printing is continuing. Print-quality problems might occur. | 1. Press √ to identify which supplies should be ordered.2. Order the identified supplies.SeeSupplies and accessoriesfor more information. |
| REPLACE SUPPLIESUsing black onlyalternates withReady | At least one color print cartridge is out. Printing can continue, but only the black cartridge is being used. | 1. Press √ to identify which supplies should be ordered.2. Order the identified supplies.SeeSupplies and accessoriesfor more information. |
| Request accepted please wait The printer has accepted a request to print an internal page, but the current job must finish printing before the internal page will print. | No action necessary. | |
| Resend upgrade | The firmware upgrade was not successful. | Attempt the upgrade again. |
| Restoring factory settings | The printer is restoring factory settings. | No action necessary. |
| Restoring... | The printer is restoring settings. | No action necessary. |
| RESTRICTED FROM PRINTING IN COLORalternates withReady | This message appears only for the HP Color LaserJet 3000 and 3800 Series printers.HP Color LaserJet 3000: The printer is set to print in black only, but the job is in color. | HP Color LaserJet 3000: Enable color printing on the SYSTEM SETUP menu. Set RESTRICT COLOR USE to ENABLE COLOR.HP Color LaserJet 3800: Get your network administrator to set the user or program permissions that will allow you to print in color. |
| HP Color LaserJet 3800: The message appears when the printer is set to COLOR IF ALLOWED and you or your software program are not authorized to print in color. | ||
| RFU LOAD ERROR An error has occurred during a firmware upgrade. | 1. Reinstall the firmware.2. If the problem persists, contact HP Support. | |
| Rotating <COLOR> motoralternates withTo exit press STOP key | A component test is in progress; the component selected is<color> Cartridge motor. | Press Stop to stop this test. |
| Rotating motoralternates withTo exit press STOP key | The printer is testing a motor. | Press Stop to stop this test. |
| SANITIZING DISK X% COMPLETEalternates withDO NOT POWER OFF | The memory disk is being sanitized. This process might take up to an hour. During this time, no jobs can be printed. | Do not turn off the printer. Wait for the process to complete.The printer automatically restarts at the end of the sanitation process. |
| Setting saved | A menu selection has been saved. | No action necessary. |
| SIZE MISMATCH IN TRAY XXalternates withReady | The tray is loaded with a media size that is different than the size for which the tray is configured. Printing can continue from other trays, but not from this one. | 1. Make sure the media guides are adjusted correctly.2. In the PAPER HANDLING menu, configure the tray for the correct size. |
| Sleep mode on The printer is in the sleep mode. Any button press or the receipt of data clears sleep mode. | No action necessary. The printer automatically exits sleep mode. | |
| STANDARD TOP BIN FULLalternates withRemove all paper from bin | The output bin is full. Printing cannot continue. | Empty the output bin. Printing resumes automatically. |
| Tray X <SIZE>alternates withTo change size or type press √ | The printer is reporting the current configuration of tray X. | No action necessary.Press ➕ to clear the message.Press √ to change the type or size.See Configuring trays for more information. |
| TRAY XX EMPTY <SIZE>alternates withReady | The tray is empty, but the current print job does not require this tray. | Fill the tray. The message indicates the type and size of media for which the tray is currently configured. |
| TRAY XX OPEN The tray is open, but printing can continue. Close the tray. | ||
| For help press ?alternates withReady | ||
| TRAY XX OPEN OR EMPTYalternates withReady | The tray is open or empty, but the current print job does not require this tray. | Close or fill the tray. |
| TYPE MISMATCH IN TRAY XXalternates withReady | The tray is loaded with a media type that is different than the type for which the tray is configured. Printing can continue from other trays, but not from this one. | In the PAPER HANDLING menu, configure the tray for the correct type. |
| Unauthorized supply in usealternates withReady | The printer has detected that a non-HP supply is currently installed and (override) was pressed. | If you believe you purchased an HP supply, go to www.hp.com/go/anticounterfeit.Service or repairs required as a result of using non-HP supplies are not covered under HP warranty. |
| USB ACCESSORY ERROR HP Color LaserJet 3000 and 3800 Series printers only.The printer has detected too much current on the USB storage accessory. | 1. Turn the printer off.2. Remove the USB storage accessory.3. Replace the USB storage accessory.4. Turn the printer on. | |
| USB Storageinitializing HP Color LaserJet 3000 and 3800 Series printers only.The USB storage device is initializing. | No action necessary. | |
| USB Storagenot functional HP Color LaserJet 3000 and 3800 Series printers only.The USB storage device is not working. | Replace the USB storage device. | |
| USB STORAGE DEVICE FAILUREalternates withReadyTo clear press | For the HP Color LaserJet 3000 and 3800 Series printers only.The USB storage device has failed. | 1. Printing can continue for jobs that do not require the storage device.2. To remove this message from the display, press✓.3. If the message persists, turn the printer off, remove and re-install the storage device, and then turn the printer on.4. If the message persists, replace the storage device. |
| USB STORAGE FILE OPERATION FAILEDalternates withReadyTo clear press | For the HP Color LaserJet 3000 and 3800 Series printers only.The printer received a PJL file system command that attempted to perform an illogical operation (for example, to download a file to a nonexistent directory). | 1. Printing can continue.2. To remove this message from the display, press✓.3. If the message reappears, a problem might exist in the software program. |
| USB STORAGE FILE SYSTEM IS FULLalternates withReadyTo clear press √ | For the HP Color LaserJet 3000 and 3800 Series printers only.The printer received a PJL file system command that attempted to store something on the file system but was unsuccessful because the file system is full. | 1. Use HP Web Jetadmin software to delete files from the storage device, and then try again.2. To remove this message from the display, press √.SeeHP Web Jetadminfor more information. |
| USB STORAGE IS WRITE PROTECTEDalternates withReadyTo clear press √ | For the HP Color LaserJet 3000 and 3800 Series printers only.The file system is protected and no new files can be written to it. | 1. To enable writing to the storage device, use HP Web Jetadmin to turn off write protection.2. To remove this message from the display, turn the printer off and then on.SeeHP Web Jetadminfor more information. |
| USB STORAGE X REMOVED HP Color LaserJet 3000 and 3800 Series printers only.The USB storage accessory was removed while the printer was turned on. | 1. Turn the printer off.2. To continue using the USB storage accessory, reinstall it.3. Turn the printer on. | |
| USE TRAY XThe printer is offering a selection of alternate media to use for the print job. | 1. Use ▲ and ▼ highlight a different size or type, and then press √ to select the size or type.2. Press ➕ to return to the previous size or type.SeeConfiguring traysfor more information. | |
Jams
Use this illustration to troubleshoot jams in the printer. For instructions to clear jams, see Clearing jams.

text_image
Diagram of a printer with numbered parts labeled 1 through 6, showing internal structure and part layout.Figure 8-1 Jam locations (printer shown without optional tray 3)
| 1 Output bin |
| 2 Paper path |
| 3 Tray 1 |
| 4 Trays 2 or 3 |
| 5 Duplex path (for 2-sided printing) |
| 6 Fuser |
Jam recovery
This printer automatically provides jam recovery, a feature that you can use to set whether the printer should attempt to automatically reprint jammed pages.
• AUTO instructs the printer to attempt to reprint jammed pages.
• OFF instructs the printer not to attempt to reprint jammed pages.

NOTE During the recovery process, the printer might reprint pages that were printed before the jam occurred. Be sure to remove any duplicated pages.
To improve print speed and increase memory resources, you might want to disable the jam recovery.
To turn off jam recovery
- Press Menu.
- Press ▼ to highlight CONFIGURE DEVICE, and then press √.
- Press ▼ to highlight SYSTEM SETUP, and then press √.
-
Press ▼ to highlight JAM RECOVERY, and then press √.
-
Press ▼ to highlight OFF, and then press √.
- Press Menu to return to the Ready state.
Common causes of jams
Common causes of jams ^1
| Cause Solution | |
| The media does not meet specifications. | Use only media that meets HP specifications. See Supported media sizes. |
| A component is installed incorrectly. | Verify that all print cartridges, the transfer unit, and the fuser are correctly installed. |
| You are using media that has already passed through a printer or copier. | Do not use media that has been previously printed on or copied. |
| An input tray is loaded incorrectly. | Remove any excess media from the input tray. Make sure that the stack is below the maximum stack height mark in the tray. See Configuring trays. |
| The media is skewed. | The input-tray guides are not adjusted correctly. Adjust them so they hold the stack firmly in place without bending it. |
| The media is binding or sticking together. | Remove the media, flex it, rotate it 180 degrees, or flip it over. Reload the media into the input tray. |
| NOTE Do not fan paper. Fanning can create static electricity, which can cause paper to stick together. | |
| The media is removed before it settles into the output bin. | Reset the printer. Wait until the page completely settles in the output bin before removing it. |
| During 2-sided printing, you removed the paper before the second side of the document was printed. | Reset the printer and print the document again. Wait until the page completely settles in the output bin before removing it. |
| The media is in poor condition. Replace the media. | |
| The internal rollers from tray 2 or tray 3 are not picking up the media. | Remove the top sheet of media. If the media is heavier than 163 g/m^2 (43 lb), it might not be picked from the tray. |
| The media has rough or jagged edges. Replace the media. | |
| The media is perforated or embossed. | Perforated or embossed media does not separate easily. Feed single sheets from tray 1. |
| Printer supply items have reached the end of their useful life. | Check the printer control panel for messages prompting you to replace supplies, or print a supplies status page to verify the remaining life of the supplies. See Replacing supplies and parts. |
| Paper was not stored correctly. Replace the paper in the trays. | Paper should be stored in the original packaging in a controlled environment. |
If the printer still continues to jam, contact HP Customer Support or your authorized HP service provider.
Clearing jams
Procedures in the following sections correspond with a jam message that might appear on the control panel.
Jam in tray 1
- Remove the media from the tray.
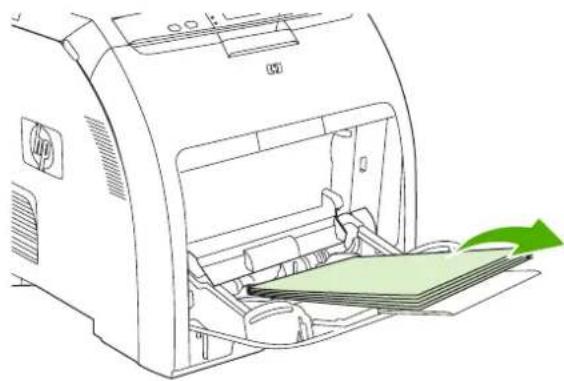
natural_image
Line drawing of a printer with paper being inserted, showing green paper being inserted (no text or symbols)- Grasp the jammed sheet by both corners and pull.
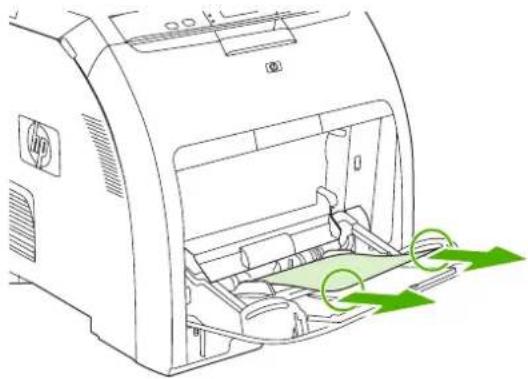
natural_image
Line drawing of a printer's internal structure with green arrows indicating motion or flow (no text or symbols)- Place the media stack in tray 1.
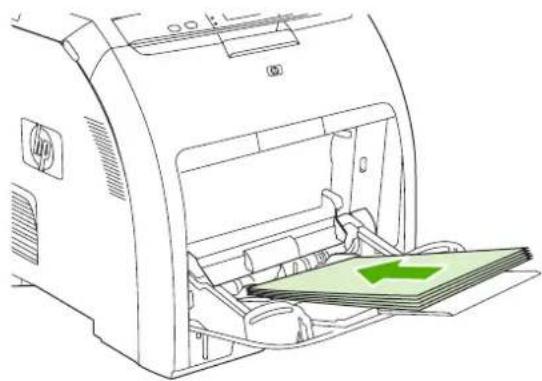
natural_image
Line drawing of a printer with a green paper feed into the output (no text or symbols)- Confirm that the media guides are against the stack without bending it and that the stack does not extend above the fill tabs.
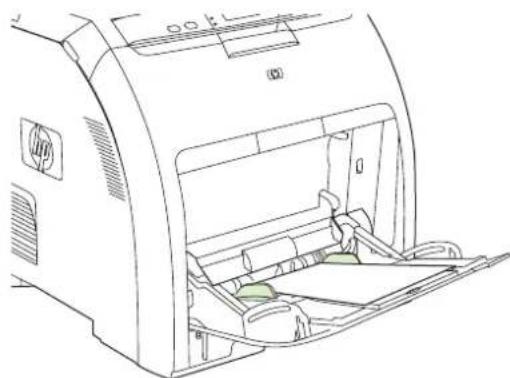
natural_image
Line drawing of a printer interior showing internal components and casing (no text or symbols)- Press to resume printing.
Jam in tray 2 or tray 3
- If the optional tray 3 is installed, pull it out and place it on a flat surface. If the jammed sheet is visible, remove it.
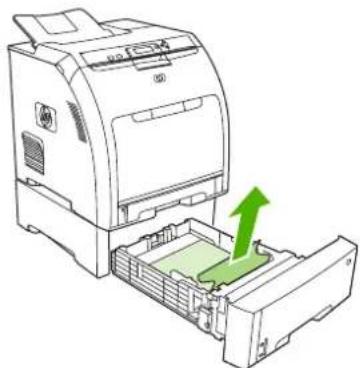
natural_image
Illustration of a printer with a green arrow indicating the process, showing internal components and no text or symbols.-
If the sheet is not visible, check inside the printer at the top of the tray opening. Remove any jammed media.
-
Pull out tray 2 and place it on a flat surface.
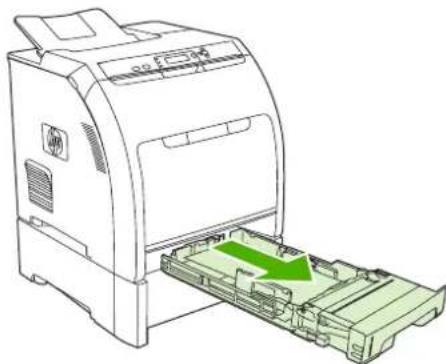
natural_image
Line drawing of a printer with a green arrow indicating a process or operation, no text or symbols present.- If the jammed sheet is visible, remove it.
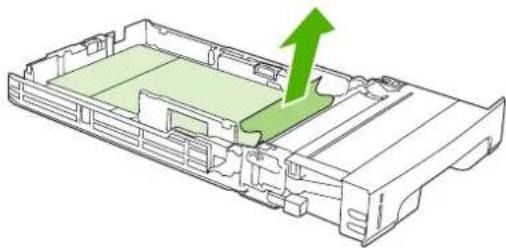
natural_image
3D diagram of a battery pack with an arrow indicating upward motion (no text or symbols)- If the sheet is not visible, check inside the printer at the top of the tray opening. Remove any jammed media.
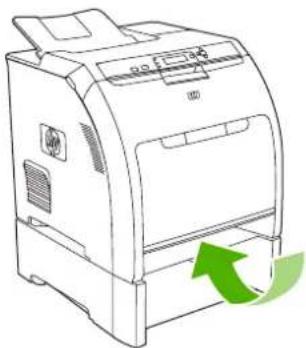
natural_image
Line drawing of a printer with a green circular arrow indicating refresh or rotation (no text or symbols)- Replace tray 2 and optional tray 3.
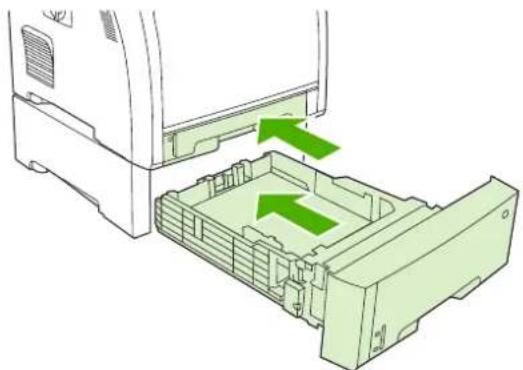
natural_image
Diagram of a device's internal structure showing green arrows indicating movement or force (no text or symbols present)
NOTE Use tray 1 when printing on heavier paper. See Printing on special media for more information.
- Press to resume printing.

NOTE When printing from tray 2, printing resumes automatically.
Jam inside the fuser area (top cover)
- Open the top cover.
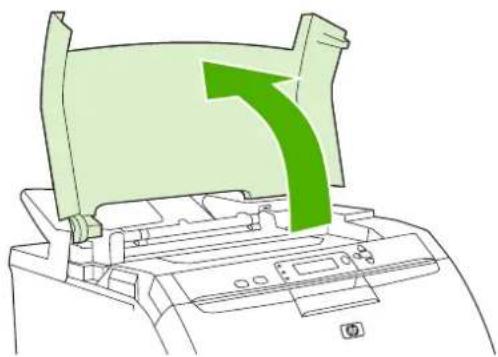
natural_image
Diagram of a printer printer with a green arrow indicating a directional shift (no text or symbols present)- If the jammed sheet is visible, remove it and then close the top cover.
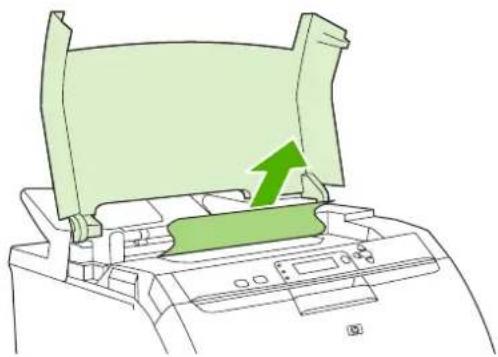
natural_image
Diagram of a printer printer with a green arrow indicating the process, no text or symbols present.- If the sheet is not visible, turn off the printer.

natural_image
Line drawing of a computer printer with a green circular button highlighting the printer's handle (no text or symbols present)
WARNING! The fuser will be hot. Wait 10 minutes before proceeding.
- Place your thumbs on the fuser latches, squeeze the latches, and pull up on the fuser to remove it.
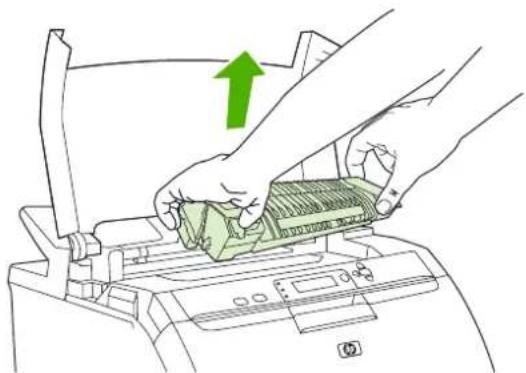
natural_image
Illustration of hands operating a printer with a green arrow indicating upward motion (no text or symbols)- On the fuser, lift the shutter door.

CAUTION Do not open the shutter door while the fuser is in the printer.
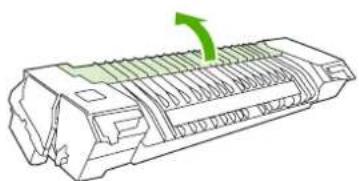
natural_image
Line drawing of a mechanical component with a green arrow indicating direction (no text or symbols)- Remove any jammed sheets.

NOTE If the sheet tears, make sure that all fragments are removed before you resume printing.
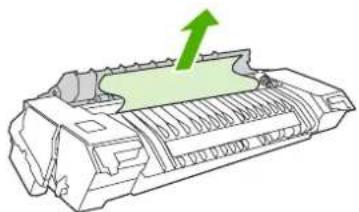
natural_image
Diagram of a printer or printer with a green arrow pointing to its cover (no text or symbols present)- Hold the fuser with your thumbs on the latches, and then push both sides of the fuser into the printer. Press the fuser down until it clicks into place.
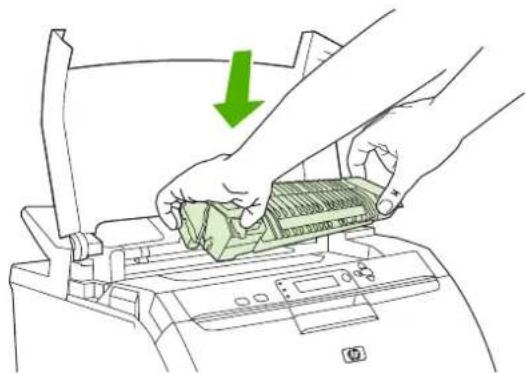
natural_image
Illustration of hands using a printer to press a green card into a machine (no text or symbols)- Close the top cover and then turn on the printer.
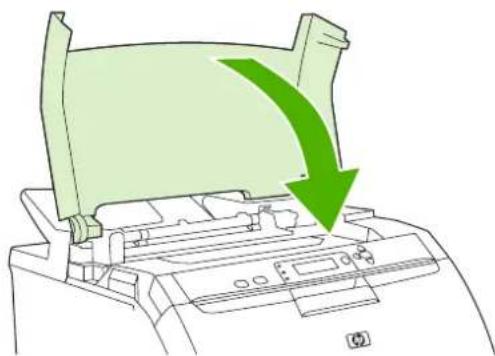
natural_image
Diagram of a printer printer with a green arrow indicating the process (no text or symbols present)Jam inside the front door
- Open the front door.
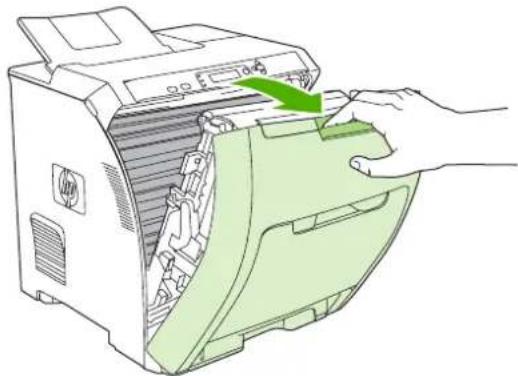
natural_image
Line drawing of a printer with a hand inserting a green arrow to the open lid (no text or symbols present)
CAUTION Do not place anything on the transfer unit. Do not touch the top of the transfer unit or the contacts on the left side of it.

NOTE If the sheet tears, make sure that all fragments are removed before resuming printing.
- Remove any visible media.
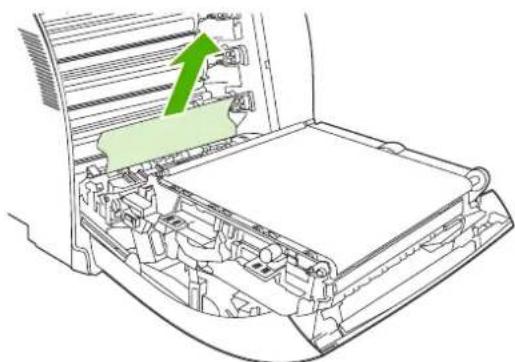
natural_image
Diagram of a car interior showing a green arrow pointing to a component, with no visible text or symbols.- Locate the green registration-plate tabs that are below the bottom print cartridge.
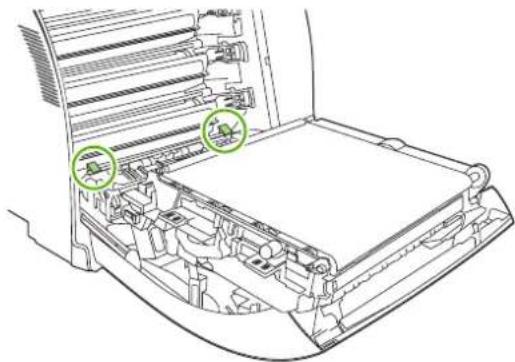
natural_image
Technical line drawing of a printer internal structure with two green circular annotations highlighting specific components (no text or symbols present)- Press the tabs, and then lift the registration plate. Remove any jammed media, and then return the registration plate to its closed position.
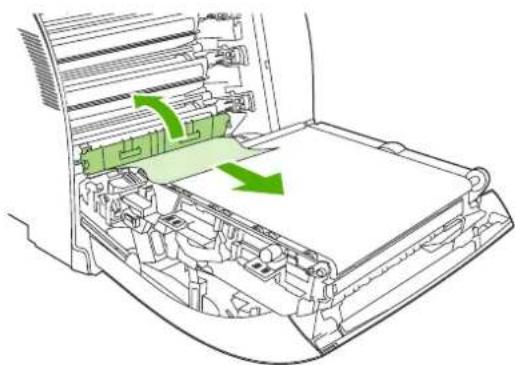
natural_image
Diagram of a printer internal structure with green arrows indicating flow or movement (no text or symbols present)
NOTE If the sheet tears, make sure that all fragments are removed before resuming printing.
- Close the front door.
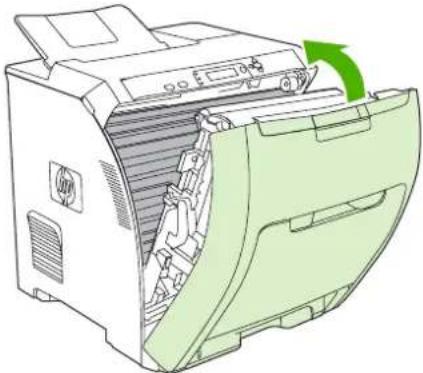
natural_image
Illustration of a printer with green cover and green paper edge, showing internal structure and no text or symbolsJam in the duplex path

NOTE This issue occurs only in models that provide automatic 2-sided printing.
- Turn off the printer, and open the top cover.
If any media is visible, remove it.
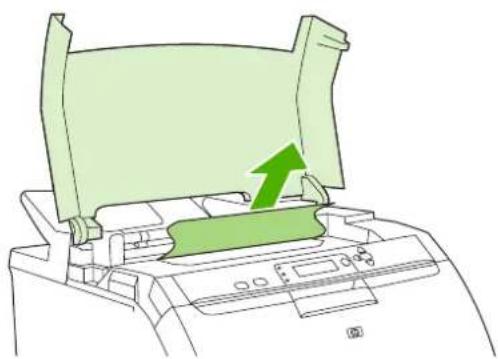
natural_image
Diagram of a printer printer with a green arrow indicating the process (no text or symbols present)- Open the front door.
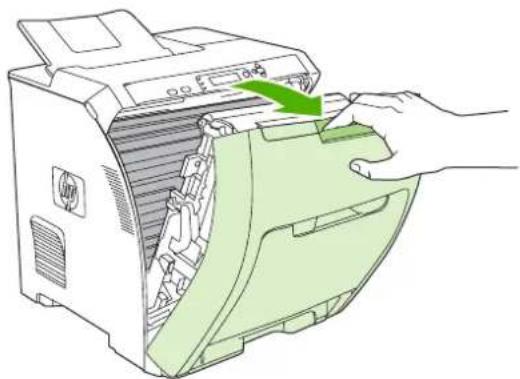
text_image
Diagram showing a hand inserting a printer into a green cover with a green arrow indicating the process.- Rotate the transfer unit up and away from the front door.
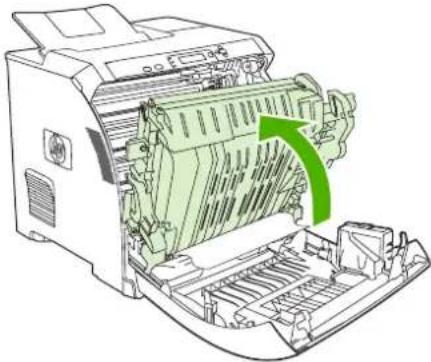
natural_image
Line drawing of a printer with green paper feed and a green arrow indicating a process (no text or symbols)- Remove any jammed sheets from under the transfer unit.
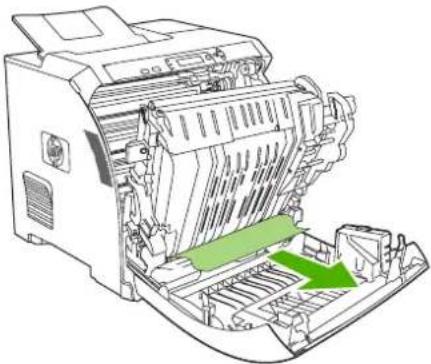
natural_image
Technical line drawing of a printer with green arrow indicating a component (no text or symbols present)- Locate the green registration-plate tabs that are below the bottom print cartridge.
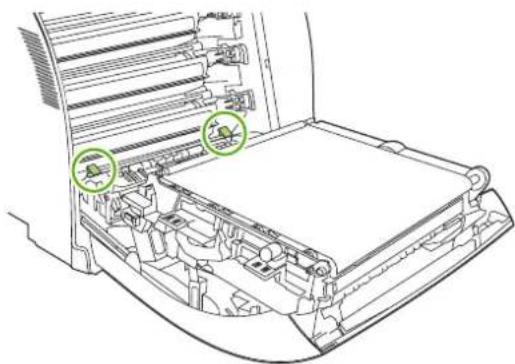
natural_image
Technical line drawing of a car interior showing internal compartments and storage racks (no text or symbols)- Press the tabs, and then lift the registration plate. Remove any jammed media, and then return the registration plate to its closed position.
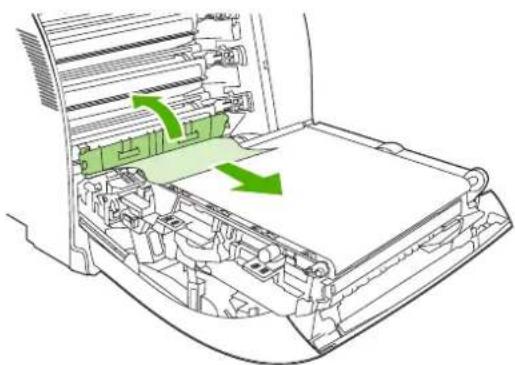
natural_image
Diagram of a printer internal structure with green arrows indicating motion or flow, no text or symbols present
NOTE If the sheet tears, make sure that all fragments are removed before resuming printing.
- Close the front door and then turn on the printer.
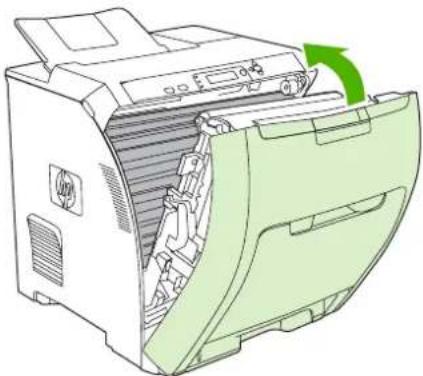
natural_image
Illustration of a printer with green paper feeding into a slot, showing internal structure and a green circular arrow indicating rotation (no text or symbols)Paper-handling problems
Use only media that meets the specifications outlined in the HP LaserJet Printer Family Print Media Specification Guide. For ordering information, see Supplies and accessories.
For paper specifications for this printer, see Supported media sizes.
Printer feeds multiple sheets
| Cause Solution | |
| The tray is overfilled. Remove excess media from the tray. | |
| The paper exceeds the maximum stack-height indicator mark in the tray (trays 2 or 3). | Open the tray and verify that the media stack is below the maximum stack-height mark. |
| The paper is sticking together. | Remove the media, flex it, rotate it 180 degrees, or flip it over, and then reload it into the tray. |
| [wzeg] NOTE Do not fan paper. Fanning can create static electricity, which can cause paper to stick together. | |
| The media does not meet the specifications for this printer. | Use only media that meets HP paper specifications for this printer. See Supported media sizes. |
| Paper is being used in a high-humidity environment. Use another type of paper. | |
Printer feeds incorrect page size
| Cause Solution | |
| The correct size paper is not loaded in the tray. Load the correct size paper in the tray. | |
| The correct size of mediais not selected in the software program or printer driver. | Confirm that the settings in the program and printer driver are appropriate, because the program settings override the printer-driver and control-panel settings, and the printer-driver settings override the control-panel settings. |
| The correct size or media for tray 1 is not selected on the printer control panel. | At the control panel, select the correct size for tray 1. |
| The media size is not configured correctly for the tray. | Print a configuration page or use the control panel to determine the size for which the tray is configured. |
Printer pulls from an incorrect tray
| Cause Solution | |
| You are using a driver for a different printer. Use a driver for this printer. | |
| The specified tray is empty. Load media in the specified tray. | |
| The tray behavior for the requested tray is set to FIRST in the SYSTEM SETUP submenu of the CONFIGURE DEVICE menu. | Change the setting to EXCLUSIVELY. |
Printer pulls from an incorrect tray
| Cause Solution | |
| The media size is not configured correctly for the tray. | Print a configuration page or use the control panel to determine the size for which the tray is configured. |
| The USE REQUESTED TRAY setting on the printer control panel is set to EXCLUSIVELY, and the requested tray is empty. The printer will not use another tray. | Load media in the requested tray.orChange the setting from EXCLUSIVELY to FIRST on the CONFIGURE DEVICE menu. The printer can use the media in other trays if none is loaded in the specified tray. |
Media does not feed automatically
| Cause Solution | |
| Manual feed is selected in the software program. | Load tray 1, or, if the tray is loaded, press √ |
| The correct size of media is not loaded. Load the correct size. | |
| The tray is empty. Load media into the tray. | |
| Media from a previous jam has not been completely removed. | Open the printer and remove any media that is in the paper path. Closely inspect the fuser area for jams. See Jams. |
| The media size is not configured correctly for the tray. | Print a configuration page or use the control panel to determine the size for which the tray is configured. |
| The guides in the tray are not against the media stack. | Verify that the guides are touching the stack. |
| The manual-feed prompt is set to ALWAYS. The printer always prompts for manual feed, even if the tray is loaded. | Open the tray, reload the media, and then close the tray.Or, change the manual-feed prompt setting to UNLESS LOADED so that the printer prompts for manual feed only when the tray is empty. |
| The USE REQUESTED TRAY setting on the printer control panel is set to EXCLUSIVELY, and the requested tray is empty. The printer will not use another tray. | Load the requested tray.orChange the setting from EXCLUSIVELY to FIRST on the CONFIGURE DEVICE menu. The printer can use other trays if no media is loaded in the specified tray. |
Media does not feed from trays 2 and 3
| Cause | Solution |
| Manual feed or tray 1 is selected in the software program. | Load tray 1, or, if the tray is loaded, press √ |
| The correct size of media is not loaded. Load the correct size. | |
| The tray is empty. Load the tray. | |
| The correct media type for the tray is not selected on the printer control panel. | At the printer control panel, select the correct type for the tray. |
| Media from a previous jam has not been completely removed. | Open the printer and remove any media that is in the paper path. Closely inspect the fuser area for jams. See Jams. |
Media does not feed from trays 2 and 3
| Cause Solution | |
| Tray 3 (500-sheet paper feeder) does not appear as a tray option. | Tray 3 appears as an option only if it is installed. Verify that tray 3 is correctly installed and that the printer driver has been configured to recognize tray 3. See Gaining access to printer driver settings. |
| Tray 3 is incorrectly installed. | Print a configuration page to confirm that tray 3 is installed. If not, verify that the optional 500-sheet feeder assembly is correctly attached to the printer. |
| The media size is not configured correctly for the tray. | Print a configuration page or use the control panel to determine the size for which the tray is configured. |
| The guides in the tray are not against the media stack. | Verify that the guides are touching the stack. |
| The USE REQUESTED TRAY setting on the printer control panel is set to EXCLUSIVELY, and the requested tray is empty. The printer will not use another tray. | Change the setting from EXCLUSIVELY, or load the requested tray. |
Transparencies or glossy paper will not feed
| Cause Solution | |
| Transparencies that do not meet HP specifications might have been loaded. | Use transparencies designed for HP Color LaserJet printers. |
| The correct media type is not specified in the software or printer driver. | Verify that the correct type is selected in the software or printer driver. |
| The tray is overfilled. Remove excess media from the tray. Make sure the stack is below the maximum stack height mark in tray 2 or 3. Do not exceed the maximum stack height for tray 1. | |
| Media in another tray is the same size as the transparencies, and the printer is defaulting to the other tray. | Make sure that the tray that contains the transparencies or glossy paper is selected in the software program or printer driver. Use the printer control panel to configure the tray to the type that is loaded. See Configuring trays. |
| The tray that contains the transparencies or glossy paper is not configured correctly for type. | Make sure that the tray that contains the transparencies or glossy paper is selected in the software program or printer driver. Use the printer control panel to configure the tray to the type that is loaded. See Configuring trays. |
Envelopes jam or will not feed into the printer
| Cause | Solution |
| Envelopes are loaded in an unsupported tray. Only tray 1 can feed envelopes. | Load envelopes into tray 1. |
| Envelopes are curled or damaged. | Try using different envelopes. Store envelopes in a controlled environment. See Envelopes for more information. |
| Envelopes are sealing because the moisture content is too high. | Try using different envelopes. Store envelopes in a controlled environment. |
| The envelope orientation is incorrect. | Verify that the envelope is loaded correctly. See Configuring trays. |
Envelopes jam or will not feed into the printer
| Cause Solution | |
| This printer does not support the envelopes. | See Supported media sizes or the HP LaserJet Printer Family Print Media Specification Guide. |
| Tray 1 is configured for a size other than envelopes. | Configure tray 1 size for envelopes. |
Output is curled or wrinkled
| Cause Solution | |
| The media does not meet the specifications for this printer. | Use only media that meets the HP paper specifications for this printer. See Supported media sizes. |
| The media is damaged or in poor condition. | Remove the media from the tray and load media that is in good condition. |
| The printer is operating in an excessively humid environment. | Verify that the printing environment is within humidity specifications. |
| You are printing large, solid-filled areas. | Large, solid-filled areas can cause excessive curl. Try using a different pattern. |
| The media was not stored correctly and may have absorbed moisture. | Remove the media and replace it with media from a fresh, unopened package. |
| The media has poorly cut edges. | Remove the media, flex it, rotate it 180 degrees, or turn it over, and then reload it into the tray. Do not fan paper. If the problem persists, replace the paper. |
| The specific media type was not configured for the tray or selected in the software. | Configure the software for the media (see the software documentation). Configure the tray for the media. See Configuring trays. |
| The media was used previously. Do not reuse media. | |
Printer will not perform duplexing (2-sided printing) or duplexes incorrectly
| Cause | Solution |
| You are trying to perform 2-sided printing on unsupported paper. | Verify that the paper is supported for 2-sided printing. See Supported media sizes. If the paper is not supported, see Manual 2-sided printing. |
| The printer driver is not set up for 2-sided printing. | Configure the printer driver for 2-sided printing. See Gaining access to printer driver settings. |
| The first page is printing on the back of preprinted forms or letterhead. | For tray 1, load the letterhead paper first-side-down, bottom first. For tray 2 or tray 3, load the letterhead paper first-side-up, top edge toward the back of the tray. See Using 2-sided (duplex) printing for more information. |
| The printer model does not support automatic 2-sided printing. | The HP Color LaserJet 3000, 3000n, 3600, 3600n, 3800, and 3800n printers do not support automatic 2-sided printing. See Manual 2-sided printing. |
| The printer configuration is not set for duplexing. | Run the automatic configuration feature:1. On the Windows taskbar, click Start, click Settings, and then click Printers. |
Cause Solution
| For Windows 2000 and Windows XP, click Start, and then click Printers. | |
| 2. Select the printer. | |
| 3. In the File menu, click Properties. | |
| 4. Click the Device Settings tab or the Configure tab. | |
| 5. Under Installable Options, click Automatic Configuration. | |
| 6. Click Update Now. |
Printing is only on one side even when 2-sided (duplex) is selected
| Cause | Solution |
| Manual 2-sided printing is not enabled. | Configure the printer driver to enable manual 2-sided printing.See Gaining access to printer driver settings. |
| The paper size that is selected does not support 2-sided (duplex) printing. | Load and select a size and type of paper that supports automatic 2-sided printing. |
Troubleshooting-information pages
From the printer control panel, you can print information pages that can help you diagnose printer problems.
| Page Description | |
| Paper-path-test page | The paper-path-test page is useful for testing the printer paper handling features. You can define the paper path that you want to test by selecting the source and other available options.1. Press Menu.2. Press ▼ to highlight DIAGNOSTICS, and then press √.3. Press ▼ to highlight PAPER PATH TEST, and then press √.The message Performing... PAPER PATH TEST appears on the control-panel display until the printer finishes the paper-path test. The printer returns to the Ready state after printing the paper-path-test page. |
| Registration page | The registration page prints a horizontal arrow and a vertical arrow that show how far from center an image can be printed on the page. Set registration values for a tray to center images on the back and front of a page. Setting the registration also allows edge-to-edge printing to be set to within approximately 2 mm (0.08 inch) of all edges of the paper. Image placement varies slightly for each tray. Perform the registration procedure for each tray.1. Press Menu.2. Press ▼ to highlight CONFIGURE DEVICE, and then press √.3. Press ▼ to highlight PRINT QUALITY, and then press √.4. Press ▼ to highlight SET REGISTRATION, and then press √.5. Press ▼ to highlight SOURCE, and then press √.6. Press ▼ or ▲ highlight a tray, and then press . √7. Press ▼ to highlight PRINT TEST PAGE, and then press √.8. Follow the instructions on the printed page. |
| Event log | The event log lists the printer events, including jams, service errors, and other conditions.1. Press Menu.2. Press ▼ to highlight DIAGNOSTICS, and then press √.3. Press ▼ to highlight PRINT EVENT LOG, and then press √.The message Printing... EVENT LOG appears on the control-panel display until the printer finishes printing the event log. The printer returns to the Ready state after printing the event log. |
| Diagnostics page | This page provides information about printer calibration, color density, and other parameters.1. Press Menu.2. Press ▼ to highlight DIAGNOSTICS, and then press √.3. Press ▼ to highlight PRINT DIAGNOSTICS PAGE, and then press √. |
| Print-quality troubleshooting page | See Print-quality-troubleshooting pages. |
Printer response problems
The control-panel display is blank
| Cause Solution | |
| The printer power button is in the off position. | Verify that the printer is on. Fans may run while the printer is in standby mode (off). |
| The printer memory DIMMs (available on the HP Color LaserJet 3000 and 3800 Series printers only) are defective or installed incorrectly. | Verify that the printer memory DIMMs are correctly installed and are not defective. |
| The power cord is not firmly plugged into both the printer and the power receptacle. | Turn off the printer and then disconnect and reconnect the power cord. Turn the printer on. |
| The line voltage is incorrect. | Connect the printer to a correct voltage source, as specified on the power rating label on the back of the printer. |
| The power cord is damaged or worn. Replace the power cord. | |
| The power source receptacle is not working correctly. | Connect the printer to a different power receptacle. |
| The formatter might not be installed correctly. | Remove the formatter assembly. To reinstall it, align the formatter board in the tracks at the top and bottom of the slot, and then slide the board back into the printer. Push the formatter until you hear the formatter latches click into place. |
The control-panel display is difficult to read
| Cause Solution | |
| The contrast is too high or too low for the office environment. | Adjust the contrast on the control-panel display. See Display Brightness feature. |
The printer is on, but nothing prints
| Cause Solution | |
| The printer Ready indicator light is not lit. | Press Stop to return the printer to the Ready state. |
| The top cover is not closed. Close the top cover firmly. | |
| The Data indicator light is flashing. | The printer is probably continuing to receive data. Wait for the Data indicator to stop flashing. |
| REPLACECARTRIDGE appears on the control-panel display. | Replace the specified print cartridge. |
| A printer message other than Ready appears on the printer control panel. | See Control-panel messages. |
| The parallel port might have an MS-DOS timeout error. | Add a MODE command to the AUTOEXEC.BAT file. See the MS-DOS manual for additional information. |
| The PS (PostScript emulation) personality is not selected. | Select PS or AUTO for the printer language. See Changing printer control-panel configuration settings. |
| The correct driver is not selected in the software program or printer driver (HP Color LaserJet 3000 and 3800 Series printers only). | Select the PS driver in the software program or printer driver. |
The printer is on, but nothing prints
| Cause Solution | |
| The printer is not configured correctly. | SeeChanging printer control-panel configuration settings. |
| The computer port is not configured or is not working correctly. | Connect another peripheral to this port to verify that the port is working. |
| The printer has not been correctly named for the network or for a Macintosh. | For Macintosh, use the appropriate utility to name the printer on the network. From the Chooser, select the AppleTalk zone and the printer. |
The printer is on but is not receiving data
| Cause Solution | |
| The printer Ready indicator light is not lit. | Press Stop to return the printer to the Ready state. |
| The front door is not closed. Close the front door firmly. | |
| A printer message other than Ready appears on the printer control panel. | See Control-panel messages. |
| The interface cable is not correct for this configuration. | Select the correct interface cable for your configuration. See USB configuration. |
| The interface cable is not securely connected to both the printer and the computer. | Disconnect and reconnect the interface cable. |
| The printer is not configured correctly. | See Changing printer control-panel configuration settings. |
| The interface configurations shown on the printer configuration page do not match those on the host computer. | Configure the printer to match the computer configuration. |
| The computer is not working correctly. | Try using a program that you know works correctly to check the computer. Or, if the printer is connected through the parallel port, open MS-DOS and type Dir>Prn at the MS-DOS command prompt. |
| The computer port that the printer is connected to is not configured or is not working correctly. | Connect another peripheral to this port to verify that the port is working. |
| The printer has not been correctly named for the network or Macintosh. | For Macintosh, use the appropriate utility to name the printer on the network. From the Chooser, select the AppleTalk zone and the printer. |
Cannot select the printer from the computer
| Cause | Solution |
| If you are using a switch box, the printer might not be selected for the computer. | Select the correct printer through the switch box. |
| The printer Ready indicator light is not lit. | Press Stop to return the printer to the Ready state. |
| A printer message other than Ready appears on the printer control panel. | See Control-panel messages. |
| The correct printer driver is not installed in the computer. | Install the correct printer driver. |
| The correct printer and port are not selected on the computer. | Select the correct printer and port. |
Cannot select the printer from the computer
| Cause Solution | |
| The network is not configured correctly for this printer. | Use the network software to verify the printer network configuration, or consult with the network administrator. |
| The power receptacle is not working correctly. | Connect the printer to a different power receptacle. |
A message appears that 2-sided printing is not available for the type and size selected
| Cause Solution | |
| The selected paper is not supported for automatic 2-sided printing. | Make sure manual 2-sided printing is enabled. See Gaining access to printer driver settings. |
Printer control-panel problems
The following table lists common printer control-panel problems and suggested solutions for resolving them.
Control-panel settings do not work correctly
| Cause | Solution |
| The printer control-panel display is blank, even when the fan is running. | Fans might run while the printer is in standby mode (off). Press the printer power button to turn on the printer. |
| Printer settings in the software program or printer driver differ from the printer control-panel settings. | Confirm that the settings in the program and printer driver are appropriate. The program settings override the printer-driver and control-panel settings, and the printer-driver settings override the control-panel settings. |
| Control-panel settings were not correctly saved. | Reselect the control-panel settings, and then press √An asterisk (*) should appear to the right of the setting. |
| The Data indicator light is lit, and no pages are printing. | Buffered data remains in the printer. Press √to print the buffered data by using current control-panel settings. Then, the new control-panel settings can take effect. |
| If the printer is on a network, another user might have changed printer control-panel settings. | Consult the network administrator to coordinate changes to printer control-panel settings. |
Unable to select tray 3 (optional 500-sheet paper feeder)
| Cause Solution | |
| Tray 3 does not appear as an input tray option on the configuration page or on the control panel. | Tray 3 appears as an option only if it is installed. Verify that tray 3 is installed correctly. |
| Tray 3 does not appear as an option in the printer driver. | Verify that the printer driver configuration recognizes tray 3. See the printer driver Help to set up and configure additional trays. See Gaining access to printer driver settings. |
Color-printing problems
Printing black instead of color
| Cause Solution | |
| Grayscaleis selected in the software program or printer driver. | In the software program or printer driver, selectColormode instead ofGrayscaleorMonochromemode. |
| The correct printer driver is not selected in your software program. | Select the correct printer driver. |
| No color appears on the configuration page. Contact HP support. | |
| The control-panel setting forCOLOR SUPPLY OUTis set to AUTOCONTINUE BLACK, and one of the color print cartridges is out. The printer continues to print in black only. | Replace the color print cartridge. |
| The control-panel setting forRESTRICT COLOR USEis set to DISABLE COLOR, or it is set to COLOR IF ALLOWEDand you do not have permission to print in color. | Change the control-panel setting toENABLE COLOR. |
Incorrect hues print
| Cause | Solution |
| The media does not meet the specifications for this printer. | See the HP LaserJet Printer Family Print Media Specification Guide.Go towww.hp.com/support/clj3000, www.hp.com/support/clj3600, orwww.hp.com/support/clj3800for HP LaserJet Printer Family Print Media Specification Guide ordering information. When you connect, selectManuals. |
| The printer operates in excessively humid or dry conditions. | Verify that the printer environment is within humidity specifications.Store the print media in the same environment as the printer.Calibrate the printer. SeePrint Quality sub-menu. NOTE For more information about color-quality problems seePrint-quality troubleshooting. NOTE For more information about color-quality problems seePrint-quality troubleshooting. |
A color is missing
| Cause | Solution |
| The HP print cartridge is defective. Replace the cartridge. | |
Inconsistent colors print after installing a print cartridge
| Cause | Solution |
| New print cartridges sometimes require printing several pages before they deliver consistent print quality. | Try printing approximately 50 pages with the new cartridge, and then try the print job again. |
Inconsistent colors print after installing a print cartridge
| Cause Solution | |
| Another print cartridge might be low. | Check the supplies gauge on the control panel or print a supplies status page. See Using printer information pages. |
| The printer might need calibration. | Calibrate the printer. See Calibrating the printer. |
| The print cartridge might be a refilled cartridge. | Use a genuine HP print cartridge. See Supplies and accessories. |
Printed colors do not match screen colors
| Cause Solution | |
| Extremely light screen colors are not being printed. | The software program might interpret extremely light colors as white. If so, avoid using extremely light colors. |
| Extremely dark screen colors print in black. | The software program might interpret extremely dark colors as black. If so, avoid using extremely dark colors. |
| The printer might need calibration. | Calibrate the printer. See Calibrating the printer. |
| The colors on the computer screen differ from the printer output. | 1. On the printer driver Color tab, in the Color Options section, select Manual. |
| For the HP Color LaserJet 3000 and 3800 Series printers only. | 2. Click Settings. |
| 3. In Manual Color Options, in the Color Options section, select Default (sRGB) for each object. | |
| 4. Click OK to finish. | |
 NOTE Several factors can influence your ability to match printed colors to those on your screen: paper, overhead lighting, software programs, operating system palettes, monitors, and video cards and drivers. See Color. NOTE Several factors can influence your ability to match printed colors to those on your screen: paper, overhead lighting, software programs, operating system palettes, monitors, and video cards and drivers. See Color. | |
Incorrect printer output
Printer output problems
Incorrect fonts print
| Cause | Solution |
| The font has not been correctly selected in the software program. | Reselect the font in the software program. |
| The font is not available to the printer. (HP Color LaserJet 3000 and 3800 series printers only.) | Download the font to the printer or use another font. (In Windows, the driver does this automatically.) |
| The correct printer driver is not selected. Select the correct printer driver. | |
| The font might be correct, but the characters appear blurry because the colors are not aligned correctly. | Perform a full printer calibration. See Calibrating the printer. |
Cannot print all characters in a symbol set
| Cause | Solution |
| The correct font is not selected. Select the correct font. | |
| The correct symbol set is not selected. Select the correct symbol set. | |
| The software program does not support the selected character or symbol set. | Use a font that supports the character or symbol. |
Text drifts between pages
| Cause Solution | |
| The software program is not resetting the printer to the top of the page. | See the software documentation or the PCL/PJL Technical Reference Package for specific information. |
Characters are erratic or missing, or the printout is interrupted
| Cause Solution | |
| The interface cable is of poor quality. | Try using a different, higher quality, IEEE-compliant interface cable. |
| The interface cable is loose. Disconnect and reconnect the interface cable. | |
| The interface cable is damaged or bad. Try using a different interface cable. | |
| The power cable is loose. Disconnect and reconnect the power cable. | |
| You are attempting to print a PCL job, but the printer is configured for PS (HP Color LaserJet 3000 and 3800 Series printers only). | From the printer control panel, select the correct printer personality and then resend the print job. |
| You are attempting to print a PS job, but the printer is configured for PCL (HP Color LaserJet 3000 and 3800 Series printers only). | From the printer control panel, select the correct printer personality and then resend the print job. |
Partial printout
| Cause Solution | |
| A memory-error message appears on the printer control panel. | 1.Increase printer memory by deleting unneeded downloaded fonts, style sheets, and macros from the printer memory.or2.Add more memory to the printer. |
| The file that you are printing contains errors. | Check the software program to verify that the file does not contain errors.1.From within the same program, print another file that you know is error-free.or2.Print the file from another program. |
Smears, vertical lines, toner specks, or repetitive marks appear on printouts
| Cause | Solution |
| The printer needs to be cleaned. | Clean the printer. SeeCleaning the printer. If the problem persists, seePrint-quality troubleshooting. |
Guidelines for printing with different fonts

NOTE This feature is available for the HP Color LaserJet 3000 and 3800 Series printers only.
The 80 internal fonts are available in PostScript Emulation (PS) and PCL mode.
• To conserve printer memory, download only those fonts that are needed.
• If you require several downloaded fonts, consider installing additional printer memory.
Some software programs automatically download fonts at the beginning of each print job. It might be possible to configure those programs to download only soft fonts that are not already resident in the printer.
Macintosh problems
This section lists problems that can occur when using Mac OS V9.x or Mac OS X.
Solving problems with Mac OS V9.x

NOTE Mac OS V9.x is supported for the HP Color LaserJet 3000 and 3800 Series printers only.
NOTE Use the Desktop Printer Utility to set up for USB and IP printing. The printer will not appear in the Chooser.
The printer name or IP address does not appear in the Desktop Printer Utility.
Cause Solution
| The printer might not be ready. | Make sure that the cables are connected correctly, the printer is on, and the Ready light is on. If you are connecting through a USB or Ethernet hub, try connecting directly to the computer or use a different port. |
| The wrong connection type might be selected. | Make sure that Printer (USB) or Printer (LPR) is selected in the Desktop Printer Utility, depending on the type of connection. |
| The wrong printer name or IP address is being used. | To check the printer name or IP address, print a configuration page. Verify that the printer name or IP address on the configuration page matches the printer name or IP address in the Desktop Printer Utility. |
| The interface cable might be defective or of poor quality. | Replace the interface cable with a high-quality cable. |
The PostScript Printer Description (PPD) file is not listed in the Desktop Printer Utility.
Cause Solution
| The printer software might not have been installed or was installed incorrectly. | Make sure that the PPD file for your printer model is in the following hard-drive folder: System Folder/Extensions/Printer Descriptions. If necessary, reinstall the software. See the getting started guide for instructions. |
| The PPD file is corrupt. | Delete the PPD file from the following hard drive folder: System Folder/Extensions/Printer Descriptions. Reinstall the software. See the getting started guide for instructions. |
A print job was not sent to the printer.
| Cause | Solution |
| The print queue might be stopped. | Restart the print queue: Select the desktop printer icon, open the Printing menu in the top menu bar, and then click Start Print Queue. |
| The wrong printer name or IP address is being used. | To check the printer name or IP address, print a configuration page. Verify that the printer name or IP address on the configuration page matches the printer name or IP address in the Desktop Printer Utility. |
| The printer might not be ready. | Make sure that the cables are connected correctly, the printer is on, and the Ready light is on. If you are connecting through a USB or |
A print job was not sent to the printer.
| Cause Solution | |
| Ethernet hub, try connecting directly to the computer or use a different port. | |
| The interface cable might be defective or of poor quality. | Replace the interface cable with a high-quality cable. |
You cannot use the computer while the printer is printing.
| Cause Solution | |
| Background Printing has not been selected. | For LaserWriter 8.6 and later: Turn on background printing by selecting Print Desktop on the File menu and then clicking Background Printing in the pop-up menu. |
An encapsulated PostScript (EPS) file prints with incorrect fonts.
| Cause | Solution |
| This problem occurs with some programs. | Send the file in ASCII format instead of binary encoding.Try downloading the fonts that are contained in the EPS file to the printer before printing. |
Your document is not printing with New York, Geneva, or Monaco fonts.
| Cause Solution | |
| The printer might be substituting fonts. | Click Options in the Page Setup dialog box to clear substituted fonts. |
You are unable to print from a third-party USB card.
| Cause | Solution |
| This error occurs when the software for USB printers is not installed. | When adding a third-party USB card, you might need the Apple USB Adapter Card Support software. The most current version of this software is available from the Apple Web site. |
When connected with a USB cable, the printer does not appear in the Desktop Printer Utility or the Apple System Profiler after the driver is selected.
| Cause | Solution |
| This problem is caused by either a software or hardware component. | Software troubleshootingCheck that your Macintosh supports USB and has the appropriate USB software from Apple.Verify that your Macintosh operating system is Mac OS V9.1 or later. |
When connected with a USB cable, the printer does not appear in the Desktop Printer Utility or the Apple System Profiler after the driver is selected.
| Cause | Solution |
| NOTE The iMac and Blue G3 desktop Macintosh systems meet all of the requirements to connect to a USB device. | |
| Hardware troubleshootingCheck that the printer is turned on.Verify that the USB cable is connected correctly.Check that you are using the appropriate high-speed USB cable.Ensure that you do not have too many USB devices drawing power from the chain. Disconnect all of the devices from the chain and connect the cable directly to the USB port on the host computer.Check to see if more than two nonpowered USB hubs are connected in a row on the chain. Disconnect all of the devices from the chain and connect the cable directly to the USB port on the host computer. | |
| NOTE The iMac keyboard is a nonpowered USB hub. |
Solving problems with Mac OS X
The printer driver is not listed in the Print Center or Printer Setup Utility.
| Cause | Solution |
| The printer software might not have been installed or was installed incorrectly. | Make sure that the printer PPD file is in the following hard-drive folder: Library/Printers/PPDs/Contents/Resources/.lproj, whereis the two-letter language code for the language that you are using. If necessary, reinstall the software. See the getting started guide for instructions. |
| The PPD file is corrupt. | Delete the PPD file from the following hard-drive folder: Library/Printers/PPDs/Contents/Resources/.lproj, whereis the two-letter language code for the language that you are using. Reinstall the software. See the getting started guide for instructions. |
The printer name, IP address, or Rendezvous host name does not appear in the printer list in the Print Center or Printer Setup Utility.
| Cause | Solution |
| The printer might not be ready. | Make sure that the cables are connected correctly, the printer is on, and the ready light is on. If you are connecting through a USB or Ethernet hub, try connecting directly to the computer or use a different port. |
| The wrong connection type might be selected. | Make sure that USB, IP Printing, or Rendezvous is selected, depending on the type of connection. |
The printer name, IP address, or Rendezvous host name does not appear in the printer list in the Print Center or Printer Setup Utility.
| Cause | Solution |
| The wrong printer name, IP address, or Rendezvous host name is being used. | Print a configuration page. Verify that the printer name, IP address, or Rendezvous host name on the configuration page matches the printer name, IP address, or Rendezvous host name in the Print Center or Printer Setup Utility. |
| The interface cable might be defective or of poor quality. | Replace the interface cable with a high-quality cable. |
The printer driver does not automatically set up your selected printer in the Print Center or Printer Setup Utility.
| Cause Solution | |
| The printer might not be ready. | Make sure that the cables are connected correctly, the printer is on, and the ready light is on. If you are connecting through a USB or Ethernet hub, try connecting directly to the computer or use a different port. |
| The printer software might not have been installed or was installed incorrectly. | Make sure that the printer PPD file is in the following hard-drive folder: Library/Printers/PPDs/Contents/Resources/.lproj, whereis the two-letter language code for the language that you are using. If necessary, reinstall the software. See the getting started guide for instructions. |
| The PPD file is corrupt. | Delete the PPD file from the following hard-drive folder: Library/Printers/PPDs/Contents/Resources/.lproj, whereis the two-letter language code for the language that you are using. Reinstall the software. See the getting started guide for instructions. |
| The interface cable might be defective or of poor quality. | Replace the interface cable with a high-quality cable. |
A print job was not sent to the printer that you wanted.
| Cause Solution | |
| The print queue might be stopped. | Restart the print queue. Open print monitor and select Start Jobs. |
| The wrong printer name, IP address, or Rendezvous host name is being used. | Print a configuration page. Verify that the printer name, IP address, or Rendezvous host name on the configuration page matches the printer name, IP address, or Rendezvous host name in the Print Center or Printer Setup Utility. |
An EPS file prints with incorrect fonts.
| Cause | Solution |
| This problem occurs with some programs. | Try downloading the fonts that are contained in the EPS file to the printer before printing.Send the file in ASCII format instead of binary encoding. |
You are unable to print from a third-party USB card.
Cause Solution
| This error occurs when the software for USB printers is not installed. |
When adding a third-party USB card, you might need the Apple USB Adapter Card Support software. The most current version of this software is available from the Apple Web site.
When connected with a USB cable, the printer does not appear in the Print Center or Printer Setup Utility after the driver is selected.
Cause Solution
| This problem is caused by either a software or a hardware component. |
Software troubleshooting
- Check that your Macintosh supports USB and has the appropriate USB software from Apple.
- Verify that your Macintosh operating system is Mac OS X V10.1 or later.
Hardware troubleshooting
- Check that the printer is turned on.
- Verify that the USB cable is connected correctly.
- Check that you are using the appropriate high-speed USB cable.
- Ensure that you do not have too many USB devices drawing power from the chain. Disconnect all of the devices from the chain, and connect the cable directly to the USB port on the host computer.
- Check to see if more than two nonpowered USB hubs are connected in a row on the chain. Disconnect all of the devices from the chain and connect the cable directly to the USB port on the host computer.

NOTE The iMac keyboard is a nonpowered USB hub.
Software program problems
Cannot change system selections
| Cause Solution | |
| The printer control panel locks out system software changes. | Contact the network administrator. |
| The software program does not support system changes. | See the software program documentation. |
| The correct printer driver is not loaded. Load the correct printer driver. | |
| The correct program driver is not loaded. Load the correct program driver. | |
Cannot select a font from the software
| Cause | Solution |
| The font is not available to the software program. See the software program documentation. | |
Cannot select colors
| Cause Solution | |
| The software program does not support color. See the software documentation. | |
| Color mode is not selected in the software program or printer driver. | Select Color mode instead of Grayscale or Monochrome mode. |
| The correct printer driver is not loaded. Load the correct printer driver. | |
Printer driver does not recognize tray 3 or the 2-sided printing accessory
| Cause Solution | |
| The printer driver has not been configured to recognize tray 3 or the 2-sided printing accessory. | See the printer driver online Help for instructions to configure the driver to recognize printer accessories. |
| The accessory might not be installed. Verify that the accessory is installed correctly. | |
Print-quality troubleshooting
If you are experiencing problems with print quality, the following sections might help you identify the cause of the problem.
Print-quality problems associated with media
Some print-quality problems arise from the use of inappropriate media.
• Use media that meets HP paper specifications. See Supported media sizes.
- The surface of the media is too smooth. Use paper that meets HP paper specifications. See Supported media sizes.
- The moisture content is uneven, too high, or too low. Use media from a different source or from an unopened ream.
- Some areas of the media reject toner. Use media from a different source or from an unopened ream.
- The letterhead you are using is printed on rough paper. Use a smoother, xerographic paper. If this solves your problem, ask the supplier of your letterhead to use paper that meets the specifications for this printer. See Supported media sizes.
• The paper is excessively rough. Use a smoother, xerographic paper.
• The driver setting is incorrect. To change the media type setting, see Type and Size.
- The media that you are using is too heavy for the media type setting that you selected, and the toner is not fusing to the media.
Overhead transparency defects
Overhead transparencies can display the same image-quality problems as other types of media and also defects that are specific to printing on transparencies. Also, because transparencies are pliable in the print path, the paper-handling components can mark their surface.

NOTE The HP Color LaserJet 3000 series printers do not support printing in color on transparencies.
NOTE Allow transparencies to cool for at least 30 seconds before handling them.
- In the printer driver Paper tab, select Transparency as the paper type. Also, make sure that the tray is correctly configured for transparencies.
• Make sure that the transparencies meet the specifications for this printer. See Supported media sizes. - The transparencies are not designed for correct toner adhesion. Use only transparencies that are designed for HP Color LaserJet printers.
- Handle transparencies by the edges. Oil from fingers can cause spots and smudges.
-
Small, random, dark areas on the trailing edge of solid-fill pages might result when transparencies stick together in the output bin. Try printing the job in smaller batches.
-
If printed colors look wrong when printed, select different colors in the software program or printer driver.
- If you are using a reflective overhead projector with the printed transparencies, use a standard overhead projector instead.
Print-quality problems associated with the environment
If the printer is operating in excessively humid or dry conditions, verify that the printing environment is within specifications. See the printer getting started guide for operating-environment specifications.
Print quality problems associated with jams
Make sure that all sheets are cleared from the paper path. See Jam recovery.
• If the printer recently jammed, print two to three pages to clean the printer.
- If the sheets do not pass through the fuser, which causes image defects on subsequent documents, print two to three pages to clean the printer. However, if the problem persists, see Print-quality-troubleshooting pages.
Print-quality problems associated with toner buildup inside the printer
Over time, toner and other particles can collect inside the printer. This buildup can cause the following print-quality problems:

NOTE To help reduce toner buildup, always configure the media type in the tray to match the media type that you are using. Printing on media that is a different type than the configuration setting can cause excess toner buildup.
- Marks at even intervals on the printed side of the page
• Toner that smears easily
• Toner specs on the page
• Vertical streaks or bands on the page
To correct these types of problems, clean the printer. See Cleaning the printer.
Print-quality-troubleshooting pages
Use the built-in print-quality-troubleshooting pages to help diagnose and solve print-quality problems.
-
Press Menu.
-
Press ▼ to highlight DIAGNOSTICS, and then press √.
-
Press ▼ to highlight PQ TROUBLESHOOTING, and then press √ to print the pages.
The printer returns to the Ready state after printing the print-quality-troubleshooting pages. If you see print-quality defects on the print-quality-troubleshooting pages, calibrate the printer. See Calibrating the printer. If defects continue to appear, go to the appropriate Web site for your printer:
• www.hp.com/go/printquality/clj3000
• www.hp.com/go/printquality/clj3800
Calibrating the printer
Calibration is a printer function that optimizes print quality. If you experience any print-quality problems, calibrate the printer.
-
Press Menu.
-
Press ▼ to highlight CONFIGURE DEVICE, and then press √.
- Press ▼ to highlight PRINT QUALITY, and then press √.
- Press ▼ to highlight FULL CALIBRATE NOW, and then press √.
A Supplies and accessories
• To order supplies in the U.S., go to www.hp.com/sbso/product/supplies.
• To order supplies worldwide, go to www.hp.com/ghp/buyonline.html.
• To order supplies in Canada, go to www.hp.ca/catalog/supplies.
• To order supplies in Europe, go to www.hp.com/go/supplies.
• To order supplies in Asia-Pacific, go to www.hp.com/paper/.
• To order accessories, go to www.hp.com/go/accessories.
Parts and supplies
Spare parts and supplies for this printer will be available for at least five years after production has stopped.
The table below lists available supplies and accessories for the HP Color LaserJet 3000, 3600, and 3800 Series printers.
Table A-1 Supplies, accessories, and part numbers
| Part Part number Type/size | ||
| Memory upgrades (DIMMs) | Q7721A | Synchronous 128 MB DDR SDRAM DIMM |
| Q7722A Synchronous 256 MB DDR SDRAM DIMM | ||
| Q7723A Synchronous 512 MB DDR SDRAM DIMM | ||
| Accessories Q5958A Optional 500-sheet paper feeder (tray 3) | ||
| Internal (EIO) connectivity for the HP Color LaserJet 3000 and 3800 Series printers | J6073A/G HP Jetdirect high-performance hard disk (20 GB) | |
| J7934A HP Jetdirect 620n print server (10/100base-TX Ethernet) | ||
| J7960A HP Jetdirect 625n print server (10/100/1000T Ethernet) | ||
| External (EX) connectivity | J3258C | HP Jetdirect 170x print server (Ethernet) |
| J6035D HP Jetdirect 175x print server (fast Ethernet, 10/100base-TX, USB 1.1) | ||
| J6072A HP bt1300 Bluetooth ^1 wireless printer adapter (USB 1.1 or parallel port interfaces) | ||
| J7942A HP Jetdirect en3700 print server (fast Ethernet, full feature set, 10/100base-TX, USB 2.0) | ||
| J7951A HP Jetdirect ew2400 wired/wireless print server (fast Ethernet, value feature set, USB 2.0) | ||
| Printer supplies for the HP Color LaserJet 3000 Series printer | Q7560A Black print cartridge | |
| Q7561A Cyan print cartridge | ||
| Q7562A Yellow print cartridge | ||
| Q7563A Magenta print cartridge | ||
| Printer supplies for the HP Color LaserJet 3600 Series printer | Q6470A Black print cartridge | |
| Q6471A Cyan print cartridge | ||
| Q6472A Yellow print cartridge | ||
| Q6473A Magenta print cartridge | ||
| Printer supplies for the HP Color LaserJet 3800 Series printer | Q6470A Black print cartridge | |
| Q7581A Cyan print cartridge | ||
| Q7582A Yellow print cartridge | ||
| Q7583A Magenta print cartridge | ||
| Cables C6518A USB 2.0 printer cable (2-meter [6.5-foot] standard) | ||
| Media C2934A 50 sheets | ||
| HP Color LaserJet Transparencies (letter) | ||
| C2936A 50 sheets | ||
| HP Color LaserJet Transparencies (A4) | ||
| Q2419A HP LaserJet High Gloss paper (letter) | ||
| C4179A 200 sheets | ||
| HP LaserJet Soft Gloss paper (letter) | ||
| C4179B 200 sheets | ||
| HP LaserJet Soft Gloss paper (A4) | ||
| Q1298A HP LaserJet Tough paper (letter) | ||
| Q1298B HP LaserJet Tough paper (A4) | ||
| HPU1132 HP Premium Choice LaserJet paper (letter) | ||
| CHP410 HP Premium Choice LaserJet paper (A4) | ||
| HPJ1124 HP LaserJet paper (letter) | ||
| CHP310 HP LaserJet paper (A4) | ||
| Reference materials | 5851-1468 | HP LaserJet Printer Family Print Media Specification Guide |
| 5021-0337 PCL/PJL Technical Reference Package | ||
| For downloadable versions, go to www.hp.com/support/clj3000, www.hp.com/support/clj3600 or www.hp.com/support/clj3800. When connected, select Manuals. | ||
Bluetooth is a trademark owned by its proprietor and used by Hewlett-Packard Company under license.
Ordering by using the embedded Web server

NOTE This feature is available for the HP Color LaserJet 3000 and 3800 Series printers only.
Use the following steps to order printing supplies directly through the embedded Web server (see Using the embedded Web server).
- In the Web browser on the computer, type the IP address for the printer. The printer status window appears. Or, go to the URL provided in the alert e-mail.
- If asked to provide a password, type the password.
- On the left side of the Device Configuration window, click Order Supplies. This provides the URL where you can purchase supplies and view supplies information, including part numbers and printer information.
- Select the part numbers you want to order and follow the onscreen instructions.
B Service and support
Hewlett-Packard limited warranty statement
HP PRODUCT DURATION OF LIMITED WARRANTY
HP Color LaserJet 3000, 3000n, 3000dn, 3000dtn, 3600, 3600n,
3600dn, 3800, 3800n, 3800dn, and 3800dtn printers
One-year limited warranty
HP warrants to you, the end-user customer, that HP hardware and accessories will be free from defects in materials and workmanship after the date of purchase, for the period specified above. If HP receives notice of such defects during the warranty period, HP will, at its option, either repair or replace products which prove to be defective. Replacement products may be either new or equivalent in performance to new.
HP warrants to you that HP software will not fail to execute its programming instructions after the date of purchase, for the period specified above, due to defects in material and workmanship when properly installed and used. If HP receives notice of such defects during the warranty period, HP will replace software which does not execute its programming instructions due to such defects.
HP does not warrant that the operation of HP products will be uninterrupted or error free. If HP is unable, within a reasonable time, to repair or replace any product to a condition as warranted, you will be entitled to a refund of the purchase price upon prompt return of the product.
HP products may contain remanufactured parts equivalent to new in performance or may have been subject to incidental use.
Warranty does not apply to defects resulting from (a) improper or inadequate maintenance or calibration, (b) software, interfacing, parts or supplies not supplied by HP, (c) unauthorized modification or misuse, (d) operation outside of the published environmental specifications for the product, or (e) improper site preparation or maintenance.
TO THE EXTENT ALLOWED BY LOCAL LAW, THE ABOVE WARRANTIES ARE EXCLUSIVE AND NO OTHER WARRANTY OR CONDITION, WHETHER WRITTEN OR ORAL, IS EXPRESSED OR IMPLIED AND HP SPECIFICALLY DISCLAIMS ANY IMPLIED WARRANTIES OR CONDITIONS OF MERCHANTABILITY, SATISFACTORY QUALITY, AND FITNESS FOR A PARTICULAR PURPOSE. Some countries/regions, states or provinces do not allow limitations on the duration of an implied warranty, so the above limitation or exclusion might not apply to you. This warranty gives you specific legal rights and you might also have other rights that vary from country/region to country/region, state to state, or province to province. HP's limited warranty is valid in any country/region or locality where HP has a support presence for this product and where HP has marketed this product. The level of warranty service you receive may vary according to local standards. HP will not alter form, fit or function of the product to make it operate in a country/region for which it was never intended to function for legal or regulatory reasons.
TO THE EXTENT ALLOWED BY LOCAL LAW, THE REMEDIES IN THIS WARRANTY STATEMENT ARE YOUR SOLE AND EXCLUSIVE REMEDIES. EXCEPT AS INDICATED ABOVE, IN NO EVENT WILL HP OR ITS SUPPLIERS BE LIABLE FOR LOSS OF DATA OR FOR DIRECT, SPECIAL, INCIDENTAL, CONSEQUENTIAL (INCLUDING LOST PROFIT OR DATA), OR OTHER DAMAGE, WHETHER BASED IN CONTRACT, TORT, OR OTHERWISE. Some countries/regions, states or provinces do not allow the exclusion or limitation of incidental or consequential damages, so the above limitation or exclusion may not apply to you.
THE WARRANTY TERMS CONTAINED IN THIS STATEMENT, EXCEPT TO THE EXTENT LAWFULLY PERMITTED, DO NOT EXCLUDE, RESTRICT OR MODIFY AND ARE IN ADDITION TO THE MANDATORY STATUTORY RIGHTS APPLICABLE TO THE SALE OF THIS PRODUCT TO YOU.
Print cartridge limited warranty statement
This HP product is warranted to be free from defects in materials and workmanship.
This warranty does not apply to products that (a) have been refilled, refurbished, remanufactured or tampered with in any way, (b) experience problems resulting from misuse, improper storage, or operation outside of the published environmental specifications for the printer product or (c) exhibit wear from ordinary use.
To obtain warranty service, please return the product to place of purchase (with a written description of the problem and print samples) or contact HP customer support. At HP's option, HP will either replace products that prove to be defective or refund your purchase price.
TO THE EXTENT ALLOWED BY LOCAL LAW, THE ABOVE WARRANTY IS EXCLUSIVE AND NO OTHER WARRANTY OR CONDITION, WHETHER WRITTEN OR ORAL, IS EXPRESSED OR IMPLIED AND HP SPECIFICALLY DISCLAIMS ANY IMPLIED WARRANTIES OR CONDITIONS OF MERCHANTABILITY, SATISFACTORY QUALITY, AND FITNESS FOR A PARTICULAR PURPOSE.
TO THE EXTENT ALLOWED BY LOCAL LAW, IN NO EVENT WILL HP OR ITS SUPPLIERS BE LIABLE FOR DIRECT, SPECIAL, INCIDENTAL, CONSEQUENTIAL (INCLUDING LOST PROFIT OR DATA), OR OTHER DAMAGE, WHETHER BASED IN CONTRACT, TORT, OR OTHERWISE.
THE WARRANTY TERMS CONTAINED IN THIS STATEMENT, EXCEPT TO THE EXTENT LAWFULLY PERMITTED, DO NOT EXCLUDE, RESTRICT OR MODIFY AND ARE IN ADDITION TO THE MANDATORY STATUTORY RIGHTS APPLICABLE TO THE SALE OF THIS PRODUCT TO YOU.
HP maintenance agreements
HP has several types of maintenance agreements that meet a wide range of support needs. Maintenance agreements are not part of the standard warranty. Support services may vary by area. Check with your local HP dealer to determine the services available to you.
On-site service agreements
To provide you with the level of support best suited to your needs, HP has on-site service agreements with a selection of response times.
Next-day on-site service
This agreement provides support by the next working day following a service request. Extended coverage hours and extended travel beyond HP's designated service zones are available on most on-site agreements (for additional charges).
Weekly (volume) on-site service
This agreement provides scheduled weekly on-site visits for organizations with many HP products. This agreement is designated for sites using 25 or more workstation products, including printers, plotters, computers, and disk drives.
Extended warranty
HP SupportPack provides coverage for the HP hardware product and all HP-supplied internal components. The hardware maintenance covers a 1 to 3 year period from date of the HP product purchase. The customer must purchase HP SupportPack within the stated factory warranty. For more information, contact the HP Customer Care Service and Support group.
Repacking the printer
If your printer needs to be moved or shipped to another location, perform the following procedure to repack the printer.

CAUTION Shipping damage as a result of inadequate packing is the customer's responsibility. The printer must remain upright during shipment.
To repack the printer

CAUTION It is extremely important to remove the print cartridges before shipping the printer. Print cartridges left in the printer during shipping will leak and entirely cover the printer engine and other parts with toner.
To prevent damage to the print cartridge, avoid touching the roller, and store the print cartridge in its original packing material or so that it is not exposed to light.
- Remove all four print cartridges and ship separately.
- Remove optional tray 3 and ship the tray separately.
- Use the original shipping container and packing material, if possible. If you have already disposed of the printer packing material, contact a local mailing service for information about repacking the printer. HP recommends insuring the equipment for shipment.
C Printer specifications
The printer specifications provide information about the size and weight, amount of power needed and used, and noise output of the printer. The specifications also describe how the different operating modes affect power consumption, heat output, and noise output.
Physical specifications
Table C-1 Physical dimensions for the HP Color LaserJet 3000, 3600, and 3800 Series printers
| Product Height Depth Width Weight | ||||
| Base model 400 mm (15.7 in) 450 mm (17.7 in) 400 mm (15.7 in) | 20.3 kg(44.8 lbs) | |||
| Base model plus duplexer | 423 mm (16.7 in) | 450 mm (17.7 in) | 400 mm (15.7 in) | 21.5 kg(47.4 lbs) |
| Base model plus optional tray 3 | 540 mm (21.3 in) | 450 mm (17.7 in) | 400 mm (15.7 in) | 25.4 kg (56 lbs) |
| Base model plus duplexer and optional tray 3 | 563 mm (22.2 in) | 450 mm (17.7 in) | 400 mm (15.7 in) | 26.6 kg(58.6 lbs) |
1 Printer weight does not include print cartridges.
Electrical specifications

WARNING! Power requirements are based on the country/region where the printer is sold. Do not convert operating voltages. This may damage the printer and void the product warranty.
Table C-2 Electrical specifications for the HP Color LaserJet 3000 Series printers
| Item 110-volt models 220-volt models | |
| Power requirements 100 to 127 V (+/-10%) | 220 to 240 V (+/-10%) |
| 50 to 60 Hz (+/-2 Hz) | 50 to 60 Hz (+/-2 Hz) |
| Minimum recommended circuit capacity 6.5 A 3.5 A | |
Table C-3 Electrical specifications for the HP Color LaserJet 3600 Series printer
| Item 110-volt models 220-volt models | |
| Power requirements 100 to 127 V (+/-10%) | 220 to 240 V (+/-10%) |
| 50 to 60 Hz (+/-2 Hz) | 50 to 60 Hz (+/-2 Hz) |
| Minimum recommended circuit capacity 6.5 A 3.5 A | |
Table C-4 Electrical specifications for the HP Color LaserJet 3800 Series printer
| Item 110-volt models 220-volt models | |
| Power requirements 100 to 127 V (+/-10%) | 220 to 240 V (+/-10%) |
| 50 to 60 Hz (+/-2 Hz) | 50 to 60 Hz (+/-2 Hz) |
| Minimum recommended circuit capacity 6.5 A 3.5 A | |
Power-consumption specifications
Table C-5 Power consumption (average, in watts) ^1
| Product Model Printing | ^2 | Ready ^3 | Sleep ^4 | Off Heat output-Ready (BTU/hour) ^5 |
| HP Color LaserJet 3000 409 29 13 0.5 100 | ||||
| HP Color LaserJet 3000n 409 29 13 0.5 100 | ||||
| HP Color LaserJet 3000dn 409 29 13 0.5 100 | ||||
| HP Color LaserJet 3000dtn 409 29 13 0.5 100 | ||||
| HP Color LaserJet 3600 337 51 15 0.5 171 | ||||
| HP Color LaserJet 3600n 337 51 15 0.5 171 | ||||
| HP Color LaserJet 3600dn 337 51 15 0.5 171 | ||||
| HP Color LaserJet 3800 437 48 15 0.5 162 | ||||
| HP Color LaserJet 3800n 437 48 15 0.5 162 | ||||
| HP Color LaserJet 3800dn 437 48 15 0.5 162 | ||||
| HP Color LaserJet 3800dtn 407 46 15 0.7 162 | ||||
1 The power consumption reflects the highest values measured for color and monochrome printing when using standard voltages.
2 HP Color LaserJet 3000: The printing speed is 15 ppm for letter-size media and 29 ppm for A4-size media. HP Color LaserJet 3600: The printing speed is 17 ppm for letter-size media and 17 ppm for A4-size media. HP Color LaserJet 3800: The printing speed is 20 ppm for letter-size media and 21 ppm for A4-size media.
^3 The default activation time from ready mode to sleep mode is 30 minutes.
4 The recovery time from sleep mode to the start of printing is 6 seconds.
5 Maximum heat dissipation for all models in ready mode is 171 BTU per hour.

NOTE These values are subject to change.
Acoustic specifications
Table C-6 Acoustic emissions for the HP Color LaserJet 3000 Series printers ^1
| Sound power level Declared per ISO 9296 | |
| Printing (15 ppm) ^2 | L_WAd = 6.9 Bels (A) [69 dB (A)] |
| Ready L | _WAd = 5.3 Bels (A) [53 dB (A)] |
| Sound pressure level: bystander position Declared per ISO 9296 | |
| Printing (15 ppm) ^2 | L_pAm = 55 dB (A) |
| Ready L | _pAm = 39 dB (A) |
1 The HP Color LaserJet 3000dn was tested in simplex mode with A4-size media.
^2 The color printing speed is 15 ppm for letter-size media and A4-size media. The monochrome printing speed is 30 ppm for letter-size media and 29 ppm for A4-size media.
Table C-7 Acoustic emissions for the HP Color LaserJet 3600 Series printer ^1
| Sound power level Declared per ISO 9296 | |
| Printing (17 ppm) ^2 | L_wAd = 6.4 Bels (A) [64 dB (A)] |
| Sound pressure level: bystander position Declared per ISO 9296 | |
| Printing (17 ppm) ^2 | L_pAm = 49 dB (A) |
1 The HP Color LaserJet 3600 printer was tested in simplex monochrome mode with A4-size media.
2 The printing speed is 17 ppm for letter-size media and 17 ppm for A4-size media.
Table C-8 Acoustic emissions for theHP Color LaserJet 3800 Series printers ^1
| Sound power level Declared per ISO 9296 | |
| Printing (20 ppm) ^2 | L_WAd = 6.4 Bels (A) [64 dB (A)] |
| Ready L | _WAd = 5.4 Bels (A) [54 dB (A)] |
| Sound pressure level: bystander position Declared per ISO 9296 | |
| Printing (20 ppm) ^2 | L_pAm = 50 dB (A) |
| Ready L | _pAm = 40 dB (A) |
1 The HP Color LaserJet 3800n was tested in simplex mode with A4-size media.
2 The printing speed is 20 ppm for letter-size media and 21 ppm for A4-size media.

NOTE These values are subject to change.
Operating-environment specifications
Table C-9 Operating environment specifications
| Environment Recommended Allowed |
| Temperature 17 to 25°C (62.6 to 77°F) 10 to 27°C (50 to 81°F) |
| Humidity 20 to 60% relative humidity (RH) 10 to 70% RH |
| Altitude Not applicable 0 to 2600 m (0 to 8530 ft) |

NOTE These values are subject to change.
D Regulatory information
This section contains the following regulatory information:
FCC regulations
• Environmental product stewardship program
• Declaration of conformity (HP Color LaserJet 3000 series)
• Declaration of conformity (HP Color LaserJet 3600 series and HP Color LaserJet 3800 series)
• Safety statements
FCC regulations
This equipment has been tested and found to comply with the limits for a Class B digital device, pursuant to Part 15 of the FCC rules. These limits are designed to provide reasonable protection against harmful interference in a residential installation. This equipment generates, uses, and can radiate radio frequency energy. If this equipment is not installed and used in accordance with the instructions, it may cause harmful interference to radio communications. However, there is no guarantee that interference will not occur in a particular installation. If this equipment does cause harmful interference to radio or television reception, which can be determined by turning the equipment off and on, the user is encouraged to try to correct the interference by one or more of the following measures:
• Reorient or relocate the receiving antenna.
- Increase separation between equipment and receiver.
- Connect equipment to an outlet on a circuit different from that to which the receiver is located.
- Consult your dealer or an experienced radio/TV technician.

NOTE Any changes or modifications to the printer that are not expressly approved by HP could void the user's authority to operate this equipment.
Use of a shielded interface cable is required to comply with the Class B limits of Part 15 of FCC rules.
Environmental product stewardship program
Protecting the environment
Hewlett-Packard Company is committed to providing quality products in an environmentally sound manner. This product has been designed with several attributes to minimize impacts on our environment.
Ozone production
This product generates no appreciable ozone gas ( O_3 ).
Power consumption
Power usage drops significantly while in Sleep mode, which saves natural resources and saves money without affecting the high performance of this product. This product qualifies for ENERGY STAR® (Version 3.0), which is a voluntary program to encourage the development of energy-efficient office products.

ENERGY STAR® and the ENERGY STAR mark are U.S. registered marks. As an ENERGY STAR partner, Hewlett-Packard Company has determined that this product meets ENERGY STAR Guidelines for energy efficiency. For more information, see www.energystar.gov/.
Toner consumption
Economode uses significantly less toner, which might extend the life of the print cartridge.
Paper use
This product's optional automatic duplex feature and N-up printing (multiple pages printed on one page) capability can reduce paper usage and the resulting demands on natural resources.
Plastics
Plastic parts over 25 grams are marked according to international standards that enhance the ability to identify plastics for recycling purposes at the end of the product's life.
HP LaserJet printing supplies
It's easy to return and recycle your empty HP LaserJet print cartridges—free of charge—with HP Planet Partners. HP is committed to providing inventive, high-quality products and services that are environmentally sound, from product design and manufacturing to distribution, operation and recycling processes. We ensure your returned HP LaserJet print cartridges are recycled properly, processing them to recover valuable plastics and metals for new products and diverting millions of tons of waste from landfills. Since this cartridge is being recycled and used in new materials, it will not be returned to you. Your empty HP LaserJet print cartridges are recycled responsibly when you participate in the HP Planet Partners program. Thank you for being environmentally responsible!
In many countries/regions, this product's printing supplies (for example, print cartridges) can be returned to HP through the HP Printing Supplies Returns and Recycling Program. An easy-to-use and free take back program is available in more than 35 countries/regions. Multilingual program information and instructions are included in every new HP LaserJet print cartridge and supplies package.
HP printing supplies returns and recycling program information
Since 1992, HP has offered HP LaserJet supplies return and recycling free of charge. In 2004, HP Planet Partners for LaserJet Supplies was available in 85% of the world market where HP LaserJet supplies are sold. Postage-paid and pre-addressed labels are included within the instruction guide in most HP LaserJet print cartridge boxes. Labels and bulk boxes are also available through the Web site: www.hp.com/recycle.
Use the label to return empty, original HP LaserJet print cartridges only. Please do not use this label for non-HP cartridges, refilled or remanufactured cartridges, or warranty returns. Printing supplies or other objects inadvertently sent to the HP Planet Partners program cannot be returned.
More than 10 million HP LaserJet print cartridges were recycled globally in 2004 through the HP Planet Partners supplies recycling program. This record number represents 26 million pounds of print cartridge materials diverted from landfills. Worldwide, in 2004, HP recycled an average of 59% of the print cartridge by weight consisting primarily of plastic and metals. Plastics and metals are used to make new products such as HP products, plastic trays, and spools. The remaining materials are disposed of in an environmentally responsible manner.
U.S. returns. For a more environmentally responsible return of used cartridges and supplies, HP encourages the use of bulk returns. Simply bundle two or more cartridges together and use the single, pre-paid, pre-addressed UPS label that is supplied in the package. For more information in the U.S., call 1-800-340-2445 or visit the HP Web site at www.hp.com/recycle.
- Non-U.S. returns. Non-U.S. customers should visit the www.hp.com/recycle Web site for further information regarding availability of the HP Supplies Returns and Recycling Program.
Paper
This product is capable of using recycled papers when the paper meets the guidelines outlined in the HP LaserJet Printer Family Print Media Specification Guide. This product is suitable for the use of recycled paper according to EN12281:2002.
Material restrictions
This HP product does not contain added mercury.
This HP product contains a battery that might require special handling at end-of-life. The batteries contained in or supplied by Hewlett-Packard for this product include the following:
| HP Color LaserJet 3000 and 3800 Series printers HP Color | LaserJet 3600 Series printer |
| Type: carbon monofluoride lithium battery BR1632 | Type: carbon monofluoride lithium battery BR2032 |
| Weight: (1.5 g) Weight: (2.0 g) | |
| Location: On formatter board Location: On I-controller board | |
| User-removable: No User-removable: No |
For recycling information, you can go to www.hp.com/recycle, or contact your local authorities or the Electronics Industries Alliance: www.eiae.org.
Disposal of waste equipment by users in private households in the European Union

This symbol on the product or on its packaging indicates that this product must not be disposed of with your other household waste. Instead, it is your responsibility to dispose of your waste equipment by handing it over to a designated collection point for the recycling of waste electrical and electronic equipment. The separate collection and recycling of your waste equipment at the time of disposal will help to conserve natural resources and ensure that it is recycled in a manner that protects human health and the environment. For more information about where you can drop off your waste equipment for recycling, please contact your local city office, your household waste disposal service or the shop where you purchased the product.
Material Safety Data Sheet (MSDS)
Material Safety Data Sheets (MSDS) for supplies containing chemical substances (for example, toner) can be obtained by contacting the HP Web site at www.hp.com/go/msds or www.hp.com/hpinfo/community/environment/productinfo/safety.
Extended warranty
HP SupportPack provides coverage for the HP hardware product and all HP supplied internal components. The hardware maintenance covers a three-year period from date of the HP product purchase. The customer must purchase HP SupportPack within the stated factory warranty. For more information, contact the HP Customer Care Service and HP Customer Support group. See Hewlett-Packard limited warranty statement.
For more information
To obtain information about these environmental topics:
• Product environmental profile sheet for this and many related HP products
HP's commitment to the environment
HP's environmental management system
HP's end-of-life product return and recycling program
• Material Safety Data Sheets
Visit www.hp.com/go/environment or www.hp.com/hpinfo/community/environment/productinfo/safety.
Declaration of conformity (HP Color LaserJet 3000 series)
Declaration of Conformity
according to ISO/IEC Guide 22 and EN 45014
Manufacturer's Name: Hewlett-Packard Company
Manufacturer's Address: 11311 Chinden Boulevard,
Boise, Idaho 83714-1021, USA
declares, that the product
Product Name: HP Color LaserJet 3000 series
Regulatory Model: ^3)
BOISB-0504-01
Including
Q5985A – Optional 500 Sheet Input Tray
Product Options: ALL
Print Cartridges: Q7560A, Q7561A, Q7562A, Q7563A
conforms to the following Product Specifications:
SAFETY: IEC 60950-1:2001 / EN60950-1: 2001 +A11
IEC 60825-1:1993 +A1+A2 / EN 60825-1:1994 +A1 +A2 (Class 1 Laser/LED Product) GB4943-2001
EMC:
CISPR22:1993 +A1 +A2 / EN55022:1994 +A1 +A2 - Class B ^1)
EN 61000-3-2:2000
EN 61000-3-3:1995 +A1
EN 55024:1998 +A1 +A2
FCC Title 47 CFR, Part 15 Class B2) / ICES-003, Issue 4 GB9254-1998, GB17625.1-2003
Supplementary Information:
The product herewith complies with the requirements of the EMC Directive 89/336/EEC and the Low Voltage Directive 73/23/EEC, and carries the CE-Marking accordingly.
1) The product was tested in a typical configuration with Hewlett-Packard Personal Computer Systems.
2) This Device complies with Part 15 of the FCC Rules. Operation is subject to the following two Conditions: (1) this device may not cause harmful interference, and (2) this device must accept any interference received, including interference that may cause undesired operation.
3) For regulatory purposes, these products are assigned a Regulatory model number. This number should not be confused with the product name or the product number(s).
Boise, Idaho 83713, USA
16 May, 2005
For Regulatory Topics Only:
| Australia Contact | Product Regulations Manager, Hewlett-Packard Australia Ltd., 31-41 Joseph Street,, Blackburn, Victoria 3130, Australia |
| European Contact | Your Local Hewlett-Packard Sales and Service Office or Hewlett-Packard GmbH, Department HQ-TRE / Standards Europe, Herrenberger Strasse 140, Böblingen, D-71034, Germany, (FAX+49-7031-14-3143) |
| USA Contact | Product Regulations Manager, Hewlett-Packard Company, PO Box 15, Mail Stop 160, Boise, ID 83707-0015, USA, (Phone: 208-396-6000) |
Declaration of conformity (HP Color LaserJet 3600 series and HP Color LaserJet 3800 series)
Declaration of Conformity
according to ISO/IEC Guide 22 and EN 45014
Manufacturer's Name: Hewlett-Packard Company
Manufacturer's Address: 11311 Chinden Boulevard,
Boise, Idaho 83714-1021, USA
declares, that the product
Product Names:4)
HP Color LaserJet 3600 series / HP Color LaserJet 3800 series
Regulatory Model: ^3)
BOISB-0504-00
Including
Q5985A – Optional 500 Sheet Input Tray
Product Options: ALL
Print Cartridges: Q6470A, Q6471A, Q6472A, Q6473A, Q7581A, Q7582A, Q7583A
conforms to the following Product Specifications:
SAFETY: IEC 60950-1:2001 / EN60950-1: 2001 +A11
IEC 60825-1:1993 +A1 +A2 / EN 60825-1:1994 +A1 +A2 (Class 1 Laser/LED Product) GB4943-2001
EMC:
CISPR22:1993 +A1 +A2 / EN55022:1994 +A1 +A2 - Class B ^1) EN 61000-3-2:2000 EN 61000-3-3:1995 +A1 EN 55024:1998 +A1 +A2 FCC Title 47 CFR, Part 15 Class B ^2) / ICES-003, Issue 4 GB9254-1998, GB17625.1-2003
Supplementary Information:
The product herewith complies with the requirements of the EMC Directive 89/336/EEC and the Low Voltage Directive 73/23/EEC, and carries the CE-Marking accordingly.
1) The product was tested in a typical configuration with Hewlett-Packard Personal Computer Systems.
2) This Device complies with Part 15 of the FCC Rules. Operation is subject to the following two Conditions: (1) this device may not cause harmful interference, and (2) this device must accept any interference received, including interference that may cause undesired operation.
3) For regulatory purposes, these products are assigned a Regulatory model number. This number should not be confused with the product name or the product number(s).
4) CLJ3600 series and CLJ3800 series are similar in design, but use various interface boards.
Boise, Idaho 83713, USA
16 May, 2005
For Regulatory Topics Only:
Australia Contact Product Regulations Manager, Hewlett-Packard Australia Ltd., 31-41 Joseph Street,, Blackburn, Victoria 3130, Australia
European Contact Your Local Hewlett-Packard Sales and Service Office or Hewlett-Packard GmbH, Department HQ-TRE / Standards Europe, Herrenberger Strasse 140, Böblingen, D-71034, Germany, (FAX +49-7031-14-3143)
USA Contact Product Regulations Manager, Hewlett-Packard Company, PO Box 15, Mail Stop 160, Boise, ID 83707-0015, USA, (Phone: 208-396-6000)
Safety statements
Laser safety
The Center for Devices and Radiological Health (CDRH) of the U.S. Food and Drug Administration has implemented regulations for laser products manufactured since August 1, 1976. Compliance is mandatory for products marketed in the United States. The printer is certified as a "Class 1" laser product under the U.S. Department of Health and Human Services (DHHS) Radiation Performance Standard according to the Radiation Control for Health and Safety Act of 1968. Since radiation emitted inside the printer is completely confined within protective housings and external covers, the laser beam cannot escape during any phase of normal user operation.

WARNING! Using controls, making adjustments, or performing procedures other than those specified in this user guide may result in exposure to hazardous radiation.
Canadian DOC regulations
Complies with Canadian EMC Class B requirements.
EMI statement (Korea)
B급 기기 (가정용 정보통신기기)
VCCI statement (Japan)
Power cord statement (Japan)
Laser statement for Finland
Luokan 1 laserlaite
Klass 1 Laser Apparat
E Working with memory
Printer memory

NOTE The information in this appendix pertains to the HP Color LaserJet 3000 and 3800 Series printers only.
The HP Color LaserJet 3000 and 3800 Series printers have one dual inline memory module (DIMM) slot. Use the DIMM slot to upgrade the printer with the following items:
• More printer memory — DIMMs are available in 128, 256, and 512 MB
• Other DIMM-based printer languages and printer options

NOTE Single in-line memory modules (SIMMs) used on previous HP LaserJet printers are not compatible with the printer.
NOTE To order DIMMs, see Supplies and accessories.
You might want to add more memory to the printer if you often print complex graphics or PostScript documents, or if you use many downloaded fonts. Additional memory also allows the printer to print multiple collated copies at the maximum speed.
Before ordering additional memory, see how much memory is currently installed by printing a configuration page. See Using printer information pages.
Installing memory DIMMs
You can install more memory for the printer, and you can also install a font DIMM to allow the printer to print characters for languages such as Chinese or the Cyrillic alphabet.

CAUTION Static electricity can damage DIMMs. When handling DIMMs, either wear an antistatic wrist strap, or frequently touch the surface of the DIMM antistatic package and then touch bare metal on the printer.
To install memory and font DIMMs
- Turn the printer off, and then disconnect all power and interface cables.
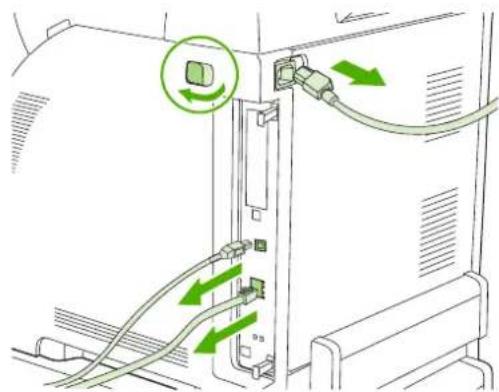
text_image
Diagram showing cable routing between a computer with labeled ports and directional arrows indicating rotation or connection.- On the right side of the printer, gently pull the black tabs together, and then pull the formatter assembly from the printer.
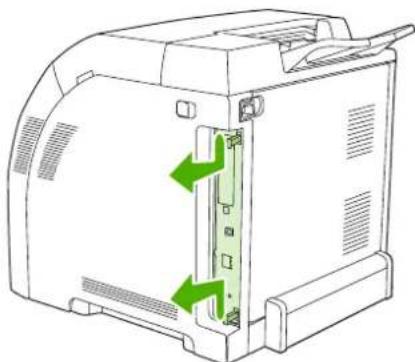
natural_image
Line drawing of a printer internal structure with green arrows indicating movement or force (no text or symbols)- Place the formatter board on a clean, flat, grounded surface.
To replace a DIMM that is currently installed, spread the latches apart on each side of the DIMM slot, lift the DIMM up at an angle, and pull it out.
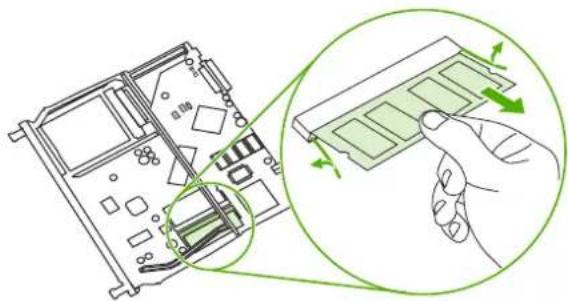
text_image
Diagram showing a computer motherboard with a magnified view of the internal structure being processed, annotated with green arrows indicating motion or force.- Remove the new DIMM from the antistatic package, and then locate the alignment notch on the bottom edge of the DIMM.
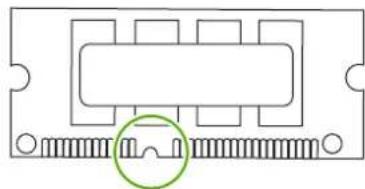
natural_image
Pure electrical connector pinout diagram without any text or symbols- Holding the DIMM by the edges, align the notch on the DIMM with the bar in the DIMM slot at an angle and firmly press the DIMM into the slot until it is fully seated. When installed correctly, the metal contacts are not visible.
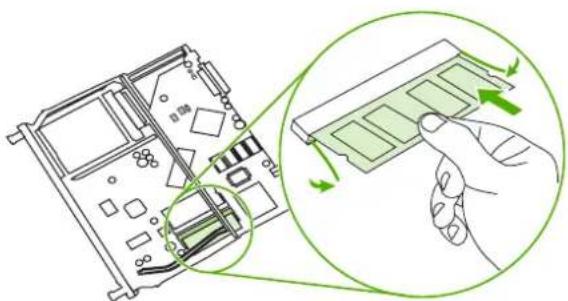
natural_image
Diagram showing a computer motherboard with a magnified view of the internal components being processed, no text or symbols present.- Push down on the DIMM until both latches engage the DIMM.
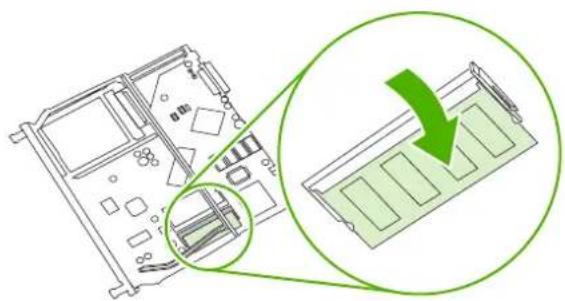
natural_image
Diagram showing a computer motherboard with a highlighted internal component and a green arrow indicating the process (no text or symbols present)
NOTE If you have difficulty inserting the DIMM, make sure that the notch on the bottom of the DIMM is aligned with the bar in the slot. If the DIMM still does not go in, make sure that you are using the correct DIMM type.
- Align the edge of the formatter board in the tracks at the top and bottom of the slot, and then slide the board back into the printer. Push the formatter firmly until you hear the formatter latches click into place.
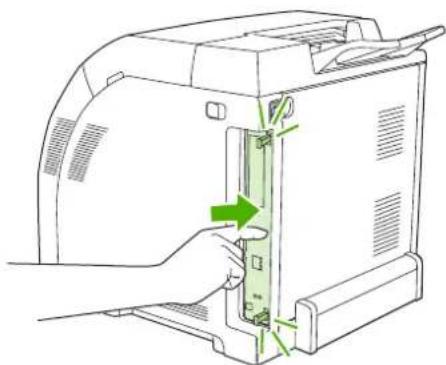
natural_image
Illustration of a hand inserting a device into a computer case, showing green arrows indicating the process (no text or symbols present)-
Reconnect the power cable and USB or network cable, and then turn on the printer.
-
After installing a memory DIMM, see Enabling memory.
Enabling memory
If you installed a memory DIMM, set the printer driver to recognize the newly added memory.
To enable memory for Windows
-
On the Start menu, point to Settings, and click Printers or Printers and Faxes.
-
Select this printer and select Properties.
-
On the Configure tab, click More.
-
In the Total Memory field, type or select the total amount of memory that is now installed.
-
Click OK.
- Go to Checking DIMM installation.
Checking DIMM installation
Check that the DIMMs are installed correctly and working.
To check DIMM installation
- Turn the printer on. Check that the printer is in the Ready state after the it has gone through the startup sequence. If an error message appears, a DIMM may have been incorrectly installed.
- Print a configuration page. See Using printer information pages.
- Check the Installed Personalities and Options section on the configuration page and compare it with the configuration page printed before the DIMM installation.
- The DIMM may not be installed correctly. Repeat the installation procedure.
-or-
The DIMM may be defective. Try a new DIMM.
Glossary
bidirectional communication Two-way data transmission.
bin A receptacle for holding printed pages.
BOOTP Abbreviation for "Bootstrap Protocol," an Internet protocol that a computer uses to find its IP address.
calibration The process in which the printer makes internal adjustments to produce the best print quality.
chooser A Macintosh accessory that you use to select a device.
control panel The area on the printer that contains buttons and a display screen. Use the control panel to set printer settings and to get information about the printer status.
default The normal or standard setting for hardware or software.
DHCP Abbreviation for “dynamic host configuration protocol.” Individual computers or peripherals that are connected to a network use DHCP to find their own configuration information, including the IP address.
DIMM Abbreviation for "dual inline memory module." A small circuit board that holds memory chips.
duplex A feature that accommodates printing on both sides of a sheet of paper. Also called "2-sided printing."
EIO Abbreviation for “enhanced input/output.” A hardware interface that is used to add a print server, network adaptor, hard disk, or other plug-in item for HP printers.
Emulated PostScript Software that emulates Adobe PostScript, a programming language that describes the appearance of the printed page. This printer language appears as "PS" in many menus.
EPS Abbreviation for "encapsulated PostScript," a type of graphics file.
firmware Programming instructions that are stored in a read-only memory unit inside the printer.
font A complete set of letters, numerals, and symbols in a typeface.
fuser The assembly that uses heat to fuse the toner onto the print media.
grayscale Various shades of gray.
halftone pattern A halftone pattern uses differing sizes of ink dots to produce a continuous-tone image such as a photograph.
HP Easy Printer Care Software Software that provides the ability to track and maintain printers from your computer desktop.
HP Jetdirect An HP product for network printing.
HP Web Jetadmin An HP-trademarked Web-based printer control software that you can use on a computer to manage any peripheral that is connected to an HP Jetdirect print server.
I/O Abbreviation for "input/output," refers to computer-port settings.
IP address The unique number assigned to a computer device that is connected to a network.
IPX/SPX Abbreviation for “internetwork packet exchange/sequenced packet exchange.”
macro A single keystroke or command that results in a series of actions or instructions.
media The paper, labels, transparencies, or other material on which the printer prints the image.
memory tag A memory partition that has a specific address.
monochrome Black and white. Devoid of color.
network A system of computers interconnected by telephone wires or other means in order to share information.
network administrator A person who manages a network.
page buffer Temporary printer memory used to hold page data while the printer creates an image of the page.
PCL Abbreviation for "Printer Control Language."
peripheral An auxiliary device, such as a printer, modem, or storage system, that works in conjunction with a computer.
personality Distinctive features or characteristics of a printer or printer language.
pixel Abbreviation for "picture element," the smallest unit of area in an image displayed on a screen.
PJL Abbreviation for "printer job language."
PostScript A trademarked page-description language.
PPD Abbreviation for "PostScript printer description."
printer driver A software program that a computer uses to gain access to printer features.
RAM Abbreviation for "random access memory," a type of computer memory that stores data that can change.
raster image An image composed of dots.
render The process of producing text or graphics.
ROM Abbreviation for "read-only memory," a type of computer memory that stores data that should not change.
supplies Materials that the printer uses and that must be replaced. Supply items for this printer are the four print cartridges.
TCP/IP An internet protocol that has become the global standard for communications.
toner The fine black or colored powder that forms the image on the printed media.
transfer unit The black plastic belt that transports media inside the printer and transfers toner from the print cartridges onto the media.
tray The receptacle that holds blank paper.
Index
Symbols/Numerics
2-sided printing
binding options 80
control panel settings 80
A
A4
sizes supported 15
A5
sizes supported 15
accessibility features 6
accessories
ordering 173
address, printer
Macintosh,
troubleshooting 163, 165
auto continue 38
automatic media sensing 67
B
B5
sizes supported 15
background printing,
troubleshooting 164
bin
locating 7
both sides, printing on 15, 36
brightness, control panel display 37
buttons, control panel 18
C
cancelling a print request 82
cardstock
printing on 77
sizes supported 14
cartridges
features 6
status messages 19
warranty 179
cleaning the printer 115
clearable warnings 38
color
adjusting 102
halftone options 102
HP ImageREt 2400 100
HP ImageREt 3600 100
managing 102
matching 105
print in grayscale 102
printed vs. monitor 105
sRGB 100
using 100
Color tab settings 72, 75
colored paper, printing on 76
configuration page
printing 88
configurations 3
configuring
e-mail alerts 90
control panel
buttons 18
display 19
display brightness 37
language, setting default 40
lights 18
locating 7
menus 21
overview 17
settings 34
shared environments 41
controlling print jobs 50
cover pages 71, 74
covers 74
custom
sizes supported 15
custom paper sizes
driver settings 70
D
Desktop Printer Utility, troubleshooting 163
diagnostics menu 33
DIMMs
installing 200
display, control panel
brightness, setting 37
language, setting default 40
messages 19
documentation 2
doors, locating 7
double-sided printing 15, 36, 79
downloading software 9
drivers
accessing 11
Macintosh,
troubleshooting 165
presets 74
quick sets 69
Duplex Blank Pages feature 36
duplex printing 79
duplexing 15
E
e-mail alerts
configuring 90
EIO (Enhanced Input/Output)
configuring 48
EIO slot 8
embedded Web server
checking toner level 109
ordering supplies 176
using 91
using to configure alerts 90
Energy Star compliance 6
enlarging documents 70
envelope
sizes supported 15
envelopes
loading in tray 1 59
printing on 77
types supported 14
EPS files, troubleshooting 164, 166
error messages, control panel 19
errors, auto-continuable 38
executive
sizes supported 15
extended warranty 180
F
FCC regulations 190
features 3, 5
file directory page
printing 89
first page
blank 71
use different paper 71, 74
font list
printing 89
fonts
EPS files,
troubleshooting 164, 166
Macintosh,
troubleshooting 164
fonts included 5
front door, locating 7
G
glossy paper
printing on 76
types supported 14
grayscale printing 102
guides, printer information 2
H
heavy paper
printing on 77
types supported 14
HP Easy Printer Care Software using 94
HP Easy Printer Care software 12
HP fraud hotline 110
HP Jetdirect print server 5
HP Jetdirect print servers 48
HP JetReady 9
HP LaserJet Tough paper 78
HP Printer Utility, Macintosh 13
HP SupportPack 180
HP Web Jetadmin
checking toner level 109
using to configure e-mail alerts 90
HP-UX software 12
|
I/O menu 31
information menu 23
input trays
configuring 24, 54
IP address
Macintosh,
troubleshooting 163, 165
J
jam recovery 39
jams
common causes 138
configuring e-mail alerts 90
locations 136
recovery 136
Japanese VCCI statement 196
Jetadmin, HP Web 12
Jetdirect print server 5
K
Korean EMI statement 196
L
labels
printing on 77
types supported 14
language, setting default 40
legal
sizes supported 15
letter
sizes supported 15
letterhead 78
lights, control panel 18, 19
Linux drivers 10
M
Macintosh
background printing 164
drivers, accessing 11
drivers, troubleshooting 165
fonts, troubleshooting 164
problems,
troubleshooting 163
USB card,
troubleshooting 164, 167
Macintosh, versions supported 9
maintenance agreements 180
manual 2-sided printing 80
manual feed 35
manuals 2
media
automatic sensing 67
colored paper 76
configuring trays 34
custom sizes, setting 70
document size, selecting 70
envelopes 77
first page 71, 74
glossy paper 76
heavy paper 77
HP LaserJet Tough paper 78
labels 77
letterhead 78
manual feed 35
pages per sheet 71, 75
preprinted forms 78
recycled paper 78
selecting 52
sizes supported 15
transparencies 76
two-sided printing 15
types supported 14
memory
adding 85, 199
enabling 202
installing 200
menu map
printing 88
menus
diagnostics 33
I/O 31
information 23
paper handling 24
print quality 27
printing 25
resets 31
system setup 28
messages, control panel 19
multiple pages per sheet 71, 75
N
n-up printing 71, 75
networks
configuring 45
control panel use in 41
default gateway 46
disabling AppleTalk 47
disabling DLC/LLC 47
disabling IPX/SPX 47
disabling protocols 46
HP Jetdirect print servers 5
IP address 45
ports, locating 8
software 11
subnet mask 45
0
on-site service agreements 180
on/off switch 8
operating systems supported 9
OS/2 drivers 10
output bin extender 57
output bins
locating 7
P
pages per sheet 71, 75
paper
colored 76
configuring trays 34
custom sizes, setting 70
document size, selecting 70
first page 71, 74
glossy 76
heavy 77
HP LaserJet Tough 78
loading in tray 1 56
manual feed 35
pages per sheet 71, 75
recycled 78
selecting 52
sizes supported 15
two-sided printing 15
types supported 14
paper handling menu 24
paper path test page 154
pausing a print request 82
PCL drivers 9
PDL driver 9
Personality feature 37
ports
locating 8
supported 5
troubleshooting
Macintosh 164, 167
PostScript Printer Description
(PPD) files
troubleshooting 163
power saving. See Sleep Mode
feature
power switch 8
PPDs
troubleshooting 163
PPDs, Macintosh 13
preprinted forms 78
presets 74
print cartridge
authentication 110
checking the toner level 108
genuine HP 110
managing 108
non-HP 110
replacing 111
storing 109
print cartridges
features 6
status messages 19
warranty 179
Print Document On 70
print quality menu 27
printer driver
Services tab 73
printer drivers 9
printer information pages 88,
170
printing menu 25
printing system software 9
processor speed 5
product stewardship
program 191
PS Defer Media feature 35
PS Emulation drivers 9
Q
quick sets 69
R
recycled paper 78
recycling
printer supplies 191
reducing documents 70
registration page 154
regulations
FCC 190
repacking the printer 181
Replace Supplies setting 39
resets menu 31
resizing documents 70
S
safety statements
laser safety 196
laser safety for Finland 197
scaling documents 70
service agreements 180
Services tab 73
settings
driver presets 74
quick sets 69
shared environments 41
shipping the printer 181
Size/Type Prompt feature 35
Sleep Delay feature 36
Sleep Mode feature 36
software
applications 13
drivers 9
embedded Web server 12
HP Easy Printer Care 12
HP Web Jetadmin 12
included 5
network 11
Web sites 9
Solaris software 12
special situations
custom-sized media 82
different first page 82
specifications
features 5
media sizes supported 15
paper types 52
paper types supported 14
statement
sizes supported 15
status, supplies
control panel messages 19
printer features 6
settings 39
stopping a print request 82
subnet mask 45
supplies
ordering 173
replacement intervals 108
supplies low
configuring e-mail alerts 90
supplies out
configuring alerts 90
supplies status
control panel messages 19
printer features 6
settings 39
supplies status page
printing 88
SupportPack, HP 180
system setup menu 28
T
toner cartridge. See print cartridge
toner cartridges. See print cartridges
top cover, locating 7
tough paper 78
transparencies
printing on 76
sizes supported 14
Tray Behavior menu 34
trays
configuring 34
locating 7
paper sizes supported 15
paper types supported 14
troubleshooting
checklist 118
EPS files 164, 166
incorrect printer output 161
information pages 154
jams 136
Macintosh problems 163
overhead transparencies 169
print quality 169
two-sided printing 15, 36, 79
U
UNIX model scripts 10
usage page
printing 88
USB port
locating 8
supported 5
troubleshooting
Macintosh 164, 167
Use Another Tray feature 35
Use Different Paper/Covers 71
Use Requested Tray feature 34
W
warranty
extended 180
print cartridge 179
product 178
watermarks
cover page 74
Web sites
documentation 2
printer features 5
software, downloading 9
Windows
drivers, accessing 11
Windows, versions supported 9
wrong printer, sending to 163
© 2006 Hewlett-Packard Development Company, L.P.
www.hp.com

invent