
LaserJet Enterprise M604n - Printer HP - Free user manual and instructions
Find the device manual for free LaserJet Enterprise M604n HP in PDF.


User questions about LaserJet Enterprise M604n HP
0 question about this device. Answer the ones you know or ask your own.
Ask a new question about this device
Download the instructions for your Printer in PDF format for free! Find your manual LaserJet Enterprise M604n - HP and take your electronic device back in hand. On this page are published all the documents necessary for the use of your device. LaserJet Enterprise M604n by HP.
USER MANUAL LaserJet Enterprise M604n HP
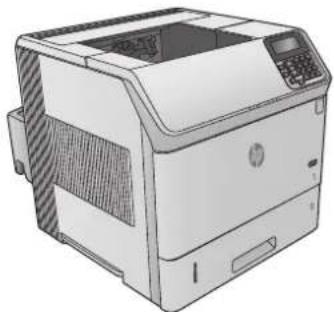
natural_image
Illustration of a HP printer with control panel and paper edge (no text or symbols visible)M604n
M605n
natural_image
Illustration of a HP printer with control panel and paper edge (no text or symbols visible)M604dn
M605dn
M606dn
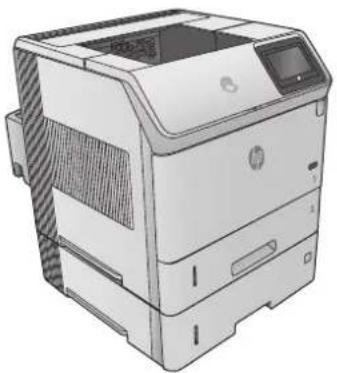
natural_image
Illustration of a HP printer with front panel and control panel (no text or symbols visible)M605x
M606x

HP LaserJet Enterprise M604, M605, M606
User Guide
Copyright and License
© 2015 Copyright Hewlett-Packard Development Company, L.P.
Reproduction, adaptation, or translation without prior written permission is prohibited, except as allowed under the copyright laws.
The information contained herein is subject to change without notice.
The only warranties for HP products and services are set forth in the express warranty statements accompanying such products and services. Nothing herein should be construed as constituting an additional warranty. HP shall not be liable for technical or editorial errors or omissions contained herein.
Part number: E6B67-90907
Edition 1, 4/2015
Trademark Credits
Adobe ^ , Adobe Photoshop ^c , Acrobat ^ , and PostScript ^b are trademarks of Adobe Systems Incorporated.
Apple and the Apple logo are trademarks of Apple Computer, Inc., registered in the U.S. and other countries. iPod is a trademark of Apple Computer, Inc. iPod is for legal or rightholder-authorized copying only. Don't steal music.
Microsoft ^® , Windows ^® , Windows ^® XP, and Windows Vista ^® are U.S. registered trademarks of Microsoft Corporation.
UNIX ^® is a registered trademark of The Open Group.
Table of contents
1 Product overview .... 1
Product views 2
Product front view 2
Product back view 3
Interface ports 4
Control-panel view (4-line control panel, n and dn models only) 5
Control-panel view (touchscreen control panel, x models only) 6
Product specifications 8
Technical specifications 8
Supported operating systems 9
Mobile printing solutions 11
Product dimensions 12
Dimensions for the products, as sold 12
Dimensions for the input and output accessories 14
Dimensions for sample combinations of the products and optional accessories ...... 18
Combination one 18
Combination two 19
Combination three 19
Power consumption, electrical specifications, and acoustic emissions 20
Operating-environment range 21
Product hardware setup and software installation 22
2 Paper trays 23
Load Tray 1 24
Introduction 24
Tray 1 paper orientation 26
Load Tray 2 and the 500-sheet trays 27
Introduction 27
Tray 2 and the 500-sheet trays paper orientation .... 29
Load the optional 1,500-sheet high-capacity tray 30
Introduction 30
Load the tray 30
Load the optional custom media tray 32
Introduction 32
Configure the product for the custom media tray 32
Load paper into the custom media tray 33
Custom media tray paper orientation 34
Load envelopes 35
Introduction 35
Envelope orientation 36
3 Supplies, accessories, and parts 37
Order supplies, accessories, and parts 38
Ordering 38
Supplies and accessories 38
Customer self-repair parts 39
Replace the toner cartridge 41
Introduction 41
Toner-cartridge information 41
Remove and replace the cartridge 42
Replace the staple cartridge 46
Introduction 46
Remove and replace the staple cartridge 46
4 Print 47
Print tasks (Windows) 48
How to print (Windows) 48
Automatically print on both sides (Windows) 50
Manually print on both sides (Windows) 50
Print multiple pages per sheet (Windows) 51
Select the paper type (Windows) 51
Additional print tasks 52
Print tasks (OS X) 53
How to print (OS X) 53
Automatically print on both sides (OS X) 53
Manually print on both sides (OS X) 53
Print multiple pages per sheet (OS X) 53
Select the paper type (OS X) 54
Additional print tasks 54
Store print jobs on the product to print later 55
Introduction 55
Create a stored job (Windows) 55
Create a stored job (OS X) 56
Print a stored job 57
Delete a stored job 57
Mobile printing 59
Introduction 59
Wi-Fi Direct and NFC Printing 59
HP ePrint via email 59
HP ePrint software 60
AirPrint 60
Android embedded printing 61
Print from the USB port 62
Introduction 62
Enable the USB port for printing 62
Print USB documents 63
5 Manage the product 65
Advanced configuration with HP Embedded Web Server (EWS) 66
Introduction 66
How to access the HP Embedded Web Server (EWS) 66
HP Embedded Web Server features 67
Information tab 67
General tab 68
Print tab 68
Troubleshooting tab 69
Security tab 69
HP Web Services tab 70
Networking tab 70
Other Links list 71
Advanced configuration with HP Utility for OS X 72
Open HP Utility 72
HP Utility features 72
Configure IP network settings 74
Printer sharing disclaimer 74
View or change network settings 74
Rename the product on a network 74
Manually configure IPv4 TCP/IP parameters from the control panel 75
Manually configure IPv6 TCP/IP parameters from the control panel 75
Link speed and duplex settings 76
Product security features 78
Introduction 78
Security statements 78
IP Security 78
Assign or change the system password using the Embedded Web Server 78
Sign in to the product 79
Encryption support: HP High Performance Secure Hard Disks 79
Lock the formatter 79
Economy settings 80
Introduction 80
Print with EconoMode 80
Set the sleep timer and configure the product to use 1 watt or less of power 80
HP Web Jetadmin 82
Software and firmware updates 83
6 Solve problems 85
Customer support 86
Control panel help system 87
Restore factory settings from the product control panel 88
Restore factory settings from the HP Embedded Web Server (network-connected products only) 88
A "Cartridge is low" or "Cartridge is very low" message displays on the product control panel 89
Change the "Very Low" settings 89
For products with fax capability 89
Order supplies 90
Product does not pick up paper or misfeeds 91
Introduction 91
The product does not pick up paper 91
The product picks up multiple sheets of paper 91
Clear paper jams 92
Introduction 92
Jam locations 93
Auto-navigation for clearing jams 93
Experiencing frequent or recurring paper jams? 93
Clear paper jams in Tray 1 95
Clear paper jams in Tray 2 and the 500-sheet trays 96
Clear paper jams in the optional 1,500-sheet high-capacity tray 98
Clear paper jams in the toner-cartridge area 100
Clear paper jams in the rear output bin 103
Clear paper jams in the fuser area 104
Clear paper jams in the output bin 109
Clear paper jams in the duplexer 110
Clear paper jams in the envelope feeder 112
Clear paper jams in the 5-bin mailbox ....114
Clear jams in the stacker or stapler/stacker 116
Clear paper jams in the stacker or stapler/stacker 116
Clear staple jams in the stapler/stacker 117
Improve print quality 119
Introduction 119
Print from a different software program 119
Check the paper-type setting for the print job 119
Check the paper type setting (Windows) 119
Check the paper type setting (OS X) 119
Check toner-cartridge status 120
Clean the product 120
Print a cleaning page 120
Visually inspect the toner cartridge 121
Check paper and the printing environment 121
Step one: Use paper that meets HP specifications .... 121
Step two: Check the environment 121
Step three: Set the individual tray alignment 122
Try a different print driver 122
Solve wired network problems 124
Introduction 124
Poor physical connection 124
The computer is using the incorrect IP address for the product 124
The computer is unable to communicate with the product 124
The product is using incorrect link and duplex settings for the network 125
New software programs might be causing compatibility problems 125
The computer or workstation might be set up incorrectly 125
The product is disabled, or other network settings are incorrect 125
Index 127
1 Product overview
Product views
Product specifications
• Product hardware setup and software installation
For more information:
Go to www.hp.com/support/ljM604, www.hp.com/support/ljM605, www.hp.com/support/ljM606.
HP's all-inclusive help for the product includes the following information:
• Install and configure
Learn and use
- Solve problems
• Download software updates
- Join support forums
• Find warranty and regulatory information
Product views
• Product front view
Product back view
- Interface ports
• Control-panel view (4-line control panel, n and dn models only)
• Control-panel view (touchscreen control panel, x models only)
Product front view
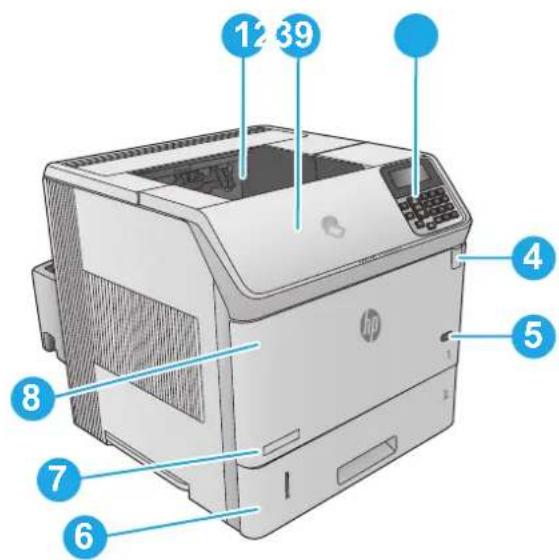
text_image
1239 4 5 6 7 8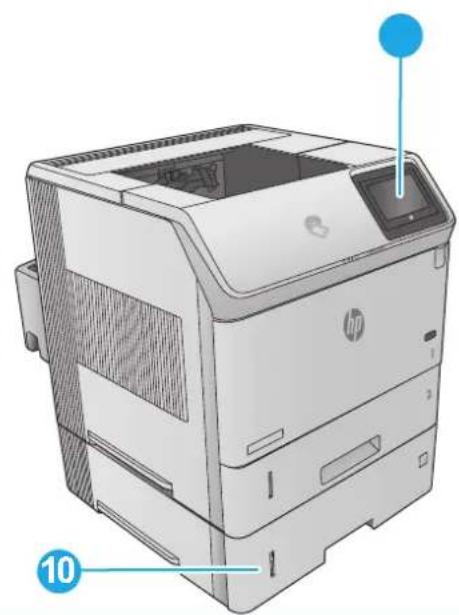
natural_image
Illustration of a HP printer with labeled parts (no text or symbols on the device itself)1 Standard output bin
2 Top cover (access to the toner cartridge)
3 4-line LCD control panel with keypad (n and dn models only)
4 Easy-access USB port
Insert a USB flash drive for printing without a computer or to update the product firmware.
NOTE: An administrator must enable this port before use.
| 5 On/off button | |||||
| 6 | T | r | a | y | 2 |
| 7 Model name | |||||
| 8 | T | r | a | y | 1 |
| 9 Control panel with color touchscreen display (x models only) | |||||
| 10 1 x 500-sheet feeder (included with the x model, optional for the other models)NOTE: The product accepts up to four 1 x 500-sheet feeders, or three 1 x 500-sheet feeders and one 1,500-sheet high-capacity input tray. | |||||
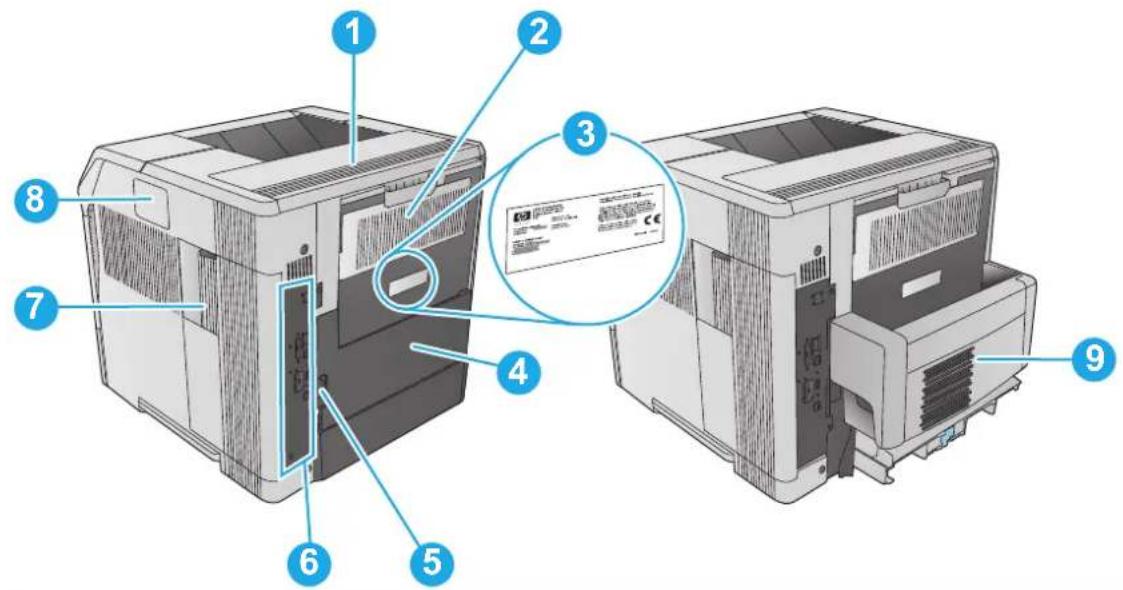
Product back view
text_image
Diagram of a computer system with numbered components and an inset showing a specification label.1 Output-accessory cover
2 Rear output bin
3 Serial number and product number label
4 Duplex accessory cover (n model only)
5 Power connection
6 Formatter (contains the interface ports)
7 Formatter cover
8 Hardware integration pocket (for connecting accessory and third-party devices)
9 Automatic duplex printing accessory (included with the dn and x models, optional for the n model)
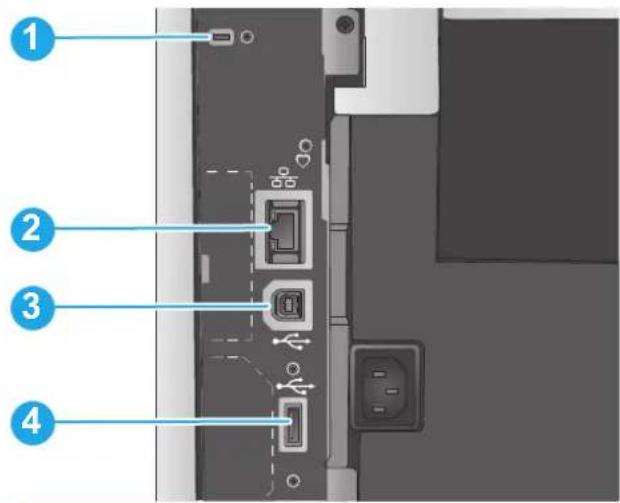
Interface ports
text_image
Diagram of a device rear panel with numbered labels pointing to ports and connectors1 Slot for a cable-type security lock
2 Local area network (LAN) Ethernet (RJ-45) network port
3 Hi-Speed USB 2.0 printing port
4 USB port for connecting external USB devices (this port might be covered)
NOTE: For easy-access USB printing, use the USB port near the control panel.
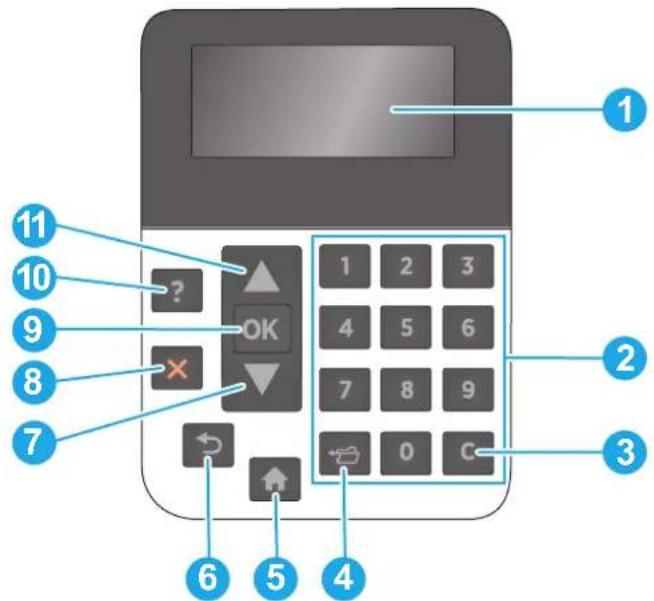
Control-panel view (4-line control panel, n and dn models only)
Use the control panel to obtain product and job status information and to configure the product.
text_image
1 2 3 4 5 6 7 8 9 10 11 OK X 0 C 6 5 41 Control-panel display Shows status information, menus, help information, and error messages
2 Numeric keypad Enter numeric values
3 Clear button Returns values to their defaults and closes the help screen
4 Folder button Provides quick access to the Retrieve Job menu
5 Home button Opens and closes the menus
6 Back button Backs up one level in the menu tree or backs up one numeric entry
7 Down arrow Navigates to the next item in the list, or decreases the value of numeric items
8 Stop button Cancels the current print job and clears the pages from the product
9 OK button • Saves the selected value for an item
- Performs the action that is associated with the item that is highlighted on the control-panel display
- Clears an error condition when the condition is clearable
10 Help button Provides information about the message on the control-panel display
11 Up arrow Navigates to the previous item in the list, or increases the value of numeric items
Control-panel view (touchscreen control panel, x models only)

NOTE: Tilt the control panel for easier viewing.
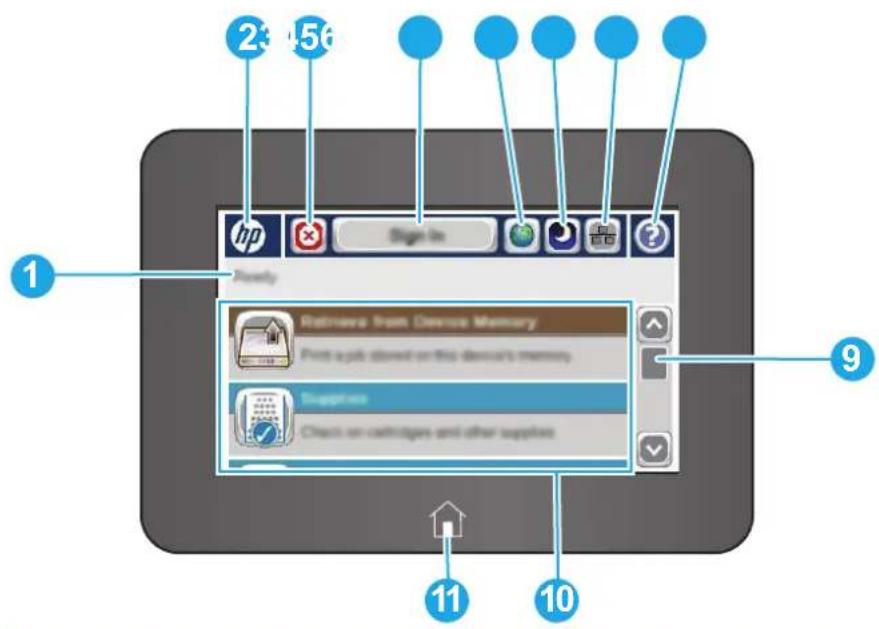
The Home screen provides access to the product features and indicates the current status of the product.
Return to the Home screen at any time by touching the Home button. Touch the Home button on the lower edge of the product control panel, or touch the Home button in the upper-left corner of most screens.

NOTE: The features that appear on the Home screen can vary, depending on the product configuration.
text_image
23 456 1 9 10 11 Supplies Check on cartridges and other supplies1 Product status The status line provides information about the overall product status.
| 2 HP logo or Home button | On any screen other than the Home screen, the HP logo changes to a Home ➕ button. Touch the Home ➕ button to return to the Home screen. | |
| 3 | Stop button | Touch the Stop button to pause the current job. The Job Status screen opens and provides options to cancel or continue the job. |
| 4 | Sign In or Sign Out button | Touch the Sign In button to access secured features.Touch the Sign Out button to sign out of the product. The product restores all options to the default settings. |
| 5 | Language Selection button | Touch the Language Selection button to select the language for the control-panel display. |
| 6 | Sleep button Touch the Sleep button to put the product into Sleep mode. | |
| 7 | Network button Touch the Network button to find information about the network connection. | |
| 8 | Help button Touch the Help button to open the embedded help system. | |
| 9 | Scroll bar Use the scroll bar to see the complete list of available features. | |
| 10 Features | Depending on the product configuration, the features that appear in this area can include any of the following items:Save to Device MemoryRetrieve from USBRetrieve from Device MemoryJob StatusSuppliesTraysAdministrationDevice Maintenance | |
| 11 Home button | Touch the Homebutton to return to the product Home screen at any time. | |
Product specifications

IMPORTANT: The following specifications are correct at the time of publication, but they are subject to change. For current information, see www.hp.com/support/ljM604, www.hp.com/support/ljM605, www.hp.com/support/ljM606.
• Technical specifications
• Supported operating systems
• Mobile printing solutions
Product dimensions
• Power consumption, electrical specifications, and acoustic emissions
• Operating-environment range
Technical specifications
| Model name | M604n, M605n | M604dn, M605dn, M606dn | M605x, M606x | |
| Product number | E6B67A, E6B69A | E6B68A, E6B70A, E6B72A | E6B71A, E6B73A | |
| Paper handling Tray 1 (100-sheet capacity) | √ | √ | √ | |
| Tray 2 (500-sheet capacity) | √ | √ | √ | |
| 1 x 500-sheet paper feeder | Optional Optional | √ | ||
| NOTE: The product supports up to four optional paper feeders. | ||||
| 1,500-sheet high-capacity feeder | Optional Optional Optional | |||
| NOTE: This accessory can be combined with up the three 1 x 500-sheet paper feeders. | ||||
| Printer stand Optional Optional | ||||
| Automatic duplex printing Optional | √ | √ | ||
| Envelope feeder for printing up to 75 envelopes | Optional Optional Optional | |||
| Custom media tray for printing small-size paper (replaces the standard Tray 2) | Optional Optional Optional | |||
| 500-sheet stapler/stacker Optional Optional Optional | ||||
| 500-sheet stacker Optional Optional Optional | ||||
| 500-sheet 5-bin mailbox Optional Optional Optional | ||||
| Connectivity 10/100/1000 Ethernet LAN connection with IPv4 and IPv6 | √ | √ | √ | |
| Hi-Speed USB 2.0 | √ | √ | √ | |
| Model nameProduct number | M604n, M605n | E6B67A, E6B69A | M604dn, M605dn,M606dnE6B68A, E6B70A,E6B72A | M605x, M606xE6B71A, E6B73A |
| Easy-access USB port for printing | without a computer and upgradingthe firmware | √ | √ | √ |
| Hardware Integration Pocket for | connecting accessory and third-party devices | √ | √ | √ |
| HP Internal USB Ports Optional Optional Optional | ||||
| HP Jetdirect 3000w NFC/Wireless | Accessory for printing from mobiledevices | Optional Optional Not supported | ||
| Integrated HP near-field | communication (NFC) and Wi-FiDirect functionality for printingfrom mobile devices | Not supported Not supported | √ | |
| HP Jetdirect 2900nw Print Server | accessory for wireless connectivity | Optional Optional Optional | ||
| Memory 512 MB base memory, expandableto 1.0 GB or 1.5 GB by adding DIMMmemory modules | √ | √ | √ | |
| HP Secure High-Performance HardDisk | Optional Optional Optional | |||
| Security HP Trusted Platform Module forencrypting all data that passesthrough the product | Optional Optional Optional | |||
| Control-panel display and input 4-line graphical display with 10-key keypad | √ | √ | Not supported | |
| Constant-view, color touchscreencontrol panel | Not supported Not supported | √ | ||
| Print Prints 50 pages per minute (ppm)on A4 and 52 ppm on letter-sizepaper | M604n M604dn | |||
| Prints 56 ppm on A4 and 58 ppmon letter-size paper | M605n M605dn M605x | |||
| Prints 63 ppm on A4 and 65 ppmon letter-size paper | M606dn | M606x | ||
| Easy-access USB printing (nocomputer required) | √ | √ | √ | |
Supported operating systems
The following information applies to the Product-Specific Windows PCL 6 and OS X print drivers and to the in-box software installation CD.
Windows: The HP Software Installer CD installs the "HP PCL.6" or "HP PCL 6" version 3 driver, depending on the Windows operating system, along with optional software when using the full software installer. Download the "HP PCL-6" version 4 print driver from the product-support Web site for this product: www.hp.com/support/ljM604, www.hp.com/support/ljM605, www.hp.com/support/ljM606.
Mac computers and OS X: Mac computers and Apple mobile devices are supported with this product. The OS X print driver and print utility are available for download from hp.com and may also be available via Apple Software Update. The HP installer software for OS X is not included in the in-box CD. Follow these steps to download the OS X installer software:
- Go to www.hp.com/support/ljM604, www.hp.com/support/ljM605, www.hp.com/support/ljM606.
- Select Support Options, and then under Download Options select Drivers, Software & Firmware.
- Click the operating system version, and then click the Download button.
| Operating system Driver installed Notes | |
| Windows® XP SP3, 32-bit The “HP PCL.6” product-specific print driver is installed for this operating system as part of the basic software installation. The basic installer installs the driver only. | The full software installer is not supported for this operating system.Use UPD drivers for 64-bit operating systems.Microsoft retired mainstream support for Windows XP in April 2009. HP will continue to provide best effort support for the discontinued XP operating system. |
| Windows Vista®, 32-bit The “HP PCL.6” product-specific print driver is installed for this operating system as part of the basic software installation. The basic installer installs the driver only. | The full software installer is not supported for this operating system.Use UPD drivers for 64-bit operating systems. |
| Windows Server 2003 SP2, 32-bit The “HP PCL.6” product-specific print driver is installed for this operating system as part of the basic software installation. The basic installer installs the driver only. | The full software installer is not supported for this operating system.Use UPD drivers for 64-bit operating systems.Microsoft retired mainstream support for Windows Server 2003 in July 2010. HP will continue to provide best effort support for the discontinued Server 2003 operating system. |
| Windows 7 SP1, 32-bit and 64-bit The “HP PCL 6” product-specific print driver is installed for this operating system as part of the full software installation. | |
| Windows 8, 32-bit and 64-bit The “HP PCL 6” product-specific print driver is installed for this operating system as part of the full software installation. | Windows 8 RT support is provided through Microsoft IN OS Version 4, 32- bit driver. |
| Windows 8.1, 32-bit and 64-bit The “HP PCL 6” product-specific print driver is installed for this operating system as part of the full software installation. | Windows 8.1 RT support is provided through Microsoft IN OS Version 4, 32- bit driver. |
| Windows Server 2008 SP2, 32-bit The “HP PCL.6” product-specific print driver is installed for this operating system as part of the basic software installation. The basic installer installs the driver only | The full software installer is not supported for this operating system. |
| Operating system Driver installed Notes | ||
| Windows Server 2008 SP2, 64-bit The “HP PCL 6” product-specific print driver is installed for this operating system as part of the full software installation. | ||
| Windows Server 2008 R2, SP 1, 64-bit The “HP PCL 6” product-specific print driver is installed for this operating system as part of the full software installation. | ||
| Windows Server 2012, 64-bit The software installer does not support Windows Server 2012 but the “HP PCL 6” version 3 and “HP PCL-6” version 4 product-specific print drivers do support it. | Download the driver from the HP Web site, and use the Windows Add Printer tool to install it. | |
| Windows Server 2012 R2, 64 bit The software installer does not support Windows Server 2012 but the “HP PCL 6” and “HP PCL-6” version 4 product-specific print drivers do support it. | Download the driver from the HP Web site, and use the Windows Add Printer tool to install it. | |
| OS X 10.7 Lion, OS X 10.8 Mountain Lion, and OS X 10.9 Mavericks | The OS X print driver and print utility are available for download from hp.com and may also be available via Apple Software Update. The HP installer software for OS X is not included in the in-box CD. | For OS X, download the full installer from the support Web site for this product.1. Go to www.hp.com/support/ljM604, www.hp.com/support/ljM605, www.hp.com/support/ljM606.2. Select Support Options, and then under Download Options select Drivers, Software & Firmware.3. Click the operating system version, and then click the Download button. |

NOTE: For a current list of supported operating systems, go to www.hp.com/support/ljM604, www.hp.com/support/ljM605, www.hp.com/support/ljM606 for HP's all-inclusive help for the product.

NOTE: For details on client and server operating systems and for HP UPD PCL6, UPD PCL 5, and UPD PS driver support for this product, go to www.hp.com/go/upd. Under Additional information, click Link to Supported products.
Mobile printing solutions
The product supports the following software for mobile printing:
HP ePrint software

NOTE: The HP ePrint Software supports the following operating systems: Windows 7 SP 1 (32-bit and 64-bit); Windows 8 (32-bit and 64-bit); Windows 8.1 (32-bit and 64-bit); and OS X versions 10.6 Snow Leopard, 10.7 Lion, 10.8 Mountain Lion, and 10.9 Mavericks.
-
HP ePrint via email (Requires HP Web Services to be enabled and the product to be registered with HP Connected)
HP ePrint app (Available for Android, iOS, and Blackberry)
ePrint Enterprise app (Supported on all products with ePrint Enterprise Server Software)
HP Home and Biz app (Available for Symbian/Nokia devices) -
Google Cloud Print 1.0 (Requires the product to be registered with HP Connected and then registered with Google Cloud)
AirPrint - Android Printing
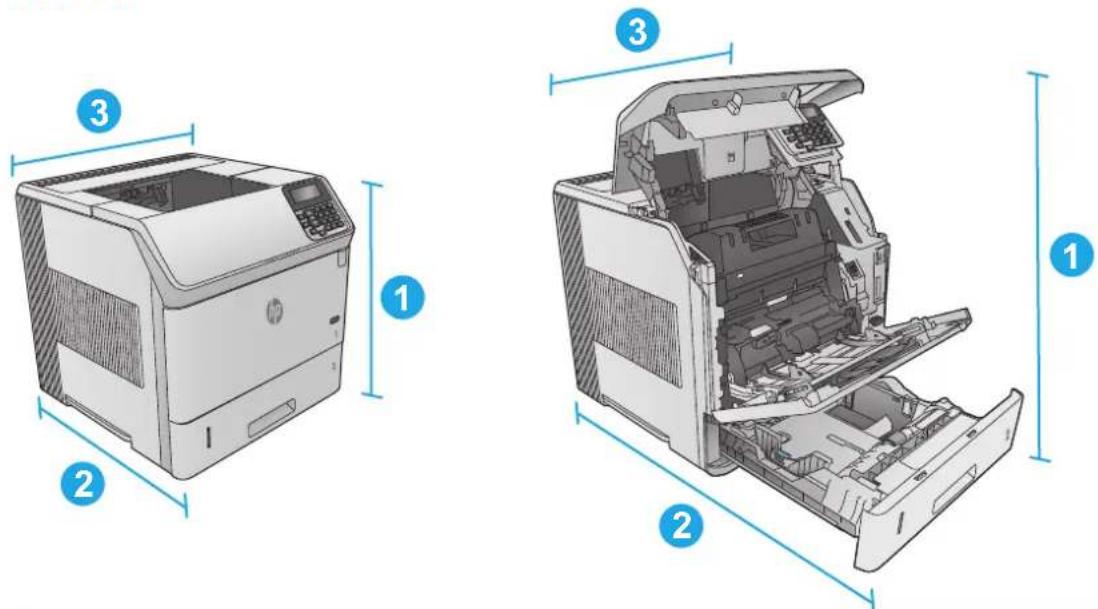
Product dimensions
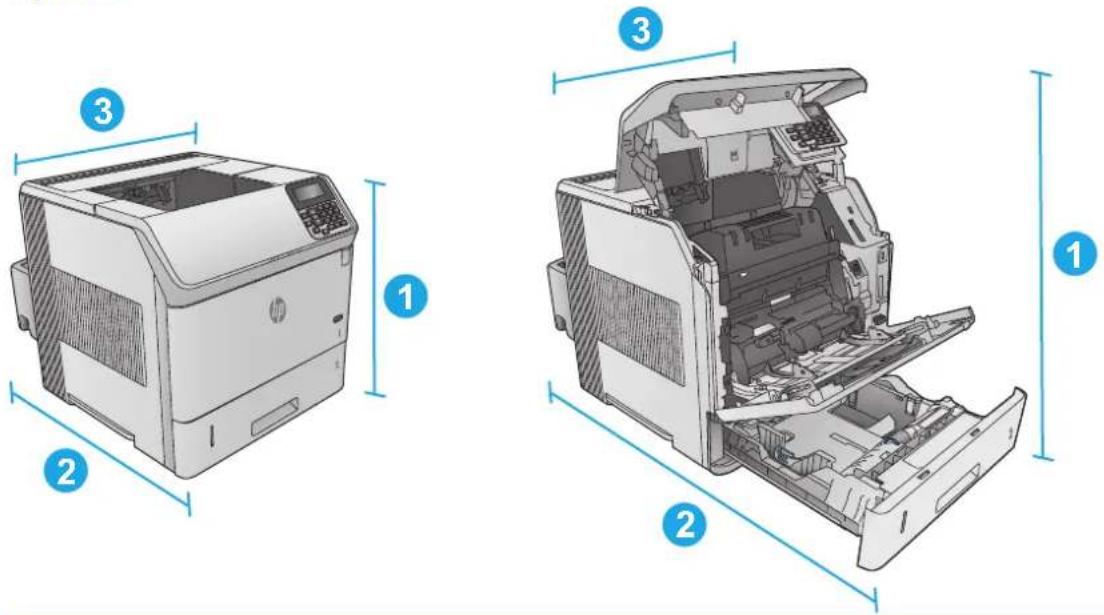
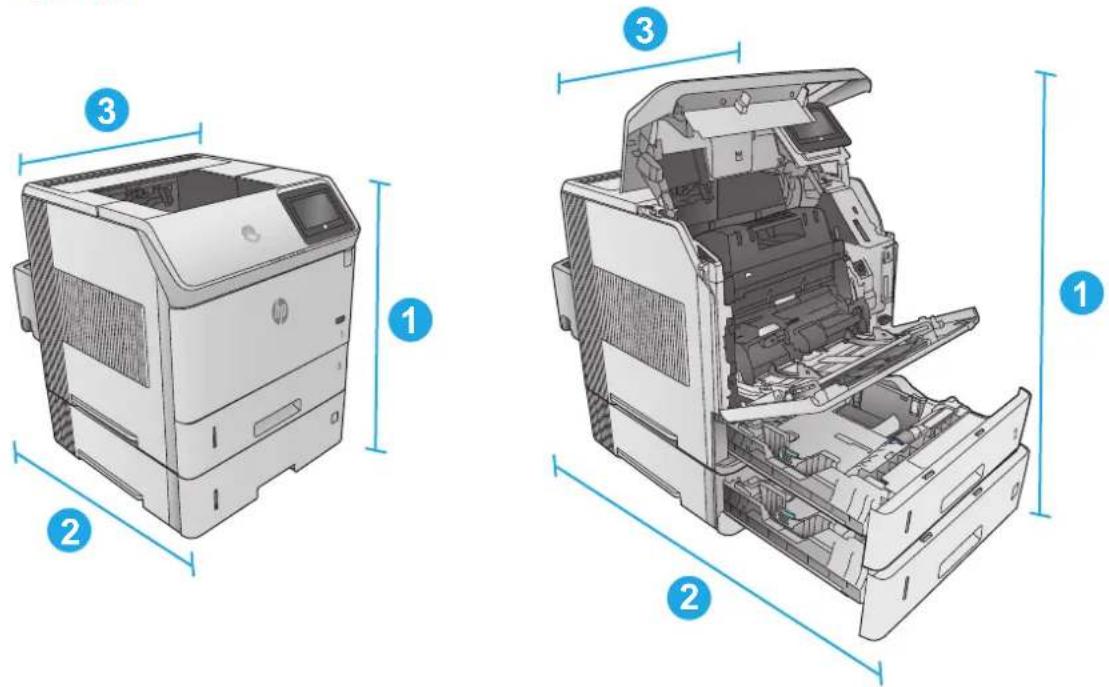
The following illustrations show the dimensions for the products as sold, for the optional input and output accessories, and for several sample configurations of the product combined with optional accessories.
Dimensions for the products, as sold
Figure 1-1 Dimensions for the n models
text_image
Technical diagram of a HP printer showing internal structure with labeled parts 1, 2, and 3.| Product fully closed Product fully opened |
| 1. Height 399 mm (15.7 in) 574 mm (22.5 in) |
| 2. Depth 451 mm (17.8 in) 754 mm (29.7 in) |
| 3. Width 425 mm (16.7 in) 425 mm (16.7 in) |
| Weight 22.6 kg (49.7 lb) |
Figure 1-2 Dimensions for the dn models
text_image
Technical diagram of a HP printer showing internal structure with labeled parts 1, 2, and 3.| Product fully closed Product fully opened |
| 1. Height 399 mm (15.7 in) 574 mm (22.5 in) |
| 2. Depth 537 mm (21.1 in) 840 mm (33 in) |
| 3. Width 425 mm (16.7 in) 425 mm (16.7 in) |
| Weight 25.9 kg (57 lb) |
Figure 1-3 Dimensions for the x models
text_image
Technical diagram showing exploded and assembled views of a HP printer with numbered parts labeled 1, 2, 3.| Product fully closed Product fully opened |
| 1. Height 521 mm (20.5 in) 695 mm (27.4 in) |
| 2. Depth 537 mm (21.1 in) 840 mm (33 in) |
| 3. Width 425 mm (16.7 in) 425 mm (16.7 in) |
| Weight 32.5 kg (71.5 lb) |
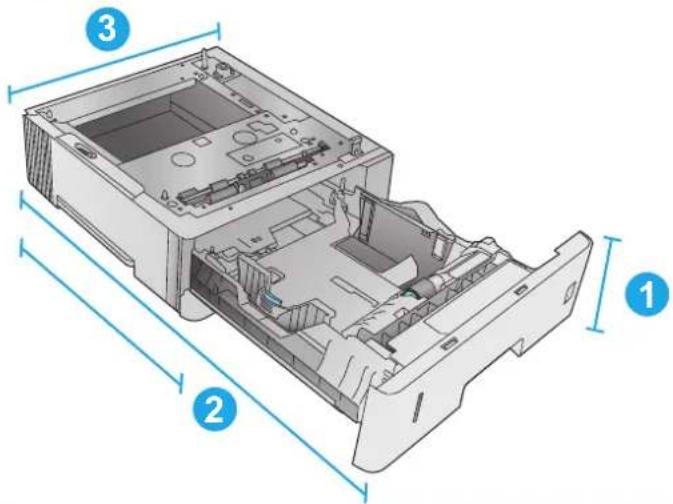
Dimensions for the input and output accessories
Figure 1-4 Dimensions for the 1 x 500-sheet paper feeder
text_image
Technical diagram of a computer case with numbered parts for identification-
Height 121 mm (4.8 in)
-
Depth Tray closed: 448 mm (17.7 in)
Tray opened: 864 mm (34 in)
- Width 415 mm (16.3 in)
Weight 6.7 kg (14.7 lb)
Figure 1-5 Dimensions for the 1,500-sheet high-capacity input tray
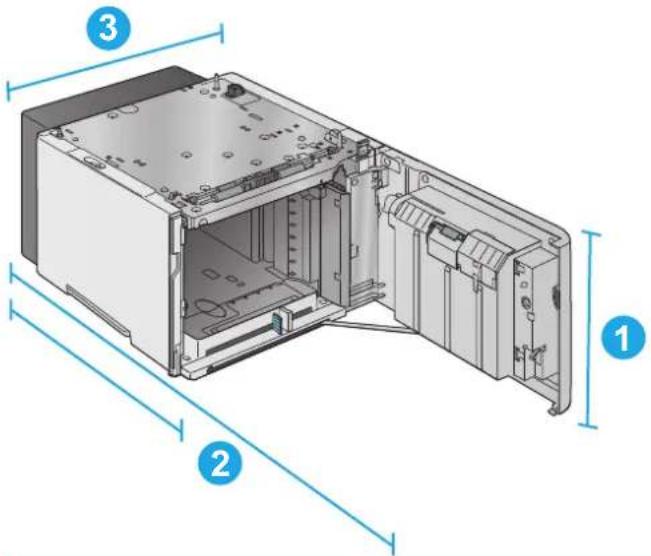
text_image
Technical diagram of an open device with numbered parts labeled 1, 2, and 3 for identification.- Height 264 mm (10.4 in)
- Depth Door closed: 448 mm (17.7 in)
Door opened: 902 mm (35.5 in)
- Width 415 mm (16.3 in)
Weight 13 kg (14.7 lb)
Figure 1-6 Dimensions for the stacker
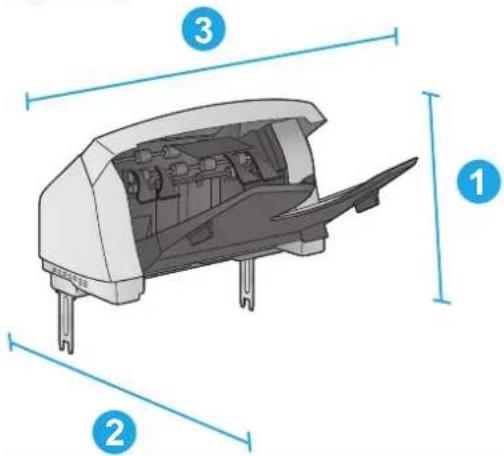
text_image
Technical diagram of a device with numbered parts labeled 1, 2, and 3 for identification.-
Height 304 mm (12 in)
-
Depth 430 mm (16.9 in)
-
Width 378 mm (14.9 in)
Weight 3.2 kg (7.1 lb)
Figure 1-7 Dimensions for the stapler/stacker
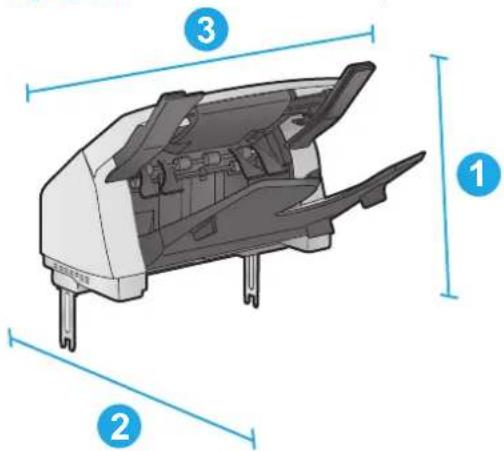
text_image
Technical diagram of a mechanical component with numbered parts labeled 1, 2, and 3.-
Height 371 mm (14.6 in)
-
Depth 430 mm (16.9 in)
-
Width 387 mm (15.2 in)
Weight 4.2 kg (9.3 lb)
Figure 1-8 Dimensions for the 5-bin mailbox
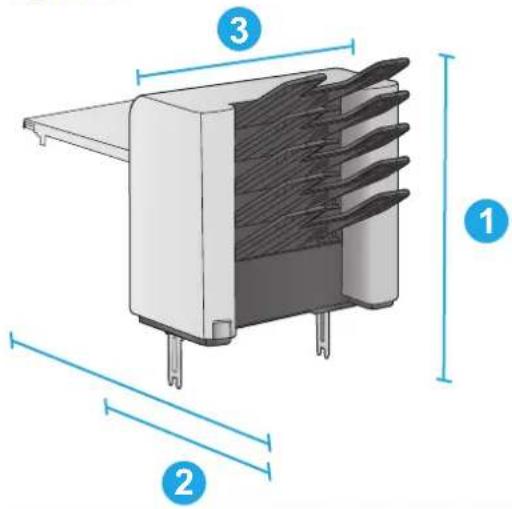
text_image
Technical diagram of a multi-pin electronic component with labeled parts 1, 2, and 3- Height 522 mm (20.6 in)
- Depth Rear door closed: 306 mm (12 in)
Rear door opened: 589 mm (23.2 in)
- Width 353 mm (13.9 in)
Weight 7.0 kg (15.4 lb)
Figure 1-9 Dimensions for the printer stand
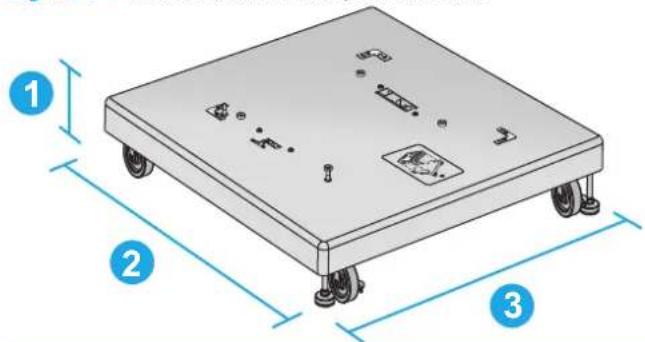
text_image
Technical diagram of a mechanical scale with numbered components and dimension lines- Height 114 mm (4.5 in)
- Depth 653 mm (25.7 in)
- Width 663 mm (26.1 in)
Weight 13.6 kg (30 lb)
Dimensions for sample combinations of the products and optional accessories
The following information is for samples of various combinations of the product and accessories. Several other combinations are possible. Use the information for the individual accessories to calculate dimensions for other combinations.
Combination one
Includes the product plus these accessories:
One 1 x 500-sheet paper feeder
• The 1,500-sheet high-capacity tray
• The stacker output accessory
Figure 1-10 Dimensions for Combination one
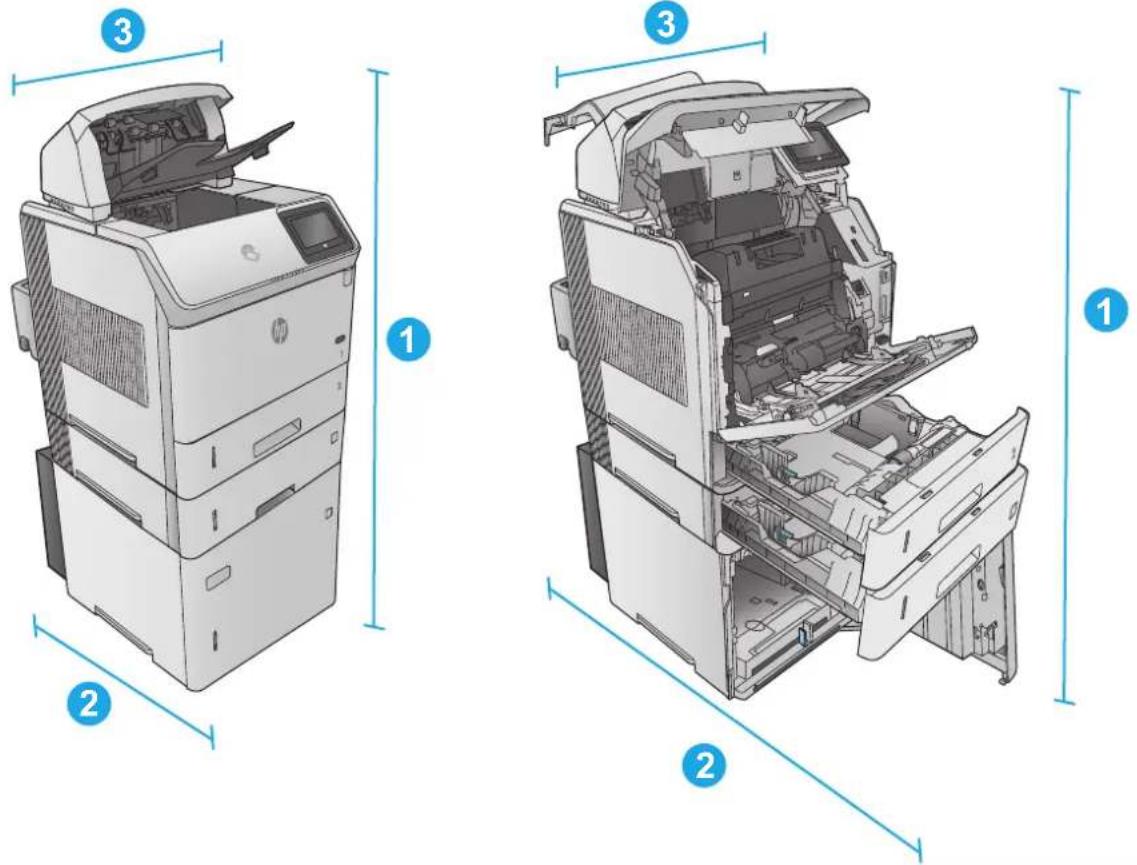
text_image
Technical diagram of a HP printer showing three views with labeled components and dimension linesProduct and accessories closed Product and accessories fully opened
| 1. Height 1089 mm (42.9 in) 1089 mm (42.9 in) |
| 2. Depth 537 mm (21.1 in) 902 mm (35.5 in) |
| 3. Width 425 mm (16.7 in) 425 mm (16.7 in) |
| Weight 48.7 kg (107.4 lb) |
Combination two
Includes the product plus these accessories:
One 1 × 500 -sheet paper feeder
The 1,500-sheet high-capacity tray
• The stapler/stacker output accessory
Figure 1-11 Dimensions for Combination two
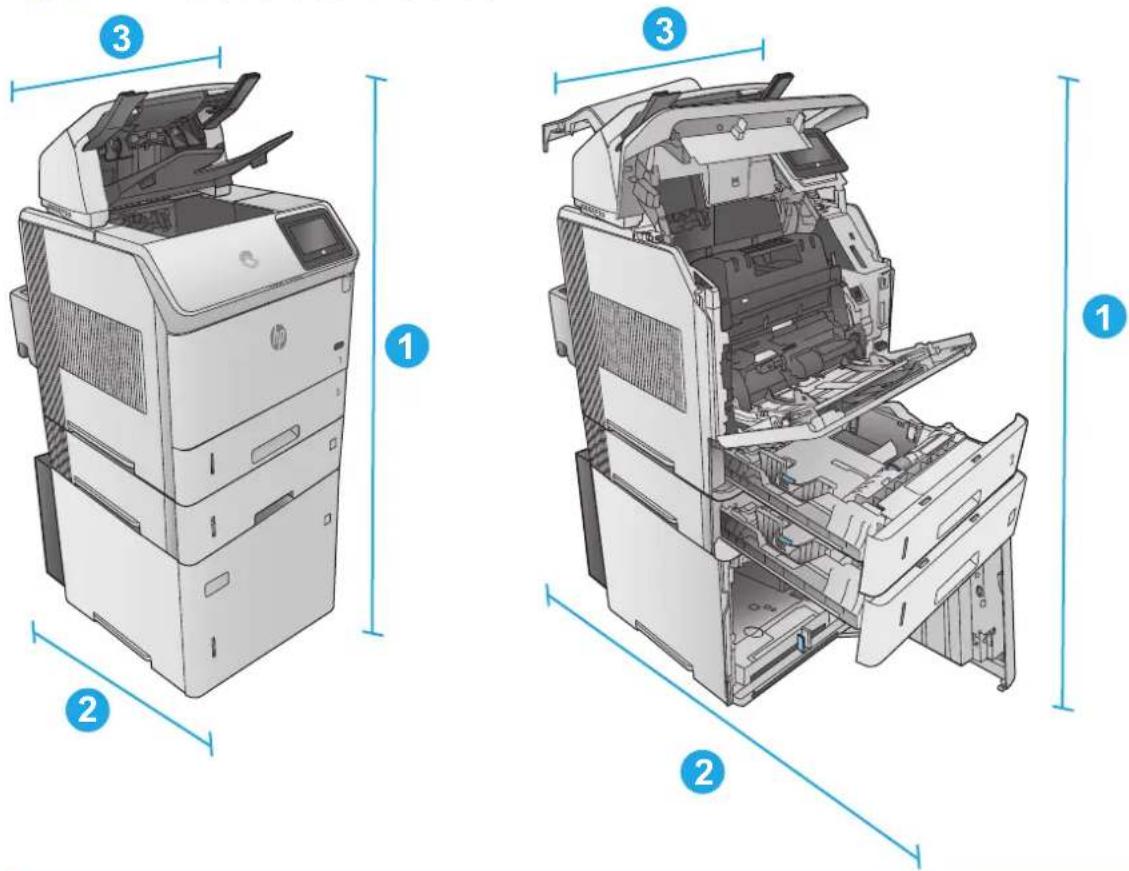
text_image
Technical diagram of a HP printer showing three views with labeled components and dimension annotationsProduct and accessories closed Product and accessories fully opened
| 1. Height 1156 mm (45.5 in) 1156 mm (45.5 in) |
| 2. Depth 537 mm (21.1 in) 902 mm (35.5 in) |
| 3. Width 425 mm (16.7 in) 425 mm (16.7 in) |
| Weight 49.7 kg (109.6 lb) |
Combination three
Includes the product plus these accessories:
One 1 × 500 -sheet paper feeder
• The 1,500-sheet high-capacity tray
• The 5-bin mailbox output accessory
Figure 1-12 Dimensions for Combination three
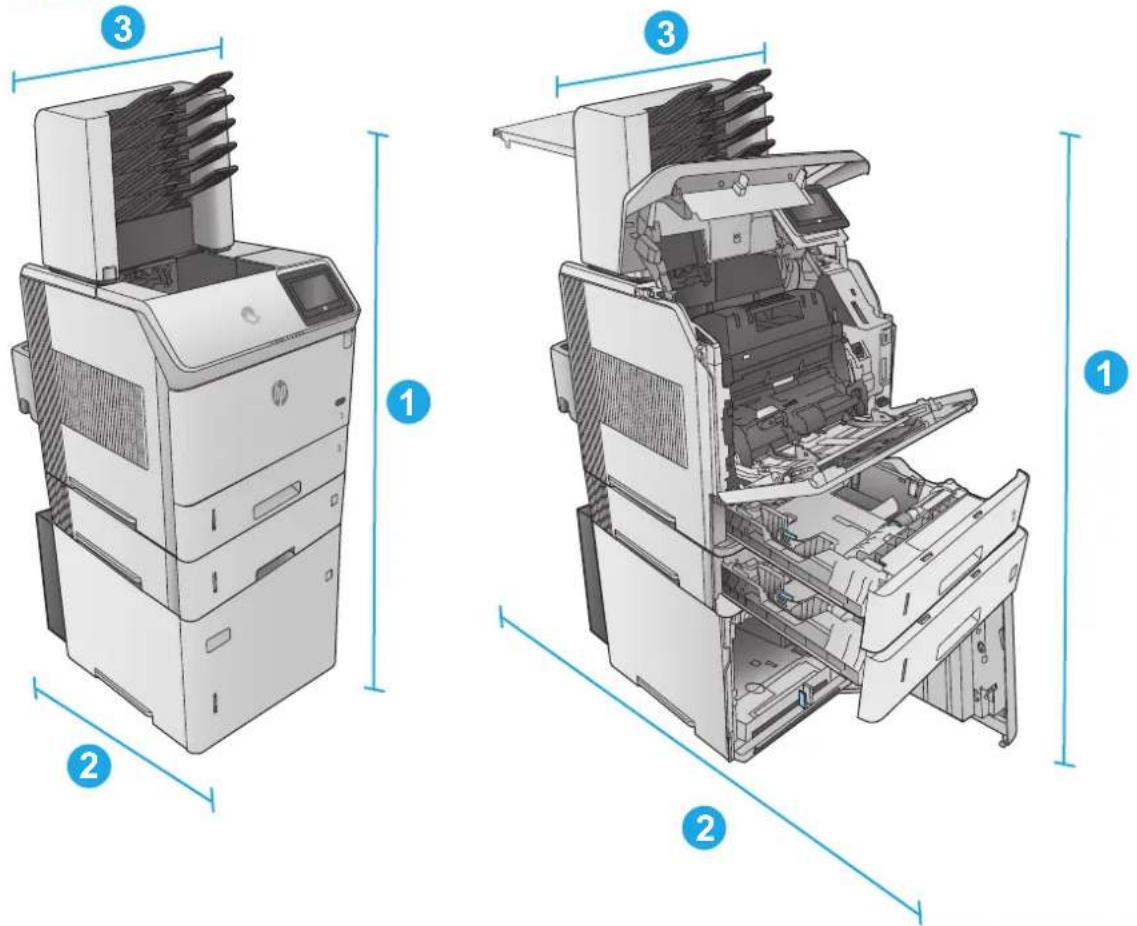
text_image
Technical diagram of a HP printer showing three views with labeled components and dimension annotationsProduct and accessories closed Product and accessories fully opened
| 1. Height 1367 mm (53.8 in) 1367 mm (53.8 in) |
| 2. Depth 537 mm (21.1 in) 1468 mm (57.8 in) |
| 3. Width 425 mm (16.7 in) 425 mm (16.7 in) |
| Weight 52.5 kg (115.7 lb) |
Power consumption, electrical specifications, and acoustic emissions
See www.hp.com/support/ljM604, www.hp.com/support/ljM605, www.hp.com/support/ljM606 for current information.

CAUTION: Power requirements are based on the country/region where the product is sold. Do not convert operating voltages. This will damage the product and void the product warranty.
Operating-environment range
Table 1-1 Operating-environment specifications
| Environment Recommended Allowed |
| Temperature 7.5° to 32.5°C (45.5° to 90.5°F) 0° to 35°C (32° to 95°F) |
| Relative humidity 5% to 90% relative humidity (RH) 35% to 85% RH |
| Altitude Not applicable 0 to 3048 m (0 to 10,000 ft) |
Product hardware setup and software installation
For basic setup instructions, see the Hardware Installation Guide that came with the product. For additional instructions, go to HP support on the Web.
Go to www.hp.com/support/ljM604, www.hp.com/support/ljM605, www.hp.com/support/ljM606 for HP's all-inclusive help for the product. Find the following support:
• Install and configure
Learn and use
- Solve problems
• Download software updates
- Join support forums
• Find warranty and regulatory information
2 Paper trays
- Load Tray 1
- Load Tray 2 and the 500-sheet trays
- Load the optional 1,500-sheet high-capacity tray
- Load the optional custom media tray
- Load envelopes
For more information:
Go to www.hp.com/support/ljM604, www.hp.com/support/ljM605, www.hp.com/support/ljM606.
HP's all-inclusive help for the product includes the following information:
• Install and configure
Learn and use
- Solve problems
• Download software updates
- Join support forums
• Find warranty and regulatory information
Load Tray 1
Introduction
The following information describes how to load paper in Tray 1. This tray holds up to 100 sheets of 75g / m^2 (20 lb) paper.

CAUTION: To avoid jams, never add or remove paper from Tray 1 during printing.
- Grasp the handle on either side of Tray 1, and pull it forward to open it.
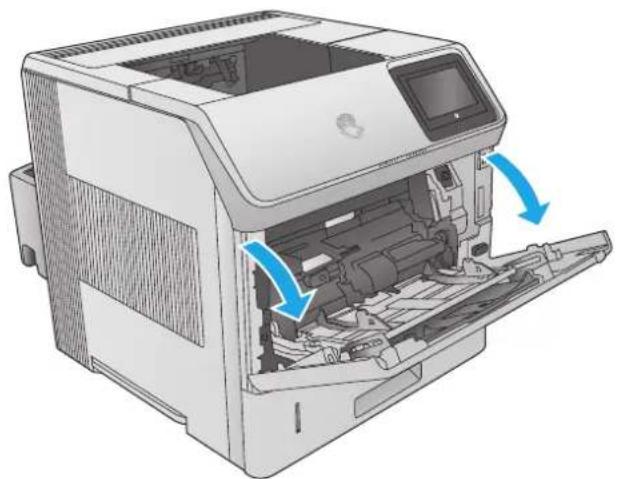
natural_image
Illustration of a printer internal structure with blue arrows indicating motion or flow (no text or symbols)- Pull out the tray extension to support the paper.
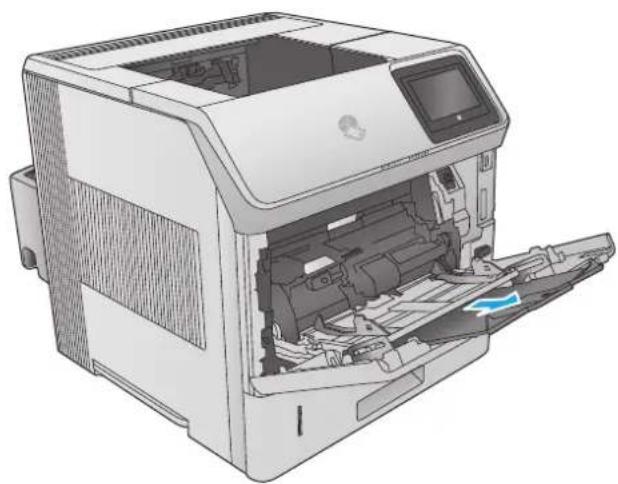
natural_image
Illustration of an HP printer internal structure showing paper feed, paper tray, and paper sheet (no text or symbols visible)-
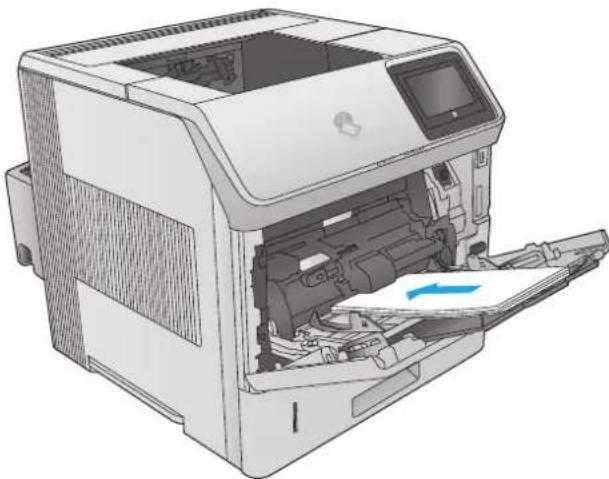
Load paper in the tray. For information about how to orient the paper, see Tray 1 paper orientation on page 26.
-
Make sure that the paper fits under the fill line on the paper guides.
NOTE: The maximum stack height is 10 mm (0.4 in), or approximately 100 sheets of 75g paper.
- Adjust the side guides so that they lightly touch the paper stack, but do not bend it.
natural_image
Illustration of a HP printer internal structure showing paper feed, print tray, and paper sheet (no text or symbols)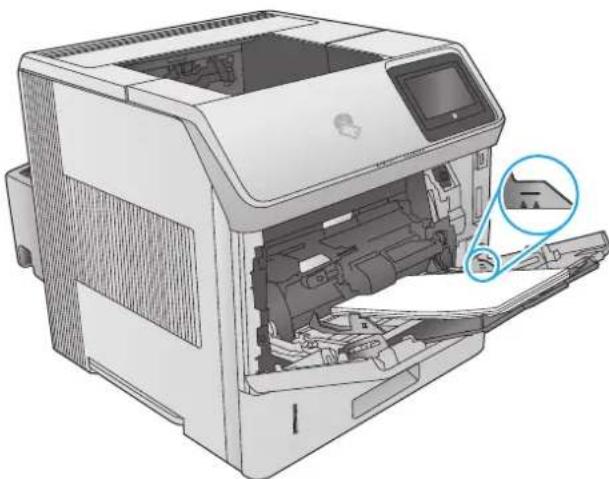
natural_image
Illustration of an HP printer internal structure with a close-up view showing internal components (no text or symbols)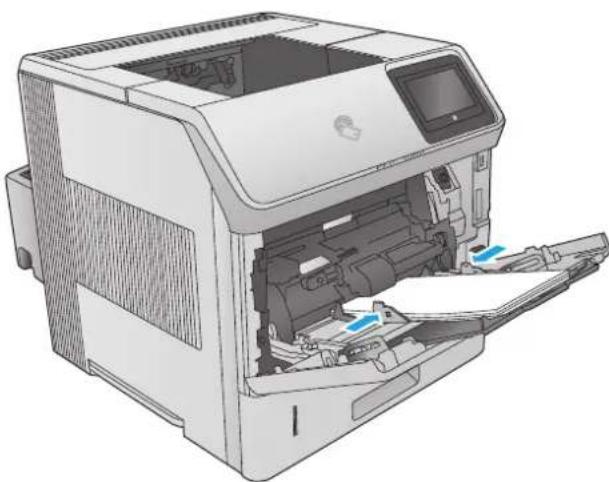
natural_image
Illustration of an HP printer internal structure showing paper feed, print tray, and paper roll (no text or symbols)Tray 1 paper orientation
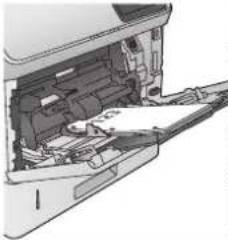
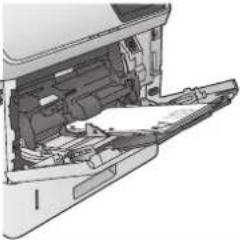
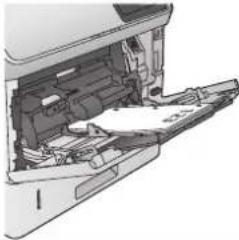
If a duplexer is installed, or if a stapler/stacker is installed, the product alters the way the images for each page are arranged. When using paper that requires a specific orientation, load it according to the information in the following table.
| Paper type Single-sided printing, no stapler/stacker | Duplex printing, no stapler/stacker | Single-sided printing, with the stapler/stacker | Duplex printing, with the stapler/stacker | |
| Letterhead, preprinted, or prepunched | Face-up | Face-down | Face-up | Face-down |
| Top edge leading into the product | Bottom edge leading into the product | Bottom edge leading into the product | Top edge leading into the product | |
 |  |  | 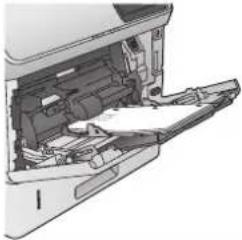 | |
Load Tray 2 and the 500-sheet trays
Introduction
The following information describes how to load paper in Tray 2 and the optional 500-sheet trays (part number F2G68A). These trays hold up to 500 sheets of 75g / m^2 (20 lb) paper.

NOTE: The procedure to load paper for the 500-sheet trays is the same as for Tray 2. Only Tray 2 is shown here.
- Open the tray.
NOTE: Do not open this tray while it is in use.
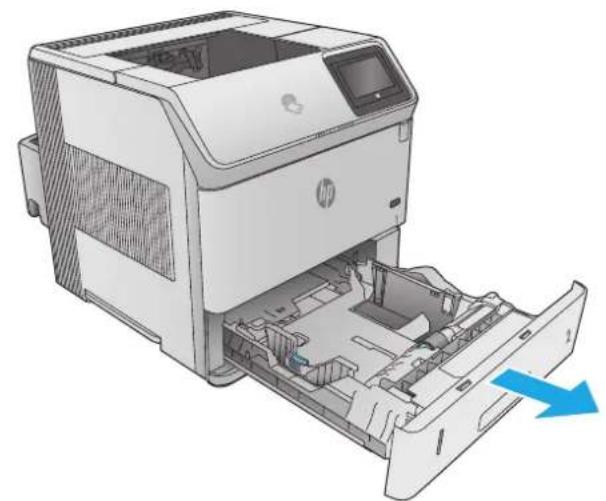
natural_image
Illustration of a HP printer with open lid and internal compartments, showing paper movement (no text or symbols)- Before loading paper, adjust the paper-width guides by squeezing the adjustment latches and sliding the guides to the size of the paper being used.
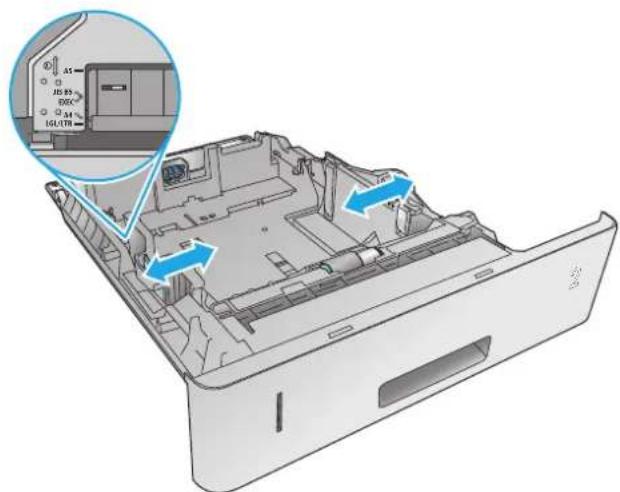
text_image
Technical diagram of a computer drive casing with labeled ports and internal components, including zoomed-in detail view.-
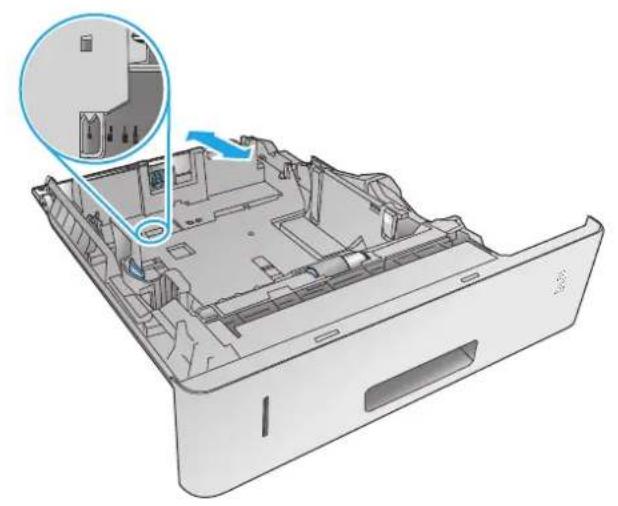
Adjust the paper-length guide by squeezing the adjustment latch and sliding the guide to the size of the paper being used.
-
Load paper into the tray. Check the paper to verify the guides lightly touch the stack, but do not bend it. For information about how to orient the paper, see Tray 2 and the 500-sheet trays paper orientation on page 29.
NOTE: To prevent jams, adjust the paper guides to the correct size and do not overfill the tray. Be sure that the top of the stack is below the tray full indicator.
- Close the tray.
natural_image
3D diagram of a computer chassis showing internal components and a highlighted section (no text or symbols)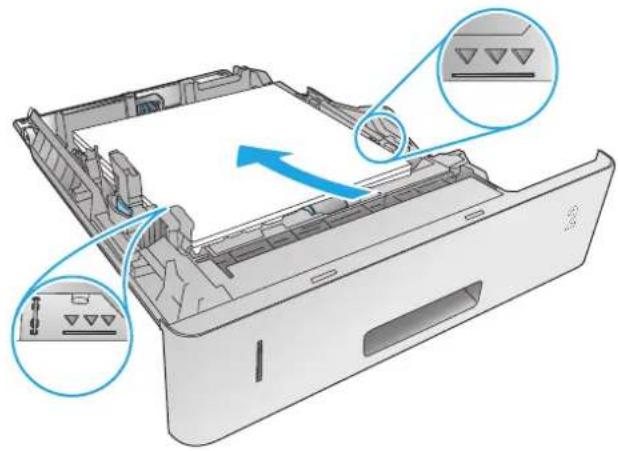
natural_image
Diagram of a printer drawer with internal components and a blue arrow indicating direction (no text or symbols present)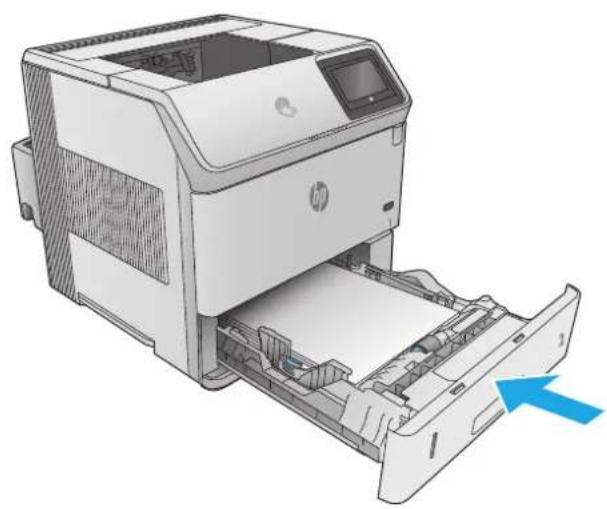
natural_image
Illustration of a HP printer with paper feed and paper roll, showing internal structure without any text or symbols.-
The tray configuration message displays on the product control panel.
-
If the paper size and type shown is not correct, select Modify to choose a different paper size or type.
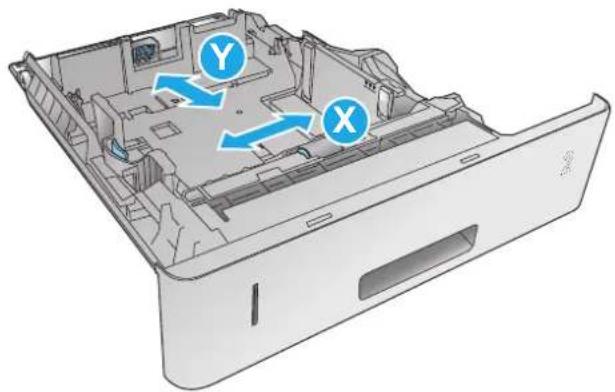
For custom-size paper, specify the X and Y dimensions for the paper when the prompt displays on the product control panel.
natural_image
3D diagram of an open computer case with internal components and directional arrows (no text or symbols)Tray 2 and the 500-sheet trays paper orientation
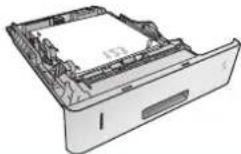
If a duplexer is installed, or if a stapler/stacker is installed, the product alters the way the images for each page are arranged. When using paper that requires a specific orientation, load it according to the information in the following table.
| Paper type Single-sided printing, no stapler/stacker | Duplex printing, no stapler/stacker | Single-sided printing, with the stapler/stacker | Duplex printing, with the stapler/stacker | |
| Letterhead, preprinted, or prepunched | Face-down | Face-up | Face-down | Face-up |
| Top edge at the front of the tray | Bottom edge at the front of the tray | Bottom edge at the front of the tray | Top edge at the front of the tray | |
 | 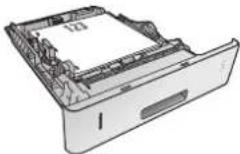 | 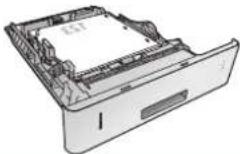 | 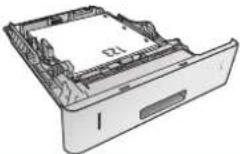 | |
Load the optional 1,500-sheet high-capacity tray
Introduction
The following information describes how to load paper in the optional 1,500 sheet high-capacity tray (part number F2G73A). This tray adjusts for Letter, A4, and Legal sizes.

CAUTION: To avoid jams, do not load trays while the product is printing.
Load the tray
-
Press the release and open the door of the 1,500-sheet tray.
-
Pinch the guides at the front of the tray and slide them to the correct paper size.
NOTE: If paper is in the tray, remove it. When paper is in the tray, the guides cannot be adjusted.
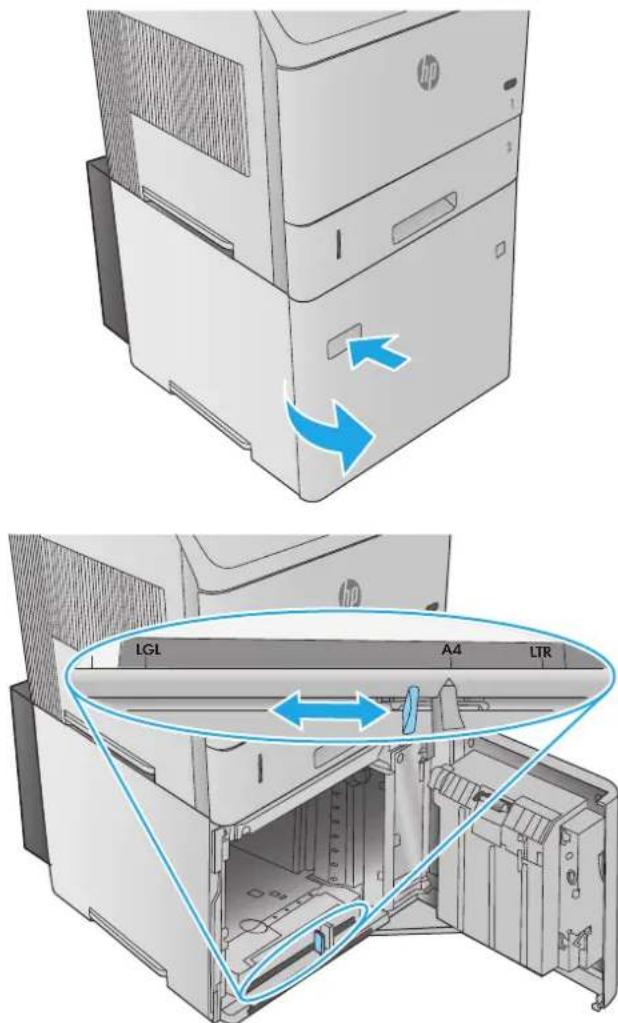
text_image
LGI A4 LTR-
Load the paper into the tray. To prevent jams, load complete reams at one time. Do not divide reams into smaller sections.
-
Make sure that the paper does not exceed the fill marks on the paper guides, and that the front edge of the stack is aligned with the arrows.
-
Close the door on the tray.
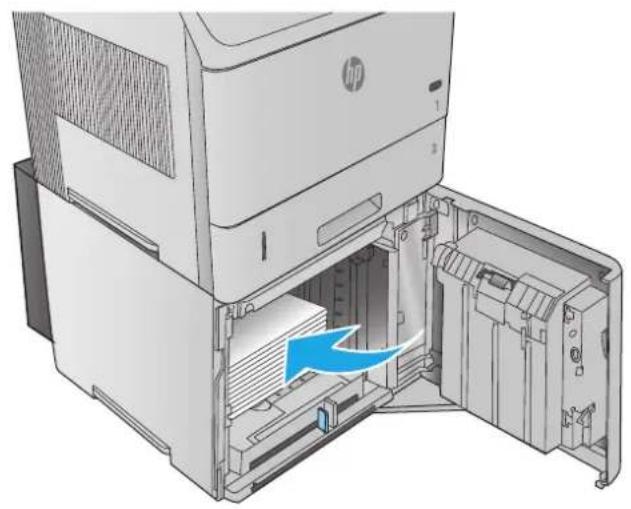
natural_image
Diagram of a HP printer internal structure showing paper feeding into a door, with no visible text or symbols.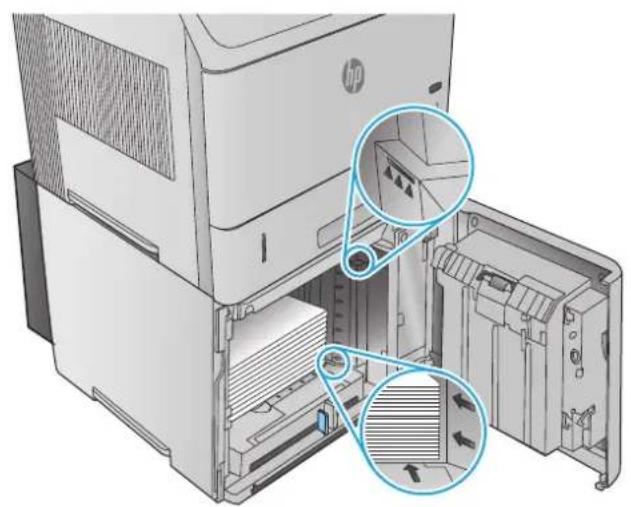
natural_image
Diagram of an HP printer internal structure showing internal components and a close-up view of the printer's internal structure (no text or labels present)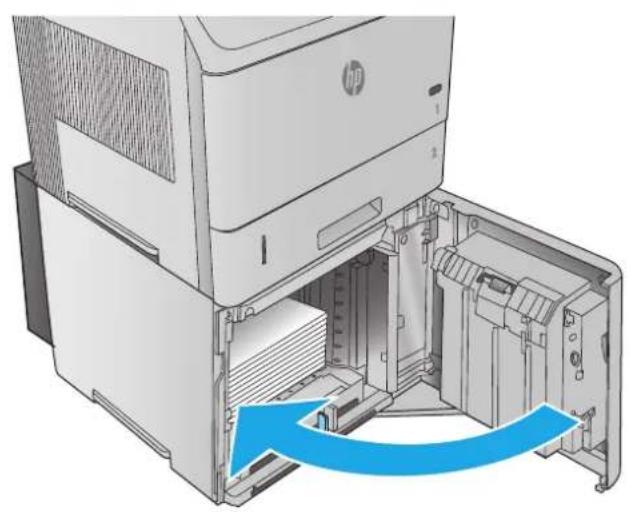
natural_image
Diagram of a HP printer internal structure showing internal components and a blue arrow indicating loading or movement (no text or symbols present)Load the optional custom media tray
Introduction
The following information describes configuring the product to use the optional custom media tray (part number F2G75A) and loading paper into this tray. The custom media tray fits into the Tray 2 position only, and it holds smaller size paper than the standard tray in the Tray 2 position. It supports these paper sizes:
Statement
5×7
5×8
A5
A6
B6 (JIS)
• Double Japan Postcard Rotated
• Double Postcard (JIS)

NOTE: The stapler does not support any of the paper sizes that the custom media tray supports. The automatic duplexer supports A5 size when paper is loaded with the short-edge first, but it does not support any of the other sizes that the custom media tray supports.
Configure the product for the custom media tray
- Press the Home 🔒 button on the product control panel.
- Open the following menus:
- Administration
- Manage Trays
- Tray 2 Model
- Select Custom Tray.
- Press OK.
Load paper into the custom media tray
-
Open the tray.
-
Open the paper-width guides at the side of the tray.
-
Open the paper-length guide at the rear of the tray.
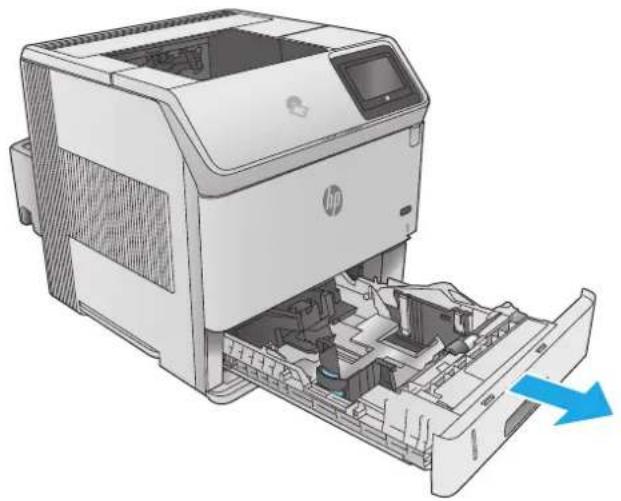
natural_image
Illustration of a HP printer internal structure showing paper feeding into a plastic sheet (no text or symbols visible)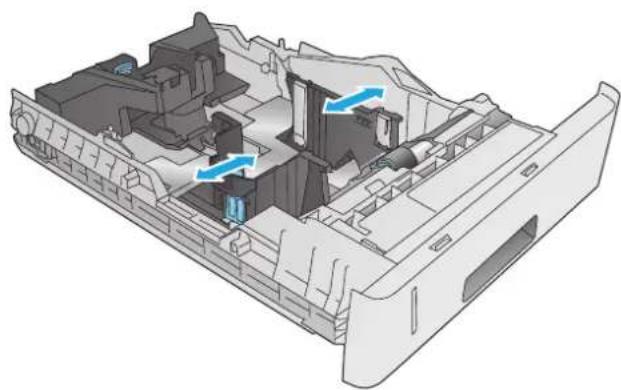
natural_image
3D mechanical assembly diagram showing internal components with blue arrows indicating flow or movement (no text or symbols)
natural_image
3D technical illustration of a mechanical assembly with internal components and a blue arrow indicating direction (no text or symbols)-
Load paper into the tray. Check the paper to verify the guides lightly touch the stack, but do not bend it. For information about how to orient the paper, see Custom media tray paper orientation on page 34.
-
Close the tray.

text_image
Technical diagram showing two views of a HP printer internal structure with blue arrows indicating process flow or assembly.Custom media tray paper orientation
When using paper that requires a specific orientation, load it according to the information in the following table.
Paper type Single-sided printing Duplex printing
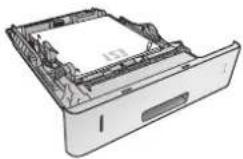
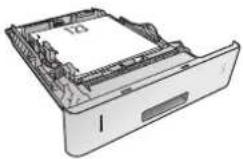
| Letterhead, preprinted, or prepunched Face-down | Face-up |
| Top edge at the front of the tray | Bottom edge at the front of the tray |
 |  |
Load envelopes
Introduction
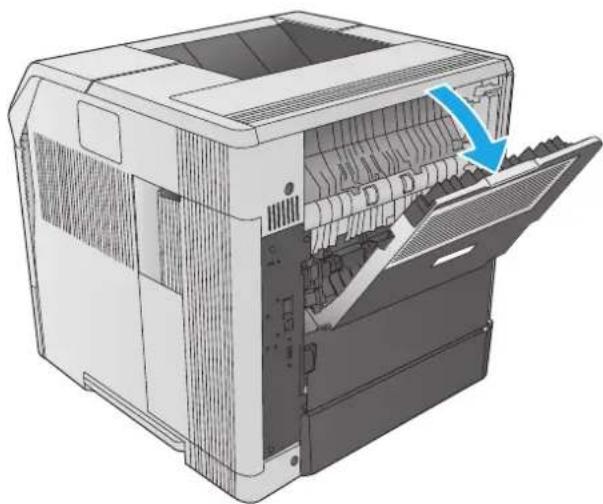
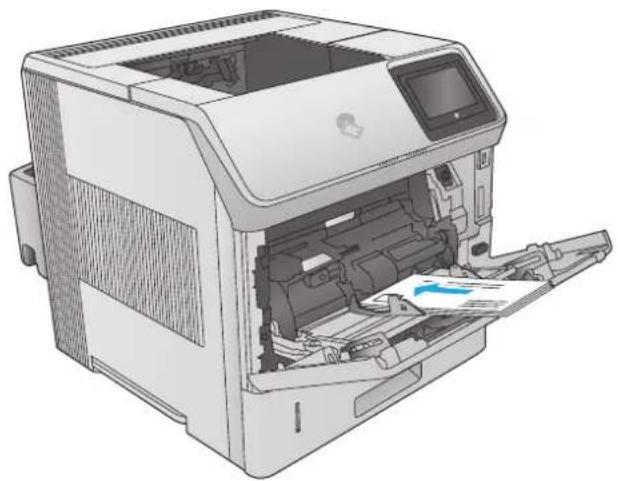
The following information describes how to load envelopes. Use only Tray 1 or the optional envelope feeder (part number F2G74A) to print on envelopes. Tray 1 holds up to 10 envelopes. The optional envelope feeder holds up to 75 envelopes.

NOTE: Select the correct paper type in the print driver before printing.
For best performance, print envelopes to the rear output bin by opening the rear bin.
natural_image
Illustration of a computer tower with an open door and internal rack, showing no text or symbols.Envelope orientation
-
In Tray 1, load envelopes with the front of the envelope facing up, and the short, postage-edge leading into the product.
-
In the optional envelope feeder, lift the pressure plate, and load envelopes with the front of the envelope facing up, and the short, postage-edge leading into the product. Lower the pressure plate onto the stack of envelopes before printing.
natural_image
Illustration of a HP printer with paper being inserted (no text or symbols visible)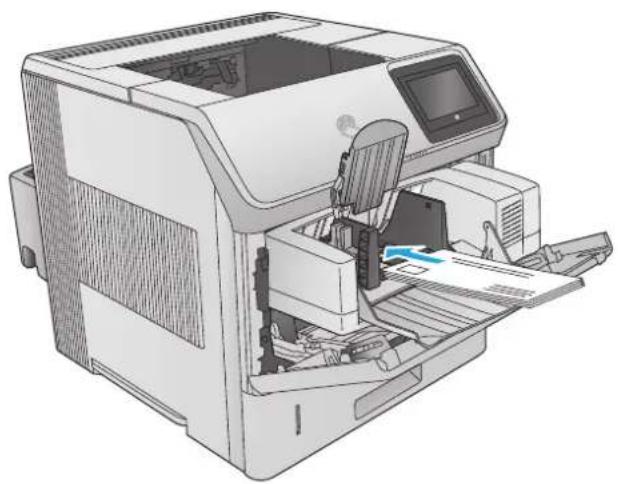
natural_image
Illustration of a paper printer with internal components and paper feed (no text or symbols visible)3 Supplies, accessories, and parts
• Order supplies, accessories, and parts
- Replace the toner cartridge
- Replace the staple cartridge
For more information:
Go to www.hp.com/support/ljM604, www.hp.com/support/ljM605, www.hp.com/support/ljM606.
HP's all-inclusive help for the product includes the following information:
• Install and configure
- Learn and use
- Solve problems
• Download software updates
- Join support forums
• Find warranty and regulatory information
Order supplies, accessories, and parts
Ordering
| Order supplies and paper www.hp.com/go/suresupply | |
| Order genuine HP parts or accessories | www.hp.com/buy/parts |
| Order through service or support providers Contact an HP-authorized service or support provider. | |
| Order using the HP Embedded Web Server (EWS) To access, in a supported Web browser on your computer, enter the product IP address or host name in the address/URL field. The EWS contains a link to the HP SureSupply Web site, which provides options for purchasing Original HP supplies. | |
Supplies and accessories
| Item Description Part number | ||
| Supplies | ||
| HP 81X High Yield Black Original LaserJet Toner CartridgeNOTE: M605 and M606 models only | High-capacity replacement toner cartridge CF281X | |
| HP 81A Black Original LaserJet Toner Cartridge Standard-capacity replacement toner cartridge CF281A | ||
| HP Staple Cartridge Refill Includes three 1,000-staple cartridges Q3216A | ||
| Preventive maintenance kit Replacement rollers for all trays, replacement transfer roller, and replacement fuserIncludes installation instructions | F2G76A (110–127 Volt)F2G77A (220–240 Volt) | |
| Accessories | ||
| Automatic duplex assembly | DuplexerIncludes installation instructions | F2G69A |
| Envelope feeder | Optional envelope feeder that holds up to 75 envelopesIncludes installation instructions | F2G74A |
| Custom media tray | Optional tray that holds small-size paper. Replaces the standard tray in the Tray 2 position.Includes installation instructions | F2G75A |
| 500-sheet paper feeder | Optional 500-sheet paper feeder (included with the x models)Includes installation instructionsNOTE: The product supports up to four 500-sheet paper feeders. When combined with the 1,500-sheet high-capacity paper feeder, the product supports up to three 500-sheet paper feeders. | F2G68A |
| 1,500-sheet high-capacity paper feeder | Optional 1,500 sheet paper feederIncludes installation instructions | F2G73A |
| Item Description Part number | |
| Printer stand Optional stand with casters to support the printer | F2G70A |
| Recommended when using multiple optional paper feeders. | |
| Includes installation instructions | |
| Stacker Optional paper-stacker output accessory | F2G71A |
| Includes installation instructions | |
| Stapler/Stacker Optional stapler/stacker output accessory | F2G72A |
| Includes installation instructions | |
| Multi-bin mailbox Optional 5-bin mailbox output accessory | F2G81A |
| Includes installation instructions | |
| 1 GB DIMM Optional DIMM to increase the product memory | G6W84A |
| Includes installation instructions | |
| NOTE: The product supports one optional DIMM. | |
| HP Secure High-Performance Hard Disk Drive Optional Hard Drive | B5L29A |
| Includes installation instructions | |
| Two Internal USB ports Two optional USB ports for connecting third-party devices | B5L28A |
| Includes installation instructions | |
| HP Trusted Platform Module Automatically encrypts all data that passes through the product | F5S62A |
| Includes installation instructions | |
| HP Jetdirect 2900nw Print Server USB wireless print server accessory J8031A | |
| HP Jetdirect 3000w NFC/Wireless Accessory Wi-Fi direct accessory for “touch” printing from mobile devices | J8030A |
| NOTE: Supported for the n and dn models only. The functionality is already integrated in the x models. | |
Customer self-repair parts
Customer Self-Repair (CSR) parts are available for many HP LaserJet products to reduce repair time. More information about the CSR program and benefits can be found at www.hp.com/go/csr-support and www.hp.com/go/csr-faq.
Genuine HP replacement parts can be ordered at www.hp.com/buy/parts or by contacting an HP-authorized service or support provider. When ordering, one of the following will be needed: part number, serial number (found on back of printer), product number, or product name.
- Parts listed as Mandatory self-replacement are to be installed by customers, unless you are willing to pay HP service personnel to perform the repair. For these parts, on-site or return-to-depot support is not provided under the HP product warranty.
- Parts listed as Optional self-replacement can be installed by HP service personnel at your request for no additional charge during the product warranty period.

NOTE: The following information is subject to change. For the current list of customer self-repair parts for this product, go to www.hp.com/support/ljM604, www.hp.com/support/ljM605, www.hp.com/support/ljM606.
| Item Description Self-replacement options Part number | |||
| Transfer roller Replacement transfer roller | Includes installation instructions | Mandatory E6B67-67904 | |
| Cassette Replacement paper cassette for Tray 2 | Includes installation instructions | Mandatory E6B67-67913 | |
| Tray 1 roller kit Replacement rollers for Tray 1 | Includes installation instructions | Optional E6B67-67906 | |
| Tray 2 through X roller kit Replacement rollers for Tray 2, the optional 500-sheet paper feeders, and the optional 1,500-sheet high-capacity paper feeder | Includes installation instructions | Mandatory E6B67-67905 | |
| Fuser kit (110 volt) Replacement fuser | Includes installation instructions | Mandatory E6B67-67901 | |
| Fuser kit (220 volt) Replacement fuser | Includes installation instructions | Mandatory E6B67-67902 | |
| Torque Limiter kit Replacement Torque Limiter | Includes installation instructions | Mandatory E6B67-67926 | |
| Output accessory cover Replacement output accessory cover | Replacement cover | Mandatory RL2-1404-000CN | |
| Formatter cover Replacement formatter cover Mandatory RC4-5802-000CN | |||
| Duplexing cover | Replacement duplexer cover | Mandatory | RM2-6310-000CN |
| Legal cover | Replacement dust cover for loading legal-size paper in Tray 2 | Mandatory RC4-5872-000CN | |
| HIP cover | Replacement cover for the Hardware Integration Pocket (HIP) | Mandatory RC4-5803-000CN | |
| Envelope feeder cover | Replacement cover for the envelope feeder slot | Mandatory RL1-1667-000CN | |
Replace the toner cartridge
Introduction
The following information provides details about the toner cartridge for the product, and it includes instructions to replace it.
• Toner-cartridge information
- Remove and replace the cartridge
Toner-cartridge information
This product indicates when the toner cartridge level is low and very low. The actual toner cartridge life remaining can vary. Consider having a replacement cartridge available to install when print quality is no longer acceptable.
To purchase cartridges or check cartridge compatibility for the product, go to HP SureSupply at www.hp.com/go/suresupply. Scroll to the bottom of the page and verify that the country/region is correct.
| Capacity Cartridge number Part number | |
| HP 81A Black Original LaserJet Toner Cartridge | 81A CF281A |
| HP 81X High Yield Black Original LaserJet Toner Cartridge | 81X CF281X |
| NOTE: M605 and M606 models only | |

NOTE: High-yield toner cartridges contain more toner than standard cartridges for increased page yield. For more information, go to www.hp.com/go/learnaboutsupplies.
Do not remove the toner cartridge from its package until it is time to replace it.

CAUTION: To prevent damage to the toner cartridge, do not expose it to light for more than a few minutes. Cover the green imaging drum if the toner cartridge must be removed from the product for an extended period of time.
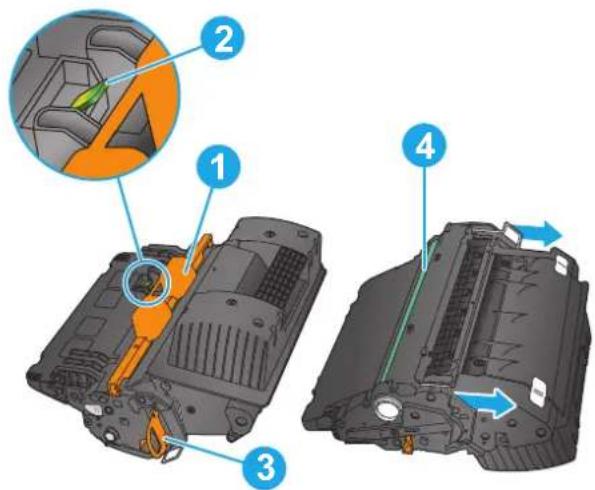
The following illustration shows the toner-cartridge components.
text_image
Technical diagram of a vehicle chassis with numbered components and directional arrows indicating assembly or movement.1 Plastic shield
2 Memory chip
3 S e a l i n
4 Imaging drum
CAUTION: Do not touch the imaging drum. Fingerprints can cause print-quality problems.
CAUTION: If toner gets on clothing, wipe it off by using a dry cloth and wash the clothes in cold water. Hot water sets toner into fabric.
NOTE: Information about recycling used toner cartridges is in the toner-cartridge box.
Remove and replace the cartridge
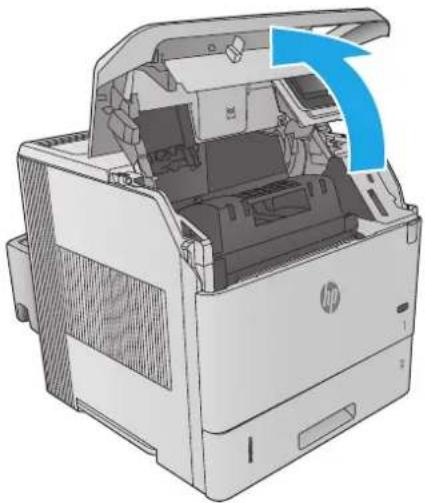
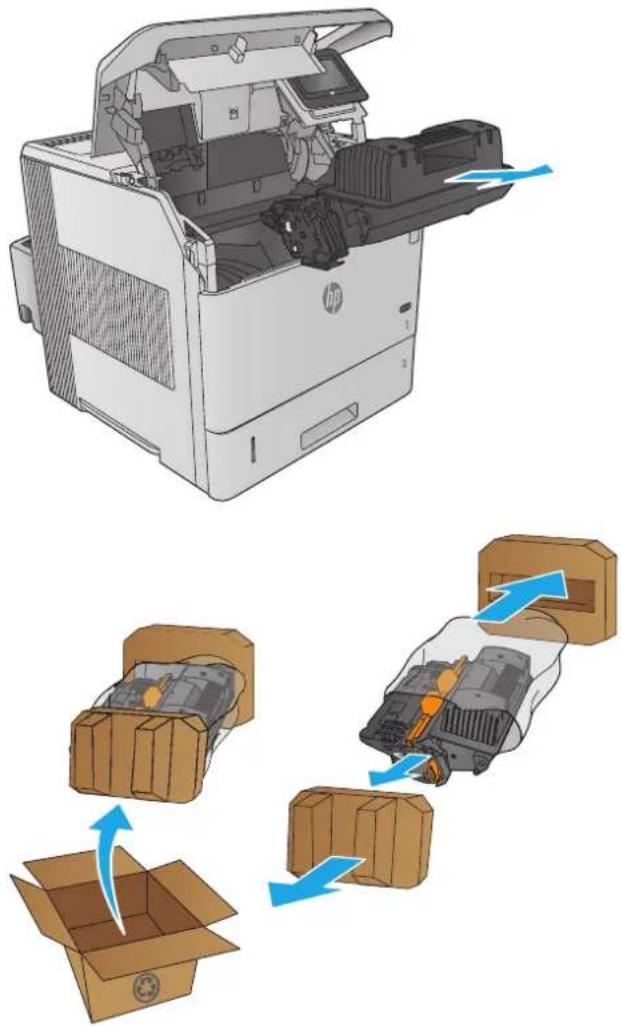
- Open the top cover.
natural_image
3D diagram of an HP printer internal structure showing paper feed, paper tray, and paper holder (no text or symbols)- Grasp the handle of the used toner cartridge and pull out to remove it.
- Remove the new toner cartridge from its protective bag. Save all packaging for recycling the used toner cartridge.
- Hold both ends of the toner cartridge and rock it 5-6 times.
text_image
Diagram illustrating the process of a HP printer's internal components, showing disassembly and packaging steps.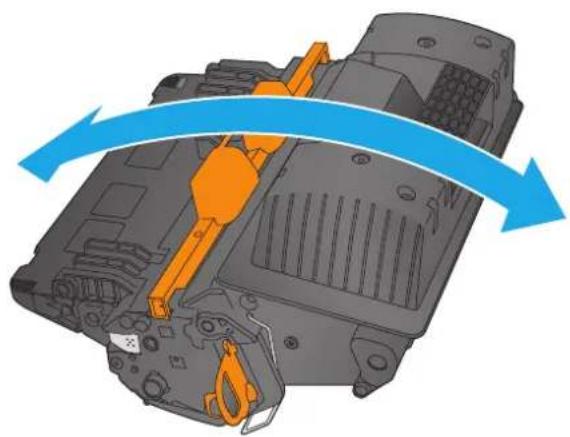
natural_image
3D mechanical assembly diagram showing a component being processed with orange tool, no text or symbols present-
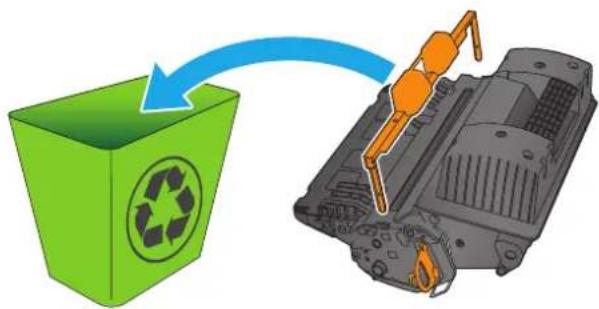
Remove the protective shield from the toner cartridge.
-
Pull on the orange tab to remove the toner sealing tape. Completely remove the sealing tape from the cartridge.
-
Align the toner cartridge with its slot, and then insert the toner cartridge into the product.
natural_image
Illustration of a green recycling bin with an orange robotic arm interacting with a mechanical device (no text or symbols)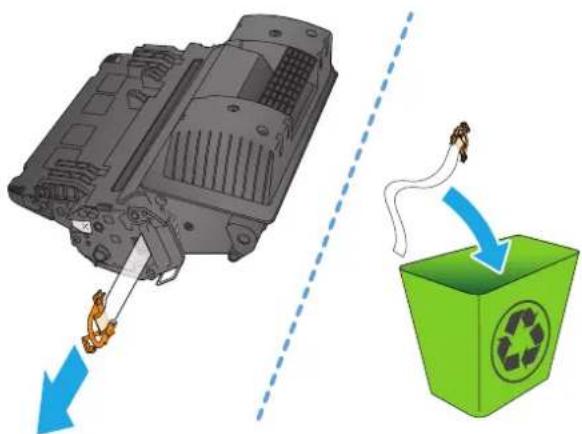
natural_image
Diagram showing a mechanical component being inserted into a green recycling bin with a hand pulling it, alongside a dashed line indicating flow direction (no text or symbols present)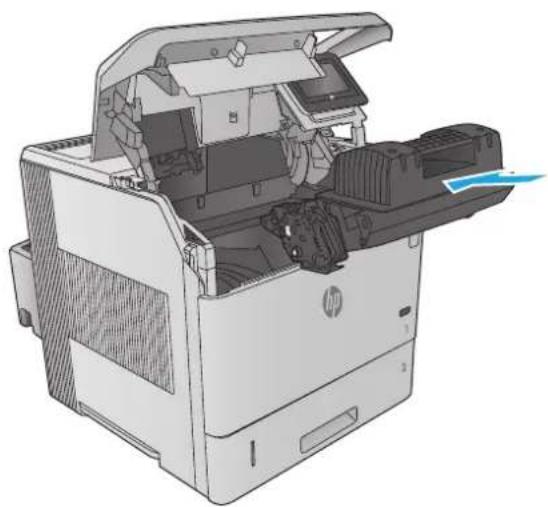
natural_image
3D cutaway view of a HP printer showing internal components and a blue arrow indicating motion (no text or symbols)-
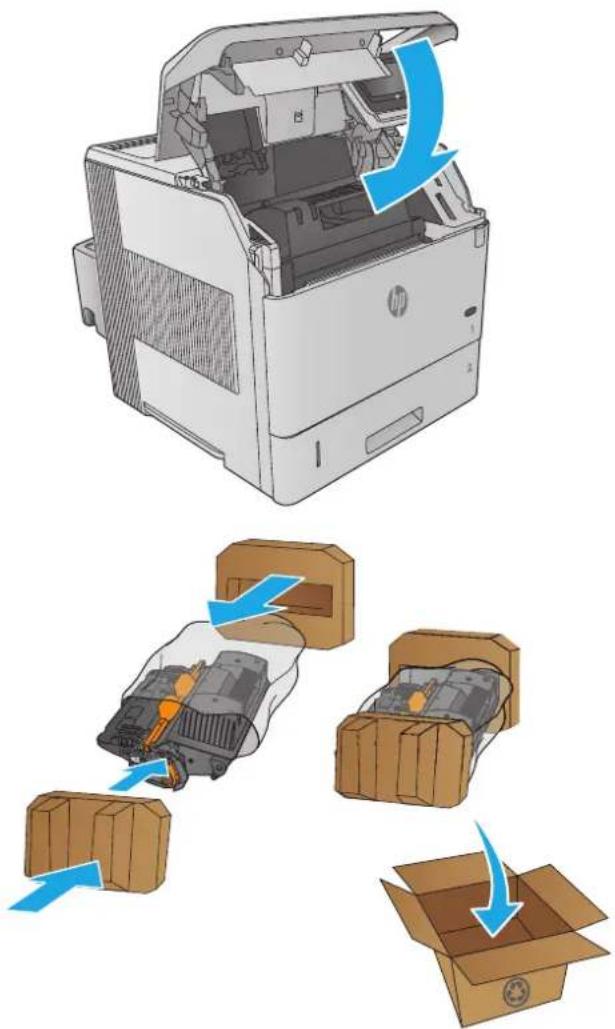
Close the top cover.
-
Pack the used toner cartridge, the protective shield, and the sealing tape into the box that the new cartridge came in.
In the U.S. and Canada, a pre-paid shipping label is included in the box. In other countries/regions, go to www.hp.com/recycle to print a pre-paid shipping label.
Adhere the pre-paid shipping label to the box, and return the used cartridge to HP for recycling.
text_image
Diagram illustrating the process of a printer's internal components being decomposed into two parts, with arrows indicating the transformation.Replace the staple cartridge
Introduction
If the stapler runs out of staples, jobs continue to print to the stapler/stacker, but they are not stapled.
To purchase staple cartridges, go to the HP Parts Store at www.hp.com/buy/parts.
Table 3-1 Staple cartridge information
| Item Description Part number |
| 1,000-staple cartridge Provides three staple cartridges Q3216A |
Remove and replace the staple cartridge
-
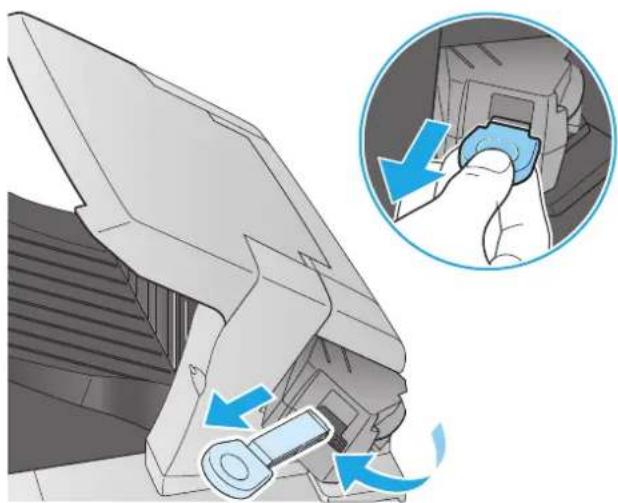
On the right side of the stapler/stacker, turn the stapler unit toward the front of the product until the unit clicks into the open position. Grasp the blue staple-cartridge handle and pull the cartridge out of the stapler unit.
-
Insert the new staple cartridge into the stapler unit and rotate the stapler unit toward the rear of the product until the unit snaps into place.
natural_image
Illustration of a mechanical device with blue arrows indicating motion or force, and an inset showing a hand holding a blue circular component (no text or symbols present)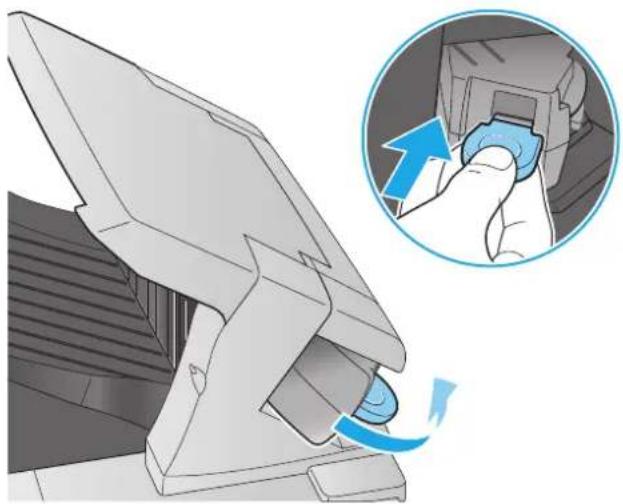
natural_image
Illustration of a computer monitor with a hand inserting a button into the case, showing a blue arrow indicating rotation (no text or symbols present)4 Print
• Print tasks (Windows)
• Print tasks (OS X)
• Store print jobs on the product to print later
- Mobile printing
• Print from the USB port
For more information:
Go to www.hp.com/support/ljM604, www.hp.com/support/ljM605, www.hp.com/support/ljM606.
HP's all-inclusive help for the product includes the following information:
• Install and configure
- Learn and use
- Solve problems
• Download software updates
- Join support forums
• Find warranty and regulatory information
Print tasks (Windows)
How to print (Windows)
The following procedure describes the basic printing process for Windows.
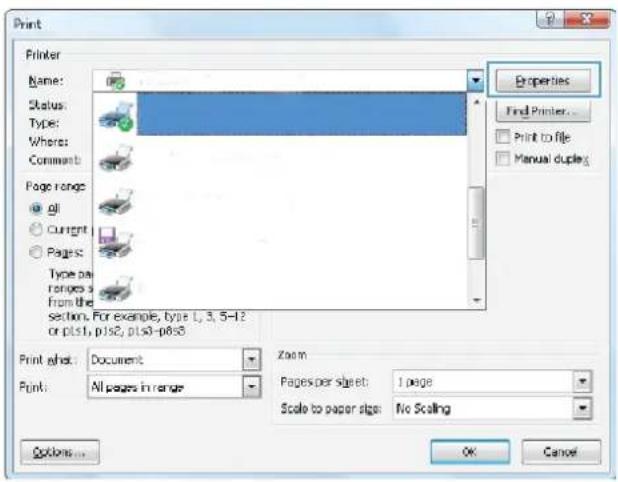
- From the software program, select the Print option.
- Select the product from the list of printers. To change settings, click or tap the Properties or Preferences button to open the print driver.
NOTE: The name of the button varies for different software programs.
NOTE: To access these features from a Windows 8 or 8.1 Start screen, select Devices, select Print, and then select the printer.
text_image
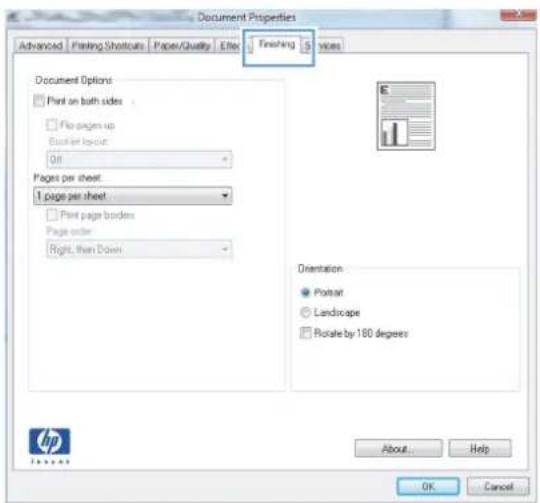
Print Printer Name: Status: Type: Where: Comment: Page range: gl Current Pages: Type per ranges: from the section. For example, type 1, 3, 5-12 or p1s1, p1s2, p1s0-p8s8 Print style: Document Zoom Pupk: All pages in range Pages per sheet: 1 page Scale to paper size: No Scaling Options... Properties Find Printer... Print to file Manual duplex OK Cancel- Click or tap the tabs in the print driver to configure the available options. For example, set the paper orientation on the Finishing tab, and set the paper source, paper type, paper size, and quality settings on the Paper/Quality tab.
text_image
Document Properties Advanced | Printing Shortcuts | Paper/Quality | Effects | Fasting | Visions Document Options Print on both sides No pages up Booklet layout: Off Pages per sheet. 1 page per sheet Print page borders Page order: Right, then Down Orientation Portrait Landscape Rotate by 180 degrees About... Help OK Cancel- Click or tap the OK button to return to the Print dialog box. Select the number of copies to print from this screen.
- Click or tap the OK button to print the job.
Automatically print on both sides (Windows)
Use this procedure for products that have an automatic duplexer installed. If the product does not have an automatic duplexer installed, or to print on paper types that the duplexer does not support, you can print on both sides manually.
- From the software program, select the Print option.
- Select the product from the list of printers, and then click or tap the Properties or Preferences button to open the print driver.

NOTE: The name of the button varies for different software programs.

NOTE: To access these features from a Windows 8 or 8.1 Start screen, select Devices, select Print, and then select the printer.
- Click or tap the Finishing tab.
- Select the Print on both sides check box. Click the OK button to close the Document Properties dialog box.
- In the Print dialog box, click the OK button to print the job.
Manually print on both sides (Windows)
Use this procedure for products that do not have an automatic duplexer installed or to print on paper that the duplexer does not support.
- From the software program, select the Print option.
- Select the product from the list of printers, and then click or tap the Properties or Preferences button to open the print driver.

NOTE: The name of the button varies for different software programs.

NOTE: To access these features from a Windows 8 or 8.1 Start screen, select Devices, select Print, and then select the printer.
- Click or tap the Finishing tab.
- Select the Print on both sides (manually) check box. Click the OK button to print the first side of the job.
- Retrieve the printed stack from the output bin, and place it in Tray 1.
- If prompted, touch the appropriate control panel button to continue.
Print multiple pages per sheet (Windows)
- From the software program, select the Print option.
- Select the product from the list of printers, and then click or tap the Properties or Preferences button to open the print driver.

NOTE: The name of the button varies for different software programs.

NOTE: To access these features from a Windows 8 or 8.1 Start screen, select Devices, select Print, and then select the printer.
-
Click or tap the Finishing tab.
-
Select the number of pages per sheet from the Pages per sheet drop-down list.
-
Select the correct Print page borders, Page order, and Orientation options. Click the OK button to close the Document Properties dialog box.
-
In the Print dialog box, click the OK button to print the job.
Select the paper type (Windows)
- From the software program, select the Print option.
- Select the product from the list of printers, and then click or tap the Properties or Preferences button to open the print driver.

NOTE: The name of the button varies for different software programs.

NOTE: To access these features from a Windows 8 or 8.1 Start screen, select Devices, select Print, and then select the printer.
-
Click or tap the Paper/Quality tab.
-
From the Paper type drop-down list, click the More... option.
-
Expand the list of Type is: options.
-
Expand the category of paper types that best describes your paper.
-
Select the option for the type of paper you are using, and then click the OK button.
-
Click the OK button to close the Document Properties dialog box. In the Print dialog box, click the OK button to print the job. If the tray needs to be configured, a tray configuration message displays on the product control panel
-
Load the tray with the specified type and size of paper, and then close the tray.
-
Touch the OK button to accept the detected type and size, or touch the Modify button to choose a different paper size or type.
-
Select the correct type and size, and then touch the OK button.
Additional print tasks
Go to www.hp.com/support/ljM604, www.hp.com/support/ljM605, www.hp.com/support/ljM606.
Instructions are available for performing specific print tasks, such as the following:
• Create and use printing shortcuts or presets
- Select the paper size, or use a custom paper size
- Select the page orientation
• Create a booklet
• Scale a document to fit a specific paper size
• Print the first or last pages of the document on different paper
• Print watermarks on a document
Print tasks (OS X)
How to print (OS X)
The following procedure describes the basic printing process for OS X.
- Click the File menu, and then click the Print option.
- Select the product.
- Click Show Details, and then select other menus to adjust the print settings.
- Click the Print button.
Automatically print on both sides (OS X)
NOTE: This information applies to products that include an automatic duplexer.
NOTE: This feature is available if you install the HP print driver. It might not be available if you are using AirPrint.
- Click the File menu, and then click the Print option.
- Select the product.
- Click Show Details, and then click the Layout menu.
- Select a binding option from the Two-Sided drop-down list.
- Click the Print button.
Manually print on both sides (OS X)
NOTE: This feature is available if you install the HP print driver. It might not be available if you are using AirPrint.
- Click the File menu, and then click the Print option.
- Select the product.
- Click Show Details, and then click the Manual Duplex menu.
- Click the Manual Duplex box, and select a binding option.
- Click the Print button.
- Go to the product, and remove any blank paper that is in Tray 1.
- Retrieve the printed stack from the output bin and place it with the printed-side facing down in the input tray.
- If prompted, touch the appropriate control panel button to continue.
Print multiple pages per sheet (OS X)
- Click the File menu, and then click the Print option.
-
Select the product.
-
Click Show Details, and then click the Layout menu.
- From the Pages per Sheet drop-down list, select the number of pages that you want to print on each sheet.
- In the Layout Direction area, select the order and placement of the pages on the sheet.
- From the Borders menu, select the type of border to print around each page on the sheet.
- Click the Print button.
Select the paper type (OS X)
- Click the File menu, and then click the Print option.
- Select the product.
- Click Show Details, and then click the Media & Quality menu or the Paper/Quality menu.
- Select a type from the Media-type drop-down list.
- Click the Print button.
Additional print tasks
Go to www.hp.com/support/ljM604, www.hp.com/support/ljM605, www.hp.com/support/ljM606.
Instructions are available for performing specific print tasks, such as the following:
• Create and use printing shortcuts or presets
- Select the paper size, or use a custom paper size
- Select the page orientation
• Create a booklet
• Scale a document to fit a specific paper size
• Print the first or last pages of the document on different paper
• Print watermarks on a document
Store print jobs on the product to print later
Introduction
The following information provides procedures for creating and printing documents that are stored on the product. This feature is enabled on the product by default.
• Create a stored job (Windows)
• Create a stored job (OS X)
• Print a stored job
- Delete a stored job
Create a stored job (Windows)
You can store jobs on the product so you can print them at any time.

NOTE: Your print driver might look different than what is shown here, but the steps are the same.
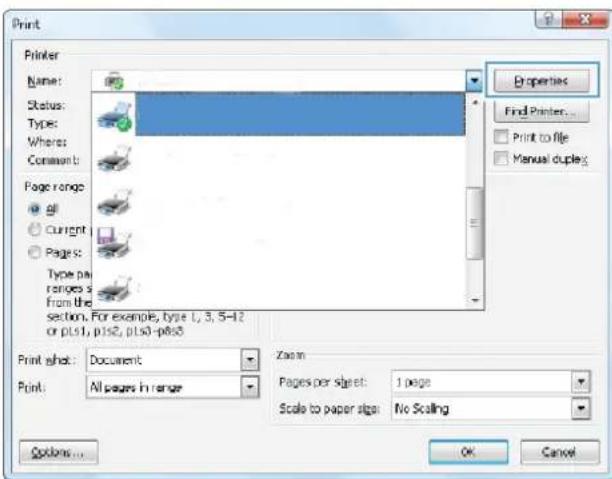
- From the software program, select the Print option.
- Select the product from the list of printers, and then select Properties or Preferences (the name varies for different software programs).

NOTE: To access these features from a Windows 8 or 8.1 Start screen, select Devices, select Print, and then select the printer.
text_image
Print Printer Name: Status: Types: Where: Comment: Page range: all Current Pages: Type pair ranges: from the section. For example, type 1, 3, 5-12 or p1s1, p1s2, p1s3-p1s8 Print sheet: Document Print: All pages in range Zoom Pages per sheet: 1 page Scale to paper size: No Scaling Options... OK Cancel Properties Find Printer... Print to file Manual duplex3. Click the Job Storage tab.
text_image
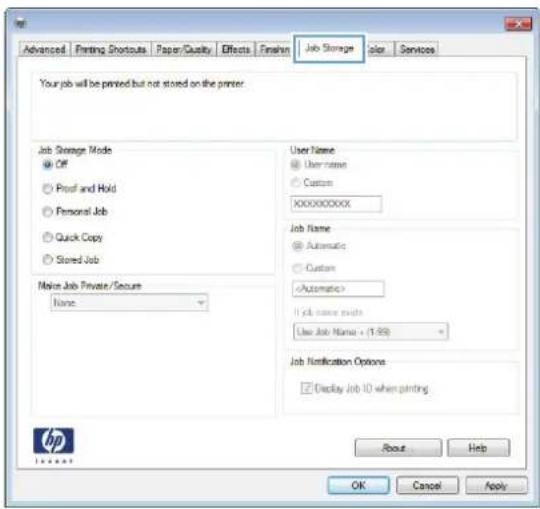
Advanced Printing Shortouts Paper/Cavity Effects Finish Job Storage plus Services Your job will be printed but not stored on the printer. Job Storage Mode Off Proof and Hold Personal Job Quick Copy Stored Job Noise Job Private/Secure None User Name Username Custom XXXXXXXXX Job Name Automatic Custom (Automatic) If job name exists Use Job Name + (1.99) Job Notification Options □ Display Job ID when printing About Help OK Cancel Apply4. Select a Job Storage Mode option.
• Proof and Hold: Print and proof one copy of a job, and then print more copies.
- Personal Job: The job does not print until you request it at the product control panel. For this job-storage mode, you can select one of the Make Job Private/Secure options. If you assign a personal identification number (PIN) to the job, you must provide the required PIN at the control panel. If you encrypt the job, you must provide the required password at the control panel.
- Quick Copy: Print the requested number of copies of a job and store a copy of the job in the product memory so you can print it again later.
- Stored Job: Store a job on the product and allow other users to print the job at any time. For this job-storage mode, you can select one of the Make Job Private/Secure options. If you assign a personal identification number (PIN) to the job, the person who prints the job must provide the required PIN at the control panel. If you encrypt the job, the person who prints the job must provide the required password at the control panel.
5. To use a custom user name or job name, click the Custom button, and then enter the user name or the job name.
Select which option to use if another stored job already has that name:
• Use Job Name + (1-99): Append a unique number to the end of the job name.
- Replace Existing File: Overwrite the existing stored job with the new one.
6. Click the OK button to close the Document Properties dialog box. In the Print dialog box, click the OK button to print the job.
Create a stored job (OS X)
You can store jobs on the product so you can print them at any time.
- Click the File menu, and then click the Print option.
-
In the Printer menu, select the product.
-
By default, the print driver displays the Copies & Pages menu. Open the menus drop-down list, and then click the Job Storage menu.
- In the Mode drop-down list, select the type of stored job.
• Proof and Hold: Print and proof one copy of a job, and then print more copies.
- Personal Job: The job does not print until you request it at the product control panel. If you assign a personal identification number (PIN) to the job, you must provide the required PIN at the control panel.
- Quick Copy: Print the requested number of copies of a job and store a copy of the job in the product memory so you can print it again later.
- Stored Job: Store a job on the product and allow other users to print the job at any time. If you assign a personal identification number (PIN) to the job, the person who prints the job must provide the required PIN at the control panel.
- To use a custom user name or job name, click the Custom button, and then enter the user name or the job name.
Select which option to use if another stored job already has that name.
• Use Job Name + (1-99): Append a unique number to the end of the job name.
- Replace Existing File: Overwrite the existing stored job with the new one.
-
If you selected the Stored Job or Personal Job option in step 3, you can protect the job with a PIN. Type a 4-digit number in the Use PIN to Print field. When other people attempt to print this job, the product prompts them to enter this PIN number.
-
Click the Print button to process the job.
Print a stored job
Use the following procedure to print a job that is stored in the product memory.
- Touch or press the Home

button on the product control panel.
-
Select Retrieve from Device Memory.
-
Select the name of the folder where the job is stored.
-
Select the name of the job. If the job is private or encrypted, enter the PIN or password.
-
Adjust the number of copies, and then touch the Start

button or press the OK button to print the job.
Delete a stored job
When you send a stored job to the product memory, the product overwrites any previous jobs with the same user and job name. If a job is not already stored under the same user and job name, and the product needs additional space, the product might delete other stored jobs starting with the oldest. You can change the number of jobs that the product can store from the General Settings menu on the product control panel.
Use this procedure to delete a job that is stored in the product memory.
- Touch or press the Home

button on the product control panel.
-
Select Retrieve from Device Memory.
-
Select the name of the folder where the job is stored.
- Select the name of the job, and then select the Delete button.
- If the job is private or encrypted, enter the PIN or the password, and then select the Delete button.
Mobile printing
Introduction
HP offers multiple Mobile and ePrint solutions to enable wireless printing to an HP printer from a laptop, tablet, smartphone, or other mobile device. To see the full list and to determine the best choice, go to www.hp.com/go/LaserJetMobilePrinting (English only).
• Wi-Fi Direct and NFC Printing
HP ePrint via email
HP ePrint software
AirPrint
• Android embedded printing
Wi-Fi Direct and NFC Printing
HP provides Wi-Fi and NFC (Near Field Communication) printing for printers with a supported HP Jetdirect NFC & Wireless Accessory. This accessory is available as an option for HP LaserJet printers that include a hardware-integration pocket (HIP).
Use a wireless accessory to print wirelessly from the following devices:
- iPhone, iPad, or iPod touch using Apple AirPrint or the HP ePrint app
• Android mobile devices using the HP ePrint App or the Android embedded print solution
• PC and Mac devices using the HP ePrint Software
For more information on HP Wireless printing, go to www.hp.com/go/wirelessprinting.
HP ePrint via email
Use HP ePrint to print documents by sending them as an email attachment to the product's email address from any email enabled device.

NOTE: The product might require a firmware update to use this feature.
To use HP ePrint, the product must meet these requirements:
The product must be connected to a wired or wireless network and have Internet access.
HP Web Services must be enabled on the product, and the product must be registered with HP Connected or HP ePrint Center.
Follow this procedure to enable HP Web Services and register with HP Connected or HP ePrint Center:
- Open the HP Embedded Web Server (EWS):
a. 4-line control panels: View the control-panel display to see the IP address.
Touchscreen control panels: From the Home screen on the product control panel, touch the Network button to display the IP address or host name.
b. Open a Web browser, and in the address line, type the IP address or host name exactly as it displays on the product control panel. Press the Enter key on the computer keyboard. The EWS opens.
https://10.10.XXXXX/
NOTE: If the Web browser displays a There is a problem with this website's security certificate message when attempting to open the EWS, click Continue to this website (not recommended).
Choosing Continue to this website (not recommended) will not harm the computer while navigating within the EWS for the HP product.
-
Click the HP Web Services tab.
-
Select the option to enable Web Services.
NOTE: Enabling Web Services might take several minutes.
- Go to www.hpconnected.com or www.hp.com/go/eprintcenter to create an HP ePrint account and complete the setup process.
HP ePrint software
The HP ePrint software makes it easy to print from a Windows or Mac desktop or laptop computer to any HP ePrint-capable product. This software makes it easy to find HP ePrint-enabled products that are registered to your HP Connected account. The target HP printer can be located in the office or at locations across the globe.
- Windows: After installing the software, open the Print option from within your application, and then select HP ePrint from the installed printers list. Click the Properties button to configure print options.
Mac: After installing the software, select File, Print, and then select the arrow next to PDF (in the bottom left of the driver screen). Select HP ePrint.
For Windows, the HP ePrint software supports TCP/IP printing to local network printers on the network (LAN or WAN) to products that support UPD PostScript®.
Windows and Mac both support IPP printing to LAN or WAN network-connected products that support ePCL.
Windows and Mac also both support printing PDF documents to public print locations and printing using HP ePrint via email through the cloud.
Go to www.hp.com/go/eprintsoftware for drivers and information.
NOTE: The HP ePrint software is a PDF workflow utility for Mac, and is not technically a print driver.
NOTE: HP ePrint Software does not support USB printing.
AirPrint
Direct printing using Apple's AirPrint is supported for iOS 4.2 or later and from Mac computers running OS X 10.7 Lion and newer. Use AirPrint to print directly to the product from an iPad, iPhone (3GS or later), or iPod touch (third generation or later) in the following mobile applications:
Mail
- Photos
Safari
iBooks
• Select third-party applications
To use AirPrint, the product must be connected to the same wireless network as the Apple device. For more information about using AirPrint and about which HP products are compatible with AirPrint, go to the support Web site for this product:
www.hp.com/support/ljM604, www.hp.com/support/ljM605, www.hp.com/support/ljM606

NOTE: AirPrint does not support USB connections.
Android embedded printing
HP's built-in print solution for Android and Kindle enables mobile devices to automatically find and print to HP printers that are either on a wireless network or within wireless range for wireless printing. The print solution is built into the supported operating systems, so installing drivers or downloading software is not necessary.
For more information on how to use Android embedded printing and which Android devices are supported, go to www.hp.com/support/ljM604, www.hp.com/support/ljM605, www.hp.com/support/ljM606.
Print from the USB port
Introduction
This product features easy-access USB printing, for quickly printing files without sending them from a computer. The product accepts standard USB flash drives in the USB port near the control panel. It supports the following types of files:
.pdf
• .prn
.pcl
. ps
.cht
Enable the USB port for printing
The USB port is disabled by default. Before using this feature, enable the USB port. Use one of the following procedures to enable the port:
Enable the USB port from the product control-panel menus
- Press the Home button on the product control panel.
-
Open the following menus:
-
Administration
- General Settings
-
Enable Retrieve from USB
-
Select the Enabled option, and then touch the Save button or press the OK button.
Enable the USB port from the HP Embedded Web server (network-connected products only)
- Open the HP Embedded Web Server (EWS):
a. 4-line control panels: View the control-panel display to see the IP address.
Touchscreen control panels: From the Home screen on the product control panel, touch the Network 📋 button to display the IP address or host name.
b. Open a Web browser, and in the address line, type the IP address or host name exactly as it displays on the product control panel. Press the Enter key on the computer keyboard. The EWS opens.

https://10.10.XXXXX/

NOTE: If the Web browser displays a There is a problem with this website's security certificate message when attempting to open the EWS, click Continue to this website (not recommended).
Choosing Continue to this website (not recommended) will not harm the computer while navigating within the EWS for the HP product.
- Open the Print tab.
- On the left side of the screen, click Retrieve from USB Setup.
- Select the Enable Retrieve from USB check box.
- Click Apply.
Print USB documents
- Insert the USB flash drive into the easy-access USB port.

NOTE: The port might be covered. For some products, the cover flips open. For other products, pull the cover straight out to remove it.
- The product detects the USB flash drive. Touch or press the OK button to access the drive, or, if prompted, select the Retrieve from USB option from the list of available applications. The Retrieve from USB screen opens.
- Select the name of the document to print.

NOTE: The document might be in a folder. Open folders as necessary.
- To adjust the number of copies, select Copies, and then use the keypad to change the number of copies.
- Touch the Start button or press the OK button to print the document.
5 Manage the product
- Advanced configuration with HP Embedded Web Server (EWS)
• Advanced configuration with HP Utility for OS X - Configure IP network settings
• Product security features
• Economy settings
HP Web Jetadmin
• Software and firmware updates
For more information:
Go to www.hp.com/support/ljM604, www.hp.com/support/ljM605, www.hp.com/support/ljM606.
HP's all-inclusive help for the product includes the following information:
• Install and configure
- Learn and use
- Solve problems
• Download software updates
- Join support forums
• Find warranty and regulatory information
Advanced configuration with HP Embedded Web Server (EWS)
Introduction
• How to access the HP Embedded Web Server (EWS)
HP Embedded Web Server features
Use the HP Embedded Web Server to manage printing functions from a computer instead of the product control panel.
• View product status information
• Determine the remaining life for all supplies and order new ones
• View and change tray configurations
• View and change the product control-panel menu configuration
• View and print internal pages
- Receive notification of product and supplies events
• View and change network configuration
The HP Embedded Web Server works when the product is connected to an IP-based network. The HP Embedded Web Server does not support IPX-based product connections. Internet access is not needed to open and use the HP Embedded Web Server.
When the product is connected to the network, the HP Embedded Web Server is automatically available.

NOTE: The HP Embedded Web Server is not accessible beyond the network firewall.
How to access the HP Embedded Web Server (EWS)
- 4-line control panels: View the control-panel display to see the IP address.
Touchscreen control panels: From the Home screen on the product control panel, touch the Network button to display the IP address or host name.
- Open a Web browser, and in the address line, type the IP address or host name exactly as it displays on the product control panel. Press the Enter key on the computer keyboard. The EWS opens.

https://10.10.XXXXX/

NOTE: If the Web browser displays a There is a problem with this website's security certificate message when attempting to open the EWS, click Continue to this website (not recommended).
Choosing Continue to this website (not recommended) will not harm the computer while navigating within the EWS for the HP product.
To use the HP Embedded Web Server, the browser must meet the following requirements:
• Windows: Microsoft Internet Explorer 5.01 or later or Netscape 6.2 or later
Mac OS X: Safari or Firefox using Bonjour or an IP address
• Linux: Netscape Navigator only
HP-UX 10 and HP-UX 11: Netscape Navigator 4.7
HP Embedded Web Server features
Information tab
General tab
Print tab
Troubleshooting tab
• Security tab
HP Web Services tab
Networking tab
Other Links list
Information tab
Table 5-1 HP Embedded Web Server Information tab
| Menu Description | |
| Device Status | Shows the product status and shows the estimated life remaining of HP supplies. The page also shows the type and size of paper set for each tray. To change the default settings, click the Change Settings link. |
| Job Log Shows a summary of all jobs the product has processed. | |
| Configuration Page Shows the information found on the configuration page. | |
| Supplies Status Page Shows the status of the supplies for the product. | |
| Event Log Page | Shows a list of all product events and errors. Use the HP Instant Support link (in the Other Links area on all HP Embedded Web Server pages) to connect to a set of dynamic Web pages that help solve problems. These pages also show additional services available for the product. |
| Usage Page | Shows a summary of the number of pages the product has printed, grouped by size, type, and paper print path. |
| Device Information | Shows the product network name, address, and model information. To customize these entries, click the Device Information menu on the General tab. |
| Control Panel Snapshot | Shows an image of the current screen on the control panel display. |
| Upload a print-ready file from the computer to print. The product uses the default print settings to print the file. | |
| Printable Reports and Pages | Lists the internal reports and pages for the product. Select one or more items to print or view. |
Table 5-2 HP Embedded Web Server General tab
| Menu Description | |
| Alerts Setup email alerts for various product and supplies events. | |
| Control Panel Administration Menu | Shows the menu structure of theAdministrationmenu on the control panel.NOTE: Configure settings on this screen, or the HP Embedded Web Server provides more advanced configuration options than are available through theAdministrationmenu. |
| AutoSend | Configure the product to send automated emails regarding product configuration and supplies to specific email addresses. |
| Edit Other Links | Add or customize a link to another Web site. This link displays in theOther Linksarea on all HP Embedded Web Server pages. |
| Ordering Information | Enter information about ordering replacement toner cartridges. This information displays on the supplies status page. |
| Device Information | Name the product and assign an asset number to it. Enter the name of the primary contact who will receive information about the product. |
| Language Set the language in which to display the HP Embedded Web Server information. | |
| Date and Time Set the date and time or synchronize with a network time server. | |
| Energy Settings | Set or edit a wake time, sleep time, and sleep delay for the product. Set a different schedule for each day of the week and for holidays.Set which interactions with the product cause it to wake from sleep mode. |
| Backup and Restore | Create a backup file that contains product and user data. If necessary, use this file to restore data to the product. |
| Restore Factory Settings Restore product settings to the factory defaults. | |
| Solution Installer | Install third-party software programs that can enhance the product functionality. |
| Firmware Upgrade Download and install product firmware upgrade files. | |
| Statistics Services | Provides connection information about third-party job-statistics services. |
Print tab
Table 5-3 HP Embedded Web Server Print tab
| Menu Description | |
| Retrieve from USB Setup | Enable or disable the Retrieve from USB menu on the control panel. |
| Manage Stored Jobs | Enable or disable the ability to store jobs in the product memory.Configure job-storage options. |
| Adjust Paper Types | Override the factory-default mode settings if print quality problems occur when using a specific paper type. |
| Restrict Color(Color products only) | Permit or restrict color printing.Specify permissions for individual users or for jobs that are sent from specific software programs. |
Table 5-3 HP Embedded Web Server Print tab (continued)
| Menu Description |
| General Print Settings Configure settings for all print jobs. |
| Manage Trays Configure settings for paper trays. |
Troubleshooting tab
Table 5-4 HP Embedded Web Server Troubleshooting tab
| Menu Description | |
| General Troubleshooting | Select from a variety of reports and tests to help solve problems with the product. |
| Online Help Obtain QR codes and Web links to solution pages for the product. | |
| Diagnostic Data | Export product information to a file that can be useful for detailed problem analysis. |
| NOTE: This item is available only if an administrator password is set from the Security tab. | |
| Calibration/Cleaning(Color products only) | Enable the automatic cleaning feature, create and print the cleaning page, and select an option to calibrate the product immediately. |
| Firmware Upgrade Download and install product firmware upgrade files. | |
| Restore Factory Settings Restore product settings to factory defaults. | |
Security tab
Table 5-5 HP Embedded Web Server Security tab
| Menu Description | |
| General Security | Settings for general security, including the following:Configure an administrator password to restrict access to certain features on the product.Set PJL password for processing PJL commands.Set file system access and firmware upgrade security.Enable or disable the Host USB port on the control panel or the USB connectivity port on the formatter for printing directly from a computer.View the status of all security settings. |
| Access Control | Configure access to product functions for specific individuals or groups, and select the method individuals use to sign in to the product. |
| Protect Stored Data Configure and manage the internal hard drive for the product. | |
| Configure settings for jobs that are stored on the product hard drive. | |
| Certificate Management | Install and manage security certificates for access to the product and the network. |
| Web Service Security | Allow resources on this product to be accessed by web pages from different domains. If no sites are added to the list, then all sites are trusted. |
| Self Test | Verify that the security functions are running according to expected system parameters. |
HP Web Services tab
Use the HP Web Services tab to configure and enable HP Web Services for this product. It is necessary to Enable HP Web Services to use the HP ePrint feature.
Table 5-6 HP Embedded Web Server Networking tab
| Menu Description | |
| Web Services Setup | Connect this product to HP Connected on the Web by enabling HP Web Services. |
| Web Proxy | Configure a proxy server if there are issues enabling HP Web Services or connecting the product to the Internet. |
| HP-ePrint Debugging Enable features for solving problems with connecting to HP ePrint services. | |
Networking tab
Use the Networking tab to configure and secure network settings for the product when it is connected to an IP-based network. This tab does not display if the product is connected to other types of networks.
Table 5-7 HP Embedded Web Server Networking tab
| Menu Description | |
| TCP/IP Settings Configure TCP/IP settings for IPv4 and IPv6 networks. | |
| NOTE: The configuration options available depend on the print server model. | |
| Network Settings | Configure IPX/SPX, AppleTalk, DLC/LLC, and SNMP settings, depending on the print server model. |
| Other Settings | Configure general printing protocols and services supported by the print server. The available options depend on the print server model, but can include firmware update, LPD queues, USB settings, support information, and refresh rate. |
| AirPrint Enable, set up, or disable network printing from Apple supported products. | |
| Select Language | Change the language displayed by the HP Embedded Web Server. This page displays if the Web pages support multiple languages. Optionally, select supported languages through language-preference settings in the browser. |
| Settings View and restore current security settings to factory-default values. | |
| Configure security settings using the Security Configuration Wizard. | |
| NOTE: Do not use the Security Configuration Wizard to configure security settings using network-management applications, such as HP Web Jetadmin. | |
| Authorization | Control configuration management and use of this product, including the following:Set or change the administrator password to control access to configuration parameters.Request, install, and manage digital certificates on the HP Jetdirect print server.Limit host access to this product through an Access Control List (ACL) (for selected print servers on IPv4 networks only). |
| Mgmt. Protocols | Configure and manage security protocols for this product, including the following:Set the security management level for the HP Embedded Web Server, and control traffic over HTTP and HTTPS.Configure the SNMP (Simple Network Management Protocol) operation. Enable or disable the SNMP v1/v2c or SNMP v3 agents on the print server.Control access through protocols that may not be secure, such as printing protocols, print services, discovery protocols, name resolution services, and configuration-management protocols. |
| 802.1X Authentication(For selected HP Jetdirect models only) | Configure 802.1X authentication settings on the Jetdirect print server as required for client authentication on the network, and reset the 802.1X authentication settings to factory-default values.CAUTION:When changing the 802.1X authentication settings; the product might lose its connection. To reconnect, it might be necessary to reset the print server to a factory-default state and reinstall the product. |
| IPsec/Firewall(For selected HP Jetdirect models only) | View or configure a Firewall policy or an IPsec/Firewall policy. |
| Announcement Agent(For selected HP Jetdirect models only) | Enable or disable the HP Device Announcement Agent, set the configuration server, and configure mutual authentication using certificates. |
| Network Statistics | Display network statistics that are collected and stored on the HP Jetdirect print server. |
| Protocol Info | View a list of network-configuration settings on the HP Jetdirect print server for each protocol. |
| Configuration Page | View the HP Jetdirect configuration page, which contains status and configuration information. |
Other Links list

NOTE: Configure which links display in the Other Links list by using the Edit Other Links menu on the General tab. The following are the default links.
Table 5-8 HP Embedded Web Server Other Links list
| Menu Description | |
| Product Support | Connect to the support site for the product to search for help on various topics. |
| Shop for Supplies | Connect to the HP SureSupply Web site for information on purchasing original HP supplies, such as toner cartridges and paper. |
| HP Instant Support Connect to the HP Web site to find solutions to product problems. | |
Advanced configuration with HP Utility for OS X
Use the HP Utility to check product status or to view or change product settings from the computer.
Use the HP Utility when the product is connected with a USB cable or is connected to a TCP/IP-based network.
Open HP Utility
- At the computer, open the System Preferences menu, and then click Print & Fax, Print & Scan, or Printers & Scanners.
- Select the product in the list.
- Click the Options & Supplies button.
- Click the Utility tab.
- Click the Open Printer Utility button.
HP Utility features
The HP Utility toolbar includes these items:
• Devices: Click this button to show or hide Mac products found by the HP Utility.
All Settings: Click this button to return to the HP Utility main view.
HP Support: Click this button to open a browser and go to the HP support Web site.
• Supplies: Click this button to open the HP SureSupply Web site.
- Registration: Click this button to open the HP registration Web site.
• Recycling: Click this button to open the HP Planet Partners Recycling Program Web site.
HP Utility consists of pages that are opened by clicking in the All Settings list. The following table describes the tasks available with HP Utility.
| Item Description | |
| Supplies Status | Shows the product supplies status and provides links for ordering supplies online. |
| Device Information Shows information about the currently selected product. | |
| File Upload Transfers files from the computer to the product. | |
| Upload Fonts Transfers font files from the computer to the product. | |
| HP Connected Accesses the HP Connected Web site. | |
| Update Firmware Transfers a firmware update file to the product. | |
| NOTE: This option is available only after you open theViewmenuand select theShow Advanced Options item. | |
| Commands | Sends special characters or print commands to the product after the print job. |
| NOTE: This option is available only after you open theViewmenuand select theShow Advanced Options item. | |
| Supplies Management | Configures how the product should behave when supplies are nearing the end of their estimated life. |
| Trays Configuration Changes the default tray settings. | |
| Output Devices Manages settings for optional output accessories. | |
| Duplex Mode Turns on the automatic two-sided printing mode. | |
| Economode & Toner Density Configures settings to conserve toner. | |
| E-mail Alerts | Configures automatic email alerts for certain product conditions, such as when supplies need to be replaced, trays are empty, doors are open, or a paper jam has occurred. |
| Resolution Sets the default print resolution. | |
| Protect Direct Ports Disables printing over USB or parallel ports. | |
| Stored Jobs Manages print jobs that are stored on the product hard disk. | |
| Network Settings Configures the network settings, such as the IPv4 and IPv6 settings. | |
| Additional Settings Provides access to the HP Embedded Web Server. | |
Configure IP network settings
• Printer sharing disclaimer
• View or change network settings
- Rename the product on a network
• Manually configure IPv4 TCP/IP parameters from the control panel
• Manually configure IPv6 TCP/IP parameters from the control panel
• Link speed and duplex settings
Printer sharing disclaimer
HP does not support peer-to-peer networking, as the feature is a function of Microsoft operating systems and not of the HP printer drivers. Go to Microsoft at www.microsoft.com.
View or change network settings
Use the HP Embedded Web Server to view or change IP configuration settings.
- Open the HP Embedded Web Server (EWS):
a. 4-line control panels: View the control-panel display to see the IP address.
Touchscreen control panels: From the Home screen on the product control panel, touch the Network 🎨 button to display the IP address or host name.
b. Open a Web browser, and in the address line, type the IP address or host name exactly as it displays on the product control panel. Press the Enter key on the computer keyboard. The EWS opens.
https://10.10.XX.XXX/

NOTE: If the Web browser displays a There is a problem with this website's security certificate message when attempting to open the EWS, click Continue to this website (not recommended).
Choosing Continue to this website (not recommended) will not harm the computer while navigating within the EWS for the HP product.
- Click the Networking tab to obtain network information. Change settings as needed.
Rename the product on a network
To rename the product on a network so that it can be uniquely identified, use the HP Embedded Web Server.
- Open the HP Embedded Web Server (EWS):
a. 4-line control panels: View the control-panel display to see the IP address.
Touchscreen control panels: From the Home screen on the product control panel, touch the Network 🎨 button to display the IP address or host name.
b. Open a Web browser, and in the address line, type the IP address or host name exactly as it displays on the product control panel. Press the Enter key on the computer keyboard. The EWS opens.

https://10.10.XXXXX/

NOTE: If the Web browser displays a There is a problem with this website's security certificate message when attempting to open the EWS, click Continue to this website (not recommended).
Choosing Continue to this website (not recommended) will not harm the computer while navigating within the EWS for the HP product.
-
Open the General tab.
-
On the Device Information page, the default product name is in the Device Name field. You can change this name to uniquely identify this product.

NOTE: Completing the other fields on this page is optional.
- Click the Apply button to save the changes.
Manually configure IPv4 TCP/IP parameters from the control panel
Use the control-panel Administration menus to manually set an IPv4 address, subnet mask, and default gateway.
-
Press the Home button on the product control panel.
-
Open the following menus:
-
Administration
• Network Settings
Jetdirect Menu
TCP/IP
• IPV 4 Settings -
Config Method
-
Select the Manual option, and then touch the Save button.
- Open the Manual Settings menu.
- Touch the IP Address, Subnet Mask, or Default Gateway option.
- Touch the first field to open a keypad. Enter the correct digits for the field, and then touch the OK button.
Repeat the process for each field, and then touch the Save button.
Manually configure IPv6 TCP/IP parameters from the control panel
Use the control-panel Administration menus to manually set an IPv6 address.
- Press the Home button on the product control panel.
-
To enable manual configuration, open the following menus:
-
Administration
• Network Settings
Jetdirect Menu
TCP/IP
• IPV6 Settings - Address
- Manual Settings
- Enable
Select the On option, and then touch the Save button.
- To configure the address, touch the Address button and then touch the field to open a keypad.
- Use the keypad to enter the address, and then touch the OK button.
- Touch the Save button, or press the OK button.
Link speed and duplex settings

NOTE: This information applies only to Ethernet networks. It does not apply to wireless networks.
The link speed and communication mode of the print server must match the network hub. For most situations, leave the product in automatic mode. Incorrect changes to the link speed and duplex settings might prevent the product from communicating with other network devices. To make changes, use the product control panel.

NOTE: The product setting must match the setting for the network device (a network hub, switch, gateway, router, or computer).

NOTE: Making changes to these settings causes the product to turn off and then on. Make changes only when the product is idle.
- Press the Home 📋 button on the product control panel.
-
Open the following menus:
-
Administration
• Network Settings
Jetdirect Menu -
Link Speed
-
Select one of the following options:
-
Auto: The print server automatically configures itself for the highest link speed and communication mode allowed on the network.
• 10T Half: 10 megabytes per second (Mbps), half-duplex operation
• 10T Full: 10 Mbps, full-duplex operation
• 10T Auto: 10 Mbps, automatic-duplex operation
• 100TX Half: 100 Mbps, half-duplex operation
• 100TX Full: 100 Mbps, full-duplex operation
• 100TX Auto: 100 Mbps, automatic-duplex operation
• 1000T Full: 1000 Mbps, full-duplex operation -
Touch the Save button, or press the OK button. The product turns off and then on.
Product security features
Introduction
The product includes several security features to restrict who has access to configuration settings, to secure data, and to prevent access to valuable hardware components.
• Security statements
IP Security
- Assign or change the system password using the Embedded Web Server
• Sign in to the product
• Encryption support: HP High Performance Secure Hard Disks
- Lock the formatter
Security statements
The product supports security standards and recommended protocols that help you keep the product secure, protect critical information on your network, and simplify the way you monitor and maintain the product.
For in-depth information about HP's secure imaging and printing solutions, visit www.hp.com/go/secureprinting. The site provides links to white papers and FAQ documents about security features.
IP Security
IP Security (IPsec) is a set of protocols that control IP-based network traffic to and from the product. IPsec provides host-to-host authentication, data integrity, and encryption of network communications.
For products that are connected to the network and have an HP Jetdirect print server, you can configure IPsec by using the Networking tab in the HP Embedded Web Server.
Assign or change the system password using the Embedded Web Server
Assign an administrator password for access to the product and the HP Embedded Web Server so that unauthorized users cannot change the product settings.
- Open the HP Embedded Web Server (EWS):
a. 4-line control panels: View the control-panel display to see the IP address.
Touchscreen control panels: From the Home screen on the product control panel, touch the Network 📋 button to display the IP address or host name.
b. Open a Web browser, and in the address line, type the IP address or host name exactly as it displays on the product control panel. Press the Enter key on the computer keyboard. The EWS opens.

https://10.10.XXXXX/

NOTE: If the Web browser displays a There is a problem with this website's security certificate message when attempting to open the EWS, click Continue to this website (not recommended).
Choosing Continue to this website (not recommended) will not harm the computer while navigating within the EWS for the HP product.
- Click the Security tab.
- Open the General Security menu.
- In the area labeled Set the Local Administrator Password, enter the name to associate with the password in the Username field.
- Enter the password in the New Password field, and then enter it again in the Verify Password field.

NOTE: To change an existing password, first enter the existing password in the Old Password field.
- Click the Apply button.

NOTE: Make note of the password and store it in a safe place.
Sign in to the product
Some features on the product control panel can be secured so that unauthorized people cannot use them. When a feature is secured, the product prompts you to sign in before you can use it. You can also sign in without waiting for a prompt by selecting Sign In from the product control panel.
Typically, the credentials for signing in to the product are the same as for signing in to the network. Consult the network administrator for this product if you have questions about which credentials to use.

- Press the Home
button on the product control panel. - Select Sign In.
- Follow the prompts to enter the credentials.

NOTE: To maintain security for the product, select Sign Out when you have finished using the product.
Encryption support: HP High Performance Secure Hard Disks
The hard disk provides hardware-based encryption so you can securely store sensitive data without impacting product performance. This hard disk uses the latest Advanced Encryption Standard (AES) and has versatile time-saving features and robust functionality.
Use the Security menu in the HP Embedded Web Server to configure the disk.
Lock the formatter
The formatter has a slot that you can use to attach a security cable. Locking the formatter prevents someone from removing valuable components from it.
Economy settings
Introduction
• Print with EconoMode
- Set the sleep timer and configure the product to use 1 watt or less of power
Print with EconoMode
This product has an EconoMode option for printing drafts of documents. Using EconoMode can use less toner. However, using EconoMode can also reduce print quality.
HP does not recommend the full-time use of EconoMode. If EconoMode is used full-time, the toner supply might outlast the mechanical parts in the toner cartridge. If print quality begins to degrade and is no longer acceptable, consider replacing the toner cartridge.

NOTE: If this option is not available in your print driver, you can set it using the product control panel.
Configure EconoMode from the print driver
- From the software program, select the Print option.
- Select the product, and then click the Properties or Preferences button.
- Click the Paper/Quality tab.
- Click the EconoMode check box to enable the feature, and then click OK.
Configure EconoMode from the product control panel
- Press the Home button on the product control panel.
-
Open the following menus:
-
Administration
- General Settings
-
Print Quality
-
Select EconoMode.
-
Select On or Off to enable or disable the feature, and then touch Save or press the OK button.
Set the sleep timer and configure the product to use 1 watt or less of power
The product has several options for the energy-saving sleep timer feature. The time delay to enter the Sleep/Auto Off state is adjustable, and the power usage during the Sleep/Auto Off state varies according to selection for the Wake/Auto On option.
- Press the Home button on the product control panel.
-
Open the following menus:
-
Administration
-
General Settings
-
Energy Settings
-
Sleep Timer Settings
-
4-line control panels only: Select Sleep/Auto Off Timer, and then select Enabled. Press the OK button.
-
Select Sleep /Auto Off After.
-
Use the keypad to enter the appropriate time period, and then touch the Save button, or press the OK button.

NOTE: The sleep-mode default time is 1 minute.
-
Select one of the Wake/Auto On to These Events options:
-
All events: The product wakes when it receives any print job (through the USB port, network port, or wireless connection), or when someone presses a button on the control panel, or opens any door or tray.
- Network port: The product wakes when it receives a print job sent through the network port, or when someone presses a button on the control panel, or opens any door or tray. With this setting, the product uses 1 watt or less of power while in the Sleep/Auto Off state.
- Power button only: The product wakes only when someone presses the power button. With this setting, the product uses 1 watt or less of power while in the Sleep/Auto Off state.
HP Web Jetadmin
HP Web Jetadmin is an award-winning, industry-leading tool for efficiently managing a wide variety of networked HP products, including printers, multifunction products, and digital senders. This single solution allows you to remotely install, monitor, maintain, troubleshoot, and secure your printing and imaging environment — ultimately increasing business productivity by helping you save time, control costs, and protect your investment.
HP Web Jetadmin upgrades are periodically made available to provide support for specific product features. Go to www.hp.com/go/webjetadmin and click the Self Help and Documentation link to learn more about upgrades.
Software and firmware updates
HP regularly updates features that are available in the product firmware. To take advantage of the most current features, update the product firmware. Download the most recent firmware update file from the Web:
Go to www.hp.com/support/ljM604, www.hp.com/support/ljM605, www.hp.com/support/ljM606. Click Drivers & Software.
6 Solve problems
- Customer support
• Control panel help system - Restore factory-set defaults
A "Cartridge is low" or "Cartridge is very low" message displays on the product control panel
• Product does not pick up paper or misfeeds
Clear paper jams - Improve print quality
- Solve wired network problems
For more information:
Go to www.hp.com/support/ljM604, www.hp.com/support/ljM605, www.hp.com/support/ljM606.
HP's all-inclusive help for the product includes the following information:
• Install and configure
Learn and use
- Solve problems
• Download software updates
- Join support forums
• Find warranty and regulatory information
Customer support
| Get telephone support for your country/regionHave the product name, serial number, date of purchase, and problem description ready. | Country/region phone numbers are on the flyer that was in the box with your product or atwww.hp.com/support/. |
| Get 24-hour Internet support, and download software utilities and drivers | www.hp.com/support/ljM604, www.hp.com/support/ljM605, www.hp.com/support/ljM606 |
| Order additional HP service or maintenance agreements | www.hp.com/go/carepack |
| Register your product | www.register.hp.com |
Control panel help system
The product has a built-in Help system that explains how to use each screen. To open the Help system, touch the Help button in the upper-right corner of the screen.
For some screens, the Help opens to a global menu where you can search for specific topics. You can browse through the menu structure by touching the buttons in the menu.
Some Help screens include animations that guide you through procedures, such as clearing jams.
For screens that contain settings for individual jobs, the Help opens to a topic that explains the options for that screen.
If the product alerts you of an error or warning, touch the Help ☐ button to open a message that describes the problem. The message also contains instructions to help solve the problem.
Use one of the following methods to restore the product to the original settings from the factory.

NOTE: Restoring factory settings might reset the product language.
Restore factory settings from the product control panel
- Press the Home 📋 button on the product control panel.
-
Open the following menus:
-
Administration
- General Settings
-
Restore Factory Settings
-
A verification message advises that completing the reset function might result in loss of data. Select Reset to complete the process.

NOTE: The product restarts automatically after the reset operation completes.
Restore factory settings from the HP Embedded Web Server (network-connected products only)
- Open the HP Embedded Web Server (EWS):
a. 4-line control panels: View the control-panel display to see the IP address.
Touchscreen control panels: From the Home screen on the product control panel, touch the Network 📋 button to display the IP address or host name.
b. Open a Web browser, and in the address line, type the IP address or host name exactly as it displays on the product control panel. Press the Enter key on the computer keyboard. The EWS opens.

https://10.10.XXXXX/

NOTE: If the Web browser displays a There is a problem with this website's security certificate message when attempting to open the EWS, click Continue to this website (not recommended).
Choosing Continue to this website (not recommended) will not harm the computer while navigating within the EWS for the HP product.
- Open the General tab.
- On the left side of the screen, click Restore Factory Settings.
- Click the Reset button.

NOTE: The product restarts automatically after the reset operation completes.
A “Cartridge is low” or “Cartridge is very low” message displays on the product control panel
Cartridge is low: The product indicates when a toner cartridge level is low. Actual toner cartridge life remaining may vary. Consider having a replacement available to install when print quality is no longer acceptable. The toner cartridge does not need to be replaced now.
Cartridge is very low: The product indicates when the toner cartridge level is very low. Actual toner cartridge life remaining may vary. Consider having a replacement available to install when print quality is no longer acceptable. The toner cartridge does not need to be replaced now unless the print quality is no longer acceptable.
Once an HP toner cartridge has reached Very Low, HP's Premium Protection Warranty on that toner cartridge has ended.
Change the "Very Low" settings
You can change the way the product reacts when supplies reach the Very Low state. You do not have to re-establish these settings when you install a new toner cartridge.
-
Press the Home button on the product control panel.
-
Open the following menus:
Supplies
- Manage Supplies
• Supply Settings
- Black Cartridge or Color Cartridges
• Very Low Settings
-
Select one of the following options:
-
Select the Stop option to set the product to stop printing when the cartridge reaches the Very Low threshold.
- Select the Prompt to continue option to set the product to stop printing when the cartridge reaches the Very Low threshold. You can acknowledge the prompt or replace the cartridge to resume printing.
- Select the Continue option to set the product to alert you that the cartridge is very low, and to continue printing beyond the Very Low setting without interaction. This can result in unsatisfactory print quality.
For products with fax capability
When the product is set to the Stop or Prompt to continue option, there is some risk that faxes will not print when the product resumes printing. This can occur if the product has received more faxes than the memory can hold while the product is waiting.
The product can print faxes without interruption when it passes the Very Low threshold if you select the Continue option for the toner cartridge, but print quality might degrade.
Order supplies
Order supplies and paper www.hp.com/go/suresupply
Order through service or support providers Contact an HP-authorized service or support provider.
Order using the HP Embedded Web Server (EWS) To access, in a supported Web browser on your computer, enter
the product IP address or host name in the address/URL field. The EWS contains a link to the HP SureSupply Web site, which provides options for purchasing Original HP supplies.
Product does not pick up paper or misfeeds
Introduction
The following solutions can help solve problems if the product is not picking up paper from the tray or is picking up multiple sheets of paper at one time.
• The product does not pick up paper
• The product picks up multiple sheets of paper
The product does not pick up paper
If the product does not pick up paper from the tray, try these solutions.
- Open the product and remove any jammed sheets of paper.
- Load the tray with the correct size of paper for your job.
- Make sure the paper size and type are set correctly on the product control panel.
- Make sure the paper guides in the tray are adjusted correctly for the size of paper. Adjust the guides to the appropriate indentation in the tray.
- Check the product control panel to see if the product is waiting for you to acknowledge a prompt to feed the paper manually. Load paper, and continue.
- The rollers above the tray might be contaminated. Clean the rollers with a lint-free cloth dampened with warm water.
The product picks up multiple sheets of paper
If the product picks up multiple sheets of paper from the tray, try these solutions.
- Remove the stack of paper from the tray and flex it, rotate it 180 degrees, and flip it over. Do not fan the paper. Return the stack of paper to the tray.
- Use only paper that meets HP specifications for this product.
- Use paper that is not wrinkled, folded, or damaged. If necessary, use paper from a different package.
- Make sure the tray is not overfilled. If it is, remove the entire stack of paper from the tray, straighten the stack, and then return some of the paper to the tray.
- Make sure the paper guides in the tray are adjusted correctly for the size of paper. Adjust the guides to the appropriate indentation in the tray.
- Make sure the printing environment is within recommended specifications.
Clear paper jams
Introduction
The following information includes instructions for clearing paper jams from the product.
Jam locations
• Auto-navigation for clearing jams
• Experiencing frequent or recurring paper jams?
• Clear paper jams in Tray 1
• Clear paper jams in Tray 2 and the 500-sheet trays
• Clear paper jams in the optional 1,500-sheet high-capacity tray
• Clear paper jams in the toner-cartridge area
• Clear paper jams in the rear output bin
• Clear paper jams in the fuser area
• Clear paper jams in the output bin
• Clear paper jams in the duplexer
• Clear paper jams in the envelope feeder
• Clear paper jams in the 5-bin mailbox
• Clear jams in the stacker or stapler/stacker
Jam locations
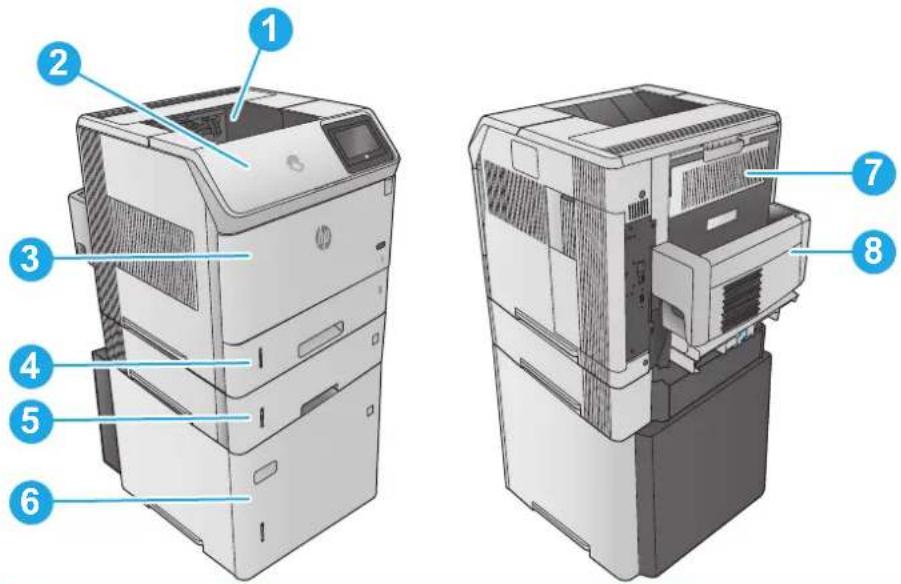
text_image
Technical diagram of a HP printer with numbered parts labeled for identification.| 1 Output bin | See Clear paper jams in the output bin on page 109. |
| 2 Toner-cartridge area See | Clear paper jams in the toner-cartridge area on page 100. |
| 3 Tray 1 See | Clear paper jams in Tray 1 on page 95. |
| 4 Tray 2 See | Clear paper jams in Tray 2 and the 500-sheet trays on page 96. |
| 5 Optional 500-sheet paper feeder See | Clear paper jams in Tray 2 and the 500-sheet trays on page 96. |
| 6 Optional 1,500-sheet high-capacity tray See | Clear paper jams in the optional 1,500-sheet high-capacity tray on page 98. |
| 7 Rear output bin and fuser area See | Clear paper jams in the rear output bin on page 103 and Clear paper jams in the fuser area on page 104. |
| 8 Optional duplexer See | Clear paper jams in the duplexer on page 110. |
| Envelope feeder (not shown) See | Clear paper jams in the envelope feeder on page 112. |
| 5-bin mailbox (not shown) See | Clear paper jams in the 5-bin mailbox on page 114. |
| Stacker or stapler/stacker (not shown) See | Clear jams in the stacker or stapler/stacker on page 116. |
Auto-navigation for clearing jams
The auto-navigation feature assists you in clearing jams by providing step-by-step instructions on the control panel. When you complete a step, the product displays instructions for the next step until you have completed all steps in the procedure.
Experiencing frequent or recurring paper jams?
To reduce the number of paper jams, try these solutions.
- Use only paper that meets HP specifications for this product.
- Use paper that is not wrinkled, folded, or damaged. If necessary, use paper from a different package.
- Use paper that has not previously been printed or copied on.
- Make sure the tray is not overfilled. If it is, remove the entire stack of paper from the tray, straighten the stack, and then return some of the paper to the tray.
- Make sure the paper guides in the tray are adjusted correctly for the size of paper. Adjust the guides so they are touching the paper stack without bending it.
- Make sure that the tray is fully inserted in the product.
- If you are printing on heavy, embossed, or perforated paper, use the manual feed feature and feed sheets one at a time.
- Open the Trays menu on the product control panel. Verify that the tray is configured correctly for the paper type and size.
- Make sure the printing environment is within recommended specifications.
Clear paper jams in Tray 1
Use the following procedure to clear paper jams in Tray 1. When a jam occurs, the control panel displays an animation that assists in clearing the jam.
- Slowly pull the jammed paper out of the product.
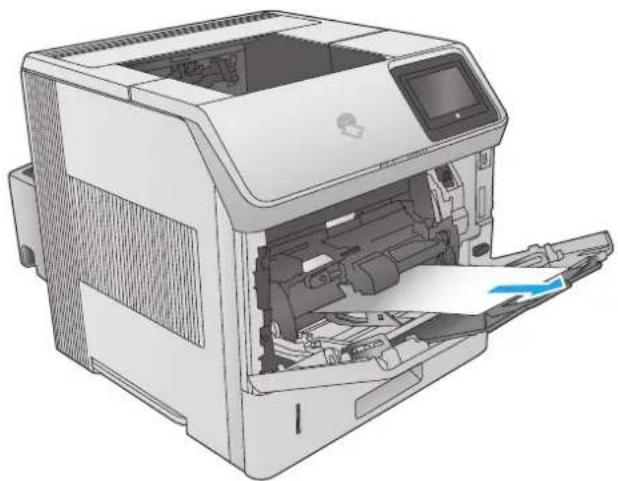
natural_image
Illustration of a HP printer with internal components and paper feed (no text or symbols visible)Clear paper jams in Tray 2 and the 500-sheet trays
Use the following procedure to check for paper in all possible jam locations related to Tray 2 and the 500-sheet trays. When a jam occurs, the control panel displays an animation that assists in clearing the jam.
- Pull the tray completely out of the product by pulling and lifting it up slightly.
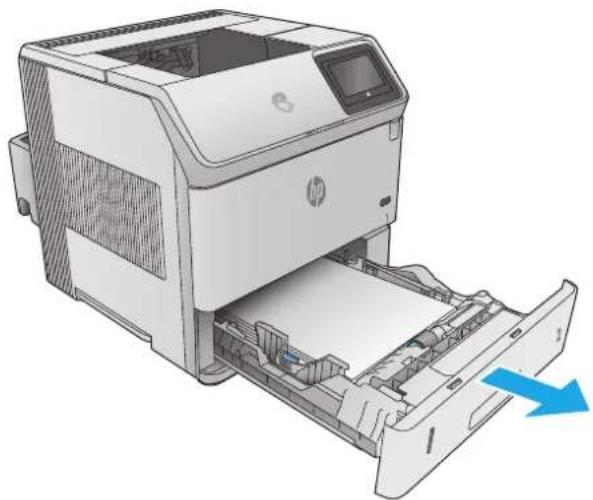
natural_image
Illustration of a HP printer with paper feed and paper roll, showing internal structure without any text or symbols.- If the edge of the jammed paper is visible in the feed area, slowly pull the paper down and toward the back of the product. Then pull it out of the product. (Do not pull the paper straight out, or it will tear.) If the paper is not visible, look in the next tray or in the top-cover area.
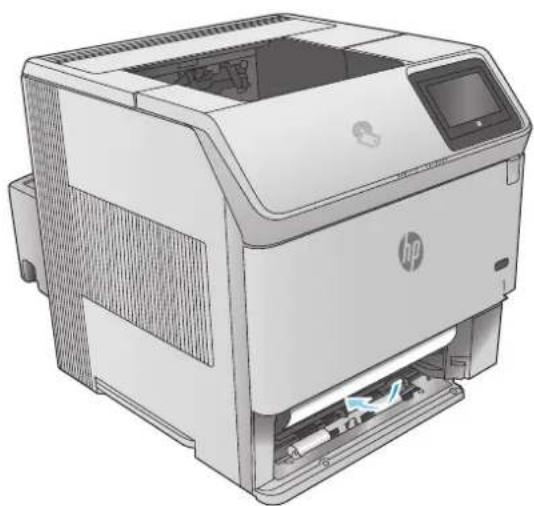
natural_image
Illustration of a HP printer with paper feed and control panel (no text or symbols visible)-
Make sure that the paper is flat in the tray at all four corners and below the maximum-height indicators.
-
Reinsert and close the tray.
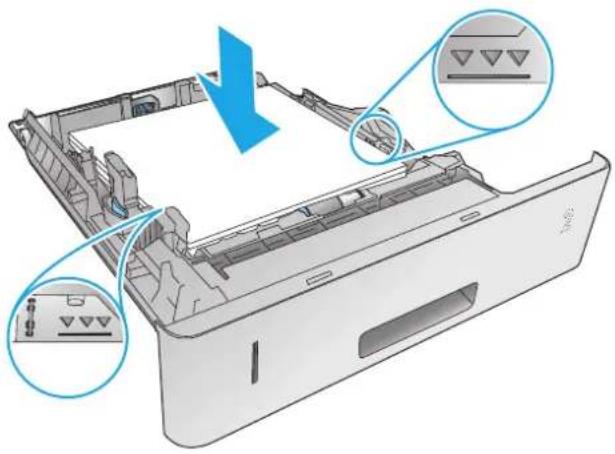
natural_image
Diagram of a computer drawer with internal components and a blue arrow indicating a process (no text or symbols present)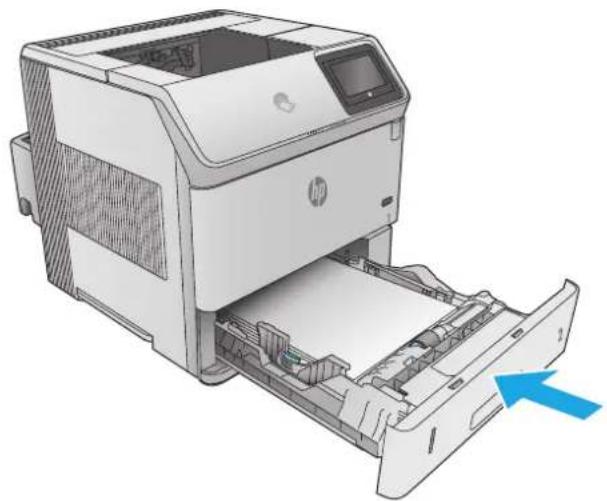
natural_image
Illustration of a HP printer with paper feed and a blue arrow indicating compression action (no text or symbols)Clear paper jams in the optional 1,500-sheet high-capacity tray
Use the following procedure to clear paper jams in the 1,500-sheet high-capacity tray. When a jam occurs, the control panel displays an animation that assists in clearing the jam.
-
Open the front door of the tray.
-
Remove the paper stack.
-
If the edge of the jammed paper is visible in the feed area, slowly pull the paper down and out of the product. (Do not pull the paper straight out, or it will tear.) If the paper is not visible, look in the top-cover area.
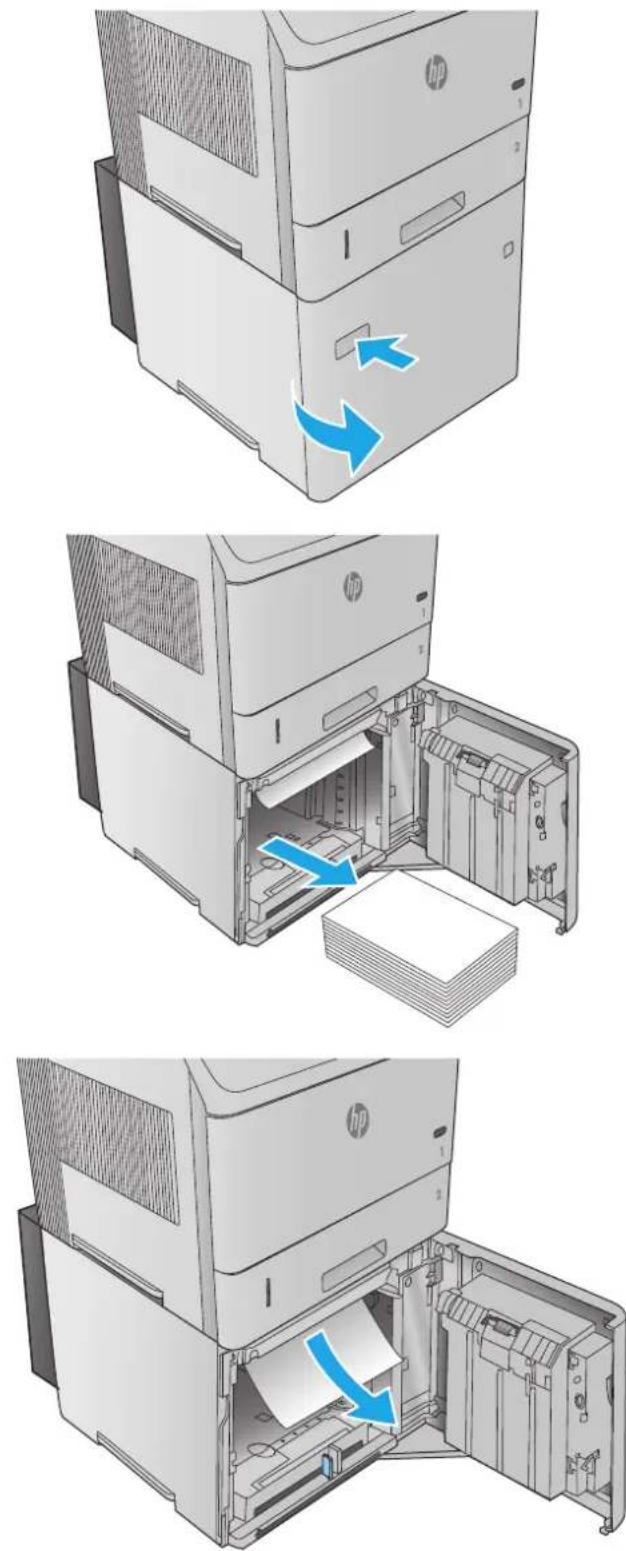
-
Make sure that the paper does not exceed the fill marks on the paper guides, and that the front edge of the stack is aligned with the arrows.
-
Close the front door of the tray.
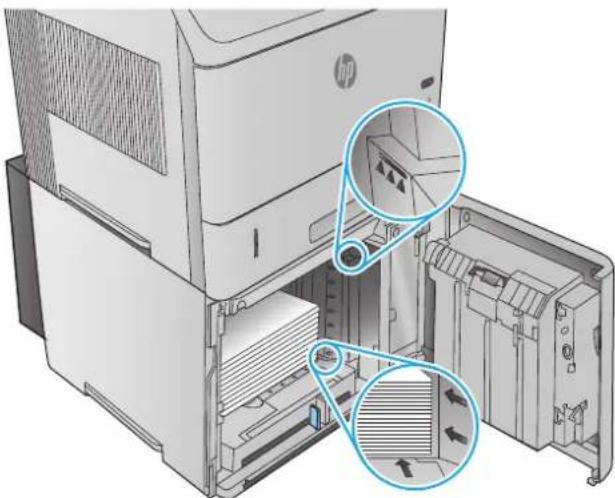
natural_image
Diagram of a HP printer internal structure showing internal components and mounting holes (no text or labels)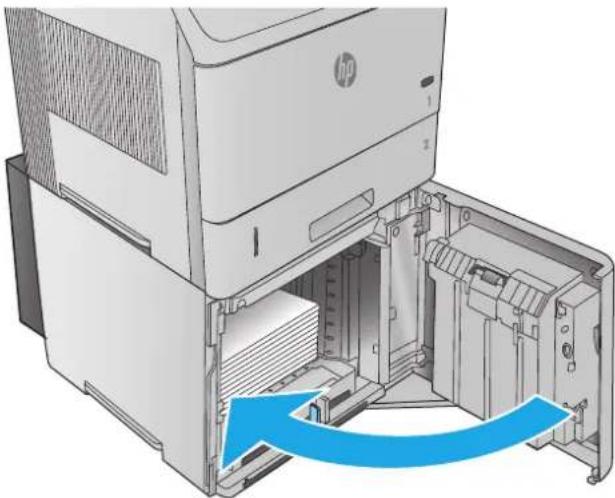
natural_image
Diagram of a HP printer internal structure showing internal components and a blue arrow indicating loading or movement (no text or symbols present)Clear paper jams in the toner-cartridge area
Use the following procedure to check for paper in all possible jam locations in the toner-cartridge area. When a jam occurs, the control panel displays an animation that assists in clearing the jam.
-
Open the top cover.
-
Remove the toner cartridge.
CAUTION: To prevent damage to the toner cartridge, do not expose it to light for more than a few minutes. Cover the toner cartridge with a sheet of paper while it is outside of the product.
- Use the green handle to lift the paper-access plate. Slowly pull the jammed paper out of the product. Do not tear the paper. If paper is difficult to remove, try clearing it from the tray area.
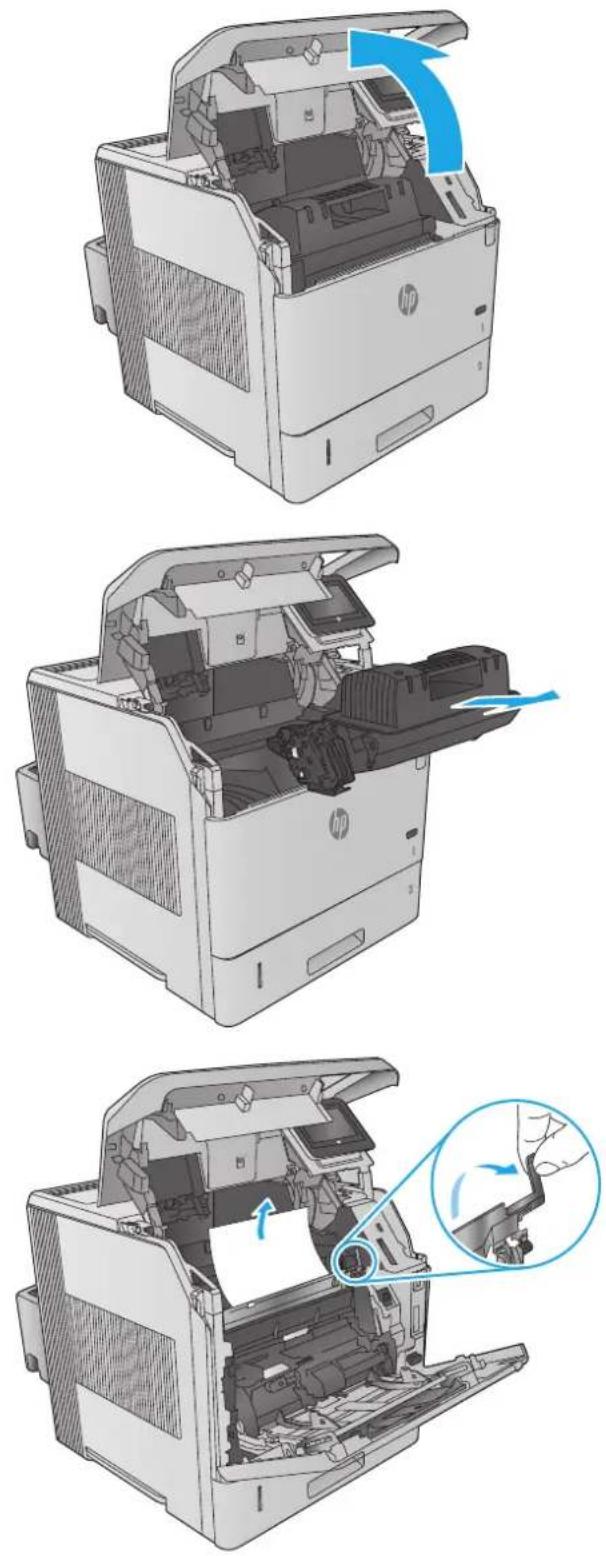
-
Open Tray 1.
-
Remove the envelope accessory cover. If paper is present, remove it.
-
Rotate the paper guide to check for additional jammed paper underneath. If jammed paper is present, remove it.
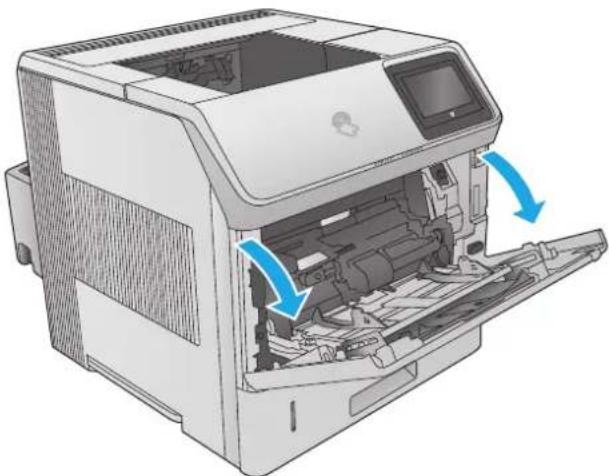
natural_image
Illustration of an HP printer internal structure with blue arrows indicating motion or flow (no text or symbols present)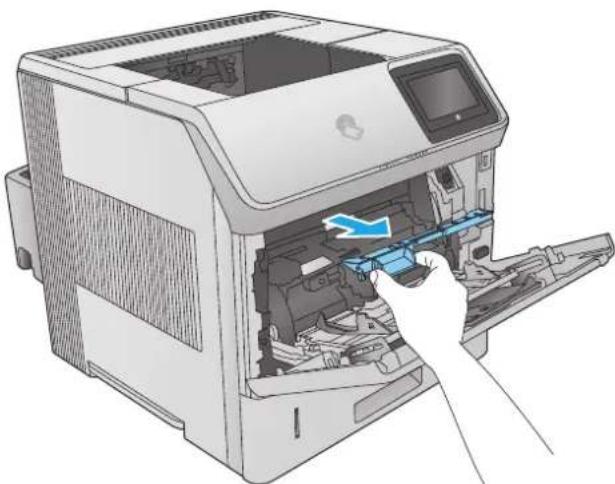
natural_image
Illustration of a printer with a hand inserting a tool into the open chamber (no text or symbols visible)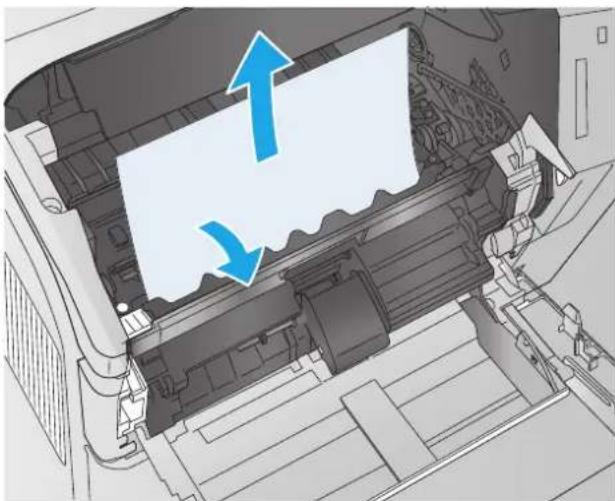
natural_image
Diagram of a printer's internal structure showing paper feed and paper roll, with no visible text or symbols-
Replace the envelope accessory cover and close Tray 1.
-
Replace the toner cartridge.
-
Close the top cover.
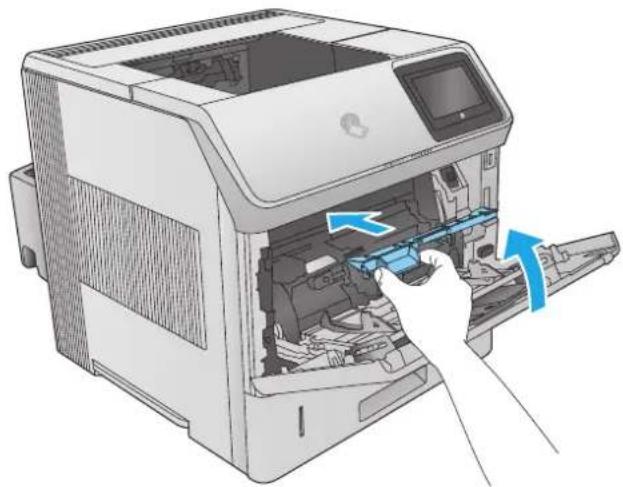
natural_image
Illustration of a printer with a hand inserting a component into the open chamber, showing internal components and a blue directional arrow (no text or symbols)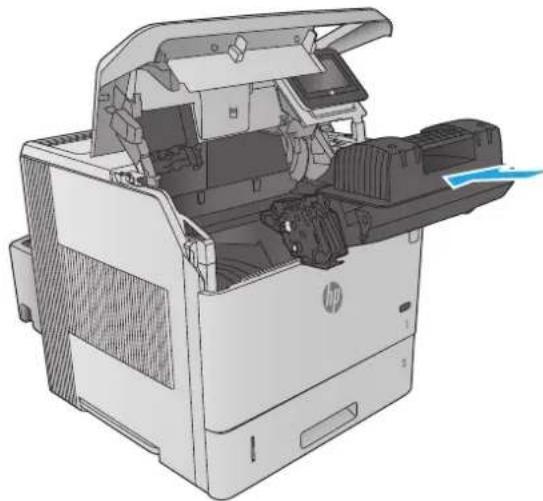
natural_image
3D rendering of an HP printer internal structure showing internal components and a blue arrow indicating a motion (no text or symbols present)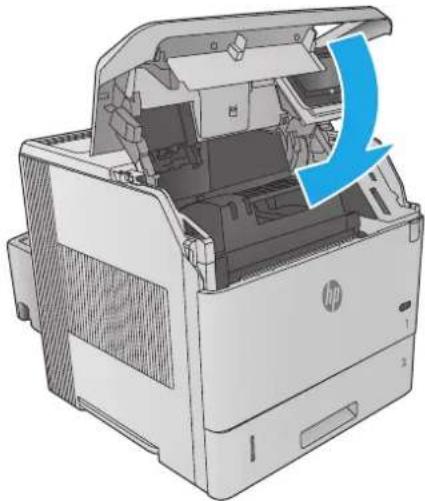
natural_image
3D diagram of an HP printer internal structure showing internal components and a blue arrow indicating rotation (no text or symbols)Clear paper jams in the rear output bin
Use the following procedure to clear paper jams in the rear output bin. When a jam occurs, the control panel displays an animation that assists in clearing the jam.
- Open the rear output bin.
NOTE: If most of the paper is still inside the product, it might be easier to remove it through the top-cover area.
- Grasp both sides of the paper, and slowly pull the paper out of the product. Loose toner might be on the sheet. Be careful not to spill it on yourself or into the product.
NOTE: If the jammed paper is difficult to remove, try opening the top cover all the way to release pressure on the paper. If the sheet has torn, or if you still cannot remove it, clear the jam from the fuser area.
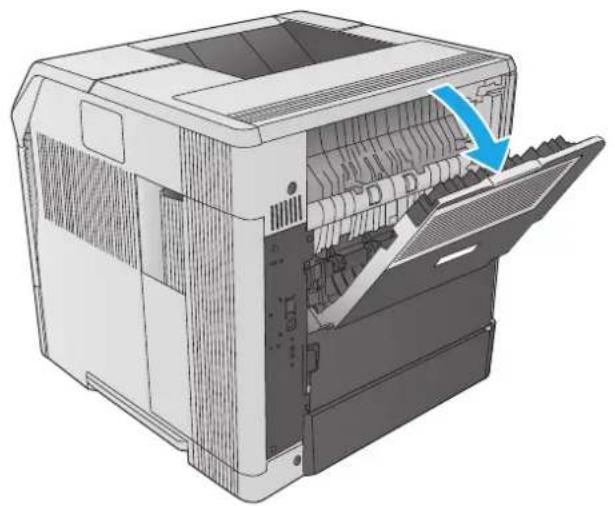
natural_image
Illustration of a computer tower internal structure showing internal components and a blue arrow indicating a process or operation (no text or symbols present)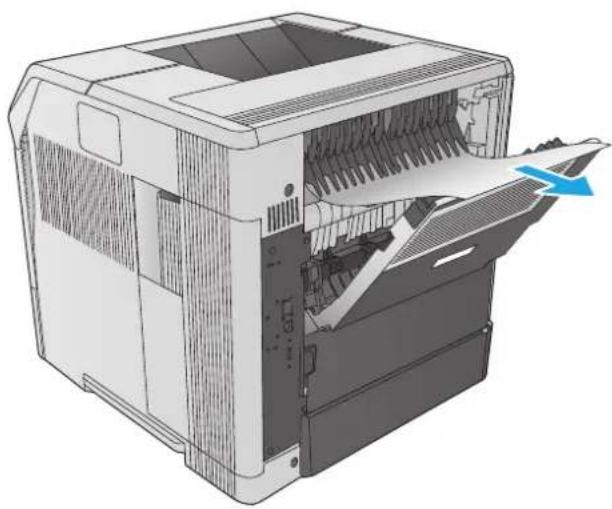
natural_image
Illustration of a computer tower internal structure showing ventilation duct and fan blades (no text or symbols)Clear paper jams in the fuser area
Use the following procedure to check for paper in all possible jam locations in the fuser area. When a jam occurs, the control panel displays an animation that assists in clearing the jam.
Use this procedure only in these situations:
-
Paper has jammed inside the fuser and cannot be removed from the top-cover area or the rear output area.
A sheet of paper tears during an attempt to clear a jam from the fuser. -
Turn the product off.
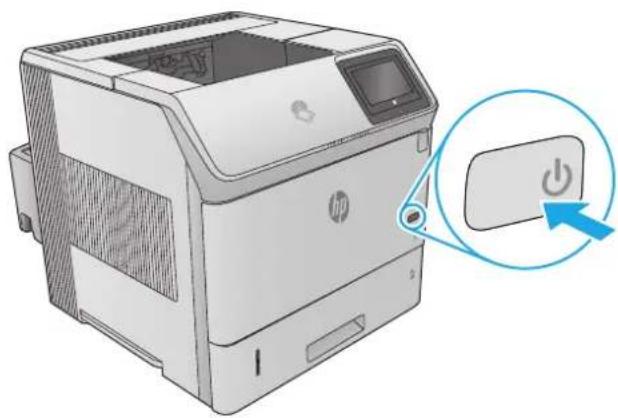
natural_image
Illustration of a HP printer with a button labeled 'Power' and a blue circular arrow pointing to it (no text or symbols on the device itself)- Disconnect the power cord.
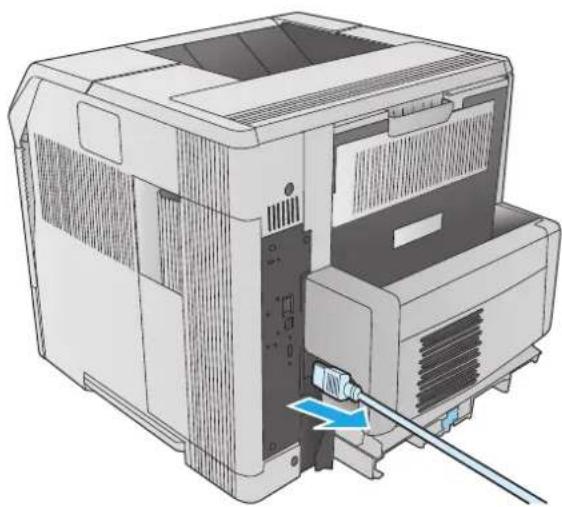
natural_image
Illustration of a computer tower with a cable inserted into the base panel (no text or symbols visible)-
If an optional duplexer is installed, lift it and pull it straight out. Set it aside.
-
Open the rear output bin.
-
Remove the rear output bin. Place a finger near the left-side hinge, and push firmly to the right until the hinge-pin clears the hole inside the product. Rotate the output bin outward to remove it.
WARNING! The fuser is very hot. To avoid burns, allow the fuser to cool before continuing.
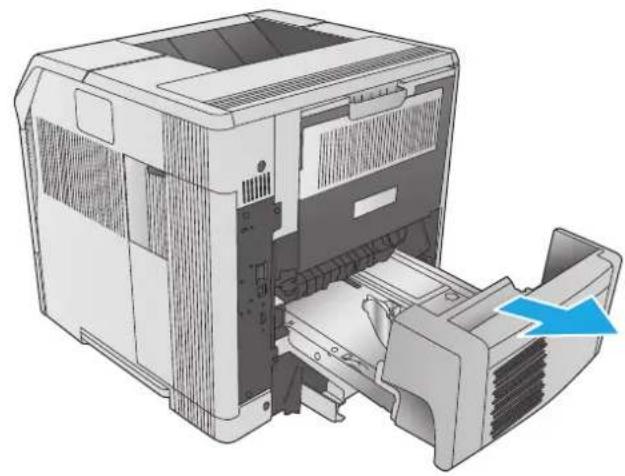
natural_image
Illustration of a computer tower with an open access port and a blue arrow indicating a component (no text or symbols present)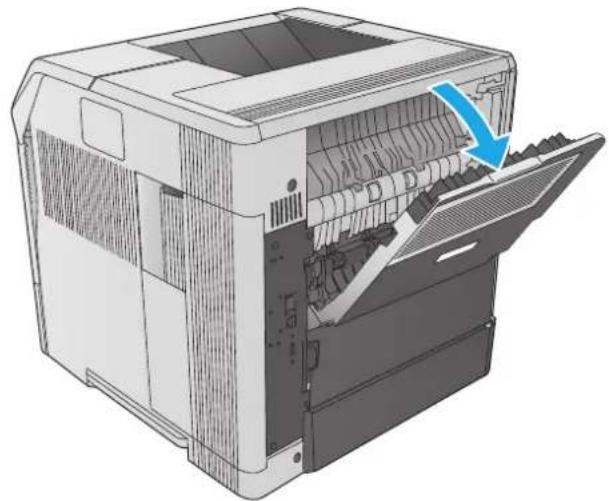
natural_image
Illustration of a computer printer internal structure showing internal components and a blue arrow indicating a component (no text or symbols present)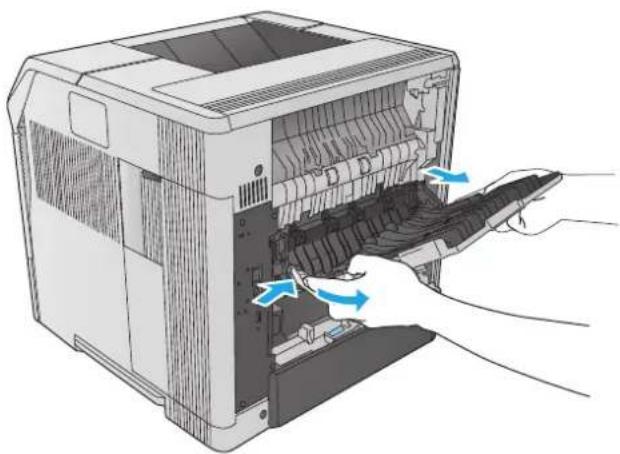
natural_image
Illustration of a computer tower with hands operating the internal panel and scroll, showing internal structure and blue directional arrows (no text or symbols)-
Push up on the two blue levers on the sides of the fuser to release it, and then pull the fuser straight out of the product to remove it..
-
Remove the jammed paper. If necessary, lift the black plastic guide that is located on the top of the fuser to gain access to the jammed sheet.
CAUTION: Do not use a sharp or metal object to clear paper from the fuser area. It might damage the fuser.
- Push the fuser straight into the product until it snaps into place.
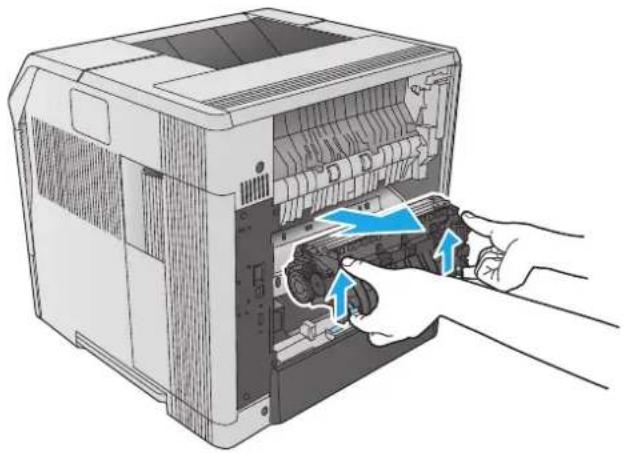
natural_image
Illustration of a computer tower internal structure with hands installing or adjusting the component (no text or symbols visible)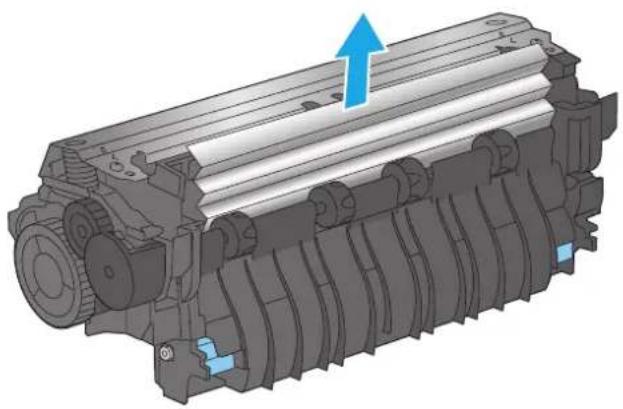
natural_image
3D mechanical assembly diagram showing a cylindrical component with internal grooves and a blue upward arrow indicating motion (no text or symbols)
natural_image
Illustration of a computer tower with hands inserting or adjusting the internal components (no text or symbols visible)-
Replace the rear output bin. Insert the right hinge-pin into the hole inside the product. Push inward on the left hinge, and slide it into the hole inside the product. Close the rear output bin.
-
Connect the power cord to the product.
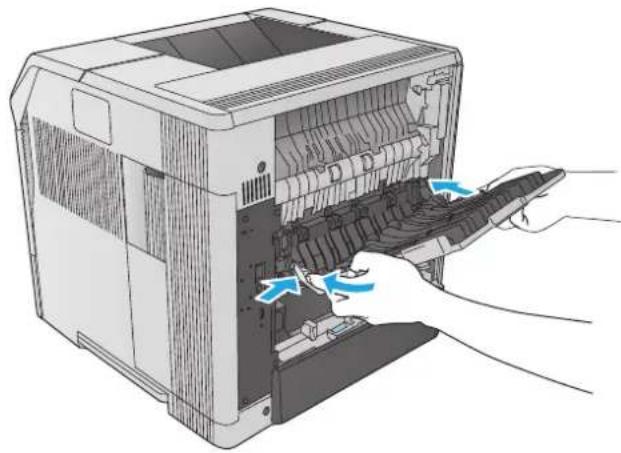
natural_image
Illustration of a computer tower with a hand holding a remote control panel, showing internal components and blue directional arrows indicating motion (no text or symbols present)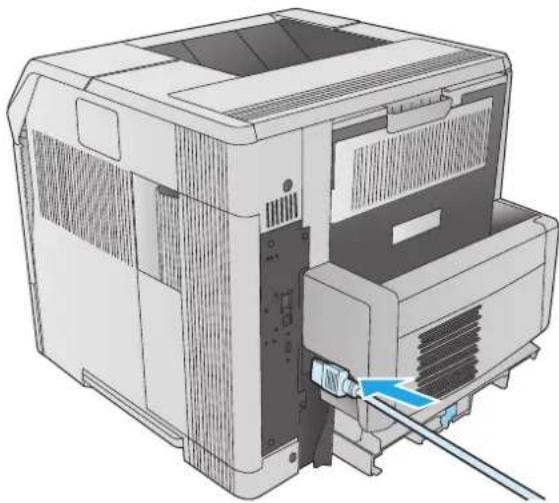
natural_image
Illustration of a computer printer internal structure with a blue arrow indicating a component (no text or symbols present)- Replace the optional duplexer, if it was removed.
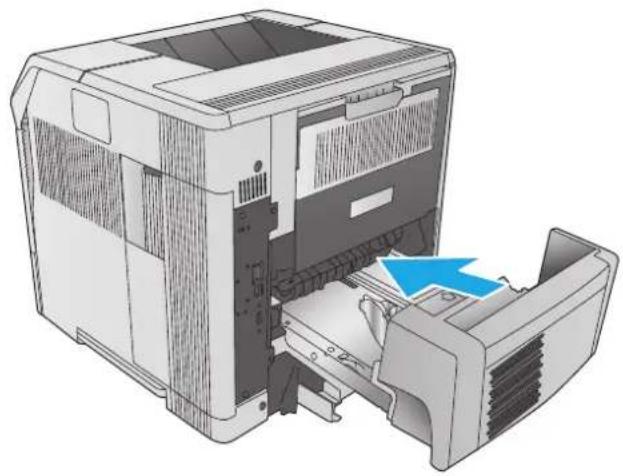
natural_image
Illustration of a computer printer internal structure with a blue arrow indicating the component (no text or symbols present)- Turn the product on.
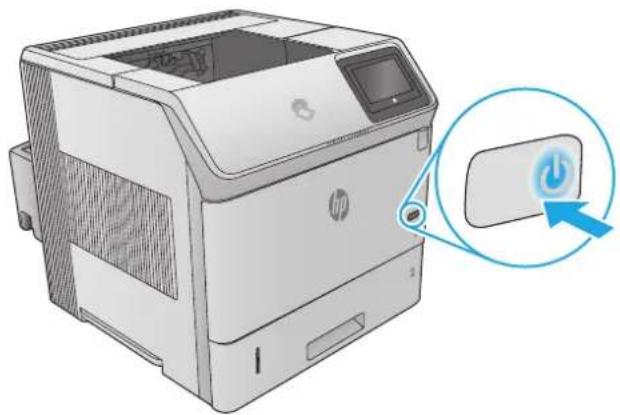
natural_image
Illustration of a HP printer with a button icon and a blue circular arrow indicating action (no text or symbols present)Clear paper jams in the output bin
Use the following procedure to check for paper in all possible jam locations in the output bin. When a jam occurs, the control panel displays an animation that assists in clearing the jam.
- If paper is visible in the output bin, grasp the leading edge and remove it.
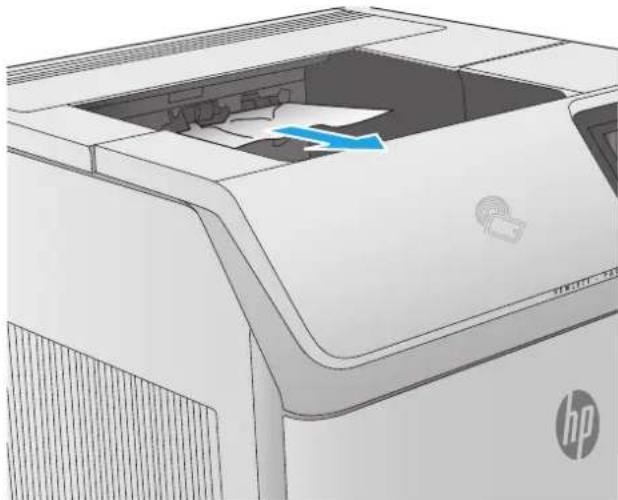
natural_image
Illustration of a HP printer with a blue arrow indicating compression or disassembly (no text or symbols present)Clear paper jams in the duplexer
Use the following procedure to check for paper in all possible jam locations in the automatic duplexer. When a jam occurs, the control panel displays an animation that assists in clearing the jam.
- Lift the duplexer up and then pull it out to remove it.
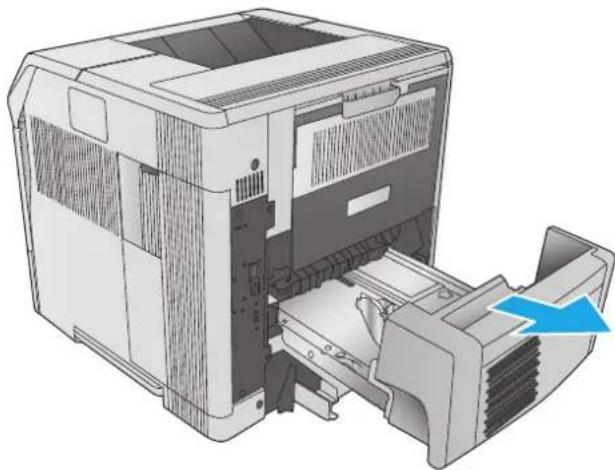
natural_image
3D illustration of a computer printer internal structure with a blue arrow indicating a component (no text or symbols present)- Remove any paper that is on top of Tray 2. (It might be necessary to reach inside the product.)
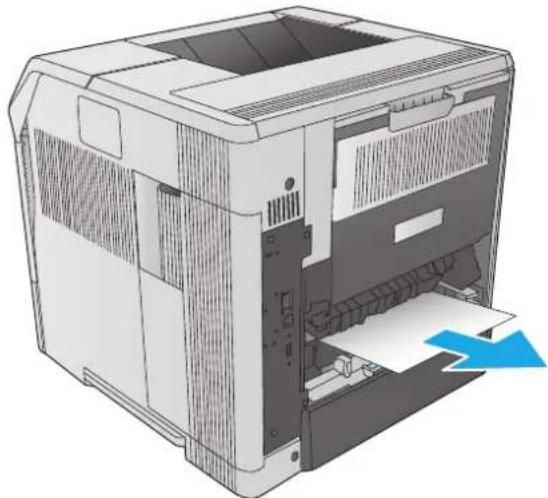
natural_image
Illustration of a computer printer with paper being inserted, showing internal structure and no text or symbols-
Slowly pull any paper out of the duplexer.
-
Insert the duplexer into the product.
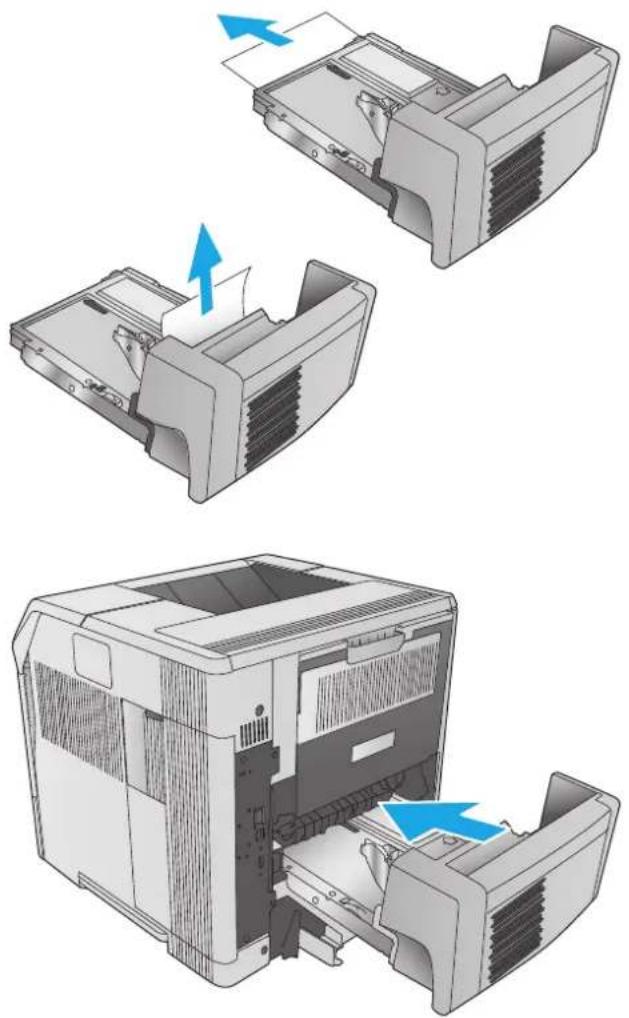
natural_image
Three-step diagram showing a printer's internal structure and external casing, with blue arrows indicating process flow (no text or symbols present)Clear paper jams in the envelope feeder
Use the following procedure to clear jams in the envelope feeder. When a jam occurs, the control panel displays an animation that assists in clearing the jam.
- Remove any envelopes that are loaded in the envelope feeder. Lower the envelope weight and lift the tray extension up, to the closed position.
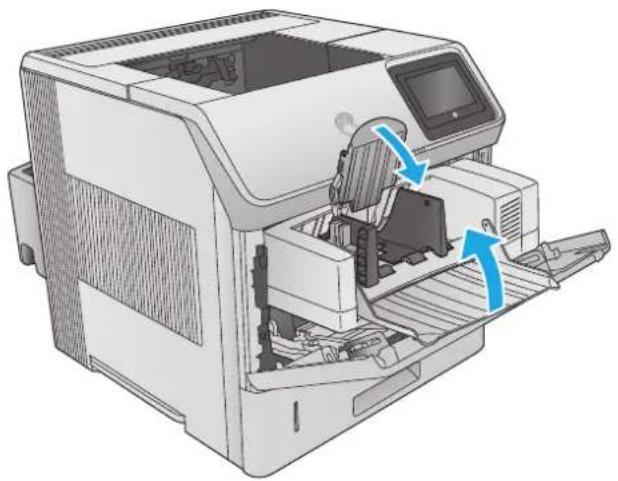
natural_image
Illustration of a HP printer internal structure with blue arrows indicating motion or movement (no text or symbols present)- Grasp both sides of the envelope feeder and carefully pull it out of the product.
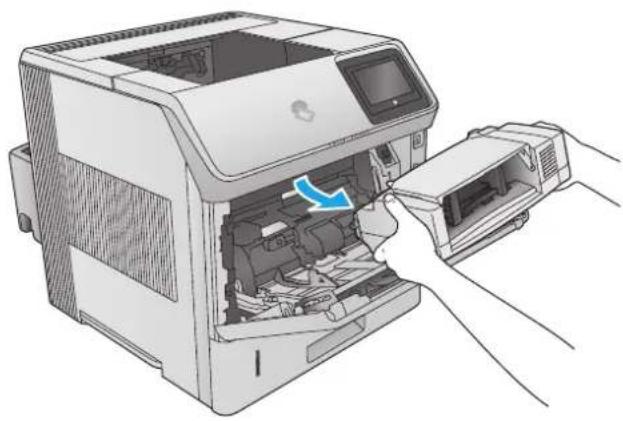
natural_image
Illustration of a printer being inserted into a paper holder, showing internal components and a blue arrow indicating rotation (no text or symbols present)- Slowly remove any jammed envelopes from the envelope feeder.
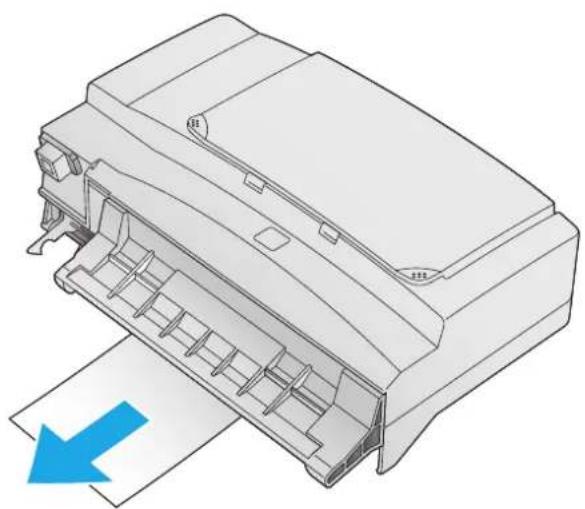
natural_image
Line drawing of a printer with paper feed and blue arrow indicating print direction (no text or symbols)-
Slowly remove any jammed envelopes from the product.
-
Install the envelope feeder.
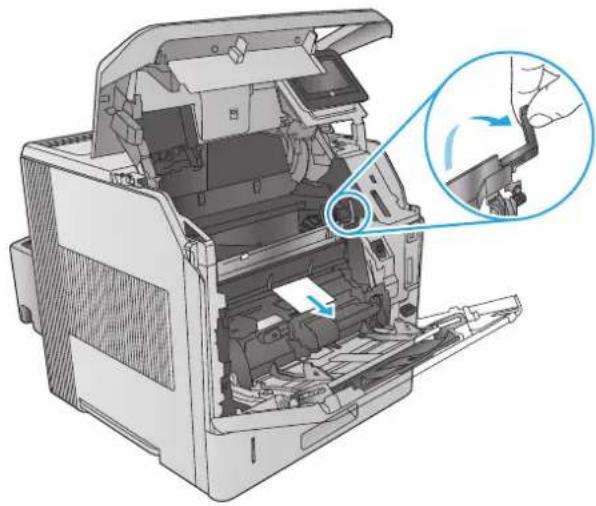
natural_image
Interior view of a computer with open lid and internal components, showing mechanical assembly (no text or symbols visible)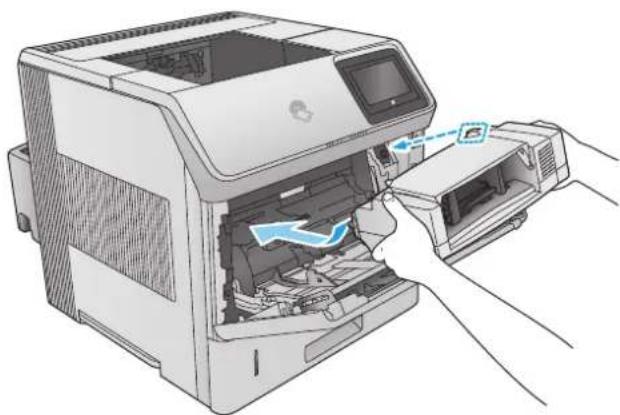
natural_image
Illustration of a printer being inserted into a paper airplane, showing internal components and a close-up of the printer's handle (no text or symbols present)Clear paper jams in the 5-bin mailbox
Use the following procedure to check for paper in all possible jam locations in the 5-bin mailbox. When a jam occurs, the control panel displays an animation that assists in clearing the jam.
- Remove any paper from the output bins.
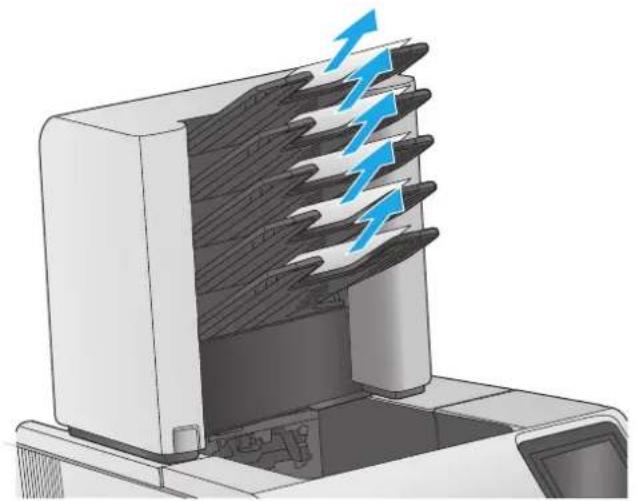
natural_image
Illustration of a printer emitting heat or airflow through a multi-layered rack, with blue arrows indicating direction (no text or symbols)- On the back of the 5-bin mailbox, open the jam-access door.
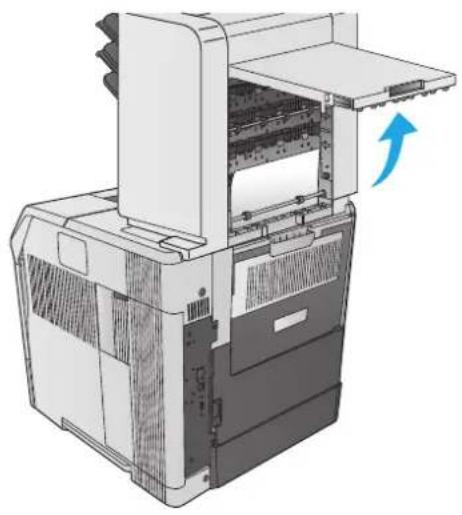
natural_image
Diagram of a computer printer internal structure showing paper feed, paper tray, and paper slot (no text or labels)-
If the paper is jammed at the top of the 5-bin mailbox, pull it straight down to remove it.
-
If the paper is jammed at the bottom of the 5-bin mailbox, open the rear output bin, and then pull straight up on the paper to remove it.
-
Close the jam-access door and the rear output bin.
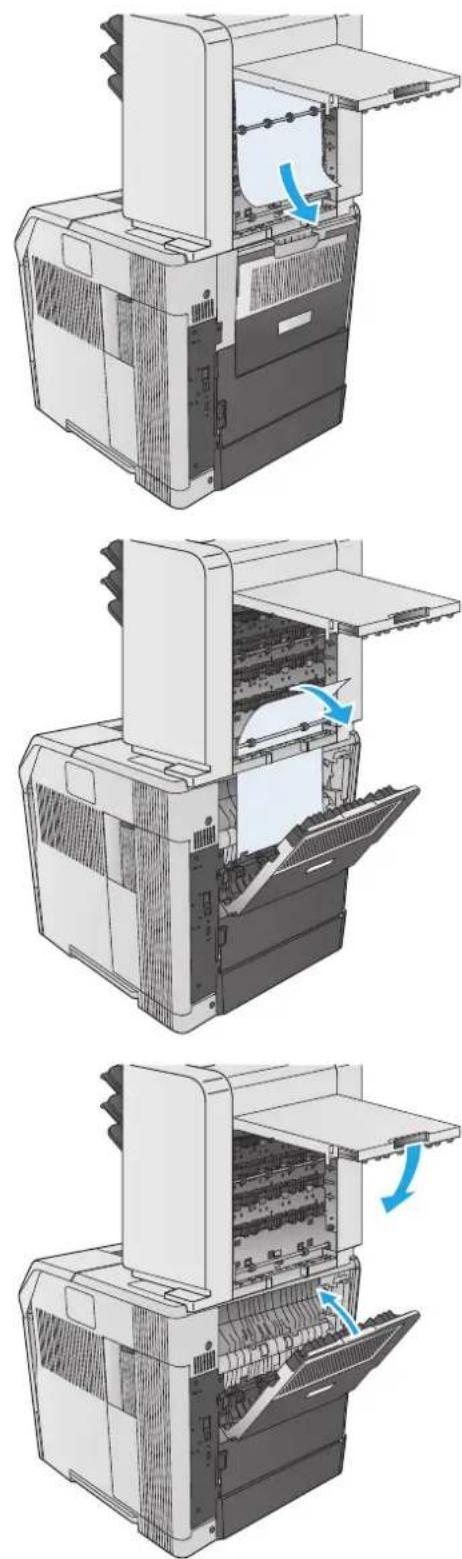
natural_image
Three-panel diagram showing a printer's internal structure and external mechanism, with no visible text or symbols.Clear jams in the stacker or stapler/stacker
• Clear paper jams in the stacker or stapler/stacker
• Clear staple jams in the stapler/stacker
Clear paper jams in the stacker or stapler/stacker
Use the following procedure to check for paper in all possible jam locations in the stacker or stapler/stacker. When a jam occurs, the control panel displays an animation that assists in clearing the jam.
- At the back of the product, open the door on the stacker or stapler/stacker, and then open the rear output bin.
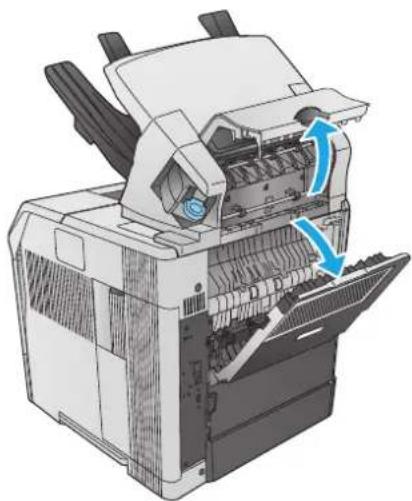
natural_image
Illustration of a printer with internal structure and blue directional arrows indicating motion (no text or symbols)-
Carefully remove any jammed paper.
-
Close the door on the stacker or stapler/stacker, and close the rear output bin.
NOTE: The output bin must be pushed down into the lowest position for printing to continue.
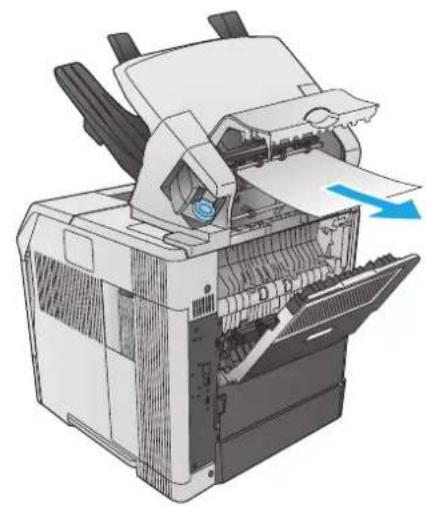
natural_image
Illustration of a printer with paper feed and paper roll, showing internal structure without any text or symbols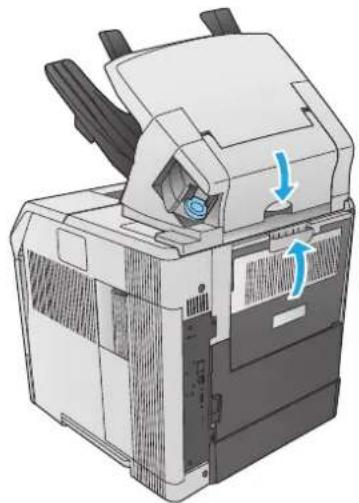
natural_image
Illustration of a printer with a blue arrow indicating motion, showing internal components and no text or symbols.Clear staple jams in the stapler/stacker
Use the following procedure to clear staple jams in the stapler/stacker. When a jam occurs, the control panel displays an animation that assists in clearing the jam.
The stapler needs to reload after clearing a staple jam, so the first few documents might not be stapled. If a print job is sent and the stapler is jammed or is out of staples, the job will still print as long as the path to the stacker bin is not blocked.
-
On the right side of the stapler/stacker, turn the stapler unit toward the front of the product until the unit clicks into the open position. Pull outward on the blue staple cartridge to remove it.
-
Rotate the green cover on the end of the staple cartridge upward, and remove the jammed staple.
-
Insert the staple cartridge into the stapler unit, and rotate the stapler unit toward the rear of the product until the unit snaps into place.
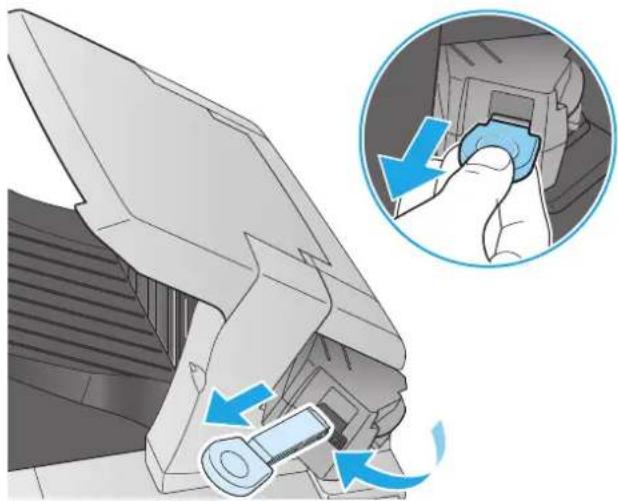
natural_image
Illustration of a computer monitor with a key inserted, showing a hand inserting a blue object into the screen (no text or symbols present)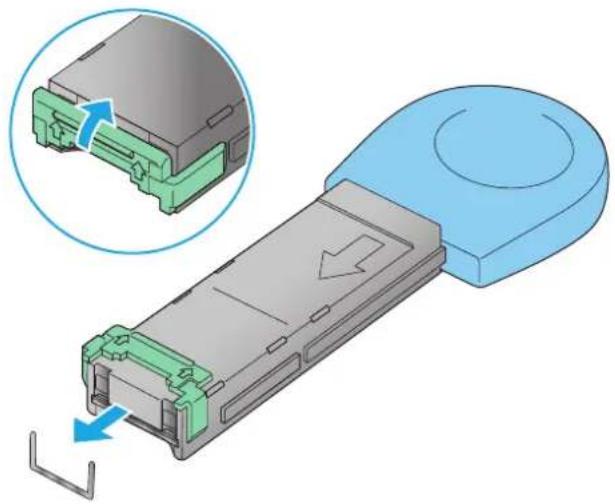
natural_image
3D illustration of a device with green and gray components, showing a close-up of a component being inserted (no text or symbols present)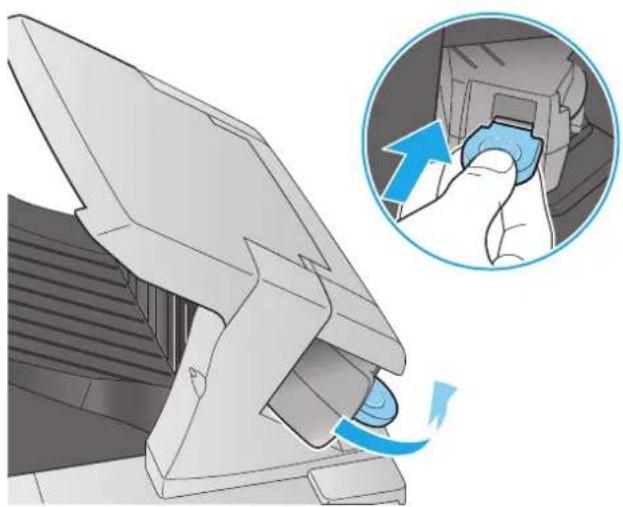
natural_image
Illustration of a computer monitor with a hand inserting a blue object into the case, showing a blue arrow indicating rotation (no text or symbols present)Improve print quality
Introduction
If the product is having print-quality problems, try the following solutions in the order presented to resolve the issue.
• Print from a different software program
• Check the paper-type setting for the print job
- Check toner-cartridge status
Clean the product
• Visually inspect the toner cartridge
• Check paper and the printing environment
• Try a different print driver
Print from a different software program
Try printing from a different software program. If the page prints correctly, the problem is with the software program from which you were printing.
Check the paper-type setting for the print job
Check the paper type setting when printing from a software program and the printed pages have smears, fuzzy or dark print, curled paper, scattered dots of toner, loose toner, or small areas of missing toner.
Check the paper type setting (Windows)
- From the software program, select the Print option.
- Select the product, and then click the Properties or Preferences button.
- Click the Paper/Quality tab.
- From the Paper Type drop-down list, click the More... option.
- Expand the list of Type is: options.
- Expand the category of paper types that best describes your paper.
- Select the option for the type of paper you are using, and click the OK button.
- Click the OK button to close the Document Properties dialog box. In the Print dialog box, click the OK button to print the job.
Check the paper type setting (OS X)
- Click the File menu, and then click the Print option.
- Select the product.
-
Click Show Details, and then click the Media & Quality menu or the Paper/Quality menu.
-
Select a type from the Media-type drop-down list.
- Click the Print button.
Check toner-cartridge status
Follow these steps to check the estimated life remaining in the toner cartridges and if applicable, the status of other replaceable maintenance parts.
Step one: Print the supplies status page
- Press the Home button on the product control panel.
- Select Supplies.
- The status of all supply items is listed on the screen.
- To print a report of the status of all supply items, including the genuine HP part number for reordering the supply, select Manage Supplies, and then select Print Supplies Status.
Step two: Check supplies status
- Look at the supplies status report to check the percent of life remaining for the toner cartridges and if applicable, the status of other replaceable maintenance parts.
Print quality problems can occur when using a toner cartridge that is at its estimated end of life. The supplies status page indicates when a supply level is very low. After an HP supply has reached the very low threshold, HP's premium protection warranty on that supply has ended.
The toner cartridge does not need to be replaced now unless the print quality is no longer acceptable. Consider having a replacement available to install when print quality is no longer acceptable.
If you determine that you need to replace a toner cartridge or other replaceable maintenance parts, the supplies status page lists the genuine HP part numbers.
- Check to see if you are using a genuine HP cartridge.
A genuine HP toner cartridge has the words “HP” or “Hewlett-Packard” on it, or has the HP logo on it. For more information on identifying HP cartridges go to www.hp.com/go/learnaboutsupplies.
Clean the product
Print a cleaning page
During the printing process paper, toner, and dust particles can accumulate inside the product and can cause print-quality issues such as toner specks or spatter, smears, streaks, lines, or repeating marks.
Follow these steps to clean the product's paper path.
- Press the Home button on the product control panel.
- Select Device Maintenance.
- Select Calibration/Cleaning, and then select Cleaning Page to print the page.
A Cleaning message displays on the product control panel. The cleaning process takes a few minutes to complete. Do not turn the product off until the cleaning process has finished. When it is finished, discard the printed page.
Visually inspect the toner cartridge
Follow these steps to inspect each toner cartridge.
- Remove the toner cartridge from the product.
- Check the memory chip for damage.
- Examine the surface of the green imaging drum.
⚠️ CAUTION: Do not touch the imaging drum. Fingerprints on the imaging drum can cause print-quality problems.
- If you see any scratches, fingerprints, or other damage on the imaging drum, replace the toner cartridge.
- Reinstall the toner cartridge, and print a few pages to see if the problem has resolved.
Check paper and the printing environment
Step one: Use paper that meets HP specifications
Some print-quality problems arise from using paper that does not meet HP specifications.
• Always use a paper type and weight that this product supports.
- Use paper that is of good quality and free of cuts, nicks, tears, spots, loose particles, dust, wrinkles, voids, staples, and curled or bent edges.
• Use paper that has not been previously printed on.
• Use paper that does not contain metallic material, such as glitter.
- Use paper that is designed for use in laser printers. Do not use paper that is designed only for use in Inkjet printers.
• Use paper that is not too rough. Using smoother paper generally results in better print quality.
Step two: Check the environment
The environment can directly affect print quality and is a common cause for print-quality or paper-feeding issues. Try the following solutions:
- Move the product away from drafty locations, such as open windows or doors, or air-conditioning vents.
• Make sure the product is not exposed to temperatures or humidity outside of product specifications. - Do not place the product in a confined space, such as a cabinet.
- Place the product on a sturdy, level surface.
- Remove anything that is blocking the vents on the product. The product requires good air flow on all sides, including the top.
- Protect the product from airborne debris, dust, steam, grease, or other elements that can leave residue inside the product.
Step three: Set the individual tray alignment
Follow these steps when text or images are not centered or aligned correctly on the printed page when printing from specific trays.
-
Press the Home button on the product control panel.
-
Open the following menus:
-
Administration
- General Settings
-
Print Quality
• Image Registration -
Select the tray to adjust.
-
Select Print Test Page, and then follow the instructions on the printed pages.
- Select Print Test Page again to verify the results, and then make further adjustments if necessary.
- Touch the Save button or press the OK button to save the new settings.
Try a different print driver
Try a different print driver when printing from a software program and the printed pages have unexpected lines in graphics, missing text, missing graphics, incorrect formatting, or substituted fonts.
Download any of the following drivers from the HP Web site: www.hp.com/support/ljM604, www.hp.com/support/ljM605, www.hp.com/support/ljM606.
| HP PCL 6 driver | Provided as the default driver on the product CD. This driver is automatically installed unless you select a different one.Recommended for all Windows environmentsProvides the overall best speed, print quality, and product-feature support for most usersDeveloped to align with the Windows Graphic Device Interface (GDI) for the best speed in Windows environmentsMight not be fully compatible with third-party and custom software programs that are based on PCL 5 |
| HP UPD PS driver | Recommended for printing with Adobe°software programs or with other highly graphics-intensive software programsProvides support for printing from postscript emulation needs, or for postscript flash font support |
| HP UPD PCL 5 | Recommended for general office printing in Windows environmentsCompatible with previous PCL versions and older HP LaserJet productsThe best choice for printing from third-party or custom software programsThe best choice when operating with mixed environments, which require the product to be set to PCL 5 (UNIX, Linux, mainframe)Designed for use in corporate Windows environments to provide a single driver for use with multiple product modelsPreferred when printing to multiple product models from a mobile Windows computer |
| HP UPD PCL 6 | Recommended for printing in all Windows environmentsProvides the overall best speed, print quality, and printer feature support for most usersDeveloped to align with Windows Graphic Device Interface (GDI) for best speed in Windows environmentsMight not be fully compatible with third-party and custom software programs that are based on PCL 5 |
Solve wired network problems
Introduction
Check the following items to verify that the product is communicating with the network. Before beginning, print a configuration page from the product control panel and locate the product IP address that is listed on this page.
• Poor physical connection
• The computer is using the incorrect IP address for the product
• The computer is unable to communicate with the product
The product is using incorrect link and duplex settings for the network
• New software programs might be causing compatibility problems
• The computer or workstation might be set up incorrectly
The product is disabled, or other network settings are incorrect

NOTE: HP does not support peer-to-peer networking, as the feature is a function of Microsoft operating systems and not of the HP print drivers. For more information, go to Microsoft at www.microsoft.com.
Poor physical connection
- Verify that the product is attached to the correct network port using a cable of the correct length.
- Verify that cable connections are secure.
- Look at the network port connection on the back of the product, and verify that the amber activity light and the green link-status light are lit.
- If the problem continues, try a different cable or port on the hub.
The computer is using the incorrect IP address for the product
- Open the printer properties and click the Ports tab. Verify that the current IP address for the product is selected. The product IP address is listed on the product configuration page.
- If you installed the product using the HP standard TCP/IP port, select the box labeled Always print to this printer, even if its IP address changes.
- If you installed the product using a Microsoft standard TCP/IP port, use the hostname instead of the IP address.
- If the IP address is correct, delete the product and then add it again.
The computer is unable to communicate with the product
- Test network communication by pinging the network.
a. Open a command-line prompt on your computer.
- For Windows, click Start, click Run, type cmd, and then press Enter.
For OS X, go to Applications, then Utilities, and open Terminal.
b. Type ping followed by the IP address for your product.
c. If the window displays round-trip times, the network is working.
- If the ping command failed, verify that the network hubs are on, and then verify that the network settings, the product, and the computer are all configured for the same network.
The product is using incorrect link and duplex settings for the network
Hewlett-Packard recommends leaving these settings in automatic mode (the default setting). If you change these settings, you must also change them for your network.
New software programs might be causing compatibility problems
Verify that any new software programs are correctly installed and that they use the correct print driver.
The computer or workstation might be set up incorrectly
- Check the network drivers, print drivers, and the network redirection settings.
- Verify that the operating system is configured correctly.
The product is disabled, or other network settings are incorrect
- Review the configuration page to check the status of the network protocol. Enable it if necessary.
- Reconfigure the network settings if necessary.
Index
Symbols/Numerics
1,500 high-capacity input tray part number 38
1,500-sheet tray clearing jams 98
500-sheet paper trays part numbers 38
500-sheet tray clearing jams 96
A
accessories ordering 38 part numbers 38
acoustic specifications 20
AirPrint 60
Android devices printing from 61
B
bins, output locating 2
Bonjour identifying 66
browser requirements HP embedded Web Server 66
C
cartridge order number 46 replacing 41
cartridges order numbers 41
cleaning paper path 120
control panel help 87 locating 2 locating features 5, 6
custom media tray paper orientation 34 part number 38
custom media tray, loading 32
customer support online 86
D
default gateway, setting 75
deleting stored jobs 57
dimensions, product 12
DIMMs part numbers 38
double-sided printing Mac 53 Windows 50
drivers, supported 9
duplex printing Mac 53
duplex printing (double-sided) settings (Windows) 50 Windows 50
duplexer clearing jams 110 locating 3 part number 38
duplexing manually (Mac) 53 manually (Windows) 50
E
easy-access USB printing 62
electrical specifications 20
Embedded Web Server changing network settings 74 changing product name 74 opening 74
Embedded Web Server (EWS) assigning passwords 78 features 66 network connection 66
energy use, optimizing 80 envelope feeder
clearing jams 112 part number 38
envelope feeder, loading 35
envelopes loading in Tray 1 24 orientation 26
envelopes, loading 35
Ethernet (RJ-45) locating 4
Explorer, versions supported HP Embedded Web Server 66
F
fax port locating 4
file upload, Mac 72
firmware update, Mac 72
fonts upload, Mac 72
formatter locating 3
fuser clearing jams 104
G
gateway, setting default 75
general configuration HP Embedded Web Server 68
H
hard disks encrypted 79
hard drive
part number 38
hardware integration pocket (HIP) locating 3
HCI tray
clearing jams 98
Help button
locating 5, 6
help, control panel 87
Hi-Speed USB 2.0 printing port locating 4
high-capacity tray, loading 30
HIP (hardware integration pocket) locating 3
Home button
locating 5, 6
HP Customer Care 86
HP Embedded Web Server changing network settings 74
changing product name 74
general configuration 68
HP Web Services 70
information pages 67
network settings 70
opening 74
other links list 71
print settings 68
security settings 69
troubleshooting tools 69
HP Embedded Web Server (EWS) features 66
network connection 66
HP ePrint 59
HP ePrint software 60
HP Utility 72
HP Utility for Mac Bonjour 72
features 72
HP Utility, OS X 72
HP Web Jetadmin 82
HP Web Services enabling 70
I
information pages
HP Embedded Web Server 67
interface ports
locating 4
Internet Explorer, versions supported HP Embedded Web Server 66
IP Security 78
IPsec 78
IPv4 address 75
IPv6 address 75
J
jams 98
1,500-sheet tray 98
500-sheet trays 96
auto-navigation 93
causes of 93
duplexer 110
envelope feeder 112
fuser 104
HCI tray 98
locations 93
mailbox accessory 114
output bin 109
rear output bin 103
stacking accessory 116
stapling accessory 116
toner cartridge area 100
Tray 1 95
Tray 2 96
Jetadmin, HP Web 82
jobs, stored
creating (Windows) 55
deleting 57
Mac settings 56
printing 57
K
keypad
locating 2
L
labels
printing (Windows) 51
LAN port
locating 4
Language Selection button
locating 6
loading
paper in Tray 1 24
paper in Tray 2 and the 500-sheet trays 27
local area network (LAN)
locating 4
lock
formatter 79
M
Mac driver settings
Job Storage 56
mailbox accessory
clearing jams 114
maintenance kits
part numbers 39
managing network 74
manual duplex
Mac 53
Windows 50
memory
included 8
memory chip (toner)
locating 41
mobile printing
Android devices 61
mobile printing, software
supported 11
multi-bin mailbox
part number 38
multiple pages per sheet
printing (Mac) 53
printing (Windows) 51
N
Near Field Communication printing 59
Netscape Navigator, versions
supported
HP embedded Web Server 66
network
product name, changing 74
settings, changing 74
settings, viewing 74
Network button
locating 6
network duplex settings, changing 76
network link speed settings,
changing 76
network settings
HP Embedded Web Server 70
networks
default gateway 75
HP Web Jetadmin 82
IPv4 address 75
IPv6 address 75
subnet mask 75
supported 8
NFC accessory part number 38
NFC printing 59
0
on/off button locating 2
online help, control panel 87
online support 86
operating systems, supported 9
ordering supplies and accessories 38
OS X
HP Utility 72
other links list HP Embedded Web Server 71
output bin clearing jams 109
output bins locating 2
P
pages per minute 8
pages per sheet selecting (Mac) 53 selecting (Windows) 51
paper custom media tray orientation 34
jams 93 loading Tray 1 24
loading Tray 2 and the 500-sheet trays 27
selecting 121
Tray 1 orientation 26
Tray 2 and the 500-sheet trays orientation 29
paper jams locations 93
paper pickup problems solving 91
paper trays part numbers 38
paper type selecting (Windows) 51
paper types selecting (Mac) 54
paper, ordering 38
part numbers accessories 38
replacement parts 39 staple cartridges 39 supplies 39 toner cartridge 39
ports locating 4
power consumption 20
power connection locating 3
power switch locating 2
power usage 1 watt or less 80
print drivers, supported 9
print media loading in Tray 1 24
print on both sides Mac 53 manually, Windows 50 Windows 50
print settings HP Embedded Web Server 68
printing from USB storage accessories 62 stored jobs 57
printing on both sides settings (Windows) 50
product number locating 3
R
rear output bin clearing jams 103
Refresh button locating 6
replacement parts part numbers 39
replacing staple cartridge 46 toner cartridge 41
restore factory settings 88
RJ-45 port locating 4
S
security settings HP Embedded Web Server 69
security encrypted hard disk 79
security lock slot locating 4
serial number locating 3
settings restore factory 88
Sign in control panel 79
Sign In button locating 6
Sign Out button locating 6
Sleep button locating 6
sleep mode 80
software HP Utility 72
special paper printing (Windows) 51
specifications electrical and acoustic 20
speed, optimizing 80
stacker part number 38
stacking accessory clearing jams 116
stand part number 38
staple cartridge order number 46 replacing 46
staple cartridges part numbers 39
stapler/stacker part number 38
staples in the stapling accessory clearing jams 116
stapling accessory clearing jams 116
status HP Utility, Mac 72
status of product 5, 6
Stop button locating 5, 6
storage, job Mac settings 56
stored jobs creating (Mac) 56
creating (Windows) 55
deleting 57
printing 57
storing jobs
with Windows 55
subnet mask 75
supplies
low threshold settings 89
ordering 38
part numbers 39
replacing staple cartridge 46
replacing toner cartridge 41
status, viewing with HP Utility for Mac 72
using when low 89
supplies status 120
support
online 86
system requirements
HP Embedded Web Server 66
T
TCP/IP
manually configuring IPv4
parameters 75
manually configuring IPv6
parameters 75
technical support
online 86
toner cartridge
components 41
low threshold settings 89
part numbers 39
replacing 41
using when low 89
toner cartridge area
clearing jams 100
toner cartridges
order numbers 41
toner-cartridge status 120
transparencies
printing (Windows) 51
Tray 1
clearing jams 95
paper orientation 26
Tray 2
clearing jams 96
Tray 2 and the 500-sheet trays
loading 27
paper orientation 29
trays
capacity 8
included 8
locating 2
troubleshooting
jams 93
network problems 124
paper feed problems 91
wired network 124
troubleshooting tools
HP Embedded Web Server 69
two-sided printing
settings (Windows) 50
U
USB port
enabling 62
locating 4
USB ports, optional
part number 38
USB storage accessories
printing from 62
W
Web browser requirements
HP Embedded Web Server 66
Web sites
customer support 86
HP Web Jetadmin, downloading
82
weight, product 12
Wi-Fi Direct Printing 59
wireless print server
part number 38
© 2015 Hewlett-Packard Development Company, L.P.
www.hp.com