
Officejet Pro N911a - Printer HP - Free user manual and instructions
Find the device manual for free Officejet Pro N911a HP in PDF.


User questions about Officejet Pro N911a HP
0 question about this device. Answer the ones you know or ask your own.
Ask a new question about this device
Download the instructions for your Printer in PDF format for free! Find your manual Officejet Pro N911a - HP and take your electronic device back in hand. On this page are published all the documents necessary for the use of your device. Officejet Pro N911a by HP.
USER MANUAL Officejet Pro N911a HP
natural_image
Exterior view of a HP printer with a digital display showing 5 seconds (no visible text or symbols on the device itself)
HP Officejet Pro 8600 e-All-in-One series
User Guide
Copyright information
© 2011 Copyright Hewlett-Packard Development Company, L.P.
Hewlett-Packard Company notices
The information contained in this document is subject to change without notice.
All rights reserved. Reproduction, adaptation, or translation of this material is prohibited without prior written permission of Hewlett-Packard, except as allowed under copyright laws.
The only warranties for HP products and services are set forth in the express warranty statements accompanying such products and services. Nothing herein should be construed as constituting an additional warranty. HP shall not be liable for technical or editorial errors or omissions contained herein.
Acknowledgements
Windows, Windows XP, and Windows Vista are U.S. registered trademarks of Microsoft Corporation.
ENERGY STAR and the ENERGY STAR mark are registered U.S. marks.
Safety information

Always follow basic safety precautions when using this product to reduce risk of injury from fire or electric shock.
- Read and understand all instructions in the documentation that comes with the printer.
- Observe all warnings and instructions marked on the product.
- Unplug this product from wall outlets before cleaning.
- Do not install or use this product near water, or when you are wet.
- Install the product securely on a stable surface.
- Install the product in a protected location where no one can step on or trip over the line cord, and the line cord cannot be damaged.
- If the product does not operate normally, see Solve a problem.
- There are no user-serviceable parts inside. Refer servicing to qualified service personnel.
Accessibility
The printer provides a number of features that make it accessible for people with disabilities.
Visual
The printer software is accessible for users with visual impairments or low
vision through the use of your operating system's accessibility options and features. It also supports most assistive technology such as screen readers, Braille readers, and voice-to-text applications. For users who are color blind, colored buttons and tabs used in the software and on the printer control panel have simple text or icon labels that convey the appropriate action.
Mobility
For users with mobility impairments, the printer software functions can be executed through keyboard commands. The software also supports Windows accessibility options such as StickyKeys, ToggleKeys, FilterKeys, and MouseKeys. The printer doors, buttons, paper trays, and paper guides can be operated by users with limited strength and reach.
Support
For more details about the accessibility of this product and HP's commitment to product accessibility, visit HP's website at www.hp.com/accessibility.
For accessibility information for Mac OS X, visit the Apple website at www.apple.com/accessibility.
Contents
1 Get started
Accessibility....10
Eco....11
Understand the printer parts....12
Front view....12
Printing supplies area....13
Back view....13
Use the printer control panel....14
Overview of buttons and lights....14
HP Officejet Pro 8600....14
HP Officejet Pro 8600 Plus and HP Officejet Pro 8600 Premium....15
Control-panel display icons....15
Change printer settings....18
Select the mode....18
Change printer settings....18
Finding the printer model number....19
Select print media....19
Recommended papers for printing and copying....19
Recommended papers for photo printing....20
Tips for selecting and using media....21
Load an original on the scanner glass....22
Load an original in the automatic document feeder (ADF)....23
Load media....24
Load standard-size media....24
Load envelopes....25
Load cards and photo paper....26
Load custom-size media....27
Insert a memory device....28
Install the accessories....29
Install the duplexer....29
Install Tray 2....30
Configure trays....32
Turn on accessories in the printer driver....33
To turn on accessories (Windows)....33
To turn on accessories on (Mac OS X)....33
Maintain the printer....33
Clean the scanner glass....33
Clean the exterior 34
Clean the automatic document feeder....34
Turn the printer off....35
2 Print
Print documents....36
Print documents (Windows)....36
Print documents (Mac OS X)....37
Print brochures....37
Print brochures (Windows)....37
Print brochures (Mac OS X)....38
Print on envelopes....38
Print on envelopes (Windows)....39
Print on envelopes (Mac OS X)....39
Print photos....39
Print photos on photo paper (Windows)....40
Print photos on photo paper (Mac OS X)....40
Print photos from a memory device 41
Print on special and custom-size paper....41
Print on special or custom-size paper (Mac OS X)....42
Set up custom sizes (Mac OS X)....42
Print borderless documents....43
Print borderless documents (Windows)......43
Print borderless documents (Mac OS X)....43
HP ePrint....44
Print on both sides (duplexing)......44
3 S c a n
Scan an original....46
Scan to a computer....46
Scan to a memory card....47
Scan using Webscan....48
Scanning documents as editable text....48
To scan documents as editable text....48
Guidelines for scanning documents as editable text....50
4 HP Digital Solutions
What are HP Digital Solutions?......51
HP Direct Digital Filing....51
HP Digital Fax....51
Requirements....52
Set up HP Digital Solutions....53
Set up HP Direct Digital Filing....53
Set up Scan to Network Folder....53
Set up Scan to Email....54
Set up HP Digital Fax....56
Use the HP Digital Solutions....57
Use HP Scan to Network Folder....57
Use Scan to Email....57
Use HP Digital Fax....58
5 Copy
Copy documents....59
Change copy settings....59
Contents
6 Fax
Send a fax....61
Send a standard fax....61
Send a standard fax from the computer....62
Send a fax manually from a phone....63
Send a fax using monitor dialing....64
Send a fax from memory....64
Schedule a fax to send later....65
Send a fax to multiple recipients....66
Send a fax in Error Correction Mode....66
Receive a fax....67
Receive a fax manually....67
Set up backup fax....68
Reprint received faxes from memory....68
Poll to receive a fax....69
Forward faxes to another number....69
Set the paper size for received faxes....70
Set automatic reduction for incoming faxes....70
Block unwanted fax numbers....70
Add numbers to the junk fax list....71
Remove numbers from the junk fax list....71
Print a Junk Fax Report....72
Receive faxes to your computer using HP Digital Fax (Fax to PC and Fax to Mac)....72
Fax to PC and Fax to Mac requirements....72
Activate Fax to PC and Fax to Mac....73
Modify Fax to PC or Fax to Mac settings....73
Set up speed-dial entries....74
Set up and change speed-dial entries....74
Set up and change group speed-dial entries....75
Delete speed-dial entries....75
Print a list of speed-dial entries....76
Change fax settings....76
Configure the fax header....76
Set the answer mode (Auto answer)....76
Set the number of rings before answering....77
Change the answer ring pattern for distinctive ring....77
Set the dial type....78
Set the redial options....78
Set the fax speed....79
Set the fax sound volume....79
Fax and digital phone services....80
Fax over Internet Protocol....80
Use reports....81
Print fax confirmation reports....81
Print fax error reports....82
Print and view the fax log....82
Clear the fax log....82
Print the details of the last fax transaction....83
Print a Caller ID Report....83
View the Call History....83
7 Web Services
What are Web Services?......84
HP ePrint....84
Printer Apps....84
Set up Web Services....85
Set up Web Services using the HP printer software....85
Set up Web Services using the printer's control panel....85
Set up Web Services using the embedded web server....86
Use Web Services....86
HP ePrint....86
Print using HP ePrint....87
Find the printer's email address....87
Turn off HP ePrint....87
Printer Apps....87
Use Printer Apps....87
Manage Printer Apps....87
Turn off Printer Apps....88
Remove Web Services....88
8 Work with ink cartridges
Information on ink cartridges and the printhead....89
Check the estimated ink levels....90
Print with one or more depleted cartridges....90
Replace the ink cartridges....90
Store printing supplies....92
Usage information collection....92
9 Solve a problem
HP support....94
Obtain electronic support....95
HP support by phone....95
Before you call....96
Phone support period....96
Telephone support numbers....96
After the phone support period....97
General troubleshooting tips and resources....98
Solve printer problems....98
The printer shuts down unexpectedly....99
Alignment fails....99
The printer is not responding (nothing prints)......99
The printer prints slowly....100
The printer is making some unexpected noises....101
Blank or partial page printed....101
Something on the page is missing or incorrect....102
Placement of the text or graphics is wrong....102
Print quality troubleshooting....103
Solve paper-feed problems....107
Contents
Solve copy problems....109
No copy came out....109
Copies are blank....109
Documents are missing or faded....110
Size is reduced....110
Copy quality is poor 110
Copy defects are apparent....111
The printer prints half a page, then ejects the paper....111
Paper mismatch....111
Solve scan problems....112
Scanner did nothing....112
Scan takes too long....112
Part of the document did not scan or text is missing....113
Text cannot be edited....113
Error messages appear....114
Scanned image quality is poor....114
Scan defects are apparent....116
Solve fax problems....116
The fax test failed....117
Solve problems using Web Services and HP websites....129
Solve problems using Web Services....130
Solve problems using HP websites....131
Solve HP Digital Solutions problems....131
Solving HP Direct Digital Filing problems....131
Common problems....131
Unable to scan to network folder....132
Unable to scan to email....133
The sharing dialog box is different after setting up HP Direct Digital Filing (Windows)....133
Solving HP Digital Fax problems....133
Solve memory device problems....135
The printer cannot read the memory device....135
The printer cannot read photos on the memory device....136
Solve wired (Ethernet) network problems....136
General network troubleshooting....136
Solve wireless problems....136
Basic wireless troubleshooting....137
Step 1 - Make sure the wireless (802.11) light is turned on....137
Step 2 - Restart components of the wireless network....137
Step 3 - Run the Print Wireless Network Test....137
Advanced wireless troubleshooting....137
Step 1: Make sure your computer is connected to your network....138
Step 2: Make sure that the printer is connected to your network....139
Step 3: Check to see if the firewall software is blocking communication....140
Step 4: Make sure the printer is online and ready....140
Step 5: Make sure the wireless version of the printer is set as the default printer driver (Windows only)....141
Step 6: Make sure your computer is not connected to your network over a Virtual Private Network (VPN)....141
After resolving the problems....142
Wireless Direct Printing....142
To turn on Wireless Direct Printing....142
To print using Wireless Direct Printing....143
Update the printer....143
Configure your firewall software to work with the printer....143
Solve printer management problems....144
Embedded web server cannot be opened....144
Troubleshoot installation issues....145
Hardware installation suggestions....145
HP software installation suggestions....146
Solve network problems....146
Understand the Printer Status Report....147
Printhead maintenance....149
Clean the printhead....149
Align the printhead....150
Reinstall the printhead....150
Understand the network configuration page....152
Clear jams....154
Clear paper jams....154
Avoid paper jams....157
A Technical information
Warranty information....158
Hewlett-Packard limited warranty statement....159
Ink cartridge warranty information....160
Contents
Printer specifications....161
Physical specifications....161
Product features and capacities....161
Processor and memory specifications....162
System requirements....162
Network protocol specifications....163
Embedded web server specifications....163
Media specifications....163
Understand specifications for supported media....164
Set minimum margins....167
Guidelines for printing on both sides of a page....168
Print specifications....168
Copy specifications....168
Fax specifications....168
Scan specifications....169
Web Services and HP website specifications....169
Web Services specifications....169
HP website specifications....170
Environmental specifications....170
Electrical specifications....170
Acoustic emission specifications....170
Memory device specifications....171
Memory card specifications....171
USB flash drives....171
Regulatory information....172
FCC statement....173
Notice to users in Korea....173
VCCI (Class B) compliance statement for users in Japan....174
Notice to users in Japan about the power cord....174
Noise emission statement for Germany....174
European Union Regulatory Notice....174
LED indicator statement....175
Gloss of housing of peripheral devices for Germany....175
Notice to users of the U.S. telephone network: FCC requirements....176
Notice to users of the Canadian telephone network....177
Notice to users of the German telephone network....177
Australia wired fax statement....177
Regulatory information for wireless products....178
Exposure to radio frequency radiation....178
Notice to users in Brazil....178
Notice to users in Canada....178
Notice to users in Taiwan....178
Regulatory model number....179
Environmental product stewardship program....180
Paper use....180
Plastics....180
Material safety data sheets....180
Recycling program....180
HP inkjet supplies recycling program....180
Disposal of waste equipment by users in private households in the European Union.....181
Power consumption....182
Chemical substances....182
Battery information....182
Battery disposal in Taiwan....182
Attention California users....182
RoHS notices (China only)....183
RoHS notices (Ukraine only)....183
Third-party licenses....184
B HP supplies and accessories
Order printing supplies online....193
Supplies....193
Ink cartridges and printheads....193
HP media....194
C Additional fax setup
Set up faxing (parallel phone systems)....195
Select the correct fax setup for your home or office....196
Case A: Separate fax line (no voice calls received)....198
Case B: Set up the printer with DSL....199
Case C: Set up the printer with a PBX phone system or an ISDN line....200
Case D: Fax with a distinctive ring service on the same line....201
Case E: Shared voice/fax line....202
Case F: Shared voice/fax line with voice mail....203
Case G: Fax line shared with computer modem (no voice calls received)....204
Set up the printer with a computer dial-up modem....204
Set up the printer with a computer DSL/ADSL modem....206
Case H: Shared voice/fax line with computer modem....207
Shared voice/fax with computer dial-up modem....207
Shared voice/fax with computer DSL/ADSL modem....209
Case I: Shared voice/fax line with answering machine....211
Case J: Shared voice/fax line with computer modem and answering machine......212
Shared voice/fax line with computer dial-up modem and answering machine......212
Shared voice/fax line with computer DSL/ADSL modem and answering machine....214
Case K: Shared voice/fax line with computer dial-up modem and voice mail......216
Serial-type fax setup....217
Test fax setup....218
D Network setup
Change basic network settings....219
View and print network settings....219
Turn the wireless radio on and off....219
Contents
Change advanced network settings....219
Set link speed....220
View IP settings....220
Change IP settings....220
Configure the printer's firewall settings....220
Creating and using firewall rules....220
Reset network settings....222
Set up the printer for wireless communication....222
Before you begin....222
Set up the printer on your wireless network....223
Set up the printer using the HP printer software....223
Set up the printer using the Wireless Setup Wizard....223
Set up the printer using WiFi Protected Setup (WPS)....223
Set up the printer using the embedded web server (EWS)....224
Change the connection type....224
Test the wireless connection....225
Guidelines for ensuring wireless network security....225
Overview of security settings....226
Add hardware addresses to a wireless router (MAC filtering)....226
Other wireless security guidelines....226
Guidelines for reducing interference on a wireless network ....227
Uninstall and reinstall the HP software....227
Windows....227
Mac OS X....228
E Printer management tools
Toolbox (Windows)......229
HP Utility (Mac OS X)....229
Embedded web server....229
About cookies....230
To open the embedded web server....230
Index 240
1 Get started
This guide provides details about how to use the printer and how to resolve problems.
- Accessibility
- Eco
• Understand the printer parts
• Use the printer control panel
• Finding the printer model number - Select print media
- Load an original on the scanner glass
- Load an original in the automatic document feeder (ADF)
- Load media
- Insert a memory device
• Install the accessories - Maintain the printer
- Turn the printer off

NOTE: If you are using the printer with a computer running Windows XP Starter Edition, Windows Vista Starter Edition, or Windows 7 Starter Edition, some features might not be available. For more information, see System requirements.
Accessibility
The printer provides a number of features that make it accessible for people with disabilities.
Visual
The HP software provided with the printer is accessible for users with visual impairments or low vision by using your operating system's accessibility options and features. The software also supports most assistive technology such as screen readers, Braille readers, and voice-to-text applications. For users who are color blind, colored buttons and tabs used in the HP software and on the printer control panel have simple text or icon labels that convey the appropriate action.
Mobility
For users with mobility impairments, the HP software functions can be executed through keyboard commands. The HP software also supports Windows accessibility options such as StickyKeys, ToggleKeys, FilterKeys, and MouseKeys. The printer doors, buttons, paper trays, and paper guides can be operated by users with limited strength and reach.
Support
For more details about the accessibility of this printer and HP's commitment to product accessibility, visit HP's website at www.hp.com/accessibility.
For accessibility information for Mac OS X, visit the Apple website at www.apple.com/accessibility.
Eco
Hewlett-Packard is committed to providing quality products in an environmentally sound manner. Design for recycling has been incorporated into this product. For more information, see Environmental product stewardship program
HP is committed to helping customers reduce their environmental footprint. HP has provided these features to help you focus on ways to assess and reduce the impact of your printing choices.
For more information about HP's environmental initiatives, visit www.hp.com/hpinfo/globalcitizenship/environment/.
Manage power
To conserve electricity, try the following:
- Turn on the printer's Sleep Mode feature, and then select the option for the shortest time. After the printer has been inactive for this period of time, the printer will go into low-power mode. To configure this feature, touch ECO (eco button) on the printer's control panel display, touch Sleep, and then touch the desired option.
- Use the printer's Schedule On and Off feature, and then select the days and time you want the printer to turn on and turn off automatically. For example, you can schedule the printer to turn on at 8am and turn off at 8pm from Monday to Friday. In this way, you will save energy during the night and weekends. To configure this feature, touch ECO (eco button) on the printer's control panel display, touch Schedule On and Off, and then set the time to turn on and off the printer.
- Adjust the screen brightness to a dimmer setting. To configure this feature, touch ECO (eco button) on the printer's control panel display, touch Screen Brightness, and then set the desired option.
NOTE: The printer's Sleep Mode and Schedule On and Off features are temporarily not available if one or more of the ink cartridges are missing. After the cartridge is reinstalled, these features resume.
CAUTION: HP recommends that you replace any missing cartridges as soon as possible to avoid print quality issues and possible extra ink usage or damage to the ink system. Never turn off the printer when ink cartridges are missing.
Conserve printing supplies
To conserve printing supplies such as ink and paper, try the following:
- Change the print mode to a draft setting. Draft setting uses less ink.
- Do not clean the printhead unnecessarily. This wastes ink and shortens the life of the cartridges.
- Reduce paper usage by printing on both sides of the paper. If the printer has an HP automatic two-sided printing accessory (duplexer), see Print on both sides (duplexing). Otherwise, you can first print just the odd pages, flip the pages over, and then print just the even pages.
Understand the printer parts
This section contains the following topics:
- Front view
• Printing supplies area - Back view
Front view
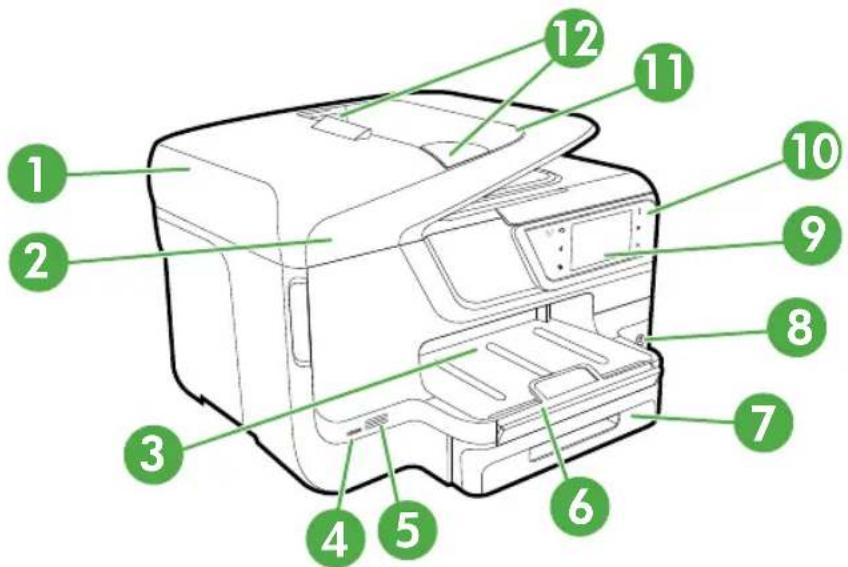
text_image
Diagram of a printer with numbered parts for identification| 1 Automatic document feeder (ADF) | |
| 2 Scanner glass | |
| 3 Output tray | |
| 4 Front universal serial bus (USB) port | |
| 5 Memory card slots | |
| 6 Output tray extension | |
| 7 Tray 1 | |
| 8 | (Power button) |
| 9 Control-panel display (differs based on the printer model that you have) | |
| 10 Control panel (differs based on the printer model that you have) | |
| 11 Document feeder tray | |
| 12 Width guides | |
Printing supplies area
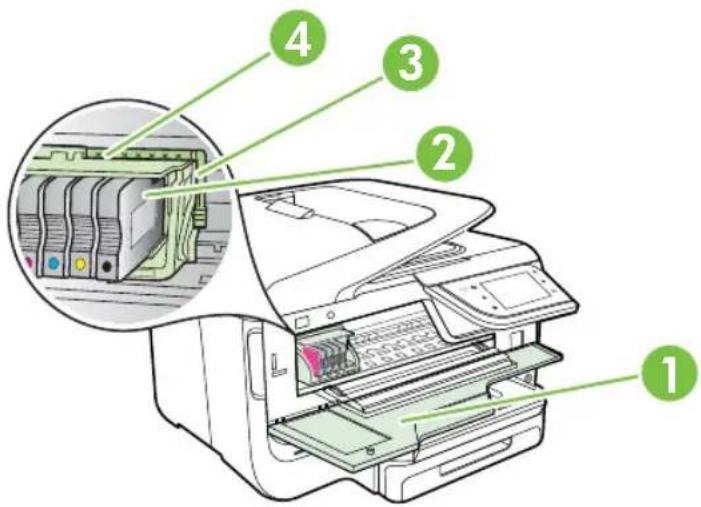
text_image
Diagram of a printer internal structure with numbered parts, showing internal components and a magnified view of the printer's internal structure.| 1 Ink | cartridge access door |
| 2 Ink | cartridges |
| 3 Printhead latch | |
| 4 Printhead | |
Back view
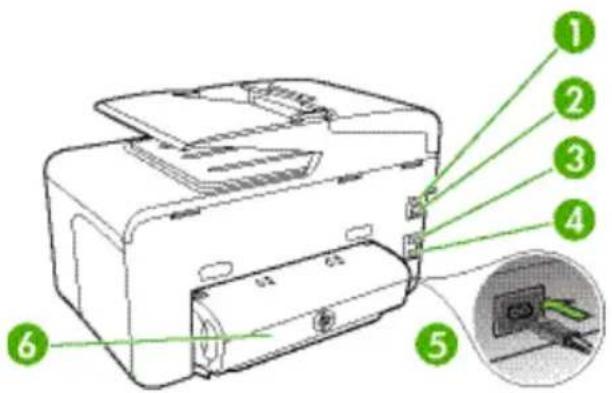
text_image
Diagram of a printer with numbered parts and an inset showing internal components, likely illustrating a printing or printing process.| 1 Fax port (1-LINE) |
| 2 Fax port (2-EXT) |
| 3 Ethernet network port |
| 4 Rear universal serial bus (USB) port |
| 5 Power input |
| 6 Automatic two-sided printing accessory (duplexer) |
Use the printer control panel
This section contains the following topics:
• Overview of buttons and lights
• Control-panel display icons
• Change printer settings
Overview of buttons and lights
The following diagrams and related tables provide a quick reference to the printer control panel features for each printer model. For more information, see Finding the printer model number.
HP Officejet Pro 8600
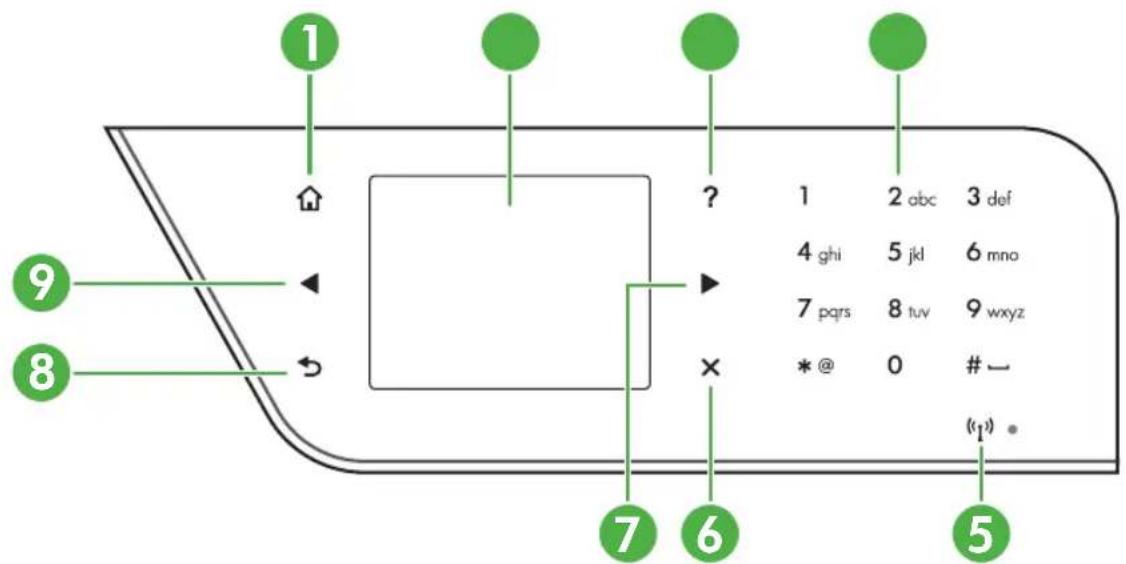
text_image
1 ? 1 2 abc 3 def 4 ghi 5 jkl 6 mno 7 pqrs 8 tuv 9 wxyz * @ 0 #一 ⟨1⟩ 9 8 7 6 5| Label Name | and Description |
| 1 Home button | Returns to the home screen from any other screen. |
| 2 | Control-panel display: Touch the screen to select menu options. For information about the icons that appear on the display, see Control-panel display icons. |
| 3 Help button | Opens the Help menu. |
| 4 Keypad: Use the keypad to enter numbers and text. | |
| 5 Wireless icon: The icon is lit when the 802.11 wireless feature is on. | |
| 6 Cancel button: Stops a job, exits a menu, or exits settings. | |
| 7 Right arrow button: Navigates through settings in the menus. | |
| 8 Back button: Returns to the previous menu. | |
| 9 Left arrow button: Navigates through settings in the menus. | |
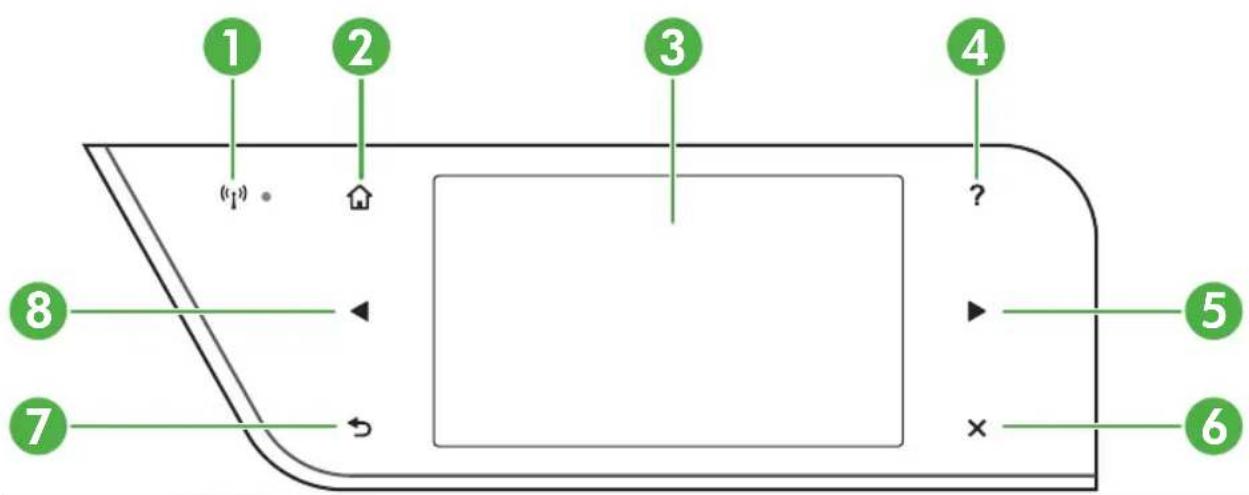
HP Officejet Pro 8600 Plus and HP Officejet Pro 8600 Premium
text_image
1 2 3 4 ? 8 5 7 6| Label Name | and Description |
| 1 Wireless icon: The icon is lit when the 802.11 wireless feature is on. | |
| 2 Home button: Returns to the home screen from any other screen. | |
| 3 | Control-panel display: Touch the screen to select menu options. For information about the icons that appear on the display, see Control-panel display icons. |
| 4 Help button: Opens the Help menu. | |
| 5 Right arrow button: Navigates through settings in the menus. | |
| 6 Cancel button: Stops a job, exits a menu, or exits settings. | |
| 7 Back button: Returns to the previous menu. | |
| 8 Left arrow button: Navigates through settings in the menus. | |
Control-panel display icons
| Icon Purpose | |
 | Shows that a wired network connection exists. |
 | Shows that a wireless network connection exists. The signal strength is indicated by the number of curved lines. This is for infrastructure mode. For more information, see Set up the printer for wireless communication. |
Chapter 1
(continued)
Icon Purpose
Shows that ePrint is turned on. For more information, see HP ePrint.
Displays a screen where you can make copies or select other options.
Displays a screen where you can make a fax, or choose fax settings.
Displays a screen where you can make a scan, or change scan settings.
Displays a screen where you can use HP Apps. For more information, see Printer Apps.
Displays a screen where you can adjust photo printing options.
Displays the Setup screen for generating reports, changing fax and other maintenance settings, and accessing the Help screen. The topic that you select from the Help screen opens a help window on your computer screen.
(continued)
| Icon Purpose | |
 | Displays the Network screen for selecting options. |
 | Provides more information about the printer's features. |
| HP Officejet Pro 8600 model | Displays a screen where you can see information about the ink cartridges, including fill levels. This icon has a red border when an ink cartridge needs attention. |
 | NOTE: Ink level warnings and indicators provide estimates for planning purposes only. When you receive a low-ink warning message, consider having a replacement cartridge available to avoid possible printing delays. You do not need to replace cartridges until prompted to do so. |
| HP Officejet Pro 8600 Plus and HP Officejet Pro 8600 Premium models | |
 | |
 | Displays the status of the Auto Answer function. TouchAuto Answerto turn it on or off. For more information, seeSet the answer mode (Auto answer). |
 | Displays a screen where you can learn about printer features that can help conserve natural resources and reduce the impact of your printing choices.TIP: You can configure settings for some features from this screen. |
Change printer settings
Use the control panel to change the printer's mode and settings, print reports, or get help for the printer.

TIP: If the printer is connected to a computer, you can also change the printer settings using HP software tools available on your computer, such as the HP printer software, HP Utility (Mac OS X), or the EWS. For more information about these tools, see Printer management tools.
This section contains the following topics:
- Select the mode
• Change printer settings
Select the mode
The main menu of the control-panel display shows the available modes for the printer.

NOTE: To select a mode, touch the ◀ (left arrow) or the ▶ (right arrow) to see the available modes, and then touch the icon to select the desired mode. Follow the prompts on the control-panel display to complete the job. The control-panel display returns to the main menu when the job is finished.
To select a different mode
Touch ← (Back button) to return to the main menu. Touch ◀ (left arrow) or ▶ (right arrow) to scroll through the available modes, and then touch the icon to select the desired mode.
To change settings for a mode
- After selecting a mode, touch the arrow buttons to scroll through the available settings, and then touch the setting you want to change.
- Follow the prompts on the display to change the settings, and then touch Done.

NOTE: Touch (Back button) to return to the previous menu.
Change printer settings
To change the printer settings or print reports, use the options available in the Setup menu:
- Touch ▶ (right arrow), and then touch Setup.
- Touch the arrow buttons to scroll through the menus.
- Touch the menu items to select menus or options.

NOTE: Touch (Back button) to return to the previous menu.
Finding the printer model number
In addition to the model name that appears on the front of the printer, this printer has a specific model number. You can use this number when obtaining support and to help determine which supplies or accessories are available for your printer.
The model number is printed on a label located on the inside of the ink cartridge access door, near the ink cartridges area.
Select print media
The printer is designed to work well with most types of office media. It is best to test a variety of print media types before buying large quantities. Use HP media for optimum print quality. For more information about HP media, visit the HP website at www.hp.com.
| ColorLok TECHNOLOGY TM | HP recommends plain papers with the ColorLok logo for printing and copying of everyday documents. All papers with the ColorLok logo are independently tested to meet high standards of reliability and print quality, and produce documents with crisp, vivid color, bolder blacks and dry faster than ordinary plain papers. Look for papers with the ColorLok logo in a variety of weights and sizes from major paper manufacturers. |
This section contains the following topics:
• Recommended papers for printing and copying
• Recommended papers for photo printing
• Tips for selecting and using media
Recommended papers for printing and copying
If you want the best print quality, HP recommends using HP papers that are specifically designed for the type of project you are printing.
Depending on your country/region, some of these papers might not be available.
| HP Brochure PaperHP Professional Paper | These papers are glossy-coated or matte-coated on both sides for two-sided use. They are the perfect choice for producing professional quality marketing materials such as brochures and mailers, as well as business graphics for report covers and calendars. |
| HP PremiumPresentation PaperHP Professional Paper | These papers are heavy two-sided matte papers perfect for presentation, proposals, reports, and newsletters. They are heavyweight for an impressive look and feel. |
| HP Bright White Inkjet Paper | HP Bright White Inkjet Paper delivers high-contrast colors and sharp text. It is opaque enough for two-sided color usage with no showthrough, which makes it ideal for newsletters, reports, and flyers. It features ColorLok Technology for less smearing, bolder blacks, and vivid colors. |
| HP Printing Paper HP Printing Paper is a high-quality multifunction paper. It produces documents that look and feel more substantial than documents printed on standard multipurpose or copy paper. It features ColorLok Technology for less smearing, bolder blacks, and vivid colors. | |
| HP Office Paper HP Office Paper is a high-quality multifunction paper. It is suitable for copies, drafts, memos and other everyday documents. It features ColorLok Technology for less smearing, bolder blacks, and vivid colors. | |
| HP Office Recycled Paper | HP Office Recycled Paper is a high-quality multifunction paper made with 30% recycled fiber. It features ColorLok Technology for less smearing, bolder blacks and vivid colors. |
| HP Premium Plus Photo Paper | HP's best photo paper is heavyweight for producing professional quality photos. Features an instant-dry finish for easy handling without smudging. It resists water, smears, fingerprints, and humidity. It is available in several sizes, including A4, 8.5 x 11 inch, 10 x 15 cm (4 x 6 inch), 13 x 18 cm (5 x 7 inch), and two finishes – glossy or soft-gloss (satin matte). It is acid-free for longer lasting documents. |
| HP Advanced Photo Paper | This thick photo paper features an instant-dry finish for easy handling without smudging. It resists water, smears, fingerprints, and humidity. Your prints have a look and feel comparable to a store processed photo. It is available in several sizes, including A4, 8.5 x 11 inch, 10 x 15 cm (4 x 6 inch), 13 x 18 cm (5 x 7 inch), and two finishes – glossy or soft gloss (satin matte). It is acid-free for longer lasting documents. |
| HP Everyday Photo Paper | Print colorful, everyday snapshots at a low cost, using paper designed for casual photo printing. This affordable, photo paper dries quickly for easy handling. Get sharp, crisp images when you use this paper with any inkjet printer. Available in semi-gloss finish in 8.5 x 11 inch, A4, 4 x 6 inch and 10 x 15 cm. It is acid-free for longer lasting documents. |
| HP Iron-On Transfers HP | Iron-on Transfers (for color fabrics or for light or white fabrics) are the ideal solution for creating custom T-shirts from your digital photos. |
To order HP papers and other supplies, go to www.hp.com. Go to Shop for Products and Services, and select Ink, toner and paper.

NOTE: At this time, some portions of the HP website are available in English only.
Recommended papers for photo printing
For the best print quality, HP recommends using HP papers that are specifically designed for the type of project you are printing. Depending on your country/region, some of these papers might not be available.
Depending on your country/region, some of these papers might not be available.
| HP Premium Plus Photo Paper | HP's best photo paper is heavyweight for producing professional quality photos. Features an instant-dry finish for easy handling without smudging. It resists water, smears, fingerprints, and humidity. It is available in several sizes, including A4, 8.5 x 11 inch, 10 x 15 cm (4 x 6 inch), 13 x 18 cm (5 x 7 inch), and two finishes – glossy or soft-gloss (satin matte). It is acid-free for longer lasting documents. |
| HP Advanced Photo Paper | This thick photo paper features an instant-dry finish for easy handling without smudging. It resists water, smears, fingerprints, and humidity. Your prints have a look and feel comparable to a store processed photo. It is available in several sizes, including A4, 8.5 x 11 inch, 10 x 15 cm (4 x 6 inch), 13x18 cm (5 x 7 inch), and two finishes – glossy or soft gloss (satin matte). It is acid-free for longer lasting documents. |
| HP Everyday Photo Paper | Print colorful, everyday snapshots at a low cost, using paper designed for casual photo printing. This affordable, photo paper dries quickly for easy handling. Get sharp, crisp images when you use this paper with any inkjet printer. Available in semi-gloss finish in 8.5 x 11 inch, A4, 4 x 6 inch, and 10 x 15 cm. It is acid-free for longer lasting documents. |
| HP Photo Value Packs HP | Photo Value Packs conveniently package original HP ink cartridges and HP Advanced Photo Paper to save you time and take the guesswork out of printing affordable, lab-quality photos with your HP printer. Original HP inks and HP Advanced Photo Paper have been designed to work together so your photos are long lasting and vivid, print after print. Great for printing out an entire vacation's worth of photos or multiple prints to share. |
To order HP papers and other supplies, go to www.hp.com. Go to Shop for Products and Services and select Ink, toner and paper.

NOTE: At this time, some portions of the HP website are available in English only.
Tips for selecting and using media
For the best results, observe the following guidelines.
• Always use media that conforms to the printer specifications. For more information, see Media specifications.
- Load only one type of media at a time into a tray or automatic document feeder (ADF).
- When loading the trays and ADF, make sure the media is loaded correctly. For more information, see Load media or Load an original in the automatic document feeder (ADF).
- Do not overload the tray or ADF. For more information, see Load media or Load an original in the automatic document feeder (ADF).
• To prevent jams, poor print quality, and other printing problems, avoid loading the following media in the trays or ADF:
- Multipart forms
• Media that is damaged, curled, or wrinkled
• Media with cutouts or perforations
• Media that is heavily textured, embossed, or does not accept ink well
Chapter 1
• Media that is too lightweight or stretches easily
• Media that contains staples or clips

NOTE: To scan, copy, or fax documents that contain pages that do not conform to these guidelines, use the scanner glass. For more information, see Load an original on the scanner glass.
Load an original on the scanner glass
You can copy, scan, or fax up to Letter- or A4-size originals by loading them on the glass.

NOTE: Many of the special features do not work correctly if the glass and lid backing are not clean. For more information, see Maintain the printer.
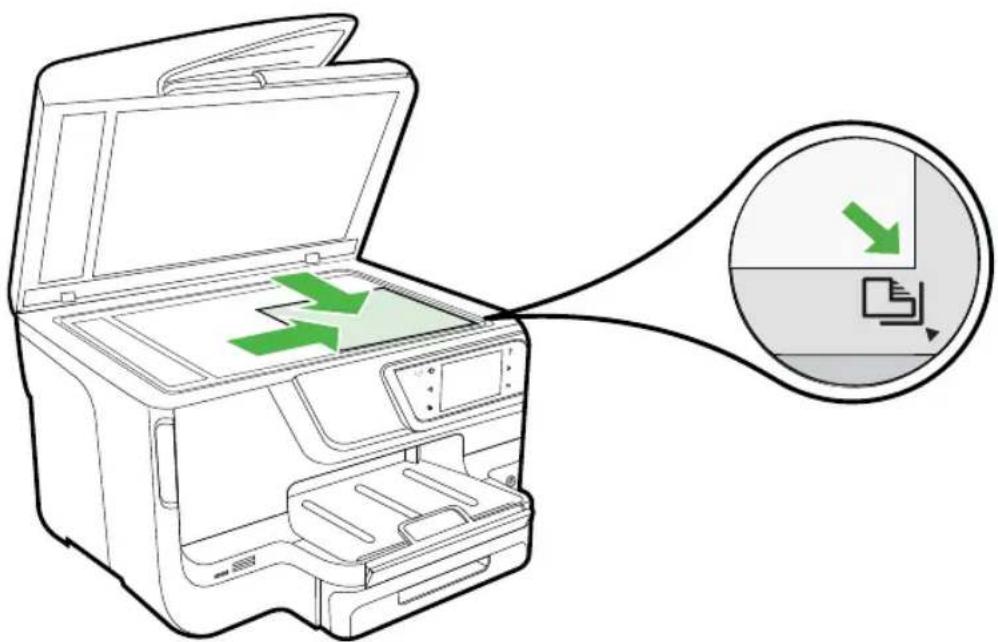
To load an original on the scanner glass
Use these steps to load an original on the scanner glass.
- Lift the scanner lid.
- Load your original print-side down.

TIP: For more help on loading an original, refer to the engraved guides along the edge of the glass.
text_image
Diagram showing a printer with green arrows indicating file transfer or download, and an inset magnifying the document icon.- Close the lid.
Load an original in the automatic document feeder (ADF)
You can copy, scan, or fax a one-sided, single- or multiple-page, A4- or Letter-size document by placing it in the automatic document feeder tray.
CAUTION: Do not load photos in the ADF; this might cause damage to your photos. Use only media that is supported by the printer. For more information, see Tips for selecting and using media.
NOTE: Only single-sided documents on A4 or Letter-size paper can be scanned, copied, or faxed using the ADF. The ADF does not support double-sided documents or other paper sizes.
NOTE: Some features, such as the Fit to Page copy feature, do not work when you load your originals in the ADF. You must load your originals on the glass.
The document feeder tray holds a maximum of 35 or 50 sheets of plain A4 or Letter-size paper, depending on the printer model.
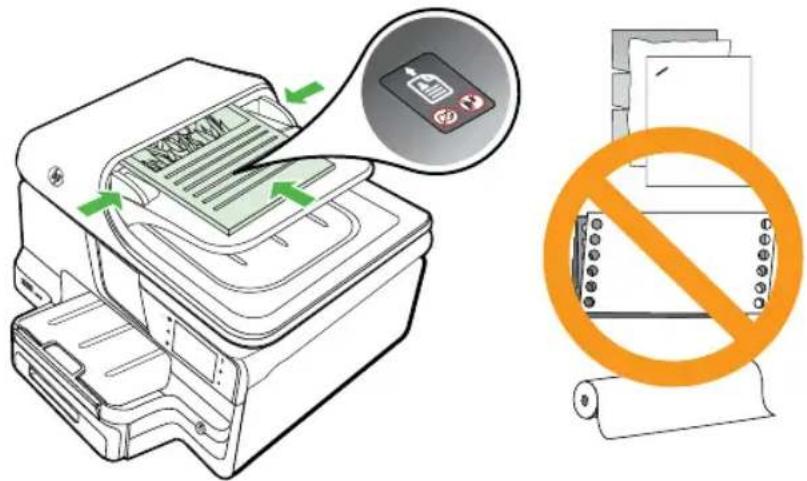
To load an original in the document feeder tray
Use these steps to load a document in the automatic document feeder.
- Load your original print-side up into the document feeder tray. Place the pages so that the top edge of the document goes in first. Slide the media into the automatic document feeder until you hear a tone or see a message on the display indicating that the loaded pages were detected.
TIP: For more help on loading originals in the automatic document feeder, refer to the diagram engraved in the document feeder tray.
text_image
Diagram illustrating printer printing process with Chinese text and prohibition symbol- Slide the width guides inward until they stop at the left and right edges of the media.
NOTE: Remove all originals from the document feeder tray before lifting the lid on the printer.
Load media
This section provides instructions for loading media into the printer.
This section contains the following topics:
- Load standard-size media
- Load envelopes
- Load cards and photo paper
- Load custom-size media
Load standard-size media
To load media
Use these instructions to load standard media.
- Pull out Tray 1.
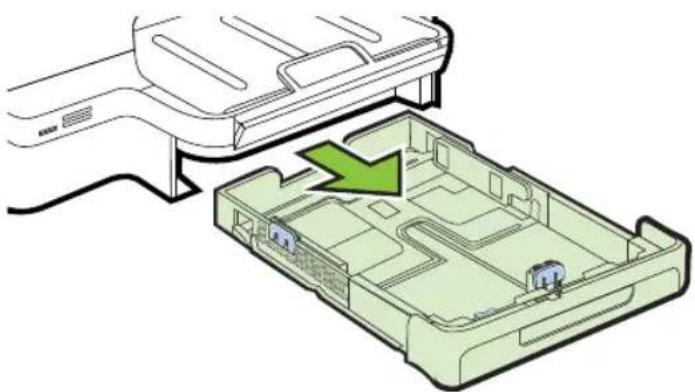
natural_image
Diagram showing a device being inserted into a green plastic tray with internal compartments (no text or symbols)- Insert the media print-side down in the center of the tray. Make sure the stack of media aligns with the line on the width guide, and is not higher than the paper stack line on the guide.

NOTE: Do not load paper while the printer is printing.
- Slide the media guides in the tray to adjust them for the media size that you have loaded, and then reinsert the tray.
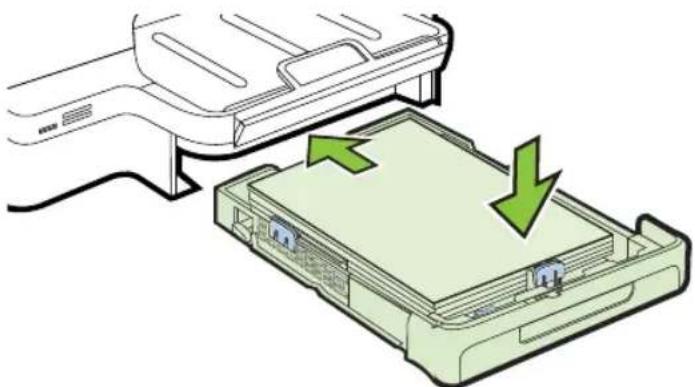
natural_image
Diagram showing a printer's internal structure with two green arrows indicating downward motion (no text or symbols present)- Pull out the extension on the output tray.
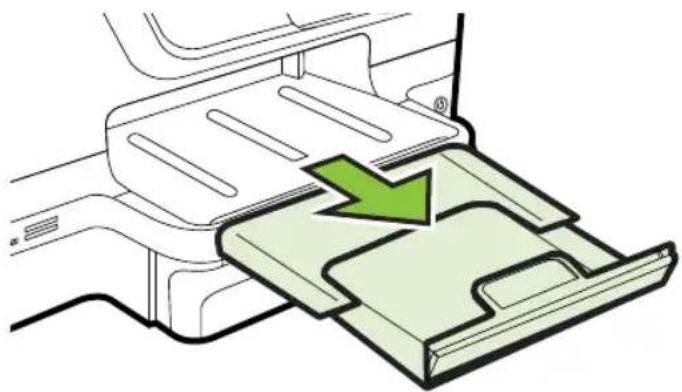
natural_image
Diagram of a car interior showing a green arrow pointing to a folded or mechanical component (no text or symbols present)Load envelopes
To load envelopes
Use these instructions to load an envelope.
- Pull out Tray 1.
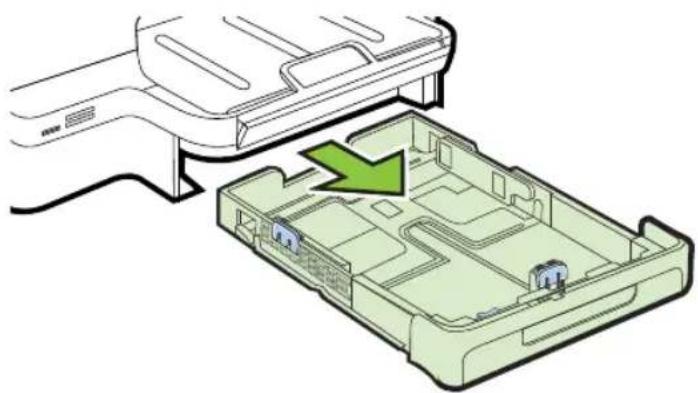
natural_image
Diagram showing a device being inserted into a green plastic housing, with a green arrow indicating the component (no text or symbols present)- Insert the envelopes print-side down and load according to the graphic. Make sure the stack of envelopes does not exceed the line marking in the tray.
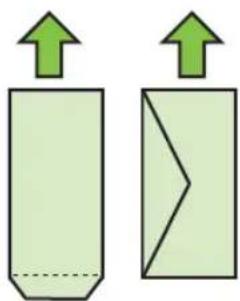
natural_image
Two simple diagrams showing upward arrows pointing to rectangular shapes, one with dashed bottom and one with zigzag cutout (no text or symbols)
NOTE: Do not load paper while the printer is printing.
Chapter 1
-
Slide the media guides in the tray to adjust them for the media size that you have loaded, and then reinsert the tray.
-
Pull out the extension on the output tray.
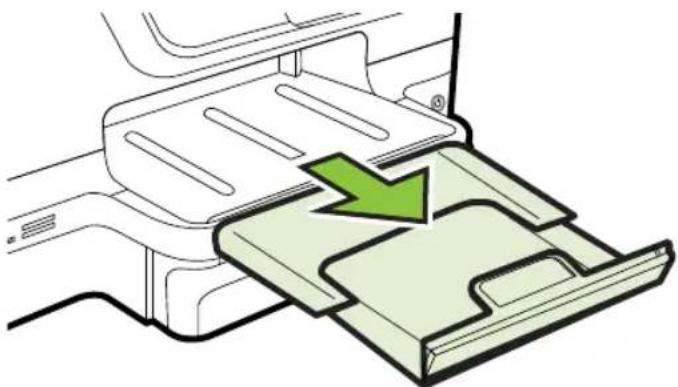
natural_image
Diagram of a car interior showing a green arrow pointing to a folded or compressed panel (no text or symbols present)Load cards and photo paper
To load cards and photo paper
Use these instructions to load photo paper.
- Pull out Tray 1.
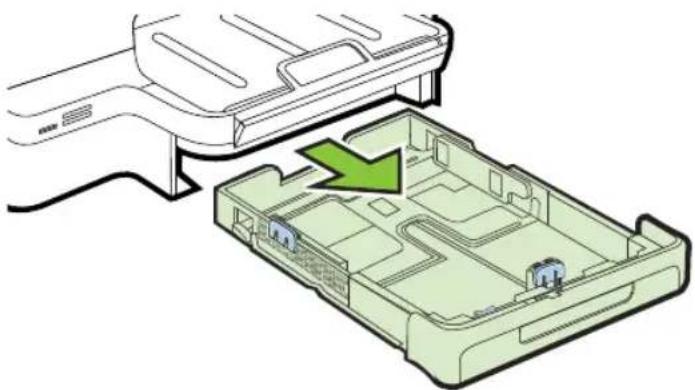
natural_image
Diagram showing a device being placed into a green plastic case with a green arrow indicating the component (no text or symbols present)- Insert the media print-side down in the center of the tray. Make sure the stack of media aligns with the line on the width guide, and is not higher than the paper stack line on the guide.

NOTE: Do not load paper while the printer is printing.
-
Slide the media guides in the tray to adjust them for the media size that you have loaded, and then reinsert the tray.
-
Pull out the extension on the output tray.
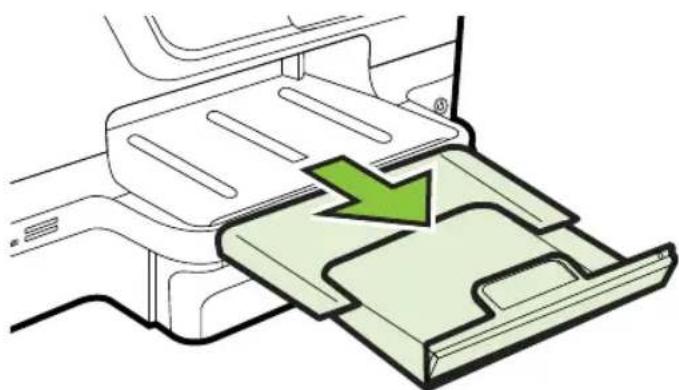
natural_image
Diagram of a car interior showing a green arrow pointing to a folded or folded panel (no text or symbols present)Load custom-size media
To load custom-size media
Use these instructions to load custom-size media.
CAUTION: Use only custom-size media that is supported by the printer. For more information, see Media specifications.
NOTE: Load only plain media in Tray 2.
- Pull out Tray 1.
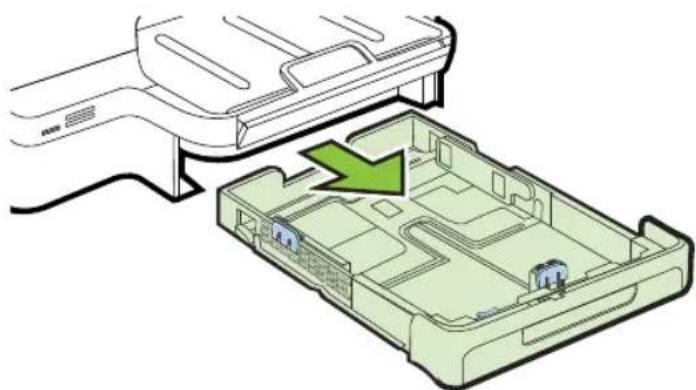
natural_image
Diagram showing a device's internal structure with a green arrow indicating a component (no text or symbols present)- Insert the media print-side down in the center of the tray. Make sure the stack of media aligns with the line on the width guide, and is not higher than the paper stack line on the guide.

NOTE: Do not load paper while the printer is printing.
Chapter 1
- Slide the media guides in the tray to adjust them for the media size that you have loaded, and then reinsert the tray.
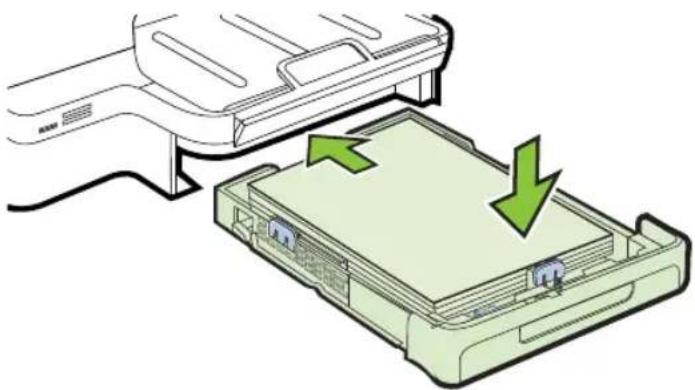
natural_image
Diagram showing a printer's internal structure with two green arrows indicating process flow (no text or symbols present)- Pull out the extension on the output tray.
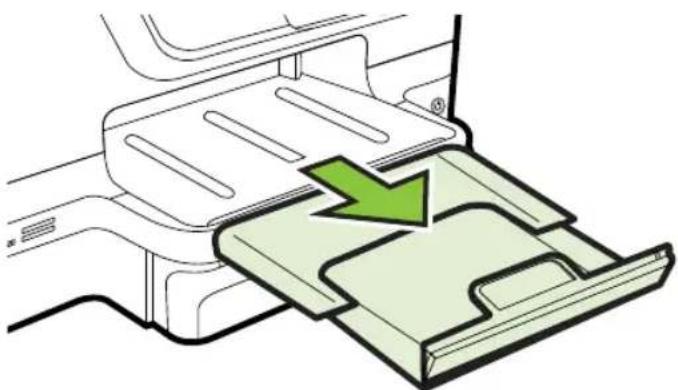
natural_image
Diagram of a car interior showing a green arrow pointing to a folded or folded panel (no text or symbols present)Insert a memory device
If your digital camera uses a memory card to store photos, you can insert the memory card into the printer to print or save your photos.

CAUTION: Attempting to remove a memory card while it is being accessed can damage files on the card. You can safely remove a card only when the photo light is not blinking. Also, never insert more than one memory card at a time as this can also damage files on the memory cards.

NOTE: The printer does not support encrypted memory cards.
For more information on the supported memory cards, see Memory device specifications.
To insert a memory card
Use these steps to insert a memory card into the printer.
-
Turn the memory card so that the label faces up, and the contacts are facing the printer.
-
Insert the memory card into the corresponding memory card slot.

NOTE: You cannot insert more than one memory card in the printer.
To connect a storage device
- If you are connecting a digital camera, change the USB mode of the camera to storage mode, and then connect one end of the USB cable to the camera.

NOTE: Different cameras use different terms to describe the storage mode. For instance, some cameras have a digital camera setting and a disk drive setting. In this instance, the disk drive setting is the storage mode setting. If storage mode does not work on your camera, you might need to upgrade the camera firmware. For more information, see the documentation that came with the camera.
- Insert the USB storage device or the other end of the camera's USB cable to the USB port on the front of the printer.

NOTE: If your USB device does not fit into this port due to size limitations, or if the connector on the device is shorter than 11 mm (0.43 in), you will need to purchase a USB extension cable in order to use your device with this port. For more information on supported USB devices, see Memory card specifications.
Install the accessories
This section contains the following topics:
• Install the duplexer
• Install Tray 2
- Configure trays
• Turn on accessories in the printer driver
Install the duplexer
You can print on both sides of a sheet of paper automatically. For information on using the duplexer, see Print on both sides (duplexing).
To install the duplexer:
Chapter 1
Slide the duplexer into the back of the printer until the unit locks into place. Do not press the buttons on either side of the duplexer when installing the unit; use them only for removing the unit from the printer.
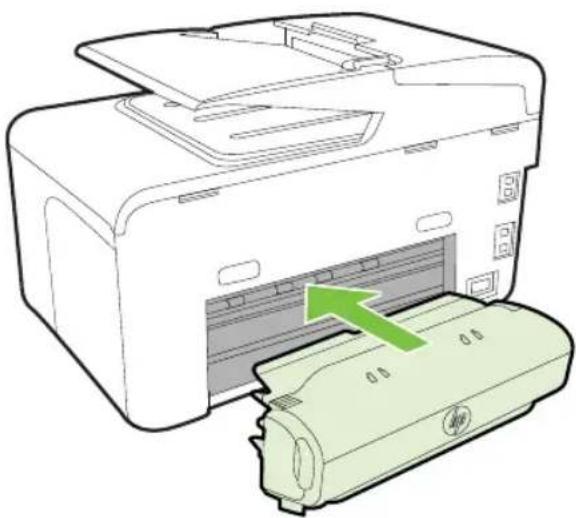
natural_image
Diagram of a printer with a green paper roll being inserted, showing internal structure and no text or symbols.Install Tray 2

NOTE: This feature is available with some models of the printer.
Tray 2 can hold up to 250 sheets of plain paper. For ordering information, see HP supplies and accessories.
To install Tray 2
- Unpack the tray, remove the packing tapes and materials, and move the tray to the prepared location. The surface must be sturdy and level.
- Turn off the printer, and disconnect the power cord.
- Set the printer on top of the tray.

CAUTION: Be careful to keep your fingers and hands clear of the bottom of the printer.
- Connect the power cord and turn on the printer.
- Enable Tray 2 in the printer driver. For more information, see Turn on accessories in the printer driver.
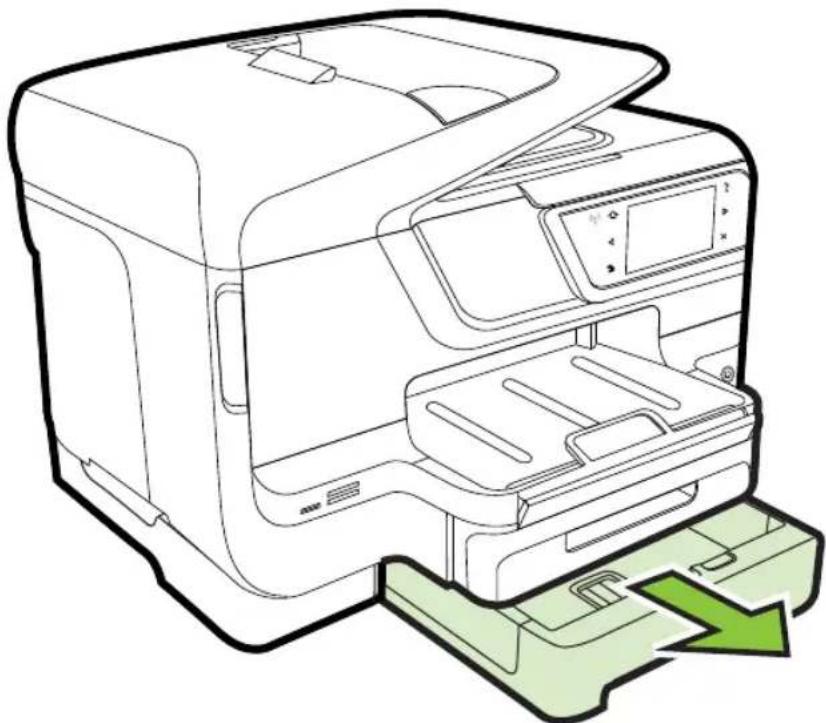
To load Tray 2
- Pull the tray out of the printer by grasping under the front of the tray.
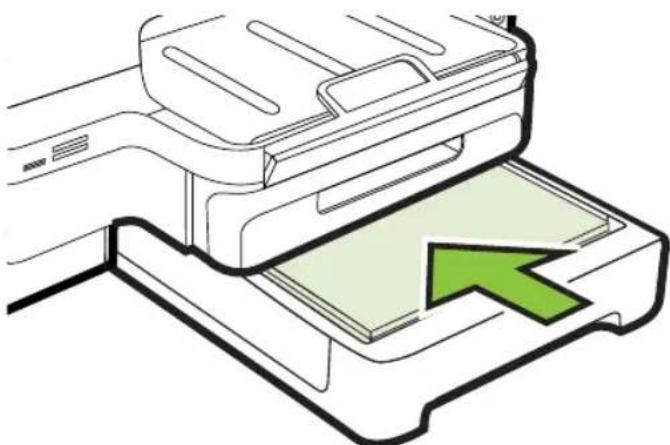
natural_image
Line drawing of a printer with open lid and green arrow indicating press or download (no text or symbols)- Insert the paper print-side down in the center of the tray. Make sure the stack of paper aligns with the line on the width guide, and does not exceed the line marking on the guide.

NOTE: Tray 2 can be loaded only with plain paper.
- Slide the media guides in the tray to adjust them for the size that you have loaded.
natural_image
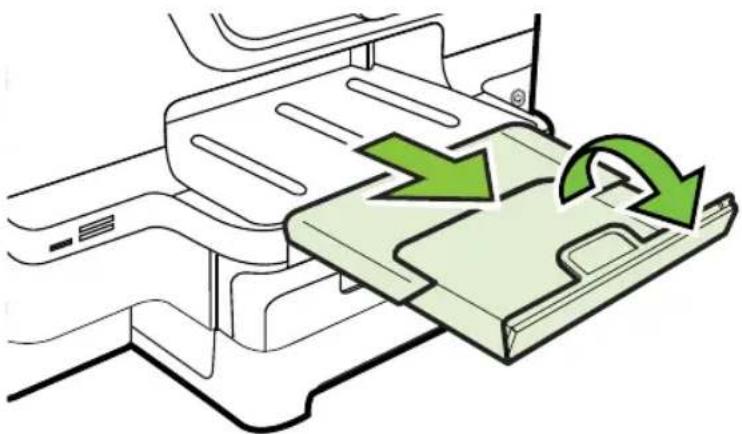
Diagram of a printer with a green arrow pointing to the cover area (no text or symbols present)- Gently reinsert the tray.
- Pull out the extension on the output tray.
natural_image
Diagram of a printer's internal structure with green arrows indicating rotation or refresh (no text or symbols)Configure trays

NOTE: Tray 2 is an optional accessory. For ordering information, see Order printing supplies online.
To configure the trays, you must have Tray 2 installed and turned on.
By default, the printer draws media from Tray 1. If Tray 1 is empty, the printer draws media from Tray 2 (if it is installed and loaded with media). You can change this default behavior by using the following features:
- Tray Lock: Use this feature to protect special media such as letterhead or preprinted media from accidental use. If the printer runs out of media while printing a document, it will not use media from a locked tray to complete the print job.
- Default Tray: Use this feature to determine the first tray from which the printer draws media.

NOTE: To use the tray lock and default tray settings, you must select the automatic tray selection option in the printer software. If the printer is on a network and you set a default tray, the setting will affect all users of the printer.
Tray 2 is designed to hold only plain paper.
The following table lists possible ways you can use the tray settings to meet your printing needs.
| I want to... Follow these steps | |
| Load both trays with the same media, and have the printer pick media from one tray if the other one is empty. | Load media in Tray 1 and Tray 2. For more information, seeLoad media.Make sure tray lock is disabled. |
| Have both special media (such as transparencies or letterhead) and plain paper loaded in the trays. | Load special media in Tray 1 and plain paper in Tray 2.Make sure the default tray is set to Tray 2.Make sure tray lock is set to Tray 1. |
| Load media in both trays but have the printer pick media from a specific tray first. | Load media in Tray 1 and Tray 2.Make sure default tray is set to the appropriate tray. |
To configure the trays
- Make sure the printer is turned on.
- Touch ▶ (right arrow), touch Setup, touch Preferences, and then select Default Tray or Tray Lock.
- Click OK or Apply after changing the desired tray settings.
Turn on accessories in the printer driver
• To turn on accessories (Windows)
• To turn on accessories on (Mac OS X)
To turn on accessories (Windows)
- Click Start, point to Settings, and then click Printers or Printers and Faxes.
-
Or -
Click Start, click Control Panel, and then double-click Printers. -
Right-click the printer icon, and then click Properties.
- Select the Device Settings tab. Click the accessory that you want to turn on, click Installed from the drop-down menu, and then click OK.
To turn on accessories on (Mac OS X)
Mac OS X automatically turns on all accessories in the printer driver when you install the printer software. If you add a new accessory later, follow these steps:
- Open the System Preferences and then select Print & Fax.
- Select the printer from list of printers, and then click Options & Supplies.
- Click the Driver tab.
- Select the options you want to install, and then click OK.
Maintain the printer
This section provides instructions for keeping the printer in top working condition. Perform these maintenance procedures as necessary.
• Clean the scanner glass
- Clean the exterior
• Clean the automatic document feeder
Clean the scanner glass

NOTE: Dust or dirt on the scanner glass, scanner lid backing, or scanner frame can slow down performance, degrade the quality of scans, and affect the accuracy of special features such as fitting copies to a certain page size.
To clean the scanner glass
- Turn the printer off. For more information, see Turn the printer off.
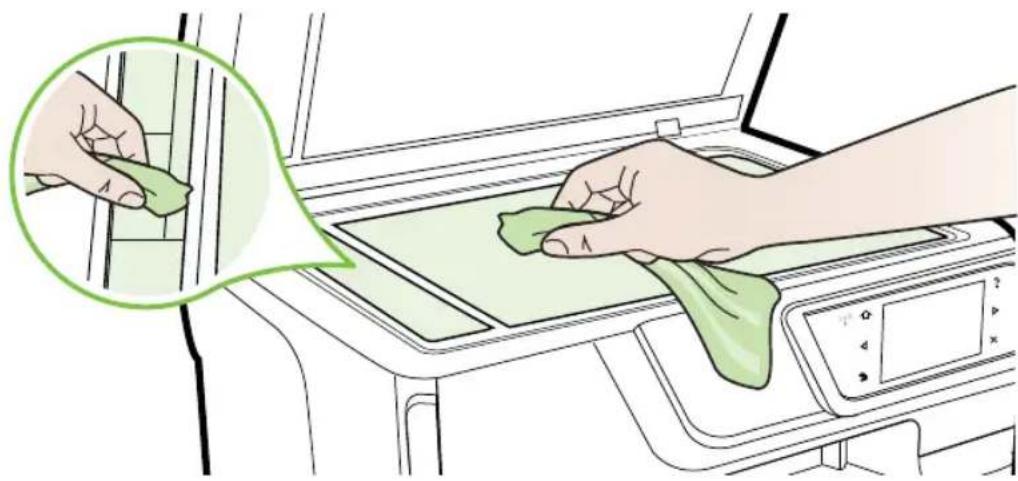
- Lift the scanner lid.
- Clean the glass and the glass strip by using a soft, lint-free cloth that has been sprayed with a mild glass cleaner. Dry the glass with a dry, soft, lint-free cloth.
natural_image
Illustration of hands cleaning a car interior with a green cloth on a green surface (no text or symbols)CAUTION: Use only glass cleaner to clean the scanner glass. Avoid cleaners that contain abrasives, acetone, benzene, and carbon tetrachloride, all of which can damage the scanner glass. Avoid isopropyl alcohol because it can leave streaks on the glass.
CAUTION: Do not spray the glass cleaner directly on the glass. If too much glass cleaner is applied, the cleaner could leak under the glass and damage the scanner.
- Close the scanner lid, and turn on the printer.
Clean the exterior
⚠ WARNING! Before cleaning the printer, turn the printer off by pressing the ⏻ (Power button) and unplug the power cord from the electrical socket.
Use a soft, damp, lint-free cloth to wipe dust, smudges, and stains off of the case. The exterior of the printer does not require cleaning. Keep fluids away from the interior of the printer, as well as from the printer control panel.
Clean the automatic document feeder
If the automatic document feeder picks up multiple pages or if it does not pick up plain paper, you can clean the rollers and separator pad. Lift the automatic document feeder
cover to access the pick assembly inside the automatic document feeder, clean the rollers or separator pad, and then close the cover.
To clean the rollers or separator pad
-
Remove all originals from the document feeder tray.
-
Lift the automatic document feeder cover (1).
This provides easy access to the rollers (2) and separator pad (3).
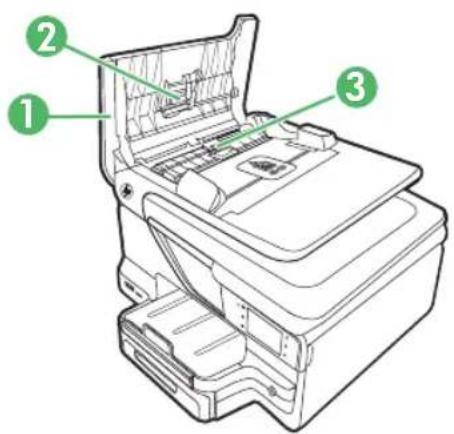
text_image
Technical diagram of a printer with numbered parts labeled 1, 2, and 3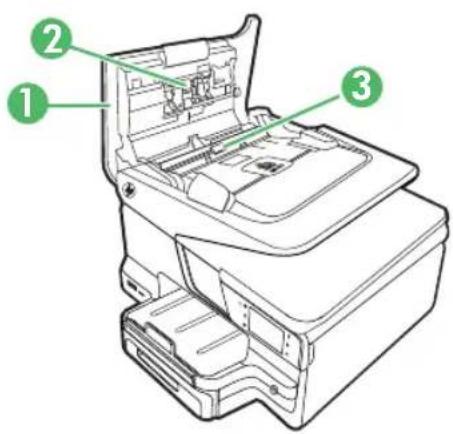
text_image
Technical diagram of a printer internal structure with numbered annotations pointing to components| 1 | Automatic document feeder cover |
| 2 | Rollers |
| 3 | Separator pad |
-
Lightly dampen a clean lint-free cloth with distilled water, then squeeze any excess liquid from the cloth.
-
Use the damp cloth to wipe any residue off the rollers or separator pad.

NOTE: If the residue does not come off using distilled water, try using isopropyl (rubbing) alcohol.
- Close the cover of the automatic document feeder.
Turn the printer off
Turn the printer off by pressing the ⏻ (Power button) located on the printer. Wait until the power light turns off before unplugging the power cord or turning off a power strip.

CAUTION: If you incorrectly turn the printer off, the print carriage might not return to the correct position causing problems with the ink cartridges and print quality issues.
CAUTION: HP recommends that you replace any missing cartridges as soon as possible to avoid print quality issues and possible extra ink usage or damage to the ink system. Never turn off the printer when ink cartridges are missing.
2 P r i n t
Most print settings are automatically handled by the software application. Change the settings manually only when you want to change print quality, print on specific types of paper, or use special features. For more information about selecting the best print media for your documents, see Select print media.
Choose a print job to continue:
 | Print documents |
 | Print brochures |
 | Print on envelopes |
 | Print photos |
 | Print on special and custom-size paper |
 | Print borderless documents |
Print documents
Follow the instructions for your operating system.
• Print documents (Windows)
• Print documents (Mac OS X)

NOTE: To print from email messages and attachments using HP's ePrint feature. For more information, see HP ePrint.
Print documents (Windows)
- Load paper in the tray. For more information, see Load media.
- On the File menu in your software application, click Print.
-
Make sure the printer you want to use is selected.
-
To change settings, click the button that opens the Properties dialog box.
Depending on your software application, this button might be called Properties, Options, Printer Setup, Printer, or Preferences. - Change the paper orientation on the Layout tab, and paper source, media type, paper size, and quality settings on the Paper/Quality tab. To print in black and white, click the Advanced button, and then change the Print in Grayscale option.
- Click OK.
- Click Print or OK to begin printing.
Print documents (Mac OS X)
-
Load paper in the tray. For more information, see Load media.
-
Select a paper size:
-
Load paper in the tray. For more information, see Load media.
- Select a paper size:
a. From the File menu in your software application, click Page Setup.

NOTE: If you do not see a Page Setup menu item, go to step 3.
b. Make sure the printer you want to use is selected in the Format For pop-up menu.
c. Select the paper size from the Paper Size pop-up menu, and then click OK.
b. Make sure the printer you want to use is selected in the Format For pop-up menu. c. Select the paper size from the Paper Size pop-up menu, and then click OK.
-
From the File menu in your software application, click Print.
-
Make sure the printer you want to use is selected.
-
Select the paper size from the Paper Size pop-up menu (if available).
-
Change the print settings for the option provided in the pop-up menus, as appropriate for your project.
-
From the File menu in your software application, click Print.
- Make sure the printer you want to use is selected.
- Select the paper size from the Paper Size pop-up menu (if available).
- Change the print settings for the option provided in the pop-up menus, as appropriate for your project.

NOTE: If you do not see any options, click the blue disclosure triangle next to the Printer pop-up menu.
- Click Print to begin printing.
Print brochures
Follow the instructions for your operating system.
• Print brochures (Windows)
• Print brochures (Mac OS X)
- Print brochures (Windows) - Print brochures (Mac OS X)

NOTE: To print from email messages and attachments using HP's ePrint feature. For more information, see HP ePrint.
Print brochures (Windows)

NOTE: To set print settings for all print jobs, make the changes in the HP software provided with the printer. For more information on the HP software, see Printer management tools.
-
Load paper in the tray. For more information, see Load media.
-
On the File menu in your software application, click Print.
-
Make sure the printer you want to use is selected.
-
Load paper in the tray. For more information, see Load media.
- On the File menu in your software application, click Print.
-
Make sure the printer you want to use is selected.
-
To change settings, click the button that opens the Properties dialog box.
Depending on your software application, this button might be called Properties, Options, Printer Setup, Printer, or Preferences.
-
Change the paper orientation on the Layout tab, and paper source, media type, paper size, and quality settings on the Paper/Quality tab. To print in black and white, click the Advanced button, and then change the Print in Grayscale option.
-
Click OK.
-
Click Print or OK to begin printing.
Print brochures (Mac OS X)
- Load paper in the tray. For more information, see Load media.
- Select a paper size:
a. From the File menu in your software application, click Page Setup.

NOTE: If you do not see a Page Setup menu item, go to step 3.
b. Make sure the printer you want to use is selected in the Format For pop-up menu.
c. Select the paper size from the Paper Size pop-up menu, and then click OK.
- From the File menu in your software application, click Print.
- Make sure the printer you want to use is selected.
- Select the paper size from the Paper Size pop-up menu (if available).
-
Click Paper Type/Quality from the pop-up menu, and then select the following settings:
-
Paper Type: The appropriate brochure paper type
• Quality: Normal or Best

NOTE: If you do not see these options, click the blue disclosure triangle next to the Printer pop-up menu.
- Select any other print settings that you want, and then click Print to begin printing.
Print on envelopes
Avoid envelopes with the following characteristics:
- Very slick finish
- Self-stick adhesives, clasps, or windows
- Thick, irregular, or curled edges
- Areas that are wrinkled, torn, or otherwise damaged
Make sure the folds of envelopes you load in the printer are sharply creased.

NOTE: For more information about printing on envelopes, see the documentation available with the software program you are using.
Follow the instructions for your operating system.
• Print on envelopes (Windows)
• Print on envelopes (Mac OS X)
Print on envelopes (Windows)
- Load envelopes print-side down in the tray. For more information, see Load media.
- On the File menu in your software application, click Print.
- Make sure the printer you want to use is selected.
- To change settings, click the button that opens the Properties dialog box.
Depending on your software application, this button might be called Properties, Options, Printer Setup, Printer, or Preferences.
- On the Layout tab, change the orientation to Landscape.
- Click Paper/Quality, and then select the appropriate envelope type from the Paper Size drop-down list.

TIP: You can change more options for the print job by using the features available on the other tabs in the dialog box.
- Click OK, and then click Print or OK to begin printing.
Print on envelopes (Mac OS X)
- Load envelopes in the tray. For more information, see Load media.
- Select a paper size:
a. From the File menu in your software application, click Page Setup.

NOTE: If you do not see a Page Setup menu item, go to step 3.
b. Make sure the printer you want to use is selected in the Format For pop-up menu.
c. Select the appropriate envelope size from the Paper Size pop-up menu, and then click OK.
-
From the File menu in your software application, click Print.
-
Make sure the printer you want to use is selected.
- Select the appropriate envelope size in the Paper Size pop-up menu (if available).
- Select the Orientation option.

NOTE: If you do not see these options, click the blue disclosure triangle next to the Printer pop-up menu.
- Select any other print settings that you want, and then click Print to begin printing.
Print photos
Do not leave unused photo paper in the input tray. The paper might start to curl, which could impair the quality of your printout. Photo paper should be flat before printing.
Follow the instructions for your operating system.
• Print photos on photo paper (Windows)
• Print photos on photo paper (Mac OS X)
• Print photos from a memory device

NOTE: To print from email messages and attachments using HP's ePrint feature. For more information, see HP ePrint.
Print photos on photo paper (Windows)
- Load paper in the tray. For more information, see Load media.
- On the File menu in your software application, click Print.
- Make sure the printer you want to use is selected.
- To change settings, click the option that opens the printer Properties dialog box. Depending on your software application, this option might be called Properties, Options, Printer Setup, Printer, or Preferences.
- On the Paper/Quality tab, select the appropriate photo paper type from the Media drop-down menu.
- Click Advanced, and then select Best or Maximum DPI from the Output Quality drop-down menu.
- To print the photo in black and white, click the Grayscale drop-down menu, and then select one of the following options:
- High-Quality Grayscale: uses all the available colors to print your photo in grayscale. This creates smooth and natural shades of gray.
- Black Ink Only: uses black ink to print your photo in grayscale. The gray shading is created by varying patterns of black dots, which might result in a grainy image.
- Click OK, and then click Print or OK to begin printing.
Print photos on photo paper (Mac OS X)
-
Load paper in the tray. For more information, see Load media.
-
Select a paper size:
a. From the File menu in your software application, click Page Setup.

NOTE: If you do not see a Page Setup menu item, go to step 3.
b. Make sure the printer you want to use is selected in the Format For pop-up menu.
c. Select the paper size from the Paper Size pop-up menu, and then click OK.
-
From the File menu in your software application, click Print.
-
Make sure the printer you want to use is selected.
-
Select the appropriate paper size from the Paper Size pop-up menu (if available).
-
Click Paper Type/Quality from the pop-up menu, and then select the following settings:
• Paper Type: The appropriate photo paper type
• Quality: Best or Maximum dpi

NOTE: If you do not see these options, click the blue disclosure triangle next to the Printer pop-up menu.
- If necessary, change the photo and color options:
a. Click the disclosure triangle beside Color Options and select the appropriate Photo Fix options:
- Off: Applies no automatic adjustments to the image.
- Basic: Automatically focuses the image; moderately adjusts image sharpness.
b. To print the photo in black and white, click Grayscale from the Color pop-up menu, and then select one of the following options:
- High Quality: Uses all the available colors to print your photo in grayscale. This creates smooth and natural shades of gray.
-
Black Print Cartridge Only: Uses black ink to print your photo in grayscale. The gray shading is created by varying patterns of black dots, which might result in a grainy image.
-
Select any other print settings that you want, and then click Print to begin printing.
Print photos from a memory device
You can connect a USB storage device (such as a keychain drive or portable hard drive) to the USB port at the back of the printer.
For more information about using memory devices, see Insert a memory device.

CAUTION: Attempting to remove a memory device while it is being accessed can damage files on the memory device. You can safely remove a memory card only when the status light is not blinking.
To print selected photos

NOTE: This function is only available if the memory device does not contain Digital Print Order Format (DPOF) content.
- Insert your memory device into the appropriate slot on the printer. The Photo screen appears on the control panel display.
- Touch View & Print. The photos are displayed.
- Follow the instructions on the control panel display to select, edit, or print the photos.
Print on special and custom-size paper
If your application supports custom-size paper, set the size in the application before printing the document. If not, set the size in the printer driver. You might need to reformat existing documents to print them correctly on custom-size paper.
Use only custom-size paper that is supported by the printer. For more information, see Media specifications.

NOTE: Defining custom-size media sizes is only available in the HP printing software in Mac OS X.
Follow the instructions for your operating system.
• Print on special or custom-size paper (Mac OS X)
• Set up custom sizes (Mac OS X)
Print on special or custom-size paper (Mac OS X)

NOTE: Before you can print on custom-size paper, you must set up the custom size in the HP software provided with the printer. For instructions, see Set up custom sizes (Mac OS X).
- Load the appropriate paper in the tray. For more information, see Load media.
- Select a paper size:
a. From the File menu in your software application, click Page Setup.

NOTE: If you do not see a Page Setup menu item, go to step 3.
b. Make sure the printer you want to use is selected in the Format For pop-up menu.
c. Select the paper size from the Paper Size pop-up menu, and then click OK.
-
From the File menu in your software application, click Print.
-
Make sure the printer you want to use is selected.
- Select the appropriate paper size from the Paper Size pop-up menu (if available).
- Click Paper Handling from the pop-up menu.
- Under Destination Paper Size, click Scale to fit paper size, and then select the custom size.
- Select any other print settings that you want, and then click Print to begin printing.
Set up custom sizes (Mac OS X)
- Load paper in the tray. For more information, seeLoad media.
- From the File menu in your software application, click Page Setup, and then make sure the printer you want to use is selected in the Format For pop-up menu.
- OR -
From the File menu in your software application, click Print, and then make sure the printer you want to use is selected.
- Select Manage Custom Sizes in the Paper Size pop-up menu.

NOTE: If you do not see these options in the Print dialog, click the blue disclosure triangle next to the Printer pop-up menu.
- Click the + on the left side of the screen, double-click Untitled, and type a name for the new, custom size.
- In the Width and Height boxes, type the dimensions, and then set the margins, if you want to customize them.
- Click OK.
Print borderless documents
Borderless printing lets you print to the edges of certain photo media types and a range of standard media sizes.

NOTE: You cannot print a borderless document if the paper type is set to Plain paper.
NOTE: Before printing a borderless document, open the file in a software application and assign the image size. Make sure the size corresponds to the media size on which you are printing the image.
NOTE: Not all applications support borderless printing.
Follow the instructions for your operating system.
• Print borderless documents (Windows)
• Print borderless documents (Mac OS X)
Print borderless documents (Windows)
- Load paper in the tray. For more information, see Load media.
- On the File menu in your software application, click Print.
- Make sure the printer you want to use is selected.
- To change settings, click the button that opens the Properties dialog box. Depending on your software application, this button might be called Properties, Options, Printer Setup, Printer, or Preferences.
- Click the Paper/Quality tab, and then click the Advanced button.
- In the Borderless Printing option, click Print Borderless, and then click the OK button.
- In the Media drop-down list, select the appropriate paper type.
- Click OK, and then click Print or OK to begin printing.
Print borderless documents (Mac OS X)
- Load paper in the tray. For more information, see Load media.
- Select a borderless paper size:
a. From the File menu in your software application, click Page Setup.

NOTE: If you do not see a Page Setup menu item, go to step 3.
b. Make sure the printer you want to use is selected in the Format For pop-up menu.
c. Select an available borderless paper size from the Paper Size pop-up menu, and then click OK.
-
From the File menu in your software application, click Print.
-
Make sure the printer you want to use is selected.
-
Select the paper size from the Paper Size pop-up menu (if available).
-
Click Paper Type/Quality from the pop-up menu, and then select the following settings:
• Paper Type: The appropriate paper type
• Quality: Best or Maximum dpi

NOTE: If you do not see these options, click the blue disclosure triangle next to the Printer pop-up menu.
- Make sure the Print Borderless check box is selected.
-
If necessary, click the blue disclosure triangle beside Color Options and select the appropriate Photo Fix options:
-
Off: Applies no automatic adjustments to the image.
-
Basic: Automatically focuses the image; moderately adjusts image sharpness.
-
Select any other print settings that you want, and then click Print to begin printing.
HP ePrint
With HP ePrint, you can print from email connected mobile phones, netbooks, other mobile devices, or traditional desktop email clients—anywhere, anytime. Using your mobile device service and the printer's web Services, you can print documents to a printer that could be sitting next to you or sitting thousands of miles away.
To use the HP ePrint service, you need to have the following components:
- An HP ePrint-enabled printer that is connected to the Internet (either using an Ethernet cable or wireless connection)
- A device that has a functioning email capability
Follow the instructions on the printer's control panel to enable and set up the printer's web services. For more information, see www.hp.com/go/ePrintCenter.
Print on both sides (duplexing)
You can print on both sides of a sheet of media automatically by using the HP Automatic Two-sided Printing Accessory (duplexer).

NOTE: Two-sided printing requires an HP Automatic Two-sided Printing Accessory (duplexer) to be installed on the printer.

TIP: You can perform manual duplexing by first printing only the odd pages, flipping the pages over, and then printing only the even pages.
Perform two-sided printing (Windows)
- Load the appropriate media. For more information, see Guidelines for printing on both sides of a page and Load media.
- Make sure the duplexer is installed correctly. For more information, see Install the duplexer.
-
With a document open, click Print on the File menu, and then under the Print on Both Sides options on the Layout tab, select either Flip on Long Edge or Flip on Short Edge.
-
Change any other settings, and then click OK.
- Print your document.
Perform two-sided printing (Mac OS X)
- Load the appropriate media. For more information, see Guidelines for printing on both sides of a page and Load media.
- Make sure the duplexer is installed correctly. For more information, see Install the duplexer.
- Select a paper size:
a. From the File menu in your software application, click Page Setup.

NOTE: If you do not see a Page Setup menu item, go to step 4.
b. Make sure the printer you want to use is selected in the Format For pop-up menu.
c. Select the paper size from the Paper Size pop-up menu, and then click OK.
- From the File menu in your software application, click Print.
- Make sure the printer you want to use is selected.
- Select the paper size from the Paper Size pop-up menu (if available).

NOTE: You might need to select the paper-size option labeled Two-Sided margins.
- Click the Two-Sided Printing pop-up menu, select Print Both Sides, and then click the appropriate binding options for the document.
- OR -
Click the Layout pop-up menu, and then select the appropriate binding options for the document from the Two-Sided pop-up menu.

NOTE: If you do not see any options, click the blue disclosure triangle next to the Printer pop-up menu.
- Select any other print settings that you want, and then click Print to begin printing.
3 Scan
You can use the printer's control panel to scan documents, photos, and other originals and send them to a variety of destinations, such as a folder on a computer. You can also scan these originals from your computer using either the HP software provided with the printer or TWAIN-compliant or WIA-compliant programs.
When scanning documents, you can use the HP software to scan documents into a format that you can search, copy, paste, and edit.

NOTE: The HP Scanning Software does not support TWAIN and WIA scanning on computers running Mac OS X.
NOTE: Some scan functions are only available after you install the HP software.

TIP: If you have problems scanning documents, see Solve scan problems.
This section contains the following topics:
- Scan an original
- Scan using Webscan
• Scanning documents as editable text
Scan an original

NOTE: Your printer and computer must be connected and turned on.
NOTE: If you are scanning an original from the printer control panel or from your computer using a the HP printer software, the HP software provided with the printer must also be installed and running on your computer prior to scanning.
NOTE: If you are scanning a borderless original, load the original on the scanner glass, not the ADF.
This section contains the following topics:
- Scan to a computer
- Scan to a memory card
Scan to a computer
To scan an original to a computer from the printer control panel

NOTE: If you are using a computer running Windows, from the computer desktop, click Start, select Programs or All Programs, select the folder for your HP printer, and then select the option for your HP printer. Double-click Scanner Actions, double-click Manage Scan to Computer, and then click Enable.
Use these steps to scan from the control panel.
- Load your original print-side down on the right-front corner of the glass or print-side up in the ADF. For more information, see Load an original on the scanner glass or Load an original in the automatic document feeder (ADF).
- Touch Scan, and then select Computer.
- Touch Document Type to select the type of document you want to save. Touch Resolution to change the scan resolution setting.
- Make changes to scan options, if needed.
- Touch Start Scan.
To scan an original from HP printer software
- Load your original print-side down on the right-front corner of the glass or print-side up in the ADF. For more information, see Load an original on the scanner glass or Load an original in the automatic document feeder (ADF).
-
On the computer, open the HP scanning software:
-
Windows: From the computer desktop, click Start, select Programs or All Programs, select the folder for your HP printer, and then select HP Scan.
-
Mac OS X: Double-click the HP Scans 3 icon. This icon is located in the Hewlett-Packard folder in the Applications folder at the top level of the hard disk.
-
Select a scan shortcut. Make changes to the scan settings, if needed.
-
To start the scan, click Scan.

NOTE: For more information, see the online Help provided with the scanning software.
NOTE: Use the HP software to scan documents into editable text, a format that allows you to search, copy, paste, and edit within the scanned document. Use this format to edit letters, newspaper clippings, and many other documents. For more information, see Scanning documents as editable text.
Scan to a memory card
You can scan directly to a memory card from the printer control panel without using a computer or the HP software provided with the printer.
To scan an original to a memory card from the printer control panel
Use these steps to scan an original to a memory card.
- Load your original print-side down on the right-front corner of the glass or print-side up in the ADF. For more information, see Load an original on the scanner glass or Load an original in the automatic document feeder (ADF).
- Insert a memory card. For more information, see Insert a memory device.
- Touch Scan, and then select Memory Device.
- Make changes to scan options, if needed.
- Touch Start Scan.

TIP: To scan documents as editable text, you must install the HP software included with the printer. For more information, see Scanning documents as editable text.
Scan using Webscan
Webscan is a feature of the embedded web server that lets you scan photos and documents from your printer to your computer using a web browser. This feature is available even if you did not install the printer software on your computer.
For more information, see Embedded web server.

NOTE: If you are unable to open Webscan in the EWS, it might be turned off by your network administrator. For more information, contact your network administrator or the person who set up your network.
To scan using Webscan
- Load your original print-side down on the right-front corner of the glass or print-side up in the ADF. For more information, see Load an original on the scanner glass or Load an original in the automatic document feeder (ADF).
- Open the embedded web server. For more information, see Embedded web server.
- Click the Scan tab, click Webscan in the left pane, change any settings, and then click Start Scan.

TIP: To scan documents as editable text, you must install the HP software included with the printer. For more information, see Scanning documents as editable text.
Scanning documents as editable text
When scanning documents, you can use the HP software to scan documents into a format that you can search, copy, paste, and edit. This allows you to edit letters, newspaper clippings, and many other documents.
This section contains the following topics:
• To scan documents as editable text
• Guidelines for scanning documents as editable text
To scan documents as editable text
Use the following guidelines for scanning documents as editable text.
Follow the instructions for your operating system.
Windows
-
Load your original print-side down on the right-front corner of the glass or print-side up in the ADF. For more information, see Load an original on the scanner glass or Load an original in the automatic document feeder (ADF).
-
From the computer desktop, click Start, select Programs or All Programs, select the folder for your HP printer, and then select HP Scan.
-
Select the type of editable text you want to use in the scan:
| I want to... Follow these steps | |
| Extract just the text, without any of the formatting of the original | Select the Save as Editable Text (OCR) shortcut from the list, and then select Text (.txt) from the File Type drop-down menu. |
| Extract the text, as well as some of the formatting of the original | Select the Save as Editable Text (OCR) shortcut from the list, and then select Rich Text (.rtf) from the File Type drop-down menu.OrSelect the Save as PDF shortcut from the list, and then select Searchable PDF (.pdf) from the File Type drop-down menu. |
- To start the scan, click Scan, and then follow the onscreen instructions.
Mac OS X
-
Load your original print-side down on the right-front corner of the glass or print-side up in the ADF. For more information, see Load an original on the scanner glass or Load an original in the automatic document feeder (ADF).
-
Double-click the HP Scan 3 icon. This icon is located in the Hewlett-Packard folder in the Applications folder at the top level of the hard disk.
-
From the HP Scan menu, click Preferences.
-
Select the Documents preset from the Presets pop-up menu.
-
To start the scan, click Scan.
-
Select the type of editable text you want to use in the scan:
| I want to... Follow these steps | |
| Extract just the text, without any of the formatting of the original | Select TXT from the Format pop-up menu. |
| Extract the text, as well as some of the formatting of the original | Select RTF or PDF-Searchable from the Format pop-up menu. |
- Click Save.
Guidelines for scanning documents as editable text
To ensure that the software can convert your documents successfully, do the following:
- Make sure the scanner glass or ADF window is clean.
When the printer scans the document, smudges or dust on the scanner glass or ADF window can be scanned, as well, and can prevent the software from converting the document to editable text.
- Make sure the document is loaded correctly.
When scanning documents as editable text from the ADF, the original must be loaded into the ADF with the top forward and face up. When scanning from the scanner glass, the original must be loaded with the top facing the right edge of the scanner glass.
Also, make sure the document is not skewed. For more information, see Load an original on the scanner glass or Load an original in the automatic document feeder (ADF).
- Make sure the text on the document is clear.
To successfully convert the document to editable text, the original must be clear and of high quality. The following conditions can cause the software to not convert the document successfully:
- The text on the original is faint or wrinkled.
- The text is too small.
• The structure of the document is too complex. - The text is tightly spaced. For example, if the text that the software converts has missing or combined characters, "rn" might appear as "m."
- The text is on a colored background. Colored backgrounds can cause images in the foreground to blend too much.
- Choose the correct profile.
Be sure to select a shortcut or preset that allows scanning as editable text. These options use scan settings designed to maximize the quality of your OCR scan. In Windows, use the Editable Text (OCR) or Save as PDF shortcuts. In Mac OS X, use the Documents preset.
- Save your file in the correct format.
If you want to extract just the text from the document, without any of the formatting of the original, select a plain text format (such as Text (.txt) or TXT). If you want to extract the text, as well as some of the formatting of the original, select Rich Text Format (such as Rich Text (.rtf) or RTF) or searchable PDF format (Searchable PDF (.pdf) or PDF-Searchable).
4 HP Digital Solutions
The printer includes a collection of digital solutions that can help you simplify and streamline your work. These digital solutions include the following:
• HP Direct Digital Filing (including Scan to Network Folder and Scan to Email)
• HP Digital Fax (including Fax to Network Folder and Fax to Email)

NOTE: Scan to Email and Fax to Email features are only supported by HP Officejet Pro 8600 Plus and HP Officejet Pro 8600 Premium.
This section contains the following topics:
• What are HP Digital Solutions?
- Requirements
• Set up HP Digital Solutions
• Use the HP Digital Solutions
What are HP Digital Solutions?
HP Digital Solutions are a set of tools provided with this printer that can help improve your office productivity.
HP Direct Digital Filing
HP Direct Digital Filing provides robust, general-office scanning—as well as basic, versatile, document-management capabilities—for multiple users over a network. With HP Direct Digital Filing, you can simply walk up to the printer, touch a button on the printer's control panel, and either scan documents directly to computer folders on your network or quickly share them with business partners as email attachments—and all without using additional scanning software.
These scanned documents can be sent to a shared network folder for personal or group access or to one or more email addresses for quick sharing. In addition, you can configure specific scan settings for each scan destination, allowing you to make sure that the best settings are being used for each specific task.
HP Digital Fax
Never lose important faxes misplaced within a stack of paper pages again!
With HP Digital Fax, you can save incoming, black-and-white faxes to a computer folder on your network for easy sharing and storage, or you can forward faxes through email—allowing you to receive important faxes from anywhere while working away from the office.
In addition, you can turn off fax printing altogether — saving money on paper and ink, as well as helping reduce paper consumption and waste.
Requirements
Before you set up the HP Digital Solutions, make sure you have the following:
For all HP Digital Solutions
• A network connection
The printer can be connected either through a wireless connection or using an Ethernet cable.

NOTE: If the printer is connected using a USB cable, you scan documents to a computer or attach scans to an email message using the HP software. For more information, see Scan an original. You can receive faxes to your computer using Fax to PC or Fax to Mac. For more information, see Receive faxes to your computer using HP Digital Fax (Fax to PC and Fax to Mac).
• The HP software
HP recommends that you set up HP Digital Solutions using the HP software provided with the printer.

TIP: If you would like to set up HP Digital Solutions without installing the HP software, you can use the printer's embedded web server.
For Scan to Network Folder, Fax to Network Folder
• An active network connection. You must be connected to the network.
- An existing Windows (SMB) shared folder
For information about finding the computer name, see the documentation for your operating system.
• The network address for the folder
On computer running Windows, network addresses are usually written in this format: \mypc\sharedfolder\
- The name of the computer where the folder is located
For information about finding the computer name, see the documentation for your operating system.
- Appropriate privileges on the shared folder
You must have write access to the folder.
- A username and password for the shared folder (if necessary)
For example, the Windows or Mac OS X username and password used to log onto the network.

NOTE: HP Direct Digital Filing does not support Active Directory.
For Scan to Email, Fax to Email

NOTE: Scan to Email and Fax to Email are only supported by HP Officejet Pro 8600 Plus and HP Officejet Pro 8600 Premium.
• A valid email address
- Outgoing SMTP server information
- An active Internet connection
If you are setting up Scan to Email or Fax to Email on a computer running Windows, the setup wizard can automatically detect the email settings for the following email applications:
• Microsoft Outlook 2003–2007 (Windows XP, Windows Vista, and Windows 7)
- Outlook Express (Windows XP)
- Windows Mail (Windows Vista)
- Mozilla Thunderbird (Windows XP, Windows Vista, and Windows 7)
• Qualcomm Eudora (version 7.0 and above) (Windows XP and Windows Vista)
- Netscape (version 7.0) (Windows XP)
However, if your email application is not listed above, you can still set up and use Scan to Email and Fax to Email if your email application meets the requirements listed in this section.
Set up HP Digital Solutions
You can set up HP Digital Solutions using the HP software provided with the printer—either using software wizards that you can open from the HP printer software (Windows) or HP Utility (Mac OS X).

TIP: You can also use the printer's EWS to set up the HP Digital Solutions. For more information about using the EWS, see Embedded web server.

NOTE: If you are using the printer in an IPv6-only network environment, you must set up the digital solutions using the EWS.
This section contains the following topics:
• Set up HP Direct Digital Filing
• Set up HP Digital Fax
Set up HP Direct Digital Filing
To set up HP Direct Digital Filing, follow the appropriate instructions.

NOTE: You can also use these steps to change settings in the future.
This section contains the following topics:
• Set up Scan to Network Folder
- Set up Scan to Email
Set up Scan to Network Folder
You can configure up to 10 destination folders for each printer.

NOTE: To use Scan to Network Folder, you must have created and configured the folder you are using on a computer connected to the network. You cannot create a folder from the printer's control panel. Also, make sure the folder preferences are set to provide read and write access. For more information about creating folders on the network and setting folder preferences, see the documentation for your operating system.
After you finish setting up Scan to Network Folder, the HP software automatically saves the configurations to the printer.
To set up Scan to Network Folder, complete the following steps for your operating system.
Windows
- Open the HP Printer Software. For more information, see Toolbox (Windows).
- Double-click Scanner Actions, and then double-click Scan to Network Folder Wizard.
- Follow the onscreen instructions.

NOTE: After you create destination folders, you can use the printer's EWS to customize the scan settings for these folders. On the last screen of the Scan to Network Folder Wizard, make sure the Launch embedded web server when finished check box is selected. When you click Finish, the EWS is displayed in your computer's default web browser. For more information about the embedded web server, see Embedded web server.
Mac OS X
- Open HP Utility. For more information, see HP Utility (Mac OS X).
- Click Scan to Network Folder under the Scan Settings section, and then follow the onscreen instructions.

NOTE: You can customize the scan settings for each destination folder.
Embedded web server (EWS)
- Open the embedded web server (EWS). For more information, see Embedded web server.
- On the Home tab, click Network Folder Setup in the Setup box.
- Click New, and then follow the onscreen instructions.

NOTE: You can customize the scan settings for each destination folder.
- After you have entered the required information about the network folder, click Save and Test to make sure the link to the network folder is working correctly. The entry is added to the Network Folder list.
Set up Scan to Email
You can use the printer to scan documents and send them to one or more email addresses as attachments—without additional scanning software. You do not need to scan files from your computer and attach them to email messages.

NOTE: Scan to Email is only supported by HP Officejet Pro 8600 Plus and HP Officejet Pro 8600 Premium.
To use the Scan to Email feature, complete the following preliminary steps:
Set the Outgoing Email Profiles
Configure the email address which will appear in the FROM portion of the email message sent by the printer. You can add up to 10 Outgoing Email Profiles. You can use the HP software installed on your computer to create these profiles.
Add email addresses to the Email Address Book
Manage the list of people to whom you can send email messages from the printer. You can add up to 15 email addresses with their corresponding contact names. You can also create email groups. To add email addresses, you must use the printer's embedded web server (EWS).
Configure other email options
You can configure default SUBJECT and body text that is included in all email messages sent from the printer. To configure these options, you must use the printer's EWS.
Step 1: Set up the outgoing email profiles
To set up the outgoing email profile used by the printer, complete the following steps for your operating system.
Windows
- Open the HP printer software. For more information, see Toolbox (Windows).
- Double-click Scanner Actions, and then double-click Scan to Email Wizard..
- Click New, and then follow the onscreen instructions.

NOTE: After you set the Outgoing Email Profile, you can use the printer's embedded web server (EWS) to add more Outgoing Email Profiles, add email addresses to the Email Address Book, and configure other email options. To open the EWS automatically, make sure the Launch embedded web server when finished check box is selected on the last screen of the Scan to Email Wizard. When you click Finish, the EWS is displayed in your computer's default web browser. For more information about the embedded web server, see Embedded web server
Mac OS X
- Open HP Utility. For more information, see HP Utility (Mac OS X).
- Click Scan to Email.
- Follow the onscreen instructions.
- After you have entered the required information about the network folder, click Save and Test to make sure the link to the network folder is working correctly. The entry is added to the Outgoing Email Profiles list.
Embedded web server (EWS)
- Open the embedded web server (EWS). For more information, see Embedded web server.
-
On the Home tab, click Outgoing Email Profiles in the Setup box.
-
Click New, and then follow the onscreen instructions.
- After you have entered the required information about the network folder, click Save and Test to make sure the link to the network folder is working correctly. The entry is added to the Outgoing Email Profile List.
Step 2: Add email addresses to the Email Address Book
To add email addresses to the Email Address Book, complete the following steps:
- Open the embedded web server (EWS). For more information, see Embedded web server.
- On the Scan tab, click Email Address Book.
- Click New to add a single email address.
-Or-
Click Group to create an email distribution list.

NOTE: Before you can create an email distribution list, you must have already added at least one email address to the Email Address Book.
- Follow the onscreen instructions. The entry is added to the Email Address Book.

NOTE: Contact names appear on the printer's control-panel display and in your email application.
Step 3: Configure other email options
To configure other email options (such as configuring default SUBJECT and body text that is included in all email messages sent from the printer, as well as scan settings used when sending email from the printer), complete the following steps:
- Open the embedded web server (EWS). For more information, see Embedded web server.
- On the Scan tab, click Email Options.
- Change any settings, and then click Apply.
Set up HP Digital Fax
With HP Digital Fax, the printer automatically receives faxes and saves them directly to a network folder (Fax to Network Folder) or forwards them as email attachments (Fax to Email).

NOTE: You can configure HP Digital Fax to use either Fax to Network Folder or to use Fax to Email. You cannot use both at the same time.
NOTE: Fax to Email is only supported by HP Officejet Pro 8600 Plus and HP Officejet Pro 8600 Premium.
Received faxes are saved as TIFF (Tagged Image File Format) or PDF files.

CAUTION: HP Digital Fax is available for receiving black-and-white faxes only. Color faxes are printed instead of being saved.
Windows
- Open the HP printer software.
- Double-click Fax Actions, and then double-click Digital Fax Setup Wizard.
- Follow the onscreen instructions.

NOTE: After you set up HP Digital Fax, you can use the printer's embedded web server (EWS) to edit HP Digital Fax settings. To open the EWS automatically, make sure the Launch embedded web server when finished check box is selected on the last screen of the Digital Fax Setup Wizard. When you click Finish, the EWS is displayed in your computer's default web browser. For more information about the embedded web server, see Embedded web server.
Mac OS X
- Open HP Utility. For more information, see HP Utility (Mac OS X).
- Click Digital Fax Archive.
- Follow the onscreen instructions.
- After you have entered the required information, click Save and Test to make sure the link to the network folder is working correctly.
Embedded web server (EWS)
- On the Home tab, click Fax to Email/Network Folder in the Setup box.
- Follow the onscreen instructions.
- After you have entered the required information, click Save and Test to make sure the link to the network folder is working correctly.
Use the HP Digital Solutions
To use the HP Digital Solutions available with the printer, follow the appropriate instructions.
Use HP Scan to Network Folder
- Load your original print-side down on the right-front corner of the glass or print-side up in the ADF. For more information, see Load an original on the scanner glass or Load an original in the automatic document feeder (ADF).
- Touch Scan, and then touch Network Folder.
- On the control-panel display, select the name that corresponds to the folder you want to use.
- If prompted, enter the PIN.
- Change any scan settings, and then touch Start Scan.

NOTE: The connection might take some time, depending on network traffic and connection speed.
Use Scan to Email

NOTE: Scan to Email is only supported by HP Officejet Pro 8600 Plus and HP Officejet Pro 8600 Premium.
- Load your original print-side down on the right-front corner of the glass or print-side up in the ADF. For more information, see Load an original on the scanner glass or Load an original in the automatic document feeder (ADF).
- Touch Scan, and then touch Email.
- On the control-panel display, select the name that corresponds to the Outgoing Email Profile you want to use.
- If prompted, enter the PIN.
- Select the TO email address (the email recipient) or enter an email address.
- Enter or change the SUBJECT for the email message.
- Change any scan settings, and then touch Start Scan.

NOTE: The connection might take some time, depending on network traffic and connection speed.
Use HP Digital Fax
After you set up HP Digital Fax, any black-and-white faxes that you receive print, by default, and then are saved to the designated destination—either the network folder or email address that you have specified:
- If you are using Fax to Network Folder, this process happens in the background. HP Digital Fax does not notify you when faxes are saved to the network folder.
- If you are using Fax to Email and if your email application is set to notify you when new email messages arrive in your inbox, you can see when new faxes arrive.

NOTE: Fax to Email is only supported by HP Officejet Pro 8600 Plus and HP Officejet Pro 8600 Premium.
5 C o p y
You can produce high-quality color and grayscale copies on a variety of paper types and sizes.

NOTE: If you are copying a document when a fax arrives, the fax is stored in the printer's memory until the copying finishes. This can reduce the number of fax pages stored in memory.
This section contains the following topics:
- Copy documents
• Change copy settings
Copy documents
You can make quality copies from the printer control panel.
To copy documents
- Make sure you have paper loaded in the main tray. For more information, see Load media.
- Place your original face down on the scanner glass or face up in the ADF. For more information, see Load an original on the scanner glass or Load an original in the automatic document feeder (ADF).

NOTE: If you are copying a photo, place the photo on the scanner glass face down, as shown on the icon on the edge of the scanner glass.
- Touch Copy.
- Change any additional settings. For more information, see Change copy settings.
- To start the copy job, touch Start Black or Start Color.

NOTE: If you have a color original, selecting Start Black produces a black-and-white copy of the color original, while selecting Start Color produces a full-color copy of the color original.
Change copy settings
You can customize copy jobs using the various settings available from the printer's control panel, including the following:
- Number of copies
- Copy paper size
- Copy paper type
- Copy speed or quality
• Lighter/Darker settings - Resizing originals to fit on different paper sizes
You can use these settings for single copy jobs, or you can save settings to be used as defaults for future jobs.
To change copy settings for a single job
- Touch Copy.
- Select the copy function settings you want to change.
- Touch Start Black or Start Color.
To save the current settings as defaults for future jobs
- Touch Copy.
- Make any changes to the copy function settings, and then touch Settings.
- Touch ▼ (down arrow), and then select Set As New Defaults.
- Touch Yes, change defaults, and then select Done.
6 Fax
You can use the printer to send and receive faxes, including color faxes. You can schedule faxes to be sent at a later time and set up speed-dials to send faxes quickly and easily to frequently used numbers. From the printer control panel, you can also set a number of fax options, such as resolution and the contrast between lightness and darkness on the faxes you send.

NOTE: Before you begin faxing, make sure you have set up the printer correctly for faxing. You might have already done this as part of the initial setup, by using either the control panel or the HP software provided with the printer. You can verify the fax is set up correctly by running the fax setup test from the control panel. For more information on the fax test, see Test fax setup.
This section contains the following topics:
- Send a fax
- Receive a fax
• Set up speed-dial entries
• Change fax settings
• Fax and digital phone services
• Fax over Internet Protocol
• Use reports
Send a fax
You can send a fax in a variety of ways. Using the printer control panel, you can send a black-and-white or color fax. You can also send a fax manually from an attached phone. This allows you to speak with the recipient before sending the fax.
This section contains the following topics:
- Send a standard fax
- Send a standard fax from the computer
- Send a fax manually from a phone
- Send a fax using monitor dialing
- Send a fax from memory
• Schedule a fax to send later - Send a fax to multiple recipients
- Send a fax in Error Correction Mode
Send a standard fax
You can easily send a single- or multiple-page black-and-white or color fax by using the printer control panel.

NOTE: If you need printed confirmation that your faxes were successfully sent, enable fax confirmation before sending any faxes.

TIP: You can also send a fax manually from a phone or by using monitor dialing. These features allow you to control the pace of your dialing. They are also useful when you want to use a calling card to charge the call and you have to respond to tone prompts while dialing.
To send a standard fax from the printer control panel
- Load your original print-side down on the right-front corner of the glass or print-side up in the ADF. For more information, see Load an original on the scanner glass or Load an original in the automatic document feeder (ADF).
- Touch Fax.
- Enter the fax number by using the keypad.

TIP: To add a pause in the fax number you are entering, touch * repeatedly, until a dash (-) appears on the display.
- Touch Start Black or Start Color.
If the printer detects an original loaded in the automatic document feeder, it sends the document to the number you entered.

TIP: If the recipient reports issues with the quality of the fax you sent, you can try changing the resolution or contrast of your fax.
Send a standard fax from the computer
You can send a document on your computer as a fax, without printing a copy and faxing it from the printer.

NOTE: Faxes sent from your computer by this method use the printer's fax connection, not your Internet connection or computer modem. Therefore, make sure the printer is connected to a working telephone line and that the fax function is set up and functioning correctly.
To use this feature, you must install the printer software using the installation program provided on the HP software CD provided with the printer.
Windows
- Open the document on your computer that you want to fax.
- On the File menu in your software application, click Print.
- From the Name list, select the printer that has "fax" in the name.
- To change settings (such as selecting to send the document as a black fax or a color fax), click the button that opens the Properties dialog box. Depending on your software application, this button might be called Properties, Options, Printer Setup, Printer, or Preferences.
- After you have changed any settings, click OK.
- Click Print or OK.
- Enter the fax number and other information for the recipient, change any further settings for the fax, and then click Send Fax. The printer begins dialing the fax number and faxing the document.
Mac OS X
- Open the document on your computer that you want to fax.
- From the File menu in your software application, click Print.
- Select the printer that has “(Fax)” in the name.
- Select Fax Information from the pop-up menu.

NOTE: If you cannot find the pop-up menu, try clicking the blue disclosure triangle next to the Printer selection.
- Enter the fax number and other information in the boxes provided.

TIP: To send a color fax, select Fax Options from the pop-up menu, and then click Color.
- Select any other fax options you want, and then click Fax to begin dialing the fax number and faxing the document.
Send a fax manually from a phone
Sending a fax manually allows you to make a phone call and talk with the recipient before you send the fax. This is useful if you want to inform the recipient that you are going to send them a fax before sending it. When you send a fax manually, you can hear the dial tones, telephone prompts, or other sounds through the handset on your telephone. This makes it easy for you to use a calling card to send your fax.
Depending on how the recipient has their fax machine set up, the recipient might answer the phone, or the fax machine might take the call. If a person answers the phone, you can speak with the recipient before sending the fax. If a fax machine answers the call, you can send the fax directly to the fax machine when you hear the fax tones from the receiving fax machine.
To send a fax manually from an extension phone
- Load your original print-side down on the right-front corner of the glass or print-side up in the ADF. For more information, see Load an original on the scanner glass or Load an original in the automatic document feeder (ADF).
- Touch Fax.
- Dial the number by using the keypad on the phone that is connected to the printer.

NOTE: Do not use the keypad on the control panel of the printer when manually sending a fax. You must use the keypad on your phone to dial the recipient's number.
- If the recipient answers the telephone, you can engage in a conversation before sending your fax.

NOTE: If a fax machine answers the call, you will hear fax tones from the receiving fax machine. Proceed to the next step to transmit the fax.
- When you are ready to send the fax, touch Start Black or Start Color.

NOTE: If prompted, select Send Fax.
If you were speaking with the recipient before sending the fax, inform the recipient that they should press Start on their fax machine after they hear fax tones. The telephone line is silent while the fax is transmitting. At this point, you can hang up the telephone. If you want to continue speaking with the recipient, remain on the line until the fax transmission is complete.
Send a fax using monitor dialing
Monitor dialing allows you to dial a number from the printer control panel as you would dial a regular telephone. When you send a fax using monitor dialing, you can hear the dial tones, telephone prompts, or other sounds through the speakers on the printer. This enables you to respond to prompts while dialing, as well as control the pace of your dialing.

TIP: If you are using a calling card and do not enter your PIN fast enough, the printer might start sending fax tones too soon and cause your PIN not to be recognized by the calling card service. If this is the case, you can create a speed dial entry to store the PIN for your calling card. For more information, see Set up speed-dial entries.

NOTE: Make sure the volume is turned on to hear a dial tone.
To send a fax using monitor dialing from the printer control panel
- Load your originals. For additional information, see Load an original on the scanner glass or Load an original in the automatic document feeder (ADF).
- Touch Fax, and then touch Start Black or Start Color. If the printer detects an original loaded in the automatic document feeder, you hear a dial tone.
- When you hear the dial tone, enter the number by using the keypad on the printer control panel.
- Follow any prompts that might occur.

TIP: If you are using a calling card to send a fax and you have your calling card PIN stored as a speed dial, when prompted to enter your PIN, touch

(Speed Dial) to select the speed dial entry where you have your PIN ed.
Your fax is sent when the receiving fax machine answers.
Send a fax from memory
You can scan a black-and-white fax into memory and then send the fax from memory. This feature is useful if the fax number you are trying to reach is busy or temporarily
unavailable. The printer scans the originals into memory and sends them once it is able to connect to the receiving fax machine. After the printer scans the pages into memory, you can immediately remove the originals from the document feeder tray or scanner glass.

NOTE: You can only send a black-and-white fax from memory.
To send a fax from memory
-
Load your originals. For additional information, see Load an original on the scanner glass or Load an original in the automatic document feeder (ADF).
-
Touch Fax, and then touch Fax Options or Fax Settings.
-
Touch Scan and Fax.
-
Enter the fax number by using the keypad, touch (Speed Dial) to select a speed dial, or touch (Call History) to select a previously dialed or received number.
-
Touch Start Fax. The printer scans the originals into memory and sends the fax when the receiving fax machine is available.
Schedule a fax to send later
You can schedule a black-and-white fax to be sent within the next 24 hours. This enables you to send a black-and-white fax late in the evening, when phone lines are not as busy or phone rates are lower, for example. The printer automatically sends your fax at the specified time.
You can only schedule one fax to be sent at a time. You can continue to send faxes normally, however, while a fax is scheduled.

NOTE: You can only send scheduled faxes in black-and-white.
To schedule a fax from the printer control panel
-
Load your originals. For additional information, see Load an original on the scanner glass or Load an original in the automatic document feeder (ADF).
-
Touch Fax, and then touch Fax Options or Fax Settings.
-
Touch Send Fax Later.
-
Enter the send time by using the numeric keypad, touch AM or PM, and then select Done.
-
Enter the fax number by using the keypad, touch (Speed Dial) to select a speed dial, or touch (Call History) to select a previously dialed or received number.
-
Touch Start Fax. The printer scans all pages and the scheduled time appears on the display. The fax is sent at the scheduled time.
To cancel a scheduled fax
- Touch the Send Fax Later message on the display.
- OR -
Touch Fax, and then select Fax Options or Fax Settings.
- Touch Cancel Scheduled Fax.
Send a fax to multiple recipients
You can send a fax to multiple recipients at once by grouping individual speed dial entries into group speed dial entries.
To send a fax to multiple recipients using group speed dial
- Load your originals. For additional information, see Load an original on the scanner glass or Load an original in the automatic document feeder (ADF).
- Touch Fax, touch (Speed Dial), and then select the recipient group.
- Touch Start Black.
If the printer detects an original loaded in the automatic document feeder, it sends the document to each number in the group speed dial entry.

NOTE: You can only use group speed dial entries to send faxes in black and white, because of memory limitations. The printer scans the fax into memory then dials the first number. When a connection is made, it sends the fax and dials the next number. If a number is busy or not answering, the printer follows the settings for Busy Redial and No Answer Redial. If a connection cannot be made, the next number is dialed and an error report is generated.
Send a fax in Error Correction Mode
Error Correction Mode (ECM) prevents loss of data due to poor phone lines by detecting errors that occur during transmission and automatically requesting retransmission of the erroneous portion. Phone charges are unaffected, or might even be reduced, on good phone lines. On poor phone lines, ECM increases sending time and phone charges, but sends the data much more reliably. The default setting is On. Turn ECM off only if it increases phone charges substantially, and if you can accept poorer quality in exchange for reduced charges.
Before turning the ECM setting off, consider the following. If you turn ECM off:
- The quality and transmission speed of faxes you send and receive are affected.
• The Fax Speed is automatically set to Medium. - You can no longer send or receive faxes in color.
To change the ECM setting from the control panel
- From the Home screen, touch ▶ (right arrow), and then select Setup.
- Touch Fax Setup and then select Advanced Fax Setup.
- Select Error Correction Mode.
- Select On or Off.
Receive a fax
You can receive faxes automatically or manually. If you turn off the Auto Answer option, you must receive faxes manually. If you turn on the Auto Answer option (the default setting), the printer automatically answers incoming calls and receives faxes after the number of rings that are specified by the Rings to Answer setting. (The default Rings to Answer setting is five rings.)
If you receive a Legal-size or larger fax and the printer is not currently set to use Legal-size paper, the printer reduces the fax so that it fits on the paper that is loaded. If you have disabled the Automatic Reduction feature, the printer prints the fax on two pages.

NOTE: If you are copying a document when a fax arrives, the fax is stored in the printer memory until the copying finishes. This can reduce the number of fax pages stored in memory.
- Receive a fax manually
- Set up backup fax
• Reprint received faxes from memory
• Poll to receive a fax
• Forward faxes to another number
• Set the paper size for received faxes - Set automatic reduction for incoming faxes
• Block unwanted fax numbers
• Receive faxes to your computer using HP Digital Fax (Fax to PC and Fax to Mac)
Receive a fax manually
When you are on the phone, the person you are speaking with can send you a fax while you are still connected. This is referred to as manual faxing. Use the instructions in this section to receive a manual fax.

NOTE: You can pick up the handset to talk or listen for fax tones.
You can receive faxes manually from a phone that is:
- Directly connected to the printer (on the 2-EXT port)
- On the same phone line, but not directly connected to the printer
To receive a fax manually
- Make sure the printer is turned on and you have paper loaded in the main tray.
- Remove any originals from the document feeder tray.
-
Set the Rings to Answer setting to a high number to allow you to answer the incoming call before the printer answers. Or, turn off the Auto Answer setting so that the printer does not automatically answer incoming calls.
-
If you are currently on the phone with the sender, instruct the sender to press Start on their fax machine.
- When you hear fax tones from a sending fax machine, do the following:
a. Touch Fax, and then select Start Black or Start Color.
b. After the printer begins to receive the fax, you can hang up the phone or remain on the line. The phone line is silent during fax transmission.
Set up backup fax
Depending on your preference and security requirements, you can set up the printer to store all the faxes it receives, only the faxes it receives while the printer is in an error condition, or none of the faxes it receives.
The following backup fax modes are available:
| On | The default setting. When Backup fax is On, the printer stores all received faxes in memory. This enables you to reprint up to eight of the most recently printed faxes if they are still saved in memory.NOTE: When printer memory is low, it overwrites the oldest, printed faxes as it receives new faxes. If the memory becomes full of unprinted faxes, the printer stops answering incoming fax calls.NOTE: If you receive a fax that is too large, such as a very detailed color photo, it might not be stored in memory due to memory limitations. |
| On Error Only Causes | es the printer to store faxes in memory only if an error condition exists that prevents the printer from printing the faxes (for example, if the printer runs out of paper). The printer continues to store incoming faxes as long as there is memory available. (If the memory becomes full, the printer stops answering incoming fax calls.) When the error condition is resolved, the faxes stored in memory print automatically, and then they are deleted from memory. |
| Off Faxes are never | stored in memory. For example, you might want to turn off Backup fax for security purposes. If an error condition occurs that prevents the printer from printing (for example, the printer runs out of paper), the printer stops answering incoming fax calls. |

NOTE: If backup fax is enabled and you turn the printer off, all faxes stored in memory are deleted, including any unprinted faxes that you might have received while the printer was in an error condition. You must contact the senders to ask them to resend any unprinted faxes. For a list of the faxes you have received, print the Fax Log. The Fax Log is not deleted when the printer is turned off.
To set backup fax from the printer control panel
- Touch ▶ (right arrow), and then select Setup.
- Touch Fax Setup, and then select Advanced Fax Setup.
- Touch Backup Fax Reception.
- Touch On, On Error Only, or Off.
Reprint received faxes from memory
If you set the Backup fax mode to On, the received faxes are stored in memory, whether the printer has an error condition or not.

NOTE: After the memory becomes full, the oldest, printed faxes are overwritten as new faxes are received. If all the stored faxes are unprinted, the printer does not receive any fax calls until you print or delete the faxes from memory. You might also want to delete the faxes in memory for security or privacy purposes.
Depending on the sizes of the faxes in memory, you can reprint up to eight of the most recently printed faxes, if they are still in memory. For example, you might need to reprint your faxes if you lost the copy of your last printout.
To reprint faxes in memory from the printer control panel
- Make sure you have paper loaded in the main tray.
- Touch ▶ (right arrow), and then select Setup.
- Touch Tools or Fax Tools, and then select Reprint Faxes in Memory.
The faxes are printed in the reverse order from which they were received with the most recently received fax printed first, and so on. - If you want to stop reprinting the faxes in memory, touch ✗ (Cancel button).
Poll to receive a fax
Polling allows the printer to ask another fax machine to send a fax that it has in its queue. When you use the Poll to Receive feature, the printer calls the designated fax machine and requests the fax from it. The designated fax machine must be set for polling and have a fax ready to send.

NOTE: The printer does not support polling pass codes. Polling pass codes are a security feature that require the receiving fax machine to provide a pass code to the printer it is polling in order to receive the fax. Make sure the printer you are polling does not have a pass code set up (or has not changed the default pass code) or the printer cannot receive the fax.
To set up poll to receive a fax from the printer control panel
- Touch Fax, and then select Fax Settings or Other Methods.
- Touch Poll to Receive.
- Enter the fax number of the other fax machine.
- Touch Start Fax.
Forward faxes to another number
You can set up the printer to forward your faxes to another fax number. A received color fax is forwarded in black and white.
HP recommends that you verify the number you are forwarding to is a working fax line. Send a test fax to make sure the fax machine is able to receive your forwarded faxes.
To forward faxes from the printer control panel
- Touch Setup.
- Touch Fax Settings or Fax Setup, and then select Advanced Fax Setup.
-
Touch Fax Forwarding.
-
Touch On (Print and Forward) to print and forward the fax, or select On (Forward) to forward the fax.
NOTE: If the printer is not able to forward the fax to the designated fax machine (for example, if it is not turned on), the printer prints the fax. If you set up the printer to print error reports for received faxes, it also prints an error report.
-
At the prompt, enter the number of the fax machine intended to receive the forwarded faxes, and then touch Done. Enter the required information for each of the following prompts: start date, start time, end date, and end time.
-
Fax forwarding is activated. Touch OK to confirm. If the printer loses power when fax forwarding is set up, it saves the fax forwarding setting and phone number. When the power is restored to the printer, the fax forwarding setting is still On.
NOTE: You can cancel fax forwarding by selecting Off from the Fax Forwarding menu.
Set the paper size for received faxes
You can select the paper size for received faxes. The paper size you select should match what is loaded in your main tray. Faxes can be printed on Letter, A4, or Legal paper only.
NOTE: If an incorrect paper size is loaded in the main tray when you receive a fax, the fax does not print and an error message appears on the display. Load Letter, A4, or Legal paper, and then touch OK to print the fax.
To set the paper size for received faxes from the printer control panel
-
Touch ▶ (right arrow), and then select Setup.
-
Touch Fax Setup, and then select Basic Fax Setup.
-
Touch Fax Paper Size, and then select an option.
Set automatic reduction for incoming faxes
The Automatic Reduction setting determines what the printer does if it receives a fax that is too large for the default paper size. This setting is turned on by default, so the image of the incoming fax is reduced to fit on one page, if possible. If this feature is turned off, information that does not fit on the first page is printed on a second page. Automatic Reduction is useful when you receive a Legal-size fax and Letter-size paper is loaded in the main tray.
To set automatic reduction from the printer control panel
-
Touch ▶ (right arrow), and then select Setup.
-
Touch Fax Setup, and then select Advanced Fax Setup.
-
Touch Automatic Reduction, and then select On or Off.
Block unwanted fax numbers
If you subscribe to a caller ID service through your phone provider, you can block specific fax numbers so the printer does not print faxes received from those numbers.
When an incoming fax call is received, the printer compares the number to the list of junk fax numbers to determine if the call should be blocked. If the number matches a number in the blocked fax numbers list, the fax is not printed. (The maximum number of fax numbers you can block varies by model.)

NOTE: This feature is not supported in all countries/regions. If it is not supported in your country/region, Junk Fax Blocker does not appear in the Fax Options or Fax Settings menu.
NOTE: If no phone numbers are added in the Caller ID list, it is assumed that you are not subscribed to a Caller ID service.
- Add numbers to the junk fax list
- Remove numbers from the junk fax list
• Print a Junk Fax Report
Add numbers to the junk fax list
You can block specific numbers by adding them to the junk fax list.
To add a number to the junk fax list
- Touch Setup.
- Touch Fax Setup, and then select Basic Fax Setup.
- Touch Junk Fax Blocker.
- A message appears stating that Caller ID is required to block junk faxes. Touch OK to continue.
- Touch Add Numbers.
- To select a fax number to block from the caller ID list, touch Select from Caller ID History.
-
or -
To manually enter a fax number to block, touch Enter new number. -
After entering a fax number to block, touch Done.

NOTE: Make sure you enter the fax number as it appears on the control-panel display, and not the fax number that appears on the fax header of the received fax, as these numbers can be different.
Remove numbers from the junk fax list
If you no longer want to block a fax number, you can remove a number from your junk fax list.
To remove numbers from the list of junk fax numbers
- Touch ▶ (right arrow), and then touch Setup.
- Touch Fax Setup, and then touch Basic Fax Setup.
- Touch ▼ (down arrow), and then touch Junk Fax Blocker or Junk Fax Blocker Setup.
- Touch Remove Numbers.
- Touch the number you want to remove, and then touch OK.
Print a Junk Fax Report
Use the following procedure to print a list of blocked junk fax numbers.
To print a Junk Fax Report
- Touch ▶ (right arrow), and then touch Setup.
- Touch Fax Setup, and then touch Basic Fax Setup.
- Touch ▼ (down arrow), and then touch Junk Fax Blocker.
- Touch Print Reports, and then touch Junk Fax List.
Receive faxes to your computer using HP Digital Fax (Fax to PC and Fax to Mac)
If the printer is connected to your computer with a USB cable, you can use HP Digital Fax (Fax to PC and Fax to Mac) to automatically receive faxes and save faxes directly to your computer. With Fax to PC and Fax to Mac, you can store digital copies of your faxes easily and also eliminate the hassle of dealing with bulky paper files.

NOTE: If the printer is connected to a network using an Ethernet cable or a wireless connection, you can use HP Digital Fax instead. For more information, see HP Digital Solutions.
Received faxes are saved as TIFF (Tagged Image File Format). Once the fax is received, you get an onscreen notification with a link to the folder where the fax is saved.
The files are named in the following method: XXXX_YYYYYYYY_ZZZZZZ.tif, where X is the sender's information, Y is the date, and Z is the time that the fax was received.

NOTE: Fax to PC and Fax to Mac are available for receiving black-and-white faxes only. Color faxes are printed instead of being saved to the computer.
This section contains the following topics:
• Fax to PC and Fax to Mac requirements
• Activate Fax to PC and Fax to Mac
- Modify Fax to PC or Fax to Mac settings
Fax to PC and Fax to Mac requirements
- The administrator computer (the computer that activated the Fax to PC or Fax to Mac feature) must be on at all times. Only one computer can act as the Fax to PC or Fax to Mac administrator computer.
- The destination folder's computer or server must be on at all times. The destination computer must also be awake, faxes will not be saved if the computer is asleep or in hibernate mode.
- Paper must be loaded in the input tray. for more information, see Load media.
Activate Fax to PC and Fax to Mac
On a computer running Windows, you can use the Digital Fax Setup Wizard to activate Fax to PC. On a Macintosh computer, you can use HP Utility.
To set up Fax to PC (Windows)
- From the computer desktop, click Start, select Programs or All Programs, select the folder for your HP printer, and then select the option for your HP printer.
- Double-click Fax Actions, and then double-click Digital Fax Setup Wizard.
- Follow the onscreen instructions.
To set up Fax to Mac (Mac OS X)
- Open HP Utility. For more information, see HP Utility (Mac OS X).
- Click the Applications icon on the HP Utility toolbar.
- Double-click HP Setup Assistant, and then follow the onscreen instructions.
Modify Fax to PC or Fax to Mac settings
You can update the Fax to PC settings from your computer at any time from the Digital Fax Setup Wizard. You can update the Fax to Mac settings from HP Utility.
You can turn off Fax to PC or Fax to Mac and disable printing faxes from the printer's control panel.
To modify settings from the printer's control panel
- Touch ▶ (right arrow), and then touch Setup.
- Touch Fax Setup, touch Basic Fax Setup, and then touch Fax to PC.
- Select the setting that you want to change. You can change the following settings:
• View PC hostname: View the name of the computer that is set up to administer Fax to PC or Fax to Mac.
- Turn Off: Turn off Fax to PC or Fax to Mac.

NOTE: Use the HP software on your computer to turn on Fax to PC or Fax to Mac.
- Disable Fax Print: Choose this option to print faxes as they are received. If you turn off printing, color faxes will still print.
To modify settings from the HP software (Windows)
- From the computer desktop, click Start, select Programs or All Programs, select the folder for your HP printer, and then select the option for your HP printer.
- Double-click Fax Actions, and then double-click Digital Fax Setup Wizard.
- Follow the onscreen instructions.
To modify settings from the HP software (Mac OS X)
- Open HP Utility. For more information, see HP Utility (Mac OS X).
- Click the Applications on the HP Utility toolbar.
- Double-click HP Setup Assistant, and then follow the onscreen instructions.
Turn off Fax to PC or Fax to Mac
- Touch ▶ (right arrow), and then touch Setup.
- Touch Fax Setup, touch Basic Fax Setup, and then touch Fax to PC.
- Touch Turn Off.
Set up speed-dial entries
You can set up frequently used fax numbers as speed-dial entries. This lets you dial those numbers quickly by using the printer's control panel.

TIP: In addition to creating and managing speed-dial entries from the printer's control panel, you can also use tools available on your computer, such as the HP software included with the printer and the printer's embedded web server (EWS). For more information, see Printer management tools.
This section contains the following topics:
• Set up and change speed-dial entries
• Set up and change group speed-dial entries
• Delete speed-dial entries
• Print a list of speed-dial entries
Set up and change speed-dial entries
You can store fax numbers as speed-dial entries.
To set up speed-dial entries
- On the printer's control panel, touch ▶ (right arrow), and then touch Setup.
- Touch Fax Setup, and then select Speed Dial Setup.
- Touch Add/Edit Speed Dial, and then touch an unused entry number.
- Type the fax number, and then touch Next.

NOTE: Be sure to include any pauses or other required numbers, such as an area code, an access code for numbers outside a PBX system (usually a 9 or 0), or a long-distance prefix.
- Type the name for the speed-dial entry, and then touch Done.
To change speed-dial entries
- On the printer's control panel, touch ▶ (right arrow), and then touch Setup.
- Touch Fax Setup, and then select Speed Dial Setup.
-
Touch Add/Edit Speed Dial, and then touch the speed-dial entry you want to change.
-
If you want to change the fax number, type the new number, and then touch Next.

NOTE: Be sure to include any pauses or other required numbers, such as an area code, an access code for numbers outside a PBX system (usually a 9 or 0), or a long-distance prefix.
- If you want to change the name of the speed-dial entry, type the new name, and then touch Done.
Set up and change group speed-dial entries
You can store groups of fax numbers as group speed-dial entries.
To set up group speed-dial entries

NOTE: Before you can create a group speed-dial entry, you must have already created at least one speed-dial entry.
- On the printer's control panel, touch ▶ (right arrow), and then touch Setup.
- Touch Fax Setup, and then select Speed Dial Setup.
- Touch Group Speed Dial, and then touch an unused entry number.
- Touch the speed-dial entries you want to include in the group speed-dial entry, and then touch OK.
- Type the name for the speed-dial entry, and then touch Done.
To change group speed-dial entries
- On the printer's control panel, touch ▶ (right arrow), and then touch Setup.
- Touch Fax Setup, and then select Speed Dial Setup.
- Select Group Speed Dial, and then touch the entry you want to change.
- If you want to add or remove speed-dial entries from the group, touch the speed-dial entries you want to include or those you want to remove, and then touch OK.
- If you want to change the name of the group speed-dial, type the new name, and then touch Done.
Delete speed-dial entries
To delete speed-dial entries or group speed-dial entries, complete the following steps:
-
On the printer's control panel, touch ▶ (right arrow), and then touch Setup.
-
Touch Fax Setup, and then touch Speed Dial Setup.
-
Touch Delete Speed Dial, touch the entry you want to delete, and then touch Yes to confirm.

NOTE: Deleting a group speed-dial entry does not delete the individual speed-dial entries.
Print a list of speed-dial entries
To print a list of all of the speed-dial entries that have been set up, complete the following steps:
- Load paper in the tray. For more information, see Load media.
- On the printer's control panel, touch ▶ (right arrow), and then touch Setup.
- Touch Fax Setup, and then touch Speed Dial Setup.
- Touch Print Speed Dial List.
Change fax settings
After completing the steps in the getting started guide that came with the printer, use the following steps to change the initial settings or to configure other options for faxing.
- Configure the fax header
• Set the answer mode (Auto answer) - Set the number of rings before answering
• Change the answer ring pattern for distinctive ring - Set the dial type
- Set the redial options
- Set the fax speed
• Set the fax sound volume
Configure the fax header
The fax header prints your name and fax number on the top of every fax you send. HP recommends that you set up the fax header by using the HP software provided with the printer. You can also set up the fax header from the printer control panel, as described here.

NOTE: In some countries/regions, the fax header information is a legal requirement.
To set or change the fax header
- Touch ▶ (right arrow), and then touch Setup.
- Touch Fax Setup, and then touch Basic Fax Setup.
- Touch Fax Header.
- Enter your personal or company name, and then touch Done.
- Enter your fax number, and then touch Done.
Set the answer mode (Auto answer)
The answer mode determines whether the printer answers incoming calls.
- Turn on the Auto Answer setting if you want the printer to answer faxes automatically. The printer answers all incoming calls and faxes.
- Turn off the Auto Answer setting if you want to receive faxes manually. You must be available to respond in person to the incoming fax call or else the printer does not receive faxes.
To set the answer mode
- Touch ▶ (right arrow), and then touch Setup.
- Touch Fax Setup, and then touch Basic Fax Setup.
- Touch Auto Answer, and then touch On or Off.
Set the number of rings before answering
If you turn on the Auto Answer setting, you can specify how many rings occur before incoming calls are automatically answered.
The Rings to Answer setting is important if you have an answering machine on the same phone line as the printer, because you want the answering machine to answer the phone before the printer does. The number of rings to answer for the printer should be greater than the number of rings to answer for the answering machine.
For example, set your answering machine to a low number of rings and the printer to answer in the maximum number of rings. (The maximum number of rings varies by country/region.) In this setup, the answering machine answers the call and the printer monitors the line. If the printer detects fax tones, it receives the fax. If the call is a voice call, the answering machine records the incoming message.
To set the number of rings before answering
- Touch ▶ (right arrow), and then touch Setup.
- Touch Fax Setup, and then touch Basic Fax Setup.
- Touch Rings to Answer.
- Touch ▲ (up arrow) or ▼ (down arrow) to change the number of rings.
- Touch Done to accept the setting.
Change the answer ring pattern for distinctive ring
Many phone companies offer a distinctive ring feature that allows you to have several phone numbers on one phone line. When you subscribe to this service, each number is assigned a different ring pattern. You can set up the printer to answer incoming calls that have a specific ring pattern.
If you connect the printer to a line with distinctive ring, have your telephone company assign one ring pattern to voice calls and another ring pattern to fax calls. HP recommends that you request double or triple rings for a fax number. When the printer detects the specified ring pattern, it answers the call and receives the fax.

TIP: You can also use the Ring Pattern Detection feature in the printer's control panel to set distinctive ring. With this feature, the printer recognizes and records the ring pattern of an incoming call and, based on this call, automatically determines the distinctive ring pattern assigned by your telephone company to fax calls.
If you do not have a distinctive ring service, use the default ring pattern, which is All Rings.

NOTE: The printer cannot receive faxes when the main phone number is off the hook.
To change the answer ring pattern for distinctive ring
- Verify that the printer is set to answer fax calls automatically.
- On the printer control panel, touch ▶ (right arrow), and then touch Setup.
- Touch Fax Setup, and then touch Advanced Fax Setup.
- Touch Distinctive Ring.
- A message appears stating that this setting should not be changed unless you have multiple numbers on the same telephone line. Touch Yes to continue.
-
Do one of the following:
-
Touch the ring pattern assigned by your telephone company to fax calls.
- Or -
- Touch Ring Pattern Detection, and then follow the instructions on the printer's control panel.

NOTE: If the Ring Pattern Detection feature cannot detect the ring pattern or if you cancel the feature before it finishes, the ring pattern is automatically set to the default, which is All Rings.
NOTE: If you are using either a PBX phone system that has different ring patterns for internal and external calls, you must call the fax number from an external number.
Set the dial type
Use this procedure to set tone-dialing or pulse-dialing mode. The factory-set default is Tone. Do not change the setting unless you know that your phone line cannot use tone dialing.

NOTE: The pulse-dialing option is not available in all countries/regions.
To set the dial type
- Touch ▶ (right arrow), and then touch Setup.
- Touch Fax Setup, and then touch Basic Fax Setup.
- Touch ▼ (down arrow), and then touch Tone or Pulse Dialing.
- Touch to select Tone Dialing or Pulse Dialing.
Set the redial options
If the printer was unable to send a fax because the receiving fax machine did not answer or was busy, the printer attempts to redial based on the settings for the busy-redial and no-answer-redial options. Use the following procedure to turn the options on or off.
- Busy redial: If this option is turned on, the printer redials automatically if it receives a busy signal. The factory-set default for this option is On.
- No answer redial: If this option is turned on, the printer redials automatically if the receiving fax machine does not answer. The factory-set default for this option is Off.
To set the redial options
- Touch ▶ (right arrow), and then touch Setup.
- Touch Fax Setup, and then touch Advanced Fax Setup.
- Touch Busy Redial or No Answer Redial, and then select the appropriate options.
Set the fax speed
You can set the fax speed used to communicate between your printer and other fax machines when sending and receiving faxes.
If you use one of the following, setting the fax speed to a slower speed might be required:
• An Internet phone service
- A PBX system
• Fax over Internet Protocol (FoIP)
- An integrated services digital network (ISDN) service
If you experience problems sending and receiving faxes, try using a lower Fax Speed. The following table provides the available fax speed settings.
| Fax speed setting Fax speed | |
| Fast v.34 (33600 baud) | |
| Medium v.17 (14400 baud) | |
| Slow v.29 (9600 baud) |
To set the fax speed
- Touch ▶ (right arrow), and then touch Setup.
- Touch Fax Setup, and then touch Advanced Fax Setup.
- Touch Fax Speed.
- Touch to select an option.
Set the fax sound volume
Use this procedure to increase or decrease the volume of the fax sounds.
To set the fax sound volume
- Touch ▶ (right arrow), and then touch Setup.
- Touch Fax Setup, and then touch Basic Fax Setup.
- Touch Fax Sound Volume.
- Touch to select Soft, Loud, or Off.
Fax and digital phone services
Many telephone companies provide their customers with digital phone services, such as the following:
- DSL: A Digital subscriber line (DSL) service through your telephone company. (DSL might be called ADSL in your country/region.)
- PBX: A private branch exchange (PBX) phone system.
- ISDN: An integrated services digital network (ISDN) system.
- FoIP: A low-cost phone service that allows you to send and receive faxes with your printer by using the Internet. This method is called Fax over Internet Protocol (FoIP). For more information, see Fax over Internet Protocol.
HP printers are designed specifically for use with traditional analog phone services. If you are in a digital phone environment (such as DSL/ADSL, PBX, or ISDN), you might need to use digital-to-analog filters or converters when setting up the printer for faxing.

NOTE: HP does not guarantee that the printer will be compatible with all digital service lines or providers, in all digital environments, or with all digital-to-analog converters. It is always recommended that you discuss with the telephone company directly for the correct setup options based on their line services provided.
Fax over Internet Protocol
You might be able to subscribe to a low cost phone service that allows you to send and receive faxes with your printer by using the Internet. This method is called Fax over Internet Protocol (FoIP).
You probably use a FoIP service (provided by your telephone company) when you:
- Dial a special access code along with the fax number, or
- Have an IP converter box that connects to the Internet and provides analog phone ports for the fax connection.

NOTE: You can only send and receive faxes by connecting a phone cord to the port labeled "1-LINE" on the printer. This means that your connection to the Internet must be done either through a converter box (which supplies regular analog phone jacks for fax connections) or your telephone company.

TIP: Support for traditional fax transmission over any Internet protocol telephone systems are often limited. If you experience problems faxing, try using a slower fax speed or disabling the fax error-correction mode (ECM). However, if you turn off ECM, you cannot send and receive color faxes. (For more information about changing the fax speed, see Set the fax speed. For more information about using ECM, see Send a fax in Error Correction Mode.
If you have questions about Internet faxing, contact your Internet faxing services support department or your local service provider for further assistance.
Use reports
You can set up the printer to print error reports and confirmation reports automatically for each fax you send and receive. You can also manually print system reports as required; these reports provide useful system information about the printer.
By default, the printer is set to print a report only if there is a problem sending or receiving a fax. A confirmation message that indicates whether a fax was successfully sent appears briefly on the control-panel display after each transaction.

NOTE: If the reports are not legible, you can check the estimated ink levels from the control panel or the HP software. For more information, see Printer management tools.
NOTE: Ink level alerts and indicators provide estimates for planning purposes only. When you receive a low-ink alert, consider having a replacement cartridge available to avoid possible printing delays. You do not need to replace the ink cartridges until prompted to do so.
NOTE: Ensure that the printhead and ink cartridges are in good condition and installed properly. For more information, see Work with ink cartridges.
This section contains the following topics:
• Print fax confirmation reports
• Print fax error reports
• Print and view the fax log
- Clear the fax log
• Print the details of the last fax transaction
• Print a Caller ID Report
• View the Call History
Print fax confirmation reports
If you require printed confirmation that your faxes were successfully sent, follow these instructions to enable fax confirmation before sending any faxes. Select either On (Fax Send) or On (Send and Receive).
The default fax confirmation setting is Off. This means that a confirmation report is not printed for each fax sent or received. A confirmation message indicating whether a fax was successfully sent appears briefly on the control-panel display after each transaction.

NOTE: You can include an image of the first page of the fax on the Fax Sent Confirmation report if you select On (Fax Send) or On (Send and Receive), and if you scan the fax to send from memory or use the Scan and Fax option.
To enable fax confirmation
- Touch ▶ (right arrow), and then touch Setup.
-
Touch Fax Setup, and then touch Fax Reports.
-
Touch Fax Confirmation.
- Touch to select one of the following options.
| Off Does not print a | fax confirmation report when you send and receive faxes successfully. This is the default setting. |
| On (Fax Send) Prints | a fax confirmation report for every fax you send. |
| On (Fax Receive) Prints | a fax confirmation report for every fax you receive. |
| On (Send andReceive) | Prints a fax confirmation report for every fax you send and receive. |
To include an image of the fax on the report
- Touch ▶ (right arrow), and then touch Setup.
- Touch Fax Reports, and then touch Fax Confirmation.
- Touch On (Fax Send) or On (Send and Receive).
- Touch Fax Confirmation with image.
Print fax error reports
You can configure the printer so that it automatically prints a report when there is an error during transmission or reception.
To set the printer to print fax error reports automatically
- Touch ▶ (right arrow), and then touch Setup.
- Touch Fax Setup, and then touch Fax Reports.
- Touch Fax Error Report.
- Touch to select one of the following.
| On (Send and Receive) | Prints whenever a transmission error occurs. |
| Off Prints whenever a receiving error occurs. | |
| On (Fax Send) Prints whenever a fax error occurs. This is the default setting. | |
| On (Fax Receive) Does not print any fax error reports. | |
Print and view the fax log
You can print a log of faxes that have been received and sent by the printer.
To print the fax log from the printer control panel
- Touch ▶ (right arrow), and then touch Setup.
- Touch Fax Setup, and then touch Fax Reports.
- Touch Fax Log.
Clear the fax log
Use the following steps to clear the fax log.

NOTE: Clearing the fax log also deletes all faxes stored in memory.
To clear the fax log
- Touch ▶ (right arrow), and then touch Setup.
- Do one of the following:
- Touch Tools.
- Or -
- Touch Fax Setup, and then touch Fax Tools.
- Touch Clear Fax Log.
Print the details of the last fax transaction
The Last Fax Transaction report prints the details of the last fax transaction to occur. Details include the fax number, number of pages, and the fax status.
To print the Last Fax Transaction report
- Touch ▶ (right arrow), and then touch Setup.
- Touch Fax Setup, and then touch Fax Reports.
- Touch Last Transaction.
Print a Caller ID Report
Use the following procedure to print a list of Caller ID fax numbers.
To print a Caller ID History Report
- Touch ▶ (right arrow), and then touch Setup.
- Touch Fax Setup, and then touch Fax Reports.
- Touch Caller ID Report.
View the Call History
Use the following procedure to view a list of all the calls placed from the printer.

NOTE: The call history cannot be printed. You can only view it from the printer's control panel display.
To view the Call History
-
Touch ▶ (right arrow), and then touch Fax.
-
Touch 📋 (Call History).
7 Web Services
The printer offers innovative, web-enabled solutions that can help you quickly access the Internet, obtain documents, and print them faster and with less hassle—and all without using a computer.

NOTE: To use these web features, the printer must be connected to the Internet (either using an Ethernet cable or wireless connection). You cannot use these web features if the printer is connected using a USB cable.
This section contains the following topics:
• What are Web Services?
- Set up Web Services
• Use Web Services
- Remove Web Services
What are Web Services?
The printer includes the following Web Services:
- HP ePrint
- Printer Apps
HP ePrint
HP ePrint is a free service from HP that allows you to print to your web-connected printer anytime, from any location. It's as simple as sending an email to the email address assigned to your printer when you enable Web Services on the printer. No special drivers or software are needed. If you can send an email, you can print from anywhere, using HP ePrint.
Once you have signed up for an account on ePrintCenter, you can sign in to view your HP ePrint job status, manage your HP ePrint printer queue, control who can use your printer's HP ePrint email address to print, and get help for HP ePrint.
Printer Apps
Printer Apps allow you to easily locate and print preformatted web content, directly from your printer. You can also scan and store your documents digitally on the Web.
Printer Apps provide a wide range of content, from store coupons to family activities, news, travel, sports, cooking, photos, and many more. You can even view and print your online images from popular photo sites.
Certain Printer Apps also allow you to schedule the delivery of app content to your printer.
Pre-formatted content designed specifically for your printer means no cut-off text and pictures, and no extra pages with only one line of text. On some printers, you can also choose paper and print quality settings on the print preview screen.
All without even having to turn on your computer!
Set up Web Services
To set up Web Services, complete the following steps.

NOTE: Before you set up Web Services, make sure you are connected to the Internet using either a wired (Ethernet) or wireless connection.
- Set up Web Services using the HP printer software
- Set up Web Services using the printer's control panel
- Set up Web Services using the embedded web server
Set up Web Services using the HP printer software
In addition to enabling key printer features, you can use the HP printer software that came with your printer to set up Web Services. If you didn't set up Web Services when you installed the HP software on your computer, you can still use the software to set up Web Services.
To set up Web Services, complete the following steps for your operating system:
Windows
- From the computer desktop, click Start, select Programs or All Programs, click HP, click the folder for your printer, and then select the icon with your printer's name.
- Double-click Web Connected Solutions, and then double-click ePrint Setup. The printer's embedded web server opens.
- On the Web Services tab, click Setup in the Web Services Settings section.
- Click Accept Terms of Use and Enable Web Services, and then click Next.
- Click Yes to allow the printer to automatically check for and install product updates.
- If your network uses proxy settings when connecting to the Internet, enter these settings.
- Follow the instructions on the Web Services information sheet to finish the setup.
Mac OS X
▲ To set up and manage Web Services in Mac OS X, you can use the printer's embedded web server (EWS). For more information, see Set up Web Services using the embedded web server.
Set up Web Services using the printer's control panel
The printer's control panel provides an easy way to set up and manage Web Services.
To set up Web Services, complete the following steps:
- Make sure the printer is connected to the Internet.
- On the printer control panel, touch (Apps) or (HP ePrint).
- Touch Accept to accept the Web Services terms of use and enable Web Services.
-
In the Auto Update screen, touch Yes to allow the printer to automatically check for and install product updates.
-
If your network uses proxy settings when connecting to the Internet, enter these settings:
a. Touch Enter Proxy.
b. Enter the proxy server settings, and then touch Done.
- Follow the instructions on the Web Services information sheet to finish the setup.
Set up Web Services using the embedded web server
You can use the printer's embedded web server (EWS) to set up and manage Web Services.
To set up Web Services, complete the following steps:
- Open the EWS. For more information, see Embedded web server.
- On the Web Services tab, click Setup in the Web Services Settings section.
- Click Accept Terms of Use and Enable Web Services, and then click Next.
- Click Yes to allow the printer to automatically check for and install product updates.
- If your network uses proxy settings when connecting to the Internet, enter these settings.
- Follow the instructions on the Web Services information sheet to finish the setup.
Use Web Services
The following section describes how to use and configure Web Services.
- HP ePrint
- Printer Apps
HP ePrint
HP ePrint allows you to print to your web-connected printer anytime, from any location.
To use HP ePrint, make sure to have the following:
- An Internet- and email-capable computer or mobile device
- An HP ePrint-capable printer on which Web Services has been enabled

TIP: For more information about managing and configuring HP ePrint settings and to learn about the latest features, visit ePrintCenter (www.eprintcenter.com).
Print using HP ePrint
To print documents using HP ePrint, complete the following steps:
- On your computer or mobile device, open your email application.

NOTE: For information about using the email application on your computer or mobile device, see the documentation provided with the application.
-
Create a new email message, and then attach the file that you want to print. For a list of files that can be printed using HP ePrint, as well as guidelines to follow when using HP ePrint, see Web Services and HP website specifications.
-
Enter the printer's email address in the "To" line of the email message, and then select the option to send the email message.

NOTE: Make sure that the printer's email address is the only address listed in the "To" line of the email message. If other email addresses are listed in the "To" line, the attachments you are sending might not print.
Find the printer's email address
To display your printer's HP ePrint email address, complete the following steps:
-
From the Home screen, touch 📋 (HP ePrint).
-
The email address for the printer appears on the display.

TIP: To print the email address, touch Print.
Turn off HP ePrint
To turn off HP ePrint, complete the following steps:
-
From the Home screen, touch 📋 (HP ePrint), and then touch Settings.
-
Touch ePrint, and then touch Off.

NOTE: To remove all Web Services, see Remove Web Services.
Printer Apps
Printer Apps allow you to easily locate and print pre-formatted web content, directly from your printer.
Use Printer Apps
To use the Printer Apps on your printer, touch Apps on the printer's control panel display, and then touch the Print App you want to use.
For more information about individual Printer Apps, visit (www.eprintcenter.com).
Manage Printer Apps
You can manage your Printer Apps with ePrintCenter. You can add, configure, or remove Printer Apps, and set the order in which they appear on your printer's display.

NOTE: To manage Printer Apps from ePrintCenter, create an account on ePrintCenter and add your printer. For more information, see (www.eprintcenter.com.
Turn off Printer Apps
To turn off Printer Apps, complete the following steps:
-
From the Home screen, touch 📋 (HP ePrint), and then touch Settings.
-
Touch Apps, and then touch Off.

NOTE: To remove all Web Services, see Remove Web Services.
Remove Web Services
To remove Web Services, complete the following steps:
-
On the printer's control panel display, touch 📋 (HP ePrint), and then touch Settings.
-
Touch Remove Web Services.
8 Work with ink cartridges
To ensure the best print quality from the printer, you need to perform some simple maintenance procedures. This section provides guidelines for handling the ink cartridges, instructions for replacing the ink cartridges, and aligning and cleaning the printhead.

TIP: If you have problems copying documents, see Print quality troubleshooting.
This section contains the following topics:
• Information on ink cartridges and the printhead
• Check the estimated ink levels
• Print with one or more depleted cartridges
- Replace the ink cartridges
• Store printing supplies
• Usage information collection
Information on ink cartridges and the printhead
The following tips help maintain HP ink cartridges and ensure consistent print quality.
- The instructions in this user guide are for replacing ink cartridges, and are not intended for first time installation.
- CAUTION: HP recommends that you replace any missing cartridges as soon as possible to avoid print quality issues and possible extra ink usage or damage to the ink system. Never turn off the printer when ink cartridges are missing.
- Keep all ink cartridges in the original sealed packages until they are needed.
- Be sure to turn off the printer properly. For more information, see Turn the printer off.
- Store ink cartridges at room temperature (15-35° C or 59-95° F).
- Do not clean the printhead unnecessarily. This wastes ink and shortens the life of the cartridges.
- Handle ink cartridges carefully. Dropping, jarring, or rough handling during installation can cause temporary printing problems.
- If you are transporting the printer, do the following to prevent ink leaking from the printer or other damage from occurring to the printer:
Make sure you turn off the printer by pressing the ⏻ (Power button). Wait until all sounds of internal motion stop before unplugging the printer. For more information, see Turn the printer off.
• Make sure you leave the ink cartridges and printhead installed.
- The printer must be transported sitting flat; it should not be placed on its side, back, front, or top.
Related topics
• Check the estimated ink levels
• Printhead maintenance
Check the estimated ink levels
You can check the estimated ink levels from the printer software or from the printer control panel. For information about using these tools, see Printer management tools and Use the printer control panel. You can also print the Printer Status page to view this information (see Understand the Printer Status Report).

NOTE: Ink level alerts and indicators provide estimates for planning purposes only. When you receive a low-ink alert, consider having a replacement cartridge available to avoid possible printing delays. You do not have to replace the cartridges until you are prompted to do so.
NOTE: If you have installed a refilled or remanufactured cartridge, or a cartridge that has been used in another printer, the ink level indicator might be inaccurate or unavailable.
NOTE: Ink from the cartridges is used in the printing process in a number of different ways, including in the initialization process, which prepares the printer and cartridges for printing, and in printhead servicing, which keeps print nozzles clear and ink flowing smoothly. In addition, some residual ink is left in the cartridge after it is used. For more information, see www.hp.com/go/inkusage.
Print with one or more depleted cartridges
The printer can operate with one or more depleted cartridges. However, printing with depleted cartridges slows the printer and affects the quality of printed documents. If the black cartridge is depleted, blacks are not as dark. If a color cartridge is depleted, output is in grayscale. When possible, replace the depleted cartridge. Do not remove the depleted cartridge until you have a new ink cartridge available to replace. For information about how to install new cartridges, see Replace the ink cartridges.

CAUTION: Wait until you have a new ink cartridge available before removing the old ink cartridge. Do not leave the ink cartridge outside of the printer for an extended period of time. This can result in damage to both the printer and the ink cartridge.
Replace the ink cartridges

NOTE: For information on recycling used ink supplies, see HP inkjet supplies recycling program.
If you do not already have replacement ink cartridges for the printer, see Ink cartridges and printheads.

NOTE: At this time, some portions of the HP website are available in English only.

CAUTION: HP recommends that you replace any missing cartridges as soon as possible to avoid print quality issues and possible extra ink usage or damage to the ink system. Never turn off the printer when ink cartridges are missing.
Use these steps to replace the ink cartridges.
To replace the ink cartridges
- Make sure the printer is turned on.
- Open the ink cartridge access door.

NOTE: Wait until the print carriage stops moving before proceeding.
- Press the front of the ink cartridge to release it, and then remove it from the slot.
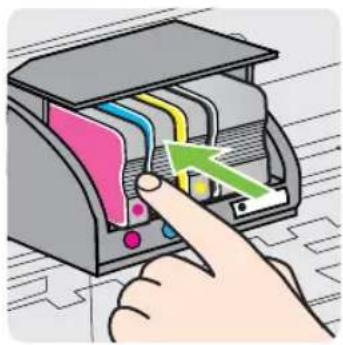
natural_image
Illustration of a hand inserting a device into an open device with colored wires (no text or symbols visible)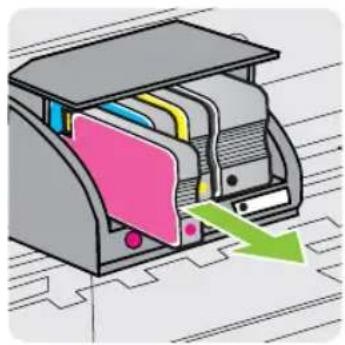
natural_image
Illustration of a mechanical device with internal components and directional arrows (no text or symbols)-
Remove the new ink cartridge from its packaging.
-
Using the color-coded letters for help, slide the ink cartridge into the empty slot until it is securely installed in the slot.

CAUTION: Do not lift the latch handle on the print carriage to install the ink cartridges. Doing so could cause the printhead or ink cartridges to be incorrectly seated, which can cause errors or print quality problems. The latch must remain down in order to correctly install the ink cartridges.
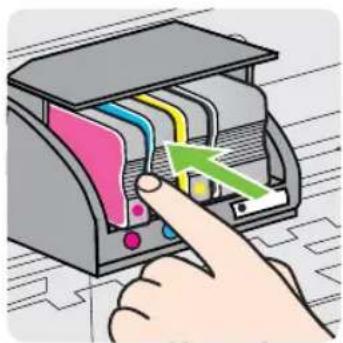
natural_image
Illustration of a hand inserting a device into an open device with colored wires (no text or symbols visible)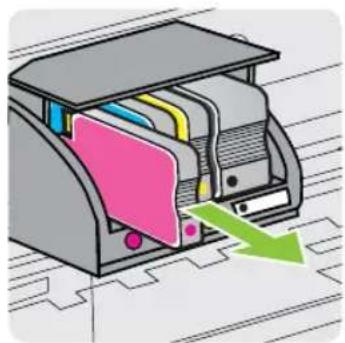
natural_image
Illustration of a mechanical device with internal components and directional arrows (no text or symbols)Make sure that you insert the ink cartridge into the slot that has the same colored letter as the color you are installing.
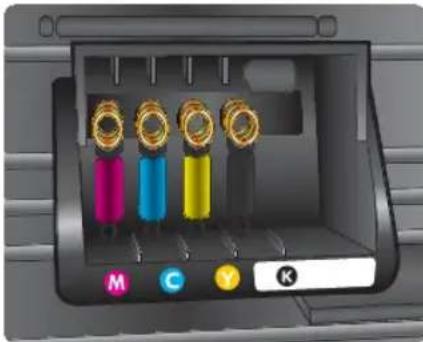
natural_image
Interior view of a device showing four colored battery cells with labels M, C, Y, K (no text or symbols on the cells themselves)- Repeat steps 3 through 5 for each ink cartridge you are replacing.
- Close the ink cartridge access door.
Related topics
Ink cartridges and printheads
Store printing supplies
Ink cartridges can be left in the printer for extended periods of time. However, to assure optimal ink cartridge health, be sure to turn off the printer properly. For more information, see Turn the printer off.
Usage information collection
The HP cartridges used with this printer contain a memory chip that assists in the operation of the printer.
In addition, this memory chip collects a limited set of information about the usage of the printer, which might include the following: the date when the cartridge was first installed, the date when the cartridge was last used, the number of pages printed using the cartridge, the page coverage, the printing modes used, any printing errors that might have occurred, and the printer model. This information helps HP design future printers to meet our customers' printing needs.
The data collected from the cartridge memory chip does not contain information that can be used to identify a customer or user of the cartridge or their printer.
HP collects a sampling of the memory chips from cartridges returned to HP's free return and recycling program (HP Planet Partners: www.hp.com/recycle). The memory chips from this sampling are read and studied in order to improve future HP printers. HP partners who assist in recycling this cartridge might have access to this data, as well.
Any third party possessing the cartridge might have access to the anonymous information on the memory chip. If you prefer to not allow access to this information, you can render the chip inoperable. However, after you render the memory chip inoperable, the cartridge cannot be used in an HP printer.
If you are concerned about providing this anonymous information, you can make this information inaccessible by turning off the memory chip's ability to collect the printer's usage information:
To turn off usage information collection
- On the printer control panel, touch ▶ (right arrow), and then touch Setup.
- Select Preferences, and then select Cartridge Chip Information.
- Touch OK to turn off usage information collection.

NOTE: If you turn off the memory chip's ability to collect the printer's usage information, you can still continue to use the cartridge in the HP printer.
9 Solve a problem
The information in this section suggests solutions to common problems. If your printer is not operating correctly and these suggestions did not solve your problem, try using one of the following support services to obtain assistance.
This section contains the following topics:
- HP support
• General troubleshooting tips and resources - Solve printer problems
• Print quality troubleshooting - Solve paper-feed problems
- Solve copy problems
- Solve scan problems
- Solve fax problems
- Solve problems using Web Services and HP websites
• Solve HP Digital Solutions problems - Solve memory device problems
- Solve wired (Ethernet) network problems
- Solve wireless problems
- Configure your firewall software to work with the printer
- Solve printer management problems
- Troubleshoot installation issues
• Understand the Printer Status Report
• Printhead maintenance
• Understand the network configuration page - Clear jams
HP support
If you have a problem, follow these steps
- Check the documentation that came with the printer.
- Visit the HP online support website at www.hp.com/go/customercare. This website provides information and utilities that can help you correct many common printer problems. HP online support is available to all HP customers. It is the fastest source for up-to-date printer information and expert assistance and includes the following features:
- Fast access to qualified online support specialists
• HP software and driver updates for the HP printer
- Valuable troubleshooting information for common problems
- Proactive printer updates, support alerts, and HP newsgrams that are available when you register the printer
For more information, see Obtain electronic support.
- Call HP support. Support options and availability vary by printer, country/region, and language. For more information, see HP support by phone.
Obtain electronic support
To find support and warranty information, go to the HP website at www.hp.com/go/customercare. This website provides information and utilities that can help you correct many common printer problems. If prompted, select your country/region, and then click Contact HP for information about calling for technical support.
This website also offers technical support, drivers, supplies, ordering information and other options such as:
- Access online support pages.
- Send HP an email message for answers to your questions.
- Connect with an HP technician by using online chat.
- Check for HP software updates.
You can also obtain support from the HP software for Windows or Mac OS X, which provide easy, step-by-step solutions to common printing problems. For more information, see Printer management tools.
Support options and availability vary by printer, country/region, and language.
HP support by phone
The phone support numbers and associated costs listed here are those in effect at time of publication and are applicable only for calls made on a land line. Different rates may apply for mobile phones.
For the most current HP list of telephone support numbers and call costs information, see www.hp.com/go/customercare. This website provides information and utilities that can help you correct many common printer problems.
During the warranty period, you may obtain assistance from the HP Customer Care Center.

NOTE: HP does not provide telephone support for Linux printing. All support is provided online at the following website: https://launchpad.net/hplip. Click the Ask a question button to begin the support process.
The HPLIP website does not provide support for Windows or Mac OS X. If you are using these operating systems, see www.hp.com/go/customercare. This website provides information and utilities that can help you correct many common printer problems.
This section contains the following topics:
- Before you call
• Phone support period
• Telephone support numbers
• After the phone support period
Before you call
Call HP support while you are in front of the computer and the printer. Be prepared to provide the following information:
- Model number
- Serial number (located on the back or bottom of the printer)
-
Messages that appear when the situation occurs
• Answers to these questions: -
Has this situation happened before?
- Can you re-create it?
• Did you add any new hardware or software to your computer at about the time that this situation began? - Did anything else occur prior to this situation (such as a thunderstorm or moving the printer)?
Phone support period
One year of phone support is available in North America, Asia Pacific, and Latin America (including Mexico).
Telephone support numbers
In many locations, HP provides toll free telephone support during the warranty period. However, some of the support numbers might not be toll free.
For the most current list of telephone support numbers, see www.hp.com/go/customercare. This website provides information and utilities that can help you correct many common printer problems.

www.hp.com/support
| Africa (English speaking) +27 11 2345872 | www.hp.com/afr/support/cc-en | |
| Afrique (francophone) +33 4993 9230 | www.hp.com/afr/support/cc-fr | |
| www.hp.com/support | 021 672 280 | الاجزاز |
| Algérie 021 67 22 80 | www.hp.com/support | |
| Argentina (Buenos Aires) 54-11-4708-1600 | www.hp.com/la/soporte | |
| Argentina 0-800-555-5000 | www.hp.com/la/soporte | |
| Australia 1300 721 147 | www.hp.com/support/australia | |
| Australia (out-of-warranty) 1902 910 910 | www.hp.com/support/australia | |
| Österreich +43 0820 87 447duppeller Orksiarif | www.hp.com/at/support/cc | |
| www.hp.com/support | 17212049 | الامعرين |
| Belgié +32 078 600 019 | Peak Hours: 0.055 € p/mLow Hours: 0,27 € p/m | www.hp.be/support/cc-nl |
| Belgique +32 078 600 020 | Peak Hours: 0.055 €m Low Hours:0,27 €m | www.hp.be/support/cc-fr |
| Brasil (Sao Paulo) 55-11-4004-7751 | www.hp.com/la/soporte | |
| Brasil 0-800-709-7751 | www.hp.com/la/soporte | |
| Canada 1-(800)-474-6836(1-800 hpinvent) | www.hp.com/support | |
| Central America & The Caribbean | www.hp.com/la/soporte | |
| Chile 800-360-999 | www.hp.com/la/soporte | |
| 中国 | 1068687980 | www.hp.com/support/china |
| 中国 | 800-810-3888 | www.hp.com/support/china |
| Colombia (Bogota) 571-606-9191 | www.hp.com/la/soporte | |
| Colombia 01-8000-51-4746-8368 | www.hp.com/la/soporte | |
| Costa Rica | 0-800-011-1046 | www.hp.com/la/soporte |
| Česká republika | 810 222 2221.53 CZN/min | www.hp.cz/support/cc |
| Danmark | +45 70 202 845Opkald: 0,145 (kr. pr. min.)Pr. min. man-ler 08.00-19.30; 0,25Pr. min. otige tidspunkter: 0,125 | www.hp.dk/support/cc |
| Ecuador (Andinatel) | 1-999-119800-711-2884 | www.hp.com/la/soporte |
| Ecuador (Pacifitel) | 1-800-225-528800-711-2884 | www.hp.com/la/soporte |
| www.hp.com/support | (02) 6910602 | مصر |
| El Salvador | 800-6160 | www.hp.com/la/soporte |
| España | +34 902 010 0590,94 € p/m | www.hp.es/soporte/cc |
| France +33 0969 320 435 | www.hp.com/fr/support/cc | |
| Deutschland | +49 01805 652 1800,14 €/Min aus dem deutschen Festplatz - bei Annden aus Mobilfunknetzen können andere Preis geilen | www.hp.com/de/support/cc |
| Ελλάδα | 801-11-75400 | www.hp.com/gr/support/cc |
| Kumpoç +800 9 2654 | www.hp.com/support | |
| Guatemala | 1-800-711-2884 | www.hp.com/la/soporte |
| 香港特別行政区 | (852) 2802 4098 | www.hp.com/support/hongkong |
| India | 1-800-425-7737 | www.hp.com/support/india |
| India | 91-80-28526900 | www.hp.com/support/india |
| Indonesia | +62 (21) 350 3408 | www.hp.com/support |
| www.hp.com/support | +971 4 224 9189 | الامعراق |
| www.hp.com/support | +971 4 224 9189 | الامكويت |
| www.hp.com/support | +971 4 224 9189 | الامئان |
| www.hp.com/support | +971 4 224 9189 | قطر |
| www.hp.com/support | +971 4 224 9189 | الابسمن |
| Ireland | +353 1890 923 902Calls cost Cost 5.1 cent peak /1.3 cent off-peak per minute | www.hp.com/ie/support/cc |
| Italia | +39 848 800 871costo telefonico locale | www.hp.com/lt/support/cc |
| Jamaica | 1-800-711-2884 | www.hp.com/la/soporte |
| 日本 | 0120-96-1665 | www.hp.com/support/japan |
| www.hp.com/support | 0800 222 47 | الارزئن |
| 韓국 | 1588-3003 | www.hp.com/support/korea |
| Luxembourg (Français) | +352 900 40 0060.15 €/min | www.hp.com/support |
| Luxemburg (Deutsch) | +352 900 40 0070.15 €/Min | www.hp.com/support |
| Madagascar | 262 262 51 21 21 | www.hp.com/support |
| Magyarország | 06 40 200 6297.2 HUF/perz vezelsikes telefonna | www.hp.hu/support/cc |
| Malaysia 1800 88 8588 | www.hp.com/support | |
| Mauritius | 262 262 210 404 | www.hp.com/support |
| México (Ciudad de México) | 55-5258-9922 | www.hp.com/la/soporte |
| México 01-800-472-68368 | www.hp.com/la/soporte | |
| Maroc | 0801 005 010 | www.hp.com/support |
| Nederland +31 0900 2020 | 650.10 €/Min | www.hp.nl/support/cc |
| New Zealand | 0800 441 147 | www.hp.com/support |
| Nigeria (01) 271 2320 | www.hp.com/support | |
| Norge | +47 815 62 070starter på 0,59 Kr per min.,dereter 0,39 Kr per min.Fra mobilitelefon geldermobilitelefontaktler. | www.hp.no/support/cc |
| www.hp.com/support | 24791773 | العمران |
| Panamá | 1-800-711-2884 | www.hp.com/la/soporte |
| Paraguay 009 800 54 1 0006 | www.hp.com/la/soporte | |
| Perú | 0-800-10111 | www.hp.com/la/soporte |
| Philippines | 2 867 3551 | www.hp.com/support |
| Polska | (22) 583 43 73Kozat pokóczenia- z tel.atacjonarnego jak za 1 Impuls wgtaryty operatora.- z tel.ko/nörkowego wg taryty operatora. | www.hp.pl/wsparcie/cc |
| Portugal | +351 808 201 492Custo: 8 céntimos no primeiro minulo a 3 céntimos restantes minutos | www.hp.pt/suporta/cc |
| Puerto Rico | 1-877-232-0589 | www.hp.com/support |
| República Dominicana | 1-800-711-2884 | www.hp.com/support |
| Reunion | 0820 890 323 | www.hp.com/support |
| România | 0801 033 390(021 204 7090) | www.hp.ro/support/cc |
| Россия (Москва) | 495 777 3284 | www.hp.ru/support/cc |
| Россия (Санкт-Петербург) | 812 332 4240 | www.hp.ru/support/cc |
| www.hp.com/support | 800 897 1415 | الاسعربية |
| Singapore | +65 6272 5300 | www.hp.com/support/singapore |
| Slovenská republika | 0850 111 256 | www.hp.com/support |
| South Africa (RSA) | 0860 104 771 | www.hp.com/za/support/cc |
| Suomi +358 0 203 66 767 | www.hp.fi/tuki/cc | |
| Sverige | +46 077 120 47650.23 kr/min | www.hp.se/support/cc |
| Switzerland | +41 0848 672 6720.38 CHF/min. | www.hp.com/support |
| 臺灣 | 0800-010055 (免費) | www.hp.com/support/taiwan |
| LTM | +66 (2) 353 9000 | www.hp.com/support |
| www.hp.com/support | 071 891 391 | کونس |
| Trinidad & Tobago | 1-800-711-2884 | www.hp.com/la/soporte |
| Tunisie | 23 926 000 | www.hp.com/support |
| Türkiye (Istanbul, Ankara, Izmir & Bursa) | 0(212) 444 0307Yerel numara: 444 0307 | www.hp.com.tr/destek/cc |
| Україна (044) 230-51-06 | www.hp.ua/support/cc | |
| www.hp.com/support | 600 54 47 47 | الإمارات AmarейيةInsalechade |
| United Kingdom | 0844 369 03690.50 £ p/m | www.hp.com/uk/support/cc |
| United States | 1-(800)-474-6836 | www.hp.com/support |
| Uruguay | 0304-054-177 | www.hp.com/la/soporte |
| Venezuela (Caracas) | 58-212-278-8666 | www.hp.com/la/soporte |
| Venezuela | 0-800-474-68368 | www.hp.com/la/soporte |
| Viêt Nam | +84 88234530 | www.hp.com/support |
After the phone support period
After the phone support period, help is available from HP at an additional cost. Help may also be available at the HP online support website: www.hp.com/go/customercare. This website provides information and utilities that can help you correct many common printer problems. Contact your HP dealer or call the support phone number for your country/region to learn more about support options.
General troubleshooting tips and resources

NOTE: Many of the following steps require HP software. If you did not install the HP software, you can install it using the HP software CD included with the printer, or you can download the HP software from the HP support website www.hp.com/go/customercare. This website provides information and utilities that can help you correct many common printer problems.
Check the following when you begin troubleshooting a printing problem.
- For a paper jam, see Clear jams.
- For paper-feed problems, such as the paper skew and paper pick, see Solve paper-feed problems.
• ⏻ (Power button) light is on and not blinking. When the printer is turned on for the first time, it takes approximately 12 minutes to initialize it after the ink cartridges are installed. - Power cord and other cables are working, and are firmly connected to the printer. Make sure the printer is connected firmly to a functioning alternating current (AC) power outlet, and is turned on. For voltage requirements, see Electrical specifications.
- Media is loaded correctly in the input tray and is not jammed in the printer.
- All packing tapes and materials are removed.
- The printer is set as the current or default printer. For Windows, set it as the default in the Printers folder. For Mac OS X, set it as the default in the Print & Fax preferences of the System Preferences. See your computer's documentation for more information.
- Pause Printing is not selected if you are using a computer running Windows.
- You are not running too many programs when you are performing a task. Close programs that you are not using or restart the computer before attempting the task again.
Solve printer problems

TIP: You can visit the HP online support website at www.hp.com/go/customercare for information and utilities that can help you correct many common printer problems.
This section contains the following topics:
• The printer shuts down unexpectedly
- Alignment fails
• The printer is not responding (nothing prints)
• The printer prints slowly
• The printer is making some unexpected noises
- Blank or partial page printed
• Something on the page is missing or incorrect
- Placement of the text or graphics is wrong
The printer shuts down unexpectedly
Check the power and power connections
Make sure the printer is connected firmly to a functioning alternating current (AC) power outlet. For voltage requirements, see Electrical specifications.
Alignment fails
If the alignment process fails, make sure you have loaded unused, plain white paper into the input tray. If you have colored paper loaded in the input tray when you align the printer, the alignment fails.
If the alignment process fails repeatedly, you may need to clean the printhead, or you might have a defective sensor. To clean the printhead, see Clean the printhead.
If cleaning the printhead does not solve the problem, contact HP support. Go to www.hp.com/go/customercare. This website provides information and utilities that can help you correct many common printer problems. If prompted, select your country/region, and then click Contact HP for information on calling for technical support.
The printer is not responding (nothing prints)
There are print jobs stuck in the print queue
Open the print queue, cancel all documents, and then reboot the computer. Try to print after the computer reboots. Refer to the Help system for the operating system for more information.
Check the printer setup
For more information, see General troubleshooting tips and resources.
Check the HP software installation
If the printer is turned off when printing, an alert message should appear on your computer screen; otherwise, the HP software provided with the printer might not be installed correctly. To resolve this, uninstall the HP software completely, and then reinstall the HP software. For more information, see Uninstall and reinstall the HP software.
Check the cable connections
- Make sure both ends of the USB cable or Ethernet cable are secure.
-
If the printer is connected to a network, check the following:
-
Check the Link light on the back of the printer.
Make sure you are not using a phone cord to connect the printer.
Check any personal firewall software installed on the computer
The personal software firewall is a security program that protects a computer from intrusion. However, the firewall might block communication between the computer and the printer. If there is a problem communicating with the printer, try temporarily disabling the firewall. If the problem persists, the firewall is not the source of the communication problem. Re-enable the firewall.
The printer prints slowly
Try the following solutions if the printer is printing very slowly.
• Solution 1: Use a lower print quality setting
• Solution 2: Check the ink levels
• Solution 3: Contact HP support
Solution 1: Use a lower print quality setting
Solution: Check the print quality setting. Best and Maximum dpi provide the best quality but are slower than Normal or Draft. Draft provides the fastest print speed.
Cause: The print quality was set to a high setting.
If this did not solve the issue, try the next solution.
Solution 2: Check the ink levels
Solution: Check the estimated ink levels in the ink cartridges.

NOTE: Ink level alerts and indicators provide estimates for planning purposes only. When you receive a low on ink message, consider having a replacement cartridge available to avoid possible printing delays. You do not need to replace the ink cartridges until prompted to do so.
NOTE: The printer can operate with one or more depleted cartridges.
However, printing with depleted cartridges slows the printer and affects the quality of printed documents. If the black cartridge is depleted, blacks are not as dark. If a color cartridge is depleted, output is in grayscale. When possible, replace the depleted cartridge. Do not remove the depleted cartridge until you have a new ink cartridge available. For information about how to install new cartridges, see Replace the ink cartridges.

CAUTION: Wait until you have a new ink cartridge available before removing the old ink cartridge. Do not leave the ink cartridge outside of the printer for an extended period of time. This can result in damage to both the printer and the ink cartridge.

NOTE: While ink cartridges are not damaged when left outside of the printer, the printhead does need to have all cartridges installed at all times after the printer is set up and in use. Leaving one or more cartridge slots empty for an extended period may lead to print quality problems and possibly damage the printhead. If you have recently left a cartridge out of the printer for an extended period, or if you have had a recent paper jam, and have noticed poor print quality, clean the printhead. For more information, see Clean the printhead.
For more information, see:
Check the estimated ink levels
Cause: The ink cartridges might have insufficient ink. Printing with depleted cartridges slows the printer.
Solution 3: Contact HP support
Solution: Contact HP support for service.
Go to: www.hp.com/go/customercare. This website provides information and utilities that can help you correct many common printer problems.
If prompted, choose your country/region, and then click Contact HP for information on calling for technical support.
Cause: There was a problem with the printer.
The printer is making some unexpected noises
You might hear some unexpected noises made by the printer. These are the servicing sounds when the printer performs automatic servicing functions to maintain the health of the printhead.

NOTE: To prevent any potential damage to your printer:
Do not turn off the printer while the printer is performing any servicing. If you are turning off the printer, wait for the printer to come to a complete stop before turning off using the ⏻ (Power button). For more information, see Turn the printer off.
Make sure all ink cartridges are installed. If any of the ink cartridge is missing, the printer will perform extra servicing to protect the printhead.
Blank or partial page printed
Clean the printhead
Complete the printhead cleaning procedure. For more information, see Clean the printhead. The printhead may need to be cleaned if the printer was turned off incorrectly.

NOTE: Incorrectly turning off the printer can cause print quality problems like blank or partial pages. Printhead cleaning can solve these problems, but turning off the printer correctly can prevent them in the first place. Always turn the printer off by pressing the ⏻ (Power button) on the printer. Wait until the ⏻ (Power button) light goes out before unplugging the power cord or turning off a power strip.
Check the media settings
- Make sure you select the correct print quality settings in the printer driver for the media loaded in the trays.
- Make sure the page settings in the printer driver match the page size of media loaded in the tray.
More than one page is being picked
For more information, see Solve paper-feed problems.
There is a blank page in the file
Check the file to make sure there is no blank page.
Something on the page is missing or incorrect
Check the Print Quality Diagnostic page
Print a Print Quality Diagnostic page to help you decide whether to run any maintenance tools to improve the print quality of your printouts. For more information, see Print quality troubleshooting.
Check the margin settings
Make sure the margin settings for the document do not exceed the printable area of the printer. For more information, see Set minimum margins.
Check the color print settings
Make sure Print in Grayscale is not selected in the printer driver.
Check the printer location and length of USB cable
High electromagnetic fields (such as those generated by USB cables) can sometimes cause slight distortions to printouts. Move the printer away from the source of the electromagnetic fields. Also, it is recommended that you use a USB cable that is less than 3 meters (9.8 feet) long to minimize the effects of these electromagnetic fields.
Placement of the text or graphics is wrong
Check how the media is loaded
Make sure the media width and length guides fit snugly against the edges of the stack of media, and make sure the tray is not overloaded. For more information, see Load media.
Check the media size
- Content on a page might be cut off if the document size is larger than the media that you are using.
- Make sure the media size selected in the printer driver match the size of media loaded in the tray.
Check the margin settings
If the text or graphics are cut off at the edges of the page, make sure the margin settings for the document do not exceed the printable area of your printer. For more information, see Set minimum margins.
Check the page-orientation setting
Make sure the media size and page orientation selected in the application match the settings in the printer driver. For more information, see Print.
Check the printer location and length of USB cable
High electromagnetic fields (such as those generated by USB cables) can sometimes cause slight distortions to printouts. Move the printer away from the source of the electromagnetic fields. Also, it is recommended that you use a USB cable that is less than 3 meters (9.8 feet) long to minimize the effects of these electromagnetic fields.
If the above solutions do not work, the problem may be caused by the inability of the application to interpret print settings correctly. See the release notes for known software conflicts, refer to the application's documentation, or contact the software manufacturer for specific help.
Print quality troubleshooting
Try the solutions in this section to resolve print quality problems in your printout.

TIP: You can visit the HP online support website at www.hp.com/go/customercare for information and utilities that can help you correct many common printer problems.
- Solution 1: Make sure you are using genuine HP ink cartridges
• Solution 2: Check the ink levels
• Solution 3: Check the paper loaded in the input tray
• Solution 4: Check the paper type
• Solution 5: Check the print settings
• Solution 6: Print and evaluate a print quality report
• Solution 7: Contact HP support
Solution 1: Make sure you are using genuine HP ink cartridges
Solution: Check to see if your ink cartridges are genuine HP ink cartridges.
HP recommends that you use genuine HP ink cartridges. Genuine HP ink cartridges are designed and tested with HP printers to help you easily produce great results, time after time.

NOTE: HP cannot guarantee the quality or reliability of non-HP supplies.
Printer service or repairs required as a result of using a non-HP supply are not covered under warranty.
If you believe you purchased genuine HP ink cartridges, go to:
www.hp.com/go/anticounterfeit
Cause: Non-HP ink cartridges were being used.
If this did not solve the issue, try the next solution.
Solution 2: Check the ink levels
Solution: Check the estimated ink levels in the ink cartridges.

NOTE: Ink level alerts and indicators provide estimates for planning purposes only. When you receive a low-ink alert, consider having a replacement cartridge available to avoid possible printing delays. You do not need to replace the ink cartridges until prompted to do so.
NOTE: The printer can operate with one or more depleted cartridges.
However, printing with depleted cartridges slows the printer and affects the quality of printed documents. If the black cartridge is depleted, blacks are not as dark. If a color cartridge is depleted, output is in grayscale. When possible, replace the depleted cartridge. Do not remove the depleted cartridge until you have a new ink cartridge available. For information about how to install new cartridges, see Replace the ink cartridges.

CAUTION: Wait until you have a new ink cartridge available before removing the old ink cartridge. Do not leave the ink cartridge outside of the printer for an extended period of time. This can result in damage to both the printer and the ink cartridge.
CAUTION: While ink cartridges are not damaged when left outside of the printer, the printhead does need to have all cartridges installed at all times after the printer is set up and in use. Leaving one or more cartridge slots empty for an extended period may lead to print quality problems and possibly damage the printhead. If you have recently left a cartridge out of the printer for an extended period, or if you have had a recent paper jam, and have noticed poor print quality, clean the printhead. For more information, see Clean the printhead.
For more information, see:
Check the estimated ink levels
Cause: The ink cartridges might have insufficient ink.
If this did not solve the issue, try the next solution.
Solution 3: Check the paper loaded in the input tray
Solution: Make sure the paper is loaded correctly and that it is not wrinkled or too thick.
- Load paper with the print side facing down. For example, if you are loading glossy photo paper, load the paper with the glossy side down.
- Make sure the paper lays flat in the input tray and is not wrinkled. If the paper is too close to the printhead during printing, the ink might be smeared. This can happen if the paper is raised, wrinkled, or very thick, such as a mailing envelope.
For more information, see:
Load media.
Cause: The paper was loaded incorrectly, or it was wrinkled or too thick.
If this did not solve the issue, try the next solution.
Solution 4: Check the paper type
Solution: HP recommends that you use HP papers or any other paper type that is appropriate for the printer.
Always make sure the paper you are printing on is flat. For best results when printing images, use HP Advanced Photo Paper.
Store specialty media in its original packaging inside a resealable plastic bag on a flat surface in a cool, dry place. When you are ready to print, remove only the paper you plan to use immediately. When you have finished printing, return any unused photo paper to the plastic bag. This prevents the photo paper from curling.

NOTE: For this issue, there is not a problem with your ink supplies. Therefore, replacing the ink cartridges is not necessary.
For more information, see:
Select print media
Cause: The wrong kind of paper was loaded in the input tray.
If this did not solve the issue, try the next solution.
Solution 5: Check the print settings
Solution: Check the print settings.
- Check the print settings to see if the color settings are incorrect.
For example, check to see if the document is set to print in grayscale. Or, check to see if advanced color settings such as saturation, brightness, or color tone, are set to modify the appearance of colors.
- Check the print quality setting and make sure it matches the type of paper loaded in the printer.
You might need to choose a lower print quality setting if colors are running into each other. Or, choose a higher setting if you are printing a high-quality photo, and then make sure photo paper such as HP Advanced Photo Paper is loaded in the input tray.

NOTE: On some computer screens, colors might appear differently than they do when printed on paper. In this case, there is nothing wrong with the printer, print settings, or ink cartridges. No further troubleshooting is required.
For more information, see:
Select print media
Cause: The print settings were set incorrectly.
If this did not solve the issue, try the next solution.
Solution 6: Print and evaluate a print quality report
Solution:
To print a print quality report
- Control panel: Touch ▶ (right arrow), and then touch Setup, select Reports, and then select Print Quality Report.
- Embedded web server: Click the Tools tab, click Print Quality Toolbox under Utilities, and then click Print Quality Report button.
- HP Utility (Mac OS X): In the Information And Support section, click Print Quality Diagnostics, and then click Print.
HP Officejet Pro 8600 N911a Series
Print Quality Diagnostic Page
Printer Information
Product model number: CM740A
Product metal /cycle: CN11HCS2N805AC
Service ID: 2105M
Hardware Version: CLM1CA1105A8
Pages printed: Tray 1x10, Tray 2x6, Yaba=10, Auto-dallas urem
link cartridge level": K=90, Y=80, M=80, C=80
*Estimates only. Actual in levels may vary.
Test Pattern 1
If few lives are out straight and curved, also the professional

natural_image
Simple line drawing of a grid with four crosshairs, no text or symbols presentTest Pattern 2
If you had thin white lines across any of the colored blocks, clean the primewell.

natural_image
Grid of eight solid color blocks in grayscale (no text or symbols)If defects are seen on the Print Quality Diagnostic report, follow the steps below:
- If the Print Quality Diagnostic report shows faded, partial, streaked, or missing color bars or patterns, check for depleted ink cartridges, and replace the ink cartridge that corresponds to the defective color bar or color pattern. If there is no depleted ink cartridge, remove and reinstall all ink cartridges to make sure they are properly installed. Do not remove the depleted cartridge until you have a new ink cartridge available to replace. For information about how to install new cartridges, see Replace the ink cartridges.
- Align the printhead. For more information, see Align the printhead.
- Clean the printhead. For more information, see Clean the printhead.
- if none of the previous steps have helped, contact HP support to replace the printhead. For more information, see HP support.
Cause: Print quality problems can have many causes: software settings, a poor image file, or the printing system itself. If you are unhappy with the quality of your
prints, a Print Quality Diagnostic page can help you determine if the printing system is working correctly.
Solution 7: Contact HP support
Solution: Contact HP support for service.
Go to: www.hp.com/go/customercare. This website provides information and utilities that can help you correct many common printer problems.
If prompted, choose your country/region, and then click Contact HP for information on calling for technical support.
Cause: There was a problem with the printhead.
Solve paper-feed problems

TIP: You can visit the HP online support website at www.hp.com/go/customercare for information and utilities that can help you correct many common printer problems.
Media is not supported for the printer or tray
Use only media that is supported for the printer and the tray being used. For more information, see Media specifications.
Media is not picked up from a tray
- Make sure media is loaded in the tray. For more information, see Load media. Fan the media before loading.
- Make sure the paper guides are set to the correct markings in the tray for the media size you are loading. Also make sure the guides are snug, but not tight, against the stack.
- Make sure media in the tray is not curled. Uncurl paper by bending it in the opposite direction of the curl.
Media is not coming out correctly
- Make sure the output tray extender is fully extended; otherwise, printed pages may fall off the printer.
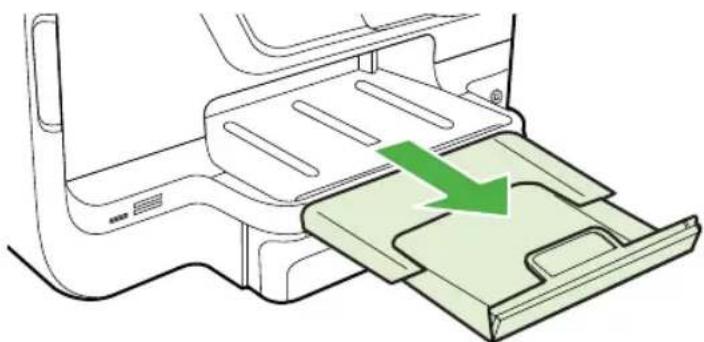
natural_image
Diagram of a car interior showing a green arrow indicating a loading or movement on the lower panel (no text or symbols present)- Remove excess media from the output tray. There is a limit to the number of sheets the tray can hold.
Pages are skewing
- Make sure the media loaded in the trays is aligned to the paper guides. If needed, pull out the trays from the printer and reload the media correctly, making sure that the paper guides are aligned correctly.
- Load media into the printer only when it is not printing.
- Remove and replace the duplexer.
- Push the button on either side of the duplexer, and then remove the unit.
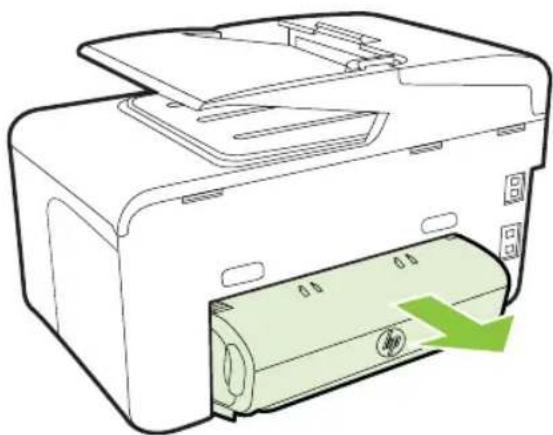
natural_image
Line drawing of a printer with a green paper roll and paperclip, showing internal components (no text or symbols)- Reinsert the duplexer into the printer.
Multiple pages are being picked up
• Fan the media before loading.
- Make sure the paper guides are set to the correct markings in the tray for the media size you are loading. Also make sure the guides are snug, but not tight, against the stack.
- Make sure the tray is not overloaded with paper.
- When using thin special media, make sure that the tray is completely loaded. If you are using special media that is only available in small quantities, try placing the special media on top of other paper of the same size to help fill the tray. (Some media is picked up more easily if the tray is full.)
- If you are using thick special media (such as brochure paper), load media so that the tray is between 1/4 and 3/4 full. If necessary, place the media on top of other paper of the same size so that the stack height is within this range.
- Use HP media for optimum performance and efficiency.
Solve copy problems

TIP: You can visit the HP online support website at www.hp.com/go/customercare for information and utilities that can help you correct many common printer problems.
- No copy came out
- Copies are blank
• Documents are missing or faded - Size is reduced
• Copy quality is poor
• Copy defects are apparent
• The printer prints half a page, then ejects the paper - Paper mismatch
No copy came out
- Check the power
Make sure that the power cord is securely connected, and the printer turned on.
- Check the status of the printer
The printer might be busy with another job. Check the control-panel display for information about the status of jobs. Wait for any job that is processing to finish.
• The printer might be jammed. Check for jams. See Clear jams.
- Check the trays
Make sure that media is loaded. For more information, see Load media
Copies are blank
- Check the media
The media might not meet Hewlett-Packard media specifications (for example, the media is too moist or too rough). For more information, see Media specifications.
- Check the settings
The contrast setting might be set too light. On the printer control panel, touch Copy, touch Lighter Darker, and then use the arrows to create darker copies.
- Check the trays
If you are copying from the automatic document feeder (ADF), make sure that the originals have been loaded correctly. For more information, see Load an original in the automatic document feeder (ADF).
Documents are missing or faded
- Check the media
The media might not meet Hewlett-Packard media specifications (for example, the media is too moist or too rough). For more information, see Media specifications.
- Check the settings
The quality setting of Fast (which produces draft-quality copies) might be responsible for the missing or faded documents. Change to the Normal or Best setting.
- Check the original
• The accuracy of the copy depends on the quality and size of the original. Use the Copy menu to adjust the brightness of the copy. If the original is too light, the copy might not be able to compensate, even if you adjust the contrast.
- Colored backgrounds might cause images in the foreground to blend into the background, or the background might appear in a different shade.
- If you are copying a borderless original, load the original on the scanner glass, not the ADF. For more information, see Load an original on the scanner glass.
- If you are copying a photo, be sure to load it on the scanner glass as indicated by the icon on the scan bed.
Size is reduced
- The reduce/enlarge or other copy feature might have been set from the printer control panel to reduce the scanned image. Check the settings for the copy job to make sure that they are for normal size.
- The HP software settings might be set to reduce the scanned image. Change the settings, if needed. See the onscreen Help for the HP software for more information.
Copy quality is poor
• Take steps to improve the copy quality
- Use quality originals.
- Load the media correctly. If the media is loaded incorrectly, it might skew, causing unclear images. For more information, see Load media.
- Use or make a carrier sheet to protect your originals.
- Check the printer
• The scanner lid might not be closed correctly.
- The scanner glass or lid backing might need cleaning. For more information, see Maintain the printer.
- The automatic document feeder (ADF) might need cleaning. For more information, see Maintain the printer.
- Print a Print Quality Diagnostic Page and follow the instructions on the page to resolve poor quality copy problems. For more information, see Print quality troubleshooting.
Copy defects are apparent
• Vertical white or faded stripes
The media might not meet Hewlett-Packard media specifications (for example, the media is too moist or too rough). For more information, see Media specifications.
- Too light or dark
Try adjusting the contrast and copy-quality settings.
- Unwanted lines
The scanner glass, lid backing, or frame might need cleaning. For more information, see Maintain the printer.
- Black dots or streaks
Ink, glue, correction fluid, or an unwanted substance might be on the scanner glass or lid backing. Try cleaning the printer. For more information, see Maintain the printer.
- Copy is slanted or skewed
If you are using the automatic document feeder (ADF), check the following:
- Make sure that the ADF input tray is not too full.
• Make sure that the ADF width adjusters are snug against the sides of the media.
- Unclear text
- Try adjusting the contrast and copy-quality settings.
- The default enhancement setting might not be suitable for the job. Check the setting and change it to enhance text or photographs, if needed. For more information, see Change copy settings.
- Incompletely filled text or graphics
Try adjusting the contrast and copy-quality settings.
• Large, black typefaces look splotchy (not smooth)
The default enhancement setting might not be suitable for the job. Check the setting and change it to enhance text or photographs, if needed. For more information, see Change copy settings.
• Horizontal grainy or white bands in light-gray to medium-gray areas
The default enhancement setting might not be suitable for the job. Check the setting and change it to enhance text or photographs, if needed. For more information, see Change copy settings.
The printer prints half a page, then ejects the paper
Check the ink cartridges
Make sure the correct ink cartridges are installed and the ink cartridges are not low on ink. For more information, see Printer management tools and Understand the Printer Status Report.
HP cannot guarantee the quality of non-HP ink cartridges.
Paper mismatch
Check the settings
Verify that the loaded media size and type matches the control panel settings.
Solve scan problems

TIP: You can visit the HP online support website at www.hp.com/go/customercare for information and utilities that can help you correct many common printer problems.

NOTE: If you are starting the scan from a computer, see the HP software Help for troubleshooting information.
- Scanner did nothing
- Scan takes too long
• Part of the document did not scan or text is missing
• Text cannot be edited
• Error messages appear
• Scanned image quality is poor
- Scan defects are apparent
Scanner did nothing
- Check the original
Make sure that the original is loaded correctly. For more information, see Load an original in the automatic document feeder (ADF) or Load an original on the scanner glass.
- Check the printer
The printer might be coming out of Sleep mode after a period of inactivity, which delays processing a short while. Wait until the printer displays the Home screen.
- Check the HP software
Make sure the HP software provided with the printer is installed correctly.
Scan takes too long
- Check the settings
If you set the resolution too high, the scan job takes longer and results in larger files. To obtain good results, do not use a resolution that is higher than needed. You can lower the resolution to scan more quickly.
• If you acquire an image through TWAIN, you can change the settings so that the original scans in black and white. See the onscreen Help for the TWAIN program for information.
- Check the status of the printer
If you sent a print or copy job before you tried to scan, the scan starts if the scanner is not busy. However, the printing and scanning processes share memory, which means that the scan might be slower.
Part of the document did not scan or text is missing
- Check the original
Make sure that you loaded the original correctly. For more information, see Load an original on the scanner glass or Load an original in the automatic document feeder (ADF).
If you scanned the document from the ADF, try scanning the document directly from the scanner glass. For more information, see Load an original on the scanner glass.
Colored backgrounds can cause images in the foreground to blend into the background. Try adjusting the settings before you scan the original, or try enhancing the image after you scan the original.
- Check the settings
• Make sure that the input media size is large enough for the original that you are scanning.
- If you are using the HP Printer Software, the default settings in the HP Printer Software might be set to automatically perform a specific task other than the one that you are attempting. See the onscreen Help for the HP Printer Software for instructions about changing the properties.
Text cannot be edited
- Check the settings
• Make sure that the OCR has been installed.
Windows: On the computer desktop, click Start, select Programs or All Programs, click HP, select your printer name, and then click Printer Setup & Software. Click Add More Software, click Customize Software Selections, and make sure the OCR option is selected.
Mac OS X: If you have installed the HP software using the Minimum installation option, the OCR software might not have been installed. To install this software, open HP Utility. (For more information, see HP Utility (Mac OS X).) Click the Applications icon on the HP Utility toolbar, double-click HP Setup Assistant, and then follow the onscreen instructions.
- When you scan the original, make sure that you select a document type in the software that creates editable text. If text is classified as a graphic, it is not converted to text.
- If you are using a separate OCR (optical character recognition) program, the OCR program might be linked to a word-processing program that does not perform OCR tasks. For more information, see the documentation provided with the OCR program. - Make sure you have selected an OCR language that corresponds to the language used for the document you are scanning. For more information, see the documentation provided with the OCR program.
- Check the originals
- When scanning documents as editable text, the original must be loaded into the scan tray with the top forward and face down. Also, make sure the document is not skewed. For more information, see Load an original on the scanner glass.
The software might not recognize text that is tightly spaced. For example, if the text that the software converts has missing or combined characters, "rn" might appear as "m."
• The accuracy of the software depends on the image quality, text size, and structure of the original and the quality of the scan itself. Make sure that your original has good image quality. - Colored backgrounds can cause images in the foreground to blend too much.
Error messages appear
- Unable to activate TWAIN source or An error occurred while acquiring the image
If you are acquiring an image from another device, such as a digital camera or another scanner, make sure that the other device is TWAIN-compliant. Devices that are not TWAIN-compliant do not work with the HP software provided with the printer.
- If you are using a USB connection, make sure that you have connected the USB Device Cable to the correct port on the back of your computer.
- Verify that the correct TWAIN source is selected. In the HP software, check the TWAIN source by selecting Select Scanner on the File menu.
- Reload document and then restart job
Touch OK on the printer control panel, and then reload the remaining documents in the ADF. For more information see Load an original in the automatic document feeder (ADF).
Scanned image quality is poor
The original is a second-generation photo or picture
Reprinted photographs, such as those in newspapers or magazines, are printed by using tiny dots of ink that make an interpretation of the original photograph, which degrades the quality. Often, the ink dots form unwanted patterns that can be detected when the image is scanned or printed or when the image appears on a screen. If the following suggestions do not solve the problem, you might need to use a better-quality version of the original.
- To eliminate the patterns, try reducing the size of the image after scanning.
- Print the scanned image to see if the quality is better.
• Make sure that the resolution and color settings are correct for the type of scan job.
- For best results, use the scanner glass for scanning rather than the ADF.
Text or images on the back of a two-sided original appear in the scan
Two-sided originals can "bleed" text or images from the back side to the scan if the originals are printed on media that is too thin or too transparent.
The scanned image is skewed (crooked)
The original might have been loaded incorrectly. Be sure to use the media guides when you load the originals into the ADF. For more information, see Load an original in the automatic document feeder (ADF).
For best results, use the scanner glass for scanning rather than the ADF.
The image quality is better when printed
The image that appears on the screen is not always an accurate representation of the quality of the scan.
• Try adjusting your computer monitor settings to use more colors (or levels of gray). In Windows, you typically make this adjustment by opening Display on the Windows control panel.
- Try adjusting the resolution and color settings.
The scanned image shows blots, lines, vertical white stripes, or other defects
• If the scanner glass is dirty, the image produced does not have optimum clarity. For cleaning instructions, see Maintain the printer.
- The defects might be on the original and are not a result of the scanning process.
Graphics look different from the original
Scan at a higher resolution.

NOTE: Scanning at high resolution can take a long time, and it can take up a large amount of space on your computer.
Take steps to improve the scan quality
- Use the glass to scan rather than the ADF.
- Use high-quality originals.
- Place the media correctly. If the media is placed incorrectly on the scanner glass, it might skew, which causes unclear images. For more information, see Load an original on the scanner glass.
- Adjust the HP software settings according to how you plan to use the scanned page.
• Use or make a carrier sheet to protect your originals. - Clean the scanner glass. For more information, see Clean the scanner glass.
Scan defects are apparent
- Blank pages
Make sure that the original document is placed correctly. Place the original document face down on the flatbed scanner with the top-left corner of the document located in the lower-right corner of the scanner glass.
- Too light or dark
Try adjusting the settings. Be sure to use the correct resolution and color settings.
- The original image might be very light or dark or might be printed on colored paper.
- Unwanted lines
Ink, glue, correction fluid, or an unwanted substance might be on the scanner glass. Try cleaning the scanner glass. For more information, see Maintain the printer.
- Black dots or streaks
- Ink, glue, correction fluid, or an unwanted substance might be on the scanner glass; the scanner glass might be dirty or scratched; or the lid backing might be dirty. Try cleaning the scanner glass and lid backing. For more information, see Maintain the printer. If cleaning does not correct the problem, the scanner glass or lid backing might need to be replaced.
- The defects might be on the original and are not a result of the scanning process.
- Unclear text
Try adjusting the settings. Make sure that the resolution and color settings are correct.
- Size is reduced
The HP software settings might be set to reduce the scanned image. See the HP printer software Help for more information about changing the settings.
Solve fax problems
This section contains fax setup troubleshooting information for the printer. If the printer is not set up correctly for faxing, you might experience problems when sending faxes, receiving faxes, or both.
If you are having faxing problems, you can print a fax test report to check the status of the printer. The test fails if the printer is not set up correctly for faxing. Perform this test after you have completed setting up the printer for faxing. For more information, see Test fax setup.
If the test fails, review the report for information on how to fix any problems found. For more information, see The fax test failed.

TIP: You can visit the HP online support website at www.hp.com/go/customercare for information and utilities that can help you correct many common printer problems.
-
The fax test failed
• The display always shows Phone Off Hook -
The printer is having problems sending and receiving faxes
• The printer is having problems sending a manual fax
• The printer cannot receive faxes, but can send faxes
• The printer cannot send faxes, but can receive faxes
• Fax tones are recorded on my answering machine
• The phone cord that came with my printer is not long enough
• Color faxes do not print
• The computer cannot receive faxes (Fax to PC and Fax to Mac)
The fax test failed
If you ran a fax test and the test failed, review the report for basic information about the error. For more detailed information, check the report to see which part of the test failed, and then review the appropriate topic in this section for solutions to try.
This section contains the following topics:
• The "Fax Hardware Test" failed
• The "Fax Connected to Active Telephone Wall Jack" test failed
• The "Phone Cord Connected to Correct Port on Fax" test failed
• The "Using Correct Type of Phone Cord with Fax" test failed
• The "Dial Tone Detection" test failed
• The "Fax Line Condition" test failed
The "Fax Hardware Test" failed
Solution:
- Turn the printer off by pressing the ⏻ (Power button) located on the printer control panel and then unplug the power cord from the back of the printer. After a few seconds, plug the power cord in again, and then turn the ⏻ (Power button) on. Run the test again. If the test fails again, continue reviewing the troubleshooting information in this section.
- Try to send or receive a test fax. If you can send or receive a fax successfully, there might not be a problem.
- If you are running the test from the Fax Setup Wizard (Windows) or HP Setup Assistant (Mac OS X), make sure the printer is not busy completing another task, such as receiving a fax or making a copy. Check the display for a message indicating that the printer is busy. If it is busy, wait until it is finished and in the idle state before running the test.
- Make sure you use the phone cord that came with the printer. If you do not use the supplied phone cord to connect from the telephone wall jack to the printer, you might not be able to send or receive faxes. After you plug in the phone cord that came with the printer, run the fax test again.
- If you are using a phone splitter, this can cause faxing problems. (A splitter is a two-cord connector that plugs into a telephone wall jack.) Try removing the splitter and connecting the printer directly to the telephone wall jack.
After you resolve any problems found, run the fax test again to make sure it passes and the printer is ready for faxing. If the Fax Hardware Test continues to fail and
you experience problems faxing, contact HP support. Go to www.hp.com/go/customercare. This website provides information and utilities that can help you correct many common printer problems. If prompted, select your country/region, and then click Contact HP for information on calling for technical support.
The "Fax Connected to Active Telephone Wall Jack" test failed
Solution:
- Check the connection between the telephone wall jack and the printer to make sure the phone cord is secure.
- Make sure you use the phone cord that came with the printer. If you do not use the supplied phone cord to connect from the telephone wall jack to the printer, you might not be able to send or receive faxes. After you plug in the phone cord that came with the printer, run the fax test again.
- Make sure you have correctly connected the printer to the telephone wall jack. Using the phone cord supplied in the box with the printer, connect one end to your telephone wall jack, then connect the other end to the port labeled 1-LINE on the back of the printer. For more information on setting up the printer for faxing, see Additional fax setup.
- If you are using a phone splitter, this can cause faxing problems. (A splitter is a two-cord connector that plugs into a telephone wall jack.) Try removing the splitter and connecting the printer directly to the telephone wall jack.
- Try connecting a working phone and phone cord to the telephone wall jack that you are using for the printer and check for a dial tone. If you do not hear a dial tone, contact your telephone company and have them check the line.
- Try to send or receive a test fax. If you can send or receive a fax successfully, there might not be a problem.
After you resolve any problems found, run the fax test again to make sure it passes and the printer is ready for faxing.
The "Phone Cord Connected to Correct Port on Fax" test failed
Solution: Plug the phone cord into the correct port.
- Using the phone cord supplied in the box with the printer, connect one end to your telephone wall jack, then connect the other end to the port labeled 1-LINE on the back of the printer.

NOTE: If you use the 2-EXT port to connect to the telephone wall jack, you cannot send or receive faxes. The 2-EXT port should only be used to connect other equipment, such as an answering machine.
Figure 9-1 Back view of the printer
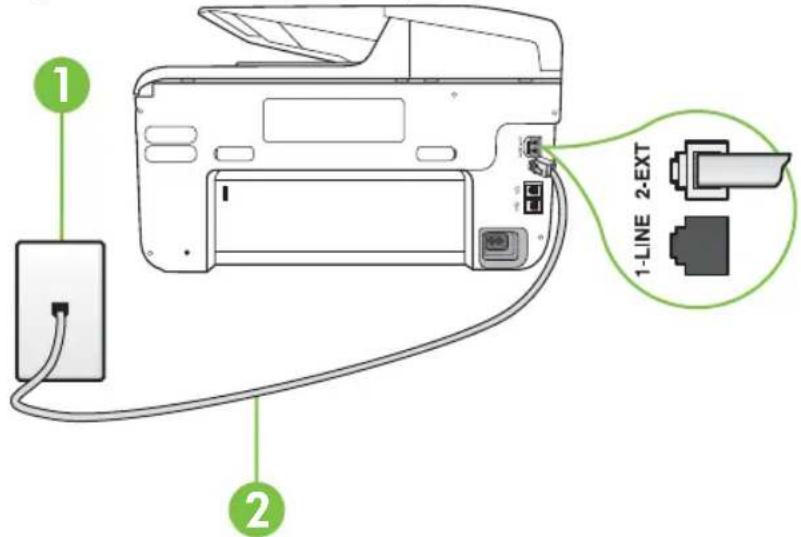
text_image
1 2 1-LINE 2-EXT1 Telephone wall jack
2 Use the phone cord supplied in the box with the printer to connect to the "1-LINE" port
- After you have connected the phone cord to the port labeled 1-LINE, run the fax test again to make sure it passes and the printer is ready for faxing.
- Try to send or receive a test fax.
- Make sure you use the phone cord that came with the printer. If you do not use the supplied phone cord to connect from the telephone wall jack to the printer, you might not be able to send or receive faxes. After you plug in the phone cord that came with the printer, run the fax test again.
- If you are using a phone splitter, this can cause faxing problems. (A splitter is a two-cord connector that plugs into a telephone wall jack.) Try removing the splitter and connecting the printer directly to the telephone wall jack.
The "Using Correct Type of Phone Cord with Fax" test failed
Solution:
- Make sure you used the phone cord supplied in the box with the printer to connect to the telephone wall jack. One end of the phone cord should be
connected to the port labeled 1-LINE on the back of the printer, and the other end to your telephone wall jack, as shown in the illustration.
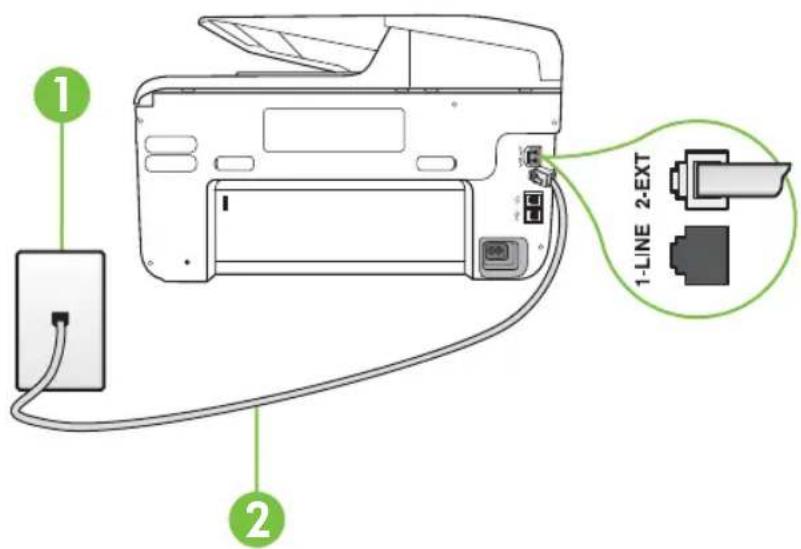
text_image
1 2 1-LINE 2-EXT1 Telephone wall jack
2 Use the phone cord supplied in the box with the printer to connect to the "1-LINE" port
If the phone cord that came with the printer is not long enough, you can use a coupler to extend the length. You can purchase a coupler at an electronics store that carries phone accessories. You also need another phone cord, which can be a standard phone cord that you might already have in your home or office.
- Check the connection between the telephone wall jack and the printer to make sure the phone cord is secure.
• Make sure you use the phone cord that came with the printer. If you do not use the supplied phone cord to connect from the telephone wall jack to the printer, you might not be able to send or receive faxes. After you plug in the phone cord that came with the printer, run the fax test again. - If you are using a phone splitter, this can cause faxing problems. (A splitter is a two-cord connector that plugs into a telephone wall jack.) Try removing the splitter and connecting the printer directly to the telephone wall jack.
The "Dial Tone Detection" test failed
Solution:
- Other equipment, which uses the same phone line as the printer, might be causing the test to fail. To find out if other equipment is causing a problem, disconnect everything from the phone line, and then run the test again. If the Dial Tone Detection Test passes without the other equipment, then one or more pieces of the equipment is causing problems; try adding them back one at a time and rerunning the test each time, until you identify which piece of equipment is causing the problem.
- Try connecting a working phone and phone cord to the telephone wall jack that you are using for the printer and check for a dial tone. If you do not hear a dial tone, contact your telephone company and have them check the line.
- Make sure you have correctly connected the printer to the telephone wall jack. Using the phone cord supplied in the box with the printer, connect one end to your telephone wall jack, then connect the other end to the port labeled 1-LINE on the back of the printer.
- If you are using a phone splitter, this can cause faxing problems. (A splitter is a two-cord connector that plugs into a telephone wall jack.) Try removing the splitter and connecting the printer directly to the telephone wall jack.
- If your telephone system is not using a standard dial tone, such as some PBX systems, this might cause the test to fail. This does not cause a problem sending or receiving faxes. Try sending or receiving a test fax.
- Check to make sure the country/region setting is set appropriately for your country/region. If the country/region setting is not set or is set incorrectly, the test might fail and you might have problems sending and receiving faxes.
- Make sure you connect the printer to an analog phone line or you cannot send or receive faxes. To check if your phone line is digital, connect a regular analog phone to the line and listen for a dial tone. If you do not hear a normal sounding dial tone, it might be a phone line set up for digital phones. Connect the printer to an analog phone line and try sending or receiving a fax.
- Make sure you use the phone cord that came with the printer. If you do not use the supplied phone cord to connect from the telephone wall jack to the printer, you might not be able to send or receive faxes. After you plug in the phone cord that came with the printer, run the fax test again.
After you resolve any problems found, run the fax test again to make sure it passes and the printer is ready for faxing. If the Dial Tone Detection test continues to fail, contact your telephone company and have them check the phone line.
The "Fax Line Condition" test failed
Solution:
- Make sure you connect the printer to an analog phone line or you cannot send or receive faxes. To check if your phone line is digital, connect a regular analog phone to the line and listen for a dial tone. If you do not hear a normal sounding dial tone, it might be a phone line set up for digital phones. Connect the printer to an analog phone line and try sending or receiving a fax.
- Check the connection between the telephone wall jack and the printer to make sure the phone cord is secure.
- Make sure you have correctly connected the printer to the telephone wall jack. Using the phone cord supplied in the box with the printer, connect one end to your telephone wall jack, then connect the other end to the port labeled 1-LINE on the back of the printer.
- Other equipment, which uses the same phone line as the printer, might be causing the test to fail. To find out if other equipment is causing a problem, disconnect everything from the phone line, and then run the test again.
If the Fax Line Condition Test passes without the other equipment, then one or more pieces of the equipment is causing problems; try adding them back one at a time and rerunning the test each time, until you identify which piece of equipment is causing the problem.
If the Fax Line Condition Test fails without the other equipment, connect the printer to a working phone line and continue reviewing the troubleshooting information in this section.
- If you are using a phone splitter, this can cause faxing problems. (A splitter is a two-cord connector that plugs into a telephone wall jack.) Try removing the splitter and connecting the printer directly to the telephone wall jack.
- Make sure you use the phone cord that came with the printer. If you do not use the supplied phone cord to connect from the telephone wall jack to the printer, you might not be able to send or receive faxes. After you plug in the phone cord that came with the printer, run the fax test again.
After you resolve any problems found, run the fax test again to make sure it passes and the printer is ready for faxing. If the Fax Line Condition test continues to fail and you experience problems faxing, contact your telephone company and have them check the phone line.
The display always shows Phone Off Hook
Solution: You are using the wrong type of phone cord. Make sure you are using the phone cord that came with the printer to connect the printer to your phone line. If the phone cord that came with the printer is not long enough, you can use a coupler to extend the length. You can purchase a coupler at an electronics store that carries phone accessories. You also need another phone cord, which can be a standard phone cord that you might already have in your home or office.
Solution: Other equipment that uses the same phone line as the printer might be in use. Make sure extension phones (phones on the same phone line, but not connected to the printer) or other equipment are not in use or off the hook. For
example, you cannot use the printer for faxing if an extension phone is off the hook, or if you are using a computer dial-up modem to send email or access the Internet.
The printer is having problems sending and receiving faxes
Solution: Make sure the printer is turned on. Look at the display on the printer. If the display is blank and the ⏻ (Power button) light is not lit, the printer is turned off. Make sure the power cord is firmly connected to the printer and plugged into a power outlet. Press the ⏻ (Power button) to turn on the printer.
After turning on the printer, HP recommends you wait five minutes before sending or receiving a fax. The printer cannot send or receive faxes while it is initializing after being turned on.
Solution: If Fax to PC or Fax to Mac has been enabled, you may not be able to send or receive faxes if the fax memory is full (limited by printer memory).
Solution:
- Make sure you used the phone cord supplied in the box with the printer to connect to the telephone wall jack. One end of the phone cord should be connected to the port labeled 1-LINE on the back of the printer and the other end to your telephone wall jack, as shown in the illustration.
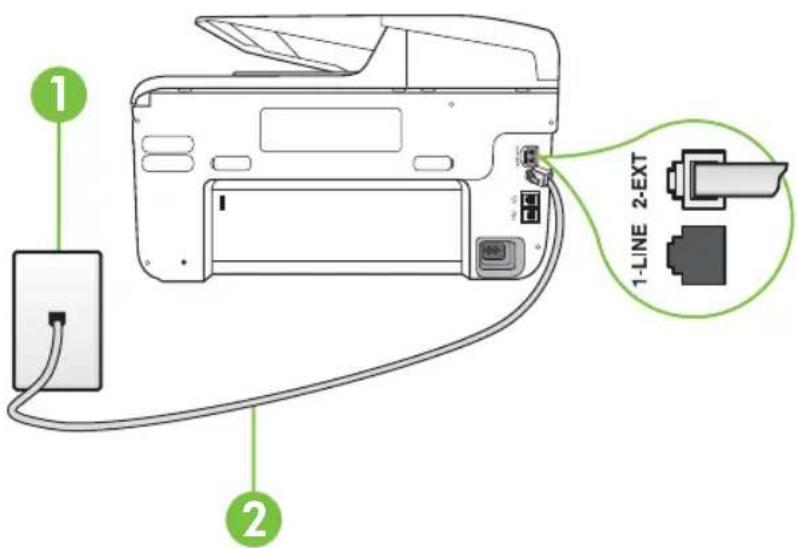
text_image
1 2 1-LINE 2-EXT1 Telephone wall jack
2 Use the phone cord supplied in the box with the printer to connect to the "1-LINE" port
If the phone cord that came with the printer is not long enough, you can use a coupler to extend the length. You can purchase a coupler at an electronics store that carries phone accessories. You also need another phone cord, which
can be a standard phone cord that you might already have in your home or office.
- Try connecting a working phone and phone cord to the telephone wall jack that you are using for the printer and check for a dial tone. If you do not hear a dial tone, call your local telephone company for service.
- Other equipment, which uses the same phone line as the printer, might be in use. For example, you cannot use the printer for faxing if an extension phone is off the hook, or if you are using a computer dial-up modem to send an email or access the Internet.
- Check to see if another process has caused an error. Check the display or your computer for an error message providing information about the problem and how to solve it. If there is an error, the printer cannot send or receive a fax until the error condition is resolved.
- The phone line connection might be noisy. Phone lines with poor sound quality (noise) can cause faxing problems. Check the sound quality of the phone line by plugging a phone into the telephone wall jack and listening for static or other noise. If you hear noise, turn Error Correction Mode (ECM) off and try faxing again. For information about changing ECM, see Send a fax in Error Correction Mode. If the problem persists, contact your telephone company.
- If you are using a digital subscriber line (DSL) service, make sure that you have a DSL filter connected or you cannot fax successfully. For more information, see Case B: Set up the printer with DSL.
- Make sure the printer is not connected to a telephone wall jack that is set up for digital phones. To check if your phone line is digital, connect a regular analog phone to the line and listen for a dial tone. If you do not hear a normal sounding dial tone, it might be a phone line set up for digital phones.
- If you are using either a private branch exchange (PBX) or an integrated services digital network (ISDN) converter/terminal adapter, make sure the printer is connected to the correct port and the terminal adapter is set to the correct switch type for your country/region, if possible. For more information, see Case C: Set up the printer with a PBX phone system or an ISDN line.
- If the printer shares the same phone line with a DSL service, the DSL modem might not be grounded correctly. If the DSL modem is not grounded correctly, it can create noise on the phone line. Phone lines with poor sound quality (noise) can cause faxing problems. You can check the sound quality of the phone line by plugging a phone into the telephone wall jack and listening for static or other noise. If you hear noise, turn off your DSL modem and completely remove power for at least 15 minutes. Turn the DSL modem back on and listen to the dial tone again.

NOTE: You might notice static on the phone line again in the future. If the printer stops sending and receiving faxes, repeat this process.
If the phone line is still noisy, contact your telephone company. For information on turning your DSL modem off, contact your DSL provider for support.
- If you are using a phone splitter, this can cause faxing problems. (A splitter is a two-cord connector that plugs into a telephone wall jack.) Try removing the splitter and connecting the printer directly to the telephone wall jack.
The printer is having problems sending a manual fax
Solution:

NOTE: This possible solution applies only in the countries/regions that receive a 2-wire phone cord in the box with the printer, including: Argentina, Australia, Brazil, Canada, Chile, China, Colombia, Greece, India, Indonesia, Ireland, Japan, Korea, Latin America, Malaysia, Mexico, Philippines, Poland, Portugal, Russia, Saudi Arabia, Singapore, Spain, Taiwan, Thailand, USA, Venezuela, and Vietnam.
- Make sure the telephone you use to initiate the fax call is connected directly to the printer. To send a fax manually, the telephone must be connected directly to the port labeled 2-EXT on the printer, as shown in the illustration.
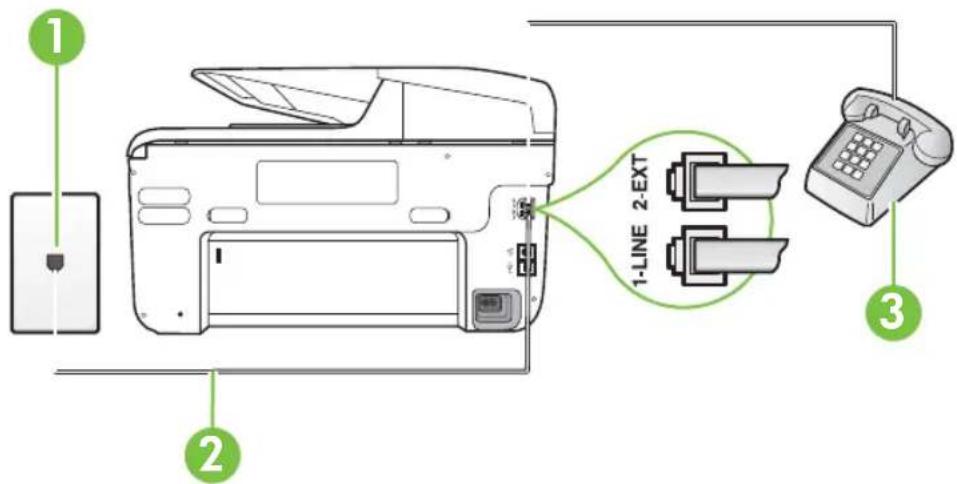
text_image
1 2 1-LINE 2-EXT 31 Telephone wall jack
2 Use the phone cord supplied in the box with the printer to connect to the "1-LINE" port
3 Telephone
- If you are sending a fax manually from your phone that is connected directly to the printer, you must use the keypad on the telephone to send the fax. You cannot use the keypad on the printer control panel.

NOTE: If using a serial-type phone system, please connect your phone directly on top of the printer cable which has a wall plug attached to it.
The printer cannot receive faxes, but can send faxes
Solution:
- If you are not using a distinctive ring service, check to make sure that the Distinctive Ring feature on the printer is set to All Rings. For more information, see Change the answer ring pattern for distinctive ring.
- If Auto Answer is set to Off, you need to receive faxes manually; otherwise, the printer cannot receive the fax. For information on receiving faxes manually, see Receive a fax manually.
- If you have a voice mail service at the same phone number you use for fax calls, you must receive faxes manually, not automatically. This means that you must be available to respond in person to incoming fax calls. For information on setting up the printer when you have a voice mail service, see Case F: Shared voice/fax line with voice mail. For information on receiving faxes manually, see Receive a fax manually.
- If you have a computer dial-up modem on the same phone line with the printer, check to make sure that the software that came with your modem is not set to receive faxes automatically. Modems that are set up to receive faxes automatically take over the phone line to receive all incoming faxes, which prevents the printer from receiving fax calls.
- If you have an answering machine on the same phone line with the printer, you might have one of the following problems:
- Your answering machine might not be set up correctly with the printer.
- Your outgoing message might be too long or too loud to allow the printer to detect fax tones, and the sending fax machine might disconnect.
- Your answering machine might not have enough quiet time after your outgoing message to allow the printer to detect fax tones. This problem is most common with digital answering machines.
The following actions might help solve these problems:
- When you have an answering machine on the same phone line you use for fax calls, try connecting the answering machine directly to the printer as described in Case I: Shared voice/fax line with answering machine.
• Make sure the printer is set to receive faxes automatically. For information on setting up the printer to receive faxes automatically, see Receive a fax.
• Make sure the Rings to Answer setting is set to a greater number of rings than the answering machine. For more information, see Set the number of rings before answering.
- Disconnect the answering machine and then try receiving a fax. If faxing is successful without the answering machine, the answering machine might be causing the problem.
Reconnect the answering machine and record your outgoing message again. Record a message that is approximately 10 seconds in duration. Speak slowly and at a low volume when recording your message. Leave at least 5 seconds of silence at the end of the voice message. There should be no background noise when recording this silent time. Try to receive a fax again.

NOTE: Some digital answering machines might not retain the recorded silence at the end of your outgoing message. Play back your outgoing message to check.
- If the printer shares the same phone line with other types of phone equipment, such as an answering machine, a computer dial-up modem, or a multi-port switch box, the fax signal level might be reduced. The signal level can also be reduced if you use a splitter or connect extra cables to extend the length of your phone. A reduced fax signal can cause problems during fax reception.
To find out if other equipment is causing a problem, disconnect everything except the printer from the phone line, and then try to receive a fax. If you can receive faxes successfully without the other equipment, one or more pieces of the other equipment is causing problems; try adding them back one at a time and receiving a fax each time, until you identify which equipment is causing the problem. - If you have a special ring pattern for your fax phone number (using a distinctive ring service through your telephone company), make sure that the Distinctive Ring feature on the printer is set to match. For more information, see Change the answer ring pattern for distinctive ring.
The printer cannot send faxes, but can receive faxes
Solution:
- The printer might be dialing too fast or too soon. You might need to insert some pauses in the number sequence. For example, if you need to access an outside line before dialing the phone number, insert a pause following the access number. If your number is 95555555, and 9 accesses an outside line, you might insert pauses as follows: 9-555-5555. To enter a pause in the fax number you are typing, touch the Space (#) button repeatedly, until a dash (-) appears on the display.
You can also send the fax using monitor dialing. This enables you to listen to the phone line as you dial. You can set the pace of your dialing and respond to prompts as you dial. For more information, see Send a fax using monitor dialing.
- The number you entered when sending the fax is not in the proper format or the receiving fax machine is having problems. To check this, try calling the fax number from a telephone and listen for fax tones. If you cannot hear fax tones, the receiving fax machine might not be turned on or connected, or a voice mail service could be interfering with the recipient's phone line. You can also ask the recipient to check the receiving fax machine for any problems.
Fax tones are recorded on my answering machine
Solution:
- When you have an answering machine on the same phone line you use for fax calls, try connecting the answering machine directly to the printer as described in Case I: Shared voice/fax line with answering machine. If you do not connect the answering machine as recommended, fax tones might be recorded on your answering machine.
- Make sure the printer is set to receive faxes automatically and that the Rings to Answer setting is correct. The number of rings to answer for the printer should be greater than the number of rings to answer for the answering machine. If the answering machine and the printer are set to the same number of rings to answer, both devices answer the call and fax tones are recorded on the answering machine.
- Set your answering machine to a low number of rings and the printer to answer in the maximum number of rings supported. (The maximum number of rings varies by country/region.) In this setup, the answering machine answers the call and the printer monitors the line. If the printer detects fax tones, the printer receives the fax. If the call is a voice call, the answering machine records the incoming message. For more information, see Set the number of rings before answering.
The phone cord that came with my printer is not long enough
Solution: If the phone cord that came with the printer is not long enough, you can use a coupler to extend the length. You can purchase a coupler at an electronics
store that carries phone accessories. You also need another phone cord, which can be a standard phone cord that you might already have in your home or office.

TIP: If the printer came with a 2-wire phone cord adaptor, you can use it with a 4-wire phone cord to extend the length. For information on using the 2-wire phone cord adaptor, see the documentation that came with it.
To extend your phone cord
- Using the phone cord supplied in the box with the printer, connect one end to the coupler, then connect the other end to the port labeled 1-LINE on the back of the printer.
- Connect another phone cord to the open port on the coupler and to the telephone wall jack.
Color faxes do not print
Cause: The Incoming Fax Printing option is turned off.
Solution: To print color faxes, make sure that the Incoming Fax Printing option in the printer control panel is turned on.
The computer cannot receive faxes (Fax to PC and Fax to Mac)
Cause: The computer selected to receive faxes is turned off.
Solution: Make sure the computer selected to receive faxes is switched on at all times.
Cause: Different computers are configured for setup and receiving faxes and one of them may be switched off.
Solution: If the computer receiving faxes is different from the one used for setup, both computers should be switched on at all times.
Cause: Fax to PC or Fax to Mac is not activated or the computer is not configured to receive faxes.
Solution: Activate Fax to PC or Fax to Mac and make sure the computer is configured to receive faxes.
Solve problems using Web Services and HP websites
This section provides solutions to common problems using Web Services and HP websites.
• Solve problems using Web Services
- Solve problems using HP websites
Solve problems using Web Services
If you are having problems using Web Services, such as HP ePrint and Printer Apps, check the following:
- Make sure the printer is connected to the Internet using an Ethernet or wireless connection.

NOTE: You cannot use these web features if the printer is connected using a USB cable.
- Make sure the latest product updates have been installed on the printer. For more information, see Update the printer.
- Make sure Web Services is enabled on the printer. For more information, see Set up Web Services using the printer's control panel.
• Make sure the network hub, switch, or router is turned on and working correctly. - If you are connecting the printer using an Ethernet cable, make sure you are not connecting the printer using a phone cord or a crossover cable to connect the printer to the network and that the Ethernet cable is securely connected to the printer. For more information, see Solve wired (Ethernet) network problems.
- If you are connecting the printer using a wireless connection, make sure the wireless network is functioning properly. For more information, see Solve wireless problems.
-
If you are using HP ePrint, check the following:
-
Make sure the printer's email address is correct.
- Make sure that the printer's email address is the only address listed in the "To" line of the email message. If other email addresses are listed in the "To" line, the attachments you are sending might not print.
• Make sure you are sending documents that meet the HP ePrint requirements. For more information, see Web Services specifications.
- If your network uses proxy settings when connecting to the Internet, make sure the proxy settings you are entering are valid:
- Check the settings being used by the Web browser you are using (such as Internet Explorer, Firefox, or Safari).
- Check with the IT administrator or person who set up your firewall. If the proxy settings used by your firewall have changed, you must update these settings in either the printer's control panel. If these settings are not updated, you will not be able to use Web Services.
For more information, see Set up Web Services using the printer's control panel.

TIP: For additional help setting up and using Web Services, visit ePrintCenter (www.eprintcenter.com).
Solve problems using HP websites
If you are having problems using HP websites from your computer, check the following:
- Make sure the computer that you are using is connected to the Internet.
- Make sure the web browser meets the minimum system requirements. For more information, see HP website specifications.
- If your web browser uses any proxy settings to connect to the Internet, try turning off these settings. For more information, see the documentation provided with your web browser.
Solve HP Digital Solutions problems

TIP: You can visit the HP online support website at www.hp.com/go/customercare for information and utilities that can help you correct many common printer problems.
This section covers the following topics:
• Solving HP Direct Digital Filing problems
• Solving HP Digital Fax problems
Solving HP Direct Digital Filing problems
This section covers the following topics:
• Common problems
- Unable to scan to network folder
- Unable to scan to email
- The sharing dialog box is different after setting up HP Direct Digital Filing (Windows)
Common problems
Scanned images are incorrectly cropped when scanning using Automatic paper size
Use the correct paper size if available, and only use Automatic when using small media/photos.
The printer is not set up correctly on the network
Make sure that the printer is set up properly and connected to the network:
- Try printing a document using the printer.
- Check the network settings for the printer and make sure it has a valid IP address.
-
PING the printer and make sure that it is responding. For more information, see the documentation for your operating system.
-
If you are connecting the printer using an Ethernet cable, make sure you are not connecting the printer using a phone cord or a crossover cable to connect the printer to the network and that the Ethernet cable is securely connected to the printer. For more information, see Solve wired (Ethernet) network problems.
- If you are connecting the printer using a wireless connection, make sure the wireless network is functioning properly. For more information, see Solve wireless problems.
The server name cannot be found or resolved
Connection to the server might fail if the server name provided during setup cannot be resolved to a specific IP address.
- Try to use the IP address of the server.
- When using DNS, be sure to do the following:
• Try to use full DNS names.
• Make sure the DNS server is set up correctly on the printer.

TIP: If you have recently changed the DNS settings, turn off and then turn on the printer.
For more information, contact your network administrator or the person who set up your network.
Unable to scan to network folder

NOTE: HP Direct Digital Filing does not support Active Directory.
The computer where the network folder is located is turned off
Make sure the computer where the network folder is stored is turned on and connected to the network.
The network folder has not been set up correctly
- Make sure the folder is created on the server. For more information, see the documentation available for your operating system.
- Make sure the folder has been shared and that users can both read and write to the folder. If you are using a Macintosh computer, make sure you have enabled SMB sharing. For more information, see the documentation available for your operating system.
- Make sure the folder name uses only the letters or characters supported by the operating system. For more information, see the documentation available with the operating system.
- Make sure the folder name is entered in the correct format in the HP software. For more information, see the information in the wizard or the setup assistant.
- Make sure the valid username and password have been entered. For more information, see the information in the wizard or the setup assistant.
The disk is full
Make sure the server containing the network folder has sufficient free disk space.
The printer cannot create a unique filename using the assigned prefix and suffix or the filename prefix has not been set up correctly
- The printer can create up to 9,999 files using the same prefix and suffix. If you have scanned many files to a folder, change the prefix.
- Make sure the filename prefix uses only the letters or characters supported by the operating system. For more information, see the documentation available with the operating system.
Unable to scan to email

NOTE: Scan to Email is only supported by HP Officejet Pro 8600 Plus and HP Officejet Pro 8600 Premium.
The email profile has not been set up correctly
Make sure the valid outgoing SMTP server settings have been specified in the HP software. For more information about the SMTP server settings, see the documentation provided by your email service provider.
Email messages are sent to some recipients but not to others when sending to multiple recipients
The email addresses might not be correct or might not be recognized by the email server. Make sure that the email addresses for all email recipients have been entered correctly in the HP software. Check your email Inbox for any delivery notification failure messages from the email server.
Sending large email messages
Some email servers have been configured to reject email messages larger than a predetermined size. To determine if your email server has a maximum file-size limit, see the documentation provided by your email service provider. If the email server does have such a limit, change the maximum email attachment size for the outgoing email profile to a value smaller than that of the email server.
The sharing dialog box is different after setting up HP Direct Digital Filing (Windows)
If you are using a computer running Windows XP, you can set up folders using Simple File Sharing (SFS). A folder set up using SFS is shared anonymously: it does not require a username or password, and all users can read and write to the folder. Also, the dialog box used to enable sharing is different from the standard, Windows sharing dialog box.
However, to ensure that data sent from the printer is secure, the Scan to Network Folder Wizard does not support SFS, and the computer displays the standard sharing dialog box instead of the SFS dialog box. For more information, see the documentation available for your operating system.
Solving HP Digital Fax problems

NOTE: Fax to Network Folder does not support Active Directory.
NOTE: Fax to Email is only supported by HP Officejet Pro 8600 Plus and HP Officejet Pro 8600 Premium.
The computer where the network folder is located is turned off
If you are using Fax to Network Folder, make sure the computer selected to receive faxes is switched on at all times and connected to the network.
The network folder has not been set up correctly
If you are using Fax to Network Folder, verify the following:
- Make sure the folder is created on the server. For more information, see the documentation available for your operating system.
- Make sure the folder has been shared and that users can both read and write to the folder. If you are using a Macintosh computer, make sure you have enabled SMB sharing. For more information, see the documentation available for your operating system.
- Make sure the folder name uses only the letters or characters supported by the operating system. For more information, see the documentation available with the operating system.
- Make sure the folder name is entered in the correct format in the HP software. For more information, see the information in the wizard or the setup assistant.
- Make sure the valid username and password have been entered. For more information, see the information in the wizard or the setup assistant.
Error conditions are interfering with HP Digital Fax
If the printer has been configured to print incoming faxes but is out of paper, load paper in the input tray or resolve the error condition. After the incoming faxes are printed, they are saved to the network folder or forwarded to the designated email address once printed.
The internal memory is full
If the internal memory in the printer is full, you cannot send or receive faxes. If the memory is full because too many unsaved faxes have been stored, follow the instructions on the printer's control panel.
CAUTION: Clearing the fax log and the internal memory deletes any unsaved faxes stored in the printer's memory.
Incorrect date and time on faxes
If you are in a country/region that is observing Daylight Savings Time, the time stamp for faxes might not always reflect the accurate time for your local time zone. In addition, the default filename of faxes archived (which includes a time stamp) might also be affected.
To see the correct times when faxes are received, print the fax log from the printer control panel.
To enable the correct time to be reported on faxes during Daylight Savings Time, use the EWS to manually change the time zone used by the printer to one that reflects the correct time:
- Open the EWS. For more information, see To open the embedded web server.
- Click the Settings tab, and then, under Preferences, click Time Zone.
- Select the time zone that corresponds to the correct time (typically a time zone that is one hour ahead of yours).

NOTE: When your country/region returns to Standard Time, change the time zone to reflect your time zone.
Solve memory device problems

TIP: You can visit the HP online support website at www.hp.com/go/customercare for information and utilities that can help you correct many common printer problems.

NOTE: If you are starting a memory device operation from a computer, see the software Help for troubleshooting information.
- The printer cannot read the memory device
• The printer cannot read photos on the memory device
The printer cannot read the memory device
- Check the memory device
• Make sure that the memory device is one of the supported types. For more information, see Memory device specifications.
- Some memory devices have a switch that controls how they can be used. Make sure that the switch is set so that the memory device can be read.
- Inspect the ends of the memory device for dirt or material that closes a hole or spoils a metal contact. Clean the contacts with a lint-free cloth and small amounts of isopropyl alcohol.
• Make sure that the memory device is working correctly by testing it with other devices.
- Check the memory device slot
• Make sure that the memory device is fully inserted into the correct slot. For more information, see Insert a memory device.
- Remove the memory card (when the light is not blinking) and shine a flashlight into the empty slot. See if any of the small pins inside are bent. When the printer is off, you can straighten slightly bent pins by using the tip of a thin, retracted ballpoint pen. If a pin has bent in such a way that it touches another pin, replace the memory card reader or have the printer serviced. For more information, see HP support. This website provides information and utilities that can help you correct many common printer problems.
• Make sure that only one memory device has been inserted at a time in the slots. An error message should appear on the control-panel display if more than one memory device is inserted.
The printer cannot read photos on the memory device
Check the memory device
The memory device might be corrupt.
Solve wired (Ethernet) network problems

TIP: You can visit the HP online support website at www.hp.com/go/customercare for information and utilities that can help you correct many common printer problems.
If you are unable to connect the printer to your wired (Ethernet) network, perform one or more of the following tasks.

NOTE: After correcting any of the following, run the installation program again.
- General network troubleshooting
General network troubleshooting
If you are unable to install the HP software provided with the printer, verify that:
- All cable connections to the computer and the printer are secure.
- The network is operational and the network hub, switch, or router is turned on.
- All applications, including virus protection programs, spyware protection programs, and firewalls, are closed or disabled for computers running Windows.
- The printer is installed on the same subnet as the computers that use the printer.
If the installation program cannot discover the printer, print the network configuration page, and enter the IP address manually in the installation program. For more information, see Understand the network configuration page.
Solve wireless problems
This section provides information about solving problems you might encounter when connecting the printer to your wireless network.
Follow these suggestions in order, starting with those listed in the "Basic wireless troubleshooting" section. If you still encounter problems, follow the suggestions provided in the "Advanced wireless troubleshooting" section.
This section contains the following topics:
• Basic wireless troubleshooting
• Advanced wireless troubleshooting
• After resolving the problems
• Wireless Direct Printing
- Update the printer

TIP: For more information about troubleshooting wireless problems, visit www.hp.com/go/wirelessprinting.
TIP: If you are using a computer running Windows, HP provides a tool called HP Home Network Diagnostic Utility that can help retrieve this information for some systems. To use this tool, visit the HP Wireless Printing Center (www.hp.com/go/wirelessprinting), and then click Network Diagnostic Utility in the Quick Links section. (At this time, this tool might not available in all languages.)

NOTE: After you resolve the problem, follow the instructions in After resolving the problems.
Basic wireless troubleshooting
Perform the following steps in the order presented.
Step 1 - Make sure the wireless (802.11) light is turned on
If the blue light near the printer's wireless button is not lit, the wireless capabilities might not have been turned on.
To turn on wireless, touch ▶ (right arrow), touch Setup, touch Network, touch Wireless Radio, and then select Yes.

NOTE: If your printer supports Ethernet networking, make sure that an Ethernet cable has not been connected to the printer. Connecting an Ethernet cable turns off the printer's wireless capabilities.
Step 2 - Restart components of the wireless network
Turn off the router and the printer, and then turn them back on in this order: router first and then the printer. If you still are unable to connect, turn off the router, printer, and your computer. Sometimes, turning off the power and then turning it back on recovers from a network communication issue.
Step 3 - Run the Print Wireless Network Test
For wireless networking issues, run the Print Wireless Network Test.
To print a Print Wireless Network Test page, touch ▶ (right arrow), touch Setup, touch Network, and then select Print Wireless Network Test or Wireless Network Test. If a problem is detected, the printed test report includes recommendations that might help solve the problem.

TIP: If the Print Wireless Network Test indicates the signal is weak, try moving the printer closer to the wireless router.
Advanced wireless troubleshooting
If you have tried the suggestions provided in Basic wireless troubleshooting and are still unable to connect to your printer to the wireless network, try the following suggestions in the order presented:
• Step 1: Make sure your computer is connected to your network
• Step 2: Make sure that the printer is connected to your network
- Step 3: Check to see if the firewall software is blocking communication
• Step 4: Make sure the printer is online and ready
- Step 5: Make sure the wireless version of the printer is set as the default printer driver (Windows only)
- Step 6: Make sure your computer is not connected to your network over a Virtual Private Network (VPN)
Step 1: Make sure your computer is connected to your network
Make sure your computer is connected to your network - either your wired (Ethernet) network or your wireless network. If the computer is not connected to the network, you cannot use the printer over the network.
To check a wired (Ethernet) connection
Many computers have indicator lights beside the port where the Ethernet cable from the router connects to your computer. Usually there are two indicator lights, one that is on and another that blinks. If your computer has indicator lights, check to see if the indicator lights are on. If the lights are not on, try reconnecting the Ethernet cable to the computer and the router. If you still do not see lights, there might be a problem with the router, the Ethernet cable, or your computer.

NOTE: Macintosh computers do not have indicator lights. To check the Ethernet connection on a Macintosh computer, click System Preferences in the Dock, and then click Network. If the Ethernet connection is working correctly, Built-in Ethernet appears in the list of connections, along with the IP address and other status information. If Built-in Ethernet does not appear in the list, there might be a problem with the router, the Ethernet cable, or your computer. For more information, click the Help button in the window.
To check a wireless connection
- Make sure that your computer's wireless has been turned on. (For more information, see the documentation that came with your computer.)
- If you are not using a unique wireless network name (SSID), then it is possible that your wireless computer could be connected to a nearby network that is not yours.
The following steps can help you determine if your computer is connected to your network:
Windows
a. Click Start, click Control Panel, point to Network Connections, and then click View Network Status and Tasks.
- Or -
Click Start, select Settings, click Control Panel, double-click Network Connections, click the View menu, and then select Details.
Leave the network dialog box open while you continue to the next step.
b. Disconnect the power cord from the wireless router. The connection status of your computer should change to Not Connected.
c. Reconnect the power cord to the wireless router. The connection status should change to Connected.
Mac OS X
▲ Click the AirPort icon in the menu bar at the top of the screen. From the menu that appears, you can determine if the AirPort is turned on and which wireless network your computer is connected to.

NOTE: For more detailed information about your AirPort connection, click System Preferences in the Dock, and then click Network. If the wireless connection is working correctly, a green dot appears next to AirPort in the list of connections. For more information, click the Help button in the window.
If you are unable to get your computer connected to your network, contact the person who set up your network or the router manufacturer as there might be a hardware issue with either your router or computer.

TIP: If you are able to access the Internet and are using a computer running Windows, you can also use the HP Network Assistant for help in setting up a network. To use this tool, visit www.hp.com/sbso/wireless/tools-setup.html?jumpid=reg_R1002_USEN. (This Web site is only available in English.)
Step 2: Make sure that the printer is connected to your network
If your printer is not connected to the same network as your computer, you cannot use the printer over the network. Follow the steps described in this section to find out if your printer is actively connected to the correct network.

NOTE: If your wireless router or Apple AirPort Base Station is using a hidden SSID, your printer cannot automatically detect the network.
A: Make sure the printer is on the network
- If the printer supports Ethernet networking and is connected to an Ethernet network, make sure an Ethernet cable is not plugged into the back of the printer. If an Ethernet cable is plugged into the back, then wireless connectivity is disabled.
- If the printer is connected to a wireless network, print the network configuration page. For more information, see Understand the network configuration page.
- After the page has been printed, check the Network Status and URL:
| Network Status | If the Network Status is Ready, the printer is actively connected to a network.If the Network Status is Offline, the printer is not connected to a network. Run the Print Wireless Network Test (using the instructions at the beginning of this section) and follow any recommendations. |
| URL The URL shown here is the network addressassigned to the printer by your router. You need this to connect to the embedded web server (EWS). | |
For information about connecting the printer to a wireless network, see Set up the printer for wireless communication.
B: Check to see if you can access the EWS
After you establish that the computer and the printer both have active connections to a network, you can verify if they are on the same network by opening the printer's EWS. For more information, see Embedded web server.
To access the EWS
- On your computer, open the EWS. For more information, see Embedded web server.

NOTE: If you are using a proxy server in your browser, you might need to disable it to access the EWS.
- If you can open the EWS, try using the printer over the network (such as to print) to see if your network setup was successful.
If you cannot open the EWS or are still having problems using the printer over the network, continue to the next section regarding firewalls.
Step 3: Check to see if the firewall software is blocking communication
If you cannot access the EWS and are sure both the computer and printer have active connections to the same network, the firewall security software might be blocking communication. Temporarily turn off any firewall security software running on your computer and then try to open the EWS again. If you can open the EWS, try using the printer (for printing).
If you are able to open the EWS and use your printer with the firewall turned off, you need to reconfigure your firewall settings to allow the computer and printer to communicate with each other over the network. For more information, see Configure your firewall software to work with the printer.
If you are able to open the EWS, but are still unable to use the printer even with the firewall turned off, try enabling the firewall software to recognize the printer. For more information, see the documentation provided with your firewall software.
Step 4: Make sure the printer is online and ready
If you have the HP software installed, you can check the printer's status from your computer to see if the printer is paused or offline, preventing you from using it.
To check the printer's status, follow the instructions for your operating system:
Windows
- Click Start, point to Settings, and then click Printers or Printers and Faxes.
- Or -
Click Start, click Control Panel, and then double-click Printers.
-
If the printers on your computer are not being displayed in Details view, click the View menu, and then click Details.
-
Do one of the following, depending on the printer status:
a. If the printer is Offline, right-click the printer, and click Use Printer Online.
b. If the printer is Paused, right-click the printer, and click Resume Printing.
- Try using the printer over the network.
Mac OS X
- Click System Preferences in the Dock, and then click Print & Fax.
- Select the printer, and then click Open Print Queue.
- If the print job is on hold, click Resume.
- If the printer is paused, click Resume Printer.
If you can use the printer after performing the steps above but find that the symptoms persist as you continue to use the printer, your firewall might be interfering. For more information, see Configure your firewall software to work with the printer.
If you still cannot use the printer over the network, continue to the next section for additional troubleshooting help.
Step 5: Make sure the wireless version of the printer is set as the default printer driver (Windows only)
If you install the HP software again, the installer might create a second version of the printer driver in your Printers or Printers and Faxes folder. If you have difficulties printing or connecting to the printer, make sure the correct version of the printer driver is set as the default.
- Click Start, point to Settings, and then click Printers or Printers and Faxes.
- Or -
Click Start, click Control Panel, and then double-click Printers.
- Determine if the version of the printer driver in the Printers or Printers and Faxes folder is connected wirelessly:
a. Right-click the printer icon, and then click Properties, Document Defaults, or Printing Preferences.
b. On the Ports tab, look for a port in the list with a checkmark. The version of the printer driver that is connected wirelessly has HP network re-discovery port monitor as the Port description, next to the checkmark.
- Right-click the printer icon for the version of the printer driver that is connected wirelessly, and select Set as Default Printer.

NOTE: If there is more than one icon in the folder for the printer, right-click the printer icon for the version of the printer driver that is connected wirelessly, and select Set as Default Printer.
Step 6: Make sure your computer is not connected to your network over a Virtual Private Network (VPN)
A Virtual Private Network (VPN) is a computer network that uses the Internet to provide a remote, secure connection to an organization's network. However, most VPN services do not allow you to access local devices (like your printer) on your local network while your computer is connected to the VPN.
To connect to the printer, disconnect from the VPN.

TIP: To use the printer while connected to the VPN, you can connect the printer to your computer with a USB cable. The printer uses its USB and network connections at the same time.
For more information, contact your network administrator or the person who set up the wireless network.
After resolving the problems
After you resolve any problems and have successfully connected the printer to your wireless network, complete the following steps for your operating system:
Windows
- On the computer desktop, click Start, select Programs or All Programs, click HP, select your printer name, and then click Printer Setup & Software.
- Click Connect a new printer, and then select the type of connection you want to use.
Mac OS X
- Open HP Utility. For more information, see HP Utility (Mac OS X).
- Click the Applications icon on the HP Utility toolbar, double-click HP Setup Assistant, and then follow the onscreen instructions.
Wireless Direct Printing
You can print directly to the printer wirelessly, without a wireless router, from your wireless-enabled computers and mobile devices with Wireless Direct Printing.

NOTE: The Wireless Direct Printing connection is available even if the printer is also connected to a wireless network. Also, all functionality available on your wireless network, such as printing, scanning, and printer maintenance, is also available when a computer (with the HP printer software installed) is connected to the printer with a Wireless Direct Printing connection. However, some functionality might not be supported if the printer has a simultaneous wireless connection to your wireless network and Wireless Direct Printing.
To turn on Wireless Direct Printing
To turn on Wireless Direct Printing, complete the following steps:
-
Touch ▶ (right arrow), touch Setup, touch Network, touch Wireless Direct Printing, and then touch On.
-
To view the Wireless Direct Printing name, touch Wireless Direct Name. This name appears in the HP software on your computer or in your mobile device's print application.

NOTE: To prevent unauthorized people from connecting to the printer, turn on security. Touch Security, and then touch On. To view the security passcode, touch Passcode.

NOTE: If you do not see these options, updating the printer might provide this feature. For more information, see Update the printer.

TIP: You can customize the Wireless Direct Printing name and security passcode from the embedded web server (EWS). For information about using the embedded web server, see Embedded web server.
To print using Wireless Direct Printing
To print using Wireless Direct Printing from a computer, be sure you've installed the HP printer software. To print using Wireless Direct Printing from a mobile device, make sure you have a print application installed on the mobile device. For more information, see the documentation provided with the print application.
- From your wireless computer or mobile device, search for and connect to the printer's Wireless Direct Printing name.
- If you have security enabled, enter the passcode.
Update the printer
HP is always working to improve the performance of its printers and bring you the latest features. If the printer is connected to a network and Web Services has been enabled, you can check for and install printer updates.
To update the printer, complete the following steps:
- On the printer control panel, touch 📋 (ePrint), touch Settings, and then touch Product Updates.
- Touch Check for Product Update, and then follow the instructions on the display.

TIP: To enable the printer to automatically check for updates, touch Settings, touch Product Updates, touch Auto Update, and then touch Automatically.
Configure your firewall software to work with the printer
A personal firewall, which is security software running on your computer, can block network communication between your printer and your computer.
If you are having problems such as:
- Printer not found when installing HP software
- Unable to print, print job stuck in queue or printer goes offline
- Scan communication errors or scanner busy messages
- Unable to see printer status on your computer
The firewall might be preventing your printer from notifying computers on your network where it can be found.
If you are using the HP software on a computer running Windows and cannot find the printer during installation (and you know the printer is on the network)—or if you have already successfully installed HP software and experience problems—check the following:
- If you have just installed the HP software, try turning off your computer and the printer, and then turning them both on again.
- Keep your security software up to date. Many security software vendors provide updates that correct known issues and provide the latest defenses against new security threats.
-
If your firewall has "High", "Medium", or "Low" security settings, use the "Medium" setting when your computer is connected to your network.
-
If you have changed any firewall settings from default, try going back to the default setting.
- If your firewall has a setting called "trusted zone", use this setting when your computer is connected to your network.
- If your firewall has a setting to "not show alert messages", you should disable this. When installing the HP software and using the HP printer you may see alert messages from your firewall software that provide options to "allow", "permit" or "unblock". You should allow any HP software that causes an alert. Also, if the alert has a "remember this action" or "create a rule for this" selection, select it. This is how the firewall learns what can be trusted on your network.
- Do not have more than one firewall enabled at the same time on your computer. An example would be having both the Windows firewall provided by the operating system and a 3rd party firewall enabled at the same time. Having more than one firewall enabled at the same time will not make your computer any safer and may cause problems.
For more information about using your printer with personal firewall software, visit www.hp.com/go/wirelessprinting, and then click Firewall Help in the Need Help Troubleshooting? section.

NOTE: At this time, some portions of this site are not available in all languages.
Solve printer management problems

TIP: You can visit the HP online support website at www.hp.com/go/customercare for information and utilities that can help you correct many common printer problems.
This section provides solutions to common problems that involve managing the printer. This section contains the following topic:
• Embedded web server cannot be opened

NOTE: To use the embedded EWS, the printer must be connected to a network using either an Ethernet or a wireless connection. You cannot use the embedded web server if the printer is connected to a computer with a USB cable.
Embedded web server cannot be opened
Check your network setup
- Make sure you are not using a phone cord or a crossover cable to connect the printer to the network.
- Make sure the network cable is securely connected to the printer.
• Make sure the network hub, switch, or router is turned on and working correctly.
Check the computer
Make sure the computer that you are using is connected to the network.

NOTE: To use the EWS, the printer must be connected to a network using either an Ethernet or a wireless connection. You cannot use the embedded web server if the printer is connected to a computer with a USB cable.
Check your web browser
- Make sure the web browser meets the minimum system requirements. For more information, see Embedded web server specifications.
- If your web browser uses any proxy settings to connect to the Internet, try turning off these settings. For more information, see the documentation available with your web browser.
- Make sure JavaScript and cookies are enabled in your web browser. For more information, see the documentation available with your web browser.
Check the printer IP address
- To check the IP address of the printer, obtain the IP address by printing a network configuration page. Touch ▶ (right arrow), select Setup, select Network, and then select Print Network Settings.
- Ping the printer using the IP address from the command prompt (Windows) or from Network Utility (Mac OS X). (Network Utility is located in the Utilities folder in the Applications folder at the top level of the hard disk.).
For example, if the IP address is 123.123.123.123, type the following at the command prompt (Windows):
C:\Ping 123.123.123.123
- Or -
In Network Utility (Mac OS X), click the Ping tab, type the 123.123.123.123 in the box, and then click Ping.
If a reply appears, the IP address is correct. If a time-out response appears, the IP address is incorrect.
Troubleshoot installation issues

TIP: You can visit the HP online support website at www.hp.com/go/customercare for information and utilities that can help you correct many common printer problems.
- Hardware installation suggestions
• HP software installation suggestions - Solve network problems
Hardware installation suggestions
Check the printer
- Make sure that all packing tape and material have been removed from outside and inside the printer.
- Make sure that the printer is loaded with paper.
- Make sure that no lights are on or blinking except the Ready light, which should be on. If the Attention light is blinking, check for messages on the printer control panel.
Check the hardware connections
- Make sure that any cords and cables that you are using are in good working order.
- Make sure that the power cord is connected securely to both the printer and to a working power outlet.
Check the printhead and ink cartridges
- Make sure that all of the printhead and ink cartridges are firmly installed in their correct, color-coded slot. The printer cannot work if they are not all installed.
- Make sure that the printhead latch is closed correctly.
HP software installation suggestions
Check the computer system
- Make sure that your computer is running one of the supported operating systems. For more information, see System requirements.
- Make sure that the computer meets at least the minimum system requirements. For more information, see System requirements
- In the Windows Device Manager, make sure that the USB drivers have not been disabled.
- If you are using a computer running Windows, and the computer cannot detect the printer, run the uninstallation utility (util\ccc\uninstall.bat on the installation CD) to perform a complete uninstallation of the printer driver. Restart your computer, and reinstall the printer driver.
Verify installation preliminaries
- Make sure to use the installation CD that contains the correct HP software for your operating system.
- Before installing HP software, make sure that all other programs are closed.
- If the computer does not recognize the path to the CD-ROM drive that you type, make sure that you are specifying the correct drive letter.
- If the computer cannot recognize the installation CD in the CD-ROM drive, inspect the installation CD for damage. You can download the printer driver from the HP website (www.hp.com/go/customercare).

NOTE: After correcting any problems, run the installation program again.
Solve network problems
General network troubleshooting
- If you are unable to install the HP software, verify that:
- All cable connections to the computer and the printer are secure.
- The network is operational and the network hub, switch, or router is turned on.
All applications, including virus protection programs, spyware protection programs, and firewalls, are closed or disabled for computers running Windows.
• Make sure the printer is installed on the same subnet as the computers that use the printer.
• If the installation program cannot discover the printer, print the network configuration page and enter the IP address manually in the installation program. For more information, see Understand the network configuration page.
- If you are using a computer running Windows, make sure that the network ports created in the printer driver match the printer IP address:
- Print the printer's network configuration page.
- Click Start, then click Printers or Printers and Faxes.
- Or -
Click Start, click Control Panel, and then double-click Printers.
- Right-click the printer icon, click Properties, and then click the Ports tab.
Select the TCP/IP port for the printer, and then click Configure Port.
• Compare the IP address listed in the dialog box and make sure it matches the IP address listed on the network configuration page. If the IP addresses are different, change the IP address in the dialog box to match the address on the network configuration page. - Click OK twice to save the settings and close the dialog boxes.
Problems connecting to a wired network
- If the Link light on the network connector does not turn on, make sure that all of the "General network troubleshooting" conditions are met.
- Though it is not recommended that you assign the printer with a static IP address, you might resolve some installation problems (such as a conflict with a personal firewall) by doing so.
To reset the printer's network settings
- Touch ▶ (right arrow), touch Network, touch Restore Network Defaults, and then select Yes. A message appears stating that the network defaults have been restored.
- Touch ▶ (right arrow), touch Setup, select Reports, and then select Print Network Configuration Page to print the network configuration page and verify that the network settings have been reset.
Understand the Printer Status Report
Use the printer status report to view current printer information and ink cartridge status. Also use the printer status report to help you troubleshoot problems with the printer.
The printer status report also contains a log of recent events.
If you need to call HP, it is often useful to print the printer status report before calling.
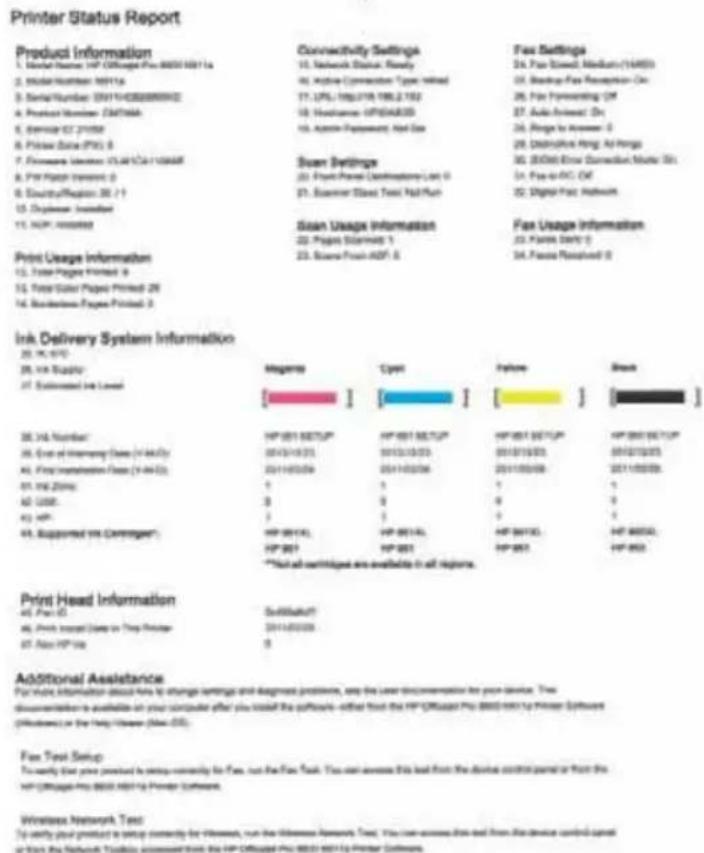
text_image
Printer Status Report Product Information 1. Serial Number: HP Offography Pro 8003-961 (a) 2. Serial Number: 961(a) 3. Serial Number: 0011400000000000000 4. Product Number: CM700A 5. Service ID: 211058 6. Private Data (PTU) 8 7. Software Provider: 75.461/CA-1106648 8. For Page Printers: 0 9. Display/Region: 38.71 10. Displayer: Insulated 11. NAV: Insulated Connectivity Settings 11. Network Status: Ready 12. Active Connection Type: Inhaled 17. IPL: 10g/118 186.2 152 18. Hardware: OFF/ASR3D 19. Adapter/Password: Not Use Sloan Settings 20. Front Paper Connection Type: 0 21. Sustiner Board Type: Not Push Sloan Usage Information 22. Pages Stairments: 1 23. Siena Front ADFI: 5 Fax Settings 24. Fax Street: Medium(16485) 25. Sendage Fax Reception: On 26. Fax Functioning: On 27. Auto Interface: On 28. Page to Answer: 0 29. Distribution Ping: Air Pongs 30. (SDD) Error Connection Marker Str 31. Fee to PC: On 32. Digital Pack: Network Fax Usage Information 33. Packet Debt: 34. Fiosse Received: Print Usage Information 35. Total Page Printers: 6 36. Total Color Page Printed: 29 37. Subscription Page Printed: 3 Ink Delivery System Information 20. PC-97C 25. VR Supply: 27. Subordinated VR Level Images Cypt Follow Share [ ] [ ] [ ] [ ] 38. VR Number: 39. Cost of Interlocking (Case: V-4445) 40. First Installation (Case: V-4445) 41. VR 250Hz: 42. USB: 43. HP: 44. Supported VR Condition: HP-801/AL HP-801/AL HP-801/AL HP-801/AL HP-801/AL HP-801/AL HP-801/AL HP-801/AL HP-801/AL HP-801/AL HP-801/AL HP-801/AL HP-801/AL HP-855/AL HP-855/AL HP-855/AL HP-855/AL HP-855/AL HP-855/AL HP-855/AL HP-855/AL HP-855/AL HP-855/AL HP-855/AL HP-855/AL HP-855/AL [ ] [ ] [ ] [ ] Print Head Information 40. Fax ID: 41. Print Input (Case on Type Provider) 47. Also HP User: 48. Subordinated HP User: 49. Add to all threads are available in all tiers. Subordinated Help Setup: To verify your product to setup currently for Web, not the Web Stack. You can access this load from the device control panel or from the WebOffography Pro 8003-961 by Printer Software. Additional Assistance For Head Information about Area to change settings and diagnosis problems, see the last discrimination for your device. This documentation is available at your particular after you install the software - offset from the HP Offography Pro 8003-961 by Printer Software (Software) or the Web User (Add: 26). Fax Test Setup: To verify your product to setup currently for Web, not the Web Stack. You can access this load from the device control panel or from the WebOffography Pro 8003-961 by Printer Software. Wireless Network Test: To identify your product to setup currently for Web, not the Wireless Remote Test, you can access this load from the device control panel or from the WebOffography Pro 8003-961 by Printer Software.-
Printer Information: Shows printer information (such as the printer name, model number, serial number, and firmware version number), the accessories that are installed (such as the duplexer), and the number of pages printed from the trays and accessories.
-
Ink Delivery System Information: Shows the estimated ink levels (represented in graphical form as gauges) and the part numbers and warranty expiration dates for the ink cartridges.

NOTE: Ink level warnings and indicators provide estimates for planning purposes only. When you receive a low-ink warning message, consider having a replacement cartridge available to avoid possible printing delays. You do not need to replace cartridges until prompted to do so.
- Additional Assistance: Provides information about where you can go to get more information about the printer, as well as information about how to set up a Fax Text and how to run a Print Wireless Network Test.
To print the Printer Status Report
From the Home screen, touch ▶ (right arrow), and then select Setup. Touch Reports, and then select Printer Status Report.
Printhead maintenance
If you are experiencing problems with printing, you might have a problem with the printhead. You should perform the procedures in the following sections only when directed to do so for resolving print quality issues.
Performing the aligning and cleaning procedures unnecessarily can waste ink and shorten the life of the cartridges.
This section contains the following topics:
- Clean the printhead
- Align the printhead
• Reinstall the printhead
Clean the printhead
If your printed output is streaked or has any incorrect or missing colors, the printhead might need to be cleaned.
There are two stages of cleaning. Each stage lasts about two minutes, uses one sheet of paper, and uses an increasing amount of ink. After each stage, review the quality of the printed page. You should only initiate the next phase of cleaning if the print quality is poor.
If print quality still seems poor after you complete both stages of cleaning, try aligning the printer. If print quality problems persist after cleaning and aligning, contact HP support. For more information, see HP support.

NOTE: Cleaning uses ink, so clean the printhead only when necessary. The cleaning process takes a few minutes. Some noise might be generated in the process. Before cleaning the printhead, make sure you load paper. For more information, see Load media.
Not turning the printer off correctly can cause print quality problems. For more information, see Turn the printer off.
To clean the printhead from the control panel
- Load Letter, A4, or Legal unused plain white paper into the main input tray.
- Touch ▶ (right arrow), and then select Setup.
- Touch Tools, and then select Clean Printhead.
To clean the printhead from Toolbox (Windows)
- Open Toolbox. For more information, see Open the Toolbox.
- Click Printer Preferences, click Maintenance Tasks, and then click Clean Printheads.
- Follow the onscreen instructions.
To clean the printhead from HP Utility (Mac OS X)
- Open HP Utility. For more information, see HP Utility (Mac OS X).
- In the Information And Support section, click Clean Printheads.
- Click Clean, and then follow the onscreen instructions.
To clean the printhead from the embedded web server (EWS)
- Open the EWS. For more information, see To open the embedded web server.
- Click the Tools tab, and then click Print Quality Toolbox in the Utilities section.
- Click Clean Printhead and follow the onscreen instructions.
Align the printhead
The printer automatically aligns the printhead during the initial setup.
You might want to use this feature when the printer status page shows streaking or white lines through any of the blocks of color or if you are having print quality issues with your printouts.
To align the printhead from the control panel
- Load Letter, A4, or Legal unused plain white paper into the main input tray.
- On the printer control panel, touch ▶ (right arrow), and then touch Setup.
- Touch Tools, and then select Align Printer.
To align the printhead from Toolbox (Windows)
- Open Toolbox. For more information, see Open the Toolbox.
- Click Printer Preferences, click Maintenance Tasks, and then click Align Printhead.
- Follow the onscreen instructions.
To align the printhead from HP Utility (Mac OS X)
- Open HP Utility. For more information, see HP Utility (Mac OS X).
- In the Information And Support section, click Align Printhead.
- Click Align, and then follow the onscreen instructions.
To align the printhead from the embedded web server (EWS)
- Open the EWS. For more information, see To open the embedded web server.
- Click the Tools tab, and then click Print Quality Toolbox in the Utilities section.
- Click Align Printhead and follow the onscreen instructions.
Reinstall the printhead

NOTE: This procedure should only be performed when a Missing or Failed Printhead message has been seen and the printer has first been turned off and then back on to try to resolve the message. If the message persists, try this procedure.
To reinstall the printhead
-
Make sure that the printer is turned on.
-
Open the ink cartridge access door.
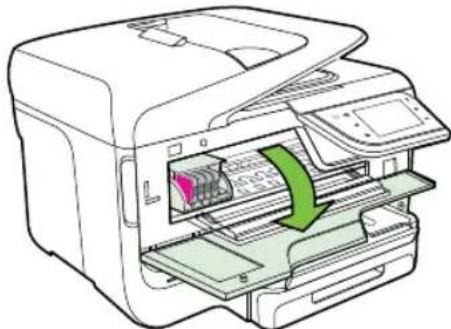
natural_image
Diagram of an HP printer internal structure showing paper feed, paper tray, and paper slot (no text or labels)- Lift the latch handle on the print carriage.
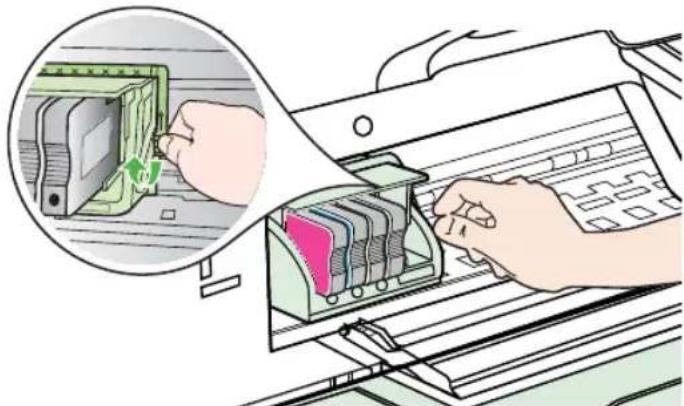
natural_image
Illustration of hands inserting a computer into a rack, with a magnified inset showing the device's internal structure (no text or symbols present)- Remove the printhead by lifting it up and then pulling it out of the printer.
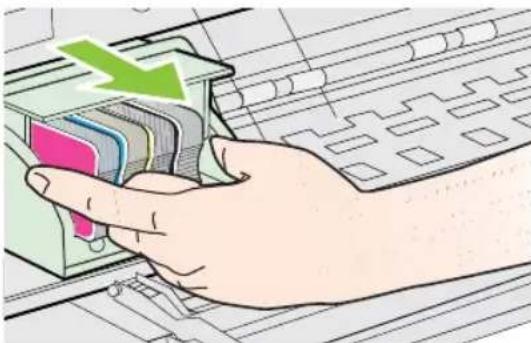
natural_image
Illustration of a hand inserting a card into a device with a green downward arrow (no text or symbols)- Make sure the latch handle is raised, and then reinsert the printhead.
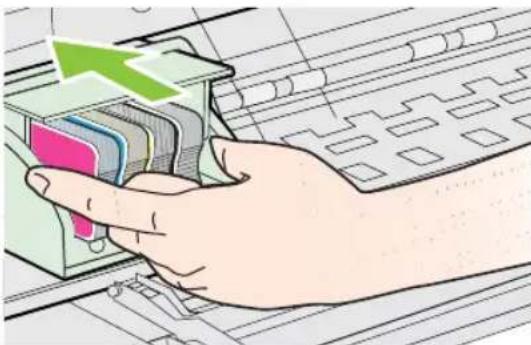
natural_image
Hand inserting a card into a file folder with a green arrow indicating the direction (no text or symbols present)- Carefully lower the latch handle.

NOTE: Make sure you lower the latch handle before reinserting the ink cartridges. Leaving the latch handle raised can result in incorrectly seated ink cartridges and problems printing. The latch must remain down in order to correctly install the ink cartridges.
- Close the ink cartridge access door.
Understand the network configuration page
If the printer is connected to a network, you can print a network configuration page to view the network settings for the printer. You can use the network configuration page to help troubleshoot network connectivity problems. If you need to call HP, it is often useful to print this page before calling.
| HP Network Configuration Page | |
| General Information Network Status Active Connection Type URL(s) for Embedded Web Server Firmware Revision Hostname Serial Number | Offline None http://0.0.0.0 CLL3CA1045AR HP2E232F CNOAP1N07205KD |
| 802.3 Wired Hardware Address (MAC) Link Configuration | 68:65:99:2e:23:2f None |
| 802.11 Wireless Hardware Address (MAC) Status Communication Mode Network Name (SSID) | 68:65:99:2c:1a:25 Disabled Adhoc hpsetup |
| Port9100 Status | Enabled |
| LPD Status | Enabled |
| Bonjour Status Service Name | Enabled Officeje! Pro 8600 [2E232F] |
| SLP Status | Enabled |
| Microsoft Web Services WS Discovery Status WS Print Status | Enabled Enabled |
| SNMP Status SNMP Version Set Community Name Get Community Name | Read-write enabled v1 Not Specified Not Specified |
| IPP Status | Enabled |
| Connected PC(s) Hostname/IP Address | Time since last access (mm:ss) |
- General Information: Shows information about the current status and active connection type of the network, and other information, such as the URL of the embedded web server.
- 802.3 Wired: Shows information about the active wired network connection, such as the IP address, subnet mask, default gateway, as well as the hardware address of the printer.
- 802.11 Wireless (some models): Shows information about your wireless network connection, such as the hostname, IP address, subnet mask, default gateway, and server.
- Miscellaneous: Shows information about more advanced network settings.
- Port 9100: The printer supports raw IP printing through TCP Port 9100. This HP-proprietary TCP/IP port on the printer is the default port for printing. It is accessed by HP software (for example, the HP Standard Port).
- LPD: Line Printer Daemon (LPD) refers to the protocol and programs associated with line-printer spooling services that may be installed on various TCP/IP systems.

NOTE: The LPD functionality can be used with any host implementation of LPD that complies with the RFC 1179 document. The process for configuring printer spoolers, however, might differ. See your system documentation for information about configuring these systems.
- Bonjour: Bonjour services (which use mDNS, or Multicast Domain Name System) are typically used on small networks for IP address and name resolution (through UDP port 5353), where a conventional DNS server is not used.
- SLP: Service Location Protocol (SLP) is an Internet standard network protocol that provides a framework to allow networking applications to discover the existence, location, and configuration of networked services in enterprise networks. This protocol simplifies discovery and use of network resources such as printers, web servers, fax machines, video cameras, files systems, backup devices (tape drives), databases, directories, mail servers, calendars.
- Microsoft web Services: Enable or disable the Microsoft web Services Dynamic Discovery (WS Discovery) protocols or Microsoft web Services for Devices (WSD) Print services supported on the printer. Disable unused print services to prevent access through those services.

NOTE: For more information about WS Discovery and WSD Print, visit www.microsoft.com.
- SNMP: SNMP (Simple Network Management Protocol) is used by network management applications for device management. The printer supports SNMPv1 protocol on IP networks.
-
WINS: If you have a Dynamic Host Configuration Protocol (DHCP) server on your network, the printer automatically obtains its IP address from that server and registers its name with any RFC 1001 and 1002-compliant dynamic name services as long as a WINS server IP address has been specified.
-
Connected PC(s): Lists the computers connected to this printer, as well as the last time these computers accessed the printer.
To print the network configuration page from the printer control panel
From the Home screen, touch ▶ (right arrow), and then select Setup. Touch Reports, and then select Network Configuration Page.
Clear jams
Occasionally, media becomes jammed during a job. Try the following remedies before you attempt to clear the jam.
- Make sure that you are printing with media that meets specifications. For more information, see Media specifications.
- Make sure that you are printing with media that is not wrinkled, folded, or damaged.
- Make sure that the printer is clean. For more information, see Maintain the printer.
- Make sure that the trays are loaded correctly and are not too full. For more information, see Load media.
This section contains the following topics:
- Clear paper jams
- Avoid paper jams
Clear paper jams
If the paper was loaded in the input tray, you might need to clear the paper jam from the duplexer.
Paper can also jam in the automatic document feeder. Several common actions can cause paper to jam the automatic document feeder:
- Placing too much paper in the document feeder tray. For information on the maximum number of sheets allowed in the automatic document feeder, see Media specifications.
- Using paper that is too thick or too thin for the printer.
- Trying to add paper to the document feeder tray while the printer is feeding pages.
To clear a jam
Use these steps to clear a paper jam.
- Remove all media from the output tray.
CAUTION: Trying to clear a paper jam from the front of the printer can damage the print mechanism. Always access and clear paper jams through the duplexer.
- Check the duplexer.
a. Push the button on either side of the duplexer, and then remove the unit.
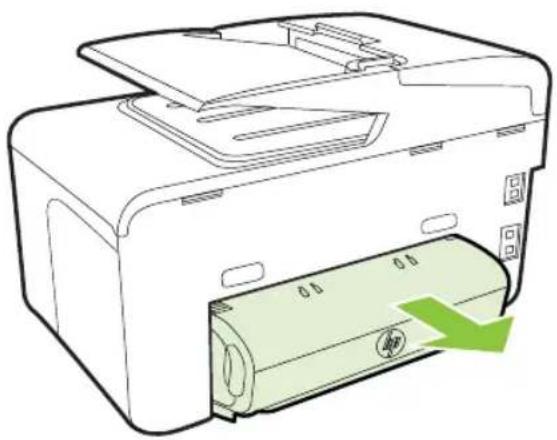
natural_image
Line drawing of a printer with a green paper roll being inserted, showing internal components and no text or symbols.b. Locate any jammed media inside the printer, grasp it with both hands and then pull it towards you.
c. If the jam is not there, push the latch on the top of the duplexer and lower its cover. If the jam is inside, carefully remove it. Close the cover.
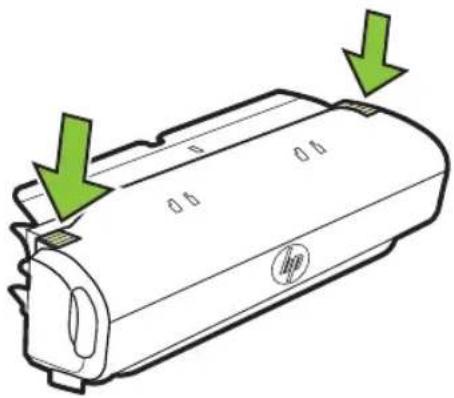
natural_image
Diagram of a cylindrical device with green arrows pointing downward, no text or symbols present
natural_image
Diagram of a mechanical roller or roller assembly with a green arrow indicating compression direction (no text or symbols present)d. Reinsert the duplexer into the printer.
-
Open the top cover and remove any debris.
-
If you have not found the jam and have Tray 2 installed, pull out the tray and remove the jammed media, if possible. If not, do the following:
a. Ensure the printer is turned off and disconnect the power cord.
b. Lift the printer off Tray 2.
c. Remove the jammed media from the bottom of the printer or from Tray 2.
d. Reposition the printer on top of Tray 2.
- Open the ink cartridge access door. If there is paper remaining inside the printer, ensure the carriage has moved to the right of the printer, free any paper scraps or wrinkled media, and pull the media towards you through the top of the printer.
⚠ WARNING! Do not reach into the printer when it is on and the carriage is stuck. When you open the ink cartridge access door, the carriage should return to its position on the right side of the printer. If it does not move to the right, turn off the printer before you remove any jam.
- After clearing the jam, close all covers, turn on the printer (if you turned it off) and resend the print job.
To clear a paper jam in the automatic document feeder
- Lift the cover of the automatic document feeder.
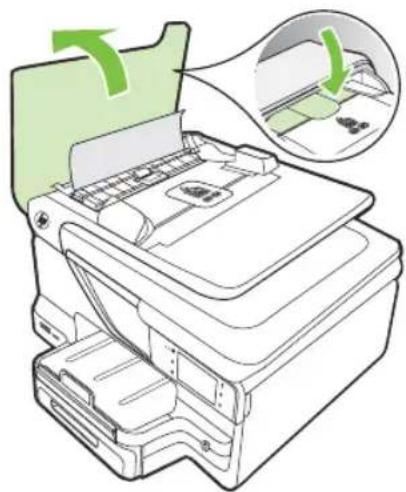
natural_image
Diagram of a printer with green paper feeding into a stack, showing internal components and a magnified inset (no text or symbols)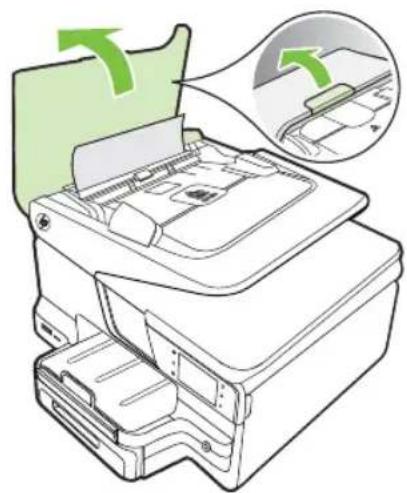
natural_image
Diagram of a printer with green arrows indicating process, showing internal structure and assembly (no text or symbols)- Lift the tab located on the front edge of the automatic document feeder.
- OR -
Push the green tab located in the center of the automatic document feeder.
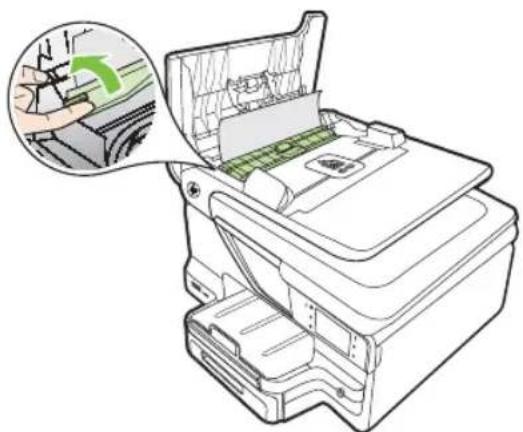
natural_image
Illustration of a printer with green paper inside, showing internal structure and a magnified view of the printer's handle (no text or symbols present)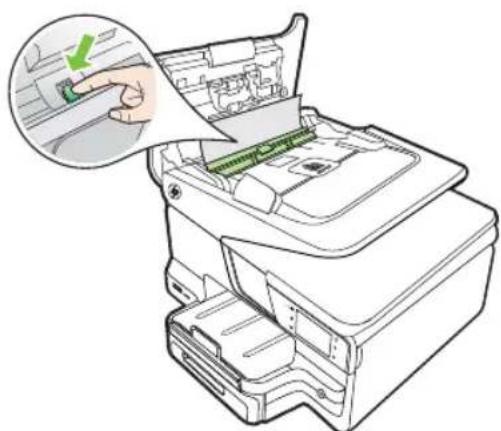
natural_image
Illustration of a printer's internal structure with a hand inserting a green button (no text or symbols)- Gently pull the paper out of the rollers.
CAUTION: If the paper tears when you are removing it from the rollers, check the rollers and wheels for torn pieces of paper that might remain inside the printer. If you do not remove all the pieces of paper from the printer, more paper jams are likely to occur.
- If you have pushed the green tab in step 2, pull it back in place.
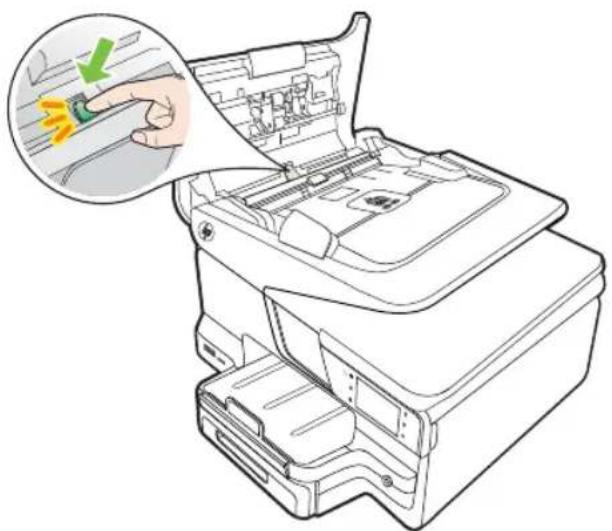
natural_image
Line drawing of a printer's internal structure with a hand inserting a button (no text or symbols)- Close the cover of the automatic document feeder.
Avoid paper jams
To help avoid paper jams, follow these guidelines.
- Remove printed papers from the output tray frequently.
- Prevent curled or wrinkled paper by storing all unused paper flat in a resealable bag.
- Ensure that paper loaded in the input tray lays flat and the edges are not bent or torn.
- Do not combine different paper types and paper sizes in the input tray; the entire stack of paper in the input tray must be the same size and type.
- Adjust the paper-width guide in the input tray to fit snugly against all paper. Make sure the paper-width guide does not bend the paper in the input tray.
- Do not force paper too far forward in the input tray.
- Use paper types that are recommended for the printer. For more information, see Media specifications.
- If the printer is about to run out of paper, allow the printer to run out of paper first and then add paper. Do not try to add paper while the printer is trying to pickup a sheet.
- If you are printing on both sides of a page, do not print highly saturated images on light weight paper.
A Technical information
This section contains the following topics:
• Warranty information
• Printer specifications
• Regulatory information
• Environmental product stewardship program
• Third-party licenses
Warranty information
This section contains the following topics:
• Hewlett-Packard limited warranty statement
• Ink cartridge warranty information
Hewlett-Packard limited warranty statement
| HP product Duration of limited warranty | |
| Software Media 90 days | |
| Printer | 1 year |
| Print or Ink cartridges Until the HP ink is depleted or the | "end of warranty" date printedon the cartridge has been reached, whichever occurs first. This warranty does not cover HP ink products that have been refilled, remanufactured, refurbished, misused, or tampered with. |
| Printheads (only applies to products with customer 1 year replaceable printheads) | |
| Accessories 1 year unless otherwise stated |
A. Extent of limited warranty
- Hewlett-Packard (HP) warrants to the end-user customer that the HP products specified above will be free from defects in materials and workmanship for the duration specified above, which duration begins on the date of purchase by the customer.
- For software products, HP's limited warranty applies only to a failure to execute programming instructions. HP does not warrant that the operation of any product will be interrupted or error free.
- HP's limited warranty covers only those defects that arise as a result of normal use of the product, and does not cover any other problems, including those that arise as a result of:
a. Improper maintenance or modification;
b. Software, media, parts, or supplies not provided or supported by HP;
c. Operation outside the product's specifications;
d. Unauthorized modification or misuse.
-
For HP printer products, the use of a non-HP cartridge or a refilled cartridge does not affect either the warranty to the customer or any HP support contract with the customer. However, if printer failure or damage is attributable to the use of a non-HP or refilled cartridge or an expired ink cartridge, HP will charge its standard time and materials charges to service the printer for the particular failure or damage.
-
If HP receives, during the applicable warranty period, notice of a defect in any product which is covered by HP's warranty, HP shall either repair or replace the product, at HP's option.
-
If HP is unable to repair or replace, as applicable, a defective product which is covered by HP's warranty, HP shall, within a reasonable time after being notified of the defect, refund the purchase price for the product.
-
HP shall have no obligation to repair, replace, or refund until the customer returns the defective product to HP.
-
Any replacement product may be either new or like-new, provided that it has functionality at least equal to that of the product being replaced.
-
HP products may contain remanufactured parts, components, or materials equivalent to new in performance.
- HP's Limited Warranty Statement is valid in any country where the covered HP product is distributed by HP. Contracts for additional warranty services, such as on-site service, may be available from any authorized HP service facility in countries where the product is distributed by HP or by an authorized importer.
B. Limitations of warranty
TO THE EXTENT ALLOWED BY LOCAL LAW, NEITHER HP NOR ITS THIRD PARTY SUPPLIERS MAKES ANY OTHER WARRANTY OR CONDITION OF ANY KIND, WHETHER EXPRESS OR IMPLIED WARRANTIES OR CONDITIONS OF MERCHANTABILITY, SATISFACTORY QUALITY, AND FITNESS FOR A PARTICULAR PURPOSE.
C. Limitations of liability
-
To the extent allowed by local law, the remedies provided in this Warranty Statement are the customer's sole and exclusive remedies.
-
TO THE EXTENT ALLOWED BY LOCAL LAW, EXCEPT FOR THE OBLIGATIONS SPECIFICALLY SET FORTH IN THIS WARRANTY STATEMENT, IN NO EVENT SHALL HP OR ITS THIRD PARTY SUPPLIERS BE LIABLE FOR DIRECT, INDIRECT, SPECIAL, INCIDENTAL, OR CONSEQUENTIAL DAMAGES, WHETHER BASED ON CONTRACT, TORT, OR ANY OTHER LEGAL THEORY AND WHETHER ADVISED OF THE POSSIBILITY OF SUCH DAMAGES.
D. Local law
- This Warranty Statement gives the customer specific legal rights. The customer may also have other rights which vary from state to state in the United States, from province to province in Canada, and from country to country elsewhere in the world.
-
To the extent that this Warranty Statement is inconsistent with local law, this Warranty Statement shall be deemed modified to be consistent with such local law. Under such local law, certain disclaimers and limitations of this Warranty Statement may not apply to the customer. For example, some states in the United States, as well as some governments outside the United States (including provinces in Canada), may:
a. Preclude the disclaimers and limitations in this Warranty Statement from limiting the statutory rights of a consumer (e.g., the United Kingdom);
b. Otherwise restrict the ability of a manufacturer to enforce such disclaimers or limitations; or
c. Grant the customer additional warranty rights, specify the duration of implied warranties which the manufacturer cannot disclaim, or allow limitations on the duration of implied warranties. -
THE TERMS IN THIS WARRANTY STATEMENT, EXCEPT TO THE EXTENT LAWFULLY PERMITTED, DO NOT EXCLUDE, RESTRICT, OR MODIFY, AND ARE IN ADDITION TO, THE MANDATORY STATUTORY RIGHTS APPLICABLE TO THE SALE OF THE HP PRODUCTS TO SUCH CUSTOMERS.
HP Limited Warranty
Dear Customer,
You will find below the name and address of the HP entity responsible for the performance of the HP Limited Warranty in your country.
You may have additional statutory rights against the seller based on your purchase agreement. Those rights are not in any way affected by this HP Limited Warranty.
Ireland: Hewlett-Packard Ireland Limited, 63-74 Sir John Rogerson's Quay, Dublin 2
United Kingdom: Hewlett-Packard Ltd, Cain Road, Bracknell, GB-Berks RG12 1HN
Malta: Hewlett-Packard International Trade B.V., Malta Branch, 48, Amery Street, Sliema SLM 1701, MALTA
South Africa: Hewlett-Packard South Africa Ltd, 12 Autumn Street, Rivonia, Sandton, 2128, Republic of South Africa
Ink cartridge warranty information
The HP cartridge warranty is applicable when the product is used in its designated HP printer. This warranty does not cover HP ink products that have been refilled, remanufactured, refurbished, misused, or tampered with.
During the warranty period the product is covered as long as the HP ink is not depleted and the end of warranty date has not been reached. The end of warranty date, in YYYY-MM format, may be found on the product as indicated:
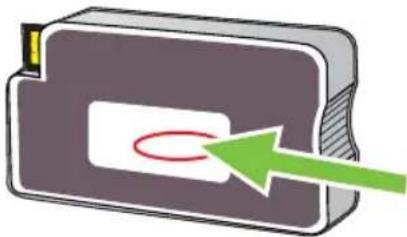
natural_image
Illustration of a rectangular electronic device with a green arrow pointing to its side (no text or symbols)Printer specifications
This section contains the following topics:
• Physical specifications
• Product features and capacities
• Processor and memory specifications
• System requirements
• Network protocol specifications
• Embedded web server specifications
• Media specifications
• Print specifications
• Copy specifications
- Fax specifications
- Scan specifications
• Web Services and HP website specifications
• Environmental specifications
• Electrical specifications
• Acoustic emission specifications
• Memory device specifications
Physical specifications
Printer size (width x height x depth)
• HP Officejet Pro 8600: 494 x 300 x 460 mm (19.4 x 11.8 x 18.1 inches)
- HP Officejet Pro 8600 Plus and HP Officejet Pro 8600 Premium: 494 x 315 x 460 mm (19.4 x 12.4 x 18.1 inches)
• With Tray 2: Adds 82 mm (2.6 inches) to the height of the printer
Printer weight (does not include printing supplies, duplexer, or Tray 2)
• HP Officejet Pro 8600: 10.67 kg (23.6 lb)
• HP Officejet Pro 8600 Plus and HP Officejet Pro 8600 Premium: 11.58 kg (25.5 lb)
- With Tray 2: Adds 2.96 kg (6.5 lb)
- With duplexer: Adds 0.63 kg (1.4 lb)
Product features and capacities
| Feature Capacity | |
| Connectivity • USB 2.0-compliant high speed | • USB 2.0 high-speed host port• Wireless 802.11b/g/n*• Wired 802.3 network (Ethernet) |
| Print method Drop-on-demand thermal inkjet printing | |
| Ink cartridges Four ink cartridges (one each for black, cyan, magenta, and yellow)NOTE: Not all ink cartridges are supported in all countries/regions. | |
| Printheads One printhead | |
Appendix A
(continued)
| Feature Capacity | |
| Supply yields For more information on estimated | inkcartridge yields, visitwww.hp.com/go/learnaboutsupplies/. |
| Printer languages HP PCL 3 | |
| Font support US fonts: CG Times, CG Times Italic,Universe, Universe Italic, Courier, Courier Italic, Letter Gothic, Letter Gothic Italic. | |
| Duty cycle Up to 25,000 pages per month | |
| Printer control-panel language supportLanguage availability varies by country/region. | Bulgarian, Croatian, Czech, Danish, Dutch, English, Finnish, French, German, Greek, Hungarian, Italian, Japanese, Korean, Norwegian, Polish, Portuguese, Romanian, Russian, Simplified Chinese, Slovak, Slovenian, Spanish, Swedish, Traditional Chinese, Turkish. |
* The printer supports the 802.11n 2.4 GHz frequency band.
Processor and memory specifications
Printer processor
ARM R4
Printer memory
HP Officejet Pro 8600: 64 MB built-in RAM
HP Officejet Pro 8600 Plus and HP Officejet Pro 8600 Premium: 128 MB built-in RAM
System requirements

NOTE: For the most current information about supported operating systems and system requirements, visit www.hp.com/go/customercare. This website provides information and utilities that can help you correct many common printer problems.
Operating system compatibility
- Windows XP Service Pack 3, Windows Vista, Windows 7
• Mac OS X v10.5, v10.6 - Linux (For more information, see http://hplipopensource.com/hplip-web/index.html)
Minimum system requirements
- Microsoft® Windows® 7: 1 GHz 32-bit (x86) or 64-bit (x64) processor; 2 GB hard disk space, CD-ROM/DVD drive or Internet connection, USB port; Internet Explorer
- Microsoft Windows Vista®: 800 MHz 32-bit (x86) or 64-bit (x64) processor; 2 GB hard disk space, CD-ROM/DVD drive or Internet connection, USB port; Internet Explorer
- Microsoft Windows XP Service Pack 3 or higher (32-bit only): Intel® Pentium® II, Celeron®, or compatible processor; 233 MHz or higher; CD-ROM/DVD drive or Internet connection, USB port, Internet Explorer 6.0 or higher
• Mac OS X v10.5 or v10.6: PowerPC G4, G5, or Intel Core processor, 500 MB free hard disk space, CD-ROM/DVD drive or Internet connection, USB port
Network protocol specifications
Network operating system compatibility
- Windows XP (32-bit) (Professional and Home Editions), Windows Vista 32-bit and 64-bit (Ultimate Edition, Enterprise Edition and Business Edition), Windows 7 (32-bit and 64-bit)
- Windows Small Business Server 2003 32-bit and 64-bit, Windows 2003 Server 32-bit and 64-bit, Windows 2003 Server R2 32-bit and 64-bit (Standard Edition, Enterprise Edition)
- Windows Small Business Server 2008 64-bit, Windows 2008 Server 32-bit and 64-bit, Windows 2008 Server R2 64-bit (Standard Edition, Enterprise Edition)
- Citrix XenDesktop 4
- Citrix XenServer 5.5
• Mac OS X v10.5, v10.6
- Microsoft Windows 2003 Server Terminal Services
- Microsoft Windows 2003 Server Terminal Services with Citrix Presentation Server 4.0
- Microsoft Windows 2003 Server Terminal Services with Citrix Presentation Server 4.5
- Microsoft Windows 2003 Server Terminal Services with Citrix XenApp 5.0
- Microsoft Windows 2003 Server Terminal Services with Citrix Metaframe XP with Feature Release 3
• Microsoft Windows 2003 Small Business Server Terminal Services
- Microsoft Windows Server 2008 Terminal Services
- Microsoft Windows Small Business Server 2008 Terminal Services
- Microsoft Windows 2008 Server Terminal Services with Citrix XenApp 5.0
• Novell Netware 6.5, Open Enterprise Server 2
Compatible network protocols
TCP/IP
Network management
Embedded web server (Ability to remotely configure and manage network printers)
Embedded web server specifications
Requirements
- A TCP/IP-based network (IPX/SPX-based networks are not supported)
- A web browser (either Microsoft Internet Explorer 7.0 or higher, Mozilla Firefox 3.0 or higher, Safari 3.0 or higher, or Google Chrome 3.0 or higher)
- A network connection (you cannot use the embedded web server connected directly to a computer with a USB cable)
- An Internet connection (required for some features)

NOTE: You can open the embedded web server without being connected to the Internet. However, some features are not available.
NOTE: The embedded web server must be on the same side of a firewall as the printer.
Media specifications
Use these tables to determine the correct media to use with your printer, and determine what features work with your media.
• Understand specifications for supported media
- Set minimum margins
• Guidelines for printing on both sides of a page
Understand specifications for supported media
Use the tables to determine the correct media to use with your printer, and to determine what features work with your media.
• Understand supported sizes
• Understand supported media types and weights
Understand supported sizes

NOTE: Tray 2 is available as an option.
| Media size Tray 1 Tray 2 Duplexer | ADF | |||
| Standard media sizes | ||||
| 10x15cm* | ✓ | |||
| 2L | ✓ | |||
| U.S. Letter (216 x 279 mm; 8.5 x 11 inches)* | ✓ | ✓ | ✓ | ✓ |
| 8.5 x 13 inches (216 x 330 mm)+ | ✓ | ✓ | ||
| U.S. Legal (216 x 356 mm; 8.5 x 14 inches)* + | ✓ | ✓ | ✓ | |
| A4 (210 x 297 mm; 8.3 x 11.7 inches)* | ✓ | ✓ | ✓ | ✓ |
| U.S. Executive (184 x 267 mm; 7.25 x 10.5 inches) | ✓ | ✓ | ✓ | |
| U.S. Statement (140 x 216 mm; 5.5 x 8.5 inches)+ | ✓ | ✓ | ||
| B5 (JIS) (182 x 257 mm; 7.17 x 10.12 inches)* + | ✓ | ✓ | ✓ | |
| A5 (148 x 210 mm; 5.8 x 8.3 inches)* | ✓ | (From Tray 1 only) | ✓ | |
| ✓ | ||||
| 6 x 8 inches+ | ✓ | ✓ | ||
| Edge-to-Edge A4* | ✓ | ✓ | ||
| Edge-to-Edge Letter* | ✓ | ✓ | ||
| Envelopes | ||||
| U.S. #10 Envelope (105 x 241 mm; 4.12 x 9.5 inches) | ✓ | |||
| Monarch Envelope (98 x 191 mm; 3.88 x 7.5 inches) | ✓ | |||
| Card Envelope (111 x 152 mm; 4.4 x 6 inches) | ✓ | |||
| A2 Envelope (111 x 146 mm; 4.37 x 5.75 inches) | √ | |||
| DL Envelope (110 x 220 mm; 4.3 x 8.7 inches) | √ | |||
| C5 Envelope (162 x 229 mm; 6.4 x 9 inches) | √ | |||
| C6 Envelope (114 x 162 mm; 4.5 x 6.4 inches) | √ | |||
| Japanese Envelope Chou #3 (120 x 235 mm; 4.7 x 9.3 inches) | √ | |||
| Japanese Envelope Chou #4 (90 x 205 mm; 3.5 x 8.1 inches) | √ | |||
| Cards | ||||
| Index card (76.2 x 127 mm; 3 x 5 inches) | √ | |||
| Index card (102 x 152 mm; 4 x 6 inches) | √ | |||
| Index card (127 x 203 mm; 5 x 8 inches) | √ | |||
| A6 card (105 x 148.5 mm; 4.13 x 5.83 inches)* | √ | |||
| A4 index card (210 x 297 mm; 8.3 x 11.7 inches) | √ | |||
| Hagaki (100 x 148 mm; 3.9 x 5.8 inches) * ** | √ | |||
| Ofuku Hagaki** (200 x 148 mm; 7.8 x 5.8 inches) | √ | |||
| Index Card Letter (216 x 279 mm; 8.5 x 11 inches) | √ | |||
| Photo media | ||||
| Photo media (76.2 x 127 mm; 3 x 5 inches) | √ | |||
| Photo media (102 x 152 mm; 4 x 6 inches)* | √ | |||
| Photo media (5 x 7 inches)* | √ | |||
| Photo media (8 x 10 inches)* | √ | |||
| Photo media (8.5 x 11 inches) | √ | |||
| Photo L (89 x 127 mm; 3.5 x 5 inches) | √ | |||
| Photo 2L (127 x 178 mm)* | √ | |||
| 13 x 18 cm* | √ | |||
| Other mediaNOTE: Defining custom-size media sizes is only available in the HP printing software in Mac OS X. | ||||
| Custom-sized media between 76.2 to 216 mm wide and 127 to 356 mm long (3 to 8.5 inches wide and 5 to 14 inches long) | √ | |||
| Custom-sized media (ADF) between 127 to 216 mm wide and 127 to 355 mm long (5 to 8.5 inches wide and 5 to 14 inches long)+ | √ |
* These sizes can be used for borderless printing.
** The printer is compatible with plain and inkjet hagaki from Japan Post only. It is not compatible with photo hagaki from Japan Post.
^+ Only single-sided scan and copy jobs are supported by the ADF.
Understand supported media types and weights

NOTE: Tray 2 is available with some models.
| Tray Type Weight Capacity | |||
| Tray 1 Paper | 60 to 105 g/m2(16 to 28 lb bond) | Up to 250 sheets of plain paper(25 mm or 1 inch stacked) | |
| Photo media | 280 g/m2(75 lb bond) | Up to 100 sheets(17 mm or 0.67 inch stacked) | |
| Labels Up to 100 sheets | (17 mm or 0.67 inch stacked) | ||
| Envelopes | 75 to 90 g/m2(20 to 24 lb bond envelope) | Up to 30 sheets(17 mm or 0.67 inch stacked) | |
| Cards | Up to 200 g/m2(110 lb index) | Up to 80 cards | |
| Tray 2 Plain paper only | 60 to 105 g/m2(16 to 28 lb bond) | Up to 250 sheets of plain paper | |
| (25 mm or 1.0 inch stacked) | |||
| Duplexer Plain and brochure | 60 to 105 g/m ^2 (16 to 28 lb bond) | Not applicable | |
| Output tray All supported media Up to 150 sheets of plain paper (text printing) | |||
| Automatic Document Feeder | All supported media except photo paper | 60 to 90 g/m ^2 (16 to 24 lb bond)long grain media only | HP Officejet Pro 8600: Up to 35 sheets of plain paper (5 mm or 0.19 inches stacked)HP Officejet Pro 8600 Plus and HP Officejet Pro 8600 Premium: Up to 50 sheets of plain paper (11 mm or 0.43 inches stacked) |
Set minimum margins
The document margins must match (or exceed) these margin settings in portrait orientation.
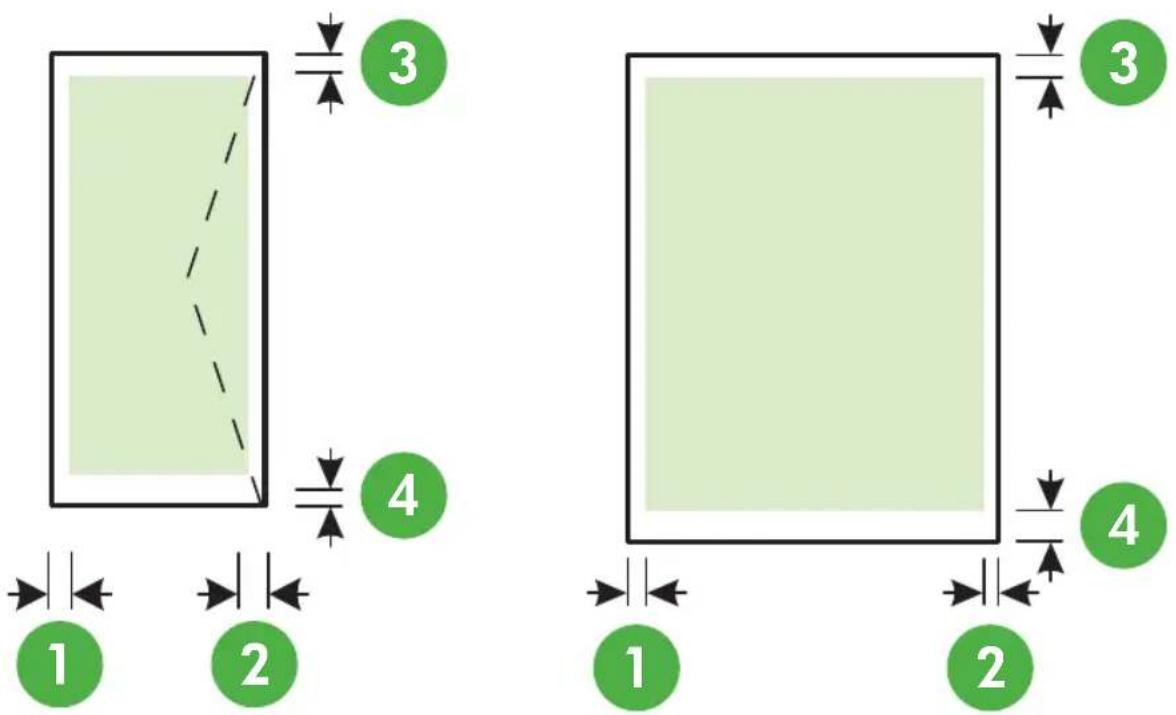
text_image
1 2 3 4 1 2 3 4| Media (1) Left | margin | (2) Right margin | (3) Top margin | (4) Bottom margin |
| U.S. Letter | 3.3 mm (0.13 inch) | 3.3 mm (0.13 inch) | 3.3 mm (0.13 inch) | 3.3 mm (0.13 inch)Windows and 12mm (0.47 |
| U.S. Legal | ||||
| A4 | ||||
| U.S. Executive | inch)Macintosh and Linux | |||
| U.S. Statement | ||||
| 8.5 x 13 inch | ||||
| B5 | ||||
| A5 | ||||
| Cards | ||||
| Custom-sized media | ||||
| Photo media | ||||
| Envelopes 3.3 mm (0.13 | inch) | 3.3 mm (0.13 inch) | 16.5 mm (0.65 inch) | 16.5 mm (0.65 inch) |
Guidelines for printing on both sides of a page
- Always use media that conforms to the printer specifications. For more information, see Media specifications.
- Specify two-sided printing options in your application or in the printer driver.
- Do not print on both sides of envelopes, photo paper, glossy media, or paper lighter than 16 lb bond (60 g/m ^2 ) or heavier than 28 lb bond (105 g/m ^2 ). Jams might occur with these media types.
- Several kinds of media require a specific orientation when you print on both sides of a page. These include letterhead, preprinted paper, and paper with watermarks and prepunched holes. When you print from a computer running Windows, the printer prints the first side of the media first. Load the media with the print side facing down.
- For auto-duplexing, when printing finishes on one side of the media, the printer holds the media and pauses while the ink dries. Once the ink dries, the media is pulled back into the printer and the second side is printed. When printing is complete, the media is dropped onto the output tray. Do not grab it before printing is complete.
- You can print on both sides of supported custom-sized media by turning the media over and feeding it into the printer again. For more information, see Media specifications.
Print specifications
Black print resolution
600 x 600 dpi with pigmented black ink
Color print resolution
Up to 4800 x 1200 dpi Optimized on HP Advanced Photo Paper with 1200 x 1200 input dpi
Copy specifications
• Digital image processing
- Up to 99 copies from original (varies by model)
• Digital zoom: from 25 to 400% (varies by model)
• Fit to page, copy preview
Fax specifications
- Walk-up black-and-white and color fax capability.
-
Up to 110 speed dials (varies by model).
-
Up to 120-page memory (varies by model, based on ITU-T Test Image #1 at standard resolution). More complicated pages or higher resolution takes longer and uses more memory.
- Manual fax send and receive.
• Automatic busy redial up to five times (varies by model).
• Automatic no-answer redial one time (varies by model). - Confirmation and activity reports.
- CCITT/ITU Group 3 fax with Error Correction Mode.
• 33.6 Kbps transmission. - 3 seconds per page speed at 33.6 Kbps (based on ITU-T Test Image #1 at standard resolution). More complicated pages or higher resolution takes longer and uses more memory.
- Ring detect with automatic fax/answering machine switching.
| Photo (dpi) Very Fine (dpi) Fine | (dpi) Standard (dpi) | ||
| Black 196 x 203 (8-bit grayscale) | 300 x 300 196 x 203 | 196 x 98 | |
| Color 200 x 200 200 x 200 200 x 200 | 200 x 200 |
Fax to PC Specifications
• Supported file type: Uncompressed TIFF
• Supported fax types: black-and-white faxes
Scan specifications
- Integrated OCR software automatically converts scanned text to editable text
- Twain-compliant interface (Windows only)
• Resolution: 4800 x 4800 ppi optical
• Color: 24-bit color, 8-bit grayscale (256 levels of gray)
• Maximum scan size from glass: HP Officejet Pro 8600: 216 x 297 mm (8.5 x 11.7 inches)
HP Officejet Pro 8600 Plus and HP Officejet Pro 8600 Premium: 216 x 356 mm (8.5 x 14 inches)
• Maximum scan size from ADF: 216 x 356 mm (8.5 x 14 inches)
Web Services and HP website specifications
Web Services specifications
An Internet connection using either a wired (Ethernet) or wireless connection.
HP ePrint
• Maximum size of email and attachments: 5 MB
• Maximum number of attachments: 10

NOTE: The printer's email address must be the only address listed in the "To" line of the email message.
Supported file types:
。 H T M L
- Standard text file formats
Appendix A
• Microsoft Word, PowerPoint
• Image files, such as PNG, JPEG, TIFF, GIF, BMP
NOTE: You might be able to use other types of files with HP ePrint. However, HP cannot guarantee that they correct functionality with the printer because they have not been fully tested.
Printer Apps
To use certain Printer Apps, you might need to set up an account with a partner website. For more information, visit www.eprintcenter.com.
HP website specifications
- A web browser (either Microsoft Internet Explorer 6.0 or higher, Mozilla Firefox 2.0 or higher, Safari 3.2.3 or higher, or Google Chrome 3.0) with the Adobe Flash plug-in (version 10 or higher).
• An Internet connection
Environmental specifications
Operating environment
Operating temperature: 5° to 40° C (41° to 104° F) Operating humidity: 15 to 80% RH non-condensing Recommended operating conditions: 15° to 32° C (59° to 90° F) Recommended relative humidity: 20 to 80 % RH non-condensing
Shipping environment
Maximum shipping temperature: -40^ to 60^ C ( -40^ to 140^ F)
Maximum shipping humidity: 5 to 90% RH non-condensing
Electrical specifications
Power supply
Universal power adapter (internal)
Power requirements
Input voltage: 100 to 240 VAC, 50/60 Hz Output voltage: +32V/+12V at 1095 mA/170 mA
Power consumption
34 watts printing (Fast Draft Mode); 36 watts copying (Fast Draft Mode)
Acoustic emission specifications
Print in Draft mode, noise levels per ISO 7779
HP Officejet Pro 8600
• Sound pressure (bystander position)
LpAm 57 (dBA) (mono Draft print)
• Sound power
LwAd 7.1 (BA)
HP Officejet Pro 8600 Plus and HP Officejet Pro 8600 Premium
• Sound pressure (bystander position)
LpAm 56 (dBA) (mono Draft print)
• Sound power
LwAd 7.0 (BA)
Memory device specifications
This section contains the following topics:
• Memory card specifications
- USB flash drives
Memory card specifications
Specifications
• Maximum recommended number of files on a memory card: 2,000
- Maximum recommended individual file size: 12 megapixel maximum, 8 MB maximum (TIFF files, 50 MB maximum)
• Maximum recommended memory card size: 64 GB (solid state only)

NOTE: Approaching any of the recommended maximums on a memory card might cause the performance of the printer to be slower than expected.
Supported memory card types
- Secure Digital (SD), Mini SD, Micro SD
• High Capacity Secure Digital - Memory Stick Pro Duo
- Memory Stick Pro Duo
- MultiMediaCard (MMC), MMC Plus, MMC (RS-MMC)
USB flash drives
HP has fully tested the following USB flash drives with the printer:
• Kingston: Data Traveler 100 USB 2.0 flash drive (4 GB, 8 GB, and 16 GB)
• Lexar JumpDrive Traveller: 1 GB
- Imation: 1 GB USB Swivel
- Sandisk: Ultra Titanium plus USB Flash Drive 4 GB
• HP: 8 GB HI.SPEED USB flash drive v100w

NOTE: You might be able to use other USB flash drives with the printer. However, HP cannot guarantee that they correct functionality with the printer because they have not been fully tested.
Regulatory information
The printer meets product requirements from regulatory agencies in your country/region.
This section contains the following topics:
- FCC statement
- Notice to users in Korea
• VCCI (Class B) compliance statement for users in Japan - Notice to users in Japan about the power cord
• Noise emission statement for Germany
• European Union Regulatory Notice
• LED indicator statement
• Gloss of housing of peripheral devices for Germany - Notice to users of the U.S. telephone network: FCC requirements
- Notice to users of the Canadian telephone network
- Notice to users of the German telephone network
• Australia wired fax statement
• Regulatory information for wireless products
• Regulatory model number
FCC statement
The United States Federal Communications Commission (in 47 CFR 15.105) has specified that the following notice be brought to the attention of users of this product.
This equipment has been tested and found to comply with the limits for a Class B digital device, pursuant to Part 15 of the FCC Rules. These limits are designed to provide reasonable protection against harmful interference in a residential installation. This equipment generates, uses and can radiate radio frequency energy and, if not installed and used in accordance with the instructions, may cause harmful interference to radio communications. However, there is no guarantee that interference will not occur in a particular installation. If this equipment does cause harmful interference to radio or television reception, which can be determined by turning the equipment off and on, the user is encouraged to try to correct the interference by one or more of the following measures:
• Reorient the receiving antenna.
- Increase the separation between the equipment and the receiver.
- Connect the equipment into an outlet on a circuit different from that to which the receiver is connected.
- Consult the dealer or an experienced radio/TV technician for help.
For further information, contact: Manager of Corporate Product Regulations Hewlett-Packard Company 3000 Hanover Street Palo Alto, Ca 94304 (650) 857-1501
Modifications (part 15.21)
The FCC requires the user to be notified that any changes or modifications made to this device that are not expressly approved by HP may void the user's authority to operate the equipment.
This device complies with Part 15 of the FCC Rules. Operation is subject to the following two conditions: (1) this device may not cause harmful interference, and (2) this device must accept any interference received, including interference that may cause undesired operation.
Notice to users in Korea
VCCI (Class B) compliance statement for users in Japan
Notice to users in Japan about the power cord
Noise emission statement for Germany
Geräuschemission
European Union Regulatory Notice
Products bearing the CE marking comply with the following EU Directives:
• Low Voltage Directive 2006/95/EC
• EMC Directive 2004/108/EC
• Ecodesign Directive 2009/125/EC, where applicable
CE compliance of this product is valid only if powered with the correct CE-marked AC adapter provided by HP.
If this product has telecommunications functionality, it also complies with the essential requirements of the following EU Directive:
R&TTE Directive 1999/5/EC
Compliance with these directives implies conformity to applicable harmonized European standards (European Norms) that are listed in the EU Declaration of Conformity issued by HP for this product or product family and available (in English only) either within the product documentation or at the following website: www.hp.com/go/certificates (type the product number in the search field).
The compliance is indicated by one of the following conformity markings placed on the product:
| CE | For non-telecommunications products and for EU harmonized telecommunications products, such as Bluetooth® within power class below 10mW. |
| CE Ⓙ | For EU non-harmonized telecommunications products (If applicable, a 4-digit notified body number is inserted between CE and !). |
Please refer to the regulatory label provided on the product.
The telecommunications functionality of this product may be used in the following EU and EFTA countries: Austria, Belgium, Bulgaria, Cyprus, Czech Republic, Denmark, Estonia, Finland, France, Germany, Greece, Hungary, Iceland, Ireland, Italy, Latvia, Liechtenstein, Lithuania, Luxembourg, Malta, Netherlands, Norway, Poland, Portugal, Romania, Slovak Republic, Slovenia, Spain, Sweden, Switzerland, and United Kingdom.
The telephone connector (not available for all products) is intended for connection to analogue telephone networks.
Products with wireless LAN devices
Some countries may have specific obligations or special requirements about the operation of Wireless LAN networks such as indoor use only or restrictions of the channels available. Please make sure that the country settings of the wireless network are correct.
France
For 2.4-GHz Wireless LAN operation of this product, certain restrictions apply: This product may be used indoors for the entire 2400-MHz to 2483.5-MHz frequency band (channels 1 to 13). For outdoor use, only the 2400-MHz to 2454-MHz frequency band (channels 1 to 7) may be used. For the latest requirements, see www.arcep.fr.
The point of contact for regulatory matters is:
Hewlett-Packard GmbH, Dept./MS: HQ-TRE, Herrenberger Strasse 140, 71034 Boeblingen, GERMANY
LED indicator statement
LED indicator statement
The display LEDs meet the requirements of EN 60825-1.
Gloss of housing of peripheral devices for Germany
Notice to users of the U.S. telephone network: FCC requirements
Notice to users of the U.S. telephone network: FCC requirements
This equipment complies with FCC rules, Part 68. On this equipment is a label that contains, among other information, the FCC Registration Number and Ringer Equivalent Number (REN) for this equipment. If requested, provide this information to your telephone company.
An FCC compliant telephone cord and modular plug is provided with this equipment. This equipment is designed to be connected to the telephone network or premises wiring using a compatible modular jack which is Part 68 compliant. This equipment connects to the telephone network through the following standard network interface jack: USOC RJ-11C.
The REN is useful to determine the quantity of devices you may connect to your telephone line and still have all of those devices ring when your number is called. Too many devices on one line might result in failure to ring in response to an incoming call. In most, but not all, areas the sum of the RENs of all devices should not exceed five (5). To be certain of the number of devices you may connect to your line, as determined by the REN, you should call your local telephone company to determine the maximum REN for your calling area.
If this equipment causes harm to the telephone network, your telephone company might discontinue your service temporarily. If possible, they will notify you in advance. If advance notice is not practical, you will be notified as soon as possible. You will also be advised of your right to file a complaint with the FCC. Your telephone company might make changes in its facilities, equipment, operations, or procedures that could affect the proper operation of your equipment. If they do, you will be given advance notice so you will have the opportunity to maintain uninterrupted service. If you experience trouble with this equipment, please contact the manufacturer, or look elsewhere in this manual, for warranty or repair information. Your telephone company might ask you to disconnect this equipment from the network until the problem has been corrected or until you are sure that the equipment is not malfunctioning.
This equipment may not be used on coin service provided by the telephone company.
Connection to party lines is subject to state tariffs. Contact your state public utility commission, public service commission, or corporation commission for more information.
This equipment includes automatic dialing capability. When programming and/or making test calls to emergency numbers:
- Remain on the line and explain to the dispatcher the reason for the call.
• Perform such activities in the off-peak hours, such as early morning or late evening.

Note The FCC hearing aid compatibility rules for telephones are not applicable to this equipment.
The Telephone Consumer Protection Act of 1991 makes it unlawful for any person to use a computer or other electronic device, including fax machines, to send any message unless such message clearly contains in a margin at the top or bottom of each transmitted page or on the first page of transmission, the date and time it is sent and an identification of the business, other entity, or other individual sending the message and the telephone number of the sending machine or such business, other entity, or individual. (The telephone number provided might not be a 900 number or any other number for which charges exceed local or long-distance transmission charges.) In order to program this information into your fax machine, you should complete the steps described in the software.
This equipment meets the applicable Industry Canada Terminal Equipment Technical Specifications. This is confirmed by the registration number. The abbreviation IC before the registration number signifies that registration was performed based on a Declaration of Conformity indicating that Industry Canada technical specifications were met. It does not imply that Industry Canada approved the equipment.
Users should ensure for their own protection that the electrical ground connections of the power utility, telephone lines and internal metallic water pipe system, if present, are connected together. This precaution might be particularly important in rural areas.

Note The REN (Ringer Equivalence Number) assigned to each terminal device provides an indication of the maximum number of terminals allowed to be connected to a telephone interface. The termination on an interface might consist of any combination of devices subject only to the requirement that the sum of the Ringer Equivalence Numbers of all the devices does not exceed 5.
The REN for this product is 0.0B, based on FCC Part 68 test results.
Notice to users of the German telephone network
Australia wired fax statement
In Australia, the HP device must be connected to Telecommunication Network through a line cord which meets the requirements of the Technical Standard AS/ACIF S008.
Regulatory information for wireless products
This section contains the following regulatory information pertaining to wireless products:
• Exposure to radio frequency radiation
• Notice to users in Brazil
• Notice to users in Canada
• Notice to users in Taiwan
Exposure to radio frequency radiation
Exposure to radio frequency radiation

Caution The radiated output power of this device is far below the FCC radio frequency exposure limits. Nevertheless, the device shall be used in such a manner that the potential for human contact during normal operation is minimized. This product and any attached external antenna, if supported, shall be placed in such a manner to minimize the potential for human contact during normal operation. In order to avoid the possibility of exceeding the FCC radio frequency exposure limits, human proximity to the antenna shall not be less than 20 cm (8 inches) during normal operation.
Notice to users in Brazil
Notice to users in Canada
For Indoor Use. This digital apparatus does not exceed the Class B limits for radio noise emissions from the digital apparatus set out in the Radio Interference Regulations of the Canadian Department of Communications. The internal wireless radio complies with RSS 210 and RSS GEN of Industry Canada.
Notice to users in Taiwan
低功率電波輻射性電機管理辦法
第十二條
Regulatory model number
For regulatory identification purposes, your product is assigned a Regulatory Model Number. The Regulatory Model Number for your product is SNPRC-1101-01. This regulatory number should not be confused with the marketing name (HP Officejet Pro 8600 e-All-in-One series) or product number.
Environmental product stewardship program
Hewlett-Packard is committed to providing quality products in an environmentally sound manner. Design for recycling has been incorporated into this product. The number of materials has been kept to a minimum while ensuring proper functionality and reliability. Dissimilar materials have been designed to separate easily. Fasteners and other connections are easy to locate, access, and remove using common tools. High priority parts have been designed to access quickly for efficient disassembly and repair.
For more information, visit HP's Commitment to the Environment website at:
www.hp.com/hpinfo/globalcitizenship/environment/index.html
This section contains the following topics:
- Paper use
- Plastics
• Material safety data sheets
• Recycling program
• HP inkjet supplies recycling program
• Disposal of waste equipment by users in private households in the European Union
• Power consumption
• Chemical substances - Battery information
• RoHS notices (China only)
• RoHS notices (Ukraine only)
Paper use
This product is suited for the use of recycled paper according to DIN 19309 and EN 12281:2002.
Plastics
Plastic parts over 25 grams are marked according to international standards that enhance the ability to identify plastics for recycling purposes at the end of product life.
Material safety data sheets
Material safety data sheets (MSDS) can be obtained from the HP website at: www.hp.com/go/msds
Recycling program
HP offers an increasing number of product return and recycling programs in many countries/regions, and partners with some of the largest electronic recycling centers throughout the world. HP conserves resources by reselling some of its most popular products. For more information regarding recycling of HP products, please visit:
www.hp.com/hpinfo/globalcitizenship/environment/recycle/
HP inkjet supplies recycling program
HP is committed to protecting the environment. The HP Inkjet Supplies Recycling Program is available in many countries/regions, and lets you recycle used print cartridges and ink cartridges free of charge. For more information, go to the following website:
www.hp.com/hpinfo/globalcitizenship/environment/recycle/
Disposal of waste equipment by users in private households in the European Union
European Union Battery Directive
This product contains a battery that is used to maintain data integrity of real time clock or product settings and is designed to last the life of the product. Any attempt to service or replace this battery should be performed by a qualified service technician.
Hewlett-Packard printing and imaging equipment marked with the ENERGY STAR® logo is qualified to the U.S. Environmental Protection Agency's ENERGY STAR specifications for imaging equipment. The following mark appears on ENERGY STAR qualified imaging products:

text_image
energy ENERGY STARENERGY STAR is a U.S. registered service mark of the U.S. EPA. As an ENERGY STAR partner, HP has determined that this product meets ENERGY STAR guidelines for energy efficiency.
Additional ENERGY STAR qualified imaging product model information is listed at: www.hp.com/go/energystar
Chemical substances
HP is committed to providing our customers with information about the chemical substances in our products as needed to comply with legal requirements such as REACH (Regulation EC No 1907/2006 of the European Parliament and the Council). A chemical information report for this product can be found at: www.hp.com/go/reach
Battery information
The printer has internal batteries that are used to maintain printer settings when the printer is turned off. These batteries might require special handling and disposal.
This section contains the following topics:
• Battery disposal in Taiwan
• Attention California users
Battery disposal in Taiwan

廢電池請回收
Please recycle waste batteries.
Attention California users
The battery supplied with this product may contain perchlorate material. Special handling may apply. For more information, go to the following website: www.dtsc.ca.gov/hazardouswaste/perchlorate.
RoHS notices (China only)
Toxic and hazardous substance table
RoHS notices (Ukraine only)
Third-party licenses
LICENSE.aes-pubdom--crypto
/* rijndael-alg-fst.c
* @version 3.0 (December 2000)
* Optimised ANSI C code for the Rijndael cipher (now AES)
* @author Vincent Rijmen vincent.rijmen@esat.kuleuven.ac.be
* @author Antoon Bosselaers antoon.bosselaers@esat.kuleuven.ac.be
* This code is hereby placed in the public domain.
* THIS SOFTWARE IS PROVIDED BY THE AUTHORS "AS IS" AND ANY EXPRESS
* OR IMPLIED WARRANTIES, INCLUDING, BUT NOT LIMITED TO, THE IMPLIED
* WARRANTIES OF MERCHANTABILITY AND FITNESS FOR A PARTICULAR PURPOSE
* ARE DISCLAIMED. IN NO EVENT SHALL THE AUTHORS OR CONTRIBUTORS BE
* LIABLE FOR ANY DIRECT, INDIRECT, INCIDENTAL, SPECIAL, EXEMPLARY, OR
* CONSEQUENTIAL DAMAGES (INCLUDING, BUT NOT LIMITED TO, PROCUREMENT OF
* SUBSTITUTE GOODS OR SERVICES; LOSS OF USE, DATA, OR PROFITS; OR
* BUSINESS INTERRUPTION) HOWEVER CAUSED AND ON ANY THEORY OF LIABILITY,
* WHETHER IN CONTRACT, STRICT LIABILITY, OR TORT (INCLUDING NEGLIGENCE
* OR OTHERWISE) ARISING IN ANY WAY OUT OF THE USE OF THIS SOFTWARE,
* EVEN IF ADVISED OF THE POSSIBILITY OF SUCH DAMAGE.
*/
LICENSE.expat-mit--expat
Copyright (c) 1998, 1999, 2000 Thai Open Source Software Center Ltd
Permission is hereby granted, free of charge, to any person obtaining a copy of this software and associated documentation files (the "Software"), to deal in the Software without restriction, including without limitation the rights to use, copy, modify, merge, publish, distribute, sublicense, and/or sell copies of the Software, and to permit persons to whom the Software is furnished to do so, subject to the following conditions:
The above copyright notice and this permission notice shall be included in all copies or substantial portions of the Software.
THE SOFTWARE IS PROVIDED "AS IS", WITHOUT WARRANTY OF ANY KIND, EXPRESS OR IMPLIED, INCLUDING BUT NOT LIMITED TO THE WARRANTIES OF MERCHANTABILITY, FITNESS FOR A PARTICULAR PURPOSE AND NONINFRINGEMENT. IN NO EVENT SHALL THE AUTHORS OR COPYRIGHT HOLDERS BE LIABLE FOR ANY CLAIM, DAMAGES OR OTHER LIABILITY, WHETHER IN AN ACTION OF CONTRACT, TORT OR OTHERWISE, ARISING FROM, OUT OF OR IN CONNECTION WITH THE SOFTWARE OR THE USE OR OTHER DEALINGS IN THE SOFTWARE.
LICENSE.hmac-sha2-bsd--nos\_crypto
/* HMAC-SHA-224/256/384/512 implementation
* Last update: 06/15/2005
* Issue date: 06/15/2005
* Copyright (C) 2005 Olivier Gay (olivier.gay@a3.epfl.ch)
* All rights reserved.
* Redistribution and use in source and binary forms, with or without
* modification, are permitted provided that the following conditions
* are met:
* 1. Redistributions of source code must retain the above copyright
* notice, this list of conditions and the following disclaimer.
* 2. Redistributions in binary form must reproduce the above copyright
* notice, this list of conditions and the following disclaimer in the
* documentation and/or other materials provided with the distribution.
* 3. Neither the name of the project nor the names of its contributors
* may be used to endorse or promote products derived from this software
* without specific prior written permission.
* THIS SOFTWARE IS PROVIDED BY THE PROJECT AND CONTRIBUTORS ``AS IS'' AND
* ANY EXPRESS OR IMPLIED WARRANTIES, INCLUDING, BUT NOT LIMITED TO, THE
* IMPLIED WARRANTIES OF MERCHANTABILITY AND FITNESS FOR A PARTICULAR PURPOSE
* ARE DISCLAIMED. IN NO EVENT SHALL THE PROJECT OR CONTRIBUTORS BE LIABLE
* FOR ANY DIRECT, INDIRECT, INCIDENTAL, SPECIAL, EXEMPLARY, OR CONSEQUENTIAL
* DAMAGES (INCLUDING, BUT NOT LIMITED TO, PROCUREMENT OF SUBSTITUTE GOODS
* OR SERVICES; LOSS OF USE, DATA, OR PROFITS; OR BUSINESS INTERRUPTION)
* HOWEVER CAUSED AND ON ANY THEORY OF LIABILITY, WHETHER IN CONTRACT, STRICT
* HOWEVER CAUSED AND ON ANY THEORY OF LIABILITY, WHETHER IN CONTRACT, STRICT
* LIABILITY, OR TORT (INCLUDING NEGLIGENCE OR OTHERWISE) ARISING IN ANY WAY
* OUT OF THE USE OF THIS SOFTWARE, EVEN IF ADVISED OF THE POSSIBILITY OF
* SUCH DAMAGE.
*/
LICENSE.md4-pubdom--jm_share_folder
LibTomCrypt is public domain. As should all quality software be.
All of the software was either written by or donated to Tom St Denis for the purposes of this project. The only exception is the SAFER.C source which has no known license status (assumed copyrighted) which is why SAFER,C is shipped as disabled.
Tom St Denis
LICENSE.md5-pubdom--jm_share_folder
LibTomCrypt is public domain. As should all quality software be.
All of the software was either written by or donated to Tom St Denis for the purposes of this project. The only exception is the SAFER.C source which has no known license status (assumed copyrighted) which is why SAFER,C is shipped as disabled.
Tom St Denis
LICENSE.open_ssl--open_ssl
Copyright (C) 1995-1998 Eric Young (eay@cryptsoft.com)
All rights reserved.
This package is an SSL implementation written
by Eric Young (eay@cryptsoft.com).
The implementation was written so as to conform with Netscapes SSL.
This library is free for commercial and non-commercial use as long as the following conditions are aheared to. The following conditions apply to all code found in this distribution, be it the RC4, RSA, Ihash, DES, etc., code; not just the SSL code. The SSL documentation included with this distribution is covered by the same copyright terms except that the holder is Tim Hudson (tjh@cryptsoft.com).
Copyright remains Eric Young's, and as such any Copyright notices in the code are not to be removed.
If this package is used in a product, Eric Young should be given attribution as the author of the parts of the library used.
This can be in the form of a textual message at program startup or in documentation (online or textual) provided with the package.
Redistribution and use in source and binary forms, with or without modification, are permitted provided that the following conditions are met:
-
Redistributions of source code must retain the copyright notice, this list of conditions and the following disclaimer.
-
Redistributions in binary form must reproduce the above copyright notice, this list of conditions and the following disclaimer in the documentation and/or other materials provided with the distribution.
- All advertising materials mentioning features or use of this software must display the following acknowledgement:
"This product includes cryptographic software written by
Eric Young (eay@cryptsoft.com)"
The word 'cryptographic' can be left out if the rouines from the library being used are not cryptographic related :-).
- If you include any Windows specific code (or a derivative thereof) from the apps directory (application code) you must include an acknowledgement:
"This product includes software written by Tim Hudson (tjh@cryptsoft.com)"
THIS SOFTWARE IS PROVIDED BY ERIC YOUNG "AS IS" AND
ANY EXPRESS OR IMPLIED WARRANTIES, INCLUDING, BUT NOT LIMITED TO, THE IMPLIED WARRANTIES OF MERCHANTABILITY AND FITNESS FOR A PARTICULAR PURPOSE
ARE DISCLAIMED. IN NO EVENT SHALL THE AUTHOR OR CONTRIBUTORS BE LIABLE FOR ANY DIRECT, INDIRECT, INCIDENTAL, SPECIAL, EXEMPLARY, OR CONSEQUENTIAL DAMAGES (INCLUDING, BUT NOT LIMITED TO, PROCUREMENT OF SUBSTITUTE GOODS OR SERVICES; LOSS OF USE, DATA, OR PROFITS; OR BUSINESS INTERRUPTION) HOWEVER CAUSED AND ON ANY THEORY OF LIABILITY, WHETHER IN CONTRACT, STRICT
LIABILITY, OR TORT (INCLUDING NEGLIGENCE OR OTHERWISE) ARISING IN ANY WAY OUT OF THE USE OF THIS SOFTWARE, EVEN IF ADVISED OF THE POSSIBILITY OF SUCH DAMAGE.
The licence and distribution terms for any publicly available version or derivative of this code cannot be changed. i.e. this code cannot simply be copied and put under another distribution licence [including the GNU Public Licence.]
Copyright (c) 1998-2001 The OpenSSL Project. All rights reserved.
Redistribution and use in source and binary forms, with or without modification, are permitted provided that the following conditions are met:
- Redistributions of source code must retain the above copyright notice, this list of conditions and the following disclaimer.
-
Redistributions in binary form must reproduce the above copyright notice, this list of conditions and the following disclaimer in the documentation and/or other materials provided with the distribution.
-
All advertising materials mentioning features or use of this software must display the following acknowledgment:
"This product includes software developed by the OpenSSL Project for use in the OpenSSL Toolkit. (http://www.openssl.org/)" - The names "OpenSSL Toolkit" and "OpenSSL Project" must not be used to endorse or promote products derived from this software without prior written permission. For written permission, please contact openssl-core@openssl.org.
- Products derived from this software may not be called "OpenSSL" nor may "OpenSSL" appear in their names without prior written permission of the OpenSSL Project.
- Redistributions of any form whatsoever must retain the following acknowledgment:
"This product includes software developed by the OpenSSL Project for use in the OpenSSL Toolkit (http://www.openssl.org/)"
THIS SOFTWARE IS PROVIDED BY THE OpenSSL PROJECT "AS IS" AND ANY EXPRESSED OR IMPLIED WARRANTIES, INCLUDING, BUT NOT LIMITED TO, THE IMPLIED WARRANTIES OF MERCHANTABILITY AND FITNESS FOR A PARTICULAR PURPOSE ARE DISCLAIMED. IN NO EVENT SHALL THE OpenSSL PROJECT OR ITS CONTRIBUTORS BE LIABLE FOR ANY DIRECT, INDIRECT, INCIDENTAL, SPECIAL, EXEMPLARY, OR CONSEQUENTIAL DAMAGES (INCLUDING, BUT NOT LIMITED TO, PROCUREMENT OF SUBSTITUTE GOODS OR SERVICES; LOSS OF USE, DATA, OR PROFITS; OR BUSINESS INTERRUPTION) HOWEVER CAUSED AND ON ANY THEORY OF LIABILITY, WHETHER IN CONTRACT, STRICT LIABILITY, OR TORT (INCLUDING NEGLIGENCE OR OTHERWISE) ARISING IN ANY WAY OUT OF THE USE OF THIS SOFTWARE, EVEN IF ADVISED OF THE POSSIBILITY OF SUCH DAMAGE.
This product includes cryptographic software written by Eric Young (eay@cryptsoft.com). This product includes software written by Tim Hudson (tjh@cryptsoft.com).
Copyright (c) 1998-2006 The OpenSSL Project. All rights reserved.
Redistribution and use in source and binary forms, with or without modification, are permitted provided that the following conditions are met:
- Redistributions of source code must retain the above copyright
notice, this list of conditions and the following disclaimer.
-
Redistributions in binary form must reproduce the above copyright notice, this list of conditions and the following disclaimer in the documentation and/or other materials provided with the distribution.
-
All advertising materials mentioning features or use of this software must display the following acknowledgment: "This product includes software developed by the OpenSSL Project for use in the OpenSSL Toolkit. (http://www.openssl.org/)"
-
The names "OpenSSL Toolkit" and "OpenSSL Project" must not be used to endorse or promote products derived from this software without prior written permission. For written permission, please contact openssl-core@openssl.org.
-
Products derived from this software may not be called "OpenSSL" nor may "OpenSSL" appear in their names without prior written permission of the OpenSSL Project.
-
Redistributions of any form whatsoever must retain the following acknowledgment: "This product includes software developed by the OpenSSL Project for use in the OpenSSL Toolkit (http://www.openssl.org/)"
THIS SOFTWARE IS PROVIDED BY THE OpenSSL PROJECT "AS IS" AND ANY EXPRESSED OR IMPLIED WARRANTIES, INCLUDING, BUT NOT LIMITED TO, THE IMPLIED WARRANTIES OF MERCHANTABILITY AND FITNESS FOR A PARTICULAR PURPOSE ARE DISCLAIMED. IN NO EVENT SHALL THE OpenSSL PROJECT OR ITS CONTRIBUTORS BE LIABLE FOR ANY DIRECT, INDIRECT, INCIDENTAL, SPECIAL, EXEMPLARY, OR CONSEQUENTIAL DAMAGES (INCLUDING, BUT NOT LIMITED TO, PROCUREMENT OF SUBSTITUTE GOODS OR SERVICES; LOSS OF USE, DATA, OR PROFITS; OR BUSINESS INTERRUPTION) HOWEVER CAUSED AND ON ANY THEORY OF LIABILITY, WHETHER IN CONTRACT, STRICT LIABILITY, OR TORT (INCLUDING NEGLIGENCE OR OTHERWISE) ARISING IN ANY WAY OUT OF THE USE OF THIS SOFTWARE, EVEN IF ADVISED OF THE POSSIBILITY OF SUCH DAMAGE.
This product includes cryptographic software written by Eric Young (eay@cryptsoft.com). This product includes software written by Tim Hudson (tjh@cryptsoft.com).
Copyright 2002 Sun Microsystems, Inc. ALL RIGHTS RESERVED. ECC cipher suite support in OpenSSL originally developed by SUN MICROSYSTEMS, INC., and contributed to the OpenSSL project.
LICENSE.sha2-bsd--nos_crypto
/* FIPS 180-2 SHA-224/256/384/512 implementation
* Last update: 02/02/2007
* Issue date: 04/30/2005
*
* Copyright (C) 2005, 2007 Olivier Gay olivier.gay@a3.epfl.ch
* All rights reserved.
*
* Redistribution and use in source and binary forms, with or without
* modification, are permitted provided that the following conditions
* are met:
* 1. Redistributions of source code must retain the above copyright
* notice, this list of conditions and the following disclaimer.
* 2. Redistributions in binary form must reproduce the above copyright
* notice, this list of conditions and the following disclaimer in the
* documentation and/or other materials provided with the distribution.
* 3. Neither the name of the project nor the names of its contributors
* may be used to endorse or promote products derived from this software
* without specific prior written permission.
*
* THIS SOFTWARE IS PROVIDED BY THE PROJECT AND CONTRIBUTORS ``AS IS'' AND
* ANY EXPRESS OR IMPLIED WARRANTIES, INCLUDING, BUT NOT LIMITED TO, THE
* IMPLIED WARRANTIES OF MERCHANTABILITY AND FITNESS FOR A PARTICULAR PURPOSE
* ARE DISCLAIMED. IN NO EVENT SHALL THE PROJECT OR CONTRIBUTORS BE LIABLE
* FOR ANY DIRECT, INDIRECT, INCIDENTAL, SPECIAL, EXEMPLARY, OR CONSEQUENTIAL
* DAMAGES (INCLUDING, BUT NOT LIMITED TO, PROCUREMENT OF SUBSTITUTE GOODS
* OR SERVICES; LOSS OF USE, DATA, OR PROFITS; OR BUSINESS INTERRUPTION)
* HOWEVER CAUSED AND ON ANY THEORY OF LIABILITY, WHETHER IN CONTRACT, STRICT
* LIABILITY, OR TORT (INCLUDING NEGLIGENCE OR OTHERWISE) ARISING IN ANY WAY
* OUT OF THE USE OF THIS SOFTWARE, EVEN IF ADVISED OF THE POSSIBILITY OF
* SUCH DAMAGE.
*/
LICENSE.unicode--jm_share_folder
/*
* Copyright 2001-2004 Unicode, Inc.
*
* Disclaimer
*
* This source code is provided as is by Unicode, Inc. No claims are
* made as to fitness for any particular purpose. No warranties of any
* kind are expressed or implied. The recipient agrees to determine
* applicability of information provided. If this file has been
* purchased on magnetic or optical media from Unicode, Inc., the
* sole remedy for any claim will be exchange of defective media
* within 90 days of receipt.
*
* Limitations on Rights to Redistribute This Code
*
* Unicode, Inc. hereby grants the right to freely use the information
* supplied in this file in the creation of products supporting the
* Unicode Standard, and to make copies of this file in any form
* for internal or external distribution as long as this notice
* remains attached.
*/
LICENSE.zlib--zlib
zlib.h -- interface of the 'zlib' general purpose compression library version 1.2.3, July 18th, 2005
Copyright (C) 1995-2005 Jean-loup Gailly and Mark Adler
This software is provided 'as-is', without any express or implied warranty. In no event will the authors be held liable for any damages arising from the use of this software.
Permission is granted to anyone to use this software for any purpose, including commercial applications, and to alter it and redistribute it freely, subject to the following restrictions:
- The origin of this software must not be misrepresented; you must not claim that you wrote the original software. If you use this software in a product, an acknowledgment in the product documentation would be appreciated but is not required.
- Altered source versions must be plainly marked as such, and must not be misrepresented as being the original software.
- This notice may not be removed or altered from any source distribution.
Jean-loup Gailly Mark Adler
jloup@gzip.org madler@alumni.caltech.edu
The data format used by the zlib library is described by RFCs (Request for Comments) 1950 to 1952 in the files http://www.ietf.org/rfc/rfc1950.txt (zlib format), rfc1951.txt (deflate format) and rfc1952.txt (gzip format).
B HP supplies and accessories
This section provides information on HP supplies and accessories for the printer. The information is subject to changes, visit the HP website (www.hpshopping.com) for the latest updates. You may also make purchases through the website.
This section contains the following topics:
• Order printing supplies online
- Supplies
Order printing supplies online
To order supplies online or create a printable shopping list, open the HP software that came with your printer and click Shopping. Select Shop for Supplies Online. The HP software uploads, with your permission, printer information, including model number, serial number, and estimated ink levels. The HP supplies that work in your printer are pre-selected. You can change quantities, add or remove items, and then print the list or purchase online at the HP Store or other online retailers (options differ by country/region). Cartridge information and links to online shopping also appear on ink alert messages.
You can also order online by visiting www.hp.com/buy/supplies. If prompted, select your country/region, follow the prompts to select your printer, and then the supplies you need.

NOTE: Ordering cartridges online is not supported in all countries/regions. However, many countries have information on ordering by telephone, locating a local store and printing a shopping list. In addition, you can select the 'How to Buy' option at the top of the www.hp.com/buy/supplies page to obtain information about purchasing HP products in your country.
Supplies
- Ink cartridges and printheads
- HP media
Ink cartridges and printheads
Ordering cartridges online is not supported in all countries/regions. However, many countries have information on ordering by telephone, locating a local store and printing a shopping list. In addition, you can select the How to Buy option at the top of the www.hp.com/buy/supplies page to obtain information about purchasing HP products in your country.
Use only the replacement cartridges that have the same cartridge number as the ink cartridge you are replacing. You can find the cartridge number in the following places:
- In the embedded web server, by clicking the Tools tab, and then, under Product Information clicking Ink Gauge. For more information, see Embedded web server.
- On the printer status report (see Understand the Printer Status Report).
- On the label of the ink cartridge you are replacing.
On a sticker inside the printer.

CAUTION: The Setup ink cartridge that comes with the printer is not available for separate purchase. Check for the correct cartridge number through the EWS, on the printer status report, or on the sticker inside the printer.

NOTE: Ink level warnings and indicators provide estimates for planning purposes only. When you receive a low-ink warning message, consider having a replacement cartridge available to avoid possible printing delays. You do not need to replace cartridges until prompted to do so.
HP media
To order media such as HP Premium Paper, go to www.hp.com.
 | HP recommends plain papers with the ColorLok logo for printing and copying of everyday documents. All papers with the ColorLok logo are independently tested to meet high standards of reliability and print quality, and produce documents with crisp, vivid color, bolder blacks, and that dry faster than ordinary plain papers. Look for papers with the ColorLok logo in a variety of weights and sizes from major paper manufacturers. |
C Additional fax setup
After completing all the steps in the getting started guide, use the instructions in this section to complete your fax setup. Keep your getting started guide for later use.
In this section, you learn how to set up the printer so that faxing works successfully with equipment and services you might already have on the same phone line.

TIP: You can also use the Fax Setup Wizard (Windows) or HP Setup Assistant (Mac OS X) to help you quickly set up some important fax settings such as the answer mode and fax header information. You can access these tools through the HP software you installed with the printer. After you run these tools, follow the procedures in this section to complete your fax setup.
This section contains the following topics:
• Set up faxing (parallel phone systems)
- Serial-type fax setup
- Test fax setup
Set up faxing (parallel phone systems)
Before you begin setting up the printer for faxing, determine which kind of phone system your country/region uses. The instructions for fax setup differ depending on whether you have a serial-or parallel-type phone system.
- If you do not see your country/region listed in the table, you probably have a serial-type phone system. In a serial-type phone system, the connector type on your shared telephone equipment (modems, phones, and answering machines) does not allow a physical connection to the "2-EXT" port on the printer. Instead, all equipment must be connected at the telephone wall jack.

NOTE: In some countries/regions that use serial-type phone systems, the phone cord that came with the printer might have an additional wall plug attached to it. This enables you to connect other telecom devices to the wall jack where you plug in the printer. You might need to connect the supplied phone cord to the adapter provided for your country/region.
- If your country/region is listed in the table, you probably have a parallel-type telephone system. In a parallel-type phone system, you are able to connect shared telephone equipment to the phone line by using the "2-EXT" port on the back of the printer.

NOTE: If you have a parallel-type phone system, HP recommends you use the 2-wire phone cord supplied with the printer to connect it to the telephone wall jack.
Table C-1 Countries/regions with a parallel-type phone system
| Argentina Australia Brazil | ||
| Canada Chile China | ||
| Colombia Greece India | ||
| Indonesia Ireland Japan | ||
| Korea Latin America Malaysia | ||
| Mexico Philippines Poland | ||
| Portugal Russia Saudi Arabia | ||
| Singapore Spain Taiwan | ||
| Thailand USA Venezuela | ||
| Vietnam |
If you are unsure which kind of telephone system you have (serial or parallel), check with your telephone company.
This section contains the following topics:
• Select the correct fax setup for your home or office
• Case A: Separate fax line (no voice calls received)
• Case B: Set up the printer with DSL
• Case C: Set up the printer with a PBX phone system or an ISDN line
• Case D: Fax with a distinctive ring service on the same line
• Case E: Shared voice/fax line
• Case F: Shared voice/fax line with voice mail
• Case G: Fax line shared with computer modem (no voice calls received)
• Case H: Shared voice/fax line with computer modem
• Case I: Shared voice/fax line with answering machine
• Case J: Shared voice/fax line with computer modem and answering machine
• Case K: Shared voice/fax line with computer dial-up modem and voice mail
Select the correct fax setup for your home or office
To fax successfully, you need to know what types of equipment and services (if any) share the same phone line with the printer. This is important because you might need to connect some of your existing office equipment directly to the printer, and you might also need to change some fax settings before you can fax successfully.
- Determine if your telephone system is serial or parallel. See Set up faxing (parallel phone systems).
a. Serial-type telephone system—See Serial-type fax setup.
b. Parallel-type telephone system—Go to step 2.
- Select the combination of equipment and services sharing your fax line.
- DSL: A Digital subscriber line (DSL) service through your telephone company. (DSL might be called ADSL in your country/region.)
- PBX: A private branch exchange (PBX) phone system or an integrated services digital network (ISDN) system.
- Distinctive ring service: A distinctive ring service through your telephone company provides multiple telephone numbers with different ring patterns.
• Voice calls: Voice calls are received at the same phone number you use for fax calls on the printer.
- Computer dial-up modem: A computer dial-up modem is on the same phone line as the printer. If you answer Yes to any of the following questions, you are using a computer dial-up modem:
Do you send and receive faxes directly to and from your computer software applications through a dial-up connection?
Do you send and receive email messages on your computer through a dial-up connection?
- Do you access the Internet from your computer through a dial-up connection?
-
Answering machine: An answering machine that answers voice calls at the same phone number you use for fax calls on the printer.
• Voice mail service: A voice mail subscription through your telephone company at the same number you use for fax calls on the printer. -
From the following table, select the combination of equipment and services applicable to your home or office setting. Then look up the recommended fax setup. Step-by-step instructions are included for each case in the sections that follow.

NOTE: If your home or office setup is not described in this section, set up the printer as you would a regular analog phone. Make sure you use the phone cord supplied in the box to connect one end to your telephone wall jack and the other end to the port labeled 1-LINE on the back of the printer. If you use another phone cord, you might experience problems sending and receiving faxes.
You might need to connect the supplied phone cord to the adapter provided for your country/region.
| Other equipment or services sharing your fax line Recommended fax | setup | ||||||
| DSL PBX Distinctive ring service | Voice calls | Computer dial-up modem | Answering machine | Voice mail service | |||
| Case A: Separatefax line (no voice calls received) | |||||||
| √ | Case B: Set up t printer with DSL | ||||||
| √ | Case C: Set up the printer with a PBX phone system or an ISDN line | ||||||
| √ | Case D: Fax with a distinctive ring service on the same line | ||||||
| √ | Case E: Shared voice/fax line | ||||||
| √ | √ | Case F: Shared voice/fax line with voice mail | |||||
| √ | Case G: Fax line shared with computer modem (no voice calls received) | ||||||
| √ | √ | Case H: Shared voice/fax line with computer modem | |||||
| √ | √ | Case I: Shared voice/fax line with answering machine | |||||
| √ | √ | √ | Case J: Sharedvoice/fax line with computer modem and answering machine | Sharedvoice/fax line with computer modem and answering machine | |||
| √ | √ | Case K: Shared | √ | voice/fax line with computer dial-up modem and voice mail | |||
Case A: Separate fax line (no voice calls received)
If you have a separate phone line on which you receive no voice calls, and you have no other equipment connected on this phone line, set up the printer as described in this section.
Back view of the printer
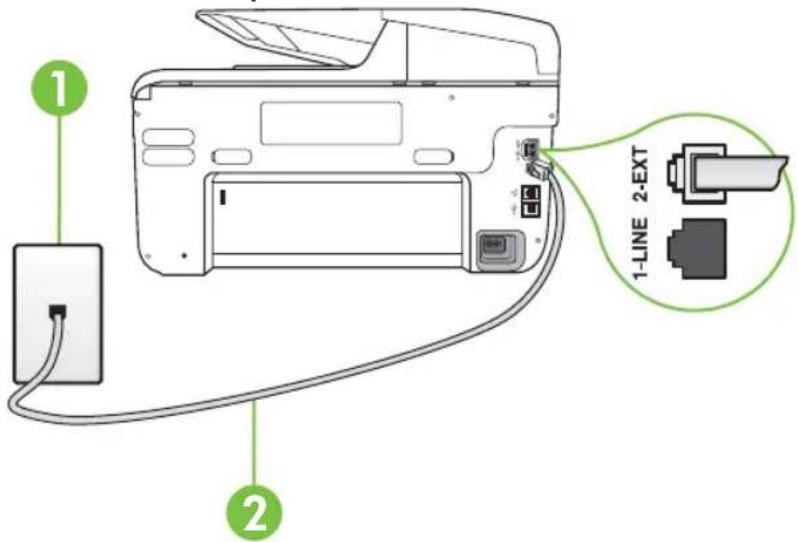
text_image
1 2 1-LINE 2-EXT| 1 Telephone wall jack | |
| 2 Use the phone cord supplied in the box with the printer to connect to the 1-LINE port.You might need to connect the supplied phone cord to the adapter provided for your country/region. | |
To set up the printer with a separate fax line
- Using the phone cord supplied in the box with the printer, connect one end to your telephone wall jack, then connect the other end to the port labeled 1-LINE on the back of the printer.

NOTE: You might need to connect the supplied phone cord to the adapter provided for your country/region.
If you do not use the supplied cord to connect from the telephone wall jack to the printer, you might not be able to fax successfully. This special phone cord is different from the phone cords you might already have in your home or office.
-
Turn on the Auto Answer setting.
-
(Optional) Change the Rings to Answer setting to the lowest setting (two rings).
-
Run a fax test.
When the phone rings, the printer answers automatically after the number of rings you set in the Rings to Answer setting. The printer begins emitting fax reception tones to the sending fax machine and receives the fax.
Case B: Set up the printer with DSL
If you have a DSL service through your telephone company, and do not connect any equipment to the printer, use the instructions in this section to connect a DSL filter between the telephone wall jack and the printer. The DSL filter removes the digital signal that can interfere with the printer, so the printer can communicate correctly with the phone line. (DSL might be called ADSL in your country/region.)

NOTE: If you have a DSL line and you do not connect the DSL filter, you cannot send and receive faxes with the printer.
Back view of the printer
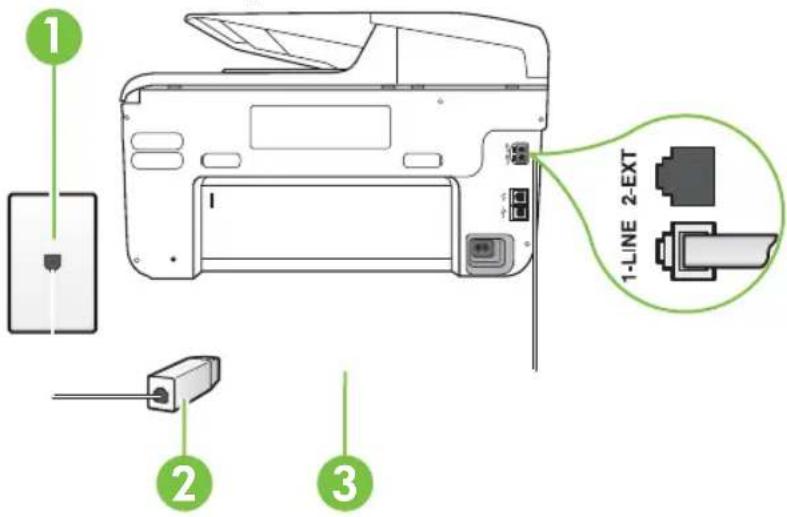
text_image
1 1-LINE 2-EXT 2 3| 1 Telephone wall jack | |
| 2 DSL (or ADSL) filter and cord supplied by your DSL provider | |
| 3 Use the phone cord supplied in the box with the printer to connect to the 1-LINE port.You might need to connect the supplied phone cord to the adapter provided for your country/region. | |
To set up the printer with DSL
- Obtain a DSL filter from your DSL provider.
- Using the phone cord supplied in the box with the printer, connect one end to the open port on the DSL filter, and then connect the other end to the port labeled 1-LINE on the back of the printer.

NOTE: You might need to connect the supplied phone cord to the adapter provided for your country/region.
If you do not use the supplied cord to connect from the DSL filter to the printer, you might not be able to fax successfully. This special phone cord is different from the phone cords you might already have in your home or office.
As only one phone cord is supplied, you might need to obtain additional phone cords for this setup.
- Connect an additional phone cord from the DSL filter to the telephone wall jack.
- Run a fax test.
If you encounter problems setting up the printer with optional equipment, contact your local service provider or vendor for further assistance.
Case C: Set up the printer with a PBX phone system or an ISDN line
If you are using either a PBX phone system or an ISDN converter/terminal adapter, make sure you do the following:
- If you are using either a PBX or an ISDN converter/terminal adaptor, connect the printer to the port that is designated for fax and phone use. Also, make sure that the terminal adapter is set to the correct switch type for your country/region, if possible.

NOTE: Some ISDN systems allow you to configure the ports for specific phone equipment. For example, you might have assigned one port for telephone and Group 3 fax and another port for multiple purposes. If you have problems when connected to the fax/phone port of your ISDN converter, try using the port designated for multiple purposes; it might be labeled "multi-combi" or something similar.
- If you are using a PBX phone system, set the call waiting tone to "off."

NOTE: Many digital PBX systems include a call-waiting tone that is set to "on" by default. The call waiting tone interferes with any fax transmission, and you cannot send or receive faxes with the printer. Refer to the documentation that came with your PBX phone system for instructions on how to turn off the call-waiting tone.
- If you are using a PBX phone system, dial the number for an outside line before dialing the fax number.
- Make sure you use the supplied cord to connect from the telephone wall jack to the printer. If you do not, you might not be able to fax successfully. This special phone cord is different from the phone cords you might already have in your home or office. If the supplied phone cord is too short, you can purchase a coupler from your local electronics store and extend it. You might need to connect the supplied phone cord to the adapter provided for your country/region.
If you encounter problems setting up the printer with optional equipment, contact your local service provider or vendor for further assistance.
Case D: Fax with a distinctive ring service on the same line
If you subscribe to a distinctive ring service (through your telephone company) that allows you to have multiple phone numbers on one phone line, each with a different ring pattern, set up the printer as described in this section.
Back view of the printer
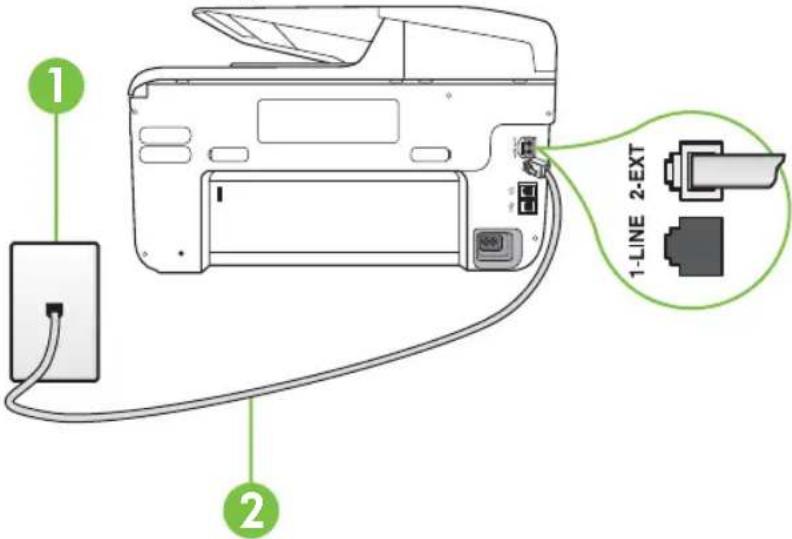
text_image
1 2 1-LINE 2-EXT| 1 Telephone wall jack | |
| 2 Use the phone cord supplied in the box with the printer to connect to the 1-LINE port.You might need to connect the supplied phone cord to the adapter provided for your country/region. | |
To set up the printer with a distinctive ring service
- Using the phone cord supplied in the box with the printer, connect one end to your telephone wall jack, then connect the other end to the port labeled 1-LINE on the back of the printer.

NOTE: You might need to connect the supplied phone cord to the adapter provided for your country/region.
If you do not use the supplied cord to connect from the telephone wall jack to the printer, you might not be able to fax successfully. This special phone cord is different from the phone cords you might already have in your home or office.
-
Turn on the Auto Answer setting.
-
Change the Distinctive Ring setting to match the pattern that the telephone company assigned to your fax number.

NOTE: By default, the printer is set to answer all ring patterns. If you do not set the Distinctive Ring to match the ring pattern assigned to your fax number, the printer might answer both voice calls and fax calls or it might not answer at all.

TIP: You can also use the Ring Pattern Detection feature in the printer's control panel to set distinctive ring. With this feature, the printer recognizes and records the ring pattern of an incoming call and, based on this call, automatically determines the distinctive ring pattern assigned by your telephone company to fax calls. For more information, see Change the answer ring pattern for distinctive ring.
-
(Optional) Change the Rings to Answer setting to the lowest setting (two rings).
-
Run a fax test.
The printer automatically answers incoming calls that have the ring pattern you selected (Distinctive Ring setting) after the number of rings you selected (Rings to Answer setting). The printer begins emitting fax reception tones to the sending fax machine and receives the fax.
If you encounter problems setting up the printer with optional equipment, contact your local service provider or vendor for further assistance.
Case E: Shared voice/fax line
If you receive both voice calls and fax calls at the same phone number, and you have no other office equipment (or voice mail) on this phone line, set up the printer as described in this section.
Back view of the printer
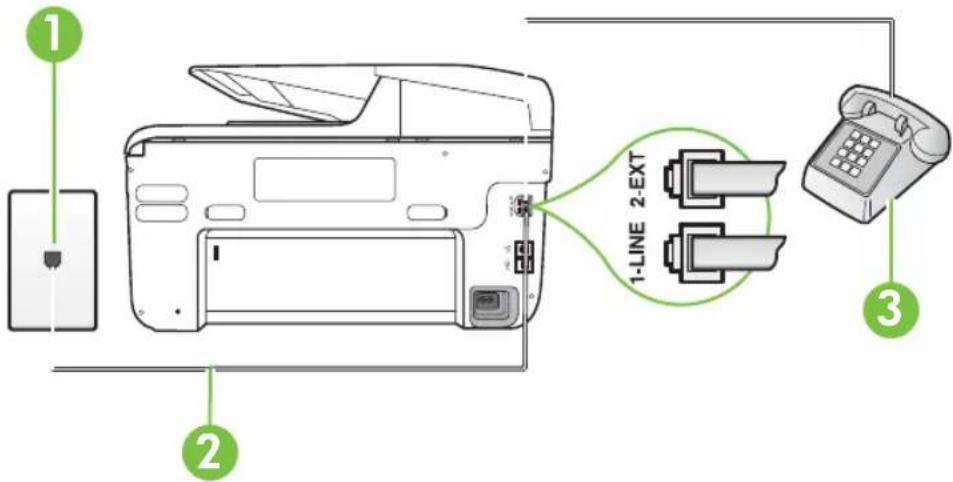
text_image
1 2 1-LINE 2-EXT 3| 1 Telephone wall jack | |
| 2 Use the phone cord supplied in the box with the printer to connect to the 1-LINE port.You might need to connect the supplied phone cord to the adapter provided for your country/region. | |
| 3 Telephone (optional) | |
To set up the printer with a shared voice/fax line
- Using the phone cord supplied in the box with the printer, connect one end to your telephone wall jack, then connect the other end to the port labeled 1-LINE on the back of the printer.

NOTE: You might need to connect the supplied phone cord to the adapter provided for your country/region.
If you do not use the supplied cord to connect from the telephone wall jack to the printer, you might not be able to fax successfully. This special phone cord is different from the phone cords you might already have in your home or office.
- Do one of the following:
- If you have a parallel-type phone system, remove the white plug from the port labeled 2-EXT on the back of the printer, and then connect a phone to this port.
- If you have a serial-type phone system, you might plug your phone directly on top of the printer cable which has a wall plug attached to it.
- Now you need to decide how you want the printer to answer calls, automatically or manually:
- If you set up the printer to answer calls automatically, it answers all incoming calls and receives faxes. The printer cannot distinguish between fax and voice calls in this case; if you suspect the call is a voice call, you need to answer it before the printer answers the call. To set up the printer to answer calls automatically, turn on the Auto Answer setting.
- If you set up the printer to answer faxes manually, you must be available to respond in person to incoming fax calls or the printer cannot receive faxes. To set up the printer to answer calls manually, turn off the Auto Answer setting.
- Run a fax test.
If you pick up the phone before the printer answers the call and hear fax tones from a sending fax machine, you need to answer the fax call manually.
If you encounter problems setting up the printer with optional equipment, contact your local service provider or vendor for further assistance.
Case F: Shared voice/fax line with voice mail
If you receive both voice calls and fax calls at the same phone number, and you also subscribe to a voice mail service through your telephone company, set up the printer as described in this section.

NOTE: You cannot receive faxes automatically if you have a voice mail service at the same phone number you use for fax calls. You must receive faxes manually; this means you must be available to respond in person to incoming fax calls. If you want to receive faxes automatically instead, contact your telephone company to subscribe to a distinctive ring service, or to obtain a separate phone line for faxing.
Back view of the printer
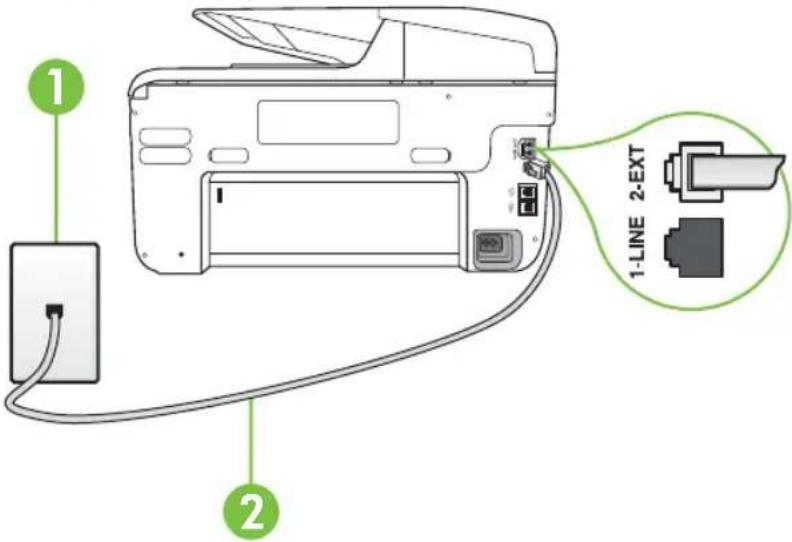
text_image
1 2 1-LINE 2-EXT| 1 Telephone wall jack | |
| 2 Use the phone cord supplied in the box with the printer to connect to the 1-LINE port.You might need to connect the supplied phone cord to the adapter provided for your country/region. | |
To set up the printer with voice mail
- Using the phone cord supplied in the box with the printer, connect one end to your telephone wall jack, then connect the other end to the port labeled 1-LINE on the back of the printer. You might need to connect the supplied phone cord to the adapter provided for your country/region.

NOTE: You might need to connect the supplied phone cord to the adapter provided for your country/region.
If you do not use the supplied cord to connect from the telephone wall jack to the printer, you might not be able to fax successfully. This special phone cord is different from the phone cords you might already have in your home or office.
-
Turn off the Auto Answer setting.
-
Run a fax test.
You must be available to respond in person to incoming fax calls, or the printer cannot receive faxes. You must initiate the manual fax before voicemail picks up the line.
If you encounter problems setting up the printer with optional equipment, contact your local service provider or vendor for further assistance.
Case G: Fax line shared with computer modem (no voice calls received)
If you have a fax line on which you receive no voice calls, and you also have a computer modem connected on this line, set up the printer as described in this section.

NOTE: If you have a computer dial-up modem, your computer dial-up modem shares the phone line with the printer. You cannot use both your modem and the printer simultaneously. For example, you cannot use the printer for faxing while you are using your computer dial-up modem to send an email or access the Internet.
- Set up the printer with a computer dial-up modem
• Set up the printer with a computer DSL/ADSL modem
Set up the printer with a computer dial-up modem
If you are using the same phone line for sending faxes and for a computer dial-up modem, follow these directions for setting up the printer.
Back view of the printer
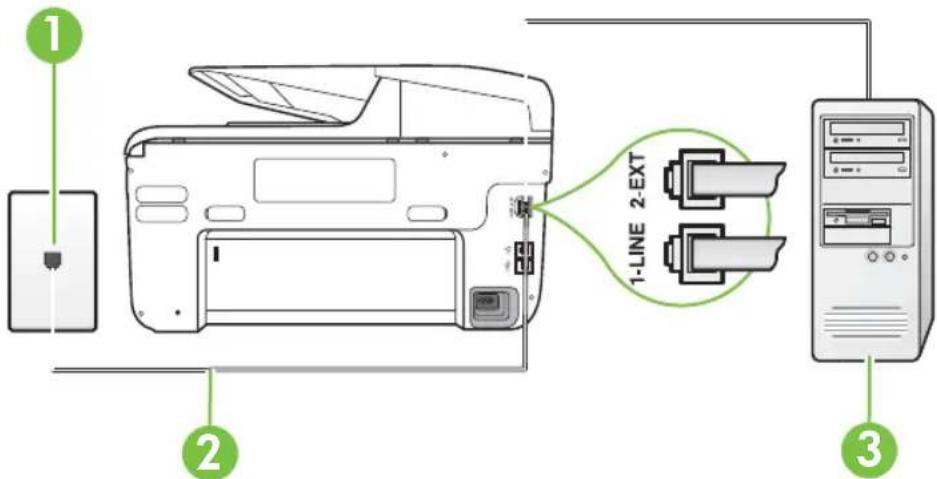
text_image
1 2 1-LINE 2-EXT 3| 1 Telephone wall jack | |
| 2 Use the phone cord supplied in the box with the printer to connect to the 1-LINE port.You might need to connect the supplied phone cord to the adapter provided for your country/region. | |
| 3 Computer with modem | |
To set up the printer with a computer dial-up modem
-
Remove the white plug from the port labeled 2-EXT on the back of the printer.
-
Find the phone cord that connects from the back of your computer (your computer dial-up modem) to a telephone wall jack. Disconnect the cord from the telephone wall jack and plug it into the port labeled 2-EXT on the back of the printer.
-
Using the phone cord supplied in the box with the printer, connect one end to your telephone wall jack, then connect the other end to the port labeled 1-LINE on the back of the printer.

NOTE: You might need to connect the supplied phone cord to the adapter provided for your country/region.
If you do not use the supplied cord to connect from the telephone wall jack to the printer, you might not be able to fax successfully. This special phone cord is different from the phone cords you might already have in your home or office.
- If your modem software is set to receive faxes to your computer automatically, turn off that setting.

NOTE: If you do not turn off the automatic fax reception setting in your modem software, the printer cannot receive faxes.
-
Turn on the Auto Answer setting.
-
(Optional) Change the Rings to Answer setting to the lowest setting (two rings).
-
Run a fax test.
When the phone rings, the printer automatically answers after the number of rings you set in the Rings to Answer setting. The printer begins emitting fax reception tones to the sending fax machine and receives the fax.
If you encounter problems setting up the printer with optional equipment, contact your local service provider or vendor for further assistance.
Set up the printer with a computer DSL/ADSL modem
If you have a DSL line and use that phone line to send faxes, follow these instructions to set up your fax.
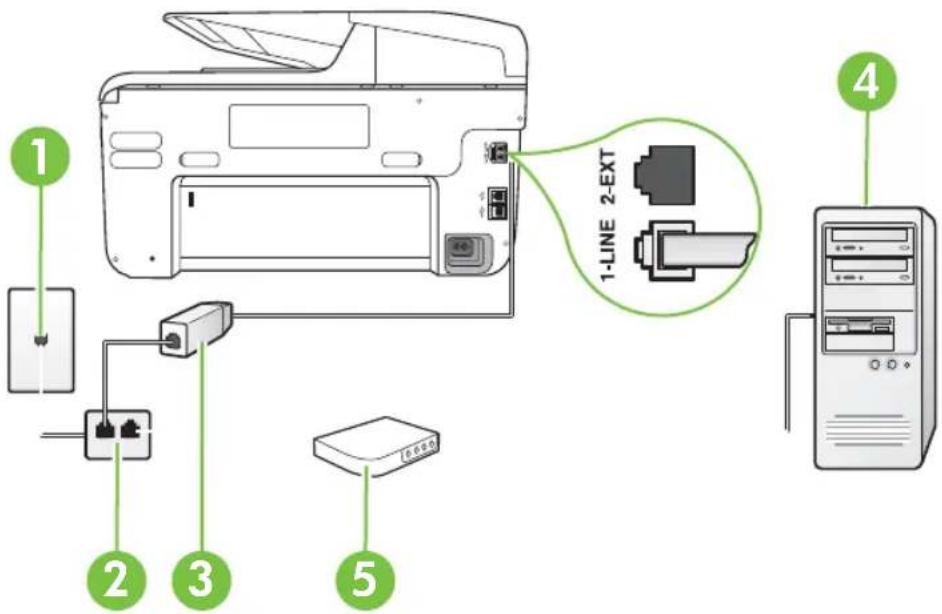
text_image
1 2 3 4 5 1-LINE 2-EXT| 1 Telephone wall jack | |
| 2 Parallel splitter | |
| 3 DSL/ADSL filter | Connect one end of the phone jack that was supplied with the printer to connect to the 1-LINE port on the back of the printer. Connect the other end of the cord to the DSL/ADSL filter.You might need to connect the supplied phone cord to the adapter provided for your country/region. |
| 4 Computer | |
| 5 Computer DSL/ADSL | modem |

NOTE: You need to purchase a parallel splitter. A parallel splitter has one RJ-11 port on the front and two RJ-11 ports on the back. Do not use a 2-line phone splitter, a serial splitter, or a parallel splitter which has two RJ-11 ports on the front and a plug on the back.

To set up the printer with a computer DSL/ADSL modem
- Obtain a DSL filter from your DSL provider.
- Using the phone cord provided in the box with the printer, connect one end to the DSL filter, and then connect the other end to the port labeled 1-LINE on the back of the printer.

NOTE: You might need to connect the supplied phone cord to the adapter provided for your country/region.
If you do not use the supplied cord to connect from the DSL filter to the back of the printer, you might not be able to fax successfully. This special phone cord is different from the phone cords you might already have in your home or office.
- Connect the DSL filter to the parallel splitter.
- Connect the DSL modem to the parallel splitter.
- Connect the parallel splitter to the wall jack.
- Run a fax test.
When the phone rings, the printer automatically answers after the number of rings you set in the Rings to Answer setting. The printer begins emitting fax reception tones to the sending fax machine and receives the fax.
If you encounter problems setting up the printer with optional equipment, contact your local service provider or vendor for further assistance.
Case H: Shared voice/fax line with computer modem
There are two different ways to set up the printer with your computer based on the number of phone ports on your computer. Before you begin, check your computer to see if it has one or two phone ports.

NOTE: If your computer has only one phone port, you need to purchase a parallel splitter (also called a coupler), as shown in the illustration. (A parallel splitter has one RJ-11 port on the front and two RJ-11 ports on the back. Do not use a two-line phone splitter, a serial splitter, or a parallel splitter which has two RJ-11 ports on the front and a plug on the back.)
- Shared voice/fax with computer dial-up modem
• Shared voice/fax with computer DSL/ADSL modem
Shared voice/fax with computer dial-up modem
If you use your phone line for both fax and telephone calls, use these instructions to set up your fax.
There are two different ways to set up the printer with your computer based on the number of phone ports on your computer. Before you begin, check your computer to see if it has one or two phone ports.

NOTE: If your computer has only one phone port, you need to purchase a parallel splitter (also called a coupler), as shown in the illustration. (A parallel splitter has one RJ-11 port on the front and two RJ-11 ports on the back. Do not use a two-line phone splitter, a serial splitter, or a parallel splitter which has two RJ-11 ports on the front and a plug on the back.)
Example of a parallel splitter

To set up the printer on the same phone line as a computer with two phone ports
Back view of the printer
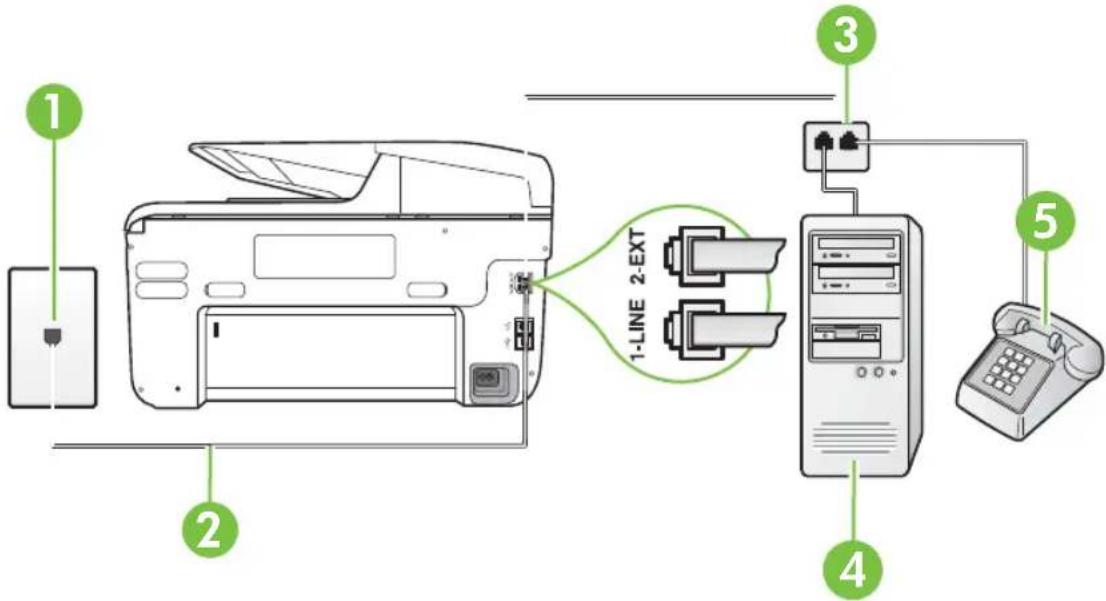
text_image
1 2 1-LINE 2-EXT 3 4 5| 1 Telephone wall jack | |
| 2 Use the phone cord | supplied in the box with the printer to connect to the 1-LINE port. |
| 3 Parallel splitter | |
| 4 Computer with modem | |
| 5 Telephone |
- Remove the white plug from the port labeled 2-EXT on the back of the printer.
- Find the phone cord that connects from the back of your computer (your computer dial-up modem) to a telephone wall jack. Disconnect the cord from the telephone wall jack and plug it into the port labeled 2-EXT on the back of the printer.
- Connect a phone to the "OUT" port on the back of your computer dial-up modem.
- Using the phone cord supplied in the box with the printer, connect one end to your telephone wall jack, then connect the other end to the port labeled 1-LINE on the back of the printer.

NOTE: You might need to connect the supplied phone cord to the adapter provided for your country/region.
If you do not use the supplied cord to connect from the telephone wall jack to the printer, you might not be able to fax successfully. This special phone cord is different from the phone cords you might already have in your home or office.
- If your modem software is set to receive faxes to your computer automatically, turn off that setting.

NOTE: If you do not turn off the automatic fax reception setting in your modem software, the printer cannot receive faxes.
- Now you need to decide how you want the printer to answer calls, automatically or manually:
- If you set up the printer to answer calls automatically, it answers all incoming calls and receives faxes. The printer cannot distinguish between fax and voice calls in this case; if you suspect the call is a voice call, you need to answer it before the printer answers the call. To set up the printer to answer calls automatically, turn on the Auto Answer setting.
- If you set up the printer to answer faxes manually, you must be available to respond in person to incoming fax calls or the printer cannot receive faxes. To set up the printer to answer calls manually, turn off the Auto Answersetting.
- Run a fax test.
If you pick up the phone before the printer answers the call and hear fax tones from a sending fax machine, you need to answer the fax call manually.
If you use your phone line for voice, fax, and your computer dial-up modem, follow these directions to set up your fax.
If you encounter problems setting up the printer with optional equipment, contact your local service provider or vendor for further assistance.
Shared voice/fax with computer DSL/ADSL modem
Use these instructions if your computer has a DSL/ADSL modem
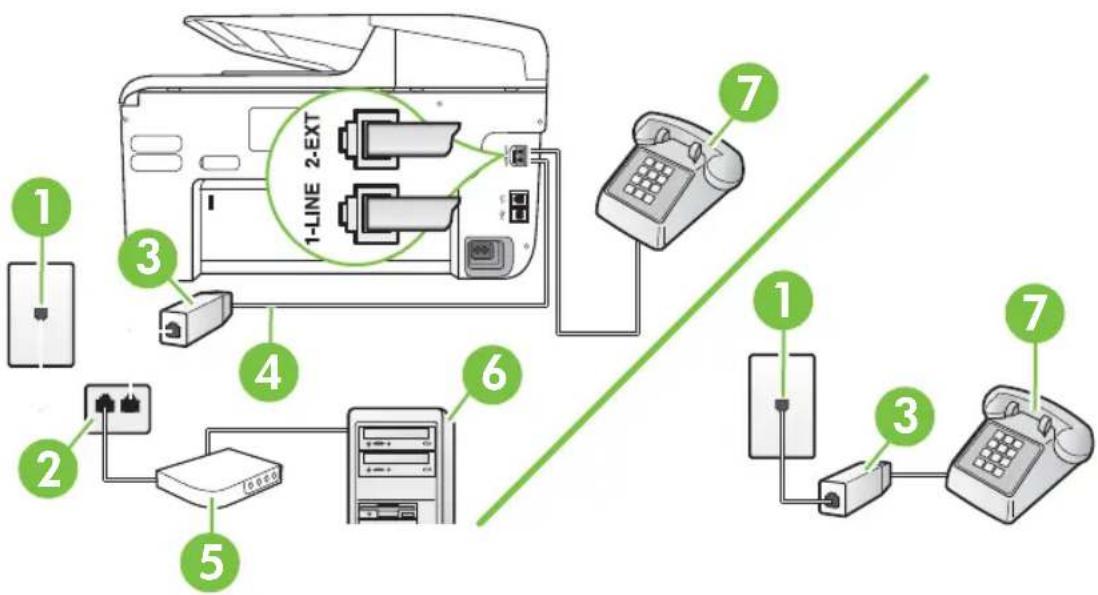
text_image
1-LINE 2-EXT 7 3 4 6 2 5 1 1 3 7| 1 Telephone wall jack | |
| 2 Parallel splitter | |
| 3 DSL/ADSL filter | |
| 4 Use the phone cord provided to connect to the 1-LINE port on the back of the printer.You might need to connect the supplied phone cord to the adapter provided for your country/region. | |
| 5 DSL/ADSL modem | |
| 6 Computer | |
| 7 Telephone | |

NOTE: You need to purchase a parallel splitter. A parallel splitter has one RJ-11 port on the front and two RJ-11 ports on the back. Do not use a 2-line phone splitter, a serial splitter, or a parallel splitter which has two RJ-11 ports on the front and a plug on the back.

To set up the printer with a computer DSL/ADSL modem
- Obtain a DSL filter from your DSL provider.

NOTE: Phones in other parts of the home/office sharing the same phone number with DSL service need to be connected to additional DSL filters to avoid noise when making voice calls.
- Using the phone cord supplied in the box with the printers, connect one end to the DSL filter, then connect the other end to the port labeled 1-LINE on the back of the printer.

NOTE: You might need to connect the supplied phone cord to the adapter provided for your country/region.
If you do not use the supplied cord to connect from the DSL filter to the printer, you might not be able to fax successfully. This special phone cord is different from phone cords you might already have in your home or office.
- If you have a parallel-type phone system, remove the white plug from the port labeled 2-EXT on the back of the printer, and then connect a phone to this port.
- Connect the DSL filter to the parallel splitter.
- Connect the DSL modem to the parallel splitter.
- Connect the parallel splitter to the wall jack.
- Run a fax test.
When the phone rings, the printer automatically answers after the number of rings you set in the Rings to Answer setting. The printer begins emitting fax reception tones to the sending fax machine and receives the fax.
If you encounter problems setting up the printer with optional equipment, contact your local service provider or vendor for further assistance.
Case I: Shared voice/fax line with answering machine
If you receive both voice calls and fax calls at the same phone number, and you also have an answering machine that answers voice calls at this phone number, set up the printer as described in this section.
Back view of the printer
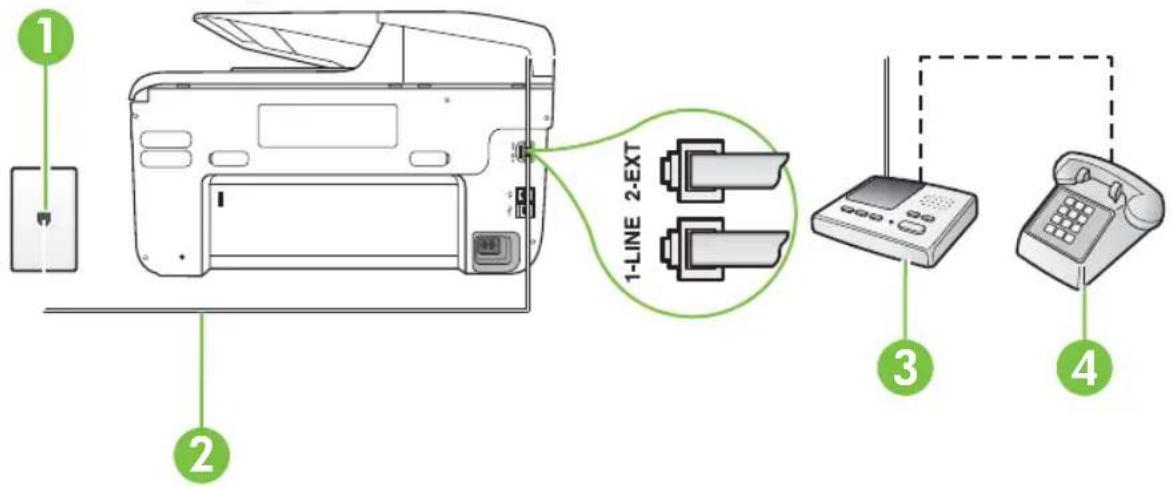
text_image
1 2 1-LINE 2-EXT 3 4| 1 Telephone wall jack | |
| 2 Use the phone cord | provided to connect to the 1-LINE port on the back of the printerYou might need to connect the supplied phone cord to the adapter provided for your country/region. |
| 3 Answering machine | |
| 4 Telephone (optional) |
To set up the printer with a shared voice/fax line with answering machine
-
Remove the white plug from the port labeled 2-EXT on the back of the printer.
-
Unplug your answering machine from the telephone wall jack, and connect it to the port labeled 2-EXT on the back of the printer.

NOTE: If you do not connect your answering machine directly to the printer, fax tones from a sending fax machine might be recorded on your answering machine, and you might not receive faxes with the printer.
- Using the phone cord supplied in the box with the printer, connect one end to your telephone wall jack, then connect the other end to the port labeled 1-LINE on the back of the printer.

NOTE: You might need to connect the supplied phone cord to the adapter provided for your country/region.
If you do not use the supplied cord to connect from the telephone wall jack to the printer, you might not be able to fax successfully. This special phone cord is different from the phone cords you might already have in your home or office.
- (Optional) If your answering machine does not have a built-in phone, for convenience you might want to connect a phone to the back of your answering machine at the "OUT" port.

NOTE: If your answering machine does not let you connect an external phone, you can purchase and use a parallel splitter (also known as a coupler) to connect both the answering machine and telephone to the printer. You can use standard phone cords for these connections.
- Turn on the Auto Answer setting.
- Set your answering machine to answer after a low number of rings.
- Change the Rings to Answer setting on the printer to the maximum number of rings supported by your printer. (The maximum number of rings varies by country/region.)
- Run a fax test.
When the phone rings, your answering machine answers after the number of rings you have set, and then plays your recorded greeting. The printer monitors the call during this time, "listening" for fax tones. If incoming fax tones are detected, the printer emits fax reception tones and receives the fax; if there are no fax tones, the printer stops monitoring the line and your answering machine can record a voice message.
If you encounter problems setting up the printer with optional equipment, contact your local service provider or vendor for further assistance.
Case J: Shared voice/fax line with computer modem and answering machine
If you receive both voice calls and fax calls at the same phone number, and you also have a computer modem and answering machine connected on this phone line, set up the printer as described in this section.

NOTE: Since your computer dial-up modem shares the phone line with the printer, you cannot use both your modem and the printer simultaneously. For example, you cannot use the printer for faxing while you are using your computer dial-up modem to send an email or access the Internet.
- Shared voice/fax line with computer dial-up modem and answering machine
• Shared voice/fax line with computer DSL/ADSL modem and answering machine
Shared voice/fax line with computer dial-up modem and answering machine
There are two different ways to set up the printer with your computer based on the number of phone ports on your computer. Before you begin, check your computer to see if it has one or two phone ports.

NOTE: If your computer has only one phone port, you need to purchase a parallel splitter (also called a coupler), as shown in the illustration. (A parallel splitter has one RJ-11 port on the front and two RJ-11 ports on the back. Do not use a two-line phone splitter, a serial splitter, or a parallel splitter which has two RJ-11 ports on the front and a plug on the back.)
Example of a parallel splitter

To set up the printer on the same phone line as a computer with two phone ports
Back view of the printer
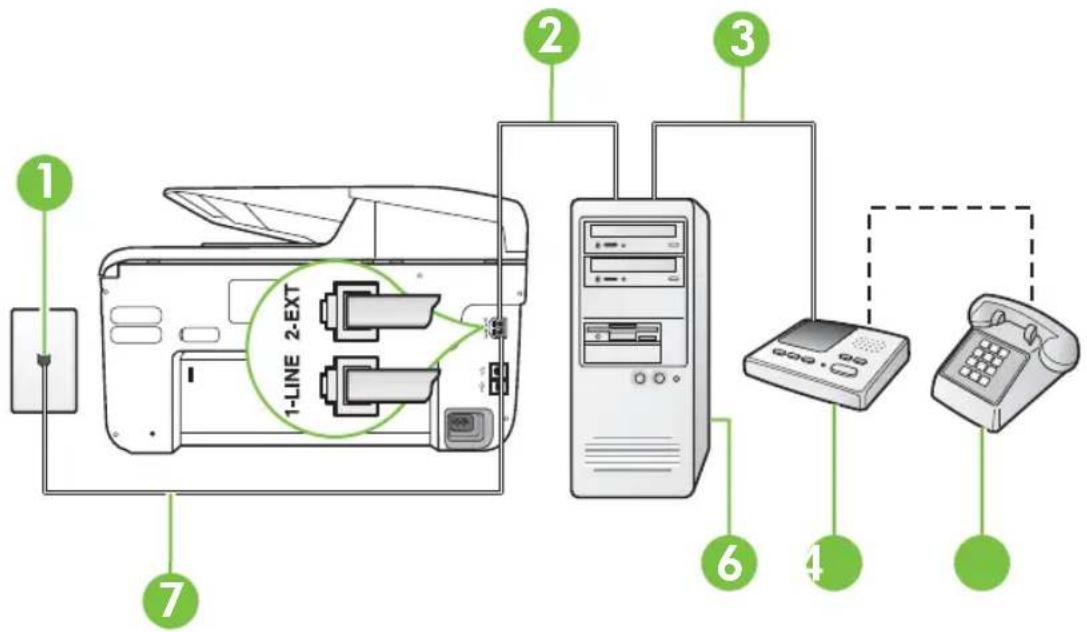
text_image
1-LINE 2-EXT 2 3 4 5 6 7| 1 Telephone wall jack | |
| 2 "IN" phone port on your computer | |
| 3 "OUT" phone port on your computer | |
| 4 Telephone (optional) | |
| 5 Answering machine | |
| 6 Computer with modem | |
| 7 Use the phone cord supplied in the box with the printer to connect to the 1-LINE port.You might need to connect the supplied phone cord to the adapter provided for your country/region. | |
-
Remove the white plug from the port labeled 2-EXT on the back of the printer.
-
Find the phone cord that connects from the back of your computer (your computer dial-up modem) to a telephone wall jack. Disconnect the cord from the telephone wall jack and plug it into the port labeled 2-EXT on the back of the printer.
-
Unplug your answering machine from the telephone wall jack, and connect it to the port labeled "OUT" on the back of the computer (the computer dial-up modem).
-
Using the phone cord supplied in the box with the printer, connect one end to your telephone wall jack, then connect the other end to the port labeled 1-LINE on the back of the printer.

NOTE: You might need to connect the supplied phone cord to the adapter provided for your country/region.
If you do not use the supplied cord to connect from the telephone wall jack to the printer, you might not be able to fax successfully. This special phone cord is different from the phone cords you might already have in your home or office.
- (Optional) If your answering machine does not have a built-in phone, for convenience you might want to connect a phone to the back of your answering machine at the "OUT" port.

NOTE: If your answering machine does not let you connect an external phone, you can purchase and use a parallel splitter (also known as a coupler) to connect both the answering machine and telephone to the printer. You can use standard phone cords for these connections.
- If your modem software is set to receive faxes to your computer automatically, turn off that setting.

NOTE: If you do not turn off the automatic fax reception setting in your modem software, the printer cannot receive faxes.
-
Turn on the Auto Answer setting.
-
Set your answering machine to answer after a low number of rings.
-
Change the Rings to Answer setting on the printer to the maximum number of rings supported by the product. (The maximum number of rings varies by country/region.)
-
Run a fax test.
When the phone rings, your answering machine answers after the number of rings you have set, and then plays your recorded greeting. The printer monitors the call during this time, "listening" for fax tones. If incoming fax tones are detected, the printer emits fax reception tones and receives the fax; if there are no fax tones, the printer stops monitoring the line and your answering machine can record a voice message.
If you encounter problems setting up the printer with optional equipment, contact your local service provider or vendor for further assistance.
Shared voice/fax line with computer DSL/ADSL modem and answering machine
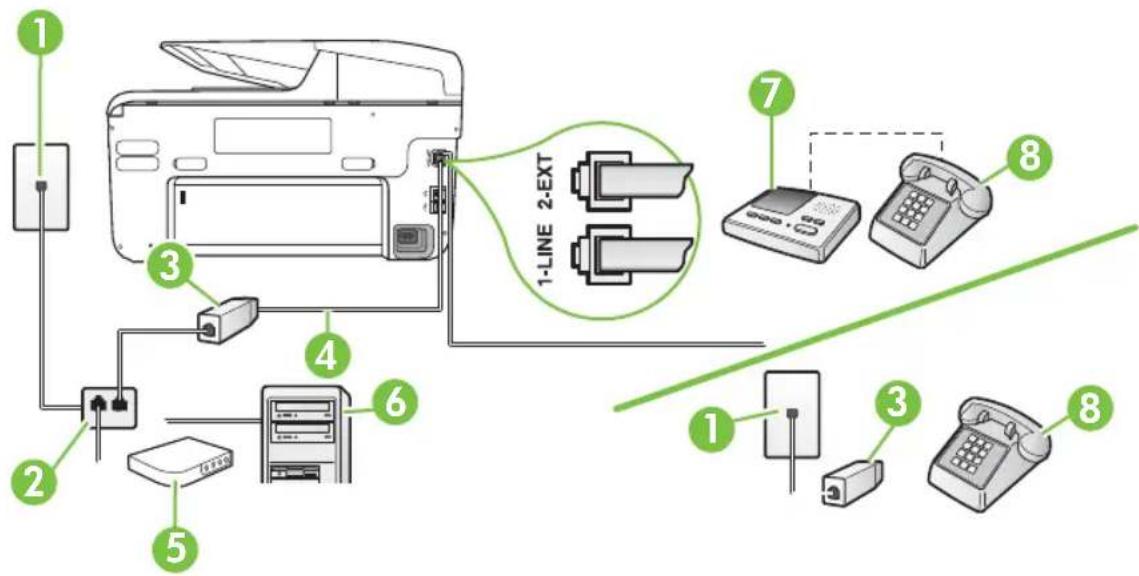
text_image
1 2 3 4 5 6 7 8 1-LINE 2-EXT 1 3 8| 1 Telephone wall jack | |
| 2 Parallel splitter | |
| 3 DSL/ADSL filter | |
| 4 Phone cord provided | with the printer connected to the 1-LINE port on the back of the printerYou might need to connect the supplied phone cord to the adapter provided for your country/region. |
| 5 DSL/ADSL modem | |
| 6 Computer | |
| 7 Answering machine | |
| 8 Telephone (optional) |

NOTE: You need to purchase a parallel splitter. A parallel splitter has one RJ-11 port on the front and two RJ-11 ports on the back. Do not use a 2-line phone splitter, a serial splitter, or a parallel splitter which has two RJ-11 ports on the front and a plug on the back.

To set up the printer with a computer DSL/ADSL modem
- Obtain a DSL/ADSL filter from your DSL/ADSL provider.

NOTE: Phones in other parts of the home/office sharing the same phone number with DSL/ADSL service need to be connected to additional DSL/ADSL filters, to avoid noise when making voice calls.
- Using the phone cord supplied in the box with the printer, connect one end to the DSL/ADSL filter, then connect the other end to the port labeled 1-LINE on the back of the printer.

NOTE: You might need to connect the supplied phone cord to the adapter provided for your country/region.
If you do not use the supplied cord to connect from the DSL/ADSL filter to the printer, you might not be able to fax successfully. This special phone cord is different from the phone cords you might already have in your home or office.
-
Connect the DSL/ADSL filter to the splitter.
-
Unplug the answering machine from the telephone wall jack, and connect it to the port labeled 2-EXT on the back of the printer.

NOTE: If you do not connect your answering machine directly to the printer, fax tones from a sending fax machine might be recorded on your answering machine, and you might not receive faxes with the printer.
-
Connect the DSL modem to the parallel splitter.
-
Connect the parallel splitter to the wall jack.
-
Set your answering machine to answer after a low number of rings.
-
Change your Rings to Answer setting on the printer to the maximum number of rings supported by the printer.

NOTE: The maximum number of rings varies by country/region.
- Run a fax test.
When the phone rings, your answering machine answers after the number of rings you have set, and then play your recorded greeting. The printer monitors the call during this time, "listening" for fax tones. If incoming fax tones are detected, the printer emits fax reception tones and receive the
fax; if there are no fax tones, the printer stops monitoring the line and your answering machine can record a voice message.
If you use the same phone line for telephone, fax, and have a computer DSL modem, follow these instructions to set up your fax.
If you encounter problems setting up the printer with optional equipment, contact your local service provider or vendor for further assistance.
Case K: Shared voice/fax line with computer dial-up modem and voice mail
If you receive both voice calls and fax calls at the same phone number, use a computer dial-up modem on the same phone line, and subscribe to a voice mail service through your telephone company, set up the printer as described in this section.

NOTE: You cannot receive faxes automatically if you have a voice mail service at the same phone number you use for fax calls. You must receive faxes manually; this means you must be available to respond in person to incoming fax calls. If you want to receive faxes automatically instead, contact your telephone company to subscribe to a distinctive ring service, or to obtain a separate phone line for faxing.
Since your computer dial-up modem shares the phone line with the printer, you cannot use both your modem and the printer simultaneously. For example, you cannot use the printer for faxing if you are using your computer dial-up modem to send an email or access the Internet.
There are two different ways to set up the printer with your computer based on the number of phone ports on your computer. Before you begin, check your computer to see if it has one or two phone ports.
- If your computer has only one phone port, you need to purchase a parallel splitter (also called a coupler), as shown in the illustration. (A parallel splitter has one RJ-11 port on the front and two RJ-11 ports on the back. Do not use a two-line phone splitter, a serial splitter, or a parallel splitter which has two RJ-11 ports on the front and a plug on the back.)
Example of a parallel splitter

- If your computer has two phone ports, set up the printer as follows:
Back view of the printer
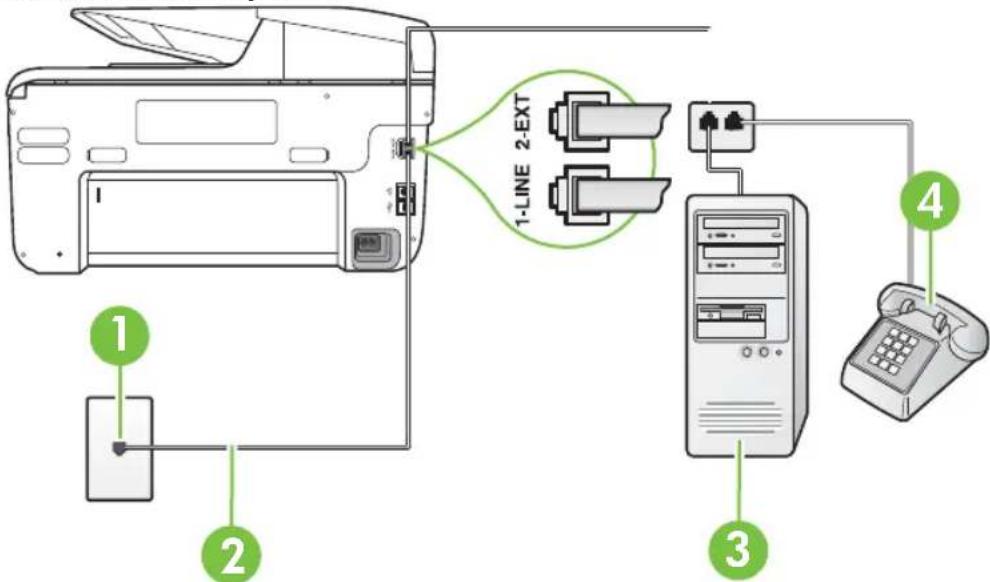
text_image
1-LINE 2-EXT 2 3 4| 1 Telephone wall jack | |
| 2 Use the phone cord supplied in the box with the printer to connect to the 1-LINE portYou might need to connect the supplied phone cord to the adapter provided for your country/region. | |
| 4 Computer with modem | |
| 5 Telephone | |
To set up the printer on the same phone line as a computer with two phone ports
-
Remove the white plug from the port labeled 2-EXT on the back of the printer.
-
Find the phone cord that connects from the back of your computer (your computer dial-up modem) to a telephone wall jack. Disconnect the cord from the telephone wall jack and plug it into the port labeled 2-EXT on the back of the printer.
-
Connect a phone to the "OUT" port on the back of your computer dial-up modem.
-
Using the phone cord supplied in the box with the printer, connect one end to your telephone wall jack, then connect the other end to the port labeled 1-LINE on the back of the printer.

NOTE: You might need to connect the supplied phone cord to the adapter provided for your country/region.
If you do not use the supplied cord to connect from the telephone wall jack to the printer, you might not be able to fax successfully. This special phone cord is different from the phone cords you might already have in your home or office.
- If your modem software is set to receive faxes to your computer automatically, turn off that setting.

NOTE: If you do not turn off the automatic fax reception setting in your modem software, the printer cannot receive faxes.
-
Turn off the Auto Answer setting.
-
Run a fax test.
You must be available to respond in person to incoming fax calls, or the printer cannot receive faxes.
If you encounter problems setting up the printer with optional equipment, contact your local service provider or vendor for further assistance.
Serial-type fax setup
For information on setting up the printer for faxing using a serial-type phone system, see the Fax Configuration website for your country/region.
| Austria | www.hp.com/at/faxconfig |
| Germany | www.hp.com/de/faxconfig |
| Switzerland (French) | www.hp.com/ch/fr/faxconfig |
| Switzerland (German) | www.hp.com/ch/de/faxconfig |
| United Kingdom | www.hp.com/uk/faxconfig |
| Finland | www.hp.fi/faxconfig |
| Denmark | www.hp.dk/faxconfig |
Appendix C
(continued)
| Sweden www.hp.se/faxconfig | |
| Norway | www.hp.no/faxconfig |
| Netherlands | www.hp.nl/faxconfig |
| Belgium (Dutch) | www.hp.be/nl/faxconfig |
| Belgium (French) | www.hp.be/fr/faxconfig |
| Portugal | www.hp.pt/faxconfig |
| Spain | www.hp.es/faxconfig |
| France | www.hp.com/fr/faxconfig |
| Ireland | www.hp.com/ie/faxconfig |
| Italy | www.hp.com/it/faxconfig |
Test fax setup
You can test your fax setup to check the status of the printer and to make sure it is set up correctly for faxing. Perform this test after you have completed setting up the printer for faxing. The test does the following:
• Tests the fax hardware
- Verifies the correct type of phone cord is connected to the printer
- Checks that the phone cord is plugged into the correct port
- Checks for a dial tone
- Checks for an active phone line
• Tests the status of your phone line connection
The printer prints a report with the results of the test. If the test fails, review the report for information on how to fix the problem and rerun the test.
To test fax setup via the printer control panel
- Set up the printer for faxing according to your particular home or office setup instructions.
- Make sure the ink cartridges are installed, and that full-size paper is loaded in the input tray before starting the test.
-
From the printer control panel, touch ▶ (right arrow), and then select Setup.
-
Select Tools, and then select Run Fax Test.
The printer displays the status of the test on the display and prints a report.
- Review the report.
- If the test passes and you are still having problems faxing, check the fax settings listed in the report to verify the settings are correct. A blank or incorrect fax setting can cause problems faxing.
- If the test fails, review the report for more information on how to fix any problems found.
D Network setup
You can manage network settings for the printer through the printer control panel as described in the next section. Additional advanced settings are available in the embedded web server, a configuration and status tool you access from your web browser using an existing network connection to the printer. For more information, see Embedded web server.
This section contains the following topics:
• Change basic network settings
• Change advanced network settings
• Set up the printer for wireless communication
• Uninstall and reinstall the HP software
Change basic network settings
The control-panel options enable you to set up and manage a wireless connection and to perform a variety of network management tasks. This includes viewing the network settings, restoring the network defaults, turning the wireless radio on and off, and changing the network settings.
This section contains the following topics:
• View and print network settings
• Turn the wireless radio on and off
View and print network settings
You can display a summary of the network settings on the printer control panel or the HP software that came with the printer. You can print a more detailed network configuration page, which lists all of the important network settings such as the IP address, link speed, DNS, and mDNS. For more information, see Understand the network configuration page.
Turn the wireless radio on and off
The wireless radio is on by default, as indicated by the blue light on the front of the printer. In order to stay connected to a wireless network, the radio must stay on. However, if your printer is connected to a wired network or you have a USB connection, the radio is not used. In this case you might want to turn the radio off.
- Touch ▶ (right arrow), touch Setup, and then touch Network.
- Touch Wireless, and then touch On to turn on the radio, or touch Off to turn off the radio.
Change advanced network settings
CAUTION: Network settings are provided for your convenience. However, unless you are an advanced user, you should not change some of these settings (such as the link speed, IP settings, default gateway, and firewall settings).
This section contains the following topics:
- Set link speed
• View IP settings
• Change IP settings - Configure the printer's firewall settings
- Reset network settings
Set link speed
You can change the speed at which data is transmitted over the network. The default is Automatic.
- Touch ▶ (right arrow), touch Setup, and then touch Network.
- Touch Advanced Setup, then touch Link Speed.
- Touch the number next to the link speed that matches your network hardware.
View IP settings
To view the IP address of the printer:
- Print the network configuration page. For more information, see configuration page. - Or-
- Open the HP software (Windows), double-click Estimated Ink Levels, click the Device Information tab. The IP address is listed in the Network Information section.
Change IP settings
The default IP setting for the IP settings is Automatic, which sets the IP settings automatically. However, if you are an advanced user, you might want to manually change settings such as the IP address, subnet mask, or the default gateway.

CAUTION: Be careful when manually assigning an IP address. If you enter an invalid IP address during the installation, your network components cannot connect with the printer.
- Touch ▶ (right arrow), Setup, and then touch Network.
- Touch Advanced Setup, and then touch IP Settings.
- A message appears warning that changing the IP address removes the printer from the network. Touch OK to continue.
-
Automatic is selected by default. To change the settings manually, touch Manual, and then enter the appropriate information for the following settings:
-
IP Address
- Subnet Mask
- Default Gateway
-
DNS Address
-
Enter your changes, and then touch Done.
Configure the printer's firewall settings
Firewall features provide network-layer security on both IPv4 and IPv6 networks. The firewall provides simple control of IP addresses that are allowed access.

NOTE: In addition to firewall protection at the network layer, the printer also supports open secure sockets layer (SSL) standards at the transport layer for secure client-server applications, such as client-server authentication or HTTPS web browsing.
For firewall operation on the printer, you must configure a firewall policy to apply to specified IP traffic. Firewall policy pages are accessed through the EWS and displayed by your web browser. After a policy is configured, it is not activated until you click Apply in the EWS.
Creating and using firewall rules
Firewall rules allow you to control IP traffic. Use firewall rules to allow or drop IP traffic based on IP addresses and services.
Enter up to ten rules, each rule specifying the host addresses, services, and the action to take for those addresses and services.
This section contains the following topics:
• Create a firewall rule
• Change the priority of firewall rules
• Change firewall options
- Reset firewall settings
• Limitations to rules, templates, and services
Create a firewall rule
To create a firewall rule, complete the following steps:
- Open the embedded web server. For more information, see Embedded web server.
- Click the Settings tab, click Firewall Rules.
- Click New, and then follow the onscreen instructions.

NOTE: After clicking Apply, the connection to the EWS might be temporarily disrupted for a short period of time. If the IP address was unchanged, the EWS connection will be enabled again. However, if the IP address was changed, use the new IP address to open the EWS.
Change the priority of firewall rules
To change the priority in which a firewall rule is used, complete the following steps:
- Open the embedded web server. For more information, see Embedded web server.
- Click the Settings tab, click Firewall Rules Priority.
- Select the priority in which you want the rule to be used from the Rule Precedence list, with 10 having the highest priority and 1 having the lowest priority.
- Click Apply.
Change firewall options
To change firewall options for the printer, complete the following steps:
- Open the embedded web server. For more information, see Embedded web server.
- Click the Settings tab, click Firewall Options.
- Change any settings, and then click Apply.

NOTE: After clicking Apply, the connection to the EWS might be temporarily disrupted for a short period of time. If the IP address was unchanged, the EWS connection will be enabled again. However, if the IP address was changed, use the new IP address to open the EWS.
Reset firewall settings
To reset the firewall settings to the factory defaults, restore the printer's network settings. For more information, see Solve network problems.
Limitations to rules, templates, and services
When creating firewall rules, note the following limitations to rules, templates, and services.
| Item Limit | |
| Maximum number of rules. 10 (one default rule) | |
| Maximum number of Address Templates. 12 | |
| Maximum number of user-defined address templates. | 5 |
| Maximum number of services you can add to a user-defined service template. | 40 |
| NOTE: The predefined All Services template is not subject to this limitation and includes all services supported by the print server. | |
| Maximum number of services you can add to the policy.For a given rule, only one address template and one service template can be added. | 40 |
| Maximum number of service templates in the policy. | 10 |
| Maximum number of user-defined custom service templates. | 5 |
Reset network settings
To reset the administrator password and network settings, touch ▶ (right arrow), touch Network, touch Restore Network Defaults, and then select Yes. A message appears stating that the network defaults have been restored.

NOTE: Print the network configuration page and verify that the network settings have been reset. For more information, see Understand the network configuration page.
NOTE: Resetting the printer's network settings also resets the printer's firewall settings. For more information about configuring the printer's firewall settings, see Configure the printer's firewall settings.
Set up the printer for wireless communication
You can set up the printer for wireless communication.
This section contains the following topics:
• Before you begin
• Set up the printer on your wireless network
• Change the connection type
• Test the wireless connection
• Guidelines for ensuring wireless network security
• Guidelines for reducing interference on a wireless network

NOTE: If you encounter problems connecting the printer, see Solve wireless problems.

TIP: For more information about setting up and using the printer wirelessly, visit the HP Wireless Printing Center (www.hp.com/go/wirelessprinting).
Before you begin
Before you begin setting up the wireless connection, check the following:
- The printer is not connected to the network using a network cable.
- The wireless network is set up and functioning correctly.
- The printer and the computers that use the printer are on the same network (subnet).
While connecting the printer, you might be prompted to enter the wireless network name (SSID) and a wireless password:
- The wireless network name is the name of your wireless network.
- The wireless password prevents other people from connecting to your wireless network without your permission. Depending on the level of security required, your wireless network might use either a WPA key or WEP passphrase.
If you have not changed the network name or the security passkey since setting up your wireless network, you can sometimes find them on the back or side of the wireless router.
If you cannot find the network name or the security passkey or cannot remember this information, see the documentation available with your computer or with the wireless router. If you still cannot find this information, contact your network administrator or the person who set up the wireless network.

TIP: If you are using a computer running Windows, HP provides a tool called HP Home Network Diagnostic Utility that can help retrieve this information for some systems. To use this tool, visit the HP Wireless Printing Center (www.hp.com/go/wirelessprinting), and then click Network Diagnostic Utility in the Quick Links section. (At this time, this tool might not available in all languages.)
Set up the printer on your wireless network
To set up the printer on your wireless network, use one of the following methods:
- Set up the printer using the HP printer software (Recommended)
- Set up the printer using the Wireless Setup Wizard
- Set up the printer using WiFi Protected Setup (WPS)
- Set up the printer using the embedded web server (EWS)

NOTE: If you have already been using the printer with a different type of connection, such as a USB connection, follow the instructions in Change the connection type to set up the printer on your wireless network.
Set up the printer using the HP printer software
In addition to enabling key printer features, you can use the HP printer software that came with your printer to set up wireless communication.
If you have already been using the printer with a different type of connection, such as a USB connection, follow the instructions in Change the connection type to set up the printer on your wireless network.
Set up the printer using the Wireless Setup Wizard
The Wireless Setup Wizard provides an easy way to set up and manage a wireless connection to your printer from the printer control panel.
- Set up the printer hardware. See the getting started guide or the setup poster that came with your printer.
- On the printer control panel, touch ▶ (right arrow), and then touch Network.
- Touch Wireless, touch Wireless Setup Wizard, and then touch OK.
- Follow the display instructions to complete the setup.

NOTE: If you cannot find the wireless network name (SSID) and wireless password (WPA passphrase, WEP key), see Before you begin.
Set up the printer using WiFi Protected Setup (WPS)
Wi-Fi Protected Setup (WPS) allows you to quickly set up the printer on your wireless network, without having to enter the wireless network name (SSID), wireless password (WPA passphrase, WEP key), or other wireless settings.

NOTE: Only set up wireless using WPS if your wireless network uses WPA data encryption. If your wireless network uses WEP or is not using any encryption at all, use one of the other methods provided in this section to set up the printer on your wireless network.
NOTE: To use WPS, make sure your wireless router or wireless access point supports
WPS. Routers that support WPS often have a 📋 (WPS) button or a button labeled "WPS".
You can use one of the following methods to set up the printer using WPS:
•
Push Button Method: Use the 📋 (WPS) or WPS button, if available, on your router.
- PIN Method: Enter the PIN generated by the printer in the router's configuration software.
To connect the printer using the Push Button Method
- On the printer control panel, touch ▶ (right arrow), touch Setup, and then touch Network.
- Touch Wi-Fi Protected Setup, and then follow the onscreen instructions.
- When prompted, touch Push Button.
- On the wireless router or wireless access point, press and hold the WPS button for 3 seconds.
Wait for about 2 minutes. If the printer connects successfully, the wireless light stops blinking but remains lit.
To connect the printer using the PIN Method
- On the printer control panel, touch ▶ (right arrow), touch Setup, and then touch Network.
A WPS PIN is printed at the bottom of the page.
- Touch Wi-Fi Protected Setup, and then follow the onscreen instructions.
- When prompted, touch PIN.
The WPS PIN appears on the display.
- Open the configuration utility or software for the wireless router or wireless access point, and then enter the WPS PIN.

NOTE: For more information about using the configuration utility, see the documentation provided with the router or wireless access point.
Wait for about 2 minutes. If the printer connects successfully, the wireless light stops blinking but remains lit.
Set up the printer using the embedded web server (EWS)
If the printer is connected to a network, you can use the printer's embedded web server (EWS) to set up wireless communication.
-
Open the EWS. For more information, see Embedded web server.
-
On the Home tab, click Wireless Setup Wizard in the Setup box.
-
Follow the onscreen instructions.

TIP: You can also set up wireless communication by entering or changing individual wireless settings. To change these settings, on the Network tab, click Advanced in the Wireless (802.11) section on the left, change the wireless settings, and then click Apply.
Change the connection type
After you have installed the HP software and connected the printer to your computer or to a network, you can use the HP software to change the connection type (for example, from a USB connection to a wireless connection).

NOTE: If you are changing to a wireless connection, make sure that an Ethernet cable has not been connected to the printer. Connecting an Ethernet cable turns off the printer's wireless capabilities.
You might be prompted to temporarily connect a USB cable during the setup process.
To change from an Ethernet connection to a wireless connection
- On the printer control panel, touch ▶ (right arrow), and then touch Network.
- Touch Wireless, touch Wireless Setup Wizard, and then touch OK.
- Follow the display instructions to complete the setup.

NOTE: If you cannot find the wireless network name (SSID) and wireless password (WPA passphrase, WEP key), see Before you begin.
To change from a USB connection to a wireless connection
Follow the instructions for your operating system.
Windows
- On the computer desktop, click Start, select Programs or All Programs, click HP, select your printer name, and then click Printer Setup & Software.
- Click Connect a new printer, and then click Convert a USB connected printer to wireless.
- Follow the display instructions to complete the setup.
Mac OS X
- Open HP Utility. For more information, see HP Utility (Mac OS X).
- Click the Applications icon on the HP Utility toolbar.
- Double-click HP Setup Assistant, and then follow the onscreen instructions.
To change from a wireless connection to a USB or Ethernet connection
To change from a wireless connection to a USB or Ethernet connection, connect the USB or Ethernet cable to the printer.

NOTE: If you are using a computer with Mac OS X, add the printer to the print queue. Click System Preferences in the Dock, click Print & Fax in the Hardware section, click +, and then select the printer.
Test the wireless connection
Print the wireless test page for information about the printer's wireless connection. The wireless test page provides information about the printer's status, hardware (MAC) address, and IP address. If the printer is connected to a network, the test page displays details about the network settings.
To print the wireless test page
- On the printer control panel, touch ▶ (right arrow), and then touch Network.
- Touch Wireless, and then touch Print Wireless Network Test.
Guidelines for ensuring wireless network security
The following information can help you keep your wireless network and wireless printer secure from unauthorized use.
For more information, visit www.hp.com/go/wirelessprinting.
This section contains the following topics:
• Overview of security settings
- Add hardware addresses to a wireless router (MAC filtering)
• Other wireless security guidelines
Overview of security settings
To help improve the security of the wireless network and prevent unauthorized access, the printer supports many common types of network authentication, including WEP, WPA, and WPA2.
- WEP: Provides security by encrypting data sent over radio waves from one wireless device to another wireless device. Devices on a WEP-enabled network use WEP keys to encode data. If your network uses WEP, you must know the WEP key(s) it uses.
- WPA: Increases the level of over-the-air data protection and access control on existing and future wireless networks. It addresses all known weaknesses of WEP, the original native security mechanism in the 802.11 standard. WPA uses the Temporal Key Integrity Protocol (TKIP) for encryption and employs 802.1X authentication with one of the standard Extensible Authentication Protocol (EAP) types available today.
- WPA2: Provides enterprise and consumer wireless users with a high level of assurance that only authorized users can access their wireless networks. WPA2 provides the Advanced Encryption Standard (AES). AES is defined in counter cipher-block chaining mode (CCM) and supports the Independent Basic Service Set (IBSS) to enable security between client workstations operating connected wirelessly without a wireless router (such as a Linksys wireless router or Apple AirPort Base Station).
Add hardware addresses to a wireless router (MAC filtering)
MAC filtering is a security feature in which a wireless router or wireless access point is configured with a list of hardware addresses (also called "MAC addresses") of devices that are allowed to gain access to the network through the router.
If the router filters hardware addresses, then the printer's hardware address must be added to the router's list of accepted hardware addresses. If the router does not have the hardware address of a printer attempting to access the network, the router denies the printer access to the network.

CAUTION: This method is not recommended, however, because your MAC addresses can easily be read and falsified by unwanted users outside your network.
To add hardware addresses to a wireless router or wireless access point
- Print the network configuration page, and then locate the printer's hardware address. For more information, see Understand the network configuration page.

NOTE: The printer maintains separate hardware addresses for the Ethernet connection and for wireless connection. Both hardware addresses are listed on the printer's network configuration page.
- Open the configuration utility for the wireless router or wireless access point, and add the printer's hardware address to the list of accepted hardware addresses.

NOTE: For more information about using the configuration utility, see the documentation provided with the router or wireless access point.
Other wireless security guidelines
To keep the wireless network secure, follow these guidelines:
- Use a wireless password with at least 20 random characters. You can use up to 64 characters in a WPA wireless password.
- Avoid any common words or phrases, easy sequences of characters (such as all 1s), and personally-identifiable information for wireless passwords. Always use random strings composed of uppercase and lowercase letters, numbers, and if allowed, special characters such as punctuation.
-
Change the default wireless password provided by the manufacturer for administrator access to the access point or wireless router. Some routers let you change the administrator name as well.
-
Turn off administrative access over wireless if possible. If you do this, you need to connect to the router with a wired Ethernet connection when you want to make configuration changes.
- Turn off remote administrative access over the Internet on your router, if possible. You can use Remote Desktop to make an encrypted connection to a computer running behind your router and make configuration changes from the local computer you are accessing over the Internet.
- To avoid accidentally connecting to another party's wireless network, turn off the setting to automatically connect to non-preferred networks. This is disabled by default in Windows XP.
Guidelines for reducing interference on a wireless network
The following tips will help reduce the chances for interference in a wireless network:
- Keep the wireless devices away from large metal objects, such as filing cabinets, and other electromagnetic devices, such as microwaves and cordless telephones, as these objects can disrupt radio signals.
- Keep the wireless devices away from large masonry structures and other building structures as these objects can absorb radio waves and lower signal strength.
- Position the access point or wireless router in a central location in line of sight with the wireless devices on the network.
- Keep all wireless devices on the network within range of one another.
Uninstall and reinstall the HP software
If your installation is incomplete, or if you connected the USB cable to the computer before prompted by the HP software installation screen, you might need to uninstall and then reinstall the HP software that came with the printer. Do not simply delete the printer application files from your computer. Make sure to remove them correctly using the uninstall utility provided when you installed the HP software.
- Windows
• Mac OS X
Windows
To uninstall — method 1
- Disconnect the printer from your computer. Do not connect it to your computer until after you have reinstalled the HP software.
- On the computer desktop, click Start, select Programs or All Programs, click HP, click the printer name, and then click Uninstall.
-
Follow the onscreen instructions.
-
If you are asked whether you would like to remove shared files, click No. Other programs that use these files might not work correctly if the files are deleted.
-
Restart your computer.
-
To reinstall the HP software, insert the HP software CD into your computer's CD drive, and follow the onscreen instructions.
-
Connect the printer when the HP software prompts you to connect it to the computer.
-
Press the ⏻ (Power button) to turn the printer on. After connecting and turning on the printer, you might have to wait several minutes for all of the Plug and Play events to complete.
-
Follow the onscreen instructions.
To uninstall — method 2

NOTE: Use this method if Uninstall is not available in the Windows Start menu.
- On the computer desktop, click Start, select Settings, click Control Panel, and then click Add/Remove Programs.
- Or -
Click Start, click Control Panel, and then double-click Programs and Features.
- Select the printer name, and then click Change/Remove or Uninstall/Change.
Follow the onscreen instructions.
-
Disconnect the printer from your computer.
-
Restart your computer.

NOTE: It is important that you disconnect the printer before restarting your computer. Do not connect the printer to your computer until after you have reinstalled the HP software.
-
Insert the HP software CD into your computer's CD drive and then start the Setup program.
-
Follow the onscreen instructions.
Mac OS X
To uninstall from a Macintosh computer
-
Double-click the HP Uninstaller icon (located in the Hewlett-Packard folder in the Applications folder at the top level of the hard disk), and then click Continue.
-
When prompted, type the correct administrator's name and password, and then click OK.
-
Follow the onscreen instructions.
-
When the HP Uninstaller finishes, restart your computer.
E Printer management tools
This section contains the following topics:
- Toolbox (Windows)
• HP Utility (Mac OS X)
• Embedded web server
Toolbox (Windows)
The Toolbox provides maintenance information about the printer.

NOTE: The Toolbox can be installed from the HP Software CD if the computer meets the system requirements.
Open the Toolbox
- From the computer desktop, click the Start tab, select Programs or All Programs, click HP, click the folder for your printer, and then select the icon with your printer's name.
- Double-click Printer Preferences, and then double-click Maintenance Tasks.
HP Utility (Mac OS X)
HP Utility contains tools to configure print settings, calibrate the printer, order supplies online, and find website support information.

NOTE: The features available in HP Utility vary depending on the selected printer.
Ink level warnings and indicators provide estimates for planning purposes only. When you receive a low on ink message, consider having a replacement cartridge available to avoid possible printing delays. You do not need to replace cartridges until prompted to do so.
Open HP Utility
To open HP Utility
Double-click the HP Utility icon. This icon is located in the Hewlett-Packard folder in the Applications folder at the top level of the hard disk.
Embedded web server
When the printer is connected to a network, you can use the printer's home page (embedded web server or EWS) to view status information, change settings, and manage it from your computer.

NOTE: For a list of system requirements for the embedded web server, see Embedded web server specifications.
To view or change some settings, you might need a password.
You can open and use the embedded web server without being connected to the Internet. However, some features are not available.
This section contains the following topics:
- About cookies
• To open the embedded web server
About cookies
The embedded web server (EWS) places very small text files (cookies) on your hard drive when you are browsing. These files let the EWS recognize your computer the next time you visit. For example, if you have configured the EWS language, a cookie helps remember which language you have selected so that the next time you access the EWS, the pages are displayed in that language. Though some cookies are cleared at the end of each session (such as the cookie that stores the selected language), others (such as the cookie that stores customer-specific preferences) are stored on the computer until you clear them manually.
You can configure your browser to accept all cookies, or you can configure it to alert you every time a cookie is offered, which allows you to decide which cookies to accept or refuse. You can also use your browser to remove unwanted cookies.

NOTE: Depending on your printer, if you disable cookies, you also disable one or more of the following features:
- Starting where you left the application (especially useful when using setup wizards)
- Remembering the EWS browser language setting
- Personalizing the EWS Home page
For information about how to change your privacy and cookie settings and how to view or delete cookies, see the documentation available with your web browser.
To open the embedded web server

NOTE: The printer must be on a network and must have an IP address. The IP address and hostname for the printer are listed on the status report. For more information, see Understand the network configuration page.
In a supported web browser on your computer, type the IP address or hostname assigned to the printer.
For example, if the IP address is 123.123.123.123, type the following address into the web browser: http://123.123.123.123.

TIP: After opening the embedded web server, you can bookmark it so that you can return to it quickly.
TIP: If you are using the Safari web browser in Mac OS X, you can also use the Bonjour bookmark to open the EWS without typing the IP address. To use the Bonjour bookmark, open Safari, and then from the Safari menu, click Preferences. On the Bookmarks tab, in the Bookmarks bar section, select Include Bonjour, and then close the window. Click the Bonjour bookmark, and then select your networked printer to open the EWS.
F How do I?
- Get started
- Scan
• Copy
Fax
• HP Digital Solutions
• Work with ink cartridges - Solve a problem
G Errors (Windows)
Fax memory full
If Backup Fax Reception or HP Digital Fax (Fax to PC or Fax to Mac) is enabled and the printer has a problem (such as a paper jam), the printer saves incoming faxes to memory until the problem is resolved. However, the printer's memory might fill up with faxes that have not been printed yet or transferred to the computer.
To solve this problem, resolve any problems with the printer.
For more information, see Solve fax problems.
Printer disconnected
The computer cannot communicate with the printer because one of the following events has occurred:
• The printer has been turned off.
- The cable connecting the printer, such as a USB cable or a network (Ethernet) cable, has been disconnected.
- If the printer is connected to a wireless network, the wireless connection has been broken.
To solve this problem, try the following solutions:
• Make sure the printer is turned on and that the ⏻ (Power button) light is on.
- Make sure the power cord and other cables are working and are firmly connected to the printer.
- Make sure the power cord is connected firmly to a functioning, alternating current (AC) power outlet.
- If the printer is connected to a network, make sure the network is functioning properly. For more information, see Solve wired (Ethernet) network problems.
- If the printer is connected to a wireless network, make sure the wireless network is functioning properly. For more information, see Solve wireless problems.
Low on ink
The ink cartridge identified in the message is low on ink.
Ink level warnings and indicators provide estimates for planning purposes only. When you receive a low ink warning message, consider having a replacement cartridge available to avoid possible printing delays. You do not need to replace cartridges until prompted to do so.
For information about replacing ink cartridges, see Replace the ink cartridges. For information about ordering ink cartridges, see Order printing supplies online. For information about recycling used ink supplies, see HP inkjet supplies recycling program.

NOTE: Ink from the cartridges is used in the printing process in a number of different ways, including in the initialization process, which prepares the printer and cartridges for printing. In addition, some residual ink is left in the cartridge after it is used. For more information see www.hp.com/go/inkusage.
Printhead problem
The printhead is missing, not detected, incorrectly installed, or incompatible.
If this error occurs at printer setup, try the following solutions.
Solution 1: Reinstall the printhead.
For instructions, see Reinstall the printhead

CAUTION: The printheads contain electrical contacts that can be damaged easily.
If the problem persists after you reinstall the printhead, contact HP support. For more information, see HP support.
If this error occurs after the printer has been used for a period of time, try the following solutions.
Solution 1: Turn the printer off and on.
Turn off the printer, and then turn it on again.
If the problem persists, contact HP support for service or replacement. For more information, see HP support.
Cartridge Problem
The ink cartridge identified in the message is missing, damaged, incompatible, or inserted into the wrong slot in the printer.

NOTE: If the cartridge is identified in the message as incompatible, see Order printing supplies online for information about obtaining cartridges for the printer.
To solve this problem, try the following solutions. Solutions are listed in order, with the most likely solution first. If the first solution does not solve the problem, continue trying the remaining solutions until the issue is resolved.
- Solution 1: Turn the printer off and on.
- Solution 2: Install the ink cartridges correctly.
- Solution 3: Clean the electrical contacts.
- Solution 4: Replace the ink cartridge.
Solution 1: Turn the printer off and on
Turn off the printer, and then turn it on again.
If the problem persists, try the next solution.
Solution 2: Install the ink cartridges correctly
Make sure all of the ink cartridges are properly installed:
- Gently pull open the ink cartridge access door.
- Remove the ink cartridge by grasping it and pulling it firmly toward you.
- Insert the cartridge into the slot. Press firmly on the cartridge to ensure proper contact.
- Close the ink cartridge cover and check if the error message has gone away.
If the problem persists, try the next solution.
Solution 3: Clean the electrical contacts
To clean the electrical contacts in the printer
- Lightly dampen a clean, lint-free cloth with bottled or distilled water.
- Clean the electrical contacts in the printer by wiping with the cloth from top to bottom. Use as many fresh, clean cloths as necessary. Clean until no ink shows on the cloth.
- Wipe the area dry with a dry lint-free cloth before proceeding to the next step.
Solution 4: Replace the ink cartridge
Replace the indicated ink cartridge. For more information, see Replace the ink cartridges.

NOTE: If your cartridge is still under warranty, contact HP support for service or replacement. For more information about ink cartridge warranty, see Ink cartridge warranty information. If the problem persists after you replace the cartridge, contact HP support. For more information, see HP support.
Paper Mismatch
The paper size or type selected in the printer driver does not match the paper loaded in the printer. Make sure that the correct paper is loaded in the printer, and then print the document again. For more information, see Load media.

NOTE: If the paper loaded in the printer is the correct size, change the selected paper size in the printer driver, and then print the document again.
The cartridge cradle cannot move
Something is blocking the ink cartridge cradle (the part of the printer that holds the ink cartridges).
To clear the obstruction, press ⏻ (Power button) to turn off the printer, and then check the printer for jams.
For more information, see Clear jams.
Paper Jam
Paper has become jammed in the printer.
Before you try to clear the jam, check the following:
- Make sure that you have loaded paper that meets specifications and is not wrinkled, folded, or damaged. For more information, see Media specifications.
- Make sure that the printer is clean. For more information, see Maintain the printer.
- Make sure that the trays are loaded correctly and are not too full. For more information, see Load media.
For instructions on clearing jams, as well as more information about how to avoid jams, see Clear jams.
The printer is out of paper
The default tray is empty.
Load more paper, and then touch OK.
For more information, see Load media.
Printer Offline
The printer is currently offline. While offline, the printer cannot be used.
To change the printer's status, complete the following steps.
- Click Start, point to Settings, and then click Printers or Printers and Faxes.
- Or - Click Start, click Control Panel, and then double-click Printers.
- If the printers listed in the dialog box are not being displayed in Details view, click the View menu, and then click Details.
- If the printer is Offline, right-click the printer, and click Use Printer Online.
- Try using the printer again.
Printer Paused
The printer is currently paused. While paused, new jobs are added to the queue but are not printed.
To change the printer's status, complete the following steps.
- Click Start, point to Settings, and then click Printers or Printers and Faxes.
- Or -
Click Start, click Control Panel, and then double-click Printers.
-
If the printers listed in the dialog box are not being displayed in Details view, click the View menu, and then click Details.
-
If the printer is paused, right-click the printer, and click Resume Printing.
-
Try using the printer again.
Document failed to print
The printer could not print the document because a problem occurred in the printing system.
For information about solving printing problems, see Solve printer problems.
Printer failure
There was a problem with the printer. Usually, you can resolve such problems by completing the following steps:
- Press ⏻ (Power button) to turn off the printer.
- Unplug the power cord, and then plug in the power cord again.
- Press ⏻ (Power button) to turn on the printer.
If this problem persists, write down the error code provided in the message, and then contact HP support. For more information about contacting HP support, see HP support.
Door or cover open
Before the printer can print documents, all doors and covers must be closed.

TIP: When completely closed, most doors and covers snap into place.
If the problem persists after you've securely closed all doors and covers, contact HP support. For more information, see HP support.
Previously used ink cartridge installed
The ink cartridge identified in the message was previously used in a different printer.
You can use ink cartridges in different printers, but if the cartridge was left outside of a printer for an extended period of time, the print quality of your documents might be affected. Also, if you use ink cartridges that have been used in a different printer, the ink level indicator might be inaccurate or unavailable.
If the print quality is unsatisfactory, try cleaning the printhead. For more information, see Clean the printhead.

NOTE: Ink from the cartridges is used in the printing process in a number of different ways, including in the initialization process, which prepares the printer and cartridges for printing, and in printhead servicing, which keeps print nozzles clear and ink flowing smoothly. In addition, some residual ink is left in the cartridge after it is used. For more information, see www.hp.com/go/inkusage.
For more information about storing ink cartridges, see Supplies.
Ink cartridges depleted
The cartridges listed in the message must be replaced to resume printing. HP recommends that you do not remove an ink cartridge until a replacement is ready to install.
For more information, see Replace the ink cartridges.
Ink cartridge failure
The cartridges listed in the message are damaged or have failed.
See Replace the ink cartridges.
Printer supply upgrade
The cartridge listed in the message can only be used to upgrade one printer. Click OK to use it on this printer. If you do not wish to proceed with the supply upgrade for this printer, click Cancel Print and then remove the cartridge.
Printer supply upgrade successful
The supply upgrade was successful. The cartridges listed in the message can now be used in the printer.
Printer supply upgrade problem
The supply upgrade was not successful. The cartridges listed in the message can still be used in this printer. Replace the Supply Upgrade cartridge. For more information, see Replace the ink cartridges.
Non-HP ink cartridges installed
HP cannot guarantee the quality or reliability of non-HP supplies. Printer service or repairs required as a result of using a non-HP supply will not be covered under warranty. If you believe you purchased Genuine HP ink cartridges, visit HP at www.hp.com/go/anticounterfeit for more information or to report fraud.
Using Genuine HP Cartridges has its Rewards
HP rewards loyal customers for using genuine HP supplies. Click the button below the message to view Rewards online. Reward may not be available in all regions.
Counterfeit Cartridge Advisory
The installed cartridge is not a new, genuine HP cartridge. Contact the store where this cartridge was purchased. To report suspected fraud, visit HP at www.hp.com/go/anticounterfeit. To continue using the cartridge, click Continue.
Used, Refilled or Counterfeit Cartridge Detected
The original HP ink in the cartridge has been depleted. The solution for this problem is to replace the ink cartridge or click OK to continue using the cartridge. For more information about replacing the cartridge, see Replace the ink cartridges. HP rewards loyal customers for using genuine HP
supplies. Click the button below the message to view Rewards online. Rewards may not be available in all regions.

WARNING! HP's ink cartridge warranty does not cover non-HP ink or cartridges. HP's printer warranty does not cover repairs or service due to use of non-HP cartridges or ink. HP does not guarantee the quality or reliability of non-HP ink. Information about ink levels will not be available.
Use SETUP cartridges
Use the SETUP cartridges that came with the printer for printer initialization. You must replace the cartridge with the setup cartridge to clear this message. For more information, see Replace the ink cartridges.
Do not use SETUP cartridges
New SETUP cartridges cannot be installed after the printer has been initialized. Install regular replacement cartridges. For more information, see Replace the ink cartridges.
New printhead ink alert
The used cartridges listed in the message might not have enough ink to complete one-time startup processes.
Solution: Install new cartridges or click Continue to use installed cartridges.
If startup cannot complete with installed cartridges, new cartridges will be needed. For information on how to install new cartridges, see Replace the ink cartridges.
Use black ink only?
The cartridges listed in the message are very low on ink.
Solutions: To print in color, replace the empty cartridges. For information about how to install new cartridges, see Replace the ink cartridges.
To temporarily print using Black ink only, click Use Black Only. The printer will replace color with grayscale. The empty cartridges will need to be replaced soon.

CAUTION: Do not remove the empty cartridge to print in black-ink only mode.
Use color ink only?
The black cartridge is very low on ink.
Solutions: To temporarily replace black with color, click Use Color Only. Black will be simulated. Text and photo quality will differ from those printed when using all cartridges. The black cartridge will need to be replaced soon.

CAUTION: Do not remove the empty cartridge to print in color-ink only mode.
To print with black, replace the black ink cartridge. For information about how to install new cartridges, see Replace the ink cartridges.
Incompatible ink cartridges
The ink cartridge is not compatible with your printer'.
Solution: Remove this cartridge immediately and replace with a compatible ink cartridge. For information about how to install new cartridges, see Replace the ink cartridges.
Ink sensor warning
The ink sensor is reporting an unexpected condition. This could be caused by the cartridge, or the sensor may have failed. If the sensor has failed, it can no longer sense when your cartridges are very low on ink. Printing with an empty cartridge will cause air to enter the ink system, which causes poor print quality. Significant amounts of ink will be used up to recover from this condition, which will deplete much of the ink supply for all cartridges.
Solution: Click OK to continue printing or replace the cartridge. For information about how to install new cartridges, see Replace the ink cartridges.
Problem with printer preparation
The printer clock has failed and ink preparation may not be complete. The estimated Ink Level gauge might be inaccurate.
Solution: Check the print quality of your print job. If it is not satisfactory, running the printhead cleaning procedure from the toolbox might improve it. For more information about cleaning the printhead, see Clean the printhead.
Color cartridge very low on ink
The cartridges listed in the message are very low on ink.
Solutions: To print in color, replace the empty cartridges. For information about how to install new cartridges, see Replace the ink cartridges.
To temporarily print using black ink only, click Cancel Print and then re-send the print job. The Use black ink only? message appears before the job prints. The empty cartridges will need to be replaced soon.

CAUTION: Do not remove the empty cartridge to print in black-ink only mode.
Black cartridge very low on ink
The black cartridge is very low on ink.
Solutions: Replace the black ink cartridge. For information about how to install new cartridges, see Replace the ink cartridges.
To temporarily replace black with color, click Cancel Print and re-send the print job. The Use color ink only? message appears before the job prints. The black cartridge will need to be replaced soon.

CAUTION: Do not remove the empty cartridge to print in color-ink only mode.
Automatic document feeder cover open
Close the cover of the Automatic Document Feeder to continue.
Ink sensor failure
The ink sensor has failed and the printer can no longer print.
Contact HP support. For more information, see HP support.
Problem with ink system
Please remove the ink cartridges and examine them for any sign of leaks. If any cartridges have leaks, contact HP. Do not use cartridges that are leaking.
If there are no leaks, re-install cartridges and close the printer cover. Turn the printer off then on again. If you get this message a second time, contact HP.
Replace the ink cartridge
Replace the indicated ink cartridge. For more information, see Replace the ink cartridges.

NOTE: If your cartridge is still under warranty, contact HP support for service or replacement. For more information about ink cartridge warranty, see Ink cartridge warranty information. If the problem persists after you replace the cartridge, contact HP support. For more information, see HP support.
Index
Symbols/Numerics
(ADF) automatic document
feeder
clean 34
feeding problems, troubleshoot 34
A
accessibility 3, 10
accessories
installation 29
printer status report 148
turn on and off in driver 33
warranty 159
acoustic emissions 170
ADF (automatic document
feeder)
capacity 23
load originals 23
ADSL, fax setup with
parallel phone systems 199
after the support period 97
align printhead 150
answer ring pattern
change 77
parallel phone systems 201
answering machine
fax tones recorded 128
set up with fax (parallel phone systems) 211
set up with fax and modem 212
automatic document feeder
(ADF)
capacity 23
clean 34
feeding problems, troubleshoot 34
load originals 23
automatic fax reduction 70
B
backup fax 68
baud rate 79
black and white pages
copy 59
fax 61
black dots or streaks,
troubleshoot
copies 111
scan 116
blank pages, troubleshoot
copy 109
print 101
scan 116
blocked fax numbers
set up 70
both sides, print on 44
broadcast faxing
send 66
buttons, control panel 14
C
cameras
insert memory cards 28
cancel
scheduled fax 66
Cancel button 14, 15
capacity
ADF 23
trays 166
cards
sizes supported 165
tray supporting 166
cartridges. See ink cartridges
clean
automatic document
feeder 34
exterior 34
printhead 149
scanner glass 33
clear
fax logs 82
color copy 59
colored text, and OCR 48
computer modem
shared with fax (parallel phone systems) 204
shared with fax and answering machine
(parallel phone
systems) 212
shared with fax and voice
line (parallel phone
systems) 207
shared with fax and voice
mail (parallel phone systems) 216
Configure
firewall 143
confirmation reports, fax 81
connection type
change 224
connectors, locating 13
control panel
buttons 14
lights 14
status icons 15
Copy 16
copy
quality 110
settings 59
specifications 168
troubleshoot 109
copy settings
copy 60
correct port test, fax 118
custom-size paper
Mac OS X 42
print on 41
custom-sized media
sizes supported 166
customer support
electronic 95
cut-off pages, troubleshoot 102
D
dark images, troubleshoot
copies 111
scans 116
default settings
copy 60
diagnostic page 106
dial tone test, failure 121
dial type, setting 78
Index
dial-up modem
shared with fax (parallel phone systems) 204
shared with fax and answering machine (parallel phone systems) 212
shared with fax and voice line (parallel phone systems) 207
shared with fax and voice mail (parallel phone systems) 216
digital cameras
insert memory cards 28
distinctive ringing change 77
parallel phone systems 201
dots or streaks, troubleshoot copies 111
dots, troubleshoot scan 116
double-sided printing 44
driver
accessories settings 33
warranty 159
DSL, fax setup with
parallel phone systems 199
duplexer
clear jams 154
installation 29
media sizes supported 164
media types and weights supported 166
turn on and off in driver 33
duty cycle 162
E
ECM. See error correction mode
edit
text in OCR program 48
electrical specifications 170
embedded web server about 229
opening 230
system requirements 163
troubleshoot, cannot be opened 144
Webscan 48
envelopes
sizes supported 164
tray supporting 166
environmental
specifications 170
environmental sustainability program 180
error correction mode 66
error messages
unable to activate TWAIN source 114
error reports, fax 82
EWS. See embedded web server
F
faded copies 110
faded stripes on copies, troubleshoot 111
fax
answer mode 76
answering machine and modem, shared with (parallel phone systems) 212
answering machine troubleshoot 128
answering machine, set up (parallel phone systems) 211
auto answer 76
backup fax 68
blocking numbers 70
confirmation reports 81
dial tone test, failed 121
dial type, setting 78
distinctive ringing setup (parallel phone systems) 201
distinctive ringing, change pattern 77
DSL, set up (parallel phone systems) 199
error correction mode 66
error reports 82
forwarding 69
header 76
Internet Protocol, over 80
ISDN line, set up (parallel phone systems) 200
line condition test, failed 122
log, clear 82
log, print 82
manual receive 67
modem and answering machine, shared with (parallel phone systems) 212
modem and voice line, shared with (parallel phone systems) 207
modem and voice mail, shared with (parallel phone systems) 216
modem, shared with (parallel phone systems) 204
monitor dialing 64, 66
paper size 70
parallel phone systems 195
PBX system, set up (parallel phone systems) 200
phone cord connection test, failed 118
phone cord too short 128
phone cord type test, failed 119
poll to receive 69
print last transaction details 83
receive 67
receive, troubleshoot 123, 126
redial options 78
reduction 70
reports 81
reprint 68
rings to answer 77
schedule 65
send 61
send, troubleshoot 123, 125, 128
separate line setup (parallel phone systems) 198
settings, change 76
setup types 196
shared phone line setup (parallel phone systems) 202
sound volume 79
specifications 168
speed 79
test failed 117
test setup 218
troubleshoot 116
voice mail, set up (parallel phone systems) 203
wall jack test, failed 118
Fax screen 16
Firewall
configure 143
firewall settings 220
firewalls, troubleshoot 99
FolP 80
fonts supported 162
forwarding faxes 69
G
glass, scanner
clean 33
load originals 22
locating 12
grainy or white bands on
copies, troubleshoot 111
graphics
incompletely filled on copies 111
look different from original scan 115
H
hardware, fax setup test 117
head 149
header, fax 76
Help 16
Hewlett-Packard Company notices 3
HP software
uninstall from Windows 227
HP Utility (Mac OS X)
opening 229
humidity specifications 170
|
ink cartridge access door, locating 13
ink cartridges
check ink levels 90
locating 13
ordering online 193
part numbers 148, 193
replace 90
status 148
supported 161
tips 89
warranty 159
warranty expiration dates 148
yields 162
ink level icons 17
ink levels, check 90
installation
accessories 29
duplexer 29
hardware installation suggestions 145
HP software installation suggestions 146
tray 2 30
troubleshooting issues 145
Internet Protocol
fax, using 80
IP address
checking for printer 145
IP settings 220
ISDN line, set up with fax
parallel phone systems 200
J
jams
clear 154
media to avoid 21
paper 154, 157
junk fax mode 70
L
language, printer 162
light images, troubleshoot
copies 111
scans 116
lights, control panel 14
line condition test, fax 122
lines
copies, troubleshoot 111
scans, troubleshoot 115, 116
link speed, setting 220
load
photo 26
tray 24, 25
tray 2 31
load cards 26
load custom-size media 27
load envelopes 25
load media 24
locking trays 32
log, fax
print 82
M
Mac OS
custom-size paper 42
Print borderless 43
Print photos 40
print settings 37
turn accessories on and off in driver 33
Mac OS X
HP Utility 229
maintain
printhead 149
maintenance
align printhead 150
check ink levels 90
clean printhead 149
diagnostic page 106
print quality report 106
printhead 149
replace ink cartridges 90
manual faxing
receive 67
send 63, 64
margins
setting, specifications 167
media
ADF capacity 23
clear jams 154
duplexing 44
HP, order 194
load tray 24
load tray 2 31
locking trays 32
print on custom-size 41
selecting 21
skewed pages 108
specifications 163, 164
supported sizes 164
troubleshoot feeding 107
types and weights
supported 166
memory
reprint faxes 68
save faxes 68
specifications 162
memory cards
insert 28
specifications 171
memory devices
print files 41
troubleshoot 135
missing or incorrect information,
troubleshoot 102
Index
MMC memory card insert 28
model number 148
modem
shared with fax (parallel phone systems) 204
shared with fax and answering machine (parallel phone systems) 212
shared with fax and voice line (parallel phone systems) 207
shared with fax and voice mail (parallel phone systems) 216
monitor dialing 64, 66
multi-feeds, troubleshoot 108
N
networks
advanced settings 219
connector illustration 13
firewall settings 220
firewalls, troubleshoot 99
IP settings 220
link speed 220
operating systems supported 163
protocols supported 163
settings, change 219
solve problems 146
system requirements 163
view and print settings 219
wireless communication setup 222
wireless settings 152
noise information 170
O
OCR
edit scanned documents 48
troubleshoot 113
operating environment
specifications 170
operating systems supported 162
originals
scan 46
output tray
locating 12
media supported 167
P
pages per month (duty cycle) 162
paper
jams 154, 157
size, set for fax 70
paper-feed problems, troubleshoot 107
parallel phone systems
answering machine setup 211
countries/regions with 195
distinctive ringing setup 201
DSL setup 199
ISDN setup 200
modem and answering machine setup 212
modem and voice mail setup 216
modem setup 204
modem shared with voice line setup 207
PBX setup 200
separate line setup 198
setup types 196
shared line setup 202
PBX system, set up with fax parallel phone systems 200
PCL 3 support 162
phone cord
connected to correct port test failed 118
correct type test failed 119 extend 128
phone line, answer ring pattern 77
phone support 95
phone support period period for support 96
phone, fax from
receive 67
send, 63
photo media
sizes supported 165
Photo screen 16
photos
insert memory cards 28
print from memory devices 41
troubleshoot memory devices 136
poll to receive fax 69
ports, specifications 161
power
specifications 170
troubleshoot 99
power input, locating 13
diagnostic page 106
double-sided 44
fax logs 82
fax reports 81
faxes 68
last fax details 83
photos from memory devices 41
print quality report 106
printer status report 148 troubleshoot 98
Print borderless
Mac OS X 43
Windows 43
Print brochures print 38
Print envelope 39
Print envelopes Mac OS X 39
Print photos
Mac OS X 40
Windows 40
print quality report 106
print settings
print quality 103
printer control panel locating 12
network settings 219
scan from 46
send faxes 62
printer driver
accessories settings 33
warranty 159
printer software (Windows) about 229
opening 229
printer status report
information on 147
print 148
printhead
clean 149
printhead latch, locating 13
printhead, align 150
printheads
ordering online 193
supported 161
printing
slow, troubleshoot 100
processor specifications 162
pulse dialing 78
Q
quality, troubleshoot
copy 110
scan 114
R
radio interference
reducing 227
regulatory information 178
radio, turn off 219
rear access panel
clear jams 154
illustration 13
receive faxes
auto answer mode 76
automatically 67
blocking numbers 70
forwarding 69
manually 67
polling 69
rings to answer 77
troubleshoot 123, 126
recycle
print cartridges 180
redial options, setting 78
reduce fax 70
regulatory information 172, 178
regulatory model number 179
replace ink cartridges 90
report
wireless test 225
reports
confirmation, fax 81
diagnostic 106
error, fax 82
fax test failed 117
print quality 106
printhead 149
reprint
faxes from memory 68
right navigation button 14, 15
rings to answer 77
s
save
faxes in memory 68
scan
error messages 114
from printer control panel 46
from Webscan 48
OCR 48
quality 114
Scan screen 16
scan specifications 169
slow 112
troubleshoot 112
Scan screen 16
scanner glass
clean 33
load originals 22
locating 12
schedule fax 65
Secure Digital memory card
insert 28
security
wireless
communication 225
send faxes
basic fax 61
manually 63
memory, from 64
monitor dialing 64, 66
schedule 65
troubleshoot 123, 125, 128
send scans
for OCR 48
troubleshoot 112
serial number 148
serial phone systems
countries/regions with 195
setup types 196
settings
copy 59
network 219
speed, fax 79
volume, fax 79
Setup 16
setup
answering machine (parallel phone systems) 211
answering machine and
modem (parallel phone
systems) 212
computer modem (parallel
phone systems) 204
computer modem and
answering machine
(parallel phone
systems) 212
computer modem and voice
line (parallel phone
systems) 207
computer modem and voice
mail (parallel phone
systems) 216
distinctive ringing 77
distinctive ringing (parallel
phone systems) 201
DSL (parallel phone
systems) 199
fax scenarios 196
fax, with parallel phone
systems 195
ISDN line (parallel phone
systems) 200
PBX system (parallel phone
systems) 200
separate fax line (parallel
phone systems) 198
shared phone line (parallel
phone systems) 202
test fax 218
voice mail (parallel phone
systems) 203
voice mail and computer
modem (parallel phone
systems) 216
shipping environment
specifications 170
size
scans, troubleshoot 116
troubleshoot copy 110
skew, troubleshoot
copy 111
print 108
scan 115
software
accessories settings 33
OCR 48
warranty 159
Webscan 48
sound pressure 170
specifications
acoustic emissions 170
electrical 170
media 163, 164
network protocols 163
operating environment 170
physical 161
processor and memory 162
shipping environment 170
system requirements 162
speed
troubleshoot for
scanner 112
Index
speed dial
send fax 61
status
network configuration
page 152
printer status report 148
status icons 15
storage devices
USB flash drives
supported 171
streaks, troubleshoot
copies 111
scan 116
stripes on scans,
troubleshoot 115
subscriber identification
code 76
supplies
ordering online 193
printer status report 148
yields 162
support 94
system requirements 162
T
technical information
copy specifications 168
fax specifications 168
memory card
specifications 171
scan specifications 169
telephone line, answer ring
pattern 77
telephone wall jack, fax 118
telephone, fax from
receive 67
send 63
temperature specifications 170
tests, fax
dial tone, failed 121
failed 117
fax line condition 122
fax phone cord type test failed 119
hardware, failed 117
port connection, failed 118
setup 218
telephone wall jack 118
text
cannot be edited after scan, troubleshoot 113
incompletely filled on
copies 111
missing from scan,
troubleshoot 113
splotchy on copies 111
troubleshoot 102
unclear on copies, troubleshoot 11
unclear scans 116
tone dialing 78
tray 1
capacity 166
media sizes supported 164
media types and weights
supported 166
tray 2
capacity 166
installation 30
load media 31
media sizes supported 164
media types and weights supported 166
turn on and off in driver 33
trays
capacities 166
clear jams 154
installation tray 2 30
load media 24
locating 12
locking 32
media sizes supported 164
media types and weights supported 166
paper guides illustration 12
setting default 32
troubleshoot feeding 107
turn on and off in driver 33
troubleshoot
answering machines 128
blank pages printed 101
copy 109
copy quality 110
cut-off pages, incorrect text or graphics placement 102
embedded web server 144
fax 116
fax dial tone test failed 121
fax hardware test failed 117
fax line test failed 122
fax phone cord connection test failed 118
fax phone cord type test failed 119
fax tests 117
fax wall jack test, failed 118
firewalls 99
jams, paper 157
media not picked up from tray 107
memory devices 135
missing or incorrect information 102
multiple pages are picked 108
network configuration page 152
nothing prints 99
paper-feed problems 107
power 99
print 98
printer status report 147
receive faxes 123, 126
scan 112
scan quality 114
send faxes 123, 125, 128
skewed copies 111
skewed pages 108
tips 98
troubleshooting
general network troubleshooting 136
hardware installation suggestions 145
HP software installation suggestions 146
installation issues 145
solve network problems 146
wired network 136
wireless problems 136
TWAIN
unable to activate source 114
two-sided printing 44
U
uninstall HP software
Windows 227
USB connection
port, locating 12, 13 specifications 161
USB flash drives 171
V
vertical stripes on copies, troubleshoot 111
view
network settings 219
voice mail
set up with fax (parallel phone systems) 203
set up with fax and computer modem (parallel phone systems) 216
voltage specifications 170
volume
fax sounds 79
X
xD-Picture memory card insert 28
W
wall jack test, fax 118
warranty 159
Webscan 48
websites
accessibility information 3, 10
customer support 95
environmental
programs 180
order supplies and
accessories 193
supply yield data sheet 162
white bands or stripes,
troubleshoot
copies 111
scans 115
Windows
borderless 43
print brochures 37
Print photos 40
print settings 36
system requirements 162
turn accessories on and off in driver 33
uninstall HP software 227
wireless communication
advanced wireless
troubleshooting 137
basic wireless
troubleshooting 137
radio, turn off 219
reducing interference 227
regulatory information 178
security 225
set up 222
wireless connection icons 15
wireless test report
print 225
© 2011 Hewlett-Packard Development Company, L.P.
www.hp.com/go/customercare