
Vue Pro - Security Camera FLIR - Free user manual and instructions
Find the device manual for free Vue Pro FLIR in PDF.


| Product Type | Thermal Security Camera |
| Brand | FLIR |
| Model | Vue Pro |
| Thermal Resolution | 640 × 512 pixels |
| Frame Rate | 30 Hz |
| Thermal Sensitivity | < 50 mK |
| Field of View | 45° × 37° (typical) |
| Dimensions | 45 × 45 × 30 mm |
| Weight | 60 g |
| Power Supply | Power over Ethernet (PoE) or 5V DC |
| Power Consumption | < 2.5 W |
| Connectivity | Ethernet (RJ45), USB 2.0 |
| Operating Temperature | -20°C to 55°C |
| Ingress Protection | IP67 (estimated) |
| Key Functions | Radiometric video, motion detection, alarm output |
| Maintenance & Cleaning | Clean lens with soft, lint-free cloth; avoid solvents |
| Safety | Protected connection with HTTPS and password authentication |
| Spare Parts & Repairability | Sealed unit; no user-serviceable parts; contact FLIR support |
| General Information | User manual available in PDF from notice-facile.com |
Frequently Asked Questions - Vue Pro FLIR
User questions about Vue Pro FLIR
0 question about this device. Answer the ones you know or ask your own.
Ask a new question about this device
Download the instructions for your Security Camera in PDF format for free! Find your manual Vue Pro - FLIR and take your electronic device back in hand. On this page are published all the documents necessary for the use of your device. Vue Pro by FLIR.
USER MANUAL Vue Pro FLIR
natural_image
Abstract blue geometric logo with two overlapping diamond shapes forming a stylized 'Z' shape (no text or symbols)FLIR®
Informaon on this page is subject to change without noce

FLIR®
The World's Sixth Sense™
Table of Contents
1 INTRODUCTION....4
1.1 SCOPE....4
1.2 REVISION HISTORY ....4
2 RESOURCES....5
2.1 FLIR WEBSITE / TECH SUPPORT INFORMATION 5
2.2 FLIR SYSTEMS DOCUMENTS....5
2.3 EXTERNAL DOCUMENTS 5
2.4 ABBREVIATIONS / ACRONYMS 6
3 WHAT'S IN THE BOX 7
3.1 UNPACKING YOUR CAMERA ....7
3.1.1 FLIR Vue Pro Camera with Camera Mount....7
3.1.2 Bench Cable 7
3.1.3 MicroSD Card 8
3.1.4 Accessory Cable 8
4 Connecting to the Camera....8
4.1 MECHANICAL INTERFACE....8
4.1.1 SIZE / WEIGHT 8
4.1.2 MOUNTING 9
4.2 ELECTRICAL INTERFACE....11
4.2.1 Bench Testing....11
4.2.2 COTS mini-USB Cables 11
4.2.3 FLIR Vue Pro Power & Video Adapter (HDMI Converter)....11
4.3 Software Interface....12
4.4 Connecting to a MAVLink Compatible Flight Controller 12
4.5 Camera Operation....13
5 The FLIR Vue Pro APP....14
5.1 Home Screen 14
5.1.1 Color Palette....15
5.1.2 Scene 16
5.1.3 Manual Controls....17
5.1.3.1 ROI 17
5.1.3.2 DDE....17
5.1.3.3 ACE....18
5.1.3.4 SSO....18
5.1.3.5 Save Custom Scene Presets....18
5.1.4 Zoom 18
5.1.5 Video/Still Image/Timelapse....18
5.1.5.1 Video....18
5.1.5.2 Still Images....19
5.1.5.3 Timelapse 19
5.1.6 Record 19
5.1.7 Recalibrate....19
5.1.8 Settings....20
5.1.8.1 Main....20
5.1.8.2 Accessory Port I/O 21
5.1.8.3 Radiometry 23
436-0013-10, Rev. 110 Vue Pro and Vue Pro R User Guide
Informaon on this page is subject to change without noce
FLIR Vue Pro and Vue Pro R User Guide
5.1.8.4 About 25
6 File Formats....27
6.1 JPEG 27
6.2 TIFF....27
6.3 Recommended Application Links 27
7 Care of FLIR Vue Pro 28
Appendix A - Software and Firmware Update....29
Appendix B - MAVLink Implementation 32
List of Figures
Figure 1. Vue Pro with Camera Mount ....7
Figure 2. Bench Cable....8
Figure 3. Accessory Cable....8
Figure 4. 14'' -20 Mounting....9
Figure 5. Side and Bottom Mounting....9
Figure 6. Action Camera Interface....10
Figure 7. HDMI Converter (FLIR pn 4206334)....11
Figure 8. PixHawk Flight Controller....12
Figure 9. Camera Status and Record LED Description....13
Figure 10. Home Screen....14
Figure 11. Color Palettes....15
Figure 12. Scene Presets....16
Figure 13. Manual Scene Controls ....17
Figure 14. Main Settings....20
Figure 15. PWM Settings....21
Figure 16. Function Selection....21
Figure 17. Radiometry Tab....23
Figure 21. Upgrade Available....26
Figure 22. Firmware Upgrade ....30
Figure 23. Upgrading and Bluetooth Disconnect Messages....30
List of Tables
Table 1. Accessory Cable Pinout Definition....12
Table 2. Image Formats Recorded on microSD Card....27
436-0013-10, Rev. 110 Vue Pro and Vue Pro R User Guide
Informaon on this page is subject to change without noce
1 INTRODUCTION
1.1 SCOPE
Designed for professional use, FLIR's Vue Pro line of camera systems are more than a collection of thermal cameras. They are thermal measurement instruments and data recorders that add tremendous value to sUAS operations and services. While the Vue Pro R resembles the Vue Pro in physical appearance, it is a different product providing even more capabilities not possible with the original Vue Pro platform.
This guide shows how to get the plug-and-play FLIR Vue Pro and Vue Pro R cameras connected, running, and mounted. Unless specifically stated otherwise, all features and functions of the Vue Pro apply to the Vue Pro R. Radiometric functions are simply added to the Vue Pro to make the Vue Pro R. All references to Vue Pro contained in this guide are applicable to Vue Pro R, but not necessarily vice versa.
1.2 REVISION HISTORY
| Version | Date | Comments |
| 100 | 01/10/2014 | Initial Release |
| 110 | 06/22/2016 | Updated content and to include Vue Pro R |
436-0013-10, Rev. 110 Vue Pro and Vue Pro R User Guide
Informaon on this page is subject to change without noce
2 RESOURCES
Here is a sample of some of the resources that can be found:
2.1 FLIR WEBSITE / TECH SUPPORT INFORMATION
In several locations throughout this document, FLIR's Vue and Vue Pro website are referenced as a source of additional information. This website can be accessed via the following URL:
http://www.lir.com/suas
Additionally, FLIR's Technical Support department is referenced as a resource for obtaining additional help or information. The department can be accessed via the following phone number: 866-667-7732.
2.2 FLIR SYSTEMS DOCUMENTS
| Document Number | Document Title |
| n/a | Vue Pro Datasheet (Web Link) |
| n/a | Vue Pro R Datasheet (Web Link) |
| 436-0013-19 | FLIR Vue Pro Technical Drawing (Web Link) |
| n/a | FLIR Vue Pro STEP File (Download) |
| n/a | UAS Radiometry Tech Note (Web Link) |
| 102-9012-01 | Interface Requirements Specification for FLIR TIFF File Format (Web Link) |
2.3 EXTERNAL DOCUMENTS
| Document Number | Document Title |
| n/a | MAVLink Protocol (Web Link) |
436-0013-10, Rev. 110 Vue Pro and Vue Pro R User Guide
Informaon on this page is subject to change without noce
2.4 ABBREVIATIONS / ACRONYMS
| Abbreviaon/Acronym | Components |
| ACI | Acon Camera Interface |
| AGC | Automac Gain Control |
| DDE | Digital Detail Enhancement |
| ESD | Electrostac Damage |
| FFC | Flat Field Correcon |
| FOV | Field of View |
| GUI | Graphical User Interface |
| I/O | Input / Output |
| ICD | Interface Control Drawing / Document |
| IDD | Interface Descripon Drawing / Document |
| LUT | Look-Up Table |
| NTSC | Naonal Television System Commiee |
| OSD | On Screen Display |
| PAL | Phase Alternang Line |
| PWM | Pulse Width Modulaon |
| RoHS | Reducon of Hazardous Substances |
| ROI | Region of Interest |
| TBD | To Be Determined |
| URL | Uniform Resource Locator |
436-0013-10, Rev. 110 Vue Pro and Vue Pro R User Guide
Informaon on this page is subject to change without noce
3 WHAT'S IN THE BOX
When unpacking the camera, please heed customary electrostatic-discharge (ESD) sensitive device precautions including static-safe work station and proper grounding. The camera is placed in a conductive anti-static bag to protect from ESD damage and safely packaged to prevent damage during shipping.
Disassembling the camera can cause permanent damage and will void the warranty. Operating the camera outside of the specified input voltage range or the specified operating temperature range can cause permanent damage. The camera back is not sealed. Avoid exposure to dust and moisture.
3.1 UNPACKING YOUR CAMERA
FLIR Vue Pro comes with the following components:
3.1.1 FLIR Vue Pro Camera with Camera Mount
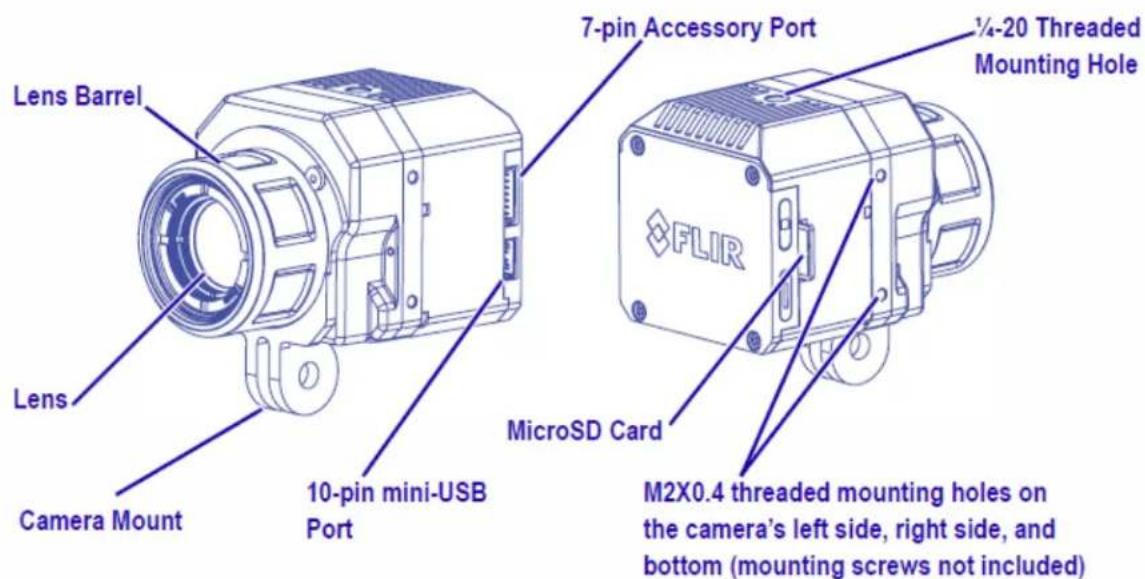
text_image
Lens Barrel Lens Camera Mount 10-pin mini-USB Port 7-pin Accessory Port MicroSD Card M2X0.4 threaded mounting holes on the camera's left side, right side, and bottom (mounting screws not included) FLIR ¼-20 Threaded Mounting HoleFigure 1. Vue Pro with Camera Mount
3.1.2 Bench Cable
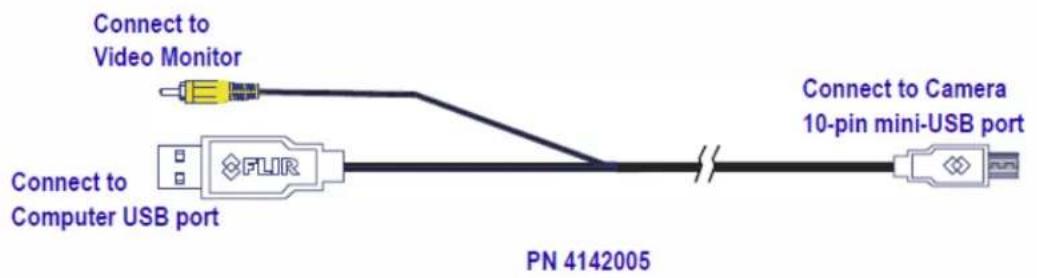
The Bench Cable should be used for connecting the FLIR Vue Pro to a computer USB port for power and ile transfer, as well as video output testing with an analog video monitor. Analog video output is accessed by connecting the RCA pigtail to a video display. Digital video is not accessible from the USB port.
436-0013-10, Rev. 110 Vue Pro and Vue Pro R User Guide
Informaon on this page is subject to change without noce
text_image
Connect to Video Monitor Connect to Computer USB port PN 4142005 Connect to Camera 10-pin mini-USB portFigure 2. Bench Cable
3.1.3 MicroSD Card
The microSD card slot is for storing images/video and upgrading camera irmware. Maximum capacity is 32GB. A Class 6 or greater card should be used to achieve full camera performance.
3.1.4 Accessory Cable
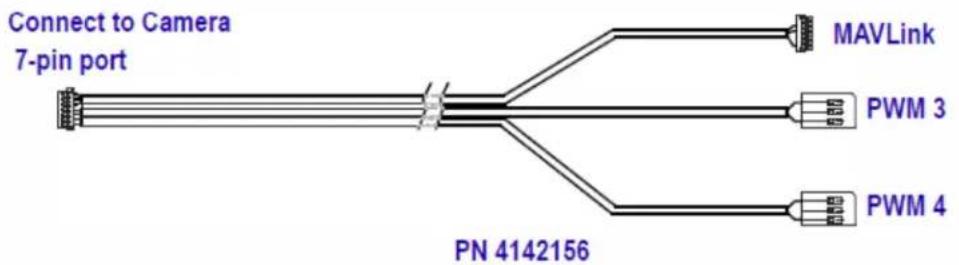
The Accessory Cable is for connecting FLIR Vue Pro to a MAVLink compatible autopilot and/or standard R/C PWM outputs. The MAVLink interface operates at a default data rate of 57.6 kbps. See Table 1 for pin deinitions and Section 5.1.8.2 for PWM signal proile.
text_image
Connect to Camera 7-pin port MAVLink PWM 3 PWM 4 PN 4142156Figure 3. Accessory Cable
4 Connecng to the Camera
This section describes installation of necessary software, physical camera connections, and software connection to the camera.
4.1 MECHANICAL INTERFACE
4.1.1 SIZE / WEIGHT
The overall size of the Vue Pro is 44.45mm (h) x 44.45mm (w) x 62.6mm (d) (1.75 x 1.75 x 2.47 inches), including the lens but excluding cables. Weight is between 3.25 and 4 ounces, depending on lens configuration. These mechanical specs do not take into account any additional mounting hardware or cabling. For additional details, please see the Vue Pro Technical Drawing referenced in Section 2.2.
436-0013-10, Rev. 110 Vue Pro and Vue Pro R User Guide Informaon on this page is subject to change without noce
4.1.2 MOUNTING
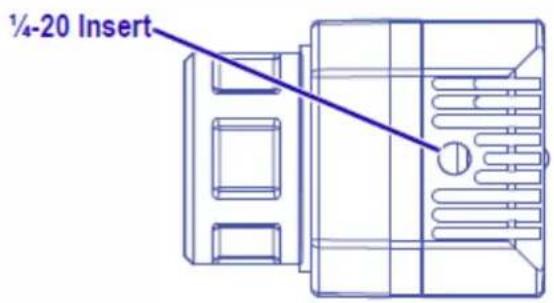
The Vue Pro camera provides precision mounting features on both sides, the top, and on the bottom surfaces of the housing. Perhaps the simplest approach to mounting the Vue Pro is to screw a standard tripod ( 14 "-20) mounting bolt into the threaded insert located on the top surface of the camera.
text_image
1/4-20 InsertFigure 4. 14 -20 Mounting
Note: Do not exceed 6.35mm (0.25 in) maximum depth as internal damage could occur and warranty will be void.
The camera also has two threaded mounting holes on each side of the housing, as well as on the bottom. These threaded holes, 24mm (0.945 in) apart accept M2x0.4 screws (not included). Refer to the Vue Pro Technical Drawing for additional information.
Note: Do not exceed 4.0mm (0.157 in) maximum depth as internal damage could occur and warranty will be void.
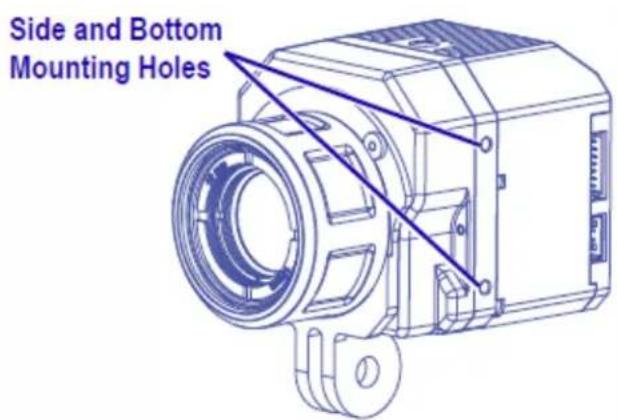
text_image
Side and Bottom Mounting HolesFigure 5. Side and Bottom Mounting
436-0013-10, Rev. 110 Vue Pro and Vue Pro R User Guide Informaon on this page is subject to change without noce
The included Action Camera Interface (ACI) allows using standard action camera mounts. If a different mounting option is to be used, the ACI can be removed using the following steps:
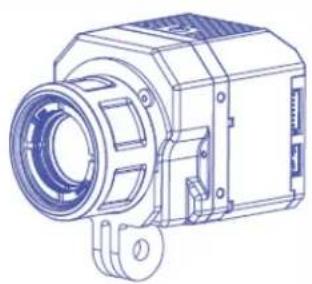
natural_image
Technical line drawing of a mechanical device with no visible text or symbolsUnscrew the Lens Nut
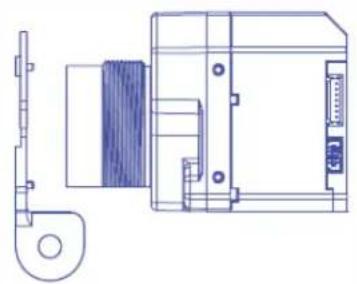
natural_image
Technical line drawing of a mechanical device with internal components and mounting bracket (no text or symbols)Slide the Camera Mount off
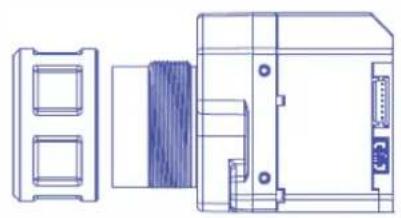
natural_image
Technical line drawing of a device housing and enclosure (no text or symbols)Screw the Lens Nut back on
Figure 6. Action Camera Interface
When installing the ACI, be sure to engage the two alignment pins with the corresponding holes on the camera body. Refer to the Vue Pro Technical Drawing for additional information.
Note: Use of retaining compound such as VIBRA-TITE VC-3 is recommended. Due to the large diameter of the thread, very lile is required to inhibit nut back o.
436-0013-10, Rev. 110 Vue Pro and Vue Pro R User Guide
Informaon on this page is subject to change without noce
4.2 ELECTRICAL INTERFACE
4.2.1 Bench Tesng
For initial bench testing, connect the 10-pin mini-USB connector on the Bench Cable (see Section 3.1.2) to the mini-USB port on the Vue Pro camera. Connect the RCA plug on the Bench Cable to an analog video monitor. Connect the USB (Type-A) connector on the Bench Cable to an available USB port on your computer.
4.2.2 COTS mini-USB Cables
FLIR Vue Pro is compatible with many commercial off-the-shelf (COTS) 10-pin mini-USB cables that are used to provide power to, and receive video from, action cameras commonly mounted on small unmanned aerial systems (sUAS). FLIR does not provide this cable as every sUAS installation is unique. Please refer to the Vue Pro Technical Drawing for electrical interface guidelines and USB connector pinout.
Simply plug the chosen cable into the mini-USB port on the FLIR Vue Pro, connect power to an appropriate regulated power supply, and video to a downlink, if desired. Approximate operating current of the Vue Pro camera is 420 mA at 5Vdc. Inrush current can reach as high as 600 mA.
Note: FLIR Vue Pro does not have over-voltage or reverse polarity protection on power or video pins. Only use a iltered, regulated 5Vdc power source with the FLIR Vue Pro! Applying more than 6Vdc, reversing polarity, or applying power to video pins will damage the camera and void the warranty.
4.2.3 FLIR Vue Pro Power & Video Adapter (HDMI Converter)
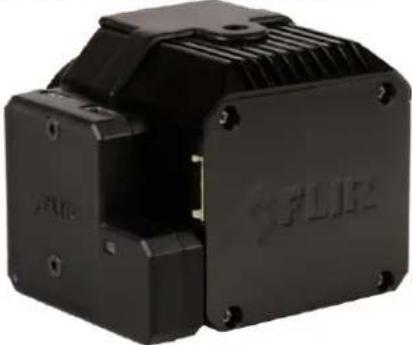
The Vue Pro HDMI Converter is a power and video adapter accessory (FLIR part number 4206334) for the Vue Pro that expands the input voltage range of the camera. It accepts input voltages between 5 and 32Vdc and regulates it down to the required 5Vdc. It also provides reverse polarity protection. This accessory also provides up-scaled 720p60 video via a micro HDMI connector. It adds approximately 15 grams to the weight and 11 mm to the width of the camera. It also utilizes the two M2 mounting holes on the side of the Vue Pro camera.
natural_image
Black industrial electronic component with visible mounting holes and internal structure (no text or symbols)Figure 7. HDMI Converter (FLIR pn 4206334)
436-0013-10, Rev. 110 Vue Pro and Vue Pro R User Guide Informaon on this page is subject to change without noce
4.3 Soware Interface
The Vue Pro camera is configured and operated through a mobile device APP. See Section 5 for additional details.
Note: The Vue Pro camera is not compatible with the FLIR Camera Controller User Interface software. When connected to the USB port on a computer, the camera appears as a mass storage device only.
There is no Software Developer's Kit or API available for the camera.
4.4 Connecng to a MAVLink Compatible Flight Controller
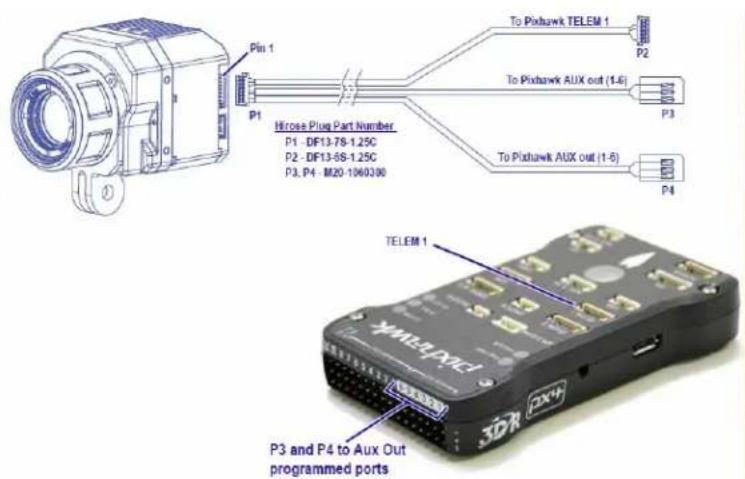
The FLIR Vue Pro camera is software- and connector-compatible with many MAVLink autopilots using the included Accessory Cable. Other light controllers or I/O modules may require different cables or connectors. Refer to the FLIR Vue Pro Technical Drawing for detailed information.
Please see Section 5.1.8.2 for port configuration.
text_image
Pin 1 P1 Hirose Plug Part Number P1 - DF13-78-1.25C P2 - DF13-68-1.25C P3, P4 M20-1060300 To Pixhawk TELEM 1 P2 To Pixhawk AUX out (1-6) P3 To Pixhawk AUX out (1-6) P4 TELEM 1 P3 and P4 to Aux Out programmed portsFigure 8. PixHawk Flight Controller
| P1 - Accessory Port (DF13-7S-1.25C) | Wire color | P2 - MAVLink (DF13-6S-1.25C) | P3 - AUX Out (M20-1060300) | P4 - AUX Out (M20-1060300) | ||||
| PWM_1 | 1 | green | RX in | 3 | ||||
| PWM_2 | 2 | white | TX out | 2 | ||||
| GND | 3 | black | GND | 6 | ||||
| PWM_3 | 4 | orange | PWM_3 | 1 | ||||
| GND | 5 | black | GND | 3 | ||||
| PWM_4 | 6 | blue | PWM_4 | 1 | ||||
| GND | 7 | black | GND | 3 | ||||
Note: All cable plug part numbers are Hirose
Table 1. Accessory Cable Pinout Definition
436-0013-10, Rev. 110 Vue Pro and Vue Pro R User Guide Informaon on this page is subject to change without noce
4.5 Camera Operaon
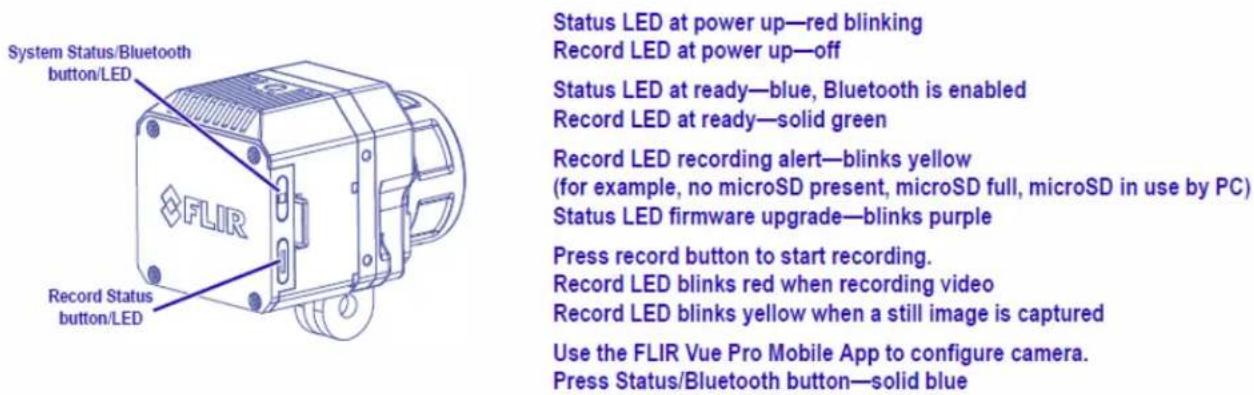
The camera does not have an on or off switch. When power is applied, IR video will start in less than ive seconds and the Bluetooth radio will be enabled in roughly 30 seconds (three beeps are sounded and the Bluetooth LED is lit blue).
- When power is applied to the camera, the Status LED blinks red for approximately 30 seconds, then changes to solid blue. When this happens, Bluetooth becomes enabled. FLIR Vue Pro beeps three times and the Record LED goes from off to solid green. (If the FLIR Vue Pro is connected to a computer, the Record LED blinks yellow.)
- Launch the APP on the mobile device. Use the APP to configure any desired camera settings and then disable the Bluetooth radio in preparation for light. The Vue Pro will automatically disable the Bluetooth radio after 2 minutes if no commands are received from the APP. It can be re-started by pressing the Bluetooth button on the camera.
Note: The Bluetooth interface is only intended to be used for ground operations. FLIR does not recommend lying while Bluetooth is enabled.
- FLIR Vue Pro is now ready for use. Press the Record button on the camera or in the APP to start recording or use PWM signals setup on the autopilot. The Record LED blinks while recording video, or lashes yellow each time it captures a still image.
See Section 5 for instructions on how to adjust camera modes, video/still image formats, PWM settings, and other configuration options using the FLIR Vue Pro Application.
text_image
System Status/Bluetooth button/LED Record Status button/LED Status LED at power up—red blinking Record LED at power up—off Status LED at ready—blue, Bluetooth is enabled Record LED at ready—solid green Record LED recording alert—blinks yellow (for example, no microSD present, microSD full, microSD in use by PC) Status LED firmware upgrade—blinks purple Press record button to start recording. Record LED blinks red when recording video Record LED blinks yellow when a still image is captured Use the FLIR Vue Pro Mobile App to configure camera. Press Status/Bluetooth button—solid blueFigure 9. Camera Status and Record LED Description
Simultaneously pressing both the start/stop and Bluetooth buttons for 5 seconds will cause the system to reboot and do a hard reset restoring all factory default settings.
436-0013-10, Rev. 110 Vue Pro and Vue Pro R User Guide
Informaon on this page is subject to change without noce
5 The FLIR Vue Pro APP
The FLIR Vue Pro APP is the primary control interface available for the Vue Pro camera. It is compatible with many mobile devices equipped with Bluetooth LE running iOS 8.0 or later and Android V 4.3 or above.
5.1 Home Screen
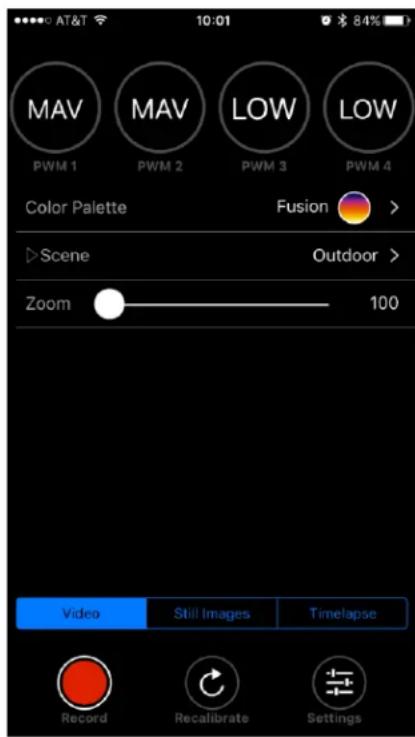
When launched, the FLIR Vue Pro APP will connect to the camera and the Home screen will be displayed (or the last screen accessed). The Home screen shows camera status and allows choosing the Color Palette, Scene Preset and Manual Controls, and Record Mode (video, still, or timelapse). The current PWM states are also displayed here.
text_image
MAV PWM 1 MOV 2 LOW PWM 3 LOW PWM 4 Color Palette Fusion > Scene Outdoor > Zoom 100 Video Still Images Timelapse Record Recalibrate SettingsFigure 10. Home Screen
436-0013-10, Rev. 110 Vue Pro and Vue Pro R User Guide
Informaon on this page is subject to change without noce
5.1.1 Color Palee
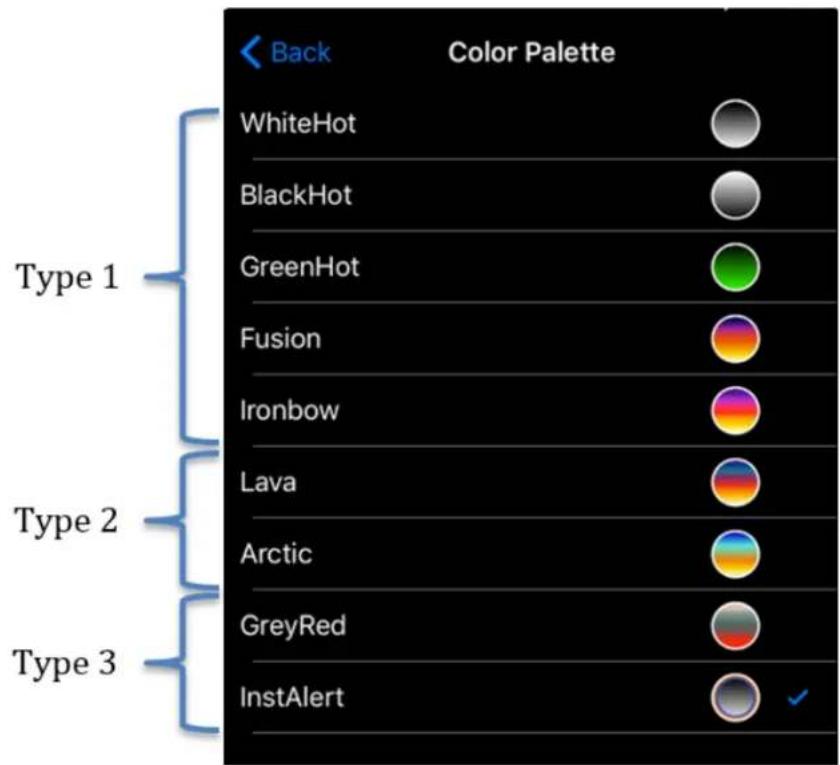
The Vue Pro detects and images long wave infrared radiation. Within the camera, this radiation is mapped (as determined by the Scene Preset selected) to a range of 255 colors. In a black and white palette, this range is converted to shades of gray with 0 being totally black and 255 being totally white. Different palettes are available to change the appearance of the image. The most common selection is either White Hot (hotter objects appear brighter than cooler objects) or Black Hot (hotter objects appear darker than cooler objects).
text_image
Back Color Palette WhiteHot BlackHot GreenHot Fusion Ironbow Lava Arctic GreyRed InstAlertFigure 11. Color Palettes
There are three main types of palettes offered in the Vue Pro camera. If an error is received while attempting to select a particular color palette, that selection may not be available in your camera.
-
Linear: Scene radiation is mapped to pixel values where color is uniformly distributed from one shade to another as pixel intensity increases. These palettes are the most common palettes for general use: WhiteHot, BlackHot, GreenHot, Fusion, Ironbow
-
Contrast: Enhances observed contrast by mapping pixel values to divergent color schemes. Subtle differences between object temperatures become more apparent. Lava, Arctic.
-
Alert: Helps draw attention to the hottest subjects in a scene by applying high-contrast color values to an otherwise linear distribution. GreyRed, InstAlert.
436-0013-10, Rev. 110 Vue Pro and Vue Pro R User Guide Informaon on this page is subject to change without noce
5.1.2 Scene
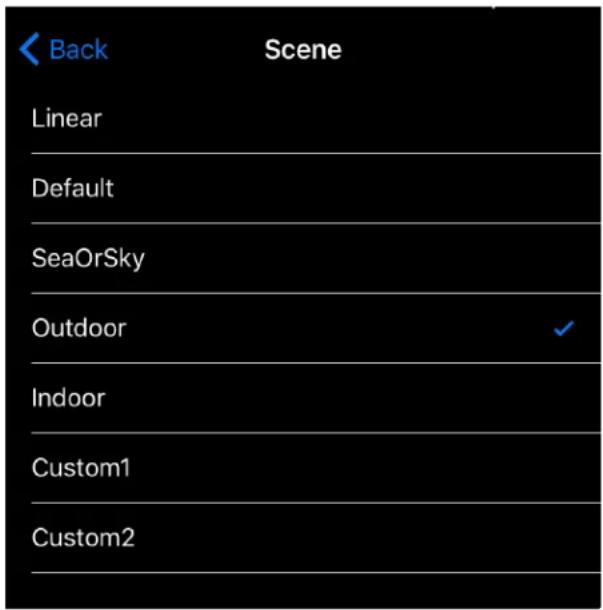
Each Scene preset provides a combination of automatic gain control (AGC) settings which have been optimized by FLIR Systems to provide the best image for a particular application. In many cases, selecting a particular Scene preset will be all the camera setup that is required. However, these settings are intended to be used as guidelines and are not guaranteed to be the optimum values for any particular scenario. Depending upon scene content and viewing/recording preferences, individual settings may be further optimized.
text_image
Back Scene Linear Default SeaOrSky Outdoor ✓ Indoor Custom1 Custom2Figure 12. Scene Presets
The Vue Pro camera includes the following Scene presets:
- Linear
- Default
- SeaOrSky
- Outdoor
- Indoor
- Custom1
- Custom2
Scene Algorithms have been tuned for each preset. Each option has its own set of image parameters. When switching between Scene settings, the camera requires a second or two to load them. If unsure which setting to use, select Default.
436-0013-10, Rev. 110 Vue Pro and Vue Pro R User Guide
Informaon on this page is subject to change without noce
5.1.3 Manual Controls
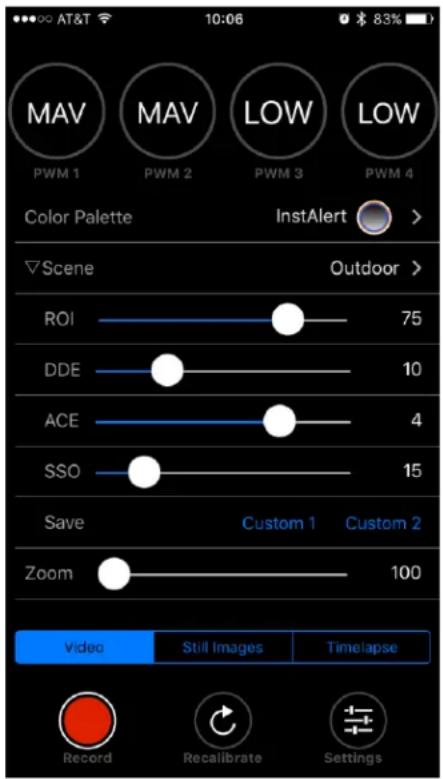
Manual controls are available to ine-tune the image for a particular scene. Manual adjustment is not required but it has the possibility of optimizing the image to bring out key details in a scene. Toggling the Scene icon will expose the options listed below.
text_image
AT&T 10:06 83% MAV PWM 1 MAV PWM 2 LOW PWM 3 LOW Color Palette InstAlert > Scene Outdoor > ROI 75 DDE 10 ACE 4 SSO 15 Save Custom 1 Custom 2 Zoom 100 Video Still Images Time lapse Record Recalibrate SettingsFigure 13. Manual Scene Controls
5.1.3.1 ROI
The ROI slider allows the user to set a region of interest (a rectangular area of pixels on the sensor array) that the Scene algorithm will use for its calculations. This rectangular area can be configured so that varying amounts of sky will be excluded. When set to 100, the full field of view will affect the image. A setting of 50 will exclude the top half of the image.
Setting the ROI to Locked (moving the slider all the way to the left) will freeze the Scene settings so that changes in image content will not alter the apparent brightness and contrast. This will also suspend FFC events. Operating in this mode could negatively impact image quality. A manual FFC can be performed to refresh the image.
5.1.3.2 DDE
Digital Detail Enhancement (DDE) is an algorithm which can be used to enhance image details and/or suppress fixed pattern noise. DDE parameters are computed automatically based on scene content and range from -20 to 100. Higher values represent higher degrees of detail enhancement. If no enhancement is desired, a value of 0 should be set. Values greater than 0 sharpen the image,
436-0013-10, Rev. 110 Vue Pro and Vue Pro R User Guide
Informaon on this page is subject to change without noce
while values less than 0 soften the image and ilter fixed pattern noise. Although large values of DDE will significantly enhance the edges of objects in the scene, it can also raise the fixed pattern noise in the image.
5.1.3.3 ACE
The Active Contrast Enhancement (ACE) feature provides a contrast adjustment dependent on the relative scene temperature. ACE thresholds greater than 0 impart more contrast to hotter scene content and decrease contrast for colder scene content (e.g. sky or ocean). ACE threshold settings less than 0 do the opposite by decreasing contrast for hotter scene content and leaving more of the gray-scale shades to represent the colder scene content. ACE can range from -8 to 8 where -8 decreases contrast in darker regions while +8 increases contrast in darker regions. Although individual operator preferences may vary, FLIR recommends to use positive values of ACE when selecting WhiteHot-based color palettes and negative values when selecting BlackHot. Color-based palettes typically require only small (if any) changes to ACE.
5.1.3.4 SSO
The Smart Scene Optimization (SSO) value deines the percentage of colors that will be linearly mapped. With SSO enabled, the difference in gray shades between two objects is more representative of the difference in temperature. SSO helps to set how linear the Scene algorithms are to provide the highest amount of perceived contrast in every scene. SSO can range from 0 to 100%.
5.1.3.5 Save Custom Scene Presets
Two user configurable Scene presets are provided. Saved settings include Scene algorithm, ROI, DDE, ACE, and SSO. The Save buttons store the presets, while the Custom selections (on the Scene page) recall them. To use this feature, begin by selecting the desired Scene preset. Once selected, the Scene preset can be further optimized using the manual control sliders (Section 0). Record the desired settings by hitting the Save button.
5.1.4 Zoom
View Pro cameras have up to 4x (slider setting of 400) digital zoom on the analog output with associated on-screen symbology. For example, a Vue Pro 336 in NTSC uses the center 320 x 240 pixels of the sensor for analog video. 2x (slider setting of 200) zoom mode will interpolate the center 160 x 120 pixels onto the video stream. Digital zoom setting has no effect on recorded imagery.
5.1.5 Video/SII Image/Timelapse
The Video, Still Images, and Timelapse tabs configure the Vue Pro's data bus for recording either still images or live video. The system cannot capture a still image during recording of video (or vice versa). The Record button is used to start and stop all ile captures.
5.1.5.1 Video
Video can be recorded in 8-bit MJPEG or H.264, or monochrome 14-bit TIFF sequence iles. TIFF sequences can be captured at roughly 2 frames per second. Under most conditions, H.264 provides superior 8-bit performance.
436-0013-10, Rev. 110 Vue Pro and Vue Pro R User Guide
Informaon on this page is subject to change without noce
5.1.5.2 SII Images
Conigures image capture at a user-selectable interval from one frame (slider setting of "Single") up to one every 60 seconds.
5.1.5.3 Timelapse
Conigures image capture at a user-selectable period and framerate. Timelapse sequences are captured as any available Video ile type.
• Period: Delay between captured images. Range: 1 – 60 seconds.
- Playback Speed: Framerate still images are replayed. Range: 1 – 60 frames per second.
5.1.6 Record
The Record button either captures a still image, or starts/stops live video recording. See Section 6 for details on available ile formats.
5.1.7 Recalibrate
To maintain optimum performance, thermal imaging cameras occasionally must perform an internal calibration. This is accomplished using an internal shutter and takes less than 1 second. A warning is provided onscreen 1-2 seconds prior to this event and can be seen in the upper right hand corner of the image. During re-calibration, an audible “click” can be heard and live video is frozen. This function takes place either automatically, based on internal camera parameters, or can be manually initiated by the user through one of the available interfaces.
A user may ind recalibrating prior to taking critical measurements will ensure best performance.
436-0013-10, Rev. 110 Vue Pro and Vue Pro R User Guide
Informaon on this page is subject to change without noce
5.1.8 Sengs
The Settings button is used to configure the operational parameters of the Vue Pro camera.
5.1.8.1 Main
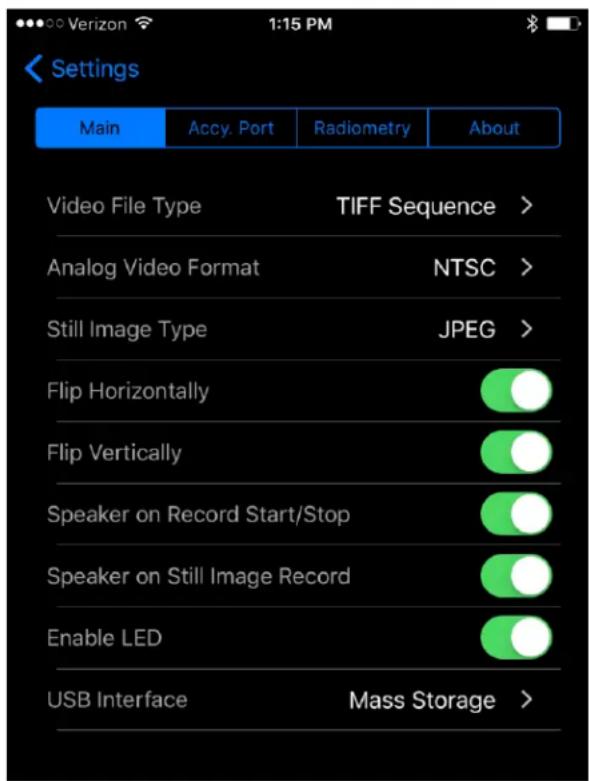
• Video File Type: Select MJPEG, H.264 or TIFF. See Section 6 for more details.
- Analog Video Format: Select NTSC or PAL as the format of the video that is output to the 10-pin mini USB port. This setting does not affect the format of the video that is saved to the microSD card.
- Still Image Type: Select formats for still images and video saved to the microSD card (See Section 6).
- Flip Horizontal/Vertical: Select image orientation. To mount the camera upside down, lip both Horizontal and Vertical. For a rear-facing application (and the effect of looking at a rear-view mirror), lip only horizontal.
- Speaker on Record Stop: Turns on/off the audible indicator for video recording. Even when turned off, the speaker will beep three times when the camera is ready after power-up.
- Speaker on Still Image Record: Turns on/off the audible indicator. Even when turned off, the speaker will beep three times when the camera is ready after power-up.
- Enable LED: Turns on/off the Status and Bluetooth LEDs. LED indicators will still be displayed while camera is booting up if this setting is turned off.
text_image
Settings Main Accy. Port Radiometry About Video File Type TIFF Sequence > Analog Video Format NTSC > Still Image Type JPEG > Flip Horizontally Flip Vertically Speaker on Record Start/Stop Speaker on Still Image Record Enable LED USB Interface Mass Storage >Figure 14. Main Settings
436-0013-10, Rev. 110 Vue Pro and Vue Pro R User Guide
Informaon on this page is subject to change without noce
5.1.8.2 Accessory Port I/O
- PWM: Using the accessory port on the Vue Pro and the included Accessory Cable (see Section 3.1.4), camera functions can be controlled directly from the sUAS light controller via PWM signals (refer to the controller manual for configuration instructions, as every brand of controller is a little different). Select the desired setting from the list of available PWM functions. No two channels can be assigned to the same function. Any functions currently assigned to PWM channels will not appear in the list of available functions for other channels. PWM 3 and PWM 4 are the channels available with the Vue Accessory Cable.
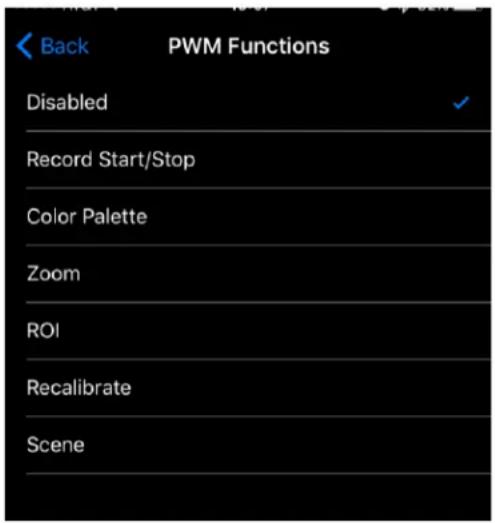
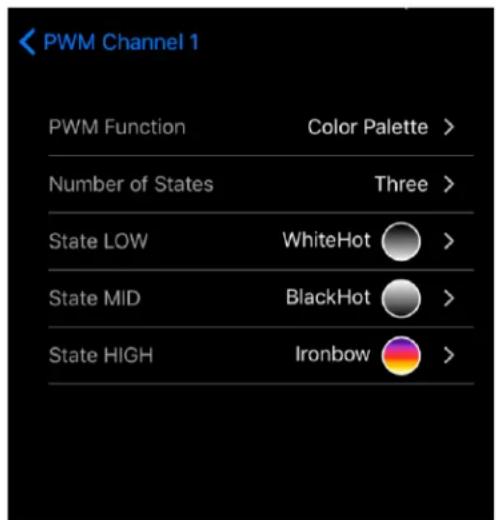
To configure, select the Settings button on the Main page. Select the Accy. Port tab at the top of the page. Ensure Serial Protocol is set to PWM. Select a PWM channel to configure (Figure 15). Select the desired function. Select the number of states (Figure 16). The number of states will depend on the type of switch that is being mapped on the light controller. For a three-position switch, the number of states will be three. Assign functions to the available states for each signal. Next, program the light controller to provide signals to the Aux Out ports for the P3 and/or P4 connectors on the Accessory Cable.
The Vue Pro accepts standard PWM inputs for the R/C industry, 3.3-5vdc, 50Hz. LOW = 1ms/20ms, MID = 1.5ms/20ms, HIGH = 2ms/20ms.
text_image
Back PWM Functions Disabled Record Start/Stop Color Palette Zoom ROI Recalibrate SceneFigure 15. PWM Settings
text_image
PWM Channel 1 PWM Function Color Palette > Number of States Three > State LOW WhiteHot > State MID BlackHot > State HIGH Ironbow >Figure 16. Function Selection
436-0013-10, Rev. 110 Vue Pro and Vue Pro R User Guide
Informaon on this page is subject to change without noce
- MAVLink: Many UAS light controllers support the MAVLink serial protocol to provide an interface with external components. The Vue Pro can be configured to use this bus to capture available telemetry data provided by GPS, altimeter, accelerometers, etc. This data is saved as standard EXIF metadata in Still Image iles (JPEG & TIFF). This data is not saved to Video iles as there is no current standard for doing this. Metadata is accessible thru standard photo editing applications, ile explorers, and suggested mapping applications (see section 6.3).
The following MAVLink 3.0 commands are currently supported by the Vue Pro FW 1.2.4:
| Command | MAVLink ID | R/S(Receive/Send) | Notes |
| HEARTBEAT | 0 | R/S | |
| PING | 4 | R/S* | If Vue Pro has received PING, then will reply with a PING |
| SYSTEM_TIME | 2 | R | |
| ATTITUDE | 30 | R | |
| GLOBAL_POSITION_INT | 33 | R | |
| GLOBAL_POSITION_INT_COV | 63 | R | |
| HIL_GPS | 113 | R | |
| MOUNT_STATUS | 158 | R |
FLIR Vue Pro communicates on the MAVLink bus at 57600 baud which is standard for most devices. Where possible, ensure RTSCTS is disabled as this is known to cause issues with communication. The included Accessory Port cable PN 4142156 is pre-terminated to connect properly with the 3DR PixHawk TELEM 1 port. If this port is already in use, see the PixHawk documentation for information on how to reconfigure ports. If all available light controller ports are full, you may need to investigate using a splitter cable to attach additional devices. Please refer to Table 1 for Accessory Port pin-out when building custom cables.
Vue Pro can operate in a receive only configuration much like an OSD, and therefore does not require the TX pin from the camera to be connected to the RX pin on a light controller. Please note that some light controllers (3DR Solo) will sleep a serial port if no connection is detected. Please plan accordingly when setting up your system.
Please see Appendix B for the full MAVLink protocol implementation.
436-0013-10, Rev. 110 Vue Pro and Vue Pro R User Guide
Informaon on this page is subject to change without noce
5.1.8.3 Radiometry
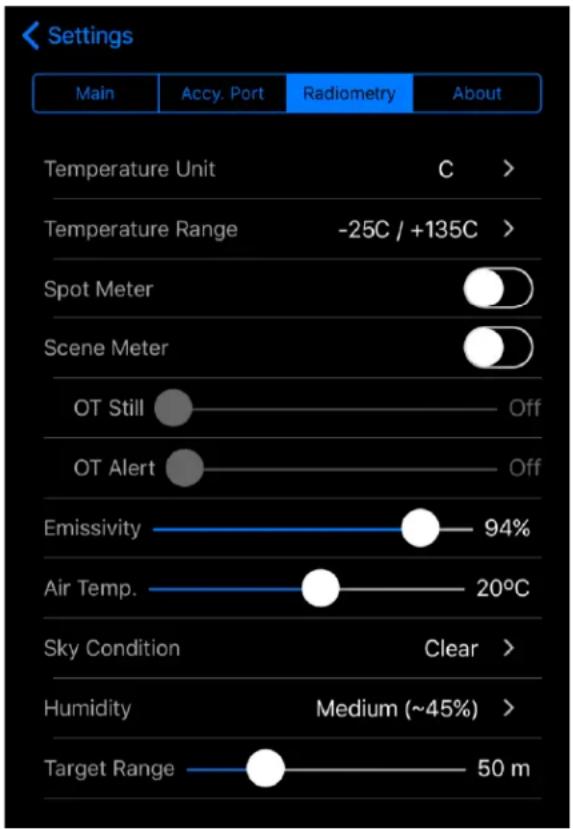
The Radiometry tab provides access to all the temperature measurement functions and settings available on the Vue Pro R. If connecting to a standard Vue Pro camera, this tab will not be visible and these features are unavailable. See FLIR's UAS Radiometry Tech Note (see Section 2.2 for the link) for a detailed discussion on how to obtain accurate temperature readings for UAS applications.
text_image
Settings Main Accy. Port Radiometry About Temperature Unit C > Temperature Range -25C / +135C > Spot Meter Scene Meter OT Still Off OT Alert Off Emissivity 94% Air Temp. 20°C Sky Condition Clear > Humidity Medium (~45%) > Target Range 50 mFigure 17. Radiometry Tab
- Temperature Unit – Units of measure displayed on the analog video. Select between Celsius and Fahrenheit.
- Temperature Range – This setting adjusts the camera sensitivity and dynamic range to provide optimum image quality. When in Auto mode the camera analyzes the scene and selects between states, based on scene conditions. Ambient temperature of the camera influences the performance of this setting. However, approximate detectable temperature ranges are as follows:
- -25/+135°C (-13/+275°F)
-40/+550°C (-40/+1022°F)
Unless extreme temperatures are expected to be encountered (i.e. ires), keep this setting configured in the Auto position.
436-0013-10, Rev. 110 Vue Pro and Vue Pro R User Guide
Informaon on this page is subject to change without noce
- Spot Meter – Turns on or off the spot meter (fixed 4x4 pixel array) in the center of the image, the on-screen thermometer on the left edge of the image, and the digital temperature in the lower left corner of the image (Figure 18). The spot consists of a 4x4 pixel array that is averaged to provide the measurement.
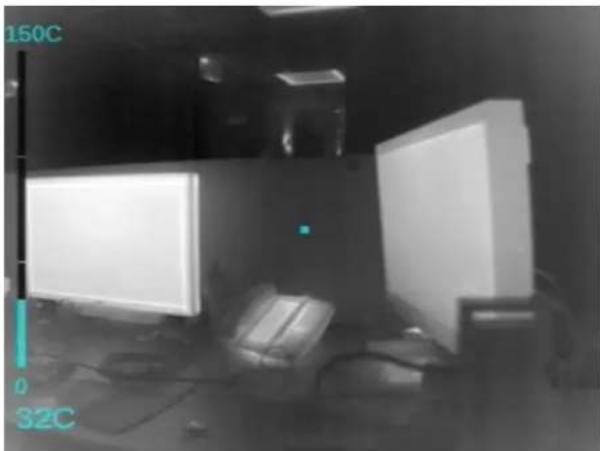
natural_image
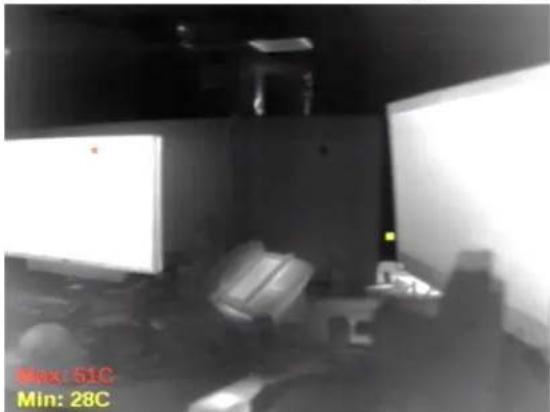
Interior view of a room with multiple computer monitors and equipment (no visible text or symbols)- Scene Meter – The Min and Max temperatures in the center 75% of the scene are actively identified and labeled by 4x4 pixel indicators. The specific values of these points are provided on screen in the lower left hand corner, and color coded to the labeled points in the image (Figure 19). There is approximately 1 second of latency to process the scene which can lead to some lag and should be considered during use.
natural_image
Interior view of a dimly lit room with multiple monitors and equipment (no visible text or symbols)Figure 19. Scene Meter OSD
436-0013-10, Rev. 110 Vue Pro and Vue Pro R User Guide Informaon on this page is subject to change without noce
- OT Still – Records a still image any time the Max: value in the Scene Meter is greater than the threshold. Values from 0 to 300°C (32 to 572°F) can be configured. The feature can also be disabled by setting it to Off.
- OT Alert – When a temperature in the scene is detected that is greater than the threshold, the Max: Scene Meter label lashes. Values from 0 to 300° C (32 to 572° F) can be configured. The feature can also be disabled by setting it to Off.
- Emissivity – Measure of the target surface ability to emit thermal energy. Values from 50-100% can be configured.
- Air Temp. – Ambient temperature of the operating environment. Values from 0 to 40°C (32 to 104°F) can be configured.
- Sky Condition – Measure of the cloud cover above the operating site. This affects the background radiation incident on the scene. Clear, Scattered and Cloudy are input values.
- Humidity – Relative moisture content of the air. Three settings are available; Low (30%), Medium (45%), High (60%).
- Target Range – Distance from the camera to the target in the scene. Values from 0-200m (0-218 yards) can be configured.
5.1.8.4 About
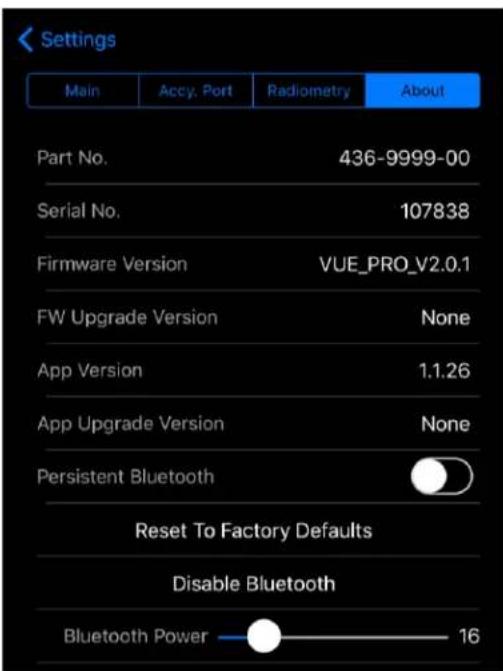
The About screen provides information on the current software installed on the Vue Pro, as well as the App version.
- Part Number – FLIR part number of the Vue Pro camera currently connected to the app.
- Serial Number – Vue Pro camera serial number currently connected to the app.
- Firmware Version – Version of irmware currently loaded in the Vue Pro camera.
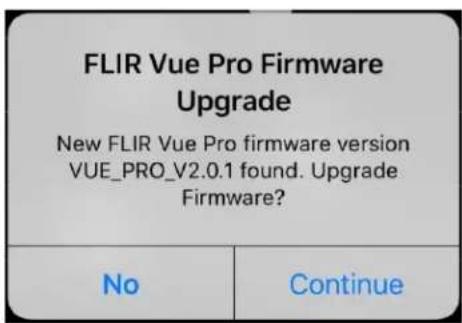
- FW Upgrade Version - Detects if a camera upgrade ile exists on the microSD card. If one is available, the Upgrade Available dialog will start. Choose Yes to begin the upgrade process. See Appendix A for details on how to upgrade camera irmware.
- App Version - Version of software currently loaded on the mobile device.
- App Upgrade Version – If the mobile device is connected to the Internet, the Vue Pro app will automatically search for any available app updates. If one exists, the user will have the option to update by following the link to the FLIR web page.
- Persistent Bluetooth – Prevents the Bluetooth interface from shutting off after 2 minutes.
- Reset To Factory Defaults – Resets settings in the Vue Pro camera to original factory configuration. This is required during most FW updates as the internal memory map will change as new features are added.
- Disable Bluetooth: Powers down the Bluetooth radio on the camera. The camera will normally disable the Bluetooth after two minutes of inactivity. See Persistent Bluetooth.
- Bluetooth Power – Adjusts the Bluetooth transmitter power and affects the maximum range at which the Vue Pro camera can connect to the mobile device. Power values are expressed in percent.
436-0013-10, Rev. 110 Vue Pro and Vue Pro R User Guide
Informaon on this page is subject to change without noce
text_image
Settings Main Accy. Port Radiometry About Part No. 436-9999-00 Serial No. 107838 Firmware Version VUE_PRO_V2.0.1 FW Upgrade Version None App Version 1.1.26 App Upgrade Version None Persistent Bluetooth Reset To Factory Defaults Disable Bluetooth Bluetooth Power 16Figure 20. About Page
It also detects if a camera upgrade ile exists on the microSD card. If one is available, the Upgrade Available dialog will start. Choose Yes to begin the upgrade process.
text_image
FLIR Vue Pro Firmware Upgrade New FLIR Vue Pro firmware version VUE_PRO_V2.0.1 found. Upgrade Firmware? No ContinueFigure 21. Upgrade Available
436-0013-10, Rev. 110 Vue Pro and Vue Pro R User Guide Informaon on this page is subject to change without noce
6 File Formats
The Vue Pro can save image data in a number of ile formats, each with unique characteristics.
6.1 JPEG
The JPEG format of the Vue Pro has both the compressed 8-bit processed JPG image and 14-bit raw sensor data in a single ile. The 8-bit image has Scene and Palette processing applied. If a compatible light controller is available telemetry will be captured and saved in standard metadata ields.
6.2 TIFF
TIFF is uncompressed 14-bit raw sensor data with no post processing. If a compatible light controller is available telemetry will be captured and saved in standard metadata ields.
| File Format | Feature | Use | Applicaons | ||||
| 8-bit | 14-bit | Scene/AGC | Palee | Telemetry | |||
| SII Image Files | |||||||
| JPEG | √ | √ | √ | √ | √ | Reporng, Research | FLIR Tools, ResearchIR, any image tool |
| TIFF | √ | √ | Mapping, Research | Pix4D, Drone Deploy, Matlab, ImageJ | |||
| Video Files | |||||||
| MJPEG | √ | √ | √ | Reporng | Any video tool | ||
| H.264 | √ | √ | √ | Reporng | Any video tool | ||
| TIFF-Seq | √ | Mapping, Research | ResearchIR, Matlab, ImageJ | ||||
Table 2. Image Formats Recorded on microSD Card
6.3 Recommended Applicaon Links
FLIR Tools: hp://www.ir.com/instruments/display/?id=54865
FLIR ResearchIR: hp://www.ir.com/Science/display/?id=51371
Pix4D: hps://pix4d.com/
DroneDeploy: hps://www.dronedeploy.com/
ImageJ: hps://imagej.nih.gov/ij/download.html
Matlab: hp://www.mathworks.com/products/matlab/
When using Matlab it is recommended that the FLIR Atlas SDK is installed to expose the full metadata set available from FLIR radiometric JPEG les: hp://support.ir.com/resources/atlas-matlab
Soware Developers can access full metadata from FLIR radiometric JPEGs by integrang the Atlas SDK: hps://ir.custhelp.com/app/answers/detail/a_id/1043/kw/atlas%20sdk
436-0013-10, Rev. 110 Vue Pro and Vue Pro R User Guide
Informaon on this page is subject to change without noce
7 Care of FLIR Vue Pro
- Only power FLIR Vue Pro with a regulated 5 Vdc power source. Using more than 6 Vdc will damage the camera and void the warranty.
- Do not touch the lens. If the lens gets dirty, a light dusting of air should dislodge any dust particles. If the lens is still noticeably dirty, use 75% Isopropyl alcohol and lens tissue. Use a light wiping motions with a fresh section of lens tissue with each swipe so as not to drag dust or dirt particles back over the lens surface.
- Do not remove the lens. Dirt and dust can settle on the interior surfaces of the camera and degrade performance.
- FLIR Vue and Vue Pro cameras have been focused at the factory and optimized for the maximum range performance of each camera/lens pair using a collimated bar target. Although it is possible to adjust the focus, doing so may compromise the external seal of the camera and factory focus will be lost. A special tool is required in order to prevent damage to the lens housing or front detector element.
- FLIR Vue Pro is neither water nor dust resistant. Care for it as you would any valuable piece of electronics equipment.
If you have questions about your Vue Pro or Vue Pro R camera, contact FLIR Tech Support at 1-866-667-7732.
436-0013-10, Rev. 110 Vue Pro and Vue Pro R User Guide
Informaon on this page is subject to change without noce
Appendix A - Software and Firmware Update
How to Update APP
Download the latest handset application from the appropriate web store for your platform. Some handy links are listed below. Also be sure to keep the OS up to date on your device as Bluetooth is an evolving protocol and receives continuous improvements.
iOS APP store (Web Link)
Android APP store (Web Link)
Android APK ile direct DL (Web Link)
How to update Firmware (FW)
Please download the latest firmware from the FLIR web site Here.
(http://www.lir.com/suas/vuepro/software)
Vue Pro Firmware Upgrade Procedure
- Backup Vue Pro settings. Connect to the Vue Pro with the Bluetooth application and make note of all your settings. The irmware upgrade will reset the camera settings to defaults since we typically are adding features and the previous settings may not be optimal for your application.
- Download irmware update. Download then save the irmware upgrade onto the camera micro SD card either by connecting your Vue Pro to a computer with the included Bench cable, or through another suitable micro SD card reader.
- Power on Vue Pro. Power on the Vue Pro and wait for it to complete the boot cycle (you'll hear the three beeps and see the Bluetooth light go steady blue and the Record light go steady red). If the Bluetooth radio does not enable, press the button to turn it on. You will see a blue light.
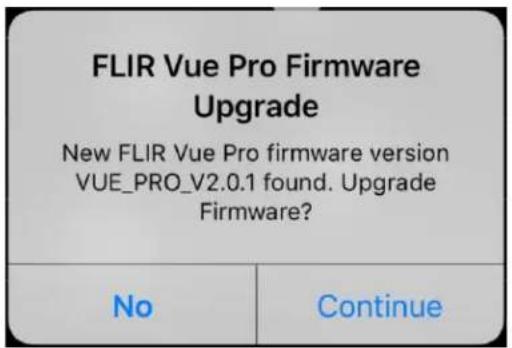
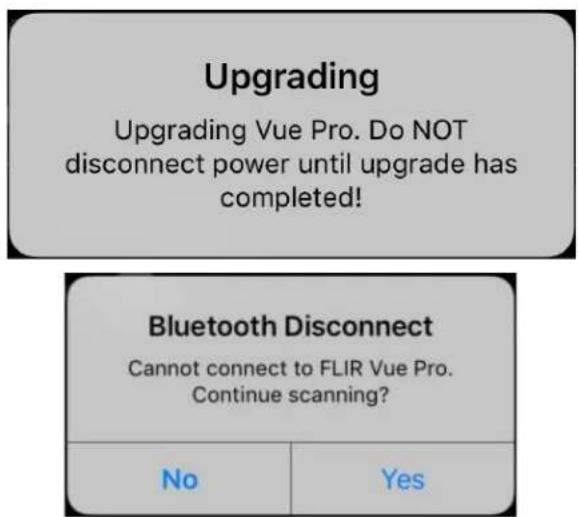
- Start update process. Open the Vue Pro app and connect to the camera. The app will read the camera's settings, then display the Firmware update message (Figure 22). Select "Yes" to begin the update. The Bluetooth light will lash purple for 30-45 seconds while it's updating, then the camera will re-boot. During this time, you will see an Upgrading message, and then the Bluetooth disconnect message. It is important to NOT remove power to the camera during the upgrade process.
436-0013-10, Rev. 110 Vue Pro and Vue Pro R User Guide
Informaon on this page is subject to change without noce
text_image
FLIR Vue Pro Firmware Upgrade New FLIR Vue Pro firmware version VUE_PRO_V2.0.1 found. Upgrade Firmware? No ContinueFigure 22. Firmware Upgrade
text_image
Upgrading Upgrading Vue Pro. Do NOT disconnect power until upgrade has completed! Bluetooth Disconnect Cannot connect to FLIR Vue Pro. Continue scanning? No YesFigure 23. Upgrading and Bluetooth Disconnect Messages
- Reconnect via Bluetooth. Once rebooted, reconnect your handset to the camera by selecting 'Yes' from the Bluetooth Disconnect dialogue (). The camera should reconnect and present you with the Main screen. If you previously selected 'No' in this dialogue you will need to force quit and restart the APP on your handset.
436-0013-10, Rev. 110 Vue Pro and Vue Pro R User Guide
Informaon on this page is subject to change without noce
-
Reset to factory defaults. This step is very important so please do not forget to perform the task. Select the Advanced button in the lower left of the screen, then the About tab, and finally 'Reset to Factory Defaults' button. A warning box will be presented, please select 'Yes'. All the iles on the micro SD card will be preserved, only the lash memory on the Vue Pro camera will be reset. This will ensure proper operation of the camera with the new irmware.
-
Restore User Settings. From your notes in Step 1 reconfigure any Main, PWM or Accessory Port settings for your specific application. You can also delete the firmware update ile from your microSD card.
436-0013-10, Rev. 110 Vue Pro and Vue Pro R User Guide
Informaon on this page is subject to change without noce
Appendix B - MAVLink Implementation
HEARTBEAT (0)
| Field Name | ENUM | Type | Ocial Descripon | FLIR Implementaon |
| System ID | MAVlink packet Byte 3 | 1 | ||
| Component ID | MAVlink packet Byte 4 | 100 | ||
| Type | MAV_TYPE | uint8_t | MAV_TYPE_GENERIC - Generic micro air vehicle. | 0 |
| Autopilot | MAV_AUTOPILOT | uint8_t | MAV_AUTOPILOT_INVALID - No valid autopilot, e.g. a GCS or other MAVLink component | 8 |
| Base Mode | MAV_MODE_FLAG | uint8_t | MAV_MODE_FLAG_MANUAL_INPUT_ENABLED - 0b01000000 remote control input is enabled. | 64 |
| Custom Mode | uint32_t | A biield for use for autopilot-specific ags. | 0 | |
| System Status | MAV_STATE | uint8_t | MAV_STATE_ACTIVE - System is acve and might be already airborne. Motors are engaged. | 4 |
| MAVLink Version | uint8_t | MAVLink version, not writable by user | default |
PING (4)
| Field Name | Type | Ocial Descripon | FLIR Implementaon | |
| Time Unix | uint64_t | Timestamp (microseconds since UNIX epoch or microseconds since system boot) | Ignored | |
| Sequence | uint32_t | PING sequence | Same as ocial | |
| System ID | uint8_t | 0: request ping from all receiving systems, if greater than 0: message is a ping response and number is the system id of the requesng system | See descripon above | |
| Component ID | uint8_t | 0: request ping from all receiving components, if greater than 0: message is a ping response and number is the system id of the requesng system | See descripon above |
SYSTEM_TIME (2)
| Field Name | Type | Ocial Descripon | FLIR Implementaon | |
| Time Unix | uint64_t | Timestamp of the master clock in microseconds since UNIX epoch. | If me is valid, it will be set to the device. | |
| Time Boot | uint32_t | Timestamp of the component clock since boot me in milliseconds. | Ignored |
436-0013-10, Rev. 110 Vue Pro and Vue Pro R User Guide
Informaon on this page is subject to change without noce

ATTITUDE (30)
| Field Name | Type | Ocial Descripon | FLIR Implementaon | |
| Time Boot | uint32_t | Timestamp (milliseconds since system boot) | Ignored | |
| Roll | oat | Roll angle (rad, -pi..+pi) | Meta = MAV Roll | |
| Pitch | oat | Pitch angle (rad, -pi..+pi) | Meta = MAV Pitch | |
| Yaw | oat | Yaw angle (rad, -pi..+pi) | Meta = MAV Yaw | |
| Roll Rate | oat | Roll angular velocity (rad/s) | Meta = MAV Roll Rate | |
| Pitch Rate | oat | Pitch angular velocity (rad/s) | Meta = MAV Pitch Rate | |
| Yaw Rate | oat | Yaw angular velocity (rad/s) | Meta = MAV Yaw Rate |
GLOBAL_POSITION_INT (33)
| Field Name | Type | Ocial Descripon | FLIR Implementaon | |
| Time Boot | uint32_t | Timestamp (milliseconds since system boot) | Ignored | |
| Latitude | int32_t | Latitude, expressed as * 1E7 | Meta = GPS Latude | |
| Longitude | int32_t | Longitude, expressed as * 1E7 | Meta = GPS Longitude | |
| Altitude (MSL) | int32_t | Altude in meters, expressed as * 1000 (millimeters), AMSL (not WGS84 - note that virtually all GPS modules provide the AMSL as well) | Meta = GPS Altude | |
| Altude (Relave) | int32_t | Altude above ground in meters, expressed as * 1000 (millimeters) | Meta = MAVRelaveAltude | |
| Velocity X | int16_t | Ground X Speed (Latitude), expressed as m/s * 100 | Calc = GPS Speed | |
| Velocity Y | int16_t | Ground Y Speed (Longitude), expressed as m/s * 100 | Calc = GPS Speed | |
| Velocity Z | int16_t | Ground Z Speed (Altude), expressed as m/s * 100 | Calc = GPS Speed | |
| Heading | uint16_t | Compass heading in degrees * 100, 0.0..359.99 degrees. If unknown, set to: UINT16_MAX | Meta = GPS Track |
GLOBAL_POSITION_INT_COV (63)
| Field Name | Type | Ocial Descripon | FLIR Implementaon |
436-0013-10, Rev. 110 Vue Pro and Vue Pro R User Guide
Informaon on this page is subject to change without noce

The World's Sixth Sense™
FLIR Vue Pro and Vue Pro R User Guide
| Time Boot | uint32_t | Timestamp (milliseconds since system boot) | Ignored | |
| Time Unix | uint64_t | Timestamp (microseconds since UNIX epoch) in UTC. 0 for unknown. | Ignored | |
| esmator_type | MAV_ESTIMATOR_TYPE | uint8_t | Class id of the esmator this esmate originated from. | Ignored |
| Latitude | int32_t | Latitude, expressed as * 1E7 | Meta = GPS Latude | |
| Longitude | int32_t | Longitude, expressed as * 1E7 | Meta = GPS Longitude | |
| Altude (MSL) | int32_t | Altude in meters, expressed as * 1000 (millimeters), AMSL (not WGS84 - note that virtually all GPS modules provide the AMSL as well) | Meta = GPS Altude | |
| Altude (Relave) | int32_t | Altude above ground in meters, expressed as * 1000 (millimeters) | Meta = MAVRelaveAltude | |
| Velocity X | oat | Ground X Speed (Latitude), expressed as m/s * 100 | Calc = GPS Speed | |
| Velocity Y | oat | Ground Y Speed (Longitude), expressed as m/s * 100 | Calc = GPS Speed | |
| Velocity Z | oat | Ground Z Speed (Altude), expressed as m/s * 100 | Calc = GPS Speed | |
| covariance | oat[36] | Covariance matrix (rst six entries are the rst ROW, next six entries are the second row, etc. | Ignored |
HIL_GPS (113)
| Field Name | Type | Ocial Descripon | FLIR Implementaon | |
| me_usec | uint64_t | Timestamp (microseconds since UNIX epoch or microseconds since system boot) | Ignored | |
| x_type | uint8_t | 0-1: no x, 2: 2D x, 3: 3D x. Some applicaons will not use the value of this eld unless it is at least two, so always correctly ll in the x. | Ignored | |
| lat | int32_t | Latitude (WGS84), in degrees * 1E7 | Meta = GPS Latude | |
| lon | int32_t | Longitude (WGS84), in degrees * 1E7 | Meta = GPS Longitude | |
| alt | int32_t | Altude (AMSL, not WGS84), in meters * 1000 (positive for up) | Meta = GPS Altude | |
| eph | uint16_t | GPS HDOP horizontal diluon of posion in cm (m*100). If unknown, set to: 65535 | Meta = GPSXYAccuracy | |
| epv | uint16_t | GPS VDOP vercal diluon of posion in cm (m*100). If unknown, set to: 65535 | Meta = GPSZAccuracy | |
| vel | uint16_t | GPS ground speed (m/s * 100). If unknown, set to: 65535 | Ignored | |
| vn | int16_t | GPS velocity in cm/s in NORTH direcon in earth-xed NED frame | Ignored | |
| ve | int16_t | GPS velocity in cm/s in EAST direcon in earth-xed NED frame | Ignored | |
| vd | int16_t | GPS velocity in cm/s in DOWN direcon in earth-xed NED frame | Ignored |
436-0013-10, Rev. 110 Vue Pro and Vue Pro R User Guide
Informaon on this page is subject to change without noce

The World's Sixth Sense™
FLIR Vue Pro and Vue Pro R User Guide
| cog | uint16_t | Course over ground (NOT heading, but direcon of movement) in degrees * 100, 0.0..359.99 degrees. If unknown, set to: 65535 | Ignored | |
| satellites_visible | uint8_t | Number of satellites visible. If unknown, set to 255 | Ignored |
MOUNT_STATUS (158)
| Field Name | Type | Ocial Descricon | FLIR Implementaon | |
| poinng_a | uint32_t | Pitch (deg*100) | Meta = Yaw (camera) | |
| poinng_a | uint32_t | Roll angle (rad, -pi..+pi) | Meta = Pitch (camera) | |
| poinng_a | uint32_t | Pitch angle (rad, -pi..+pi) | Meta = Roll (camera) | |
| Target System | uint8_t | Yaw angle (rad, -pi..+pi) | Ignored | |
| Target Component | uint8_t | Roll angular velocity (rad/s) | Ignored |
436-0013-10, Rev. 110 Vue Pro and Vue Pro R User Guide
Informaon on this page is subject to change without noce
FLIRCommercial Systems, 2011. All rights reserved worldwide. No parts of this manual, in whole or in part, may be copied, photocopied, translated, or transmitted to any electronic medium or machine readable form without the prior written permission of FLIRCommercial Systems
Names and mark appearing on the product herein are either registered trademarks or trademarks of FLIR Commercial Systems and/or its subsidiaries. All other trademarks, trade names, or company names referenced herein are used for identification only and are the property of their respective owners.
Liberation fonts are copyright 2009 by RedHat and are used under authority of the GNU public license. Information about these fonts and the GNU public license can be found at: https://www.redhat.com/promo/fonts/.
This product is protected by patents, design patents, patents pending, or design patents pending.
If you have questions that are not covered in this manual, or need service, contact FLIR Commercial Systems Customer Support at 805.964.9797 for additional information prior to returning a camera.
This documentation and the requirements specified herein are subject to change without notice.
This equipment must be disposed of as electronic waste.
Contact your nearest FLIR Commercial Systems, Inc. representative for instructions on how to return the product to FLIR for proper disposal.
FCC Notice. This device is a subassembly designed for incorporation into other products in order to provide an infrared camera function. It is not an end-product it for consumer use. When incorporated into a host device, the end-product will generate, use, and radiate radio frequency energy that may cause radio interference. As such, the end-product incorporating this subassembly must be tested and approved under the rules of the Federal Communications Commission (FCC) before the end-product may be offered for sale or lease, advertised, imported, sold, or leased in the United States. The FCC regulations are designed to provide reasonable protection against interference to radio communications. See 47 C.F.R. §§ 2.803 and 15.1 et seq.
Industry Canada Notice. This device is a subassembly designed for incorporation into other products in order to provide an infrared camera function. It is not an end-product it for consumer use. When incorporated into a host device, the end-product will generate, use, and radiate radio frequency energy that may cause radio interference. As such, the end-product incorporating this subassembly must be tested for compliance with the Interference-Causing Equipment Standard, Digital Apparatus, ICES-003, of Industry Canada before the product incorporating this device may be: manufactured or offered for sale or lease, imported, distributed, sold, or leased in Canada.
EU Notice. This device is a subassembly or component intended only for product evaluation, development or incorporation into other products in order to provide an infrared camera function. It is not a finished end-product it for general consumer use. Persons handling this device must have appropriate electronics training and observe good engineering practice standards. As such, this product does not fall within the scope of the European Union (EU) directives regarding electromagnetic compatibility (EMC). Any end-product intended for general consumer use that incorporates this device must be tested in accordance and comply with all applicable EU EMC and other relevant directives.
436-0013-10, Rev. 110 Vue Pro and Vue Pro R User Guide
Informaon on this page is subject to change without noce

FLIR®
The World's Sixth Sense™