Ultra ED700 - Security Camera EverFocus - Free user manual and instructions
Find the device manual for free Ultra ED700 EverFocus in PDF.


User questions about Ultra ED700 EverFocus
0 question about this device. Answer the ones you know or ask your own.
Ask a new question about this device
Download the instructions for your Security Camera in PDF format for free! Find your manual Ultra ED700 - EverFocus and take your electronic device back in hand. On this page are published all the documents necessary for the use of your device. Ultra ED700 by EverFocus.
USER MANUAL Ultra ED700 EverFocus
natural_image
Close-up of a black EverFocus surveillance camera head with lens and dome (no text or symbols on the device itself)EverFocus EVERFOCUS
Ultra Series Low Light 720+ TVL 3-Axis Indoor 12VDC Dome Style Camera Operation Instructions
Model No. ED700
Please read this manual first for correct installation and operation. This manual should be retained for future reference. The information in this manual was current when published. The manufacturer reserves the right to revise and improve its products. All specifications are therefore subject to change without notice.
PRECAUTIONS
- Do not install the camera near electric or magnetic fields.
Install the camera away from TV/radio transmitters, magnets, electric motors, transformers and audio speakers since the electromagnetic fields generated from these devices may distort the video image or otherwise interfere with camera operation.
-
Never disassemble the camera beyond the recommendations in this manual nor introduce materials other than those recommended herein. Improper disassembly or introduction of corrosive materials may result in equipment failure or other damage.
-
Try to avoid facing the camera toward the sun.
In some circumstances, direct sunlight may cause permanent damage to the sensor and/or internal circuits, as well as creating unbalanced illumination beyond the capability of the camera to compensate.
-
Keep the power cord away from water and other liquids and never touch the power cord with wet hands. Touching a wet power cord with your hands or touching the power cord with wet hands may result in electric shock.
-
Never install the camera in areas exposed to oil, gas or solvents.
Oil, gas or solvents may result in equipment failure, electric shock or, in extreme cases, fire.
- Cleaning
For cameras with interchangeable lenses, do not touch the surface of the sensor directly with the hands. Use lens tissue or a cotton tipped applicator and ethanol to clean the sensor and the camera lens. Use a damp soft cloth to remove any dirt from the camera body. Please do not use complex solvents, corrosive or abrasive agents for cleaning of any part of the camera.
-
Do not operate the camera beyond the specified temperature, humidity or power source ratings. This camera is suitable for indoor operation only. Use the camera at temperatures within -10^ +50^ ( 14^ 122^ ) and humidity between 20% and 80%. This device is not rated as submersible. The input power source is 12VDC.
-
Mounting
Use care in selecting a solid mounting surface which will support the weight of the camera plus any wind, snow, ice or other loading, and securely attach the camera to the mounting surface using screws and anchors which will properly support the camera. If necessary (e.g. when mounting to drop ceilings) use a safety wire to provide additional support for the camera.
Table of Contents
Product Overview....1
Main Features....2
Content List.... 2
Specifications.... 3
Dimensions....4
Installation....4
Product Overview
Get exceptional low light sensitivity and the ultra high resolution listed in the specs from the actual camera you install. The EverFocus Ultra Series EQ700 uses the Sony Exview HAD II 960H CCD to produce in excess of 720 horizontal TV lines of resolution from each and every Ultra Series 720+ camera we deliver; the resolution delivered by this advanced imaging technology will amaze you. Combine this with digital day/night, a native low light sensitivity of 0.05 lux, back light compensation (BLC) and highlight compensation (HLC) in a 3-axis wall or ceiling mount indoor plastic housing and you have a cost effective camera that fits a wide variety
of indoor applications. The EQ700 comes with a 3.6mm lens (other focal lengths available – contact EverFocus) that covers a field of view 67° wide. With low 12VDC current draw, this is the package of price/performance camera features that you have been waiting for to create analog CCTV systems that produce astounding image clarity in a wide range of low light applications.
FEATURES
- Ultra resolution of over 720 horizontal TV lines for astounding image quality
- Exview HAD II sensor delivers exceptional low light sensitivity of .05 lux
- Automatic day/night: excellent low light sensitivity with switching from color to B/W images at low levels of ambient light
- Back Light Compensation (BLC) and Highlight Compensation (HLC) handle unbalanced illumination in the field of view
- Provides 2D-Noise Reduction to improve picture clarity while enabling DVRs to improve disk storage utilization
- Astounding image clarity from the 3.6mm fixed lens
- Indoor 3-Axis plastic housing allows wide range of mounting flexibility
- Low current draw of only 110mA@ 12VDC (regulated supply required)
Box Contents
Camera
This User Guide
Mounting Screws (2)
Power adapter pigtail
Mounting Template
SPECIFICATIONS
| Imaging Device 1/3" Sony Exview HAD | 960H High Sensitivity Interline CCD |
| Video Format NTSC-or-PAL (separate models) | |
| Picture Elements NTSC: 1020(H)x508(V) | PAL:1020(H)x596(V) |
| Effective Picture Elements NTSC: 976(H) x 494(V) PAL:976(H) x 582(V) | |
| Horizontal Resolution More than 720 TVL from production cameras | |
| Light Sensitivity .05 lux | |
| S/N Ratio Over 50dB (AGC off) | |
| Video Output BNC 1.0V p-p 75Ω, | |
| Gamma Correction 0.45 | |
| Lens 3.6mm fixed | |
| Auto Gain Control Auto | |
| Electronic Shutter | 1/60 (1/50) ~1/100,000 sec. |
| Sync. Mode | Internal |
| Day & Night | Auto Digital Day/Night |
| Digital Noise Reduction | 2D-DNR |
| Adaptive Tone Curve Reproduction | Wide Range ATW (1,800K to 10,500K) |
| Back Light Compensation (BLC) | On |
| Highlight Compensation (HLC) | On |
| Power Source | 12VDC regulated supply required |
| Power Consumption | 110mA (1.32W) |
| Operating Temperature | 14°F~122°F; -10°C~50°C |
| Storage Temperature | -4°F~140°F; -20°C~60°C |
| Humidity | Less than 80% non condensing |
| Dimensions | 4.08"/103.7mm diameter; 3.09"/78.5mm high |
| Weight | ~.35 lb/~400g |
| Certifications | CE / FCC |
DIMENSIONS

text_image
4.08" Φ79 mm 37.5mm 1.48" 4.08" Φ103.7mm 3.09" 78.5mm 3.23" 82 mmINSTALLATION
Warning
- To prevent electrical shock, turn off the electrical power before making electrical connections.
Drill the Holes and Attach Camera
-
Locate a solid location which can bear the weight of the camera, and which is free of other electrical wires or other hazards.
-
Place the drilling template on the ceiling or wall
-
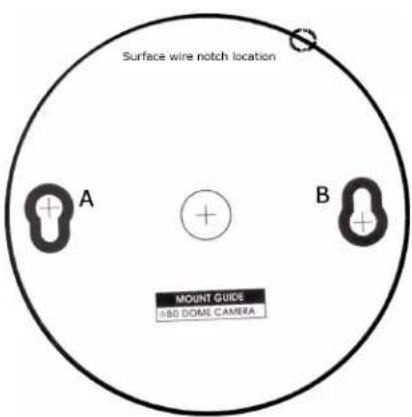
Drill 2 or 3 holes, 2 for mounting screws A & B; optionally, 1 for power/video cable if wires will be hidden. If surface wiring will be used, there is a notch in the base to clear the wire.
-
Start the mounting screws provided partway into the mounting surface.
-
Remove the clear dome by twisting CCW and lift it off.
text_image
Surface wire notch location A + + B MOUNT GUIDE D80 DOME CAMERATemplate
-
If the wires will be concealed, first connect the camera power and video (observe polarity for power – connecting reverse polarity will damage the camera and void the warranty.
-
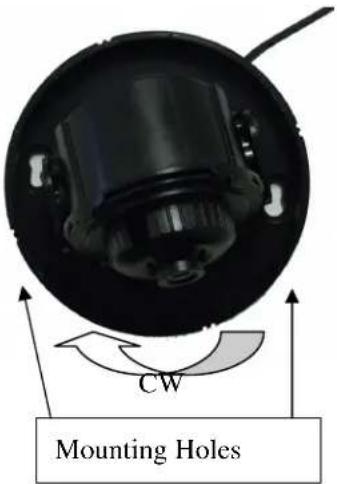
Attach the camera base to the mounting surface by passing the larger part of the 'keyhole' mounting holes over the heads of the screw and then twisting slightly clockwise.
-
While holding the base in the CW position, tighten the screws, being careful not to over tighten (and if wire is to be run along the mounting surface, be sure to pass the wire though the notch in the base).
text_image
CW Mounting HolesAdjusting the Camera Direction
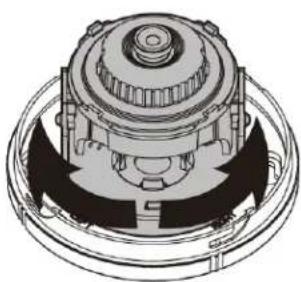
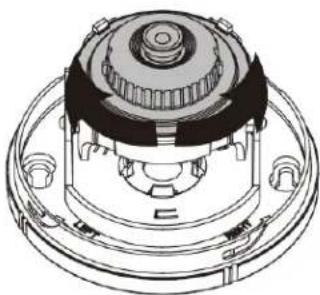
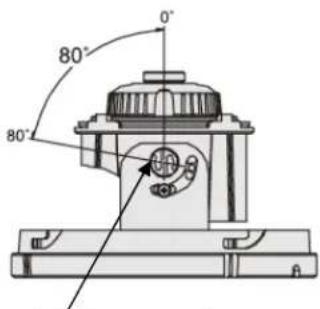
Rotate the inner mechanisms to point the camera in the desired direction. Rotate the camera module on its axis if necessary to align the image ‘upright’. Loosen the screws which lock the tilt mechanism. Adjust to obtain the desired field of view and tighten the tilt mechanism screws.
natural_image
Technical illustration of a mechanical gear assembly (no text or symbols visible)Inner Mechanism
natural_image
Technical line drawing of a mechanical assembly with gears and housing (no text or symbols)Camera module
text_image
80° 80° 0°Tilt lock 2 places
Replace the dome cover removed in step 5 above, twisting the cover CW to lock it in place.
EverFocus Electronics Corp.
Corporate Headquarter:
12F, No.79 Sec. 1 Shin-Tai Wu Road,
Hsi-Chih, Taipei, Taiwan
TEL: +886-2-26982334
FAX: +886-2-26982380
www.everfocus.com.tw
marketing@everfocus.com.tw
China Office:
Room 609, Technology Trade Building,
Shangdi Information Industry Base,
Haidian District, Beijing, China 100085
TEL: +86-10-62973336\~39
FAX: +86-10-62971423
www.everfocus.com.cn
marketing@everfocus.com.cn
U.S.A - California Office:
1801 Highland Avenue Units A & B
Duarte, CA 91010
TEL: +1-626-844-8888
FAX: +1-626-844-8838
www.everfocus.com
sales@everfocus.com
U.S.A - New York Office:
415 Oser Avenue Unit S
Happauge, NY 11788
TEL: +1-631-436-5070
FAX: +1-631-436-5027
www.everfocus.com
sales@everfocus.com
Europe - Germany Office:
D-46446 Emmerich, Germany
TEL: +49-2822-93940
FAX: +49-2822-939495
www.everfocus.de
info@everfocus.de
Japan Office:
5F Kinshicho city Building,
2-13-4 Koto-Bashi,
Sumida-Ku, Tokyo, 130-0022 Japan
TEL: +81-3-5625-8188
FAX: +81-3-5625-8189
www.everfocus.co.jp
info@everfocus.co.jp
India Office:
Suite 803, Housefin Bhavan, C-21,
Bandra Kurla Complex, Bandra (East),
Mumbai 400051. India.
TEL: +91-22-6128-8700
FAX: +91-22-6128-8705
www.everfocus.in
UK Office:
Unit 12 Spitfire Business Park
Hawker Road
Croydon, CR0 4WD
London: 0845 430 9999
Telford: 0845 430 8888
Fax: 020 8649 9907
uk.support@EverFocus.com

Your EverFocus product is designed and manufactured with high quality materials and components which can be recycled and reused.
This symbol means that electrical and electronic equipment, at their end-of-life, should be disposed of separately from your household waste.
Please, dispose of this equipment at your local community waste collection/recycling centre.
In the European Union there are separate collection systems for used electrical and electronic product.
Please, help us to conserve the environment we live in!