
Color LaserJet CP5525dn - Printer HP - Free user manual and instructions
Find the device manual for free Color LaserJet CP5525dn HP in PDF.


User questions about Color LaserJet CP5525dn HP
0 question about this device. Answer the ones you know or ask your own.
Ask a new question about this device
Download the instructions for your Printer in PDF format for free! Find your manual Color LaserJet CP5525dn - HP and take your electronic device back in hand. On this page are published all the documents necessary for the use of your device. Color LaserJet CP5525dn by HP.
USER MANUAL Color LaserJet CP5525dn HP
natural_image
Illustration of a HP printer with control panel and paper filter (no text or symbols visible)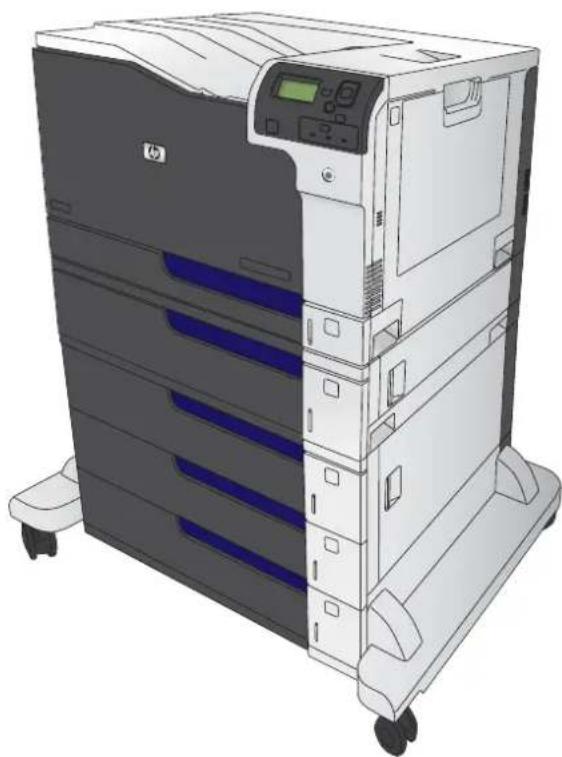
natural_image
Illustration of a multi-tiered HP printer with control panel and drive mechanism (no text or symbols visible)
HP Color LaserJet Enterprise CP5520
Series Printer
User Guide
Copyright and License
© 2010 Copyright Hewlett-Packard Development Company, L.P.
Reproduction, adaptation, or translation without prior written permission is prohibited, except as allowed under the copyright laws.
The information contained herein is subject to change without notice.
The only warranties for HP products and services are set forth in the express warranty statements accompanying such products and services. Nothing herein should be construed as constituting an additional warranty. HP shall not be liable for technical or editorial errors or omissions contained herein.
Part number: CE707-90901
Edition 2, 11/2010
Trademark Credits
Adobe ^® , Adobe Photoshop ^® , Arobat ^® , and PostScript ^® are trademarks of Adobe Systems Incorporated.
Corel® is a trademark or registered trademark of Corel Corporation or Corel Corporation Limited.
Intel® Core™ is a trademark of Intel Corporation in the U.S. and other countries.
Java™ is a US trademark of Sun Microsystems, Inc.
Microsoft®, Windows®, Windows® XP, and Windows Vista® are U.S. registered trademarks of Microsoft Corporation.
PANTONE® is the property of Pantone, Inc.
UNIX® is a registered trademark of The Open Group.
ENERGY STAR® and the ENERGY STAR® mark are registered U.S. marks.
Conventions used in this guide
TIP: Tips provide helpful hints or shortcuts.
NOTE: Notes provide important information to explain a concept or to complete a task.
△ CAUTION: Cautions indicate procedures that you should follow to avoid losing data or damaging the product.
⚠ WARNING! Warnings alert you to specific procedures that you should follow to avoid personal injury, catastrophic loss of data, or extensive damage to the product.
Table of contents
1 Product basics .... 1
Product comparison 2
Environmental features 3
Accessibility features 4
Product views 5
Front view 5
Back view 6
Interface ports 6
Serial number and model number location 7
Control panel layout 8
2 Control panel menus 9
Control panel menus 10
Sign In menu 10
Retrieve Job From USB menu 10
Retrieve Job From Device Memory menu 11
Supplies menu 12
Trays menu 14
Administration menu 15
Reports menu 15
General Settings menu 15
Retrieve From USB Settings menu 20
Print Settings menu 20
Print Options menu 21
Display Settings menu 23
Manage Supplies menu 24
Manage Trays menu 25
Network Settings menu 26
Troubleshooting menu 30
Device Maintenance menu 32
Backup/Restore menu 32
Calibration/Cleaning menu 32
USB Firmware Upgrade menu 33
Service menu 33
3 Software for Windows 35
Supported operating systems for Windows® 36
Supported printer drivers for Windows 36
Select the correct printer driver for Windows 37
HP Universal Print Driver (UPD) 38
UPD installation modes 38
Priority for print settings 39
Change printer-driver settings for Windows 40
Change the settings for all print jobs until the software program is closed 40
Change the default settings for all print jobs 40
Change the product configuration settings 40
Remove software for Windows 41
Supported utilities for Windows 42
HP Web Jetadmin 42
HP Embedded Web Server 42
Software for other operating systems 43
4 Use the product with Mac 45
Software for Mac 46
Supported operating systems for Mac 46
Supported printer drivers for Mac 46
Install software for Mac operating systems 46
Install software for Mac computers connected directly to the product ..... 46
Install software for Mac computers on a wired network 47
Configure the IP address 47
Install the Mac software 48
Remove software from Mac operating systems 49
Priority for print settings for Mac 50
Change printer-driver settings for Mac 50
Software for Mac computers 51
HP Utility for Mac 51
Open the HP Utility 51
HP Utility features 51
Supported utilities for Mac 52
HP Embedded Web Server 52
Print with Mac 53
Cancel a print job with a Mac 53
Change the paper size and type with Mac 53
Resize documents or print on a custom paper size with Mac 53
Create and use printing presets with Mac 54
Print a cover page with Mac 54
Use watermarks with Mac 55
Print multiple pages on one sheet of paper with Mac 55
Print on both sides of the page (duplex printing) with Mac 55
Store jobs with Mac 56
Set the color options with Mac 57
Use the Services menu with Mac 57
Solve problems with a Mac 57
5 Connect the product 59
Supported network operating systems 60
Printer sharing disclaimer 60
Connect with USB 61
Connect to a network 61
Supported network protocols 61
Install the product on a wired network 64
Configure the IP address 64
Install the software 65
Configure network settings 66
View or change network settings 66
Set or change the network password 66
Manually configure IPv4 TCP/IP parameters from the control panel 67
Manually configure IPv6 TCP/IP parameters from the control panel .... 68
Link speed and duplex settings 69
6 Paper and print media 71
Understand paper use 72
Special paper guidelines 72
Change the printer driver to match the paper type and size 74
Supported paper sizes 75
Supported paper sizes for duplex printing 77
Supported paper types and tray capacity 78
Load paper trays 80
Load Tray 1 80
Load Tray 2, Tray 3, and optional Trays 4, 5, and 6 with standard-size paper ....81
Load Tray 2, Tray 3, and optional Trays 4, 5, and 6 with custom-size paper ....83
Tray and bin capacity 84
Paper orientation for loading trays 85
Paper orientation for loading Tray 1 86
Paper orientation for loading Tray 2, Tray 3, or optional Trays 4, 5, and 6 .... 88
Configure trays 90
Configure a tray when loading paper 90
Configure a tray to match print job settings 90
Configure a tray from the control panel 90
Automatic paper sensing (auto-sense mode) 91
Auto-sense settings 91
Select the paper by source, type, or size 91
Source 91
Type and size 91
7 Manage supplies 93
Print cartridge information 94
Supplies views 94
Print cartridge views 94
Manage print cartridges 95
Settings for print cartridges 95
Print when a print cartridge is at estimated end of life 95
Enable or disable the Very Low Settings options from the control panel ..... 95
Recycle supplies 96
Print-cartridge storage 96
HP policy on non-HP print cartridges 96
HP fraud hotline and Web site 97
Replacement instructions 98
Replace print cartridges 98
Replace the toner collection unit 100
Solve problems with supplies 103
Check the print cartridges 103
Inspect the print cartridge for damage 104
Repeating defects 105
Print the Supplies Status page 105
Interpret control panel messages for supplies 106
8 Print tasks 113
Cancel a print job 114
Basic print tasks with Windows 115
Open the printer driver with Windows 115
Get help for any printing option with Windows 116
Change the number of print copies with Windows 116
Save custom print settings for reuse with Windows 116
Use a printing shortcut with Windows 116
Create printing shortcuts 118
Improve print quality with Windows 121
Select the page size with Windows 121
Select a custom page size with Windows 121
Select the paper type with Windows 121
Select the paper tray with Windows 121
Select the print resolution 121
Print on both sides (duplex) with Windows 123
Manually print on both sides with Windows 123
Automatically print on both sides with Windows 124
Print multiple pages per sheet with Windows 126
Select page orientation with Windows 127
Set color options with Windows 129
Additional print tasks with Windows 131
Print colored text as black (grayscale) with Windows 131
Print on preprinted letterhead or forms with Windows 132
Print on special paper, labels, or transparencies 134
Print the first or last page on different paper with Windows 137
Scale a document to fit page size 139
Add a watermark to a document with Windows 141
Create a booklet with Windows 142
Use job storage features with Windows 143
Create a stored job with Windows 144
Print a stored job 145
Delete a stored job 146
Set job storage options with Windows 146
Print one copy for proof before printing all the copies 146
Temporarily store a personal job on the product and print it later .. 146
Temporarily store a job on the product 147
Permanently store a job on the product 147
Make a permanently stored job private so that anyone who tries to print it must provide a PIN 147
Receive notification when someone prints a stored job 148
Set the user name for a stored job 148
Specify a name for the stored job 148
Print special jobs with Windows 149
Print business graphics or marketing material 149
Supported glossy paper 149
Print weatherproof maps and outdoor signs 149
Supported tough paper 150
Set the duplex alignment 150
Walk-up USB printing 151
9 Color 153
Adjust color 154
Automatic 154
Print in Grayscale 154
Manual color adjustment 155
Manual color options 155
Use the HP EasyColor option 156
Match colors 157
Sample book color matching 157
Print color samples 158
PANTONE® color matching 158
Advanced color use 159
HP ColorSphere toner 159
HP ImageREt 3600 159
Paper selection 159
Color options 159
Standard red-green-blue (sRGB) 160
10 Manage and maintain 161
Print information pages 162
Print the menu map 162
Print the configuration report 162
Use the HP Embedded Web Server 163
Open the HP Embedded Web Server by using a network connection 163
Features 164
Information tab 164
General tab 164
Print tab 165
Troubleshooting tab 165
Security tab 166
Networking tab 166
Other Links list 166
Use HP Web Jetadmin software 167
Product security features 168
Security statements 168
IP Security 168
Secure the HP Embedded Web Server 168
Encryption support: HP Encrypted High Performance Hard Disks 168
Secure stored jobs 169
Lock the control panel menus 169
Lock the formatter 169
Economy settings 170
Optimize speed or energy usage 170
Power-saving modes 170
Set sleep mode 170
Set sleep delay 171
Wake time 171
Set the real-time clock 171
Set the wake time 172
Install external I/O cards 173
Clean the product 175
Clean the paper path 175
Product updates 176
11 Solve problems 177
Self help 178
Solve general problems 179
Troubleshooting checklist 179
Factors that affect product performance 180
Restore factory settings 180
Interpret control-panel messages 181
Control-panel message types 181
Control-panel messages 181
Clear jams 182
Prevent jams 182
Jam locations 183
Clear jams in the upper right door 184
Clear jams in the lower right door 186
Clear jams in Tray 1 187
Clear jams from Tray 2, Tray 3, or an optional tray 189
Clear jams in the output bin area 190
Change jam recovery 191
Paper does not feed automatically 192
Product feeds multiple sheets 193
Improve print quality 194
Select a paper type 194
Use paper that meets HP specifications 194
Print a cleaning page 195
Calibrate the product 195
Set the image registration 195
Internal print-quality test pages 196
Check the print cartridge 196
Use the printer driver that best meets your printing needs 197
Repetitive defects ruler 198
The product does not print or it prints slowly 199
Solve walk-up USB printing problems 200
The Open From USB menu does not open when you insert the USB accessory 200
The file does not print from the USB storage accessory 200
The file that you want to print is not listed in the Open From USB menu 200
Solve connectivity problems 201
Solve direct-connect problems 201
Solve network problems 201
Solve software problems 202
Solve common Windows problems 203
Solve common Mac problems 203
Appendix A Supplies and accessories 207
Order parts, accessories, and supplies 208
Part numbers 209
Accessories 209
Print cartridges 209
Memory 209
Cables and interfaces 209
Maintenance kits 210
Appendix B Service and support 211
Hewlett-Packard limited warranty statement 212
HP's Premium Protection Warranty: LaserJet print cartridge limited warranty statement 214
Color LaserJet Fuser Kit, Toner Collection Unit, and Transfer Kit Limited Warranty Statement ...... 215
Data stored on the print cartridge 216
End User License Agreement 217
Customer self-repair warranty service 220
Customer support 221
Appendix C Product specifications 223
Physical specifications 224
Power consumption, electrical specifications, and acoustic emissions 224
Environmental specifications 224
Appendix D Regulatory information 225
FCC regulations 226
Environmental product stewardship program 227
Protecting the environment 227
Power consumption 227
Paper use 227
Plastics 227
HP LaserJet print supplies 227
Return and recycling instructions 228
United States and Puerto Rico 228
Multiple returns (more than one cartridge) 228
Single returns 228
Shipping 228
Non-U.S. returns 228
Paper 229
Material restrictions 229
Disposal of waste equipment by users in private households in the European Union ..... 229
Chemical substances 230
Material Safety Data Sheet (MSDS) 230
For more information 230
Declaration of conformity 231
Safety statements 233
Laser safety 233
Canadian DOC regulations 233
VCCI statement (Japan) 233
Power cord instructions 233
Power cord statement (Japan) 233
EMC statement (China) 234
EMC statement (Korea) 234
EMI statement (Taiwan) 234
Laser statement for Finland 234
GS statement (Germany) 235
Substances Table (China) 235
Restriction on Hazardous Substances statement (Turkey) 235
Index 237
1 Product basics
Product comparison
• Environmental features
- Accessibility features
Product views
Product comparison
Model Features
HP Color LaserJet CP5525n | 100-sheet multipurpose input tray (Tray 1)250-sheet input tray (Tray 2)500-sheet input tray (Tray 3)300-sheet, face-down output binHi-Speed USB 2.0 portHP Jetdirect embedded print server for connecting to a 10/100/1000Base-TX network1 gigabyte (GB) of random access memory (RAM)USB port on the control panel for walk-up printing |
HP Color LaserJet CP5525dn | 100-sheet multipurpose input tray (Tray 1)250-sheet input tray (Tray 2)500-sheet input tray (Tray 3)300-sheet, face-down output binHi-Speed USB 2.0 portHP Jetdirect embedded print server for connecting to a 10/100/1000Base-TX network1 GB of RAMUSB port on the control panel for walk-up printingAutomatic two-sided printing |
HP Color LaserJet CP5525xh | 100-sheet multipurpose input tray (Tray 1)250-sheet input tray (Tray 2)500-sheet input tray (Tray 3)HP 3 x 500-sheet paper feeder (Trays 4, 5, and 6)300-sheet, face-down output binHi-Speed USB 2.0 portHP Jetdirect embedded print server for connecting to a 10/100/1000Base-TX network1 GB of RAMUSB port on the control panel for walk-up printingAutomatic two-sided printingHP Encrypted High Performance Hard Disk |
Environmental features
| Duplex | Save paper by using duplex printing as your default print setting. |
| Print multiple pages per sheet | Save paper by printing two or more pages of a document side-by-side on one sheet of paper.Access this feature through the printer driver. |
| Recycling Reduce waste by using recycled paper.Recycle print cartridges by using the HP return process. | |
| Energy savings Save energy by initiating sleep mode for the product. | |
| HP Smart Web printing | Use HP Smart Web printing to select, store, and organize text and graphics from multiple Web pages and then edit and print exactly what you see onscreen. It gives you the control you need for printing meaningful information while minimizing waste.Download HP Smart Web printing from this Web site: www.hp.com/go/smartweb. |
| Job storage Use the job storage features to manage print jobs. By using job storage, you activate printing while you are at the shared product, eliminating lost print jobs that are then reprinted. | |
Accessibility features
The product includes several features that aid you with accessibility issues.
• Online user guide that is compatible with text screen-readers.
• Print cartridges can be installed and removed by using one hand.
• All doors and covers can be opened by using one hand.
• Paper can be loaded in Tray 1 by using one hand.
Product views
Front view
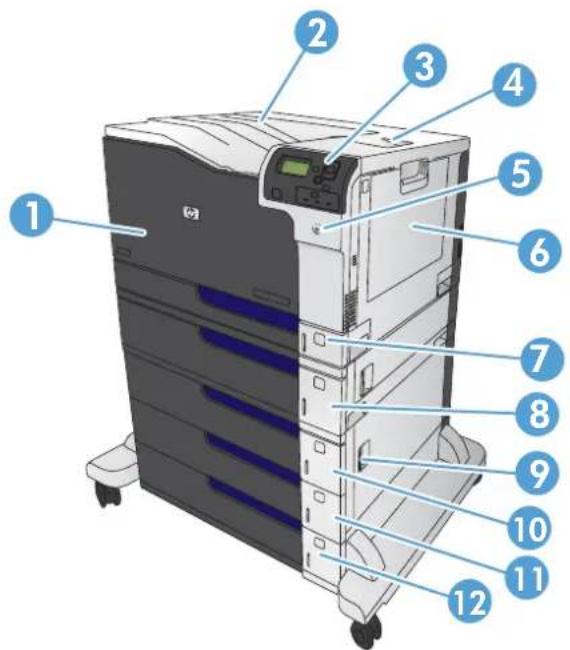
text_image
Diagram of a HP printer with numbered parts labeled for identification| 1 Front door (access to print cartridges) | |
| 2 Standard output bin | |
| 3 Control panel | |
| 4 Right door (access for clearing jams) | |
| 5 On/off button (illuminates when turned on) | |
| 6 Tray 1 (pull the handle to open the tray) | |
| 7 | T r a y 2 |
| 8 | T r a y 3 |
| 9 Lower right door (access for clearing jams) | |
| 10 Optional Tray 4 (included with the HP Color LaserJet CP5525xh model) | |
| 11 Optional Tray 5 (included with the HP Color LaserJet CP5525xh model) | |
| 12 Optional Tray 6 (included with the HP Color LaserJet CP5525xh model) | |
Back view
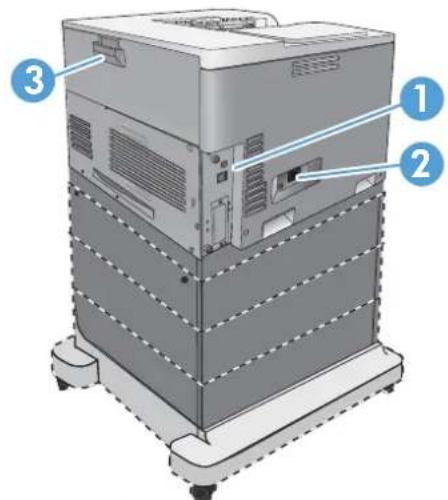
text_image
Diagram of a server rack with numbered annotations pointing to different components| 1 | l | n | t | e | r | f | a | c | e |
| 2 Power connection | |||||||||
| 3 Rear door (access to the toner collection unit) | |||||||||
p
Interface ports
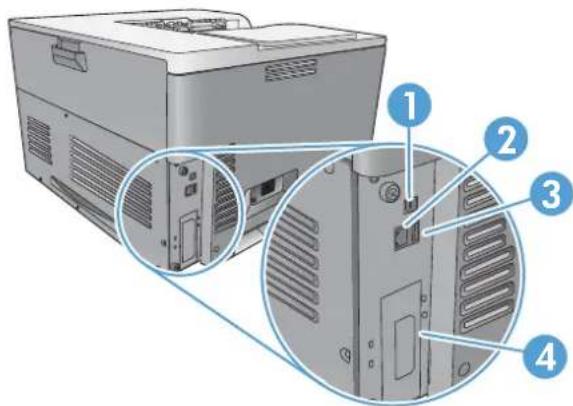
text_image
Diagram of a server rack with numbered components and magnified views showing internal structure| 1 Hi-Speed USB 2.0 printing port |
| 2 Local area network (LAN) Ethernet (RJ-45) network port |
| 3 USB port for a third-party device |
| 4 EIO interface expansion slot |
Serial number and model number location
The model number and serial number are listed on an identification label located on the left side of the product. The serial number contains information about the country/region of origin, the product version, production code, and the production number of the product.
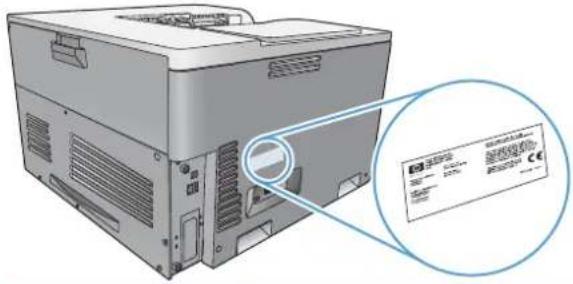
text_image
Diagram of a computer tower with an inset showing a device label and a magnified view of its internal structure.Model name Model number
HP Color LaserJet CP5525n CE707A
HP Color LaserJet CP5525dn CE708A
HP Color LaserJet CP5525xh CE709A
Control panel layout
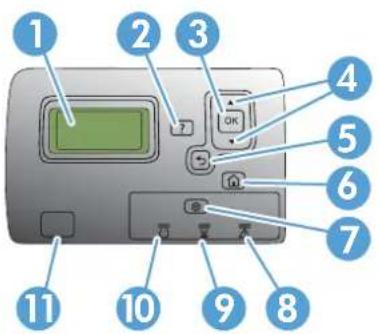
The control panel includes a color, graphical and text display, job-control buttons, and three light-emitting diode (LED) status lights.
text_image
Diagram of a device control panel with numbered labels pointing to key components such as display, switch, and buttons.| 1 | Control panel display | Shows status information, menus, help information, and error messages |
| 2 | Help button Provides detailed information, including animations, about product messages or menus | |
| 3 | OK button | Makes selections and resumes printing after continuable errors |
| 4 | Up arrow button Navigates menus and text, and increases the values of numerical items in the display | |
| Down arrow button Navigates menus and text, and decreases the values of numerical items in the display | ||
| 5 | Back arrow button Navigates backward in nested menus | |
| 6 | Home button Opens and closes the menu structure | |
| 7 | Stop button Halts the current job, presents a choice to resume or cancel the current job, clears paper from the product, and clears any continuable errors that are associated with the halted job. If the product is not printing a job, pressing the Stop button pauses the product | |
| 8 | Attention light | Indicates that the product has a condition that requires interventionTIP: For example, an empty paper tray or an error message on the display. |
| 9 | Data light | Indicates that the product is receiving data |
| 10 | Ready light | Indicates that the product is ready to begin processing any job |
| 11 Walk-up | USB port Connect a USB flash drive for walk-up printing | TIP: Use the control-panel menus or the HP Embedded Web Server to enable the USB walk-up printing feature. |
2 Control panel menus
• Control panel menus
Sign In menu
• Retrieve Job From USB menu
• Retrieve Job From Device Memory menu
• Supplies menu
Trays menu
• Administration menu
Troubleshooting menu
• Device Maintenance menu
Control panel menus
To use all of the capabilities of this product, a firmware upgrade might be required. HP recommends that you periodically go to www.hp.com/support/cljcp5525 to see if a new version of firmware is available.

NOTE: Print a configuration page to determine the version of firmware currently installed in this product.
Navigate the control-panel menus
- Press the Home button 📄 to access the menus.
- Press the OK button to select the menu item.
• Use the up arrow button ▲ and down arrow button ▼ to highlight a desired menu item.
Sign In menu
Table 2-1 Sign In menu
| First level Second level Values |
| User Access Code Access Code |
| Administrator Access Code Access Code |
| Service Access Code Access Code |
Retrieve Job From USB menu
Use the Retrieve Job From USB menu to view listings of jobs stored on an external USB memory device.

NOTE: You must enable this feature by using the control-panel menus or the HP Embedded Web Server before it can be used.
To enable this feature by using the control-panel menus, access the Administration menu, Retrieve From USB Settings sub menu, and then select Enable. To enable this feature by using the HP Embedded Web Server, access the Print tab.
Table 2-2 Retrieve Job From USB menu
| First level Second level Values | |
| Retrieve Job From USB OK | |
| Cancel | |
| Select a File or Folder | Select from the provided list. |
Retrieve Job From Device Memory menu
Use the Retrieve Job From Device Memory menu to view listings of jobs stored on the internal product memory.
Table 2-3 Retrieve Job From Device Memory menu
| First level Second level Third level Values | ||
| Retrieve Job From Device Memory | All Jobs (No PIN) | Print Range: 1 – 9999 |
| NOTE: Individual job name also appear. | Default = 1 | |
| Delete Select from the provided list. | ||
Supplies menu
In the following table, asterisks (*) indicate the factory default setting.
Table 2-4 Supplies menu
| First level Second level Third level Fourth level Values | |||
| Manage Supplies Print Supplies Status | |||
| Supply Settings Black Cartridge Very Low | Settings | Stop | |
| Prompt to continue* | |||
| Continue | |||
| Low Threshold Settings | 1-100% | ||
| Color Cartridges Very Low Settings | Stop | ||
| Prompt to continue* | |||
| Continue | |||
| Low Threshold Settings | Cyan Cartridge | 1-100% | |
| Magenta Cartridge | |||
| Yellow Cartridge | |||
| Fuser Very Low Settings | Stop | ||
| Prompt to continue* | |||
| Continue | |||
| Low Threshold Settings | 1-100% | ||
| Transfer Kit Very Low Settings | Stop | ||
| Prompt to continue* | |||
| Continue | |||
| Low Threshold Settings | 1-100% | ||
| Color/Black Mix | Auto* | ||
| Mostly Color Pages | |||
| Mostly Black Pages | |||
Table 2-4 Supplies menu (continued)
| First level Second level Third level Fourth level Values | ||
| Supply Messages Low Message | On* | |
| Off | ||
| Level Gauge | On* | |
| Off | ||
| Black CartridgeOK: - Status | ||
| Cyan CartridgeOK: - Status | ||
| MagentaCartridge OK: -Status | ||
| Yellow CartridgeOK: - Status | ||
| Toner CollectionUnit OK: - Status | ||
| Transfer Kit OK: -Status | ||
| Fuser OK: -Status | ||
Trays menu
In the following table, asterisks (*) indicate the factory default setting.
Table 2-5 Trays menu
| First level Second level Values | |
| Manage Trays Use Requested Tray Exclusively* | |
| First | |
| Manually Feed Prompt Always* | |
| Unless loaded | |
| Size/Type Prompt Display* | |
| Do not display | |
| Use Another Tray Enabled* | |
| Disabled | |
| Alternative Letterhead Mode Disabled* | |
| Enabled | |
| Blank Pages Auto* | |
| Yes | |
| Override A4/Letter Yes* | |
| No | |
| Tray 1 Size Select from a provided list. | |
| Tray 1 Type Select from a provided list. | |
| Tray 2 Size Select from a provided list. | |
| Tray 2 Type Select from a provided list. | |
| Tray 3 Size Select from a provided list. | |
| Tray 3 Type Select from a provided list. | |
| Tray 4 Size Select from a provided list. | |
| Tray 4 Type Select from a provided list. | |
| Tray 5 Size Select from a provided list. | |
| Tray 5 Type Select from a provided list. | |
| Tray 6 Size Select from a provided list. | |
| Tray 6 Type Select from a provided list. | |
Administration menu
Reports menu
Table 2-6 Reports menu
| First level Second level Third level Values | |
| Configuration/Status Pages Print | |
| Administration Menu Map | |
| Configuration Page | |
| Supplies Status Page | |
| Usage Page | |
| Paper Path Page | |
| File Directory Page | |
| Current Settings Page | |
| Color Usage Job Log | |
| Other Pages | |
| Demonstration Page | |
| RGB Samples | |
| CMYK Samples | |
| PCL Font List | |
| PS Font List | |
General Settings menu
In the following table, asterisks (*) indicate the factory default setting.
Table 2-7 General Settings menu
| First level | Second level | Third level | Fourth level | Values |
| Date/Time Settings | Date/Time Format | Date Format | DD/MMM/YYYYMMM/DD/YYYY*YYYY/MMM/DD | |
| Time Format | 12 hour (AM/PM)*24 hours | |||
| Date/Time | Date | |||
| Time | ||||
| Time Zone |
Table 2-7 General Settings menu (continued)
| First level Second level Third level Fourth level Values | |||
| Adjust for Daylight Savings | On | Off* | |
| Energy Settings Sleep Delay | 60* | Select sleep delay period from a list. | |
| Optimum Speed/ Energy Usage | Faster First Page*Save EnergySave More EnergySave Most Energy | ||
| Print Quality Adjust Color Highlights Cyan Density | -5 to 5Default = 0 | ||
| Magenta Density | |||
| Yellow Density | |||
| Black Density | |||
| Midtones Cyan Density | -5 to 5Default = 0 | ||
| Magenta Density | |||
| Yellow Density | |||
| Black Density | |||
| Shadows Cyan Density | -5 to 5Default = 0 | ||
| Magenta Density | |||
| Yellow Density | |||
| Black Density | |||
| Restore Color Values | |||
| Image Registration Adjust Tray <X> Print Test Page | |||
| X1 Shift | -5.00 mm to 5.00 mm | ||
| Y1 Shift | Default = 0 | ||
| X2 Shift | |||
| Y2 Shift | |||
| Auto Sense Mode | Tray 1 Sensing | Full sensingExpanded sensing*Transparency Only | |
Table 2-7 General Settings menu (continued)
| First level Second level Third level Fourth level Values | ||
| Tray X Sensing | Expanded sensing* | |
| Transparency Only | ||
| Adjust Paper Types Select from a list of paper | types that the product supports. The available options are the same for each paper type. | Print Mode Select from a list of print modes.Default = Auto Sense Mode |
| Resistance Mode Normal* | ||
| Up | ||
| Down | ||
| Humidity Mode Normal* | ||
| High | ||
| Fuser Temp Mode Normal* | ||
| Up | ||
| Down | ||
| Paper Curl Mode Normal* | ||
| Reduced | ||
| Optimize Normal Paper Standard* | ||
| Smooth | ||
| Light Media | Normal* | |
| Smooth | ||
| Heavy Paper Standard* | ||
| Smooth | ||
| Envelope Control | Normal* | |
| Alternate 1 | ||
| Alternate 2 | ||
| Environment | Normal* | |
| Low Temp | ||
| Line Voltage | Normal* | |
| Low Voltage | ||
| Tray 1 | Normal* | |
| Alternate | ||
| Cleaning Control Normal* | ||
| Alternate | ||
| Background | Normal* | |
| Alternate 1 | ||
| Alternate 2 | ||
| Alternate 3 | ||
| Media Temp Normal* | ||
| Alternate | ||
| Uniformity Control Normal* | ||
| Alternate 1 | ||
| Alternate 2 | ||
| Alternate 3 | ||
| Pre-Rotation Normal* | ||
| Alternate 1 | ||
| Alternate 2 | ||
| Alternate 3 | ||
| Registration Normal* | ||
| Alternate | ||
| Transfer Control Normal* | ||
| Alternate 1 | ||
| Alternate 2 | ||
| Alternate 3 | ||
| Moisture Control | Normal* | |
| Alternate | ||
| Restore Optimize | ||
| Edge Control | Off | |
| Light | ||
| Normal* | ||
| Maximum | ||
| Jam Recovery | Auto* | |
| Off | ||
| On | ||
| Manage Stored Jobs Quick Copy Job Storage Limit | 1-300 | |
| Default = 32 | ||
| Quick Copy Job Held Timeout | Off* | |
| 1 Hour | ||
| 4 Hours | ||
| 1 Day | ||
| 1 Week | ||
| Default Folder Name for Stored Jobs | Select from a list of folder | names. |
| Public* | ||
| Sort Stored Jobs By | Job Name* | |
| Date | ||
| Restore Factory Settings Reset | All | Calibration |
| General | ||
| Security | ||
| Restrict Color | Enable | Disable |
| Color if Allowed* | ||
Retrieve From USB Settings menu
Table 2-8 Retrieve From USB Settings menu
| First level Second level Values | |
| Retrieve From USB Settings Access Code Enable* | Disable |
Print Settings menu
In the following table, asterisks (*) indicate the factory default setting.
Table 2-9 Print Settings menu
| First level Second level Values | |
| Manual Feed Enabled | |
| Disabled* | |
| Courier Font Regular* | |
| Dark | |
| Wide A4 Enabled | |
| Disabled* | |
| Print PS Errors Enabled | |
| Disabled* | |
| Print PDF Errors Enabled | |
| Disabled* | |
| Personality Auto* | |
| PCL | |
| POSTSCRIPT | |
| PCL Form Length Range: 5 - 128 | |
| Default = 60 | |
| Orientation Portrait* | |
| Landscape | |
| Font Source Internal* | |
| Soft | |
| USB | |
| Font Number Range: 0 – 999 | Default = 0 |
| Font Pitch Range: 0.44 – 99.99 | Default = 10 |
| Font Point Size Range: 4.00 – 999.75 | Default = 12.00 |
| Symbol Set Select from a list of symbol sets. | |
| Append CR to LF No* | Yes |
| Suppress Blank Pages No* | Yes |
| Media Source Mapping Standard* | Classic |
Print Options menu
In the following table, asterisks (*) indicate the factory default setting.
Table 2-10 Print Options menu
| First level Second level Values | |||
| Number of Copies | Default | = | |
| Default Paper Size | Select from a list of sizes that the product supports. | ||
| Default Custom Paper Size | Inches | X Dimension | Range: 2.99 – 12.28 |
| Default = 12.28 | |||
| Y Dimension Range: 5.00 – 18.50 | |||
| Default = 18.5 | |||
| MM | X Dimension | Range: 76 – 312 | |
| Default = 312 | |||
| Y Dimension Range: 127 – 470 | |||
| Default = 470 | |||
| Sides | 1-sided* | ||
| 2-sided | |||
Table 2-10 Print Options menu (continued)
| First level Second level Values | |
| Two-Sided Format | Book-style* |
| Flip-style | |
| Enable Edge to Edge Overrides | Enabled |
| Disabled* | |
Display Settings menu
In the following table, asterisks (*) indicate the factory default setting.
Table 2-11 Display Settings menu
| First level Second level Values | |
| Display Brightness Range: -10 to 10 | |
| Default = 0 | |
| Language Select from a list of languages that the product supports. | |
| Show IP Address Display* | |
| Hide | |
| Sleep Mode Disabled | |
| Use sleep delay* | |
| Use sleep schedule | |
| Balance power savings/Wait time | |
| Inactivity Timeout Range: 10 – 300 seconds | |
| Default = 60 | |
| Clearable Warnings On | |
| Job* | |
| Continuable Events | Auto continue (10 seconds)* |
| Press OK to continue | |
Manage Supplies menu
In the following table, asterisks (*) indicate the factory default setting.
Table 2-12 Manage Supplies menu
| First level Second level Third level Fourth level Values | |||
| Print Supplies Status | |||
| Supply Settings Black Cartridge Very Low Settings Stop | Prompt to continue*Continue | ||
| Low Threshold Settings | 1-100% | ||
| Color Cartridges Very Low Settings Stop | Prompt to continue*Continue | ||
| Low Threshold Settings | Cyan Cartridge | 1-100% | |
| Magenta Cartridge | |||
| Yellow Cartridge | |||
| Fuser Very Low Settings Stop | Prompt to continue*Continue | ||
| Low Threshold Settings | 1-100% | ||
| Transfer Kit Very Low Settings Stop | Prompt to continue*Continue | ||
| Low Threshold Settings | 1-100% | ||
| Color/Black Mix | Auto* | Mostly Color PagesMostly Black Pages | |
| Supply Messages Low Message | On*Off | ||
| Level Gauge | On* | Off | |
| Reset Supplies New Fuser Kit | No | ||
| Yes | |||
| New Transfer Kit | No | ||
| Yes | |||
Manage Trays menu
In the following table, asterisks (*) indicate the factory default setting.
Table 2-13 Manage Trays menu
| First level Values | |
| Use Requested Tray Exclusively* | |
| First | |
| Manually Feed Prompt Always* | |
| Unless loaded | |
| Size/Type Prompt Display* | |
| Do not display | |
| Use Another Tray Enabled* | |
| Disabled | |
| Alternative Letterhead Mode Disabled* | |
| Enabled | |
| Blank Pages | Auto* |
| Yes | |
| Override A4/Letter | Yes* |
| No | |
Network Settings menu
In the following table, asterisks (*) indicate the factory default setting.
Table 2-14 Network Settings menu
| First level Values |
| I/O Timeout Range: 5 – 300 secDefault = 15 |
| Embedded Jetdirect See the table that follows for details. These menus have the same structure. If an additional HP Jetdirect network card is installed in the EIO slot, then both menus are available. |
Table 2-15 Embedded Jetdirect
| First level Second level Third level Fourth level Fifth level Values | ||||
| Information Print Sec Report | Yes | |||
| No* | ||||
| TCP/IP Enable | On* | |||
| Off | ||||
| Host Name | Use | the | arrow | |
| buttons to edit the host name. | ||||
| NPIXXXXXX* | ||||
| IPv4 Settings | Config Method | Bootp* | ||
| DHCP | ||||
| Auto IP | ||||
| Manual | ||||
| Default IP | Auto IP* | |||
| Legacy | ||||
| DHCP Release | Yes | |||
| No* | ||||
| DHCP Renew | Yes | |||
| No* | ||||
| Primary DNS | Range: 0 - 255 | |||
| Default = xxx.xxx.xx.xx | ||||
| Secondary DNS | Range: 0 - 255 | |||
| Default = 0.0.0.0 | ||||
Table 2-15 Embedded Jetdirect (continued)
| First level Second level Third level Fourth level Fifth level Values | |||
| IPv6 Settings Enable | On* | ||
| Off | |||
| Address Manual Settings Enable On | |||
| Off* | |||
| Address Select from a provided list. | |||
| DHCPV6 Policy | Router Specified | ||
| Router Unavailable* | |||
| Always | |||
| Primary DNS | S | e | |
| provided list. | |||
| Secondary DNS | S | e | |
| provided list. | |||
| Proxy Server | S | e | |
| provided list. | |||
| Proxy Port | D | e | |
| Idle Timeout | D | e | |
| Security | Secure Web | HTTPS Required* | |
| HTTPS Optional | |||
| IPSEC | Keep | ||
| Disable* | |||
| 802.1x | Reset | ||
| Keep* | |||
| Reset Security | Yes | ||
| No* | |||
| Diagnostics | Embedded Test | LAN HW Test | Yes |
| No* | |||
| HTTP Test | Yes | ||
| No* | |||
| SNMP Test | Yes | ||
| No* | |||
| Data Path Test | Yes | ||
| No* | |||
| Select All Tests | Yes | ||
| No* | |||
| Execution Time Range: 1 - 60 hours | |||
| Default = 1 | |||
| Execute | Yes | ||
| No* | |||
| Ping Test Dest Type | IPv4 | ||
| IPv6 | |||
| Dest IPv4 Range: 0 - 255 | |||
| Default = 127.0.0.1 | |||
| Dest IPv6 | S | e provided list. | |
| Default = : : 1 | |||
| Packet Size | D | e | |
| Timeout | D | ||
| Count | D | ||
| Print Results | Yes | ||
| No* | |||
| Execute | Yes | ||
| No* | |||
| Ping Results | Packets Sent | Default = 00000 | |
| Packets Received | Default = 00000 | ||
| Percent Lost | Default = 000 | ||
| RTT Min | D | ||
| RTT Max | D | ||
| RTT Average | D | e | |
| Ping In Progress | Yes | ||
| No* | |||
Table 2-15 Embedded Jetdirect (continued)
| First level Second level Third level Fourth level Fifth level Values | ||
| Refresh | Yes | |
| No* | ||
| Link Speed | Auto* | |
| 10T Half | ||
| 10T Full | ||
| 100TX Half | ||
| 100TX Full | ||
| 100TX Auto | ||
| 1000T Full | ||
Troubleshooting menu
In the following table, asterisks (*) indicate the factory default setting.
Table 2-16 Troubleshooting menu
| First level Second level Third level Fourth level Values | ||
| Exit Troubleshooting | ||
| NOTE: This item only displays if you are backing out of the Troubleshooting menu. | ||
| Print Event Log | ||
| View Event Log | ||
| Print Quality Pages Print PQ Troubleshooting Pages | ||
| Diagnostic Page | ||
| Color Band Test Print Test Page | ||
| Copies Range: 1 - 30 | Default = 1 | |
| Diagnostic Tests Disable Cartridge Check | ||
| Paper Path Sensors | Start Test | |
| Paper Path Test | Print Test Page | |
| Source | Select from a list of the available trays. | |
| Test Duplex Path | Off* | |
| On | ||
| Number of Copies | Range: 1 - 500 | |
| Default = 1 | ||
| Manual Sensor Test | Select from a list of the product sensors. | |
| Tray/Bin Manual | Select from a list of the sensor Test | product sensors. |
| Component Test | Select from a list of available components. | |
| Repeat | Off* | |
| On | ||
| Print/Stop Test | ||
| Retrieve Diagnostic Data | Export to USB | |
| Diagnostic Files | Device Data File | |
| Debug Information File* | ||
| Include Crash Dumps | Off | On* |
| Cleanup Debug Info | Off | On* |
| General Debug Data | ||
Device Maintenance menu
Backup/Restore menu
△ CAUTION: Data backup and restoration is the responsibility of the customer/administrator of the product. Service personnel should not back up or restore customer data under any circumstances.
In the following table, asterisks (*) indicate the factory default setting.
Table 2-17 Backup/Restore menu
| First level Second level Third level Values | ||
| Backup Data Scheduled Backups Enable Scheduling Disabled* | ||
| Enabled | ||
| Backup Time Default = current time | ||
| Days Between Backups | Default = 1 | |
| Backup Now | ||
| Export Last Backup | ||
| Restore Data Insert a USB drive that contains | the backup file. | |
Calibration/Cleaning menu
In the following table, asterisks (*) indicate the factory default setting.
Table 2-18 Calibration/Cleaning menu
| First level Second level Values | |
| Auto Cleaning | Off* |
| On | |
| Cleaning Interval | Select from a list of cleaning intervals. |
| Auto Cleaning Size | Letter* |
| A4 | |
| Print Cleaning Page | |
| Clean Laser Glass | |
| Quick Calibration | |
| Full Calibration | |
| Delay Calibration at Wake/Power On | Yes* |
| No | |
USB Firmware Upgrade menu
To display: At the product control panel, select the Device Maintenance menu, and then select the USB Firmware Upgrade menu.
Insert a USB storage device with a firmware upgrade bundle into the USB port, and follow the on-screen instructions.
Service menu
The Service menu is locked and requires a PIN for access. This menu is intended for use by authorized service personnel.
3 Software for Windows
• Supported operating systems for Windows®
• Supported printer drivers for Windows
- Select the correct printer driver for Windows
• Priority for print settings
• Change printer-driver settings for Windows
- Remove software for Windows
• Supported utilities for Windows
• Software for other operating systems
Supported operating systems for Windows®
The product supports the following Windows operating systems:
- Windows® XP (32-bit and 64-bit)
• Windows Vista® (32-bit and 64-bit)
• Windows 7 (32-bit and 64-bit)
• Windows Server 2003 (32-bit and 64-bit)
• Windows Server 2008 (32-bit and 64-bit)
Supported printer drivers for Windows
HP PCL 6 (this is the default printer driver)
HP PCL 6 Universal Print Driver (HP UPD PCL 6)
HP postscript emulation Universal Print Driver (HP UPD PS)
HP PCL 5 Universal Print Driver (HP UPD PCL 5)
The printer drivers include online Help that has instructions for common printing tasks and also describes the buttons, checkboxes, and dropdown lists that are in the printer driver.

NOTE: For more information about the UPD, see www.hp.com/go/upd.
Select the correct printer driver for Windows
Printer drivers provide access to the product features and allow the computer to communicate with the product (using a printer language). The following printer drivers are available at www.hp.com/support/cljcp5525.
| HP PCL 6 driver | Provided as the default driver. This driver is automatically installed unless you select a different one.Recommended for all Windows environmentsProvides the overall best speed, print quality, and product-feature support for most usersDeveloped to align with the Windows Graphic Device Interface (GDI) for the best speed in Windows environmentsMight not be fully compatible with third-party and custom software programs that are based on PCL 5 |
| HP UPD PCL 6 driver | Recommended for all Windows environmentsProvides the overall best speed, print quality, and product-feature support for most usersDeveloped to align with the Windows GDI for the best speed in Windows environmentsMight not be fully compatible with third-party and custom software programs that are based on PCL 5 |
| HP UPD PS driver | Recommended for printing with Adobe® software programs or with other highly graphics-intensive software programsProvides support for printing from postscript emulation needs, or for postscript flash font support |
| HP UPD PCL 5 | Recommended for general office printing in Windows environmentsCompatible with previous PCL versions and older HP LaserJet productsThe best choice for printing from third-party or custom software programsThe best choice when operating with mixed environments, which require the product to be set to PCL 5 (UNIX®, Linux, mainframe)Designed for use in corporate Windows environments to provide a single driver for use with multiple printer modelsPreferred when printing to multiple printer models from a mobile Windows computer |
HP Universal Print Driver (UPD)
The HP Universal Print Driver (UPD) for Windows is a single driver that gives you instant access to virtually any HP LaserJet product, from any location, without downloading separate drivers. It is built on proven HP print driver technology and has been tested thoroughly and used with many software programs. It is a powerful solution that performs consistently over time.
The HP UPD communicates directly with each HP product, gathers configuration information, and then customizes the user interface to show the product's unique, available features. It automatically enables features that are available for the product, such as two-sided printing and stapling, so you do not need to enable them manually.
For more information, go to www.hp.com/go/upd.
UPD installation modes
| Traditional mode | Use this mode if you are installing the driver from a CD for a single computer.When installed from the CD that comes with the product, UPD operates like traditional printer drivers. It operates with a specific product.If you use this mode, you must install UPD separately for each computer and for each product. |
| Dynamic mode | To use this mode, download UPD from the Internet. See www.hp.com/go/upd.Dynamic mode allows you to use a single driver installation, so you can discover and print to HP products in any location.Use this mode if you are installing UPD for a workgroup. |
Priority for print settings
Changes to print settings are prioritized depending on where the changes are made:

NOTE: The names of commands and dialog boxes might vary depending on your software program.
Page Setup dialog box: Click Page Setup or a similar command on the File menu of the program you are working in to open this dialog box. Settings changed here override settings changed anywhere else.
- Print dialog box: Click Print, Print Setup, or a similar command on the File menu of the program you are working in to open this dialog box. Settings changed in the Print dialog box have a lower priority and usually do not override changes made in the Page Setup dialog box.
- Printer Properties dialog box (printer driver): Click Properties in the Print dialog box to open the printer driver. Settings changed in the Printer Properties dialog box usually do not override settings anywhere else in the printing software. You can change most of the print settings here.
- Default printer driver settings: The default printer driver settings determine the settings used in all print jobs, unless settings are changed in the Page Setup, Print, or Printer Properties dialog boxes.
- Printer control panel settings: Settings changed at the printer control panel have a lower priority than changes made anywhere else.
Change printer-driver settings for Windows
Change the settings for all print jobs until the software program is closed
- On the File menu in the software program, click Print.
- Select the driver, and then click Properties or Preferences.
The steps can vary; this procedure is most common.
Change the default settings for all print jobs
-
Windows XP, Windows Server 2003, and Windows Server 2008 (using the default Start menu view): Click Start, and then click Printers and Faxes.
Windows XP, Windows Server 2003, and Windows Server 2008 (using the Classic Start menu view): Click Start, click Settings, and then click Printers.
Windows Vista: Click Start, click Control Panel, and then in the category for Hardware and Sound click Printer.
Windows 7: Click Start, and then click Devices and Printers. -
Right-click the driver icon, and then select Printing Preferences.
Change the product configuration settings
-
Windows XP, Windows Server 2003, and Windows Server 2008 (using the default Start menu view): Click Start, and then click Printers and Faxes.
Windows XP, Windows Server 2003, and Windows Server 2008 (using the Classic Start menu view): Click Start, click Settings, and then click Printers.
Windows Vista: Click Start, click Control Panel, and then in the category for Hardware and Sound click Printer.
Windows 7: Click Start, and then click Devices and Printers. -
Right-click the driver icon, and then select Properties or Printer properties.
- Click the Device Settings tab.
Remove software for Windows
Windows XP
- Click Start, Control Panel, and then Add or Remove Programs.
- Find and select the product from the list.
- Click the Change/Remove button to remove the software.
Windows Vista
- Click Start, Control Panel, and then Programs and Features.
- Find and select the product from the list.
- Select the Uninstall/Change option.
Windows 7
- Click Start, Control Panel, and then under the Programs heading, click Uninstall a program.
- Find and select the product from the list.
- Select the Uninstall option.
Supported utilities for Windows
HP Web Jetadmin
HP Web Jetadmin is a simple print and imaging peripheral management software tool that helps optimize product use, control color costs, secure products, and streamline supplies management by enabling remote configuration, proactive monitoring, security troubleshooting, and reporting of printing and imaging products.
To download a current version of HP Web Jetadmin and for the latest list of supported host systems, visit www.hp.com/go/webjetadmin.
When installed on a host server, a Windows client can gain access to HP Web Jetadmin by using a supported Web browser (such as Microsoft® Internet Explorer) by navigating to the HP Web Jetadmin host.
HP Embedded Web Server
The product is equipped with the HP Embedded Web Server, which provides access to information about product and network activities. This information appears in a Web browser, such as Microsoft Internet Explorer, Netscape Navigator, Apple Safari, or Mozilla Firefox.
The HP Embedded Web Server resides on the product. It is not loaded on a network server.
The HP Embedded Web Server provides an interface to the product that anyone who has a network-connected computer and a standard Web browser can use. No special software is installed or configured, but you must have a supported Web browser on your computer. To gain access to the HP Embedded Web Server, type the IP address for the product in the address line of the browser. (To find the IP address, print a configuration page. For more information about printing a configuration page, see Print information pages on page 162).
For a complete explanation of the features and functionality of the HP Embedded Web Server, see Use the HP Embedded Web Server on page 163.
Software for other operating systems
OS Software
| UNIX For HP-UX and Solaris networks, go to model scripts using the HP Jetdirect printer installer (HPPI) for UNIX.For the latest model scripts, go to www.hp.com/go/unixmodelscripts. | |
| Linux For information, go to | www.hplip.net. |
| SAP For drivers, go to | www.hp.com/go/sap/driversFor information, go to www.hp.com/go/sap/print |
4 Use the product with Mac
- Software for Mac
- Print with Mac
- Solve problems with a Mac
Software for Mac
Supported operating systems for Mac
The product supports the following Mac operating systems:
• Mac OS X 10.4, 10.5, 10.6, and later
NOTE: For Mac OS X 10.4 and later, PPC and Intel® Core™ Processor Macs are supported.
Supported printer drivers for Mac
The HP LaserJet software installer provides PostScript® Printer Description (PPD) files, Printer Dialog Extensions (PDEs), and the HP Utility for use with Mac OS X computers. The HP printer PPD and PDE files, in combination with the built-in Apple PostScript printer drivers, provide full printing functionality and access to specific HP printer features.
Install software for Mac operating systems
Install software for Mac computers connected directly to the product
- Install the software from the CD.
- Click the product icon, and follow the onscreen instructions.
- Click the Close button.
- When the software prompts you, connect the USB cable to the product and the computer.

natural_image
Diagram showing connection between a computer unit and an attached device, with no visible text or symbols.- To configure the product software to recognize the installed accessories, complete these steps:
| Mac OS X 10.4 1. | From the Apple menu 📁, click theSystem Preferencesmenu and then click thePrint & Faxicon. |
| 2. Click thePrinter Setupbutton. | |
| 3. Click theInstallable Optionsmenu. | |
| Mac OS X 10.5 and 10.6 1. | From the Apple menu 📁, click theSystem Preferencesmenu and then click thePrint & Faxicon. |
| 2. Select the product in the left side of the window. | |
| 3. Click theOptions & Suppliesbutton. | |
| 4. Click theDrivertab. | |
| 5. Configure the installed options. | |
| NOTE: For Mac OS X 10.5 and 10.6, the installation procedure should automatically configure the installed options. |
- Print a page from any program to make sure that the software is correctly installed.
NOTE: If the installation failed, reinstall the software.
Install software for Mac computers on a wired network
Configure the IP address
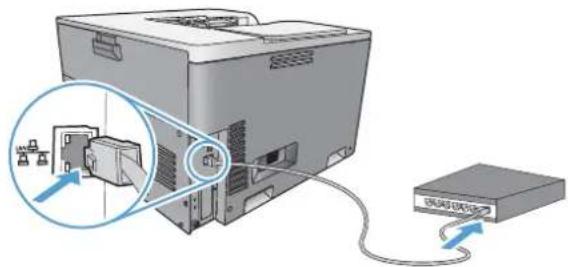
- Connect the network cable to the product and to the network.
text_image
Diagram showing a computer setup with an open device connected to a network switch, highlighting a hand operating the internal components.-
Wait for 60 seconds before continuing. During this time, the network recognizes the product and assigns an IP address or host name for the product.
-
At the product control panel, press the Home button Ⓞ.
-
Press the down arrow ▼ to highlight the Administration menu, and then press the OK button.
-
Press the down arrow ▼ to highlight the Reports menu, and then press the OK button.
-
Press the down arrow ▼ to highlight the Configuration/Status Pages menu, and then press the OK button.
-
Press the down arrow ▼ to highlight the Configuration Page menu, and then press the OK button.
-
Find the IP address on the Embedded Jetdirect page.

text_image
HP Color LaserJet CP5525 Printer Embedded Jodirect Page- IPv4: If the IP address is 0.0.0.0, or 192.0.0.192, or 169.254.x.x, you must manually configure the IP address. See Manually configure IPv4 TCP/IP parameters from the control panel on page 67. Otherwise, the network configuration was successful.
IPv6: If the IP address begins with "fe80:", the product should be able to print. If not, you must manually configure the IP address. See Manually configure IPv6 TCP/IP parameters from the control panel on page 68.
Install the Mac software
Mac
- Quit all programs on the computer.
- Install the software from the CD.
- Click the product icon, and follow the onscreen instructions.
- Click the Close button when the installation is complete.
- At the computer, open the Apple menu 📄, click the System Preferences menu, and then click the Print & Fax icon.
- Click the plus symbol (+).
By default, Mac OS X uses the Bonjour method to find the driver and add the product to the printer pop-up menu. This method is best in most situations. If Mac OS X cannot find the HP printer driver, an error message displays. Reinstall the software.
If you are connecting the product to a large network, you might need to use IP printing to connect rather than Bonjour. Follow these steps:
a. Click the IP Printer button.
b. From the Protocol drop-down list, select the HP Jetdirect-Socket option. Enter the IP address or host name for the product. From the Print Using drop-down list, select the product model if one is not already selected.
- To configure the product to recognize the installed accessories, complete these steps:
| Mac OS X 10.4 1. | From the Apple menu , click theSystem Preferencesmenu and then click thePrint & Faxicon. |
| 2. Click thePrinter Setupbutton. | |
| 3. Click theInstallable Optionsmenu. | |
| Mac OS X 10.5 and 10.6 1. | From the Apple menu , click theSystem Preferencesmenu and then click thePrint & Faxicon. |
| 2. Select the product in the left side of the window. | |
| 3. Click theOptions & Suppliesbutton. | |
| 4. Click theDrivertab. | |
| 5. Configure the installed options. | |
| NOTE: For Mac OS X 10.5 and 10.6, the installation procedure should automatically configure the installed options. |
- Print a page from any program to make sure that the software is correctly installed.
NOTE: If the installation failed, reinstall the software.
Remove software from Mac operating systems
You must have administrator rights to remove the software.
- Open System Preferences.
- Select Print & Fax.
- Highlight the product.
- Click the minus (-) symbol.
- Delete the print queue, if necessary.
-
Delete the .GZ file from the following hard-drive folder:
-
Mac OS X 10.4: Library/Printers/PPDs/Contents/Resources/
.lproj, where is the two-letter language code for the language that you are using.
• Mac OS X 10.5 and 10.6: Library/Printers/PPDs/Contents/Resources
Priority for print settings for Mac
Changes to print settings are prioritized depending on where the changes are made:

NOTE: The names of commands and dialog boxes might vary depending on your software program.
Page Setup dialog box: Click Page Setup or a similar command on the File menu of the program you are working in to open this dialog box. Settings changed here might override settings changed anywhere else.
- Print dialog box: Click Print, Print Setup, or a similar command on the File menu of the program you are working in to open this dialog box. Settings changed in the Print dialog box have a lower priority and do not override changes made in the Page Setup dialog box.
- Default printer driver settings: The default printer driver settings determine the settings used in all print jobs, unless settings are changed in the Page Setup, Print, or Printer Properties dialog boxes.
- Printer control panel settings: Settings changed at the printer control panel have a lower priority than changes made anywhere else.
Change printer-driver settings for Mac
| Change the settings for all print jobs until the software program is closed | Change the default settings for all print jobs | Change the product configuration settings |
| 1. On the File menu, click the Print button.2. Change the settings that you want on the various menus. | 1. On the File menu, click the Print button.2. Change the settings that you want on the various menus.3. On the Presets menu, click the Save As... option and type a name for the preset.These settings are saved in the Presets menu. To use the new settings, you must select the saved preset option every time you open a program and print. | Mac OS X 10.41. From the Apple menu , click the System Preferences menu and then click the Print & Fax icon.2. Click the Printer Setup button.3. Click the Installable Options menu.Mac OS X 10.5 and 10.61. From the Apple menu , click the System Preferences menu and then click the Print & Fax icon.2. Select the product in the left side of the window.3. Click the Options & Supplies button.4. Click the Driver tab.5. Configure the installed options. |
Software for Mac computers
HP Utility for Mac
Use the HP Utility to set up product features that are not available in the printer driver.
You can use the HP Utility when the product uses a universal serial bus (USB) cable or is connected to a TCP/IP-based network.
Open the HP Utility
| Mac OS X 10.4 | 1. Open the Finder, clickApplications, clickUtilities, and then double-click Printer Setup Utility.2. Select the product that you want to configure, and then clickUtility. |
| Mac OS X 10.5 and 10.6 | 1. From thePrinter Browsermenu, clickPrinter Utility.-or-From thePrint Queue, click theUtilityicon. |
HP Utility features
The HP Utility consists of pages that you open by clicking in the Configuration Settings list. The following table describes the tasks that you can perform from these pages.
| Menu Item Description | ||
| Information And Support | Supplies Status | Shows the product supplies status and provides links for online supplies-ordering |
| Device Information | Shows information about the currently selected product | |
| HP Support | Provides access to technical assistance, online supplies ordering, online registration, and recycling and return information | |
| Color Usage | Shows the total pages printed, the number of pages printed in color, and the number of pages printed in black only | |
| File Upload | Transfers files from the computer to the product | |
| Upload Fonts | Transfers font files from the computer to the product | |
| Printer Settings Trays Configuration Changes the default tray settings | ||
| Duplex Mode | Turns on the automatic two-sided printing mode | |
| Stored Jobs | Manages print jobs that are stored on the product hard disk | |
| E-mail Alerts | Configures the product to send e-mail notices for certain events | |
| Network Settings | Configures the network settings, such as the IPv4 and IPv6 settings | |
| Supplies | Management | Configures how the product should behave when supplies are nearing the end of their estimated life |
| Menu Item Description | |
| Restrict Color | Configures color-printing restrictions for specific users and software programsNOTE: This option is available only after you open theViewmenu, and then select theShow Advancedoption. |
| Protect Direct Ports | Disables printing over USB or parallel ports |
| Additional Settings | Provides access to the HP Embedded Web Server |
Supported utilities for Mac
HP Embedded Web Server
The product is equipped with an embedded Web server, which provides access to information about product and network activities. For more information, see Features on page 164.
Print with Mac
Cancel a print job with a Mac
If the print job is currently printing, cancel it by pressing the Cancel button on the product control panel.

NOTE: Pressing the Cancel button clears the job that the product is currently processing. If more than one process is running (for example, the product is printing a document while receiving a fax), pressing the Cancel button clears the process that currently appears on the product control panel.
You can also cancel a print job from a software program or a print queue.
To stop the print job immediately, remove the remaining print media from the product. After printing stops, use one of the following options:
- Product control panel: To cancel the print job, press and release the Cancel button on the product control panel.
- Software program: Typically, a dialog box appears briefly on the computer screen, allowing you to cancel the print job.
- Mac print queue: Open the print queue by double-clicking the product icon in the dock. Highlight the print job, and then click Delete.
Change the paper size and type with Mac
- On the File menu in the software program, click the Print option.
- In the Copies & Pages menu, click the Page Setup button.
- Select a size from the Paper Size drop-down list, and then click the OK button.
- Open the Finishing menu.
- Select a type from the Media-type drop-down list.
- Click the Print button.
Resize documents or print on a custom paper size with Mac
Mac OS X 10.4, 10.5, and 10.6
- On the File menu, click the Page Setup option.
- Select the product, and then select the correct settings for the Paper Size and Orientation options.
Mac OS X 10.5 and 10.6
Use one of these methods.
-
On the File menu, click the Print option.
-
Click the Page Setup button.
-
Select the product, and then select the correct settings for the Paper Size and Orientation options.
-
On the File menu, click the Print option.
-
Open the Paper Handling menu.
-
In the Destination Paper Size area, click the Scale to fit paper size box, and then select the size from the drop-down list.
Create and use printing presets with Mac
Use printing presets to save the current printer driver settings for reuse.
Create a printing preset
- On the File menu, click the Print option.
- Select the driver.
- Select the print settings that you want to save for reuse.
- In the Presets menu, click the Save As... option, and type a name for the preset.
- Click the OK button.
Use printing presets
- On the File menu, click the Print option.
- Select the driver.
- In the Presets menu, select the printing preset.

NOTE: To use printer-driver default settings, select the standard option.
Print a cover page with Mac
- On the File menu, click the Print option.
- Select the driver.
- Open the Cover Page menu, and then select where to print the cover page. Click either the Before Document button or the After Document button.
- In the Cover Page Type menu, select the message that you want to print on the cover page.

NOTE: To print a blank cover page, select the standard option from the Cover Page Type menu.
Use watermarks with Mac
- On the File menu, click the Print option.
- Open the Watermarks menu.
- From the Mode menu, select the type of watermark to use. Select the Watermark option to print a semi-transparent message. Select the Overlay option to print a message that is not transparent.
- From the Pages menu, select whether to print the watermark on all pages or on the first page only.
- From the Text menu, select one of the standard messages, or select the Custom option and type a new message in the box.
- Select options for the remaining settings.
Print multiple pages on one sheet of paper with Mac
text_image
1 1 2 1 2 3 4- On the File menu, click the Print option.
- Select the driver.
- Open the Layout menu.
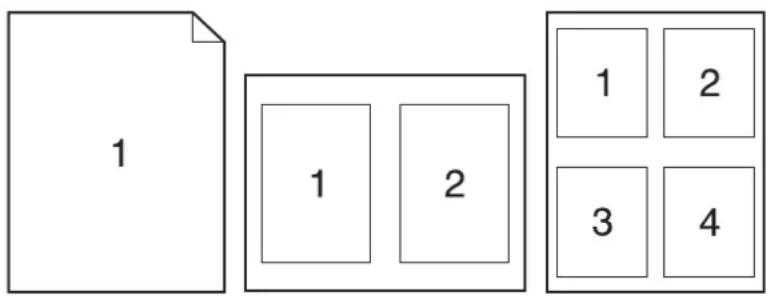
- From the Pages per Sheet menu, select the number of pages that you want to print on each sheet (1, 2, 4, 6, 9, or 16).
- In the Layout Direction area, select the order and placement of the pages on the sheet.
- From the Borders menu, select the type of border to print around each page on the sheet.
Print on both sides of the page (duplex printing) with Mac
Use automatic duplex printing
- Insert enough paper into one of the trays to accommodate the print job.
-
On the File menu, click the Print option.
-
Open the Layout menu.
- From the Two-Sided menu, select a binding option.
Print on both sides manually
- Insert enough paper into one of the trays to accommodate the print job.
- On the File menu, click the Print option.
- Open the Finishing menu, and click the Manual Duplex tab or open the Manual Duplex menu.
- Click the Manual Duplex box, and select a binding option.
- Click the Print button. Follow the instructions in the pop-up window that appears on the computer screen before replacing the output stack in Tray 1 for printing the second half.
- Go to the product, and remove any blank paper that is in Tray 1.
- Insert the printed stack face-up with the bottom edge feeding into the printer first in Tray 1. You must print the second side from Tray 1.
- If prompted, press the appropriate control-panel button to continue.
Store jobs with Mac
You can store jobs on the product so you can print them at any time. You can share stored jobs with other users, or you can make them private.
- On the File menu, click the Print option.
- Open the Job Storage menu.
-
In the Job Storage Mode drop-down list, select the type of stored job.
-
Proof and Hold: This feature provides a quick way to print and proof one copy of a job and then print more copies.
- Personal Job: When you send a job to the product, the job does not print until you request it at the product control panel. If you assign a personal identification number (PIN) to the job, you must provide the required PIN at the control panel.
- Quick Copy: If the optional hard disk is installed on the product, you can print the requested number of copies of a job and then store a copy of the job on the optional hard disk. Storing the job allows you to print additional copies of the job later.
-
Stored Job: If the optional hard disk is installed on the product, you can store a job such as a personnel form, time sheet, or calendar on the product and allow other users to print the job at any time. Stored jobs also can be protected by a PIN.
-
To use a custom user name or job name, click the Custom button, and then enter the user name or the job name.
Select which option to use if another stored job already has that name.
Use Job Name + (1 - 99) Append a unique number to the end of the job name.
Replace Existing File Overwrite the existing stored job with the new one.
- If you selected the Stored Job or Personal Job option in step 3, you can protect the job with a PIN. Type a 4-digit number in the Use PIN to Print field. When other people attempt to print this job, the product prompts them to enter this PIN number.
Set the color options with Mac
Use the Color Options menu or the Color/Quality Options menu to control how colors are interpreted and printed from software programs.
- On the File menu, click the Print option.
- Select the driver.
- Open the Color Options menu or the Color/Quality Options menu.
- Open the Advanced menu, or select the appropriate tab.
- Adjust the individual settings for text, graphics, and photographs.
Use the Services menu with Mac
If the product is connected to a network, use the Services menu to obtain product and supply-status information.
- On the File menu, click the Print option.
- Open the Services menu.
-
To open the embedded Web server and perform a maintenance task, do the following:
a. Select the Device Maintenance tab.
b. Select a task from the drop-down list.
c. Click the Launch button. -
To go to various support Web sites for this product, do the following:
a. Select the Services on the Web tab.
b. Select an option from the menu.
c. Click the Go! button.
Solve problems with a Mac
See Solve common Mac problems on page 203.
5 Connect the product
• Supported network operating systems
Connect with USB
- Connect to a network
Supported network operating systems
The following operating systems support network printing:
• Windows 7 (32-bit and 64-bit)
• Windows Vista (32-bit and 64-bit)
• Windows Server 2008 (32-bit and 64-bit)
• Windows XP (32-bit, Service Pack 2)
• Windows XP (64-bit, Service Pack 1)
• Mac OS X 10.4, 10.5, 10.6, and higher
• Windows Server 2003 (Service Pack 1, 32-bit and 64-bit)

NOTE: Most network operating systems support a full software installation.
Printer sharing disclaimer
HP does not support peer-to-peer networking, as the feature is a function of Microsoft operating systems and not of the HP printer drivers. Go to Microsoft at www.microsoft.com.
Connect with USB
This product supports a USB 2.0 connection. You must use an A-to-B type USB cable that is no longer than 2 m (6.5 ft).
△ CAUTION: Do not connect the USB cable until the installation software prompts you to connect it.
-
Quit all open programs on the computer.
-
Install the software from the CD, and follow the onscreen instructions.
-
When prompted, select the Connected directly to the computer option, and then click the Install button.
-
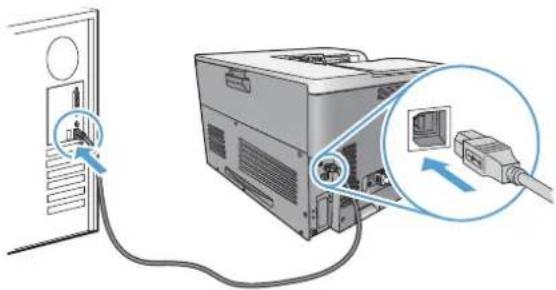
When the software prompts you, connect the USB cable to the product and the computer.
natural_image
Diagram showing a computer setup with an open door, cable, and a close-up of a device with an attached cable (no text or symbols visible)-
At the end of the installation, click the Finish button.
-
On the Additional Options screen, you can install more software, or click the Exit button.
-
Print a page from any program to make sure that the software is correctly installed.
NOTE: If the installation failed, reinstall the software.
Connect to a network
You can configure network parameters from the control panel, the HP Embedded Web Server, or for most networks, from the HP Web Jetadmin software.
NOTE: HP Web Jetadmin software is not supported on Mac OS X operating systems.
For a complete list of supported networks and for instructions on configuring network parameters from software, see the HP Jetdirect Embedded Print Server Administrator's Guide. The guide comes with products in which an HP Jetdirect embedded print server is installed.
Supported network protocols
The product supports the TCP/IP network protocol, the most widely used and accepted networking protocol. Many networking services utilize this protocol. The following tables list the supported networking services and protocols.
Table 5-1 Printing
| Service name Description | |
| port9100 (Direct Mode) Printing service | |
| Line printer daemon (LPD) Printing service | |
| Advanced LPD (custom LPD queues) | Protocol and programs associated with line-printer spooling services installed on TCP/IP systems. |
| FTP TCP/IP utility for transferring data between systems. | |
| WS Print Uses the Microsoft Web Services for Devices (WSD) Print services on the HP Jetdirect print server. | |
| WS Discovery Allows Microsoft WS discovery protocols on the HP Jetdirect print server. | |
Table 5-2 Network device discovery
| Service name Description | |
| SLP (Service Location Protocol) Device-discovery protocol, used to help find and configurenetwork devices. Used primarily by Microsoft-based programs. | |
| Bonjour Device-discovery protocol, used to help find and configurenetwork devices. Used primarily by Apple Macintosh-based programs. |
Table 5-3 Messaging and management
| Service name Description | |
| HTTP (Hyper Text Transfer Protocol) | Allows Web browsers to communicate with embedded Web server. |
| EWS (embedded Web server) Allows you to manage the product through a Web browser. | |
| SNMP (Simple Network Management Protocol) | Used by network applications for product management. SNMP v1, SNMP v3, and standard MIB-II (Management Information Base) objects are supported. |
| LLMNR (Link Local Multicast Name Resolution) Specifies if the product responds to LLMNR requests over IPv4 and IPv6. | |
| TFTP Configuration Allows you to use TFTP to download a configuration file containing additional configuration parameters, such as SNMP or non-default settings, for an HP Jetdirect print server. | |
Table 5-4 IP addressing
| Service name Description | |
| DHCP (Dynamic Host Configuration Protocol) | For automatic IP address assignment. The product supports IPv4 and IPv6. The DHCP server provides the product with an IP address. Generally, no user intervention is required for the product to obtain an IP address from a DHCP server. |
| BOOTP (Bootstrap Protocol) For automatic IP address assignment. The BOOTP server provides the product with an IP address. Requires the administrator to input a product's MAC hardware address on the BOOTP server for the product to obtain an IP address from that server. | |
| Auto IP For automatic IP address assignment. If neither a DHCP server nor a BOOTP server is present, the product uses this service to generate a unique IP address. | |
Table 5-5 Security features
| Service name Description | |
| IPsec/Firewall Provides network-layer security on IPv4 and IPv6 networks. A firewall provides simple control of IP traffic. IPsec provides additional protection through authentication and encryption protocols. | |
| Kerberos Allows you to exchange private information across an open network by assigning a unique key, called a ticket, to each user who logs on to the network. The ticket is then embedded in messages to identify the sender. | |
| SNMP v3 Employs a user-based security model for SNMP v3, which provides user authentication and data privacy through encryption. | |
| Access control list (ACL) Specifies the individual host systems, or networks of host systems, that are allowed to access the HP Jetdirect print server and the attached network product. | |
| SSL/TLS Allows you to transmit private documents via the Internet and guarantee privacy and data integrity between the client and server applications. | |
| IPsec batch configuration | Provides network-layer security through the simple control of IP traffic to and from the product. This protocol provides the benefits of encryption and authentication and allows for multiple configurations. |
Install the product on a wired network
Configure the IP address
- Connect the network cable to the product and to the network.

natural_image
Diagram showing a computer setup with an attached device and cable, no visible text or symbols-
Wait for 60 seconds before continuing. During this time, the network recognizes the product and assigns an IP address or host name for the product.
-
At the product control panel, press the Home button ☐.
-
Press the down arrow ▼ to highlight the Administration menu, and then press the OK button.
-
Press the down arrow ▼ to highlight the Reports menu, and then press the OK button.
-
Press the down arrow ▼ to highlight the Configuration/Status Pages menu, and then press the OK button.
-
Press the down arrow ▼ to highlight the Configuration Page item, and then press the OK button.
-
Press the up arrow ▲ to highlight the Print option, and then press the OK button to print the report.
-
Find the IP address on the Embedded Jetdirect page.
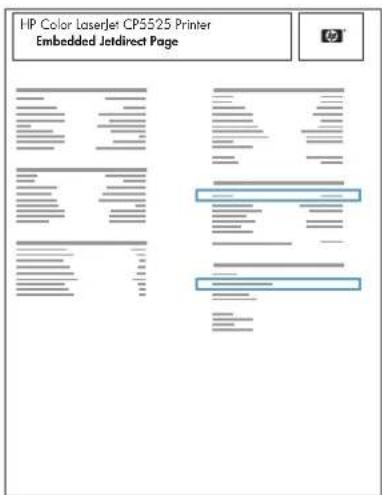
text_image
HP Color LaserJet CP5525 Printer Embedded Jodirect Page- IPv4: If the IP address is 0.0.0.0, or 192.0.0.192, or 169.254.x.x, you must manually configure the IP address. See Manually configure IPv4 TCP/IP parameters from the control panel on page 67. Otherwise, the network configuration was successful.
IPv6: If the IP address begins with "fe80:", the product should be able to print. If not, you must manually configure the IP address. See Manually configure IPv6 TCP/IP parameters from the control panel on page 68.
Install the software
- Quit all programs on the computer.
- Install the software from the CD.
- Follow the onscreen instructions.
- When prompted, select the Connected via the Network option, and then click the Install button.
- From the list of available printers, select the printer that has the correct IP address.
- Click the Finish button.
- On the Additional Options screen, you can install more software, or click the Exit button.
- Print a page from any program to make sure that the software is correctly installed.

NOTE: If the installation failed, reinstall the software.
Configure network settings
View or change network settings
Use the embedded Web server to view or change IP configuration settings.
- Print a configuration page, and locate the IP address.
- If you are using IPv4, the IP address contains only digits. It has this format:
XXX.XXX.XXX.XXX
- If you are using IPv6, the IP address is a hexadecimal combination of characters and digits. It has a format similar to this:
XXXX::XXXX:XXXX:XXXX:XXXX
-
To open the embedded Web server, type the IP address into the address line of a Web browser.
-
Click the Networking tab to obtain network information. You can change settings as needed.
Set or change the network password
Use the embedded Web server to set a network password or change an existing password.
- Open the embedded Web server, click the Security tab, and then click the General Security link.
NOTE: If a password has previously been set, you are prompted to type the password. Type the password, and then click the Apply button.
-
Type the new password in the New Password box and in the Verify password box.
-
At the bottom of the window, click the Apply button to save the password.
Manually configure IPv4 TCP/IP parameters from the control panel
Use the control-panel menus to manually set an IPv4 address, subnet mask, syslog server, and default gateway.
- Press the Home button 🔒.
- Press the down arrow ▼ to highlight the Administration menu, and then press the OK button.
- Press the down arrow ▼ to highlight the Network Settings menu, and then press the OK button.
- Press the down arrow ▼ to highlight the Embedded Jetdirect menu, and then press the OK button.
- Press the down arrow ▼ to highlight the TCP/IP menu, and then press the OK button.
- Press the down arrow ▼ to highlight the IPv4 Settings menu, and then press the OK button.
- Press the down arrow ▼ to highlight the Config Method menu, and then press the OK button.
- Press the down arrow ▼ to highlight the Manual option, and then press the OK button.
- Press the down arrow ▼ to highlight the Manual Settings menu, and then press the OK button.
- Press the down arrow ▼ to highlight the IP Address, Subnet Mask, or Default Gateway menu, and then press the OK button.
- Press the up arrow ▲ or the down arrow ▼ to increase or decrease the number for the first byte of the IP address, subnet mask, syslog server, or default gateway.
- Press the OK button to move to the next set of numbers, or press the back arrow Ⓗ to move to the previous set of numbers.
- Repeat steps 10 and 11 until the IP address, subnet mask, or default gateway is complete, and then press the OK button to save the setting.
- Press the Home button ☑ to return to the Ready state.
Manually configure IPv6 TCP/IP parameters from the control panel
Use the control-panel menus to manually set an IPv6 address.
-
Press the Home button ☐.
-
Press the down arrow ▼ to highlight the Administration menu, and then press the OK button.
-
Press the down arrow ▼ to highlight the Network Settings menu, and then press the OK button.
-
Press the down arrow ▼ to highlight the Embedded Jetdirect menu, and then press the OK button.
-
Press the down arrow ▼ to highlight the TCP/IP menu, and then press the OK button.
-
Press the down arrow ▼ to highlight the IPv6 Settings menu, and then press the OK button.
-
Press the down arrow ▼ to highlight the Address menu, and then press the OK button.
-
Press the OK button to select the Manual Settings menu.
-
Press the down arrow ▼ to highlight the Address option, and then press the OK button.
-
Press the up arrow ▲ or the down arrow ▼ to select the first character of the address. Press the OK button.
Repeat this process for each character in the address.
NOTE: You must press the OK button after entering each character.
-
After entering all of the address characters, press the up arrow ▲ or the down arrow ▼ to select the stop character ⊗. Press the OK button.
-
Press the Home button ☑ to return to the Ready state.
Link speed and duplex settings
The link speed and communication mode of the print server must match the network. For most situations, leave the product in automatic mode. Incorrect changes to the link speed and duplex settings might prevent the product from communicating with other network devices. If you need to make changes, use the product control panel.

NOTE: Making changes to these settings causes the product to turn off and then on. Make changes only when the product is idle.
- Press the Home button .
- Press the down arrow ▼ to highlight the Administration menu, and then press the OK button.
- Press the down arrow ▼ to highlight the Network Settings menu, and then press the OK button.
- Press the down arrow ▼ to highlight the Embedded Jetdirect menu, and then press the OK button.
- Press the down arrow ▼ to highlight the Link Speed menu, and then press the OK button.
- Press the down arrow ▼ to highlight one of the following options.
Setting Description
| Auto The print server automatically configures itself for the highest link speed and communication mode allowed on the network. | |
| 10T Half | 10 megabytes per second (Mbps), half-duplex operation |
| 10T Full 10 Mbps, full-duplex operation | |
| 100TX Half 100 Mbps, half-duplex operation | |
| 100TX Full 100 Mbps, full-duplex operation | |
| 100TX Auto Limits auto-negotiation to a maximum link speed of 100 Mbps | |
| 1000T Full 1000 Mbps, full-duplex operation | |
- Press the OK button. The product turns off and then on.
6 Paper and print media
• Understand paper use
• Change the printer driver to match the paper type and size
• Supported paper sizes
• Supported paper types and tray capacity
- Load paper trays
Configure trays
Understand paper use
This product supports a variety of paper and other print media in accordance with the guidelines in this user guide. Paper or print media that does not meet these guidelines might cause poor print quality, increased jams, and premature wear on the product.
For best results, use only HP-brand paper and print media designed for laser printers or multiuse. Do not use paper or print media made for inkjet printers. Hewlett-Packard Company cannot recommend the use of other brands of media because HP cannot control their quality.
It is possible for paper to meet all of the guidelines in this user guide and still not produce satisfactory results. This might be the result of improper handling, unacceptable temperature and/or humidity levels, or other variables over which Hewlett-Packard has no control.
△ CAUTION: Using paper or print media that does not meet Hewlett-Packard's specifications might cause problems for the product, requiring repair. This repair is not covered by the Hewlett-Packard warranty or service agreements.
Special paper guidelines
This product supports printing on special media. Use the following guidelines to obtain satisfactory results. When using special paper or print media, be sure to set the type and size in the printer driver to obtain the best results.
△ CAUTION: HP LaserJet products use fusers to bond dry toner particles to the paper in very precise dots. HP laser paper is designed to withstand this extreme heat. Using inkjet paper could damage the product.
| Media type Do Do not | ||
| Envelopes | Store envelopes flat.Use envelopes where the seam extends all the way to the corner of the envelope.Use peel-off adhesive strips that are approved for use in laser printers. | Do not use envelopes that are wrinkled, nicked, stuck together, or otherwise damaged.Do not use envelopes that have clasps, snaps, windows, or coated linings.Do not use self-stick adhesives or other synthetic materials. |
| Labels | Use only labels that have no exposed backing between them.Use labels that lie flat.Use only full sheets of labels. | Do not use labels that have wrinkles or bubbles, or are damaged.Do not print partial sheets of labels. |
| Transparencies | Use only transparencies that are approved for use in color laser printers.Place transparencies on a flat surface after removing them from the product. | Do not use transparent print media not approved for laser printers. |
| Letterhead or preprinted forms | Use only letterhead or forms approved for use in laser printers. | Do not use raised or metallic letterhead. |
| Heavy paper | Use only heavy paper that is approved for use in laser printers and meets the weight specifications for this product. | Do not use paper that is heavier than the recommended media specification for this product unless it is HP paper that has been approved for use in this product. |
| Glossy or coated paper | Use only glossy or coated paper that is approved for use in laser printers. | Do not use glossy or coated paper designed for use in inkjet products. |
Change the printer driver to match the paper type and size
Change the paper size and type (Windows)
- On the File menu in the software program, click Print.
- Select the product, and then click the Properties or Preferences button.
- Click the Paper/Quality tab.
- Select a size from the Paper size drop-down list.
- Select a paper type from the Paper type drop-down list.
- Click the OK button.
Change the paper size and type (Mac)
- On the File menu in the software program, click the Print option.
- In the Copies & Pages menu, click the Page Setup button.
- Select a size from the Paper Size drop-down list, and then click the OK button.
- Open the Finishing menu.
- Select a type from the Media-type drop-down list.
- Click the Print button.
Supported paper sizes
This product supports a number of paper sizes, and it adapts to various media.

NOTE: To obtain best print results, select the appropriate paper size and type in your print driver before printing.
Table 6-1 Supported paper and print media sizes
| S | i | z | e | D | i | m | e trays 4, 5, and 6 | n |
| Letter1 | 216 x 279 mm (8.5 x 11 in) | √ | √ | √ | ||||
| Legal 216 x 356 mm (8.5 x 14 in) | √ | √ | √ | |||||
| A41 | 210 x 297 mm (8.27 x 11.69 in) | √ | √ | √ | ||||
| RA4 215 x 305 mm (8.47 x 12 in) | √ | √ | √ | |||||
| SRA4 225 x 320 mm (8.86 x 12.6 in) | √ | √ | √ | |||||
| Executive 184 x 267 mm (7.25 x 10.5 in) | √ | √ | √ | |||||
| A3 297 x 420 mm (11.69 x 16.54 in) | √ | √ | √ | |||||
| A5 148 x 210 mm (5.83 x 8.27 in) | √ | √ | √2 | |||||
| A6 105 x 148 mm (4.13 x 5.83 in) | √ | |||||||
| B4 (JIS) 257 x 364 mm (10.12 x 14.33 in) | √ | √ | √ | |||||
| B5 (JIS) 182 x 257 mm (7.17 x 10.12 in) | √ | √ | √ | |||||
| B6 (JIS) 128 x 182 mm (5.04 x 7.17 in) | √ | |||||||
| 8k 270 x 390 mm (10.6 x 15.4 in) | √ | √ | √ | |||||
| 260 x 368 mm (10.2 x 14.5 in) | √ | √ | ||||||
| 273 x 394 mm (10.75 x 15.5 in) | √ | √ | ||||||
| 16k 184 x 260 mm (7.24 x 10.24 in) | √ | √ | √ | |||||
| 195 x 270 mm (7.68 x 10.63 in) | √ | √ | ||||||
| 197 x 273 mm (7.75 x 10.75 in) | √ | √ | ||||||
| 8.5 x 13 (Folio) | 216 x 330 mm (8.5 x 13 in) | √ | √ | √ | ||||
Table 6-1 Supported paper and print media sizes (continued)
| S | i | z | e | D | i | m | e n trays 4, 5, and 6 |
| Index card | 76 × 127 mm (3 × 5 in)^3 | ✓ | |||||
| 101.6 × 152 mm (4 × 6 in) | ✓ | ||||||
| 127 × 177.8 mm (5 × 7 in) | ✓ | ||||||
| 127 × 203 mm (5 × 8 in) | ✓ | ||||||
| Statement 139.7 × 216 mm (5.5 × 8.5 in) | ✓ | ||||||
| 10 × 15 cm 100 × 150 mm (3.9 × 5.9 in) | ✓ | ||||||
| 11 × 17 (Tabloid) | 279 × 432 mm (11 × 17 in) | ✓ | ✓ | ✓ | |||
| 12 × 18 (Arch B) | 305 × 457 mm (12 × 18 in) | ✓ | |||||
| RA3 305 × 430 mm (12 × 16.9 in) | ✓ | ||||||
| SRA3 320 × 450 mm (12.6 × 17.7 in) | ✓ | ||||||
| Custom Minimum: 76 × 127 mm (3 × 5 in) | ✓ | ||||||
| Maximum: 312/320 × 470 mm (12.3/12.6 × 18.5 in)^3 | |||||||
| Minimum: 148 × 182 mm (5.8 × 7.1 in) | ✓ | ||||||
| Maximum: 297 × 432 mm (11.7 × 17 in) | |||||||
| Minimum: 210 × 148 mm (8.3 × 5.8 in) | ✓ | ||||||
| Maximum: 297 × 432 mm (11.7 × 17 in) | |||||||
These sizes can be loaded in a rotated orientation in Tray 2, Tray 3, and optional Trays 4, 5, and 6.
2 A5 size is supported for Tray 3 only, as a custom size, with the long edge feeding into the product first. A5 size is not supported for two-sided (duplex) printing from Tray 3.
3 Custom media width is limited to 312 mm (12.3 in). However, SRA3, which is 320 mm (12.6 in) wide, is supported. The maximum printable image is 302 mm (11.9 in) wide. With the required blank 5 mm (0.2 in) margins on each side for printing, any media wider than 312 mm (11.9 in) will have its image centered and limited to 302 mm wide.
Table 6-2 Supported envelopes and postcards
| Size Dimensions Tray 1 Tray 2 | |
| Envelope #9 98.4 x 225.4 mm (3.9 x 8.9 in) | √ |
| Envelope #10 105 x 241 mm (4.13 x 9.5 in) | √ |
| Envelope DL 110 x 220 mm (4.33 x 8.66 in) | √ |
| Envelope C5 162 x 229 mm (6.4 x 9 in) | √ |
| Envelope C6 114 x 162 mm (4.5 x 6.4 in) | √ |
| Envelope B5 176 x 250 mm (6.9 x 9.8 in) | √ |
| Envelope 98 x 191 mm (3.9 x 7.5 in) Monarch | √ |
| Postcard 100 x 148 mm (3.94 x 5.83 in) | √ |
| Double postcard 148 x 200 mm (5.83 x 7.87 in) | √ |
Supported paper sizes for duplex printing
• Minimum: 148 x 182 mm (5.8 x 7.2 in)
• Maximum: 312/320 x 457 mm (12.3/12.6 x 18 in)
NOTE: Custom media width is limited to 312 mm (12.3 in). However, SRA3, which is 320 mm (12.6 in) wide, is supported. The maximum printable image is 302 mm (11.9 in) wide. With the required blank 5 mm (0.2 in) margins on each side for printing, any media wider than 312 mm (11.9 in) will have its image centered and limited to 302 mm wide.
NOTE: For automatic duplexing, do not load paper that is heavier than 120 g/m^2 (32-lb bond). Use manual duplexing to print on heavier paper.
Supported paper types and tray capacity
| Media type | Dimensions1 | Weight | Capacity2 |
| Paper, including the following types: | Tray 1 minimum: 76 x 127 mm (3 x 5 in) | 60 to 105 g/m2 (16 to 28 lb) | Tray 1: up to 100 sheets of 75 g/m2 (20 lb bond) |
| Plain | Tray 1 maximum: 320 x 470 mm (12.6 x 18.5 in) | Tray 2: up to 250 sheets of 75 g/m2 (20 lb bond) | |
| Letterhead | |||
| Color | Tray 2 minimum: 148 x 182 mm (5.8 x 7.2 in) | Trays 3-6: up to 500 sheets of 75 g/m2 (20 lb bond) | |
| Preprinted | Trays 3-6 minimum: 210 x 148 mm (8.3 x 5.8 in) | ||
| Prepunched | |||
| Recycled | Trays 2-6 maximum: 297 x 432 mm (11.7 x 17 in) | ||
| Heavy paper Same as for paper | Tray 1: up to 220 g/m2 (58 lb) | Tray 1: up to 10 mm (0.4 in) | |
| Trays 3-6: up to 163 g/m2 (90 lb) | Tray 2: up to 25 mm (0.98 in) stack height | ||
| Trays 3-6: up to 53 mm (2.1 in) stack height | |||
| Cover paper Same as for paper | Tray 1: up to 220 g/m2 (58 lb) | Tray 1: up to 10 mm (0.4 in) | |
| Trays 3-6: up to 163 g/m2 (90 lb) | Tray 2: up to 25 mm (0.98 in) stack height | ||
| Trays3-6: up to 53 mm (2.1 in) stack height | |||
| Glossy paper | Same as for paper | Tray 1-6: up to 220 g/m2 (58 lb) | Tray 1: up to 10 mm (0.4 in) |
| Photo paper | Tray 2: up to 20 mm (0.79 in) stack height | ||
| Trays 3-6: up to 40 mm (1.6 in) stack height | |||
| Transparencies A4 or Letter Thickness: 0.12 to 0.13 mm (4.7 to 5.1 mils) | Tray 1: up to 10 mm (0.4 in) | ||
| Labels^3 | A4 or Letter Thickness: up to 0.23 mm (9 mils) | Tray 1: up to 10 mm (0.4 in) | |
| Envelopes | COM 10 | Up to 90 g/m2 (24 lb) | Tray 1: up to 10 envelopes |
| Monarch | |||
| DL | |||
| C5 | |||
| B5 | |||
Postcards or index cards 76 x 127 mm (3 x 5 in) Tray 1: up to 10 mm (0.4 in)
The product supports a wide range of standard and custom sizes of print media. Check the printer driver for supported sizes.
2 Capacity can vary depending on media weight and thickness, and environmental conditions.
3 Smoothness: 100 to 250 (Sheffield)
Load paper trays
Load Tray 1
-
Open Tray 1.
-
Pull out the tray extension to support the paper.
-
Load paper in the tray.
TIP: To achieve the highest print-quality, HP recommends that you load the paper long-edge first.
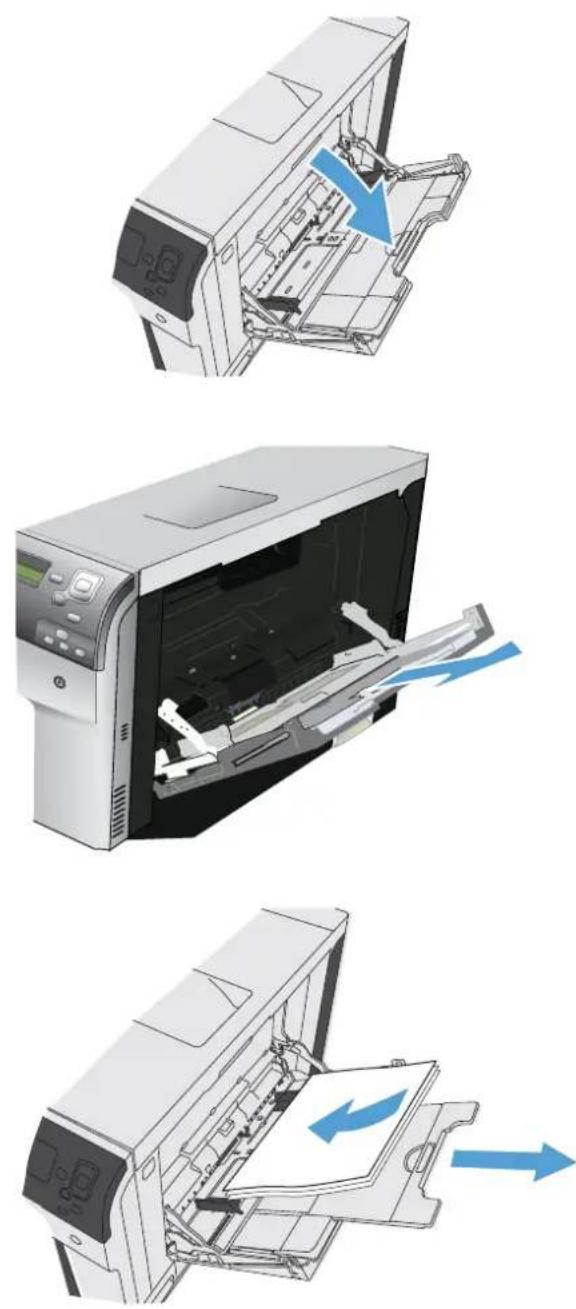
- Make sure that the stack fits under the tabs on the guides and does not exceed the load-level indicators.
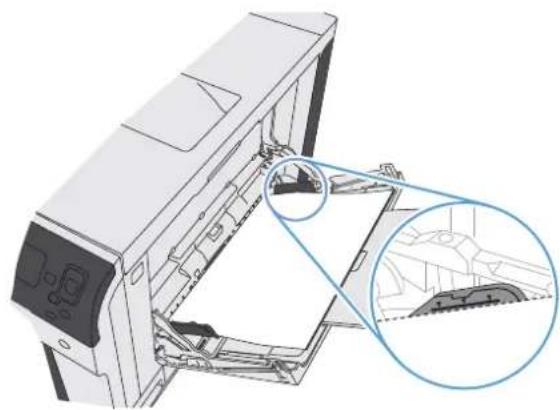
natural_image
Technical illustration of a mechanical device with internal components and a magnified inset showing detail (no text or symbols)- Adjust the side guides so that they lightly touch the paper stack but do not bend it.
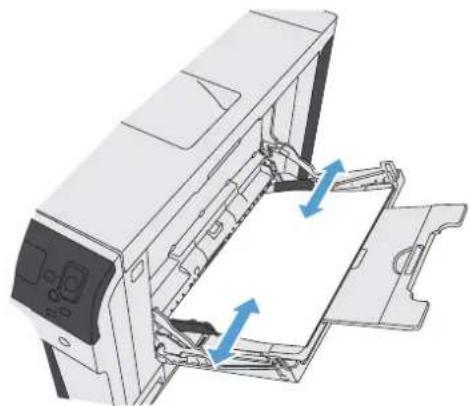
natural_image
Diagram of a printer internal structure with blue directional arrows indicating movement or flow (no text or symbols present)Load Tray 2, Tray 3, and optional Trays 4, 5, and 6 with standard-size paper
- Open the tray.
NOTE: Do not open the tray while it is in use.
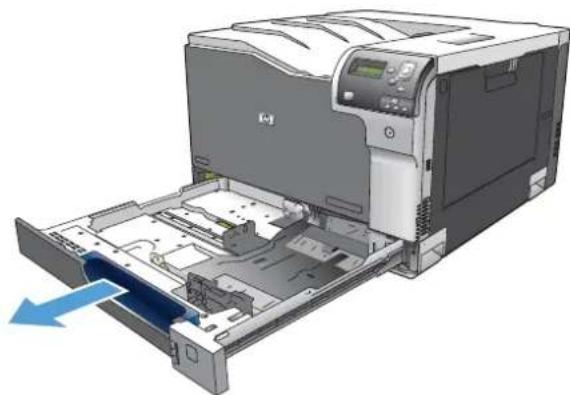
natural_image
3D rendering of a HP printer with internal components and a blue arrow indicating a loading or movement (no text or symbols visible)-
Adjust the paper-length and paper-width guides by squeezing the adjustment latches and sliding the guides to the size of the paper being used.
-
Load paper into the tray. Check the paper to verify the guides lightly touch the stack, but do not bend it.
NOTE: To prevent jams, do not overfill the tray. Be sure that the top of the stack is below the tray full indicator.
NOTE: If the tray is not adjusted correctly, an error message might appear during printing or the paper might jam.
-
Close the tray.
-
The control panel shows the tray's paper type and size. If the configuration is not correct, follow the instructions on the control panel to change the size or type.
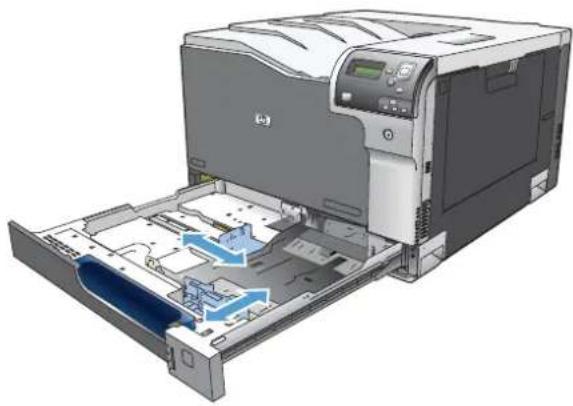
natural_image
3D rendering of a HP printer with internal components and a blue arrow indicating a flow or movement (no text or symbols visible)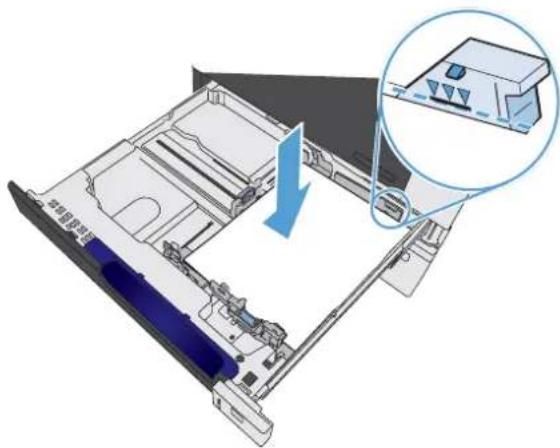
natural_image
3D diagram of a computer drive bay with an inset showing a component (no text or symbols visible)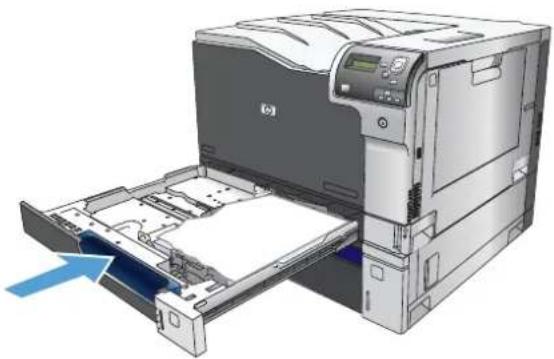
natural_image
Illustration of a HP printer with paper feed and paper sheet being inserted (no text or symbols visible)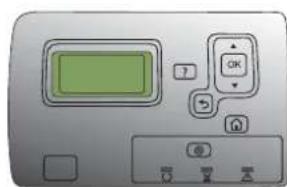
natural_image
Close-up of a computer control panel with green display, buttons, and function buttons (no readable text or symbols)Load Tray 2, Tray 3, and optional Trays 4, 5, and 6 with custom-size paper
-
Open the tray.
-
Adjust the paper-length and paper-width guides by squeezing the adjustment latches and sliding the guides to the size of the paper being used.
NOTE: It might be easier to load the custom-size paper first, and then adjust the guides.
- Load paper into the tray. Check the paper to verify the guides lightly touch the stack, but do not bend it.
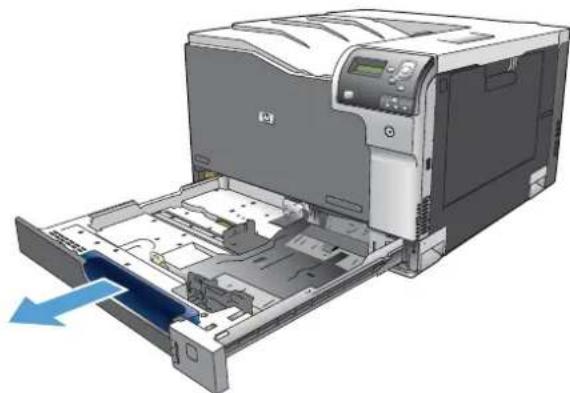
natural_image
3D rendering of a HP printer with internal components and a blue arrow indicating compression direction (no text or symbols)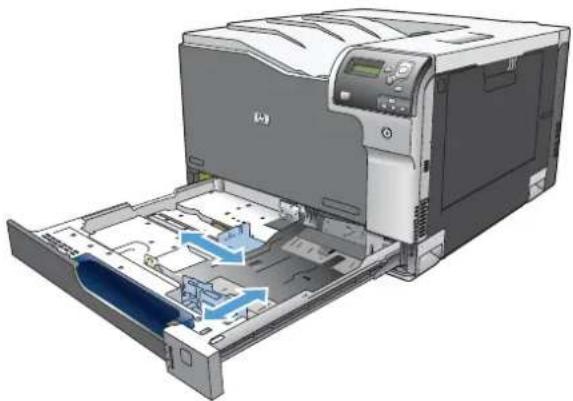
natural_image
3D rendering of a printer with internal components and a blue arrow indicating a flow or movement (no text or symbols visible)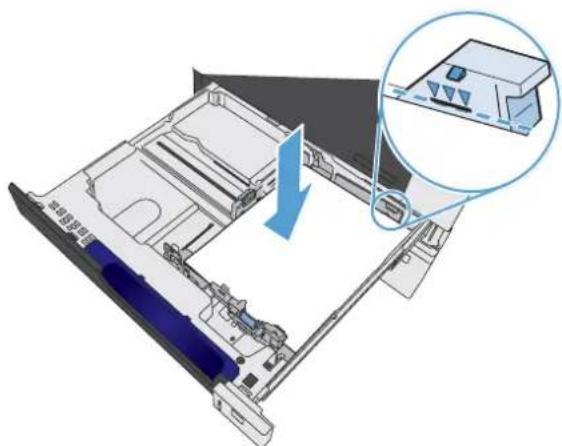
natural_image
3D diagram of a computer drive bay with an inset showing a close-up of the internal components (no text or symbols visible)- Close the tray.
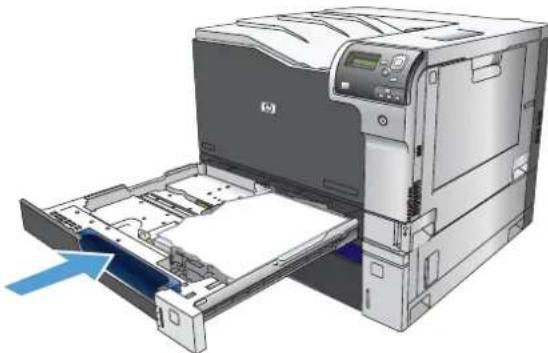
natural_image
Illustration of a HP printer with paper feed and paper sheet being inserted (no text or symbols visible)- The control panel prompts you to set the paper size and type. Select the Custom setting, and then configure the X and Y dimensions of the custom paper size.
NOTE: See the label in the paper tray, or the following illustration, to determine the X and Y dimensions.
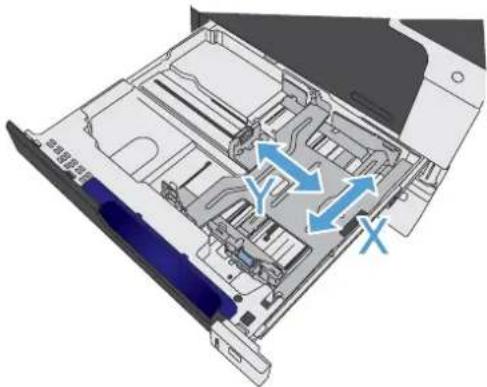
natural_image
3D diagram of a computer drive bay with blue directional arrows indicating internal components (no text or symbols)Tray and bin capacity
| Tray or bin Paper type Specifications Quantity | ||
| Tray 1 Paper Range: | Maximum stack height: 10 mm(0.39 in) | |
| 60 g/m2 (16 lb) bond to 220 g/m2(58 lb) bond | Equivalent to 100 sheets of 75 g/m2(20 lb) bond | |
| Envelopes | Less than 60 g/m2 (16 lb) bond to90 g/m2 (24 lb) bond | Up to 10 envelopes |
| Labels Maximum: 0.102 mm (0.004 in) thick Maximum stack height: 10 mm(0.39 in) | ||
| Transparencies Minimum: 0.102 mm (0.004 in) thick Maximum stack height: 10 mm(0.39 in) | ||
| Glossy paper Range: | 105 g/m2 (28 lb) bond to 220 g/m2(58 lb) bond | Up to 50 sheets |
| Maximum stack height: 10 mm (0.39in) | ||
| Up to 50 sheets | ||
| Tray 2 | Paper Range: | Maximum stack height: 25 mm (.98 in) |
| 60 g/m2(16 lb) bond to 220 g/m2(59 lb) bond | Equivalent to 250 sheets of 75 g/m2(20 lb) bond | |
| Transparencies Minimum: 0.102 mm (0.004 in) thick Maximum stack height: 25 mm (.98 in) | ||
| Glossy paper Range: | Maximum stack height: 25 mm (.98 in) | |
| 105 g/m2(28 lb) bond to 220 g/m2(58 lb) bond | ||
| Tray 3 and optional Trays 4, 5, and 61 | Paper Range: | Equivalent to 500 sheets of 75 g/m2(20 lb) bond |
| 60 g/m2(16 lb) bond to 220 g/m2(59 lb) bond | Maximum stack height: 53 mm (2.1 in) | |
| Transparencies Minimum: 0.102 mm (0.004 in) thick Maximum stack height: 53 mm (2.1 in) | ||
| Glossy paper Range: | Maximum stack height: 53 mm (2.1 in) | |
| 105 g/m2(28 lb) bond to 220 g/m2(58 lb) bond | ||
| Output bin Paper | Up to 300 sheets of 75 g/m2(20 lb) bond | |
Trays 2, 3, 4, 5, and 6 can print on bond paper heavier than 220g / m^2 (59 lb) in some circumstances, but HP does not guarantee results.
Paper orientation for loading trays
If you are using paper that requires a specific orientation, load it according to the information in the following tables.

NOTE: The Alternative Letterhead Mode and Image Rotation settings affect the way you load letterhead or preprinted paper. The following information depicts the default setting.
Paper orientation for loading Tray 1
Paper type Image orientation Duplex mode How to load paper
Preprinted or letterhead Portrait 1-sided printing Face down
Top edge toward the back of the product
Automatic 2-sided printing Face up
Top edge toward the back of the product
Landscape 1-sided printing Face down
Top edge toward the back of the product
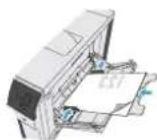
Automatic 2-sided printing Face up
Top edge toward the back of the product
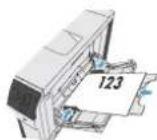
Paper type Image orientation Duplex mode How to load paper
Prepunched Portrait or landscape 1- or 2-sided printing Face down
Holes toward the right side of the tray
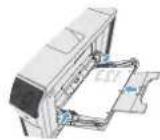
Envelopes Short edge of the envelope
feeding into the product
1-sided printing Face down
Top edge toward the back of the product
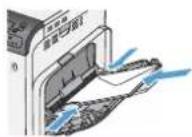
Paper orientation for loading Tray 2, Tray 3, or optional Trays 4, 5, and 6
Paper type Image orientation Duplex mode How to load paper
Preprinted or letterhead Portrait 1-sided printing Face up
Top edge at the back of the tray
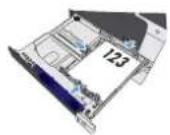
Automatic 2-sided printing Face down
Top edge at the back of the tray
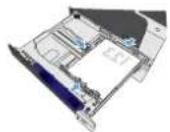
Landscape 1-sided printing Face up
Top edge toward the right side of the tray
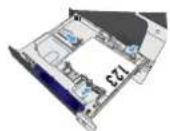
Automatic 2-sided printing Face down
Top edge toward the right side of the tray
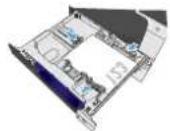
Paper type Image orientation Duplex mode How to load paper
Prepunched Portrait 1-sided printing Face up
Holes toward the left side of the tray
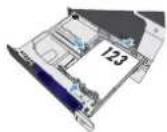
Automatic 2-sided printing Face down
Holes toward the right side of the tray
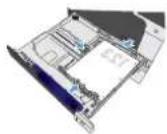
Configure trays
The product automatically prompts you to configure a tray for type and size in the following situations:
- When you load paper into the tray
- When you specify a particular tray or media type for a print job through the printer driver or a software program and the tray is not configured to match the print-job's settings
NOTE: The prompt does not appear if you are printing from Tray 1, and it is configured for the Any Size and Any Type settings. In this situation, if the print job does not specify a tray, the product prints from Tray 1, even if the paper size and type settings in the print job do not match the paper loaded in Tray 1.
Configure a tray when loading paper
- Load paper in the tray. Close the tray if you are using Tray 2, 3, 4, 5, or 6.
- The tray configuration message appears.
-
Do one of the following:
-
Press the OK button to accept the size and type.
- To modify the tray size configuration, press the down arrow ▼ to highlight the Modify option, and then press the OK button.
a. Press the down arrow ▼ to highlight the correct size, and then press the OK button.
b. Press the down arrow ▼ to highlight the correct type, and then press the OK button.
Configure a tray to match print job settings
- In the software program, specify the source tray, the paper size, and the paper type.
- Send the job to the product.
If the tray needs to be configured, the tray configuration message appears.
- Load the tray with the specified type and size of paper, and then close the tray.
- When the size and type confirmation messages appear, press the OK button to confirm the paper size and type.
Configure a tray from the control panel
You can also configure the trays for type and size without a prompt from the product.
- Press the Home button 🔒.
- Open the Trays menu.
-
Press the down arrow ▼ to highlight the size or type setting for the desired tray, and then press the OK button.
-
Press the up arrow ▲ or the down arrow ▼ to highlight the size or type. If you select a custom size, select the unit of measure, and then set the X dimension and the Y dimension.
- Press the OK button to save your selection.
- Press the Home button ☑ to exit the menus.
Automatic paper sensing (auto-sense mode)
The automatic media type sensor functions when that tray is configured to the Any Type or plain type setting. It also functions when the Print Mode setting for that tray is set to the Auto Sense Mode option.
After it has picked up paper from the tray, the product can detect overhead transparencies, paper weight, and gloss level.
For more control, a specific type must be selected in the job or configured in a tray.
Auto-sense settings
| Full sensing (Tray 1 only) | For each sheet of paper that it picks up from the tray, the product detects light paper, plain paper, heavy paper, glossy paper, tough paper, and transparencies. |
| Expanded sensing | For the first few sheets of paper that it picks up from the tray, the product detects light paper, plain paper, heavy paper, glossy paper, tough paper, and transparencies. The product assumes the rest of the pages are of the same type. |
| Transparency only | The product distinguishes between transparencies and non-transparencies. |
Select the paper by source, type, or size
In the Microsoft Windows operating system, three settings affect how the printer driver tries to pull media when you send a print job. Source, Type, and Size settings appear in the Page Setup, Print, Preferences, or Print Properties dialog boxes in most software programs. Unless you change these settings, the product automatically selects a tray using the default settings.
Source
To print by source, select a specific tray in the printer driver for the product to pull from. If you select a tray that is configured for a type or size that does not match your print job, the product prompts you to load the tray with the type or size of paper for your print job before printing it. When you load the tray, the product begins printing.
Type and size
- Printing by type or size causes the product to pull from the tray that is loaded with the correct type and size of paper.
- Selecting paper by type rather than source helps protect special paper from accidental use.
- Using the wrong setting might result in unsatisfactory print quality. Always print by type for special print media, such as labels or transparencies.
• Print by type or size for envelopes, if possible.
- To print by type or size, select the type or size from the Page Setup dialog box, the Print dialog box, the Preferences dialog box, or the Print Properties dialog box, depending on the software program.
- If you often print on a certain type or size of paper, configure a tray for that type or size. Then, when you select that type or size as you print a job, the product automatically pulls paper from the tray that is configured for that type or size.
7 Manage supplies
• Print cartridge information
• Supplies views
- Manage print cartridges
- Replacement instructions
- Solve problems with supplies
Print cartridge information
Feature Description
| Part numbers | Standard-capacity black print cartridge: CE270A |
| Cyan print cartridge: CE271A | |
| Yellow print cartridge: CE272A | |
| Magenta print cartridge: CE273A | |
| Accessibility | The print cartridges can be installed and removed by using one hand. |
| Environmental features | Recycle print cartridges by using the HP Planet Partners return and recycling program. |
For more information about supplies, go to www.hp.com/go/learnaboutsupplies.
Supplies views
Print cartridge views
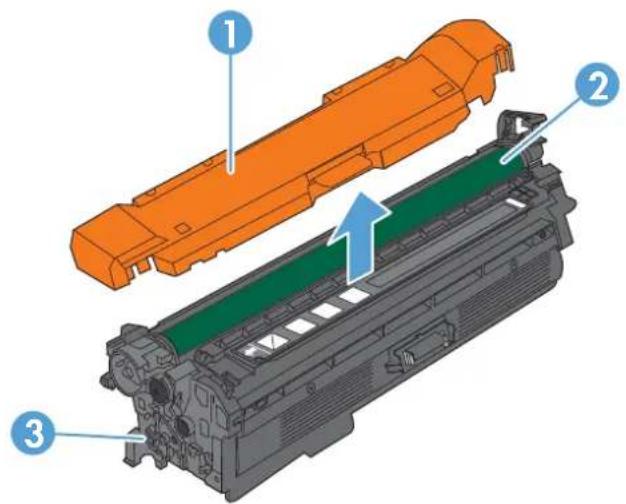
text_image
Diagram of a printer's internal structure with labeled parts, showing orange and green components and directional arrows.| 1 Plastic shield | |||||||||||
| 2 | l | m | a | g | i | n | g | d | r | u | m |
| 3 Print cartridge memory tag | |||||||||||
Manage print cartridges
Correctly using, storing, and monitoring the print cartridge can help ensure high-quality print output.
Settings for print cartridges
Print when a print cartridge is at estimated end of life
A
A
Print-quality problems can occur when using a supply that is at its estimated end of life.
Enable or disable the Very Low Settings options from the control panel
You can enable or disable the default settings at any time, and you do not have to re-enable them when you install a new cartridge.
△ CAUTION: Once an HP supply has reached Very Low, the HP premium Protection Warranty on that supply has ended.
- At the control panel, press the Home button ☐.
-
Open the following menus:
-
Administration
- Manage Supplies
- Supply Settings
- Black Cartridge or Color Cartridges
-
Very Low Settings
-
Use the arrow buttons to highlight your selection, and then press the OK button to select it. Select one of the following options:
NOTE: If you select the Stop or Prompt to continue option, the product stops printing when it reaches the Very Low threshold. When you replace the cartridge, the product automatically resumes printing.
- Select the Stop option to set the product to stop printing until you replace the cartridge.
- Select the Prompt to continue option to set the product to stop printing and prompt you to replace the cartridge. You can acknowledge the prompt and continue printing.
- Select the Continue option to set the product to alert you that the cartridge is very low, but to continue printing.
NOTE: Using the Continue setting allows printing beyond Very Low without customer interaction and can result in unsatisfactory print quality.
Recycle supplies
To recycle a genuine HP print cartridge, place the used cartridge in the box in which the new cartridge arrived. For complete information, see the recycling guide that is included with each new HP supply item.
Print-cartridge storage
Do not remove the print cartridge from its package until you are ready to use it.
△ CAUTION: To prevent damage to the print cartridge, do not expose it to light for more than a few minutes.
HP policy on non-HP print cartridges
Hewlett-Packard Company cannot recommend the use of non-HP print cartridges, either new or remanufactured.
NOTE: Any damage caused by a non-HP print cartridge is not covered under the HP warranty and service agreements.
HP fraud hotline and Web site
Call the HP fraud hotline (1-877-219-3183, toll-free in North America) or go to www.hp.com/go/anticounterfeit when you install an HP print cartridge and the control-panel message says the cartridge is non-HP. HP will help determine if the cartridge is genuine and take steps to resolve the problem.
Your print cartridge might not be a genuine HP print cartridge if you notice the following:
The supplies status page indicates that a non-HP supply is installed.
• You are experiencing a high number of problems with the print cartridge.
- The cartridge does not look like it usually does (for example, the packaging differs from HP packaging).
Replacement instructions
Replace print cartridges
The product uses four colors and has a different print cartridge for each color: black (K), magenta (M), cyan (C), and yellow (Y).
△ CAUTION: If toner gets on clothing, wipe it off with a dry cloth and wash the clothes in cold water. Hot water sets toner into fabric.
NOTE: Information about recycling used print cartridges is on the print-cartridge box.
-
Open the front door. Make sure that the door is completely open.
-
Grasp the handle of the used print cartridge and pull out to remove.
-
Store the used print cartridge in a protective bag. Information about recycling used print cartridges is on the print-cartridge box.
-
Remove the new print cartridge from its protective bag.
NOTE: Be careful not to damage the memory tag on the print cartridge.
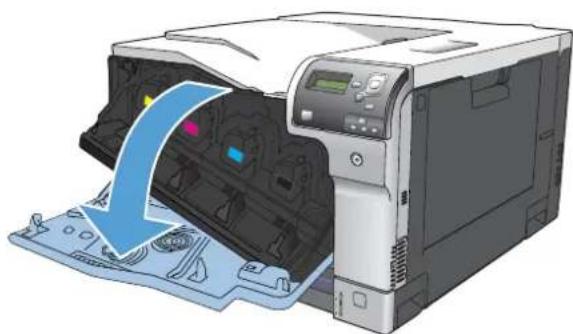
natural_image
Illustration of a printer with a blue arrow indicating compression process (no text or symbols)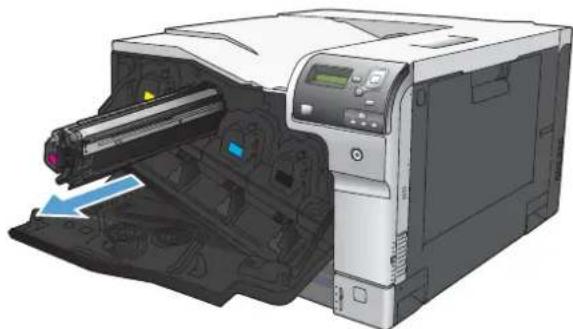
natural_image
Illustration of a printer with internal components and a blue arrow indicating a motion or operation (no text or symbols present)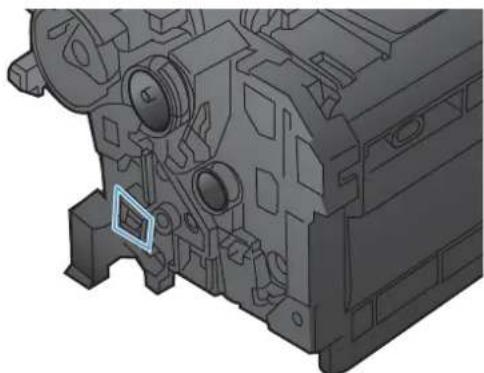
natural_image
3D mechanical component diagram showing internal cavities and mounting holes (no text or symbols)-
Grasp both sides of the print cartridge and distribute the toner by gently rocking the print cartridge.
-
Remove the orange protective cover from the print cartridge.
CAUTION: Avoid prolonged exposure to light.
CAUTION: Do not touch the green roller. Doing so can damage the cartridge.
- Align the print cartridge with its slot and insert the print cartridge until it clicks into place.
NOTE: The print cartridges go in at a slight angle.
- Close the front door.
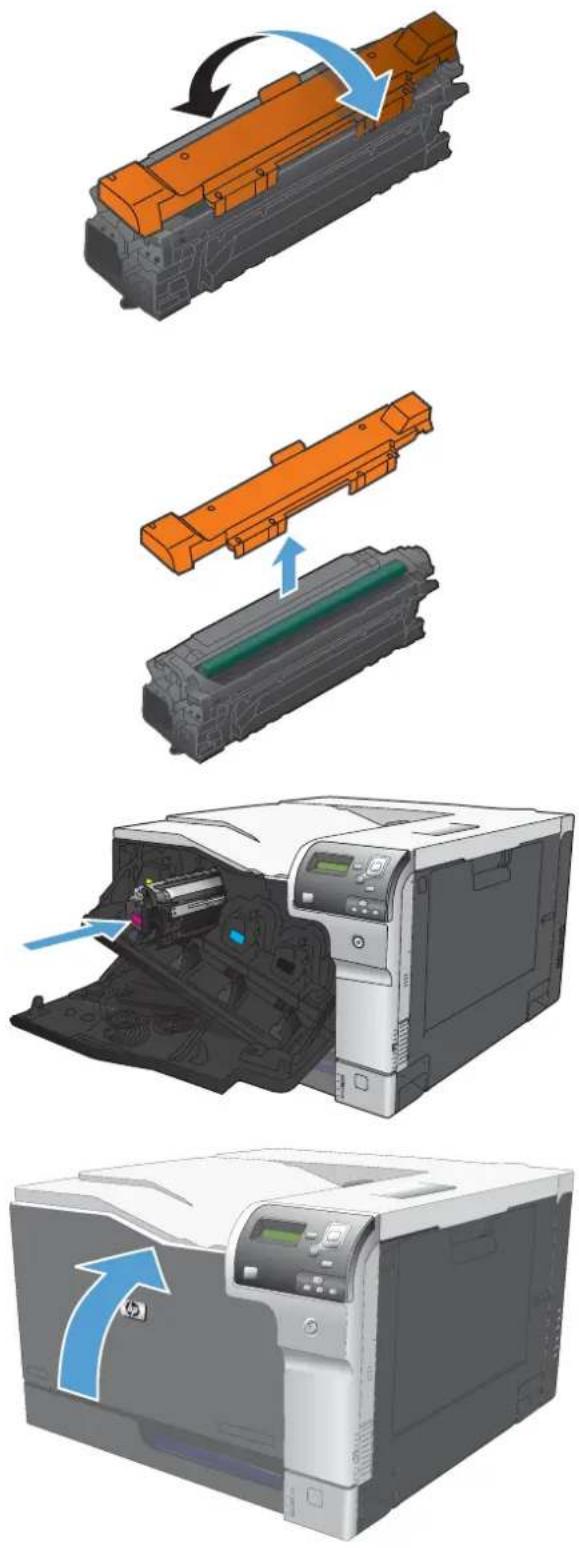
text_image
Diagram illustrating the process of printer printing and packaging, showing steps from raw material to final output.Replace the toner collection unit
Replace the toner collection unit when the control panel prompts you.

NOTE: The toner collection unit is designed for a single use. Do not attempt to empty the toner collection unit and reuse it. Doing so could lead to toner being spilled inside the product, which could result in reduced print quality. After use, return the toner collection unit to HP's Planet Partners program for recycling.
- Open the rear door. Make sure that the door is completely open.
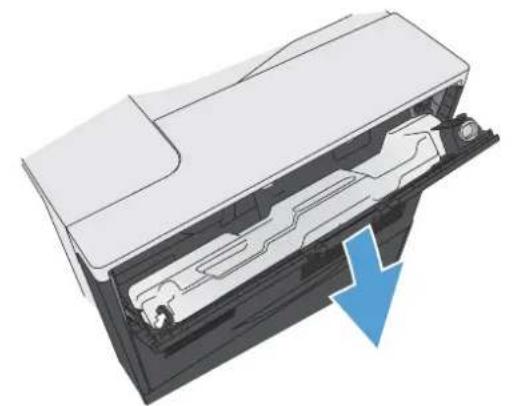
natural_image
3D diagram of a printer internal structure with a blue arrow indicating compression or disassembly (no text or symbols)- Grasp the top of the toner collection unit and remove it from the product.
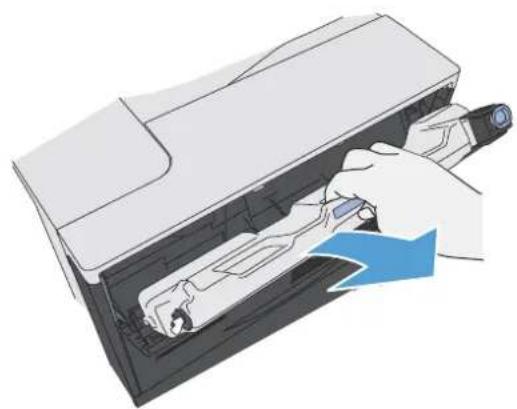
natural_image
Illustration of a hand inserting a device into a printer case (no text or symbols visible)-
Place the attached cap over the opening at the top of the unit.
-
Remove the new toner collection unit from its packaging.
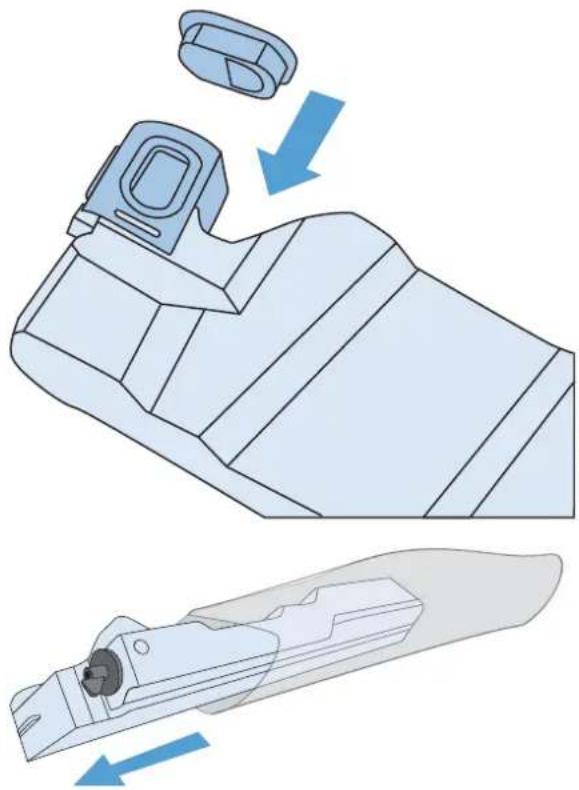
natural_image
Technical illustration of a mechanical component with blue arrows indicating assembly or motion (no text or symbols)-
Insert the bottom of the new unit into the product first and then push the top of the unit until it clicks into place.
-
Close the rear door.
To recycle the used toner collection unit, follow the instructions included with the new toner collection unit.
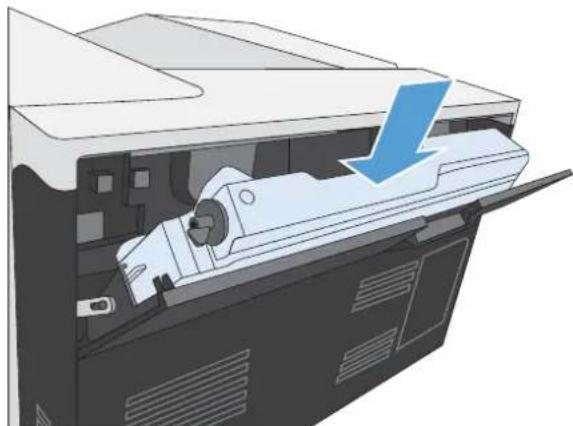
natural_image
Diagram of a printer or printer internal structure with a blue arrow indicating a loading or movement (no text or symbols present)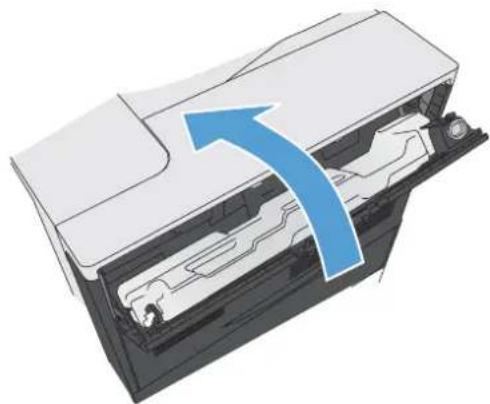
natural_image
Diagram of a printer's internal structure with a blue arrow indicating compression or disassembly (no text or symbols present)Solve problems with supplies
Check the print cartridges
Check the print cartridge, and replace it if necessary, if you are having any of the following problems:
The printing is too light or seems faded in areas.
• Printed pages have small unprinted areas.
• Printed pages have streaks or bands.

NOTE: If you are using a draft or EconoMode print setting, the printing might appear light.
If you determine that you need to replace a print cartridge, print the supplies status page to find the part number for the correct genuine HP print cartridge.
| Type of print cartridge Steps to resolve the problem | |
| Refilled or remanufactured print cartridge | Hewlett-Packard Company cannot recommend the use of non-HP supplies, either new or remanufactured. Because they are not HP products, HP cannot influence their design or control their quality. If you are using a refilled or remanufactured print cartridge and are not satisfied with the print quality, replace the cartridge with a genuine HP cartridge that has the words “HP” or “Hewlett-Packard” on it, or has the HP logo on it. |
| Genuine HP print cartridge | 1. The product control panel or the supplies status page indicates Very Low status when the cartridge has reached the end of its designated life. Replace the print cartridge if print quality is no longer acceptable.2. Visually inspect the print cartridge for damage. See the instructions that follow. Replace the print cartridge if necessary.3. If printed pages have marks that repeat several times at the same distance apart, print a cleaning page. If this does not solve the problem, use the repeating defects information in this document to identify the cause of the problem. |
Inspect the print cartridge for damage
-
Remove the print cartridge from the product, and verify that the sealing tape has been removed.
-
Check the memory chip for damage.
-
Examine the surface of the green imaging drum on the bottom of the print cartridge.
△ CAUTION: Do not touch the green roller (imaging drum) on the bottom of the cartridge. Fingerprints on the imaging drum can cause print-quality problems.
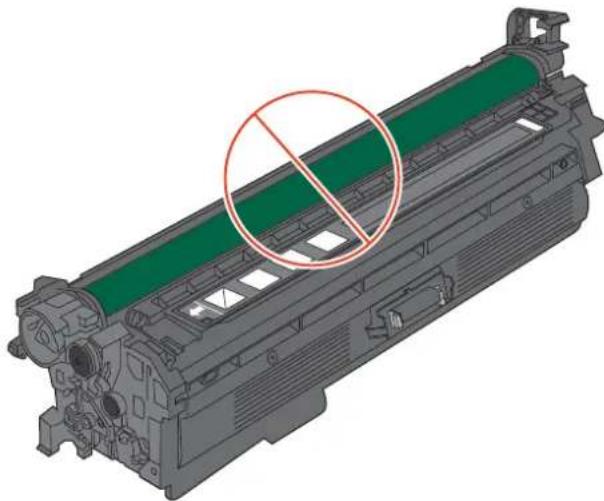
natural_image
3D rendering of a green roller roller with a red prohibition symbol overlay (no text or symbols present)-
If you see any scratches, fingerprints, or other damage on the imaging drum, replace the print cartridge.
-
If the imaging drum does not appear to be damaged, rock the print cartridge gently several times and reinstall it. Print a few pages to see if the problem has resolved.
Repeating defects
If defects repeat at regular intervals on the page, use this ruler to identify the cause of the defect. Place the top of the ruler at the first defect. The marking that is beside the next occurrence of the defect indicates which component needs to be replaced.
| Distance between defects Product components that cause the defect |
| 35 mm Print cartridge (primary charging roller) |
| 42 mm Print cartridge (developer roller) |
| 50 mm Print engine (primary transfer roller) |
| 61 mm Print engine (secondary transfer roller) |
| 76 mm Fuser (fuser film) |
| 78 mm Fuser (pressure roller) |
| 94 mm Print cartridge (OPC) |
Print the Supplies Status page
The Print Supplies Status page indicates the estimated life remaining in print cartridges. It also lists the part number for the correct genuine HP print cartridge for your product so you can order a replacement print cartridge, as well as other useful information.
- At the control panel, press the Home button ☐.
-
Open the following menus:
-
Administration
- Reports
-
Configuration/Status Pages
-
Use the down arrow button ▼ to highlight the Supplies Status Page item, and then press the OK button to select it.
- Use the up arrow button ▲ to highlight the Print item, and then press the OK button.
Interpret control panel messages for supplies
The following table contains important information about supplies status messages.
Table 7-1 Supplies status messages
| Control panel message Description Recommended action | ||
| 10.XX.YY Supply memory error The product cannot read or write to at least one print cartridge memory chip or a memory chip is missing from a print cartridge. | Reinstall the print cartridge, or install a new print cartridge. | |
| Memory chip memory errors | ||
| • YY = 00 | ||
| • XX = 00 - Black | ||
| • XX = 01 - Cyan | ||
| • XX = 02 - Magenta | ||
| • XX = 03 - Yellow | ||
| Memory chip missing errors | ||
| • YY = 10 | ||
| • XX = 00 - Black | ||
| • XX = 01 - Cyan | ||
| • XX = 02 - Magenta | ||
| • XX = 03 - Yellow | ||
| Black cartridge low The print cartridge is nearing the estimated end of its useful life. | The product indicates when the print cartridge level is low. The actual print cartridge life remaining can vary. Consider having a replacement cartridge available to install when the print quality is no longer acceptable. The print cartridge does not need to be replaced now. | |
| Black cartridge very low The print cartridge is at the estimated end of its useful life. | To ensure optimal print quality, HP recommends replacing the print cartridge at this point. You do not need to replace the print cartridge at this time unless the print quality is no longer acceptable. The actual print cartridge life can vary. | |
| Print quality might decrease. Replace the print cartridge when the print quality becomes unacceptable. | Once an HP print cartridge has reached the very low threshold, the HP Premium Protection Warranty on that print cartridge has ended. All print defects or print cartridge failures incurred when an HP print cartridge is used in “continue in very low” mode will not be considered to be defects in materials or workmanship in the print cartridge under the HP Print Cartridge Warranty Statement. | |
| Cyan cartridge low The print cartridge is nearing the estimated end of its useful life. | The product indicates when the print cartridge level is low. The actual print cartridge life remaining can vary. Consider having a replacement cartridge available to install when the print quality is no longer acceptable. The print cartridge does not need to be replaced now. | |
| Cyan cartridge very low The print cartridge is at the estimated end of its useful life.Print quality might decrease. Replace the print cartridge when the print quality becomes unacceptable. | To ensure optimal print quality, HP recommends replacing the print cartridge at this point. You do not need to replace the print cartridge at this time unless the print quality is no longer acceptable. The actual print cartridge life can vary.Once an HP print cartridge has reached the very low threshold, the HP Premium Protection Warranty on that print cartridge has ended. All print defects or print cartridge failures incurred when an HP print cartridge is used in “continue in very low” mode will not be considered to be defects in materials or workmanship in the print cartridge under the HP Print Cartridge Warranty Statement. | |
| Fuser kit low The fuser kit is low. The actual supply liferemaining might vary. Consider having a replacement fuser kit available to install when print quality is no longer acceptable. You do not need to replace the fuser kit at this time unless print quality is no longer acceptable. | If print quality is no longer acceptable, replace the fuser kit. Instructions are included with the fuser kit. | |
| Fuser kit very low The fuser kit is very low. The actual supplylife remaining might vary. You do not need to replace the fuser kit at this time unless print quality is no longer acceptable. After an HP supply has reached the very low threshold, the HP Premium Protection Warranty for that supply has ended. | If print quality is no longer acceptable, replace the fuser kit. Instructions are included with the fuser kit. | |
| Incompatiblecartridge | The indicated color print cartridge is not compatible with this product. | Replace the print cartridge with one that is designed for this product. |
| Incompatible fuser | The fuser is not compatible with this product. | WARNING! The fuser can be hot while the product is in use. Wait for the fuser to cool before handling it.Open the right door.Remove the incompatible fuser.Install the correct fuser.Close the right door. |
| Magenta cartridge low The print cartridge is nearing the estimated end of its useful life. | The product indicates when the print cartridge level is low. The actual print cartridge life remaining can vary. Consider having a replacement cartridge available to install when the print quality is no longer acceptable. The print cartridge does not need to be replaced now. | |
| Magenta cartridge very low The print cartridge is at the estimated end of its useful life.Print quality might decrease. Replace the print cartridge when the print quality becomes unacceptable. | To ensure optimal print quality, HP recommends replacing the print cartridge at this point. You do not need to replace the print cartridge at this time unless the print quality is no longer acceptable. The actual print cartridge life can vary.Once an HP print cartridge has reached the very low threshold, the HP Premium Protection Warranty on that print cartridge has ended. All print defects or print cartridge failures incurred when an HP print cartridge is used in “continue in very low” mode will not be considered to be defects in materials or workmanship in the print cartridge under the HP Print Cartridge Warranty Statement. | |
| Replacecartridge This alert appears only if the product is configured to stop when the print cartridge reaches the very low threshold. The product indicates when a supply level is at its estimated end of life. The actual life remaining might be different than the estimation. Have a replacement supply available to install when print quality is no longer acceptable. The supply does not need to be replaced now unless the print quality is no longer acceptable. After an HP supply has reached its approximated end of life, the HP Premium Protection Warranty on that supply ends. | Replace the specified color cartridge.Or, configure the product to continue printing by using the Manage Supplies menu. | |
| Replace fuser kit The product indicates when the fuser kit is at its estimated end of life. The actual life remaining might be different than the estimation. Have a replacement fuser kit available to install when print quality is no longer acceptable. The fuser kit does not need to be replaced now unless the print quality is no longer acceptable. After the fuser kit reaches its approximated end of life, the HP Premium Protection Warranty on that fuser kit ends. | WARNING! The fuser can be hot while the product is in use. Wait for the fuser to cool before handling it.Replace the fuser kit. Instructions are included with the fuser kit. | |
| Replace supplies This alert appears only if the product isconfigured to stop when the print cartridgesreach the "very low" threshold. Two or moresupplies are at the estimated end of life. Theactual life remaining might be different thanthe estimation. Consider having replacementsupplies available to install when printquality is no longer acceptable. The supplydoes not need to be replaced now unless theprint quality is no longer acceptable. Afteran HP supply has reached its approximatedend of life, the HP Premium ProtectionWarranty on that supply ends. | Replace the necessary supplies.Or, configure the product to continueprinting by using the Manage Suppliesmenu. | |
| Replace toner collection unit The product indicates when a tonercollection unit is full and needs to bereplaced. Continuing to print withoutreplacing the toner collection unit mightcause product damage, toner spill, or othererror conditions. Have a replacement tonercollection unit available to install. After atoner collection unit has become full, theHP Premium Protection Warranty on thattoner collection unit ends. | Replace the toner collection unit. | |
| Replace transfer kit The product indicates when a transfer kit isat its estimated end of life. The actual liferemaining might be different than theestimation. Have a replacement transfer kitavailable to install when print quality is nolonger acceptable. The transfer kit does notneed to be replaced now unless the printquality is no longer acceptable. After atransfer kit has reached its approximatedend of life, the HP Premium ProtectionWarranty on that transfer kit ends. | Replace the transfer kit. Instructions areincluded with the transfer kit. | |
| Supplies in wrong position Two or more print-cartridge slots contain thewrong color print cartridge.From left to right, the print cartridges shouldbe installed in this order:YellowMagentaCyanBlack | Install the correct color cartridge in each slot. | |
| Supplies low This message appears when at least twosupplies have reached the low threshold. The actual supply life remaining might vary.Identify which supplies are low. You do not need to replace the supplies at this time unless print quality is no longer acceptable.After an HP supply has reached the very low threshold, the HP Premium Protection Warranty for that supply has ended. | To continue printing in color, either replace the supply or reconfigure the product by using the Manage Supplies menu on the control panel. | |
| Supplies very low This message appears when at least twosupplies have reached the very low threshold. Identify which supplies are low.The actual supply life remaining might vary.You do not need to replace the supplies at this time unless print quality is no longer acceptable. After an HP supply has reached the very low threshold, the HP Premium Protection Warranty for that supply has ended. | To continue printing in color, either replace the supply or reconfigure the product by using the Manage Supplies menu on the control panel. | |
| Toner Collection Unit Almost Full The toner collection unit is almost full. This condition is equivalent to the supply life being low. The actual supply life can vary.You do not need to replace the toner collection unit at this time. | No action is necessary to continue. | |
| Transfer kit low | This message appears when the transfer kit reaches the low threshold. The actual supply life remaining might vary. You do not need to replace the transfer kit at this time unless print quality is no longer acceptable. | No action is necessary to continue. If the print quality is no longer acceptable, replace the transfer kit. Instructions are included with the new transfer kit. |
| Transfer kit very low | This message appears when the transfer kit has reached the very low threshold. The actual supply life remaining might vary. You do not need to replace the supplies at this time unless print quality is no longer acceptable. After an HP supply has reached the very low threshold, the HP Premium Protection Warranty for that supply has ended. | To continue printing, either replace the transfer kit or reconfigure the product to continue printing by using the Manage Supplies menu on the control panel. |
| Unsupported supply installed One of the print cartridges is for a different HP product. | If print quality is no longer acceptable, replace the print cartridge. | |
| Used supply in use One of the print cartridges has been previously used. | If you believe you purchased a genuine HP supply, go to www.hp.com/go/anticounterfeit. | |
| Wrong cartridge inslotThe indicated slot for a print cartridge contains a cartridge that is not the correct color. From left to right, the print cartridges should be installed in this order:YellowMagentaCyanBlack | Remove the print cartridge from that slot, and install a cartridge that is the correct color. | |
| Yellow cartridge lowThe print cartridge is nearing the estimated end of its useful life. | The product indicates when the print cartridge level is low. The actual print cartridge life remaining can vary. Consider having a replacement cartridge available to install when the print quality is no longer acceptable. The print cartridge does not need to be replaced now. | |
| Yellow cartridge very lowThe print cartridge is at the estimated end of its useful life.Print quality might decrease. Replace the print cartridge when the print quality becomes unacceptable. | To ensure optimal print quality, HP recommends replacing the print cartridge at this point. You do not need to replace the print cartridge at this time unless the print quality is no longer acceptable. The actual print cartridge life can vary.Once an HP print cartridge has reached the very low threshold, the HP Premium Protection Warranty on that print cartridge has ended. All print defects or print cartridge failures incurred when an HP print cartridge is used in “continue in very low” mode will not be considered to be defects in materials or workmanship in the print cartridge under the HP Print Cartridge Warranty Statement. | |
8 Print tasks
- Cancel a print job
• Basic print tasks with Windows
• Additional print tasks with Windows
Walk-up USB printing
Cancel a print job
-
Press the stop button on the control panel.
-
Press the down arrow ▼ highlight the Cancel Current Job option, and then press the OK button.
NOTE: It can take some time for all printing to clear after you have canceled a print job.
text_image
Control panel interface with green display and function buttons including OK, Cancel, and OK/Cancel iconsBasic print tasks with Windows
Open the printer driver with Windows
-
On the File menu in the software program, click Print.
-
Select the product, and then click the Properties or Preferences button.
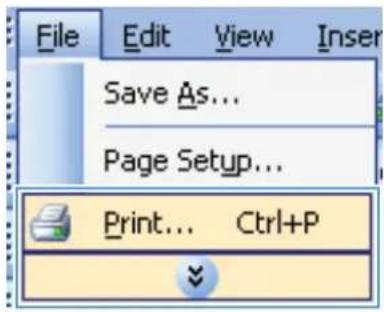
text_image
File Edit View Insert Save As... Page Setup... Print... Ctrl+P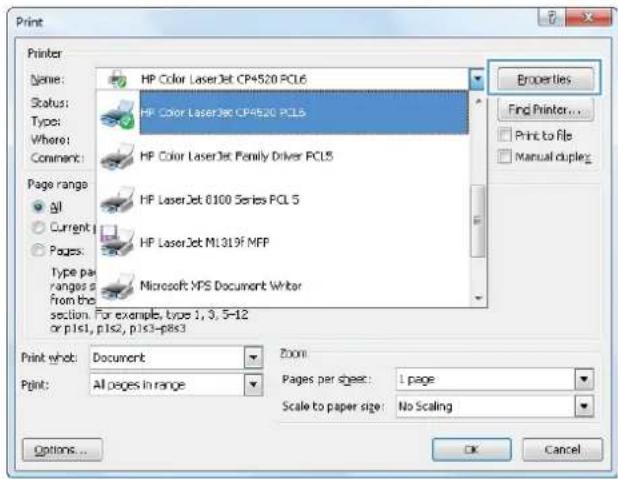
text_image
Print Printer Name: HP Color LaserJet CP4520 PCL6 Status: HP Color LaserJet CP4520 PCL6 Type: Where: Comment: Page range: All Current Pages: Type par ranges p from the section. For example, type 1, 3, 5-12 or p1s1, p1s2, p1s3-p8s3 Print whot: Document Print: All pages in range Print to file Manual duplex Properties Find Printer... Print to file Options... OK CancelGet help for any printing option with Windows
- Click the Help button to open the online Help.
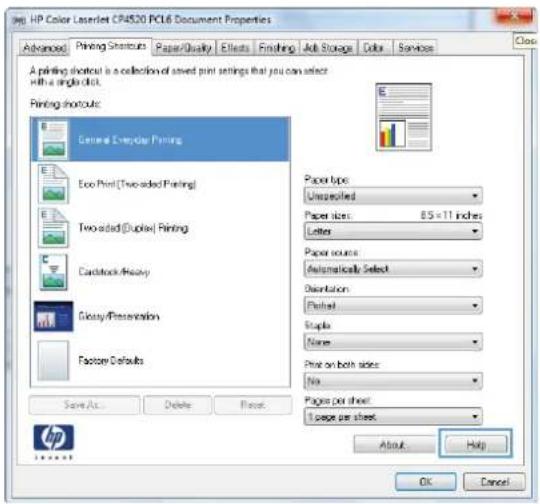
text_image
HP Color LaserJet CR4520 PCL6 Document Properties Advanced Printing Shortcuts Paper/Quality Effects Finishing Add Storage Color Services Close A printing shortcut is a collection of saved print settings that you can select with a single click. Printing shortcuts: General Ecosystem Printing Eco Print (Two-sided Printing) Two-sided (Duplex) Printing Cardboard Display Glossy/Presentation Factor Defaults Save As... Delete Reset Paper type Unsupplied Paper sizes: 85 x 11 inches Letter Paper source Automatically Select Orientation: Planned Template None Print on both sides: No Pages per sheet: 1 page per sheet About Help OK CancelChange the number of print copies with Windows
- On the File menu in the software program, click Print.
- Select the product, and then select the number of copies.
Save custom print settings for reuse with Windows
Use a printing shortcut with Windows
- On the File menu in the software program, click Print.
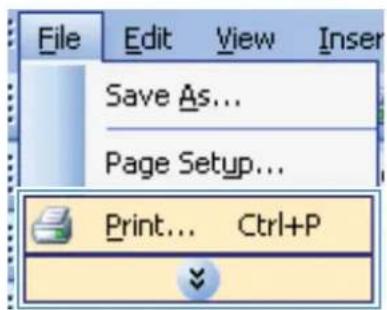
text_image
File Edit View Insert Save As... Page Setup... Print... Ctrl+P- Select the product, and then click the Properties or Preferences button.
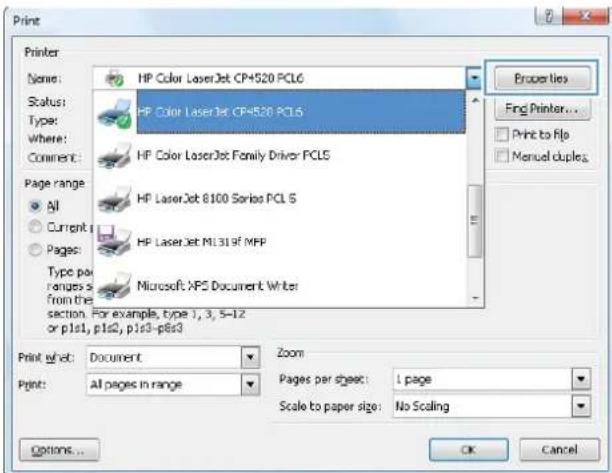
text_image
Printer Name: HP Color LaserJet CP4520 PCL6 Status: Type: Where: Comment: Page range: All Current Pages: Type pair Ranges s from the section. For example, type 1, 3, 5-12 or p1s1, p1s2, p1s3-p8s3 Print what: Document Zoom Print: All pages in range Pages per sheet: 1 page Scale to paper size: No Scaling Options... Properties Fng Printer... Print to Fip Manual duples OK Cancel- Click the Printing Shortcuts tab.
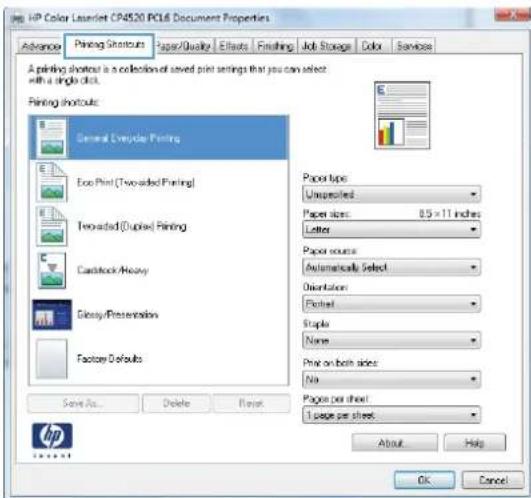
text_image
HP Color Lasset CP4520 PC16 Document Properties Advance Printing Shortcuts Paper/Quality Effects Finishing Job Storage Color Services A printing shortout is a collection of saved print settings that you can select with a single click. Printing shortouts General Eclipse Printing Eco Print (Two-aided Printing) Two-aided (Cuppler) Printing Cardstock/Heavy Glossy/Presentation Factory Defaults Save As... Delete Reset Paper type: Unspecified Paper sizes: 8.5 x 11 inches Letter Paper source: Automatically Select Orientation: Panel Maple Name Print on both sides: No Pages per sheet: 1 page per sheet. About Help OK Cancel- Select one of the shortcuts, and then click the OK button.
NOTE: When you select a shortcut, the corresponding settings change on the other tabs in the printer driver.
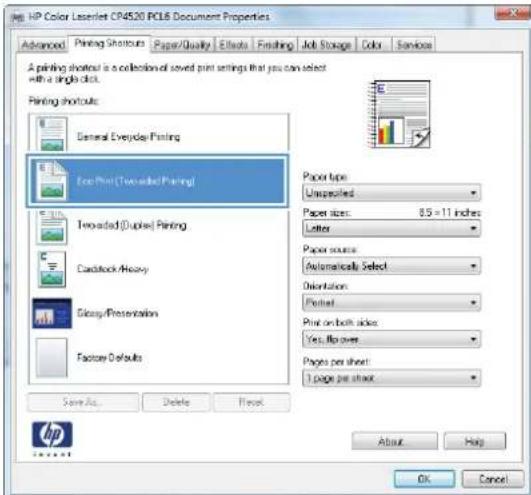
text_image
HP Color Laserlet CP4520 PCL6 Document Properties Advanced Printing Shortcuts Paper/Quality Effects Finishing Job Storage Color Services A printing shortout is a collection of saved print settings that you can select with a single click. Printing shortouts General Everyday Printing Eco Print (Trevaded Printing) Trevaded (Duplex) Printing Cardstock Heavy Galaxy/Presentation Factory Defaults Same As... Delete Preview Paper type Unappalled Paper sizes: 8.5 x 11 inches Letter Paper source: Automatically Select Orientation: Forward Print on both sides: Yes, far over Pages per sheet: 1 page per arrow About Help OK CancelCreate printing shortcuts
-
On the File menu in the software program, click Print.
-
Select the product, and then click the Properties or Preferences button.
-
Click the Printing Shortcuts tab.
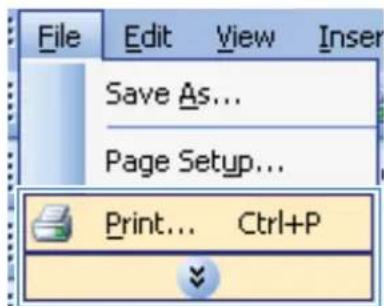
text_image
File Edit View Insert Save As... Page Setup... Print... Ctrl+P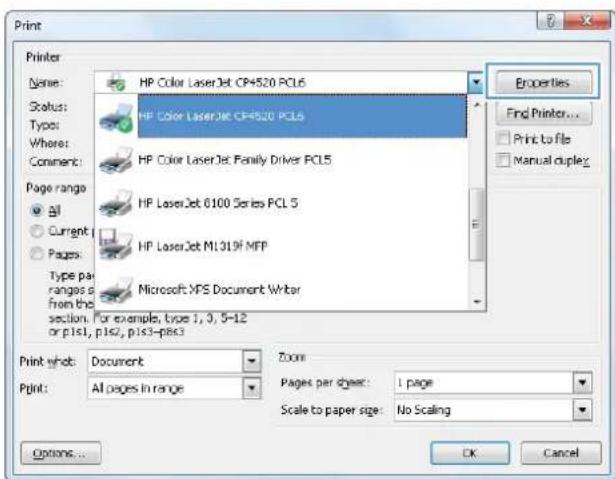
text_image
Print Printer Name: HP Color LaserJet CP4520 PCL6 Status: HP Color LaserJet CP4520 PCL6 Type: Where: Comment: Page range All Current Pages: Type par ranges From the section. For example, type 1, 3, 5-12 or p1s1, p1s2, p1s3-p1s3 Microsoft XPS Document Writer Print what: Document Zoom Print: All pages in range Pages per sheet: 1 page Scale to paper size: No Scaling Options... OK Cancel Properties Find Printer... Print to file Manual duplex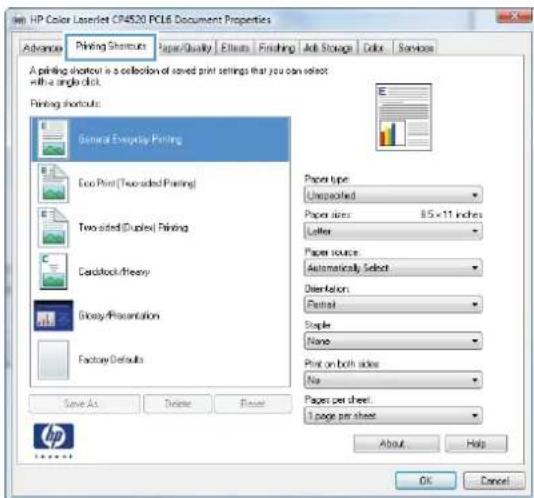
text_image
HP Color LaserJet CP4520 PCL6 Document Properties Advance Printing Shortcuts Paper/Quality Effects Finishing Anti Storage Color Services A printing shortcut is a collection of saved print settings that you can select with a single click. Printing shortcuts: General Evolution Printing Eco Print (Two-sided Printing) Two-sided (Duplex) Printing Cardblock/Heavy Gloosy/Presentation Factory Defaults Save As... Delete Finish Paper type: Unspecified Paper sizes: 8.5 x 11 inches Letter Paper source: Automatically Select Orientation: Portrait Sample: None Print on both sides: No Papers per sheet: 1 page per sheet About... Help OK Cancel HP Internet- Select an existing shortcut as a base.
NOTE: Always select a shortcut before adjusting any of the settings on the right side of the screen. If you adjust the settings and then select a shortcut, all your adjustments are lost.
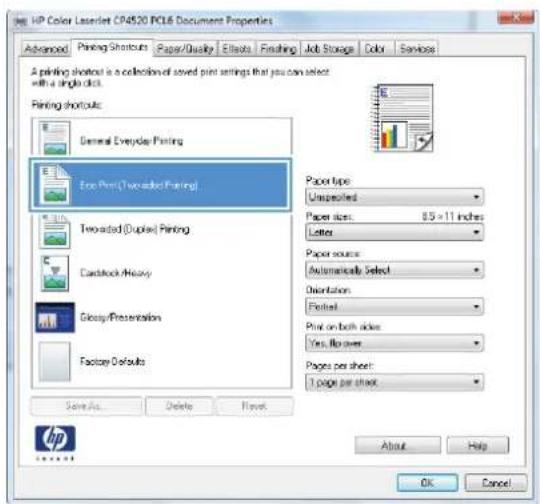
text_image
HP Color LaserJet CP4520 PC16 Document Properties Advanced Printing Shortcuts Paper/Quality Effects Finishing Job Storage Color Services A printing snapshot is a collection of saved print settings that you can select with a single click. Printing shortcuts: General Everyday Printing Eco Print(Two-aided Printing) Two-aided (Duplex) Printing Cardlock/Heavy Glossy/Presentation Factory Defaults Paper type: Unspecified Paper size: 8.5 x 11 inches Letter Paper source: Automatically Select Orientation: Flatted Print on both sides: Yes, No more Pages per sheet: 1 page per sheet Save As... Delete Finish About Help OK Cancel- Select the print options for the new shortcut.
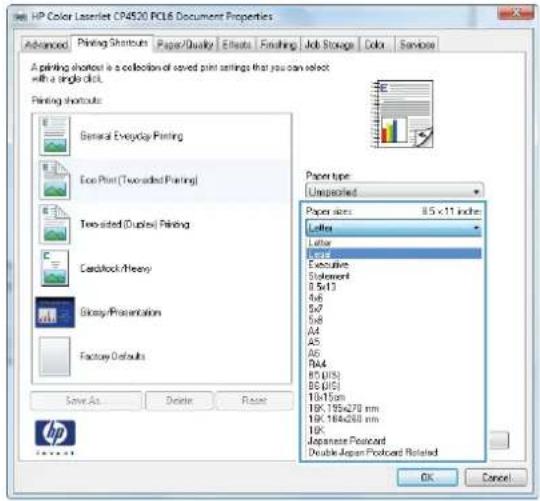
text_image
HP Color Laserjet CP4520 RCL6 Document Properties Advanced Printing Shortcuts Paper/Quality Effects Finishing Job Storage Color Services A printing shots is a collection of saved print settings that you can select with a single click. Printing shortcuts General Everyday Printing Eco Print (Text-randed Printing) Two-sided (Dual) Printing Cardlock/Heavy Gloosy/Presentation Factory Defaults Save As... Delete Reset Paper type: Unspecified Paper size: 8.5 x 11 inches Letter Letter Executive Statement B 5x13 A/B S/X S/B A4 A5 A6 R4A B5 (U/S) B6 (U/S) 10x15mm 10K 195x270 mm 10K 184x260 mm 10K Japanese Postcard Double Japan Postcard Related OK Cancel-
Click the Save As button.
-
Type a name for the shortcut, and click the OK button.
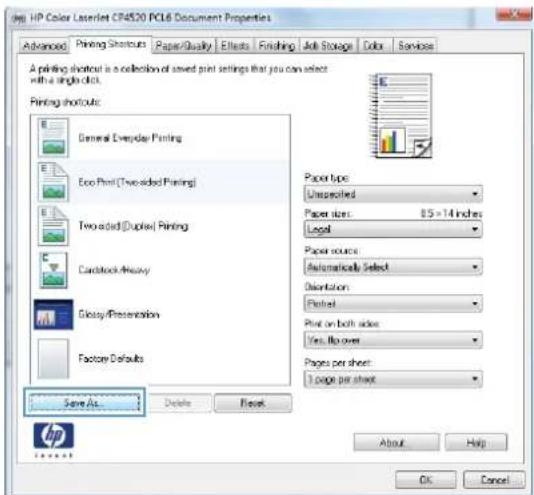
text_image
HP Color LaserJet CR4520 PCL6 Document Properties Advanced Printing Shortcuts Paper/Quality Effects Finishing Anti Storage Color Services A printing shortcut is a collection of saved print settings that you can select with a single click. Printing shortcuts General Everyday Printing Eco Print (Two-sided Printing) Two-sided (Dual) Printing Cardstock Heavy Glossy/Presentation Factory Defaults Save As... Delete Reset Paper type: Unspecified Paper sizes: 8.5 x 1.4 inches Legal Paper source: Automatically Select Orientation: Printed Print on both sides: Yes, No over Pages per sheet: 1 page per sheet About Help OK Cancel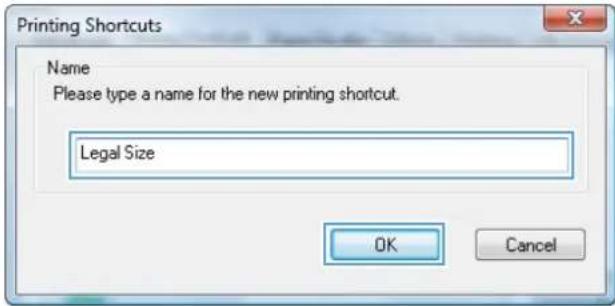
text_image
Printing Shortcuts Name Please type a name for the new printing shortcut. Legal Size OK CancelImprove print quality with Windows
Select the page size with Windows
- On the File menu in the software program, click Print.
- Select the product, and then click the Properties or Preferences button.
- Click the Paper/Quality tab.
- Select a size from the Paper size drop-down list.
Select a custom page size with Windows
- On the File menu in the software program, click Print.
- Select the product, and then click the Properties or Preferences button.
- Click the Paper/Quality tab.
- Click the Custom button.
- Type a name for the custom size, specify the dimensions, and click the OK button.
Select the paper type with Windows
- On the File menu in the software program, click Print.
- Select the product, and then click the Properties or Preferences button.
- Click the Paper/Quality tab.
- From the Paper type drop-down list, click the More... option.
- Expand the list of Type is: options.
- Expand the category of paper types that best describes your paper, and then click the paper type that you are using.
Select the paper tray with Windows
- On the File menu in the software program, click Print.
- Select the product, and then click the Properties or Preferences button.
- Click the Paper/Quality tab.
- Select a tray from the Paper source drop-down list.
Select the print resolution
- On the File menu in the software program, click Print.
-
Select the product, and then click the Properties or Preferences button.
-
Click the Paper/Quality tab.
- In the Print Quality area, select the resolution from the first drop-down list.
Print on both sides (duplex) with Windows

NOTE: See Paper orientation for loading trays on page 85 for information about the correct way to load paper.
Manually print on both sides with Windows

NOTE: This information applies only to products that do not have an automatic duplexer.
- On the File menu in the software program, click Print.
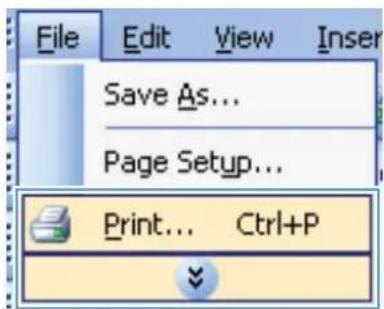
text_image
File Edit View Insert Save As... Page Setup... Print... Ctrl+P- Select the product, and then click the Properties or Preferences button.
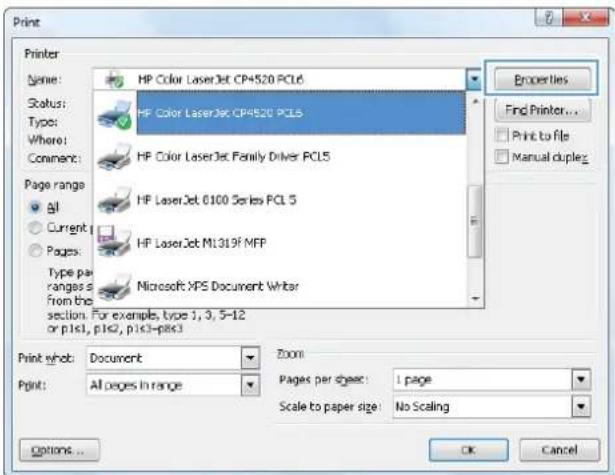
text_image
Print Printer Name: HP Color LaserJet CP4520 PCL6 Status: HP Color LaserJet CP4520 PCL6 Type: Where: Comment: Page range: All Current Pages: Type per ranges s From the section. For example, type 1, 3, 5-12 or p1s1, p1s2, p1c1-p8c3 Print whot: Document Zoom Print: All pages in range Pages per dysec: 1 page Scale to paper size: No Scaling Options... OK Cancel Properties Find Printer... Print to file Manual dupleg- Click the Finishing tab.
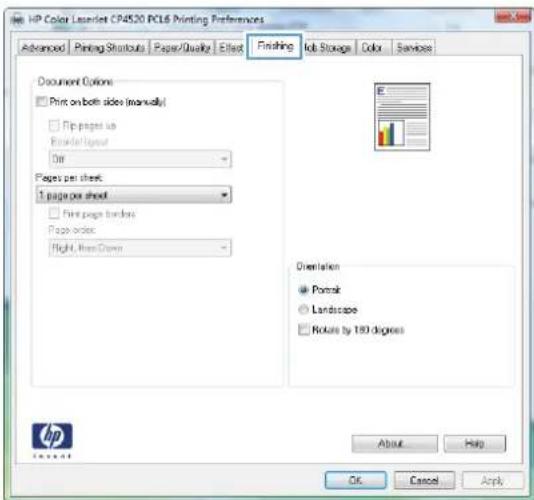
text_image
HP Color Labellet CP4520 PCL6 Printing Preferences Advanced Printing Shutouts Paper/Quality Effect Finishing Lob Storage(Color Services Document Options Print on both sides (manually) Print pages up RenderLayout Off Pages per sheet: 1 page per sheet Print pages borders Pages order: Right, Left/Down Orientation Portrait Landscape Rotate by 183 degrees About Help OK Cancel Apply HP Export- Select the Print on both sides (manually) check box. Click the OK button to print the first side of the job.
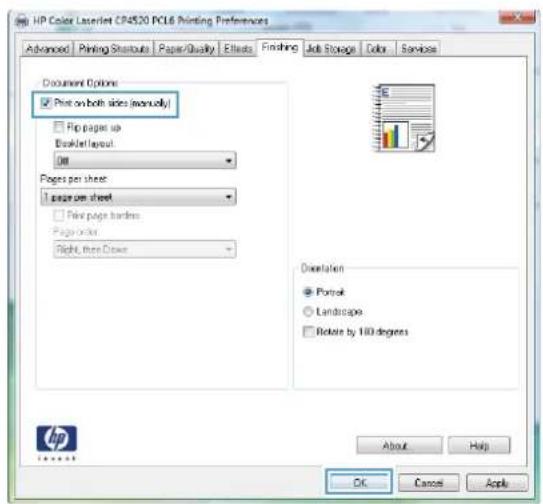
text_image
HP Color LaserNet CP4520 PCL6 Printing Preferences Advanced Printing Startouts Paper Quality Effects Finishing Job Storage Colors Services Document Options ✓ Print on both sides (vanually) ✓ Flip pages up Breaker/Layout Off Pages per sheet: 1 page per sheet ✓ Flip pages hardlines Page order Right, free Draw Orientation ● Portrait ○ Landscape □ Rotate by 110 degrees About Help OK Cancel Apply- Retrieve the printed stack from the output bin, and place it with the printed-side facing up in Tray 1.
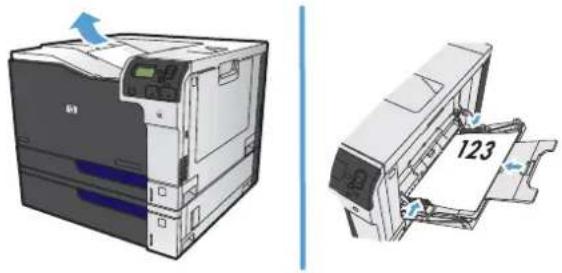
natural_image
Illustration of a printer and its internal paper holder (no text or symbols visible)- On the control panel, press the OK button to print the second side of the job.
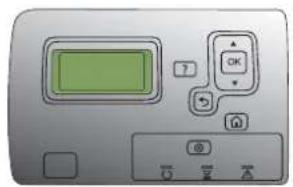
text_image
Control panel with green display and function buttons including OK, 7, and control iconsAutomatically print on both sides with Windows

NOTE: This information applies only to products that have an automatic duplexer.
- On the File menu in the software program, click Print.
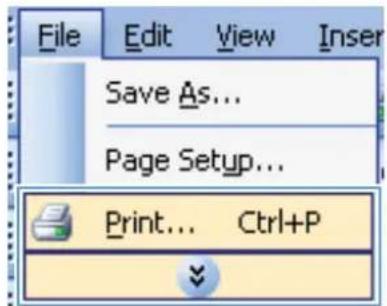
text_image
File Edit View Insert Save As... Page Setup... Print... Ctrl+P- Select the product, and then click the Properties or Preferences button.
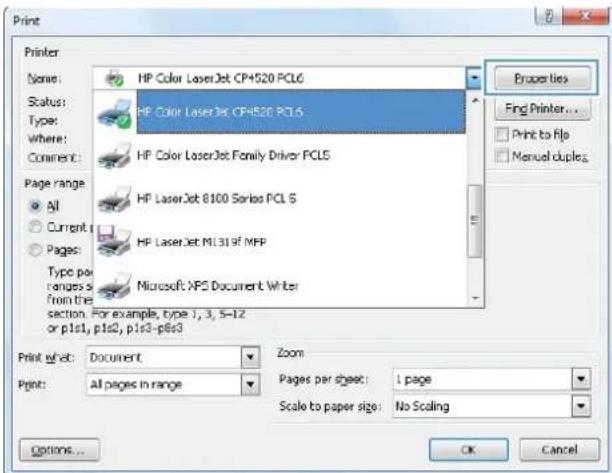
text_image
Print Printer: Name: HP Color LaserJet CP4520 PCL6 Status: HP Color LaserJet CP4520 PCL6 Type: Where: Comment: Page range: All Current Pages: Type per ranges s from the section. For example, type 1, 3, 5-12 or p1s1, p1s2, p1s3-p8s3 Print wt: Document Zoom Print: All pages in range Pages per sheet: 1 page Scale to paper size: No Scaling Properties Find Printer... Print to Fip Manual duples Options... OK Cancel- Click the Finishing tab.
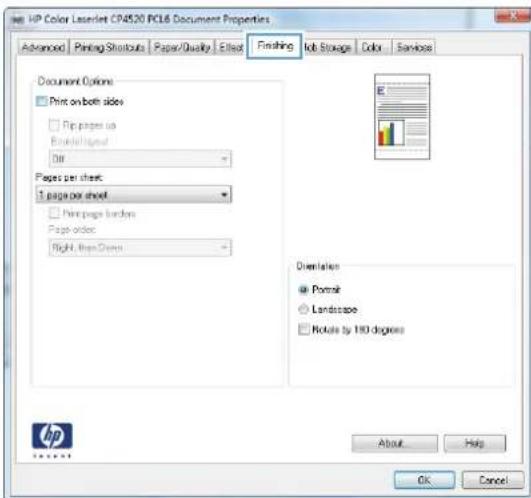
text_image
HP Color LaserJet CP4520 PC16 Document Properties Advanced Printing Shutouts Paper Quality Effect Finishing"Ibit Storage(Color Services Document Options Print on both sides Print pages in Spread/striped Off Pages per sheet: 1 page per sheet Print pages border Pages order: Right, Open Down Diversification ● Portrait ○ Landscape □ Rotate by 180 degrees About Help OK Cancel- Select the Print on both sides check box. Click the OK button to print the job.
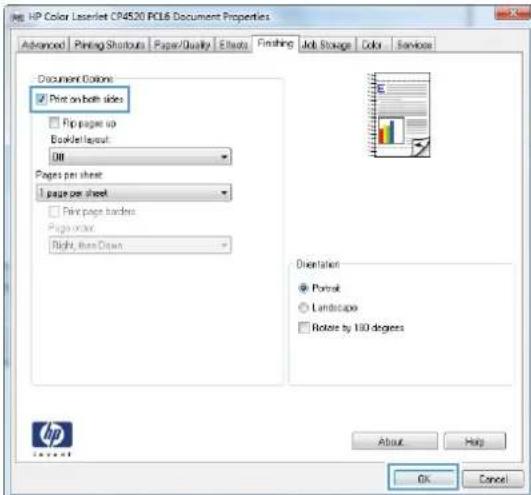
text_image
HP Color Laserjet CP4520 PC16 Document Properties Advanced | Printing Shoutouts | Paper/Quality | Effects | Finishing | Job Storage | Color | Services Document Colors ✓ Print on both sides ✓ Print pages up BorderLayout: Off Pages per sheet: 1 page per sheet ✓ Print pages hardens Pages order: Right, then Down Orientation ● Portrait ○ Landscape □ Rotate by 100 degrees About Help OK CancelPrint multiple pages per sheet with Windows
-
On the File menu in the software program, click Print.
-
Select the product, and then click the Properties or Preferences button.
-
Click the Finishing tab.
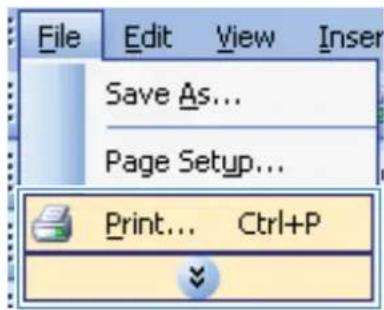
text_image
File Edit View Insert Save As... Page Setup... Print... Ctrl+P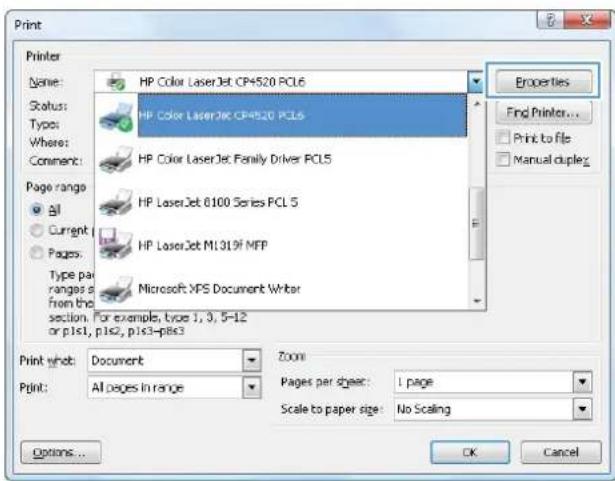
text_image
Print Printer Name: HP Color LaserJet CP4520 PCL6 Status: HP Color LaserJet CP4520 PCL6 Types: HP Color LaserJet Family Driver PCL5 Where: Comment: HP LaserJet 6100 Series PCL 5 Page range: All Current Pages: Type pair ranges from the section. For example, type 1, 3, 5-12 or p1s1, p1s2, p1s3-p1s3 Microsoft XPS Document Writer Print whb: Document Print: All pages in range Zoom: Pages per sheet: 1 page Scale to paper size: No Scaling Options... OK Cancel Properties Find Printer... Print to file Manual duplex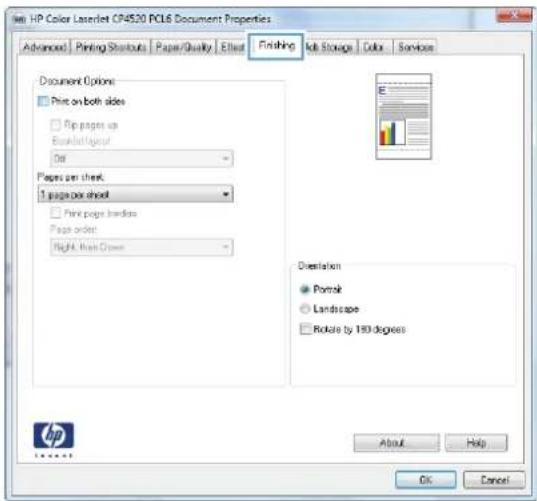
text_image
HP Color LaserJet CF4520 PCL6 Document Properties Advanced Printing Shortcuts Paper/Quality Effect Finishing"Ibit Storage(Color Services Document Options Print on both sides Rip pages up BookletLayout Out Papers per sheet. 1 page per sheet Print pages binders Pages order: Right, Main Drawn Orientation Portrait Landscape Rotate by 193 degrees About Help OK Cancel- Select the number of pages per sheet from the Pages per sheet drop-down list.
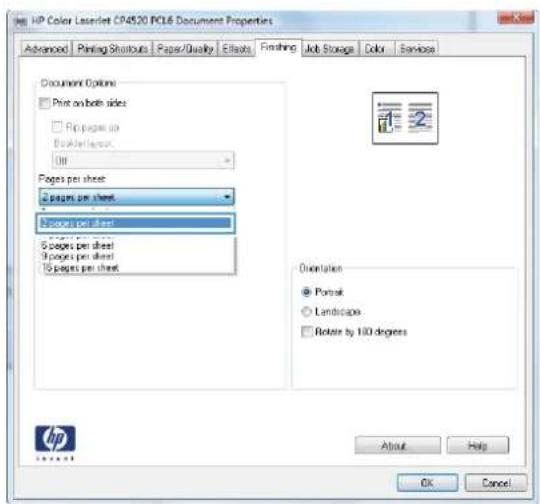
text_image
HP Color LaserJet CP4520 PC16 Document Properties Advanced Printing Shutouts Papers/Quality Effects Finding Job Storage(Color Services Document Options Print on both sides Rip pages up Book/Layout Up Pages per sheet: 6 pages per sheet 8 pages per sheet 9 pages per sheet 10 pages per sheet Orientation Portrait Landscape Rotate by 100 degrees About Help OK Cancel- Select the correct Print page borders, Page order, and Orientation options.
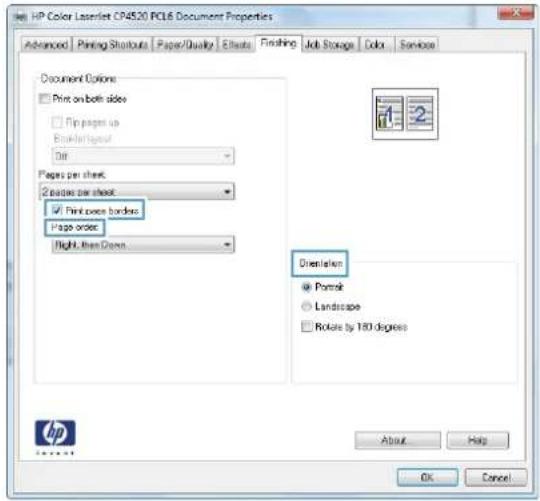
text_image
HP Color Labelset CP4520 RCL6 Document Properties Advanced Printing Shutouts Paper/Quality Effects Fhashing Job StorageColor Services Document Options Print on both sides Flip pages up Breakthrough Dot Pages per sheet 2 pages per sheet Print pages borders Pages order: Right, then Down... Orientation Portrait Landscape Rotate by 180 degrees About Help OK CancelSelect page orientation with Windows
- On the File menu in the software program, click Print.
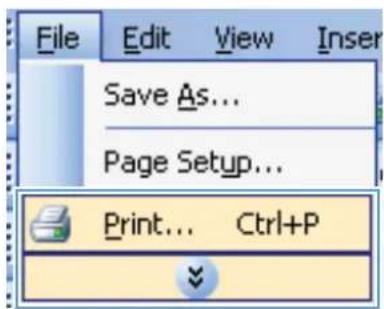
text_image
File Edit View Insert Save As... Page Setup... Print... Ctrl+P- Select the product, and then click the Properties or Preferences button.
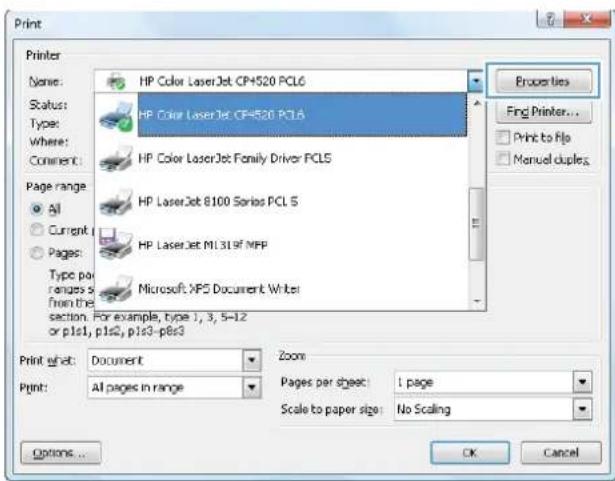
text_image
Printer Name: HP Color LaserJet CP+520 PCL6 Scus: HP Color LaserJet CP+520 PCL6 Type: HP Color LaserJet Family Driver PCLS Where: Comment: HP LaserJet 8100 Series PCL 5 Page range: All Current Pages: Type per ranges s From the section. For example, type 1, 3, 5-12 or p1s1, p1s2, p1s3-p8s3 Microsoft XPS Document Writer Print what: Document Zoom Print: All pages in range Pages per sheet: 1 page Scale to paper size: No Scaling Options... Properties Find Printer... Print to Fio Manual duples OK Cancel- Click the Finishing tab.
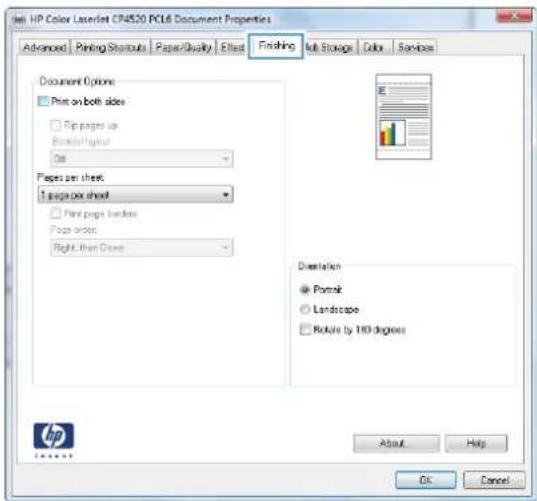
text_image
HP Color LaserJet CP4520 PC16 Document Properties Advanced Printing Shutouts Paper/Quality Effect Finishing Left StorageColor Services Document Options Print on both sides Flip pages up BorderLayout Get Pages per sheet: 5 pages per sheet Print pages borders Pages order: Right, then Drive Orientation Portrait Landscape Rotate by 180 degrees About Help OK Cancel- In the Orientation area, select the Portrait or Landscape option.
To print the page image upside down, select the Rotate by 180 degrees option.
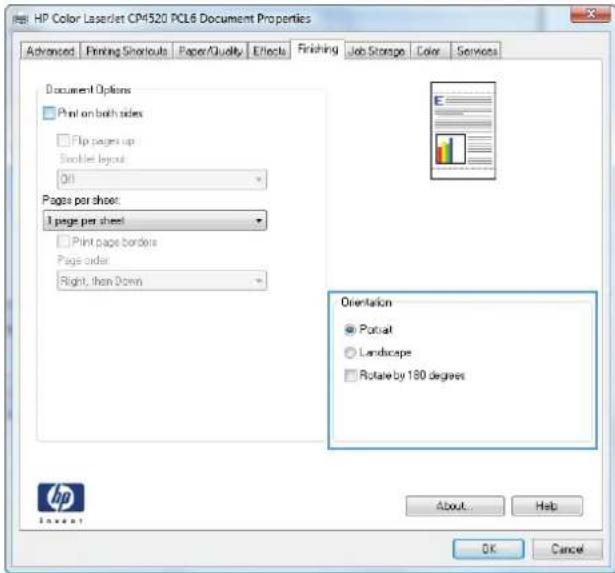
text_image
HP Color LaserJet CPM520 PCL6 Document Properties Advanced Finishing Shortcuts Paper/Quality Effects Finishing Job Storage Color Services Document Options Print on both sides Flip pages up Doublet layout Oil Pages per sheet: 1 page per sheet Print page borders Pages order Right, then Down Orientation Portal Landscape Rotate by 180 degrees About... Help OK CancelSet color options with Windows
-
On the File menu in the software program, click Print.
-
Select the product, and then click the Properties or Preferences button.
-
Click the Color tab.
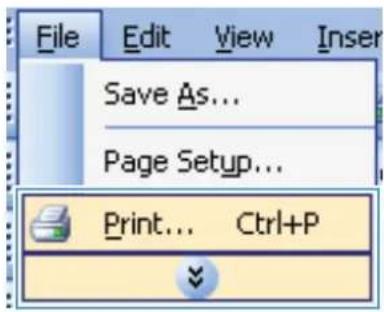
text_image
File Edit View Insert Save As... Page Setup... Print... Ctrl+P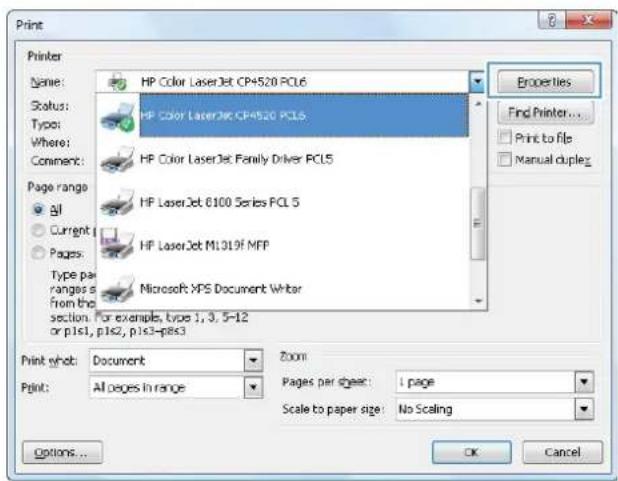
text_image
Print Printer Name: HP Color LaserJet CP4520 PCL6 Status: Type: Where: Comment: Page range: All Current Pages: Type par ranges s From the section: or p1s1, p1s2, p1s3-p8s3 Print what: Document Print: All pages in range Properties Find Printer... Print to file Manual duplex Pages per sheet: 1 page Scale to paper size: No Scaling Options... OK Cancel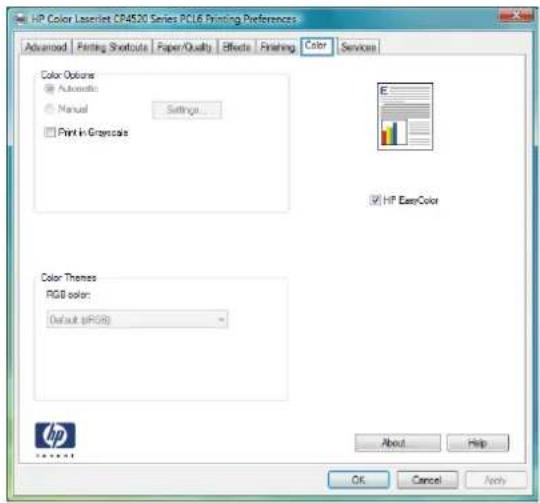
text_image
HP Color Labellet CP4520 Series PCL6 Printing Preferences Advanced | Fitting Shortcuts | Paper Quality | Effects | Finishing | Color | Services Color Options Automatic Manual Settings... Print in Grayscale HP EasyColor Color Themes RGB color: Default (RGB) About Help OK Cancel Apply-
Click the HP EasyColor check box to clear it.
-
In the Color Options area, click the Manual option, and then click the Settings button.
-
Adjust the general settings for Edge Control, and settings for text, graphics, and photographs.
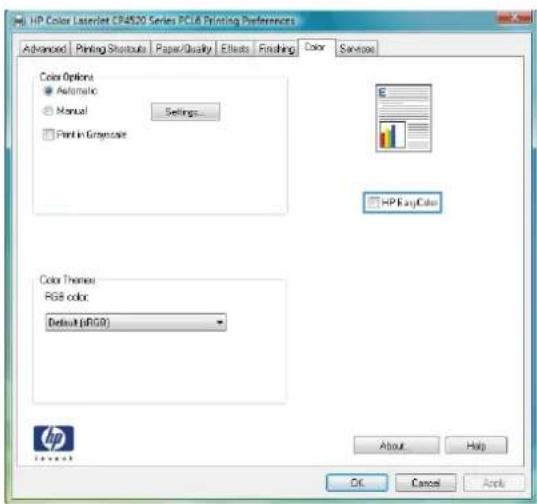
text_image
HP Color Laserjet CP4520 Series PCIA Printing Preferences Advanced | Printing Shortcuts | Paper/Quality | Effects | Finishing | Color | Services Color Options ● Automatic ○ Manual □ Print in Gray-scale HP FlashColor Color Theme: RGB color Default (sRGB) About Help OK Cancel Apply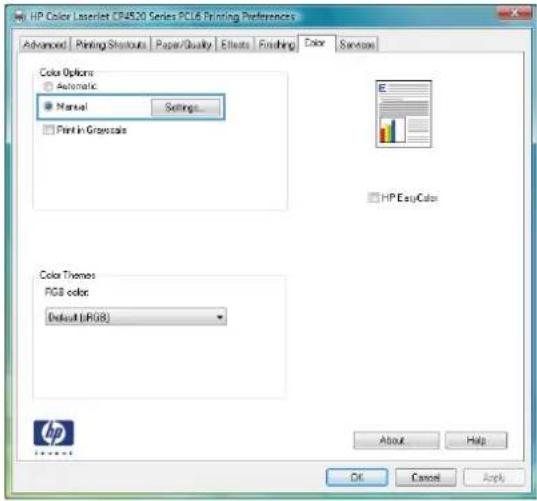
text_image
HP Color Laserlet CP4520 Series PLC6 Printing Preferences Advanced | Printing Shutouts | Paper/Quality | Effects | Finishing | Color | Services Color Options Automatic Manual Settings... Print in Gropecal HP EasyColor Color Themes RGB color Default (RGB) About Help OK Cancel Apply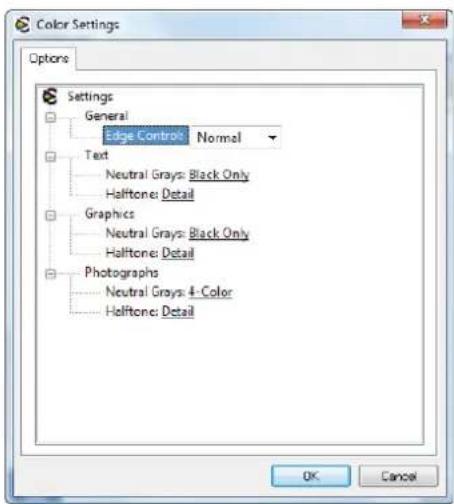
text_image
Color Settings Options Settings General Edge Controls: Normal Text Neutral Grays: Black Only Halitone: Detail Graphics Neutral Grays: Black Only Halitone: Detail Photographs Neutral Grays: & Color Halitone: Detail OK CancelAdditional print tasks with Windows
Print colored text as black (grayscale) with Windows
- On the File menu in the software program, click Print.
- Select the product, and then click the Properties or Preferences button.
- Click the Advanced tab.
- Expand the Document Options section.
- Expand the Printer Features section.
- In the Print All Text as Black drop-down list, select the Enabled option.
Print on preprinted letterhead or forms with Windows
-
On the File menu in the software program, click Print.
-
Select the product, and then click the Properties or Preferences button.
-
Click the Paper/Quality tab.
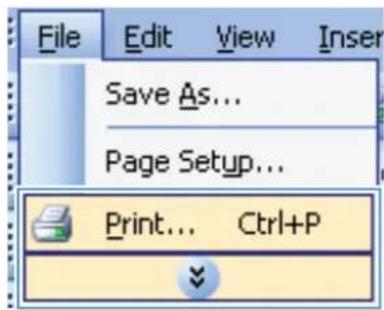
text_image
File Edit View Insert Save As... Page Setup... Print... Ctrl+P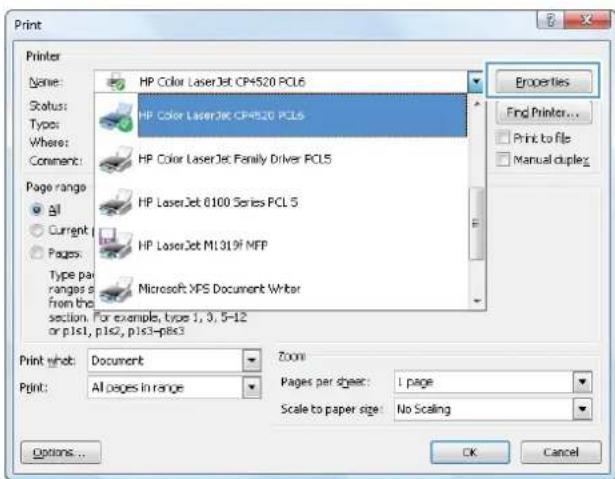
text_image
Print Printer Name: HP Color LaserJet CP4520 PCL6 Status: Type: Where: Comment: Page range All Current Pages: Type pair ranges From the section. For example, type 1, 3, 5-12 or p1s1, p1s2, p1s3-p1s3 Print what: Document Zoom Print: All pages in range Pages per sheet: 1 page Scale to paper size: No Scaling Options... Properties Find Printer... Print to file Manual duplex OK Cancel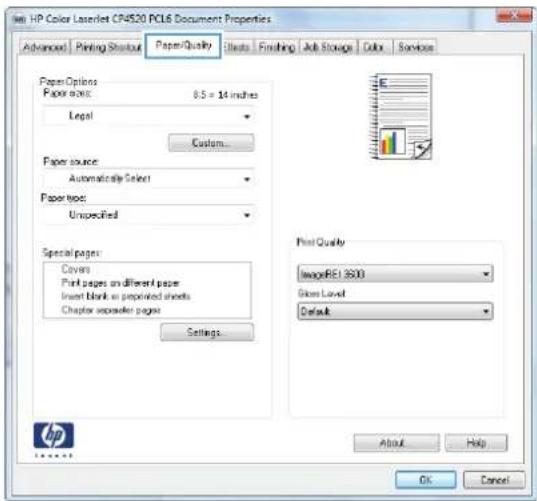
text_image
HP Color LaserJet CF4520 PCL6 Document Properties Advanced Printing Shout Paper Quality Effects Finishing Job Storage Color Service Paper Options Paper type: 8.5 = 14 inches Legal Custom... Paper source: Automatically Select Paper type: Unspecified Special pages: Covers Print pages on different pages Insert blank or preprinted sheets Chapter separator pages Settings... Print Quality Image361.9300 Size Level Default About Help OK Cancel- From the Paper type drop-down list, click the More... option.
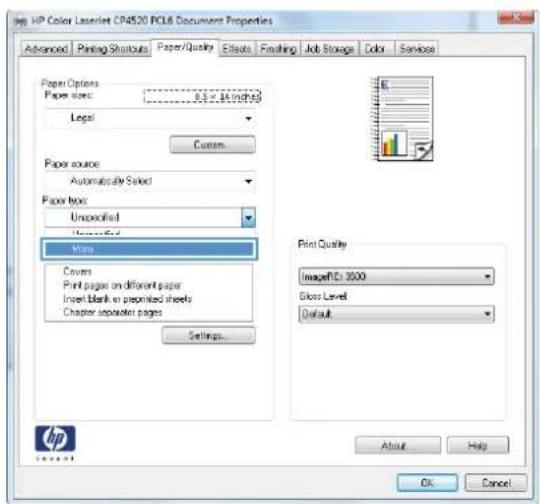
text_image
HP Color LaserNet CP4520 RCL6 Document Properties Advanced Printing Shutouts Paper/Quality Effects Finaling Job Storage Colors Services Paper Options Paper size: 3.5 x .34 (1997) Legal Custom... Paper source Automatically Select Paper Note Unspecified Unspecified None Covers Print pages on different paper Insert blank or preprinted sheets Chapter separator pages Settings... Print Quality ImageFCI 3000 Glass Level Default About Help OK Cancel- Expand the list of Type is: options.
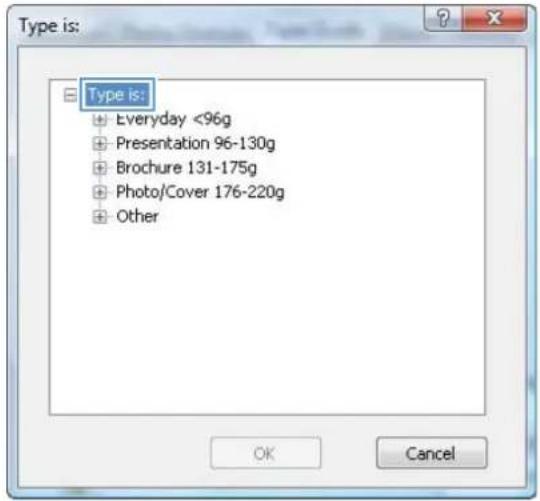
text_image
Type is: ■ Type is: ● Everyday <96g ● Presentation 96-130g ● Brochure 131-175g ● Photo/Cover 176-220g ● Other OK Cancel- Expand the list of Other options.
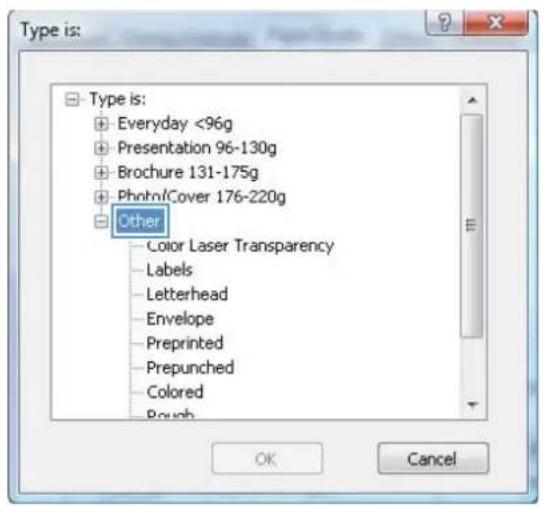
text_image
Type is: + Everyday <96g + Presentation 96-130g + Brochure 131-175g + Photrol/Cover 176-220g + Other - Color Laser Transparency - Labels - Letterhead - Envelope - Preprinted - Prepunched - Colored - Rough OK Cancel- Select the option for the type of paper you are using, and click the OK button.
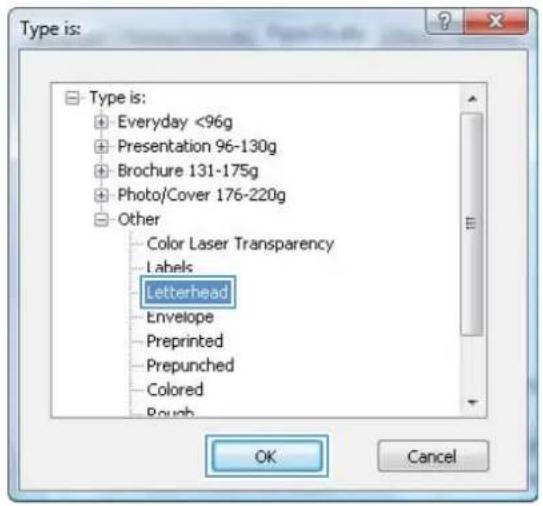
text_image
Type is: □ Type is: ● Everyday <96g ● Presentation 96-130g ● Brochure 131-175g ● Photo/Cover 176-220g □ Other Color Laser Transparency Labels Letterhead Envelope Preprinted Prepunched Colored Rough OK CancelPrint on special paper, labels, or transparencies
- On the File menu in the software program, click Print.
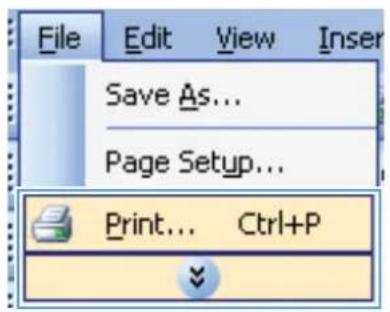
text_image
File Edit View Insert Save As... Page Setup... Print... Ctrl+P- Select the product, and then click the Properties or Preferences button.
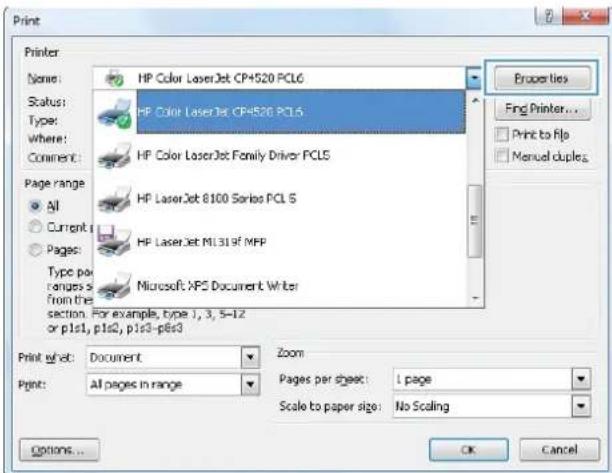
text_image
Print Printer: Name: HP Color LaserJet CP4520 PCL6 Status: HP Color LaserJet CP4520 PCL6 Type: Where: Comment: Page range: All Current Pages: Type per ranges s from the section. For example, type 1, 3, 5-12 or p1s1, p1s2, p1s3-p8s3 Print wt: Document Zoom Print: All pages in range Pages per sheet: 1 page Scale to paper size: No Scaling Options... Properties Fng Printer... Print to Fip Manual duples OK Cancel- Click the Paper/Quality tab.
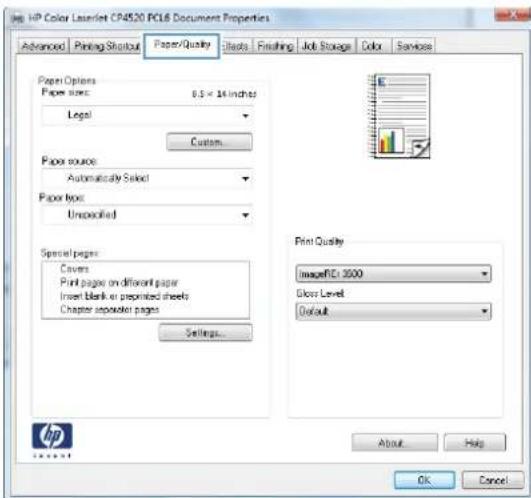
text_image
HP Color Lasset CP4520 PC16 Document Properties Advanced Printing Shutout Paper/Quality Effects Friishing Job Storage Colors Services Paper Options Paper sizes: 8.5 x 14 inches Legal Custom... Paper source Automatically Select Paper types Unspecified Special pages: Covers Print pages on different paper Insert blank or preprinted sheets Chapter installed pages Settings... Print Quality ImageFCI 3500 Glass Level Default About Help OK Cancel- From the Paper type drop-down list, click the More... option.
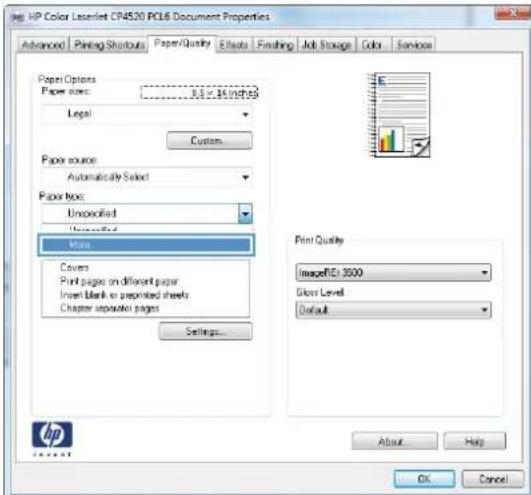
text_image
HP Color Laserjet CP4520 PC16 Document Properties Advanced Printing Shortouts Paper Quality Effects Finishing Job Storage Color Services Paper Options Paper size: 3.5 x 14 inches Legal Custom Paper source Automatically Select Paper type: Unspecified Unspecified Main Covers Print pages on different paper Insert Blank or preprinted sheets Chapter uppermost pages Settings... Print Quality ImageID: 3500 Gloss Level Default About Help OK Cancel-
Expand the list of Type is: options.
-
Expand the category of paper types that best describes your paper.
NOTE: Labels and transparencies are in the list of Other options.
- Select the option for the type of paper you are using, and click the OK button.
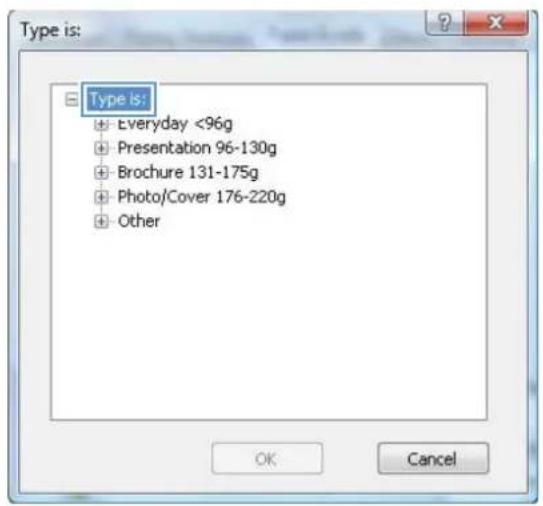
text_image
Type is: + Everyday <96g + Presentation 96-130g + Brochure 131-175g + Photo/Cover 176-220g + Other OK Cancel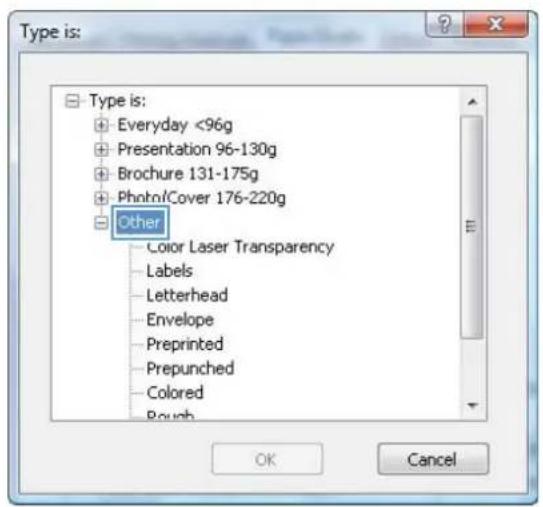
text_image
Type is: □ Type is: + Everyday <96g + Presentation 96-130g + Brochure 131-175g + Photrol/Cover 176-220g □ Other - Color Laser Transparency - Labels - Letterhead - Envelope - Preprinted - Prepunched - Colored - Rough OK Cancel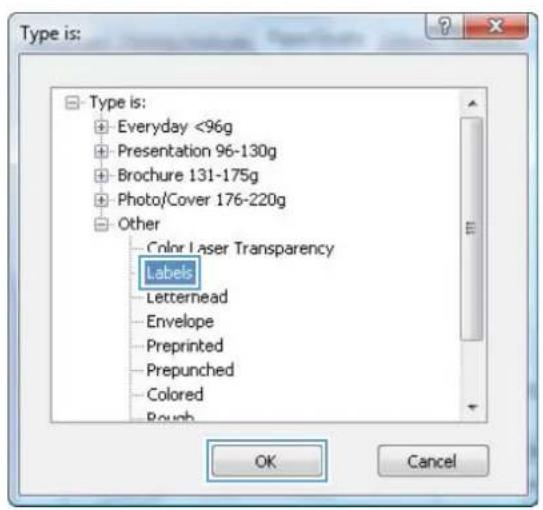
text_image
Type is: + Everyday <96g + Presentation 96-130g + Brochure 131-175g + Photo/Cover 176-220g + Other - Color Laser Transparency Labels - Letterhead - Envelope - Preprinted - Prepunched - Colored - Rough OK CancelPrint the first or last page on different paper with Windows
-
On the File menu in the software program, click Print.
-
Select the product, and then click the Properties or Preferences button.
-
Click the Paper/Quality tab.
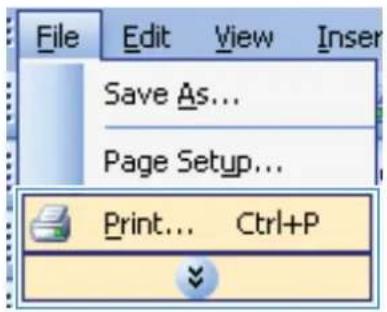
text_image
File Edit View Insert Save As... Page Setup... Print... Ctrl+P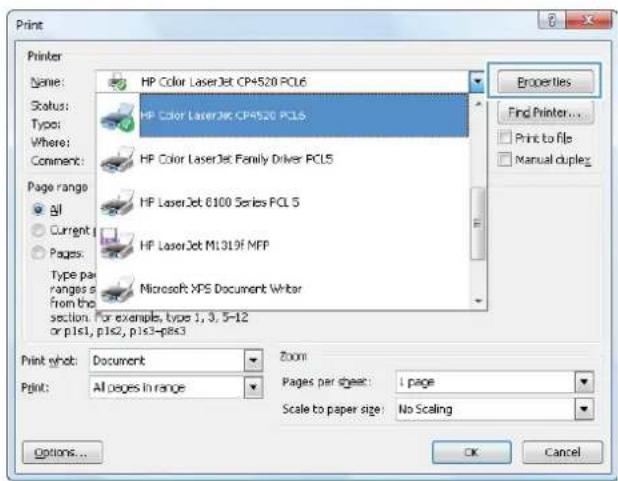
text_image
Print Printer Name: HP Color LaserJet CP4520 PCL6 Status: Type: Where: Comment: Page range: All Current Pages: Type par ranges s From the section: For example, type 1, 3, 5-12 or p1s1, p1s2, p1s3-p8s3 Print whc: Document Print: All pages in range Zoom Pages per sheet: 1 page Scale to paper size: No Scaling Properties Find Printer... Print to file Manual duplex Options... OK Cancel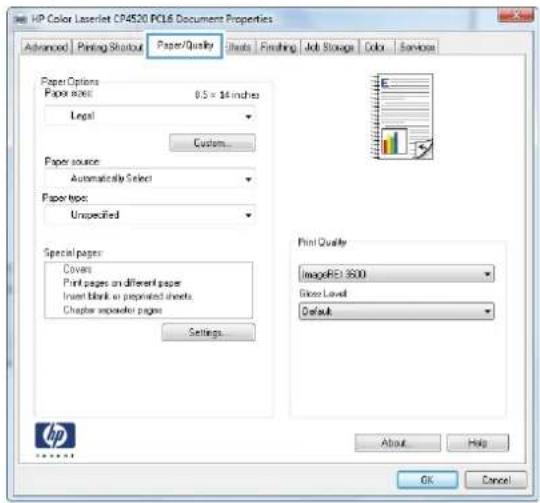
text_image
HP Color LaserJet CP4520 PCL6 Document Properties Advanced Printing Shutout Paper/Quality Shuts Finishing Job Storage Color Services Paper Options Paper sizes: 8.5 x 14 inches Legal Custom... Paper source: Automatically Select Paper type: Unspecified Special paper: Covers Print pages on different paper Insert blank or preprinted sheets. Chapter separator pages Settings... Print Quality ImageREV 9000 Gloos Level Default About Help OK Cancel hp-
In the Special pages area, click the Print pages on different paper option, and then click the Settings button.
-
In the Pages in document area, select either the First or Last option.
-
Select the correct options from the Paper source and Paper type drop-down lists. Click the Add button.
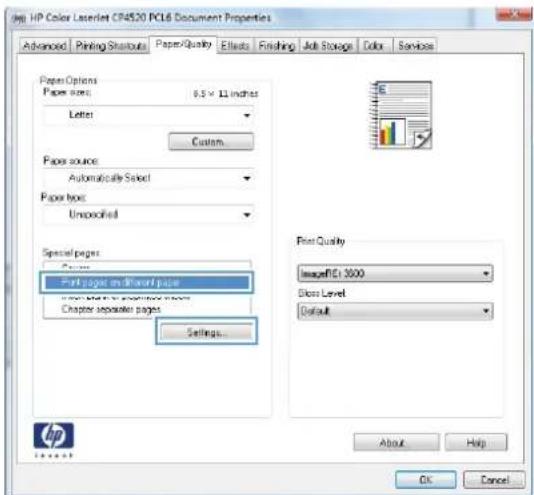
text_image
HP Color LaserJet C#4520 PC16 Document Properties Advanced Printing Startouts Paper Quality Effects Focoling Job Storage Color Services Paper Options Paper sizes: 8.5 x 11 inches Letter Custom... Paper source: Automatically Select Paper box: Unspecified Special pages Page on /Block page Page in the format key Chapter separator pages Settings... First Quality Image(IE) 3000 Class Level Default About Help OK Cancel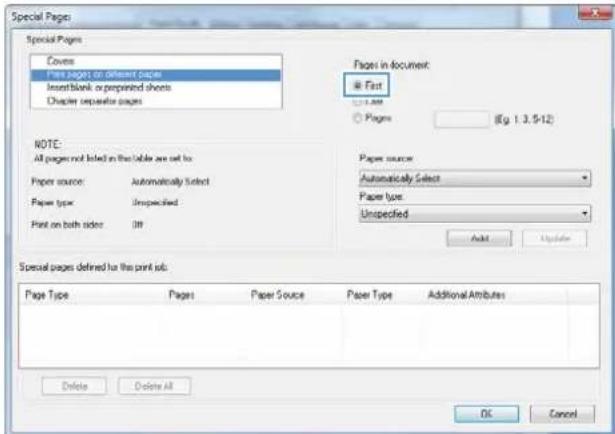
text_image
Special Pages Special Pages Covers Print pages on different pages InsertBlank or prepared sheets Chapter separate pages Pages in document: ■ Fast Pages Fig. 1.3.5-12 NOTE: All pages not listed in the table are set to: Paper source: Automatically Select Paper type: Unspecified Print on both sides: OFF Paper source: Automatically Select Paper type: Unspecified Add Update Special pages defined for this print site: Page Type Pages Paper Source Paper Type Additional Attributes Delete Delete All OK Cancel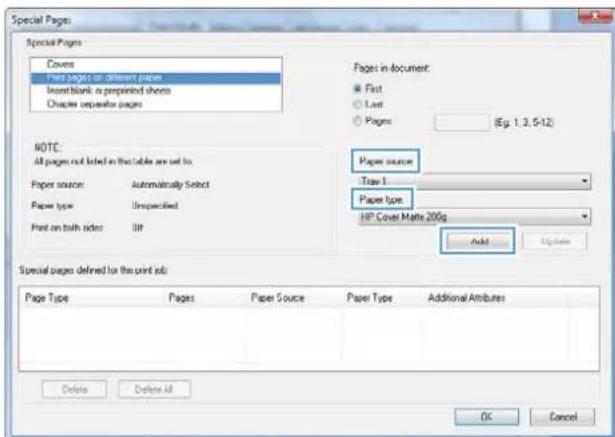
text_image
Special Pages Special Pages Covers Pare pages on different pages Insertblank as preprinted sheets Chapter separator pages Pages in document: ● First ○ Last ○ Pages (Eg. 1.3.5-12) NOTE: All pages out listed in the table are set to: Paper source: Automatically Select Paper type: Unspecified Print on both sides: Off Paper source True 1 Paper type: HP Cover Matte 200p Add Update Special pages defined for the print site: Page Type Pages Paper Source Paper Type Additional Attributes Delete Delete All OK Cancel-
If you are printing both the first and last pages on different paper, repeat steps 5 and 6, selecting the options for the other page.
-
Click the OK button.
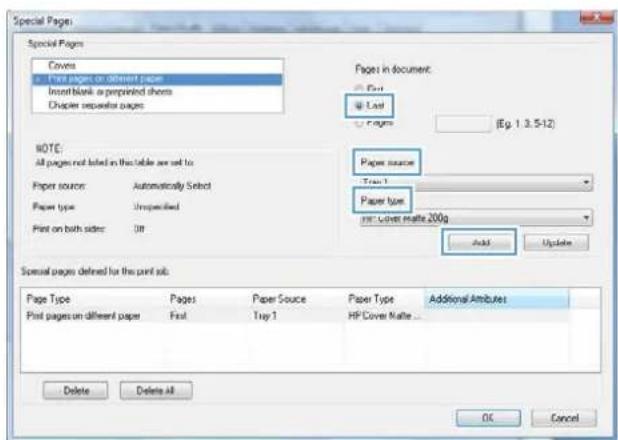
text_image
Special Pages Special Pages Covers Print pages on different pages Insert blank or preprinted sheets Chapter repeater pages Pages in document First Last pages (Eg. 1.3.5-12) NOTE: All pages not listed in this table are set to Paper source: Automatically Select Paper type: Unspecified Print on both sides: Off Paper source First Paper type: First Cover Matte 200g Add Update Special pages defined for the print sub: Page Type Pages Paper Source Paper Type Additional Attributes Print pages on different paper First Tray 1 HP Cover Matte... Delete Delete All OK Cancel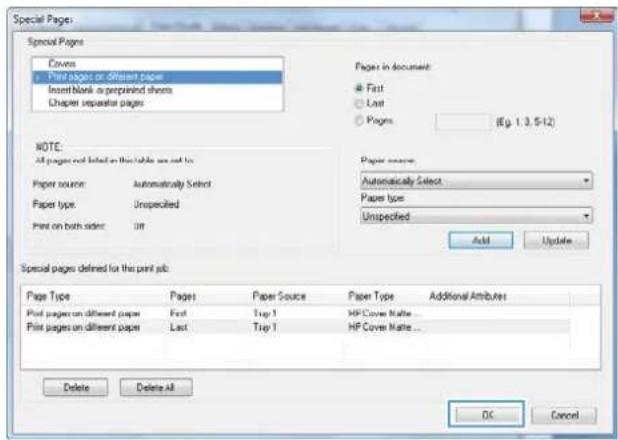
text_image
Special Pages Special Pages Covers Print pages on different paper Insert blank or preprinted sheets Chapter separator pages Paper in Document Fast Last Pages (Eq. 1.3.5-12) NOTE: All pages not listed on this table are set to Paper source: Automatically Select Paper type: Unspecified Print on both sides: Off Paper source: Automatically Select Paper type: Unspecified Add Update Special pages defined for the print job Page Type Pages Paper Source Paper Type Additional Attributes Print pages on different paper First Trip 1 HP Cover Matte... Print pages on different paper Last Trip 1 HP Cover Matte... Delete Delete All OK CancelScale a document to fit page size
- On the File menu in the software program, click Print.
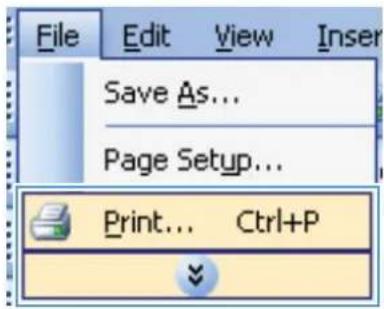
text_image
File Edit View Insert Save As... Page Setup... Print... Ctrl+P- Select the product, and then click the Properties or Preferences button.
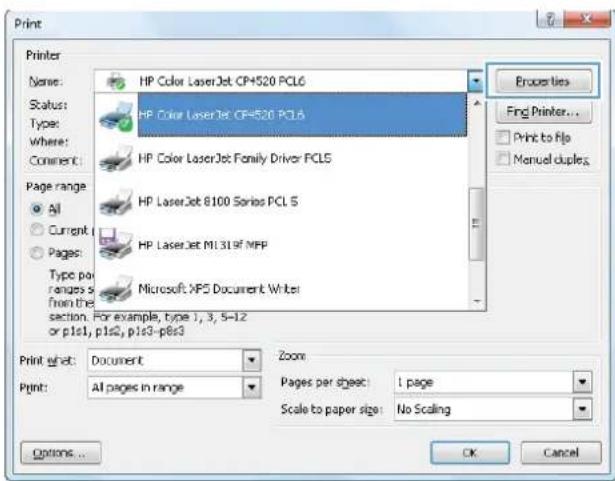
text_image
Print Printer Name: HP Color LaserJet CP+520 PCL6 Scus: HP Color LaserJet CP+520 PCL6 Type: HP Color LaserJet Family Driver PCLS Where: Comment: Page range: All Current Pages: Type pair ranges From the section. For example, type 1, 3, 5-12 or p1s1, p1s2, p1s3-p8s3 Microsoft XPS Document Writer Print what: Document Zoom Print: All pages in range Pages per sheet: 1 page Scale to paper size: No Scaling Options... Properties Find Printer... Print to Fio Manual duples OK Cancel- Click the Effects tab.
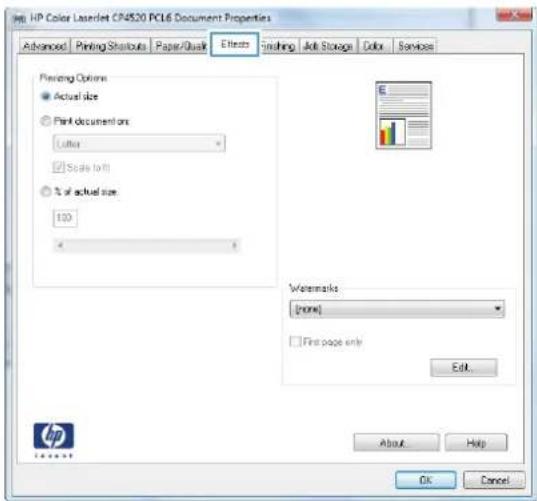
text_image
HP Color Labellet CP4520 PCL6 Document Properties Advanced Printing Shutouts Paper/Quick Effects Fishing Alt StorageColor Services Preview Options ● Actual size ○ First documents Letter □ Scale to fit ○ % of actual size 100 Watermarks [none] □ First page only Edit... About Help OK Cancel- Select the Print document on option, and then select a size from the drop-down list.
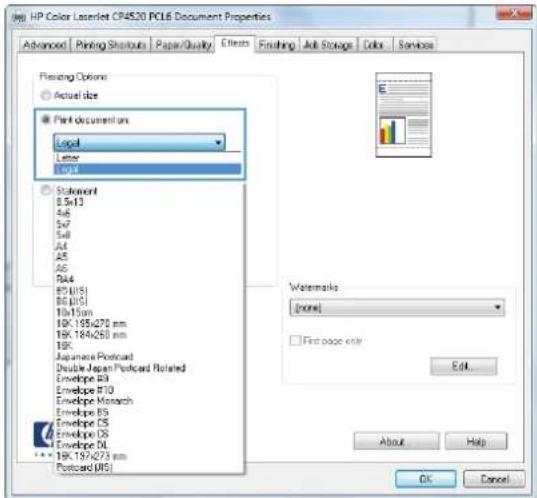
text_image
HP Color Laserlet CP4520 PCL6 Document Properties Advanced Printing Shutouts Paper/Quality Effects Finishing Alt Storage Color Services Fingerprint Options Actual size Part document on: Local Layer LPG Statement E:5x13 A:6 S:7 S:8 A:9 A:10 A:11 A:12 A:13 A:14 A:15 A:16 A:17 A:18 A:19 A:20 A:21 A:22 A:23 A:24 A:25 A:26 A:27 A:28 A:29 A:30 Watermarks [none] First page only Edit... About Help OK CancelAdd a watermark to a document with Windows
- On the File menu in the software program, click Print.
- Select the product, and then click the Properties or Preferences button.
- Click the Effects tab.
-
Select a watermark from the Watermarks drop-down list.
Or, to add a new watermark to the list, click the Edit button. Specify the settings for the watermark, and then click the OK button. -
To print the watermark on the first page only, select the First page only check box. Otherwise, the watermark is printed on each page.
Create a booklet with Windows
-
On the File menu in the software program, click Print.
-
Select the product, and then click the Properties or Preferences button.
-
Click the Finishing tab.
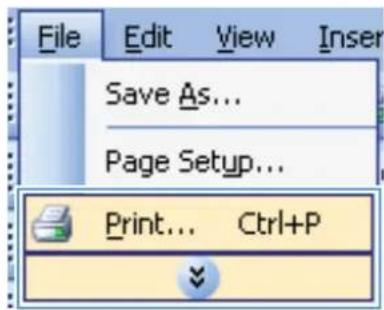
text_image
File Edit View Insert Save As... Page Setup... Print... Ctrl+P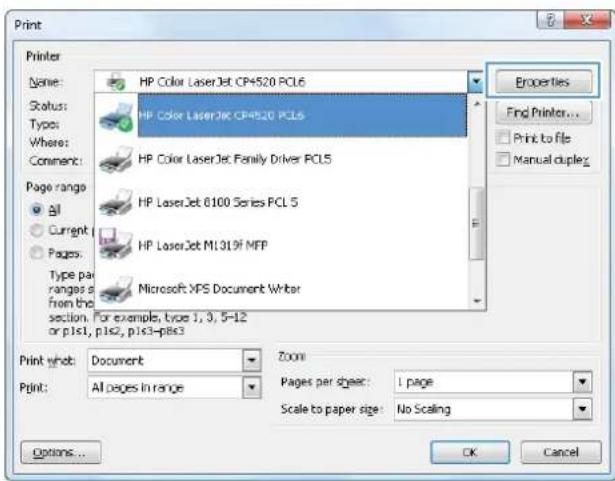
text_image
Print Printer Name: HP Color LaserJet CP4520 PCL6 Status: HP Color LaserJet CP4520 PCL6 Types: HP Color LaserJet Family Driver PCL5 Where: Comment: HP LaserJet 6100 Series PCL 5 Page range: All Current Pages: Type pair ranges from the section. For example, type 1, 3, 5-12 or p1s1, p1s2, p1s3-p1s3 Microsoft XPS Document Writer Print whb: Document Print: All pages in range Zoom: Pages per sheet: 1 page Scale to paper size: No Scaling Options... OK Cancel Properties Find Printer... Print to file Manual duplex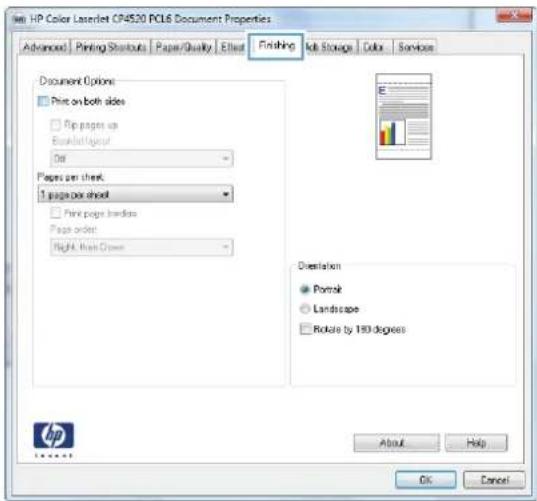
text_image
HP Color LaserJet CF4520 PCL6 Document Properties Advanced Printing Shortcuts Paper/Quality Effect Finishing"Ibit Storage(Color Services Document Options Print on both sides Rip pages up BookletLayout Out Papers per sheet. 1 page per sheet Print pages binders Pages order: Right, Main Drawn Orientation Portrait Landscape Rotate by 193 degrees About Help OK Cancel- Select the Print on both sides check box.
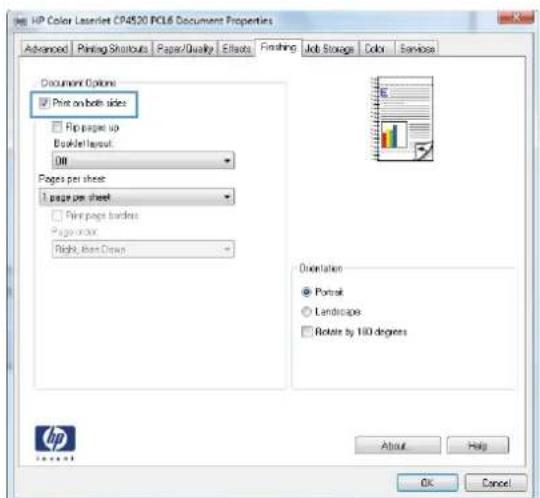
text_image
HP Color LaserNet CP4520 PLC6 Document Properties Advanced Printing Shutouts Paper/Quality Effects Finding Job Storage(Color Services Document Options ✓ Print on both sides ✓ Flip pages up Bookshelfout... Off Pages per sheet: 1 page per sheet ✓ Flip pages harder Pages/cross: Right, then Draw Orientation ● Portrait ○ Landscape □ Rotate by 110 degrees About Help OK Cancel HP- In the Booklet layout drop-down list, click the Left binding or Right binding option. The Pages per sheet option automatically changes to 2 pages per sheet.
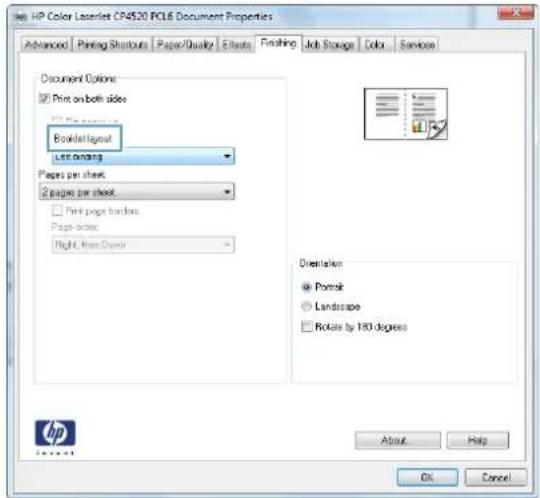
text_image
HP Color Labellet CP4520 RCL6 Document Properties Advanced | Printing Shortcuts | Paper/Quality | Effects | Finishing | Job Storage | Color | Services Document Colors: Print on both sides Bookdellagout Last opening Pages per sheet: 2 pages per sheet Print page borders Page order: Right, From Down Dietalies: Portrait Landscape Rotate by 180 degrees About Help OK CancelUse job storage features with Windows
The following job-storage modes are available for print jobs:
Proof and Hold: This feature provides a quick way to print and proof one copy of a job and then print more copies.
- Personal Job: When you send a job to the product, the job does not print until you request it at the product control panel. If you assign a personal identification number (PIN) to the job, you must provide the required PIN at the control panel.
- Quick Copy: If the optional hard disk is installed on the product, you can print the requested number of copies of a job and then store a copy of the job on the optional hard disk. Storing the job allows you to print additional copies of the job later.
- Stored Job: If the optional hard disk is installed on the product, you can store a job such as a personnel form, time sheet, or calendar on the product and allow other users to print the job at any time. Stored jobs also can be protected by a PIN.
△ CAUTION: If you turn off the product, all Quick Copy, Proof and Hold, and Personal Job types of stored jobs are deleted. To permanently store the job and prevent the product from deleting it when space is needed for something else, select the Stored Job option in the driver.
Create a stored job with Windows
-
On the File menu in the software program, click Print.
-
Select the product, and then click the Properties or Preferences button.
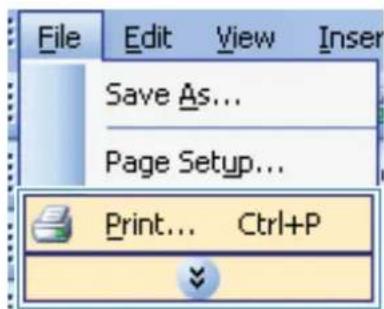
text_image
File Edit View Insert Save As... Page Setup... Print... Ctrl+P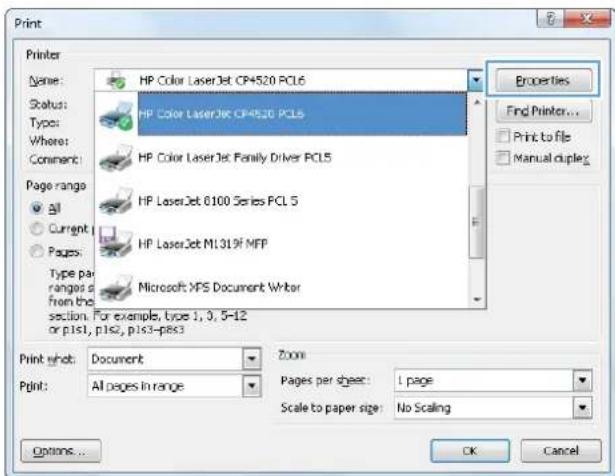
text_image
Print Printer Name: HP Color LaserJet CP4520 PCL6 Status: HP Color LaserJet CP4520 PCL6 Type: HP Color LaserJet Family Driver PCL5 Where: Comment: HP LaserJet 0100 Series PCL 5 Page range: All Current Pages: Type pair ranges of from the section. For example, type 1, 3, 5-12 or p1s1, p1s2, p1s3-p1s3 Microsoft XPS Document Writer Print void: Document Print: All pages in range Zoom Pages per sheet: 1 page Scale to paper size: No Scaling Properties Find Printer... Print to file Manual duplex Options... OK Cancel-
Click the Job Storage tab.
-
Select a Job Storage Mode option, and then click the OK button.
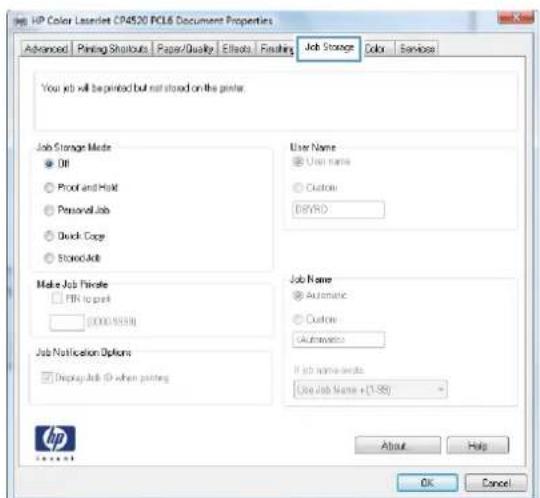
text_image
HP Color LaserNet CP4520 PCL6 Document Properties Advanced Printing Shutouts Paper/Quality Effects Finaling Job StorageColor Services You job will be printed but not stored on the printer Job Storage Mode ● Off ○ Proof and Mark ○ Personal Job ○ Quick Copy ○ Stored Job Make Job Private □ FIN to park (000-8559) Job Notification Options □ Display Job (0 when printing) User Name ● User name ○ Custom D#YRD Job Name ● Automatic ○ Custom CAutomatics If job name works: Use Job Name + (1-39) About Help OK Cancel HP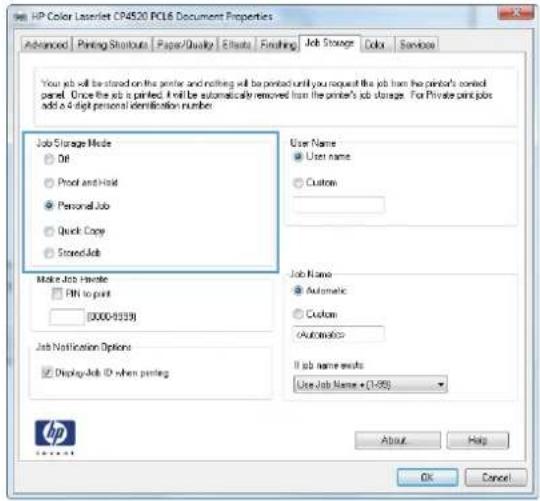
text_image
HP Color Labellet CP4520 PCL6 Document Properties Advanced Printing Shutouts Paper/Quality Effects Finding Job Storage Colors Services Your job will be stored on the printer and nothing will be printed until you request this job from the printer's card panel. Once the job is printed, I will be automatically removed from the printer's job storage. For private principles add a 4 digit personal identification number. Job Storage Mode ● Off ○ Print and Hold ● Personal Job ○ Quick Copy ○ Stored Job Make Job Header □ PIN to print (0000-9339) Job Notification Options ☑ Display Job ID when printing User Name ● User name ○ Custom Job Name ● Automatic ○ Custom (Automatic) If job name results: Use Job Name + (1-89) About Help OK CancelPrint a stored job
- Press the Home button .
- Press the down arrow ▼ highlight the Retrieve Job From Device Memory menu, and then press the OK button.
- Press the down arrow ▼ to highlight your user name, and then press the OK button.
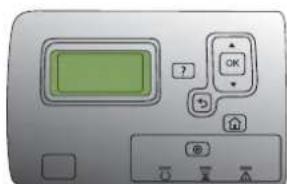
text_image
Control panel interface with green display, OK button, and function buttons- Press the down arrow to highlight a job name, and then press the OK button.
The Print or Delete option is highlighted.
NOTE: If you have stored more than one job on the product, you have the option to print or delete all of them at the same time.
- Press the OK button to select the Print or Delete option.
Delete a stored job
When you send a stored job, the product overwrites any previous jobs with the same user and job name. If a job is not already stored under the same user and job name, and the product needs additional space, the product might delete other stored jobs starting with the oldest. You can change the number of jobs that can be stored from the Retrieve Job From Device Memory menu on the product control panel.
You can delete a job from the control panel, from the HP Embedded Web Server, or from HP Web Jetadmin. To delete a job from the control panel, use the following procedure:
- Press the Home button 🔒.
- Press the down arrow ▼ to highlight the Retrieve Job From Device Memory menu, and then press the OK button.
- Press the down arrow ▼ to highlight a job name, and then press the OK button.
- Press the down arrow ▼ to highlight the Delete option, and then press the OK button.
Set job storage options with Windows
Print one copy for proof before printing all the copies
- On the File menu in the software program, click Print.
- Select the product, and then click the Properties or Preferences button.
- Click the Job Storage tab.
- In the Job Storage Mode area, click the Proof and Hold option.
Temporarily store a personal job on the product and print it later

NOTE: The product deletes the job after you print it.
- On the File menu in the software program, click Print.
- Select the product, and then click the Properties or Preferences button.
- Click the Job Storage tab.
-
In the Job Storage Mode area, click the Personal Job option.
-
Optional: In the Make Job Private area, click the PIN to print option, and enter a 4-digit personal identification number (PIN).
- Print the job at any time from the product control panel.
Temporarily store a job on the product
NOTE: This option is available if the optional hard disk is installed in the product.
NOTE: The product stores the job until you turn the product off.
- On the File menu in the software program, click Print.
- Select the product, and then click the Properties or Preferences button.
- Click the Job Storage tab.
- In the Job Storage Mode area, click the Quick Copy option.
The requested number of copies are printed immediately, and you can print more copies from the product control panel.
Permanently store a job on the product
NOTE: This option is available if the optional hard disk is installed in the product.
- On the File menu in the software program, click Print.
- Select the product, and then click the Properties or Preferences button.
- Click the Job Storage tab.
- In the Job Storage Mode area, click the Stored Job option.
Make a permanently stored job private so that anyone who tries to print it must provide a PIN
NOTE: This option is available if the optional hard disk is installed in the product.
- On the File menu in the software program, click Print.
- Select the product, and then click the Properties or Preferences button.
- Click the Job Storage tab.
- In the Job Storage Mode area, click the Stored Job option or the Personal Job option.
- In the Make Job Private area, click the PIN to print option, and enter a 4-digit personal identification number (PIN).
NOTE: To print the job or to delete it, you must provide the PIN at the product control panel.
Receive notification when someone prints a stored job
NOTE: Only the person who created the stored job receives notification. You do not receive notification when someone prints a stored job that another person has created.
- On the File menu in the software program, click Print.
- Select the product, and then click the Properties or Preferences button.
- Click the Job Storage tab.
- Select the job storage mode that you want.
- In the Job Notifications Options area, click the Display Job ID when printing option.
Set the user name for a stored job
Follow this procedure to change the user name for a stored job.
- On the File menu in the software program, click Print.
- Select the product, and then click the Properties or Preferences button.
- Click the Job Storage tab.
- Select the job storage mode that you want.
- In the User Name area, click the User name option to use the Windows default user name. To provide a different user name, click the Custom option and type the name.
Specify a name for the stored job
Follow this procedure to change the default name for a stored job.
- On the File menu in the software program, click Print.
- Select the product, and then click the Properties or Preferences button.
- Click the Job Storage tab.
- Select the job storage mode that you want.
-
To automatically generate the job name associated with the stored document, in the Job Name area, click the Automatic option. The driver uses the document file name, if it is available. If the document has no file name, the driver uses the software program name or a time stamp for the job name.
To specify a job name, click the Custom option and type the name. -
Select an option from the If job name exists drop-down list.
-
Select the Use Job Name + (1-99) option to add a number to the end of the existing name.
- Select the Replace Existing File option to overwrite a job that already has that name.
Print special jobs with Windows
Print business graphics or marketing material
You can use this product to print marketing and sales material or other color documents on glossy paper. To maximize the quality of this output you must do the following:
- Choose the appropriate paper. See the following table.
- At the product control panel, configure the paper tray for the correct paper type.
- Select the corresponding settings in the printer driver.
Supported glossy paper
| HP glossy paper product Product code Product size Control panel and print | driver settings | |
| HP Laser Presentation Paper, Soft Gloss | Q6541A Letter HP soft gloss 120g | |
| HP Laser Presentation Paper, Glossy | Q2546A Letter HP glossy 130g | |
| HP Laser Presentation Paper, Glossy | Q2552A A4 HP glossy 130g | |
| HP Laser Professional Paper, Soft Gloss | Q6542A A4 HP soft gloss 120g | |
| HP Laser Brochure Paper, Glossy | Q6611A, Q6610A Letter HP glossy 160g | |
| HP Laser Superior Paper, Glossy | Q6616A A4 HP glossy 160g | |
| HP Laser Photo Paper, Glossy | Q6607A, Q6608A Letter HP glossy 220g | |
| HP Laser Photo Paper, Glossy | Q6614A A4 HP glossy 220g | |
| HP Laser Photo Paper, Glossy 4x6 | Q8842A 101.6 x 152.4 mm (4 x 6 in) HP glossy 220g | |
| HP Laser Photo Paper, Glossy 10 x 15 cm | Q8843A 101.6 x 152.4 mm (4 x 6 in) HP glossy 220g | |

NOTE: In the United States, see www.hp.com/go/paper for a complete list of HP brand paper.
Print weatherproof maps and outdoor signs
The product can print durable, waterproof maps, signs, or menus by using HP Tough Paper. HP Tough Paper is a waterproof, tear-proof, satin finish paper that retains rich, vibrant print color and clarity even
when exposed to heavy usage or weather. This avoids expensive and time-consuming lamination. To maximize the quality of this output, you must do the following:
- Choose the appropriate paper. See the following table.
- At the product control panel, configure the paper tray for the correct paper type.
- Select the corresponding settings in the printer driver.
Supported tough paper
| HP paper name Product code Product size Control panel and print | driver settings |
| HP LaserJet Tough Paper Q1298A Letter HP Tough Paper | |
| HP LaserJet Tough Paper Q1298B A4 HP Tough Paper |
Set the duplex alignment
For documents that are printed on both sides, such as brochures, set the registration for the tray before printing to ensure that the front and back of the page are aligned.
- Press the Home button 📄.
- Press the down arrow ▼ to highlight the Administration menu, and then press the OK button.
- Press the down arrow ▼ to highlight the General Settings menu, and then press the OK button.
- Press the down arrow ▼ to highlight the Print Quality menu, and then press the OK button.
- Press the down arrow ▼ to highlight the Image Registration menu, and then press the OK button.
- Press the down arrow ▼ to highlight the Adjust Tray
menu for the tray that you want to adjust, and then press the OK button. - Press the down arrow ▼ to highlight the Print Test Page setting, and then press the OK button.
- Follow the instructions on the test page to complete the adjustment.
Walk-up USB printing
This product features walk-up USB printing, so you can quickly print files without sending them from a computer. The product accepts standard USB storage accessories in the USB port on the front of the product. You can print the following types of files:

NOTE: You must enable this feature by using the control-panel menus or the HP Embedded Web Server before it can be used.
To enable this feature by using the control-panel menus, access the Administration menu, Retrieve From USB Settings sub menu, and then select Enable. To enable this feature by using the HP Embedded Web Server, access the Print tab.
.pdf
.prn
.pcl
. ps
.cht
- Insert the USB storage accessory into the USB port on the front of the product.
NOTE: You might need to remove the cover from the USB port
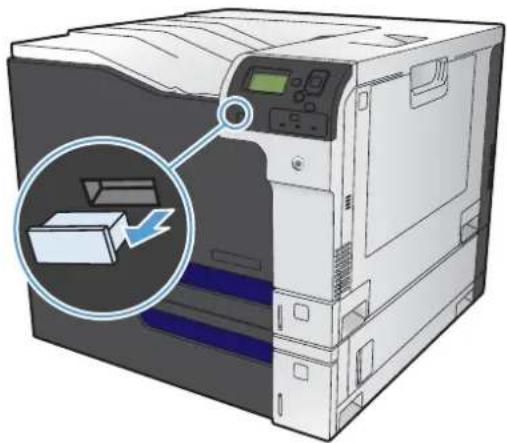
natural_image
Illustration of a printer with a magnified inset showing a printer's internal structure (no text or symbols present)- Press the down arrow ▼ to highlight OK, and then press the OK button.
- Press the down arrow ▼ to highlight Select a File or Folder, and then press the OK button.
- Press the down arrow ▼ to select a folder from the list.
- Select the name of the document that you want to print.
- Press the OK button to print the document.
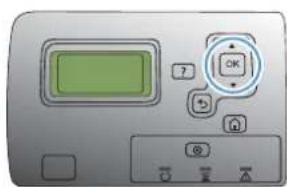
text_image
Control panel interface with green display, OK button, and function buttons9 Color
- Adjust color
- Match colors
- Advanced color use
Adjust color
Manage color by changing the settings on the Color tab (Windows) or the Color Options or Color/Quality Options menu (Mac) in the printer driver.
Automatic
Setting color options to the default or Automatic setting typically produces the best possible print quality for color documents. The default or Automatic color adjustment option optimizes the neutral-gray color treatment, halftones, and edge enhancements for each element in a document. For more information, see the printer driver online Help.
Print in Grayscale
Select the Print in Grayscale option (Windows) or the Print Color as Gray option (Mac) from the printer driver to print a color document in black and white. This option is useful for printing color documents that will be photocopied or faxed. The product uses the monochrome mode, which reduces use of the color cartridges.
Manual color adjustment
Manually set the color options to adjust the neutral-gray color treatment, halftones, and edge enhancements for text, graphics, and photographs. To open the manual color adjustment options, follow one of these procedures:
- Windows: From the Color tab, click the HP EasyColor check box to clear it, click the Manual button, and then click the Settings button.
Mac: Open the Advanced menu, or select the appropriate tab with the Color/Quality Options tab. Click the HP EasyColor check box to clear it, and then enable the manual settings.
Manual color options
Use manual color options to adjust the Neutral Grays, Halftone, and Edge Control options for text, graphics, and photographs.
Table 9-1 Manual color options
| Setting description Setting options | |
| HalftoneHalftoneoptions affect the color output resolution and clarity. | Smoothprovides better results for large, solid-filled print areas and enhances photographs by smoothing color gradations. Select this option when uniform and smooth area fills are the top priority.Detailis useful for text and graphics that require sharp distinctions among lines or colors, or images that contain a pattern or a high level of detail. Select this option when sharp edges and details are the top priority. |
| Neutral GraysThe Neutral Grayssetting determines the method for creating gray colors used in text, graphics, and photographs. | Black Onlygenerates neutral colors (grays and black) by using only black toner. This guarantees neutral colors without a color cast. This setting is best for documents and grayscale viewgraphs.4-Colorgenerates neutral colors (grays and black) by combining all four toner colors. This method produces smoother gradients and transitions to other colors, and it produces the darkest black. |
| Edge ControlThe Edge Controlsetting determines how edges are rendered. Edge control has two components: adaptive halftoning and trapping. Adaptive halftoning increases edge sharpness. Trapping reduces the effect of color-plane misregistration by overlapping the edges of adjacent objects slightly. | Maximumis the most aggressive trapping setting. Adaptive halftoning is on.Normalsets trapping at a medium level. Adaptive halftoning is on.Lightsets trapping at a minimal level. Adaptive halftoning is on.Offturns off both trapping and adaptive halftoning. |
Use the HP EasyColor option
If you are using the HP PCL 6 printer driver for Windows, the HP EasyColor technology automatically improves mixed-content documents that are printed from Microsoft Office programs. This technology scans documents and automatically adjusts photographic images in .JPEG or .PNG format.
HP EasyColor technology enhances the entire image at one time, rather than dividing it into several pieces, which results in improved color consistency, sharper details, and faster printing.
If you are using the HP Postscript printer driver for Mac, HP EasyColor technology scans all documents and automatically adjusts all photographic images with the same improved photographic results.
In the following example, the images on the left were created without using the HP EasyColor option. The images on the right show the enhancements that result from using the HP EasyColor option.


text_image
Bring your photos to LIFEpowered by hp EasyColor and the UPD

The HP EasyColor option is enabled by default in both the HP PCL 6 printer driver and the HP Mac Postscript printer driver, so you do not need to make manual color adjustments. To disable the option so you can manually adjust the color settings, open the Color tab in the Windows driver or the Color/Quality Options tab in the Mac driver, and then click the HP EasyColor check box to clear it.
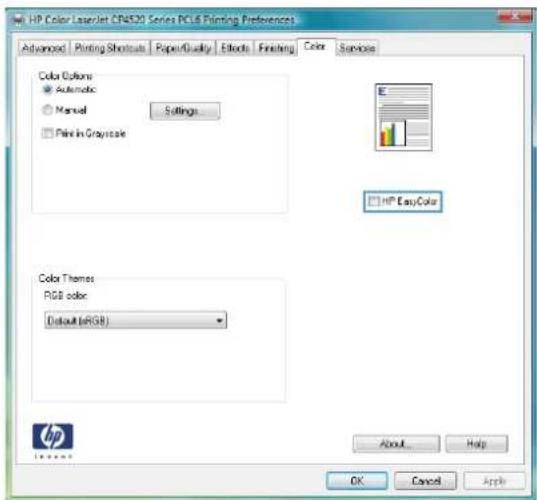
text_image
HP Color LaserJet CF4520 Series PC36 Printing Preferences Advanced | Printing Shortcuts | Paper/Quality | Effects | Finishing | Color | Services Color Options Automatic Manual Settings... Print in Gray-scale HP EasyColor Color Themes RGB color: Default (RGB) About... Help OK Cancel ApplyMatch colors
The process of matching product output color to your computer screen is quite complex, because printers and computer monitors use different methods of producing color. Monitors display colors by light pixels using an RGB (red, green, blue) color process, but printers print colors using a CMYK (cyan, magenta, yellow, and black) process.
Several factors can influence your ability to match printed colors to those on your monitor. These factors include:
Paper
• Printer colorants (inks or toners for example)
• Printing process (inkjet, press, or laser technology for example)
Overhead lighting
• Personal differences in perception of color
- Software programs
Printer drivers
• Computer operating system
• Monitors and monitor settings
• Video cards and drivers
• Operating environment (humidity for example)
Keep the above factors in mind when colors on your screen do not perfectly match your printed colors.
For most users, the best method for matching colors on your screen to your product is to print sRGB colors.
Sample book color matching
The process for matching product output to preprinted sample books and standard color references is complex. In general, you can obtain a reasonably good match to a sample book if the inks used to create the sample book are cyan, magenta, yellow, and black. These are usually referred to as process color sample books.
Some sample books are created from spot colors. Spot colors are specially created colorants. Many of these spot colors are outside of the range of the product. Most spot color sample books have companion process sample books that provide CMYK approximations to the spot color.
Most process sample books will state which process standards were used to print the sample book. In most cases they will be SWOP, EURO, or DIC. To get optimal color matching to the process sample book, select the corresponding ink emulation from the product menu. If you cannot identify the process standard, use SWOP ink emulation.
Print color samples
To use the color samples, select the color sample that is the closest match to the desired color. Use the sample's color value in your software program to describe the object you wish to match. Colors might vary depending on paper type and the software program used. For more details on how to use the color samples, go to www.hp.com/support/cljcp5525.
Use the following procedure to print color samples at the product using the control panel:
- Press the Home button 🔒.
- Press the down arrow ▼ to highlight the Administration menu, and press the OK button.
- Press the down arrow ▼ to highlight the Reports menu, and press the OK button.
- Press the down arrow ▼ to highlight the Other Pages menu, and press the OK button.
- Press the down arrow ▼ to highlight either the RGB Samples or the Print CMYK Values option, and press the OK button.
PANTONE® color matching
PANTONE has multiple color matching systems. PANTONE MATCHING SYSTEM® is very popular and uses solid inks to generate a wide range of color hues and tints. See www.hp.com/support/cljcp5525 for details on how to use PANTONE Colors with this product.
NOTE: PANTONE Colors generated might not match PANTONE-identified standards. Consult current PANTONE Publications for accurate color.
Advanced color use
The product provides automatic color features that generate excellent color results. Carefully designed and tested color tables provide smooth, accurate color rendition of all printable colors.
The product also provides sophisticated tools for the experienced professional.
HP ColorSphere toner
HP designs the print system (printer, print cartridges, toner, and paper) to work together to optimize print quality, product reliability, and user productivity. Original HP print cartridges contain HP ColorSphere toner that is specifically matched to your printer so that it will produce a wide range of brilliant colors. This helps you create professional looking documents that contain sharp, clear text and graphics and realistic printed photos.
HP ColorSphere toner produces print-quality consistency and intensity you can depend on across a wide range of papers. You can produce documents that help you make the right impression. Plus, HP professional-quality everyday and specialty papers (including a wide variety of HP media types and weights) are designed for the way you work.
HP ImageREt 3600
HP ImageREt 3600 print technology is a system of innovative technologies developed exclusively by HP to deliver superior print quality. The HP ImageREt system sets itself apart from the industry by integrating technology advancements and optimizing each element of the print system. Several categories of HP ImageREt have been developed for a variety of user needs.
The system's foundation is composed of key color laser technologies, including image enhancements, smart supplies, and high-resolution imaging. As the level or category of ImageREt increases, these core technologies are refined for more advanced system usage, and additional technologies are integrated. HP offers superior image enhancements for general office documents and marketing collateral. Optimized for printing on HP color laser high-gloss papers, HP Image REt 3600 provides superior results on all supported media, and under a variety of environmental conditions.
Paper selection
For the best color and image quality, select the appropriate paper type from the control panel menu or from the printer driver.
Color options
Color options automatically provide optimal color output. These options use object tagging, which provides optimal color and halftone settings for different objects (text, graphics, and photos) on a page. The printer driver determines which objects appear on a page and uses halftone and color settings that provide the best print quality for each object.
In the Windows environment, the Automatic and Manual color options are on the Color tab in the printer driver.
Standard red-green-blue (sRGB)
Standard red-green-blue (sRGB) is a worldwide color standard that HP and Microsoft developed as a common color language for monitors, input devices (scanners and digital cameras), and output devices (printers and plotters). It is the default color space used for HP products, Microsoft operating systems, the World Wide Web, and most office software. The sRGB standard represents the typical Windows monitor and is the convergence standard for high-definition television.
NOTE: Factors such as the type of monitor you use and the room lighting can affect the appearance of colors on your screen. For more information, see Match colors on page 157.
The latest versions of Adobe PhotoShop ^® , CorelDRAW ^® , Microsoft Office, and many other programs use sRGB to communicate color. Because it is the default color space in Microsoft operating systems, sRGB has been adopted broadly. When programs and devices use sRGB to exchange color information, typical users experience greatly improved color matching.
The sRGB standard improves your ability to match colors between the product, the computer monitor, and other input devices automatically, and eliminates the need to become a color expert.
10 Manage and maintain
• Print information pages
• Use the HP Embedded Web Server
• Use HP Web Jetadmin software
• Product security features
• Economy settings
• Install external I/O cards
Clean the product
Product updates
Print information pages
Information pages provide details about the product and its current configuration. Use the following procedures to print commonly used information pages:
Print the menu map
The menu map report presents the entire structure of the Administration menu so you can identify how to navigate to any option.
- At the control panel, press the Home button ☐.
-
Open the following menus:
-
Administration
- Reports
-
Configuration/Status Pages
-
Use the down arrow button ▼ to highlight the Administration Menu Map item, and then press the OK button to select it.
-
Use the up arrow button ▲ to highlight the Print item, and then press the OK button.
Print the configuration report
The configuration report lists the current product settings and installed options. Use this report to find the product IP address or host name, the current firmware version, and information about network protocols.
- At the control panel, press the Home button ☐.
-
Open the following menus:
-
Administration
- Reports
-
Configuration/Status Pages
-
Use the down arrow button ▼ to highlight the Configuration Page item, and then press the OK button to select it.
- Use the up arrow button ▲ to highlight the Print item, and then press the OK button. The report consists of several pages.
NOTE: The product IP address or host name is listed on the HP Jetdirect page.
Use the HP Embedded Web Server
Use the HP Embedded Web Server to view product status, configure product network settings, and to manage printing functions from your computer instead of from the product control panel. The following are examples of what you can do using the HP Embedded Web Server:
• View product status information.
• Determine the remaining life for all supplies and order new ones.
• View and change tray configurations.
• View and change the product control-panel menu configuration.
• View and print internal pages.
• Receive notification of product and supplies events.
• View and change network configuration.
To use the HP Embedded Web Server, you must have Microsoft Internet Explorer 5.01 or later or Netscape 6.2 or later for Windows, Mac OS, and Linux (Netscape only). Netscape Navigator 4.7 is required for HP-UX 10 and HP-UX 11. The HP Embedded Web Server works when the product is connected to an IP-based network. The HP Embedded Web Server does not support IPX-based product connections. You do not have to have Internet access to open and use the HP Embedded Web Server.
When the product is connected to the network, the HP Embedded Web Server is automatically available.

NOTE: For complete information about using the HP Embedded Web Server, see the HP Embedded Web Server User Guide, which is on the HP website at www.hp.com/support/cljcp5525.
Open the HP Embedded Web Server by using a network connection
- Identify the product IP address or host name.
Open the following menus:
- Administration
- Reports
-
Configuration/Status Pages
-
Use the down arrow button ▼ to highlight the Configuration Page item, and then press the OK button.
-
Use the up arrow button ▲ to highlight the Print item, and then press the OK button.
-
Locate the IP address or host name on the HP Jetdirect page.
-
In a supported Web browser on your computer, type the product IP address or host name in the address/URL field.
Features
Information tab
Table 10-1 HP Embedded Web Server Information tab
| Menu Description | |
| Device Status | Shows the product status and shows the estimated life remaining of HP supplies. The page also shows the type and size of paper set for each tray. To change the default settings, click the Change Settings link. |
| Configuration Page | Shows the information found on the configuration page. |
| Supplies Status Page | Shows a detailed status of the installed HP supplies. |
| Event Log Page | Shows a list of all product events and errors. Use the HP Instant Support link (in the Other Links area on all HP Embedded Web Server pages) to connect to a set of dynamic Web pages that help you solve problems. These pages also show additional services available for the product. |
| Usage Page | Shows a summary of the number of pages the product has printed, grouped by size, type, and paper print path. |
| Device Information | Shows the product network name, address, and model information. To customize these entries, click the Device Information menu on the General tab. |
| Allows uploading a file from your hard disk or network file server to be printed. The following file types are supported:.txt.ps.pdf.pcl.cht.prn | |
| Print Reports and Pages | Lists the internal reports and pages for the product. Select one or more items to print or view. |
General tab
Table 10-2 HP Embedded Web Server General tab
| Menu Description | |
| Control Panel Administration Menu | Provides a remote view of theAdministrationmenu available at the control panel of the product. |
| Alert Subscriptions Set up e-mail alerts for various product and supplies events. | |
| AutoSend | Configure the product to send automated e-mails regarding product configuration and supplies to specific e-mail addresses. |
| Control Panel Snapshot Provides an inactive view of the control panel of the product. | |
| Sleep Schedule | Set or edit a wake time, sleep time, and sleep delay for the product. You can set a different schedule for each day of the week and for holidays. |
| Edit Other Links | Add or customize a link to another website. This link appears in theOther Links area on all HP Embedded Web Server pages. |
| Device Information | Name the product and assign an asset number to it. Enter the name of the primary contact who will receive information about the product. |
| Language | Set the language in which to display the HP Embedded Web Server information. |
| Date and Time Set the date and time or synchronize with a network time server. | |
| Backup and Restore | Create a backup file that contains product and user data. If necessary, you can use this file to restore data to the product. |
| Solution Installer | Install third-party software programs that can enhance the product functionality. |
| Firmware upgrade Download and install product firmware upgrade files. | |
Print tab
Use the Print tab to enable or disable walk-up USB printing. Jobs printed from USB will use the default print settings. the following file types are supported for walk-up USB printing:
.pdf
.prn
.pcl
. ps
.cht
Table 10-3 HP Embedded Web Server Print tab
| Menu Description | |
| Retrieve Job From USB Use this item to enable or disable this feature. | |
| Manage Stored Jobs Use this feature to manage jobs stored on the product memory. | |
| Restrict Color Use this item to restrict the number of color pages that can be printed from this product. | |
| General Print Settings Use this item to manage the print settings for this product. |
Troubleshooting tab
Table 10-4 HP Embedded Web Server Troubleshooting tab
| Menu Description | |
| Reports and Tests | Print or view product settings, information pages, and diagnostic test pages. |
| Calibration/Cleaning | Provides remote control of the cleaning and calibration operations of the product. |
| Firmware upgrade | Download and install product firmware upgrade files. |
Security tab
Table 10-5 HP Embedded Web Server Security tab
| Menu Description | |
| General Security | Configure an administrator password so you can restrict access to certain features on the product. Enable or disable the Host USB port on the control panel or the USB connectivity port on the formatter for printing directly from a computer. |
| Access Control | Configure access to product functions for specific individuals or groups. Also select the method by which individuals sign in to the product. |
| Protect Stored Data | Configure and manage the internal hard drive for the product. This product includes an encrypted hard drive for maximum security. Configure settings for jobs that are stored on the product hard drive. |
| Certificate Management | Install and manage security certificates for access to the product and the network. |
Networking tab
Use the Networking tab to change network settings for the product when it is connected to an IP-based network. This tab does not appear if the product is connected to other types of networks.
Other Links list

NOTE: You can configure which items appear in the Other Links list by using the Edit Other Links menu on the General tab. The following items are the default links.
Table 10-6 HP Embedded Web Server Other Links list
| Menu Description | |
| HP Instant Support | Connects you to the HP website to help you find solutions to product problems. |
| Shop for Supplies Connects you to the HP website for ordering supplies. | |
| Product Support | Connects to the support site for the product, from which you can search for help regarding various topics. |
| Show Me How Connects you to the HP website for product support. | |
Use HP Web Jetadmin software
HP Web Jetadmin is a Web-based software solution for remotely installing, monitoring, and troubleshooting network-connected peripherals. Management is proactive, allowing network administrators the ability to resolve issues before users are affected. Download this free, enhanced-management software at www.hp.com/go/webjetadmin.
Device plug-ins can be installed into HP Web Jetadmin to provide support for specific product features. The HP Web Jetadmin software can automatically notify you when new plug-ins are available. On the Product Update page, follow the directions to automatically connect to the HP Web site and install the latest device plug-ins for your product.

NOTE: Browsers must be Java™-enabled. Browsing from an Apple PC is not supported.
Product security features
Security statements
The product supports security standards and recommended protocols that help you keep the product secure, protect critical information on your network, and simplify the way you monitor and maintain the product.
For in-depth information about HP's secure imaging and printing solutions, visit www.hp.com/go/secureprinting. The site provides links to white papers and FAQ documents about security features.
IP Security
IP Security (IPsec) is a set of protocols that control IP-based network traffic to and from the product. IPsec provides host-to-host authentication, data integrity, and encryption of network communications.
For products that are connected to the network and have an HP Jetdirect print server, you can configure IPsec by using the Networking tab in the HP Embedded Web Server.
Secure the HP Embedded Web Server
Assign an administrator password for access to the product and the HP Embedded Web Server so that unauthorized users cannot change the product settings.
- Open the HP Embedded Web Server by entering the product IP address into the address line of a Web browser.
- Click the Security tab.
- Open the General Security menu.
- In the Username field, type the name to associate with the password.
- Type the password in the New Password box, and then type it again in the Verify password box.
NOTE: If you are changing an existing password, you must first type the existing password in the Old Password field.
- Click the Apply button. Make note of the password and store it in a safe place.
Encryption support: HP Encrypted High Performance Hard Disks
This product includes an encrypted hard disk (standard for the HP Color LaserJet CP5525xh; optional on other models). This hard disk provides hardware-based encryption so you can securely store sensitive print, copy, and scan data without impacting product performance. This hard disk uses the latest Advanced Encryption Standard (AES) and has versatile time-saving features and robust functionality.
Use the Security menu in the HP Embedded Web Server to configure the disk.
For more information about the encrypted hard disk, see the HP High-Performance Secure Hard Disk Setup Guide.
-
Go to www.hp.com/support.
-
Type Secure Hard Disk into the search box and click the >> button.
-
Click the HP Secure High Performance Hard Disk Drive link.
-
Click the Manuals link.
Secure stored jobs
You can protect jobs that are stored on the product by assigning a PIN to them. Anyone who tries to print these protected jobs must first enter the PIN at the product control panel.
Lock the control panel menus
You can lock various features on the control panel by using the HP Embedded Web Server.
- Open the HP Embedded Web Server by entering the product IP address into the address line of a Web browser.
- Click the the Security tab.
- Open the Access Control menu.
- In the Sign In and Permission Policies area, select which types of users have permission for each of the features.
- Click the Apply button.
Lock the formatter
The formatter area, on the back of the product, has a slot that you can use to attach a security cable. Locking the formatter prevents someone from removing valuable components from it.
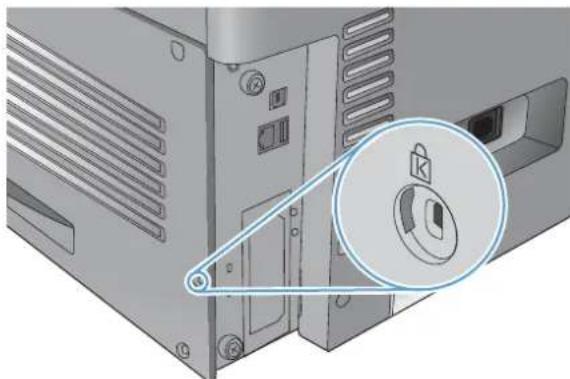
natural_image
3D diagram of a computer tower with a magnified inset showing a lock mechanism (no text or symbols)Economy settings
Optimize speed or energy usage
The optimum speed or energy usage feature controls the fuser cool down behavior. The following settings are available:
| Faster First Page The fuser maintains power and the first page processes fasterfor any new job that is sent to the product. | |
| Save Energy The fuser reduces power when it is idle. | |
| Save More Energy | The fuser reduces power when it is idle. The fuser reduces more power than the Save Energy setting. |
| Save Most Energy | The fuser is turned-off and it gradually cools to room temperature. The Save Most Energy setting takes the longest time to print the first page. |
Complete the following steps to optimize the product for speed or energy usage:
- Press the Home button 🔒.
- Press the down arrow ▼ to highlight the Administration menu, and then press the OK button.
- Press the down arrow ▼ to highlight the General Settings menu, and then press the OK button.
- Press the down arrow ▼ to highlight the Energy Settings menu, and then press the OK button.
- Press the down arrow ▼ to highlight the Optimum Speed/Energy Usage menu, and then press the OK button.
- Select the appropriate option, and then press the OK button.
Power-saving modes
The adjustable sleep mode feature reduces power consumption when the product has been inactive for an extended period. You can set the length of time before the product enters sleep mode.
NOTE: This mode does not affect product warm-up time.
Set sleep mode
- Press the Home button .
- Press the down arrow ▼ to highlight the Administration menu, and then press the OK button.
- Press the down arrow ▼ to highlight the Display Settings menu, and then press the OK button.
- Press the down arrow ▼ to highlight the Sleep Mode menu, and then press the OK button.
- Press the down arrow ▼ to highlight the appropriate setting, and then press the OK button.
Set sleep delay
- Press the Home button .
- Press the down arrow ▼ to highlight the Administration menu, and then press the OK button.
- Press the down arrow ▼ to highlight the General Settings menu, and then press the OK button.
- Press the down arrow ▼ to highlight the Energy Settings menu, and then press the OK button.
- Press the down arrow ▼ to highlight the Sleep Delay menu, and then press the OK button.
- Press the up or down arrow ▲/▼ to select the appropriate time period, and then press the OK button.
Wake time
The wake time feature allows you to instruct the product to wake at a certain time on selected days, to eliminate waiting for the warm-up and calibration periods. You must have the Sleep Mode setting on to set the wake time.

NOTE: Make sure that the real-time clock is set to the correct date and time before you set the wake time.
Set the real-time clock
Use the real-time clock feature to set the date and time settings. The date and time information is attached to stored print jobs, so you can identify the most recent versions.
| Open the Date/Time Settings menu | 1. Press the Home button . [IMAGE]2. Press the down arrow ▼ to highlight theAdministrationmenu, and then press the OKbutton.3. Press the down arrow ▼ to highlight theGeneral Settingsmenu, and then press theOKbutton.4. Press the down arrow ▼ to highlight theDate/Time Settingsmenu, and then press theOKbutton. |
| Set the date | 1. Open theDate/Timemenu, and then select theDatemenu.2. Press the up arrow or down arrow ▲/▼to select the year, month, and day. Press theOKbutton after each selection. |
| Set the date format | 1. Open theDate/Time Formatmenu, and then select theDate Formatmenu.2. Press the up arrow or down arrow ▲/▼to select the date format, and then press the OKbutton. |
| Set the time | 1. Open theDate/Timemenu, and then select theTimemenu.2. Press the up arrow or down arrow ▲/▼to select the hour, minute, and AM/PM setting. Press theOKbutton after each selection. |
| Set the time format | 1. Open the Date/Time Format menu, and then select the Time Format menu.2. Press the up arrow or down arrow ▲/▼to select the time format, and then press the OK button. |
| Set the time zone | 1. Open the Date/Time menu, and then select the Time Zone menu.2. Press the up arrow or down arrow ▲/▼to select the time zone, and then press the OK button. |
Set the wake time
- Press the Home button ☐.
- Press the down arrow ▼ to highlight the Administration menu, and then press the OK button.
- Press the down arrow ▼ to highlight the General Settings menu, and then press the OK button.
- Press the down arrow ▼ to highlight the Energy Settings menu, and then press the OK button.
- Press the down arrow ▼ to highlight an existing sleep mode delay or add an event, and then press the OK button.
Install external I/O cards
This product is equipped with an external I/O (EIO) slot. You can install an additional HP Jetdirect print server card or external EIO hard drive in the available EIO slot.

NOTE: This example shows installing an HP Jetdirect print server card.
- Turn the product off.
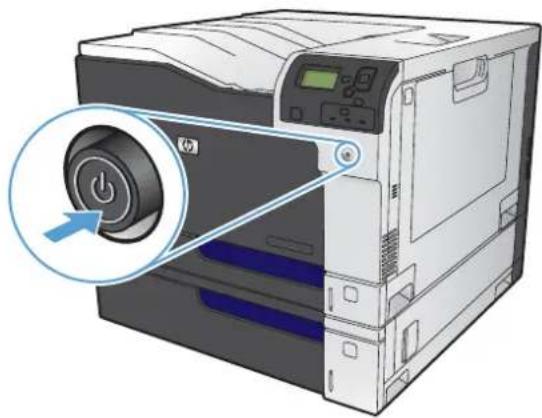
natural_image
Illustration of a HP printer with a power button and control panel, no text or symbols present- Disconnect all power and interface cables.

NOTE: This illustration might not show all the cables.
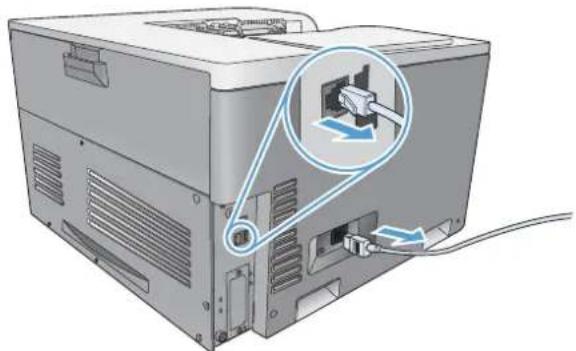
natural_image
Illustration of a computer tower with an attached plug and cable, showing internal components and a magnified view of the plug (no text or symbols present)- Loosen and remove the two retaining screws holding the cover for the EIO slot, and then remove the cover. You will not need these screws and the cover again. They can be discarded.
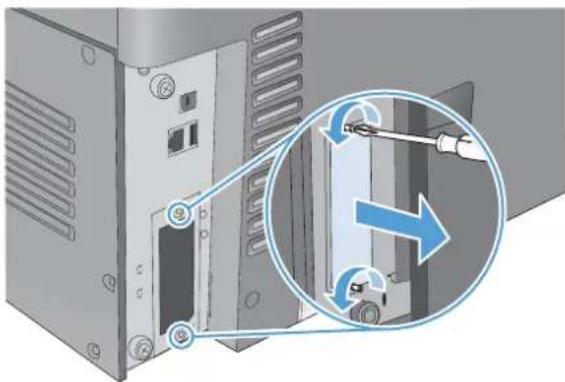
natural_image
Diagram of a computer tower with a magnified inset showing a gear shift mechanism (no text or symbols present)- Firmly insert the HP Jetdirect print server card or other EIO accessory into the EIO slot.
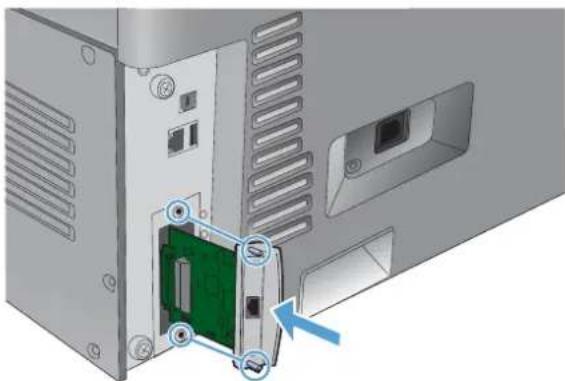
natural_image
3D diagram of a computer tower case with a green internal component and a blue arrow indicating direction (no text or symbols)- Insert and tighten the retaining screws that came with the print server card.
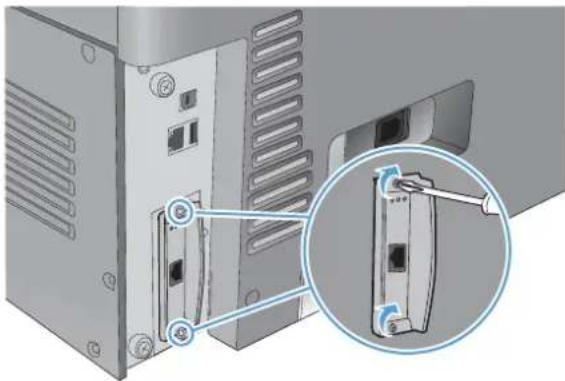
natural_image
Diagram of a computer tower with an inset close-up showing a cable clip inserted into a drive (no text or symbols present)- Reconnect the power cable, connect the interface cable to the HP Jetdirect print server card, and turn the product on.
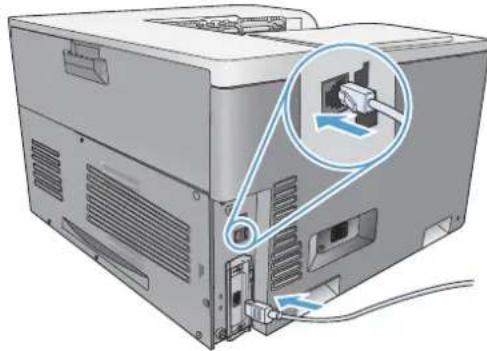
natural_image
Illustration of a computer tower with an attached cable and a magnified inset showing internal components (no text or symbols)- Print a configuration page. An HP Jetdirect configuration page that contains network configuration and status information should also print.
If it does not print, turn the product off, and then uninstall and reinstall the print server card to ensure that it is completely seated in the slot.
- Perform one of these steps:
- Choose the correct port. See the computer or operating system documentation for instructions.
● Reinstall the software, choosing the network installation this time.
Clean the product
Over time, particles of toner and paper accumulate inside the product. This can cause print-quality problems during printing. Cleaning the product eliminates or reduces these problems.
Clean the paper path and print-cartridge areas every time that you change the print cartridge or whenever print-quality problems occur. As much as possible, keep the product free from dust and debris.
To clean the product exterior, use a soft, water-moistened cloth.
Clean the paper path
-
At the product control panel, press the Home button ☐.
-
Open the following menus:
-
Device Maintenance
-
Calibration/Cleaning
-
Press the down arrow ▼ to highlight the Print Cleaning Page menu item, and then press the OK button.
- Completion of the cleaning process depends on the product model:
- Non-duplex models: After the first side prints, reload the page into Tray 1 according to the instructions, and then press the OK button. After the second side prints, the task is complete. Discard the printed page.
- Duplex models: After both sides print, the task is complete. Discard the printed page.
Product updates
To download the most recent firmware upgrade for the product, go to www.hp.com/support/cljcp5525 or www.hp.com/go/cljcp5525_firmware.
11 Solve problems
- Self help
- Solve general problems
- Restore factory settings
• Interpret control-panel messages
Clear jams
• Paper does not feed automatically
• Product feeds multiple sheets - Improve print quality
• The product does not print or it prints slowly - Solve walk-up USB printing problems
- Solve connectivity problems
- Solve software problems
Self help
In addition to the information in this guide, other sources are available that provide helpful information.
| Printable poster for using the product control panel | This poster is available on the product CD. It prints on four full-color pages that you can post near the product. It contains information on using the buttons and other features available on the product control panel. |
| Quick Reference Topics | Several Quick Reference Topics for this product are available at this website:www.hp.com/support/cljcp5525.You can print these topics and keep them near the product. They are a handy reference for procedures that you perform frequently. |
| Quick Reference Guide | This guide contains procedures for the most commonly used product functions. The guide is available from this website:www.hp.com/support/cljcp5525.You can print this guide and keep it near the product. |
| Control panel help The control panel has built-in help that guides you through several tasks, such as replacing print cartridges and clearing jams. | |
Solve general problems
If the product is not responding correctly, complete the steps in the following checklist, in order. If the product does not pass a step, follow the corresponding troubleshooting suggestions. If a step resolves the problem, you can stop without performing the other steps on the checklist.
Troubleshooting checklist
- Make sure that the product Ready light is on. If no lights are on, complete these steps:
a. Check the power-cable connections.
b. Check that the power is turned on.
c. Make sure that the line voltage is correct for the product power configuration. (See the label that is on the back of the product for voltage requirements.) If you are using a power strip and its voltage is not within specifications, plug the product directly into the wall. If it is already plugged into the wall, try a different outlet.
d. If none of these measures restores power, contact HP Customer Care.
- Check the cabling.
a. Check the cable connection between the product and the computer or network port. Make sure that the connection is secure.
b. Make sure that the cable itself is not faulty by using a different cable, if possible.
c. Check the network connection.
- Check to see if any messages appear on the control-panel display. If any error messages appear, see Interpret control-panel messages on page 181.
- Ensure that the paper that you are using meets specifications.
- Print a configuration page. See Print information pages on page 162. If the product is connected to a network, an HP Jetdirect page also prints.
a. If the pages do not print, check that at least one tray contains paper.
b. If the page jams in the product, see Clear jams on page 182.
- If the configuration page prints, check the following items:
a. If the page does not print correctly, the problem is with the product hardware. Contact HP Customer Care.
b. If the page prints correctly, then the product hardware is working. The problem is with the computer you are using, with the printer driver, or with the program.
- Select one of the following options:
Windows: Click Start, click Settings, and then click Printers or Printers and Faxes.
Double-click the name of the product.
-or-
Mac OS X: Open the Printer Setup Utility or the Print & Fax list, and double-click the line for the product.
- Verify that you have installed the printer driver for this product. Check the program to make sure that you are using the printer driver for this product.
- Print a short document from a different program that has worked in the past. If this solution works, then the problem is with the program you are using. If this solution does not work (the document does not print), complete these steps:
a. Try printing the job from another computer that has the product software installed.
b. If you connected the product to the network, connect the product directly to a computer with a USB cable. Redirect the product to the correct port, or reinstall the software, selecting the new connection type that you are using.
Factors that affect product performance
Several factors affect the time it takes to print a job:
• Maximum product speed, measured in pages per minute (ppm)
The use of special paper (such as transparencies, heavy paper, and custom-size paper)
• Product processing and download time
• The complexity and size of graphics
• The speed of the computer you are using
The USB connection
• The printer I/O configuration
• The network operating system and configuration (if applicable)
• The printer driver that you are using
Restore factory settings
Use the control panel menus to restore factory settings.
- At the product control panel, press the Home button ☐.
- Press the down arrow ▼ to highlight the Administration menu, and then press the OK button.
- Press the down arrow ▼ to highlight the General Settings menu, and then press the OK button.
- Press the down arrow ▼ to highlight the Restore Factory Settings option, and then press the OK button to reset the product to the original factory settings.
Interpret control-panel messages
Control-panel message types
Four types of control-panel messages can indicate the status of or problems with the product.
| Message type Description | |
| Status messages | Status messages reflect the current state of the product. They inform you of normal product operation and require no interaction to clear them. They change as the state of the product changes. Whenever the product is ready, not busy, and has no pending warning messages, the Ready status message appears if the product is online. |
| Warning messages | Warning messages inform you of data and print errors. These messages typically alternate with the Ready or status messages and remain until you press the OK button. Some warning messages are clearable. If the Clearable Warnings menu in the Display Settings menu is set to the Job option, the next print job clears these messages. |
| Error messages Error messages communicate that some action must be performed, such as adding paper or clearing a jam. | |
| Critical-error messages | Critical error messages inform you of a product failure. You can clear some of these messages by turning the product off and then on. These messages are not affected by the Auto continue (10 seconds) setting. If a critical error persists, service is required. |
Control-panel messages
The product provides robust control panel messaging. When a message appears on the control panel, follow the on-screen instructions to resolve the issue. If the product displays an "Error" or "Attention" message, and no steps are shown to resolve the issue, turn the product off then on. Contact HP support if you continue to experience issues with the product.
For additional information on a variety of topics, press the Help button ☐ on the control panel.
Clear jams
Prevent jams
Common causes of jams ^1
| Cause Solution | |
| The paper length and width guides are not adjusted correctly. | Adjust the guides so they are against the paper stack. |
| The media does not meet specifications. Use only media that meets HP specifications. Seeprint media on page 71. | Paper and |
| You are using media that has already passed through a printer or copier. | Do not use media that has been previously printed on or copied. |
| An input tray is loaded incorrectly. | Remove any excess media from the input tray. Make sure that the stack is below the maximum stack height mark in the tray.SeeLoad paper trays on page 80. |
| The media is skewed. The input-tray guides are not adjusted correctly. Adjust themso that they hold the stack firmly in place without bending it. | |
| The media is binding or sticking together. Remove the media, flex it, rotate it 180 degrees, or flip itover. Reload the media into the input tray.NOTE: Do not fan paper. Fanning can create static electricity, which can cause paper to stick together. | |
| The media is removed before it settles into the output bin. | Wait until the page completely settles in the output bin before removing it. |
| The paper is too heavy. Do not use paper that exceeds the supported weights for theinput tray. SeeSupported paper types and tray capacityon page 78.Do not use paper that exceeds the supported weight for automatic duplex printing. SeeSupported paper sizes forduplex printing on page 77. | |
| The media is in poor condition. Replace the media. | |
| The internal rollers from the tray are not picking up the media. | Remove the top sheet of media. If the media is too heavy, it might not be picked from the tray. SeeSupported paper typesand tray capacity on page 78. |
| The media has rough or jagged edges. Replace the media. | |
| The media is perforated or embossed. | Perforated or embossed media does not separate easily. Load sheets one at a time. |
| Paper was not stored correctly. | Replace the paper in the trays. Paper should be stored in the original packaging in a controlled environment. |
If the product continues to jam, contact HP Customer Support or your authorized HP service provider.
Jam locations
Use this illustration to identify locations of jams. In addition, instructions appear on the control panel to direct you to the location of jammed paper and how to clear it.

NOTE: Internal areas of the product that might need to be opened to clear jams have green handles or green labels.
Figure 11-1 Jam locations
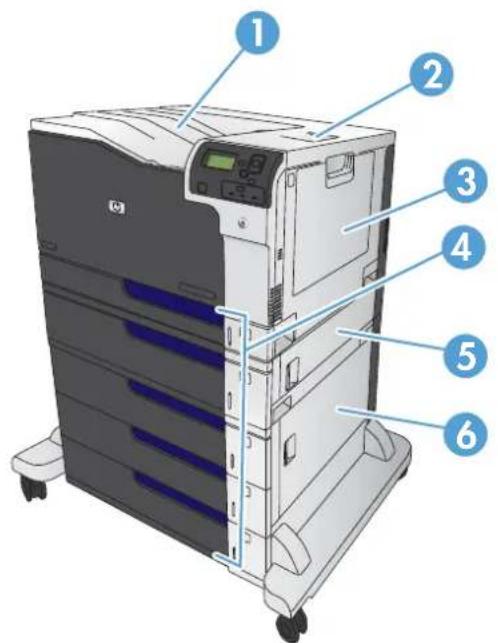
text_image
Diagram of a HP industrial machine with numbered parts labeled 1 through 6 for identification.| 1 Output bin | |
| 2 Upper right door | |
| 3 | T r a y l a r e a |
| 4 Tray 2, Tray 3, and optional Trays 4, 5, and 6 | |
| 5 Middle right door | |
| 6 Lower right door | |

WARNING! To avoid electrical shock, remove any necklaces, bracelets, or other metal items before reaching into the inside of the product.
Clear jams in the upper right door
⚠ WARNING! The fuser can be hot while the product is in use. Wait for the fuser to cool before handling it.
- Open the upper right door.
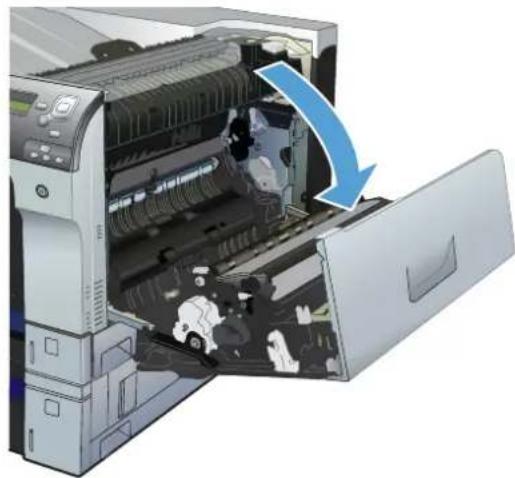
natural_image
Diagram of an open industrial machine with internal components and a blue arrow indicating flow direction (no text or symbols present)- Gently pull the paper out of the pickup area.
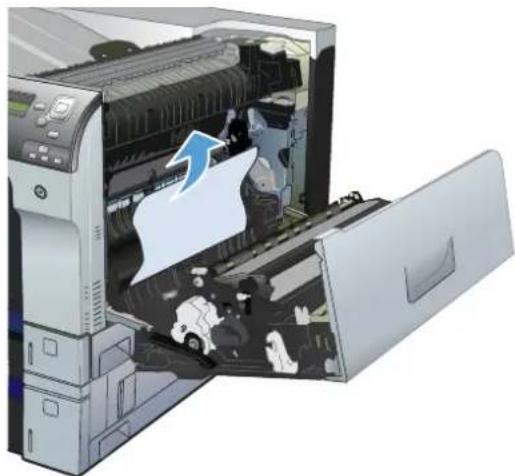
natural_image
Illustration of a printer's internal structure showing paper feeding into a paper airplane (no text or symbols visible)- If paper is visible entering the bottom of the fuser, gently pull downward to remove it.
CAUTION: Do not touch the transfer roller (callout 1). Contaminants on the roller can affect print quality.
- Paper could be jammed inside the fuser where it would not be visible. Open the fuser jam access door. If paper is jammed inside the fuser, gently pull it straight up to remove it. If the paper tears, remove all paper fragments.
WARNING! Even if the body of the fuser has cooled, the rollers that are inside could still be hot. Do not touch the fuser rollers until they have cooled.
If no paper is found but the product still reports a jam, remove the fuser to check for jammed paper inside the fuser cavity. Remove any paper, and then reinstall the fuser.
NOTE: Make sure that the fuser is reinstalled correctly before closing the upper right door.
- Close the upper right door.
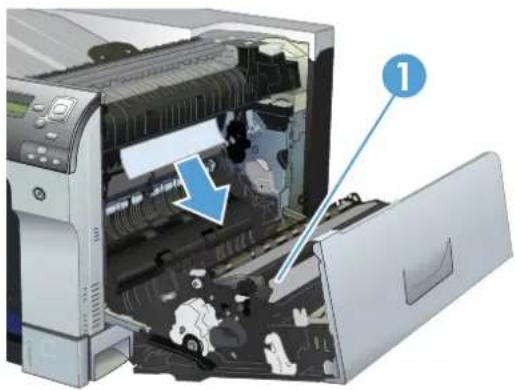
natural_image
Interior view of a printer showing internal components and a blue arrow indicating a location (no text or symbols present)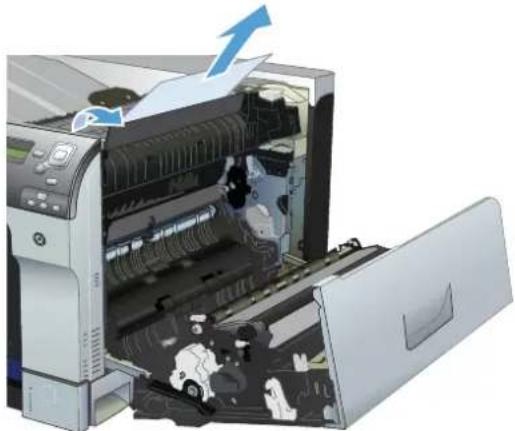
natural_image
Illustration of an open printer with internal components and a blue arrow indicating paper direction (no text or symbols present)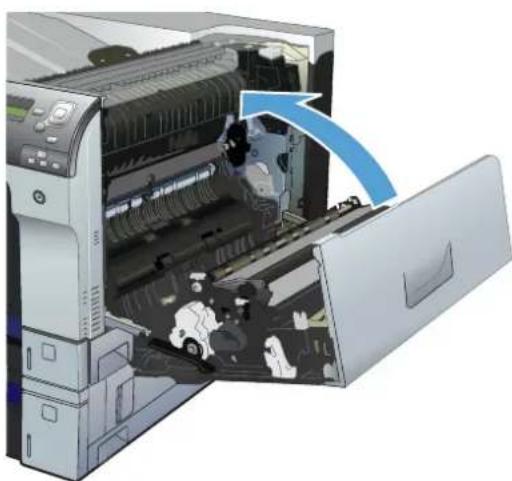
natural_image
Illustration of an open printer with internal components and a blue arrow indicating a process (no text or symbols present)Clear jams in the lower right door
-
Open the lower right door.
-
If paper is visible, gently pull the jammed paper up or down to remove it.
-
Close the lower right door.
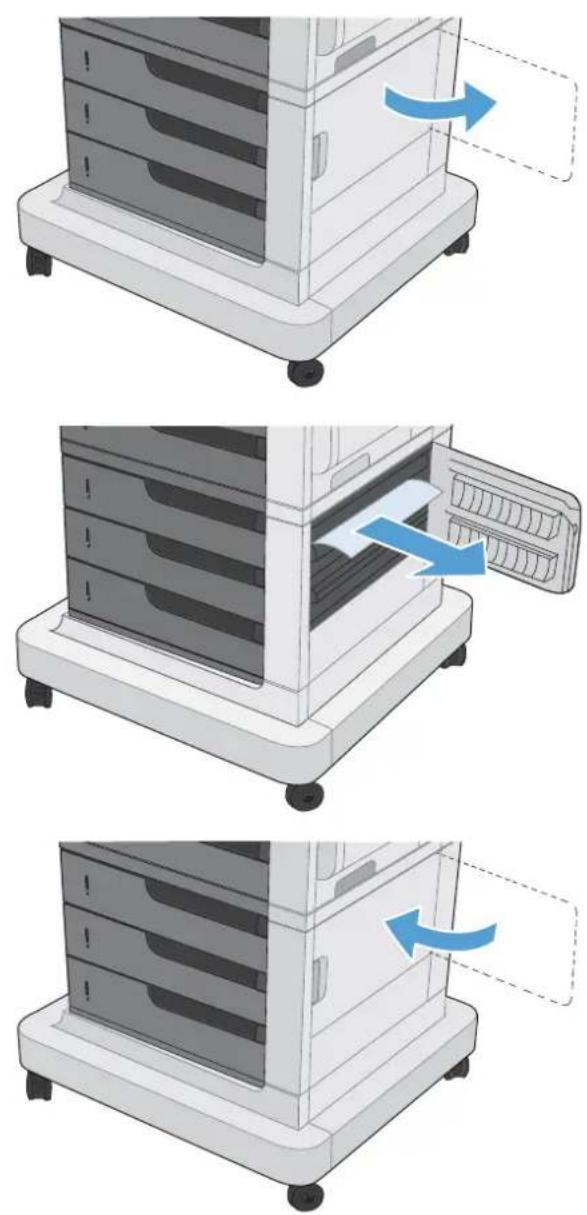
Clear jams in Tray 1
-
If jammed paper is visible in Tray 1, clear the jam by gently pulling the paper straight out. Touch the OK button to clear the message.
-
If you cannot remove the paper, or if no jammed paper is visible in Tray 1, close Tray 1 and open the upper right door.
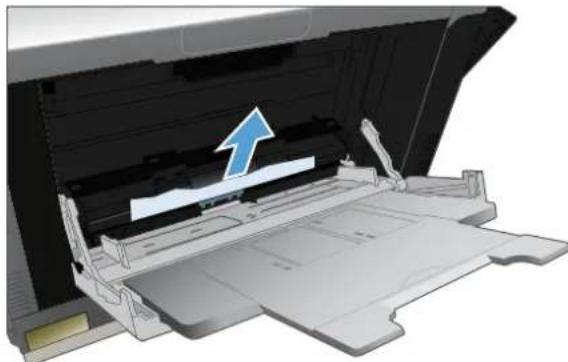
natural_image
3D rendering of a printer's internal structure showing paper tray and cover, with a blue arrow indicating the paper's edge (no text or symbols present)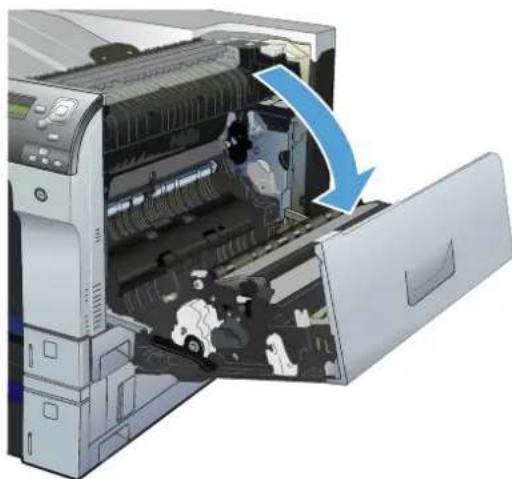
natural_image
Illustration of an open printer with internal components and a blue arrow indicating a process (no text or symbols present)- Gently pull the paper out of the pick up area.
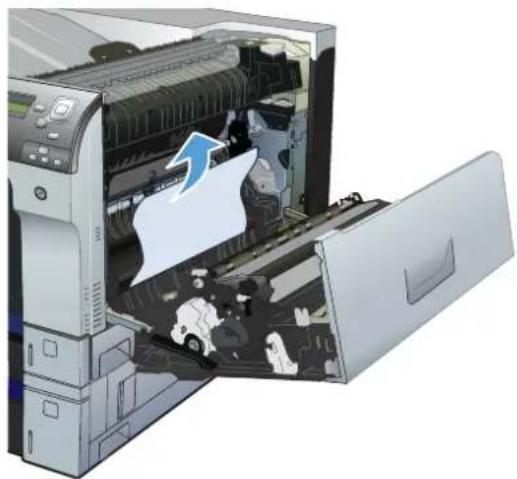
natural_image
Illustration of a printer with open lid and internal components, showing a person opening the paper (no text or symbols visible)- Close the upper right door.

natural_image
Illustration of an open industrial machine with internal components and a blue arrow indicating flow direction (no text or symbols present)Clear jams from Tray 2, Tray 3, or an optional tray
△ CAUTION: Opening a tray when paper is jammed can cause the paper to tear and leave pieces of paper in the tray, which might cause another jam. Be sure to clear jams from the upper and lower right door before opening a tray.
-
Open the tray and make sure that the paper is stacked correctly. Remove any jammed or damaged sheets of paper. To access jammed paper from the tray cavity, remove the tray from the product.
-
Close the tray.
-
If the jam is in Tray 3, you also can open the door on the right side of the tray, remove the jammed paper, and then close the door.
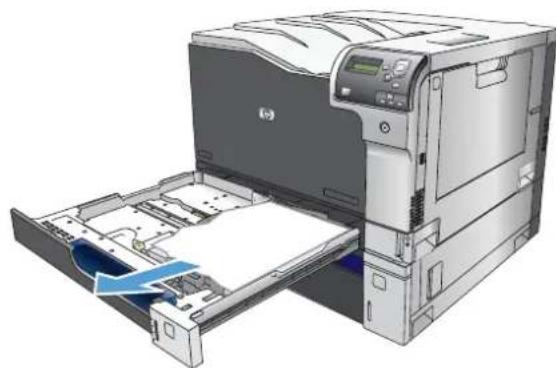
natural_image
Illustration of a HP printer with paper feed and paper sheet, showing internal components (no text or symbols)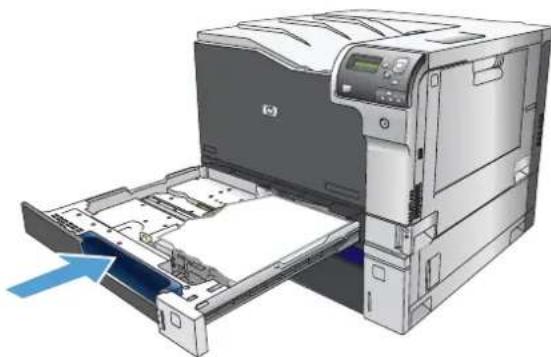
natural_image
Illustration of a HP printer with an open paper sheet being inserted, showing internal components and a blue arrow indicating the paper's direction (no text or symbols present)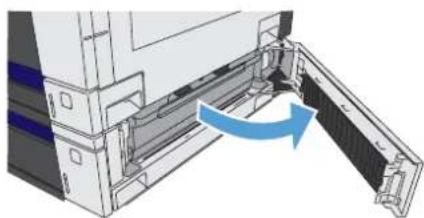
natural_image
Diagram of a mechanical assembly with a blue arrow indicating direction (no text or symbols present)Clear jams in the output bin area
- If paper is visible from the output bin, grasp the leading edge and remove it.
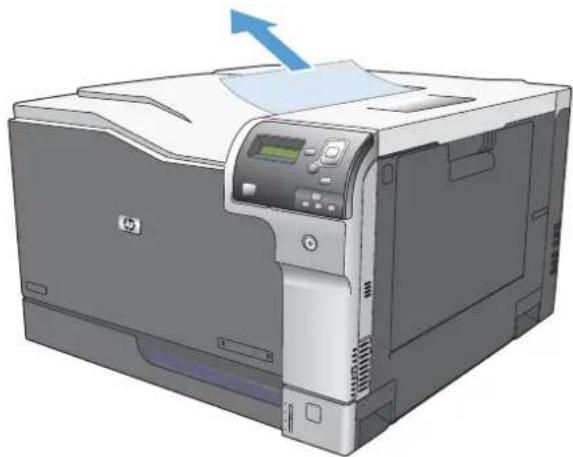
natural_image
Illustration of a HP printer with a blue arrow indicating paper direction (no text or symbols present)Change jam recovery
This product provides a jam recovery feature that reprints jammed pages.
- Press the Home button 🔒.
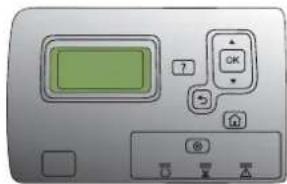
text_image
Control panel interface with green display, OK button, and navigation buttons-
Press the down arrow ▼ highlight the Administration menu, and then press the OK button.
-
Press the down arrow ▼ to highlight the General Settings menu, and then press the OK button.
-
Press the down arrow ▼ to highlight the Jam Recovery menu, and then press the OK button.
-
Press the down arrow ▼ or up arrow ▲ to highlight the appropriate setting, and then press the OK button. The following options are available:
- Auto — The product attempts to reprint jammed pages when sufficient memory is available. This is the default setting. - Off — The product does not attempt to reprint jammed pages. Because no memory is used to store the most recent pages, performance is optimal.
CAUTION: When using this option, if the product runs out of paper and the job is being printed on both sides, some pages can be lost.
- On — The product always reprints jammed pages. Additional memory is allocated to store the last few pages printed. This might cause overall performance to suffer.
- Press the Home button 🔒 to return to the Ready state.
Paper does not feed automatically
Paper does not feed automatically
| Cause Solution | |
| Manual feed is selected in the software program. | Load Tray 1 with paper, or, if the paper is loaded, press the OK button. |
| The correct size paper is not loaded. Load the correct size paper. | |
| The input tray is empty. Load paper into the input tray. | |
| Paper from a previous jam has not been completely removed. | Open the product and remove any paper in the paper path. |
| The paper size is not configured correctly for the input tray. | Print a configuration page or use the control panel to determine the paper size for which the tray is configured. |
| The guides in the tray are not against the paper. | Verify that the paper guides are touching the paper. |
| The manual-feed prompt is set to Always. The product always prompts for manual feed, even if the tray is loaded. | Load Tray 1 with paper, or, if the paper is loaded, press the OK button.Or, change the manual-feed prompt setting to Unless loaded, so that the product prompts for manual feed only when the tray is empty. |
| The Use Requested Tray setting on the Mamage trays menu is set to Exclusively, and the requested tray is empty. The product will not use another tray. | Load the requested tray.Or, change the setting from Exclusively to First on the Manage Trays menu. The product can use other trays if no media is loaded in the specified tray. |
Product feeds multiple sheets
Product feeds multiple sheets
| Cause Solution | |
| Print paper is sticking together. | Remove paper, flex it, rotate it 180 degrees or flip it over, and then reload it into the tray. |
| NOTE: Do not fan paper. Fanning can cause static electricity, which can cause paper to stick together. | |
| Paper does not meet the specifications for this product. Use only paper that meets HP paper specifications for this product. | |
| Trays are not properly adjusted. Make sure that the paper guides match the size of paper being used. | |
Improve print quality
You can prevent most print-quality problems by following these guidelines.
• Use the correct paper type setting in the printer driver.
• Use paper that meets HP specifications for this product.
• Clean the product as necessary.
- Replace print cartridges when they are reaching the end of their estimated life and print quality is no longer acceptable.
• Use the printer driver that best meets your printing needs.
Select a paper type
- Open the printer driver, click the Properties or Preferences button, and then click the Paper/Quality tab.
- Select a type from the Type is drop-down list.
- Click the OK button.
Use paper that meets HP specifications
Use different paper if you are having any of the following problems:
The printing is too light or seems faded in areas.
Specks of toner are on the printed pages.
- Toner is smearing on the printed pages.
• Printed characters seem misformed.
• Printed pages are curled.
Always use a paper type and weight that this product supports. In addition, follow these guidelines when selecting paper:
- Use paper that is of good quality and free of cuts, nicks, tears, spots, loose particles, dust, wrinkles, voids, staples, and curled or bent edges.
• Use paper that has not been previously printed on. - Use paper that is designed for use in laser printers. Do not use paper that is designed only for use in Inkjet printers.
• Use paper that is not too rough. Using smoother paper generally results in better print quality.
Print a cleaning page
Print a cleaning page to remove dust and excess toner from the paper path if you are having any of the following problems:
Specks of toner are on the printed pages.
- Toner is smearing on the printed pages.
• Repeated marks occur on the printed pages.
Use the following procedure to print a cleaning page.
-
At the product control panel, press the Home button ☐.
-
Open the following menus:
1. Device Maintenance
2. Calibration/Cleaning
- Press the down arrow ▼ to highlight the Print Cleaning Page menu item, and then press the OK button.
- Completion of the cleaning process depends on the product model:
- Non-duplex models: After the first side prints, reload the page into Tray 1 according to the instructions, and then press the OK button. After the second side prints, the task is complete. Discard the printed page.
- Duplex models: After both sides print, the task is complete. Discard the printed page.
Calibrate the product
Calibration is a product function that optimizes print quality. If you experience any image-quality problems, calibrate the product.
- Press the Home button 📄.
- Press the down arrow ▼ to highlight the Device Maintenance menu, and then press the OK button.
- Press the down arrow ▼ to highlight the Calibration/Cleaning menu, and then press the OK button.
- Press the down arrow ▼ to highlight the Full Calibration setting, and then press the OK button.
Set the image registration
If you are having problems with text aligning on the page, use the Set Registration menu to set the image registration.
- Press the Home button 📄.
-
Press the down arrow ▼ to highlight the Administration menu, and then press the OK button.
-
Press the down arrow ▼ to highlight the General Settings menu, and then press the OK button.
- Press the down arrow ▼ to highlight the Print Quality menu, and then press the OK button.
- Press the down arrow ▼ to highlight the Image Registration menu, and then press the OK button.
- Press the down arrow ▼ to highlight the Adjust Tray
menu for the tray that you want to adjust, and then press the OK button. - Press the down arrow ▼ to highlight the Print Test Page setting, and then press the OK button.
- Follow the instructions on the test page to complete the adjustment.
Internal print-quality test pages
Use the built-in print-quality troubleshooting pages to help diagnose and solve print-quality problems.
- Press the Home button 📄.
- Open the following menus:
1. Troubleshooting
2. Print Quality Pages
- Press the down arrow ▼ to highlight the Print PQ Troubleshooting Pages item, and then press the OK button to print the pages.
The product returns to the Ready state after printing the print-quality troubleshooting pages. Follow the instructions on the pages that print out.
Check the print cartridge
Check each print cartridge, and replace it if necessary, if you are having any of the following problems:
• The printing is too light or seems faded in areas.
• Printed pages have small unprinted areas.
• Printed pages have streaks or bands.
NOTE: If you are using a draft or EconoMode print setting, the printing might appear light.
If you determine that you need to replace a print cartridge, print the supplies status page to find the part number for the correct genuine HP print cartridge.
| Type of print cartridge Steps to resolve the problem | |
| Refilled or remanufactured print cartridge | Hewlett-Packard Company cannot recommend the use of non-HP supplies, either new or remanufactured. Because they are not HP products, HP cannot influence their design or control their quality. If you are using a refilled or remanufactured print cartridge and are not satisfied with the print quality, replace the cartridge with a genuine HP cartridge that has the words “HP” or “Hewlett-Packard” on it, or has the HP logo on it. |
| Genuine HP print cartridge | 1. The product control panel or the supplies status page indicates Very Low status when the cartridge has reached the end of its designated life. Replace the print cartridge if print quality is no longer acceptable.2. Visually inspect the print cartridge for damage. See the instructions that follow. Replace the print cartridge if necessary.3. If printed pages have marks that repeat several times at the same distance apart, print a cleaning page. If this does not solve the problem, use the repeating defects information in this document to identify the cause of the problem. |
Use the printer driver that best meets your printing needs
You might need to use a different printer driver if the printed page has unexpected lines in graphics, missing text, missing graphics, incorrect formatting, or substituted fonts.
| HP PCL 6 driver | Provided as the default driver. This driver is automatically installed unless you select a different one.Recommended for all Windows environmentsProvides the overall best speed, print quality, and product-feature support for most usersDeveloped to align with the Windows Graphic Device Interface (GDI) for the best speed in Windows environmentsMight not be fully compatible with third-party and custom software programs that are based on PCL 5 |
| HP UPD PCL 6 driver | Recommended for all Windows environmentsProvides the overall best speed, print quality, and product-feature support for most usersDeveloped to align with the Windows GDI for the best speed in Windows environmentsMight not be fully compatible with third-party and custom software programs that are based on PCL 5 |
| HP UPD PS driver | Recommended for printing with Adobe® software programs or with other highly graphics-intensive software programsProvides support for printing from postscript emulation needs, or for postscript flash font support |
| HP UPD PCL 5 | Recommended for general office printing in Windows environmentsCompatible with previous PCL versions and older HP LaserJet productsThe best choice for printing from third-party or custom software programsThe best choice when operating with mixed environments, which require the product to be set to PCL 5 (UNIX®, Linux, mainframe)Designed for use in corporate Windows environments to provide a single driver for use with multiple printer modelsPreferred when printing to multiple printer models from a mobile Windows computer |
Download additional printer drivers from this Web site: www.hp.com/support/cljcp5525.
Repetitive defects ruler
If the print-quality issues repeat at regular intervals use the table below to identify the cause of the defect.
Place the top of a ruler at the first defect. The measurement that is beside the next occurrence of the defect indicates which component needs to be replaced.
| Distance between defects Product components that cause the defect |
| 35 mm Print cartridge (primary charging roller) |
| 42 mm Print cartridge (developer roller) |
| 50 mm Print engine (primary transfer roller) |
| 61 mm Print engine (secondary transfer roller) |
| 76 mm Fuser (fuser film) |
| 78 mm Fuser (pressure roller) |
| 94 mm Print cartridge (OPC) |
The product does not print or it prints slowly
| Problem Cause Solution | ||
| Pages print but are totally blank. The document might contain blank pages. | Check the document that you are printing to see if content appears on all of the pages. | |
| The product might be malfunctioning. To check the product, print a Configuration page. | ||
| All of the print cartridges might have reached the end of life. | Replace the toner cartridges if a Supplies very low message is displayed. | |
| Pages print very slowly. Heavier paper types can slow the print job. | Print on a different type of paper. Proper fusing may require a slower print speed to ensure the best print quality. | |
| Complex pages can print slowly. Simplify the page. | ||
| Pages did not print. The product might not be pulling paper correctly. | Make sure that paper is loaded in the tray correctly. | |
| The paper is jamming in the product. Clear the jam. See clear jams on page 182. | ||
| The USB cable might be defective or incorrectly connected. | Disconnect the USB cable at both ends and reconnect it.Try printing a job that has printed in the past.Try using a different USB cable. | |
| Other devices are running on your computer. | The product might not share a USB port. If you have an external hard drive or network switchbox that is connected to the same port as the product, the other device might be interfering. To connect and use the product, you must disconnect the other device or you must use two USB ports on the computer. | |
Solve walk-up USB printing problems
• The Open From USB menu does not open when you insert the USB accessory
• The file does not print from the USB storage accessory
• The file that you want to print is not listed in the Open From USB menu
The Open From USB menu does not open when you insert the USB accessory
- You might be using a USB storage accessory or a file system that this product does not support. Save the files on a standard USB storage accessory that uses File Allocation Table (FAT) file systems. The product supports FAT12, FAT16, and FAT32 USB storage accessories.
- If another menu is already open, close that menu and then reinsert the USB storage accessory.
- The USB storage accessory might have multiple partitions. (Some USB storage accessory manufacturers install software on the accessory that creates partitions, similar to a CD.) Reformat the USB storage accessory to remove the partitions, or use a different USB storage accessory.
- The USB storage accessory might require more power than the product can provide.
a. Remove the USB storage accessory.
b. Turn the product off and then on.
c. Use a USB storage accessory that has its own power supply or that requires less power.
- The USB storage accessory might not be functioning correctly.
a. Remove the USB storage accessory.
b. Turn the product off and then on.
c. Try printing from another USB storage accessory.
The file does not print from the USB storage accessory
- Make sure that paper is in the tray.
- Check the control panel for messages. If paper is jammed in the product, clear the jam.
The file that you want to print is not listed in the Open From USB menu
- You might be trying to print a file type that the USB printing feature does not support. The product supports .pdf, .prn, .pcl, .ps, and .cht file types.
- You might have too many files in a single folder on the USB storage accessory. Reduce the number of files in the folder by moving them to subfolders.
- You might be using a character set for the file name that the product does not support. In this case, the product replaces the file names with characters from a different character set. Rename the files using ASCII characters.
Solve connectivity problems
Solve direct-connect problems
If you have connected the product directly to a computer, check the cable.
- Verify that the cable is connected to the computer and to the product.
- Verify that the cable is not longer than 2 m (6.5 ft). Replace the cable if necessary.
- Verify that the cable is working correctly by connecting it to another product. Replace the cable if necessary.
Solve network problems
Check the following items to verify that the product is communicating with the network. Before beginning, print a configuration page. See Print information pages on page 162.
| Problem Solution | |
| Poor physical connection Verify that the product is attached to the correct network port using a cable of the correct length. | |
| Verify that cable connections are secure. | |
| Look at the network port connection on the back of the product, and verify that the amber activity light and the green link-status light are lit. | |
| If the problem continues, try a different cable or port on the hub. | |
| The computer is unable to communicate with the product. | Use the command prompt to ping the product from your computer. For example: ping 192.168.45.39 |
| Verify that the ping displays round-trip times, which indicates that it is working. | |
| If the ping command failed, verify that the network hubs are on, and then verify that the network settings, the product, and the computer are all configured for the same network. | |
| Incorrect link and duplex settings | Hewlett-Packard recommends leaving this setting in automatic mode (the default setting). See Link speed and duplex settings on page 69. |
| Incorrect IP address for the product on the computer | Use the correct IP address. The IP address is listed on the configuration page. If the IP address is correct, delete the product and then add it again. |
| New software programs have caused compatibility problems. | Verify that any new software programs are correctly installed and that they use the correct printer driver. |
| Your computer or workstation is set up incorrectly. | Check the network drivers, printer drivers, and the network redirection. Verify that the operating system is configured correctly. |
| The protocol is disabled, or other network settings are incorrect. | Review the configuration page to check the status of the protocol. Enable it if necessary. Reconfigure the network settings if necessary. See Connect to a network on page 61. |
Solve software problems
Problem Solution
| A printer driver for the product is not visible in the Printer folder | Reinstall the product software. Install the software from the CD, and follow the onscreen instructions.NOTE: Close any applications that are running. To close an application that has an icon in the system tray, right-click the icon, and selectCloseorDisable. | |
| Try plugging the USB cable into a different USB port on the computer. | ||
| An error message was displayed during the software installation | Reinstall the product software. Install the software from the CD, and follow the onscreen instructions.NOTE: Close any applications that are running. To close an application that has an icon in the task bar, right-click the icon, and selectCloseorDisable. | |
| Check the amount of free space on the drive where you are installing the product software. If necessary, free up as much space as you can, and reinstall the product software. Install the software from the CD, and follow the onscreen instructions. | ||
| If necessary, run the Disk Defragmenter, and reinstall the product software. Install the software from the CD, and follow the onscreen instructions. | ||
| The product is in Ready mode, but nothing prints | Print a Configuration page, and verify the product functionality. | |
| Verify that all of the cables are correctly seated and within specifications. This includes the USB and power cables. Try a new cable. | ||
| Verify the IP Address on the Embedded Jetdirect Page matches the IP address for the software port. Use one of the following procedures: | ||
| Windows XP, Windows Server | 2003, Windows Server 2008, and Windows Vista | 1. Click Start.2. Click Settings.3. Click Printers and Faxes (using the default Start menu view) or click Printers (using the Classic Start menu view).4. Right-click the product driver icon, and then selectProperties.5. Click thePortstab, and then clickConfigure Port.6. Verify the IP address, and then clickOKorCancel.7. If the IP Addresses are not the same, delete the driver, and reinstall the driver using the correct IP address. |
| Windows 7 | 1. Click Start.2. Click Devices and Printers.3. Right-click the product driver icon, and then selectPrinter properties.4. Clic k thePortstab, and then clickConfigure Port.5. Verify the IP address, and then clickOKorCancel.6. If the IP Addresses are not the same, delete the driver, and reinstall the driver using the correct IP address. | |
Solve common Windows problems
Error message:
"(Name of the program, for example, Internet Explorer) has encountered a problem and needs to close. We are sorry for the inconvenience"
Cause Solution
| Close all software programs, restart Windows, and try again. | |
| If the application referenced is the printer driver, select or install a different printer driver. If the product PCL 6 printer driver is selected, switch to the PCL 5 or HP postscript level 3 emulation printer driver. | |
| See the Microsoft Windows documentation that came with the computer for more information about Windows error messages, or go towww.microsoft.com. |
Solve common Mac problems
The printer driver is not listed in the Printer Setup Utility or the Print & Fax list.
Cause Solution
| The product software might not have been installed or was installed incorrectly. | Make sure that the product .GZ file is in the following hard-drive folder:Mac OS X 10.4: Library/Printers/PPDs/Contents/Resources/.lproj, whereis the two-letter language code for the language that you are using.Mac OS X 10.5 and 10.6: Library/Printers/PPDs/Contents/ResourcesIf necessary, reinstall the software. See the getting started guide for instructions. |
The Postscript Printer Description (PPD) file is corrupt. Delete the .GZ file from the following hard-drive folder:
- Mac OS X 10.4: Library/Printers/PPDs/Contents/Resources/
.lproj, where is the two-letter language code for the language that you are using.
• Mac OS X 10.5 and 10.6: Library/Printers/PPDs/Contents/Resources
Reinstall the software. See the getting started guide for instructions.
The product name, IP address, or Bonjour host name does not appear in the product list in the Printer Setup Utility or the Print & Fax list.
| Cause Solution | |
| The product might not be ready. | Make sure that the cables are connected correctly, the product is on, and the Ready light is on. If you are connecting through a USB or Ethernet hub, try connecting directly to the computer or use a different port. |
| The wrong connection type might be selected. | Make sure that USB, IP Printing, or Bonjour is selected, depending on the type of connection that exists between the product and the computer. |
| The wrong product name, IP address, or Bonjour host name is being used. | Print a configuration page to check the product name, IP address, or Bonjour host name. Verify that the name, IP address, or Bonjour host name on the configuration page matches the product name, IP address, or Bonjour host name in the Printer Setup Utility or the Print & Fax list. |
| The interface cable might be defective or of poor quality. | Replace the cable with a high-quality cable. |
The printer driver does not automatically set up your selected product in the Printer Setup Utility or the Print & Fax list.
| Cause Solution | |
| The product might not be ready. | Make sure that the cables are connected correctly, the product is on, and the Ready light is on. If you are connecting through a USB or Ethernet hub, try connecting directly to the computer or use a different port. |
| The product software might not have been installed or was installed incorrectly. | Make sure that the product PPD is in the following hard-drive folder:Mac OS X 10.4: Library/Printers/PPDs/Contents/Resources/.lproj, whereis the two-letter language code for the language that you are using.Mac OS X 10.5 and 10.6: Library/Printers/PPDs/Contents/ResourcesIf necessary, reinstall the software. See the getting started guide for instructions. |
| The Postscript Printer Description (PPD) file is corrupt. Delete the .GZ file from the following hard-drive folder:Mac OS X 10.4: Library/Printers/PPDs/Contents/Resources/.lproj, whereis the two-letter language code for the language that you are using.Mac OS X 10.5 and 10.6: Library/Printers/PPDs/Contents/ResourcesReinstall the software. See the getting started guide for instructions. | |
| The interface cable might be defective or of poor quality. | Replace the interface cable with a high-quality cable. |
A print job was not sent to the product that you wanted.
| Cause Solution | |
| The print queue might be stopped. | Restart the print queue. Open print monitor and select Start Printer. |
| The wrong product name or IP address is being used. Another product with the same or similar name, IP address, or Bonjour host name might have received your print job. | Print a configuration page to check the product name, IP address, or Bonjour host name. Verify that the name, IP address, or Bonjour host name on the configuration page matches the product name, IP address, or Bonjour host name in the Printer Setup Utility or the Print & Fax list. |
An encapsulated PostScript (EPS) file does not print with the correct fonts.
| Cause Solution | |
| This problem occurs with some programs. | Try downloading the fonts that are contained in the EPS file to the product before printing.Send the file in ASCII format instead of binary encoding. |
You are unable to print from a third-party USB card.
| Cause Solution | |
| This error occurs when the software for USB products is not installed. | When adding a third-party USB card, you might need the Apple USB Adapter Card Support software. The most current version of this software is available from the Apple Web site. |
When connected with a USB cable, the product does not appear in the Printer Setup Utility or the Print & Fax list after the driver is selected.
Cause Solution
| This problem is caused by either a software or a hardware component. | Software troubleshootingCheck that your Macintosh supports USB.Verify that your Macintosh operating system is Mac OS X 10.4 or later.Ensure that your Macintosh has the appropriate USB software from Apple.Hardware troubleshootingCheck that the product is turned on.Verify that the USB cable is connected correctly.Check that you are using the appropriate high-speed USB cable.Ensure that you do not have too many USB devices drawing power from the chain. Disconnect all of the devices from the chain, and connect the cable directly to the USB port on the host computer.Check to see if more than two nonpowered USB hubs are connected in a row on the chain. Disconnect all of the devices from the chain and connect the cable directly to the USB port on the host computer.NOTE: The iMac keyboard is a nonpowered USB hub. |
A Supplies and accessories
• Order parts, accessories, and supplies
Part numbers
Order parts, accessories, and supplies
| Order supplies and paper www.hp.com/go/suresupply | |
| Order genuine HP parts or accessories | www.hp.com/buy/parts |
| Order through service or support providers | Contact an HP-authorized service or support provider. |
| Order using HP software | Use the HP Embedded Web Server on page 163 |
Part numbers
Ordering information and availability might change during the life of the product.
Accessories
| Item Description Part number | ||
| HP Color LaserJet 1 x 500 Paper Feeder | 500-sheet paper tray CE860A | |
| HP Color LaserJet 3 x 500 Paper Feeder and stand | 1500-sheet paper tray. Contains three 500-sheet trays. | CE725A |
Print cartridges
| Item | Description1 | Part number |
| HP Color LaserJet black print cartridge Black cartridge CE270A | ||
| HP Color LaserJet cyan print cartridge Cyan cartridge CE271A | ||
| HP Color LaserJet yellow print cartridge Yellow cartridge CE272A | ||
| HP Color LaserJet magenta print cartridge | Magenta cartridge CE273A | |
For more information, go to www.hp.com/go/learnaboutsupplies.
Memory
| Item Description Part number | ||
| HP Secure High Performance EIO Hard Disk | Hard disk to install in the EIO accessory slot | J8019A |
| 63 mm (2.5 in) | ||
Cables and interfaces
| Item Description Part number | |
| Enhanced I/O (EIO) card HP Jetdirect 635n IPv6/IPsec Print Server | J7961G |
| HP Jetdirect 690n IPv6/IPsec 802.11g Wireless Print Server | J8007G |
| USB cable 2-meter standard USB-compatible device connector | C6518A |
Maintenance kits
Item Description Part number
| Fuser kit 110 Volt replacement fuser CE977A | |
| 220 Volt replacement fuser CE978A | |
| Transfer kit Replacement transfer belt, transfer roller unit, 9 feed rollers for Trays 2-6, and 6 pickup rollers for Trays 1-6. | CE979A |
| Toner Collection Unit Receptacle for toner that has not fused to the paper. | CE980A |
B Service and support
• Hewlett-Packard limited warranty statement
HP's Premium Protection Warranty: LaserJet print cartridge limited warranty statement
• Color LaserJet Fuser Kit, Toner Collection Unit, and Transfer Kit Limited Warranty Statement
• Data stored on the print cartridge
• End User License Agreement
- Customer self-repair warranty service
- Customer support
Hewlett-Packard limited warranty statement
HP PRODUCT DURATION OF LIMITED WARRANTY
HP Color LaserJet CP5525n, CP5525dn, CP5525xh One-year on-site warranty
HP warrants to you, the end-user customer, that HP hardware and accessories will be free from defects in materials and workmanship after the date of purchase, for the period specified above. If HP receives notice of such defects during the warranty period, HP will, at its option, either repair or replace products which prove to be defective. Replacement products may be either new or equivalent in performance to new.
HP warrants to you that HP software will not fail to execute its programming instructions after the date of purchase, for the period specified above, due to defects in material and workmanship when properly installed and used. If HP receives notice of such defects during the warranty period, HP will replace software which does not execute its programming instructions due to such defects.
HP does not warrant that the operation of HP products will be uninterrupted or error free. If HP is unable, within a reasonable time, to repair or replace any product to a condition as warranted, you will be entitled to a refund of the purchase price upon prompt return of the product.
HP products may contain remanufactured parts equivalent to new in performance or may have been subject to incidental use.
Warranty does not apply to defects resulting from (a) improper or inadequate maintenance or calibration, (b) software, interfacing, parts or supplies not supplied by HP, (c) unauthorized modification or misuse, (d) operation outside of the published environmental specifications for the product, or (e) improper site preparation or maintenance.
TO THE EXTENT ALLOWED BY LOCAL LAW, THE ABOVE WARRANTIES ARE EXCLUSIVE AND NO OTHER WARRANTY OR CONDITION, WHETHER WRITTEN OR ORAL, IS EXPRESSED OR IMPLIED AND HP SPECIFICALLY DISCLAIMS ANY IMPLIED WARRANTIES OR CONDITIONS OF MERCHANTABILITY, SATISFACTORY QUALITY, AND FITNESS FOR A PARTICULAR PURPOSE. Some countries/regions, states or provinces do not allow limitations on the duration of an implied warranty, so the above limitation or exclusion might not apply to you. This warranty gives you specific legal rights and you might also have other rights that vary from country/region to country/region, state to state, or province to province.
HP's limited warranty is valid in any country/region or locality where HP has a support presence for this product and where HP has marketed this product. The level of warranty service you receive may vary according to local standards. HP will not alter form, fit or function of the product to make it operate in a country/region for which it was never intended to function for legal or regulatory reasons.
TO THE EXTENT ALLOWED BY LOCAL LAW, THE REMEDIES IN THIS WARRANTY STATEMENT ARE YOUR SOLE AND EXCLUSIVE REMEDIES. EXCEPT AS INDICATED ABOVE, IN NO EVENT WILL HP OR ITS SUPPLIERS BE LIABLE FOR LOSS OF DATA OR FOR DIRECT, SPECIAL, INCIDENTAL, CONSEQUENTIAL (INCLUDING LOST PROFIT OR DATA), OR OTHER DAMAGE, WHETHER BASED IN CONTRACT, TORT, OR OTHERWISE. Some countries/regions, states or provinces do not allow the exclusion or limitation of incidental or consequential damages, so the above limitation or exclusion may not apply to you.
THE WARRANTY TERMS CONTAINED IN THIS STATEMENT, EXCEPT TO THE EXTENT LAWFULLY PERMITTED, DO NOT EXCLUDE, RESTRICT OR MODIFY AND ARE IN ADDITION TO THE MANDATORY STATUTORY RIGHTS APPLICABLE TO THE SALE OF THIS PRODUCT TO YOU.
HP's Premium Protection Warranty: LaserJet print cartridge limited warranty statement
This HP product is warranted to be free from defects in materials and workmanship.
This warranty does not apply to products that (a) have been refilled, refurbished, remanufactured or tampered with in any way, (b) experience problems resulting from misuse, improper storage, or operation outside of the published environmental specifications for the printer product or (c) exhibit wear from ordinary use.
To obtain warranty service, please return the product to place of purchase (with a written description of the problem and print samples) or contact HP customer support. At HP's option, HP will either replace products that prove to be defective or refund your purchase price.
TO THE EXTENT ALLOWED BY LOCAL LAW, THE ABOVE WARRANTY IS EXCLUSIVE AND NO OTHER WARRANTY OR CONDITION, WHETHER WRITTEN OR ORAL, IS EXPRESSED OR IMPLIED AND HP SPECIFICALLY DISCLAIMS ANY IMPLIED WARRANTIES OR CONDITIONS OF MERCHANTABILITY, SATISFACTORY QUALITY, AND FITNESS FOR A PARTICULAR PURPOSE.
TO THE EXTENT ALLOWED BY LOCAL LAW, IN NO EVENT WILL HP OR ITS SUPPLIERS BE LIABLE FOR DIRECT, SPECIAL, INCIDENTAL, CONSEQUENTIAL (INCLUDING LOST PROFIT OR DATA), OR OTHER DAMAGE, WHETHER BASED IN CONTRACT, TORT, OR OTHERWISE.
THE WARRANTY TERMS CONTAINED IN THIS STATEMENT, EXCEPT TO THE EXTENT LAWFULLY PERMITTED, DO NOT EXCLUDE, RESTRICT OR MODIFY AND ARE IN ADDITION TO THE MANDATORY STATUTORY RIGHTS APPLICABLE TO THE SALE OF THIS PRODUCT TO YOU.
Color LaserJet Fuser Kit, Toner Collection Unit, and Transfer Kit Limited Warranty Statement
This HP product is warranted to be free from defects in materials and workmanship until the printer provides a low-life indicator on the control panel.
This warranty does not apply to products that (a) have been refurbished, remanufactured or tampered with in any way, (b) experience problems resulting from misuse, improper storage, or operation outside of the published environmental specifications for the printer product or (c) exhibit wear from ordinary use.
To obtain warranty service, please return the product to place of purchase (with a written description of the problem) or contact HP customer support. At HP's option, HP will either replace products that prove to be defective or refund your purchase price.
TO THE EXTENT ALLOWED BY LOCAL LAW, THE ABOVE WARRANTY IS EXCLUSIVE AND NO OTHER WARRANTY OR CONDITION, WHETHER WRITTEN OR ORAL, IS EXPRESSED OR IMPLIED AND HP SPECIFICALLY DISCLAIMS ANY IMPLIED WARRANTIES OR CONDITIONS OF MERCHANTABILITY, SATISFACTORY QUALITY, AND FITNESS FOR A PARTICULAR PURPOSE.
TO THE EXTENT ALLOWED BY LOCAL LAW, IN NO EVENT WILL HP OR ITS SUPPLIERS BE LIABLE FOR DIRECT, SPECIAL, INCIDENTAL, CONSEQUENTIAL (INCLUDING LOST PROFIT OR DATA), OR OTHER DAMAGE, WHETHER BASED IN CONTRACT, TORT, OR OTHERWISE.
THE WARRANTY TERMS CONTAINED IN THIS STATEMENT, EXCEPT TO THE EXTENT LAWFULLY PERMITTED, DO NOT EXCLUDE, RESTRICT OR MODIFY AND ARE IN ADDITION TO THE MANDATORY STATUTORY RIGHTS APPLICABLE TO THE SALE OF THIS PRODUCT TO YOU.
Data stored on the print cartridge
The HP print cartridges used with this product contain a memory chip that assists in the operation of the product.
In addition, this memory chip collects a limited set of information about the usage of the product, which might include the following: the date when the print cartridge was first installed, the date when the print cartridge was last used, the number of pages printed using the print cartridge, the page coverage, the printing modes used, any printing errors that might have occurred, and the product model. This information helps HP design future products to meet our customers' printing needs.
The data collected from the print cartridge memory chip does not contain information that can be used to identify a customer or user of the print cartridge or their product.
HP collects a sampling of the memory chips from print cartridges returned to HP's free return and recycling program (HP Planet Partners: www.hp.com/recycle). The memory chips from this sampling are read and studied in order to improve future HP products. HP partners who assist in recycling this print cartridge might have access to this data, as well.
Any third party possessing the print cartridge might have access to the anonymous information on the memory chip. If you prefer to not allow access to this information, you can render the chip inoperable. However, after you render the memory chip inoperable, the memory chip cannot be used in an HP product.
End User License Agreement
PLEASE READ CAREFULLY BEFORE USING THIS SOFTWARE PRODUCT: This End-User License Agreement ("EULA") is a contract between (a) you (either an individual or the entity you represent) and (b) Hewlett-Packard Company ("HP") that governs your use of the software product ("Software"). This EULA does not apply if there is a separate license agreement between you and HP or its suppliers for the Software, including a license agreement in online documentation. The term "Software" may include (i) associated media, (ii) a user guide and other printed materials, and (iii) "online" or electronic documentation (collectively "User Documentation").
RIGHTS IN THE SOFTWARE ARE OFFERED ONLY ON THE CONDITION THAT YOU AGREE TO ALL TERMS AND CONDITIONS OF THIS EULA. BY INSTALLING, COPYING, DOWNLOADING, OR OTHERWISE USING THE SOFTWARE, YOU AGREE TO BE BOUND BY THIS EULA. IF YOU DO NOT ACCEPT THIS EULA, DO NOT INSTALL, DOWNLOAD, OR OTHERWISE USE THE SOFTWARE. IF YOU PURCHASED THE SOFTWARE BUT DO NOT AGREE TO THIS EULA, PLEASE RETURN THE SOFTWARE TO YOUR PLACE OF PURCHASE WITHIN FOURTEEN DAYS FOR A REFUND OF THE PURCHASE PRICE; IF THE SOFTWARE IS INSTALLED ON OR MADE AVAILABLE WITH ANOTHER HP PRODUCT, YOU MAY RETURN THE ENTIRE UNUSED PRODUCT.
-
THIRD PARTY SOFTWARE. The Software may include, in addition to HP proprietary software ("HP Software"), software under licenses from third parties ("Third Party Software" and "Third Party License"). Any Third Party Software is licensed to you subject to the terms and conditions of the corresponding Third Party License. Generally, the Third Party License is in a file such as "license.txt" or a "readme" file. You should contact HP support if you cannot find a Third Party License. If the Third Party Licenses include licenses that provide for the availability of source code (such as the GNU General Public License) and the corresponding source code is not included with the Software, then check the product support pages of HP's website (hp.com) to learn how to obtain such source code.
-
LICENSE RIGHTS. You will have the following rights provided you comply with all terms and conditions of this EULA:
a. Use. HP grants you a license to Use one copy of the HP Software. "Use" means installing, copying, storing, loading, executing, displaying, or otherwise using the HP Software. You may not modify the HP Software or disable any licensing or control feature of the HP Software. If this Software is provided by HP for Use with an imaging or printing product (for example, if the Software is a printer driver, firmware, or add-on), the HP Software may only be used with such product ("HP Product"). Additional restrictions on Use may appear in the User Documentation. You may not separate component parts of the HP Software for Use. You do not have the right to distribute the HP Software.
b. Copying. Your right to copy means you may make archival or back-up copies of the HP Software, provided each copy contains all the original HP Software's proprietary notices and is used only for back-up purposes.
- UPGRADES. To Use HP Software provided by HP as an upgrade, update, or supplement (collectively "Upgrade"), you must first be licensed for the original HP Software identified by HP as eligible for the Upgrade. To the extent the Upgrade supersedes the original HP Software, you may no longer use such HP Software. This EULA applies to each Upgrade unless HP provides other terms with the Upgrade. In case of a conflict between this EULA and such other terms, the other terms will prevail.
4. TRANSFER.
a. Third Party Transfer. The initial end user of the HP Software may make a one-time transfer of the HP Software to another end user. Any transfer will include all component parts, media, User Documentation, this EULA, and if applicable, the Certificate of Authenticity. The transfer may not be an indirect transfer, such as a consignment. Prior to the transfer, the end user receiving the transferred Software will agree to this EULA. Upon transfer of the HP Software, your license is automatically terminated.
b. Restrictions. You may not rent, lease or lend the HP Software or Use the HP Software for commercial timesharing or bureau use. You may not sublicense, assign or otherwise transfer the HP Software except as expressly provided in this EULA.
- PROPRIETARY RIGHTS. All intellectual property rights in the Software and User Documentation are owned by HP or its suppliers and are protected by law, including applicable copyright, trade secret, patent, and trademark laws. You will not remove any product identification, copyright notice, or proprietary restriction from the Software.
- LIMITATION ON REVERSE ENGINEERING. You may not reverse engineer, decompile, or disassemble the HP Software, except and only to the extent that the right to do so is allowed under applicable law.
- CONSENT TO USE OF DATA. HP and its affiliates may collect and use technical information you provide in relation to (i) your Use of the Software or the HP Product, or (ii) the provision of support services related to the Software or the HP Product. All such information will be subject to HP's privacy policy. HP will not use such information in a form that personally identifies you except to the extent necessary to enhance your Use or provide support services.
- LIMITATION OF LIABILITY. Notwithstanding any damages that you might incur, the entire liability of HP and its suppliers under this EULA and your exclusive remedy under this EULA will be limited to the greater of the amount actually paid by you for the Product or U.S. \$5.00. TO THE MAXIMUM EXTENT PERMITTED BY APPLICABLE LAW, IN NO EVENT WILL HP OR ITS SUPPLIERS BE LIABLE FOR ANY SPECIAL, INCIDENTAL, INDIRECT, OR CONSEQUENTIAL DAMAGES (INCLUDING DAMAGES FOR LOST PROFITS, LOST DATA, BUSINESS INTERRUPTION, PERSONAL INJURY, OR LOSS OF PRIVACY) RELATED IN ANY WAY TO THE USE OF OR INABILITY TO USE THE SOFTWARE, EVEN IF HP OR ANY SUPPLIER HAS BEEN ADVISED OF THE POSSIBILITY OF SUCH DAMAGES AND EVEN IF THE ABOVE REMEDY FAILS OF ITS ESSENTIAL PURPOSE. Some states or other jurisdictions do not allow the exclusion or limitation of incidental or consequential damages, so the above limitation or exclusion may not apply to you.
- U.S. GOVERNMENT CUSTOMERS. Software was developed entirely at private expense. All Software is commercial computer software within the meaning of the applicable acquisition regulations. Accordingly, pursuant to US FAR 48 CFR 12.212 and DFAR 48 CFR 227.7202, use, duplication and disclosure of the Software by or for the U.S. Government or a U.S. Government subcontractor is subject solely to the terms and conditions set forth in this End User License Agreement, except for provisions which are contrary to applicable mandatory federal laws.
- COMPLIANCE WITH EXPORT LAWS. You will comply with all laws, rules, and regulations (i) applicable to the export or import of the Software, or (ii) restricting the Use of the Software, including any restrictions on nuclear, chemical, or biological weapons proliferation.
- RESERVATION OF RIGHTS. HP and its suppliers reserve all rights not expressly granted to you in this EULA.
© 2009 Hewlett-Packard Development Company, L.P.
Rev. 04/09
Customer self-repair warranty service
HP products are designed with many Customer Self Repair (CSR) parts to minimize repair time and allow for greater flexibility in performing defective parts replacement. If during the diagnosis period, HP identifies that the repair can be accomplished by the use of a CSR part, HP will ship that part directly to you for replacement. There are two categories of CSR parts: 1) Parts for which customer self repair is mandatory. If you request HP to replace these parts, you will be charged for the travel and labor costs of this service. 2) Parts for which customer self repair is optional. These parts are also designed for Customer Self Repair. If, however, you require that HP replace them for you, this may be done at no additional charge under the type of warranty service designated for your product.
Based on availability and where geography permits, CSR parts will be shipped for next business day delivery. Same-day or four-hour delivery may be offered at an additional charge where geography permits. If assistance is required, you can call the HP Technical Support Center and a technician will help you over the phone. HP specifies in the materials shipped with a replacement CSR part whether a defective part must be returned to HP. In cases where it is required to return the defective part to HP, you must ship the defective part back to HP within a defined period of time, normally five (5) business days. The defective part must be returned with the associated documentation in the provided shipping material. Failure to return the defective part may result in HP billing you for the replacement. With a customer self repair, HP will pay all shipping and part return costs and determine the courier/carrier to be used.
Customer support
| Get telephone support for your country/regionHave the product name, serial number, date of purchase, and problem description ready. | Country/region phone numbers are on the flyer that was in the box with your product or atwww.hp.com/support/. |
| Get 24-hour Internet support | www.hp.com/support/cljcp5525 |
| Get support for products used with a Macintosh computer | www.hp.com/go/macosx |
| Download software utilities, drivers, and electronic information | www.hp.com/support/cljcp5525 |
| Order additional HP service or maintenance agreements | www.hp.com/go/carepack |
| Register your product | www.register.hp.com |
C Product specifications
• Physical specifications
• Power consumption, electrical specifications, and acoustic emissions
• Environmental specifications
Physical specifications
Table C-1 Product dimensions
| Product Height Depth Width Weight |
| HP Color LaserJet CP5525n 465 mm (18.3 in) 586 mm (23 in) 544 mm (21.4 in) 53.3 kg (117.3 lb) |
| HP Color LaserJet CP5525dn 465 mm (18.3 in) 586 mm (23 in) 544 mm (21.4 in) 53.5 kg (117.8 lb) |
| HP Color LaserJet CP5525xh 885 mm (34.8 in) 688 mm (27 in) 745 mm (29.3 in) 84 kg (184.8 lb) |
Power consumption, electrical specifications, and acoustic emissions
See www.hp.com/support/cljcp5525 for current information.
Environmental specifications
| Environmental condition Recommended Allowed | ||
| Temperature (product and print cartridge) | 17° to 25°C (63° to 77°F) | 15° to 27°C (59° to 81°F) |
| Relative humidity 30% to 70% relative humidity (RH) | 10% to 70% RH | |
| Altitude | N/A | 0 m (0 ft) to 3000 m (9842 ft) |
D Regulatory information
FCC regulations
• Environmental product stewardship program
• Declaration of conformity
- Safety statements
FCC regulations
This equipment has been tested and found to comply with the limits for a Class A digital device, pursuant to Part 15 of the FCC rules. These limits are designed to provide reasonable protection against harmful interference in a residential installation. This equipment generates, uses, and can radiate radio frequency energy, and if not installed and used in accordance with the instruction manual, may cause harmful interference to radio communications. Operation of this equipment in a residential area is likely to cause harmful interference in which case the user will be required to correct the interference at his own expense.
NOTE: Any changes or modifications to the printer that are not expressly approved by HP could void the user's authority to operate this equipment.
Use of a shielded interface cable is required to comply with the Class A limits of Part 15 of FCC rules.
Environmental product stewardship program
Protecting the environment
Hewlett-Packard Company is committed to providing quality products in an environmentally sound manner. This product has been designed with several attributes to minimize impacts on our environment.
Ozone production
This product generates no appreciable ozone gas ( O_3 ).
Power consumption
Power usage drops significantly while in Ready and Sleep mode, which saves natural resources and saves money without affecting the high performance of this product. To determine the ENERGY STAR® qualification status for this product, see the Product Data Sheet or Specifications Sheet. Qualified products are also listed at:
www.hp.com/go/energystar
Paper use
This product's optional automatic duplex feature (two-sided printing) and N-up printing (multiple pages printed on one page) capability can reduce paper usage and the resulting demands on natural resources.
Plastics
Plastic parts over 25 grams are marked according to international standards that enhance the ability to identify plastics for recycling purposes at the end of the product's life.
HP LaserJet print supplies
It's easy to return and recycle your HP LaserJet print cartridges after use—free of charge—with HP Planet Partners. Multilingual program information and instructions are included in every new HP LaserJet print cartridge and supplies package. You help reduce the toll on the environment further when you return multiple cartridges together rather than separately.
HP is committed to providing inventive, high-quality products and services that are environmentally sound, from product design and manufacturing to distribution, customer use and recycling. When you participate in the HP Planet Partners program, we ensure your HP LaserJet print cartridges are recycled properly, processing them to recover plastics and metals for new products and diverting millions of tons of waste from landfills. Since this cartridge is being recycled and used in new materials, it will not be returned to you. Thank you for being environmentally responsible!
NOTE: Use the return label to return original HP LaserJet print cartridges only. Please do not use this label for HP inkjet cartridges, non-HP cartridges, refilled or remanufactured cartridges or warranty returns. For information about recycling your HP inkjet cartridges please go to http://www.hp.com/recycle.
Return and recycling instructions
United States and Puerto Rico
The enclosed label in the HP LaserJet toner cartridge box is for the return and recycling of one or more HP LaserJet print cartridges after use. Please follow the applicable instructions below.
Multiple returns (more than one cartridge)
- Package each HP LaserJet print cartridge in its original box and bag.
- Tape the boxes together using strapping or packaging tape. The package can weigh up to 31 kg (70 lb).
- Use a single pre-paid shipping label.
OR
- Use your own suitable box, or request a free bulk collection box from www.hp.com/recycle or 1-800-340-2445 (holds up to 31 kg (70 lb) of HP LaserJet print cartridges).
- Use a single pre-paid shipping label.
Single returns
- Package the HP LaserJet print cartridge in its original bag and box.
- Place the shipping label on the front of the box.
Shipping
For all HP LaserJet print cartridge recycling returns, give the package to UPS during your next delivery or pickup, or take it to an authorized UPS drop-off center. For the location of your local UPS drop-off center, call 1-800-PICKUPS or visit www.ups.com. If you are returning via USPS label, give the package to a U.S. Postal Service carrier or drop off at a U.S. Postal Service Office. For more information, or to order additional labels or boxes for bulk returns, visit www.hp.com/recycle or call 1-800-340-2445. Requested UPS pickup will be charged normal pickup rates. Information subject to change without notice.
Residents of Alaska and Hawaii
Do not use the UPS label. Call 1-800-340-2445 for information and instructions. The U.S. Postal Service provides no-cost cartridge return transportation services under an arrangement with HP for Alaska and Hawaii.
Non-U.S. returns
To participate in HP Planet Partners return and recycling program, just follow the simple directions in the recycling guide (found inside the packaging of your new product supply item) or visit www.hp.com/recycle. Select your country/region for information on how to return your HP LaserJet printing supplies.
Paper
This product is capable of using recycled papers when the paper meets the guidelines outlined in the HP LaserJet Printer Family Print Media Guide. This product is suitable for the use of recycled paper according to EN12281:2002.
Material restrictions
This HP product does not contain added mercury.
This HP product contains a battery that might require special handling at end-of-life. The batteries contained in or supplied by Hewlett-Packard for this product include the following:
| HP Color LaserJet Enterprise CP5520 Series Printer | |
| Type Carbon monofluoride lithium | |
| Weight 0.8 g | |
| Location On formatter board | |
| User-removable No | |

廢電池請回收
For recycling information, you can go to www.hp.com/recycle, or contact your local authorities or the Electronics Industries Alliance: www.eiae.org.
Disposal of waste equipment by users in private households in the European Union


This symbol on the product or on its packaging indicates that this product must not be disposed of with your other household waste. Instead, it is your responsibility to dispose of your waste equipment by handing it over to a designated collection point for the recycling of waste electrical and electronic equipment. The separate collection and recycling of your waste equipment at the time of disposal will help to conserve natural resources and ensure that it is recycled in a manner that protects human health and the environment. For more information about where you can drop off your waste equipment for recycling, please contact your local city office, your household waste disposal service or the shop where you purchased the product.
Chemical substances
HP is committed to providing our customers with information about the chemical substances in our products as needed to comply with legal requirements such as REACH (Regulation EC No 1907/2006 of the European Parliament and the Council). A chemical information report for this product can be found at: www.hp.com/go/reach.
Material Safety Data Sheet (MSDS)
Material Safety Data Sheets (MSDS) for supplies containing chemical substances (for example, toner) can be obtained by accessing the HP Web site at www.hp.com/go/msds or www.hp.com/hpinfo/community/environment/productinfo/safety.
For more information
To obtain information about these environmental topics:
• Product environmental profile sheet for this and many related HP products
HP's commitment to the environment
HP's environmental management system
HP's end-of-life product return and recycling program
• Material Safety Data Sheets
Visit www.hp.com/go/environment or www.hp.com/hpinfo/globalcitizenship/environment.
Declaration of conformity
Declaration of Conformity
according to ISO/IEC 17050-1 and EN 17050-1
Manufacturer's Name:
Hewlett-Packard Company
DoC#: BOISB-0905-00 rel.1.0
Manufacturer's Address: 11311 Chinden Boulevard
Boise, Idaho 83714-1021, USA
declares, that the product
Product Name: HP LaserJet Enterprise CP5525 Series
Including:
CE860A - 500-sheet paper tray
CE725A - 3x500-sheet paper tray and stand
Regulatory Model Number ^2)
BOISB-0905-00
Product Options: ALL
Print Cartridges: CE270A, CE271A, CE272A, CE273A
conforms to the following Product Specifications:
SAFETY: IEC 60950-1:2005 / EN60950-1: 2006
IEC 60825-1:2007 / EN 60825-1:2007 (Class 1 Laser/LED Product)
IEC 62311:2007 / EN62311:2008
GB4943-2001
EMC:
CISPR22:2005 +A1 / EN55022:2006 +A1 - Class A ^1) . 2)
EN 61000-3-2:2006
EN 61000-3-3:1995 +A1 +A2
EN 55024:1998 +A1 +A2
FCC Title 47 CFR, Part 15 Class A ^2) / ICES-003, Issue 4
GB9254-2008, GB17625.1-2003
Supplementary Information:
The product herewith complies with the requirements of the EMC Directive 2004/108/EC and the Low Voltage Directive 2006/95/EC, and carries the CE-Marking CE accordingly.
This Device complies with Part 15 of the FCC Rules. Operation is subject to the following two Conditions: (1) this device may not cause harmful interference, and (2) this device must accept any interference received, including interference that may cause undesired operation.
- The product was tested in a typical configuration with Hewlett-Packard Personal Computer Systems.
- The product meets the requirements of EN55022 & CNS13438 Class A in which case the following applies: "Warning – This is a class A product. In a domestic environment this product may cause radio interference in which case the user may be required to take adequate measures."
- 3) For regulatory purposes, this product is assigned a Regulatory model number. This number should not be confused with the product name or the product number(s).
Boise, Idaho USA
October 2010
For regulatory topics only:
European Contact: Your Local Hewlett-Packard Sales and Service Office or Hewlett-Packard GmbH, Department HQ-TRE / Standards Europe, Herrenberger Strasse 140, D-71034, Böblingen (FAX: +49-7031-14-3143) www.hp.com/go/certificates
USA Contact: Product Regulations Manager, Hewlett-Packard Company, PO Box 15, Mail Stop 160, Boise, Idaho 83707-0015 (Phone: 208-396-6000)
Safety statements
Laser safety
The Center for Devices and Radiological Health (CDRH) of the U.S. Food and Drug Administration has implemented regulations for laser products manufactured since August 1, 1976. Compliance is mandatory for products marketed in the United States. The device is certified as a "Class 1" laser product under the U.S. Department of Health and Human Services (DHHS) Radiation Performance Standard according to the Radiation Control for Health and Safety Act of 1968. Since radiation emitted inside the device is completely confined within protective housings and external covers, the laser beam cannot escape during any phase of normal user operation.
⚠ WARNING! Using controls, making adjustments, or performing procedures other than those specified in this user guide may result in exposure to hazardous radiation.
Canadian DOC regulations
Complies with Canadian EMC Class A requirements.
VCCI statement (Japan)
Power cord instructions
Make sure your power source is adequate for the product voltage rating. The voltage rating is on the product label. The product uses either 100-127 Vac or 220-240 Vac and 50/60 Hz.
Connect the power cord between the product and a grounded AC outlet.
△ CAUTION: To prevent damage to the product, use only the power cord that is provided with the product.
Power cord statement (Japan)
EMC statement (Korea)
EMI statement (Taiwan)
Laser statement for Finland
Luokan 1 laserlaite
Klass 1 Laser Apparat
GS statement (Germany)
Substances Table (China)
有毒有害物质表
Restriction on Hazardous Substances statement (Turkey)
acoustic specifications 224
address, printer
Macintosh,
troubleshooting 204
Administration menu, control panel 15
alerts, e-mail 51
anticounterfeit supplies 97
Attention light
locating 8
automatic paper sensing 91
B
Backup/Restore menu, control panel 32
batteries included 229
bins, output
capacity 84
locating 5
blank pages
troubleshooting 199
booklets
creating (Windows) 142
both sides, printing on
turning on (Mac) 51
browser requirements
HP embedded Web
Server 163
business graphics
printing 149
buttons, control panel
locating 8
C
cable, USB
part number 209
troubleshooting 199
Calibrate/Cleaning menu, control panel 32
Canadian DOC regulations 233
canceling
print job 53
canceling print jobs 114
cartridges
non-HP 96
recycling 96, 227
storage 96
warranty 214
cartridges, print
Macintosh status 57
part numbers 209
replacing 98
cautions iii
cleaning
paper path 195
product 175
clock, real-time
setting 171
color
adjusting 155
Edge Control 155
halftone options 155
HP ImageREt 3600 159
manage 153
managing 154
match 157
Neutral Grays 155
Pantone® matching 158
print color samples 158
print in grayscale 154
printed vs. monitor 157
printing in grayscale
(Windows) 131
sample book matching 157
sRGB 160
using 153
color options
HP EasyColor (Windows) 156
setting (Windows) 129
Color tab settings 57
Color usage, Macintosh 51
configurations, models 2
configuring
IP address 47, 64
connectivity
solving problems 201
USB 61
control panel
Administration menu 15
Backup/Restore menu 32
buttons 8
Calibrate/Cleaning menu 32
cleaning page, printing 175
Display Settings menu 23
General Settings menu 15
lights 8
locating 5
Manage Supplies menu 24
Manage Trays menu 25
messages, numerical list 106
messages, types of 181
Network Settings menu 26
Print Options menu 21
Print Settings menu 20
Reports menu 15
security 169
Service menu 33
settings 39, 50
Supplies menu 12
Trays menu 14
Troubleshooting menu 30 USB Firmware Upgrade menu 33
control-panel menus Retrieve From USB Settings 20 retrieve job from device memory 11 Retrieve Job From USB 10 Sign In 10
controlling print jobs 91
conventions, document iii
copies changing number of (Windows) 116
counterfeit supplies 97
cover pages printing (Mac) 54 printing on different paper (Windows) 137
covers, locating 5
custom print settings (Windows) 116
custom-size paper settings Macintosh 53
customer support HP Utility pages 51 online 221
D
Data light locating 8
date, setting 171
default gateway, setting 67
defects, repeating 105, 198
deleting stored jobs 146
device discovery 62
device status Macintosh Services tab 57
Display Settings menu, control panel 23
disposal, end-of-life 229
document conventions iii
double-sided printing (duplexing) loading paper 85 Mac 56 turning on (Mac) 51
drivers changing paper types and sizes 74
changing settings (Mac) 50
changing settings (Windows) 40
presets (Mac) 54
settings 39 settings (Mac) 54
settings (Windows) 115
supported (Windows) 36
troubleshooting (Mac) 203 universal 38
duplex alignment setting 150
duplex printing (double-sided) loading paper 85 settings (Windows) 123 supported paper sizes 77 turning on (Mac) 51
duplex settings, changing 69
E
e-mail alerts 51
economy settings 170
Edge Control 155
electrical specifications 224
Embedded Web Server (EWS) assigning passwords 168 features 163 network connection 163
end-of-life disposal 229
Enhanced I/O (EIO) card installing 173 part number 209
envelope sizes supported 75
envelopes loading in Tray 1 80 loading orientation 85
environment, specifications 224
environmental features 3
Environmental Product Stewardship Program 227
EPS files, troubleshooting 205
error messages control panel 181
e-mail alerts 51
numerical list 106
types of 181
errors software 202
European Union, waste disposal 229
Explorer, versions supported HP Embedded Web Server 163
F
FCC regulations 226
features 2
File Upload, Macintosh 51
Finnish laser safety statement 234
firmware, downloading new 176
first page printing on different paper (Windows) 137 use different paper 54
fonts EPS files, troubleshooting 205 Upload Macintosh 51
formatter security 169
forms printing (Windows) 132
fraud hotline 97
fuser jams 184
fuser kit part number 210
G
gateway, setting default 67
general configuration HP Embedded Web Server 164
General Settings menu, control panel 15
glossy paper, supported 149
graphical and text display, control panel 8
graphics, business printing 149
grayscale printing (Windows) 131
grayscale printing 154
H
hard disks encrypted 168 ordering 209 part numbers 209
help
printing options
(Windows) 116
Home button 8
HP Customer Care 221
HP Easy Color
disabling 156
using 156
HP Embedded Web Server
general configuration 164
information pages 164
network settings 166
other links list 166
print tab 165
security settings 166
troubleshooting tools 165
HP Embedded Web Server (EWS)
features 163
network connection 163
HP fraud hotline 97
HP Jetdirect print server
installing 173
HP tough paper 149, 150
HP Universal Print Driver 38
HP Utility 51
HP Utility, Macintosh 51
HP Web Jetadmin 42, 167
HP-UX software 43
humidity requirements 224
1
information pages
HP Embedded Web
Server 164
printing or viewing 162
installing
EIO card 173
EIO cards 173
print cartridges 98
product on wired networks 64
product on wired networks,
Mac 47
software, USB connections for
Mac 46
software, wired networks 65
software, wired networks,
Mac 48
toner collection unit 100
installing Mac software 46
interface ports
locating 6
Internet Explorer, versions
supported
HP Embedded Web
Server 163
IP address
configuring 47, 64
Macintosh,
troubleshooting 204
IP addressing 63
IP Security 168
IPsec 168
IPv4 address 67
IPv6 address 68
J
jams
common causes of 182
fuser 184
locations 183
Japanese VCCI statement 233
Jetadmin, HP Web 42, 167
Jetdirect print server
installing 173
job retention
setting options (Windows) 146
job storage
Macintosh settings 56
modes available 143
setting options (Windows) 146
jobs
Macintosh settings 51
jobs, print
storing permanent copies
(Windows) 147
storing permanent private
copies (Windows) 147
storing temporarily
(Windows) 146
storing temporary copies
(Windows) 147
jobs, stored
creating (Windows) 144
deleting 146
printing 145
receiving notification when
printed (Windows) 148
setting user names
(Windows) 148
specifying names
(Windows) 148
K
keys, control panel
locating 8
Korean EMC statement 234
L
labels
printing (Windows) 134
landscape orientation
selecting, Windows 127
laser safety statements 233, 234
last page
printing on different paper
(Windows) 137
letterhead
printing (Windows) 132
license, software 217
lights
control panel 8
link speed settings 69
Linux software 43
loading
Tray 1 80
Tray 2 81, 83
Tray 3 81, 83
Tray 4, 5, and 6 81, 83
loading paper 80
lower right door
jams 186
M
Mac
changing paper types and
sizes 53, 74
driver settings 50, 54
installing software 46, 48
removing software 49
software 51
supported operating systems 46
Macintosh
HP Utility 51
problems, troubleshooting 203
resize documents 53
support 221
USB card, troubleshooting 205
Macintosh driver settings
custom-size paper 53
Job Storage 56
Services tab 57
watermarks 55
Manage Supplies menu, control panel 24
Manage Trays menu, control panel 25
managing network 66
maps, printing 149
marketing materials printing 149
material restrictions 229
Material Safety Data Sheet (MSDS) 230
media
custom-size, Macintosh
settings 53
first page 54
pages per sheet 55
supported sizes 75
memory
included 2, 51
supply errors 106
memory chip, print cartridge description 216
memory DIMMs
security 169
memory tag
locating 98
menus, control panel
Administration 15
Backup/Restore 32
Calibrate/Cleaning 32
Display Settings 23
General Settings 15
Manage Supplies 24
Manage Trays 25
Network Settings 26
Print Options 21
Print Settings 20
Reports 15
Service 33
Supplies 12
Trays 14
Troubleshooting 30
USB Firmware Upgrade 33
menus, control-panel
Retrieve From USB Settings 20
retrieve job from device memory 11
Retrieve Job From USB 10
Sign In 10
mercury-free product 229
messages
e-mail alerts 51
numerical list 106
types of 181
model number
location 7
models, features 2
multiple pages per sheet
printing (Windows) 126
N
n-up printing
selecting (Windows) 126
names, job
specifying (Windows) 148
Netscape Navigator, versions
supported
HP embedded Web
Server 163
network
operating systems
supported 60
password, changing 66
password, setting 66
settings, changing 66
settings, viewing 66
network settings
HP Embedded Web
Server 166
Network Settings menu, control
panel 26
networks
configuring 61
default gateway 67
device discovery 62
HP Web Jetadmin 167
installing EIO cards 173
IP address 63
IPv4 address 67
IPv6 address 68
print servers included 2
protocols supported 61
security 63
subnet mask 67
networks, wired
installing product 64
installing product for Mac 47
Neutral Grays 155
non-HP supplies 96
notes iii
O
on/off button, locating 5
online support 221
opening printer drivers
(Windows) 115
operating environment
specifications 224
operating systems
supported 36, 46
operating systems, networks 60
optimize speed or energy usage 170
ordering
part numbers for 209
supplies and accessories 208
orientation
paper, while loading 85
selecting, Windows 127
other links list
HP Embedded Web
Server 166
output bin
jams 190
locating 5
P
page sizes
scaling documents to fit
(Windows) 139
pages
blank 199
not printing 199
printing slowly 199
pages per sheet selecting (Windows) 126
paper covers, using different paper 137
custom-size, Macintosh settings 53
first and last pages, using different paper 137
first page 54 load 80
loading orientation 85
pages per sheet 55
printing on preprinted letterhead or forms (Windows) 132 selecting 194
paper jams common causes of 182 locations 183
paper path cleaning 175
paper size changing 74
paper sizes selecting 121 selecting custom 121 supported 75 supported for duplex 77
paper types changing 74 selecting 121 supported 78
paper, ordering 208
paper, special printing (Windows) 134
part numbers hard disks 209 list of 209
print cartridges 209
PCL drivers universal 38
personal jobs storing temporarily (Windows) 146
portrait orientation selecting, Windows 127
ports locating 6 troubleshooting Macintosh 205
PostScript Printer Description (PPD) files included 51
power consumption 224 troubleshooting 179
power connection locating 6
power switch, locating 5
PPDs included 51
preprinted paper printing (Windows) 132
presets (Mac) 54
print cartridges checking for damage 104
Macintosh status 57
memory chips 216
non-HP 96
part numbers 209
recycling 96, 227
replacing 98
storage 96
warranty 214
print job canceling 53
print jobs storing permanent copies (Windows) 147
storing permanent private copies (Windows) 147
storing temporarily (Windows) 146
storing temporary copies (Windows) 147
print media loading in Tray 1 80
Print Options menu, control panel 21
print quality improving 194 improving (Windows) 121
print server card installing 173
Print Settings menu, control panel 20
print tab HP Embedded Web Server 165
print tasks 113
printer drivers choosing 197
printer drivers (Mac) changing settings 50 settings 54
troubleshooting 203
printer drivers (Windows) changing settings 40 settings 115 supported 36
printing canceling jobs 114
from USB storage accessories 151
settings (Mac) 54
settings (Windows) 115
stored jobs 145
troubleshooting 199
printing on both sides settings (Windows) 123
priority, settings 39, 50
private jobs storing permanently (Windows) 147
problem-solving e-mail alerts 51 messages, types of 181 Windows issues 203
product info 1 product specifications 223
proof and hold selecting (Windows) 146
protocols, network 61 PS Emulation drivers 36
Q
quick copy jobs storing (Windows) 147
R
Ready light locating 8
real-time clock 171
recycling HP printing supplies returns and environmental program 228
recycling supplies 96
regulatory statements environmental product stewardship program 227
removing Mac software 49
repeating defects, troubleshooting 105, 198
Reports menu, control panel 15
resize documents Macintosh 53 Windows 139
resolution selecting (Windows) 121
retention, job modes available 143 setting options (Windows) 146
Retrieve From USB Settings menu 20
retrieve job from device memory menu 11
Retrieve Job From USB menu 10
RGB settings 160
ruler, repetitive defect 105, 198
S
safety statements 233, 234
SAPx software 43
scale documents Macintosh 53 Windows 139
security settings HP Embedded Web Server 166
security encrypted hard disk 168
security features 63
security slot locating 6
self help accessing 178
serial number location 7
Service menu, control panel 33
Services tab Macintosh 57
settings color 159 driver presets (Mac) 54 drivers 40 drivers (Mac) 50 priority 39, 50
shortcuts (Windows) creating 118 using 116
Sign In menu 10
signs, printing 149
sleep delay disabling 170 enabling 170
software
embedded Web server 42
HP Utility 51
HP Web Jetadmin 42
installing Mac 46
installing, USB connections for Mac 46
installing, wired networks 65
installing, wired networks, Mac 48
Mac 51
problems 202
settings 39, 50
software license agreement 217
supported operating systems 36, 46
uninstalling for Windows 41
uninstalling Mac 49
Solaris software 43
solving direct-connect problems 201 network problems 201 walk-up USB printing problems 200
special media
guidelines 72
special paper
guidelines 72
printing (Windows) 134
specifications
electrical and acoustic 224
operating environment 224
sRGB settings 160
status
HP Utility, Macintosh 51
Macintosh services tab 57
messages, types of 181
Stop button 8
stopping print jobs 114
storage, job
Macintosh settings 51, 56
modes available 143
setting options (Windows) 146
stored jobs
creating (Windows) 144
deleting 146
printing 145
receiving notification when printed (Windows) 148
security 169
setting user names (Windows) 148
specifying names (Windows) 148
storing
print cartridges 96
storing jobs
permanent copies (Windows) 147
permanent private copies (Windows) 147
proof and hold (Windows) 146
setting options (Windows) 146
temporary copies (Windows) 147
temporary personal jobs (Windows) 146
with Windows 144
subnet mask 67
supplies
counterfeit 97
memory errors 106
non-HP 96
ordering 208
part numbers 209
recycling 96, 227
status, viewing with HP Utility 51
Supplies menu, control panel 12
supplies status page printing 105
supply-status, Services tab Macintosh 57
support
HP Utility pages 51 online 221
supported paper 75
system requirements
HP Embedded Web Server 163
T
Taiwan EMI statement 234
TCP/IP
manually configuring IPv4 parameters 67
manually configuring IPv6 parameters 68
operating systems supported 60
technical support online 221
temperature requirements 224
time clock, setting real- 171
tips iii
toner cartridges. See print cartridges
toner collection unit replacing 100
tough paper 149, 150
transfer kit part number 210
transparencies automatic sensing 91 printing (Windows) 134
trapping 155
Tray 1 automatic paper sensing 91 capacity 84 double-sided printing 56 jams 187
Tray 2 capacity 85 jams 189
trays capacity 84 configure 90 double-sided printing 56 included 2 load 80 locating 5 Macintosh settings 51 paper orientation 85 selecting (Windows) 121
Trays menu, control panel 14
troubleshooting blank pages 199 checklist 179 control panel messages 181 direct-connect problems 201 EPS files 205
error messages, numerical list 106
Macintosh problems 203
network problems 201
pages not printing 199
pages printing slowly 199
repeating defects 105, 198 USB cables 199
walk-up USB printing problems 200
Troubleshooting menu, control panel 30
troubleshooting tools HP Embedded Web Server 165
two-sided printing settings (Windows) 123 turning on (Mac) 51
U
uninstalling Mac software 49 uninstalling Windows software 41
universal print driver 38
UNIX software 43
updates, downloading product 176
USB Firmware Upgrade menu, control panel 33
USB port troubleshooting 199 troubleshooting Macintosh 205
USB storage accessories printing from 151
user names setting for stored jobs (Windows) 148
W
wake time changing 171 setting 171
walk-up USB printing 151
warnings iii
warranty customer self repair 220 license 217
print cartridges 214 product 212
watermarks adding (Windows) 141
Web browser requirements HP Embedded Web Server 163
Web sites customer support 221 fraud reports 97
HP Web Jetadmin, downloading 167
Macintosh customer support 221
Material Safety Data Sheet (MSDS) 230
universal print driver 38
Windows changing paper types and sizes 74
driver settings 40
drivers supported 36
problem-solving issues 203
supported operating systems 36
universal print driver 38