
Color LaserJet Enterprise CP4525dn - Printer HP - Free user manual and instructions
Find the device manual for free Color LaserJet Enterprise CP4525dn HP in PDF.


User questions about Color LaserJet Enterprise CP4525dn HP
0 question about this device. Answer the ones you know or ask your own.
Ask a new question about this device
Download the instructions for your Printer in PDF format for free! Find your manual Color LaserJet Enterprise CP4525dn - HP and take your electronic device back in hand. On this page are published all the documents necessary for the use of your device. Color LaserJet Enterprise CP4525dn by HP.
USER MANUAL Color LaserJet Enterprise CP4525dn HP
natural_image
Exterior view of a HP printer with paper feed and control panel (no visible text or symbols)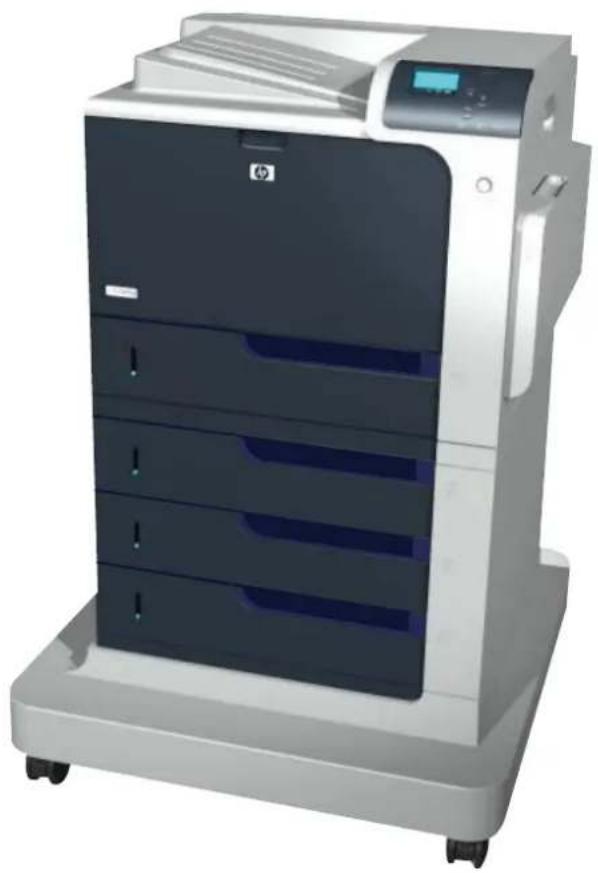
natural_image
Exterior view of a HP industrial paper handling machine (no visible text or symbols)CP4025n
CP4025dn
CP4525n
CP4525dn
CP4525xh
HP Color LaserJet Enterprise CP4020-CP4520 Series Printer User Guide
Copyright and License
© 2009 Copyright Hewlett-Packard Development Company, L.P.
Reproduction, adaptation, or translation without prior written permission is prohibited, except as allowed under the copyright laws.
The information contained herein is subject to change without notice.
The only warranties for HP products and services are set forth in the express warranty statements accompanying such products and services. Nothing herein should be construed as constituting an additional warranty. HP shall not be liable for technical or editorial errors or omissions contained herein.
Part number: CC489-90901
Edition 3, 10/2009
Trademark Credits
Adobe ^® , Acrobat ^® , and PostScript ^® are trademarks of Adobe Systems Incorporated.
Corel® is a trademark or registered trademark of Corel Corporation or Corel Corporation Limited.
Intel® Core™ is a trademark of Intel Corporation in the U.S. and other countries.
Java ^™ is a US trademark of Sun Microsystems, Inc.
Microsoft®, Windows®, Windows® XP, and Windows Vista® are U.S. registered trademarks of Microsoft Corporation.
PANTONE® is Pantone, Inc's check-standard trademark for color.
UNIX ^® is a registered trademark of The Open Group.
ENERGY STAR and the ENERGY STAR mark are registered U.S. marks.
Conventions used in this guide
TIP: Tips provide helpful hints or shortcuts.
NOTE: Notes provide important information to explain a concept or to complete a task.
△ CAUTION: Cautions indicate procedures that you should follow to avoid losing data or damaging the product.
⚠ WARNING! Warnings alert you to specific procedures that you should follow to avoid personal injury, catastrophic loss of data, or extensive damage to the product.
Table of contents
1 Product basics
Product comparison 2
Environmental features .... 3
Product features 4
Product views 7
Front view 7
Back view 8
Interface ports 9
Serial number and model number location 9
Control-panel layout 10
2 Control panel menus
Control panel menus 12
Show Me How menu 12
Retrieve job menu 12
Information menu 14
Paper handling menu 15
Manage supplies menu 16
Configure device menu 19
Printing menu 19
PCL sub-menu 21
Print Quality menu 23
System setup menu 27
I/O menu 32
Resets menu 40
Diagnostics menu 40
Service menu 42
3 Software for Windows
Supported operating systems for Windows 44
Supported printer drivers for Windows 45
Select the correct printer driver for Windows 46
HP Universal Print Driver (UPD) 46
UPD installation modes 47
Priority for print settings 48
Change printer-driver settings for Windows 49
Change the settings for all print jobs until the software program is closed 49
Change the default settings for all print jobs 49
Change the product configuration settings 49
Remove software for Windows 50
Supported utilities for Windows 51
HP Web Jetadmin 51
HP Embedded Web Server 51
HP Easy Printer Care 51
Software for other operating systems 53
4 Use the product with Mac
Software for Mac 56
Supported operating systems for Mac 56
Supported printer drivers for Mac 56
Remove software from Mac operating systems 56
Priority for print settings for Mac 57
Change printer-driver settings for Mac 57
Software for Mac computers 58
HP Utility for Mac 58
Open the HP Printer Utility 58
HP Utility features 58
Supported utilities for Mac 59
HP Embedded Web Server 59
Print with Mac 60
Create and use printing presets with Mac 60
Resize documents or print on a custom paper size with Mac 60
Print a cover page with Mac 60
Use watermarks with Mac 61
Print multiple pages on one sheet of paper with Mac 61
Print on both sides of the page (duplex printing) with Mac 62
Store jobs with Mac 62
Set the color options with Mac 63
Use the Services menu with Mac 63
5 Connect the product
Supported network operating systems 66
Printer sharing disclaimer 66
Connect with USB 67
CD installation 67
Connect to a network 68
Supported network protocols 68
Install the product on a wired network 71
Configure the IP address 71
Install the software 72
Configure network settings 74
View or change network settings 74
Set or change the network password 74
Manually configure IPv4 TCP/IP parameters from the control panel 75
Manually configure IPv6 TCP/IP parameters from the control panel 76
Link speed and duplex settings 77
6 Paper and print media
Understand paper use 80
Special paper guidelines 80
Change the printer driver to match the paper type and size 82
Supported paper sizes 83
Supported paper types 85
Tray and bin capacity 86
Paper orientation for loading trays 87
Paper orientation for loading Tray 1 87
Paper orientation for loading Tray 2 or optional Trays 3, 4, and 5 89
Load paper trays 90
Load Tray 1 90
Load Tray 2 and optional Trays 3, 4, and 5 with standard-size paper 92
Load Tray 2 and optional Trays 3, 4, and 5 with custom-size paper 93
Load Tray 2 with 10 x 15 cm4 x 6 in size paper 95
Configure trays 97
Configure a tray when loading paper 97
Configure a tray to match print job settings 97
Configure a tray by using the Paper Handling menu 97
Automatic paper sensing (auto-sense mode) 98
Auto-sense settings 98
Select the paper by source, type, or size 98
Source 98
Type and Size 98
7 Print tasks
Cancel a print job 102
Print with Windows 103
Open the printer driver with Windows 103
Get help for any printing option with Windows 104
Change the number of print copies with Windows 104
Print colored text as black (grayscale) with Windows 104
Save custom print settings for reuse with Windows 105
Use a printing shortcut with Windows 105
Create printing shortcuts 106
Improve print quality with Windows 109
Select the page size with Windows 109
Select a custom page size with Windows 109
Select the paper type with Windows 109
Select the paper tray with Windows 109
Select the print resolution 109
Print on preprinted letterhead or forms with Windows 110
Print on special paper, labels, or transparencies 112
Print the first or last page on different paper with Windows 115
Scale a document to fit page size 117
Add a watermark to a document with Windows 119
Print on both sides (duplex) with Windows 120
Manually print on both sides with Windows 120
Automatically print on both sides with Windows 121
Create a booklet with Windows 123
Print on 10 x 15 cm (4 x 6 in) paper with Windows 124
Print multiple pages per sheet with Windows 125
Select page orientation with Windows 126
Use job storage features with Windows 128
Create a stored job with Windows 128
Print a stored job 129
Delete a stored job 130
Set job storage options with Windows 131
Print one copy for proof before printing all the copies 131
Temporarily store a personal job on the product and print it later 131
Temporarily store a job on the product 131
Permanently store a job on the product 131
Make a permanently stored job private so that anyone who tries to print it must provide a PIN 132
Receive notification when someone prints a stored job 132
Set the user name for a stored job 132
Specify a name for the stored job 132
Set color options with Windows 133
Print special jobs with Windows 135
Print business graphics or marketing material 135
Supported glossy paper 135
Print weatherproof maps and outdoor signs 136
Supported tough paper 136
Set the duplex alignment 137
8 Color
Adjust color 140
Automatic 140
Print in Grayscale 140
Manual color adjustment 141
Manual color options 141
Use the HP EasyColor option for Windows 142
Match colors 143
Sample book color matching 143
Print color samples 143
PANTONE® color matching 144
Advanced color use 145
HP ColorSphere toner 145
HP ImageREt 3600 145
Paper selection 145
Color options 145
Standard red-green-blue (sRGB) 145
9 Manage and maintain
Print information pages 148
Use the HP Easy Printer Care software 149
Open the HP Easy Printer Care software 149
HP Easy Printer Care software sections 149
Use the HP Embedded Web Server 152
Open the HP Embedded Web Server by using a network connection 152
Features 153
Use HP Web Jetadmin software 155
Product security features 156
Security statements 156
IP Security 156
Secure the HP Embedded Web Server 156
HP Encrypted High Performance Hard Disks 156
Secure stored jobs 157
Lock the control panel menus .... 157
Lock the formatter 158
Economy settings 159
Optimize speed or energy usage 159
Powersave modes 159
Disable or enable sleep mode 159
Set sleep delay 160
Wake time 160
Set the real-time clock 160
Set the wake time 161
Manage supplies and accessories 162
Print when a cartridge reaches estimated end of life 162
Manage print cartridges 162
Print-cartridge storage 162
HP policy on non-HP print cartridges 162
HP fraud hotline and Web site 162
Recycle supplies 163
Cartridge memory tag 163
Replacement instructions 164
Replace print cartridges 164
Replace the toner collection unit 167
Install memory DIMMs 169
Enable memory 172
Check DIMM installation 173
Memory allocation 173
Install external I/O cards 174
Clean the product 176
Clean the paper path 176
Product updates 177
10 Solve problems
Solve general problems 180
Troubleshooting checklist 180
Factors that affect product performance 181
Restore factory settings 182
Interpret control-panel messages 183
Control-panel message types 183
Control-panel messages 183
Clear jams 206
Common causes of jams 206
Jam locations 207
Clear jams in the right door 209
Clear jams in the output bin area 212
Clear jams in Tray 1 213
Clear jams in Tray 2 or optional Trays 3, 4, or 5 215
Clear jams in the lower right door (Tray 3, 4, or 5) 216
Change jam recovery 217
Solve paper-handling problems 218
Product feeds multiple sheets 218
Product feeds incorrect page size 218
Product pulls from incorrect tray 219
Paper does not feed automatically 219
Paper does not feed from Tray 2, 3, 4, or 5 220
Transparencies or glossy paper will not feed 220
Envelopes jam or will not feed in the product 221
Output is curled or wrinkled 221
Product does not duplex or duplexes incorrectly 222
Solve image-quality problems 223
Example print quality problems ....223
Repetitive defects ruler 224
Optimize and improve image quality 225
Internal print-quality-test pages 225
Manage and configure printer drivers 225
Calibrate the product 225
Set the image registration 226
Solve performance problems 227
Solve connectivity problems 228
Solve direct-connect problems 228
Solve network problems 228
Product software problems 229
Solve common Windows problems 230
Solve common Mac problems ....231
Appendix A Supplies and accessories
Order parts, accessories, and supplies 236
Part numbers 237
Accessories 237
Print cartridges and toner collection unit 237
Memory 237
Cables and interfaces 238
Maintenance kits 238
Appendix B Service and support
Hewlett-Packard limited warranty statement 240
HP's Premium Protection Warranty: LaserJet print cartridge limited warranty statement 241
Color LaserJet Fuser Kit, Transfer Kit, and Roller Kit Limited Warranty Statement 242
End User License Agreement 243
Customer self-repair warranty service 245
Customer support 246
Appendix C Product specifications
Physical specifications 248
Power consumption, electrical specifications, and acoustic emissions 248
Environmental specifications 248
Appendix D Regulatory information
FCC regulations 250
Environmental product stewardship program 251
Protecting the environment 251
Power consumption 251
Paper use 251
Plastics 251
HP LaserJet print supplies 251
Return and recycling instructions 252
United States and Puerto Rico 252
Multiple returns (more than one cartridge) 252
Single returns 252
Shipping 252
Non-U.S. returns 252
Paper 252
Material restrictions 253
Disposal of waste equipment by users in private households in the European Union .... 253
Chemical substances 253
Material Safety Data Sheet (MSDS) 254
For more information 254
Declaration of Conformity 255
Safety statements 256
Laser safety 256
Canadian DOC regulations 256
VCCI statement (Japan) 256
Power cord instructions 256
Power cord statement (Japan) 256
EMC statement (China) 257
EMC statement (Korea) 257
EMI statement (Taiwan) 257
Laser statement for Finland 257
Substances Table (China) 258
Index 259
1 Product basics
Product comparison
• Environmental features
Product features
Product views
• Control-panel layout
Product comparison
Model Features
HP Color LaserJet CP4025n
HP Color LaserJet CP4525n
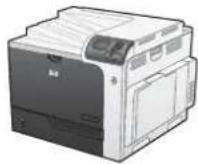
HP Color LaserJet CP4025dn
HP Color LaserJet CP4525dn
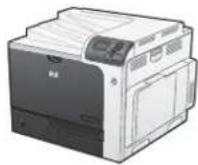
HP Color LaserJet CP4525xh
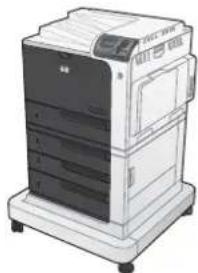
natural_image
Illustration of a multi-tiered printer or paper holder with no visible text or symbols on the device itself.• 100-sheet multipurpose input tray (Tray 1)
500-sheet input tray (Tray 2)
500-sheet, face-down output bin
Hi-speed USB 2.0 port
HP Jetdirect embedded print server for connecting to a 10/100/1000Base-TX network
512 megabytes (MB) of random access memory (RAM)
• 100-sheet multipurpose input tray (Tray 1)
500-sheet input tray (Tray 2)
500-sheet, face-down output bin
• Hi-speed USB 2.0 port
HP Jetdirect embedded print server for connecting to a 10/100/1000Base-TX network
512 megabytes (MB) of random access memory (RAM)
• Automatic two-sided printing
• 100-sheet multipurpose input tray (Tray 1)
500-sheet input tray (Tray 2)
HP 3x500-sheet paper feeder (Trays 3, 4, and 5)
500-sheet, face-down output bin
• Hi-speed USB 2.0 port
HP Jetdirect embedded print server for connecting to a 10/100/1000Base-TX network
• 1 gigabyte (GB) of random access memory (RAM)
• Automatic two-sided printing
• HP Encrypted High Performance Hard Disk
Environmental features
| Duplex | Save paper by using duplex printing as your default print setting. |
| Print multiple pages per sheet | Save paper by printing two or more pages of a document side-by-side on one sheet of paper.Access this feature through the printer driver. |
| Recycling Reduce waste by using recycled paper. | |
| Recycle print cartridges by using the HP return process. | |
| Energy savings Save energy by initiating sleep mode for the product. | |
| HP Smart Web printing | Use HP Smart Web printing to select, store, and organize text and graphics from multiple Web pages and then edit and print exactly what you see onscreen. It gives you the control you need for printing meaningful information while minimizing waste. |
| Download HP Smart Web printing from this Web site: www.hp.com/go/smartweb. | |
| Job storage | Use the job storage features to manage print jobs. By using job storage, you activate printing while you are at the shared product, eliminating lost print jobs that are then reprinted. |
Product features
| Speed and throughput | HP Color LaserJet CP4025 modelsPrint up to 35 pages per minute (ppm) on letter-size paper and 35 ppm on A4-size paper.As quick as 10 seconds to print the first pageRecommended monthly print volume of 2,000 to 7,500 pagesA 800 megahertz (MHz) microprocessor |
| HP Color LaserJet CP4525 modelsPrint up to 42 pages per minute (ppm) on letter-size paper and 40 ppm on A4-size paper.As quick as 10 seconds to print the first pageRecommended monthly print volume of 2,500 to 10,000 pagesA 800 megahertz (MHz) microprocessor | |
| Resolution | 1200 dots per inch (dpi) with Image Resolution Enhancement technology 36001200 x 1200 dpi for detailed line work and small text |
| Memory | n and dn models: 512 MB of random-access memory (RAM), expandable to 1 GB by adding into the open DIMM slot 200-pin small outline dual inline memory modules (DDR2 SODIMM) that support 256 MB or 512 MB of RAM.xh models: 1 gigabyte (GB) of random-access memory (RAM).Memory Enhancement technology (MEt) automatically compresses data to use RAM more efficiently. |
| User interface | Four-line color graphical display on the control panelHP Embedded Web Server to configure and manage the product remotely from any computer connected to the same networkHP Easy Printer Care software (an optional status and troubleshooting tool)Internet-enabled supply-ordering capabilities through HP Easy Printer Care software, driver Status Notification pop-up messages, and HP Embedded Web Server |
| Paper-handling | Tray 1 (multipurpose tray): A multipurpose tray for paper, transparencies, labels, envelopes, and other paper types. The tray holds up to 100 sheets of paper, 50 transparencies, or 10 envelopes.Tray 2: 500-sheet tray, and an optional HP Postcard media insert.Optional Trays 3, 4 and 5: 500-sheet traysTwo-sided printing: The dn and xh models support automatic two-sided printing. The other models support manual two-sided printing.Standard output bin: Hold up to 500 sheets of paper. The product has a sensor that indicates when the bin is full.For information about supported paper sizes, see Supported paper sizes on page 83.For information about supported paper types, see Supported paper types on page 85. |
| Languages and fonts | HP Printer Control Language PCL 5, PCL 6, and HP postscript level 3 emulationDirect PDF93 scalable TrueType PS typefaces |
| Print cartridges | For information regarding print cartridges, seewww.hp.com/go/learnaboutsupplies.Authentic HP print cartridge detectionAutomatic toner strip remover |
| Supported operating systems | Microsoft®Windows®XP, Windows Vista®, Windows®Server 2003, Windows®Server 2008, and Windows®7Macintosh OS X 10.4, 10.5, 10.6, and laterNovell NetWare V6.5 and iPrint V5.12 and laterCitrixMeta Frame XPPresentation Server V4.0 and laterXenApp 5.0UNIX®Linux |
| Connectivity | USB 2.0 connectionLocal area network (LAN) Ethernet (RJ-45) connector for the embedded HP Jetdirect print serverOne enhanced input/output (EIO) slot |
| Environment | Sleep setting saves energyHigh content of recyclable components and materialsInstant-on fuser saves energy |
| Security | Security lock (optional)Job retentionUser PIN authentication for stored jobsIPsec securityHP encrypted High Performance EIO hard drive (included with the xh model, and available as an optional accessory for the other models) |
| Self-help | Show-me-how pages that you can print from the control panelJob aids for specific tasks available fromwww.hp.com/support/cljcp4025orwww.hp.com/support/cljcp4525.Animations and help on the control panel |
| Accessibility | The online user guide is compatible with text screen-readers.The print cartridges can be installed and removed by using one hand.All doors and covers can be opened by using one hand.Paper can be loaded in Tray 1 by using one hand. |
Product views
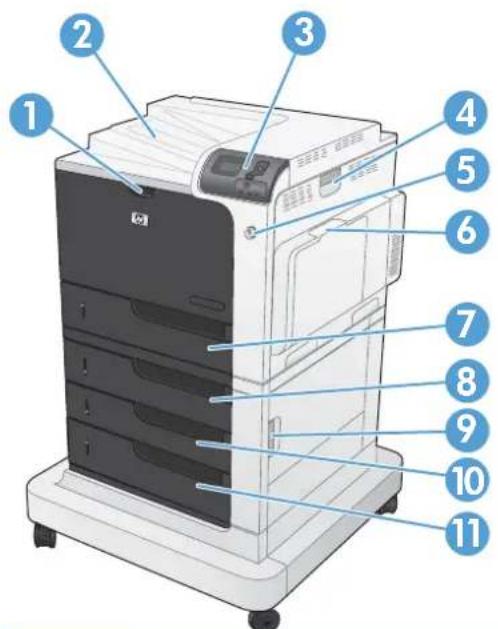
Front view
text_image
Diagram of a HP printer with numbered parts labeled for identification| 1 Front door (access to print cartridges and toner collection unit) |
| 2 Standard output bin |
| 3 Control panel |
| 4 Right door (access for clearing jams) |
| 5 On/off button (illuminates when turned on) |
| 6 Tray 1 (pull the handle to open the tray) |
| 7 Tray 2 |
| 8 Optional Tray 3 (included with the HP Color LaserJet CP4525xh model) |
| 9 Lower right door (access for clearing jams) |
| 10 Optional Tray 4 (included with the HP Color LaserJet CP4525xh model) |
| 11 Optional Tray 5 (included with the HP Color LaserJet CP4525xh model) |
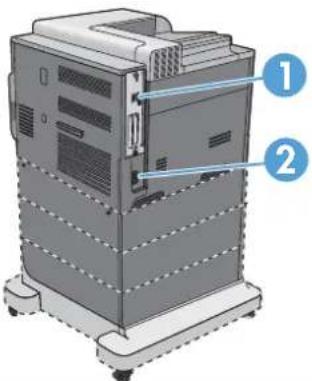
Back view
text_image
Diagram of a server rack with labeled components, showing numbered parts 1 and 2.1 Interface ports
2 Power connection
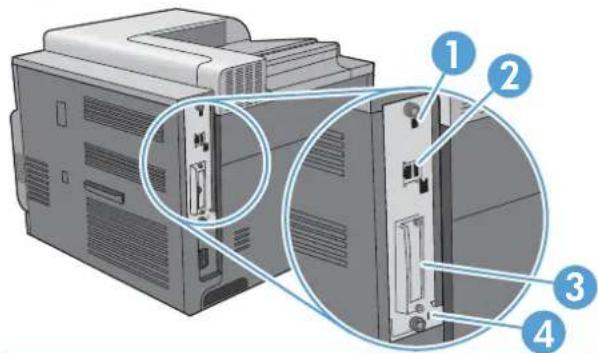
Interface ports
text_image
Diagram of a computer tower with numbered parts highlighting internal components| 1 Hi-speed USB 2.0 printing port |
| 2 Local area network (LAN) Ethernet (RJ-45) network port |
| 3 EIO interface expansion slot |
| 4 Slot for a cable-type security lock |
Serial number and model number location
The model number and serial number are listed on an identification label located on the back of the product. The serial number contains information about the country/region of origin, the product version, production code, and the production number of the product.
| Model name Model number |
| HP Color LaserJet CP4025n CC489A |
| HP Color LaserJet CP4025dn CC490A |
| HP Color LaserJet CP4525n CC493A |
| HP Color LaserJet CP4525dn CC494A |
| HP Color LaserJet CP4525xh CC495A |
Control-panel layout
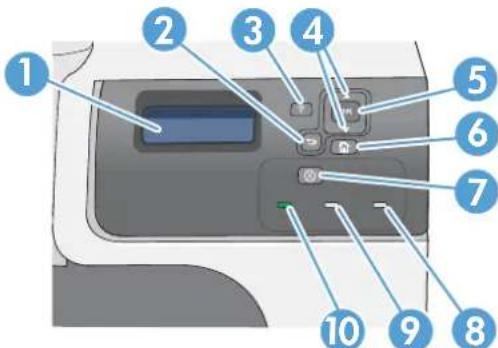
The control panel includes a color, graphical and text display, job-control buttons, and three light-emitting diode (LED) status lights.
text_image
Diagram of a printer front panel with numbered labels pointing to key components| 1 | Control panel display | Shows status information, menus, help information, and error messages. |
| 2 Back arrow button Navigates backward in nested menus. | ||
| 3 | ? Help button | Provides detailed information, including animations, about product messages or menus. |
| 4 | ▲ Up arrow button | Navigates menus and text, and increases the values of numerical items in the display. |
| ▼ Down arrow button | Navigates menus and text, and decreases the values of numerical items in the display. | |
| 5 | OK button | Makes selections and resumes printing after continuable errors. |
| 6 | Home button | Opens and closes the menu structure. |
| 7 | ⊗ Stop button | Halts the current job, presents a choice to resume or cancel the current job, clears paper from the product, and clears any continuable errors that are associated with the halted job. If the product is not printing a job, pressing the Stop button pauses the product. |
| 8 |  Attention light Attention light | The Attention light indicates that the product has a condition that requires intervention. Examples include an empty paper tray or an error message on the display. |
| 9 | 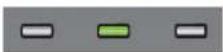 Data light Data light | The Data light indicates that the product is receiving data. |
| 10 |  Ready light Ready light | The Ready light indicates that the product is ready to begin processing any job. |
2 Control panel menus
• Control panel menus
Control panel menus
You can control the product by changing settings in the menus on the product control panel. Use the control panel to access features not supported by the printer driver or software application, and to configure trays for paper size and type.
Show Me How menu
The SHOW ME HOW menu prints pages that provide more information about the product. You can print the pages and keep them near the product for convenient reference.
To display: Press the Home button 🔒, and then select the SHOW ME HOW menu.
| Item Explanation | |
| CLEAR JAMS Provides instructions for clearing jams on the product. | |
| LOAD TRAYS Provides instructions for loading and configuring trays. | |
| LOAD SPECIAL MEDIA | Provides instructions for loading special print media such as envelopes, transparencies, and labels. |
| LOAD MEDIA 4 X 6 (10 X 15CM) Provides instructions for loading 4 x 6 media. | |
| PRINT BOTH SIDES | Provides instructions for printing on both sides of the paper (duplex printing). |
| SUPPORTED PAPER Provides a list of the supported paper and print media. | |
| PRINT HELP GUIDE Prints a page that shows links to additional help on the Web. | |
Retrieve job menu
Use the RETRIEVE JOB menu to view listings of all stored jobs.
To display: Press the Home button 🔒, and then select the RETRIEVE JOB menu.
| Item | Sub-item | Sub-item | Sub-item | Description |
| NO STORED JOBS | This message appears if no jobs are currently stored on the product. | |||
| Each user who has stored jobs is listed | by name. Select the appropriate user name to see a list of stored jobs. | |||
| Item Sub-Item Sub-item Sub-item Description | ||
| ALL JOBS (WITH PIN) PRINT | This message appears if a user has two or more stored jobs that require a PIN. IfPRINTorPRINT AND DELETEis selected then the PIN will be requested. If the jobs have different PINs, only the jobs with the PIN entered will be printed. If the PIN does not match any of the jobs, an error message is displayed. Either thePRINToption or thePRINT AND DELETEoption displays, depending on the type of jobs listed. If the stored jobs are Personal or Proof and Hold jobs,PRINT AND DELETEis displayed. These jobs are deleted after they are printed. IfPRINTis displayed, there is at least one Quick Copy or standard stored job. WhenPRINTis selected, any Personal or Proof and Hold jobs in the list will be printed and deleted. | |
| PRINT AND DELETE | ||
| DELETE | ||
| COPIES | WhenPRINTorPRINT AND DELETEis selected, theCOPIESoption allows you to specify the number of copies of the job to print. The default is 1 and the range is from 1 to 3,200.The following copy options are also available:Select theJOBoption to print the number of copies specified in the driver.Select theCUSTOM VALUEoption to specify the number of copies of the job to be printed. The number of copies that were specified in the driver are multiplied by the number of copies specified on the control panel. For example, if you specified two copies in the driver and specify two copies on the control panel, a total of four copies of the job are printed. | |
| ALL JOBS (NO PIN) PRINT | This message appears if a user has two or more stored jobs that do not require a PIN. Either thePRINToption or thePRINT AND DELETEoption displays, depending on the type of jobs listed. If the stored jobs are Personal or Proof and Hold jobs,PRINT AND DELETEis displayed. These jobs are deleted after they are printed. IfPRINTis displayed, there is at least one Quick Copy or standard stored job. WhenPRINTis selected, any Personal or Proof and Hold jobs in the list will be printed and deleted. | |
| PRINT AND DELETE | ||
| DELETE | ||
Item Sub-item Sub-item Sub-item Description
| COPIES | JOBCUSTOM VALUE | WhenPRINTorPRINT AND DELETEis selected, theCOPIESoption allowsyou to specify the number of copies ofthe job to print. The default is 1 and therange is from 1 to 3,200.The following copy options are alsoavailable:Select theJOBoption to print thenumber of copies specified in thedriver.Select theCUSTOM VALUEoption to specify the number ofcopies of the job to be printed. Thenumber of copies that werespecified in the driver aremultiplied by the number of copiesspecified on the control panel. Forexample, if you specified twocopies in the driver and specify twocopies on the control panel, a totalof four copies of the job are printed. | |
| <JOB NAME X>PRINT | Each individual job for the user is listedby name.PRINT ANDDELETEDELETE | Either thePRINToption or thePRINTAND DELETEoption displays,depending on the type of jobs listed. IfPRINT AND DELETEis displayed, all ofthe stored jobs are either Personal orProof and Hold jobs. These jobs aredeleted after they are printed. IfPRINTis displayed, there is at least one QuickCopy or Standard stored job. If there areany Personal or Proof and Hold jobsthey will be printed and deleted, eventhough thePRINToption was selected. | |
| COPIES | WhenPRINTorPRINT AND DELETEis selected, aCOPIESoption allows youto specify the number of copies of thejob to print. The default is 1 and therange is from 1 to 3,200. | ||
Information menu
Use the INFORMATION menu to access and print specific product information.
To display: Press the Home button 🔒, and then select the INFORMATION menu.
| Item Description | |
| PRINT MENU MAP Prints the control-panel menu map, which shows the layout and current settings of the control-panel menu items. | |
| PRINT CONFIGURATION | Prints the product configuration pages, which show the printer settings and installed accessories. |
| PRINT SUPPLIES STATUS PAGE | Prints the approximate remaining life for the supplies; reports statistics on total number of pages and jobs processed, serial number, page counts, and maintenance information. |
| HP provides approximations of the remaining life for the supplies as a customer convenience. The actual remaining supply levels might be different than the approximations provided. | |
| SUPPLIES STATUS | Displays the approximate status of the print cartridges, transfer kit, fuser kit, and toner collection unit in a scrollable list. Press the OK button to open help for each item. |
| PRINT USAGE PAGE | Prints a count of all paper sizes that have passed through the product; lists whether they were simplex, duplex, monochrome, or color; and reports the page count. |
| PRINT COLOR USAGE JOB LOG | Prints the color-use statistics for the printer. |
| PRINT DEMO PAGE | Prints a demonstration page. |
| PRINT RGB SAMPLES | Prints color samples for different RGB values. Use the samples as a guide for matching printed colors. |
| PRINT CMYK SAMPLES | Prints color samples for different CMYK values. Use the samples as a guide for matching printed colors. |
| PRINT FILE DIRECTORY | Prints the name and directory of files stored in the product. |
| PRINT PCL FONT LIST | Prints the available PCL fonts. |
| PRINT PS FONT LIST | Prints the available PS fonts. |
Paper handling menu
Use this menu to configure input trays by size and type. It is important to correctly configure the trays with this menu before you print for the first time. This menu also appears when you close Trays 2-5 and press the OK button after the prompt to set the paper size and type.
To display: Press the Home button 🔒, and then select the PAPER HANDLING menu.

NOTE: If you have used other HP LaserJet product models, you might be accustomed to configuring Tray 1 to First mode or Cassette mode. On HP Color LaserJet Enterprise CP4020-CP4520 Series printers, setting Tray 1 to ANY SIZE and ANY TYPE is equivalent to First mode. Setting Tray 1 to a setting other than ANY SIZE or ANY TYPE is equivalent to Cassette mode.
| Menu item Value Description | ||
| TRAY 1 SIZE | A list of available sizes appears. | Allows you to configure the paper size for Tray 1. The default is ANY SIZE. See Supported paper sizes on page 83 for a complete list of available sizes. |
| TRAY 1 TYPE | A list of available types appears. | Allows you to configure the paper type for Tray 1. The default is ANY TYPE. See Supported paper types on page 85 for a complete list of available types. |
| Menu item Value Description | |
| TRAYSIZEX = 2 or optional 3, 4, or 5 | A list of available sizes appears. Allows you to configure the paper size for Tray 2 or optional Tray 3, 4, or 5. These trays can detect the paper size by the guides in the tray. SeeSupported paper sizes on page 83for a complete list of available sizes. |
| TRAYTYPEX = 2 or optional 3, 4, or 5 | A list of available types appears. Allows you to configure the paper type for Tray 2 or optional Tray 3, 4, or 5. The default is PLAIN. SeeSupported paper types on page 85for a complete list of available types. |
Manage supplies menu
Use this menu to configure how the product alerts you when supplies are approaching the estimated end of life.
To display: Press the Home button 📋, and then select the MANAGE SUPPLIES menu.

NOTE: Values that have an asterisk (*) are the factory-default values. Some menu items have no default.
Menu item Sub-menu item Values Description
| AT VERY LOW BLACK CARTRIDGE STOP | PROMPT TO CONTINUE* | Select what the product should do when the print cartridge is very near the end of its estimated life. |
| CONTINUE | STOP: The product stops until you replace the cartridge. | |
| PROMPT TO CONTINUE: The product stops until you clear the prompt message. After the prompt message is cleared, there will not be another message indicating that the supply needs to be replaced. | ||
| CONTINUE: The product provides an alert message, but it continues printing. There will not be another message indicating that the supply needs to be replaced. | ||
| Menu item Sub-menu item Values Description | ||
| COLOR CARTRIDGES STOP | PROMPT TO CONTINUE* | Select what the product should do when the print cartridge is very near the end of its estimated life. |
| CONTINUE | STOP: The product stops until you replace the cartridge. | |
| PRINT IN BLACK | PROMPT TO CONTINUE: The product stops until you clear the prompt message. | |
| CONTINUE: The product provides an alert message, but it continues printing. | ||
| PRINT IN BLACK: The product prints in black when a color cartridge is near the end of its estimated life. | ||
| TRANSFER KIT STOP | PROMPT TO CONTINUE* | STOP: The product stops until you replace the transfer kit. |
| CONTINUE | PROMPT TO CONTINUE: The product stops until you clear the prompt message. | |
| CONTINUE: The product provides an alert message, but it continues printing. | ||
| FUSER KIT STOP | PROMPT TO CONTINUE* | STOP: The product stops until you replace the fuser kit. |
| CONTINUE | PROMPT TO CONTINUE: The product stops until you clear the prompt message. | |
| CONTINUE: The product provides an alert message, but it continues printing. | ||
| TONER COLLECTION UNIT STOP* | PROMPT TO CONTINUE | STOP: The product stops until you replace the toner collection unit. |
| CONTINUE | PROMPT TO CONTINUE: The product stops until you clear the prompt message. | |
| CONTINUE: The product provides an alert message, but it continues printing. | ||
| NOTE: Using a Toner collection unit after a prompt or alert message might result in toner leakage, especially when replacing the Toner collection unit. | ||
Menu item Sub-menu item Values Description
| USER DEFINED LOW YELLOW CARTRIDGE | Range from 0–100% Use the arrow buttons to enter the percentage of estimated cartridge life at which you want the product to alert you that the cartridge is low. | |
| MAGENTA CARTRIDGE | ||
| CYAN CARTRIDGE | ||
| BLACK CARTRIDGE | ||
| TRANSFER KIT Range from 0–100% | Default is 2% | Use the arrow buttons to enter the percentage of estimated cartridge life at which you want the product to alert you. |
| FUSER KIT Range from 0–100% | Default is 2% | Use the arrow buttons to enter the percentage of estimated cartridge life at which you want the product to alert you. |
| SUPPLY MESSAGES LOW MESSAGE ON* | OFF | Select how the product displays the supply information. |
| LOW MESSAGE: Determines whether or not a low supply message is displayed on the control panel. | ||
| LEVEL GAUGE ON* | OFF | LEVEL GAUGE: Determines whether or not a supply level gauge appears on the control panel. |
| APPROXIMATE PAGES ON* | OFF | APPROXIMATE PAGES: Determines whether or not the approximate pages remaining is displayed in the low supply messages. |
| Menu item Sub-menu item Values Description | ||
| RESTRICT COLOR USE | ENABLE COLOR* | This menu item controls the authorization of color printing. |
| COLOR IF ALLOWED | DISABLE COLOR: All jobs sent to the product print only in monochrome. | |
| DISABLE COLOR | ENABLE COLOR: All color pages sent to the product print in color. | |
| COLOR IF ALLOWED: A permissions database is referenced to verify if color pages are printed in color or monochrome. | ||
| COLOR/BLACK MIX AUTO* | MOSTLY COLOR PAGES | These menu selections allow you to balance the trade-off between supply life and performance. |
| MOSTLY BLACK PAGES | AUTO: The product software uses an algorithm based on printing data to achieve the best output. | |
| MOSTLY COLOR PAGES: This selection provides the highest performance. If most of the printing is in color, this selection will not negatively affect supply life. | ||
| MOSTLY BLACK PAGES: This selection conserves the most supply life and is the best choice if most of the printing is done in black and white. | ||
Configure device menu
The CONFIGURE DEVICE menu allows you to change the default printing settings, adjust the print quality, change the system configuration and I/O options, and reset the default settings.
Printing menu
These settings affect only jobs without identified properties. Most jobs identify all of the properties and override the values set from this menu.
To display: Press the Home button ⓗ, select the CONFIGURE DEVICE menu, and then select the PRINTING menu.

NOTE: Values that have an asterisk (*) are the factory-default values. Some menu items have no default.
| Menu item Sub-menu item Values Description | |||
| COPIES | Range: 1 - 32000 | Allows you to set the default number of copies for print jobs. The default number is 1. | |
| DEFAULT PAPER SIZE A list of available sizes | appears. See Supported paper sizes on page 83. | Allows you to set the default paper size. | |
| DEFAULT CUSTOM PAPER SIZE | UNIT OF MEASURE | Allows you to set the default size for any custom print job that does not specify the dimensions. The default unit of measure is MILLIMETERS. | |
| X DIMENSION | |||
| Y DIMENSION | |||
| DUPLEX OFF* | ON | Allows you to enable or disable two-sided printing. NOTE: This menu is available only on models that have automatic duplexing. | |
| DUPLEX BINDING | LONG EDGE* SHORT EDGE | Allows you to change the binding edge for two-sided printing. NOTE: This menu is available only on models that have automatic duplexing. | |
| OVERRIDE A4/LETTER NO | YES* | Allows you to set the product to print an A4 job on letter-size paper when no tray is configured for A4 paper, or to print on A4-size paper when no tray is configured for letter paper. | |
| MANUAL FEED OFF* | ON | Setting this option to ON makes MANUAL FEED the default for jobs that do not select a tray. The Autoselect option in the printer driver overrides this option. | |
| COURIER FONT REGULAR* | DARK | Allows you to select a version of the Courier font. The DARK setting is an internal Courier font available on HP LaserJet Series III printers and older. | |
| WIDE A4 NO * | YES | Allows you to change the printable area of A4 paper. If you select NO, the printable area is seventy-eight 10-pitch characters on a single line. If you select YES, the printable area is eighty 10-pitch characters on a single line. | |
| Menu item Sub-menu item Values Description | ||
| PRINT PS ERRORS OFF* | ON | Allows you to select to print PS error pages. |
| PRINT PDF ERRORS OFF* | ON | Allows you to select to print PDF error pages. |
PCL sub-menu
This menu configures settings for the printer control language.
To display: Press the Home button ⓗ, select the CONFIGURE DEVICE menu, select the PRINTING menu, and then select the PCL menu.
NOTE: Values that have an asterisk (*) are the factory-default values. Some menu items have no default.
| Item Values Description | ||
| FORM LENGTH | Range: 5-128 lines | Sets vertical spacing for default paper size. The default is 60. |
| ORIENTATION PORTRAIT* | LANDSCAPE | Allows you to set the default page orientation to portrait or landscape. |
| FONT SOURCE A list of available font sources displays. | Selects the font source. The default is INTERNAL. | |
| FONT NUMBER | Range: 0-102 | The product assigns a number to each font and lists the numbers on the PCL font list. The default is 0. |
| FONT PITCH | Range: 0.44-99.99 | Selects the font pitch. This item might not appear, depending on the font selected. The default is 10.00. |
| FONT POINT SIZE | Range: 4.00-999.75 | Selects the font point size. The default is 12.00. |
| SYMBOL SET | A list of available symbol sets displays. | Selects any one of several available symbol sets at the product control panel. A symbol set is a unique grouping of all the characters in a font. PC-8 or PC-850 is recommended for line-draw characters. The default is PC-8. |
| APPEND CR TO LF | NO* | Select YES to append a carriage return to each line-feed that is encountered in backward-compatible PCL jobs (pure text, no job control). Some environments indicate a new line by only the line-feed control code. Use this option to append the required carriage return to each line feed. |
| YES | ||
| Item Values Description | |
| SUPPRESS BLANK PAGES NO* | When generating your own PCL, extra form feeds are included that would cause a blank page to be printed. Select YES for form feeds to be ignored if the page is blank. |
| YES | |
| MEDIA SOURCE MAPPING STANDARD* | The PCL5 MEDIA SOURCE MAPPING command selects an input tray by a number that maps to the various available trays and feeders. |
| CLASSIC | The STANDARD numbering is based on newer HP LaserJet printers with updated changes to the numbering of trays and feeders.The CLASSIC numbering is based on HP LaserJet 4 printers and earlier models. |
Print Quality menu
To display: Press the Home button ⓗ, select the CONFIGURE DEVICE menu, and then select the PRINT QUALITY menu.

NOTE: Values that have an asterisk (*) are the factory-default values. Some menu items have no default.
| Item | Sub-item | Sub-item | Values | Description |
| ADJUST COLOR HIGHLIGHTS CYAN DENSITY | Range from +5 to -5. Default is 0. | Adjust the darkness or lightness of highlights on a printed page. Lower values represent lighter highlights on a printed page, and higher values represent darker highlights on a printed page. | ||
| MAGENTA DENSITY | ||||
| YELLOW DENSITY | ||||
| BLACK DENSITY | ||||
| MIDTONES CYAN DENSITY | Range from +5 to -5. Default is 0. | Adjust the darkness or lightness of midtones on a printed page. Lower values represent lighter midtones on a printed page, and higher values represent darker midtones on a printed page. | ||
| MAGENTA DENSITY | ||||
| YELLOW DENSITY | ||||
| BLACK DENSITY | ||||
| SHADOWS CYAN DENSITY | Range from +5 to -5. Default is 0. | Adjust the darkness or lightness of shadows on a printed page. Lower values represent lighter shadows on a printed page, and higher values represent darker shadows on a printed page. | ||
| MAGENTA DENSITY | ||||
| YELLOW DENSITY | ||||
| BLACK DENSITY | ||||
| RESTORE COLOR VALUES | Restore the color settings by resetting the density values of each color. | |||
| SET REGISTRATION | For each tray, setting the registration shifts the margin alignment to center the image on the page from top to bottom and from left to right. You can also align the image on the front with the image printed on the back. | |||
| ADJUST TRAY | Perform the alignment procedure for each tray.When it creates an image, the product scans across the page from side to side as the sheet feeds from top to bottom into the product. | |||
| PRINT TEST PAGE | Print a test page and instructions for setting the registration of the image location. | |||
Item Sub-item Sub-item Values Description
| X1 SHIFT | Y1 SHIFT | Range: -5 mm to +5 mm | The scan direction is referred to as X. X1 is the scan direction for a single-sided page or for the second side of a two-sided page. X2 is the scan direction for the first side of a two-sided page.The feed direction is referred to as Y. Y1 is the feed direction for a single-sided page or for the second side of a two-sided page. Y2 is the feed direction for the first side of a two-sided page. | |
| X2 SHIFT | ||||
| Y2 SHIFT | ||||
| AUTO SENSE MODE | TRAY 1 SENSING | FULL SENSING EXPANDED SENSING* TRANSPARENCY ONLY | Sets the sensing option for Tray 1 for paper types using AUTO SENSE mode.When FULL SENSING is selected, the product senses every page and switches modes accordingly. The product can distinguish light paper, plain paper, heavy paper, glossy paper, tough paper, or transparencies. Using this mode significantly reduces print speed. Use it only when you are printing on mixed paper types.When EXPANDED SENSING is selected, the product senses only the first page and assumes the rest of the pages are the same type. The product can distinguish light paper, plain paper, heavy paper, glossy paper, tough paper, or transparencies.When TRANSPARENCY ONLY is selected, the product senses only the first page. The product can distinguish transparencies from other paper types. | |
| TRAYSENSING EXPANDED | SENSING* TRANSPARENCY ONLY | Sets the sensing option for Trays 2-5 for paper types using AUTO SENSE mode.When EXPANDED SENSING is selected, the product senses only the first few pages and assumes the rest of the pages are the same type. The product can distinguish light paper, plain paper, heavy paper, glossy paper, tough paper, or transparencies. The product senses the paper type when you turn it on and after you open and close a tray.When TRANSPARENCY ONLY is selected, the product senses only the first page. The product can distinguish transparencies from other paper types. | ||
| Item Sub-item Sub-item Values Description | ||||
| ADJUST PAPER TYPES | A list of paper types displays. | PRINT MODERESISTANCE MODEHUMIDITY MODEPRE-ROTATION MODEFUSER TEMPMODEPAPER CURL MODE | A list of print modes displays. | Configure the print mode that is associated with each media type. |
| RESTORE MODES | Use this feature to return all paper type-mode settings to the factory-default settings. | |||
| OPTIMIZE A list of available options displays. | Allows you to optimize various print modesto address print quality issues. | |||
| RESTORE OPTIMIZE | Use this feature to return all the settings inthe OPTIMIZE menu to the factory-default values. | |||
| QUICK CALIBRATENOW | Performs a partial product calibration. | |||
| FULL CALIBRATENOW | Performs all product calibrations. | |||
| DELAY CALIBRATION AT WAKE/POWER-ON | NO | YES* | This menu controls the timing of the calibration when the product wakes up or is turned on.Select NO to have the product calibrate immediately when it wakes up or is turned on. The product will not print any jobs until it finishes calibrating.Select YES to enable a product that is asleep to accept print jobs before it calibrates. It may start calibrating before it has printed all the jobs it has received. This option allows quicker printing when coming out of sleep mode or when you turn the product on, but print quality might be reduced.NOTE: For best results, allow the product to calibrate before printing. Print jobs performed before calibration might not be of the highest quality. | |
| RESOLUTION | Image REt 3600*1200x1200 dpi | Sets the resolution at which the product prints. The default value is Image REt 3600. Try the 1200x1200 dpi setting to improve printing for detailed line work or small text. | ||
| EDGE CONTROL | OFF | The Edge Control setting determines how edges are rendered. Edge control has two components: adaptive halftoning and trapping. Adaptive halftoning increases edge sharpness. Trapping reduces the effect of color-plane misregistration by overlapping the edges of adjacent objects slightly.OFFturns off both trapping and adaptive halftoning.LIGHTsets trapping at a minimal level, and adaptive halftoning is on.NORMALis the default trapping setting. Trapping is at a medium level and adaptive halftoning is on.MAXIMUMis the most aggressive trapping setting. Adaptive halftoning is on. | ||
| LIGHT | ||||
| NORMAL* | ||||
| MAXIMUM | ||||
| AUTO CLEANING | OFF* | ON | When auto-cleaning is on, the product prints a cleaning page when the page count reaches the CLEANING INTERVAL setting. | |
| CLEANING INTERVAL | 500* | 1000 | Specify the number of pages that are printed before a cleaning page is automatically printed. This item appears only when the AUTO CLEANING option is set to ON. | |
| 2000 | ||||
| 5000 | ||||
| 10000 | ||||
| 20000 | ||||
| AUTO CLEANING SIZE | LETTER* | A4 | Specify the paper size that is used to print the cleaning page. This item appears only when the AUTO CLEANING option is set to ON. | |
| CREATE CLEANING PAGE | Prints a page of instructions for cleaning | excess toner off the pressure roller in the fuser. | ||
| NOTE:This option is available only for the HP Color LaserJet CP4025n printer and the HP Color LaserJet CP4525n printer. | ||||
| PROCESS CLEANING PAGE | Allows you to create and process a cleaning | page for cleaning the pressure roller in the fuser. When the cleaning process runs, a cleaning page is printed. This page can be discarded. | ||
| NOTE:For the HP Color LaserJet CP4025n printer and the HP Color LaserJet CP4525n printer, you must first select the CREATE CLEANING PAGE option. | ||||
System setup menu
Use the SYSTEM SETUP menu to change product-configuration defaults such as sleep mode, product personality (language), and jam recovery.
To display: Press the Home button ⓗ, select the CONFIGURE DEVICE menu, and then select the SYSTEM SETUP menu.

NOTE: Values that have an asterisk (*) are the factory-default values. Some menu items have no default.
| Item Sub-Item Values Description | ||
| DATE/TIME DATE - - - - /[MMM]/[DD] YEAR = | [YYYY]/- - - /[DD] MONTH= | Allows you to set the correct date. The range for the year is 2008 to 2037. |
| [YYYY]/[MMM]/- - DAY= | ||
| DATE FORMAT YYYY/MMM/DD* | MMM/DD/YYYY | Allows you to choose the order in which the year, month, and day appear in the date. |
| DD/MMM/YYYY | ||
| TIME - -: [MM] [PM] HOUR = | [HH]: - - [PM] MINUTE= | Allows you to select from various configurations for the TIME format. Different wizards appear depending on the TIME FORMAT selected. |
| [HH]: [MM] - - AM/PM= | ||
| TIME FORMAT 12 HOUR* | 24 HOUR | Allows you to select 12 HOUR or 24 HOUR format. |
| JOB STORAGE LIMIT Continuous value | Range: 1–100Default = 32 | Allows you to specify the number of Quick Copy jobs that can be stored on the product. The default value is 32. The maximum allowed value is 100. |
| JOB HELD TIMEOUT OFF* | 1 HOUR4 HOURS1 DAY1 WEEK | Allows you to set the amount of time that Quick Copy jobs are kept before being automatically deleted from the queue. This menu item only appears when a hard disk is installed. |
| SHOW ADDRESS AUTO | OFF* | This item determines whether the product's IP address is shown on the display with the Ready message. |
| TRAY BEHAVIOR Use this menu to control how the | product handles paper trays and related prompts at the control panel. | |
| Item Sub-item Values Description | |||
| USE REQUESTED TRAY EXCLUSIVELY* | FIRST | USE REQUESTED TRAY handles jobs that have specified a specific input tray. Two options are available:EXCLUSIVELY: The product never selects a different tray when the user has indicated that a specific tray should be used, even if that tray is empty.FIRST: The product can pull from another tray if the specified tray is empty, even though the user specifically indicated a tray for the job. | |
| MANUALLY FEED PROMPT | ALWAYS*UNLESS LOADED | This option controls whether a manual feed message should appear when the type or size for a job does not match the size or type configured for Tray 1. Two options are available:ALWAYS: A prompt always appears before printing a manual-feed job.UNLESS LOADED: A message appears only if the multipurpose tray is empty or does not match the size or type of the job. | |
| PS DEFER MEDIA ENABLED* | DISABLED | This option affects how paper is handled when printing from an Adobe PS print driver.ENABLED uses HP's paper-handling model.DISABLED uses the Adobe PS paper-handling model. | |
| SIZE/TYPE PROMPT DISPLAY* | DO NOT DISPLAY | This option controls whether the tray configuration message appears whenever a tray is closed. Two options are available:DISPLAY: This option shows the tray configuration message when a tray is closed. You can configure the tray size or type directly from this message.DO NOT DISPLAY: This option prevents the tray configuration message from automatically appearing. | |
| USE ANOTHER TRAY ENABLED* | DISABLED | This option turns on or off the control-panel prompt to select another tray when the specified tray is empty. | |
| ALTERNATIVE | LETTERHEAD MODE | ON | When this option is ON you can load letterhead or preprinted paper the same way for every job, whether printing on one or both sides of the page. |
| OFF* | NOTE: This option is available only for models that have automatic duplexing. | ||
| DUPLEX BLANK PAGES AUTO* | YES | This option controls how the product handles two-sided jobs (duplexing). Two options are available:AUTO: Enables Smart Duplexing, which instructs the product not to process both sides if the second side is blank. Letterhead and prepunched paper types are exceptions. This can improve print speed.YES: Disables Smart Duplexing and forces the duplexer to flip the sheet of paper even if it is printed on only one side. | |
| NOTE: This option is available only for models that have automatic duplexing. | |||
| IMAGE ROTATION STANDARD * | ALTERNATE | Select the ALTERNATE setting if you are having trouble aligning images on preprinted forms. | |
| SLEEP DELAY 1 MINUTE | 3 MINUTES | Reduces power consumption when the product has been inactive for the selected period. | |
| 5 MINUTES | NOTE: The SLEEP MODE setting in the RESETS menu must be on. | ||
| 10 MINUTES | |||
| 15 MINUTES | |||
| 30 MINUTES* | |||
| 45 MINUTES | |||
| 60 MINUTES | |||
| 90 MINUTES | |||
| 2 HOURS | |||
Item Sub-item Values Description
| WAKE TIME | OFF*CUSTOM | Select the CUSTOM option toconfigure the daily wake time forthe product to avoid warm-up orcalibration time. Select a day of theweek, set the wake time for thatday, and then choose whether thewake time should be applied to alldays of the week. | |
| OPTIMUM SPEED/ENERGYUSAGE | FASTER FIRST PAGE* | SAVE ENERGYSAVE MORE ENERGYSAVE MOST ENERGY | Controls the fuser cool downbehavior.FASTER FIRST PAGE: The fusermaintains power and the first pageprocesses faster for any new jobthat is sent to the product.SAVE ENERGY: The fuserreduces power when it is idle.SAVE MORE ENERGY: The fuserreduces more power than theSAVE ENERGYoption.SAVE MOST ENERGY: The fuseris turned off and it gradually coolsto room temperature. The SAVEMOST ENERGYoption takes thelongest time to print the first page. |
| DISPLAY BRIGHTNESS | Range is -10 through 10. | Sets the brightness of the controlpanel display. The default is 0. Thisitem also controls the viewingangle at which the display isvisible. | |
| PERSONALITY AUTO* | PCLPDFPS | Sets the default personality toautomatic switching, PCL, PDF, orPS modes. | |
| CLEARABLE WARNINGS JOB* | ON | Sets whether a warning is clearedon the control panel or whenanother job is sent.JOB: The warning messagesidappears at the end of thejob.ON: The warning messageremains until you press theOKbutton. |
| Item Sub-item Values Description | ||
| AUTO CONTINUE OFF | ON* | Determines product behavior when the system generates an Auto Continuable error.ON: Allows the product to continue printing.OFF: Stops the product from printing until the error is cleared by the user. |
| JAM RECOVERY AUTO* | OFF | Sets whether the product will attempt to reprint pages after a jam. If you select AUTO, the product reprints pages if enough memory is available for full-speed two-sided printing. |
| ON | ||
| RAM DISK AUTO* | OFF | Sets how the RAM disk feature is configured. This is only available if there is no hard disk installed and the printer has at least 8 MB of memory.If the AUTO setting is enabled, the product determines the optimal RAM disk size based on the amount of available memory.If the OFF setting is enabled, the RAM disk is disabled, but a minimal RAM disk is still active. |
| LANGUAGE A listing of available languages | appears. | Sets the language. The default language is ENGLISH. |
I/O menu
Items on the I/O (input/output) menu affect the communication between the product and the computer. If the product contains an HP Jetdirect print server, you can configure basic networking parameters by using this submenu. You can also configure these and other parameters through HP Web Jetadmin or the embedded Web server.
For more information on these options, see Connect to a network on page 68.
To display: Press the Home button ⓗ, select the CONFIGURE DEVICE menu, and then select the I/O menu.
NOTE: Values that have an asterisk (*) are the factory-default values. Some menu items have no default.
Item Sub-item Values Description
| I/O TIMEOUT | Range: 5 - 300 | Allows you to set the product I/O TIMEOUT in seconds. The default is 15 seconds.Use this setting to adjust timeout for the best performance. If data from other ports appears in the middle of your print job, increase the timeout value. |
EMBEDDED JETDIRECT MENU See the next table for a list of options.
Table 2-1 Embedded Jetdirect menu
| Item | Sub-item | Sub-item | Sub-item | Description |
| INFORMATION | PRINT SEC PAGE | YES* | YES: Prints a page that contains the current security settings on the HP Jetdirect print server. | |
| NO | NO: A security settings page is not printed. | |||
| TCP/IP | ENABLE | ON* | ON: Enable the TCP/IP protocol. | |
| OFF | OFF: Disable the TCP/IP protocol. | |||
| HOST NAME | An alphanumeric string, up to 32 characters, used to identify the product. This name is listed on the HP Jetdirect configuration page. The default host name is NPIxxxxxx, where xxxxxx is the last six digits of the LAN hardware (MAC) address. |
Table 2-1 Embedded Jetdirect menu (continued)
| Item Sub-item Sub-item Sub-item Description | |||
| IPV4 SETTINGS | CONFIG METHOD | BOOTP | Specifies the method that TCP/IPv4 parameters will be configured on the HP Jetdirect print server. |
| DHCP* | |||
| AUTO IP | Use BOOTP (Bootstrap Protocol) for automatic configuration from a BootP server. | ||
| MANUAL | Use DHCP (Dynamic Host Configuration Protocol) for automatic configuration from a DHCPv4 server. If selected and a DHCP lease exists, DHCP RELEASE and DHCP RENEW menus are available to set DHCP lease options. | ||
| Use AUTO IP for automatic link-local IPv4 addressing. An address in the form 169.254.x.x is assigned automatically. | |||
| If you set this option to MANUAL, use the MANUAL SETTINGS menu to configure TCP/IPv4 parameters. | |||
| MANUAL | SETTINGS | IP ADDRESS | (Available only if CONFIG METHOD is set to MANUAL) Configure parameters directly from the product control panel: |
| SUBNET MASK | |||
| DEFAULT GATEWAY | IP ADDRESS: The unique IP address (n.n.n.n) of the product, where n is a value from 0 to 255. | ||
| SUBNET MASK: The subnet mask (n.n.n.n) for the product, where n is a value from 0 to 255. | |||
| DEFAULT GATEWAY: The IP address of the gateway or router used for communications with other networks. | |||
| DEFAULT IP AUTO IP* | LEGACY | Specify the IP address to default to when the print server is unable to obtain an IP address from the network during a forced TCP/IP reconfiguration (for example, when manually configured to use BootP or DHCP). | |
| NOTE: This feature assigns a static IP address that might interfere with a managed network. | |||
| AUTO IP: A link-local IP address 169.254.x.x is set. | |||
| LEGACY: The address 192.0.0.192 is set, consistent with older HP Jetdirect products. | |||
| DHCP RELEASE NO* | YES | This menu appears if CONFIG METHOD is set to DHCP and a DHCP lease for the print server exists. | |
| NO: The current DHCP lease is saved. | |||
| YES: The current DHCP lease and the leased IP address are released. | |||
Table 2-1 Embedded Jetdirect menu (continued)
| Item Sub-item Sub-item Sub-item Description | ||
| DHCP RENEW NO* | YES | This menu appears if CONFIG METHOD is set to DHCP and a DHCP lease for the print server exists. |
| NO: The print server does not request to renew the DHCP lease. | ||
| YES: The print server requests to renew the current DHCP lease. | ||
| PRIMARY DNS | Specify the IP address (n.n.n.n) of a Primary DNS Server. | |
| SECONDARY DNS Specify the IP address (n.n.n.n) of a | Secondary Domain Name System (DNS) Server. | |
| IPV6 SETTINGS ENABLE ON | OFF* | Use this item to enable or disable IPv6 operation on the print server. |
| OFF: IPv6 is disabled. | ||
| ON: IPv6 is enabled. | ||
| ADDRESS MANUAL | SETTINGS | Use this item to enable and manually configure a TCP/IPv6 address. |
| ENABLE | ENABLE: Choose ON to enable manual configuration, or OFF to disable manual configuration. The default is OFF. | |
| ADDRESS | ADDRESS: Use this item to type a 32 hexadecimal digit IPv6 node address that uses the colon hexadecimal syntax. | |
| DHCPV6 POLICY ROUTER | SPECIFIED | ROUTER SPECIFIED: The stateful auto-configuration method to be used by the print server is determined by a router. The router specifies whether the print server obtains its address, its configuration information, or both from a DHCPv6 server. |
| ROUTER UNAVAILABLE* | ROUTER UNAVAILABLE: If a router is not available, the print server should attempt to obtain its stateful configuration from a DHCPv6 server. | |
| ALWAYS | ALWAYS: Whether or not a router is available, the print server always attempts to obtain its stateful configuration from a DHCPv6 server. | |
| PRIMARY DNS | Use this item to specify an IPv6 address for a primary DNS server that the print server should use. | |
| SECONDARY DNS | Use this item to specify an IPv6 address for a secondary DNS server that the print server should use. | |
Table 2-1 Embedded Jetdirect menu (continued)
| Item Sub-item Sub-item Sub-item Description | |||
| PROXY SERVER | Specifies the proxy server to be used by embedded applications in the product. A proxy server is typically used by network clients for Internet access. It caches Web pages, and provides a degree of Internet security, for those clients.To specify a proxy server, enter its IPv4 address or fully-qualified domain name. The name can be up to 255 octets.For some networks, you might need to contact your Internet Service Provider (ISP) for the proxy server address. | ||
| PROXY PORT | Type the port number used by the proxy | server for client support. The port number identifies the port reserved for proxy activity on your network, and can be a value from 0 to 65535. | |
| IDLE TIMEOUT | IDLE TIMEOUT: The time period, in seconds, after which an idle TCP print data connection is closed (default is 270 seconds, 0 disables the timeout). | ||
| IPX/SPX | ENABLE | ON* | ON: Enable the IPX/SPX protocol. |
| OFF | OFF: Disable the IPX/SPX protocol. | ||
| FRAME TYPE AUTO* | EN_8023 | Selects the frame-type setting for your network. | |
| EN_II | AUTO: Automatically sets and limits the frame type to the first one detected. | ||
| EN_8022 | EN_8023, EN_II, EN_8022, and EN_SNAP are frame-type selections for Ethernet networks. | ||
| EN_SNAP | |||
| APPLETALK | ENABLE | ON* | Configures an AppleTalk network. |
| OFF | |||
| DLC/LLC | ENABLE | ON* | ON: Enable the DLC/LLC protocol. |
| OFF | OFF: Disable the DLC/LLC protocol. | ||
| SECURITY | SECURE WEB | HTTPS REQUIRED* | For configuration management, specify whether the embedded Web server will accept communications using HTTPS (Secure HTTP) only, or both HTTP and HTTPS. |
| HTTPS OPTIONAL | |||
| HTTPS REQUIRED: For secure, encrypted communications, only HTTPS access is accepted. The print server will appear as a secure site. | |||
| HTTPS OPTIONAL: Access using either HTTP or HTTPS is permitted. | |||
Table 2-1 Embedded Jetdirect menu (continued)
| Item Sub-item Sub-item Sub-item Description | ||
| IPSEC KEEP | DISABLE* | Specify the IPSec status on the print server. |
| KEEP: IPSec status remains the same as currently configured. | ||
| DISABLE: IPSec operation on the print server is disabled. | ||
| 802.1X RESET | KEEP* | Specify whether the 802.1X settings on the print server are reset to the factory defaults. |
| RESET: The 802.1X settings are reset to the factory defaults. | ||
| KEEP: The current 802.1X settings are maintained. | ||
| RESET SECURITY YES | NO* | Specify whether the current security settings on the print server will be saved or reset to factory defaults. |
| YES: Security settings are reset to factory defaults. | ||
| NO: The current security settings are maintained. | ||
| DIAGNOSTICS EMBEDDED TESTS | This menu provides tests to help diagnose network hardware or TCP/IP network connection problems. | |
| Embedded tests help to identify whether a network fault is internal or external to the product. Use an embedded test to check hardware and communication paths on the print server. After you select and enable a test and set the execution time, you must select EXECUTE to initiate the test. | ||
| Depending on the execution time, a selected test runs continuously until either the product is turned off, or an error occurs and a diagnostic page is printed. | ||
| LAN HW TEST YES | NO* | CAUTION: Running this embedded test will erase your TCP/IP configuration. |
| This test performs an internal loopback test. An internal loopback test will send and receive packets only on the internal network hardware. There are no external transmissions on your network. | ||
| Select YES to choose this test, or NO to not choose it. | ||
| HTTP TEST YES | NO* | This test checks operation of HTTP by retrieving predefined pages from the product, and tests the embedded Web server. |
| Select YES to choose this test, or NO to not choose it. | ||
Table 2-1 Embedded Jetdirect menu (continued)
| Item Sub-item Sub-item Sub-item Description | |||
| SNMP TEST YES | NO* | This test checks operation of SNMP communications by accessing predefined SNMP objects on the product.Select YES to choose this test, or NO to not choose it. | |
| DATA PATH TEST YES | NO* | This test helps to identify data path and corruption problems on an HP postscript level 3 emulation product. It sends a predefined PS file to the product, However, the test is paperless; the file will not print.Select YES to choose this test, or NO to not choose it. | |
| SELECT ALL | TESTS | YES | Use this item to select all available embedded tests.Select YES to choose all tests. Select NO to select individual tests. |
| EXECUTION TIME | [H] | Use this item to specify the length of time (in hours) that an embedded test will be run. You can select a value from 0 to 24 hours. If you select zero (0), the test runs indefinitely until an error occurs or the product is turned off.Data gathered from the HTTP, SNMP, and Data Path tests is printed after the tests have completed. | |
| EXECUTE YES | NO* | NO: Do not initiate the selected tests.YES: Initiate the selected tests. | |
| PING TEST This test is used to check network | communications. This test sends link-level packets to a remote network host, then waits for an appropriate response. To run a ping test, set the following items: | ||
| DEST TYPE IPV4 | IPV6 | Specify whether the target product is an IPv4 or IPv6 node. | |
| DEST IPV4 Type the IPv4 address. | |||
| DEST IPV6 Type the IPv6 address. | |||
| PACKET SIZE | Specify the size of each packet, in bytes, to be sent to the remote host. The minimum is 64 (default) and the maximum is 2048. | ||
| TIMEOUT | Specify the length of time, in seconds, to wait for a response from the remote host. The default is 1 and the maximum is 100. | ||
| COUNT Specify the number of ping test packets to send for this test. Select a value from 0 to 100. The default is 4. To configure the test to run continuously, select 0. | |||
| PRINT RESULTS YES | NO* | If the ping test was not set for continuous operation, you can choose to print the test results. Select YES to print results. If you select NO, results are not printed. | |
| EXECUTE YES | NO* | Specify whether to initiate the ping test. Select YES to initiate the test, or NO to not run the test. | |
| PING RESULTS | Use this item to view the ping test status and results using the control panel display. You can select the following items: | ||
| PACKETS SENT Shows the number of packets (0 - 65535) | sent to the remote host since the most recent test was initiated or completed. The default is 0. | ||
| PACKETS | RECEIVED | Shows the number of packets (0 - 65535) received from the remote host since the most recent test was initiated or completed. The default is 0. | |
| PERCENT LOST | Shows the percent (0 to 100) of ping test packets that were sent with no response from the remote host since the most recent test was initiated or completed. The default is 0. | ||
| RTT MIN | Shows the minimum detected roundtrip-time (RTT), from 0 to 4096 milliseconds, for packet transmission and response. The default is 0. | ||
| RTT MAX Shows the maximum detected roundtrip-time | (RTT), from 0 to 4096 milliseconds, for packet transmission and response. The default is 0. | ||
| RTT AVERAGE | Shows the average round-trip-time (RTT), from 0 to 4096 milliseconds, for packet transmission and response. The default is 0. | ||
| PING IN | PROGRESS | YES | Shows whether a ping test is in progress. YES indicates a test in progress, and NO indicates that a test completed or was not run. |
| NO* | |||
| REFRESH YES | NO* | When viewing the ping test results, this item updates the ping test data with current results. Select YES to update the data, or NO to maintain the existing data. However, a refresh automatically occurs when the menu times out or you manually return to the main menu. | |
| LINK SPEED The link speed and communication mode of | the print server must match the network. The available settings depend on the product and installed print server. Select one of the following link configuration settings:CAUTION: If you change the link setting, network communications with the print server and network product might be lost. | ||
| AUTO* The print server uses auto-negotiation to | configure itself with the highest link speed and communication mode allowed. If auto-negotiation fails, either 100TX HALF or 10THALF is set depending on the detected link speed of the hub/switch port. (A 1000T half-duplex selection is not supported.) | ||
| 10T HALF 10 Mbps, half-duplex operation. | |||
| 10T FULL 10 Mbps, full-duplex operation. | |||
| 100TX HALF 100 Mbps, half-duplex operation. | |||
| 100TX FULL 100 Mbps, full-duplex operation. | |||
| 100TX AUTO | Limits auto-negotiation to a maximum link speed of 100 Mbps. | ||
| 1000T FULL 1000 Mbps, full-duplex operation. | |||
Resets menu
The RESETS menu allows you to reset factory settings, and disable or enable sleep mode.
To display: Press the Home button ⓗ, select the CONFIGURE DEVICE menu, and then select the RESETS menu.

NOTE: Values that have an asterisk (*) are the factory-default values. Some menu items have no default.
| Item Sub-item Values Description | ||
| RESTORE FACTORY SETTINGS | Allows you to clear the page | buffer, remove all perishable personality data, reset the printing environment, and return most settings to factory defaults. |
| CALIBRATION RESET | Resets calibration values on the | formatter. |
| SLEEP MODE OFF | ON* | If SLEEP MODE is OFF, the product will never enter power save mode and no asterisk will appear next to any item when the user enters the menu item SLEEP DELAY. |
Diagnostics menu
The DIAGNOSTICS menu allows you to run tests that can help you identify and solve problems with the product.
To display: Press the Home button 🔒, and then select the DIAGNOSTICS menu.

NOTE: Values that have an asterisk (*) are the factory-default values. Some menu items have no default.
| Item Sub-item Values Description | ||
| PRINT EVENT LOG | Prints a report containing the last | 50 entries in the product's event log, starting with the most recent. |
| SHOW EVENT LOG | Displays the last 50 events, starting with the most recent. | |
| PQ TROUBLESHOOTING | Prints a page that includes | instructions, pages for each color, a demo page, and a configuration page. These pages can help isolate print-quality problems. |
| PRINT DIAGNOSTICS PAGE | Prints a page that can assist in | diagnosing product problems. |
| DISABLE CARTRIDGE CHECK | This item allows you to remove a | print cartridge to help determine which cartridge is the source of a problem. |
| Item Sub-Item Values Description | |||
| PAPER PATH SENSORS | Performs a test on each of the | product's sensors to determine if they are working correctly and displays the status of each sensor. | |
| PAPER PATH TEST | Tests the paper-handling features | of the product, such as the configuration of the trays. | |
| PRINT TEST PAGE | Generates a page for testing the | paper-handling features. You must define the path for the test in order to test specific paper paths. | |
| SOURCE ALL TRAYS | TRAY 1 | Specifies whether the test page is printed from all trays or from a specific tray. | |
| TRAY 2* | |||
| TRAY 3 | |||
| TRAY 4 | |||
| TRAY 5 | |||
| DUPLEX OFF | ON | Determines whether the duplexer is included in the test. | |
| NOTE: This option is available only for models that have an automatic duplexer. | |||
| COPIES 1* | 10 | Determines how many pages should be sent from the specified source as part of the test. | |
| 50 | |||
| 100 | |||
| 500 | |||
| MANUAL SENSOR TEST | Performs tests to determine | whether the paper path sensors are operating correctly. | |
| MANUAL SENSOR TEST 2 | Performs additional tests to | determine whether the paper path sensors are operating correctly. | |
| COMPONENT TEST A list of available components appears. | Activate individual parts | independently to isolate noise, leaking, and other hardware issues. | |
| PRINT/STOP TEST | Range is 0 - 60,000 milliseconds. | The default is 0. | Isolates print quality faults more accurately by stopping the product in mid-print cycle, which allows you to see where the image begins to degrade. This causes a jam message that might need to be manually cleared. A service representative should perform this test. |
Item Sub-item Values Description
| COLOR BAND TEST | PRINT TEST PAGE | Prints a color band test page that is used to identify arcing in the high-voltage power supply. | |
| COPIES Range is 1 to 30. The default value | is 1. | Specify how many copies of the internal page are printed. | |
Service menu
The SERVICE menu is locked and requires a PIN for access. This menu is intended for use by authorized service personnel.
3 Software for Windows
• Supported operating systems for Windows
• Supported printer drivers for Windows
- Select the correct printer driver for Windows
• Priority for print settings
• Change printer-driver settings for Windows
- Remove software for Windows
• Supported utilities for Windows
• Software for other operating systems
Supported operating systems for Windows
The product supports the following Windows operating systems:
• Windows XP (32-bit and 64-bit)
• Windows Server 2003 (32-bit and 64-bit)
• Windows Server 2008 (32-bit and 64-bit)
• Windows Vista (32-bit and 64-bit)
• Windows 7 (32-bit and 64-bit)
Supported printer drivers for Windows
HP PCL 6 (this is the default printer driver)
HP postscript emulation Universal Print Driver (HP UPD PS)
HP PCL 5 Universal Print Driver (HP UPD PCL 5)
The printer drivers include online Help that has instructions for common printing tasks and also describes the buttons, checkboxes, and drop-down lists that are in the printer driver.

NOTE: For more information about the UPD, see www.hp.com/go/upd.
Select the correct printer driver for Windows
Printer drivers provide access to the product features and allow the computer to communicate with the product (using a printer language). The following printer drivers are available at www.hp.com/go/cljcp4025_software or www.hp.com/go/cljcp4525_software.
| HP PCL 6 driver | Provided as the default driver. This driver is automatically installed unless you select a different one.Recommended for all Windows environmentsProvides the overall best speed, print quality, and product-feature support for most usersDeveloped to align with the Windows Graphic Device Interface (GDI) for the best speed in Windows environmentsMight not be fully compatible with third-party and custom software programs that are based on PCL 5 |
| HP UPD PS driver | Recommended for printing with Adobe® software programs or with other highly graphics-intensive software programsProvides support for printing from postscript emulation needs, or for postscript flash font support |
| HP UPD PCL 5 | Recommended for general office printing in Windows environmentsCompatible with previous PCL versions and older HP LaserJet productsThe best choice for printing from third-party or custom software programsThe best choice when operating with mixed environments, which require the product to be set to PCL 5 (UNIX, Linux, mainframe)Designed for use in corporate Windows environments to provide a single driver for use with multiple printer modelsPreferred when printing to multiple printer models from a mobile Windows computer |
HP Universal Print Driver (UPD)
The HP Universal Print Driver (UPD) for Windows is a single driver that gives you instant access to virtually any HP LaserJet product, from any location, without downloading separate drivers. It is built on proven HP print driver technology and has been tested thoroughly and used with many software programs. It is a powerful solution that performs consistently over time.
The HP UPD communicates directly with each HP product, gathers configuration information, and then customizes the user interface to show the product's unique, available features. It automatically enables features that are available for the product, such as two-sided printing and stapling, so you do not need to enable them manually.
For more information, go to www.hp.com/go/upd.
UPD installation modes
| Traditional mode | Use this mode if you are installing the driver from a CD for a single computer.When installed from the CD that comes with the product, UPD operates like traditional printer drivers. It operates with a specific product.If you use this mode, you must install UPD separately for each computer and for each product. |
| Dynamic mode | To use this mode, download UPD from the Internet. Seewww.hp.com/go/upd.Dynamic mode allows you to use a single driver installation, so you can discover and print to HP products in any location.Use this mode if you are installing UPD for a workgroup. |
Priority for print settings
Changes to print settings are prioritized depending on where the changes are made:

NOTE: The names of commands and dialog boxes might vary depending on your software program.
- Page Setup dialog box: Click Page Setup or a similar command on the File menu of the program you are working in to open this dialog box. Settings changed here override settings changed anywhere else.
- Print dialog box: Click Print, Print Setup, or a similar command on the File menu of the program you are working in to open this dialog box. Settings changed in the Print dialog box have a lower priority and usually do not override changes made in the Page Setup dialog box.
- Printer Properties dialog box (printer driver): Click Properties in the Print dialog box to open the printer driver. Settings changed in the Printer Properties dialog box usually do not override settings anywhere else in the printing software. You can change most of the print settings here.
- Default printer driver settings: The default printer driver settings determine the settings used in all print jobs, unless settings are changed in the Page Setup, Print, or Printer Properties dialog boxes.
- Printer control panel settings: Settings changed at the printer control panel have a lower priority than changes made anywhere else.
Change printer-driver settings for Windows
Change the settings for all print jobs until the software program is closed
- On the File menu in the software program, click Print.
- Select the driver, and then click Properties or Preferences.
The steps can vary; this procedure is most common.
Change the default settings for all print jobs
- Windows XP, Windows Server 2003, and Windows Server 2008 (using the default Start menu view): Click Start, and then click Printers and Faxes.
Windows XP, Windows Server 2003, and Windows Server 2008 (using the Classic Start menu view): Click Start, click Settings, and then click Printers.
Windows Vista: Click Start, click Control Panel, and then in the category for Hardware and Sound click Printer.
Windows 7: Click Start, and then click Devices and Printers.
- Right-click the driver icon, and then select Printing Preferences.
Change the product configuration settings
- Windows XP, Windows Server 2003, and Windows Server 2008 (using the default Start menu view): Click Start, and then click Printers and Faxes.
Windows XP, Windows Server 2003, and Windows Server 2008 (using the Classic Start menu view): Click Start, click Settings, and then click Printers.
Windows Vista: Click Start, click Control Panel, and then in the category for Hardware and Sound click Printer.
Windows 7: Click Start, and then click Devices and Printers.
-
Right-click the driver icon, and then select Properties or Printer properties.
-
Click the Device Settings tab.
Remove software for Windows
Windows XP
- Click Start, Control Panel, and then Add or Remove Programs.
- Find and select the product from the list.
- Click the Change/Remove button to remove the software.
Windows Vista
- Click Start, Control Panel, and then Programs and Features.
- Find and select the product from the list.
- Select the Uninstall/Change option.
Windows 7
- Click Start, Control Panel, and then under the Programs heading, click Uninstall a program.
- Find and select the product from the list.
- Select the Uninstall option.
Supported utilities for Windows
HP Web Jetadmin
HP Web Jetadmin is a simple print and imaging peripheral management software tool that helps optimize product use, control color costs, secure products, and streamline supplies management by enabling remote configuration, proactive monitoring, security troubleshooting, and reporting of printing and imaging products.
To download a current version of HP Web Jetadmin and for the latest list of supported host systems, visit www.hp.com/go/webjetadmin.
When installed on a host server, a Windows client can gain access to HP Web Jetadmin by using a supported Web browser (such as Microsoft® Internet Explorer) by navigating to the HP Web Jetadmin host.
HP Embedded Web Server
The product is equipped with the HP Embedded Web Server, which provides access to information about product and network activities. This information appears in a Web browser, such as Microsoft Internet Explorer, Netscape Navigator, Apple Safari, or Mozilla Firefox.
The HP Embedded Web Server resides on the product. It is not loaded on a network server.
The HP Embedded Web Server provides an interface to the product that anyone who has a network-connected computer and a standard Web browser can use. No special software is installed or configured, but you must have a supported Web browser on your computer. To gain access to the HP Embedded Web Server, type the IP address for the product in the address line of the browser. (To find the IP address, print a configuration page. For more information about printing a configuration page, see Print information pages on page 148).
For a complete explanation of the features and functionality of the HP Embedded Web Server, see Use the HP Embedded Web Server on page 152.
HP Easy Printer Care
HP Easy Printer Care software is a program that you can use for the following tasks:
- Check the product status
- Check the supplies status and use HP SureSupply to shop online for supplies
- Set up alerts
• View product usage reports
• View product documentation
• Gain access to troubleshooting and maintenance tools - Use HP Proactive Support to routinely scan your printing system and to prevent potential problems. HP Proactive Support can update software, firmware, and HP printer drivers.
You can view HP Easy Printer Care software when the product is directly connected to your computer or when it is connected to a network.
| Supported operating systems | Microsoft Windows XP, Service Pack 2 (32-bit and 64-bit) |
| Microsoft Windows Server 2003, Service Pack 1 (32-bit and 64-bit) | |
| Microsoft Windows Server 2008 (32-bit and 64-bit) | |
| Microsoft Windows Vista (32-bit and 64-bit) | |
| Microsoft Windows 7 (32-bit and 64-bit) | |
| Supported browsers | Microsoft Internet Explorer 6.0 or 7.0 |
To download HP Easy Printer Care software, go to www.hp.com/go/easyprintercare. This Web site also provides updated information about supported browsers and a list of HP products that support HP Easy Printer Care software.
For more information about using HP Easy Printer Care software, see Use the HP Easy Printer Care software on page 149.
Software for other operating systems
| OS Software | |
| UNIX | For HP-UX and Solaris networks, go towww.hp.com/go/jetdirectunix_softwareto install model scripts using the HP Jetdirect printer installer (HPPI) for UNIX.For the latest model scripts, go towww.hp.com/go/unixmodelscripts. |
| Linux | For information, go towww.hp.com/go/linuxprinting. |
4 Use the product with Mac
- Software for Mac
- Print with Mac
Software for Mac
Supported operating systems for Mac
The product supports the following Mac operating systems:
• Mac OS X 10.4, 10.5, 10.6, and later
NOTE: For Mac OS X 10.4 and later, PPC and Intel® Core™ Processor Macs are supported.
Supported printer drivers for Mac
The HP LaserJet software installer provides PostScript ^® Printer Description (PPD) files, Printer Dialog Extensions (PDEs), and the HP Utility for use with Mac OS X computers. The HP printer PPD and PDE files, in combination with the built-in Apple PostScript printer drivers, provide full printing functionality and access to specific HP printer features.
Remove software from Mac operating systems
You must have administrator rights to remove the software.
- Open System Preferences.
- Select Print & Fax.
- Highlight the product.
- Click the minus (-) symbol.
- Delete the print queue, if necessary.
-
Delete the .GZ file from the following hard-drive folder:
-
Mac OS X 10.4: Library/Printers/PPDs/Contents/Resources/
.lproj, where is the two-letter language code for the language that you are using.
• Mac OS X 10.5 and 10.6: Library/Printers/PPDs/Contents/Resources
Priority for print settings for Mac
Changes to print settings are prioritized depending on where the changes are made:

NOTE: The names of commands and dialog boxes might vary depending on your software program.
- Page Setup dialog box: Click Page Setup or a similar command on the File menu of the program you are working in to open this dialog box. Settings changed here might override settings changed anywhere else.
- Print dialog box: Click Print, Print Setup, or a similar command on the File menu of the program you are working in to open this dialog box. Settings changed in the Print dialog box have a lower priority and do not override changes made in the Page Setup dialog box.
- Default printer driver settings: The default printer driver settings determine the settings used in all print jobs, unless settings are changed in the Page Setup, Print, or Printer Properties dialog boxes.
- Printer control panel settings: Settings changed at the printer control panel have a lower priority than changes made anywhere else.
Change printer-driver settings for Mac
| Change the settings for all print jobs until the software program is closed | Change the default settings for all print jobs | Change the product configuration settings |
| 1. On the File menu, click the Print button.2. Change the settings that you want on the various menus. | 1. On the File menu, click the Print button.2. Change the settings that you want on the various menus.3. On the Presets menu, click the Save As... option and type a name for the preset.These settings are saved in the Presets menu. To use the new settings, you must select the saved preset option every time you open a program and print. | Mac OS X 10.41. From the Apple menu 📄, click the System Preferences menu and then click the Print & Fax icon.2. Click the Printer Setup button.3. Click the Installable Options menu.Mac OS X 10.5 and 10.61. From the Apple menu 📄, click the System Preferences menu and then click the Print & Fax icon.2. Select the product in the left side of the window.3. Click the Options & Supplies button.4. Click the Driver tab.5. Configure the installed options. |
Software for Mac computers
HP Utility for Mac
Use the HP Utility to set up product features that are not available in the printer driver.
You can use the HP Utility when the product uses a universal serial bus (USB) cable or is connected to a TCP/IP-based network.
Open the HP Printer Utility
| Mac OS X 10.4 | 1. Open the Finder, clickApplications, clickUtilities, and then double-click Printer Setup Utility.2. Select the product that you want to configure, and then clickUtility. |
| Mac OS X 10.5 and 10.6 | 1. From thePrinter Browsermenu, click Printer Utility.-or-From thePrint Queue, click theUtilityicon. |
HP Utility features
The HP Utility consists of pages that you open by clicking in the Configuration Settings list. The following table describes the tasks that you can perform from these pages.
| Menu Item Description | ||
| Information And Support | Supplies Status Shows the product supplies status and provides links for online supplies-ordering. | |
| Device Information | Shows information about the currently selected product. | |
| HP Support | Provides access to technical assistance, online supplies ordering, online registration, and recycling and return information. | |
| Color Usage | Shows the total pages printed, the number of pages printed in color, and the number of pages printed in black only. | |
| File Upload | Transfers files from the computer to the product. | |
| Upload Fonts | Transfers font files from the computer to the product. | |
| Printer Settings | Trays Configuration | Changes the default tray settings. |
| Duplex Mode | Turns on the automatic two-sided printing mode. | |
| Stored Jobs | Manages print jobs that are stored on the product hard disk. | |
| E-mail Alerts | Configures the product to send e-mail notices for certain events. | |
| Network Settings | Configures the network settings, such as the IPv4 and IPv6 settings. | |
| Supplies Management | Configures how the product should behave when supplies are nearing the end of their estimated life. | |
| Restrict Color | Configures color-printing restrictions for specific users and software programs.NOTE: This option is available only after you open theViewmenu and select theShow Advancedoption. | |
| Menu Item Description | |
| Protect Direct Ports | Disables printing over USB or parallel ports. |
| Additional Settings | Provides access to the embedded Web server. |
Supported utilities for Mac
HP Embedded Web Server
The product is equipped with an embedded Web server, which provides access to information about product and network activities. For more information, see Features on page 153.
Print with Mac
Create and use printing presets with Mac
Use printing presets to save the current printer driver settings for reuse.
Create a printing preset
- On the File menu, click the Print option.
- Select the driver.
- Select the print settings that you want to save for reuse.
- In the Presets menu, click the Save As... option, and type a name for the preset.
- Click the OK button.
Use printing presets
- On the File menu, click the Print option.
- Select the driver.
- In the Presets menu, select the printing preset.
NOTE: To use printer-driver default settings, select the standard option.
Resize documents or print on a custom paper size with Mac
| Mac OS X 10.4, 10.5, and 10.6 | 1. On the File menu, click the Page Setup option.2. Select the product, and then select the correct settings for the Paper Size and Orientation options. |
| Mac OS X 10.5 and 10.6 | 1. On the File menu, click the Print option. |
| Use one of these methods. | 2. Click the Page Setup button.3. Select the product, and then select the correct settings for the Paper Size and Orientation options. |
| 1. On the File menu, click the Print option.2. Open the Paper Handling menu.3. In the Destination Paper Size area, click the Scale to fit paper size box, and then select the size from the drop-down list. |
Print a cover page with Mac
- On the File menu, click the Print option.
-
Select the driver.
-
Open the Cover Page menu, and then select where to print the cover page. Click either the Before Document button or the After Document button.
- In the Cover Page Type menu, select the message that you want to print on the cover page.

NOTE: To print a blank cover page, select the standard option from the Cover Page Type menu.
Use watermarks with Mac
- On the File menu, click the Print option.
- Open the Watermarks menu.
- From the Mode menu, select the type of watermark to use. Select the Watermark option to print a semi-transparent message. Select the Overlay option to print a message that is not transparent.
- From the Pages menu, select whether to print the watermark on all pages or on the first page only.
- From the Text menu, select one of the standard messages, or select the Custom option and type a new message in the box.
- Select options for the remaining settings.
Print multiple pages on one sheet of paper with Mac
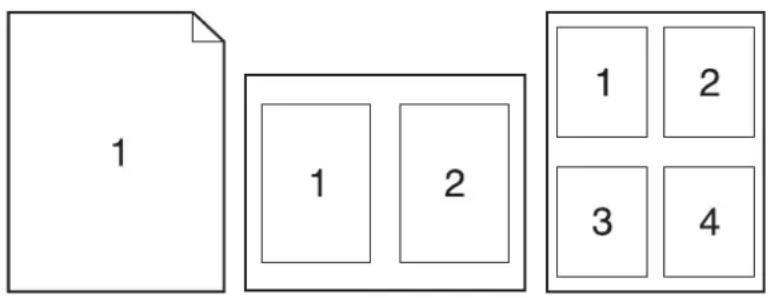
text_image
1 1 2 1 2 3 4- On the File menu, click the Print option.
- Select the driver.
- Open the Layout menu.
- From the Pages per Sheet menu, select the number of pages that you want to print on each sheet (1, 2, 4, 6, 9, or 16).
- In the Layout Direction area, select the order and placement of the pages on the sheet.
- From the Borders menu, select the type of border to print around each page on the sheet.
Print on both sides of the page (duplex printing) with Mac
Use automatic duplex printing
- Insert enough paper into one of the trays to accommodate the print job.
- On the File menu, click the Print option.
- Open the Layout menu.
- From the Two-Sided menu, select a binding option.
Print on both sides manually
- Insert enough paper into one of the trays to accommodate the print job.
- On the File menu, click the Print option.
- Open the Finishing menu, and click the Manual Duplex tab or open the Manual Duplex menu.
- Click the Manual Duplex box, and select a binding option.
- Click the Print button. Follow the instructions in the pop-up window that appears on the computer screen before replacing the output stack in Tray 1 for printing the second half.
- Go to the product, and remove any blank paper that is in Tray 1.
- Insert the printed stack face-up with the bottom edge feeding into the printer first in Tray 1. You must print the second side from Tray 1.
- If prompted, press the appropriate control-panel button to continue.
Store jobs with Mac
You can store jobs on the product so you can print them at any time. You can share stored jobs with other users, or you can make them private.
- On the File menu, click the Print option.
- Open the Job Storage menu.
-
In the Job Storage Mode drop-down list, select the type of stored job.
-
Proof and Hold: This feature provides a quick way to print and proof one copy of a job and then print more copies.
- Personal Job: When you send a job to the product, the job does not print until you request it at the product control panel. If you assign a personal identification number (PIN) to the job, you must provide the required PIN at the control panel.
- Quick Copy: If the optional hard disk is installed on the product, you can print the requested number of copies of a job and then store a copy of the job on the optional hard disk. Storing the job allows you to print additional copies of the job later.
- Stored Job: If the optional hard disk is installed on the product, you can store a job such as a personnel form, time sheet, or calendar on the product and allow other users to print the job at any time. Stored jobs also can be protected by a PIN.
- To use a custom user name or job name, click the Custom button, and then enter the user name or the job name.
Select which option to use if another stored job already has that name.
Use Job Name + (1 - 99) Append a unique number to the end of the job name.
Replace Existing File Overwrite the existing stored job with the new one.
- If you selected the Stored Job or Personal Job option in step 3, you can protect the job with a PIN. Type a 4-digit number in the Use PIN to Print field. When other people attempt to print this job, the product prompts them to enter this PIN number.
Set the color options with Mac
Use the Color Options menu or the Color/Quality Options menu to control how colors are interpreted and printed from software programs.
- On the File menu, click the Print option.
- Select the driver.
- Open the Color Options menu or the Color/Quality Options menu.
- Open the Advanced menu, or select the appropriate tab.
- Adjust the individual settings for text, graphics, and photographs.
Use the Services menu with Mac
If the product is connected to a network, use the Services menu to obtain product and supply-status information.
- On the File menu, click the Print option.
- Open the Services menu.
- To open the embedded Web server and perform a maintenance task, do the following:
a. Select the Device Maintenance tab.
b. Select a task from the drop-down list.
c. Click the Launch button.
- To go to various support Web sites for this product, do the following:
a. Select the Services on the Web tab.
b. Select an option from the menu.
c. Click the Go! button.
5 Connect the product
• Supported network operating systems
- Connect with USB
- Connect to a network
Supported network operating systems
The following operating systems support network printing:
• Windows 7 (32-bit and 64-bit)
• Windows Vista (32-bit and 64-bit)
• Windows Server 2008 (32-bit and 64-bit)
• Windows XP (32-bit, Service Pack 2)
• Windows XP (64-bit, Service Pack 1)
• Windows Server 2003 (Service Pack 1, 32-bit and 64-bit)
• Mac OS X 10.4, 10.5, 10.6, and higher
NOTE: Most network operating systems support a full software installation.
Printer sharing disclaimer
HP does not support peer-to-peer networking, as the feature is a function of Microsoft operating systems and not of the HP printer drivers. Go to Microsoft at www.microsoft.com.
Connect with USB
This product supports a USB 2.0 connection. You must use an A-to-B type USB cable that is no longer than 2 m (6.5 ft).
△ CAUTION: Do not connect the USB cable until the installation software prompts you to connect it.
CD installation
Windows
- Quit all open programs on the computer.
- Install the software from the CD, and follow the onscreen instructions.
- When prompted, select the Connected directly to the computer option, and then click the Install button.
- When the software prompts you, connect the USB cable to the product and the computer.
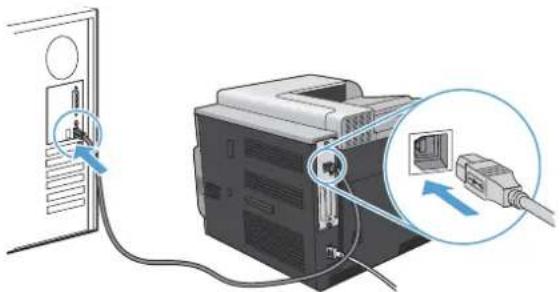
natural_image
Diagram showing a printer with cable inserted into a door, connected to an RJ4 network device (no text or symbols visible)- At the end of the installation, click the Finish button.
- On the Additional Options screen, you can install more software, or click the Exit button.
- Print a page from any program to make sure that the software is correctly installed.
NOTE: If the installation failed, reinstall the software.
Mac
- Install the software from the CD.
- Click the product icon, and follow the onscreen instructions.
-
Click the Close button.
-
When the software prompts you, connect the USB cable to the product and the computer.
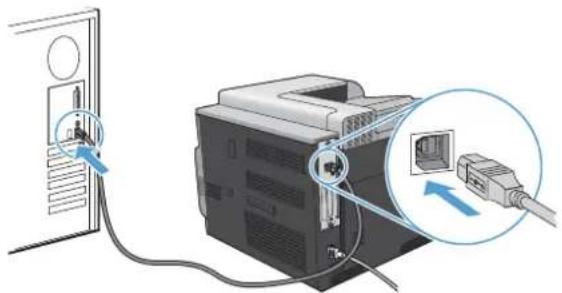
natural_image
Diagram showing a computer monitor connected to an Ethernet port via cable, with a close-up of the internal components (no text or symbols present)- To configure the product software to recognize the installed accessories, complete these steps:
| Mac OS X 10.4 1. | From the Apple menu 🎥, click the System Preferences menu and then click the Print & Fax icon. |
| 2. Click the Printer Setup button. | |
| 3. Click the Installable Options menu. | |
| Mac OS X 10.5 and 10.6 1. | From the Apple menu 🎥, click the System Preferences menu and then click the Print & Fax icon. |
| 2. Select the product in the left side of the window. | |
| 3. Click the Options & Supplies button. | |
| 4. Click the Driver tab. | |
| 5. Configure the installed options. | |
| NOTE: For Mac OS X 10.5 and 10.6, the installation procedure should automatically configure the installed options. |
- Print a page from any program to make sure that the software is correctly installed.

NOTE: If the installation failed, reinstall the software.
Connect to a network
You can configure network parameters from the control panel, the HP Embedded Web Server, or for most networks, from the HP Web Jetadmin software.

NOTE: HP Web Jetadmin software is not supported on Mac OS X operating systems.
For a complete list of supported networks and for instructions on configuring network parameters from software, see the HP Jetdirect Embedded Print Server Administrator's Guide. The guide comes with products in which an HP Jetdirect embedded print server is installed.
Supported network protocols
The product supports the TCP/IP network protocol, the most widely used and accepted networking protocol. Many networking services utilize this protocol. The following tables list the supported networking services and protocols.
Table 5-1 Printing
| Service name Description | |
| port9100 (Direct Mode) Printing service | |
| Line printer daemon (LPD) Printing service | |
| Advanced LPD (custom LPD queues) | Protocol and programs associated with line-printer spooling services installed on TCP/IP systems. |
| FTP TCP/IP utility for transferring data between systems. | |
| WS Print Uses the Microsoft Web Services for Devices (WSD) Print services on the HP Jetdirect print server. | |
| WS Discovery Allows Microsoft WS discovery protocols on the HP Jetdirect print server. | |
Table 5-2 Network device discovery
| Service name Description | |
| SLP (Service Location Protocol) Device-discovery protocol, used to help find and configurenetwork devices. Used primarily by Microsoft-based programs. | |
| Bonjour Device-discovery protocol, used to help find and configurenetwork devices. Used primarily by Apple Macintosh-based programs. |
Table 5-3 Messaging and management
| Service name Description | |
| HTTP (Hyper Text Transfer Protocol) Allows Web browsers to communicate with embedded Web server. | |
| EWS (embedded Web server) Allows you to manage the product through a Web browser. | |
| SNMP (Simple Network Management Protocol) | Used by network applications for product management. SNMP v1, SNMP v3, and standard MIB-II (Management Information Base) objects are supported. |
| LLMNR (Link Local Multicast Name Resolution) | Specifies if the product responds to LLMNR requests over IPv4 and IPv6. |
| TFTP Configuration Allows you to use TFTP to download a configuration file containing additional configuration parameters, such as SNMP or non-default settings, for an HP Jetdirect print server. | |
Table 5-4 IP addressing
| Service name Description | |
| DHCP (Dynamic Host Configuration Protocol) | For automatic IP address assignment. The product supports IPv4 and IPv6. The DHCP server provides the product with an IP address. Generally, no user intervention is required for the product to obtain an IP address from a DHCP server. |
| BOOTP (Bootstrap Protocol) For automatic IP address assignment. The BOOTP serverprovides the product with an IP address. Requires the administrator to input a product's MAC hardware address on the BOOTP server for the product to obtain an IP address from that server. | |
| Auto IP For automatic IP address assignment. If neither a DHCPserver nor a BOOTP server is present, the product uses this service to generate a unique IP address. | |
Table 5-5 Security features
| Service name Description | |
| IPsec/Firewall Provides network-layer security on IPv4 and IPv6 networks. A firewall provides simple control of IP traffic. IPsec provides additional protection through authentication and encryption protocols. | |
| Kerberos Allows you to exchange private information across an open network by assigning a unique key, called a ticket, to each user who logs on to the network. The ticket is then embedded in messages to identify the sender. | |
| SNMP v3 Employs a user-based security model for SNMP v3, which provides user authentication and data privacy through encryption. | |
| Access control list (ACL) Specifies the individual host systems, or networks of host systems, that are allowed to access the HP Jetdirect print server and the attached network product. | |
| SSL/TLS Allows you to transmit private documents via the Internet and guarantee privacy and data integrity between the client and server applications. | |
| IPsec batch configuration Provides network-layer security through the simple control of IP traffic to and from the product. This protocol provides the benefits of encryption and authentication and allows for multiple configurations. |
Install the product on a wired network
Configure the IP address
- Connect the network cable to the product and to the network.
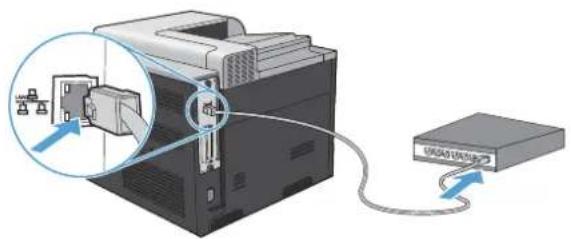
natural_image
Diagram of a printer with attached cable and connector, showing internal components (no text or symbols)- Wait for 60 seconds before continuing. During this time, the network recognizes the product and assigns an IP address or host name for the product.
- At the product control panel, press the Home button 📋.
- Press the down arrow ▼ to highlight the INFORMATION menu, and then press the OK button.
- Press the down arrow ▼ to highlight the PRINT CONFIGURATION menu, and then press the OK button.
- Find the IP address on the Embedded Jetdirect page.
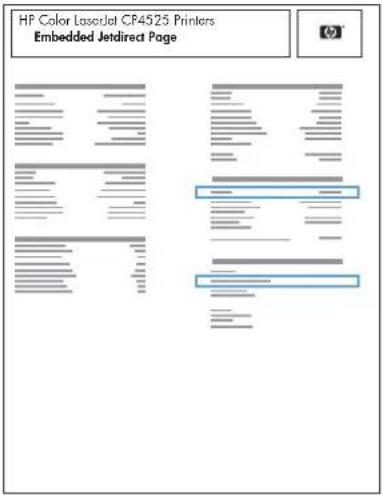
text_image
HP Color Laserdot CF4525 Printers Embedded Jetdirect Page- IPv4: If the IP address is 0.0.0.0, or 192.0.0.192, or 169.254.x.x, you must manually configure the IP address. See Manually configure IPv4 TCP/IP parameters from the control panel on page 75. Otherwise, the network configuration was successful.
IPv6: If the IP address begins with "fe80:", the product should be able to print. If not, you must manually configure the IP address. See Manually configure IPv6 TCP/IP parameters from the control panel on page 76.
Install the software
Windows
- Quit all programs on the computer.
- Install the software from the CD.
- Follow the onscreen instructions.
- When prompted, select the Connected via the Network option, and then click the Install button.
- From the list of available printers, select the printer that has the correct IP address.
- Click the Finish button.
- On the Additional Options screen, you can install more software, or click the Exit button.
- Print a page from any program to make sure that the software is correctly installed.

NOTE: If the installation failed, reinstall the software.
Mac
- Quit all programs on the computer.
- Install the software from the CD.
- Click the product icon, and follow the onscreen instructions.
- Click the Close button when the installation is complete.
- At the computer, open the Apple menu 📄, click the System Preferences menu, and then click the Print & Fax icon.
- Click the plus symbol (+).
By default, Mac OS X uses the Bonjour method to find the driver and add the product to the printer pop-up menu. This method is best in most situations. If Mac OS X cannot find the HP printer driver, an error message displays. Reinstall the software.
If you are connecting the product to a large network, you might need to use IP printing to connect rather than Bonjour. Follow these steps:
a. Click the IP Printer button.
b. From the Protocol drop-down list, select the HP Jetdirect-Socket option. Enter the IP address or host name for the product. From the Print Using drop-down list, select the product model if one is not already selected.
- To configure the product to recognize the installed accessories, complete these steps:
| Mac OS X 10.4 1. | From the Apple menu 🎥, click theSystem Preferencesmenu and then click thePrint & Faxicon. |
| 2. Click thePrinter Setupbutton. | |
| 3. Click theInstallable Optionsmenu. | |
| Mac OS X 10.5 and 10.6 1. | From the Apple menu 🎥, click theSystem Preferencesmenu and then click thePrint & Faxicon. |
| 2. Select the product in the left side of the window. | |
| 3. Click theOptions & Suppliesbutton. | |
| 4. Click theDrivertab. | |
| 5. Configure the installed options. | |
| NOTE: For Mac OS X 10.5 and 10.6, the installation procedure should automatically configure the installed options. |
- Print a page from any program to make sure that the software is correctly installed.

NOTE: If the installation failed, reinstall the software.
Configure network settings
View or change network settings
Use the embedded Web server to view or change IP configuration settings.
- Print a configuration page, and locate the IP address.
- If you are using IPv4, the IP address contains only digits. It has this format:
XXX, XXX, XXX, XXX
- If you are using IPv6, the IP address is a hexadecimal combination of characters and digits. It has a format similar to this:
XXXX::XXXX:XXXX:XXXX:XXXX
-
To open the embedded Web server, type the IP address into the address line of a Web browser.
-
Click the Networking tab to obtain network information. You can change settings as needed.
Set or change the network password
Use the embedded Web server to set a network password or change an existing password.
- Open the embedded Web server, click the Networking tab, and click the Security link.
NOTE: If a password has previously been set, you are prompted to type the password. Type the password, and then click the Apply button.
-
Type the new password in the New Password box and in the Verify password box.
-
At the bottom of the window, click the Apply button to save the password.
Manually configure IPv4 TCP/IP parameters from the control panel
Use the control-panel menus to manually set an IPv4 address, subnet mask, and default gateway.
-
Press the Home button 📋.
-
Open each of the following menus. Press the down arrow ▼ to highlight it and then press the OK button to select it.
a. CONFIGURE DEVICE
b. I/O
c. EMBEDDED JETDIRECT MENU
d. TCP/IP
e. IPV4 SETTINGS
f. CONFIG METHOD
g. MANUAL
h. MANUAL SETTINGS
i. IP ADDRESS, SUBNET MASK, or DEFAULT GATEWAY
- Press the up arrow ▲ or the down arrow ▼ to increase or decrease the number for the first byte of the IP address, subnet mask, or default gateway.
- Press the OK button to move to the next set of numbers, or press the back arrow ↩ to move to the previous set of numbers.
- Repeat steps 3 and 4 until the IP address, subnet mask, or default gateway is complete, and then press the OK button to save the setting.
- Press the Home button 📋 to return to the Ready state.
Manually configure IPv6 TCP/IP parameters from the control panel
Use the control-panel menus to manually set an IPv6 address.
-
Press the Home button 📋.
-
Open each of the following menus. Press the down arrow ▼ to highlight it and then press the OK button to select it.
a. CONFIGURE DEVICE
b. I/O
d. TCP/IP
e. IPV6 SETTINGS
f. ADDRESS
g. MANUAL SETTINGS
h. ENABLE
i. ON
j. ADDRESS
c. EMBEDDED JETDIRECT MENU
- Press the up arrow ▲ or the down arrow ▼ to select the first character of the address. Press the OK button.
Repeat this process for each character in the address.
NOTE: You must press the OK button after entering each character.
-
Press the up arrow ▲ or the down arrow ▼ to select the stop character ⊗. Press the OK button.
-
Press the Home button 🔒 to return to the Ready state.
Link speed and duplex settings
The link speed and communication mode of the print server must match the network. For most situations, leave the product in automatic mode. Incorrect changes to the link speed and duplex settings might prevent the product from communicating with other network devices. If you need to make changes, use the product control panel.

NOTE: Making changes to these settings causes the product to turn off and then on. Make changes only when the product is idle.
-
Press the Home button 🏠.
-
Open each of the following menus. Press the down arrow ▼ to highlight it and then press the OK button to select it.
a. CONFIGURE DEVICE
b. I/O
c. EMBEDDED JETDIRECT MENU
d. LINK SPEED
- Press the down arrow ▼ to highlight one of the following options.
Setting Description
| AUTO | The print server automatically configures itself for the highest link speed and communication mode allowed on the network. |
| 10T HALF 10 megabytes per second (Mbps), half-duplex operation | |
| 10T FULL 10 Mbps, full-duplex operation | |
| 100TX HALF 100 Mbps, half-duplex operation | |
| 100TX FULL 100 Mbps, full-duplex operation | |
| 100TX AUTO Limits auto-negotiation to a maximum link speed of 100 Mbps | |
| 1000T FULL 1000 Mbps, full-duplex operation | |
- Press the OK button. The product turns off and then on.
6 Paper and print media
• Understand paper use
- Change the printer driver to match the paper type and size
• Supported paper sizes
• Supported paper types
- Tray and bin capacity
• Paper orientation for loading trays
- Load paper trays
- Configure trays
Understand paper use
This product supports a variety of paper and other print media in accordance with the guidelines in this user guide. Paper or print media that does not meet these guidelines might cause poor print quality, increased jams, and premature wear on the product.
For best results, use only HP-brand paper and print media designed for laser printers or multiuse. Do not use paper or print media made for inkjet printers. Hewlett-Packard Company cannot recommend the use of other brands of media because HP cannot control their quality.
It is possible for paper to meet all of the guidelines in this user guide and still not produce satisfactory results. This might be the result of improper handling, unacceptable temperature and/or humidity levels, or other variables over which Hewlett-Packard has no control.
△ CAUTION: Using paper or print media that does not meet Hewlett-Packard's specifications might cause problems for the product, requiring repair. This repair is not covered by the Hewlett-Packard warranty or service agreements.
Special paper guidelines
This product supports printing on special media. Use the following guidelines to obtain satisfactory results. When using special paper or print media, be sure to set the type and size in the printer driver to obtain the best results.
△ CAUTION: HP LaserJet products use fusers to bond dry toner particles to the paper in very precise dots. HP laser paper is designed to withstand this extreme heat. Using inkjet paper could damage the product.
| Media type Do Do not | ||
| Envelopes | Store envelopes flat.Use envelopes where the seam extends all the way to the corner of the envelope.Use peel-off adhesive strips that are approved for use in laser printers. | Do not use envelopes that are wrinkled, nicked, stuck together, or otherwise damaged.Do not use envelopes that have clasps, snaps, windows, or coated linings.Do not use self-stick adhesives or other synthetic materials. |
| Labels | Use only labels that have no exposed backing between them.Use labels that lie flat.Use only full sheets of labels. | Do not use labels that have wrinkles or bubbles, or are damaged.Do not print partial sheets of labels. |
| Transparencies | Use only transparencies that are approved for use in color laser printers.Place transparencies on a flat surface after removing them from the product. | Do not use transparent print media not approved for laser printers. |
| Letterhead or preprinted forms | Use only letterhead or forms approved for use in laser printers. | Do not use raised or metallic letterhead. |
| Heavy paper | Use only heavy paper that is approved for use in laser printers and meets the weight specifications for this product. | Do not use paper that is heavier than the recommended media specification for this product unless it is HP paper that has been approved for use in this product. |
| Glossy or coated paper | Use only glossy or coated paper that is approved for use in laser printers. | Do not use glossy or coated paper designed for use in inkjet products. |
Change the printer driver to match the paper type and size
Change the paper size and type (Windows)
- On the File menu in the software program, click Print.
- Select the product, and then click the Properties or Preferences button.
- Click the Paper/Quality tab.
- Select a size from the Paper size drop-down list.
- Select a paper type from the Paper type drop-down list.
- Click the OK button.
Change the paper size and type (Mac)
- On the File menu in the software program, click the Print option.
- In the Copies & Pages menu, click the Page Setup button.
- Select a size from the Paper Size drop-down list, and then click the OK button.
- Open the Finishing menu.
- Select a type from the Media-type drop-down list.
- Click the Print button.
Supported paper sizes

NOTE: To obtain best results, select the correct paper size and type in the printer driver before printing.
Table 6-1 Supported paper and print media sizes
| Size and dimensions | Tray 1 | Tray 2 | Optional Trays 3,4, and 5 | Automatic duplex printing |
| Letter | √ | √ | √ | √ |
| 216 x 279 mm (8.5 x 11 in) | ||||
| Legal | √ | √ | √ | √ |
| 216 x 356 mm (8.5 x 14 in) | ||||
| Executive | √ | √ | √ | √ |
| 184 x 267 mm (7.24 x 10.51 in) | ||||
| Statement | √ | |||
| 140 x 216 mm (5.5 x 8.5 in) | ||||
| 8.5 x 13 | √ | √ | √ | √ |
| 216 x 330 mm (8.5 x 13 in) | ||||
| 4 x 6 | √ | √ | ||
| 101.6 x 152.4 mm (4 x 6 in) | The HP postcardmedia insert mustbe installed. | |||
| 10 x 15 cm | √ | √ | ||
| 101.6 x 152.4 mm (4 x 6 in) | The HP postcardmedia insert mustbe installed. | |||
| 5 x 7 | √ | |||
| 127 x 188 mm (5 x 7 in) | ||||
| 5 x 8 | √ | |||
| 127 x 203 mm (5 x 8 in) | ||||
| A4 | √ | √ | √ | √ |
| 210 x 297 mm (8.27 x 11.69 in) | ||||
| RA4 | √ | √ | √ | √ |
| 215 x 305 mm (8.46 x 12.01 in) | ||||
| A5 | √ | √ | √ | √ |
| 148 x 210 mm (5.83 x 8.27 in) | ||||
| A6 | √ | |||
| 105 x 148 mm (4.13 x 5.82 in) | ||||
| B5 (JIS) | √ | √ | √ | √ |
| 182 x 257 mm (7.17 x 10.12 in)B6 (JIS) | √ | |||
| 128 x 182 mm (5.03 x 7.16 in) | ||||
| 16K | √ | √ | √ | √ |
| 195 x 270 mm (7.67 x 10.62 in) | ||||
| 184 x 260 mm (7.24 x 10.23 in) | ||||
| 197 x 273 mm (7.75 x 10.74 in) | ||||
| Postcard (JIS) | √ | |||
| 100 x 148 mm (3.93 x 5.82 in) | ||||
| DPostcard (JIS) | √ | |||
| 148 x 200 mm (5.82 x 7.87 in) | ||||
| Custom | √1 | |||
| 76 x 127 mm to 216 x 356 mm (3 x 5 in to 8.5 x 14 in) | ||||
| Custom | √ | √ | ||
| 148 x 210 mm to 216 x 356 mm (5.83 x 8.27 in to 8.5 x 14 in) | ||||
| Envelope #9 | √ | |||
| 98 x 225 mm (3.85 x 8.85 in) | ||||
| Envelope #10 | √ | |||
| 105 x 241 mm (4.13 x 9.48 in) | ||||
| Envelope Monarch | √ | |||
| 98 x 191 mm (3.9 x 7.5 in) | ||||
| Envelope B5 | √ | |||
| 176 x 250 mm (6.92 x 9.84 in) | ||||
| Envelope C5 | √ | |||
| 162 x 229 mm (6.37 x 9.01 in) | ||||
| Envelope C6 | √ | |||
| 162 x 114 mm (6.37 x 4.48 in) | ||||
| Envelope DL ISO | √ | |||
| 110 x 220 mm (4.33 x 8.66 in) |
The product can print on 76 x 127 mm (3 x 5 in) size paper from Tray 1 for Extra Heavy (131-175 g/m ^2 ) and Cardstock (176-220 g/m ^2 ) paper types.
Supported paper types
| Paper type | Tray 1 | Tray 2 | Optional Trays 3, 4, and 5 | Automatic duplex printing |
| Plain Paper | √ | √ | √ | √ |
| HP Matte (105 g/m2) | √ | √ | √ | √ |
| HP Matte (120 g/m2) | √ | √ | √ | √ |
| HP Matte (160 g/m2) | √ | ^112 | √ | √ |
| HP Matte (200 g/m2) | √ | ^1 | ^1 | |
| HP Soft Gloss (120 g/m2) | √ | √ | √ | √ |
| HP Glossy (130 g/m2) | √ | √ | √ | √ |
| HP Glossy (160 g/m2) | √ | √ | √ | √ |
| HP Glossy (220 g/m2) | √ | √ | √ | √ |
| Light (60–74 g/m2) | √ | √ | √ | √ |
| Midweight (96–110 g/m2) | √ | √ | √ | √ |
| Heavy (111–130 g/m2) | √ | √ | √ | √ |
| Extra Heavy (131–175 g/m2) | √ | ^112 | √ | √ |
| Cardstock (176–220 gm2) | √ | ^1 | ^1 | |
| Mid-weight glossy (96–110 g/m2) | √ | √ | √ | √ |
| Heavy glossy (111–130 g/m2) | √ | √ | √ | √ |
| Extra-heavy glossy (131–175 g/m2) | √ | √ | √ | √ |
| Card glossy (176–220 g/m2) | √ | √ | √ | √ |
| Color Transparency | √ | √ | √ | |
| Labels | √ | ^1 | ^1 | |
| Letterhead | √ | √ | √ | √ |
| Envelope | √ | |||
| Preprinted | √ | √ | √ | √ |
| Prepunched | √ | √ | √ | √ |
| Colored | √ | √ | √ | √ |
| Bond | √ | √ | √ | √ |
| Recycled | √ | √ | √ | √ |
| Rough | √ | √ | √ | √ |
| HP Tough Paper | √ | √ | √ | √ |
| Opaque film | √ | √ | √ | √ |
1 Trays 2, 3, 4, and 5 can print on this paper in some circumstances, but HP does not guarantee results.
2 The product can automatically print on both sides for this paper type in some circumstances, but HP does not guarantee results.
Tray or bin Paper type Specifications Quantity
| Tray 1 Paper Range: | 60 g/m2(16 lb) bond to 216 g/m2(58 lb) bond | Maximum stack height: 10 mm (0.39 in)Equivalent to 100 sheets of 75 g/ m2(20 lb) bond | |
| Envelopes | Less than 60 g/m2(16 lb) bond to 90 g/m2(24 lb) bond | Up to 10 envelopes | |
| Labels Maximum 0.102 mm (0.004 in) thick | Maximum stack height: 10 mm (0.39 in) | ||
| Transparencies Minimum 0.102 mm (0.004 in) thick | Maximum stack height: 10 mm (0.39 in)Up to 50 sheets | ||
| Glossy paper Range: | 105 g/m2(28 lb) bond to 220 g/ m2(58 lb) bond | Maximum stack height: 10 mm (0.39 in)Up to 50 sheets | |
| Tray 21 | Paper Range: | 60 g/m2(16 lb) bond to 220 g/m2(59 lb) bond | Maximum stack height: 56 mm (2.2 in)Equivalent to 500 sheets of 75 g/ m2(20 lb) bondMaximum stack height for 10 x 15 cm (4 x 6 in) size paper: 15 mm (0.59 in) |
| Transparencies Minimum 0.102 mm (0.004 in) thick | Maximum stack height: 56 mm (2.2 in) | ||
| Glossy paper Range: | 105 g/m2(28 lb) bond to 220 g/ m2(58 lb) bond | Maximum stack height: 56 mm (2.2 in) | |
| Optional Trays 3, 4, and 51 | Paper Range: | 60 g/m2(16 lb) bond to 220 g/m2(59 lb) bond | Equivalent to 500 sheets of 75 g/ m2(20 lb) bondMaximum stack height: 56 mm (2.2 in) |
| Transparencies Minimum 0.102 mm (0.004 in) thick | Maximum stack height: 56 mm (2.2 in) | ||
| Glossy paper Range: | 105 g/m2(28 lb) bond to 220 g/ m2(58 lb) bond | Maximum stack height: 56 mm (2.2 in) | |
| Output bin Paper | Up to 500 sheets of 75 g/m2(20 lb) bond | ||
1 Trays 2, 3, 4, and 5 can print on bond paper heavier than 220g / m^2 (59 lb) in some circumstances, but HP does not guarantee results.
Paper orientation for loading trays
If you are using paper that requires a specific orientation, load it according to the information in the following tables.

NOTE: The ALTERNATIVE LETTERHEAD MODE and IMAGE ROTATION settings affect the way you load letterhead or preprinted paper. The following information depicts the default setting. For more information, see System setup menu on page 27.
Paper orientation for loading Tray 1
| Paper type | Image orientation | Duplex mode | How to load paper |
| Preprinted or letterhead | Portrait | 1-sided printing | Face downBottom edge leading into the product |
Automatic 2-sided printing Face upBottom edge leading into the product | |||
| Landscape 1-sided printing Face down | Top edge toward the back of the product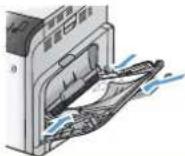 | ||
Automatic 2-sided printing Face upTop edge toward the back of the product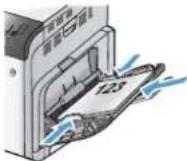 | |||
| Prepunched | Portrait or landscape | 1- or 2-sided printing | Holes toward the back of the product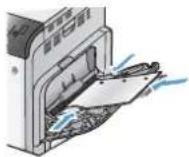 |
| Envelopes Short edge of the envelope feeding into the product | 1-sided printing Face down | Top edge toward the front of the product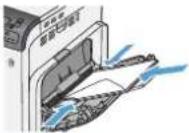 | |
| Long edge of the envelope feeding into the product | 1-sided printing Face downTop edge leading into the product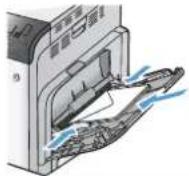 | ||
Paper orientation for loading Tray 2 or optional Trays 3, 4, and 5
| Paper type | Image orientation | Duplex mode | How to load paper |
| Preprinted or letterhead | Portrait | 1-sided printing | Face upTop edge at the left side of the tray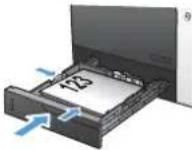 |
Automatic 2-sided printing Face downTop edge at the left side of the tray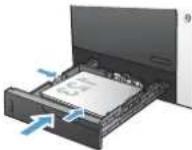 | |||
| Landscape 1-sided printing Face up | Top edge toward the back of the product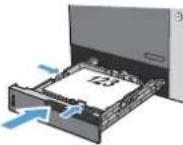 | ||
Automatic 2-sided printing Face downTop edge toward the back of the product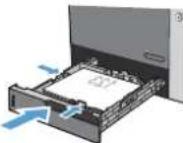 | |||
| Prepunched Portrait or landscape 1- or 2-sided printing Holes toward the back of the product | |||
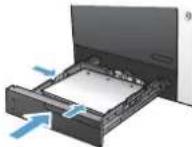 | |||
Load paper trays
Load Tray 1
-
Open Tray 1.
-
Fold out the tray extension to support the paper and set the side guides to the correct width.
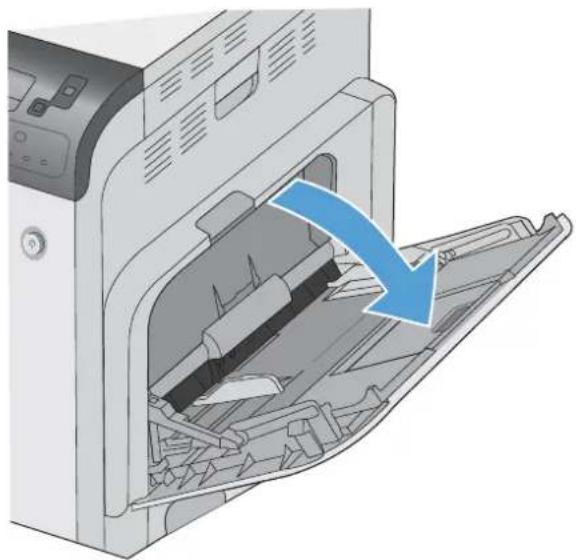
natural_image
Illustration of a printer's internal structure with a blue arrow indicating a process or transformation (no text or symbols present)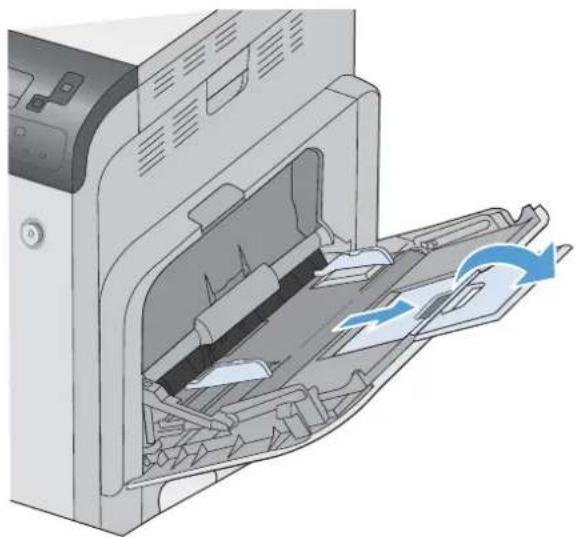
natural_image
Illustration of a printer's internal structure showing paper feed, paper sheet, and paper roll (no text or symbols)- Load paper in the tray.
- Make sure the stack fits under the tabs on the guides and does not exceed the load-level indicators.
- Adjust the side guides so that they lightly touch the paper stack but do not bend it.
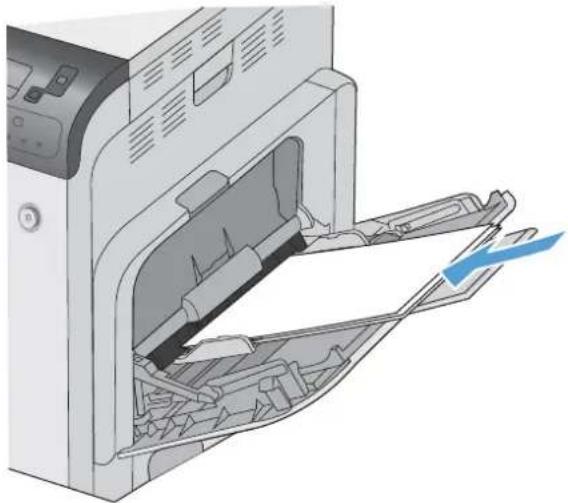
natural_image
Illustration of a printer's internal structure showing paper feed and paper tray (no text or symbols)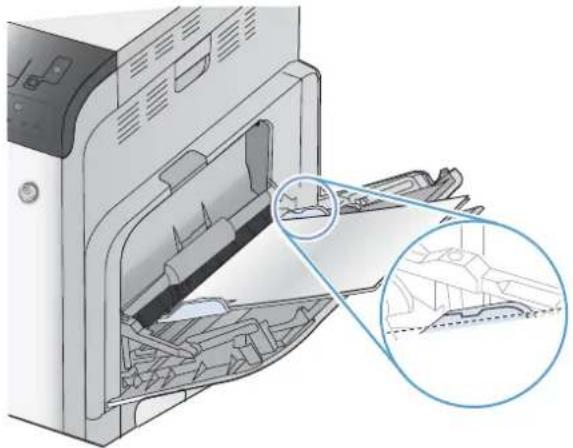
natural_image
Illustration of a printer's internal structure showing internal components and a magnified view of the printer's interior (no text or symbols present)
natural_image
Illustration of a printer's internal structure showing paper feeding into a paper airplane (no text or symbols visible)Load Tray 2 and optional Trays 3, 4, and 5 with standard-size paper
- Open the tray.
NOTE: Do not open the tray while it is in use.
-
Adjust the paper-length and paper-width guides by squeezing the adjustment latches and sliding the guides to the size of the paper being used.
-
Load paper into the tray. Check the paper to verify the guides lightly touch the stack, but do not bend it.
NOTE: To prevent jams, do not overfill the tray. Be sure the top of the stack is below the tray full indicator.
NOTE: If the tray is not adjusted correctly, an error message might appear during printing or the paper might jam.
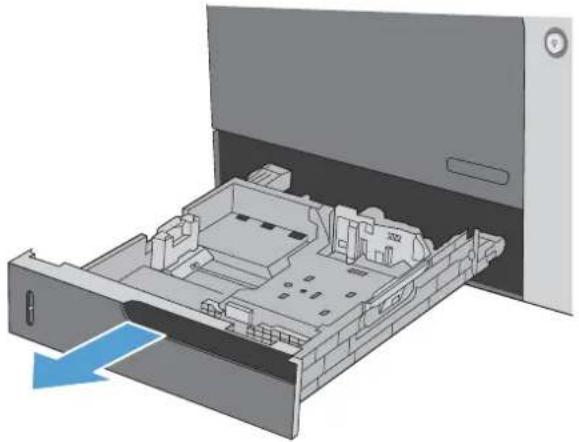
natural_image
3D diagram of a computer drive bay with internal components and a blue arrow indicating direction (no text or symbols)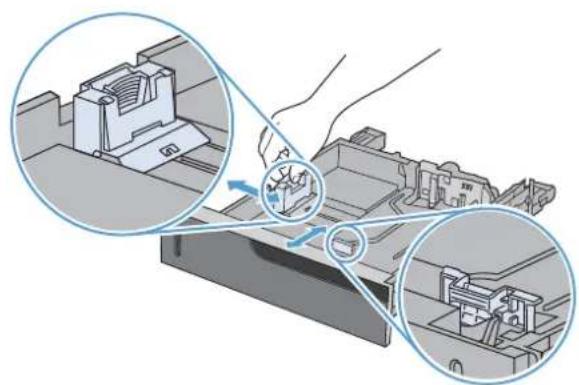
natural_image
Diagram showing a printer's internal structure with two magnified views of the printer's internal components (no text or symbols present)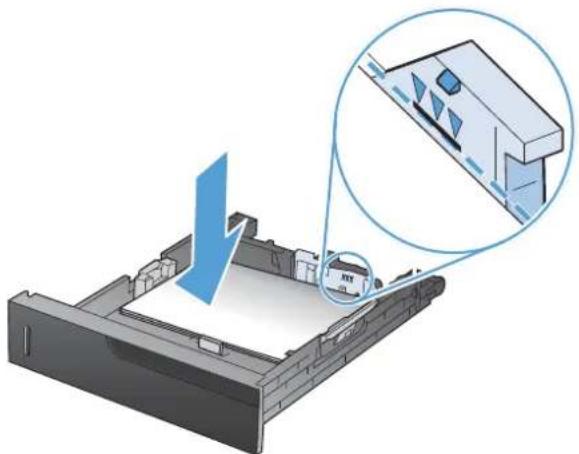
natural_image
Diagram of a mechanical assembly with a blue lightning bolt and magnified detail showing internal components (no text or symbols)- Close the tray.
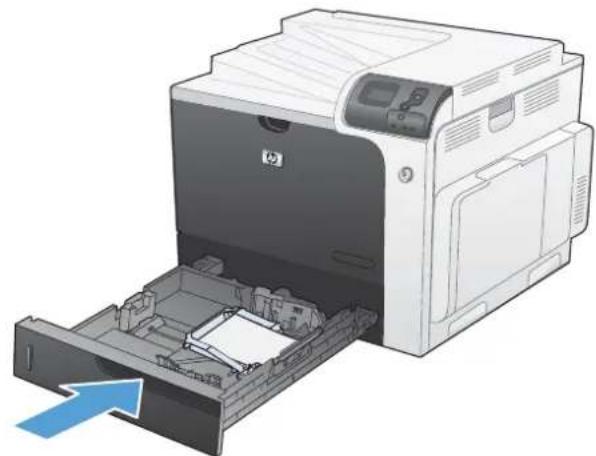
natural_image
Illustration of a HP printer with an open drawer and paper feed being inserted (no text or symbols visible)- The control panel shows the tray's paper type and size. If the configuration is not correct, follow the instructions on the control panel to change the size or type.
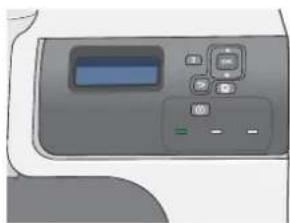
natural_image
Illustration of a handheld electronic device with control buttons and a display screen (no text or symbols visible)Load Tray 2 and optional Trays 3, 4, and 5 with custom-size paper
- Open the tray.
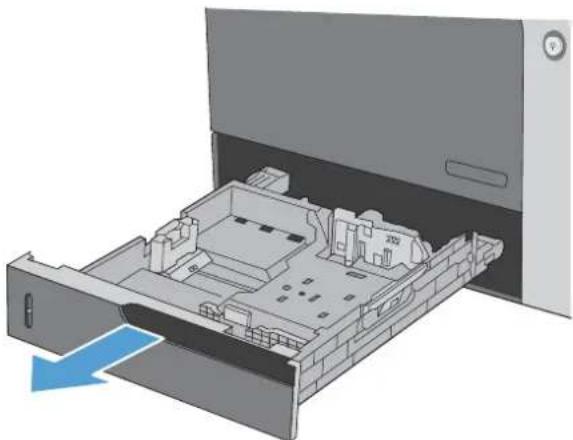
natural_image
3D diagram of a file drawer with internal compartments and a monitor, showing no text or symbols- Adjust the paper-length and paper-width guides by squeezing the adjustment latches and sliding the guides to the size of the paper being used.
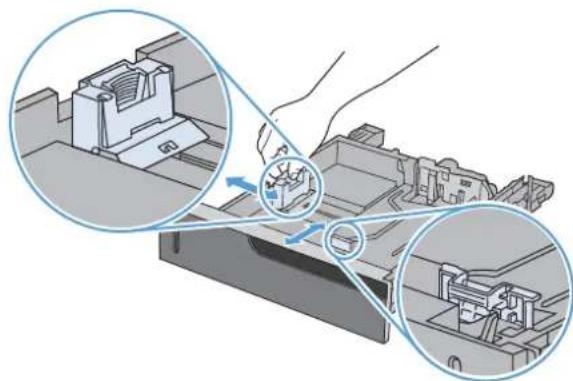
natural_image
Diagram showing a printer's internal structure being inserted into a CD or DVD drive, with magnified insets highlighting the components (no text or symbols present)-
Load paper into the tray. Check the paper to verify the guides lightly touch the stack, but do not bend it.
-
Close the tray.
-
The control panel prompts you to set the paper size and type. Select the CUSTOM setting, and then configure the X and Y dimensions of the custom paper size.
NOTE: See the label in the paper tray, or the following illustration, to determine the X and Y dimensions.
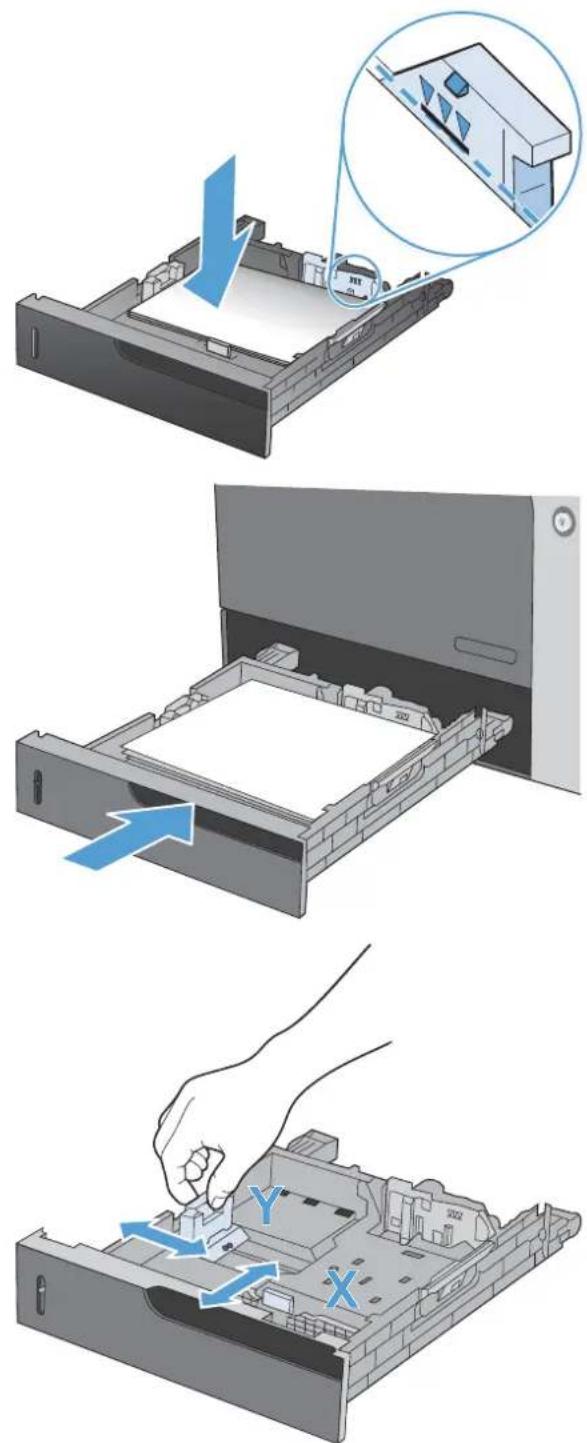
text_image
Diagram illustrating the process of inserting a physical device into a file, with labeled arrows and annotations in Chinese.Load Tray 2 with 10 × 15 ~cm (4 x 6 in) size paper
- Open the tray.
- Adjust the paper-length and paper-width guides by squeezing the adjustment latches and adjusting the guides to the fully opened position.
- Fit the HP postcard media insert into Tray 2 and then slide the insert to the right until it snaps into place.
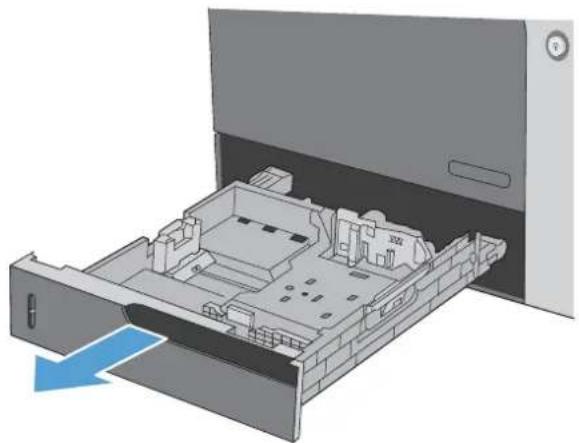
natural_image
3D diagram of a file drawer with internal compartments and a computer monitor, showing no text or symbols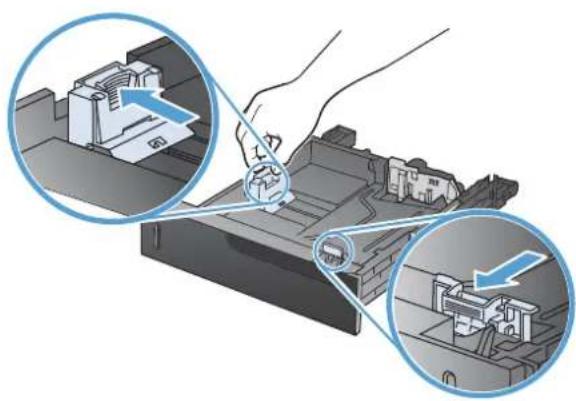
natural_image
Illustration of a printer's internal structure with two magnified views showing internal components (no text or symbols)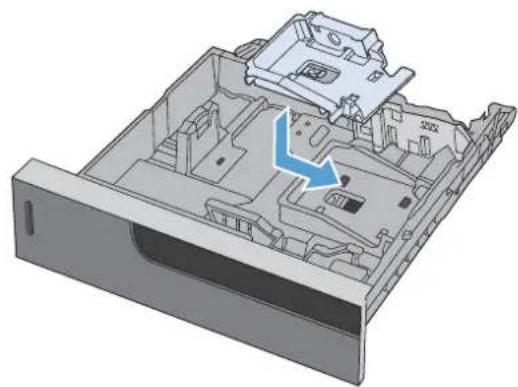
natural_image
3D mechanical assembly diagram showing internal components with a blue arrow indicating a specific part (no text or symbols present)- Load 10 x 15 cm (4 x 6 in) paper into the tray.
- Adjust the paper-length and paper-width guides by squeezing the adjustment latches and adjusting the guides to the fully closed position.
- Close the tray.
- The control panel prompts you to set the paper size and type. Select 10 x 15 cm (4 x 6 in) size paper.
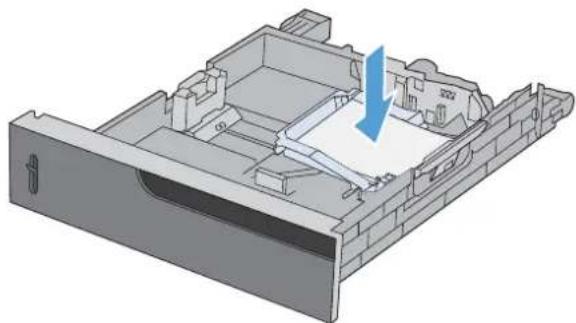
natural_image
3D technical illustration of a mechanical assembly with a blue arrow indicating a component (no text or symbols present)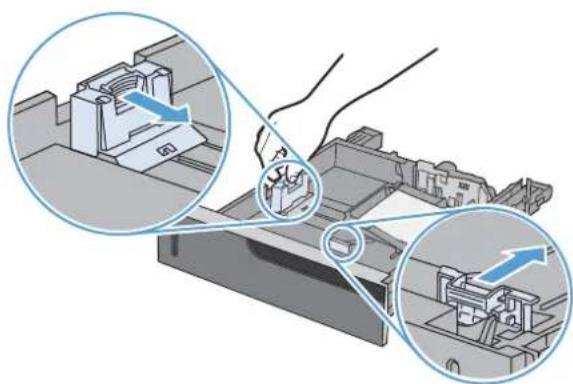
natural_image
Diagram showing a printer's internal structure with two views of the printer's internal components (no text or symbols present)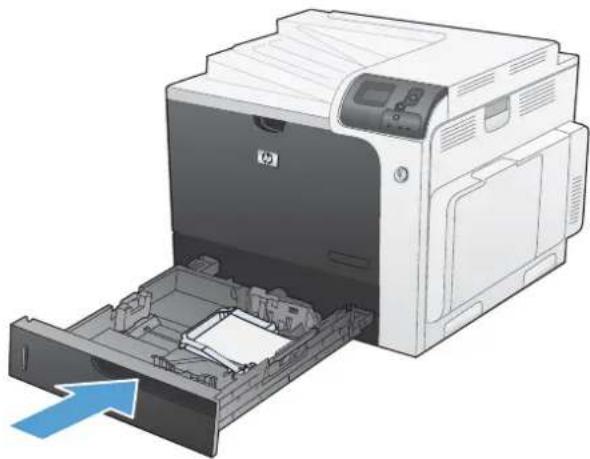
natural_image
Illustration of a HP printer with an open drawer and internal components, showing no text or symbols.
natural_image
Illustration of a generic electronic device with control buttons and a display screen (no text or symbols visible)Configure trays
The product automatically prompts you to configure a tray for type and size in the following situations:
- When you load paper into the tray
- When you specify a particular tray or media type for a print job through the printer driver or a software program and the tray is not configured to match the print-job's settings
NOTE: The prompt does not appear if you are printing from Tray 1, and it is configured for the ANY SIZE and ANY TYPE settings. In this situation, if the print job does not specify a tray, the product prints from Tray 1, even if the paper size and type settings in the print job do not match the paper loaded in Tray 1.
Configure a tray when loading paper
- Load paper in the tray. Close the tray if you are using Tray 2, 3, 4, or 5.
- The tray configuration message appears.
- Press the back arrow ↩ to accept the size and type, or press the OK button to choose a different paper size or paper type.
- To modify the tray size configuration, press the down arrow ▼ to highlight the correct size, and then press the OK button.
- To modify the tray type configuration, press the down arrow ▼ to highlight the correct type, and then press the OK button.
Configure a tray to match print job settings
- In the software program, specify the source tray, the paper size, and the paper type.
- Send the job to the product.
If the tray needs to be configured, the LOAD TRAY[TYPE] [SIZE] message appears. - Load the tray with the specified type and size of paper, and then close the tray.
- When the TRAY
SIZE = message appears, press the OK button to confirm the size. - When the TRAY
TYPE= message appears, press the OK button to confirm the type and continue with the job.
Configure a tray by using the Paper Handling menu
You can also configure the trays for type and size without a prompt from the product.
-
Press the Home button 🔒.
-
Press the down arrow ▼ to highlight the PAPER HANDLING menu, and then press the OK button.
-
Press the down arrow ▼ to highlight the size or type setting for the desired tray, and then press the OK button.
-
Press the up arrow ▲ or the down arrow ▼ to highlight the size or type. If you select a custom size, select the unit of measure, and then set the X dimension and the Y dimension.
-
Press the OK button to save your selection.
- Press the Home button 📋 to exit the menus.
Automatic paper sensing (auto-sense mode)
The automatic media type sensor functions when that tray is configured to the ANY TYPE or plain type setting. It also functions when the PRINT MODE setting for that tray is set to the AUTO SENSE MODE option.
After it has picked up paper from the tray, the product can detect overhead transparencies, paper weight, and gloss level.
For more control, a specific type must be selected in the job or configured in a tray.
Auto-sense settings
| Full sensing (Tray 1 only) | For each sheet of paper that it picks up from the tray, the product detects light paper, plain paper, heavy paper, glossy paper, tough paper, and transparencies. |
| Expanded sensing | For the first few sheets of paper that it picks up from the tray, the product detects light paper, plain paper, heavy paper, glossy paper, tough paper, and transparencies. The product assumes the rest of the pages are of the same type. |
| Transparency only The product distinguishes between transparencies and non-transparencies. | |
For more information about setting these options, see Print Quality menu on page 23.
Select the paper by source, type, or size
In the Microsoft Windows operating system, three settings affect how the printer driver tries to pull media when you send a print job. Source, Type, and Size settings appear in the Page Setup, Print, or Print Properties dialog boxes in most software programs. Unless you change these settings, the product automatically selects a tray using the default settings.
Source
To print by source, select a specific tray in the printer driver for the product to pull from. If you select a tray that is configured for a type or size that does not match your print job, the product prompts you to load the tray with the type or size of paper for your print job before printing it. When you load the tray, the product begins printing.
Type and Size
- Printing by type or size causes the product to pull from the tray that is loaded with the correct type and size of paper.
- Selecting paper by type rather than source helps protect special paper from accidental use.
-
Using the wrong setting might result in unsatisfactory print quality. Always print by type for special print media, such as labels or transparencies.
• Print by type or size for envelopes, if possible. -
To print by type or size, select the type or size from the Page Setup dialog box, the Print dialog box, or the Print Properties dialog box, depending on the software program.
- If you often print on a certain type or size of paper, configure a tray for that type or size. Then, when you select that type or size as you print a job, the product automatically pulls paper from the tray that is configured for that type or size.
7 Print tasks
- Cancel a print job
- Print with Windows
Cancel a print job
-
Press the stop button on the control panel.
-
Press the down arrow to highlight the CANCEL CURRENT JOB option, and then press the OK button.
NOTE: It can take some time for all printing to clear after you have canceled a print job.
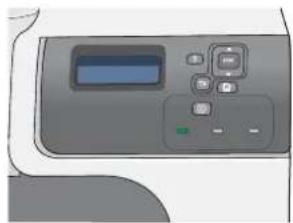
natural_image
Illustration of a handheld electronic device with control buttons and a display screen (no text or symbols visible)Print with Windows
Open the printer driver with Windows
-
On the File menu in the software program, click Print.
-
Select the product, and then click the Properties or Preferences button.
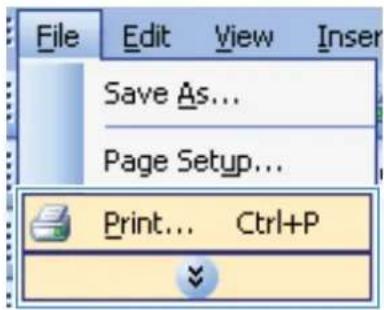
text_image
File Edit View Insert Save As... Page Setup... Print... Ctrl+P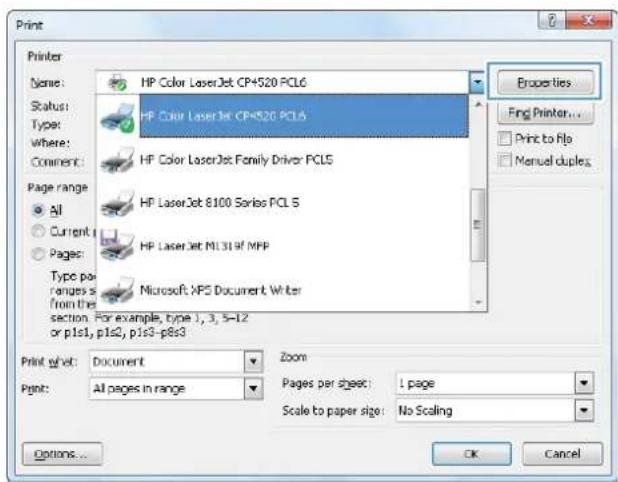
text_image
Print Printer Name: HP Color LaserJet CP+520 PCL6 Status: Type: Where: Comment: Page range: All Current Pages: Type pair ranges From the section. For example, type 1, 3, 5-12 or p1s1, p1s2, p1s3-p8s3 Print world: Document Zoom Print: All pages in range Pages per sheet: 1 page Scale to paper size: No Scaling Properties Fing Printer... Print to file Manual duples. Options... OK CancelGet help for any printing option with Windows
- Click the Help button to open the online Help.
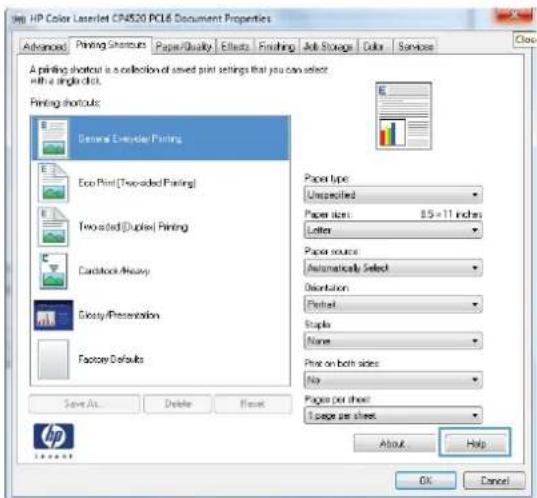
text_image
HP Color LaserJet CP4520 PCL6 Document Properties Advanced Printing Shortcuts Paper/Quality Effects Finishing Job Storage Color Services Close A printing shortcut is a collection of saved print settings that you can select with a single click. Printing shortcuts General Designer Printing Eco Print(Two-sided Printing) Two-sided(Duplex) Printing Cardboard Analysis Glossy/Presentation Factory Defaults Save As... Delete Reset Paper type: Unspecified Paper size: 8.5 x 11 inches Letter Paper source: Automatically Select Orientation Portrait Staple None Print on both sides: No Pages per sheet: 5 pages per sheet About Help OK Cancel HPChange the number of print copies with Windows
- On the File menu in the software program, click Print.
- Select the product, and then select the number of copies.
Print colored text as black (grayscale) with Windows
- On the File menu in the software program, click Print.
- Select the product, and then click the Properties or Preferences button.
- Click the Advanced tab.
- Expand the Document Options section.
- Expand the Printer Features section.
- In the Print All Text as Black drop-down list, select the Enabled option.
Save custom print settings for reuse with Windows
Use a printing shortcut with Windows
-
On the File menu in the software program, click Print.
-
Select the product, and then click the Properties or Preferences button.
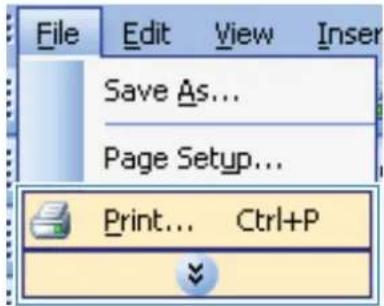
text_image
File Edit View Insert Save As... Page Setup... Print... Ctrl+P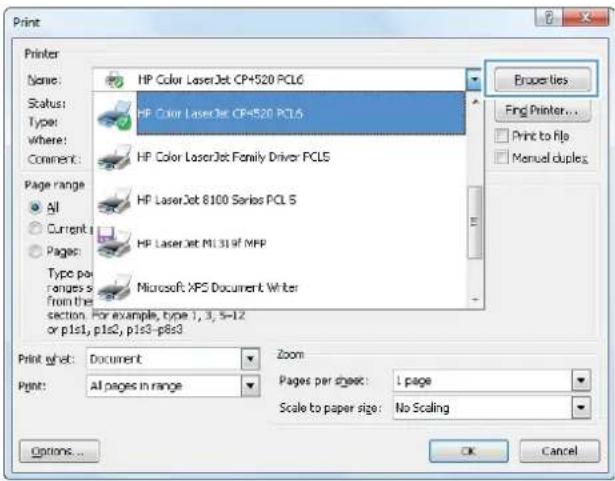
text_image
Print Printer Name: HP Color LaserJet CP+520 PCL6 Status: Type: Where: Comment: Page range: All Current Pages: Type per ranges s from the section. For example, type 1, 3, 5-12 or p1s1, p1s2, p1s3-p8s3 Print w/wt: Document Zoom Print: All pages in range Pages per sheet: 1 page Scale to paper size: No Scaling Properties Fng Printer... Print to file Manual duples Options... OK Cancel-
Click the Printing Shortcuts tab.
-
Select one of the shortcuts, and then click the OK button.
NOTE: When you select a shortcut, the corresponding settings change on the other tabs in the printer driver.
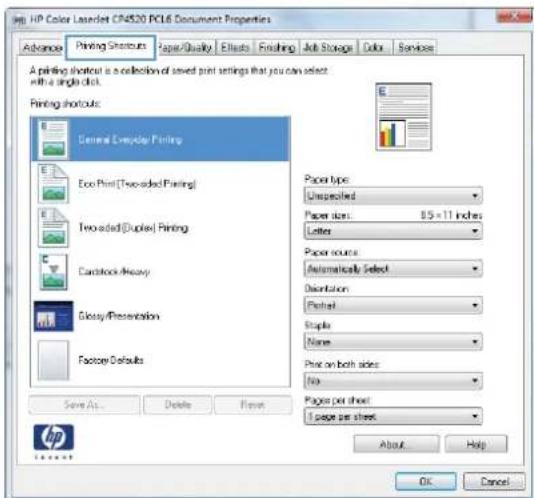
text_image
HP Color LASDEL CIN520 PCL6 Document Properties Advance Printing Shortcuts Paper/Quality Effects Finishing Job Storage Color Services A printing shortcut is a collection of saved print settings that you can select with a single click. Printing shortcuts General Everyday Printing Eco Print(Two-sided Printing) Two-sided(Duplex) Printing Cardstock Heavy Glossy/Presentation Factory Defaults Save As... Delete Finish Paper type: Unspecified Paper sizes: 8.5 x 11 inches Letters Paper source: Automatically Select Orientation Pencil Maple Name Print on both sides: No Pages per sheet: If page per sheet About Help OK Cancel
text_image
HP Color LaserJet CF4520 PC16 Document Properties Advanced Printing Shortcuts Paper Quality Effects Finishing Adj Storage Color Services A printing shortcut is a collection of saved print settings that you can select with a single click. Printing shortcuts General Everyday Printing Eco Print(Corosided Printing) Two-edged(Duplex) Printing Cardstock Analysis Glossy/Preservation Factory Defaults Paper type: Unsupplied Paper sizes: 8.5 x 11 inches Letter Paper source: Automatically Select Orientation: Portrait Print on both sides: Yes, No over Pages per sheet: 1 page per sheet Save As... Delete Placet About Help OK CancelCreate printing shortcuts
- On the File menu in the software program, click Print.
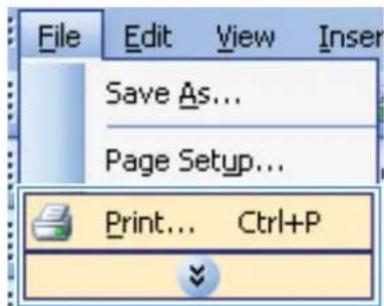
text_image
File Edit View Insert Save As... Page Setup... Print... Ctrl+P- Select the product, and then click the Properties or Preferences button.
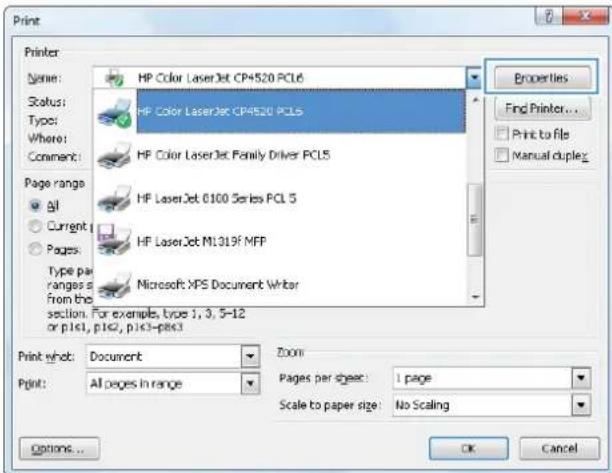
text_image
Print Printer: Name: HP Color LaserJet CP4520 PCL6 Status: HP Color LaserJet CP4520 PCL5 Type: Where: Comment: Page range: All Current Pages: Type per ranges a from the section. For example, type 1, 3, 5-12 or p1s1, p1s2, p1c3-p8c3 Print ywt: Document Zoom Print: All pages in range Pages per sheet: 1 page Scale to paper size: No Scaling Properties Find Printer... Print to file Manual duplex Options... OK Cancel- Click the Printing Shortcuts tab.
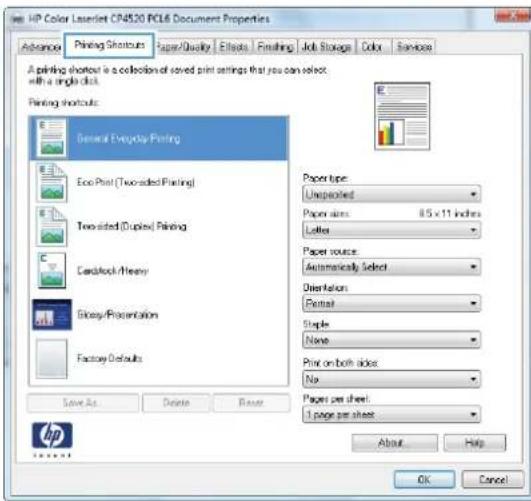
text_image
HP Color LaserJet CP4520 RCL6 Document Properties Advance Printing Shortcuts Paper/Quality Effects Finishing Job Storage Color Services A printing shortcut is a collection of saved print settings that you can select with a single click. Printing shortcuts. General Everyday Printing Eco-Print (Truxided Printing) Transided (Duplex) Printing Cardlock/Honey Glossy/Presentation Factory Defaults Save As Delete Finish Paper type: Unspecified Paper sizes: 8.5 x 11 inches Letters Paper source: Automatically Select Orientation: Routsk Staple: None Print on both sides: No Pages per sheet: 1 page per sheet About Help OK Cancel- Select an existing shortcut as a base.
NOTE: Always select a shortcut before adjusting any of the settings on the right side of the screen. If you adjust the settings and then select a shortcut, all your adjustments are lost.
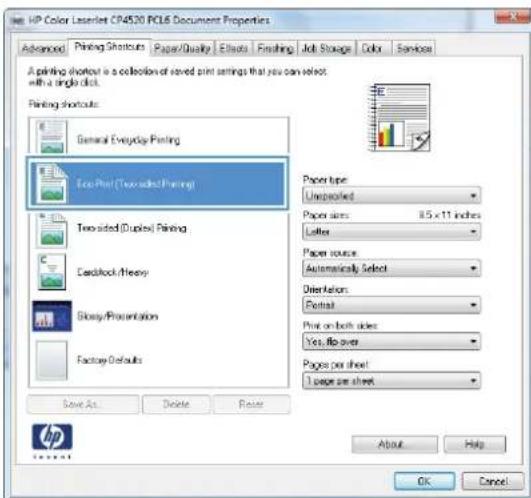
text_image
HP Color LaserJet CP4520 RCL6 Document Properties Advanced Printing Shortcuts Paper/Quality Effects Finishing Job Storage Color Services A printing shortcut is a collection of saved print settings that you can select. with a single click. Printing shortcuts General Everyday Printing Eco Print (Two-sided Printing) Two-sided (Dual) Printing Cardlock/Heavy Slurry/Presentation Factory Defaults Save As... Delete Reset Paper type: Unspecified Paper sizes: 8.5 x 11 inches Letter Paper source: Automatically Select Orientation: Portrait Print on both sides: Yes, No over Pages per sheet: 1 page per sheet About Help OK Cancel- Select the print options for the new shortcut.
- Click the Save As button.
- Type a name for the shortcut, and click the OK button.
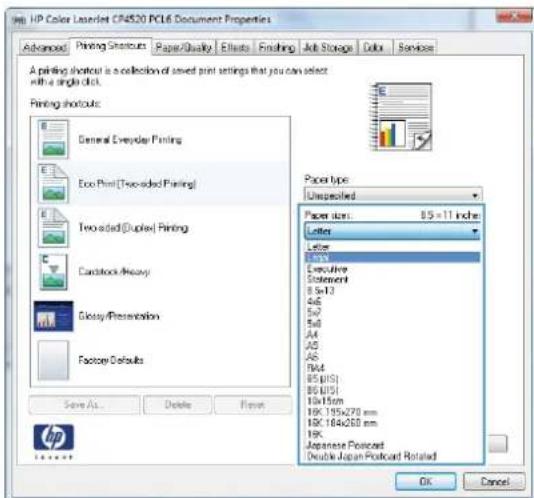
text_image
HP Color LaserJet CIN520 PLC6 Document Properties Advanced Printing Shortcuts Paper Quality Effects Finishing Job Storage Color Services A printing shortcut is a collection of saved print settings that you can select with a single click. Printing shortcuts General Everyday Printing Eco Print (Two-sided Printing) Two-sided (Duplicated) Printing Cardstock Heavy Glossy/Preservation Factory Defaults Save As... Delete Finish Paper type Unspecified Paper size: 8.5 x 11 inches Letter Letter Executive Statement 8 x 13 4x6 5x7 5x8 AA AS AS BM BS (BS) BS (BS) 10x15mm 19K 195x270 mm 19K 194x260 mm 19K Japanese Pocketed Double Japan Pocketed Rotated OK Cancel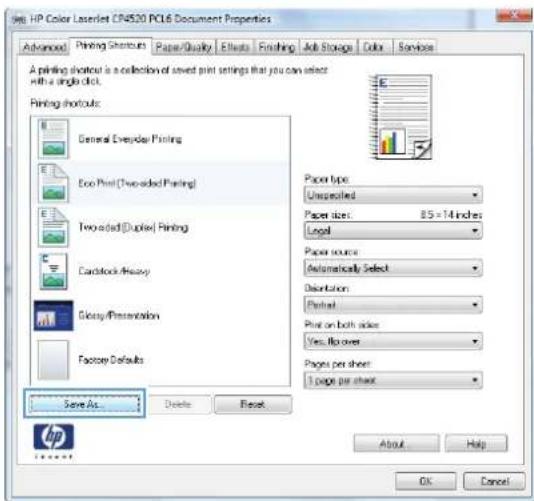
text_image
HP Color LaserJet CR4520 PCL6 Document Properties Advanced Printing Shortcuts Paper/Quality Effects Finishing Adj Storage Color Services A printing shortcut is a collection of saved print settings that you can select with a single click. Printing shortcuts General Eversider Printing Eco Print (Two-sided Printing) Two-sided (Duplex) Printing Cardstock/Heavy Glossy/Presentation Factory Defaults Save As... Delete Reset Paper type Unspecified Paper sizes: 8.5 x 14 inches Legal Paper source: Automatically Select Orientation: Printed Print on both sides: Yes, No over Pages per sheet: 1 page per sheet About Help OK Cancel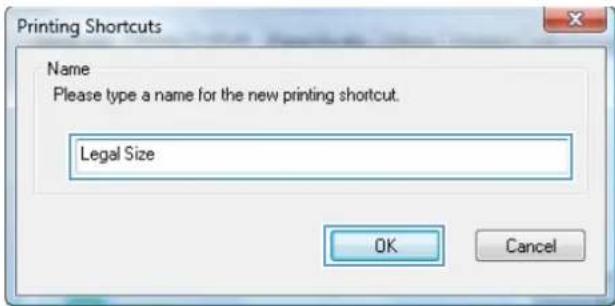
text_image
Printing Shortcuts Name Please type a name for the new printing shortcut. Legal Size OK CancelImprove print quality with Windows
Select the page size with Windows
- On the File menu in the software program, click Print.
- Select the product, and then click the Properties or Preferences button.
- Click the Paper/Quality tab.
- Select a size from the Paper size drop-down list.
Select a custom page size with Windows
- On the File menu in the software program, click Print.
- Select the product, and then click the Properties or Preferences button.
- Click the Paper/Quality tab.
- Click the Custom button.
- Type a name for the custom size, specify the dimensions, and click the OK button.
Select the paper type with Windows
- On the File menu in the software program, click Print.
- Select the product, and then click the Properties or Preferences button.
- Click the Paper/Quality tab.
- From the Paper type drop-down list, click the More... option.
- Expand the list of Type is: options.
- Expand the category of paper types that best describes your paper, and then click the paper type that you are using.
Select the paper tray with Windows
- On the File menu in the software program, click Print.
- Select the product, and then click the Properties or Preferences button.
- Click the Paper/Quality tab.
- Select a tray from the Paper source drop-down list.
Select the print resolution
- On the File menu in the software program, click Print.
- Select the product, and then click the Properties or Preferences button.
- Click the Paper/Quality tab.
- In the Print Quality area, select the resolution from the first drop-down list.
Print on preprinted letterhead or forms with Windows
-
On the File menu in the software program, click Print.
-
Select the product, and then click the Properties or Preferences button.
-
Click the Paper/Quality tab.
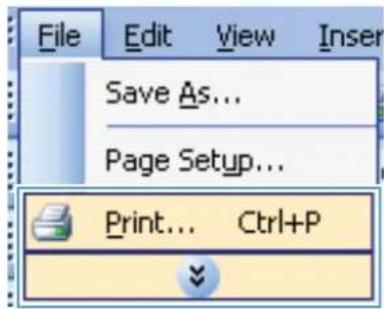
text_image
File Edit View Insert Save As... Page Setup... Print... Ctrl+P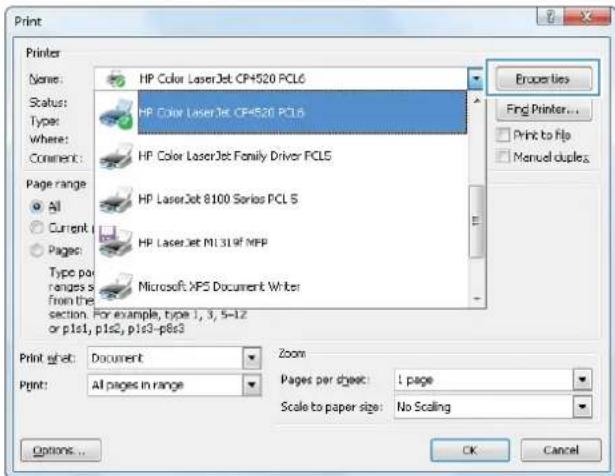
text_image
Print Printer Name: HP Color LaserJet CP+520 PCL6 Status: HP Color LaserJet CP+520 PCL6 Type: HP Color LaserJet Family Driver PCL5 Where: HP LaserJet 8100 Series PCL 5 Comment: HP LaserJet M1.319F NPP Page range: All Current Pages: Type port ranges From the section. For example, type 1, 3, 5-12 or p1s1, p1s2, p1s3-p8s3 Microsoft XPS Document Writer Print what: Document Zoom Print: All pages in range Pages per dject: 1 page Scale to paper size: No Scaling Options... OK Cancel Properties Find Printer... Print to Fip Manual duples...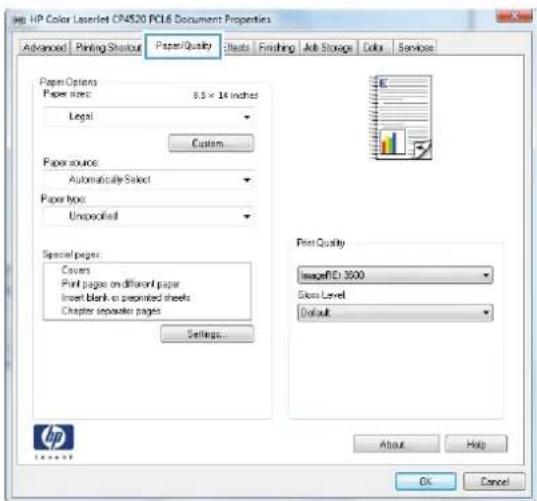
text_image
HP Color LaserJet CP4520 PCL6 Document Properties Advanced Printing Shout Paper Quality Effects Finishing Job Storage Color Services Paper Options Paper sizes: 8.5 x 14 inches Legal Custom... Paper source: Automatically Select Paper type: Unspecified Special pages: Covers Print pages on different paper Insert blank or preprinted sheets Chapter separator pages Settings... Print Quality ImageFCI 3500 Glass Level Default About Help OK Cancel- From the Paper type drop-down list, click the More... option.
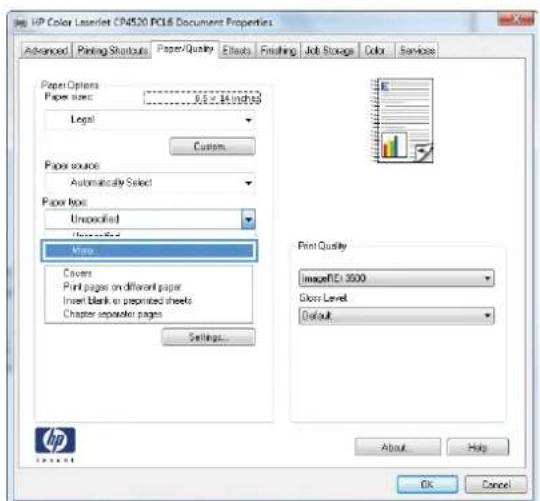
text_image
HP Color Labellet CP4520 PC16 Document Properties Advanced Printing Startouts Paper/Quality Effects Finishing Job Storage Color Services Paper Options Paper size: JUL 2.14.019733 Legal Custom Paper Source Automatically Select Paper Note: Unspecified Unspecified Map Covers Print pages on different paper Insert blank or preprinted sheets Chapter separator pages Settings... Print Quality ImageRC1 3500 Gloss Level Default About Help OK Cancel HP- Expand the list of Type is: options.

text_image
Type is: + Everyday <96g + Presentation 96-130g + Brochure 131-175g + Photo/Cover 176-220g + Other OK Cancel- Expand the list of Other options.
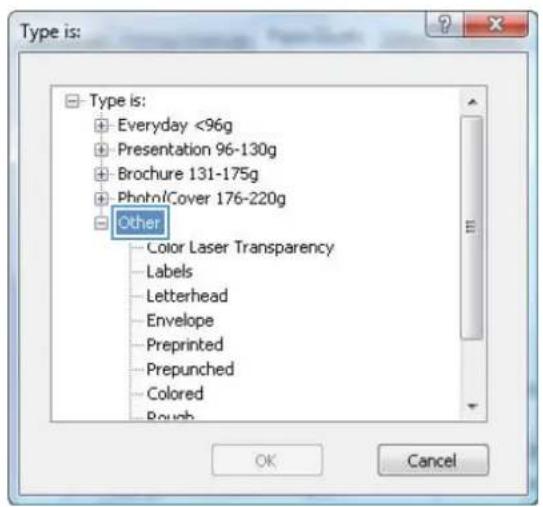
text_image
Type is: + Everyday <96g + Presentation 96-130g + Brochure 131-175g + Photrol/Cover 176-220g + Other - Color Laser Transparency - Labels - Letterhead - Envelope - Preprinted - Prepunched - Colored - Rough OK Cancel- Select the option for the type of paper you are using, and click the OK button.
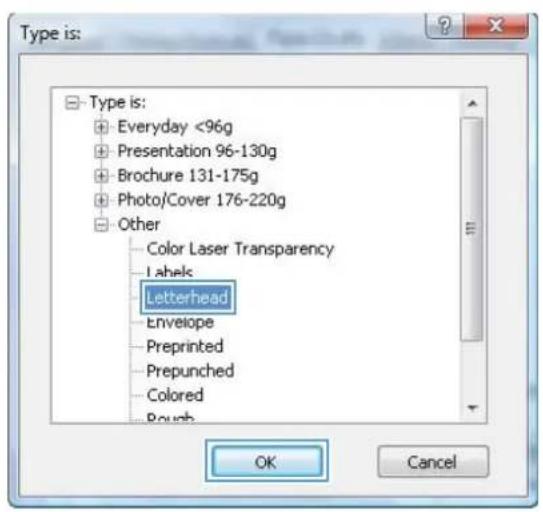
text_image
Type is: + Everyday <96g + Presentation 96-130g + Brochure 131-175g + Photo/Cover 176-220g + Other - Color Laser Transparency - Labels Letterhead Envelope Preprinted Prepunched Colored Pough OK CancelPrint on special paper, labels, or transparencies
- On the File menu in the software program, click Print.
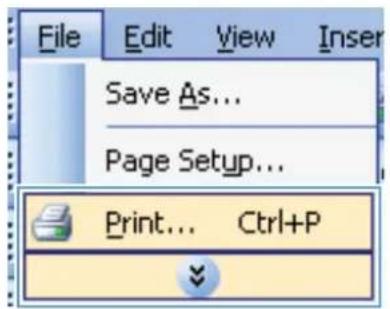
text_image
File Edit View Insert Save As... Page Setup... Print... Ctrl+P- Select the product, and then click the Properties or Preferences button.
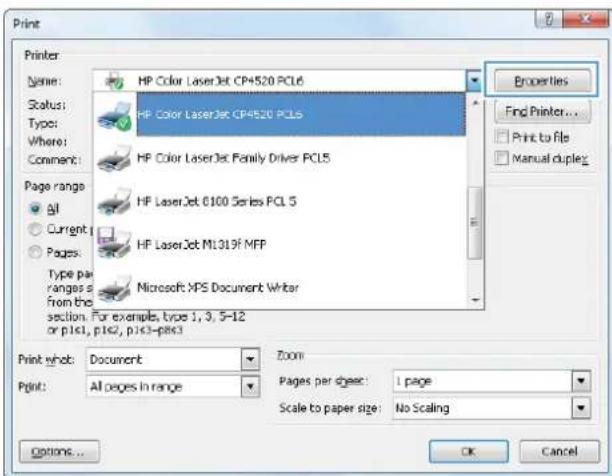
text_image
Print Printer: Name: HP Color LaserJet CP4520 PCL6 Status: HP Color LaserJet CP4520 PCL6 Type: Where: Comment: Page range: All Current Pages: Type par ranges a from the section. For example, type 1, 3, 5-12 or p1s1, p1s2, p1c3-p8c3 Print who: Document Zoom Print: All pages in range Pages per dysec: 1 page Scale to paper size: No Scaling Properties Find Printer... Print to file Manual duples Options... OK Cancel- Click the Paper/Quality tab.
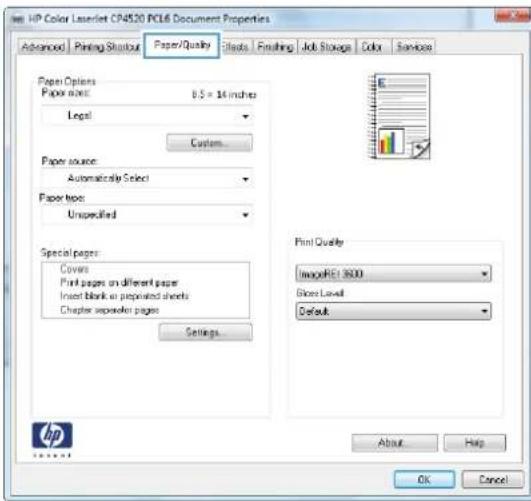
text_image
HP Color Laserjet CP4520 PCL6 Document Properties Advanced Printing Shutoff Paper/Quality Sheets Finishing Job Storage Color Services Paper Options Paper name: 8.5 x 16 inches Legal Custom... Paper source: Automatically Select Paper type: Unspecified Special pages: Covers Print pages on different paper Insert blank or prepared sheets Chapter separator pages Settings... Print Quality ImageRE1 9000 Store Level Default About Help OK Cancel- From the Paper type drop-down list, click the More... option.
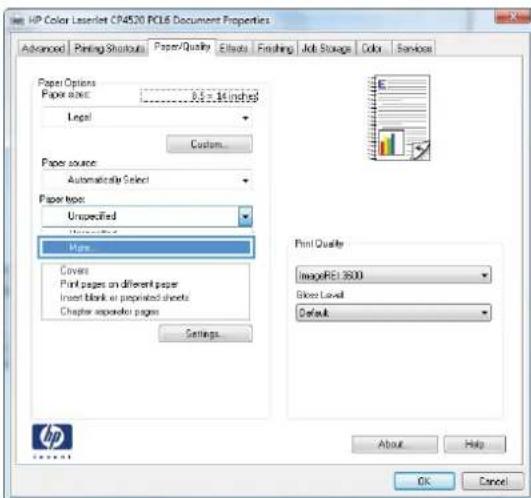
text_image
HP Color LaserJet CP4520 PCL6 Document Properties Advanced Printing Shutouts Paper/Quality Effects Finishing Job Storage Color Services Paper Options Paper size: 8.5 x 16 inches Legal Custom... Paper source: Automatica Select Paper type: Unspecified Unspecified Maps Covers Print pages on different paper Insert blank or preprinted sheets Chapter exporter pages Settings Print Quality ImagePE13000 Store Level Default About Help OK Cancel-
Expand the list of Type is: options.
-
Expand the category of paper types that best describes your paper.
NOTE: Labels and transparencies are in the list of Other options.
- Select the option for the type of paper you are using, and click the OK button.
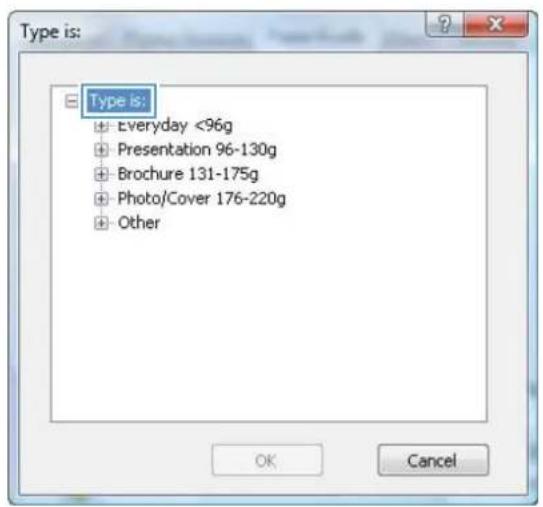
text_image
Type is: • Everyday <96g • Presentation 96-130g • Brochure 131-175g • Photo/Cover 176-220g • Other OK Cancel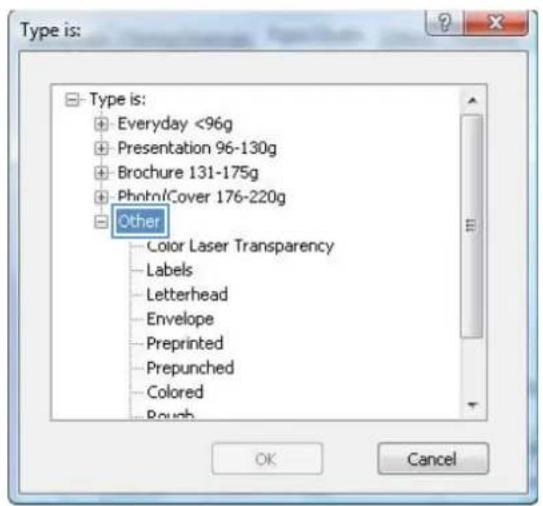
text_image
Type is: + Everyday <96g + Presentation 96-130g + Brochure 131-175g + Photrol/Cover 176-220g + Other - Color Laser Transparency - Labels - Letterhead - Envelope - Preprinted - Prepunched - Colored - Rough OK Cancel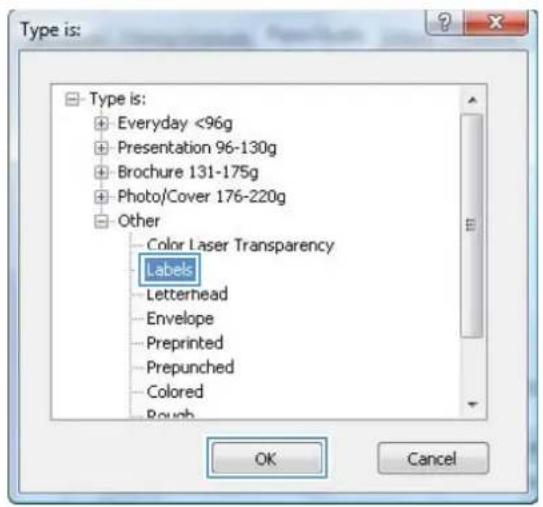
text_image
Type is: + Everyday <96g + Presentation 96-130g + Brochure 131-175g + Photo/Cover 176-220g + Other Color Laser Transparency Labels Letterhead Envelope Preprinted Prepunched Colored Rough OK CancelPrint the first or last page on different paper with Windows
-
On the File menu in the software program, click Print.
-
Select the product, and then click the Properties or Preferences button.
-
Click the Paper/Quality tab.
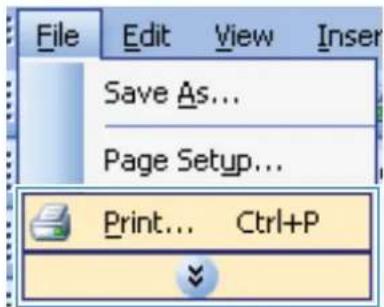
text_image
File Edit View Insert Save As... Page Setup... Print... Ctrl+P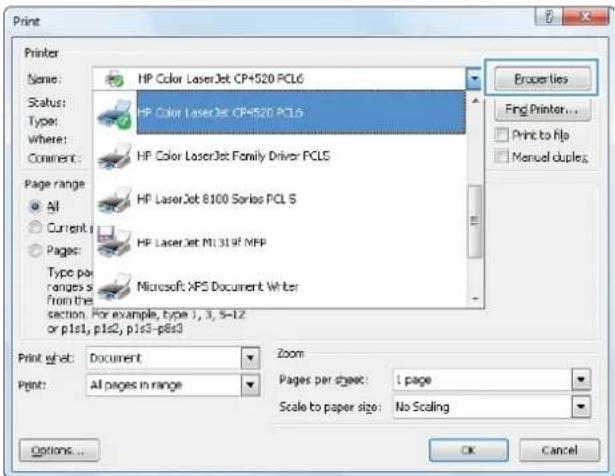
text_image
Print Printer Name: HP Color LaserJet CP+520 PCL6 Status: Type: Where: Comment: Page range: All Current: Pages: Type per ranges s from the section. For example, type 1, 3, 5-12 or p1s1, p1s2, p1s3-p8s3 Print w/wt: Document Zoom Print: All pages in range Pages per djeet: 1 page Scale to paper size: No Scaling Properties Fing Printer... Print to file Manual duples Options... OK Cancel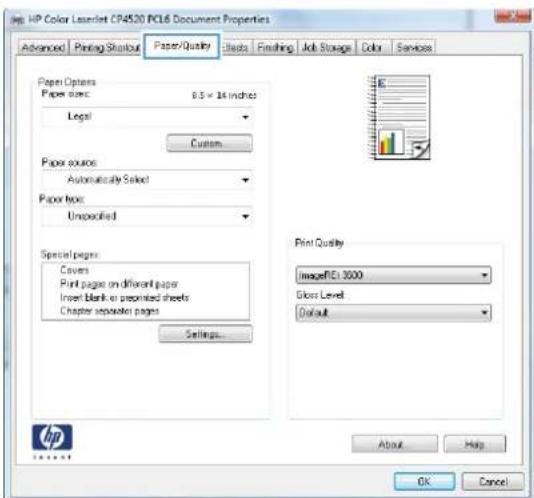
text_image
HP Color Labellet CP4520 PCL6 Document Properties Advanced | Printing Shoutout | Paper/Quality | Slacks | Finishing | Job Storage | Color | Services Paper Options Paper size: 8.5 x 14 inches Legal Custom Paper source: Automatically Select Paper type: Unspecified Special pages: Covers Print pages on different paper Insert blank or preprinted sheets Chapter separator pages Settings Print Quality ImageFCI 3000 Gloss Level Default About Help OK Cancel- In the Special pages area, click the Print pages on different paper option, and then click the Settings button.
- In the Pages in document area, select either the First or Last option.
- Select the correct options from the Paper source and Paper type drop-down lists. Click the Add button.
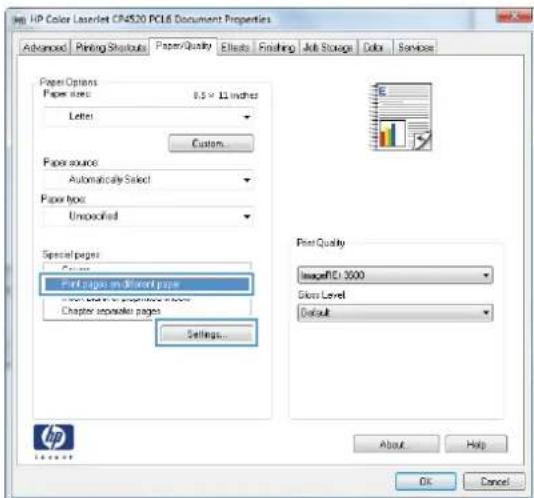
text_image
HP Color LaserJet CNS20 PC16 Document Properties Advanced Printing Shutouts Paper/Quality Effects Finishing Job Storage Color Services Paper Options Paper sizes: 8.5 x 11 inches Letter Custom... Paper source Automatically Select Paper type Unspecified Special pages Page on Sheet paper Chapter separate pages Settings... Print quality ImageFCI 3000 Gross Level Default About Help OK Cancel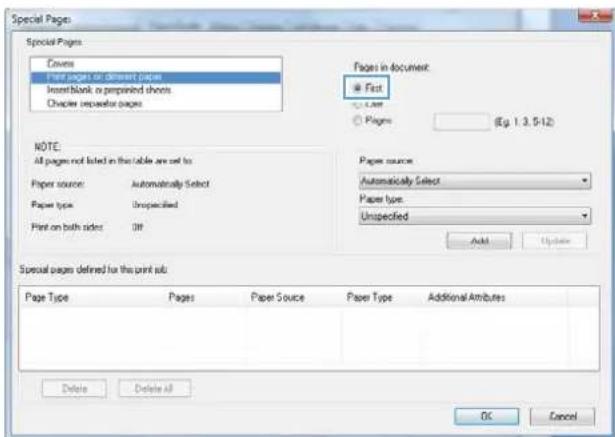
text_image
Special Pages Special Pages Covers Print pages or different pages Insert blank or preprinted sheets Chapter separator pages Pages in document: Fast Last Pages (Eg. 1.3.5-12) NOTE: All pages not listed in this table are set to Paper source: Automatically Select Paper type: Unspecified Print on both sides: Off Paper source: Automatically Select Paper type: Unspecified Add Update Special pages defined for the print info. Page Type Pages Paper Source Paper Type Additional Attributes Delete Delete All OK Cancel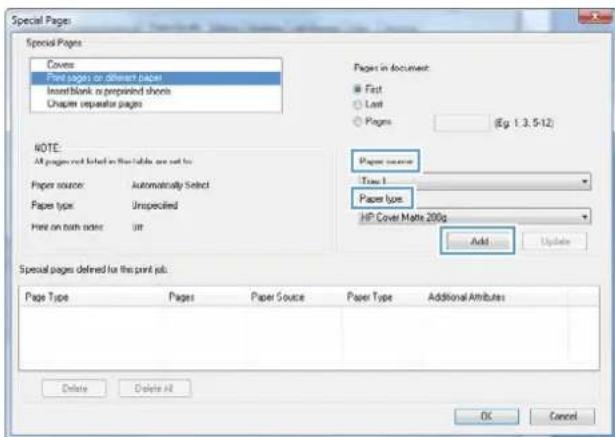
text_image
Special Pages Special Pages Covers Print pages on different pages InsertBlank or preprinted sheets Chapter separator pages Pages in document ● First ○ Last ○ Pages (Eg. 1.3.5-12) NOTE: All pages not listed in this table are not to: Paper source: Automatically Select Paper type: Unspecified Print on both sides: UTR Paper source Type 1 Paper type: HP Cover Matte 200p Add Update Special pages defined for the print job: Page Type Pages Paper Source Paper Type Additional Attributes Delete Delete All OK Cancel- If you are printing both the first and last pages on different paper, repeat steps 5 and 6, selecting the options for the other page.
- Click the OK button.
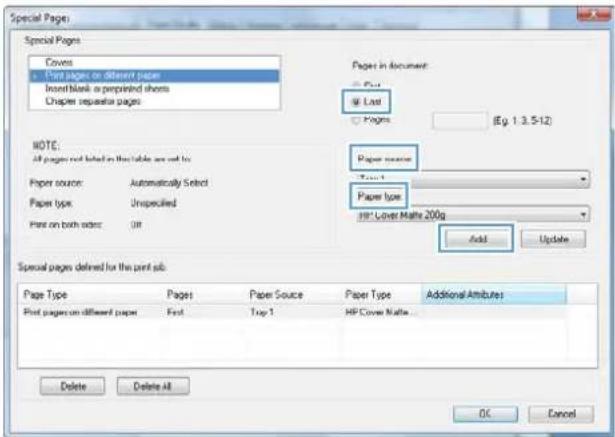
text_image
Special Pages Special Pages Covers Page pages on different pages Insert/Blank or preprinted sheets Chapter separate pages Pages in document: Last Pages (Eg. 1.3.5-12) NOTE: All pages not listed on this table are not to: Paper source: Automatically Select Paper type: Unspecified Print on both sides: Off Paper source: Type 1 Paper type: HP Cover Matte 200g Add Update Special pages defined for the print sub: Page Type Pages Paper Source Paper Type Additional Attributes First pages on different pages First Top 1 HP Cover Matte Delete Delete All OK Cancel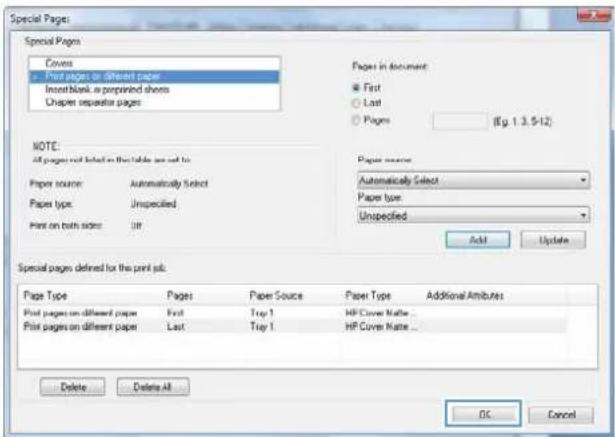
text_image
Special Pages Special Pages Covers • First pages or different paper InsertBlank or printed sheets Chapter separator pages Pages in document ● First ○ Last ○ Pages (Eg. 1.3.5-12) NOTE: All pages not listed on the table are not to Paper source: Automatically Select Paper type: Unspecified Print on both sides: UIF Paper source: Automatically Select Paper type: Unspecified Add Update Special pages defined for the print site: Page Type Pages Paper Source Paper Type Additional Attributes Print pages on different paper First Top 1 HP Cover Nature ... Print pages on different paper Last Top 1 HP Cover Nature ... Delete Delete All OK CancelScale a document to fit page size
- On the File menu in the software program, click Print.
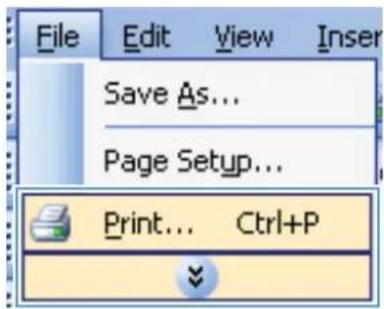
text_image
File Edit View Insert Save As... Page Setup... Print... Ctrl+P- Select the product, and then click the Properties or Preferences button.

text_image
Print Printer Name: HP Color LaserJet CP4520 PCL6 Status: HP Color LaserJet CP4520 PCL6 Types: Where: Comment: Page range: All Current Pages: Type par ranges d From the section. For example, type 1, 3, 5-12 or p161, p162, p163-p8c3 Print whct: Document Print: All pages in range Zoom Pages per sheet: 1 page Scale to paper size: No Scaling Options... OK Cancel Properties Find Printer... Print to file Manual duplex- Click the Effects tab.
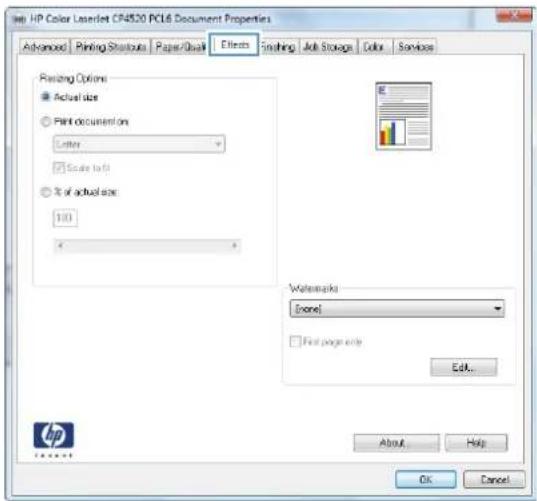
text_image
HP Color LaserJet CF4520 PCL6 Document Properties Advanced | Printing Shutouts | Paper/Quail | Effects | Setting | Add Storage | Color | Services Printing Options ● Actual size ○ Print document on: Letter □ Scale to 0 ● % of actual size: 100 Watermarks [none] □ First page only Edit... About Help OK Cancel- Select the Print document on option, and then select a size from the drop-down list.
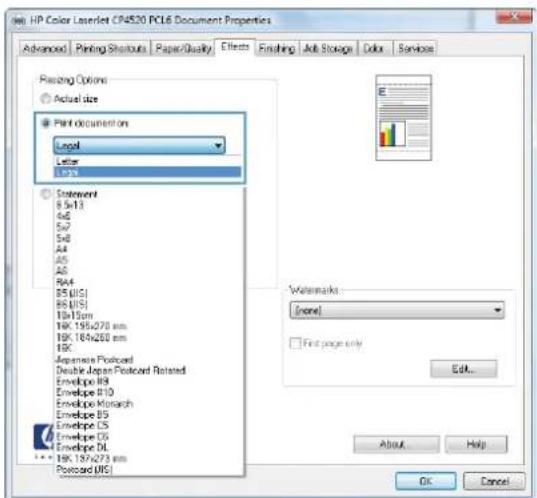
text_image
HP Color LaserJet CP4520 PCL6 Document Properties Advanced | Printing Shutouts | Paper/Quality | Effects | Finishing | Job Storage | Color | Services Passing Options Actual size Print document on Legal Letter 1.73 Statement 8.5x13 4x6 5x7 5x8 A4 A5 A6 RA4 R5 (US) R6 (US) 18x15mm 18K 195x270 mm 18K 195x260 mm 18K Japanese Postcard Double Japan Postcard Rotated Envelope R9 Envelope R10 Envelope Monarch Envelope RS Envelope LS Envelope DL 18K 194x273 mm Postcard (MS) Watermarks [none] First page only Edit... About Help OK CancelAdd a watermark to a document with Windows
- On the File menu in the software program, click Print.
- Select the product, and then click the Properties or Preferences button.
- Click the Effects tab.
- Select a watermark from the Watermarks drop-down list.
Or, to add a new watermark to the list, click the Edit button. Specify the settings for the watermark, and then click the OK button. - To print the watermark on the first page only, select the First page only check box. Otherwise, the watermark is printed on each page.
Print on both sides (duplex) with Windows

NOTE: See Paper orientation for loading trays on page 87 for information about the correct way to load paper.
Manually print on both sides with Windows

NOTE: This information applies only to products that do not have an automatic duplexer.
- On the File menu in the software program, click Print.
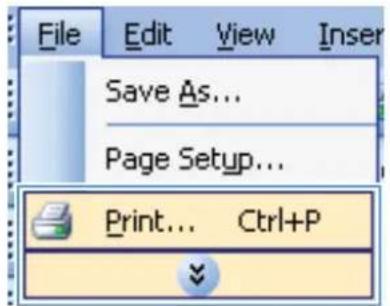
text_image
File Edit View Insert Save As... Page Setup... Print... Ctrl+P- Select the product, and then click the Properties or Preferences button.
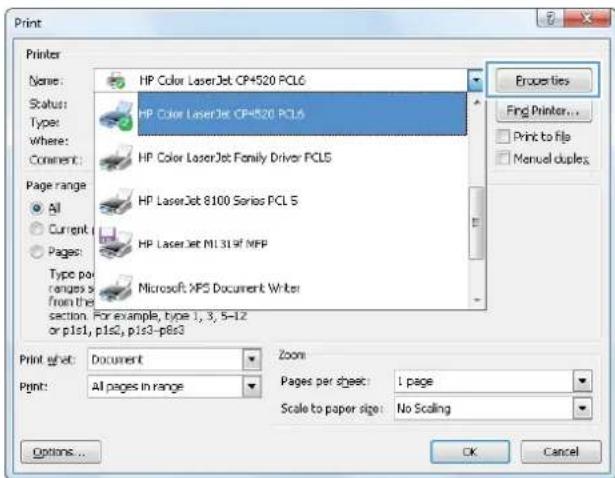
text_image
Print Printer Name: HP Color LaserJet CP4520 PCL6 Status: Type: Where: Comment: Page range: All Current Pages: Type port ranges From the section. For example, type 1, 3, 5-12 or p1s1, p1s2, p1s3-p1s3 Print at: Document Zoom Print: All pages in range Pages per sheet: 1 page Scale to paper size: No Scaling Options... Properties Find Printer... Print to file Manual duples... OK Cancel- Click the Finishing tab.
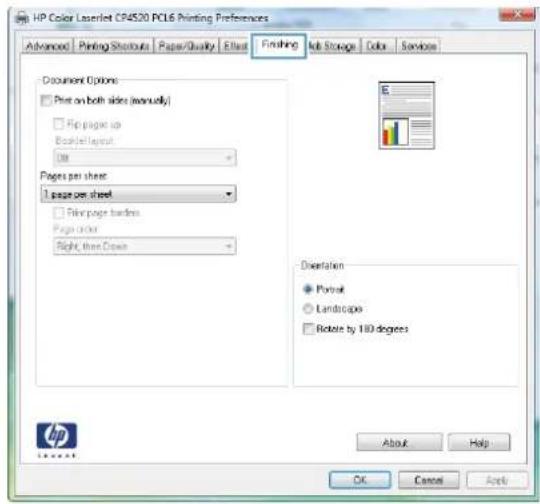
text_image
HP Color LaserJet CP4520 PC16 Printing Preferences Advanced Printing Shortcuts Paper/Quality Effect Finishing Job Storage(Color Service Document Options □ Plot on both sides (manually) □ Hip pages up Bookjet layout On Pages per sheet: 1 pages per sheet □ Film pages hardens Pages list Right, then Close Orientation ● Portrait ○ Landscape ○ Rotate by 180 degrees About Help OK Cancel Apply- Select the Print on both sides (manually) check box. Click the OK button to print the first side of the job.
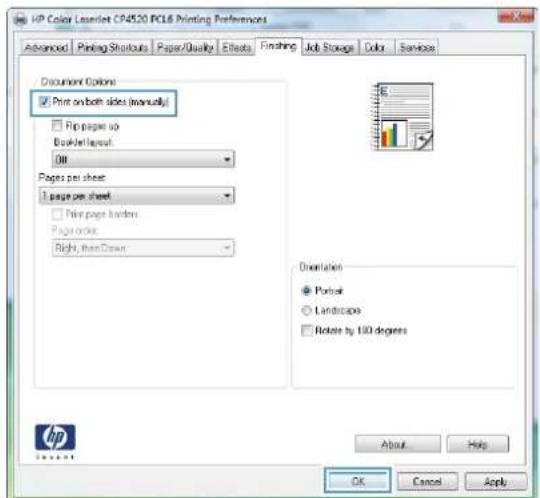
text_image
HP Color Labellet CP4520 PC16 Printing Preferences Advanced Printing Shortcuts Paper/Quality Effects Finding Job Storage(Color Services Document Options ✓ Print on both sides (manually) ✓ Copy pages up BorderLayout Off Pages per sheet: 1 page per sheet ✓ Copy pages border Pages order: Right, then Draw Orientation ● Portrait ○ Landscape □ Rotate by 100 degrees About Help OK Cancel Apply HP- Retrieve the printed stack from the output bin, and place it with the printed-side facing up in Tray 1.
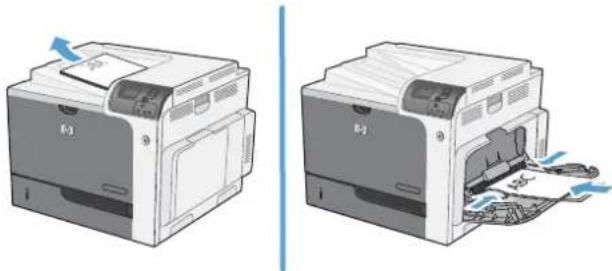
natural_image
Two illustrations of a printer with paper being inserted into a paper airplane (no text or symbols visible)- On the control panel, press the OK button to print the second side of the job.
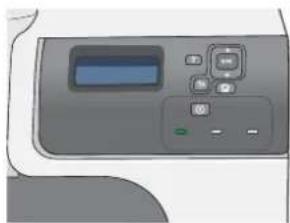
natural_image
Illustration of a handheld electronic device with control buttons and a display screen (no text or symbols visible)Automatically print on both sides with Windows

NOTE: This information applies only to products that have an automatic duplexer.
- On the File menu in the software program, click Print.
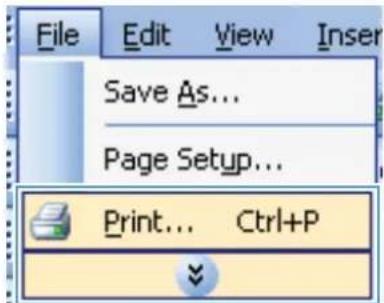
text_image
File Edit View Insert Save As... Page Setup... Print... Ctrl+P- Select the product, and then click the Properties or Preferences button.
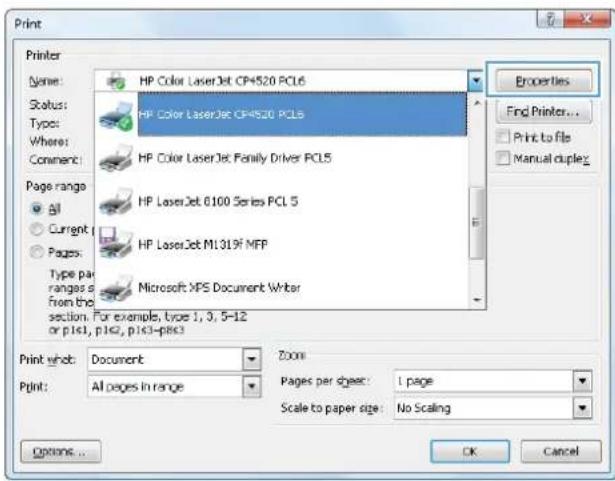
text_image
Print Printer Name: HP Color LaserJet CP4520 PCL6 Status: HP Color LaserJet CP4520 PCL6 Type: HP Color LaserJet Family Driver PCL5 Where: Comment: HP LaserJet 0100 Series PCL 5 Page range: All Current Pages: Type par ranges a From the section. For example, type 1, 3, 5-12 or p1s1, p1s2, p1s3-p1s3 Microsoft MPS Document Writer Print whct: Document Print: All pages in range Zoom: Pages per sheet: 1 page Scale to paper size: No Scaling Options... OK Cancel Properties End Printer... Print to file Manual duplex- Click the Finishing tab.
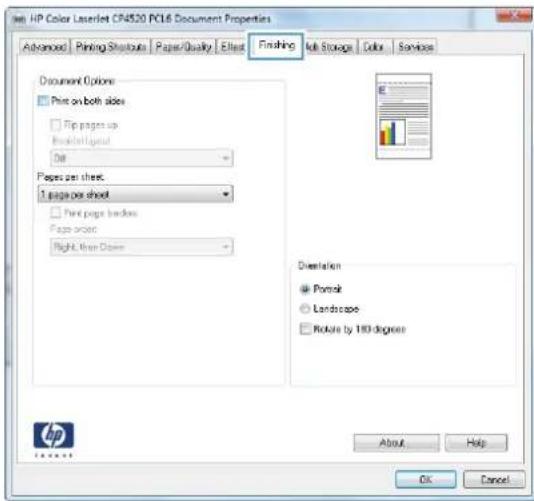
text_image
HP Color LaserJet CF4520 PC16 Document Properties Advanced Printing Shutouts Paper/Quality Effect Finishing"Ibit Storage Colors Services Document Options Print on both sides Top pages up Inset/Layout Dot Pages per sheet: 1 page per sheet Print pages border Pages ordered Right, then Diver Dietalation Pencil Landscape Rotate by 183 degrees About Help OK Cancel- Select the Print on both sides check box. Click the OK button to print the job.
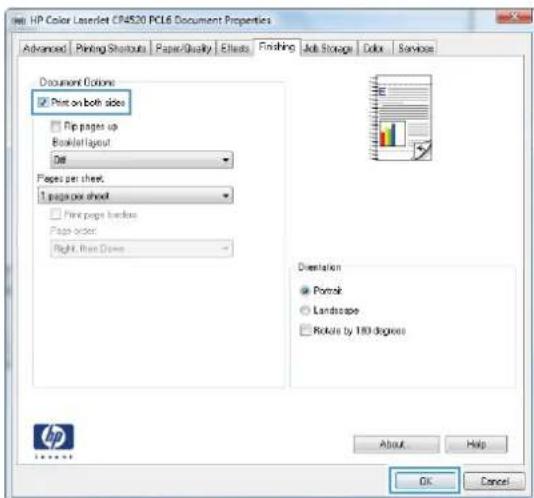
text_image
HP Color Labellet CP4520 PCL6 Document Properties Advanced Printing Shortouts Paper/Quality Effects Finalishing Job Storage Colors Services Document Options ✓ Print on both sides □ Copy pages up BorderLayout Dot Pages per sheet: 1 pages per sheet □ Print pages hardbox Pages order: Right, then Drows Orientation ● Potrock ○ Landscape □ Rotate by 183 degrees About Help OK CancelCreate a booklet with Windows
-
On the File menu in the software program, click Print.
-
Select the product, and then click the Properties or Preferences button.
-
Click the Finishing tab.
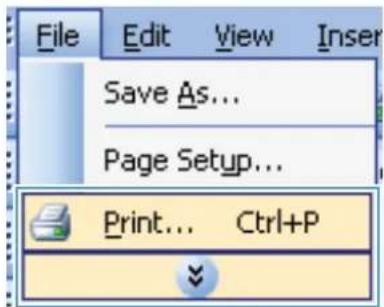
text_image
File Edit View Insert Save As... Page Setup... Print... Ctrl+P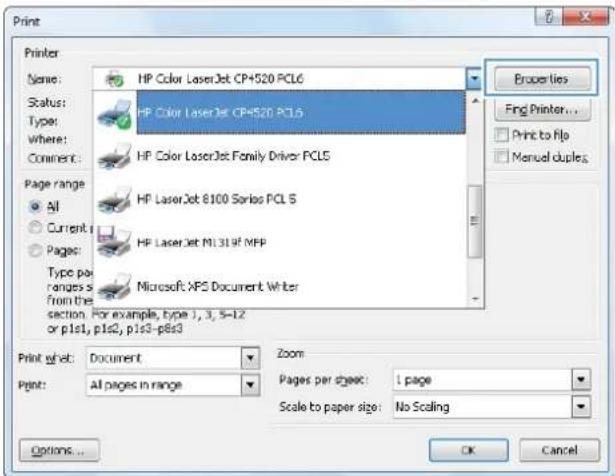
text_image
Print Printer Name: HP Color LaserJet CP+520 PCL6 Status: Type: Where: Comment: Page range: All Current: Pages: Type per ranges s from the section. For example, type 1, 3, 5-12 or p1s1, p1s2, p1s3-p8s3 Print w/wt: Document Zoom Print: All pages in range Pages per djeet: 1 page Scale to paper size: No Scaling Properties Fing Printer... Print to file Manual duples Options... OK Cancel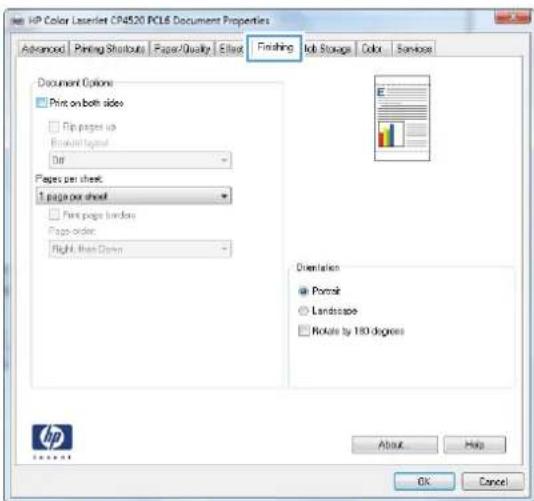
text_image
HP Color LaserJet CP4520 PCL6 Document Properties Advanced Printing Shutoffs Paper Quality Elink Finishing"Ibit Storage(Color Services Document Options Print on both sides Flip pages up Breakthrough Off Pages per sheet: 1 page per sheet Print pages borders Pages order: Right, then Down Diversities Portrait Landscape Rotate by 183 degrees About Help OK Cancel- Select the Print on both sides check box.
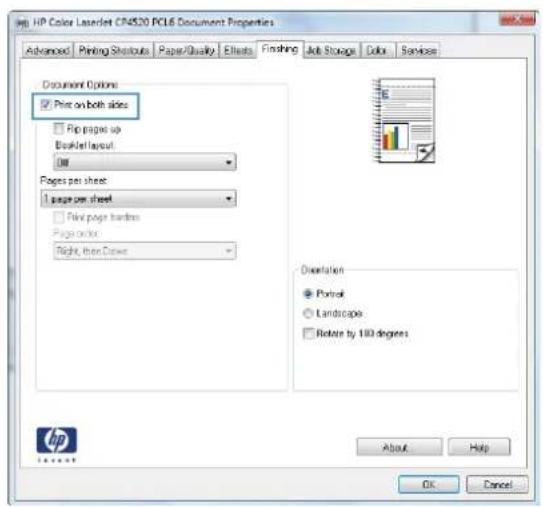
text_image
HP Color Lazardet CR4520 PC16 Document Properties Advanced Printing Shutouts Paper Quality Effects Finding Jolt Storage Cube Services Document Options ✓ Price on both sides ✓ Flip pages up Breaker layout OK Pages per sheet: 1 page per sheet ✓ Flip page borders Page order: Right, then Drive Orientation ● Portfolio ○ Landscape □ Rotate by 100 degrees About Help OK Cancel- In the Booklet layout drop-down list, click the Left binding or Right binding option. The Pages per sheet option automatically changes to 2 pages per sheet.
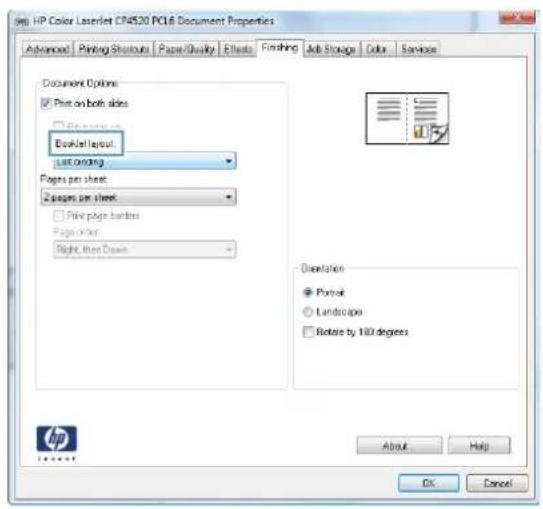
text_image
HP Color Laserlet CF8520 PC16 Document Properties Advanced Printing Shutouts Paper/Quality Elects Fhashing Job Storage Colors Services Document Options ✓ Print on both sides □ Page Layout Booklet layout Last Ordering Pages per sheet □ Pages per sheet □ Page page hardness Page order Right, then Draw Orientation ● Portfolio ○ Landscape □ Rotate by 110 degrees About Help OK CancelPrint on 10 x 15 cm (4 x 6 in) paper with Windows
- On the File menu in the software program, click Print.
- Select the product, and then click the Properties or Preferences button.
- Click the Paper/Quality tab.
- From the Paper size drop-down list, select either the 4x6 or 10x15cm size.
- From the Paper source drop-down list, select the Tray 2 option.
- From the Paper type drop-down list, click the More... option.
- Expand the list of Type is: options.
- Expand the list of Photo/Cover 176-220g paper types, and select the paper type that you are using.
Print multiple pages per sheet with Windows
-
On the File menu in the software program, click Print.
-
Select the product, and then click the Properties or Preferences button.
-
Click the Finishing tab.
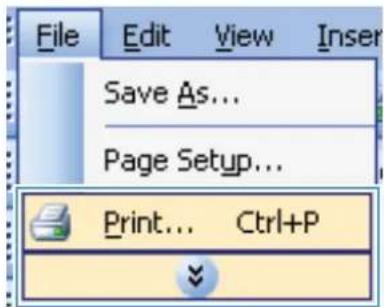
text_image
File Edit View Insert Save As... Page Setup... Print... Ctrl+P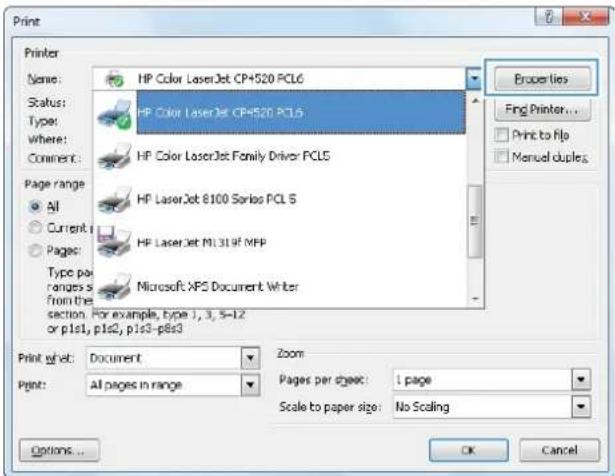
text_image
Print Printer Name: HP Color LaserJet CP+520 PCL6 Status: Type: Where: Comment: Page range: All Current: Pages: Type per ranges s from the section. For example, type 1, 3, 5-12 or p1s1, p1s2, p1s3-p8s3 Print w/wt: Document Zoom Print: All pages in range Pages per djeet: 1 page Scale to paper size: No Scaling Properties Fing Printer... Print to file Manual duples Options... OK Cancel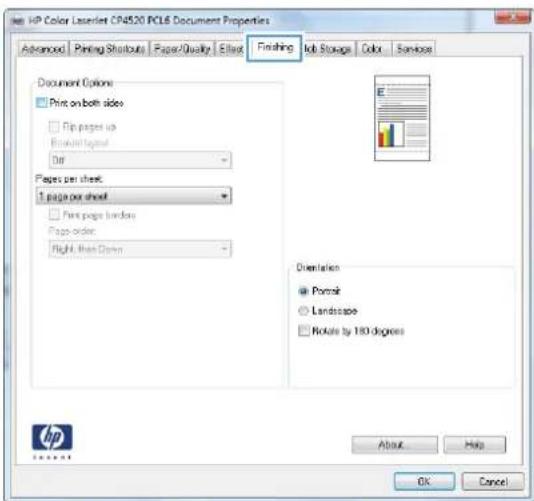
text_image
HP Color LaserJet CP4520 PCL6 Document Properties Advanced Printing Shutoffs Paper Quality Elink Finishing"Ibit Storage(Color Services Document Options Print on both sides Flip pages up Breakthrough Off Pages per sheet: 1 page per sheet Print pages borders Pages order: Right, then Down Diversities Portrait Landscape Rotate by 183 degrees About Help OK Cancel- Select the number of pages per sheet from the Pages per sheet drop-down list.

text_image
HP Color Lazardet CN4520 PCL6 Document Properties Advanced Printing Shutouts Paper Quality Effects Finding Job Storage Colors Services Document Options Print on both sides Print pages up Driver layout Pages per sheet: 6 pages per sheet 5 pages per sheet 6 pages per sheet 9 pages per sheet 10 pages per sheet Dietalion Portrait Landscape Rotate by 100 degrees About Help OK Cancel- Select the correct Print page borders, Page order, and Orientation options.
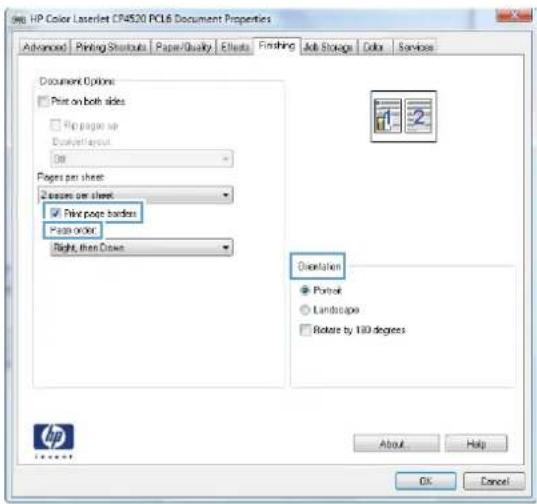
text_image
HP Color Laserlet CP4520 RC16 Document Properties Advanced | Printing Shutouts | Paper/Quality | Effects | Finishing | Job Storage | Color | Services Document Options: Print on both sides Print page up Ducturing layout Off Pages per sheet: Access on sheet Print page border Page order Right, then Down Orientation ● Portfolio ○ Landscape □ Rotate by 110 degrees About Help OK CancelSelect page orientation with Windows
- On the File menu in the software program, click Print.
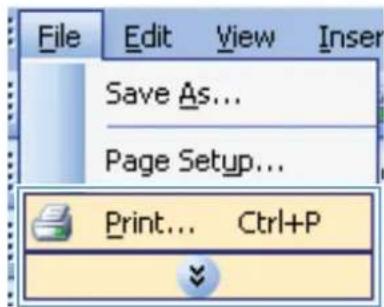
text_image
File Edit View Insert Save As... Page Setup... Print... Ctrl+P- Select the product, and then click the Properties or Preferences button.
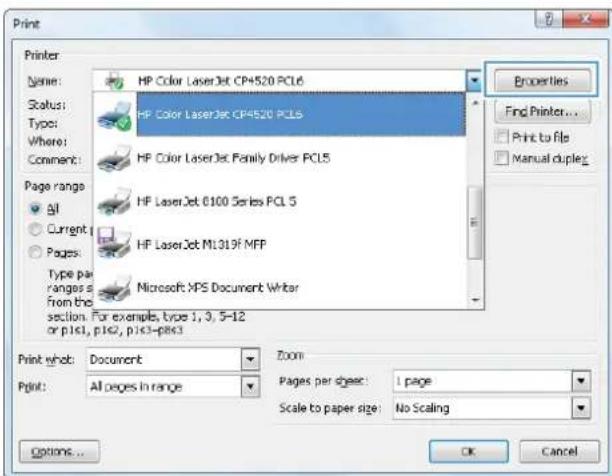
text_image
Print Printer: Name: HP Color LaserJet CP4520 PCL6 Status: HP Color LaserJet CP4520 PCL6 Type: Where: Comment: Page range: All Current Pages: Type pair ranges a from the section. For example, type 1, 3, 5-12 or p1s1, p1s2, p1c3-p8c3 Print whot: Document Zoom Print: All pages in range Pages per sheet: 1 page Scale to paper size: No Scaling Properties Find Printer... Print to file Manual duplex Options... OK Cancel- Click the Finishing tab.
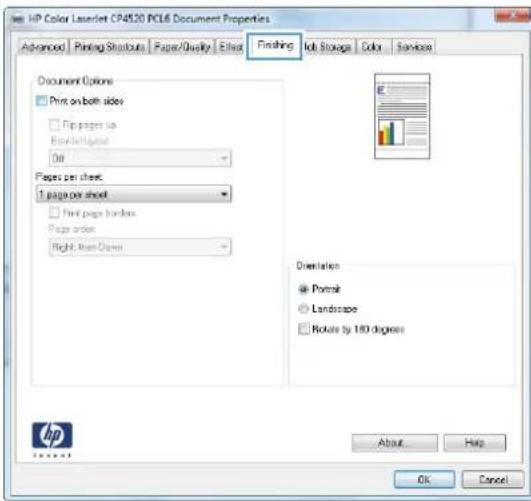
text_image
HP Color LaserJet CP4520 PCL6 Document Properties Advanced | Printing Shutouts | Paper/Quality | Effect | Finishing | Job Storage | Color | Services Document Options Print on both sides Print pages up End-ripting On Pages per sheet: 1 page per sheet Print pages borders Pages order: Right, then Down Orientation ● Portable ○ Landscape □ Rotate by 180 degrees About Help OK Cancel- In the Orientation area, select the Portrait or Landscape option.
To print the page image upside down, select the Rotate by 180 degrees option.
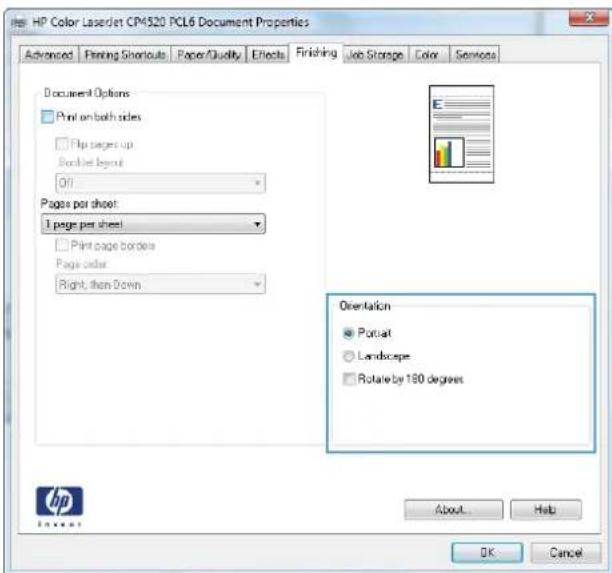
text_image
HP Color LaserJet CPM520 PCL6 Document Properties Advanced Flining Shortcuts Paper/Quality Effects Finishing Job Storage Color Semnote Document Options Print on both sides Flip pages up Book the layout Off Pages per sheet: 1 page per sheet Print page borders Page color Right, then Down Orientation Portrait Landscape Rotate by 180 degrees About Help OK CancelUse job storage features with Windows
The following job-storage modes are available for print jobs:
Proof and Hold: This feature provides a quick way to print and proof one copy of a job and then print more copies.
- Personal Job: When you send a job to the product, the job does not print until you request it at the product control panel. If you assign a personal identification number (PIN) to the job, you must provide the required PIN at the control panel.
- Quick Copy: If the optional hard disk is installed on the product, you can print the requested number of copies of a job and then store a copy of the job on the optional hard disk. Storing the job allows you to print additional copies of the job later.
- Stored Job: If the optional hard disk is installed on the product, you can store a job such as a personnel form, time sheet, or calendar on the product and allow other users to print the job at any time. Stored jobs also can be protected by a PIN.
△ CAUTION: If you turn off the product, all Quick Copy, Proof and Hold, and Personal Job types of stored jobs are deleted. To permanently store the job and prevent the product from deleting it when space is needed for something else, select the Stored Job option in the driver.
Create a stored job with Windows
-
On the File menu in the software program, click Print.
-
Select the product, and then click the Properties or Preferences button.
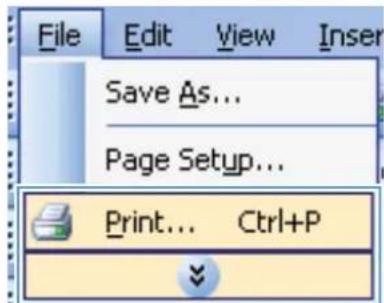
text_image
File Edit View Insert Save As... Page Setup... Print... Ctrl+P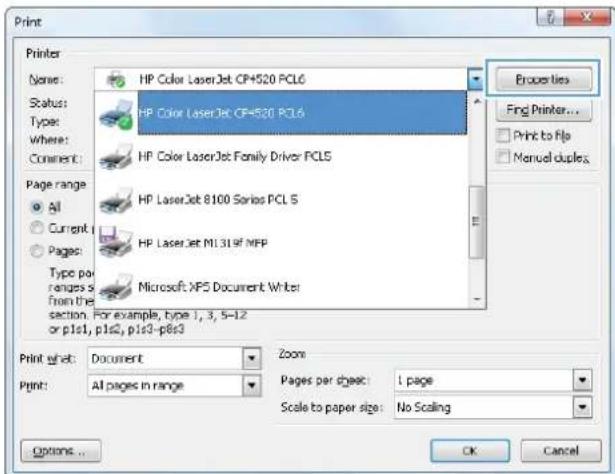
text_image
Print Printer Name: HP Color LaserJet CP+520 PCL6 Status: Type: Where: Comment: Page range: All Current Pages: Type per ranges s From the section. For example, type 1, 3, 5-12 or p1s1, p1s2, p1s3-p8s3 Print what: Document Zoom Print: All pages in range Pages per sheet: 1 page Scale to paper size: No Scaling Options... Properties Find Printer... Print to Fio Manual duples OK Cancel- Click the Job Storage tab.
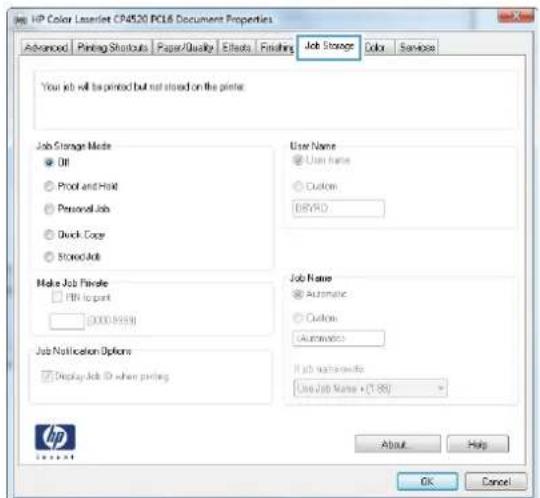
text_image
HP Color LaserNet CP4520 PC16 Document Properties Advanced Printing Shortouts Paper/Quality Effects Finishing Job Storage Color Service Your job will be printed but not stored on the printer Job Storage Mode ● Off ○ Proof and Hold ○ Personal Job ○ Quick Copy ○ Stored Job Make Job Private □ HR to port (0000-9999) Job Notification Options □ Display Job ID when printing User Name ● User Name ○ Custom BHYD Job Name ● Automatic ○ Custom (Autrows) If job not available Use Job Name + (1.88) About Help OK Cancel HP- Select a Job Storage Mode option.
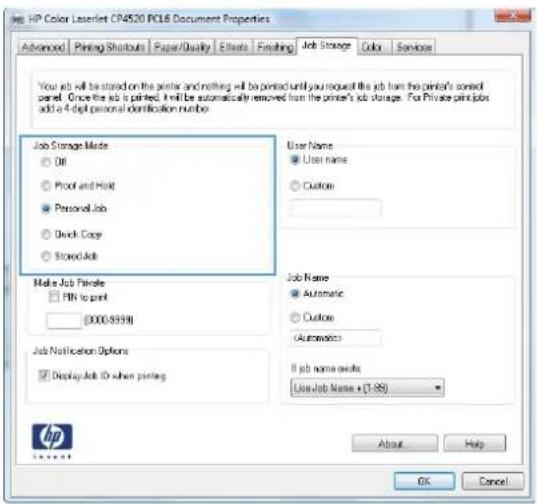
text_image
HP Color LaserNet CP4520 RCL6 Document Properties Advanced Printing Shutouts Paper/Quality Effects Finaling Job Storage Color Services Your job will be stored on the printer and mailing will be printed until you request the job from the printer's signed panel. Once the job is printed, it will be automatically removed from the printer's job storage. For Private principles add a 4-dept personal identification number. Job Storage Mode ● Oil ○ Proof and Hold ● Personal Job ○ Quick Copy ○ Stored Job Make Job Phone □ PIN to print (0000.9999) Job Notification Options ☑ Display Job ID when posting User Name ● User Name ○ Custom Job Name ● Automatic ○ Custom Automatics If job name defaults Use job Name + (1.88) About Help OK Cancel HPPrint a stored job
- Press the Home button 🔒.
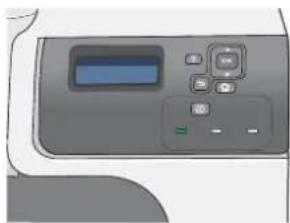
natural_image
Illustration of a generic electronic device with control buttons and a display screen (no text or symbols)- Press the down arrow to highlight the RETRIEVE JOB menu, and then press the OK button.
-
Press the down arrow ▼ to highlight your user name, and then press the OK button.
-
Press the down arrow to highlight a job name, and then press the OK button.
The PRINT or PRINT AND DELETE option is highlighted.
NOTE: If you have stored more than one job on the product, you have the option to print or delete all of them at the same time.
-
Press the OK button to select the PRINT or PRINT AND DELETE option.
-
If the job requires a PIN, press the up arrow ▲ or the down arrow ▼ to enter the PIN, and then press the OK button.
NOTE: If you use the up arrow ▲ or the down arrow ▼ to enter the PIN, press the OK button after each digit.
-
Press the OK button to select the COPIES option.
-
To print the number of copies specified in the driver when the job was stored, press the OK button to select the JOB option.
To print more copies than were specified in the driver when the job was stored, press the down arrow ▼ to highlight the COPIES option, and then press the OK button. Press the up arrow ▲ or the down arrow ▼ to select the number of copies, and then press the OK button. The number of copies printed is the number of copies specified in the driver multiplied by the number of copies specified for the COPIES option.
Delete a stored job
When you send a stored job, the product overwrites any previous jobs with the same user and job name. If a job is not already stored under the same user and job name, and the product needs additional space, the product might delete other stored jobs starting with the oldest. You can change the number of jobs that can be stored from the RETRIEVE JOB menu on the product control panel.
You can delete a job from the control panel, from the HP Embedded Web Server, or from HP Web Jetadmin. To delete a job from the control panel, use the following procedure:
-
Press the Home button 📋.
-
Press the down arrow ▼ to highlight the RETRIEVE JOB menu, and then press the OK button.
-
Press the down arrow ▼ to highlight your user name, and then press the OK button.
-
Press the down arrow ▼ to highlight a job name, and then press the OK button.
-
Press the down arrow ▼ to highlight the DELETE option, and then press the OK button.
-
If the job requires a PIN, press the up arrow ▲ or the down arrow ▼ to enter the PIN, and then press the OK button.
NOTE: If you use the up arrow ▲ or the down arrow ▼ to enter the PIN, press the OK button after each digit.
- Press the OK button to confirm that you want to delete the job.
Set job storage options with Windows
Print one copy for proof before printing all the copies
- On the File menu in the software program, click Print.
- Select the product, and then click the Properties or Preferences button.
- Click the Job Storage tab.
- In the Job Storage Mode area, click the Proof and Hold option.
Temporarily store a personal job on the product and print it later
NOTE: The product deletes the job after you print it.
- On the File menu in the software program, click Print.
- Select the product, and then click the Properties or Preferences button.
- Click the Job Storage tab.
- In the Job Storage Mode area, click the Personal Job option.
- Optional: In the Make Job Private area, click the PIN to print option, and enter a 4-digit personal identification number (PIN).
- Print the job at any time from the product control panel.
Temporarily store a job on the product
NOTE: This option is available if the optional hard disk is installed in the product.
NOTE: The product stores the job until you turn the product off.
- On the File menu in the software program, click Print.
- Select the product, and then click the Properties or Preferences button.
- Click the Job Storage tab.
- In the Job Storage Mode area, click the Quick Copy option.
The requested number of copies are printed immediately, and you can print more copies from the product control panel.
Permanently store a job on the product
NOTE: This option is available if the optional hard disk is installed in the product.
- On the File menu in the software program, click Print.
-
Select the product, and then click the Properties or Preferences button.
-
Click the Job Storage tab.
- In the Job Storage Mode area, click the Stored Job option.
Make a permanently stored job private so that anyone who tries to print it must provide a PIN

NOTE: This option is available if the optional hard disk is installed in the product.
- On the File menu in the software program, click Print.
- Select the product, and then click the Properties or Preferences button.
- Click the Job Storage tab.
- In the Job Storage Mode area, click the Stored Job option or the Personal Job option.
- In the Make Job Private area, click the PIN to print option, and enter a 4-digit personal identification number (PIN).

NOTE: To print the job or to delete it, you must provide the PIN at the product control panel.
Receive notification when someone prints a stored job

NOTE: Only the person who created the stored job receives notification. You do not receive notification when someone prints a stored job that another person has created.
- On the File menu in the software program, click Print.
- Select the product, and then click the Properties or Preferences button.
- Click the Job Storage tab.
- Select the job storage mode that you want.
- In the Job Notifications Options area, click the Display Job ID when printing option.
Set the user name for a stored job
Follow this procedure to change the user name for a stored job.
- On the File menu in the software program, click Print.
- Select the product, and then click the Properties or Preferences button.
- Click the Job Storage tab.
- Select the job storage mode that you want.
- In the User Name area, click the User name option to use the Windows default user name. To provide a different user name, click the Custom option and type the name.
Specify a name for the stored job
Follow this procedure to change the default name for a stored job.
- On the File menu in the software program, click Print.
- Select the product, and then click the Properties or Preferences button.
-
Click the Job Storage tab.
-
Select the job storage mode that you want.
-
To automatically generate the job name associated with the stored document, in the Job Name area, click the Automatic option. The driver uses the document file name, if it is available. If the document has no file name, the driver uses the software program name or a time stamp for the job name.
To specify a job name, click the Custom option and type the name.
-
Select an option from the If job name exists drop-down list.
-
Select the Use Job Name + (1-99) option to add a number to the end of the existing name.
- Select the Replace Existing File option to overwrite a job that already has that name.
Set color options with Windows
-
On the File menu in the software program, click Print.
-
Select the product, and then click the Properties or Preferences button.
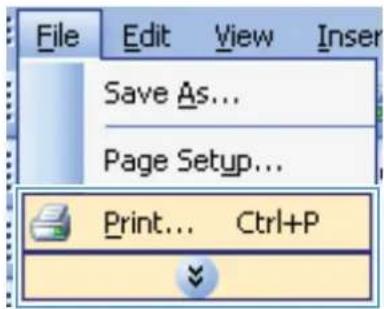
text_image
File Edit View Insert Save As... Page Setup... Print... Ctrl+P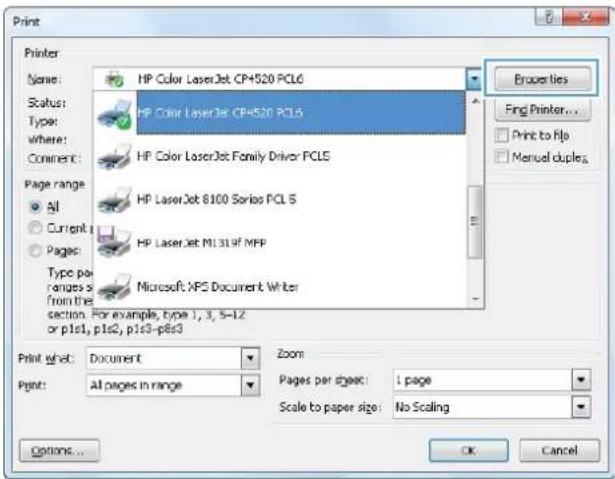
text_image
Print Printer Name: HP Color LaserJet CP+520 PCL6 Status: HP Color LaserJet CP+520 PCL6 Type: HP Color LaserJet Family Driver PCL5 Where: Comment: HP LaserJet 8100 Series PCL 5 Page range: All Current Pages: Type per ranges s from the section. For example, type 1, 3, 5-12 or p1s1, p1s2, p1s3-p8s3 Microsoft XPS Document Writer Print what: Document Zoom Print: All pages in range Pages per sheet: 1 page Scale to paper size: No Scaling Options... OK Cancel Properties Fing Printer... Print to file Manual duples.- Click the Color tab.
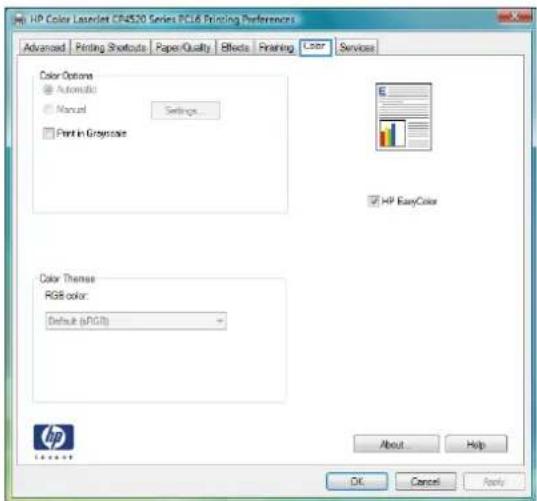
text_image
HP Color LASdet CP4520 Series PC16 Printing Preferences Advanced | Printing Shoutouts | Paper Quality | Effects | Printing | Laser | Services Color Options Automatic Manual Settings... Print in Gray-scale HP EasyColor Color Themes RGB color: Default (a/PGT) About... Help OK Cancel Apply- Click the HP EasyColor check box to clear it.
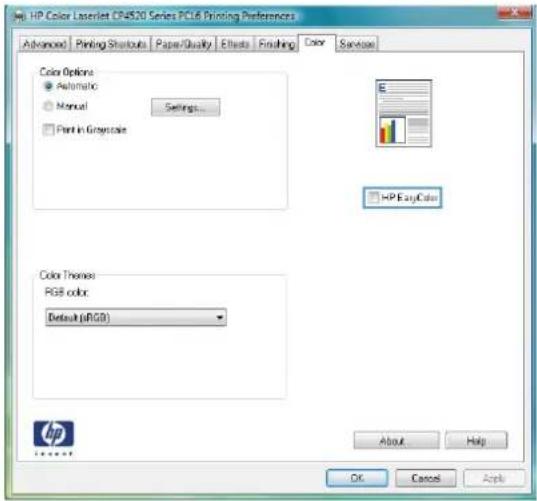
text_image
HP Color LASERLET CR4520 Series PCL6 Printing Preferences Advanced Printing Shortouts Paper Quality Effects FinishingColor Services Color Options ● Automatic ○ Manual Settings... □ Print in Imagecolor HP EasyColor Color Themes RGB color Default (pRGB) About Help OK Cancel Apply- In the Color Options area, click the Manual option, and then click the Settings button.
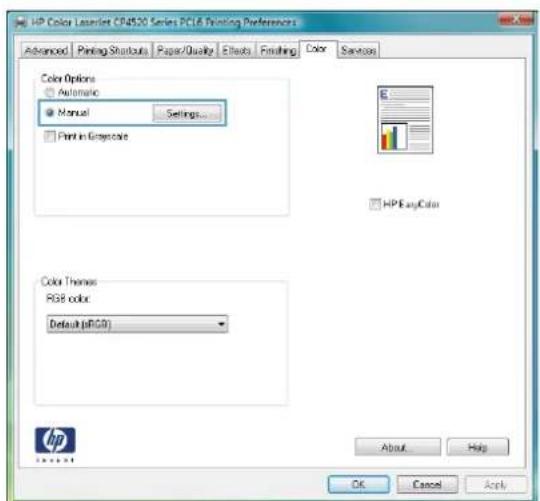
text_image
HP Color LASNet CP4520 Series PCL6 Printing Preferences Advanced | Printing Startouts | Paper/Quality | Effects | Finishing | Color | Services Color Options Automatic Manual Settings... Print in Greycore HP EasyColor Color Themes RGB color Default (pRGB) About Help OK Cancel Apply- Adjust the general settings for Edge Control, and settings for text, graphics, and photographs.
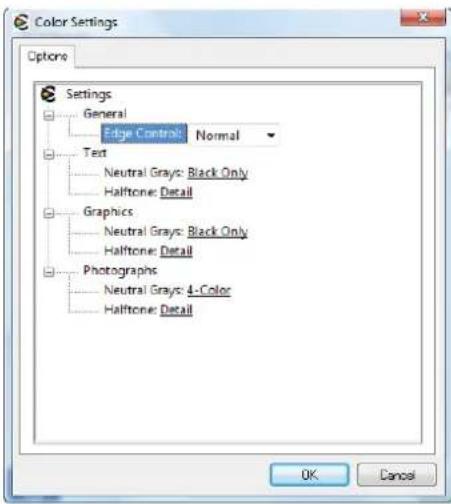
text_image
Color Settings Options Settings General Edge Control: Normal Text Neutral Grays: Black Only Halftone: Detail Graphics Neutral Grays: Black Only Halftone: Detail Photographs Neutral Grays: ↓-Color Halftone: Detail OK CancelPrint special jobs with Windows
Print business graphics or marketing material
You can use this product to print marketing and sales material or other color documents on glossy paper. To maximize the quality of this output you must do the following:
- Choose the appropriate paper. See the following table.
- At the product control panel, configure the paper tray for the correct paper type.
- Select the corresponding settings in the printer driver.
Supported glossy paper
| HP glossy paper product Product code Product size Control panel and print | driver settings | |
| HP Laser Presentation Paper, Soft Gloss | Q6541A Letter HP soft gloss 120g | |
| HP glossy paper product | Product code | Product size | Control panel and print driver settings |
| HP Laser Presentation Paper, Glossy | Q2546A Letter HP glossy 130g | ||
| HP Laser Presentation Paper, Glossy | Q2552A A4 HP glossy 130g | ||
| HP Laser Professional Paper, Soft Gloss | Q6542A A4 HP soft gloss 120g | ||
| HP Laser Brochure Paper, Glossy | Q6611A, Q6610A Letter HP glossy 160g | ||
| HP Laser Superior Paper, Glossy | Q6616A A4 HP glossy 160g | ||
| HP Laser Photo Paper, Glossy | Q6607A, Q6608A Letter HP glossy 220g | ||
| HP Laser Photo Paper, Glossy | Q6614A A4 HP glossy 220g | ||
| HP Laser Photo Paper, Glossy 4x6 | Q8842A 101.6 x 152.4 mm (4 x 6 in) HP glossy 220g | ||
| HP Laser Photo Paper, Glossy 10 cm x 15 cm | Q8843A 101.6 x 152.4 mm (4 x 6 in) HP glossy 220g |

NOTE: In the United States, see www.hp.com/go/paper for a complete list of HP brand paper.
Print weatherproof maps and outdoor signs
The product can print durable, waterproof maps, signs, or menus by using HP Tough Paper. HP Tough Paper is a waterproof, tear-proof, satin finish paper that retains rich, vibrant print color and clarity even when exposed to heavy usage or weather. This avoids expensive and time-consuming lamination. To maximize the quality of this output you must do the following:
- Choose the appropriate paper. See the following table.
- At the product control panel, configure the paper tray for the correct paper type.
- Select the corresponding settings in the printer driver.
Supported tough paper
| HP paper name | Product code | Product size | Control panel and print driver settings |
| HP LaserJet Tough Paper | Q1298A | Letter | HP Tough Paper |
| HP LaserJet Tough Paper Q1298B A4 HP Tough Paper | |||
Set the duplex alignment
For documents that are printed on both sides, such as brochures, set the registration for the tray before printing to ensure that the front and back of the page are aligned.
- Press the Home button 📋.
- Press the down arrow ▼ to highlight the CONFIGURE DEVICE menu, and then press the OK button.
- Press the down arrow ▼ to highlight the PRINT QUALITY menu, and then press the OK button.
- Press the down arrow ▼ to highlight the SET REGISTRATION menu, and then press the OK button.
- Press the down arrow ▼ to highlight the ADJUST TRAY
menu for the tray that you want to adjust, and then press the OK button. - Press the down arrow ▼ to highlight the PRINT TEST PAGE setting, and then press the OK button.
- Follow the instructions on the test page to complete the adjustment.
8 Color
- Adjust color
- Match colors
• Advanced color use
Adjust color
Manage color by changing the settings on the Color tab (Windows) or the Color Options or Color/Quality Options menu (Mac) in the printer driver.
Automatic
Setting color options to the default or Automatic setting typically produces the best possible print quality for color documents. The default or Automatic color adjustment option optimizes the neutral-gray color treatment, halftones, and edge enhancements for each element in a document. For more information, see the printer driver online Help.
Print in Grayscale
Select the Print in Grayscale option (Windows) or the Print Color as Gray option (Mac) from the printer driver to print a color document in black and white. This option is useful for printing color documents that will be photocopied or faxed. The product uses the monochrome mode, which reduces use of the color cartridges.
Manual color adjustment
Manually set the color options to adjust the neutral-gray color treatment, halftones, and edge enhancements for text, graphics, and photographs. To open the manual color adjustment options, follow one of these procedures:
- Windows: From the Color tab, click the HP EasyColor check box to clear it, click the Manual button, and then click the Settings button.
• Mac: Open the Advanced menu, or select the appropriate tab.
Manual color options
Use manual color options to adjust the Neutral Grays, Halftone, and Edge Control options for text, graphics, and photographs.
Table 8-1 Manual color options
| Setting description Setting options | |
| HalftoneHalftone options affect the color output resolution and clarity. | Smooth provides better results for large, solid-filled print areas and enhances photographs by smoothing color gradations. Select this option when uniform and smooth area fills are the top priority.Detail is useful for text and graphics that require sharp distinctions among lines or colors, or images that contain a pattern or a high level of detail. Select this option when sharp edges and details are the top priority. |
| Neutral GraysThe Neutral Grays setting determines the method for creating gray colors used in text, graphics, and photographs. | Black Only generates neutral colors (grays and black) by using only black toner. This guarantees neutral colors without a color cast. This setting is best for documents and grayscale viewgraphs.4-Color generates neutral colors (grays and black) by combining all four toner colors. This method produces smoother gradients and transitions to other colors, and it produces the darkest black. |
| Edge ControlThe Edge Control setting determines how edges are rendered. Edge control has two components: adaptive halftoning and trapping. Adaptive halftoning increases edge sharpness. Trapping reduces the effect of color-plane misregistration by overlapping the edges of adjacent objects slightly. | Maximum is the most aggressive trapping setting. Adaptive halftoning is on.Normal sets trapping at a medium level. Adaptive halftoning is on.Light sets trapping at a minimal level. Adaptive halftoning is on.Off turns off both trapping and adaptive halftoning. |
Use the HP EasyColor option for Windows
If you are using the HP PCL 6 printer driver for Windows, the HP EasyColor technology automatically improves mixed-content documents that are printed from Microsoft Office programs. This technology scans documents and automatically adjusts photographic images in .JPEG or .PNG format.
HP EasyColor technology enhances the entire image at one time, rather than dividing it into several pieces, which results in improved color consistency, sharper details, and faster printing.
In the following example, the images on the left were created without using the HP EasyColor option. The images on the right show the enhancements that result from using the HP EasyColor option.

text_image
Bring your photos to LIFE powered by hp EasyColor and the UPD
text_image
Bring your photos to LIFE powered by hp EasyColor and the UPDThe HP EasyColor option is enabled by default in the HP PCL 6 printer driver, so you do not need to make manual color adjustments. To disable the option so you can manually adjust the color settings, open the Color tab, and click the HP EasyColor check box to clear it.
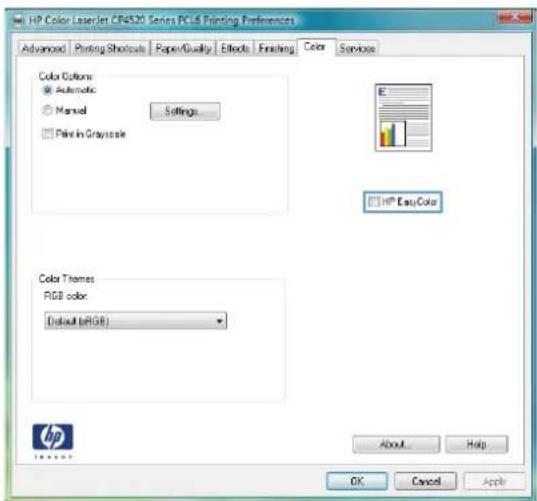
text_image
HP Color LaserJet CF4520 Series PC6 Printing Preferences Advanced | Printing Shutouts | Paper/Quality | Effects | Finishing | Color | Services Color Options Automatic Manual Pain in Gray-scale Settings HP EasyColor Color Themes RGB color Default (RGB) About Help OK Cancel ApplyMatch colors
The process of matching product output color to your computer screen is quite complex because printers and computer monitors use different methods of producing color. Monitors display colors by light pixels using an RGB (red, green, blue) color process, but printers print colors using a CMYK (cyan, magenta, yellow, and black) process.
Several factors can influence your ability to match printed colors to those on your monitor. These factors include:
Paper
• Printer colorants (inks or toners for example)
- Printing process (inkjet, press, or laser technology for example)
• Overhead lighting
• Personal differences in perception of color
- Software programs
Printer drivers
• Computer operating system
• Monitors and monitor settings
• Video cards and drivers
• Operating environment (humidity for example)
Keep the above factors in mind when colors on your screen do not perfectly match your printed colors.
For most users, the best method for matching colors on your screen to your product is to print sRGB colors.
Sample book color matching
The process for matching product output to preprinted sample books and standard color references is complex. In general, you can obtain a reasonably good match to a sample book if the inks used to create the sample book are cyan, magenta, yellow, and black. These are usually referred to as process color sample books.
Some sample books are created from spot colors. Spot colors are specially created colorants. Many of these spot colors are outside of the range of the product. Most spot color sample books have companion process sample books that provide CMYK approximations to the spot color.
Most process sample books will state which process standards were used to print the sample book. In most cases they will be SWOP, EURO, or DIC. To get optimal color matching to the process sample book, select the corresponding ink emulation from the product menu. If you cannot identify the process standard, use SWOP ink emulation.
Print color samples
To use the color samples, select the color sample that is the closest match to the desired color. Use the sample's color value in your software program to describe the object you wish to match. Colors may
vary depending on paper type and the software program used. For more details on how to use the color samples, go to www.hp.com/support/cljcp4025 or www.hp.com/support/cljcp4525.
Use the following procedure to print color samples at the product using the control panel:
-
Press the Home button 📋.
-
Press the down arrow ▼ to highlight the INFORMATION menu, and press the OK button.
-
Press the down arrow ▼ to highlight either the PRINT RGB SAMPLES or the PRINT CMYK SAMPLES option, and press the OK button.
PANTONE® color matching
PANTONE has multiple color matching systems. PANTONE MATCHING SYSTEM® is very popular and uses solid inks to generate a wide range of color hues and tints. See www.hp.com/go/cljcp4025_software or www.hp.com/go/cljcp4525_software for details on how to use PANTONE Colors with this product.
NOTE: PANTONE Colors generated might not match PANTONE-identified standards. Consult current PANTONE Publications for accurate color.
Advanced color use
The product provides automatic color features that generate excellent color results. Carefully designed and tested color tables provide smooth, accurate color rendition of all printable colors.
The product also provides sophisticated tools for the experienced professional.
HP ColorSphere toner
HP designs the print system (printer, print cartridges, toner, and paper) to work together to optimize print quality, product reliability, and user productivity. Original HP print cartridges contain HP ColorSphere toner that is specifically matched to your printer so that it will produce a wide range of brilliant colors. This helps you create professional looking documents that contain sharp, clear text and graphics and realistic printed photos.
HP ColorSphere toner produces print-quality consistency and intensity you can depend on across a wide range of papers. You can produce documents that help you make the right impression. Plus, HP professional-quality everyday and specialty papers (including a wide variety of HP media types and weights) are designed for the way you work.
HP ImageREt 3600
HP ImageREt 3600 print technology is a system of innovative technologies developed exclusively by HP to deliver superior print quality. The HP ImageREt system sets itself apart from the industry by integrating technology advancements and optimizing each element of the print system. Several categories of HP ImageREt have been developed for a variety of user needs.
The system's foundation is composed of key color laser technologies, including image enhancements, smart supplies, and high-resolution imaging. As the level or category of ImageREt increases, these core technologies are refined for more advanced system usage, and additional technologies are integrated. HP offers superior image enhancements for general office documents and marketing collateral. Optimized for printing on HP color laser high-gloss papers, HP Image REt 3600 provides superior results on all supported media, and under a variety of environmental conditions.
Paper selection
For the best color and image quality, select the appropriate paper type from the control panel menu or from the printer driver.
Color options
Color options automatically provide optimal color output. These options use object tagging, which provides optimal color and halftone settings for different objects (text, graphics, and photos) on a page. The printer driver determines which objects appear on a page and uses halftone and color settings that provide the best print quality for each object.
In the Windows environment, the Automatic and Manual color options are on the Color tab in the printer driver.
Standard red-green-blue (sRGB)
Standard red-green-blue (sRGB) is a worldwide color standard that HP and Microsoft developed as a common color language for monitors, input devices (scanners and digital cameras), and output devices (printers and plotters). It is the default color space used for HP products, Microsoft operating systems,
the World Wide Web, and most office software. The sRGB standard represents the typical Windows monitor and is the convergence standard for high-definition television.
NOTE: Factors such as the type of monitor you use and the room lighting can affect the appearance of colors on your screen. For more information, see Match colors on page 143.
The latest versions of Adobe PhotoShop ^® , CorelDRAW ^® , Microsoft Office, and many other programs use sRGB to communicate color. Because it is the default color space in Microsoft operating systems, sRGB has been adopted broadly. When programs and devices use sRGB to exchange color information, typical users experience greatly improved color matching.
The sRGB standard improves your ability to match colors between the product, the computer monitor, and other input devices automatically, and eliminates the need to become a color expert.
9 Manage and maintain
• Print information pages
• Use the HP Easy Printer Care software
• Use the HP Embedded Web Server
• Use HP Web Jetadmin software
• Product security features
• Economy settings
- Manage supplies and accessories
- Replacement instructions
Clean the product
Product updates
Print information pages
Information pages provide details about the product and its current configuration. Use the following procedure to print the information pages:
- Press the Home button.
- Press the down arrow ▼ to highlight the INFORMATION menu, and then press the OK button.
- Press the down arrow ▼ to highlight the required information, and then press the OK button to print.
Item Description
| PRINT MENU MAP Prints the control-panel menu map, which shows the layout and current settings of the control-panel menu items. | |
| PRINT CONFIGURATION | Prints the product configuration pages, which show the printer settings and installed accessories. |
| PRINT SUPPLIES STATUS PAGE | Prints the approximate remaining life for the supplies; reports statistics on total number of pages and jobs processed, serial number, page counts, and maintenance information.HP provides approximations of the remaining life for the supplies as a customer convenience. The actual remaining supply levels might be different than the approximations provided. |
| SUPPLIES STATUS | Displays the approximate status of the print cartridges, transfer kit, fuser kit, and toner collection unit in a scrollable list. Press the OK button to open help for each item. |
| PRINT USAGE PAGE | Prints a count of all paper sizes that have passed through the product; lists whether they were simplex, duplex, monochrome, or color; and reports the page count. |
PRINT COLOR USAGE JOB LOG Prints the color-use statistics for the printer.
| PRINT DEMO PAGE Prints a demonstration page. | |
| PRINT RGB SAMPLES | Prints color samples for different RGB values. Use the samples as a guide for matching printed colors. |
| PRINT CMYK SAMPLES | Prints color samples for different CMYK values. Use the samples as a guide for matching printed colors. |
PRINT FILE DIRECTORY Prints the name and directory of files stored in the product.
PRINT PCL FONT LIST Prints the available PCL fonts.
PRINT PS FONT LIST Prints the available PS fonts.
Use the HP Easy Printer Care software
Open the HP Easy Printer Care software

NOTE: HP Easy Printer Care is not compatible with Mac OS.
Use one of the following methods to open the HP Easy Printer Care software:
- On the Start menu, select Programs, select Hewlett-Packard, select HP Easy Printer Care, and then click Start HP Easy Printer Care.
- In the Windows system tray (in the lower-right corner of the desktop), double-click the HP Easy Printer Care icon.
• Double-click the desktop icon.
HP Easy Printer Care software sections
HP Easy Printer Care software can provide information about multiple HP products that are on your network as well as any products that are directly connected to your computer. Some of the items that are in the following table might not be available for every product.
The Help button (?) in the upper-right corner of each page provides more detailed information about the options on that page.
| Section Options | |
| Device List tabWhen you open the software, this is the first page that appears.NOTE:To return to this page from any tab, clickMy HP Printersin the left side of the window. | Deviceslist: Shows the products that you can select.NOTE:The product information appears either in list form or as icons, depending on the setting for theView asoption.The information on this tab includes current alerts for the product.If you click a product in the list, the HP Easy Printer Care opens theOverviewtab for that product. |
| Compatible Printers | Provides a list of all the HP products that support HP Easy Printer Care software. |
| Find Other PrinterswindowAdd more products to theMy HP Printerslist | Click theFind Other Printerslink in theDeviceslistto open theFind Other Printerswindow. TheFind Other Printerswindowprovides a utility that detects other network printers so that you can add them to theMy HP Printerslist and then monitor those products from your computer. |
| OverviewtabContains basic status information for the product | Device Statussection: This section shows product-identification information and the product status. It indicates product-alert conditions, such as when a print cartridge has reached is estimated end of life. After you correct a problem with the product, click the refresh buttonin the upper-right corner of the window to update the status.Supplies Statussection: Shows detailed supplies status, such as the estimated life remaining in the print cartridge and the status of the paper that is loaded in each tray.Supplies Detailslink: Opens the supplies status page to view more detailed information about product supplies, ordering information, and recycling information. |
| Support tabProvides links to support information | Device Status section: This section shows product-identification information and the product status. It indicates product-alert conditions, such as a print cartridge that is at its estimated end of life. After you correct a problem with the product, click the refresh button in the upper-right corner of the window to update the status.Device Management section: Provides links to information about HP Easy Printer Care, to advanced product settings, and to product usage reports.Troubleshooting and Help: Provides links to tools that you can use to resolve problems, to online product support information, and to online HP experts. |
| Settings tabConfigure product settings, adjust print-quality settings, and find information about specific product featuresNOTE: This tab is not available for some products. | About: Provides general information about this tab.General: Provides information about the product, such as the model number, serial number, and the settings for date and time, if they are available.Information Pages: Provides links to print the information pages that are available for the product.Capabilities: Provides information about product features, such as duplexing, the available memory, and the available printing personalities. Click Changeto adjust the settings.Print Quality: Provides information about print-quality settings. Click Changeto adjust the settings.Trays / Paper: Provides information about the trays and how they are configured. Click Changeto adjust the settings.Restore Defaults: Provides a way to restore the product settings to the factory defaults. Click Restore to restore the settings to the defaults. |
| HP Proactive SupportNOTE: This item is available from the Overview and Support tabs. | When enabled, HP Proactive Support routinely scans your printing system to identify potential problems. Click themore info link to configure how frequently the scans occur. This page also provides information about available updates for product software, firmware, and HP printer drivers. You can accept or decline each recommended update. |
| Supplies Ordering buttonClick the Supplies Ordering button on any tab to open the Supplies Ordering window, which provides access to online supplies ordering.NOTE: This item is available from the Overview and Support tabs. | Ordering list: Shows the supplies that you can order for each product. To order a certain item, click the Order check box for that item in the supplies list. You can sort the list by product, or by the supplies that need to be ordered the soonest. The list contains supplies information for every product that is in the My HP Printers list.Shop Online for Supplies button: Opens the HP SureSupply Web site in a new browser window. If you have checked the Order check box for any items, the information about those items can be transferred to the Web site, where you will receive information on options for purchasing your selected supplies.Print Shopping List button: Prints the information for the supplies that have the Order check box selected. |
| Alert Settings linkNOTE: This item is available from the Overview and Support tabs. | Click Alert Settings to open the Alert Settings window, in which you can configure alerts for each product.Alerting is on or off: Activates or deactivates the alerts feature.Printer Alerts: Select the option to receive alerts for critical errors only, or for any error.Job Alerts: For products that support it, you can receive alerts for specific print jobs. |
| Color Access ControlNOTE: This item is available only for HP color products that support Color Access Control.NOTE: This item is available from the Overview and Support tabs. | Use this feature to permit or restrict color printing. |
Use the HP Embedded Web Server
Use the HP Embedded Web Server to view product status, configure product network settings, and to manage printing functions from your computer instead of from the product control panel. The following are examples of what you can do using the HP Embedded Web Server:
NOTE: When the product is directly connected to a computer, use the HP Easy Printer Care software to view the product status instead of the HP Embedded Web Server.
• View product status information.
• Determine the remaining life for all supplies and order new ones.
• View and change tray configurations.
• View and change the product control-panel menu configuration.
• View and print internal pages.
- Receive notification of product and supplies events.
• View and change network configuration.
To use the HP Embedded Web Server, you must have Microsoft Internet Explorer 5.01 or later or Netscape 6.2 or later for Windows, Mac OS, and Linux (Netscape only). Netscape Navigator 4.7 is required for HP-UX 10 and HP-UX 11. The HP Embedded Web Server works when the product is connected to an IP-based network. The HP Embedded Web Server does not support IPX-based product connections. You do not have to have Internet access to open and use the HP Embedded Web Server.
When the product is connected to the network, the HP Embedded Web Server is automatically available.
NOTE: For complete information about using the HP Embedded Web Server, see the HP Embedded Web Server User Guide, which is on the HP Web site at www.hp.com/support/cljcp4025 or www.hp.com/support/cljcp4525.
Open the HP Embedded Web Server by using a network connection
- Identify the product IP address or host name:
a. At the product control panel press the Home button.
b. Highlight and select the INFORMATION menu.
c. Highlight and select the PRINT CONFIGURATION option.
d. Locate the IP address or host name on the HP Jetdirect page.
- In a supported Web browser on your computer, type the product IP address or host name in the address/URL field.
Features
| Tab or section Options Description | ||
| Information tabProvides product, status, and configuration information | Device Status Shows the product status and shows the estimated life remaining of HP supplies. The page also shows the type and size of print paper set for each tray. To change the default settings, click Change Settings. | |
| Configuration Page | Shows the information found on the configuration page. | |
| Supplies Status | Shows the estimated life remaining of HP supplies. This page also provides supplies part numbers. To order new supplies, click Shop for Supplies in the Other Links area on the left side of the window. | |
| Event Log | Shows a list of all product events and errors. Use the HP Instant Support link (in the Other Links area on all HP Embedded Web Server pages) to connect to a set of dynamic Web pages that help you solve Event Log issues and other problems. These pages also show additional services available for the product. | |
| Usage Page | Shows a summary of the number of pages the product has printed, grouped by size, type, and paper print path. | |
| Diagnostics Page | Provides the time of the last calibration and the electro-photographic (EP) parameters that can be used to diagnose some print quality problems. For more information, contact HP Support. See Customer support on page 246. | |
| Device Information | Shows the product network name, address, and model information. To customize these entries, click Device Information on the Settings tab. | |
| Control Panel | Shows messages from the control panel, such as Ready or Sleep mode on. | |
| Color Usage Job Log | Shows the total pages printed, the number of pages printed in color, and the number of pages printed in black only. | |
| Print Send print-ready jobs to the product. | ||
| Settings tabProvides the ability to configure the product from your computerNOTE: The Settings tab can be password-protected. If this product is on a network, always consult with the system administrator before changing settings on this tab. | Configure Device Configure product default settings. This page contains the traditional menus found on the control-panel display. | |
| Tray Sizes/Types | Configure the size and type of paper for each tray. | |
| E-mail Server | Network only. Used in conjunction with the Alert Subscriptions page to set up e-mail alerts. | |
| Alert Subscriptions | Network only. Receive e-mail alerts for various product and supplies events. Click New Destination List to set up an e-mail list for alert messages. | |
| Alert Thresholds | Set the time or value for when the product sends particular alerts. | |
Tab or section Options Description
| AutoSend | Configure the product to send automated e-mails regarding product configuration and supplies to specific e-mail addresses. | |
| Security | Set a password for access to the Settings and Networking tabs as well as portions of the product's control panel and HP Jetdirect networking. Enable and disable certain features of the product. | |
| Edit Other Links | Add or customize a link to another Web site. This link appears in the Other Links area on all HP Embedded Web Server pages. | |
| Device Information | Name the product and assign an asset number to it. Enter the name of the primary contact who will receive information about the product. | |
| Language | Set the language in which to display the HP Embedded Web Server information. | |
| Date & Time | Set the date and time or synchronize with a network time server. | |
| Sleep Schedule | Set or edit the product sleep time and a wake time for the product to become ready. | |
| Restrict Color | Permit or restrict color printing. You can specify permissions for individual users or for jobs that are sent from specific software programs. | |
| Networking tabProvides the ability to change network settings from your computerNOTE: The Networking tab can be password-protected. | Network administrators can use this tab to control network-related settings for the product when it is connected to an IP-based network. This tab does not appear if the product is directly connected to a computer, or if the product is connected to a network using anything other than an HP Jetdirect print server.For Mac OS X, you can change the Bonjour name that displays for products on the network. | |
| Other LinksContains links that connect you to the InternetNOTE: You must have Internet access in order to use any of these links. If you use a dial-up connection and did not connect when you first opened the HP Embedded Web Server, you must connect before you can visit these Web sites. Connecting might require that you close the HP Embedded Web Server and reopen it. | HP Instant Support Connects to the HP Web site to help you find solutions to product problems. | |
| Shop for Supplies | Connects to the HP SureSupply Web site, where you can receive information on options for purchasing original HP supplies, such as print cartridges and paper. | |
| Product Support | Connects to the support site for the product. | |
| Show Me How | Connects to information that demonstrates specific tasks for the product, such as clearing jams and printing on various types of paper. | |
Use HP Web Jetadmin software
HP Web Jetadmin is a Web-based software solution for remotely installing, monitoring, and troubleshooting network-connected peripherals. Management is proactive, allowing network administrators the ability to resolve issues before users are affected. Download this free, enhanced-management software at www.hp.com/go/webjetadmin.
Device plug-ins can be installed into HP Web Jetadmin to provide support for specific product features. The HP Web Jetadmin software can automatically notify you when new plug-ins are available. On the Product Update page, follow the directions to automatically connect to the HP Web site and install the latest device plug-ins for your product.

NOTE: Browsers must be Java™-enabled. Browsing from an Apple PC is not supported.
Product security features
Security statements
The product supports security standards and recommended protocols that help you keep the product secure, protect critical information on your network, and simplify the way you monitor and maintain the product.
For in-depth information about HP's secure imaging and printing solutions, visit www.hp.com/go/secureprinting. The site provides links to white papers and FAQ documents about security features.
IP Security
IP Security (IPsec) is a set of protocols that control IP-based network traffic to and from the product. IPsec provides host-to-host authentication, data integrity, and encryption of network communications.
For products that are connected to the network and have an HP Jetdirect print server, you can configure IPsec by using the Networking tab in the HP Embedded Web Server.
Secure the HP Embedded Web Server
Assign a password for access to the embedded Web server so that unauthorized users cannot change the product settings.
- Open the HP Embedded Web Server by entering the product IP address into the address line of a Web browser.
- Click the Settings tab.
- On the left side of the window, click the Security menu.
- In the Device Security Settings area, click the Configure . . . button.
- In the Device Password area, type the password in the New Password box, and type it again in the Verify password box.
- Click the Apply button. Make note of the password and store it in a safe place.
HP Encrypted High Performance Hard Disks
This product supports an optional encrypted hard disk that you can install in the EIO accessory slot. This hard disk provides hardware-based encryption so you can securely store sensitive print, copy, and scan data without impacting product performance. This hard disk uses the latest Advanced Encryption Standard (AES) and has versatile time-saving features and robust functionality.
Use the Security menu in the HP Embedded Web Server to configure the disk.
For more information about the encrypted hard disk, see the HP High-Performance Secure Hard Disk Setup Guide.
- Go to www.hp.com/support.
- Type Secure Hard Disk into the search box and click the >> button.
- Click the HP Secure High Performance Hard Disk Drive link.
- Click the Manuals link.
For information about ordering this accessory, see Supplies and accessories on page 235.
Secure stored jobs
You can protect jobs that are stored on the product by assigning a PIN to them. Anyone who tries to print these protected jobs must first enter the PIN at the product control panel.
For more information, see Use job storage features with Windows on page 128.
Lock the control panel menus
You can lock various menus on the control panel by using the HP Embedded Web Server.
- Open the HP Embedded Web Server by entering the product IP address into the address line of a Web browser.
- Click the Settings tab, and then click the Security link.
- Click the Device Security Settings button.
- In the Control Panel Access Lock area, select the level of security that you want.
Minimum Menu Lock
• The SYSTEM SETUP menu is locked.
• The I/O menu is locked.
• The RESETS menu is locked.
• The MANAGE SUPPLIES menu is locked.
Moderate Menu Lock
• The CONFIGURE DEVICE menu is locked (all submenus).
• The DIAGNOSTICS menu is locked.
• The MANAGE SUPPLIES menu is locked.
Intermediate Menu Lock
• The PAPER HANDLING menu is locked.
• The CONFIGURE DEVICE menu is locked (all submenus).
• The DIAGNOSTICS menu is locked.
• The MANAGE SUPPLIES menu is locked.
Maximum Menu Lock
• The INFORMATION menu is locked.
• The PAPER HANDLING menu is locked.
• The CONFIGURE DEVICE menu is locked (all submenus).
• The DIAGNOSTICS menu is locked.
• The MANAGE SUPPLIES menu is locked.
- Click the Apply button.
Lock the formatter
The formatter area, on the back of the product, has a slot that you can use to attach a security cable. Locking the formatter prevents someone from removing valuable components from it.
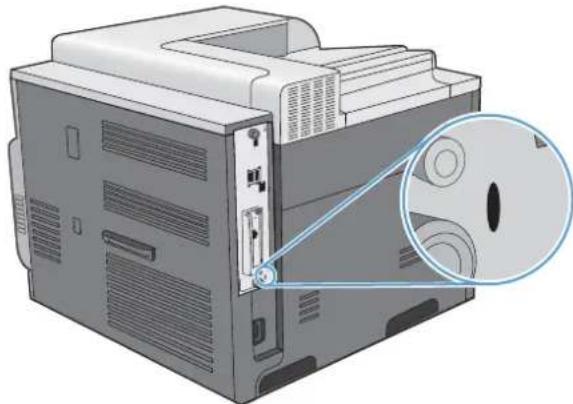
natural_image
Illustration of a computer tower with a close-up inset showing internal components (no text or symbols)Economy settings
Optimize speed or energy usage
The optimum speed or energy usage feature controls the fuser cool down behavior. The following settings are available:
| FASTER FIRST PAGE The fuser maintains power and the first page processes fasterfor any new job that is sent to the product. |
| SAVE ENERGY The fuser reduces power when it is idle. |
| SAVE MORE ENERGY The fuser reduces power when it is idle. The fuser reduces more power than the SAVE ENERGY setting. |
| SAVE MOST ENERGY The fuser is turned-off and it gradually cools to room temperature. The SAVE MOST ENERGYsetting takes the longest time to print the first page. |
Complete the following steps to optimize the product for speed or energy usage:
- Press the Home button 📋.
- Open each of the following menus. Press the down arrow ▼ to highlight it and then press the OK button to select it.
a. CONFIGURE DEVICE
b. SYSTEM SETUP
c. OPTIMUM SPEED/ENERGY USAGE
- Select the appropriate option.
Powersave modes
The adjustable sleep mode feature reduces power consumption when the product has been inactive for an extended period. You can set the length of time before the product enters sleep mode.
NOTE: This mode does not affect product warm-up time.
Disable or enable sleep mode
- Press the Home button 📋.
- Open each of the following menus. Press the down arrow ▼ to highlight it and then press the OK button to select it.
a. CONFIGURE DEVICE
b. RESETS
c. SLEEP MODE
- Press the up arrow or down arrow ▲/▼ to select the ON or OFF setting, and then press the OK button.
- Press the Home button 🔒.
Set sleep delay
- Press the Home button 📋.
- Open each of the following menus. Press the down arrow ▼ to highlight it and then press the OK button to select it.
a. CONFIGURE DEVICE
b. SYSTEM SETUP
c. SLEEP DELAY
-
Press the up or down arrow ▲/▼ to select the appropriate time period, and then press the OK button.
-
Press the Home button 📋.
Wake time
The wake time feature allows you to instruct the product to wake at a certain time on selected days, to eliminate waiting for the warm-up and calibration periods. You must have the SLEEP MODE setting on to set the wake time.
NOTE: Make sure that the real-time clock is set to the correct date and time before you set the wake time.
Set the real-time clock
Use the real-time clock feature to set the date and time settings. The date and time information is attached to stored print jobs, so you can identify the most recent versions.
| Access the DATE/TIME menu | 1. Press the Home button [IMAGE].2. Open each of the following menus. Press the down arrow ▼ to highlight it and then press the OK button to select it.a. CONFIGURE DEVICEb. SYSTEM SETUPc. DATE/TIME |
| Set the date | 1. From the DATE/TIME menu, highlight and select the DATE menu.2. Press the up arrow or down arrow ▲/▼ to select the year, month, and day. Press the OK button after each selection. |
| Set the date format | 1. From the DATE/TIME menu, highlight and select the DATE FORMAT menu.2. Press the up arrow or down arrow ▲/▼ to select the date format, and then press the OK button. |
| Set the time | 1. From the DATE/TIME menu, highlight and select the TIME menu.2. Press the up arrow or down arrow ▲/▼to select the hour, minute, and AM/PM setting. Press the OK button after each selection. |
| Set the time format | 1. From the DATE/TIME menu, highlight and select the TIME FORMAT menu.2. Press the up arrow or down arrow ▲/▼to select the time format, and then press the OK button. |
Set the wake time
- Press the Home button 📋.
- Open each of the following menus. Press the down arrow ▼ to highlight it and then press the OK button to select it.
a. CONFIGURE DEVICE
b. SYSTEM SETUP
c. WAKE TIME
- Press the up arrow or down arrow ▲/▼ to select the day of the week, and then press the OK button.
- Press the down arrow ▼ to select the CUSTOM setting, and then press the OK button.
- Press the up arrow or down arrow ▲/▼to select the hour, minutes, and the AM or PM setting. Press the OK button after each selection.
- Press the OK button to enter the APPLY TO ALL DAYS menu.
- Press the up arrow or down arrow ▲/▼ to select the YES or the NO setting, and then press the OK button.
- If you select NO, use the up arrow or down arrow ▲/▼ to set the WAKE TIME setting for the other days of the week, and then press the OK button to accept each selection.
- Press the Home button 📋.
Manage supplies and accessories
Print when a cartridge reaches estimated end of life
When a print cartridge reaches the end of its estimated useful life, the control panel displays a
You can configure the product to stop when the
The cartridge-life remaining is an approximation only, and it varies depending on the types of documents you print and other factors.
Manage print cartridges
Print-cartridge storage
Do not remove the print cartridge from its package until you are ready to use it.
△ CAUTION: To prevent damage to the print cartridge, do not expose it to light for more than a few minutes.
HP policy on non-HP print cartridges
Hewlett-Packard Company cannot recommend the use of non-HP print cartridges, either new or remanufactured.
NOTE: Any damage caused by a non-HP print cartridge is not covered under the HP warranty and service agreements.
To install a new HP print cartridge, see Replace print cartridges on page 164. To recycle the used cartridge, follow the instructions included with the new cartridge. For more information about recycling, see Return and recycling instructions on page 252.
HP fraud hotline and Web site
Call the HP fraud hotline (1-877-219-3183, toll-free in North America) or go to www.hp.com/go/anticounterfeit when you install an HP print cartridge and the control-panel message says the cartridge is non-HP. HP will help determine if the cartridge is genuine and take steps to resolve the problem.
Your print cartridge might not be a genuine HP print cartridge if you notice the following:
The supplies status page indicates that a non-HP supply is installed.
- You are experiencing a high number of problems with the print cartridge.
- The cartridge does not look like it usually does (for example, the packaging differs from HP packaging).
Recycle supplies
Information about recycling used print cartridges is on the print-cartridge box. See Return and recycling instructions on page 252.
Cartridge memory tag
The HP print cartridges used with this product contain a memory tag that assists in product operation.
In addition, this memory tag collects a limited set of information about product usage, which might include the following information:
• The date when the print cartridge was first installed
The date when the print cartridge was last used
• The number of pages printed using the print cartridge
The page coverage
• The printing modes used
• Any printing errors that might have occurred
The product model
This information helps HP design future products to meet customers' printing needs.
The data collected from the print cartridge memory tag does not contain information that can be used to identify a customer or the specific product.
HP collects a sampling of the memory tags from print cartridges that are returned to HP's free return and recycling program (HP Planet Partners: www.hp.com/recycle). The memory tags from this sampling are read and studied to improve future HP products. HP partners who assist in recycling this print cartridge might also have access to this data.
Any third-party company that possesses the print cartridge might have access to the anonymous information on the memory tag. If you prefer to not allow access to this information, you can render the tag inoperable. However, after you render the memory tag inoperable, the memory tag cannot be used in an HP product.
Replacement instructions
Replace print cartridges
The product uses four colors and has a different print cartridge for each color: black (K), magenta (M), cyan (C), and yellow (Y).
△ CAUTION: If toner gets on clothing, wipe it off with a dry cloth and wash the clothes in cold water. Hot water sets toner into fabric.
NOTE: Information about recycling used print cartridges is on the print-cartridge box.
- Open the front door. Make sure that the door is completely open.
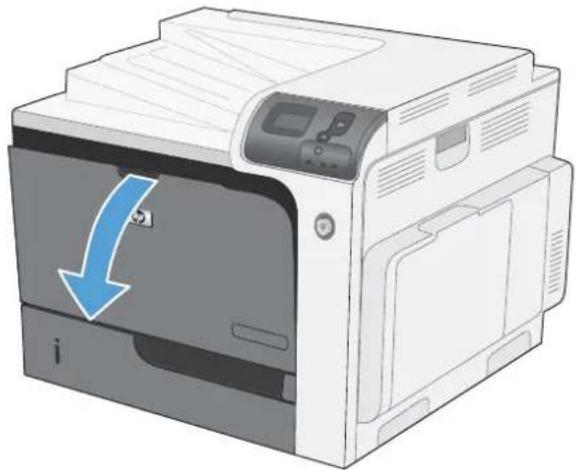
natural_image
Illustration of a printer with a blue arrow indicating compression or disassembly (no text or symbols present)- Grasp the handle of the used print cartridge and pull out to remove.
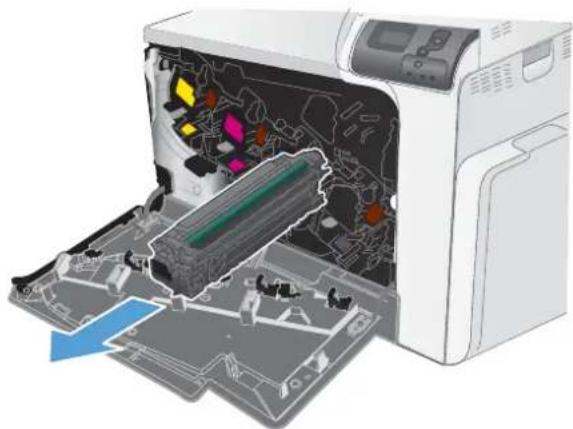
natural_image
Diagram of a printer's internal structure showing internal components and packaging (no text or symbols)-
Store the used print cartridge in a protective bag. Information about recycling used print cartridges is on the print-cartridge box.
-
Remove the new print cartridge from its protective bag.
NOTE: Be careful not to damage the memory tag on the print cartridge.
-
Grasp both sides of the print cartridge and distribute the toner by gently rocking the print cartridge.
-
Remove the orange protective cover from the print cartridge.
CAUTION: Avoid prolonged exposure to light.
CAUTION: Do not touch the green roller. Doing so can damage the cartridge.
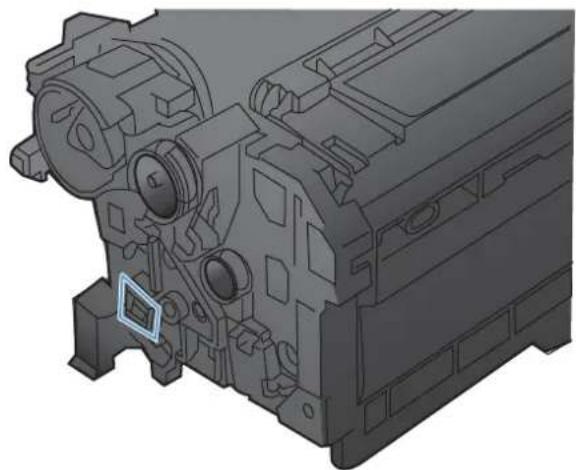
natural_image
3D mechanical component diagram showing internal cavities and mounting holes (no text or symbols)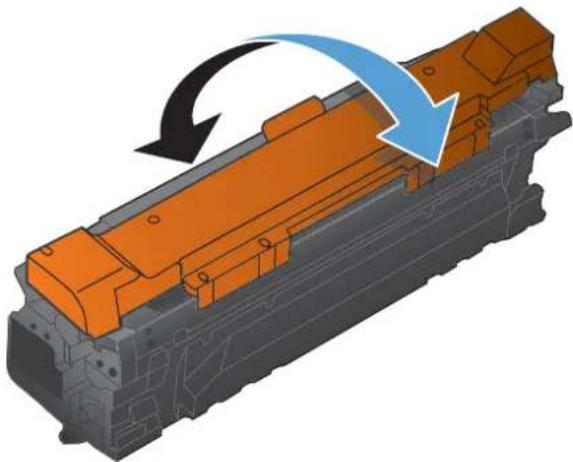
natural_image
3D mechanical assembly diagram showing orange components and blue directional arrows indicating motion (no text or symbols)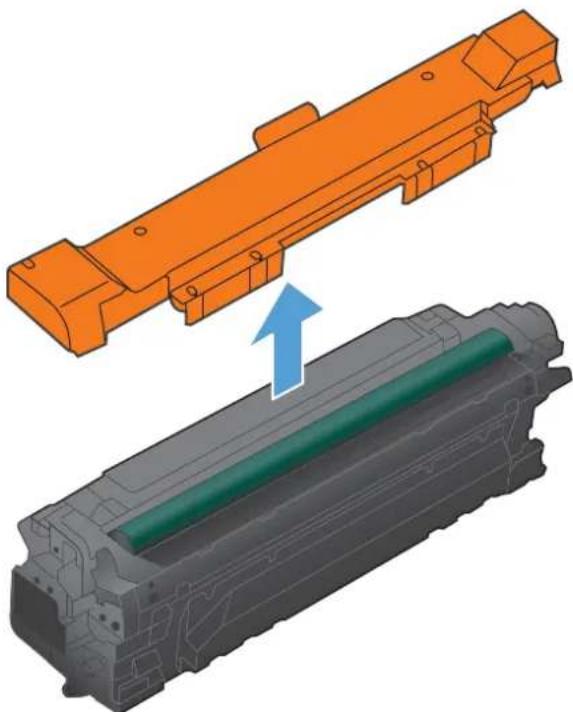
natural_image
3D mechanical assembly diagram showing a component being lowered into a battery pack (no text or symbols present)- Align the print cartridge with its slot and insert the print cartridge until it clicks into place.
NOTE: The print cartridges go in at a slight angle.
- Close the front door.
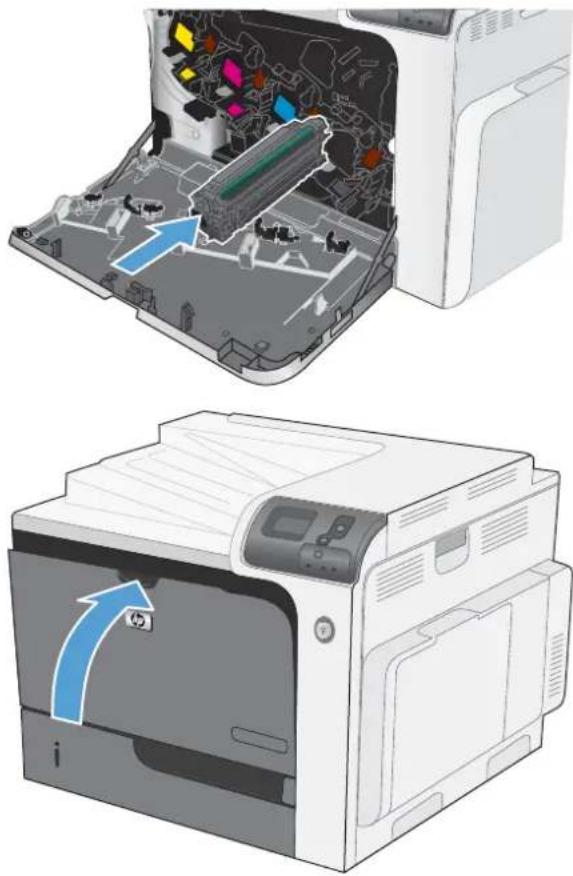
natural_image
Two views of an open printer showing internal components and a paper airplane (no text or symbols visible)Replace the toner collection unit
Replace the toner collection unit when the control panel prompts you.

NOTE: The toner collection unit is designed for a single use. Do not attempt to empty the toner collection unit and reuse it. Doing so could lead to toner being spilled inside the product, which could result in reduced print quality. After use, return the toner collection unit to HP's Planet Partners program for recycling.
-
Open the front door. Make sure that the door is completely open.
-
Grasp the top of the toner collection unit and remove it from the product.
-
Place the attached cap over the opening at the top of the unit.
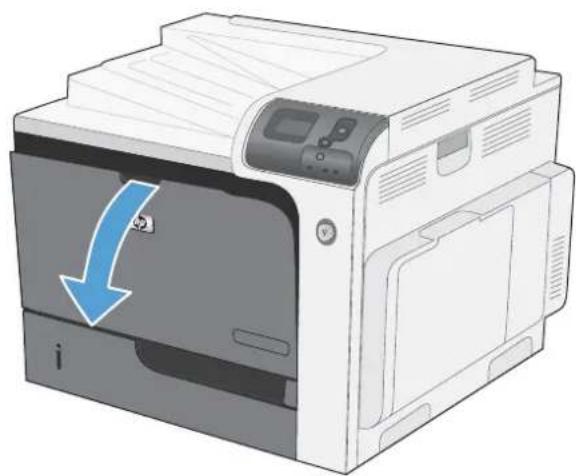
natural_image
Illustration of a printer with a blue arrow indicating compression or disassembly (no text or symbols present)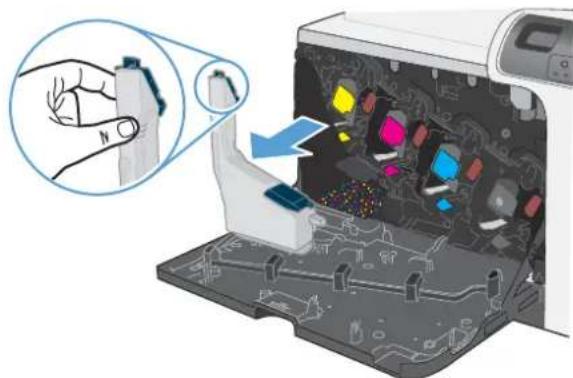
natural_image
Diagram of a hand operating a device with a magnified inset showing the hand interacting with a device (no text or symbols present)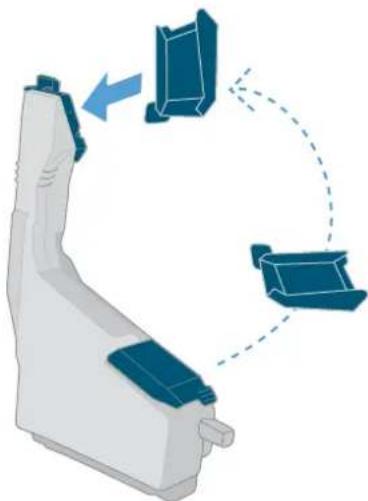
natural_image
3D diagram of a mechanical device with blue components and directional arrows indicating motion (no text or symbols)-
Remove the new toner collection unit from its packaging.
-
Insert the bottom of the new unit into the product first and then push the top of the unit until it clicks into place.
-
Close the front door.
NOTE: If the toner collection unit is not installed correctly, the front door does not close completely.
To recycle the used toner collection unit, follow the instructions included with the new toner collection unit.
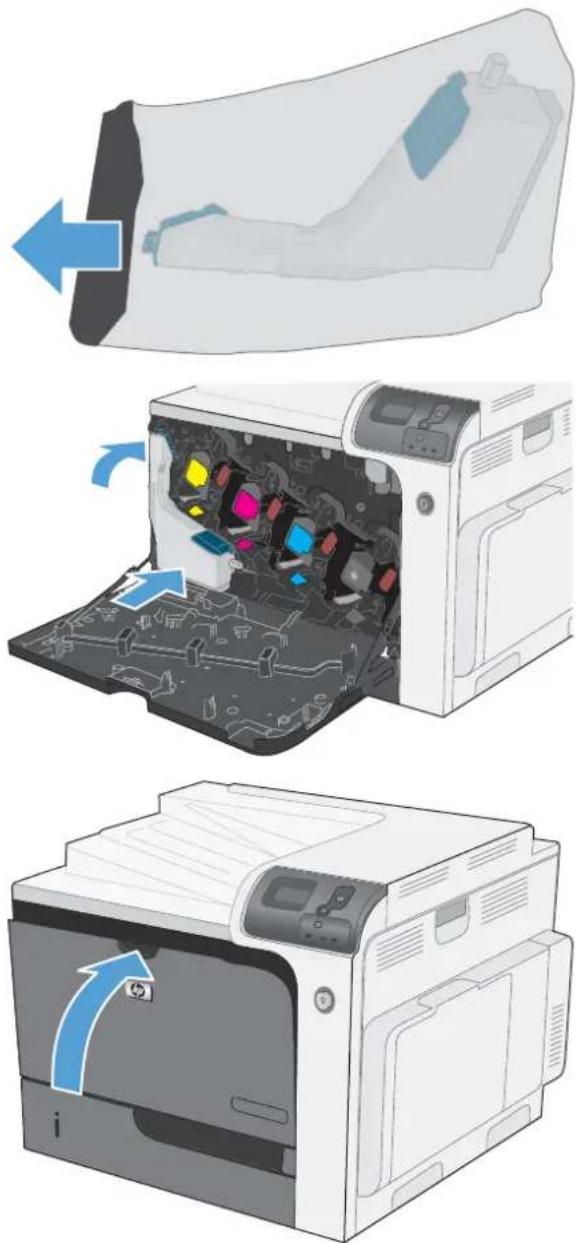
natural_image
Three-step illustration of a printer's internal structure showing open, closed, and closed-up views with color-coded components (no text or symbols)Install memory DIMMs
You can install more memory for the product by adding a dual inline memory module (DIMM).
△ CAUTION: Static electricity can damage electronic parts. When handling electronic parts, either wear an antistatic wrist strap, or frequently touch the surface of the antistatic package and then touch bare metal on the product.
- Turn the product off.
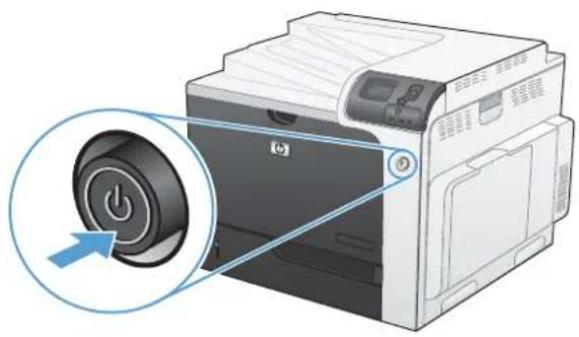
natural_image
Illustration of a printer with a power button and circular arrow indicating action (no text or symbols)- Disconnect all power and interface cables.
NOTE: This illustration might not show all the cables.
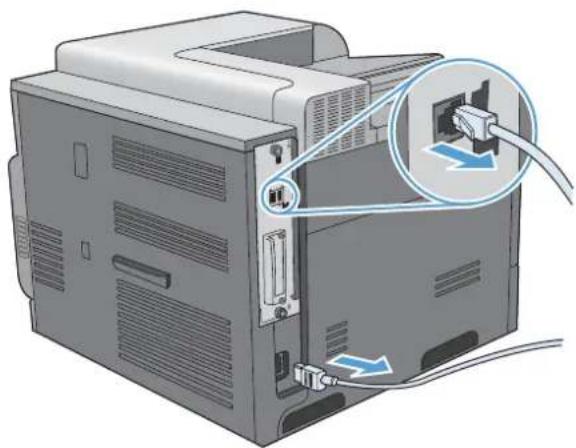
natural_image
Illustration of a computer printer with cable and socket, showing internal components and connection arrows (no text or symbols)- Locate the thumb screws on the formatter board in the rear of the product.
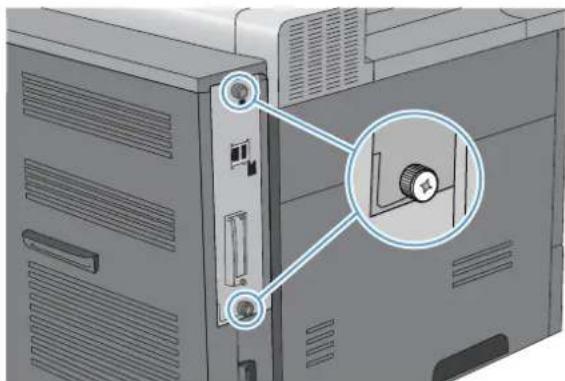
natural_image
Diagram of a computer tower with a magnified inset showing a button component (no text or symbols present)- Unscrew the thumb screws and then pull the formatter board from the product. Place the formatter board on a clean, flat, grounded surface.
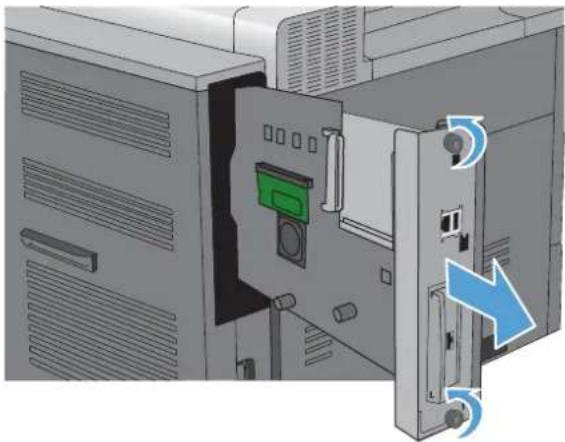
natural_image
3D diagram of a computer tower with an open drive and a green drive slot, showing no text or symbols.- To replace a DIMM that is currently installed, spread the latches apart on each side of the DIMM slot, lift the DIMM up at an angle, and pull it out.
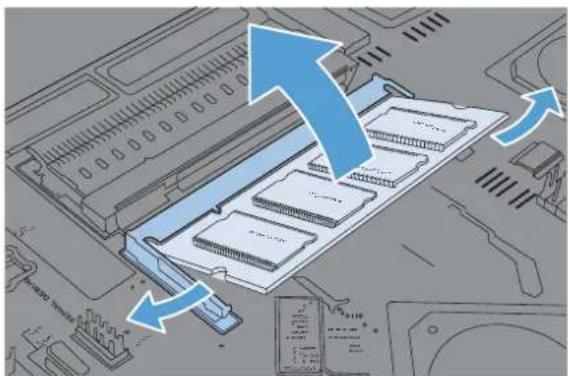
natural_image
Diagram of a computer motherboard showing memory slots and ventilation ducts (no text or symbols)- Remove the new DIMM from the antistatic package. Locate the alignment notch on the bottom edge of the DIMM.
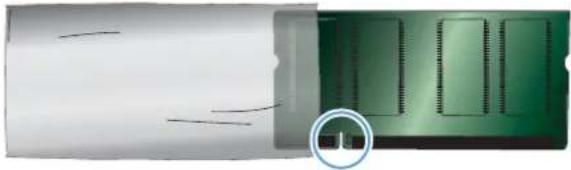
natural_image
Close-up of a cylindrical electronic component with internal traces, alongside a green circuit board (no visible text or symbols)- Holding the DIMM by the edges, align the notch on the DIMM with the bar in the DIMM slot at an angle and firmly press the DIMM into the slot until it is fully seated. When installed correctly, the metal contacts are not visible.
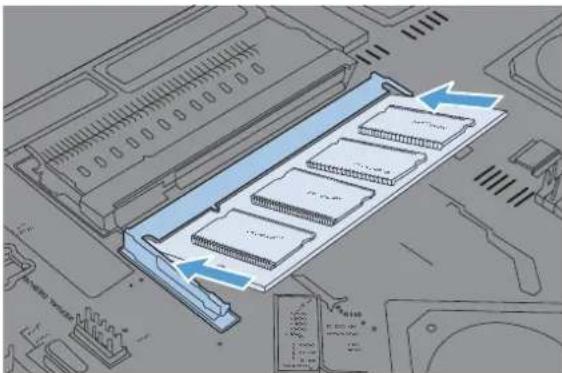
natural_image
Diagram of a computer RAM module with arrows indicating memory or ventilation direction (no text or symbols present)- Push down on the DIMM until both latches engage the DIMM.
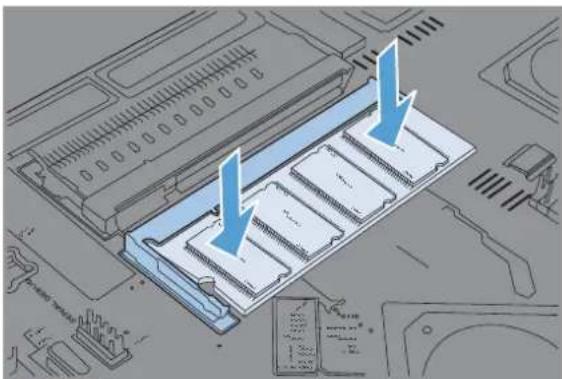
natural_image
Diagram of a computer RAM module with two blue arrows indicating internal components (no text or symbols present)NOTE: If you have difficulty inserting the DIMM, make sure the notch on the bottom of the DIMM is aligned with the bar in the slot. If the DIMM still does not go in, make sure you are using the correct type of DIMM.
- Align the formatter board in the tracks at the bottom of the slot, and then slide the board back into the product.
NOTE: To prevent damage to the formatter board, ensure the formatter board is aligned in the tracks at the top and the bottom of the opening.
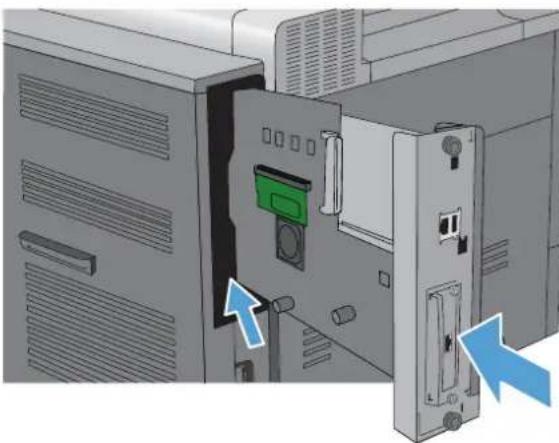
natural_image
Diagram of a computer tower with an open drive and two blue arrows indicating directional changes (no text or symbols present)- Reconnect the power cable and interface cables, and turn the product on.
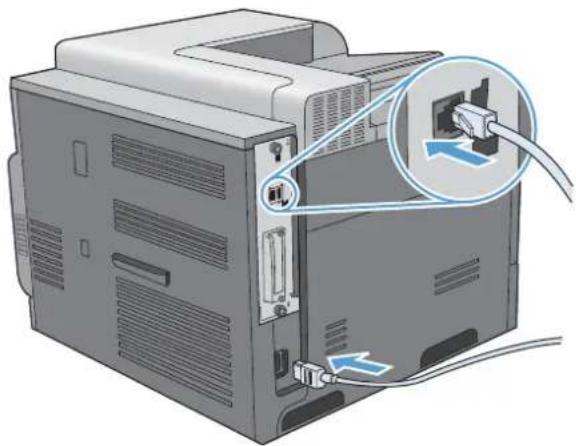
natural_image
Illustration of a computer printer with cable and socket, showing internal components and connection point (no text or symbols)Enable memory
| Windows XP, Windows Server 2003, Windows Server 2008, and Windows Vista | 1. Click Start.2. Click Settings.3. Click Printers and Faxes (using the default Start menu view) or click Printers (using the Classic Start menu view).4. Right-click the product driver icon, and then select Properties.5. Click the Device Settings tab.6. Expand the area for Installable Options.7. Next to Automatic Configuration, select Update Now.8. Click OK.NOTE: If the memory is not updated correctly after using the Update Now option, you can manually select the total amount of memory installed in the product in the Installable Options area.The Update Now option overwrites any existing product configuration settings. |
| Windows 7 | 1. Click Start.2. Click Devices and Printers.3. Right-click the product driver icon, and then select Printer properties.4. Click the Device Settings tab.5. Expand the area for Installable Options.6. Next to Automatic Configuration, select Update Now.7. Click OK.NOTE: If the memory is not updated correctly after using the Update Now option, you can manually select the total amount of memory installed in the product in the Installable Options area.The Update Now option overwrites any existing product configuration settings. |
| Mac OS X 10.4 1. | From the Apple menu 📋, click the System Preferences menu and then click the Print & Fax icon. |
| 2. Select the product in the left side of the window. | |
| 3. Click the Printer Setup button. | |
| 4. Click the Installable Options menu. | |
| Mac OS X 10.5 and 10.6 1. | From the Apple menu 📋, click the System Preferences menu and then click the Print & Fax icon. |
| 2. Select the product in the left side of the window. | |
| 3. Click the Options & Supplies button. | |
| 4. Click the Driver tab. | |
| 5. Configure the installed options. |
Check DIMM installation
After installing the DIMM, make sure that the installation was successful.
- Turn the product on. Check that the Ready light is illuminated after the product has gone through the startup sequence. If an error message appears, a DIMM might have been incorrectly installed. See Control-panel messages on page 183.
- Print a configuration page (see Print information pages on page 148).
- Check the memory section on the configuration page and compare it to the configuration page that was printed before the memory installation. If the amount of memory has not increased, the DIMM might not be installed correctly, or the DIMM might be defective. Repeat the installation procedure. If necessary, install a different DIMM.
NOTE: If you installed a product language (personality), check the "Installed Personalities and Options" section on the configuration page. This area should list the new product language.
Memory allocation
Utilities or jobs that you download to the product sometimes include resources (for example, fonts, macros, or patterns). Resources that are internally marked as permanent remain in the product memory until you turn the product off.
Use the following guidelines if you use the page description language (PDL) ability to mark resources as permanent. For technical details, see an appropriate PDL reference for PCL or PS.
- Mark resources as permanent only when it is absolutely necessary that they remain in memory while the product is turned on.
- Send permanent resources to the product only at the beginning of a print job and not while the product is printing.
NOTE: Overusing permanent resources or downloading them while the product is printing might affect product performance or the ability to print complex pages.
Install external I/O cards
This product is equipped with an external I/O (EIO) slot. You can install an additional HP Jetdirect print server card or external EIO hard drive in the available EIO slot.

NOTE: This example shows installing an HP Jetdirect print server card.
- Turn the product off.
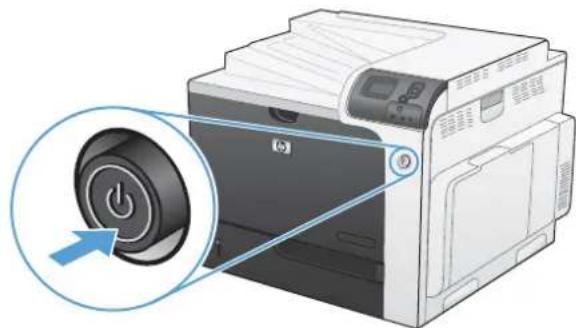
natural_image
Illustration of a printer with a power button icon and a magnified view of its circular button (no text or symbols)- Disconnect all power and interface cables.

NOTE: This illustration might not show all the cables.
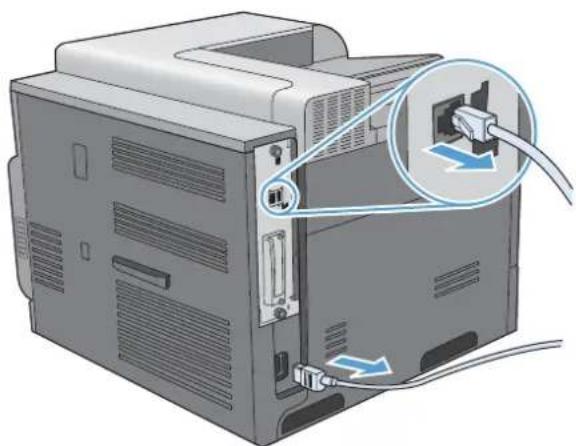
natural_image
Illustration of a computer tower with cable and socket, showing internal components connected to a power outlet (no text or symbols present)- Loosen and remove the two retaining screws holding the cover for the EIO slot, and then remove the cover. You will not need these screws and the cover again. They can be discarded.
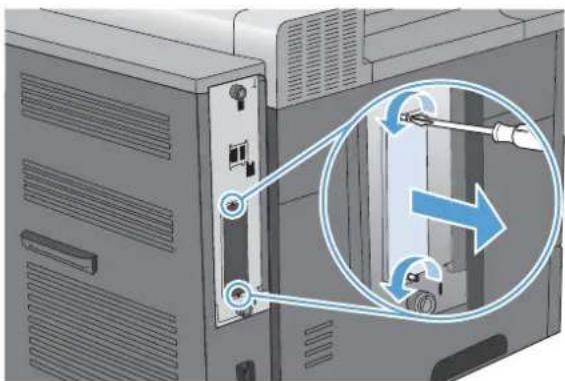
natural_image
Diagram of a computer tower with a magnified inset showing a mechanical component (no text or symbols present)- Firmly insert the HP Jetdirect print server card into the EIO slot.
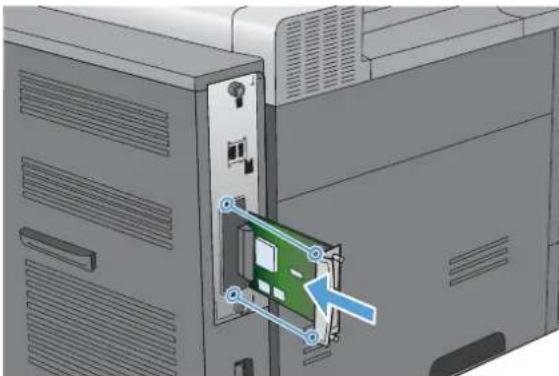
natural_image
3D diagram of a computer tower with an internal green drive component inserted, showing no text or symbols.- Insert and tighten the retaining screws that came with the print server card.
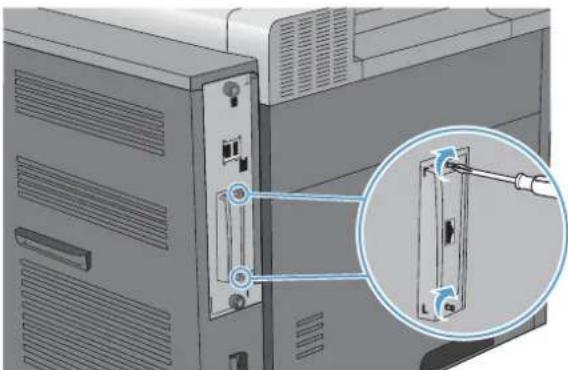
natural_image
Diagram of a computer tower with an inserted drive and a magnified inset showing the internal components (no text or symbols)- Reconnect the power cable and remaining interface cables, and turn the product on.
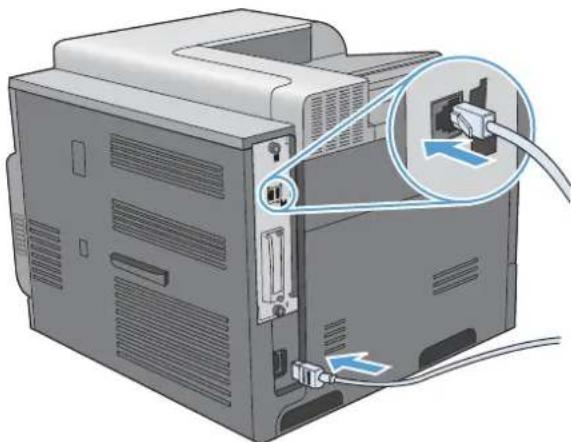
natural_image
Illustration of a computer printer with cable and socket inserted, showing internal components (no text or symbols)- Print a configuration page. An HP Jetdirect configuration page that contains network configuration and status information should also print.
If it does not print, turn the product off, and then uninstall and reinstall the print server card to ensure that it is completely seated in the slot.
-
Perform one of these steps:
-
Choose the correct port. See the computer or operating system documentation for instructions.
- Reinstall the software, choosing the network installation this time.
Clean the product
Over time, particles of toner and paper accumulate inside the product. This can cause print-quality problems during printing. Cleaning the product eliminates or reduces these problems.
Clean the paper path and print-cartridge areas every time that you change the print cartridge or whenever print-quality problems occur. As much as possible, keep the product free from dust and debris.
To clean the print-cartridge area and the product exterior, use a soft, water-moistened cloth.
Clean the paper path
- Press the Home button
- Press the up arrow or down arrow ▲/▼ to highlight the CONFIGURE DEVICE menu, and then press the OK button.
- Press the up arrow or down arrow ▲/▼ to highlight the PRINT QUALITY menu, and then press the OK button.
- If the product has automatic two-sided printing, go to step 5.
If the product does not have automatic two-sided printing, press the up arrow or down arrow ▲/▼ to highlight the CREATE CLEANING PAGE option, and then press the OK button. Follow the instructions on the printed page.
- Press the up arrow or down arrow ▲/▼ to highlight the PROCESS CLEANING PAGE option, and then press the OK button. The cleaning process takes several minutes.
- Discard the printed page. The task is complete.
Product updates
To download the most recent firmware upgrade for the product, go to www.hp.com/go/cljcp4025_firmware or www.hp.com/go/cljcp4525_firmware.
10 Solve problems
- Solve general problems
- Restore factory settings
• Interpret control-panel messages
Clear jams - Solve paper-handling problems
- Solve image-quality problems
- Solve performance problems
- Solve connectivity problems
• Product software problems - Solve common Windows problems
- Solve common Mac problems
Solve general problems
If the product is not responding correctly, complete the steps in the following checklist, in order. If the product does not pass a step, follow the corresponding troubleshooting suggestions. If a step resolves the problem, you can stop without performing the other steps on the checklist.
Troubleshooting checklist
- Make sure the product Ready light is on. If no lights are on, complete these steps:
a. Check the power-cable connections.
b. Check that the power is turned on.
c. Make sure that the line voltage is correct for the product power configuration. (See the label that is on the back of the product for voltage requirements.) If you are using a power strip and its voltage is not within specifications, plug the product directly into the wall. If it is already plugged into the wall, try a different outlet.
d. If none of these measures restores power, contact HP Customer Care.
- Check the cabling.
a. Check the cable connection between the product and the computer or network port. Make sure that the connection is secure.
b. Make sure that the cable itself is not faulty by using a different cable, if possible.
c. Check the network connection.
- Check to see if any messages appear on the control-panel display. If any error messages appear, see Control-panel messages on page 183.
- Ensure that the paper that you are using meets specifications.
- Print a configuration page. See Print information pages on page 148. If the product is connected to a network, an HP Jetdirect page also prints.
a. If the pages do not print, check that at least one tray contains paper.
b. If the page jams in the product, see Clear jams on page 206.
- If the configuration page prints, check the following items:
a. If the page does not print correctly, the problem is with the product hardware. Contact HP Customer Care.
b. If the page prints correctly, then the product hardware is working. The problem is with the computer you are using, with the printer driver, or with the program.
- Select one of the following options:
Windows: Click Start, click Settings, and then click Printers or Printers and Faxes. Double-click the name of the product.
-or-
Mac OS X: Open the Printer Setup Utility or the Print & Fax list, and double-click the line for the product.
- Verify that you have installed the printer driver for this product. Check the program to make sure that you are using the printer driver for this product.
- Print a short document from a different program that has worked in the past. If this solution works, then the problem is with the program you are using. If this solution does not work (the document does not print), complete these steps:
a. Try printing the job from another computer that has the product software installed.
b. If you connected the product to the network, connect the product directly to a computer with a USB cable. Redirect the product to the correct port, or reinstall the software, selecting the new connection type that you are using.
Factors that affect product performance
Several factors affect the time it takes to print a job:
• Maximum product speed, measured in pages per minute (ppm)
The use of special paper (such as transparencies, heavy paper, and custom-size paper)
• Product processing and download time
• The complexity and size of graphics
• The speed of the computer you are using
The USB connection
• The printer I/O configuration
• The amount of memory installed in the product
The network operating system and configuration (if applicable)
• The printer driver that you are using

NOTE: Although additional memory can improve how the product handles complex graphics and improve download times, it will not increase maximum product speed (ppm).
Restore factory settings
Use the RESETS menu to restore factory settings.
- Press the Home button 📋.
- Press the down arrow ▼ to highlight the CONFIGURE DEVICE menu, and then press the OK button.
- Press the down arrow ▼ to highlight the RESETS menu, and then press the OK button.
- Press the down arrow ▼ to highlight the RESTORE FACTORY SETTINGS option, and then press the OK button to reset the product to the original factory settings.
For more information, see Resets menu on page 40.
Interpret control-panel messages
Control-panel message types
Four types of control-panel messages can indicate the status of or problems with the product.
| Message type Description | |
| Status messages | Status messages reflect the current state of the product. They inform you of normal product operation and require no interaction to clear them. They change as the state of the product changes. Whenever the product is ready, not busy, and has no pending warning messages, the status message Ready appears if the product is online. |
| Warning messages | Warning messages inform you of data and print errors. These messages typically alternate with the Ready or status messages and remain until OK is pressed. Some warning messages are clearable. If CLEARABLE WARNINGS is set to JOB on the product CONFIGURE DEVICE menu, the next print job clears these messages. |
| Error messages | Error messages communicate that some action must be performed, such as adding paper or clearing a jam.Some error messages are auto-continuable. If AUTO-CONTINUE is set on the menus, the product will continue normal operation after an auto-continuable error message appears for 10 seconds.NOTE:Pressing any button during the 10-second auto-continuable error message overrides the auto-continue feature, and the button function takes precedence. For example, pressing the stop button × pauses printing and offers the option to cancel the print job. |
| Critical-error messages | Critical error messages inform you of a product failure. Some of these messages can be cleared by turning the product off and then on. These messages are not affected by the AUTO-CONTINUE setting. If a critical error persists, service is required. |
Control-panel messages
Table 10-1 Control-panel messages
| Description Recommended action | ||
| 10.XX.YY SUPPLY MEMORY ERROR The product cannot read or write to at least one print cartridge memory tag or a memory tag is missing from a print cartridge. | Reinstall the print cartridge, or install a new print cartridge. | |
| XX values | ||
| 00 = Memory tag memory error | ||
| 10 = Memory tag missing | ||
| YY values | ||
| 00 = Black | ||
| 01 = Cyan | ||
| 02 = Magenta | ||
| 03 = Yellow | ||
| 11.XX Internal clock errorTo continue press OK | The product real-time clock has experienced an error. | Whenever the product is turned off and then turned on again, set the time and date at the control panel. SeeSystem setup menu on page 27.If the message persists, contact HP support.SeeCustomer support on page 246. |
| 13.XX.YY FUSER AREA JAM | A jam has occurred in the fuser area. | CAUTION:The fuser can be hot while the product is in use. Wait for the fuser to cool before handling it.For instructions on clearing the jam, seeClear jams in the right door on page 209. |
| 13.XX.YY FUSER WRAP JAM | A jam has occurred in the fuser. | CAUTION:The fuser can be hot while the product is in use. Wait for the fuser to cool before handling it.For instructions on clearing the jam, seeClear jams in the right door on page 209. |
| 13.XX.YY JAM ABOVE TOP OUTPUT BIN | A jam has occurred in the output area. | For instructions on clearing the jam, seeClear jams in the output bin area on page 212. |
| 13.XX.YY JAM IN LOWER RIGHT DOORA jam has occurred in the lower-right door (Tray 3). | For instructions on clearing the jam, seeClear jams in the lower right door (Tray 3. 4, or 5) on page 216. | |
| 13.XX.YY JAM IN RIGHT DOORA jam has occurred in the duplex and feed area inside the right door. | For instructions on clearing the jam, seeClear jams in the right door on page 209. | |
| 13.XX.YY JAM IN TOP OUTPUT BIN | A jam has occurred in the top output bin. | For instructions on clearing the jam, seeClear jams in the output bin area on page 212. |
| 13.XX.YY JAM IN TRAY 1 | A jam has occurred in Tray 1. | For instructions on clearing the jam, seeClear jams in Tray 1 on page 213. |
| 13.XX.YY JAM IN TRAY <X> | A jam has occurred in the indicated tray. | For instructions on clearing the jam, seeClear jams in Tray 2 or optional Trays 3. 4, or 5 on page 215. |
| 13.XX.YY JAMS IN RIGHT DOOR | A jam has occurred in the fuser area. | CAUTION:The fuser can be hot while the product is in use. Wait for the fuser to cool before handling it.For instructions on clearing the jam, seeClear jams in the right door on page 209. |
| 20 INSUFFICIENT MEMORYTo continue press OK | The product received more data than can fit in the available memory. You might have tried to transfer too many macros, soft fonts, or complex graphics. | Press theOKbutton to print the transferred data (some data might be lost), and then simplify the print job or install additional memory. |
| 22 EIO X BUFFER OVERFLOWTo continue press OK | Too much data was sent to the EIO card in the specified slot (x). An incorrect communications protocol might be in use. | Press theOKbutton to print the transferred data. (Some data might be lost.)Check the host configuration. If the message persists, contact HP support. SeeCustomer support on page 246. |
| 22 EMBEDDED I/O BUFFER OVERFLOWTo continue press OK | Too much data was sent to the embedded HP Jetdirect print server. | Press the OK button to print the transferred data. (Some data might be lost.)Check the host configuration. If the message persists, contact HP support. SeeCustomer support on page 246. |
| 22 USB I/O BUFFER OVERFLOWTo continue press OK | The product's USB buffer has overflowed. | Press the OK button to print the transferred data. (Some data might be lost.)Check the host configuration. If the message persists, contact HP support. SeeCustomer support on page 246. |
| 40 EIO X BAD TRANSMISSIONTo continue press OK | The connection between the product and the EIO card in the specified slot has been broken. | Press the OK button to clear the error message and continue printing.Try to reinstall the EIO card. |
| 40 EMBEDDED I/O BAD TRANSMISSIONTo continue press OK | A temporary printing error has occurred. | Press the OK button to clear the error message. (Data will be lost.) |
| 41.3 UNEXPECTED SIZE IN TRAYLOAD TRAY[TYPE] [SIZE]To use another tray press OK | The product detected a different paper size than expected.The prompt to use another tray is displayed only if another tray has paper loaded. | Load the tray with the size and type of paper indicated, or use another tray. |
| 41.5 UNEXPECTED TYPE IN TRAYLOAD TRAY[TYPE] [SIZE]To use another tray press OK | The product detected a different paper type than expected.The prompt to use another tray is displayed only if another tray has paper loaded. | Load the tray with the size and type of paper indicated, or use another tray if available. |
| 41.7 ERRORTo continue press OK | A temporary printing error has occurred. Try using different paper. | If the error does not clear, turn the product off and then on. |
| 48.01 TRANSFER UNIT ERROR The transfer belt has dislocated during printing. | Turn product off then on.If the message persists, remove and reinstall the transfer unit. Contact HP support if the message appears after reinstalling the transfer unit. SeeCustomer support on page 246. | |
| 49.XXXX ERRORTo continue turn off then on | A firmware error has occurred. This error can be caused by corrupted print jobs, software applications issues, non-product specific printer drivers, poor-quality USB or network cables, bad network connections or incorrect configurations, invalid firmware operations, or unsupported accessories.1. Turn the product off and then on.2. If the error returns, check the following items:The error might be caused by a network connectivity problem, such as a bad interface cable, a bad USB port, or an invalid network configuration setting.The error might be caused by the print job, such as an invalid printer driver, a problem with the software application, or a problem with the file you are printing. For more information about solving print job problems, see Solve general problems on page 180.Upgrading the product firmware might help resolve the error. See Product updates on page 177.3. If the message still persists, contact HP support. See Customer support on page 246. | |
| 50.X FUSER ERROR | A fuser error has occurred. | Make sure you have the correct fuser. Re-seat the fuser. Turn the product off, and then turn the product on.If the message persists, contact HP support. See Customer support on page 246. |
| 51.XY ERRORTo continue turn off then on | A product error has occurred. Turn the product off, and then turn the product on. If the message persists, contact HP support. See Customer support on page 246. | |
| 52.XY ERRORTo continue turn off then on | A product error has occurred. Turn the product off, and then turn the product on. If the message persists, contact HP support. See Customer support on page 246. | |
| 54.XX ERRORTo continue turn off then on | Error requires that the product be turned off then on. | Turn the product off, and then turn the product on.If the message persists, contact HP support. See Customer support on page 246. |
| 55.XX.YY DC CONTROLLER ERRORTo continue turn off then on | The print engine is not communicating with the formatter. | Turn the product off, and then turn the product on.If the message persists, contact HP support. See Customer support on page 246. |
| 56.X ERRORTo continue turn off then on | A temporary printing error has occurred. Turn the product off, and then turn the product on.If the message persists, contact HP support.SeeCustomer support on page 246. | |
| 57.XX ERRORTo continue turn off then on | A temporary printing error has occurred. Turn the product off, and then turn the product on.If the message persists, contact HP support.SeeCustomer support on page 246. | |
| 58.XX ERRORTo continue turn off then on | A temporary printing error has occurred. Turn the product off, and then turn the product on.If the message persists, contact HP support.SeeCustomer support on page 246. | |
| 59.BO CLEANING MOTOR ERRORREPLACE TONER COLLECTION UNIT | This message appears for one of the following reasons:The cleaning motor is stuck.The toner collection unit is full.The chute at the top of the toner collection unit is clogged. | Replace the toner collection unit. SeeReplace the toner collection unit on page 167. |
| 59.XY ERRORTo continue turn off then on | A temporary printing error has occurred. Turn the product off, and then turn the product on.If the message persists, contact HP support.SeeCustomer support on page 246. | |
| 60.X ERRORTo continue turn off then on | The tray specified by X is not lifting correctly.X values2 = Tray 23 = Tray 3 | Follow the instructions on the product control panel. |
| 62 NO SYSTEMTo continue turn off then on | The product has an internal problem. Turn the product off and then on.If the message persists, contact HP support.SeeCustomer support on page 246. | |
| 66.XY.ZZ SERVICE ERRORCheck cables and turn off then on | The external paper-handling controller has detected a failure. | Turn the product off and then on.If the message persists, contact HP support.SeeCustomer support on page 246. |
| 68.X PERMANENT STORAGE FULLTo continue press OK | The product NVRAM is full. Some settings saved in the NVRAM might have been reset to the factory defaults. Printing can continue, but some unexpected functions might occur if an error occurred in permanent storage.X values0 = Internal memory1 = Removable disk | Press theOKbutton to clear the message. If the message is not cleared, turn the product off, and then turn the product on.If the message persists, contact HP support.SeeCustomer support on page 246. |
| 68.X PERMANENT STORAGE WRITE FAILTo continue press OK | The product NVRAM is failing to write.Printing can continue, but some unexpected functions might occur if an error occurred in permanent storage. | Press the OK button to clear the message. If the message is not cleared, turn the product off, and then turn the product on.If the message persists, contact HP support.See Customer support on page 246. |
| X values0 = Internal memory1 = Removable disk | ||
| 68.X STORAGE ERROR SETTINGS CHANGEDTo continue press OK | One or more product settings are invalid and have been reset to the factory-default settings. Printing can continue, but some unexpected functions might occur if an error occurred in permanent storage. | Press the OK button to clear the message. If the message is not cleared, turn the product off, and then turn the product on.If the message persists, contact HP support.See Customer support on page 246. |
| 69.X ERRORTo continue turn off then on | A temporary printing error occurred. Turn the product off, and then turn the product on.If the message persists, contact HP support.See Customer support on page 246. | |
| 79.XXXX ERRORTo continue turn off then on | An internal product error has occurred. Turn the product off and then on. | |
| 8X.YYYY EIO ERROR This message appears in English only. It indicates that the EIO card in slot X has failed. | Replace the EIO card. | |
| 8X.YYYY EMBEDDED JETDIRECT ERROR This message appears in English only. It indicates that the embedded HP Jetdirect card has failed. | Contact HP support. See Customer support on page 246. | |
| ACCEPT BAD SIGNATURE?Yes press OKalternates withACCEPT BAD SIGNATURE?No press ☒ | The product is performing a remote firmware upgrade, and the code signature is invalid. | Download the correct firmware upgrade file for this product, and then reinstall the upgrade. See Product updates on page 177. |
| Access denied MENUS LOCKED The control-panel menu that you tried to select is currently locked. | Consult with the person who administers the product. | |
| Action not currently available for tray x Tray size cannot be ANY SIZE/ANY CUSTOM | Duplex registration is not available when the size is set to ANY SIZE or ANY CUSTOM. | Configure the tray to a specific size, and then set the registration for that tray. |
| BAD OPTIONAL TRAY CONNECTION | The optional tray is not connected correctly. | 1. Turn the product off.2. Remove and then reinstall the optional tray.If the message persists, contact HP support.See Customer support on page 246. |
| Bad SignatureUpgrade cancelled | The firmware upgrade code does not match the product signature. | Download the correct firmware upgrade file for this product, and then reinstall the upgrade. See Product updates on page 177. |
| BLACK CARTRIDGE LOW The product indicates when a supply level is low. Actual print cartridge life might vary. You do not need to replace the print cartridge at this time unless print quality is no longer acceptable. | If print quality is no longer acceptable, replace the print cartridge. Consider purchasing a replacement cartridge so it is available when the installed cartridge has reached the end of its estimated life. SeeReplace print cartridges on page 164. | |
| BLACK CARTRIDGE LOW LESS THAN XXXX PAGES | The product indicates when a supply level is low. Actual print cartridge life might vary. You do not need to replace the print cartridge at this time unless print quality is no longer acceptable. Estimated pages remaining is based upon the historical page coverage of this product. | If print quality is no longer acceptable, replace the print cartridge. Consider purchasing a replacement cartridge so it is available when the installed cartridge has reached the end of its estimated life. SeeReplace print cartridges on page 164. |
| BLACK CARTRIDGE VERY LOW The product indicates when a supply level is very low. Actual print cartridge life might vary. You do not need to replace the print cartridge at this time unless print quality is no longer acceptable. After an HP supply has reached the very low threshold, the HP premium protection warranty for that supply has ended. | If print quality is no longer acceptable, replace the print cartridge. Consider purchasing a replacement cartridge so it is available when the installed cartridge has reached the end of its estimated life. SeeReplace print cartridges on page 164. | |
| BLACK CARTRIDGE VERY LOW PRINTING BLACK ONLY | The product indicates when a supply level is very low. The product has been configured to print using only black when the level of a color supply is very low. The actual print cartridge life might vary. You do not need to replace the cartridge at this time unless print quality is no longer acceptable. After an HP supply has reached the very low threshold, the HP premium protection warranty for that supply has ended. | To stop printing black only, change the AT VERY LOW menu item for Color Cartridges to a setting other thanPRINT IN BLACKor replace the very low color cartridges. Consider purchasing replacement cartridges so they are available when the installed cartridges have reached the end of their estimated lives. SeeReplace print cartridges on page 164. |
| BLACK CARTRIDGE VERY LOW To continue press OK | The product indicates when a supply level is very low. Actual print cartridge life might vary. Consider having a replacement print cartridge available to install when print quality is no longer acceptable. You do not need to replace the print cartridge at this time unless print quality is no longer acceptable. After an HP supply has reached the very low threshold, the HP premium protection warranty for that supply has ended. | Press theOKbutton to continue. If print quality is no longer acceptable, replace the print cartridge. Consider purchasing a replacement cartridge so it is available when the installed cartridge is empty. SeeReplace print cartridges on page 164. |
| Calibrating... | Displays during calibration. | No action is necessary. |
| CALIBRATION RESET PENDING Processing... | A calibration reset will occur when all jobs are processed. | To begin the reset sooner, cancel all jobs by pressing the Stop button ✗. |
| Canceling... | The product is canceling the current job. | No action is necessary. |
| CARD SLOTNOT FUNCTIONAL The compact flash card in slotis not working correctly. | Remove the card from the slot indicated, and replace with a new card. | |
| CARD SLOT DEVICE FAILURE To clear press OK | The specified device has failed. | Press theOKbutton to clear. |
| CARD SLOT FILE OPERATION FAILED To clear press OK | A PJL file system command attempted to perform an illogical operation. | Press theOKbutton to clear. |
| CARD SLOT FILE SYSTEM IS FULLTo clear press OK | A PJL file system command could not store something on the file system because the file system was full. | Press the OK button to clear. |
| CARD SLOT IS WRITE PROTECTEDTo clear press OK | The file system device is protected and no new files can be written to it. | Press the OK button to clear. |
| CARD SLOT NOT INITIALIZED This file-storage component must be initialized before use. | Use the embedded Web server or HP Web Jetadmin to initialize the component. | |
| CHECKING PAPER PATH The product is checking for possible paper jams. | No action is necessary. | |
| CHECKING PRINTER | The product is conducting an internal test. | No action is necessary. |
| CHOSEN PERSONALITY NOT AVAILABLETo continue press OK | A print job requested a product language (personality) that is not available for this product. The job will not print and will be cleared from memory. | Print the job by using a printer driver for a different printer language, or add the requested language to the product (if possible). To see a list of available personalities, print a configuration page. (See Print information pages on page 148.) |
| CLEANING DISK% COMPLETEDo not power off | The product is cleaning the hard disk or a compact flash disk. | Do not turn off. The product will automatically restart when cleaning is complete. Product functions are unavailable. |
| CLEANING... The product is performing an automatic cleaning cycle. Printing will continue after the cleaning is complete. | No action is necessary. | |
| CLEARING EVENT LOG This message is displayed while the event log is cleared. The product will exit the menus once the event log has been cleared. | No action is necessary. | |
| CLEARING PAPER PATH The product is attempting to eject jammed paper. | Check progress at the bottom of the display. | |
| CLOSE FRONT DOOR | The front door of the product is open. | 1. Close the door.2. If the message persists, contact HP support. See Customer support on page 246. |
| CLOSE RIGHT DOOR | A door on the right side of the product is open. | 1. Close the door.2. If the message persists, contact HP support. See Customer support on page 246. |
| COLLECTION UNIT ALMOST FULL | The toner collection unit is almost full. The actual supply life remaining might vary. You do not need to replace the toner collection unit at this time unless print quality is no longer acceptable. | To continue printing, either press the OK button or replace the toner collection unit. See Replace the toner collection unit on page 167. |
| Cooling engine | The product is cooling. | No action is necessary. |
| Creating... | A cleaning page is being generated. | No action is necessary. |
| CLEANING PAGE | ||
| CYAN CARTRIDGE LOW The product indicates when a supply level is low. Actual print cartridge life might vary. You do not need to replace the print cartridge at this time unless print quality is no longer acceptable. | If print quality is no longer acceptable, replace the print cartridge. Consider purchasing a replacement cartridge so it is available when the installed cartridge has reached the end of its estimated life. SeeReplace print cartridges on page 164. | |
| CYAN CARTRIDGE LOW LESS THAN XXXX PAGES | The product indicates when a supply level is low. Actual print cartridge life might vary. You do not need to replace the print cartridge at this time unless print quality is no longer acceptable. Estimated pages remaining is based upon the historical page coverage of this product. | If print quality is no longer acceptable, replace the print cartridge. Consider purchasing a replacement cartridge so it is available when the installed cartridge has reached the end of its estimated life. SeeReplace print cartridges on page 164. |
| CYAN CARTRIDGE VERY LOW The product indicates when a supply level is very low. Actual print cartridge life might vary. Consider having a replacement print cartridge available to install when print quality is no longer acceptable. You do not need to replace the print cartridge at this time unless print quality is no longer acceptable. After an HP supply has reached the very low threshold, the HP premium protection warranty for that supply has ended. | If print quality is no longer acceptable, replace the print cartridge. SeeReplace print cartridges on page 164. | |
| CYAN CARTRIDGE VERY LOW To continue press OK | The product indicates when a supply level is very low. Actual print cartridge life might vary. Consider having a replacement print cartridge available to install when print quality is no longer acceptable. You do not need to replace the print cartridge at this time unless print quality is no longer acceptable. After an HP supply has reached the very low threshold, the HP premium protection warranty for that supply has ended. | Press theOKbutton to continue. If print quality is no longer acceptable, replace the print cartridge. SeeReplace print cartridges on page 164. |
| DATA RECEIVED To print last page press OK | The product is waiting for the command to print the last page. | Press theOKbutton to print the last page. |
| DATE/TIME = YYYY/MMMM/DD HH:MM To change press OKTo skip press ☒ | The current date and time set for the product. | Press theOKbutton to set the date and time or press the stop button ☒ to skip setup. |
| Deleting private jobs | The product is deleting a private stored job. | No action is necessary. |
| Deleting... The product is currently deleting the stored job. | No action is necessary. | |
| EIODISK INITIALIZING | The specified EIO disk device is initializing. | No action is necessary. |
| EIODISK NOT FUNCTIONAL The EIO disk in slotis not working correctly. | 1.Turn the product off.2.Remove the disk from the slot indicated.3.Replace with a new disk.4.Turn the product on. | |
| EIODISK SPINNING UPEIO disk device in slotis spinning up its platter. Jobs that require disk access must wait. | No action is necessary. | |
| EIO DEVICE FAILURETo clear press OK | The specified device has failed. | Press theOKbutton to clear. |
| EIO FILE OPERATION FAILEDTo clear press OK | A PJL file system command attempted to perform an illogical operation. | Press theOKbutton to clear. |
| EIO FILE SYSTEM IS FULLTo clear press OK | A PJL file system command could not store something on the file system because the file system was full. | Press theOKbutton to clear. |
| EIO IS WRITE PROTECTEDTo clear press OK | The file system device is protected and no new files can be written to it. | Press theOKbutton to clear. |
| EIO NOT INITIALIZED This file-storage component must be initialized before use. | Use the embedded Web server or HP Web Jetadmin to initialize the component. | |
| Event log empty | No product events are in the log. | No action is necessary. |
| EXPECTED DRIVE MISSING The product cannot find the encrypted hard drive. | Insert the encrypted hard drive. | |
| FUSER KIT LOW The fuser kit is low. The actual supply life remaining might vary. You do not need to replace the fuser kit at this time unless print quality is no longer acceptable. | If print quality is no longer acceptable, replace the fuser kit. Instructions are included with the fuser kit. Consider purchasing a replacement fuser kit so it is available when the installed fuser kit has reached the end of its estimated life. | |
| FUSER KIT VERY LOW The fuser kit is very low. The actual supply life remaining might vary. You do not need to replace the fuser kit at this time unless print quality is no longer acceptable. After an HP supply has reached the very low threshold, the HP premium protection warranty for that supply has ended. | If print quality is no longer acceptable, replace the fuser kit. Instructions are included with the fuser kit. | |
| FUSER KIT VERY LOWTo continue press OK | The fuser kit is very low and theAT VERY LOWmenu for the fuser kit is set toPROMPT TO CONTINUE. The product stops printing until you press theOKbutton or replace the fuser kit. You do not need to replace the fuser kit at this time unless print quality is no longer acceptable. After an HP supply has reached the very low threshold, the HP premium protection warranty for that supply has ended. | Press theOKbutton to clear the message. If print quality is no longer acceptable, replace the fuser kit. Instructions are included with the fuser kit. |
| Genuine HP supplies installed You have installed more than one new print cartridge that was manufactured by HP. | No action is necessary. | |
| HP SECURE DRIVE DISABLED The drive has been encrypted for another product. | Remove the drive or see the embedded Web server for more information. | |
| INCOMPATIBLECARTRIDGE The indicated color print cartridge is not compatible with this product. | Replace the print cartridge with one that is designed for this product. | |
| INCOMPATIBLE FUSER | The incorrect fuser was installed. | CAUTION: The fuser can be hot while the product is in use. Wait for the fuser to cool before handling it.1. Open the right door.2. Remove the incompatible fuser.3. Install the correct fuser.4. Close the right door. |
| INCOMPATIBLE SUPPLIESFor status press OK | Print cartridges or other supply items are installed that were not designed for this product. The product cannot print with these supplies installed. | Press the OK button to identify the incompatible supplies. Install supplies that are designed for this product. |
| INCOMPATIBLE TRANSFER UNIT | The incorrect transfer unit was installed. | 1. Open right door.2. Remove the incompatible transfer unit.3. Install the correct transfer unit.4. Close the right door. |
| Incorrect | The PIN is incorrect. | Use the up arrow ▲ and down arrow ▼ buttons to enter the correct PIN. |
| Initializing | The product is starting. | No action is necessary. Please wait until the Ready message appears on the display. |
| Initializing permanent storage Displayed when the product is turned on to show that permanent storage is being initialized. | No action is necessary. | |
| INSTALLCARTRIDGE | The print cartridge has been removed or has been installed incorrectly. | Replace or reinstall the print cartridge correctly to continue printing. See Replace print cartridges on page 164. |
| INSTALL FUSER | The fuser has been removed or installed incorrectly. | CAUTION: The fuser can be hot while the product is in use. Wait for the fuser to cool before handling it.1. Open the right door.2. Install or adjust the fuser.3. Close the right door. |
| INSTALL SUPPLIESFor status press OK | More than one supply is missing or is installed incorrectly. | Press the OK button to identify which supplies need to be replaced. Press the OK button a second time for more information about the specific supply. Insert the supply item or make sure the installed supply item is fully seated. |
| INSTALL TRANSFER UNIT | The transfer unit has been removed or installed incorrectly. | 1. Open right door.2. Install the transfer unit.3. Close the right door. |
| INSUFFICIENT MEMORY TO LOAD FONTSDATA | The product does not have enough memory to load the data (for example, fonts or macros) from the location specified. | To continue without this information, press the OK button. If the message persists, add more memory. |
| LOAD TRAY 1 [TYPE] [SIZE] | Tray 1 is empty. Load Tray 1 with the requested paper. | |
| For help press ? | If the paper is already in the Tray 1, press the help button ?, and then press the OK button to print.To use another tray, remove paper from Tray 1, and then press the OK button to continue. | |
| LOAD TRAY 1 [TYPE] [SIZE] | The indicated tray is loaded and configured for a type and size other than the one specified in the job. | 1. If the correct paper is loaded, press the OK button.2. Otherwise, remove the incorrect paper and load the tray with the specified paper.3. If prompted, confirm the size and type of paper loaded.4. Confirm that the paper guides are in the correct position.5. To use another tray, remove paper from the tray and then press the OK button. |
| To continue press OK | ||
| LOAD TRAY 1 [TYPE] [SIZE] | Tray 1 is empty and the other trays are available. | 1. If the correct paper is loaded, press the OK button.2. Otherwise, remove the incorrect paper and load the tray with the specified paper.3. If prompted, confirm the size and type of paper loaded.4. Confirm that the paper guides are in the correct position.5. To use another tray, remove paper from the tray and then press the OK button. |
| To use another tray press OK | ||
| LOAD TRAY 2 [TYPE] [SIZE] | This message appears when printing 100 x 150 mm (4 x 6 in) paper, which requires the HP postcard media insert in Tray 2. | Install the HP postcard media insert in Tray 2, and load the requested paper. SeeLoad paper trays on page 90.If you do not have the HP postcard media insert, you can print 100 x 150 mm (4 x 6 in) paper from Tray 1 without the insert. |
| Media insert required in tray | ||
| LOAD TRAY <X> [TYPE] [SIZE] This message appears when the indicated tray is selected but is not loaded, and no other paper trays are available for use.It also appears when the tray is configured for a different paper type or size than the print job requires. | Load the tray with requested paper. | |
| LOAD TRAY <X> [TYPE] [SIZE] | This message appears when the indicated tray is selected but is not loaded, and other paper trays are available for use.It also appears when the tray is configured for a different paper type or size than the print job requires. | 1. Load the correct paper in the tray.2. If prompted, confirm the size and type of paper loaded.3. Otherwise, press the OK button to select another tray. |
| To use another tray press OK | ||
| LOADING PROGRAMDo not power off | Programs and fonts can be stored on the product's file system and are loaded into RAM when the product is turned on. The number XX specifies a sequence number indicating the current program being loaded. | No action necessary. Do not turn the product off. |
| MAGENTA CARTRIDGE LOW The product indicates when a supply level is low. Actual print cartridge life might vary. You do not need to replace the print cartridge at this time unless print quality is no longer acceptable. | If print quality is no longer acceptable, replace the print cartridge. Consider purchasing a replacement cartridge so it is available when the installed cartridge has reached the end of its estimated life. SeeReplace print cartridges on page 164. | |
| MAGENTA CARTRIDGE LOWLESS THAN XXXX PAGES | The product indicates when a supply level is low. Actual print cartridge life might vary. You do not need to replace the print cartridge at this time unless print quality is no longer acceptable. Estimated pages remaining is based upon the historical page coverage of this product. | If print quality is no longer acceptable, replace the print cartridge. Consider purchasing a replacement cartridge so it is available when the installed cartridge has reached the end of its estimated life. SeeReplace print cartridges on page 164. |
| MAGENTA CARTRIDGE VERY LOW The product indicates when a supply level is very low. Actual print cartridge life might vary. Consider having a replacement print cartridge available to install when print quality is no longer acceptable. You do not need to replace the print cartridge at this time unless print quality is no longer acceptable. After an HP supply has reached the very low threshold, the HP premium protection warranty for that supply has ended. | If print quality is no longer acceptable, replace the print cartridge. SeeReplace print cartridges on page 164. | |
| MAGENTA CARTRIDGE VERY LOWTo continue press OK | The product indicates when a supply level is very low. Actual print cartridge life might vary. Consider having a replacement print cartridge available to install when print quality is no longer acceptable. You do not need to replace the print cartridge at this time unless print quality is no longer acceptable. After an HP supply has reached the very low threshold, the HP premium protection warranty for that supply has ended. | Press theOKbutton to continue. If print quality is no longer acceptable, replace the print cartridge. SeeReplace print cartridges on page 164. |
| MANUALLY FEED | This message appears when MANUAL FEEDis selected and all trays are empty. | Load tray with requested paper. If paper is already in tray, press the help button ↗ to exit message and then press theOKbutton to print. To use another tray, clear paper from Tray 1, press the help button ↗ to exit the message and then press theOKbutton. |
| MANUALLY FEEDTo continue press OK | This message appears when MANUAL FEEDis selected and Tray 1 is loaded. | Load tray with requested paper.To override the message, press theOKbutton to use a type and size of paper that is available in another tray. |
| MANUALLY FEEDTo use another tray press OK | This message appears when MANUAL FEEDis selected, Tray 1 is not loaded, and other trays are available. | Load tray with requested paper. If paper is already in tray, press the help button ↗ to exit the message and then press theOKbutton to print. To use another tray, clear paper from Tray 1, press the help button ↗ to exit the message and then press theOKbutton. |
| MANUALLY FEED OUTPUT STACKThen press OK to print second side | The product has printed the first side of a manual duplex job and is waiting for the user to insert the output stack to print the second side. | 1. Maintaining the same orientation, remove document from the output bin.2. Flip document printed side up.3. Load document in Tray 1.4. Press the OK button to print. |
| MOVING SOLENOIDTo exit press ✉ | The solenoid is moving as part of a component test. | No action is necessary. |
| MOVING SOLENOID AND MOTORTo exit press ✉ | The solenoid and a motor are moving as part of a component test. | No action is necessary. |
| No job to cancel You have pressed the stop button but the product is not actively processing any jobs. | No action is necessary. | |
| NO STORED JOBS Displayed when the user enters the RETRIEVE JOB menu and there are no jobs to retrieve. | No action is necessary. | |
| NON HP SUPPLY INSTALLED The product is using a non-HP supply. This message appears for six seconds after you install a non-HP supply. | If you believe you purchased a genuine HP supply, go to www.hp.com/go/anticounterfeit. Any product repair required as a result of using non-HP or unauthorized supplies is not covered under warranty. HP cannot ensure the accuracy or the availability of certain features. | |
| PausedTo return to Ready press ✉ | The product is paused, and there are no error messages pending at the display. The I/O continues receiving data until memory is full. | Press the stop button ✉ |
| Performing upgrade% completeDo not power off | The product is in the process of upgrading the firmware. | Please wait until the upgrade is complete. |
| Performing... COLOR BAND TEST | The color-band test is being performed. | No action is necessary. |
| Performing... PAPER PATH TEST | The product is performing a paper path test. | No action is necessary. |
| Please wait | The product is in the process of clearing data. | No action is necessary. |
| Powering off... | The product is shutting down. | Please wait until the product shuts down. |
| Printing | The product is printing an internal page. The product will return to the online Ready state when the page is completed. | No action is necessary. |
| PRINTING STOPPEDTo continue press OK | Time has expired on the Print/Stop test. | Press the OK button to continue. |
| Processing duplex jobDo not grab paper until job completes | Paper temporarily comes into the output bin while printing a duplex job. Do not attempt to remove the pages until the job is complete. | Do not grab paper as it temporarily comes into the output bin. The message will disappear when the job is finished. |
| Processing... The product is currently processing a job butis not yet picking pages. When paper motion begins, this message will be replaced by a message that indicates which tray the job is being printed from. | No action is necessary. | |
| Processing... | The product is processing a cleaning page. No action is necessary. | |
| CLEANING PAGE | ||
| Processing... copyofThe product is currently processing or printing collated copies. The message indicates that copy X of Y total copies is currently being processed. | No action is necessary. | |
| Processing... from trayThe product is actively processing a job from the designated tray. | No action is necessary. | |
| RAM DISK DEVICE FAILURETo clear press OK | The specified device has failed. | Press the OK button to clear. |
| RAM DISK FILE OPERATION FAILEDTo clear press OK | A PJL file system command attempted to perform an illogical operation. | Press the OK button to clear. |
| RAM DISK FILE SYSTEM IS FULLTo clear press OK | A PJL file system command could not store something on the file system because the file system was full. | Press the OK button to clear. |
| RAM DISK IS WRITE PROTECTEDTo clear press OK | The file system device is protected and no new files can be written to it. | Press the OK button to clear. |
| RAM DISK NOT INITIALLIZED This file-storage component must be initialized before use. | Use the HP Embedded Web Server or HP Web Jetadmin to initialize the component. | |
| Ready The product is online and ready for data. No status or product attendance messages are pending at the display. | No action is necessary. | |
| ReadyIP ADDRESS | The product is online and ready. No action is necessary. | |
| Ready Diagnostics modeTo exit press | The product is in Diagnostics mode. To stop Diagnostic mode, press the Stop button | No action is necessary. |
| Receiving Upgrade | A firmware upgrade is in progress. | Do not turn the product off until the product returns to Ready. |
| Remove all print cartridgesTo exit press | The product is testing the transfer unit assembly. | To perform the test, remove all the print cartridges. To cancel the test, press the stop button |
| Remove at least one print cartridgeTo exit press | The product is testing the print-cartridge motor. | To perform the test, remove at least one print cartridge. To cancel the test, press the stop button |
| REMOVE CARTRIDGE LOCKS At least one cartridge shipping lock was not removed before you turned the product on. | 1. Open the front door.2. Remove cartridge locks. | |
| REMOVE SHIPPING SHEET The transfer unit shipping sheet was not removed before you turned the product on. | 1. Open the right door.2. Remove the shipping sheet.3. Close the right door. | |
| REPLACECARTRIDGE The product indicates when a supply level is at its estimated end of life. The actual life remaining might be different than the estimation. Have a replacement supply available to install when print quality is no longer acceptable. The supply does not need to be replaced now unless the print quality is no longer acceptable. After an HP supply has reached its approximated end of life, HP's premium Protection Warranty on that supply ends. | Replace the specified color cartridge. SeeReplace print cartridges on page 164.Or, configure the product to continue printing by using theMANAGESUPPLIESmenu. For more information about theMANAGESUPPLIESmenu, seeManage supplies menu on page 16. | |
| REPLACE FUSER KIT The product indicates when the fuser kit is at its estimated end of life. The actual life remaining might be different than the estimation. Have a replacement fuser kit available to install when print quality is no longer acceptable. The fuser kit does not need to be replaced now unless the print quality is no longer acceptable. After the fuser kit reaches its approximated end of life, HP's premium Protection Warranty on that fuser kit ends. | CAUTION: The fuser can be hot while the product is in use. Wait for the fuser to cool before handling it.1. Open the right door.2. Grasp the blue handles on both sides of the fuser and pull straight out to remove it.3. Install the new fuser.4. Close the right door. | |
| REPLACE SUPPLIESFor status press OK | Two or more supplies are at the estimated end of life. The actual life remaining might be different than the estimation. Have a replacement supply available to install when print quality is no longer acceptable. The supply does not need to be replaced now unless the print quality is no longer acceptable. After an HP supply has reached its approximated end of life, HP's premium Protection Warranty on that supply ends. | Press theOKbutton to see which supplies need to be replaced.Or, configure the product to continue printing by using theMANAGESUPPLIESmenu. For more information about theMANAGESUPPLIESmenu, seeManage supplies menu on page 16. |
| REPLACE SUPPLIES - Using black only You can configure the product to print using only black when the level of a color supply has reached its estimated end of life. However, the color supply might still be able to produce acceptable print quality.The supply life remaining is used to determine if a supply is very low. The supply life remaining is an approximation only and varies depending on the types of documents printed and other factors. | No user input is required for printing to continue in black. To continue printing in color, either replace the supply or reconfigure the product by using theMANAGESUPPLIESmenu on the control panel.For more information about ordering supplies, seeSupplies and accessories on page 235.For more information about theMANAGESUPPLIESmenu, seeManage supplies menu on page 16. | |
| REPLACE SUPPLYPrinting black only | At least one print cartridge has reached the very low condition and you have set the COLOR CARTRIDGES items to the PRINT IN BLACK option.The supply life remaining is used to determine if a supply is very low. The supply life remaining is an approximation only and varies depending on the types of documents printed and other factors. | No action is required for printing to continue in black. To continue printing in color, either replace the print cartridge or reconfigure the product by using the MANAGE SUPPLIES menu on the control panel.For more information about ordering supplies, see Supplies and accessories on page 235.For more information about the MANAGE SUPPLIES menu, see Manage supplies menu on page 16. |
| REPLACE TONER COLLECTION UNIT | The product indicates when a toner collection unit is at its estimated end of life. The actual life remaining might be different than the estimation. Have a replacement toner collection unit available to install when print quality is no longer acceptable. The toner collection unit does not need to be replaced now unless the print quality is no longer acceptable. After a toner collection unit has reached its approximated end of life, HP's premium Protection Warranty on that toner collection unit ends. | Replace the toner collection unit.If you wish to have the toner collection unit operate past its estimated capacity, configure the product to continue printing by using the MANAGE SUPPLIES menu. For more information about the MANAGE SUPPLIES menu, see Manage supplies menu on page 16. This is not a recommended option because of the risk of overfilling the toner collection unit, which could result in the need to service the product. |
| REPLACE TRANSFER KIT | The product indicates when a transfer kit is at its estimated end of life. The actual life remaining might be different than the estimation. Have a replacement transfer kit available to install when print quality is no longer acceptable. The transfer kit does not need to be replaced now unless the print quality is no longer acceptable. After a transfer kit has reached its approximated end of life, HP's premium Protection Warranty on that transfer kit ends. | Replace the transfer kit. Instructions are included with the transfer kit. |
| Request accepted please wait | The product has accepted a request to print an internal page, but the current job must finish printing before the internal page will print. | No action is necessary. |
| Resend Upgrade | The firmware upgrade was not completed successfully. | Attempt upgrade again. |
| Resetting kit count | You have selected the option to reset the count for a new supply item. | No action is necessary. |
| Restoring factory settings | The product is restoring factory settings. | No action is necessary. |
| Restoring... | The product is restoring settings. | Please wait until the process is complete. |
| RESTRICTED FROM PRINTING IN COLOR | This message appears when color printing is disabled for the product or when it is disabled for a particular user or print job. | To enable color printing for the product, change the RESTRICT COLOR USE setting in the Manage supplies menu on page 16. |
| ROM DISK DEVICE FAILURETo clear press OK | The specified device has failed. | Press the OK button to clear. |
| ROM DISK FILE OPERATION FAILEDTo clear press OK | A PJL file system command attempted to perform an illogical operation. | Press theOKbutton to clear. |
| ROM DISK FILE SYSTEM IS FULLTo clear press OK | A PJL file system command could not store something on the file system because the file system was full. | Press theOKbutton to clear. |
| ROM DISK IS WRITE PROTECTEDTo clear press OK | The file system device is protected and no new files can be written to it. | Press theOKbutton to clear. |
| RotatingMotorTo exit press ✉ | A component test is in progress; the component selected is thecartridge motor. | Press the stop button when ready to stop this test. |
| Rotating MotorTo exit press ✉ | The product is executing a component test and the component selected is a motor. | Press the stop button when ready to stop this test. |
| SANITIZING DISK% COMPLETEDo not power off | The hard disk is being cleaned. Contact the network administrator. | |
| SIZE MISMATCH IN TRAY XX The paper in the listed tray does not match the size specified for that tray. | 1.Load the correct paper.2.Verify the paper is positioned correctly.3.Close the tray and verify that the control panel lists the correct paper size and type. Reconfigure the size and type if necessary.4.If the message persists, contact HP support. SeeCustomer support on page 246. | |
| Sleep mode on The product is in sleep mode. A button press, receipt of printable data, or an error condition will clear this message. | No action is necessary. | |
| STANDARD TOP BIN FULLRemove all paper from bin | The output bin is full. Empty the bin and continue printing. | |
| SUPPLIES IN WRONG POSITION Two or more print-cartridge slots contain the wrong color print cartridge.From left to right, the print cartridges should be installed in this order:YellowMagentaCyanBlack | Install the correct color cartridge in each slot. | |
| SUPPLIES LOW This message appears when at least twosupplies have reached the low threshold. The actual supply life remaining might vary. You do not need to replace the supplies at this time unless print quality is no longer acceptable. After an HP supply has reached the very low threshold, the HP premium protection warranty for that supply has ended. | To continue printing in color, either replace the supply or reconfigure the product by using the MANAGE SUPPLIES menu on the control panel.For more information about ordering supplies, seeSupplies and accessories on page 235.For more information about the MANAGE SUPPLIES menu, seeManage supplies menu on page 16. | |
| SUPPLIES LOWPRINTING BLACK ONLY | This message appears when at least twosupplies have reached the low threshold. The product has been configured to print using only black when the level of a color supply is low. The actual supply life might vary. You do not need to replace the supplies at this time unless print quality is no longer acceptable. | To continue printing in color, either replace the supply or reconfigure the product by using the MANAGE SUPPLIES menu on the control panel.For more information about ordering supplies, seeSupplies and accessories on page 235.For more information about the MANAGE SUPPLIES menu, seeManage supplies menu on page 16. |
| SUPPLIES VERY LOW This message appears when at least twosupplies have reached the very low threshold. The actual supply life remaining might vary. You do not need to replace the supplies at this time unless print quality is no longer acceptable. After an HP supply has reached the very low threshold, the HP premium protection warranty for that supply has ended. | To continue printing in color, either replace the supply or reconfigure the product by using the MANAGE SUPPLIES menu on the control panel.For more information about ordering supplies, seeSupplies and accessories on page 235. For more information about the MANAGE SUPPLIES menu, seeManage supplies menu on page 16. | |
| SUPPLIES VERY LOWPRINTING BLACK ONLY | This message appears when at least two supplies have reached the very low threshold. The product has been configured to print using only black when the level of a color supply is very low. The actual supply life might vary. You do not need to replace the supplies at this time unless print quality is no longer acceptable. After an HP supply has reached the very low threshold, the HP premium protection warranty for that supply has ended. | To continue printing in color, either replace the supply or reconfigure the product by using the MANAGE SUPPLIES menu on the control panel.For more information about ordering supplies, seeSupplies and accessories on page 235. For more information about the MANAGESUPPLIES menu, seeManage supplies menu on page 16. |
| SUPPLIES VERY LOWTo continue press OK | This message appears when at least two supplies have reached the low threshold. The actual supply life remaining might vary. You do not need to replace the supplies at this time unless print quality is no longer acceptable. After an HP supply has reached the very low threshold, the HP premium protection warranty for that supply has ended. | To continue printing in color, either replace the supply or reconfigure the product by using theMANAGE SUPPLIESmenu on the control panel.For more information about ordering supplies, seeSupplies and accessories on page 235.For more information about the MANAGESUPPLIES menu, seeManage supplies menu on page 16. |
| TONER COLLECTION UNIT LOW The toner collection unit is almost full. The actual supply life remaining might vary. You do not need to replace the toner collection unit at this time unless print quality is no longer acceptable. | To continue printing, either press the OK button or replace the toner collection unit.SeeReplace the toner collection unit on page 167. | |
| TONER COLLECTION UNIT VERY LOW The toner collection unit is almost full. The actual supply life remaining might vary. You do not need to replace the toner collection unit at this time unless print quality is no longer acceptable. After an HP supply has reached the very low threshold, the HP premium protection warranty for that supply has ended. | To continue printing, either press the OK button or replace the toner collection unit.SeeReplace the toner collection unit on page 167. | |
| TONER COLLECTION UNIT VERY LOW To continue press OK | The toner collection unit is almost full. The actual supply life remaining might vary. You do not need to replace the toner collection unit at this time unless print quality is no longer acceptable. After an HP supply has reached the very low threshold, the HP premium protection warranty for that supply has ended. | To continue printing, either press the OK button or replace the toner collection unit.SeeReplace the toner collection unit on page 167. |
| TRANSFER KIT LOW This message appears when the transfer kit reaches the low threshold. The actual supply life remaining might vary. You do not need to replace the transfer kit at this time unless print quality is no longer acceptable. | No action is necessary to continue. If the print quality is no longer acceptable, replace the transfer kit. Instructions are included with the new transfer kit. | |
| TRANSFER KIT LOW LESS THAN XXXX PAGES | The transfer kit is nearing the end of its estimated useful life. The actual supply life might vary. Estimated pages remaining is based upon the historical page coverage of this product. You do not need to replace the transfer kit at this time unless print quality is no longer acceptable. | No action is necessary to continue. If the print quality is no longer acceptable, replace the transfer kit. Instructions are included with the new transfer kit. |
| TRANSFER KIT VERY LOW This message appears when the transfer kit has reached the very low threshold. The actual supply life remaining might vary. You do not need to replace the supplies at this time unless print quality is no longer acceptable. After an HP supply has reached the very low threshold, the HP premium protection warranty for that supply has ended. | To continue printing in color, either replace the supply or reconfigure the product by using theMANAGE SUPPLIESmenu on the control panel.For more information about ordering supplies, seeSupplies and accessories on page 235.For more information about theMANAGE SUPPLIESmenu, seeManage supplies menu on page 16. | |
| TRANSFER KIT VERY LOW To continue press OK | This message appears when the transfer kit has reached the very low threshold. The actual supply life remaining might vary. You do not need to replace the supplies at this time unless print quality is no longer acceptable. After an HP supply has reached the very low threshold, the HP premium protection warranty for that supply has ended. | To continue printing in color, either replace the supply or reconfigure the product by using theMANAGE SUPPLIESmenu on the control panel.For more information about ordering supplies, seesupplies and accessories on page 235.For more information about theMANAGE SUPPLIESmenu, seeManage supplies menu on page 16. |
| TRAY <X> [TYPE] [SIZE]To change size or type press OKTo accept settings press ↩ | This message states the current type and size configuration of the tray. | To change size or type press the OK button.To accept settings press the back arrow ↩. |
| TRAY <X> EMPTY [TYPE] [SIZE] The specified tray is empty and the current job does not need this tray to print. | Refill the tray at a convenient time. | |
| TRAY <X> OPEN The specified tray is open or not closed completely. | Close the tray. | |
| TRAY <X> OVERFILLEDRemove some paper | The tray is filled above the stack-height marking. | Remove enough paper so that the paper stack does not exceed the limit for the tray. |
| TRAY <X> SIZE = Media insert required in tray | The product is set to print on a small paper size that requires the HP postcard media-insert to be installed in this tray. | To use this size paper, install the media insert before loading the paper. SeeLoad paper trays on page 90.If you do not have the HP postcard media insert, 100 x 150 mm (4 x 6 in) paper can be printed from Tray 1 without the insert. |
| TYPE MISMATCH IN TRAY X The specified tray contains a paper type that does not match the configured type. | The specified tray will not be used until this condition is addressed. Printing can continue from other trays.1. Load the correct paper in the specified tray.2. Verify the type configuration. | |
| UNABLE TO COPY JOB The product does not have enough memory to produce multiple original prints of this job. One copy will be printed. | Add more memory to the product. SeeInstall memory DIMMs on page 169. | |
| UNABLE TO STORE JOB A job cannot be stored because of a memory or configuration problem. | Install additional memory in the product. | |
| Unsupported data on [FS] DIMM in slot x To clear press OK | The data on the DIMM for the indicated file system is not a type that the product supports. [FS] can be either a ROM or Flash file system. | Press theOKbutton to clear the message.Replace the DIMM. SeeInstall memory DIMMs on page 169. |
| UNSUPPORTED DRIVE INSTALLED A non-supported hard drive has been installed. | Turn off the product, remove the hard drive, and then turn on the product. | |
| UNSUPPORTED SUPPLY INSTALLED To continue press OK | The print cartridge is for a different HP product. | If print quality is no longer acceptable, replace the print cartridge.For a list of supported print cartridges, seeSupplies and accessories on page 235. |
| USB ACCESSORIES EXCEED POWER LIMIT | A USB accessory is drawing too much electrical current. Printing cannot continue. | Remove the USB accessory, and then restart the product.Use a USB accessory that uses less power or that contains its own power supply. |
| USB ACCESSORY ERROR This message appears when a connected USB accessory draws too much power. When this happens, the ACC port is disabled and printing stops. | Remove the USB accessory, and then restart the productUse a USB accessory that uses less power or that contains its own power supply. | |
| USB ACCESSORY NOT FUNCTIONAL | A USB accessory is not working correctly. | 1. Turn product off.2. Disconnect the USB accessory, and replace with a new USB accessory. |
| USB ACCESSORY UNAVAILABLETo clear press OK | The USB accessory is currently unavailable. | To use the USB accessory, install the software for the USB accessory and turn the product off. Then, turn the product on with the accessory attached. |
| USB STORAGE DEVICE FAILURETo clear press OK | The specified device has failed. | Press the OK button to clear. |
| USB STORAGE FILE OPERATION FAILEDTo clear press OK | A PJL file system command attempted to perform an illogical operation. | Press the OK button to clear. |
| USB STORAGE FILE SYSTEM IS FULLTo clear press OK | A PJL file system command could not store something on the file system because the file system was full. | Press the OK button to clear. |
| USB STORAGE IS WRITE PROTECTEDTo clear press OK | The file system device is protected and no new files can be written to it. | Press the OK button to clear. |
| USB STORAGE NOT INITIALLIZED This file-storage component must be initialized before use. | Use the embedded Web server or HP Web Jetadmin to initialize the component. | |
| USED SUPPLY IN USE | The print cartridge has been previously used. | If you believe you purchased a genuine HP supply, go to www.hp.com/go/anticounterfeit. |
| WAIT FOR PRINTER TO REINITIALIZE This message can appear for a variety of reasons:The RAM DISK settings changed before the product has restarted.The product is restarting after changing external device modes.Diagnostics has been exited.A new formatter has been installed with an old engine or a new engine has been installed with an old formatter. | No action is necessary. | |
| WAITING FOR TRAYTO LIFT | The specified tray is lifting paper for feeding. | No action is necessary. |
| WARMING UP | The product is coming out of Sleep mode. | No action is necessary. |
| WRONG CARTRIDGE INSLOT | The indicated slot for a print cartridge contains a cartridge that is not the correct color. From left to right, the print cartridges should be installed in this order:YellowMagentaCyanBlack | Remove the print cartridge from that slot, and install a cartridge that is the correct color. |
| YELLOW CARTRIDGE LOW The product indicates when a supply level is low. Actual print cartridge life might vary. You do not need to replace the print cartridge at this time unless print quality is no longer acceptable. | If print quality is no longer acceptable, replace the print cartridge. Consider purchasing a replacement cartridge so it is available when the installed cartridge has reached the end of its estimated life. See Replace print cartridges on page 164. | |
| YELLOW CARTRIDGE LOW LESS THAN XXXX PAGES | The product indicates when a supply level is low. Actual print cartridge life might vary. You do not need to replace the print cartridge at this time unless print quality is no longer acceptable. Estimated pages remaining is based upon the historical page coverage of this product. | If print quality is no longer acceptable, replace the print cartridge. Consider purchasing a replacement cartridge so it is available when the installed cartridge has reached the end of its estimated life. See Replace print cartridges on page 164. |
| YELLOW CARTRIDGE VERY LOW The product indicates when a supply level is very low. Actual print cartridge life might vary. Consider having a replacement print cartridge available to install when print quality is no longer acceptable. You do not need to replace the print cartridge at this time unless print quality is no longer acceptable. After an HP supply has reached the very low threshold, the HP premium protection warranty for that supply has ended. | If print quality is no longer acceptable, replace the print cartridge. See Replace print cartridges on page 164. | |
| YELLOW CARTRIDGE VERY LOW To continue press OK | The product indicates when a supply level is very low. Actual print cartridge life might vary. Consider having a replacement print cartridge available to install when print quality is no longer acceptable. You do not need to replace the print cartridge at this time unless print quality is no longer acceptable. After an HP supply has reached the very low threshold, the HP premium protection warranty for that supply has ended. | Press the OK button to continue. If print quality is no longer acceptable, replace the print cartridge. See Replace print cartridges on page 164. |
Clear jams
Common causes of jams
The product is jammed.
| Cause | Solution |
| The paper does not meet specifications. | Use only paper that meets HP specifications. See Supported paper sizes on page 83. |
| A component is installed incorrectly. | Verify that the transfer belt and transfer roller are correctly installed. |
| You are using paper that has already passed through a product or copier. | Do not use paper that has been previously printed on or copied. |
| An input tray is loaded incorrectly. | Remove any excess paper from the input tray. Make sure that the stack is below the maximum stack height mark in the tray. See Load paper trays on page 90. |
| The paper is skewed. The input-tray guides are not adjusted correctly. Adjust them so they hold the stack firmly in place without bending it. | |
| The paper is binding or sticking together. | Remove the paper, flex it, rotate it 180°, or flip it over. Reload the paper into the input tray. |
| The paper is removed before it settles into the output bin. | Reset the product. Wait until the page completely settles in the output bin before removing it. |
| During two-sided printing, you removed the paper before the second side of the document was printed. | Reset the product and print the document again. Wait until the page completely settles in the output bin before removing it. |
| The paper is in poor condition. Replace the paper. | |
| The internal tray rollers are not picking up the paper. | If the paper is heavier than 220 g/m2 (58 lb), it might not be picked from the tray.The rollers are worn. Replace the rollers. |
| The paper has rough or jagged edges. Replace the paper. | |
| The paper is perforated or embossed. | Perforated or embossed paper does not separate easily. Feed single sheets from Tray 1. |
| Paper was not stored correctly. | Replace the paper in the trays. Paper should be stored in the original packaging in a controlled environment. |
| Not all product packing material was removed. | Verify that the packing tape, cardboard, and plastic shipping locks have been removed from the product. |
| The HP postcard media insert is installed in Tray 2, and you are not printing on 10 x 15 cm (4 x 6 in) paper.OrThe HP postcard media insert is not installed in Tray 2, and you are printing on 10 x 15 cm (4 x 6 in) paper. | Always use the HP postcard media insert when printing on 10 x 15 cm (4 x 6 in) paper, but remove it when printing on other sizes. |
If the product still continues to jam, contact HP Customer Support or your authorized HP service provider.
Jam locations
Use this illustration to identify locations of jams. In addition, instructions appear on the control panel to direct you to the location of jammed paper and how to clear it.

NOTE: Internal areas of the product that might need to be opened to clear jams have green handles or green labels.
Figure 10-1 Jam locations
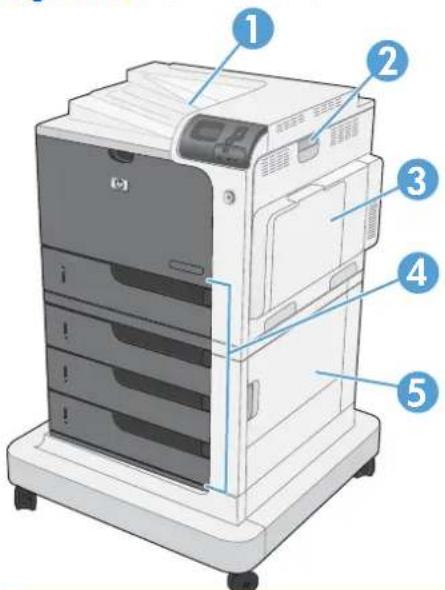
text_image
Diagram of a printer with numbered parts labeled 1 to 5 for identification| 1 Output bin | |
| 2 Right door | |
| 3 Tray 1 area | |
| 4 Tray 2, and optional Trays 3, 4, and 5 | |
| 5 Lower-right door | |
When a jam occurs, a message appears on the control-panel display that describes the location of the jam. The following table lists the messages that can appear and provides links to the procedures for clearing the jam.

WARNING! To avoid electrical shock, remove any necklaces, bracelets, or other metal items before reaching into the inside of the product.
| Type of jam Procedure | |
| 13.XX.YY JAM IN RIGHT DOOR | See Clear jams in the right door on page 209. |
| 13.XX.YY JAMS IN RIGHT DOOR | |
| 13.XX.YY FUSER AREA JAM | |
| 13.XX.YY FUSER WRAP JAM | |
| 13.XX.YY JAM ABOVE TOP OUTPUT BIN | See Clear jams in the output bin area on page 212. |
| 13.XX.YY JAM IN TRAY 1 | See Clear jams in Tray 1 on page 213. |
| 13.XX.YY JAM IN TRAY 2 | See Clear jams in Tray 2 or optional Trays 3, 4, or 5 on page 215. |
| 13.XX.YY JAM IN OPTIONAL TRAYS | See Clear jams in Tray 2 or optional Trays 3, 4, or 5 on page 215. |
| 13.XX.YY JAM IN LOWER RIGHT DOOR | See Clear jams in the lower right door (Tray 3, 4, or 5) on page 216. |
Clear jams in the right door
△ CAUTION: The fuser can be hot while the product is in use. Wait for the fuser to cool before handling it.
- Open the right door.
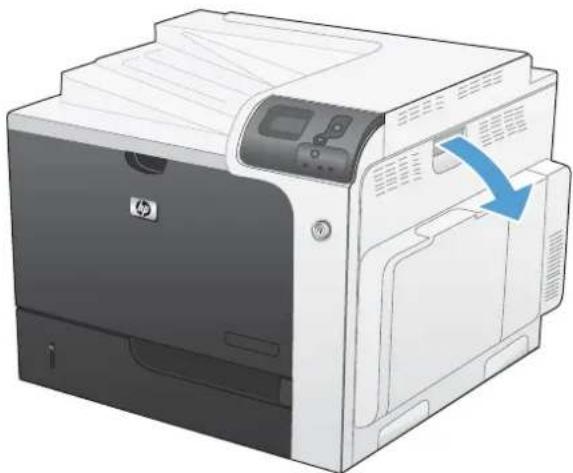
natural_image
Illustration of a HP printer with a blue arrow indicating a process or operation (no text or symbols present)- Gently pull the paper out of the pickup area.
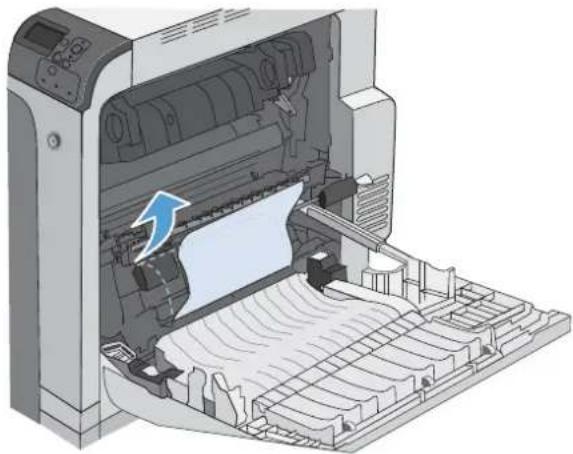
natural_image
3D illustration of a printer's internal structure showing paper feed, print sheet, and paper tray (no text or symbols)- If paper is visible entering the bottom of the fuser, gently pull downward to remove it.
CAUTION: Do not touch the rollers on the transfer roller. Contaminants can affect print quality.
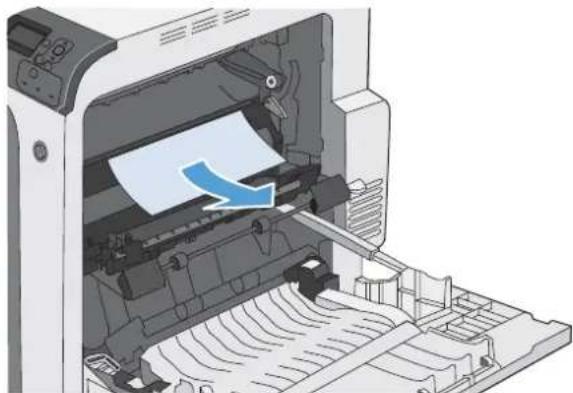
natural_image
Illustration of a printer's internal structure showing paper being inserted into a machine (no text or symbols visible)-
If paper is jammed as it enters the output bin, remove the fuser and gently pull the paper downward to remove it.
-
Paper could be jammed inside the fuser where it would not be visible. Remove the fuser to check for jammed paper inside.
CAUTION: The fuser can be hot while the product is in use. Wait for the fuser to cool before handling it.
-
Grasp the fuser handles, lift up slightly, and pull straight out to remove the fuser.
-
Open the jam-access door. If paper is jammed inside the fuser, gently pull it straight up to remove it. If the paper tears, remove all paper fragments.
CAUTION: Even if the body of the fuser has cooled, the rollers that are inside could still be hot. Do not touch the fuser rollers until they have cooled.
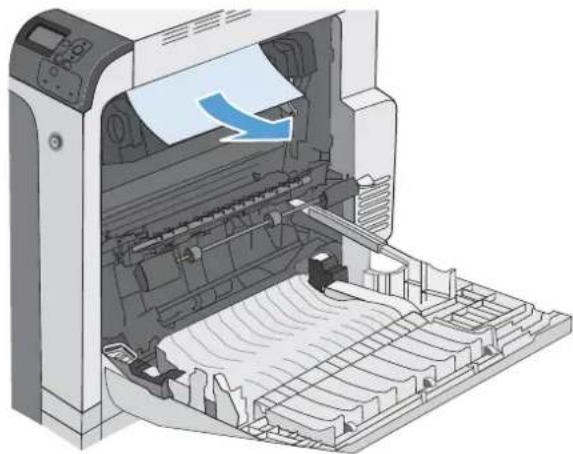
natural_image
Illustration of a printer's internal structure showing paper feed and paper sheet (no text or symbols)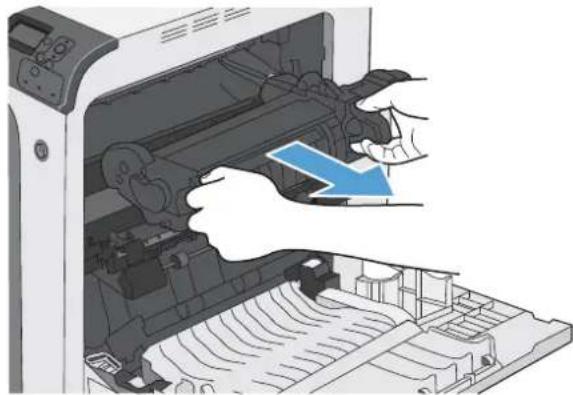
natural_image
Illustration of a printer's internal structure with hands operating it, showing no text or symbols
natural_image
3D mechanical component diagram showing fluid flow direction with blue arrows indicating movement (no text or symbols)-
Close the jam-access door, and push the fuser completely into the product.
-
Close the right door.
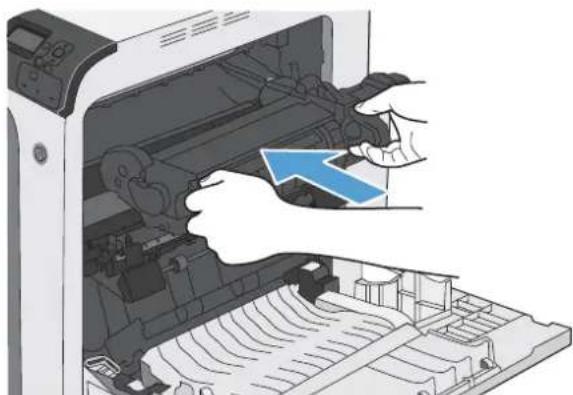
natural_image
Illustration of hands operating a printer into a rack with visible internal components (no text or symbols)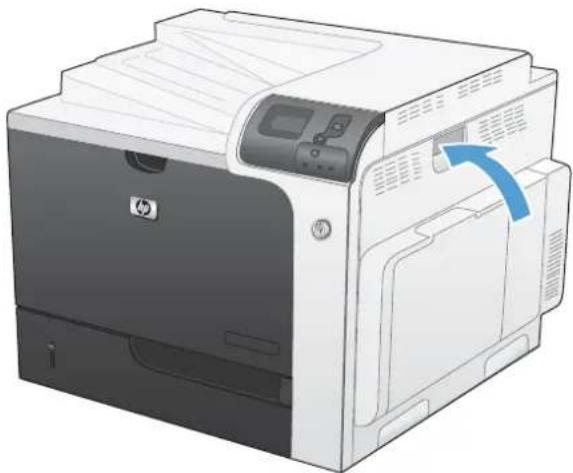
natural_image
Illustration of a HP printer with a blue arrow indicating a scroll or scroll (no text or symbols present)Clear jams in the output bin area
- If paper is visible from the output bin, grasp the leading edge and remove it.
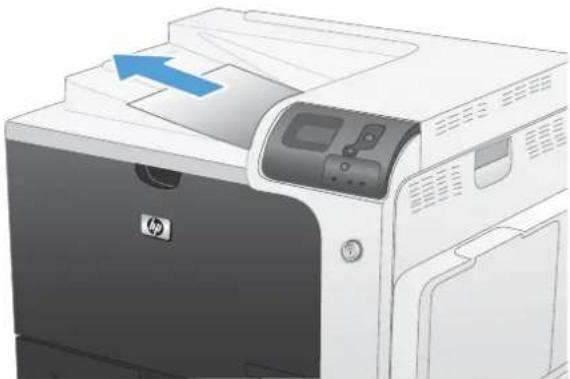
natural_image
Illustration of a HP printer with an arrow indicating paper direction (no text or symbols present)Clear jams in Tray 1
-
If jammed paper is visible in Tray 1, clear the jam by gently pulling the paper straight out. Press the OK button to clear the message.
-
If you cannot remove the paper, or if no jammed paper is visible in Tray 1, close Tray 1 and open the right door.
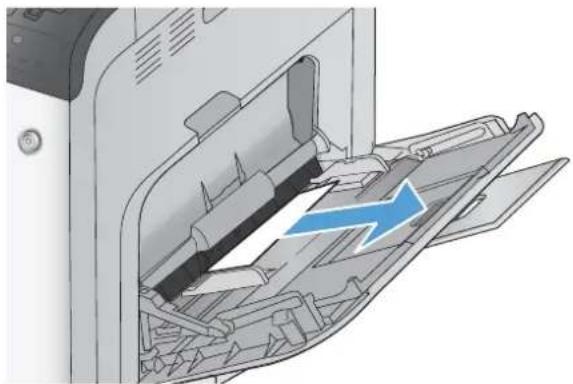
natural_image
Diagram of a printer's internal structure showing paper feeding into a slot, with a blue arrow indicating the direction (no text or symbols present)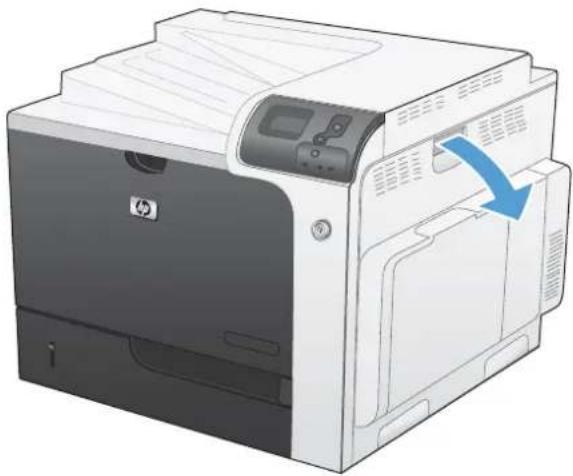
natural_image
Illustration of a HP printer with a blue arrow indicating a process or operation (no text or symbols present)-
Gently pull the paper out of the pick up area.
-
Close the right door.
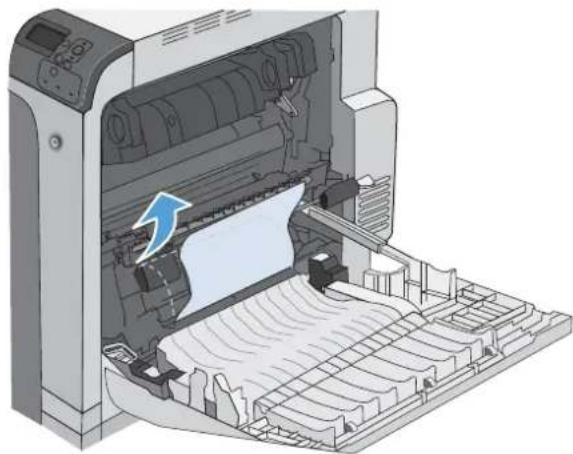
natural_image
Illustration of a printer's internal structure showing paper feed, print sheet, and printer casing (no text or symbols)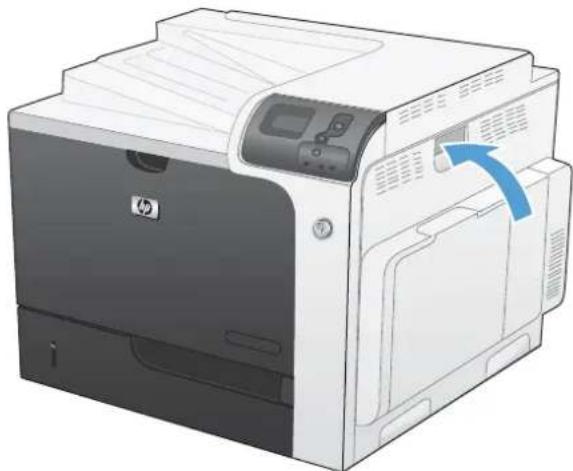
natural_image
Illustration of a HP printer with a blue arrow indicating the paper's left side (no text or symbols present)Clear jams in Tray 2 or optional Trays 3, 4, or 5
△ CAUTION: Opening a tray when paper is jammed can cause the paper to tear and leave pieces of paper in the tray, which might cause another jam. Be sure to clear jams before opening the tray.
- Open Tray 2 and make sure that the paper is stacked correctly. Remove any jammed or damaged sheets of paper. To access jammed paper from the tray cavity, remove Tray 2 from the product.
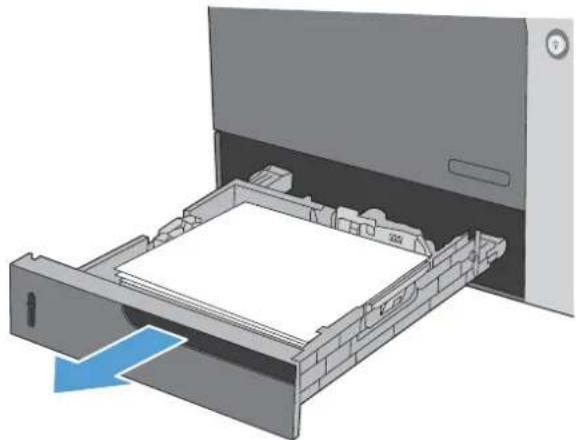
natural_image
Diagram of a file drawer with an open drawer and a computer monitor, showing internal components (no text or symbols)- Close the tray.
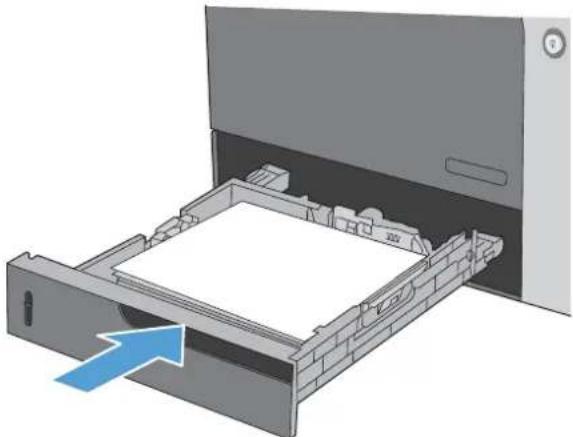
natural_image
3D diagram of a file drawer with an arrow indicating direction, no text or symbols presentClear jams in the lower right door (Tray 3, 4, or 5)
-
Open the lower right door.
-
If paper is visible, gently pull the jammed paper up or down to remove it.
-
Close the lower right door.
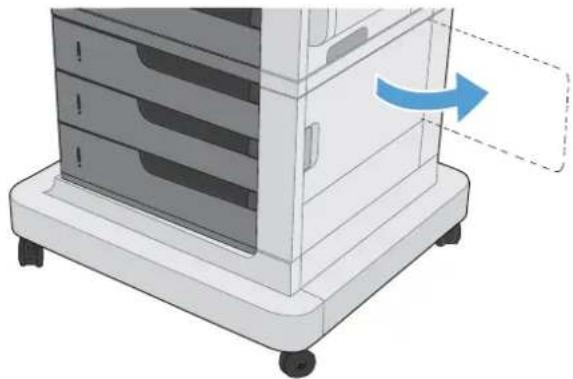
natural_image
Illustration of a medical or laboratory device with a blue arrow indicating rotation, no text or symbols present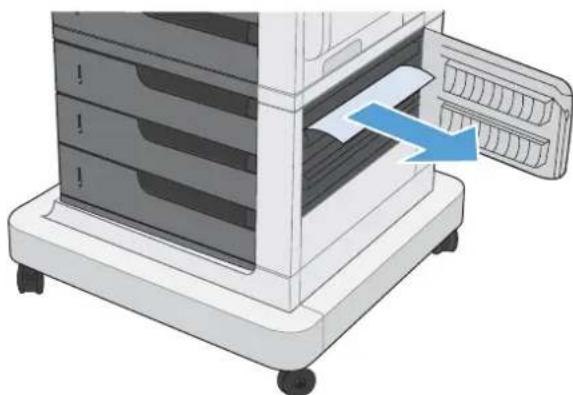
natural_image
Illustration of a mechanical device with a blue arrow indicating a process or operation, no text or symbols present.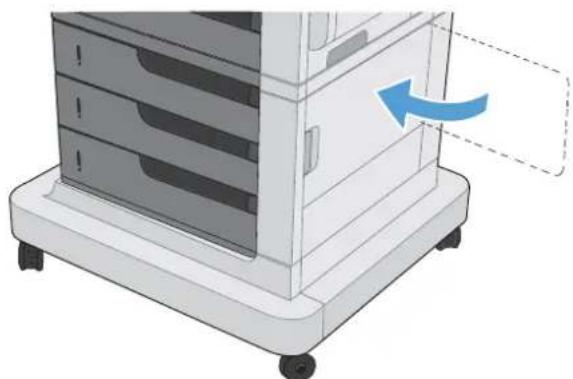
natural_image
Illustration of a medical or laboratory device with a blue arrow indicating rotation, no text or symbols presentChange jam recovery
This product provides a jam recovery feature that reprints jammed pages.
- Press the Home button 🔒.
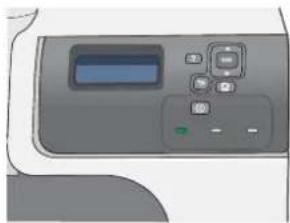
natural_image
Illustration of a handheld electronic device with control buttons and a display screen (no text or symbols visible)-
Press the down arrow to highlight the CONFIGURE DEVICE menu, and then press the OK button.
-
Press the down arrow ▼ to highlight the SYSTEM SETUP menu, and then press the OK button.
-
Press the down arrow ▼ to highlight the JAM RECOVERY menu, and then press the OK button.
-
Press the down arrow or up arrow ▼/▲to highlight the appropriate setting, and then press the OK button. The following options are available:
- AUTO — The product attempts to reprint jammed pages when sufficient memory is available. This is the default setting.
- OFF — The product does not attempt to reprint jammed pages. Because no memory is used to store the most recent pages, performance is optimal.
NOTE: When using this option, if the product runs out of paper and the job is being printed on both sides, some pages can be lost.
- ON — The product always reprints jammed pages. Additional memory is allocated to store the last few pages printed. This might cause overall performance to suffer.
- Press the Home button 🔒 to return to the Ready state.
Solve paper-handling problems
Use only paper that meets the specifications outlined in the HP LaserJet Printer Family Print Media Guide. Always configure the paper type on the control panel to match the type of paper that is loaded in the tray.
Product feeds multiple sheets
Product feeds multiple sheets
| Cause | Solution |
| Print paper is sticking together. | Remove paper, flex it, rotate it 180 degrees or flip it over, and then reload it into the tray. |
| NOTE: Do not fan paper. Fanning can cause static electricity, which can cause paper to stick together. | |
| Paper does not meet the specifications for this product. | Use only paper that meets HP paper specifications for this product. |
| Trays are not properly adjusted. Make sure that the paper guides match the size of paper being used. | |
Product feeds incorrect page size
Product feeds incorrect page size
| Cause | Solution |
| The correct size paper is not loaded in the input tray. | Load the correct size paper in the input tray. |
| The correct size paper is not selected in the software program or printer driver. | Confirm that the settings in the software program and printer driver are correct, because the software program settings override the printer driver and control panel settings, and the printer driver settings override the control panel settings. For more information, see Change printer-driver settings for Windows on page 49 or Change printer-driver settings for Mac on page 57. |
| The correct size paper for the tray is not selected in the product control panel. | From the control panel, select the correct size paper for the tray. |
| The paper size is not configured correctly for the input tray. | Print a configuration page or use the control panel to determine the paper size for which the tray is configured. |
| The guides in the tray are not against the paper. Verify that the paper guides are touching the paper. | |
Product pulls from incorrect tray
Product pulls from incorrect tray
| Cause | Solution |
| You are using a driver for a different product. Use a driver for this product. | |
| The specified tray is empty. Load paper in the specified tray. | |
| You did not specify the tray for the print job. | Select the correct tray for the print job using the control panel or by configuring your print settings. |
| The paper size is not configured correctly for the input tray. | Print a configuration page or use the control panel to determine the paper size for which the tray is configured. |
| The guides in the tray are not against the paper. Verify that the guides are touching the paper. | |
Paper does not feed automatically
Paper does not feed automatically
| Cause | Solution |
| Manual feed is selected in the software program. | Load Tray 1 with paper, or, if the paper is loaded, press the OK button. |
| The correct size paper is not loaded. Load the correct size paper. | |
| The input tray is empty. Load paper into the input tray. | |
| Paper from a previous jam has not been completely removed. | Open the product and remove any paper in the paper path. |
| The paper size is not configured correctly for the input tray. | Print a configuration page or use the control panel to determine the paper size for which the tray is configured. |
| The guides in the tray are not against the paper. | Verify that the paper guides are touching the paper. |
| The manual-feed prompt is set to ALWAYS. The product always prompts for manual feed, even if the tray is loaded. | Load Tray 1 with paper, or, if the paper is loaded, press the OK button.Or, change the manual-feed prompt setting to UNLESS LOADED, so that the product prompts for manual feed only when the tray is empty. |
| The USE REQUESTED TRAY setting on the product is set to EXCLUSIVELY, and the requested tray is empty. The product will not use another tray. | Load the requested tray.Or, change the setting from EXCLUSIVELY to FIRST on the CONFIGURE DEVICE menu. The product can use other trays if no media is loaded in the specified tray. |
Paper does not feed from Tray 2, 3, 4, or 5
Paper does not feed from Tray 2, 3, 4, or 5
| Cause | Solution |
| The correct size paper is not loaded. Load the correct size paper. | |
| The input tray is empty. Load paper in the input tray. | |
| The correct paper type for the input tray is not selected in the product control panel. | From the product control panel, select the correct paper type for the input tray. Trays configured for a paper type with a specific weight range will not match a print job that specifies an exact weight, even if the specified weight is within the weight range. |
| Paper from a previous jam has not been completely removed. | Open the product and remove any paper in the paper path.Closely inspect the fuser area for jams. |
| None of the optional trays appear as input tray options. | The optional trays only display as available if they are installed.Verify that any optional trays are correctly installed. Verify that the printer driver has been configured to recognize the optional trays. |
| An optional tray is incorrectly installed. | Print a configuration page to confirm that the optional tray is installed. If not, verify that the tray is correctly attached to the product. |
| The paper size is not configured correctly for the input tray. | Print a configuration page or use the control panel to determine the paper size for which the tray is configured. |
| The guides in the tray are not against the paper. | Verify that the guides are touching the paper. |
Transparencies or glossy paper will not feed
Transparencies or glossy paper will not feed
| Cause | Solution |
| The correct paper type is not specified in the software or printer driver. | Verify that the correct paper type is selected in the software or printer driver. |
| The input tray is overfilled. Remove excess paper from the input tray. Do not exceed the maximum stack height marks for the tray. | |
| Paper in another input tray is the same size as the transparencies, and the product is defaulting to the other tray. | Make sure that the input tray containing the transparencies or glossy paper is selected in the software program or printer driver. Use the product control panel to configure the tray to the paper type loaded. |
| The tray containing the transparencies or glossy paper is not configured correctly for type. | Make sure that the input tray containing the transparencies or glossy paper is selected in the software program or printer driver. Use the product control panel to configure the tray to the paper type loaded. |
| Transparencies or glossy paper might not meet supported paper specifications. | Use only paper that meets the HP paper specifications for this product. |
| High-humidity environments may cause glossy paper not to feed, or to feed too many sheets. | Avoid printing glossy paper in high humidity conditions. When printing glossy paper, removing the paper from the wrapper and letting it rest for a few hours can improve feeding into the product. However, letting paper rest in humid environments may also cause blisters. |
Envelopes jam or will not feed in the product
Envelopes jam or will not feed in the product
| Cause | Solution |
| Envelopes are loaded in an unsupported tray. Only Tray 1 can feed envelopes. | Load envelopes into Tray 1. |
| Envelopes are curled or damaged. | Try using different envelopes. Store envelopes in a controlled environment. |
| Envelopes are sealing because the moisture content is too high. | Try using different envelopes. Store envelopes in a controlled environment. |
| Envelope orientation is incorrect. Verify that the envelope is loaded correctly. | |
| This product does not support the envelopes being used. | Refer to the HP LaserJet Printer Family Print Media Guide. |
| Tray 1 is configured for a size other than envelopes. | Configure Tray 1 size for envelopes. If the envelope is a custom size, configure Tray 1 paper type to ENVELOPE. |
Output is curled or wrinkled
Output is curled or wrinkled
| Cause | Solution |
| Paper does not meet the specifications for this product. | Use only paper that meets the HP paper specifications for this product. |
| Paper is damaged or in poor condition. | Remove paper from the input tray and load paper that is in good condition. |
| Product is operating in an excessively humid environment. | Verify that the printing environment is within humidity specifications. |
| You are printing large, solid-filled areas. | Large, solid-filled areas can cause excessive curl. Try using a different pattern. |
| Paper used was not stored correctly and might have absorbed moisture. | Remove paper and replace it with paper from a fresh, unopened package. |
| Paper has poorly cut edges. | Remove paper, flex it, rotate it 180 degrees or turn it over, and then reload it into the input tray. Do not fan paper. If the problem persists, replace the paper. |
| The specific paper type was not configured for the tray or selected in the software. | Configure the software for the paper (see the software documentation). Configure the tray for the paper, seeLoad paper trays on page 90. |
| The paper has previously been used for a print job. Do not re-use paper. | |
Product does not duplex or duplexes incorrectly
Product does not duplex (print 2-sided jobs) or duplexes incorrectly
| Cause | Solution |
| You are trying to duplex on unsupported paper. | Verify that the paper is supported for duplex printing. |
| The printer driver is not set up for duplex printing. | Set up the printer driver to enable duplex printing. |
| The first page is printing on the back of preprinted forms or letterhead. | Preprinted paper requires a specific orientation in the tray. See Paper orientation for loading trays on page 87. |
| The product model does not support automatic 2-sided printing. | The HP Color LaserJet CP4525n and HP Color LaserJet CP4025n models do not support automatic 2-sided printing. |
| The product configuration is not set for duplexing. | In Windows, run the automatic configuration feature:1. Click the Start button, point to Settings, and then click Printers and Faxes.2. Right-click the HP product icon, and then click Properties or Printing Preferences.3. Click the Device Settings tab.4. Under Installable Options, click Update Now in the Automatic Configuration list. |
Solve image-quality problems
You can prevent most print-quality problems by following these guidelines.
- Configure the trays for the correct paper-type setting. See Configure trays on page 97.
• Use paper that meets HP specifications. See Paper and print media on page 79. - Clean the product as necessary. See Clean the paper path on page 176.
Example print quality problems
Some print quality problems arise from low or very low cartridges or other supplies. The solution is to replace the low or very low supplies.
Some print quality problems arise from use of inappropriate paper.
• Use paper that meets HP paper specifications.
The surface of the paper is too rough. Use paper that meets HP paper specifications.
- The printer driver setting or paper tray setting might be incorrect. Be sure that you have configured the paper tray at the product control panel and have also selected the correct driver setting for the paper that you are using.
The print mode might be set incorrectly, or the paper might not meet recommended specifications.
- The transparencies you are using are not designed for proper toner adhesion. Use only transparencies designed for HP Color LaserJet products.
- The moisture content of the paper is uneven, too high, or too low. Use paper from a different source or from an unopened ream of paper.
- Some areas of the paper reject toner. Use paper from a different source or from an unopened ream of paper.
- The letterhead you are using is printed on rough paper. Use a smoother, xerographic paper. If this solves your problem, consult with the printer of your letterhead to verify that the paper used meets the specifications for this product.
- Several optimize print modes can be used to address print quality issues. See Print Quality menu on page 23.
If you are having problems with light streaks in an image, use the INFORMATION menu to print the supplies status page. If none of the cartridges has reached its estimated end of life, remove the cartridges from the product, and then reinstall them. The product initiates a cleaning mechanism that might correct the light streaks.
Repetitive defects ruler
If defects repeat at regular intervals on the page, use this ruler to identify the cause of the defect. Place the top of the ruler at the first defect. The marking that is beside the next occurrence of the defect indicates which component needs to be replaced.
Figure 10-2 Repetitive defects ruler
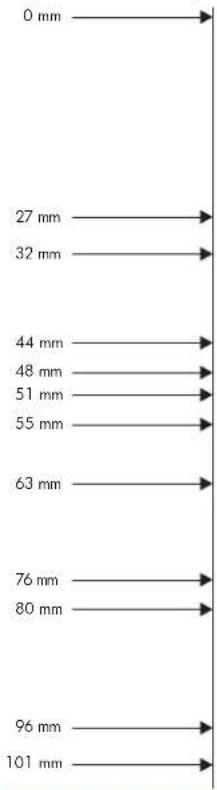
text_image
0 mm 27 mm 32 mm 44 mm 48 mm 51 mm 55 mm 63 mm 76 mm 80 mm 96 mm 101 mmDistance between defects Product components that cause the defect
| 27 mm Print cartridge |
| 32 mm Print cartridge |
| 44 mm Transfer unit |
| 48 mm Print cartridge |
| 51 mm Transfer roller |
| 55 mm Print engine |
| 63 mm Transfer unit |
| 76 mm Print cartridge |
| 76 mm Fuser |
| 80 mm Fuser |
| 96 mm Print engine |
| 101 mm Print engine |
Optimize and improve image quality
Internal print-quality-test pages
Use the built-in print-quality-troubleshooting pages to help diagnose and solve print-quality problems.
-
Press the Home button 🔒.
-
Press the down arrow ▼ to highlight the DIAGNOSTICS menu, and then press the OK button.
-
Press the down arrow ▼ to highlight the PQ TROUBLESHOOTING setting, and then press the OK button to print the pages.
The product returns to the Ready state after printing the print-quality-troubleshooting pages. Follow the instructions on the pages that print out.
Manage and configure printer drivers
The product uses the paper-type setting to establish many internal settings that affect print quality. Always use the correct paper-type setting in the printer driver and at the product control panel. Also make sure that the other settings on the Paper/Quality tab in the printer driver are correct.
For Windows operating systems, use the printer driver that best matches your printing needs.
| HP PCL 6 driver | Provides the overall best speed, print quality, and product-feature support for most usersDeveloped to align with the Windows Graphic Device Interface (GDI) for the best speed in Windows environmentsMight not be fully compatible with third-party and custom software programs that are based on PCL 5 |
| HP UPD PS driver | Recommended for printing with Adobe® software programs or with other highly graphics-intensive software programsProvides support for printing from postscript emulation needs, or for postscript flash font support |
| HP UPD PCL 5 driver | The best choice for printing from third-party or custom software programsThe best choice when operating with mixed environments, which require the product to be set to PCL 5 (UNIX, Linux, mainframe) |
Calibrate the product
Calibration is a product function that optimizes print quality. If you experience any image-quality problems, calibrate the product.
-
Press the Home button 📋.
-
Press the down arrow ▼ to highlight the CONFIGURE DEVICE menu, and then press the OK button.
-
Press the down arrow ▼ to highlight the PRINT QUALITY menu, and then press the OK button.
-
Press the down arrow ▼ to highlight the FULL CALIBRATE NOW setting, and then press the OK button.
Set the image registration
If you are having problems with text aligning on the page, use the SET REGISTRATION menu to set the image registration. For instructions, see Set the duplex alignment on page 137.
Solve performance problems
| Problem Cause Solution | ||
| Pages print but are totally blank. The document might contain blank pages. | The product might be malfunctioning. To check the product, print a Configuration page. | Check the document that you are printing to see if content appears on all of the pages. |
| All of the print cartridges might be very low on toner. | Replace the toner cartridges if a SUPPLIES VERY LOW message is displayed. | |
| Pages print very slowly. Heavier paper types can slow the print job. | Complex pages can print slowly. Simplify the page. | Print on a different type of paper. Proper fusing may require a slower print speed to ensure the best print quality. |
| Pages did not print. The product might not be pulling paper correctly. | The paper is jamming in the product. | Make sure paper is loaded in the tray correctly. |
| The USB cable might be defective or incorrectly connected. | Clear the jam. See Clear jams on page 206. | |
| Disconnect the USB cable at both ends and reconnect it.Try printing a job that has printed in the past.Try using a different USB cable. | ||
| Other devices are running on your computer. | The product might not share a USB port. If you have an external hard drive or network switchbox that is connected to the same port as the product, the other device might be interfering. To connect and use the product, you must disconnect the other device or you must use two USB ports on the computer. | |
Solve connectivity problems
Solve direct-connect problems
If you have connected the product directly to a computer, check the cable.
- Verify that the cable is connected to the computer and to the product.
- Verify that the cable is not longer than 2 m (6.5 ft). Replace the cable if necessary.
- Verify that the cable is working correctly by connecting it to another product. Replace the cable if necessary.
Solve network problems
Check the following items to verify that the product is communicating with the network. Before beginning, print a configuration page. See Print information pages on page 148.
| Problem Solution | |
| Poor physical connection | Verify that the product is attached to the correct network port using a cable of the correct length.Verify that cable connections are secure.Look at the network port connection on the back of the product, and verify that the amber activity light and the green link-status light are lit.If the problem continues, try a different cable or port on the hub. |
| The computer is unable to communicate with the product. | Use the command prompt to ping the product from your computer. For example:ping 192.168.45.39Verify that the ping displays round-trip times, which indicates that it is working.If the ping command failed, verify that the network hubs are on, and then verify that the network settings, the product, and the computer are all configured for the same network. |
| Incorrect link and duplex settings | Hewlett-Packard recommends leaving this setting in automatic mode (the default setting). See Link speed and duplex settings on page 77. |
| Incorrect IP address for the product on the computer | Use the correct IP address. The IP address is listed on the configuration page.If the IP address is correct, delete the product and then add it again. |
| New software programs have caused compatibility problems. | Verify that any new software programs are correctly installed and that they use the correct printer driver. |
| Your computer or workstation is set up incorrectly. | Check the network drivers, printer drivers, and the network redirection.Verify that the operating system is configured correctly. |
| The protocol is disabled, or other network settings are incorrect. | Review the configuration page to check the status of the protocol. Enable it if necessary.Reconfigure the network settings if necessary. See Connect to a network on page 68. |
Product software problems
Problem Solution
| A printer driver for the product is not visible in the Printer folder | Reinstall the product software. | |
| NOTE: Close any applications that are running. To close an application that has an icon in the system tray, right-click the icon, and selectCloseorDisable. | ||
| Try plugging the USB cable into a different USB port on the computer. | ||
| An error message was displayed during the software installation | Reinstall the product software. | |
| NOTE: Close any applications that are running. To close an application that has an icon in the task bar, right-click the icon, and selectCloseorDisable. | ||
| Check the amount of free space on the drive where you are installing the product software. If necessary, free up as much space as you can, and reinstall the product software. | ||
| If necessary, run the Disk Defragmenter, and reinstall the product software. | ||
| The product is in Ready mode, but nothing prints | Print a Configuration page, and verify the product functionality. | |
| Verify that all of the cables are correctly seated and within specifications. This includes the USB and power cables. Try a new cable. | ||
| Verify the IP Address on the Embedded Jetdirect Page matches the IP address for the software port. Use one of the following procedures: | ||
| Windows XP, Windows Server 2003, Windows Server 2008, and Windows Vista | 1. Click Start.2. Click Settings.3. Click Printers and Faxes (using the default Start menu view) or click Printers (using the Classic Start menu view).4. Right-click the product driver icon, and then selectProperties.5. Click thePortstab, and then clickConfigure Port.6. Verify the IP address, and then clickOKorCancel.7. If the IP Addresses are not the same, delete the driver, and reinstall the driver using the correct IP address. | |
| Windows 7 | 1. Click Start.2. Click Devices and Printers.3. Right-click the product driver icon, and then selectPrinter properties.4. Click thePortstab, and then clickConfigure Port.5. Verify the IP address, and then clickOKorCancel.6. If the IP Addresses are not the same, delete the driver, and reinstall the driver using the correct IP address. | |
Solve common Windows problems
Error message:
"(Name of the program, for example, Internet Explorer) has encountered a problem and needs to close. We are sorry for the inconvenience"
| Cause | Solution |
| Close all software programs, restart Windows, and try again. | |
| If the application referenced is the printer driver, select or install a different printer driver. If the product PCL 6 printer driver is selected, switch to the PCL 5 or HP postscript level 3 emulation printer driver. | |
| See the Microsoft Windows documentation that came with the computer for more information about Windows error messages, or go towww.microsoft.com. |
Solve common Mac problems
The printer driver is not listed in the Printer Setup Utility or the Print & Fax list.
| Cause | Solution |
| The product software might not have been installed or was installed incorrectly. | Make sure that the product .GZ file is in the following hard-drive folder:Mac OS X 10.4: Library/Printers/PPDs/Contents/Resources/.lproj, whereis the two-letter language code for the language that you are using.Mac OS X 10.5 and 10.6: Library/Printers/PPDs/Contents/ResourcesIf necessary, reinstall the software. See the getting started guide for instructions. |
| The Postscript Printer Description (PPD) file is corrupt. Delete the .GZ file from the following hard-drive folder:Mac OS X 10.4: Library/Printers/PPDs/Contents/Resources/.lproj, whereis the two-letter language code for the language that you are using.Mac OS X 10.5 and 10.6: Library/Printers/PPDs/Contents/ResourcesReinstall the software. See the getting started guide for instructions. | |
The product name, IP address, or Bonjour host name does not appear in the product list in the Printer Setup Utility or the Print & Fax list.
| Cause | Solution |
| The product might not be ready. | Make sure that the cables are connected correctly, the product is on, and the Ready light is on. If you are connecting through a USB or Ethernet hub, try connecting directly to the computer or use a different port. |
| The wrong connection type might be selected. | Make sure that USB, IP Printing, or Bonjour is selected, depending on the type of connection that exists between the product and the computer. |
| The wrong product name, IP address, or Bonjour host name is being used. | Print a configuration page to check the product name, IP address, or Bonjour host name. Verify that the name, IP address, or Bonjour host name on the configuration page matches the product name, IP address, or Bonjour host name in the Printer Setup Utility or the Print & Fax list. |
| The interface cable might be defective or of poor quality. Replace the cable with a high-quality cable. | |
The printer driver does not automatically set up your selected product in the Printer Setup Utility or the Print & Fax list.
| Cause | Solution |
| The product might not be ready. Make sure that the cables are connected correctly, the product is on,and the Ready light is on. If you are connecting through a USB or Ethernet hub, try connecting directly to the computer or use a different port. | |
The printer driver does not automatically set up your selected product in the Printer Setup Utility or the Print & Fax list.
| Cause | Solution |
| The product software might not have been installed or was installed incorrectly. | Make sure that the product PPD is in the following hard-drive folder:Mac OS X 10.4: Library/Printers/PPDs/Contents/Resources/.lproj, whereis the two-letter language code for the language that you are using.Mac OS X 10.5 and 10.6: Library/Printers/PPDs/Contents/ResourcesIf necessary, reinstall the software. See the getting started guide for instructions. |
| The Postscript Printer Description (PPD) file is corrupt. | Delete the .GZ file from the following hard-drive folder:Mac OS X 10.4: Library/Printers/PPDs/Contents/Resources/.lproj, whereis the two-letter language code for the language that you are using.Mac OS X 10.5 and 10.6: Library/Printers/PPDs/Contents/ResourcesReinstall the software. See the getting started guide for instructions. |
| The interface cable might be defective or of poor quality. | Replace the interface cable with a high-quality cable. |
A print job was not sent to the product that you wanted.
| Cause | Solution |
| The print queue might be stopped. | Restart the print queue. Openprint monitorand selectStart Printer. |
| The wrong product name or IP address is being used. Another product with the same or similar name, IP address, or Bonjour host name might have received your print job. | Print a configuration page to check the product name, IP address, or Bonjour host name. Verify that the name, IP address, or Bonjour host name on the configuration page matches the product name, IP address, or Bonjour host name in the Printer Setup Utility or the Print & Fax list. |
An encapsulated PostScript (EPS) file does not print with the correct fonts.
| Cause | Solution |
| This problem occurs with some programs. | Try downloading the fonts that are contained in the EPS file to the product before printing.Send the file in ASCII format instead of binary encoding. |
You are unable to print from a third-party USB card.
| Cause | Solution |
| This error occurs when the software for USB products is not installed. | When adding a third-party USB card, you might need the Apple USB Adapter Card Support software. The most current version of this software is available from the Apple Web site. |
When connected with a USB cable, the product does not appear in the Printer Setup Utility or the Print & Fax list after the driver is selected.
| Cause | Solution |
| This problem is caused by either a software or a hardware component. | Software troubleshootingCheck that your Macintosh supports USB.Verify that your Macintosh operating system is Mac OS X 10.4 or later.Ensure that your Macintosh has the appropriate USB software from Apple.Hardware troubleshootingCheck that the product is turned on.Verify that the USB cable is connected correctly.Check that you are using the appropriate high-speed USB cable.Ensure that you do not have too many USB devices drawing power from the chain. Disconnect all of the devices from the chain, and connect the cable directly to the USB port on the host computer.Check to see if more than two nonpowered USB hubs are connected in a row on the chain. Disconnect all of the devices from the chain and connect the cable directly to the USB port on the host computer.NOTE: The iMac keyboard is a nonpowered USB hub. |
A Supplies and accessories
• Order parts, accessories, and supplies
Part numbers
Order parts, accessories, and supplies
| Order supplies and paper www.hp.com/go/suresupply | |
| Order genuine HP parts or accessories www.hp.com/buy/parts | |
| Order through service or support providers Contact an HP-authorized service or support provider. | |
| Order using HP software | Use the HP Easy Printer Care software on page 149 |
| Use the HP Embedded Web Server on page 152 | |
Part numbers
Ordering information and availability might change during the life of the product.
Accessories
| Item Description Part number | ||
| HP Color LaserJet 1 x 500 Paper Feeder and stand | 500-sheet paper tray. CE422A | |
| HP Color LaserJet 3 x 500 Paper Feeder and stand | 1500-sheet paper tray. Contains three 500-sheet trays. | CE423A |
| HP Postcard media insert Plastic tray for printing 10 x 15 cm (4 x 6 in) paper. | CC497A | |
Print cartridges and toner collection unit
| Item Description | 1 | Part number |
| HP Color LaserJet black print cartridge Standard black cartridge CE260A | ||
| HP Color LaserJet black print cartridge High-capacity black cartridge for CLJ4525 models only | CE260X | |
| HP Color LaserJet cyan print cartridge Cyan cartridge CE261A | ||
| HP Color LaserJet yellow print cartridge Yellow cartridge CE262A | ||
| HP Color LaserJet magenta print cartridge | Magenta cartridge CE263A | |
| Toner Collection Unit Receptacle for toner that has not fused to the paper. | CE265A | |
1 For more information, go to www.hp.com/go/learnaboutsupplies.
Memory
| Item Description Part number | ||
| 200-pin DDR2 SODIMM x32 memory modules | 256 MB CE466A | |
| 512 MB CE467A | ||
| Boosts the ability of the product to handle large or complex print jobs. | ||
| HP Encrypted High Performance hard disks | EIO encrypted hard disk to install in the EIO accessory slot | J8019A |
| 63 mm (2.5 in) | ||
Cables and interfaces
| Item Description Part number | |
| Enhanced I/O (EIO) card HP Jetdirect 635n IPv6/IPsec Print Server | J7961G |
| USB cable 2-meter standard USB-compatible device connector | C6518A |
Maintenance kits
| Item Description Part number | |
| Fuser kit 110 Volt replacement fuser CE246A | |
| 220 Volt replacement fuser CE247A | |
| Transfer kit Replacement transfer unit, transfer roller, Tray 1 pickup roller, and eight feed and separation rollers for Trays 2-5. | CE249A |
B Service and support
• Hewlett-Packard limited warranty statement
• HP's Premium Protection Warranty: LaserJet print cartridge limited warranty statement
• Color LaserJet Fuser Kit, Transfer Kit, and Roller Kit Limited Warranty Statement
• End User License Agreement
- Customer self-repair warranty service
- Customer support
Hewlett-Packard limited warranty statement
HP PRODUCT DURATION OF LIMITED WARRANTY
HP Color LaserJet CP4025n, CP4025dn, CP4525n, CP4525dn, CP4525xh
One-year on-site warranty
HP warrants to you, the end-user customer, that HP hardware and accessories will be free from defects in materials and workmanship after the date of purchase, for the period specified above. If HP receives notice of such defects during the warranty period, HP will, at its option, either repair or replace products which prove to be defective. Replacement products may be either new or equivalent in performance to new.
HP warrants to you that HP software will not fail to execute its programming instructions after the date of purchase, for the period specified above, due to defects in material and workmanship when properly installed and used. If HP receives notice of such defects during the warranty period, HP will replace software which does not execute its programming instructions due to such defects.
HP does not warrant that the operation of HP products will be uninterrupted or error free. If HP is unable, within a reasonable time, to repair or replace any product to a condition as warranted, you will be entitled to a refund of the purchase price upon prompt return of the product.
HP products may contain remanufactured parts equivalent to new in performance or may have been subject to incidental use.
Warranty does not apply to defects resulting from (a) improper or inadequate maintenance or calibration, (b) software, interfacing, parts or supplies not supplied by HP, (c) unauthorized modification or misuse, (d) operation outside of the published environmental specifications for the product, or (e) improper site preparation or maintenance.
TO THE EXTENT ALLOWED BY LOCAL LAW, THE ABOVE WARRANTIES ARE EXCLUSIVE AND NO OTHER WARRANTY OR CONDITION, WHETHER WRITTEN OR ORAL, IS EXPRESSED OR IMPLIED AND HP SPECIFICALLY DISCLAIMS ANY IMPLIED WARRANTIES OR CONDITIONS OF MERCHANTABILITY, SATISFACTORY QUALITY, AND FITNESS FOR A PARTICULAR PURPOSE. Some countries/regions, states or provinces do not allow limitations on the duration of an implied warranty, so the above limitation or exclusion might not apply to you. This warranty gives you specific legal rights and you might also have other rights that vary from country/region to country/region, state to state, or province to province.
HP's limited warranty is valid in any country/region or locality where HP has a support presence for this product and where HP has marketed this product. The level of warranty service you receive may vary according to local standards. HP will not alter form, fit or function of the product to make it operate in a country/region for which it was never intended to function for legal or regulatory reasons.
TO THE EXTENT ALLOWED BY LOCAL LAW, THE REMEDIES IN THIS WARRANTY STATEMENT ARE YOUR SOLE AND EXCLUSIVE REMEDIES. EXCEPT AS INDICATED ABOVE, IN NO EVENT WILL HP OR ITS SUPPLIERS BE LIABLE FOR LOSS OF DATA OR FOR DIRECT, SPECIAL, INCIDENTAL, CONSEQUENTIAL (INCLUDING LOST PROFIT OR DATA), OR OTHER DAMAGE, WHETHER BASED IN CONTRACT, TORT, OR OTHERWISE. Some countries/regions, states or provinces do not allow the exclusion or limitation of incidental or consequential damages, so the above limitation or exclusion may not apply to you.
THE WARRANTY TERMS CONTAINED IN THIS STATEMENT, EXCEPT TO THE EXTENT LAWFULLY PERMITTED, DO NOT EXCLUDE, RESTRICT OR MODIFY AND ARE IN ADDITION TO THE MANDATORY STATUTORY RIGHTS APPLICABLE TO THE SALE OF THIS PRODUCT TO YOU.
HP's Premium Protection Warranty: LaserJet print cartridge limited warranty statement
This HP product is warranted to be free from defects in materials and workmanship.
This warranty does not apply to products that (a) have been refilled, refurbished, remanufactured or tampered with in any way, (b) experience problems resulting from misuse, improper storage, or operation outside of the published environmental specifications for the printer product or (c) exhibit wear from ordinary use.
To obtain warranty service, please return the product to place of purchase (with a written description of the problem and print samples) or contact HP customer support. At HP's option, HP will either replace products that prove to be defective or refund your purchase price.
TO THE EXTENT ALLOWED BY LOCAL LAW, THE ABOVE WARRANTY IS EXCLUSIVE AND NO OTHER WARRANTY OR CONDITION, WHETHER WRITTEN OR ORAL, IS EXPRESSED OR IMPLIED AND HP SPECIFICALLY DISCLAIMS ANY IMPLIED WARRANTIES OR CONDITIONS OF MERCHANTABILITY, SATISFACTORY QUALITY, AND FITNESS FOR A PARTICULAR PURPOSE.
TO THE EXTENT ALLOWED BY LOCAL LAW, IN NO EVENT WILL HP OR ITS SUPPLIERS BE LIABLE FOR DIRECT, SPECIAL, INCIDENTAL, CONSEQUENTIAL (INCLUDING LOST PROFIT OR DATA), OR OTHER DAMAGE, WHETHER BASED IN CONTRACT, TORT, OR OTHERWISE.
THE WARRANTY TERMS CONTAINED IN THIS STATEMENT, EXCEPT TO THE EXTENT LAWFULLY PERMITTED, DO NOT EXCLUDE, RESTRICT OR MODIFY AND ARE IN ADDITION TO THE MANDATORY STATUTORY RIGHTS APPLICABLE TO THE SALE OF THIS PRODUCT TO YOU.
Color LaserJet Fuser Kit, Transfer Kit, and Roller Kit Limited Warranty Statement
This HP product is warranted to be free from defects in materials and workmanship until the printer provides a low-life indicator on the control panel.
This warranty does not apply to products that (a) have been refurbished, remanufactured or tampered with in any way, (b) experience problems resulting from misuse, improper storage, or operation outside of the published environmental specifications for the printer product or (c) exhibit wear from ordinary use.
To obtain warranty service, please return the product to place of purchase (with a written description of the problem) or contact HP customer support. At HP's option, HP will either replace products that prove to be defective or refund your purchase price.
TO THE EXTENT ALLOWED BY LOCAL LAW, THE ABOVE WARRANTY IS EXCLUSIVE AND NO OTHER WARRANTY OR CONDITION, WHETHER WRITTEN OR ORAL, IS EXPRESSED OR IMPLIED AND HP SPECIFICALLY DISCLAIMS ANY IMPLIED WARRANTIES OR CONDITIONS OF MERCHANTABILITY, SATISFACTORY QUALITY, AND FITNESS FOR A PARTICULAR PURPOSE.
TO THE EXTENT ALLOWED BY LOCAL LAW, IN NO EVENT WILL HP OR ITS SUPPLIERS BE LIABLE FOR DIRECT, SPECIAL, INCIDENTAL, CONSEQUENTIAL (INCLUDING LOST PROFIT OR DATA), OR OTHER DAMAGE, WHETHER BASED IN CONTRACT, TORT, OR OTHERWISE.
THE WARRANTY TERMS CONTAINED IN THIS STATEMENT, EXCEPT TO THE EXTENT LAWFULLY PERMITTED, DO NOT EXCLUDE, RESTRICT OR MODIFY AND ARE IN ADDITION TO THE MANDATORY STATUTORY RIGHTS APPLICABLE TO THE SALE OF THIS PRODUCT TO YOU.
End User License Agreement
PLEASE READ CAREFULLY BEFORE USING THIS SOFTWARE PRODUCT: This End-User License Agreement ("EULA") is a contract between (a) you (either an individual or the entity you represent) and (b) Hewlett-Packard Company ("HP") that governs your use of the software product ("Software"). This EULA does not apply if there is a separate license agreement between you and HP or its suppliers for the Software, including a license agreement in online documentation. The term "Software" may include (i) associated media, (ii) a user guide and other printed materials, and (iii) "online" or electronic documentation (collectively "User Documentation").
RIGHTS IN THE SOFTWARE ARE OFFERED ONLY ON THE CONDITION THAT YOU AGREE TO ALL TERMS AND CONDITIONS OF THIS EULA. BY INSTALLING, COPYING, DOWNLOADING, OR OTHERWISE USING THE SOFTWARE, YOU AGREE TO BE BOUND BY THIS EULA. IF YOU DO NOT ACCEPT THIS EULA, DO NOT INSTALL, DOWNLOAD, OR OTHERWISE USE THE SOFTWARE. IF YOU PURCHASED THE SOFTWARE BUT DO NOT AGREE TO THIS EULA, PLEASE RETURN THE SOFTWARE TO YOUR PLACE OF PURCHASE WITHIN FOURTEEN DAYS FOR A REFUND OF THE PURCHASE PRICE; IF THE SOFTWARE IS INSTALLED ON OR MADE AVAILABLE WITH ANOTHER HP PRODUCT, YOU MAY RETURN THE ENTIRE UNUSED PRODUCT.
-
THIRD PARTY SOFTWARE. The Software may include, in addition to HP proprietary software ("HP Software"), software under licenses from third parties ("Third Party Software" and "Third Party License"). Any Third Party Software is licensed to you subject to the terms and conditions of the corresponding Third Party License. Generally, the Third Party License is located in a file such as license.txt; you should contact HP support if you cannot find any Third Party License. If the Third Party Licenses include licenses that provide for the availability of source code (such as the GNU General Public License) and the corresponding source code is not included with the Software, then check the product support pages of HP's website (hp.com) to learn how to obtain such source code.
-
LICENSE RIGHTS. You will have the following rights provided you comply with all terms and conditions of this EULA:
a. Use. HP grants you a license to Use one copy of the HP Software. "Use" means installing, copying, storing, loading, executing, displaying, or otherwise using the HP Software. You may not modify the HP Software or disable any licensing or control feature of the HP Software. If this Software is provided by HP for Use with an imaging or printing product (for example, if the Software is a printer driver, firmware, or add-on), the HP Software may only be used with such product ("HP Product"). Additional restrictions on Use may appear in the User Documentation. You may not separate component parts of the HP Software for Use. You do not have the right to distribute the HP Software.
b. Copying. Your right to copy means you may make archival or back-up copies of the HP Software, provided each copy contains all the original HP Software's proprietary notices and is used only for back-up purposes.
-
UPGRADES. To Use HP Software provided by HP as an upgrade, update, or supplement (collectively "Upgrade"), you must first be licensed for the original HP Software identified by HP as eligible for the Upgrade. To the extent the Upgrade supersedes the original HP Software, you may no longer use such HP Software. This EULA applies to each Upgrade unless HP provides other terms with the Upgrade. In case of a conflict between this EULA and such other terms, the other terms will prevail.
-
TRANSFER.
a. Third Party Transfer. The initial end user of the HP Software may make a one-time transfer of the HP Software to another end user. Any transfer will include all component parts, media, User Documentation, this EULA, and if applicable, the Certificate of Authenticity. The transfer may not be an indirect transfer, such as a consignment. Prior to the transfer, the end user receiving the transferred
Software will agree to this EULA. Upon transfer of the HP Software, your license is automatically terminated.
b. Restrictions. You may not rent, lease or lend the HP Software or Use the HP Software for commercial timesharing or bureau use. You may not sublicense, assign or otherwise transfer the HP Software except as expressly provided in this EULA.
-
PROPRIETARY RIGHTS. All intellectual property rights in the Software and User Documentation are owned by HP or its suppliers and are protected by law, including applicable copyright, trade secret, patent, and trademark laws. You will not remove any product identification, copyright notice, or proprietary restriction from the Software.
-
LIMITATION ON REVERSE ENGINEERING. You may not reverse engineer, decompile, or disassemble the HP Software, except and only to the extent that the right to do so is allowed under applicable law.
-
CONSENT TO USE OF DATA. HP and its affiliates may collect and use technical information you provide in relation to (i) your Use of the Software or the HP Product, or (ii) the provision of support services related to the Software or the HP Product. All such information will be subject to HP's privacy policy. HP will not use such information in a form that personally identifies you except to the extent necessary to enhance your Use or provide support services.
-
LIMITATION OF LIABILITY. Notwithstanding any damages that you might incur, the entire liability of HP and its suppliers under this EULA and your exclusive remedy under this EULA will be limited to the greater of the amount actually paid by you for the Product or U.S. \$5.00. TO THE MAXIMUM EXTENT PERMITTED BY APPLICABLE LAW, IN NO EVENT WILL HP OR ITS SUPPLIERS BE LIABLE FOR ANY SPECIAL, INCIDENTAL, INDIRECT, OR CONSEQUENTIAL DAMAGES (INCLUDING DAMAGES FOR LOST PROFITS, LOST DATA, BUSINESS INTERRUPTION, PERSONAL INJURY, OR LOSS OF PRIVACY) RELATED IN ANY WAY TO THE USE OF OR INABILITY TO USE THE SOFTWARE, EVEN IF HP OR ANY SUPPLIER HAS BEEN ADVISED OF THE POSSIBILITY OF SUCH DAMAGES AND EVEN IF THE ABOVE REMEDY FAILS OF ITS ESSENTIAL PURPOSE. Some states or other jurisdictions do not allow the exclusion or limitation of incidental or consequential damages, so the above limitation or exclusion may not apply to you.
-
U.S. GOVERNMENT CUSTOMERS. If you are a U.S. Government entity, then consistent with FAR 12.211 and FAR 12.212, Commercial Computer Software, Computer Software Documentation, and Technical Data for Commercial Items are licensed under the applicable HP commercial license agreement.
-
COMPLIANCE WITH EXPORT LAWS. You will comply with all laws, rules, and regulations (i) applicable to the export or import of the Software, or (ii) restricting the Use of the Software, including any restrictions on nuclear, chemical, or biological weapons proliferation.
-
RESERVATION OF RIGHTS. HP and its suppliers reserve all rights not expressly granted to you in this EULA.
(c) 2007 Hewlett-Packard Development Company, L.P.
Rev. 11/06
Customer self-repair warranty service
HP products are designed with many Customer Self Repair (CSR) parts to minimize repair time and allow for greater flexibility in performing defective parts replacement. If during the diagnosis period, HP identifies that the repair can be accomplished by the use of a CSR part, HP will ship that part directly to you for replacement. There are two categories of CSR parts: 1) Parts for which customer self repair is mandatory. If you request HP to replace these parts, you will be charged for the travel and labor costs of this service. 2) Parts for which customer self repair is optional. These parts are also designed for Customer Self Repair. If, however, you require that HP replace them for you, this may be done at no additional charge under the type of warranty service designated for your product.
Based on availability and where geography permits, CSR parts will be shipped for next business day delivery. Same-day or four-hour delivery may be offered at an additional charge where geography permits. If assistance is required, you can call the HP Technical Support Center and a technician will help you over the phone. HP specifies in the materials shipped with a replacement CSR part whether a defective part must be returned to HP. In cases where it is required to return the defective part to HP, you must ship the defective part back to HP within a defined period of time, normally five (5) business days. The defective part must be returned with the associated documentation in the provided shipping material. Failure to return the defective part may result in HP billing you for the replacement. With a customer self repair, HP will pay all shipping and part return costs and determine the courier/carrier to be used.
Customer support
| Get telephone support, free during your warranty period, for your country/regionHave the product name, serial number, date of purchase, and problem description ready. | Country/region phone numbers are on the flyer that was in the box with your product or atwww.hp.com/support/. |
| Get 24-hour Internet support | www.hp.com/support/cljcp4025orwww.hp.com/support/cljcp4525 |
| Get support for products used with a Macintosh computer | www.hp.com/go/macosx |
| Download software utilities, drivers, and electronic information | www.hp.com/go/cljcp4025_softwareorwww.hp.com/go/cljcp4525_software |
| Order additional HP service or maintenance agreements | www.hp.com/go/carepack |
C Product specifications
• Physical specifications
• Power consumption, electrical specifications, and acoustic emissions
• Environmental specifications
Physical specifications
Table C-1 Product dimensions
| Product Height Depth Width Weight | ||||
| HP Color LaserJet CP4025n | 420 mm (16.5 in) | 522 mm (20.6 in) | 540 mm (21.3 in) | 38.5 kg (84.6 lb) |
| HP Color LaserJet CP4025dn | 420 mm (16.5 in) | 522 mm (20.6 in) | 540 mm (21.3 in) | 38.5 kg (84.6 lb) |
| HP Color LaserJet CP4525n | 420 mm (16.5 in) | 522 mm (20.6 in) | 540 mm (21.3 in) | 38.5 kg (84.6 lb) |
| HP Color LaserJet CP4525dn | 420 mm (16.5 in) | 522 mm (20.6 in) | 540 mm (21.3 in) | 38.5 kg (84.6 lb) |
| HP Color LaserJet CP4525xh 964 mm (38.0 in) 651 mm (25.7 in) 662 mm (26.1 in) 64.1 kg (141.1 lb) | ||||
Table C-2 Product dimensions, with all doors and trays fully opened
| Product Height Depth Width | |||
| HP Color LaserJet CP4025n | 420 mm (16.5 in) | 522 mm (20.6 in) | 765 mm (30.1 in) |
| HP Color LaserJet CP4025dn | 420 mm (16.5 in) | 522 mm (20.6 in) | 765 mm (30.1 in) |
| HP Color LaserJet CP4525n | 420 mm (16.5 in) | 522 mm (20.6 in) | 765 mm (30.1 in) |
| HP Color LaserJet CP4525dn | 420 mm (16.5 in) | 522 mm (20.6 in) | 765 mm (30.1 in) |
| HP Color LaserJet CP4525xh | 964 mm (38.0 in) | 651 mm (25.7 in) | 866 mm (34.1 in) |
Power consumption, electrical specifications, and acoustic emissions
See www.hp.com/go/cljcp4025_regulatory or www.hp.com/go/cljcp4525_regulatory for current information.
Environmental specifications
| Environmental condition | Recommended | Allowed |
| Temperature (product and print cartridge) | 17° to 27°C (62.6° to 80.6°F) | 10° to 30°C (50° to 86°F) |
| Relative humidity | 30% to 70% relative humidity (RH) | 10% to 80% RH |
| Altitude | N/A | 0 m (0 ft) to 3000 m (9842 ft) |
D Regulatory information
FCC regulations
• Environmental product stewardship program
• Declaration of Conformity
Safety statements
FCC regulations
This equipment has been tested and found to comply with the limits for a Class A digital device, pursuant to Part 15 of the FCC rules. These limits are designed to provide reasonable protection against harmful interference in a residential installation. This equipment generates, uses, and can radiate radio frequency energy, and if not installed and used in accordance with the instruction manual, may cause harmful interference to radio communications. Operation of this equipment in a residential area is likely to cause harmful interference in which case the user will be required to correct the interference at his own expense.
NOTE: Any changes or modifications to the printer that are not expressly approved by HP could void the user's authority to operate this equipment.
Use of a shielded interface cable is required to comply with the Class A limits of Part 15 of FCC rules.
Environmental product stewardship program
Protecting the environment
Hewlett-Packard Company is committed to providing quality products in an environmentally sound manner. This product has been designed with several attributes to minimize impacts on our environment.
Ozone production
This product generates no appreciable ozone gas ( O_3 ).
Power consumption
Power usage drops significantly while in Ready and Sleep mode, which saves natural resources and saves money without affecting the high performance of this product. To determine the ENERGY STAR® qualification status for this product, see the Product Data Sheet or Specifications Sheet. Qualified products are also listed at:
www.hp.com/go/energystar
Paper use
This product's optional automatic duplex feature (two-sided printing) and N-up printing (multiple pages printed on one page) capability can reduce paper usage and the resulting demands on natural resources.
Plastics
Plastic parts over 25 grams are marked according to international standards that enhance the ability to identify plastics for recycling purposes at the end of the product's life.
HP LaserJet print supplies
It's easy to return and recycle your HP LaserJet print cartridges after use—free of charge—with HP Planet Partners. Multilingual program information and instructions are included in every new HP LaserJet print cartridge and supplies package. You help reduce the toll on the environment further when you return multiple cartridges together rather than separately.
HP is committed to providing inventive, high-quality products and services that are environmentally sound, from product design and manufacturing to distribution, customer use and recycling. When you participate in the HP Planet Partners program, we ensure your HP LaserJet print cartridges are recycled properly, processing them to recover plastics and metals for new products and diverting millions of tons of waste from landfills. Since this cartridge is being recycled and used in new materials, it will not be returned to you. Thank you for being environmentally responsible!

NOTE: Use the return label to return original HP LaserJet print cartridges only. Please do not use this label for HP inkjet cartridges, non-HP cartridges, refilled or remanufactured cartridges or warranty returns. For information about recycling your HP inkjet cartridges please go to http://www.hp.com/recycle.
Return and recycling instructions
United States and Puerto Rico
The enclosed label in the HP LaserJet toner cartridge box is for the return and recycling of one or more HP LaserJet print cartridges after use. Please follow the applicable instructions below.
Multiple returns (more than one cartridge)
- Package each HP LaserJet print cartridge in its original box and bag.
- Tape the boxes together using strapping or packaging tape. The package can weigh up to 31 kg (70 lb).
- Use a single pre-paid shipping label.
OR
- Use your own suitable box, or request a free bulk collection box from www.hp.com/recycle or 1-800-340-2445 (holds up to 31 kg (70 lb) of HP LaserJet print cartridges).
- Use a single pre-paid shipping label.
Single returns
- Package the HP LaserJet print cartridge in its original bag and box.
- Place the shipping label on the front of the box.
Shipping
For all HP LaserJet print cartridge recycling returns, give the package to UPS during your next delivery or pickup, or take it to an authorized UPS drop-off center. For the location of your local UPS drop-off center, call 1-800-PICKUPS or visit www.ups.com. If you are returning via USPS label, give the package to a U.S. Postal Service carrier or drop off at a U.S. Postal Service Office. For more information, or to order additional labels or boxes for bulk returns, visit www.hp.com/recycle or call 1-800-340-2445. Requested UPS pickup will be charged normal pickup rates. Information subject to change without notice.
Residents of Alaska and Hawaii
Do not use the UPS label. Call 1-800-340-2445 for information and instructions. The U.S. Postal Service provides no-cost cartridge return transportation services under an arrangement with HP for Alaska and Hawaii.
Non-U.S. returns
To participate in HP Planet Partners return and recycling program, just follow the simple directions in the recycling guide (found inside the packaging of your new product supply item) or visit www.hp.com/recycle. Select your country/region for information on how to return your HP LaserJet printing supplies.
Paper
This product is capable of using recycled papers when the paper meets the guidelines outlined in the HP LaserJet Printer Family Print Media Guide. This product is suitable for the use of recycled paper according to EN12281:2002.
Material restrictions
This HP product does not contain added mercury.
This HP product contains a battery that might require special handling at end-of-life. The batteries contained in or supplied by Hewlett-Packard for this product include the following:
| HP Color LaserJet Enterprise CP4020-CP4520 Series | |
| Type Carbon monofluoride lithium | |
| Weight 0.8 g | |
| Location On formatter board | |
| User-removable No | |

廢電池請回收
For recycling information, you can go to www.hp.com/recycle, or contact your local authorities or the Electronics Industries Alliance: www.eiae.org.
Disposal of waste equipment by users in private households in the European Union

This symbol on the product or on its packaging indicates that this product must not be disposed of with your other household waste. Instead, it is your responsibility to dispose of your waste equipment by handing it over to a designated collection point for the recycling of waste electrical and electronic equipment. The separate collection and recycling of your waste equipment at the time of disposal will help to conserve natural resources and ensure that it is recycled in a manner that protects human health and the environment. For more information about where you can drop off your waste equipment for recycling, please contact your local city office, your household waste disposal service or the shop where you purchased the product.

Chemical substances
HP is committed to providing our customers with information about the chemical substances in our products as needed to comply with legal requirements such as REACH (Regulation EC No 1907/2006 of the European Parliament and the Council). A chemical information report for this product can be found at: www.hp.com/go/reach.
Material Safety Data Sheet (MSDS)
Material Safety Data Sheets (MSDS) for supplies containing chemical substances (for example, toner) can be obtained by accessing the HP Web site at www.hp.com/go/msds or www.hp.com/hpinfo/community/environment/productinfo/safety.
For more information
To obtain information about these environmental topics:
• Product environmental profile sheet for this and many related HP products
HP's commitment to the environment
HP's environmental management system
HP's end-of-life product return and recycling program
• Material Safety Data Sheets
Visit www.hp.com/go/environment or www.hp.com/hpinfo/globalcitizenship/environment.
Declaration of Conformity
Declaration of Conformity
according to ISO/IEC 17050-1 and EN 17050-1, DoC#: BOISB-0806-00-rel.1.0
Manufacturer's Name: Hewlett-Packard Company
Manufacturer's Address: 11311 Chinden Boulevard,
Boise, Idaho 83714-1021, USA
declares that the product
Product Name: HP Color LaserJet CP4525/CP4025 series
Regulatory Model Number: ^2)
BOISB-0806-00
Including: CE423A — 3 x 500-Sheet Paper Tray
CE422A — 500-Sheet Paper Tray
Product Options: ALL
Print Cartridges: CE260A, CE260X, CE261A, CE262A, CE263A
conforms to the following Product Specifications:
Safety: IEC 60950-1:2001 / EN60950-1: 2001 + A11
IEC 60825-1:1993 +A1 +A2 / EN 60825-1:1994 +A1 +A2 (Class 1 Laser/LED Product)
GB4943-2001
EMC: CISPR 22:2005 / EN 55022:2006 – Class A ^1) ^3)
EN 61000-3-2:2006
EN 61000-3-3:1995 + A1 + A2
EN 55024:1998 +A1 + A2
FCC Title 47 CFR, Part 15 Class A / ICES-003, Issue 4
GB9254-1998, GB17625.1-2003
Supplementary Information:
The product herewith complies with the requirements of the EMC Directive 2004/108/EC and the Low Voltage Directive 2006/95/EC, and carries the CE-Marking € accordingly.
This Device complies with Part 15 of the FCC Rules. Operation is subject to the following two Conditions: (1) this device may not cause harmful interference, and (2) this device must accept any interference received, including interference that may cause undesired operation.
1) The product was tested in a typical configuration with Hewlett-Packard Personal Computer Systems.
2) For regulatory purposes, this product is assigned a Regulatory model number. This number should not be confused with the product name or the product number(s).
3) The product meets the requirements of EN55022 & CNS13438 Class A in which case the following applies: "Warning - This is a class A product. In a domestic environment this product may cause radio interference in which case the user may be required to take adequate measures."
Boise, Idaho, USA
October 2009
For regulatory topics only:
European Contact: Your Local Hewlett-Packard Sales and Service Office or Hewlett-Packard GmbH, Department HQ-TRE / Standards Europe, Herrenberger Straße 140, D-71034 Böblingen, Germany, (FAX: +49-7031-14-3143), http://www.hp.com/go/certificates
USA Contact: Product Regulations Manager, Hewlett-Packard Company, PO Box 15, Mail Stop 160, Boise, Idaho 83707-0015, USA, (Phone: 208-396-6000)
Safety statements
Laser safety
The Center for Devices and Radiological Health (CDRH) of the U.S. Food and Drug Administration has implemented regulations for laser products manufactured since August 1, 1976. Compliance is mandatory for products marketed in the United States. The device is certified as a "Class 1" laser product under the U.S. Department of Health and Human Services (DHHS) Radiation Performance Standard according to the Radiation Control for Health and Safety Act of 1968. Since radiation emitted inside the device is completely confined within protective housings and external covers, the laser beam cannot escape during any phase of normal user operation.
⚠ WARNING! Using controls, making adjustments, or performing procedures other than those specified in this user guide may result in exposure to hazardous radiation.
Canadian DOC regulations
Complies with Canadian EMC Class A requirements.
VCCI statement (Japan)
Power cord instructions
Make sure your power source is adequate for the product voltage rating. The voltage rating is on the product label. The product uses either 100-127 Vac or 220-240 Vac and 50/60 Hz.
Connect the power cord between the product and a grounded AC outlet.
△ CAUTION: To prevent damage to the product, use only the power cord that is provided with the product.
Power cord statement (Japan)
EMC statement (Korea)
EMI statement (Taiwan)
警告使用者:
Laser statement for Finland
Luokan 1 laserlaite
Klass 1 Laser Apparat
Substances Table (China)
有毒有害物质表
4 x 6 in paper printing (Windows) 124
A
accessibility features 6
accessories ordering 236 part numbers 237
acoustic specifications 248
address, printer Macintosh, troubleshooting 231
alerts, e-mail 58
anticounterfeit supplies 162
Attention light locating 10
automatic paper sensing 98
B
batteries included 253
bins, output capacity 4, 86 locating 7
blank pages troubleshooting 227
booklets creating (Windows) 123
both sides, printing on Show Me How menu 12 turning on (Mac) 58
browser requirements HP embedded Web Server 152
buffer overflow errors 184
business graphics printing 135
buttons, control panel locating 10
C
cable, USB
part number 238 troubleshooting 227
Canadian DOC regulations 256
canceling print jobs 102
capacity output bins 4
cartridges
non-HP 162
printing at estimated end of life 162
recycling 251
storage 162
warranty 241
cartridges, print error messages 193
Macintosh status 63
ordering through HP embedded Web Server 154
part numbers 237
replacing 162
cautions iii
chosen personality not available 190
cleaning product 176
clock error message 184
clock, real-time setting 160
color adjusting 141
Edge Control 141
halftone options 141
HP ImageREt 3600 145 manage 139
managing 140
match 143
Neutral Grays 141
Pantone® matching 144
print color samples 143
print in grayscale 140
printed vs. monitor 143
printing in grayscale (Windows) 104
sample book matching 143
sRGB 145
using 139
color options
HP EasyColor (Windows) 142
setting (Windows) 133
Color tab settings 63
Color usage, Macintosh 58
configurations, models 2
configure device menu 19
configuring IP address 71
connectivity
features 5
solving problems 228 USB 67
control panel
buttons 10
cleaning page, printing 176
I/O menu 32
lights 10
locating 7
menus 12
messages, alphabetical list 183
messages, numerical list 173, 183
messages, types of 183
security 157
settings 48, 57
Show Me How menu 12
control-panel menus
manage supplies 16
retrieve job 12
controlling print jobs 98
conventions, document iii
copies
changing number of
(Windows) 104
counterfeit supplies 162
cover pages
printing (Mac) 60
printing on different paper
(Windows) 115
covers, locating 7
custom print settings
(Windows) 105
custom-size paper settings
Macintosh 60
customer support
HP embedded Web Server
links 154
HP Printer Utility pages 58
online 153
D
Data light
locating 10
date, setting 160
Declaration of Conformity 255
default gateway, setting 71
defects, repeating 224
deleting
stored jobs 130
device discovery 69
device status
Macintosh Services tab 63
DHCP 33
diagnostics
networks 36
diagnostics menu 40
DIMMs
verifying installation 173
DIMMs (dual inline memory
modules)
installing 169
part numbers 237
disposal, end-of-life 253
DLC/LLC 35
DNS settings 34
document conventions iii
double-sided printing (duplexing)
loading paper 87
Mac 62
Show Me How menu 12
turning on (Mac) 58
drivers
changing paper types and sizes 82
changing settings (Mac) 57
changing settings
(Windows) 49
choosing (Windows) 225
presets (Mac) 60
settings 48
settings (Mac) 60
settings (Windows) 103
supported (Windows) 45
troubleshooting (Mac) 231
universal 46
duplex alignment
setting 137
duplex printing (double-sided)
loading paper 87
settings (Windows) 120
Show Me How menu 12
turning on (Mac) 58
duplex settings, changing 77
duty cycle 4
E
e-mail alerts 58
economy settings 159
Edge Control 141
electrical specifications 248
Embedded Web Server (EWS)
assigning passwords 156
features 152
end of life
print cartridges, printing when
reached 162
end-of-life disposal 253
Enhanced I/O (EIO) card
buffer overflow 184
installing 174
part number 238
partnumber 238
settings 32
envelopes
jams 221
loading in Tray 1 90
loading orientation 87
environment, specifications 248
environmental features 3
Environmental Product
Stewardship Program 251
EPS files, troubleshooting 232
error messages
alphabetical list 183
e-mail alerts 58
numerical list 173, 183
types of 183
errors
software 229
Ethernet cards 5
European Union, waste
disposal 253
Explorer, versions supported
HP Embedded Web
Server 152
F
FCC regulations 250
features 2, 4
File Upload, Macintosh 58
Finnish laser safety
statement 257
firmware, downloading new 177
first page
printing on different paper
(Windows) 115
use different paper 60
fonts
EPS files, troubleshooting 232
included 5
permanent resources 173
Upload Macintosh 58
formatter
security 158
forms
printing (Windows) 110
fraud hotline 162
fuser
error messages 186
jams 184
G
gateway, setting default 71
glossy paper, supported 135
graphical and text display, control panel 10
graphics, business printing 135
grayscale printing (Windows) 104
grayscale printing 140
H
hard disks
encrypted 156
ordering 237
part numbers 237
help
printing options
(Windows) 104
Show Me How menu 12
Home button 10
HP Customer Care 153
HP Easy Color
disabling 142
using 142
HP Easy Printer Care
description 51
downloading 51
opening 149
options 149
supported browsers 51
supported operating systems 51
using 52
HP Embedded Web Server 51
HP Embedded Web Server (EWS) features 152
HP fraud hotline 162
HP Jetdirect print server installing 174
models including 2
HP Printer Utility 58
HP tough paper 136
HP Universal Print Driver 46
HP Utility 58
HP Utility, Macintosh 58
HP Web Jetadmin 51, 155
HP-UX software 53
humidity requirements 248
|
I/O (input/output) menu 32
I/O menu 32
information menu 14
information pages 51
Information tab, HP embedded Web Server 153
input trays
configuring 15
install cartridge error message 193
installing
DIMMs 169
EIO card 174
EIO cards 174
print cartridges 162
product on wired networks 71
software, USB connections 67
software, wired networks 72 toner collection unit 167
insufficient memory 184, 193
interface ports
included 5
locating 8, 9
internal clock errors 184
Internet Explorer, versions supported
HP Embedded Web Server 152
IP address
configuring 71
Macintosh, troubleshooting 231
IP addressing 69
IP Security 156
IPsec 156
IPv4 address 71
IPv6 address 71
IPV6 settings 34
IPX/SPX settings 35
J
jams
clearing 207
common causes of 206
envelopes 221
fuser 184
Japanese VCCI statement 256
Jetadmin, HP Web 51, 155
Jetdirect print server installing 174
models including 2
job retention
setting options (Windows) 131
job storage
Macintosh settings 62
modes available 128
setting options (Windows) 131
jobs
Macintosh settings 58
jobs, print
storing permanent copies (Windows) 131
storing permanent private copies (Windows) 132
storing temporarily (Windows) 131
Storing temporary copies (Windows) 131
jobs, stored
creating (Windows) 128
deleting 130
printing 129
receiving notification when printed (Windows) 132
setting user names (Windows) 132
specifying names (Windows) 132
K
keys, control panel locating 10
Korean EMC statement 257
L
labels
printing (Windows) 112
LAN-connector 5
landscape orientation
selecting, Windows 126
languages, printer 5
laser safety statements 256, 257
last page
printing on different paper (Windows) 115
letterhead
printing (Windows) 110
license, software 243
lights
control panel 10
link speed settings 38, 77
Linux software 53
loading
loading small size 95
Show Me How menu 12
Tray 1 90
Tray 2 92, 93, 95
Tray 3, 4, and 5 92, 93
loading paper 90
lower right door
jams 184
M
Mac
changing paper types and sizes 82
driver settings 57, 60
installing software 67, 72
removing software 56
software 58
supported operating systems 56
Macintosh
HP Printer Utility 58
problems,
troubleshooting 231
resize documents 60
support 246
USB card,
troubleshooting 232
Macintosh driver settings
custom-size paper 60
Job Storage 62
Services tab 63
watermarks 61
manage supplies menu 16
managing network 74
maps, printing 136
marketing materials
printing 135
material restrictions 253
Material Safety Data Sheet (MSDS) 254
media
custom-size, Macintosh settings 60
first page 60
pages per sheet 61
Show Me How menu 12 supported sizes 4
memory
features 4
included 2, 58
insufficient 184, 193
part numbers 237
permanent resources 173
permanent storage error messages 187
supply errors 183
verifying installation 173
memory DIMMs
security 158
memory tag
description 163
locating 165
menu map
description 14, 148
menus
configure device 19
diagnostics 40
I/O (input/output) 32
information 14
paper handling 15
printing 19
resets 40
system setup 27
menus, control panel
I/O 32
Show Me How 12
menus, control-panel
manage supplies 16
retrieve job 12
mercury-free product 253
messages
alphabetical list 183
e-mail alerts 58
numerical list 173, 183
types of 183
models, features 2
monthly duty cycle 4
multiple pages per sheet printing (Windows) 125
N
n-up printing
selecting (Windows) 125
names, job
specifying (Windows) 132
Netscape Navigator, versions supported
HP embedded Web Server 152
network
operating systems supported 66
password, changing 74
password, setting 74
settings, changing 74
settings, viewing 74
Networking tab, HP embedded Web Server 154
networks
configuring 68
connectivity features 5
default gateway 71
device discovery 69
diagnostics 36
HP Web Jetadmin 155
installing EIO cards 174
IP address 69
IPv4 address 71
IPv6 address 71
link speed settings 38
print servers included 2
protocols 32
protocols supported 68
security 32, 70
settings 32
subnet mask 71
networks, wired
installing product 71
Neutral Grays 141
non-HP supplies 162
notes iii
NVRAM errors 187
0
on/off button, locating 7
online support 153
opening printer drivers (Windows) 103
operating environment specifications 248
operating systems supported 44, 56
operating systems, networks 66
optimize speed or energy usage 159
ordering part numbers for 237
supplies and accessories 236
supplies through HP embedded Web Server 154
orientation
paper, while loading 87
selecting, Windows 126
output bin
capacity 4
jams 184
locating 7
output quality
troubleshooting 223
P
page sizes
scaling documents to fit (Windows) 117
pages
blank 227
not printing 227
printing slowly 227
pages per minute 4
pages per sheet
selecting (Windows) 125
paper
covers, using different paper 115
custom-size, Macintosh settings 60
first and last pages, using different paper 115
first page 60
load 90
loading orientation 87
pages per sheet 61
printing on preprinted letterhead or forms (Windows) 110
Show Me How menu 12
paper handling menu 15
paper jams
clearing 207
paper size
changing 82
paper sizes
selecting 109
selecting custom 109
supported 4
paper types
changing 82
selecting 109
supported 4
paper, ordering 236
paper, special
printing (Windows) 112
part numbers
hard disks 237
memory 237
print cartridges 237
PCL drivers
universal 46
permanent resources 173
permanent storage errors 187
personal jobs
storing temporarily (Windows) 131
portrait orientation
selecting, Windows 126
ports
included 5
locating 9
troubleshooting
Macintosh 232
PostScript Printer Description
(PPD) files
included 58
power
consumption 248
troubleshooting 180
power connection
locating 8
power switch, locating 7
PPDs
included 58
preprinted paper
printing (Windows) 110
presets (Mac) 60
print cartridge
managing 162
print cartridges
error messages 193
Macintosh status 63
memory tags 163
non-HP 162
ordering through HP embedded
Web Server 154
part numbers 237
printing at estimated end of life 162
recycling 251
replacing 162
storage 162
warranty 241
print jobs
storing permanent copies (Windows) 131
storing permanent private copies (Windows) 132
storing temporarily
(Windows) 131
storing temporary copies (Windows) 131
print media
loading in Tray 1 90
print quality
improving (Windows) 109
troubleshooting 223
print server card
installing 174
print tasks 101
printer drivers (Mac)
changing settings 57
settings 60
troubleshooting 231
printer drivers (Windows)
changing settings 49
choosing 225
settings 103
supported 45
printer languages 5
printer settings
configure 19
printing
canceling jobs 102
settings (Mac) 60
settings (Windows) 103
speed specifications 4
stored jobs 129
troubleshooting 227
printing menu 19
printing on both sides settings (Windows) 120
priority, settings 48, 57
private jobs storing permanently (Windows) 132
problem-solving e-mail alerts 58 messages, types of 183 networks 36 Windows issues 230
processor speed 4
product info 1
product status HP Easy Printer Care 149
proof and hold selecting (Windows) 131
protocols, network 32, 68
Proxy Server settings 35
PS Emulation drivers 45
Q
quality troubleshooting 223
quick copy jobs storing (Windows) 131
R
Ready light locating 10
real-time clock 160
recycling HP printing supplies returns and environmental program 162
regulatory statements Declaration of Conformity 255 environmental product stewardship program 251
removing Mac software 56
repeating defects, troubleshooting 224
resets menu 40
resize documents Macintosh 60 Windows 117
resolution selecting (Windows) 109 specifications 4 troubleshooting quality 223
resource saving 173
retention, job modes available 128 setting options (Windows) 131
retrieve job menu 12
RGB settings 145
right door jams 184
ruler, repetitive defect 224
S
safety statements 256, 257
saving resources, memory 173
scale documents Macintosh 60 Windows 117
scanning speed specifications 4
security encrypted hard disk 156 settings 32
security features 5, 70
security slot locating 9
Services tab Macintosh 63
settings color 145 driver presets (Mac) 60 drivers 49 drivers (Mac) 57 priority 48, 57
Settings tab, HP embedded Web Server 153
shortcuts (Windows) creating 106 using 105
Show Me How menu 12
signs, printing 136
sleep delay disabling 159 enabling 159
small size paper printing (Windows) 124
software embedded Web server 51 HP Easy Printer Care 51, 149 HP Printer Utility 58 HP Web Jetadmin 51
installing, USB connections 67
installing, wired networks 72 Mac 58
problems 229
settings 48, 57
software license agreement 243
supported operating systems 44, 56
uninstalling for Windows 50 uninstalling Mac 56
Solaris software 53
solving direct-connect problems 228 network problems 228
special media guidelines 80
special paper guidelines 80 printing (Windows) 112
specifications electrical and acoustic 248 features 4 operating environment 248
speed specifications 4
sRGB settings 145
standard output bin capacity 4
status HP Easy Printer Care 149 HP Embedded Web Server 59
HP Utility, Macintosh 58 Macintosh services tab 63 messages, types of 183
Stop button 10 stopping print jobs 102
storage, job Macintosh settings 58, 62 modes available 128 setting options (Windows) 131
stored jobs creating (Windows) 128 deleting 130 printing 129
receiving notification when printed (Windows) 132 security 157
setting user names
(Windows) 132
specifying names
(Windows) 132
storing
print cartridges 162
storing jobs
permanent copies
(Windows) 131
permanent private copies
(Windows) 132
proof and hold (Windows) 131
setting options (Windows) 131
temporary copies
(Windows) 131
temporary personal jobs
(Windows) 131
with Windows 128
subnet mask 71
supplies
counterfeit 162
managing 16
memory errors 183
non-HP 162
ordering 236
ordering through HP embedded
Web Server 154
part numbers 237
recycling 251
replacing 164
status, viewing with HP
Embedded Web Server 59
status, viewing with HP
Utility 58
supplies status page
description 15, 148
supplies, status
HP Easy Printer Care 149
supply messages
configuring 16
supply-status, Services tab
Macintosh 63
support
HP embedded Web Server
links 154
HP Printer Utility pages 58
online 153
supported paper 4
system requirements
HP Embedded Web
Server 152
system setup menu 27
T
Taiwan EMI statement 257
TCP/IP
manually configuring IPv4
parameters 71
manually configuring IPv6
parameters 71
operating systems
supported 66
TCP/IP settings
32
technical support
online 153
temperature requirements 248
tests
networks 36
time clock, setting real- 160
tips iii
toner cartridges. See print
cartridges
toner collection unit
replacing 167
tough paper 136
transparencies
automatic sensing 98
printing (Windows) 112
trapping 141
Tray 1
automatic paper sensing 98
capacity 86
double-sided printing 62
jams 184
Tray 2
capacity 86
jams 184
Tray 3
jams 184
trays
capacity 86
configure 97
double-sided printing 62
included 2
load 90
locating 7
Macintosh settings 58
paper orientation 87
selecting (Windows) 109
Show Me How menu 12
trays, status
HP Easy Printer Care 149
troubleshooting
blank pages 227
checklist 180
control panel messages, numerical 173
direct-connect problems 228
duplexing 222
EPS files 232
error messages, alphabetical list 183
error messages, numerical
list 183
Macintosh problems 231
network problems 228
pages not printing 227
pages printing slowly 227
paper handling problems 218
quality 223
repeating defects 224
Show Me How menu 12
transparencies 220
USB cables 227
TrueType fonts included 5
two-sided printing
settings (Windows) 120
Show Me How menu 12
turning on (Mac) 58
typefaces
included 5
U
uninstalling Mac software 56
uninstalling Windows software 50
universal print driver 46
UNIX software 53
updates, downloading
product 177
usage page
description 15, 148
USB configuration 67
USB port
troubleshooting 227
troubleshooting
Macintosh 232
user names
setting for stored jobs
(Windows) 132
W
wake time
changing 160
setting 160
warnings iii
warranty
customer self repair 245
license 243
print cartridges 241
product 240
watermarks
adding (Windows) 119
Web browser requirements
HP Embedded Web
Server 152
Web sites
customer support 153
fraud reports 162
HP Web Jetadmin,
downloading 155
Macintosh customer
support 246
Material Safety Data Sheet
(MSDS) 254
universal print driver 46
Windows
changing paper types and
sizes 82
driver settings 49
drivers supported 45
installing software 67, 72
problem-solving issues 230
supported operating
systems 44
universal print driver 46