
Officejet J6480 - Printer HP - Free user manual and instructions
Find the device manual for free Officejet J6480 HP in PDF.


User questions about Officejet J6480 HP
0 question about this device. Answer the ones you know or ask your own.
Ask a new question about this device
Download the instructions for your Printer in PDF format for free! Find your manual Officejet J6480 - HP and take your electronic device back in hand. On this page are published all the documents necessary for the use of your device. Officejet J6480 by HP.
USER MANUAL Officejet J6480 HP
HP Officejet J6400 All-in-One series User Guide
natural_image
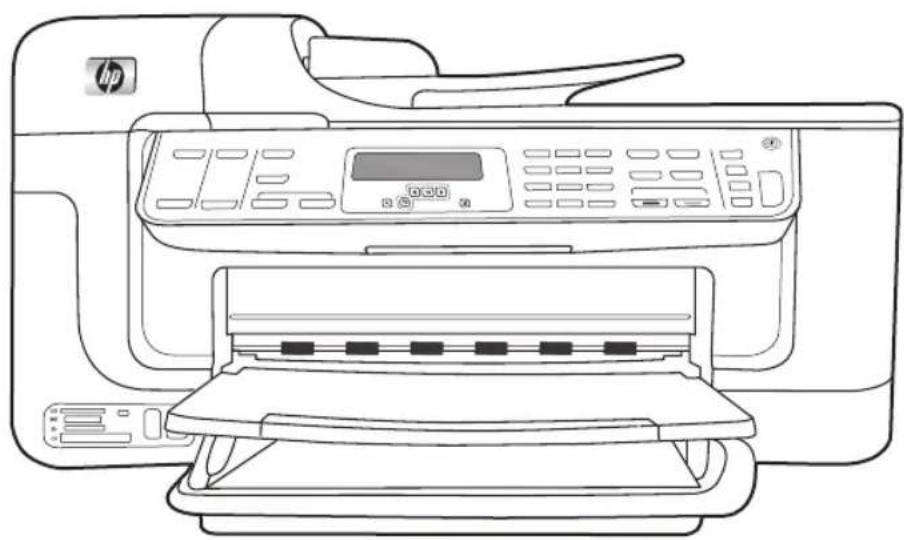
Line drawing of an HP printer with paper feed and control panel (no text or symbols)HP Officejet J6400 All-in-One series User Guide

Copyright information
© 2008 Copyright Hewlett-Packard Development Company, L.P.
Hewlett-Packard Company notices
The information contained in this document is subject to change without notice.
All rights reserved. Reproduction, adaptation, or translation of this material is prohibited without prior written permission of Hewlett-Packard, except as allowed under copyright laws.
The only warranties for HP products and services are set forth in the express warranty statements accompanying such products and services. Nothing herein should be construed as constituting an additional warranty. HP shall not be liable for technical or editorial errors or omissions contained herein.
Acknowledgements
Windows and Windows XP are U.S. registered trademarks of Microsoft Corporation. Windows Vista is either a registered trademark or trademark of Microsoft Corporation in the United States and/or other countries.

Secure Digital memory card is supported by the product. SD Logo is a trademark of its proprietor.
Safety information

Always follow basic safety precautions when using this product to reduce risk of injury from fire or electric shock.
- Read and understand all instructions in the documentation that comes with the device.
- Use only a grounded electrical outlet when connecting this product to a power source. If you do not know whether the outlet is grounded, check with a qualified electrician.
- Observe all warnings and instructions marked on the product.
- Unplug this product from wall outlets before cleaning.
- Do not install or use this product near water, or when you are wet.
-
Install the product securely on a stable surface.
-
Install the product in a protected location where no one can step on or trip over the line cord, and the line cord cannot be damaged.
- If the product does not operate normally, see Maintain and troubleshoot.
- There are no user-serviceable parts inside. Refer servicing to qualified service personnel.
- Use only the external power adaptor/battery provided with the device.
Accessibility
The device provides a number of features that make it accessible for people with disabilities.
Visual
The device software is accessible for users with visual impairments or low vision through the use of your operating system's accessibility options and features. It also supports most assistive technology such as screen readers, Braille readers, and voice-to-text applications. For users who are color blind, colored buttons and tabs used in the software and on the device control panel have simple text or icon labels that convey the appropriate action.
Mobility
For users with mobility impairments, the device software functions can be executed through keyboard commands. The software also supports Windows accessibility options such as StickyKeys, ToggleKeys, FilterKeys, and MouseKeys. The device doors, buttons, paper trays, and paper guides can be operated by users with limited strength and reach.
Support
For more details about the accessibility of this product and HP's commitment to product accessibility, visit HP's Web site at www.hp.com/accessibility.
For accessibility information for the Mac OS, visit the Apple Web site at www.apple.com/accessibility.
Contents
1 Get started
Find other resources for the product ....9
Understand the device parts ....10
Front view 10
Printing supplies area 11
Back view 11
Device control panel buttons and lights 12
Connection information 13
Turn off the device 14
2 Use the device
Use device control panel menus ....15
Device control-panel message types 16
Status messages 16
Warning messages 16
Error messages 16
Critical error messages ....16
Change device settings 16
Use the HP Solution Center (Windows) 17
Use the HP photo and imaging software 17
Load originals ....18
Load an original on the scanner glass ....19
Load an original in the automatic document feeder (ADF) 19
Select print media ....20
Tips for selecting and using print media ....20
Understand specifications for supported media 21
Understand supported sizes 22
Understand supported media types and weights 24
Set minimum margins 25
Load media 26
Print on special and custom-sized media 27
Print borderless 28
Set up speed-dial entries ....30
Set up fax numbers as speed-dial entries or groups 30
Set up speed-dial entries 30
Set up a speed-dial group 30
Print and view a list of speed-dial entries ....31
View a list of speed-dial entries ....31
Install the duplexer ....32
3 Print
Change print settings ....33
Change settings from an application for current jobs (Windows) 33
Change default settings for all future jobs (Windows) 33
Change settings (Mac OS) 34
Print on both sides (duplexing) 34
Guidelines for printing on both sides of a page 34
Perform duplexing ....34
Cancel a print job 35
4 Copy
Make copies from the device control panel 36
Change the copy settings ....36
Set the number of copies 37
Set the copy paper size ....37
Set the copy paper type 37
Change copy speed or quality 38
Resize an original to fit onto letter or A4 paper 39
Copy a legal-size document onto letter paper 39
Adjust the lightness and darkness of your copy 40
Enhance blurred areas of your copy 40
Enhance light areas of your copy 41
Cancel a copy job ....41
5 Scan
Scan an original 42
Scan an original to a program on a computer (direct connection) 43
Scan an original to a memory device 43
Use Webscan via embedded Web server 43
Scan from a TWAIN-compliant or a WIA-compliant program ....43
Scan from a TWAIN-compliant program ....44
Scan from a WIA-compliant program ....44
Edit a scanned original 44
Edit a scanned photo or graphic ....44
Edit a scanned document using optical character recognition (OCR) software ....44
Change scan settings 45
Cancel a scan job 45
6 Work with memory devices
Insert a memory card ....46
Print DPOF photos 47
View photos 47
View photos using your computer 48
Print an index sheet from the device control panel 48
Save photos to your computer 48
Contents
7 Fax
Send a fax 49
Send a basic fax 50
Send a fax manually from a phone 50
Send a fax using monitor dialing 51
Send a fax from memory 52
Schedule a fax to send later 52
Send a fax to multiple recipients 53
Send a fax to multiple recipients from the device control panel 53
Send a fax to multiple recipients from the HP Photosmart Studio Software (Mac OS) 53
Send a color original or photo fax 54
Change the fax resolution and Lighter / Darker settings ....54
Change the fax resolution 55
Change the Lighter / Darker setting 56
Set new default settings 56
Send a fax in Error Correction Mode ....56
Receive a fax 57
Receive a fax manually ....57
Set up backup fax reception 58
Reprint received faxes from memory 59
Poll to receive a fax 59
Forward faxes to another number 60
Set the paper size for received faxes 61
Set automatic reduction for incoming faxes 61
Block junk fax numbers 61
Set the junk fax mode 62
Add numbers to the junk fax list 62
Remove numbers from the junk fax list 63
Receive faxes to your computer (Fax to PC) 63
Activate Fax to PC 63
Modify Fax to PC settings 64
Change fax settings 65
Configure the fax header 65
Set the answer mode (Auto answer) 65
Set the number of rings before answering 66
Change the answer ring pattern for distinctive ring 66
Set the fax error correction mode 67
Set the dial type 67
Set the redial options 67
Set the fax speed 67
Fax over the Internet 68
Test fax setup 69
Use reports 69
Print fax confirmation reports 70
Print fax error reports 70
Print and view the fax log ....71
Cancel a fax 71
8 Configure and manage
Manage the device 72
Monitor the device ....73
Administer the device ....73
Use device management tools ....74
Toolbox (Windows) 74
Open the Toolbox ....74
Toolbox tabs 74
Embedded Web server 75
To open the embedded Web server ....75
Embedded Web server pages ....76
HP Printer Utility (Mac OS) 76
Open the HP Printer Utility 77
HP Printer Utility panels 77
Understand the self-test diagnostic page ....77
Understand the network configuration page ....78
Channel range definitions ....80
Configure network options 80
Change basic network settings 80
Use the Wireless Setup Wizard ....81
View and print network settings 81
Turn the wireless radio on and off 81
Change advanced network settings 81
Set link speed 82
To View IP settings 82
To Change IP settings 82
Set up faxing for the device 82
Set up faxing (parallel phone systems) 83
Choose the correct fax setup for your home or office 84
Select your fax setup case ....85
Case A: Separate fax line (no voice calls received) 87
Case B: Set up the device with DSL 88
Case C: Set up the device with a PBX phone system or an ISDN line ....89
Case D: Fax with a distinctive ring service on the same line 89
Case E: Shared voice/fax line 90
Case F: Shared voice/fax line with voice mail 91
Case G: Fax line shared with computer modem (no voice calls received) .....92
Case H: Shared voice/fax line with computer modem 95
Case I: Shared voice/fax line with answering machine 99
Case J: Shared voice/fax line with computer modem and answering machine .....100
Case K: Shared voice/fax line with computer dial-up modem and voice mail .....104
Serial-type fax setup ....106
Contents
Configure the device (Windows) 106
Direct connection 107
Install the software before connecting the device (recommended) 107
Connect the device before installing the software 107
Share the device on a locally shared network 108
Network connection 108
To install the device on a network 109
To install the device software on client computers ....109
To install the printer driver using Add Printer 110
Configure the device (Mac OS) 110
Install the software for network or direct connection ....110
Share the device on a locally shared network 111
Set up the device for wireless communication 112
Understand 802.11 wireless network settings 113
To set up wireless communication using the device control panel with wireless setup wizard 114
To set up wireless communication using the installer (Windows) 114
To set up the device on a wireless network (Mac OS) 115
To turn off wireless communication 115
Guidelines for reducing interference on a wireless network 116
Guidelines for ensuring wireless network security 116
To add hardware addresses to a WAP 116
Other guidelines 116
Uninstall and reinstall the software 117
9 Maintain and troubleshoot
Work with print cartridges 120
Supported print cartridges 120
Handle the print cartridges ....121
Replace the print cartridges 121
Align the print cartridges 124
Clean the print cartridges 125
Clean the print cartridge contacts 126
Clean the area around the ink nozzles 128
Store printing supplies 129
Clean the device 130
Clean the scanner glass 131
Clean the exterior 131
Clean the automatic document feeder ....131
General troubleshooting tips and resources 134
Solve printing problems 135
The device shuts down unexpectedly ....135
Error message appears on control-panel display 136
The device is not responding (nothing prints) 136
Device takes a long time to print 136
Blank or partial page printed 137
Something on the page is missing or incorrect 137
Placement of the text or graphics is wrong 138
The device prints half a page, then ejects the paper 138
Poor print quality and unexpected printouts 138
Common poor quality printout problems 139
Meaningless characters print 139
Ink is smearing 140
Ink is not filling the text or graphics completely 141
Output is faded or dull colored 141
Colors are printing as black and white 141
Wrong colors are printing 142
Printout shows bleeding colors 142
Colors do not line up properly 142
Lines or dots are missing from text or graphics 143
Solve paper-feed problems 143
Solve copy problems 144
No copy came out 145
Copies are blank 145
Documents are missing or faded 145
Size is reduced 145
Copy quality is poor 146
Copy defects are apparent 146
The device prints half a page, then ejects the paper 147
Error messages appear 147
Solve scan problems 147
Scanner did nothing 147
Scan takes too long 148
Part of the document did not scan or text is missing 148
Text cannot be edited 149
Error messages appear 149
Scanned image quality is poor 149
Scan defects are apparent 150
Solve fax problems 151
The fax test failed 151
Solve network problems 163
Solve wireless problems 165
Solve photo (memory card) problems 166
The device cannot read the memory card 166
The device cannot read photos on the memory card 167
The device prints half a page, then ejects the paper 167
Troubleshoot installation issues 167
Hardware installation suggestions 167
Software installation suggestions 168
Clear jams 169
Clear paper jams 169
Avoid paper jams 171
A HP supplies and accessories
Order printing supplies online 172
Supplies 172
Supported print cartridges 172
HP media 172
Contents
B Support and warranty
Obtain electronic support 173
Warranty 174
Obtain HP telephone support 175
Before you call 175
Support process 175
HP support by phone 175
Phone support period 176
Telephone support numbers 176
Placing a call 177
After the phone support period 177
Additional warranty options 177
HP Quick Exchange Service (Japan) 178
HP Korea customer support 178
Prepare the device for shipment 179
Remove the device control-panel faceplate 179
Remove the print cartridges before shipment 180
Remove the duplexer 181
Remove the output tray 182
Pack the device 182
C Device specifications
Physical specifications ....184
Product features and capacities 184
Processor and memory specifications ....185
System requirements 185
Network protocol specifications 186
Embedded Web server specifications 186
Print specifications ....187
Copy specifications ....187
Fax specifications ....187
Scan specifications 188
Environmental specifications ....188
Electrical specifications 188
Acoustic emission specifications (print in Draft mode, noise levels per ISO 7779) ......188
Memory card specifications ....189
D Regulatory information
FCC statement 191
Notice to users in Korea 191
VCCI (Class B) compliance statement for users in Japan 192
Notice to users in Japan about the power cord 192
Toxic and hazardous substance table 192
LED indicator statement 192
Noise emission statement for Germany 193
Notice to users of the U.S. telephone network: FCC requirements 194
Notice to users of the Canadian telephone network 195
Notice to users in the European Economic Area 196
Notice to users of the German telephone network 196
Australia wired fax statement 196
Regulatory information for wireless products 197
Exposure to radio frequency radiation 197
Notice to users in Brazil 197
Notice to users in Canada 197
Notice to users in Taiwan 198
European Union regulatory notice ....199
Regulatory model number 199
Declaration of conformity 200
Environmental product stewardship program ....201
Paper use 201
Plastics 201
Material safety data sheets 201
Recycling program 201
HP inkjet supplies recycling program 201
Disposal of waste equipment by users in private households in the European Union ....202
Energy Star® notice 203
Index....204
1 Get started
This guide provides details about how to use the device and to resolve problems.
• Find other resources for the product
• Understand the device parts
- Turn off the device
Find other resources for the product
You can obtain product information and further troubleshooting resources that are not included in this guide from the following resources:
| Resource Description Location | ||
| Setup poster | Provides illustrated setup information. | A printed version of the document is provided with the device. |
| Readme file and release notes | Provide late-breaking information and troubleshooting tips. | Included on the Starter CD. |
| Toolbox (Microsoft® Windows®) | Provides information about print cartridge health and access to maintenance services.For more information, see Toolbox (Windows). | The Toolbox is typically installed with the device software as an available installation option. |
| HP Printer Utility (Mac OS) Contains tools to configure print settings, calibrate the device, clean the print cartridges, print the configuration page, order supplies online, and find support information from the Web site.For more information, see HP Printer Utility (Mac OS). | The HP Printer Utility is typically installed with the device software. | |
| Device control panel Provides status, error, and warning information about operations. | For more information, see Device control panel buttons and lights. | |
| Logs and reports Provides information about events that have occurred. | For more information, see Monitor the device. | |
| Self-Test diagnostic page | • Device information:○ Product name○ Model numberSerial numberFirmware version numberNumber of pages printed from the trays and accessoriesInk levels | For more information, see Understand the self-test diagnostic page. |
| HP Web sites Provide the latest printer software, and product and support information. | www.hp.com/supportwww.hp.com | |
| HP telephone support Lists information to contact HP. During the warranty period, this support is often free of charge. | For more information, see Obtain HP telephone support. | |
| HP photo and imaging software help | Provides information about using the software. | For more information, see Use the HP photo and imaging software. |
Understand the device parts
This section contains the following topics:
- Front view
• Printing supplies area - Back view
• Device control panel buttons and lights
• Connection information
Front view
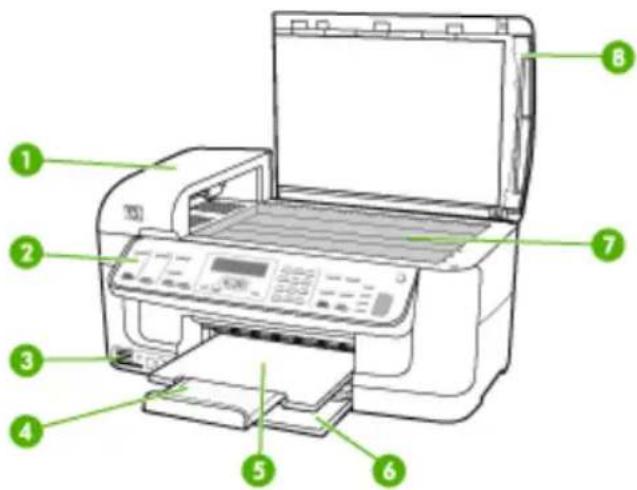
text_image
Diagram of an HP printer with numbered parts labeled for identification| 1 Automatic document feeder (ADF) |
| 2 Device control panel |
| 3 Memory card slots |
| 4 Output tray extension |
| 5 Output tray |
| 6 Input tray |
| 7 Scanner glass |
| 8 Scanner lid |
Printing supplies area
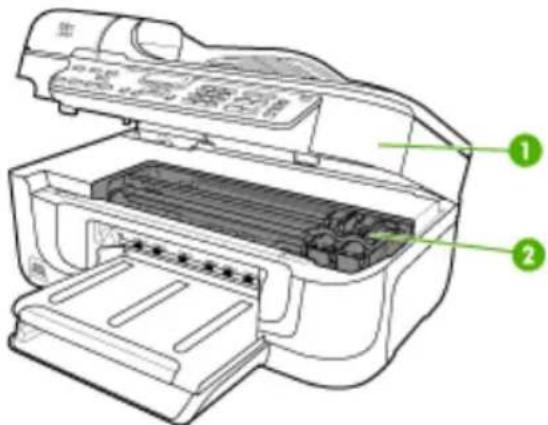
text_image
Diagram of an HP printer with labeled parts, showing internal structure and component layout| 1 Print-carriage access door |
| 2 Print cartridges |
Back view
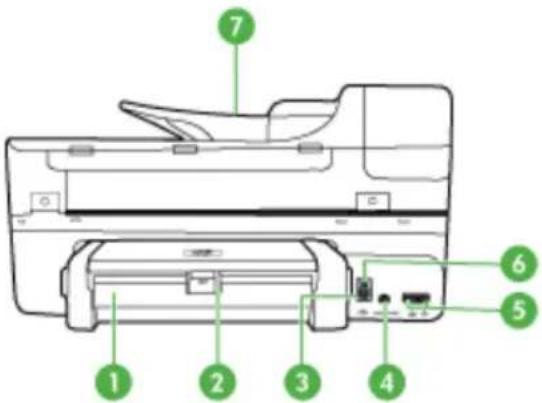
text_image
Diagram of an HP printer with numbered parts labeled 1 through 7 for identification.| 1 Duplexer |
| 2 Duplexer latch |
| 3 Ethernet port |
| 4 Power input |
| 5 1-Line (fax), 2-EXT (phone) |
| 6 Rear universal serial bus (USB) port |
| 7 Document feeder tray |
Device control panel buttons and lights
The following diagram and related table provide a quick reference to the device control panel features.
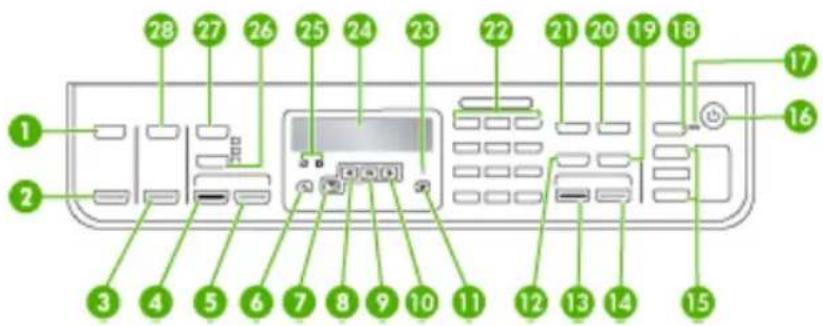
text_image
1 2 3 4 5 6 7 8 9 10 11 12 13 14 15 16 17 18 19 20 21 22 23 24 25 26 27 28| Label Name | and Description |
| 1 | Scan To: Presents the Scan To menu for selecting a scan destination. |
| 2 | START SCAN: Starts a scan job and sends it to the destination you selected using the Scan To button. |
| 3 | PRINT PHOTOS: Selects the photo function. Use this button to print photos from a memory card. |
| 4 | START COPY Black: Starts a black-and-white copy job. |
| 5 | START COPY Color: Starts a color copy job. |
| 6 Setup: Presents the Setup Menu for generating reports and other maintenance settings, and accessing the Help menu. The topic that you select from the Help menu opens a help window on your computer screen. | |
| 7 | Back: Moves you one level up in the menu. |
| 8 | Left arrow: Decreases values on the display. |
| 9 | OK: Selects a menu or a setting on the display. |
| 10 | Right arrow: Increases values on the display. |
| 11 | Cancel: Stops a job, exits a menu, or exits settings. |
| 12 | Speed Dial: Selects a speed-dial number. |
| 13 START FAX Black: Starts a black-and-white fax job. | |
| 14 START FAX Color: Starts a color fax job. | |
| 15 | One-touch speed-dial buttons: Access the first five speed-dial numbers. |
| 16 | Power: Turns the device on or off. The Power button is lit when the device is on. The light blinks while performing a job.When the device is turned off, a minimal amount of power is still supplied. To completely disconnect the power supply, turn the device off, and then unplug the power cord. |
| 17 | Auto answer light: When this is lit, the device automatically answers incoming phone calls. When off, the device does not answer any incoming fax calls. |
| 18 | Auto Answer: When this button is lit, the device automatically answers incoming phone calls. When off, the device does not answer any incoming fax calls. |
| 19 | The button name and functionality depends on the country/region in which the device is sold.Resolution: Adjusts the resolution for the fax you are sending.Junk Fax Blocker: Presents the Junk Fax Blocker Set Up menu for managing unwanted fax calls. You are required to subscribe to a caller ID service to use this feature. |
| 20 | Redial/Pause: Redial the most recently dialed number, or insert a 3-second pause in a fax number. |
| 21 | Fax Menu: Presents the Fax menu for selecting fax options. |
| 22 | Keypad: Enters values. |
| 23 | Attention light: When blinking, the attention light indicates an error has occurred that requires your attention. |
| 24 Display: View menus and messages. | |
| 25 | Print cartridge indicators: Indicates which print cartridge needs servicing. |
| 26 | Quality: Selects Best, Normal, or Fast quality for copying. |
| 27 | Copy Menu: Presents the Copy menu for selecting options. |
| 28 | Photo Menu: Presents the Photo menu for selecting options. |
Connection information
| Description Recommended | number of connected computers for best performance | Supported software features | Setup instructions |
| USB connection | One computer connected with a USB cable to the rear USB 2.0 high-speed port on the device. | All features are supported. | Follow the setup poster guide for detailed instructions. |
| Ethernet (wired) connection | Up to five computers connected to the device using a hub or router. | All features are supported, including Webscan. | Follow the instructions in the getting startedguide, and then see Configure network options in this guide for further instructions. |
| Printer sharing | Up to five computers.The host computer must be turned on at all times, or the other computers cannot print to the device. | All features resident on the host computer are supported. Only print is supported from the other computers. | Follow the instructions in Share the device on a locally shared network. |
| 802.11 wireless Up to five computers connected to the device using a hub or router. | All features are supported, including Webscan. | Follow the instructions in Set up the device for wireless communication. | |
Turn off the device
The device has two off modes. The soft off is a mode that draws a very small amount of electricity and allows for a faster boot-up time than starting from a hard off. The hard off mode draws no electricity. Both modes only are deactivated using the Power button.
2 Use the device
This section contains the following topics:
• Use device control panel menus
• Device control-panel message types
• Change device settings
• Use the HP Solution Center (Windows)
• Use the HP photo and imaging software
- Load originals
- Select print media
- Load media
• Print on special and custom-sized media
- Print borderless
• Set up speed-dial entries
• Install the duplexer
Use device control panel menus
The following sections provide a quick reference to top-level menus that appear on the control-panel display. To display a menu, press the menu button for the function you want to use.
- Scan menu: Presents a list of destinations. Some destinations require the HP Photosmart Software to be loaded.
-
Copy menu: Menu options include:
-
Selecting copy quantities
- Reducing/enlarging
- Selecting media type and size
- Fax menu: Allows you to enter a fax or speed-dial number, or display the Fax menu. Menu options include:
- Modifying resolution
Lightening/darkening - Sending delayed faxes
- Setting up new defaults
- Photo menu: Menu options include:
- Selecting print options
- Using special features
- Editing
- Transferring to a computer
- Selecting a proof sheet
Device control-panel message types
This section contains the following topics:
- Status messages
• Warning messages - Error messages
• Critical error messages
Status messages
Status messages reflect the current state of the device. They inform you of normal operation and require no action to clear them. They change as the state of the device changes. Whenever the device is ready, not busy, and has no pending warning messages, the status message READY appears if the device is turned on.
Warning messages
Warning messages inform you of events that require your attention, but they do not prevent the device from operating. An example of a warning message is a low ink warning. These messages appear until you resolve the condition.
Error messages
Error messages communicate that some action must be performed, such as adding media or clearing a media jam. These messages are usually accompanied by a blinking red Attention light. Take the appropriate action to continue printing.
If the error message shows an error code, press the Power button to turn off the device, and then turn it on again. In most situations, this action solves the problem. If the message persists, your device might need service. For more information, see Support and warranty.
Critical error messages
Critical error messages inform you of a device failure. Some of these messages can be cleared by pressing the Power button to turn off the device, and then turning it on again. If a critical error persists, service is required. For more information, see Support and warranty.
Change device settings
You can change the device settings from these places:
- From the device control panel.
- From the HP Solution Center (Windows) or HP Device Manager (Mac OS). For more information, see Use the HP photo and imaging software.

NOTE: When you are configuring settings in HP Solution Center or in the HP Device Manager, you cannot see the settings that have been configured from the device control panel (such as the scan settings).
To change settings from the device control panel
- At the device control panel, press the menu button for the function you are using (for example, Copy Menu).
-
To reach the option that you want to change, use one of the following methods:
-
Press a control-panel button, and then use the left or right arrow keys to adjust the value.
-
Select the option from the menu on the control-panel display.
-
Select the value that you want, and then press OK.
To change settings from the HP Solution Center (Windows)
▲ SeeUse the HP photo and imaging software.
To change settings from the HP photo and imaging software (Mac OS)
- Click the HP Device Manager icon in the Dock.
- Select the device in the Devices drop-down menu.
- On the Information and Settings menu, click an item that you want to change.
Use the HP Solution Center (Windows)
On a Windows computer, the HP Solution Center is the entry point for the HP Photosmart Software. Use the HP Solution Center to change print settings, order supplies, and access the onscreen Help.
The features available in the HP Solution Center vary depending on the devices you have installed. The HP Solution Center is customized to show icons that are associated with the selected device. If the selected device is not equipped with a particular feature, then the icon for that feature does not appear in the HP Solution Center.
If the HP Solution Center on your computer does not contain any icons, an error might have occurred during the software installation. To correct this, use the Control Panel in Windows to completely uninstall the HP Photosmart Software, and then reinstall the software. For more information, see the onscreen Help that came with the device.
For information about opening the HP Solution Center, see Use the HP photo and imaging software.
Use the HP photo and imaging software
You can use the HP photo and imaging software to access many features that are not available from the device control panel.
The software is installed on your computer during setup. For further information, see the setup documentation that came with your device.
Access to the HP photo and imaging software differs by operating system (OS). For example, if you have a Windows computer, the HP photo and imaging software entry point is the HP Photosmart Software window. If you have a Macintosh computer, the HP photo and imaging software entry point is the HP Photosmart Studio window.
Regardless, the entry point serves as the launching pad for the HP photo and imaging software and services.
To open the HP Photosmart Software on a Windows computer
-
Do one of the following:
-
On the Windows desktop, double-click the HP Photosmart Software icon.
- In the system tray at the far right of the Windows taskbar, double-click the HP Digital Imaging Monitor icon.
-
On the taskbar, click Start, point to Programs or All Programs, select HP, and then click HP Photosmart Software.
-
If you have more than one HP device installed, select the tab with your product's name.

NOTE: On a Windows computer, the features available in the HP Photosmart Software vary depending on the devices you have installed. The software is customized to show icons that are associated with the selected device. If the selected device is not equipped with a particular feature, then the icon for that feature does not appear in the software.

TIP: If the HP Photosmart Software on your computer does not contain any icons, an error might have occurred during the software installation. To correct this, use the Control Panel in Windows to completely uninstall the HP Photosmart Software; then reinstall the software. For more information, see the setup poster that came with your device.
To open the HP Photosmart Studio software on a Macintosh computer
-
Click the HP Photosmart Studio icon in the Dock.
The HP Photosmart Studio window appears. -
In the HP Photosmart Studio task bar, click Devices.
The HP Device Manager window appears. -
Select your device from the Device drop-down menu.
From here, you can scan, import documents, and perform maintenance procedures such as checking the ink levels for the print cartridges.

NOTE: On a Macintosh computer, the features available in the HP Photosmart Studio software vary depending on the selected device.

TIP: When the HP Photosmart Studio software is opened, you can gain access to the Dock menu shortcuts by selecting and holding the mouse button over the HP Photosmart Studio icon in the Dock.
Load originals
You can load an original for a copy or a scan job on the scanner glass or in the automatic document feeder (ADF). For more information on loading media in the main tray, see Load media.
This section contains the following topics:
- Load an original on the scanner glass
- Load an original in the automatic document feeder (ADF)
Load an original on the scanner glass
You can copy or scan up to letter- or A4-size originals by loading them on the glass.

NOTE: Many of the special features will not work correctly if the glass and lid backing are not clean. For more information, see Clean the device.
To load an original on the scanner glass
- Lift the scanner lid.
- Load your original print side down in the right front corner of the glass.

TIP: For more help on loading an original, refer to the engraved guides along the edge of the glass.
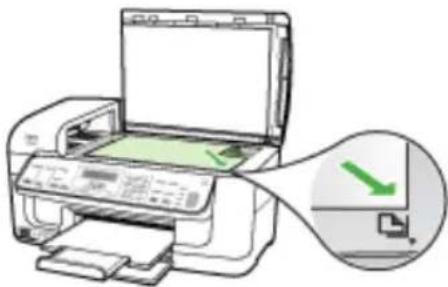
natural_image
Illustration of a printer with a green paper airplane being inserted, showing a magnified view of the printer's internal structure (no text or symbols present)- Close the lid.
Load an original in the automatic document feeder (ADF)
You can copy, scan, or fax a one-sided or two-sided, single- or multiple-page, A4- or letter-size document by placing it in the document feeder tray.

CAUTION: Do not load photos in the ADF; this might cause damage to your photos.

NOTE: Two-sided legal-size documents cannot be scanned, copied, or faxed using the ADF. Some features, such as the Fit to Page copy feature, do not work when you load your originals in the ADF. You must load your originals on the glass.
The document feeder tray holds a maximum of 35 sheets of plain paper.
To load an original in the document feeder tray
- Load your original, with the print side up, into the document feeder tray. Place the pages so that the top edge of the document goes in first. Slide the media into the
automatic document feeder until you hear a beep or see a message on the display indicating that the loaded pages were detected.

TIP: For more help on loading originals in the automatic document feeder, refer to the diagram engraved in the document feeder tray.
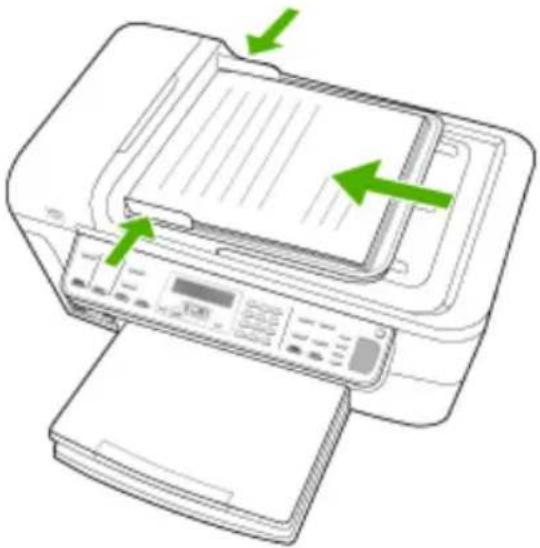
natural_image
Line drawing of a printer with green arrows indicating directional movement (no text or symbols)- Slide the width guides inward until they stop at the left and right edges of the media.

NOTE: Remove all originals from the document feeder tray before lifting the lid on the device.
Select print media
The device is designed to work well with most types of office media. It is best to test a variety of print media types before buying large quantities. Use HP media for optimum print quality. Visit the HP Web site at www.hp.com for more information about HP media.
This section contains the following topics:
• Tips for selecting and using print media
• Understand specifications for supported media
- Set minimum margins
Tips for selecting and using print media
For the best results, observe the following guidelines.
• Always use media that conforms to the device specifications. For more information, see Understand specifications for supported media.
- Load only one type of media at a time into a tray.
- Load media print-side down and aligned against the right and back edges of the tray. For more information, see Load media.
- Do not overload the trays. For more information, see Understand specifications for supported media.
- To prevent jams, poor print quality, and other printing problems, avoid the following media:
- Multipart forms
Media that is damaged, curled, or wrinkled
• Media with cutouts or perforations
Media that is heavily textured, embossed, or does not accept ink well
Media that is too lightweight or stretches easily
Cards and envelopes
- Avoid envelopes that have a very slick finish, self-stick adhesives, clasps, or windows. Also avoid cards and envelopes with thick, irregular, or curled edges, or areas that are wrinkled, torn, or otherwise damaged.
- Use tightly constructed envelopes, and make sure the folds are sharply creased.
- Load envelopes with the flaps facing up.
Photo media
- Use the Best mode to print photographs. Note that in this mode, printing takes longer and more memory is required from your computer.
- Remove each sheet as it prints and set it aside to dry. Allowing wet media to stack up may cause smearing.
Transparencies
- Insert transparencies with the rough side down and the adhesive strip pointing towards the back of the device.
- Use the Normal mode to print transparencies. This mode provides longer drying time and ensures that the ink dries completely before the next page is delivered to the output tray.
- Remove each sheet as it prints and set it aside to dry. Allowing wet media to stack up may cause smearing.
Custom-sized media
- Use only custom-sized media that is supported by the device.
- If your application supports custom-sized media, set the media size in the application before printing the document. If not, set the size in the print driver. You might need to reformat existing documents to print them correctly on custom-sized media.
Understand specifications for supported media
Use the Understand supported sizes and Understand supported media types and weights tables to determine the correct media to use with your device, and determine what features will work with your media.
• Understand supported sizes
• Understand supported media types and weights
Understand supported sizes
| Media size Input tray | Duplexer ADF | ||
| Standard media sizes | |||
| U.S. Letter (216 x 279 mm; 8.5 x 11 inches) | ✓ | ✓ | ✓ |
| U.S. Legal (216 x 356 mm; 8.5 x 14 inches) | ✓ | ✓ | |
| A4 (210 x 297 mm; 8.3 x 11.7 inches) | ✓ | ✓ | ✓ |
| U.S. Executive (184 x 267 mm; 7.25 x 10.5 inches) | ✓ | ✓ | |
| B5 (JIS) (182 x 257 mm; 7.17 x 10.12 inches) | ✓ | ✓ | |
| B5 (ISO) (176 x 250 mm; 6.9 x 9.8 inches) | ✓ | ✓ | |
| B7 (88 x 125mm; 3.5 x 4.9 inches) | ✓ | ||
| A5 (148 x 210 mm; 5.8 x 8.3 inches) | ✓ | ✓ | |
| Borderless A4 (210 x 297 mm; 8.3 x 11.7 inches) | ✓ | ||
| Borderless A5 (148 x 210 mm; 5.8 x 8.3 inches) | ✓ | ||
| Borderless B5 (182 x 257 mm; 7.17 x 10.12 inches) | ✓ | ||
| HV (101 x 180 mm; 4.0 x 7.1 inches) | ✓ | ||
| Cabinet size (120 x 165 mm; 4.7 x 6.5 inches) | ✓ | ||
| 13 x 18 cm (5 x 7 inches) | ✓ | ||
| Borderless cabinet (120 x 165 mm; 4.7 x 6.5 inches) | ✓ | ||
| Borderless 13 x 18 cm (5 x 7 inches) | ✓ | ||
| Envelopes | |||
| U.S. #10 Envelope (105 x 241 mm; 4.12 x 9.5 inches) | ✓ | ||
| DL Envelope (110 x 220 mm; 4.3 x 8.7 inches) | ✓ | ||
| C6 Envelope (114 x 162 mm; 4.5 x 6.4 inches) | ✓ | ||
| Japanese Envelope Chou #3 (120 x 235 mm; 4.7 x 9.3 inches) | ✓ | ||
| Japanese Envelope Chou #4 (90 x 205 mm; 3.5 x 8.1 inches) | √ | ||
| Cards | |||
| Index card (76.2 x 127 mm; 3 x 5 inches) | √ | √ | |
| Index card (102 x 152 mm; 4 x 6 inches) | √ | √ | |
| Index card (127 x 203 mm; 5 x 8 inches) | √ | √ | |
| A6 card (105 x 148.5 mm; 4.13 x 5.83 inches) | √ | √ | |
| Borderless A6 card (105 x 148.5 mm; 4.13 x 5.83 inches) | √ | ||
| Hagaki** (100 x 148 mm; 3.9 x 5.8 inches) | √ | √ | |
| Ofuku hagaki** | √ | ||
| Borderless hagaki (100 x 148 mm; 3.9 x 5.8 inches)** | √ | √ | |
| Photo media | |||
| Photo media (102 x 152 mm; 4 x 6 inches) | √ | ||
| Photo media (5 x 7 inches) | √ | ||
| Photo media (8 x 10 inches) | √ | ||
| Photo media (10 x 15 cm) | √ | ||
| Photo L (89 x 127 mm; 3.5 x 5 inches) | √ | ||
| 2L (178 x 127 mm; 7.0 x 5.0 inches) | √ | ||
| Borderless photo media (102 x 152 mm; 4 x 6 inches) | √ | ||
| Borderless photo media (5 x 7 inches) | √ | ||
| Borderless photo media (8 x 10 inches) | √ | ||
| Borderless photo media (8.5 x 11 inches) | √ | ||
| Borderless photo media (10 x 15 cm) | √ | ||
| Borderless Photo L (89 x 127 mm; 3.5 x 5 inches) | √ | ||
| Borderless 2L (178 x 127 mm; 7.0 x 5.0 inches) | √ | ||
| Borderless B5 (182 x 257 mm; 7.2 x 10.1 inches) | √ | ||
| Borderless B7 (88 x 125mm; 3.5 x 4.9 inches) | √ | ||
| Borderless 4 x 6 tab (102 x 152 mm; 4 x 6 inches) | √ | ||
| Borderless 10 x 15 cm tab | √ | ||
| Borderless 4 x 8 tab (10 x 20 cm) | √ | ||
| Borderless HV (101 x 180 mm; 4.0 x 7.1 inches) | √ | ||
| Borderless double A4 (210 x 594 mm; 8.3 x 23.4 inches) | √ | ||
| 4 x 6 tab (102 x 152 mm; 4 x 6 inches) | √ | ||
| 10 x 15 cm tab | √ | ||
| 4 x 8 tab / 10 x 20 cm tab | √ | ||
| Other media | |||
| Custom-sized media between 76.2 to 216 mm wide and 127 to 610 mm long (3 to 8.5 inches wide and 5 to 24 inches long) | √ | ||
| Custom-sized media (ADF) between 127 to 216 mm wide and 241 to 305 mm long (5 to 8.5 inches wide and 9.5 to 12 inches long) | |||
| Panorama (4 x 10 inches, 4 x 11 inches, and 4 x 12 inches) | √ | ||
| Borderless panorama (4 x 10 inches, 4 x 11 inches, and 4 x 12 inches) | √ | ||
** The device is compatible with plain and inkjet hagaki from Japan Post only. It is not compatible with photo hagaki from Japan Post.
Understand supported media types and weights
| Tray Type Weight Capacity | |||
| Input tray Paper | 60 to 105 g/m2(16 to 28 lb bond) | Up to 250 sheets of plain paper(25 mm or 1 inch stacked) | |
| Transparencies Up to 70 sheets | |||
| Tray Type Weight Capacity | |||
| (17 mm or 0.67 inch stacked) | |||
| Photo media | 280 g/m2(75 lb bond) | Up to 100 sheets(17 mm or 0.67 inch stacked) | |
| Labels Up to 100 sheets | (17 mm or 0.67 inch stacked) | ||
| Envelopes | 75 to 90 g/m2(20 to 24 lb bond envelope) | Up to 30 sheets(17 mm or 0.67 inch stacked) | |
| Cards | Up to 200 g/m2(110 lb index) | Up to 80 cards | |
| Duplexer Paper | 60 to 105 g/m2(16 to 28 lb bond) | Not applicable | |
| Output tray | All supported media Up to 150 sheets of | plain paper (text printing) | |
| ADF Paper | 60 to 90 g/m2(16 to 24 lb bond) | Plain paper: 35 sheetsLegal and special paper: 20 sheets | |
Set minimum margins
The document margins must match (or exceed) these margin settings in portrait orientation.
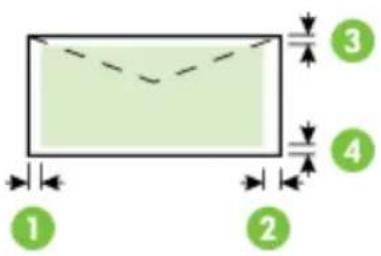
text_image
1 2 3 4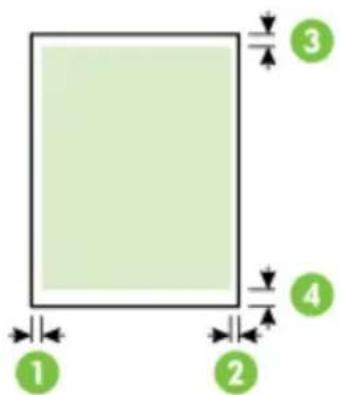
text_image
1 2 3 4| Media (1) Left | margin | (2) Right margin | (3) Top margin | (4) Bottom margin* |
| U.S. Letter 3.0 mm (0.12 inch) | inch) | 3.0 mm (0.12 inch) | 3.0 mm (0.12 inch) - single-sided printing | 3.0 mm (0.12 inch) |
| U.S. Legal | 14 mm (0.55 inch) - duplex printing | 14 mm (0.55 inch) - duplex printing | ||
| A4 | ||||
| U.S. Executive | ||||
| U.S. Statement | ||||
| 8.5 x 13 inch | ||||
| B5 | ||||
| A5 | ||||
| Cards | ||||
| Custom-sized media | ||||
| Photo media | ||||
| Envelopes 3.0 mm (0.12 inch) | 3.0 mm (0.12 inch) | 3.0 mm (0.12 inch) | 14.0 mm (0.55 inch) | |
* To achieve this margin setting on a computer running Windows, click the Advanced tab in the print driver, and select Minimize Margins.
Load media
This section provides instructions for loading media into the device.
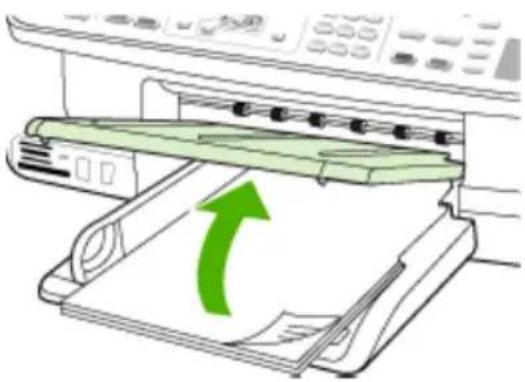
To load Tray 1 (main tray)
- Lift the output tray.
natural_image
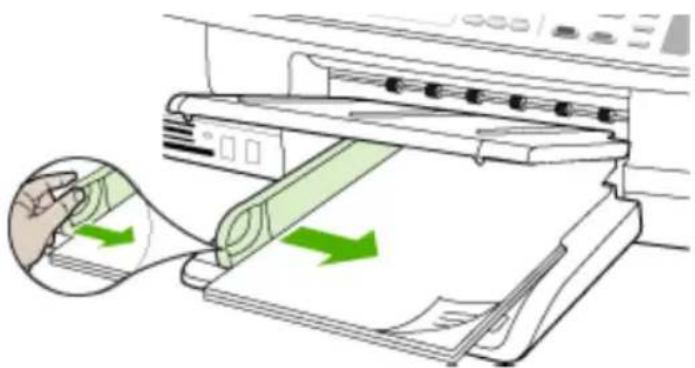
Illustration of a printer printing a green paper with an upward arrow (no text or symbols)- Insert the media print-side down along the right of the tray. Make sure the stack of media aligns with the right and back edges of the tray, and does not exceed the line marking in the tray.

NOTE: Do not load paper while the device is printing.
- Slide the media guide in the tray to adjust it for the media size that you have loaded, and then lower the output tray.
natural_image
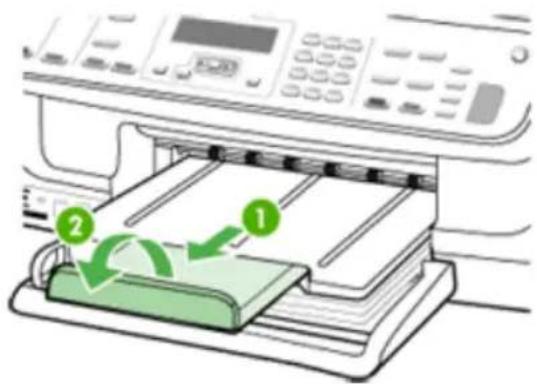
Illustration of a printer being inserted into a paper sheet with green arrows indicating the process (no text or symbols present)- Pull out the extension on the output tray.
text_image
Diagram showing printer printing process with labeled steps 1 and 2, indicating green recycling or print movement.Print on special and custom-sized media
To print on special or custom-sized media (Windows)
-
Load the appropriate media. For more information, see Load media.
-
With a document open, click Print on the File menu, and then click Setup, Properties, or Preferences.
-
Click the Paper/Features tab.
-
Select the media size from the Size is drop-down list.
To set a custom media size:
a. Click the Custom button.
b. Type a name for the new custom size.
c. In the Width and Height boxes, type the dimensions, and then click Save.
d. Click OK twice to close the properties or preferences dialog box. Open the dialog box again.
e. Select the new custom size.
- To select the media type:
a. Click More in the Type is drop-down list.
b. Click the desired media type, and then click OK.
-
Select the media source from the Source is drop-down list.
-
Change any other settings, and then click OK.
-
Print your document.
To print on special or custom-sized media (Mac OS)
- Load the appropriate media. For more information, see Load media.
- On the File menu, click Page Setup.
- From the drop-down list, select the HP device.
- Select the media size.
- To set a custom media size:
a. Click Manage Custom Sizes in the Paper Size pull-down menu.
b. Click New and type a name for the size in the Paper Size Name box.
c. In the Width and Height boxes, type the dimensions and set the margins, if desired.
d. Click Done or OK, and then click Save.
-
On the File menu, click Page Setup, and then select the new custom size.
-
Click OK.
- On the File menu, click Print.
- Open the Paper Handling panel.
- Under Destination Paper Size, click the Scale to fit paper size tab, and then select the customized paper size.
- Change any other desired settings, and then click OK or Print.
Print borderless
Borderless printing lets you print to the edges of certain media types and a range of standard media sizes.

NOTE: Open the file in a software application and assign the image size. Make sure the size corresponds to the media size on which you are printing the image. In Windows, you can also gain access to this feature from the Printing Shortcuts tab. Open the printer driver, select the Printing Shortcuts tab, and select the printing shortcut for this print job drop-down list.
NOTE: Borderless printing is not supported on plain media.
To print a borderless document (Windows)
- Load the appropriate media. For more information, see Load media.
- Open the file that you want to print.
-
From the application, open the print driver:
a. Click File, and then click Print.
b. Click Properties or Setup. -
Click the Paper/Quality tab.
- Select the media size from the Size is drop-down list.
- Select the Borderless Printing check box.
- Select the media source from the Source is drop-down list.
- Select the media type from the Type is drop-down list.

NOTE: Borderless printing is not supported on plain media.
- If you are printing photos, select Best from the Print Quality drop-down list. Alternatively, select Maximum dpi, which provides up to 4800 x 1200 optimized dpi* for optimum print quality.
*Up to 4800 x 1200 optimized dpi for color printing and 1200 input dpi. This setting might temporarily use a large amount of hard disk space (400 MB or more) and will print more slowly. - Change any other print settings, and then click OK.
- Print the document.
- If you printed on photo media with a tear-off tab, remove the tab to make the document completely borderless.
To print a borderless document (Mac OS)
- Load the appropriate media. For more information, see Load media.
- Open the file that you want to print.
- From the drop-down list, select the HP device.
- Click File, and then click Page Setup.
- Select the borderless media size, and then click OK.
- Click File, and then click Print.
- Open the Paper Type/Quality panel.
- Click the Paper tab, and then select the media type from the Paper type dropdown list.

NOTE: Borderless printing is not supported on plain media.
- If you are printing photos, select Best from the Quality drop-down list.
Alternatively, select Maximum dpi, which provides up to 4800 x 1200 optimized dpi*.
*Up to 4800 x 1200 optimized dpi for color printing and 1200 input dpi. This setting might temporarily use a large amount of hard disk space (400 MB or more) and will print more slowly.
- Select the media source. If you are printing on thick or photo media, select the manual feed option.
- Change any other print settings, and then click Print.
- If you printed on photo media with a tear-off tab, remove the tab to make the document completely borderless.
Set up speed-dial entries
You can set up frequently used fax numbers as speed-dial entries. This lets you dial those numbers quickly by using the device control panel. The first five entries for each of these destinations are associated with the five speed-dial buttons on the device control panel.
This section contains the following topics:
- Set up fax numbers as speed-dial entries or groups
• Print and view a list of speed-dial entries
Set up fax numbers as speed-dial entries or groups
You can store fax numbers or groups of fax numbers as speed-dial entries. Speed-dial entries 1 through 3 are associated with the corresponding three speed-dial buttons on the device control panel.
For information about printing a list of the speed-dial entries that are set up, see Print and view a list of speed-dial entries.
This section contains the following topics:
• Set up speed-dial entries
• Set up a speed-dial group
Set up speed-dial entries
- HP Photosmart Software (Windows): Open the HP Photosmart Software and follow the instructions in the onscreen Help.
- HP Device Manager (Mac OS): Launch HP Device Manager, click Information and Settings, and then select Fax Speed Dial Settings from the drop-down list.
• Device control panel: Press Setup, and then select the Speed Dial Setup option.
To add or change an entry: Select Individual Speed Dial or Group Speed Dial and press the arrow keys to move to an unused entry number, or type a number on the keypad. Type the fax number, and then press OK. Include any pauses or other required numbers, such as an area code, an access code for numbers outside a PBX system (usually a 9 or 0), or a long-distance prefix. Type the name, and then press OK.
To delete one entry or all entries: Select Delete Speed Dial, press the arrow keys to highlight the speed-dial entry that you want to delete, and then press OK.
Set up a speed-dial group
If you send information to the same group of fax numbers on a regular basis, you can set up a speed-dial entry for a group in order to simplify the task. The speed-dial entry for a group can be associated with a speed-dial button on the device control panel.
A group member must be a member of the speed-dial list before you can add the member to a speed-dial group. You can add up to 20 fax numbers to each group (with up to 50 characters for each fax number).
- HP Photosmart Software (Windows): Open the HP Photosmart Software and follow the instructions in the onscreen Help.
- HP Device Manager (Mac OS): Launch HP Device Manager, click Information and Settings, and then select Fax Speed Dial Settings from the drop-down list.
- Device control panel: Press the Setup button, and then select the Speed Dial Setup option.
To add a group: Select Group Speed Dial, select an unassigned speed-dial entry, and then press OK. Use the arrow keys to highlight a speed-dial entry, and then press OK to select it. Repeat this step to add additional speed-dial entries to this group. When finished, select the Done Selecting option, and then press OK. Use the onscreen keyboard to enter a group speed-dial name, and then select Done.
To add entries to a group: Select Group Speed Dial, select the group speed-dial entry that you want to change, and then press OK. Use the arrow keys to highlight a speed-dial entry, and then press OK to select it (a check mark appears next to the speed-dial entry). Repeat this step to add additional speed-dial entries to this group. When finished, select the Done Selecting option, and then press OK. Select Done at the Group Name screen.
To delete a group: Select Delete Speed Dial, press the arrow keys to highlight the speed-dial entry that you want to delete, and then press OK.
Print and view a list of speed-dial entries
You can print or view a list of all of the speed-dial entries that have been set up. Each entry in the list contains the following information:
- Speed-dial number (the first five entries correspond to the five speed-dial buttons on the device control panel)
- Name associated with the fax number or group of fax numbers
- For the fax speed-dial list, the fax number (or all of the fax numbers for a group)
This section contains the following topics:
• View a list of speed-dial entries
View a list of speed-dial entries
- HP Device Manager (Mac OS): Launch HP Device Manager, click Information and Settings, and then select Fax Speed Dial Settings from the drop-down list.
- HP Photosmart Software (Windows): Open the HP Photosmart Software and follow the instructions in the onscreen Help.
- Control Panel: Press the Setup button, select Speed Dial Setup, and then select Print Speed Dial List.
Install the duplexer
You can print on both sides of a sheet of paper automatically. For information on using the duplexer, see Print on both sides (duplexing).
To install the duplexer
-
If you are installing the duplexer for the first time, remove the tape and cardboard protecting the rear of the device.
-
Slide the duplexer into the device until the unit locks into place. Do not press the buttons on either side of the duplexer when installing the unit; use them only for removing the unit from the device.
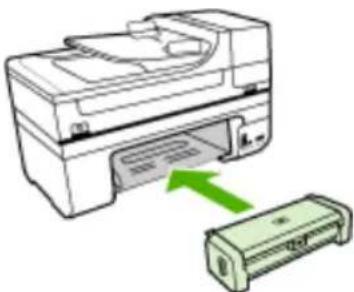
natural_image
Illustration of a printer with a green arrow pointing to it, showing no text or symbols on the printer itself.3 Print
This section contains the following topics:
• Change print settings
• Print on both sides (duplexing)
- Cancel a print job
Change print settings
You can change print settings (such as paper size or type) from an application or the printer driver. Changes made from an application take precedence over changes made from the printer driver. However, after the application is closed, the settings return to the defaults configured in the driver.

NOTE: To set print settings for all print jobs, make the changes in the printer driver.
For more information about the features of the Windows printer driver, see the online help for the driver. For more information about printing from a specific application, see the documentation that came with the application.
This section contains the following topics:
• Change settings from an application for current jobs (Windows)
• Change default settings for all future jobs (Windows)
• Change settings (Mac OS)
Change settings from an application for current jobs (Windows)
To change the settings
- Open the document that you want to print.
- On the File menu, click Print, and then click Setup, Properties, or Preferences. (Specific options may vary depending on the application that you are using.)
- Change the settings that you want, and then click OK, Print, or a similar command.
Change default settings for all future jobs (Windows)
To change the settings
- Click Start, point to Settings, and then click Printers or Printers and Faxes.
-
Or -
Click Start, click Control Panel, and then double-click Printers. -
Right-click the printer icon, and then click Properties, Document Defaults, or Printing Preferences.
-
Change the settings that you want, and then click OK.
Change settings (Mac OS)
To change the settings
- On the File menu, click Page Setup.
- Change the settings that you want (such as paper size), and then click OK.
- On the File menu, click Print to open the print driver.
- Change the settings that you want (such as media type), and then click OK or Print.
Print on both sides (duplexing)
You can print on both sides of a sheet of media either manually, or automatically using the duplexer.

NOTE: The printer driver does not support manual duplexing. Two-sided printing requires an HP Automatic Two-sided Printing Accessory to be installed on the device.
This section contains the following topics:
• Guidelines for printing on both sides of a page
• Perform duplexing
Guidelines for printing on both sides of a page
- Always use media that conforms to the device specifications. For more information, see Understand specifications for supported media.
- Specify two-sided printing options in your application or in the printer driver.
- Do not print on both sides of transparencies, envelopes, photo paper, glossy media, or paper lighter than 16 lb bond (60 g/m ^2 ) or heavier than 28 lb bond (105 g/ m ^2 ). Jams might occur with these media types.
- Several kinds of media require a specific orientation when you print on both sides of a page, such as letterhead, preprinted paper, and paper with watermarks and prepunched holes. When you print from a computer running Windows, the device prints the first side of the media first. Load the media with the print side facing down.
- For auto-duplexing, when printing finishes on one side of the media, the device holds the media and pauses while the ink dries. Once the ink dries, the media is pulled back into the device and the second side is printed. When printing is complete, the media is dropped onto the output tray. Do not grab it before printing is complete.
- You can print on both sides of supported custom-sized media by turning the media over and feeding it into the device again. For more information, see Understand specifications for supported media.
Perform duplexing

NOTE: You can perform manual duplexing by first printing only the odd pages, flipping the pages over, and then printing only the even pages.
To print automatically on both sides of a page (Windows)
- Load the appropriate media. For more information, see Guidelines for printing on both sides of a page and Load media.
- Make sure the duplexer is properly installed. For more information, see Install the duplexer.
- With a document open, click Print on the File menu, and then click Setup, Properties, or Preferences.
- Click the Features tab.
- Select the Two-sided printing drop-down list. For auto-duplexing, ensure that Automatic is selected.
- To automatically resize each page to match the document's onscreen layout, ensure Preserve Layout is selected. Clearing this option might result in unwanted page breaks.
- Select or clear the Flip Pages Up check box depending on which way you want the binding. See the graphics in the print driver for examples.
- Choose a booklet layout from the Booklet Layout drop-down list, if you want.
- Change any other settings, and then click OK.
- Print your document.
To print automatically on both sides of a page (Mac OS)
- Load the appropriate media. For more information, see Guidelines for printing on both sides of a page and Load media.
- Make sure the duplexer is properly installed. For more information, see Install the duplexer.
- On the File menu, click Print.
- Select Copies and Pages from the drop-down list.
- Select the option to print on both sides.
- Select the binding orientation by clicking the appropriate icon.
- Change any other settings, and then click Print.
Cancel a print job
You can cancel a print job using one of the following methods.
Device control panel: Press ✗ (Cancel button). This clears the job that the device is currently processing. It does not affect jobs waiting to be processed.
Windows: Double-click the printer icon that appears in the lower-right corner of the computer screen. Select the print job, and then press the Delete key on the keyboard.
Mac OS: Double-click the printer in the Printer Setup Utility. Select the print job, click Hold, and then click Delete.
4 Copy
You can produce high-quality color and grayscale copies on a variety of paper types and sizes.

NOTE: Copying from the HP photo and imaging software is only available on the Mac OS. See the software's help for more information.
NOTE: If you are copying a document when a fax arrives, the fax is stored in the device memory until the copying finishes. This can reduce the number of fax pages stored in memory.
This section contains the following topics:
• Make copies from the device control panel
• Change the copy settings
• Set the number of copies
• Set the copy paper size
• Set the copy paper type
• Change copy speed or quality
- Resize an original to fit onto letter or A4 paper
• Copy a legal-size document onto letter paper
- Adjust the lightness and darkness of your copy
• Enhance blurred areas of your copy
• Enhance light areas of your copy
- Cancel a copy job
Make copies from the device control panel
You can make quality copies from the device control panel.
To make a copy from the device control panel
- Make sure you have paper loaded in the input tray.
- Place your original face down on the scanner glass. For more information, see Load originals.
- Do one of the following:
- Press START COPY Black to start a black-and-white copy job.
- Press START COPY Color to start a color copy job.

NOTE: If you have a color original, pressing START COPY Black produces a black-and-white copy of the color original, while pressing START COPY Color produces a full-color copy of the color original.
Change the copy settings
You can customize the copy settings to handle nearly any task.
When you change copy settings, the changes are for the current copy job only. You must set the changes as defaults for the settings to apply to all future copy jobs.
To save the current settings as defaults for future jobs
- Make any necessary changes to the settings in the Copy Menu.
- Press Copy Menu, and then press the arrow keys until Set New Defaults appears.
- Press the arrow keys to select Yes, and then press OK.
Set the number of copies
You can set the number of copies that you want to print by using the Number of Copies option on the device control panel.
To set the number of copies from the device control panel
- Make sure you have paper loaded in the input tray.
- Place your original face down on the scanner glass.
- In the Copy area, press Copy Menu repeatedly until Number of Copies appears.
- Press ▶ or use the keypad to enter the number of copies, up to the maximum.

TIP: If you hold down either of the arrow buttons, the number of copies changes by increments of 5 to make it easier to set a large number of copies.
5. Press START COPY Black or START COPY Color.

NOTE: Copy functions can also be performed using the HP Photosmart Software (Windows) or HP Photosmart Studio Software (Mac OS). See the software's Help for more information.
Set the copy paper size
You can set the paper size on the device. The paper size you select should match what is loaded in your input tray.
To set the paper size from the device control panel
- In the Copy area, press Copy Menu repeatedly until Copy Paper Size appears.
- Press ▶ until the appropriate paper size appears.
- Press START COPY Black or START COPY Color.

NOTE: Copy functions can also be performed using the HP Photosmart Software (Windows) or HP Photosmart Studio Software (Mac OS). See the software's Help for more information.
Set the copy paper type
You can set the paper type on the device.
To set the paper type for copies from the device control panel
- In the Copy area, press Copy Menu repeatedly until Paper Type appears.
- Press ▶ until the appropriate paper type appears.
- Press START COPY Black or START COPY Color.
Refer to the following table to determine which paper type setting to choose based on the paper loaded in the input tray.
| Paper type Device control panel setting | |
| Copier paper or letterhead Plain Paper | |
| HP Bright White Paper Plain Paper | |
| HP Premium Plus Photo Paper, Glossy Premium Photo | |
| HP Premium Plus Photo Paper, Matte Premium Photo | |
| HP Premium Plus 10 x 15 cm (4 x 6 inch) Photo Paper Premium Photo | |
| HP Premium or Premium Plus Inkjet Transparency Film Transparency | |
| Other transparency film Transparency | |
| Plain Hagaki Plain Paper | |
| Inkjet Hagaki Premium inkjet | |
| L (Japan only) Premium Photo | |
| 2L Premium photo |

NOTE: Copy functions can also be performed using the HP Photosmart Software (Windows) or HP Photosmart Studio Software (Mac OS). See the software's Help for more information.
Change copy speed or quality
The device provides three options that affect copy speed and quality:
- Best (3 stars) produces the highest quality for all paper and eliminates the banding (striping) effect that sometimes occurs in solid areas. Best copies slower than the other quality settings.
- Normal (2 stars) delivers high-quality output and is the recommended setting for most of your copying. Normal copies faster than Best and is the default setting.
- Fast (1 star) copies faster than the Normal setting. The text is comparable to the quality of the Normal setting, but the graphics might be lower quality. The Fast setting uses less ink and extends the life of your print cartridges.
To change the copy quality from the device control panel
- Make sure you have paper loaded in the input tray.
- Place your original face down on the glass.
- In the Copy area, press Quality until the appropriate quality setting is lit.
- Press START COPY Black or START COPY Color.

NOTE: Copy functions can also be performed using the HP Photosmart Software (Windows) or HP Photosmart Studio Software (Mac OS). See the software's Help for more information.
Resize an original to fit onto letter or A4 paper
If the image or text on your original fills the entire sheet with no margins, use Fit to Page or Full Page 91% to reduce your original and prevent unwanted cropping of the text or images at the edges of the sheet.
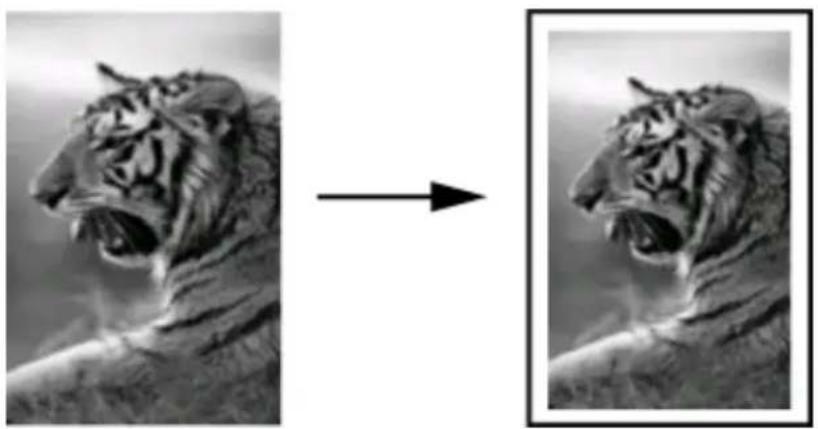
natural_image
Black-and-white photo of a tiger's head in profile, showing before and after transformation (no text or symbols)
TIP: You can also use Fit to Page to enlarge a small photo to fit within the printable area of a full-size page. In order to do this without changing the proportions of the original or cropping the edges, the device might leave an uneven amount of white space around the edges of the paper.
To resize a document from the device control panel
-
Make sure you have paper loaded in the input tray.
-
Place your original face down on the scanner glass.
-
In the Copy area, press the Reduce/Enlarge button.
-
Press ▶ until Full Page 91% appears.
-
Press START COPY Black or START COPY Color.

NOTE: Copy functions can also be performed using the HP Photosmart Software (Windows) or HP Photosmart Studio Software (Mac OS). See the software's Help for more information.
Copy a legal-size document onto letter paper
You can use the Legal > Ltr 72% setting to reduce a copy of a legal-size document to a size that fits onto letter paper.

NOTE: The percentage in the example, Legal > Ltr 72%, might not match the percentage that appears in the display.
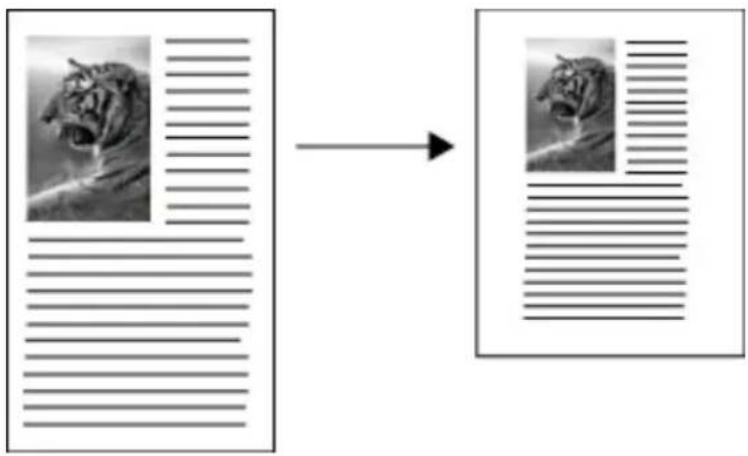
text_image
Diagram showing a document transforming into a document with a tiger image, illustrating the process of text editing.To copy a legal-size document onto letter paper
- Make sure you have paper loaded in the input tray.
- Place your original face down on the scanner glass.
- In the Copy area, press the Reduce / Enlarge button.
- Press ▶ until Legal > Ltr 72% appears.
- Press START COPY Black or START COPY Color.
Adjust the lightness and darkness of your copy
You can use the Lighter / Darker option to adjust the contrast of the copies you make.
To adjust the copy contrast from the device control panel
- Make sure you have paper loaded in the input tray.
- Place your original face down on the scanner glass.
-
In the Copy area, press Copy Menu repeatedly until Lighter / Darker appears.
-
Do one of the following:
-
Press ▶ to darken the copy.
-
Press ◀ to lighten the copy.
-
Press START COPY Black or START COPY Color.

NOTE: Copy functions can also be performed using the HP Photosmart Software (Windows) or HP Photosmart Studio Software (Mac OS). See the software's Help for more information.
Enhance blurred areas of your copy
You can use the Enhancements feature to adjust the quality of text documents by sharpening edges of black text or adjust photographs by enhancing light colors that might otherwise appear white.
The Mixed enhancement is the default option. Use the Mixed enhancement to sharpen edges of most originals.
To copy a blurred document from the device control panel
- Make sure you have paper loaded in the input tray.
- Place your original face down on the scanner glass.
- In the Copy area, press Copy Menu repeatedly until Enhancements appears.
- Press ▶ until the Text setting appears.
- Press START COPY Black or START COPY Color.
If any of the following occur, turn off Text enhancement by selecting Photo or None:
- Stray dots of color surround some text on your copies
• Large, black typefaces look splotchy (not smooth) - Thin, colored objects or lines contain black sections
• Horizontal grainy or white bands appear in light- to medium-gray areas
Enhance light areas of your copy
You can use Photo enhancements to enhance light colors that might otherwise appear white. You can also use Photo enhancements to eliminate or reduce any of the following that might occur when copying with Text enhancements:
- Stray dots of color surround some text on your copies
• Large, black typefaces look splotchy (not smooth) - Thin, colored objects or lines contain black sections
• Horizontal grainy or white bands appear in light- to medium-gray areas
To copy an overexposed photo from the device control panel
- Make sure you have paper loaded in the input tray.
- Place your original face down on the scanner glass.
- In the Copy area, press Copy Menu repeatedly until Enhancements appears.
- Press ▶ until the Photo enhancement setting appears.
- Press START COPY Color.
Cancel a copy job
To stop copying, press Cancel on the device control panel.
5 Scan
You can scan originals and send them to a variety of destinations, such as a folder on the network or a program on a computer. You can use the device control panel, the HP photo and imaging software, and TWAIN-compliant or WIA-compliant programs on a computer.
Scan functions are only available after you install the software.
This section contains the following topics:
- Scan an original
• Use Webscan via embedded Web server - Scan from a TWAIN-compliant or a WIA-compliant program
• Edit a scanned original
• Change scan settings - Cancel a scan job
Scan an original
You can start a scan from a computer or from the device control panel. This section explains how to scan from the device control panel only.

NOTE: You can also use the HP Photosmart Software to scan an image, including panorama images. Using this software, you can edit a scanned image and create special projects using a scanned image. For information about how to scan from the computer, and how to adjust, resize, rotate, crop, and sharpen your scans, see the onscreen HP Photosmart Software Help that came with your software.
To use the scan features, your device and computer must be connected and turned on. The printer software must also be installed and running on your computer prior to scanning. To verify that the printer software is running on a computer running Windows, look for the device icon in the system tray at the lower-right side of the screen, near the clock. To verify this on a computer using the Mac OS, open the HP Device Manager, and click Scan Picture. If a scanner is available, it will launch the HP ScanPro application. If it is not available, a message appears to let you know that a scanner was not found.

NOTE: Closing the HP Digital Imaging Monitor icon in your Windows system tray can cause your device to lose some of its scan functionality and result in the No Connection error message. If this happens, you can restore full functionality by restarting your computer or by starting the HP Photosmart Software.
This section contains the following topics:
- Scan an original to a program on a computer (direct connection)
- Scan an original to a memory device
Scan an original to a program on a computer (direct connection)
Use the following steps if your device is directly connected to a computer via a USB cable.
When the scan is complete, the program that you have selected opens and displays the document that you have scanned.
To send a scan to a program on a computer from the HP photo and imaging software
- On the computer, open the HP photo and imaging software. For more information, see Use the HP photo and imaging software.
- See the onscreen Help for further instructions.
To send a scan to a program on a computer from the device control panel (direct connect)
- Load the original on the scanner glass. For more information, see Load originals.
- Press the Scan Menu or Scan To button.
- Press the arrow keys to select the program that you want to use (such as the HP photo and imaging software), and then press OK.
- Press START SCAN.
Scan an original to a memory device
You can send the scanned image as a JPEG image to the memory card that is currently inserted.
To scan to a memory device
- Load your original print-side down in the right-front corner of the glass or in the ADF.
- Insert the memory device.
- Press Scan To.
- Press the arrow keys to highlight Memory Device, and then press OK. The device scans the image and saves the file to the memory card.
Use Webscan via embedded Web server
Webscan is a feature of the embedded Web server that lets you scan photos and documents from your device to your computer using a Web browser. This feature is available even if you did not install the device software on your computer.
▲ Click the Information tab, click Webscan in the left pane, make selections for Image Type and Document Size, and then click Scan or Preview.
For more information on the embedded Web server, see Embedded Web server.
Scan from a TWAIN-compliant or a WIA-compliant program
The device is TWAIN-complaint and WIA-compliant and works with programs that support TWAIN-compliant and WIA-compliant scanning devices. While you are in a
TWAIN-compliant or WIA-compliant program, you can gain access to the scanning feature and scan an image directly into the program.
TWAIN is supported in all Windows and Mac OS operating systems.
In Windows operating systems, WIA is supported only for Windows XP and Vista direct connections. WIA is not supported for the Mac OS.
This section contains the following topics:
• Scan from a TWAIN-compliant program
• Scan from a WIA-compliant program
Scan from a TWAIN-compliant program
Generally, a software program is TWAIN-compliant if it has a command such as Acquire, File Acquire, Scan, Import New Object, Insert from, or Scanner. If you are unsure whether the program is compliant or you do not know what the command is called, see the software program Help or documentation.
Start the scan from within the TWAIN-compliant program. See the software program Help or documentation for information about the commands and steps to use.
Scan from a WIA-compliant program
Generally, a software program is WIA-compliant if it has a command such as Picture/From Scanner or Camera in the Insert or File menu. If you are unsure whether the program is compliant or you do not know what the command is called, see the software program Help or documentation.
Start the scan from within the WIA-compliant program. See the software program Help or documentation for information about the commands and steps to use.
Edit a scanned original
You can edit a scanned image using the HP Photosmart Software. You can also edit a scanned document by using your Optical Character Recognition (OCR) software.
This section contains the following topics:
• Edit a scanned photo or graphic
• Edit a scanned document using optical character recognition (OCR) software
Edit a scanned photo or graphic
You can edit a scanned photo or graphic using the HP Photosmart Software. Use this software to adjust the brightness, contrast, color saturation, and more. You can also rotate the image using the HP Photosmart Software.
For more information, see the onscreen HP Photosmart Software Help.
Edit a scanned document using optical character recognition (OCR) software
You can use OCR software to import scanned text into your preferred word-processing program for editing. This allows you to edit letters, newspaper clippings, and many other documents.
You can specify the word-processing program that you want to use for editing. If the word-processing icon is not present or active, either you do not have word-processing software installed on your computer, or the scanner software did not recognize the program during the installation. See the onscreen Help for the HP photo and imaging software for information about how to create a link to the word-processing program.
The OCR software does not support scanning colored text. Colored text is always converted to black-and-white text before being sent to OCR. Thus, all text in the final document is in black and white, regardless of the original color.
Because of the complexity of some word-processing programs and their interaction with the device, it is sometimes preferable to scan to Wordpad (a Windows accessory), and then cut and paste the text into the preferred word-processing program.
Change scan settings
To change scan settings
- HP Device Manager (Mac OS): Launch HP Device Manager, click Information and Settings, and then select Scan Preferences from the drop-down list.
- Windows: Open the device software, select Settings, select Scan Settings and Preferences, then select from the available options and make your selections.
Cancel a scan job
To cancel a scan job, press Cancel on the device control panel.
6 Work with memory devices
The device comes with a memory card reader that can read several types of digital camera memory cards. You can print an index sheet, which shows thumbnail views of photos that are stored on a memory card.
This section contains the following topics:
- Insert a memory card
• Print DPOF photos
• View photos
• Print an index sheet from the device control panel
• Save photos to your computer
Insert a memory card
If your digital camera uses a memory card to store photos, you can insert the memory card into the device to print or save your photos.
△ CAUTION: Attempting to remove a memory card while it is being accessed can damage files on the card. You can safely remove a card only when the photo light is not blinking. Also, never insert more than one memory card at a time as this can also damage files on the memory cards.
The device supports the memory cards described below. Each type of memory card can only be inserted in the appropriate slot for that card.
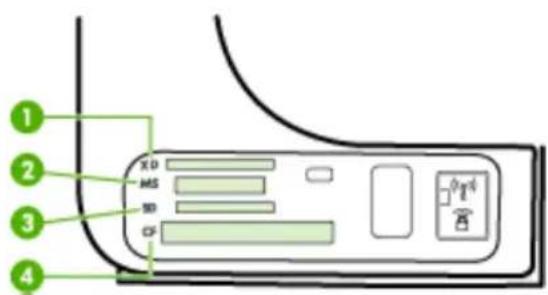
text_image
1 2 3 4 XD MS SD CF| 1 | xD |
| 2 | Memory Stick, MagicGate Memory Stick, Memory Stick Duo, and Memory Stick Pro, Memory Stick Micro (requires adapter that must be purchased separately) |
| 3 | Secure Digital, High Capacity Secure Digital (HCSD), MultimediaCard (MMC), Secure MMC.Reduced-Size MultiMediaCard RS - MMC/MMCmobile, MMCmicro, miniSD, microSD (all require adapters that must be purchased separately) |
| 4 | CompactFlash (Type I and II) |
To insert a memory card
-
Turn the memory card so that the label faces up, and the contacts are facing the device.
-
Insert the memory card into the corresponding memory card slot.
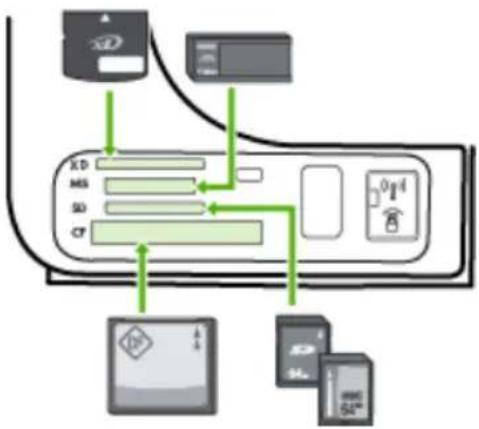
flowchart
graph TD
    A["Device 1"] --> B["Central Device"]
    C["Device 2"] --> B
    D["Device 3"] --> B
    E["Device 4"] --> B
    F["Device 5"] --> B
    G["Device 6"] --> B
    H["Device 7"] --> B
    I["Device 8"] --> B
    J["Device 9"] --> B
    K["Device 10"] --> B
    L["Device 11"] --> B
    M["Device 12"] --> B
    N["Device 13"] --> B
    O["Device 14"] --> B
    P["Device 15"] --> B
    Q["Device 16"] --> B
    R["Device 17"] --> B
    S["Device 18"] --> B
    T["Device 19"] --> B
    U["Device 20"] --> B
    V["Device 21"] --> B
    W["Device 22"] --> B
    X["Device 23"] --> B
    Y["Device 24"] --> B
    Z["Device 25"] --> B
    AA["Device 26"] --> B
    AB["Device 27"] --> B
    AC["Device 28"] --> B
    AD["Device 29"] --> B
    AE["Device 30"] --> B
    AF["Device 31"] --> B
    AG["Device 32"] --> B
    AH["Device 33"] --> B
    AI["Device 34"] --> B
    AJ["Device 35"] --> B
    AK["Device 36"] --> B
    AL["Device 37"] --> B
    AM["Device 38"] --> B
    AN["Device 39"] --> B
    AO["Device 40"] --> B
    AP["Device 41"] --> B
    AQ["Device 42"] --> B
    AR["Device 43"] --> B
    AS["Device 44"] --> B
    AT["Device 45"] --> B
    AU["Device 46"] --> B
    AV["Device 47"] --> B
    AW["Device 48"] --> B
    AX["Device 49"] --> B
    AY["Device 50"] --> B
Print DPOF photos
Camera-selected photos are photos you marked for printing with your digital camera. Depending on your camera, the camera might identify page layout, number of copies, rotation, and other print settings.
The device supports the Digital Print Order Format (DPOF) file format 1.1, so you do not have to reselect the photos to print.
When you print camera-selected photos, the device print settings do not apply; the DPOF settings for page layout and number of copies override those of the device.

NOTE: Not all digital cameras enable you to tag your photos for printing. See the documentation that came with your digital camera to see if your camera supports DPOF file format 1.1.
To print camera-selected photos using the DPOF standard
-
Insert your memory card into the appropriate slot on the device.
-
When prompted, do one of the following:
- Press OK to print all DPOF-tagged photos. The device prints all DPOF-tagged photos.
- Press the arrow keys to highlight No, and then press OK. This bypasses DPOF printing.
View photos
You can view photos using the HP Photosmart Software.
This section contains the following topics:
• View photos using your computer
View photos using your computer
You can view and edit photos using the HP Photosmart Software that came with your device.
For more information, see the onscreen HP Photosmart Software Help.
Print an index sheet from the device control panel

NOTE: From the device, you can only access JPEG and TIFF image files. To print other types of files, transfer the files from your memory card to your computer and use the HP Photosmart Software.
To print an index sheet
- Insert a memory card into the appropriate slot on the device.
- Press the Photo Menu button.
- Press the right arrow key repeatedly to select Index Sheet.
- Press OK.
Save photos to your computer
After you take photos with your digital camera, you can print them immediately or save them to your computer. To save the photos to your computer, remove the memory card from your digital camera and insert it in the appropriate memory card slot on the device.
To save photos

NOTE: Use these instructions only when you are using a network connection. If you are using a USB connection, then a dialog box will automatically appear on the computer when you insert the memory card in the device.
- Insert a memory card into the appropriate slot on the device.
- Press Photo Menu.
- Press the arrow keys and select Photo Transfer, and then press OK.
- Press the arrow keys and select Yes.
- Press the arrow keys and select Transfer to computer, and then select the name of your computer.
- Follow the onscreen prompts on your computer to save the photos to your computer.
7 Fax
You can use the device to send and receive faxes, including color faxes. You can schedule faxes to be sent at a later time and set up speed-dials to send faxes quickly and easily to frequently used numbers. From the device control panel, you can also set a number of fax options, such as resolution and the contrast between lightness and darkness on the faxes you send.
If the device is directly connected to a computer, you can use the HP photo and imaging software to perform fax procedures that are not available from the device control panel. For more information, see Use the HP photo and imaging software.

NOTE: Before you begin faxing, make sure you have set up the device properly for faxing. You might have already done this as part of the initial setup, by using either the device control panel or the software that came with the device. You can verify the fax is set up correctly by running the fax setup test from the device control panel. To run the fax test, press Setup, select Tools, select Run fax test, and then press OK.
This section contains the following topics:
- Send a fax
- Receive a fax
• Change fax settings
• Fax over the Internet - Test fax setup
- Use reports
- Cancel a fax
Send a fax
You can send a fax in a variety of ways. Using the device control panel, you can send a black-and-white or color fax. You can also send a fax manually from an attached phone. This allows you to speak with the recipient before sending the fax.
This section contains the following topics:
- Send a basic fax
- Send a fax manually from a phone
- Send a fax using monitor dialing
- Send a fax from memory
• Schedule a fax to send later - Send a fax to multiple recipients
- Send a color original or photo fax
• Change the fax resolution and Lighter / Darker settings - Send a fax in Error Correction Mode
Send a basic fax
You can easily send a single- or multiple-page black-and-white fax by using the device control panel.

NOTE: If you need printed confirmation that your faxes were successfully sent, enable fax confirmation before sending any faxes.

TIP: You can also send a fax manually from a phone or by using monitor dialing. These features allow you to control the pace of your dialing. They are also useful when you want to use a calling card to charge the call and you have to respond to tone prompts while dialing.
To send a basic fax from the device control panel
- Load your originals. For additional information, see Load originals.
- Enter the fax number by using the keypad, press Speed Dial or a one-touch speed dial button to select a speed dial, or press Redial/Pause to redial the last number dialed.

TIP: To add a pause in the fax number you are entering, press Redial/Pause, or press the Symbols (*) button repeatedly, until a dash (-) appears on the display.
3. Press START FAX Black.
If the device detects an original loaded in the automatic document feeder, it sends the document to the number you entered.

TIP: If the recipient reports issues with the quality of the fax you sent, you can try changing the resolution or contrast of your fax.
Send a fax manually from a phone
Sending a fax manually allows you to make a phone call and talk with the recipient before you send the fax. This is useful if you want to inform the recipient that you are going to send them a fax before sending it. When you send a fax manually, you can hear the dial tones, telephone prompts, or other sounds through the handset on your telephone. This makes it easy for you to use a calling card to send your fax.
Depending on how the recipient has their fax machine set up, the recipient might answer the phone, or the fax machine might take the call. If a person answers the phone, you can speak with the recipient before sending the fax. If a fax machine answers the call, you can send the fax directly to the fax machine when you hear the fax tones from the receiving fax machine.
To send a fax manually from a phone
- Load your originals. For additional information, see Load originals.
- Dial the number by using the keypad on the phone that is connected to the device.

NOTE: Do not use the keypad on the device control panel when manually sending a fax. You must use the keypad on your phone to dial the recipient's number.
- If the recipient answers the telephone, you can engage in a conversation before sending your fax.

NOTE: If a fax machine answers the call, you will hear fax tones from the receiving fax machine. Proceed to the next step to transmit the fax.
- When you are ready to send the fax, press START FAX Black or START FAX Color.

NOTE: If prompted, select Send Fax, and then press START FAX Black or START FAX Color again.
If you were speaking with the recipient before sending the fax, inform the recipient that they should press Start on their fax machine after they hear fax tones.
The telephone line is silent while the fax is transmitting. At this point, you can hang up the telephone. If you want to continue speaking with the recipient, remain on the line until the fax transmission is complete.
Send a fax using monitor dialing
Monitor dialing allows you to dial a number from the device control panel as you would dial a regular telephone. When you send a fax using monitor dialing, you can hear the dial tones, telephone prompts, or other sounds through the speakers on the device. This enables you to respond to prompts while dialing, as well as control the pace of your dialing.

TIP: If you do not enter your calling card PIN fast enough, the device might start sending fax tones too soon and cause your PIN not to be recognized by the calling card service. If this is the case, you can create a speed dial entry to store the PIN for your calling card.

NOTE: Make sure the volume is turned on, or you will not hear a dial tone.
To send a fax using monitor dialing from the device control panel
- Load your originals. For additional information, see Load originals.
- Press START FAX Black or START FAX Color.
If the device detects an original loaded in the automatic document feeder, you will hear a dial tone.
- When you hear the dial tone, enter the number by using the keypad on the device control panel.
- Follow any prompts that might occur.

TIP: If you are using a calling card to send a fax and you have your calling card PIN stored as a speed dial, when prompted to enter your PIN, press Speed Dial or a one-touch speed dial button to select the speed dial entry where you have your PIN stored.
Your fax is sent when the receiving fax machine answers.
Send a fax from memory
You can scan a black-and-white fax into memory and then send the fax from memory. This feature is useful if the fax number you are trying to reach is busy or temporarily unavailable. The device scans the originals into memory and sends them once it is able to connect to the receiving fax machine. After the device scans the pages into memory, you can immediately remove the originals from the document feeder tray.

NOTE: You can only send a black-and-white fax from memory.
To send a fax from memory
- Load your originals. For additional information, see Load originals.
- In the Fax area, press Fax Menu.
The Enter Number prompt appears.
- Enter the fax number by using the keypad, press Speed Dial or a one-touch speed dial button to select a speed dial, or press Redial/Pause to redial the last number dialed.
- In the Fax area, press Fax Menu repeatedly until How to Fax appears.
- Press ▶ until Scan & Fax appears, and then press OK.
- Press START FAX Black.
The device scans the originals into memory and sends the fax when the receiving fax machine is available.
Schedule a fax to send later
You can schedule a black-and-white fax to be sent within the next 24 hours. This enables you to send a black-and-white fax late in the evening, when phone lines are not as busy or phone rates are lower, for example. The device automatically sends your fax at the specified time.
You can only schedule one fax to be sent at a time. You can continue to send faxes normally, however, while a fax is scheduled.

NOTE: You can only send faxes in black and white due to memory limitations.
To schedule a fax from the device control panel
- Load your originals. For additional information, see Load originals.
- In the Fax area, press Fax Menu repeatedly until How to Fax appears.
- Press ▶ until Send Fax Later appears, and then press OK.
- Enter the send time by using the numeric keypad, and then press OK. If prompted, press 1 for AM, or 2 for PM.
- Enter the fax number by using the keypad, press Speed Dial or a one-touch speed dial button to select a speed dial, or press Redial/Pause to redial the last number dialed.
- Press START FAX Black.
The device scans all pages and the scheduled time appears on the display. The fax is sent at the scheduled time.
To cancel a scheduled fax
- In the Fax area, press Fax Menu repeatedly until How to Fax appears.
- Press ▶ until Send Fax Later appears, and then press OK.
If there is a fax already scheduled, the Cancel prompt appears on the display.
- Press 1 to select Yes.

NOTE: You can also cancel the scheduled fax by pressing Cancel on the device control panel when the scheduled time is visible on the display.
Send a fax to multiple recipients
This section contains the following topics:
- Send a fax to multiple recipients from the device control panel
- Send a fax to multiple recipients from the HP Photosmart Studio Software (Mac OS)
Send a fax to multiple recipients from the device control panel
You can send a fax to multiple recipients at once by grouping individual speed dial entries into group speed dial entries.
To send a fax to multiple recipients using group speed dial
- Load your originals. For additional information, see Load originals.
- Press Speed Dial repeatedly, until the appropriate group speed dial entry appears.

TIP: You can also scroll through the speed dial entries by pressing ◀ or ▶, or you can select a speed dial entry by entering its speed dial code using the keypad on the device control panel.
3. Press START FAX Black.
If the device detects an original loaded in the automatic document feeder, it sends the document to each number in the group speed dial entry.

NOTE: You can only use group speed dial entries to send faxes in black and white, because of memory limitations. The device scans the fax into memory then dials the first number. When a connection is made, it sends the fax and dials the next number. If a number is busy or not answering, the device follows the settings for Busy Redial and No Answer Redial. If a connection cannot be made, the next number is dialed and an error report is generated.
Send a fax to multiple recipients from the HP Photosmart Studio Software (Mac OS)
To send a fax to multiple recipients from the software
- Load your originals. For additional information, see Load originals.
- Select the HP Device Manager from the Dock.
The HP Device Manager window appears.
- In the Devices pop-up menu, choose the HP All-in-One, and then double-click Send Fax.
The Print dialog box opens. - From the Printer pop-up menu, choose the HP All-in-One (Fax).
- From the pop-up menu, choose Fax Recipients.
- Enter the recipient information, and then click Add to Recipients.

NOTE: You can also add recipients from the Phone Book or from the Address Book. To select a recipient from the Address Book, click Open Address Book, and then drag and drop the recipient to the Fax Recipients area.
- Continue to enter recipients, clicking Add to Recipients after each one, until all the appropriate recipients are in the Recipient List.
- Click Send Fax Now.
Send a color original or photo fax
You can fax a color original or photo from the device. If it determines that the recipient's fax machine only supports black-and-white faxes, the fax is sent in black and white.
HP recommends that you use only color originals for color faxing.
To send a color original or photo fax from the device control panel
- Load your originals. For additional information, see Load originals.
- In the Fax area, press Fax Menu.
The Enter Number prompt appears.
- Enter the fax number by using the keypad, press Speed Dial or a one-touch speed dial button to select a speed dial, or press Redial/Pause to redial the last number dialed.
- Press START FAX Color.
If the device detects an original loaded in the automatic document feeder, it sends the document to the number you entered.

NOTE: If the recipient's fax machine only supports black-and-white faxes, the HP All-in-One automatically sends the fax in black and white. A message appears after the fax has been sent indicating that the fax was sent in black and white. Press OK to clear the message.
Change the fax resolution and Lighter / Darker settings
You can change the Resolution and Lighter / Darker settings for documents that you are faxing.

NOTE: These settings do not affect copy settings. Copy resolution and lightness/darkness are set independently from fax resolution and lightness/darkness. Also, the settings that you change from the device control panel do not affect faxes you send from your computer.
This section contains the following topics:
• Change the fax resolution
• Change the Lighter / Darker setting
- Set new default settings
Change the fax resolution
The Resolution setting affects the transmission speed and quality of faxed black-and-white documents. If the receiving fax machine does not support the resolution you have chosen, the HP All-in-One sends faxes at the highest resolution supported by the receiving fax machine.

NOTE: You can only change the resolution for faxes that you are sending in black and white. The device sends all color faxes using Fine resolution.
The following resolution settings are available for sending faxes: Fine, Very Fine, Photo, and Standard.
- Fine: provides high-quality text suitable for faxing most documents. This is the default setting. When sending faxes in color, the device always uses the Fine setting.
- Very Fine: provides the best quality fax when you are faxing documents with very fine detail. If you choose Very Fine, be aware that the faxing process takes longer to complete and you can only send black-and-white faxes using this resolution. If you send a color fax, it will be sent using Fine resolution instead.
- Photo: provides the best quality fax when sending photographs in black and white. If you choose Photo, be aware that the faxing process takes longer to complete. When faxing photographs in black and white, HP recommends that you choose Photo.
• Standard: provides the fastest possible fax transmission with the lowest quality.
When you exit the Fax menu, this option returns to the default setting unless you set your changes as the default.
To change the resolution from the device control panel
-
Load your originals. For additional information, see Load originals.
-
In the Fax area, press Fax Menu. The Enter Number prompt appears.
-
Enter the fax number by using the keypad, press Speed Dial or a one-touch speed dial button to select a speed dial, or press Redial/Pause to redial the last number dialed.
-
In the Fax area, press Fax Menu repeatedly until Resolution appears.
-
Press ▶ to select a resolution setting, and then press OK.
-
Press START FAX Black. If the device detects an original loaded in the automatic document feeder, it sends the document to the number you entered.
Change the Lighter / Darker setting
You can change the contrast of a fax to be darker or lighter than the original. This feature is useful if you are faxing a document that is faded, washed out, or handwritten. You can darken the original by adjusting the contrast.

NOTE: The Lighter / Darker setting applies to black-and-white faxes only, not color faxes.
When you exit the Fax menu, this option returns to the default setting unless you set your changes as the default.
To change the Lighter / Darker setting from the device control panel
- Load your originals. For additional information, see Load originals.
- In the Fax area, press Fax Menu.
The Enter Number prompt appears. - Enter the fax number by using the keypad, press Speed Dial or a one-touch speed dial button to select a speed dial, or press Redial/Pause to redial the last number dialed.
- In the Fax area, press Fax Menu repeatedly until Lighter / Darker appears.
- Press ◀ to lighten the fax or press ▶ to darken it, and then press OK.
The indicator moves to the left or right as you press an arrow button. - Press START FAX Black.
If the device detects an original loaded in the automatic document feeder, it sends the document to the number you entered.
Set new default settings
You can change the default value for the Resolution and Lighter / Darker settings through the device control panel.
To set new default settings from the device control panel
- Make changes to the Resolution and Lighter / Darker settings.
- In the Fax area, press Fax Menu repeatedly until Set New Defaults appears.
- Press ▶ until Yes appears, and then press OK.
Send a fax in Error Correction Mode
Error Correction Mode (ECM) prevents loss of data due to poor phone lines by detecting errors that occur during transmission and automatically requesting retransmission of the erroneous portion. Phone charges are unaffected, or might even be reduced, on good phone lines. On poor phone lines, ECM increases sending time and phone charges, but sends the data much more reliably. The default setting is On. Turn ECM off only if it increases phone charges substantially, and you can accept poorer quality in exchange for reduced charges.
Before turning the ECM setting off, consider the following. If you turn ECM off
- The quality and transmission speed of faxes you send and receive are affected.
• The Fax Speed is automatically set to Medium. - You will no longer be able to send or receive faxes in color.
To change the ECM setting from the device control panel
-
Press Setup.
-
Press 5, and then press 6.
This selects Advanced Fax Setup and then selects Error Correction Mode.
-
Press ▶ to select On or Off.
-
Press OK.
Receive a fax
You can receive faxes automatically or manually. If you turn off the Auto Answer option, you must receive faxes manually. If you turn on the Auto Answer option (the default setting), the device automatically answers incoming calls and receives faxes after the number of rings that are specified by the Rings to Answer setting. (The default Rings to Answer setting is five rings.)
If you receive a legal-size fax and the device is not currently set to use legal-size paper, the device reduces the fax so that it fits on the paper that is loaded. If you have disabled the Automatic Reduction feature, the device prints the fax on two pages.

NOTE: If you are copying a document when a fax arrives, the fax is stored in the device memory until the copying finishes. This can reduce the number of fax pages stored in memory.
This section contains the following topics:
• Receive a fax manually
• Set up backup fax reception
• Reprint received faxes from memory
• Poll to receive a fax
• Forward faxes to another number
• Set the paper size for received faxes
- Set automatic reduction for incoming faxes
• Block junk fax numbers
• Receive faxes to your computer (Fax to PC)
Receive a fax manually
When you are on the phone, the person you are speaking with can send you a fax while you are still connected. This is referred to as manual faxing. Use the instructions in this section to receive a manual fax.

NOTE: You can pick up the handset to talk or listen for fax tones.
You can receive faxes manually from a phone that is:
- Directly connected to the device (on the 2-EXT port)
- On the same phone line, but not directly connected to the device
To receive a fax manually
- Make sure the device is turned on and you have paper loaded in the input tray.
- Remove any originals from the document feeder tray.

NOTE: The automatic document feeder must be empty to receive a fax. If there are documents in the document feeder, then receiving the fax will be unsuccessful.
- Set the Rings to Answer setting to a high number to allow you to answer the incoming call before the device answers. Or, turn off the Auto Answer setting so that the device does not automatically answer incoming calls.
- If you are currently on the phone with the sender, instruct the sender to press Start on their fax machine.
- When you hear fax tones from a sending fax machine, do the following:
a. Press START FAX Black or START FAX Color on the device control panel.
b. When prompted, select Fax Receive.
c. After the device begins to receive the fax, you can hang up the phone or remain on the line. The phone line is silent during fax transmission.
Set up backup fax reception
Depending on your preference and security requirements, you can set up the device to store all the faxes it receives, only the faxes it receives while the device is in an error condition, or none of the faxes it receives.
The following Backup Fax Reception modes are available:
| On | The default setting. When Backup Fax Reception is On, the device stores all received faxes in memory. This enables you to reprint up to eight of the most recently printed faxes if they are still saved in memory.NOTE: When device memory is low, it overwrites the oldest, printed faxes as it receives new faxes. If the memory becomes full of unprinted faxes, the device stops answering incoming fax calls.NOTE: If you receive a fax that is too large, such as a very detailed color photo, it might not be stored in memory due to memory limitations. |
| On Error Only Causes | the device to store faxes in memory only if an error condition exists that prevents the device from printing the faxes (for example, if the device runs out of paper). The device continues to store incoming faxes as long as there is memory available. (If the memory becomes full, the device stops answering incoming fax calls.) When the error condition is resolved, the faxes stored in memory print automatically, and then they are deleted from memory. |
| Off Faxes are never | stored in memory. For example, you might want to turn off Backup Fax Reception for security purposes. If an error condition occurs that prevents the device from printing (for example, the device runs out of paper), the device stops answering incoming fax calls. |

NOTE: If Backup Fax Reception is enabled and you turn off the device, all faxes stored in memory are deleted, including any unprinted faxes that you might have received while the device was in an error condition. You must contact the senders to ask them to resend any unprinted faxes. For a list of the faxes you have received, print the Fax Log. The Fax Log is not deleted when the device is turned off.
NOTE: If you turn on Fax to PC, set Backup Fax Reception to On. If you set Backup Fax Reception to On Error Only or Off, then the backup fax reception will attempt to save color faxes.
To set backup fax reception from the device control panel
- Press Setup.
- Select Advance Fax Setup, and then select Backup Fax Reception.
- Press the right arrow button to select On, On Error Only, or Off.
- Press OK.
Reprint received faxes from memory
If you set the Backup Fax Reception mode to On, the received faxes are stored in memory, whether the device has an error condition or not.

NOTE: After the memory becomes full, the oldest, printed faxes are overwritten as new faxes are received. If all the stored faxes are unprinted, the device does not receive any fax calls until you print or delete the faxes from memory. You might also want to delete the faxes in memory for security or privacy purposes.
Depending on the sizes of the faxes in memory, you can reprint up to eight of the most recently printed faxes, if they are still in memory. For example, you might need to reprint your faxes if you lost the copy of your last printout.
To reprint faxes in memory from the device control panel
- Make sure you have paper loaded in the input tray.
- Press Setup.
- Select Tools, and then select Reprint Faxes in Memory.
The faxes are printed in the reverse order from which they were received with the most recently received fax printed first, and so on. - If you want to stop reprinting the faxes in memory, press Cancel.
To delete all the faxes in memory from the device control panel
▲ Turn off the device by pressing the Power button. All faxes stored in memory are deleted from memory when you turn off the power.
Poll to receive a fax
Polling allows the HP All-in-One to ask another fax machine to send a fax that it has in its queue. When you use the Poll to Receive feature, the HP All-in-One calls the designated fax machine and requests the fax from it. The designated fax machine must be set for polling and have a fax ready to send.

NOTE: The HP All-in-One does not support polling pass codes. Polling pass codes are a security feature that require the receiving fax machine to provide a pass code to the device it is polling in order to receive the fax. Make sure the device you are polling does not have a pass code set up (or has not changed the default pass code) or the HP All-in-One will not be able to receive the fax.
To set up poll to receive a fax from the device control panel
- In the Fax area, press Fax Menu repeatedly until How to Fax appears.
- Press ▶ until Poll to Receive appears, and then press OK.
- Enter the fax number of the other fax machine.
- Press START FAX Black or START FAX Color.

NOTE: If you press START FAX Color but the sender sent the fax in black and white, the device prints the fax in black and white.
Forward faxes to another number
You can set up the device to forward your faxes to another fax number. A received color fax is forwarded in black and white.
HP recommends that you verify the number you are forwarding to is a working fax line. Send a test fax to make sure the fax machine is able to receive your forwarded faxes.
To forward faxes from the device control panel
- Press Setup.
- Select Advance Fax Setup, and then select Fax Forwarding Black Only.
- Press the right arrow button until On-Forward or On-Print & Forward appears, and then press OK.
- Choose On-Forward if you want to forward the fax to another number without printing a backup copy on the device.

NOTE: If the device is not able to forward the fax to the designated fax machine (for example, if it is not turned on), the device prints the fax. If you set up the device to print error reports for received faxes, it will also print an error report.
- Choose On-Print & Forward to print a backup copy of your received fax while forwarding the fax to another number.
-
At the prompt, enter the number of the fax machine that will receive the forwarded faxes.
-
At the prompt, enter a start time and date and a stop time and date.
- Press OK.
Fax Forwarding appears on the control-panel display.
If the device loses power when Fax Forwarding is set up, it saves the Fax Forwarding setting and phone number. When power is restored to the device, the Fax Forwarding setting is still On.

NOTE: You can cancel fax forwarding by pressing Cancel on the device control panel when the Fax Forwarding message is visible on the display, or you can select Off from the Fax Forwarding Black Only menu.
Set the paper size for received faxes
You can select the paper size for received faxes. The paper size you select should match what is loaded in your input tray. Faxes can be printed on letter, A4, or legal paper only.

NOTE: If an incorrect paper size is loaded in the input tray when you receive a fax, the fax does not print and an error message appears on the display. Load letter, A4, or legal paper, and then press OK to print the fax.
To set the paper size for received faxes from the device control panel
- Press Setup.
- Select Basic Fax Setup and then select Fax Paper Size.
- Press ▶ to select an option, and then press OK.
Set automatic reduction for incoming faxes
The Automatic Reduction setting determines what the HP All-in-One does if it receives a fax that is too large for the default paper size. This setting is turned on by default, so the image of the incoming fax is reduced to fit on one page, if possible. If this feature is turned off, information that does not fit on the first page is printed on a second page. Automatic Reduction is useful when you receive a legal-size fax and letter-size paper is loaded in the input tray.
To set automatic reduction from the device control panel
- Press Setup.
- Select Advanced Fax Setup and then select Automatic Reduction.
- Press ▶ to select Off or On.
- Press OK.
Block junk fax numbers
If you subscribe to a caller ID service through your phone provider, you can block specific fax numbers so the device does not print faxes received from those numbers. When an incoming fax call is received, the device compares the number to the list of junk fax numbers to determine if the call should be blocked. If the number matches a number in the blocked fax numbers list, the fax is not printed. (The maximum number of fax numbers you can block varies by model.)

NOTE: This feature is not supported in all countries/regions. If it is not supported in your country/region, Junk Fax Blocker Set Up does not appear in the Basic Fax Setup menu.
NOTE: If no phone numbers are added in the Caller ID list, it is assumed that the user has not signed up for the Caller ID service with the phone company.
This section contains the following topics:
- Set the junk fax mode
• Add numbers to the junk fax list - Remove numbers from the junk fax list
Set the junk fax mode
By default, Block Junk Fax mode is turned On. If you do not subscribe to a caller ID service through your phone provider, or do not want to use this feature, you can turn off this setting.
To set the junk fax mode
▲ Press the Junk Fax Blocker button, select the Block Junk Fax option, and then select On or Off.
Add numbers to the junk fax list
There are two ways to add a number to your junk list. You can select numbers from your caller ID history, or you can enter new numbers. The numbers in your junk list are blocked if Block Junk Fax mode is set to On.
To select a number from the caller ID list
- Press Setup.
- Press Basic Fax Setup, and then press Junk Fax Blocker Setup.
- Press Add number to Junk List, and then press Select Number.
- Press the right arrow button to scroll through the numbers from which you have received faxes. When the number you want to block appears, press OK to select it.
-
When the Select Another? prompt appears, do one of the following:
-
If you want to add another number to the list of junk fax numbers, press Yes, and then repeat step 4 for each number you want to block.
- If you are done, press No.
To manually enter a number to block
- Press Setup.
- Press Basic Fax Setup, and then press Junk Fax Blocker Setup.
-
Press Add number to Junk List, and then press Enter Number.
-
Use the keypad to enter a fax number to block, and then press OK.
Make sure you enter the fax number as it appears on the control-panel display, and not the fax number that appears on the fax header of the received fax, as these numbers can be different.
- When the Enter Another? prompt appears, do one of the following:
- If you want to add another number to the list of junk fax numbers, press Yes, and then repeat step 4 for each number you want to block.
• If you are done, press No.
Remove numbers from the junk fax list
If you no longer want to block a fax number, you can remove a number from your junk fax list.
To remove numbers from the list of junk fax numbers
- Press Setup.
- Press Basic Fax Setup, and then press Junk Fax Blocker Setup.
- Press Remove Number from Junk List.
- Press the right arrow button to scroll through the numbers you have blocked. When the number you want to remove appears, press OK to select it.
- When the Delete Another? prompt appears, do one of the following:
- If you want to remove another number from the list of junk fax numbers, press Yes, and then repeat step 4 for each number you want to block.
• If you are done, press No.
Receive faxes to your computer (Fax to PC)
Use Fax to PC to automatically receive faxes and save faxes directly to your computer. With Fax to PC, you can store digital copies of your faxes easily and also eliminate the hassle of dealing with bulky paper files. Received faxes are saved as TIFF (Tagged Image File Format). Once the fax is received, you get a notification with a link to the folder where the fax is saved.
The files are named in the following method: XXXX_YYYYYYY_ZZZZZZ.tif, where X is the sender's information, Y is the date, and Z is the time that the fax was received.

NOTE: Fax to PC is available for receiving black-and-white faxes only. Color faxes are printed instead of being saved to the computer.
NOTE: Fax to PC is only supported on Windows.
This section contains the following topics:
• Activate Fax to PC
- Modify Fax to PC settings
Activate Fax to PC
Use the Fax to PC Setup Wizard to activate Fax to PC. The Fax to PC Setup Wizard can be started from the Solution Center.

NOTE: If you turn on Fax to PC, make sure the Backup Fax Reception is set to "On".
Fax to PC requirements:
- The administrator program, the computer that activated the Fax to PC feature, must be on at all times. Only one computer can act as the Fax to PC administrator computer.
- The destination folder's computer or server, if different than the Fax to PC administrator computer, must be on at all times. The destination computer must also be awake, faxes will not be saved if the computer is asleep or in hibernate mode.
- HP Digital Imaging monitor in Windows Taskbar must be on at all times.
- Paper must be loaded in the input tray.
To start the Fax to PC Setup Wizard from the Solution Center
- Open the Solution Center. For more information, see Use the HP Solution Center (Windows).
- Select Settings, and then select Fax to PC Setup Wizard.
- Follow the onscreen instructions to set up Fax to PC.
Modify Fax to PC settings
You can update the Fax to PC settings from your computer at any time from the Fax settings page in the Solution Center. You can turn off Fax to PC and disable printing faxes from the device control panel.
To modify Fax to PC settings from the device control panel
- Press the Setup button, select Basic Fax Settings, and then Fax to PC.
- Select the setting that you want to change. You can change the following settings:
• View PC hostname: View the name of the computer that is set up to administer Fax to PC.
- Turn Off: Turn off Fax to PC.

NOTE: Use the Solution Center to turn on Fax to PC.
- Disable Fax Print: Choose this option to print faxes as they are received. If you turn off printing, color faxes will still print.
To modify Fax to PC settings from the Solution Center
- Open the Solution Center. For more information, see Use the HP Solution Center (Windows).
- Select Settings, and then select Fax Settings.
- Select the Fax to PC Settings tab.
- Make any changes to the settings you want to modify. Press OK.

NOTE: Any changes you make will overwrite the original settings.
Change fax settings
After completing the steps in the getting started guide that came with the device, use the following steps to change the initial settings or to configure other options for faxing.
This section contains the following topics:
- Configure the fax header
• Set the answer mode (Auto answer)
• Set the number of rings before answering
• Change the answer ring pattern for distinctive ring
• Set the fax error correction mode - Set the dial type
• Set the redial options - Set the fax speed
Configure the fax header
The fax header prints your name and fax number on the top of every fax you send. HP recommends that you set up the fax header by using the software that you installed with the device. You can also set up the fax header from the device control panel, as described here.

NOTE: In some countries/regions, the fax header information is a legal requirement.
To set or change the fax header
- Press Setup.
- Press Basic Fax Setup, and then press Fax Header.
- Enter your personal or company name using the numeric keypad, and then press OK.
- Enter your fax number by using the numeric keypad, and then press OK.
Set the answer mode (Auto answer)
The answer mode determines whether the device answers incoming calls.
- Turn on the Auto Answer setting if you want the device to answer faxes automatically. The device answers all incoming calls and faxes.
- Turn off the Auto Answer setting if you want to receive faxes manually. You must be available to respond in person to the incoming fax call or the device does not receive faxes.
To set the answer mode to manual or automatic via the device control panel
▲ Press Auto Answer to turn the light on or off, as appropriate for your setup. When the Auto Answer light is on, the device answers calls automatically. When the light is off, the it does not answer calls.
Set the number of rings before answering
If you turn on the Auto Answer setting, you can specify how many rings occur before incoming calls are automatically answered.
The Rings to Answer setting is important if you have an answering machine on the same phone line as the device, because you want the answering machine to answer the phone before the device does. The number of rings to answer for the device should be greater than the number of rings to answer for the answering machine.
For example, set your answering machine to a low number of rings and the device to answer in the maximum number of rings. (The maximum number of rings varies by country/region.) In this setup, the answering machine answers the call and the device monitors the line. If the device detects fax tones, it receives the fax. If the call is a voice call, the answering machine records the incoming message.
To set the number of rings before answering via the device control panel
- Press Setup.
- Press Basic Fax Setup, and then press Rings to Answer.
- Enter the appropriate number of rings by using the keypad, or press the left or right arrow button to change the number of rings.
- Press OK to accept the setting.
Change the answer ring pattern for distinctive ring
Many phone companies offer a distinctive ring feature that allows you to have several phone numbers on one phone line. When you subscribe to this service, each number is assigned a different ring pattern. You can set up the device to answer incoming calls that have a specific ring pattern.
If you connect the device to a line with distinctive ring, have your telephone company assign one ring pattern to voice calls and another ring pattern to fax calls. HP recommends that you request double or triple rings for a fax number. When the device detects the specified ring pattern, it answers the call and receives the fax.
If you do not have a distinctive ring service, use the default ring pattern, which is All Rings.

NOTE: The HP fax cannot receive faxes when the main phone number is off the hook.
To change the answer ring pattern for distinctive ring via the device control panel
- Verify that the device is set to answer fax calls automatically.
- Press Setup.
- Press Advance Fax Setup, and then press Distinctive Ring.
- Press the right arrow button to select an option, and then press OK. When the phone rings with the ring pattern assigned to your fax line, the device answers the call and receives the fax.
Set the fax error correction mode
Typically, the device monitors the signals on the phone line while it is sending or receiving a fax. If it detects an error signal during the transmission and the error-correction setting is on, the device can request that a portion of the fax be resent.
Turn off error correction only if you are having trouble sending or receiving a fax, and you want to accept the errors in the transmission. Turning off the setting might be useful when you are trying to send a fax to another country/region or receive a fax from another country/region, or if you are using a satellite phone connection.
To set the fax error-correction mode
▲ Device control panel: Press Fax Menu, open the Advance Fax Setup menu, and then use the Error correction mode option.
Set the dial type
Use this procedure to set tone-dialing or pulse-dialing mode. The factory-set default is Tone. Do not change the setting unless you know that your phone line cannot use tone dialing.

NOTE: The pulse-dialing option is not available in all countries/regions.
To set the dial type
▲ Device control panel: Press Setup, press Basic Fax Setup, and then use the Tone or Pulse Dialing option.
Set the redial options
If the device was unable to send a fax because the receiving fax machine did not answer or was busy, the device attempts to redial based on the settings for the busy-redial and no-answer-redial options. Use the following procedure to turn the options on or off.
- Busy redial: If this option is turned on, the device redials automatically if it receives a busy signal. The factory-set default for this option is ON.
- No answer redial: If this option is turned on, the device redials automatically if the receiving fax machine does not answer. The factory-set default for this option is OFF.
To set the redial options
▲ Device control panel: Press Setup, press Advance Fax Setup, and then use the Busy Redial or No Answer Redial options.
Set the fax speed
You can set the fax speed used to communicate between your device and other fax machines when sending and receiving faxes. The default fax speed is Fast.
If you use one of the following, setting the fax speed to a slower speed might be required:
• An Internet phone service
• A PBX system
• Fax over Internet Protocol (FoIP)
• An integrated services digital network (ISDN) service
If you experience problems sending and receiving faxes, you might want to try setting the Fax Speed setting to Medium or Slow. The following table provides the available fax speed settings.
| Fax speed setting Fax speed | |
| Fast v.34 (33600 baud) | |
| Medium v.17 (14400 baud) | |
| Slow v.29 (9600 baud) |
To set the fax speed from the device control panel
-
Press Setup.
-
Select Advanced Fax Setup, and then press Fax Speed.
-
Select an option using the arrow keys, and then press OK.
Fax over the Internet
You may subscribe to a low cost phone service that allows you to send and receive faxes with your device by using the Internet. This method is called Fax over Internet Protocol (FoIP). You probably use a FoIP service (provided by your telephone company) if you:
- Dial a special access code along with the fax number, or
- Have an IP converter box that connects to the Internet and provides analog phone ports for the fax connection.

NOTE: You can only send and receive faxes by connecting a phone cord to the port labeled "1-LINE" on the device. This means that your connection to the Internet must be done either through a converter box (which supplies regular analog phone jacks for fax connections) or your telephone company.
Some Internet faxing services do not work properly when the device is sending and receiving faxes at high speed (33600bps). If you experience problems sending and receiving faxes while using an Internet fax service, use a slower fax speed. You can do this by changing the Fax Speed setting from High (the default) to Medium. For information on changing this setting, see Set the fax speed.
If you have questions about internet faxing, contact your internet faxing services support department.
Test fax setup
You can test your fax setup to check the status of the device and to make sure it is set up properly for faxing. Perform this test after you have completed setting up the device for faxing. The test does the following:
- Tests the fax hardware
- Verifies the correct type of phone cord is connected to the device
- Checks that the phone cord is plugged into the correct port
- Checks for a dial tone
- Checks for an active phone line
- Tests the status of your phone line connection
The device prints a report with the results of the test. If the test fails, review the report for information on how to fix the problem and rerun the test.
To test fax setup
- Set up the device for faxing according to your particular home or office setup instructions.
- Make sure the print cartridges are installed, and that full-size paper is loaded in the input tray before starting the test.
- From the device control panel, press Setup.
-
Select Tools, and then select Run Fax Test.
The device displays the status of the test on the display and prints a report. -
Review the report.
-
If the test passes and you are still having problems faxing, check the fax settings listed in the report to verify the settings are correct. A blank or incorrect fax setting can cause problems faxing.
- If the test fails, review the report for more information on how to fix any problems found.
Use reports
You can set up the device to print error reports and confirmation reports automatically for each fax you send and receive. You can also manually print system reports as required; these reports provide useful system information about the device.
By default, the device is set to print a report only if there is a problem sending or receiving a fax. A confirmation message that indicates whether a fax was successfully sent appears briefly on the control-panel display after each transaction.
This section contains the following topics:
• Print fax confirmation reports
• Print fax error reports
• Print and view the fax log
Print fax confirmation reports
If you require printed confirmation that your faxes were successfully sent, follow these instructions to enable fax confirmation before sending any faxes. Select either On Fax Send or Send & Receive.
The default fax confirmation setting is Off. This means that a confirmation report is not printed for each fax sent or received. A confirmation message indicating whether a fax was successfully sent appears briefly on the control-panel display after each transaction.
To enable fax confirmation
- Press Setup.
- Press Print Report, and then Fax Confirmation.
- Press the right arrow button to select one of the following, and then press OK.
| Off Does not print a | fax confirmation report when you send and receive faxes successfully. This is the default setting. |
| On Fax Send Prints | a fax confirmation report for every fax you send. |
| On Fax Receive Prints | a fax confirmation report for every fax you receive. |
| Send & Receive Prints | a fax confirmation report for every fax you send and receive. |

TIP: If you choose On Fax Send or Send & Receive, and scan your fax to send from memory, you can include an image of the first page of the fax on the Fax Sent Confirmation report. Press Setup, press Fax Confirmation, and then press On Fax Send again. Select On from the Image on Fax Send Report menu.
Print fax error reports
You can configure the device so that it automatically prints a report when there is an error during transmission or reception.
To set the device to print fax error reports automatically
- Press Setup.
- Press Print Report, and then press Fax Error Report.
- Press the right arrow button to select one of the following, and then press OK.
| Send & Receive Prints whenever a fax error occurs. This is the default setting. | |
| Off Does not print any fax error reports. | |
| On Fax Send Prints whenever a transmission error occurs. | |
| On Fax Receive Prints whenever a receiving error occurs. |
Print and view the fax log
The logs list faxes that have been sent from the device control panel and all faxes that have been received.
You can print a log of faxes that have been received and sent by the device. Each entry in the log contains the following information:
• Transmission date and time
- Type (whether received or sent)
- Fax number
- Duration
- Number of pages
• Result (status) of transmission
To view the fax log from the HP photo and imaging software
- At the computer, open the HP photo and imaging software. For more information, see Use the HP photo and imaging software.
- See the onscreen Help for the HP photo and imaging software for further instructions.
The log lists faxes that have been sent from the device control panel and the HP photo and imaging software and all faxes that have been received.
To print the fax log from the device control panel
- On the device control panel, press Setup.
- Press the arrow key to move down to Print Report, and then press OK.
- Press the arrow key to move down to Fax Log, and then press OK.
- Press OK again to print the log.
Cancel a fax
You can cancel a fax you are sending or receiving at any time.
To cancel a fax
▲ Press Cancel on the device control panel to stop a fax you are sending or receiving. If the device does not stop faxing, press Cancel again.
The device prints any pages it has already started printing and then cancels the remainder of the fax. This can take a few moments.
To cancel a number you are dialing
▲ Press Cancel to cancel a number you are currently dialing.
8 Configure and manage
This section is intended for the administrator or individual who is responsible for managing the device. This section contains information about the following topics.
This section contains the following topics:
- Manage the device
• Use device management tools
• Understand the self-test diagnostic page
• Understand the network configuration page - Configure network options
• Set up faxing for the device - Configure the device (Windows)
• Configure the device (Mac OS) - Set up the device for wireless communication
• Uninstall and reinstall the software
Manage the device
The following, common tools can be used to manage the device. For information about accessing and using the tools, see Use device management tools.

NOTE: Specific procedures might include other methods.
Windows
- Device control panel
- Printer driver
- Toolbox
Mac OS
- Device control panel
- HP Printer Utility
This section contains the following topics:
• Monitor the device
• Administer the device
Monitor the device
This section provides instructions for monitoring the device.
| Use this tool... to obtain the following information... | |
| Device control panel Obtain information about the status of jobs that are being processed, the operating status of the device, and the status of print cartridges. | |
| Toolbox (Windows) Print cartridge information: Click the Estimated Ink Levels tab to view the ink-level information, and then scroll to display the Cartridge Details button. Click the Cartridge Details button to view information about replacement print cartridges and expiration dates.* | |
| HP Printer Utility (Mac OS) Ink cartridge information: Open the Information and Support panel and click Supplies Status. * |
* Ink level warnings and indicators provide estimates for planning purposes only. When you receive a low-ink warning message, consider having a replacement cartridge available to avoid possible printing delays. You do not need to replace the print cartridges until print quality becomes unacceptable.
Administer the device
This section provides information about administering the device and modifying settings.
| Use this tool... to do the following... | |
| Device control panel | Language and country/region: Press Setup, and then open the Preferences menu. If you do not see your country/region, press 99, and then find your country/region in the list.Device control panel volume: Press Setup, and then open the Preferences menu.Fax sound volume: Press Setup, and then select Fax Sound Volume.Automatic report printing: Press Setup, and then open the Advance Fax Setup menu.Set the dial type: Press Setup, and then open the Basic Fax Setup menu.Set up redial options: Press Setup, and then open the Advance Fax Setup menu.Set the date and time: Press Setup, press Tools, and then press Date and Time. |
| Toolbox (Windows) | Perform device maintenance tasks: Click the Services tab. |
| HP Printer Utility (Mac OS) | Change tray settings: Click Paper Handling from the Printer Settings panel.Perform device maintenance tasks: Open the Information and Support panel, and then click the option for the task that you want to perform. |
Use device management tools
This section contains the following topics:
- Toolbox (Windows)
• Embedded Web server
• HP Printer Utility (Mac OS)
Toolbox (Windows)
The Toolbox provides maintenance information about the device.

NOTE: The Toolbox can be installed from the Starter CD by selecting the full installation option if the computer meets the system requirements.
This section contains the following topics:
- Open the Toolbox
- Toolbox tabs
Open the Toolbox
- From the HP Solution Center, click the Settings menu, point to Print Settings, and then click Printer Toolbox.
- Right-click the HP Digital Imaging Monitor in the taskbar, point to Printer Model Name and then click Display Printer Toolbox.
Toolbox tabs
The Toolbox contains the following tabs.
| Tabs Contents | |
| Estimated Ink Level | Ink Level Information: Shows estimated ink level for each cartridge.NOTE: Ink level warnings and indicators provide estimates for planning purposes only. When you receive a low-ink warning message, consider having a replacement cartridge available to avoid possible printing delays. You do not need to replace the print cartridges until print quality becomes unacceptable.Shop Online: Provides access to a Web site from which you can order printing supplies for the device online.Dial a cartridge: Shows telephone numbers that you can call to order supplies for the device. Telephone numbers are not available for all countries/regions.Cartridge Details: Shows order numbers of the installed print cartridges. |
| Services | Print Diagnostic Page: Allows you to print the self-test diagnostic page of the device. This page contains information about the device and the supplies. For more information, see Understand the self-test diagnostic page.Print a Test Page: Allows you to print the self-test report of the device. This page contains information about the device and print cartridges. For more information, see Understand the self-test diagnostic page.Align Print Cartridges: Guides you through aligning the print cartridges. For more information, see Align the print cartridges.Clean Print Cartridges: Guides you through cleaning the print cartridges. For more information, see Clean the print cartridges.Calibrate color: Allows you to calibrate the colors that are printed. |
Embedded Web server
When the device is connected to a network, you can use the embedded Web server to view status information, change settings, and manage it from your computer.

NOTE: For a list of system requirements for the embedded Web server, see Embedded Web server specifications.
Some settings might be restricted by the requirement for a password.
You can open and use the embedded Web server without being connected to the Internet; however, some features will not be available.
This section contains the following topics:
• To open the embedded Web server
• Embedded Web server pages
To open the embedded Web server
You can open the embedded Web server by using these methods:

NOTE: To open the embedded Web server from the printer driver (Windows), or the HP Printer Utility (Mac OS), the device must be on a network and must have an IP address.
- Web browser: In a supported Web browser on your computer, type the IP address that has been assigned to the device.
For example, if the IP address is 123.123.123.123, type the following address into the Web browser: http://123.123.123.123
The IP address for the device is listed on the self-test diagnostic page. For more information, see Understand the network configuration page.
After opening the embedded Web server, you can bookmark it so that you can return to it quickly in the future.
- HP Printer Utility (Mac OS): On the Printer Settings panel, click Additional Settings, and then click the Open Embedded Web Server button.
Embedded Web server pages
The embedded Web server contains pages that you can use to view product information and change device settings. The pages also contain links to other e-services.
| Pages/buttons Contents | |
| Information page Shows status information | about the device, its ink supplies and usage, and a log of device events (such as errors). |
| Settings page Shows the settings that have | been configured for the device and gives you the ability to change these settings. |
| Networking page Shows network status and | the network settings that have been configured for the device. These pages only appear if the device is connected to a network. For more information, see Configure network options. |
| Bluetooth page Shows the Bluetooth settings | that have been configured for the device and gives you the ability to change these settings. |
| Support and Order Supplies buttons | Support provides a number of support services.Order Supplies connects you to online ordering of supplies. |
HP Printer Utility (Mac OS)
The HP Printer Utility contains tools to configure print settings, calibrate the device, order supplies online, and find Web site support information.
This section contains the following topics:
• Open the HP Printer Utility
• HP Printer Utility panels
Open the HP Printer Utility
To open the HP Printer Utility from the Desktop
- From the Finder, select Computer from the Go menu.
- Select Applications, and then double-click Utilities.
- Double-click Printer Setup Utility.
- Select the HP device and click the Utility button.
- Select the HP device and click the Launch Utility.
To open the HP Printer Utility from the HP Device Manager
- Click on the HP Device Manager listed in the Dock.
- Select Maintain printer from the Information and Settings menu.
- Select the HP device and click the Launch Utility.
HP Printer Utility panels
Information and Support panel
• Supplies Status: Shows the information about currently installed print cartridges.
- Supply Info: Shows the print cartridge replacement options.
• Device Information: Displays information about the model and serial number. This page contains information about the device and the supplies.
- Clean: Guides you through cleaning the print cartridges.
- Align: Guides you through aligning the print cartridges.
- HP Support: Gain access to HP Web site where you can find support for the device, register the device, and find information about returning and recycling used printing supplies.
Understand the self-test diagnostic page
Use the self-test diagnostic page to:
• View current device information and print cartridge status
• Help troubleshoot problems
The self-test diagnostic page also contains a log of recent events.
If you need to call HP, it is often useful to print the self-test diagnostic page before calling.
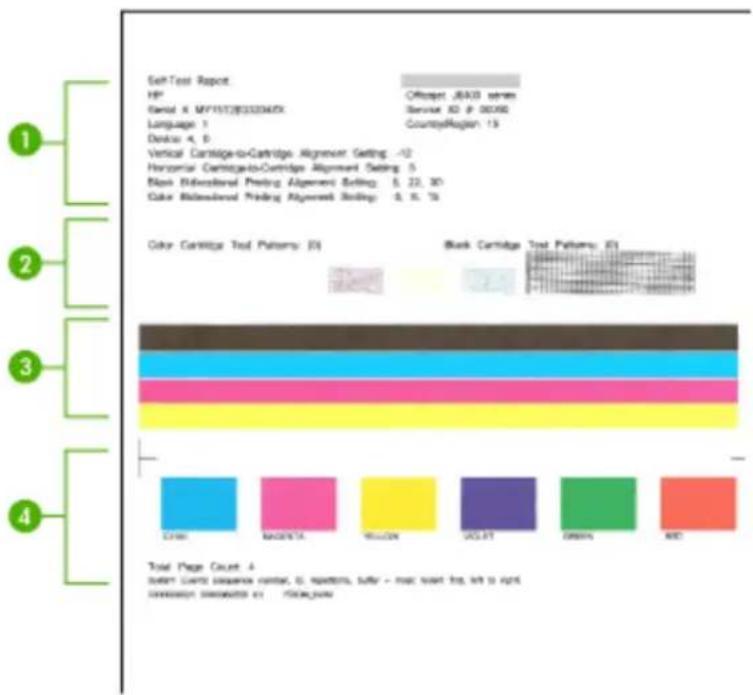
text_image
Self-Test Report: HP Officer: J0A33 series Serial X: MFY15728332349X Service ID: 000590 Language 1 CountryRegion: 13 Device 4, 6 Vertical Cartridge-to-Cartridge Alignment Setting -12 Horizontal Cartridge-to-Cartridge Alignment Setting 5 Black Embedded Printing Alignment Setting: 5, 22, 30 Color Multidimensional Printing Alignment Setting: 0, 0, 1% Color Cartridge Test Pattern: 0% Black Cartridge Test Pattern: 0% Cross MAGNETA YELLOW USSFT GREEN MEO Total Page Count: 4 System Users Sequence Center, C. Redstroms, buffer - max switch fps, left to right Dimension measurements ex : 150mm.pow- Printer Information: Shows device information (such as the product name, model number, serial number, and firmware version number), and the number of pages printed from the tray.
- Nozzle test pattern: Missing lines indicate problems with the print cartridges. Try cleaning the cartridges, or replacing the cartridges.
- Color bars and boxes: Uneven, faded, or faint color bars or boxes indicate low ink. Check the ink levels.
- Event Log: Shows a log of recent events that have occurred.
To print the Self-Test Diagnostic Page
• Device control panel: Press Setup, select Print Report, select Self-Test Report, and then press OK.
- Toolbox (Windows): Click the Services tab, and then click Print a Test Page.
- HP Printer Utility (Mac OS): Click Device Information from the Information and Support panel, and then click Print Configuration Page.
Understand the network configuration page
If the device is connected to a network, you can print a network configuration page to view the network settings for the device. You can use the network configuration page
to help troubleshoot network connectivity problems. If you need to call HP, it is often useful to print this page before calling.
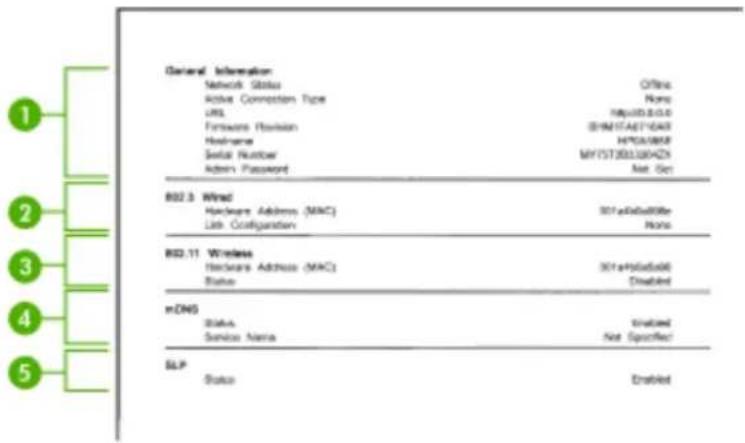
text_image
General Information Network Status Active Connection Type URL Hardware Provision Hedrame Serial Number Admin Password Offins None MioUSB3510.0 EINMT46T16A8 MPO3868F MYST393100HZD Net Set 802.3 Wind Hardware Address (MAC) Lab Configuration 802.11 Wireless Hardware Address (MAC) Status 301a910a95e Disabled mDNS Status Service Name Enabled Not Specified SLP Status EnabledNetwork Configuration Page
- General Information: Shows information about the current status and active connection type of the network, and other information, such as the URL of the embedded Web server.
- 802.3 Wired: Shows information about the active wired network connection, such as the IP address, subnet mask, default gateway, as well as the hardware address of the device.
- 802.11 Wireless: Shows information about the active wireless network connection, such as the IP address, the communication mode, the network name, authentication type, and signal strength.
- mDNS: Shows information about the active Multicast Domain Name System (mDNS) connection. mDNS services are typically used on small networks for IP address and name resolution (through UDP port 5353) where a conventional DNS server is not used.
- SLP: Shows information about the current Service Location Protocol (SLP) connection. SLP is used by network management applications for device management. The device supports SNMPv1 protocol on IP networks.
To print the network configuration page from the device control panel
- If the device has a two-line display: Press the Setup button, select Network Setup, select Print Network Settings, and then press OK.
- If the device has a color display: Press the Setup button, select Network, select View Network Settings, select Print Network Configuration Page, and then press OK.
This section contains the following topics:
• Channel range definitions
Channel range definitions
The following table lists the 802.11 Wireless channel range definitions.
| The first digit stands for Locale Number | |
| Locale 0: Channels 1-11:high-power 802.11blow-power 802.11g | |
| Locale 1: Channels 1-13:low-power 802.11blow-power 802.11g | |
| Locale 2: Channels 1-14:low-power 802.11blow-power 802.11gNOTE: 802.11g is not allowed on channel 14. | |
| The second digit stands for Ad-Hoc Compatibility Mode | 0: Ad-Hoc connection status nominal1: Ad-Hoc always appears connected |
| The third digit stands for Infrastructure Rate Restriction | 0: 802.11b or 802.11g1: 802.11b only |
| The fourth digit stands for Ad-Hoc Rate Restriction | 0: 802.11b or 802.11g1: 802.11b only |
Configure network options
You can manage network settings for the device through the device control panel as described in the next section. Additional advanced settings are available in the embedded Web server, a configuration and status tool you access from your Web browser using an existing network connection to the device. For more information, see Embedded Web server.
This section contains the following topics:
• Change basic network settings
• Change advanced network settings
Change basic network settings
The control-panel options enable you to set up and manage a wireless connection and to perform a variety of network management tasks. This includes viewing the network settings, restoring the network defaults, turning the wireless radio on and off, and changing the network settings.
This section contains the following topics:
• Use the Wireless Setup Wizard
• View and print network settings
• Turn the wireless radio on and off
Use the Wireless Setup Wizard
The Wireless Setup Wizard provides an easy way to set up and manage a wireless connection to your device. For more information on setting up a wireless connection and the Wireless Setup Wizard, see Set up the device for wireless communication.
View and print network settings
You can display a summary of the network settings on the device control panel, or you can print a more detailed network configuration page. The network configuration page lists all of the important network settings such as the IP address, link speed, DNS, and mDNS. For information on the network settings, see Understand the network configuration page.
- Press the Setup button.
- Press the arrow keys until Network is highlighted, and then press OK.
-
Do one of the following:
-
To display wired (Ethernet) network settings, select View Network Settings, and then select Display Wired Summary.
- To display wireless network settings, select View Network Settings, and then select Display Wireless Summary.
- To print the network configuration page, select View Network Settings, and then select Print Network Configuration Page.
Turn the wireless radio on and off
The wireless radio is on by default, as indicated by the blue light on the front of the device. In order to stay connected to a wireless network, the radio must stay on. However, if your device is connected to a wired network or you have a USB connection, the radio is not used. In this case you might want to turn the radio off.
- Press the Setup button.
- Press the arrow keys until Network is highlighted, and then press OK.
- Select Wireless Radio, and then select Yes to turn the radio on, or No to turn the radio off.
Change advanced network settings
The advanced network settings are provided for your convenience. However, unless you are an advanced user, you should not change any of these settings. The advanced settings include Link Speed, IP Settings, and Memory Card Security.
This section contains the following topics:
- Set link speed
• To View IP settings
• To Change IP settings
Set link speed
You can change the speed at which data is transmitted over the network. The default is Automatic.
- Press the Setup button.
- Press the arrow keys until Network is highlighted, then press OK.
- Select Advanced Setup, then select Link Speed.
- Press the number next to the link speed that matches your network hardware:
• 1. Automatic
• 2. 10-Full
• 3. 10-Half
• 4. 100-Full
• 5. 100-Half
To View IP settings
- Color display: To view the IP address of the device from the device control panel, press the Setup button, select Network, select View Network Settings, and then select either Display Wired Summary or Display Wireless Summary.
- Two-line display: To view the IP address of the device, you must print the network configuration page. For more information, see Understand the network configuration page.
To Change IP settings
The default IP setting for the IP settings is Automatic, which sets the IP settings automatically. However, if you are an advanced user, you might want to manually change the IP address, subnet mask, or the default gateway.
△ CAUTION: Be careful when manually assigning an IP address. If you enter an invalid IP address during the installation, your network components will not be able to connect with the device.
- Press the Setup button.
- Press the arrow keys until Network is highlighted, and then press OK.
- Select Advanced Setup, select IP Settings, and then select Manual IP Settings.
- Press the number next to the IP setting:
• 1. IP Address
• 2. Subnet Mask
• 3. Default Gateway
- Enter your changes, and then press OK.
Set up faxing for the device
After completing all the steps in the getting started guide, use the instructions in this section to complete your fax setup. Keep your getting started guide for later use.
In this section, you will learn how to set up the device so that faxing works successfully with equipment and services you might already have on the same phone line.

TIP: You can also use the Fax Setup Wizard (Windows) or HP Fax Setup Utility (Mac OS) to help you quickly set up some important fax settings such as the answer mode and fax header information. You can access the Fax Setup Wizard (Windows) or HP Fax Setup Utility (Mac OS) through the software you installed with the device. After you run the Fax Setup Wizard (Windows) or HP Fax Setup Utility (Mac OS), follow the procedures in this section to complete your fax setup.
This section contains the following topics:
• Set up faxing (parallel phone systems)
- Serial-type fax setup
Set up faxing (parallel phone systems)
Before you begin setting up the device for faxing, determine which kind of phone system your country/region uses. The instructions for fax setup differ depending on whether you have a serial- or parallel-type phone system.
- If you do not see your country/region listed in the table below, you probably have a serial-type phone system. In a serial-type phone system, the connector type on your shared telephone equipment (modems, phones, and answering machines) does not allow a physical connection to the "2-EXT" port on the device. Instead, all equipment must be connected at the telephone wall jack.

NOTE: In some countries/regions that use serial-type phone systems, the phone cord that came with the device might have an additional wall plug attached to it. This enables you to connect other telecom devices to the wall jack where you plug in the device.
- If your country/region is listed in the table below, you probably have a parallel-type telephone system. In a parallel-type phone system, you are able to connect shared telephone equipment to the phone line by using the "2-EXT" port on the back of the device.

NOTE: If you have a parallel-type phone system, HP recommends you use the 2-wire phone cord supplied with the device to connect it to the telephone wall jack.
Table 8-1 Countries/regions with a parallel-type phone system
| Argentina Australia Brazil | ||
| Canada Chile China | ||
| Colombia Greece India | ||
| Indonesia Ireland Japan | ||
| Korea Latin America Malaysia | ||
| Mexico Philippines Poland | ||
| Portugal Russia Saudi Arabia | ||
| Singapore | Spain | Taiwan |
| Thailand USA Venezuela | ||
| Vietnam |
If you are unsure which kind of telephone system you have (serial or parallel), check with your telephone company.
This section contains the following topics:
- Choose the correct fax setup for your home or office
• Select your fax setup case
• Case A: Separate fax line (no voice calls received)
• Case B: Set up the device with DSL
• Case C: Set up the device with a PBX phone system or an ISDN line
• Case D: Fax with a distinctive ring service on the same line
• Case E: Shared voice/fax line
• Case F: Shared voice/fax line with voice mail
• Case G: Fax line shared with computer modem (no voice calls received)
• Case H: Shared voice/fax line with computer modem
• Case I: Shared voice/fax line with answering machine
• Case J: Shared voice/fax line with computer modem and answering machine
• Case K: Shared voice/fax line with computer dial-up modem and voice mail
Choose the correct fax setup for your home or office
To fax successfully, you need to know what types of equipment and services (if any) share the same phone line with the device. This is important because you might need to connect some of your existing office equipment directly to the device, and you might also need to change some fax settings before you can fax successfully.
To determine the best way to set up the device in your home or office, first read through the questions in this section and record your answers. Next, refer to the table in the following section and choose the recommended setup case based on your answers.
Make sure to read and answer the following questions in the order they are presented.
- Do you have a digital subscriber line (DSL) service through your telephone company? (DSL might be called ADSL in your country/region.)
If you answered Yes, proceed directly to Case B: Set up the device with DSL. You do not need to continue answering questions.
If you answered No, continue answering questions.
- Do you have a private branch exchange (PBX) phone system or an integrated services digital network (ISDN) system?
If you answered Yes, proceed directly to Case C: Set up the device with a PBX phone system or an ISDN line. You do not need to continue answering questions. If you answered No, continue answering questions.
- Do you subscribe to a distinctive ring service through your telephone company that provides multiple phone numbers with different ring patterns?
If you answered Yes, proceed directly to Case D: Fax with a distinctive ring service on the same line. You do not need to continue answering questions.
If you answered No, continue answering questions.
Are you unsure if you have distinctive ring? Many phone companies offer a distinctive ring feature that allows you to have several phone numbers on one phone line.
When you subscribe to this service, each phone number will have a different ring pattern. For example, you can have single, double, and triple rings for the different numbers. You might assign one phone number with a single ring to your voice calls, and another phone number with double rings to your fax calls. This allows you to tell the difference between voice and fax calls when the phone rings.
- Do you receive voice calls at the same phone number you will use for fax calls on the device?
Continue answering questions.
- Do you have a computer dial-up modem on the same phone line as the device?
Are you unsure if you use a computer dial-up modem? If you answer Yes to any of the following questions, you are using a computer dial-up modem:
- Do you send and receive faxes directly to and from your computer software applications through a dial-up connection?
- Do you send and receive e-mail messages on your computer through a dial-up connection?
- Do you access the Internet from your computer through a dial-up connection?
Continue answering questions.
- Do you have an answering machine that answers voice calls at the same phone number you will use for fax calls on the device?
Continue answering questions.
- Do you subscribe to a voice mail service through your telephone company at the same phone number you will use for fax calls on the device?
After you have completed answering the questions, proceed to the next section to select your fax setup case.
Select your fax setup case
Now that you have answered all the questions about the equipment and services that share the phone line with the device, you are ready to choose the best setup case for your home or office.
From the first column in the following table, choose the combination of equipment and services applicable to your home or office setting. Then look up the appropriate setup case in the second or third column based on your phone system. Step-by-step instructions are included for each case in the sections that follow.
If you have answered all the questions in the previous section and have none of the described equipment or services, choose "None" from the first column in the table.

NOTE: If your home or office setup is not described in this section, set up the device as you would a regular analog phone. Make sure you use the phone cord supplied in the box to connect one end to your telephone wall jack and the other end to the port labeled 1-LINE on the back of the device. If you use another phone cord, you might experience problems sending and receiving faxes.
| Other equipment/services sharing your fax line | Recommended fax setup for parallel-type phone systems | Recommended fax setup for serial-type phone systems |
| None(You answered No to all questions.) | Case A: Separate fax line (no voice calls received) | Refer to your country in Serial-type fax setup |
| DSL service(You answered Yes to question 1 only.) | Case B: Set up the device with DSL | Refer to your country in Serial-type fax setup |
| PBX or ISDN system(You answered Yes to question 2 only.) | Case C: Set up the device with a PBX phone system or an ISDN line | Refer to your country in Serial-type fax setup |
| Distinctive ring service(You answered Yes to question 3 only.) | Case D: Fax with a distinctive ring service on the same line | Refer to your country in Serial-type fax setup |
| Voice calls(You answered Yes to question 4 only.) | Case E: Shared voice/fax line | Refer to your country in Serial-type fax setup |
| Voice calls and voice mail service(You answered Yes to questions 4 and 7 only.) | Case F: Shared voice/fax line with voice mail | Refer to your country in Serial-type fax setup |
| Computer dial-up modem(You answered Yes to question 5 only.) | Case G: Fax line shared with computer modem (no voice calls received) | Not applicable. |
| Voice calls and computer dial-up modem(You answered Yes to questions 4 and 5 only.) | Case H: Shared voice/fax line with computer modem | Not applicable. |
| Voice calls and answering machine(You answered Yes to questions 4 and 6 only.) | Case I: Shared voice/fax line with answering machine | Not applicable. |
| Voice calls, computer dial-up modem, and answering machine(You answered Yes to questions 4, 5, and 6 only.) | Case J: Shared voice/fax line with computer modem and answering machine | Not applicable. |
| Voice calls, computer dial-up modem, and voice mail service (You answered Yes to questions 4, 5, and 7 only.) | Case K: Shared voice/fax line with computer dial-up modem and voice mail | Not applicable. |
Case A: Separate fax line (no voice calls received)
If you have a separate phone line on which you receive no voice calls, and you have no other equipment connected on this phone line, set up the device as described in this section.
Figure 8-1 Back view of the device
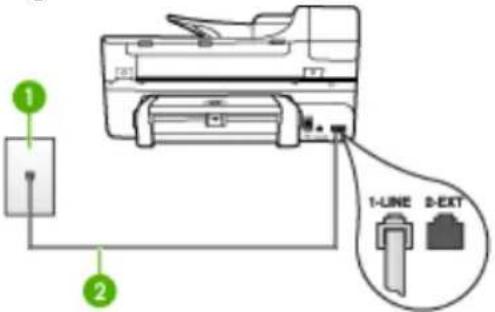
text_image
1 2 1-LINE 2-EXT| 1 Telephone wall jack | |
| 2 Use the phone cord supplied in the box with the device to connect to the 1-LINE port | |
To set up the device with a separate fax line
- Using the phone cord supplied in the box with the device, connect one end to your telephone wall jack, then connect the other end to the port labeled 1-LINE on the back of the device.

NOTE: If you do not use the supplied cord to connect from the telephone wall jack to the device, you might not be able to fax successfully. This special phone cord is different from the phone cords you might already have in your home or office.
- Turn on the Auto Answer setting.
- (Optional) Change the Rings to Answer setting to the lowest setting (two rings).
- Run a fax test.
When the phone rings, the device answers automatically after the number of rings you set in the Rings to Answer setting. The device begins emitting fax reception tones to the sending fax machine and receives the fax.
Case B: Set up the device with DSL
If you have a DSL service through your telephone company, and do not connect any equipment to the device, use the instructions in this section to connect a DSL filter between the telephone wall jack and the device. The DSL filter removes the digital signal that can interfere with the device, so the device can communicate properly with the phone line. (DSL might be called ADSL in your country/region.)

NOTE: If you have a DSL line and you do not connect the DSL filter, you will not be able to send and receive faxes with the device.
Figure 8-2 Back view of the device
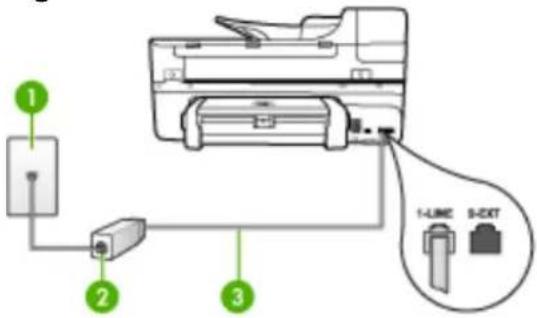
text_image
1 2 3 1-LINE 5-EXT| 1 Telephone wall jack | |
| 2 DSL (or ADSL) filter and cord supplied by your DSL provider | |
| 3 Use the phone cord supplied in the box with the device to connect to the 1-LINE port | |
To set up the device with DSL
- Obtain a DSL filter from your DSL provider.
- Using the phone cord supplied in the box with the device, connect one end to the open port on the DSL filter, and then connect the other end to the port labeled 1-LINE on the back of the device.

NOTE: If you do not use the supplied cord to connect from the DSL filter to the device, you might not be able to fax successfully. This special phone cord is different from the phone cords you might already have in your home or office.
As only one phone cord is supplied, you may will need to obtain additional phone cords for this setup.
- Connect an additional phone cord from the DSL filter to the telephone wall jack.
- Run a fax test.
Case C: Set up the device with a PBX phone system or an ISDN line
If you are using either a PBX phone system or an ISDN converter/terminal adapter, make sure you do the following:
- If you are using either a PBX or an ISDN converter/terminal adaptor, connect the device to the port that is designated for fax and phone use. Also, make sure that the terminal adapter is set to the correct switch type for your country/region, if possible.

NOTE: Some ISDN systems allow you to configure the ports for specific phone equipment. For example, you might have assigned one port for telephone and Group 3 fax and another port for multiple purposes. If you have problems when connected to the fax/phone port of your ISDN converter, try using the port designated for multiple purposes; it might be labeled "multi-combi" or something similar.
- If you are using a PBX phone system, set the call waiting tone to "off."

NOTE: Many digital PBX systems include a call-waiting tone that is set to "on" by default. The call waiting tone will interfere with any fax transmission, and you will not be able to send or receive faxes with the device. Refer to the documentation that came with your PBX phone system for instructions on how to turn off the call-waiting tone.
- If you are using a PBX phone system, dial the number for an outside line before dialing the fax number.
- Make sure you use the supplied cord to connect from the telephone wall jack to the device. If you do not, you might not be able to fax successfully. This special phone cord is different from the phone cords you might already have in your home or office. If the supplied phone cord is too short, you can purchase a coupler from your local electronics store and extend it.
Case D: Fax with a distinctive ring service on the same line
If you subscribe to a distinctive ring service (through your telephone company) that allows you to have multiple phone numbers on one phone line, each with a different ring pattern, set up the device as described in this section.
Figure 8-3 Back view of the device
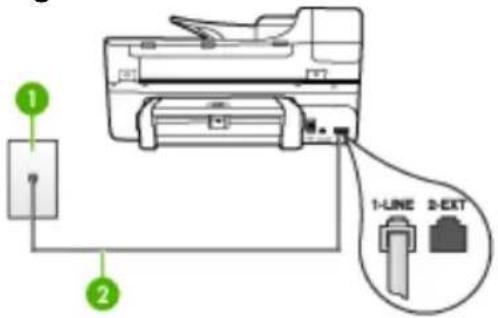
text_image
1 2 1-LINE 2-EXT| 1 Telephone wall jack | |
| 2 Use the phone cord supplied in the box with the device to connect to the 1-LINE port | |
To set up the device with a distinctive ring service
- Using the phone cord supplied in the box with the device, connect one end to your telephone wall jack, then connect the other end to the port labeled 1-LINE on the back of the device.

NOTE: If you do not use the supplied cord to connect from the telephone wall jack to the device, you might not be able to fax successfully. This special phone cord is different from the phone cords you might already have in your home or office.
-
Turn on the Auto Answer setting.
-
Change the Distinctive Ring setting to match the pattern that the telephone company assigned to your fax number.

NOTE: By default, the device is set to answer all ring patterns. If you do not set the Distinctive Ring to match the ring pattern assigned to your fax number, the device might answer both voice calls and fax calls or it might not answer at all.
-
(Optional) Change the Rings to Answer setting to the lowest setting (two rings).
-
Run a fax test.
The device automatically answers incoming calls that have the ring pattern you selected (Distinctive Ring setting) after the number of rings you selected (Rings to Answer setting). The device begins emitting fax reception tones to the sending fax machine and receives the fax.
Case E: Shared voice/fax line
If you receive both voice calls and fax calls at the same phone number, and you have no other office equipment (or voice mail) on this phone line, set up the device as described in this section.
Figure 8-4 Back view of the device
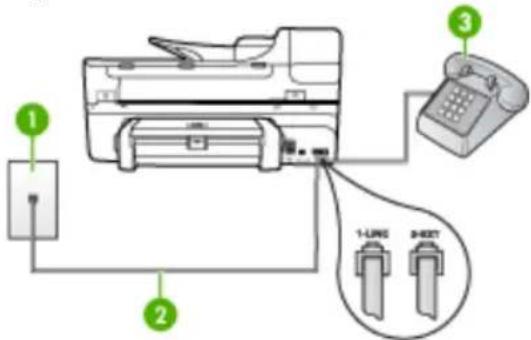
text_image
Diagram showing printer connection with labeled parts: printer, telephone, and two USB connectors (1-UNIC and 9-80XT)| 1 Telephone wall jack | |
| 2 Use the phone cord supplied in the box with the device to connect to the 1-LINE port | |
| 3 Telephone (optional) | |
To set up the device with a shared voice/fax line
- Using the phone cord supplied in the box with the device, connect one end to your telephone wall jack, then connect the other end to the port labeled 1-LINE on the back of the device.

NOTE: If you do not use the supplied cord to connect from the telephone wall jack to the device, you might not be able to fax successfully. This special phone cord is different from the phone cords you might already have in your home or office.
-
Do one of the following:
-
If you have a parallel-type phone system, remove the white plug from the port labeled 2-EXT on the back of the device, and then connect a phone to this port.
-
If you have a serial-type phone system, you might plug your phone directly on top of the device cable which has a wall plug attached to it.
-
Now you need to decide how you want the device to answer calls, automatically or manually:
-
If you set up the device to answer calls automatically, it answers all incoming calls and receives faxes. The device will not be able to distinguish between fax and voice calls in this case; if you suspect the call is a voice call, you will need to answer it before the device answers the call. To set up the device to answer calls automatically, turn on the Auto Answer setting.
-
If you set up the device to answer faxes manually, you must be available to respond in person to incoming fax calls or the device cannot receive faxes. To set up the device to answer calls manually, turn off the Auto Answer setting.
-
Run a fax test.
If you pick up the phone before the device answers the call and hear fax tones from a sending fax machine, you will need to answer the fax call manually.
Case F: Shared voice/fax line with voice mail
If you receive both voice calls and fax calls at the same phone number, and you also subscribe to a voice mail service through your telephone company, set up the device as described in this section.

NOTE: You cannot receive faxes automatically if you have a voice mail service at the same phone number you use for fax calls. You must receive faxes manually; this means you must be available to respond in person to incoming fax calls. If you want to receive faxes automatically instead, contact your telephone company to subscribe to a distinctive ring service, or to obtain a separate phone line for faxing.
Figure 8-5 Back view of the device
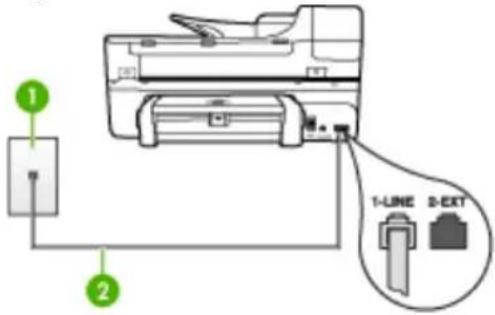
text_image
1 2 1-LINE 2-EXT| 1 Telephone wall jack | |
| 2 Use the phone cord supplied in the box with the device to connect to the "1-LINE" port | |
To set up the device with voice mail
- Using the phone cord supplied in the box with the device, connect one end to your telephone wall jack, then connect the other end to the port labeled 1-LINE on the back of the device.

NOTE: If you do not use the supplied cord to connect from the telephone wall jack to the device, you might not be able to fax successfully. This special phone cord is different from the phone cords you might already have in your home or office.
-
Turn off the Auto Answer setting.
-
Run a fax test.
You must be available to respond in person to incoming fax calls, or the device cannot receive faxes. You must initiate the manual fax before voicemail picks up the line.
Case G: Fax line shared with computer modem (no voice calls received)
If you have a fax line on which you receive no voice calls, and you also have a computer modem connected on this line, set up the device as described in this section.

NOTE: If you have a computer dial-up modem, your computer dial-up modem shares the phone line with the device. You will not be able to use both your modem and the device simultaneously. For example, you cannot use the device for faxing while you are using your computer dial-up modem to send an e-mail or access the Internet.
- Set up the device with a computer dial-up modem
- Set up the device with a computer DSL/ADSL modem
Set up the device with a computer dial-up modem
If you are using the same phone line for sending faxes and for a computer dial-up modem, follow these directions for setting up the device.
Figure 8-6 Back view of the device
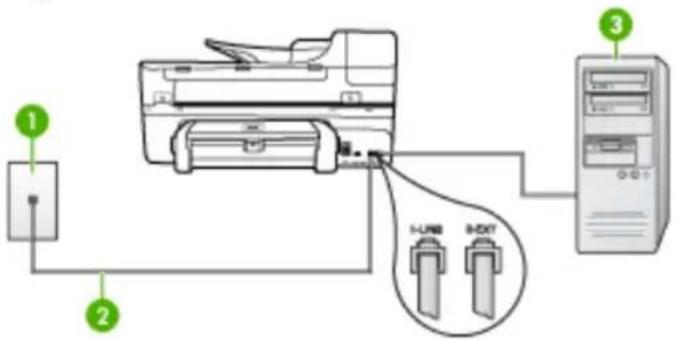
text_image
1 2 3 I-UNI I-EXT| 1 Telephone wall jack | |
| 2 Use the phone cord supplied in the box with the device to connect to the "1-LINE" port | |
| 3 Computer with modem | |
To set up the device with a computer dial-up modem
- Remove the white plug from the port labeled 2-EXT on the back of the device.
- Find the phone cord that connects from the back of your computer (your computer dial-up modem) to a telephone wall jack. Disconnect the cord from the telephone wall jack and plug it into the port labeled 2-EXT on the back of the device.
- Using the phone cord supplied in the box with the device, connect one end to your telephone wall jack, then connect the other end to the port labeled 1-LINE on the back of the device.

NOTE: If you do not use the supplied cord to connect from the telephone wall jack to the device, you might not be able to fax successfully. This special phone cord is different from the phone cords you might already have in your home or office.
- If your modem software is set to receive faxes to your computer automatically, turn off that setting.

NOTE: If you do not turn off the automatic fax reception setting in your modem software, the device will not be able to receive faxes.
-
Turn on the Auto Answer setting.
-
(Optional) Change the Rings to Answer setting to the lowest setting (two rings).
-
Run a fax test.
When the phone rings, the device automatically answers after the number of rings you set in the Rings to Answer setting. The device begins emitting fax reception tones to the sending fax machine and receives the fax.
Set up the device with a computer DSL/ADSL modem
If you have a DSL line and use that phone line to send faxes, follow these instructions to set up your fax.
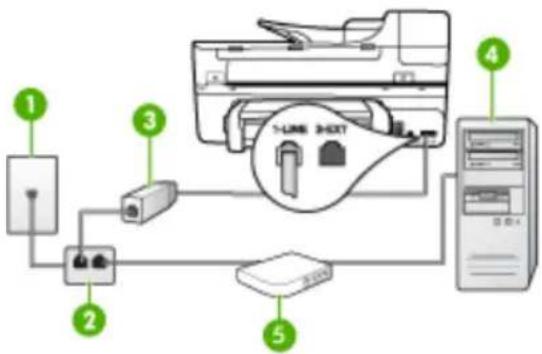
flowchart
graph TD
    A["Printer"] --> B["Switch"]
    B --> C["Computer"]
    C --> D["Monitor"]
    D --> E["Server"]
    style A fill:#f9f,stroke:#333
    style B fill:#ccf,stroke:#333
    style C fill:#cfc,stroke:#333
    style D fill:#fcc,stroke:#333
    style E fill:#ffc,stroke:#333
| 1 Telephone wall jack | |
| 2 Parallel splitter | |
| 3 DSL/ADSL filter | Connect one end of the phone jack that was supplied with the device to connect to the 1-LINE port on the back of the device. Connect the other end of the cord to the DSL/ADSL filter. |
| 4 Computer | |
| 5 Computer DSL/ADSL | modem |

NOTE: You will need to purchase a parallel splitter. A parallel splitter has one RJ-11 port on the front and two RJ-11 ports on the back. Do not use a 2-line phone splitter, a serial splitter, or a parallel splitter which has two RJ-11 ports on the front and a plug on the back.

To set up the device with a computer DSL/ADSL modem
-
Obtain a DSL filter from your DSL provider.
-
Using the phone cord provided in the box with the device, connect one end to the DSL filter, and then connect the other end to the port labeled 1-LINE on the back of the device.

NOTE: If you do not use the supplied cord to connect from the DSL filter to the back of the device, you might not be able to fax successfully. This special phone cord is different from the phone cords you might already have in your home or office.
-
Connect the DSL filter to the parallel splitter.
-
Connect the DSL modem to the parallel splitter.
-
Connect the parallel splitter to the wall jack.
- Run a fax test.
When the phone rings, the device automatically answers after the number of rings you set in the Rings to Answer setting. The device begins emitting fax reception tones to the sending fax machine and receives the fax.
Case H: Shared voice/fax line with computer modem
If you receive both voice calls and fax calls at the same phone number, and you also have a computer modem connected on this phone line, set up the device as described in this section.

NOTE: Since your computer modem shares the phone line with the device, you cannot use both your modem and the device simultaneously. For example, you cannot use the device for faxing while you are using your computer modem to send an e-mail or access the Internet.
- Shared voice/fax with computer dial-up modem
• Shared voice/fax with computer DSL/ADSL modem
Shared voice/fax with computer dial-up modem
If you use your phone line for both fax and telephone calls, use these instructions to set up your fax.
There are two different ways to set up the device with your computer based on the number of phone ports on your computer. Before you begin, check your computer to see if it has one or two phone ports.
- If your computer has only one phone port, you will need to purchase a parallel splitter (also called a coupler), as shown below. (A parallel splitter has one RJ-11 port on the front and two RJ-11 ports on the back. Do not use a two-line phone splitter, a serial splitter, or a parallel splitter which has two RJ-11 ports on the front and a plug on the back.)
Figure 8-7 Example of a parallel splitter

- If your computer has one phone port, set up the device as described below.
Figure 8-8 Back view of the device
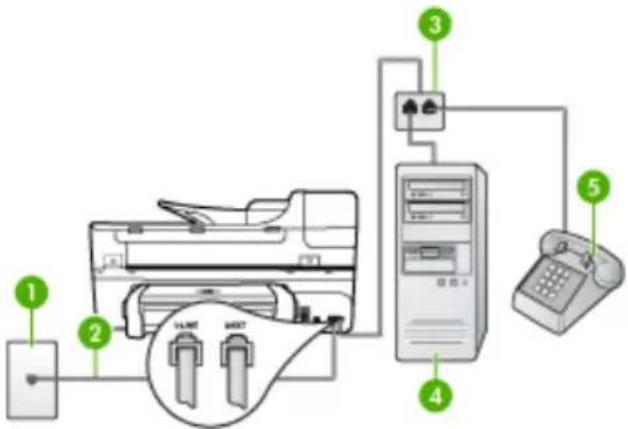
text_image
Diagram of printer system connection showing printer, tower, and telephone connections with labeled parts| 1 Telephone wall jack | |
| 2 Phone cord provided with the device plugged into the 1-LINE port on the back of the device | |
| 3 Parallel splitter | |
| 4 Computer | |
| 5 Telephone | |
To set up the device on the same phone line as a computer with one phone port
- Remove the white plug from the port labeled 2-EXT on the back of the device.
- Find the phone cord that connects from the back of your computer (your computer dial-up modem) to a telephone wall jack. Disconnect the cord from the telephone wall jack and plug it into the parallel splitter.
- Connect a phone cord from the parallel splitter to the port labeled 2-EXT on the back of the device.
- Connect a phone to the parallel splitter.
- Using the phone cord supplied in the box with the device, connect one end to your telephone wall jack, then connect the other end to the port labeled 1-LINE on the back of the device.

NOTE: If you do not use the supplied cord to connect from the telephone wall jack to the device, you might not be able to fax successfully. This special phone cord is different from the phone cords you might already have in your home or office.
- If your modem software is set to receive faxes to your computer automatically, turn off that setting.

NOTE: If you do not turn off the automatic fax reception setting in your modem software, the HP device will not be able to receive faxes.
- Now you need to decide how you want the device to answer calls, automatically or manually:
- If you set up the device to answer calls automatically, it answers all incoming calls and receives faxes. The device will not be able to distinguish between fax and voice calls in this case; if you suspect the call is a voice call, you will need to answer it before the device answers the call. To set up the device to answer calls automatically, turn on the Auto Answer setting. - If you set up the device to answer faxes manually, you must be available to respond in person to incoming fax calls or the device cannot receive faxes. To set up the device to answer calls manually, turn off the Auto Answer setting.
- Run a fax test.

NOTE: If your computer has two telephone ports on the back, you do not need to use a parallel splitter. You can plug the telephone into the "OUT" port on the computer dial-up modem.
If you pick up the phone before the device answers the call and hear fax tones from a sending fax machine, you will need to answer the fax call manually.
If you use your phone line for voice, fax, and your computer dial-up modem, follow these directions to set up your fax.
Shared voice/fax with computer DSL/ADSL modem
Use these instructions if your computer has a DSL/ADSL modem
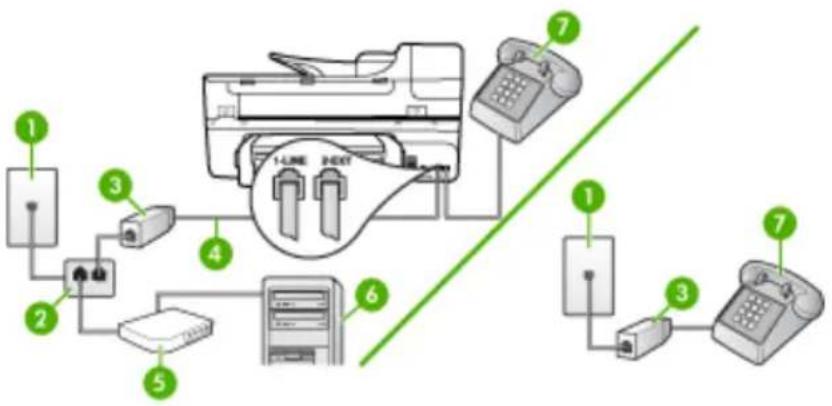
flowchart
graph TD
    A["Printer"] --> B["Phone 1"]
    A --> C["Phone 2"]
    A --> D["Phone 3"]
    A --> E["Phone 4"]
    A --> F["Phone 5"]
    A --> G["Phone 6"]
    A --> H["Phone 7"]
    A --> I["Phone 8"]
    style A fill:#f9f,stroke:#333
    style B fill:#ccf,stroke:#333
    style C fill:#ccf,stroke:#333
    style D fill:#ccf,stroke:#333
    style E fill:#ccf,stroke:#333
    style F fill:#ccf,stroke:#333
    style G fill:#ccf,stroke:#333
    style H fill:#ccf,stroke:#333
    style I fill:#ccf,stroke:#333
| 1 Telephone wall jack | |
| 2 Parallel splitter | |
| 3 DSL/ADSL filter | |
| 4 Phone cord supplied with the device | |
| 5 DSL/ADSL modem | |
| 6 Computer | |
| 7 Telephone | |

NOTE: You will need to purchase a parallel splitter. A parallel splitter has one RJ-11 port on the front and two RJ-11 ports on the back. Do not use a 2-line phone splitter, a serial splitter, or a parallel splitter which has two RJ-11 ports on the front and a plug on the back.

To set up the device with a computer DSL/ADSL modem
- Obtain a DSL filter from your DSL provider.

NOTE: Phones in other parts of the home/office sharing the same phone number with DSL service will need to be connected to additional DSL filters, otherwise you will experience noise when making voice calls.
- Using the phone cord supplied in the box with the devices, connect one end to the DSL filter, then connect the other end to the port labeled 1-LINE on the back of the device.

NOTE: If you do not use the supplied cord to connect from the DSL filter to the device, you might not be able to fax successfully. This special phone cord is different from phone cords you might already have in your home or office.
- If you have a parallel-type phone system, remove the white plug from the port labeled 2-EXT on the back of the device, and then connect a phone to this port.
- Connect the DSL filter to the parallel splitter.
- Connect the DSL modem to the parallel splitter.
- Connect the parallel splitter to the wall jack.
- Run a fax test.
When the phone rings, the device automatically answers after the number of rings you set in the Rings to Answer setting. The device begins emitting fax reception tones to the sending fax machine and receives the fax.
Case I: Shared voice/fax line with answering machine
If you receive both voice calls and fax calls at the same phone number, and you also have an answering machine that answers voice calls at this phone number, set up the device as described in this section.
Figure 8-9 Back view of the device
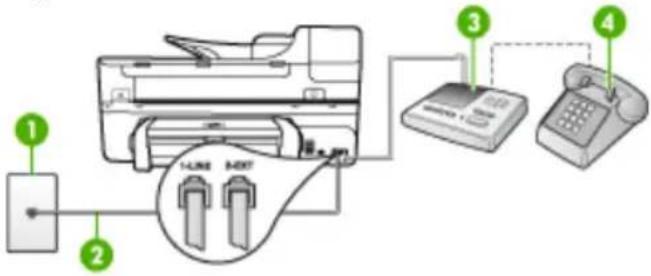
text_image
1 2 3 4 14LINE NEXT| 1 Telephone wall jack |
| 2 Use the phone cord provided to connect to the 1-LINE port on the back of the device |
| 3 Answering machine |
| 4 Telephone (optional) |
To set up the device with a shared voice/fax line with answering machine
-
Remove the white plug from the port labeled 2-EXT on the back of the device.
-
Unplug your answering machine from the telephone wall jack, and connect it to the port labeled 2-EXT on the back of the device.

NOTE: If you do not connect your answering machine directly to the device, fax tones from a sending fax machine might be recorded on your answering machine, and you probably will not be able to receive faxes with the device.
- Using the phone cord supplied in the box with the device, connect one end to your telephone wall jack, then connect the other end to the port labeled 1-LINE on the back of the device.

NOTE: If you do not use the supplied cord to connect from the telephone wall jack to the device, you might not be able to fax successfully. This special phone cord is different from the phone cords you might already have in your home or office.
- (Optional) If your answering machine does not have a built-in phone, for convenience you might want to connect a phone to the back of your answering machine at the "OUT" port.

NOTE: If your answering machine does not let you connect an external phone, you can purchase and use a parallel splitter (also known as a coupler) to connect both the answering machine and telephone to the device. You can use standard phone cords for these connections.
-
Turn on the Auto Answer setting.
-
Set your answering machine to answer after a low number of rings.
- Change the Rings to Answer setting on the device to the maximum number of rings supported by your device. (The maximum number of rings varies by country/region.)
- Run a fax test.
When the phone rings, your answering machine answers after the number of rings you have set, and then plays your recorded greeting. The device monitors the call during this time, "listening" for fax tones. If incoming fax tones are detected, the device emits fax reception tones and receives the fax; if there are no fax tones, the device stops monitoring the line and your answering machine can record a voice message.
Case J: Shared voice/fax line with computer modem and answering machine
If you receive both voice calls and fax calls at the same phone number, and you also have a computer modem and answering machine connected on this phone line, set up the HP device as described in this section.

NOTE: Since your computer dial-up modem shares the phone line with the HP device, you cannot use both your modem and the device simultaneously. For example, you cannot use the HP device for faxing while you are using your computer dial-up modem to send an e-mail or access the Internet.
- Shared voice/fax line with computer dial-up modem and answering machine
• Shared voice/fax line with computer DSL/ADSL modem and answering machine
Shared voice/fax line with computer dial-up modem and answering machine
There are two different ways to set the HP device with your computer based on the number of phone ports on your computer. Before you begin, check your computer to see if it has one or two phone ports.
- If your computer has only one phone port, you will need to purchase a parallel splitter, as shown below. (A parallel splitter has one RJ-11 port on the front and two RJ-11 ports on the back. Do not use a two-line phone splitter, a serial splitter, or a parallel splitter which has two RJ-11 ports on the front and a plug on the back.)
Figure 8-10 Example of a parallel splitter

- If your computer has one phone port, set up the HP device as described below.
Figure 8-11 Back view of the device
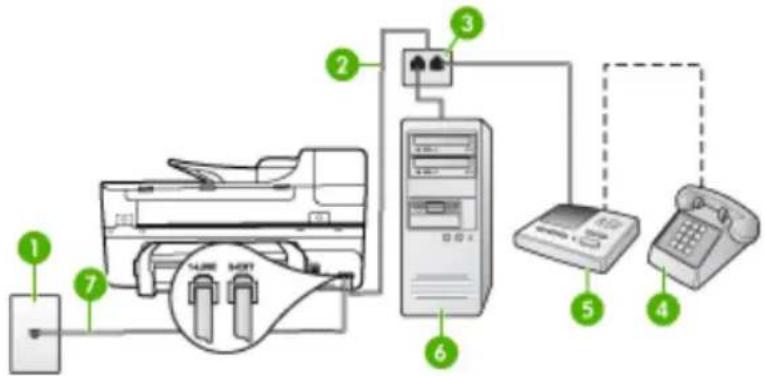
text_image
Diagram of a printer system with labeled components including printer, tower, and telephone connection| 1 Telephone wall jack |
| 2 Telephone cord connected to the parallel splitter |
| 3 Parallel splitter |
| 4 Telephone (optional) |
| 5 Answering machine |
| 6 Computer with modem |
| 7 Use the phone cord supplied in the box with the device to connect to the "1-LINE" port |
To set up the device on the same phone line as a computer with one phone port
-
Remove the white plug from the port labeled 2-EXT on the back of the HP device.
-
Find the phone cord that connects from the back of your computer (your computer dial-up modem) to a telephone wall jack. Disconnect the cord from the telephone wall jack and plug it into the port labeled 2-EXT on the back of the device.
-
Unplug your answering machine from the telephone wall jack, and connect it to the port labeled 2-EXT on the back of the device.

NOTE: If you do not connect your answering machine directly to the device, fax tones from a sending fax machine might be recorded on your answering machine, and you might not be able to receive faxes with the device.
- Using the phone cord supplied in the box with the HP device, connect one end to your telephone wall jack, then connect the other end to the port labeled 1-LINE on the back of the HP device.

NOTE: If you do not use the supplied cord to connect from the telephone wall jack to the device, you might not be able to fax successfully. This special phone cord is different from the phone cords you might already have in your home or office.
- (Optional) If your answering machine does not have a built-in phone, for convenience you might want to connect a phone to the back of your answering machine at the "OUT" port.

NOTE: If your answering machine does not let you connect an external phone, you can purchase and use a parallel splitter (also known as a coupler) to connect both the answering machine and telephone to the device. You can use standard phone cords for these connections.
- If your modem software is set to receive faxes to your computer automatically, turn off that setting.

NOTE: If you do not turn off the automatic fax reception setting in your modem software, the device will not be able to receive faxes.
-
Turn on the Auto Answer setting.
-
Set your answering machine to answer after a low number of rings.
-
Change the Rings to Answer setting on the HP device to the maximum number of rings supported by your HP device. (The maximum number of rings varies by country/region.)
-
Run a fax test.

NOTE: If you are using a computer with two telephone ports, you do not need a parallel splitter. You can plug the answering machine into the "OUT" port on the back of the computer.
When the phone rings, your answering machine answers after the number of rings you have set, and then plays your recorded greeting. The device monitors the call during this time, "listening" for fax tones. If incoming fax tones are detected, the device emits fax reception tones and receives the fax; if there are no fax tones, the device stops monitoring the line and your answering machine can record a voice message.
Shared voice/fax line with computer DSL/ADSL modem and answering machine
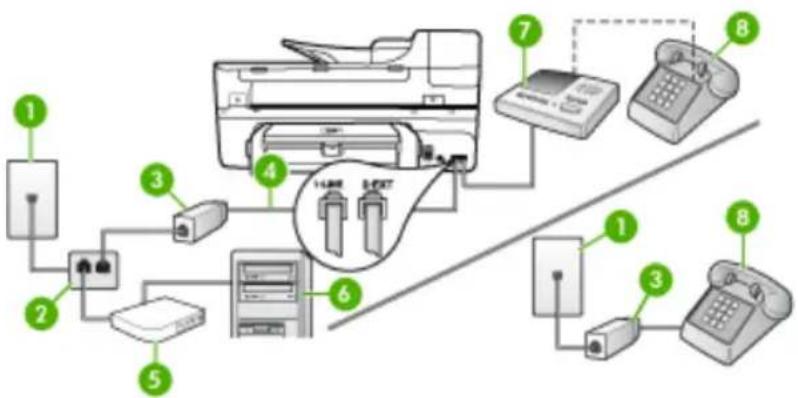
text_image
Diagram of a printer system with labeled components including printer, telephone, and control panel| 1 Telephone wall jack | |
| 2 Parallel splitter | |
| 3 DSL/ADSL filter | |
| 4 Phone cord provided | with the device connected to the 1-LINE port on the back of the device |
| 5 DSL/ADSL modem | |
| 6 Computer | |
| 7 Answering machine | |
| 8 Telephone (optional) |

NOTE: You will need to purchase a parallel splitter. A parallel splitter has one RJ-11 port on the front and two RJ-11 ports on the back. Do not use a 2-line phone splitter, a serial splitter, or a parallel splitter which has two RJ-11 ports on the front and a plug on the back.

To set up the device with a computer DSL/ADSL modem
- Obtain a DSL/ADSL filter from your DSL/ADSL provider.

NOTE: Phones in other parts of the home/office sharing the same phone number with DSL/ADSL service will need to be connected to additional DSL/ADSL filters, otherwise you will experience noise when making voice calls.
- Using the phone cord supplied in the box with the device, connect one end to the DSL/ADSL filter, then connect the other end to the port labeled 1-LINE on the back of the device.

NOTE: If you do not use the supplied cord to connect from the DSL/ADSL filter to the device, you might not be able to fax successfully. This special phone cord is different from the phone cords you might already have in your home or office.
-
Connect the DSL/ADSL filter to the splitter.
-
Unplug the answering machine from the telephone wall jack, and connect it to the port labeled 2-EXT on the back of the device.

NOTE: If you do not connect your answering machine directly to the device, fax tones from a sending fax machine might be recorded on your answering machine, and you probably will not be able to receive faxes with the device.
-
Connect the DSL modem to the parallel splitter.
-
Connect the parallel splitter to the wall jack.
-
Set your answering machine to answer after a low number of rings.
-
Change your Rings to Answer setting on the device to the maximum number of rings supported by the device.

NOTE: The maximum number of rings varies by country/region.
9. Run a fax test.
When the phone rings, your answering machine will answer after the number of rings you have set, and then play your recorded greeting. The device monitors the call during this time, "listening" for fax tones. If incoming fax tones are detected, the device will emit fax reception tones and receive the fax; if there are no fax tones, the device stops monitoring the line and your answering machine can record a voice message.
If you use the same phone line for telephone, fax, and have a computer DSL modem, follow these instructions to set up your fax.
Case K: Shared voice/fax line with computer dial-up modem and voice mail
If you receive both voice calls and fax calls at the same phone number, use a computer dial-up modem on the same phone line, and subscribe to a voice mail service through your telephone company, set up the device as described in this section.

NOTE: You cannot receive faxes automatically if you have a voice mail service at the same phone number you use for fax calls. You must receive faxes manually; this means you must be available to respond in person to incoming fax calls. If you want to receive faxes automatically instead, contact your telephone company to subscribe to a distinctive ring service, or to obtain a separate phone line for faxing.
Since your computer dial-up modem shares the phone line with the device, you cannot use both your modem and the device simultaneously. For example, you cannot use the device for faxing if you are using your computer dial-up modem to send an e-mail or access the Internet.
There are two different ways to set up the device with your computer based on the number of phone ports on your computer. Before you begin, check your computer to see if it has one or two phone ports.
- If your computer has only one phone port, you will need to purchase a parallel splitter (also called a coupler), as shown below. (A parallel splitter has one RJ-11 port on the front and two RJ-11 ports on the back. Do not use a two-line phone splitter, a serial splitter, or a parallel splitter which has two RJ-11 ports on the front and a plug on the back.)
Figure 8-12 Example of a parallel splitter

- If your computer has two phone ports, set up the device as described below.
Figure 8-13 Back view of the device
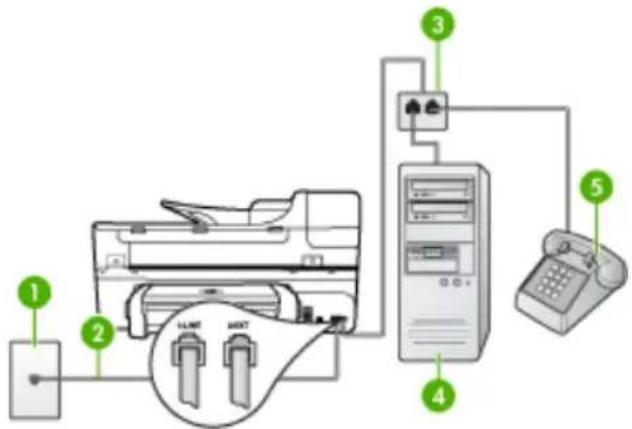
text_image
Diagram of a printer system with labeled components including printer, tower, and telephone connection| 1 Telephone wall jack | |
| 2 Use the phone cord supplied in the box with the device to connect to the 1-LINE port | |
| 3 Parallel splitter | |
| 4 Computer with modem | |
| 5 Telephone | |
To set up the device on the same phone line as a computer with two phone ports
-
Remove the white plug from the port labeled 2-EXT on the back of the device.
-
Find the phone cord that connects from the back of your computer (your computer dial-up modem) to a telephone wall jack. Disconnect the cord from the telephone wall jack and plug it into the port labeled 2-EXT on the back of the device.
-
Connect a phone to the "OUT" port on the back of your computer dial-up modem.
-
Using the phone cord supplied in the box with the device, connect one end to your telephone wall jack, then connect the other end to the port labeled 1-LINE on the back of the device.

NOTE: If you do not use the supplied cord to connect from the telephone wall jack to the device, you might not be able to fax successfully. This special phone cord is different from the phone cords you might already have in your home or office.
- If your modem software is set to receive faxes to your computer automatically, turn off that setting.

NOTE: If you do not turn off the automatic fax reception setting in your modem software, the device will not be able to receive faxes.
-
Turn off the Auto Answer setting.
-
Run a fax test.
You must be available to respond in person to incoming fax calls, or the device cannot receive faxes.
Serial-type fax setup
For information on setting up the device for faxing using a serial-type phone system, see the Fax Configuration Web site for your country/region.
| Austria www.hp.com/at/faxconfig | |
| Germany www.hp.com/de/faxconfig | |
| Switzerland (French) www.hp.com/ch/fr/faxconfig | |
| Switzerland (German) www.hp.com/ch/de/faxconfig | |
| United Kingdom www.hp.com/uk/faxconfig | |
| Finland www.hp.fi/faxconfig | |
| Denmark www.hp.dk/faxconfig | |
| Sweden www.hp.se/faxconfig | |
| Norway www.hp.no/faxconfig | |
| Netherlands www.hp.nl/faxconfig | |
| Belgium (Dutch) www.hp.be/nl/faxconfig | |
| Belguim (French) www.hp.be/fr/faxconfig | |
| Portugal www.hp.pt/faxconfig | |
| Spain www.hp.es/faxconfig | |
| France www.hp.com/fr/faxconfig | |
| Ireland www.hp.com/ie/faxconfig | |
| Italy | www.hp.com/it/faxconfig |
Configure the device (Windows)

NOTE: Microsoft Internet Explorer 6.0 or higher must be installed on the computer system to run the installation program.
In addition, you must have administrator privileges to install a printer driver on Windows 2000, Windows XP, or Windows Vista.
When setting up the device, HP recommends that you connect it after you install the software because the installation program is designed to provide you with the easiest setup experience. However, if you have connected the cable first, see Connect the device before installing the software.
This section contains the following topics:
- Direct connection
• Network connection
Direct connection
You can connect the device directly to your computer using a USB cable.

NOTE: If you install the device software and connect the device to a computer running Windows, you can connect additional devices to the same computer with USB cables without reinstalling the device software.
When setting up the device, HP recommends that you connect the device after you install the software because the installation program is designed to provide you with the easiest setup experience. However, if you have connected the cable first, see Connect the device before installing the software.
This section contains the following topics:
• Install the software before connecting the device (recommended)
- Connect the device before installing the software
• Share the device on a locally shared network
Install the software before connecting the device (recommended)
To install the software
- Close any applications that are running.
- Insert the Starter CD into the CD drive. The CD menu runs automatically. If the CD menu does not start automatically, double-click the setup icon on the Starter CD.
- On the CD menu, click Install and follow the onscreen instructions.
- When prompted, turn on the device and connect it to the computer using a USB cable. The Found New Hardware wizard appears on the computer screen, and the device icon is created in the Printers folder.

NOTE: You may connect the USB cable at a later time when you need to use the device.
You can also share the device with other computers using a simple form of networking known as locally shared networking. For more information, see Share the device on a locally shared network.
Connect the device before installing the software
If you connected the device to the computer before installing the device software, the Found New Hardware wizard displays on the computer screen.

NOTE: If you turned on the device, do not turn it off or unplug the cable from the device while the installation program is running. If you do so, the installation program will not finish.
To connect the device
- In the Found New Hardware dialog box that displays methods for locating the printer driver, select the Advanced option, and then click Next.

NOTE: Do not allow the Found New Hardware wizard to perform an automatic search for the printer driver.
-
Select the check box for specifying the driver location, and ensure that the other check boxes are clear.
-
Insert the Starter CD into the CD drive. If the CD menu appears, close it.
-
Browse to locate the root directory on the Starter CD (for example, D), and then click OK.
-
Click Next and follow the onscreen instructions.
-
Click Finish to close the Found New Hardware wizard. The wizard automatically starts the installation program (this might take a short while).
-
Complete the installation process.

NOTE: You can also share the device with other computers using a simple form of networking known as locally shared networking. For more information, see Share the device on a locally shared network.
Share the device on a locally shared network
In a locally shared network, the device is connected directly to the USB connector of a selected computer (known as the server) and is shared by other computers (clients).

NOTE: When sharing a directly connected device, use the computer with the newest operating system as the server. For example, if you have a computer running Windows XP and another computer running an older version of Windows, use the computer running Windows XP as the server.
Use this configuration only in small groups or when usage is low. The connected computer is slowed down when many users print to the device.
Only the printing function is shared. Scan and Copy functions are not shared.
To share the device
- Click Start, point to Settings, and then click Printers or Printers and Faxes.
- Or -
Click Start, click Control Panel, and then double-click Printers.
-
Right-click the device icon, click Properties, and then click the Sharing tab.
-
Click the option to share the device, and give it a share name.
-
To share the device with client computers that use other versions of Windows, click Additional Drivers to install those drivers as a convenience to the users. You must have the Starter CD in your CD drive.
Network connection
If the device has network capability, it can be shared in a network environment by connecting it directly to the network. This type of connection offers the ability to
manage the device using the embedded Web server from any computer on the network.

NOTE: Microsoft Internet Explorer 6.0, or higher, must be installed on the computer system to run the installation program.
Choose the installation option for the type of network you have:
- Client/server network: If your network has a computer acting as a dedicated print server, install the device software on the server, and then install the device software on the client computers. For more information see To install the device on a network and To install the device software on client computers. This method does not allow you to share the full functionality of the device. Client computers can only print from the device.
- Peer-to-peer network: If you have a peer-to-peer network (a network without a dedicated print server), install the software on the computers that will be using the device. For more information, see To install the device on a network.
In addition, you can connect to a network printer on both types of networks using the Add Printer wizard in Windows. For more information, see To install the printer driver using Add Printer.
This section contains the following topics:
• To install the device on a network
• To install the device software on client computers
• To install the printer driver using Add Printer
To install the device on a network
Use the following steps to install the device software in the following networking scenarios:
You have a peer-to-peer network (a network without a dedicated print server)
- Remove the protective cover from the device's network port and connect the device to the network.
- Insert the Starter CD into the CD drive. The CD menu starts automatically. If the CD menu does not start automatically, browse to the CD drive of the computer and double-click Setup.exe.
- On the CD menu, click Install, and then follow the onscreen instructions.
- On the Connection Type screen, select Wired network/Wireless, and then click Next.
- Follow the onscreen instructions to complete the installation.

NOTE: To share the device with Windows client computers, see To install the device software on client computers and Share the device on a locally shared network.
To install the device software on client computers
After printer drivers are installed on the computer that is acting as the print server, the printing functionality can be shared. Individual Windows users who want to use the network device must install the software on their computers (clients).
A client computer can connect to the device in the following ways:
- In the Printers folder, double-click the Add Printer icon and follow the instructions for a network installation. For more information, see To install the printer driver using Add Printer.
- On the network, browse to the device and drag it to your Printers folder.
- Add the device and install the software from the INF file on your network. On the Starter CD, the INF files are stored in the root directory of the CD.
To install the printer driver using Add Printer
- Click Start, point to Settings, and then click Printers or Printers and Faxes.
-
Or -
Click Start, click Control Panel, and then double-click Printers. -
Double-click Add Printer, and then click Next.
-
Select Network Printer or Network Printer Server.
-
Click Next.
-
Do one of the following:
Type in the network path or queue name of the shared device, and then click Next. Click Have Disk when prompted to select the device model.
Click Next and locate the device in the list of shared printers.
- Click Next and follow the onscreen instructions to complete the installation.
Configure the device (Mac OS)
You can use the device with a single Macintosh computer using a USB cable, or you can share it among other users on a network.
This section contains the following topics:
• Install the software for network or direct connection
• Share the device on a locally shared network
Install the software for network or direct connection
To install the software for a direct connection
- Connect the device to your computer with a USB cable.
-
Insert the Starter CD into the CD drive. Double-click the CD icon on the desktop, and then double-click the setup icon. Also, you can locate the Installer folder on the Starter CD.
-
Click Install Software and follow the onscreen instructions.
-
If necessary, share the device with other Macintosh computer users.
- Direct connection: Share the device with the other Macintosh computer users. For more information, see Share the device on a locally shared network.
• Network connection: Individual Macintosh computer users who want to use the device on the network must install the device software on their computers.
To install the software for a network connection
- Remove the protective cover from the device's network port and connect the device to the network.
- Insert the Starter CD into the CD drive. The CD menu starts automatically. If the CD menu does not start automatically, double-click the CD on the desktop.
- On the CD menu, click Install, and then follow the onscreen instructions.
- On the Connection Type screen, select Wired network/Wireless, and then click Next.
- Follow the onscreen instructions to complete the installation.
Share the device on a locally shared network
When you connect the device directly, you can share it with other computers using a simple form of networking known as Printer Sharing. Use this Printer Sharing only in small groups or when usage is low. The connected computer is slowed down when many users print to the device.
Basic requirements for sharing in the Mac OS environment include the following items:
- The Macintosh computers must be communicating on the network using TCP/IP, and they must have IP addresses. (AppleTalk is not supported.)
- The device that is being shared must be connected to a built-in USB port on the host Macintosh computer.
- Both the host Macintosh computer and the client Macintosh computers that are using the shared device must have the driver or PPD for the device that is installed. (You can run the installation program to install the device sharing software and associated Help files.)
For more information about USB device sharing, see the support information on the Apple Web site (www.apple.com) or the Apple Macintosh Help on the computer.

NOTE: Printer Sharing is supported in Mac OS 10.3 and higher.
To share the device among computers running Mac OS
-
Turn on printer sharing on all Macintosh computers (host and clients) that are connected to the printer. Depending on the OS version you are using, do one of the following:
-
Mac OS 10.3: Open System Preferences, click Print & Fax, and then check the box next to Share my printers with other computers.
-
Mac OS 10.4: Open System Preferences, click Print & Fax, click the Sharing tab, check the box next to Share these printers with other computers, and then select the printer to be shared.
-
To print from the other Macintosh computers (the clients) on the network, do the following:
a. Click File, and then select Page Setup in the document you want to print.
b. In the drop-down menu next to Format for, select Shared Printers, and then select your device.
c. Select the Paper Size, and then click OK.
d. In the document, click File, and then select Print.
e. From the drop-down menu next to Printer, select Shared Printers, and then select your device.
f. Make additional settings, if necessary, and then click Print.
Set up the device for wireless communication
You may set up the device for wireless communication using one of the following ways:
| Setup method Infrastructure | wireless communication | Ad hoc wireless communication* |
| USB cableFor more information, seeTo set up the device on a wireless network (Mac OS) or To set up wireless communication using the installer (Windows). | √ | √ |
| Device control panel | √ | √ |
* An ad hoc network can be set up using the Wireless Connection Utility on the Starter CD.

NOTE: If you encounter problems, see Solve wireless problems.
To use the device with any wireless connection, you must run the installation program at least once from the Starter CD and create a wireless connection.
Make sure the device is not connected to the network using a network cable.
The sending device must have built-in 802.11 capabilities or an 802.11 wireless card installed.
The device and the computers that use it must be on the same subnet.
Before installing the device software, you may wish to find out the settings of your network. Obtain the information from your system administrators, or complete the following tasks:
- Obtain your network's network name or Service Set Identifier (SSID) and communication mode (infrastructure or ad hoc) from the configuration utility for the network's wireless access point (WAP) or the computer's network card.
- Find out the type of encryption your network uses, such as Wired Equivalent Privacy (WEP).
- Find out the security password or encryption key of the wireless device.
This section contains the following topics:
• Understand 802.11 wireless network settings
- To set up wireless communication using the device control panel with wireless setup wizard
• To set up wireless communication using the installer (Windows)
• To set up the device on a wireless network (Mac OS)
• To turn off wireless communication
• Guidelines for reducing interference on a wireless network
• Guidelines for ensuring wireless network security
Understand 802.11 wireless network settings
Network name (SSID)
By default, the device looks for the wireless network name or SSID named "hpsetup." Your network may have a different SSID.
Communication mode
There are two communication mode options:
- Ad hoc: On an ad hoc network, the device is set to ad hoc communication mode and communicates directly with other wireless devices without the use of a WAP. All devices on the ad hoc network must:
- Be 802.11 compatible
- Have ad hoc as the communication mode
- Have the same network name (SSID)
- Be on the same subnet and same channel
- Have the same 802.11 security settings
- Infrastructure (recommended): On an infrastructure network, the device is set to infrastructure communication mode and communicates with other devices on the network, whether the devices are wired or wireless, through a WAP. WAPs commonly act as routers or gateways on small networks.
Security settings

NOTE: For the available settings for the device, see Understand the network configuration page.
For more information on wireless security, visit www.weca.net/opensection/pdf/whitepaper_wi-fi_security4-29-03.pdf.
- Network authentication: The device's factory default setting is 'Open,' which does not require security for authorization or encryption. The other possible values are 'OpenThenShared,' 'Shared,' and 'WPA-PSK' (Wi-Fi® Protected Access Pre-Shared Key).
WPA increases the level of over-the-air data protection and access control on existing and future Wi-Fi networks. It addresses all known weaknesses of WEP, the original native security mechanism in the 802.11 standard.
WPA2 is the second generation of WPA security; it provides enterprise and consumer Wi-Fi users with a high level of assurance that only authorized users can access their wireless networks.
- Data encryption:
- Wired Equivalent Privacy (WEP) provides security by encrypting data sent over radio waves from one wireless device to another wireless device. Devices on a WEP-enabled network use WEP keys to encode data. If your network uses WEP, you must know the WEP key(s) it uses.
WPA uses the Temporal Key Integrity Protocol (TKIP) for encryption and employs 802.1X authentication with one of the standard Extensible Authentication Protocol (EAP) types available today.
WPA2 provides a new encryption scheme, the Advanced Encryption Standard (AES). AES is defined in counter cipher-block chaining mode (CCM) and supports the Independent Basic Service Set (IBSS) to enable security between client workstations operating in ad hoc mode.
To set up wireless communication using the device control panel with wireless setup wizard
The Wireless Setup Wizard provides an easy way to set up and manage a wireless connection to your device.

NOTE: To use this method, you must have a wireless network set up and running.
- Set up the device hardware (see the getting started guide or the setup poster that came with your device).
- On the device control panel, press the Setup button.
- Press an arrow button to move to Network, and then press OK.
- Press an arrow button to move to Wizard, and then press OK.
- Follow the display instructions to complete the setup.
To set up wireless communication using the installer (Windows)
For this method, you will need to have a network set up and running.
- Set up the device hardware (see the setup poster).
- Remove the protective cover from the device's network port.
- Close any applications that are running on your computer system.
- Insert the Starter CD into the CD drive. The CD menu runs automatically. If the CD menu does not start automatically, double-click the setup icon on the Starter CD.
- On the CD menu, click Install and follow the onscreen instructions.
- On the Connection Type screen, select Wireless, and then click Next.

NOTE: If the device cannot be found, you will have the option to temporarily use a network cable to communicate with the device and configure its wireless settings.
Complete the following steps to temporarily connect the device to your computer network if you are unable to establish wireless communication.
a. Temporarily connect the device to the network with a USB cable.
b. Follow the onscreen instructions and disconnect the cable when prompted.
-
On the Select a Network Name (SSID) screen, click Select a detected Wireless Network Name (SSID) to select the wireless network, or click Specify a wireless network to enter a new network name.
-
If you chose to enter a new network name, enter it on the device control panel, and then press Done.

NOTE: If the SSID that you entered is not found, you will be asked to provide security information. If the network does not use encryption, setup will attempt to verify the SSID before continuing.
- If the device cannot connect to the network name, supply the appropriate WEP key or WPA passphrase on the keypad when prompted, and then press Done.

NOTE: Be sure to unplug the USB cable when you are done.
To set up the device on a wireless network (Mac OS)
- Set up the device hardware (see the setup poster).
- Ensure an AirPort card is installed on the computer.
- Close any applications that are running on your computer system.
- Open the AirPort Setup Assistant from the Utilities folder. Refer to the AirPort documentation for details on setting up on wireless networks.
- For ad hoc networks, click the AirPort icon on the menu bar and select "hpsetup" under Computer to Computer Networks. For wireless networks, click the AirPort icon, and then click Other to join the network.
- Insert the Starter CD into the CD drive. The CD menu runs automatically. If the CD menu does not start automatically, double-click the setup icon on the Starter CD.
- On the CD menu, click Install Software and follow the onscreen instructions.
- On the Connection Type screen, select the wireless network option, and then click Done.
- Follow the onscreen instructions in the Network Printer Setup Utility, which starts running automatically, to install the printer driver.
To turn off wireless communication
- Device control panel: Press Setup, then select Network Menu, then select Wireless Radio, and then select either On or Off.
- Press the wireless button on the front of the device.
Guidelines for reducing interference on a wireless network
The following tips will help reduce the chances for interference in a wireless network:
- Keep the wireless devices away from large metal objects, such as filing cabinets, and other electromagnetic devices, such as microwaves and cordless telephones, as these objects can disrupt radio signals.
- Keep the wireless devices away from large masonry structures and other building structures as these objects can absorb radio waves and lower signal strength.
- For an infrastructure network, position the WAP in a central location in line of sight with the wireless devices on the network.
- Keep all wireless devices on the network within range of one another.
Guidelines for ensuring wireless network security
This section contains the following topics:
• To add hardware addresses to a WAP
• Other guidelines
To add hardware addresses to a WAP
MAC filtering is a security feature in which a WAP is configured with a list of MAC addresses (also called "hardware addresses") of devices that are allowed to gain access to the network through the WAP.
If the WAP does not have the hardware address of a device attempting to access the network, the WAP denies the device access to the network.
If the WAP filters MAC addresses, then the device's MAC address must be added to the WAP's list of accepted MAC addresses.
- Print the network configuration page. For information on the network configuration page, see Understand the network configuration page.
- Open the WAP's configuration utility, and add the device's hardware address to the list of accepted MAC addresses.
Other guidelines
To keep the wireless network secure, follow these guidelines:
- Use a password with at least 20 random characters. You can use up to 63 characters in a WPA password.
- Avoid any common words or phrases, easy sequences of characters (such as all 1s), and personally-identifiable information for passwords. Always use random strings composed of uppercase and lowercase letters, numbers, and if allowed, special characters such as punctuation.
- Change the password periodically.
- Change the default password provided by the manufacturer for administrator access to the access point or wireless router. Some routers let you change the administrator name as well.
-
Place the access point or router in the center of a room and not near a window.
-
Turn off administrative access over wireless if possible. If you do this, you need to connect to the router with a wired Ethernet connection when you want to make configuration changes.
- Turn off remote administrative access over the Internet on your router, if possible. You can use Remote Desktop to make an encrypted connection to a computer running behind your router and make configuration changes from the local computer you are accessing over the Internet.
- To avoid accidentally connecting to another party's wireless network, turn off the setting to automatically connect to non-preferred networks. This is disabled by default in Windows XP.
Uninstall and reinstall the software
If your installation is incomplete, or if you connected the USB cable to the computer before prompted by the software installation screen, you might need to uninstall and then reinstall the software. Do not simply delete the device application files from your computer. Make sure to remove them properly using the uninstall utility provided when you installed the software that came with the device.
There are three methods to uninstall the software on a Windows computer, and one method to uninstall on a Macintosh computer.
To uninstall from a Windows computer, method 1
- Disconnect the device from your computer. Do not connect it to your computer until after you have reinstalled the software.
- Press the Power button to turn off the device.
- On the Windows taskbar, click Start, select Programs or All Programs, select HP, select Officejet J6400 Series, and then click Uninstall.
- Follow the onscreen instructions.
- If you are asked whether you would like to remove shared files, click No. Other programs that use these files might not work properly if the files are deleted.
- Restart your computer.
- To reinstall the software, insert the device Starter CD into your computer's CD-ROM drive, follow the onscreen instructions, and also see Install the software before connecting the device (recommended).
- After the software is installed, connect the device to your computer.
- Press the Power button to turn the device on. After connecting and turning on the device, you might have to wait several minutes for all of the Plug and Play events to complete.
- Follow the onscreen instructions.
When the software installation is complete, the HP Digital Imaging Monitor icon appears in the Windows system tray.
To uninstall from a Windows computer, method 2

NOTE: Use this method if Uninstall is not available in the Windows Start menu.
- On the Windows taskbar, click Start, select Settings, select Control Panel, and then click Add/Remove Programs.
-
Or -
Click Start, click Control Panel, and then double-click Programs and Features. -
Select HP Officejet Pro All-in-One Series, and then click Change/Remove or Uninstall/Change.
Follow the onscreen instructions.
-
Disconnect the device from your computer.
-
Restart your computer.

NOTE: It is important that you disconnect the device before restarting your computer. Do not connect the device to your computer until after you have reinstalled the software.
-
Insert the device Starter CD into your computer's CD-ROM drive and then start the Setup program.
-
Follow the onscreen instructions and also see connecting the device (recommended). Install the software before
To uninstall from a Windows computer, method 3

NOTE: Use this method if Uninstall is not available in the Windows Start menu.
- Insert the device Starter CD into your computer's CD-ROM drive, and then start the Setup program.
- Disconnect the device from your computer.
- Select Uninstall and follow the onscreen directions.
- Restart your computer.

NOTE: It is important that you disconnect the device before restarting your computer. Do not connect the device to your computer until after you have reinstalled the software.
-
Start the Setup program for the device again.
-
Select Install.
-
Follow the onscreen instructions and also see Install the software before connecting the device (recommended).
To uninstall from a Macintosh computer
- Launch HP Device Manager.
- Click Information and Settings.
- Select Uninstall HP AiO Software from the pull-down menu. Follow the onscreen instructions.
-
After the software is uninstalled, restart your computer.
-
To reinstall the software, insert the device Starter CD into your computer's CD-ROM drive.
-
On the desktop, open the CD-ROM, and then double-click HP All-in-One Installer.
- Follow the onscreen instructions and also see Install the software for network or direct connection.
9 Maintain and troubleshoot
This section contains the following topics:
• Work with print cartridges
- Clean the device
• General troubleshooting tips and resources
- Solve printing problems
• Poor print quality and unexpected printouts
- Solve paper-feed problems
- Solve copy problems
- Solve scan problems
- Solve fax problems
- Solve network problems
- Solve wireless problems
- Solve photo (memory card) problems
• Troubleshoot installation issues
- Clear jams
Work with print cartridges
This section contains the following topics:
• Supported print cartridges
• Handle the print cartridges
- Replace the print cartridges
- Align the print cartridges
• Clean the print cartridges
• Clean the print cartridge contacts
• Clean the area around the ink nozzles
• Store printing supplies
Supported print cartridges
The availability of print cartridges varies by country/region. The print cartridges might come in different sizes.
You can find the print cartridge number in the following places:
- On the label of the print cartridge you are replacing.
- Windows: From the Toolbox, if you have bidirectional communication, click the Estimated Ink Levels tab, scroll to display the Cartridge Details button, and then click Cartridge Details.
• Mac OS: From the HP Printer Utility, click Supply Info from the Information and Support panel, and then click Retail Supplies Information.
Handle the print cartridges
Before you replace or clean a print cartridge, you should know the part names and how to handle the print cartridges.
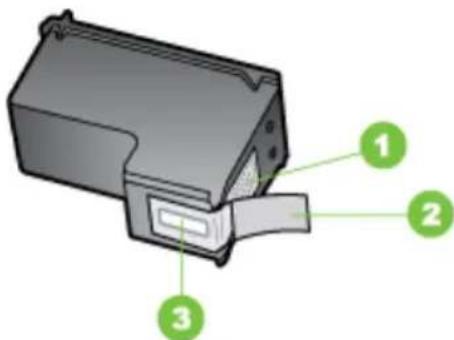
text_image
Diagram of a device component with numbered parts labeled 1, 2, and 31 Copper-colored contacts
2 Plastic tape with pink pull tab (must be removed before installing)
3 Ink nozzles under tape
Hold the print cartridges by their black plastic sides, with the label on top. Do not touch the copper-colored contacts or the ink nozzles.
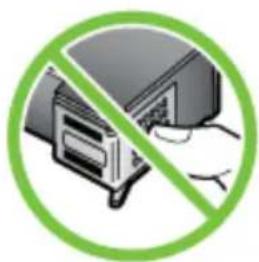
natural_image
Green circular icon showing a device with a diagonal line crossing through it, no text or symbols present.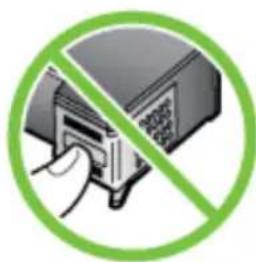
natural_image
Green circular prohibition symbol with a hand inserting a device into a device (no text or symbols)
NOTE: Handle the print cartridges carefully. Dropping or jarring cartridges can cause temporary printing problems, or even permanent damage.
Replace the print cartridges
Follow these instructions when the ink level is low.

NOTE: When the ink level for a print cartridge is low, a message appears on the display. You can also check the ink levels by using the printer Toolbox (Windows) or the HP Printer Utility (Mac OS).
NOTE: Ink from the cartridges is used in the printing process in a number of different ways, including in the initialization process, which prepares the device and cartridges for printing. In addition, some residual ink is left in the cartridge after it is used. For more information see www.hp.com/go/inkusage.
Ink level warnings and indicators provide estimates for planning purposes only. When you receive a low-ink warning message, consider having a replacement cartridge
available to avoid possible printing delays. You do not need to replace the print cartridges until print quality becomes unacceptable.
To order print cartridges for the device, go to www.hpshopping.com. If prompted, choose your country/region, follow the prompts to select your product, and then click one of the shopping links on the page.
To replace the print cartridges
- Make sure the device is on.
△ CAUTION: If the device is off when you open the print cartridge door to access the print cartridges, the device will not release the cartridges for changing. You might damage the device if the print cartridges are not docked safely when you try to remove them.
- Open the print cartridge door.
The print carriage moves to the far right side of the device.
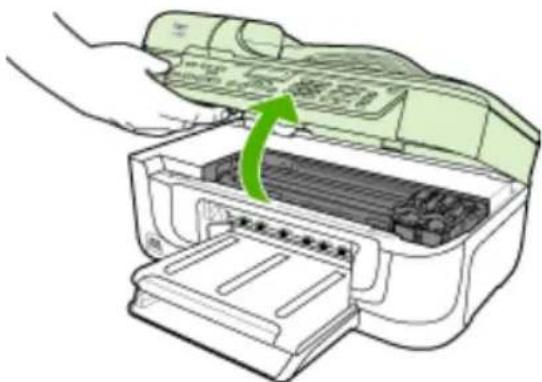
natural_image
Illustration of a printer being inserted into a paper airplane, showing the green arrow indicating the process (no text or symbols present)- Wait until the print carriage is idle and silent, and then lightly press down on a print cartridge to release it.
If you are replacing the tri-color print cartridge, remove the print cartridge from the slot on the left.
If you are replacing the black, photo, or gray photo print cartridge, remove the print cartridge from the slot on the right.
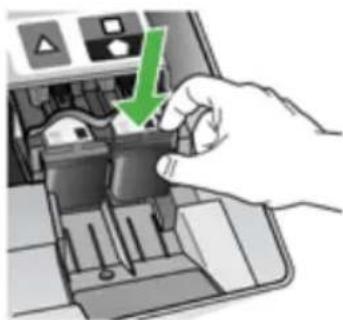
natural_image
Hand inserting a device into a computer case with a green lightning bolt (no text or symbols visible)-
Pull the print cartridge toward you out of its slot.
-
If you are removing the black print cartridge in order to install the photo or gray photo print cartridge, store the black print cartridge in the print cartridge protector or an airtight plastic container.
-
Remove the new print cartridge from its packaging and, being careful to touch only the black plastic, gently remove the plastic tape by using the pink pull tab.
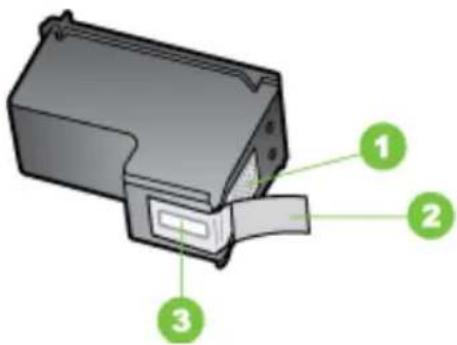
text_image
Diagram of a device component with numbered parts labeled 1, 2, and 31 Copper-colored contacts
2 Plastic tape with pink pull tab (must be removed before installing)
3 Ink nozzles under tape
△ CAUTION: Do not touch the copper-colored contacts or ink nozzles. Also, do not re-tape the print cartridges. Doing so can result in clogs, ink failure, and bad electrical connections.
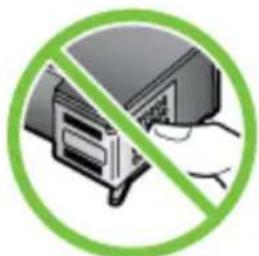
natural_image
Prohibition symbol of a computer with a diagonal line crossing over it, no text or symbols present.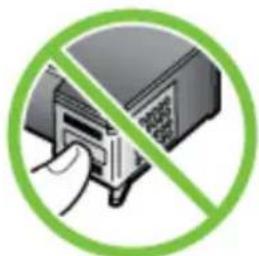
natural_image
Green circular prohibition sign with a hand inserting a device into a device (no text or symbols)- Hold the print cartridge with the HP logo on top, and insert the new print cartridge into the empty cartridge slot. Make sure you push the print cartridge in firmly until it snaps into place.
If you are installing the tri-color print cartridge, slide it into the left slot.
If you are installing a black, photo, or gray photo print cartridge, slide it into the right slot.
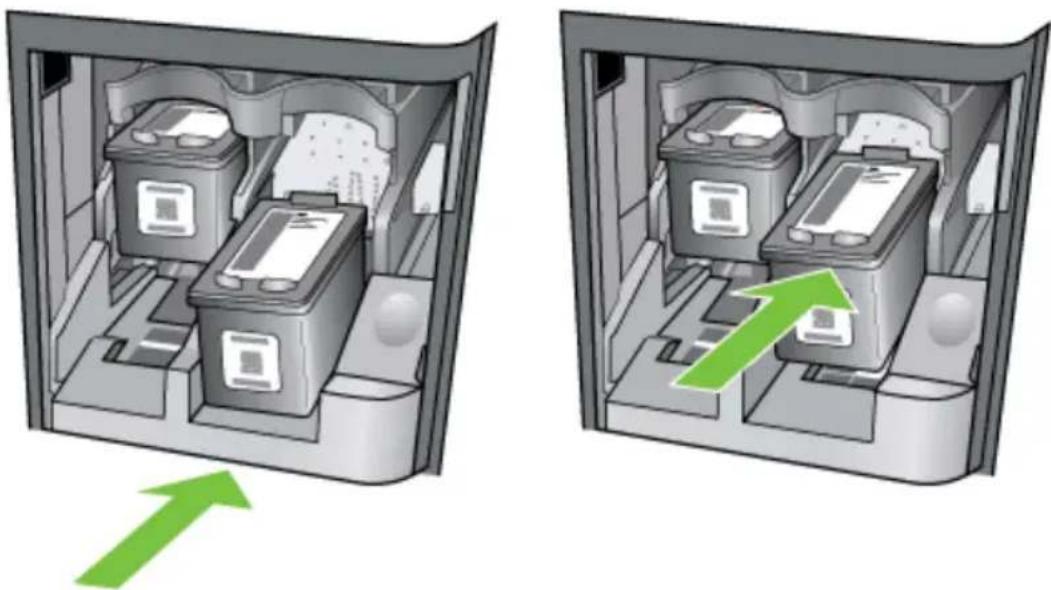
natural_image
Two identical 3D diagrams showing internal battery compartments with green arrows pointing to one (no text or symbols)- Close the print cartridge door.
If you installed a new print cartridge, the device prints a print cartridge alignment page.
-
When prompted, ensure plain white paper is loaded in the input tray, then press OK.
-
The device prints a test page, aligns the print head, and calibrates the printer. Recycle or discard the page.
A success or failure message appears.

NOTE: If you have colored paper loaded in the input tray when you align the printer, the alignment will fail. Load unused plain white paper into the input tray, and then try the alignment again.
- Press OK to continue.
Align the print cartridges
The HP All-in-One prompts you to align cartridges every time you install or replace a print cartridge. You can also align the print cartridges at any time from the device control panel or by using the software you installed with the device. Aligning the print cartridges ensures high-quality output.

NOTE: If you remove and reinstall the same print cartridge, the device will not prompt you to align the print cartridges. It remembers the alignment values for that print cartridge, so you do not need to realign the print cartridges.
To align the print cartridges from the device control panel when prompted
- Make sure you have letter or A4 unused plain white paper loaded in the input tray, and then press OK.
- The device prints a test page and calibrates the printer. Recycle or discard the page.

NOTE: If you have colored paper loaded in the input tray when you align the print cartridges, the alignment will fail. Load unused plain white paper into the input tray, and then try the alignment again.
If the alignment fails again, you might have a defective sensor or print cartridge. Contact HP Support. Go to www.hp.com/support. If prompted, choose your country/region, and then click Contact HP for information on calling for technical support.
To align the cartridges from the device control panel at any time
- Load letter, A4, or legal unused plain white paper into the input tray.
- Press Setup.
- Selects Tools and then select Align Print Cartridge.
- The device prints a test page and calibrates the printer. Recycle or discard the page.
To align the print cartridges from the HP Photosmart Software (Windows)
- Load letter, A4, or legal unused plain white paper into the input tray.
- In the HP Solution Center, click Settings, point to Print Settings, and then click Printer Toolbox.

NOTE: You can also open the Printer Toolbox from the Print Properties dialog box. In the Print Properties dialog box, click the Services tab, and then click Service this device.
The Printer Toolbox appears.
- Click the Device Services tab.
- Click Align the Print Cartridges.
The device prints a test page and calibrates the printer. Recycle or discard the page.
To align the print cartridges from the HP Photosmart Studio Software (Mac OS)
- Load letter, A4, or legal unused plain white paper into the input tray.
- HP Printer Utility (Mac OS): Open the HP Printer Utility. For more information, see HP Printer Utility (Mac OS). Click Align and follow the onscreen instructions.
Clean the print cartridges
Use this feature when there is streaking, white lines through any of the lines of color or when a color is muddy. Do not clean print cartridges unnecessarily, as this wastes ink and shortens the life of the ink nozzles.
To clean the print cartridges from the device control panel
- Load letter, A4, or legal unused plain white paper into the input tray.
- Press Setup.
- Press 6, then press 1.
This selects Tools and then selects Clean Print Cartridge.
The device prints a page that you can recycle or discard.
If copy or print quality still seems poor after you clean the print cartridges, try cleaning the print cartridge contacts before replacing the affected print cartridge.
To clean the print cartridges from the HP Photosmart Software
- Load letter, A4, or legal unused plain white paper into the input tray.
- In the HP Solution Center, click Settings, point to Print Settings, and then click Printer Toolbox.

NOTE: You can also open the Printer Toolbox from the Print Properties dialog box. In the Print Properties dialog box, click the Services tab, and then click Service this device.
The Printer Toolbox appears.
- Click the Device Services tab.
- Click Clean the Print Cartridges.
- Follow the prompts until you are satisfied with the quality of the output, and then click Done.
If copy or print quality still seems poor after you clean the print cartridges, try cleaning the print cartridge contacts before replacing the affected print cartridge.
HP Printer Utility (Mac OS)
- Open the HP Printer Utility. For more information, see HP Printer Utility (Mac OS).
- Click Clean and follow the onscreen instructions.
Clean the print cartridge contacts
Clean the print cartridge contacts only if you get repeated messages on the display prompting you to check a print cartridge after you already have cleaned or aligned the print cartridges.
Before cleaning the print cartridge contacts, remove the print cartridge and verify that nothing is covering the print cartridge contacts, then reinstall the print cartridge. If you continue to get messages to check the print cartridges, clean the print cartridge contacts.
Make sure you have the following materials available:
- Dry foam rubber swabs, lint-free cloth, or any soft material that will not come apart or leave fibers.

TIP: Coffee filters are lint-free and work well for cleaning print cartridges.
• Distilled, filtered, or bottled water (tap water might contain contaminants that can damage the print cartridges).

CAUTION: Do not use platen cleaners or alcohol to clean the print cartridge contacts. These can damage the print cartridge or the HP All-in-One.
To clean the print cartridge contacts
- Turn on the device and open the print cartridge door.
The print carriage moves to the far right side of the device.
- Wait until the print carriage is idle and silent, and then unplug the power cord from the back of the device.

NOTE: Depending how long the HP All-in-One is unplugged, the date and time might be erased. You might need to reset the date and time later, when you plug the power cord back in.
-
Lightly press down on the print cartridge to release it, and then pull it toward you out of the slot.
-
Inspect the print cartridge contacts for ink and debris buildup.
-
Dip a clean foam rubber swab or lint-free cloth into distilled water, and squeeze any excess water from it.
-
Hold the print cartridge by its sides.
-
Clean only the copper-colored contacts. Allow the print cartridges to dry for approximately ten minutes.
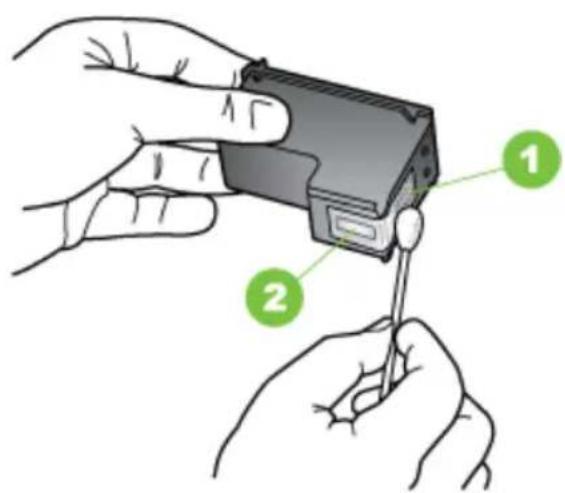
text_image
Diagram showing two hands holding a device with labeled parts 1 and 2, likely illustrating a mechanical or electrical assembly.1 Copper-colored contacts
2 Ink nozzles (do not clean)
- Slide the print cartridge back into the slot. Push the print cartridge forward until it clicks into place.
- Repeat if necessary for the other print cartridge.
- Gently close the print cartridge door and plug the power cord into the back of the device.
Clean the area around the ink nozzles
If the device is used in a dusty environment, a small amount of debris might accumulate inside the device. This debris can include dust, hair, carpet, or clothing fibers. When debris gets on the print cartridges, it can cause ink streaks and smudges on printed pages. Ink streaking can be corrected by cleaning around the ink nozzles as described here.

NOTE: Clean the area around the ink nozzles only if you continue to see streaks and smudges on your printed pages after you have already cleaned the print cartridges by using the device control panel or the software you installed with the HP All-in-One.
Make sure you have the following materials available:
- Dry foam rubber swabs, lint-free cloth, or any soft material that will not come apart or leave fibers.

TIP: Coffee filters are lint-free and work well for cleaning print cartridges.
- Distilled, filtered, or bottled water (tap water might contain contaminants that can damage the print cartridges).

CAUTION: Do not touch the copper-colored contacts or ink nozzles. Touching these parts can result in clogs, ink failure, and bad electrical connections.
To clean the area around the ink nozzles
- Turn on the device and open the print cartridge door.
The print carriage moves to the far right side of the device. - Wait until the print carriage is idle and silent, and then unplug the power cord from the back of the device.

NOTE: Depending how long the HP All-in-One is unplugged, the date and time might be erased. You might need to reset the date and time later, when you plug the power cord back in.
- Lightly press down on the print cartridge to release it, and then pull it toward you out of the slot.

NOTE: Do not remove both print cartridges at the same time. Remove and clean each print cartridge one at a time. Do not leave a print cartridge outside the device for more than 30 minutes.
-
Place the print cartridge on a piece of paper with the ink nozzles facing up.
-
Lightly moisten a clean foam rubber swab with distilled water.
-
Clean the face and edges around the ink nozzle area with the swab, as shown below.
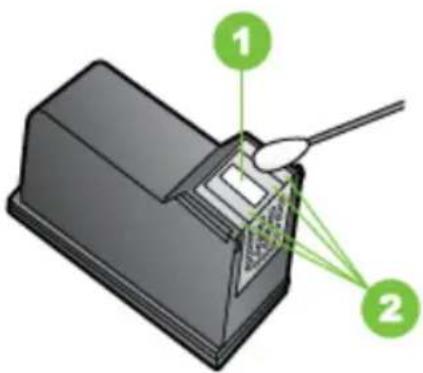
text_image
Diagram of a device with labeled parts, showing a component with two green annotations pointing to features.1 Nozzle plate (do not clean)
2 Face and edges around the ink nozzle area

CAUTION: Do not clean the nozzle plate.
- Slide the print cartridge back into the slot. Push the print cartridge forward until it clicks into place.
- Repeat if necessary for the other print cartridge.
- Gently close the print cartridge door and plug the power cord into the back of the device.
Store printing supplies
The print cartridge protector is designed to keep a print cartridge secure and prevent it from drying out when it is not being used. Whenever you remove a print cartridge from the device with the intention of using it again later, store it in the print cartridge protector. For example, store the black print cartridge in a print cartridge protector if you are removing it so you can print high-quality photos with the photo and tri-color print cartridges.

NOTE: If you do not have a print cartridge protector, you can order one from HP Support. For more information, see Support and warranty. You can also use an air-tight container, such as a plastic tub. Make sure the nozzles are not touching anything when you store the print cartridges.
To insert a print cartridge into the print cartridge protector
▲ Place the print cartridge into the print cartridge protector at a slight angle and snap it securely into place.
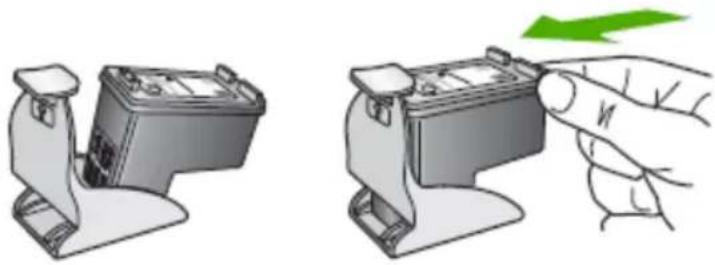
natural_image
Illustration of two hand positioning a small electronic device with a green arrow indicating rotation (no text or symbols present)To remove the print cartridge from the print cartridge protector
▲ Press down on the top of the print cartridge protector to release the print cartridge, then gently remove the print cartridge out of the print cartridge protector.
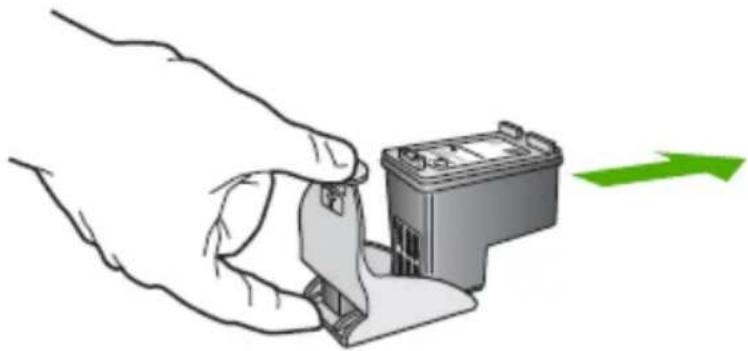
natural_image
Illustration of a hand inserting a card into a battery with a green arrow indicating direction (no text or symbols)Clean the device
This section provides instructions for keeping the device in top working condition. Perform these maintenance procedures as necessary.
Dust or dirt on the scanner glass, scanner lid backing, or scanner frame can slow down performance, degrade the quality of scans, and affect the accuracy of special features such as fitting copies to a certain page size.
This section contains the following topics:
• Clean the scanner glass
- Clean the exterior
• Clean the automatic document feeder
Clean the scanner glass
To clean the scanner glass
-
Turn off the device.
-
Lift the scanner lid.
-
Clean the glass by using a soft, lint-free cloth that has been sprayed with a mild glass cleaner. Dry the glass with a dry, soft, lint-free cloth.
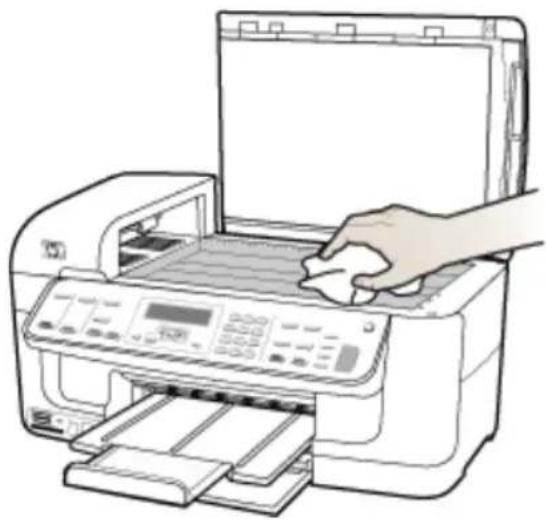
natural_image
Illustration of a hand using a printer to press documents (no text or symbols visible)
CAUTION: Use only glass cleaner to clean the scanner glass. Avoid cleaners that contain abrasives, acetone, benzene, and carbon tetrachloride, all of which can damage the scanner glass. Avoid isopropyl alcohol because it can leave streaks on the glass.
CAUTION: Do not spray the glass cleaner directly on the glass. If too much glass cleaner is applied, the cleaner could leak under the glass and damage the scanner.
- Close the scanner lid, and turn on the device.
Clean the exterior

NOTE: Before cleaning the device, turn off the power and unplug the power cord from the electrical socket.
Use a soft, damp, lint-free cloth to wipe dust, smudges, and stains off of the case. The exterior of the device does not require cleaning. Keep fluids away from the interior of the device, as well as from the device control panel.
Clean the automatic document feeder
If the automatic document feeder picks up multiple pages or if it does not pick up plain paper, you can clean the rollers and separator pad. Lift the automatic document feeder
cover to access the pick assembly inside the automatic document feeder, clean the rollers or separator pad, and then close the cover.
To clean the rollers or separator pad
- Remove all originals from the document feeder tray.
- Lift the automatic document feeder cover (1).
This provides easy access to the rollers (2) and separator pad (3), as shown below.
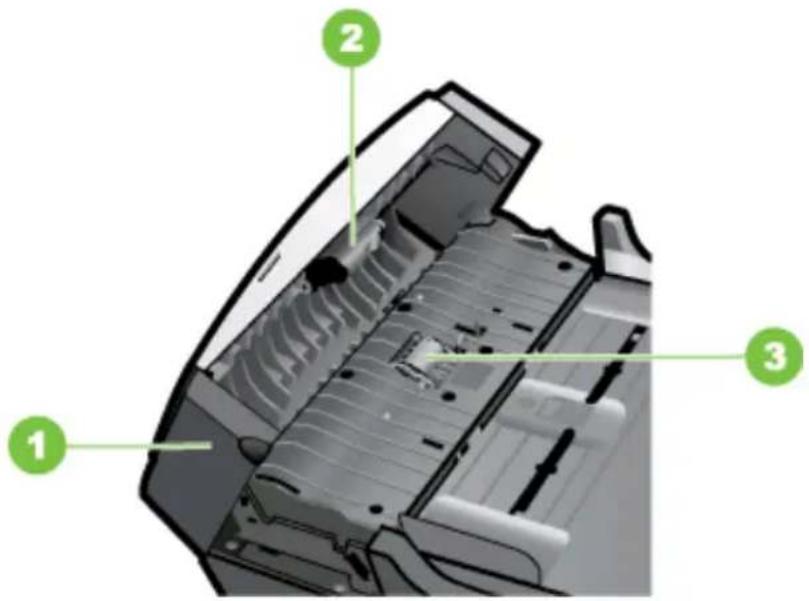
text_image
Diagram of a printer internal structure with numbered annotations pointing to different parts.1 Automatic document feeder cover
2 Rollers
3 Separator pad
- Lightly dampen a clean lint-free cloth with distilled water, then squeeze any excess liquid from the cloth.
- Use the damp cloth to wipe any residue off the rollers or separator pad.

NOTE: If the residue does not come off using distilled water, try using isopropyl (rubbing) alcohol.
- Close the cover of the automatic document feeder.
To clean the glass strip inside the automatic document feeder
- Turn off the HP All-in-One, and unplug the power cord.

NOTE: Depending how long the HP All-in-One is unplugged, the date and time might be erased. You might need to reset the date and time later, when you plug the power cord back in.
- Raise the lid, as if you were loading an original on the glass.
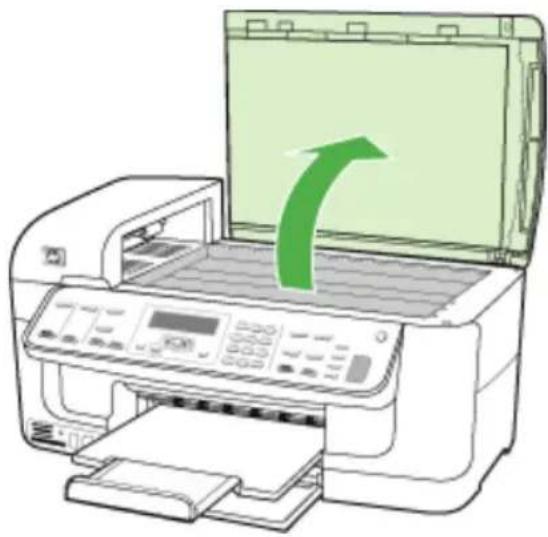
natural_image
Illustration of an open printer with a green arrow indicating the print direction (no text or symbols present)- Lift the cover of the automatic document feeder.
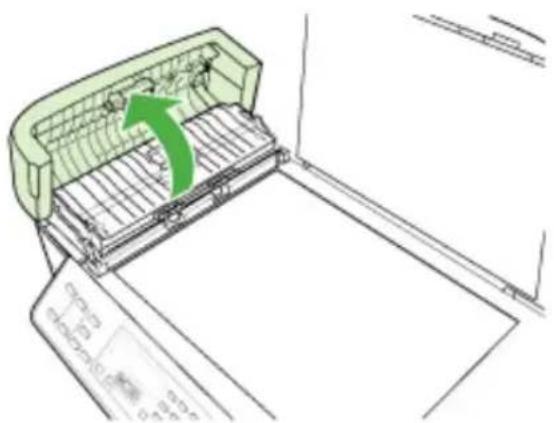
natural_image
Technical line drawing of a mechanical device with a green arrow indicating direction (no text or symbols)- Lift the automatic document feeder mechanism.
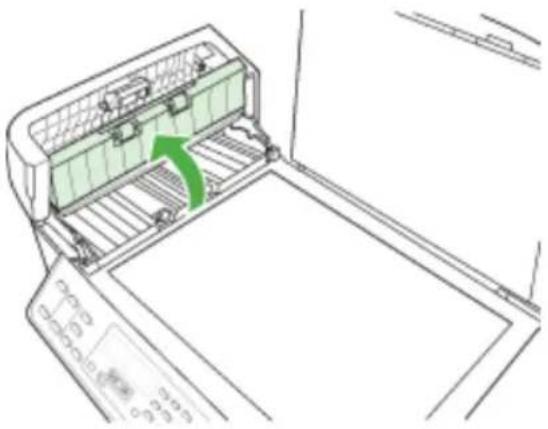
natural_image
Line drawing of a printer drawer with a green arrow indicating the opening area (no text or symbols present)There is a glass strip under the automatic document feeder.
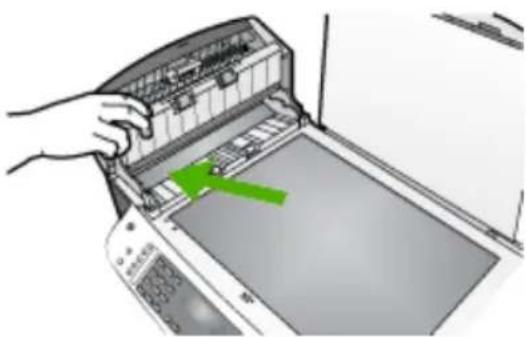
natural_image
Hand inserting a printer into a machine, showing the printer's internal structure and green arrow indicating the component (no text or symbols present)- Clean the glass strip with a soft cloth or sponge slightly moistened with a nonabrasive glass cleaner.
△ CAUTION: Do not use abrasives, acetone, benzene, or carbon tetrachloride on the glass, since they can damage it. Do not place or spray liquid directly on the glass. The liquid might seep under the glass and damage the device.
- Lower the automatic document feeder mechanism, and then close the cover of the automatic document feeder.
- Close the lid.
- Plug in the power cord, and then turn on the HP All-in-One.
General troubleshooting tips and resources
Try these when you begin troubleshooting a printing problem.
• For a paper jam, see Clear jams.
- For paper-feed problems, such as the paper skew and paper pick, see solve paper-feed problems.
- Power light is on and not blinking. When the device is turned on for the first time, it takes approximately 12 minutes to initialize it after the print cartridges are installed.
- Power cord and other cables are working, and are firmly connected to the device. Make sure the device is connected firmly to a functioning alternating current (AC) power outlet, and is turned on. For voltage requirements, see Electrical specifications.
- Media is loaded correctly in the input tray and is not jammed in the device.
- All packing tapes and materials are removed.
- The device is set as the current or default printer. For Windows, set it as the default in the Printers folder. For the Mac OS, set it as the default in the Printer Setup Utility. See your computer's documentation for more information.
- Pause Printing is not selected if you are using a computer running Windows.
- You are not running too many programs when you are performing a task. Close programs that you are not using or restart the computer before attempting the task again.
Troubleshooting topics
- Solve printing problems
• Poor print quality and unexpected printouts - Solve paper-feed problems
- Solve copy problems
- Solve scan problems
- Solve fax problems
- Solve network problems
- Solve wireless problems
- Solve photo (memory card) problems
- Troubleshoot installation issues
Solve printing problems
This section contains the following topics:
• The device shuts down unexpectedly
• Error message appears on control-panel display
• The device is not responding (nothing prints)
• Device takes a long time to print
- Blank or partial page printed
• Something on the page is missing or incorrect
- Placement of the text or graphics is wrong
• The device prints half a page, then ejects the paper
The device shuts down unexpectedly
Check the power and power connections
Make sure the device is connected firmly to a functioning alternating current (AC) power outlet. For voltage requirements, see Electrical specifications.
Error message appears on control-panel display
A non-recoverable error has occurred
Disconnect all cables (such as power cord and USB cable), wait about 20 seconds, and reconnect the cables. If the problem persists, visit the HP Web site (www.hp.com/support) for the latest troubleshooting information, or product fixes and updates.
The device is not responding (nothing prints)
There are print jobs stuck in the print queue
Open the print queue, cancel all documents, and then reboot the computer. Try to print after the computer reboots. Refer to the Help system for the operating system for more information.
Check the device setup
For more information, see General troubleshooting tips and resources.
Check the device software installation
If the device is turned off when printing, an alert message should appear on your computer screen; otherwise, the device software might not be installed correctly. To resolve this, uninstall the software completely, and then reinstall the device software. For more information, see Uninstall and reinstall the software.
Check the cable connections
- Make sure both ends of the network/USB cable are secure.
-
If the device is connected to a network, check the following:
-
Check the Link light on the back of the device.
• Make sure you are not using a phone cord to connect the device.
Check any personal firewall software installed on the computer
The personal software firewall is a security program that protects a computer from intrusion. However, the firewall might block communication between the computer and the device. If there is a problem communicating with the device, try temporarily disabling the firewall. If the problem persists, the firewall is not the source of the communication problem. Re-enable the firewall.
Device takes a long time to print
Check the system configuration and resources
Make sure the computer meets the minimum system requirements for the device. For more information, see System requirements.
Check the device software settings
Print speed is slower when Best or Maximum dpi is selected as the print quality. To increase the print speed, select different print settings in the device driver. For more information, see Change print settings.
Blank or partial page printed
Clean the print cartridge
Complete the print cartridge cleaning procedure. For more information, see Clean the print cartridges.
Check the media settings
- Make sure you select the correct print quality settings in the printer driver for the media loaded in the trays.
- Make sure the page settings in the printer driver match the page size of media loaded in the tray.
More than one page is being picked
For more information on paper-feed problems, see Solve paper-feed problems.
There is a blank page in the file
Check the file to make sure there is no blank page.
Something on the page is missing or incorrect
Check the print cartridges
Make sure the correct print cartridges are installed and the print cartridges are not low on ink. For more information, see Manage the device and Supported print cartridges.
Check the margin settings
Make sure the margin settings for the document do not exceed the printable area of the device. For more information, see Set minimum margins.
Check the color print settings
Make sure Print in Grayscale is not selected in the print driver.
Check the device location and length of USB cable
High electromagnetic fields (such as those generated by USB cables) can sometimes cause slight distortions to printouts. Move the device away from the source of the electromagnetic fields. Also, it is recommended that you use a USB cable that is less than 3 meters (9.8 feet) long to minimize the effects of these electromagnetic fields.
Placement of the text or graphics is wrong
Check how the media is loaded
Make sure the media width and length guides fit snugly against the edges of the stack of media, and make sure the tray is not overloaded. For more information, see Load media.
Check the media size
- Content on a page might be cut off if the document size is larger than the media that you are using.
- Make sure the media size selected in the printer driver match the size of media loaded in the tray.
Check the margin settings
If the text or graphics are cut off at the edges of the page, make sure the margin settings for the document do not exceed the printable area of your device. For more information, see Set minimum margins.
Check the page-orientation setting
Make sure the media size and page orientation selected in the application match the settings in the printer driver. For more information, see Change print settings.
Check the device location and length of USB cable
High electromagnetic fields (such as those generated by USB cables) can sometimes cause slight distortions to printouts. Move the device away from the source of the electromagnetic fields. Also, it is recommended that you use a USB cable that is less than 3 meters (9.8 feet) long to minimize the effects of these electromagnetic fields.
If the above solutions do not work, the problem may be caused by the inability of the application to interpret print settings properly. See the release notes for known software conflicts, refer to the application's documentation, or contact the software manufacturer for specific help.
The device prints half a page, then ejects the paper
Check the print cartridges
Make sure the correct print cartridges are installed and the print cartridges are not low on ink. For more information, see Manage the device and Work with print cartridges. HP cannot guarantee the quality of non-HP print cartridges.
Poor print quality and unexpected printouts
This section contains the following topics:
• Common poor quality printout problems
• Meaningless characters print
- Ink is smearing
- Ink is not filling the text or graphics completely
• Output is faded or dull colored
• Colors are printing as black and white
• Wrong colors are printing
• Printout shows bleeding colors
• Colors do not line up properly
• Lines or dots are missing from text or graphics
Common poor quality printout problems
Check the print cartridges
Make sure the correct print cartridges are installed and the print cartridges are not low on ink. For more information, see Manage the device and Work with print cartridges. HP cannot guarantee the quality of non-HP print cartridges.
Check the paper quality
The paper might be too moist or too rough. Make sure the media meets HP specifications, and try to print again. For more information, see Select print media.
Check the type of media loaded in the device
Make sure the tray supports the type of media you have loaded. For more information, see Understand specifications for supported media.
Check the device location and length of USB cable
High electromagnetic fields (such as those generated by USB cables) can sometimes cause slight distortions to printouts. Move the device away from the source of the electromagnetic fields. Also, it is recommended that you use a USB cable that is less than 3 meters (9.8 feet) long to minimize the effects of these electromagnetic fields.
Align the print cartridges
Align the print cartridges. For more information, see Align the print cartridges.
Clean the print cartridge
The print cartridges may need to be cleaned. For more information, see, Clean the print cartridges.
Meaningless characters print
If an interruption occurs to a job that is printing, the device might not recognize the rest of the job.
Cancel the print job and wait for the device to return to the ready state. If the device does not return to the ready state, cancel all jobs and wait again. When the device is ready, resend the job. If prompted by the computer to retry the job, click Cancel.
Check the cable connections
If the device and computer are connected with a USB cable, the problem may be due to a poor cable connection.
Make sure the cable connections at both ends are secure. If the problem persists, turn off the device, disconnect the cable from the device, turn on the device without connecting the cable, and delete any remaining jobs from the print spooler. When the Power light is on and not flashing, reconnect the cable.
Check the document file
The document file may be damaged. If you can print other documents from the same application, try printing a backup copy of your document, if available.
Align the print cartridges
Align the print cartridges. For more information, see Align the print cartridges.
Ink is smearing
Check the print settings
- When you print documents that use much ink, allow more time to dry before handling the printouts. This is especially true for transparencies. In the printer driver, select the Best print quality, and also increase the ink drying time and reduce the ink saturation using the ink volume under the advanced features (Windows) or ink features (Mac OS). However, note that decreasing ink saturation might give printouts a "washed-out" quality.
- Color documents that have rich, blended colors can wrinkle or smear when printed using the Best print quality. Try using another print mode, such as Normal, to reduce ink, or use HP Premium Paper designed for printing vivid color documents. For more information, see Change print settings.
Check the media type
Some types of media do not accept ink well. For these types of media, ink will dry more slowly and smearing may occur. For more information, see Select print media.
Check the print cartridges
Make sure the correct print cartridges are installed and the print cartridges are not low on ink. For more information, see Manage the device and Work with print cartridges. HP cannot guarantee the quality of non-HP print cartridges.
Clean the print cartridge
The print cartridges may need to be cleaned. For more information, see, Clean the print cartridges.
Ink is not filling the text or graphics completely
Check the media type
Some media types are not suitable for use with the device. For more information, see Select print media.
Check the print cartridges
Make sure the print cartridges are not low on ink. For more information, see Work with print cartridges.
HP cannot guarantee the quality of non-HP print cartridges.
Clean the print cartridge
The print cartridges may need to be cleaned. For more information, see, Clean the print cartridges.
Output is faded or dull colored
Check the print mode
The Draft or Fast mode in the printer driver allows you to print at a faster rate, which is good for printing drafts. To get better results, select Normal or Best. For more information, see Change print settings.
Check the paper type setting
When printing on transparencies or other special media, select the corresponding media type in the print driver. For more information, see Print on special and custom-sized media.
Clean the print cartridge
The print cartridges may need to be cleaned. For more information, see, Clean the print cartridges.
Check the print cartridges
Make sure the correct print cartridges are installed and the print cartridges are not low on ink. For more information, see Manage the device and Work with print cartridges.
HP cannot guarantee the quality of non-HP print cartridges.
Colors are printing as black and white
Check the print settings
Make sure Print in Grayscale is not selected in the printer driver. For information on changing this setting, see Change print settings.
Wrong colors are printing
Check the print settings
Make sure Print in Grayscale is not selected in the printer driver. For information on changing this setting, see Change print settings.
Check the print cartridges
Make sure the correct print cartridges are installed and the print cartridges are not low on ink. For more information, see Manage the device and Work with print cartridges.
HP cannot guarantee the quality of non-HP print cartridges.
Clean the print cartridge
The print cartridges may need to be cleaned. For more information, see, Clean the print cartridges.
Printout shows bleeding colors
Check the print cartridges
Make sure the correct print cartridges are installed and the print cartridges are not low on ink. For more information, see Manage the device and Work with print cartridges.
HP cannot guarantee the quality of non-HP print cartridges.
Check the print settings
Make sure Print in Grayscale is not selected in the printer driver. For information on changing this setting, see Change print settings.
Check the media type
Some types of media do not accept ink well. For these types of media, ink will dry more slowly and smearing may occur. For more information, see Select print media.
Colors do not line up properly
Check the print cartridges
Make sure the correct print cartridges are installed and the print cartridges are not low on ink. For more information, see Manage the device and Work with print cartridges.
HP cannot guarantee the quality of non-HP print cartridges.
Check the graphics placement
Use the zoom or print preview feature of your software to check for gaps in the placement of graphics on the page.
Align the print cartridges
Align the print cartridges. For more information, see Align the print cartridges.
Lines or dots are missing from text or graphics
Check the print cartridges
Make sure the print cartridges are not low on ink. For more information, see Work with print cartridges.
HP cannot guarantee the quality of non-HP print cartridges.
Solve paper-feed problems
Media is not supported for the printer or tray
Use only media that is supported for the device and the tray being used. For more information, see Understand specifications for supported media.
Media is not picked up from a tray
- Make sure media is loaded in the tray. For more information, see Load media. Fan the media before loading.
- Make sure the paper guides are set to the correct markings in the tray for the media size you are loading. Also make sure the guides are snug, but not tight, against the stack.
- Make sure media in the tray is not curled. Uncurl paper by bending it in the opposite direction of the curl.
- When using thin special media, make sure that the tray is completely loaded. If you are using special media that is only available in small quantities, try placing the special media on top of other paper of the same size to help fill the tray. (Some media is picked up more easily if the tray is full.)
- If you are using thick special media (such as brochure paper), load media so that the tray is between 1/4 and 3/4 full. If necessary, place the media on top of other paper of the same size so that the stack height is within this range.
Media is not coming out correctly
- Make sure the output tray extension is extended; otherwise, printed pages may fall off the device.
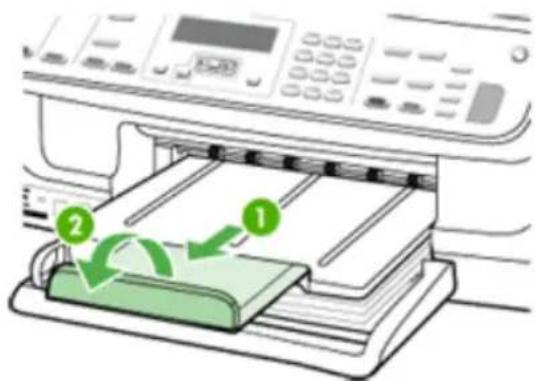
text_image
Diagram showing printer printing process with labeled steps 1 and 2, indicating green circular arrows on a green paper sheet.- Remove excess media from the output tray. There is a limit to the number of sheets the tray can hold.
Pages are skewing
- Make sure the media loaded in the trays is aligned to the paper guides. If needed, pull out the trays from the device and reload the media properly, making sure that the paper guides are properly aligned.
- Make sure the duplexer is properly installed.
- Load media into the device only when it is not printing.
Multiple pages are being picked up
- Fan the media before loading.
- Make sure the paper guides are set to the correct markings in the tray for the media size you are loading. Also make sure the guides are snug, but not tight, against the stack.
- Make sure the tray is not overloaded with paper.
- When using thin special media, make sure that the tray is completely loaded. If you are using special media that is only available in small quantities, try placing the special media on top of other paper of the same size to help fill the tray. (Some media is picked up more easily if the tray is full.)
- If you are using thick special media (such as brochure paper), load media so that the tray is between 1/4 and 3/4 full. If necessary, place the media on top of other paper of the same size so that the stack height is within this range.
- Use HP media for optimum performance and efficiency.
Solve copy problems
If the following topics do not help, see Support and warranty for information about HP support.
• No copy came out
- Copies are blank
• Documents are missing or faded
• Size is reduced
• Copy quality is poor
• Copy defects are apparent
• The device prints half a page, then ejects the paper
- Error messages appear
No copy came out
- Check the power
Make sure that the power cord is securely connected, and the device turned on.
- Check the status of the device
The device might be busy with another job. Check the control-panel display for information about the status of jobs. Wait for any job that is processing to finish.
The device might be jammed. Check for jams. See Clear jams.
- Check the trays
Make sure that media is loaded. See Load media for more information.
Copies are blank
- Check the media
The media might not meet Hewlett-Packard media specifications (for example, the media is too moist or too rough). See Select print media for more information.
- Check the settings
The contrast setting might be set too light. Use the Copy button on the device control panel to create darker copies.
- Check the trays
If you are copying from the ADF, make sure that the originals have been loaded correctly. For more information, see Load an original in the automatic document feeder (ADF).
Documents are missing or faded
- Check the media
The media might not meet Hewlett-Packard media specifications (for example, the media is too moist or too rough). See Select print media for more information.
- Check the settings
The quality setting of Fast (which produces draft-quality copies) might be responsible for the missing or faded documents. Change to the Normal or Best setting.
- Check the original
The accuracy of the copy depends on the quality and size of the original. Use the Copy menu to adjust the brightness of the copy. If the original is too light, the copy might not be able to compensate, even if you adjust the contrast.
Colored backgrounds might cause images in the foreground to blend into the background, or the background might appear in a different shade.
Size is reduced
- The reduce/enlarge or other copy feature might have been set from the device control panel to reduce the scanned image. Check the settings for the copy job to make sure that they are for normal size.
- The HP photo and imaging software settings might be set to reduce the scanned image. Change the settings, if needed. See the onscreen Help for the HP photo and imaging software for more information.
Copy quality is poor
• Take steps to improve the copy quality
- Use quality originals.
- Load the media correctly. If the media is loaded incorrectly, it might skew, causing unclear images. See Select print media for more information.
- Use or make a carrier sheet to protect your originals.
- Check the device
- The scanner lid might not be closed properly.
The scanner glass or lid backing might need cleaning. See Clean the device for more information.
The ADF might need cleaning. See Clean the device for more information.
Copy defects are apparent
• Vertical white or faded stripes
The media might not meet Hewlett-Packard media specifications (for example, the media is too moist or too rough). See Select print media for more information.
- Too light or dark
Try adjusting the contrast and copy-quality settings.
- Unwanted lines
The scanner glass, lid backing, or frame might need cleaning. See Clean the device for more information.
- Black dots or streaks
Ink, glue, correction fluid, or an unwanted substance might be on the scanner glass or lid backing. Try cleaning the device. See Clean the device for more information.
• Copy is slanted or skewed
• Make sure that the ADF input tray is not too full.
Make sure that the ADF width adjusters are snug against the sides of the media.
- Unclear text
- Try adjusting the contrast and copy-quality settings.
The default enhancement setting might not be suitable for the job. Check the setting and change it to enhance text or photographs, if needed. For more information, see Change the copy settings.
• Incompletely filled text or graphics
Try adjusting the contrast and copy-quality settings.
• Large, black typefaces look splotchy (not smooth)
The default enhancement setting might not be suitable for the job. Check the setting and change it to enhance text or photographs, if needed. For more information, see Change the copy settings.
• Horizontal grainy or white bands in light-gray to medium-gray areas
The default enhancement setting might not be suitable for the job. Check the setting and change it to enhance text or photographs, if needed. For more information, see Change the copy settings.
The device prints half a page, then ejects the paper
Check the print cartridges
Make sure the correct print cartridges are installed and the print cartridges are not low on ink. For more information, see Manage the device and Work with print cartridges.
HP cannot guarantee the quality of non-HP print cartridges.
Error messages appear
"Reload document and then reload job"
Press the OK button, and then reload the remaining documents (up to 20 pages) in the ADF. For more information see Load originals.
Solve scan problems
If the following topics do not help, see Support and warranty for information about HP support.

NOTE: If you are starting the scan from a computer, see the software Help for troubleshooting information.
- Scanner did nothing
- Scan takes too long
• Text cannot be edited
• Error messages appear
• Scanned image quality is poor - Scan defects are apparent
• Part of the document did not scan or text is missing
Scanner did nothing
- Check the original
Make sure that the original is placed on the scanner glass correctly. For more information, see Load an original on the scanner glass.
- Check the device
The device might be coming out of PowerSave mode after a period of inactivity, which delays processing a short while. Wait until the device reaches the READY state.
Scan takes too long
- Check the settings
If you set the resolution too high, the scan job takes longer and results in larger files. To obtain good results when scanning or copying, do not use a resolution that is higher than needed. You can lower the resolution to scan more quickly.
If you acquire an image through TWAIN, you can change the settings so that the original scans in black and white. See the onscreen Help for the TWAIN program for information.
- Check the status of the device
If you sent a print or copy job before you tried to scan, the scan starts if the scanner is not busy. However, the printing and scanning processes share memory, which means that the scan might be slower.
Part of the document did not scan or text is missing
- Check the original
• Make sure that you loaded the original correctly. For more information, see Load originals.
If you scanned the document from the ADF, try scanning the document directly from the scanner glass. For more information, see Load an original on the scanner glass.
Colored backgrounds can cause images in the foreground to blend into the background. Try adjusting the settings before you scan the original, or try enhancing the image after you scan the original.
- Check the settings
• Make sure that the input media size is large enough for the original that you are scanning.
If you are using the HP photo and imaging software, the default settings in the HP photo and imaging software might be set to automatically perform a specific task other than the one that you are attempting. See the onscreen Help for the HP photo and imaging software for instructions about changing the properties.
Text cannot be edited
- Check the settings
• Make sure that the OCR software is set to edit text.
When you scan the original, make sure that you select a document type that creates editable text. If text is classified as a graphic, it is not converted to text.
- Your OCR program might be linked to a word-processing program that does not perform OCR tasks. See the product software Help for more information about linking programs.
- Check the originals
For OCR, the original must be loaded into the ADF with the top forward and face-up. Make sure that you loaded the original correctly. For more information, see Load originals.
The OCR program might not recognize text that is tightly spaced. For example, if the text that the OCR program converts has missing or combined characters, "rn" might appear as "m."
The accuracy of the OCR program depends on the image quality, text size, and structure of the original and the quality of the scan itself. Make sure that your original has good image quality.
Colored backgrounds can cause images in the foreground to blend too much. Try adjusting the settings before you scan the original, or try enhancing the image after you scan the original. If you are performing an OCR operation on an original, any colored text on the original does not scan well, if at all.
Error messages appear
- "Unable to activate TWAIN source" or "An error occurred while acquiring the image"
If you are acquiring an image from another device, such as a digital camera or another scanner, make sure that the other device is TWAIN-compliant. Devices that are not TWAIN-compliant do not work with the device software.
Make sure that you have connected the USB Device Cable to the correct port on the back of your computer.
- Verify that the correct TWAIN source is selected. In the software, check the TWAIN source by selecting Select Scanner on the File menu.
- "Reload document and then restart job"
Press the OK button, and then reload the remaining documents (up to 50 pages) in the ADF. For more information see Load originals.
Scanned image quality is poor
The original is a second-generation photo or picture
Reprinted photographs, such as those in newspapers or magazines, are printed by using tiny dots of ink that make an interpretation of the original photograph, which degrades the quality. Often, the ink dots form unwanted patterns that can be detected when the image is scanned or printed or when the image appears on a screen. If the
following suggestions do not solve the problem, you might need to use a better-quality version of the original.
To eliminate the patterns, try reducing the size of the image after scanning.
- Print the scanned image to see if the quality is better.
• Make sure that the resolution and color settings are correct for the type of scan job.
- For best results, use the flatbed scanner for scanning rather than the ADF.
Text or images on the back of a two-sided original appear in the scan
Two-sided originals can "bleed" text or images from the back side to the scan if the originals are printed on media that is too thin or too transparent.
The scanned image is skewed (crooked)
The original might have been loaded incorrectly. Be sure to use the media guides when you load the originals into the ADF. For more information, see Load originals.
The image quality is better when printed
The image that appears on the screen is not always an accurate representation of the quality of the scan.
Try adjusting your computer monitor settings to use more colors (or levels of gray). On Windows computers, you typically make this adjustment by opening Display on the Windows control panel.
- Try adjusting the resolution and color settings.
The scanned image shows blots, lines, vertical white stripes, or other defects
If the scanner glass is dirty, the image produced does not have optimum clarity. See Clean the device for cleaning instructions.
The defects might be on the original and not a result of the scanning process.
Graphics look different from the original
The graphics settings might not be suitable for the type of scan job that you are performing. Try changing the graphics settings.
Take steps to improve the scan quality
- Use the glass to scan rather than the ADF.
- Use high-quality originals.
- Place the media correctly. If the media is placed incorrectly on the scanner glass, it might skew, which causes unclear images. For more information, see Load originals.
- Adjust the software settings according to how you plan to use the scanned page.
- Use or make a carrier sheet to protect your originals.
- Clean the scanner glass. See Clean the scanner glass for more information.
Scan defects are apparent
- Blank pages
Make sure that the original document is placed correctly. Place the original document face down on the flatbed scanner with the top-left corner of the document located in the lower-right corner of the scanner glass.
- Too light or dark
- Try adjusting the settings. Be sure to use the correct resolution and color settings.
The original image might be very light or dark or might be printed on colored paper.
- Unwanted lines
Ink, glue, correction fluid, or an unwanted substance might be on the scanner glass. Try cleaning the scanner glass. See Clean the device for more information.
- Black dots or streaks
Ink, glue, correction fluid, or an unwanted substance might be on the scanner glass, the scanner glass might be dirty or scratched, or the lid backing might be dirty. Try cleaning the scanner glass and lid backing. See Clean the device for more information. If cleaning does not correct the problem, the scanner glass or lid backing might need to be replaced.
- The defects might be on the original and not a result of the scanning process.
- Unclear text
Try adjusting the settings. Make sure that the resolution and color settings are correct.
- Size is reduced
The HP software settings might be set to reduce the scanned image. See the product software Help for more information about changing the settings.
Solve fax problems
This section contains fax setup troubleshooting information for the device. If the device is not set up properly for faxing, you might experience problems when sending faxes, receiving faxes, or both.
If you are having faxing problems, you can print a fax test report to check the status of the device. The test will fail if the device is not set up properly for faxing. Perform this test after you have completed setting up the device for faxing. For more information, see Test fax setup.
If the test fails, review the report for information on how to fix any problems found. For more information, see The fax test failed.
• The fax test failed
• The display always shows Phone Off Hook
• The device is having problems sending and receiving faxes
• The device is having problems sending a manual fax
• The device cannot receive faxes, but can send faxes
• The device cannot send faxes, but can receive faxes
• Fax tones are recorded on my answering machine
• The phone cord that came with my device is not long enough
• The computer cannot receive faxes (Fax to PC)
The fax test failed
If you ran a fax test and the test failed, review the report for basic information about the error. For more detailed information, check the report to see which part of the test failed, and then review the appropriate topic in this section for solutions to try.
This section contains the following topics:
• The "Fax Hardware Test" failed
• The "Fax Connected to Active Telephone Wall Jack" test failed
• The "Phone Cord Connected to Correct Port on Fax" test failed
• The "Using Correct Type of Phone Cord with Fax" test failed
• The "Dial Tone Detection" test failed
• The "Fax Line Condition" test failed
The "Fax Hardware Test" failed
Solution:
- Turn off the device by using the Power button located on the device control panel and then unplug the power cord from the back of the device. After a few seconds, plug the power cord in again, and then turn the power on. Run the test again. If the test fails again, continue reviewing the troubleshooting information in this section.
- Try to send or receive a test fax. If you can send or receive a fax successfully, there might not be a problem.
- If you are running the test from the Fax Setup Wizard (Windows) or HP Fax Setup Utility (Mac OS), make sure the device is not busy completing another task, such as receiving a fax or making a copy. Check the display for a message indicating that the device is busy. If it is busy, wait until it is finished and in the idle state before running the test.
- Make sure you use the phone cord that came with the device. If you do not use the supplied phone cord to connect from the telephone wall jack to the device, you might not be able to send or receive faxes. After you plug in the phone cord that came with the device, run the fax test again.
- If you are using a phone splitter, this can cause faxing problems. (A splitter is a two-cord connector that plugs into a telephone wall jack.) Try removing the splitter and connecting the device directly to the telephone wall jack.
After you resolve any problems found, run the fax test again to make sure it passes and the device is ready for faxing. If the Fax Hardware Test continues to fail and you experience problems faxing, contact HP Support. Go to www.hp.com/support. If prompted, choose your country/region, and then click Contact HP for information on calling for technical support.
The "Fax Connected to Active Telephone Wall Jack" test failed
Solution:
- Check the connection between the telephone wall jack and the device to make sure the phone cord is secure.
-
Make sure you use the phone cord that came with the device. If you do not use the supplied phone cord to connect from the telephone wall jack to the device, you might not be able to send or receive faxes. After you plug in the phone cord that came with the device, run the fax test again.
-
Make sure you have correctly connected the device to the telephone wall jack. Using the phone cord supplied in the box with the device, connect one end to your telephone wall jack, then connect the other end to the port labeled 1-LINE on the back of the device. For more information on setting up the device for faxing, see Set up faxing for the device.
- If you are using a phone splitter, this can cause faxing problems. (A splitter is a two-cord connector that plugs into a telephone wall jack.) Try removing the splitter and connecting the device directly to the telephone wall jack.
- Try connecting a working phone and phone cord to the telephone wall jack that you are using for the device and check for a dial tone. If you do not hear a dial tone, contact your telephone company and have them check the line.
- Try to send or receive a test fax. If you can send or receive a fax successfully, there might not be a problem.
After you resolve any problems found, run the fax test again to make sure it passes and the device is ready for faxing.
The "Phone Cord Connected to Correct Port on Fax" test failed
Solution: Plug the phone cord into the correct port.
- Using the phone cord supplied in the box with the device, connect one end to your telephone wall jack, then connect the other end to the port labeled 1-LINE on the back of the device.

NOTE: If you use the 2-EXT port to connect to the telephone wall jack, you will not be able to send or receive faxes. The 2-EXT port should only be used to connect other equipment, such as an answering machine.
Figure 9-1 Back view of the device
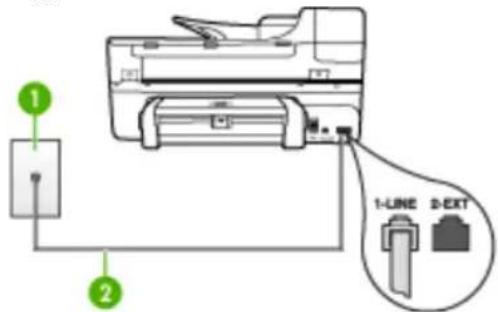
text_image
1 2 1-LINE 2-EXT1 Telephone wall jack
2 Use the phone cord supplied in the box with the device to connect to the "1-LINE" port
-
After you have connected the phone cord to the port labeled 1-LINE, run the fax test again to make sure it passes and the device is ready for faxing.
-
Try to send or receive a test fax.
-
Make sure you use the phone cord that came with the device. If you do not use the supplied phone cord to connect from the telephone wall jack to the device, you might not be able to send or receive faxes. After you plug in the phone cord that came with the device, run the fax test again.
- If you are using a phone splitter, this can cause faxing problems. (A splitter is a two-cord connector that plugs into a telephone wall jack.) Try removing the splitter and connecting the device directly to the telephone wall jack.
The "Using Correct Type of Phone Cord with Fax" test failed
Solution:
- Make sure you used the phone cord supplied in the box with the device to connect to the telephone wall jack. One end of the phone cord should be connected to the port labeled 1-LINE on the back of the device, and the other end to your telephone wall jack, as shown below.

text_image
1 2 1-LINE 2-EXT1 Telephone wall jack
2 Use the phone cord supplied in the box with the device to connect to the "1-LINE" port
If the phone cord that came with the device is not long enough, you can use a coupler to extend the length. You can purchase a coupler at an electronics store that carries phone accessories. You will also need another phone cord, which can be a standard phone cord that you might already have in your home or office.
- Check the connection between the telephone wall jack and the device to make sure the phone cord is secure.
- Make sure you use the phone cord that came with the device. If you do not use the supplied phone cord to connect from the telephone wall jack to the device, you might not be able to send or receive faxes. After you plug in the phone cord that came with the device, run the fax test again.
- If you are using a phone splitter, this can cause faxing problems. (A splitter is a two-cord connector that plugs into a telephone wall jack.) Try removing the splitter and connecting the device directly to the telephone wall jack.
The "Dial Tone Detection" test failed
Solution:
- Other equipment, which uses the same phone line as the device, might be causing the test to fail. To find out if other equipment is causing a problem, disconnect everything from the phone line, and then run the test again. If the Dial Tone Detection Test passes without the other equipment, then one or more pieces of the equipment is causing problems; try adding them back one at a time and rerunning the test each time, until you identify which piece of equipment is causing the problem.
- Try connecting a working phone and phone cord to the telephone wall jack that you are using for the device and check for a dial tone. If you do not hear a dial tone, contact your telephone company and have them check the line.
- Make sure you have correctly connected the device to the telephone wall jack. Using the phone cord supplied in the box with the device, connect one end to your telephone wall jack, then connect the other end to the port labeled 1-LINE on the back of the device.
- If you are using a phone splitter, this can cause faxing problems. (A splitter is a two-cord connector that plugs into a telephone wall jack.) Try removing the splitter and connecting the device directly to the telephone wall jack.
- If your telephone system is not using a standard dial tone, such as some PBX systems, this might cause the test to fail. This will not cause a problem sending or receiving faxes. Try sending or receiving a test fax.
- Check to make sure the country/region setting is set appropriately for your country/region. If the country/region setting is not set or is set incorrectly, the test might fail and you might have problems sending and receiving faxes.
- Make sure you connect the device to an analog phone line or you will not be able to send or receive faxes. To check if your phone line is digital, connect a regular analog phone to the line and listen for a dial tone. If you do not hear a normal sounding dial tone, it might be a phone line set up for digital phones. Connect the device to an analog phone line and try sending or receiving a fax.
- Make sure you use the phone cord that came with the device. If you do not use the supplied phone cord to connect from the telephone wall jack to the device, you might not be able to send or receive faxes. After you plug in the phone cord that came with the device, run the fax test again.
After you resolve any problems found, run the fax test again to make sure it passes and the device is ready for faxing. If the Dial Tone Detection test continues to fail, contact your telephone company and have them check the phone line.
The "Fax Line Condition" test failed
Solution:
- Make sure you connect the device to an analog phone line or you will not be able to send or receive faxes. To check if your phone line is digital, connect a regular analog phone to the line and listen for a dial tone. If you do not hear a normal sounding dial tone, it might be a phone line set up for digital phones. Connect the device to an analog phone line and try sending or receiving a fax.
- Check the connection between the telephone wall jack and the device to make sure the phone cord is secure.
- Make sure you have correctly connected the device to the telephone wall jack. Using the phone cord supplied in the box with the device, connect one end to your telephone wall jack, then connect the other end to the port labeled 1-LINE on the back of the device.
- Other equipment, which uses the same phone line as the device, might be causing the test to fail. To find out if other equipment is causing a problem, disconnect everything from the phone line, and then run the test again.
- If the Fax Line Condition Test passes without the other equipment, then one or more pieces of the equipment is causing problems; try adding them back one at a time and rerunning the test each time, until you identify which piece of equipment is causing the problem. - If the Fax Line Condition Test fails without the other equipment, connect the device to a working phone line and continue reviewing the troubleshooting information in this section.
- If you are using a phone splitter, this can cause faxing problems. (A splitter is a two-cord connector that plugs into a telephone wall jack.) Try removing the splitter and connecting the device directly to the telephone wall jack.
- Make sure you use the phone cord that came with the device. If you do not use the supplied phone cord to connect from the telephone wall jack to the device, you might not be able to send or receive faxes. After you plug in the phone cord that came with the device, run the fax test again.
After you resolve any problems found, run the fax test again to make sure it passes and the device is ready for faxing. If the Fax Line Condition test continues to fail and you experience problems faxing, contact your telephone company and have them check the phone line.
The display always shows Phone Off Hook
Solution: You are using the wrong type of phone cord. Make sure you are using the phone cord that came with the device to connect the device to your phone line. If the phone cord that came with the device is not long enough, you can use a coupler to extend the length. You can purchase a coupler at an electronics store that carries phone accessories. You will also need another phone cord, which can be a standard phone cord that you might already have in your home or office.
Solution: Other equipment that uses the same phone line as the device might be in use. Make sure extension phones (phones on the same phone line, but not
connected to the device) or other equipment are not in use or off the hook. For example, you cannot use the device for faxing if an extension phone is off the hook, or if you are using a computer dial-up modem to send e-mail or access the Internet.
The device is having problems sending and receiving faxes
Solution: Make sure the device is turned on. Look at the display on the device. If the display is blank and the Power light is not lit, the device is turned off. Make sure the power cord is firmly connected to the device and plugged into a power outlet. Press the Power button to turn on the device.
After turning on the device, HP recommends you wait five minutes before sending or receiving a fax. The device cannot send or receive faxes while it is initializing after being turned on.
Solution:
- Make sure you used the phone cord supplied in the box with the device to connect to the telephone wall jack. One end of the phone cord should be connected to the port labeled 1-LINE on the back of the device and the other end to your telephone wall jack, as shown below.
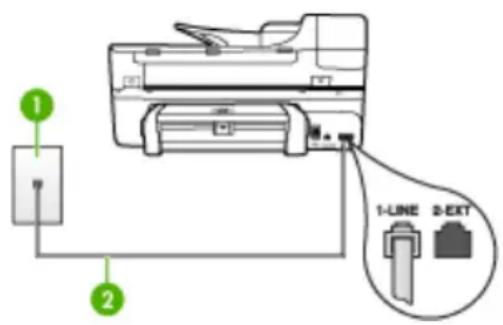
text_image
1 2 1-LINE 2-EXT1 Telephone wall jack
2 Use the phone cord supplied in the box with the device to connect to the "1-LINE" port
If the phone cord that came with the device is not long enough, you can use a coupler to extend the length. You can purchase a coupler at an electronics store that carries phone accessories. You will also need another phone cord, which can be a standard phone cord that you might already have in your home or office.
- Try connecting a working phone and phone cord to the telephone wall jack that you are using for the device and check for a dial tone. If you do not hear a dial tone, call your local telephone company for service.
- Other equipment, which uses the same phone line as the device, might be in use. For example, you cannot use the device for faxing if an extension phone is off the hook, or if you are using a computer dial-up modem to send an e-mail or access the Internet.
- Check to see if another process has caused an error. Check the display or your computer for an error message providing information about the problem and how to solve it. If there is an error, the device will not send or receive a fax until the error condition is resolved.
- The phone line connection might be noisy. Phone lines with poor sound quality (noise) can cause faxing problems. Check the sound quality of the phone line by plugging a phone into the telephone wall jack and listening for static or other noise. If you hear noise, turn Error Correction Mode (ECM) off and try faxing again. For information about changing ECM, see the onscreen Help. If the problem persists, contact your telephone company.
- If you are using a digital subscriber line (DSL) service, make sure that you have a DSL filter connected or you will not be able to fax successfully. For more information, see Case B: Set up the device with DSL.
- Make sure the device is not connected to a telephone wall jack that is set up for digital phones. To check if your phone line is digital, connect a regular analog phone to the line and listen for a dial tone. If you do not hear a normal sounding dial tone, it might be a phone line set up for digital phones.
- If you are using either a private branch exchange (PBX) or an integrated services digital network (ISDN) converter/terminal adapter, make sure the device is connected to the correct port and the terminal adapter is set to the correct switch type for your country/region, if possible. For more information, see Case C: Set up the device with a PBX phone system or an ISDN line.
- If the device shares the same phone line with a DSL service, the DSL modem might not be properly grounded. If the DSL modem is not properly grounded, it can create noise on the phone line. Phone lines with poor sound quality (noise) can cause faxing problems. You can check the sound quality of the phone line by plugging a phone into the telephone wall jack and listening for static or other noise. If you hear noise, turn off your DSL modem and completely remove power for at least 15 minutes. Turn the DSL modem back on and listen to the dial tone again.

NOTE: You might notice static on the phone line again in the future. If the device stops sending and receiving faxes, repeat this process.
If the phone line is still noisy, contact your telephone company. For information on turning your DSL modem off, contact your DSL provider for support.
- If you are using a phone splitter, this can cause faxing problems. (A splitter is a two-cord connector that plugs into a telephone wall jack.) Try removing the splitter and connecting the device directly to the telephone wall jack.
The device is having problems sending a manual fax
Solution:

NOTE: This possible solution applies only in the countries/regions that receive a 2-wire phone cord in the box with the device, including: Argentina, Australia, Brazil, Canada, Chile, China, Colombia, Greece, India, Indonesia, Ireland, Japan, Korea, Latin America, Malaysia, Mexico, Philippines, Poland, Portugal, Russia, Saudi Arabia, Singapore, Spain, Taiwan, Thailand, USA, Venezuela, and Vietnam.
- Make sure the telephone you use to initiate the fax call is connected directly to the device. To send a fax manually, the telephone must be connected directly to the port labeled 2-EXT on the device, as shown below.
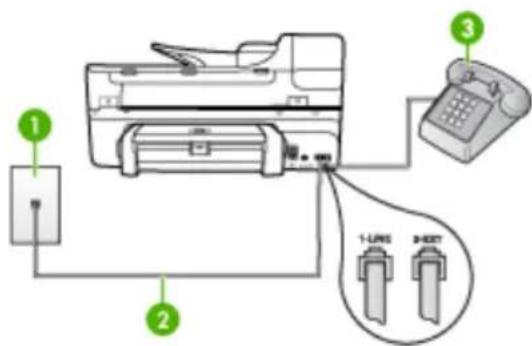
text_image
Diagram showing printer connection with labeled parts including printer, telephone, and two USB devices1 Telephone wall jack
2 Use the phone cord supplied in the box with the device to connect to the "1-LINE" port
3 Telephone
- If you are sending a fax manually from your phone that is connected directly to the device, you must use the keypad on the telephone to send the fax. You cannot use the keypad on the device control panel.

NOTE: If using a serial-type phone system, please connect your phone directly on top of the device cable which has a wall plug attached to it.
The device cannot receive faxes, but can send faxes
Solution:
- If you are not using a distinctive ring service, check to make sure that the Distinctive Ring feature on the device is set to All Rings. For more information, see Change the answer ring pattern for distinctive ring.
-
If Auto Answer is set to Off, you will need to receive faxes manually; otherwise, the device will not receive the fax. For information on receiving faxes manually, see Receive a fax manually.
-
If you have a voice mail service at the same phone number you use for fax calls, you must receive faxes manually, not automatically. This means that you must be available to respond in person to incoming fax calls. For information on setting up the device when you have a voice mail service, see Case F: Shared voice/fax line with voice mail. For information on receiving faxes manually, see Receive a fax manually.
- If you have a computer dial-up modem on the same phone line with the device, check to make sure that the software that came with your modem is not set to receive faxes automatically. Modems that are set up to receive faxes automatically take over the phone line to receive all incoming faxes, which prevents the device from receiving fax calls.
-
If you have an answering machine on the same phone line with the device, you might have one of the following problems:
-
Your answering machine might not be set up properly with the device.
- Your outgoing message might be too long or too loud to allow the device to detect fax tones, and the sending fax machine might disconnect.
- Your answering machine might not have enough quiet time after your outgoing message to allow the device to detect fax tones. This problem is most common with digital answering machines.
The following actions might help solve these problems:
- When you have an answering machine on the same phone line you use for fax calls, try connecting the answering machine directly to the device as described in Case I: Shared voice/fax line with answering machine.
Make sure the device is set to receive faxes automatically. For information on setting up the device to receive faxes automatically, see Receive a fax.
• Make sure the Rings to Answer setting is set to a greater number of rings than the answering machine. For more information, see Set the number of rings before answering. - Disconnect the answering machine and then try receiving a fax. If faxing is successful without the answering machine, the answering machine might be causing the problem.
Reconnect the answering machine and record your outgoing message again. Record a message that is approximately 10 seconds in duration. Speak slowly and at a low volume when recording your message. Leave at least 5 seconds of silence at the end of the voice message. There should be no background noise when recording this silent time. Try to receive a fax again.

NOTE: Some digital answering machines might not retain the recorded silence at the end of your outgoing message. Play back your outgoing message to check.
- If the device shares the same phone line with other types of phone equipment, such as an answering machine, a computer dial-up modem, or a multi-port switch box, the fax signal level might be reduced. The signal level can also be reduced if you use a splitter or connect extra cables to extend the length of your phone. A reduced fax signal can cause problems during fax reception. To find out if other equipment is causing a problem, disconnect everything except the device from the phone line, and then try to receive a fax. If you can receive faxes successfully without the other equipment, one or more pieces of the other equipment is causing problems; try adding them back one at a time and receiving a fax each time, until you identify which equipment is causing the problem.
- If you have a special ring pattern for your fax phone number (using a distinctive ring service through your telephone company), make sure that the Distinctive Ring feature on the device is set to match. For more information, see Change the answer ring pattern for distinctive ring.
The device cannot send faxes, but can receive faxes
Solution:
- The device might be dialing too fast or too soon. You might need to insert some pauses in the number sequence. For example, if you need to access an outside line before dialing the phone number, insert a pause following the access number. If your number is 9555555, and 9 accesses an outside line, you might insert pauses as follows: 9-555-5555. To enter a pause in the fax number you are typing, press Redial/Pause, or press the Space (#) button repeatedly, until a dash (-) appears on the display. You can also send the fax using monitor dialing. This enables you to listen to the phone line as you dial. You can set the pace of your dialing and respond to prompts as you dial. For more information, see Send a fax using monitor dialing.
- The number you entered when sending the fax is not in the proper format or the receiving fax machine is having problems. To check this, try calling the fax number from a telephone and listen for fax tones. If you cannot hear fax tones, the receiving fax machine might not be turned on or connected, or a voice mail service could be interfering with the recipient's phone line. You can also ask the recipient to check the receiving fax machine for any problems.
Fax tones are recorded on my answering machine
Solution:
- When you have an answering machine on the same phone line you use for fax calls, try connecting the answering machine directly to the device as described in Case I: Shared voice/fax line with answering machine. If you do not connect the answering machine as recommended, fax tones might be recorded on your answering machine.
- Make sure the device is set to receive faxes automatically and that the Rings to Answer setting is correct. The number of rings to answer for the device should be greater than the number of rings to answer for the answering machine. If the answering machine and the device are set to the same number of rings to answer, both devices answer the call and fax tones are recorded on the answering machine.
- Set your answering machine to a low number of rings and the device to answer in the maximum number of rings supported. (The maximum number of rings varies by country/region.) In this setup, the answering machine answers the call and the device monitors the line. If the device detects fax tones, the device receives the fax. If the call is a voice call, the answering machine records the incoming message. For more information, see Set the number of rings before answering.
The phone cord that came with my device is not long enough
Solution: If the phone cord that came with the device is not long enough, you can use a coupler to extend the length. You can purchase a coupler at an electronics store that carries phone accessories. You will also need another phone cord, which can be a standard phone cord that you might already have in your home or office.

TIP: If the device came with a 2-wire phone cord adaptor, you can use it with a 4-wire phone cord to extend the length. For information on using the 2-wire phone cord adaptor, see the documentation that came with it.
To extend your phone cord
- Using the phone cord supplied in the box with the device, connect one end to the coupler, then connect the other end to the port labeled 1-LINE on the back of the device.
- Connect another phone cord to the open port on the coupler and to the telephone wall jack.
The computer cannot receive faxes (Fax to PC)
Cause: The HP Digital Imaging monitor is turned off.
Solution: Check the taskbar and ensure that the HP Digital Imaging monitor is turned on at all times.
Cause: The computer selected to receive faxes is turned off.
Solution: Make sure the computer selected to receive faxes is switched on at all times.
Cause: Different computers are configured for setup and receiving faxes and one of them may be switched off.
Solution: If the computer receiving faxes is different from the one used for setup, both computers should be switched on at all times.
Cause: There is no paper in the input tray.
Solution: Load paper in the input tray.
Cause: The internal memory is full.
Solution: Clear the internal memory by clearing the fax log and memory.
Cause: Fax to PC is not activated or the computer is not configured to receive faxes
Solution: Activate Fax to PC and make sure the computer is configured to receive faxes.
Cause: HP Digital Imaging Monitor is not operating properly
Solution: Restart the HP Digital Imaging Monitor or restart the computer.
Solve network problems

NOTE: After correcting any of the following, run the installation program again.
General network troubleshooting
- If you are unable to install the device software, verify that:
-
All cable connections to the computer and the device are secure.
The network is operational and the network hub is turned on.
All applications, including virus protection programs, spyware protection programs, and firewalls, are closed or disabled for computers running Windows. -
Make sure the device is installed on the same subnet as the computers that will be using the device.
If the installation program cannot discover the device, print the network configuration page, and enter the IP address manually in the installation program. For more information, see Understand the network configuration page
- If you are using a computer running Windows, make sure that the network ports created in the device driver match the device IP address:
- Print the device's network configuration page.
- Click Start, point to Settings, and then click Printers or Printers and Faxes. - Or -
Click Start, click Control Panel, and then double-click Printers.
- Right-click the device icon, click Properties, and then click the Ports tab.
Select the TCP/IP port for the device, and then click Configure Port.
- Compare the IP address listed in the dialog box and make sure it matches the IP address listed on the network configuration page. If the IP addresses are different, change the IP address in the dialog box to match the address on the network configuration page.
- Click OK twice to save the settings and close the dialog boxes.
Problems connecting to a wired network
- If the Link light on the network connector does not turn on, make sure that all of the “General network troubleshooting” conditions are met.
- Though it is not recommended that you assign the device with a static IP address, you might resolve some installation problems (such as a conflict with a personal firewall) by doing so.
Solve wireless problems
If the device is unable to communicate with the network after completing the wireless setup and software installation, perform one or more of the following tasks.
Check the wireless communication settings
- Make sure the computer's wireless card is set to the correct wireless profile. A wireless profile is a set of network settings unique to a given network. A single wireless card might have several wireless profiles (for example, one for a home network and one for an office network). Open the Configuration utility for the network card installed on your computer, and ensure that the profile selected is the profile for the device's network.
- Make sure the device's network settings match those of your network. Do one of the following to find the settings for your network:
Infrastructure communication: Open the wireless access point's (WAP) Configuration utility.
Ad hoc communication: Open the Configuration utility for the network card installed in your computer.
- Compare the network's settings to those on the device's network configuration page, and note any differences. For more information, see Understand the network configuration page. Possible problems include the following:
- The WAP filters hardware addresses (MAC addresses).
One of these settings in the device might be incorrect: communication mode, network name (SSID), channel (ad hoc networks only), authentication type, encryption.
Print a document. If the document still does not print, then reset the device's network settings and reinstall the device software.
If the wireless network settings are correct, the computer might be associated with another wireless network. Ensure that the computer is associated with the same wireless network as that of the device.
Users can ensure this by checking the wireless settings on their respective computers. In addition, ensure that the computers have access to the wireless network.
If the wireless network settings are incorrect, follow these steps to correct the device's settings:
- Connect the device to your network with a network cable or to the computer using the network cable.
- Open the device's embedded Web server.
- Click the Networking tab, and then click Wireless (802.11) in the left pane.
- Use the Wireless Setup wizard on the Wireless Setup tab to change the device's settings to match the settings of the network.
- Close the device's embedded Web server, and then disconnect the network cable from the device.
- Uninstall the device software completely, and then reinstall the software.
Add hardware addresses to a wireless access point (WAP)
MAC filtering is a security feature in which a wireless access point (WAP) is configured with a list of MAC addresses (also called “hardware addresses”) of devices that are allowed to gain access to the network through the WAP. If the WAP does not have the hardware address of a device attempting to access the network, the WAP denies the device access to the network. If the WAP filters MAC addresses, then the device’s MAC address must be added to the WAP’s list of accepted MAC addresses.
- Print the network configuration page. For more information, see Understand the network configuration page.
- Open the WAP's configuration utility, and add the device's hardware address to the list of accepted MAC addresses.
Reset network configuration settings
If the device is still unable to communicate with the network, reset the device's network settings.
- Press Setup. Press an arrow button to move to Network, and then press OK.
- Press an arrow button to move to Restore Network Defaults, and then press OK.
- Print the network configuration page and verify that the network settings have been reset. For more information, see Understand the network configuration page. By default, the network name (SSID) is “hpsetup” and the communication mode is “ad hoc.”
Solve photo (memory card) problems
If the following topics do not help, see Support and warranty for information about HP support.

NOTE: If you are starting a memory card operation from a computer, see the software Help for troubleshooting information.
- The device cannot read the memory card
• The device cannot read photos on the memory card
• The device prints half a page, then ejects the paper
The device cannot read the memory card
- Check the memory card
• Make sure that the memory card is one of the supported types. For Compact Flash II - solid state memory only. For more information, see Insert a memory card.
Some memory cards have a switch that controls how they can be used. Make sure that the switch is set so that the memory card can be read.
Inspect the ends of the memory card for dirt or material that closes a hole or spoils a metal contact. Clean the contacts with a lint-free cloth and small amounts of isopropyl alcohol.
• Assure that the memory card is working properly by testing it with other devices.
- Check the memory card slot
• Make sure that the memory card is fully inserted into the correct slot. For more information, see Insert a memory card.
Remove the memory card (when the light is not blinking) and shine a flashlight into the empty slot. See if any of the small pins inside are bent. When the computer is off, you can straighten slightly bent pins by using the tip of a thin, retracted ballpoint pen. If a pin has bent in such a way that it touches another pin, replace the memory card reader or have the device serviced. For more information, see Support and warranty.
Make sure that only one memory card has been inserted at a time in the slots. An error message should appear on the control-panel display if more than one memory card is inserted.
The device cannot read photos on the memory card
Check the memory card
The memory card might be corrupt.
The device prints half a page, then ejects the paper
Check the print cartridges
Make sure the correct print cartridges are installed and the print cartridges are not low on ink. For more information, see Manage the device and Work with print cartridges.
HP cannot guarantee the quality of non-HP print cartridges.
Troubleshoot installation issues
If the following topics do not help, see Support and warranty for information about HP support.
• Hardware installation suggestions
• Software installation suggestions
Hardware installation suggestions
Check the device
- Make sure that all packing tape and material have been removed from outside and inside the device.
- Make sure that the device is loaded with paper.
- Make sure that no lights are on or blinking except the Ready light, which should be on. If the Attention light is blinking, check for messages on the device control panel.
Check the hardware connections
- Make sure that any cords and cables that you are using are in good working order.
- Make sure that the power cord is connected securely to both the device and to a working power outlet.
- Make sure that the phone cord is connected to the 1-LINE port.
Check the print cartridges
- Whenever you install a new print cartridge, the device aligns the print cartridges automatically. If the alignment fails, check to make sure the cartridges are installed correctly, and start the print cartridge alignment. For more information, see Align the print cartridges.
- Make sure that all latches and covers are closed properly.
Check the computer system
- Make sure that your computer is running one of the supported operating systems.
- Make sure that the computer meets at least the minimum system requirements.
Check the device to ensure the following
- Power light is on and not blinking. When the device is first turned on, it takes approximately 45 seconds to warm up.
- The device is in the Ready state, and no other lights on the device control panel are lit or blinking. If lights are lit or blinking, see the message on the device control panel.
- Ensure power cord and other cables are working, and are firmly connected to the device.
- All packing tapes and materials are removed from the device.
- Duplexer is locked into place.
- Paper is loaded correctly in the tray, and is not jammed in the device.
- All latches and covers are closed.
Software installation suggestions
Verify installation preliminaries
- Make sure to use the Starter CD that contains the correct installation software for your operating system.
- Before installing software, make sure that all other programs are closed.
- If the computer does not recognize the path to the CD-ROM drive that you type, make sure that you are specifying the correct drive letter.
- If the computer cannot recognize the Starter CD in the CD-ROM drive, inspect the Starter CD for damage. You can download the device driver from the HP Web site (www.hp.com/support).
Check or perform the following
- Make sure the computer meets the system requirements.
- Before installing software on a Windows computer, ensure all other programs are closed.
- If the computer does not recognize the path to the CD drive that you typed, ensure you are specifying the correct drive letter.
- If the computer cannot recognize the Starter CD in the CD drive, inspect the CD for damage. You can download the device driver from the HP Web site (www.hp.com/support).
- In the Windows device manager, make sure that the USB drivers have not been disabled.
- If you are using a computer running Windows, and the computer cannot detect the device, run the uninstallation utility (util\ccc\uninstall.bat on the Starter CD) to perform a clean uninstallation of the device driver. Restart your computer, and reinstall the device driver.
Check the computer system
- Make sure that your computer is running one of the supported operating systems.
- Make sure that the computer meets at least the minimum system requirements.
Clear jams
Occasionally, media becomes jammed during a job. Try the following remedies before you attempt to clear the jam.
- Make sure that you are printing with media that meets specifications. For more information, see Select print media.
- Make sure that you are printing with media that is not wrinkled, folded, or damaged.
- Make sure that the device is clean. For more information, see Clean the device.
- Make sure that the trays are loaded correctly and are not too full. For more information, see Load media.
This section contains the following topics:
- Clear paper jams
- Avoid paper jams
Clear paper jams
If the paper was loaded in the input tray, you might need to clear the paper jam from the duplexer.
Paper can also jam in the automatic document feeder. Several common actions can cause paper to jam the automatic document feeder:
- Placing too much paper in the document feeder tray. For information on the maximum number of sheets allowed in the automatic document feeder, see Load originals.
- Using paper that is too thick or too thin for the device.
- Trying to add paper to the document feeder tray while the device is feeding pages.
To clear a paper jam from the duplexer
- Remove the duplexer.
△ CAUTION: Trying to clear a paper jam from the front of the device can damage the print mechanism. Always access and clear paper jams through the duplexer.
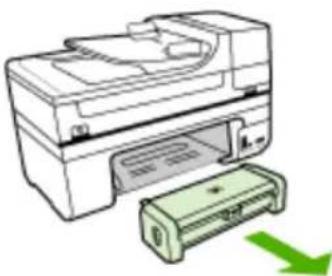
natural_image
Illustration of a printer with a green paper holder and a green arrow indicating compression (no text or symbols)- Gently pull the paper out of the rollers.
△ CAUTION: If the paper tears when you are removing it from the rollers, check the rollers and wheels for torn pieces of paper that might be remaining inside the device. If you do not remove all the pieces of paper from the device, more paper jams are likely to occur.
-
Replace the duplexer. Gently push the door forward until it snaps into place.
-
Press OK to continue the current job.
To clear a paper jam in the automatic document feeder
- Lift the cover of the automatic document feeder.
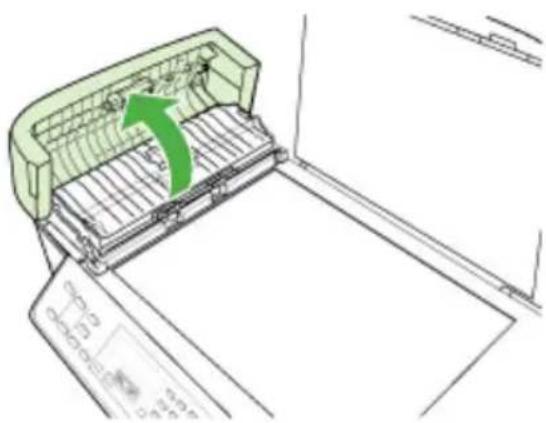
natural_image
Diagram of a printer drawer with green arrow indicating motion (no text or symbols)- Gently pull the paper out of the rollers.
△ CAUTION: If the paper tears when you are removing it from the rollers, check the rollers and wheels for torn pieces of paper that might be remaining inside the device. If you do not remove all the pieces of paper from the device, more paper jams are likely to occur.
- Close the cover of the automatic document feeder.
Avoid paper jams
To help avoid paper jams, follow these guidelines.
- Remove printed papers from the output tray frequently.
- Prevent curled or wrinkled paper by storing all unused paper flat in a resealable bag.
- Ensure that paper loaded in the input tray lays flat and the edges are not bent or torn.
- Do not combine different paper types and paper sizes in the input tray; the entire stack of paper in the input tray must be the same size and type.
- Adjust the paper-width guide in the input tray to fit snugly against all paper. Make sure the paper-width guide does not bend the paper in the input tray.
- Do not force paper too far forward in the input tray.
- Use paper types that are recommended for the device. For more information, see Understand specifications for supported media.
- Do not leave originals on the glass. If you load an original in the automatic document feeder while there is already an original on the glass, the original can jam in the automatic document feeder.
A HP supplies and accessories
This section provides information on HP supplies and accessories for the device. The information is subject to changes, visit the HP Web site (www.hpshopping.com) for the latest updates. You may also make purchases through the Web site.
This section contains the following topics:
• Order printing supplies online
- Supplies
Order printing supplies online
Besides the HP Web site, you may order printing supplies using the following tools:
- Toolbox (Windows): On the Estimated Ink Level tab, click Shop Online.
- HP Printer Utility (Mac OS): Click Supplies Status from the Information and Support panel, click the Shop for HP Supplies drop-down menu, and then choose Online.
Supplies
This section contains the following topics:
• Supported print cartridges
- HP media
Supported print cartridges
The availability of print cartridges varies by country/region. The print cartridges might come in different sizes.
You can find the print cartridge number in the following places:
- On the label of the print cartridge you are replacing.
- Windows: From the Toolbox, if you have bidirectional communication, click the Estimated Ink Levels tab, scroll to display the Cartridge Details button, and then click Cartridge Details.
• Mac OS: From the HP Printer Utility, click Supply Info from the Information and Support panel, and then click Retail Supplies Information.
HP media
To order media such as HP Premium Plus Photo Paper or HP Premium Paper, go to www.hp.com. Choose your country/region, and then select Buy or Shopping.
B Support and warranty
The information in Maintain and troubleshoot suggests solutions to common problems. If your device is not operating correctly and those suggestions did not solve your problem, try using one of the following support services to obtain assistance.
This section contains the following topics:
• Obtain electronic support
- Warranty
• Obtain HP telephone support
• Prepare the device for shipment
- Pack the device
Obtain electronic support
To find support and warranty information, go to the HP Web site at www.hp.com/support. If prompted, choose your country/region, and then click Contact HP for information on calling for technical support.
This Web site also offers technical support, drivers, supplies, ordering information and other options such as:
- Access online support pages.
- Send HP an e-mail message for answers to your questions.
- Connect with an HP technician by using online chat.
- Check for software updates.
You can also obtain support from the Toolbox (Windows) or HP Printer Utility (Mac OS), which provide easy, step-by-step solutions to common printing problems. For more information, see Toolbox (Windows) or HP Printer Utility (Mac OS).
Support options and availability vary by product, country/region, and language.
Warranty
| HP product Duration of limited warranty | |
| Software Media 90 days | |
| Printer | 1 year |
| Print or Ink cartridges | Until the HP ink is depleted or the “end of warranty” date printed on the cartridge has been reached, whichever occurs first. This warranty does not cover HP ink products that have been refilled, remanufactured, refurbished, misused, or tampered with. |
| Accessories 1 year unless otherwise stated |
A. Extent of limited warranty
- Hewlett-Packard (HP) warrants to the end-user customer that the HP products specified above will be free from defects in materials and workmanship for the duration specified above, which duration begins on the date of purchase by the customer.
- For software products, HP's limited warranty applies only to a failure to execute programming instructions. HP does not warrant that the operation of any product will be interrupted or error free.
- HP's limited warranty covers only those defects that arise as a result of normal use of the product, and does not cover any other problems, including those that arise as a result of:
a. Improper maintenance or modification; b. Software, media, parts, or supplies not provided or supported by HP;
c. Operation outside the product's specifications; d. Unauthorized modification or misuse.
-
For HP printer products, the use of a non-HP cartridge or a refilled cartridge does not affect either the warranty to the customer or any HP support contract with the customer. However, if printer failure or damage is attributable to the use of a non-HP or refilled cartridge or an expired ink cartridge, HP will charge its standard time and materials charges to service the printer for the particular failure or damage.
-
If HP receives, during the applicable warranty period, notice of a defect in any product which is covered by HP's warranty, HP shall either repair or replace the product, at HP's option.
-
If HP is unable to repair or replace, as applicable, a defective product which is covered by HP's warranty, HP shall, within a reasonable time after being notified of the defect, refund the purchase price for the product.
-
HP shall have no obligation to repair, replace, or refund until the customer returns the defective product to HP.
-
Any replacement product may be either new or like-new, provided that it has functionality at least equal to that of the product being replaced.
-
HP products may contain remanufactured parts, components, or materials equivalent to new in performance.
-
HP's Limited Warranty Statement is valid in any country where the covered HP product is distributed by HP. Contracts for additional warranty services, such as on-site service, may be available from any authorized HP service facility in countries where the product is distributed by HP or by an authorized importer.
B. Limitations of warranty
TO THE EXTENT ALLOWED BY LOCAL LAW, NEITHER HP NOR ITS THIRD PARTY SUPPLIERS MAKES ANY OTHER WARRANTY OR CONDITION OF ANY KIND, WHETHER EXPRESS OR IMPLIED WARRANTIES OR CONDITIONS OF MERCHANTABILITY, SATISFACTORY QUALITY, AND FITNESS FOR A PARTICULAR PURPOSE.
C. Limitations of liability
-
To the extent allowed by local law, the remedies provided in this Warranty Statement are the customer's sole and exclusive remedies.
-
TO THE EXTENT ALLOWED BY LOCAL LAW, EXCEPT FOR THE OBLIGATIONS SPECIFICALLY SET FORTH IN THIS WARRANTY STATEMENT, IN NO EVENT SHALL HP OR ITS THIRD PARTY SUPPLIERS BE LIABLE FOR DIRECT, INDIRECT, SPECIAL, INCIDENTAL, OR CONSEQUENTIAL DAMAGES, WHETHER BASED ON CONTRACT, TORT, OR ANY OTHER LEGAL THEORY AND WHETHER ADVISED OF THE POSSIBILITY OF SUCH DAMAGES.
D. Local law
-
This Warranty Statement gives the customer specific legal rights. The customer may also have other rights which vary from state to state in the United States, from province to province in Canada, and from country to country elsewhere in the world.
-
To the extent that this Warranty Statement is inconsistent with local law, this Warranty Statement shall be deemed modified to be consistent with such local law. Under such local law, certain disclaimers and limitations of this Warranty Statement may not apply to the customer. For example, some states in the United States, as well as some governments outside the United States (including provinces in Canada), may:
a. Preclude the disclaimers and limitations in this Warranty Statement from limiting the statutory rights of a consumer
(e.g., the United Kingdom);
b. Otherwise restrict the ability of a manufacturer to enforce such disclaimers or limitations; or
c. Grant the customer additional warranty rights, specify the duration of implied warranties which the manufacturer cannot disclaim, or allow limitations on the duration of implied warranties.
- THE TERMS IN THIS WARRANTY STATEMENT, EXCEPT TO THE EXTENT LAWFULLY PERMITTED, DO NOT EXCLUDE, RESTRICT, OR MODIFY, AND ARE IN ADDITION TO, THE MANDATORY STATUTORY RIGHTS APPLICABLE TO THE SALE OF THE HP PRODUCTS TO SUCH CUSTOMERS.
HP Limited Warranty
Dear Customer,
You will find below the name and address of the HP entity responsible for the performance of the HP Limited Warranty in your country.
You may have additional statutory rights against the seller based on your purchase agreement. Those rights are not in any way affected by this HP Limited Warranty.
Ireland: Hewlett-Packard Ireland Ltd. 30 Herbert Street IRL-Dublin 2
United Kingdom: Hewlett-Packard Ltd, Cain Road, Bracknell, GB-Berks RG12 1HN
Obtain HP telephone support
During the warranty period, you may obtain assistance from the HP Customer Care Center.
This section contains the following topics:
• Before you call
• Support process
• HP support by phone
• Additional warranty options
• HP Quick Exchange Service (Japan)
• HP Korea customer support
Before you call
Visit the HP Web site (www.hp.com/support) for the latest troubleshooting information, or product fixes and updates.
To assist our Customer Care Center representatives to serve you better, prepare the following information if you need to call HP.
-
Print the self-test diagnostic page of the device. For more information, see Understand the self-test diagnostic page. If the device does not print, get the following information ready:
-
Device model
-
Model number and serial number (check the back of the device)
-
Check the operating system that you are using, such as Windows XP.
- If the device is connected to the network, check the network operating system.
- Note how the device is connected to your system, such as through USB or network connection.
- Obtain the version number of the printer software. (To find the version number of the printer driver, open the printer settings or properties dialog box, and click the About tab.)
- If you have a problem printing from a particular application, note the application and version number.
Support process
If you have a problem, follow these steps
- Check the documentation that came with the device.
-
Visit the HP online support Web site at www.hp.com/support. HP online support is available to all HP customers. It is the fastest source for up-to-date device information and expert assistance and includes the following features:
-
Fast access to qualified online support specialists
- Software and driver updates for the HP All-in-One
- Valuable troubleshooting information for common problems
-
Proactive device updates, support alerts, and HP newsgrams that are available when you register the HP All-in-One
-
Call HP support. Support options and availability vary by device, country/region, and language.
HP support by phone
This section contains the following topics:
• Phone support period
- Telephone support numbers
- Placing a call
• After the phone support period
Phone support period
One year of phone support is available in North America, Asia Pacific, and Latin America (including Mexico).
Telephone support numbers
In many locations, HP provides toll free telephone support during the warranty period. However, some of the support numbers might not be toll free.
For the most current list of telephone support numbers, see www.hp.com/support.
Placing a call
Call HP support while you are in front of the computer and the HP All-in-One. Be prepared to provide the following information:
- Model number (located on the label on the front of the device)
- Serial number (located on the back or bottom of the device)
-
Messages that appear when the situation occurs
• Answers to these questions: -
Has this situation happened before?
- Can you re-create it?
- Did you add any new hardware or software to your computer at about the time that this situation began?
Did anything else occur prior to this situation (such as a thunderstorm, HP All-in-One was moved, etc.)?
After the phone support period
After the phone support period, help is available from HP at an additional cost. Help may also be available at the HP online support Web site: www.hp.com/support. Contact your HP dealer or call the support phone number for your country/region to learn more about support options.
Additional warranty options
Extended service plans are available for the HP All-in-One at additional costs. Go to www.hp.com/support, select your country/region and language, then explore the services and warranty area for information about the extended service plans.
HP Quick Exchange Service (Japan)
For instructions on how to pack your product for exchange, see Pack the device.
HP Korea customer support
HP 한국 고객 지원 문의
Prepare the device for shipment
If after contacting HP Customer Support or returning to the point of purchase, you are requested to send the device in for service, make sure you remove and keep the following items before returning your device:
- The print cartridges
• The control-panel faceplate - The duplexer
- The output tray
- The power cord, USB cable, and any other cable connected to the device
- Any paper loaded in the input tray
- Remove any originals you might have loaded in the device
This section contains the following topics:
- Remove the device control-panel faceplate
- Remove the print cartridges before shipment
- Remove the duplexer
- Remove the output tray
Remove the device control-panel faceplate
Complete the following steps once you have removed the print cartridges.

NOTE: This information does not apply to customers in Japan.

CAUTION: The device must be unplugged before following these steps.
CAUTION: The replacement device will not be shipped with a power cord. Store the power cord in a safe place until the replacement arrives.
To remove the control-panel faceplate
- Press the Power button to turn off the device.
-
Unplug the power cord, and then disconnect it from the device. Do not return the power cord with the device.
-
Remove the control-panel faceplate as follows:
a. Lift the scanner lid.
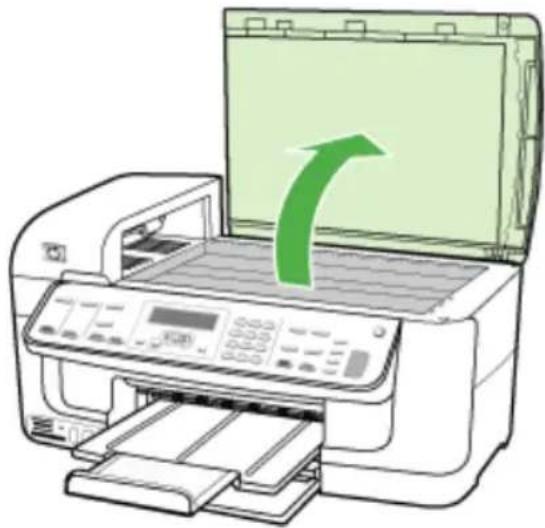
natural_image
Illustration of an HP printer with a green arrow indicating the print process (no text or symbols present)b. Use either your finger or insert a thin object in the tab on the upper right corner of the control-panel faceplate to pry the control-panel faceplate off.
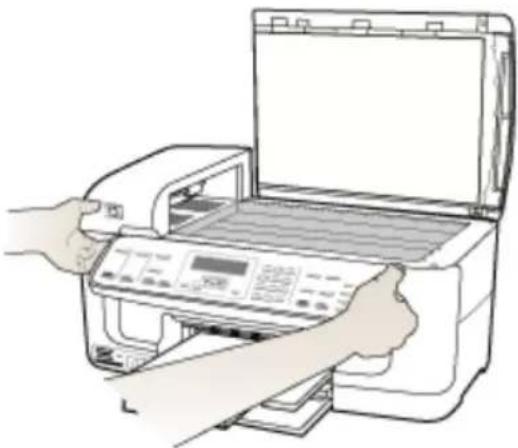
natural_image
Illustration of hands operating a printer with an open lid (no text or symbols visible)- Retain the control-panel faceplate. Do not return the control-panel faceplate with the HP All-in-One.

CAUTION: The replacement device might not come with a control-panel faceplate. Store your control-panel faceplate in a safe place, and when the replacement device arrives, reattach your control-panel faceplate. You must attach your control-panel faceplate to use the control-panel functions on the replacement device.

NOTE: See the setup poster that came with the device for instructions on how to attach your control-panel faceplate. The replacement device might come with instructions for setting up your device.
Remove the print cartridges before shipment
Before you return the device, make sure you remove the print cartridges.

NOTE: This information does not apply to customers in Japan.
To remove print cartridges before shipment
- Turn on the device and wait until the print carriage is idle and silent. If the device will not turn on, skip this step and go to step 2.

NOTE: If the device does not turn on, you can unplug the power cord and then manually slide the print carriage to the far right side to remove the print cartridges.
- Gently pull open the print cartridge cover.
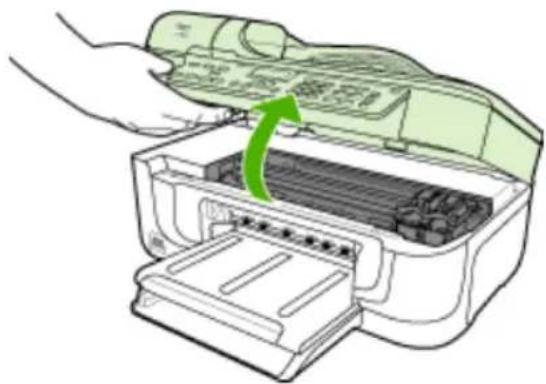
natural_image
Illustration of a printer being inserted into a paper airplane, showing the green arrow indicating the process (no text or symbols present)- Remove the print cartridges from their slots by grasping each between your thumb and forefinger and pulling it firmly toward you.
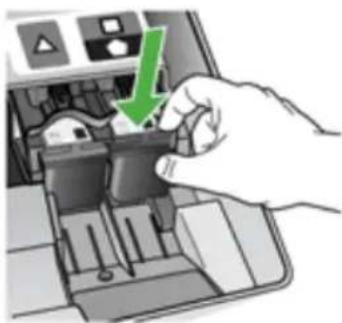
natural_image
Hand inserting a component into a device with a green arrow indicating the action (no text or symbols present)- Place the print cartridges in an airtight plastic container so they will not dry out, and put them aside. Do not send them with the device unless the HP customer support call agent instructs you to.
- Close the print cartridge door and wait a few minutes for the print carriage to move back to its home position (on the left side).
- After the scanner is idle and has returned to its parked position, press the Power button to turn off the device.
Remove the duplexer
Remove the duplexer before shipping the device.
Appendix B
▲ Push the button on either side of the rear access panel or the duplexer, and then remove the panel or unit.
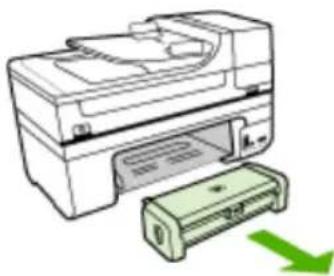
natural_image
Illustration of a printer with a green printer inserted into the base, showing no text or symbols.Remove the output tray
Remove the output tray before shipping the device.
▲ Lift the output tray, and gently pull it out of the device.
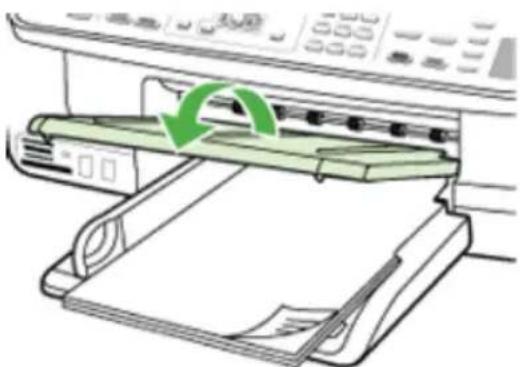
natural_image
Illustration of a printer printer with green circular arrow indicating rotation (no text or symbols)Pack the device
Complete the following steps after you have prepared the device for shipment.
To pack the device
- If available, pack the device for shipment by using the original packaging materials, or use the packaging materials that came with your replacement device.
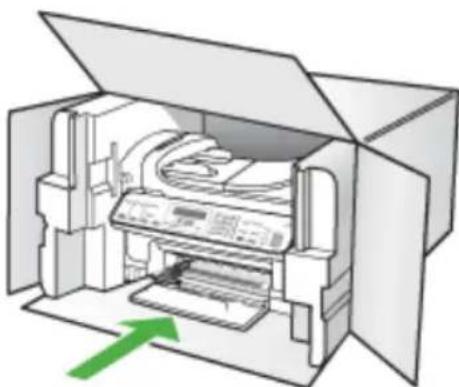
natural_image
Diagram of an open printer with internal circuitry and a green arrow indicating orientation (no text or symbols)If you do not have the original packaging materials, please use other adequate packaging materials. Shipping damage caused by improper packaging and/or improper transportation is not covered under the warranty.
-
Place the return shipping label on the outside of the box.
-
Include the following items in the box:
-
A complete description of symptoms for service personnel (samples of print quality problems are helpful).
- A copy of the sales slip or other proof of purchase to establish the warranty coverage period.
- Your name, address, and a phone number where you can be reached during the day.
C Device specifications
For media and media-handling specifications, see Understand specifications for supported media.
This section contains the following topics:
• Physical specifications
• Product features and capacities
• Processor and memory specifications
• System requirements
• Network protocol specifications
• Embedded Web server specifications
- Print specifications
• Copy specifications
• Fax specifications
- Scan specifications
• Environmental specifications
• Electrical specifications
• Acoustic emission specifications (print in Draft mode, noise levels per ISO 7779)
• Memory card specifications
Physical specifications
Size (width x depth x height)
Device with A4/Letter-size scanner glass and duplexer: 476 x 473 x 258 mm (19.0 x 18.9 x 10.3 inches)
Device weight (including print supplies)
Device with A4/Letter-size scanner glass and duplexer: 8.6 kg (19 lb)
Product features and capacities
| Feature Capacity | |
| Connectivity | • USB 2.0-compliant high speed• Wireless 802.11b/g• Wired network |
| Print cartridges | Four print cartridges (black, tri-color print cartridge, photo, and photo-gray)NOTE: Not all print cartridges are supported in all countries/regions. |
| Supply yields | Visitwww.hp.com/pageyield/ for more information on estimated print cartridge yields. |
| Device languages HP PCL 3 | |
| Font support | US fonts: CG Times, CG Times Italic, Universe, Universe Italic, Courier, Courier Italic, Letter Gothic, Letter Gothic Italic. |
| Duty cycle | Up to 5000 pages per month |
| Device control panel language supportLanguage availability varies by country/region. | Bulgarian, Croatian, Czech, Danish, Dutch, English, Finnish, French, German, Greek, Hungarian, Italian, Japanese, Korean, Norwegian, Polish, Portuguese, Romanian, Russian, Simplified Chinese, Slovak, Slovenian, Spanish, Swedish, Traditional Chinese, Turkish, Ukrainian. |
Processor and memory specifications
Device processor
192 MHz ARM946ES, ETM9 (medium)
Device memory
64 MB built-in RAM, 16 MB built-in MROM + 2 MB built-in Flash ROM
System requirements

NOTE: For the most current information about supported operating systems and system requirements, visit http://www.hp.com/support/.
Operating system compatibility
- Windows 2000, Windows XP, Windows XP x64, Windows Vista

NOTE: For Windows 2000, only printer drivers, scanner drivers, and the Toolbox are available.
- Mac OS X (10.3, 10.4)
- Linux
Minimum requirements
- Windows 2000 Service Pack 4: Intel Pentium II or Celeron processor, 128 MB RAM, 200 MB free hard disk space, Microsoft Internet Explorer 6.0
- Windows XP (32-bit): Intel Pentium II or Celeron processor, 128 MB RAM, 410 MB free hard disk space, Microsoft Internet Explorer 6.0
- Microsoft® Windows® x64: AMD Athlon 64, AMD Opteron, Intel Xeon processor with Intel EM64T support, or Intel Pentium 4 processor with Intel EM64T support, 128 MB RAM, 200 MB free hard disk space, Microsoft Internet Explorer 6.0
- Windows Vista: 800 MHz 32-bit (x86) or 64-bit (x64) processor, 512 MB RAM, 765 MB free hard disk space, Microsoft Internet Explorer 7.0
- Mac OS X (10.3.9 and higher, 10.4.9 and higher): 400 MHz Power PC G3 (v10.3.9 and higher, 10.4.9 and higher) or 1.83 GHz Intel Core Duo (10.4.9 and higher), 256 MB memory - 800 MB free hard disk space
- Quick Time 5.0 or later (Mac OS)
- Adobe Acrobat Reader 5.0 or later
Recommended requirements
- Windows 2000 Service Pack 4: Intel Pentium III or higher processor, 256 MB RAM, 500 MB free hard disk space
- Windows XP (32-bit): Intel Pentium III or higher processor, 256 MB RAM, 500 MB free hard disk space
- Microsoft® Windows® XP x64: AMD Athlon 64, AMD Opteron, Intel Xeon processor with Intel EM64T support, or Intel Pentium 4 processor with Intel EM64T support, 256 MB RAM, 500 MB free hard disk space
- Windows Vista: 1 GHz 32-bit (x86) or 64-bit (x64) processor, 1 GB RAM, 1.2 GB free hard disk space
- Mac OS X (10.3.9 and higher, 10.4.9 and higher): 400 MHz Power PC G4 (v10.3.9 and higher, 10.4.9 and higher) or 1.83 GHz Intel Core Duo (10.4.9 and higher), 256 MB memory - 800 MB free hard disk space
• Microsoft Internet Explorer 6.0 or later (Windows 2000, Windows XP); Internet Explorer 7.0 or later (Windows Vista)
Network protocol specifications
Network operating system compatibility
- Windows 2000, Windows XP (32-bit), Windows XP x64 (Professional and Home Editions), Windows Vista (32-bit) & (64-bit) [Ultimate, Enterprise & Business Edition]
• Mac OS X (10.3, 10.4)
- Microsoft Windows 2000 Server Terminal Services with Citrix Metaframe XP with Feature Release 3
- Microsoft Windows 2000 Server Terminal Services with Citrix Presentation Server 4.0
- Microsoft Windows 2000 Server Terminal Services
- Microsoft Windows 2003 Server Terminal Services
- Microsoft Windows 2003 Server Terminal Services with Citrix Presentation Server 4.0
- Microsoft Windows 2003 Server Terminal Services with Citrix Presentation Server 4.5
- Microsoft Windows 2003 Server Terminal Services with Citrix Metaframe XP with Feature Release 3
- Microsoft Windows 2003 Small Business Server Terminal Services
• Novell Netware 6, 6.5, Open Enterprise Server 6.5
Compatible network protocols
TCP/IP
Network management
Embedded Web server
Features
Ability to remotely configure and manage network devices
Embedded Web server specifications
Requirements
- A TCP/IP-based network (IPX/SPX-based networks are not supported)
- A Web browser (either Microsoft Internet Explorer 5.5 or higher, Opera 8.0 or higher, Mozilla Firefox 1.0 or higher, or Safari 1.2, or higher)
- A network connection (you cannot use the embedded Web server connected directly to a computer with a USB cable)
- An Internet connection (required for some features)

NOTE: You can open the embedded Web server without being connected to the Internet. However, some features will not be available.
- It must be on the same side of a firewall as the device.
Print specifications
Black print resolution
Up to 1200 dpi with pigmented black ink
Color print resolution
HP enhanced photo quality with Vivera inks (up to 4800 by 1200 dpi Optimized on HP Premium Plus photo papers with 1200 x 1200 input dpi)
Copy specifications
• Digital image processing
- Up to 100 copies from original (varies by model)
• Digital zoom: from 25 to 400% (varies by model)
- Fit to page, pre-scan
- Copy speeds vary according to the complexity of the document
| Mode | Type Scan resolution (dpi) | |
| Best Black up to 600 x 1200 | ||
| Color up to 600 x 1200 | ||
| Normal Black up to 300 x 300 | ||
| Color up to 300 x 300 | ||
| Fast Black up to 300 x 300 | ||
| Color up to 300 x 300 |
Fax specifications
- Walk-up black-and-white and color fax capability.
- Up to 110 speed dials (varies by model).
- Up to 120-page memory (varies by model, based on ITU-T Test Image #1 at standard resolution). More complicated pages or higher resolution takes longer and uses more memory.
- Manual fax send and receive.
• Automatic busy redial up to five times (varies by model).
• Automatic no-answer redial one time (varies by model).
• Confirmation and activity reports. - CCITT/ITU Group 3 fax with Error Correction Mode.
• 33.6 Kbps transmission. - 3 seconds per page speed at 33.6 Kbps (based on ITU-T Test Image #1 at standard resolution). More complicated pages or higher resolution take longer and use more memory.
- Ring detect with automatic fax/answering machine switching.
| Photo (dpi) | Very Fine (dpi) | Fine (dpi) | Standard (dpi) | |
| Black 196 x 203 (8-bit grayscale) | 300 x 300 196 x 203 | 196 x 98 | ||
| Color 200 x 200 200 x 200 200 x 200 | 200 x 200 | |||
Fax to PC Specifications
• Supported file type: Uncompressed TIFF
• Supported fax types: black-and-white faxes
Scan specifications
• Image editor included
- Integrated OCR software automatically converts scanned text to editable text
- Scan speeds vary according to the complexity of the document
- Twain-compliant interface
• Resolution: 2400 x 4800 ppi optical, up to 19,200 ppi enhanced
• Color: 16-bit per RGB color, 48-bit total
• Maximum scan size from glass: 216 x 297 mm (8.5 x 11.7 inches)
• Maximum scan size from ADF: 216 x 356 mm (8.5 x 14 inches)
Environmental specifications
Operating environment
Operating temperature: 5° to 40° C (41° to 104° F) Recommended operating conditions: 15° to 32° C (59° to 90° F) Recommended relative humidity: 25 to 75% noncondensing
Storage environment
Storage temperature: -40^ to 60^ (-40° to 140°F)
Storage relative humidity: Up to 90% noncondensing at a temperature of 65^ (150°F)
Electrical specifications
Power supply
Universal power adapter (external)
Power requirements
Input voltage: 100 to 240 VAC (± 10%), 50/60 Hz (± 3Hz) Output voltage: 32 Vdc at 940 mA; 16 Vdc at 625 mA
Power consumption
35 watts printing (Fast Draft Mode); 40 watts copying (Fast Draft Mode)
Acoustic emission specifications (print in Draft mode, noise levels per ISO 7779)
Sound pressure (bystander position)
LpAd 55 (dBA)
Sound power
LwAd 6.9 (BA)
Memory card specifications
• Maximum recommended number of files on a memory card: 1,000
• Maximum recommended individual file size: 12 megapixel maximum, 8 MB maximum
• Maximum recommended memory card size: 1 GB (solid state only)

NOTE: Approaching any of the recommended maximums on a memory card might cause the performance of the device to be slower than expected.
Supported memory card types
- CompactFlash (Type I and II)
- Memory Stick, Memory Stock Duo, Memory Stick Pro, MagicGate Memory Stick Duo
- Memory Stick Micro (requires adapter, sold separately)
- Secure Digital
• High Capacity Secure Digital - miniSD, microSD (requires adapter, sold separately)
- MultiMediaCard (MMC), Secure MultiMediaCard
- Reduced-Size MultiMmediaCard (RS-MMC), MMC Mobile, MMCmicro (requires adapter, sold separately)
- xD-Picture Card
D Regulatory information
The device meets product requirements from regulatory agencies in your country/region.
This section contains the following topics:
- FCC statement
• Notice to users in Korea
• VCCI (Class B) compliance statement for users in Japan - Notice to users in Japan about the power cord
- Toxic and hazardous substance table
• LED indicator statement - Noise emission statement for Germany
- Notice to users of the U.S. telephone network: FCC requirements
• Notice to users of the Canadian telephone network - Notice to users in the European Economic Area
- Notice to users of the German telephone network
• Australia wired fax statement
• Regulatory information for wireless products
• Regulatory model number - Declaration of conformity
• Environmental product stewardship program
FCC statement
FCC statement
The United States Federal Communications Commission (in 47 CFR 15.105) has specified that the following notice be brought to the attention of users of this product.
This equipment has been tested and found to comply with the limits for a Class B digital device, pursuant to Part 15 of the FCC Rules. These limits are designed to provide reasonable protection against harmful interference in a residential installation. This equipment generates, uses and can radiate radio frequency energy and, if not installed and used in accordance with the instructions, may cause harmful interference to radio communications. However, there is no guarantee that interference will not occur in a particular installation. If this equipment does cause harmful interference to radio or television reception, which can be determined by turning the equipment off and on, the user is encouraged to try to correct the interference by one or more of the following measures:
• Reorient the receiving antenna.
- Increase the separation between the equipment and the receiver.
- Connect the equipment into an outlet on a circuit different from that to which the receiver is connected.
- Consult the dealer or an experienced radio/TV technician for help.
For further information, contact: Manager of Corporate Product Regulations Hewlett-Packard Company 3000 Hanover Street Palo Alto, Ca 94304 (650) 857-1501
Modifications (part 15.21)
The FCC requires the user to be notified that any changes or modifications made to this device that are not expressly approved by HP may void the user's authority to operate the equipment.
This device complies with Part 15 of the FCC Rules. Operation is subject to the following two conditions: (1) this device may not cause harmful interference, and (2) this device must accept any interference received, including interference that may cause undesired operation.
Notice to users in Korea
사용자 안내문(B급 기기)
VCCI (Class B) compliance statement for users in Japan
Notice to users in Japan about the power cord
LED indicator statement
LED indicator statement
The display LEDs meet the requirements of EN 60825-1.
Noise emission statement for Germany
Geräuschemission
Notice to users of the U.S. telephone network: FCC requirements
Notice to users of the U.S. telephone network: FCC requirements
This equipment complies with FCC rules, Part 68. On this equipment is a label that contains, among other information, the FCC Registration Number and Ringer Equivalent Number (REN) for this equipment. If requested, provide this information to your telephone company.
An FCC compliant telephone cord and modular plug is provided with this equipment. This equipment is designed to be connected to the telephone network or premises wiring using a compatible modular jack which is Part 68 compliant. This equipment connects to the telephone network through the following standard network interface jack: USOC RJ-11C.
The REN is useful to determine the quantity of devices you may connect to your telephone line and still have all of those devices ring when your number is called. Too many devices on one line might result in failure to ring in response to an incoming call. In most, but not all, areas the sum of the RENs of all devices should not exceed five (5). To be certain of the number of devices you may connect to your line, as determined by the REN, you should call your local telephone company to determine the maximum REN for your calling area.
If this equipment causes harm to the telephone network, your telephone company might discontinue your service temporarily. If possible, they will notify you in advance. If advance notice is not practical, you will be notified as soon as possible. You will also be advised of your right to file a complaint with the FCC. Your telephone company might make changes in its facilities, equipment, operations, or procedures that could affect the proper operation of your equipment. If they do, you will be given advance notice so you will have the opportunity to maintain uninterrupted service. If you experience trouble with this equipment, please contact the manufacturer, or look elsewhere in this manual, for warranty or repair information. Your telephone company might ask you to disconnect this equipment from the network until the problem has been corrected or until you are sure that the equipment is not malfunctioning.
This equipment may not be used on coin service provided by the telephone company.
Connection to party lines is subject to state tariffs. Contact your state public utility commission, public service commission, or corporation commission for more information.
This equipment includes automatic dialing capability. When programming and/or making test calls to emergency numbers:
- Remain on the line and explain to the dispatcher the reason for the call.
• Perform such activities in the off-peak hours, such as early morning or late evening.

Note The FCC hearing aid compatibility rules for telephones are not applicable to this equipment.
The Telephone Consumer Protection Act of 1991 makes it unlawful for any person to use a computer or other electronic device, including fax machines, to send any message unless such message clearly contains in a margin at the top or bottom of each transmitted page or on the first page of transmission, the date and time it is sent and an identification of the business, other entity, or other individual sending the message and the telephone number of the sending machine or such business, other entity, or individual. (The telephone number provided might not be a 900 number or any other number for which charges exceed local or long-distance transmission charges.) In order to program this information into your fax machine, you should complete the steps described in the software.
Notice to users of the Canadian telephone network
This equipment meets the applicable Industry Canada Terminal Equipment Technical Specifications. This is confirmed by the registration number. The abbreviation IC before the registration number signifies that registration was performed based on a Declaration of Conformity indicating that Industry Canada technical specifications were met. It does not imply that Industry Canada approved the equipment.
Users should ensure for their own protection that the electrical ground connections of the power utility, telephone lines and internal metallic water pipe system, if present, are connected together. This precaution might be particularly important in rural areas.

Note The REN (Ringer Equivalence Number) assigned to each terminal device provides an indication of the maximum number of terminals allowed to be connected to a telephone interface. The termination on an interface might consist of any combination of devices subject only to the requirement that the sum of the Ringer Equivalence Numbers of all the devices does not exceed 5.
The REN for this product is 0.0B, based on FCC Part 68 test results.
Notice to users in the European Economic Area
Notice to users in the European Economic Area

This product is designed to be connected to the analog Switched Telecommunication Networks (PSTN) of the European Economic Area (EEA) countries/regions.
Network compatibility depends on customer selected settings, which must be reset to use the equipment on a telephone network in a country/region other than where the product was purchased. Contact the vendor or Hewlett-Packard Company if additional product support is necessary.
This equipment has been certified by the manufacturer in accordance with Directive 1999/5/EC (annex II) for Pan-European single-terminal connection to the public switched telephone network (PSTN). However, due to differences between the individual PSTNs provided in different countries, the approval does not, of itself, give an unconditional assurance of successful operation on every PSTN network termination point.
In the event of problems, you should contact your equipment supplier in the first instance.
This equipment is designed for DTMF tone dialing and loop disconnect dialing. In the unlikely event of problems with loop disconnect dialing, it is recommended to use this equipment only with the DTMF tone dial setting.
Notice to users of the German telephone network
Australia wired fax statement
In Australia, the HP device must be connected to Telecommunication Network through a line cord which meets the requirements of the Technical Standard AS/ACIF S008.
Regulatory information for wireless products
This section contains the following regulatory information pertaining to wireless products:
• Exposure to radio frequency radiation
• Notice to users in Brazil
- Notice to users in Canada
- Notice to users in Taiwan
• European Union regulatory notice
Exposure to radio frequency radiation
Exposure to radio frequency radiation

Caution The radiated output power of this device is far below the FCC radio frequency exposure limits. Nevertheless, the device shall be used in such a manner that the potential for human contact during normal operation is minimized. This product and any attached external antenna, if supported, shall be placed in such a manner to minimize the potential for human contact during normal operation. In order to avoid the possibility of exceeding the FCC radio frequency exposure limits, human proximity to the antenna shall not be less than 20 cm (8 inches) during normal operation.
Notice to users in Brazil
Notice to users in Canada
For Indoor Use. This digital apparatus does not exceed the Class B limits for radio noise emissions from the digital apparatus set out in the Radio Interference Regulations of the Canadian Department of Communications. The internal wireless radio complies with RSS 210 and RSS GEN of Industry Canada.
Notice to users in Taiwan
低功率電波輻射性電機管理辦法
第十二條
European Union Regulatory Notice
Products bearing the CE marking comply with the following EU Directives:
• Low Voltage Directive 73/23/EEC
• EMC Directive 2004/108/EC
CE compliance of this product is valid only if powered with the correct CE-marked AC adapter provided by HP.
If this product has telecommunications functionality, it also complies with the essential requirements of the following EU Directive:
• R&TTE Directive 1999/5/EC
Compliance with these directives implies conformity to harmonized European standards (European Norms) that are listed in the EU Declaration of Conformity issued by HP for this product or product family. This compliance is indicated by the following conformity marking placed on the product.

The wireless telecommunications functionality of this product may be used in the following EU and EFTA countries:
Austria, Belgium, Cyprus, Czech Republic, Denmark, Estonia, Finland, France, Germany, Greece, Hungary, Iceland, Ireland, Italy, Latvia, Liechtenstein, Lithuania, Luxembourg, Malta, Netherlands, Norway, Poland, Portugal, Slovak Republic, Slovenia, Spain, Sweden, Switzerland, and United Kingdom.
Products with 2.4-GHz wireless LAN devices
France
For 2.4 GHz Wireless LAN operation of this product certain restrictions apply: This product may be used indoor for the entire 2400-2483.5 MHz frequency band (channels 1-13). For outdoor use, only 2400-2454 MHz frequency band (channels 1-9) may be used. For the latest requirements, see http://www.art-telecom.fr.
Italy
License required for use. Verify with your dealer or directly with the General Direction for Frequency Planning and Management (Direzione Generale Pianificazione e Gestione Frequenze).
Regulatory model number
For regulatory identification purposes, your product is assigned a Regulatory Model Number. The Regulatory Model Number for your product is SNPRC-0701. This regulatory number should not be confused with the marketing name (HP Officejet J6400 All-in-One series) or product number.
Declaration of conformity

invent
DECLARATION OF CONFORMITY
according to ISO/IEC 17050-1 and EN 17050-1
Supplier's Name: Hewlett-Packard Company DoC#: SNPRC-0701-B
Supplier's Address: 60, Alexandra Terrace, # 07-01 The Comtech, Singapore 118502
declares, that the product
Product Name: HP Officejet J6400 series
Regulatory Model Number: ^1) SNPRC-0701
Product Options: All
Radio Module Number: RSVLD-0608
conforms to the following Product Specifications and Regulations:
SAFETY: IEC 60950-1:2001 / EN60950-1:2001
EN 60825-1 1994+A1:2002+A2:2001
EMC: CISPR 22:2005/ EN 55022: 2006 Class B
EN 55024:1998 +A1:2001 + A2:2003
EN 61000-3-2: 2000 + A2: 2005
EN 61000-3-3:1995 +A1: 2001
FCC CFR 47, Part 15 Class B / ICES-003, Issue 4 Class B
TELECOM: EN 301 489-1 V1.4.1:2002 / EN 301 489-17 V1.2.1:2002
EN 300 328 V1.6.1:2004-11
TBR 21: 1998 ^3)
FCC Rules and Regulations 47CFR Part 68
TIA-968-A-1 +A-2 +A-3+A-4 Telecommunications – Telephone Terminal Equipment
CS-03, Part I, Issue 9, Feb 2005
HEALTH: EU: 1999/519/EC
Supplementary Information:
- This product is assigned a Regulatory Model Number which stays with the regulatory aspects of the design. The Regulatory Model Number is the main product identifier in the regulatory documentation and test reports, this number should not be confused with the marketing name or the product numbers.
- This product complies with the requirements of the Low Voltage Directive 2006/95/EC, the EMC Directive 2004/108/EC & the R&TTE Directive 99/5/EC and carries the CE-marking accordingly. In addition, it complies with the WEEE Directive 2002/96/EC and RoHS Directive 2002/95/EC.
- This product complies with TBR21:1998, except clause 4.7.1 (DC characteristic), which complies with ES 203 021-3, clause 4.7.1.
- This Device complies with Part 15 of the FCC Rules. Operation is subject to the following two Conditions: (1) This device may not cause harmful interference, and (2) this device must accept any interference received, including interference that may cause undesired operation.
- The product was tested in a typical configuration.
Singapore
18 July 2007
Local contact for regulatory topics only:
EMEA: Hewlett-Packard GmbH, HQ-TRE, Herrenberger Strasse 140, 71034 Boeblingen, Germany www.hp.com/go/certificates
USA : Hewlett-Packard, 3000 Hanover St., Palo Alto 94304, U.S.A. 650-857-1501
Environmental product stewardship program
Hewlett-Packard is committed to providing quality products in an environmentally sound manner. Design for recycling has been incorporated into this product. The number of materials has been kept to a minimum while ensuring proper functionality and reliability. Dissimilar materials have been designed to separate easily. Fasteners and other connections are easy to locate, access, and remove using common tools. High priority parts have been designed to access quickly for efficient disassembly and repair.
For more information, visit HP's Commitment to the Environment Web site at:
www.hp.com/hpinfo/globalcitizenship/environment/index.html
This section contains the following topics:
- Paper use
- Plastics
• Material safety data sheets
• Recycling program
• HP inkjet supplies recycling program - Disposal of waste equipment by users in private households in the European Union
• Energy Star® notice
Paper use
This product is suited for the use of recycled paper according to DIN 19309 and EN 12281:2002.
Plastics
Plastic parts over 25 grams are marked according to international standards that enhance the ability to identify plastics for recycling purposes at the end of product life.
Material safety data sheets
Material safety data sheets (MSDS) can be obtained from the HP Web site at: www.hp.com/go/msds
Recycling program
HP offers an increasing number of product return and recycling programs in many countries/regions, and partners with some of the largest electronic recycling centers throughout the world. HP conserves resources by reselling some of its most popular products. For more information regarding recycling of HP products, please visit:
www.hp.com/hpinfo/globalcitizenship/environment/recycle/
HP inkjet supplies recycling program
HP is committed to protecting the environment. The HP Inkjet Supplies Recycling Program is available in many countries/regions, and lets you recycle used print cartridges and ink cartridges free of charge. For more information, go to the following Web site:
www.hp.com/hpinfo/globalcitizenship/environment/recycle/
Disposal of waste equipment by users in private households in the European Union

Disposal of Waste Equipment by Users in Private Households in the European Union
This symbol on the product or on its packaging indicates that this product must not be disposed of with your other household waste. Instead, it is your responsibility to dispose of your waste equipment by handling it over to a designated collection point for the recycling of waste electrical and electronic equipment. The separate collection and recycling of your waste equipment at the time of disposal will help to conserve natural resources and ensure that it is recycled in a manner that protects human health and the environment. For more information about where you can drop off your waste equipment for recycling, please contact your local city office, your household waste disposal service or the shop where you purchased the product.
This product is designed to reduce power consumption and save natural resources without compromising product performance. It has been designed to reduce total energy consumption both during operation and when the device is not active. This product qualifies for ENERGY STAR® which is a voluntary program established to encourage the development of energy-efficient office products.

ENERGY STAR
ENERGY STAR is a U.S. registered service mark of the U.S. EPA. As an ENERGY STAR partner, HP has determined that this product meets ENERGY STAR guidelines for energy efficiency.
For more information on ENERGY STAR guidelines, go to the following Web site:
www.energystar.gov
Index
Symbols/Numerics
(ADF) automatic document
feeder
clean 131
feeding problems, troubleshoot 13
10 x 15 cm photo paper copy 37
4 x 6 inch photo paper copy 37
A
accessibility 3
accessories
self-test report 78
acoustic emissions 188
Add Printer installation 110
ADF
media sizes supported 22
ADF (automatic document feeder)
capacity 19
load originals 19
administrator
settings 73
ADSL, fax setup with
parallel phone systems 88
after the support period 177
align print cartridges 124
answer ring pattern
change 66
parallel phone systems 89
answering machine
fax tones recorded 162
set up with fax (parallel phone systems) 99
set up with fax and modem 100
Attention light 13
Auto Answer button 13
automatic document feeder (ADF)
capacity 19
clean 131
feeding problems,
troubleshoot 131
load originals 19
automatic fax reduction 61
B
Back button 12
backup fax reception 58
baud rate 67
best copy quality 38
black and white pages
copy 36
fax 49
troubleshoot 141
black dots or streaks,
troubleshoot
copies 146
scan 151
blank pages, troubleshoot
copy 145
print 137
scan 150
blocked fax numbers
device control panel
button 13
set up 61
borderless printing
Mac OS 29
Windows 28
both sides, print on 34
broadcast faxing
send 53
buttons, control panel 12
C
cameras
insert memory cards 46
cancel
copy 41
print job 35
scan 45
scheduled fax 53
Cancel button 12
capacity
ADF 19
tray 24
cards
guidelines 21
sizes supported 23
tray supporting 24
clean
automatic document
feeder 131
exterior 131
print cartridge contacts 126
print cartridge ink nozzle area 128
print cartridges 125
scanner glass 130
color
copies 41
fax 54
color copy 36
colored text, and OCR 44
colors
bleeding 142
faded or dull 141
print black and white, troubleshoot 141
troubleshoot 142
wrong 142
CompactFlash memory card insert 46
computer modem
shared with fax (parallel phone systems) 92
shared with fax and answering machine (parallel phone systems) 100
shared with fax and voice line (parallel phone systems) 95
shared with fax and voice mail (parallel phone systems) 104
confirmation reports, fax 70
connections
features available 13
connectors, locating 11
contrast, fax 56
Index
control panel
buttons 12
lights 12
copy
cancel 41
enhance light areas 41
from the device control panel 36
legal to letter 39
number of copies 37
paper size 37
paper types, recommended 37
photos, enhance 40
quality 38, 146
reduce 39
settings 36
specifications 187
speed 38
text, enhance 40
troubleshoot 144
Copy button 13
Copy menu 15
correct port test, fax 153
critical error messages 16
custom-sized media
guidelines 21
print on 27
sizes supported 24
customer support
electronic 173
phone support 175
warranty 177
cut-off pages, troubleshoot 138
D
dark images, troubleshoot
copies 146
scans 150
darken
copies 40
faxes 56
Declaration of Conformity (DOC) 200
default settings copy 37
device control panel 16
driver 33
fax 56
print 33
deleting faxes from memory 59
device control panel
administrator settings 73
copy from 36
faceplate, removing 179
locating 10
menus 15
messages 16
network settings 80
scan from 42
send faxes 50
send scans to programs 43
settings, change 16
dial tone test, failure 155
dial type, setting 67
dial-up modem
shared with fax (parallel
phone systems) 92
shared with fax and
answering machine
(parallel phone sy
anstems) 100
shared with fax and voice
line (parallel phone
systems) 95
shared with fax and voice
mail (parallel phone
systems) 104
digital cameras
connect 47
insert memory cards 46
distinctive ringing
change 66
parallel phone systems 89
DOC 200
documentation 9
dots or streaks, troubleshoot copies 146
dots per inch (dpi)
fax 13
dots, troubleshoot
scan 151
double-sided printing 34
driver
settings 33
version 175
DSL, fax setup with
parallel phone systems 88
duplexer
clear jams 169
installation 32
media sizes supported 22
remove 181
duty cycle 185
E
ECM. See error correction mode edit
scanned images 44
text in OCR program 44
electrical specifications 188
embedded Web server
about 75
opening 75
pages 76
system requirements 186
Webscan 43
envelopes
guidelines 21
sizes supported 22
tray supporting 24
environmental
specifications 188
environmental sustainability program 201
error correction mode 56
error messages
device control panel 16
unable to activate TWAIN source 149
error reports, fax 70
error-correction mode, fax 67
Ethernet connections 13
event log 78
EWS. See embedded Web server
F
faded copies 145
faded stripes on copies, troubleshoot 146
fast copy quality 38
fax
answer mode 65
answering machine and modem, shared with (parallel phone systems) 100
answering machine troubleshoot 162
answering machine, set up (parallel phone systems) 99
auto answer 13, 65
backup fax reception 58
block numbers 13
blocking numbers 61
confirmation reports 70
contrast 56
darken or lighten 56
default settings 56
deleting from memory 59
dial tone test, failed 155
dial type, setting 67
distinctive ringing setup (parallel phone systems) 89
distinctive ringing, change pattern 66
DSL, set up (parallel phone systems) 88
error correction mode 56
error reports 70
error-correction mode 67
Fax Menu button 13
Fax to PC 63
forwarding 60
header 65
Internet, over 68
ISDN line, set up (parallel phone systems) 89
lighten or darken 56
line condition test, failed 156
log, print 71
manual receive 57
modem and answering machine, shared with (parallel phone systems) 100
modem and voice line, shared with (parallel phone systems) 95
modem and voice mail, shared with (parallel phone systems) 104
modem, shared with (parallel phone systems) 92
monitor dialing 51, 53
paper size 61
parallel phone systems 83
PBX system, set up (parallel phone systems) 89
phone cord connection test, failed 153
phone cord too short 162
phone cord type test, failed 154
photos 54
poll to receive 59
receive 57
receive, troubleshoot 157, 159
redial options 67
reduction 61
reports 69
reprint 59
resolution 55
rings to answer 66
schedule 52
send 49
send to multiple recipients 53
send, troubleshoot 157, 159, 161
separate line setup (parallel phone systems) 87
set up 82
settings 54
settings, change 65
setup types 84
shared phone line setup (parallel phone systems) 90
specifications 187
speed 67
speed-dial entries, set up 30
speed-dial groups, set up 30
test failed 151
test setup 69
troubleshoot 151
voice mail, set up (parallel phone systems) 91
wall jack test, failed 152
Fax Menu button 13
Fax to PC
activate 63
modify 63
firewalls, troubleshoot 136
fit to page 39
FoIP 68
fonts supported 184
forwarding faxes 60
G
glass, scanner clean 130
load originals 19
locating 10
grainy or white bands on
copies, troubleshoot 146
graphics
incompletely filled on copies 146
ink not filling in 141
look different from original scan 150
missing lines or dots 143
groups, speed-dial set up 30
H
hardware, fax setup test 152
header, fax 65
help 173
see also customer support
Help button 12
Hewlett-Packard Company notices 3
HP Photosmart Software send scans to programs 43
HP Photosmart Studio send scans to programs 43
HP Printer Utility (Mac OS) administrator settings 74 opening 76 panels 77
HP Solution Center 17
humidity specifications 188
|
index sheets print 48
ink smearing, troubleshoot 140
installation
Add Printer, Windows 110 duplexer 32
software for Mac OS 110
software for Windows 106 troubleshoot 167
Windows network software 108
Internet
fax, using 68
IP settings 82
ISDN line, set up with fax parallel phone systems 89
J
jams
clear 169
media to avoid 21
paper 169, 171
Index
jobs
settings 16
Junk Fax Blocker button 13
junk fax mode 61
K
keypad, device control panel locating 13
L
language, printer 184, 185
left arrow 12
legal paper copy 37
letter paper copy 37
light images, troubleshoot copies 146 scans 150
lighten copies 40 faxes 56
lights, control panel 12
line condition test, fax 156
lines copies, troubleshoot 146 scans, troubleshoot 150, 151
link speed, setting 82
load tray 1 26
log, fax print 71
M
Mac OS
borderless printing 29
HP Photosmart Studio 17
HP Printer Utility 76
install software 110
print on special, or custom-sized media 28
print settings 34
sharing device 111
uninstall software 118
wireless communication setup 115
maintenance
align print cartridges 124
clean print cartridges 125
replace print cartridges 121
manual faxing
receive 57
send 50, 51
margins
setting, specifications 25
media
ADF capacity 19
borderless printing 28
clear jams 169
duplexing 34
HP, order 172
load tray 26
print on custom-sized 27
selecting 20
skewed pages 144
specifications 21
supported sizes 22
troubleshoot feeding 143
types and weights supported 24
memory
deleting faxes 59
reprint faxes 59
save faxes 58
specifications 185
memory cards
index sheets 48
insert 46
print DPOF files 47
save photos to computer 48
scan to 43
specifications 189
troubleshoot 166
Memory Stick cards
insert 46
slot, locating 46
menus, device control panel 15
missing lines or dots, troubleshoot 143
missing or incorrect
information, troubleshoot 137
MMC memory card insert 46
model number 78
modem
shared with fax (parallel phone systems) 92
shared with fax and answering machine (parallel phone systems) 100
shared with fax and voice line (parallel phone systems) 95
shared with fax and voice mail (parallel phone systems) 104
monitor dialing 51, 53
monitoring tools 73
multi-feeds, troubleshoot 144
N
networks
advanced settings 81
connector illustration 11
Ethernet connections 13
firewalls, troubleshoot 136
IP settings 82
link speed 82
Mac OS setup 110
operating systems supported 186
protocols supported 186
settings, change 80
sharing, Windows 108
system requirements 186
view and printsettings 81
Windows setup 108
wireless communication setup 112
wireless settings 78, 113
Wireless Setup Wizard 81
noise information 188
normal copy quality 38
number of copies 37
0
OCR
edit scanned documents 44 troubleshoot 149
OK button 12
On button 13
one-touch speed dial buttons 13
operating environment specifications 188
operating systems supported 185
originals
edit scans 44
scan 42
output tray
locating 10
media supported 25 remove 182
P
packing the device 182
pages per month (duty cycle) 185
paper
jams 169, 171
legal to letter copy 39
recommended copy types 37
size, set for fax 61
paper size
copy setting 37
paper-feed problems, troubleshoot 143
parallel phone systems answering machine setup 99
countries/regions with 83
distinctive ringing setup 89
DSL setup 88
ISDN setup 89
modem and answering machine setup 100
modem and voice mail setup 104
modem setup 92
modem shared with voice line setup 95
PBX setup 89
separate line setup 87
setup types 84
shared line setup 90
PBX system, set up with fax parallel phone systems 89
PCL 3 support 184
phone cord
connected to correct port test failed 153
correct type test failed 154 extend 162
phone customer support 175
phone line, answer ring pattern 66
phone support 175
phone support period period for support 176
phone, fax from receive 57 send, 50
photo media
guidelines 21
sizes supported 23
Photo Menu button 13
photo paper copy 37
photos
borderless printing 28
edit scans 44
enhance copies 41
fax 54
index sheets 48
insert memory cards 46
print from DPOF files 47
save to computer 48
troubleshoot memory cards 167
view 47
Photosmart Software
send scans to programs 43
Photosmart Studio
send scans to programs 43
poll to receive fax 59
ports, specifications 184
power
specifications 188
troubleshoot 135
power input, locating 11
power on button 13
cancel 35
double-sided 34
fax logs 71
fax reports 69
faxes 59
index sheets 48
photos from DPOF file 47
self-test diagnostic page 78
settings 33
slow 136
speed-dial entries 31
troubleshoot 135
print cartridge door, locating 11
print cartridge latch, locating 11
print cartridges
align 124
clean 125
clean contacts 126
clean ink nozzle area 128
handle 121
locating 11
order online 172
part names 121
remove 180
replace 121
status 73
supported 120, 172, 184
test 78
yields 184
print driver
settings 33
version 175
print quality
troubleshoot 138
print-carriage access door, locating 11
printer driver
settings 33
version 175
processor specifications 185
pulse dialing 67
Q
Quality button 13
quality, copy 38
quality, troubleshoot copy 146
print 138
scan 149
R
radio interference
reducing 116
regulatory information 197
radio, turn off 81
readme 9
rear access panel
clear jams 169
illustration 11
receive faxes
auto answer mode 65
automatically 57
blocking numbers 61
forwarding 60
manually 57
polling 59
rings to answer 66
troubleshoot 157, 159
recycle
print cartridges 201
redial options, setting 67
reduce fax 61
reduce/enlarge copies
resize to fit letter 39
resize to fit letter or A4 39
Index
regulatory information 190, 197
regulatory model number 199
release notes 9
remove print cartridges 180
replace print cartridges 121
reports
confirmation, fax 70
error, fax 70
fax test failed 151
reprint
faxes from memory 59
resolution
fax 13
Resolution button 13
resolution, fax 55
Right arrow 12
rings to answer 66
s
save
default settings 16
faxes in memory 58
photos to computer 48
scan
cancel 45
edit images 44
error messages 149
from a TWAIN- or WIA- compliant program 43
from device control panel 42
from Webscan 43
OCR 44
quality 149
scan specifications 188
Scan To button 12
send to a program 43
settings for 45
slow 148
Start Color Photo button 12
Start Color Scan button 12
to memory card 43
troubleshoot 147
Scan menu 15
Scan To button 12
scanner glass
clean 130
load originals 19
locating 10
schedule fax 52
Secure Digital memory card
insert 46
security
wireless communication 116
wireless settings 113
self-test diagnostic page
information on 77
print 78
send faxes
basic fax 50
color fax 54
manually 50
memory, from 52
monitor dialing 51, 53
multiple recipients 53
schedule 52
troubleshoot 157, 159, 161
send scans
forOCR44
to a program 43
troubleshoot 147
serial number 78
serial phone systems
countries/regions with 83
setup types 84
Services tab, Toolbox
(Windows) 75
settings
administrator 73
control panel 16
copy 36
driver 33
fax 54
network 80
scan 45
speed, fax 67
setup
answering machine
(parallel phone
systems) 99
answering machine and
modem (parallel phone
systems) 100
computer modem (parallel
phone systems) 92
computer modem and
answering machine
(parallel phone
systems) 100
computer modem and
voice line (parallel phone
systems) 95
computer modem and
voice mail (parallel
phone systems) 104
connection types 13
distinctive ringing 66
distinctive ringing (parallel phone systems) 89
DSL (parallel phone systems) 88
fax 82
fax scenarios 84
fax, with parallel phone systems 83
ISDN line (parallel phone systems) 89
PBX system (parallel phone systems) 89
separate fax line (parallel phone systems) 87
shared phone line (parallel phone systems) 90
test fax 69
voice mail (parallel phone systems) 91
voice mail and computer modem (parallel phone systems) 104
Windows 106
Windows networks 108
Setup button 12
setup poster 9
sharing 14
sharing device
Mac OS 111
Windows 108
shipping the device 179
size
scans, troubleshoot 151
troubleshoot copy 145
skew, troubleshoot
copy 146
print 144
scan 150
slow print, troubleshoot 136
software
connection types 13
HP Photosmart 17
installation on Mac OS 110
installation on Windows 106
OCR 44
uninstall from Mac OS 118
uninstall from Windows 117
Webscan 43
Solution Center 17
sound pressure 188
specifications
acoustic emissions 188
electrical 188
media 21
network protocols 186
operating environment 188
physical 184
processor and memory 185
storage environment 188
system requirements 185
speed
copy 38
troubleshoot for
scanner 148
troubleshoot print 136
speed dial
buttons 12
fax numbers, set up 30
groups, set up 30
one-touch buttons 13
print and view 31
send fax 50
Start Color Photo button 12
Start Color Scan button 12
Start Copy buttons
black 12
color 12
status
messages 16
network configuration
page 78
self-test report 78
supplies 73
storage environment
specifications 188
streaks, troubleshoot
copies 146
scan 151
stripes on scans,
troubleshoot 150
subscriber identification code 65
supplies
order online 172
self-test report 78
status 73
yields 184
support. See customer support
support process 175
system requirements 185
T
technical information
copy specifications 187
fax specifications 187
memory card
specifications 189
scan specifications 188
telephone customer support 175
telephone line, answer ring
pattern 66
telephone wall jack, fax 152
telephone, fax from
receive 57
send 50
temperature specifications 188
tests, fax
dial tone, failed 155
failed 151
fax line condition 156
fax phone cord type test failed 154
hardware, failed 152
port connection, failed 153
setup 69
telephone wall jack 152
text
cannot be edited after scan, troubleshoot 149
enhance on copies 40
incompletely filled on copies 146
missing from scan, troubleshoot 148
splotchy on copies 146
troubleshoot 138, 141, 143
unclear on copies, troubleshoot 146
unclear scans 151
tone dialing 67
Toolbox (Windows)
about 74
administrator settings 73
Estimated Ink Level tab 74
opening 74
Services tab 75
transparencies
copy 37
tray
capacity 24
media sizes supported 22
media types and weights supported 24
tray 1
load media 26
trays
capacities 24
clear jams 169
load media 26
locating 10
media sizes supported 22
paper guides illustration 10
troubleshoot feeding 143
troubleshoot
answering machines 162
blank pages printed 137
bleeding colors 142
colors 141, 142
copy 144
copy quality 146
cut-off pages, incorrect text or graphics
placement 138
device control-panel messages 16
fax 151
fax dial tone test failed 155
fax hardware test failed 152
fax line test failed 156
fax phone cord connection test failed 153
fax phone cord type test failed 154
fax tests 151
fax wall jack test, failed 152
firewalls 136
ink not filling text or graphics 141
ink smearing 140
installation 167
jams, paper 171
meaningless characters print 139
media not picked up from tray 143
memory cards 166
missing lines or dots 143
missing or incorrect information 137
multiple pages are picked 144
network configuration page 78
nothing prints 136
paper-feed problems 143
power 135
print 135
print quality 138
receive faxes 157, 159
scan 147
Index
scan quality 149
self-test diagnostic page 77
send faxes 157, 159, 161
skewed copies 146
skewed pages 144
slow print 136
tips 134
TWAIN
scan from 43
unable to activate source 149
two-sided printing 34
U
uninstall software
Mac OS 118
Windows 117
USB connection
features available 13
port, locating 10, 11
setup Mac OS 110
setup Windows 107
specifications 184
V
vertical stripes on copies, troubleshoot 146
view
network settings 81
photos 47
speed-dial entries 31
voice mail
set up with fax (parallel phone systems) 91
set up with fax and computer modem (parallel phone systems) 104
voltage specifications 188
W
wall jack test, fax 152
warning messages 16
warranty 177
Web sites
accessibility information 3
Apple 111
customer support 173
environmental
programs 201
order supplies and
accessories 172
supply yield data sheet 184 wireless security 113
Webscan 43
white bands or stripes,
troubleshoot
copies 146
scans 150
WIA (Windows Image
Application), scan from 43
Windows
Add Printer installation 110
borderless printing 28
duplexing 34
HP Photosmart Software 17
HP Solution Center 17
install software 106, 107
network setup 108
print on special or custom-sized media 27
print settings 33
set up wireless communication 114
sharing device 108
system requirements 185
uninstall software 117
Windows Image Application
(WIA), scan from 43
wireless communication
Ethernet setup 114
radio, turn off 81
reducing interference 116
regulatory information 197
security 116
set up 112
set up on Mac OS 115
settings 113
turn off 115
wizard 114
Wireless Setup Wizard 81
X
xD-Picture memory card
insert 46
slot, locating 46
© 2008 Hewlett-Packard Development Company, L.P.
www.hp.com/support