Definity System - Audio/video converter K&K Sound - Free user manual and instructions
Find the device manual for free Definity System K&K Sound in PDF.


User questions about Definity System K&K Sound
0 question about this device. Answer the ones you know or ask your own.
Ask a new question about this device
Download the instructions for your Audio/video converter in PDF format for free! Find your manual Definity System - K&K Sound and take your electronic device back in hand. On this page are published all the documents necessary for the use of your device. Definity System by K&K Sound.
USER MANUAL Definity System K&K Sound
text_image
K&K SOUND NATURAL PICKUP POWERPRODUCT MANUAL
DEFINITY SYSTEM
GENERAL PICKUP INFORMATION
The Definity pickup is a hybrid of a compression pickup and a soundboard transducer. Its super-thin and flexible design allows for a variety of applications especially on instruments with floating bridges.
The Definity System is paired with the Definity Preamp, which is optimized for the Definity pickup and a very important part of the system. The Definity Preamp features a phase switch, which is particularly important for this pickup. Please see p. 3 for more information on the phase switch.
We found the Definity System performs best when the pickup is installed so that part of it is under pressure by the floating bridge and part of it is "free floating" to pick up vibrations like a sound board pickup.
It is not necessary for the Definity pickup to cover the entire area of a bridge or bridge foot. As a general rule, you want to aim for a placement that allows approximately half of the pickup under a bridge (compression) and the other half free on the soundboard. There are some exceptions for instruments with narrow bridges, like banjos. (More detailed information on this on p. 4.) But it is a good
strategy for Archtop or Maccaferri/Selmer guitars and many other floating bridge instruments.
This manual will describe installation techniques and locations that we have tested to deliver the best results for a variety of popular floating bridge instruments.
GENERAL INSTALLATION PROCEDURE
- Mark the position of the bridge on the soundboard with tape. Make sure the tape will not interfere with the position of the Definity pickup. Then loosen the strings and move the bridge out of the way to allow mounting the pickup.
- Install the Definity pickup so that the bridge stands on its front portion and the back half (where the cable exits) sticks on the soundboard, similar to how it is shown on one of the photos below.
- Remove the red release foil on the bottom of the pickup and stick the transducer in place.
-
Move the bridge back into position and secure the gray cable of the pickup with tape so it does not cause noise.
-
The jack can be mounted at a convenient spot near the endpin of the instrument.
- Coil up extra cable and secure it, e.g. with clear tape.
OUTPUT JACK
The Definity pickup comes with a Switchcraft stereo endpin jack wired in mono. It has a self-adhesive removable clip attached to it. This jack also allows for internal mount when the clip is removed. If go this route, it may require you to temporarily unsolder the pickup during installation. Please consult a skilled technician if you choose this option.
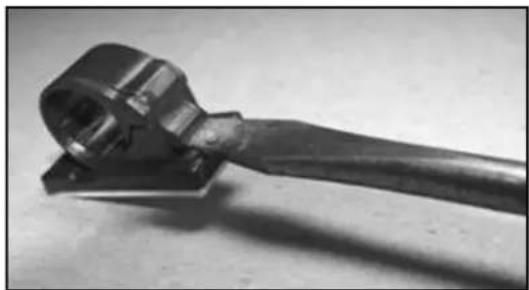
Too remove the clip please use a slot screwdriver to open the snap tab (see photo). Then remove the black electrical tape that is wound around the jack. This tape only builds up the diameter of the jack to match the clip.
natural_image
Close-up of a metal tool with a curved handle and mounting base (no visible text or symbols)INTERNAL JACK INSTALLATION
- For internal mount only, skip this section if you are using the clip.
- Drill or widen the endpin hole to 1/2" using protective tape to cover the area around the hole. This helps to prevent chips and scratches.
- Unscrew the endpin jack's strap mount knob.
- Take off the nut and washer.
- Find out the thickness of your end block and set the nut on the cap accordingly (see picture below). Once in place, screw the cap in as far as it goes.
- Insert the jack from the inside into the endpin hole. Tip: a chopstick or something similar
helps to get a hold of the jack and pull it through the hole.
7. Attach outside washer and nut and tighten.
Use a small Allen wrench or similar in the small front holes of the jack to hold on while tightening the nut. Attach the end knob and tighten by hand.
Important: Make sure that the strap knob screws in ALL THE WAY over the outer threaded part of the jack, so that a tiny portion of the thread is exposed when the strap-knob is tightened. If you don't do this, you might experience insufficient signal transmission and sound cutting in and out.
THE DEFINITY PREAMP
Open the lid of the box (it just pulls off – it snaps back on) to get access to the battery compartment and to the adjustment options inside the preamp.
Install a 9-volt battery in the battery compartment.
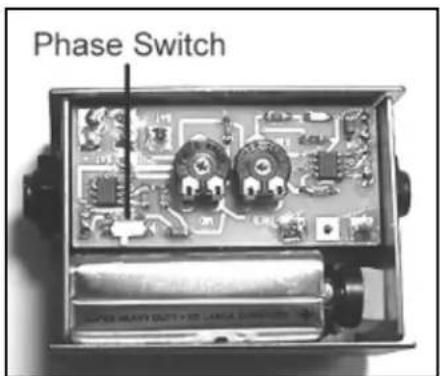
There are midrange and treble trim-potentiometers (trim-pots) that can be adjusted with a small screwdriver. When the little white arrow in the center of the trimmer is in the 12 o'clock position, the setting is flat with no cut or boost. Turning the pots counterclockwise cuts frequencies, and turning clockwise boosts frequencies. Mids are centered at 1250Hz (X-wide-band Q) and treble are at 8000Hz (high shelf).
On the battery side of the circuit board is a phase (toggle) switch with a small white tab. It has a big effect on feedback control and on overall tone. There is a detailed description of the effect on the phase setting below. Move the white tab left or right (2 positions) and listen. There will be one setting that sounds better with less feedback.
text_image
Phase SwitchCONNECTION TO AMPLIFIER
Use a regular guitar cable (not supplied) to connect the output-jack of the pickup with the input of the preamp. Connect the output of the preamp to an amplifier with a regular mono guitar cord. Please note that a stereo cable will NOT switch on the preamp.
USING THE PHASE SWITCH
The Definity Preamp has a miniature phase switch mounted on the battery side of the circuit board. It is a sliding switch (a small white tab) that you can slide to the left and right with your finger or with a small screwdriver. There are only two settings.
The Pure XLR Preamp has a push-release phase switch on the back.
Phase switches are usually marketed as a feedback controlling device, but they accomplish more than just that. A phase switch inverts the amplified sound wave so that it does not interfere with the original, un-amplified sound coming from your instrument.
Every acoustic instrument projects sound waves into the air at a certain phase when it is played unplugged. For optimal sound amplification, the phase that is projected from the amplified speaker source needs to be "in phase" with the acoustic instrument's own acoustically generated sound waves.
The problem is that amplification systems, effect units, or any electronic audio device may or may not invert the phase of the incoming signal. The manufacturers do not specify. An out-of-phase problem is indicated by early feedback and somewhat tinny, unbalanced sound. This may be tolerable in some tone ranges and quite noticeable in others, even resulting in sound cancellations on some notes.
By toggling the phase switch back and forth on the Definity Preamp or pushing/releasing it on the Pure XLR Preamp, you will notice fuller, warmer, and nicely balanced tone with less feedback in one setting. This is the correct phase switch setting. Keep in mind that it may be different with different amplification systems.
DEFINITY PRO WITH PURE XLR PREAMP
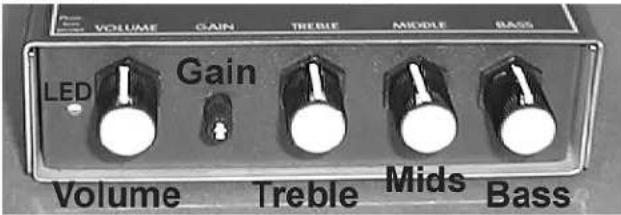
The Pure XLR Preamp operates on 12–48 volt Phantom Power or 9-volt battery. The LED light on the front-panel indicates if phantom power is present. In order to save battery life it will not light when the unit is running on battery power.
With phantom power, the battery will not be drained as long as the phantom power provides more than 10 volt.
FRONT:
text_image
Volume GAIN TREBLE MIDDLE BASS LED Gain Volume Treble Mids BassBACK:
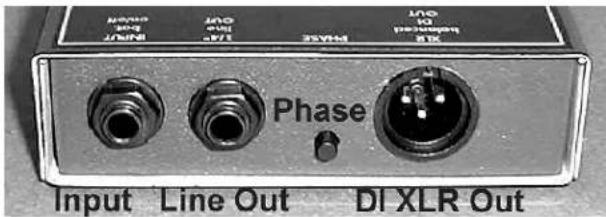
text_image
Input Line Out DI XLR Out Phase MINI OUT OUT STVM MINI OUT DI XLR OutCHANGING THE BATTERY
To insert and change the battery, open the 2 screws on the sides of the unit, remove the lid, connect a new 9-volt battery to the battery clip and place it in the marked compartment.
The unit is delivered without a battery.
UNPLUG THE INPUT CABLE IN ORDER TO SWITCH OFF THE BATTERY!
ADJUSTABLE GAIN CONTROL
Gain and volume both have an effect on the output volume of the preamp, but they accomplish different tasks.
The gain (also called input gain or sensitivity control) is located at the INPUT of the circuit. It sets the amount of pre-amplification before the signal enters the EQ section, DI etc. The volume control is located at the OUTPUT (the very end of the circuit) and simply allows you to adjust the volume.
It is very important to properly set the gain control to fit the instrument you are using. An instrument with a high output signal will require a lot less gain than one with a weaker output. To set the gain correctly, you have to connect your instrument to the Pure XI Preamp and to your amplification system.
Start with the gain at low (counterclockwise/left) setting. The volume control on the Pure XLR Preamp has to be set to fully clockwise/right and the EQ should be about centered at this point. Adjust the volume at the amp until you hear a fairly low volume signal.
Now, play your instrument in your loudest dynamic range (play it hard) and slowly turn the gain up until distortion just begins to occur. Now back the gain off a little bit until the signal is clear again. This is the correct gain setting for this instrument.
Please keep in mind that excessive EQ boost applied after the initial gain setting procedure may introduce distortion, in this case you have to reduce the gain a little bit.
OUTPUTS
The active DI XLR output and the line output can be used simultaneously. This way, the 1/4" line out can be used as a monitor out or for connecting to a tuner while the unit is connected to the PA via the XLR out. You can, of course, use each output individually.
EQ AND OTHER SPECIFICATIONS
The Pure XLR Preamp features strong +/-20 db bass, mid, and treble controls. The special super-wide-band midrange filter is absolutely great in combination with the Pure pickups. The bass control is set to roll of at 100Hz, the midrange at 1.5kHz with extra large bandwidth and the treble are set at 10kHz. Input impedance is 1 meg. Output impedance on balanced XLR and 1/4" line out is 100 Ohm. Frequency response is 30 -30000 Hz.
REMOVING THE PICKUP
Carefully lift off the solid part of the pickup (the end by the cable). Do NOT pull on the cable itself!
Once this part is loose you can use it to hold onto and CAREFULLY pull the foil part off the instrument. Try to avoid pulling the pickup at an extreme angle and go slowly. Once you have enough of the foil pa off you can carefully hold on to the foil to loosen the rest of the pickup.
If the old adhesive is still in one piece on the pickup, you might successfully re-apply the pickup with it.
If the adhesive is spotty or does not stick anymore, you can rub it off with your thumb. DO NOT USE SOLVENTS ON ANY KIND as this may damage the pickup. We include double-sided adhesive tape that allows for a couple of new installations.
INSTALLATION NOTES: ARCHTOP GUITAR
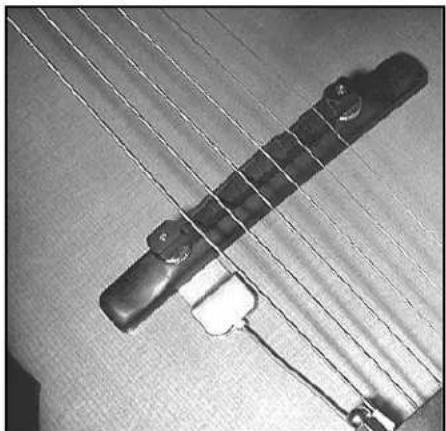
Here we mount the pickup under the bass side of the bridge. You can orient the pickup either with the cable coming out towards the f hole or towards the tailpiece. Both methods will yield nearly identical tone. It depends on how you want to route the cable. You can also lead the cable into the bass side f hole and mount the jack internally if desired.
natural_image
Close-up of a guitar fretboard with strings and keyway (no text or symbols visible)INSTALLATION NOTES: MACCAFERRI GUITAR
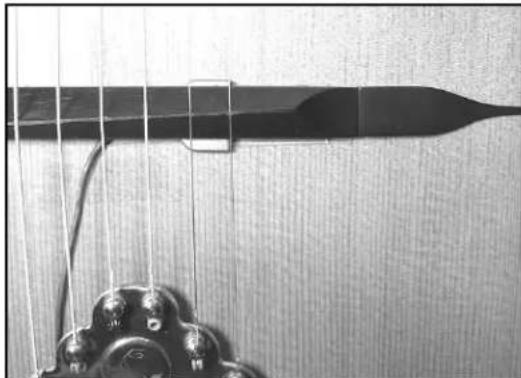
Here we chose the treble side of the bridge. Maccaferri bridges are supposed to have hollow feet. On the guitar shown in the photo, we removed some material at one side of the bridge arch to allow the end piece of the pickup to sit inside the arch.
If you do not wish to modify your bridge, you can orient the pickup with the cable towards the tailpiece. Please note that due to the hollow bridge feet, the pickup will be under compression at its outer perimeter only. The inner part of the transducers will act like a soundboard transducer.
We also shimmed the other side/foot of the bridge with a piece of thin cardstock (we used a business card that had the same height as the transducer). We found that this was necessary for the bridge to sit
perfectly flat on the soundboard and to avoid minor sound balance problems. This phenomenon must be specific to the hollow bridge feet as we did not encounter this problem in bridges with sold feet.
natural_image
Close-up of a guitar fretboard with strings and a curved blade, no visible text or symbolsINSTALLATION NOTES: BANJO
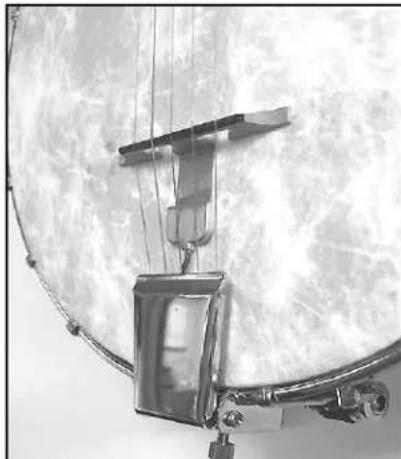
Here we simply stick the pickup under the center foot. The bridge is standing on the very tip of the pickup only. Make sure to secure the cable well! The banjo head is very resonant and will cause buzzing if the cable is not secured perfectly.
natural_image
Close-up of a mechanical device with a metallic frame and attached lever, mounted on a curved surface (no visible text or symbols)SEMI ACOUSTIC ELECTRIC GUITARS WITH TUNE-O-MATIC BRIDGES (ES335 TYPE)
Even though it's impossible to achieve a true acoustic tone with this type of guitar (since there is a solid wood block inside the center of the guitar body), we believe that the Definity System is as close as you can get. In our testing, we've found it resembles an acoustic quality more closely than any other acoustic pickup. We think that it sounds especially nice for strumming and adds a nice sound quality to the mix with the magnetic pickup.
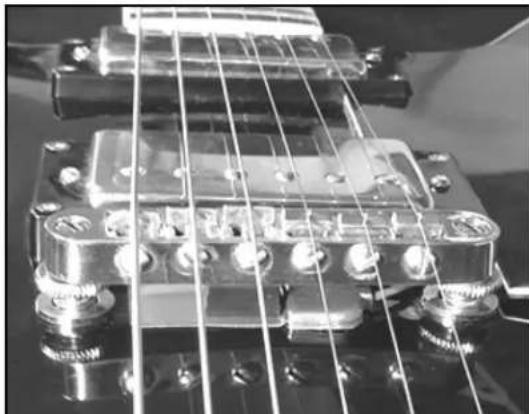
To install the Definity, you must fabricate two hard rubber pressure pieces that fill the entire area of the pickups foil (see photo). These rubber pieces need to be of slightly different height as the guitartop is also slightly arched.
Stick the Definity under the bridge so that the front end is approximately flush with the low e string. Together, the two rubber pressure pieces should approximately fill the area of the foil part of the pickup. The piece on the low e string side needs to be slightly higher due to the arched top. Hard rubber can be cut and sanded. We also used electrical tape to build up the individual blocks to the desired height for fine adjustments.
Once in place, you have to fine-tune the two height adjustment screws on each side of the bridge to get the best tonal balance. This is the tricky part. The height of the rubber blocks needs to be just right for best tone plus proper string action height. You want the bridge to almost entirely rest on the rubber but then you have to raise the height adjustment screws a tiny little bit (1/16 to 1/8 of a turn) so they do not rattle and share the load with the rubber to a degree. This takes some trial and error. Be prepared to work on the height of the rubber blocks several times.
The most elegant and functional solution is to wire the pickup to the guitar's jack. A skilled guitar tech can use the endpin jack of the Definity System to replace the existing guitar output jack. Wire the magnetic pickup to the tip terminal and the Definity Pickup to the ring terminal. Use a stereo breakout-cable and two channels in your amp or PA.