Pick your language and provide your email: we'll send you a specifically translated version.
This manual is not available in your language
User questions about PT-CW240 PANASONIC
0 question about this device. Answer the ones you know or ask your own.
Ask a new question about this device
No questions yet. Be the first to ask one.
Download the instructions for your Vidéo-projecteur in PDF format for free! Find your manual PT-CW240 -
PANASONIC and take your electronic device back in hand. On this page are published all the documents necessary for the use of your device. PT-CW240 by PANASONIC.
USER MANUAL PT-CW240 PANASONIC
Operating Instructions
Functional Manual
DLP ^TM Projector
Commercial Use
Model No. PT-CW330EA PT-CW240EA PT-CX300EA
natural_image
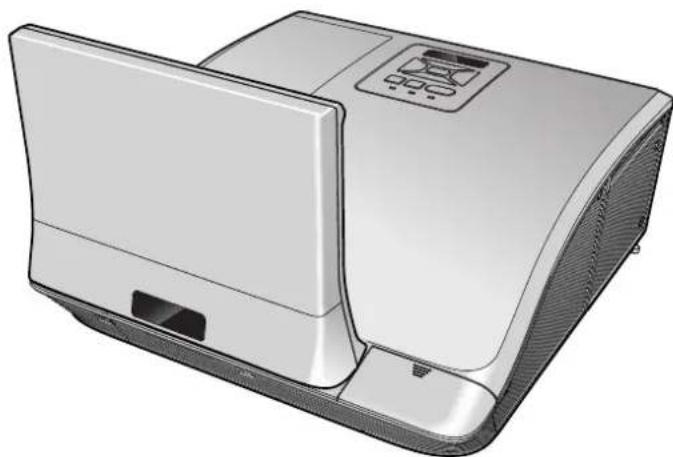
Illustration of a white electronic device with a front panel and control panel (no text or symbols visible)
text_image
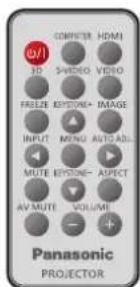
COMPUTER HDMI
3D SWEDD VIDEO
FREEZI KPISTON+ IMAGE
INPUT MING AUTO ADL
MUTE EYSTONE- ASPECT
AV MUTE VOLUME
Panasonic
PROJECTOR
Thank you for purchasing this Panasonic Product.
Before operating this product, please read the instructions carefully, and save this manual for future use.
Before using your projector, be sure to read "Read this first!" (See pages 2 to 9).
Read this first!
WARNING: THIS APPARATUS MUST BE EARTHED.
WARNING: To prevent damage which may result in fire or shock hazard, do not expose this appliance to rain or moisture.
This device is not intended for use in the direct field of view at visual display workplaces. To avoid incommoding reflexions at visual display workplaces this device must not be placed in the direct field of view.
The equipment is not intended for used at a video workstation in compliance BildscharbV.
The sound pressure level at the operator position is equal or less than 70 dB (A) according to ISO 7779.
WARNING:
Remove the plug from the mains socket when this unit is not in use for a prolonged period of time.
To prevent electric shock, do not remove cover. No user serviceable parts inside. Refer servicing to qualified service personnel.
Do not remove the earthing pin on the mains plug. This apparatus is equipped with a three prong earthing type mains plug. This plug will only fit an earthing-type mains socket. This is a safety feature. If you are unable to insert the plug into the mains socket, contact an electrician. Do not defeat the purpose of the earthing plug.
CAUTION: To assure continued compliance, follow the attached installation instructions. The user must use the provided RGB computer interface cable with ferrite cores. If HDMI interface cable is to be used, the user must use only shielded HDMI interface cable with ferrite cores to avoid potential harmful interference. Any unauthorized changes or modifications to this equipment will void the user's authority to operate.
WARNING: TO REDUCE THE RISK OF FIRE OR ELECTRIC SHOCK, DO NOT EXPOSE THIS PRODUCT TO RAIN OR MOISTURE.
IMPORTANT: THE MOULDED PLUG (U.K. only)
FOR YOUR SAFETY, PLEASE READ THE FOLLOWING TEXT CAREFULLY.
This appliance is supplied with a moulded three pin mains plug for your safety and convenience. A 13 amp fuse is fitted in this plug. Should the fuse need to be replaced, please ensure that the replacement fuse has a rating of 13 amps and that it is approved by ASTA or BSI to BS1362.
Check for the ASTA mark for the BSI mark on the body of the fuse.
If the plug contains a removable fuse cover, you must ensure that it is refitted when the fuse is replaced. If you lose the fuse cover, the plug must not be used until a replacement cover is obtained. A replacement fuse cover can be purchased from an Authorised Service Center.
If the fitted moulded plug is unsuitable for the mains socket in your home, then the fuse should be removed and the plug cut off and disposed of safely. There is a danger of severe electrical shock if the cut off plug is inserted into any 13 amp socket.
If a new plug is to be fitted, please observe the wiring code as shown below.
If in any doubt, please consult a qualified electrician.
WARNING: THIS APPLIANCE MUST BE EARTHED.
IMPORTANT: The wires in this mains lead are coloured in accordance with the following code:
Green - and - Yellow: Earth
Blue: Neutral
Brown: Live
As the colours of the wire in the mains lead of this appliance may not correspond with the coloured markings identifying the terminals in your plug, proceed as follows.
The wire which is coloured GREEN - AND - YELLOW must be connected to the terminal in the plug which is marked with the letter E or by the Earth symbol or coloured GREEN or GREEN - AND - YELLOW.
The wire which is coloured BLUE must be connected to the terminal in the plug which is marked with the letter N or coloured BLACK.
The wire which is coloured BROWN must be connected to the terminal in the plug which is marked with the letter L or coloured RED.
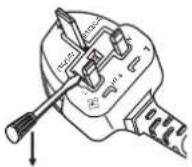
How to replace the fuse: Open the fuse compartment with a screwdriver and replace the fuse.
WARNING:
POWER
The wall outlet or the circuit breaker shall be installed near the equipment and shall be easily accessible when problems occur. If the following problems occur, cut off the power supply immediately.
Continued use of the projector in these conditions will result in fire or electric shock.
If foreign objects or water get inside the projector, cut off the power supply.
If the projector is dropped or the cabinet is broken, cut off the power supply.
If you notice smoke, strange smells or noise coming from the projector, cut off the power supply.
Please contact an Authorized Service Center for repairs, and do not attempt to repair the projector yourself.
During a thunderstorm, do not touch the projector or the cable.
Electric shocks can result.
Do not do anything that might damage the power cord or the power plug.
If the power cord is used while damaged, electric shocks, short-circuits or fire will result.
- Do not damage the power cord, make any modifications to it, place it near any hot objects, bend it excessively, twist it, pull it, place heavy objects on top of it or wrap it into a bundle.
Ask an Authorized Service Center to carry out any repairs to the power cord that might be necessary.
Completely insert the power plug into the wall outlet and the power connector into the projector terminal.
If the plug is not inserted correctly, electric shocks or overheating will result.
- Do not use plugs which are damaged or wall outlets which are coming loose from the wall.
Do not use anything other than the provided power cord.
Failure to observe this will result in fire or electric shocks. Please note that if you do not use the provided power cord to ground the device on the side of the outlet, this may result in electric shocks.
Clean the power plug regularly to prevent it from becoming covered in dust.
Failure to observe this will cause a fire.
If dust builds up on the power plug, the resulting humidity can damage the insulation.
If not using the projector for an extended period of time, pull the power plug out from the wall outlet.
Pull the power plug out from the wall outlet and wipe it with a dry cloth regularly.
Do not handle the power plug with wet hands.
Failure to observe this will result in electric shocks.
Do not overload the wall outlet.
If the power supply is overloaded (ex., by using too many adapters), overheating may occur and fire will result.
■ ON USE/INSTALLATION
Do not place liquid containers on top of the projector.
If water spills onto the projector or gets inside it, fire or electric shocks will result.
If any water gets inside the projector, contact an Authorized Service Center.
Do not place the projector on soft materials such as carpets or sponge mats.
Doing so will cause the projector to overheat, which can cause burns, fire or damage to the projector.
Do not set up the projector in humid or dusty places or in places where the projector may come into contact with oily smoke or steam, ex. a bathroom.
Using the projector under such conditions will result in fire, electric shocks or components deterioration.
Components deterioration (such as ceiling mount brackets) may cause the projector which is mounted on the ceiling to fall down.
Do not install this projector in a place which is not strong enough to take the full weight of the projector or on top of a surface which is sloped or unstable.
Failure to observe this will cause projector to fall down or tip over the projector, and severe injury or damage could result.
Do not place another projector or other heavy objects on top of the projector.
Failure to observe this will cause the projector to become unbalanced and fall, which could result in damage or injury. The projector will be damaged or deformed.
WARNING:
Installation work (such as ceiling mount bracket) should only be carried out by a qualified technician.
If installation is not carried out and secured correctly it can cause injury or accidents, such as electric shocks.
Do not use anything other than an authorized ceiling mount bracket.
Be sure to use the wire provided with the projector mount base for ceiling mount as an extra safety measure to prevent the projector from falling down. (Install in a different location to the ceiling mount bracket.)
Do not cover the air inlet port or the air outlet port.
Doing so will cause the projector to overheat, which can cause re or damage to the projector.
Do not place the projector in narrow, badly ventilated places.
Do not place the projector on cloth or papers, as these materials could be drawn into the air inlet port.
Do not place your hands or other objects close to the air outlet port.
Doing so will cause burns or damage your hands or other objects.
- Heated air comes out of the air outlet port. Do not place your hands or face, or objects which cannot withstand heat close to this port.
Do not look and place your skin into the lights emitted from the projection window while the projector is being used.
Doing so can cause burns or loss of sight.
Strong light is emitted from the projector's projection window. Do not look or place your hands directly into this light.
Be especially careful not to let young children look into the projection window. In addition, turn off the power and disconnect the power plug when you are away from the projector.
Do not insert any foreign objects into the projector.
Doing so will cause re or electric shocks.
- Do not insert any metal objects or lammable objects into the projector or drop them onto the projector.
Never attempt to remodel or disassemble the projector.
High voltages can cause re or electric shocks.
- For any inspection, adjustment and repair work, please contact an Authorized Service Center.
Do not allow metal objects, flammable objects, or liquids to enter inside of the projector. Do not allow the projector to get wet.
Doing so may cause short circuits or overheating, and result in re, electric shock, or malfunction of the projector.
Do not place containers of liquid or metal objects near the projector.
If liquid enters inside of the projector, consult your dealer.
● Particular attention must be paid to children.
Use the ceiling mount bracket and the wall mount bracket specified by Panasonic.
Defects in the ceiling mount bracket will result in falling accidents.
- Attach the supplied safety cable to the ceiling mount bracket to prevent the projector from falling down.
WARNING:
ACCESSORIES
Do not use or handle the battery improperly, and refer to the following.
Failure to observe this will cause burns, battery to leak, overheat, explode or catch fire.
Do not use unspecified battery.
Do not disassemble coin cell battery.
Do not heat the battery or place them into water or fire.
Do not allow the + and - terminals of the battery to come into contact with metallic objects such as necklaces or hairpins.
Do not bring or store battery together with metallic objects.
Store the battery in a plastic bag and keep them away from metallic objects.
Make sure the polarities (+ and -) are correct when inserting the battery.
Remove the empty battery from the remote control at once.
● Insulate the battery using tape or something similar before disposal.
Do not allow children to reach the battery (CR2025).
● The battery can cause personal injury if swallowed.
- If swallowed, seek medical advice immediately.
If the battery fluid leaks, do not touch it with bare hands, and take the following measures if necessary.
● Battery fluid on your skin or clothing could result in skin inflammation or injury.
Rinse with clean water and seek medical advice immediately.
● Battery fluid coming in contact with your eyes could result in loss of sight.
In this case, do not rub your eyes. Rinse with clean water and seek medical advice immediately.
Do not disassemble the lamp unit.
If the lamp breaks, it could cause injury.
Do not remove unspecified screws during the lamp unit replacement.
Doing so can cause electric shocks, burns, or injury.
Lamp replacement
The lamp has high internal pressure. If improperly handled, an explosion and severe injury or accidents will result.
● The lamp can easily explode if struck against hard objects or dropped.
- Before replacing the lamp, be sure to disconnect the power plug from the wall outlet. Electric shocks or explosions can result if this is not done.
- When replacing the lamp, turn the power off and allow the lamp it to cool for at least 1 hour before handling it otherwise it can cause burns.
Do not allow infants or pets to touch the remote control unit.
- Keep the remote control unit out of the reach of infants and pets after using it.
Do not use the supplied power cord with devices other than this projector.
- Using the supplied power cord with devices other than this projector may cause short circuits or overheating, and result in electric shock or fire.
Remove the depleted battery from the remote control promptly.
● Leaving them in the unit may result in fluid leakage, overheating, or explosion of the battery.
CAUTION:
POWER
When disconnecting the power cord, be sure to hold the power plug and power connector.
If the power cord itself is pulled, the lead will become damaged, and fire, short-circuits or serious electric shocks will result.
When not using the projector for an extended period of time, disconnect the power plug from the wall outlet.
Failure to do so may result in fire or electric shock.
Disconnect the power plug from the wall outlet before carrying out any cleaning and replacing the unit.
Electric shocks can result if this is not done.
■ ON USE/INSTALLATION
Do not put your weight on this projector.
You could fall or the projector could break, and injury will result.
- Be especially careful not to let young children stand or sit on the projector.
Do not place the projector in extremely hot locations.
Doing so will cause the outer casing or internal components to deteriorate, or result in fire.
● Take particular care in locations exposed to direct sunlight or near stoves.
Do not make strong force or shock to the mirror.
Doing so may cause damage to the glass mirror.
Always disconnect all cables before moving the projector.
Moving the projector with cables still attached can damage the cables, which will cause fire or electric shocks to occur.
Never plug headphones and earphones into AUDIO OUT jack.
Excessive sound pressure from earphones and headphones can cause hearing loss.
ACCESSORIES
Do not use the old lamp unit.
If used it could cause lamp explosion.
If the lamp has broken, ventilate the room immediately. Do not touch or bring your face close to the broken pieces.
Failure to observe this will cause the user to absorb the gas which was released when the lamp broke and which contains nearly the same amount of mercury as fluorescent lamps, and the broken pieces will cause injury.
- If you believe that you have absorbed the gas or that the gas has got into your eyes or mouth, seek medical advice immediately.
- Ask your dealer about replacing the lamp unit and check the inside of the projector.
When not using the projector for an extended period of time, remove the battery from the remote control.
● Failure to observe this will cause the battery to leak, overheat, catch fire or explode, which may result in fire or contamination of surrounding area.
Do not open the desiccant bag or eat it, and do not discard it to moisture circumstances.
Accidentally swallow the contents of the desiccant bag may cause bad result to your body. Moreover, the contents may generate heat if exposing to moisture, so it may cause inflammation or injury to your skin if such contents is attached to your body or clothes.
- In case that the desiccant has got into your eyes or mouth, wash with clean water immediately and seek medical advice.
● Particular attention must be paid to children.
CAUTION:
VIEWING 3D IMAGES
Those with a medical history of oversensitivity to light, heart problems, or poor physical health should not view 3D images.
This may lead to a worsening of medical conditions.
If you feel tiredness or discomfort, or other abnormality while viewing with 3D Eyewear, discontinue viewing.
Continuing use may cause health problems. Take a break as necessary.
When viewing 3D movies, aim to view one movie at a time and take a break as necessary.
When viewing 3D images, for example when playing 3D games or using a PC where two way interaction is possible, take an appropriate break every 30 to 60 minutes.
Watching for long periods of time may cause eye fatigue.
When preparing contents, use contents properly created to be used for 3D.
This may cause eye fatigue or health problems.
When viewing 3D images, pay attention to people and objects in the vicinity.
3D video may be mistaken for actual objects, and the related bodily movements can cause damage to objects and lead to injury.
Use 3D Eyewear when viewing 3D videos.
Do not tilt your head when viewing with 3D Eyewear.
Those who are near or far sighted, those with weaker eyesight in one eye, or those with astigmatism should use corrective eyewear etc. when using 3D Eyewear.
If the image appears distinctly double when viewing 3D video, discontinue viewing.
Watching for long periods of time may cause eye fatigue.
View at a distance of at least three times the effective height of the screen.
Viewing at distance closer than the recommended distance may cause eye fatigue. As with movies, if there are black bands at the top and bottom of the video, view at a distance of 3 times or more of the height of the video section.
Children younger than 5 or 6 years old should not use 3D Eyewear.
As it is difficult to gauge the reactions of children to fatigue and discomfort their condition may worsen suddenly.
If a child uses the 3D Eyewear, guardians should beware of the child's eyes becoming tired.
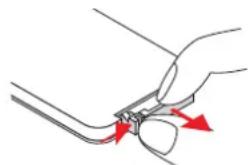
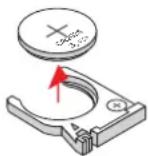
To remove the battery
Remote Control Battery
Press the guide and pull out the battery base.
natural_image
Illustration of a hand holding a tool with red arrows indicating motion (no text or symbols)
Remove the battery.
Trademarks
- HDMI, the HDMI Logo, and High-Definition Multimedia Interface are trademarks or registered trademarks of HDMI Licensing LLC in the United States and other countries.
PJLink™ is a trademark or pending trademark in Japan, the United States, and other countries and regions.
RoomView, Crestron RoomView are registered trademarks of Crestron Electronics, Inc, and Crestron Connected is the trademark of Crestron Electronics, Inc.
Other names, company names or product names used in these operating instructions are the trademarks or registered trademarks of their respective holders.
Please note that the operating instructions do not include the ^® and ^TM symbols.
Illustrations in these operating instructions
• Note that illustrations of the projector and screens may differ from the ones you actually see.
Page references
• In these instructions, references to pages are indicated as: (→page 00).
Term
- In these instructions, the "Wireless remote control unit" accessory is referred to as the "Remote control".
Features of the Projector
Blu-ray 3D compatible discs
▶ You can use the projector to view 3D videos by playing media such as Blu-ray 3D compatible discs on a 3D device such as a 3D Blu-ray player.
Large Screen in Limited Space
▶ Short focus lens allows you to project large images from short distance. If the presenter stands in front of the projecting board, the image of the presenter will not go into the board and the project light will not go into the presenter's eyes.
Sufficient brightness in the classroom
The 3 100 lm* brightness enables you to project bright and clear image under education circumstances even in a bright classroom.
(* 3 100 lm is for PT-CW330EA and PT-CX300EA.
2 600 lm is for PT-CW240EA.)
Quick steps
For details, see the corresponding pages.
Set up your projector.
(→page 22)
Connect with other devices.
(→page 27)
Connect the power cord.
(→page 30)
Power on.
(→page 32)
Select the input signal.
(→page 33)
Adjust the image.
(→page 33)
Important Information
Read this first! 2
Contents ......11
Precautions for Use.... 13
Cautions when transporting 13
Cautions when installing 13
Security 14
Disposal 14
Cautions on use 15
Accessories....16
Optional accessories....16
Preparation
About Your Projector 17
Remote control 17
Projector body 18
Control Panel and Indicators 19
Connecting terminals.... 20
Using Remote control 21
Installing and Removing battery 21
Setting Remote control ID numbers 21
Getting Started
Setting up 22
Projection method 22
Parts for ceiling or wall mount (Optional) 22
Adjusting Projection Image Size 23
Adjusting the Projector's Height 26
Adjusting the Projector's Focus 26
Connections 27
Before connecting to the projector 27
Connecting example: Computers 28
Connecting example: AV equipment 29
Basic Operation
Powering ON/OFF 30
Connecting the power cord 30
ON(G)/STANDBY(R) indicator.... 31
Powering On the Projector 32
Powering Off the Projector 32
Projecting 33
Selecting the input signal 33
How to adjust the state of the image 33
Viewing 3D Images .... 34
About viewing 3D images .... 34
Settings
On-screen Display Menus.... 35
How to operate menu 35
Menu Tree 36
Picture 38
Color Mode.... 38
Wall color.... 38
Brightness 38
Contrast.... 38
Sharpness 39
Saturation 39
Hue....39
Gamma 39
Color Temp 39
Color Space.... 39
Position 40
Aspect Ratio 40
Phase 40
Clock 40
H Position 40
V Position 41
Digital Zoom 41
V Keystone 41
Ceiling Mount 41
Setting 42
Language 42
Menu Location 42
Closed Caption....42
VGA Out (Standby).... 42
LAN (Standby)....42
Test Pattern 43
Remote ID 43
Startup Logo 43
Reset 43
Audio 44
Mute 44
Volume 44
In Standby Mode (Audio) 44
Options 45
Auto Source.... 45
Input 45
Auto Power Off (Min)...... 45
Lamp Settings 45
Dynamic Black.... 46
High Altitude 46
Dust Filter Reminder 46
Contents
Information 46
3D 47
3D 47
3D Invert 47
3D Format 47
1080p@24 48
Safety Precautions Message 48
Safety Precautions 48
LAN 49
DHCP 49
IP Address 49
Subnet Mask 49
Gateway 49
DNS....49
Store....50
Reset 50
Connect to Network....51
Computer operation via network 52
Web Management 52
Maintenance
About indicator status 56
If an indicator turns on 56
Maintenance/replacement.... 57
Before cleaning/replacing the unit 57
Maintenance....57
Replacing the unit 59
Troubleshooting 62
Appendices
Appendices 65
Serial terminal 65
Other terminals....68
PJLink protocol 69
List of compatible signals 70
3D compatible signals 71
Specifications 72
Dimensions 74
Ceiling mount bracket safeguards...... 74
Index 75
Precautions for Use
Cautions when transporting
When transporting the projector, be careful not to touch the mirror.
When transporting the projector, hold it securely by its bottom and avoid excessive vibration and impacts. Doing so may damage the internal parts and result in malfunctions.
Do not transport the projector with the adjustable feet extended. Doing so may damage the adjustable feet.
Cautions when installing
- Do not set up the projector outdoors.
The projector is designed for indoor use only.
- Do not use under the following conditions.
Places where vibration and impacts occur such as in a car or vehicle: Doing so may damage the internal parts and result in malfunctions.
Near the exhaust of an air conditioner: Depending on the conditions of use, the screen may fluctuate in rare cases due to the hot air from the air exhaust port or the heated or cooled air. Make sure that the exhaust from the projector or other equipment, or the air from the air conditioner does not blow toward the front of the projector.
Near lights (studio lamps, etc.) and other locations of great temperature fluctuation (“Operating environment” (→ page 73)): Doing so may shorten the life of the lamp or result in deformation of the outer case and malfunctions.
● Near high-voltage power lines or near motors: Doing so may interfere with the operation of the projector.
Place where there is high-power laser equipment: Directing a laser beam onto the lens surface causes damage to the DLP chips.
- Be sure to ask a specialized technician when installing the product to a ceiling or wall.
This requires an optional ceiling mount bracket.
Model No.: ET-PKV100H (for high ceilings), ET-PKV100S (for low ceilings), ET-PKC200B (Projector Mount Base), ET-PKC200W (Wall Mount Bracket).
Lens focus
The high clarity projection lens is thermally affected by the light from the light source, making the focus unstable in the period just after switching on the power. Wait at least 30 minutes with the image projected before adjusting the lens focus.
When using the projector at elevations below approx. 1 000 m (3 300 ft), make sure [High altitude] is set to [Off].
Failure to do so may shorten the life of the internal parts and result in malfunctions.
When using the projector at elevations approx. 1 000 m (3 300 ft) and approx. 3 000 m (10 000 ft), make sure [High altitude] is set to [On].
Failure to do so may shorten the life of the internal parts and result in malfunctions.
- Do not install the projector at elevations approx. 3 000 m (10 000 ft) or higher above sea level.
Failure to do so may shorten the life of the internal parts and result in malfunctions.
■ Confirm and set the using environment temperature ["Operating environment" (→ page 73)]
Precautions for Use
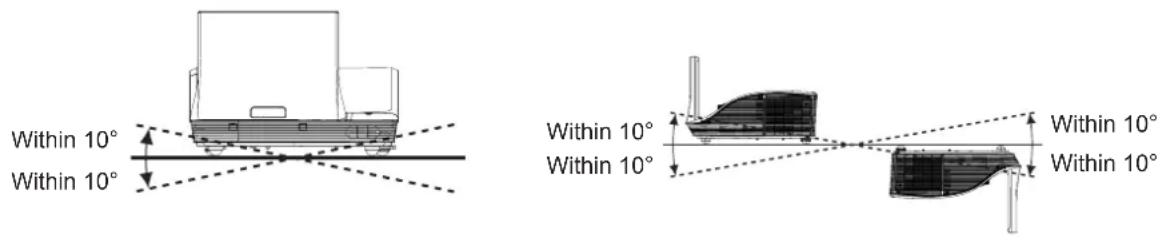
Do not tilt the projector or place it on its side.
Do not tilt the projector body more than approximately ±10^ vertically or ±10^ horizontally. Over-tilting may result in shortening the life of the components.
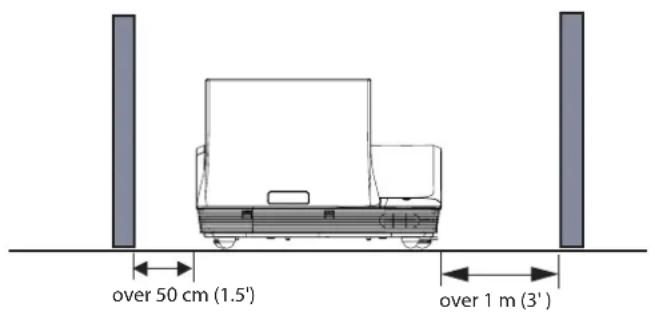
Cautions when setting the projectors
Do not stack the projectors.
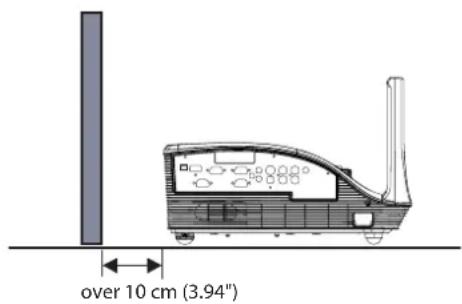
Do not block the ventilation ports (intake and exhaust) of the projector.
Avoid heating and cooling air from the air conditioning system directly blow to the ventilation ports (intake and exhaust) of the projector.
text_image
over 50 cm (1.5')
over 1 m (3')
text_image
over 10 cm (3.94"
- Do not place the projector in an enclosed space.
If you need to place the projector in an enclosed space, additional air conditioning and ventilation system must be equipped. When ventilation is insufficient, remaining heat may trigger the protection circuit of the projector.
Security
Take safety measures against following incidents.
● Personal information being leaked via this product.
● Unauthorized operation of this product by a malicious third party.
● Interfering or stopping of this product by a malicious third party.
Security instruction ( page 54)
● Make your password as difficult to guess as possible.
- Change your password periodically.
- Panasonic or its affiliate company never inquires a password directly to a customer. Do not tell your password in case you receive such an inquiry.
● The connecting network must be secured by firewall or others.
- Set an administrator password for the Web Management and restrict the users who can log in.
Disposal
When disposing of the product, ask your local authority or dealer about the correct methods of disposal.
The lamp contains mercury. When disposing of the used lamp unit, ask your nearest local authorities or dealer about proper disposal of the unit.
Dispose of used battery according to the instructions or your local disposal rule or guidelines.
Cautions on use
In order to get the picture quality
Draw curtains or blinds over windows and turn off any lights near the screen to prevent outside light or light from indoor lamps from shining onto the screen.
Depending on where the projector is used, heated air from an exhaust port or warm or cold air from an air conditioner can cause a shimmering effect on screen.
Avoid use in locations where exhaust or streams of air from projector, other devices and air conditioners flow between the projector and the screen.
The lens of projector is affected by the heat from the luminous source. Because of this, the focusing may not be stable right after the power is turned on. Focusing is stabled after projecting image for 30 minutes and longer.
- Do not touch the surface of the mirror and the projection lens with your bare hand.
If the surface of the mirror and the projection lens becomes dirty from fingerprints or anything else, this will be magnified and projected onto the screen.
DLP chips
The DLP chips are precision-made. Note that in rare cases, pixels of high precision could be missing or always lit, but this is not a malfunction.
Directing a high power laser beam onto the projection window surface can damage the DLP chips.
■ Optical components
Operating the projector in an environment with high temperature or heavy exposure to dust or tobacco smoke will reduce the service life of the optical components and may necessitate their replacement within less than one year of use. For details, consult your dealer.
Lamp
The luminous source of the projector is a mercury lamp with high internal pressure.
A high pressure mercury lamp has following characteristics.
● The brightness of the lamp will decrease by duration of usage.
● The lamp may burst with sound or shorten life by shock or chipping.
- The life of the lamp varies greatly depending on individual specificities and usage conditions. In particular, continuous use over 22 hours and frequent on/off switching of the power greatly deteriorate the lamp and affect the lamp life.
- In rare cases, the lamp burst shortly after the projection.
- The risk of bursting increases when the lamp is used beyond its replacement cycle. Make sure to replace the lamp unit consistently. (→ page 60)
- If the lamp bursts, gas contained inside of the lamp is released in a form of smoke.
- It is recommended to store replacement lamps for contingency.
- It is recommended to have authorized engineer or your dealer replace the lamp unit.
■ About connections to computer or peripheral device
To assure continued compliance, follow the attached installation instructions, which include using the provided power cord and shielded interface cables when connecting to computer or peripheral device.
Importer's name and address within the European Union
Panasonic Marketing Europe GmbH
Panasonic Testing Center
Winsbergring 15, 22525 Hamburg, Germany
Precautions for Use
Accessories
Make sure the following accessories are provided with your projector. Numbers in the brackets ( ) show the number of accessories.
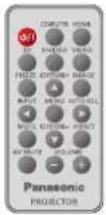
Wireless remote control unit (x1)(H458SZ01G001)
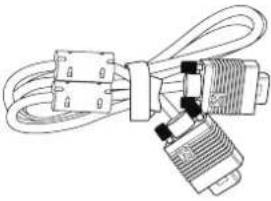
Computer cable (x1)(H4200200G005)
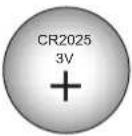
Lithium coin cell BatteryCR2025 (x1)
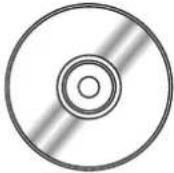
CD-ROM (x1)(H368SY01G001(B))
Included to the remote control unit at the time of purchase)
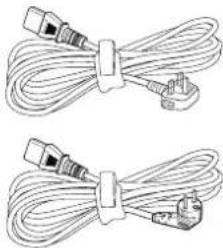
Power Cord (x2)(H4200128G001)(H4200118G001)
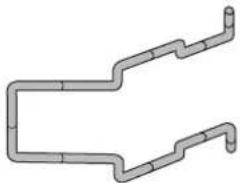
AC power cord cover (x1)(H758SZ02G001))
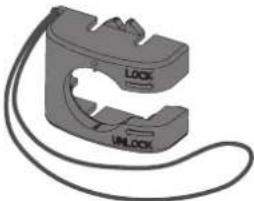
AC power cord holder (x1)(H618SZ09H001)
Attention
After unpacking the projector, discard the power cord cap and packaging material properly.
● For lost accessories, consult your dealer.
● The part numbers of accessories and separately sold components are subject to change without notice.
- Store small parts in an appropriate manner, and keep them away from young children.
Optional accessories
Options Model No.
Replacement lamp unit
ET-LAC300 (for PT-CW330EA and PT-CX300EA)ET-LAC200 (for PT-CW240EA)
Ceiling Mount Bracket
ET-PKV100H (for high ceilings)ET-PKV100S (for low ceilings)
Projector Mount Base ET
-PKC200B
Wall Mount Bracket ET
-PKC200W
Remote control
text_image
(1)
(2)
(3)
(4)
(5)
(6)
(7)
(8)
(9)
(10)
Panasonic
PROJECTOR
COMPUTER HDMI
3D S-VIDEO VIDEO
FREEZE KEYSTONE+ IMAGE
INPUT MENU AUTO ADJ.
MUTE KEYSTONE ASPECT
AV MUTE VOLUME
- +
(11)
(12)
(13)
(14)
(15)
(16)
(17)
(18)
(19)
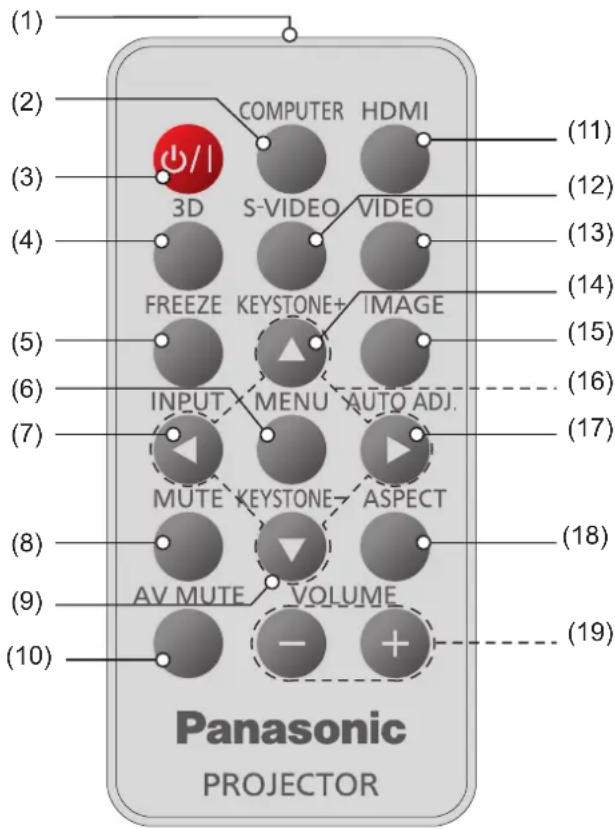
(1) Remote control signal emitter
(2) button
Switches COMPUTER 1 or COMPUTER 2 input. If either of the input is selected, press button will switch to the other one.
(3) <@/▷ button
Turns the projector on/off.
(4) <3D> button
Displays [3D] menu.
(5) button
Temporarily stops the image and mute the sound. Press again to return to previous state.
(6)
Do not drop the remote control.
Avoid contact with liquids.
Do not attempt to modify or disassemble the remote control.
Note
The operation may not optimize the image position or the resolution, depending on the input signal format or the image contents. In this case, switch to a different image and execute again.
When pointing the remote control directly toward the projector (Remote control signal receiver), operating range for the remote control is within 8 m (26.25 ft). Also, operation range available for four directions (up, down, left, right to the projector) is ± 35° and the operation distance may become short.
If there are any obstacles between the remote control and the remote control signal receiver, the remote control may not operate correctly.
You can operate the projector by reflecting the remote control signal on the screen. The operating range may differ due to the loss of light caused by the properties of the screen.
When the remote control signal receiver is lit with a fluorescent light or other strong light source, the projector may become inoperative. Set the projector as far from the luminous source as possible.
You can operate all of the functions of the projector via the remote control. Make sure not to lose the remote control.
Before using the remote control for the first time, remove the transparent insulation tape.
text_image
Transparent
insulation tape
Projector body
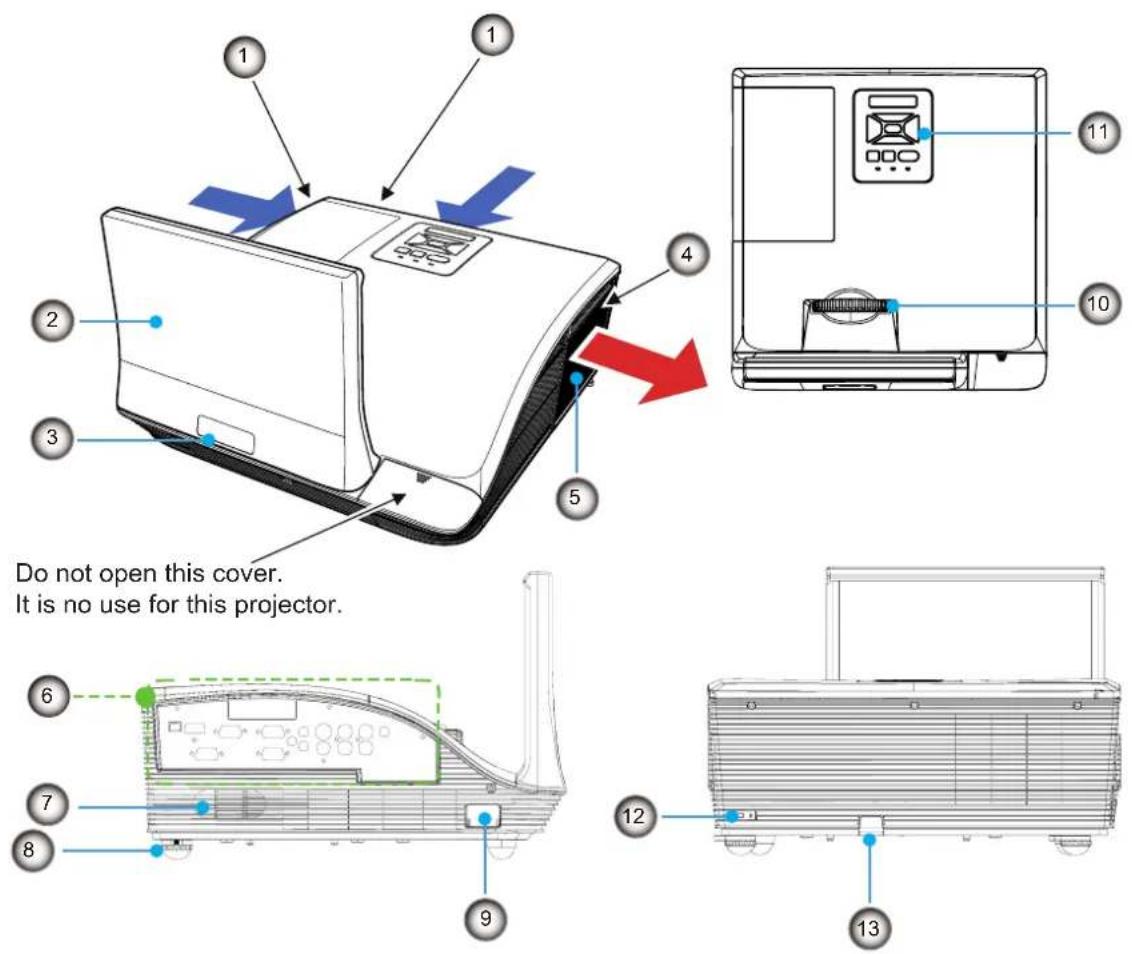
(1) Air intake port
(2) Mirror Cover
(3) Remote control signal receiver
(4) Air exhaust port
WARNING:
■Keep your hands and other objects away from the air exhaust port.
Keep your hand and face away.
Do not insert your finger.
Keep heat-sensitive articles away.
Heated air from the air exhaust port can cause burns or external damage.
(11) Control panel and Indicators (→ page 19)
(12) Security slot
Attaches the commercial shackle lock, manufactured by Kensington, to protect your projector. Compatible with the Kensington MicroSaver Security System.
(13) Security Bar
You can install designed wire to prevent theft.
Control Panel and Indicators
flowchart
graph TD
    A["1 ON(G)/STANDBY(R) TEMP LAMP"] --> B["2"]
    B --> C["3"]
    C --> D["4"]
    D --> E["5"]
    E --> F["6"]
    F --> G["7"]
    G --> H["8"]
    H --> I["9"]
    I --> J["1"]
    J --> K["2"]
    K --> L["3"]
    L --> M["4"]
    M --> N["5"]
    N --> O["6"]
    O --> P["7"]
    P --> Q["8"]
    Q --> R["9"]
    R --> S["1"]
    S --> T["2"]
    T --> U["3"]
    U --> V["4"]
    V --> W["5"]
    W --> X["6"]
    X --> Y["7"]
    Y --> Z["8"]
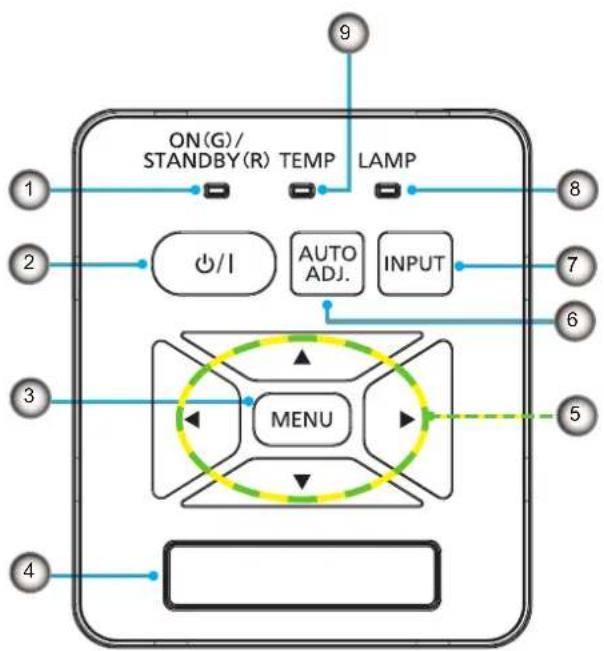
(1) indicator
Indicates the projector's status.
(2) </► button
Turns the projector on/off.
(3)
Note
- The operation may not optimize the image position or the resolution, depending on the input signal format or the image contents. In this case, switch to a different image and execute again.
(7) button
Displays [Source] menu. (→ page 33)
(8) indicator
Indicates the projector's lamp status.
(9) indicator
Indicates the status of the internal temperature or the cooling fan of the projector.
About Your Projector
Connecting terminals
text_image
1
2
3
4
5
6
MINI USB
HDMI
IN
MONITOR OUT
LAN
S-VIDEO IN
AUDIO IN
L
L
SERIAL IN
COMPUTER 1 IN — AUDIO 1 IN
COMPUTER 2 IN — AUDIO 2 IN
R
R
VIDEO IN — AUDIO IN
VARIABLE AUDIO OUT
7
8
9
10
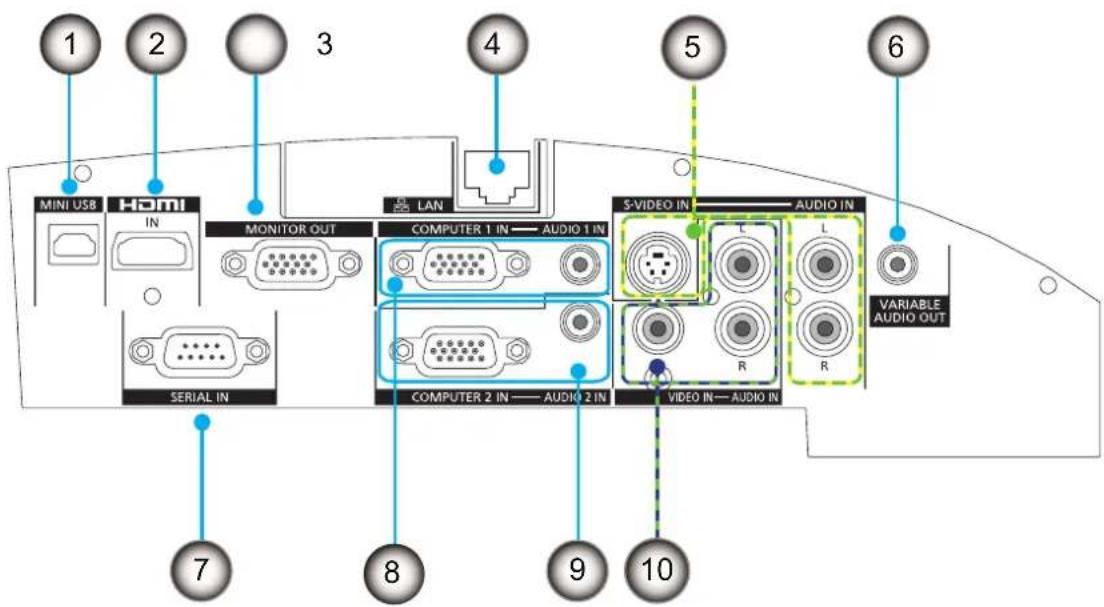
(1)
For service use.
(2) Input
Connects to HDMI input signals.
(3)
Outputs COMPUTER 1 or COMPUTER 2 signals input to the projector.
(4)
Connects to a LAN cable for network connection.
(5)
Connects to S-VIDEO IN input signal and AUDIO IN signal.
(6)
Outputs the audio signals input to the projector.
(7)
Connects to a computer via an RS-232C cable.
(8)
Connects to COMPUTER 1 IN input signal and AUDIO 1 IN signal.
(9)
Connects to COMPUTER 2 IN input signal and AUDIO 2 IN signal.
(10)
Other manuals PANASONIC
Discover other manuals and user guides for the brand PANASONIC
💬 Hi! I'm your manual assistant.I know your PANASONIC PT-CW240.
How can I help you? (use, settings, error codes, maintenance, explaining a step from the manual, etc.)💡 Examples :
• How do I use it ?
• Error code E3 ?
• How do I clean it ?









 Included to the remote control unit at the time of purchase)