Bull Ant PCS350S - Lawn mower Sanli - Free user manual and instructions
Find the device manual for free Bull Ant PCS350S Sanli in PDF.


User questions about Bull Ant PCS350S Sanli
0 question about this device. Answer the ones you know or ask your own.
Ask a new question about this device
Download the instructions for your Lawn mower in PDF format for free! Find your manual Bull Ant PCS350S - Sanli and take your electronic device back in hand. On this page are published all the documents necessary for the use of your device. Bull Ant PCS350S by Sanli.
USER MANUAL Bull Ant PCS350S Sanli
natural_image
Abstract geometric logo with interlocking angular shapes inside an oval (no text or symbols)SANLI
INSTRUCTION MANUAL
text_image
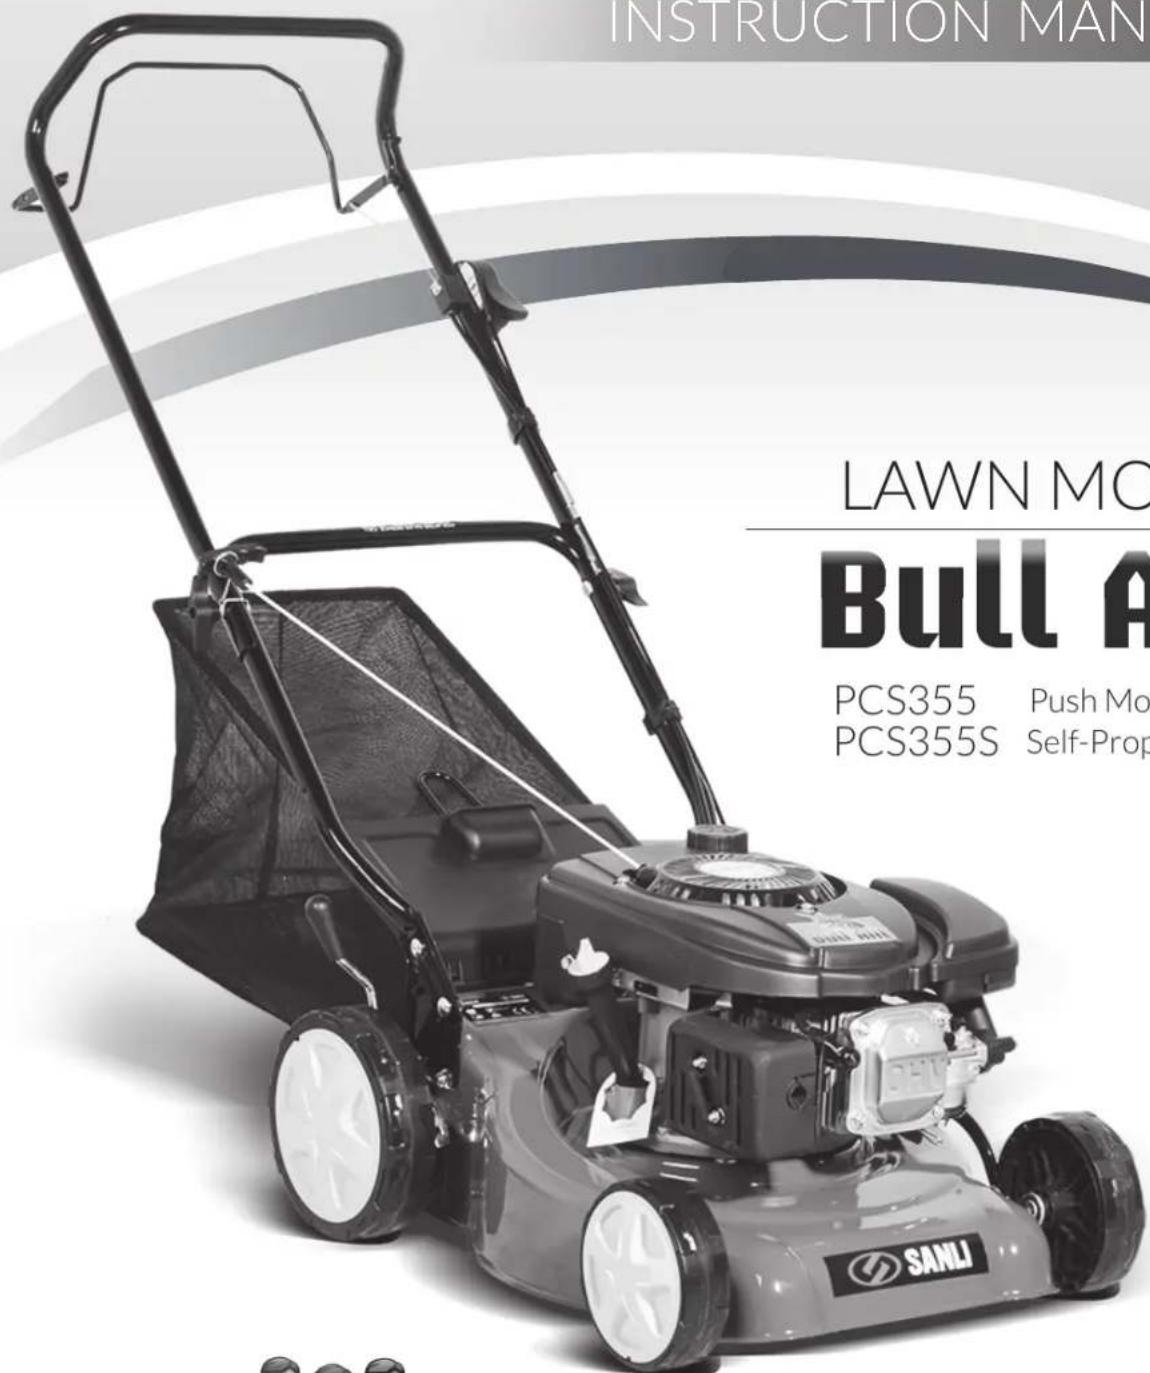
INSTRUCTION MAN LAWN MO BULL A PCS355 Push Mo PCS355S Self-Prop SANLILAWN MOWER
Bull Ant
PCS355
Push Mower
PCS355S
Self-Propelled Mower
CONSUMER
HELPLINE
1800 466 068

PLEASE READ THE INSTRUCTIONS IN THIS MANUAL BEFORE OPERATION.
PCS 355 Push Mower PCS 355 S Self-Propelled Mower
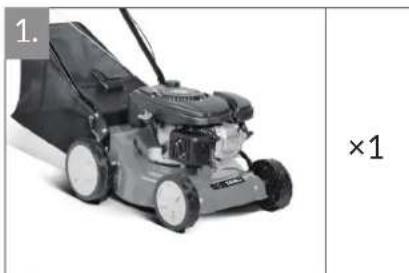
What you get with your mower
natural_image
Black-and-white photo of a lawn mower with visible blades and wheels, next to a multiplication expression (×1) on the right side.
text_image
2. SANLI LAWN POWER Bull Ant ×1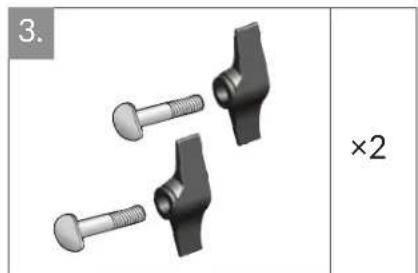
natural_image
3D rendered mechanical components with threaded fasteners and a close-up view labeled '×2' (no text or symbols on the components themselves)
natural_image
Black backpack with a close-up view, labeled '×1' on the right side (no other text or symbols)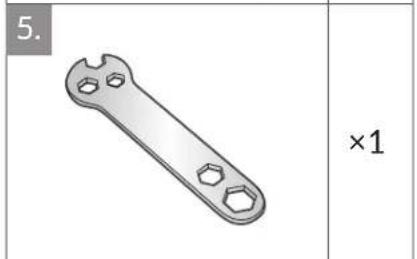
natural_image
Metallic wrench-shaped tool with hexagonal end caps, shown in 3D view (no text or symbols on the tool itself)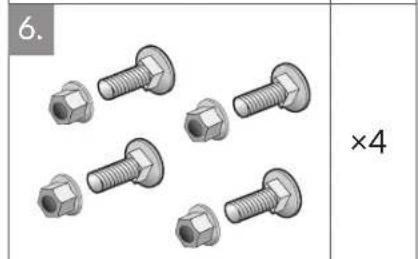
text_image
6. ×4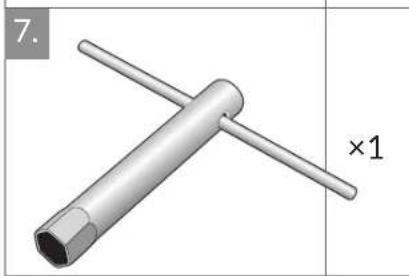
natural_image
3D illustration of a mechanical tool with two cross-shaped arms, labeled '×1' (no text or symbols on the tool itself)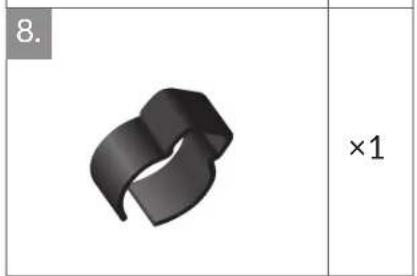
text_image
8. ×1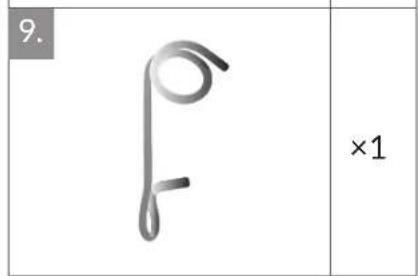
text_image
9. ×1- Petrol Engine Mower
- Grass Catcher
-
Spark Plug Socket 21mm
-
Instruction Manual
- Spanner
-
Cable Clip
-
Handle Knobs and Bolts
- Bolt and Nut Assembly
- Spring Cord Guide
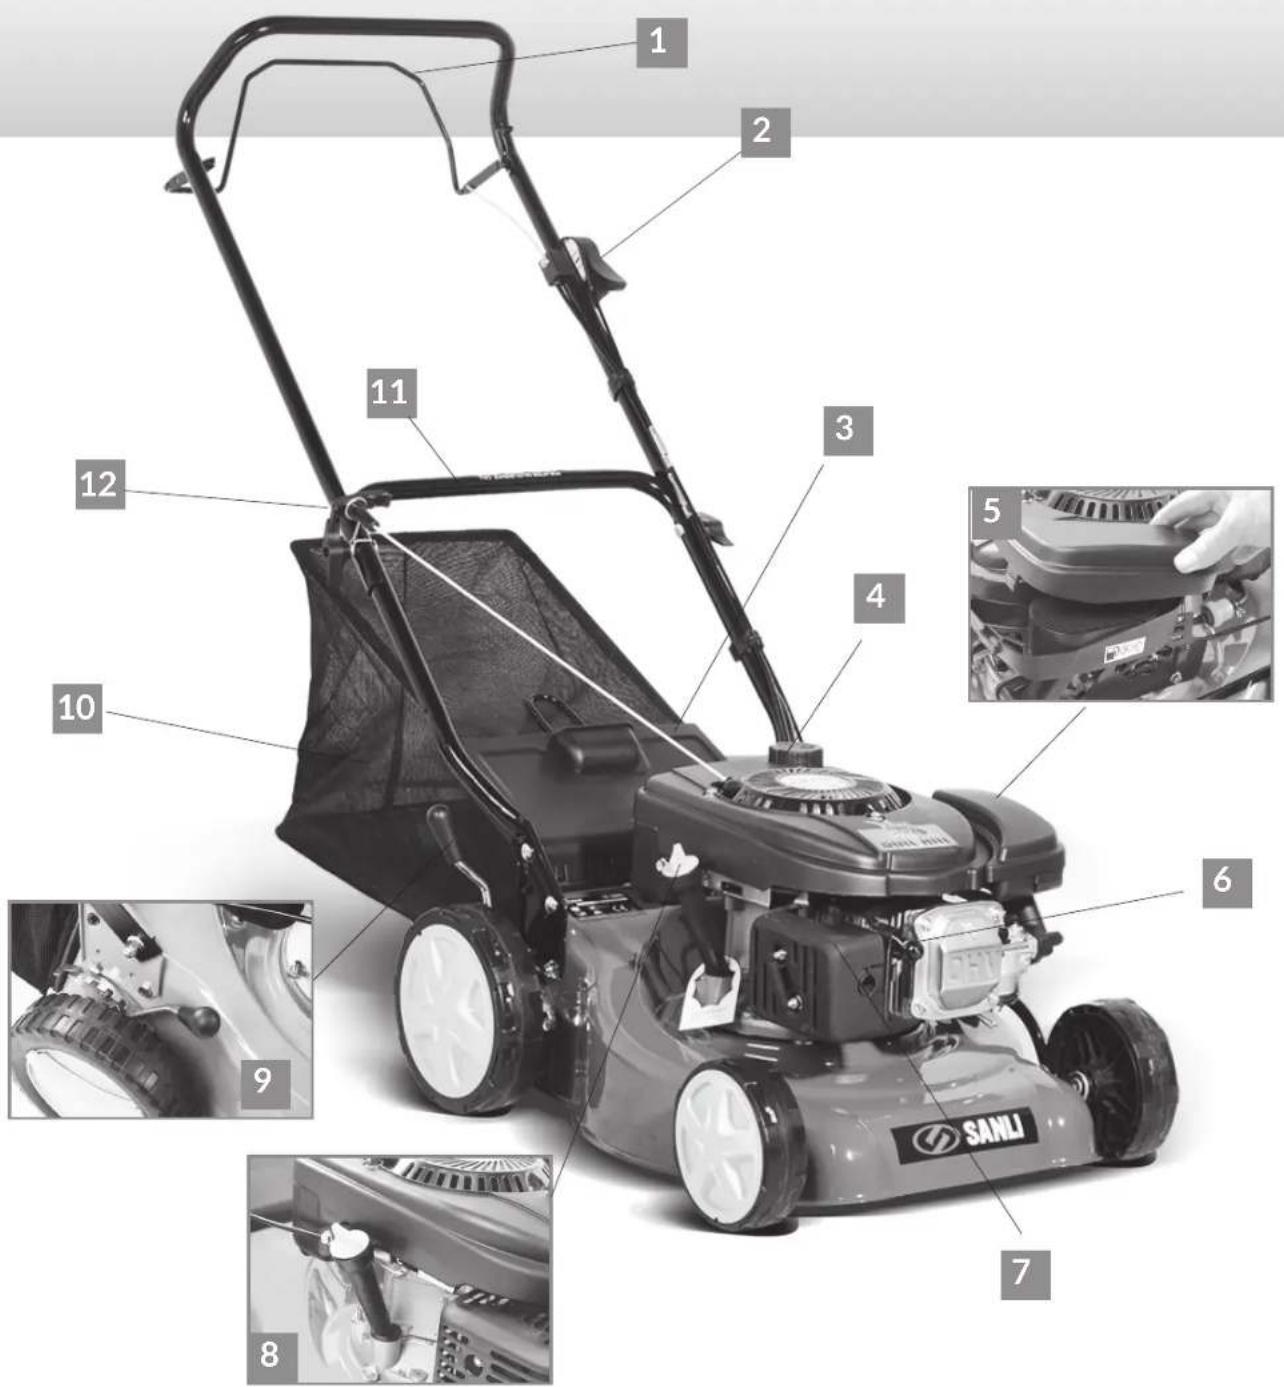
text_image
1 2 3 4 5 6 7 8 9 10 11 12- Drive Lever (PCS355S only)
- Throttle Control Lever
- Rear Flap
-
Fuel Tank
-
Air Filter
- Spark Plug
- Muffler/Exhaust
-
Oil Sump
-
Height Adjustment Lever
- Grass Catcher
- Lower Loop Handle
- Spring Cord Guide
natural_image
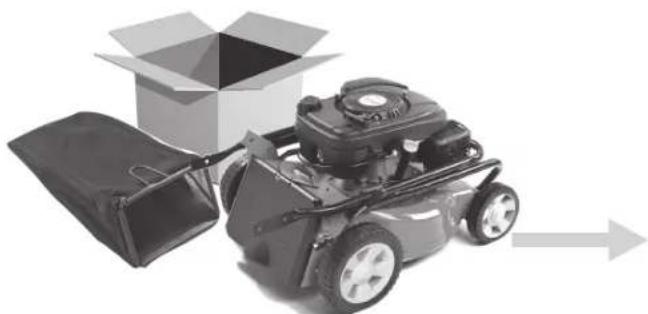
Black-and-white illustration of a small utility vehicle with open lid, next to an open box and directional arrow (no text or symbols)Remove and ensure you have all the parts required for assembly (see page 2 for reference)
natural_image
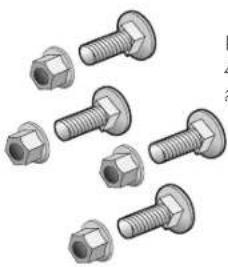
Illustration of multiple bolts with hexagonal heads, no text or symbols presentParts required:
4 x Round cap nuts and 4 cm length bolts
text_image
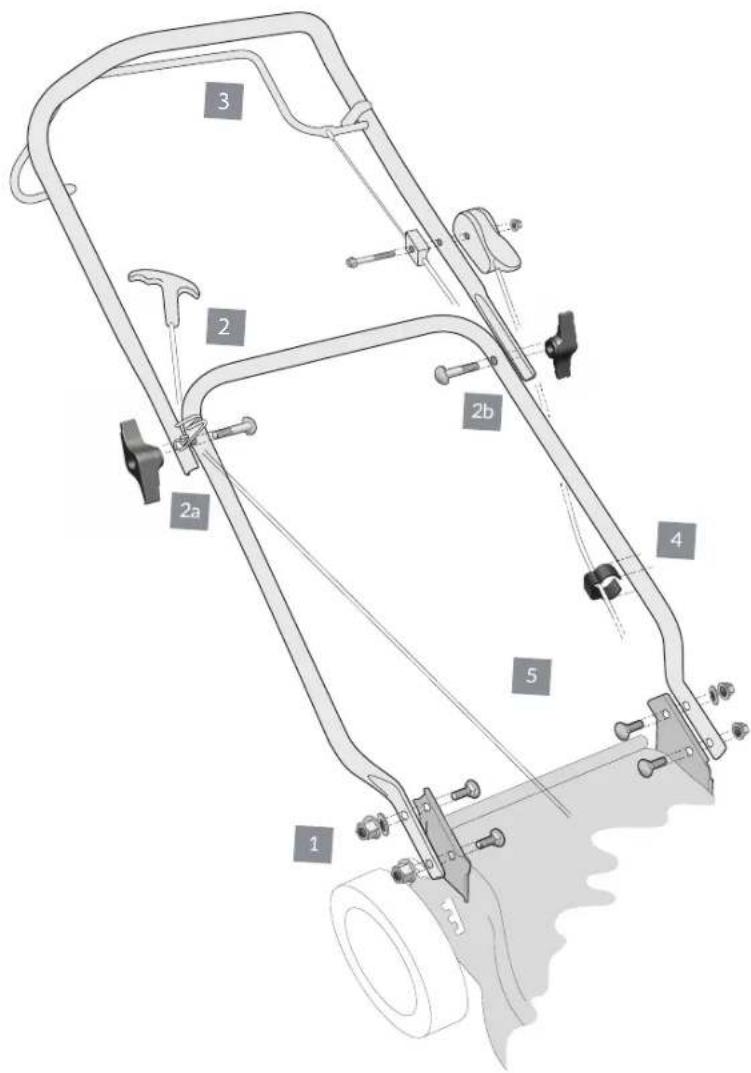
Technical diagram of a mechanical clamp or latch assembly with numbered components labeled 1 through 5- LOWER LOOP HANDLE ASSEMBLY
natural_image
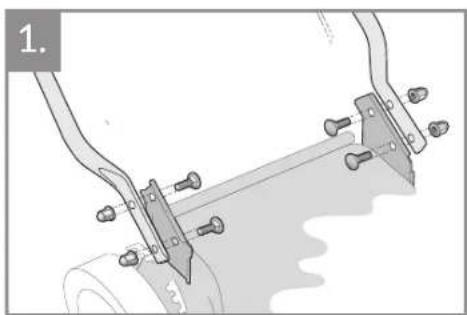
Mechanical assembly diagram showing a lever mechanism with bolts and a curved pipe (no text or symbols)1. Lower Loop Handle Assembly
Attach lower handle bar bolts. Take the weight off the handle bar and fit the lower bolt first.
Please make sure to place throttle cable and driving cable outside of lower loop handle
2a. Locate the Starter Cord
Pull the starter cord up to the spring and hold the cord at the lower side of the spring. Rotate the string clockwise around the spring.
2b. Upper Handle Assembly
Fit the right side Handle Knobs and Bolts. When assembling, please take care to place cable above lower loop handle.
ASSEMBLY GUIDELINES
LAWN MOWER PCS355S/PCS355
2. UPPER HANDLE ASSEMBLY
natural_image
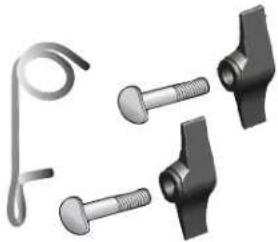
Collection of mechanical fasteners and screws (no text or symbols visible)Parts required:
2 x Handle Knobs
2 x 8 cm length Bolts
1 x Spring Cord Guide

natural_image
Mechanical assembly diagram showing a clamp and rod inserted into a pipe (no text or symbols)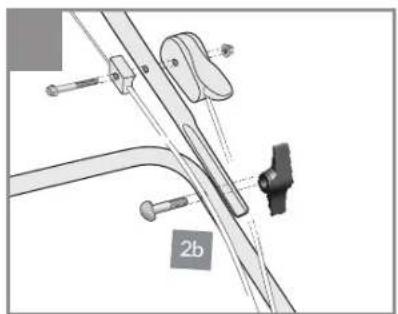
natural_image
Mechanical assembly diagram showing a lever and clamp mechanism (no text or symbols)3. ATTACHING THE DRIVE CABLE (PCS350S ONLY) 4. FIT THE CABLE CLIP
text_image
3a.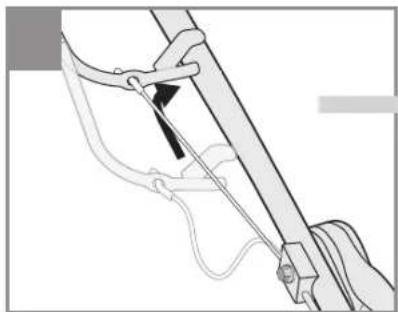
natural_image
Illustration of a hand holding a bow and arrow, no text or symbols present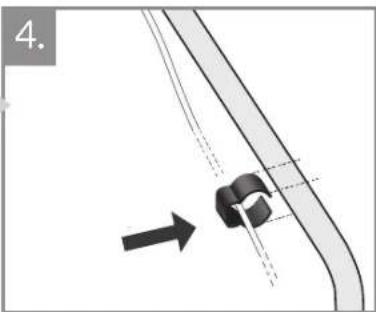
natural_image
Diagram showing a mechanical component with an arrow indicating direction, no text or symbols present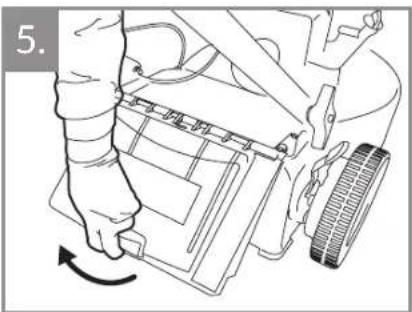
natural_image
Line drawing of a hand operating a mechanical device with a rotating button (no text or symbols)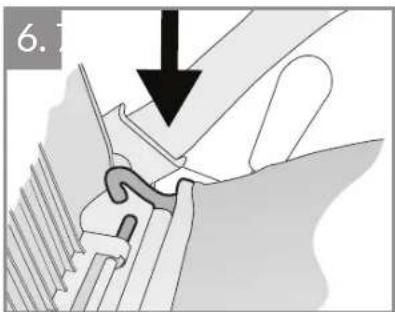
natural_image
Mechanical assembly diagram showing a hook inserted into a component, with no visible text or symbols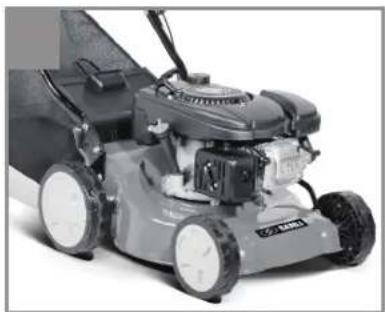
natural_image
Close-up of a lawn mower with visible blades and wheels (no text or symbols)3. Attaching the Drive Cable
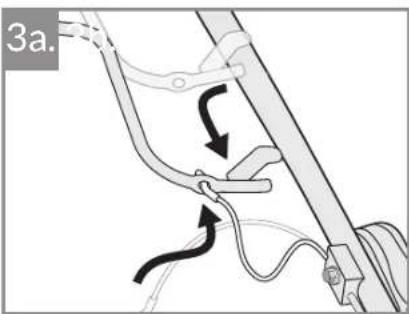
3a. Pull the drive lever out of the left side hole and lower towards the mower.
3b. Refit the lever into the hole in the mower handle
4. Fit the Cable Clip
Push the cable Clip into place.
5. Attach the Grass Catcher
Lift the Rear Flap with one hand.
6. Attach the Grass Catcher
Lower the Grass Catcher hook onto bar.
- Machine is now assembled.
BEFORE YOU BEGIN
WARNING! The following procedures must be carried out before you start the engine of your lawnmower.

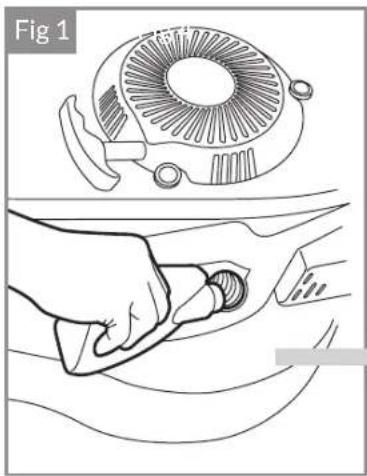
FILL OIL SUMP WITH 600ml of SAE 30 Oil

FILL FUEL TANK WITH PREMIUM PETROL (NO E10 PETROL)
natural_image
Line drawing of a hand holding a button next to a fan-shaped object (no text or symbols)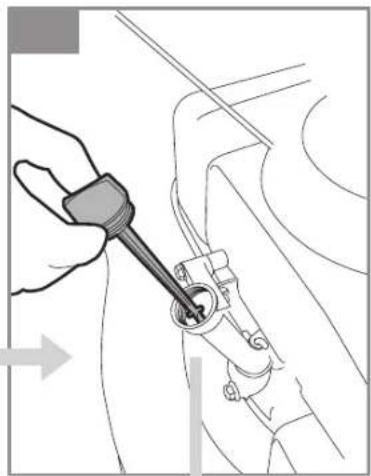
natural_image
Illustration of a hand using a tool to adjust or install a mechanical component (no text or symbols visible)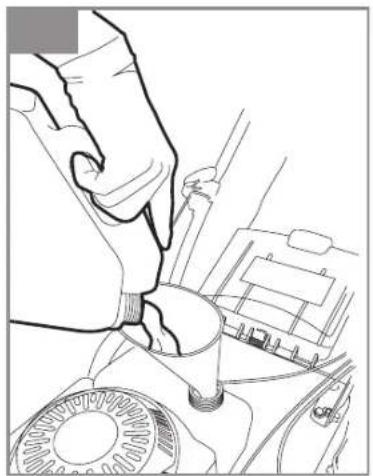
natural_image
Line drawing of a hand using a tool to adjust or install a mechanical component (no text or symbols visible)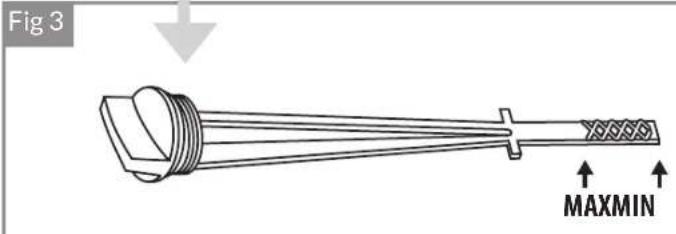
text_image
Fig 3 MAXMINFilling oil sump with oil
You have to add 600ml oil before starting the engine for the first lime.
-
Firstly, remove the warning label from under the dipstick, then remove the dipstick and slowly pour 600ml of SAE30 lawnmower grade engine oil into the engine via the oil filler (Fig. 1). Replace the dipstick and tighten.
-
Before you use the mower each time, check the oil level (Fig. 2) and if necessary top up with SAE30 engine oil. To check the oil level, unscrew the yellow dipstick, wipe with a rag and dip into the oil filler (do not screw back in place), remove the dipstick again and check the level.
-
The oil level must be between the min and max marks on the dipstick (Fig. 3). Replace the dipstick and screw into place.
Fill Fuel tank with min 95 octane premium unleaded petrol (Do not use Ethanol petrol ie. E10).
Petrol is highly flammable so extreme caution must be taken when handling it. Always store petrol in approved containers and you must ensure that you use fresh petrol that is less than 4-6 weeks old. Do not mix oil with petrol.
- To put petrol in the fuel tank, firstly remove the warning label from under the petrol cap. It's best to fill the tank using a clean funnel, but never fill it completely (Fig. 4). Instead, leave at least 13mm from the bottom of the filler neck to allow for expansion. Ensure that you securely tighten the petrol cap after filling. (Funnel & Fuel not supplied).
STARTING THE ENGINE

WARNING! The following procedures must be carried out before you start the engine of your lawnmower.
Starting the engine
- Make sure that your mower is on a safe, flat area (a paved area or path is ideal - avoid thick wet grass and gravel surfaces) away from fuel or fueling area to make starting safe.
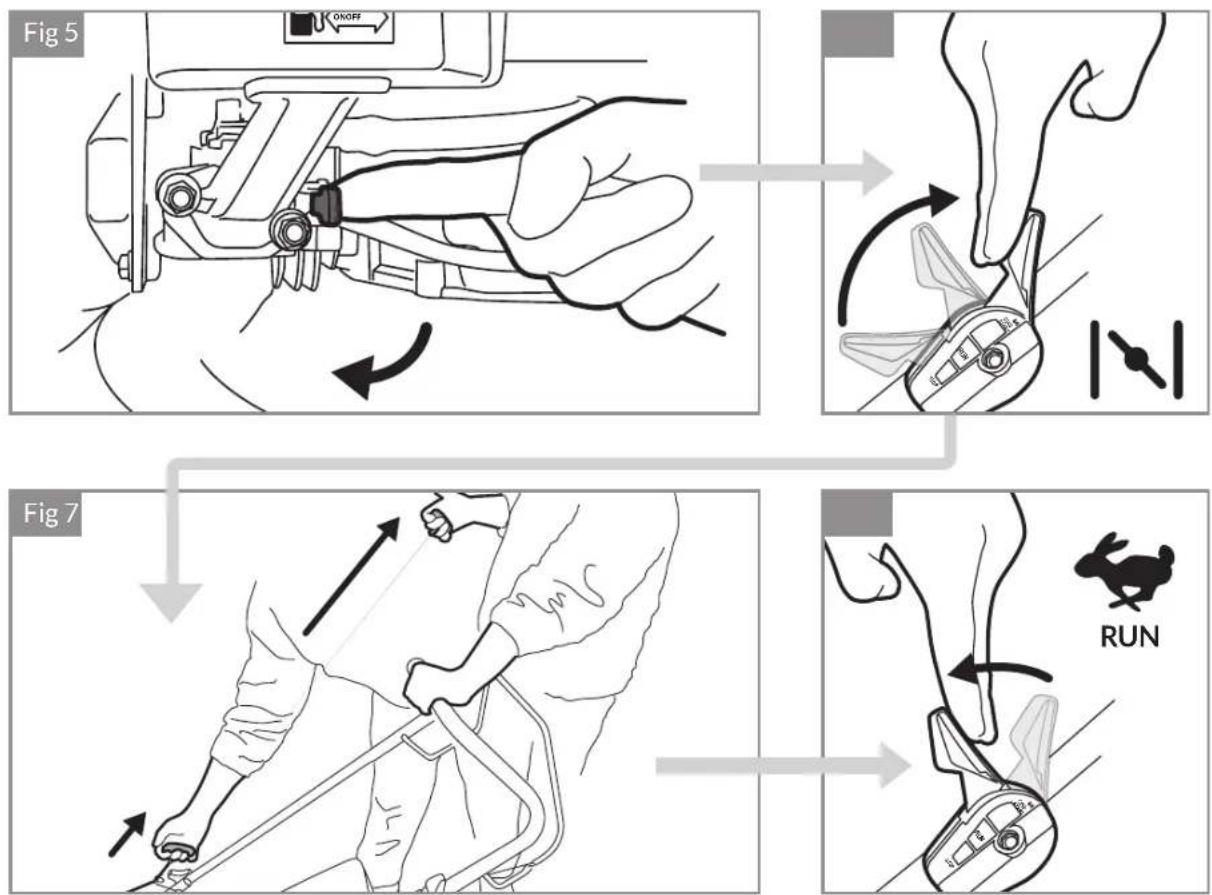
- Slide the 'Red' petrol tap lever to the left 'On' position (Fig. 5).
-
Move the throttle control lever located on the handle to the 'Cold Start' position (Fig. 6).
-
Firmly hold the top handle with one hand, and then with your other hand pull the cord slowly until you feel resistance. Then pull vigorously with one steady action (Fig. 7). Guide the cord back to it's rest position (do not release).
-
When the engine has been running for at least 15 seconds (more time on cold days) (Fig. 8) adjust the throttle control lever to the 'Run' position.
-
To restart a hot engine, move the throttle control lever to the 'Run' position and then refer to 'Point 4'.
- To turn off your mower, slide the throttle control lever down to the 'Stop' position. After it has stopped, slide the 'Red' petrol lap lever to the right 'Off' position.
USING YOUR MOWER
natural_image
Line drawing of a mechanical assembly with no visible text or symbols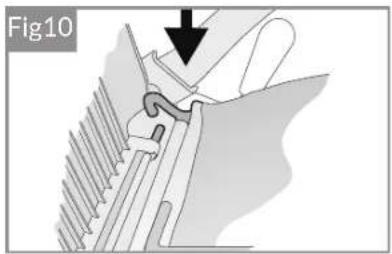
natural_image
Mechanical assembly diagram showing a gear and tool interacting with a spring (no text or symbols)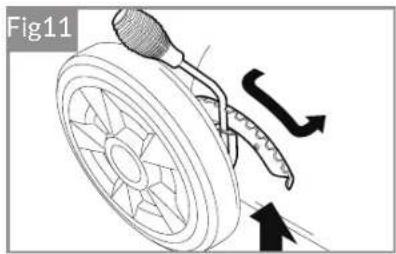
natural_image
Diagram of a steering wheel with a fork and directional arrows indicating motion (no text or symbols)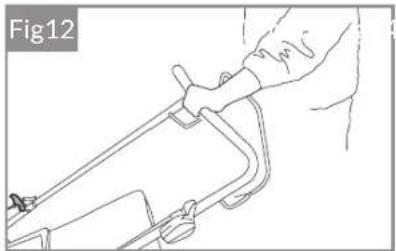
natural_image
Line drawing of a hand holding a tool over a mechanical component (no text or symbols)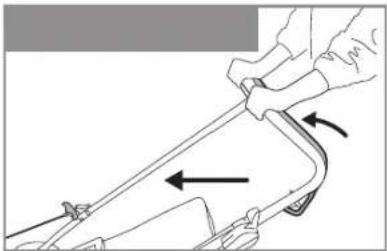
natural_image
Diagram of a person using a tool to lift a vehicle, showing motion arrows (no text or symbols)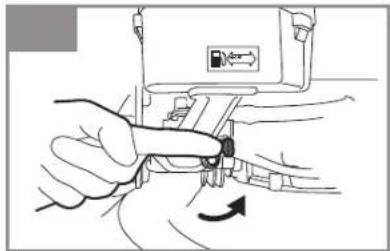
natural_image
Illustration of hands using a tool to adjust or install a device component, with an arrow indicating rotation (no text or symbols present)Attach the Grass Catcher
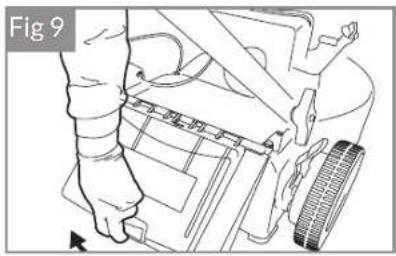
The grass catcher attaches easily by lifting the mower's Rear Flap with one hand (Fig. 9) and locking the Grass Catcher into position (Fig. 10).
Cutting Height Adjustment

WARNING!
Turn power off before adjusting cutting height lever
For best results adjust the cutting height of your mower to suit the mowing conditions (Fig. 11). Do not try to remove too much grass in one pass.
Adjustment of the cutting height is made centrally. Turn off the mower and take the weight of the mower by lifting. Take hold of the cut height adjustment lever, positioned on the mower's right hand rear wheel.
Move the lever outwards to release it from its locating notch. Move the lever towards the front of the machine to increase the cutting height and towards the rear to reduce the cutting height. Return the lever to the locating notch to set the desired cutting height.
Make sure the handle fits snugly and securely into its serrated holder.
Mowing your Lawn
Start your mower (see: Starting the engine).
For PCS350S only: To power the mower forward, move the Drive Lever up and forward (Fig 13). The mower can be pushed with the drive disengaged for more precise handling.
After mowing and emptying the Grass Catcher ensure the engine is turned off.
Cleaning your Mower

WARNING!
Turn mower off before cleaning
Regular cleaning after each use will ensure better functioning of the mower and reduce the risk of corrosion or seizure.
Having finished mowing, allow the engine to cool then remove accumulated grass clippings from and around the engine with a brush. Clean the grass collection bag annually with a brush or gentle spray of water and allow to dry.
Clean underneath regularly - disconnect the spark plug cap and tilt the mower backwards. Remove cut grass from the cutting system with a scraper and a brush.
Do not use a pressure washer or hot water to clean the mower. Dry off the machine before storing by leaving it running for a few minutes on a flat, clear surface to prevent corrosion or seizure.
Storing your Mower

WARNING!
Store your mower in a dry, well-ventilated area, away from flames. sparks or heat sources.
Store your mower in a dry, well-ventilated area, away from sparks or heat sources. Disconnect the spark plug cap. Avoid storing beneath a tarpaulin or similar cover as it may cause condensation resulting in corrosion.
Transporting your Mower
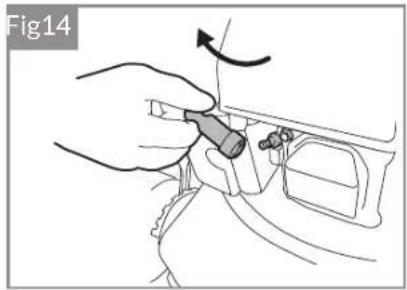
Ensure the fuel tank is empty. Run the engine until any remaining fuel is consumed. Allow the engine to cool. Turn fuel tap to OFF position (Fig. 14).
How to cut for best results
For best results cut your lawn in alternative directions switching direction each time you cut. Cut your lawn at an equal and same height. Slightly overlap your cutting lines.

natural_image
Pure diagram of a coiled spring or coil with grid pattern, no text or symbols presentTIPS ON MOWER SAFETY
natural_image
Top-down diagram of a mechanical assembly with labeled part 3/4 (no text or symbols on the diagram itself)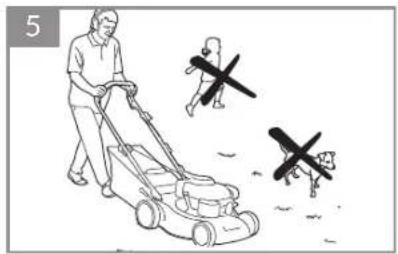
natural_image
Illustration of a man plowing a lawn mower with two other figures marked with crosses (no text or symbols)
text_image
7 HOT!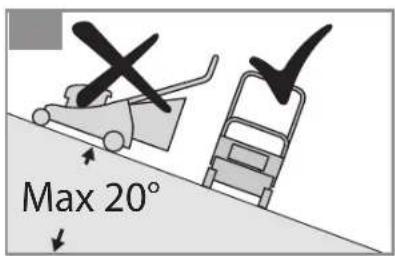
text_image
Max 20°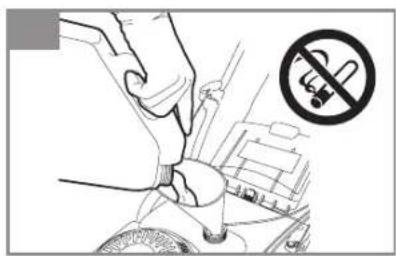
text_image
Diagram showing hand using a tool to stop a car, with a no-smoking symbol nearby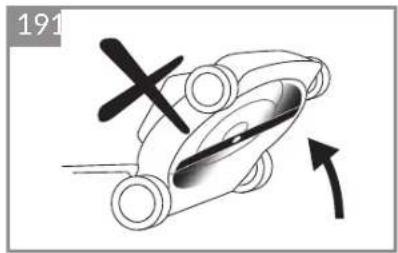
text_image
191 X- Before starting your mower inspect it carefully to ensure that there are no loose parts and that it is in good working order.
- Be sure of your footing. Always walk, never run, when operating the lawnmower.
- Keep hands, feet and clothing away from the mower's moving parts. Always wear appropriate footwear (avoid sandals or open shoes).
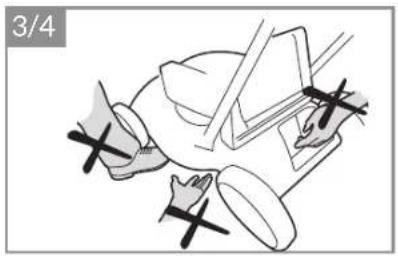
- Never put your hands or feet underneath the chassis of the lawnmower while the engine is running.
- Clear the area to be mowed of any stones, sticks, wire and debris before beginning. Always ensure that you mow a safe distance away from adults, children and animals.
- Turn off the engine and disconnect the spark plug cap before cleaning, transporting or making adjustments. Never leave the mower unattended.
-
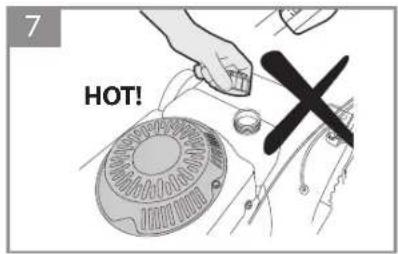
Never open the fuel filler cap, or fill the tank, if the engine is still hot after use. Please ensure that you securely tighten the petrol cap after filling.
-
Mow across the face of slopes, not up and down. Avoid mowing on very steep slopes. We recommend you avoid mowing when it is raining, after nightfall or in poor light conditions.
- Do not operate the machine by pulling it towards you as you risk pulling it onto your feet. Instead, always push and walk behind your lawnmower.
- Do not fill the tank, or start the lawnmower indoors, or in a poorly ventilated area, as exhaust gases contain poisonous substances and petrol fumes are flammable and dangerous.
- Do not alter engine governing settings or over-rev the engine, as excessive speed is dangerous and can reduce engine life.
- Do not smoke when filling the fuel tank, using the machine, or when petrol is in the immediate area. Never use or store the mower near a naked flame.
-
Always use fresh 95 octane premium unleaded petrol that is not more than 4-6 weeks old. Fill the tank using a funnel, but never completely. Clean up any overflow or splashes before starting.
-
Do not transport the mower in a vehicle if there is any petrol in the tank.
- Be aware that the machine's exhaust area and other parts of the lawnmower get very hot during and right after use.
- Turn off the engine before emptying the grass-catcher and before clearing any grass caught in the rear flap where the catcher fits.
- Store fuel and oil in a cool well-ventilated place, away from direct sunlight and gas cylinders or hot water heater systems.
- It is recommended that you wear ear protection, safety goggles and safety boots when using a lawnmower.
- To inspect the underside of your mower, only tilt the lawnmower to your right or back, when standing behind it (this is the side where the exhaust is near the ground) otherwise oil may leak into inappropriate areas of the engine. Never tilt the lawnmower when the engine is running.
- All servicing and repair work under warranty must be carried out by an Authorised Dealer.
MAINTENANCE SCHEDULE

WARNING! The following procedures must be carried out before you start the engine of your lawnmower.
SUMMARY OF REGULAR MAINTENANCE REQUIRED BY THE MOWER
| Components\Frequency | Before each mowing | After 5 hours | Every 25 hours or once a year minimum before winter lay-up |
| Cutting system | Check and verify its condition | Sharpen and balance blade. Replace worn or damaged blade. | |
| Spark plug | Check | Clean and check the clearance of the electrodes. Replace if necessary. | |
| Air Filter | Check | Clean the filter. Replace if necessary. | |
| Oil | Check the level | Drain and renew | Drain and renew |
Cutting System
Before and after each mowing session, check that the blade, its attachment bolts and drive shaft are not damaged or excessively worn. Never try to straighten a bent blade. Replace a damaged, worn or bent blade as soon as possible. Use only genuine SANLI parts or those approved by SANLI.
Excessive vibration when mowing is a good indication of a problem with the cutting system.

Vibration from a bent or damaged blade can cause costly damage to the mower. Working with an excessively worn blade wastes fuel and can lead to injury if the blade becomes detached from the machine.
Removing the blade
Wear appropriate protective gloves to prevent possible injury when handling the blade. Disconnect the spark plug cap(Fig.14) and tilt the mower on its side with air filter and carburettor side up.
Holding the blade firmly in one hand, use a spanner or socket to loosen the blade screw.
Sharpening the blade
For best mowing results, have the edges sharpened and the blade balanced at least once a year by a specialist service dealer or agent.
Mounting the blade
Wear appropriate protective gloves to prevent possible injury when handling the blade. Disconnect the spark plug cap and tilt the mower on its side with air filter side up.
Check that all components (the blade, key, blade holder, screws and washers) are present, clean and in good condition. Position the blade with the cooling fins facing the engine.
Tighten the screws connecting all of the components. Make a final visual check that all parts are present and aligned before tightening the fixing bolt very firmly with a wrench while holding the blade tightly in one hand (NB wear suitable gloves).
natural_image
Illustration of a hand using a tool to adjust or install a component, with no visible text or symbols.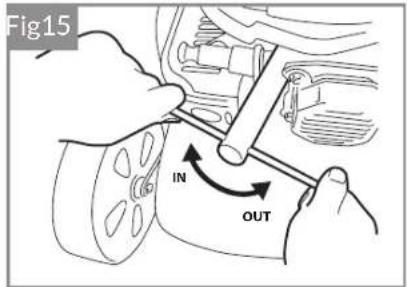
text_image
Fig15 IN OUTSpark Plug
Check the spark plug initially after the first five hours of mower use. Thereafter, maintenance of the spark plug should take place every 25 hours.
Remove the spark plug cap (Fig.14) using a rotary motion and then remove the spark plug with the wrench provided (Fig.15).
Clean off any carbon deposits using a copper brush and check the electrode gap with a feeler gauge (the gap should be ≈ 0.7 mm). Replace and tighten the serviced spark plug and replace the cap.
If the spark plug is worn or damaged, replace with a new spark plug of the same or suitable type for the engine.
We recommend to use NGK BPR6ES or Torch F6RTC for Sanli mowers.
If in doubt, contact your point of purchase or local dealer.
BASIC MAINTENANCE
LAWN MOWER PCS355S/PCS355
natural_image
Diagram of three stacked boxes with arrows indicating movement or assembly (no text or symbols)WARNING!
Do not twist the foam cartridge to clean it as this could cause damage. If your mower is not serviced correctly, you could reduce your mower's ability to operate and void warranty.
Air Filter
An air filter in poor condition will reduce the performance and life of the engine while making it harder to start. Regular checks are therefore essential, especially when using the mower in dusty conditions. Check and clean the air filter every 25 hours of use or more often if the engine is used in a dusty environment.
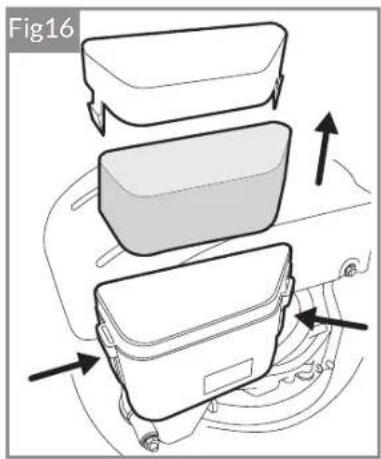
Remove the air filter cover lid and carefully remove the foam filter cartridge. Clean the cartridge in a small bowl of warm water containing a few drops of washing-up liquid until it is perfectly clean and free from all traces of grease and dust. Rinse the filter cartridge in clean water and then squeeze gently to remove most of the water. Let it air dry until it is completely dry.
Clean the cover and inside of the air filter box with a clean lint-free cloth. Apply a uniform layer of oil to the outside of the cartridge filter with a brush (you can use clean engine oil for this). Insert the filter cartridge into its housing and replace the filter lid, ensuring that each component is in place and properly installed. If the filter cartridge is damaged or is very dirty, replace it using a genuine part.
natural_image
Line drawing of a hand using a tool to adjust or install a component, no text or symbols present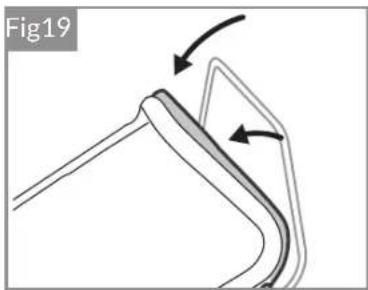
natural_image
Diagram of a curved mechanical component with directional arrows indicating motion (no text or symbols)Adjusting the transmission cable
In its transmission engaged position (Fig. 19), the mower's Brake Lever is pushed fully towards the handlebar. An incorrectly adjusted transmission cable can cause premature wear to the mower's drive system.
If the transmission cable is too tight, it will be difficult to move the drive lever towards the handlebars. Conversely, if the transmission cable is not tight enough, the transmission will function poorly and will lack power.
To adjust the tension of the cable transmission, increase or reduce the length of the adjustment device using the spanner (Fig. 20). Check the effectiveness of the transmission and the resistance of the lever.
Once proper adjustment has been reached, secure the adjustment device by tightening the lock nuts.
Checking the oil level
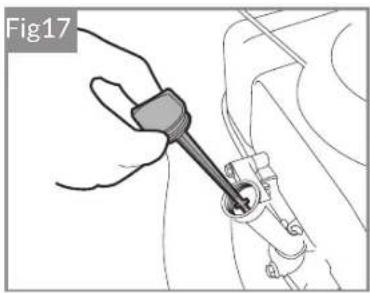
Position the mower on a firm, level surface. Unscrew the oil level dipstick (Fig.17) and wipe dry. Insert the dipstick until it reaches the filler neck, but do not screw

text_image
Fig18 MAX → ← MIN MAX → ← MIN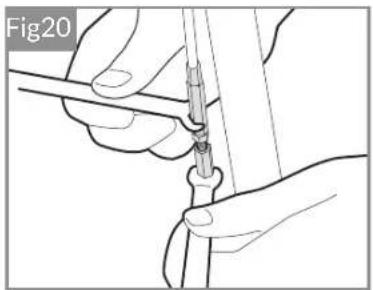
natural_image
Illustration of hands using a tool to connect or adjust a cable or wire (no text or symbols visible)in. Remove the dipstick and check the oil level holding the dipstick horizontal.
The oil level should be between the minimum and maximum oil level marks on the dipstick (Fig.18). Add oil if necessary and repeat the above checking process. Running the engine without oil or with too little oil can cause serious engine damage.
Note: Dispose of used engine oil carefully, responsibly and in accordance with local or national regulations
Changing the oil (use SAE30 oil)
The first oil change should be carried out after the first 5 hours of mower use. Thereafter, change the oil after every 25 hours use or at least once a year. Leave the engine running outdoors for several minutes to warm the oil and make it more fluid.
WARNING!
Parts of the engine will become very hot and can cause severe burns.
Remove the spark plug cap and unscrew the oil level dipstick. Use a suitable oil suction pump and follow its instructions, then fill the engine with new oil.
TECHNICAL SPECIFICATION
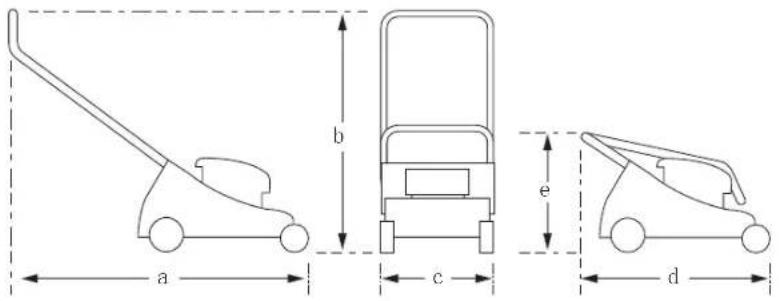
text_image
a b c d e| Model | PCS355S/PCS355 |
| Engine | SL1P64F-A/SL1P60F-A |
| Displacement | 135 cm^3/118 cm^3 |
| Maximum pow | 2.75 kw/2.6kw |
| Tank capacity | 1.0 L |
| Engine oil capacity | 0.6 L |
| Maximum operating speed | 3100 rpm |
| Cutting width | 400 mm |
| Adjustable cutting heights | 7 |
| Cutting height 25-60mm / 20-68 mm | |
Consistent with our policy of continuous improvement, SANLI reserves the right to change the design and conFiguration of any of its products without notice or obligation.
Therefore, please treat the text and images in this manual as being for illustrative purposes only. They may not, in any case, serve as a basis for any legal claim.
| Grass collection capacity | 50 L | |
| Noise level | 75 dB | |
| Chassis | Heavy duty steel | |
| Dimensions: (cms) | a = 136, b = 102, c = 54, d = 88, e = 56 | |
| Problem Likely cause | Suggested remedy | |
| Engine does not start | Throttle lever not set properly Set to 'Cold Start' for cold or a little lower when warm | |
| Out, or almost out, of fuel Fill tank with min 95 octane premium unleaded petrol | ||
| Spark plug depleted Replace with a suitable new spark plug | ||
| Spark plug dirty Clean or replace with a new spark plug | ||
| Spark plug not connected | Press firmly on the terminal cover | |
| Flooded engine | Turn fuel 'off' then pull starter rope until the mower starts, then turn the fuel on | |
| Old petrol in the tank (older than 4-6 weeks) | Contact an authorised dealer | |
| Water in the fuel tank Contact an authorised dealer | ||
| Engine stops often | Blocked fuel supply Ensure the fuel line is not pinched or blocked | |
| Fuel cap is not venting You may need to slightly loosen the fuel cap | ||
| Wrong type of fuel | Drain petrol tank and fill with new min 95 octane premium unleaded petrol | |
| Engine loses power | Dirty air cleaner filter | Clean or replace with a new air-filter |
| Incorrect height adjustment | Raise the mower's cutting height lever | |
| Blocked fuel cap vent holes | Ensure the 3 holes in the fuel tank cap are clear | |
| Mower vibrates too much | Loose cutting blade | Check and tighten bolts and nuts |
| Bent or broken disc/blades | Replace disc or blades | |
| Excessive grass/dirt build-up | Clean and ensure underside clear of build up | |
| Disc or blades worn/damaged | Replace blades | |
| Poor cutting or catching | Catcher not fitted correctly | Reattach carefully and also check for damage |
| Incorrect cutting height set | Adjust the cutting height | |
| Blocked grass catcher vents | Clear and clean the vents | |
Please note that your warranty is affected by terms and conditions. Read on to fully understand what is covered by the warranty and what is not. Those items not covered by the warranty are the responsibility of the owner and any repairs will be at the owner's expense.
Defective parts will be replaced or repaired by an Authorised Sanli Dealer without charge for labour or materials subject to conditions. Repairs or adjustments required by failure to follow the manufacturer's instructions are chargeable to the owner.
The warranty does not affect your statutory rights or remedies as outlined in applicable consumer legislation.
The warranty is not transferable and is only applicable to the original purchaser that can provide the original proof of purchase.
Sanli provides a Premium Warranty Cover for this product for a period of 5 years from your original purchase date with the exception of commercial use.
To qualify for the Sanli Premium Warranty Cover, you must comply with our servicing requirements:
-
Register your product warranty with Sanli Australia
-
Mower serviced and the service log updated by Sanli Authorised Dealers
-
Use genuine Sanli parts
Sanli warranty does not cover
- Intentional or unintentional misuse, abuse or breakages
• Normal wear and tear - Oiled air cleaner or starting difficulty caused by mower incorrectly tipped on its side
- Consumable items, such as oil, blades, air filter element, spark plug and grass catcher bag
- Defects or faults caused by an act or omission after leaving manufacture
- Incorrect, contaminated or poor quality fuel (older than 3 months or E10 petrol)
- Incorrect, contaminated or poor quality engine oil
- Incorrect maintenance or storage of the product
• Water damage or environmental conditions - Failure to observe safety requirements
The warranty will become void if any unauthorised person dismantles, repairs, or modifies the product.
Sanli Product Service Schedule
To validate your 5-year warranty you must
* Register your mower with Sanli Australia
* Maintain your mower and update this service log by Authorised Sanli Dealers
* Use fresh 95 Octane premium petrol (Not older than 3 months)
* Change the Engine Oil every 25 hours or once a year using SAE30 (Details refer to page 11)
* Use and maintain your mower as per instruction manual
| Product Code | Serial No. | Purchase Date | Serial No. | Purchase Date |
Proof of service 11(After 5 hours of usage)
| Clean the machine to remove any grass build up and oil residue | Yes No | |
| Change the Engine Oil (SAE30) | Yes No | |
| Clean air filter (Details refer to page 11) | Yes No | |
| Check Spark Plug (Details refer to page 10) | Yes No |
Notes
Proof of service 2 (25 hours usage after initial service or one year after purchase)
| Clean the machine to remove any grass build up and oil residue | Yes No | |
| Flush the fuel tank to remove any stale fuel and contamination | Yes No | |
| Check engine running speed and tune carburetor | Yes No | |
| Replace starter cord and re-wind the return spring and lubricate all moving parts | Yes No | |
| Run and test all machine functions (safety inspection) | Yes No | |
| Lubricate height adjuster mechanism, all control levers and cables | Yes No | |
| Check driving belt and cables and make any necessary adjustment | Yes No | |
| Change the Engine Oil (SAE30) | Yes No | |
| Check the air gap on the ignition coil and fit a new spark plug | Yes No | |
| Check air filter element and replace it (if required) | Yes No | |
| Sharpen and balance blade. Replace worn or damaged blade | Yes No | |
| Check fuel line and clean carburettor | Yes No |
Notes
Service carried out by: (Sanli Dealer's Stamp)
Invoice No/Job No: ____ Service Date: / /
| Proof of service 3 (25 hours usage after second service or two years after purchase) | ||
| Clean the machine to remove any grass build up and oil residue | Yes No | |
| Flush the fuel tank to remove any stale fuel and contamination | Yes No | |
| Check engine running speed and tune carburetor | Yes No | |
| Replace starter cord and re-wind the return spring and lubricate all moving parts | Yes No | |
| Run and test all machine functions (safety inspection) | Yes No | |
| Lubricate height adjuster mechanism, all control levers and cables | Yes No | |
| Check driving belt and cables and make any necessary adjustment | Yes No | |
| Change the Engine Oil (SAE30) | Yes No | |
| Check spark plug and replace if need | Yes No | |
| Check air filter element and replace (if required) | Yes No | |
| Sharpen and balance blade. Replace worn or damaged blade | Yes No | |
| Clean fuel line and carburettor | Yes No | |
| Notes | ||
| Service carried out by: (Sanli Dealer's Stamp) | ||
| Invoice No/Job No: Service Date: / / | ||
| Proof of service 4 (25 hours usage after third service or three years after purchase) | ||
| Clean the machine to remove any grass build up and oil residue | Yes No | |
| Flush the fuel tank to remove any stale fuel and contamination | Yes No | |
| Check engine running speed and tune carburetor | Yes No | |
| Replace starter cord and re-wind the return spring and lubricate all moving parts | Yes No | |
| Run and test all machine functions (safety inspection) | Yes No | |
| Lubricate height adjuster mechanism, all control levers and cables | Yes No | |
| Check driving belt and cables and make any necessary adjustment | Yes No | |
| Change the Engine Oil (SAE30) | Yes No | |
| Check spark plug and replace if need | Yes No | |
| Check air filter element and replace (if required) | Yes No | |
| Sharpen and balance blade. Replace worn or damaged blade | Yes No | |
| Clean fuel line and carburettor | Yes No | |
| Notes | ||
| Service carried out by: (Sanli Dealer's Stamp) | ||
| Invoice No/Job No: Service Date: / / | ||
| Proof of service 5 (25 hours usage after fourth service or four years after purchase) | ||
| Clean the machine to remove any grass build up and oil residue | Yes No | |
| Flush the fuel tank to remove any stale fuel and contamination | Yes No | |
| Check engine running speed and tune carburetor | Yes No | |
| Replace starter cord and re-wind the return spring and lubricate all moving parts | Yes No | |
| Run and test all machine functions (safety inspection) | Yes No | |
| Lubricate height adjuster mechanism, all control levers and cables | Yes No | |
| Check driving belt and cables and make any necessary adjustment | Yes No | |
| Change the Engine Oil (SAE30) | Yes No | |
| Check spark plug and replace if need | Yes No | |
| Check air filter element and replace it (if required) | Yes No | |
| Sharpen and balance blade. Replace worn or damaged blade | Yes No | |
| Clean fuel line and carburettor | Yes No | |
| Notes | ||
| Service carried out by: (Sanli Dealer's Stamp) | ||
| Invoice No/Job No: Service Date: / / | ||
| Proof of service 6 (25 hours usage after fifth service or five years after purchase) | ||
| Clean the machine to remove any grass build up and oil residue | Yes No | |
| Flush the fuel tank to remove any stale fuel and contamination | Yes No | |
| Check engine running speed and tune carburetor | Yes No | |
| Lubricate height adjuster mechanism, all control levers and cables | Yes No | |
| Run and test all machine functions (safety inspection) | Yes No | |
| Lubricate height adjuster mechanism and all control levers and cables | Yes No | |
| Check driving belt and cables and make any necessary adjustment | Yes No | |
| Change the Engine Oil (SAE30) | Yes No | |
| Check spark plug and replace if need | Yes No | |
| Check air filter element and replace it (if required) | Yes No | |
| Sharpen and balance blade. Replace worn or damaged blade | Yes No | |
| Clean fuel line and carburettor | Yes No | |
| Notes | ||
| Service carried out by: (Sanli Dealer's Stamp) | ||
| Invoice No/Job No: Service Date: / / | ||
Notes.