
Portege M100 - Laptop TOSHIBA - Free user manual and instructions
Find the device manual for free Portege M100 TOSHIBA in PDF.


User questions about Portege M100 TOSHIBA
0 question about this device. Answer the ones you know or ask your own.
Ask a new question about this device
Download the instructions for your Laptop in PDF format for free! Find your manual Portege M100 - TOSHIBA and take your electronic device back in hand. On this page are published all the documents necessary for the use of your device. Portege M100 by TOSHIBA.
USER MANUAL Portege M100 TOSHIBA
Portégé® M100 Series User's Guide
If you need assistance:
Toshiba Global Support Centre Calling within the United States (800) 457-7777 Calling from outside the United States (949) 859-4273
For more information, see “If Something Goes Wrong” on page 188 in this guide.
▲WARNING
Handling the cord on this product will expose you to lead, a chemical known to the State of California to cause birth defects or other reproductive harm. Wash hands after handling.
Models: Portégé R100 Series
ReWritable CD/DVD Drives
The computer system you purchased may include a ReWritable CD and/or DVD drive(s), among the most advanced data storage technologies available. As with any new technology, you must read and follow all set-up and usage instructions in the applicable user guides and/or manuals enclosed. If you fail to do so, this product may not function properly and you may lose data or suffer other damage. TOSHIBA AMERICA INFORMATION SYSTEMS (“TOSHIBA”), ITS AFFILIATES AND SUPPLIERS DO NOT WARRANT THAT OPERATION OF THE PRODUCT WILL BE UNINTERRUPTED OR ERROR FREE. YOU AGREE THAT TOSHIBA, ITS AFFILIATES AND SUPPLIERS SHALL HAVE NO RESPONSIBILITY FOR DAMAGE TO OR LOSS OF ANY BUSINESS, PROFITS, PROGRAMS, DATA OR REMOVABLE STORAGE MEDIA ARISING OUT OF OR RESULTING FROM THE USE OF THE PRODUCT, EVEN IF ADVISED OF THE POSSIBILITY THEREOF.
Protection of Stored Data
For your important data, please make periodic back-up copies of all the data stored on the hard disk or other storage devices as a precaution against possible failures, alteration, or loss of the data. IF YOUR DATA IS ALTERED OR LOST DUE TO ANY TROUBLE, FAILURE OR MALFUNCTION OF THE HARD DISK DRIVE OR OTHER STORAGE DEVICES AND THE DATA CANNOT BE RECOVERED, TOSHIBA SHALL NOT BE LIABLE FOR ANY DAMAGE OR LOSS OF DATA, OR ANY OTHER DAMAGE RESULTING THEREFROM. WHEN COPYING OR TRANSFERRING YOUR DATA, PLEASE BE SURE TO CONFIRM WHETHER THE DATA HAS BEEN SUCCESSFULLY COPIED OR TRANSFERRED. TOSHIBA DISCLAIMS ANY LIABILITY FOR THE FAILURE TO COPY OR TRANSFER THE DATA CORRECTLY.
Critical Applications
The computer you have purchased is not designed for any “critical applications.” “Critical applications” means life support systems, medical applications, connections to implanted medical devices, commercial transportation, nuclear facilities or systems or any other applications where product failure could lead to injury to persons or loss of life or catastrophic property damage.
ACCORDINGLY, TOSHIBA, ITS AFFILIATES AND SUPPLIERS DISCLAIM ANY AND ALL LIABILITY ARISING OUT OF THE USE OF THE COMPUTER PRODUCTS IN ANY CRITICAL APPLICATIONS. IF YOU USE THE COMPUTER PRODUCTS IN A
CRITICAL APPLICATION, YOU, AND NOT TOSHIBA, ASSUME FULL RESPONSIBILITY FOR SUCH USE.
FCC Notice “Declaration of Conformity Information”
This equipment has been tested and found to comply with the limits for a Class B digital device, pursuant to Part 15 of the FCC rules. These limits are designed to provide reasonable protection against harmful interference in a residential installation.
This equipment generates, uses and can radiate radio frequency energy and, if not installed and used in accordance with the instructions, it may cause harmful interference to radio communications. However, there is no guarantee that interference will not occur in a particular installation. If this equipment does cause harmful interference to radio or television reception, which can be determined by turning the equipment off and on, the user is encouraged to try to correct the interference by one or more of the following measures:
◆ Reorient or relocate the receiving antenna.
◆ Increase the separation between the equipment and receiver.
Connect the equipment to an outlet on a circuit different from that to which the receiver is connected.
Consult the dealer or an experienced radio/TV technician for help.
NOTE
Only Peripherals complying with the FCC Class B limits may be attached to this equipment. Operation with noncompliant peripherals or peripherals not recommended by Toshiba is likely to result in interference to radio and TV reception. Shielded cables must be used between the external devices and the computer's parallel port, monitor port, USB port, PS/2 port ^® , i.LINK ^® port and microphone jack. Changes or modifications made to this equipment not expressly approved by Toshiba or parties authorized by Toshiba could void the user's authority to operate the equipment.
This device complies with Part 15 of the FCC Rules. Operation is subject to the following two conditions:
This device may not cause harmful interference.
This device must accept any interference received, including interference that may cause undesired operation.
Contact:
Toshiba America Information Systems, Inc.
9740 Irvine Blvd.
Irvine, CA 92618-1697
(949) 583-3000
Industry Canada requirement
This Class B digital apparatus complies with Canadian ICES-003.
The following information is pursuant to FCC CFR 47, Part 68 and refers to internal modems.
This equipment complies with Part 68 of the FCC rules. On the bottom of this equipment is a label that contains, among other information, the FCC registration number and ringer equivalence number (REN) for this equipment. If requested, the information must be provided to the telephone company.
The modem connects to the telephone line by means of a standard jack called the USOC RJ11C.
A plug and jack used to connect this equipment to the premises wiring and telephone network must comply with the applicable FCC part 68 rules and requirements adopted by the ACTA. It is designed to be connected to a compatible modular jack that is also compliant.
The REN is used to determine the number of devices that may be connected to a telephone line. Excessive RENs on a telephone line may result in the devices not ringing in response to an incoming call. In most but not all areas, the sum of RENs should not exceed five (5.0). To be certain of the number of devices that may be connected to a line, as determined by the total RENs, contact the local telephone company. For products approved after July 23, 2001, the REN for this product is part of the product identifier that has the format
US:AAAEQ##TXXXX. The digits represented by the ## are the REN without a decimal point (e.g., 03 is a REN of 0.3). For earlier products, the REN is separately shown on the label.
Connection to party line service is subject to state tariffs. Contact the state public utility commission, public service commission or corporation commission for information.
Telephone Company Procedures
The goal of the telephone company is to provide you with the best service it can. In order to do this, it may occasionally be necessary for them to make changes in their equipment, operations or procedures. If these changes might affect your service or the operation of your equipment, the telephone company will give you notice, in writing, to allow you to make any changes necessary to maintain uninterrupted service.
If Problems Arise
If this equipment causes harm to the telephone network, the telephone company will notify you in advance that temporary discontinuance of service may be required. But if advanced notice is not practical, the telephone company will notify the customer as soon as possible. Also, you will be advised of your right to file a complaint with the FCC if you believe it is necessary.
If trouble is experienced with this equipment, for repair or limited warranty information, please contact Toshiba Corporation, Toshiba America Information Systems, Inc. or an authorized representative of Toshiba, or the Toshiba Support Centre within the United States at (800) 457-7777 or Outside the United States at (949) 859-4273. If the equipment is causing harm to the telephone network, the telephone company may request that you disconnect the equipment until the problem is resolved.
Disconnection
If you should ever decide to permanently disconnect your modem from its present line, please call the telephone company and let them know of this change.
Fax Branding
The Telephone Consumer Protection Act of 1991 makes it unlawful for any person to use a computer or other electronic device, including Fax machines, to send any message unless such message clearly contains in a margin at the top or bottom of each transmitted page or on the first page of the transmission, the date and time it is sent and an identification of the business or other entity, or other individual sending the message and the telephone number of the sending machine or such business, other entity, or individual. (The telephone number provided may not be a 900 number or any other number for which charges exceed local or long-distance transmission charges.)
In order to program this information into your fax transmission, refer to the fax software instructions installed on this computer.
Alarm Equipment
If your home has specially wired alarm equipment connected to the telephone line, ensure the installation of this equipment does not disable your alarm equipment. If you have questions about what will disable alarm equipment, consult your telephone company or a qualified installer.
Instructions for IC CS-03 Certified Equipment
1 NOTICE: The Industry Canada label identifies certified equipment. This certification means that the equipment meets certain telecommunications network protective, operational and safety requirements as prescribed in the appropriate Terminal Equipment Technical Requirements document(s). The Department does not guarantee the equipment will operate to the user's satisfaction.
Before installing this equipment, users should ensure that it is permissible to be connected to the facilities of the local telecommunications company. The equipment must also be installed using an acceptable method of connection. The customer should be aware that compliance with the above conditions may not prevent degradation of service in some situations.
Repairs to certified equipment should be coordinated by a representative designated by the supplier. Any repairs or alterations made by the user to this equipment, or equipment malfunctions, may give the telecommunications company cause to request the user to disconnect the equipment.
Users should ensure for their own protection that the electrical ground connections of the power utility, telephone lines and internal metallic water pipe system, if present, are connected together. This precaution may be particularly important in rural areas.
Caution: Users should not attempt to make such connections themselves, but should contact the appropriate electric inspection authority, or electrician, as appropriate.
2 The user manual of analog equipment must contain the equipment's Ringer Equivalence Number (REN) and an explanation notice similar to the following:
The Ringer Equivalence Number (REN) of this device can be found on the label affixed to your computer.
NOTICE: The Ringer Equivalence Number (REN) assigned to each terminal device provides an indication of the maximum number of terminals allowed to be connected to a telephone interface. The termination on an interface may consist of any combination of devices subject only to the requirement that the sum of the Ringer Equivalence Numbers of all the devices does not exceed 5.
3 The standard connecting arrangement (telephone jack type) for this equipment is jack type(s): USOC RJ11C.
Wireless Interoperability
The TOSHIBA Wireless LAN Mini PCI Card products are designed to be interoperable with any wireless LAN product that is based on Direct Sequence Spread Spectrum (DSSS) radio technology, and is compliant to:
The IEEE 802.11 Standard on Wireless LANs (Revision A/B/G), as defined and approved by the Institute of Electrical and Electronics Engineers.
The Wireless Fidelity (Wi-Fi) certification as defined by the Wi-Fi Alliance. The “Wi-Fi CERTIFIED” logo is a certification mark of the Wi-Fi Alliance.
CAUTION
Bluetooth™ and Wireless LAN devices operate within the same radio frequency range and may interfere with one another. If you use Bluetooth™ and Wireless LAN devices simultaneously, you may occasionally experience a less than optimal network performance or even lose your network connection.
If you should experience any such problem, immediately turn off your Bluetooth ^™ or Wireless LAN device.
Please contact Toshiba PC product support on Web site http://www.toshiba-europe.com/computers/tnt/bluetooth.htm in Europe or http://www.pcsupport.global.toshiba.com in the United States for more information.
CAUTION
This device is restricted to indoor use due to its operation in the 5.15 GHz to 5.25 GHz frequency range.
Wireless LAN and your Health
Wireless LAN products, like other radio devices, emit radio frequency electromagnetic energy. The level of energy emitted by Wireless LAN devices however is far much less than the electromagnetic energy emitted by wireless devices like for example mobile phones.
Because Wireless LAN products operate within the guidelines found in radio frequency safety standards and recommendations, TOSHIBA believes Wireless LAN is safe for use by consumers. These standards and recommendations reflect the consensus of the scientific community and result from deliberations of panels and committees of scientists who continually review and interpret the extensive research literature.
In some situations or environments, the use of Wireless LAN may be restricted by the proprietor of the building or responsible representatives of the organization. These situations may for example include:
◆ Using the Wireless LAN equipment on board of airplanes, or
In any other environment where the risk of interference to other devices or services is perceived or identified as harmful.
If you are uncertain of the policy that applies on the use of wireless devices in a specific organization or environment (e.g. airports), you are encouraged to ask for authorization to use the Wireless LAN device prior to turning on the equipment.
Regulatory Information
The TOSHIBA Wireless LAN Mini PCI Card must be installed and used in strict accordance with the manufacturer's instructions as described in the user documentation that comes with the product. This device complies with the following radio frequency and safety standards.
Canada – Industry Canada (IC)
This device complies with RSS 210 of Industry Canada.
CAUTION
The installer of this radio equipment must ensure that the antenna is located or pointed such that it does not emit RF field in excess of Health Canada limits for the general population; consult Safety Code 6, obtainable from Health Canada's Web site www.hc-sc.gc.ca/rpb. The RF device shall not be co-located with any other transmitter that has not been tested with this device.
Operation is subject to the following two conditions: (1) this device may not cause interference, and (2) this device must accept any interference, including interference that may cause undesired operation of this device.
The term “IC” before the equipment certification number only signifies that the Industry Canada technical specifications were met.
To prevent radio interference to the licensed service, this device is intended to be operated indoors and away from windows to provide maximum shielding. Equipment (or its transmit antenna) that is installed outdoors is subject to licensing.
This device is restricted to indoor use due to its operation in the 5.15 GHz to 5.25 GHz frequency range. Industry Canada requires this product to be used indoors for frequency range 5.15 GHz to 5.25 GHz to reduce the potential for harmful interference to co-channel Mobile Satellite systems.
High power radars are allocated as primary users of the 5.25 GHz to 5.35 GHz and 5.65 GHz to 5.85 GHz bands. These radar stations can cause interference with and/or damage this device.
Europe – EU Declaration of Conformity C€
This device complies with the essential requirements of the R&TTE Directive 1999/5/EC with essential test suites as per standards:
EN 60950 Safety of Information Technology equipment
ETS 300 328 Technical requirements for radio equipment
ETS 300 826 General EMC requirements for radio equipment.
| English: Hereby, | TOSHIBA Corp. Digital Media Network Company, declares that this Radio LAN device is in compliance with the essential requirements and other relevant provisions of Directive 1999/5/EC. |
| Finnish: Valmistaja | TOSHIBA Corp. Digital Media Network Company vakuuttaa täten että Radio LAN device tyyppinen laite on direktiivin 1999/5/EY oleellisten vaatimusten ja sitä koskevien direktiivin muiden ehtojen mukainen. |
| Dutch: Hierbij verklaart | TOSHIBA Corp. Digital Media Network Company dat het toestel Radio LAN device in overeenstemming is met de essentiële eisen en de andere relevante bepalingen van richtlijn 1999/5/EG. |
| Bij deze TOSHIBA Corp. Digital Media Network Company dat deze Radio LAN device voldoet aan de essentiële eisen en aan de overige relevante bepalingen van Richtlijn 1999/5/EC. | |
| French: Par la présente | TOSHIBA Corp. Digital Media Network Company déclare que l'appareil Radio LAN device est conforme aux exigences essentielles et aux autres dispositions pertinentes de la directive 1999/5/CE. |
| Par la présente, TOSHIBA Corp. Digital Media Network Company déclare que ce Radio LAN device est conforme aux exigences essentielles et aux autres dispositions de la directive 1999/5/CE qui lui sont applicables. | |
| Swedish: Härmed | intygar TOSHIBA Corp. Digital Media Network Company att denna Radio LAN device står I överensstämmelse med de väsentliga egenskapskrav och övriga relevanta bestämmelser som framgår av direktiv 1999/5/EG. |
| Danish: Underteghede | TOSHIBA Corp. Digital Media Network Company erklærer herved, at fölgende udstyr Radio LAN device overholder de väsentlige krav og øvrige relevante krav i direktiv 1999/5/EF |
| German: Hiermit erklärt | TOSHIBA Corp. Digital Media Network Company, dass sich dieser/diese/dieses Radio LAN device in Übereinstimmung mit den grundlegenden Anforderungen und den anderen relevanten Vorschriften der Richtlinie 1999/5/EG befindet". (BMWi) |
| Hiermit erklärt TOSHIBA Corp. Digital Media Network Company die Übereinstimmung des Gerätes Radio LAN device mit den grundlegenden Anforderungen und den anderen relevanten Festlegungen der Richtlinie 1999/5/EG. (Wien) | |
| Greek: | ME THN ΠΑΡΟΥΣΑ TOSHIBA Corp. Digital Media Network Company ΔΗΛΩΝΕΙ ΟΤΙ Radio LAN device ΣΥΜΜΟΡΦΩΝΕΤΑΙ ΠΡΟΣ ΤΙΣ ΟΥΣΙΩΔΕΙΣ ΑΠΑΙΤΗΣΕΙΣ ΚΑΙ ΤΙΣ ΛΟΙΠΕΣ ΣΧΕΤΙΚΕΣ ΔΙΑΤΑΞΕΙΣ ΤΗΣ ΟΔΗΓΙΑΣ 1999/5/ΕΚ |
| Italian: Con la presente TOSHIBA Corp. Digital Media Network Company dichiara che questo Radio LAN device è conforme ai requisiti essenziali ed alle altre disposizioni pertinenti stabilite dalla direttiva 1999/5/CE. |
| Spanish: Por medio de la presente TOSHIBA Corp. Digital Media Network Company declara que el Radio LAN device cumple con los requisitos esenciales y cualesquiera otras disposiciones aplicables o exigibles de la Directiva 1999/5/CE. |
| Portuguese: TOSHIBA Corp. Digital Media Network Company declara que este Radio LAN device está conforme com os requisitos essenciais e outras disposições da Directiva 1999/5/CE. |
USA – Federal Communications Commission (FCC)
This device complies with Part 15 of FCC Rules. Operation of the devices in a Wireless LAN System is subject to the following two conditions:
This device may not cause harmful interference.
This device must accept any interference that may cause undesired operation.
TOSHIBA is not responsible for any radio or television interference caused by unauthorized modification of the devices included with this TOSHIBA Wireless LAN Mini PCI Card, or the substitution or attachment of connecting cables and equipment other than specified by TOSHIBA.
The correction of interference caused by such unauthorized modification, substitution or attachment will be the responsibility of the user.
Caution: Exposure to Radio Frequency Radiation
The radiated output power of the TOSHIBA Wireless LAN Mini PCI Card is far below the FCC radio frequency exposure limits. Nevertheless, the TOSHIBA Wireless LAN Mini PCI Card shall be used in such a manner that the potential for human contact during normal operation is minimized. In normal operating configuration, the LCD in the upright position, the distance between the antenna and the user should not be less than 20 cm. The antenna(s) used for this transmitter must not be co-located or operating in conjunction with any other antenna or transmitter. Antenna(s) used in 5.15 GHz to 5.25 GHz frequency band must be integral antenna which provide no access to the end user.
Refer to the Regulatory Statements as identified in the documentation that comes with those products for additional information.
Caution: Radio Frequency Interference Requirements
This device is restricted to indoor use due to its operation in the 5.15 GHz to 5.25 GHz frequency range. FCC requires this product to be used indoors for frequency range 5.15 GHz to 5.25 GHz to reduce the potential for harmful interference to co-channel Mobile Satellite systems.
High power radars are allocated as primary users of the 5.25 GHz to 5.35 GHz and 5.65 GHz to 5.85 GHz bands. These radar stations can cause interference with and/or damage this device.
NOTE
The above Caution information applies to products that operate with an 802.11a device.
Taiwan
| Article 14 Unless approved, for any model accredited low power radio frequency electric machinery, any company, trader or user shall not change the frequency, increase the power or change the features and functions of the original design. |
| Article 17 Any use of low power radio frequency electric machinery shall not affect the aviation safety and interfere with legal communications. In event that any interference is found, the use of such electric machinery shall be stopped immediately, and reusing of such products can be resumed until no interference occurs after improvement. |
The legal communications mentioned in the above item refer to radio communications operated in accordance with telecommunication laws and regulations.
Low power radio frequency electric machinery shall resist against interference from legal communications or from industrial, scientific and medical radio emission electric machinery.
Using this Equipment in Japan
In Japan, the frequency bandwidth of 2,400 MHz to 2,483.5 MHz for second generation low-power data communication systems such as this equipment overlaps that of mobile object identification systems (premises radio station and specified low-power radio station).
1. Sticker
Please put the following sticker on devices incorporating this product.
In the frequency bandwidth of this equipment, industrial device, scientific device, medical device like microwave oven, licensed premises radio station and non-licensed specified low-power radio station for mobile object identification system (RF-ID) that is used in product line of factories. (Other Radio Stations) are used.
I Please make sure before using this equipment that no Other Radio Stations are used in the neighborhood.
2 In case that RF interference occurs to Other Radio Stations from this equipment, please change promptly the frequency for use, place to use, or stop emitting Radio.
3 Please contact TOSHIBA Direct PC if you have a problem, such as interference from this equipment to Other Radio Stations
2. Indication
The indication shown below appears on this equipment.
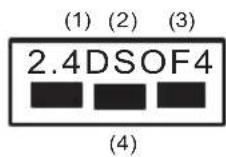
1 2.4: This equipment uses a frequency of 2.4 GHz.
2 DS: This equipment uses DS-SS modulation.
OF: This equipment uses OFDM modulation.
3 The interference range of this equipment is less than 40m.
4 This equipment uses a frequency bandwidth from 2,400 MHz to 2,483.5 MHz.
It is possible to avoid the band of mobile object identification systems.
- TOSHIBA Direct PC
Monday – Friday: 10:00 – 17:00
Toll Free Tel: 0120-13-1100
Direct Dial: 03-3457-5916
Fax: 03-5444-9450
Device Authorization
This device obtains the Technical Regulation Conformity Certification and the Technical Conditions Compliance Approval, and it belongs to the device class of radio equipment of low-power data communication system radio station stipulated in the Radio Law and the Telecommunications Business Law of Japan.
The Name of the radio equipment: refer to the equipment label provided on the computer
JAPAN APPROVALS INSTITUTE FOR TELECOMMUNICATIONS EQUIPMENT
Approval Number: D01-1128JP
TELECOM ENGINEERING CENTER Approval Number: 03NY.A0018, 03GZDA0017
The following restrictions apply:
Do not disassemble or modify the device.
Do not install the embedded wireless module into other device.
◆5.17 GHz to 5.23 GHz for indoor use only
Radio approvals for wireless devices
NOTE
The following information is dependent on what type of wireless device is in your computer.
Approved Countries/Regions for use for the Atheros AR5BMB-43/44 Mini PCI Wireless network adapter
This equipment is approved to the radio standard by the countries/regions in the following table.
CAUTION
Do not use this equipment except in the countries/regions in the following table.
NOTE
This device works on passive scan only.
A peer-to-peer mode is not available in 802.11a and Turbo Mode.
802.11b (2.4 GHz)
| Australia | Austria | Belgium |
| Canada | Denmark | Finland |
| France Germany Greece | ||
| Ireland | Italy | Liechtenstein |
| Luxembourg | Netherlands | New Zealand |
| Norway Portugal Sweden | ||
| Switzerland UK USA |
Europe - Restrictions for use of 2.4 GHz Frequencies in European Community Countries
| België/ Belgique: | For private usage outside buildings across public grounds over less than 300m no special registration with IBPT/BIPT is required. Registration to IBPT/BIPT is required for private usage outside buildings across public grounds over more than 300m. For registration and license please contact IBPT/BIPT. |
| Voor privé-gebruik buiten gebouw over publieke groud over afstand kleiner dan 300m geen registratie bij BIPT/IBPT nodig; voor gebruik over afstand groter dan 300m is wel registratie bij BIPT/IBPT nodig. Voor registratie of licentie kunt u contact opnemen met BIPT. | |
| Dans le cas d'une utilisation privée, à l'extérieur d'un bâtiment, au-dessus d'un espace public, aucun enregistrement n'est nécessaire pour une distance de moins de 300m. Pour une distance supérieure à 300m un enregistrement auprès de l'IBPT est requise. Pour les enregistrements et licences, veuillez contacter l'IBPT. | |
| Deutschland: License | se required for outdoor installations. Check with reseller for procedure to follow. |
| Anmeldung im Outdoor-Bereich notwendig, aber nicht genehmigungspflichtig.Bitte mit Händler die Vorgehensweise abstimmen. | |
| France: Restricted | frequency band: only channels 1 to 7 (2400 MHz and 2454 MHz respectively) may be used outdoors in France. Please contact A.R.T. (http://www.art-telecom.fr) for applicable procedures to follow. |
| Bande de fréquence restreinte: seuls les canaux 1-7 (2400 et 2454 MHz respectivement) doivent être utilisés endroits extérieur en France. Vous pouvez contacter l'Autorité de Régulation des Télécommunications (http://www.art-telecom.fr) pour la procédure à suivre. | |
| Italia: | License required for indoor use. Use with outdoor installations not allowed. |
| E'necessaria la concessione ministerialeanche per l'uso interno. Verificare con i rivenditori la procedura da seguire. | |
| Nederland: License | required for outdoor installations. Check with reseller for procedure to follow. |
| Licentie verplicht voor gebruik met buitenantennes. Neem contact op met verkoper voor juiste procedure. |
802.11a (5 GHz)
| Australia | Austria | Belgium | |
| Canada | Denmark | Finland | |
| France Germany Greece | |||
| Ireland | Italy | Liechtenstein | |
| Luxembourg | Netherlands | New Zealand | |
| Norway Portugal Sweden | |||
| Switzerland UK USA | |||
Turbo Mode (5 GHz)
| Canada | USA |
Europe - Restrictions for use of 5 GHz Frequencies in European Community Countries
| European Community Countries | 5150-5250 MHzChannels: 36, 40, 44, 48Indoor Only | 5250-5350 MHzChannels: 52, 56, 60, 64Indoor Only | 5470-5725 MHzChannels: 100, 104, 108, 112, 116, 120, 124, 128, 132, 136, 140Indoor/Outdoor |
| Austria | O | x | x |
| Belgium, France, Switzerland/Lichtenstein | O | O | x |
| Denmark, Finland, Germany, Greece, Ireland, Italy, Luxembourg, Netherlands, Norway, Portugal, Sweden, UK | O | O | O |
| Iceland, Spain | O | O | O |
O: allowed ×: forbidden
To remain in conformance with European spectrum usage laws for Wireless LAN operation, the above 2.4 GHz and 5 GHz channel limitations apply.
The user should use the wireless LAN utility to check the current channel of operation. If operation is occurring outside of the allowable frequencies as listed above, the user must cease operating the Wireless LAN at that location and consult he local technical support staff responsible for the wireless network.
The 5 GHz Turbo mode feature is not allowed for operation in any European Community country.
This device must not be operated in ad-hoc mode using channels in the 5 GHz bands in the European Community. Ad-hoc mode provides a direct communication between two client devices without a Wireless LAN Access Point.
This device must be used with Access Points that have employed and activated a radar detection feature required for European Community operation in the 5 GHz bands. This device will operate under the control of the Access Point in order to avoid operating on a channel occupied by any radar system in the area. The presence of nearby radar operation may result in temporary interruption of operation of this device. The Access Point's radar detection feature will automatically restart operation on a channel free of radar. You may consult with the local technical support staff responsible for the wireless network to ensure the Access Point device(s) are properly configured for European Community operation.
Approved Countries/Regions for use for the Atheros AR5001X Mini PCI Wireless network adapter
This equipment is approved to the radio standard by the countries/regions in the following table.
CAUTION
Do not use this equipment except in the countries/regions in the following table.
NOTE
This device works on passive scan only.
A peer-to-peer mode is not available in 802.11a and Turbo Mode.
802.11b (2.4 GHz)
| Australia | Austria | Belgium |
| Canada | Denmark | Finland |
| France Germany Greece | ||
| Ireland | Italy | Liechtenstein |
| Luxembourg | Netherlands | New Zealand |
| Norway Portugal Sweden | ||
| Switzerland UK USA |
802.11a (5 GHz)
| Australia | Austria | Belgium |
| Canada | Denmark | Finland |
| France Germany Greece | ||
| Ireland | Italy | Liechtenstein |
| Luxembourg | Netherlands | New Zealand |
| Norway Portugal Sweden | ||
| Switzerland UK USA |
Turbo Mode (5 GHz)
| Canada | USA |
Approved Countries/Regions for use for the Intel® PRO/Wireless LAN 2100 3B Mini PCI Adapter
This equipment is approved to the radio standard by the countries/regions in the following table.
CAUTION
Do not use this equipment except in the countries/regions in the following table.
| Argentina | Australia | Austria |
| Belgium | Brazil | Canada |
| Chile | Denmark | Finland |
| France Germany Greece | ||
| Iceland | Ireland | Italy |
| Japan | Liechtenstein | Luxembourg |
| Mexico Netherlands New Zealand | ||
| Norway Peru Portugal | ||
| Singapore Spain Sweden | ||
| Switzerland UK Uruguay | ||
| USA Venezuela |
Approved Countries/Regions for use for the Toshiba Mini PCI Wireless LAN Card
This equipment is approved to the radio standard by the countries/regions in the following table.
CAUTION
Do not use this equipment except in the countries/regions in the following table.
| Australia | Austria | Belgium |
| Canada | Denmark | Finland |
| France Germany | Greece | |
| Hong Kong Iceland | Ireland | |
| Italy Japan | Liechtenstein | |
| Luxembourg | Malaysia | Netherlands |
| New Zealand | Norway | Philippines |
| Portugal | Singapore | Spain |
| Sweden Switzerland Thailand | ||
| UK | USA | |
Bluetooth wireless technology Interoperability
Bluetooth™ Cards from TOSHIBA are designed to be interoperable with any product with Bluetooth wireless technology that is based on Frequency Hopping Spread Spectrum (FHSS) radio technology, and is compliant to:
Bluetooth Specification as defined and approved by The Bluetooth Special Interest Group.
◆Logo certification with Bluetooth wireless technology as defined by The Bluetooth Special interest Group.
CAUTION
Bluetooth wireless technology is a new innovative technology, and TOSHIBA has not confirmed compatibility of its Bluetooth™ products with all PCs and/or equipment using Bluetooth wireless technology other than TOSHIBA portable computers.
Always use Bluetooth™ cards from TOSHIBA in order to enable wireless networks over two or more (up to a total of seven) TOSHIBA portable computers using these cards. Please contact TOSHIBA PC product support on Web site http://www.toshiba-europe.com/computers/tnt/bluetooth.htm in Europe or http://www.pcsupport.global.toshiba.com in the United States for more information.
When you use Bluetooth™ cards from TOSHIBA close to 2.4 GHz Wireless LAN devices, Bluetooth transmissions might slow down or cause errors. If you detect certain interference while you use Bluetooth™ cards from TOSHIBA, always change the frequency, move your PC to the area outside of the interference range of 2.4 GHz Wireless LAN devices (40 meters/43.74 yards or more) or stop transmitting from your PC. Please contact TOSHIBA PC product support on Web site http://www.toshiba-europe.com/computers/tnt/bluetooth.htm in Europe or http://www.pcsupport.global.toshiba.com in the United States for more information.
Bluetooth™ and Wireless LAN devices operate within the same radio frequency range and may interfere with one another. If you use Bluetooth™ and Wireless LAN devices simultaneously, you may occasionally experience a less than optimal network performance or even lose your network connection. If you should experience any such problem, immediately turn off either one of your Bluetooth™ or Wireless LAN. Please contact Toshiba PC product support on Web site http://www.toshiba-europe.com/computers/tnt/bluetooth.htm in Europe or http://www.pcsupport.global.toshiba.com in the United States for more information.
Bluetooth wireless technology and your Health
The products with Bluetooth wireless technology, like other radio devices, emit radio frequency electromagnetic energy. The level of energy emitted by devices with Bluetooth wireless technology however is far much less than the electromagnetic energy emitted by wireless devices like for example mobile phones.
Because products with Bluetooth wireless technology operate within the guidelines found in radio frequency safety standards and recommendations, TOSHIBA believes Bluetooth wireless technology is safe for use by consumers. These standards and recommendations reflect the consensus of the scientific
community and result from deliberations of panels and committees of scientists who continually review and interpret the extensive research literature.
In some situations or environments, the use of Bluetooth wireless technology may be restricted by the proprietor of the building or responsible representatives of the organization. These situations may for example include:
Using the equipment with Bluetooth wireless technology on board of airplanes, or
In any other environment where the risk of interference to other devices or services is perceived or identified as harmful.
If you are uncertain of the policy that applies on the use of wireless devices in a specific organization or environment (e.g. airports), you are encouraged to ask for authorization to use the device with Bluetooth wireless technology prior to turning on the equipment.
Regulatory statements
This product complies with any mandatory product specification in any country/region where the product is sold. In addition, the product complies with the following:
European Union (EU) and EFTA
This equipment complies with the R&TTE directive 1999/5/EC and has been provided with the CE mark accordingly.
Canada — Industry Canada (IC)
This device complies with RSS 210 of Industry Canada.
Operation is subject to the following two conditions: (1) this device may not cause interference, and (2) this device must accept any interference, including interference that may cause undesired operation of this device.”
The term “IC” before the equipment certification number only signifies that the Industry Canada technical specifications were met.
Caution: FCC Interference Statement
This device complies with part15 of the FCC rules. Operation is subject to the following two conditions:
This device may not cause harmful interference, and
This device must accept any interference received, including interference that may cause undesired operation.
Note that any changes or modifications to this equipment not expressly approved by the manufacturer may void the authorization to operate this equipment.
Caution: Exposure to Radio Frequency Radiation
The radiated output power of the Bluetooth ^™ Card from TOSHIBA is far below the FCC radio frequency exposure limits. Nevertheless, the Bluetooth ^™ Card from TOSHIBA shall be used in such a manner that the potential for human contact during normal operation is minimized.
In order to comply with FCC radio-frequency radiation exposure guidelines for an uncontrolled environment, the Bluetooth™ Card from TOSHIBA has to be operated while maintaining a minimum body to antenna which are located on top of LCD distance of 20 cm.
Refer to the Regulatory Statements as identified in the documentation that comes with those products for additional information.
The Bluetooth ^™ Card from TOSHIBA is far below the FCC radio frequency exposure limits.
Nevertheless, it is advised to use the Bluetooth ^™ Card from TOSHIBA in such a manner that human contact during normal operation is minimized.
NOTE
Changes or modifications made to this equipment not expressly approved by TOSHIBA or parties authorized by TOSHIBA could void the user's authority to operate the equipment.
Taiwan
| Article 14 Unless | approved, for any model accredited low power radio frequency electric machinery, any company, trader or user shall not change the frequency, increase the power or change the features and functions of the original design. |
| Article 17 Any use of low power radio frequency electric machinery shall not affect the aviation safety and interfere with legal communications. In event that any interference is found, the use of such electric machinery shall be stopped immediately, and reusing of such products can be resumed until no interference occurs after improvement. | |
The legal communications mentioned in the above item refer to radio communications operated in accordance with telecommunication laws and regulations.
Low power radio frequency electric machinery shall resist against interference from legal communications or from industrial, scientific and medical radio emission electric machinery.
Using this equipment in Japan
In Japan, the frequency bandwidth of 2,400 MHz to 2,483.5 MHz for second generation low-power data communication systems such as this equipment overlaps that of mobile object identification systems (premises radio station and specified low-power radio station).
1. Sticker
Please put the following sticker on devices incorporating this product.
In the frequency bandwidth of this equipment, industrial device, scientific device, medical device like microwave oven, licensed premises radio station and non-licensed specified low-power radio station for mobile object identification system (RF-ID) that is used in product line of factories.(Other Radio Stations) are used.
I Please make sure before using this equipment that no Other Radio Stations are used in the neighborhood.
2. In case that RI ^2 interference occurs to Other Radio Stations from this equipment, please change promptly the frequency for use, place to use, or stop emitting Radio.
3 Please contact TOSHIBA Direct PC if you have a problem, such as interference from this equipment to Other Radio Stations
2. Indication
The indication shown below appears on this equipment.
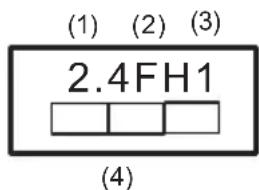
text_image
(1) (2) (3) 2.4FH1 (4)1 2.4: This equipment uses a frequency of 2.4 GHz.
2 FH: This equipment uses FH-SS modulation.
3 The interference range of this equipment is less than 10m.
4 This equipment uses a frequency bandwidth from 2,400 MHz to 2,483.5 MHz. It is impossible to avoid the band of mobile object identification systems.
3. TOSHIBA Direct PC
Monday – Friday: 10:00 – 17:00
Toll Free Tel: 0120-13-1100
Direct Dial: 03-3457-5916
Fax: 03-5444-9450
Device Authorization
This device obtains the Technical Regulation Conformity Certification, and it belongs to the device class of radio equipment of low-power data communication system radio station stipulated in the Radio Law of Japan.
The Name of the radio equipment: EYXF2CS
TELECOM ENGINEERING CENTER
Approval Number: 01NYDA1305
The following restrictions apply:
Do not disassemble or modify the device.
Do not install the embedded wireless module into other device.
DVD-ROM, multi-function drive safety instructions
The DVD-ROM and multi-function drives employ a laser system. To ensure proper use of this product, please read this instruction manual carefully and retain for future reference. Should the unit ever require maintenance, contact an authorized service location.
Use of controls, adjustments or the performance of procedures other than those specified may result in hazardous radiation exposure.
To prevent direct exposure to the laser beam, do not try to open the enclosure.
Location of the required label
(Sample shown below. Location of the label and manufacturing information may vary.)
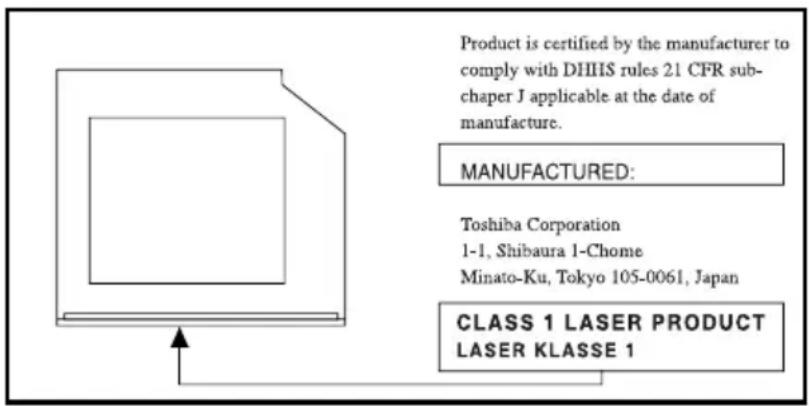
text_image
Product is certified by the manufacturer to comply with DHIIS rules 21 CFR sub-chaper J applicable at the date of manufacture. MANUFACTURED: Toshiba Corporation 1-1, Shibaura 1-Chome Minato-Ku, Tokyo 105-0061, Japan CLASS 1 LASER PRODUCT LASER KLASSE 1▲ CAUTION
This appliance contains a laser system and is classified as a “CLASS 1 LASER PRODUCT.” To use this model properly, read the user's guide carefully and keep it for your future reference. In case of any trouble with this model, please contact your nearest “AUTHORIZED service station.” To prevent direct exposure to the laser beam, do not try to open the enclosure.
CLASS 1 LASER PRODUCT LASSER KLASSE 1
Use of controls or adjustments or performance of procedures other than those specified in the owner's manual may result in hazardous radiation exposure.
Copyright
This guide is copyrighted by Toshiba America Information Systems, Inc. with all rights reserved. Under the copyright laws, this guide cannot be reproduced in any form without the prior written permission of Toshiba. No patent liability is assumed, however, with respect to the use of the information contained herein.
©2004 by Toshiba America Information Systems, Inc. All rights reserved.
Export Administration Regulation
This document contains technical data that may be controlled under the U.S. Export Administration Regulations, and may be subject to the approval of the U.S. Department of Commerce prior to export. Any export, directly or indirectly, in contravention of the U.S. Export Administration Regulations is prohibited.
Notice
The information contained in this manual, including but not limited to any product specifications, is subject to change without notice.
TOSHIBA CORPORATION AND TOSHIBA AMERICA INFORMATION SYSTEMS, INC. (TOSHIBA) PROVIDES NO WARRANTY WITH REGARD TO THIS MANUAL OR ANY OTHER INFORMATION CONTAINED HEREIN AND HEREBY EXPRESSLY DISCLAIMS ANY IMPLIED WARRANTIES OF MERCHANTABILITY OR FITNESS FOR ANY PARTICULAR PURPOSE WITH REGARD TO ANY OF THE FOREGOING. TOSHIBA ASSUMES NO LIABILITY FOR ANY DAMAGES INCURRED DIRECTLY OR INDIRECTLY FROM ANY TECHNICAL OR TYPOGRAPHICAL ERRORS OR OMISSIONS CONTAINED HEREIN OR FOR DISCREPANCIES BETWEEN THE PRODUCT AND THE MANUAL. IN NO EVENT SHALL TOSHIBA BE LIABLE FOR ANY INCIDENTAL, CONSEQUENTIAL, SPECIAL, OR EXEMPLARY DAMAGES, WHETHER BASED ON TORT, CONTRACT OR OTHERWISE, ARISING OUT OF OR IN CONNECTION WITH THIS MANUAL OR ANY OTHER INFORMATION CONTAINED HEREIN OR THE USE THEREOF.
Trademarks
Portégé and Noteworthy are registered trademarks, FreedomWare, and SmartMedia are trademarks, of Toshiba America Information Systems, Inc. and/or Toshiba Corporation.
Microsoft and Windows are registered trademarks of Microsoft Corporation in the United States and/or other countries.
DirectX, Active Desktop, DirectShow, and Windows Media are registered trademarks of Microsoft Corporation.
ConfigFree is a trademark of Toshiba Corporation.
Wi-Fi is a registered trademark of the Wireless Capability Ethernet Alliance.
Dolby - Manufactured by Toshiba under license from Dolby Laboratories/ Dolby and the double-D symbol are trademarks of Dolby Laboratories.
TouchPad is a trademark of Synaptics, Inc.
All other brand and product names are trademarks or registered trademarks of their respective companies.
Computer disposal information
This product contains mercury. Disposal of this material may be regulated due to environmental considerations. For disposal, reuse or recycling information, please contact your local government or the Electronic Industries Alliance at www.eiae.org.
Contents
Introduction 37
This guide 38
Safety icons 38
Other icons used 40
Other documentation 40
Service options 41
Chapter 1: Getting Started 42
Selecting a place to work 42
Creating a computer-friendly environment ..... 42
Keeping yourself comfortable.... 43
Other precautions 47
Important information on your computer's cooling fan.... 48
Setting up your computer 49
Setting up your software 49
Registering your computer with Toshiba...... 50
Adding external devices 50
Connecting a power source.... 51
Using the computer for the first time.... 55
Opening the display panel 55
Your computer's features and specifications...... 56
Turning on the power 56
Using the AccuPoint II 57
Installing additional memory (optional) 58
Removing a memory module 64
Connecting an external USB mouse.... 65
Connecting an external USB keyboard 65
Connecting a printer 65
Connecting the modem.... 67
Connecting to a phone line 67
Connecting other external devices 68
Customizing your computer's settings 69
Powering off the computer 69
Closing the display panel.... 70
Different ways to turn the computer on and off.... 70
Caring for your computer.... 71
Cleaning the computer 71
Moving the computer 71
Using a computer lock 71
Chapter 2: Learning the Basics 73
Computing tips 73
Using the keyboard 75
Character keys 75
Making your keyboard emulate a full-size keyboard 75
Ctrl, Fn, and Alt keys 76
Function keys 76
Windows ^® special keys 77
Overlay keys....77
Starting a program.... 79
Starting a program from the Start menu 79
Starting a program from Windows ^® Explorer .... 80
Starting a program from the Run
dialog box 81
Saving your work.... 82
Printing your work 84
Using optional external disks 85
Inserting and removing disks 85
Copying documents to a disk 86
Taking care of disks.... 87
Backing up your work 87
Restoring your work 88
Using the DVD-ROM or multi-function drive...... 89
DVD-ROM or multi-function drive components 90
Inserting a compact disc 91
Playing an audio CD 93
Viewing the contents of a CD or DVD 94
Removing compact discs with the computer on 95
Removing compact discs with the computer off 95
Caring for CDs and DVDs 96
Powering down the computer.... 96
Turn Off or Shut down.... 97
Restart command.... 97
Hibernation command.... 98
Standby command 98
Using Turn Off or Shut down 99
Turning off more quickly 100
Starting again after Turn Off or Shut down...... 102
Using Hibernation 102
Enabling the Hibernation command .... 102
Going into Hibernation mode 104
Going into Hibernation mode more quickly ..... 106
Starting again from Hibernation 106
Using Standby 106
Going into Standby mode more quickly ..... 107
Starting again from Standby 110
Toshiba's online resources.... 110
Chapter 3: Mobile Computing 111
Toshiba's energy-saver design 111
Running the computer on battery power ...... 112
Battery Notice.... 112
Power management 113
Using additional batteries.... 113
Charging batteries.... 113
Charging the batteries.... 114
Charging the main battery.... 114
Charging the RTC battery 114
Using a battery charger 116
Monitoring main battery power.... 116
Determining remaining battery power 117
What to do when the main battery runs low..... 117
Setting battery alarms 118
Conserving battery power 119
Setting a power usage mode.... 119
Turning off the display automatically 121
Enabling the screen saver 121
Changing the main battery 122
Removing the battery from the computer ..... 123
Inserting a charged battery 124
Taking care of your battery.... 125
Safety precautions.... 125
Maximizing battery life 126
Disposing of used batteries 127
Traveling tips.... 128
Chapter 4: Expansion Options....129
Using your computer at the office.... 129
Using an expansion device.... 130
Using the optional external USB diskette drive..... 130
Connecting the optional external USB diskette drive.... 130
Using the optional USB external diskette drive with a PC Card.... 131
Using a keyboard with the Advanced Port Replicator 132
Connecting a keyboard to the Advanced Port Replicator.... 132
Making your external keyboard emulate the Fn key.... 132
Using a mouse with the Advanced Port Replicator 133
Connecting a mouse to the Advanced Port Replicator.... 133
Using a printer with the Advanced Port Replicator 134
Connecting a USB printer.... 134
Connecting a serial or parallel printer.... 134
Using external display devices 135
Directing the display output when you turn on the computer 135
Adjusting the quality of the external display ..... 136
Display limitations.... 136
Using Slim SelectBay modules 137
Removing a module from the Slim SelectBay 137
Inserting a module into the Slim SelectBay...... 139
Using PC Cards.... 139
Inserting a PC Card 139
Removing a PC Card 140
Hot swapping PC Cards.... 141
Using an SD card 141
Installing SD card drivers 142
Installing the SD card in the SD slot.... 142
Formatting an SD card 143
Using Standby or Hibernate while using the SD card 143
Removing an SD card 143
Using the i.LINK ^® port 144
Chapter 5: Enhancing Productivity 145
Windows ^® XP special features..... 145
Personalizing your desktop.... 146
Customizing the taskbar.... 146
Bringing the world to your desktop 147
Changing desktop and browsing style.... 148
Personalizing individual windows.... 149
Customizing window toolbars 150
Displaying information about each folder...... 151
Setting up for communications.... 152
Determining the COM port 153
Using the Ethernet LAN Port 154
Accessing a LAN 154
Exchanging data with another computer.... 155
Transferring application files 155
Setting up a direct cable connection 156
Setting up a wireless connection.... 156
Using Bluetooth.... 156
Using audio features 157
Using external speakers or headphones...... 157
Recording sounds 158
Using a microphone 159
Adjusting recording settings 159
Chapter 6: Toshiba Utilities
Fn-esse 161
Starting Fn-esse 162
Assigning a key to a program or document...... 163
Viewing existing key assignments.... 165
Changing or removing existing key
assignments.... 165
Hotkey utility.... 165
Expansion device properties 166
Mobile Extension.... 166
TOSHIBA Console 168
Customizing Your Computer 169
Network.... 170
Security 170
TOSHIBA Button Controls 170
Power Management 171
Toshiba Hardware Setup.... 174
Chapter 7: Keeping Your Files Safe .... 176
Using passwords in Windows 176
User-level passwords 177
Setting a user-level password.... 177
Using an instant password 178
Setting a Windows user password 178
Setting a user-level password in System Setup.... 179
Disabling a user password 181
Disabling a user-level password in System Setup.... 182
Using the power-on (user-level) password...... 184
Using the instant (user-level) password ..... 185
Using a supervisor password.... 185
Setting a supervisor password .... 185
Deleting a supervisor password .... 186
Chapter 8: If Something Goes Wrong 188
Problems that are easy to fix 188
Problems when you turn on the computer...... 190
The Windows ^® operating system is not working. 192
Using Startup options to fix problems...... 192
Internet problems.... 193
The Windows ^® XP operating system can
help you 194
Resolving a hardware conflict.... 194
A plan of action 195
Resolving hardware conflicts on your own ..... 195
Fixing a problem with Device Manager...... 197
Memory problems.... 198
Power and the batteries.... 199
Keyboard problems 201
AccuPoint II problems.... 201
Display problems 202
Disk drive problems 205
Problems with the DVD-ROM or multi-function drive.... 207
Sound system problems 208
PC Card problems 209
Printer problems 211
Modem problems.... 212
Internet Problems 213
DVD operating problems.... 214
Develop good computing habits 216
If you need further assistance.... 217
Before you call 218
Contacting Toshiba.... 218
Other Toshiba Internet Web sites 219
Toshiba's worldwide offices 220
Appendix A: Hot Keys....222
Volume Mute.... 222
Password security 222
Without a password 222
With a password 223
Power usage mode 223
Standby mode.... 224
Hibernation mode 225
Display modes 226
Display brightness 226
Wireless device enable/disable.... 227
Keyboard hot keys 227
Appendix B: Power Cord/Cable Connectors ...... 228
USA and Canada.... 228
United Kingdom 228
Australia 228
Europe.... 228
Appendix C: Using ConfigFree™ with your Toshiba
Computer.... 230
Getting Started.... 231
ConfigFree Main Screen 231
Starting ConfigFree 232
Configuring ConfigFree.... 232
ConfigFree Utilities.... 233
Connectivity Doctor.... 233
Device Settings.... 234
Profile Settings.... 236
Quick Connect 237
Using Auto Switch 238
Auto Switch (Cable Disconnect) 239
Auto Switch (SSID) 239
Glossary 240
Index 255
Introduction
Welcome to the world of powerful and portable multimedia computers! With your new Toshiba notebook computer, your access to information can accompany you wherever you go.
You will find that your Microsoft ^® Windows ^® XP Professional operating system is already installed on your computer. It offers exciting features and easy Internet access.
NOTE
The product specifications and configuration information are designed for a product Series. Your particular model may not have all the features and specifications listed or illustrated. For more detailed information about the features and specifications on your particular model, please visit Toshiba's Web site at pcsupport.toshiba.com.
While Toshiba has made every effort at the time of publication to ensure the accuracy of the information provided herein, product specifications, configurations, prices, system/component/options availability are all subject to change without notice. For the most up-to-date product information about your computer, or to stay current with the various computer software or hardware options, visit Toshiba's Web site at pcsupport.toshiba.com.
This guide
This guide introduces the computer's features. You can:
Read the entire guide from beginning to end.
◆Skim through and stop when a topic interests you.
Use the table of contents and the index to find specific information.
If you are new to computers, or have not used a notebook computer before, read through the first couple of chapters to familiarize yourself with the components of the computer and how to turn it on. After that, seek out whatever interests you most.
Safety icons
This manual contains safety instructions that must be observed in order to avoid potential hazards that could result in personal injuries, damage to your equipment, or loss of
data. These safety cautions have been classified according to the seriousness of the risk, and the icons highlight these instructions as follows:
DANGER
Indicates an imminently hazardous situation which, if not avoided, will result in death or serious injury.
▲WARNING
Indicates a potentially hazardous situation which, if not avoided, could result in death or serious injury.
▲ CAUTION
Indicates a potentially hazardous situation which, if not avoided, may result in minor or moderate injury.
CAUTION
Indicates a potentially hazardous situation which, if not avoided, may result in property damage.
NOTE
Provides important information.
Other icons used
Additional icons highlight other helpful or educational information:

TECHNICAL NOTE: This icon highlights technical information about the computer.

HINT: This icon denotes helpful hints and tips.

DEFINITION: This icon indicates the definition of a term used in the text.
Other documentation
Your computer comes with the following documentation in addition to this user's guide:
This electronic version of the user's guide.
Guides for other programs that may come preinstalled on your computer and for additional programs on your Recovery media (if applicable to your system).
For accessory information, visit Toshiba's web site at accessories.toshiba.com.
The Microsoft ^ Windows ^ operating system documentation, which explains the features of the operating system.
Service options
Toshiba offers a full line of optional service programs to complement its limited warranty. To stay current on the most recent software and hardware options for your computer, and for other product information, be sure to regularly check the Toshiba Web site pcsupport.toshiba.com.
If you have a problem or need to contact Toshiba, see “If Something Goes Wrong” on page 188.
Chapter 1
Getting Started
This chapter provides tips for working comfortably, summarizes how to connect components, and explains what to do the first time you use your notebook computer.
Selecting a place to work
Your computer is designed to be used in a variety of circumstances and locations. This section provides guidelines for setting up your computing environment.
Creating a computer-friendly environment
Place the computer on a flat surface that is large enough for the computer and any other items you are using, such as a printer. Leave enough space around the computer and other equipment to provide adequate ventilation. Otherwise, they may overheat.
To keep your computer in prime operating condition, protect your work area from:
◆Dust, moisture, and direct sunlight.
◆ Equipment that generates a strong electromagnetic field, such as stereo speakers (other than speakers that are connected to the computer) or speakerphones.
◆Rapid changes in temperature or humidity and sources of temperature change such as air conditioner vents or heaters.
◆Extreme heat, cold, or humidity.
◆Liquids and corrosive chemicals.
CAUTION
If you spill liquid into the computer, turn it off, unplug it from the AC power source, and let it dry out completely before turning it on again.
If the computer does not operate properly after you turn it back on, contact a Toshiba service representative or your network administrator.
Keeping yourself comfortable
Strain and stress injuries are becoming more common as people spend more time using their computers. With a little care and proper use of the equipment you can work comfortably throughout the day.
This section provides hints on avoiding strain and stress injuries. For more information, consult books on ergonomics, repetitive-strain injury, and repetitive-stress syndrome.
Placement of the computer
Proper placement of the computer and external devices is important to avoid stress-related injuries. Consider the following when placing your computer:
Place the computer on a flat surface at a comfortable height and distance. You should be able to type without
twisting your torso or neck, and look at the screen without slouching.
If you are using an external monitor, the top of the screen should be no higher than eye level.
If you use a paper holder, set it at about the same height and distance as the screen.
Seating and posture
When using your computer, maintain good posture with your body relaxed and your weight distributed evenly. Proper seating is a primary factor in reducing work strain. Some people find a backless chair more comfortable than a conventional chair.
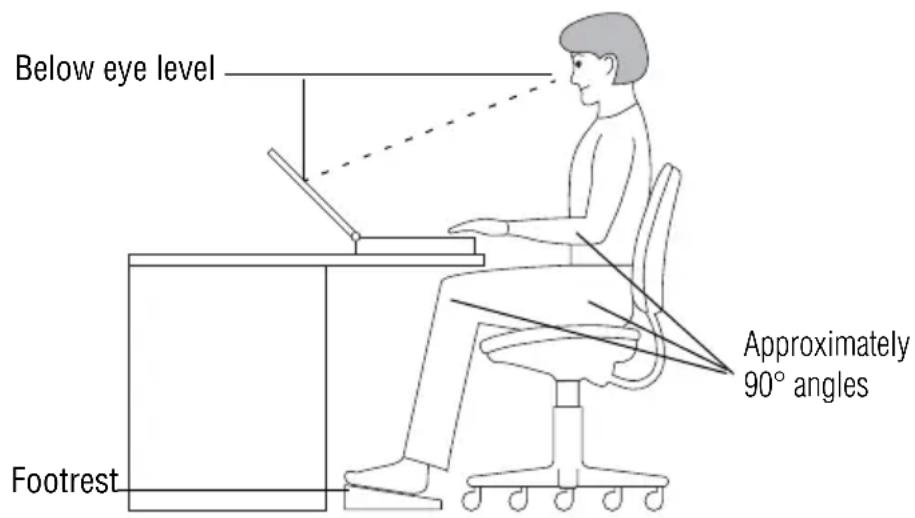
text_image
Below eye level Footrest Approximately 90° anglesCorrect posture and positioning of the computer
Position your chair so that the keyboard is at or slightly lower than the level of your elbow. You should be able to type comfortably with your shoulders relaxed and your forearms parallel to the floor.
If you are using a conventional chair:
- Your knees should be slightly higher than your hips. If necessary, use a footrest to raise the level of your knees and ease the pressure on the back of your thighs.
Adjust the back of your chair so that it supports the lower curve of your spine. If necessary, use a cushion to provide extra back support. Lower-back-support cushions are available at many office supply stores.
- Sit with your back straight so that your knees, hips, and elbows form approximately 90-degree angles when you work. Avoid slumping forward or leaning back too far.
Lighting
Proper lighting can improve the visibility of the display and reduce eyestrain.
◆Position the display panel or external monitor so that sunlight or bright indoor lighting does not reflect off the screen. Use tinted windows or shades to reduce glare.
Avoid placing your computer in front of a bright light that could shine directly in your eyes.
If possible, use soft, indirect lighting in your computer work area.
▲ CAUTION
Your LCD display has a brightness approaching that of a TV device. We recommend that you adjust the brightness of your LCD to a comfortable level to prevent possible strain on your eyes.
Arms and wrists
Avoid bending, arching or twisting your wrists. Keep them in a relaxed, neutral position while typing.
Exercise your hands, wrists and arms to improve circulation.
NOTE
Using the computer keyboard incorrectly may result in discomfort and possible injury. If your hands, wrists, and/or arms bother you while typing, stop using the computer and rest. If the discomfort persists, consult a physician.
Work habits
The key to avoiding discomfort or injury from strain is to vary your activities. If possible, schedule a variety of tasks into your working day. Finding ways to break up the routine can reduce stress and improve your efficiency.
Take frequent breaks to change position, stretch your muscles and relieve your eyes. A break of two or three minutes every half hour is more effective than a long break after several hours.
❖Avoid performing repetitive activities for long periods. Intersperse such activities with other tasks.
✿Focusing your eyes on your computer screen for long periods can cause eyestrain. Look away from the computer frequently and focus your eyes on a distant object for at least thirty seconds.
▲ CAUTION
Your LCD display has a brightness approaching that of a TV device. We recommend that you adjust the brightness of your LCD to a comfortable level to prevent possible strain on your eyes.
Other precautions
Your computer is designed to optimize safety, minimize strain, and withstand the rigors of portability. However, you should observe certain precautions to further reduce the risk of personal injury or damage to the computer.
- Avoid prolonged physical contact with the underside of the computer.
If the computer is used for long periods, its case can become very warm. While the temperature may not feel too hot to the touch, if you maintain physical contact with the computer for a long time (if you rest the computer on your lap, for example), your skin might suffer low-heat injury.
CAUTION
Do not apply heavy pressure to the computer or subject it to sharp impacts. Excessive pressure or impact can damage computer components or cause your computer to malfunction.
CAUTION
Some PC Cards can become hot with prolonged use. If two cards are installed, both can become hot even if only one is used extensively. Overheating of a PC Card can result in errors or instability in the PC Card operation.
Be careful when you remove a PC Card that has been used for lengthy periods of time.
Avoid spilling liquids on the computer's keyboard.
If you do spill a liquid that gets into the keyboard, turn off the computer immediately. Leave the computer turned off overnight to let it dry out before you use it again.
✿Never turn off the computer if a drive light indicates a drive is active.
Turning off the computer while it is reading from or writing o a disk may damage the disk, the drive, or both.
✿Turning off the computer while it is reading from or writing to a disk may damage the disk, the drive or both.
- Keep the computer and disk away from objects that generate strong magnetic fields, such as large stereo speakers.
Information on disks is stored magnetically. Placing a magnet too close to a disk can erase important files.
◆Scan all new files for viruses.
This precaution is especially important for files you receive via email or download from the Internet. Occasionally, even new programs you buy from a supplier may contain a computer virus. You will need a special program to check for viruses. Ask your dealer to help you.
Important information on your computer's cooling fan
Your computer may have a CPU cooling fan that cools the CPU by drawing outside air into the computer. The cooling fan may be located on the bottom of the computer.
CAUTION
To prevent possible overheating of the CPU, make sure the air intake on the cooling fan is not blocked. The fan draws in air by creating a vacuum. If the fan is blocked, it could cause the CPU to run at a lower performance level or cause the computer to shut down. Loose items such as notebook and tissue paper, plastic wrappers, or other similar materials can block the air intake, preventing air from reaching the CPU. Do not use the computer on surfaces with objects that can be drawn in by the cooling fan.
NOTE
The cooling fan location will vary depending on the computer.
Setting up your computer

TECHNICAL NOTE: You must complete all set up steps up to "Setting up your software" on page 49 before adding external or internal components to your computer. These components include, but are not limited to, a mouse, keyboard, printer, memory, and PC Cards.
Your computer contains a rechargeable main battery that needs to be charged before you can use it.
To use external power or to charge the battery, you must attach the AC adapter. See “Connecting a power source” on page 51.
Setting up your software
NOTE
The names of windows displayed, and the order in which windows appear, may vary according to your software setup choices.
The first time you turn on your computer, the Setup Wizard guides you through steps to set up your software.
1 From the welcome screen, click Next to enter the Setup Wizard.
2 Confirm acceptance of Microsoft's End User License Agreement and click Next.
3 Enter your name and the name of your company or organization and click Next.
The computer will pause for a moment while checking for an internet connection.
A window will display the message “An Internet connection could not be chosen.”
4 Enter the information about your computer.
NOTE
If you are connecting your computer to a network, consult your system administrator before you choose your computer name and network settings.
5 Set the correct date, time and time zone for your computer and click Next.
Your computer restarts automatically.
Registering your computer with Toshiba
Product registration is strongly recommended, and allows Toshiba to send Customer periodic updates, announcements, and special offers applicable to the product. Product registration can be completed during the initial start up process of your computer. If you opt not to register at that time, you can either double-click the icon on your desktop or go to the Toshiba Web site at www.register.toshiba.com. Customer failure to complete Product Registration will not diminish Customer rights under this limited Warranty.
Adding external devices
NOTE
Before adding external devices, Toshiba recommends setting up your software. See "Setting up your software" on page 49.
Before starting to use your computer, you may also want to:
Add more memory (see “Using the AccuPoint II” on page 57)
Connect a mouse (see “Connecting an external USB mouse” on page 65 and “Connecting a mouse to the Advanced Port Replicator” on page 133)
Connect a full-size keyboard (see “Connecting an external USB keyboard” on page 65 and “Connecting a keyboard to the Advanced Port Replicator” on page 132)
Connect an external monitor (see “Connecting other external devices” on page 68 and “Using external display devices” on page 135)
Connect a local printer (see “Connecting a printer” on page 65, “Connecting a USB printer” on page 134 and “Connecting a serial or parallel printer” on page 134)
Install PC Cards (see “Using PC Cards” on page 139)
Connecting a power source
Your computer requires power to operate. Use the power cord/cable and AC adapter to connect the computer to a live electrical outlet, or to charge the computer's battery.
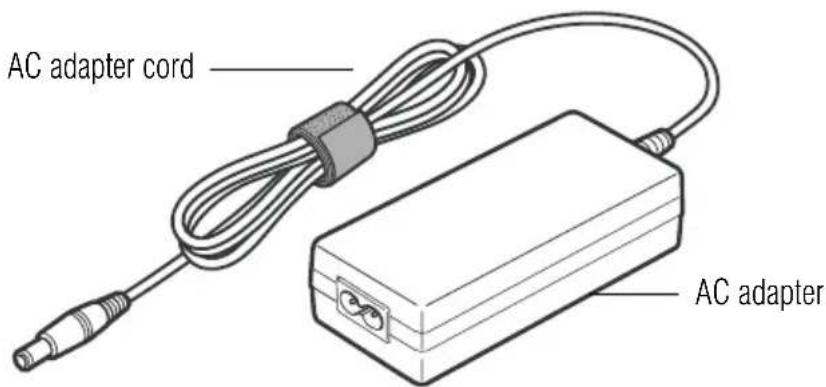
text_image
AC adapter cord AC adapterSample Power cord/cable and AC adapter
▲WARNING
Hold the power cord/cable by its plug when you connect/disconnect it. Do NOT pull the cable itself. Doing so may damage the power cord/cable and result in a short circuit or electric shock.
▲WARNING
When you connect the AC adapter to the computer, always follow the steps in the exact order as described in the User's Manual. Connecting the power cord/cable to a live electrical outlet should be the last step; otherwise' the adapter DC output plug could hold an electrical charge and cause an electrical shock or minor bodily injury when touched. As a general safety precaution, avoid touching any metal parts.
▲ CAUTION
Use only the AC adapter supplied with your computer or an equivalent adapter that is compatible. Use of any incompatible adapter could damage your computer. Toshiba assumes no liability for any damage caused by use of an incompatible adapter.
To connect AC power to the computer:
1 Connect the power cord/cable to the AC adapter.
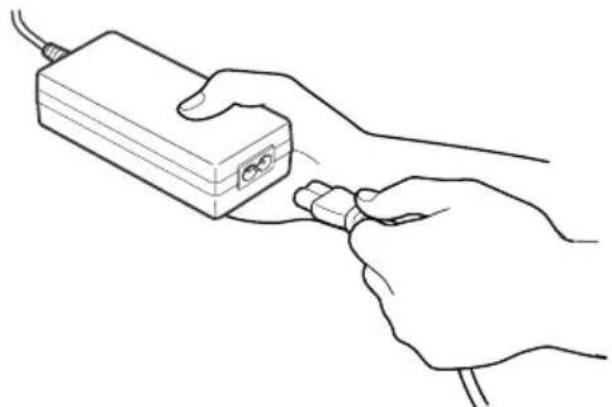
natural_image
Line drawing of two hands holding a rectangular electronic device with ports, no text or symbols presentSample connecting the power cord/cable to the AC adapter
▲WARNING
Handling the cord on this product will expose you to lead, a chemical known to the State of California to cause birth defects or other reproductive harm. Wash hands after handling.
- C +
2 Plug the AC adapter into the DC-IN on the left side of the computer.
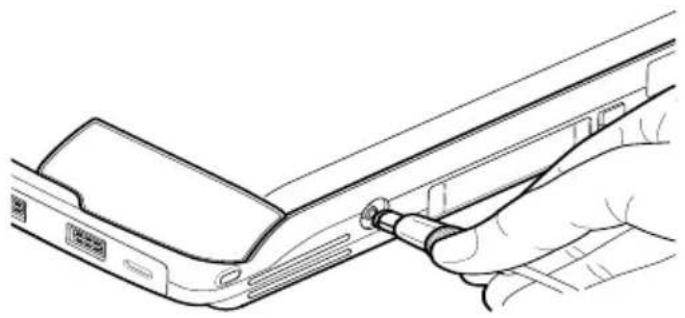
natural_image
Line drawing of a hand inserting a cable into a device (no text or symbols)Sample connecting the AC adapter to the computer
3 Connect the power cord/cable to a live electrical outlet.
If the electrical outlet is live, the system indicator panel's AC power light (●) glows green.
▲WARNING
Damaged power cords/cables can cause fire or electric shock. Never modify, forcibly bend, place heavy objects on top of, or apply heat to the power cord/cable.
If the power cords/cable becomes damaged or the plug overheats, discontinue use. There is a risk of electric shock.
Never remove the power plug from the outlet with wet hands. Doing so may cause an electric shock.
Charging the main battery
To charge the main battery, plug the computer into a live wall outlet. It takes several hours to charge the battery with the computer off. It takes much longer to charge the battery while the computer is on. For more information on battery use, see “Running the computer on battery power” on page 112.
CAUTION
Once the battery is charged for the first time, avoid leaving the computer plugged in and turned off for more than a few hours at a time. Continuing to charge a fully charged battery can damage the battery.

TECHNICAL NOTE: When your computer is using all of the power provided by the AC Adaptor to run applications, features, and devices, the recharging of the battery can not occur. Your computer's Power Saver utility can be used to select a power level setting that reduces the power required for system operation and will allow the battery to recharge.
NOTE
Battery life and charge time may vary depending on the applications, power management setting.
Using the computer for the first time
For information on connecting devices, see “Setting up your computer” on page 49.
Opening the display panel
1 Release the display latch.
2 Lift the display panel.
▲ CAUTION
To avoid damaging the display panel, do not force it beyond the point where it moves easily.
Never lift the computer by the display panel.
Small bright dots may appear on your TFT display when you turn on your computer. Your display contains an extremely large number of thin-film transistors (TFT) and is manufactured using high-precision technology. Any small bright dots that may appear on your display are an intrinsic characteristic of the TFT manufacturing technology.
NOTE
Over a period of time, and depending on the usage of the computer, the brightness of the LCD Screen will deteriorate. This is an intrinsic characteristic of LCD technology.
Screen will dim when the computer is operated on battery power and you may not be able to increase the brightness of the screen.
Your computer's features and specifications
Certain notebook chassis are designed to accommodate all possible configurations for an entire product Series. Your selected model may not have all the features and specifications corresponding to all of the icons or switches shown on the notebook chassis, unless you have selected all those features.
Below is an example of one of the many possible icons that may come with your computer:

natural_image
Three black-and-white icons: a stylized 'S' logo, a wireless signal icon, and a database icon (no text or symbols)Sample system icons
This information applies to all the features and icons described in this guide.
Turning on the power
To turn on the computer:
1 Make sure any external devices (such as the AC adapter, if you plan to use AC power rather than battery power) are properly connected and ready.
2 If an optional external diskette drive is connected to your computer, check that the drive is empty.
3 Press and hold in the power button until the on/off light on the system indicator panel glows green—about one second.

CAUTION
When you turn on the computer for the first time, do not turn off the power again until the operating system has loaded completely.
4 The preinstalled operating system will load automatically.
CAUTION
Never turn off the computer while any drive is in use.
Using the AccuPoint II
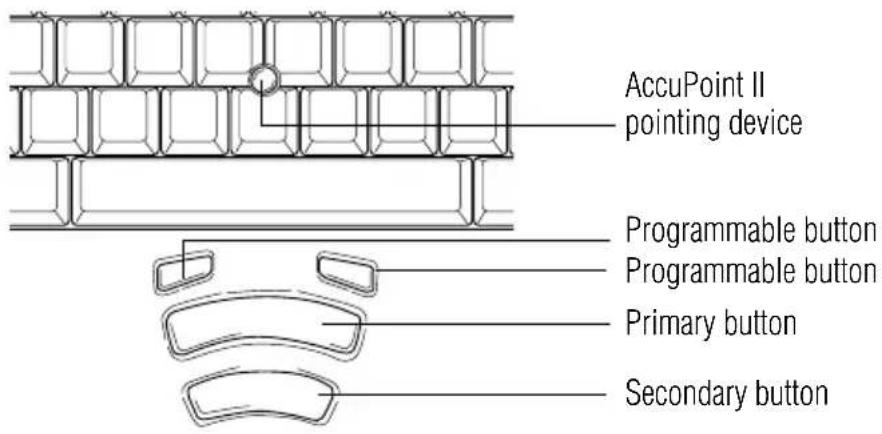
text_image
AccuPoint II pointing device Programmable button Programmable button Primary button Secondary buttonAccuPoint II keys
AccuPoint II pointing device—Enables you to move the cursor and to select items on the screen. (If you would prefer to use a mouse or trackball, you can connect one to the computer’s USB port, or to the optional port replicator’s PS/2 or serial ports. For information on connecting a mouse to the computer, see “Connecting an external USB mouse” on page 65. For information on connecting a mouse using the Advanced Port Replicator, see “Connecting a mouse to the Advanced Port Replicator” on page 133.
To move the cursor, gently push the pointing device in the direction you want the cursor to move. Pushing harder on the pointing device moves the cursor faster.
Primary and secondary control buttons
The control buttons are used like the buttons on a mouse. The primary control button corresponds to the left mouse button. To double-click, press the primary button twice in rapid succession.
The function of the secondary button depends on the program you are using. It usually corresponds to the right mouse button. Check your program's documentation to find whether it uses the secondary mouse button.
Installing additional memory (optional)
CAUTION
Before you install or remove a memory module, turn off the computer using the Start menu. If you install or remove a memory module while the computer is in Standby or Hibernation mode, data will be lost.

HINT: To purchase additional memory modules, see the accessories information packaged with your system or visit Toshiba's Web site at toshibaaccessories.com.

Your computer comes with enough memory to run most of today's popular applications. You may want to increase the computer's memory if you use complex software or process large amounts of data.
Additional memory comes in various capacities (to stay current on the most recent software and hardware options for your computer, and for other product information, be sure to regularly check the Toshiba Web site at accessories.toshiba.com.
The computer has two memory expansion slots—Slot A and Slot B. You can install one or two memory modules.
CAUTION
Before you install or remove a memory module, turn off the computer using the Start menu. If you install or remove a memory module while the computer is in Standby or Hibernation mode, data will be lost.
A memory module must be installed in slot A. do not try to operate the computer with a memory module in slot B only.
If you install a memory module that is incompatible with the computer, a beep will sound when you turn on the computer. If the module is installed in slot A, thee will be a long beep followed by a short beep. If the module is in slot B, there will be a long beep followed by two short beeps. In this case, turn off the computer and remove the incompatible module.
CAUTION
If you use the computer for a long time, the memory modules become hot. If this happens, let the memory modules cool to room temperature before you replace them.
Additional memory modules can be installed in the memory expansion slots under your computer's keyboard. You will need a standard Phillips no.1 screwdriver and a small flat head screwdriver for this procedure.
CAUTION
To avoid damaging the computer's screws, use a standard Phillips no. 1 screwdriver that is in good condition.
1 Shut down your computer completely using the Shut Down or Turn Off command.
See “Powering down the computer” on page 96.
2 Unplug the computer and remove any cables you may have connected.
▲ CAUTION
Installing a memory module with the computer's power on may damage the computer, the module, or both.
3 Open the display panel and remove the panel that contains the Power and TOSHIBA Console buttons.
▲ CAUTION
When removing the computer's power and TOSHIBA Console button panel to install additional memory, be careful not to damage the display or circuit board.
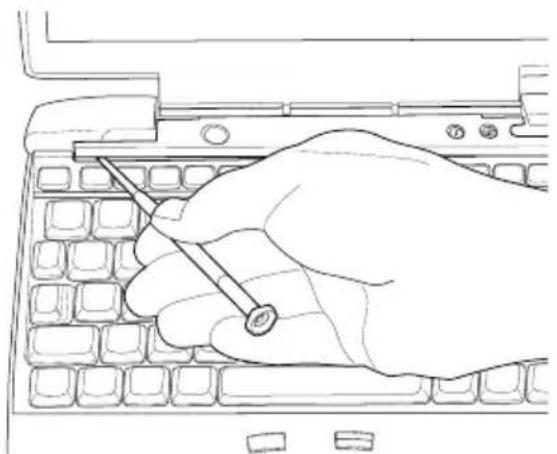
natural_image
Line drawing of a hand using a screwdriver to press a keyboard (no text or symbols present)Using a flat head screw driver to pry the panel off
You can pry the panel out of its position by using a flat head screwdriver. Starting at the left or right side, carefully wedge the flat head screwdriver between the panel and the surrounding housing. Grasp the end of the panel, lift up and wiggle it back and forth until the panel comes free.
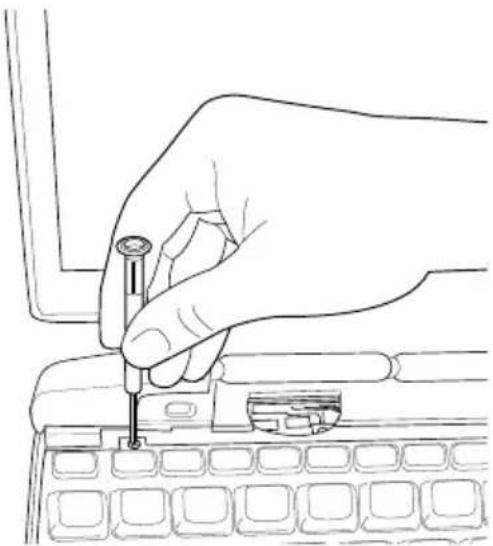
natural_image
Line drawing of a hand using a screwdriver to press a keyboard (no text or symbols present)Removing the left keyboard screw
4 Locate and remove the screws that hold the keyboard in place.
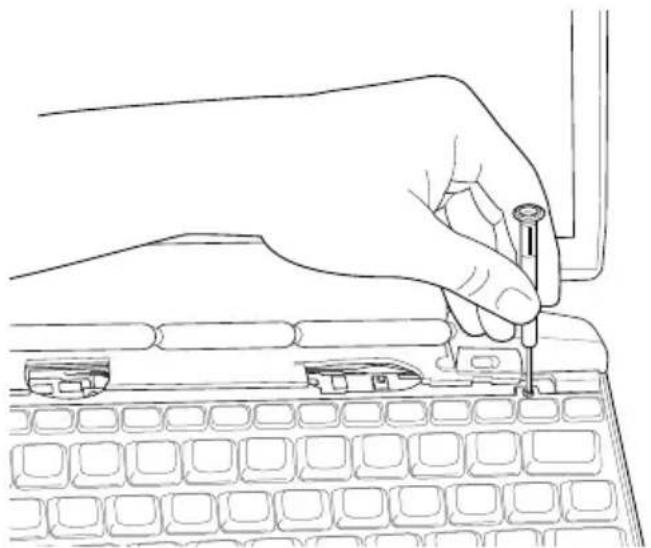
natural_image
Line drawing of a hand using a screwdriver to press or install a keyboard (no text or symbols present)Removing the right keyboard screw
5 Lift the keyboard and place it face down on the palm rest of the computer.
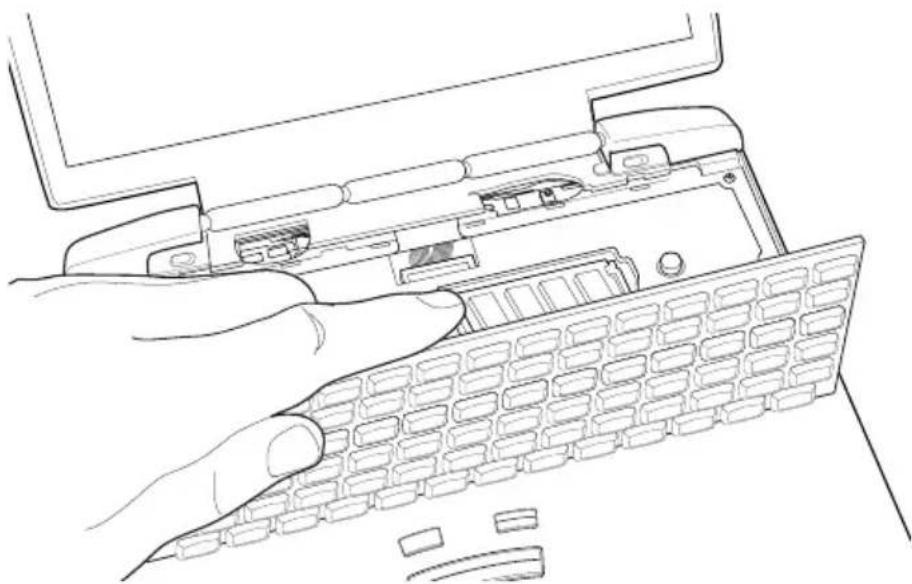
natural_image
Line drawing of a hand inserting a component into a computer keyboard (no text or symbols)Lifting off the keyboard
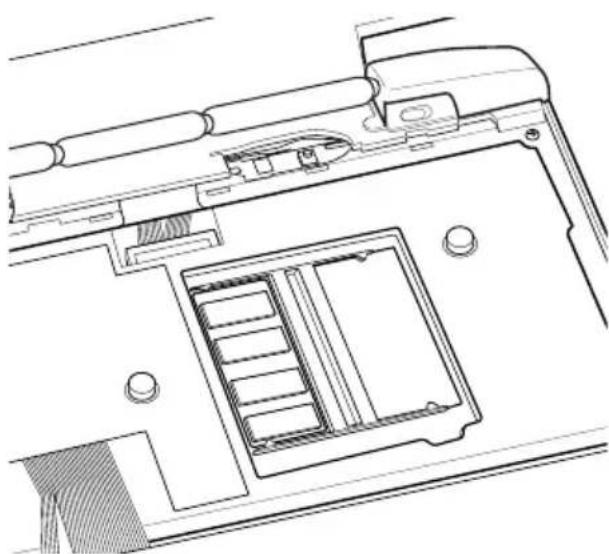
natural_image
Technical line drawing of a mechanical component with internal structure and mounting holes (no text or symbols)The memory module expansion slots
▲ CAUTION
Static electricity can damage the memory module. Before you handle the module, touch a grounded metal surface to discharge any static electricity you may have built up.
To avoid damaging the memory module, be careful not to touch its pin connector on the side you insert into the computer.
6 Remove the new memory module from its antistatic packaging.
7 Insert the memory module in the slot and gently press it down into place.
The clips on either side of the module will click to secure the module.
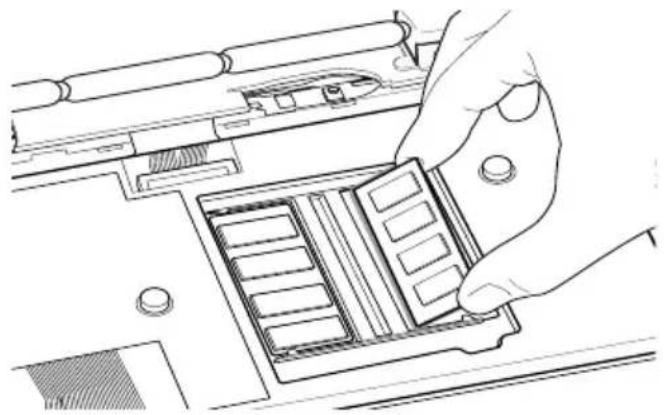
natural_image
Line drawing of a hand inserting a component into a device panel (no text or symbols visible)Inserting the memory module into the slot
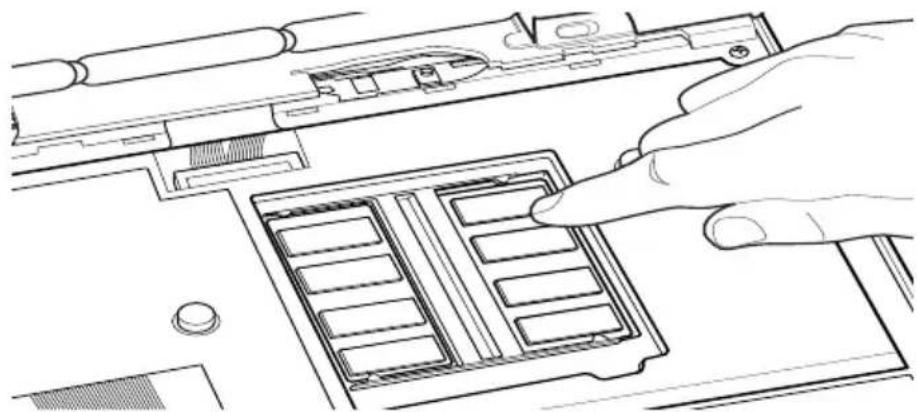
natural_image
Line drawing of a hand pressing a component into a computer motherboard (no text or symbols)Pressing the memory module into the slot
8 Replace the keyboard and the screws.
9 Replace the panel that contains the Power and TOSHIBA Console buttons. Press hard on the keyboard panel to snap it into place.
10 Restart the computer.
When you turn on the computer, it automatically recognizes the additional memory.
Removing a memory module
If you need to remove a memory module:
1 Complete steps 1–5 in “‘Installing additional memory (optional)’” to shut down the computer and expose the memory module(s).
2 Pull the clips away from the memory module.
The memory module pops partially out of the slot.
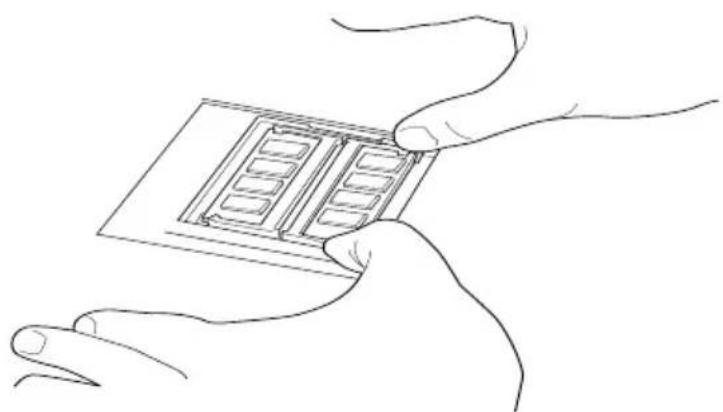
natural_image
Line drawing of two hands holding a small electronic component (no text or symbols visible)Pulling the clips away from the memory module
3 Carefully remove the module from the slot.
4 Replace the keyboard and the screws.
5 Replace the panel that contains the Power and TOSHIBA Console buttons.
6 Restart the computer.
Connecting an external USB mouse
You may want to use a mouse instead of the computer's built-in pointing device, the AccuPoint II. You can attach an external mouse to one of the computer's USB ports, provided the mouse is USB-compatible.
Connecting an external USB keyboard
You can attach an external standard keyboard to a USB port on your computer, provided the keyboard is USB-compatible.
NOTE
The emulation Fn key is not supported when using a USB keyboard.
Connecting a printer
You can connect a local printer to your computer.
Your computer has USB connectivity. Connecting a printer with a parallel or serial interface requires a port replicator. See “Using a printer with the Advanced Port Replicator” on page 134.
If the printer has a USB interface, you can connect it directly to the computer.
You also need a USB cable, which may come with your printer. Alternatively, your organization may keep a stock of cables; consult your network administrator. Otherwise, you can purchase one from a computer or electronics store.
Connecting a USB printer
1 Connect the flat end of the USB cable to the USB port.
2 Connect the other end of the USB cable to the printer.
3 Connect the printer's power cords/cable to a power outlet and turn on the printer.
See your printer documentation for additional configuration steps, or see “Setting up a printer” on page 66.
Setting up a printer
If you have a printer, follow these steps to set it up for the first time. You only need to set up the printer once.
1 Click Start, Printers and Faxes.
The Printers and Faxes window appears.
2 Click Add a Printer.
The Add Printer Wizard appears
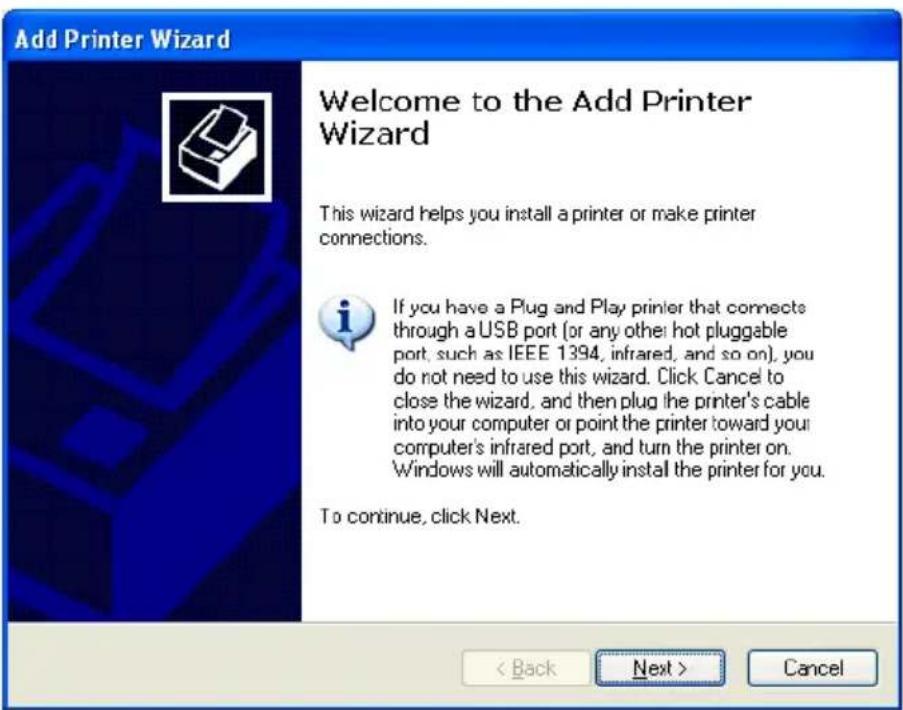
text_image
Add Printer Wizard Welcome to the Add Printer Wizard This wizard helps you install a printer or make printer connections. If you have a Plug and Play printer that connects through a USB port (or any other hot pluggable port, such as IEEE 1394, infrared, and so on), you do not need to use this wizard. Click Cancel to close the wizard, and then plug the printer's cable into your computer or point the printer toward your computer's infrared port, and turn the printer on. 'Windows will automatically install the printer for you. To continue, click Next. < Back Next > CancelSample Add Printer Wizard
3 Follow the on-screen instructions to set up your printer.

TECHNICAL NOTE: Some printers require a specific installation process. In this case, the Windows ^® XP Professional Add Printer Wizard will display an error message. If this happens, refer to your printer installation guide for further instructions.
Connecting the modem
Your computer comes with a built-in modem that can be connected to a standard voice-grade telephone line.
The modem allows you to:
◆Access the Internet.
Communicate with your office's local area network (LAN), or a larger corporate wide area network (WAN).
For specific information about connecting to a LAN or WAN, consult your network administrator.
◆Send a fax directly from your computer.
Connecting to a phone line
Before you can communicate using the modem, you need to connect it to a telephone line. Your computer's built-in modem provides an RJ11 jack.
1 Plug one end of a telephone cable (purchased separately) into the modem port on the back of the computer.
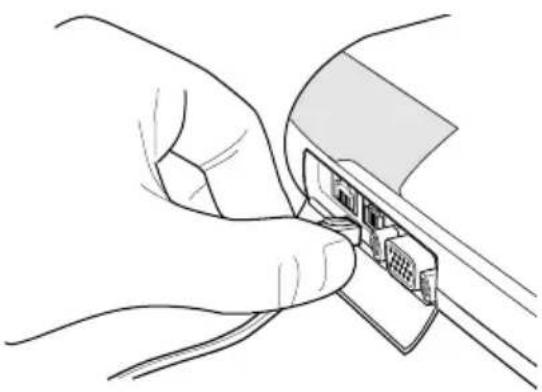
natural_image
Line drawing of hands inserting a component into a cable (no text or symbols)Connecting the telephone cable to the modem port
2 Connect the other end to the RJ11 wall jack.
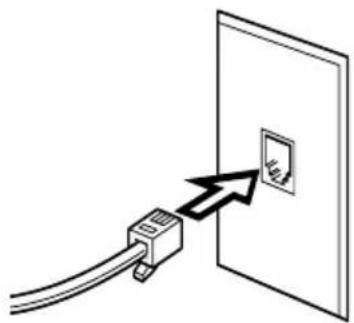
natural_image
Diagram showing a cable inserted into a wall socket with a lightning bolt pointing to the socket (no text or symbols present)Connecting to a wall jack
▲ CAUTION
The modem is designed for use with a standard analog telephone line. Never connect the modem to a digital telephone line. A digital line will damage the modem.
Now you're ready to send a fax or use the modem to connect to an online service or the Internet.
For more information on using a modem, see “Setting up for communications” on page 152.
Connecting other external devices
For more information on attaching other external devices, such as a keyboard and diskette drive, see the “Expansion Options” chapter on page 129.
Customizing your computer's settings
There are several ways in which you can customize your computer to suit your particular requirements. Refer to your operating system documentation or Help and Support for details.
You may also wish to customize your power usage settings. For more information, see “Turning off the display automatically” on page 121. There are additional custom settings you can choose. See “Toshiba Utilities” on page 161.
Powering off the computer
It's a good idea to power off your computer when you are not using it for a while.
If you are using the computer for the first time, leave the computer plugged into a power source (even though the computer is off) to fully charge the main battery. When the main battery light glows green, the battery is fully charged.
Guidelines for powering off the computer:
If you have work in progress and if you are not connected to a network, use the Hibernate command to save your system settings to the hard disk so that, when you turn on the computer again, you automatically return to where you left off.
To leave the computer off for a longer period, power down the computer. The Windows® XP Professional operating system uses the Shut down command to power down the computer if you are connected to a Windows® network server (domain server) or the Turn Off command if you are not.
When the hard disk drive light on the system indicator panel is on, do not turn off the power. Doing so may damage your hard disk.
For more information, see “Powering down the computer” on page 96.
Closing the display panel
When you are finished using the computer, power off and close the display panel to keep dust and dirt out of the computer.
If you close the display panel while the computer is still on, one of these actions will occur:
If you have the audible warning set, the computer will beep to notify you that it is still on. See “Toshiba Hardware Setup” on page 174.
If you have an action feature set, the computer will perform that action (Nothing, Standby, Hibernate). For more information, see “Power Management” on page 171.
Different ways to turn the computer on and off
Pressing the power button is not the only way to turn on and off the computer.
Alternatives include:
◆Using Hot Key combinations
◆Opening and closing the display panel
For more information, see “Using Hibernation” on page 102 and “Using Standby” on page 106.
Caring for your computer
This section gives tips on cleaning and moving your computer. For information about taking care of your computer's main battery, see “Safety precautions” on page 125.
Cleaning the computer
CAUTION
Keep liquid, including cleaning fluid, out of the computer's keyboard, speaker grille and other openings. Never spray cleaner directly onto the computer. Never use harsh or caustic chemical products to clean the computer.
To keep your computer clean, gently wipe the display panel and exterior case with a lightly dampened cloth. Ask your network administrator for suggestions for appropriate cleaning products.
Moving the computer
Before moving your computer, even across the room, make sure all disk activity has ended (the drive-in-use light stops glowing) and all external peripheral cables are disconnected.
Using a computer lock
You may want to secure your computer to a heavy object such as your desk. The easiest way to do this is to purchase an optional PORT-Noteworthycomputer lock cable.
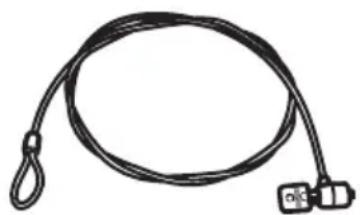
natural_image
Coiled black cable with two connectors, no text or symbols visibleSample PORT-Noteworthy computer lock cable
To secure the computer:
1 Loop the cable through or around some part of a heavy object.
Make sure there is no way for a potential thief to slip the cable off the object.
2 Pass the locking end through the loop.
3 Insert the cable's locking end into the security lock slot on your computer, then engage the locking device.
The computer is now securely locked.
Chapter 2
Learning the Basics
This chapter lists computing tips and provides important information about the system's basic features.
Computing tips
◆Save your work frequently.
Your work stays in the computer's temporary memory until you save it to the disk. If the network you are using goes down and you must restart your computer to reconnect, or your battery runs out of charge while you are working, you will lose all work since you last saved.
See “Saving your work” on page 82 for further information.

HINT: Some programs have an automatic save feature which you can turn on. This feature saves your file to the hard disk at preset intervals. See your software documentation for details.
◆Back up your files to disks (or other removable storage media) on a regular basis. Label the backup copies clearly and store them in a safe place.
If your hard disk suddenly fails, you may lose all the data on it unless you have a separate backup copy.
Use Error-checking and Disk Defragmenter regularly to conserve disk space and improve performance. Consult your operating system documentation for more information on these and other utilities.
Scan all new files for viruses. This precaution is especially important for files you receive via diskette, email, or download from the Internet.
Take frequent breaks to avoid repetitive-motion injuries and eyestrain.
Do not turn off the computer if a drive indicator light indicates a drive is active.
Turning off the computer while it is reading from or writing to a disk may damage the disk, the drive, or both.
Before turning off the computer, use the Turn off computer command or Standby command. See “Powering down the computer” on page 96 to learn more about Standby.
NOTE
The operating system records information, such as your desktop setup, during its shutdown procedure. If you do not let the operating system shut down, details such as new icon positions may be lost.
Using the keyboard
Your computer's keyboard contains character keys, control keys, function keys, and special Windows keys, providing all the functionality of a full-size keyboard.
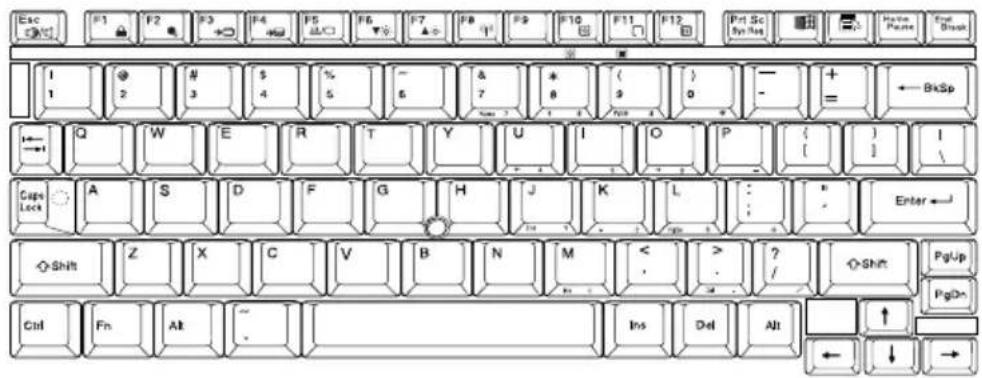
text_image
Esc F1 F2 F3 F4 F5 F6 F7 F8 F9 F10 F11 F12 Prt Sc Eg Hua Pauer Ena BkSp Q W E R T Y U I O P { Gaps Lock A S D F G H J K L : : Enter ← Shift Z X C V B N M < > ? Ctrl Fn Alt Ins Del Alt PglUp PgOn ↑ ← ↓ →Sample keyboard
Character keys
Typing with the character keys is very much like typing on a typewriter, except that:
The space bar creates a space character instead of just passing over an area of the page.
The lowercase letter 1 (el) and the number 1 are not interchangeable.
The uppercase letter O and the number 0 are not interchangeable.
The Caps Lock key changes only the alphabet keys to upper case—the number and symbol keys are not affected. The light on the Caps Lock key glows when you press the Caps Lock key.
Making your keyboard emulate a full-size keyboard
Although your computer's keyboard layout is compatible with a standard full-size keyboard, it has fewer keys.
A standard full-size keyboard has two Enter, Ctrl, and Alt keys; editing keys; cursor positioning keys; and a numeric keypad.
Pressing the Fn key simultaneously in combination with one of the specially marked keys allows you to emulate a full-size keyboard.
Your computer's keyboard has only oneEnter and one Ctrl key. Most of the time, this does not matter. However, some programs assign separate functions to the right and left Ctrl and Alt keys, or to the regular and numeric pad Enter keys on the full-sized keyboard. Using the Fn key you can simulate these separate keys, as follows:
Press Fn and Ctrl simultaneously to simulate the Ctrl key on the right side of the enhanced keyboard.
Press Fn and Enter simultaneously to simulate the Enter key on the numeric pad of the enhanced keyboard.
Ctrl, Fn, and Alt keys
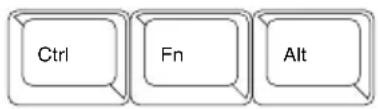
text_image
Ctrl Fn AltCtrl, Fn, and Alt keys
The Ctrl, Fn, and Alt keys do different things depending on the program you are using. For more information, see your program documentation.
Function keys

text_image
Esc F1 F2 F3 F4 F5 F6 F7 F8 F9 F10 F11 F12Function keys
The function keys (not to be confused with the Fn key) are the 12 keys at the top of the keyboard.
F1 through F12 are called function keys because they execute programmed functions when pressed. Used in combination with the Fn key, function keys marked with icons execute specific functions on the computer. For example, Fn+F9 turns
off the TouchPad. For more information, see “Fn-esse®” on page 149, or “Hot Keys” on page 199.
Hot keys
When used in combination with the Fn key, function keys marked with icons run programmed functions specific to your computer. For more information, see “Hot Keys” on page 222.
Windows® special keys
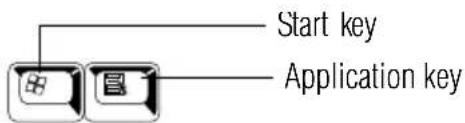
text_image
Start key Application keyWindows ^® special keys
The keyboard provides two keys that have special functions:
The Start key opens the Start menu.
The Application key has the same function as the secondary (or right mouse) control button.
Overlay keys
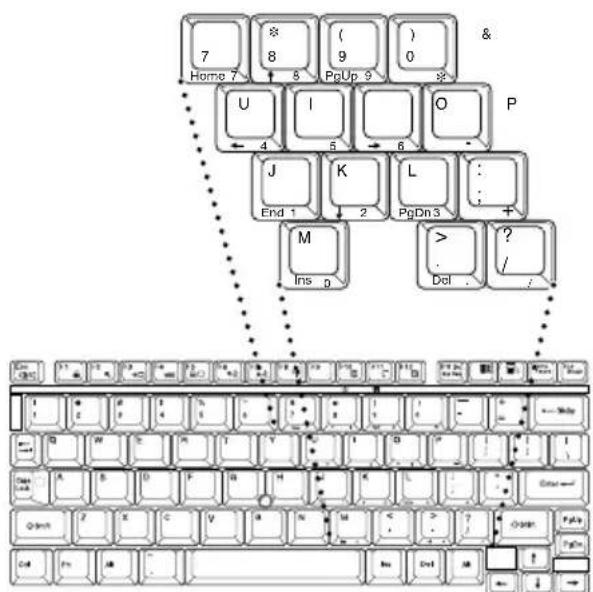
text_image
Home 7 8 (9) 0 & U I O P J K L : + End 1 2 PgDn3 M Ins p Del . ? / ... C#e 1 2 3 4 5 6 7 8 9 10 11 12 13 14 15 16 17 18 19 20 21 22 23 24 25 26 27 28 29 30 31 32 33 34 35 36 37 38 39 40 C#e 1 2 3 4 5 6 7 8 9 10 11 12 13 14 15 16 17 18 19 20 C#e A B C D E F G H I J K L M N O P Q R S T U V W X Y Z X Y Y Z X Y Z X Y Z X Y Z X Y Z X Y Z X Y Z X Y Z X Y Z X Y Z X Y Z X Y Z X Y Z X Y Z X Y Z X Y Z X Y Z X Y Z X Y Z X Y Z X Y Z X Y Z X Y Z X Y Z X Y Z X Y Z X Y Z X Y Z X Y Z X Y Z X Y Z X Y Z X Y Z X Y Z X A C#e Q#ch F K C V R N M < > ? Oran PgAg PgDn C#e Fm AB Ins Dnd ABKeyboard overlay keys
The keys with numbers and symbols on them form the numeric and cursor overlay. This overlay lets you enter numeric data or control the cursor as you would using the ten-key keypad on a full-size keyboard.
Using the overlay to type numeric data
The keys with the numbers on their right front are the numeric overlay keys.

To turn the numeric overlay on, pressFn and F11 simultaneously. The numeric mode light on the keyboard indicator panel glows when the numeric overlay is on.
You can still use the overlay keys to type alphabetic characters while the numeric overlay is on. To do so:
For lowercase letters, hold down Fn while you type the letters.
For uppercase letters, hold down both Fn and Shift while you type the letters.
To turn off the numeric overlay, hold down theFn key and press F11 again. The numeric mode light on the keyboard indicator panel goes out.
Using the overlay for cursor control

To turn the cursor control overlay on, press Fn and F10 simultaneously. The cursor control mode light on the keyboard indicator panel glows when the cursor control overlay is on.
To type alphabetic characters while the overlay is on:
For lowercase letters, hold down Fn while you type the letters.
For uppercase letters, hold down both Fn and Shift while you type the letters.
To use the numeric keypad overlay when the cursor control overlay is on, hold down Shift while you use the
numeric overlay keys. To return to the cursor control overlay, release Shift.
To turn off the cursor control overlay, hold down the Fn key and press F10 again. The cursor control mode light on the keyboard indicator panel goes out.
Starting a program
The easiest way to start a program is to double-click the name of the file that contains the information you want to work on. To find the file, use My Computer or Windows Explorer.
If you prefer to open the program first, you have four options. You can:
Double-click the icon for the program on your desktop
Use the Start menu
Use Windows Explorer or My Computer to locate the program file
◆Use the Run dialog box
The next three sections explain how to start a program from the Start menu, Explorer and the Run dialog box.
Starting a program from the Start menu
When you install a program, the operating system usually puts an icon in the All Programs menu. To start a program that has an icon in the All Programs menu, follow these steps, which use the Windows WordPad program as an example:
1 Click Start, then point to All Programs.
The Windows XP operating system displays the All Programs menu, which lists programs and program groups. If your program is listed, go to step 3, otherwise, continue with step 2.
2 Point to the program group, in this example, Accessories. The Accessories menu is displayed.
3 Click the program, in this example, WordPad. WordPad opens.

To close the program, click the Close button in the upper-right corner of the program's window.
Starting a program from Windows® Explorer
If a program is not listed in the Programs menu, you can start it from Windows Explorer. Windows Explorer gives you a view of your computer's contents as a hierarchy or "tree." You can easily see the content of each drive and folder on your computer. To use this method, you should know the file name and location of the program's executable file (this file ends with .exe).
This example opens WordPad using its file name, wordpad.exe.
1 Click Start, then point to All Programs.
2 Click Accessories.
3 Click Windows Explorer.
4 Click My Computer, to expand it.
5 In the left part of the window, under the C: icon, double-click the folder containing the program, in this case Program Files.
Windows Explorer shows the contents of the Program Files folder on the right side of the window. The left side of the window shows all the folders contained within the Program Files folder.
6 In the left part of the window, click Windows NT.
7 Click Accessories.
Windows Explorer shows the contents of the Accessories folder on the right side of the window.
8 In the right part of the window, double-click WordPad.
WordPad opens.

To close the program, click the Close button in the upper-right corner of the program's window.
Starting a program from the Run dialog box
This example uses the Run command to start WordPad:
1 Click Start, then click Run.
The Run dialog box appears.
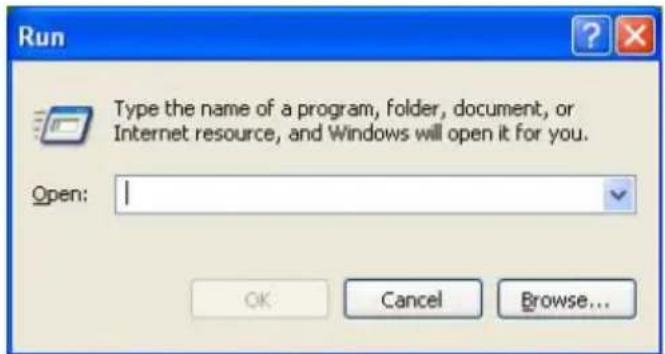
text_image
Run Type the name of a program, folder, document, or Internet resource, and Windows will open it for you. Open: OK Cancel Browse...Sample Run dialog box
2 In the Run dialog box:
If you know the program's location, type the command line. For a program in the Windows folder, type just the program name. Otherwise, type the full file path. For example, to access WordPad, type: c:\Program Files\WindowsNT\Accessories\Wordpad, then click OK.
If you do not know the location, click Browse.... In the Browse dialog box, enter the file name (for example, wordpad.exe) and select the drive to search.
When the operating system has found the file, click Open.

HINT: To run the same program again, click the arrow to the right of the text box and select the command line from the drop-down list.
Saving your work
Before you turn off the computer, save your work on the hard disk drive or a diskette.
CAUTION
Always save your data even when you are using Stand by mode. If your battery fully discharges, your information will be lost. Your computer can be configured to warn you when the battery is running low, see “Setting battery alarms” on page 116.
Many programs offer a feature that saves documents at regular intervals. Check your program's documentation to see if it has an automatic save feature.
Saving files
1 On the File menu of your Windows program, click Save.
If you are working with a document that already has a file name, this is all you need to do. If you created a new document, your program displays a Save As dialog box.
Use this dialog box to specify where to store the document and to give it a file name.
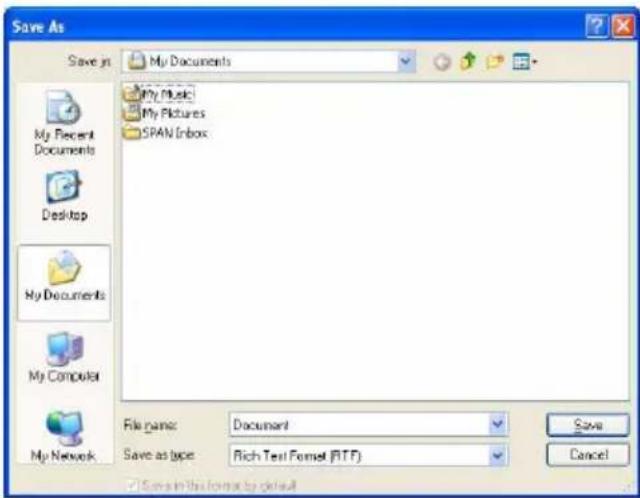
text_image
Save As Save in My Documents My Music My Pictures SPAN Inbox My Recent Documents Desktop My Documents My Computer My Network File name: Document Save as type: Rich Text Format (RTF) Save Cancel ✓ Save in this format by defaultSample Save As dialog box
2 Choose the drive and folder where you want your file to be stored.
3 Type a file name, then click Save.

HINT: To make another copy of the file you are currently working with, choose Save As from the File menu and give the new file a different name.
The Windows XP operating system supports file names of up to 255 characters; the names can include spaces. Some applications still require MS-DOS ^® file names.
File names
If you plan to share your files with a computer using a pre-Windows ^® 95 version of the Windows operating system, the file name must be no more than eight characters long. Typically the file name also has an extension, consisting of a period and up to three additional characters.
You may use all the letters and numbers on the keyboard plus these characters: _ ^ \\~ ! # % & @ and '. MS-DOS^$ file names are not case-sensitive and must not contain spaces.
Using a file extension
Most programs assign an extension to the file name that identifies the file as being created in the program with a particular format. For example, Microsoft Word saves files with a .doc extension. Any file name with an extension of “.doc” is assumed to be a Microsoft Word file. Creating your own extension is usually unwise, since the program is unlikely to recognize a strange extension and may refuse to handle your file correctly.
Printing your work
Verify that the Windows ^® XP operating system is set up for your printer as described in “Setting up a printer” on page 66.

TECHNICAL NOTE: You only need to set up the printer the first time you connect it. If you use more than one printer or are changing printers, you will need to set up the operating system to run with the additional printer(s).
To print a file:
1 If your printer is not on, turn it on now.
2 Open the File menu of your Windows program and click Print.
The program displays a Print dialog box.
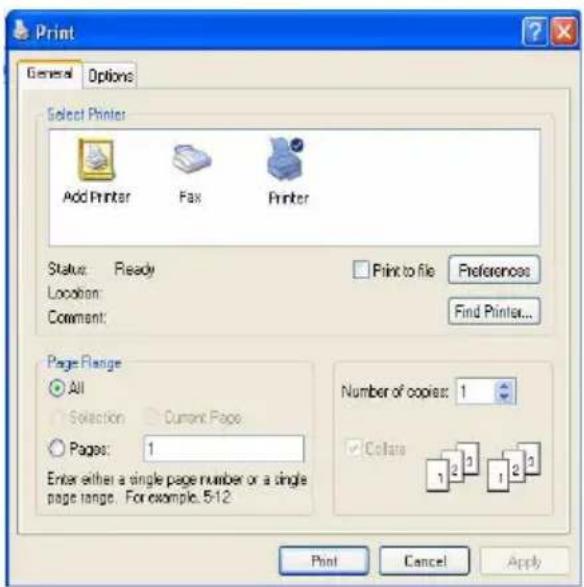
text_image
Print General Options Select Printer Add Printer Fax Printer Status: Ready Location: Comment: Print to file Preferences Find Printer... Page Range All Selection Current Page Pages: 1 Enter either a single page number or a single page range. For example, 5:12. Number of copies: 1 Delete 1 2 3 1 2 3 Print Cancel ApplySample Print dialog box
3 Specify the print parameters. For example, the range of pages and number of copies to print.
4 Click Print.
Using optional external disks
To use disks, you must connect the optional external USB disk drive to the USB port on the back of the computer, or to the optional Advanced Port Replicator. See “Using the optional external USB diskette drive” on page 130 for more information.
Inserting and removing disks
1 Insert a disk into the insertion slot until it clicks in place.
A protective flap inside the drive's insertion slot automatically retracts when you insert a disk.
The disk-in-use light glows when the computer is accessing a disk.
2 Push the disk eject button to remove a disk from the drive.
Copying documents to a disk
disks provide an easy means of transferring files from one computer to another. Copying a file to a disk also gives you a backup copy in case something happens to the original on your hard disk. This section describes how to use the My Computer window to copy a file from the hard disk to a disk.
To copy files to a disk:
1 Connect the optional external USB diskette drive to the computer.
2 Insert a disk into the drive.
3 Double-click the My Computer icon.
The operating system opens the My Computer window.
4 Double-click the drive that contains the file you want to copy.
The operating system displays the contents of the drive.
5 Double-click the folder that contains the file, then click the file you want to copy.

HINT: Use the Ctrl or Shift key to select more than one file.
6 On the menu bar, click File, then click Send To.
7 Click the icon for 3 12 Floppy (A:).
The operating system copies the file(s).

HINT: You can also copy a file to disk by clicking the file (or files) you want to copy with the secondary button, then pointing to Send To and clicking 3 ½ Floppy (A:).
Taking care of disks
To protect the data stored on your disks:
◆Store your disks in their boxes or other containers to protect them and keep them clean.
◆Keep disks at room temperature and avoid exposing them to direct sunlight. Otherwise data may be lost.
◆Keep your disks away from sources of magnetism, such as speakers and radios, since these can destroy data.
- Clean dirty disks with a soft cloth moistened in water. Do not use cleaning fluids.
Avoid:
◆Sliding back the protective metal cover.
◆Touching the magnetic surface of a disk. Fingerprints can prevent the drive from reading the data held on a disk.
◆Twisting or bending a disk.
◆Placing heavy objects on your disks.
◆Eating, smoking or using erasers near your disks. Foreign particles can damage the surface.
Backing up your work
To back up several files at one time, use the Backup or Restore Wizard. You can choose the files and the type of backup you want to perform.
1 Connect the backup device to your computer as shown in the manufacturer's instructions.
2 Click Start, All Programs, Accessories, System Tools, Backup.
The Backup or Restore Wizard window appears.
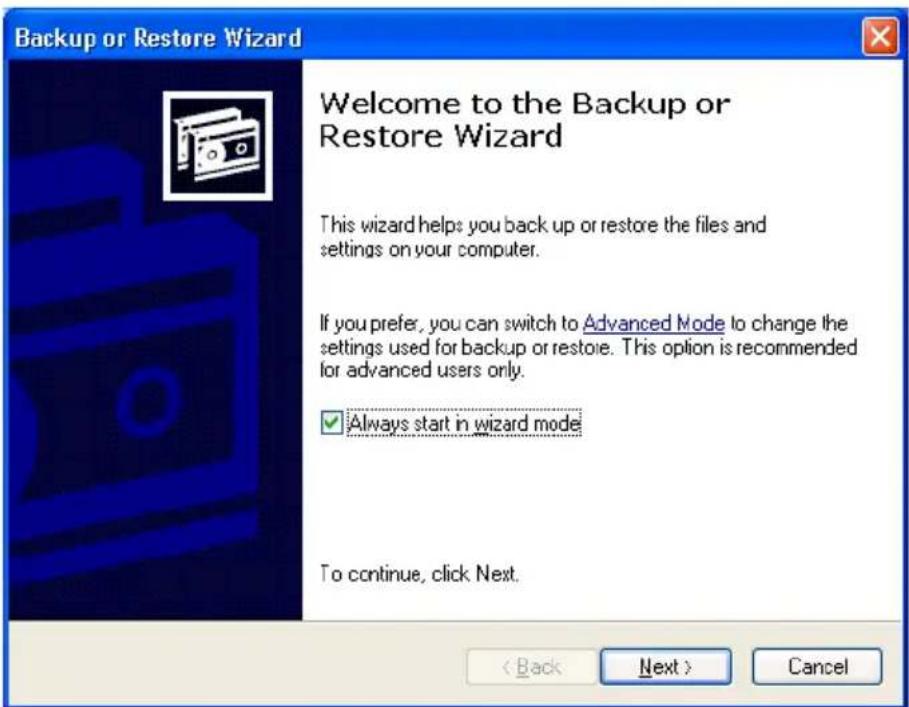
text_image
Backup or Restore Wizard Welcome to the Backup or Restore Wizard This wizard helps you back up or restore the files and settings on your computer. If you prefer, you can switch to Advanced Mode to change the settings used for backup or restore. This option is recommended for advanced users only. ✓ Always start in wizard mode To continue, click Next. < Back Next > CancelSample Backup or Restore Wizard window
3 Follow the on-screen instructions.
Restoring your work
You can also use the Backup or Restore Wizard to restore information from your backup media to your hard disk.

TECHNICAL NOTE: When restoring files, the backup program prompts you if you try to overwrite a file that already exists on the hard disk. Make sure the backup version is the one you want before overwriting the existing file.
Using the DVD-ROM or multi-function drive
Optical storage has become the preferred medium for software, music, and video. Digital versatile discs (DVDs) provide a significant increase in data storage and support features that are not available on any other video platform. These features include wide-screen movies, multiple language tracks, digital surround sound, multiple camera angles, and interactive menus.
For these reasons, your computer may come with a DVD-ROM drive or multi-function drive.

TECHNICAL NOTE: Your DVD-ROM or multi-function drive is set to play region 1 (North America) DVD-ROMs. If you play a DVD disc from another region, the drive will automatically change to play in the format of the other region. The drive will allow you to change regions four times. On the fourth change, the region will be “locked in.” That is, the drive will only play DVDs from that last region. Note that changing from region 1 to region 2 and back to region 1 is counted as two changes.
NOTE
NOTE: For optimum DVD performance, it is recommended that you play DVDs while running on AC power rather than battery power.
You use CD-ROMs or DVD-ROMs to load and run software, and to access reference material such as catalogs, as well as listen to music.
If the drive is not currently installed in the Slim SelectBay, follow the instructions in “Using Slim SelectBay modules” on page 137.
DVD-ROM or multi-function drive components
Your DVD-ROM or multi-function drive may look like this:
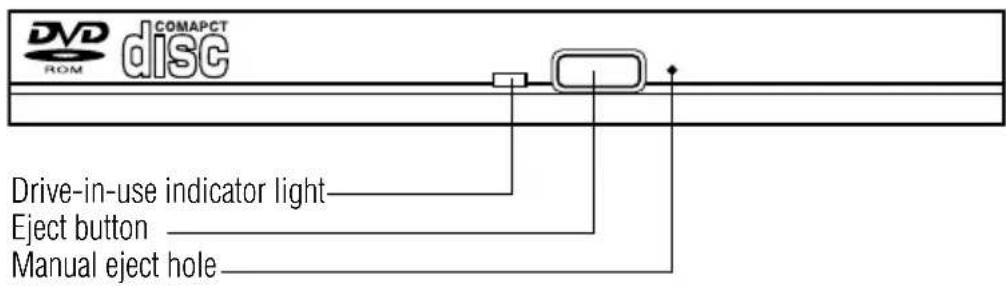
text_image
DVD ROM COMAPCT disc Drive-in-use indicator light Eject button Manual eject holeSample DVD-ROM or multi-function drive
Drive-in-use indicator light—Glows when the drive is in use.
Eject button—Press to release the disc tray.
CAUTION
Do not press the eject button or turn off the computer while the Drive in-use indicator light is glowing. Doing so could damage the disc or the drive.
When the disc tray is open, be careful not to touch the lens or the area around it. Doing so could cause the drive to malfunction.
Manual eject hole—Use if you need to release the disc tray when the power is off. Use a straightened paper clip or other narrow object to press the manual eject button located inside the hole.
▲ CAUTION
Never use a pencil to press the eject button. Pencil lead can break off inside the computer and damage it.
Inserting a compact disc
To insert a compact disc into the drive:
1 Make sure the computer is turned on.
2 Make sure the drive-in-use indicator light is off.
CAUTION
To avoid damaging a disc or losing data, check that the disc activity light is off before opening the disc tray.
3 Press the drive's eject button.
The disc tray slides partially out of the drive (about 1 inch).

HINT: The drive will not open if the computer's power is off.
4 Grasp the tray and pull it fully open.
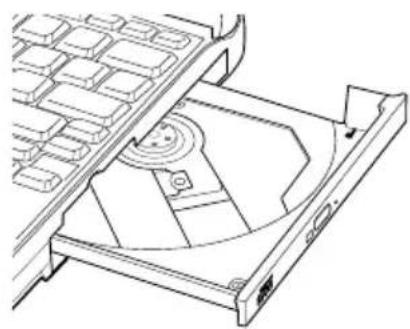
natural_image
Technical line drawing of a mechanical component with internal structure and mounting bracket (no text or symbols)Drive tray fully extended
5 Hold the disc by its edges and check that it is clean and free of dust.
CAUTION
Handle discs carefully. Avoid touching the surface of the disc. Grasp it by its center hole and edge. If you handle the disc incorrectly, you could lose data.
If the disc is dusty, clean it as described in “Caring for CDs and DVDs” on page 96.
6 Place the disc carefully in the disc tray, label side up.
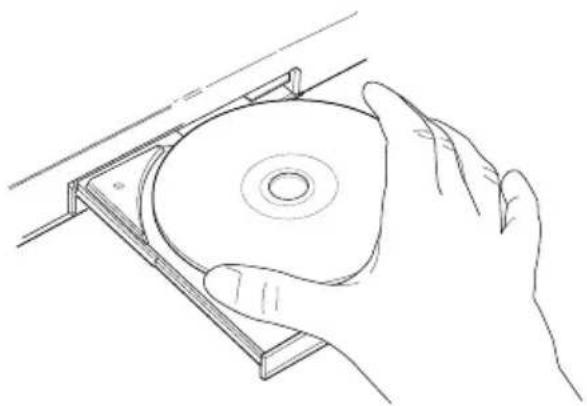
natural_image
Line drawing of a hand holding a CD inside a mechanical frame (no text or symbols)Positioning the disc in the drive
7 Gently press the disc onto the center spindle until it clicks into place.
CAUTION
Be careful not to touch the drive's lens (located underneath the drive's spindle) or the area around it. Doing so could cause the drive to malfunction.
8 Make sure the disc is completely on the spindle and is lying flat on the tray.
▲ CAUTION
If you insert the disc incorrectly, it may jam the drive. If this happens, contact your network administrator for assistance.
9 Push the disc tray in by pressing gently on the center of the tray until it clicks into place.
You are ready to use the disc.
Playing an audio CD
Insert an audio CD and close the disc tray.
The computer automatically detects a disc in the drive and opens the Audio CD window. To play an audio CD select the Play Audio CD using Windows Media ^® Player option and click OK.
The Windows Media Player opens and the CD begins to play. You can use the Windows Media Player program to control the CD.
To access the Windows Media Player, you can open it through the Start menu or activate it from the taskbar.
NOTE
When using Windows Media Player, your system may not be able to activate Standby or Hibernation modes. To prevent this from occurring, close Windows Media Player before you select Standby or Hibernation mode.

TECHNICAL NOTE: If you record MP3 files, you will only be able to play them on a device capable of playing MP3 files.
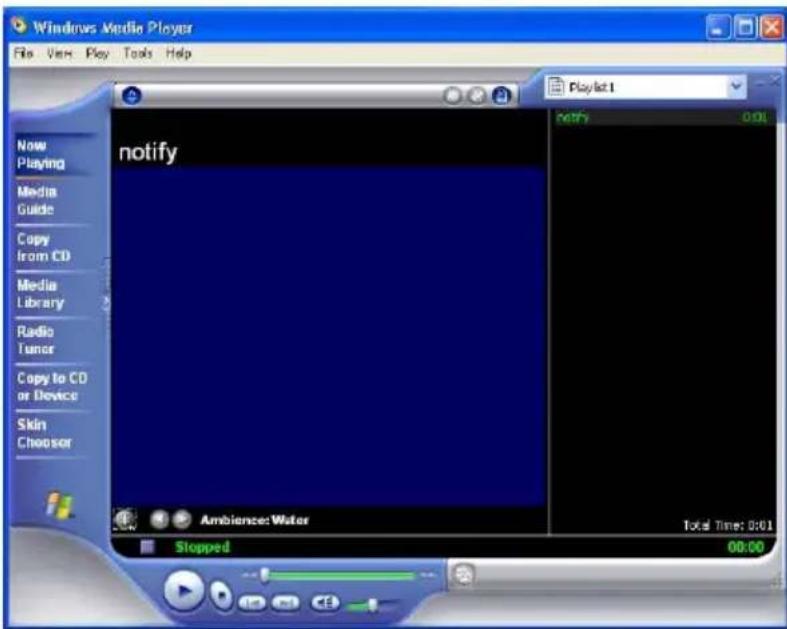
text_image
Windows Media Player File View Play Tools Help Now Playing Media Guide Copy from CD Media Library Radio Tuner Copy to CD or Device Skin Chooser notify Ambience: Water Total Time: 0:01 Stopped 00:00Sample Windows Media Player screen
The Windows Media Player control panel works much like an ordinary compact disc player:
To play the CD or to pause, click the Play/pause button on the CD Player control panel.
To stop the CD, click the Stop button.
▲WARNING
Before using headphones to listen to an audio CD, turn the volume dial down. Playing the CD with the volume set too high could damage your ears.
Viewing the contents of a CD or DVD
CDs and DVDs contain files just like the hard disk. CDs are often used to install software or store files that require lots of space, such as photographs and large presentation files. You can use Explorer or My Computer to view the contents of any CD or DVD.
Removing compact discs with the computer on
To remove a compact disc (CD or DVD) with the computer turned on:
CAUTION
Never press the eject button or turn off the computer while the in-use indicator light is glowing. Doing so could damage the disc or the drive.
1 Press the eject button on the drive.
CAUTION
If the disc is still spinning when you open the disc tray, wait for it to stop before removing it.
2 Pull the tray until it is fully open, remove the disc, and place it in its protective cover.
3 Gently push the tray in to close it.
Removing compact discs with the computer off
To remove a compact disc with the computer turned off:
1 Insert a slender object, such as a straightened paper clip, into the manual eject hole.
CAUTION
Never press the eject button or turn off the computer while the drive-in-use light is glowing. Doing so could damage the disk or the drive.
2 Gently pull the tray out until it is fully open, remove the disc, and place it in its protective cover.
3 Gently push the tray in to close it.
Caring for CDs and DVDs
◆Store your discs in their original containers to protect them from scratches and keep them clean.
Do not bend a disc or place heavy objects on top of it.
Do not apply a label to, or otherwise mar the surface of a disc.
Hold a disc by its outside edge. Fingerprints on the surface can prevent the DVD-ROM drive or multifunction drive from reading the data properly.
Do not expose discs to direct sunlight or extreme heat or cold.
To clean a disc that is dirty, wipe it with a clean, dry cloth. The most efficient method to clean it is to start from the center of the disc and wipe toward the outward edge (not in a circle). If necessary, moisten the cloth with water or a neutral cleaner (not benzine or rubbing alcohol). Let the disc dry completely before inserting it in the drive.

TECHNICAL NOTE: If you record MP3 files, you will only be able to play them on a device capable of playing MP3 files.
Powering down the computer
When you power down the computer, you have a number of options to choose from:
◆Turn Off or Shut down, which power off the computer
◆Hibernation, which saves the current operating state to the hard disk and powers off the computer
Standby, which saves the current operating state to memory and enters a low power mode
◆Restart, which restarts the computer
Each option has its advantages.

TECHNICAL NOTE: Before using any of these options to power down your computer, save your files and make sure the disk activity lights are off.
If you change your mind and decide to continue working after all, wait a few seconds before turning the computer on again.
Turn Off or Shut down
The Turn Off or Shut down commands power off the computer. The Windows ^® XP Professional operating system uses Turn Off if you are not connected to a Windows ^® network server (domain server). It uses Shut down if you are connected to a Windows ^® network server (domain server).
Factors to consider when choosing Turn Off or Shut down:
No power is used while the computer is turned off. This is the most efficient mode if you will be away from your computer for an extended time.
◆ Restarting from Turn Off or Shut down uses the most time and battery power.
When starting up again, the system does not automatically open the programs and files you were previously using.
Restart command
Restart is the same as Turn Off or Shut down but automatically powers up the computer. Use it when you need to reload the operating system, for example to activate changes to system settings.
Hibernation command
The Hibernation command powers off the computer, but it first saves the current state of the computer to the hard disk. Since Hibernation does not require power to maintain the saved information, the system settings are retained indefinitely. Restoring information from the hard disk takes longer than restoring it from memory. When you start up again, the computer runs a self-test, loads the operating system, and then returns to the state in which you left it.
Factors to consider when choosing Hibernation:
- While in Hibernation mode, the computer uses no battery power.
- Because the state of the system is held on the hard disk, no data is lost if the battery discharges while the computer is in Hibernation mode.
When starting up again, this choice uses less time and battery power than the Turn Off or Shut down option. But it uses a little more time and battery power to start up than the Standby option, because information is being retrieved from the hard disk instead of from memory.
On restarting, the computer returns to the state in which you left it, and opens all the programs and files you were using.
Standby command
The Standby command puts the computer into a power-saving mode. Standby stores the current state of the computer in memory so that, when you restart the computer, you can continue working from where you left off.
Factors to consider when choosing Standby: ◆While in Standby mode, the computer uses some battery power. If your computer is left in Standby mode for an extended period, your computer could lose data.
[Non-Text]
When starting up again, this choice uses less time and battery power than either Turn Off, Shut down or Hibernation.
On restarting, the computer returns to the state in which you left it, and opens all the programs and files you were using.
NOTE
If you power down using the Standby command and the battery discharges fully, your information will be lost. Be sure to save your work often.
Using Turn Off or Shut down
If you are not connected to a Windows ^® network server (domain server), power off the computer as follows:
To turn off the computer.
1 Click Start, Turn off computer.
The Turn off computer window appears.
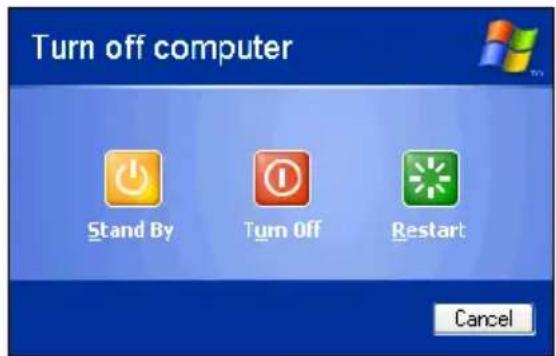
text_image
Turn off computer Stand By Turn Off Restart CancelSample Turn off computer window
2 Click Turn Off.
The computer turns itself off.
If you are connected to a Windows ^® network server (domain server), power off the computer as follows:
1 Click the Start button, then Shut down.
The Shut Down window appears.
2 Select Shut down from the drop-down list.
3 Click OK.
The computer shuts down completely.
Turning off more quickly
In addition to the method described above, you can turn off the computer by pressing the power button.
To use this method, you first need to turn on the feature in TOSHIBA Power Saver.
1 Click Start, Control Panel.
The Control Panel window appears.
2 Click Performance and Maintenance.
3 Double-click the Toshiba Power Saver icon.
The TOSHIBA Power Saver Properties window appears.
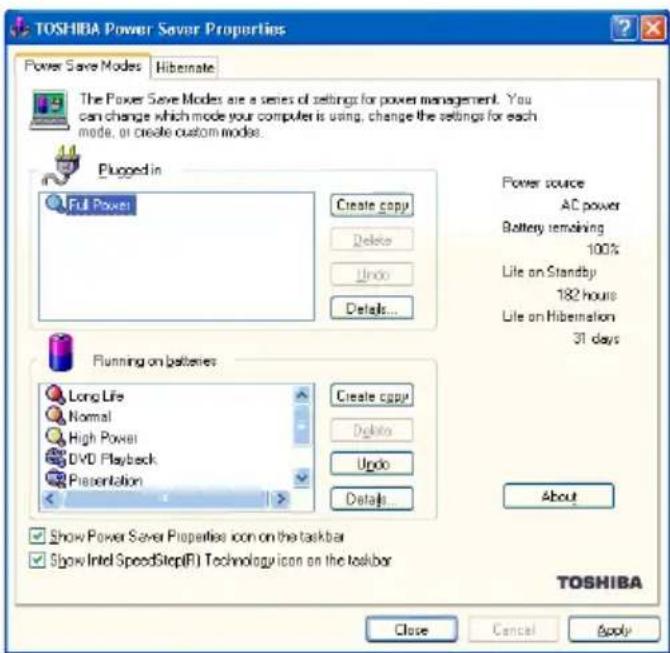
text_image
TOSHIBA Power Save Properties Power Save Modes Hibernate The Power Save Modes are a series of settings for power management. You can change which mode your computer is using, change the settings for each mode, or create custom modes. Plug-in Full Power Create copy Delete Undo Details... Power source AC power Battery remaining 100% Life on Standby 182 hours Life on Hibernation 31 days Running on batteries Long Life Normal High Power DVD Playback Presentation Create copy Delete Undo Details... About Show Power Save Properties icon on the taskbar Show Intel SpeedStep(R) Technology icon on the taskbar TOSHIBA Close Cancel ApplySample TOSHIBA Power Saver Properties window
4 Click Details in the Running on batteries section. The Full Power Properties window appears.
5 Click the System Power Mode tab.
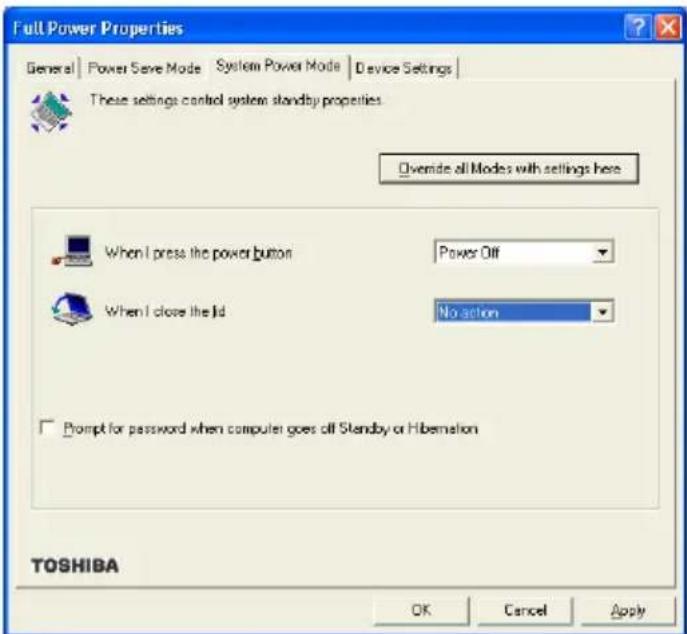
text_image
Full Power Properties General | Power Save Mode | System Power Mode | Device Settings | These settings control system standby properties Override all Modes with settings here When I press the power button Power Off When I close the lid No action Prompt for password when computer goes off Standby or Hibernation TOSHIBA OK Cancel ApplySample Full Power Properties window
6 Select Power Off for the option you want.
When I press the power button
Set this option to Power Off if you want the computer to turn off when you press the power button.
7 Click Override all Modes with settings here.
The Set the range window appears.
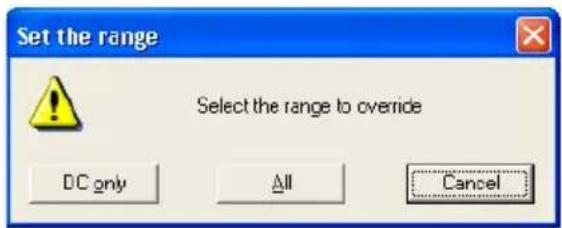
text_image
Set the range Select the range to override DC only All CancelSample Set the range window with DC only option
8 Do one of the following:
Click DC only if you want the settings to apply only when you are using battery power.
Click All for the settings to apply whether you are using battery power or outlet power.
9 Click OK to close the Full Power Properties window.
10 Click OK to close the TOSHIBA Power Saver Properties window, then close the Control Panel.
Starting again after Turn Off or Shut down
To start the computer up again, press and release the power button; the on/off light changes to green.
Using Hibernation
Enabling the Hibernation command
Hibernation is a default setting. If it should become disabled, you can enable it as follows:
1 Click Start, Control Panel.
The Control Panel window appears.
2 Click Performance and Maintenance.
3 Double-click the Toshiba Power Saver icon.
The TOSHIBA Power Saver Properties window appears.
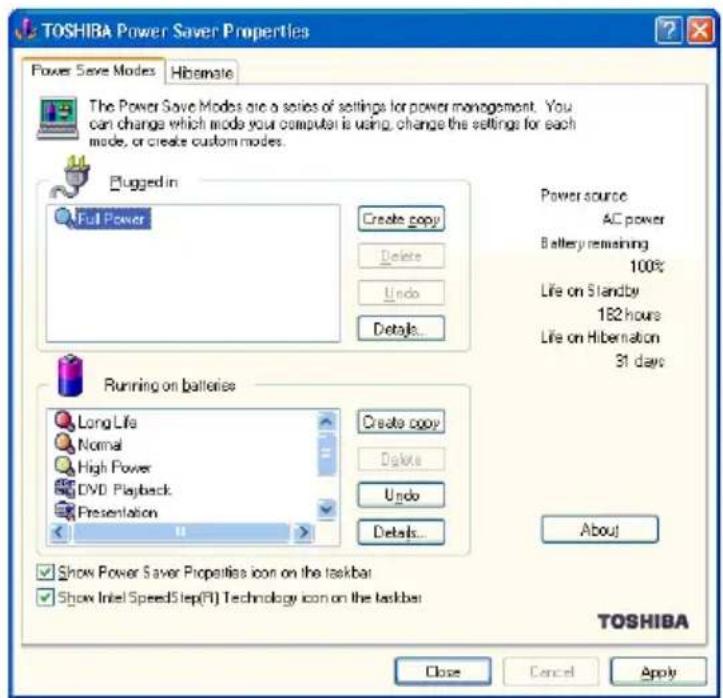
text_image
TOSHIBA Power Saver Properties Power Save Modes Hibemale The Power Save Modes are a series of settings for power management. You can change which mode your computer is using, change the settings for each mode, or create custom modes. Plugged in Full Power Create copy Delete Undo Details... Power source AC power Battery remaining 100% Life on Standby 182 hours Life on Hibernation 31 days Running on batteries Long Life Normal High Power DVD Playback Presentation Create copy Delete Undo Details... About Show Power Saver Properties icon on the taskbar Show Intel SpeedStep(B) Technology icon on the taskbar TOSHIBA Close Cancel ApplySample TOSHIBA Power Saver Properties window
4 In the Running on batteries area, click the Details button.
5 Click the System Power Mode tab.
6 Select Hibernation for the options you want.
When I press the power button
Set this option to Hibernation so that the computer will go into Hibernation mode when you press the power button.
When I close the lid
Set this option to Hibernation so that the computer will go into Hibernation mode when you close the display panel.
7 Click Override all Modes with settings here.
The Set the range window appears.
text_image
Set the range Select the range to override DC only All CancelSample Set the range window with DC only option
8 Do one of the following:
Click DC only if you want the settings to apply only when you are using battery power.
- Click All for the settings to apply whether you are using battery power or outlet power.
9 Click OK to close the Full Power Properties window.
10 Click the Hibernate tab, then click the Enable hibernate support check box.
11 Click OK to close the TOSHIBA Power Saver Properties window, then close the Control Panel.
into Hibernation mode
If you are not connected to a Windows ^® network server (domain server), power off the computer using the Hibernation command as follows:
1 Click Start, Turn off computer.
The Turn off computer window appears.
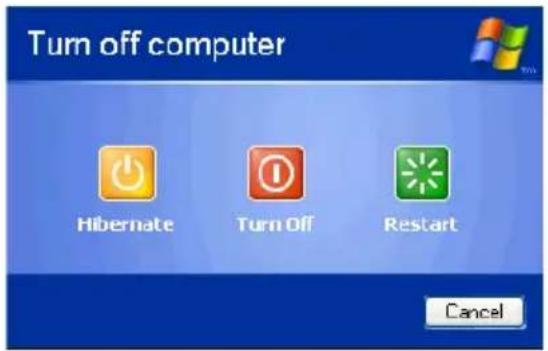
text_image
Turn off computer Hibernate Turn Off Restart CancelSample Turn off computer window with shift key held down to show Hibernate option
2 Hold down the shift key and click Hibernate
("Hibernate" only appears when the shift key is pressed), or press the "H" key.
The computer saves the state of the system, including all open programs and files, to the hard disk, and then powers down completely.
If you are connected to a Windows ^® network server (domain server), follow these steps to power down the computer using Hibernation:
1 Click Start, then Shut Down.
The Shut Down window appears.
2 Select Hibernate from the drop-down list of options.
3 Click OK.
The computer saves the state of the system, including all open programs and files, to the hard disk, and then powers down completely.
Going into Hibernation mode more quickly
You can also put the computer into Hibernation mode in three ways:
◆By pressing the hotkey combination Fn+F4
◆By pressing the power button
◆By closing the display panel
Starting again from Hibernation
To start up the computer from Hibernation mode, press and release the power button until the on/off icon glows green. The computer returns to the screen you were using.
If you went into Hibernation mode by closing the display panel, you can start the computer again by opening the display panel.
Using Standby
If you are not connected to a Windows ^® network server (domain server), power down the computer using the Standby command as follows:
1 Click Start, Turn off computer.
The Turn off computer window appears.
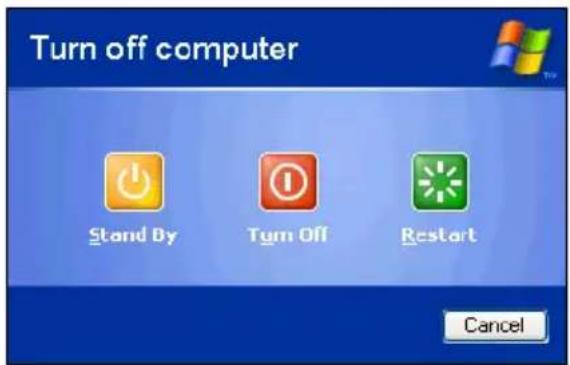
text_image
Turn off computer Stand By Turn Off Restart CancelSample Turn off computer window with Stand By option
2 Click Stand By or press the "S" key.
The computer saves the state of all open programs and files to memory, turns off the display, and goes into a low-power mode. The on/off light ( )blinks amber indicating the machine is in Standby mode.
If you are connected to a Windows ^® network server (domain server), power down the computer using the Standby command as follows:
1 Click the Start button, then select Shut down.
The Shut Down window appears.
2 Select Stand by from the drop-down list of options.
3 Click OK.
The computer saves the state of all open programs and files to memory, turns off the display, and goes into a low-power mode. The on/off light blinks green to indicate the machine is in Standby mode.
NOTE
If you power down using the Standby command and the battery discharges fully, your information will be lost. Be sure to save your work often.
Going into Standby mode more quickly
You can also put the computer into Standby mode in three ways:
◆By pressing the hot key combination Fn+F3.
◆By pressing the power button
◆By closing the display panel.
To put the computer into Standby mode when you press the power button or close the display panel, you must preset the mode:
1 Click Start, Control Panel.
The Control Panel window appears
2 Click Performance and Maintenance.
3 Double-click the Toshiba Power Saver icon.
The TOSHIBA Power Saver Properties window appears.
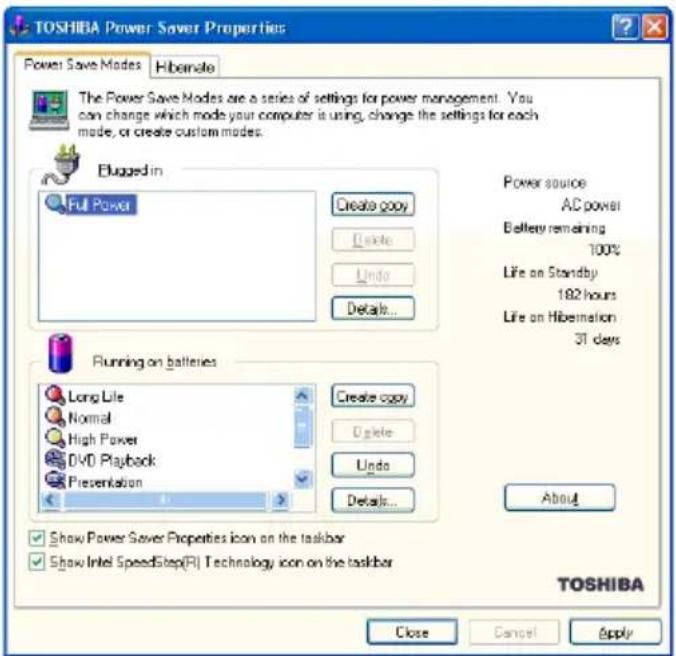
text_image
TOSHIBA Power Save Properties Power Save Modes Hibernate The Power Save Modes are a series of settings for power management. You can change which mode your computer is using, change the settings for each mode, or create custom modes. Elugged in Full Power Create copy Delete Undo Details... Power source AC power Battery remaining 100% Life on Standby 182 hours Life on Hibernation 31 days Running on batteries Long Life Normal High Power DVD Playback Presentation Create copy Delete Undo Details... About Show Power Save Properties icon on the taskbar Show Intel SpeedStep(R) Technology icon on the taskbar TOSHIBA Close Cancel ApplySample TOSHIBA Power Saver Properties window
4 Click Details in the Running on batteries section.
The Full Power Properties window appears.
5 Click the System Power Mode tab.
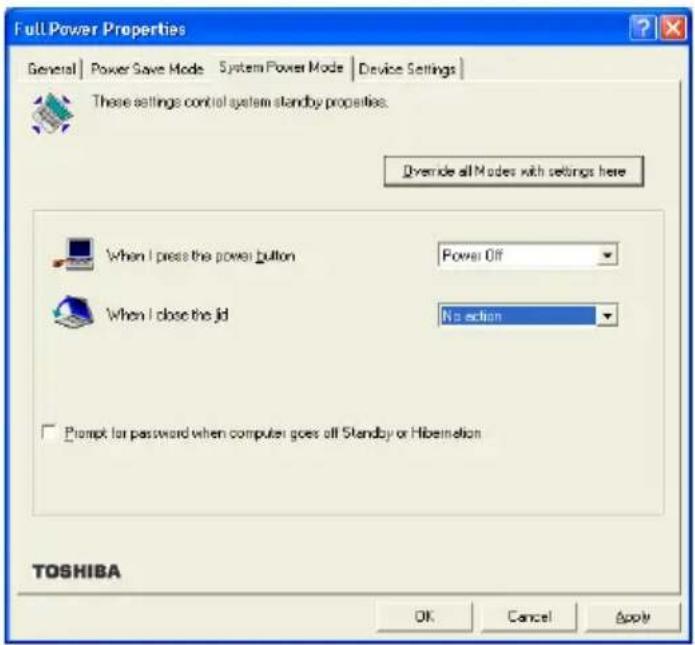
text_image
Full Power Properties General | Power Save Mode | System Power Mode | Device Settings | These settings control system standby properties. Override all Modes with settings here When I press the power button Power Off When I close the jd No action Prompt for password when computer goes off Standby or Hibernation TOSHIBA OK Cancel ApplySample Full Power Properties window
6 Select Standby for the options you want.
When I press the power button
Set this option to Standby so that the computer will go into Standby mode when you press the power button.
When I close the lid
Set this option to Standby so that the computer will go into Standby mode when you close the display panel.
When the system standby time has passed
Set this option to Standby if you want the computer to automatically go into Standby mode when you have not used it for a specified amount of time. You can set the System standby time on the Power Save Mode tab.
7 Click Override all Modes with settings here.
The Set the range window appears.
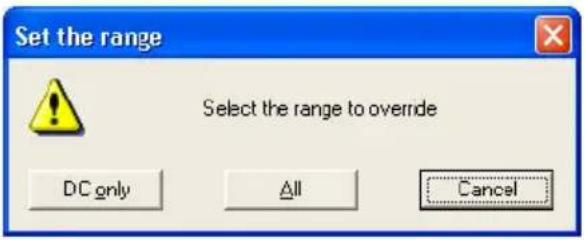
text_image
Set the range Select the range to override DC only All CancelSample Set the range window with DC only option
8 Do one of the following:
- Click DC only for the settings to apply only when you are using battery power.
- Click All for the settings to apply whether you are using battery power or outlet power.
9 Click OK to close the Full Power Properties window.
10 Click OK to close the TOSHIBA Power Saver Properties window, then close the Control Panel.
Starting again from Standby
To start up the computer from Standby mode, press and release the power button until the on/off light changes to green. The computer returns to the screen you were using.
If you put the computer in Standby mode by closing the display panel, you can start the computer again by opening the display panel.
Toshiba's online resources
Toshiba maintains a number of online sites to which you can connect. These sites provide information about Toshiba products, give help with technical questions and keep you up to date with future upgrades. For more information, see “Contacting Toshiba” on page 218.
Chapter 3
Mobile Computing
This chapter covers all aspects of using your computer while traveling.
Toshiba's energy-saver design
Your computer enters a low-power standby mode when it is not being used, thereby conserving energy and saving money in the process. It has a number of other features that enhance its energy efficiency.
Many of these energy-saving features have been set by Toshiba. We recommend you leave these features active, allowing your computer to operate at its maximum energy efficiency, so that you can use it for longer periods while traveling.
Many of these energy-saving features have been set by Toshiba. We recommend you leave these features active, allowing your computer to operate at its maximum energy efficiency, so that you can use it for longer periods while traveling.
Running the computer on battery power

The computer contains a removable Lithium-Ion (Li-Ion) high-capacity battery that provides power when you are away from an AC outlet. You can recharge it many times.
Battery Notice
Battery life may vary, depending on applications, power management settings, and features utilized. Recharge time varies depending on usage. The battery may not charge while the computer is consuming full power.
After a period of time, the battery will lose its ability to perform at maximum capacity and will need to be replaced. This is normal for all batteries. To purchase a new battery pack, see your accessories information that shipped with your computer, or to stay current on the most recent software and hardware options for your computer, and for other product information, regularly check the Toshiba Web site at accessories.toshiba.com.
To ensure that the battery maintains its maximum capacity, operate the computer on battery power at least once a month until the battery is fully discharged. Please see “Maximizing battery life” on page 126 for procedures. If the computer is continuously operated on AC power, either through an AC adapter or a docking station (if applicable to your system), for an extended period (more than a month), the battery may fail to retain a charge. This may shorten the life of the battery, and the battery light may not indicate a low-battery condition.
NOTE
For optimum DVD performance, Toshiba recommends that you play DVDs while running on AC power rather than on battery power.
Battery life is less than when using similar applications in the Windows operating system.
NOTE
Over a period of time, and depending on the usage of the computer, the brightness of the LCD Screen will deteriorate. This is an intrinsic characteristic of LCD technology.
Screen will dim when the computer is operated on battery power and you may not be able to increase the brightness of the screen.
Power management
Your computer ships with the power management options preset to a configuration that will provide the most stable operating environment and optimum system performance for both AC power and battery modes.
CAUTION
Changes to these settings may result in system performance or stability issues. users who are not completely familiar with the power management component of the system should use the preset configuration. For assistance with setup changes, contact Toshiba's Global Support Centre.
Using additional batteries
If you spend a lot of time traveling and need to work for many hours without an AC power source, you may want to carry additional charged batteries with you. You can then replace a discharged battery and continue working.
Charging batteries
The main battery and replacement batteries need to be charged before you can use them to power the computer. You can charge the main battery using either your computer or an optional battery charger.
Charging the batteries
NOTE
Battery charge time may vary depending on the applications, power management settings, and features used.
The battery needs to be charged before you can use it to power the computer.
CAUTION
Never leave batteries in the battery charger for more than a week at a time. Doing so may reduce the potential charge of the battery.
Use only battery chargers designed to work with your notebook computer. You can order a Toshiba battery charger from Toshiba's Web site at accessories.toshiba.com.
Charging the main battery
The main battery light (☐) glows amber while the battery is being charged, and glows green when it is fully charged.
A battery may not start charging immediately under the following conditions:
◆The battery is extremely hot or cold.
To ensure that the battery charges to its full capacity, wait until it reaches room temperature.
◆The battery is almost completely discharged.
Leave the power connected and the battery should begin charging after a few minutes.
Charging the RTC battery
Your computer has an internal real-time clock (RTC) battery.
The RTC battery powers the System Time Clock and BIOS
memory used to store your computer's configuration settings. When fully charged, it maintains this information for up to a month when the computer is powered off.
The RTC battery may have become completely discharged while your computer was shipped, resulting in the following error message during startup:
BAD RTC BATTERY
BAD CHECKSUM (CMOS)
CHECK SYSTEM
NOTE
The above error message may vary by computer model.
The RTC battery does not charge while the computer is turned off even when the AC adapter is charging the computer.
If the RTC battery is low, the real-time clock and calendar may display the incorrect time and date, or stop working.
To recharge the RTC battery, connect the computer and leave it powered on for 24 hours.
NOTE
It is seldom necessary to charge the RTC battery because it charges while the computer is on. If the RTC battery is low, the real-time clock and calendar may display the incorrect time and date or stop working.
When Hibernation mode is enabled and the RTC battery is completely discharged, a warning prompts you to reset the real-time clock.
The computer can be used while the RTC battery is being charged, although the charging status of the RTC battery cannot be monitored.
Using a battery charger
You can purchase an optional battery charger that recharges batteries without requiring the use of your computer.
▲ CAUTION
Avoid leaving batteries in the battery charger for more than a week at a time. Doing so may reduce the potential charge of the battery.
Use only battery chargers designed to work with your computer and its batteries. You can order a Toshiba battery charger through the accessories information sheet or Toshiba's Web site at toshibaaccessories.com.
Monitoring main battery power

The computer's main battery light gives you an indication of the main battery's current charge:
No illumination means the main battery is not in use and the AC Adapter is not connected.
◆Green means the main battery is fully charged.
- Amber means the main battery is charging (AC Adapter connected).
- Flashing amber means the main battery charge is low and it is time to recharge the main battery or plug in the AC Adapter.

HINT: Be careful not to confuse the main battery light (☐) with the on/off light (☐). When the on/off light flashes amber, it indicates that the system is suspended (using the operating system Standby command).
Determining remaining battery power
NOTE
Wait at least 16 seconds after turning on the computer before trying to monitor the remaining battery power. The computer needs this time to check the battery's remaining capacity and perform its calculations.

1 Click Start, then click Control Panel.
2 Click Performance and Maintenance.
3 Click the Toshiba Power Saver icon.
The Power Saver Properties window appears.
The current power source and battery power remaining section displays the current charge state of the battery. The value is shown as a percentage of remaining battery charge.

TECHNICAL NOTE: The computer drains the battery faster at low temperatures. Check your remaining charge frequently if you are working in temperatures below 50 degrees Fahrenheit.
The computer calculates the remaining battery charge based on your current rate of power use and other factors such as the age of the battery.
What to do when the main battery runs low
When the main battery runs low you can:
Plug the computer into an external power source and recharge the main battery.
Put the computer in Hibernation mode and replace the main battery with a charged spare.
◆Connect the computer to the optional high-capacity battery.
◆Save your work and turn off the computer.
If you do not manage to do any of these things before the main battery completely runs out of power, the computer automatically enters Standby mode and turns itself off. Standby mode keeps track of where you were so, when you turn on the power again, you can continue where you left off.
The computer stores information on what you were doing until the main battery runs out of power. If you have Hibernation mode enabled (the default), the computer copies the details of your open programs and files to the hard disk before shutting down.
Setting battery alarms
You can set two alarms. Each alarm can be set to alert you when a specified percentage of remaining battery power has been reached. You can set how the warning occurs: sound an alarm, display a message, both, or none. You can also set the computer to enter Standby mode or Hibernation mode or to completely power down when the alarm goes off.
To set an alarm or alarms:
1 Click Start, Control Panel.
2 Click Performance and Maintenance.
3 Click the Toshiba Power Saver icon.
The TOSHIBA Power Saver Properties window appears.
4 In the "Running on batteries" section, click Details.
The mode Properties window appears.
5 Click the Alarm tab and set the alarm(s), as desired.
Conserving battery power
How long a fully charged battery lasts when you are using the computer depends on a number of factors, such as:
How the computer is configured
How much you use the display panel instead of an external monitor
How much you use the hard disk and other drives
◆Whether you use any optional devices to which the battery supplies power, such as a PC Card
Where you are working—since operating time decreases at low temperatures
Toshiba's power-saving options greatly increase the length of time you can use the computer before it becomes necessary to recharge the battery.
Toshiba has combined these options into preset power usage modes.
Setting a power usage mode
1 Click Start, Control Panel.
The Control Panel window appears.
2 Click Performance and Maintenance.
3 Click the Toshiba Power Saver icon.
The TOSHIBA Power Saver Properties window appears.
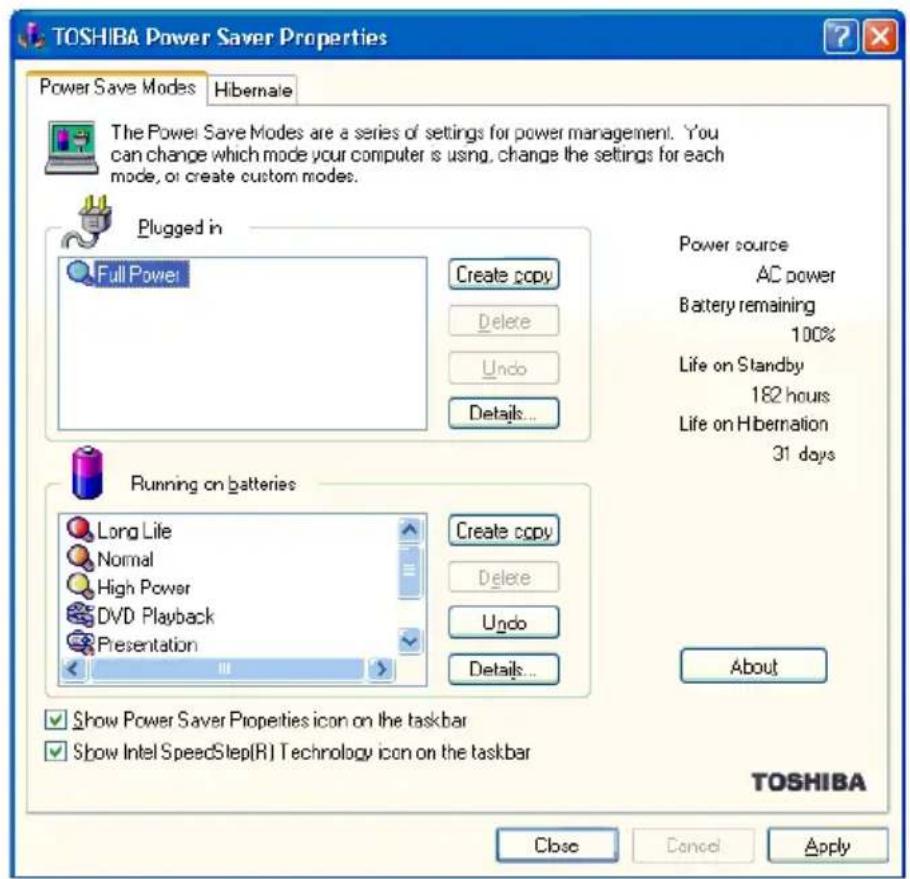
text_image
TOSHIBA Power Saver Properties Power Save Modes Hibernale The Power Save Modes are a series of settings for power management. You can change which mode your computer is using, change the settings for each mode, or create custom modes. Plugged in Full Power Create copy Delete Undo Details... Power source AC power Battery remaining 100% Life on Standby 182 hours Life on Hibernation 31 days Running on batteries Long Life Normal High Power DVD Playback Presentation Create copy Delete Undo Details... About Show Power Saver Properties icon on the taskbar Show Intel SpeedStep(R) Technology icon on the taskbar TOSHIBA Close Cancel ApplySample TOSHIBA Power Saver Properties window
By changing the options that appear in the Power Saver Properties dialog box and clicking OK, you can reconfigure that function. You may choose a power-saving management strategy to best suit your computing needs. If you are running on batteries and the programs that you are using do not require a lot of system resources, you may experience longer work sessions by enabling the Normal setting. Any options that you change become the active settings when you exit the program. (You do not have to restart your system before they become active settings.)
Using a hot key to select the power usage mode
1 Press Fn and F2 simultaneously to display the power usage pop-up window.
2 While continuing to press Fn, press F2 until you select the desired power usage mode.
3 Release the Fn key.
The computer is now in the selected mode.
Turning off the display automatically
To save power, it's a good idea to set the display to turn off automatically when you're not using the computer. You can do this in several ways:
Use the Display Properties to enable the blank screen saver.
Use the Power Saver Properties to turn off the LCD panel after a certain amount of time has passed.
Enabling the screen saver
1 Click Start, Control Panel.
2 Click Appearance and Themes.
3 Click Display.
The Display Properties window appears.
4 Click the Screen Saver tab.
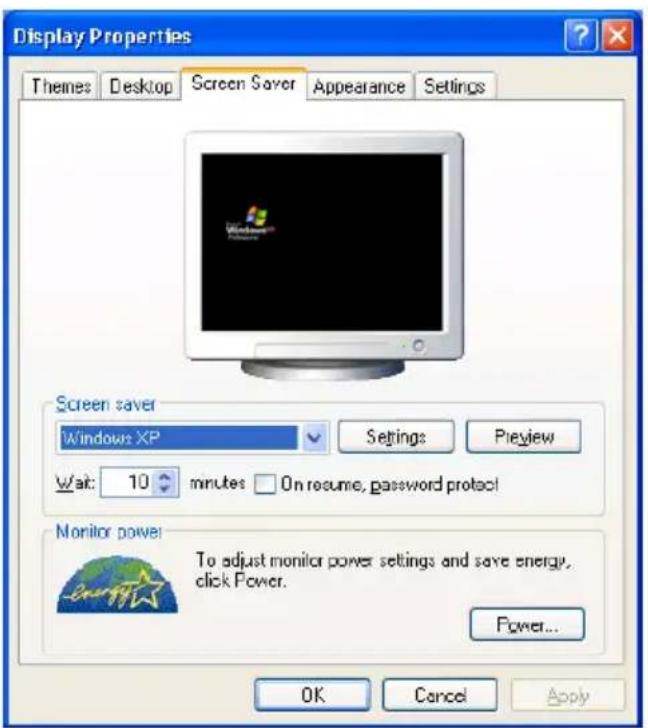
text_image
Display Properties Themes Desktop Screen Saver Appearance Settings Screen saver Windows XP Settings Preview Wait: 10 minutes On resume, password protect Monitor power To adjust monitor power settings and save energy, click Power. Power... OK Cancel ApplySample Display Properties window with Screen Saver tab displayed
5 In the section labeled Screen Saver, select the screen saver of your choice.
6 In the Wait window, click the up and down buttons to set the number of minutes of inactivity before the display turns off automatically.
7 Click Apply, then OK.
Changing the main battery
When your main battery has run out of power, you have two options: plug in the AC Adapter or install a fresh main battery.
CAUTION
When handling a battery, be careful not to drop it or short-circuit its terminals. Also, do not drop, hit, or otherwise impact the battery. Do not scratch or break the casing and do not twist or bend the battery pack.
Do not remove the battery pack while the computer is in Standby mode. Data in memory will be lost.
CAUTION
If your battery discharges fully, your information will be lost. Be sure to save your work often.
Removing the battery from the computer
To remove the battery:
1 Save your work.
2 Shut down and turn off the computer.
3 Remove all cables connected to the computer.
4 Turn the computer over.
5 Slide the battery lock up and slide the release latch to the left.
6 Insert a fingertip in the battery module recessed area and pull the discharged battery module out of the computer.

natural_image
Line drawing of a hand inserting a component into a laptop case (no text or symbols)Unlocking the battery
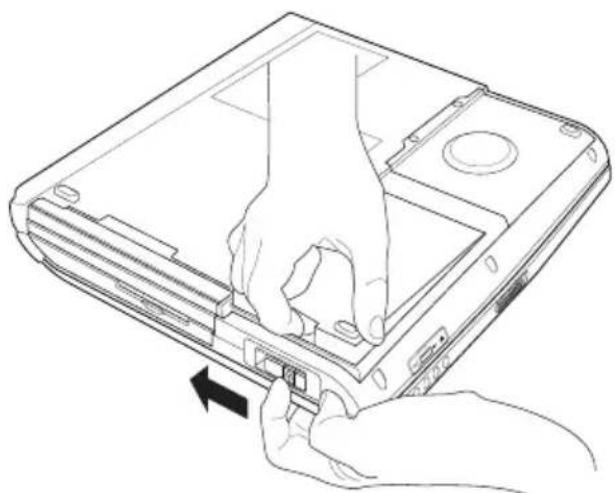
natural_image
Line drawing of hands installing or adjusting a device into a computer chassis (no text or symbols)Removing the discharged battery
▲WARNING
If the battery is leaking or its case is cracked, put on protective gloves to handle it, and discard it immediately following the advice in "Disposing of used batteries" on page 127.
Inserting a charged battery
1 Wipe the terminals of the charged battery with a clean cloth to ensure a good connection.
2 Insert the charged battery into the slot.
The battery has been designed so that you cannot install it with reverse polarity.
▲ CAUTION
If the battery does not slide into the slot easily, remove the battery and try again. Avoid forcing the battery into position.
3 Turn the computer right side up and lock the battery into place using the battery lock.
4 Reconnect any cables.
5 Restart the computer.
For information on changing a battery in a Slim SelectBay module, see “Using Slim SelectBay modules” on page 137.
Taking care of your battery
The following sections offer tips on how to take care of your battery and prolong its life.
Safety precautions
If the battery pack produces an odor, overheats or changes color or shape while it is being used or charged, turn off the computer's power immediately and disconnect the power cord/cable from the power socket. Carefully remove the battery pack from the computer.
Do not try to disassemble a battery pack.
Do not overcharge or reverse charge a battery.
Overcharging will shorten its life, and reverse charging could damage it.
Avoid touching the metal terminals of the battery with another metal object. Short-circuiting the battery can cause it to overheat and may cause damage to the battery or the computer.
Do not incinerate a spent battery, as this could cause it to explode and release toxic materials.
If a battery is leaking or damaged, replace it immediately. Use protective gloves when handling a damaged battery.
To replace the main battery, use an identical battery that you can purchase through to Toshiba Web site at accessories.toshiba.com.
A reverse polarity condition should be avoided with all batteries. The main battery is designed so that it cannot be installed in reverse polarity.
◆Charge the battery only in the computer or in a battery charger designated as an approved option.
When you install the battery pack, you should hear a click when it is seated properly.
Do not expose the battery pack to fire. The battery pack could explode.
Maximizing battery life
To maximize the life of your battery pack:
At least once a month, disconnect the computer from a power source and operate it on battery power until the battery pack fully discharges. Before doing so, follow the steps below:
1 Turn off the computer's power.
2 Disconnect the AC adapter and turn on the computer's power. If it does not turn on, go to step 4.
3 Operate the computer on battery power for five minutes. If the battery pack has at least five minutes of operating time, continue operating until the battery pack is fully discharged. If the battery light LED flashes or there is some other warning to indicate a low battery, go to step 4.
4 Connect the AC adapter to the computer and the power cord/cable to a power outlet. The DC-IN or AC power-light LED should glow green, and the Battery LED should glow amber to indicate that the battery pack is being charged. If the DC-IN or AC power-light indicator does not glow, power is not being supplied. Check the connections for the AC adapter and power cord/cable.
5 Charge the battery pack until the Battery LED glows green.
If you have extra battery packs, rotate their use.
If you will not be using the system for an extended period, more than one month, remove the battery pack.
◆Disconnect the AC adapter when the battery is fully charged. Overcharging makes the battery hot and shortens life.
If you are not going to use the computer for more than eight hours, disconnect the AC adapter.
◆Store spare battery packs in a cool dry place out of direct sunlight.
Disposing of used batteries
The life of a battery pack should last for years. When the battery pack needs replacing, the main battery light flashes amber shortly after you have fully recharged the battery.
You must discard a battery if it becomes damaged.
▲WARNING
The computer's main battery is a Lithium-Ion (Li-Ion) battery, which can explode if not properly replaced, used, handled, or disposed of. Putting spent batteries in the trash is not only irresponsible, it may be illegal. Dispose of the battery as required by local ordinances or regulations.
Use only batteries recommended by Toshiba.
After repeated use, the batteries will finally lose their ability to hold a charge and you will need to replace them. Under federal, state, and local laws, it may be illegal to dispose of old batteries by placing them in the trash.
Please be kind to our shared environment. Check with your local government authority for details regarding where to recycle old batteries or how to dispose of them properly. If you cannot find the information you need elsewhere, call Toshiba at: (800) 457-7777.
Traveling tips
The environmental precautions listed in “Selecting a place to work” on page 39, also apply while traveling.
- Never leave your computer on a sunny ledge or in a place where it could get wet or covered in dust.
◆Always travel with the computer in a carrying case. Toshiba offers a choice of carrying cases for the computer. They all provide plenty of extra space for manuals, power cords/cables, and compact discs. Contact your authorized Toshiba representative for more information.

TECHNICAL NOTE: When traveling by air, you may be required to pass your notebook through airport security equipment. The X-ray equipment will not harm your computer.
Chapter 4
Expansion Options
Your computer is designed to work in your office as well as on the road. This chapter explains how to set up several optional external devices so that your notebook can provide all the convenience of a traditional desktop computer.
To order additional devices and accessories, see the accessories information provided with your computer, or visit toshibaaccessories.com.
Using your computer at the office
By connecting an external full-size keyboard, an external monitor, a mouse and a printer, you can work with your computer as if it were a standard office model. You can connect a monitor and USB-compatible devices, such as the keyboard, mouse and printer, directly to the computer, or to the optional Advanced Port Replicator.
For information on connecting a mouse and a printer, see the “Getting Started” chapter on page 42.
If you want to connect your computer to the office network, you can use the LAN port or your optional wireless LAN (Wi-Fi) capability.
Using an expansion device

The expansion port allows you to connect your computer to a port replicator, which is an excellent investment if you're using your computer both in and out of the office.
When you return to your desk, you probably want to connect to your network, print reports from your computer, or use a mouse instead of the AccuPoint II. Connecting cables for each of these devices every time you return to the office is time-consuming and inconvenient.
With a port replicator, you can leave external devices connected while you are using your computer away from your desk. When you return, you can quickly connect your computer and have immediate access to all the devices.
A port replicator also provides serial, parallel and PS/2 ports to support legacy devices such as a serial mouse and PS/2 keyboard.
For more information, see the documentation that comes with the device.
To purchase an expansion device, see the accessories information packaged with your system or visit Toshiba's Web site at toshibaaccessories.com.
Using the optional external USB diskette drive
The optional external USB diskette drive allows you to use diskettes and is useful for installing software on the hard disk, exchanging information with other systems, and making backup copies of the files stored on your hard disk.
Connecting the optional external USB diskette drive
You can attach the optional external USB diskette drive to a USB port on the computer or to any of the USB ports on the optional Advanced Port Replicator.
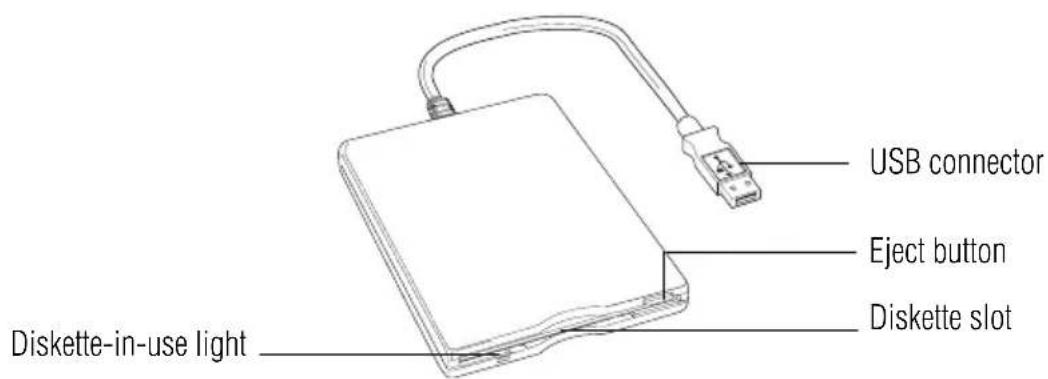
text_image
USB connector Eject button Diskette-in-use light Diskette slotOptional external USB diskette drive and connector cable

TECHNICAL NOTE: You may attach the optional external USB diskette drive while the computer is on or off.
If you attempt to access the drive when it is not attached to the computer, you will receive an error message.
To attach the optional external USB diskette drive cable to a USB port on either the computer or the optional Advanced Port Replicator, gently push the connector into the USB port.
The computer automatically recognizes the optional external USB diskette drive and calls it A:.
Using the optional USB external diskette drive with a PC Card
If you have connected a USB external diskette drive and a PC Card storage device before turning on your computer, the operating system may display two external diskette drives, instead of one diskette drive and one PC Card drive.
If you want to use both a USB external diskette drive and PC Card device simultaneously, please connect one or both devices after the operating system startup process is complete.
Using a keyboard with the Advanced Port Replicator
If you prefer to use a standard keyboard, you can attach one to a USB, PS/2 or serial port on the optional Advanced Port Replicator, provided the keyboard is USB- or PS/2-compatible.
Connecting a keyboard to the Advanced Port Replicator
To connect a USB or PS/2 keyboard to the optional Advanced Port Replicator, gently push the keyboard cable into the USB or PS/2 port.
NOTE
If you connect a PS/2 keyboard to the computer while it is in Standby or Hibernation mode, you will not be able to use the keyboard when you turn on the computer.
Making your external keyboard emulate the Fn key
An external keyboard does not have the Fn key provided by the computer's built-in keyboard. You can use the Fn Key Emulation option in Toshiba Hardware Setup to assign an external keyboard key combination that will emulate the internal keyboard's Fn key.
In Toshiba Hardware Setup, you can emulate the Fn keys by setting key combinations in the keyboard option of the utility. See “Toshiba Hardware Setup” on page 174 for more information.
NOTE
The Fn emulation key is not supported when using a USB keyboard.
Using a mouse with the Advanced Port Replicator
If you prefer to use an external mouse, you can attach one to a PS/2 port, serial port, or USB port on the optional Advanced Port Replicator, provided the mouse is PS/2-, serial-, or USB-compatible.
NOTE
A PS/2-compatible mouse disables the AccuPoint II device.
▲ CAUTION
When connecting any PS/2 or serial device, turn off your computer to prevent any possible hardware damage.
Connecting a mouse to the Advanced Port Replicator
To connect the USB, PS/2, or serial mouse to the optional Advanced Port Replicator, gently push the mouse cable into the USB, PS/2 or serial port.
NOTE
If you connect a PS/2 mouse to the Advanced Port Replicator while it is in Standby or Hibernation mode, you will not be able to use the mouse when you turn on the computer.
If you connect a PS/2 mouse to the optional Advance Port Replicator, the mouse cursor may move irregularly after hot-docking the computer. Simply wait a few minutes until the mouse stabilizes.
Using a printer with the Advanced Port Replicator
In addition to connecting a printer to your computer, you can also connect a printer to an Advanced Port Replicator. The replicator supports a USB-, serial-, or parallel-compatible printer.
Before you can connect the printer to the replicator, you need to know whether it uses a USB, serial or parallel interface. Check the printer's documentation.
If the printer is not a USB printer and can be switched between serial and parallel mode, chose parallel because it is faster.
Connecting a USB printer
To connect a USB printer to the Advanced Port Replicator:
1 Connect the computer to the port replicator.
2 Connect the flat end of the USB cable to the USB port on the port replicator.
3 Connect the other end of the USB cable to the printer.
4 Connect the printer's power cable to a power outlet and turn on the printer.
Connecting a serial or parallel printer
To connect a printer to a serial or parallel port on the Advanced Port Replicator:
1 If the computer is on, turn it off.
2 Connect the computer to the port replicator.
3 Connect the printer cable to the serial or parallel port on the port replicator.
4 Connect the printer's power cable to a power outlet and turn on the printer.
5 Turn on the computer.
▲ CAUTION
For a parallel or serial printer, never connect the printer cable while the computer's power is on. Doing so may damage the printer, the computer, or both.
Using external display devices
Your computer comes with a built-in LCD display, but you can easily attach an external monitor to your computer if you need a larger screen. To do this:

1 Connect the monitor's video cable to the RGB (monitor) port on the back of the computer.
2 Connect the monitor's power cable to a live electrical outlet.
3 Turn on the external monitor.
4 Set the display mode by pressing Fn + F5, or by setting the Display Properties settings. For more information, see “Directing the display output when you turn on the computer” on page 135.
Directing the display output when you turn on the computer
Once you've connected an external display device, you can choose to use the internal display only, the external device only, or both simultaneously. The quickest way to change the display output settings is to use the display hot key (Fn + F5):
1 Press Fn and F5 simultaneously.
2 While holding down Fn, press F5 repeatedly until the setting you want takes effect.
This hot key cycles through the settings in the following order:
◆Built-in display panel only
◆Built-in display panel and external monitor simultaneously
◆External monitor only
3 Release the Fn key.

TECHNICAL NOTE: You can also change these settings using the Display Properties Box.
Adjusting the quality of the external display
To obtain the best picture quality from your external display device, you may need to adjust the video settings. See the documentation supplied with the device for additional configuration steps.

TECHNICAL NOTE: In order to use the simultaneous mode, you must set the resolution of the internal display panel to match the resolution of the external display device. The external display device must support a resolution of 640 X 480 or higher.
Display limitations
Keep in mind that the quality of the display will be limited to the capabilities of the external video device.
If the external video device, such as an SVGA monitor, is capable of displaying at a maximum resolution of 640 x 480 and your system is set for a higher resolution, only part of the desktop will appear on the screen. You can view the “lost” area by scrolling to it.
If you use the display hot key (Fn + F5) to change the display output with the LCD Display Stretch option enabled and the Display area (resolution) set to 640 x 480
or 800 x 600, the image on the internal display panel may appear stretched.
Using Slim SelectBay modules
The Slim SelectBay gives you additional flexibility. By inserting and removing Slim SelectBay modules, you can configure your computer for the task at hand without having to carry unnecessary components with you when you travel. For example, any one of several modules can be used in the Slim SelectBay:
DVD-ROM drive. This drive can also be used as a standard CD-ROM drive.
CD-R/RW drive
multi-function drive
DVD Multi drive
Weight saver insert (a “honeycomb” piece of plastic) that reinforces the Slim SelectBay for travel. The weight saver came in your computer’s accessories box.

HINT: Items from this list that did not come with your computer can be purchased separately. See the accessories information packaged with your system or visit Toshiba's Web site at toshibaaccessories.com.
Removing a module from the Slim SelectBay
CAUTION
Use caution when lifting or turning your computer. Failure to do so may result in damage to components, such as cables attached to your computer, or to the computer itself.
1 Turn off the computer.
You may also hot swap a module in the Slim SelectBay. Stop the module by clicking the Safely Remove Hardware icon on the System tray. After the module is stopped, it is safe to remove.
2 Turn the computer upside down and locate the Slim SelectBay module.
3 Slide the Slim SelectBay latch toward the back of the computer.
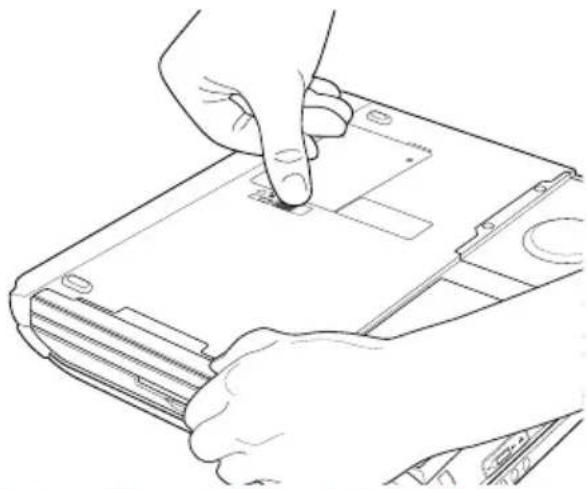
natural_image
Line drawing of hands installing or adjusting a device on a flat surface (no text or symbols)Unlatching the Slim SelectBay
4 While holding the latch, slide the module out of the computer.
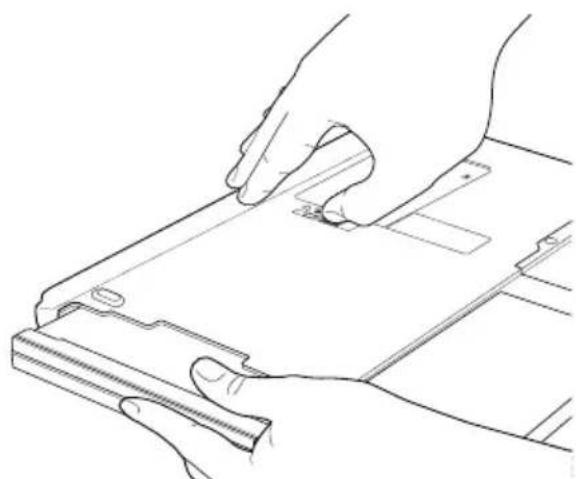
natural_image
Line drawing of hands holding a flatboard with a ruler, no text or symbols presentSliding the module out
If you are removing the weight saver, retain it for transporting the computer when no other module is installed in the Slim SelectBay.
Inserting a module into the Slim SelectBay
To install a module into the Slim SelectBay, slide the module all the way into the Slim SelectBay.
Using PC Cards
You may insert two Type II cards or one Type III card into the computer's PC Card slots.
PC Cards are credit-card sized expansion cards that greatly increase the capabilities of your computer.
Some PC Cards combine several functions. multi-function cards allow you to get the most out of your PC Card slots.
Most PC Cards conform to the PCMCIA (Personal Computer Memory Card International Association) standard.

TECHNICAL NOTE: For PCMCIA-compatible PC Cards, check the package to make sure they conform to the PCMCIA 2.1 standard (or later). Other cards may work with your computer, but they are likely to be much more difficult to set up and use.
Inserting a PC Card
Before inserting a PC Card, read the documentation that came with the card to see if it has any special requirements.

HINT: The operating system provides the Card and Socket Services software for your PC Card. Even if your PC Card comes with its own version of Card and Socket Services, you should use the files included in the operating system.
To insert a PC Card or Cards:
1 Locate the PC Card slots on the left side of the computer.
2 Insert the PC Card or Cards.
If you have a Type III card, insert it in the lower part of the slot. If you have a Type II card, you can insert it in either the upper or lower part of the slot.
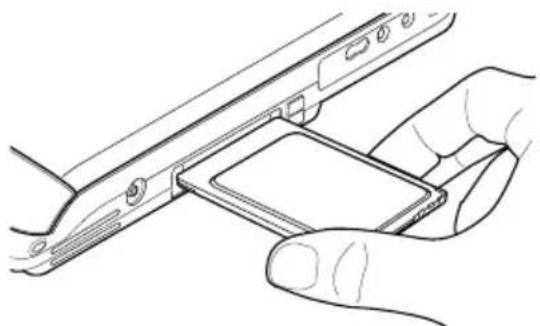
natural_image
Line drawing of hands inserting a card into a device (no text or symbols)Inserting a PC Card
3 When the card is almost all the way into the slot, push firmly, but gently, to ensure a firm connection with the computer. Avoid forcing the card into position.
Removing a PC Card
1 Locate the PC Card ejection tab that corresponds to the slot in which your PC Card is installed.
The top tab releases a card in the upper slot. The bottom tab releases a card in the lower slot.
2 Push the eject button.
The eject button pops out from the slot.
3 Push the eject button again so the card will pop out.
4 Grasp the edges of the PC Card and slide it out of the slot.
Hot swapping PC Cards
One of the great things about PC Cards is that you can replace one PC Card with another while the computer is on. This is called “hot swapping.”

DEFINITION: Hot swapping is the ability to change PC Cards while the computer is on.
Hot swapping precautions
Although you can insert a PC Card at any time, remember not to remove a card while it is in use. Otherwise, you could lose valuable information.
For example:
✿Never remove a hard disk card or CD-ROM drive card while the system is accessing the card.
✿Never remove a network card while you are connected to the network.
✿Never remove a SCSI card while any of the SCSI devices connected to it are operating.

DEFINITION: SCSI is an acronym for Small Computer Systems Interface. A single SCSI PC Card enables you to connect several SCSI devices to your computer at the same time.
Before removing a PC Card, stop it by clicking the PC Card (PCMCIA) icon on the taskbar.
Using an SD card
Your computer supports the use of an SD card, a stamp-size flash memory card with various capacities of memory. The card can be used with a variety of digital products: digital
music players, cellular phones, PDAs, digital cameras, digital video camcorders, etc.
▲ CAUTION
Do not touch the SD connector. You could expose the storage area to static electricity which can destroy data.
Do not remove an SD card while data is being written or read. Even when the message “copying...” in the windows disappears, the computer may be writing to the computer and your data could be destroyed. Wait for the SD indicator light to go out.
Installing SD card drivers
During installation of the SD card drivers, one or more dialog boxes may appear indicating that the driver is not digitally signed. The message may appear as “Digital Signature not found (About Secure Digital Emulation from Toshiba).”
Click Yes to continue.
Installing the SD card in the SD slot
To insert an SD card, turn the card so that the connector (metal area) faces down then push the card in the slot until it locks in place.
If the operating system does not recognize an inserted SD card, remove and insert it again.
The green LED on the left side of the SD card slot will glow when the card is being accessed.
▲ CAUTION
If the SD card is not inserted into the slot correctly, any data saved to the card may be lost.
Formatting an SD card
If you want to format your SD card, you may do so using Windows ^® operating system formats such as FAT16 or FAT32. You can also use the TOSHIBA SD Memory Card Format Utility. After formatting is complete, there is a possibility that the SD card may become unusable on some devices which have an SD card slot.
NOTE
Multi Media Cards (MMCs) are not supported by this product.
Stopping or removing the SD card after formatting
If you have formatted the SD card drive with the Windows ^® operating system format (see Formatting an SD Card in the preceding section), you may be unable to stop or eject your card. If this occurs, try restarting the computer.
Using Standby or Hibernate while using the SD card
It is recommended that you do not select Standby or Hibernation mode while an SD card is in use. If you do so, your system may not enter Standby or Hibernation mode, some tasks may become unresponsive, and the operating system may not shut down properly. If this occurs, reset your computer by holding down the power button for four seconds.
Removing an SD card
Before removing an SD card from the SD slot, close any applications which utilize the SD card. Use the eject utility to ensure that the card is ready to be removed. Once the activity indicator light has turned off, you may safely remove the card.
To remove an SD card, press the card inward to release it. The card pops out slightly. The device name will disappear only
after you have physically removed the card from your computer.
▲ CAUTION
Removing the SD card without the eject utility may result in lost data on your SD card.
Using the i.LINK® port
The i.LINK ^® port on the rear of the computer provides an extremely fast data transfer rate (up to 400 mega bits per second [Mbps]). You can connect up to 63 external devices to the i.LINK ^® port.
In addition to high speed, the i.LINK ^® port also supports isochronous data-the delivery of data at a guaranteed rate. This makes it ideal for devices that transfer high levels of data in real-time, such as video devices.
As with USB ports, the i.LINK ^® port supports both Plug-and-Play (automatic configuration) and hot swapping (the ability to connect and disconnect devices while the computer is on). The main difference between i.LINK ^® and USB technology is that i.LINK ^® supports faster data transfer rates.
Chapter 5
Enhancing Productivity
In this chapter, you will explore other features of your notebook computer.
Windows® XP special features
The Windows ^® XP Professional operating system offers you several new features and enhancements, including:
◆New system file protection
A system restore function, allowing you to rollback the system to its previous mode
An improved help center, support automation, and automatic Windows® operating system update
◆ Wizards to simplify setting up your home network
◆ Ability to share one Internet connection among multiple PCs
An automatic discovery feature that allows your computer to detect new and intelligent devices
Personalizing your desktop
Your desktop is your virtual workspace. This section explains how to customize its features for the way you like to work. You can customize the following aspects of the desktop:
◆Taskbar—which resources to display for quick access
- Web content interface—what information from the Internet to always display
◆Desktop style—how windows are displayed and how to browse folders and files
- Toolbars—what information appears at the top of each window
Customizing the taskbar
As you work, the taskbar changes to reflect what you are doing. Its icons provide shortcuts to programs, documents, files, folders, system features, and components. Open applications also have Forward and Backward buttons to allow navigation through folders, documents, and Web sites.
For example, you can personalize the taskbar to include Quick Launch icons, and also your favorite URL addresses or local folders and programs.

DEFINITION: URL stands for Uniform Resource Locator, which is the address that defines the route to a file on the Web or any other Internet facility. Generically, it is known as the World Wide Web site address.
Having a list of favorite URLs handy saves time. Using it bypasses the need for you to launch your browser first.
To customize your taskbar settings, point to an empty space in the taskbar and click the secondary button. Then click Properties.
Bringing the world to your desktop
With the Windows ^® XP operating system you can set up your desktop with complete World Wide Web integration at a single click.
Turning on the Web content interface
The first step to bring active content to your desktop is to turn on the Web contentinterface:
1 Point to an empty space on the desktop and click the secondary button.
2 Click Properties.
The Display Properties window appears.
3 Click the Desktop tab.
4 Click the Customize Desktop button.
5 Click the Web tab.
6 Follow the instructions to set up your desktop.
Adding components to the Web content interface
1 Point to an empty space on the desktop and click the secondary button.
2 Click on Properties.
The Display Properties window appear.
3 Click the Desktop tab.
4 Click the Customize Desktop button.
5 Click the Web tab.
The operating system displays a list of items to add to the desktop.
6 To view additional components, click New.
The New Desktop Item dialog box appears.
7 To browse the Gallery for more components to add, click Visit Gallery.
In order to browse, an active Internet connection must be established.
8 To select some other Web site, type the address of the Web site you want or click Browse to locate it.
You can configure the Web content interface in several other ways. For further information, see your operating system documentation or access Windows® Help by clicking Start, Help and Support.
Changing desktop and browsing style
The operating system enables you to customize the way you view your desktop and browse the files and folders on your local computer or network file server.
You can specify that:
Items that normally require a double-click will open with a single click.
◆Folders will open in their own window instead of in the same window.
◆Folders are accompanied by a list of common tasks instead of being displayed alone.
The options you choose determine how you browse in the operating system, regardless of whether you start from the desktop, My Computer, Windows Explorer, or Internet Explorer.
For more information about changing your desktop style, enter desktop in the Help and Support Index.
Choosing a style
To select desktop and browsing style options:
1 Click Start, then click My Computer.
The My Computer window appears.
2 Select the Tools menu, then click Folder Options.
The Folder Options dialog box appears.
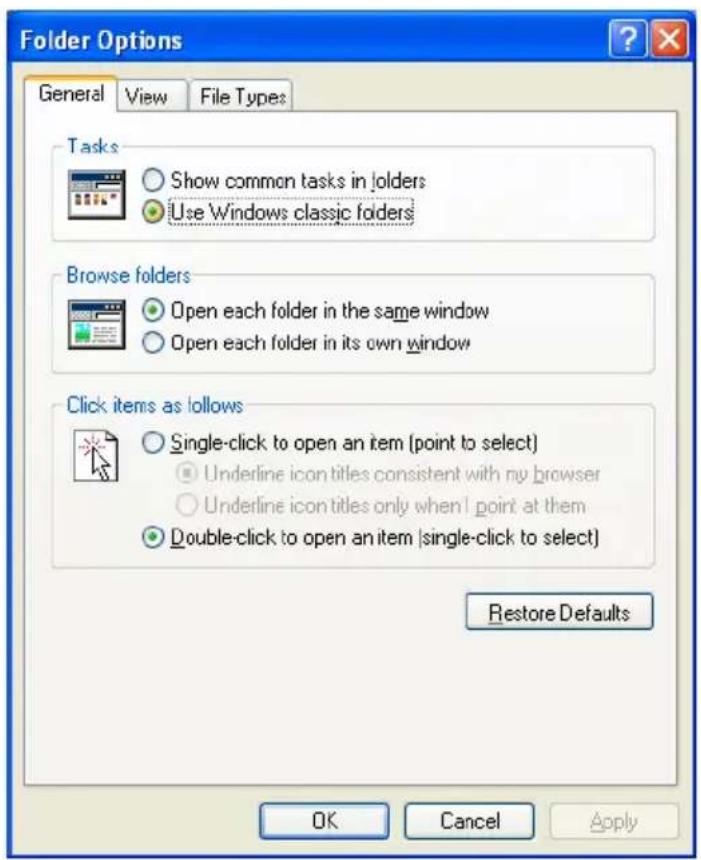
text_image
Folder Options General View File Types Tasks Show common tasks in folders Use Windows classic folders Browse folders Open each folder in the same window Open each folder in its own window Click items as follows Single-click to open an item (point to select) Underline icon titles consistent with my browser Underline icon titles only when | point at them Double-click to open an item (single-click to select) Restore Defaults OK Cancel ApplySample Folder Options dialog box
3 Click the preferred options.
4 Click Apply, then OK.
Personalizing individual windows
Just as you can display a Web page on your desktop, you can also display a Web page in an individual window. If you subscribe to the Web page, it can be automatically updated on a regular basis. For example, using this Web integration feature you can monitor weather, game scores, stock prices, or headlines—all in the window of your choice.
Customizing window toolbars
You can display one or more customizable toolbars at the top of a window. As you browse, the operating system detects the kind of information presented in the window and automatically displays the appropriate toolbar buttons and menus.
You can also add these toolbars to the taskbar.
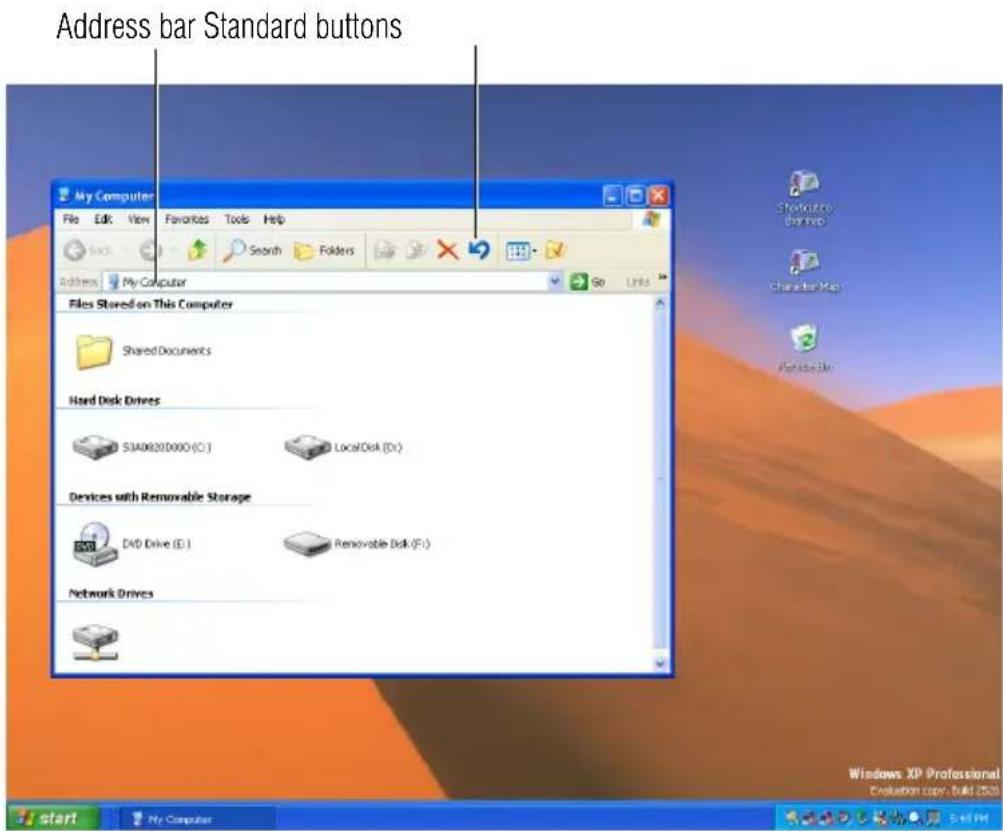
text_image
Address bar Standard buttons My Computer File Edit View Favorites Tools Help Back Search Folders Address My Computer Files Stored on This Computer Shared Documents Hard Disk Drives S3A0820000 (C:) LocalDisk (D:) Devices with Removable Storage DVD Drive (E:) Removable Disk (F:) Network Drives Windows XP Professional Completion copy: Build 2010 start My Computer S-47 PMSample toolbar locations
The elements you can add to the top of the window are:
Toolbar element Description
Address Bar Opens Web pages, programs, folders, or documents. By default, the address bar shows your current location, and whether it is a folder or a Web page. You can browse to another location by typing an address — a URL, a path, or even a program name.
If you start typing a previously typed address, the AutoComplete feature finishes the address for you.
Standard buttons Displays buttons for commonly used commands, such as copying, pasting, deleting items, changing views, and browsing backward and forward.
Displaying a toolbar in a window
1 Click Start, then click My Computer.
The My Computer window appears.
2 On the View menu, point to Toolbars, then click the name of the toolbar you want to display.
The toolbar appears below the menu bar of the current window.
Displaying information about each folder
In addition to displaying the contents of each window, you might find it helpful to have the operating system display the name of the folder and brief information about how to use the folder. This means displaying an individual window as a Web page.
1 Click Start, then click My Computer.
The My Computer window appears.
2 Open the folder you want to view as a Web page.
3 In the Tools menu, select Folder Options.
4 In the Tasks section, click the button for Show common tasks in folders.
5 Click Apply, then OK.
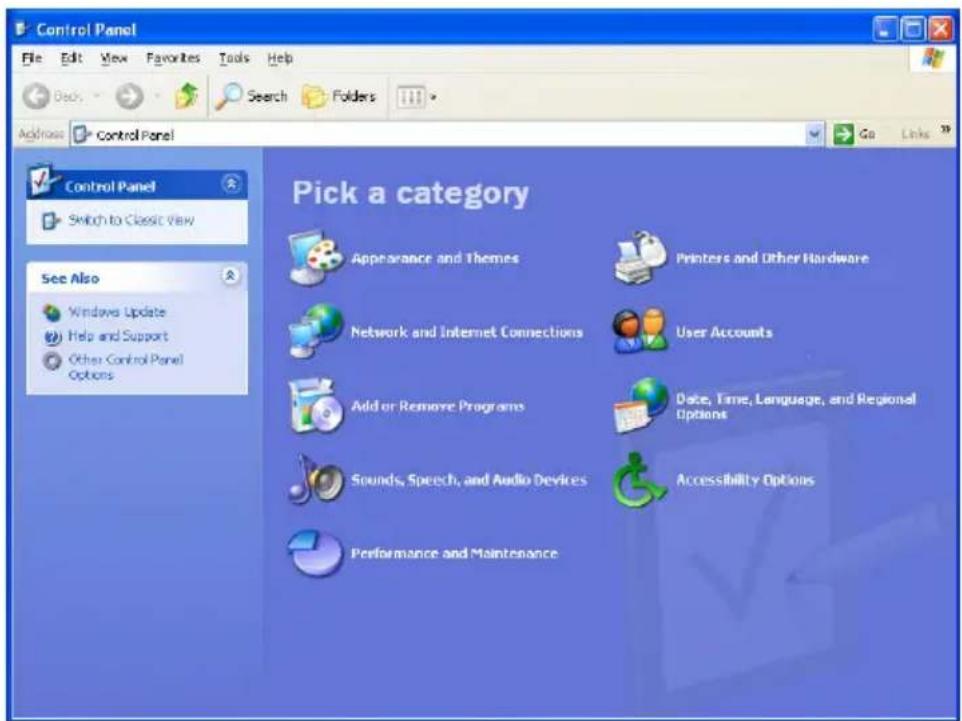
text_image
Control Panel File Edit View Favorites Tools Help Back Search Folders Address Control Panel Go Links Control Panel Switch to Classic View See Also Windows Update Help and Support Other Control Panel Options Pick a category Appearance and Themes Printers and Other Hardware Network and Internet Connections User Accounts Add or Remove Programs Date, Time, Language, and Regional Options Sounds, Speech, and Audio Devices Accessibility Options Performance and MaintenanceSample Control Panel window as a Web page
The addition of the name of the folder and instructions for how to use the folder on the left give the window the appearance of a Web page.
Setting up for communications
In order to connect to the Internet, use an online service, or communicate across the telephone lines with another computer, you need:
A modem (one comes with your computer)
A telephone line
◆A browser or communications program
◆An Internet Service Provider (ISP) or online service if you plan to use the Internet
Determining the COM port
Your modem is connected to one of the computer's COM (communications) ports. The default setting for the modem is COM3.
The following procedure is intended to support you if you need to either upgrade your modem or reset the port to the default settings.
If you're having trouble connecting through the modem, you may need to determine the current COM port name and possibly change it.
To find out which port your modem is connected to in the operating system:
1 Click Start, click Control Panel, then Printers and Other Hardware.
The Control Panel opens.
2 Click Phone and Modem options.
The Phone and Modem options window appears.
3 Click the Modems tab.
A location box appears.
4 Make a note of the COM port number shown in the Attached to field.
5 To verify that the modem is set up properly, double-click the COM port to which your modem is connected.
The Modem AMR Properties box appears. In the device status area, the computer should indicate whether the modem is working properly.
6 If the modem is not working properly, click Troubleshooting and follow the instructions.
7 Click OK to close the Properties box, then the Phone and Modem options box.
8 Close the Control Panel.
Using the Ethernet LAN Port
If your operating system is Windows ^® XP Professional, you can connect your computer to a Local Area Network (LAN) at work or from a remote location.
When your computer starts, the Windows ^® operating system attempts to contact a Dynamic Host Configuration Protocol (DHCP) server. If the computer is not connected to a network, it may pause a few minutes as it waits for a reply. To avoid this delay, you can configure the Windows ^® operating system to disable the LAN port.
To disable the LAN port:
1 Click Start and then click Control Panel.
2 Click Performance and Maintenance.
3 Click the System icon and select the Hardware tab, then select the Device Manager button
4 Select Network Adapters, then select the specific Network Adapter.
5 Right-click the Adapter and click Disable.
6 Click Yes to confirm disabling the network card.
Your LAN port is now disabled.
Accessing a LAN
To access a LAN:
At the office, you can connect the network Ethernet cable to the RJ45 jack on your computer.
- Your computer may be equipped for wireless communications. If so, see the next section on “Exchanging data with another computer.”
From home or while on the road you'll need a dial-up connection. Ask your network administrator for the telephone number to access the network.
Exchanging data with another computer
To transfer a large amount of information between your notebook and another computer with a compatible infrared port, you can use a special synchronization program.
1 Place the computers so that their infrared ports are aligned.
2 Load the synchronization program on both computers.
3 Set any specific options.
4 Start the transfer.
5 When you have finished transferring files, close the synchronization programs on both computers.
Transferring application files
There may be instances when you will need to transfer application files from the Recovery media that comes with your computer. If a DVD-ROM or multi-function drive is not a standard feature of your computer, but you can transfer these files to your computer in the following ways:
◆Use an external DVD-ROM or multi-function drive.
You can order a PORT-Noteworthy PC Card CD-ROM drive from Toshiba and install it in the PC Card slots on the left side of the computer. Alternatively, if you have a PC Card SCSI adapter, you can use a SCSI CD-ROM drive.
Connect to a network.
You can access your Recovery media by connecting your notebook to the office network. You then can upload the files on the media from another computer with a DVD-
ROM or multi-function drive onto a network server and download the files onto your notebook.
Use the infrared port to connect your notebook to another computer that has a DVD-ROM or multi-function drive.
Setting up a direct cable connection
To establish a direct cable connection with another computer:
1 Click Start, All Programs.
2 Point to Accessories, Communications, and click New Connection Wizard.
3 Click Next.
4 Select Set up an advanced connection.
5 Click Next.
6 Select Connect directly to another computer.
7 Choose the appropriate role for your computer:
Guest
Host
8 Follow the on-screen instructions.
Setting up a wireless connection
For information on how to set up a wireless connection, refer to your wireless networking device documentation.
Using Bluetooth
The following information applies to those systems with the optional Bluetooth wireless feature:
Bluetooth is a technology that expands wireless communication beyond networking equipment, and can connect many different kinds of electronic devices without the need for cables. Bluetooth uses the 2.4 GHz frequency band for wireless communications.
Bluetooth can transmit at data rates up to 1 Mbit/sec. The range (through walls and floors) of the wireless transmission is up to 100 feet.
If your computer is equipped with Bluetooth, and you want to enable the Bluetooth module:
1 Flip the wireless antenna on/off switch to the on position.
The antenna is enabled.
2 Hold down the function key ( Fn) and press F8 until the Bluetooth icon is highlighted.
3 Release the keys.
Bluetooth is now enabled.
Your Bluetooth module is based on the Bluetooth specification version 1.1. Toshiba cannot confirm all compatibility with PC products and/or electronic devices using Bluetooth other than Toshiba mobile PCs.
Using audio features
Your computer is equipped with a built-in monaural speaker.
The computer plays sounds through the internal speaker. It uses the sound settings in your operating system, except for the system speaker, which is configured by the Toshiba System utility. To adjust the volume, click the speaker icon in the taskbar.
Using external speakers or headphones
Your computer is equipped with a full stereo sound system with internal speakers. Instead of using the internal speakers,
you can connect headphones or a pair of external stereo speakers.

TECHNICAL NOTE: Use amplified speakers that require an external power source. Other types of speakers will be inadequate to produce sound from the computer.

To play back sound files through headphones or external speakers:
1 Locate the headphone jack on the computer.
2 Using any necessary adapters, plug the cable from the headphones or external speakers into the headphone jack.
The headphone jack requires a 16-ohm stereo mini jack.
To adjust the volume:
For external speakers, use the volume controls on each speaker.
For headphones, use the computer's volume control dial.
Recording sounds
The external microphone may be used with other software to record monaural audio sounds and save them as digital audio.WAV files on disk.

DEFINITION: A .WAV (pronounced "wave") file is the format for storing sound in files.
You may also record sounds as .WAV files by connecting an external microphone or other sound source to the microphone jack.
Using a microphone
1 Connect an external microphone to the computer.
2 Click Start, point to All Programs, Accessories, Entertainment, then click Sound Recorder.
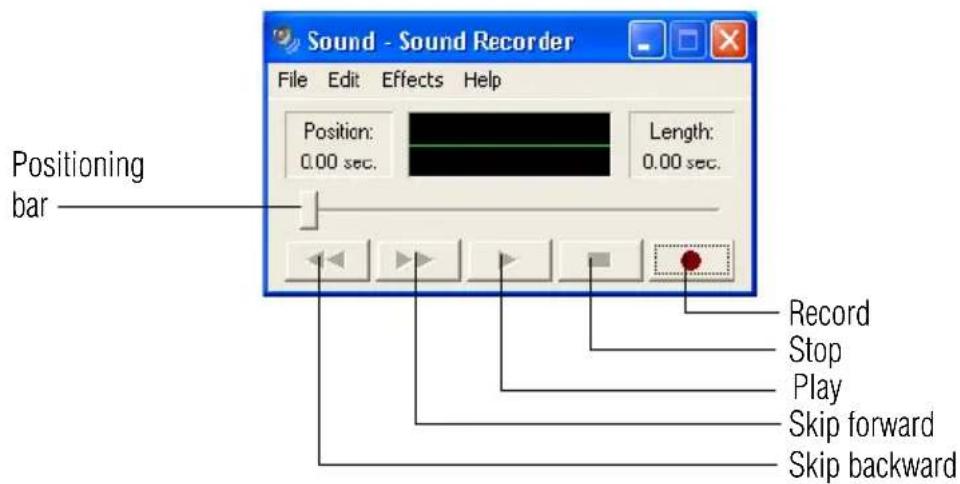
text_image
Sound - Sound Recorder File Edit Effects Help Positioning bar 0.00 sec. Length: 0.00 sec. Record Stop Play Skip forward Skip backwardSample Sound Recorder screen

3 Click the Record button and speak normally into the microphone.
You can only record 60 seconds at a time.


4 When you have finished recording, click the Stop button.
5 To hear what you just recorded, click the Play button.
6 To save the file, select Save from the File menu.
Adjusting recording settings
The better the quality of the recording, the more disk space the sound file requires. Experiment to find a balance that fits your needs.
1 Open Sound Recorder, if necessary (click Start, point to All Programs, Accessories, Entertainment, then click Sound Recorder).
2 In the Sound Recorder window, click Edit, then click Audio Properties.
3 In the Audio Properties dialog box, adjust the Recording Volume and Preferred device.
4 Click OK.
Your new settings take effect the next time you record.

TECHNICAL NOTE: If you record MP3 files, you will only be able to play them on a device capable of playing MP3 files.
Chapter 6
Toshiba Utilities
Your computer includes several utilities designed to help you to reconfigure your system to best meet your individual needs. Together, these allow you to ascertain certain system details, set additional options, or change default options. These utilities are described in this chapter:
Fn-esse®
Hotkey utility
TOSHIBA Mobile Extension Service Configuration
TOSHIBA Console
TOSHIBA Button Controls
Fn-esse
The operating system shortcuts and Toshiba's Fn-esse program provide quick ways to open programs, documents, and folders from within any program without using the Start menu.
This section describes how to use the Fn-esse program to quickly access your programs and files.
With Fn-esse, you can assign an Fn key combination to:
Open a Windows ^® program
◆Open a file in its associated Windows ^® program
◆Display a customized folder of Windows ^ programs and/or files from which to choose
Fn-esse also has several keys, known as hot keys, that perform preassigned operations. For more information, see “Hot Keys” on page 222.
You can assign any key that is not associated with a hot key or a keyboard overlay.
Starting Fn-esse
You can access Fn-esse in one of two ways:
Click Start, All Programs, Toshiba Utilities and Fn-esse.
Click the Fn-esse icon.
The Fn-esse keyboard appears.
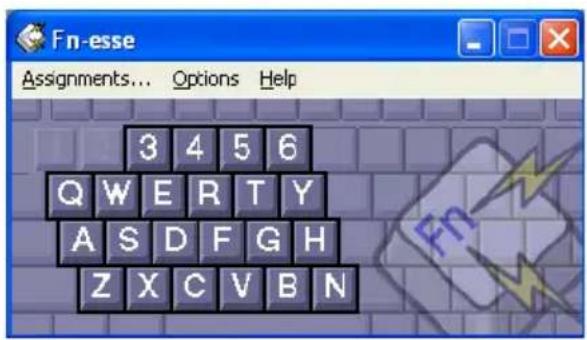
text_image
Fn-esse Assignments... Options Help 3 4 5 6 Q W E R T Y A S D F G H Z X C V B NSample Fn-esse keyboard
The keys are color-coded as follows:
◆ Available keys are black.
- Assigned keys and keys associated with a popup list are shown on the Fn-esse keyboard in the selected color.
◆Unavailable keys are dark gray.
Assigning a key to a program or document
There are two ways to assign a key to open a program or document:
Drag-and-drop
◆Use the keyboard or pointing device
The method most often used is drag-and-drop.
Using drag-and-drop
To assign a key to a program or document:
1 Start both Fn-esse and Windows ^® Explorer (or the program supporting drag-and-drop).
2 Resize the Explorer window so that you can see both the Fn-esse keyboard and Explorer at the same time.
3 In the Explorer window, highlight the program or document file you wish to assign to a key.
4 Click and hold the primary button as you drag the highlighted item from Explorer to the key on the Fn-esse keyboard you want to assign to it.
5 Release the primary button.
Fn-esse displays the Add/Edit Command dialog box with the Description, Command Line, and Working Directory fields automatically completed.
6 Click OK to close the Add/Edit Command dialog box with your key assignment in place.
The program or document is now associated with the key you just selected. To open the program or document, press Fn plus the appropriate key from within any Windows ^® program.
Using the keyboard or pointing device
To assign a key to open a program or document:
1 Start Fn-esse.
2 Perform one of the following:
Using the keyboard, press and hold the Fn key, then press the desired assignment key.
◆ Using the pointing device, move the cursor over the desired key and press the secondary button.
The Assignment Type dialog box appears.

HINT: If you are making a direct key assignment, complete step 3. If you are making a popup assignment, complete step 4.
3 To make a direct key assignment, select Direct to display the Add/Edit Command dialog box, then complete these steps:
Enter the Description, Command Line, and Working Directory for the new Fn-esse key assignment, or click the Browse button to specify this information.
Click OK.
4 To make a popup assignment, select Popup to display the Application Explorer dialog box, then complete these steps:
Select the desired folder. The left side of the Application Explorer window displays the folders in the Programs menu. The right side lists the programs and documents in the folder. These are the items that appear in the popup list.
To create a popup list with items from various folders, or to pick only a few items from a folder, create a new folder containing only the desired programs and documents. If you are unsure how to
do this, refer to your operating system documentation.
- Click OK to associate the folder with the key you just selected.
To open a popup list showing the items in that folder, press Fn plus the appropriate key from within any Windows ^® program.
Viewing existing key assignments
To view the existing key assignments, choose Assignments from the Fn-esse keyboard. Fn-esse displays the Function Key Assignments dialog box. This box lists all the key assignments and the program or document to which each key is assigned.
To view items in a popup list, click the Expand popup lists check box.
Changing or removing existing key assignments
1 In the Fn-esse keyboard, click the key you wish to change with the secondary button.
Fn-esse displays the Assignment Type dialog box.
2 To change the key assignment, click Direct or Popup and continue as if you were creating a new assignment.
3 To remove the key assignment, click Clear.
Hotkey utility
The hotkey utility allows you to receive a confirmation message when you use the hot key combination for Standby [Fn+F3] and Hibernation [Fn+F4] .
To activate the utility:
1 Click Start, then click Hotkey utility
The Hotkey window appears.
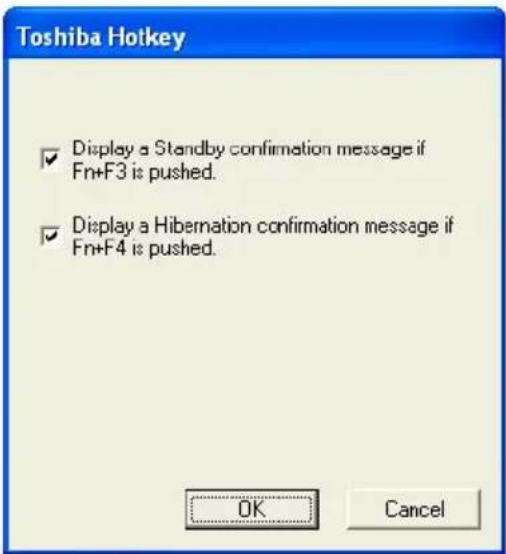
text_image
Toshiba Hotkey ✓ Display a Standby confirmation message if Fn+F3 is pushed. ✓ Display a Hibernation confirmation message if Fn+F4 is pushed. OK CancelSample Toshiba Hotkey utility window
2 Put a check mark next to the desired option.
3 Click OK.
Expansion device properties
To adjust the settings for the optional Slim Port Replicator, use the TOSHIBA Mobile Extension Service Configuration utility.
Mobile Extension
To adjust the settings for docking or using the Slim SelectBay, use the TOSHIBA Mobile Extension.
1 Click Start, then Control Panel, and then click TOSHIBA Mobile Extension.
The TOSHIBA Mobile Extension dialog box appears.
2 Under the Mobile Extension Service tab, you can select behaviors to enable or disable, like Warm Undock Service and Parallel Port Check, by checking or unchecking the appropriate box.
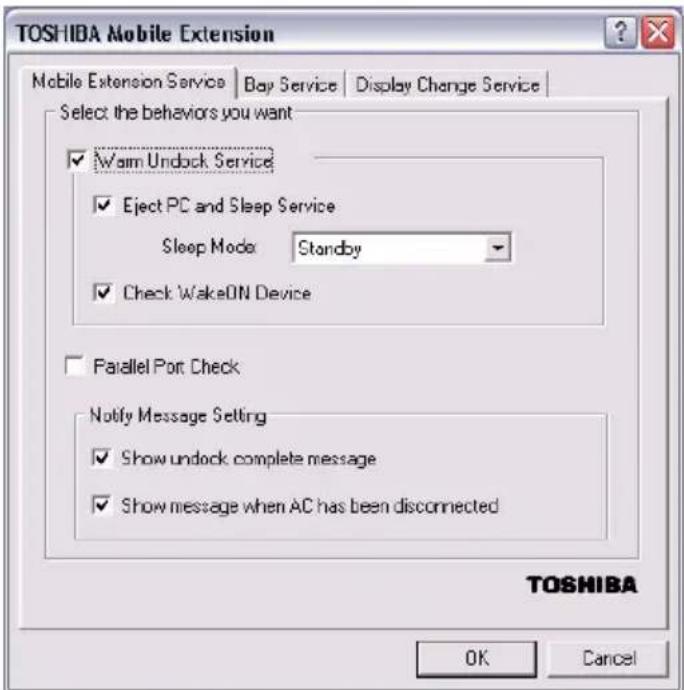
text_image
TOSHIBA Mobile Extension Mobile Extension Service | Bay Service | Display Change Service | Select the behaviors you want ✓ Warm Undock Service ✓ Eject PC and Sleep Service Sleep Mode Standby ✓ Check WakeON Device ✓ Parallel Port Check Notify Message Setting ✓ Show undock complete message ✓ Show message when AC has been disconnected OK Cancel TOSHIBASample Mobile Extension Service tab options
3 Under the SelectBay Service tab, you can select behaviors like Hot Dock and Warm Dock for your Slim SelectBay.
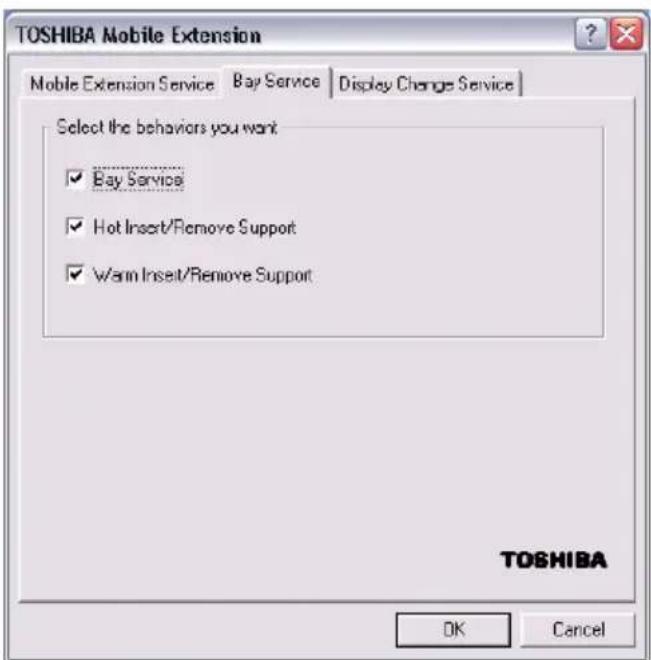
text_image
TOSHIBA Mobile Extension Mobile Extension Service Bay Service Display Change Service Select the behaviors you want ✓ Bay Service ✓ Hot Insert/Remove Support ✓ Warm Insert/Remove Support TOSHIBA OK CancelSample SelectBay Service tab options
4 Under the Display Change Service tab, you can select behaviors of the display output of an external monitor when the system is docked.
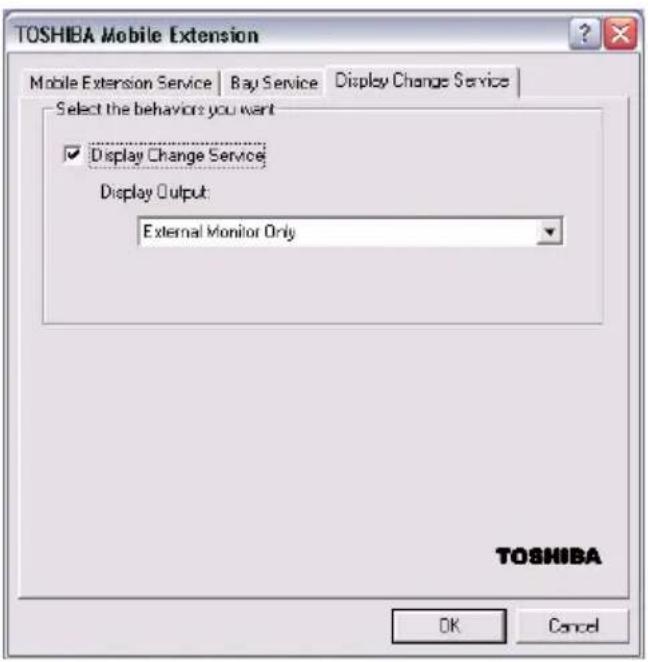
text_image
TOSHIBA Mobile Extension Mobile Extension Service | Bay Service | Display Change Service Select the behaviors you want ✓ Display Change Service Display Output: External Monitor Only OK CancelSample Display Change Service tab options
TOSHIBA Console
The TOSHIBA Console provides quick access to computer functions and allows you to customize a range of computer settings.
You can normally access this utility in two ways:
◆Press the TOSHIBA Console button located above the F12 key on your keyboard.
◆Use the Start menu, as follows.
1 Click Start, then click All Programs.
2 Point to TOSHIBA Console, then click the resulting TOSHIBA Console selection.
The TOSHIBA Console window appears.
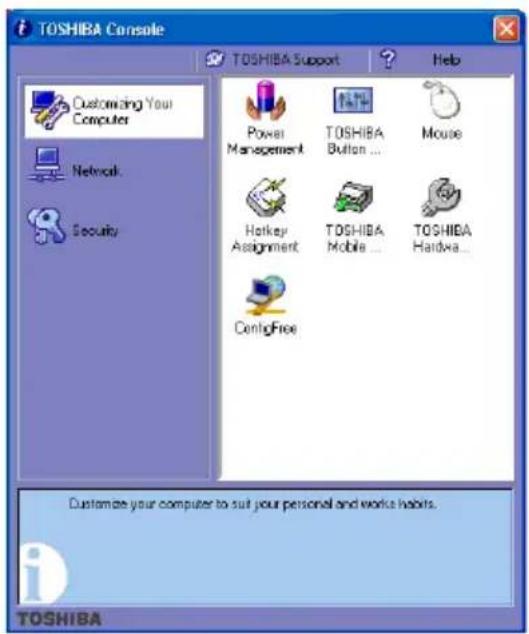
text_image
TOSHIBA Console Customizing Your Computer Network Security Power Management TOSHIBA Button ... Mouse Hotkey Assignment TOSHIBA Mobile ... TOSHIBA Handwa... ConfigFree Customize your computer to suit your personal and works habits. i TOSHIBASample TOSHIBA Console window
The TOSHIBA Console offers three categories of features:
◆Customize Your Computer
Network
Security
Customizing Your Computer
The features available in this category are:
Power Management
TOSHIBA Button Controls
Mouse
Hotkey assignment (for detailed information, see "Fn-esse" on page 161)
Toshiba Hardware Setup
Toshiba Mobile Extension
Config Free
Network
The features in this category are the IR Utility and Connectivity Doctor.
Security
The features available in this category are:
Supervisor password
User password
TOSHIBA Button Controls
The Toshiba Button Controls allow you to program the TOSHIBA Console button and to choose the resolution of the image output of the TOSHIBA Presentation button. Those buttons are located just above the function keys at the top of the keyboard.
To access these controls:
1 In the TOSHIBA Console window, click TOSHIBA Button Controls.
The TOSHIBA Controls Properties window appears.
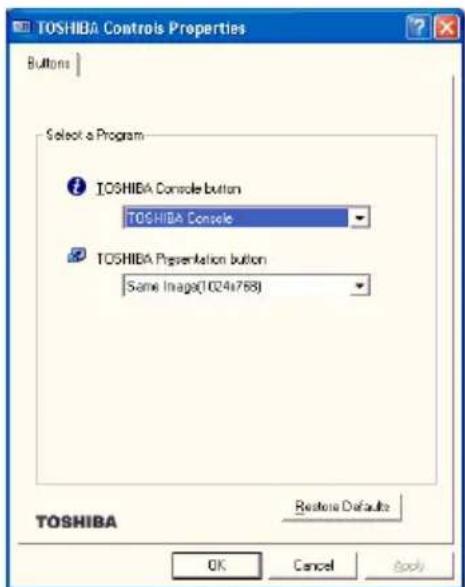
text_image
TOSHIBA Controls Properties Buttons | Select a Program TOSHIBA Console button TOSHIBA Console TOSHIBA Presentation button Same Image(1024x768) Restore Defaults OK Cancel Apply TOSHIBASample TOSHIBA Controls Properties window
2 Select the desired option for either button from the dropdown menu.
3 Click Apply, then click OK.
Power Management
The Power Management feature enables you to control your computer's power usage, regardless of the source, and use the many preset power modes, or create one yourself.
To access Power Management through the TOSHIBA Console, double-click the Power Management icon.
The TOSHIBA Power Saver Properties window appears.
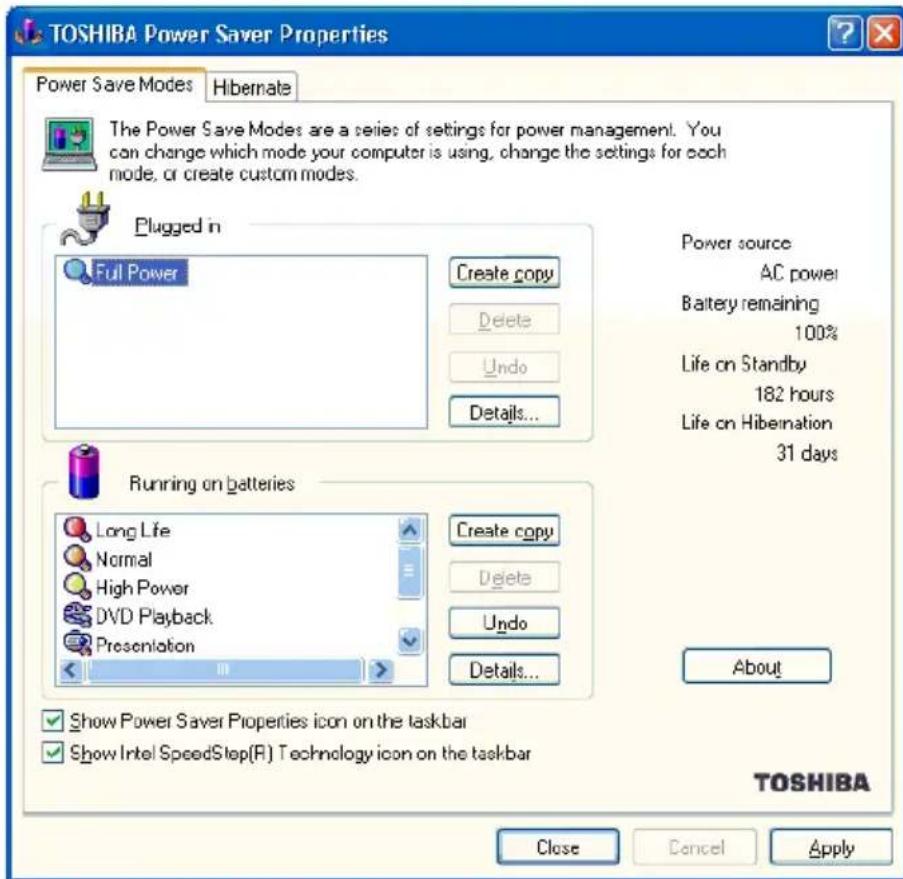
text_image
TOSHIBA Power Saver Properties Power Save Modes Hibernate The Power Save Modes are a series of settings for power management. You can change which mode your computer is using, change the settings for each mode, or create custom modes. Plugged in Full Power Create copy Delete Undo Details... Power source AC power Battery remaining 100% Life on Standby 182 hours Life on Hibernation 31 days Running on batteries Long Life Create copy Normal Delete High Power Undo DVD Playback Presentation Details... About Show Power Saver Properties icon on the taskbar Show Intel SpeedStep(R) Technology icon on the taskbar TOSHIBA Close Cancel ApplySample TOSHIBA Power Saver Properties window
The Power Save Modes tab shows the power usage modes for both AC power (“Plugged in”) and battery power (Running on batteries”).
You can either use one of the preset modes or create and use your own customized mode. The preset modes cannot be deleted.
By changing the options that appear in the Toshiba Power Saver Properties window and clicking OK, you can reconfigure that function. Any options that you change become effective when you click either OK or Apply.
Plugged in section
This section has a single preset power usage mode — Full Power. You can create other AC power modes, but Toshiba recommends use of the preset Full Power mode.
The windows and settings for creating and customizing AC power modes are described below.
Running on batteries section
This section lists the preset modes along with the estimated battery life for each mode. The preset modes are:
Long Life
Normal
High Power
DVD Playback
Presentation
Super Long Life
Although you can change the properties for any of these modes, this is not recommended. If you need a customized mode, create a new mode with the properties you require.
The Super Long Life mode is designed to maximize battery operating time. When it is enabled, all LAN functions, both wired and wireless (CardBus controller), are disabled. The Super Long Life mode is not enabled by default on your computer.
To enable LAN settings in the Super Long Life mode, follow these steps:
1 Click the Device Settings tab.
2 Right-click the status setting for the device and select Enable.
3 To disable LAN settings, follow the previous steps and select Disable.
Creating a new power mode
1 Highlight one of the preset modes.
2 Click Create copy.
3 A new mode appears with the title “Copy Name” where Name is the title of the mode you copied. Delete this title, type in the name for your new power mode, then press Enter.
Customizing a power mode
1 Highlight the mode on the Power Save Modes window.
2 Click Details....
The Properties window for the selected mode opens with the General tab displayed.
This tab enables you to choose an icon for your power usage mode, describe the mode's characteristics and, optionally, associate it with a program.
The Name field displays the name assigned to the mode in the Power Saver Properties window. You can change the name here if you wish.
Toshiba Hardware Setup
Toshiba Hardware Setup is the Toshiba configuration management tool. To access it:
In the TOSHIBA Console, double-click the Toshiba Hardware Setup icon.
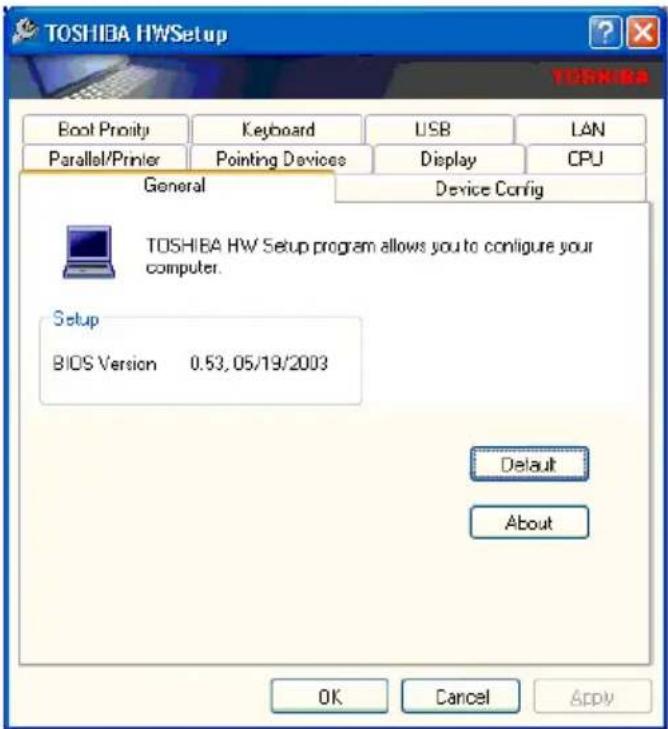
text_image
TOSHIBA HWSetup Boot Priority Keyboard USB LAN Parallel/Printer Pointing Devices Display CPU General Device Config TOSHIBA HW Setup program allows you to configure your computer. Setup BIOS Version 0.53, 05/19/2003 Default About OK Cancel ApplySample TOSHIBA HWSetup window
The TOSHIBA HWSetup window appears with tabs for the following:
✿ Boot Priority — Allows you to change the sequence in which your computer accesses its disk drives for the files that load and initialize the operating system.
You can also manually choose the boot-up sequence by pressing the power button, then quickly pressing the right or left arrow keys.
Select the boot device by pressing the right or left arrow keys, then pressing the Enter key.
Since the system is a quick-booting system, you must press the arrow keys immediately after pressing the power button.
Keyboard—Allows you to configure the Fn function key emulation for an external keyboard. This function does not work with a USB keyboard.
USB—Allows you to enable or disable USB Legacy Emulation.
- LAN — Lets you enable or disable the Wake-up on LAN feature.
◆Parallel/Printer—Allows you to configure the Advanced Port Replicator parallel port default settings.
◆Display—Allows you to change various default settings for the built-in LCD display and external video displays.
CPU—Allows you to enable or disable the processor serial number, and to set the “CPU Frequency Mode” to one of “Dynamically Switchable,” “Always High,” or “Always Low.”
◆General — Allows you to view the current BIOS.
Device Config—Shows the Device configuration options.
Chapter 7
Keeping Your Files Safe
You may have files on your computer that you want to keep private. Your computer comes with several options that can help you keep your computer and files safe from unwanted intrusion.
This chapter describes the security options for your notebook computer.
Using passwords in Windows
Setting a password lets you leave your computer, secure in the knowledge that nobody can access your files. When you set a password, you must enter the password before you can work on your computer again.
Toshiba supports the following types of passwords on the M100 Series computer:
A power-on (user-level) password that requires you to enter the password whenever you start the computer.
An instant (user-level) password that secures your open programs and files when you need to leave the computer temporarily.
A supervisor-level password that protects system settings by restricting who can make changes in Toshiba Utilities and System Setup. This is useful if more than one person is using the computer.
User-level passwords
The user-level password is the basic level of password security. You can use it as a power-on password. For most users, this is all the password security you'll need.
You can set (register) a user-level password in either Toshiba Hardware Setup or System Setup. If you use System Setup, however, you can also create a password service diskette which can be used to bypass the password function when starting your computer. Once you have used the diskette, you must reset your password and create another password service diskette.
CAUTION
Make sure you use a password you can remember easily. If you ever forget your password, contact your network administrator.
A good way to prevent forgetting your password is to create a password service diskette. Refer to “Setting a user-level password in System Setup” on page 179 for instructions.
Setting a user-level password
You can set a user-level password in Toshiba Console or in System Setup.
Setting a user-level password in Toshiba Hardware Setup
Setting a password leaves your computer secure so that nobody can access your files. You must enter the password before you can work on your computer.
A single user password supports the instant and power-on password functions.
Using an instant password
An instant password secures your system with a single keystroke. Use this feature when you leave your desk for a few minutes and don't want to turn off the computer.
1 Press Fn, then press F1.
The screen goes blank.
2 Move the Dual Pointing Device, or press a key.
On the displayed screen, select a user.
3 For the selected user:
If you have not registered a user password, press Enter.
If you have registered a user password, type the password and press Enter.
The desktop displays.
Setting a Windows user password
To register a password for the Windows Logon and Instant Password functions:
1 Click Start, then Control Panel.
2 Click User Accounts.
3 Select Create a password.
4 Enter the password and password hint as directed.
5 Click Create Password.
6 Click the Close icon (x) to close the User Accounts window.
When you log into Windows, you will be asked for this password. This password will also be required to bring the machine out of the instant security mode that
Setting a user-level password in System Setup

HINT: If you forget your password and have lost your password service diskette, contact Toshiba Technical Support. For more information, refer to “If you need further assistance” on page 217.
To register a user-level password in System Setup and create a password service diskette:
1 Click Start, then Shut Down. Select Shut down and click OK.
The computer shuts down and turns itself off.
2 Connect your diskette drive. For instructions, see “Using the optional external USB diskette drive” on page 130.
3 Insert a write-enabled diskette into the diskette drive.

HINT: Run System Setup outside Windows, at a system prompt. If you try to run System Setup from an MS-DOS session under Windows, results can be unpredictable.

4 Hold down the Esc key and press and hold the power button in until the on/off light on the system indicator panel turns on (green)—about one second. When you
receive the following message:
“Check system. Then press [F1] key,” press F1.
System Setup displays a setup screen.
5 Press P to move to the PASSWORD section of the screen.
6 Press the spacebar.
System Setup asks you to enter a new password.
7 Type a password of 1 to 16 characters and press Enter.
You may use any combination of letters and numbers in your password.
8 When System Setup prompts you to do so, verify the password by typing it again and pressing Enter.
If the two passwords match, System Setup displays: Registered.
If the two passwords don't match System Setup displays an error message. Repeat steps 7 and 8 to enter the password again.
9 Press End to save your change.
System Setup asks you to confirm your choice.
10 Press Y to confirm you want to quit.
System Setup prompts you to select the type of diskette you inserted.
CAUTION
The System Setup process overwrites all existing information on the password service diskette. Make sure the diskette you use does not contain any important information.
11 Press 1 if you're using a 1.44 MB diskette or press 2 if you're using a 720 KB diskette.
System Setup creates the password service diskette and displays a message when it's finished.
12 Remove the diskette and press any key to continue.
System Setup closes, returning you to the system prompt. The next time you start the computer your password will be in effect.
13 Store your password service diskette in a safe place, away from the computer.
CAUTION
Don't use your password service diskette for any other purpose. If you try to access the diskette, you'll receive an error message, and will have to reset your password and create a new password service diskette.
Disabling a user password
To cancel the password that supports the instant and power-on password functions:
1 Press the Toshiba Console button and click on Security.
2 Click the User Password icon.
3 Click Delete.
4 Type your password in the Enter Password box and click Delete.
5 Click OK twice.

TECHNICAL NOTE: You have three tries to enter the correct password. After an incorrect try, an "Incorrect Password" dialog box will appear. Click OK to reenter the password.
After three incorrect tries, this message appears: "Sorry, access denied! Reboot is required to regain access." You will need to turn off the computer, then reboot.
6 Click OK to exit.
Disabling a user-level password in System Setup
To register a user-level password in System Setup and create a password service diskette:
1 Click Start, then Shut Down. Select Shut down and click OK.
The computer shuts down and turns itself off.

HINT: Run System Setup outside Windows, at a system prompt. If you try to run System Setup from an MS-DOS session under Windows, results can be unpredictable.

2 Hold down the Esc key and press and hold the power button in until the on/off light on the system indicator panel turns on (green)—about one second. When you receive the following message:
“Check system. Then press [F1] key,” press F1.
System Setup displays a setup screen.
3 Press P to move to the PASSWORD section of the screen.
4 Press the spacebar.
System Setup asks you to enter a new password.
5 Press Enter.
6 When System Setup prompts you to do so, verify the password by pressing Enter.
7 Press End to save your change.
System Setup asks you to confirm your choice.
8 Press Y to confirm you want to quit.
System Setup closes, returning you to the system prompt. The next time you start the computer, your password will be disabled.
Using the power-on (user-level) password
Whenever you start your computer with a power-on (user-level) password in effect, the computer prompts you to enter the password before it goes through its normal startup procedure.
When your computer prompts you to enter your password, type it in and press Enter. If you enter the password correctly, the computer continues with its normal startup procedure. If you enter an incorrect password, the computer beeps. After three incorrect attempts, the system turns off automatically.
If you've forgotten your password and you have a password service diskette:
1 Connect your diskette drive. For instructions, see “Using the optional external USB diskette drive” on page 130.
2 Turn on the computer.
The system prompts you for your password.
3 Insert the password service diskette into the diskette drive and press Enter.
The system prompts you, "Set Password Again (Y/N)?"
CAUTION
The password service diskette is not reusable. Once you use it, you must create a new diskette, even if you set the same password.
4 To enter System Setup and reset your password, press Y. Follow the instructions in “Setting a user-level password in System Setup” on page 179 to reset your password.
To remove your password, press N. It will no longer be registered.
Using the instant (user-level) password
An instant password secures your system with a single keystroke. Use this feature when you need to leave your desk for a few minutes and don't want to turn off the computer.
To use an instant password, pressFn and F1 simultaneously. Pressing this hot key freezes the keyboard and AccuPoint II and blanks the screen. An instant password has no effect on an optional serial mouse or trackball.
If you have not registered a user-level password, press Enter to unlock your system.
If you have registered a user-level password, type your password and press Enter. If you enter the password correctly, the computer returns to where it was when you pressed the hot key.
Using a supervisor password
A supervisor password prevents other users from changing hardware configuration options.
Setting a supervisor password
1 Click Start, then click All Programs.
2 Point to Toshiba Console, then click the resulting Toshiba Consol e selection.
The Toshiba Console window appears.
3 Select Security.
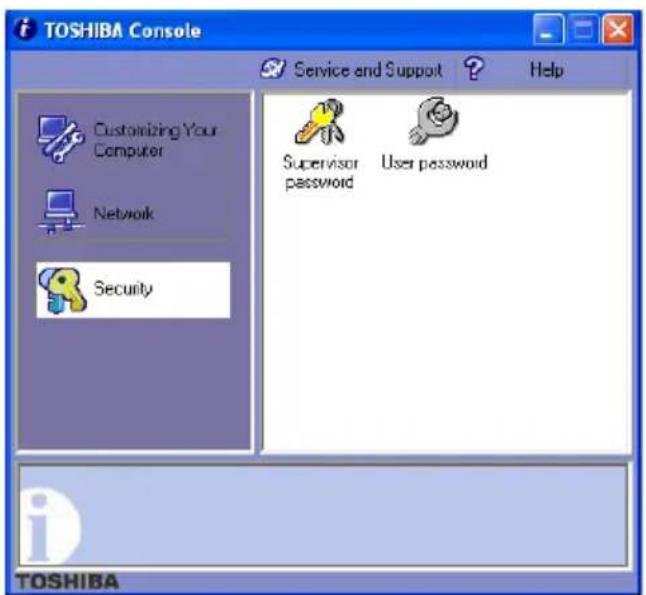
text_image
TOSHIBA Console Service and Support Help Customizing Your Computer Network Security Supervisor password User password i TOSHIBASample Toshiba Console Security window
4 Click the Supervisor password icon, then click on the Supervisor Password tab.
5 Select Set.
6 Enter a password (then enter it again to verify).
7 Click Set.
8 Click OK if you want to save the password to a text file on a diskette. Click Cancel if you do not want to save the password to a text file on a diskette.
9 Click OK to exit.
Deleting a supervisor password
1 Click Start, then click All Programs.
2 Point to Toshiba Console, then click the resulting Toshiba Consol e selection.
The Toshiba Console window appears.
3 Select Security.
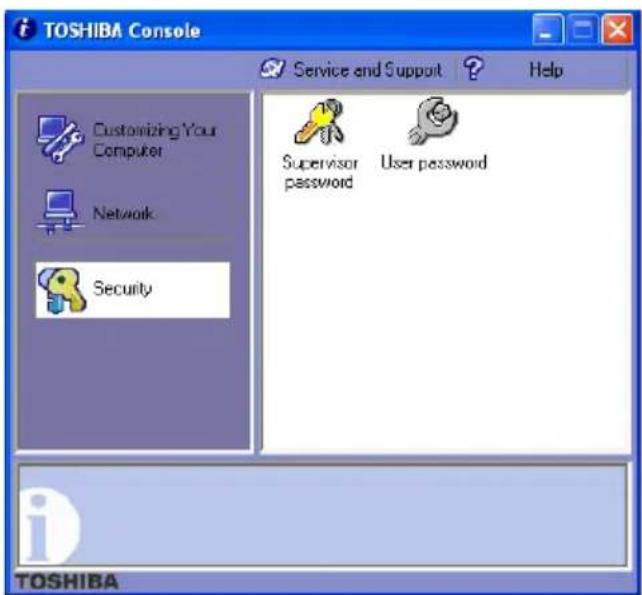
text_image
TOSHIBA Console Service and Support Help Customizing Your Computer Network Security Supervisor password User password i TOSHIBASample Toshiba Console Security window
4 Click the Supervisor password icon.
5 Select Delete.
6 Enter the correct password.
7 Click Delete, then click OK twice to exit.
Chapter 8
If Something Goes Wrong
Some problems you may encounter when using your computer are relatively easy to identify and solve. Others may require help from your network administrator or the manufacturer of a software program.
This chapter aims to help you solve many problems by yourself. It covers the problems you are most likely to encounter.
If all else fails, contact Toshiba. You will find information on Toshiba's support services at the end of this chapter.
Problems that are easy to fix
Your program stops responding.
If you are working with a program that suddenly freezes all operations, chances are the program has stopped responding. You can exit the failed program without shutting down the operating system or closing other programs.
To close a program that has stopped responding:
1 Press Ctrl, Alt, and Del simultaneously (once).
2 Click Windows Task Manager.
The Windows Task Manager window appears.
3 Click the Applications tab.
If a program has stopped responding, the words “not responding” appear beside its name in the list.
4 Select the program you want to close, then click End Task.
Closing the failed program should allow you to continue working. If it does not, continue with step 5.
5 Close the remaining programs one by one by selecting the program name, then End Task.
To power off your computer, do one of the following:
If you are not connected to a domain server:
1 Click Start, Turn off computer.
The Turn off computer window appears.
2 Click Turn Off.
The computer turns off.
If you are connected to a domain server:
1 Click the Start button, then Shut down.
The Shut Down window appears.
2 Select Shut down from the drop-down list.
3 Click OK.
The computer shuts down completely.
Your program performs an illegal operation.
If you receive the message, “Your program has performed an illegal operation,” you should record the details of the message and consult the software manufacturer.
To record the details:
1 Click the Details button and select the text the operating system displays.
The Details button displays information that the software manufacturer needs to help you solve your problem.
2 Press Ctrl and c simultaneously to copy the text to the clipboard.
3 Open Notepad (click Start, point to All Programs, then point to Accessories and click Notepad).
4 Press Ctrl and v simultaneously to paste the details into Notepad.
5 Add a paragraph break and type some notes describing what you were doing when you received the message.
6 Save the file and refer to it when you contact the software manufacturer.
Problems when you turn on the computer
These problems may occur when you turn on the power.
The computer will not start.
Make sure you attached the AC adapter and power cord/cable properly or installed a charged battery.
Press and hold down the power button for a few seconds.
If you are using the AC adapter, check that the wall outlet is working by plugging in another device, such as a lamp.
The computer starts but, when you press a key, nothing happens.
You are probably in Standby mode and have a software or resource conflict. When this happens, turning the power on returns you to the problem instead of restarting the system. To clear the condition, press Ctrl, Alt, and Del simultaneously.
Clearing the condition may get the computer running, but it will not solve a resource conflict. Read the documentation that came with the conflicting device and “Resolving a hardware conflict” on page 194.
The computer is not accessing the hard disk or the optional external diskette drive.
Your computer normally loads the operating system from the hard disk. If you have a hard disk problem, you will not be able to start the computer. Insert a system diskette into the optional external diskette drive and press F12 when the machine starts and use the arrow keys to select the boot-up device.
The computer displays the WARNING RESUME FAILURE message.
The computer was placed in Stand By mode and the battery has discharged. Data stored in the computer's memory has been lost.
To charge the battery, leave the computer plugged into a live wall outlet for several hours. For more information, see “Power and the batteries” on page 199.
The computer displays the Non-System disk or disk error message.
Make sure there is no diskette in the optional external diskette drive. If there is one, remove it and press any key to continue. If pressing any key does not work, press Ctrl, Alt, and Del to restart the computer.
The Windows® operating system is not working
Once you are familiar with the desktop and used to the way the operating system responds to your work routine, you can easily detect if the operating system is not working correctly. For example:
The operating system fails to start after the Starting Windows XP message appears.
The operating system takes a long time to start.
The operating system responds differently from the normal routine.
◆The screen does not look right.
Unless a hardware device has failed, problems usually occur when you change the system in some way such as installing a new program or adding a device.
If you experience any of these problems, use the options in the Startup menu to fix the problem.
Using Startup options to fix problems
If the operating system fails to start properly, you may have to change your system's configuration or verify the startup procedure to fix the problem. To do this, use the options in the Startup menu. This section describes each option and when to use the procedure.
To open the Startup menu:
1 Restart your computer.
2 Press F8 when your computer starts.
The Windows ^® Advanced Options menu displays these options:
Safe Mode
◆Safe Mode (with Networking)
◆Safe Mode (with Command Prompt)
◆Enable Boot Logging
Enable VGA Mode
◆Last known good configuration (your most recent settings that worked)
◆Directory Services Restore Mode (Windows ^® domain controllers only)
◆Debugging Mode
◆Start Windows ^® normally
Reboot
◆Return to OS Choices (menu)
See your Windows ^® documentation for further explanation.

TECHNICAL NOTE: If your computer is connected to a network, the Startup menu may display different versions of Safe mode.
Internet problems
My Internet connection is very slow.
Many factors contribute to the speed with which you can surf the Internet. They include: modem speed, time of day (when everyone else is surfing, your access can be slow) and popularity of the site. If accessing a particular site is very slow, try later.
My browser can not find the URL address I typed in.
Make sure you separated the domain names of the address with the forward slash (/). Check the spelling of each name and the syntax of the address carefully. A single incorrect letter or missed character, comma instead of period (“dot”) or
other mistake makes it impossible for your browser to locate the site.
My browser can not find a site I bookmarked.
The World Wide Web is constantly changing. A site you bookmarked yesterday may not be available today or its server may be down for temporary repair. Try again later.
The Windows® XP operating system can help you
If the operating system has started properly, but you still have a problem using your computer, the online Help can assist you in troubleshooting the problem.
To access Windows ^® XP Help and Support:
1 Click Start, then click Help and Support.
The Help and Support window appears.
2 Then do one or both of the following:
In the search field, type in the topic on which you need help and follow the on-screen instructions.
◆Click a problem you would like help with from the listings and follow the on-screen instructions.
You can connect to Support Online by clicking Support from the menu.
Resolving a hardware conflict
If you receive an error message telling you there is a device driver conflict or a general hardware problem, try using Windows ^® Help and Support to troubleshoot the problem first.
For help on hardware conflicts:
1 Click Start, then click Help and Support.
2 Click the Hardware link in the window's left pane.
A list of category links appear.
3 Click the Fixing a hardware problem.
4 Choose from specific topics and follow the steps.
If there is still a problem, the operating system should display a message that explains what the conflict is.
A plan of action
The smooth operation of the system depends on the interaction of all devices, programs, and features. If the system or one of its attached devices is not working, resolving the problem can be time-consuming and frustrating.
The recommended procedure for getting multiple devices to work together is to add and set up one device at a time. After you add each device, test it to make sure it and all previously connected devices work.
The device most recently connected to the system is the one most likely to be causing a hardware conflict.
Resolving hardware conflicts on your own
Computer components need resources to accomplish a task. A device, such as a disk drive or a modem, needs a channel to the computer's Central Processing Unit (CPU). It also needs a direct channel to the computer's memory to store information as it works. These channels of communication are commonly referred to as system resources.
Interrupt Request Channel
The channel to the CPU is called an Interrupt Request (IRQ) because it interrupts what the processor is doing and requests some of the processor's time. If two or more devices use the same IRQ, the processor does not know which device is asking for attention. This causes a hardware conflict.
Direct Memory Access
Similarly, the data required by the device is stored in a specific place or address in memory called the Direct Memory Access (DMA). The DMA provides a dedicated channel for adapter cards to bypass the microprocessor and access memory directly. If two or more devices use the same DMA, the data required by one device overwrites the data required by the other, causing a hardware conflict.
Plug and Play
With Plug and Play and the operating system, avoiding hardware conflicts is easy. Plug and Play is a computer standard that helps the system BIOS (basic input/output system) and the operating system to automatically assign system resources to Plug and Play-compliant devices. In theory, if every device connected to the computer is Plug and Play-compliant, no two devices will compete for the same system resources. Plug in the device and turn on your computer. The operating system is automatically set up to accommodate the new device.
If you install an older (legacy) device that the operating system cannot recognize, the operating system may have difficulty assigning resources to it. As a result, a hardware conflict can occur.
Resolving conflicts
There are three things you can do to resolve hardware conflicts:
◆Disable the device.
For an older device, remove it from the computer.
◆Disable another system component and use its resources for the new device, see “Fixing a problem with Device Manager” on page 197.
◆Reconfigure the device so that its requirements do not conflict. Refer to the device’s documentation for instructions about changing settings on the device.
Fixing a problem with Device Manager
Device Manager provides a way to check and change the configuration of a device.
▲ CAUTION
Changing the default settings using Device Manager can cause other conflicts that make one or more devices unusable. Device Manager is a configuration tool for advanced users who understand configuration parameters and the ramifications of changing them.
Disabling a device
1 Click Start, Control Panel, Administrative Tools.
2 Click the Computer Management icon.
3 Select the specific device from the device category.
4 In the toolbar, look to the far right for an icon of a monitor with a strike mark through a circle on the front. This is the disable feature.
5 Click the icon.
You are given the option of disabling the device.
6 Click yes or no, whichever is appropriate.
Checking device properties
Device Manager provides a way to view the properties of a device. Properties include the name of the manufacturer, the type of device, the drivers installed, and the system resources assigned to the device.
To check a device's properties:
1 Click Start, Control Panel, Administrative Tools.
2 Click the Computer Management icon.
3 Click the Device Manager button.
4 To view the device(s) installed, double-click the device type.
5 To view the properties, double-click the device.
The operating system displays the Device Properties dialog box, which provides an array of tabs. They include:
The General tab, which provides basic information about the device.
The Resource tab, which lists resources assigned to the monitor, optional external diskette disk drive, and other power-using functions.
The Drivers tab, which displays the drivers being used by the device.
A Troubleshooting button is also present.
6 Click troubleshooting.
A Help and Support window for that device appears.
For more information about Device Manager, refer to Windows ^® XP online help.
Memory problems
Incorrectly connected or faulty memory modules may cause errors that seem to be device-related. It is worthwhile checking for these first:
1 Click Start, Turn off computer.
2 Click Turn Off.
The operating system shuts down and turns off the computer automatically.
3 Remove the memory module, following the instructions in “Removing a memory module” on page 64.
4 Reinstall the memory module, following the instructions in “Using the AccuPoint II” on page 57, and making sure the module is seated properly.
5 Check for the error again.
6 If the error recurs, remove the memory module entirely and check for the error again.
If removing the memory module eliminates the error, the memory module may be faulty. If the error recurs without the memory module installed, the error is not caused by the memory module.

TECHNICAL NOTE: You must have at least one memory module installed for the computer to work.
Power and the batteries
Your computer receives its power through the AC adapter and power cord/cable or from the system batteries (main battery, optional high-capacity battery and real-time clock (RTC) battery). Power problems are interrelated. For example, a faulty AC adapter or power cord/cable will neither power the computer nor recharge the batteries.
Here are some typical problems and how to solve them:
The AC power light does not come on when you plug in the AC adapter and power cord/cable.
Make sure the AC adapter and power cord/cable are firmly plugged into both the wall outlet and the computer.
If the AC power light still does not come on, check that the wall outlet is working properly by plugging in a lamp or other appliance.
The AC adapter and power cord/cable work correctly, but the battery will not charge.
The battery does not charge while the computer is consuming full power. Try turning off the computer.
The main battery may not be inserted correctly in the computer. Turn off the computer, remove the battery, clean the contacts with a soft dry cloth (if necessary) and replace the battery. See “Removing the battery from the computer” on page 123.
The battery may be too hot or too cold to charge properly. If you think this is the probable cause, let the battery reach room temperature and try again.
If the battery has completely discharged, it will not begin charging immediately. Leave the AC adapter and power cord/cable connected, wait 20 minutes and see if the battery is charging.
If the battery light is glowing after 20 minutes, let the computer continue charging the battery for at least another 20 minutes before you turn on the computer.
If the battery light does not glow after 20 minutes, the battery may have reached the end of its useful life. Try replacing it.
The battery appears not to power the computer for as long as it usually does.
If you frequently recharge a partially charged battery, it may not charge fully. Let the battery discharge completely, then try charging it again.
Check the power options using the Power Management utility. Have you added a device, such as a PC Card or memory module, that takes its power from the battery? Is your software using the hard disk more? Is the display power set to turn off automatically? Was the battery fully charged to begin with? All these conditions affect how long the charge lasts.
For more information on maximizing battery power, see “Charging batteries” on page 113.
Keyboard problems
If, when you type, strange things happen or nothing happens, the problem may be related to the keyboard itself.
The keyboard produces unexpected characters.
A keypad overlay may be on. If the numlock light or cursor control mode light is on, press Fn and F10 simultaneously to turn off the cursor control mode light or Fn and F11 simultaneously to turn off the numlock light.
If the problem occurs when both the keypad overlays are off, make sure the software you are using is not remapping the keyboard. Refer to the software documentation and check that the program does not assign different meanings to any of the keys.
You've connected an external keyboard and the operating system displays one or more keyboard error messages.
The keyboard you connected may be defective or incompatible with the computer. Try using a different make of keyboard.
Nothing happens when you press the keys on the external keyboard.
You may have plugged the external PS/2 keyboard in while the computer was turned on. Click Start, Shut Down or Turn off computer, and Restart the computer using the AccuPoint II on the internal keyboard. The computer will restart and recognize the device.
AccuPoint II problems
Some of the keyboard problems already listed may affect the AccuPoint II. In addition:
Your finger slides off the AccuPoint II easily.
If the AccuPoint II cap is oily, remove the cap and clean it with a cotton swab dipped in rubbing alcohol.
To remove the cap:
1 Firmly grasp the cap and pull it straight up.
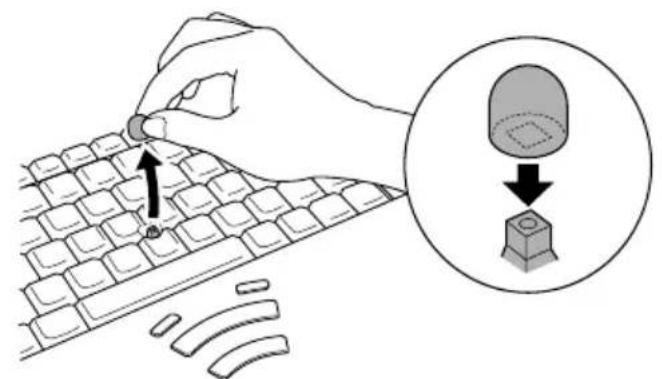
text_image
Illustration showing a hand typing on a keyboard with an arrow pointing to the key, and a magnified view of a button labeled '按钮' (button) pointing to a key.Removing the AccuPoint II cap
2 After cleaning the cap, position it on the peg and press it into place.
NOTE
The peg is square, so be careful to align the cap's hole with the peg.
Display problems
Here are some typical display problems and their solutions:
The screen is blank.
Display Auto Off may have gone into effect. Press any key to activate the screen.
You may have activated the instant password feature by pressing Fn and F1 simultaneously. If you have registered a password, press any key, type the password and press Enter. If no password is registered, press any key. The screen reactivates and allows you to continue working.
If you are using the built-in screen, make sure the display priority is not set for an external monitor. To do this, press Fn and F5 simultaneously (once). If this does not correct the problem, press Fn and F5 simultaneously again to return the display priority to its previous setting.
If you are using an external monitor:
◆Check that the monitor is turned on.
Check that the monitor's power cable is firmly plugged into a working power outlet.
Check that the cable connecting the external monitor to the computer is firmly attached.
❖Try adjusting the contrast and brightness controls on the external monitor.
- Press Fn and F5 simultaneously to make sure the display priority is not set for the built-in screen.
The screen does not look right.
You can change the display settings by clicking a blank area of the desktop with the secondary control button, then clicking Properties. This opens the Display Properties dialog box. The Appearance tab of this dialog box allows you to choose the colors for the screen. The Settings tab allows you to choose the screen resolution.
The built-in screen flickers.
Some flickering is a normal result of the way the screen produces colors. To reduce the amount of flickering, try using fewer colors.
To change the number of colors displayed:
1 Point at the desktop and click with the secondary button.
2 Click Properties, and then the Settings tab.
3 Change the Colors option and click OK.
For more information, see Windows ^® Help.
A message tells you that there is a problem with your display settings and that the adapter type is incorrect or the current settings do not work with your hardware.
Reduce the size of the color palette to one that is supported by the computer's internal display.
To change the display properties:
1 Point at the desktop and click with the secondary button. The Display Properties window appears.
2 Click Properties, then click the Settings tab.
3 Adjust the screen resolution and/or color quality.
4 Click OK.
The display mode is set to Simultaneous and the external display device does not work.
Make sure the external monitor is capable of displaying at resolutions of 800 x 600 or higher. Devices that do not support this resolution will only work in External monitor only mode.
Small bright dots appear on your TFT display when you turn on your computer.
Your display contains an extremely large number of thin-film transistors (TFT) and is manufactured using high-precision technology. The small bright dots that appear on your display are an intrinsic characteristic of the TFT manufacturing technology.
NOTE
Over a period of time, and depending on the usage of the computer, the brightness of the LCD Screen will deteriorate. This is an intrinsic characteristic of LCD technology.
Screen will dim when the computer is operated on battery power and you may not be able to increase the brightness of the screen.
Disk drive problems
Problems with the hard disk or with a diskette drive usually show up as an inability to access the disk or as sector errors. Sometimes a disk problem may cause one or more files to appear to have garbage in them. Typical disk problems are:
You are having trouble accessing a disk, or one or more files appear to be missing.
Make sure you are identifying the drive by its correct name (A: or C:).
Error-checking
Run Error-checking, which analyzes the directories, files and File Allocation Table (FAT) on the disk and repairs any damage it finds:
To run Error-checking:
1 Click Start, then click My Computer.
2 Right-click the drive you want to check.
The drive's Properties box appears.
3 Click the Tools tab.
4 Click the Check now button.
The Check Disk All Apps box appears.
5 You can choose one or both options:
◆Automatically fix file system errors
◆Scan for and attempt recovery of bad sectors
6 Click Start.
Error-checking tests and repairs the disk.
Your hard disk seems very slow.
If you have been using your computer for some time, your files may have become fragmented. Run Disk Defragmenter.
To do this, click Start, then click All Programs, point to Accessories and System Tools, and click Disk Defragmenter.
Your data files are damaged or corrupted.
Refer to your software documentation for file recovery procedures. Many software packages automatically create backup files.
You may also be able to recover lost data using utility software. Consult your network administrator.
Some programs run correctly but others do not.
This is probably a configuration problem. If a program does not run properly, refer to its documentation and check that the hardware configuration meets its needs.
A diskette will not go into the optional external diskette drive.
You may already have a diskette in the drive. Make sure the drive is empty.
You may be inserting the diskette incorrectly. Hold the diskette with the hub side facing down, and insert it so that the metal head window cover goes into the drive first.
The metal cover or a loose label may be obstructing the path into the drive. Carefully inspect the diskette. If the metal cover is loose, replace the diskette. If the label is loose, replace the label and try inserting the diskette again.
The computer displays the Non-system disk or disk error message.
If you are starting the computer from a diskette, the diskette in the drive does not have the files necessary to start the computer. Replace it with a bootable diskette.
The drive cannot read a diskette.
Try another diskette. If you can access the second diskette, the first diskette (not the drive) is probably causing the
problem. Run Error-checking on the faulty diskette (for instructions, see “Disk drive problems” on page 205).
Problems with the DVD-ROM or multi-function drive
You cannot access a disc in the drive.
Make sure the tray which holds the CD-ROM or DVD-ROM is closed properly. Press gently until it clicks into place.
Open the tray and remove the disc. Make sure the tray is clean. Any dirt or foreign object can interfere with the laser beam.
Examine the disc to see if it is dirty. If necessary, wipe it with a clean cloth dipped in water or a neutral cleaner.
Replace the disc in the tray. Make sure that the disc is lying flat, label side uppermost. Close the tray carefully, making sure it has shut completely.
You press the DVD-ROM or multi-function drive eject button, but the DVD-ROM or multi-function drive tray does not slide out.
Make sure the computer is connected to a power source and turned on. The DVD-ROM or multi-function drive eject mechanism requires power to operate.
If you need to remove a disc and cannot turn on the computer (for example, if the battery is completely discharged), use a narrow object, such as a straightened paper clip, to press the manual eject button. This button is in the small hole next to the DVD-ROM or multi-function eject button on the face of the DVD-ROM/multi-function tray.
Some discs run correctly but others do not.
Check the type of disc you are using. The DVD-ROM drive supports the Digital Versatile Disc (DVD) formats DVD-ROM, DVD-R (read-only), plus CD-ROM, CD-R (read-
only), and CD-RW (read-only). The CD-ROM drive supports CD-ROM, CD-R (read-only), and CD-RW (read-only).

HINT: The DVD-ROM drive is initially set for Region 1 (North America) DVDs.
If the problem is with a data CD or DVD, refer to the software's documentation and check that the hardware configuration meets the program's needs.
The disc will not come out of the drive when you click the eject button on the screen.
Press the button on the DVD-ROM or multi-function drive itself.
Sound system problems
You do not hear any sound from the computer.
Adjust the volume control.
If you are using external headphones or speakers, check that they are securely connected to your computer.
The computer emits a loud, high-pitched noise.
This is feedback between the microphone and the speakers. It occurs in any sound system when input from a microphone is fed to the speakers and the speaker volume is too loud. Adjust the volume control.
Changing the settings for the Record Monitor feature in the Recording Control Utility (default Off), or the Mute feature in the Mixer Utility (default Enabled), may cause feedback. Revert to the default settings.
PC Card problems
PC Cards (PCMCIA-compatible) include many types of devices, such as a removable hard disk, additional memory, or a pager.
Most PC Card problems occur during installation and setup of new cards. If you're having trouble getting one or more of these devices to work together, several sections in this chapter may apply.
Resource conflicts can cause problems when using PC Cards. See “Resolving a hardware conflict” on page 194.
Card Information Structure
When you insert a PC Card into a slot, the computer attempts to determine the type of card and the resources it requires by reading its Card Information Structure (CIS). Sometimes the CIS contains enough information for you to use the card immediately.
Other cards must be set up before you can use them. Use the Windows ^® XP PC Card (PCMCIA) Wizard to set up the card. Refer to your Microsoft ^® documentation for more information, or refer to the documentation that came with the PC Card.
Some card manufacturers use special software called enablers to support their cards. Enablers result in nonstandard configurations that can cause problems when installing the PC Card.
If your system does not have built-in drivers for your PC Card and the card did not come with an operating system driver, it may not work under the operating system. Contact the manufacturer of the PC Card for information about using the card under the operating system.
PC Card checklist
Make sure the card is inserted properly into the slot.
See “Using Slim SelectBay modules” on page 137 for how to insert PC Cards.
Make sure all cables are securely connected.
Occasionally a defective PC Card slips through quality control. If another PCMCIA-equipped computer is available, try the card in that machine. If the card malfunctions again, it may be defective.
Resolving PC Card problems
Here are some common problems and their solutions:
The slot appears to be dead. PC Cards that used to work no longer work.
Check the PC Card status:
1 Click Start.
2 Click My Computer icon with the secondary button, then click Properties.
The System Properties dialog box appears.
3 Click the Hardware tab.
4 Click the Device Manager button.
5 Double-click the PCMCIA adapter.
6 Double-click the appropriate PC Card.
The operating system displays your PC Card's Properties dialog box, which contains information about your PC Card configuration and status.
The computer stops working (hangs) when you insert a PC Card.
The problem may be caused by an I/O (input/output) conflict between the PCMCIA socket and another device in the
system. Use Device Manager to make sure each device has its own I/O base address. See “Fixing a problem with Device Manager” on page 197 for more information.
Since all PC Cards share the same socket, each card is not required to have its own address.
Hot swapping (removing one PC Card and inserting another without turning the computer off) fails.
Follow this procedure before you remove a PC Card:
1 Double-click the PC Card icon on the taskbar.
2 Click Safely remove xxxx, where xxxx is the identifier for your PC Card.
The operating system displays a message that you may safely remove the card.
3 Remove the card from the slot.
The system does not recognize your PC Card.
Refer to the PC Card documentation.
Removing a malfunctioning card and reinstalling it can correct many problems. For more information, see “Using Slim SelectBay modules” on page 137.
A PC Card error occurs.
Reinsert the card to make sure it is properly connected.
If the card is attached to an external device, check that the connection is secure.
Refer to the card's documentation, which should contain a troubleshooting section.
Printer problems
This section lists some of the most common printer problems:
The printer will not print.
Check that the printer is connected to a working power outlet, turned on and ready (on line).
Check that the printer has plenty of paper. Some printers will not start printing when there are just two or three sheets of paper left in the tray.
Make sure the printer cable is firmly attached to the computer and the printer.
Run the printer's self-test to check for any problem with the printer itself.
Make sure you installed the proper printer drivers, as shown in “Setting up a printer” on page 66.
You may have connected the printer while the computer is on. Disable Standby mode, turn off the computer, and turn off the printer. Turn the printer back on, make sure it is on line, then turn the computer back on.
Try printing another file. For example, you could create and attempt to print a short test file using Notepad. If a Notepad file prints correctly, the problem may be in your original file.
If you cannot resolve the problem, contact the printer's manufacturer.
The printer will not print what you see on the screen.
Many programs display information on the screen differently from the way they print it. See if your program has a print preview mode. This mode lets you see your work exactly as it will print. Contact the software manufacturer for more information.
Modem problems
This section lists common modem problems:
The modem will not receive or transmit properly.
Make sure the cable from the modem to the telephone line is firmly connected to the computer's modem port and the telephone line jack.
Check the port settings to make sure the hardware and software are referring to the same COM port. See “Determining the COM port” on page 153.
Check the communications parameters (baud rate, parity, data length and stop bits) specified in the communications program. It should be set up to transmit at 300, 1200, 2400, 4800, 9600, 14400, 28800, 33600 bps (bits per second) or higher. Refer to the program's documentation and the modem manual for information on how to change these settings.
The modem is on, set up properly and still will not transmit or receive data.
Make sure the line has a dial tone. Connect a telephone handset to the line to check this.
The other system may be busy or off line. Try making a test transmission to someone else.
Internet Problems
My Internet connection is very slow.
Many factors contribute to the speed with which you can surf the Internet. They include: modem speed, time of day (when everyone else is surfing, your access can be slow), and popularity of the site. If accessing a particular site is very slow, try later.
My browser can not find the URL address I typed in.
Make sure you separated the domain names of the address with the forward slash(/). Check the spelling of each name and the syntax of the address carefully. A single incorrect letter, missed period (“dot”) or other mistake makes it impossible for your browser to locate the site.
My browser can not find a site I bookmarked.
The World Wide Web is constantly changing. A site you bookmarked yesterday may not be available today or its server may be down to temporary repair. Try again later.
DVD operating problems
If you experience a problem playing DVDs, you may be able to fix the problem yourself.
For general problems playing a DVD title, try the following steps:
1 Check that the disc is in a format that the drive supports DVD-ROM.
2 Ensure that the drive is properly installed in the SelectBay. It must be inserted completely.
3 Ensure that the disc is properly inserted in the drive tray.
4 Ensure that the Display properties are not True Color (24-bit). If it is set to 24-bit color, there will be a video format error. To verify your display settings:
- Click Start, Control Panel, Appearance and Themes, and double-click Display.
- Click on the Settings tab and check the Color Palette. It should be set to High Color (16-bit).
If it is not set to High Color, change the settings to 16-bit color and click OK.
5 Clean the disc and try again.
A dirty drive can also cause audio problems. If you have tried several discs and all fail, consider sending your drive to an authorized service provider to get it cleaned.
6 Verify that your computer recognizes your DVD-ROM drive. To do this:
Double-click the My Computer icon on the desktop. The DVD-ROM drive should appear in the list.
7 See “Checking device properties” on page 197 for instructions on using Device Manager to view the DVD-ROM properties.
8 Check the Toshiba Web site for new information on DVD-ROM drives and their operation.
A blank screen appears while watching a DVD-ROM movie or title.
Disable the Shut off Monitor feature in the Display Properties using the following steps:
1 Click the secondary mouse button on a blank area of the desktop.
2 Click Properties.
3 Click the Screen Saver tab.
4 Deselect Shut off Monitor.
Jumping video lines appear around the DVD-ROM video window.
To change the screen's display resolution:
1 Click Start, Control Panel.
The Control Panel window appears.
2 Click Appearance and Themes, and double-click the Display icon.
The Display Properties dialog box appears.
3 Click the Settings tab.
4 Next to the words Desktop Area, move the slider to a lower setting, such as 800 x 600 or 640 x 480.
5 Click OK.
DVD titles, games, or applications appear distorted.
Having Stretch enabled when your video resolution is set to 640 x 480 or 800 x 600 can cause distortion. To disable
Stretch, go into Hardware Setup and disable it. For more information, see “Toshiba Hardware Setup” on page 174.
The screen saver runs while you are watching a movie or title.
If the screen saver is enabled, it runs on top of any movie or title you are watching. To disable the screen saver:
1 Click Start, Control Panel.
The Control Panel window appears.
2 Click Appearance and Themes, and double-click the Display icon.
The Display Properties dialog box appears.
3 Click the Screen Saver tab.
In the Screen Saver list, the current screen saver is highlighted.
4 Click the down arrow at the right of the current screen saver name.
A list of screen savers displays.
5 Click and hold the up arrow by the list or move the slide to the top.
6 Click None.
7 Click OK.
Develop good computing habits
Make sure you are prepared.
Save your work frequently.
You can never predict when your computer will lock, forcing you to close a program and lose unsaved changes. Many software programs build in an automatic backup, but you should not rely solely on this feature. Save your work!
On a regular basis, back up the information stored on your hard disk.
Here are some ways you can do this:
◆Copy files to diskette.
Connect a tape drive to the system and use specialized software to copy everything on the hard disk to a tape.
Connect your computer to the office network and copy files to your network partition.
Some people use a combination of these methods, backing up all files to tape weekly and copying critical files to diskette on a daily basis.
If you have installed your own programs, you should back up these programs as well as your data files. If something goes wrong that requires you to reformat your hard disk and start again, reloading all your programs and data files from a backup source will save time.
Read the user's guides.
It's very difficult to provide a fail-safe set of steps you can follow every time you experience a problem with the computer. Your ability to solve problems will improve as you learn about how the computer and its software work together.
Get familiar with all the user's guides provided with your computer, as well as the manuals that come with the programs and devices you purchase.
Your local computer store or book store sells a variety of self-help books you can use to supplement the information in the manuals.
If you need further assistance
If you have followed the recommendations in this chapter and are still having problems, you may need additional technical assistance. This section contains the steps to take to ask for help.
Before you call
Since some problems may be related to the operating system or the program you are using, it is important to investigate other sources of assistance first.
Before contacting Toshiba:
◆Review the troubleshooting information in your operating system documentation.
If the problem occurs while you are running a program, consult the program's documentation for troubleshooting suggestions. Contact the software company's technical support group for their assistance.
◆Consult your network administrator.
◆Consult your authorized Toshiba representative, who is your best source for current information.
Detailed system specifications are available at www.ts.toshiba.com by selecting your particular product and model number, clicking GO, and then clicking the Detailed Specs link from the menu on the left. Or just refer to the computer documentation that shipped with your product.
For the number of a Toshiba dealer near you in the United States, call: (800) 457-7777.
Contacting Toshiba
If you still need help and suspect that the problem is hardware-related, Toshiba offers a variety of resources to help you. You can access Toshiba on the Internet using any Internet browser by typing support.toshiba.com
Toshiba voice contact
Before calling Toshiba, make sure you have:
- Your computer’s serial number.
The computer and any optional devices related to the problem.
The recovery media that came with your system.
Name and version of the program involved in the problem along with its installation diskettes or CD-ROM.
Information about what you were doing when the problem occurred.
◆Exact error messages and when they occurred.
For technical support, call the Toshiba InTouch Center:
Within the United States at (800) 457-7777
Outside the United States at (949) 859-4273
Other Toshiba Internet Web sites
toshiba.com Worldwide Toshiba corporate site computers.toshiba.com Marketing and product information in the USA www.toshiba.ca Canada www.toshiba-Europe.com Europe www.toshiba.co.jp/index.htm Japan http://servicio.toshiba.com Mexico and all of Latin America
Toshiba's worldwide offices
Australia
Toshiba (Australia) Pty. Limited 84-92 Talavera Road North Ryde NSW 2113 Sydney Australia
France
Latin America and Caribbean Toshiba America Information Systems 9740 Irvine Blvd. Irvine, California 92618 USA
800-457-7777 (within the US) 949-859-4273 (outside of the US - this call may incur long-distance charges)
Canada
Toshiba Canada Ltd. 191 McNabb Street Markham, Ontario L3R - 8H2 Canada
Germany
Toshiba Europe GmbH Leibnizstraße 2 D-93055 Regensburg Germany
Japan
Toshiba Corporation, PCO-IO 1-1, Shibaura 1-Chome Minato-Ku, Tokyo, 105-8001 Japan
Mexico
Toshiba de México S.A. de C.V. Sierra Candela No.111, 6to. Piso Col. Lomas de Chapultepec. CP 11000 Mexico, DF.
Spain
Toshiba Information Systems
(España) S.A.
Parque Empresarial San Fernando
Edificio Europa, 1a Planta
Escalera A
28831 (Madrid) San Fernando de
Henares
Spain
United Kingdom
Toshiba Information Systems
(U.K) Ltd.
Toshiba Court
Weybridge Business Park
Addlestone Road
Weybridge, Surrey KT15 2UL
United Kingdom
United States
Toshiba America Information
Systems, Inc.
9740 Irvine Boulevard
Irvine, California 92618
United States
The Rest of Europe
For more information on additional Toshiba worldwide locations, please visit: www.toshiba.co.jp/index.htm.
Appendix A
Hot Keys
Hot keys are keys that, when pressed in combination with the Fn key, turn system functions on and off. Hot keys have a legend on the key indicating the option or feature the key controls.
Volume Mute
Fn +
This hot key enables/disables volume mute on your computer.
When volume mute is enabled, no sound will come from the speakers or headphones.
Password security
Fn + This shot key blanks the display.
Without a password
The Fn + F1 key combination turns off the display. Using the mouse or any key will make the display reappear.
With a password
The Fn + F1 key combination turns off the display and activates the security feature. Using the mouse or any key will make the password dialog box appear. Choose a user name and key the associated password to make the display reappear.
Power usage mode
Fn + This hot key displays the power usage pop-up window and cycles through the battery save modes.
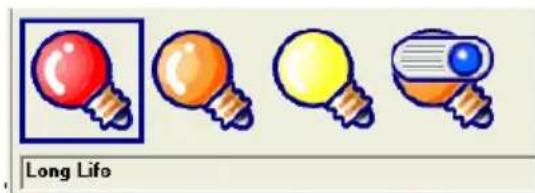
text_image
Long LifeSample power usage modes
The properties of each mode are set in the Toshiba Power Management utility. For more information, see “Power Management” on page 171.
Standby mode
Fn + This-hot key puts the computer into Standby mode.
A message box is displayed by default to confirm that the computer is going into Standby mode. You can choose not to display this message box.
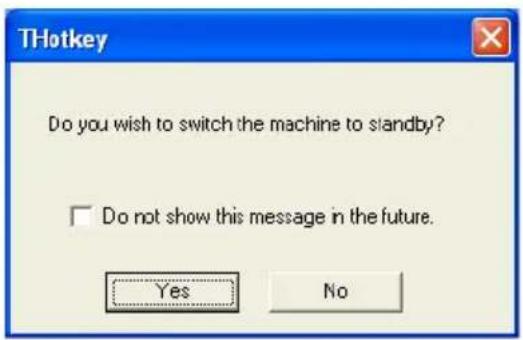
text_image
Do you wish to switch the machine to standby? Do not show this message in the future. Yes NoSample Standby confirmation box
For more information about Standby mode, please see “Using Standby” on page 106.
Hibernation mode
Fn + This hot key puts the computer into Hibernation mode.
If Hibernation mode is enabled (the default) a message box is displayed by default to confirm the computer is going into Hibernation mode. You can choose not to display this message box.
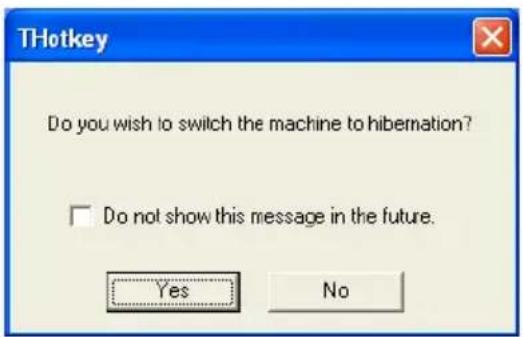
text_image
Do you wish to switch the machine to hibernation? □ Do not show this message in the future. Yes NoSample Hibernation confirmation box
If Hibernation mode is disabled, this hot key will not respond. For more information on Hibernation mode, see "Using Hibernation" on page 102.
Display modes
Fn + This hot key cycles through the power-on display options.
The display modes are:
◆Built-in display panel only
◆Built-in display panel and external monitor simultaneously
◆External monitor only
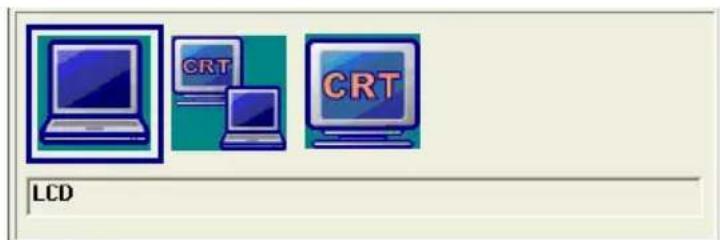
text_image
CRT CRT LCDSample display options window
Display brightness
Fn + This hot key decreases the screen brightness.
Fn + F7 ▲ This hot key increases the screen brightness.
Wireless device enable/disable
Fn + This hot key enables and disables the optional wireless devices installed in your computer.
The wireless modes are:
All disabled—This disables both the Bluetooth and Wi-Fi modules.
- Wi-Fi enabled—This enables just the Wi-Fi module.
Bluetooth enabled—This enables just the Bluetooth module (see “Using Bluetooth” on page 156).
All enabled—This enables both Bluetooth and Wi-Fi.
Keyboard hot keys
Fn + This hot key turns the cursor control overlay on and off.
Fn + This hot key turns the numeric overlay on and off.
Fn + F12 This hot key turns the scroll lock feature on and off.
Appendix B
Power Cord/Cable Connectors
Your computer features a universal power supply you can use worldwide. This appendix shows the shapes of the typical AC power cord/cable connectors for various parts of the world.
USA and Canada
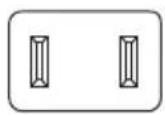
UL approved CSA approved
Australia
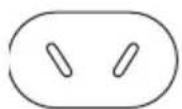
AS approved
United Kingdom
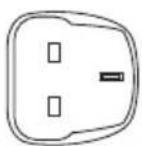
BS approved
Europe
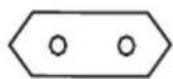
VDA approved NEMKO approved
Using ConfigFree™ with your Toshiba Computer
ConfigFree ^TM is a set of utilities used for configuring networks that use both wired and wireless network devices. These utilities include the following:
Connectivity Doctor — The Connectivity Doctor utility is used to help fix networking problems with your notebook computer. For more information, see “Connectivity Doctor” on page 233.
Device Settings — The Device Settings utility is used to enable and disable any of the wired, wireless, and infrared (for systems with infrared) network devices. You can also change the device properties of your wired and wireless local area network (LAN), and specify settings to automatically switch between wired and wireless LAN. For more information, see “Device Settings” on page 234.
Profile Settings — The Profiles utility is used to enable a faster and more efficient network configuration. Multiple profiles can be created for various network configurations. For more information, see “Profile Settings” on page 236.
Quick Connect — The Quick Connect utility is used to configure a wireless LAN connection (ad hoc connection) between a personal computer and a Toshiba Wireless Projector. The Toshiba Wireless Projector utility must be installed in order to enable Quick Connect. For more information, see “Quick Connect” on page 237
Getting Started
This section contains information about the ConfigFree main screen, and how to start and configure ConfigFree.
ConfigFree Main Screen
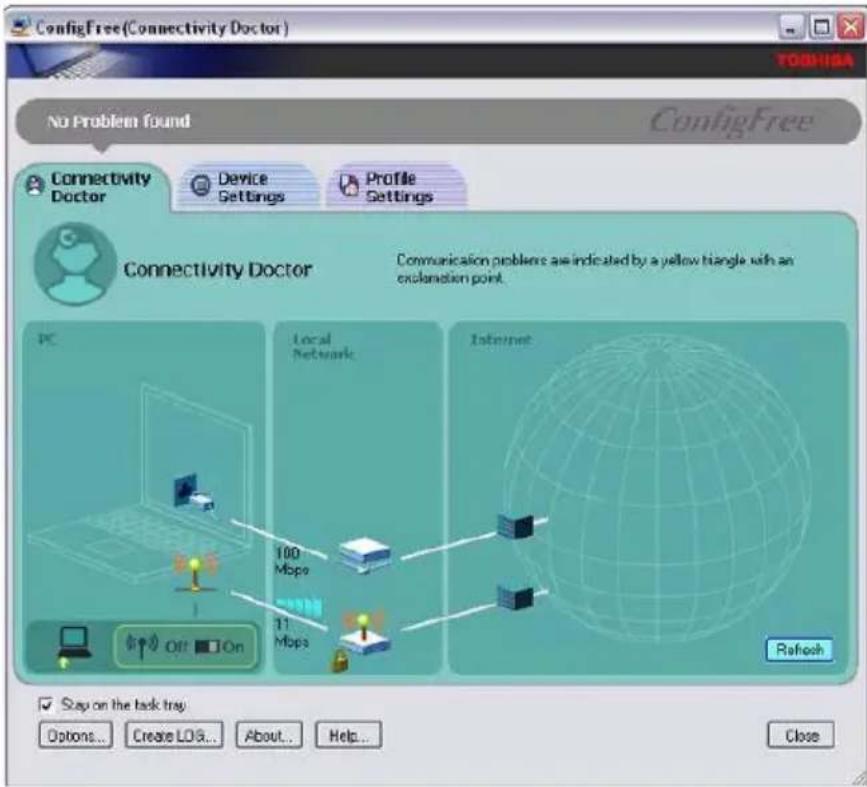
text_image
ConfigFree(Connectivity Doctor) TOSHISA No Problem Found ConfigFree® Connectivity Doctor Device Settings Profile Settings Connectivity Doctor Communication problems are indicated by a yellow triangle with an exclamation point. PC Local Network Internet 100 Mbps 11 Mbps Off On Refresh Stay on the task tray Options... Create LOS... About... Help... CloseConfigFree main screen
Stay on the task tray — Select this check box to display the ConfigFree icon in the taskbar.
Options — Use to configure options in ConfigFree. For more information, see “Configuring ConfigFree” on page 232.
- Create LOG — Creates and displays a log file containing diagnostic information about devices connected to the network.
◆About — Displays version information about ConfigFree.
◆Help — Displays the online help file.
Starting ConfigFree
To start ConfigFree, do any of the following:
(Microsoft ^ Windows ^ XP users) Click the Start button, and then point to All Programs. Point to the TOSHIBA ConfigFree folder, and then click ConfigFree.
(Microsoft ^ Windows ^ 2000 users) Click the Start button, and then point to Programs. Point to the TOSHIBA ConfigFree folder, and then click ConfigFree.
Double-click the ConfigFree icon on the taskbar.
Click the ConfigFree icon on the taskbar, and then click the desired utility.
- Press the Toshiba Console button (if applicable to your system) to open the Toshiba Console, and then click the ConfigFree icon.
Configuring ConfigFree
The ConfigFree Option dialog box is used to specify various options, such as whether certain warning messages should display and what information should be captured when creating a profile. You can also enable and disable sounds from this dialog box.
To access the ConfigFree Option dialog box, do one of the following:
Open ConfigFree, and then click Options.
Right-click the ConfigFree icon on the taskbar, and then click Options.
For more information on configuring ConfigFree, see the online help.
ConfigFree Utilities
Connectivity Doctor
The Connectivity Doctor displays the connection configuration and the status of all wired and wireless LAN devices that are connected to the network. For wireless network devices, the signal strength and WEP (Wired Equivalent Privacy) key settings (if applicable) also display.
NOTE
Infrared (for systems with infrared) and dial-up devices are not tested by the Connectivity Doctor.
If a problem, or potential problem, is detected, an exclamation point displays in the Connectivity Doctor screen at the relevant location. You can then view a possible cause and solution for the problem by clicking on the exclamation point.
For example, if the connection to a wireless network cannot be established because the wireless communication switch is turned off, an exclamation point displays next to the wireless communication switch. Upon clicking the exclamation point, a description of the problem and a solution displays.
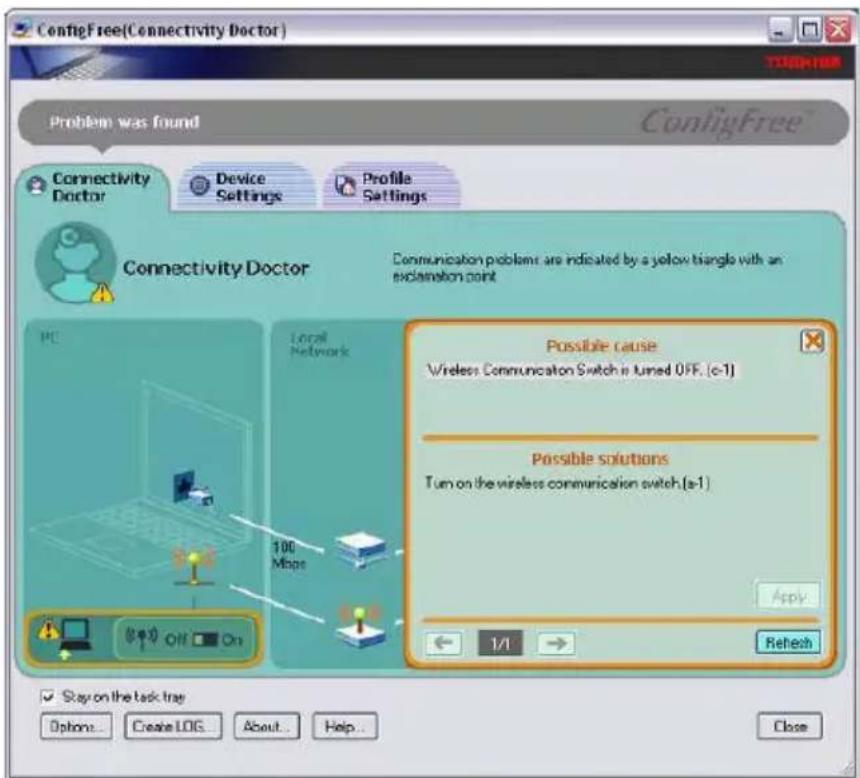
text_image
ConfigFree(Connectivity Doctor) Problem was found Connectivity Doctor Device Settings Profile Settings Connectivity Doctor Communication problems are indicated by a yellow triangle with an explanation point Possible cause Wireless Communication Switch is tuned OFF. (c-1) Possible solutions Turn on the wireless communication switch (a-1) Apply 1/1 Refresh Stay on the task tray Options... Create LOG About... Help... CloseThe Connectivity Doctor
The Connectivity Doctor screen automatically refreshes. However, you can also use the Refresh button to refresh the screen.
Device Settings
The Device Settings screen displays a list of all wired, wireless, and infrared (for systems with infrared) devices that are connected to the network. Detailed information about each device, such as the driver version number and the status, are also displayed.
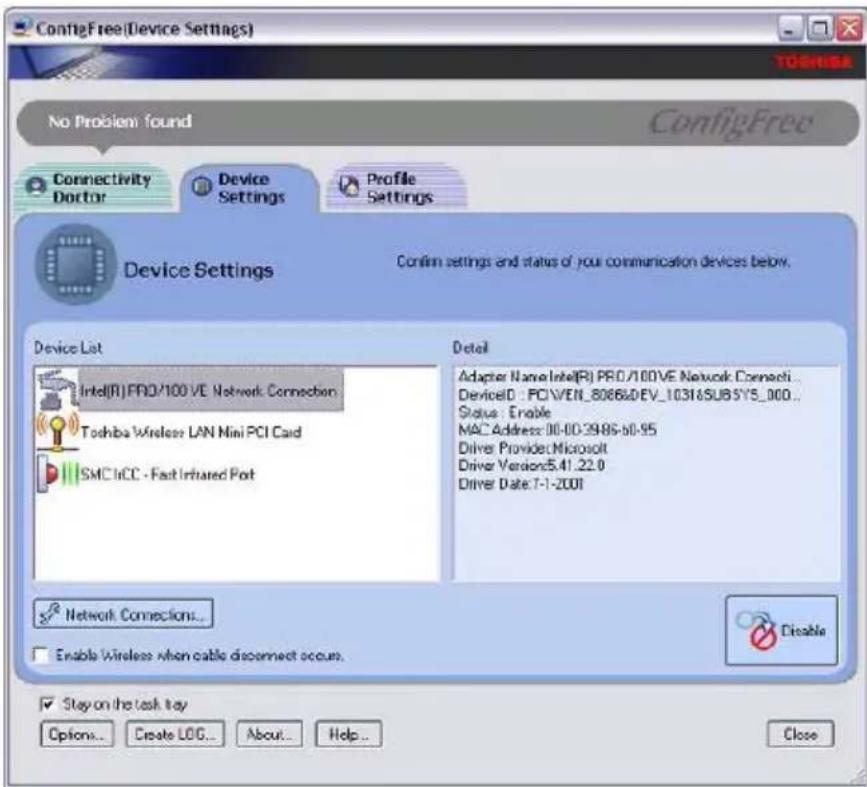
text_image
ConfigFree(Device Settings) TOSHISA No Problem found ConfigFree Connectivity Doctor Device Settings Profile Settings Device Settings Confirm settings and status of your communication devices below. Device List Intel(R) PRO/100 VE Network Connection Toshiba Wireless LAN Mini PCI Card SMC HiCC - Fast Infrared Port Detail Adapter Name Intel(R) PRO/100VE Network Connect... DeviceID : PCI/VEN_8086&0EV_10318SUBSY5_000.. Status : Enable MAC Address: 00-00-2986-50-95 Driver Provider: Microsoft Driver Version: 5.41.22.0 Driver Date: 7-1-2001 Network Connections... Enable Wireless when cable disconnect occurs. Disable Stay on the task tray Options... Create LOG... About... Help... CloseViewing the device settings
Network Connections — Displays the Network Connection window, which contains detailed information about the network connection.
Enable/Disable — You can easily enable or disable any of the listed devices simply by selecting the desired device, and then clicking the Enable/Disable button. Each time a device is enabled or disabled, the status of the device will change.
Enable Wireless when cable disconnect occurs — Select this check box to enable the Auto Switch feature. For more information, see “Using Auto Switch” on page 238.
Profile Settings
The Profile Settings utility displays a list of all the registered profiles in ConfigFree. You can also add, modify, and delete profiles; switch the profile being used; and view specific details about each profile.
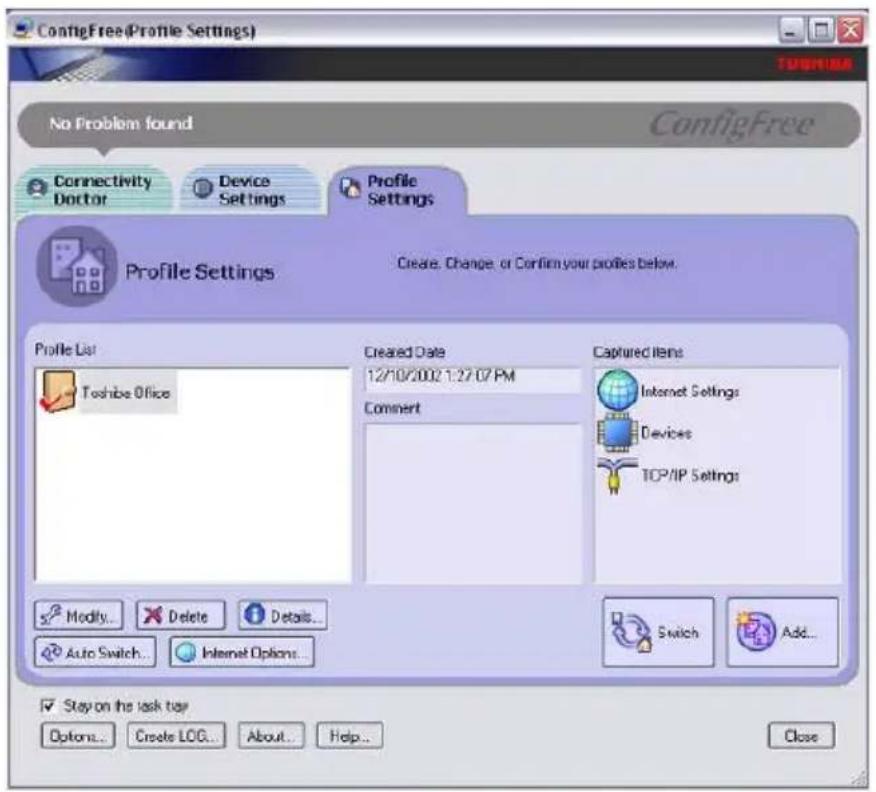
text_image
ConfigFree(Profile Settings) TSMR183 No Problem found ConfigFree Connectivity Doctor Device Settings Profile Settings Profile Settings Create, Change, or Confirm your profiles below. Profile List Toshiba Office Created Date 12/10/2002 1:27:07 PM Comment Captured Items Internet Settings Devices TCP/IP Settings Modify... Delete Details... Auto Switch... Internet Options... Switch Add... Stay on the task tree Options... Create LOG... About... Help... CloseViewing registered profiles
Details — The Details button displays the ConfigFree Details screen. This screen displays detailed information for each profile and can be used to view the various settings for each registered profile.
Auto Switch — The Auto Switch button accesses the Auto Switch feature. For more information, see “Using Auto Switch” on page 238.
Internet Options — The Internet Options button opens the Microsoft® Windows® Internet Options dialog box. See your Microsoft® Windows® documentation for more information.
Add, Modify, and Delete a Profile
To add a new profile to ConfigFree, click the Add button in the Profile Settings screen. To overwrite an existing profile, select the profile to be overwritten, and then click Add.
To modify an existing profile, select the profile you want to modify, and then click Modify.
To delete an existing profile, select the profile to be deleted, and then click Delete. A message box displays confirming that you want to delete the profile.
Switch Profiles
To switch the profile that is being used, select the profile you want to switch to, and then click Switch.
Quick Connect
The Quick Connect feature switches the Wireless LAN connection to connect to the Toshiba Wireless Projector.
As a result, you will not be able to use the network to connect to a Toshiba Wireless Projector when the wireless LAN Configuration is set to Ad hoc. If you are connected to an access point, the connection will be broken and later re-established.
If the Toshiba Wireless Projector setting has been changed from the default, change the connection setting by using Quick Connect-Setup menu.
NOTE
The connection will be made in Ad hoc mode, therefore, if the setting on the Toshiba Wireless Projector is in Infrastructure mode, it will not connect.
If the wireless mode for the wireless setting is set for 5 GHz (802.11a), Quick Connect will change this mode to 2.4 GHz (802.11b), and then connect to the projector.
The wireless LAN configuration will return to the default settings under the following conditions:
If the Toshiba Wireless Projector utility is closed.
If you select Toshiba Wireless Projector (DPJ) from the ConfigFree tray menu (this will disconnect the wireless LAN connection).
If you select a profile from the ConfigFree tray menu or when you disable a wireless device.
◆If you close ConfigFree.
Using Auto Switch
The Auto Switch feature contains options for automatically switching network devices and profiles if a network connection should fail.
Auto Switch (Cable Disconnect) — This option automatically switches network devices if a wired network cable is disconnected. For more information, see “Auto Switch (Cable Disconnect)” on page 239.
Auto Switch (SSID) — If your notebook computer is connected to a wireless LAN network, ConfigFree automatically switches profiles if a network failure occurs. For more information, see “Auto Switch (SSID)” on page 239.
A message displays each time the Auto Switch feature is applied. You then have the option of disabling the Auto Switch option for future use.
You can access the Auto Switch feature in any of the following ways:
From the taskbar, right-click the Config Free icon, and then click Auto Switch.
From the Profile Settings screen, you can click the Auto Switch button.
Auto Switch (Cable Disconnect)
If a wired network cable is disconnected from the network, the Auto Switch (Cable Disconnect) option will automatically switch to another network device.
Enable Wireless when cable disconnect occurs — If your notebook computer is connected to multiple wired LAN devices, and the physical connection to all of these devices is disconnected, ConfigFree switches to a wireless LAN device.
However, if the cable connection to only one wired LAN device is disconnected, ConfigFree will not switch to a wireless device.
Auto Switch (SSID)
The Auto Switch (SSID) option automatically switches to a different profile if your notebook computer is connected to a wireless LAN network and a network failure occurs.
ConfigFree detects the Service Set Identifier (SSID) of the wireless network that you are connected to. If the SSID matches the Wireless Network SSID specified in Auto Switch, the ConfigFree switches to the corresponding profile.
NOTE
If your notebook computer is connected to multiple wireless LAN devices, the Auto Switch (SSID) feature is disabled. To enable this feature, only one wireless LAN device can be used.
Glossary

TECHNICAL NOTE: Some features defined in this glossary may not be available on your computer.
Acronyms
The following acronyms may appear in this user's guide.
AC alternating current
BIOS basic input/output system
bps bits per second
CD compact disc
CD-ROM compact disc read-only memory
CD-RW compact disc rewrite memory
CMOS complementary metal-oxide semiconductor
COM1 communications port 1 (serial port)
COM2 communications port 2 (serial port)
CPU central processing unit
DC direct current
DMA direct memory access
DIMM dual inline memory module
DOS disk operating system
DPI dots per inch
DSTN dual supertwist nematic
DVD digital versatile (or video) disc
DVD-ROM digital versatile (or video) disc read-only memory
ECP enhanced capabilities port
EPROM erasable programmable read-only memory
FAT file allocation table
FCC Federal Communications Commission
FIR fast infrared
GB gigabyte
HDD hard disk drive
HTML Hypertext Markup Language
IEEE Institute of Electrical and Electronics Engineers
I/O input/output
IRQ interrupt request
ISP Internet service provider
KB kilobyte
LAN local area network
LCD liquid crystal display
LPT1 line printer port 1 (parallel port)
LSI large-scale integration
MB megabyte
MIDI Musical Instrument Digital Interface
PC personal computer
PCI Peripheral Component Interconnect
PCMCIA Personal Computer Memory Card International Association
RAM random access memory
RFI radio frequency interference
ROM read-only memory
RTC real-time clock
SCSI small computer system interface
SDRAM synchronous dynamic random access memory
SRAM static random access memory
SVGA super video graphics adapter
TFT thin film transistor
USB universal serial bus
URL uniform resource locator
WANwide area network
www World Wide Web
Terms
The following terms may appear in this user's guide.
A
active-matrix display — A liquid crystal display (LCD) made from an array of liquid crystal cells using active-matrix technology. Also known as a “TFT display,” in its simplest form there is one thin film transistor (TFT) for each cell. This type of display works well with notebook computers because of its shallow depth and high-quality color. Active-matrix displays are viewable from wider angles than most passive-matrix displays.
adapter — A device that provides a compatible connection between two units. For example, the computer's internal display adapter receives information from the software and translates it into images on the screen. An adapter can take a number of forms, from a microprocessor to a simple connector. An intelligent adapter (one that is capable of doing some processing) may also be called a controller.
alternating current (AC) — The type of power usually supplied to residential and commercial wall outlets. AC reverses its direction at regular intervals. Compare direct current (DC).
B
application — A computer program that you use to perform tasks of a specific type. Applications include word processors, spreadsheets, and database management systems. See also program.
backup — A copy of a file, usually on a removable disk, kept in case the original file is lost or damaged.
basic input/output system (BIOS) — See BIOS.
baud rate — The speed at which a communication device, such as a printer or modem, transmits information. Baud rate is the number of signal changes per second (not necessarily the same as bits per second). See also bits per second.
BIOS (basic input/output system) — Basic instructions, stored in read-only memory (ROM), containing the information the computer needs in order to check hardware and load the operating system when you start up the computer.
bit: — Short for “binary digit.” A bit is the smallest unit of information used by a computer. A group of eight bits is a byte. See also byte.
bits per second (bps) — A way of measuring the speed at which information is passed between two devices. The basic measure used in modem communications, bps is similar, but not identical, to the baud rate. See also baud rate.
boot — To start the computer. The term “boot” originates from bootstrap program (as in “pulling itself up by its bootstraps”), a program that loads and initializes the operating system. See also reboot.
boot disk — See system disk.
boot priority (startup sequence) — The order in which the computer accesses its disk drives to locate the startup files. Under the default startup sequence, the computer looks for the startup files in the diskette drive before checking the hard disk.
bus — An electrical circuit that connects the central processing unit (CPU) with other parts of the computer, such as the video adapter, disk drives, and ports. It is the pathway through which data flows from one device to another. See also bus speed, frontside bus.
bus speed — The speed at which the central processing unit (CPU) communicates with the other parts of the computer.
C
byte — A sequence of eight bits. A byte is the smallest addressable unit of data. See also bit, gigabyte, kilobyte, megabyte.
cache — A section of very fast memory in which frequently used information is duplicated for quick access. Accessing data from cache is faster than accessing it from the computer's main memory. See also CPU cache, L1 cache, L2 cache.
CD — An individual compact disc. See also CD-ROM.
CD-ROM (compact disc read-only memory) — A form of high-capacity storage that uses laser optics instead of magnetic means for reading data. See also CD. Compare DVD-ROM.
central processing unit (CPU) — The chip that functions as the “brain” of the computer. It takes information from outside sources, such as memory or keyboard input, processes the information, and sends the results to another device that uses the information.
character — Any letter, number, or symbol you can use on the computer. Some characters are non-printing characters, such as a paragraph break in a word-processing program. A character occupies one byte of computer storage.
chip — A small piece of silicon containing computer logic and circuits for processing, memory, input/output, and/or control functions. Chips are mounted on printed circuit boards.
click — To press and release the AccuPoint II control button or mouse button without moving the AccuPoint II or mouse. In the Windows® operating system, this refers to the left mouse button or primary AccuPoint control button, unless otherwise stated. See also double-click.
color palette — A set of specified colors that establishes the colors that can be displayed on the screen at a particular time.
compatibility — The extent to which computers, programs, or devices can work together harmoniously, using the same commands, formats, or language as another.
configuration — (1) The collection of components that make up a single computer system. (2) How parts of the system are set up (that is, configured).
controller — A device that controls the transfer of data from a computer to a peripheral device and vice versa. For example, disk drives, monitors, keyboards, and printers all require controllers.
CPU — See central processing unit (CPU).
CPU cache — A section of very fast memory residing between the CPU and the computer's main memory that temporarily stores data and instructions the CPU will need to execute commands and programs. See also cache, L1 cache, L2 cache.
cursor — A symbol that indicates the current position on the screen. The shape of the cursor varies, depending on the program you're using and what you're doing.
D
default — The setting selected by a program when the user does not specify an alternative setting.
device — A component attached to the computer. Devices may be external (outside the computer's case) or internal (inside the computer's case). Printers, disk drives, and modems are examples of devices.
device driver — A program (called a “driver”) that permits a computer to communicate with a device.
dialog box — An on-screen window displayed by the operating system or a program giving a direction or requesting input from the user.
direct current (DC) — The type of power usually supplied by batteries. DC flows in one direction. Compare alternating current (AC).
direct memory access (DMA) — A dedicated channel, bypassing the CPU, that enables direct data transfer between memory and a device.
directory — See folder.
disable — To turn a computer option off. See also enable.
disc — A round, flat piece of metal, designed to be read from and written to by optical (laser) technology, and used in the production of optical discs, such as CDs and DVDs. Compare disk.
disk — A round, flat piece of material that can be magnetically influenced to hold information in digital form, and used in the production of magnetic disks, such as diskettes and hard disks. Compare disc. See also diskette, hard disk.
disk drive — The device that reads and writes information and programs on a diskette or hard disk. It rotates the disk at high speed past one or more read/write heads.
diskette — A thin, flexible disk in a protective jacket that stores magnetically encoded data. Diskettes can be removed from the computer and come in two sizes: 5.25-inch and 3.5-inch. Your computer uses 3.5-inch diskettes. See also double-density diskette, high-density diskette.
document — Any file created with an application and, if saved to disk, given a name by which it can be retrieved. See also file.
double-click — To press the AccuPoint II control button or mouse button rapidly twice without moving the AccuPoint or mouse. In the Windows® operating system, this refers to the primary AccuPoint control button or left mouse button, unless otherwise stated.
double-density diskette — A 3.5-inch diskette that can hold up to 720 KB of information (half the capacity of a high-density diskette). See also diskette, high-density diskette.
download — (1) In communications, to receive a file from another computer through a modem or network. (2) To send font data from the computer to a printer. See also upload.
drag — To hold down the AccuPoint II control button or mouse button while moving the cursor to drag a selected object. In the Windows® operating system, this refers to the primary AccuPoint II control button or left mouse button, unless otherwise stated.
driver — See device driver.
DVD — An individual digital versatile (or video) disc. See also DVD-ROM.
E
DVD-ROM (digital versatile [or video] disc read-only memory) — A very high-capacity storage medium that uses laser optics for reading data. Each DVD-ROM can hold as much data as several CD-ROMs. Compare CD-ROM.
emulation — A technique in which a device or program imitates another device or program.
enable — To turn on a computer option. See also disable.
executable file — A computer program that is ready to run. Application programs and batch files are examples of executable files. Names of executable files usually end with a .bat or .exe extension.
expansion device — A device that connects to a computer to expand its capabilities. Other names for an expansion device are port expander, port replicator, docking station, or network adapter.
extension — See file extension.
external device — See device.
F
file — A collection of related information, saved on disk with a unique name. A file may be a program, information used by a program, or a document. See also document.
file allocation table (FAT) — The section of a disk that keeps track of the location of files stored on the disk.
file name — A set of characters that uniquely identifies a file within a particular folder. It consists of two parts: the actual name and the file name extension. See also file extension.
file extension — The three characters following the period (pronounced “dot”) at the end of a file name. The extension indicates the type of file. Examples are .exe for program files and .hlp for help files. See also file name.
folder — Also called directory. A container for organizing files saved to a disk. A folder is symbolized on screen by a graphical image (icon) of a file folder. A folder can contain files and other folders.
format — (verb) To prepare a blank disk for use with the computer's operating system. Formatting creates a structure on the disk so the operating system can write information to the disk or read information from it.
G
frontside bus — The primary pathway (bus) between the CPU and the computer's main memory. Also called “system bus.” See also bus.
function keys — The keys labeled F1 through F12, typically located on the keyboard. Their function is determined by the operating system and/or individual programs.
gigabyte (GB) — A unit of data equal to 1,073,741,824 bytes (1024 x 1024 x 1024 bytes). See also byte.
ground — A conductor to which all components of an electric circuit are connected. It has a potential of zero (0) volts, is connected to the earth, and is the point of reference for voltages in the circuit.
H
hard disk — A storage device composed of a rigid platter or platters that can be magnetically coded with data. Hard disks hold much more information than diskettes and are used for long-term storage of programs and data. The primary (or only) hard disk in a computer is usually fixed, but some computers have secondary hard disks that are removable. By default, the hard disk is referred to as drive C.
hardware — The physical components of a computer system. Compare software.
Hibernation — A feature of many Toshiba notebook computers that saves to the hard disk the current state of your work, including all open files and programs, when you turn the computer off. When you turn on the computer again, your work is returned to the same state it was when the computer was turned off. See also Standby, Suspend.
high-density diskette — A 3.5-inch diskette that holds 1.44 MB of data. See also diskette.
hot key — (1) A feature in which certain keys in combination with the Fn key can set system options or control system parameters, such as the battery save mode. (2) A key or combination of keys that activates a memory resident program.
hot swapping — The ability to add or remove devices from a computer while the computer is running and have the operating system automatically recognize the change.
icon — A small image displayed on the screen that represents a function, file, or program.
interlaced — A method of refreshing a computer screen, in which only every other line of pixels is refreshed. Interlaced monitors take two passes to create a complete screen image. Compare non-interlaced.
internal device — See device.
Internet — The decentralized, world-wide network of computers that provides electronic mail, the World Wide Web, and other services. See also World Wide Web.
keyboard shortcut — A key or combination of keys that you use to perform a task instead of using a pointing device such as the AccuPoint.
kilobyte (KB) — A unit of data equal to 1024 bytes. See also byte.
L1 (level one) cache — Memory cache built into the processor to help improve processing speed. See also cache, CPU cache, L2 cache.
L2 (level two) cache — Memory cache installed on the motherboard to help improve processing speed. It is slower than L1 cache and faster than main memory. See also cache, CPU cache, L1 cache.
LAN (local area network) — A group of computers or other devices dispersed over a relatively limited area and connected by a communications link that enables any device to interact with any other on the network.
liquid crystal display (LCD) — A type of display that uses a liquid substance between two transparent electrode panels. When an electric current passes through the electrodes, the molecules in the liquid form a crystalline pattern that polarizes the light passing through it. A filter over the electrodes permits only non-polarized light to pass to the surface of the display, creating light and dark pixels.
load — To move information from a storage device (such as a hard disk) into memory for processing.
local area network — See LAN.
|
K
L
M
logical drive — A section of a disk that is recognized by the operating system as a separate disk drive. A system’s logical drives may differ from its physical drives. For example, a single hard disk drive may be partitioned into two or more logical drives.
megabyte (MB) — A unit of data equal to 1,048,576 bytes (1024 x 1024 bytes). See also bytes.
memory — Typically refers to the computer's main memory, where programs are run and data is temporarily stored and processed. Memory can be volatile and hold data temporarily, such as RAM, or it can be nonvolatile and hold data permanently, such as ROM. A computer's main memory is RAM. See RAM, ROM.
microprocessor — See central processing unit (CPU).
MIDI (Musical Instrument Digital Interface) — A standard for connecting musical instruments, synthesizers, and computers. The MIDI standard provides a way of translating music into a form computers can use, and vice versa.
modem — Short for “modulator/demodulator.” A device that converts information from digital to analog and back to digital, enabling information to pass back and forth between digital computers and analog telephone lines.
motherboard — The main circuit board in the computer. It contains the processor, memory, and other primary components.
MS-DOS prompt — See system prompt.
multimedia — A combination of two or more media, such as sound, animation, and video in a computer program or presentation.
Musical Instrument Digital Interface — See MIDI.
N
network — A collection of computers and associated devices that are connected by communications facilities. A network allows you to share data and peripheral devices, such as printers, with other users and to exchange electronic mail.
non-interlaced — A method of refreshing a computer screen, in which each pixel of every line is refreshed as the electron beam scans across and down the screen. Compare interlaced.
0
non-system disk — A disk for storing programs and data that cannot be used to start the computer. Compare system disk.
online — Available through the computer. Online may refer to information being read from your own computer's hard disk, such as online documentation or online help, or to information coming from another company on a company network or the Internet.
operating system — A set of programs that controls how the computer works. Examples of operating systems are the Windows ^® XP Professional and Windows ^® XP Home operating systems.
P
palette — See color palette.
parallel — Processes that occur simultaneously. In communications, it means the transmission of more than one bit of information at a time. On your computer, the parallel port provides a parallel communications interface between the computer and an appropriate device. Most modern printers are parallel. Compare serial.
password — A unique string of characters entered by a user to verify his or her identity to the computer or the network.
PC Card — A credit-card-sized expansion card designed to increase the capabilities of notebook computers. PC Cards provide functions such as modem, fax/modem, hard disk drive, network adapter, sound card, or SCSI adapter.
peripheral — Any device, such as a printer or joystick, that is attached to the computer and controlled by the computer's CPU.
pixel — Short for “picture element.” The smallest dot that can be produced on a screen or printer.
Plug and Play — Generally, refers to the computer's ability to automatically configure itself to work with peripheral devices. When capitalized, refers to a standard that, when followed by a device manufacturer, allows a PC to configure itself automatically to work with the device.
pointing device — Any device, such as the AccuPoint or a mouse, that enables you to move the cursor on the screen.
port — A socket on the computer where you plug in a cable for connection to a network or a peripheral device.
processor — See central processing unit (CPU).
program — A set of instructions that can be executed by a computer. The general classes of programs (also called software) are operating system, application, and utility. See also operating system, application, utility.
properties — The attributes of an object or device. For example, the properties of a file include the file's type, size, and creation date.
R
RAM (random access memory) — Volatile memory that can be written to as well as read. By volatile, we mean that information in RAM is lost when you turn off your computer. This type of memory is used for your computer's main memory. See also memory. Compare ROM.
random access memory — See RAM.
read-only memory — See ROM.
reboot — See boot, restart.
removable disk — A disk that can be removed from a disk drive. A diskette is one example of a removable disk.
resolution — A measure of the sharpness of the images that can be produced by a printer or displayed on a screen. For a printer, resolution is expressed in dots per inch (dpi). For a screen, it is expressed as the number of pixels available horizontally and vertically.
restart — Synonymous with reboot. To reset the computer by reloading the operating system without turning the computer off. See also boot.
RJ11 — A modular connector used on most U.S. telephone systems and direct-connect modems. The RJ11 connector is a 6-wire connector.
ROM (read-only memory) — Non-volatile memory that can be read but not written to. By non-volatile, we mean that information in ROM remains whether or not the computer is receiving power. This type of memory is used to store your computer's BIOS, which is essential instructions the computer reads when you start it up. See also BIOS, memory. Compare RAM.
S
select — To highlight or otherwise specify text, data, or graphics with the intent to perform some operation on it.
serial — Processes that occur one at a time. In communications, it means the transmission of one bit at a time sequentially over a single channel. On your computer, the serial port provides a serial interface between the computer and an appropriate device. Compare parallel.
shortcut — See keyboard shortcut.
software — See program. Compare hardware.
Standby — A feature of some Windows ^® operating systems that allows you to turn off the computer without exiting your open applications and to continue from where you left off when you turn the computer on again.
Suspend — A feature of some Windows ^® operating systems that allows you to turn off the computer without exiting your open applications and to continue from where you left off when you turn the computer on again.
system disk — A diskette that contains the operating system files needed to start the computer. Any diskette can be formatted as a system disk. A system disk is also called a “bootable disk” or a “startup disk.” Compare non-system disk.
system prompt — The symbol (in the MS-DOS ^® operating system, generally a drive letter followed by a “greater than” sign) indicating where users are to enter commands.
T U
TFT display — See active-matrix display.
universal serial bus (USB) — A serial bus that supports a data transfer rate of up to 480 Mbps (million bits per second). USB can connect up to 127 peripheral devices through a single all-purpose USB port. USB allows hot swapping of peripherals. See also bus, hot swapping, serial.
upload — To send a file to another computer through a modem or network. See also download.
USB — See universal serial bus (USB).
W
utility — A computer program designed to perform a narrowly focused operation or solve a specific problem. Utilities are often related to computer system management.
Web — See World Wide Web.
Wi-Fi — A trademarked term by the Wireless Capability Ethernet Alliance which stands for Wireless Fidelity. Wi-Fi is another term for the IEEE 2.11b communication protocol to permit an Ethernet connection using wireless communication components.
World Wide Web (www) — The worldwide network of Web sites linked together over the Internet. A user of the Web can jump from site to site regardless of the location of the computer hosting the site. See also Internet.
Index
Numerics
101-key keyboard 75
A
accessories
devices 137
expansion devices 130
memory 58
PORT-Noteworthy computer lock cable 71
AccuPoint II
replacing the cap 202
troubleshooting 201
adding
memory 58
adding memory 58
Advanced Port Replicator 129, 130, 133
keyboard
connecting 132
mouse
connecting 133
ports
parallel 134
PS/2 133
serial 133, 134
USB 133, 134
printer
connecting 134
audio
.WAV digital wave files158
features 157
B
Backup or Restore Wizard 87, 88
basics
keyboard 75
battery
changing 122, 123
charge indicator light 116
charge not lasting 200
charging main 113
conserving power 119
disposal 127
low charge 117
monitoring power 116
not charging 200
optional charger 116
power usage mode 119, 223
remaining power 117
removing 124
unlocking 123, 124
Bluetooth 156
buttons
control 58
primary control 58
secondary control 58
C
CD
playing an audio 93
channels
DMA 196
IRQ 195
checking device properties 197
cleaning the computer 71
COM port 153
communications
network connection 154
system resources 195
compact discs
inserting 91
removing 95
computer
lock 71
non-system disk or disk error message 191
not accessing disk drives 191
precautions 47
running on battery power 112
setting up 49
warning resume failure message 191
computing tips 73
configuring
password 176
connecting
external monitor 135
external USB keyboard 65
external USB mouse 65
modem to telephone line 67
parallel printer 134
printer 65
serial printer 134
conserving battery power 119
control buttons 58
copying files 155
critical applications 2
customizing
taskbar 146
D
desktop
browsing style 148
changing styles 148
personalizing 146
Device Manager 197
checking properties 197, 198
disabling a device 197
digital audio .WAV files158
disc, positioning 92
Disk Defragmenter 206
disk drive
corrupted/damaged data files 206
missing files/trouble accessing a disk 205
running slow 205
diskette
care 87
copying documents to 86
copying files 86
inserting and removing 85
protecting stored data 87
diskette drive
attaching external USB 130, 131
can't insert a diskette 206
can't read a diskette 207
display
doesn't look normal/flickers 203
external monitor not working 204
external monitor, connecting 135
external, adjusting 136
hot key 135
screen is blank 202
display panel
closing 70
turn off automatically 121
displaying folder information 151
disposal information 27
disposing of used batteries 127
DMA (Direct Memory Access) 196
double-click 58
DVD player
general problems 214
DVD-ROM/Multifunction drive
opening 91
troubleshooting 207
E
environment
computer-friendly 42
ergonomics 43, 45
error messages
device driver conflict 194
general hardware problem 194
non-system disk or disk error 191, 206
problem with display settings/
current settings not working
with hardware 204
program has performed an illegal
operation 190
warning resume failure 191
Error-checking 205
Ethernet LAN Port
disabling 154
using 154
exchanging data 155
expansion capability 130
external
diskette drive 130
using with PC Card 131
monitor
not working 204
external monitor
connecting 135
F
FAT (File Allocation Table) 205
FCC Notice "Declaration of
Conformity Information" 3
FCC requirements 4
file extensions 84
file names 83
files
.WAV 158
backing up 74
printing 84
restoring 88
saving 82
transferring application files 155
Fn key
assigning functions 162, 163
Fn-esse 162
Fn key emulation 132
Fn-esse 161
assigning keys 162, 163
change/remove key assignments 165
drag-and-drop 163
keyboard 162
starting 162
using keyboard or pointing device 164
viewing key assignments 165
folders
displaying information 151
H
hardware conflicts 194
resolving 196
headphones 158
Help and Support
Windows XP 194
Hibernation command 98
enabling 102
Hibernation mode 98
methods 104, 106, 107
hot key
display brightness 226
display modes 226
display output settings 135
Hibernation mode 225
instant password 185
keyboard overlays 227
password security 222
power usage mode 223
Standby mode 224
volume mute 222
wireless mode 227
hot keys
power usage modes 121
hot swapping 141
precautions 141
Hotkey utility 165

i.LINK
FCC 3
icons
safety 39
Industry Canada requirement 4
infrared port
transferring files 155
installing
memory modules 58
instant password 185
hot key 185
instant passwords, using 178
Internet
bookmarked site not found 194
slow connection 193
URL address not found 193
IRQ (Interrupt Request) 195
K
keyboard
caps lock key 75
character keys 75
connecting
to Advanced Port Replicator 132
connecting USB-compatible 65
emulating Fn keys 132
Fn-esse 162
function keys 76
hot keys 227
not working 191
numeric overlay 78
troubleshooting 201
keyboard, full-size 75
L
LCD panel
closing 70
screen saver 121
turn off automatically 121
lighting 45
M
memory
adding 58
expansion slots 58
installing additional 58
problem solving 198
memory module
removing 64
removing screws 61
microphone
using 159
modem
connecting to telephone line 67
determining COM port 153
problem solving 213
resetting port to default settings 153
upgrading 153
modes
Hibernation 98
Standby 98
monitor
adjusting display 136
connecting 135
not working 203
mouse
connecting
to Advanced Port Replicator 133
connecting USB-compatible 65
moving the computer 71
N
network
accessing 154
0
optional additional equipment
battery charger 113, 116
memory modules 58
Noteworthy computer lock cable 71
P
parallel printer
connecting 134
password 176
creating 177
deleting a supervisor 186
disabling a user 181
forgetting 179
instant 185
power-on 176
service diskette 179
supervisor
set up 185
supervisor-level 177
types 176
user-level 176, 185
passwords
instant, using 178
PC Card
checklist 210
CIS (Card Information Structure) 209
computer stops working 210
errors 211
hot swapping 141
hot swapping fails 211
inserting 140
modem default 153
not recognized 211
problem solving 209, 210
removing 140
slots 139
using with diskette drive 131
PC Card slots 139
Plug and Play 196
port
COM 153
power
computer will not start 190
energy-saving features 111
preset usage modes 119
problem solving 199
power button 56, 180, 182
power cord/cable connectors 228
Power Management 171
running on batteries 172
power mode
Super Long Life 172
power off
guidelines 69
power usage mode 119
power usage modes
changing 119
customizing 173
preset 119
powering down the computer 96
options 96
precautions 47, 54
primary control button 58
printer
connecting 65
to Advanced Port Replicator 134
parallel port
connecting to 134
problem solving 212
serial port
connecting to 134
setting up 66
printing a file 84
problem solving
AC power 199
accessing disk drives 191
battery charge doesn't last 200
battery not charging 200
can't insert diskette in drive 206
can't read a diskette 207
changing display properties 204
checking device properties 197
computer hangs when PC Card inserted 210
computer will not power up 190
contacting Toshiba 218
corrupted/damaged data files 206
Device Manager 197
disabling a device 197
disk drive is slow 205
display is blank 202
external display not working 204
external monitor 203
faulty memory 198
hardware conflict 194, 195, 196
high-pitched noise 208
illegal operation 190
Internet bookmarked site not found 194
Internet connection is slow 193
keyboard
not responding 191
missing files/trouble accessing a disk 205
modem not receiving or transmitting 213
no sound 208
non-system disk or disk error 191, 206
PC Card 209
checklist 210
error occurs 211
hot swapping fails 211
not recognized 211
slots appear dead 210
power and batteries 199
printer 212
program not responding 188
program not working properly 206
screen does not look right/flickers 203
Startup options 192
system resources 195
trouble prevention 216
URL address not found 193
warning resume failure 191
Windows won't start 191
Windows XP not working 192
problems
forgetting your password 179
program, starting 79
programs
not running correctly 206
protection of stored data 2
R
recording
adjusting quality 159
recording sounds 158
Recovery media 40
transferring application files 156
registering computer 50
remaining battery power 117
removing
PC Cards 140
Restart command 97
restoring work 88
RJ11 modem jack, connecting
telephone cable 68
Run dialog box 81
running the computer on battery power 112
S
safety
computer 128
disposing of batteries 127
icons 39
saving files 82
screen
blank 202
doesn't look normal/flickers 203
screen saver
enabling 121
SD card
formatting 143
installing drivers 142
installing in SD slot 142
using 141
using in Hibernation mode 143
using in Standby mode 143
secondary control button 58
security
password 176
serial printer
connecting 134
setting up
computer 49
printer 66
Shut down
using 99
Slim SelectBay
modules 137
removing module 138
unlatching 138
sound
problem solving 208
speakers
connecting external 158
Standby command 98, 107
Standby mode 98
hot key 224
starting a program 79
Run dialog box 81
Windows Explorer 80
Windows Start menu 79
starting the computer
password 184
Startup menu
problem solving 192
stored data protection 2
Super Long Life mode 172
supervisor password, deleting 186
supervisor password, set up 185
T
taskbar
customizing 146
toolbars
displaying in a window 151
Toshiba
Forum 218
Internet Web sites 219
online services 218
registering computer 50
Toshiba Accessories
information 40, 41
TOSHIBA Button Controls 170
TOSHIBA Console 168
Toshiba Hardware Setup 174
TOSHIBA Mobile Extension 166
traveling tips 128
troubleshooting
AccuPoint II 201, 202
DVD player
general problems 214
DVD-ROM/Multifunction drive
207
external keyboard 201
keyboard 201
AccuPoint II problems 201
keypad overlay 201
Turn Off
using 99
Turn Off command 100
Turn Off methods 100
turning off the computer 69
U
Uniform Resource Locator (URL) 146
URL (Uniform Resource Locator) 146
USB-compatible
diskette drive
connecting 130
keyboard
connecting 65
mouse
connecting 65
printer
connecting 65
user password, disabling 181
using
Bluetooth 156
using a file extension 84
utilities
Fn-esse 161
Hotkey utility 165
Power Management 171
TOSHIBA Mobile Extension 166
V
Volume 222
volume control 157
W
Web content interface 147
Web sites 218
Web sites,Toshiba 219
Windows Explorer80
Windows Media Player 93
Windows Start menu 79
Windows XP
Help and Support 194
problem solving 192
special features 145
wireless features
Bluetooth 156
wireless interoperability 7
wizards
Add Printer 67