
L30FABESI - Fireplace SMEG - Free user manual and instructions
Find the device manual for free L30FABESI SMEG in PDF.


| Product Type | Wall-mounted electric fireplace |
| Brand | Smeg |
| Model | L30FABESI |
| Power Supply | 220-240V AC, 50Hz |
| Fuse Rating | 13 Amp |
| Heating Power | 1800W |
| Heating Settings | 7 (22°C to 60°C / 71°F to 99°F) |
| Flame Brightness Settings | 5 (Dim to Full) |
| Lighting Type | LED (maintenance-free) |
| Remote Control | Yes, with CR2025 battery |
| Off Timer | Yes (10 min to 9 hours) |
| Ember/Fuelbed Effect | Dynamic, selectable |
| Control Panel | Located underneath decorative frame, bottom right |
| Installation | Wall-mounted using provided bracket and fixings |
| Minimum Clearances | Top: 300mm, Bottom: 300mm, Sides: 100mm, Front: 500mm |
| Suitable Locations | Indoor, dry areas; not bathrooms or outdoors |
| Safety Features | Thermostat, thermal cut-out, overheat protection |
| Cleaning | Soft duster; glass with soft cloth; disconnect power |
| Remote Battery | CR2025 lithium, replace when range shortens |
| Guarantee | 2 years from date of purchase with proof |
Frequently Asked Questions - L30FABESI SMEG
User questions about L30FABESI SMEG
0 question about this device. Answer the ones you know or ask your own.
Ask a new question about this device
Download the instructions for your Fireplace in PDF format for free! Find your manual L30FABESI - SMEG and take your electronic device back in hand. On this page are published all the documents necessary for the use of your device. L30FABESI by SMEG.
USER MANUAL L30FABESI SMEG
INSTALLATION & USER INSTRUCTIONS
WALL MOUNTED ELECTRIC FIRE

SMEG UK LTD
3a Park Square
Milton Park
Abingdon
OX14 4RN
MODELS COVERED BY THESE INSTRUCTIONS
L30 FABEBL
L30 FABECR
L30 FABERE
L30 FABESI
L30 FABE
Please note: Except where otherwise stated, all rights, including copyright in the text, images and layout of this booklet is owned by Smeg (UK) Ltd. You are not permitted to copy or adapt any of the content without the prior written permission of Smeg (UK) Ltd.
All instructions must be handed to the user for safekeeping.
Revision A - 10/13
INSTALLATION & USER INSTRUCTIO
NSIE
| Section | Contents | Page No. | Section | Contents | Page No. |
| 1.0 | Important Notes | 2 | 8.0 | Installing The Appliance | 4 |
| 2.0 | Installation Requirements | 2 | 9.0 | Fitting The Decorative Frame | 5 |
| 3.0 | Appliance Data | 2 | 10.0 | Operating The Appliance | 5 |
| 4.0 | Unpacking The Appliance | 3 | 11.0 | Cleaning And Maintenance | 6 |
| 5.0 | Component Checklist | 3 | 12.0 | Troubleshooting Guide | 7 |
| 6.0 | Site Requirements | 3 | 13.0 | Guarantee-Terms And Conditions | 7 |
| 7.0 | Clearances To Combustibles | 3 |
1.0 IMPORTANT NOTES
IMPORTANT - THESE INSTRUCTIONS SHOULD BE READ CAREFULLY AND RETAINED FOR FUTURE REFERENCE.
When using this electrical appliance, basic precautions should be followed to reduce the risk of fire, electric shock and injury to person, including the following:
- This heater must be used on an AC supply only and the voltage marked on the heater's rating label must correspond to the supply voltage.
- Do not switch the appliance on until it is properly installed as described in this manual.
- The heater must not be located immediately above a socket outlet.
- Keep furniture, curtains and other fabric material away from the appliance.
- Do not leave the appliance unattended during use.
- From time to time, check the cord for damage. Never use the appliance if the cord or any part of the appliance shows signs of damage.
A damaged cord must only be replaced by a qualified person. - Do not operate this appliance with a damaged plug or cord, after a malfunction or after being dropped or damaged in any way.
- Repairs to electrical appliances should only be performed by a qualified electrician. Improper repairs may place the user at serious risk.
- Do not run the mains cable under carpets, rugs etc.
- Do not cover or obstruct the heater in any way. Overheating will result if it is accidentally covered.
- Never immerse the product in water or any other liquids.
- Do not use this heater where it may come into contact with water e.g. in bathrooms, shower rooms etc.
- Do not use the appliance outdoors.
- Before cleaning the appliance, ensure it is unplugged from the power and that it is completely cool.
- Do not clean the appliance with abrasive chemicals.
- Never use accessories that are not recommended or supplied by the manufacturer: It could cause danger to the user or damage to the appliance.
- This appliance is not intended for use by persons (including children) with reduced physical, sensory or mental capabilities, or lack of experience and knowledge unless they have been given supervision or instruction concerning use of the appliance by a person responsible for their safety.
- Children should be supervised to ensure that they do not play with the appliance.
- Do not lift the appliance by the decorative fascia.
- CAUTION! In order to avoid a hazard due to inadvertent resetting of the thermal cut out, this appliance must not be supplied through an external switching device such as a timer or connected to a circuit that is regularly switched on and off by the utility.
- Do not insert or allow foreign objects to enter the inlet or outlet vents as this may result in electric shock, fire or damage to the appliance.
- Do not install the fire using an extension cord.
- Unplug from the mains supply if the appliance is not to be used for long periods.
2.0 INSTALLATION REQUIREMENTS
The appliance is supplied with a pre-wired three pin plug (13 Amp fuse rated) and 1.8 metres of electrical cable. It is therefore necessary for a suitable electrical socket to be located within this distance and be easily accessible. This appliance is designed to be wall hung, using the wall fixtures/fixings provided. DO NOT recess any part of appliance into the wall. This appliance is suitable for installation in static holiday/park homes.
3.0 APPLIANCE DATA
Supply Voltage: 220\~240V AC, 50Hz Fuse Rating: 13 Amp
Heating Elements: 1800W Lighting: LED
This fire is fitted with LED's (Light Emitting Diode) in place of conventional bulbs. LED's generate the same light levels as conventional bulbs, but use a fraction of the energy consumed. LED's are maintenance free and will not require replacing during the life of the product.
4.0 UNPACKING THE APPLIANCE
GB IE
Read all the instructions before continuing to unpack or install this appliance. Carefully remove the appliance from its packaging and lay on the floor with it's back surface downward. Note: DO NOT stand the appliance on its frame as this may cause distortion. Check that the remaining packaging contents correlate with the component checklist below. Please dispose of all packaging at your local recycling centre.
5.0 COMPONENT CHECKLIST
QUANTITY DESCRIPTION
I Wall heater
I Decorative fascia
1 Instruction booklet
I Remote control
Pack of fixing screws and wall plugs (5 x 40mm pozi pan head screws / 5 x wall plugs)
I Wall mounting bracket
6.0 SITE REQUIREMENTS
This appliance is designed to be wall mounted using the mounting bracket and fixings provided. The wall should be relatively flat and not interfere with any of the ventilation slots in the rear panel.
The wall must be structurally sound and of a material capable of withstanding moderate heat. Finished plaster, conventional wallpaper, dry-lined plaster board are examples of suitable materials. Materials such as flock, blown vinyl, embossed paper and cloth wall coverings which are sensitive to even small amounts of heat should be avoided, as some discolouration may occur.
It should be noted that the appliance creates warm convected air currents. These currents move heat from the room surroundings to, and up the wall surfaces adjacent to the heater.
Installing the heater next to these types of wall coverings or operating the heater where impurities in the air, (such as tobacco smoke) exist, may slightly discolour wall finishing.
If the appliance is to be mounted on a dry lined or timber framed construction then the integrity and ability of the wall to carry the weight of the appliance must be confirmed. It is important in these circumstances that any vapour barrier and/or structural members of the house frame are not damaged.
If you are unsure of the ability of the wall to carry the weight and/or which type of wall fixing to use, you should take professional advice and obtain the correct fixings. Alternatively, find a more suitable wall location.
DO NOT
- mount on a ceiling or floor.
- recess any part of the appliance into the wall, or run the supply cable under carpets.
- site any electrical equipment e.g. plasma screen TV sets etc, on the wall below the appliance.
- site in a position where curtains or drapes could cover the appliance, or other soft materials could cover e.g. below a coat rack.
- site behind an opening door where mechanical impact/damage could occur.
- site where the supply cable would become a trip hazard.
- sit, stand or forcefully pull on the appliance.
- obstruct, cover or force items into the openings.
- use the heater to dry clothes.
- site/use in an outdoor location(s).
7.0 CLEARANCES TO COMBUSTIBLE MATERIALS
It is important that the following clearances are maintained from the appliance to combustible materials. These clearances are dependent on the mounting location as defined below:
- The minimum distance from the top of the appliance to a ceiling is 300mm
- The minimum distance from the bottom of the appliance to the floor is 300mm
- The minimum distance to the sides of the appliance is 100mm
- The minimum distance to the front of the appliance is 500mm
CAUTION: DO NOT CONNECT THE APPLIANCE TO THE ELECTRICAL SUPPLY AT THIS TIME.
Smeg (UK). Assumes absolutely no responsibility for injuries and damages that may occur due to improper installation or handling.
Remove any protective film coatings from the finished/decorative surfaces of the appliance, if any. After having selected the final mounting position of the appliance taking into account the integrity of the wall the firebox of the appliance may be secured to the wall.
To ensure customer safety, be sure to design the installation so that the strength of both the wall and any wall fixings used are sufficient. The appliance should not be installed until all wet plastering and/or dry wall sanding and wall painting has been completed. Do not block the ventilation holes of the appliance. The wall onto which the appliance is installed must be flat. Install only on a vertical surface. Avoid sloped surfaces. Installation onto anything other than a vertical wall may result in fire, damage or injury.
If the appliance is to be mounted on the inner leaf of a conventional cavity brick wall, or a solid wall, then the wall plugs and fixing screws provided may be used. Depending on the condition of the wall it may be necessary to use additional fixings. In this situation, any additional fixings and wallplugs should be of the same size and type as the ones provided.
If the appliance is to be mounted on a dry lined wall or a timber framed construction wall then efforts should be made to fix in at least two positions vertically, into one of the wooden studs, or supporting wooden members of the wall using two of the fixing screws provided. If this is not achievable then the wall should be strengthened using appropriate building materials.
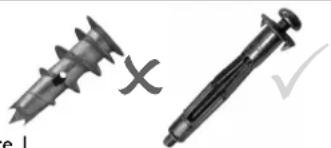
If there is no alternative than to rely on some plasterboard fixings then special cavity screw fixings or hollow wall anchors will be required which are not supplied with this product. These should be constructed from metal and not plastic and of the design indicated (Figure 1). For further guidance for wall fixing in timber frames, Figure 2 buildings refer to any relevant local codes of practice.
WARNING
The wall where the appliance is to be installed must be capable of long-term support of the total load of the appliance. Measures should also be taken to ensure sufficient strength to withstand the force of earthquakes, vibration and other external forces. Plasterboard alone is not considered to be a structural material. It is not recommended to rely on plasterboard fixings alone to support the weight of the appliance.
natural_image
Two types of mechanical fasteners or fasteners shown side by side, no text or symbols visible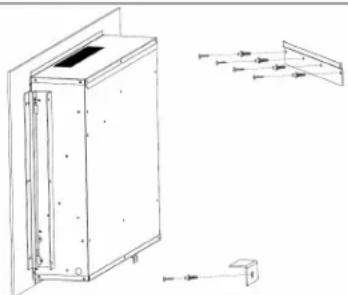
natural_image
Technical line drawing of a rectangular device with internal components and external projection (no text or symbols)Figure 2
For optimum viewing install the fire out of direct sunlight. Ensure that the bracket is level by using a spirit level whilst marking out the hole positions. Fix the wall bracket using the plugs and screws provided. Carefully lift the heater up ensuring that the top rear ledge of heater engages with the wall bracket and is sitting centrally. This process should be carried out by two people to avoid injury or damage to property or the appliance.
Gently bring the heater down against the wall. Mark the lower fixing bracket one fixing hole position on the wall, remove the heater. Drill the wall and insert the wall plug. Refit the heater to the wall and fasten the bottom fixing bracket to the wall using the screw provided to permanently fix the heater in place (Figure 2).
The facia panel is supported by four M6 screws which protrude from the front of the outer casing as shown in figure 3. Ensure each screw is unscrewed approximately one turn from the fully screwed in position in order to create a 2mm gap as shown in figure 4. Simply hang the facia panel onto the outer casing ensuring that the corresponding keyhole shaped holes engage the screwheads fully.
2mm
Figure 4
Figure 3
The control panel is located underneath the decorative frame on the bottom right hand side of the appliance.
CONTROL PANEL
POWER ON/OFF
FLAME BRIGHTNESS (5 settings)
Press to adjust the brightness level
FULL (5) - HIGH (4) - MEDIUM (3) - LOW (2) - DIM (1) - (LOOP)
HEATING (7 settings)
Press / V to adjust the temperature level
60^ / 99^ - 30^ / 86^ - 28^ / 82^ - 26^ / 78^ - 24^ / 75^ - 22^ / 71^ - OFF-
(LOOP) Press button for 10s to convert between °C and °F (model dependent)
EMBER/FUELBED EFFECT
Press to select the dynamic fuelbed effect
All of the appliances features can be operated by the remote control.
Check that the fan outlet, mounted underneath the appliance, is not covered or obstructed in any way. Ensure the power to the fire is switched ON.
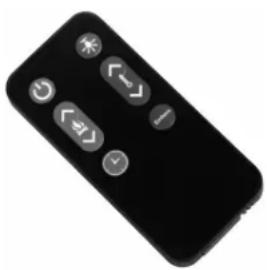
REMOTE CONTROL
natural_image
Black remote control device with control buttons (no visible text or symbols)EMBER/FUELBED EFFECT

POWER - ON/OFF
OFF will cancel the OFF TIMER and the flame brightness slowly fades to OFF.

FLAME BRIGHTNESS (5 settings)
Press / to adjust the brightness level
FULL (5) - HIGH (4) - MEDIUM (3) - LOW (2) - DIM (1)

HEATING (7 settings)
Press / to adjust the temperature level
60°C/99°F - 30°C/86°F - 28°C/82°F - 26°C/78°F - 24°C/75°F - 22°C/71°F - OFF - (LOOP)

OFF TIMER
Press to set the OFF TIMER
10m - 20m - 30m - 40m - 50m - 1H - 2H - 3H - 4H - 5H - 6H - 7H - 8H - 9H - (LOOP)

Press to select the dynamic fuelbed effect
11.0 CLEANING AND MAINTENANCE
ALWAYS DISCONNECT THE APPLIANCE FROM THE MAINS SUPPLY OUTLET SOCKET BEFORE UNDERTAKING ANY CLEANING OR MAINTENANCE!
For general cleaning use a soft clean duster - never use harsh abrasive or cleaners. The glass viewing screen should be cleaned carefully with a soft cloth.
If in doubt consult a qualified electrician. Refer to Section 3.0 Appliance Data for fuse specification. Excluding fuses, use only genuine manufacturers spare parts available from your supplier.
Replacing the remote control battery:
When the battery becomes weak, the range of the remote control becomes shorter. Replace the battery with a new CR2025 lithium battery.
Note: Keep the lithium battery out of the reach of children.
12.0 TROUBLESHOOTING GUIDE
Fire is not switching on Ensure mains switch is on
| Replace the fuse in the plug | |
| Fire is not emitting any heat | The fire is fitted with an energy saving thermostat. If the temperature in the room is higher than the temperature selected on the fire, then the thermostat will stop the heater from turning on. For example, if the room temperature is 22^ or above and the fires heater is set at 22^ , then the heater will not be required until the room temperature drops below 22^ . If this is the case select a higher temperature setting than the room’s temperature and the heater will begin to operate.The safety cut-out may have operated. Switch your fire off, leave for two minutes and then switch back on. |
| Fire shuts off after a period of time | Check that the temperature is not set onto the lower settings. If the room is warm enough the thermostat will stop the fire switching the heat on.Check that the chimney/flue is blocked off. |
| Fire seems noisy | There is a level of noise when the flame effect is in use, caused by a motor that helps generate the effect. This noise will be heard when there is no other background noise.There is a higher level of noise associated with the heater motor; this is due to the air flow required when heat has been selected. |
Remote is not operating Check or replace batteries.
I3.0 GUARANTEE - TERMS AND CONDITIONS
Registration is not required.
For any claim to be made within the 2 years from date of purchase you will be required to provide and supply us with your proof of purchase. The guarantee does not cover consumable items such as pebbles, coals or light bulbs.
Making a claim is easy.
If you wish to make a claim under our 2 year guarantee and all the terms and conditions for your product have been met then please submit the following information to Smeg (UK) at the address below. Alternatively, you can email or call. Please note that this does not affect your statutory rights.
Smeg UK Ltd, 3a Park Square, Milton Park, Abingdon, OX14 4RN.
Alternatively email: enquiries@smegfires.info or call: 0844 5579907.
Details required:
I. Name, full address including post code and contact telephone number.
2. Receipt of purchase or credit card statement.

- INSTALLATION & USER INSTRUCTIONS
- WALL MOUNTED ELECTRIC FIRE
- INSTALLATION & USER INSTRUCTIO
- IMPORTANT NOTES
- IMPORTANT - THESE INSTRUCTIONS SHOULD BE READ CAREFULLY AND RETAINED FOR FUTURE REFERENCE.
- INSTALLATION REQUIREMENTS
- APPLIANCE DATA
- UNPACKING THE APPLIANCE
- COMPONENT CHECKLIST
- QUANTITY DESCRIPTION
- SITE REQUIREMENTS
- DO NOT
- CLEARANCES TO COMBUSTIBLE MATERIALS
- CAUTION: DO NOT CONNECT THE APPLIANCE TO THE ELECTRICAL SUPPLY AT THIS TIME.
- WARNING
- POWER ON/OFF
- REMOTE CONTROL
- CLEANING AND MAINTENANCE
- ALWAYS DISCONNECT THE APPLIANCE FROM THE MAINS SUPPLY OUTLET SOCKET BEFORE UNDERTAKING ANY CLEANING OR MAINTENANCE!
- Replacing the remote control battery:
- TROUBLESHOOTING GUIDE
- I3.0 GUARANTEE - TERMS AND CONDITIONS
- Registration is not required.
- Making a claim is easy.
- Details required:
Brand : SMEG
Model : L30FABESI
Category : Fireplace