LSN5TR3P1 - Air-conditioner LG - Free user manual and instructions
Find the device manual for free LSN5TR3P1 LG in PDF.


User questions about LSN5TR3P1 LG
0 question about this device. Answer the ones you know or ask your own.
Ask a new question about this device
Download the instructions for your Air-conditioner in PDF format for free! Find your manual LSN5TR3P1 - LG and take your electronic device back in hand. On this page are published all the documents necessary for the use of your device. LSN5TR3P1 by LG.
USER MANUAL LSN5TR3P1 LG
- Please read this installation manual completely before installing the product.
- When the power cord is damaged, replacement work shall be performed by authorized personnel on;y.
• Installation work must be performed in accordance with the national wiring standards by authorized personnel only. - Please retain this installation manual for future reference after reading it thoroughly.
TYPE : WALL MOUNTED
P/No. MFL39754838
text_image
LG 24 x 7 CALL CENTER 1800-180-9999 5757554 (Toll Free) (Sond SMS) www.lg.com serviceindia@lge.comLG Electronics India Pvt. Ltd.
Registered Office : A-27, Mohan Co-operative Industrial Estate, Mathura Road, New Delhi-110044 Tel: 011-26991412, Fax: 011-26991410
www.lg.com
TIPS FOR SAVING ENERGY
Here are some tips that will help you minimize the power consumption when you use the air conditioner. You can use your air conditioner more efficiently by referring to the instructions below:
- Do not cool excessively indoors. This may be harmful for your health and may consume more electricity. (Recommended 24°C is suitable for human body)
- Block sunlight with blinds or curtains while you are operating the air conditioner.
- Keep doors or windows closed tightly while you are operating the air conditioner.
- Adjust the direction of the air flow vertically or horizontally to circulate indoor air.
- Speed up the fan to cool or warm indoor air quickly, in a short period of time.
- Open windows regularly for ventilation as the indoor air quality may deteriorate if the air conditioner is used for many hours.
- Clean the air filter once every 2 weeks. Dust and impurities collected in the air filter may block the air flow or weaken the cooling / dehumidifying functions. (Refer page no. 21 and 22 owner's manual)
For your records
Staple your receipt to this page in case you need it to prove the date of purchase or for warranty purposes. Write the model number and the serial number here:
Model number :
Serial number :
You can find them on a label on the side of each unit.
Dealer's name :
Date of purchase :
IMPORTANT SAFETY INSTRUCTIONS
READ ALL INSTRUCTIONS BEFORE USING THE APPLIANCE.
Always comply with the following precautions to avoid dangerous situations and ensure peak performance of your product

WARNING
It can result in serious injury or death when the directions are ignored

CAUTION
It can result in minor injury or product damage when the directions are ignored

WARNING
• Installation or repairs made by unqualified persons can result in hazards to you and others.
- The information contained in the manual is intended for use by a qualified service technician familiar with safety procedures and equipped with the proper tools and test instruments.
- Failure to carefully read and follow all instructions in this manual can result in equipment malfunction, property damage, personal injury and/or death.
Installation
- There is risk of fire or electric shock.
- For electrical work, contact the dealer, seller, a qualified electrician, or an Authorized Service Center. - Do not disassemble or repair the product. There is risk of fire or electric shock.
- Always ground the product. - There is risk of fire or electric shock.
- Install the panel and the cover of control box securely. - There is risk of fire or electric shock.
- Always install a dedicated circuit and breaker. - Improper wiring or installation may cause fire or electric shock.
- Use the correctly rated breaker or fuse. - There is risk of fire or electric shock.
- Do not modify or extend the power cable. - There is risk of fire or electric shock.
- Do not let the air conditioner run for a long time when the humidity is very high and a door or a window is left open. - Moisture may condense and wet or damage furniture.
- Be cautious when unpacking and installing the product. - Sharp edges could cause injury. Be especially careful of the case edges and the fins on the condenser and evaporator.
- For installation, always contact the dealer or an Authorized Service Center. - There is risk of fire, electric shock, explosion, or injury.
- Do not install the product on a defective installation stand.
- It may cause injury, accident, or damage to the product.
- Be sure the installation area does not deteriorate with age.
- If the base collapses, the air conditioner could fall with it, causing property damage, product failure, and personal injury.
Operation
- Do not store or use flammable gas or combustibles near the product.
- There is risk of fire or failure of product.

CAUTION
Installation
• Always check for gas (refrigerant) leakage after installation or repair of product.
- Low refrigerant levels may cause failure of product.
• Install the drain hose to ensure that water is drained away properly.
- A bad connection may cause water leakage.
- Keep level even when installing the product.
- To avoid vibration or water leakage.
- Do not install the product where the noise or hot air from the outdoor unit could damage the neighborhoods.
- It may cause a problem for your neighbors.
- Use two or more people to lift and transport the product.
- Avoid personal injury.
- Do not install the product where it will be exposed to sea wind (salt spray) directly.
- It may cause corrosion on the product. Corrosion, particularly on the condenser and evaporator fins, could cause product malfunction or inefficient operation.
TABLE OF CONTENTS
6 INSTALLATION PARTS
6 Installation Parts provided with the Unit
6 Installation Parts you must purchase
7 Required Tools
8 INSTALLATION
8 Installation of Indoor & Outdoor Unit
10 Flaring Work and Connection of Piping
11 Connection of piping (Indoor)
11 For right rear piping
12 For left rear piping
14 Connection of piping (Outdoor)
15 Connecting the cable between indoor unit and outdoor unit
17 Checking the drainage and forming the piping
18 Air purging
20 Test running
INSTALLATION PARTS
Installation parts provided with the unit
| Type ‘A’ Screw Quantity | Shape Others | ||
| Type ‘A’ Screw | 4 |  | • Paper pattern for installation.• Owner’s Manual• Installation Manual |
| Installation Plate | 1 | 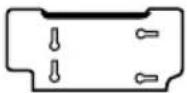 | |
| Type ‘B’ Screw | 2 |  | |
| Holder Remote Control | 1 | 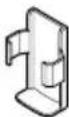 |
Installation parts you must purchase
| Type ‘A’ Screw Quantity | Shape Others | ||
| Sleeve | (Left air are ice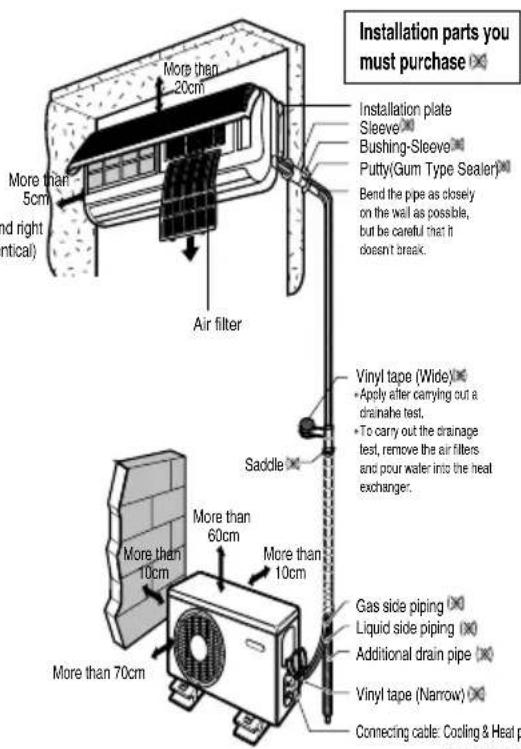 | • Paper pattern for installation.• Owner's Manual• Installation Manual | |
| Bushing Sleave | |||
| Putty (Gum type sealer) | |||
| Vinyl tape (Wide) | |||
| Gas side piping | |||
| Liquid side piping | |||
| Additional drain pipe | |||
| Vinyl tape (Narrow) | |||
| Saddle |
Installation Tools
| S.No. | Required Tools |
| 1 | Level Gauge |
| 2 | Screw Driver |
| 3 | Electric Drill |
| 4 | Hole Core Drill (Dia-70mm) |
| 5 | Flaring Tool Set |
| 6 | Specified torque wrenches 1.8kg.m, 4.2kg.m, 5.5kg.m, 6.6kg.m(Different depending on model no.) |
| 7 | Spanner (Half Union) |
| 8 | A glass of water |
| 9 | Hexagonal Wrench |
| 10 | Gas-Leak Detector |
| 11 | Vacuum Pump |
| 12 | Gauge Manifold |
| 13 | Owner's Manual |
| 14 | Thermometer |
INSTALLATION OF INDOOR & OUTDOOR UNIT
Read completely, then follow step by step.
Select the best location
A Indoor Unit
- Do not have any heat or steam near the unit.
- Select a place where there are no obstacles in front of the unit.
■ Make sure that condensation drainage can be conveniently routed away.
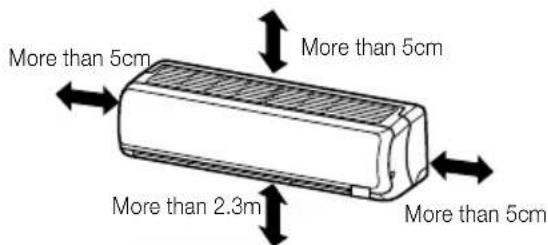
Do not install near a doorway. - Ensure that the space around the left and right of the unit is more than 5cm. The unit should be installed as high on the wall as possible, allowing a minimum of 5cm from ceiling.
Use a stud finder to locate studs to prevent unnecessary damage to the wall.
text_image
More than 5cm More than 5cm More than 2.3m More than 5cmCAUTION
Install the indoor unit on the wall where the height from the floors more than 2.3 meters.
B Outdoor Unit
If an awning is built over the unit to prevent direct sunlight or rain exposure, make sure that heat radiation from the condenser is not restricted.
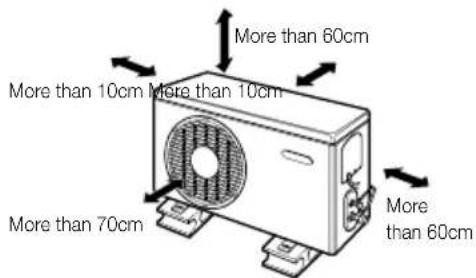
- Ensure that the space around the back and sides is more than 10cm. The front of the unit should have more than 70cm of space.
Do not place animals and plants in the path of the warm air.
Take the air conditioner weight into account and select a place where noise and vibration are minimum.
- Select a place so that the warm air and noise from the air conditioner do not disturb neighbors.
text_image
More than 60cm More than 10cm More than 10cm More than 70cm More than 60cm■ Rooftop Installation
If the outdoor unit is installed on a roof structure, be sure to level the unit. Ensure the roof structure and anchoring method are adequate for the unit location. Consult local codes regarding rooftop mounting.
Piping length and elevation
| Capacity(Btu/h) | Pipe Size | Standard Length(m) | Max. length Ⓐ (m) | Additional Refrigerant(g/m) | |
| GAS | LIQUID | ||||
| 9K | 3/8" | 1/4" | 3 to 5 | 20 | 20 |
| 9K, 12K,18K (50Hz) | 1/2" | 1/4" | 3 to 5 | 20 | 20 |
| 18K (60Hz)24K Cooling | 5/8" | 1/4" | 3 to 5 | 20 | 20 |
| 24K, 26KCooling & Heat Pump | 5/8" | 3/8" | 3 to 5 | 20 | 20 |
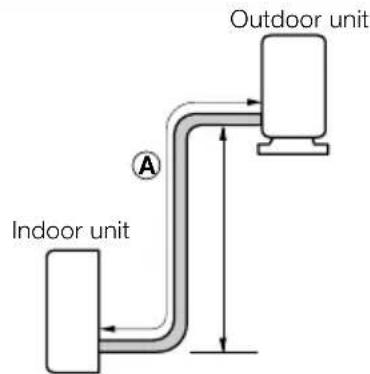
text_image
Outdoor unit A Indoor unit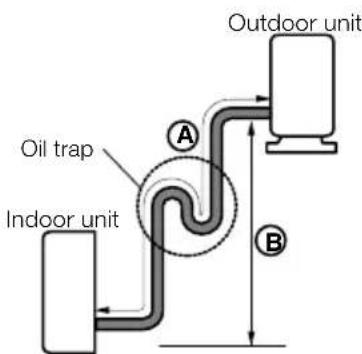
text_image
Oil trap Indoor unit A Outdoor unit BIn case more than 5m
CAUTION
- Capacity is based on standard length and maximum allowance length is on the basis of reliability.
- Oil trap should be installed every 5\~7 meters.
INSTALLATION OF INDOOR & OUTDOOR UNIT
How to fix installation plate Drill a hole in the wall
The wall you select should be strong and solid enough to prevent vibration.
A Mount the installation plate on the wall with four type A screws. If mounting the unit on a concrete wall, use anchor bolts.
■ Mount the installation plate horizontally by aligning the centerline using a level.
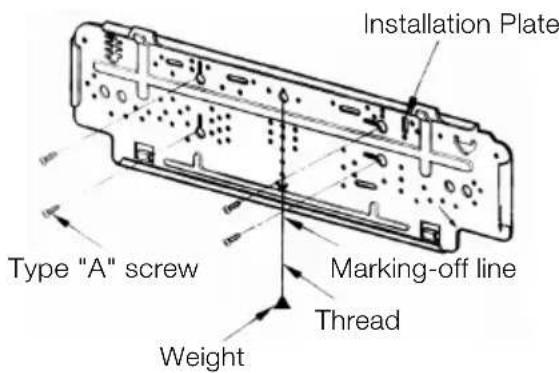
text_image
Installation Plate Type "A" screw Marking-off line Thread WeightDrill the piping hole with a 70mm hole core drill. Drill the piping hole at either the right or the left with the hole slightly slanted to the outdoor side.
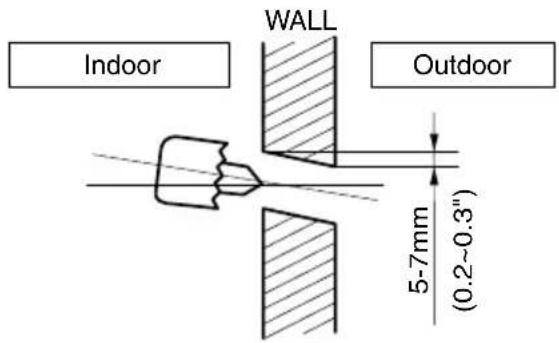
text_image
WALL Indoor Outdoor 5-7mm (0.2~0.3")CAUTION
- Make sure that the drilled hole in the wall is properly sealed (using a proper sealant, for example cement, plaster of paris etc.) after passing the installation pipe, drainage pipe and the inter connecting cable.
B Measure the wall and mark the centerline. It is also important to use caution concerning the location of the installation plate-routing of the wiring to power outlets is through the walls typically. Drilling the hole through the wall for piping connections must be done safely.
Usage of Drain Pan (Heat Pump)
Drain pan along with drain pipe (as shown below) can be used to drain the water accumulated in the outdoor during the Heat Mode.
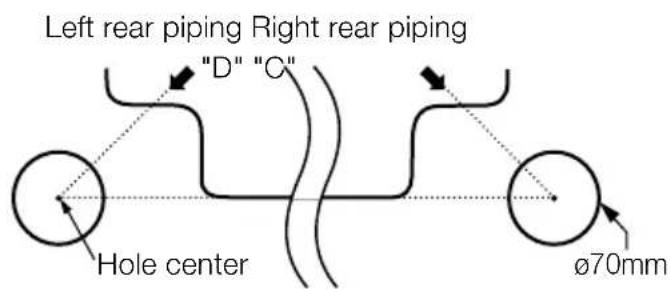
text_image
Left rear piping Right rear piping "D" "C" Hole center Ø70mm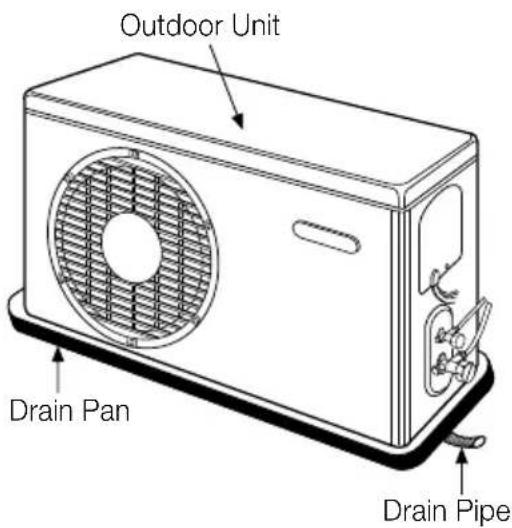
text_image
Outdoor Unit Drain Pan Drain PipeFLARING WORK AND CONNECTION OF PIPING
Flaring work
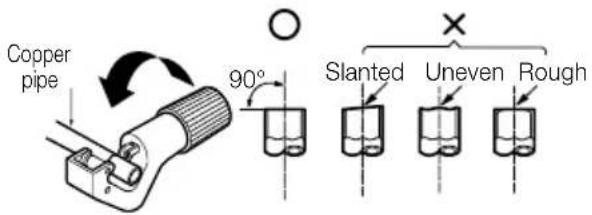
Main cause for gas leakage is due to defect in flaring work. Carry out correct flaring work in the following procedure.
A Cut the pipes and the cable
■ Use the piping kit accessory or the pipes purchased locally.
■ Measure the distance between the indoor and the outdoor unit.
- Cut the pipes a little longer than measured distance.
- Cut the cable 1.5m longer than the pipe length.
text_image
Copper pipe 90° Slanted Uneven RoughD Flaring work
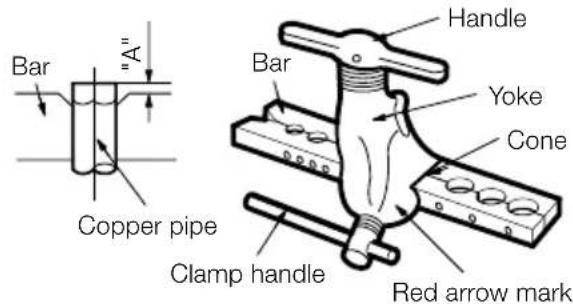
- Carry out flaring work using flaring tool as shown below.
| Outside diameter | A | |
| mm | inch | mm |
| ø6.35 | 1/4 | 0~0.5 |
| ø9.52 | 3/8 | 0~0.5 |
| ø12.7 | 1/2 | 0~0.5 |
| ø15.88 | 5/8 | 0~1.0 |
Firmly hold copper pipe in a die in the dimension shown in the table above.
text_image
Handle Yoke Cone Clamp handle Red arrow mark Copper pipe Bar A"B Burrs removal
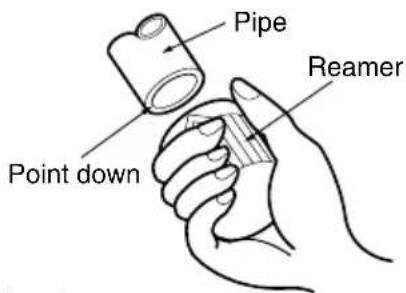
■ Completely remove all burrs from the cut cross section of pipe/tube.
- Put the end of the copper tube/pipe in a downward direction as you remove burrs in order to avoid dropping burrs into the tubing.
E Check
Compare the flared work with figure below. If flare is noted to be defective, cut off the flared section and do flaring work again.
text_image
Pipe Point down ReamerC Putting nut on
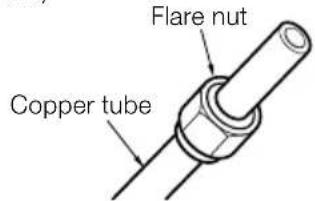
■ Remove flare nuts attached to indoor and outdoor unit, then put them on pipe/tube having completed burr removal. (not possible to put them on after flaring work)
text_image
Flare nut Copper tube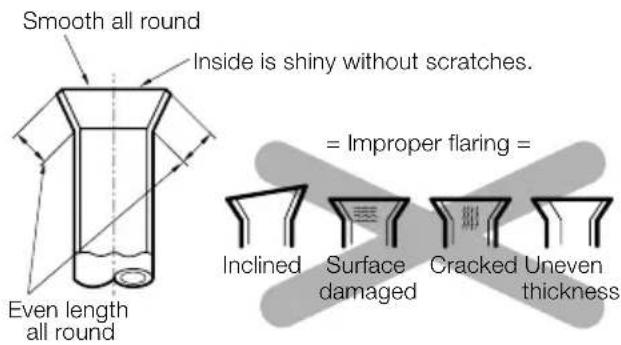
text_image
Smooth all round Inside is shiny without scratches. Even length all round = Improper flaring = Inclined Surface damaged Cracked Uneven thicknessFLARING WORK AND CONNECTION OF PIPING
Connection of piping-Indoor
■ Preparing the indoor unit's piping and drain hose for installation through the wall.
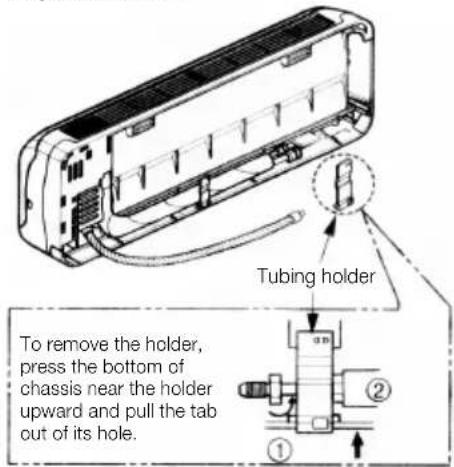
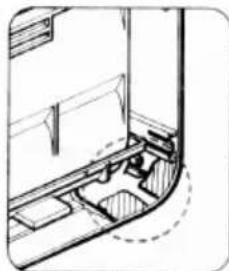
■ Remove the plastic tubing retainer (see illustration below) and pull the tubing and drain hose away from chassis.
- Replace the plastic tubing holder in the original position.
text_image
Tubing holder To remove the holder, press the bottom of chassis near the holder upward and pull the tab out of its hole.CAUTION
When install, make sure that the remaining parts must be removed clearly so as not to damage the piping and drain hose, especially power cord and connecting cable.
natural_image
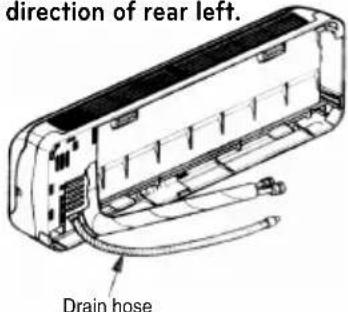
Architectural line drawing of a room interior with furniture and structural elements (no text or symbols)For left rear piping

Route the indoor tubing and the drain hose in the direction of rear left.
text_image
direction of rear left. Drain hose
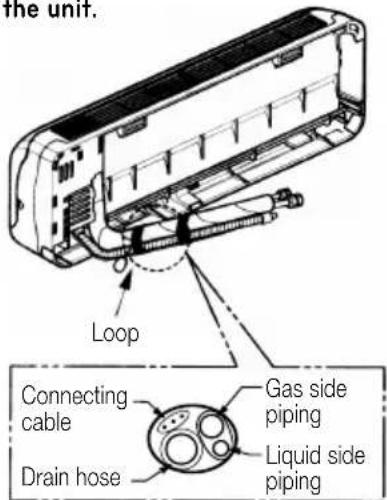
Insert the connecting cable into the indoor unit from the outdoor unit through the piping hole.
- Do not connect the cable to the indoor unit.
■ Make a small loop with the cable for easy connection later.

Tape the tubing, drain hose and the connecting cable. Be sure that the drain hose is located at the lowest side of the bundle. Locating at the upper side can cause drain pan to overflow inside the unit.
text_image
the unit. Loop Connecting cable Drain hose Gas side piping Liquid side pipingNOTE: If the drain hose is routed inside the room, insulate the hose with an insulation material* so that dripping from "sweating"(condensation) will not damage furniture or floors.
*Foamed polyethylene or equivalent is recommended.

Indoor unit installation
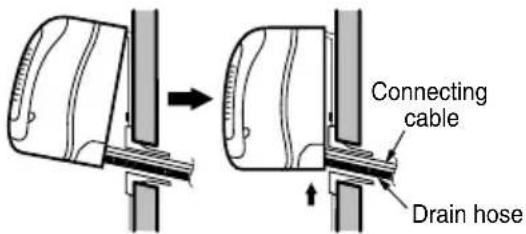
Hook the indoor unit onto the upper portion of the installation plate.(Engage the two hooks of the rear top of the indoor unit with the upper edge of the installation plate.) Ensure that the hooks are properly seated on the installation plate by moving it left and right
text_image
Connecting cable Drain hosePress the lower left and right sides of the unit against the installation plate until the hooks engage into their slots (clicking-sound).

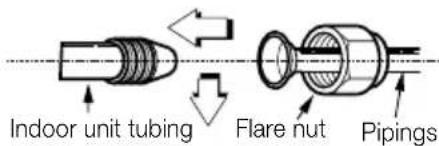
Connecting the pipings to the indoor unit and drain hose to drain pipe.
- Align the center of the pipings and sufficiently tighten the flare nut by hand.
text_image
Indoor unit tubing Flare nut PipingsFLARING WORK AND CONNECTION OF PIPING
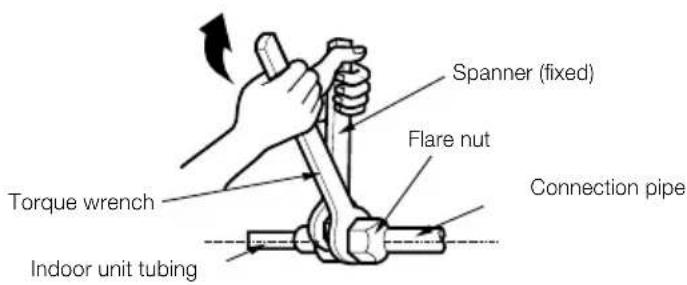
■ Tighten the flare nut with a wrench.
text_image
Spanner (fixed) Flare nut Connection pipe Torque wrench Indoor unit tubing| Capacity(Btu/h) | Pipe Size[Torque] | |
| GAS LIQUID | ||
| 9K, 12K18K, 24K, 26K | 1/2"[5.5kg·m]5/8"[6.6kg·m] | 1/4"[1.8kg·m]3/8"[4.2kg·m] |
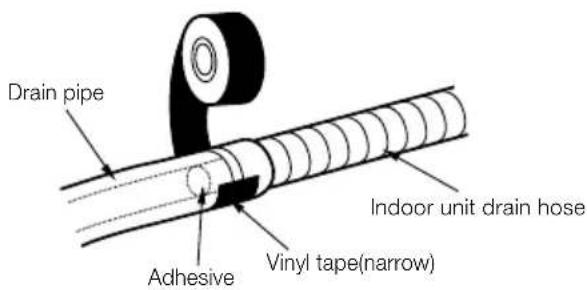
- When extending the drain hose at the indoor unit, install the drain pipe.
text_image
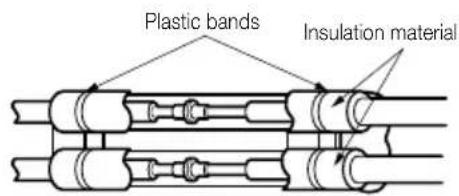
Drain pipe Adhesive Vinyl tape(narrow) Indoor unit drain hoseF Wrap the insulation material around the connecting portion.
Overlap the connection pipe insulation material and the indoor unit pipe insulation material. Bind them together with vinyl tape so that thee is no gap.
text_image
Plastic bands Insulation material- Wrap the area which accommodates the rear piping housing section with vinyl tape.
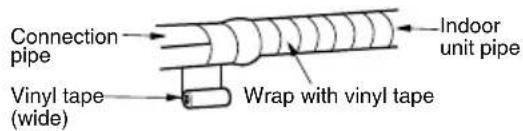
text_image
Connection pipe Vinyl tape (wide) Wrap with vinyl tape Indoor unit pipe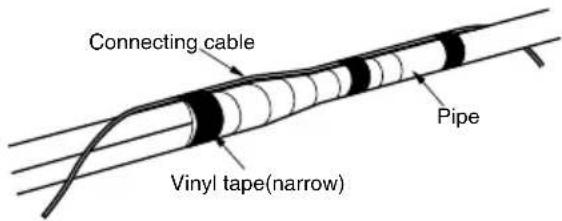
text_image
Connecting cable Vinyl tape(narrow) PipeBundle the piping and drain hose together by wrapping them with vinyl tape over the range within which they fit into the rear piping housing section.
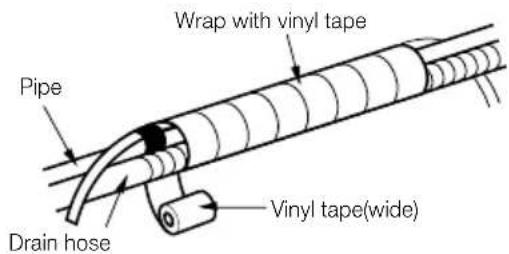
text_image
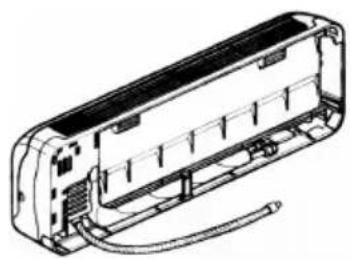
Wrap with vinyl tape Pipe Drain hose Vinyl tape(wide)For right rear piping
A Route the indoor tubing and the drain hose to the required piping hole position.
natural_image
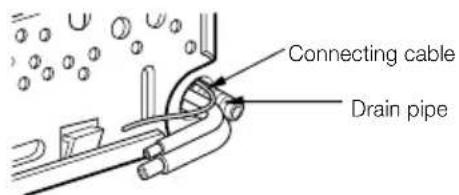
Technical line drawing of a rectangular electronic device with internal components and wiring (no text or symbols)B Insert the piping, drain hose and the connecting cable into the piping hole.
text_image
Connecting cable Drain pipeFLARING WORK AND CONNECTION OF PIPING
C Insert the connecting cable into the indoor unit.
- Don't connect the cable to the indoor unit.
■ Make a small loop with the cable for easy connection later.
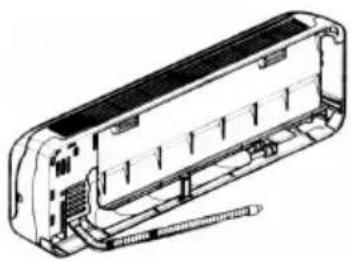
D Tape the drain hose and the connecting cable.
- Connecting cable
natural_image
Technical line drawing of a refrigerated air conditioner unit (no text or symbols)E Indoor unit installation
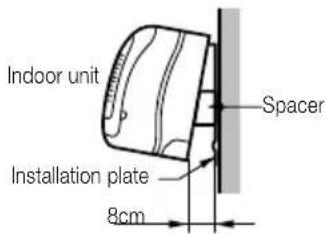
- Hang the indoor unit from the hooks at the top of the installation plate.
Insert the spacer etc. between the indoor unit and the installation plate and separate the bottom of the indoor unit from the wall.
text_image
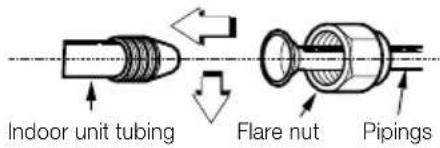
Indoor unit Spacer Installation plate 8cmF Connecting the pipings to the indoor unit and the drain hose to drain pipe.
- Align the center of the pipings and sufficiently tighten the flare nut by hand.
text_image
Indoor unit tubing Flare nut Pipings■ Tighten the flare nut with a wrench.
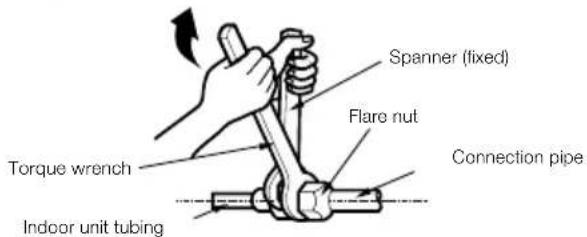
text_image
Spanner (fixed) Flare nut Torque wrench Connection pipe Indoor unit tubing| Capacity (Btu/h) | Pipe Size[Torque] | |
| GAS LIQUID | ||
| 9K, 12K | 1/2"[5.5kg·m] | 1/4"[1.8kg·m] |
| 18K, 24K, 26K | 5/8"[6.6kg·m] | 3/8"[4.2kg·m] |
- When extending the drain hose at the indoor unit, install the drain pipe.
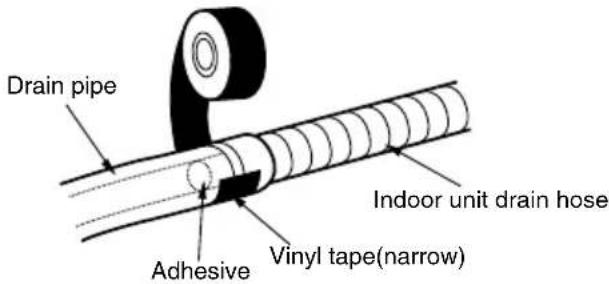
text_image
Drain pipe Adhesive Vinyl tape(narrow) Indoor unit drain hoseG Wrap the insulation material around the connecting portion.
■ Overlap the connection pipe heat insulation and the indoor unit pipe heat insulation material. Bind them together with vinyl tape so that there is no gap.
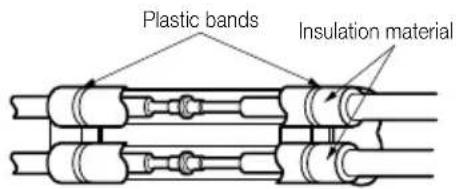
text_image
Plastic bands Insulation material- Wrap the area which accommodates the rear piping housing section with vinyl tape.
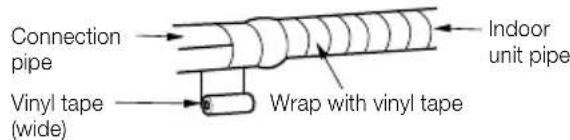
text_image
Connection pipe Vinyl tape (wide) Wrap with vinyl tape Indoor unit pipe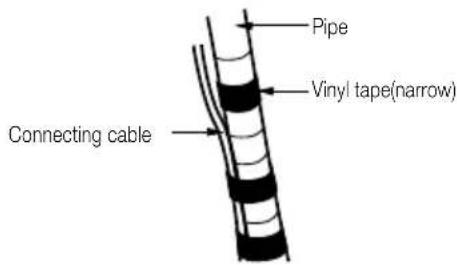
text_image
Pipe Vinyl tape(narrow) Connecting cableFLARING WORK AND CONNECTION OF PIPING
Bundle the piping and drain hose together by wrapping them with cloth tape over the range within which they fit into the rear piping housing section.
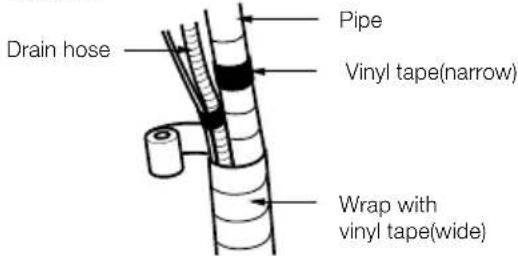
text_image
Drain hose Pipe Vinyl tape(narrow) Wrap with vinyl tape(wide)H Reroute the pipings and the drain hose across the back of the chassis.
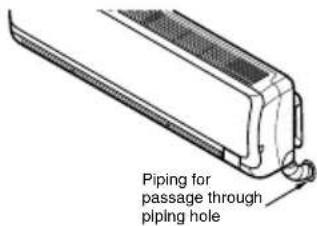
text_image
Piping for passage through pliping holeSet the pipings and the drain hose to the back of the chassis with the tubing holder.
Hook the edge of tubing holder to tap on chassis and push the bottom of tubing holder to be engaged at the bottom of chassis.
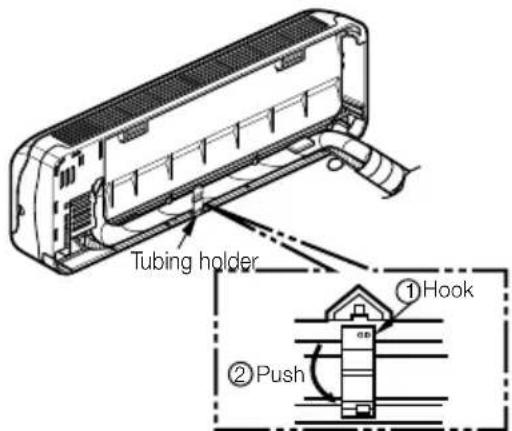
text_image
Tubing holder ①Hook ②PushJ Indoor unit installation
- Remove the spacer. - Ensure that the hooks are properly seated on the installation plate by moving it left and right.
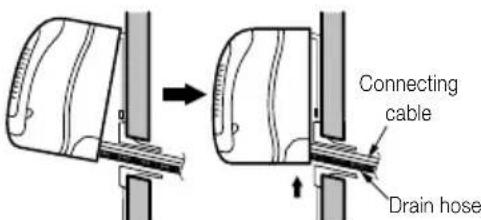
text_image
Connecting cable Drain hosePress the lower left and right sides of the unit against the installation plate until the hooks engage into their slots(clicking sound).
Connection of the pipes-Outdoor
A Align the center of the pipings and sufficiently tighten the flare nut by hand.
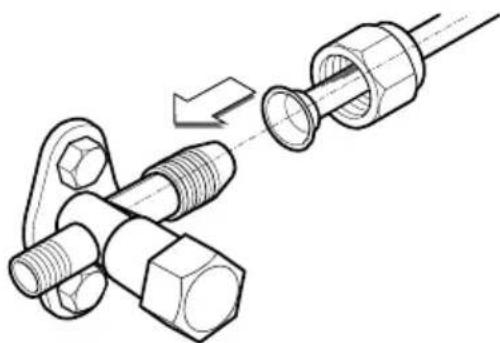
natural_image
Technical illustration of a mechanical assembly with bolts and a pin, showing a disassembly or assembly process (no text or symbols present)B Finally, tighten the flare nut with torque wrench until the wrench clicks.
When tightening the flare nut with torque wrench, ensure the direction for tightening follows the arrow on the wrench.
| Capacity (Btu/h) | Pipe Size[Torque] | |
| GAS LIQUID | ||
| 9K, 12K18K, 24K, 26K | 1/2"[5.5kg·m]5/8"[6.6kg·m] | 1/4"[1.8kg·m]3/8"[4.2kg·m] |
Outdoor unit
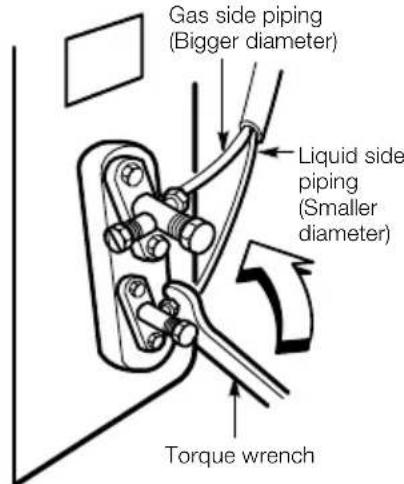
text_image
Gas side piping (Bigger diameter) Liquid side piping (Smaller diameter) Torque wrenchCONNECTING THE CABLE BETWEEN INDOOR & OUTDOOR UNIT
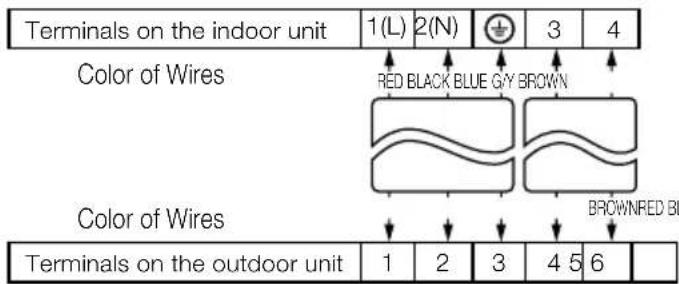
Connect the cable from Indoor to outdoor unit.
■ Connect the cable to the indoor unit by connecting the wires to the terminals on the control board individually according to the outdoor unit connection.
(Ensure that the color of the wires of the outdoor unit and the terminal No. are the same as those of the indoor unit.)
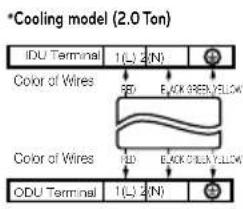
text_image
*Cooling model (2.0 Ton) IDU Terminal 1(L) 2(N) Color of Wires RED BLACK YELLOW YELLOW Color of Wires RED BLACK YELLOW YELLOW ODU Terminal 1(L) 2(N)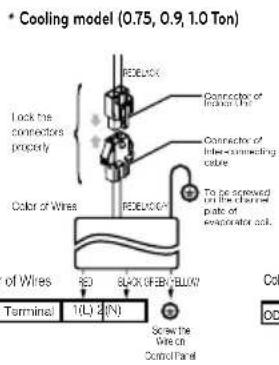
text_image
Cooling model (0.75, 0.9, 1.0 Ton) Lock the connectors properly Color of Wire REDELOCK Connector of indoor unit Connector of inter-connecting cable To be screwed on the channel rates of evaporator act. REDELOCKA of Wires RD BLOCK OFEBULOW Terminal 1(L) 2(N) Screw the Wire on Comul Panel Col OD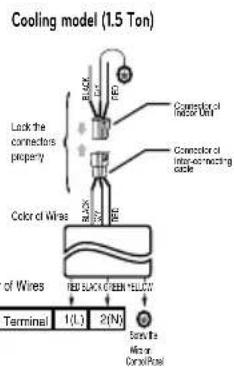
text_image
Cooling model (1.5 Ton) Lock the connectors property Color of Wires Red BLACK GREEN YELLOW Terminal 1(L) 2(N) Connector of RNGD Unit Connector of inter-co-matching candle End to Minor Control Panel- Heat pump model
text_image
Terminals on the indoor unit 1(L) 2(N) 3 4 Color of Wires RED BLACK BLUE GAY BROWN Color of Wires BROWNRED BL Terminals on the outdoor unit 1 2 3 4 5 6CAUTION
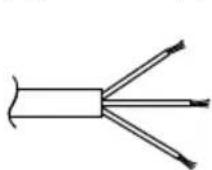
The power cord connected to the indoor unit should be compiled with the following specifications (Type H05VV-F approved by HAR or SAA).
| Capacity (Btu/h) | NORMAL CROSS -SECTIONAL AREA |
| 9K, 12K | 1.0mm ^2 |
| 18K | 1.5mm ^2 |
| 24K26K | 2.5mm ^2 |
The power connecting cable connected to the indoor and outdoor unit should be compiled with the following specifications
(Type H07RN-F approved by HAR or SAA).
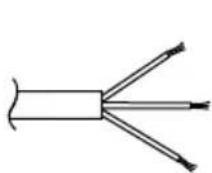
| Capacity (Btu/h) | NORMAL CROSS -SECTIONAL AREA |
| 9K, 12K | 1.0mm ^2 |
| 18K, 24K 26K | 2.5mm ^2 |
The connecting cable connected to the indoor and outdoor unit should be compiled with the following specifications (Type H07RN-F approved by HAR or SAA).
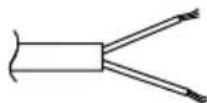
NORMAL CROSS-SECTIONAL AREA 0.75mm ^2
The length of the power supply cord should be over 1.8m measured from the power supply cord entry of the cabinet to the middle of the live pin of the plug.
CAUTION
If a power plug is not to be used, provide a circuit breaker between power source and the unit as shown below.
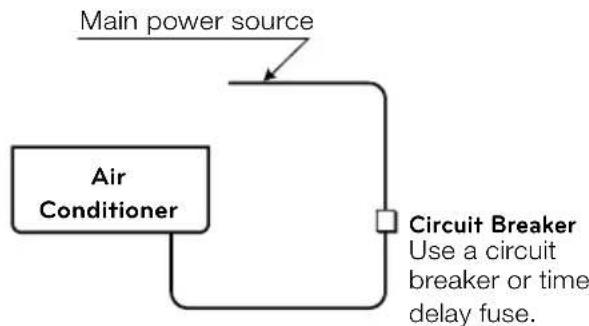
flowchart
graph TD
    A["Main power source"] --> B["Air Conditioner"]
    B --> C["Circuit Breaker\nUse a circuit breaker or time delay fuse."]
CONNECTING THE CABLE BETWEEN INDOOR & OUTDOOR UNIT
Connect the cable to the outdoor unit
A Remove the control cover from the unit by loosening the screw.
Connect the wires to the terminals on the control board individually.
B Secure the cable onto the control board with the cord clamp.
C Refix the control cover to the original position with the screw.
D Use a recognized circuit breaker 20A (18K), 25A (24K, 26K) between the power source and the unit. A disconnecting device to adequately disconnect all supply lines must be fitted.
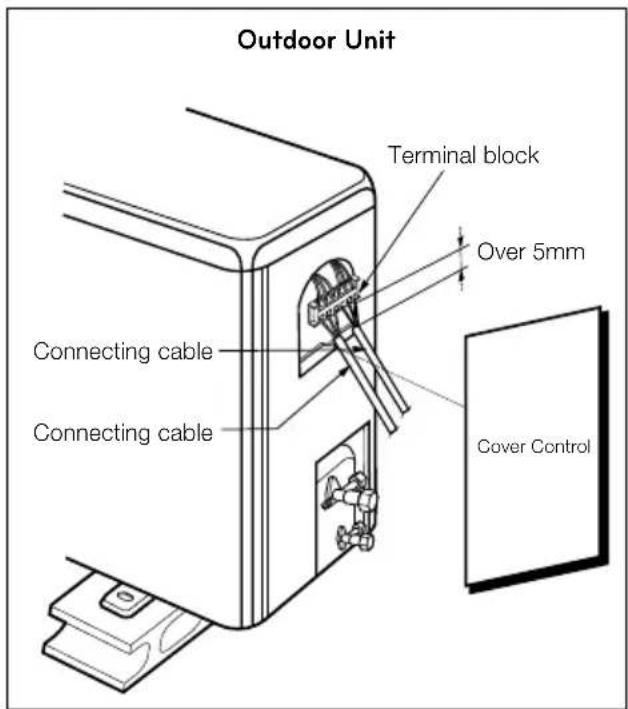
text_image
Outdoor Unit Terminal block Over 5mm Connecting cable Connecting cable Cover ControlCAUTION
After the confirmation of the above conditions, prepare the wiring as follows:
1) Never fail to have an individual power circuit specifically for the air conditioner. As for the method of wiring, be guided by the circuit diagram posted on the inside of control cover.
2) The screw which fasten the wiring in the casing of electrical fittings are liable to come loose from vibrations to which the unit is subjected during the course of transportation. Check them and make sure that they are all tightly fastened. (If they are loose, it could cause burn-out of the wires.)
3) Specification of power source.
4) Confirm that electrical capability is sufficient.
5) See to that the starting voltage is maintained at more than 90 percent of the rated voltage marked on the name plate.
6) Confirm that the cable thickness is as specified in the power source specification. (Particularly note the relation between cable length and thickness. (Refer to page 11))
7) Always install an earth leakage circuit breaker in a wet or moist area.
8) The following would be caused by voltage drop.
- Vibration of a magnetic switch, which will damage the contact point, fuse breaking, disturbance of the normal function of the overload.
9) The means for disconnection from a power supply shall be incorporated in the fixed wiring and have an air gap contact separation of at least 3mm in each active(phase) conductors.
CONNECTING THE CABLE BETWEEN INDOOR & OUTDOOR UNIT
Checking the drainage
A To remove the front panel from the indoor unit, remove the front panel from the indoor unit cabinet.
- Set the air direction louvers up-and-down to the position(horizontally) by hand.
■ Remove the securing screws that retain the front panel. Pull the lower left and right sides of the grille toward you and lift it off. (18K, 24K, 26K Btu models: 3EA)
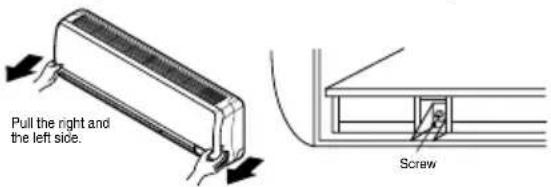
text_image
Pull the right and the left side. ScrewB To check the drainage.
Pour a glass of water on the evaporator.
- Ensure the water flows through the drain hose of the indoor unit without any leakage and goes out the drain exit.
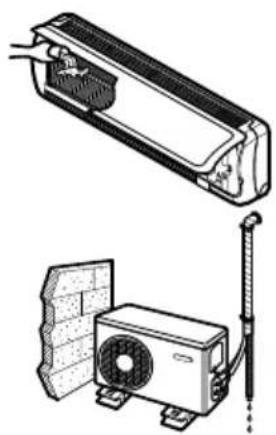
natural_image
Technical illustration of an air conditioner unit with cooling fan and mounted fan (no text or symbols)C Drain piping
The drain hose should point downward for easy drain flow.
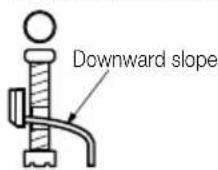
■ Do not make drain piping.
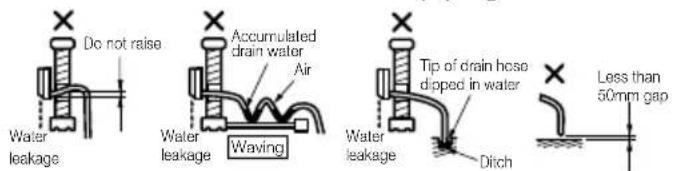
text_image
Do not raise Accumulated drain water Air Water leakage Waving Tip of drain hose doped in water Water leakage Ditch Less than 50mm gapForm the piping
A Form the piping by wrapping the connecting portion of the indoor unit with insulation material and secure it with two kinds of vinyl tapes.
If you want to connect an additional drain hose, the end of the drain outlet should be routed above the ground. Secure the drain hose appropriately.
B In cases where the outdoor unit is installed below the indoor unit perform the following.
■ Tape the piping, drain hose and connecting cable from down to up.
- Secure the tapped piping along the exterior wall using saddle or equivalent.
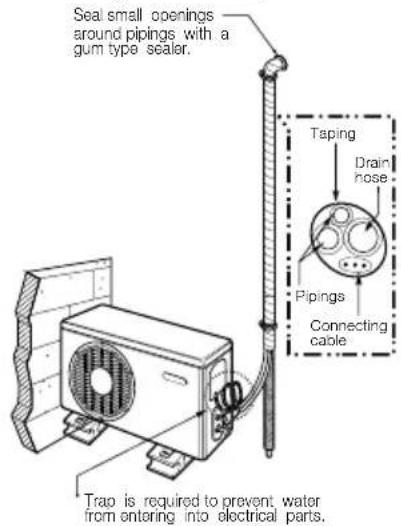
text_image
Seal small openings around pipings with a gum type sealer. Taping Drain nose Pipings Connecting cable Trap is required to prevent water from entering into electrical parts.C In cases where the Outdoor unit is installed above the Indoor unit perform the following.
■ Tape the piping, and connecting cable from down to up.
- Secure the taped piping along the exterior wall. Form a trap to prevent water entering the room.
- Fix the piping onto the wall by saddle or equivalent.
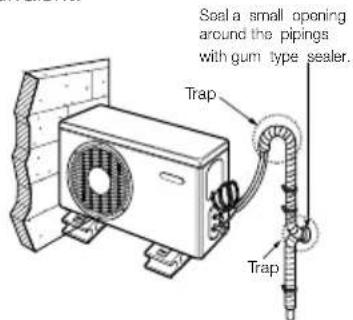
text_image
Seal a small opening around the pipings with gum type sealer. Trap TrapAIR PURGING
Air purging
Air and moisture remaining in the refrigerant system have undesirable effects as indicated below.
■ Pressure in the system rises.
- Operating current rises.
■ Cooling(or heating) efficiency drops.
■ Moisture in the refrigerant circuit may freeze and block capillary tubing.
■ Water may lead to corrosion of parts in the refrigeration system.
Therefore, the indoor unit and tubing between the indoor and outdoor unit must be leak tested and evacuated to remove any noncondensables and moisture from the system.
Air purging with vacuum pump

Preparation
Check that each tube(both liquid and gas side tubes) between the indoor and outdoor units have been properly connected and all wiring for the test run has been completed. Remove the service valve caps from both the gas and the liquid side on the outdoor unit. Note that both the liquid and the gas side service valves on the outdoor unit are kept closed at this stage.

Leak test
■ Connect the manifold valve(with pressure gauges) and dry nitrogen gas cylinder to this service port with charge hoses.
CAUTION
Be sure to use a manifold valve for air purging. If it is not available, use a stop valve for this purpose. The "Hi" knob of the manifold valve must always be kept close.
Pressurize the system to no more than 150 P.S.I.G. with dry nitrogen gas and close the cylinder valve when the gauge reading reached 150 P.S.I.G. Next, test for leaks with liquid soap.
CAUTION
To avoid nitrogen entering the refrigerant system in a liquid state, the top of the cylinder must be higher than its bottom when you pressurize the system. Usually, the cylinder is used in a vertical standing position.
Do a leak test of all joints of the tubing(both indoor and outdoor) and both gas and liquid side service valves. Bubbles indicate a leak. Be sure to wipe off the soap with a clean cloth.
After the system is found to be free of leaks, relieve the nitrogen pressure by loosening the charge hose connector at the nitrogen cylinder. When the system pressure is reduced to normal, disconnect the hose from the cylinder.
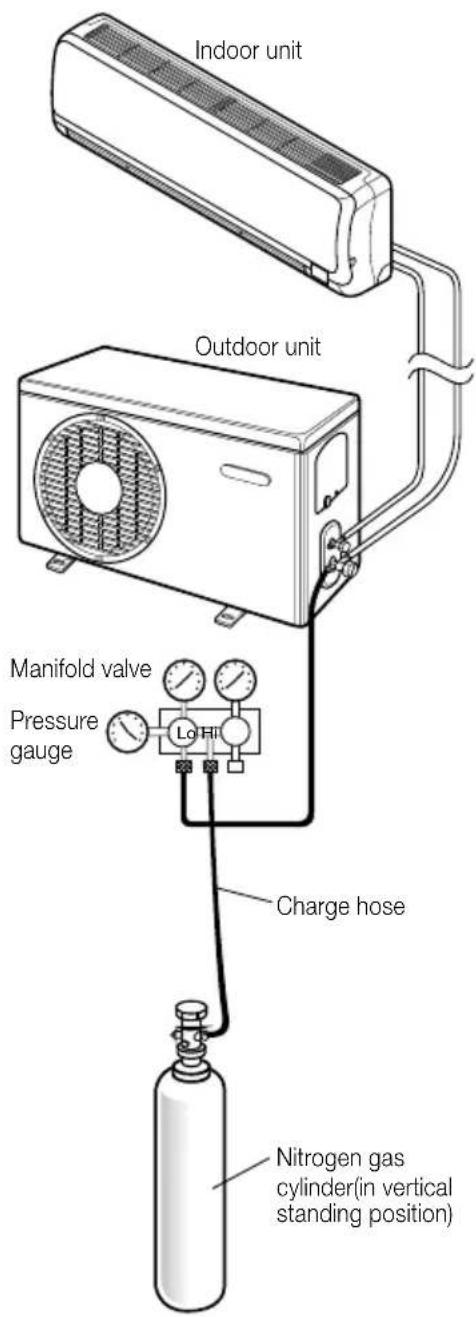
text_image
Indoor unit Outdoor unit Manifold valve Pressure gauge Lo Hi Charge hose Nitrogen gas cylinder(in vertical standing position)AIR PURGING
Soap water method
(1) Remove the caps from the 2-way and 3-way valves.
(2) Remove the service-port cap from the 3-way valves.
(3) To open the 2-way valve turn the valve stem counterclockwise approximately 90°, wait for about 2\~3 sec, and close it.
(4) Apply a soap water or a liquid neutral detergent on the indoor unit connection or outdoor unit connections by a soft brush to check for leakage of the connecting points of the piping.
(5) If bubbles come out, the pipes have leakage.

Evacuation
Connect the charge hose end described in the preceding steps to the vacuum pump to evacuate the tubing and indoor unit. Confirm the "Lo" knob of the manifold valve is open. Then, run the vacuum pump. The operation time for evacuation varies with tubing length and capacity of the pump. The following table shows the time required for evacuation.
| Required time for evacuation when 30 gal/h vacuum pump is used | |
| If tubing length is less than 10m (33 ft) | If tubing length is longer than 10m (33 ft) |
| 10 min. or more 15 | min. or more |
When the desired vacuum is reached, close the "Lo" knob of the manifold valve and stop the vacuum pump.

Finishing the job
With a service valve wrench, turn the valve stem of liquid side valve counter-clockwise to fully open the valve.
■ Turn the valve stem of gas side valve counter-clockwise to fully open the valve.
■ Loosen the charge hose connected to the gas side service port slightly to release the pressure, then remove the hose.
- Replace the flare nut and its bonnet on the gas side service port and fasten the flare nut securely with an adjustable wrench. This process is very important to prevent leakage from the system.
- Replace the valve caps at both gas and liquid side service valves and fasten them tight.
This completes air purging with a vacuum pump.
The air conditioner is now ready to test run.
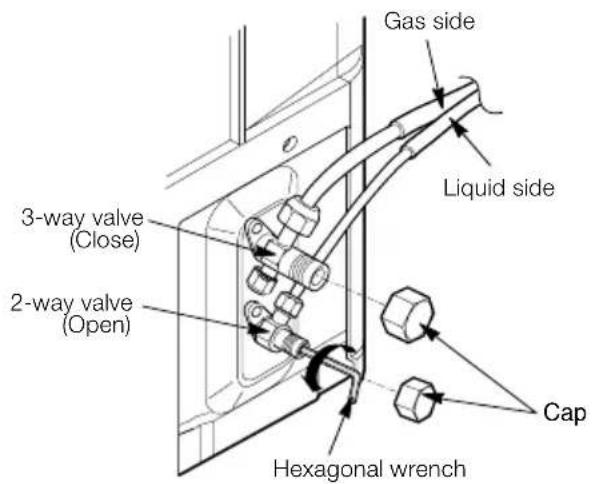
text_image
Gas side Liquid side 3-way valve (Close) 2-way valve (Open) Hexagonal wrench Cap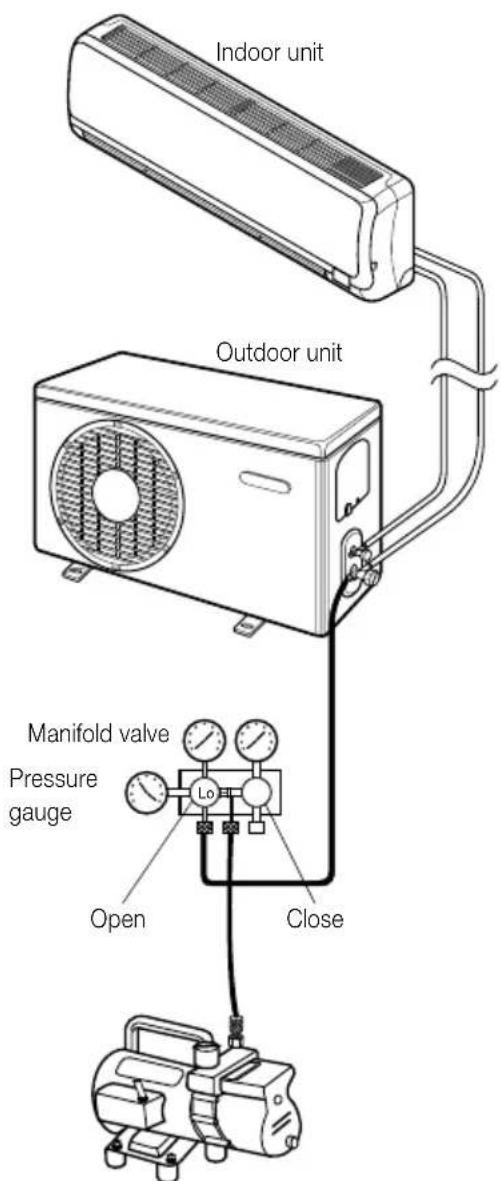
text_image
Indoor unit Outdoor unit Manifold valve Pressure gauge Open CloseVacuum pump
TEST RUNNING
- Check that all tubing and wiring have been properly connected.
- Check that the gas and liquid side service valves are fully open.
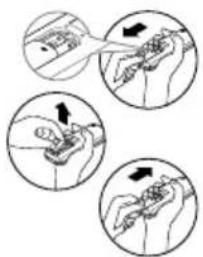
A Prepare remote control
- Remove the battery cover by pulling it according to the arrow direction.
- Insert new batteries making sure that the (+) and (−) of battery are installed correctly.
- Reattach the cover by pushing it back into position.
natural_image
Illustration of four hand positions showing a finger pressing down, with arrows indicating movement direction (no text or symbols)NOTE:
- Use 2 AAA(1.5volt) batteries. Do not use rechargeable batteries.
- Remove the batteries from the remote control if the system is not going to be used for a long time.
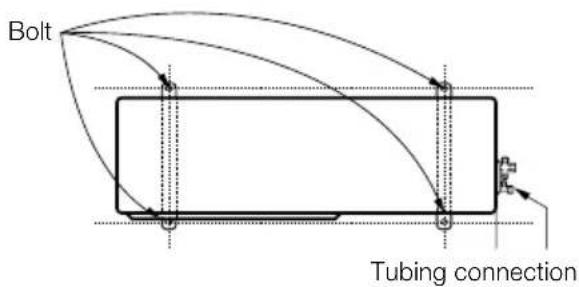
B Settlement of outdoor unit
Anchor the outdoor unit with a bolt and nut 10mm ) tightly and horizontally on a concrete or rigid mount.
When installing on the wall, roof or rooftop, anchor the mounting base securely with a nail or wire assuming the influence of wind and earthquake.
In the case when the vibration of the unit is conveyed to the hose, secure the unit with an anti-vibration rubber.
text_image
Bolt Tubing connectionC Evaluation of the performance
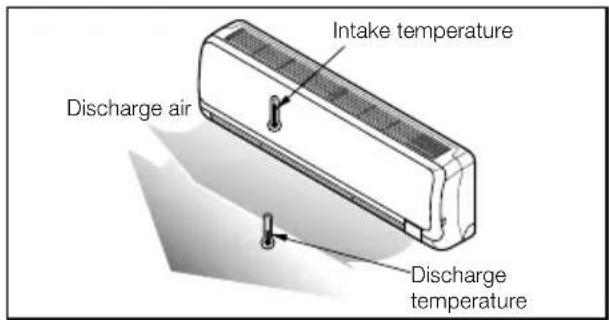
Operate unit for 15\~20 minutes, then check the system refrigerant charge:
- Measure the pressure of the gas side service valve.
-
Measure the temperature of the intake and discharge of air.
-
Ensure the difference between the intake temperature and the discharge is more than 8^ C (Cooling) or reversely (Heating).
text_image
Intake temperature Discharge air Discharge temperature- For reference; the gas side pressure of optimum condition is as below.(Cooling)
| Outside ambient TEMP. | The pressure of the gas side service valve |
| 35°C(95°F) | 4~5kg/cm2 G(56.8~71.0 P.S.I.G. |
NOTE: If the actual pressure are higher than shown, the system is most likely over-charged, and charge should be removed. If the actual pressure are lower than shown, the system is most likely undercharged, and charge should be added The air conditioner is now ready for use.
PUMP DOWN
This is performed when the unit is to be relocated or the refrigerant circuit is serviced.
Pump Down means collecting all refrigerant in the outdoor unit without loss in refrigerant gas.
CAUTION:
Be sure to perform Pump Down procedure with the unit cooling mode.
Pump Down Procedure
- Connect a low-pressure gauge mainifold hose to the charge port on the gas side service valve.
- Open the gas side service valve halfway and purge the air from the manifold hose using the refrigerant gas.
- Close the liquid side service valve(all the way in).
- Turn on the unit's operating switch and start the cooling operation.
- When the low-pressure gauge reading becomes 1 to 0.5kg/cm^2G(14.2 to 7.1 P.S.I.G.), fully close the gas side valve stem and then quickly turn off the unit. At that time, Pump Down has been completed and all refrigerant gas will have been collected in the outdoor unit.
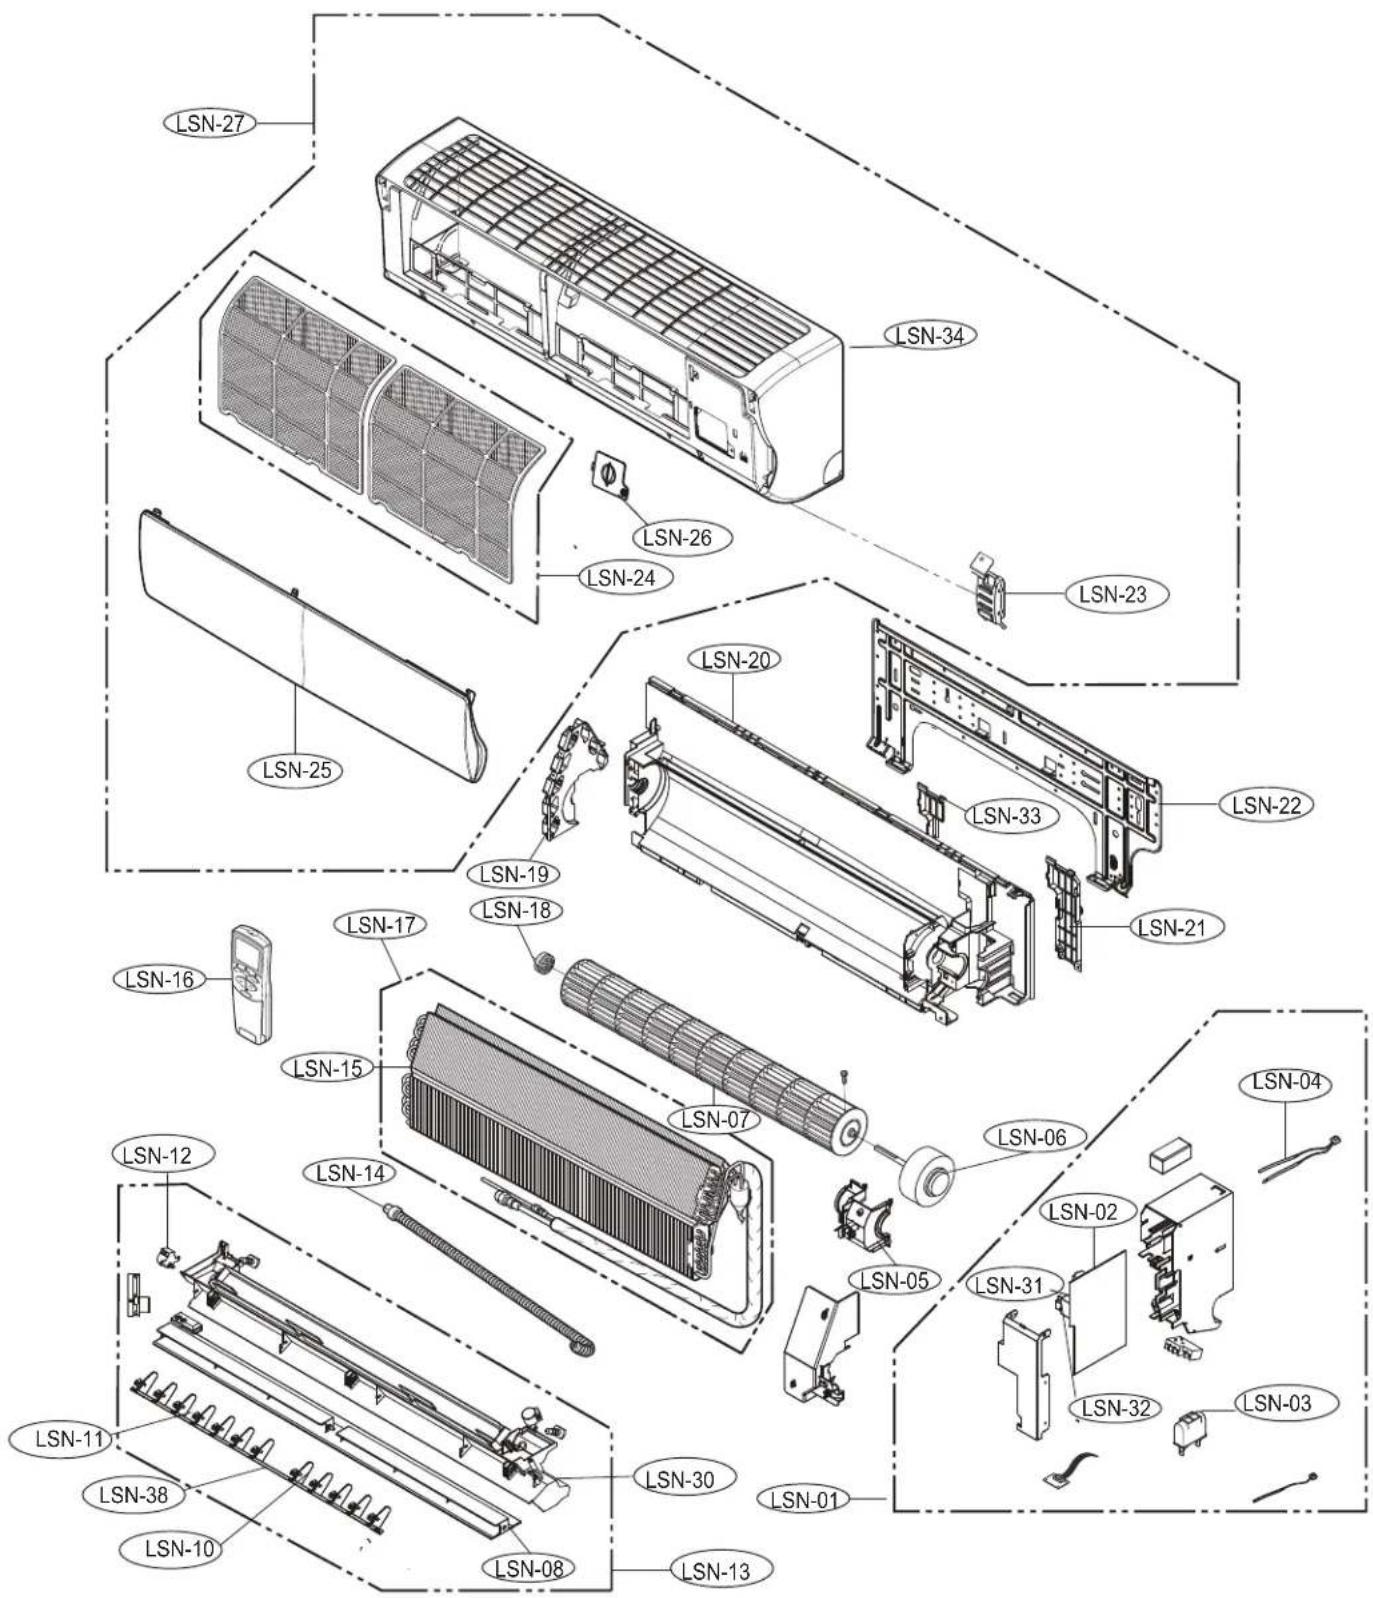
Exploded View
Indoor Unit