
Eee PC 1000HE - Laptop ASUS - Free user manual and instructions
Find the device manual for free Eee PC 1000HE ASUS in PDF.


User questions about Eee PC 1000HE ASUS
0 question about this device. Answer the ones you know or ask your own.
Ask a new question about this device
Download the instructions for your Laptop in PDF format for free! Find your manual Eee PC 1000HE - ASUS and take your electronic device back in hand. On this page are published all the documents necessary for the use of your device. Eee PC 1000HE by ASUS.
USER MANUAL Eee PC 1000HE ASUS
Eee PC User's Manual Windows® XP Edition
Eee PC 1000 Series Eee PC 904 Series Eee PC 901 Series
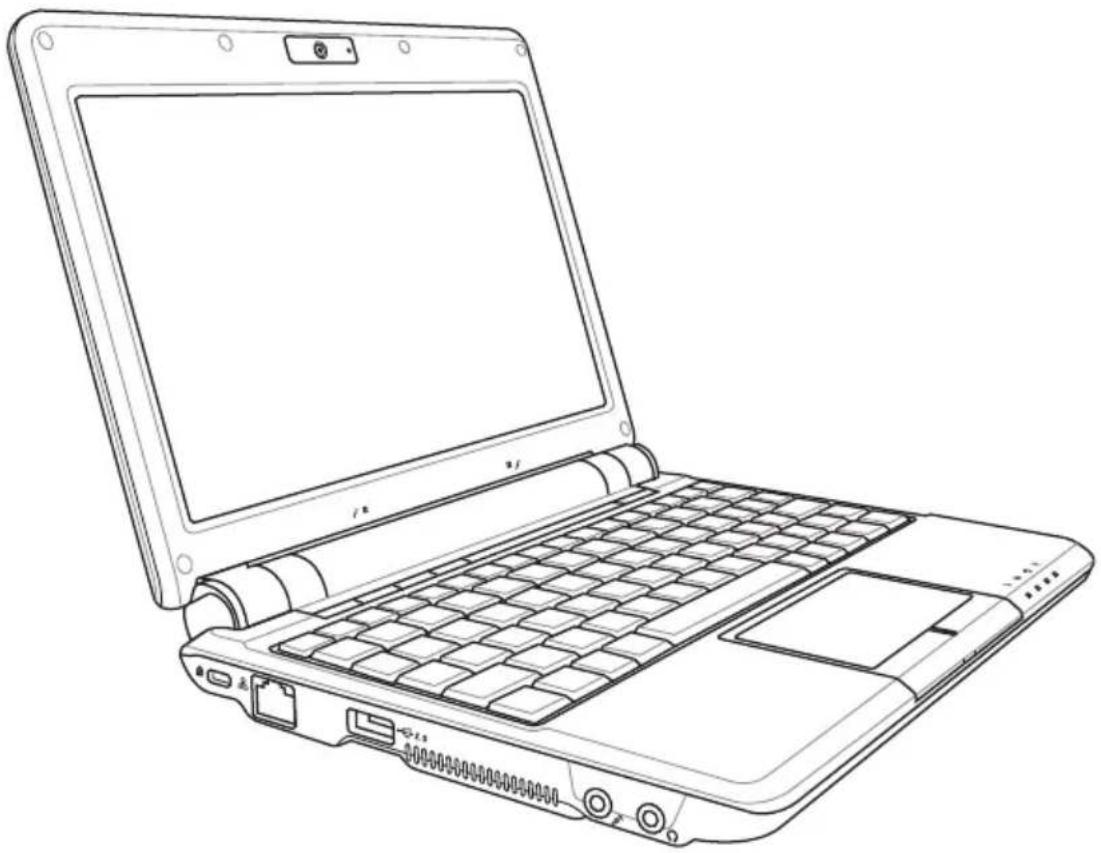
natural_image
Line drawing of a laptop computer with open screen and keyboard (no text or symbols)January 2009
15G06Q034201
Table of Contents
Chapter 1: Introducing the Eee PC
About This User's Manual 1-2
Notes for This Manual.... 1-3
Safety Precautions 1-4
Transportation Precautions 1-6
Charging Your Batteries 1-6
Airplane Precautions 1-6
Preparing your Eee PC 1-7
Chapter 2: Knowing the Parts
Top Side 2-2
Bottom Side 2-6
Right Side 2-8
Left Side 2-10
Rear Side 2-11
Chapter 3: Getting Started
Power System 3-2
Using AC Power 3-2
Using Battery Power 3-3
Battery Care 3-4
Power Mode 3-4
Emergency Shutdown & Reset 3-5
Touchpad Usage 3-6
Single-finger gesture input 3-6
Multi-finger gesture input 3-8
Keyboard Usage 3-9
Special Function Keys 3-9
First-time Startup 3-14
Desktop 3-17
ASUS EeePC Tray Utility 3-18
Enabling and Disabling Devices 3-18
Adjusting the display resolution ....3-19
Shutdown....3-20
Table of Contents
Chapter 4: Using the Eee PC
Network Connection 4-2
Configuring a wireless network connection 4-2
Configuring a network connection 4-4
Browsing web pages 4-10
ASUS Update 4-11
Updating the BIOS through the Internet 4-11
Updating the BIOS through a BIOS file 4-13
Bluetooth Connection(on selected models) 4-14
ASUS Instant Key 4-16
Super Hybrid Engine 4-17
Super Hybrid Engine Modes 4-17
Eee Storage 4-18
Video Conferencing....4-20
Chapter 5: Support DVD & System Recovery
Support DVD information....5-2
Running the support DVD 5-2
Drivers menu 5-2
Utilities menu 5-3
Contact 5-4
Other information 5-4
System Recovery 5-5
Using the Support DVD 5-5
Using Hard Disk Partition 5-7
Boot Booster 5-8
Appendix
Declarations and Safety Statements ......A-2
Federal Communications Commission Statement ......A-2
FCC Radio Frequency (RF) Exposure Caution Statement ......A-3
Declaration of Conformity(R&TTE directive 1999/5/EC) ......A-4
CE Mark Warning ......A-4
IC Radiation Exposure Statement for Canada ....A-4
Wireless Operation Channel for Different Domains ......A-6
France Restricted Wireless Frequency Bands ......A-6
UL Safety Notices ......A-8
Power Safety Requirement ....A-9
Nordic Lithium Cautions (for lithium-ion batteries) ...... A-10
Copyright Information A-12
Limitation of Liability....A-13
Service and Support A-13
About This User's Manual
Notes for This Manual
Safety Precautions
Preparing Your Eee PC
Introducing the Eee PC
About This User's Manual
You are reading the Eee PC User's Manual. This User's Manual provides information regarding the various components in the Eee PC and how to use them. The following are major sections of this User's Manual:
1. Introducing the Eee PC
Introduces the Eee PC and this User's Manual.
2. Knowing the Parts
Provides information on the Eee PC's components.
3. Getting Started
Provides information on getting started with the Eee PC.
4. Using the Eee PC
Provides information on using the Eee PC's utilities.
5. System Recovery
Gives you information on system recovery.
6. Appendix
Gives you safety statements.

The actual bundled applications differ by models and territories. There may be differences between your Eee PC and the pictures shown in this manual. Please accept your Eee PC as being correct.
Notes for This Manual
A few notes and warnings are used throughout this guide, allowing you to complete certain tasks safely and effectively. These notes have different degrees of importance as follows:

WARNING! Important information that must be followed for safe operation.

IMPORTANT! Vital information that must be followed to prevent damage to data, components, or persons.

TIP: Tips for completing tasks.

NOTE: Information for special situations.
Safety Precautions
The following safety precautions will increase the life of the Eee PC. Follow all precautions and instructions. Except as described in this manual, refer all servicing to qualified personnel.

Disconnect the AC power and remove the battery pack(s) before cleaning. Wipe the Eee PC using a clean cellulose sponge or chamois cloth dampened with a solution of nonabrasive detergent and a few drops of warm water and remove any extra moisture with a dry cloth.
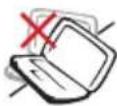
DO NOT place on uneven or unstable work surfaces. Seek servicing if the casing has been damaged.

DO NOT place or drop objects on top and do not shove any foreign objects into the Eee PC.

DO NOT expose to dirty or dusty environments. DO NOT operate during a gas leak.
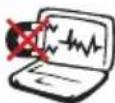
DO NOT expose to strong magnetic or electrical fields.

DO NOT press or touch the display panel. DO NOT place together with small items that may scratch or enter the Eee PC.
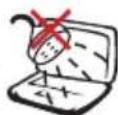
DO NOT expose to or use near liquids, rain, or moisture. DO NOT use the modem during electrical storms.

DO NOT leave the Eee PC on your lap or any part of the body to prevent discomfort or injury from heat exposure.

Battery safety warning: DO NOT throw the battery in fire. DO NOT short circuit the contacts. DO NOT disassemble the battery.
SAFE TEMP: This Eee PC should only be used in environments with ambient temperatures between 5°C (41°F) and 35°C (95°F)
INPUT RATING: Refer to the rating label on the bottom of the Eee PC and be sure that your power adapter complies with the rating.

DO NOT carry or cover an Eee PC that is powered ON with any materials that will reduce air circulation such as a carrying bag.

DO NOT use strong solvents such as thinners, benzene, or other chemicals on or near the surface.

DO NOT use damaged power cords, accessories, or other peripherals.

Incorrect installation of battery may cause explosion and damage the Eee PC.

DO NOT throw the Eee PC in municipal waste. This product has been designed to enable proper reuse of parts and recycling. The symbol of the crossed out wheeled bin indicates that the product (electrical, electronic equipment and mercury-containing button cell battery) should not be placed in municipal waste. Check local regulations for disposal of electronic products.

DO NOT throw the battery in municipal waste. The symbol of the crossed out wheeled bin indicates that the battery should not be placed in municipal waste.
Transportation Precautions
To prepare the Eee PC for transport, you should close the display panel to protect the keyboard and display panel.
The Eee PC's surface is easily dulled if not properly cared for. Be careful not to rub or scrape surfaces when transporting your Eee PC. You can put your Eee PC in a carrying case for protection from dirt, water, shock, and scratches.

For the model that comes with a hard disk drive, you should turn it OFF and disconnect all external peripherals to prevent damage to the connectors when you prepare for transport. The hard disk drive's head retracts when the power is turned OFF to prevent scratching of the hard disk surface during transport. Never transport it while the power is still ON.
Charging Your Batteries
If you intend to use battery power, be sure to fully charge your battery pack and any optional battery packs before going on long trips. Remember that the power adapter charges the battery pack as long as it is plugged into the computer and an AC power source. Be aware that it takes much longer to charge the battery pack when the Eee PC is in use.
Airplane Precautions
Contact your airline if you want to use the Eee PC on the airplane. Most airlines have restrictions for using electronic devices. Most airlines allow electronic use only between and not during takeoffs and landings.

There are three main types of airport security devices: X-ray machines (used on items placed on conveyor belts), magnetic detectors (used on people walking through security checks), and magnetic wands (hand-held devices used on people or individual items). You can send your Eee PC and diskettes through airport X-ray machines. However, it is recommended that you do not send your Eee PC or diskettes through airport magnetic detectors or expose them to magnetic wands.
Preparing your Eee PC
These are only quick instructions for using your Eee PC. Read the following chapters for detailed information.
1. Install the battery pack
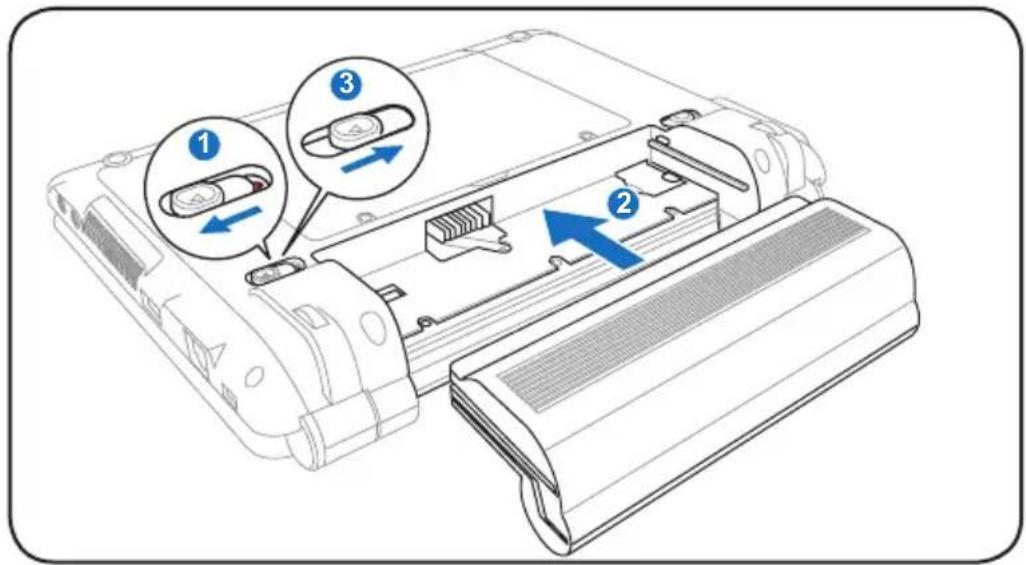
text_image
Diagram of a device's internal structure with numbered annotations indicating component locations2. Connect the AC power adapter
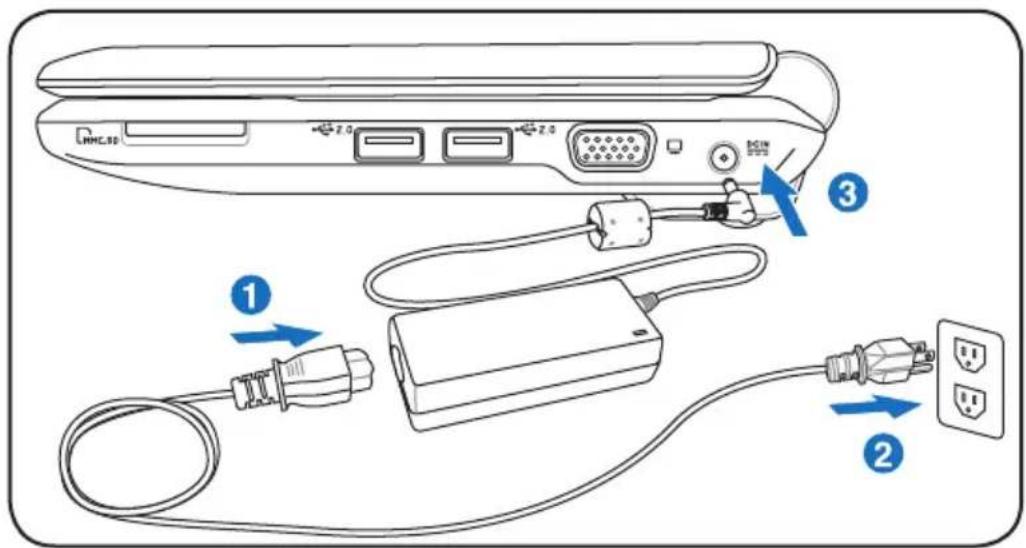
text_image
Diagram showing cable connection to a device with labeled components and directional arrows indicating connections.
Your Eee PC may come with either a two or three-prong plug depending on territory. If a three-prong plug is provided, you must use a grounded AC outlet or use a properly grounded adapter to ensure safe operation of the Eee PC.
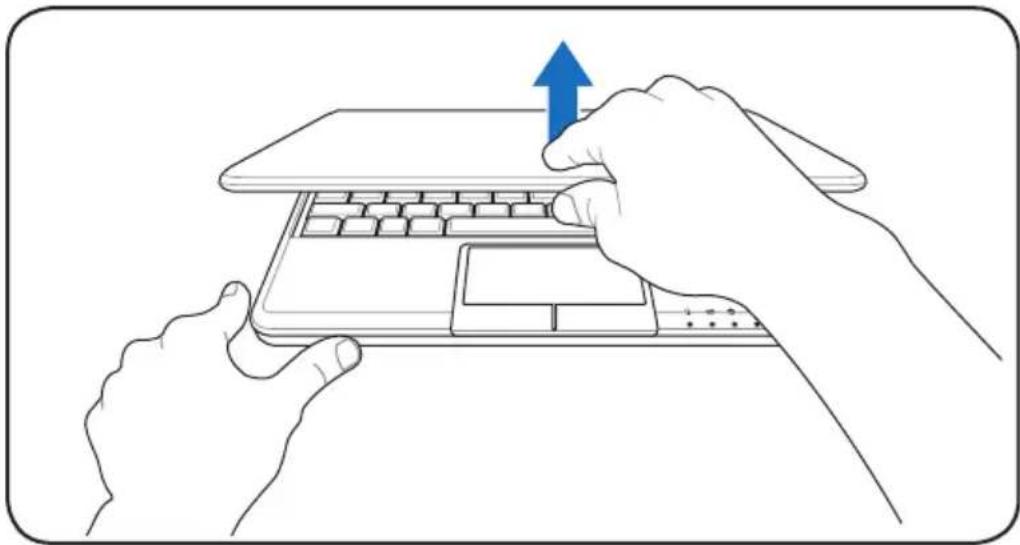
3. Open the display panel
natural_image
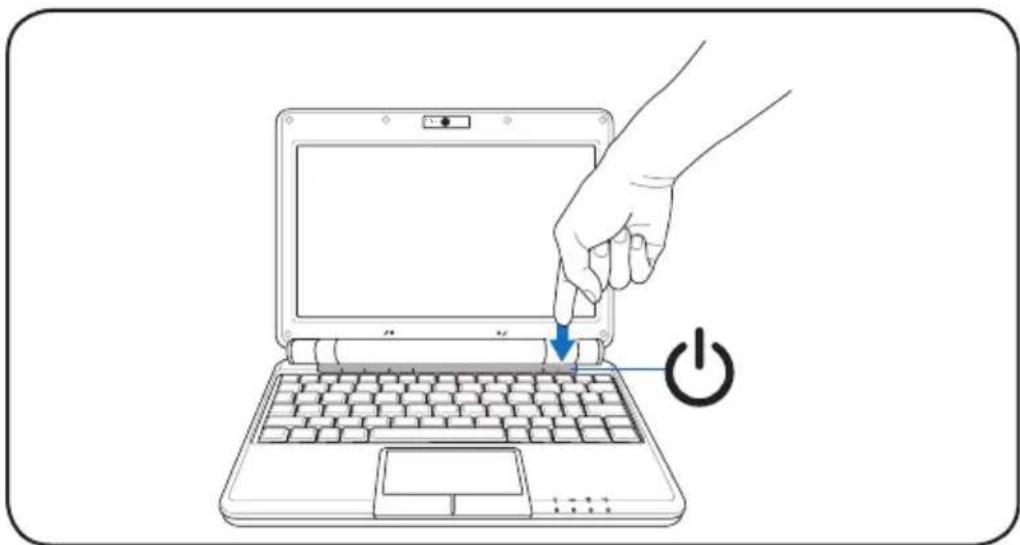
Line drawing of two hands typing on a laptop keyboard, one with a blue upward arrow indicating the press (no text or symbols present)4. Turn ON the Eee PC
natural_image
Line drawing of a hand pressing down on a laptop keyboard with a power button (no text or symbols)
When you open the display panel, do not force it down to the table or else the hinges may break! Never lift the Eee PC by the display panel!
Top Side
Bottom Side
Right Side
Left Side
Rear Side
Knowing the Parts
Top Side
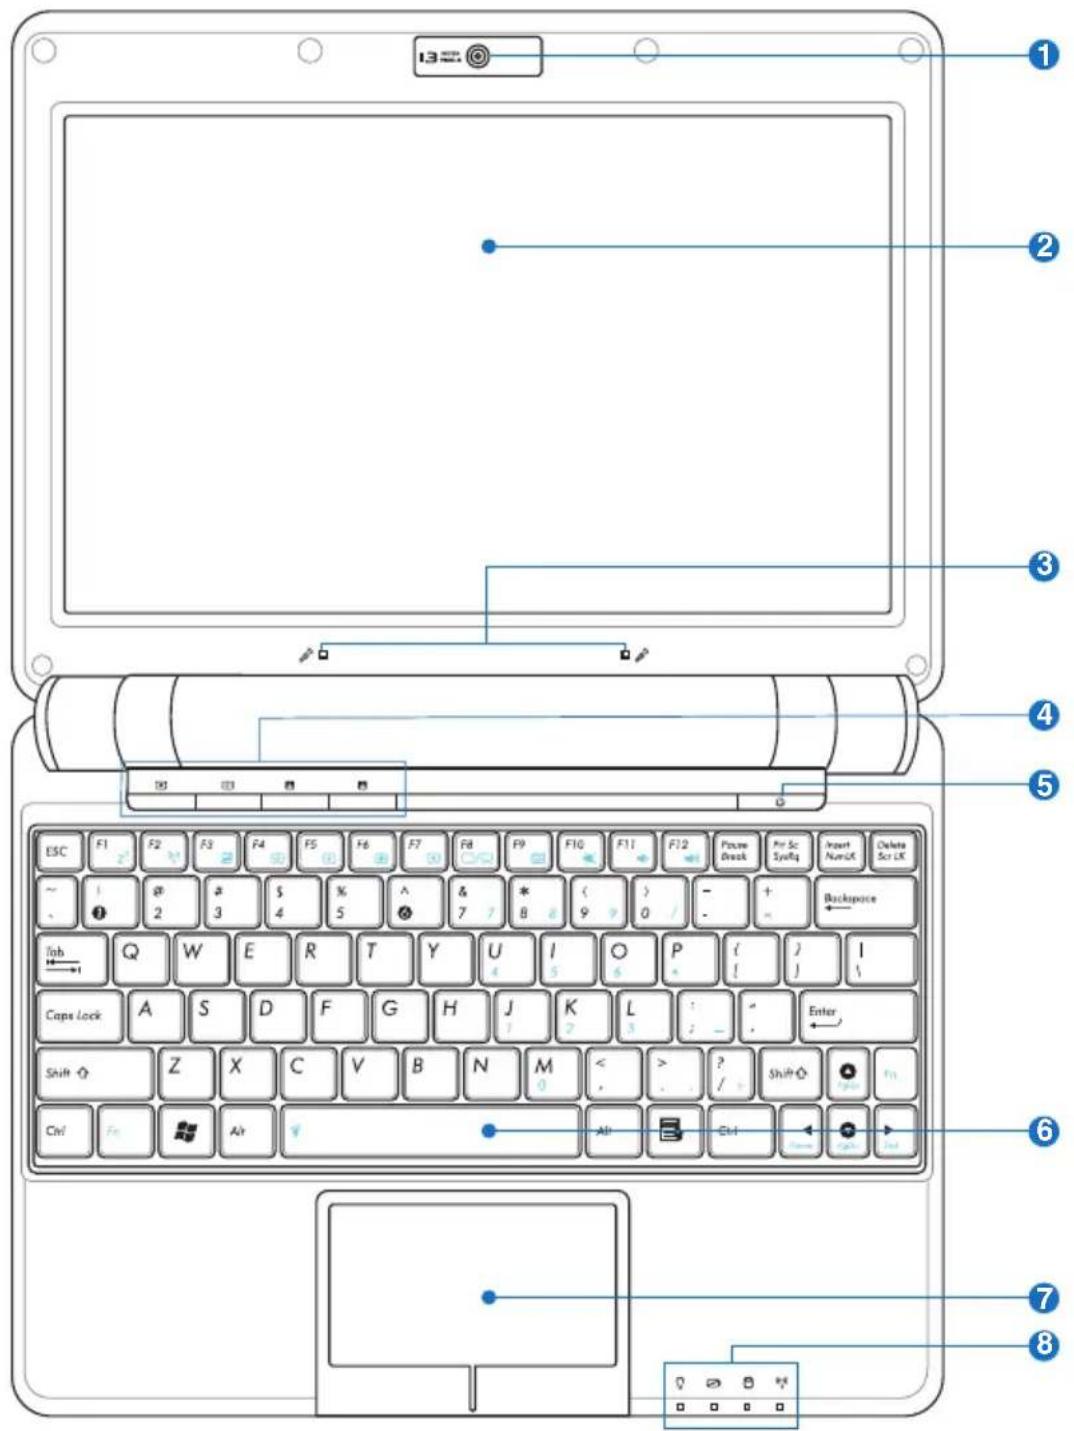
Refer to the illustration below to identify the components on this side of the Eee PC.

The top side may vary in appearance depending on model.
text_image
13 ESC F1 F2 F3 F4 F5 F6 F7 F8 F9 F10 F11 F12 Power Break Air Sci Syncs Insert Num/UK Delete Scr UK ~ 1 @ # $ % ^ & * ( ) - + . 2 3 4 5 7 8 9 0 / - Inb Q W E R T Y U I O P ( ) I Cape Lock A S D F G H J K L : " Enter Shift Q Z X C V B N M < ? Shift # Ctrl Ctrl Alt Alt Ctrl Add Input ① ② ③ ④ ⑤ ⑥ ⑦ ⑧
The keyboard differs for each territory.
Built-in Camera
The built-in camera allows picture taking or video recording.
2 Display Panel
The display panel functions the same as a desktop monitor. The Eee PC uses an active matrix TFT LCD, which provides excellent viewing like that of desktop monitors. Unlike desktop monitors, the LCD panel does not produce any radiation or flickering, so it is easier on the eyes. Use a soft cloth without chemical liquids (use plain water if necessary) to clean the display panel.
3 Array Microphone (Built-in)
The built-in array microphone is more clear and echo-free compared with traditional single microphones and can be used for video conferencing, voice narrations, audio recordings, and multimedia applications.
4 Instant Keys
Instant keys allow you to launch frequently used applications with one push of a button.
Backlight Key
Pressing this key turns off the LCD monitor backlight. Any action on the keyboard, mouse or touchpad will activate monitor again.
Resolution Key
The Resolution key allows you to adjust display resolution. Press this key repeatedly to switch resolution.
User-defined Key
This key is reserved for customized definition. The default definition is for Super Hybrid Engine function.
User-defined Key
This key is reserved for customized definition. The default definition is for launching Skype.

Only models with built-in wireless LAN and Bluetooth support the user-defined key for Skype.
5 Power Switch
The power switch allows powering ON and OFF the Eee PC and recovering from STR. Press the switch once to turn ON and hold it to turn OFF the Eee PC. The power switch only works when the display panel is opened.
6 Keyboard
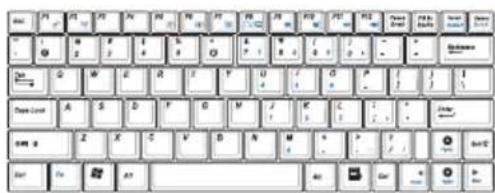
The keyboard provides keys with comfortable travel (depth at which the keys can be depressed) and palm rest for both hands.
text_image
SET SET SET SET SET SET SET SET SET SET SET SET SET SET SET SET SET SET SET SET SET SET SET SET SET SET SET SET SET SET SET SET SET SET SET SET SET SET SET SET SET SET SET SET SET SET SET SET SET SET SET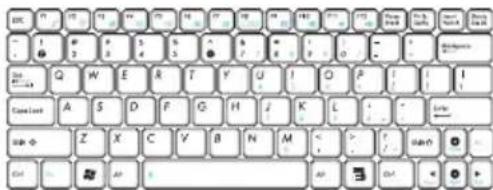
text_image
Screenshot of a standard computer keyboard with standard keys and function labels visible on the left.
The keyboard differs depending on model.
7 Touchpad and Buttons
The touchpad and its buttons comprises a pointing device that provides the same functions as a desktop mouse. Multi-finger gesture input is available to allow easy web and document navigation.
8

Status Indicators (front)

Power Indicator
The power indicator lights when the Eee PC is turned ON and blinks slowly when the Eee PC is in the Save-to-RAM (Suspend) mode. This indicator is OFF when the Eee PC is turned OFF.

Battery Charge Indicator
The battery charge indicator (LED) shows the status of the battery's power as follows:
Powered ON
| AC Mode Battery Model | ||
| Battery charge is between 100%-80% | Orange ON Green ON | |
| Battery charge is between 80%-10% | Orange Blinking Slowly | Green Blinking Slowly |
| Battery charge is less than 10% | Orange Blinking Quickly | Green Blinking Quickly |
Standby Mode / Powered OFF
| AC Mode Battery Model | ||
| Battery charge is between 100%-80% | Orange ON Off | |
| Battery charge is between 80%-10% | Orange Blinking Slowly Off | |
| Battery charge is less than 10% | Orange Blinking Quickly Off | |

The Battery Charge Indicator will not light when the battery is removed from your Eee PC.

Solid-State disk (SSD)/Hard disk (HDD) Indicator
The solid-state disk drive/hard disk drive indicator blinks when data is written to or read from the disk drive.

Wireless/Bluetooth Indicator
This is only applicable on models with built-in wireless LAN/Bluetooth. When the built-in wireless LAN/Bluetooth is enabled, this indicator lights.
Bottom Side
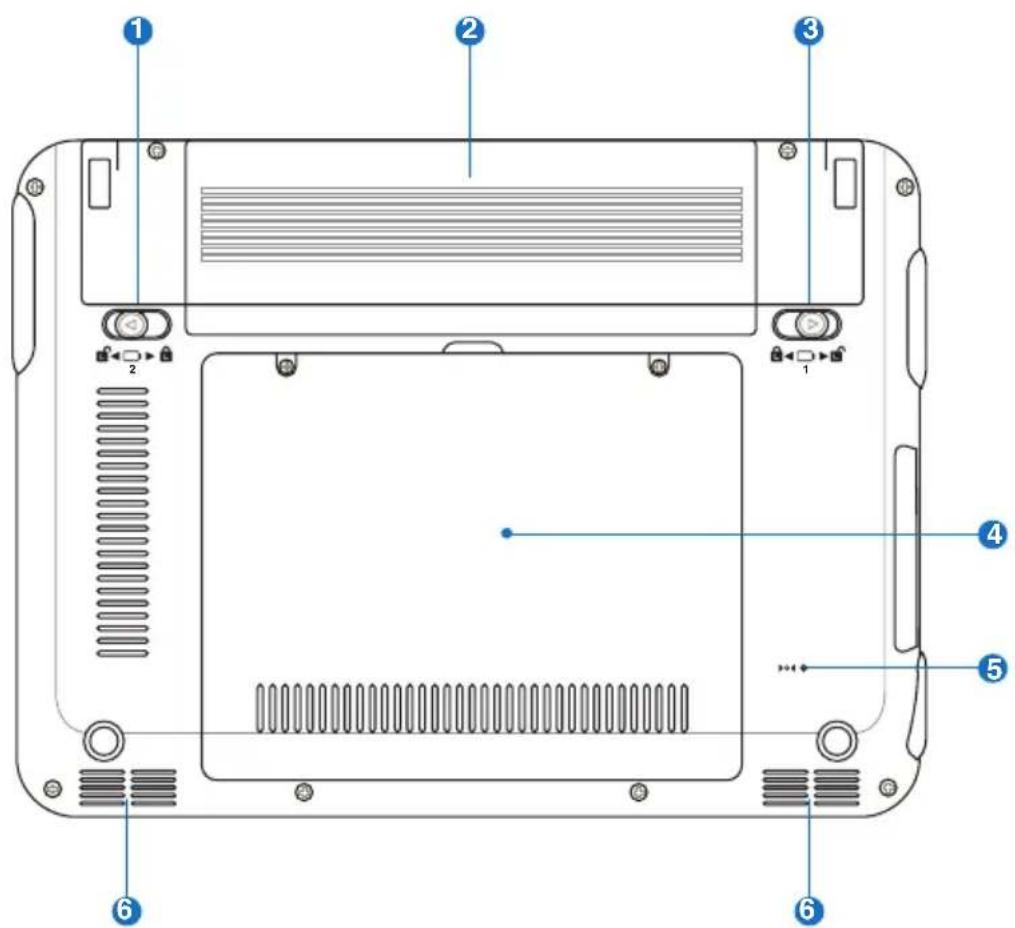
Refer to the illustration below to identify the components on this side of the Eee PC.

The bottom side may vary in appearance depending on model.
text_image
Diagram of a device rear panel with numbered components and labeled parts in Chinese
The bottom of the Eee PC can get very hot. Be careful when handling the Eee PC while it is in operation or recently been in operation. High temperatures are normal during charging or operation. DO NOT use on soft surfaces such as beds or sofas, which may block the vents. DO NOT PUT THE Eee PC ON YOUR LAP OR OTHER PARTS OF THE BODY TO AVOID INJURY FROM THE HEAT.
1 Battery Lock - Spring
The spring battery lock keeps the battery pack secure.
When the battery pack is inserted, it will automatically lock. When removing the battery pack, this spring lock must be retained in the unlocked position.
2 Battery Pack
The battery pack is automatically charged when connected to an AC power source and maintains power to the Eee PC when AC power is not connected. This allows use when moving temporarily between locations. Battery time varies by usage and by the specifications for this Eee PC. The battery pack cannot be disassembled and must be purchased as a single unit.
3 Battery Lock - Manual
The manual battery lock is used to keep the battery pack secured. Move the manual lock to the unlocked position to insert or remove the battery pack. Move the manual lock to the locked position after inserting the battery pack.
4 Solid-State Disk/Hard disk drive & Memory Compartment
The solid-state disk drive/ hard disk drive and memory are secured in a dedicated compartment.
5 Reset Button (Emergency)
In case your operating system cannot properly turn OFF or restart, the reset button can be depressed with a pin or a straightened paper clip to restart the Eee PC.

The reset button is available on selected models.
6 Audio Speaker System
The built-in stereo speaker system allows you to hear audio without additional attachments. The multimedia sound system features an integrated digital audio controller that produces rich, vibrant sound (results improved with external stereo headphones or speakers). Audio features are software controlled.
Right Side
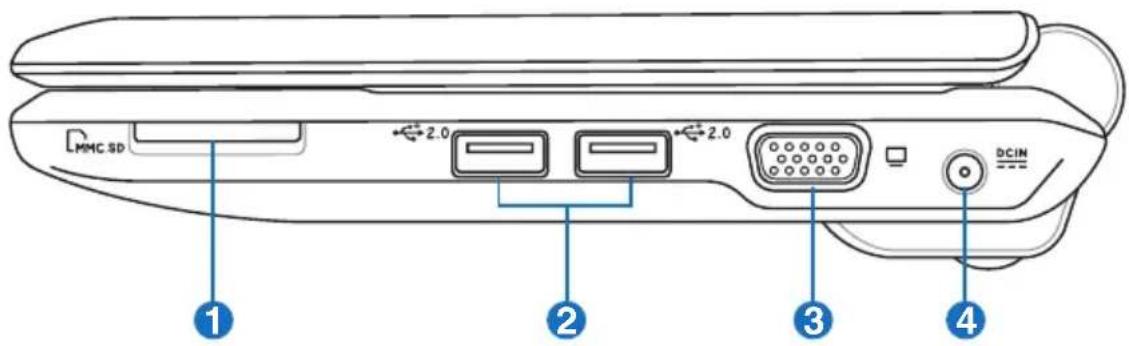
Refer to the illustration below to identify the components on this side of the Eee PC.
text_image
MMC SD 2.0 2.0 DCIN 1 2 3 41 Memory Card Slot
The built-in memory card reader can read MMC/SD cards from devices such as digital cameras, MP3 players, mobile phones, and PDAs.
② 2.0 USB Port (2.0/1.1)
The USB (Universal Serial Bus) port is compatible with USB 2.0 or USB 1.1 devices such as keyboards, pointing devices, cameras, and storage devices, connected in a series up to 12Mbits/sec (USB 1.1) and 480Mbits/sec (USB 2.0). USB allows many devices to run simultaneously on a single computer, with some peripherals acting as additional plug-in sites or hubs. Also, the USB supports hot-swapping function.
3 □ Display (Monitor) Output
The 15-pin D-sub monitor port supports a standard VGA-compatible device such as a monitor or projector to allow viewing on a larger external display.


Power (DC) Input
The supplied power adapter converts AC power to DC power for use with this jack. Power supplied through this jack supplies power to the Eee PC and charges the internal battery pack. To prevent damage to the Eee PC and battery pack, always use the supplied power adapter.

CAUTION: MAY BECOME WARM TO HOT WHEN IN USE. BE SURE NOT TO COVER THE ADAPTER AND KEEP IT AWAY FROM YOUR BODY.
Left Side
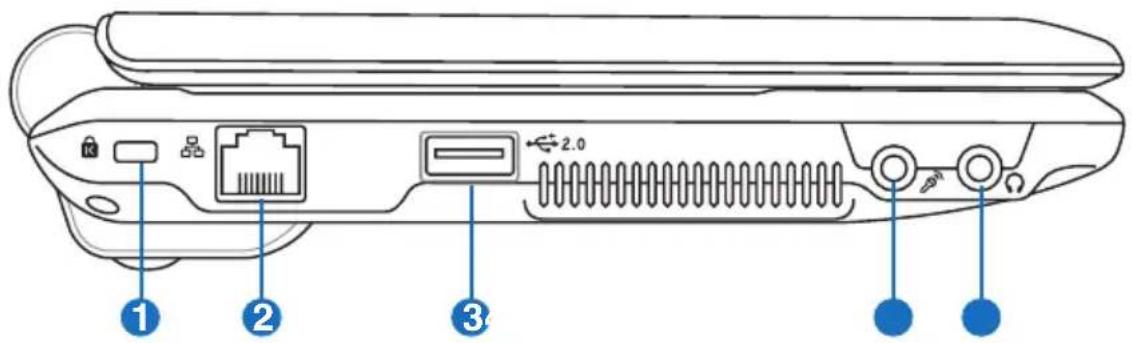
Refer to the illustration below to identify the components on this side of the Eee PC.
text_image
Diagram of a device rear panel with labeled ports and connectors, including ports 1, 2, and 3 with connection details.1 Kensington® Lock Port
The Kensington® lock port allows the Eee PC to be secured using Kensington® compatible security products. These security products usually include a metal cable and lock that prevent the Eee PC to be removed from a fixed object.
2 品 LAN Port
The eight-pin RJ-45 LAN port (10/100M bit) supports a standard Ethernet cable for connection to a local network. The built-in connector allows convenient use without additional adapters.
③ 2.0 USB Port (2.0/1.1)
The USB (Universal Serial Bus) port is compatible with USB 2.0 or USB 1.1 devices such as keyboards, pointing devices, cameras, and storage devices, connected in a series up to 12Mbits/sec (USB 1.1) and 480Mbits/sec (USB 2.0). USB allows many devices to run simultaneously on a single computer, with some peripherals acting as additional plug-in sites or hubs. Also, it supports hot-swapping function.
4 Microphone Jack
The microphone jack is designed to connect the microphone used for Skype, voice narrations, or simple audio recordings.


Headphone Output Jack
The 18 " stereo headphone jack (3.55mm) connects the Eee PC's audio out signal to amplified speakers or headphones. Using this jack automatically disables the built-in speakers.
Rear Side
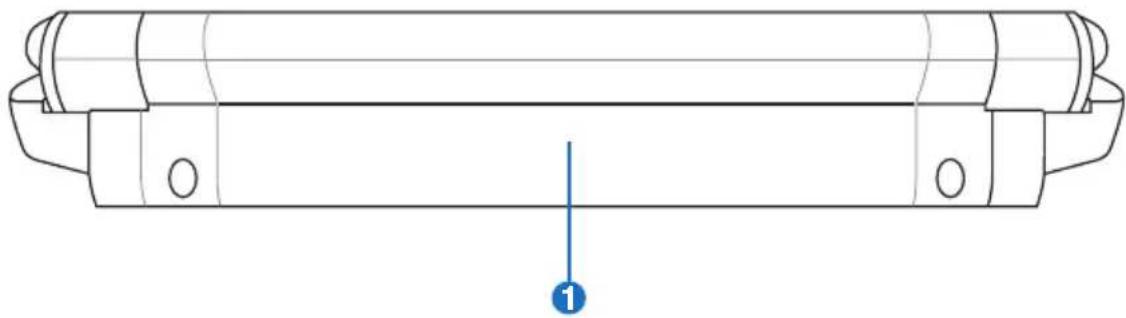
Refer to the illustration below to identify the components on this side of the Eee PC.
natural_image
Technical line drawing of a cylindrical mechanical component with mounting flanges and a labeled dimension (no text or symbols beyond the number 1)

Battery Pack
The battery pack is automatically charged when connected to an AC power source and maintains power to the Eee PC when AC power is not connected. This allows use when moving temporarily between locations. Battery time varies by usage and by the specifications for this Eee PC. The battery pack cannot be disassembled and must be purchased as a single unit.
Power System
Touchpad Usage
Keyboard Usage
First Run Wizard
Operating Mode
Shutdown
Getting Started
Power System
Using AC Power
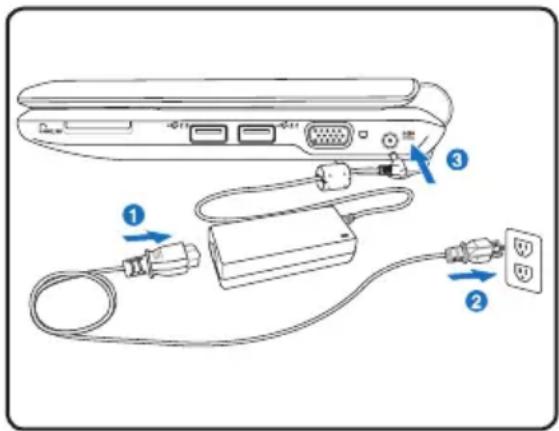
The Eee PC power comprises two parts, the power adapter and the battery power system. The power adapter converts AC power from a wall outlet to the DC power required by the Eee PC. Your Eee PC comes with a universal AC-DC adapter for connection to any 100V-120V as well as 220V-240V outlets without setting switches or using power converters. Different countries may require an adapter to connect the provided US-standard AC power cord to a different standard. Most hotels will provide universal outlets to support different power cords as well as voltages. It is always best to ask an experienced traveler about AC outlet voltages before travelling.
text_image
Diagram of a device cable connection showing cable routing from top panel to terminal and charging port, with numbered annotations indicating components.With the AC power cord connected to the AC-DC converter, connect the AC power cord to an AC outlet (preferably with surge-protection) and then connect the DC plug to the Eee PC. Connecting the AC-DC adapter to the AC outlet first allows you to test the AC outlet's power and the AC-DC converter itself for compatibility problems before connecting the DC power to the Eee PC. The power indicator on the adapter (if available) will light if the power is within accepted ranges.

THE POWER ADAPTER MAY BECOME WARM TO HOT WHEN IN USE. BE SURE NOT TO COVER THE ADAPTER AND KEEP IT AWAY FROM YOUR BODY.

This Eee PC may come with either a two or three-prong plug depending on territory to fit your wall outlet. If a three-prong plug is provided, you must use a grounded AC outlet or use a properly grounded adapter to ensure safe operation of the Eee PC.

Damage may occur if you use a different adapter to power the Eee PC or use the Eee PC's adapter to power other electrical devices. If there is smoke, burning scent, or extreme heat coming from the AC-DC adapter, seek servicing. Seek servicing if you suspect a faulty AC-DC adapter. You may damage both your battery pack(s) and the Eee PC with a faulty AC-DC adapter.
Using Battery Power
The Eee PC is designed to work with a removable battery pack. The battery pack consists of a set of battery cells housed together. A fully charged pack will provide several hours of battery life. Additional battery packs are optional and can be purchased separately through an Eee PC retailer.

Remember to fully charge the battery before first use and whenever it is depleted to prolong battery life. The battery reaches its maximum capacity after a few full charging and discharging cycles.
Installing and Removing the Battery Pack
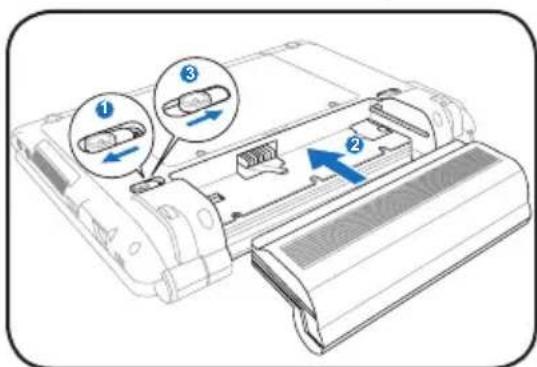
Your Eee PC may not have its battery pack installed. If not, use the following procedures to install the battery pack.

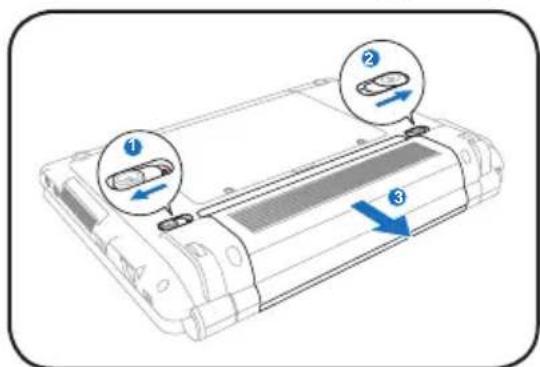
Never attempt to remove the battery pack while the Eee PC is turned ON, as this may result in the loss of working data.
To install the battery pack:
text_image
Diagram of a device's internal structure with numbered annotations indicating component locationsTo remove the battery pack:
text_image
Diagram of a device with labeled parts and directional arrows indicating movement or assembly.
Only use battery packs and power adapters supplied with this Eee PC or specifically approved by the manufacturer or retailer for use with this model or else damage may occur to the Eee PC.
Battery Care
The Eee PC's battery pack, like all rechargeable batteries, has a limit on the number times it can be recharged. The battery pack's useful life will depend on your environment temperature, humidity, and how your Eee PC is used. It is ideal that the battery be used in a temperature range between 5°C and 35°C (41°F and 95°F). You must also take into account that the Eee PC's internal temperature is higher than the outside temperature. Any temperatures above or below this range will shorten the life of the battery. But in any case, the battery pack's usage time will eventually decrease and a new battery pack must be purchased from an authorized dealer for this Eee PC. Because batteries also have a shelf life, it is not recommended to buy extras for storing.

For safety reasons, DO NOT throw the battery in fire, DO NOT short circuit the contacts, and DO NOT disassemble the battery. If there is any abnormal operation or damage to the battery pack caused by impact, turn OFF the Eee PC and contact an authorized service center.

Power Mode
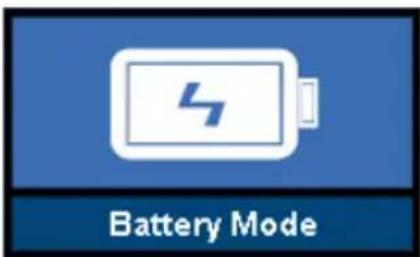
Your Eee PC is equipped with a smart power system. The power-saving Battery mode lowers down the CPU frequency and decreases the power consumption to maximize the battery life. The AC mode enables the CPU to run at the full speed and to obtain the best performance. When applying or removing the power adapter, the AC mode and Battery mode will be shown on the display as a reminder.
text_image
Battery Mode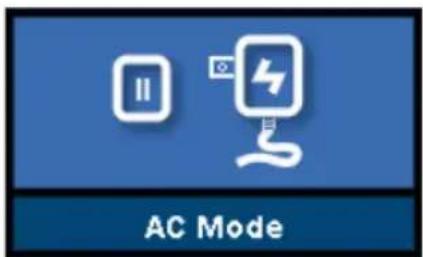
text_image
AC ModeBattery Mode AC Mode
Emergency Shutdown & Reset
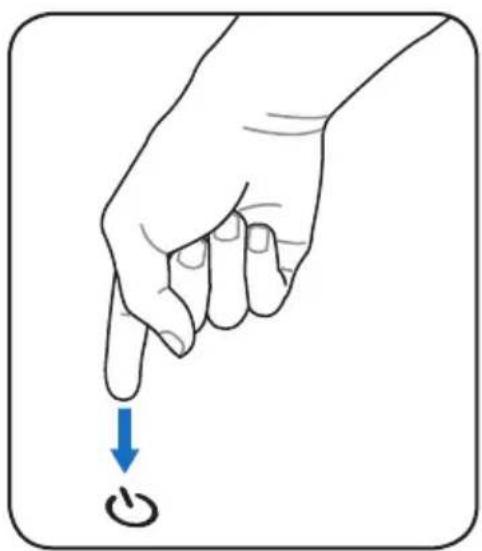
In case your operating system cannot properly turn OFF or restart, there are additional ways to shutdown and reset your Eee PC:
Shutdown: Hold the power button until the system shuts down.
natural_image
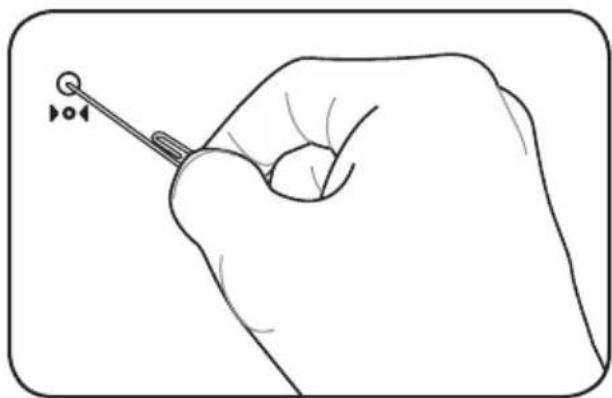
Line drawing of a hand pointing to a button with a blue arrow indicating downward motion (no text or symbols)Reset: Press the reset button.
▶ ◀
natural_image
Line drawing of a hand holding a small object with a pointer, no text or symbols present
Use a pin or a straightened paper clip to press the reset button.

DO NOT use emergency shutdown/reset while data is being written or read; doing so can result in loss or destruction of your data.

The reset button is available on selected models.
Touchpad Usage
Single-finger gesture input
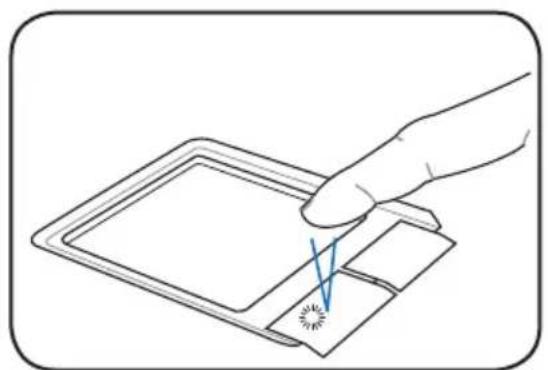
Clicking/Tapping - With the pointer over an item, press the left button or use your fingertip to touch the touchpad lightly, keeping your finger on the touchpad until the item is selected. The selected item will change color. The following 2 illustrations produce the same results.
natural_image
Line drawing of a hand inserting a small object into a device (no text or symbols)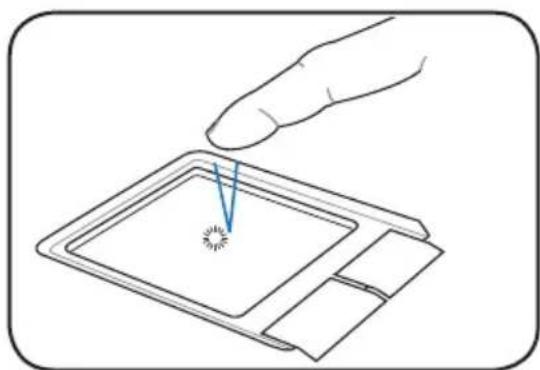
natural_image
Line drawing of a hand pressing a small square component with a pointer and starburst pattern (no text or symbols)Double-clicking/Double-tapping - This is a common skill for launching a program directly from the corresponding icon you select. Move the pointer over the icon you wish to execute, press the left button or tap the pad twice in rapid succession, and the system launches the corresponding program. If the interval between the clicks or taps is too long, the operation will not be executed. The following 2 illustrations produce the same results.

natural_image
Illustration of a hand inserting a card into a tray with a blue zigzag line (no text or symbols)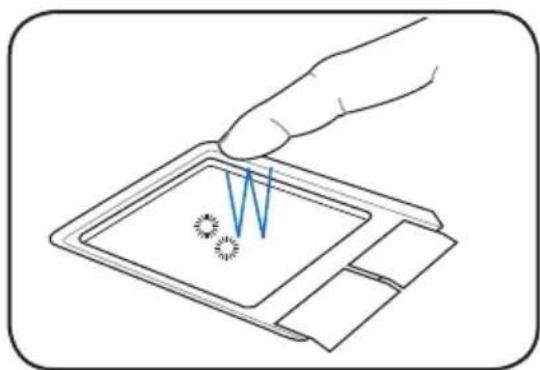
natural_image
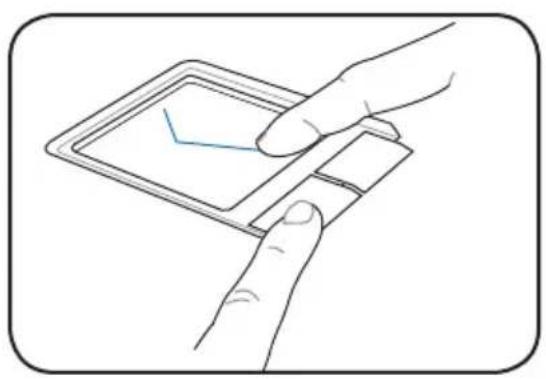
Illustration of a hand holding a small electronic device with a coil and magnetic field lines (no text or symbols)Dragging - Dragging means to pick up an item and place it anywhere on the screen you wish. You can move the pointer over the item you select, and while keeping the left button depressed, moving the pointer to the desired location, then release the button. Or, you can simply double-tap on the item and hold while dragging the item with your fingertip. The following illustrations produce the same results.
natural_image
Line drawing of a hand holding a tablet device with a blue checkmark (no text or symbols)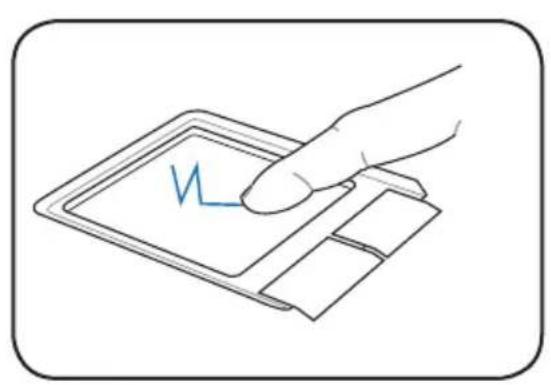
natural_image
Line drawing of a hand pressing down on a digital tablet device (no text or symbols)Multi-finger gesture input
| Finger gesture Applications | |
| Two-finger zooming in/out | OpenOffice Writer/Impress, Adobe reader, Photomanager |
| Two-finger scrolling All |
Two-finger zooming in/out - Moving two fingertips apart or together on the touchpad to zoom in or zoom out. This is convenient when viewing photos or reading documents.
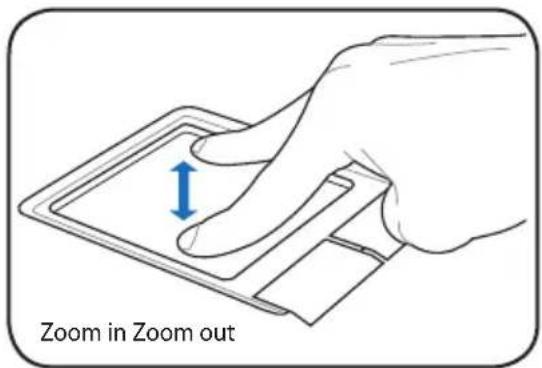
text_image
Zoom in Zoom out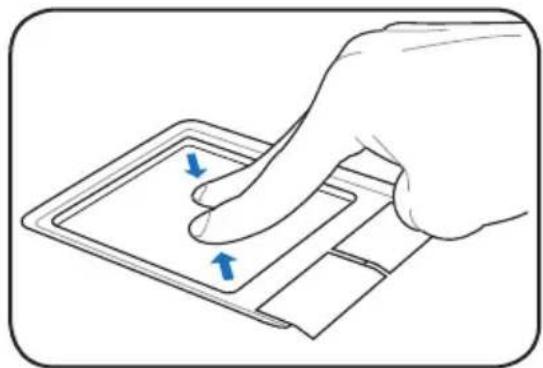
natural_image
Illustration of a hand pressing down on a device with blue directional arrows indicating movement (no text or symbols)Two-finger scrolling - Use two fingertips to slide up or down on the touchpad to scroll a window up or down. If your display window includes several sub-windows, move the pointer on that pane before scrolling.
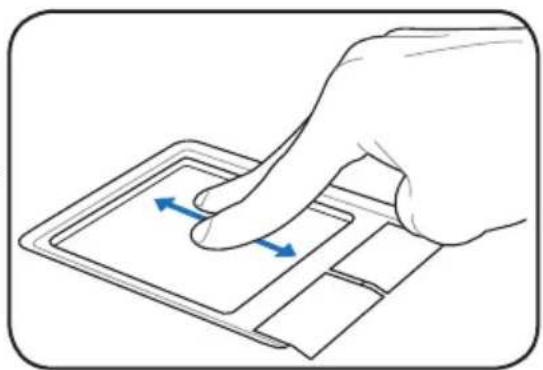
natural_image
Illustration of a hand pressing down on a tablet device with blue directional arrows indicating movement (no text or symbols)Keyboard Usage
Special Function Keys
The following defines the colored hot keys on the Eee PC's keyboard. The colored commands can only be accessed by first pressing and holding the function key while pressing a key with a colored command. Some function icons appear in the Notification area after activation.

The Hot Key locations on the function keys may vary depending on model but the functions should remain the same. Follow the icons whenever your hot key locations do not match the manual.
901 Series


zzZ Icon (F1): Places the Eee PC in suspend mode-to-RAM).


Radio Tower (F2): Wireless Models Only: Toggles internal wireless LAN or Bluetooth (on selected lights) ON or OFF with an on-screen-display. On enabled, the corresponding wireless indicator light.

The default setting is WLAN ON / Bluetooth OFF.


Sun Down Icon (F3): Decreases the display tness.


Sun Up Icon (F4): Increases the display brightness.


LCD/Monitor Icons (F5): Toggles between the Eee
PC's LCD display and an external monitor in this series: LCD Only -> CRT Only (External Monitor) -> LCD + CRT Clone -> LCD + CRT Extend.

LCD + CRT Clone mode only supports a maximum resolution of 1024 x 600 pixels.

Set your Eee PC to High Performance or Super Performance mode if you want to use a higher resolution with a connected external monitor.

Connect an external monitor before booting up the Eee PC.


Task Manager Icon (F6): Initiates the Task Manager how the application process or terminates cations.


Crossed Speaker Icon (F7): Mutes the speaker.


Speaker Down Icon (F8): Decreases speaker ne.


Speaker Up Icon (F9): Increases the speaker name.


Num Lk (F11): Toggles the numeric keypad (number ON and OFF. Allows use of a larger portion the keyboard for number entering.


Scr Lk (F12): Toggles the "Scroll Lock" ON and Allows you to use a larger portion of the board for cell navigation.


Prt Sc (Ins): Toggles the "Print Screen" key to the screen capture utility to capture, save, or the contents of entire desktop.


Pg Up (↑): Press to scroll up in documents or the browser.


Pg Dn ( ↓ ): Press to scroll down in documents or the browser.


Home ( ← ): Press to move the pointer to the beginning of the line.


End ( →): Press to move the pointer to the end of me.

s icon: Displays the start menu.

th pointer icon : Activates the properties
menu and is equivalent to right-clicking the touchpad/mouse on an object.
904 series / 1000 series


zzZ Icon (F1): Places the Eee PC in suspend mode (Save-to-RAM).


Radio Tower (F2): Wireless Models Only: Toggles the internal wireless LAN or Bluetooth (on selected models) ON or OFF with an on-screen-display. When enabled, the corresponding wireless indicator will light.

The default setting is WLAN ON / Bluetooth OFF.


Touchpad (F3): Toggles the touchpad ON/OFF.


Resolution Selection (F4): Press to adjust the display resolution.

The Touchpad (


Sun Down Icon (F5): Decreases the display
brightness.


Sun Up Icon (F6): Increases the display brightness.


Crossed Screen Icon (F7): Turns off the display
backlight.


LCD/Monitor Icons (F8): Toggles between the Eee
PC's LCD display and an external monitor in this series: LCD Only -> CRT Only (External Monitor) -> LCD + CRT Clone -> LCD + CRT Extend.

LCD + CRT Clone mode only supports a maximum resolution of 1024 x 600 pixels.

Set your Eee PC to High Performance or Super Performance mode if you want to use a higher resolution with a connected external monitor.

Connect an external monitor before booting up the Eee PC.


Task Manager Icon (F9): Initiates the Task Manager
to view the application process or terminates applications.


Crossed Speaker Icon (F10): Mutes the speaker.


Volume Down Icon (F11): Decreases speaker
volume.


Volume Up Icon (F12): Increases the speaker
volume.


Num Lk (Insert): Toggles the numeric keypad
(number lock) ON and OFF. Allows use of a larger portion of the keyboard for number entering.


Scr Lk (Delete): Toggles the "Scroll Lock" ON and
OFF. Allows you to use a larger portion of the keyboard for cell navigation.


Pg Up (↑): Press to scroll up in documents or the
web browser.


Pg Dn (↓): Press to scroll down in documents or the
web browser.


Home ( ← ): Press to move the pointer to the
beginning of the line.


End ( →): Press to move the pointer to the end of
the line.

s icon: Displays the start menu.

th pointer icon : Activates the properties
menu and is equivalent to right-clicking the touchpad/mouse on an object.
First-time Startup
For the first time you start your Eee PC, the Windows wizard will launch automatically and lead you through setting up your preferences and some basic information.
Follow the wizard instructions to finish the initialization:
- The Welcome message appears. Click Next to continue.
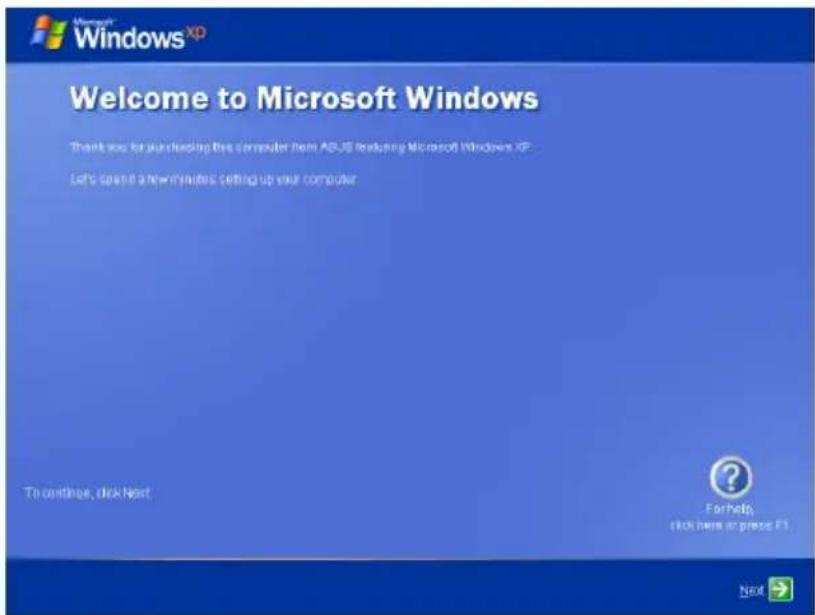
text_image
Microsoft Windows XP Welcome to Microsoft Windows Thank you for purchasing the computer from ASUS Reusing Microsoft Windows XP. Let's spend a new minutes setting up your computer. To continue, click Next. For help, click here at press F1 Next- Select you system settings by specifying the region you are in, the language you use and the keyboard type you use. Click Next to continue.
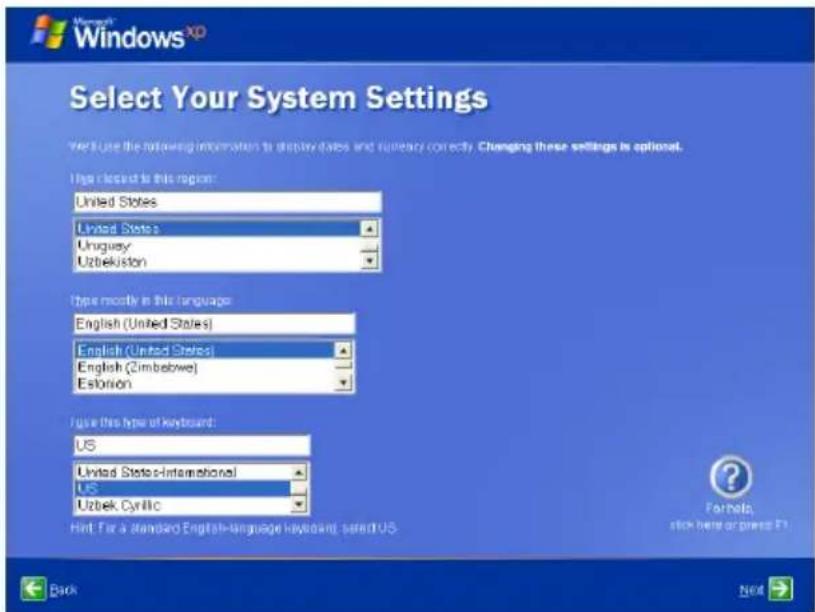
text_image
Select Your System Settings We Use the following informators to display dates and updates correctly. Changing these settings is optional. Use closest to this region: United States United States Uruguay Uzbekistan Type mostly in this language: English (United States) English (United States) English (Zimbabwe) Estonian Use this type of keyboard: US United States-International US Uzbek Cyrillic Hint: For a standard English-language keyboard, saved US Forward: stick here or press F1 Back Next3 Select the time zone you are in and click Next to continue.
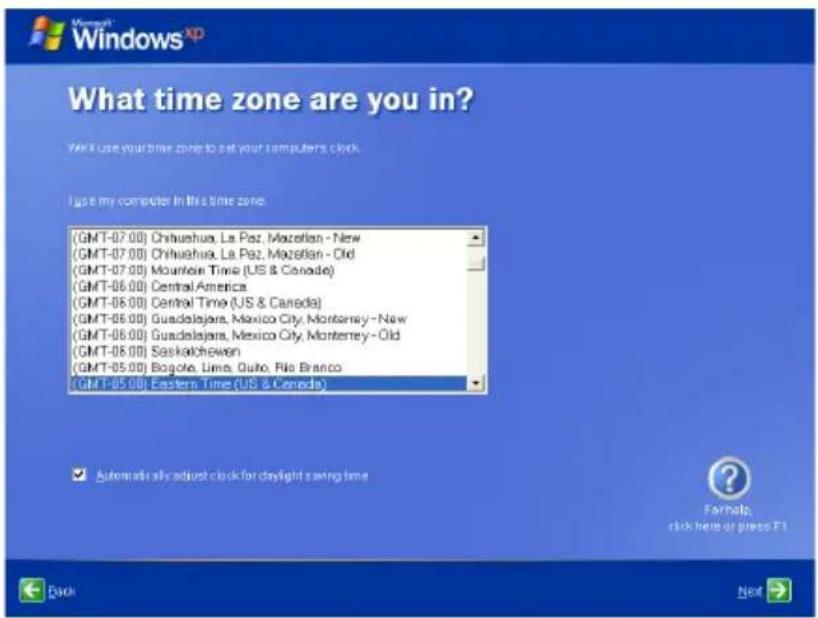
text_image
What time zone are you in? You'll use your time zone to set your computers clock. I use my computer in this time zone. (GMT-07.00) Chihuahua, La Paz, Mozellan - New (GMT-07.00) Chihuahua, La Paz, Mozellan - Old (GMT-07.00) Mountain Time (US & Canada) (GMT-06.00) Central America (GMT-06.00) Central Time (US & Canada) (GMT-06.00) Guadalajara, Mexico City, Monterrey - New (GMT-06.00) Guadalajara, Mexico City, Monterrey - Old (GMT-06.00) Saskatchewan (GMT-05.00) Bogotá, Lima, Auto, Fla Branco (GMT-05.00) Eastern Time (US & Canada) Automatically adjust clock for daylight saving time Fa?Help click help or press F1 Back Next- Read the end user license agreement and click Yes, I accept. Click Next to continue.
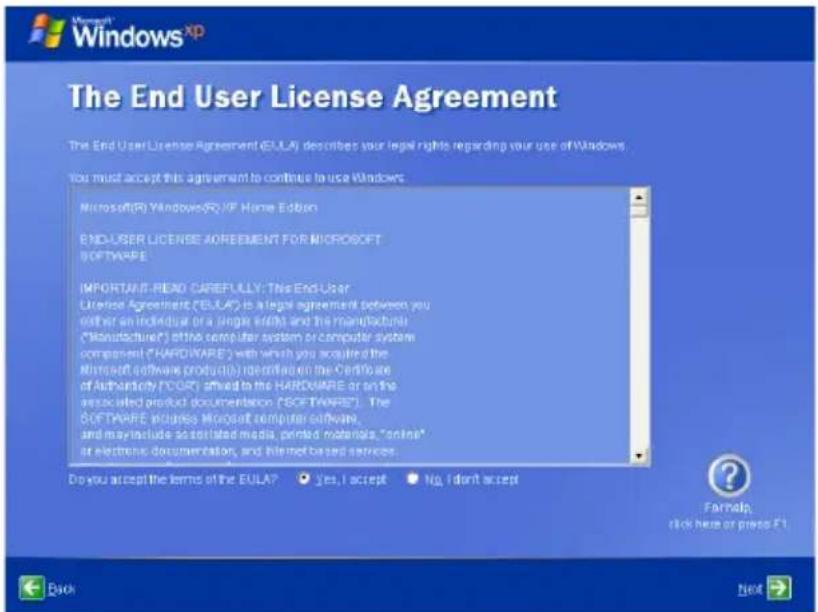
text_image
Microsoft® Windows® XP Home Edition END-USER LICENSE AGREEMENT FOR MICROSOFT SOFTWARE IMPORTANT-READ CAREFULLY: This End User License Agreement ("EULAP") is a legal agreement between you either an individual or a single entity and the manufacturer ("Manufacturer") of the computer system or computer system component ("HARDWARE") with which you acquired the Microsoft software product(s) identified on the Certificate of Authority (FOR) offered to the HARDWARE or on the associated product documentation ("SOFTWARE"). The SOFTWARE licenses Microsoft computer software, and may include associated media, printed materials, "online" or electronic documentation, and Internet-based services. Do you accept the terms of the EULAP? Yes, I accept No, I don't accept FarnHelp. click here or press F1 Back- Click Help protect my PC by turning on Automatic Updates now to get the latest important updates and click Next to continue.
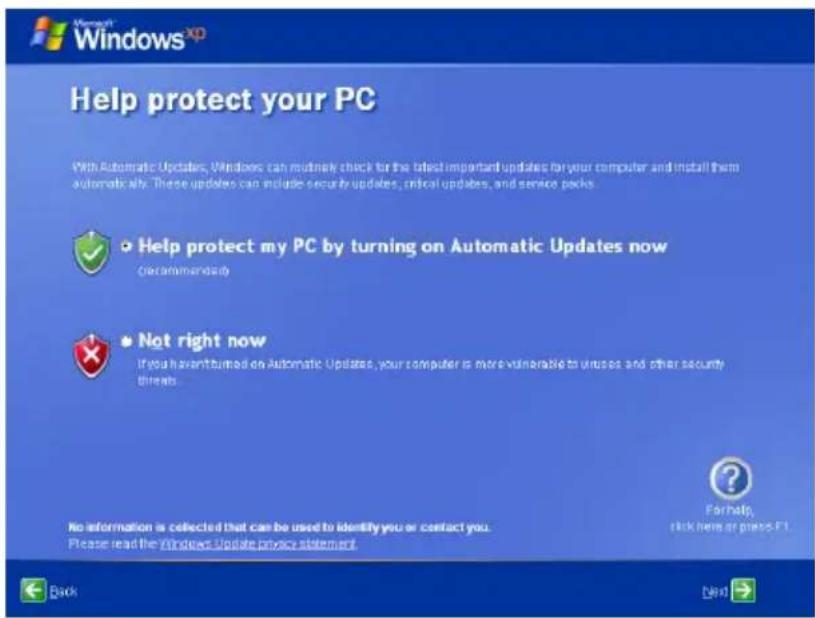
text_image
Microsoft Windows® Help protect your PC With Automatic Updates, Windows can routinely check for the latest important updates for your computer and install them automatically. These updates can include security updates, critical updates, and service packs. Help protect my PC by turning on Automatic Updates now (Decahmandate) Not right now If you want turned on Automatic Updates, your computer is more vulnerable to abuses and other security threats. No information is collected that can be used to identify you or contact you. Please read the Windows Update Privacy Statement. Back Next- Type your computer's name in the Computer name box and click Next to continue.
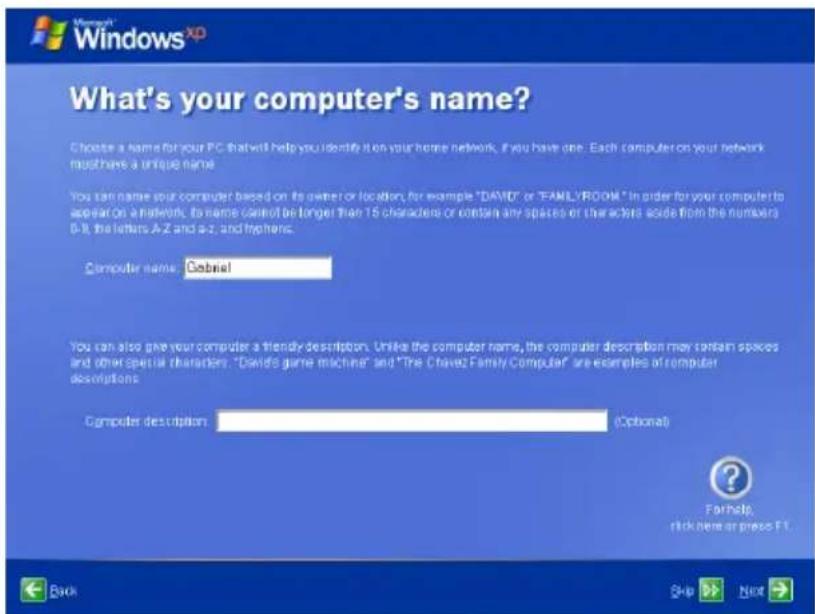
text_image
What's your computer's name? Choose a name for your PC that will help you identify it on your home network, if you have one. Each computer on your network must have a unique name. You can name your computer based on its owner or location, for example "DAVID" or "FAMILYROOM." In order for your computer to appear on a list, to name cannot be longer than 15 characters or contain any spaces or characters aside from the numbers 0-9, the letters A-Z and A-Z, and tryphen. Computer name: Gabriel You can also give your computer a friendly description. Unlike the computer name, the computer description may contain spaces and other special characters. "Davids game machine" and "The Chavez Family Computer" are examples of computer descriptions. Computer description: (Optional) Back Help Next- Follow the onscreen instructions to register with Microsoft and finish the initialization.
Desktop
The are several shortcuts on the desktop. Double-click them to launch the corresponding applications and enter the specified folders. Some applications would form minimized icons in the Notification area.
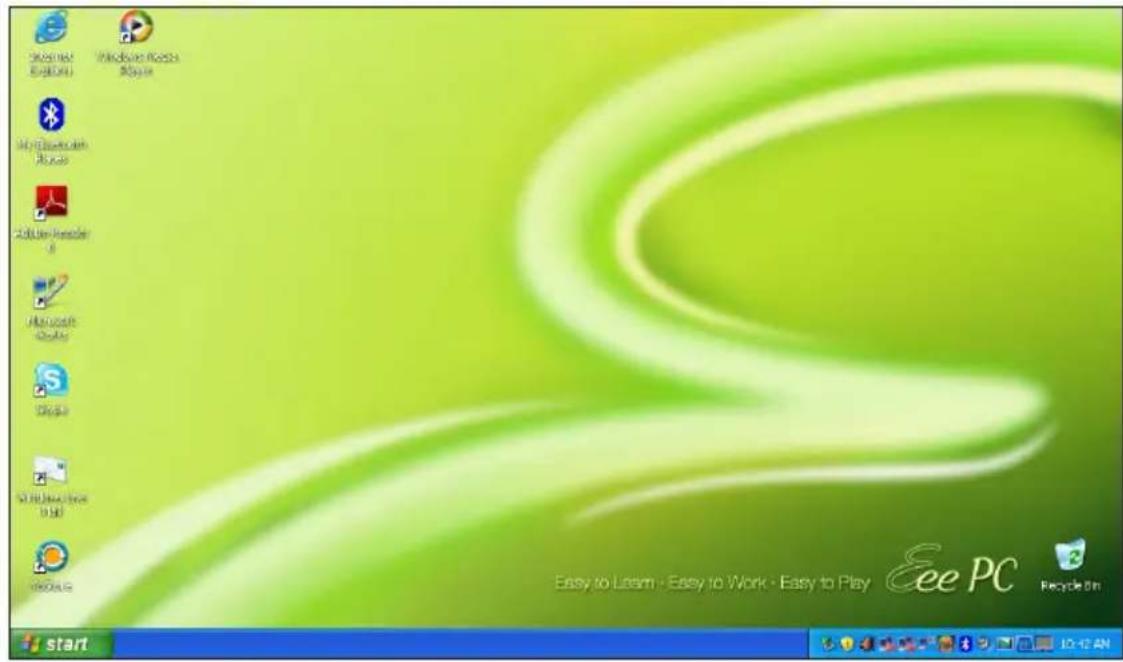
text_image
Microsoft Excel Windows 9.03.2014 My Computer Tools Add User Reader Microsoft Office Google Microsoft Excel Microsoft Excel Easy to Learn - Easy to Work - Easy to Play Ee PC Recycle Bin startASUS EeePC Tray Utility
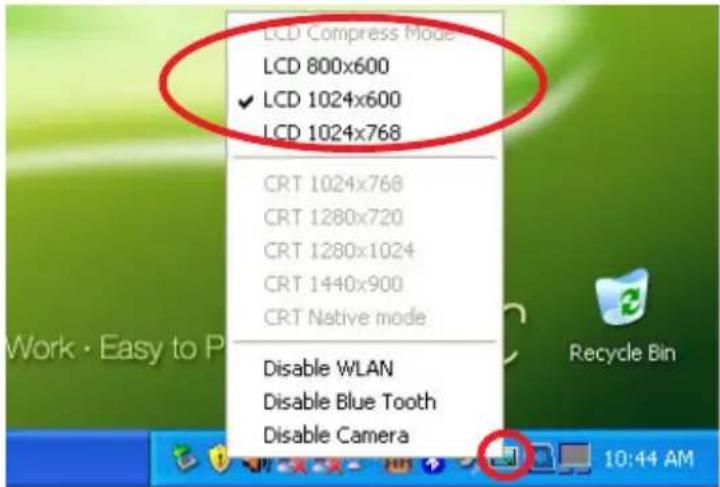
The preloaded ASUS EeePC Tray utility allows you to turn off some devices to minimize the power consumption and helps you adjust the display resolution easily.
Enabling and Disabling Devices
To disable or enable devices
- Right-click the ASUS EeePC Tray Utility icon in the Notification area and the utility shows the available options:
Disable WLAN: Turns on and off the wireless LAN connection.
Disable Blue Tooth: Turns on and off the Bluetooth connection.
Disable Camera: Enable or disable the built-in camera.
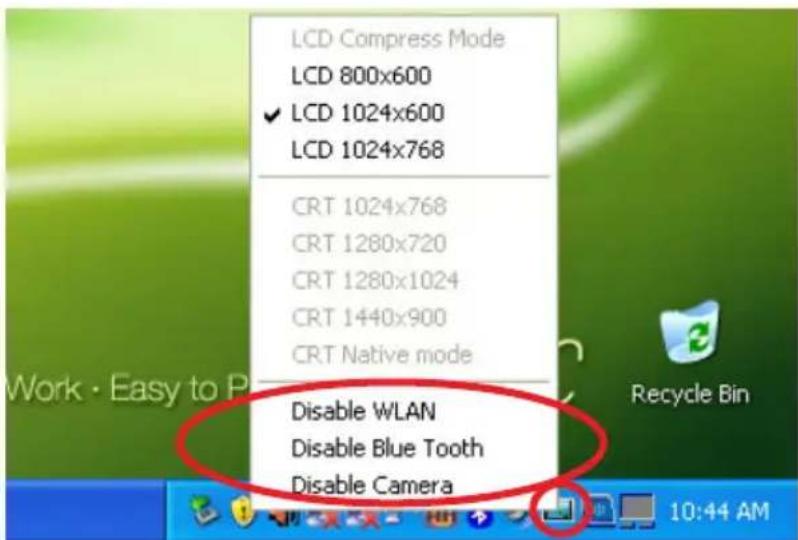
text_image
LCD Compress Mode LCD 800x600 ✓ LCD 1024x600 LCD 1024x768 CRT 1024x768 CRT 1280x720 CRT 1280x1024 CRT 1440x900 CRT Native mode Disable WLAN Disable Blue Tooth Disable Camera- Select an option to turn it on or off based on your needs. The unavailable options are dimmed.

Bluetooth is available on selected models.
Adjusting the display resolution
Click the ASUS EeePC Tray Utility icon in the Notification area to adjust the display resolution. Select the resolution based on your needs.
text_image
LCD Compress Mode LCD 800x600 ✓ LCD 1024x600 LCD 1024x768 CRT 1024x768 CRT 1280x720 CRT 1280x1024 CRT 1440x900 CRT Native mode Disable WLAN Disable Blue Tooth Disable Camera Work · Easy to P Recycle Bin 10:44 AM
The CRT-related options are unavailable when there is no connected external monitors.
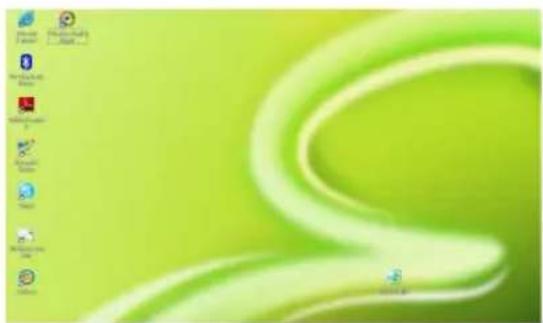
When you select LCD 1024 x 768, move the pointer to scroll up and down the screen.
natural_image
Windows desktop with green abstract background and multiple application icons (no readable text or symbols)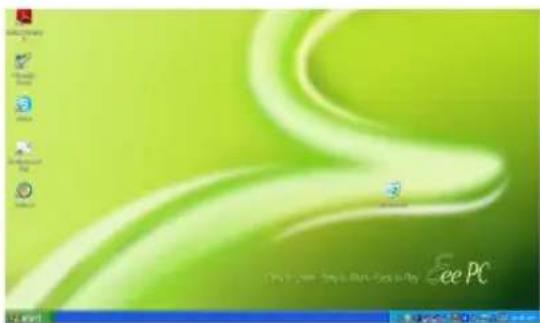
text_image
See PCScroll down to see the bottom of the screen.Scroll up to see the top of

You need not scroll up and down the screen when you select LCD Compress Mode.

Some applications, such as Windows Media Player, may not be compatible with the LCD Compress Mode. When watching videos in LCD Compress Mode, use WinDVD Player instead.

When the display mode of your Eee PC is CRT Only and the power mode is Power Saving, DO NOT use a resolution higher than 1024 x 600 pixels. Doing so would make the connected external monitor function abnormally.
Shutdown
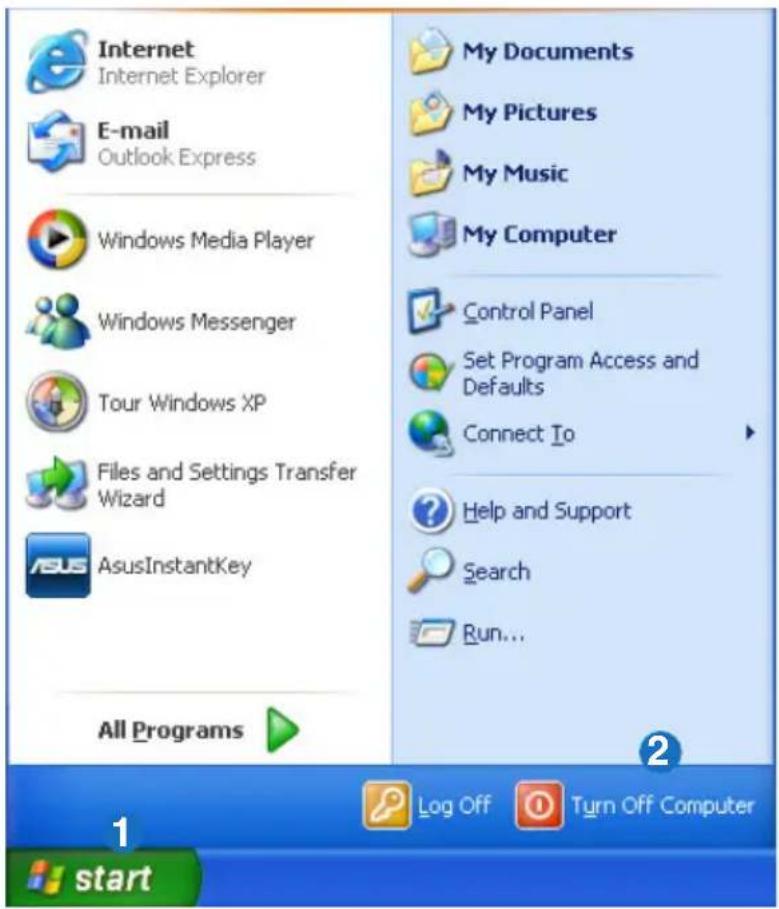
Do the following instructions to turn down your Eee PC.
- Click the start button to display the start menu.
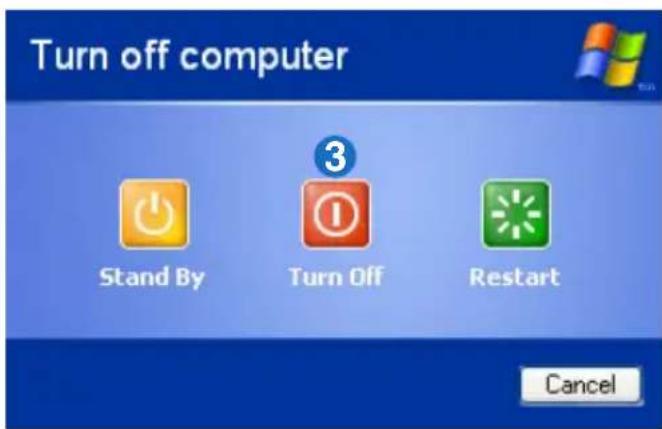
- Click Turn Off Computer.
text_image
Internet Internet Explorer E-mail Outlook Express Windows Media Player Windows Messenger Tour Windows XP Files and Settings Transfer Wizard AsusInstantKey All Programs My Documents My Pictures My Music My Computer Control Panel Set Program Access and Defaults Connect To Help and Support Search Run... Log Off Turn Off Computer start- Select Turn Off to power off your Eee PC.
text_image
Turn off computer Stand By Turn Off Restart CancelNetwork Connection
ASUS Update
Bluetooth Connection (on selected models)
ASUS Instant Key
Super Hybrid Engine
Eee Storage
Video Conferencing
Network Connection
Configuring a wireless network connection
- Double-click the crossed wireless network icon Notification area.


If the wireless connection icon does not show in the Notification area. Activate the wireless LAN function by pressing + 2 Fn + F2 before configuring a wireless network connection.
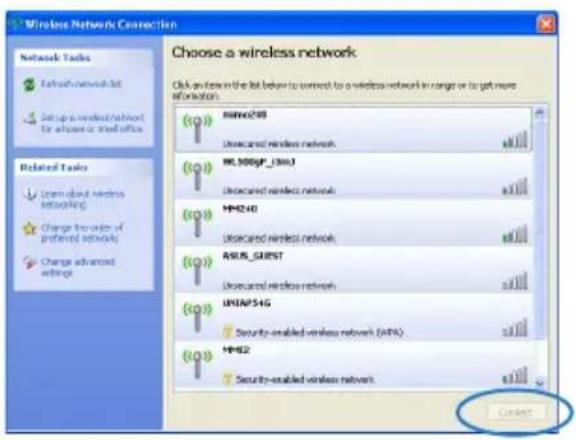
- Select the wireless access point you want to connect to from the list and click Connect to build the connection.
text_image
Wireless Network Connection Choose a wireless network Click an item in the list below to correct to a wireless network in range or to get more information. Network Tasks Refresh network list Setup a wireless network for advance or next office Related Tasks Item about necessary networking Change the order of preferred network Change advanced settings BMM0248 Unsecured wireless network ML300GP_1300J Unsecured wireless network MM240 Unsecured wireless network ASLS_GREST Unsecured wireless network UNIAP54G Security-enabled wireless network (AIFC) MM62 Security-enabled wireless network OK
If you cannot find the desired access point, click Refresh network list in the left pane and search in the list again.
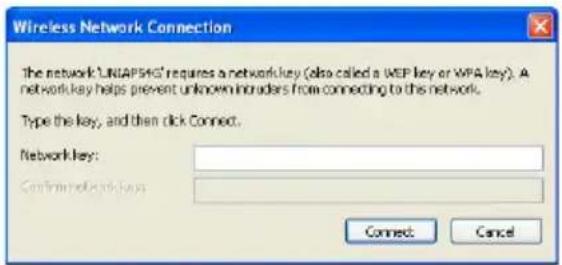
- When connecting, you may have to enter a password.
text_image
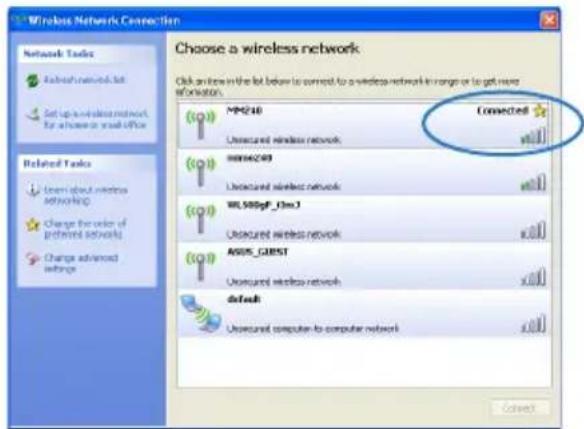
Wireless Network Connection The network 'UNIAP54G' requires a network key (also called a WEP key or WPA key). A network key helps prevent unknown intruders from connecting to this network. Type the key, and then click Connect. Network key: Confirm network keys Connect Cancel- After a connection has been established, the connection is shown on the list.
text_image
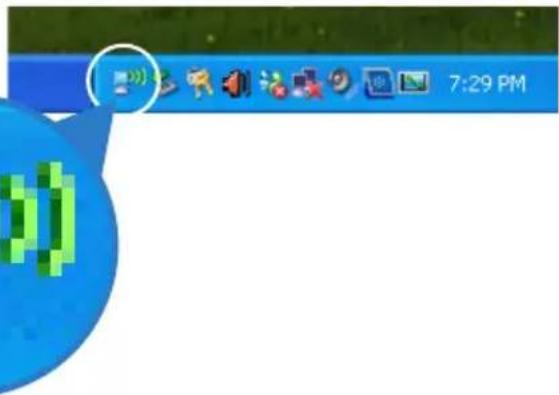
Windows Networks Connection Choose a wireless network Click an link in the list below is correct to a wireless network in range or to get more information. Network Tools Rebeach network.txt Get up a wireless network for choose or read office Related Tasks Learn about wireless networking Change the order of preferred networks Change advanced networking MP240 Unsecured wireless network Connected MSN6249 Unsecured wireless network WL500gf_13mJ Unsecured wireless network ASUS_GREST Unsecured wireless network default Unsecured computer-to-computer network 确定- You can see the wireless network icon in the Notification area.
text_image
7:29 PM
The wireless connection icon disappears when you Press + 2 (
Configuring a network connection
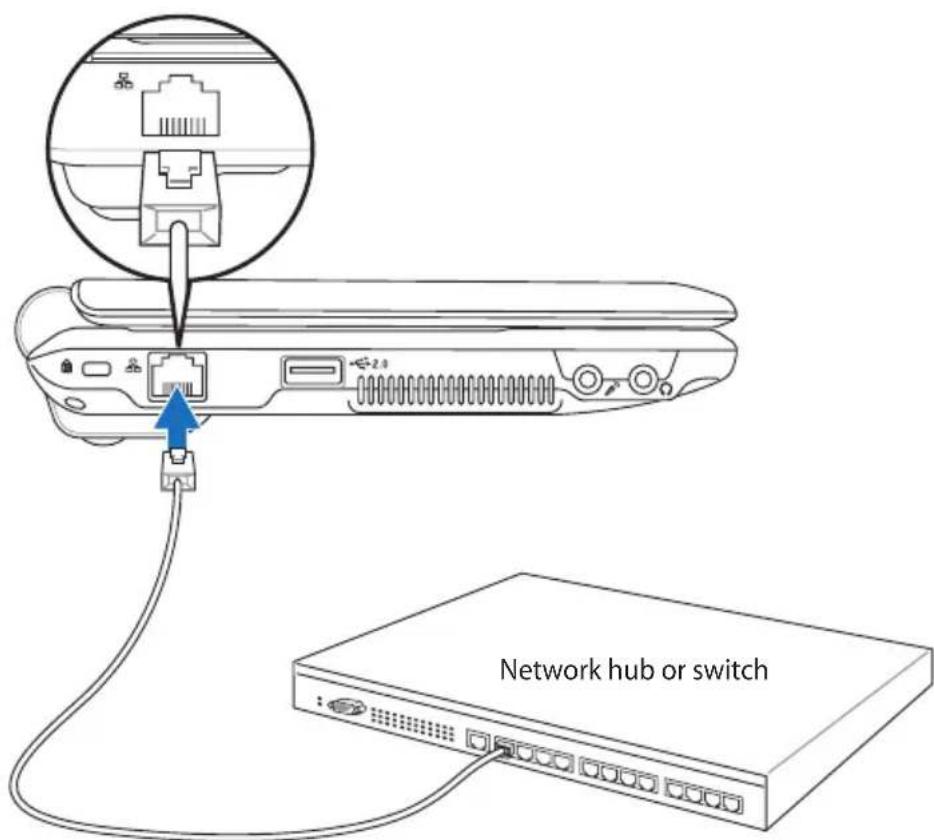
If you want to obtain network access, connect the network cable, with RJ-45 connectors on each end, to the network port on the Eee PC and the other end to a hub or switch. The illustration below is the example of your Eee PC connected to a network hub or switch for use with the built-in Ethernet controller. Connect to network before enjoying all the network services and functions in Eee PC.
text_image
Network hub or switchNetwork cable with RJ-45 connectors
Local Area Network
Using a dynamic IP:
- Right-click the network icon with a yellow warning triangle the Notification area and select Open Network Connections.
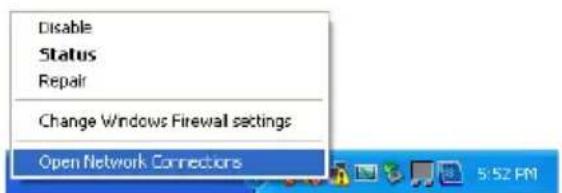
text_image
Disable Status Repair Change Windows Firewall settings Open Network Connectors- Right-click Local Area Connection and select Properties.
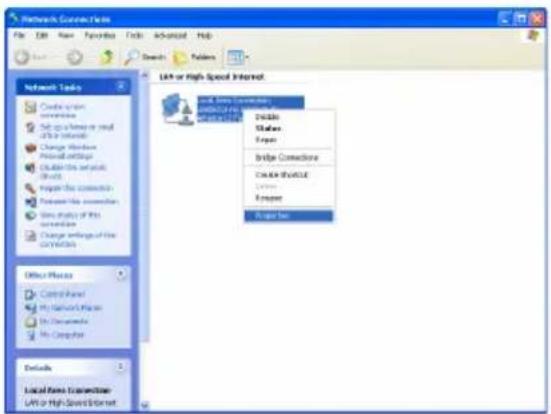
text_image
Network Course Tasks File Edit View Favorites Tools Advanced Help Search Favorites Network Tasks Create spatial connections Set up a home or small Office networks Change Windows Proband network Connect the network Help the connection Provide the connection Show study of the Internet Change settings of the Cryorkics Office Places Control Panel My Network Places My Documents My Computer Details Local Data Connection LVM or High Speed Internet LVM or High Speed Internet Create Status Export Bridge Connection Create Software Options Export for- Highlight Internet Protocol(TCP/IP) and click Properties.
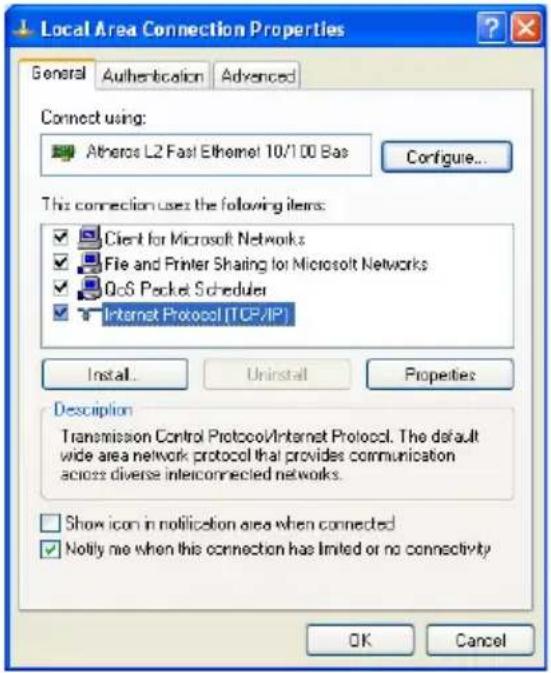
text_image
Local Area Connection Properties General Authentication Advanced Connect using: Atheroc L2 Fast Ethernet 10/100 Bas Configure... This connection uses the following items: ✓ Client for Microsoft Networks ✓ File and Printer Sharing for Microsoft Networks ✓ QoS Packet Scheduler ✓ Internet Protocol (TCP/IP) Install... Uninstall Properties Description Transmission Control Protocol/Internet Protocol. The default wide area network protocol that provides communication across diverse interconnected networks. Show icon in notification area when connected ✓ Notify me when this connection has limited or no connectivity OK Cancel- Click Obtain an IP address automatically and click OK.

text_image
Internet Protocol (TCP/IP) Properties General Alternate Configuration You can get IP settings assigned automatically if your network supports this capability. Otherwise, you need to ask your network administrator for the appropriate IP settings. Obtain an IP address automatically Use the following IP address: IP address: ...... Submit mask: ...... Default gateway: ...... Obtain DNS server address automatically Use the following DNS server addresses: Plettered DNS server: ...... Alternate DNS server: ...... Advanced... OK Cancel- Click Create a new connection to start the New Connection Wizard.
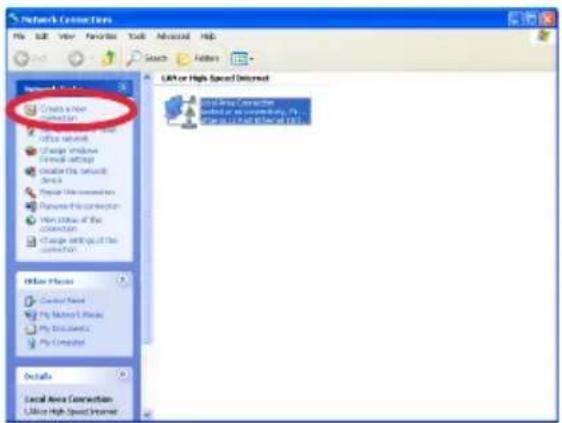
text_image
Network Connection Create a new connection Office network Change windows Final settings Create this network Service Regularly connected Provide the connection Show status of the connection Change existing and the connection Local Features Control Panel Play History Files Play Instruments Play Computer Details Local Area Connection LIA or High Speed Ethernet- Click Next.
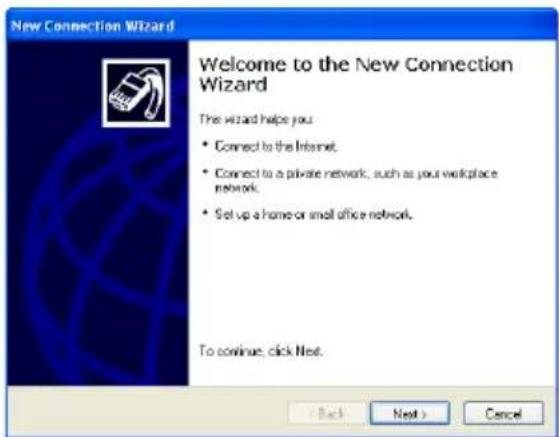
text_image
New Connection Wizard Welcome to the New Connection Wizard The wizard helps you: • Connect to the Internet. • Connect to a private network, such as your workplace network. • Set up a home or small office network. To continue, click Next. ( Back Next ) Cancel- Click Connect to the Internet and click Next.
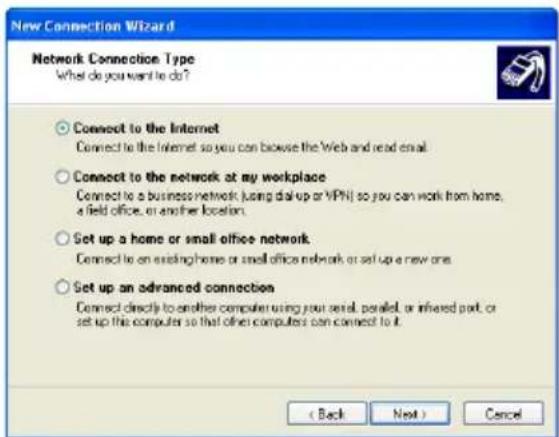
text_image
New Connection Wizard Network Connection Type What do you want to do? Connect to the Internet Connect to the Internet so you can browse the Web and read email. Connect to the network at my workplace Connect to a business network (using dial-up or VPN) so you can work from home, a field office, or another location. Set up a home or small office network Connect to an existing home or small office network or set up a new one. Set up an advanced connection Connect directly to another computer using your serial, parallel, or infrared port, or set up this computer so that other computers can connect to it. ( Back Next ) Cancel- Click Set up my connection manually.
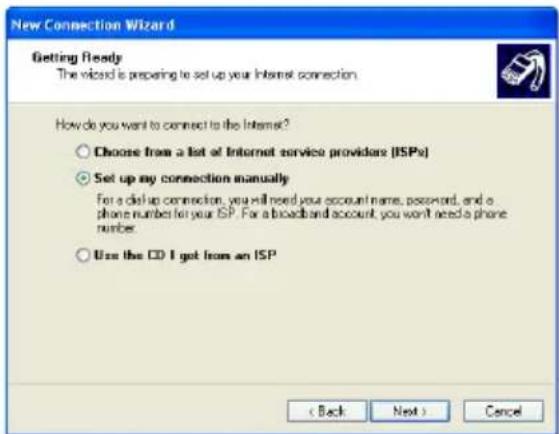
text_image
New Connection Wizard Getting Ready The wizard is preparing to set up your Internet connection. How do you want to connect to the Internet? Choose from a list of Internet service providers (ISPs) Set up my connection manually For a dial-up connection, you will need your account name, password, and a phone number for your ISP. For a broadband account, you won't need a phone number Use the CD I got from an ISP < Back Next > Cancel- Select your connection type and click Next.
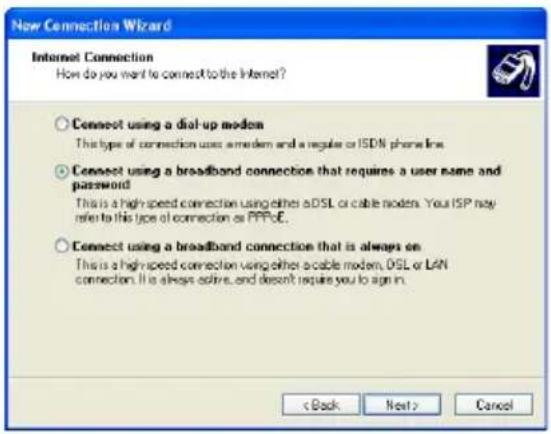
text_image
New Connection Wizard Internet Connection How do you want to connect to the Internet? Connect using a dial-up mode This type of connection uses a modem and a regular or ISDN phone line Connect using a broadband connection that requires a user name and password This is a high-speed connection using either a DSL or cable mode. You ISP may refer to this type of connection as PPPoE. Connect using a broadband connection that is always on This is a high-speed connection using either a cable mode, DSL or LAN connection. It is always active, and doesn't require you to sign in. < Back Next > Cancel- Enter your ISP Name and click Next.
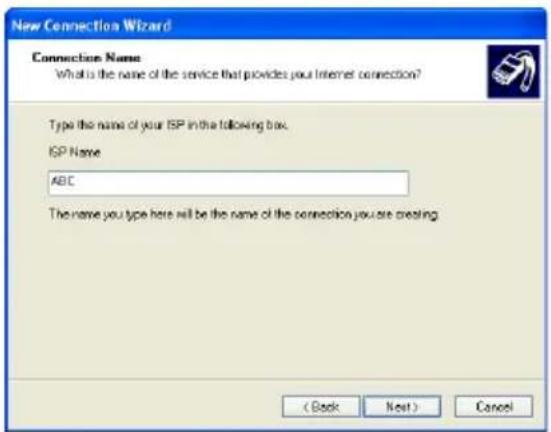
text_image
New Connection Wizard Connection Name What is the name of the service that provides your Internet connection? Type this name of your ISP in the following box. ISP Name ABC The name you type here will be the name of the connection you are creating ( Back Next ) Cancel- Enter your User name and Password. Click Next.
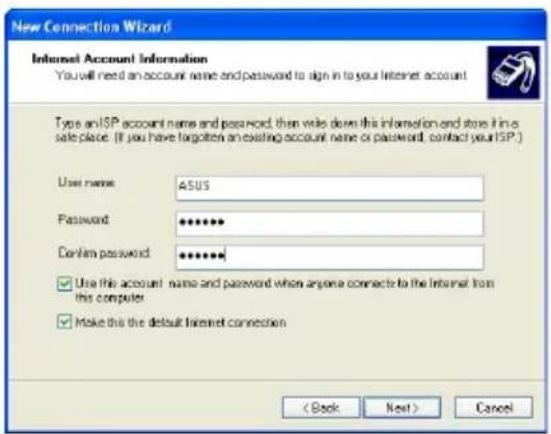
text_image
New Connection Wizard Internet Account Information You will need an account name and password to sign in to your Internet account Type anISP account name and password, then write down this information and store it in a safe place. (If you have forgotten an existing account name or password, contact yourISP.) User name: ASUS Password: ****** Confirm password: ****** Use this account name and password when anyone connects to the Internet from this computer Make this the default Internet connection < Back Next > Cancel- Click Finish to finish the configuration.
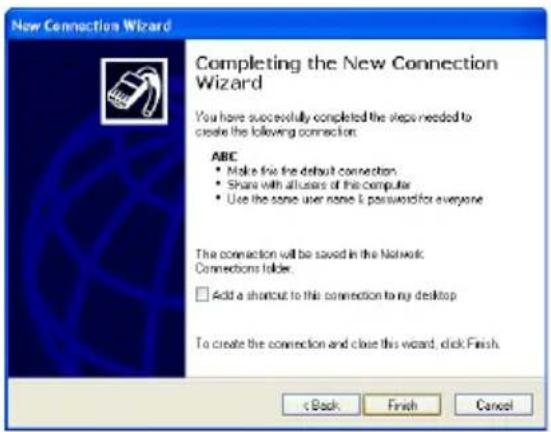
text_image
New Connection Wizard Completing the New Connection Wizard You have successfully completed the steps needed to create the following connection: ABC • Make fix the default connection • Share with all users of this computer • Use the same user name & password for everyone The connection will be saved in the Network Connections folder. □ Add a shortcut to this connection to my desktop To create the connection and close this wizard, click Finish.- Enter your user name and password. Click Connect to connect to the Internet.
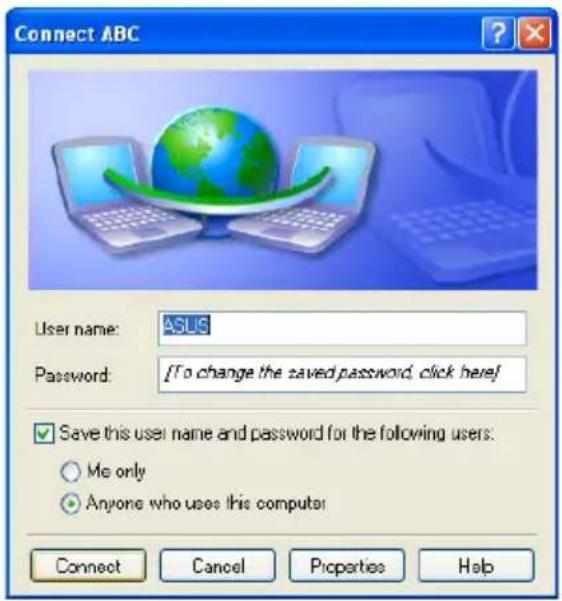
text_image
Connect ABC User name: ASUS Password: [To change the saved password, click here] ✓ Save this user name and password for the following users: ○ Me only ● Anyone who uses this computer Connect Cancel Properties Help
Contact your Internet Service Provider (ISP) if you have problems connecting to the network.
Using a static IP:
- Repeat the step 1–3 of Using a dynamic IP to start the static IP network configuration.
2 Click Use the following IP address.
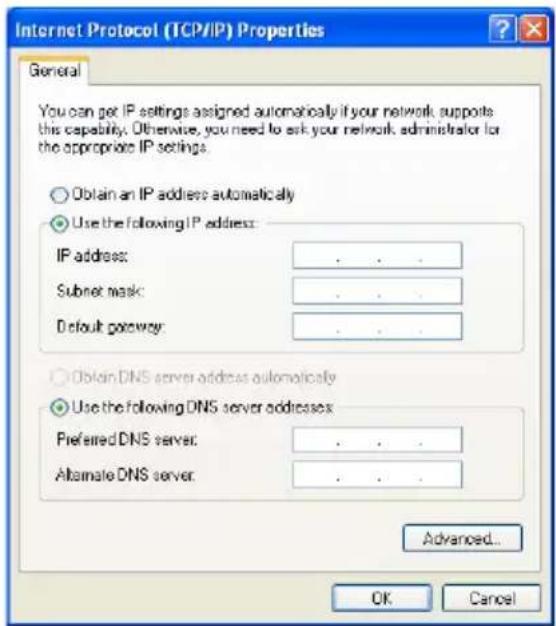
text_image
Internet Protocol (TCP/IP) Properties General You can get IP settings assigned automatically if your network supports this capability. Otherwise, you need to ask your network administrator for the appropriate IP settings. ○ Obtain an IP address automatically ● Use the following IP address: IP address: .... Subnet mask: .... Default gateway: .... ○ Obtain DNS server address automatically ● Use the following DNS server addresses: Preferred DNS server: .... Alternate DNS server: .... Advanced... OK Cancel-
Enter the IP address, Subnet mask and Gateway from your service provider.
-
If needed, enter the preferred DNS Server address and alternative address.
-
After entering all the related values, click OK to build the network connection.

Contact your Internet Service Provider (ISP) if you have problems connecting to the network.
Browsing web pages
After you finish the network setup, click Internet Explorer on the desktop and start enjoying net surfing.
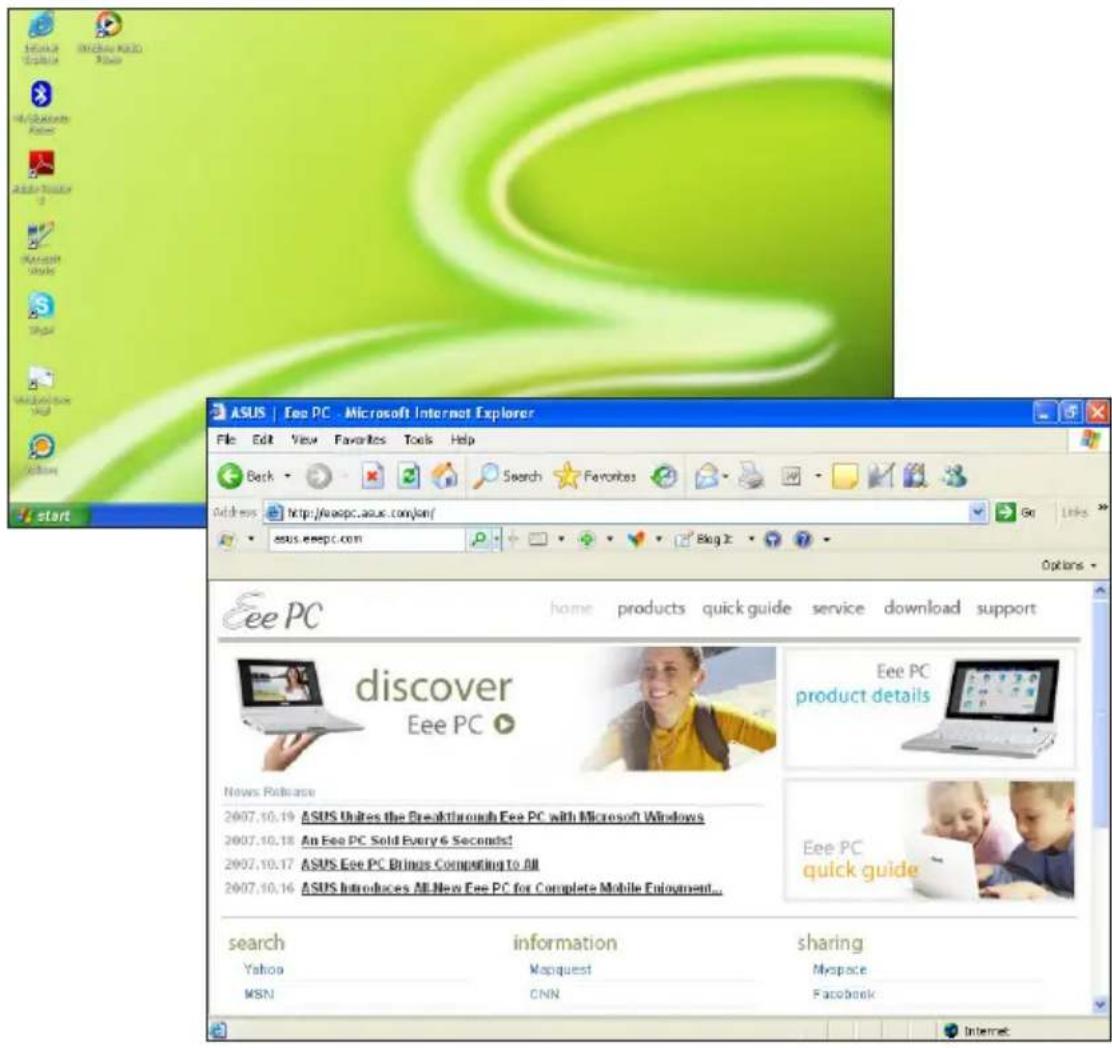
text_image
Microsoft Internet Explorer File Edit View Favorites Tools Help Back Search Favorites Address http://eeepc.aee.com/ion/ esus.eeepc.com Eee PC home products quick guide service download support discover Eee PC Eee PC product details News Release 2007.10.19 ASUS Unites the Breakthrough Fee PC with Microsoft Windows 2007.10.18 An Fee PC Sold Every 6 Seconds! 2007.10.17 ASUS Fee PC Brings Comparing to All 2007.10.16 ASUS Introduces All-New Fee PC for Complete Mobile Enjoyment... search information sharing Yahoo Mapquest Myspace MSN CNN Facebook Internet
Visit our Eee PC homepage (http://eeepc.asus.com) to obtain the latest information and register at http://vip.asus.com for full service of your Eee PC.
ASUS Update
The ASUS Update is a utility that allows you to manage, save, and update the Eee PC BIOS in Windows® environment. The ASUS Update utility allows you to:
- Save the current BIOS file
- Download the latest BIOS file from the Internet
- Update the BIOS from an updated BIOS file
- Update the BIOS directly from the Internet, and
• View the BIOS version information.
This utility is pre-loaded in your Eee PC and is also available in the support DVD that comes with the Eee PC package.

ASUS Update requires an Internet connection either through a network or an Internet Service Provider (ISP).
Updating the BIOS through the Internet
To update the BIOS through the Internet:
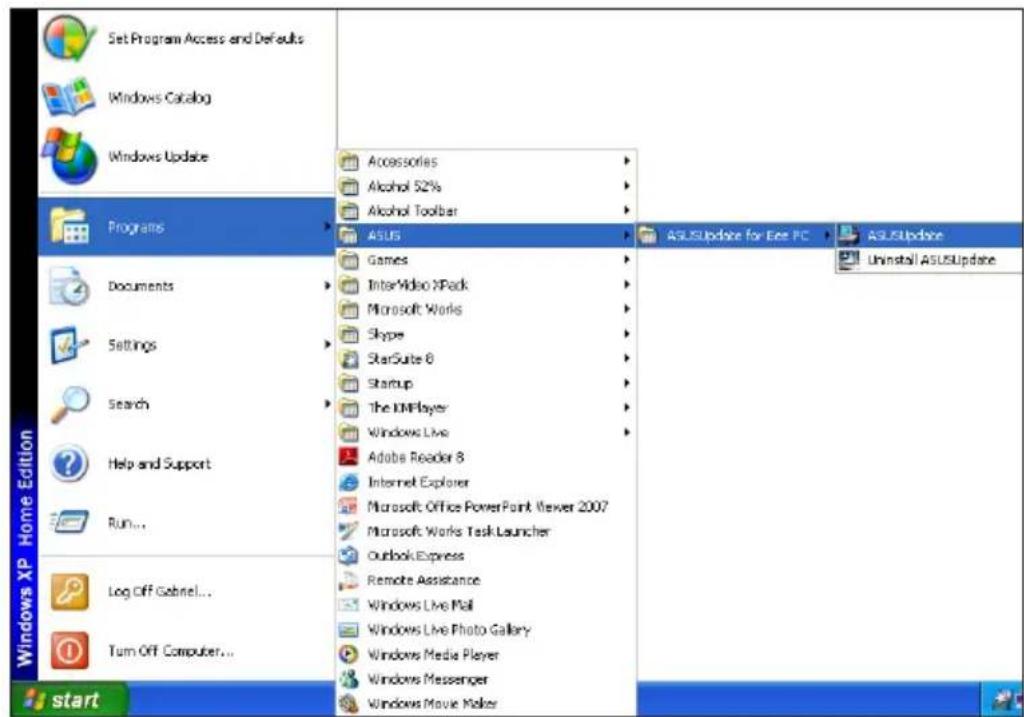
- Launch the ASUS Update utility from the Windows® desktop by clicking Start > All Programs > ASUS > ASUSUpdate for Eee PC> ASUSUpdate. The ASUS Update main window appears.
text_image
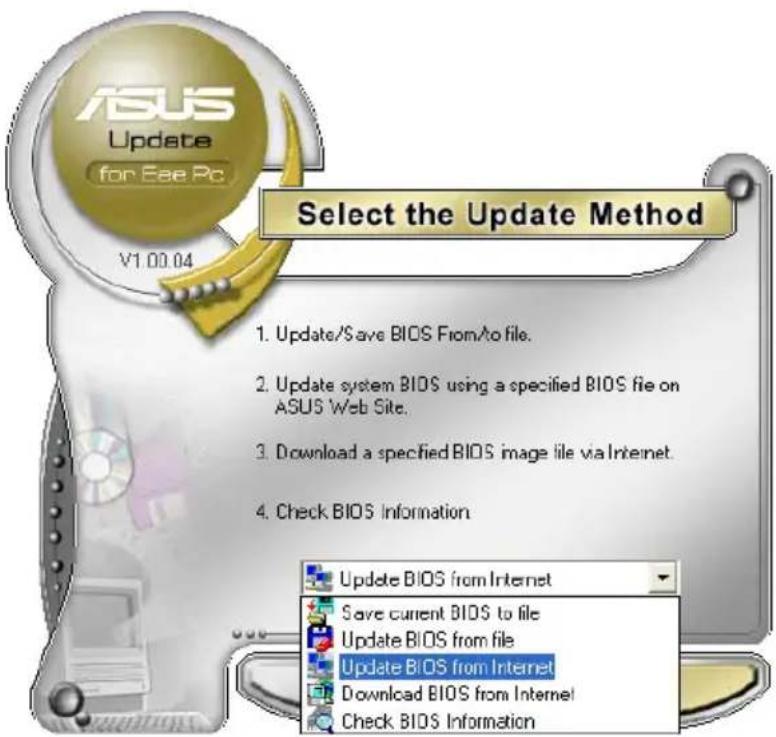
Set Program Access and Defaults Windows Catalog Windows Update Programs Documents Settings Search Help and Support Run... Log Off Gabriel... Turn Off Computer... Start Accessories Alcohol 52% Alcohol Toolbar ASUS Games Inter-Video XPack Microsoft Works Skype StarSuite 6 Startup The KIMPlayer Windows Live Adobe Reader 8 Internet Explorer Microsoft Office PowerPoint Viewer 2007 Microsoft Works Task Launcher Outlook Express Remote Assistance Windows Live Mail Windows Live Photo Gallery Windows Media Player Windows Messenger Windows Movie Maker ASUSUpdate for Eee PC ASUSUpdate Uninstall ASUSUpdate- Select Update BIOS from Internet from the drop-down menu, then click Next.
text_image
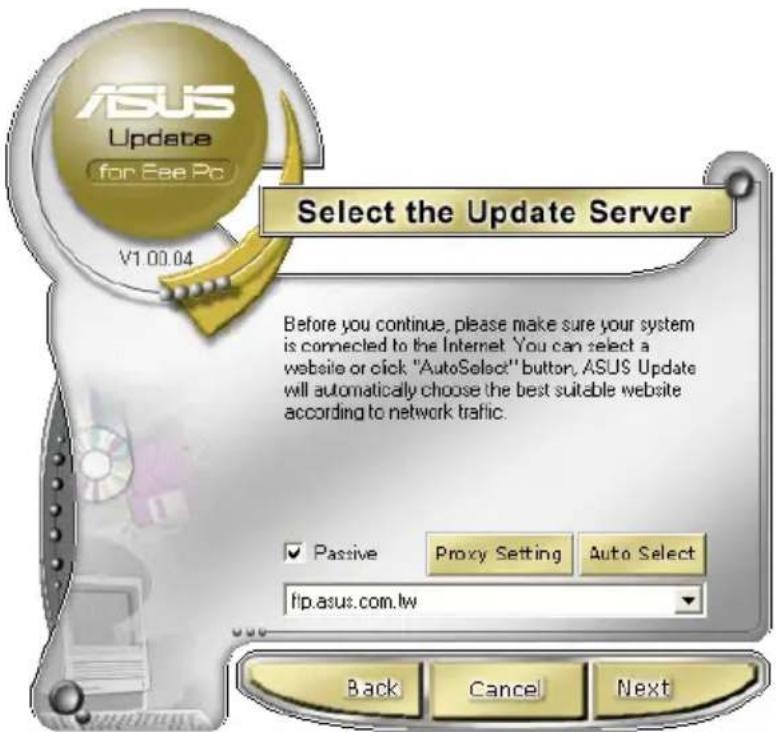
ASUS Update for Eye Pc V1 00.04 Select the Update Method 1. Update/Save BIOS From/To file. 2. Update system BIOS using a specified BIOS file on ASUS Web Site. 3. Download a specified BIOS image file via Internet. 4. Check BIOS Information Update BIOS from Internet Save current BIOS to file Update BIOS from file Update BIOS from Internet Download BIOS from Internet Check BIOS Information- Select the ASUS FTP site nearest you to avoid network traffic, or click Auto Select. Click Next.
text_image
ASUS Update for Eye Pc V1.00.04 Select the Update Server Before you continue, please make sure your system is connected to the Internet. You can select a website or click "AutoSelect" button, ASUS Update will automatically choose the best suitable website according to network traffic. ✓ Passive Proxy Setting Auto Select fip.asus.com.lw Back Cancel Next-
From the FTP site, select the desired BIOS version and click Next.
-
Follow the screen instructions to complete the update process.

The ASUS Update utility is capable of updating itself through the Internet. Always update the utility to avail all its features.
Updating the BIOS through a BIOS file
To update the BIOS through a BIOS file:
-
Launch the ASUS Update utility from the Windows ^® desktop by clicking Start > Programs > ASUS > ASUSUpdate for EeePC> ASUSUpdate. The ASUS Update main window appears.
-
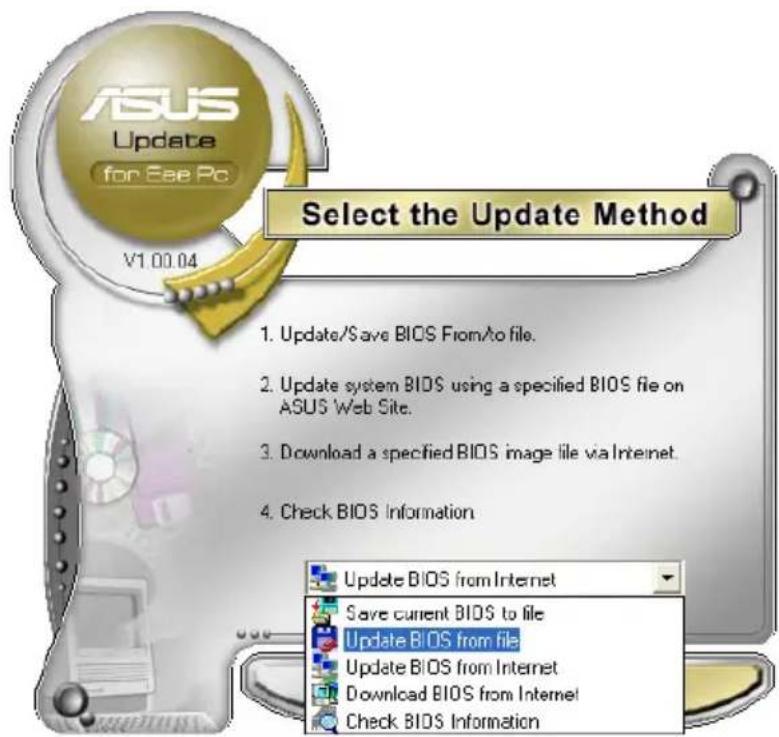
Select Update BIOS from file from the drop-down menu, then click Next.
text_image
ASUS Update for Eye Pc V1 00.04 Select the Update Method 1. Update/Save BIOS From/To file. 2. Update system BIOS using a specified BIOS file on ASUS Web Site. 3. Download a specified BIOS image file via Internet. 4. Check BIOS Information Update BIOS from Internet Save current BIOS to file Update BIOS from file Update BIOS from Internet Download BIOS from Internet Check BIOS Information- Locate the BIOS file from the Open window, then click Open.
- Follow the screen instructions to complete the update process.
Bluetooth Connection (on selected models)
Bluetooth technology eliminates the need for cables for connecting Bluetooth-enabled devices. Examples of Bluetooth-enabled devices may be Notebook PCs, Desktop PCs, mobile phones, and PDAs.
To connect to a Bluetooth-enabled device
-
Press
+ repeatedly until Bluetooth ON or WLAN & Bluetooth ON is shown. -
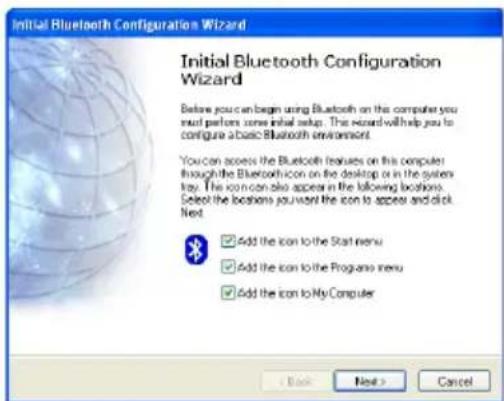
Click My Bluetooth Places on the desktop and follow the onscreen instructions to finish initialization. Click Next to continue.
-
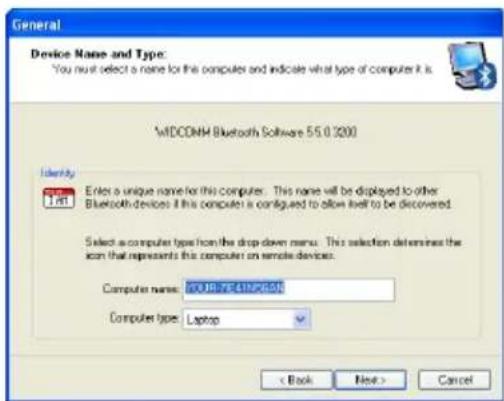
Name your Eee PC and select the device type. Click Next to continue.
text_image
Initial Bluetooth Configuration Wizard Initial Bluetooth Configuration Wizard Before you can begin using Bluetooth on the computer you must perform some initial setup. This award will help you to configure a basic Bluetooth environment. You can access the Bluetooth features on this computer through the Bluetooth icon on the desktop or in the system lay. This icon can also appear in the following locations: Select the locations you want the icon to appear and click. Next Add the icon to the Start menu Add the icon to the Programs menu Add the icon to My Computer < Back Next > Cancel- To decide the Bluetooth services this device offers, click Next to continue.
text_image
General Device Name and Type: You must select a name for this computer and indicate what type of computer it is. WDCOMM Bluetooth Software 5.5.0.3200 Identity Enter a unique name for this computer. This name will be displayed to other Bluetooth devices if this computer is configured to allow itself to be discovered. Select ascomputer types from the drop-down menu. This selection determines the icon that represents this computer on remote devices. Computer name: C:\UB\PE41NPG58 Computer type: Laptop < Back Next > Cancel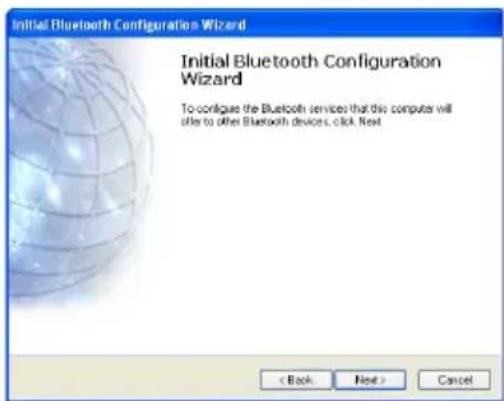
text_image
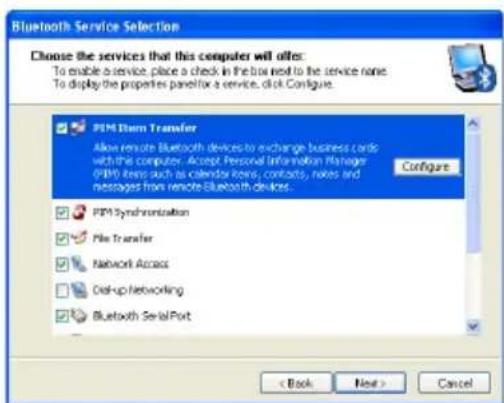
Initial Bluetooth Configuration Wizard Initial Bluetooth Configuration Wizard To configure the Bluetooth services that this computer will offer to other Bluetooth devices. click Next < Back Next > Cancel- Select the service you would like to offer from the list and click Next to continue.
text_image
Bluetooth Service Selection Choose the services that this computer will offer: To enable a service, place a check in the box next to the service name. To display the properties panel for a service, click Configure. PPM Item Transfer Allow remote Bluetooth devices to exchange business cards with this computer. Accept Personal Information Manager (PPM) files such as calendar items, contacts, notes and necrogras from remote Bluetooth devices. Configure PPM Synchronization File Transfer Network Access Disk-up Networking Bluetooth Serial Port < Back Next > Cancel- Click Next to start setting up the Bluetooth connection.
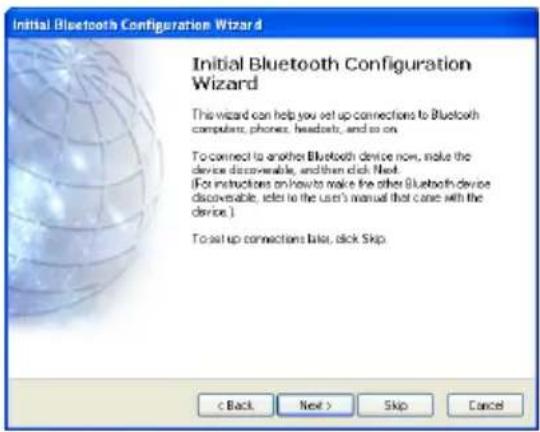
text_image
Initial Bluetooth Configuration Wizard This wizard can help you set up connections to Bluetooth computers, phones, headsets, and so on. To connect to another Bluetooth device now, make the device discoverable, and then click Next. (For instructions on how to make the other Bluetooth device discoverable, select to the user's manual that calls with the device.) To set up connections later, click Skip.- Select a Bluetooth-enabled device from the list and click Next.
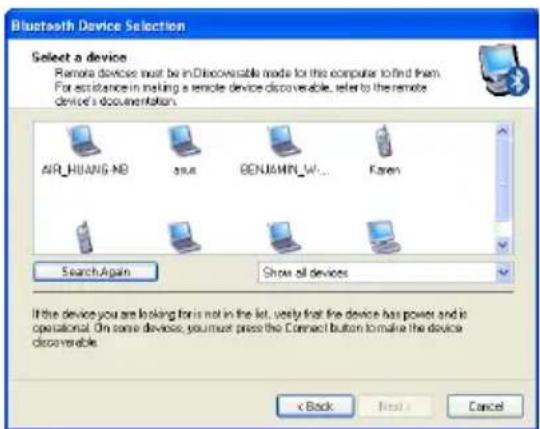
text_image
Bluetooth Device Selection Select a device Remote devices must be in.Discoverable mode for this computer to find from. For assistance in making a remote device discoverable, select to the remote device's documentation. AIR_HUANG_MB 500A DENJAMIN_W... Faren Search Again Show all devices If the device you are looking for is not in the list, verify that the device has power and in operational. On some devices, you must press the Connect button to make the device discoverable. < Back Next > Cancel- Enter the Bluetooth security code and start pairing.
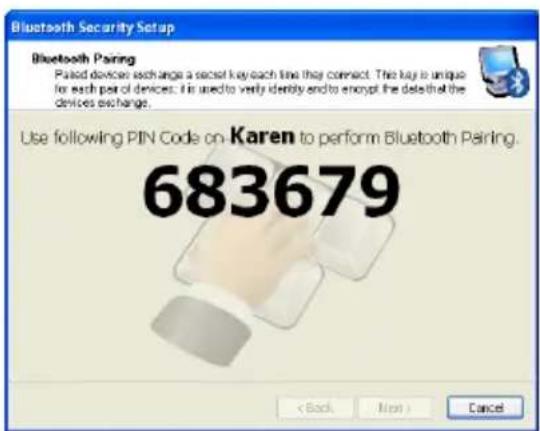
text_image
Bluetooth Security Setup Bluetooth Pairing Pulsed devices exchange a secret key each line they connect. This key is unique for each pair of devices. It is used to verify identity and to encrypt the data that the devices exchange. Use following PIN Code on-Karen to perform Bluetooth Pairing. 683679 < Back Next > Cancel- After the paired relationship is built, select the service you are interested in from the list and click Finish to use the selected service.
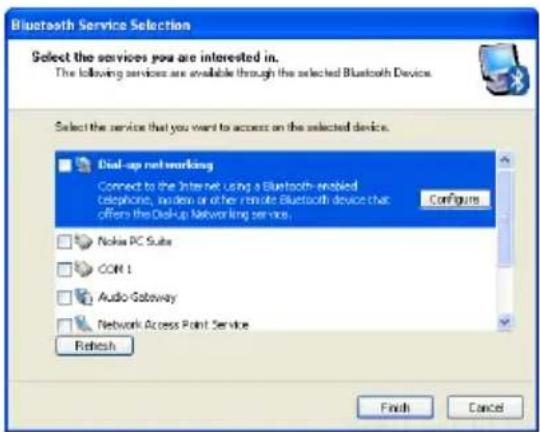
text_image
Bluetooth Service Selection Select the services you are interested in. The following services are available through the selected Bluetooth Device. Select the service that you want to access on the selected device. Dial-up networking Connect to the Internet Using a Bluetooth-enabled Telephone, modem or of her remote Bluetooth device that offers the Dial-up Networking service. Configure Nokia PC Suite COM 1 Audio Gateway Network Access Point Service Refresh Finish CancelASUS Instant Key
ASUS Instant Key allows you customized definitions to launch frequently used applications with one touch of a button.
- Click start > All Programs > ASUS > EeePC > ASUSInstantKey > ASUSInstantKey.
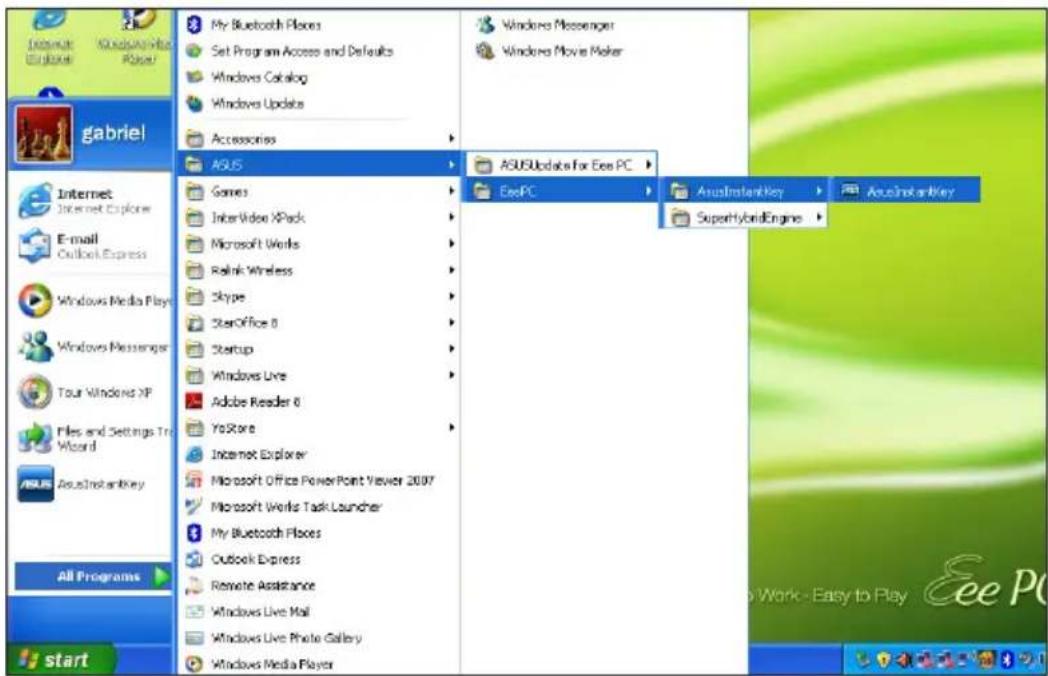
text_image
My Bluetooth Files Set Program Access and Defaults Windows Catalog Windows Update Accessories ASUS Games InterVideo XPack Microsoft Works Ralink Wireless Skype StarOffice 8 Startup Windows Live Adobe Reader 8 YoStore Internet Explorer Microsoft Office PowerPoint Viewer 2007 Microsoft Works Task Launcher My Bluetooth Files Outlook Express Remote Assistance Windows Live Mail Windows Live Photo Gallery Windows Media Player Windows Messenger Windows Movie Maker ASUSUpdate for Eee PC EeePC ArausInstantKey SuperHybridEngine ArausInstantKey All Programs start- Click the Change button to configure.
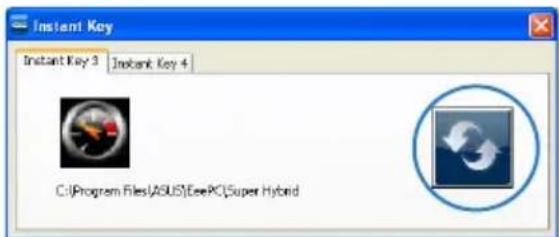
text_image
Instant Key Instant Key 3 Instant Key 4 C:\Program Files\ASUS\ExePC\Super Hybrid- Locate and select a preferred application for the instant key and click OK.
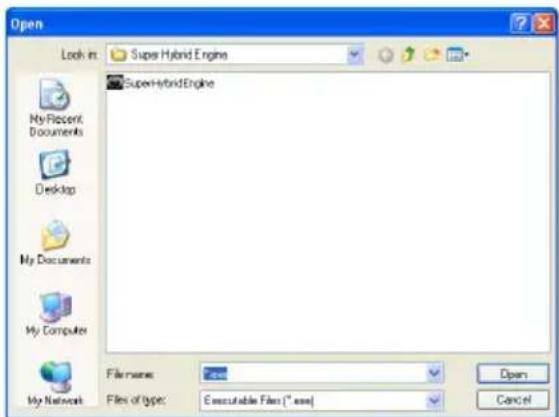
text_image
Open Look in: Super Hybrid Engine SuperHybridEngine My Recent Documents Desktop My Documents My Computers My Network File name: 7.000 File of type: Executable Files (*.exe) Open Cancel- Click EXIT to finish the instant key setup and repeat the previous steps to customize another instant key.
Super Hybrid Engine
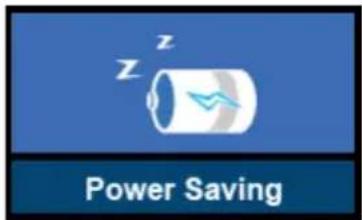
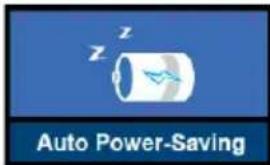
Super Hybrid Engine offers different power modes. The assigned instant key toggles power savings between various power saving modes. The power saving modes control many aspects of your Eee PC to maximize performance versus battery time. The selected mode is shown on the display.
To change the power mode
- Click start > All Programs > ASUS > EeePC > SuperHybridEngine > SuperHybridEngine.
- Press Instant Key 3 repeatedly to switch power modes.
- Right-click the Super Hybrid Engine icon in the Notification area, and select a preferred power mode.
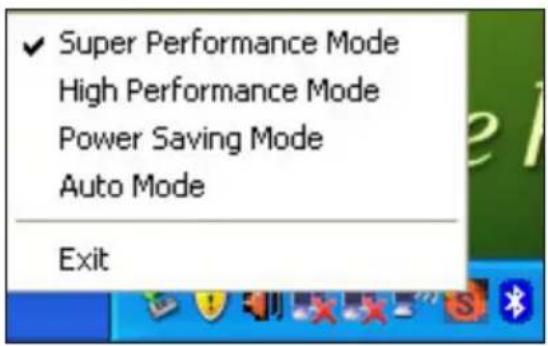
text_image
✓ Super Performance Mode High Performance Mode Power Saving Mode Auto Mode ExitSuper Hybrid Engine Modes
text_image
Power Saving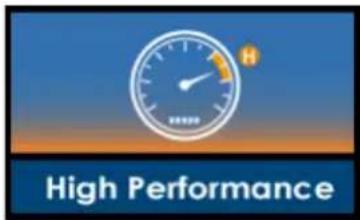
text_image
High Performance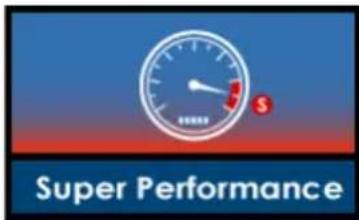
text_image
Super Performance
Auto High Performance and Auto Power-Saving mode are available only when applying or removing the power adapter.
text_image
Auto Power-Saving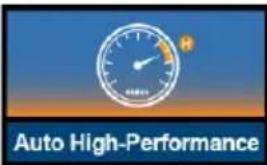
text_image
Auto High-Performance
If your external monitor functions abnormally in Power Saving mode at a resolution of 1024 x 768 pixels or higher, press
Eee Storage
Eee PC users can enjoy free online space. With Internet connection, you can access and share any files whenever you want and wherever you are.

The content of the free service provided to you is subject to Eee Storage Web Hard Drive Service Agreement on Eee Storage official website. Eee Storage reserves the rights to modify or discontinue the provided web storage service with or without further notice. Visit the official website for details.
To use Eee Storage
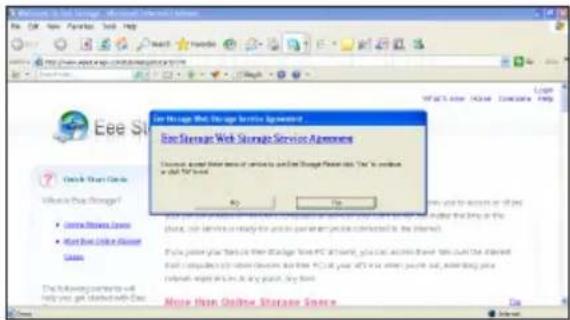
- Double-click the Eee Storage shortcut on the desktop, and read the service agreement before clicking Yes to continue.
text_image
Eee St Check Start Menu Which for Free Storage? • Console Stores Dataset • Web Store Online Server Sales The following company will help you get started with Eee More than Online Storage Service
Ensure that your Eee PC is connected to the Internet.
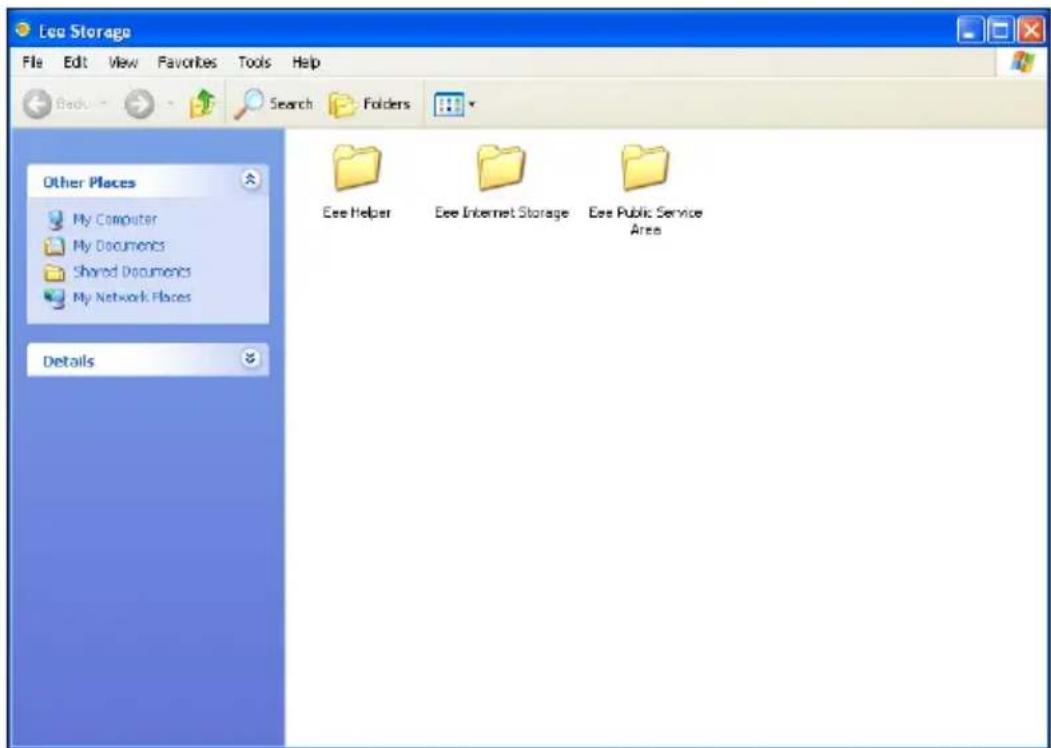
- Double-click Eee Internet Storage.
text_image
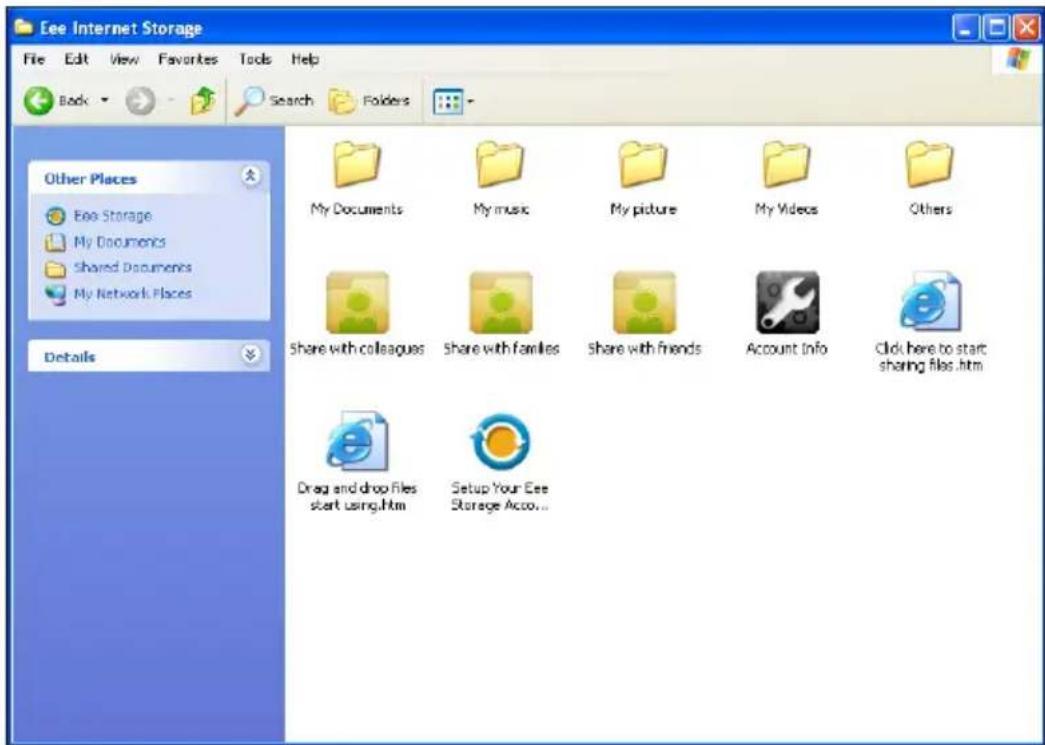
Lee Storage File Edit View Favorites Tools Help Baidu Search Folders Other Places My Computer My Documents Shared Documents My Network Places Details Eee Helper Eee Internet Storage Eee Public Service Area- You can easily drag and drop to upload files onto your free online space.
text_image
Eee Internet Storage File Edit View Favorites Tools Help Back Search Folders Other Places Eee Storage My Documents Shared Documents My Network Places Details My Documents My music My picture My Videos Others Share with colleagues Share with families Share with friends Account Info Click here to start sharing files.htm Drag and drop Files start using.htm Setup Your Eee Storage Acco...
Double-click Setup Your Eee Storage Account information in the Web Storage folder to apply an account and setup a password if you need to use more advanced functions. This set of account and password is also indispensable when you use Eee Storage service with other computer.
Video Conferencing
Skype enables users to make free calls to other Skype users or cheaper calls to landlines or mobile phones with Internet access. It also offers instant messaging and video conferencing function, which users can use to chat online.
To start using Skype application
- Double-click the Skype icon on the desktop.
- Enter your Skype name and other information to create a new Skype account. If you have already had a Skype account, click Cancel to sign in directly.
-
Enter your Skype Name and Password in the box and click Sign in.
-
You can make a video phone call now.

Ensure that you have checked the Start my video automatically when I am in a call check box in Video Settings.

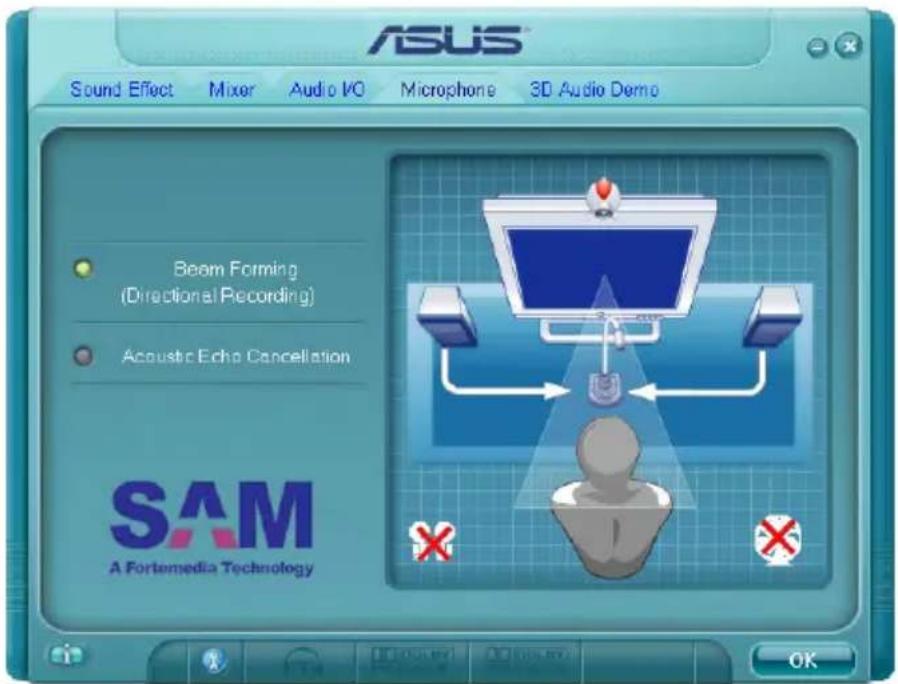
Ensure that Beam Forming in the Microphone tab in Realtek HD Audio Manager is enabled. (Beam Forming and Acoustic Echo Cancellation are enabled by default.) Doing so eliminates surrounding noise interferences and enhances the quality of the call. To obtain the best voice quality, we recommend you speak right in front of the microphone.
text_image
ASUS Sound Effect Mixer Audio VQ Microphone 3D Audio Demo Beam Forming (Directional Recording) Acoustic Echo Cancellation SAM A Fortemedia Technology OKSupport DVD
System Recovery
Boot Booster
Support DVD & System Recovery
Support DVD information
The support DVD that comes with the Eee PC package contains the drivers, software applications, and utilities that you can install to avail all the features.
Running the support DVD
Insert the support DVD in the external optical drive. The DVD automatically displays the Drivers menu if Autorun is enabled in your computer.

If Autorun is NOT enabled in your computer, browse the contents of the support DVD to locate the file ASSETUP.EXE from the BIN folder. Double-click the ASSETUP.EXE file to run the DVD.

The drivers and utilities bundled in the support DVD may vary by models and are subject to change without notice.
Drivers menu
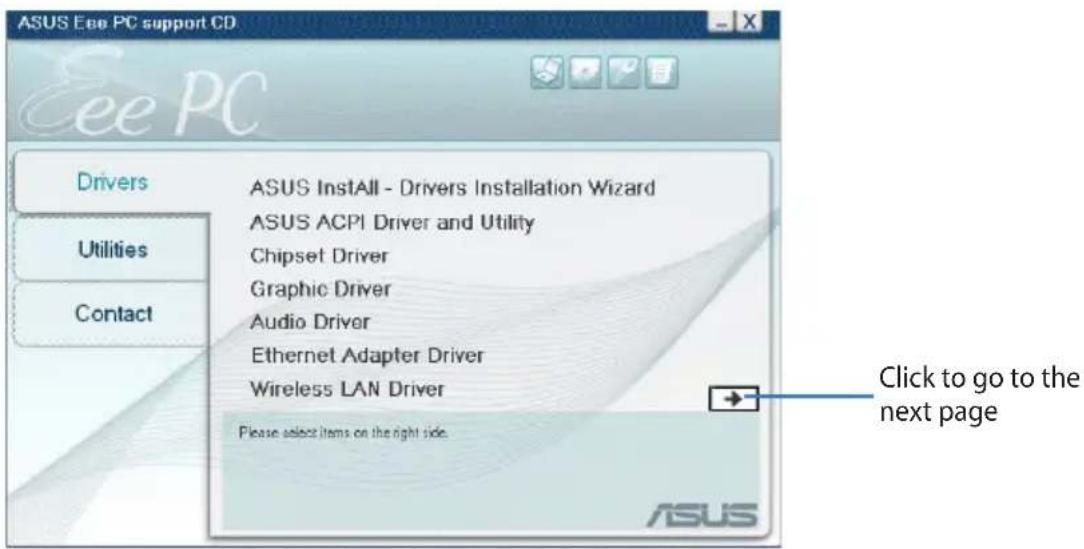
The Drivers menu shows available device drivers when the system detects installed devices. Install the necessary drivers to activate the devices.
text_image
ASUS Eee PC support CD Eee PC Drivers ASUS Install - Drivers Installation Wizard ASUS ACPI Driver and Utility Chipset Driver Graphic Driver Audio Driver Ethernet Adapter Driver Wireless LAN Driver Please select items on the right side. Click to go to the next page Utilities Contact ASUS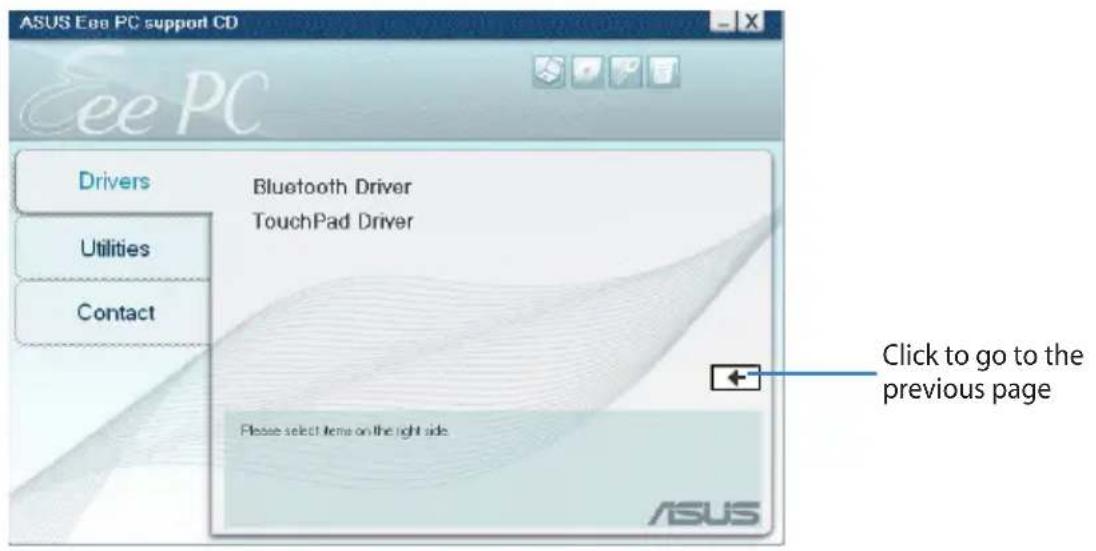
text_image
ASUS Eee PC support CD Eee PC Drivers Bluetooth Driver TouchPad Driver Utilities Contact Please select items on the right side. Click to go to the previous page ASUSUtilities menu
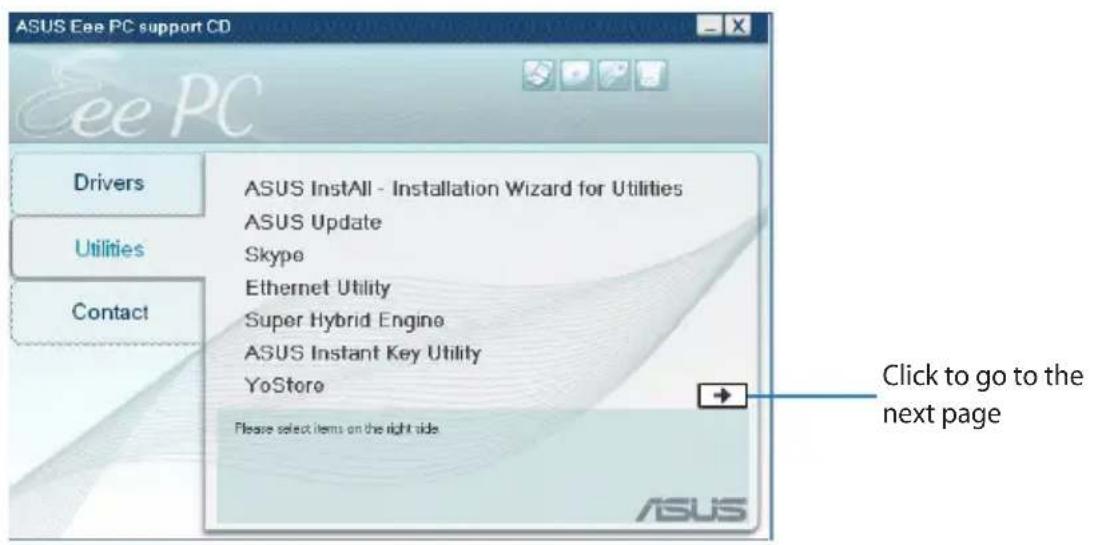
The Utilities menu shows the applications that the Eee PC supports.
text_image
ASUS Eee PC support CD Eee PC Drivers Utilities Contact ASUS InstAll - Installation Wizard for Utilities ASUS Update Skype Ethernet Utility Super Hybrid Engine ASUS Instant Key Utility YoStore Please select items on the right side Click to go to the next page ASUS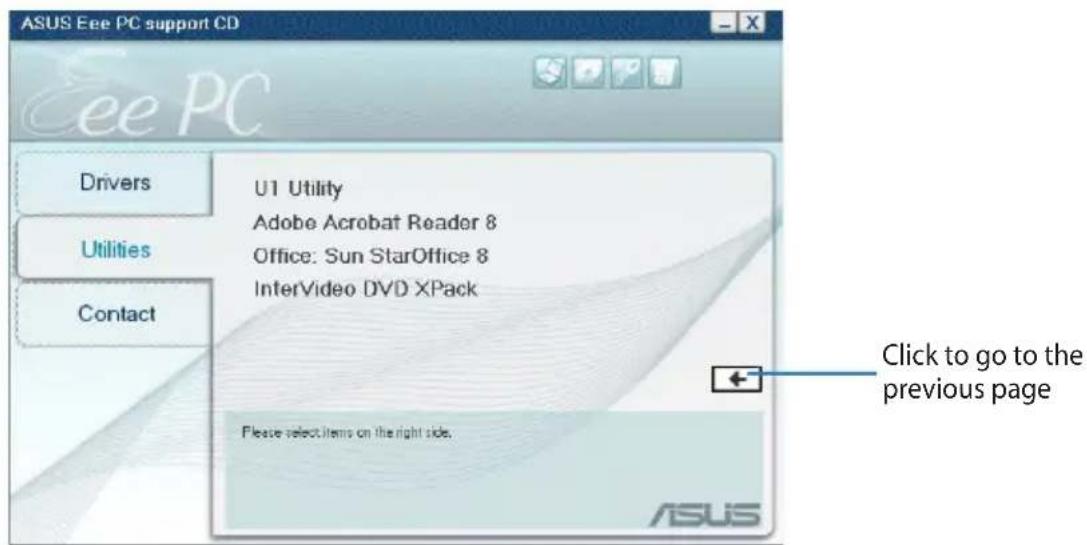
text_image
ASUS Eee PC support CD Eee PC Drivers Utilities Contact U1 Utility Adobe Acrobat Reader 8 Office: Sun StarOffice 8 InterVideo DVD XPack Please select items on the right side. Click to go to the previous page ASUSContact
Click the Contact tab to display the ASUS contact information.
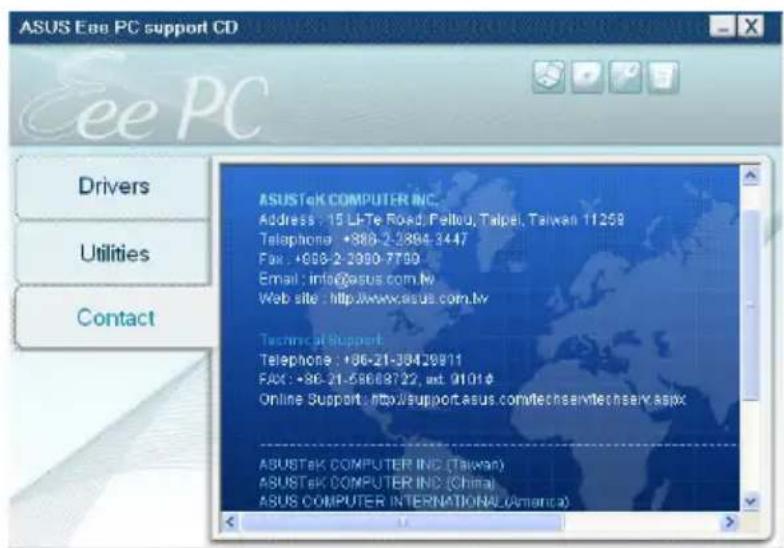
text_image
ASUS Eee PC support CD Eee PC Drivers Utilities Contact ASUSTeK COMPUTER INC. Address: 15 LlTe Road, Feilou, Taipei, Taiwan 11259 Telephone: +86-2-2304-3447 Fax: +86-2-3900-7799 Email: info@asus.com.lv Web site: http://www.asus.com.lv Technical Support Telephone: +86-21-38429911 FAX: +86-21-58689722, ext. 9101# Online Support: http://support.asus.com/techse/mtechseky.aspx ASUSTeK COMPUTER INC (Taiwan) ASUSTeK COMPUTER INC (China) ASUS COMPUTER INTERNATIONAL (America)Other information
The icons on the top right corner of the screen provide additional information on the Eee PC and the contents of the support DVD. Click an icon to display the specified information.

System information

Technical support

DVD content

File list
System Recovery
Using the Support DVD
The Support DVD includes an image of the operating system, installed on your system at the factory. The Support DVD provides a comprehensive recovery solution that quickly restores your system to its original working state, provided that your system drive is in good working order. Before using the Support DVD, copy your data files to floppy disks or to a network drive and make note of any customized configuration settings (such as network settings).

Disable Boot Booster in BIOS setup before your perform system recovery from the external optical drive. Refer to the end of this chapter for details.
- Connect an external optical drive to your Eee PC and insert the Support DVD into the optical drive (System needs to be powered ON).
- Press
on bootup and the Please select boot device screen appears. Select USB:XXXXXX (may be labeled as the ODD brand name) to boot from the optical drive.
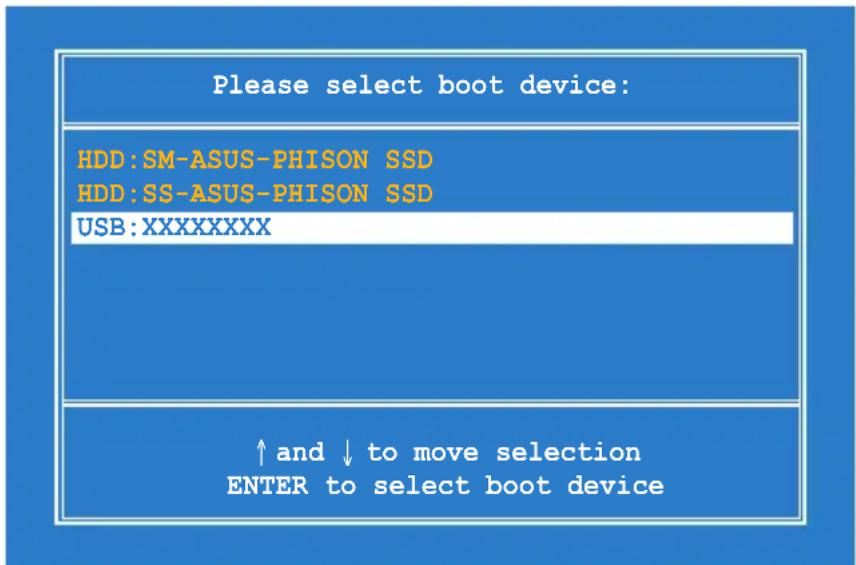
text_image
Please select boot device: HDD:SM-ASUS-PHISON SSD HDD:SS-ASUS-PHISON SSD USB:XXXXXXXX ↑ and ↓ to move selection ENTER to select boot device- Press any key to boot from the optical drive.
Press any key to boot from CD...
- Click OK in the Recovery System for Eee PC dialog box.
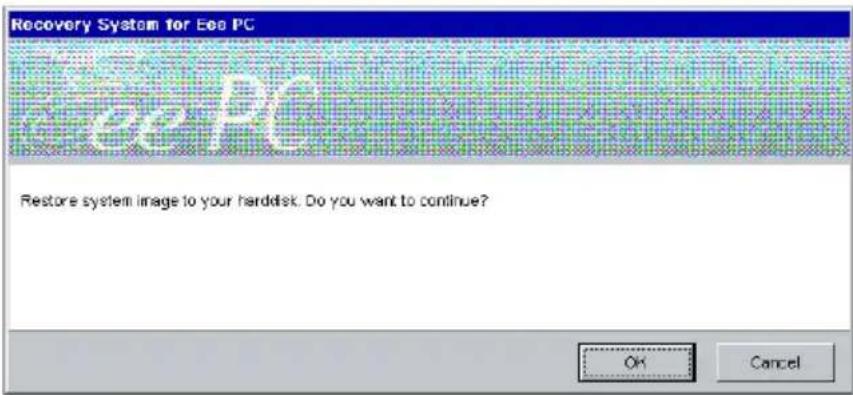
text_image
Recovery System for Bee PC Restore system image to your harddisk. Do you want to continue? OK Cancel- Click Yes to start the system recovery.

You will lose all your data during the system recovery. Ensure to back up your important data before recovering your system.
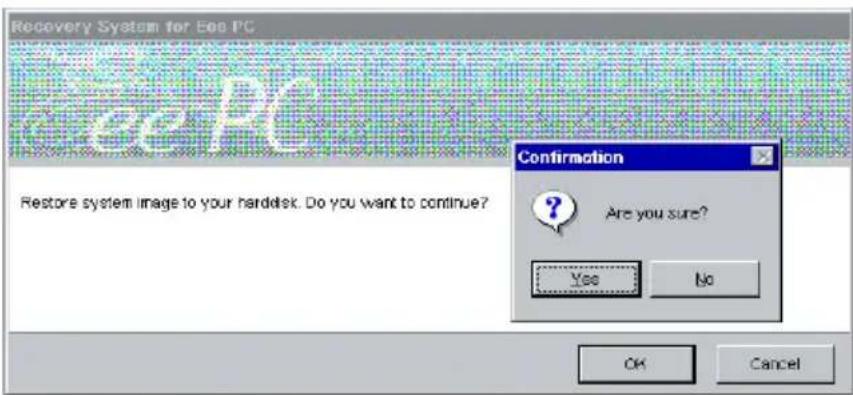
text_image
Recovery System for Eye PC Save PC Restore system image to your harddesk. Do you want to continue? Confirmation Are you sure? Yes No OK Cancel- After the system recovery is completed, eject the Support DVD from the optical drive and click OK to restart the Eee PC.
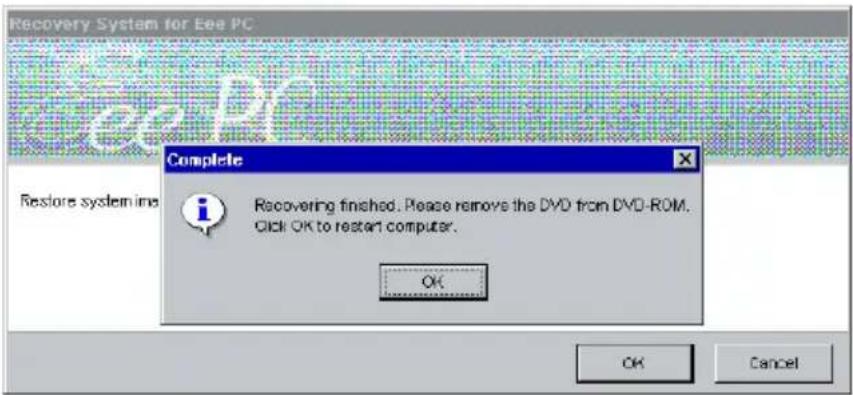
text_image
Recovery System for Eea PC Complete Recovering finished. Please remove the DVD from DVD-ROM. Click OK to restart computer. OK OK CancelUsing Hard Disk Partition
The Recovery Partition includes an image of the operating system, drivers, and utilities installed on your Eee PC at the factory. The Recovery Partition provides a comprehensive recovery solution that quickly restores your Eee PC's software to its original working state, provided that your hard disk drive is in good working order. Before using the Recovery Partition, copy your data files to floppy disks or to a network drive and make note of any customized configuration settings (such as network settings).

Disable Boot Booster in BIOS setup before your perform system recovery from USB flash disk, external optical drive or hidden partition.
About the Recovery Partition
The Recovery Partition is a space reserved on your hard disk drive used to restore the operating system, drivers, and utilities installed on your Eee PC at the factory.
Using the Recovery Partition:
- Press
during bootup (requires a Recovery Partition) - Click the check mark button to start the system recovery.
- The system starts system recovery automatically and follows the onscreen instructions to complete the recovery process.

For models that come with a multi-language operating system, you need to select a desired display language for your Eee PC during the first run wizard instructions and the display language cannot be altered after the confirmation. The hidden partition only stores the OS file in the selected language and recovers the system in that selected language.
Boot Booster
The Boot Booster item in BIOS setup helps shorten your Eee PC bootup time. However, you MUST disable this BIOS item before you change any Eee PC components or perform system recovery from the external optical drive. Follow the instructions below to disable Boot Booster:
- Start the system and press
on bootup to show the POST screen. Press again to enter the BIOS setup.

If you fail to see the POST screen or enter the BIOS setup by doing the instruction above, restart the system and try pressing
- Set Boot Booster to [Disabled]
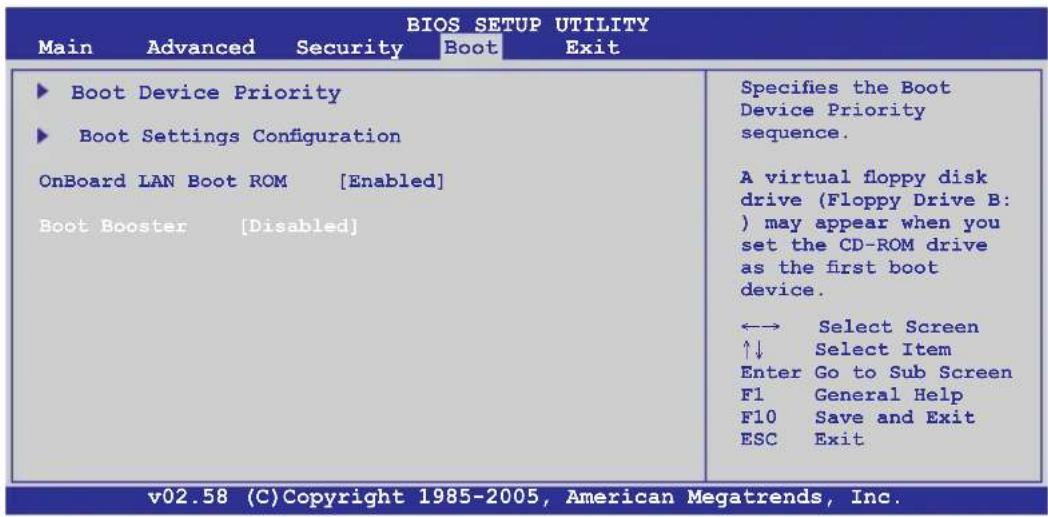
text_image
BIOS SETUP UTILITY Main Advanced Security Boot Exit ► Boot Device Priority ► Boot Settings Configuration OnBoard LAN Boot ROM [Enabled] Boot Booster [Disabled] Specifies the Boot Device Priority sequence. A virtual floppy disk drive (Floppy Drive B: ) may appear when you set the CD-ROM drive as the first boot device. ←→ Select Screen ↑↓ Select Item Enter Go to Sub Screen F1 General Help F10 Save and Exit ESC Exit v02.58 (C)Copyright 1985-2005, American Megatrends, Inc.- Press
to save the configuration and restart Eee PC.

Remember to enable Boot Booster after you complete hardware change or system recovery.
Declarations and Safety Statements
Copyright Information
Limitation of Liability
Service and Support
Appendix
Declarations and Safety Statements
Federal Communications Commission Statement
This device complies with FCC Rules Part 15. Operation is subject to the following two conditions:
- This device may not cause harmful interference, and
- This device must accept any interference received, including interference that may cause undesired operation.
This equipment has been tested and found to comply with the limits for a class B digital device, pursuant to Part 15 of the Federal Communications Commission (FCC) rules. These limits are designed to provide reasonable protection against harmful interference in a residential installation. This equipment generates, uses, and can radiate radio frequency energy and, if not installed and used in accordance with the instructions, may cause harmful interference to radio communications. However, there is no guarantee that interference will not occur in a particular installation. If this equipment does cause harmful interference to radio or television reception, which can be determined by turning the equipment off and on, the user is encouraged to try to correct the interference by one or more of the following measures:
- Reorient or relocate the receiving antenna.
- Increase the separation between the equipment and receiver.
- Connect the equipment into an outlet on a circuit different from that to which the receiver is connected.
- Consult the dealer or an experienced radio/TV technician for help.

The use of a shielded-type power cord is required in order to meet FCC emission limits and to prevent interference to the nearby radio and television reception. It is essential that only the supplied power cord be used. Use only shielded cables to connect I/O devices to this equipment. You are cautioned that changes or modifications not expressly approved by the party responsible for compliance could void your authority to operate the equipment.
(Reprinted from the Code of Federal Regulations #47, part 15.193, 1993. Washington DC: Office of the Federal Register, National Archives and Records Administration, U.S. Government Printing Office.)
FCC Radio Frequency (RF) Exposure Caution Statement

Any changes or modifications not expressly approved by the party responsible for compliance could void the user's authority to operate this equipment. "The manufacture declares that this device is limited to Channels 1 through 11 in the 2.4GHz frequency by specified firmware controlled in the USA."
This equipment complies with FCC radiation exposure limits set forth for an uncontrolled environment. To maintain compliance with FCC RF exposure compliance requirements, please avoid direct contact to the transmitting antenna during transmitting. End users must follow the specific operating instructions for satisfying RF exposure compliance.
Eee PC 1000/904 Series
Max. SAR Measurement (1g)
802.11b SAR Value: 0.021 W/kg
802.11g SAR Value: 0.023 W/kg
802.11n SAR Value: 0.068 W/kg
Eee PC 1000HD/904HD Series
Max. SAR Measurement (1g)
802.11b SAR Value: 0.074 W/kg
802.11g SAR Value: 0.102 W/kg
Eee PC 901 Series
Max. SAR Measurement (1g)
802.11b SAR Value: 0.086 W/kg
802.11g SAR Value: 0.091 W/kg
802.11n (20M) SAR Value: 0.139 W/kg
802.11n (40M) SAR Value: 0.081 W/kg
Declaration of Conformity (R&TTE directive 1999/5/EC)
The following items were completed and are considered relevant and sufficient:
• Essential requirements as in [Article 3]
- Protection requirements for health and safety as in [Article 3.1a]
- Testing for electric safety according to [EN 60950]
- Protection requirements for electromagnetic compatibility in [Article 3.1b]
- Testing for electromagnetic compatibility in [EN 301 489-1] & [EN 301]
• Testing according to [489-17]
• Effective use of the radio spectrum as in [Article 3.2]
• Radio test suites according to [EN 300 328-2]
CE Mark Warning
This is a Class B product, in a domestic environment, this product may cause radio interference, in which case the user may be required to take adequate measures.
IC Radiation Exposure Statement for Canada
This equipment complies with IC radiation exposure limits set forth for an uncontrolled environment. To maintain compliance with IC RF exposure compliance requirements, please avoid direct contact to the transmitting antenna during transmitting. End users must follow the specific operating instructions for satisfying RF exposure compliance.
Operation is subject to the following two conditions:
• This device may not cause interference and
- This device must accept any interference, including interference that may cause undesired operation of the device.
To prevent radio interference to the licensed service (i.e. co-channel Mobile Satellite systems) this device is intended to be operated indoors and away from windows to provide maximum shielding. Equipment (or its transmit antenna) that is installed outdoors is subject to licensing.
Because high power radars are allocated as primary users (meaning they have priority) in 5250-5350 MHz, these radars could cause interference and/or damage to license exempt LAN devices.
Eee PC 1000/904 Series
Max. SAR Measurement (1g)
802.11b SAR Value: 0.021 W/kg
802.11g SAR Value: 0.023 W/kg
802.11n SAR Value: 0.068 W/kg
Eee PC 1000HD/904HD Series
Max. SAR Measurement (1g)
802.11b SAR Value: 0.074 W/kg
802.11g SAR Value: 0.102 W/kg
Eee PC 901 Series
Max. SAR Measurement (1g)
802.11b SAR Value: 0.086 W/kg
802.11g SAR Value: 0.091 W/kg
802.11n (20M) SAR Value: 0.139 W/kg
802.11n (40M) SAR Value: 0.081 W/kg
Wireless Operation Channel for Different Domains
N. America 2.412-2.462 GHz Ch01 through CH11
Japan 2.412-2.484 GHz Ch01 through Ch14
Europe ETSI 2.412-2.472 GHz Ch01 through Ch13
France Restricted Wireless Frequency Bands
Some areas of France have a restricted frequency band. The worst case maximum authorized power indoors are:
- 10mW for the entire 2.4 GHz band (2400 MHz–2483.5 MHz)
• 100mW for frequencies between 2446.5 MHz and 2483.5 MHz

Channels 10 through 13 inclusive operate in the band 2446.6 MHz to 2483.5 MHz.
There are few possibilities for outdoor use: On private property or on the private property of public persons, use is subject to a preliminary authorization procedure by the Ministry of Defense, with maximum authorized power of 100mW in the 2446.5–2483.5 MHz band. Use outdoors on public property is not permitted.
In the departments listed below, for the entire 2.4 GHz band:
• Maximum authorized power indoors is 100mW
• Maximum authorized power outdoors is 10mW
Departments in which the use of the 2400–2483.5 MHz band is permitted with an EIRP of less than 100mW indoors and less than 10mW outdoors:
01 Ain Orientales 02 Aisne 03 Allier
05 Hautes Alpes 08 Ardennes 09 Ariège
11 Aude 12 Aveyron 16 Charente
24 Dordogne 25 Doubs 26 Drôme
32 Gers 36 Indre 37 Indre et Loire
41 Loir et Cher 45 Loiret 50 Manche
55 Meuse 58 Nièvre 59 Nord
60 Oise 61 Orne 63 Puy du Dôme
64 Pyrénées Atlantique 66 Pyrénées 67 Bas Rhin
68 Haut Rhin 70 Haute Saône
71 Saône et Loire 75 Paris
82 Tarn et Garonne 84 Vaucluse 88 Vosges
89 Yonne 90 Territoire de Belfort
94 Val de Marne
This requirement is likely to change over time, allowing you to use your wireless LAN card in more areas within France. Please check with ART for the latest information (www.art-telecom.fr)

Your WLAN Card transmits less than 100mW, but more than 10mW.
UL Safety Notices
Required for UL 1459 covering telecommunications (telephone) equipment intended to be electrically connected to a telecommunication network that has an operating voltage to ground that does not exceed 200V peak, 300V peak-to-peak, and 105V rms, and installed or used in accordance with the National Electrical Code (NFPA 70).
When using the Eee PC modem, basic safety precautions should always be followed to reduce the risk of fire, electric shock, and injury to persons, including the following:
- DO NOT use the Eee PC near water, for example, near a bath tub, wash bowl, kitchen sink or laundry tub, in a wet basement or near a swimming pool.
- DO NOT use the Eee PC during an electrical storm. There may be a remote risk of electric shock from lightning.
- DO NOT use the Eee PC in the vicinity of a gas leak.
Required for UL 1642 covering primary (nonrechargeable) and secondary (rechargeable) lithium batteries for use as power sources in products. These batteries contain metallic lithium, or a lithium alloy, or a lithium ion, and may consist of a single electrochemical cell or two or more cells connected in series, parallel, or both, that convert chemical energy into electrical energy by an irreversible or reversible chemical reaction.
- Do not dispose the Eee PC battery pack in a fire, as they may explode. Check with local codes for possible special disposal instructions to reduce the risk of injury to persons due to fire or explosion.
- Do not use power adapters or batteries from other devices to reduce the risk of injury to persons due to fire or explosion. Use only UL certified power adapters or batteries supplied by the manufacturer or authorized retailers.
Power Safety Requirement
Products with electrical current ratings up to 6A and weighing more than 3Kg must use approved power cords greater than or equal to: H05VV-F, 3G, 0.75mm ^2 or H05VV-F, 2G, 0.75mm ^2 .
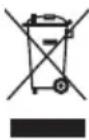
This symbol of the crossed out wheeled bin indicates that the product (electrical, electronic equipment, and mercury-containing button cell battery) should not be placed in municipal waste. Check local regulations for disposal of electronic products.
Nordic Lithium Cautions (for lithium-ion batteries)

CAUTION! Danger of explosion if battery is incorrectly replaced. Replace only with the same or equivalent type recommended by the manufacturer. Dispose of used batteries according to the manufacturer's instructions. (English)

natural_image
National flag of Norway featuring red and blue vertical stripes (no text or symbols)No part of this manual, including the products and software described in it, may be reproduced, transmitted, transcribed, stored in a retrieval system, or translated into any language in any form or by any means, except documentation kept by the purchaser for backup purposes, without the express written permission of ASUSTeK COMPUTER INC. ("ASUS").
ASUS PROVIDES THIS MANUAL "AS IS" WITHOUT WARRANTY OF ANY KIND, EITHER EXPRESS OR IMPLIED, INCLUDING BUT NOT LIMITED TO THE IMPLIED WARRANTIES OR CONDITIONS OF MERCHANTABILITY OR FITNESS FOR A PARTICULAR PURPOSE. IN NO EVENT SHALL ASUS, ITS DIRECTORS, OFFICERS, EMPLOYEES OR AGENTS BE LIABLE FOR ANY INDIRECT, SPECIAL, INCIDENTAL, OR CONSEQUENTIAL DAMAGES (INCLUDING DAMAGES FOR LOSS OF PROFITS, LOSS OF BUSINESS, LOSS OF USE OR DATA, INTERRUPTION OF BUSINESS AND THE LIKE), EVEN IF ASUS HAS BEEN ADVISED OF THE POSSIBILITY OF SUCH DAMAGES ARISING FROM ANY DEFECT OR ERROR IN THIS MANUAL OR PRODUCT.
Products and corporate names appearing in this manual may or may not be registered trademarks or copyrights of their respective companies, and are used only for identification or explanation and to the owners' benefit, without intent to infringe.
SPECIFICATIONS AND INFORMATION CONTAINED IN THIS MANUAL ARE FURNISHED FOR INFORMATIONAL USE ONLY, AND ARE SUBJECT TO CHANGE AT ANY TIME WITHOUT NOTICE, AND SHOULD NOT BE CONSTRUED AS A COMMITMENT BY ASUS. ASUS ASSUMES NO RESPONSIBILITY OR LIABILITY FOR ANY ERRORS OR INACCURACIES THAT MAY APPEAR IN THIS MANUAL, INCLUDING THE PRODUCTS AND SOFTWARE DESCRIBED IN IT.
Copyright © 2009 ASUSTeK COMPUTER INC. All Rights Reserved.
Limitation of Liability
Circumstances may arise where because of a default on ASUS' part or other liability, you are entitled to recover damages from ASUS. In each such instance, regardless of the basis on which you are entitled to claim damages from ASUS, ASUS is liable for no more than damages for bodily injury (including death) and damage to real property and tangible personal property; or any other actual and direct damages resulted from omission or failure of performing legal duties under this Warranty Statement, up to the listed contract price of each product.
ASUS will only be responsible for or indemnify you for loss, damages or claims based in contract, tort or infringement under this Warranty Statement.
This limit also applies to ASUS' suppliers and its reseller. It is the maximum for which ASUS, its suppliers, and your reseller are collectively responsible.
UNDER NO CIRCUMSTANCES IS ASUS LIABLE FOR ANY OF THE FOLLOWING: (1) THIRD-PARTY CLAIMS AGAINST YOU FOR DAMAGES; (2) LOSS OF, OR DAMAGE TO, YOUR RECORDS OR DATA; OR (3) SPECIAL, INCIDENTAL, OR INDIRECT DAMAGES OR FOR ANY ECONOMIC CONSEQUENTIAL DAMAGES (INCLUDING LOST PROFITS OR SAVINGS), EVEN IF ASUS, ITS SUPPLIERS OR YOUR RESELLER IS INFORMED OF THEIR POSSIBILITY.
Service and Support
Visit our multi-language web site at http://support.asus.com