
IdeaCentre Q700 - Desktop computer LENOVO - Free user manual and instructions
Find the device manual for free IdeaCentre Q700 LENOVO in PDF.


User questions about IdeaCentre Q700 LENOVO
0 question about this device. Answer the ones you know or ask your own.
Ask a new question about this device
Download the instructions for your Desktop computer in PDF format for free! Find your manual IdeaCentre Q700 - LENOVO and take your electronic device back in hand. On this page are published all the documents necessary for the use of your device. IdeaCentre Q700 by LENOVO.
USER MANUAL IdeaCentre Q700 LENOVO
Before using this manual, it is important that you read and understand all of the related safety information for this product. Refer to the Safety and Warranty Guide you received with this product for the latest safety information. Reading and understanding this safety information reduces the risk of personal injury and damage to your product.

Danger: Beware of extremely hazardous or lethal situations.

Attention: Beware of possible damage to programs, devices, or data.

Note: Pay attention to this important information.
© Copyright Lenovo 2007, 2009.

natural_image
Color calibration bar with grayscale, gray, and yellow squares, plus a central crosshair (no text or symbols)

Contents
Important Safety Information
Chapter 1 Using the Computer Hardware .... 1
1.1 Front view of the computer chassis ....2
1.2 Rear view of the computer chassis ....3
1.3 Computer stand instruction ....4
1.4 Connecting your computer ....5
1.5 Using the Remote Control .....11
Chapter 2 Using the Rescue System .... 15
2.1 Installing Drivers and Software Shipped with Your Computer ...16
2.2 OneKey Recovery ....17
2.3 File Management ....18
2.4 OneKey Antivirus ....20
Chapter 3 Using the Computer Software .... 23
3.1 Power2Go — Burning Discs .....24
3.2 WinDVD 25
3.3 Trend Micro Internet Security 26
3.4 Media Show 28
Chapter 4 System Maintenance and Recovery .... 29
4.1 Restoring the System ....30
4.2 Backup status and configuration ....30
4.3 Cleaning Up the Disk ....30
4.4 Checking For and Correcting Disk Errors .....31
4.5 Defragmenting the Disk(s) ....31
4.6 Performing Daily Maintenance Tasks ....31
Contents
Chapter 5 Troubleshooting and Confirming Setup .... 33
5.1 Troubleshooting Display Problems ....34
5.2 Troubleshooting Audio Problems ....35
5.3 Troubleshooting Software Problems....35
5.4 Troubleshooting Problems with Optical Drives and Hard Disks ....36
5.5 Special considerations for troubleshooting Windows ....37
1 Chapter
Using the Computer Hardware
This chapter contains the following topics:
▶ Computer hardware introduction
Information on computer connections
Note: The descriptions in this chapter may vary from your computer setup, depending on computer models and configurations.
User Guide
1.1 Front view of the computer chassis

Attention: Ensure that none of the air vents on the computer are blocked. Blocked air vents can lead to overheating problems.
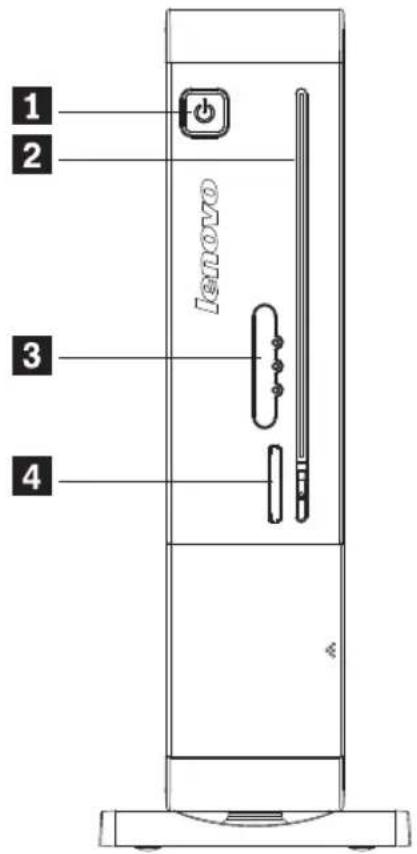
text_image
1 2 3 4 NEW070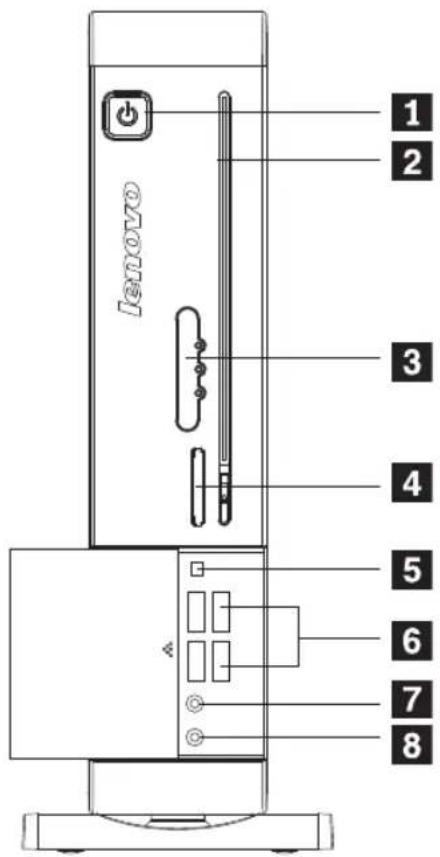
text_image
1 2 3 4 5 6 7 8 Lenovo1 Power button
5 IEEE 1394 port
2 Optical drive slot USB ports (4)
6
3 LED indicators (3) and IR receiver Microphone socket
4 Memory card reader Headphone socket
1.2 Rear view of the computer chassis
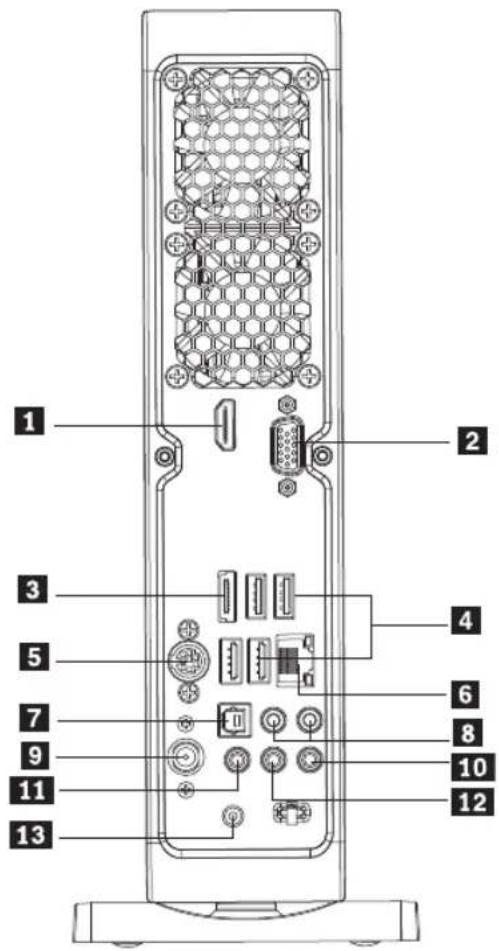
text_image
Diagram of a remote control panel with numbered labels pointing to various ports and connectors1 HDMI port Audio line-out sockets (2) 8
2 VGA port TV-tuner port (selected models only)
3 eSATA port Audio line-in socket 10
4 USB ports (4) Microphone port 11
5 S-Video port (selected models only) Radio line-out port
6 Ethernet port Power socket 13
7 SPDIF port
1.3 Computer stand instruction
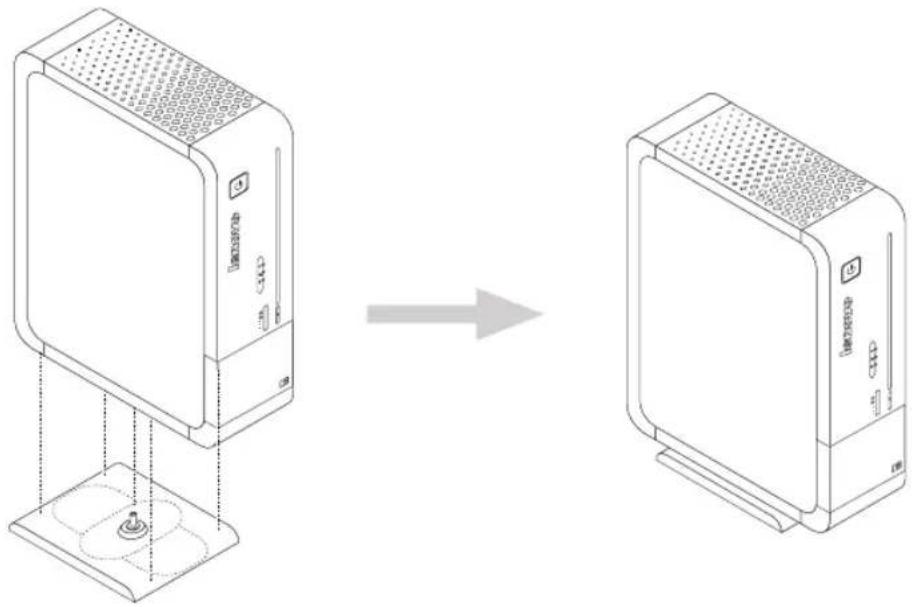
The computer chassis can be placed in a vertical position.
natural_image
Diagram showing a device being processed from a base to a server unit, with no visible text or symbols.Note: Make sure to install the base stand before placing the chassis in a vertical position.
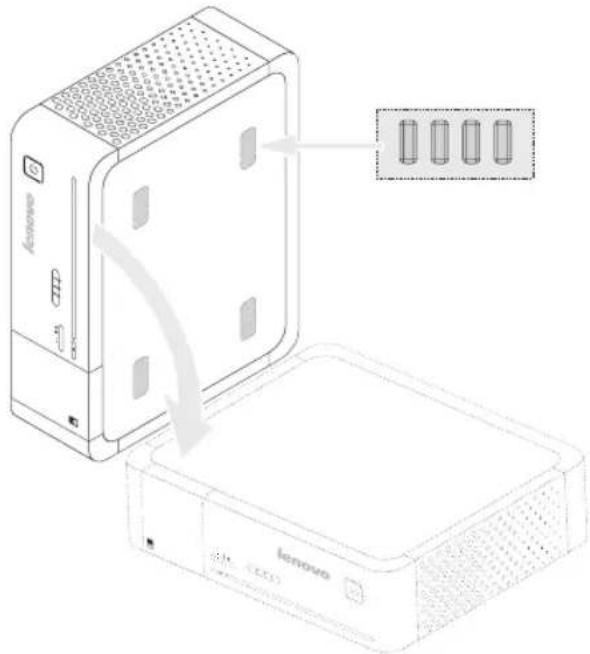
The computer chassis can also be placed in a horizontal position.
- Attach the four sticky pieces as in the diagram below.
- Lay the chassis down on its side as in the diagram below.
text_image
Diagram showing a Lenovo device with an attached case and its internal components, labeled in English.1.4 Connecting your computer
Use the following information when connecting your computer.
- Look for the small port/socket icons on the back of your computer. Match the cable ends to the icons.
- If your computer cables and ports/sockets panels have color-coded ports or sockets, match the color of the cable end with the color of the port or socket.

Note: Your computer might not have all of the ports and sockets that are described in this section.
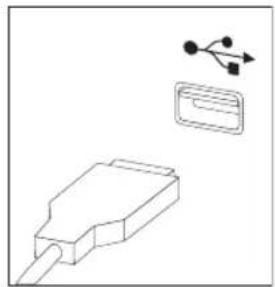
1.4.1 Connect the keyboard cable to the appropriate keyboard port (USB port). (Not all models are equipped with a keyboard.)
natural_image
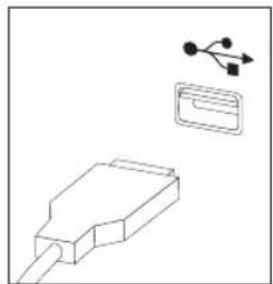
Pure electrical connector diagram without any text, numbers, or symbols1.4.2 Connect the mouse cable to the appropriate mouse port (USB port). (Not all models are equipped with a mouse.)
natural_image
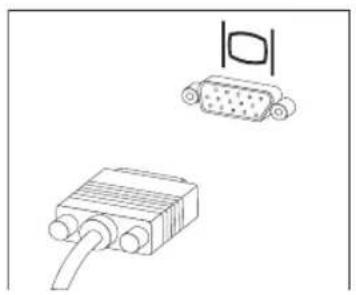
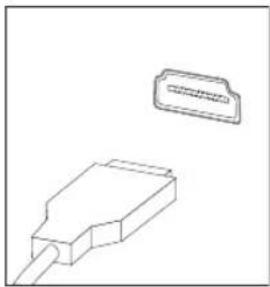
Pure electrical circuit lines without any symbols1.4.3 Connect the monitor cable to the monitor port on the computer.
- If you have a Video Graphics Array (VGA) Standard monitor, connect the cable to the port as shown.
natural_image
Line drawing of three electronic components: a 10-pin connector, a USB cable, and a separate 10-pin connector (no text or symbols present)- If you have an HDMI monitor, your computer must have an adapter installed that supports the HDMI monitor. Connect the cable to the port as shown.
natural_image
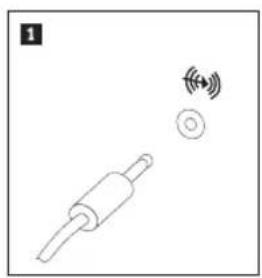
Technical line drawing of a connector with a cable and a rectangular housing (no text or symbols)1.4.4 If you have audio devices, use the following information to connect them.
natural_image
Simple line drawing of a mechanical component emitting sound waves (no text or symbols)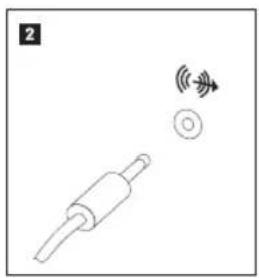
natural_image
Simple line drawing of a mechanical component emitting signals, no text or symbols present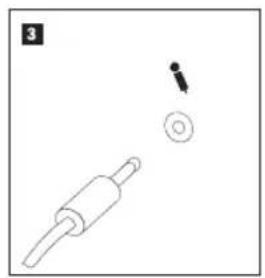
natural_image
Simple line drawing of a rolling pin and a circular button with an arrow (no text or symbols)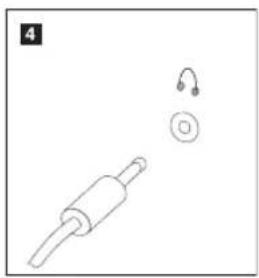
natural_image
Simple line drawing of a plug and ear with a circular button (no text or symbols)1 Audio line-in This socket receives audio signals from an external audio device, such as a stereo system.
2 Audio line-out This socket sends audio signals from the computer to external devices, such as powered stereo speakers.
3 Microphone Use this socket to attach a microphone to your computer when you want to record sound or if you use speech-recognition software. This socket might be located on the front of the computer.
4 Headphone Use this socket to attach headphones to your computer when you want to listen to music or other sounds without disturbing anyone. This socket may be located on the front of the computer chassis.
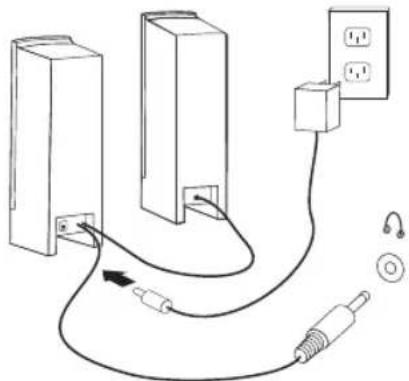
1.4.5 If you have powered speakers with an adapter:
natural_image
Pure electrical circuit lines without any symbols(This picture is only a sketch for guidance, it does not necessarily show actual speakers)
a. Connect the cable that runs between the speakers, if necessary. On some speakers, this cable is permanently attached.
b. Connect the adapter cable to the speaker, if necessary. On some speakers, this cable is permanently attached.
c. Connect the speakers to audio line-out port on the computer.
d. Connect the adapter to the power source.
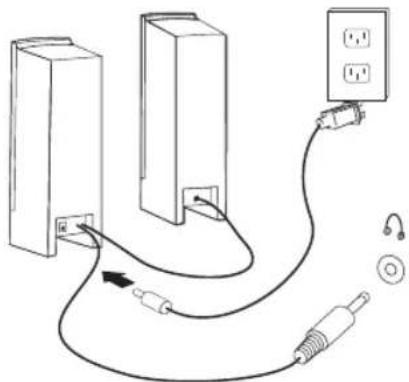
1.4.6 If you have powered speakers without an adapter:
natural_image
Diagram of a cable connection with two vertical connectors, a power outlet, and a plug inserted (no text or symbols)(This picture is only a sketch print, it is not necessarily meant to be a true representation of the speakers)
a. Connect the cable that runs between the speakers, if necessary. On some speakers, this cable is permanently attached.
b. Connect the cable to the speaker, if necessary. On some speakers, this cable is permanently attached.
c. Connect the speakers to the audio line-out port on the computer.
d. Connect the plug to the power source.
Note: Some models are not equipped with external speakers.
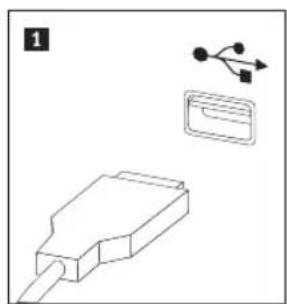
1.4.7 Connect any additional devices that you have. Your computer might not have all the ports/sockets shown.
natural_image
Technical line drawing of a plug and its internal socket (no text or symbols)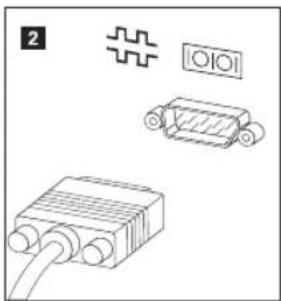
natural_image
Technical line drawing of three electronic components: a connector, a switch, and a USB drive (no text or symbols)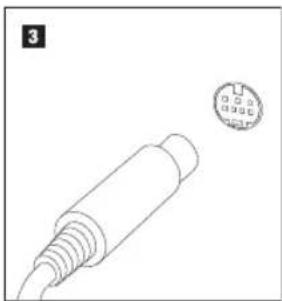
natural_image
Technical line drawing of a cable connector with a circular component on top (no text or symbols)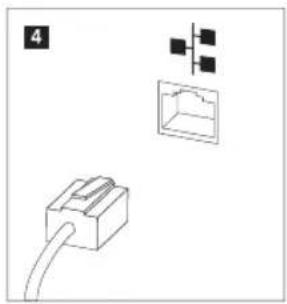
natural_image
Diagram showing a cable connector, a grid connection, and an electrical outlet (no text or symbols)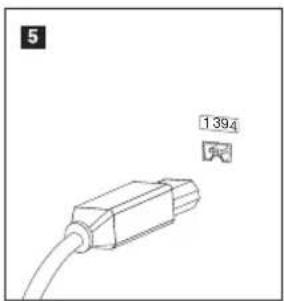
text_image
5 13941 USB Use this port to attach a device that requires a USB connection.
2 S-Video Use this port to attach a television set that has an S-Video port.
3 TV-Tuner Only supported on systems with optional TV tuner card.
4 Ethernet Use this port to attach the computer to an Ethernet-type local area network (LAN).
5 IEEE 1394 This port offers connection to several different types of consumer electronic products, including digital audio devices and scanners.
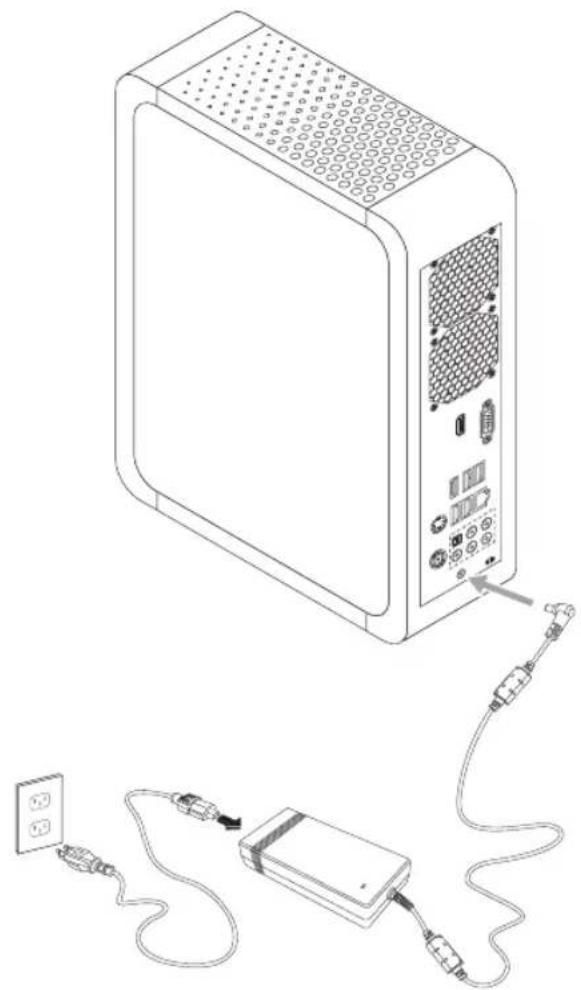
1.4.8 Connect the power cables properly to earthed electrical outlets.
natural_image
Line drawing of a desktop computer tower connected to a cable via a power adapter (no text or symbols)1.4.9 If your computer is equipped with a Memory Card Reader Port, it is able to read/write data from/to the following:
SD, MMC, Memory stick, Memory stick pro
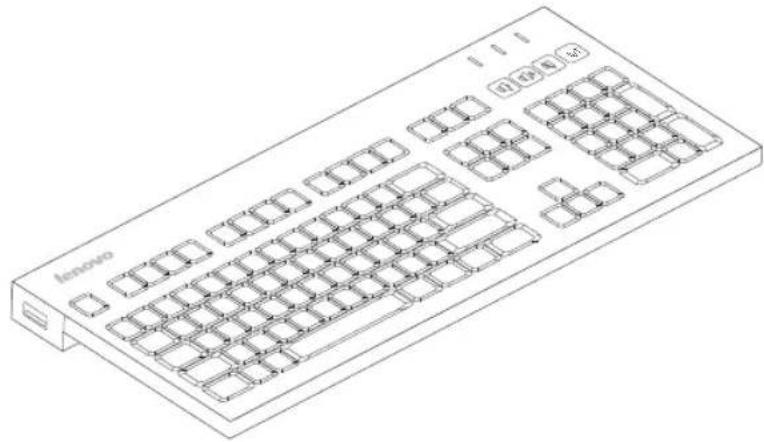
1.4.10 Keyboard and Mouse, wired (not all models are equipped with a keyboard and mouse).
natural_image
Line drawing of a Lenovo computer keyboard with no text or symbols on the main bodyVolume down
Volume up
Mute
LVT — On the right side of your keyboard, you will find the LVT key. Kindly note that this key is disabled because the LVT program is not installed on your computer.
F2 — Your computer has the Lenovo Rescue System installed. To learn more about this program, turn on the computer, and when the Lenovo logo appears, press the F2 key and the Lenovo Rescue System will open.
1.5 Using the Remote Control (not all models are equipped with remote control).
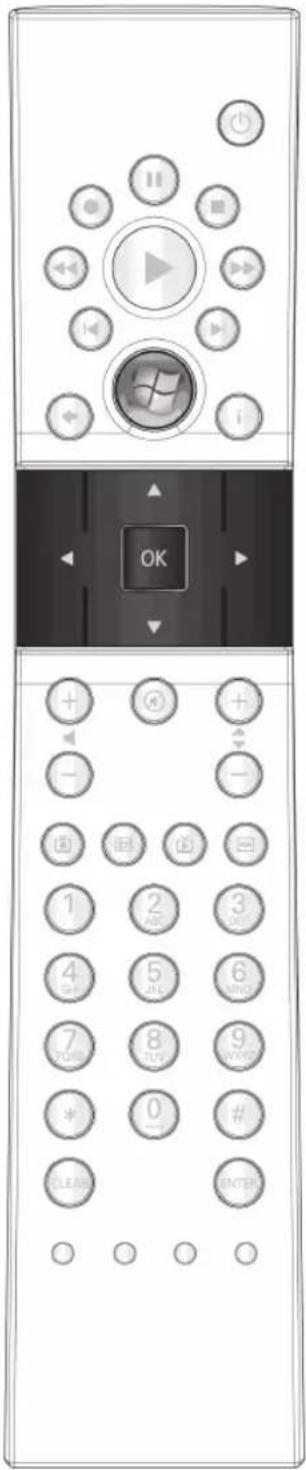
The remote control (not shipped with all computer models) works with the remote control receiver on the chassis. Adjust the angle of the remote control correctly.
text_image
Diagram of a remote control with labeled buttons and icons, including 'OK' and function keys like 'i', 'i', 'i'.Buttons on the remote control:
| Button Description | |
 | Up |
 | Down |
 | Left |
| [362C] | Right |
| OK Confirm | |
 | Back |
 | Details |
| [SWTH] | Guide (this function is not available in Microsoft Windows operating systems.) |
 | Shows live TV on the currently selected channel. |
 | Displays the Recorded TV page in Windows Media Center. |
 | Play |
 | Pause |
| [ASYY] | Stop |
| [HWS7] | Record |
 | Fast Forward |
| [020C] | Rewind |
| [53TG] | Skip |
| SKIP | |
 | Replay |
| REPLAY | |
 | Starts Windows Media Center. |
 | Adjusts volume up/down |
 | Previous/next channel |
 | Mute |
 | DVD menu |
 | Power supply (standby) |
| 0~9 | Number (and/or Letter) buttons |
| # | # key |
| * | * key |
| CLEAR | Clear |
| ENTER | Enter |

natural_image
Color calibration bar with grayscale and multicolor sections, no text or symbols present
2 Chapter
Using the Rescue System
This chapter contains the following topics:
▶ Rescue System
▶ Internet application instructions

Attention: Using this program will result in a loss of data.
- You can reset the C drive of the computer to the factory default settings or to the last system backup status using OneKey Recovery. With this operation, all of the existing data on drive C will be lost, but the content and format of the other partitions of the hard disk drive will remain unchanged.
- If you want to install an operating system with the Windows Vista Recovery DVD and back it up with OneKey Recovery, you must format the C partition in NTFS format and install the operating system on the C partition. Otherwise, the OneKey Recovery system cannot run.
User Guide
Note about the service partition:
The files and relevant data used by the rescue system are saved in the service partition. Deleting this partition will make the rescue system unusable. For more detailed information, see the following instructions:
By selecting Control Panel → Management Tools → Computer Management → Disk Management, you can see the service partition, which must not be deleted.

Note: The recovery files and relevant data used by the rescue system are saved in the service partition. If the service partition is deleted or damaged by someone other than authorized Lenovo service technicians, Lenovo shall not in any way be liable for any losses arising therefrom.
2.1 Installing Drivers and Software Shipped with Your Computer
The installation drivers and software functions in the rescue system provide a way for the user to conveniently install the drivers and software shipped with the computer. The rescue system can automatically install all its drivers and software shipped with the computer, or it can selectively install some of the drivers and software as required by the user.
Method 1: Automatic Installation
Turn on the computer. When the Lenovo logo appears, press the F2 key on the keyboard to start the Rescue System, then select Install drivers and software.
Follow the screen prompts to install the drivers and software. Click Install to start installing the drivers and software.
The system will restart. After the system has restarted, the installation process will continue until completion.
Method 2: Manual Installation
From Windows, click Start → All Programs → Lenovo → Drivers and Application Installation.
After starting the procedure, install all the drivers and software manually according to the prompts.
Notes:
-
It is recommended that you do not install software which is already on the computer.
-
Before accessing the operating system, ensure that the Drivers and Application software has been installed automatically. After that, the manual installation function can be used. To start the manual installation, restart the operating system, a prompt dialog will pop up asking whether or not to continue automatically installing. Click Cancel.
2.2 OneKey Recovery
Main functions:
- If a Windows operating system is preinstalled on your computer, the OneKey Recovery function works in the following way:
Recover Factory Backup: Recover the computer system partition (drive C) to the original factory default settings.
!
Note: After this operation, all existing data in the system partition will be lost and other partitions on the disk will remain unchanged. In order to prevent loss of data, be sure to back up important data before this operation.
- If a Windows operating system is not pre-installed on your computer, the OneKey Recovery function will provide the following two functions:
Create base backup: In the absence of the factory backup, the Lenovo OneKey Recovery system enables you to back up all data on the current system partition manually after installing the operating system and standard software. Upon completion of the base backup, you can use the Recover Base Backup function to recover the system partition to the original default settings.
!
Note: Create base backup can only be used once. After the user has performed a base backup, this operation cannot be used again. It is recommended that this operation is performed after installing the Windows operating system and the drivers and software shipped with the computer. Otherwise, the backup space is insufficient.
Recover base backup: This operation recovers the computer system partition (drive C) to the base backup state.
Note: After this operation, all existing data in the system partition will be lost, but other partitions on the disk will remain unchanged. In order to prevent loss of data, be sure to back up important data before this operation.
Note: Do not change the size of partition drive C after the backup operation. This will ensure that the required space for every recovery option is available.
Detailed Operation Procedure (example: Recovering Factory Backup):
- Turn on the computer. When the Lenovo logo appears, press the F2 key on the keyboard to start the Rescue System, then you can select OneKey Recovery.
- Select Recover Factory Backup to start the system recovery function.
Note: System Recovery will overwrite all of the data on drive C. To prevent loss of data, be sure to back up relevant data before performing system recovery.
- Follow the onscreen instructions, and press E on the keyboard to start recovery if you are sure you want to recover.
- Please wait during the process of system recovery. Do not interrupt the operation during the recovery process.
- After the system is recovered successfully, the software prompts you to restart the computer. Restart the computer and enter the system.
2.3 File Management
With the File Management module, you may access the critical data in directories such as Desktop or My Documents in the system partition (usually drive C) when the system crashes and is irrecoverable. You may then back up such data to other partitions or external storage devices.
2.3.1 Launch
Turn on the computer. When the Lenovo logo appears, press the F2 key to launch Rescue System. Then select File Management.
2.3.2 File Backup
Select the file and folder to be copied in the left dialog box, and select the target folder and drive letter in the right dialog box.
Note: The drive letter of the source file must be different from the target drive letter.
Then click the copy icon.
Wait for the copying process to finish.
Note: Please do wait during the copying process. The time required for this operation depends on the quantity and size of files you need to copy. Do not power off the computer, otherwise system files might be corrupted.
2.3.3 Setting a Password
To ensure authentication of the user who is copying the files, the Lenovo file management function enables you to set a protection password. Users are unable to access the files in your hard disk drive partitions without passing through the password authentication procedure. Follow the instructions below:
Single-click the key-shaped icon on the upper right side of the main interface to configure the password.
The default password is blank.
Set a password when you access the File Backup for the first time. If you don't want to set a password, you may simply access the system directly and operate accordingly.
2.3.4 Search
File management provides a search function, and backs up the searched files. Input the file or file type to search for, and click the search icon at the bottom to start searching the files.
Notes:
-
During the process of copying files, do not power off the computer. Otherwise, files on the hard disk drive may be damaged.
-
The disk partition identifier in the file management interface may fail to correspond to that in the Windows system. Select operations based on the directory content.
-
The file copying function cannot be performed within the same partition. If the source address and the target address of the same partition, the Copy button is disabled.
2.4 OneKey Antivirus
The OneKey Antivirus software is independent of the operating system. It can run general virus scans and also kill viruses. and it can even scan and kill viruses when Windows cannot start and other antivirus software cannot work as a result of virus infection.
Therefore, it can restore your computer system when the operating system is damaged by a virus.
2.4.1 Launch
Turn on the computer. When the Lenovo logo appears, press the F2 key to launch Rescue System. Then select OneKey Antivirus.
2.4.2 Scan and Kill Viruses
There are two options when scanning and killing viruses:
1) Scan all partitions of the disk consecutively and kill any detected viruses.
2) Scan just the operating system partition (usually drive C) and kill viruses on it.
To perform a scan and kill viruses, do the following:
- Use Alt plus the optional character or the Tab key to select the option to start scanning and killing viruses.
- Wait while the software is scanning and killing viruses. Try to avoid interrupting the process.
- If you need to stop scanning or killing viruses in the middle of the process, click the corresponding stop button to stop the virus scanning/killing process. Click the corresponding cancel button to continue scanning.
- The software will report the results of a scan upon completion of the scanning/ killing process, it will list all viruses killed and quarantined.
- Click the corresponding button to display the files which are infected with viruses and quarantined.
In the quarantined zone, you can clear, delete and recover infected files.
2.4.3 Update
To ensure that OneKey Antivirus functions normally and is able to detect the latest viruses, the virus definitions need to be updated regularly.
2.4.3.1 Launch
In the OneKey Antivirus main interface, select the corresponding button to start
updating virus definitions. Virus definitions can be updated by:
- Downloading the latest virus package online.
- Obtaining the latest virus package from the flash disk.
Select the relevant update option to start the update.
2.4.3.2 Online Update
Depending on the network access mode of the computer, select "ADSL" or "LAN Connection" in the network connection modes.
- If you select "ADSL," input the username and password of the ADSL connection.
- If you select "LAN connection," configure the IP address and proxy server of the LAN.
a. After the network is configured properly, the software will show that the network has been configured successfully. Click the OK button to start updating.
b. Wait until the update process is complete. Try to avoid interruption of the process.
c. After the virus definitions are updated successfully, the software will show that the update has been completed successfully.
2.4.3.3 Obtaining the Latest Virus Package from a Flash Disk
- First, using Windows, make a copy of OneKey Antivirus on a flash disk. Connect the flash disk to the USB port, and click Start → All Programs → Lenovo → Download USB update package.
- Save the latest virus definitions to the flash disk. Creating an update on the flash disk will not destroy the source file in it.
- After creating the flash disk, restart the computer and access the OneKey Antivirus interface.
- Select Obtain the latest virus package from the flash disk, and click the update icon.
The virus definitions will be updated automatically.
Notes:
-
OneKey Antivirus does not guarantee to solve all problems caused by computer viruses. If the problems cannot be solved after you run OneKey Antivirus, please use other methods to recover the system or solve the system problems.
-
This software only scans and kills viruses on the hard disk drive

natural_image
Color palette bar with grayscale shades and a central crosshair (no text or symbols)partitions, not those located on floppy disks, flash disks or CDs. You can install and use anti-virus software in Windows to scan such media.
- In the process of cleaning viruses, do not power off the computer. Otherwise, files on the hard disk drive may be damaged.

Using the Computer Software
This chapter contains the following topics:
▶ Computer software instructions
Note: The interface and functionality of these features are may vary according to the actual software that was shipped with the computer model that you purchased.
User Guide

Note:
The standard product has no installation software for high quality audio and video players nor a plug-in; though some models may come with audio and video software, it is not guaranteed that they will support all high quality audio and video formats. Therefore, if the user needs to play high quality audio and video or CD material, the user will need to purchase or download software or a plug-in from the internet that can play the corresponding audio or video files.
Because audio and video files in the market or via the internet do not yet have uniform production standards, if the user cannot play or smoothly play some of the audio and video files during normal operation, it does not necessarily mean there is a hardware or system problem; instead, the user is recommended to consult with the supplier or manufacturer for problems related to audio and video players, plugins and audio and video files.
This product has been tested for playing high quality audio and video files of the following specifications: (the actual audio and video performance may be different according to differences in individual product configuration, software and hardware, as well as audio and video file formats)
| Resolution Video encoding format Bit rate Frame rate | |||
| 1920x1080 VC-1 | 11Mbps 24fps | ||
| 1920x1080 MPEG2 | 20Mbps 24fps | ||
| 1920x1080 H.264 | 12Mbps 24fps | ||
3.1 Power2Go — Burning Discs
(This software can only be used on models with a rewritable optical drive)
Power2Go is the software for disc burning. It provides various burning tools that enable you to easily store your files on CDs or DVDs.
Power2Go can make common data discs, music discs, video/photo discs and mixed discs. It also supports disc duplication.

Note: This software does not support the burning of VCD audio or Blu-ray disc DVDs.
3.1.1 Launch
-
Choose All Programs → Lenovo → Power2Go → Power2GoExpress from the Start menu to launch the burner program.
-
The shortcut to launch the burner software is the block icon on the desktop. To use the burner program, just drag and drop the files to be recorded onto their appropriate data, music, or video icon.
3.1.2 Starting the Burner Software
- Choose All Programs → Lenovo → Power2Go → Power2Go from the Start menu to launch the burner program.
- Choose a task for the burner from the task list. Then start the burner to record files.
- Choose the medium to burn to from the disc type, then click the OK icon to access the burner interface.
- Select the file to be burned from the select source box, and then click the Add Files icon to add your files to the disc compilation column. Click the burn icon to start the burning process.
3.1.3 Disc Utility
The burner also provides utility tools for preparing and processing various CDs and DVDs, such as the recording of mirror files, erasing of discs, and conversion of audio.
3.1.4 Help
For more information about using Power2Go, click the Help icon.
3.2 WinDVD (This software is provided only with computer models equipped with a Blu-ray optical drive.)
With WinDVD, you can play DVDs and VCDs.
To launch the player:
Select All Programs → InterVideo WinDVD from the Start menu to launch the player.
Click the “?” icon to obtain more information about WinDVD.
The WinDVD Blu-ray Disc (BD) software can play DVD standard format discs and Blu-ray format discs with an optical drive.
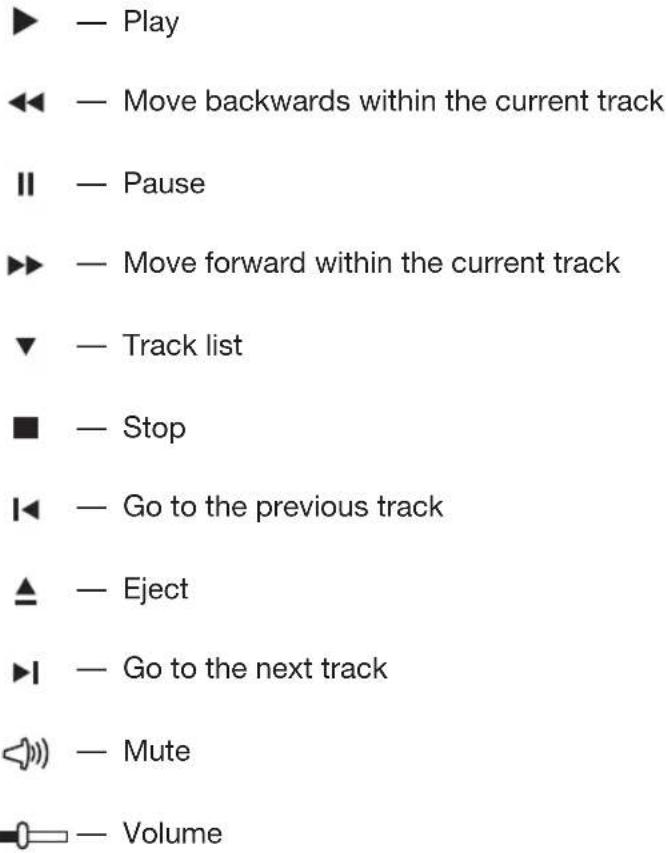
The WinDVD player includes the following basic buttons:
text_image
▶ — Play ◀◀ — Move backwards within the current track || — Pause ▶▶ — Move forward within the current track ▼ — Track list ■ — Stop I◀ — Go to the previous track ▲ — Eject ▶I — Go to the next track ◀◀ — Mute ■— Volume3.3 Trend Micro Internet Security
If the Trend Micro Internet Security antivirus software is installed on your computer, use the following instructions.
Trend Micro Internet Security is a common type of antivirus software. It can scan and kill viruses and Trojans on the computer.
3.3.1 Using Trend Micro Internet Security
Choose Trend Micro Internet Security in All Programs from the Start menu to launch the Trend Micro Internet Security antivirus software.
Another option is to right click the Trend Micro Internet Security icon in the system tray and launch the antivirus software from the pop-up options.
3.3.2 Scanning for Viruses
In the main Trend Micro Internet Security interface, click the Scan icon to scan the computer. Upon completion, the software will pop up a system scanning report, which lists all virus files detected, and you can then quarantine or delete them as required.
3.3.3 Upgrade
In the main Trend Micro Internet Security interface, click the update icon to upgrade the software's virus definitions.
Note: Connect to the Internet before upgrading.
3.3.4 Configuring the Scanning of the Specified Disk
In the main Trend Micro Internet Security interface, select Custom Scan from "More Options." You can select the disks that you want to scan in the scan targets dialog.
3.3.5 Other Protection Functions
Other software settings are available in the toolbar on the left side, including the level of protection against Trojan viruses, personal network and interconnection settings, and email settings. Configure them as you require.
3.3.6 Help and Support
For more information on using Trend Micro Internet Security, see Product Help Information in the Help and Support option. In the help document, you can learn more about Trend Micro Internet Security operation and settings.
Note: Restart your computer from the prompt dialog box after uninstalling Trend Micro Internet Security.
3.4 Media Show
MediaShow is a new and innovative way to view and be creative with your media. MediaShow lets you be as imaginative as you want to be with the following functions:
• View your photos and videos
- Edit and add effects to your photos and videos
- Create screen savers and slideshows with your photos
- Create stylish and professional looking movies with your videos
- Upload your photos directly to Flickr
- Email photos and videos directly from MediaShow to your friends
• Create discs with your photos and video
3.4.1 Photos
You can manage your photos in MediaShow via the different creative functions, there are a variety of editing functions and you have the ability to email your photos or upload them to Flickr.
3.4.2 Videos
You can manage your videos in MediaShow through the different creative functions, there are a variety of editing functions as well as the ability to email your videos.
3.4.3 Create DVD Discs
With this utility, you can create professional looking DVD discs with themes and menus from your videos and photos. You also can configure your DVD disc settings.

System Maintenance and Recovery
This chapter contains the following topics:
Daily Maintenance and Tools Instructions
User Guide
4.1 Restoring the System
The system can develop problems due to erroneous operation or the installation of additional software. If software problems develop in the originally installed software, you can restore the system by the using system backup and restoration features.
Note: The existing system settings will change after restoration. Check the settings of the restored system to ensure they match settings that may be critical to your needs.
Use the following procedure to restore the software to a known functional level:
- Click Start → All Programs → Accessories → System Tools → System Restore.
- Choose either the recommended restore point, or select a different recovery time from the pop-up dialog. Choose the last date when the system was running properly.
Click Next to continue.
- The system will start restoration. When all processes have completed, the software displays a message informing you that the restore operation has completed successfully.
4.2 Backup status and configuration
For added security, you can back up the state of your system before you install additional software, or otherwise modify system settings. To back up your system, do the following:
- Click Start → All Programs → Accessories → System Tools → Backup status and configuration.
- Select the location for your backup. Click Next and follow the instructions to continue.
4.3 Cleaning Up the Disk
Do the following periodically to clean up the disks and help to enhance your computer's performance:
- Click Start → All Programs → Accessories → System Tools → Disk Cleanup.
- Choose the disk you want to clean up.
- Click the OK button to start the cleanup process.
4.4 Checking For and Correcting Disk Errors
To properly maintain your system, you should periodically check for and fix hard disk errors by doing the following:
- Right-click the icon for the hard disk drive (HDD) that you want to reorganize, then select Properties from the pop-up menu.
- Select the Tools tab, and then click Check Now.
- Check your inspection items for the disk and click Start.
Note: You cannot start error checking until the computer is restarted and initialized.
4.5 Defragmenting the Disk(s)
Disk fragments are tiny unused storage areas scattered on the disk. The system cannot directly reutilize these “blank” spaces and system performance can decrease as system operations usually cause the number of unused storage gaps to increase. To defragment your disk storage, do the following:
- Right-click the icon for the hard disk drive (HDD) that you want to reorganize, then select Properties from the pop-up menu.
- Go to the Tools tab from disk Properties and select Defragment Now.
- Select the time and scheme to be used by the defragging program, then start the defragmenting program. Depending on the amount of defragmentation on the hard disk drive, this procedure can take a long time (sometimes more than one hour).
4.6 Performing Daily Maintenance Tasks
Cleaning the computer components
Because many of the computer components consist of sophisticated integrated circuit boards, it is very important to periodically clean in and around the computer to prevent dust buildup. The cleaning supplies you need in order to clean the components include: a vacuum cleaner, a soft cotton cloth, clean water (distilled water preferred) and cotton swabs.

Attention: Before you clean your computer, disconnect the computer from the electrical outlet. Clean your computer with a soft cloth dampened with water. Do not use liquid or aerosol cleaners, which may contain flammable substances.
Note: To avoid damaging the computer or display, do not spray cleaning solution directly onto the display. Only use products specifically designed for cleaning displays, and follow the instructions that are included with the product.
The following are general methods for cleaning the components:
- You can use a soft cloth to remove dust on the surface of the computer, the monitor, the printer, the speakers and the mouse.
- You can use a vacuum cleaner to clean in otherwise inaccessible corners.
- To clean the keyboard thoroughly, shut down the computer and scrub it gently with a wet cloth.
- Do not use the keyboard unless it is dry.
Do not do any of the following:
- Allow water to enter the computer
- Use a heavily dampened cloth
- Spray water directly onto the surface of the monitor or anywhere inside the computer chassis.
Daily attention should be given to LCD monitors. Use a dry cloth daily to brush dust from the monitor and keyboard. Keep all surfaces clean and free of grease.

Troubleshooting and Confirming Setup
This chapter contains the following topics:
Troubleshooting and Problem Resolution
Note: The description of the TV-Tuner card in this manual is relevant only to machines which have a TV-Tuner card. It does not apply to products that do not have a TV-Tuner card.
User Guide
Solving Problems
Follow these tips when you troubleshoot your computer:
- If you added or removed a part before the problem started, review the installation procedures and ensure that the part is correctly installed.
- If a peripheral device does not work, ensure that the device is properly connected.
- If an error message appears on the screen, write down the exact message.
This message may help support personnel diagnose and fix the problem(s).
- If an error message occurs in a program, view the program's documentation.

Note: The procedures in this document were written for Windows in default view mode, so they may not apply if you set your Lenovo® computer to Windows Classic view.
5.1 Troubleshooting Display Problems
Problem: Blank screen or no image is displayed on the monitor
Troubleshooting and problem resolution:
- Check that the monitor has been turned on; if not, press the Power button.
- Check to see if the monitor power cable is loose; if so, securely plug the power cable into the monitor.
- Check that the signal cable to the monitor is securely connected to the computer graphics card port; if not, shut down the computer then securely connect the signal cable of the monitor.
Problem: You need to change the display property settings.
Setting display background and icon properties:
- Right-click the desktop anywhere except over an icon, then select Personalize from the pop-up menu.
-
From here, select the appropriate options to:
-
Change the desktop background
- Select a screen saver
- Select colors and appearance options for icons and characters
- Set resolution and colors by using Display Settings options.
Problem: Ripple on screen
Troubleshooting and problem resolution:
- Check for devices located less than one meter from the computer such as refrigerators, electric fans, electric dryers, UPSs, regulators, fluorescent lamps or other computers that may be generating magnetic interference.
- Move any interfering devices away from the computer.
- If the problem persists, consult Lenovo Service.
5.2 Troubleshooting Audio Problems
Problem: No sound from integrated speakers
Troubleshooting and problem resolution:
- Adjust the Windows volume control — double-click the speaker icon in the lower-right corner of your screen. Ensure that the volume is turned up and that the sound is not muted. Adjust the volume, bass, and treble controls to eliminate distortion.
• Reinstall the audio driver - Disconnect any headphones from the headphone socket — sound from the speakers is automatically disabled when headphones are connected to the computer's side-panel headphone socket.
Problem: No sound from headphones
Troubleshooting and problem resolution:
- Check the headphone cable connection — ensure that the headphone cable is securely inserted into the headphone socket.
- Adjust the Windows volume control — click or double-click the speaker icon in the lower-right corner of your screen. Ensure that the volume is turned up and that the sound is not muted.
5.3 Troubleshooting Software Problems
Problem: You are unable to exit a running program normally.
Troubleshooting and problem resolution:
- Open the Task Manager window by pressing Ctrl, Alt and Delete at the same time.
- Select the Application tab, select the problematic program, and then click the End Task button.
Problem: You need to install or uninstall a program.
Problem resolution:
During installation never abort the install process by powering the system off or through other drastic means. This can cause system program disorder or even failure during system initialization.
During the uninstall process, never directly delete individual files or folders. This is harmful to the system, and might cause a system-wide malfunction.
Use the following procedure to properly uninstall programs:
- Back up all documents and system settings related to the program before removing it.
- If the program has its own uninstaller, run it directly to uninstall the program.
- If the program does not have its own uninstaller, then selectControl Panel from Start menu.
- From the Control Panel, choose Programs and Functions.
- Find the applicable program in the Programs and Functions dialog box and then select Uninstall/Modify.
- Follow the displayed instructions to uninstall the software.
5.4 Troubleshooting Problems with Optical Drives and Hard Disks
Problem: The Optical drive is unable to read a CD/DVD.
Troubleshooting and problem resolution:
- Check to determine if there is an optical drive icon in the resource manager of the operating system. If not, restart your computer. If there is still no icon, contact Lenovo Service. Otherwise, continue with the next step of this procedure.
- Confirm that the CD/DVD has been properly placed in the drive. If not, reload the CD or DVD. Otherwise, continue with the next step of this procedure.
- Check the specifications that came with your computer to confirm that your optical drive should be able to read this type of CD or DVD.
- If the CD/DVD cannot be read, replace it with a known good CD/DVD such as one that was shipped with the computer.
- If the known good CD/DVD cannot be read, visually inspect the data side of the CD/DVD for defects.
Problem: The capacity of the hard disk, as indicated by the system, is less than the nominal capacity.
Troubleshooting and problem resolution: For computers equipped with the OneKey Recovery feature, the system recovery feature needs to occupy some hard disk space. This may account for the apparent hard disk capacity deficit.
Further Technical Explanation: The nominal capacity of the hard disk is expressed in the decimal system, 1000 bytes. But the actual hard disk capacity is expressed in the binary system as 1024 bytes (For example, a nominal capacity of 1GB is 1000MB, while the actual capacity of 1GB is 1024MB).
The capacity of the hard disk shown in Windows can be worked out according to the calculations in the following example:
The nominal capacity of the hard disk is 40GB, while its actual capacity should be: 40 × 1000 × 1000 × 1000 / (1024 × 1024 × 1024) = 37GB .
If the Service partition of 3GB - 3 x 1000 x 1000 x 1000/ (1024 x 1024 x1024) = 2.79GB is subtracted, the capacity of the hard disk shown in the system can be obtained.
The capacity of the hard disk as calculated using this method may be slightly different from the actual capacity due to the rounding of totals.
5.5 Special considerations for troubleshooting Windows
Record the following information that may be useful later when troubleshooting system problems:
-
The serial number of the software. The serial number is shipped on the computer and is also provided separately by the manufacturer. The Help Center is unable to retrieve this number.
-
The drivers for this computer model only support the Windows Vista system.
-
When you use the Windows Media Center to watch TV, pay particular attention to the following:
- In the following two situations, you must re-save the channel list:
a. When you change your TV signal from digital to analog, your saved channel list for digital TV is deleted. When you want to watch digital TV again, you must create and save a new channel list.
b. When you change your TV signal from analog to digital, your saved channel list for analog TV is deleted. When you want to watch analog TV again, you must create and save a new channel list.

natural_image
Color palette bar with grayscale shades and a central crosshair (no text or symbols)- Before you can watch teletext programming, you must set the TV tuner input signal to analog.