
TravelMate 5530G - Laptop ACER - Free user manual and instructions
Find the device manual for free TravelMate 5530G ACER in PDF.


User questions about TravelMate 5530G ACER
0 question about this device. Answer the ones you know or ask your own.
Ask a new question about this device
Download the instructions for your Laptop in PDF format for free! Find your manual TravelMate 5530G - ACER and take your electronic device back in hand. On this page are published all the documents necessary for the use of your device. TravelMate 5530G by ACER.
USER MANUAL TravelMate 5530G ACER
Copyright © 2008. Acer Incorporated. All Rights Reserved.
TravelMate Series Generic User Guide Original Issue: 08/2008
This company makes no representations or warranties, either express or implied, with respect to the contents hereof and specifically disclaims the implied warranties of merchantability or fitness for a particular purpose. Although care has been taken to ensure accuracy, this company shall not be liable for any errors (including, but not limited to, typos, factual errors, etc.) contained in this publication.
Changes may be made periodically to the information in this publication without obligation to notify any person of such revisions or changes. Such changes will be incorporated in new editions of this manual or supplementary documents and publications. This company makes no representations or warranties, either expressed or implied, with respect to the contents hereof and specifically disclaims the implied warranties of merchantability or fitness for a particular purpose.
Record the model number, serial number, purchase date and place of purchase information in the space provided below. The serial number and model number are recorded on the label affixed to your computer. All correspondence concerning your unit should include the serial number, model number and purchase information.
No part of this publication may be reproduced, stored in a retrieval system, or transmitted, in any form or by any means, electronically, mechanically, by photocopy, recording or otherwise, without the prior written permission of Acer Incorporated.
TravelMate Series Notebook PC
Model number: ____
Serial number: ____
Date of purchase: ____
Place of purchase: ____
Acer and the Acer logo are registered trademarks of Acer Incorporated. Other companies' product names or trademarks are used herein for identification purposes only and belong to their respective companies.
Information for your safety and comfort
Safety instructions
Read these instructions carefully. Keep this document for future reference. Follow all warnings and instructions marked on the product.
Turning the product off before cleaning
Unplug this product from the wall outlet before cleaning. Do not use liquid cleaners or aerosol cleaners. Use a damp cloth for cleaning.
CAUTION for plug as disconnecting device
Observe the following guidelines when connecting and disconnecting power to the power supply unit:
Install the power supply unit before connecting the power cord to the AC power outlet.
Unplug the power cord before removing the power supply unit from the computer.
If the system has multiple sources of power, disconnect power from the system by unplugging all power cords from the power supplies.
CAUTION for Accessibility
Be sure that the power outlet you plug the power cord into is easily accessible and located as close to the equipment operator as possible. When you need to disconnect power to the equipment, be sure to unplug the power cord from the electrical outlet.
CAUTION for bundled dummy cards (only for certain models)
Your computer shipped with plastic dummies installed in the card slots.
Dummies protect unused slots from dust, metal objects or other particles. Save the dummies for use when no cards are in the slots.
CAUTION for Listening
To protect your hearing, follow these instructions.
- Increase the volume gradually until you can hear clearly and comfortably.
- Do not increase the volume level after your ears have adjusted.
• Do not listen to music at high volumes for extended periods.
- Do not increase the volume to block out noisy surroundings.
- Decrease the volume if you can't hear people speaking near you.
iv
Warnings
- Do not use this product near water.
- Do not place this product on an unstable cart, stand or table. If the product falls, it could be seriously damaged.
- Slots and openings are provided for ventilation to ensure reliable operation of the product and to protect it from overheating. These openings must not be blocked or covered. The openings should never be blocked by placing the product on a bed, sofa, rug or other similar surface. This product should never be placed near or over a radiator or heat register, or in a built-in installation unless proper ventilation is provided.
- Never push objects of any kind into this product through cabinet slots as they may touch dangerous voltage points or short-out parts that could result in a fire or electric shock. Never spill liquid of any kind onto or into the product.
•To avoid damage of internal components and to prevent battery leakage, do not place the product on a vibrating surface.
- Never use it under sporting, exercising, or any vibrating environment which will probably cause unexpected short current or damage rotor devices, HDD, Optical drive, and even exposure risk from lithium battery pack.
- Your device and its enhancements may contain small parts. Keep them out of the reach of small children.
Using electrical power
- This product should be operated from the type of power indicated on the marking label. If you are not sure of the type of power available, consult your dealer or local power company.
- Do not allow anything to rest on the power cord. Do not locate this product where people will walk on the cord.
- If an extension cord is used with this product, make sure that the total ampere rating of the equipment plugged into the extension cord does not exceed the extension cord ampere rating. Also, make sure that the total rating of all products plugged into the wall outlet does not exceed the fuse rating.
- Do not overload a power outlet, strip or receptacle by plugging in too many devices. The overall system load must not exceed 80% of the branch circuit rating. If power strips are used, the load should not exceed 80% of the power strip's input rating.
- This product's AC adapter is equipped with a three-wire grounded plug. The plug only fits in a grounded power outlet. Make sure the power outlet is properly grounded before inserting the AC adapter plug. Do not insert the plug into a non-grounded power outlet. Contact your electrician for details.

Warning! The grounding pin is a safety feature. Using a power outlet that is not properly grounded may result in electric shock and/or injury.

Note: The grounding pin also provides good protection from unexpected noise produced by other nearby electrical devices that may interfere with the performance of this product.
- Use the product only with the supplied power supply cord set. If you need to replace the power cord set, make sure that the new power cord meets the following requirements: detachable type, UL listed/CSA certified, type SPT-2, rated 7 A 125 V minimum, VDE approved or its equivalent, 4.6 meters (15 feet) maximum length.
Product servicing
Do not attempt to service this product yourself, as opening or removing covers may expose you to dangerous voltage points or other risks. Refer all servicing to qualified service personnel.
Unplug this product from the wall outlet and refer servicing to qualified service personnel when:
• the power cord or plug is damaged, cut or frayed
- liquid was spilled into the product
•the product was exposed to rain or water
•the product has been dropped or the case has been damaged
• the product exhibits a distinct change in performance, indicating a need for service
• the product does not operate normally after following the operating instructions

Note: Adjust only those controls that are covered by the operating instructions, since improper adjustment of other controls may result in damage and will often require extensive work by a qualified technician to restore the product to normal condition.
Guidelines for safe battery usage
This notebook uses a Lithium-ion battery. Do not use it in a humid, wet or corrosive environment. Do not put, store or leave your product in or near a heat source, in a high temperature location, in strong direct sunlight, in a microwave oven or in a pressurized container, and do not expose it to temperatures over 60^ C ( 140^ F). Failure to follow these guidelines may cause the battery to leak acid, become hot, explode or ignite and cause injury and/or damage. Do not pierce, open or disassemble the battery. If the battery leaks and you come into
vi
contact with the leaked fluids, rinse thoroughly with water and seek medical attention immediately. For safety reasons, and to prolong the lifetime of the battery, charging will not occur at temperatures below 0^ C ( 32^ F) or above 40^ C ( 104^ F).
The full performance of a new battery is achieved only after two or three complete charge and discharge cycles. The battery can be charged and discharged hundreds of times, but it will eventually wear out. When the operation time becomes noticeably shorter than normal, buy a new battery. Use only Acer approved batteries, and recharge your battery only with Acer approved chargers designated for this device.
Use the battery only for its intended purpose. Never use any charger or battery that is damaged. Do not short-circuit the battery. Accidental short-circuiting can occur when a metallic object such as a coin, clip or pen causes direct connection of the positive (+) and negative (-) terminals of the battery. (These look like metal strips on the battery.) This might happen, for example, when you carry a spare battery in your pocket or purse. Short-circuiting the terminals may damage the battery or the connecting object.
The capacity and lifetime of the battery will be reduced if the battery is left in hot or cold places, such as in a closed car in summer or winter. Always try to keep the battery between 15°C and 25°C (59°F and 77°F). A device with a hot or cold battery may not work temporarily, even when the battery is fully charged. Battery performance is especially limited in temperatures well below freezing.
Do not dispose of batteries in a fire as they may explode. Batteries may also explode if damaged. Dispose of batteries according to local regulations. Please recycle when possible. Do not dispose as household waste.
Wireless devices may be susceptible to interference from the battery, which could affect performance.
Replacing the battery pack
The notebook uses lithium batteries. Replace the battery with the same type as that which came bundled with your product. Use of another battery may present a risk of fire or explosion.

Warning! Batteries may explode if not handled properly. Do not disassemble or dispose of them in fire. Keep them away from children. Follow local regulations when disposing of used batteries.
Telephone line safety
- Disconnect all telephone lines from the equipment when not in use and/or before servicing.
•To avoid the remote risk of electric shock from lightning, do not connect the telephone line to this equipment during lightning or thunderstorms.

Warning! For safety reasons, do not use non-compliant parts when adding or changing components. Consult your reseller for purchase options.
Operating environment

Warning! For safety reasons, turn off all wireless or radio transmitting devices when using your laptop under the following conditions. These devices may include, but are not limited to: wireless lan (WLAN), Bluetooth and/or 3G.
Remember to follow any special regulations in force in any area, and always switch off your device when its use is prohibited or when it may cause interference or danger. Use the device only in its normal operating positions. This device meets RF exposure guidelines when used normally, and it and its antenna are positioned at least 1.5 centimeters (5/8 inches) away from your body (refer to the figure below). It should not contain metal and you should position the device the above-stated distance from your body. To successfully transmit data files or messages, this device requires a good quality connection to the network. In some cases, transmission of data files or messages may be delayed until such a connection is available. Ensure that the above separation distance instructions are followed until the transmission is completed. Parts of the device are magnetic. Metallic materials may be attracted to the device, and persons with hearing aids should not hold the device to the ear with the hearing aid. Do not place credit cards or other magnetic storage media near the device, because information stored on them may be erased.
Medical devices
Operation of any radio transmitting equipment, including wireless phones, may interfere with the functionality of inadequately protected medical devices. Consult a physician or the manufacturer of the medical device to determine if they are adequately shielded from external RF energy or if you have any questions. Switch off your device in health care facilities when any regulations posted in these areas instruct you to do so. Hospitals or health care facilities may be using equipment that could be sensitive to external RF transmissions..
Pacemakers. Pacemaker manufacturers recommend that a minimum separation of 15.3 centimeters (6 inches) be maintained between wireless devices and a pacemaker to avoid potential interference with the pacemaker. These recommendations are consistent with the independent research by and recommendations of Wireless Technology Research. Persons with pacemakers should do the following:
•Always keep the device more than 15.3 centimeters (6 inches) from the pacemaker
- Not carry the device near your pacemaker when the device is switched o. If you suspect interference, switch off your device, and move it.
viii
Hearing aids. Some digital wireless devices may interfere with some hearing aids. If interference occurs, consult your service provider.
Vehicles
RF signals may affect improperly installed or inadequately shielded electronic systems in motor vehicles such as electronic fuel injection systems, electronic antiskid (antilock) braking systems, electronic speed control systems, and air bag systems. For more information, check with the manufacturer, or its representative, of your vehicle or any equipment that has been added. Only qualified personnel should service the device, or install the device in a vehicle. Faulty installation or service may be dangerous and may invalidate any warranty that may apply to the device. Check regularly that all wireless equipment in your vehicle is mounted and operating properly. Do not store or carry flammable liquids, gases, or explosive materials in the same compartment as the device, its parts, or enhancements. For vehicles equipped with an air bag, remember that air bags inflate with great force. Do not place objects, including installed or portable wireless equipment in the area over the air bag or in the air bag deployment area. If in-vehicle wireless equipment is improperly installed, and the air bag inflates, serious injury could result. Using your device while flying in aircraft is prohibited. Switch off your device before boarding an aircraft. The use of wireless teledevices in an aircraft may be dangerous to the operation of the aircraft, disrupt the wireless telephone network, and may be illegal.
Potentially explosive environments
Switch off your device when in any area with a potentially explosive atmosphere and obey all signs and instructions. Potentially explosive atmospheres include areas where you would normally be advised to turn off your vehicle engine. Sparks in such areas could cause an explosion or fire resulting in bodily injury or even death. Switch off the device at refueling points such as near gas pumps at service stations. Observe restrictions on the use of radio equipment in fuel depots, storage, and distribution areas; chemical plants; or where blasting operations are in progress. Areas with a potentially explosive atmosphere are often, but not always, clearly marked. They include below deck on boats, chemical transfer or storage facilities, vehicles using liquefied petroleum gas (such as propane or butane), and areas where the air contains chemicals or particles such as grain, dust or metal powders. Do not switch the notebook on when wireless phone use is prohibited or when it may cause interference or danger.
Emergency calls
Warning: You cannot make emergency calls through this device. To make an emergency call you shall dial out through your mobile phone or other telephone call system.
Disposal instructions
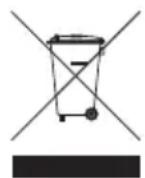
Do not throw this electronic device into the trash when discarding. To minimize pollution and ensure utmost protection of the global environment, please recycle. For more information on the Waste from Electrical and Electronics Equipment (WEEE) regulations, visit http://global.acer.com/about/sustainability.htm
Mercury advisory
For projectors or electronic products containing an LCD/CRT monitor or display: Lamp(s) inside this product contain mercury and must be recycled or disposed of according to local, state or federal laws. For more information, contact the Electronic Industries Alliance at www.eiae.org. For lamp-specific disposal information, check www.lamprecycle.org.

Rechargeable Recycling Program in US and Canada
Acer supports the efforts of the Rechargeable Battery Recycling Corporation's Call2Recycle (RBRC) program. The RBRC is deigned to recycle rechargeable batteries at no cost to the consumer.
Disposal
To safety dispose of battery or rechargeable battery pack, including: Nickel Metal Hydride "Ni-MH", Lithium Ion "Li-ion", and Small Sealed Lead "Pb" rechargeable batteries weighing up to 2 lbs, we recommend that you take it to a participating collection center. For a list of locations, go to www.rbrc.org or Call 1-800-8-BATTERY (1-800-822-8837).

text_image
energyENERGY STAR
ENERGY STAR is a government program (public/private partnership) that gives people the power to protect the environment in a cost effective way and without sacrificing quality or product features. Products that earn the ENERGY STAR prevent greenhouse gas emissions by meeting strict energy efficiency guidelines set by the US Environmental Protection Agency (EPA) and the US Department of Energy (DOE). In the average home, 75% of all electricity used to power home electronics is consumed while the products are turned off. ENERGY STAR qualified home electronic products in the off position use up to 50% less energy than conventional equipment. More information refers to http://www.energystar.gov and http://www.energystar.gov/powermanagement.

Note: The statement above is applicable only to Acer notebooks with an ENERGY STAR sticker located in the bottom right-hand corner of the palm rest.
As an ENERGY STAR partner, Acer Inc. has determined that this product meets the ENERGY STAR guidelines for energy efficiency.
This product has been shipped enabled for power management:
- Activate display' Sleep mode within 15 minutes of user inactivity.
- Activate computer's Sleep mode within 30 minutes of user inactivity.
- Wake the computer from Sleep mode by pushing power button.
- More power management settings can be done through Acer ePower Management.
Tips and information for comfortable use
Computer users may complain of eyestrain and headaches after prolonged use. Users are also at risk of physical injury after long hours of working in front of a computer. Long work periods, bad posture, poor work habits, stress, inadequate working conditions, personal health and other factors greatly increase the risk of physical injury.
Incorrect computer usage may lead to carpal tunnel syndrome, tendonitis, tenosynovitis or other musculoskeletal disorders. The following symptoms may appear in the hands, wrists, arms, shoulders, neck or back:
- numbness, or a burning or tingling sensation
- aching, soreness or tenderness
• pain, swelling or throbbing
•stiffness or tightness
•coldness or weakness
If you have these symptoms, or any other recurring or persistent discomfort and/or pain related to computer use, consult a physician immediately and inform your company's health and safety department.
The following section provides tips for more comfortable computer use.
Finding your comfort zone
Find your comfort zone by adjusting the viewing angle of the monitor, using a footrest, or raising your sitting height to achieve maximum comfort. Observe the following tips:
•refrain from staying too long in one fixed posture
- avoid slouching forward and/or leaning backward
- stand up and walk around regularly to remove the strain on your leg muscles
•take short rests to relax your neck and shoulders
- avoid tensing your muscles or shrugging your shoulders
• install the external display, keyboard and mouse properly and within comfortable reach
- if you view your monitor more than your documents, place the display at the center of your desk to minimize neck strain
Taking care of your vision
Long viewing hours, wearing incorrect glasses or contact lenses, glare, excessive room lighting, poorly focused screens, very small typefaces and low-contrast displays could stress your eyes. The following sections provide suggestions on how to reduce eyestrain.
Eyes
•Rest your eyes frequently.
- Give your eyes regular breaks by looking away from the monitor and focusing on a distant point.
- Blink frequently to keep your eyes from drying out.
Display
- Keep your display clean.
- Keep your head at a higher level than the top edge of the display so your eyes point downward when looking at the middle of the display.
- Adjust the display brightness and/or contrast to a comfortable level for enhanced text readability and graphics clarity.
- Eliminate glare and reflections by:
- placing your display in such a way that the side faces the window or any light source
- minimizing room light by using drapes, shades or blinds
• using a task light
- changing the display's viewing angle
• using a glare-reduction filter
• using a display visor, such as a piece of cardboard extended from the display's top front edge
- Avoid adjusting your display to an awkward viewing angle.
xii
- Avoid looking at bright light sources, such as open windows, for extended periods of time.
Developing good work habits
Develop the following work habits to make your computer use more relaxing and productive:
•Take short breaks regularly and often.
•Perform some stretching exercises.
•Breathe fresh air as often as possible.
•Exercise regularly and maintain a healthy body.

Warning! We do not recommend using the computer on a couch or bed. If this is unavoidable, work for only short periods, take breaks regularly, and do some stretching exercises.

Note: For more information, please refer to "Regulations and safety notices" on page 57 in the AcerSystem User Guide.
First things first
We would like to thank you for making an Acer notebook your choice for meeting your mobile computing needs.
Your guides
To help you use your Acer notebook, we have designed a set of guides:
First off, the Just for Starters...poster helps you get started with setting up your computer.
TravelMate Series Generic User Guide contains useful information applying to all models in the TravelMate product series. It covers basic topics such as Acer's Empowering Technology, using the keyboard, Audio, etc. Please understand that due to its nature, the Generic User Guide as well as the AcerSystem User Guide mentioned below will occasionally refer to functions or features which are only contained in certain models of the series, but not necessarily in the model you purchased. Such instances are marked in the text with language such as "only for certain models".
Quick Guide introduces you to the basic features and functions of your new computer. For more on how your computer can help you to be more productive, please refer to the AcerSystem User Guide. This guide contains detailed information on such subjects as system utilities, data recovery, expansion options and troubleshooting. In addition it contains warranty information and the general regulations and safety notices for your notebook. It is available in Portable Document Format (PDF) and comes preloaded on your notebook. Follow these steps to access it:
1 Click on

Start, All Programs, AcerSystem.
2 Click on AcerSystem User Guide.

Note: Viewing the file requires Adobe Reader. If Adobe Reader is not installed on your computer, clicking on AcerSystem User Guide will run the Adobe Reader setup program first. Follow the instructions on the screen to complete the installation. For instructions on how to use Adobe Reader, access the Help and Support menu.
Basic care and tips for using your computer
Turning your computer on and off
To turn on the computer, simply press and release the power button below the LCD screen beside the easy-launch buttons. Please refre to "Quick Guide" for the location of the power button.
xiv
To turn the power off, do any of the following:
- Use the Windows shutdown command
Click on Start

then click on Shut Down.
- Use the power button
You can also put the computer in sleep mode by pressing the sleep hotkey

Note: If you cannot power off the computer normally, press and hold the power button for more than four seconds to shut down the computer. If you turn off the computer and want to turn it on again, wait at least two seconds before powering up.
Taking care of your computer
Your computer will serve you well if you take care of it.
- Do not expose the computer to direct sunlight. Do not place it near sources of heat, such as a radiator.
- Do not expose the computer to temperatures below 0^ (32 °F) or above 50^ (122 °F).
- Do not subject the computer to magnetic fields.
- Do not expose the computer to rain or moisture.
- Do not spill water or any liquid on the computer.
- Do not subject the computer to heavy shock or vibration.
- Do not expose the computer to dust or dirt.
- Never place objects on top of the computer.
- Do not slam the computer display when you close it.
- Never place the computer on uneven surfaces.
Taking care of your AC adapter
Here are some ways to take care of your AC adapter:
- Do not connect the adapter to any other device.
- Do not step on the power cord or place heavy objects on top of it. Carefully route the power cord and any cables away from foot traffic.
- When unplugging the power cord, do not pull on the cord itself but pull on the plug.
- The total ampere ratings of the equipment plugged in should not exceed the ampere rating of the cord if you are using an extension cord. Also, the total current rating of all equipment plugged into a single wall outlet should not exceed the fuse rating.
Taking care of your battery pack
Here are some ways to take care of your battery pack:
- Use only batteries of the same kind as replacements. Turn the power off before removing or replacing batteries.
- Do not tamper with batteries. Keep them away from children.
- Dispose of used batteries according to local regulations. Recycle if possible.
Cleaning and servicing
When cleaning the computer, follow these steps:
1 Turn off the computer and remove the battery pack.
2 Disconnect the AC adapter.
3 Use a soft, moist cloth. Do not use liquid or aerosol cleaners.
If either of the following occurs:
• the computer has been dropped or the body has been damaged;
• the computer does not operate normally
Please refer to "Frequently asked questions" on page 22.
xvi
Information for your safety and comfort iii
Safety instructions iii
Operating environment vii
Medical devices vii
Vehicles viii
Potentially explosive environments viii
Emergency calls viii
Disposal instructions ix
Mercury advisory ix
Rechargeable Recycling Program in US and Canada ix
Tips and information for comfortable use x
First things first xiii
Your guides xiii
Basic care and tips for using your computer xiii
Turning your computer on and off xiii
Taking care of your computer xiv
Taking care of your AC adapter xiv
Taking care of your battery pack xv
Cleaning and servicing xv
Acer Empowering Technology 1
Launching Acer Empowering Technology 1
Empowering Technology password 2
Acer ePower Management
(only for certain models) 4
Acer eRecovery Management
(only for certain models) 6
Windows Mobility Center 8
Indicators 9
Easy-launch buttons 10
Productivity keys
(only for certain models) 11
Touchpad 12
Touchpad basics (with fingerprint reader) 12
Touchpad basics (with two-click buttons) 13
FineTrack and FineTrack buttons
(only for certain models) 14
FineTrack basics 14
Using a computer security lock 14
Using the keyboard 15
Lock keys and embedded numeric keypad 15
Windows keys 16
Hotkeys 17
Special keys (only for certain models) 18
Audio 18
Acer PureZone (only for certain models) 18
Acer Bio-Protection (only for certain models) 19
Acer GridVista (dual-display compatible) 20
Frequently asked questions 22
Requesting service 25
International Travelers Warranty (ITW) 25
Before you call 25
Battery pack 26
Battery pack characteristics 26
Maximizing the battery's life 26
Installing and removing the battery pack 27
Charging the battery 28
Checking the battery level 28
Optimising battery life 28
Battery-low warning 29
Taking your notebook PC with you 30
Disconnecting from the desktop 30
Disconnecting from Acer ezDock II/II+ 30
Moving around 30
Preparing the computer 30
What to bring to meetings 31
Taking the computer home 31
Preparing the computer 31
What to take with you 31
Special considerations 32
Setting up a home office 32
Traveling with the computer 32
Preparing the computer 32
What to take with you 32
Special considerations 33
Traveling internationally with the computer 33
Preparing the computer 33
What to bring with you 33
Special considerations 33
Securing your computer 34
Using a computer security lock 34
Using passwords 34
Entering passwords 35
Setting passwords 35
Expanding through options 36
Connectivity options 36
Fax/data modem 36
Built-in network feature 37
Fast Infrared (FIR) (only for certain models) 37
Universal Serial Bus (USB) 38
IEEE 1394 port (only for certain models) 38
High-Definition Multimedia Interface
(only for certain models) 39
PC Card slot 39
ExpressCard 40
Installing memory 41
BIOS utility 43
Boot sequence 43
Enable disk-to-disk recovery 43
Password 43
Using software 44
Playing DVD movies 44
Power management 45
Acer eRecovery Management 46
Burn backup discs 47
Create a user backup 48
Manage user backups 50
Restore 51
Restore Windows Vista from backup discs 52
Troubleshooting 55
Troubleshooting tips 55
Error messages 55
Regulations and safety notices 57
FCC statement 57
Modem notices 58
Laser compliance statement 61
LCD pixel statement 61
Radio device regulatory notice 62
General 62
The FCC RF safety requirement 62
Canada — Low-power license-exempt radio
communication devices (RSS-210) 63
Exposure of humans to RF fields (RSS-102) 63
LCD panel ergonomic specifications 64
Index 65
Acer Empowering Technology
The Empowering Technology toolbar makes it easy for you to access frequently used functions and manage your new Acer system. Activated by pressing the Empowering Key, it provides access to the following utilities:

Note: The following content is for general reference only. Actual product specifications may vary.
- Acer ePower Management optimizes battery usage via customizable power plans (only for certain models).
- Acer eRecovery Management backs up and recovers data flexibly, reliably and completely (only for certain models).

text_image
empowering technologyFor more information, right-click on the Empowering Technology toolbar, then select Help. For help with a particular utility, launch the utility and click the icon at the bottom of the active window.
Launching Acer Empowering Technology
To launch Acer Empowering Technology:
1 Press the Empowering Key to display the Acer Empowering Technology toolbar on the desktop.
2 To hide the toolbar, press the Empowering Key again or click the hide button on the toolbar.
You may also launch Acer Empowering Technology by running the program from the Acer Empowering Technology program group in the Start menu, or by
double-clicking the icon if you have created a desktop shortcut.

To launch Acer Empowering Technology applications:
1 On the Acer Empowering Technology toolbar, click the icon that corresponds to the application you want to launch.
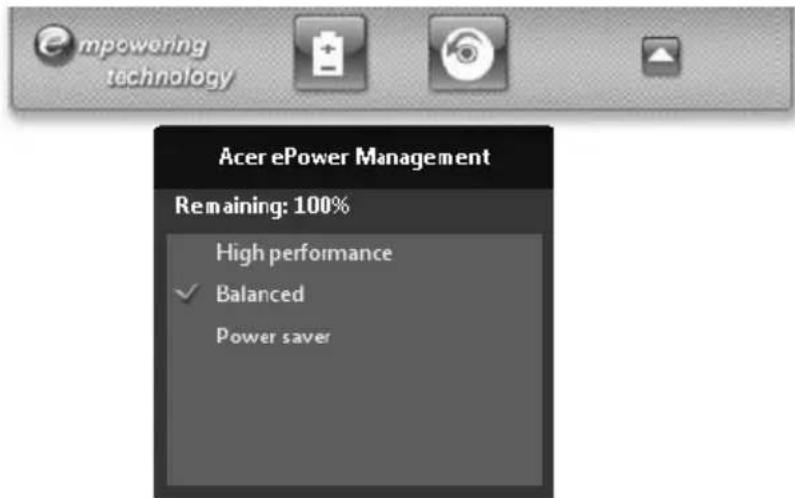
2 When you mouse over an application icon, a quick menu appears below the toolbar. The quick menu allows you to perform certain tasks simply and quickly.
text_image
mpowering technology Acer ePower Management Remaining: 100% High performance ✓ Balanced Power saver3 You may also run the application by selecting it from the Acer Empowering Technology program group in the Start menu.
Empowering Technology password
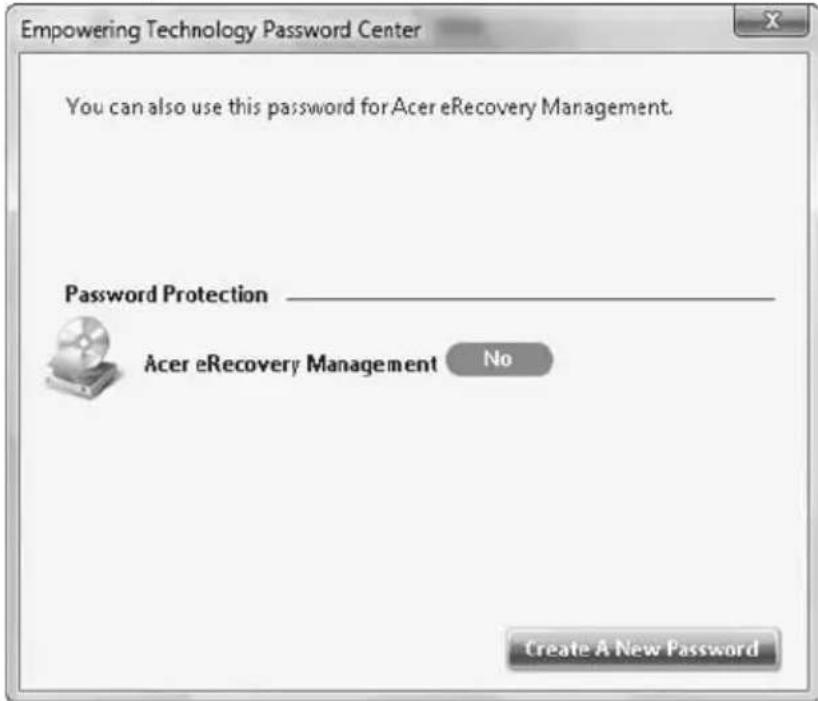
You must set the Empowering Technology password to use the password protection feature of Acer eRecovery Management.
To set the Empowering Technology password:
1 Launch Acer eRecovery Management.
2 Click the Restore tab.
3 Click Password settings. The Empowering Technology Password Center dialog box pops up.
4 Click Create a new password.
text_image
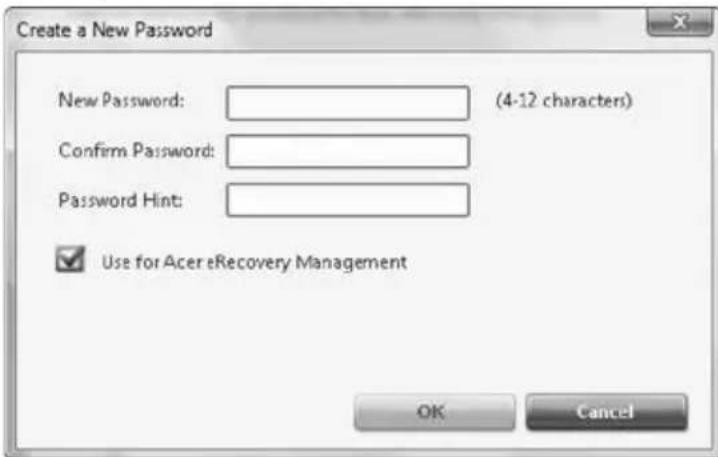
Empowering Technology Password Center You can also use this password for Acer eRecovery Management. Password Protection _ Acer eRecovery Management No Create A New Password5 In the Create a New Password dialog box, key in and confirm your password in the appropriate boxes. Your password should have a minimum of 4 and a maximum of 12 characters.
6 Enter a password hint that will help you remember your password.
7 Make sure the box Use for Acer eRecovery Management is checked.
8 Click OK to set the password.
text_image
Create a New Password New Password: (4-12 characters) Confirm Password: Password Hint: Use for Acer eRecovery Management OK CancelAcer ePower Management
(only for certain models)
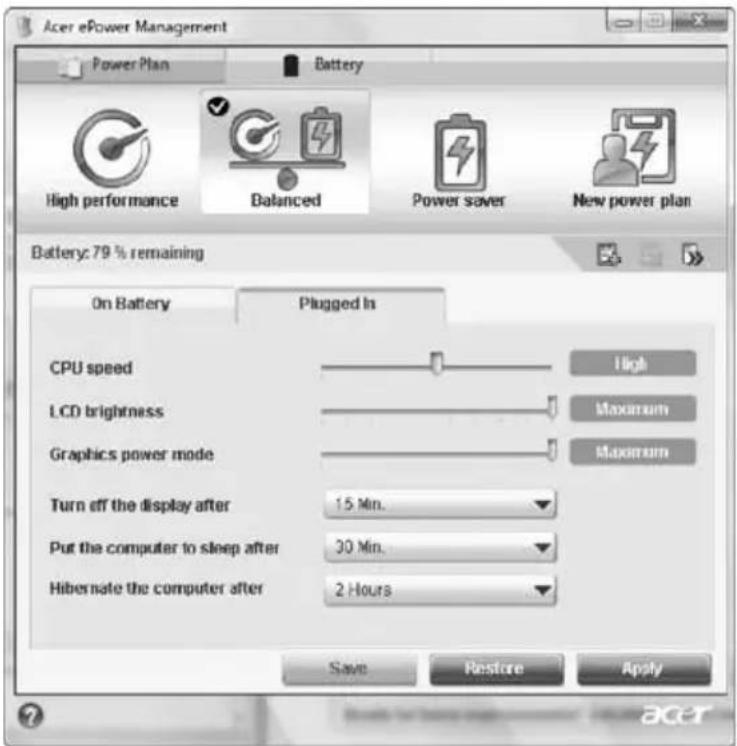
Acer ePower Management features a straightforward user interface for configuring your power management options. To access this utility, select Acer ePower Management from the Empowering Technology toolbar, run the program from the Acer Empowering Technology program group in Start menu, or right-click the Windows power icon in the system tray and select Acer ePower Management.
Using power plans
Acer ePower Management comes with three predefined power plans: Balanced, High performance and Power saver. You can also create customized power plans. You can create, switch between, edit, delete and restore power plans, as described below.
View and adjust settings for On Battery and Plugged In modes by clicking the
appropriate tabs. For more power options, click in the Acer ePower
Management utility, or right-click the Windows power icon in the system tray and select Power Options.

Note: You cannot delete the predefined power plans.
To create a new power plan:
Creating customized power plans allows you to save and quickly switch to a personalized set of power options.
1 Click the New power plan option or icon .

2 Enter a name for your new power plan.
3 Choose a predefined power plan to base your customized plan on.
4 If necessary, change the display, sleep and hibernation settings you want your computer to use.
5 Click OK to save your new power plan.
To switch between power plans:
1 Mouse over the Acer ePower Management application on the Acer Empowering Technology toolbar. The quick menu appears. Select the power plan you want to switch to.
2 You may also switch between power plans by launching the Acer ePower Management application. Select the power plan you wish to switch to, then click Apply.
To edit a power plan:
Editing a power plan allows you to adjust system settings like LCD brightness and CPU speed.
1 Switch to the power plan you wish to edit.
2 Adjust settings as required.
3 Click Apply to save your new settings.
To delete a power plan:
You cannot delete the power plan you are currently using. If you want to delete the active power plan, switch to another one first.
1 Select the power plan you wish to delete.
2 Click the Delete Power Plan icon.

Battery status
1 The quick menu shows the remaining battery life based on current usage.
2 You can also launch the Acer ePower Management application and refer to the Battery status panel located just below the power plans.
3 Click the Battery tab to view remaining battery life, battery status, and remaining battery life in standby and hibernate modes.
text_image
Acer ePower Management Power Plan Battery High performance Balanced Power saver New power plan Battery: 79 % remaining On Battery Plugged in CPU speed High LCD brightness Maximum Graphics power mode Maximum Turn off the display after 15 Min. Put the computer to sleep after 30 Min. Hibernate the computer after 2 Hours Save Restore Apply ?ACERAcer eRecovery Management
(only for certain models)
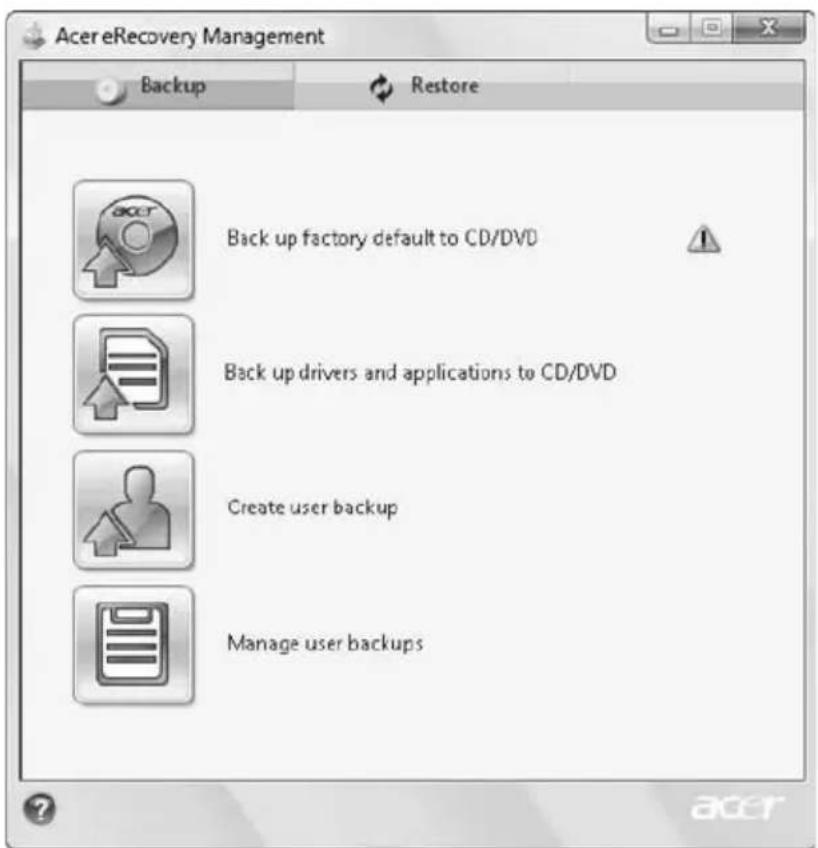
Acer eRecovery Management is a versatile backup utility. It allows you to create full or incremental backups, burn the factory default image to optical disc, and restore from previously created backups or reinstall applications and drivers. By default, user-created backups are stored to the D:\ drive.
Acer eRecovery Management provides you with:
- Backup:
• Back up factory default to CD/DVD
• Back up drivers and applications to CD/DVD
- Create user backup
- Manage user backups
-Restore:
- Restore system to factory default
•Reinstall applications/drivers - Restore system from user backup
- Password settings
To use the password protection feature of Acer eRecovery Management to protect your data, you must first set the Empowering Technology password. To set the password, refer to the section "Empowering Technology password".
text_image
Acer eRecovery Management Backup Restore Back up factory default to CD/DVD Back up drivers and applications to CD/DVD Create user backup Manage user backupsFor more information, please refer to "Acer eRecovery Management" on page 46 in the Acer System User Guide.

Note: If your computer did not come with a Recovery CD or System CD, please use Acer eRecovery Management's Backup factory default to CD/DVD feature to burn a backup image to CD or DVD. To ensure the best results when recovering your system using a CD or Acer eRecovery Management, detach all peripherals (except the external Acer ODD, if your computer has one), including your Acer ezDock.
Windows Mobility Center
text_image
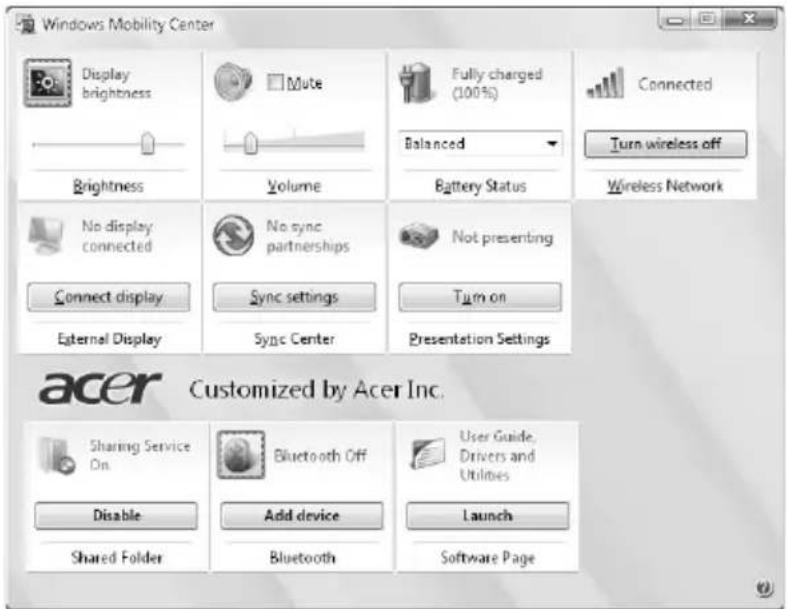
Windows Mobility Center Display brightness Mute Fully charged (100%) Balanced Connected Turn wireless off Brightness Volume Battery Status Wireless Network No display connected No sync partnerships Not presenting Connect display Sync settings Turn on External Display Sync Center Presentation Settings acer Customized by Acer Inc. Sharing Service On Bluetooth Off User Guide, Drivers and Utilities Disable Add device Launch Shared Folder Bluetooth Software PageThe Windows Mobility Center collects key mobile-related system settings in one easy-to-find place, so you can quickly configure your Acer system to fit the situation as you change locations, networks or activities. Settings include display brightness, power plan, volume, wireless networking on/off, external display settings, display orientation and synchronization status.
Windows Mobility Center also includes Acer-specific settings like Bluetooth Add Device (if applicable), sharing folders overview/sharing service on or off, and a shortcut to the Acer user guide, drivers and utilities.
To launch Windows Mobility Center:
- Use the shortcut key < > +
- Start Windows Mobility Center from the Control panel
- Start Windows Mobility Center from the Accessories program group in the Start menu
- Launch Windows Mobility Center by right-clicking in the system tray and select Windows Mobility Center.
Indicators
The computer has several easy-to-read status indicators.
The front panel indicators are visible even when the computer cover is closed up.
| Icon Function Description | |
| HDD Indicates when the hard disk drive is active. | |
| Num Lock Lights up when Num Lock is activated. | |
| Caps Lock Lights up when Caps Lock is activated. | |
| Power Indicates the computer's power status. | |
| Battery Indicates the computer's battery status. | |
| Bluetooth (Manufacturing option) Indicates the status of Bluetooth communication. | |
| Wireless LAN (Manufacturing option) Indicates the status of wireless LAN communication. | |

- Charging: The light shows amber when the battery is charging.
- Fully charged: The light shows green when in AC mode.
Easy-launch buttons
Located beside the keyboard are application buttons. These buttons are called easy-launch buttons. They are: WLAN, Internet, email, Bluetooth and Acer Empowering Technology.
The mail and Web browser buttons are pre-set to email and Internet programs, but can be reset by users. To set the Web browser, mail and programmable buttons, run the Acer Launch Manager, you can access the Launch Manager by clicking on Start, All Programs, and then Launch Manager to start the application.
| Icon Easy-launch button Default application | ||
| Acer Empowering Technology | Acer Empowering Technology (user-programmable) | |
| Web browser Internet browser (user-programmable) | ||
| Mail Email application (user-programmable) | ||
| P | Programmable key User-programmable | |
Productivity keys (only for certain models)
Three productivity keys give users one-touch access to protection and manageability features for a more secure, smarter and easier way to work.
- Lock key - runs the Windows ^ lock function to lock the notebook when you step out. If the laptop is equipped with Acer Bio-Protection, you only need to swipe your finger to log into Windows ^ again.
- Presentation key - minimizes open application windows and prepares the display for impressive presentations.
- Sync key - instantly synchronizes your computer system to an external storage device, for convenient and secure backup.
| Icon Productivity key Default application | |
| Lock Launch Windows Lock function | |
| Presentation Minimizes your open windows and prepares your display for presenting | |
| Sync Launch NTI Shadow | |
Touchpad
The built-in touchpad is a pointing device that senses movement on its surface. This means the cursor responds as you move your finger across the surface of the touchpad. The central location on the palmrest provides optimum comfort and support.
Touchpad basics (with fingerprint reader)
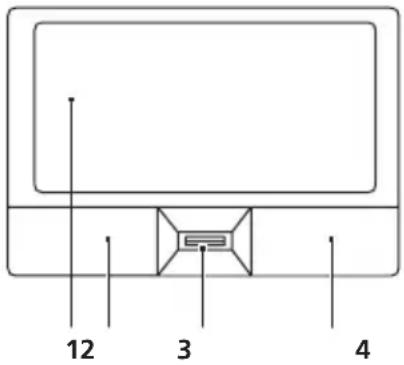
The following items show you how to use the touchpad with Acer Bio-Protection fingerprint reader.
- Move your finger across the touchpad (1) to move the cursor.
- Press the left (2) and right (4) buttons located beneath the touchpad to perform selection and execution functions. These two buttons are similar to the left and right buttons on a mouse. Tapping on the touchpad is the same as clicking the left but
text_image
12 3 4- Use Acer Bio-Protection fingerprint reader (3) supporting Acer FingerNav 4-way control function (only for certain models) to scroll up or down and move left or right a page. This fingerprint reader or button mimics your cursor pressing on the right scroll bar of Windows applications.
| Function | Left button (2) | Right button (4) | Main touchpad (1) | Center button (3) |
| Execute Quickly click twice. | Tap twice (at the same speed as double-clicking a mouse button). | |||
| Select Click once. Tap once. | ||||
| Drag Click and hold, then use finger on the touchpad to drag the cursor. | Tap twice (at the same speed as double-clicking a mouse button); rest your finger on the touchpad on the second tap and drag the cursor. | |||
| Access context menu | Click once. | |||
| Scroll Swipe up/down/left/ | right using Acer FingerNav 4-way control function (Manufacturing option). | |||
Touchpad basics (with two-click buttons)
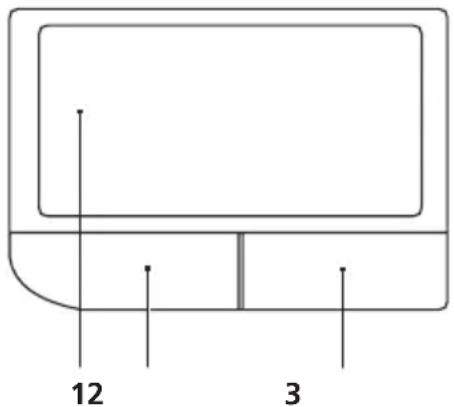
The following items show you how to use the touchpad with two-click buttons.
- Move your finger across the touchpad (1) to move the cursor.
- Press the left (2) and right (3) buttons located beneath the touchpad to perform selection and execution functions. These two buttons are similar to the left and right buttons on a mouse. Tapping on the touchpad is the same as clicking the left button.
text_image
12 3| Function Left button (2) | Right button (3) | Main touchpad (1) |
| Execute Quickly click twice. Tap twice (at the same speed as double-clicking a mouse button). | ||
| Select Click once. Tap once. | ||
| Drag Click and hold, then use finger on the touchpad to drag the cursor. | Tap twice (at the same speed as double-clicking a mouse button); rest your finger on the touchpad on the second tap and drag the cursor. | |
| Access context menu | Click once. | |

Note1: When using the touchpad, keep it — and your fingers — dry and clean. The touchpad is sensitive to finger movement; hence, the lighter the touch, the better the response. Tapping harder will not increase the touchpad's responsiveness.

Note2: By default, vertical and horizontal scrolling is enabled on your touchpad. It can be disabled under Mouse settings in Windows Control Panel.
FineTrack and FineTrack buttons (only for certain models)
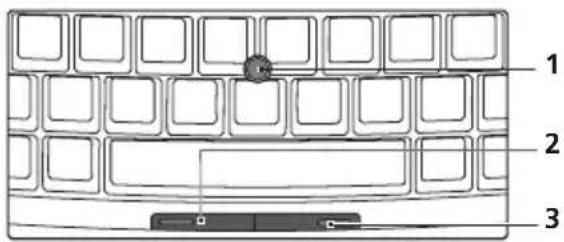
The built-in FineTrack is a pointing device that senses movement on its surface. This means the cursor responds as you use your finger to move the FineTrack. Its central location on the keyboard provides optimum comfort and support.
text_image
1 2 3FineTrack basics
The following items show you how to use the FineTrack and FineTrack buttons:
- Using your finger, apply light, steady force on the FineTrack (1) to move the cursor.
- Press the FineTrack left (2) and right (3) buttons located below the keyboard to perform selection and execution functions. These two FineTrack buttons are similar to the left and right buttons on a mouse.
Function Left button (2) Right button (3)
Execute Quickly click twice.
Select Click once.
Drag Click and hold, then use finger on the FineTrack to drag the cursor.
Access context menu Click once.
Using a computer security lock
The notebook comes with a Kensington-compatible security slot for a security lock.
Wrap the computer security lock cable around an immovable object such as a table or handle of a locked drawer. Insert the lock into the notch and turn the key to secure the lock. Some keyless models are also available.
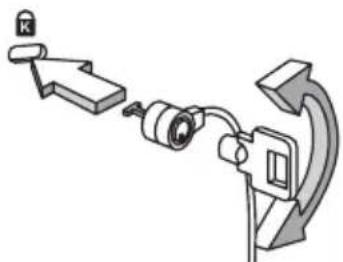
natural_image
Diagram of a mechanical device with a lock and directional arrow, no text or symbols present
Note: Illustrations for reference only. The exact configuration of your PC depends on the model purchased.
Using the keyboard
The keyboard has full-sized keys and an embedded numeric keypad, separate cursor, lock, Windows, function and special keys..
Lock keys and embedded numeric keypad
The keyboard has three lock keys which you can toggle on and off.
Lock key Description
| Caps Lock When Caps Lock is on, all alphabetic characters typed are in uppercase. | |
| Num Lock+ | When Num Lock is on, the embedded keypad is in numeric mode. The keys function as a calculator (complete with the arithmetic operators +, -, *, and /). Use this mode when you need to do a lot of numeric data entry. A better solution would be to connect an external keypad. |

Note:
| Scroll Lock+ | When Scroll Lock is on, the screen moves one line up or down when you press the up or down arrow keys respectively. Scroll Lock does not work with some applications. |
The embedded numeric keypad functions like a desktop numeric keypad. It is indicated by small characters located on the upper right corner of the keycaps. To simplify the keyboard legend, cursor-control key symbols are not printed on the keys.
Desired access Num Lock on Num Lock off
| Number keys on embedded keypad | Type numbers in a normal manner. | |
| Cursor-control keys on embedded keypad | Holdwhile using cursor-control keys. | Holdwhile using cursor-control keys. |
| Main keyboard keys | Holdwhile typing letters on embedded keypad. | Type the letters in a normal manner. |
Windows keys
The keyboard has two keys that perform Windows-specific functions.
Key Description

Windows key
Pressed alone, this key has the same effect as clicking on the Windows Start button; it launches the Start menu.
It can also be used with other keys to provide a variety of functions:
<> : Open or close the Start menu
<+
<>
<+F>: Search for a file or folder
<×4
<+
<★+
<★+
<>+:
<×+ : Open Ease of Access Center
<>
<×4+
<+
<>

Note: Depending on your edition of Windows Vista or Windows XP, some shortcuts may not function as described.

Application key
This key has the same effect as clicking the right mouse button; it opens the application's context menu.
Hotkeys
The computer employs hotkeys or key combinations to access most of the computer's controls like screen brightness, volume output and the BIOS utility. To activate hotkeys, press and hold the
| Hotkey Icon Function Description | ||
| +Hotk help Displays help on hotkeys. | ||
+Acer ePower  Management Management | Launches Acer ePower Management in Acer Empowering Technology.See "Acer Empowering Technology" on page 1. | |
| +Sleep Puts the computer in Sleep mode. | ||
+Display toggle Switches display output between the  | display screen, external monitor (if connected) and both. | |
+Screen blank Turns the display screen backlight  | off to save power. Press any key to return. | |
+Tou  toggle Turns the internal touchpad on and off. toggle Turns the internal touchpad on and off. | ||
+Spe  Toggle Turns the speakers on and off. Toggle Turns the speakers on and off. | ||
+<Δ | Volume up Increases the sound volume. | |
+<Δ | Volume down Decreases the sound volume. | |
+<Δ | Brightness up Increases the screen brightness. | |
+<Δ | Brightness down Decreases the screen brightness. | |
Special keys (only for certain models)
You can locate the Euro symbol and the US dollar sign at the upper-center and/or bottom-right of your keyboard.
The Euro symbol
1 Open a text editor or word processor.
2 Either press <€> at the bottom-right of the keyboard, or hold

Note: Some fonts and software do not support the Euro symbol. Please refer to www.microsoft.com/typography/faq/faq12.htm for more information.
The US dollar sign
1 Open a text editor or word processor.
2 Either press < \$ > at the bottom-right of the keyboard, or hold

Note: This function varies according to the language settings.
Audio
The computer comes with 32-bit High Definition (HD) Audio, and stereo speakers.
Acer PureZone (only for certain models)
The system provides you whole new enthusiastic audio experience including Acer PureZone with built-in stereo microphones featuring beam forming and echo cancellation technologies. Acer PureZone technology supports Acoustic Echo Cancellation, Beam Forming and Noise Suppression for pure sound recording. To set up your microphone, run the Acer HD Audio Manager by double-clicking the Acer HD Audio Manager icon in the system tray of your Windows system. The Acer HD Audio Manager dialog box will pop up. Click the Microphone tab, and then click the Microphone Effects tab. Select Beam Forming and Acoustic Echo Canellation to set the microphone effect.

Note: Disable the beam forming to get the multi-sound source input.
Acer Bio-Protection (only for certain models)
Acer Bio-Protection Fingerprint Solution is a multi-purpose fingerprint software package integrated with the Microsoft Windows operating system. Utilizing the uniqueness of one's fingerprint features, Acer Bio-Protection Fingerprint Solution has incorporated protection against unauthorized access to your computer with centralized password management with Password Bank, easy music player launching with Acer MusicLaunch, secure Internet favorites via Acer MyLaunch, and fast application/website launching and login with Acer FingerLaunch, while Acer ProfileLaunch can launch up to three applications/websites from a single finger swipe.
Acer Bio-Protection Fingerprint Solution also allows you to navigate through web browsers and documents using Acer FingerNav. With Acer Bio-Protection Fingerprint Solution, you can now enjoy an extra layer of protection for your personal computer, as well as the convenience of accessing your daily tasks with a simple swipe of your finger!
For more information refer to the Acer Bio-Protection help files.
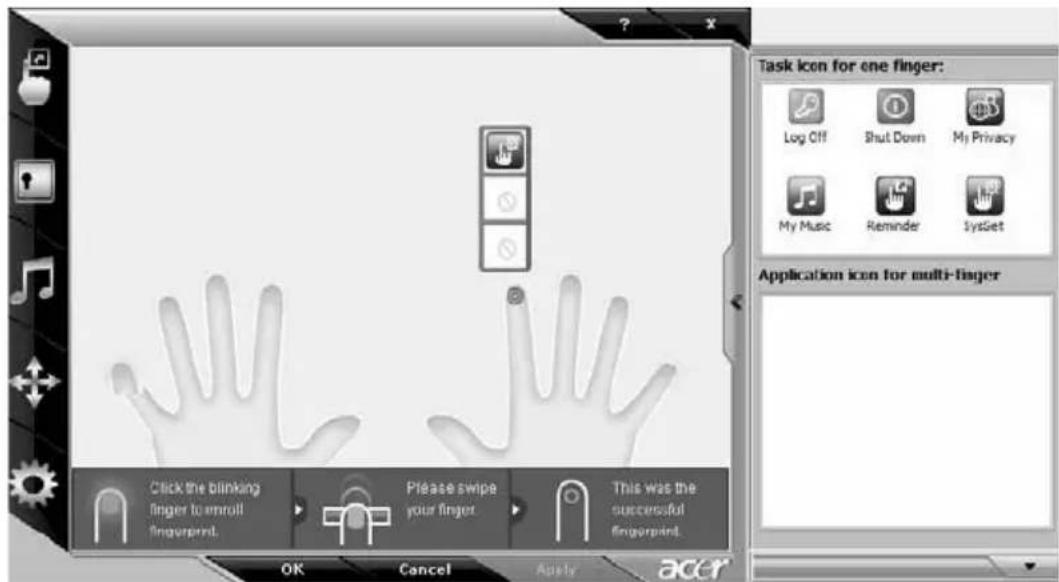
text_image
Task icon for one finger: Log Off Shut Down My Privacy My Music Reminder SysGet Application icon for multi-finger Click the blinking finger to enroll fingerprint. Please swipe your finger. This was the successful fingerprint. OK Cancel Apply acerAcer GridVista (dual-display compatible)

Note: This feature is only available on certain models.
To enable the dual display feature of your notebook, first ensure that a second display is connected, then, open the Display Settings properties box using the Control Panel or by right-clicking the Windows desktop and selecting Personalize. Select the secondary monitor (2) icon in the display box and then click the check box Extend the desktop onto this monitor. Finally, click Apply to confirm the new settings and click OK to complete the process.
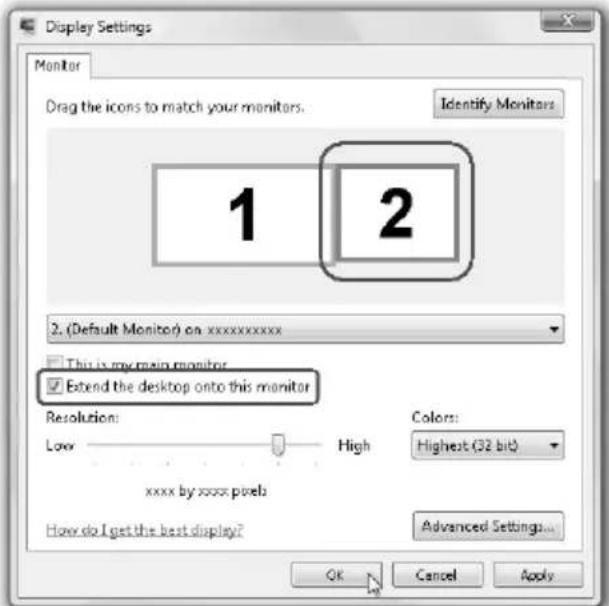
text_image
Display Settings Monitor Drag the icons to match your monitors. Identify Monitors 1 2 2. (Default Monitor) on xxxxxxxxxxxx This is my main monitor Extend the desktop onto this monitor Resolution: Low High Colors: Highest (32 bit) xxxx by xxxx pixels How do I get the best display? Advanced Settings... OK Cancel ApplyAcer GridVista is a handy utility that offers four pre-defined display settings so you can view multiple windows on the same screen. To access this function, please go to Start, All Programs and click on Acer GridVista. You may choose any one of the four display settings indicated below:

text_image
1 2 1 2 3 1 3 2 1 3 2 4Double (vertical), Triple (primary at left), Triple (primary at right), or Quad
Acer Gridvista is dual-display compatible, allowing two displays to be partitioned independently.
Acer GridVista is simple to set up:
1 Run Acer GridVista and select your preferred screen configuration for each display from the taskbar.
2 Drag and drop each window into the appropriate grid.
3 Enjoy the convenience of a well-organized desktop.
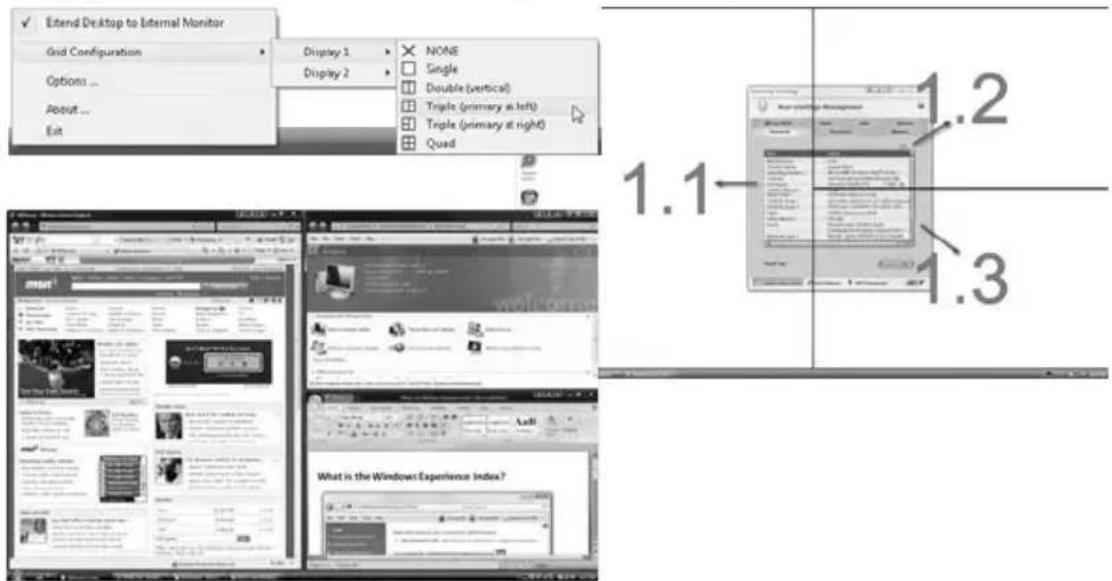
text_image
Extend Desktop to External Monitor Grid Configuration Options ... About ... Exit Display 1 None Single Double (vertical) Triple (primary at left) Triple (primary at right) Quad 1.1- 1.2 1.3
Note: Please ensure that the resolution setting of your second monitor is set to the manufacturer's recommended value.
Frequently asked questions
The following is a list of possible situations that may arise during the use of your computer. Easy solutions are provided for each one.
I turned on the power, but the computer does not start or boot up.
Look at the power indicator:
- If it is not lit, no power is being supplied to the computer. Check the following:
- If you are using on the battery, it may be low and unable to power the computer. Connect the AC adapter to recharge the battery pack.
- Make sure that the AC adapter is properly plugged into the computer and to the power outlet.
• If it is lit, check the following:
- Is a non-bootable (non-system) disk in the external USB floppy drive? Remove or replace it with a system disk and press to restart the system.
Nothing appears on the screen.
The computer's power management system automatically blanks the screen to save power. Press any key to turn the display back on.
If pressing a key does not turn the display back on, three things might be the cause:
- The brightness level might be too low. Press
+ <-> (increase) to adjust the brightness level. - The display device might be set to an external monitor. Press the display toggle hotkey
+ to toggle the display back to the computer. - If the Sleep indicator is lit, the computer is in Sleep mode. Press and release the power button to resume.
No audio is heard from the computer.
Check the following:
- The volume may be muted. In Windows, look at the volume control (speaker) icon on the taskbar. If it is crossed-out, click on the icon and deselect the Mute all option.
- The volume level may be too low. In Windows, look at the volume control icon on the taskbar. You can also use the volume control buttons to adjust the volume. See "Hotkeys" on page 17 for more detail.
- If headphones, earphones or external speakers are connected to the line-out port on the computer, the internal speakers automatically turn off.
I want to eject the optical drive tray without turning on the power.
There is a mechanical eject hole on the optical drive. Simply insert the tip of a pen or paperclip into the hole and push to eject the tray.
The keyboard does not respond.
Try attaching an external keyboard to a USB port on the computer. If it works, contact your dealer or an authorized service center as the internal keyboard cable may be loose.
The printer does not work.
Check the following:
- Make sure that the printer is connected to a power outlet and that it is turned on.
- Make sure that the printer cable is connected securely to the computer's parallel port or a USB port and the corresponding port on the printer.
I want to set up my location to use the internal modem.
To properly use your communication software, you need to set up your location:
1 Click on Start, Control Panel.
2 Double-click on Phone and Modem Options.
3 Begin setting up your location.
Refer to the Windows manual.

Note: Please note, on first booting your notebook, that you can skip the Internet Connection setup, as it is not necessary to complete the installation of your Operating System. After the Operating System is set up, you can proceed with the Internet Connection setup.
I want to restore my computer to its original settings without recovery CDs.

Note: If your system is the multilingual version, the operating system and language you choose when you first turn on the system will be the only option for future recovery operations.
This recovery process helps you restore the C: drive with the original software content that is installed when you purchase your notebook. Follow the steps below to rebuild your C: drive. (Your C: drive will be reformatted and all data will be erased.) It is important to back up all data files before using this option.
Before performing a restore operation, please check the BIOS settings.
1 Check to see if Acer disk-to-disk recovery is enabled or not.
2 Make sure the D2D Recovery setting in Main is Enabled.
3 Exit the BIOS utility and save changes. The system will reboot.

Note: To activate the BIOS utility, press
To start the recovery process:
1 Restart the system.
2 While the Acer logo is showing, press
3 Refer to the onscreen instructions to perform system recovery.

Important! This feature occupies 15 GB in a hidden partition on your hard disk.
Requesting service
International Travelers Warranty (ITW)
Your computer is backed by an International Travelers Warranty (ITW) that gives you security and peace of mind when traveling. Our worldwide network of service centers are there to give you a helping hand.
An ITW passport comes with your computer. This passport contains all you need to know about the ITW program. A list of available, authorized service centers is in this handy booklet. Read this passport thoroughly.
Always have your ITW passport on hand, especially when you travel, to receive the benefits from our support centers. Place your proof-of-purchase in the flap located inside the front cover of the ITW passport.
If the country you are traveling in does not have an Acer-authorized ITW service site, you can still get in contact with our offices worldwide. Please consult http://global.acer.com.
Before you call
Please have the following information available when you call Acer for online service, and please be at your computer when you call. With your support, we can reduce the amount of time a call takes and help solve your problems efficiently. If there are error messages or beeps reported by your computer, write them down as they appear on the screen (or the number and sequence in the case of beeps).
You are required to provide the following information:
Name: ____
Address: ____
Telephone number: ____
Machine and model type: ____
Serial number: ____
Date of purchase: ____
Battery pack
The computer uses a battery pack that gives you long use between charges.
Battery pack characteristics
The battery pack has the following characteristics:
- Employs current battery technology standards.
- Delivers a battery-low warning.
The battery is recharged whenever you connect the computer to the AC adapter. Your computer supports charge-in-use, enabling you to recharge the battery while you continue to operate the computer. However, recharging with the computer turned off results in a significantly faster charge time.
The battery will come in handy when you travel or during a power failure. It is advisable to have an extra fully charged battery pack available as backup. Contact your dealer for details on ordering a spare battery pack.
Maximizing the battery's life
Like all other batteries, your computer's battery will degrade over time. This means that the battery's performance will diminish with time and use. To maximize your battery's life, you are advised to adhere to the recommendations set out below.
Conditioning a new battery pack
Before you use a battery pack for the first time, there is a "conditioning" process that you should follow:
1 Insert the new battery without turning the computer on.
2 Connect the AC adapter and fully charge the battery.
3 Disconnect the AC adapter.
4 Turn on the computer and operate using battery power.
5 Fully deplete the battery until the battery-low warning appears.
6 Reconnect the AC adapter and fully charge the battery again.
Follow these steps again until the battery has been charged and discharged three times.
Use this conditioning process for all new batteries, or if a battery hasn't been used for a long time. If the computer is to be stored for more than two weeks, you are advised to remove the battery pack from the unit.

Warning: Do not expose battery packs to temperatures below 0^ C ( 32^ F) or above 45^ C ( 113^ F). Extreme temperatures may adversely affect the battery pack.
By following the battery conditioning process you condition your battery to accept the maximum possible charge. Failure to follow this procedure will prevent you from obtaining the maximum battery charge, and will also shorten the effective lifespan of the battery.
In addition, the useful lifespan of the battery is adversely affected by the following usage patterns:
- Using the computer on constant AC power with the battery inserted. If you want to use constant AC power, you are advised to remove the battery pack after it is fully charged.
- Not discharging and recharging the battery to its extremes, as described above.
- Frequent use; the more you use the battery, the faster it will reach the end of its effective life. A standard computer battery has a life span of about 300 charges.
Installing and removing the battery pack

Important! Before removing the battery from the unit, connect the AC adapter if you want to continue using your computer. Otherwise, turn off the computer first.
To install a battery pack:
1 Align the battery with the open battery bay; make sure that the end with the contacts will enter first, and that the top surface of the battery is facing up.
2 Slide the battery into the battery bay and gently push until the battery locks in place.
To remove a battery pack:
1 Slide the battery release latch to release the battery.
2 Pull the battery from the battery bay.
Charging the battery
To charge the battery, first make sure that it is correctly installed in the battery bay. Plug the AC adapter into the computer, and connect to a mains power outlet. You can continue to operate your computer on AC power while your battery is charging. However, charging the battery with the computer turned off results in a significantly faster charge time.

Note: You are advised to charge the battery before retiring for the day. Charging the battery overnight before traveling enables you to start the next day with a fully charged battery.
Checking the battery level
The Windows power meter indicates the current battery level. Rest the cursor over the battery/power icon on the taskbar to see the battery's present charge level.
Optimising battery life
Optimizing battery life helps you get the most out of battery operation, prolonging the charge/recharge cycle and improving recharging efficiency. You are advised to follow the suggestions set out below:
• Purchase an extra battery pack.
- Use AC power whenever possible, reserving battery for on-the-go use.
- Eject a PC Card if it is not being used, as it will continue to draw power (for selected model).
- Store the battery pack in a cool, dry place. The recommended temperature is 10^ (50°F) to 30^ (86°F). Higher temperatures cause the battery to self-discharge faster.
- Excessive recharging decreases the battery life.
- Look after your AC adapter and battery.
Battery-low warning
When using battery power pay attention to the Windows power meter.

Warning: Connect the AC adapter as soon as possible after the battery-low warning appears. Data will be lost if the battery to become fully depleted and the computer shuts down.
When the battery-low warning appears, the recommended course of action depends on your situation:
Situation Recommended Action
| The AC adapter and a power outlet are available. | 1. Plug the AC adapter into the computer, and then connect to the mains power supply.2. Save all necessary files.3. Resume work.Turn off the computer if you want to recharge the battery rapidly. |
| An extra fully charged battery pack is available. | 1. Save all necessary files.2. Close all applications.3. Shut down the operating system to turn off the computer.4. Replace the battery pack.5. Turn on the computer and resume work. |
| The AC adapter or a power outlet is unavailable. You have no spare battery pack. | 1. Save all necessary files.2. Close all applications.3. Shut down the operating system to turn off the computer. |
Taking your notebook PC with you
This section gives you tips and hints to consider when moving around or traveling with your computer.
Disconnecting from the desktop
Follow these steps to disconnect your computer from external accessories:
1 Save any open files.
2 Remove any media, floppy disks or compact disks from the drive(s).
3 Shut down the computer.
4 Close the display cover.
5 Disconnect the cord from the AC adapter.
6 Disconnect the keyboard, pointing device, printer, external monitor and other external devices.
7 Disconnect the Kensington lock if you are using one to secure the computer.
Disconnecting from Acer ezDock II/II+ (only for certain models)
Follow these steps to disconnect your computer from Acer ezDock II/II+:
1 Make sure that the battery pack is charged enough for normal operation.
2 Make sure the security lock key of ezDock II/II+ is in place and in the unlocked position.
3 Press the undock button until the computer moves up.
4 Grasping both sides of the computer, remove the computer from the ezDock.
Moving around
When you are just moving within short distances, for example, from your office desk to a meeting room.
Preparing the computer
Before moving the computer, close and latch the display cover to place it in Sleep mode. You can now safely take the computer anywhere you go within the building. To bring the computer out of Sleep mode, open the display; then press and release the power button.
If you are taking the computer to a client's office or a different building, you may choose to shut down the computer:
Click on Start, Turn Off Computer, then click on Turn Off
Or:
You can put the computer in Sleep mode by pressing
When you are ready to use the computer again, unlatch and open the display; then press and release the power button.

Note: If the Sleep indicator is off, the computer has entered Hibernation mode and is turned off. If the power indicator is off but the Sleep indicator is on, the computer has entered Sleep mode. In both cases, press and release the power button to turn the computer back on. Note that the computer may enter Hibernation mode after being in Sleep mode for a period of time.
What to bring to meetings
If your meeting is relatively short, you probably do not need to bring anything with you other than your computer. If your meeting will be longer, or if your battery is not fully charged, you may want to bring the AC adapter with you to plug in your computer in the meeting room.
If the meeting room does not have an electrical outlet, reduce the drain on the battery by putting the computer in Sleep mode. Press
Taking the computer home
When you are moving from your office to your home or vice versa.
Preparing the computer
After disconnecting the computer from your desktop, follow these steps to prepare the computer for the trip home:
- Check that you have removed all media and compact disks from the drive(s). Failure to remove the media can damage the drive head.
- Pack the computer in a protective case that can prevent the computer from sliding around and cushion it if it should fall.

Caution: Avoid packing items next to the top cover of the computer. Pressure against the top cover can damage the screen.
What to take with you
Unless you have some items at home, take the following items with you:
• AC adapter and power cord
•The printed User's Guide
Special considerations
Follow these guidelines to protect your computer while traveling to and from work:
- Minimize the effects of temperature changes by keeping the computer with you.
- If you need to stop for an extended period of time and cannot carry the computer with you, leave the computer in the trunk of the car to avoid exposing the computer to excessive heat.
- Changes in temperature and humidity can cause condensation. Allow the computer to return to room temperature, and inspect the screen for condensation before turning on the computer. If the temperature change is greater than 10^ (18 °F), allow the computer to come to room temperature slowly. If possible, leave the computer for 30 minutes in an environment with a temperature between outside and room temperature.
Setting up a home office
If you frequently work on your computer at home, you may want to purchase a second AC adapter for use at home. With a second AC adapter, you can avoid carrying the extra weight to and from home.
If you use your computer at home for significant periods of time, you might also want to add an external keyboard, monitor or mouse.
Traveling with the computer
When you are moving within a larger distance, for instance, from your office building to a client's office building or traveling locally.
Preparing the computer
Prepare the computer as if you were taking it home. Make sure that the battery in the computer is charged. Airport security may require you to turn on your computer when carrying it into the gate area.
What to take with you
Take the following items with you:
- AC adapter
- Spare, fully-charged battery pack(s)
• Additional printer driver files if you plan to use another printer
Special considerations
In addition to the guidelines for taking the computer home, follow these guidelines to protect your computer while traveling:
•Always take the computer as carry-on luggage.
- If possible, have the computer inspected by hand. Airport security X-ray machines are safe, but do not put the computer through a metal detector.
- Avoid exposing floppy disks to hand-held metal detectors.
Traveling internationally with the computer
When you are moving from country to country.
Preparing the computer
Prepare the computer as you would normally prepare it for traveling.
What to bring with you
Bring the following items with you:
- AC adapter
• Power cords that are appropriate for the country to which you are traveling - Spare, fully-charged battery packs
• Additional printer driver files if you plan to use another printer
•Proof of purchase, in case you need to show it to customs officials
• International Travelers Warranty passport
Special considerations
Follow the same special considerations as when traveling with the computer. In addition, these tips are useful when traveling internationally:
- When traveling in another country, check that the local AC voltage and the AC adapter power cord specifications are compatible. If not, purchase a power cord that is compatible with the local AC voltage. Do not use converter kits sold for appliances to power the computer.
- If you are using the modem, check if the modem and connector is compatible with the telecommunications system of the country you are traveling in.
Securing your computer
Your computer is a valuable investment that you need to take care of. Learn how to protect and take care of your computer.
Security features include hardware and software locks — a security notch and passwords.
Using a computer security lock
The notebook comes with a Kensington-compatible security slot for a security lock.
Wrap a computer security lock cable around an immovable object such as a table or handle of a locked drawer. Insert the lock into the notch and turn the key to secure the lock. Some keyless models are also available.
Using passwords
Passwords protect your computer from unauthorized access. Setting these passwords creates several different levels of protection for your computer and data:
• Supervisor Password prevents unauthorized entry into the BIOS utility. Once set, you must enter this password to gain access to the BIOS utility.
- User Password secures your computer against unauthorized use. Combine the use of this password with password checkpoints on boot-up and resume from Hibernation for maximum security.
- Password on Boot secures your computer against unauthorized use. Combine the use of this password with password checkpoints on boot-up and resume from Hibernation for maximum security.

Important! Do not forget your Supervisor Password! If you forget your password, please get in touch with your dealer or an authorized service center.
Entering passwords
When a password is set, a password prompt appears in the center of the display screen.
- When the Supervisor Password is set, a prompt appears when you press
to enter the BIOS utility at boot-up. - Type the Supervisor Password and press
to access the BIOS utility. If you enter the password incorrectly, a warning message appears. Try again and press . - When the User Password is set and the password on boot parameter is enabled, a prompt appears at boot-up.
- Type the User Password and press
to use the computer. If you enter the password incorrectly, a warning message appears. Try again and press .

Important! You have three chances to enter a password. If you fail to enter the password correctly after three tries, the system halts. Press and hold the power button for four seconds to shut down the computer. Then turn on the computer again, and try again.
Setting passwords
You can set passwords using the BIOS utility.
Expanding through options
Your notebook PC offers you a complete mobile computing experience.
Connectivity options
Ports allow you to connect peripheral devices to your computer as you would with a desktop PC. For instructions on how to connect different external devices to the computer, read the following section.
Fax/data modem
Your computer has a built-in V.92 56 Kbps fax/data modem.

Warning! This modem port is not compatible with digital phone lines. Plugging this modem into a digital phone line will damage the modem.
To use the fax/data modem port, connect a phone cable from the modem port to a telephone jack.
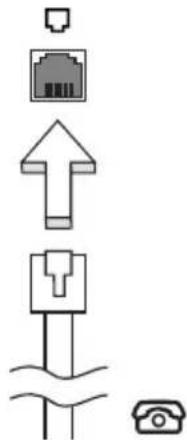
text_image
Diagram showing five types of electrical connectors or switches with corresponding icons and labels
Warning! Please make sure that the cable you use is appropriate for the country in which you are working.
Built-in network feature
The built-in network feature allows you to connect your computer to an Ethernet-based network.
To use the network feature, connect an Ethernet cable from the Ethernet (RJ-45) port on the chassis of the computer to a network jack or hub on your network.
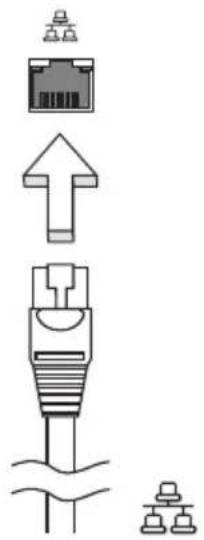
text_image
Diagram showing various types of connectors and components with Chinese labelsFast Infrared (FIR) (only for certain models)
The computer's Fast Infrared (FIR) port allows you to do wireless data transfer with other IR-aware computers and peripherals such as PDAs, mobile phones, and infrared printers. The infrared port can transfer data at speeds of up to 4 Mbps at a distance of up to one meter.
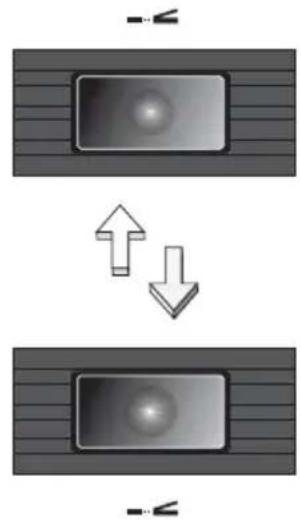
flowchart
graph TD
    A["Block 1"] --> B["Block 2"]
    B --> C["..."]
Universal Serial Bus (USB)
The USB 2.0 port is a high-speed serial bus which allows you to connect USB peripherals without taking up precious system resources.
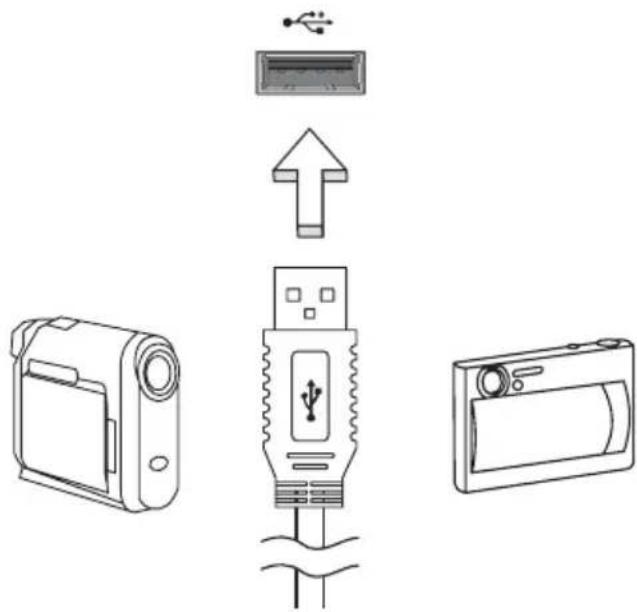
text_image
Diagram showing the installation of a device via USB, connected to a camera and a digital camera.IEEE 1394 port (only for certain models)
The computer's IEEE 1394 port allows you to connect to an IEEE 1394-compatible device like a video camera or digital camera. See your video or digital camera's documentation for details.
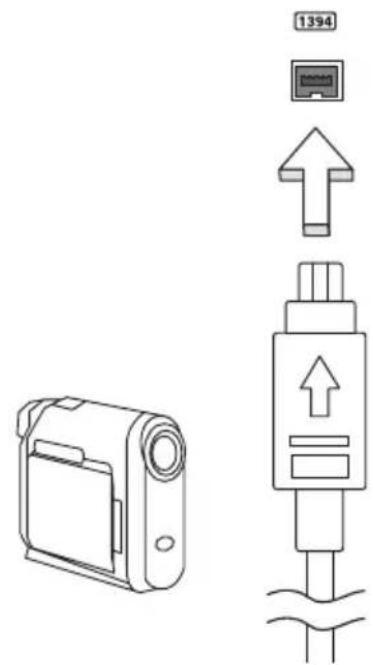
text_image
Diagram showing a digital camera and its internal component with pin labels and an upward arrow indicating direction.High-Definition Multimedia Interface (only for certain models)
HDMI (High-Definition Multimedia Interface) is an industry-supported, uncompressed, all-digital audio/video interface. HDMI provides an interface between any compatible digital audio/video source, such as a set-top box, DVD player, and A/V receiver and a compatible digital audio and/or video monitor, such as a digital television (DTV), over a single cable.
Use the HDMI port on your computer to connect with high-end audio and video equipment. Single cable implementation allows tidy setup and fast connection.
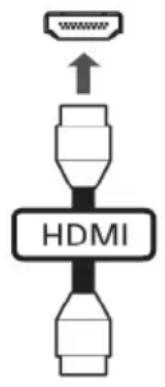
text_image
HDMIPC Card slot
The Type II PC Card slot of the computer accepts PC Cards that enhance the usability and expandability of the computer. These cards should have a PC Card logo on them.
PC Cards (formerly PCMCIA) are add-on cards for portable computers, giving you expansion possibilities long afforded by desktop PCs. Popular PC Cards include flash, fax/data modem, wireless LAN and SCSI cards. CardBus improves on the 16-bit PC card technology by expanding the bandwidth to 32 bits.

Note: Refer to your card's manual for details on how to install and use the card, and its functions.
Inserting a PC Card
Insert the card into the slot and make the proper connections (e.g., network cable), if necessary. See your card manual for details.
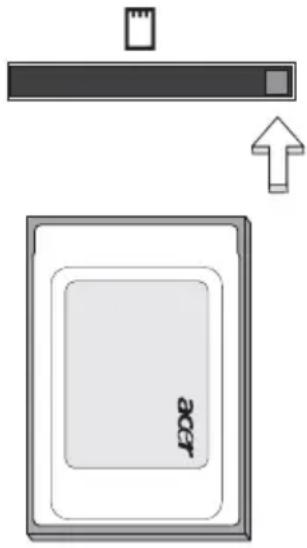
text_image
aerEjecting a PC Card
Before ejecting a PC Card:
1 Exit the application using the card.
2 Left-click on the PC Card icon on the taskbar and stop the card operation.
3 Press the slot eject button to pop out the eject button; then press it again to eject the card.
ExpressCard
The ExpressCard is the newest version of the PC Card. It is a smaller and faster interface that further enhances the usability and expandability of your computer.
ExpressCards support a vast number of expansion options, including flash memory card adapters, TV-tuners, Bluetooth connectivity and IEEE 1394B adapters. ExpressCards support USB 2.0 and PCI Express applications.

Important! There are two types, ExpressCard/54 and ExpressCard/34 (54mm and 34mm), each with different functions. Not all ExpressCard slots will support both types. Please refer to your card's manual for details on how to install and use the card, and its functions.
Inserting an ExpressCard
Insert the card into the slot and push gently until it clicks into position.
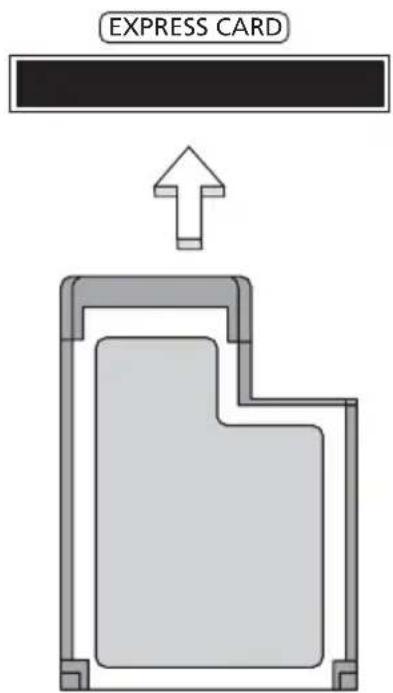
text_image
EXPRESS CARDEjecting an ExpressCard
Before ejecting an ExpressCard:
1 Exit the application using the card.
2 Left-click on the remove hardware icon on the taskbar and stop the card operation.
3 Push the card gently into the slot and release to pop out the card. Then pull the card free from the slot.
Installing memory
Follow these steps to install memory:
1 Turn off the computer, unplug the AC adapter (if connected) and remove the battery pack. Then turn the computer over to access its base.
2 Remove the screws from the memory cover; then lift up and remove the memory cover.
3 (a) Insert the memory module diagonally into the slot, then (b) gently press it down until it clicks into place.
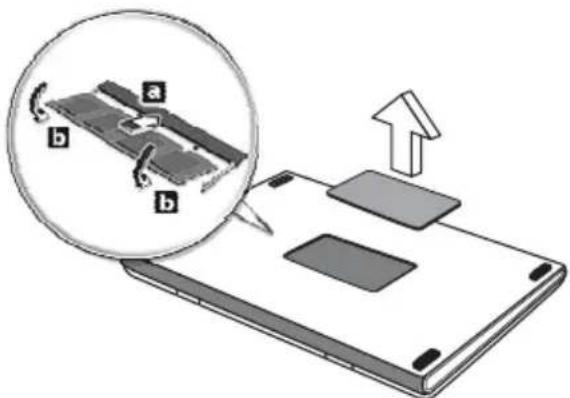
text_image
Diagram showing a device with labeled parts (a, b) and an inset magnified view of a device's internal structure.4 Replace the memory cover and secure it with the screw.
5 Reinstall the battery pack, and reconnect the AC adapter.
6 Turn on the computer.
The computer automatically detects and reconfigures the total memory size. Please consult a qualified technician or contact your local Acer dealer.
BIOS utility
The BIOS utility is a hardware configuration program built into your computer's BIOS.
Your computer is already properly configured and optimized, and you do not need to run this utility. However, if you encounter configuration problems, you may need to run it.
To activate the BIOS utility, press
Boot sequence
To set the boot sequence in the BIOS utility, activate the BIOS utility, then select Boot from the categories listed at the top of the screen.
Enable disk-to-disk recovery
To enable disk-to-disk recovery (hard disk recovery), activate the BIOS utility, then select Main from the categories listed at the top of the screen. Find D2D Recovery at the bottom of the screen and use the
Password
To set a password on boot, activate the BIOS utility, then select Security from the categories listed at the top of the screen. Find Password on boot: and use the
Using software
Playing DVD movies
When the DVD drive module is installed in the optical drive bay, you can play DVD movies on your computer.
1 Eject the DVD disk.

Important! When you launch the DVD player for the first time, the program asks you to enter the region code. DVD disks are divided into 6 regions. Once your DVD drive is set to a region code, it will play DVD disks of that region only. You can set the region code a maximum of five times (including the first time), after which the last region code set will remain permanent. Recovering your hard disk does not reset the number of times the region code has been set. Refer to the table below for DVD movie region code information.
2 The DVD movie will automatically play after a few seconds.
| Region code Country or region |
| 1 USA, Canada |
| 2 Europe, Middle East, South Africa, Japan |
| 3 Southeast Asia, Taiwan, South Korea |
| 4 Latin America, Australia, New Zealand |
| 5 Former USSR, parts of Africa, India |
| 6 People's Republic of China |

Note: To change the region code, insert a DVD movie of a different region into the DVD drive. Please refer to the online help for more information.
Power management
This computer has a built-in power management unit that monitors system activity. System activity refers to any activity involving one or more of the following devices: keyboard, mouse, hard disk, peripherals connected to the computer, and video memory. If no activity is detected for a period of time (called an inactivity timeout), the computer stops some or all of these devices in order to conserve energy.
This computer employs a power management scheme that supports the advanced configuration and power interface (ACPI), which allows for maximum power conservation and maximum performance at the same time. Windows handles all power-saving chores for your computer.
Acer eRecovery Management
Acer eRecovery Management is a tool to quickly back up and restore the system. You can create and save a backup of the entire C:\ drive to a hard disk, CDs or DVDs. You can also back up/restore the factory default image, and reinstall applications and drivers.

Note: All of the following content is for general reference only. Actual product specifications may vary.
Acer eRecovery Management consists of the following functions:
1 Backup:
• Back up factory default to CD/DVD
- Back up drivers and applications to CD/DVD
- Create user backup
- Manage user backups
2 Restore:
- Restore system to factory default
•Reinstall applications/drivers - Restore system from user backup
- Password settings
This chapter will guide you through each process.

Note: This feature is only available on certain models. For systems that do not have a built-in optical disc burner, plug in an external optical disc burner before entering Acer eRecovery Management for optical disc-related tasks.
To use the password protection feature of Acer eRecovery Management, you must first set the Empowering Technology password. The Empowering Technology password is set by launching Acer eRecovery Management and clicking Password settings in the Restore page.
Burn backup discs
From the Backup page of Acer eRecovery Management, you can burn the factory default image or back up drivers and applications.
1 Select Acer eRecovery Management from the Empowering Technology toolbar to start Acer eRecovery Management.
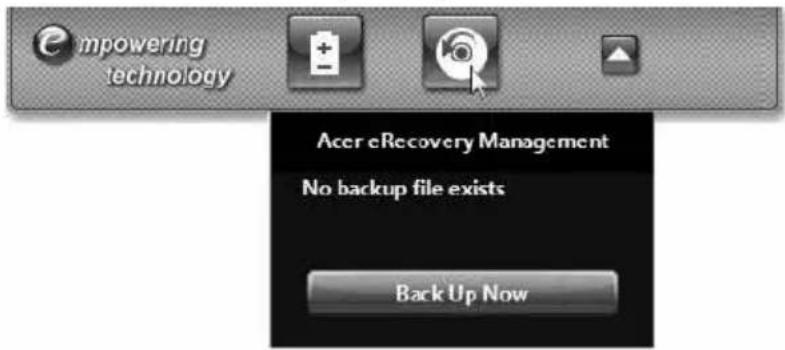
text_image
Impowering technology Acer eRecovery Management No backup file exists Back Up Now2 Acer eRecovery Management opens to the Backup page.
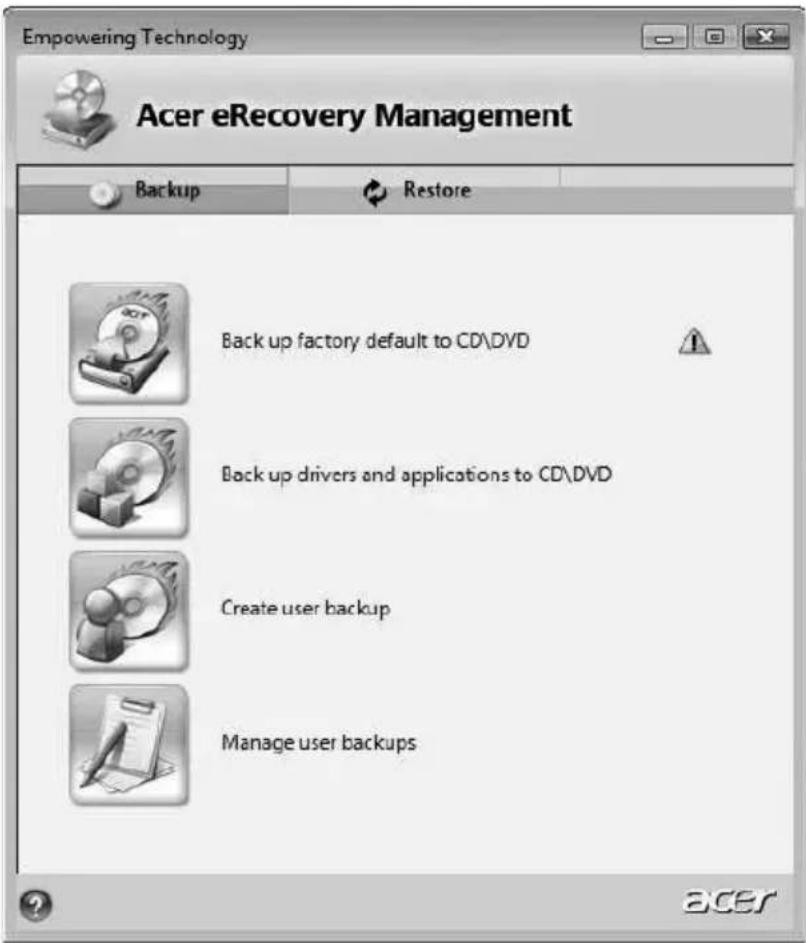
text_image
Empowering Technology Acer eRecovery Management Backup Restore Back up factory default to CD\DVD Back up drivers and applications to CD\DVD Create user backup Manage user backups ? acer3 Select the type of backup (factory default or drivers and applications) you would like to burn to disc.
4 Follow the instructions on screen to complete the process.

Note: Create a factory default image when you want to burn a bootable disc that contains your computer's entire operating system as it was delivered to you from the factory. If you wish to have a disc that will allow you to browse the contents and install selected drivers and applications, create a drivers and application backup instead — this disc will not be bootable.
Create a user backup
You can easily create full and fast (incremental) backup of the whole C:\ drive to a hard disk or optical discs from the Backup page of Acer eRecovery Management.

Note: Fast (incremental) Backup is only available after a Full Backup is made.
1 Select Acer eRecovery Management from the Empowering Technology toolbar to start Acer eRecovery Management.
2 On the Backup page of Acer eRecovery Management, click Create user backup.
3 Choose the destination of the backup you are going to create. By default, user-created backups are stored to the D:\ drive.
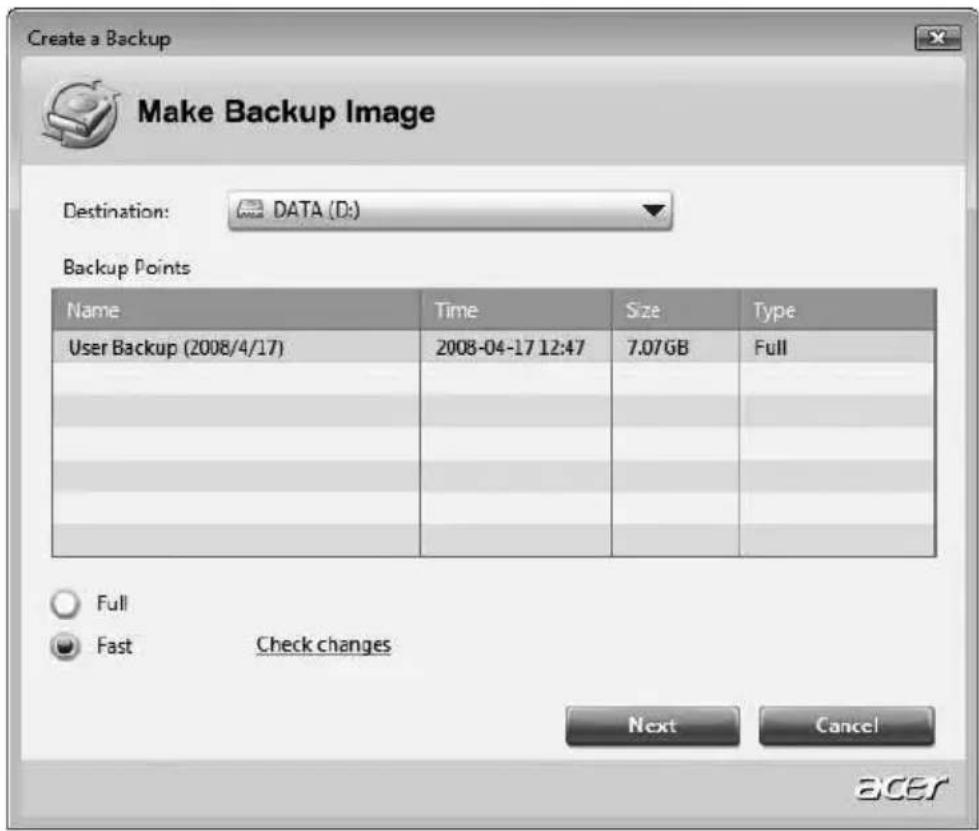
text_image
Create a Backup Make Backup Image Destination: DATA (D:) Backup Points Name Time Size Type User Backup (2008/4/17) 2008-04-17 12:47 7.07GB Full Full Fast Check changes Next Cancel ACER4 Select whether you want to create a Full or Fast backup.
5 Follow the instructions on screen to complete the process.
Manage user backups
You can delete, rename or burn backups to disc from this page.
1 Select Acer eRecovery Management from the Empowering Technology toolbar to start Acer eRecovery Management.
2 On the Backup page of Acer eRecovery Management, click Manage user backups.
3 Select the user backup file you want to Delete, Rename or Burn disc.
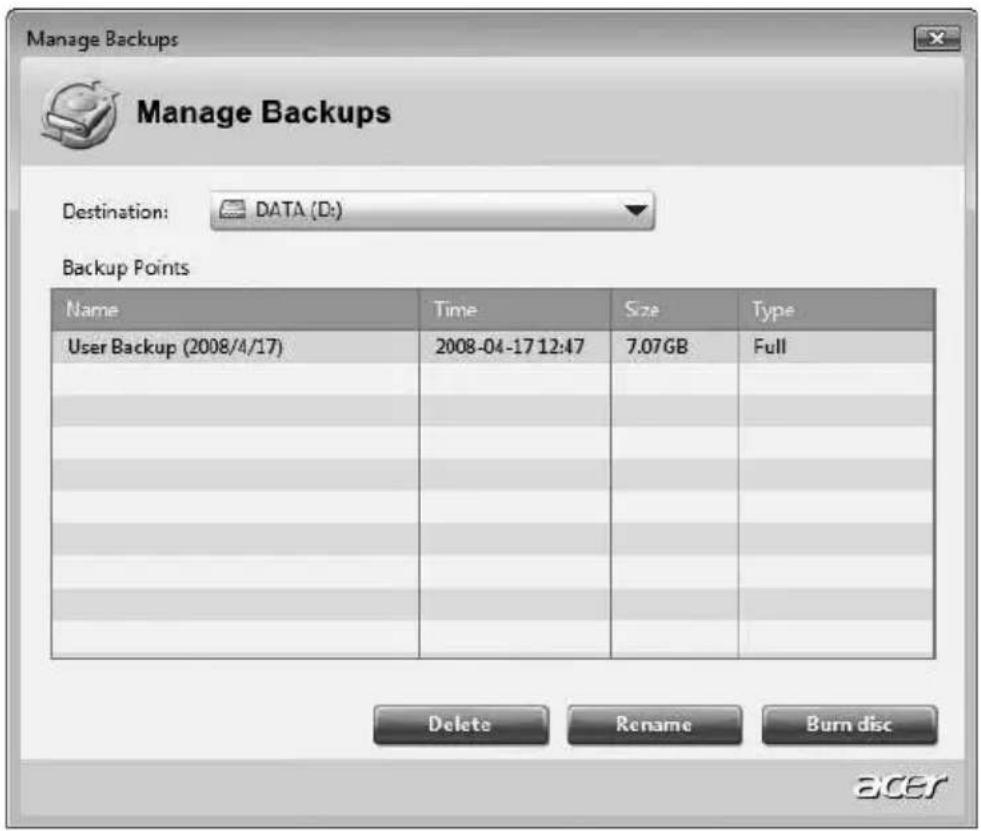
text_image
Manage Backups Manage Backups Destination: DATA (D:) Backup Points Name Time Size Type User Backup (2008/4/17) 2008-04-17 12:47 7.07GB Full Delete Rename Burn disc ACER4 Select the action you want to perform.
5 Follow the instructions on screen to complete the process.
Restore
The restore feature allows you to restore or recover the system from a factory default image, from a user-created image, or from previously created CD and DVD backups. You can also reinstall applications and drivers for your Acer system.
1 Select Acer eRecovery Management from the Empowering Technology toolbar to start Acer eRecovery Management.
2 Switch to the restore page by selecting the Restore button.

text_image
Empowering Technology Acer eRecovery Management Backup Restore Restore system to factory default Reinstall applications/drivers Restore system from user backup Password settings acer3 You can choose to restore the system from a factory default image, restore from a previously created user backup or reinstall applications and drivers. If you choose to restore from a user-created backup, you will need to select the backup point you would like to restore from.
4 Follow the instructions on screen to complete the process.
Restore Windows Vista from backup discs
To restore Windows Vista from your previously burned backup discs, you will need to insert the first backup disc and enable the F12 Boot Menu via the BIOS Setup Utility.
1 Turn on your computer and insert the first system recovery disc into the optical disc drive. Restart your computer.
2 During startup when the Acer logo shows, press the F2 key to enter BIOS Setup, where you can set system parameters.
3 Use the left and right arrow keys to select the Main submenu.
4 Use the up and down arrow keys to select F12 Boot Menu
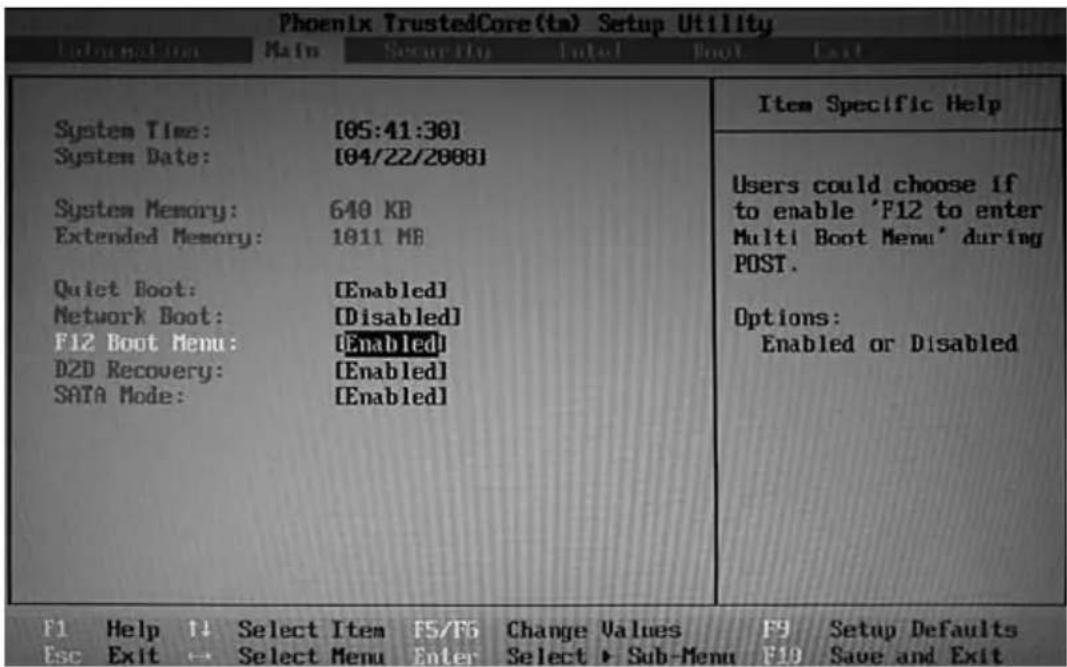
text_image
Phoenix TrustedCore(ta) Setup Utility System Time: [05:41:30] System Date: [04/22/2008] System Memory: 640 KB Extended Memory: 1811 MB Quiet Boot: [Enabled] Network Boot: [Disabled] F12 Boot Menu: [Enabled] D2D Recovery: [Enabled] SATA Mode: [Enabled] Item Specific Help Users could choose if to enable 'F12 to enter Multi Boot Menu' during POST. Options: Enabled or Disabled F1 Help ↑ Select Item F5/F6 Change Values F9 Setup Defaults Esc Exit → Select Menu Enter Select ▶ Sub-Menu F10 Save and Exit5 Use the F5 or F6 key to change F12 Boot Menu to Enabled.
6 Press the ESC key to enter the Exit submenu, press the ENTER key to Exit Saving Changes. Press the ENTER key again to select Yes. The system will reboot.
7 After rebooting, when the Acer logo shows, press the F12 key to open the Boot Menu. Here you can select which device to boot from.
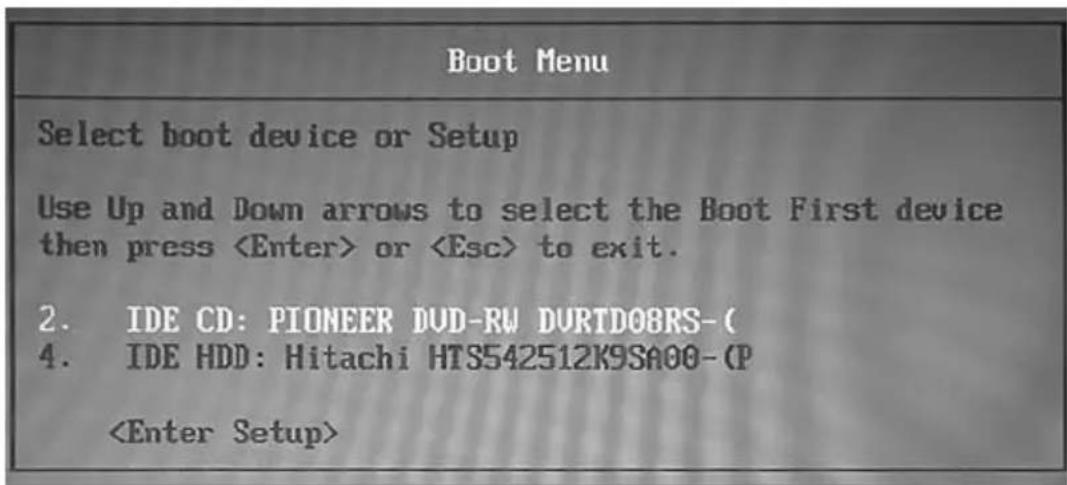
text_image
Boot Menu Select boot device or Setup Use Up and Down arrows to select the Boot First device then press8 Use the arrow keys to select the IDE CD, then press the ENTER key. Windows will be installed from the recovery disc.
9 Insert the second recovery disc when prompted, then follow the onscreen prompts to complete the restore.
10 Remove the recovery disc from the optical drive once the restore is complete. Do this before rebooting your computer.

Note: This feature is only available on certain models.
If you prefer to set the boot priority for long-term use, you should select the Boot submenu.
1 Turn on your computer and insert the first system recovery disc into the optical disc drive. Restart your computer.
2 During startup when the Acer logo shows, press the F2 key to enter BIOS Setup, where you can set system parameters.
3 Use the left and right arrow keys to select the Boot submenu.
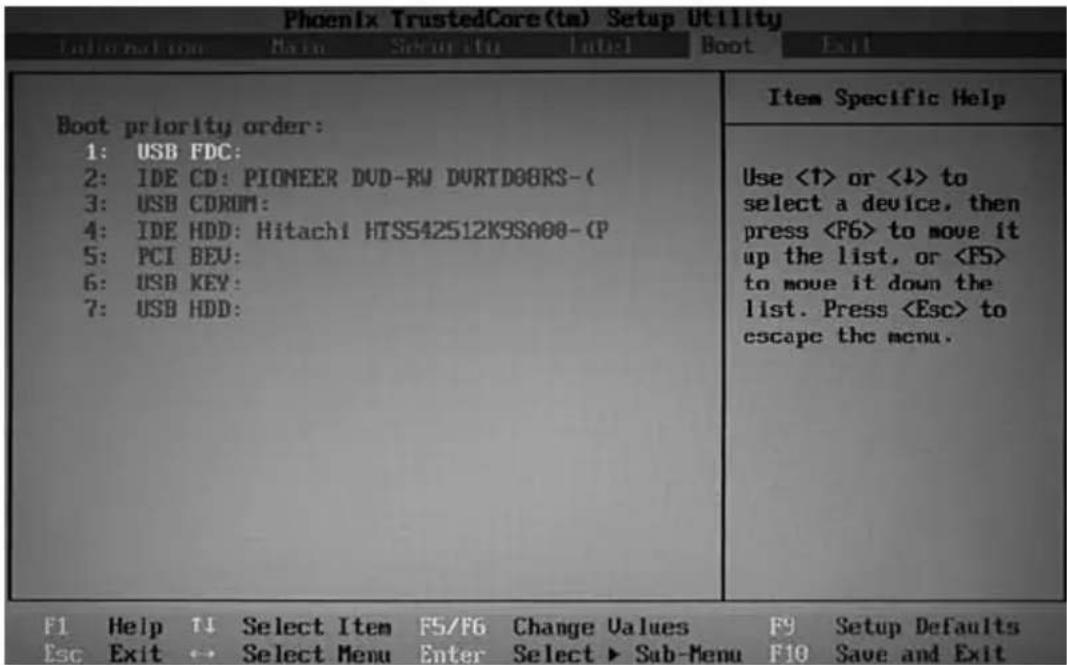
text_image
Phoenix TrustedCore (ta) Setup Utility Lational time Date Security Label Boot Exit Boot priority order: 1: USB FDC: 2: IDE CD: PIONEER DUD-RW DURTD08RS-( 3: USB CDROM: 4: IDE HDD: Hitachi HTS542512K9SA00-CP 5: PCI BEV: 6: USB KEY: 7: USB HDD: Item Specific Help Use <↑> or <↓> to select a device, then press4 Use the up and down arrow keys to select the IDE CD device.
5 Use the F6 key to move the IDE CD device to the highest boot priority, or use the F5 key to move other devices to a lower boot priority. Ensure that the IDE CD device is the highest priority.
6 Press the ESC key to enter the Exit submenu, press the ENTER key to Exit Saving Changes. Press the ENTER key again to select Yes. The system will reboot.
7 When you reboot, Windows will be installed from the recovery disc.
8 Insert the second recovery disc when prompted, then follow the onscreen prompts to complete the restore.
9 Remove the recovery disc from the optical drive once the restore is complete. Do this before rebooting your computer.
Troubleshooting
This chapter shows you how to deal with common system problems.
Read it before calling a technician if a problem occurs. Solutions to more serious problems require opening up the computer. Do not attempt to open the computer yourself; contact your dealer or authorized service center for assistance.
Troubleshooting tips
This notebook PC incorporates an advanced design that delivers onscreen error message reports to help you solve problems.
If the system reports an error message or an error symptom occurs, see "Error messages" below. If the problem cannot be resolved, contact your dealer. See "Requesting service" on page 25.
Error messages
If you receive an error message, note the message and take the corrective action. The following table lists the error messages in alphabetical order together with the recommended course of action.
| Error messages Corrective action | |
| CMOS battery bad Contact your dealer or an authorized service center. | |
| CMOS checksum error Contact your dealer or an authorized service center. | |
| Disk boot failure Insert a system (bootable) disk into the floppy drive (A:), then pressto reboot. | |
| Equipment configuration error | Press(during POST) to enter the BIOS utility, then press Exit in the BIOS utility to reboot. |
| Hard disk 0 error Contact your dealer or an authorized service center. | |
| Hard disk 0 extended type error | Contact your dealer or an authorized service center. |
| I/O parity error Contact your dealer or an authorized service center. | |
| Keyboard error or no keyboard connected | Contact your dealer or an authorized service center. |
| Keyboard interface error | Contact your dealer or an authorized service center. |
| Memory size mismatch | Press(during POST) to enter the BIOS utility, then press Exit in the BIOS utility to reboot. |
If you still encounter problems after going through the corrective measures, please contact your dealer or an authorized service center for assistance. Some problems may be solved using the BIOS utility.
Regulations and safety notices
FCC statement
This device has been tested and found to comply with the limits for a Class B digital device pursuant to Part 15 of the FCC rules. These limits are designed to provide reasonable protection against harmful interference in a residential installation. This device generates, uses, and can radiate radio frequency energy and, if not installed and used in accordance with the instructions, may cause harmful interference to radio communications.
However, there is no guarantee that interference will not occur in a particular installation. If this device does cause harmful interference to radio or television reception, which can be determined by turning the device off and on, the user is encouraged to try to correct the interference by one or more of the following measures:
- Reorient or relocate the receiving antenna.
- Increase the separation between the device and receiver.
- Connect the device into an outlet on a circuit different from that to which the receiver is connected.
- Consult the dealer or an experienced radio/television technician for help.
Notice: Shielded cables
All connections to other computing devices must be made using shielded cables to maintain compliance with FCC regulations.
Notice: Peripheral devices
Only peripherals (input/output devices, terminals, printers, etc.) certified to comply with the Class B limits may be attached to this equipment. Operation with non-certified peripherals is likely to result in interference to radio and TV reception.
Caution
Changes or modifications not expressly approved by the manufacturer could void the user's authority, which is granted by the Federal Communications Commission, to operate this computer.
Notice: Canadian users
This Class B digital apparatus complies with Canadian ICES-003.
Compliant with Russian regulatory certification

ME61
Modem notices
Notice for USA
This equipment complies with Part 68 of the FCC rules. Located on the modem is a label that contains, among other information, the FCC Registration Number and Ringer Equivalence Number (REN) for this equipment. Upon request, you must provide this information to your telephone company.
If your telephone equipment causes harm to the telephone network, the telephone company may discontinue your service temporarily. If possible, they will notify you in advance. But, if advance notice is not practical, you will be notified as soon as possible. You will also be informed of your right to file a complaint with the FCC.
Your telephone company may make changes in its facilities, equipment, operations, or procedures that could affect the proper functioning of your equipment. If they do, you will be notified in advance to give you an opportunity to maintain uninterrupted telephone service.
If this equipment should fail to operate properly, disconnect the equipment from the phone line to determine if it is causing the problem. If the problem is with the equipment, discontinue use and contact your dealer or vendor.

Caution: To reduce the risk of fire, use only No. 26 AWG or larger UL Listed or CSA Certified Telecommunication Line Cord.
TBR 21
This equipment has been approved [Council Decision 98/482/EC - "TBR 21"] for single terminal connection to the Public Switched Telephone Network (PSTN). However, due to differences between the individual PSTNs provided in different countries, the approval does not, of itself, give an unconditional assurance of successful operation on every PSTN termination point. In the event of problems, you should contact your equipment supplier in the first instance.
List of applicable countries
EU member states as of May 2004 are: Belgium, Denmark, Germany, Greece, Spain, France, Ireland, Italy, Luxembourg, the Netherlands, Austria, Portugal, Finland, Sweden, United Kingdom Estonia, Latvia, Lithuania, Poland, Hungary, Czech Republic, Slovak Republic, Slovenia, Cyprus and Malta. Usage allowed in the countries of European Union, as well as Norway, Switzerland, Iceland and Liechtenstein. This device must be used in strict accordance with the regulations and constraints in the country of use. For further information, please contact local office in the country of use.
Notice for Australia
For safety reasons, only connect headsets with a telecommunications compliance label. This includes customer equipment previously labelled permitted or certified.
Notice for New Zealand
1 The grant of a Telepermit for any item of terminal equipment indicates only that Telecom has accepted that the item complies with minimum conditions for connection to its network. It indicates no endorsement of the product by Telecom, nor does it provide any sort of warranty. Above all, it provides no assurance that any item will work correctly in all respects with another item of Telepermitted equipment of a different make or model, nor does it imply that any product is compatible with all of Telecom's network services.
2 This equipment is not capable, under all operating conditions, of correct operation at the higher speeds for which it is designed. Telecom will accept no responsibility should difficulties arise in such circumstances.
3 Some parameters required for compliance with Telecom's Telepermit requirements are dependent on the equipment (PC) associated with this device. The associated equipment shall be set to operate within the following limits for compliance with Telecom's Specifications:
a There shall be no more than 10 call attempts to the same number within any 30 minute period for any single manual call initiation, and b The equipment shall go on-hook for a period of not less than 30 seconds between the end of one attempt and the beginning of the next call attempt.
4 Some parameters required for compliance with Telecom's Telepermit requirements are dependent on the equipment (PC) associated with this device. In order to operate within the limits for compliance with Telecom's specifications, the associated equipment shall be set to ensure that automatic calls to different numbers are spaced such that there is not less than 5 seconds between the end of one call attempt and the beginning of another.
5 This equipment shall not be set up to make automatic calls to Telecom's 111 Emergency Service.
6 This device is equipped with pulse dialing while the Telecom standard is DTMF tone dialing. There is no guarantee that Telecom lines will always continue to support pulse dialing.
7 Use of pulse dialing, when this equipment is connected to the same line as other equipment, may give rise to bell tinkle or noise and may also cause a false answer condition. Should such problems occur, the user should NOT contact the telecom Fault Service.
8 This equipment may not provide for the effective hand-over of a call to another device connected to the same line.
9 Under power failure conditions this appliance may not operate. Please ensure that a separate telephone, not dependent on local power, is available for emergency use.
Laser compliance statement
The CD or DVD drive used with this computer is a laser product.
The CD or DVD drive's classification label (shown below) is located on the drive.
CLASS 1 LASER PRODUCT
CAUTION: INVISIBLE LASER RADIATION WHEN OPEN. AVOID EXPOSURE TO BEAM.
APPAREIL A LASER DE CLASSE 1 PRODUIT
LASERATTENTION: RADIATION DU FAISCEAU LASER INVISIBLE EN CAS
D'OUVERTURE. EVITTER TOUTE EXPOSITION AUX RAYONS.
LUOKAN 1 LASERLAITE LASER KLASSE 1
The LCD unit is produced with high-precision manufacturing techniques.
Nevertheless, some pixels may occasionally misfire or appear as black or red dots. This has no effect on the recorded image and does not constitute a malfunction.
Radio device regulatory notice

Note: Below regulatory information is for models with wireless LAN and / or Bluetooth only.
General
This product complies with the radio frequency and safety standards of any country or region in which it has been approved for wireless use. Depending on configurations, this product may or may not contain wireless radio devices (such as wireless LAN and/or Bluetooth modules). Below information is for products with such devices.
Declaration of Conformity for EU countries
Hereby, Acer, declares that this notebook PC series is in compliance with the essential requirements and other relevant provisions of Directive 1999/5/EC.
List of applicable countries
EU member states as of May 2004 are: Belgium, Denmark, Germany, Greece, Spain, France, Ireland, Italy, Luxembourg, the Netherlands, Austria, Portugal, Finland, Sweden, United Kingdom Estonia, Latvia, Lithuania, Poland, Hungary, Czech Republic, Slovak Republic, Slovenia, Cyprus and Malta. Usage allowed in the countries of European Union, as well as Norway, Switzerland, Iceland and Liechtenstein. This device must be used in strict accordance with the regulations and constraints in the country of use. For further information, please contact local office in the country of use.
The FCC RF safety requirement
The radiated output power of the wireless LAN Mini PCI Card and Bluetooth card is far below the FCC radio frequency exposure limits. Nevertheless, the notebook PC series shall be used in such a manner that the potential for human contact during normal operation is minimized as follows:
1 Users are requested to follow the RF safety instructions on wireless option devices that are included in the user's manual of each RF option device.

Caution: To comply with FCC RF exposure compliance requirements, a separation distance of at least 20 cm (8 inches) must be maintained between the antenna for the integrated
wireless LAN Mini PCI Card built in to the screen section and all persons.
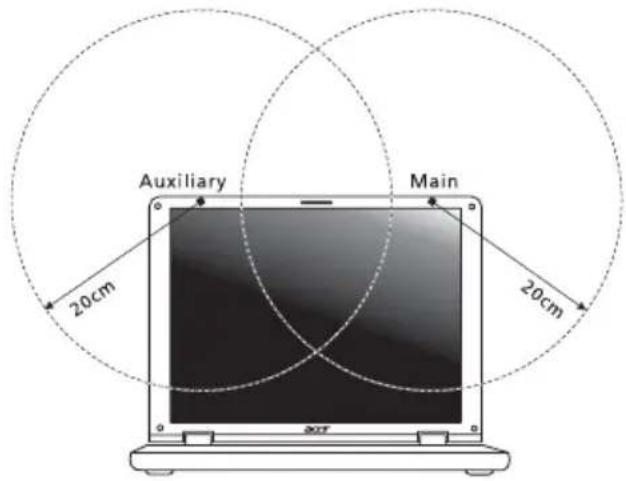
text_image
Auxiliary Main 20cm 20cm
Note: The Acer wireless Mini PCI adapter implements a transmission diversity function. The function does not emit radio frequencies simultaneously from both antennas. One of the antennas is selected automatically or manually (by users) to ensure good quality radiocommunication.
2 This device is restricted to indoor use due to its operation in the 5.15 to 5.25 GHz frequency range. FCC requires this product to be used indoors for the frequency range 5.15 to 5.25 GHz to reduce the potential for harmful interference to co-channel Mobile Satellite systems.
3 High power radar are allocated as primary users of the 5.25 to 5.35 GHz and 5.65 to 5.85 GHz bands. These radar stations can cause interference with and/or damage this device.
4 An improper installation or unauthorized use may cause harmful interference to radio communications. Also any tampering of the internal antenna will void the FCC certification and your warranty.
Canada — Low-power license-exempt radio communication devices (RSS-210)
Exposure of humans to RF fields (RSS-102)
The notebook PC series employs low gain integral antennas that do not emit RF field in excess of Health Canada limits for the general population; consult Safety Code 6, obtainable from Health Canada's website at www.hc-sc.gc.ca/rpb.
LCD panel ergonomic specifications
| Design viewing distance 500 mm | |
| Design inclination angle 0.0° | |
| Design azimuth angle 90.0° | |
| Viewing direction range class Class IV | |
| Screen tilt angle 85.0° | |
| Design screen illuminance •Illuminance level:[250 + (250cosα)] lx where α = 85°•Color: Source D65 | |
| Reflection class of LCD panel(positive and negative polarity) | •Ordinary LCD: Class I•Protective or Acer CrystalBrite ^TM LCD:Class III |
| Image polarity Both | |
| Reference white:Pre-setting of luminance and color temperature @ 6500K(tested under BM7) | •Yn•u'n•v'n |
| Pixel fault class Class II | |
Index
A
AC adapter
caring for xvi
audio
adjusting the volume 29
troubleshooting 33
B
battery pack
battery-low warning 40
caring for xvii
characteristics 37
charging 39
checking charge level 39
installing 38
low conditions 40
maximizing life 37
optimizing 39
removing 39
using the first time 37
BIOS utility 53
brightness
hotkeys 28
C
caps lock 25
on indicator 21
care
AC adapter xvi
battery pack xvii
computer xvi
CD-ROM
ejecting manually 34
troubleshooting 34
charging
checking level 39
cleaning
computer xvii
computer
caring for xvi
cleaning xvii
disconnecting 41
features 12, 31
indicators 21
keyboards 25
moving around 41
on indicator 21
security 45
setting up a home office 43
taking home 42
traveling internationally 44
traveling on local trips 43
troubleshooting 59
turning off xvi
connections
network 48
D
display
hotkeys 27
troubleshooting 33
DVD 54
DVD movies
playing 54
E
error messages 59
Euro 28
F
FAQ. See frequently-asked questions
frequently-asked questions 33
front view 14
H
Hibernation mode
hotkey 27
hotkeys 27
K
keyboard 25
embedded numeric keypad 25
hotkeys 27
lock keys 25
troubleshooting 34
Windows keys 26
L
left view 14
M
media access
on indicator 21
memory
installing 51–52
messages
error 59
modem 47
N
network 48
Notebook Manager hotkey 27
num lock 25
on indicator 21
numeric keypad
embedded 25
P
password 45
types 45
PC Card 49
ejecting 50
inserting 50
ports 47
printer
troubleshooting 34
problems 33
CD-ROM 34
display 33
keyboard 34
printer 34
startup 33
troubleshooting 59
Q
questions
setting location for modem use 34
S
safety
CD or DVD 65
modem notices 62
scroll lock 25
security
keylock 24, 45
passwords 45
speakers
hotkey 27
troubleshooting 33
support
information 36
T
touchpad 23
hotkey 27
using 23-24
travel
international flights 44
local trips 43
troubleshooting 59
tips 59
U
universal serial bus 48
V
view
front 15
left 15
rear 17
right 16
volume
adjusting 29
W
Windows keys 26