
Mini NB100 - Laptop TOSHIBA - Free user manual and instructions
Find the device manual for free Mini NB100 TOSHIBA in PDF.


User questions about Mini NB100 TOSHIBA
0 question about this device. Answer the ones you know or ask your own.
Ask a new question about this device
Download the instructions for your Laptop in PDF format for free! Find your manual Mini NB100 - TOSHIBA and take your electronic device back in hand. On this page are published all the documents necessary for the use of your device. Mini NB100 by TOSHIBA.
USER MANUAL Mini NB100 TOSHIBA
© 2008 by TOSHIBA Corporation. All rights reserved. Under the copyright laws, this manual cannot be reproduced in any form without the prior written permission of TOSHIBA. No patent liability is assumed, with respect to the use of the information contained herein.
TOSHIBA NB 100 Series Portable Personal Computer User's Manual First edition August 2008
Copyright authority for music, movies, computer programs, data bases and other intellectual property covered by copyright laws belongs to the author or to the copyright owner. Copyrighted material can be reproduced only for personal use or use within the home. Any other use beyond that stipulated above (including conversion to digital format, alteration, transfer of copied material and distribution on a network) without the permission of the copyright owner is a violation of copyright or author's rights and is subject to civil damages or criminal action. Please comply with copyright laws in making any reproduction from this manual.
Disclaimer
This manual has been validated and reviewed for accuracy. The instructions and descriptions it contains are accurate for the TOSHIBA NB 100 Series Portable Personal Computer at the time of this manual's production. However, succeeding computers and manuals are subject to change without notice. TOSHIBA assumes no liability for damages incurred directly or indirectly from errors, omissions or discrepancies between the computer and the manual.
Trademarks
IBM is a registered trademark, and IBM PC and PS/2 are trademarks of International Business Machines Corporation.
Intel, Intel SpeedStep and Intel Core and Centrino are trademarks or registered trademarks of Intel Corporation or its subsidiaries in the United States and other countries/regions.
Windows and Microsoft are registered trademarks of Microsoft Corporation.
Photo CD is a trademark of Eastman Kodak.
Bluetooth is a registered trademark owned by its proprietor and used by TOSHIBA under license.
Memory Stick is a registered trademark of SonyCorporation.
Other trademarks and registered trademarks not listed above may be used in this manual.
EU Declaration of Comformity

This product and - if applicable - the supplied accessories too are marked with "CE" and comply therefore with the applicable harmonized European standards listed under the Low Voltage Directive 2006/95/EC, the EMC Directive 2004/108/EC and/or R&TTE Directive 1999/5/EC.
Responsible for CE marking: TOSHIBA EUROPE GMBH, Hamfeldamm 8, 41460 Neuss, Germany.
Manufacturer: Toshiba Corporation, 1-1 Shibaura 1-chome, Minato-ku, Tokyo, 105-8001, Japan.
The complete official EU CE Declaration can be obtained on following internet page: http://epps.toshiba-teg.com
Following information is only valid for EU-member States:
Disposal of products
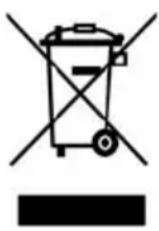
The crossed out wheeled dust bin symbol indicates that products must be collected and disposed of separately from household waste. Integrated batteries and accumulators can be disposed of with the product. They will be separated at the recycling centres.
The black bar indicates that the product was placed on the market after August 13, 2005.
By participating in separate collection of products and batteries, you will help to assure the proper disposal of products and batteries and thus help to prevent potential negative consequences for the environment and human health.
For more detailed information about the collection and recycling programmes available in your country, please visit our website (http://eu.computers.toshiba-europe.com) or contact your local city office or the shop where you purchased the product.
Disposal of batteries and/or accumulators

Pb, Hg, Cd
The crossed out wheeled dust bin symbol indicates that batteries and/or accumulators must be collected and disposed of separately from household waste.
If the battery or accumulator contains more than the specified values of lead (Pb), mercury (Hg), and/or cadmium (Cd) defined in the Battery Directive (2006/66/EC), then the chemical symbols for lead (Pb), mercury (Hg) and/or cadmium (Cd) will appear below the crossed out wheeled dust bin symbol.
By participating in separate collection of batteries, you will help to assure the proper disposal of products and batteries and thus help to prevent potential negative consequences for the environment and human health.
For more detailed information about the collection and recycling programmes available in your country, please visit our website (http://eu.computers.toshiba-europe.com) or contact your local city office or the shop where you purchased the product.

This symbol may not be displayed depending on the country and region where you purchased.
Disposing of the computer and the computer's batteries
■ Discard this computer in accordance with applicable laws and regulations. For further information, contact your local government.
This computer contains rechargeable batteries. After repeated use, the batteries will finally lose their ability to hold a charge and you will need to replace them. Under certain applicable laws and regulation, it may be illegal to dispose of old batteries by placing them in the trash.
Please be kind to our shared environment. Check with your local government authority for details regarding where to recycle old batteries or how to dispose of them properly.
GOST
Your computer model may be ENERGY STAR® compliant. If the model you purchased is compliant, it is labeled with the ENERGY STAR logo on the computer and the following information applies.
TOSHIBA is a partner in the ENERGY STAR® Program and has designed this computer to meet the latest ENERGY STAR® guidelines for energy efficiency. Your computer ships with the power management options preset to a configuration that will provide the most stable operating environment and optimum system performance for both AC power and battery modes.
To conserve energy, your computer is set to enter the low-power Suspend Mode which shuts down the system and display within 15 minutes of inactivity in AC power mode. TOSHIBA recommends that you leave this and other energy saving features active, so that your computer will operate at its maximum energy efficiency. You can wake the computer from Suspend Mode by pressing the power button.
Products that earn the ENERGY STAR® prevent greenhouse gas emissions by meeting strict energy efficiency guidelines set by the US EPA and the EU Commission. According to the EPA, a computer meeting the new ENERGY STAR® specifications will use between 20% and 50% less energy depending on how it is used.
Visit http://www.eu-energystar.org or http://www.energystar.gov for more information regarding the ENERGY STAR® Program.
Table of Contents
Chapter 1 Introduction
Equipment checklist.... 1-1
Features.... 1-2
Special features 1-5
Utilities.... 1-7
Options 1-8
Chapter 2 The Grand Tour
Front with the display closed 2-1
Left side 2-2
Right side 2-3
Back side.... 2-4
Underside 2-4
Front with the display open.... 2-6
System indicators.... 2-8
AC adaptor 2-9
Chapter 3 Getting Started
Connecting the AC adaptor 3-2
Opening the display 3-4
Turning on the power 3-5
Starting up for the first time 3-5
Turning off the power.... 3-5
Restarting the computer 3-8
System recovery options.... 3-9
Chapter 4 Operating Basics
Using the touchpad 4-1
TOSHIBA Disc Creator 4-2
Using the web camera 4-4
Using the microphone 4-6
Wireless communications 4-6
LAN 4-8
Cleaning the computer.... 4-9
Moving the computer 4-9
Heat dispersal 4-10
Chapter 5 The Keyboard
Typewriter keys.... 5-1
Function keys: F1 ... F12 .... 5-2
Soft keys: Fn key combinations 5-2
Windows special keys 5-5
Keypad overlay 5-5
Generating ASCII characters.... 5-7
Chapter 6 Power and Power-up Modes
Power conditions 6-1
Power indicators.... 6-2
Battery types. 6-3
Real Time Clock battery.... 6-4
Care and use of the battery pack 6-4
Replacing the battery pack 6-8
Starting the computer by password 6-11
Power-up modes. 6-11
Chapter 7 BIOS Setup and Passwords
Accessing BIOS Setup Menu 7-1
Chapter 8 Optional Devices
Bridge media card slot. 8-1
Memory expansion 8-4
SIM card.... 8-7
Additional AC adaptor 8-8
USB FDD Kit 8-8
External monitor 8-8
Security lock 8-9
Chapter 9 Troubleshooting
Problem solving process.... 9-1
Hardware and system checklist 9-3
TOSHIBA support 9-12
Chapter 10 Disclaimers
CPU*1 10-1
Memory (main system)*2 10-2
Battery life*3 10-2
HDD drive capacity*4 10-2
LCD*5.... 10-3
Graphics Processor Unit (GPU)*6....10-3
Wireless LAN*7 10-3
Non-applicable icons *8 10-3
Copy protection 10-3
USB Sleep and Charge.... 10-3
Appendix A Specifications
Appendix B Display Controller
Appendix C Wireless LAN
Appendix D AC Power Cord and Connectors
Appendix E If your computer is stolen
Glossary
Index
Preface
Congratulations on your purchase of the TOSHIBA NB 100 Series computer. This powerful, lightweight notebook computer is designed to provide years of reliable, computing.
This manual tells you how to set up and begin using your NB 100 Series computer. It also provides detailed information on configuring your computer, basic operations and care, using optional devices and troubleshooting.
If you are a new user of computers or if you are new to portable computing, first read over the Introduction and The Grand Tour chapters to familiarize yourself with the computer's features, components and accessory devices. Then read Getting Started for step-by-step instructions on setting up your computer.
If you are an experienced computer user, please continue reading the preface to learn how this manual is organized, then become acquainted with this manual by browsing through its pages. Be sure to read the Special features section of the Introduction, to learn about features that are uncommon or unique to the computers and carefully read BIOS Setup and Passwords. If you are going to install SIM card, or connect external devices such as a printer, be sure to read Chapter 8, Optional Devices.
Manual contents
This manual is composed of the following chapters, appendixes, a glossary and an index.
Chapter 1, Introduction, is an overview of the computer's features, capabilities, and options.
Chapter 2, The Grand Tour, identifies the components of the computer and briefly explains how they function.
Chapter 3, Getting Started, provides a quick overview of how to begin operating your computer.
Chapter 4, Operating Basics, includes tips on care of the computer and on using the touchpad, the web camera, the microphone, wireless communication and LAN.
Chapter 5, The Keyboard, describes special keyboard functions including the keypad overlay and hot keys.
Chapter 6, Power and Power-up Modes, gives details on the computer's power resources and battery save modes.
Chapter 7, BIOS Setup and Passwords, explains how to configure the computer using the BIOS Setup program. It also tells how to set a password.
Chapter 8, Optional Devices, describes the optional hardware available. Chapter 9, Troubleshooting, provides helpful information on how to perform some diagnostic tests, and suggests courses of action if the computer doesn't seem to be working properly.
Chapter 10, Disclaimers, provides Legal Footnotes information related to your computer.
The Appendixes provide technical information about your computer.
The Glossary defines general computer terminology and includes a list of acronyms used in the text.
The Index quickly directs you to the information contained in this manual.
Conventions
This manual uses the following formats to describe, identify, and highlight terms and operating procedures.
Abbreviations
On first appearance, and whenever necessary for clarity, abbreviations are enclosed in parenthesis following their definition. For example: Read Only Memory (ROM). Acronyms are also defined in the Glossary.
Icons
Icons identify ports, dials, and other parts of your computer. The indicator panel also uses icons to identify the components it is providing information on.
Keys The keyboard keys are used in the text to describe many computer operations. A distinctive typeface identifies the key top symbols as they appear on the keyboard. For example, Enter identifies the Enter key.
Key operation
Some operations require you to simultaneously use two or more keys. We identify such operations by the key top symbols separated by a plus sign (+). For example, Ctrl + C means you must hold down Ctrl and at the same time press C. If three keys are used, hold down the first two and at the same time press the third.
ABC When procedures require an action such as clicking an icon or entering text, the icon's name or the text you are to type in is represented in the typeface you see to the left.
Display
ABC Names of windows or icons or text generated by the computer that appear on its display screen are presented in the typeface you see to the left.
Messages
Messages are used in this manual to bring important information to your attention. Each type of message is identified as shown below.

Pay attention! A caution informs you that improper use of equipment or failure to follow instructions may cause data loss or damage your equipment.

Please read. A note is a hint or advice that helps you make best use of your equipment.

Indicates a potentially hazardous situation, which could result in death or serious injury, if you do not follow instructions.
General Precautions
TOSHIBA computers are designed to optimize safety, minimize strain and withstand the rigors of portability. However, certain precautions should be observed to further reduce the risk of personal injury or damage to the computer.
Be certain to read the general precautions below and to note the cautions included in the text of the manual.
Provide adequate ventilation
■ Always make sure your computer and AC adaptor have adequate ventilation and are protected from overheating when the power is turned on or when an AC adaptor is connected to a power outlet (even if your computer is in Sleep Mode). In this condition, observe the following:
■Never cover your computer or AC adaptor with any object.
- Never place your computer or AC adaptor near a heat source, such as anelectric blanket or heater.
- Never cover or block the air vents including those located at the base of the computer.
■ Always operate your computer on a hard flat surface. Using your computer on a carpet or other soft material can block the vents.c
■Always provide sufficient space around the computer.
■ Overheating your computer or AC adaptor could cause system failure, computer or AC adaptor damage or a fire, possibly resulting in serious injury.
Creating a computer-friendly environment
Place the computer on a flat surface that is large enough for the computer and any other items you are using, such as a printer.
Leave enough space around the computer and other equipment to provide adequate ventilation. Otherwise, they may overheat.
To keep your computer in prime operating condition, protect your work area from:
■Dust, moisture, and direct sunlight.
■ Equipment that generates a strong electromagnetic field, such as stereo speakers(other than speakers that are connected to the computer) or speakerphones.
■ Rapid changes in temperature or humidity and sources of temperature change such as air conditioner vents or heaters.
■Extreme heat, cold, or humidity.
■Liquids and corrosive chemicals.
Stress injury
Carefully read the Instruction Manual for Safety and Comfort. It contains information on the prevention of stress injuries to your hands and wrists that can be caused by extensive keyboard use.
Heat injury
Avoid prolonged physical contact with the computer. If the computer is used for long periods, its surface can become very warm. While the temperature will not feel hot to the touch, if you maintain physical contact with the computer for a long time, for example if you rest the computer on your lap or if you keep your hands on the palm rest, your skin might suffer a low-heat injury.
If the computer has been used for a long time, avoid direct contact with the metal plate supporting the various interface ports as this can become hot.
■The surface of the AC adaptor can become hot when in use but this condition does not indicate a malfunction. If you need to transport the AC adaptor, you should disconnect it and let it cool before moving it.
■Do not lay the AC adaptor on a material that is sensitive to heat as the material could become damaged.
Pressure or impact damage
Do not apply heavy pressure to the computer or subject it to any form of strong impact as this can damage the computer's components or otherwise cause it to malfunction.
Mobile phones
Please be aware that the use of mobile phones can interfere with the audio system. The operation of the computer will not be impaired in any way, but it is recommended that a minimum distance of 30cm is maintained between the computer and a mobile phone that is in use.
Instruction Manual for Safety and Comfort
All important information on the safe and proper use of this computer is described in the enclosed Instruction Manual for Safety and Comfort. Be sure to read it before using the computer.
Chapter 1
Introduction
This chapter provides an equipment checklist, and it identifies the computer's features, options and accessories.

Some of the features described in this manual may not function properly if you use an operating system that was not preinstalled by TOSHIBA.
Equipment checklist
Carefully unpack your computer. Save the box and packaging materials for future use.
Hardware
Check to make sure you have all the following items:
■NB 100 Series Portable Personal Computer
■Universal AC adaptor and power cord
■Battery pack (is pre-installed in some models)
Software
Windows XP Home Service Pack 3
The following software is preinstalled:
■Microsoft ^® Windows XP Home
■Bluetooth Driver (Can be used only for Bluetooth models)
■LAN Driver
Pointing Device Driver
■ Wireless LAN driver (Can be used only for Wireless LAN models=
TOSHIBA DVD PLAYER
TOSHIBA ConfigFree
■TOSHIBA Disc Creator
■TOSHIBA 3G RF Power Control Utility (Can be used only for 3G models)
TOSHIBA User's Manual
Documentation
■TOSHIBA NB 100 Series User's Manual
■TOSHIBA NB 100 Series Quickstart
■Instruction Manual for Safety and Comfort
Warranty information
If any of the items are missing or damaged contact your dealer immediately.
Features
This computer incorporates the following features and benefits:
Processor
Built-in Your computer is equipped with one processor and processor type varies depending on model. To check which type of processor is included in your model, clicking Start → Control Panel → Performance and Maintenance → System, and check the CPU information.
CPU*1 For more information regarding CPU, please refer to the Disclaimer section in Chapter 10 or click the *1 above.
Memory
Slots PC2-5300/ PC6400 512 MB or 1 GB memory module can be installed in the memory slot of all model: Mobile Intel® 945GSE Express Chipset model Maximum system memory size and speed depend on the model you purchased. The actual amount of useable system memory will be less than the installed memory modules.

PC2-6400/PC2-5300 memory modules work as PC2-4200 speed on 945GSE Express chipset.
Video RAM Depending on the model you purchased.
Mobile Intel® 945GSE Express Chipset Video RAM capacity shares with main memory, and the proportion depends on Dynamic Video Memory Technology.
Memory (main system)\*2
For more information regarding Memory (Main System), please refer to the Disclaimer section in Chapter 10 or click the *2 above.
Disks
Hard disk drive (HDD) The computer has one or two integrated, 2 1/2" hard disk drive(s) for nonvolatile storage of data and software (depending on the model you purchased). It comes in the following sizes.
120 GB
■160 GB Additional Hard Disk drive or Solid State Disk sizes may be introduced.
HDD drive capacity\*4
For more information regarding Hard disk drive capacity, please refer to the Disclaimers section in Chapter 10 or click the *4 above.
Keyboard
| Built-in | 80 keys, compatible with IBM® enhanced keyboard, embedded numeric overlay, dedicated cursor control, and keys. See Chapter 5, The Keyboard, for details. |
Pointing device
Built-in A touchpad and control buttons in the palm rest enable control of the on-screen pointer.
Power
Battery pack The computer is powered by one rechargeable lithium-ion battery pack.
Battery life\*3
For more information regarding Battery life, please refer to the Disclaimers section in Chapter 10 or click the *3 above.
RTC battery The internal RTC battery backs up the Real Time Clock (RTC) and calendar.
AC adaptor The universal AC adaptor provides power to the system and recharges the batteries when they are low. It comes with a detachable power cord. Because it is universal, it can receive a range of AC voltage between 100 and 240 volts.
Ports
| Headphone Enables connection of a stereo headphone. | |
| Microphone Enables connection of a microphone. | |
| External monitor 15-pin, analog VGA port. | |
| Universal Serial Bus (USB 2.0) | Three Universal Serial Bus (USB) enable a chain connection of USB-equipped devices to your computer through the ports. The ports with the icon (✗has USB Sleep and Charge function. |
Slots
| Bridge media card slot | This slot lets you easily transfer data from devices, such as digital cameras and Personal Digital Assistants, that use flash memory (SD/MS/MS Pro memory cards)See Chapter 8, Optional Devices, for details. |
| SIM card slot | This slot allows you to install a SIM card to expand functionality.See Chapter 8, Optional Devices, for details.(Provided with some models) |
Multimedia
| Web camera Record/Send still or video images with this integrated web camera. (Provided with some models) |
| Sound system Sound System provides internal speaker as well as jacks for an external microphone and headphone. |
Communications
LAN The computer is equipped with a LAN that supports Ethernet LAN (10 Mbit/s, 10BASE-T) and Fast Ethernet LAN (100 Mbit/s, 100BASE-TX). It is preinstalled as a standard device in some markets.
Wireless LAN The computers in this series are equipped with a Wireless LAN module that is compatible with other LAN systems based on Direct Sequence Spread Spectrum/Orthogonal Frequency Division Multiplexing radio technology that complies with the IEEE 802.11 Standard.
Wireless LAN\*7
For more information regarding Wireless LAN, please refer to the Disclaimer section in Chapter 10 or click the *7 above.
Wireless WAN Some computers in this series are equipped with Wireless WAN function. Wireless WAN provides the high speed data service, the speed generally above several hundred kbps. And Wireless WAN service also can simultaneously transmit the sound (telephone conversation) and the data message (the email, the immediate communication and so on). (Provided with some models)
Bluetooth Some computers in this series are equipped with Bluetooth functions. Bluetooth ^TM wireless technology eliminates the need for cables between electronic devices such as computers and printers. Bluetooth ^TM provides fast, reliable, and secure wireless communication in a small space.
Security
Security lock slot Connects a security lock to anchor the computer to a desk or other large object.
Special features
The following features are either unique to TOSHIBA computers or are advanced features which make the computer more convenient to use..
Hot keys Key combinations let you quickly modify the system configuration directly from the keyboard without running a system configuration program.
| Display automatic power off | This feature automatically cuts off power to the internal display when there is no keyboard input for a time specified. Power is restored when any key is pressed. |
| HDD automatic power off | This feature automatically cuts off power to the hard disk drive when it is not accessed for a time specified. Power is restored when the hard disk is accessed. |
| System automatic standby/hibernation | This feature automatically shuts down the system in standby mode or hibernation mode when there is no input or hardware access for a time specified. |
| Keypad overlay A ten-key pad is integrated into the keyboard.Refer to the Keypad overlay section in Chapter 5,The Keyboard, for instructions on using the keypad overlay. | |
| Power-on password Two levels of password security, supervisor and user, are available to prevent unauthorized access to your computer. | |
| Instant security A hot key function blanks the screen and disables the computer providing data security. | |
| Intelligent power supply | A microprocessor in the computer's intelligent power supply detects the battery's charge and calculates the remaining battery capacity. It also protects electronic components from abnormal conditions, such as voltage overload from an AC adaptor. |
| Battery save mode This feature allows you to save battery power. | |
| Panel power on/off This feature turns power to the computer off when the display panel is closed and turns it back on when the panel is opened. | |
| Low battery automatic hibernation mode | When battery power is exhausted to the power that computer operation cannot be continued, the system automatically enters Hibernation and shuts down. |
| Heat dispersal | To protect from overheating, the CPU has an internal temperature sensor. If the computer's internal temperature rises to a certain level, the CPU processing speed will lower half. |
| Hibernation This feature lets you turn off the power without exiting from your software. The contents of main memory are saved to the hard disk, when you turn on the power again, you can continue working right where you left off. Refer to theTurning off the powersection in Chapter 3,Getting Started, for details | |
| Standby If you have to interrupt your work, you can turn off the power without exiting from your software. Data is maintained in the computer’s main memory. When you turn on the power again, you can continue working right where you left off. | |
Utilities
This section describes preinstalled utilities and tells how to start them. For details on operation, refer to each utility's online manual, help files or readme.txt files.
| TOSHIBA DVD PLAYER | This software is provided for playback of DVD Video.(This software is preinstalled in some modelsl) |
| TOSHIBA ConfigFree | ConfigFree is a suite of utilities to allow easy control of communication devices and network connections. ConfigFree also allows you to find communication problems and create profiles for easy switching between location and communication networks.You can boot ConfigFree from the menu bar as follows.Start → All Programs → TOSHIBA → Networking → ConfigFree |
| TOSHIBA Disc Creator | You can create CD/DVDs in several formats including audio CDs that can be played on a standard stereo CD player and data CD/DVDs to store the files and folderson your hard disk drive.This software can be used on a model with CD-RW/DVD-ROM drive, and DVD Super Multi drive.You can boot TOSHIBA Disc Creator from the menu bar as follows.Start → All Programs → TOSHIBA → CD&DVD Applications → Disc Creator |
| TOSHIBA Bluetooth Stack (depending on the model you purchased) | This software enables communication between remote Bluetooth devices. |

Bluetooth cannot be used in models that do not have a Bluetooth module installed.
Options
You can add a number of options to make your computer even more powerful and convenient to use. The following options are available:
| Memory PC2-5300/ PC2-6400 512 MB or 1 GB memorymodule can be installed in the memory slot of all models:Mobile Intel® 945GSE Express Chipset modelMaximum system memory size and speed depend on the model you purchased. The actual amount of useable system memory will be less than the installed memory modules. |

PC2-5300/PC2-6400 memory modules work as PC2-4200 speed on 945GSE Express chipset.
| Battery Pack An additional battery pack 4 cell Type can be purchased from your TOSHIBA dealer. The battery pack is identical to the one that came with your computer. Use it as a spare or replacement. |
| Universal AC adaptor If you use your computer at more than one site, it may be convenient to purchase an additional AC adaptor for each site so you will not have to carry the adaptor with you. |
| USB FDD Kit The USB floppy disk drive accommodates either a 1.44 MB or 720 KB floppy disk through connection to one of the computer’s USB ports. |
Security lock A slot is available to attach a security cable to the computer to deter theft.
Chapter 2
The Grand Tour
This chapter identifies the various components of your computer. Become familiar with each component before you operate the computer.
Non-applicable icons*8
For more information regarding Non-applicable icons, please refer to the Disclaimer section in Chapter 10 or click the *8 above.
Front with the display closed
Figure below shows the computer's front with its display panel in the closed position.
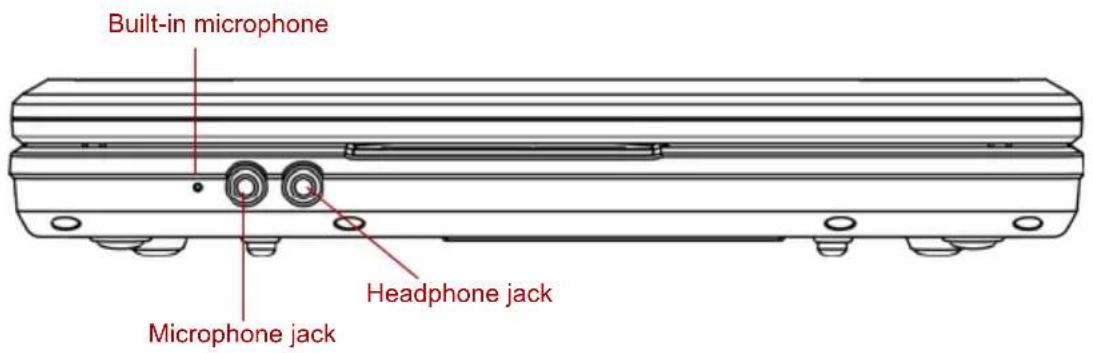
text_image
Built-in microphone Headphone jack Microphone jackFront of the computer with display closed
Microphone jack A standard 3.5 mm mini microphone jack enables connection of a microphone or other device for audio input.
Headphone jack A standard 3.5 mm mini headphone jack enables connection of a stereo headphone (16 ohm minimum) or other device for audio output. When you connect headphones, the internal speaker is automatically disabled.
Built-in microphone Record monaural sounds into your applications. (Provided with some models)
Left side
Figure below shows the computer's left side.
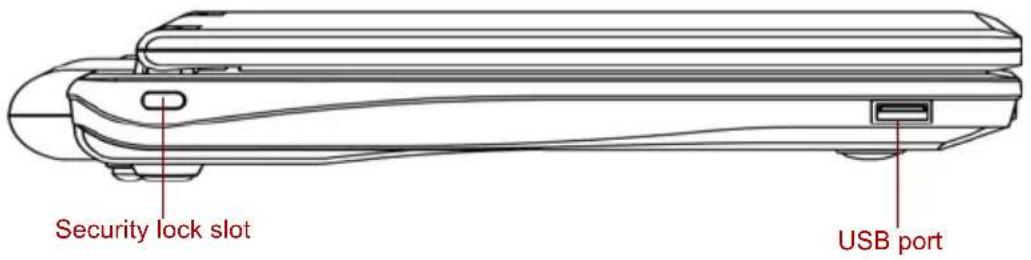
text_image
Security lock slot USB portThe left side of the computer
Universal serial bus (USB 2.0) ports
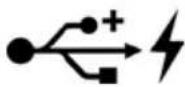
The universal serial bus (USB) port comply with USB Serial 2.0 standards, which enables data transfer speeds 40 times faster than the USB 1.1 standards. The ports with the icon (✗) has USB Sleep and Charge function.
Security lock slot A
security cable attaches to this slot. The optional security cable anchors your computer to a desk or other large object to deter theft.

Keep foreign metal objects, such as screws, staples and paper clips, out of the USB connectors. Foreign metal objects can create a short circuit, which can cause damage and fire, possibly resulting in serious injury.

Please note that it is not possible to confirm the operation of all functions of all USB devices that are available. In view of this it may be noted that some functions associated with a specific device might not operate properly.
Right side
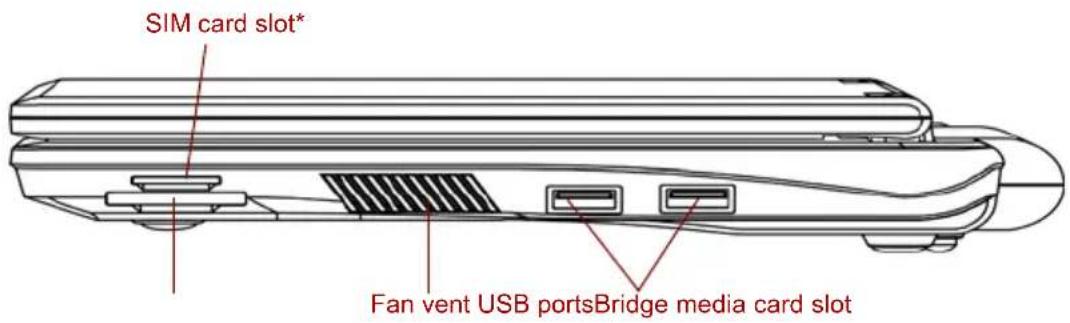
Figure below shows the computer's right side.
text_image
SIM card slot* Fan vent USB portsBridge media card slot*Depending on the model you purchased
The right side of the computer
Bridge media card slot

This slot lets you easily transfer data from devices, such as digital camera and PDA, that use flash memory. (SD/MS/MS Pro memory cards)
SIM card slot The computer provides a SIM card slot on right side, which allows you to install an additional SIM card. (Provided with some models)
Fan vent Provides air flow for the fan.
Universal serial bus (USB 2.0) ports
The two universal serial bus (USB) ports comply with USB Serial 2.0 standards, which enables data transfer speeds 40 times faster than the USB 1.1 standards. The ports with the icon ( ) has USB Sleep and Charge function.

Keep foreign metal objects, such as screws, staples and paper clips, out of the USB connectors. Foreign metal objects can create a short circuit, which can cause damage and fire, possibly resulting in serious injury.

Please note that it is not possible to confirm the operation of all functions of all USB devices that are available. In view of this it may be noted that some functions associated with a specific device might not operate properly.
Security lock slot A security cable attaches to this slot. The optional security cable anchors your computer to a desk or other large object to deter theft.
Back side
Figure below shows the computer's back side.

text_image
LAN jackExternal monitor port DC IN 19VThe computer's back side
External monitor port This 15-pin port allows you to connect an external monitor.
LAN jack This jack lets you connect to a LAN. The adaptor has built-in support for Ethernet LAN (10 Mbit/s, 10BASE-T), or Fast Ethernet LAN (100 Mbit/s, 100BASE-TX).
DC IN 19V The AC adaptor connects to this socket. Use only the model of AC adaptor that comes with the computer. Using the wrong adaptor can damage your computer.
Underside
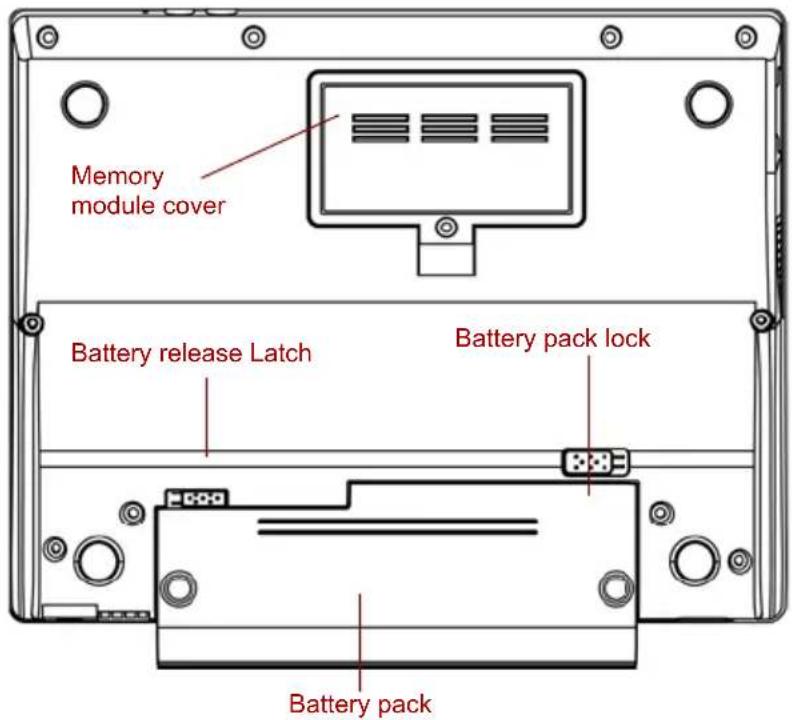
Figure below shows the underside of the computer. Make sure the display is closed before turning over your computer.
text_image
Memory module cover Battery release Latch Battery pack lock Battery packThe underside of the computer
| Battery pack The battery pack powers the computer when the AC adaptor is not connected. The Batteries section in Chapter 6,Power and Power-up Modes, describes how to access the battery pack. Additional battery packs can be purchased from your TOSHIBA dealer to extend the computer's battery operating time.. | |
Battery release latch | Slide this latch to release the battery pack.This latch moves only when the computer is upside down. |
Battery pack lock | Slide the battery pack lock to unlocked position to free the battery latch. |
Memory module cover | This cover protects one memory module socket.One module is preinstalled. |
Front with the display open
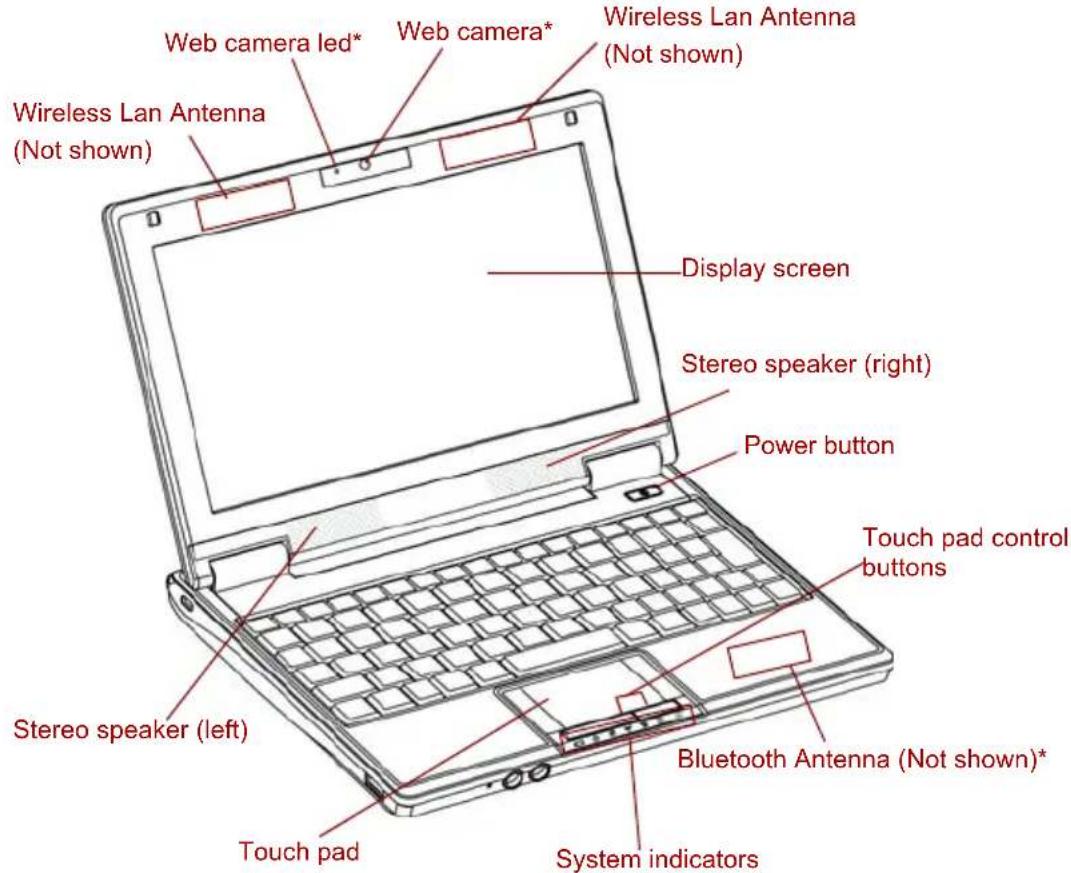
Figure below shows the front of the computer with the display open. To open the display, lift the display up and position the display at a comfortable viewing angle.
text_image
Web camera led* Web camera* Wireless Lan Antenna (Not shown) Wireless Lan Antenna (Not shown) Display screen Stereo speaker (right) Power button Touch pad control buttons Bluetooth Antenna (Not shown)* System indicators Touch pad Stereo speaker (left)*Depending on the model you purchased
The front with the display open
| Display screen | The full-color LCD displays high-contrast text and graphics The computer's LCD is 8.9" WSVGA, 1024 horizontal × 600 vertical pixels.The computer has a Thin-Film Transistor (TFT) display. Refer to Appendix B, Display Controller.When the computer operates on power through the AC adaptor, the display screen's image won't change. |
LCD\*5
For more information regarding LCD, please refer to the Disclaimer section in Chapter 10 or click the *5 above.
Graphics Processor Unit (GPU)\*6
For more information regarding Graphics Processor Unit (GPU), please refer to the Disclaimer section in Chapter 10 or click the *6 above.
| Stereo speaker The speaker emits sound generated by your software as well as audio alarms, such as low battery condition, generated by the system. | |
| Touch pad Moves the pointer and selects or activates items on the screen. Can be set to perform other mouse functions, such as scrolling, selecting, and double-clicking. | |
| Touch pad control buttons | Function like the left and right buttons on an external mouse. |
| System indicators Seven LEDs let you monitor the main battery, power status, HDD, Wireless LAN/ Bluetooth, Wireless WAN, numeric lock and caps lock. Details are in the system indicators section. | |
| Power button Press the power button to turn the computer's power on and off. The power button LED indicates the status. | |
| Web camera Record/Send still or video images with this integrated web camera. (Provided with some models) | |
| Web camera LED The web camera LED glows blue when the web camera software is used. (Provided with some models) | |
| Bluetooth antenna Some computers in this series are equipped with a Bluetooth antenna. (Provided with some models) | |
| Wireless LAN antenna The computers in this series are equipped with the Wireless LAN antenna. | |

Please handle your computer carefully to avoid scratching or damaging the surface.
System indicators
Figure below shows the system indicators, which light when various computer operations are in progress.
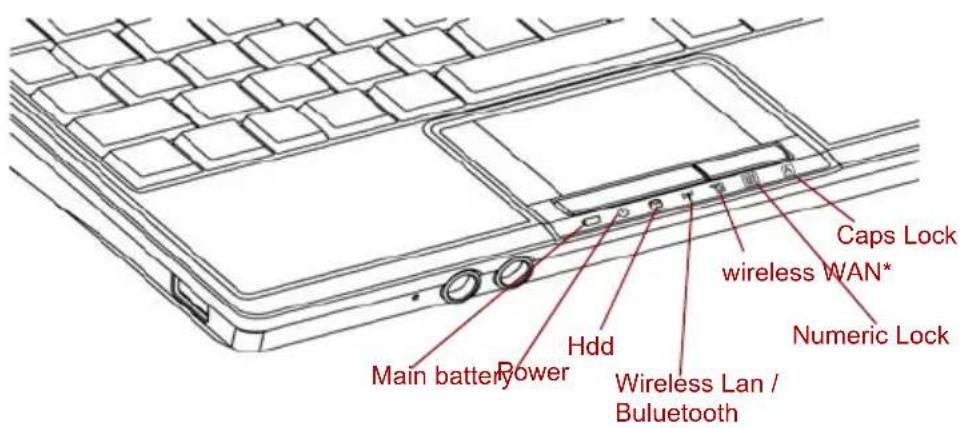
text_image
Caps Lock wireless WAN* Numeric Lock Main battery Power Hdd Wireless Lan / Buluetooth*Depending on the model you purchased
System indicators
Main battery | The Main battery indicator shows the condition of the charge. Green means fully charged and Slow blinking Green means being charged. Refer to Chapter 6,Power and Power-up Modes. |
Power | The Power indicator glows green when the computer is on. If you turn off the computer in standby mode, this indicator blinks Green. If the computer shuts down, this indicator shows no light. |
HDD The HDD indicator  | glows green when the computer is accessing a Hard Disk Drive. |
Wireless communication | The Wireless/Bluetooth indicator glows orange when the computer is enable to connect wireless LAN or Bluetooth. (Provided with some models). |
Wireless WAN | The wireless WAN indicator glows orange when the computer is enable to connect wireless WAN. (Provided with some models) |
| Numeric Lock This indicator glows green, You can use the keypad overlay (dark gary labeled keys) for numeric input. | |
CAPS Lock This indicator glows green when letter keys are locked into their uppercase format. | |
AC adaptor
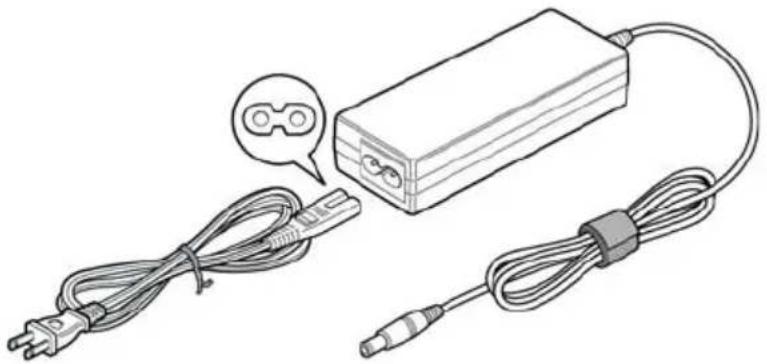
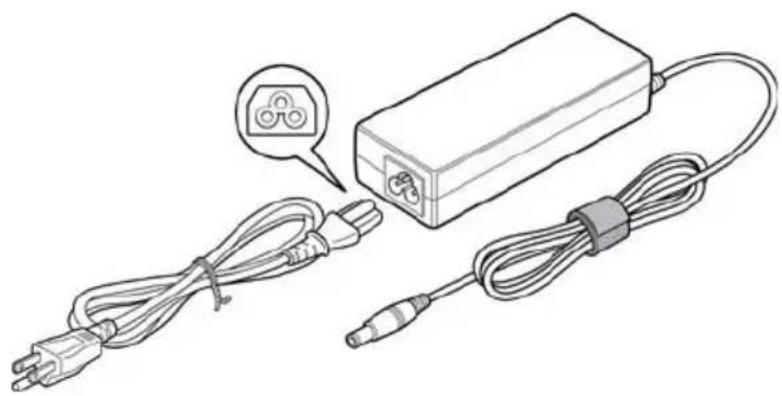
The AC adaptor converts AC power to DC power and reduces the voltage supplied to the computer. It can automatically adjust to any voltage from 100 to 240 volts and to a frequency of either 50 or 60 hertz, enabling you to use the computer in almost any region.
To recharge the battery, simply connect the AC adaptor to a power source and the computer. See Chapter 6 Power and Power-up Modes for details.
natural_image
Line drawing of a battery pack connected to two cables, one with a magnified inset showing a small device (no text or symbols)The AC adaptor (2-pin plug)
natural_image
Line drawing of a power adapter connected to two cables, one with a three-pin connector (no text or symbols)The AC adaptor (3-pin plug)

■Depending on the model in question, either a 2-pin or 3-pin adaptor/power lead will be bundled with the computer.
■ Do not use a 3-pin to 2-pin conversion plug.
The supplied power cord conforms to safety rules and regulations in the region the product is bought and should not be used outside of this region. In order to use the adaptor/computer in other regions, you should please buy a power cord that conforms to the safety rules and regulations in that particular region.
Chapter 3
Getting Started
This chapter provides basic information to start using your computer. It covers the following topics:

All users should be sure to carefully read the sections Microsoft ® Windows XP setup, which describe actions to take when you turn on the power for the first time.
■Be sure to read the enclosed Instruction Manual for Safety and Comfort for information on the safe and proper use of this computer. It is intended to help you be more comfortable and productive while using a notebook computer. By following the recommendations in it you may reduce your chance of developing a painful or disabling injury to your hand, arms, shoulders or neck.
■Connecting the AC adaptor
■Opening the display
■Turning on the power
■Starting up for the first time
■Turning off the power
■Restarting the computer
■System Recovery Options
If you are a new user, follow the steps in each section of this chapter as you prepare to operate your computer.

■ Use a virus-check program and make sure it is updated regularly.
■Never format storage media without checking its content - formatting destroys all stored data.
It is a good idea to periodically back up the internal hard disk drive or other main storage device to external media. General storage media is not durable or stable over long periods of time and under certain conditions may result in data loss.
Before you install a device or application, save any data in memory to the hard disk drive or other storage media. Failure to do so may result in the loss of data.
Connecting the AC adaptor
Attach the AC adaptor when you need to charge the battery or you want to operate from AC power. It is also the fastest way to get started, because the battery pack will need to be charged before you can operate from battery power.
The AC adaptor can be connected to any power source supplying from 100 to 240 volts and 50 or 60 hertz. For details on using the AC adaptor to charge the battery pack, refer to Chapter 6, Power and Power-up Modes.

■Always use the TOSHIBA AC adaptor that was included with your computer or use AC adaptors specified by TOSHIBA to avoid any risk of fire or other damage to the computer. Use of an incompatible AC adaptor could cause fire or damage to the computer possibly resulting in serious injury. TOSHIBA assumes no liability for any damage caused by use of an incompatible adaptor.
■ Never plug the AC adaptor into a power source that does not correspond to both the voltage and the frequency specified on the regulatory label of the unit. Failure to do so could result in a fire or electric shock, possibly resulting in serious injury.
■Always use or purchase power cables that comply with the legal voltage and frequency specifications and requirements in the country of use. Failure to do so could result in a fire or electric shock, possibly resulting in serious injury.
The supplied power cord conforms to safety rules and regulations in the region the product is bought and should not be used outside this region. For use in other regions, please buy power cords that conform to safety rules and regulations in the particular region.
Do not use a 3-pin to 2-pin conversion plug. When you connect the AC adaptor to the computer, always follow the steps in the exact order as described in the User's Manual. Connecting the power cable to a live electrical outlet should be the last step otherwise the adaptor DC output plug could hold an electrical charge and cause an electrical shock or minor bodily injury when touched. As a general safety precaution, avoid touching any metal parts.
■Never place your computer or AC adaptor on a wooden surface, furniture, or any other surface that could be marred by exposure to heat since the computer base and AC adaptor's surface increase in temperature during normal use.
■Always place your computer or AC adaptor on a flat and hard surface that is resistant to heat damage.
Refer to the enclosed Instruction Manual for Safety and Comfort for detailed precautions and handling instructions.
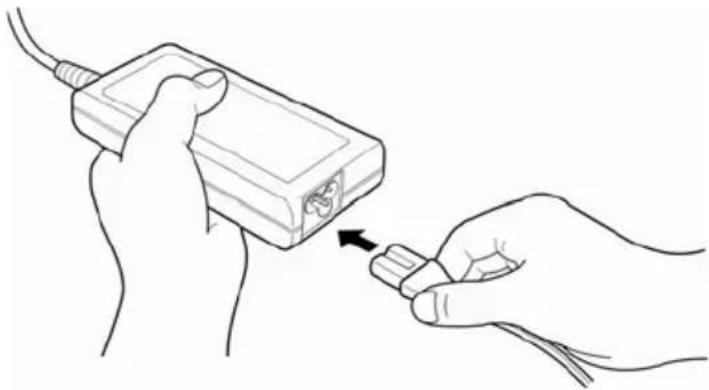
- Connect the power cord to the AC adaptor.
natural_image
Line drawing of hands inserting a USB into a device (no text or symbols)Connecting the power cord to the AC adaptor
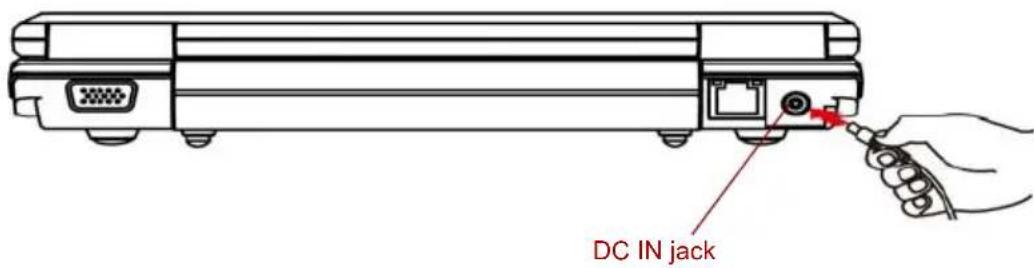
- Connect the AC adaptor's DC output plug to the DC IN 19V jack on the back side of the computer.
text_image
DC IN jackConnecting the adaptor to the computer
- Plug the power cord into a live wall outlet - the Battery indicator on the front of the computer should glow.
Opening the display
The display panel can be rotated in a wide range of angles for optimal viewing.
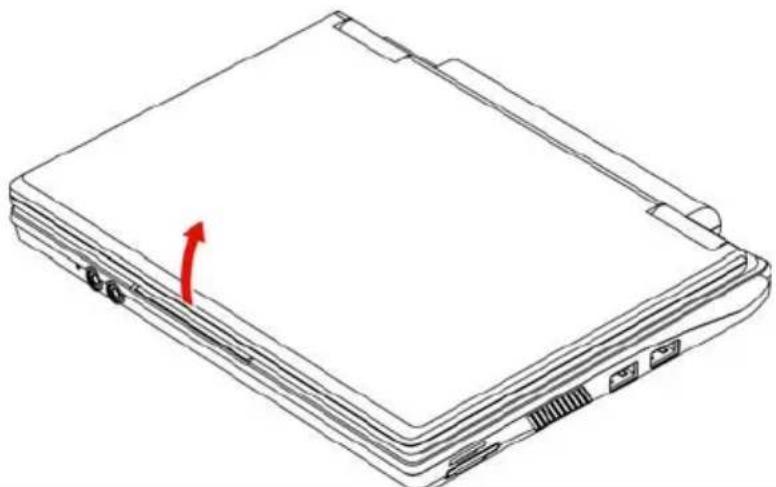
To open the display, lift the panel up and adjust it to the best viewing angle.

natural_image
Line drawing of a laptop with a red arrow indicating the left side of the screen (no text or symbols present)When you open the display, be sure to hold the base firmly and lift up the monitor slowly.
Opening the display panel

- Be careful not to open the display panel too far as this could put stress on the display panel's hinges and cause damage.
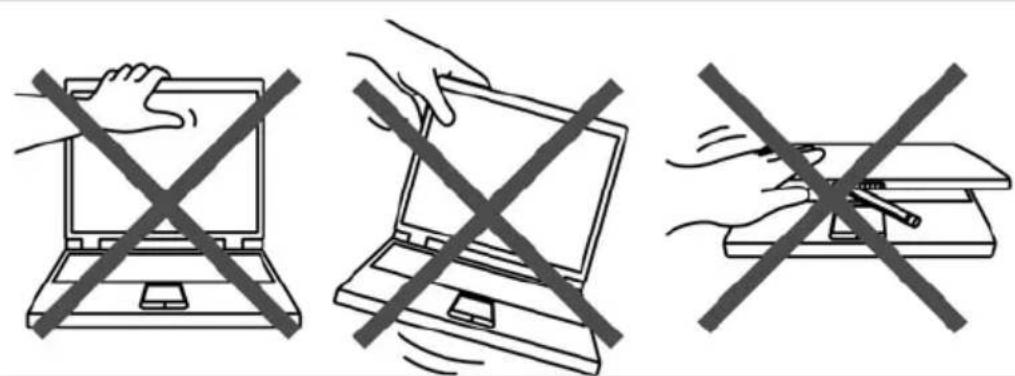
■ Do not press or push on the display panel.
■ Do not lift the computer by the display panel.
■Do not close the display panel with pens or any other objects left in between the display panel and the keyboard.
When opening or closing the display panel, place one hand on the palm rest to hold the computer in place and use the other hand to slowly open or close the display panel (Do not use excessive force when opening or closing the display panel).
text_image
Three-panel illustration showing a laptop with a hand crossed out by a 'X' symbol, and another device with a pen on top crossed out by a 'X' symbol.Turning on the power
This section describes how to turn on the power

After you turn on the power for the first time, do not turn it off until you have set up the operating system (OS) and the OS has started up.
- Open the display panel.
- Press and hold the computer's power button for two or three seconds.
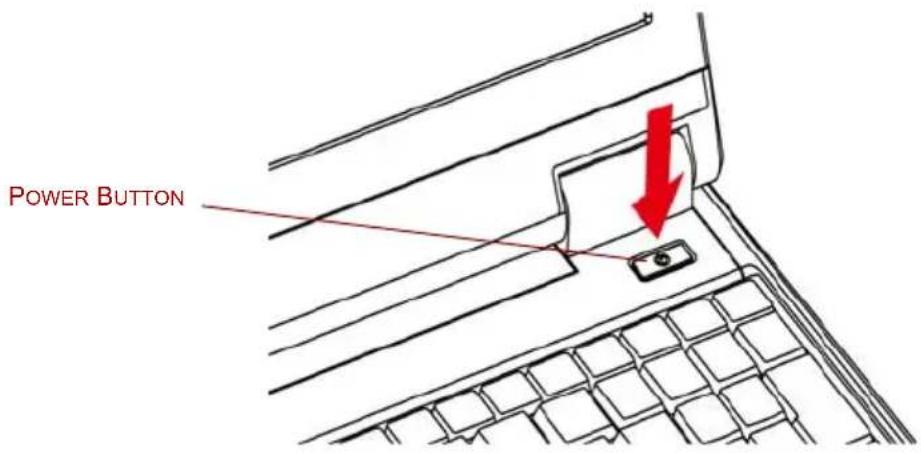
text_image
POWER BUTTONTurning on the power
Starting up for the first time
When you first turn on the power, the computer's initial screen is the Microsoft® Windows XP Startup Screen Logo.
Follow the on-screen directions.
Turning off the power
The power can be turned off in one of three modes: shut down, hibernation mode or standby mode.
Shut down mode
When you turn off the power in shut down mode, no data is saved and the computer will boot to the operating system's main screen.
- If you have entered data, save it to the hard disk or to a diskette.
- Make sure all disk(disc) activities are terminated, then remove any diskette.

■ Make sure the Hard Disk Drive indicator is off. If you turn off the power while a disk (disc) is being accessed, you may lose data or damage the disk.
■Never turn off the power while an application is running. Doing so could cause loss of data.
■Never turn off the power, disconnect an external storage device or remove storage media during data read/write. Doing so can cause data loss.
- Click Start button, then click Turn Off Computer. From Turn Off Computer menu select Turn Off.
- Turn off the power to any peripheral devices.

Do not turn the computer or devices back on immediately. Wait a moment to let all capacitors fully discharge.
Hibernation mode
The hibernation feature saves the contents of memory to the hard disk when the computer is turned off. The next time the computer is turned on, the previous state is restored. The hibernation feature does not save the status of peripheral devices.

While entering hibernation mode, the computer saves the contents of memory to the HDD. Data will be lost if you remove the battery or disconnect the AC adaptor before the save is completed. Wait for the Disk indicator to go out.
■Do not install or remove a memory module while the computer is in hibernation mode. Data will be lost.
Benefits of hibernation mode
The hibernation feature provides the following benefits:
■ Saves data to the hard disk when the computer automatically shuts down because of a low battery.

For the computer to shut down in hibernation mode, the hibernation feature must be enabled in the Hibernate tab in Power Management and Setup Action tab in Power Management. Otherwise, the computer will shut down in Standby mode. If battery power becomes depleted, data saved in Standby mode will be lost.
■You can return to your previous working environment immediately when you turn on the computer.
■ Saves power by shutting down the system when the computer receives no input or hardware access for the duration set by the system hibernation feature.
■You can use the panel power off feature.
Starting hibernation mode
To enter hibernation mode, follow the steps below.
- Click Windows Start button.
- Select Turn Off Computer.
- Open the Turn Off Computer dialog box.
- Select Hibernate.
You can also enable hibernation mode by pressing Fn + F2 - please refer to Chapter 5, The Keyboard, for further details.
Data save in hibernation mode
When you turn off the power in hibernation mode, the computer takes a moment to save current memory data to the hard disk. During this time, the Disk indicator will light.
After you turn off the computer and memory is saved to the hard disk, turn off the power to any peripheral devices.

Do not turn the computer or devices back on immediately. Wait a moment to let all capacitors fully discharge.
Standby mode
In standby mode the power remains on, but the CPU and all other devices are in standby mode.

Turning Off your computer where electronic devices are regulated or controlled.
When you have to turn off your computer aboard an aircraft or in places where electronic devices are regulated or controlled, always shut down the computer completely or put the computer into hibernation mode instead of allowing it to go into standby mode, and turn off any wireless communication switches or devices, while in standby mode, the computer operating system may reactivate itself to run pre-programmed tasks or to preserve unsaved data, and might interfere with aviation or other systems, possibly causing serious injury.

■Before entering standby mode, be sure to save your data.
Do not install or remove a memory module while the computer is in Standby mode. The computer or the module could be damaged.
Do not remove the battery pack while the computer is in standby mode (unless the computer is connected to an AC power source). Data in memory will be lost.
Benefits of standby mode
The standby feature provides the following benefits:
■Restores the previous working environment more rapidly than does hibernation feature.
■ Saves power by shutting down the system when the computer receives no input or hardware access for the duration set by the system Standby feature.
■You can use the panel power off feature.
Executing standby mode
You can enter sleep mode in one of three ways:
- Click Windows Start button, click Turn Off Computer, and then click Stand By.
- Close the display panel. This feature must be enabled.
- Press the power button. This feature must be enabled.
When you turn the power back on, you can continue where you left when you shut down the computer.

When the computer is shut down in Standby mode, the power indicator glows blinking green.
If you are operating the computer on battery power, you can lengthen the operating time by shutting down in Hibernation mode. Standby mode consumes more power.
Standby mode limitations
Standby mode will not function under the following conditions:
■Power is turned back on immediately after shutting down.
■ Memory circuits are exposed to static electricity or electrical noise.
Restarting the computer
Certain conditions require that you reset the computer, for example, if:
■You change certain computer settings.
■An error occurs and the computer does not respond to your keyboard commands.
If you need to restart the computer, there are three ways this can be achieved:
- Click Start then click Turn Off Compute. From the Turn Off Computer menu select Restart.
- Press the power button and hold it down for five seconds. Wait 10 to 15 seconds, then turn on the power again by pressing the power but ton.
System recovery options
Restoring the preinstalled software from the Product Recovery disc

You can use TOSHIBA Product Recovery Disc when you connect External ODD.

When you reinstall the Windows operating system, the hard disk will be reformatted and all data will be lost.
■Be sure to connect the AC adaptor, otherwise you may run out of battery during the recovery process

In case of damage, loss or other reasons you can order a Product Recovery disc for your notebook in the TOSHIBA Europe Backup Media Online Shop by following the link below.
https://backupmedia.toshiba.eu
Please note this is not a free of charge service.
If preinstalled files are damaged, use the Product Recovery disc to restore them. To restore the operating system and all preinstalled software, follow the steps below.
- Ensure that there is uninterrupted power supply through out the recovery process by connecting to the AC power supply and checking whether the battery is fully charged.
- Connect an external optical drive to any one of the USB slot.
- Insert the Product Recovery disc.
- Turn on the computer and immediately press the F12 key.
- The menu for selecting the boot up media sequence appears.
- Select CDROM using the arrow keys and press Enter.
- Wait for the system to boot up from the Product Recovery disc and the recovery screen appears.

Some external optical drive may not be compatible with the Product Recovery media. So verify the external optical drive supports the Product Recovery media.
- Follow the on-screen directions.
- Disconnect the CD drive and keep the Product Recovery disc for future use.
Chapter 4
Operating Basics
This chapter gives information on basic operations including using the touchpad, Audio/Video controls, the web camera, the microphone, Wireless communication and LAN.
Using the touchpad
To use the touchpad, simply touch and move your finger tip across it in the direction you want the on-screen pointer to go.
Two buttons below the touchpad are used like the buttons on a mouse pointer.
Press the left button to select a menu item or to manipulate text or graphics designated by the pointer. Press the right button to display a menu or other function depending on the software you are using.

You can also tap the touchpad to perform functions similar to those of the left button on a standard mouse.
Click: Tap the touchpad once.
Double-click: Tap twice
Drag and drop: Tap to select the material you want to move. Leave your finger on the touchpad after the second tap and move the material.
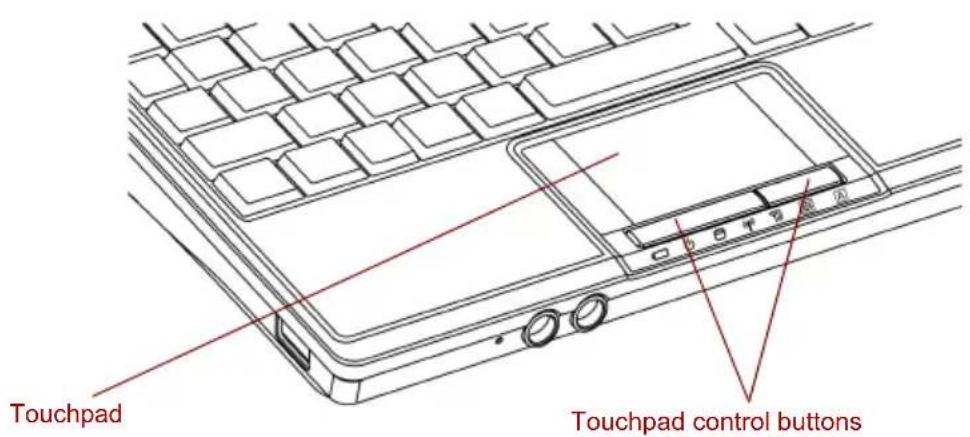
text_image
Touchpad Touchpad control buttonsTouchpad and touchpad control buttons
TOSHIBA Disc Creator

You can use TOSHIBA Recovery Disc Creator when you connect External ODD.
Note the following limitations when you use TOSHIBA Disc Creator:
DVD-Video cannot be created using TOSHIBA Disc Creator.
■DVD-Audio cannot be created using TOSHIBA Disc Creator.
■You cannot use TOSHIBA Disc Creator's 'Audio CD for Car or Home CD Player' function to record music to DVD-R, DVD-R DL, DVD-RW, DVD+R, DVD+R DL, or DVD+RW media.
■Do not use the 'Disc Backup' function of TOSHIBA Disc Creator in order to copy DVD Video, or DVD-ROM material that has copyright protection.
■DVD-RAM discs cannot be backed up using the 'Disc Backup' function of TOSHIBA Disc Creator.
- You cannot back up CD-ROM, CD-R or CD-RW media to DVD-R, DVD-R DL, or DVD-RW media using the 'Disc Backup' function of TOSHIBA Disc Creator.
■You cannot back up CD-ROM, CD-R or CD-RW media to DVD+R, DVD+R DL or DVD+RW media using the 'Disc Backup' function of TOSHIBA Disc Creator.
You cannot back up DVD-ROM, DVD Video, DVD-R, DVD-R DL, DVD-RW, DVD+R, DVD+R DL, or DVD+RW to CD-R or CD-RW media using the 'Disc Backup' function of TOSHIBA Disc Creator.
■TOSHIBA Disc Creator cannot record in packet format.
■You might not be able to use the 'Disc Backup' function of TOSHIBA Disc Creator to back up a DVD-R, DVD-R DL, DVD-RW, DVD+R, DVD+R DL, or DVD+RW disc that was made with other software on a different optical media recorder.
If you add data to a DVD-R, DVD-R DL, DVD+R, or DVD+R DL disc that you have already recorded to, you might not be able to read the added data under some circumstances. For example, it cannot be read under 16-bit operating systems, such as Windows 98SE and Windows Me, while in Windows NT4 you will need Service Pack 6 or later, and in Windows 2000, you will need Service Pack 2. In addition to this, some DVD-ROM and DVD-ROM / CD-R/RW drives cannot read this added data regardless of the operating system.
■TOSHIBA Disc Creator does not support recording to DVD-RAM discs - to achieve this you should use Windows Explorer or another similar utility.
When you back up a DVD disc, be sure that the source drive supports recording to DVD-R, DVD-R DL, DVD-RW, DVD+R, DVD+R DL or DVD+RW media - if this is not the case then the source disc might not be backed up correctly.
When you back up a DVD-R, DVD-R DL, DVD-RW, DVD+R,DVD+R DL, or DVD+RW disc, be sure to use the same type of disc. You cannot partially delete any data written to a CD-RW, DVD-RW, DVD+RW disc.
Data verification
To verify that data has been written or rewritten correctly to a data CD/DVD you should follow the steps below before you begin the write/rewrite process:
-
Display the setting dialog box by one of the following two steps:
■Click the setting button ( ) for writing on the main toolbar in the Data Disc mode.
■ Select Setting for Each Mode Data Disc in the Setting menu. -
Mark the Verify written data check box.
- Select File Open or Full Compare mode.
- Click the OK button.
How to learn more about TOSHIBA Disc Creator
■ Please refer to the Help files for additional TOSHIBA Disc Creator information.
Using the web camera
Built-in web camera is provided with some models.
The section in the Online manual describes the bundled webcam utility, which can capture still and video images. The web camera will auto-run when Windows starts.

Please unstick the protective plastic-film before using the Web Camera.
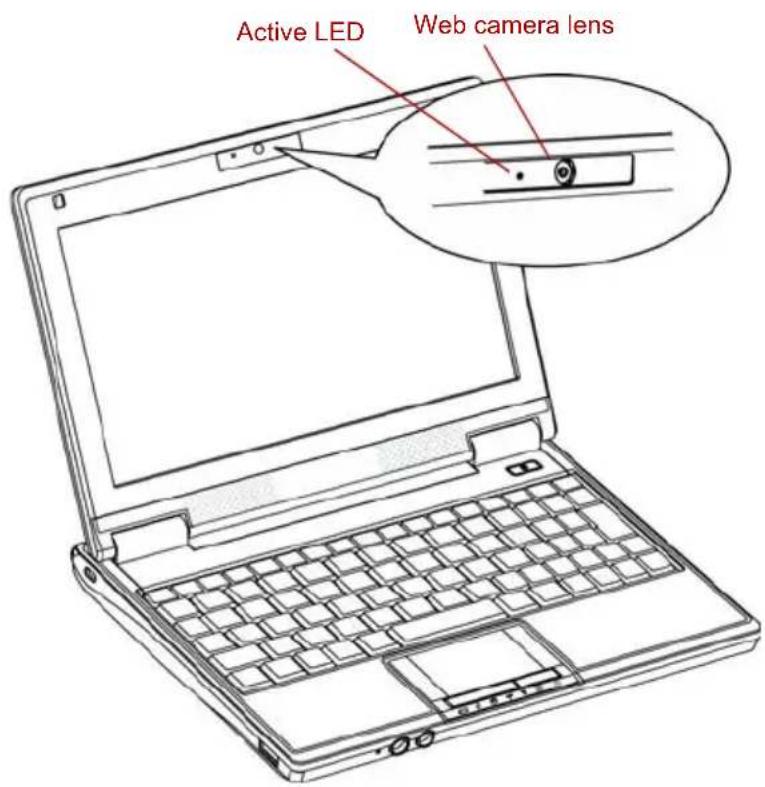
text_image
Active LED Web camera lensWeb Camera
Using the software
The web camera software is pre-configured to start when you turn on Windows XP; if you need to restart it go to Start → All Programs → Camera Assistant Software → Camera Assistant Software.
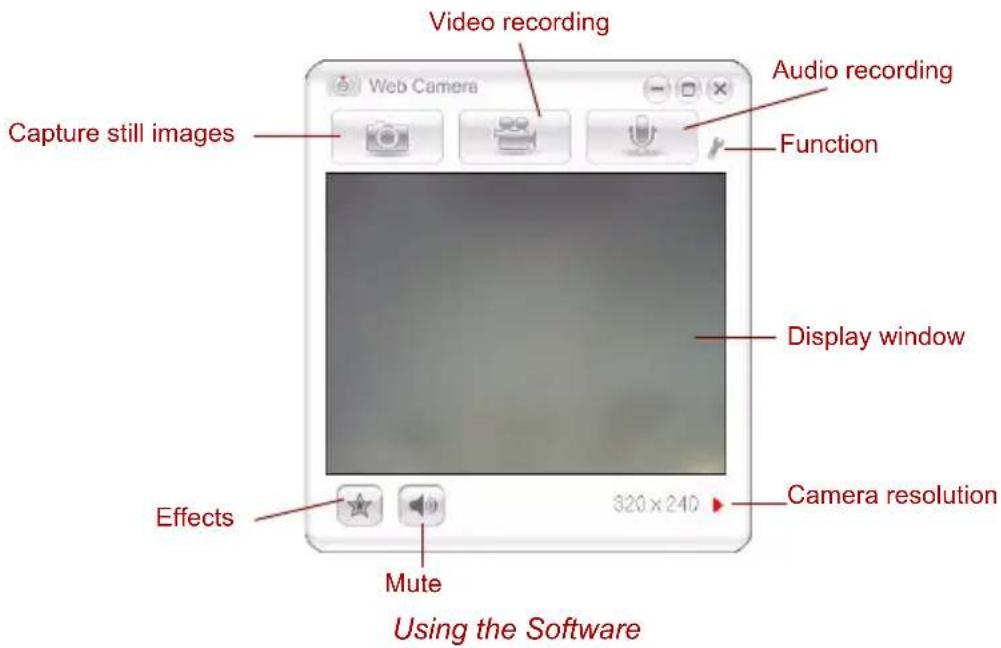
text_image
Video recording Audio recording Function Capture still images Display window Effects Mute 320 x 240 Camera resolution Using the Software| Capture Still Image Click to see a preview of the captured image; you can also e-mail the image. | |
| Video Recording | Click to prepare for recording. Click again to start recording. One more to stop recording and see preview of the video. |
| Audio Recording Click to start recording, Click again to stop and listen to a preview of the audio. | |
| Function Accesses additional functions: About, Player, Effects, Properties, Settings and Help. | |
| About Displays software manufacturer details. | |
| Player Plays video files. | |
| Effects Chooses images to be displayed on the capture screen. | |
| Properties Chooses from the Options tab to flip, zoom, flicker rate, night mode and backlight compensation; in the Image tab change the colour settings; in the profile tab change the lighting conditions. | |
| Settings | Chooses from the: Options tab to change the tool position; the Picture tab to select picture output options such as size, export file and saving location; the Video tab to choose output settings such as Frame Rate, Size, Compression and the file save path; the Audio Device, Compression, Volume and file save path. |
| Help Displays the help files for the software. | |
Using the microphone
You can use the built-in or an external microphone that connects to the microphone jack to record monaural sounds into your applications. It can also be used to issue voice commands to applications that support such functions.(Built-in microphone is provided with some models)
Since your computer has a microphone and speaker, “feedback” may be heard under certain conditions. Feedback occurs when sound from the speaker is picked up in the microphone and amplified back to the speaker, which amplifies it again to the microphone.
This feedback occurs repeatedly and causes a very loud, high-pitched noise. It is a common phenomenon that occurs in any sound system when the microphone input is output to the speaker (throughput) and the speaker volume is too loud or too close to the microphone. You can control throughput by adjusting the volume of your speaker or through the Mute function in the Master Volume panel. Refer to your Windows documentation for details on using the Master Volume panel.
Wireless communications
The computer's wireless communication function supports both Wireless LAN and Bluetooth devices.
Wireless LAN
The Wireless LAN is compatible with other LAN systems based on Direct Sequence Spread Spectrum/Orthogonal Frequency Division Multiplexing radio technology that complies with IEEE 802.11 wireless LAN standard (Revision B and G).
Supported features. It supports the following features:
■Automatic Transmit Rate Select mechanism in the transmit range of 54, 48, 36, 24, 18, 9 and 6 Mbit/s (Revision G).
■Automatic Transmit Rate Select mechanism in the transmit range of 11, 5.5, 2 and 1 Mbit/s (Revision B).
■Frequency Channel Selection (Revision B/G: 2.4GHz)
■Roaming over multiple channels
Card Power Management
■Wired Equivalent Privacy (WEP) data encryption, based on the 128 bit encryption algorithm (Atheros module type).
Security
■Be sure to enable encryption function. Otherwise your computer will allow the illegal access by outsider through wireless LAN to cause illegal instruction, eavesdropping, and loss or destruction of stored data. TOSHIBA strongly recommends the customer to enable the encryption function.
■ TOSHIBA is not liable for the eavesdropping of data due to the use of Wireless LAN and the damage thereof.
Bluetooth™ wireless technology
Bluetooth ^TM wireless technology eliminates the need for cables between electronic devices such as desktop computers, printers and mobile phones. You cannot use the built-in Bluetooth functions and an optional Bluetooth Adaptor simultaneously.
Bluetooth ^TM wireless technology has the following features:
Worldwide operation
The Bluetooth radio transmitter and receiver operates in the 2.45 GHz band, which is license-free and compatible with radio systems in most countries in the world.
Radio links
You can easily establish links between two or more devices. The link is maintained even if the devices are not within line of sight.
Security
Two advanced security mechanisms ensure a high level of security:
■Authentication prevents access to critical data and makes it impossible to falsify the origin of a message.
■Encryption prevents eavesdropping and maintains link privacy.
Wireless communication switch
You can enable or disable RF transmission (Wireless LAN) functions on and off, with hot keys. No transmissions are sent or received when the hot keys don't work.

Set the switch to off in airplanes and hospitals. Check the indicator. It will stop glowing when the wireless communication function is off.
Turn the computer off when you enter an airplane and check the carrier's regulations before you use a computer on board.
Wireless communication Indicator
The wireless communication indicator indicates the status of the wireless communication functions.
Indicator status Indication
| Indicator off | Wireless communication hot keys are set to off. Automatic power down because of overheating. Power malfunction |
Indicator glows Wireless communication hot keys are on.
Wireless LAN is turned on by an application.
If you used the Task Bar to disable Wireless LAN, restart the computer or follow the procedures below to enable the system to recognize Wireless LAN. Click Start → Control Panel → Performance and Maintenance → System → Hardware → Device Manager → Network adaptors, and right click the wireless device then choose Enable.
LAN
The computer has built-in support for Ethernet LAN (10 megabits per second, 10BASE-T), and Fast Ethernet LAN (100 megabits per second, 100BASE-TX). This section describes how to connect/disconnect to a LAN.

Do not install or remove an optional memory module while Wake-up on LAN is enabled.

The Wake-up on LAN function consumes power even when the system is off. Leave the AC adaptor connected while using this feature.
Connecting LAN cable

The computer must be configured properly before connecting to a LAN. Logging onto a LAN using the computer's default settings could cause a malfunction in LAN operation. Check with your LAN administrator regarding set-up procedures.
If you are using Fast Ethernet LAN (100 Mbit/s, 100BASE-TX), be sure to connect with a category 5 cable, CAT5, or higher.
If you are using Ethernet LAN (10 Mbit/s, 10BASE-T), connect with a category 3 cable, CAT3, or higher.
To connect the LAN cable, follow the steps below.
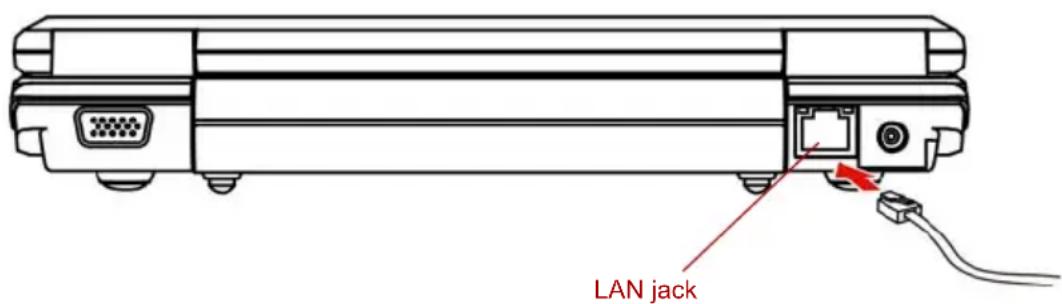
- Plug one end of the cable into the LAN jack. Press gently until you hear the latch click into place.
text_image
LAN jackConnecting the LAN cable
- Plug the other end of the cable into a LAN hub connector. Check with your LAN administrator before connecting to a hub.
Disconnecting LAN cable
To disconnect the LAN cable, follow the steps below.
- Pinch the lever on the connector in the computer's LAN jack and pull out the connector.
- Disconnect the cable from the LAN hub in the same manner. Check with your LAN administrator before disconnecting from the hub.
Cleaning the computer
To help ensure long, trouble-free operation, keep the computer free of dust and use care with liquids around the computer.
■Be careful not to spill liquids into the computer. If the computer does get wet, turn the power off immediately and let the computer dry completely before you turn it on again.
- Clean the computer using a slightly damp (with water) cloth. You can use glass cleaner on the display. Spray a small amount of cleaner on a soft, clean cloth and wipe the screen gently with the cloth.

Never spray cleaner directly onto the computer or let liquid run into any part of it. Never use harsh or caustic chemical products to clean the computer.
Moving the computer
The computer is designed for rugged durability. However, a few simple precautions taken when moving the computer will help ensure trouble-free operation.
■Make sure all disk activities are terminated before moving the computer. Check if the Disk indicator and external device indicator are off.
■Turn off the power to the computer.
■ Disconnect the AC adaptor and all peripherals before moving the computer.
■Close the display. Do not pick up the computer by its display panel.
■Close all port covers.
■Use the carrying case when transporting the computer.
■When carrying your computer, be sure to hold it securely so that it does not fall or hit anything.
- Do not carry your computer by holding protruded portions.
Heat dispersal
To protect from overheating, the CPU has an internal temperature sensor. If the computer's internal temperature rises to a certain level, the cooling fan is turned on or the processing speed is lowered. You can select whether to control the CPU temperature by turning on the fan first, then if necessary, lowering the CPU speed. Or, by lowering the CPU speed first, then if necessary, turning on the fan. Use the Cooling Method item of the Basic Setup window in Power Option.
When the CPU temperature falls to a normal range, the fan is turned off and the CPU operation returns to standard speed.

If the CPU temperature reaches an unacceptably high level with either setting, the system automatically shuts down to prevent damage. Data in memory will be lost.
Chapter 5
The Keyboard
The computer's keyboard layout is compatible with a 104/105-key enhanced keyboard. Pressing Fn key an other keys can execute all enhanced keyboard function.
The number of keys on your keyboard depends on which country/region's keyboard layout your computer is configured with. Keyboards for numerous languages are available.
There are five types of keys: typewriter keys, function keys, soft keys and keypad overlay.
Typewriter keys
The typewriter keys, produce the uppercase and lowercase letters, numbers, punctuation marks, and special symbols that appear on the screen.
There are some differences, however, between using a typewriter and using a computer keyboard:
■Letters and numbers produced in computer text vary in width. Spaces, which are created by a “space character,” may also vary depending on line justification and other factors.
■The lowercase I (el) and the number 1 (one) are not interchangeable on computers as they are on a typewriter.
■The uppercase O (oh) and the 0 (zero) are not interchangeable.
The Caps Lock function key locks only the alphabetic characters in uppercase while the shift lock on a typewriter places all keys in the shifted position.
The Shift keys, the Tab key, and the Back Space key perform the same function as their typewriter counterparts but also have special computer functions.
Function keys: F1 ... F12
The function keys, not to be confused with Fn, are the 12 keys at the top of your keyboard. These keys are dark gray, but function differently from the other dark gray keys.

text_image
F1 (↑) F2 → F3 E/□ F4 F5 F6 A/A F7 F8 A F9 ▼ F10 ▲ F11 U F12F1 through F12 are called function keys because they execute programmed functions when pressed. Used in combination with the Fn key, keys marked with icons execute specific functions on the computer. See the section, Soft keys: Fn key combinations, in this chapter. The function executed by individual keys depends on the software you are using.
Soft keys: Fn key combinations
The Fn (function) is unique to Toshiba computers and is used in combination with other keys to form soft keys. Soft keys are key combinations that enable, disable or configure specific features.

Some software may disable or interfere with soft-key operations. Soft key settings are not restored by the Resume feature.
Emulating keys on an enhanced keyboard
The keyboard is designed to provide all the features of the 104/105-key enhanced keyboard, shown in figure 5-1. The 104/105-key enhanced keyboard has a numeric keypad. It also has additional Enter and Alt keys to the right of the main keyboard. Since the keyboard is smaller and has fewer keys, some of the enhanced keyboard functions must be simulated using two keys instead of one on the larger keyboard.
Your software may require you to use keys that the keyboard does not have. Pressing the Fn key and one of the following keys simulates the enhanced keyboard's functions.
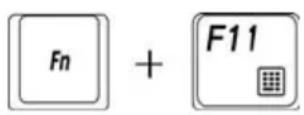
Press Fn + F11 to access the computer's integrated keypad.
When activated, the keys marked with dark gray figures will become numeric keypad. Please refer to the Windows special keys section in this chapter for more information on how to operate these keys. Please note that the default setting for the function is off.
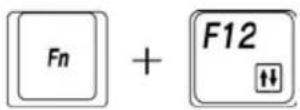 | Press Fn + F12 (Scroll Lock) to lock the cursor on a specific line. The power on default is off. |
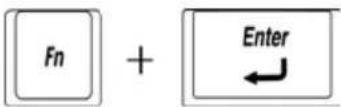 | Press Fn + Enter to simulate Enter on the enhanced keyboard's numeric keypad. |
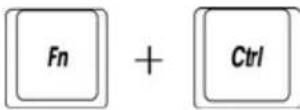 | Press Fn + Ctrl to simulate the enhanced keyboard's right Ctrl key. |
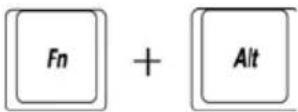 | Press Fn + Alt to simulate the enhanced keyboard's right Alt key. |
Hot keys
Hot keys (pressing Fn + a function or Esc key) let you enable or disable certain features of the computer.
Zoom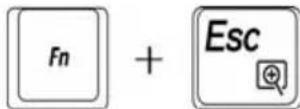 | Pressing Fn + Esc changes the display resolution. |
Wireless WAN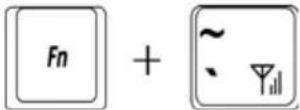 | Pressing Fn + ~ changes wireless WAN On or Off.(Provided with some models) |
Wireless communication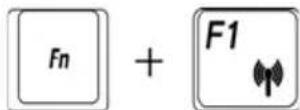 | Pressing Fn + F1 changes “Wireless (WLAN/ BT/wireless WAN) On/Off”. When user presses Fn + F1, all the wireless should enable.(Provided with some models) |
Hibernation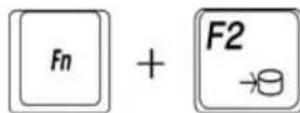 | Pressing Fn + F2 switches the system to hibernation mode. |
Output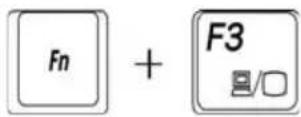 | Pressing Fn + F3 changes the active display device. |
Mute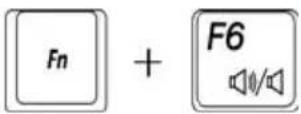 | Pressing Fn + F6 turns sound on or off. When you press these hot keys, the current setting will be displayed as an icon. |
Silent Mode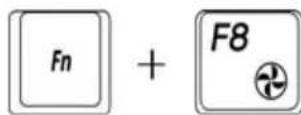 | Pressing Fn + F8 can activact the intelligent control of the CPU clock and voltage, adjusting fan noise effectively and extending battery power. |
Brightness down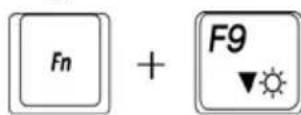 | Pressing Fn + F9 decreases the computer's display panel brightness in individual steps. |
Brightness up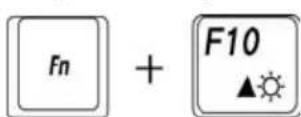 | Pressing Fn + F10 increases the computer's display panel brightness in individual steps. |
Speaker down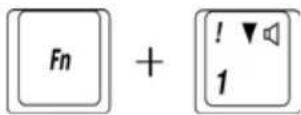 | Pressing Fn + 1 decreases the speaker volume in individual steps. |
Speaker Up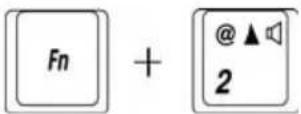 | Pressing Fn + 2 increases the speaker volume in individual steps. |
TOSHIBA zooming utility (reduce)
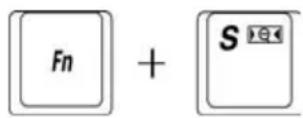
Pressing Fn + S reduces the icon size on the desktop or the font sizes within one of the supported application windows.
TOSHIBA zooming utility (enlarge)

Pressing Fn + A enlarges the icon size on the desktop or the font sizes within one of the supported application windows.
Windows special keys
The keyboard provides two keys that have special functions in Windows: one activates the Start menu and the other has the same function as the secondary mouse button.

This key activates the Windows Start menu.

This key has the same function as the secondary mouse button.
Keypad overlay
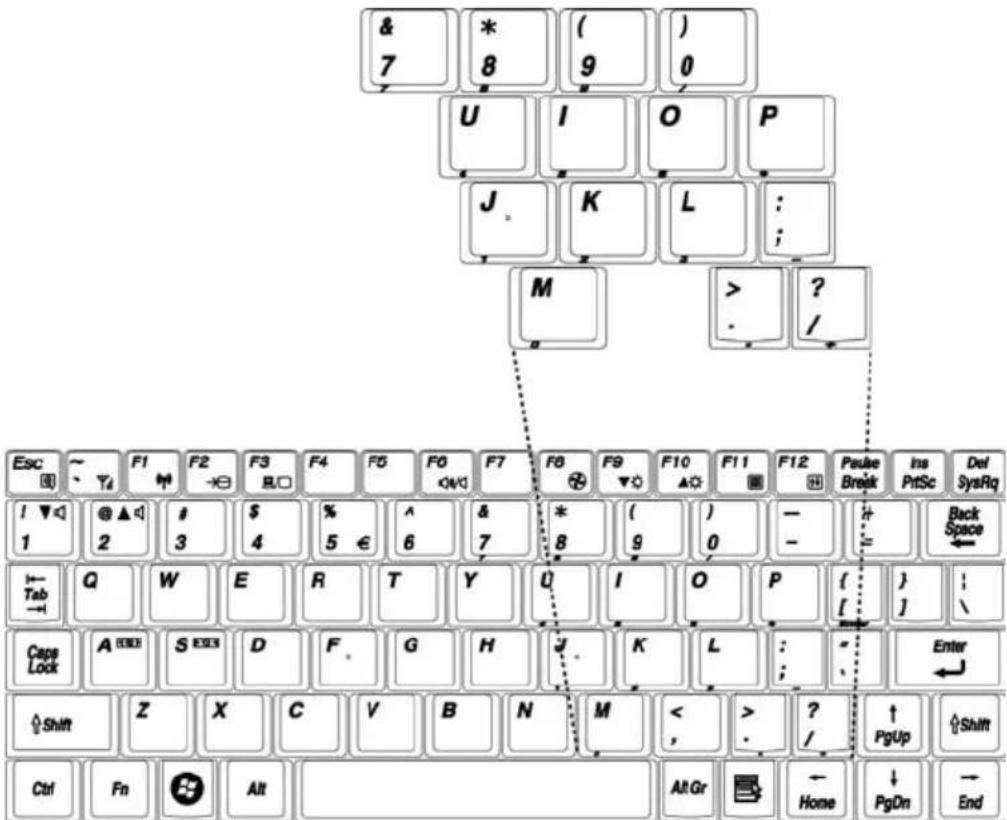
Your computer's keyboard does not have a separate numeric keypad but includes a numeric keypad overlay which functions like one - this is located in the center of the keyboard with the relevant keys having dark gray letters at their front edge. The overlay provides the same functions as the numeric keypad on a standard 104/105-key enhanced keyboard.
Turning on the overlays
The numeric keypad overlay can be used for numeric data input.
Numeric mode
To turn on the Numeric mode, press Fn + F11. The Numeric mode indicator lights. Now try numeric data entry using the keys in figure 5-1. Press Fn + F11 again to turn off the overlay.
text_image
& 7 * 8 ( ) 9 0 U I O P J K L : ; M > ? / Esc ~ F1 F2 F3 F4 F5 F6 F7 F8 F9 F10 F11 F12 Paule Break Ins PtSc Def SysRq ! 1▼ @▲ # $ % & * ( ) - = Back Space 1 2 3 4 5 € 6 7 8 9 0 - Tab Q W E R T Y U I O P { } \ Caps Lock A EEXB S EEXB D F. G H J. K L : Enter Shift Z X C V B N M < > ? / ↑PgUp ↑Shift Ctrl Fn Alt AltGr Home ↓PgDn →EndThe numeric keypad overlay
Temporarily using normal keyboard (overlay on)
While using the overlay, you can temporarily access the normal keyboard functions without turning off the overlay :
- Hold Fn and press any other key. All keys will operate as if the overlay were off.
- Type uppercase characters by holding Fn + Shift and pressing a character key.
- Release Fn to continue using the overlay.
Temporarily using overlay (overlay off)
While using the normal keyboard, you can temporarily use the keypad overlay without turning it on:
- Press and hold down Fn.
- Check the keyboard indicators. Pressing Fn turns on the most recently used overlay. If the Numeric mode indicator lights, you can use the overlay for numeric entry. If the Arrow mode indicator lights, you can use the overlay for cursor and page control.
- Release Fn to return to normal keyboard operation.
Temporarily changing modes
If the computer is in Numeric mode, you can switch temporarily to Arrow mode by pressing Shift.
If the computer is in Arrow mode, you can switch temporarily to Numeric mode by pressing Shift.
Generating ASCII characters
Not all ASCII characters can be generated using normal keyboard operation. But, you can generate these characters using their ASCII codes.
With the overlay on:
- Hold down Alt.
- Using the overlay keys, type the ASCII code.
- Release Alt, and the ASCII character appears on the display screen.
With the overlay off:
- Hold Alt + Fn.
- Using the overlay keys, type the ASCII code.
- Release Alt + Fn, and the ASCII character appears on the display screen.
Chapter 6
Power and Power-up Modes
The computer's power resources include the AC adaptor and internal battery. This chapter gives details on making the most effective use of these resources including charging and changing battery, tips for saving battery power, and power-up modes.
Power conditions
The computer's operating capability and battery charge status are affected by the power conditions: whether an AC adaptor is connected, whether a battery is installed and what the charge level is for the battery.
Table Power conditions
| Power on Power off | (no operation) | ||
| AC adaptor connected | Battery fully charged | OperatesLED: Battery off | LED: Battery off |
| Battery partially charged or no charge | OperatesQuick ChargeLED: Battery blinking Green slow | Quick chargeLED: Battery blinking Green slow | |
| No battery installed | OperatesNo chargeLED: Battery off | No chargeLED: Battery off | |
| AC adaptor not connected | Battery charge is above low battery trigger point | OperatesLED: Battery Green | |
| Battery charge is below low battery trigger point | OperatesLED: Battery Blinking Green | ||
| Battery charge is exhausted | Computer goes into hibernation or shuts down (depending on the Toshiba power Management Utility Setting) | ||
| No battery installed | No operationLED: Battery off | ||
Power indicators
The Battery and Power indicators on the system indicator panel alert you to the computer's operating capability and battery charge status.
Battery indicator
Check the Battery indicator to determine the status of the battery pack - the following indicator conditions should be noted:
| Blinking Green Indicates battery charge is below low battery trigger point. |
| Blinking Green Slow Indicates the AC adaptor is connected and charging the battery. |
| Green Indicates the AC adaptor is not connected and the battery charge is above low battery trigger point. |
| No light Under any other conditions, the indicator does not light. |

If the battery becomes too hot while it is being charged, the charge will stop and the battery indicator will go out. When the battery's temperature falls to a normal range, charge will resume. This event occurs regardless of whether the power to the computer is on or off.
Power indicator
Check the Power indicator to determine the power status of the computer - the following indicator conditions should be noted:
Green Indicates power is being supplied to the computer and the computer is turned on.
Blinking Green Indicates the power was turned off while the computer was in Standby mode.
No light Under any other conditions, the indicator does not light.
Battery types
The computer has two different types of battery:
Battery — 4 cell.
■Real Time Clock (RTC) battery
Battery
When the AC power cord is not connected, the computer's main power source is a removable lithium ion battery pack, also referred to in this manual as the battery. You can purchase additional battery packs for extended use of the computer away from an AC power source.

The battery pack is a lithium ion battery, which can explode if not properly replaced, used, handled or disposed of. Dispose of the battery as required by local ordinances or regulations. Use only battery recommended by TOSHIBA as replacements.
The battery recharges the RTC battery. The battery maintains the state of the computer when you enable Resume.

When the computer is powered off in hibernation and standby mode, and the AC adaptor is not connected, the battery pack supply power to maintain data and programs in memory. If the battery pack is completely discharged, hibernation and standby mode do not function and the computer loses all data in memory.
One of the following messages appears when you turn on the power:
The firmware has detected that a CMOS battery fail occurred.
The firmware has detected that a CMOS battery fail occurred.
To ensure that the battery pack maintains its maximum capacity, operate the computer on battery power at least once a month until the battery pack is fully discharged. Refer to Extending battery life in this chapter for procedures. If the computer is continuously operated on AC power, more than a month, the battery may fail to retain a charge. It may not function efficiently over the expected life of the battery and the Battery LED may not indicate a low-battery condition.
Real Time Clock battery
The Real Time Clock (RTC) battery provides power for the internal real time clock and calendar. It also maintains the system configuration.
If the RTC battery becomes completely discharged, the system loses this data and the real time clock and calendar stop working. One of the following messages appears when you turn on the power:
The firmware has detected that a CMOS battery fail occurred.

The computer's RTC battery is a lithium ion battery and should be replaced only by your dealer or by a TOSHIBA service representative. The battery can explode if not properly replaced, used, handled or disposed of. Dispose of the battery as required by local ordinances or regulations
Care and use of the battery pack
This section provides the important safety precautions in order to handle your battery pack properly.
Refer to the enclosed Instruction Manual for Safety and Comfort for detailed precautions and handling instructions.

■ Make sure the battery is securely installed in the computer before attempting to charge the battery pack. Improper installation could generate smoke or fire, or cause the battery pack to rupture.
- Keep the battery pack out of reach of infants and children. It can cause injury.

The battery pack, Extended Battery Pack and High Capacity Battery Pack are lithium ion batteries, which can explode if not replaced, used, handled or disposed of properly. Dispose of the battery as required by local ordinances or regulations. Use only batteries recommended by TOSHIBA as replacements.
Charge the battery pack only in an ambient temperature between 5 and 35 degrees Celsius. Otherwise, the electrolyte solution might leak, battery pack performance might deteriorate and the battery life might be shortened.
- Never install or remove the battery pack without first turning off the power and disconnecting the AC adaptor. Never remove the battery pack while the computer is in Sleep Mode. Data could be lost.
When the High Capacity Battery Pack is connected to the computer, do not hold on only to the High Capacity Battery Pack when lifting the computer up. The High Capacity Battery Pack may separate from them computer, causing it to fall and cause injuries.

Never remove the battery pack while the Wake-up on LAN function is enabled. Data will be lost. Before you remove a battery pack, disable the Wake-up on LAN function.
Charging the battery
When the power in the battery pack becomes low, the Battery indicator flashes green fast indicating that only a few minutes of battery power remain. If you continue to use the computer while the Battery indicator flashes, the computer enables hibernation mode (so you don't lose data) and automatically turns off.

The computer enters hibernate mode only if hibernation is enabled in the Hibernate tab in Power Options.
You must recharge a battery pack when it becomes discharged.
Procedures
To recharge a battery pack while it is installed in the computer, connect the AC adaptor to the DC IN socket and plug the other end into a working outlet.
The Battery indicator glows blinking green slow when the battery is being charged.

Use only the computer connected to an AC power source or the optional TOSHIBA battery charger to charge the battery pack. Never attempt to charge the battery pack with any other charger
Time
The following table shows the approximate time required to fully charge a discharged battery.
Charging time (hours)
Battery type Power on Power off
Battery pack (4 cell) 4 hours or more 4 hours
RTC battery 24 hours 24 hours

The charging time when the computer is on is affected by ambient temperature, the temperature of the computer and how you use the computer. If you make heavy use of external devices, for example, the battery might scarcely charge at all during operation. Refer also to the section Maximizing battery operating time.
Battery charging notice
The battery may not charge right away under the following conditions:
The battery is extremely hot or cold. If the battery is extremely hot, it might not charge at all. Also, to ensure the battery charges to its full capacity, charge the battery at room temperature of 10^ to 30^ C ( 50^ to 86^ F).
■The battery is nearly completely discharged. Leave the AC adaptor connected for a few minutes and the battery should begin charging.
The Battery indicator may show a rapid decrease in battery operating time when you try to charge a battery under the following conditions:
■The battery has not been used for a long time.
■The battery has completely discharged and been left in the computer for a long time.
A cool battery is installed in a warm computer.
In such case, follow the steps below.
-
Fully discharge the battery by leaving it in the computer with the power on until the power automatically shuts off.
-
Plug in the AC adaptor.
-
Charge the battery until the Battery indicator glows green.
-
Fully discharge the battery by leaving it in the computer with the power on until the power automatically shuts off.
- Plug in the AC adaptor.
- Charge the battery until the Battery indicator glows green.
Repeat the steps two or three times until the battery recovers normal capacity.

Leaving the AC adaptor connected will shorten battery life. At least once a month, run the computer on battery power until the battery is fully discharged, then recharged the battery.
Monitoring battery capacity
Remaining battery power can be monitored in Power Options.

Wait at least 16 seconds after turning on the computer before trying to monitor the remaining operating time. The computer needs this time to check the battery's remaining capacity and to calculate the remaining operating time, based on the current power consumption rate and remaining battery capacity. The actual remaining operating time may differ slightly from the calculated time.
Maximizing battery operating time
A battery's usefulness depends on how long it can supply power on a single charge.
How long the charge lasts in a battery depends on:
■How you configure the computer (for example, whether you enable battery-power saving options). The computer provides a battery save mode, which can be set in Power Options, to conserve battery power. This mode has the following options:
■CPU Precessing speed
Screen brightness
Cooling Method
System Standby
System hibernation
■Monitor Power off
■HDD Power off
How often and how long you use the hard disk, optical disc drive and the diskette drive.
■How much charge the battery contained to begin with.
■Enabling hibernation and Standby mode conserves battery power if you are frequently turning the computer off and on.
■Where you store your programs and data.
■Closing the display when you are not using the keyboard saves power.
■Operating time decreases at low temperatures.
■The condition of the battery terminals. Make sure the battery terminals stay clean by wiping them with a clean dry cloth before installing the battery pack.
Retaining data with power off
When you turn off your computer with fully charged battery, the battery retain data for the following approximate time periods.
Retention Time
Battery type State and Retention Time
Battery pack (4 cell) about 3 hours (standby mode)
about 14 days (shutdown mode)
RTC battery about 3 months
Extending battery life
To maximize the life of your battery packs:
At least once a month, disconnect the computer from a power source and operate it on battery power until the battery pack fully discharges. Before doing so, follow the steps below.
- Turn off the computer's power.
- Disconnect the AC adaptor and turn on the computer's power. If it does not turn on then go to Step 4.
- Operate the computer on battery power for five minutes. If the battery pack has at least five minutes of operating time, continue operating until the battery pack is fully discharged. If the battery LED flashes or there is some other warning to indicate a low battery, go to step 4.
-
Connect the AC adaptor to the computer and the power cord to a power outlet. The Battery LED should glow blinking green slow to indicate that the battery pack is being charged. If the battery indicator does not glow, power is not being supplied. Check the connections for the AC adaptor and power cord.
-
Charge the battery pack until the Battery indicator glows green.
If you have extra battery packs, rotate their use.
If you will not be using the system for an extended period more than one month, remove the battery pack.
■Disconnect the AC adaptor when the battery is fully charged. Overcharging makes the battery hot and shortens life.
If you are not going to use the computer for more than eight hours, disconnect the AC adaptor.
■Store spare battery packs in a cool dry place out of direct sunlight.
Replacing the battery pack
When the battery pack reaches the end of its operating life you will need to install a new one. If the Battery indicator flashes green shortly after fully recharging the battery, the battery pack needs to be replaced.
You might also replace a discharged battery pack with a charged spare when you are operating your computer away from an AC power source. This section explains how to remove and install battery packs.
Removing the battery pack
To remove a discharged battery, follow the steps as detailed below:

When handling battery pack, be careful not to short circuit the terminals. Also do not drop, hit or otherwise apply impact; do not scratch or break the casing and do not twist or bend the battery pack.
Do not remove the battery pack while the computer is in Standby mode. Data is stored in RAM, so if the computer loses power it will be lose.
In hibernation mode, data will be lose if you remove the battery or disconnect the AC adaptor before the save is completed. Wait for the Disk indicator, optical disc drive indicator and external device indicator to go out.
- Save your work.
- Turn the computer's power off. Make sure the Power indicator is off.
- Remove all cables connected to the computer.
- Turn the computer upside down with the back of the computer facing you.
- Slide the battery pack locking latch toward the unlock position .
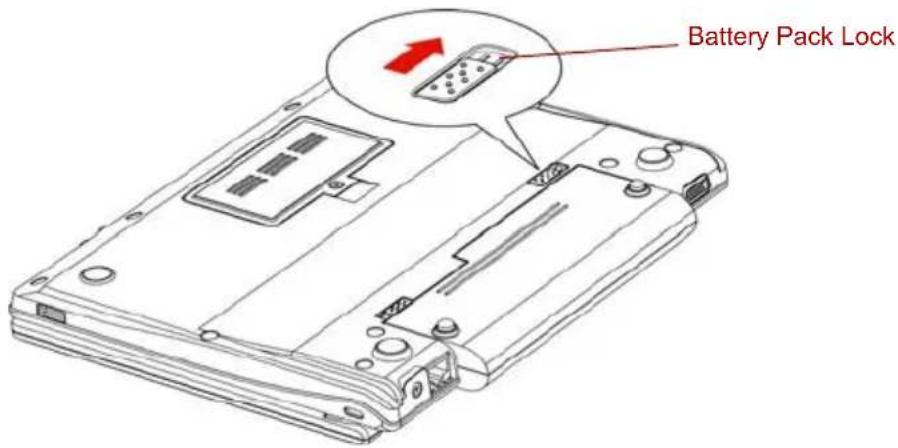
text_image
Battery Pack LockSlide the locking latch to the unlocked position
- Slide the battery release latch to free the battery pack for removal, then lift up the battery pack.

text_image
Battery Release Latch Battery PackRemoving the battery pack
- Pull the battery pack forward to remove it.

For environmental reasons, do not throw away a spent battery pack. Please return spent battery pack to your TOSHIBA dealer.
Installing the battery pack
To install a battery pack, follow the steps below.

The battery pack is a lithium ion battery, which can explode if not properly replaced, used, handled or disposed of. Dispose of the battery as required by local ordinances or regulations. Use only battery recommended by TOSHIBA as replacements.
- Be sure the computer's power is off and all cables are disconnected.
- Insert the battery pack.
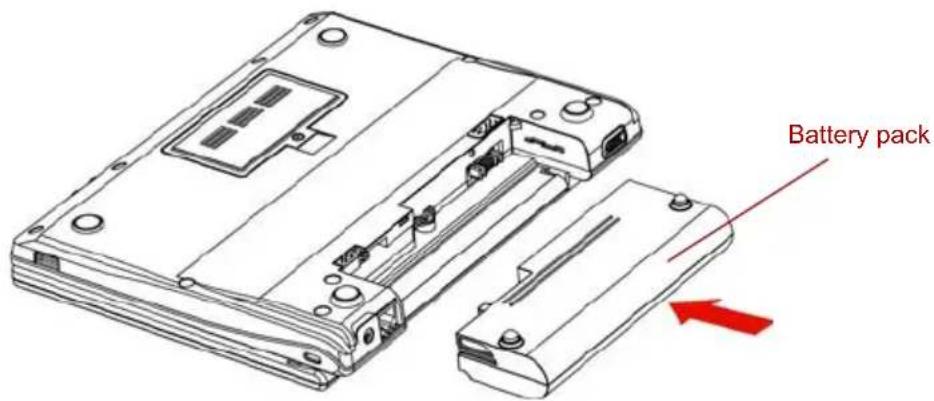
text_image
Battery packInstalling the battery pack
- Push the battery pack until it is firmly seated.
- Slide the battery pack locking latch toward the lock position.
Starting the computer by password
If you have already registered a password, please enter the password manually to start the computer:
To start up the computer with the user password, follow these steps:
- Turn on the power as described in Chapter 3, Getting Started. The following message appears:
Username

At this point, the hot keys Fn + F1 to F9 do not work. They will function after you enter the password.
- Enter the password.
- Press Enter.
Power-up modes
The computer has the following power-up modes:
■ Boot: Computer shuts down without saving data. Always save your work before you turn the computer off in boot mode.
■Hibernation: Data in memory is saved to the hard disk.
■Standby: Data is maintained in the computer's main memory.

Refer also to the sections Turning on the power and Turning off the power in Chapter 3, Getting Started.
Hot keys
You can use hot keys Fn + F2 to enter hibernation mode. See Chapter 5, The Keyboard for details.
Panel power on/off
You can set up your computer so that power turns off automatically when you close the display panel. When you open the panel, power turns on in standby or hibernation mode but not in boot mode.

If the panel power off function is enabled and use Shut down Windows, do not close the display until the shut down function is completed.
System auto off
This feature turns the system off automatically if it is not used for a set duration. The system shuts down in standby mode or hibernation mode.
Chapter 7
BIOS Setup and Passwords
This chapter explains how to use BIOS to set up user and supervisor passwords.
Accessing BIOS Setup Menu
To start the utility, please press "F2" to enter the BIOS Setup Menu when boot up the computer.
BIOS Setup Menu
When enter BIOS Setup Menu, please choice Security item then you can change or modify the User Password or Supervisor Password.
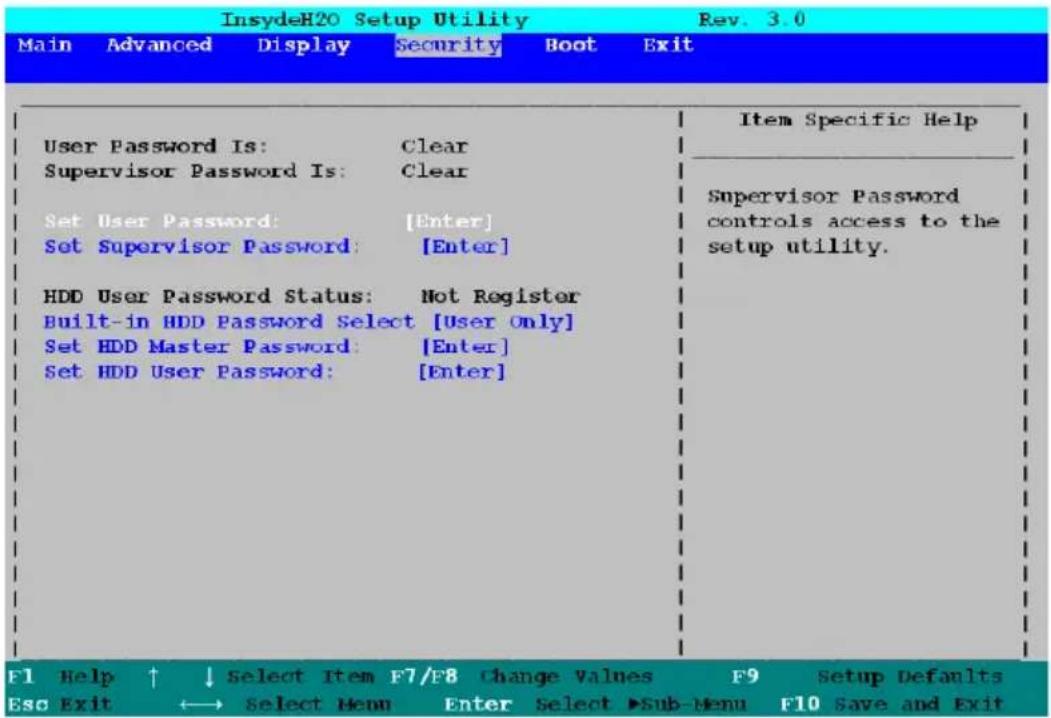
text_image
InsydeH20 Setup Utility Rev. 3.0 Main Advanced Display Security Boot Exit User Password Is: Clear Supervisor Password Is: Clear Set User Password: [Enter] Set Supervisor Password: [Enter] HDD User Password Status: Not Register Built-in HDD Password Select [User Only] Set HDD Master Password: [Enter] Set HDD User Password: [Enter] Item Specific Help Supervisor Password controls access to the setup utility. F1 Help ↑ ↓ Select Item F7/F8 Change Values F9 Setup Defaults Eso Exit ←→ Select Menu Enter Select ▶Sub-Menu F10 Save and ExitBIOS Setup Menu
Password
User Password / Supervisor Password
This option allows you to set or reset the user password for power on.
To enter a user password:
- Enter a password of up to 10 characters. The character string you enter is displayed as a string of asterisks. For example, if you enter a password consisting of four characters, the display is shown as:
Enter Password: ****
- Click the ENTER button. The following message appears, allowing you to verify the password.
Verify Password:
- If character strings match, the password is registered click OK button. If they do not match, the following message appears. You must repeat from step 1.
Passwords are not the same Press ENTER to continue!!!
If you enter the password incorrectly three times in a row, the computer need to shut off. You will not be able to access the password option in the BIOS Setup Menu. In this case you must turn the power off and back on to retry the procedure.
Boot Priority
Boot Priority Options
This option sets the priority for booting the computer.
To change the boot drive, follow the steps below.
- Hold down F12 and boot the computer.
- Use the up/down cursor keys to select boot device you want and press ENTER.
If a supervisor password is set, the menu above does not appear when you use the user password to start the computer.
If you press a key other than one of those above or if the selected device is not installed, the system will boot according to the current setting in BIOS Setup Menu.
USB
Legacy USB Support
When enter BIOS Setup Menu, please choice Advanced item then you can change or modify the Legacy USB support.
Use this option to enable or disable USB Legacy Emulation. If your operating system does not support USB, you can still use a USB mouse and keyboard by setting the USB Legacy Emulation item to enabled.
Enabled Enables the USB Legacy Emulation. (Default)
Disabled Disables the USB Legacy Emulation.
USB Sleep and Charge
When enter BIOS Setup Menu, please choice Advanced item then you can change or modify the USB Sleep and Charge
Your computer can supply USB bus power (DC5V) to the USB port even when the power of the computer is turned OFF. "Power OFF" includes Sleep Mode, Hibernation Mode or shutdown state. This function can be used for ports that support the USB Sleep and Charge function (hereinafter called "compatible ports").
Compatible ports are USB ports that have the (⚡) symbol icon. You can use the "USB Sleep and Charge function" to charge certain USBcompatible external devices such as mobile phones or portable digital music players.
However, the "USB Sleep and Charge function" may not work with certain external devices even if they are compliant with the USB specification. In those cases, turn the power of the computer ON to charge the device.
When "USB Sleep and Charge function" is set to [Enabled], USB bus power (DC5V) will be supplied to compatible ports even when the power of the computer is turned OFF.
USB bus power (DC5V) is similarly supplied to the external devices which are connected to the compatible ports. However, some external devices cannot be charged solely by supplying USB bus power (DC5V).
As for the specifications of the external devices, please contact the device manufacturer or check the specifications of the external devices thoroughly before use.
■ Using the USB sleep and charge function to charge external devices will take longer than charging the devices with their own chargers.
If external devices are connected to compatible ports when the AC adaptor is not connected to the computer, the battery of the computer will be depleted even when the power of the computer is turned OFF. As such, we recommend that you connect the AC adaptor to the computer when using the USB sleep and charge function.
■External devices connected to the USB bus power (DC5V) function that interfaces with the power ON/OFF of the computer may always be in an operational state.
■When there is a current overflow of the external devices connected to the compatible ports, USB bus power (DC5V) supply may be stopped for safety reasons.

Metal paper clips or hair pins/clips will generate heat if they come into contact with USB ports. Do not allow USB ports to come into contact with metal products, for example when carrying the computer in your bag.
The default setting is [Disabled]. Changing the setting to [Enabled] enables the use of this function.
There are two modes, Mode1 and Mode2 in [Enabled]. For normal use, set the setting to Mode1.

If the function does not work with Mode1 setting, change it to Mode2. Some external devices may not be able to use this function in either mode. When this happens, change the setting to [Disabled].
| Enabled (Mode 1) | Enabled (Mode 1) |
| Enabled (Mode 2) | Enables USB Sleep and Charge function. |
| Disabled | Disables USB Sleep and Charge function (Default). |
LAN
Wake-up on LAN
This feature lets the computer's power be turned on when it receives a wake-up signal from the LAN.
| Enabled | Enables the Wake-up on LAN.(Default) |
| Disabled | Disables the Wake-up on LAN. |

Do not install or remove an optional memory module while Wake-up on LAN is enabled.

Wake-up on LAN does not work without the AC adaptor. Leave it connected, if you are using this feature.
Chapter 8
Optional Devices
Optional devices can expand the computer's capabilities and its versatility. The following optional devices are available from your TOSHIBA dealer:
Cards/Memory
■SD, MS, MS Pro memory cards
■Memory expansion
SIM card
Power devices
■Additional battery pack (4 cell)
■Additional AC adaptor
Peripheral devices
USB FDD Kit
■External monitor
Other
■Security lock
Bridge media card slot
The computer is equipped with a bridge media card slot that can accommodate Secure Digital (SD)/ Memory Stick (MS)/Memory Stick Pro (MS Pro) memory cards. These memory cards let you easily transfer data from devices, such as digital cameras and Personal Digital Assistants, that use SD/MS/MS Pro memory cards.
See below for the card capacities:
Card Type Capacities
SD 8 MB, 16 MB, 32 MB, 64 MB, 128 MB, 256 MB, 512 MB, 1 GB, 2 GB
MS 8 MB, 16 MB, 32 MB, 64 MB, 128 MB, 256 MB
MS Pro 256 MB, 512 MB, 1 GB, 2 GB

The Logo of SD Memory card is

Installing a SD/MS/MS Pro Card
To install the memory card, follow the steps below.
- Insert the memory card.
- Press gently to ensure a firm connection.
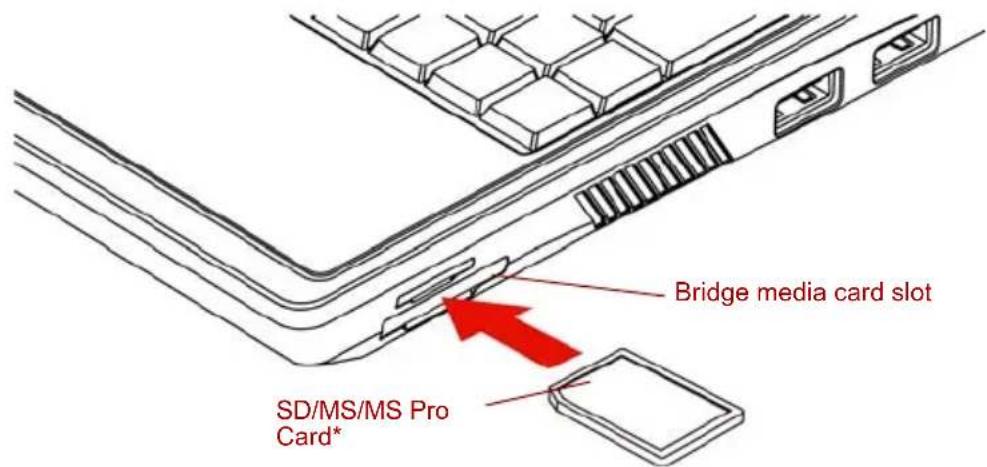
text_image
Bridge media card slot SD/MS/MS Pro Card**The cards' shape depend on the card you purchased
Inserting the memory card

Remove the memory card from memory card slot when moving the computer.

- Keep foreign objects out of the bridge media card slot. A pin or similar object can damage the computer's circuitry.
■Make sure the SD/MS/MS Pro Card is oriented properly before you insert it.
■Memory Stick Duo/PRO Duo and the Memory Stick adaptor are not compatible with the bridge media card slot. Do not insert Memory Stick Duo/PRO Duo into the slot. Data may be lost or damaged if you use any card other than those supported.
■ Two kinds of cards will not work at the same time. Please insert only one card when using bridge media card slot.
Do not format a memory card with Windows as it might result in that card not being able to be used with some peripheral devices.
The card is designed so that it can be inserted only one way. Do not try to force the card into the slot.
For more details on using memory cards, see manuals accompanying the cards.

If Windows fail to read the SD/MS/MS Pro Card, remove it then reinsert it.
Removing a SD/MS/MS Pro Card
To remove the memory card, follow the steps below.
- In Windows XP, open the Safely Remove Hardware icon on the system tray and disable the inserted memory card.
- Directly pull out the memory card inside the socket to eject it.
- Grasp the card and remove it.
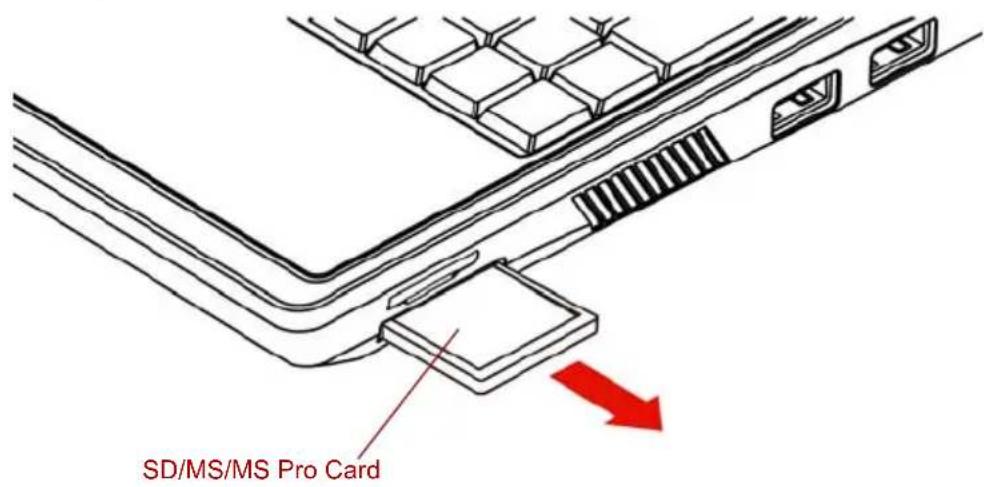
text_image
SD/MS/MS Pro CardRemoving the inserted memory card

■Make sure the bridge media card slot indicator is out before you remove the card or turn off the computer's power. If you remove the card or turn off the power while the computer is accessing the card you may lose data or damage the card.
■Please do not remove the inserted memory card from the bridge media card slot while in standby or in hibernation state. If you do, PC may become unstable or the data in the memory card may be lost.
■Do not turn off or make computer in standby or hibernation mode during data is being transferred. The computer could become unstable or data would be lost.
Memory expansion
You can install additional memory in the computer's memory module to increase the amount of RAM.
Installing memory module
To install a memory module, make sure the computer is in boot mode then:
- Turn the computer off in boot mode. Refer to the Turning off the power section in Chapter 3.

If you use the computer for a long time, the memory modules will become hot. In this case, let the memory modules cool to room temperature before you replace them.
Do not try to install a memory module with the computer turned on or turned off in sleep and hibernation mode. You can damage the computer and the memory module.
- Remove all cables connected to the computer.
- Turn the computer upside down and remove the battery pack (refer to Chapter 6, Power and Power-up Modes.)
- Remove one screw securing the memory module cover.
- Lift off the cover.
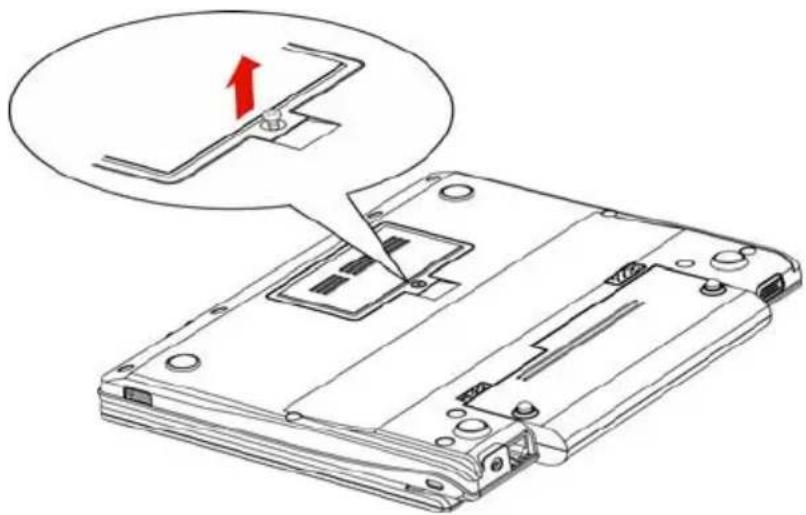
text_image
Technical diagram showing a device's internal structure with an arrow indicating a component being inserted, labeled in Chinese.Removing the cover
- Insert the memory module into the connector on the computer. Press the module carefully and firmly to ensure a solid connection.
- Push the module down so that it lies flat and is secured by two latches.

Do not touch the connectors on the memory module or on the computer. Debris on the connectors may cause memory access problems.
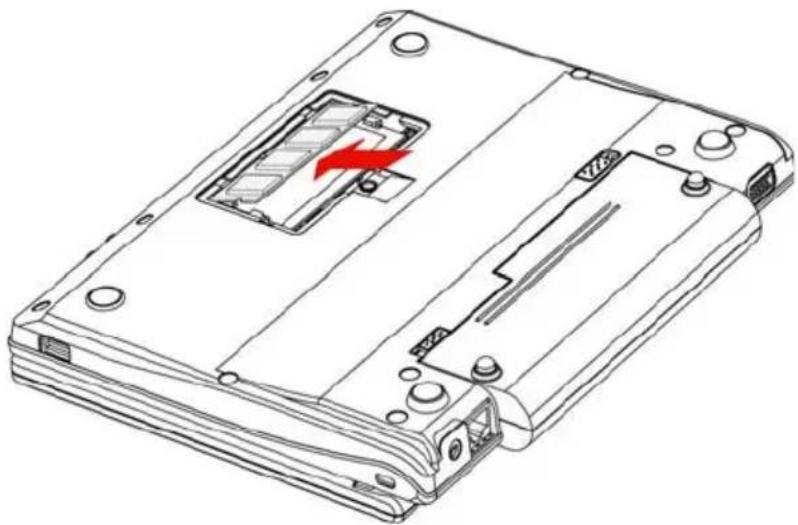
natural_image
Technical line drawing of a device casing with internal components and a red arrow indicating a specific part (no text or symbols present)Inserting the memory module
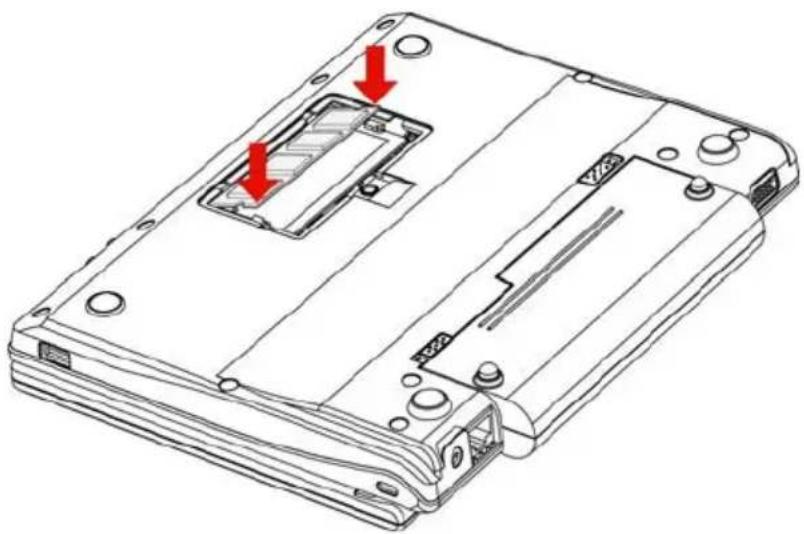
natural_image
Technical line drawing of a device casing with red arrows indicating internal components (no text or symbols)Pushing the memory module down
-
Seat the cover and secure it with one screw.
-
When you turn the computer on, it should automatically recognize the total memory capacity. If it is not recognized, check the module's connection.
Removing memory module
To remove the memory module, make sure the computer is in boot mode then:
- Turn the computer off and remove all cables connected to the computer.

If you use the computer for a long time, the memory modules will become hot. In this case, let the memory modules cool to room temperature before you replace them.
Do not try to remove a memory module with the computer turned on or turned off in standby and hibernation mode. You can damage the computer and the memory module.
-
Turn the computer upside down and remove the battery pack (refer to Chapter 6, Power and Power-up Modes.)
-
Remove one screw securing the memory module cover.
-
Lift off the cover.
-
Use a slender object such as a pen to press two latches on either side of the memory module to the outside. The memory module will pop up.
-
Grasp the memory module by the sides and pull it out.

Do not touch the connectors on the memory module or on the computer. Debris on the connectors may cause memory access problems.
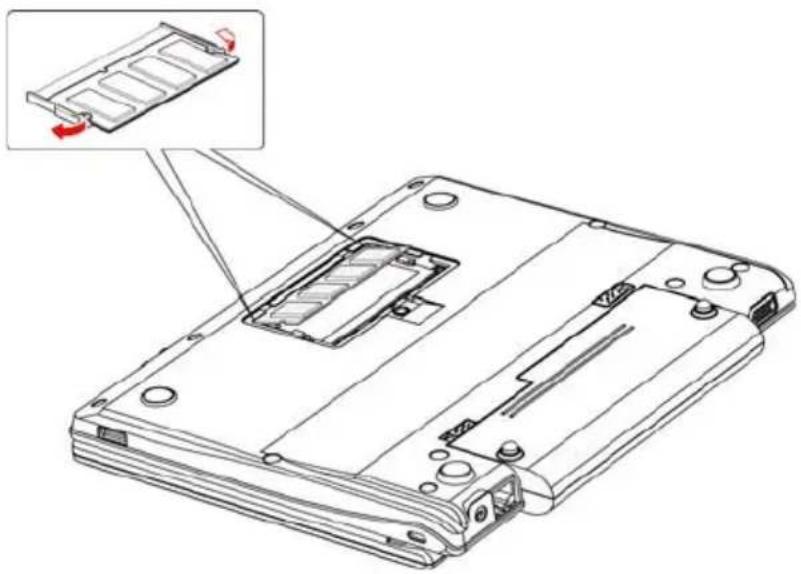
natural_image
Technical line drawing of a battery pack assembly with an inset showing a component detail (no text or symbols present)Removing the memory module
- Seat the cover and secure it with one screw.
SIM card
Some models are equipped with a SIM card slot that can accommodate a sim card.
Installing a SIM card
To install a SIM card, follow the steps below.
- Turn the computer off in boot mode. Refer to the Turning off the power section in Chapter 3.
- Remove all cables connected to the computer.
- Insert the SIM card.
- Press gently to ensure a firm connection.

- Keep foreign objects out of the bridge media card slot. A pin or similar object can damage the computer's circuitry.
The card is designed so that it can be inserted only one way. Do not try to force the card into the slot.
Do not touch the connectors on the SIM card. Any debris on the connectors may cause access problems.
For more details on using memory cards, see manuals accompanying the cards.
Removing the SIM card
To remove the SIM card, follow the steps below.
- Turn the computer off in boot mode. Refer to the Turning off the power section in Chapter 3.
- Remove all cables connected to the computer.
- Directly pull out the sim card inside the socket to eject it.
- Grasp the card and remove it.
Additional AC adaptor
If you frequently transport the computer between different sites such as your home and office, purchasing an AC adaptor for each location will reduce the weight and bulk of your carrying load. PA3467U-1ACA/PA3467E-1AC3.
USB FDD Kit
The 3 1/2" external FDD drive module can be connected to the USB port.
External monitor
An external analog monitor can be connected to the external monitor port on the computer. The computer supports VGA and Super VGA video modes. To connect a monitor, follow the steps below.

The hibernation and standby feature can be used with an external monitor. Simply enable hibernation and standby and the computer will maintain the data as it is displayed on the external monitor.
- Connect the monitor to the external monitor port.
- Turn the monitor's power on.
When you turn on the power, the computer automatically recognizes the monitor and determines whether it is color or monochrome.
You can use the BIOS Setup to select between Auto-Selected and LCD+Analog RGB displays. Refer to Chapter 7, BIOS Setup and Passwords.
If you have selected LCD+Analog RGB under the Display options of the BIOS Setup, both the external monitor and the internal LCD will be active when you turn on the computer. If Auto-Selected is selected, only the external monitor will be active.
To change the display settings, press Fn + F3. If you disconnect the monitor before you turn the computer off, be sure to press Fn + F3 to switch to the internal display. Refer to Chapter 5, The Keyboard, for details on using hot keys to change the display setting.

If you set LCD+Analog RGB for the computer's display, you must set the computer's display resolution to the same as that of the external monitor or other device, such as a projector.
Security lock
A security lock enables you to anchor your computer to a desk or other heavy object to help prevent unauthorized removal of the computer.
Attach one end of a cable to the desk and the other end to the security lock slot on the right or left side of the computer.
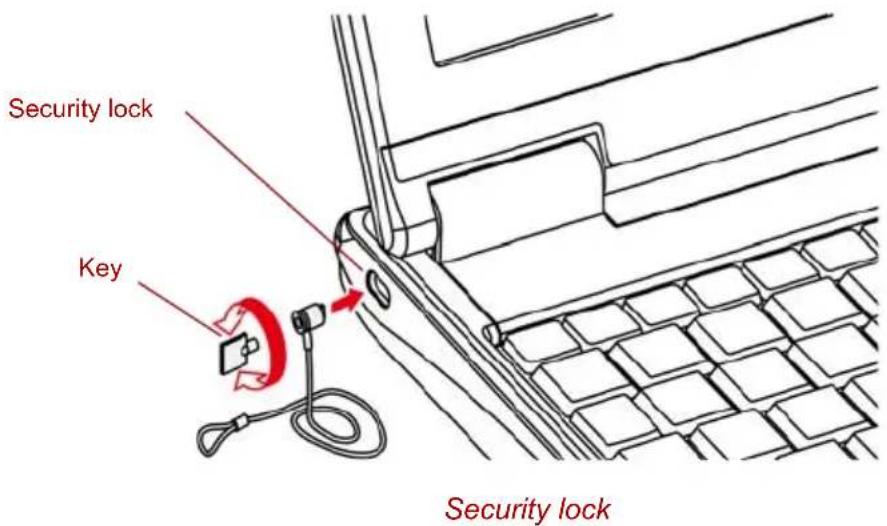
text_image
Security lock Key Security lockChapter 9
Troubleshooting
TOSHIBA designed the computer for durability. However, should problems occur, following the procedures in this chapter can help to determine the cause.
All readers should become familiar with this chapter. Knowing what might go wrong can help prevent problems from occurring.
Problem solving process
Resolving problems will be much easier if you observe the following guidelines:
■Stop immediately when you recognize a problem exists. Further action may result in data loss or damage. You may destroy valuable problem-related information that can help solve the problem.
Observe what is happening. Write down what the system is doing and what actions you performed immediately before the problem occurred. If you have a printer attached, print a copy of the screen using the PRTSC(Print Screen) key.
The questions and procedures offered in this chapter are meant as a guide, they are not definitive problem solving techniques. Many problems can be solved simply, but a few may require help from your dealer. If you find you need to consult your dealer or others, be prepared to describe the problem in as much detail as possible.
Preliminary checklist
Consider the simplest solution first. The items in this checklist are easy to fix and yet can cause what appears to be a serious problem.
■Make sure you turn on all peripheral devices before you turn on the computer. This includes your printer and any other external device you are using.
■Before you attach an external device, turn the computer off. When you turn the computer back on it recognizes the new device.
■Make sure all options are set properly in the setup program.
- Check all cables. Are they correctly and firmly attached? Loose cables can cause signal errors.
■Inspect all connecting cables for loose wires and all connectors for loose pins.
- Check that your diskette is correctly inserted and that the diskette's write protect tab is correctly set.
Make notes of your observations and keep them in a permanent error log. This will help you describe your problems to your dealer. If a problem recurs, the log will help you identify the problem faster.
Analyzing the problem
Sometimes the system gives clues that can help you identify why it is malfunctioning. Keep the following questions in mind:
■Which part of the system is not operating properly: keyboard, diskette drives, hard disk drive, printer, display. Each device produces different symptoms.
Is the operating system configuration set properly? Check the configuration options.
What appears on the display screen? Does it display any messages or random characters? Print a copy of the screen if you have a printer attached. Look up the messages in the software and operating system documentation. Check that all connecting cables are correctly and firmly attached. Loose cables can cause erroneous or intermittent signals.
Do any icons light? Which ones? What color are they? Do they stay on or blink? Write down what you see.
Record your observations so you can describe them to your dealer.
Software The problems may be caused by your software or diskette. If you cannot load a software package, the media (usually a diskette) may be damaged or the program might be corrupted. Try loading another copy of the software. If an error message appears while you are using a software package, check the software documentation. These documents usually include a problem solving section or a summary of error messages. Next, check any error messages in the OS documentation.
Hardware If you cannot find a software problem, check your hardware. First run through the items in the preliminary checklist above. If you still cannot correct the problem, try to identify the source. The next section provides checklists for individual components and peripherals.
Hardware and system checklist
This section discusses problems caused by your computer's hardware or attached peripherals. Basic problems may occur in the following areas:
System start-up
SD/MS/MS Pro Card
Self test
SIM Card
Power
External Monitor
Password
Sound system
Keyboard
USB
LCD panel
Standby/Hibernation
Hard disk drive
LAN
Pointing device
Wireless LAN
■Touchpad device
System start-up
When the computer does not start properly, check the following items:
Self Test
Power Sources
Power-on Password
Self test
When the computer starts up, the self-test will be run automatically, and the following will be displayed:
TOSHIBA Leading Innovation>>>
This message remains on the screen for a few seconds.
If the self test is successful, the computer tries to load the operating system.
Depending on how the Boot Priority is set in the Hardware Setup, the computer tries to load first from drive A then from drive C, or first from drive C then from drive A.
If any of the following conditions are present, the self test failed:
■The computer stops and does not proceed to display information or messages.
■Random characters appear on the screen, and the system does not function normally.
■The screen displays an error message.
Turn off the computer and check all cable connections. If the test fails again, contact your dealer.
Power
When the computer is not plugged into an AC adaptor, the battery pack is the primary power source. However, your computer has a number of other power resources, including intelligent power supply and Real Time Clock battery. These resources are interrelated and any one could affect apparent power problems. This section provides check lists for AC adaptor and the main battery. If you cannot resolve a problem after following them, the cause could lie with another power resource. In such case, contact your dealer.
Overheating power down
If the computer's internal temperature becomes too high, the computer will automatically shut down.
AC power
If you have trouble turning on the computer with the AC adaptor connected. Please refer to Chapter 6, Power and Power-up Modes for more information.
Problem Procedure
| AC adaptor doesn’t power the computer | Check the connections. Make sure the cord is firmly connected to the computer and a power outlet.Check the condition of the cord and terminals. If the cord is frayed or damaged, replace it. If the terminals are soiled, wipe them with cotton or a clean cloth.If the AC adaptor still does not power the computer, contact your dealer. |
Battery
If you suspect a problem with the battery, check the DC IN connect and the battery indicator. For information on indicators and battery operation see Chapter 6, Power and Power-up Modes.
Problem Procedure
| Battery doesn’t power the computer | The battery may be discharged - connect the AC adaptor to recharge the battery. |
| Problem Procedure | |
| Battery doesn’t charge when the AC adaptor is attached (Battery indicator does not glow green). | If the battery is completely discharged, it will not begin charging immediately. Wait a few minutes.If the battery still does not charge, make sure the outlet is supplying power. Test it by plugging in an appliance. If it doesn’t work, try another power source |
| Check whether the battery is hot or cold to the touch. If the battery is too hot or too cold, it will not charge properly. Make it reach room temperature. | |
| Unplug the AC adaptor and remove the battery to make sure the terminals are clean. If necessary wipe them with a soft dry cloth dipped in alcohol.Connect the AC adaptor and replace the battery.Make sure it is securely seated. | |
| Check the Battery indicator. If it does not glow, make the computer charge the battery for at least 20 minutes. If the Battery indicator glows after 20 minutes, make the battery continue to charge at least another 20 minutes before turning on the computer.If the indicator still does not glow, the battery may be at the end of its operating life. Replace it.If you do not think the battery is at the end of its operating life, see your dealer. | |
| Battery doesn’t power the computer as long as expected | If you frequently recharge a partially charged battery, the battery might not charge to its full potential. Fully discharge the battery, then try to charge it again. |
| Check the power consumption settings in Power Management. Consider using a power saving mode. | |
Password
| Problem Procedure | |
| Cannot enter password | Refer to the Password section in Chapter 7, BIOS Setup and Passwords. |
Keyboard
Keyboard problems can be caused by your setup configuration. For more information refer to Chapter 5, The Keyboard and Chapter 7, BIOS Setup and Passwords.
| Problem Procedure | |
| Some letter keys produce numbers | Check that the numeric keypad overlay is not selected. Press Fn + F11 and try typing again. |
| Output to screen is garbled | Make sure the software you are using is not remapping the keyboard. Remapping involves reassigning the meaning of each key. See your software’s documentation.If you are still unable to use the keyboard, consult your dealer |
LCD panel
Apparent LCD problems may be related to the computer's setup. Refer to Chapter 7, BIOS Setup and Passwords, for more information.
| Problem Procedure | |
| No display | Press hot keys Fn + F3 to change the display priority, to make sure it is not set for an external monitor. |
| Markings appear on the LCD screen. | They might have come from contact with the keyboard or touchpad. Try wiping the LCD gently with a clean dry cloth. If markings remain, use LCD cleaner. Be sure to let the LCD dry before closing it. |
| Problems above remain unresolved or other problems occur | Refer to your software’s documentation to determine if the software is causing the difficulty. Contact your dealer if the problems continue. |
Hard disk drive
| Problem Procedure | |
| Computer does not boot from hard disk drive | Check if a diskette is in the diskette drive or a CD/DVD is in the optical disc drive. Remove any diskette and/or CD/DVD and check Boot priority. Refer to Chapter 7,Boot Prioritysection. |
| There may be a problem with your operating system files. Refer to your OS documentation. | |
Problem Procedure
| Slow performance Your files may be fragmented. Run SCANDISK and defragmenter to check the condition of your files and disk. Refer to your OS documentation or online HELP for information on running SCANDISK and the defragmenter. |
| As a last resort, reformat the hard disk. Then, reload the operating system and other files. If problems persist, contact your dealer. |
Pointing device
If you are using a USB mouse, also refer to the USB section in this chapter and to your mouse documentation.
Touchpad
| Problem Procedure | |
| On-screen pointer does not respond to Pad operation | The system might be busy. If the pointer is shaped as an hourglass, wait for it to resume its normal shape and try again to move it. |
| Double-tapping does not work | Try changing the double-click speed setting in the mouse control utility.1. Open the Control Panel and Printers and Other Hardware, select the Mouse icon and press Enter.2. Click the Buttons tab.3. Set the double-click speed as instructed and click OK. |
| The mouse pointer moves too fast or too slow | Try changing the speed setting in the mouse control utility.1. Open the Control Panel and Printers and Other Hardware, select the Mouse icon and press Enter.2. Click the Pointer Options tab.3. Set the speed as instructed and click OK. |
Problem Procedure
| When the reaction of touchpad is sensitive to slow | Adjust the touch Sensitivity. |
| 1. Open the Control Panel. | |
| 2. Click the Printers icon and Other Hardware icon. | |
| 3. Click the Mouse icon. | |
| 4. Click the Device Setting tab. | |
| 5. Click the Setting button. | |
| 6. The Properties for Synaptics touchpad on PS/2 port screen appears. Double-click Sensitivity in the Select an item section on the left side of the screen. | |
| 7. PalmCheck and Touch Sensitivity are displayed. Click Touch Sensitivity. | |
| 8. Move the slide bar for Touch Sensitivity to make an adjustment. Click the OK button. | |
| 9. Click the OK button on the Device Setting tab. | |
| If problems persist, contact your dealer. |
USB mouse
This section applies only with Windows XP operating systems.
Problem Procedure
| On-screen pointer does not respond to mouse operation | The system might be busy. If the pointer is shaped as an hourglass, wait for it to resume its normal shape and try again to move it. |
| Make sure the mouse is properly connected to the USB port. | |
| Double-clicking does not work | Try changing the double-click sped setting in the mouse control utility |
| 1. Open the Control Panel and Printers and Other Hardware, select the Mouse icon andpress Enter.2. Click the Buttons tab.3. Set the double-click speed as instructed and click OK. | |
| The mouse pointer moves too fast or too slow | Try changing the speed setting in the mouse control utility.1. Open the Control Panel and Printers and Other Hardware, select the Mouse icon andpress Enter.2. Click the Pointer Options tab.3. Set the speed as instructed and click OK. |
| Problem Procedure | |
| The mouse pointer moves erratically | The mouse might be dirty. Refer to your mouse documentations for instructions on cleaning.If problems persist, contact your dealer. |
SD/MS/MS Pro Card
Refer also to Chapter 8, Optional Devices.
| Problem Procedure | |
| Memory card error occurs | Reseat the memory card to make sure it is firmly connected. |
| Check the card's documentation. | |
| You cannot write to the memory card | Make sure the card is not write protected. |
| You cannot read a file | Make sure the target file is on the memory card inserted in the slot. |
| If problems persist, contact your dealer. | |
SIM card
Refer also to Chapter 8, Optional Devices.
| Problem | Procedure |
| SIM card error occurs | Remove the SIM card from the computer, make sure to confirm that the card oriented correctly and reinsert it in order to ensure it is firmly connected. |
| Check the card's documentation.If problems persist, contact your dealer |
External Monitor
Refer also to Chapter 8, Optional Devices, and to your monitor's documentation.
| Problem Procedure | |
| Monitor does not turn on | Make sure that the external monitor's power switch is on. Confirm that the external monitor's power cable is plugged into a working power outlet. |
| No display Try adjusting | the contrast and brightness controls on the external monitor. |
| Press hot keys Fn + F3 to change the display priority and make sure it is not set for the internal display. | |
Problem Procedure
Display error occurs Check that the cable connecting the external monitor to the computer is attached firmly. If problems persist, contact your dealer.
Sound system
Problem Procedure
No sound is heard Check the software volume settings.
Make sure the headphone connection is secure.
Check Sound Preferences. Make sure the sound function is enabled and that settings for I/O address, Interrupt level and DMA are correct for your software and do not conflict with other hardware devices that you may have connected to the computer.
If problems persist, contact your dealer.
USB
Refer also to your USB device's documentation.
Problem Procedure
USB device does not work Check for a firm cable connection between the USB ports on the computer and the USB device.
Make sure the USB device drivers are properly installed. Refer to your Windows documentation for information on checking the drivers.
If you are using an operating system that does not support USB, you can still use a USB mouse and/or USB keyboard. If these devices do not work, make sure the USB KB/Mouse Legacy Emulation item in BIOS Setup is set to Enabled.
If problems persist, contact your dealer.
Standby/Hibernation
Problem Procedure
The system will not enter standby/ hibernation Is Audio Player open? The system might not enter standby/hibernation, if Audio Player is either playing a selection or finished playing a selection. Close Audio Player before you select standby/hibernation.
If problems persist, contact your dealer.
LAN
Problem Procedure
Cannot access LAN Check for a firm cable connection between the LAN jack and the LAN HUB.
Wake-up on LAN Make sure the AC adaptor is connected. The does not work Wake-up on LAN function consumes power even when the system is off. If problems persist, consult your LAN administrator.
Wireless LAN
If the following procedures do not restore LAN access, consult your LAN administrator. For more information on wireless communication, refer to Chapter 4, Operating Basics.
Problem Procedure
Cannot access Wireless LAN Make sure the computer's wireless communication switch is set to on. If problems persist, consult your LAN administrator.
Bluetooth
For more information on wireless communication, refer to Chapter 4, Operating Basics.
| Problem | Procedure |
| Cannot accessBluetooth device | Make sure the computer’s wireless communication switch is set to on.Make sure the Bluetooth Manager is running and the power to the Bluetooth device is turned on.Make sure no optional Bluetooth Adpater is installed in the computer. The built-in Bluetooth function and an optional Bluetooth Adpater cannot operate simultaneously.If problems persist, contact your dealer. |
TOSHIBA support
If you require any additional help using your computer or if you are having problems operating the computer, you may need to contact TOSHIBA for additional technical assistance.
Before you call
Some problems you experience may be related to software or the operating system so it is important that you investigate other sources of assistance first. Before contacting TOSHIBA, try the following:
■Review troubleshooting sections in the documentation supplied with your software and/or peripheral devices.
If a problem occurs when you are running software applications, consult the software documentation for troubleshooting suggestions and consider calling the software company's technical support department for assistance.
- Consult the dealer you purchased your computer and/or software. They are your best resource for current information and support.
Where to write
If you are still unable to solve the problem and suspect that it is hardware related, write to TOSHIBA at the location listed in the accompanying warranty booklet or visit http://www.toshiba-europe.com on the Internet.
Chapter 10
Disclaimers
This chapter slates the Disclaimer(s) information applicable to TOSHIBA computers. In the text in this manual, *XX is used to show which Disclaimer(s) description is related to TOSHIBA computers.
Description(s) related to this computer are marked with a blue *XX in this manual. Clicking on *XX will display the related description.
CPU\*1
Central Processing Unit ("CPU") Performance Disclaimer.
CPU performance in your computer product may vary from specifications under the following conditions:
■use of certain external peripheral products
■use of battery power instead of AC power
■use of certain multimedia, computer generated graphics or video applications
■use of standard telephone lines or low speed network connections
■use of complex modeling software, such as high end computer aided design applications
■use of several applications or functionalities simultaneously
■use of computer in areas with low air pressure (high altitude > 1,000 meters or > 3,280 feet above sea level)
■ use of computer at temperatures outside the range of 5°C to 30°C (41°F to 86°F) or >25°C (77°F) at high altitude (all temperature references are approximate and may vary depending on the specific computer model-please refer to your PC documentation or visit the Toshiba website at http://www.pcsupport.toshiba.com for details).
CPU performance may also vary from specifications due to design configuration.
Under some conditions, your computer product may automatically shutdown. This is a normal protective feature designed to reduce the risk of lost data or damage to the product when used outside recommended conditions. To avoid risk of lost data, always make back-up copies of data by periodically storing it on an external storage medium. For optimum performance, use your computer product only under recommended conditions. Read additional restrictions in your product documentation. Contact Toshiba technical service and support, refer to TOSHIBA support section in chapter 9, Troubleshooting for more information.
A 32-bit version of the operating system is preinstalled on your computer unless explicitly stated that the operating system is 64-bit. See "http://www.pcsupport.toshiba.com" for more information.
Memory (main system)\*2
Part of the main system memory may be used by the graphics system for graphics performance and therefore reduce the amount of main system memory available for other computing activities. The amount of main system memory allocated to support graphics may vary depending on the graphics system, applications utilized, system memory size and other factors.
For PC's configured with 1 GB of system memory, the full system memory space for computing activities will be considerably less and will vary by model and system configuration.
Battery life\*3
Battery life may vary considerably depending on product model, configuration, applications, power management settings and features utilized, as well as the natural performance variations produced by the design of individual components. Published battery life numbers are achieved on select models and configurations tested by Toshiba at the time of publication. Recharge time varies depending on usage. Battery may not charge while computer is consuming full power.
After a period of time, the battery will lose its ability to perform at maximum capacity and will need to be replaced. This is a normal phenomenon for all batteries. To purchase a new battery pack, see the accessories information that is shipped with your computer, or visit the Toshiba web site at http://www.pcsupport.toshiba.com.
HDD drive capacity\*4
1 Gigabyte (GB) means 10^9 = 1,000,000,000 bytes using powers of 10. The computer operating system, however, reports storage capacity using powers of 2 for the definition of 1 GB = 2^30 = 1,073,741,824 bytes, and therefore shows less storage capacity. Available storage capacity will also be less if the product includes one or more pre-installed operating systems, such as Microsoft Windows and/or pre-installed software applications, or media content. Actual formatted capacity may vary.
LCD\*5
Over a period of time, and depending on the usage of the computer, the brightness of the LCD screen will deteriorate. This is an intrinsic characteristic of LCD technology.
Graphics Processor Unit (GPU)\*6
Graphics processor unit (GPU) performance may vary depending on product model, design configuration, applications, power management settings and features utilized. GPU performance is only optimized when operating in AC power mode and may decrease considerably when operating in battery power mode.
Wireless LAN\*7
The transmission speed over the wireless LAN and the distance over which wireless LAN can reach may vary depending on surrounding electromagnetic environment, obstacles, access point design and configuration, and client design and software/hardware configurations.
The actual transmission speed will be lower than the theoretical maximum speed.
Non-applicable icons \*8
Certain notebook chassis are designed to accommodate all possible configurations for an entire product series. Therefore, please be aware that your selected model may not have all the features and specifications corresponding to all of the icons or switches shown on the notebook chassis, unless you have selected all those features.
Copy protection
Copy protection technology included in certain media may prevent or limit recording or viewing of the media.
USB Sleep and Charge
The "USB Sleep and Charge function" may not work with certain external devices even if they are compliant with the USB specification. In those cases, turn the power of the computer ON to change the device.
Appendix A
Specifications
This appendix summarizes the computer's technical specifications.
Physical Dimensions
Size
With Battery 225(w) x 190.5(d) X 29.5 / 33(h) millimeters (not including parts that extend beyond the main body)
Without Battery 225(w) x 178(d) x 29.5 / 33(h) millimeters (not including parts that extend beyond the main body)
Environmental requirements
| Operating Non-operating |
| Ambient temperature 5°C to 35°C -20°C to 60°C |
| Relative humidity 20% to 80% 10% to 90% |
| Altitude (from sea level) 0 to 3,000 meters 0 to10,000 meters |
Power requirements
AC adaptor 100-240 volts AC 50 or 60 hertz (cycles per second)
Computer 19V DC
Appendix B
Display Controller
Display controller
The display controller interprets software commands into hardware commands that turn particular pixels on or off.
The controller is an advanced Video Graphics Array (VGA) that provides Super VGA (SVGA) and Extended Graphics Array (XGA) support for the internal LCD and external monitors.
A high-resolution external monitor connected to the computer can display up to 2048 horizontal and 1536 vertical pixels at up to 16M colors.
The display controller also controls the video mode, which uses industry standard rules to govern the screen resolution and the maximum number of colors that can be displayed on screen.
Software written for a given video mode will run on any computer that supports the mode.
The computer's display controller supports all SVGA and XGA modes, the most widely used industry standards.

Some of display modes might not be supported depending on the external monitor which you use.

If you are running some application (for example a 3D application or video playback and so on), you may use some disturbance, flickering or frame dropping on your screen. If that occurs, adjust the resolution of display, lowering it until the screen is displayed properly. You could also disable Windows Aero™ to help correct this situation.
Appendix C
Wireless LAN
This appendix is intended to help you get your Wireless LAN network up and running, with a minimum of parameters.
Card specifications
| Form Factor | ■Mini Card |
| Compatibility | ■IEEE 802.11 Standard for Wireless LANs■Wi-Fi (Wireless Fidelity) certified by the Wi-Fi Alliance. The ‘Wi-Fi CERTIFIED’ logo is a certification mark of the Wi-Fi Alliance. |
| Media Access Protocol | ■CSMA/CA (Collision Avoidance) with Acknowledgment (ACK) |
| Data Rate | ■54/48/36/24/18/9/6 Mb/s (Revision G)■11/5.5/2/1 Mb/s (Revision B) |
Radio characteristics
Radio characteristics of Wireless LAN cards may vary according to:
■Country/region where the product was purchased
■Type of product
Wireless communication is often subject to local radio regulations.
Although Wireless LAN wireless networking products have been designed for operation in the license-free 2.4 GHz, local radio regulations may impose a number of limitations to the use of wireless communication equipment.

Refer to the sheet Information to the User for regulatory information that may apply in your country/region.
R-F Frequency ■Band 2.4 GHz (2400-2483.5 MHz) (Revision B)
The range of the wireless signal is related to the transmit rate of the wireless communication. Communications at lower transmit range may travel larger distances.
The range of your wireless devices can be affected when the antennas are placed near metal surfaces and solid high-density materials.
■Range is also impacted due to “obstacles” in the signal path of the radio that may either absorb or reflect the radio signal.
Supported frequency sub-bands
Subject to the radio regulations that apply in your country/region, your Wireless LAN card may support a different set of 2.4 GHz channels. Consult your Authorized Wireless LAN or TOSHIBA Sales office for information about the radio regulations that apply in your country/region.
Table Wireless IEEE 802.11 Channels Sets (Revision B and G)
| Frequency Range Channel ID 2400-2483.5 MHz | |
| 1 2412 | |
| 2 2417 | |
| 3 2422 | |
| 4 2427 | |
| 5 2432 | |
| 6 2437 | |
| 7 2442 | |
| 8 2447 | |
| 9 2452 | |
| 10 | 2457^*1 |
| 11 2462 | |
| 12 | 2467^*2 |
| 13 | 2472^*2 |
When installing Wireless LAN cards, the channel configuration is managed as follows:
For wireless clients that operate in a Wireless LAN infrastructure, the Wireless LAN card will automatically start operation at the channel identified by the Wireless LAN Access Point. When roaming between different access points the station can dynamically switch to another channel if required.
In a Wireless LAN Access Point, the Wireless LAN card will use the factory-set default channel(printed in bold), unless the LAN Administrator selected a different channel when configuring the Wireless LAN Access Point device.
*1 Factory-set default channels
*2 Refer to the sheet Approved Countries/Regions for use for the countries/regions that in which these channels can be used.
Appendix D
AC Power Cord and Connectors
The AC input plug of power cord must be compatible with various international AC power outlets. Power cords need to meet the local standards and the specifications listed as below:
| Length: Minimum 1.7 meters | |
| Wire size: Minimum 0.75 mm | 2 |
Current rating: Minimum 2.5 amperes
Voltage rating: 125 or 250V AC (depending on country/region's power standards)
Certification agencies
Europe:
| Austria: OVE Italy: IMQ | |||
| Belgium: | CEBEC | The Netherlands: | KEMA |
| Denmark: | DEMKO | Norway: | NEMKO |
| Finland: | FIMKO | Sweden: | SEMKO |
| France: | LCIE | Switzerland: | SEV |
| Germany: | VDE | United Kingdom: | BSI |
Outside of Europe:
| U.S. and Canada: | UL listed and CSA certifiedNo. 18 AWG, Type SVT or SPT-2 | ||
| China: | CCC, CQC | India: | STQC |
Australia: AS
In Europe, two conductors power cords must be VDE type, H05VVH2-F or H03VVH2-F; while three conductors be VDE type, H05VV-F.
For the United States and Canada, two pin plug configuration must be 2-15P (250V) or 1-15P (125V); while three pin be 6-15P (250V) or 5-15P (125V) as designated in the U.S. National Electrical code handbook and the Canadian Electrical Code Part II.
The following illustrations show the plug shapes for USA, Australia, Canada, United Kingdom, Europe, and China.
USA
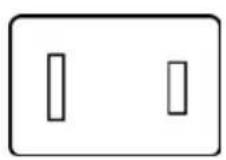
United Kingdom
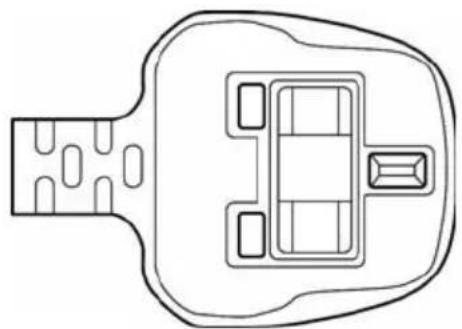
natural_image
Top-down schematic of a vehicle or connector component outline (no text or symbols)UL approved BS approved
Australia Europe
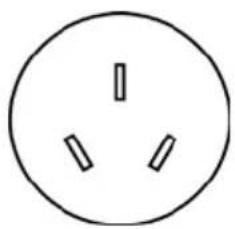
natural_image
Simple line drawing of a three-pin electrical socket (no text or symbols)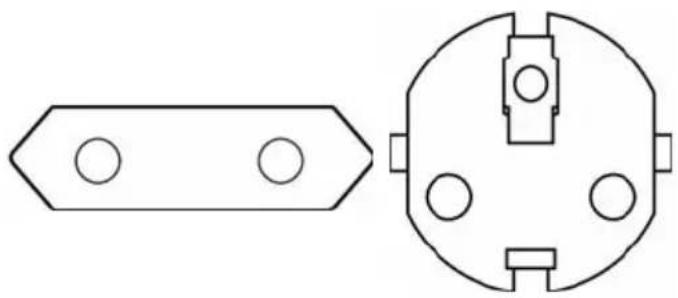
natural_image
Technical line drawing of a hexagonal component with two circular holes and an octagonal top view (no text or symbols)AS approved Approved by the
appropriate agency
Canada
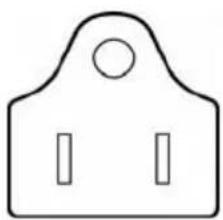
natural_image
Simple line drawing of a rectangular object with a circular top and two vertical slots inside (no text or symbols)China

natural_image
Simple line drawing of a three-pin electrical socket (no text or symbols)CSA approved
CCC approved
Appendix E
If your computer is stolen

Always take care of your computer and try to prevent it from being stolen. You are the owner of a valuable technical device, which may be highly attractive to thieves, so please do not leave it unattended in a public place. To further help protect against theft, security cables can be bought for use with your notebook when it is being used at home or in the office.
Make a note of your computer's machine type, model number, and serial number, and put it in a safe place. You will find this information on the underside of your notebook. Please also keep the receipt of the computer you purchased.
Should your computer be stolen, however, we'll help you try to find it. Before contacting TOSHIBA, please prepare the following information which is necessary to uniquely identify your computer:
In which country was your computer stolen?
■What type of machine do you have?
■What was the model number (PA number)?
■What was the serial number (8 digits)?
■When was it stolen, i.e. date?
■What is your address, phone, and fax number?
To register the theft on paper, please follow these procedures:
■Fill in the TOSHIBA Theft Registration form (or a copy of it) below.
- Attach a copy of your receipt showing where your computer was purchased.
Either fax or send the receipt and registration form to the address below.
To register the theft online, please follow these procedures:
- Visit http://www.toshiba-europe.com on the Internet. In the product area, choose Computer Systems.
In the Computer Systems page, open the Support & Downloads menu and choose the Stolen Units Database option.
Your entries are used to track your computer at our service points.
TOSHIBA Theft Registration
Send to: TOSHIBA Europe GmbH
Technical Service and Support
Leibnizstr. 2
93055 Regensburg
Germany
Fax number: +49 (0) 941 7807 921
Country stolen:
Machine type:
(e.g. NB 100 Series)
Model number:
(e.g. PSA30EYXT)
Serial number:
(e.g. 12345678G)

Date stolen: Year Month Day

Owner's details
Last name, first name:
Company:
Street:
Postal Code/City:
Country:
Phone:
Fax:
Glossary
The terms in this glossary cover topics related to this manual. Alternate naming is included for reference.
Abbreviations
AC: alternating current
AGP: accelerated graphics port
ANSI: American National Standards Institute
APM: advanced power manager
ASCII: American Standard Code for Information Interchange
BIOS: basic input output system
CD-ROM: Compact Disc Read Only Memory
CD-RW: Compact Disc ReWritable
CMOS: complementary metal-oxide semiconductor
CPU: central processing unit
CRT: cathode ray tube
DC: direct current
DDC: display data channel
DMA: direct memory access
DOS: disk operating system
DVD: digital versatile disc
DVD-R: Digital Versatile Disc Recordable
DVD-RAM: Digital Versatile Disc Random Access Memory
DVD-R DL: Digital Versatile Disc Recordable Dual Layer
DVD-ROM: Digital Versatile Disc Read Only Memory
DVD-RW: Digital Versatile Disc ReWritable
DVD+R DL: Digital Versatile Disc Recordable Double Layer
ECP: extended capabilities port
FDD: floppy diskette drive
FIR: fast infrared
HDD: hard disk drive
IDE: integrated drive electronics
I/O: input/output
IrDA: Infrared Data Association
IRQ: interrupt request
KB: kilobyte
LCD: liquid crystal display
LED: light emitting diode
LSI: large scale integration
MB: megabyte
OCR: optical character recognition (reader)
PCB: printed circuit board
PCI: peripheral component interconnect
RAM: random access memory
RGB: red, green, and blue
ROM: read only memory
RTC: real time clock
SCSI: small computer system interface
SIO: serial input/output
TFT: thin-film transistor
UART: universal asynchronous receiver/transmitter
USB: Universal Serial Bus
VESA: Video Electronic Standards Association
VGA: video graphics array
VRT: voltage reduction technology
WXGA+: wide extended graphics array plus
WUXGA: wide ultra extended graphics array
XGA: extended graphics array
A
adaptor: A device that provides an interface between two dissimilar electronic devices. For example, the AC adaptor modifies the power from a wall outlet for use by the computer. This term also refers to the add-in circuit cards that control external devices, such as video monitors and magnetic tape devices.
allocate: To assign a space or function for a specific task.
alphanumeric: Keyboard characters including letters, numbers and other symbols, such as punctuation marks or mathematical symbols.
alternating current (AC): Electric current that reverses its direction of flow at regular intervals.
analog signal: A signal whose characteristics such as amplitude and frequency vary in proportion to (are an analog of) the value to be transmitted. Voice communications are analog signals.
ANSI: American National Standards Institute. An organization established to adopt and define standards for a variety of technical disciplines. For example, ANSI defined the ASCII standard and other information processing requirements.
antistatic: A material used to prevent the buildup of static electricity.
application: A group of programs that together are used for a specific task such as accounting, financial planning, spreadsheets, word processing and games.
ASCII: American Standard Code for Information Interchange. ASCII code is a set of 256 binary codes that represent the most commonly used letters, numbers, and symbols.
async: Short for asynchronous.
asynchronous: Lacking regular time relationship. As applied to computer communications, asynchronous refers to the method of transmitting data that does not require a steady stream of bits to be transmitted at regular time intervals.
B
backup: A duplicate copy of files kept as a spare in case the original is destroyed.
batch file: A file that can be executed from the system prompt containing a sequence of operating system commands or executable files.
binary: The base two number system composed of zeros and ones (off or on), used by most digital computers. The right-most digit of a binary number has a value of 1, the next a value of 2, then 4, 8, 16, and so on. For example, the binary number 101 has a value of 5. See also ASCII.
BIOS: Basic Input Output System. The firmware that controls data flow within the computer. See also firmware.
bit: Derived from "binary digit," the basic unit of information used by the computer. It is either zero or one. Eight bits is one byte. See also byte.
board: A circuit board. An internal card containing electronic components, called chips, which perform a specific function or increase the capabilities of the system.
boot: Short for bootstrap. A program that starts or restarts the computer. The program reads instructions from a storage device into the computer's memory.
bps: Bits per second. Typically used to describe the data transmission speed of a modem.
buffer: The portion of the computer's memory where data is temporarily stored. Buffers often compensate for differences in the rate of flow from one device to another.
bus: An interface for transmission of signals, data or electric power.
byte: The representation of a single character. A sequence of eight bits treated as a single unit; also the smallest addressable unit within the system.
C
cache memory: High speed memory which stores data that increases processor speed and data transfer rate. When the CPU reads data from main memory, it stores a copy of this data in cache memory. The next time the CPU needs that same data, it looks for it in the cache memory rather than the main memory, which saves time. The computer has two cache levels. Level one is incorporated into the processor and level two resides in external memory.
capacity: The amount of data that can be stored on a magnetic storage device such as a floppy diskette or hard disk drive. It is usually described in terms of kilobytes (KB), where one KB = 1024 bytes and megabytes (MB), where one MB = 1024 KB.
card: Synonym for board. See board.
CardBus: An industry standard bus for 32-bit PC Cards.
CD-ROM: A Compact Disc Read Only Memory is a high capacity disc that can be read from but not written to. The CD-ROM drive uses a laser, rather than magnetic heads, to read data from the disc.
CD-R: A Compact Disc Recordable disc can be written once and read many times. See also CD-ROM.
CD-RW: A Compact Disc ReWritable disc can be rewritten many times. See also CD-ROM.
character: Any letter, number, punctuation mark, or symbol used by the computer. Also synonymous with byte.
chassis: The frame containing the computer.
chip: A small semiconductor containing computer logic and circuitry for processing, memory, input/output functions and controlling other chips.
CMOS: Complementary Metal-Oxide Semiconductor. An electronic circuit fabricated on a silicon wafer that requires very little power. Integrated circuits implemented in CMOS technology can be tightly packaged and are highly reliable.
cold start: Starting a computer that is currently off (turning on the power).
COM1, COM2, COM3 and COM4: The names assigned to the serial and communication ports.
commands: Instructions you enter at the terminal keyboard that direct the actions of the computer or its peripheral devices.
communications: The means by which a computer transmits and receives data to and from another computer or device.
compatibility: 1) The ability of one computer to accept and process data in the same manner as another computer without modifying the data or the media upon which it is being transferred.
2) the ability of one device to connect to or communicate with another system or component.
components: Elements or parts (of a system) which make up the whole (system).
Composite Video (YUV): A standard video signal used to transmit images, e.g. from a VCR to a TV.
computer program: A set of instructions written for a computer that enable it to achieve a desired result.
computer system: A combination of hardware, software, firmware, and peripheral components assembled to process data into useful information.
control keys: A key or sequence of keys you enter from the keyboard to initiate a particular function within a program.
controller: Built-in hardware and software that controls the functions of a specific internal or peripheral device (e.g. keyboard controller).
co-processor: A circuit built into the processor that is dedicated to intensive math calculations.
CPS: Characters Per Second. Typically used to indicate the transmission speed of a printer.
CPU: Central Processing Unit. The portion of the computer that interprets and executes instructions.
CRT: Cathode Ray Tube. A vacuum tube in which beams projected on a fluorescent screen-producing luminous spots. An example is the television set.
cursor: A small, blinking rectangle or line that indicates the current position on the display screen.
D
data: Information that is factual, measurable or statistical that a computer can process, store, or retrieve.
data bits: A data communications parameter controlling the number of bits (binary digits) used to make up a byte. If data bits = 7 the computer can generate 128 unique characters. If data bits = 8 the computer can generate 256 unique characters.
DC: Direct Current. Electric current that flows in one direction. This type of power is usually supplied by batteries.
default: The parameter value automatically selected by the system when you or the program do not provide instructions. Also called a preset value.
delete: To remove data from a disk or other data storage device. Synonymous with erase.
device driver: A program that controls communication between a specific peripheral device and the computer. The CONFIG.SYS file contains device drivers that MS-DOS loads when you turn the computer on.
dialog box: A window that accepts user input to make system settings or record other information.
Digital Audio: An audio compression standard that enables high-quality transmission and real-time playback of sound files.
disk drive: The device that randomly accesses information on a disk and copies it to the computer's memory. It also writes data from memory to the disk. To accomplish these tasks, the unit physically rotates the disk at high speed past a read-write head.
disk storage: Storing data on magnetic disk. Data is arranged on concentric tracks much like a phonograph record.
display: A CRT, LCD, or other image producing device used to view computer output.
documentation: The set of manuals and/or other instructions written for the users of a computer system or application. Computer system documentation typically includes procedural and tutorial information as well as system functions.
DOS: Disk Operating System. See operating system.
driver: A software program, generally part of the operating system, that controls a specific piece of hardware (frequently a peripheral device such as a printer or mouse).
DVB-T (Digital Video Broadcasting - Terrestrial): Also known as terrestrial digital TV. Digital TV broadcasting standard.
DVD-R (+R, -R): A Digital Versatile Disc Recordable disk can be written once and read many times. The DVD-R drive uses a laser to read data from the disc.
DVD-RAM: A Digital Versatile Disc Random Access Memory is a high-capacity, high performance disc that lets you store large volumes of data. The DVD-RAM drive uses a laser to read data from the disc.
DVD-R DL: A disc having two layers on one side with the DVD-R storage capacity about 1.8 times larger than before. The DVD-RW drive uses a laser to read data from the disc.
DVD-ROM: A Digital Versatile Disc Read Only Memory is a high capacity, high performance disc suitable for play back of video and other high-density files. The DVD-ROM drive uses a laser to read data from the disc.
DVD-RW (+RW, -RW): A Digital Versatile Disc ReWritable disc can be rewritten many times.
DVD+R DL: A disc having two layers on one side with the DVD+R storage capacity about 1.8 times larger than before. The DVD-RW drive uses a laser to read data from the disc.
E
echo: To send back a reflection of the transmitted data to the sending device. You can display the information on the screen, or output it to the printer, or both. When a computer receives back data it transmitted to a CRT (or other peripheral device) and then retransmits the data to printer, the printer is said to echo the CRT.
erase: See delete.
escape: 1) A code (ASCII code 27), signaling the computer that what follows are commands; used with peripheral devices such as printers and modems.
2) A means of aborting the task currently in progress.
escape guard time: A time before and after an escape code is sent to the modem which distinguishes between escapes that are part of the transmitted data, and escapes that are intended as a command to the modem.
execute: To interpret and execute an instruction.
Extended Capability Port: An industry standard that provides a data buffer, switchable forward and reverse data transmission, and run length encoding (RLE) support.
F
fast infrared: An industry standard that enables cableless infrared serial data transfer at speeds of up to 4 Mbps.
file: A collection of related information; a file can contain data, programs, or both.
firmware: A set of instructions built into the hardware which controls and directs a microprocessor's activities.
floppy diskette: A removable disk that stores magnetically encoded data.
floppy diskette drive (FDD): An electromechanical device that reads and writes to floppy diskettes.
Fn-esse: A TOSHIBA utility that lets you assign functions to hot keys.
folder: An icon in Windows used to store documents or other folders.
format: The process of readying a blank disk for its first use. Formatting establishes the structure of the disk that the operating system expects before it writes files or programs onto the disk.
function keys: The keys labeled F1 through F12 that tell the computer to perform certain functions.
G
gigabyte (GB): A unit of data storage equal to 1024 megabytes. See also megabyte.
graphics: Drawings, pictures, or other images, such as charts or graphs, to present information.
H
hard disk: A non-removable disk usually referred to as drive C. The factory installs this disk and only a trained engineer can remove it for servicing. Also called fixed disk.
hard disk drive (HDD): An electromechanical device that reads and writes a hard disk. See also hard disk.
hardware: The physical electronic and mechanical components of a computer system: typically, the computer itself, external disk drives, etc. See also software and firmware.
hertz: A unit of wave frequency that equals one cycle per second.
hexadecimal: The base 16 numbering system composed of the digits 0 through 9 and the letters A, B, C, D, E, and F.
host computer: The computer that controls, regulates, and transmits information to a device or another computer.
hot key: The computer's feature in which certain keys in combination with the extended function key, Fn, can be used to set system parameters, such as speaker volume.

icon: A small graphic image displayed on the screen or in the indicator panel. In Windows, an icon represents an object that the user can manipulate.
i.LINK (IEEE1394): This port enables high-speed data transfer directly from external devices such as digital video cameras.
input: The data or instructions you provide to a computer, communication device or other peripheral device from the keyboard or external or internal storage devices. The data sent (or output) by the sending computer is input for the receiving computer.
instruction: Statements or commands that specify how to perform a particular task.
interface: 1) Hardware and/or software components of a system used specifically to connect one system or device to another.
2) To physically connect one system or device to another to exchange information.
3) The point of contact between user, the computer, and the program, for example, the keyboard or a menu.
interrupt request: A signal that gives a component access to the processor.
I/O: Input/output. Refers to acceptance and transfer of data to and from a computer.
I/O devices: Equipment used to communicate with the computer and transfer data to and from it.
IrDA 1.1: An industry standard that enables cableless infrared serial data transfer at speeds of up to 4 Mbps.

jumper: A small clip or wire that allows you to change the hardware characteristics by electrically connecting two points of a circuit.
K
K: Taken from the Greek word kilo, meaning 1000; often used as equivalent to 1024, or 2 raised to the 10th power. See also byte and kilobyte.
KB: See kilobyte.
keyboard: An input device containing switches that are activated by manually pressing marked keys. Each keystroke activates a switch that transmits a specific code to the computer. For each key, the transmitted code is, in turn, representative of the (ASCII) character marked on the key.
kilobyte (KB): A unit of data storage equal to 1024 bytes. See also byte and megabyte.
L
level 2 cache: See cache.
Light Emitting Diode (LED): A semiconductor device that emits light when a current is applied.
Liquid Crystal Display (LCD): Liquid crystal sealed between two sheets of glass coated with transparent conducting material. The viewing-side coating is etched into character forming segments with leads that extend to the edge of the glass. Applying a voltage between the glass sheets alters the brightness of the liquid crystal.
LSI: Large Scale Integration.
1) A technology that allows the inclusion of up to 100,000 simple logic gates on a single chip.
2) An integrated circuit that uses large scale integration.
M
main board: See motherboard.
megabyte (MB): A unit of data storage equal to 1024 kilobytes. See also kilobyte.
megahertz: A unit of wave frequency that equals 1 million cycles per second. See also hertz.
menu: A software interface that displays a list of options on the screen. Also called a screen.
microprocessor: A hardware component contained in a single integrated circuit that carries out instructions. Also called the central processing unit (CPU), one of the main parts of the computer.
mode: A method of operation, for example, the Boot Mode, Standby Mode or the Hibernation Mode.
modem: Derived from modulator/demodulator, a device that converts (modulates) digital data for transmission over telephone lines and then converts modulated data (demodulates) to digital format where received.
monitor: A device that uses rows and columns of pixels to display alphanumeric characters or graphic images. See also CRT.
motherboard: A name sometimes used to refer to the main printed circuit board in processing equipment. It usually contains integrated circuits that perform the processor's basic functions and provides connectors for adding other boards that perform special functions. Sometimes called a main board.
N
non-system disk: A formatted floppy diskette you can use to store programs and data but you cannot use to start the computer. See system disk.
nonvolatile memory: Memory, usually read-only (ROM), that is capable of permanently storing information. Turning the computer's power off does not alter data stored in nonvolatile memory.
numeric keypad overlay: A feature that allows you to use certain keys on the keyboard to perform numeric entry, or to control cursor and page movement.
0
OCR: Optical Character Recognition (reader). A technique or device that uses laser or visible light to identify characters and input them into a storage device.
online state: A functional state of a peripheral device when it is ready to receive or transmit data.
operating system: A group of programs that controls the basic operation of a computer. Operating system functions include interpreting programs, creating data files, and controlling the transmission and receipt (input/output) of data to and from memory and peripheral devices.
output: The results of a computer operation. Output commonly indicates data.
1) printed on paper, 2) displayed at a terminal, 3) sent through the serial port of internal modem, or 4) stored on some magnetic media.
P
PAL: PAL (Phase Alternating Line) is the dominant video and broadcasting standard in Europe.
parity: 1) The symmetrical relationship between two parameter values (integers) both of which are either on or off; odd or even; 0 or 1. 2) In serial communications, an error detection bit that is added to a group of data bits making the sum of the bits even or odd. Parity can be set to none, odd, or even.
password: A unique string of characters used to identify a specific user. The computer provides various levels of password protection such as user and supervisor.
pel: The smallest area of the display that can be addressed by software. Equal in size to a pixel or group of pixels. See pixel.
peripheral component interconnect: An industry standard 32-bit bus.
peripheral device: An I/O device that is external to the central processor and/or main memory such as a printer or a mouse.
Péritel: Péritel is a 21-pin connecting cable/port system that allows images and high-quality stereo sound (including Dolby® Pro-Logic sound formats) to be sent from one audio-visual device to another. It is also known as a “SCART connector” or “Euro connector”.
pixel: A picture element. The smallest dot that can be made on a display or printer. Also called a pel.
plug and play: A capability with Windows that enables the system to automatically recognize connections of external devices and make the necessary configurations in the computer.
port: The electrical connection through which the computer sends and receives data to and from devices or other computers.
Power Saver Utility: A TOSHIBA utility that lets you set the parameters for various power-saving functions.
printed circuit board (PCB): A hardware component of a processor to which integrated circuits and other components are attached. The board itself is typically flat and rectangular, and constructed of fiberglass, to form the attachment surface.
program: A set of instructions a computer can execute that enables it to achieve a desired result. See also application.
prompt: A message the computer provides indicating it is ready for or requires information or an action from you.
R
Radio frequency interference (RFI) shield: A metal shield enclosing the printed circuit boards of the printer or computer to prevent radio and TV interference. All computer equipment generates radio frequency signals. The FCC regulates the amount of signals a computing device can allow past its shielding. A Class A device is sufficient for office use. Class B provides a more stringent classification for home equipment use. TOSHIBA portable computers comply with Class B computing device regulations.
Random Access Memory (RAM): High speed memory within the computer circuitry that can be read or written to.
restart: Resetting a computer without turning it off (also called "warm boot" or "soft reset"). See also boot.
RGB: Red, green and blue. A device that uses three input signals, each activating an electron gun for a primary additive color (red, green and blue) or port for using such a device. See also CRT.
RJ11: A modular telephone jack.
RJ45: A modular LAN jack.
ROM: Read Only Memory: A nonvolatile memory chip manufactured to contain information that controls the computer's basic operation. You cannot access or change information stored in ROM.
S
S-Video: Short for Super-Video, a type of connection used by S-VHS videocassette players, camcorders, DVD players, etc. to transmit high-quality video signals.
SCSI: Small Computer System Interface is an industry standard interface for connection of a variety of peripheral devices.
SD Card: Secure Digital cards are flash memory widely used in a variety of digital devices such as digital cameras and Personal Digital Assistants.
SECAM L: SECAM (Sequential Color Memory) is a broadcasting standard used in France.
serial communications: A communications technique that uses as few as two interconnecting wires to send bits one after another.
serial interface: Refer to a type of information exchange that transmits information sequentially, one bit at a time.
SIO: Serial Input/Output. The electronic methodology used in serial data transmission.
soft key: Key combinations that emulate keys on the IBM keyboard, change some configuration options, stop program execution, and access the numeric keypad overlay.
software: The set of programs, procedures and related documentation associated with a computer system. Specifically refers to computer programs that direct and control the computer system's activities. See also hardware.
stop bit: One or more bits of a byte that follow the transmitted character or group codes in asynchronous serial communications.
subpixel: Three elements, one red, one green and blue (RGB), that make up a pixel on the color LCD. The computer sets subpixels independently, each may emit a different degree of brightness. See also pixel.
synchronous: Having a constant time interval between successive bits, characters or events.
system disk: A disk that has been formatted with an operating system. For MS-DOS the operating system is contained in two hidden files and the COMMAND.COM file. You can boot a computer using a system disk. Also called an operating system disk.
T
terminal: A typewriter-like keyboard and CRT display screen connected to the computer for data input/output.
TFT display: A liquid crystal display (LCD) made from an array of liquid crystal cells using active-matrix technology with thin film transistor (TFT) to drive each cell.
touchpad: A pointing device integrated into the TOSHIBA computer palm rest.
TTL: Transistor-transistor logic. A logic circuit design that uses switching transistors for gates and storage.
U
Universal Serial Bus: This serial interface lets you communicate with several devices connected in a chain to a single port on the computer.
V
VGA: Video Graphics Array is an industry standard video adaptor that lets you run any popular software.
volatile memory: Random access memory (RAM) that stores information as long as power is supplied to the computer.
W
warm start: Restarting or resetting a computer without turning it off.
window: A portion of the screen that can display its own application, document or dialog box. Often used to mean a Microsoft Windows window.
Wireless LAN: Local Area Network (LAN) through wireless communication.
write protection: A method for protecting a floppy diskette from accidental erasure.
Index
A
AC adaptor, 1-4, 2-4, A-1
additional, 8-8
connecting, 3-2
problems, 9-4
safety instructions, -xiii
ASCII characters, 5-7
Auto power on, See Power
B
Battery
charging, 6-5
indicator, 2-8
monitoring capacity, 6-7
real time clock, 6-4
Real Time Clock battery, 1-4, 6-4
retention time, 6-8
types, 6-3
Battery pack, 1-3, 1-8, 6-3
extending battery life, 6-8
indicator, 6-2
location, 2-4
operating time, 6-7
problems, 9-4
replacing, 6-8
safety instructions, 6-4
save mode, 1-6
Battery, See also Battery pack
indicator, 2-8
Bluetooth
problems, 9-11
Bluetooth, 1-5, 4-7
indicator, 4-7
problems, 9-11
Bridge media card slot, 1-4, 8-1
C
Checklist
equipment, 1-1
problems, 9-1, 9-3
Cleaning the computer, 4-9
D
DC IN
connecting, 3-3
DC IN 19V, 2-4
Disk indicator, 2-8
Display, 2-6
automatic power off, 1-6
brightness down, 5-4
brightness up, 5-4
controller and modes, B-1
opening, 3-4
problems, 9-6, 9-9
resolution, 5-3
E
ExpressCard, 1-4
External monitor, 8-8
controller and modes, B-1
port, 1-4
problems, 9-9
F
Fn + \~, 5-3
Fn + 1(Speaker Up), 5-4
FN + 2 (TOSHIBA zooming
utility enlarge), 5-5
Fn + Alt (enhanced keyboard simulation), 5-3
Fn + Ctrl (enhanced keyboard simulation), 5-3
Fn + Enter, 5-3
Fn + Esc (Zoom), 5-3
Fn + F1 (Wireless/ Bluetooth/ 3G), 5-3
Fn + F10 (Brightness up), 5-4
Fn + F12 (scroll lock), 5-3
Fn + F2 (Hibernation), 5-3
Fn + F3 (Output), 5-4
Fn + F6 (Mute), 5-4
Fn + F8 (Silent Mode), 5-4
Fn + F9 (Brightness down), 5-4
FN + S (TOSHIBA zooming utility reduce), 5-5
FN + SPACE (zoom), 5-3
Fn+2 (Speaker down), 5-4
Fn+A (TOSHIBA zooming utility (enlarge)), 5-5
Fn+S (TOSHIBA zooming utility (reduce)), 5-5
Function keys, 5-2
H
Hard disk drive, 1-3
automatic power off, 1-6
capacity, 10-2
problems, 9-6
Headphone
problems, 9-10
Hibernation, 5-3
Hibernation mode, 1-6
setting, 3-6
Hot keys, 1-5
brightness down, 5-4
brightness up, 5-4
Output, 5-4
TOSHIBA zooming utility enlarge, 5-5
TOSHIBA zooming utility reduce, 5-5
|
Indicator
battery, 6-2
power, 6-3
wireless communication, 4-7
K
Keyboard, 1-3, 5-1
emulating keys on
enhanced, 5-2
function keys, 5-2
hot keys, 5-3
problems, 9-6
typewriter keys, 5-1
Windows special keys, 5-5
Keypad overlay, 1-6, 5-5
numeric mode, 5-6
temporarily changing modes, 5-7
temporarily using normal keyboard (overlay on), 5-6
temporarily using overlay (overlay off), 5-7
turning on the overlays, 5-5
L
LAN, 1-5, 4-8
cable types, 4-8
connecting, 4-8
disconnecting, 4-9
Lock, security, See Security lock
M
Main battery, See Battery pack
Memory, 1-2
expansion, 8-4
installing module, 8-4
removing module, 8-6
Microphone, 1-4
problems, 9-10
using, 4-6
Microprocessor, See Processor
Moving the computer, 4-9
Multiple digital media card slot using, 8-1
Mute, 5-4
N
Numeric keypad, See Keypad overlay
0
Optional, 8-1
Optional Devices, 8-1
P
Password
power on, 1-6
problems, 9-5
Pointing device
touchpad, 4-1
Ports
external monitor, 1-4, 2-4
headphone, See Sound system
LAN, 2-4
USB, 1-4, 2-2, 2-3
Power, 1-3
button location, 2-6
conditions, 6-1
hibernation mode, 3-6
indicator, 2-8, 6-3
panel on/off, 1-6
Shut Down mode (Boot Mode), 3-5
turning off, 3-5
turning on, 3-5
Problems
AC power, 9-4
analyzing the problem, 9-2
battery, 9-4
Bluetooth, 9-11
external monitor, 9-9
hard disk drive, 9-6
hardware and system checklist, 9-3
keyboard, 9-6
LAN, 9-11
LCD panel, 9-6
overheating power down, 9-4
password, 9-5
power, 9-4
SD/MS/MS Pro Card, 9-9
self test, 9-3
sound system, 9-10
system start-up, 9-3
TOSHIBA support, 9-12
touchpad, 9-7
USB, 9-10
USB mouse, 9-8
Wireless LAN, 9-11
Processor, 1-2
R
Real Time Clock battery, See
Battery
Restarting the computer, 3-8
S
Security lock, 8-9
attaching, 8-9
location, 2-2
Security lock slot, 1-5
Silent Mode, 5-4
SIM card, 8-7, 9-9
SIM card slot, 1-4
Soft keys
emulating keys on enhanced keyboard, 5-2
Enter, 5-3
right Alt key, 5-3
right Ctrl key, 5-3
scroll lock, 5-3
Sound system, 1-4
headphone, 1-4, 2-1
microphone, 2-1
speaker, 2-7
Speaker down, 5-4
Speaker Up, 5-4
Standby, 1-7
Standby/Hibernation, 9-10
Starting the computer by
password, 6-11
Supend mode, 3-7
T
TOSHIBA Bluetooth Stack, 1-7
TOSHIBA Disc Creator, 4-2
TOSHIBA support, 9-12
TOSHIBA Theft Registration,
E-2
TOSHIBA zooming utility
(enlarge), 5-5
TOSHIBA zooming utility
(reduce), 5-5
Touchpad
using, 4-1
U
Universal AC adaptor additional, 1-8
USB
location, 2-2, 2-3
USB device, 1-4
V
Video modes, B-1
Video RAM, 1-2
W
Web camera, 1-4
Windows special keys, 5-5
Wireless communication, 5-3
Wireless LAN, 1-5
indicator, 4-7
using, 4-6
Wireless WAN, 1-5, 5-3
Z
Zoom, 5-3