Aspire 1520 - Laptop ACER - Free user manual and instructions
Find the device manual for free Aspire 1520 ACER in PDF.


User questions about Aspire 1520 ACER
0 question about this device. Answer the ones you know or ask your own.
Ask a new question about this device
Download the instructions for your Laptop in PDF format for free! Find your manual Aspire 1520 - ACER and take your electronic device back in hand. On this page are published all the documents necessary for the use of your device. Aspire 1520 by ACER.
USER MANUAL Aspire 1520 ACER
Acer Aspire 1360 / 1520 Series
User's Guide
Changes may be made periodically to the information in this publication without obligation to notify any person of such revision or changes. Such changes will be incorporated in new editions of this manual or supplementary documents and publications. This company makes no representations or warranties, either expressed or implied, with respect to the contents hereof and specifically disclaims the implied warranties of merchantability or fitness for a particular purpose.
Record the model number, serial number, purchase date, and place of purchase information in the space provided below. The serial number and model number are recorded on the label affixed to your computer. All correspondense concerning your unit should include the serial number, model number, and purchase information.
No part of this publication may be reproduced, stored in a retrieval system, or transmitted, in any form or by any means, electronic, mechanical, photocopy, recording, or otherwise, without the prior written permission of Acer Incorporated.
Acer Aspire 1360 / 1520 Series Notebook Computer
Model Number : ____
Serial Number: ____
Purchase Date: ____
Place of Purchase: ____
All trademarks and registered trademarks are the properties of their respective companies.
First things first
Your guides
A set of guides is provided to help you set up and use your Aspire computer:

The Just for starters... poster shows you how to set up your computer.
This User's Guide provides clear and concise information on using your computer productively. You are advised to read it thoroughly and keep it handy for future reference.
For more information on Acer's products, services, and support, please visit the web site: http://www.acer.com.
Basic care and tips for using your computer
Turning your computer on and off
To turn on your computer, open the lid and press the power button above the keyboard.
To turn the power off, you can do any of the following:
- Click on the Start button in Windows, and then select Shut Down on the popup menu.
- Push the power button.
To use this method, you must first click on the Power Management icon in Windows Control Panel, and then check that the power button is set to shut down the computer when pressed. See Windows Help and Support for more information.

Note: If you are unable to shut down the computer in the usual way, press and hold the power button for more than four seconds. You should then wait at least two seconds before turning the computer on again.
Taking care of your computer
Your computer will serve you well if you take care of it.
- Do not expose the computer to direct sunlight. Do not place it near sources of heat, such as a radiator.
- Do not expose the computer to temperatures below 0^ (32°F), or above 50^ (122°F).
- Do not expose the computer to magnetic fields.
- Do not expose the computer to rain or moisture.
- Do not spill water or any liquid on the computer.
- Do not subject the computer to heavy shock or vibration.
- Do not expose the computer to dust or dirt.
- Do not place objects on top of the computer.
- Do not slam the lid shut. Close the computer gently.
- Do not place the computer on unstable or uneven surfaces.
Taking care of your AC adaptor
It is important that you look after your AC adaptor.
- Do not connect the adaptor to any other device.
- Do not step on the power cord or place heavy objects on it. Route the power cord away from areas where people might walk on it or trip over it.
- Do not pull on the power cord when disconnecting from the mains power socket. Grasp and pull the plug instead.
- The total ampere ratings of equipment plugged into a power strip should not exceed the ampere rating for that power strip.
Taking care of your battery pack
It is also important that you look after your computer's battery pack.
- Use the correct battery model for your computer. Do not use other kinds of batteries.
- Turn the power off before removing or replacing the battery.
- Do not tamper with the battery. Keep the battery away from children.
- Dispose of batteries according to local regulations. Recycle if possible.
Cleaning and servicing
When cleaning your computer, it is important that you follow these steps:
- Turn off the computer and remove the battery.
- Disconnect the AC adaptor.
- Clean with a soft cloth moistened with a little water. Do not use liquid or aerosol cleaners.
Refer to the chapter entitled "Frequently asked questions" on page 65 if any of the following occurs:
- You drop the computer or damage the case.
- You spill liquid on the computer.
- The computer does not operate normally.

First things first iii
Your guides iii
Basic care and tips for using your computer iii
Getting familiar with your computer 1
A tour of your computer 3
Front view 3
Left view 5
Right view 6
Rear view 7
Bottom view 8
Features 9
Indicators 11
Keyboard 12
Lock keys 12
Embedded keypad 13
Windows keys 14
Hot keys 15
The Euro symbol 17
Touchpad 18
Touchpad basics 18
Launch keys 20
Storage 22
Ejecting the optical drive tray 23
Emergency ejection of the optical drive tray 23
Connectivity options 24
Ethernet and LAN 24
Fax/Data modem 25
Audio 26
Securing your computer 27
Security slot 27
Operating on battery power 29
Battery pack 31
Battery pack characteristics 31
Installing and removing the battery pack 32
Charging the battery 33
Checking the battery level 33
Optimizing battery life 33
Battery-low warning 34
Power management 35
Peripherals and options 37
External display devices 39
External input devices 39
External keyboard 39
External keypad 39
External pointing device 39
USB devices 40
IEEE 1394 Port 41
Printer 42
Audio devices 42
Expansion devices 43
PC Card 43
44
Miscellaneous options 44
Battery pack 44
AC adapter 44
Key component upgrades 45
Memory upgrade 45
Hard disk upgrade 46
Moving with your computer 47
Disconnecting from the desktop 49
Moving around 50
Preparing the computer 50
What to bring to short meetings 50
What to bring to long meetings 50
Taking the computer home 51
Preparing the computer 51
What to bring with you 51
Special considerations 51
Setting up a home office 52
Traveling with the computer 52
Preparing the computer 52
What to take with you 52
Special considerations 52
Traveling internationally with your computer 53
Preparing the computer 53
What to take with you 53
Special considerations 53
Software 55
Using system utilities 57
Acer eManager 57
System software 58
Launch Manager 58
BIOS Setup Utility 59
D to D Recovery (Disc to Disc) 60
Multilingual operating system installation 60
Restore without a Recovery CD 60
Setup password and exit 61
Troubleshooting 63
Frequently asked questions 65
Requesting service 68
International Traveler's Warranty (ITW) 68
Before you call 68
Appendix A Specifications 69
Appendix B
Regulation & safety notices 75
Index

Getting familiar with your computer
Your Aspire 1360 / 1520 series notebook computer combines solid performance, versatility, multimedia capabilities and portability with a stylish design. Increase your productivity by working wherever you are. This chapter provides an in-depth "tour" of your computer's features.
A tour of your computer
After setting up your new Aspire notebook computer, as illustrated in the Just for starters... poster, take a few minutes to explore the unit.
Front view
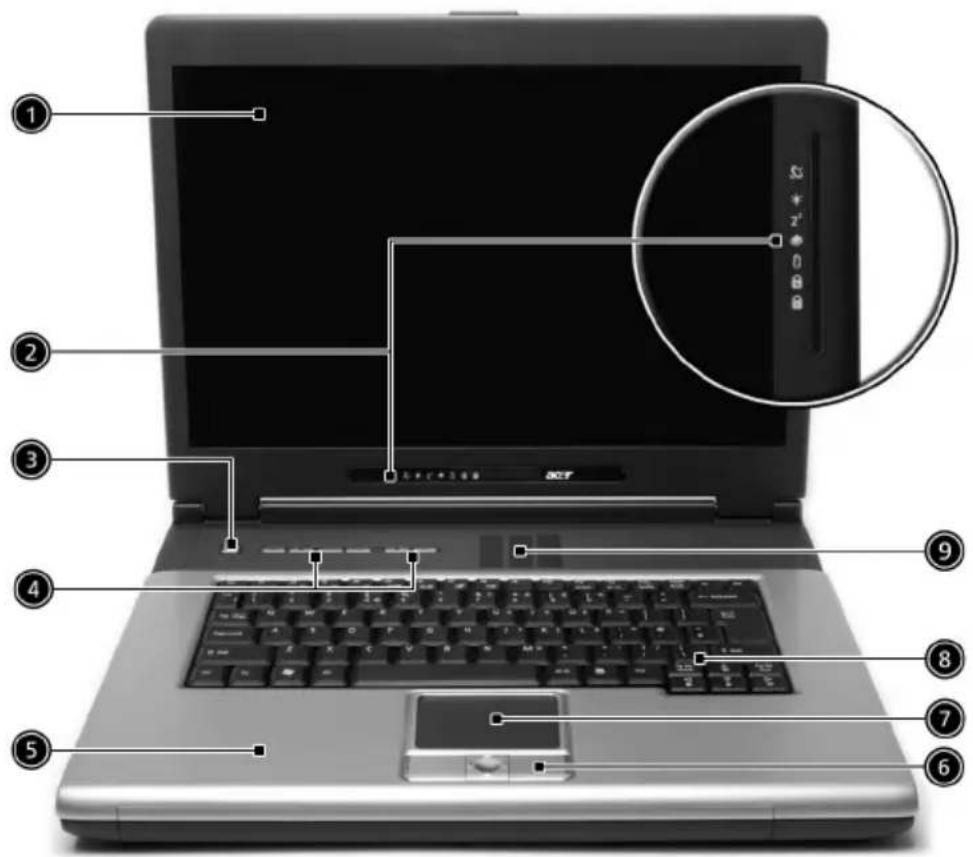
text_image
Laptop screen diagram with numbered annotations pointing to key components such as keyboard, mouse, and display screen# Item Description
1 Display screen Liquid-Crystal Display (LCD) provides visual output.
2 Status indicators Light-Emitting Diodes (LEDs) that turn on and off to show the status of the computer, its functions and components.
# Item Description
3 Power button Turns the computer on and off.
4 Launch keys Buttons for launching frequently used programs. See "Launch keys" on page 21 for more details.
5 Palmrest Comfortable support area for your hands when you use the computer.
6 Click buttons & 4-way scroll key The left and right buttons function like the left and right mouse buttons; the 4-way scroll key scrolls the contents of a window up, down, left and right.
7 Touchpad Touch-sensitive pointing device which functions like a computer mouse.
8 Keyboard Inputs data into your computer.
9 Ventilation slot Enables the computer to stay cool, even after prolonged use.
Left view
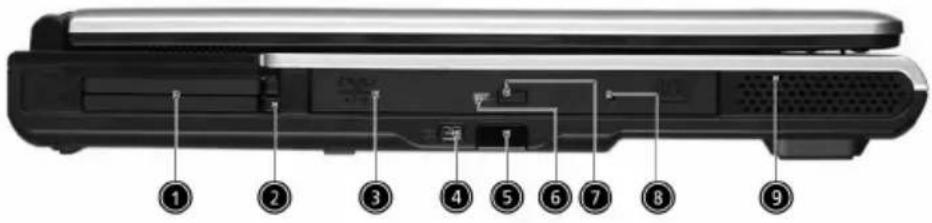
text_image
Diagram of a device rear panel with numbered labels pointing to internal components# Item Description
1 PC Card slots Support one Type III or two Type II CardBus PC Card(s).

2 Eject buttons Ejects the PC Card(s) from the slots.
3 Optical drive Internal optical drive; accepts CDs or DVDs depending on the optical drive type.
4 IEEE 1394 port Connects to IEEE 1394 devices.
1394
5 Infrared port Interfaces with infrared devices (e.g. infrared printer and IR-aware computer).
-..<
6 LED indicator Lights up when the optical drive is active.
7 Eject button Ejects the optical drive tray from the drive.
8 Emergency eject hole Ejects the optical drive tray when the computer is turned off. See page 23 for more details.
9 Speaker Delivers stereo audio output.
Right view
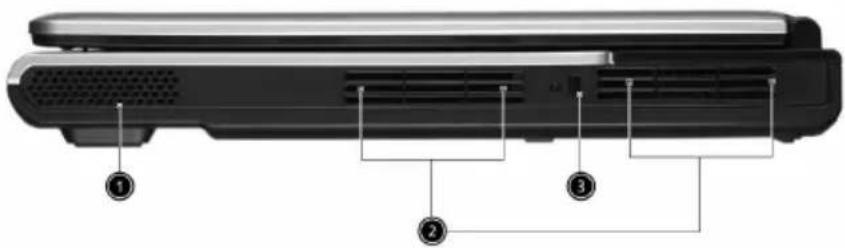
text_image
Diagram of a device rear panel with numbered labels pointing to key components# Item Description
1 Speaker Delivers stereo audio output.
2 Ventilation slots Enable the computer to stay cool, even after prolonged use.
3 Security keylock Connects to a Kensington-compatible computer security lock.
Rear view
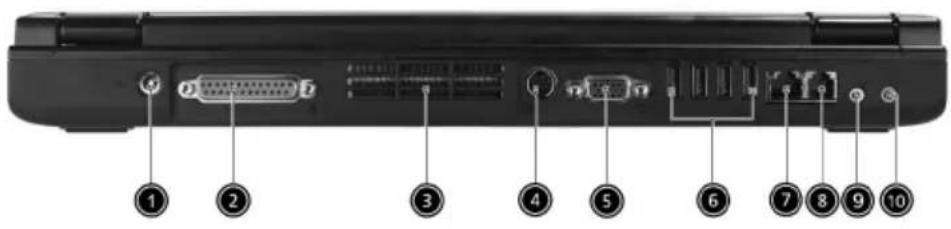
text_image
Labeled diagram of a computer rear panel showing ports, connectors, and memory drive indicators# Item Description
1 Power jack Connects to an AC adaptor.

2 Parallel port Connects to a parallel device
(e.g., parallel printer).

3 Ventilation slots Enable the computer to stay cool, even after prolonged use.
4 S-video port Connects to a television or display device
with S-video input.

5 External display port Connects to a display device (e.g., external
VGA monitor and LCD projector).

6 Four USB 2.0 ports Connect to Universal Serial Bus (USB) 2.0
devices (e.g., USB mouse and USB camera).

7 Network jack Connects to an Ethernet LAN network.

8 Modem jack Connects to a phone line.

# Item Description
9 Speaker/Line-Out/ Headphone jack
Connects to audio line-out devices (e.g., speakers and headphones).

10 Line-in/Mic-in jack Accepts audio line-in devices
(e.g., audio CD player and stereo walkman).

Bottom view
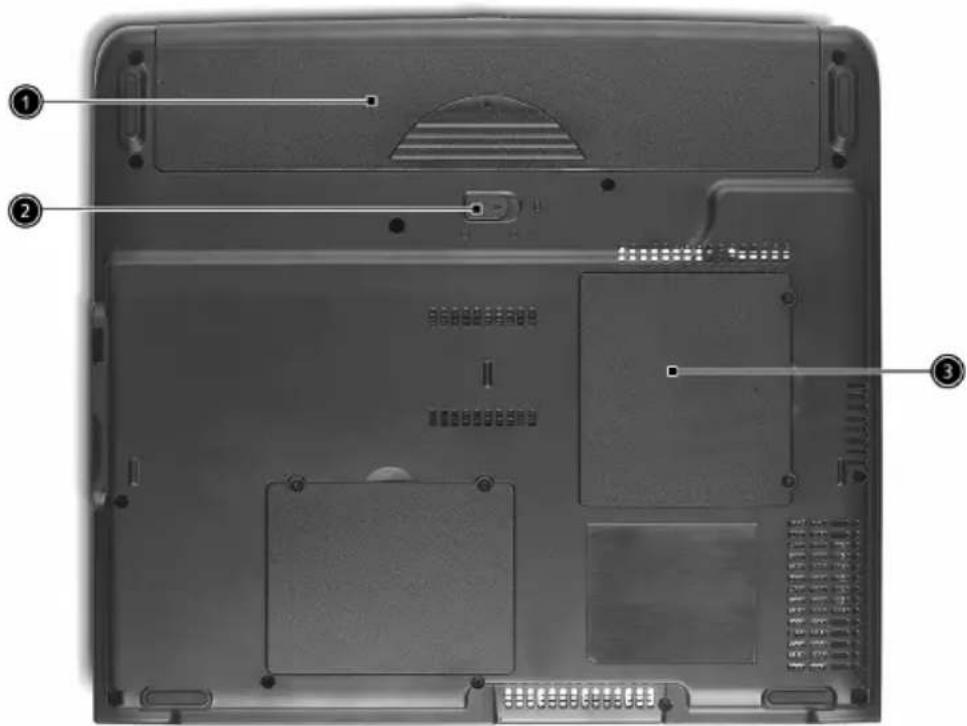
text_image
Laptop back panel with numbered annotations pointing to internal components# Item Description
1 Battery bay Houses the computer's battery pack.
2 Battery release latch Unlatches to remove the battery pack.
3 Memory compartment Houses the computer's main memory.
Features
Performance
- Mobile AMD Sempron™ processors 2600+ to 3300+ or higher with 128 / 256 KBL2 chache, supporting AMD PowerNow! Technology and HyperTransport technology (for Aspire 1360 only)
- AMD Athlon™ 64 processor 3000+ to 3400+ or higher with 1 MB cache, supporting HyperTransport technology (for Aspire 1520 only)
• VIA Chipset-integrated Unichrome ^TM PRO graphics core, with up to 64 MB of shared memory - 256/512 MB of DDR333 SDRAM, upgradeable to 2048 MB with dual soDIMM modules
- 30 GB and above high-capacity, Enhanced-IDE hard disk (for Aspire 1360 only)
- 40 GB and above high-capacity, Enhanced-IDE hard disk (for Aspire 1520 only)
- Advanced Configuration Power Interface (ACPI) power management system
Display
- The TFT LCD panel providing a large viewing area for maximum efficiency and ease-of-use:
- 14.1" XGA (1024x768) resolution (for Aspire 1360 only)
- 15.0" XGA (1024x768) or SXGA+ (1400x1050) resolution
- 15.4" WXGA (1280x800)
• NVIDIA GeForce4 448 Go with 64 MB of video memory (manufacturing option)
• NVIDIA GeForce FX Go5200 with 64 MB of video memory (manufacturing option)
• NVIDIA GeForce FX Go5700 with 64 MB of video memory (manufacturing option)
• 3D graphics support
- Simultaneous LCD and CRT display support
- S-video for output to a television or display device that supports S-video input
- "Automatic LCD dim" feature, automatically selecting the best setting for the display in order to conserve power
- DualView™ support
Multimedia
• High-speed built-in optical drive: DVD/CD-RW Combo, DVD-Dual, or DVD-Super Multi
• MS DirectSound compatible
• Built-in dual speakers
Connectivity
- Integrated 10/100 Mbps Fast Ethernet connection (for Aspire 1360 only)
- Integrated 10/100/1000 Mbps Fast Ethernet connection (for Aspire 1520 only)
• Built-in 56Kbps fax/data modem
• Four Universal Serial Bus (USB) 2.0 ports - One IEEE 1394 port
- IEEE 802.11b/g Wireless LAN (manufacturing option)
• B I u ^® (manufacturing option)
Human-centric design
- Rugged, yet extremely portable design
- Stylish appearance
• Full-size keyboard with four programmable launch keys - Comfortable palm rest area with well-positioned touchpad
Expansion
- One Type III or two Type II CardBus PC Card slots
- Upgradeable memory modules
Indicators
Your computer provides an array of seven indicators located either on the right hand side of the display screen (for normal 14" and 15" screen) or below the display screen (for 15.4" wide), showing the status of the computer and its components.
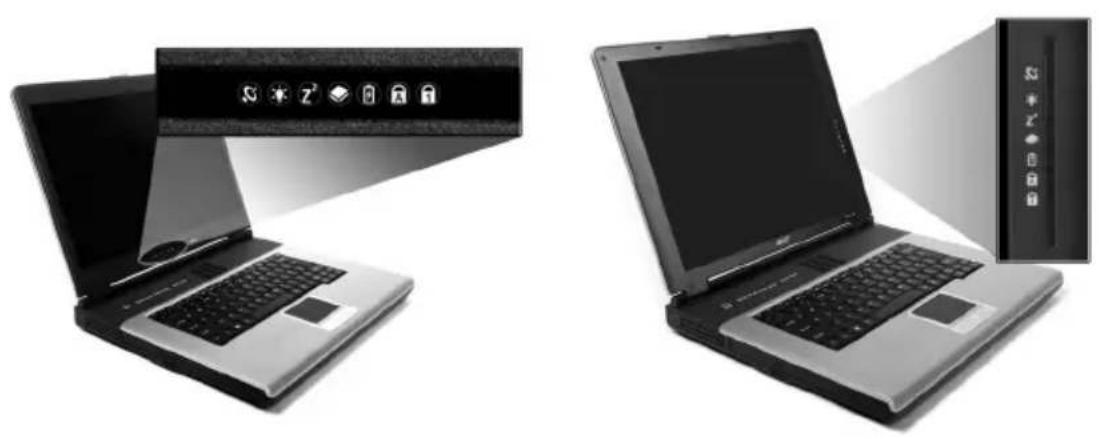
natural_image
Two laptops shown from different angles, one with a lock icon and the other with a screen (no text or symbols visible)| Icon Function Description | ||
| Wireless communications | Indicates status of wireless or Bluetooth®(optional) communications.Orange--WLAN; Blue--Bluetooth® | |
| Power Lights when the computer is on. | ||
| Sleep Lights when the computer enters Standby mode, and blinks when it enters into or resumes from hibernation mode. | ||
| Media activity Lights when the hard disk or optical drive is active. | ||
| Battery charge Lights when the battery is being charged. | ||
| Caps Lock Lights when Caps Lock is activated. | ||

Icon Function Description

Num Lock Lights when Num Lock is activated.
Keyboard
The keyboard features full-size keys with an embedded keypad, separate cursor control keys, two Windows keys, and twelve function keys (hot keys).
Lock keys
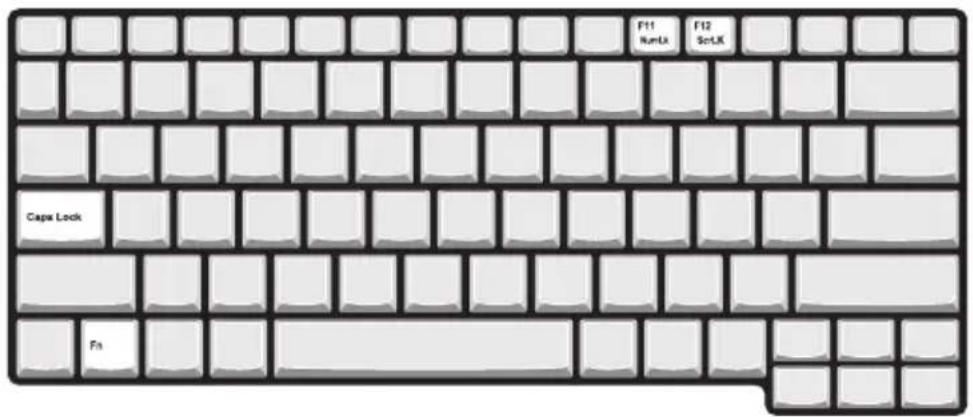
text_image
F11 NumLi F12 ScrLi Capex Lock FnThe keyboard has three lock keys which you can toggle on and off.
Lock Key Description
Caps Lock When Caps Lock is on, all alphabetic characters typed are in uppercase.
Num Lock (Fn+F11) When Num Lock is on, the embedded keypad is in numeric mode. The keys function as a calculator (complete with the arithmetic operators +, -, *, and /). Use this mode when you need to do a lot of numeric data entry. A better solution would be to connect an external keypad.
Scroll Lock (Fn+F12) When Scroll Lock is on, the screen moves one line up or down when you press the up or down arrow keys respectively. Scroll Lock does not work with some applications.
Embedded keypad
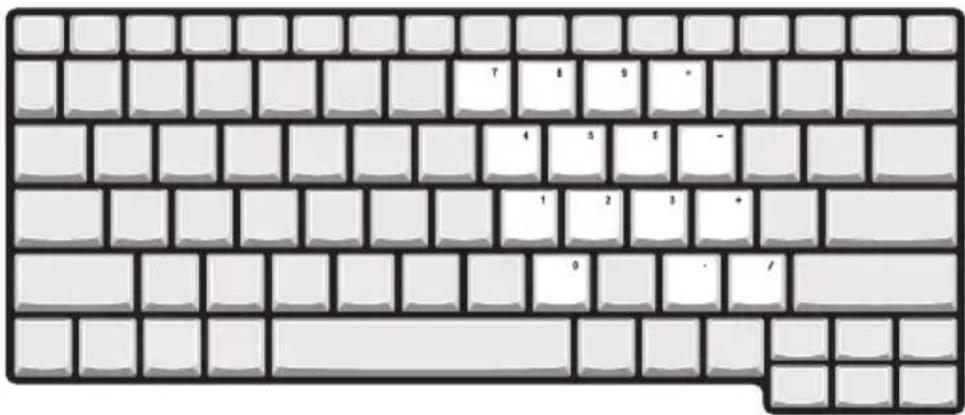
The embedded numeric keypad functions like a desktop numeric keypad. It is indicated by small characters located on the upper right corner of the keycaps. To simplify the keyboard legend, cursor-control key symbols are not printed on the keys.
text_image
7 8 9 - 4 5 6 - 1 2 3 + 0 . /Desired Access Num Lock On Num Lock Off
| Number keys on embedded keypad | Type numbers using embedded keypad in a normal manner. | |
| Cursor-control keys on embedded keypad | Hold Shift while using cursor-control keys. | Hold Fn while using cursor-control keys. |
| Main keyboard keys | Hold Fn while typing letters on embedded keypad. | Type the letters in a normal manner. |
Windows keys
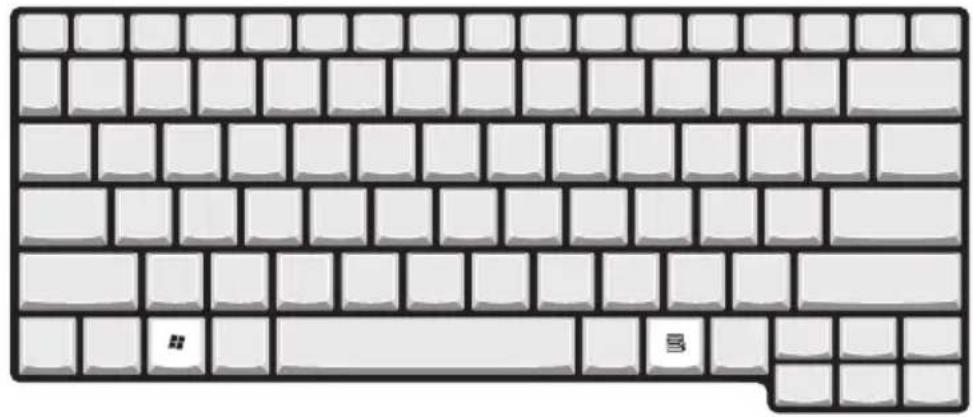
The keyboard features two keys that provide Windows-specific functions.
natural_image
Illustration of a brick wall with square tiles and a central keyboard (no text or symbols)Key Description
Windows key Pressed alone, this key has the same effect as clicking on

the Windows Start button; it launches the Start menu. It can also be used with other keys to provide a variety of functions:
+ Tab Activates the next Taskbar button.
+ E Opens the My Computer window.
+ F1 Opens Help and Support.
+ F Opens the Find: All Files dialog box.
+ M Minimizes all windows.
Shift + 📄M Undoes Minimize all windows
( +M) action.
+ R Opens the Run dialog box.
Application key This key has the same effect as clicking the right mouse
button; it opens the application's context menu.

Hot keys
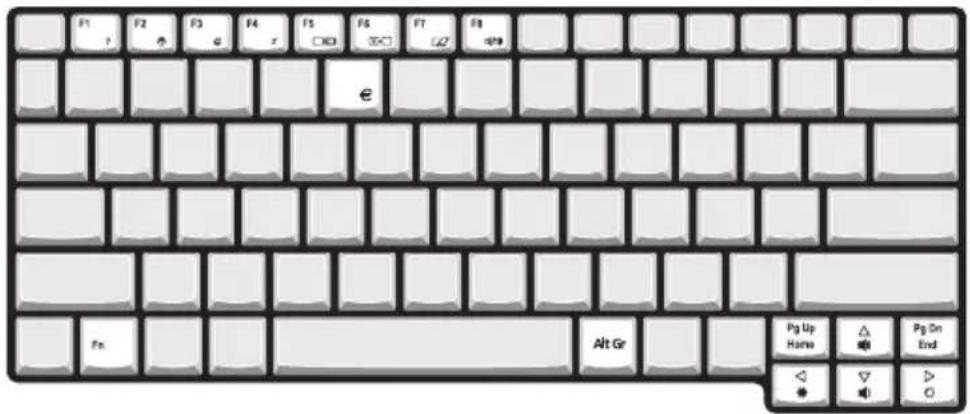
Using the Fn key with another key creates a hot key, providing a quick and convenient method for controlling various functions.
To use a hot key, first hold down the Fn key. Next, press the second key in the combination. Finally, release both keys.
text_image
F1 F2 F3 F4 F5 F6 F7 F8 F9 F10 F11 F12 F13 F14 F15 F16 F17 F18 F19 F20 F21 F22 F23 F24 F25 F26 F27 F28 F29 F30 F31 F32 F33 F34 F35 F36 F37 F38 F39 F40 F41 F42 F43 F44 F45 F46 F47 F48 F49 F50 F51 F52 F53 F54 F55 F56 F57 F58 F59 F60 F61 F62 F63 F64 F65 F66 F67 F68 F69 F70 F71 F72 F73 F74 F75 F76 F77 F78 F79 F80 F81 F82 F83 F84 F85 F86 F87 F88 F89 F90 Alt Gr Pg Up Home △ Pg On End ◀ ▼ ○Your computer provides the following hot keys:
Hot Key Icon Function Description
Fn-F1 Hot key help Displays help on hot keys.
Fn-F2 Setup Accesses the computer's

property window.
Fn-F3 Power

Management Scheme toggle
Switches the power management scheme used by the computer (function available if supported by operating system).
Fn-F4 Sleep Puts the computer in Sleep

mode.
Fn-F5 Display toggle Switches display output
between the display screen, external monitor (if connected) and both the display screen and external monitor.
| Hot Key | Icon | Function | Description |
| Fn-F6 Screen blank Turns the display screen | backlight off to save power. Press any key to return. | ||
| Fn-F7 Touchpad toggle Turns the internal touchpad on and off. | |||
| Fn-F8 Speaker toggle Turns the speakers on and off. | |||
| Fn-↑ Volume up Increases the sound volume. | |||
| Fn-↓ Volume down Decreases the sound volume. | |||
| Fn-→ Brightness up Increases the screen brightness. | |||
| Fn-← Brightness down Decreases the screen brightness. | |||
| Fn-Pg Up Home Functions as the Home key. | |||
| Fn-Pg Dn End Functions as the End key. | |||
| Alt Gr-Euro | € | Euro Types the Euro symbol. | |
The Euro symbol
If your keyboard layout is set to United States-International or United Kingdom or if you have a keyboard with a European layout, you can type the Euro symbol on your keyboard.

Note for US keyboard users: The keyboard layout is set when you first set up Windows. For the Euro symbol to work, the keyboard layout has to be set to United States-International.
To verify the keyboard type:
1 Click on Start, Control Panel.
2 Double-click on Regional and Language Options.
3 Click on the Language tab and click on Details.
4 Verify that the keyboard layout used for "En English (United States)" is set to United States-International.
If not, select and click on ADD; then select United States-International and click on OK.
5 Click on OK.
To type the Euro symbol:
1 Locate the Euro symbol on your keyboard.
2 Open a text editor or word processor.
3 H o l d Alt Gr and press the Euro symbol.

Some fonts and software do not support the Euro symbol. Please refer to http://www.microsoft.com/typography/faq/faq12.htm for more information.
Touchpad
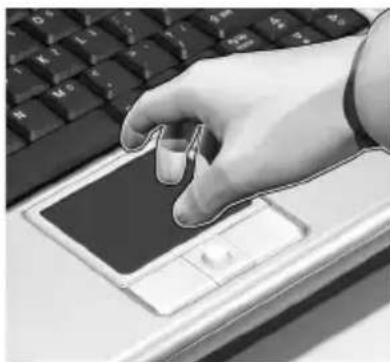
The built-in touchpad is a PS/2-compatible pointing device that senses movement on its surface. The cursor responds to your finger movements on the touchpad. In addition, the two click buttons provide the same functionality as a computer mouse, while the scroll key enables easy 4-way scrolling in documents and web pages.
The touchpad is located in the middle of the palm rest area, providing maximum comfort and efficiency.
natural_image
Close-up of a hand using a stylus on a laptop keyboard (no visible text or symbols)Touchpad basics
Use the touchpad as follows:
text_image
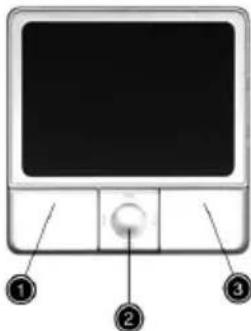
Diagram of a computer monitor with labeled buttons for navigation and reset functions- Slide your finger over the surface of the touchpad to control the movement of the cursor. Tap the touchpad to perform selection and execution functions.
- Press the left (1) and right (3) click buttons to perform selection and execution functions, just as you would use the buttons on a computer mouse.
- Use the scroll key (2) to scroll through long documents and web pages. Press the top of the key to scroll up, bottom to scroll down; left to scroll left, and right to scroll right.
| Function Left Button | Right Button | 4-Way Scroll Key | Tap |
| Execute Click twice quickly. | Tap twice quickly. | ||
| Select Click once. Tap once. | |||
| Drag Click and hold.Then, slide your finger across the touchpad to drag the cursor over the selection. | Tap twice quickly. On the second tap, slide your finger across the touchpad to drag the cursor over the selection. | ||
| Access content menu | Click once. | ||
| Scroll Click and | hold the up/ down/left/ right button. | ||

Note: Keep your fingers, as well as the surface of the touchpad, clean and dry. The touchpad is sensitive to your finger movements: the lighter your touch, the better the response. Tapping hard will not increase the touchpad's responsiveness.
Launch keys
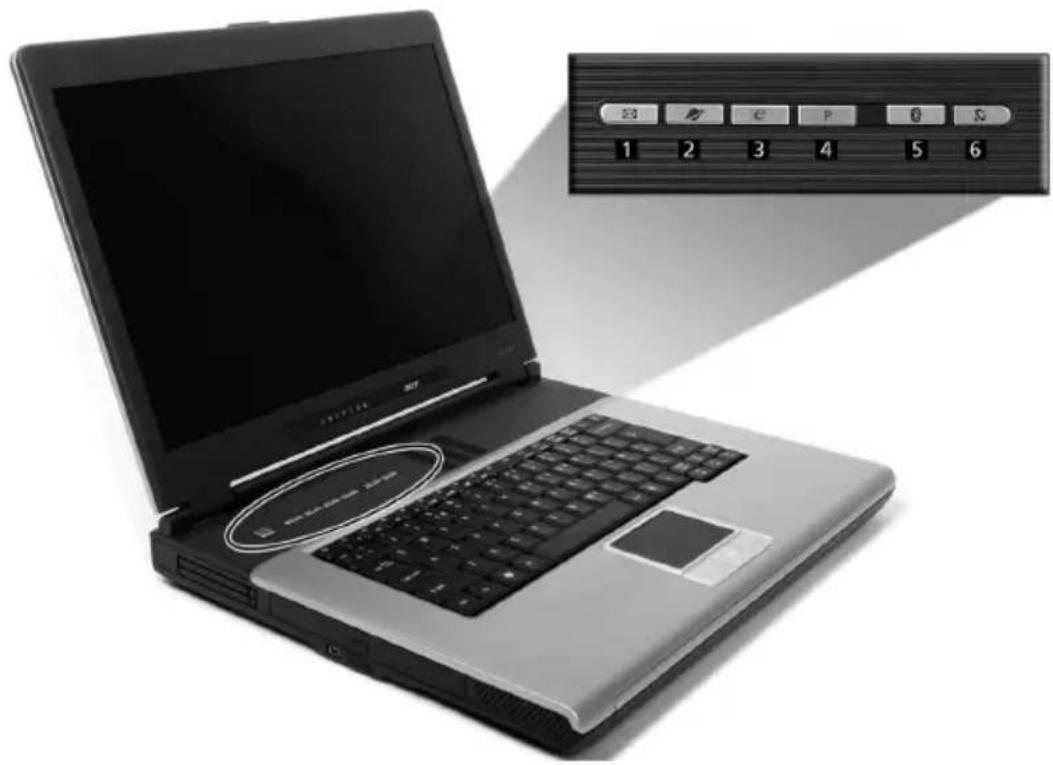
Located at the upper-right above the keyboard are four buttons. These buttons are called launch keys. They are designated as the mail, Web browser, Empowering and programmable keys.
Press the Acer Empowering Key to run the Acer eManager. Please see "Acer eManager" on page 57. The mail and Web browser are default for Email and Internet programs, but can be reset by users. To set the mail, Web browser and programmable keys, run the Acer Launch Manager. See "Launch Manager" on page 58.
natural_image
Laptop with keyboard and front panel showing numeric keypad (no readable text or symbols on main device)Launch Key Default Application
1 Mail Email application (User-programmable)
2 Web browser Internet browser application (User-programmable)
3 e Acer eManager application (User-programmable)
4 P User-programmable
Launch Key Default Application
5 Bluetooth® Enables your Bluetooth®. (optional)
6 Wireless (optional) Enables your 802.11b/g Wireless LAN.

Caution: It is important that the Bluetooth ^® and Wireless LAN features are turned off before boarding an airplane.
Storage
Your computer offers a variety of data storage options:
- The high capacity Enhanced-IDE hard disk drive.
The hard drive is upgradeable, enabling you to increase your storage capacity in the future. Consult your dealer if you need to upgrade.
• The high speed optical drive.
Depending on your model, you have a DVD/CD-RW Combo, DVD-Dual or DVD-Super Multi. The optical drive provides increased storage capacity, as well as offering a host of multimedia possibilities.
See the section entitled "A tour of your computer" on page 3 for the locations of these drives.
Ejecting the optical drive tray
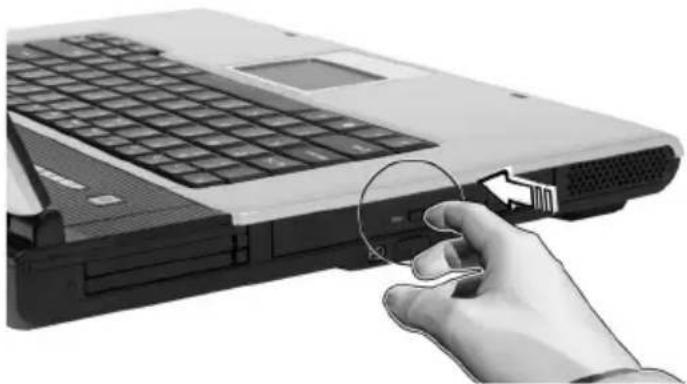
To eject the optical drive tray:
- With the computer turned on, press the optical drive eject button.
• The tray will be released, and partially popped open.
• Gently pull the tray out to its limit.
natural_image
Hand inserting a circular component into a laptop keyboard (no text or symbols visible)To load an optical disc:
- Place a CD or DVD on the open tray. Align the disc's center hole with the tray's spindle.
• Gently push down on the disc until it clicks in place on the spindle.
• Gently push in the tray until it clicks closed.
Emergency ejection of the optical drive tray
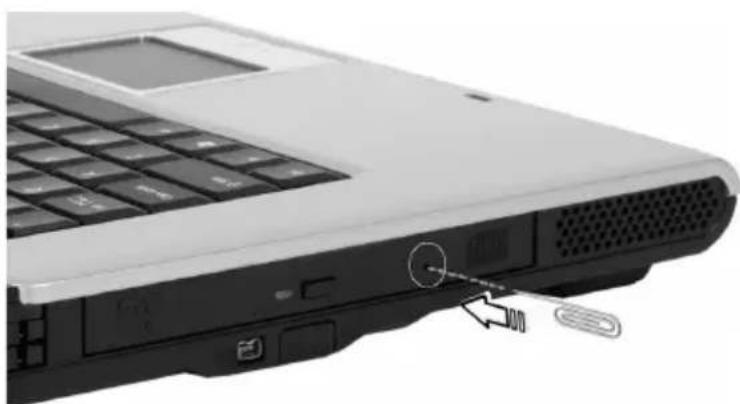
If you need to eject the optical drive tray when the computer is turned off, push a straightened paper clip into the optical drive emergency eject hole. The tray will be released, and partially popped open.
natural_image
Close-up of a laptop keyboard and drive head with a cable being inserted (no visible text or symbols)Connectivity options
Your computer has built-in connectivity options, enabling you to hook up to a network or communicate over a phone line.
Ethernet and LAN
The integrated network feature allows you to connect your computer to an Ethernet-based (10/100 BASE-T for Aspire 1360 or 10/100/1000 BASE-T for Aspire 1520) network.
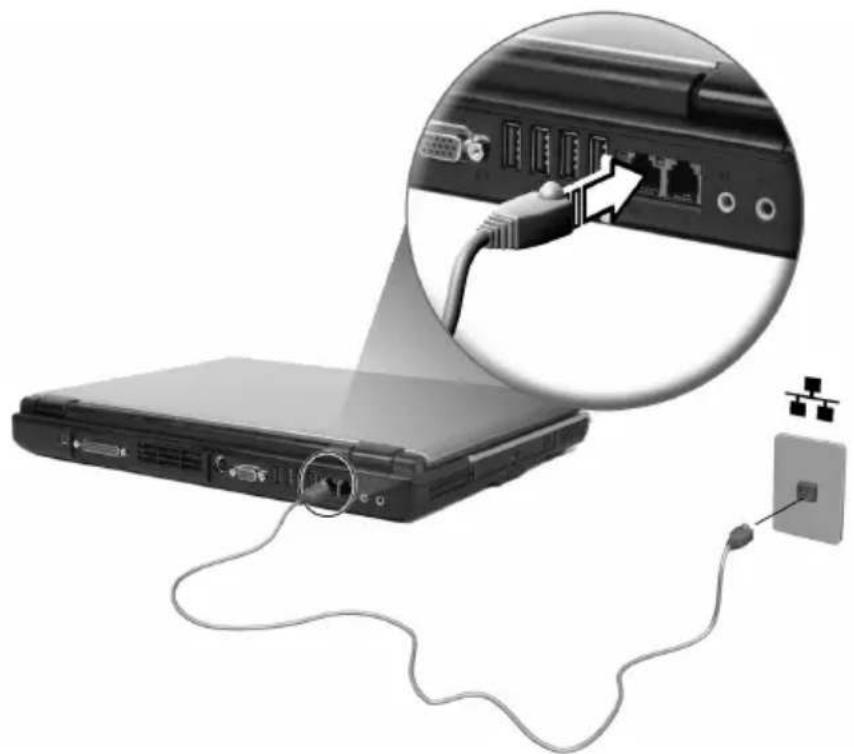
To use the network feature, plug an Ethernet cable into your computer's network jack, and then connect the other end to a network jack or hub on your network.
natural_image
Laptop connected to a cable with an attached plug, showing internal wiring and a magnified view of the plug connector (no text or symbols visible)See Windows Help and Support for information on setting up a network connection.
Fax/Data modem
Your computer features a built-in fax/data modem, enabling you to communicate over a phone line. This means that you can connect to the Internet via a dialup account with an ISP, log in to your network from a remote location, or send faxes.

Warning: Your modem is not compatible with digital phone lines. Plugging the computer into a digital phone system will damage the modem.
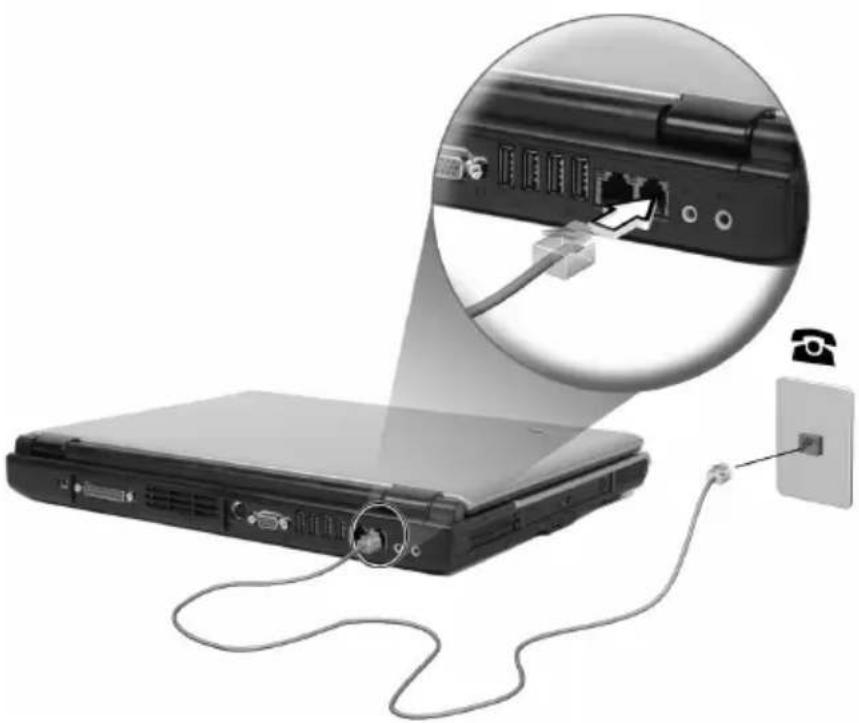
To use the fax/data modem, plug a phone cable into your computer's modem jack, and then connect the other end to a telephone jack.
natural_image
Laptop connected to a wall-mounted power outlet, showing cable routing and port connectivity (no text or symbols visible)
Warning: Please use the delivered phone cable in the country of use.
Audio
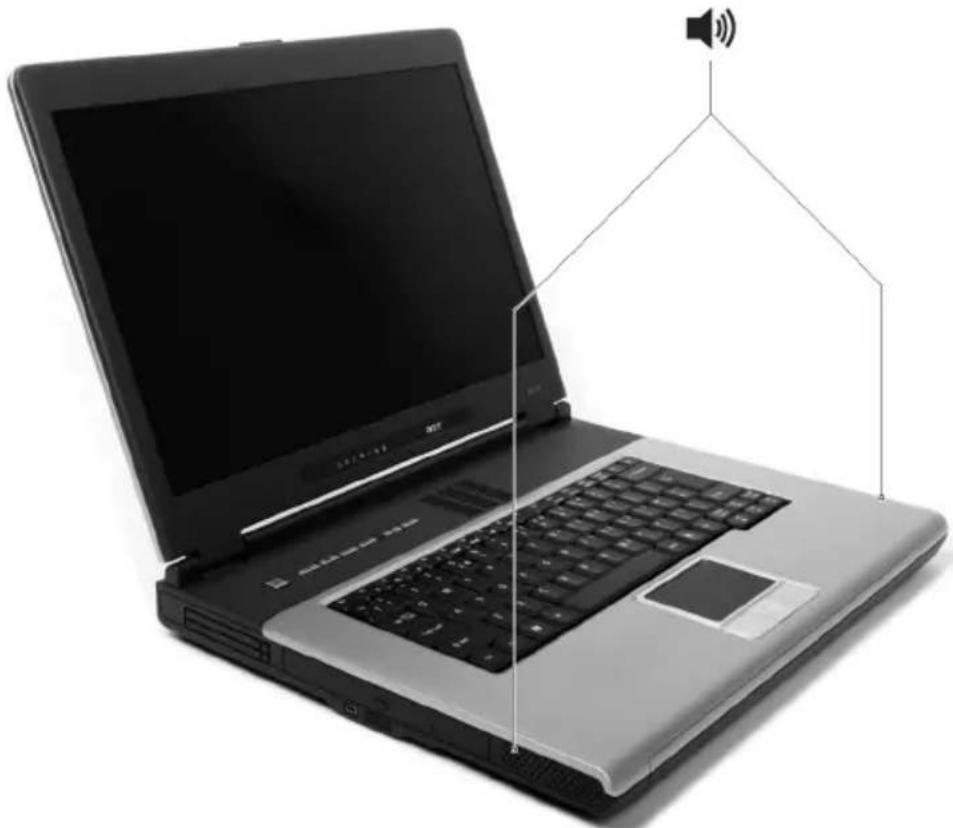
Your computer includes an integrated stereo audio system. Built-in stereo speakers are located at the front on both sides of the unit.
natural_image
Laptop with a speaker icon and sound wave representation on top (no text or symbols on the laptop or background)Volume is adjusted using software, such as Volume Control in Windows, Volume Fn keys, or any other application that provides a volume adjustment control.
Two audio ports on the rear side of the computer enable external devices to be connected. See "A tour of your computer" for the location of the audio ports. For information on connecting external devices, see "Audio devices" in the section entitled, "Peripherals and options."
Securing your computer
Your computer features hardware and software security solutions, in the form of a slot for a Kensington lock and a password facility.
Security slot
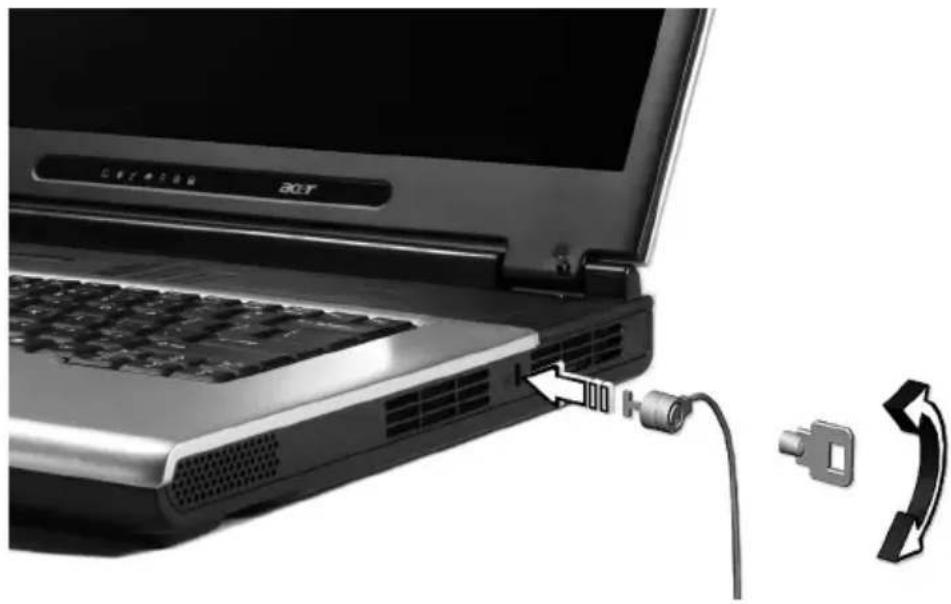
A slot for a Kensington slot enables you to physically protect your computer from theft. Use this feature as follows:
- Wrap a security lock cable around a heavy or immovable object, such as a drawer handle on a file cabinet, or a table leg.
- Insert the lock into the slot on the computer, turn it 90^ , and then lock it in place.
natural_image
Laptop with USB cable and connector, showing a blue LED cable inserted into the front panel (no text or symbols visible)Setting a password
Passwords protect your computer from unauthorized access. When set, no one can access the computer without entering the correct password.
There are three types of passwords you can set:
1 Supervisor Password secures your computer against unauthorized entry to and use of the BIOS Utility.
2 User Password secures your computer against unauthorized use.
3 Hard Disk Password protects your data by preventing unauthorized access to your hard disk.

Important! Do not forget your Setup and Hard Disk passwords! If you forget your passwords, please get in touch with your dealer or an authorized service center.
You can set the passwords using the BIOS Utility.
Operating on
battery power
Your Aspire 1360 / 1520 series notebook computer operates on battery or AC power. This chapter provides information for operating on battery power, as well as information on how your computer manages and saves power.
Battery pack
The computer uses a battery pack that gives you long use between charges.
Battery pack characteristics
The battery pack has the following characteristics:
- Employs current battery technology standards.
- Delivers a battery-low warning.
The battery is recharged whenever you connect the computer to the mains power supply. Your computer supports charge-in-use, enabling you to recharge the battery while you continue to operate the computer. However, recharging with the computer turned off results in a significantly faster charge time.
The battery will come in handy when you travel or during a power failure. It is advisable to have an extra fully charged battery pack available as backup. Contact your dealer for details on ordering a spare battery pack.
Maximizing the battery's life
Like all other batteries, your computer's battery will degrade over time. This means that the battery's performance will diminish with time and use. To maximize your battery's life, you are advised to adhere to the recommendations set out below.
Conditioning a new battery pack
Before you use a battery pack for the first time, there is a "conditioning" process that you should follow:
1 Insert the new battery without turning the computer on.
2 Connect the AC adaptor and fully charge the battery.
3 Disconnect the AC adaptor.
4 Turn on the computer and operate using battery power.
5 Fully deplete the battery until the battery-low warning appears.
6 Reconnect the AC adaptor and fully charge the battery again.
Follow these steps again until the battery has been charged and discharged three times.
Use this conditioning process for all new batteries, or if a battery hasn't been used for a long time. If the computer is to be stored for more than two weeks, you are advised to remove the battery pack from the unit.

Warning: Do not expose battery packs to temperatures below 0^ C ( 32^ F) or above 60^ C ( 140^ F). Extreme temperatures may adversely affect the battery pack.
By following the battery conditioning process you condition your battery to accept the maximum possible charge. Failure to follow this procedure will prevent you from obtaining the maximum battery charge, and will also shorten the effective lifespan of the battery.
In addition, the useful lifespan of the battery is adversely affected by the following usage patterns:
- Using the computer on constant AC power with the battery inserted. If you want to use constant AC power, you are advised to remove the battery pack after it is fully charged.
- Not discharging and recharging the battery to its extremes, as described above.
- Frequent use; the more you use the battery, the faster it will reach the end of its effective life. A standard computer battery has a life span of about 500 charges.
Installing and removing the battery pack

Important! Before removing the battery from the unit, connect the AC adaptor if you want to continue using your computer. Otherwise, turn off the computer first.
To install a battery pack:
1 Align the battery with the open battery bay; make sure that the end with the contacts will enter first, and that the top surface of the battery is facing up.
2 Slide the battery into the battery bay and gently push until the battery locks in place.
To remove a battery pack:
1 Slide the battery release latch to release the battery.
2 Pull the battery from the battery bay.
Charging the battery
To charge the battery, first make sure that it is correctly installed in the battery bay. Plug the AC adaptor into the computer, and connect to a mains power outlet. You can continue to operate your computer on AC power while your battery is charging. However, charging the battery with the computer turned off results in a significantly faster charge time.

Note: You are advised to charge the battery before retiring for the day. Charging the battery overnight before traveling enables you to start the next day with a fully charged battery.
Checking the battery level
The Windows Power Meter indicates the current battery level. Rest the cursor over the battery/power icon on the taskbar to see the battery's present charge level.
Optimising battery life
Optimising battery life helps you get the most out of battery operation, prolonging the charge/recharge cycle and improving recharging efficiency. You are advised to follow the suggestions set out below:
• Purchase an extra battery pack.
- Use AC power whenever possible, reserving battery for on-the-go use.
- Eject a PC Card if it is not being used, as it will continue to draw power.
- Store the battery pack in a cool, dry place. The recommended temperature is 10°C to 30°C. Higher temperatures cause the battery to self-discharge faster.
- Excessive recharging decreases the battery life.
- Look after your AC adaptor and battery.
Battery-low warning
When using battery power pay attention to the Windows Power Meter.

Warning: Connect the AC adaptor as soon as possible after the battery-low warning appears. Data will be lost if the battery to become fully depleted and the computer shuts down.
When the battery-low warning appears, the recommended course of action depends on your situation:
Situation Recommended Action
| The AC adaptor and a power outlet are available. | 1. Plug the AC adaptor into the computer, and then connect to the mains power supply.2. Save all necessary files.3. Resume work.Turn off the computer if you want to recharge the battery rapidly. |
| An extra fully charged battery pack is available. | 1. Save all necessary files.2. Close all applications.3. Shut down the operating system to turn off the computer.4. Replace the battery pack.5. Turn on the computer and resume work. |
| The AC adaptor or a power outlet is unavailable. You have no spare battery pack. | 1. Save all necessary files.2. Close all applications.3. Shut down the operating system to turn off the computer. |
Power management
Your computer features a built-in power management unit that constantly monitors system activity. System activity refers to any activity involving one or more of the following devices: keyboard, touchpad/mouse, hard disk drive, optical drive, peripherals connected to the computer, and video memory. If no activity is detected for a period of time (the settings are controlled in Windows Power Management), the computer turns off some, or all, of these devices in order to conserve power.
Your computer employs a power management scheme that supports Advanced Configuration and Power Interface (ACPI), enabling maximum power conservation without compromising system performance. ACPI allows Windows to control the amount of power given to each device attached to the computer. In this way, Windows handles all power-saving chores for your computer. Refer to Windows Help and Support for more information.

Peripherals and
options
Your Aspire 1360 / 1520 series notebook computer offers good expansion capabilities.
This chapter provides information on connecting peripherals to expand your system. It also describes how to upgrade key components to enhance system performance and keep your computer in step with the latest technology.
You are advised to consult your dealer for information on peripherals. In addition, make sure that you read the manuals and other documentation provided with new hardware.
External display devices
You can connect an external (VGA) monitor or projector to your computer's external display port.
Use the Fn + F5 hot key to toggle the display setting between the computer's LCD panel and the external display device. See "Hot keys" on page 16 for more information.
External input devices
You can connect a variety of input devices to your computer's USB ports, providing increased functionality and greater ease-of-use. In addition, the USB ports can be used to connect many other peripheral devices, such as digital cameras, printers and scanners. See “Expansion devices” on page 43 for more information on connecting PC Card devices.
External keyboard
Your computer features a full-size keyboard. However, if you prefer, you can connect an external keyboard to one of your computer's USB ports. This enables you to enjoy the comfort and added features of a full-size desktop system keyboard when inputting typed data on your notebook computer.
External keypad
Your computer features an embedded keypad that, when combined with the Num Lock feature, enables you to easily input typed numeric data. Alternatively, you can connect a 17-key numeric keypad to one of your computer's USB ports. This enables you to enjoy the benefits of a numeric keypad without interfering with your use of the computer's keyboard for typing text.
External pointing device
Your computer features a sensitive touchpad pointing device with two click buttons and a scroll key. However, if you prefer to use a conventional mouse or other pointing device, you can connect it to one of your computer's USB ports.
USB devices
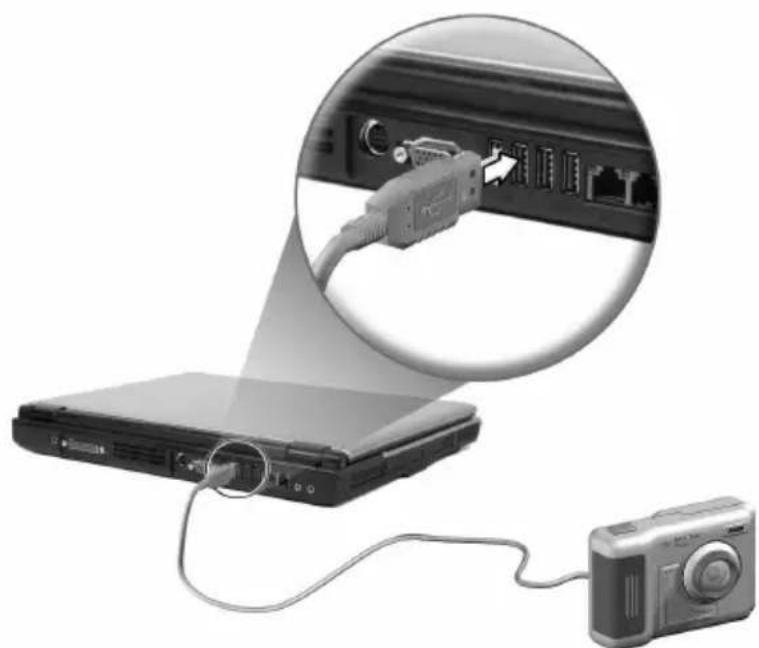
Your computer features four Universal Serial Bus (USB) 2.0 ports for connecting a range of USB peripherals. See “External input devices” on page 39, and “Printer” on page 42 for information on connecting a USB keyboard, keypad, mouse or printer. Other common USB devices include digital cameras, scanners, and external storage devices.
natural_image
Laptop connected to a digital camera via cable, with an inset showing the cable being inserted into a network interface (no text or symbols visible)USB is plug and play, which means that you can connect and start using a USB device without having to restart your computer. You can also disconnect the device at any time.
A further advantage of USB is the ability to use USB hubs. This means that several devices can share a USB port simultaneously.
IEEE 1394 Port
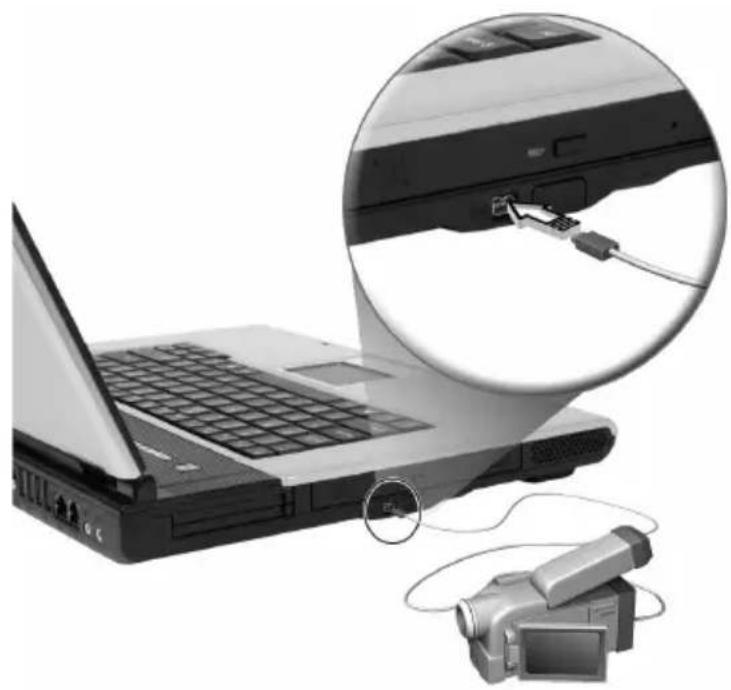
The computer's IEEE 1394 port allows you to connect to an IEEE 1394 supported device like a digital video camera.
natural_image
Laptop with attached cable and a digital camera, shown in an inset magnified view of the device (no text or symbols visible)See your video or digital camera's documentation for details.
Printer
Your computer supports both parallel and USB printers.
Refer to the printer's manual for information on:
- Setting up the hardware
• Installing the necessary drivers in Windows - Operating instructions
To use a USB printer, simply connect the device to one of your computer's USB ports, and then wait for Windows to find the new hardware.
To connect a parallel printer, first shut down the operating system. Connect the printer to the parallel port, and then restart the computer. Wait for Windows to find the new hardware.
Audio devices
Your computer offers built-in stereo speakers. See the section entitled "Audio" on page 26 for more information on these features. However, in addition to the integrated devices, the two audio ports on the rear side of the unit enable you to connect external audio input and output devices.
You can plug an external microphone into your computer's microphone-in jack. This offers the convenience of greater freedom of movement, as well as improved audio input quality.
Connect headphones to the headphone jack for private listening and improved audio output quality.
Expansion devices
PC Card
Your computer features two PC Card slots that support two standard Type II or one Type III CardBus (PCMCIA). This greatly increases your computer's usability and expandability. A variety of PC Cards are available, such as flash memory, SRAM, fax/data modem, LAN, and SCSI Cards. Consult your dealer for information on PC Card options for your computer.

Note: Refer to your card's manual for details on how to install and use the card.
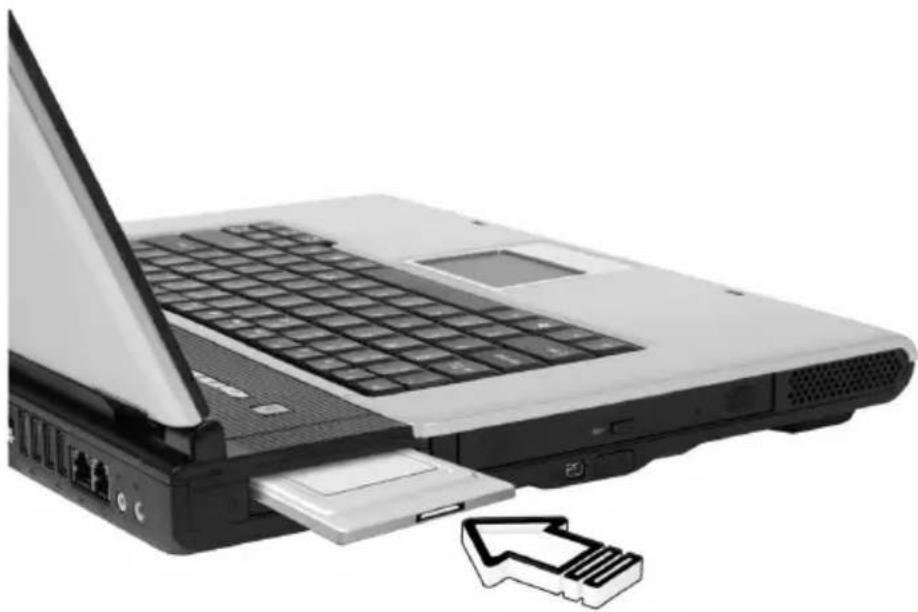
To insert a PC Card:
1 Align the card with your computer's PC Card slot. Make sure that the edge with the connectors is facing the slot, and that the card is the right way up. Many cards are marked with an arrow to help you insert them correctly.
2 Slide the card into the slot, and push gently until the card connects.
3 If necessary, connect the card's cable to the jack on the outer edge of the card.
4 Windows will automatically detect the card's presence.
natural_image
Laptop with open lid and USB drive, showing front panel and rear panel (no text or symbols visible)To remove a PC Card:
1 Close the application that is using the PC Card.
2 Double click on the PC Card icon on the taskbar, and then select the option to safely remove the card. Wait for the message telling you that it is now safe to remove the card.
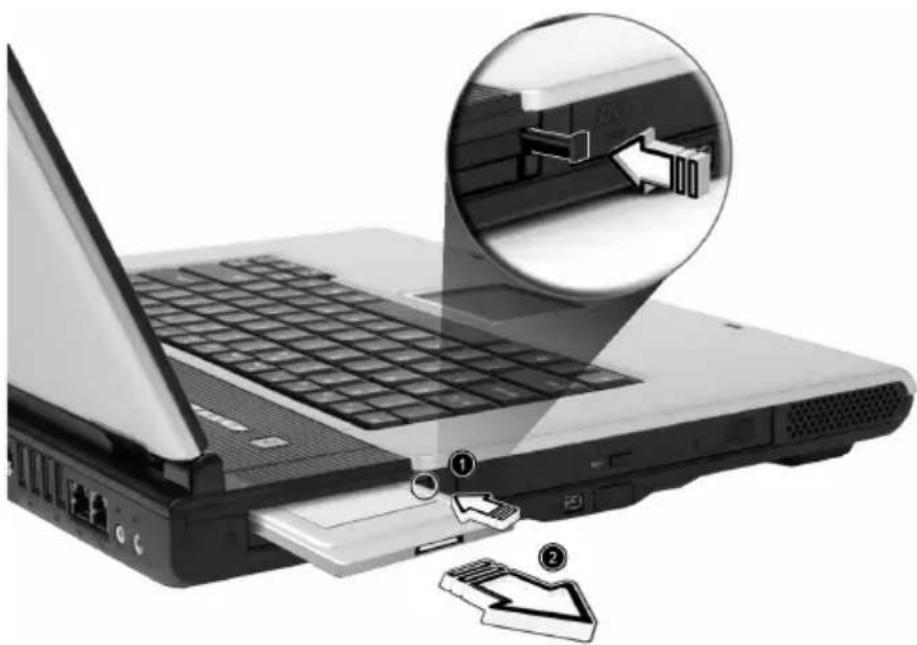
3 Press the PC Card eject button to partially eject the card (1).
4 Pull the card from the slot (2).
natural_image
Laptop with open circuit board and attached USB port, showing a close-up of the keyboard inside (no text or symbols visible)Miscellaneous options
Battery pack
It is a good idea to have a spare battery, especially when you travel with your computer. This greatly increases your productive range when you are on the move.
AC adaptor
Having a spare AC adaptor allows you to keep one in two different places. For example, you could have one AC adaptor at home and another at work. This means that you don't have to carry an AC adaptor when traveling between your two base locations.
Key component upgrades
Your computer is designed to deliver solid performance. However, in time, you might find that your applications demand even more computing power. For this reason, you are able to upgrade key components.

Note: Contact your authorized dealer if you decide to perform a key component upgrade.
Memory upgrade
Memory is expandable to 2GB, employing 256/512/1024 MB dual industry standard small outline Dual Inline Memory Modules (soDIMM). The computer supports Double Data Rate (DDR) SDRAM.
Your computer has two memory slots. Upgrade memory by inserting a higher capacity DIMM into one or both of these slots.
Installing memory:
1 Turn off the computer. Make sure that the AC adaptor is disconnected, and then remove the battery pack.
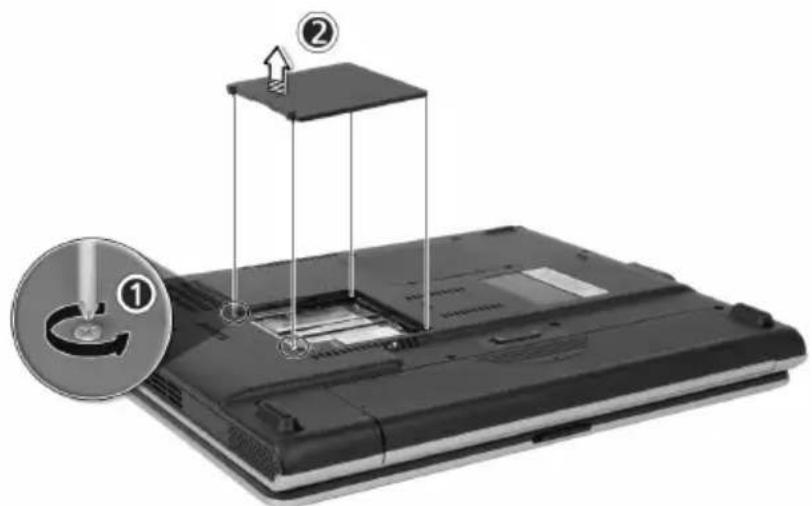
2 Turn the computer over to access the memory compartment on the bottom of the unit. Remove all screws (1) from the memory compartment door, and then lift the door off (2).
text_image
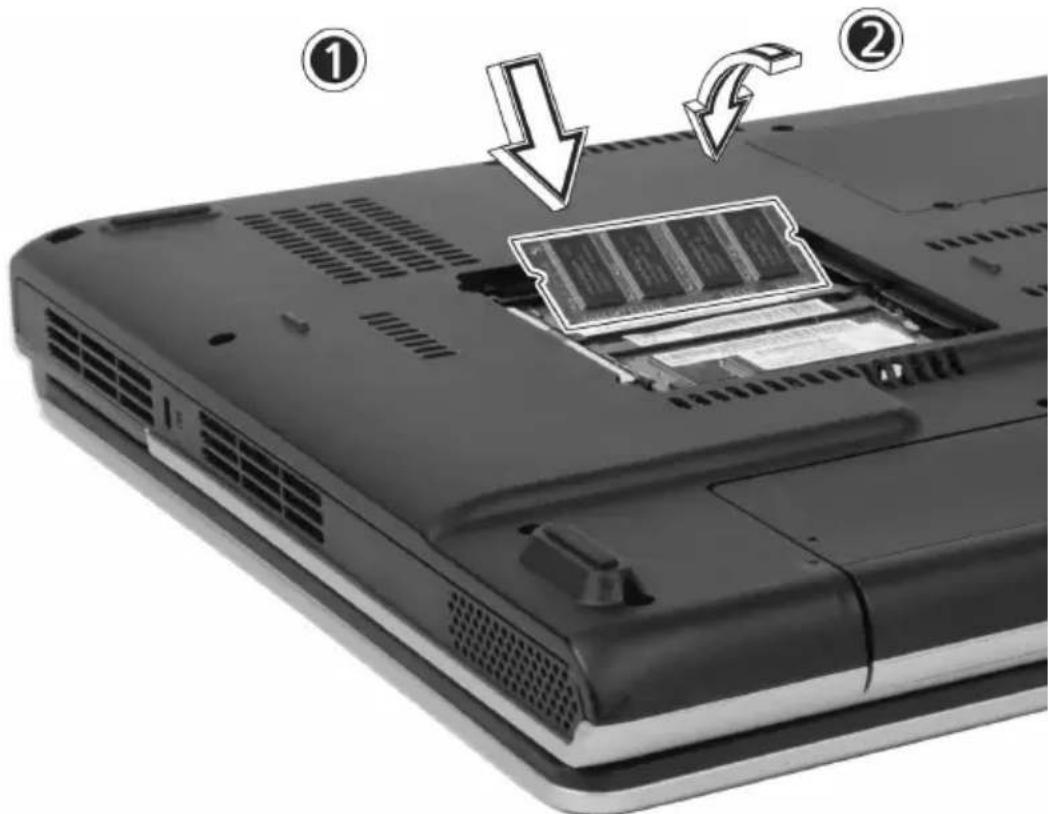
Diagram of a laptop with labeled parts and a magnified inset showing a mechanical component with numbered annotations.3 Insert the memory module diagonally in the slot (1), and then press down gently until it clicks in place (2).
text_image
Laptop interior with labeled components and arrows indicating assembly or repair steps4 Replace the memory compartment door, and fasten the screw.
The computer automatically detects the new module and reconfigures the memory.
Hard disk upgrade
It is possible to replace your hard disk with a higher capacity drive when you need more storage space. Your computer uses a 9.5mm 2.5-inch Enhanced-IDE hard disk. Consult your dealer if you need to perform a hard disk upgrade.
Moving with your computer
Your Aspire 1360 / 1520 series notebook computer is ideal for taking with you when you move around.
This chapter provides tips on things to consider when traveling with your computer.
Disconnecting from the desktop
Before moving with your computer, you must turn it off and disconnect all peripherals:
1 Save your work and close all applications.
2 Shut down Windows to turn off your computer.
3 Unplug the AC adaptor from the main outlet, and then disconnect it from the computer.
4 Disconnect any external devices, such as a keyboard, mouse, or printer, that are attached to your computer.
5 If you are using a security lock cable, disconnect the lock from the computer.
6 Pack your computer in a strong, waterproof bag or case.
Moving around
Sometimes you might need to move your computer a short distance. For example, you might need to move from your office desk to a meeting room. In these situations, you don't have to shut down the operating system.
Preparing the computer
First, disconnect any peripherals that you don't want to take with you. Next close the lid, placing your computer in Standby mode. You can now safely carry it around the building with you.
When you are ready to use your computer again, open the lid and then press the power button to bring it out of Standby mode.
What to bring to short meetings
If your battery is fully charged, you probably won't need to take anything else with you to the meeting.
What to bring to long meetings
For longer meetings, take along the AC adaptor. You can use main power throughout the meeting, or you can run down your battery first, and then connect the AC adaptor after receiving the battery-low warning.
If the meeting room does not have an available power outlet, reduce your computer's power consumption by putting it in Standby mode during long periods of inactivity. It is advisable to take along a spare battery if you have one.
Taking the computer home
When you move between your office and home you will need to prepare your computer for the short trip.
Preparing the computer
After disconnecting your computer from the desktop, prepare the unit as follows:
1 Remove all media from the drives. Loaded media can damage the drive heads during transit.
2 Pack the computer in a protective case that is padded to guard against knocks. Make sure that the unit cannot slide around inside the case.

Caution: Avoid packing items next to the top of the computer, as this could result in damage to the screen.
What to bring with you
If you don't have spare items at home, it is advisable to take along the AC adaptor and this User's Guide.
Special considerations
To protect your computer in transit, it is advisable to pay attention to the following:
- Minimise the effect of temperature changes. Keep your computer with you instead of placing it in storage holds.
- Avoid leaving your computer in a hot car.
- Changes in temperature and humidity can cause condensation to form within your computer. Before turning the computer on, allow it to return to room temperature, and then check the screen for signs of condensation. If the temperature change is greater than 10^ (18°F), allow the computer to come to room temperature slowly by placing it in a room with a temperature between the outside and room temperatures.
Setting up a home office
If you frequently work on your computer at home, as well as at work, it may be worthwhile purchasing a second AC adaptor. This will allow you to travel lighter, as you can keep an AC adaptor in each location.
You might also find it worthwhile keeping a second set of peripherals at home, such as a keyboard, keypad, mouse and printer.
Traveling with the computer
Sometimes you might need to make longer trips with your computer.
Preparing the computer
Prepare the computer as you would for moving between your office and home. It is advisable to make sure that the battery is fully charged. If you are traveling by air, you might be required to turn on the computer during security checks.
What to take with you
It is advisable to take the following items with you:
- AC adaptor.
- Spare, fully charged battery packs.
- Additional printer driver files (if you plan to use another printer).
- Phone and network cables (if you plan to use the computer's modem and network connections).
Special considerations
In addition to the considerations for taking your computer home, keep the following in mind:
• Always take your computer as carry-on luggage.
- If possible, have your computer manually inspected at security checks. Although the computer can pass safely through security X-ray machines, you should never expose it to a metal detector.
Traveling internationally with your computer
Occasionally you might need to travel between countries with your computer.
Preparing the computer
Prepare the computer as you would for normal travel. Remember to take special precautions for air travel.
What to take with you
It is advisable to take the following items with you:
- AC adaptor.
- Power cords that are appropriate for the countries you plan to visit.
- Spare, fully charged battery packs.
- Additional printer driver files (if you plan to use another printer).
- Phone and network cables (if you plan to use the computer's modem and network connections). Check that your modem is suitable for the telephone system in the countries you plan to visit. You might have to use a PC Card modem in some locations.
Special considerations
In addition to the considerations for normal travel with your computer, keep the following in mind when traveling internationally:
- Check that your power cord is suitable for the local power supply. If necessary, purchase a power cord that meets local requirements. Avoid using converter kits.
- If you plan to connect over a phone line, check that the computer's modem and your phone cord are suitable for the local phone system. If necessary, purchase a PC Card modem that meets local requirements.

Software
Your Aspire 1360 / 1520 series notebook computer includes system utilities.
This chapter provides information on the important software that comes with your computer.
Using system utilities
Acer eManager
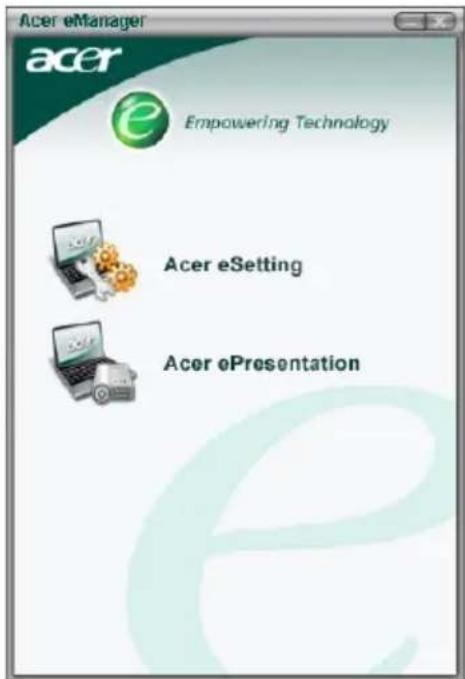
Acer eManager is an innovative software designed for frequently used functions. At the press of the Acer Empowering Key, the Acer eManager user interface appears, featuring two main settings; Acer eSetting and Acer ePresentation.
text_image
Acer eManager acer Empowering Technology Acer eSetting Acer ePresentationTo set the Acer Empowering Key, see "Launch keys" on page 21.
System software
Your computer comes preloaded with the following software:
- Microsoft ^ Windows ^ operating system
• Hardware BIOS Setup Utility
- System utilities, drivers and application software

Note: To run software applications in Windows ^® , first click on the Start button. Next, select the appropriate folder, and then click on the application icon. To learn about the software and utility, make use of the online help provided by the software.
Launch Manager
Launch Manager allows you to set the four launch keys located above the keyboard. See "Launch keys" on page 21 for the location of the launch keys.
You can access the Launch Manager by clicking on Start, All Programs, and then Launch Manager to start the application.
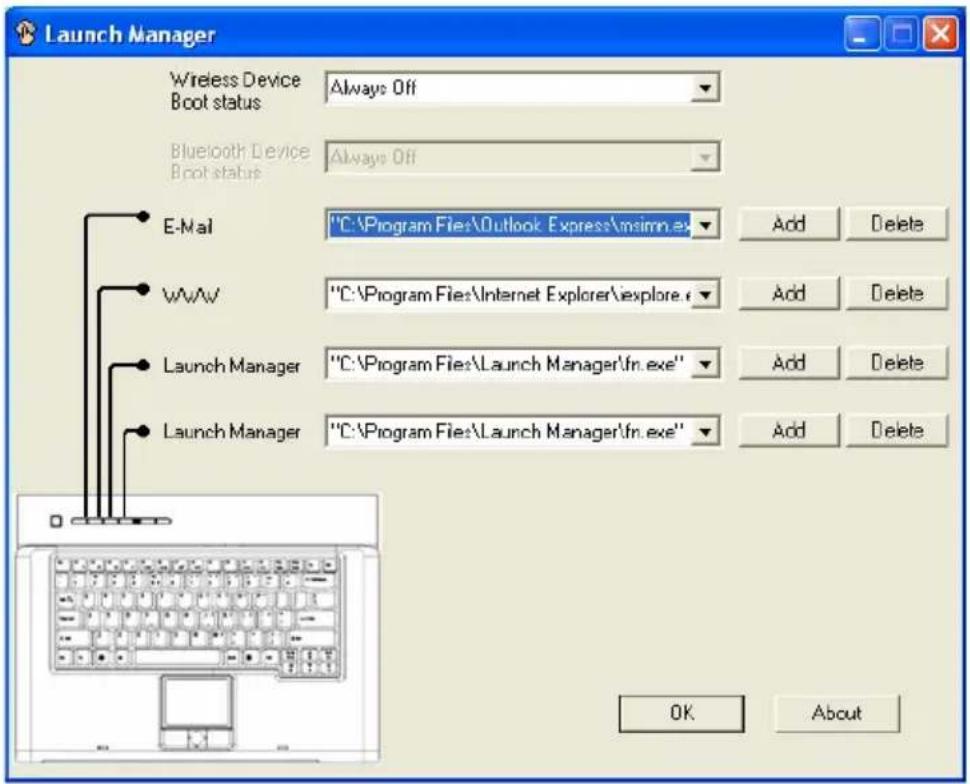
text_image
Launch Manager Wireless Device Boot status Always Off Bluetooth Device Boot status Always Off E-Mail "C:\Program Files\Outlook Express\msirm.exe Add Delete W\W\V "C:\Program Files\Internet Explorer\explore.r Add Delete Launch Manager "C:\Program Files\Launch Manager\fn.exe" Add Delete Launch Manager "C:\Program Files\Launch Manager\fn.exe" Add Delete OK AboutBIOS Setup Utility
The Basic Input/Output System (BIOS) contains important information used to configure the hardware and system software settings. Your computer reads the BIOS when it first starts up, before it loads the operating system.
Your computer's BIOS includes a built-in setup utility called Phoenix Software System Configuration Utility (SCU). It can be started shortly after you turn the computer on, by pressing the F2 key during Power-On Self Test (POST).
The BIOS Setup Utility displays summary information on your computer, its devices, processor and memory.
Your computer is already configured for optimal performance, and so you should not need to run this utility. However, you may need to change the BIOS settings if you encounter configuration problems in the future. Refer to "Frequently asked questions" on page 65 if a problem arises.
Acer Disc to Disc Recovery

Note: This feature is only available on certain models.
Multilingual operating system installation
Follow the instructions to choose the operating system and language you use when you first power-on the system.
1 Turn on the system.
2 Acer multilingual operating system selection menu will pop-up automatically.
3 Use the arrow keys to scroll to the language version you want. Press Enter to confirm your selection.
4 The operating system and language you choose now will be the only option for future recovery operations.
5 The system will install the operating system and language you choose.
Restore without a Recovery CD
This recovery process helps you restore the C: drive with the original software content that is installed when you purchase your notebook. Follow the steps below to rebuild your C: drive (Your C: drive will be reformatted and all data will be erased). It is important to back up all data files before you use this option.
Before performing a restore operation, please check the BIOS settings.
a Check to see if "Acer disc-to disc recovery" function is enabled or not.
b Make sure the [D2D Recovery] setting in [Main] is [Enabled].
c Exit the BIOS Setup Utility and save changes. The system will reboot.

Note: To activate BIOS Setup Utility, press
1 Restart the system.
2 The instruction "Press
3 Press
4 The message "The system has password protection. Please enter 000000:" is displayed.
5 Enter six 0s and continue.
6 "Acer Self-Configuration Preload" window appears.
7 Use the arrow keys to scroll through the items (operating system versions) and press "Enter" to select.
Setup password and exit
Press "F3" to setup password or press "F5" to exit the system recovery process when "Acer Self-Configuration Preload" window appears.
If "F3" is pressed, the next screen shows "Please enter new password:" enter one to eight alphanumeric characters. You will be asked to reenter your password for confirmation before continuing.
The screen will display "Password has been created. Press any key to reboot...", hit any key to reboot your system.
If "F5" is pressed, the recovery process will be terminated and the system will reboot and start normally.

Important: This feature occupies 2 GB in a hidden partition on your hard drive.

Troubleshooting
This chapter instructs you on how to deal with common system problems. Please read it before calling a technician.
Solutions to more serious problems may require opening the computer. Do not attempt to open and service the computer by yourself. Contact your dealer or an authorized service center for assistance.
Frequently asked questions
This section suggests solutions to commonly encountered problems.
I press the power button, but my computer does not start or boot-up. Look at the Power status indicator.
- If it is not lit, no power is being delivered to the computer. Check the following:
- If you are running on battery power, the battery may be low and unable to power the computer. Connect the AC adaptor to recharge the battery pack.
- If you are running on main power, make sure that the AC adaptor is properly plugged in to the computer and to the power outlet.
- If it is lit, check the following:
- If the Sleep indicator is lit, the computer is in Sleep mode. Press any key or tap on the touchpad to resume.
Nothing appears on the screen.
The computer's power management system automatically blanks the screen to save power. Press any key to turn the display back on.
If pressing a key does not turn the display back on, check the following:
- The brightness level might be too low. Press Fn + → hot key to increase the screen brightness level.
- The display device might be set to an external monitor. Press the Fn + F5 hot key to toggle the display setting.
- The system may be in standby mode. Try pressing the power button to resume.
The image is not full-screen.
Make sure that the resolution is set to a resolution your system supports:
- Right click on your Windows ^ desktop and select Properties to bring up the Display Properties dialog box. Alternatively, click on the Display icon in Control Panel.
- Click on the Settings tab to check the resolution setting. Resolutions lower than the specified resolution result in a display that is less than full-screen.
There is no audio coming from my computer.
Check the following:
- The volume may be muted. In Windows ^ , look at the volume control icon on the taskbar. If it is crossed-out, click on the icon and deselect the Mute option.
- The volume level may be too low. In Windows ^ , click on the volume control icon on the taskbar, and then use the slider control to increase the volume level.
- If headphones are connected to the headphone jack on the computer, your computer's built-in speakers will be turned off.
My external microphone does not work.
Check the following:
- Make sure that the external microphone is properly plugged into the microphone-in jack on the computer.
- Make sure that the volume is not muted or set too low.
I can't eject the optical drive tray with my computer turned off.
The computer needs to be turned on for the optical drive eject button to function. If you need to eject the optical drive tray when the computer is turned off, push a straightened paper clip into the optical drive emergency eject hole. See “Emergency ejection of the optical drive tray” on page 23 for more information.
The keyboard does not respond.
Try attaching an external USB keyboard to one of your computer's USB ports. If it works, the internal keyboard might have become disconnected. Contact your dealer or an authorized service center.
The optical drive cannot read a disc.
Check the following:
- Make sure that the disc is supported by the drive. If your computer has a CD-ROM drive, it can read CDs but cannot read DVDs. If your computer has a DVD drive, it can read both CDs and DVDs.
- When placing a disc in the drive tray, make sure that it is secure on the spindle of the drive tray.
- Make sure that the disc is free from scratches or smudges. If the disc is dirty, clean it using a disc cleaning kit.
- If the disc is OK, the drive head might be dirty. Clean it using a drive head cleaning kit.
The printer does not work.
Check the following:
- Make sure that the printer is connected to a power outlet and it is turned on.
- Check that the cable is properly connected to the appropriate ports on both the computer and the printer.
- If you are using a printer connected to your computer's parallel port, restart the computer. Windows® needs to find the new hardware and install the necessary drivers.
I want to set up my location to use the internal modem.
Follow these steps:
- Click on Start, and then click on Control Panel.
- Double-click on Phone and Modem Options.
• In the Dialing Rules tab, begin setting up your location.
Refer to Windows ^® Help and Support for more information.
When the battery is 95-99% full, it won't charge to 100% capacity.
To preserve the life of the battery, the system only lets you charge the battery when its capacity falls below 95%. It is recommended that you run down the battery, and then fully recharge it.
Requesting service
International Traveler's Warranty (ITW)
Your computer is backed by an International Traveler's Warranty (ITW) that gives you security and peace of mind when traveling. Our worldwide network of service centers are there to give you a helping hand.
An ITW passport comes with your computer. This passport contains all you need to know about the ITW program. A list of available, authorized service centers is in this handy booklet. Read this passport thoroughly.
Always have your ITW passport on hand, especially when you travel to receive the benefits from our support centers. Place your proof-of-purchase in the flap located inside the front cover of the ITW passport.
If the country you are traveling in does not have an Acer-authorized ITW service site, you can still get in contact with our offices worldwide.
Please consult www.acersupport.com
Before you call
Please have the following information available when you call Acer for online service, and please be at your computer when you call. With your support, we can reduce the amount of time a call takes and help solve your problems efficiently.
If there are error messages or beeps reported by your computer, write them down as they appear on the screen (or the number and sequence in the case of beeps).
You are required to provide the following information:
Name:
Address:
Telephone number: ____
Machine and model type:
Serial number:
Date of purchase: ____
Appendix A
Specifications
This appendix lists the general specifications of your computer.
Microprocessor
- Mobile AMD Sempron™ processors 2600+ to 3300+ or higher with 128 / 256 KBL2 chache, supporting AMD PowerNow! Technology and HyperTransport technology (for Aspire 1360 only)
- AMD Athlon™ 64 processor 3000+ to 3400+ or higher with 1 MB cache, supporting HyperTransport technology (for Aspire 1520 only)
Memory
- 256/512 MB of DDR333 SDRAM standard, upgradeable to 2048 MB with dual soDIMM modules
• 512 KB flash ROM BIOS
Data storage
- 30 GB and above high-capacity, Enhanced-IDE hard disk (for Aspire 1360 only)
- 40 GB and above high-capacity, Enhanced-IDE hard disk (for Aspire 1520 only)
• One internal optical drive
Display and video
- The TFT LCD panel providing a large viewing area for maximum efficiency and ease-of-use:
- 14.1" XGA (1024x768) resolution (for Aspire 1360 only)
- 15.0" XGA (1024x768) or SXGA+ (1400x1050) resolution
- 15.4" WXGA (1280x800)
- Simultaneous LCD and CRT display support
- DualView™ support
- S-video for output to a television or display device that supports S-video input
- "Automatic LCD dim" feature, automatically selecting the best setting for the display in order to conserve power
Connectivity
- Integrated 10/100 Mbps Fast Ethernet connection (for Aspire 1360 only)
- Integrated 10/100/1000 Mbps Fast Ethernet connection (for Aspire 1520 only)
• Built-in 56Kbps fax/data modem - IEEE 802.11b/g Wireless LAN (manufacturing option)
• B I u ^® (manufacturing option)
Audio
- Two built-in stereo speakers
• MS DirectSound compatible
• Audio ports for microphone-in and headphones
Keyboard and pointing device
• 84/85/88-key Windows keyboard
- Ergonomically-centered touchpad pointing device
I/O ports
- One Type III or two Type II PC CardBus (PCMCIA) slots
- One IEEE 1394 port
• One Infrared (FIR) port
• One RJ-11 modem jack (V.92, 56Kbps modem)
• One RJ-45 network jack (Ethernet 10/100 Base-T) - One DC-in jack
- One parallel port (ECP/EPP compliant)
- One S-video port
• One external monitor port
• One microphone-in jack (3.5mm mini jack)
• One headphone jack (3.5mm mini jack) - Four USB 2.0 ports
Weight and dimensions
- 15.4"display model:
- 3.6 kg (8 lbs)
- 361(W) x 292.5(D) x 47.3(H) mm
Environment
- Temperature:
- Operating: 5°C \~ 35°C
- Non-operating: -20°C \~ 65°C
• Humidity (non-condensing): - Operating: 20% \~ 80% RH
- Non-operating: 20% \~ 80% RH
Operating system
- Microsoft ^ Windows ^ XP Home / Pro operating system
• Supports Linux operating system - ACPI 1.0b support
- DMI 2.0-compliant
Power
- 8-cell Li-ion battery pack
(normal for Aspire 1360, high rate for Aspire 1520)
• 90W AC adaptor 19V(Aspire 1360)
• 135W AC adaptor 19V(Aspire 1520)
Options
• 256MB/512MB/1GB memory upgrade module
• Additional 90W / 135W AC adaptor
- Type No.:
- ADP-90SB B (Tech No.: 19Vdc 90W Aspire 1360)
- PA-1900-05 (Tech No.: 19Vdc 90W Aspire 1360)
- ADP-135DB (Tech No.: 19Vdc 135W Aspire 1520)
- HP-OW135F13 (Tech No.: 19Vdc 135W Aspire 1520)
- PA-1131-08 (Tech No.: 19Vdc 135W Aspire 1520)

• Additional Li-ion battery pack
- Type No.:
- BTP-58A1 (Tech No.: 14.8Vdc)
- BTP-60A1 (Tech No.: 14.8Vdc)
- BTP-84A1 (Tech No.: 14.8Vdc)
- BTP-85A1 (Tech No.: 14.8Vdc)
Appendix B
Regulation &
safety notices
This appendix lists the general notices for your computer.
Energy Star Guidelines Compliance
As an Energy Star Partner, Acer Inc. has determined that this product meets the Energy Star guidelines for energy efficiency.
FCC notice
This device has been tested and found to comply with the limits for a Class B digital device pursuant to Part 15 of the FCC Rules. These limits are designed to provide reasonable protection against harmful interference in a residential installation. This device generates, uses, and can radiate radio frequency energy and, if not installed and used in accordance with the instructions, may cause harmful interference to radio communications.
However, there is no guarantee that interference will not occur in a particular installation. If this device does cause harmful interference to radio or television reception, which can be determined by turning the device off and on, the user is encouraged to try to correct the interference by one or more of the following measures:
- Reorient or relocate the receiving antenna.
- Increase the separation between the device and receiver.
- Connect the device into an outlet on a circuit different from that to which the receiver is connected.
- Consult the dealer or an experienced radio/television technician for help.
Notice: Shielded cables
All connections to other computing devices must be made using shielded cables to maintain compliance with FCC regulations.
Notice: Peripheral devices
Only peripherals (input/output devices, terminals, printers, etc.) certified to comply with the Class B limits may be attached to this equipment. Operation with non-certified peripherals is likely to result in interference to radio and TV reception.
Caution
Changes or modifications not expressly approved by the manufacturer could void the user's authority, which is granted by the Federal Communications Commission, to operate this computer.
Operation conditions
This device complies with Part 15 of the FCC Rules. Operation is subject to the following two conditions: (1) this device may not cause harmful interference, and (2) this device must accept any interference received, including interference that may cause undesired operation.
Notice: Canadian users
This Class B digital apparatus complies with Canadian ICES-003.
Declaration of Conformity for EU countries
Hereby, Acer, declares that this Aspire series is in compliance with the essential requirements and other relevant provisions of Directive 1999/5/EC. (Please visit www.acer.com/about/certificates/nb for complete documents.)
Modern notices
Notice for USA
This equipment complies with Part 68 of the FCC rules. Located on the bottom side of the modem is a label that contains, among other information, the FCC Registration Number and Ringer Equivalence Number (REN) for this equipment. Upon request, you must provide this information to your telephone company.
If your telephone equipment causes harm to the telephone network, the telephone company may discontinue your service temporarily. If possible, they will notify you in advance. But, if advance notice is not practical, you will be notified as soon as possible. You will also be informed of your right to file a complaint with the FCC.
Your telephone company may make changes in its facilities, equipment, operations, or procedures that could affect the proper functioning of your equipment. If they do, you will be notified in advance to give you an opportunity to maintain uninterrupted telephone service.
If this equipment should fail to operate properly, disconnect the equipment from the phone line to determine if it is causing the problem. If
the problem is with the equipment, discontinue use and contact your dealer or vendor.

Caution: To reduce the risk of fire, use only No. 26 AWG or larger UL Listed or CSA Certified Telecommunication Line Cord.
TBR 21
This equipment has been approved [Council Decision 98/482/EC - "TBR 21"] for single terminal connection to the Public Switched Telephone Network (PSTN). However, due to differences between the individual PSTNs provided in different countries, the approval does not, of itself, give an unconditional assurance of successful operation on every PSTN termination point. In the event of problems, you should contact your equipment supplier in the first instance.
List of Applicable Countries
EU member states as of May 2004 are: Belgium, Denmark, Germany, Greece, Spain, France, Ireland, Italy, Luxembourg, the Netherlands, Austria, Portugal, Finland, Sweden, United Kingdom Estonia, Latvia, Lithuania, Poland, Hungary, Czech Republic, Slovak Republic, Slovenia, Cyprus and Malta. Usage allowed in the countries of European Union, as well as Norway, Switzerland, Iceland and Liechtenstein. This device must be used in strict accordance with the regulations and constraints in the country of use. For further information, please contact local office in the country of use.
Notice for Australia
For safety reasons, only connect headsets with a telecommunications compliance label. This includes customer equipment previously labelled permitted or certified.
Notice for New Zealand
For modems with approval number PTC 211/03/008
1 The grant of a Telepermit for any item of terminal equipment indicates only that Telecom has accepted that the item complies with minimum conditions for connection to its network. It indicates no endorsement of the product by Telecom, nor does it provide any sort of warranty. Above all, it provides no assurance that any item will work correctly in all respects with another item of Telepermitted equipment of a different make or model, nor does it imply that any product is compatible with all of Telecom's network services.
2 This equipment is not capable, under all operating conditions, of correct operation at the higher speeds for which it is designed. Telecom will accept no responsibility should difficulties arise in such circumstances.
3 Some parameters required for compliance with Telecom's Telepermit requirements are dependent on the equipment (PC) associated with this device. The associated equipment shall be set to operate within the following limits for compliance with Telecom's Specifications:
a There shall be no more than 10 call attempts to the same number within any 30 minute period for any single manual call initiation, and
b The equipment shall go on-hook for a period of not less than 30 seconds between the end of one attempt and the beginning of the next call attempt.
4 Some parameters required for compliance with Telecom's Telepermit requirements are dependent on the equipment (PC) associated with this device. In order to operate within the limits for compliance with Telecom's specifications, the associated equipment shall be set to ensure that automatic calls to different numbers are spaced such that there is not less than 5 seconds between the end of one call attempt and the beginning of another.
5 This equipment shall not be set up to make automatic calls to Telecom's 111 Emergency Service.
For modems with approval number PTC 211/01/030
1 The grant of a Telepermit for any item of terminal equipment indicates only that Telecom has accepted that the item complies with minimum conditions for connection to its network. It indicates no endorsement of the product by Telecom, nor does it provide any sort of warranty. Above all, it provides no assurance that any item will work correctly in all respects with another item of Telepermitted equipment of a different make or model, nor does it imply that any product is compatible with all of Telecom's network services.
2 This equipment is not capable, under all operating conditions, of correct operation at the higher speeds for which it is designed. Telecom will accept no responsibility should difficulties arise in such circumstances.
3 This device is equipped with pulse dialing while the Telecom standard is DTMF tone dialing. There is no guarantee that Telecom lines will always continue to support pulse dialing.
4 Use of pulse dialing, when this equipment is connected to the same line as other equipment, may give rise to bell tinkle or noise and may also cause a false answer condition. Should such problems occur, the user should NOT contact the telecom Fault Service.
5 This equipment may not provide for the effective hand-over of a call to another device connected to the same line.
6 Under power failure conditions this appliance may not operate. Please ensure that a separate telephone, not dependent on local power, is available for emergency use.
7 Some parameters required for compliance with Telecom's Telepermit requirements are dependent on the equipment (PC) associated with this device. The associated equipment shall be set to operate within the following limits for compliance with Telecom's specifications, the associated equipment shall be set to ensure that calls are answered between 3 and 30 seconds of receipt of ringing.
8 This equipment shall not be set up to make automatic calls to Telecom's 111 Emergency Service.
Important safety instructions
Read these instructions carefully. Save them for future reference.
1 Follow all warnings and instructions marked on the product.
2 Unplug this product from the wall outlet before cleaning. Do not use liquid cleaners or aerosol cleaners. Use a damp cloth for cleaning.
3 Do not use this product near water.
4 Do not place this product on an unstable cart, stand, or table. The product may fall, causing serious damage to the product.
5 Slots and openings are provided for ventilation; to ensure reliable operation of the product and to protect it from overheating. These openings must not be blocked or covered. The openings should never be blocked by placing the product on a bed, sofa, rug, or other similar surface. This product should never be placed near or over a radiator or heat register, or in a built-in installation unless proper ventilation is provided.
6 This product should be operated from the type of power indicated on the marking label. If you are not sure of the type of power available, consult your dealer or local power company.
7 Do not allow anything to rest on the power cord. Do not locate this product where persons will walk on the cord.
8 If an extension cord is used with this product, make sure that the total ampere rating of the equipment plugged into the extension cord does not exceed the extension cord ampere rating. Also, make sure that the total rating of all products plugged into the wall outlet does not exceed the fuse rating.
9 Never push objects of any kind into this product through cabinet slots as they may touch dangerous voltage points or short out parts that could result in a fire or electric shock. Never spill liquid of any kind on the product.
10 Do not attempt to service this product yourself, as opening or removing covers may expose you to dangerous voltage points or other risks. Refer all servicing to qualified service personnel.
11 Unplug this product from the wall outlet and refer servicing to qualified service personnel under the following conditions:
a When the power cord or plug is damaged or frayed.
b If liquid has been spilled into the product.
c If the product has been exposed to rain or water.
d If the product does not operate normally when the operating instructions are followed. Adjust only those controls that are covered by the operating instructions since improper adjustment of other controls may result in damage and will often require extensive work by a qualified technician to restore the product to normal condition.
e If the product has been dropped or the case has been damaged.
f If the product exhibits a distinct change in performance, indicating a need for service.
12 The Aspire series uses the lithium battery.
Replace the battery with the same type as the product's battery we recommend in the product specification list. Use of another battery may present a risk of fire or explosion.
13 Warning! Batteries may explode if not handled properly. Do not disassemble or dispose of them in fire. Keep them away from children and dispose of used batteries promptly.
14 Use only the proper type of power supply cord set (provided in your accessories box) for this unit. It should be a detachable type: UL listed/CSA certified, type SPT-2, rated 7A 125V minimum, VDE approved or its equivalent. Maximum length is 15 feet (4.6 meters).
15 Always disconnect all telephone lines from the wall outlet before serving or disassembling this equipment.
16 Avoid using a telephone (other than a cordless type) during an electrical storm. There may be a remote risk of electric shock from lightning.
Laser compliance statement
The CD or DVD drive used with this computer is a laser product. The CD or DVD drive's classification label (shown below) is located on the drive.
CLASS 1 LASER PRODUCT
CAUTION: INVISIBLE LASER RADIATION WHEN OPEN. AVOID EXPOSURE TO BEAM.
APPAREIL A LASER DE CLASSE 1 PRODUIT
LASERATTENTION: RADIATION DU FAISCEAU LASER INVISIBLE EN CAS D'OUVERTURE. EVITTER TOUTE EXPOSITION AUX RAYONS.
LUOKAN 1 LASERLAITE LASER KLASSE 1
The LCD unit is produced with high-precision manufacturing techniques. Nevertheless, some pixels may occasionally misfire or appear as black or red dots. This has no effect on the recorded image and does not constitute a malfunction.
Macrovision® copyright protection notice
This product incorporates copyright protection technology that is protected by method claims of certain U.S. patents and other intellectual property rights owned by Macrovision Corporation and other rights owners. Use of this copyright protection technology must be authorized by Macrovision Corporation, and is intended for home and other limited viewing uses only unless otherwise authorized by Macrovision Corporation. Reverse engineering or disassembly is prohibited.
Apparatus Claims of U.S. Patent Nos. 4,631,603, 4,577,216, 4,819,098, 4,907,093, and 6,516,132 licensed for limited viewing uses only.
Radio Device Regulatory Notice
Note: Below regulatory information is for models with wireless LAN and/or Bluetooth ^® only.
General
This product complies with the radio frequency and safety standards of any country or region in which it has been approved for wireless use.
Depending on configurations, this product may or may not contain wireless radio devices (such as wireless LAN and/or Bluetooth ^® modules). Below information is for products with such devices.
European Union (EU)
This device complies with the essential requirements of the European Council Directives listed below:
73/23/EEC Low Voltage Directive
• EN 60950
89/336/EEC Electromagnetic Compatibility (EMC) Directive
• EN 55022
• EN 55024
• EN 61000-3-2/-3
99/5/EC Radio & Telecommunications Terminal Equipment (R&TTE) Directive
- Art.3.1a) EN 60950
• Art.3.1b) EN 301 489 -1/-17
• Art.3.2) EN 300 328-2
• Art.3.2) EN 301 893 *applied to 5 GHz only

(for 5 GHz device)
List of Applicable Countries
EU member states as of May 2004 are: Belgium, Denmark, Germany, Greece, Spain, France, Ireland, Italy, Luxembourg, the Netherlands, Austria, Portugal, Finland, Sweden, United Kingdom Estonia, Latvia, Lithuania, Poland, Hungary, Czech Republic, Slovak Republic, Slovenia, Cyprus and Malta. Usage allowed in the countries of European Union, as well as Norway, Switzerland, Iceland and Liechtenstein. This device must be used in strict accordance with the regulations and constraints in the country of use. For further information, please contact local office in the country of use.
The FCC RF safety requirement
The radiated output power of Wireless LAN Mini-PCI Card and Bluetooth® Card is far below the FCC radio frequency exposure limits. Nevertheless, the Aspire series shall be used in such a manner that the potential for human contact during normal operation is minimized as follows.
1 Users are requested to follow the RF safety instructions on wireless option devices that are included in the user's manual of each RF option device.

Caution: To comply with FCC RF exposure compliance requirements, a separation distance of at least 20 cm (8 inches) must be maintained between the antenna for the integrated Wireless LAN Mini-PCI Card built in to the screen section and all persons.
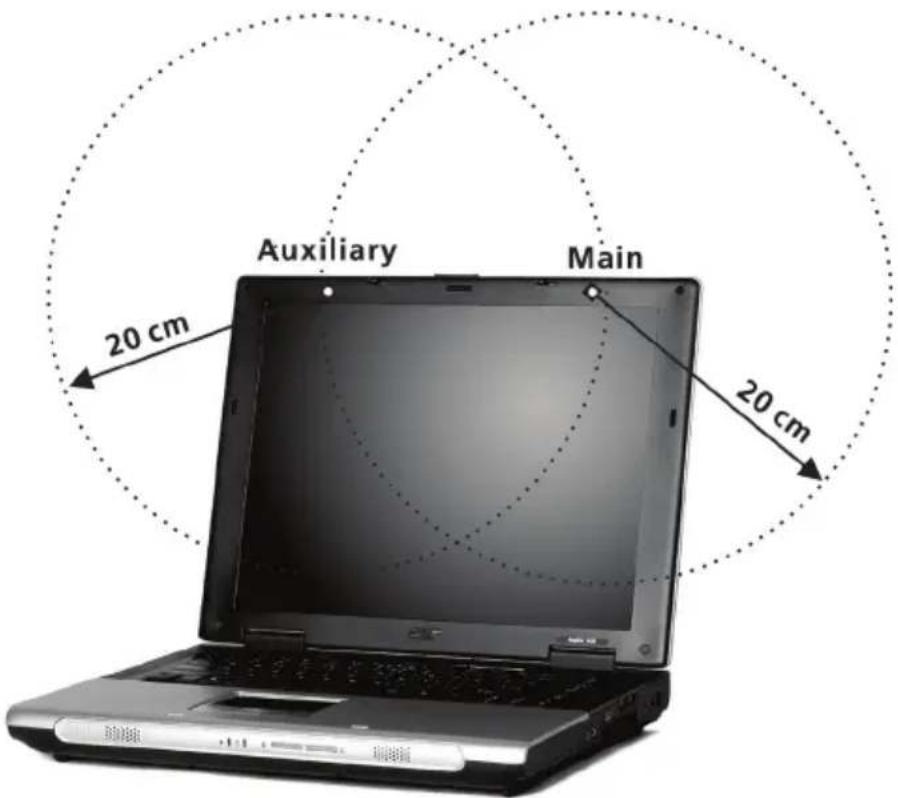
text_image
Auxiliary Main 20 cm 20 cm
Note: Acer Wireless Mini PCI adaptor implements transmission diversity function. The function does not emit radio frequencies simultaneously from both antennas. One of the antennas is
selected automatically or manually (by users) to have good quality of radio communication.
2 This device is restricted to indoor use due to its operation in the 5.15 to 5.25 GHz frequency range. FCC requires this product to be used indoors for the frequency range 5.15 to 5.25 GHz to reduce the potential for harmful interference to co-channel Mobile Satellite systems.
3 High power radar are allocated as primary users of the 5.25 to 5.35 GHz and 5.65 to 5.85 GHz bands. These radar stations can cause interference with and/or damage this device.
4 An improper installation or unauthorized use may cause harmful interference to radio communications. Also any tampering of the internal antenna will void the FCC certification and your warranty.
Canada - Low power license-exempt radio communication devices (RSS-210)
a. Common information
Operation is subject to the following two conditions:
- This device may not cause interference, and
- This device must accept any interference, including interference that may cause undesired operation of the device.
b. Operation in 2.4 GHz band
To prevent radio interference to the licensed service, this device is intended to be operated indoors and installed outdoors is subject to licensing.
Exposure of humans to RF fields (RSS-102)
The Aspire series employs low gain integral antennas that do not emit RF field in excess of Health Canada limits for the general population; consult Safety Code 6, obtainable from Health Canada's Web site at www.hc-sc.gc.ca/rpb

Federal Communications Commission Declaration of Conformity
This device complies with Part 15 of the FCC Rules. Operation is subject to the following two conditions: (1) this device may not cause harmful interference, and (2) this device must accept any interference received, including interference that may cause undesired operation.
The following local Manufacturer/Importer is responsible for this declaration:
Product: Notebook Personal Computer
Model Number: MS2159 / MS2159W
Machine Type: Aspire 1360 / 1520
SKU Number: Aspire 136xxx / 152xxx
$$ \left(" x" = 0 \sim 9, a \sim z, \text { or } A \sim Z\right) $$
Name of Responsible Party: Acer America Corporation
Address of Responsible Party: 2641 Orchard Parkway, San Jose
CA 95134, U. S. A.
Contact Person: Mr. Young Kim
Phone No.: 408-922-2909
Fax No.: 408-922-2606

text_image
CE!Declaration of Conformity for CE marking
We,
Acer Inc.
8F, 88, Sec. 1, Hsin Tai Wu Rd., Hsichih,
Taipei Hsien 221, Taiwan, R. O. C.
Contact Person: Mr. Easy Lai
Tel: 886-2-8691-3089 Fax: 886-2-8691-3000
Hereby declare that:
Product: Notebook PC
Trade Name: Acer
Model Number: MS2159 / MS2159W
Machine Type: Aspire 1360 / 1520
SKU Number: Aspire 136xxx / 152xxx
$$ \left(" x" = 0 \sim 9, a \sim z, o r A \sim Z\right) $$
Is in compliance with the essential requirements and other relevant provisions of the following EC directives.
Reference No. Title
89/336/EEC Electromagnetic Compatibility (EMC directive)
73/23/EEC Low Voltage Directive (LVD)
1999/5/EC Radio & Telecommunications Terminal Equipment Directive (R&TTE)
The product specified above was tested conforming to the applicable Rules under the most accurate measurement standards possible, and that all the necessary steps have been taken and are in force to assure that production units of the same product will continue to comply with the requirements.
2004/3/5
Easy Lai
Easy Lai/ Director Date
Qualification Center
Product Assurance, Acer Inc.

Index
A
audio 26
connecting externally 42
controlling volume 26
troubleshooting 66
B
battery pack
battery-low warning 34
caring for v
characteristics 31
charging 33
charging indicator 11
checking charge level 33
installing 32
low conditions 34
maximizing life 31
optimizing 33
removing 33
using the first time 31
BIOS Setup Utility 59
entering 59
brightness
hotkeys 16
C
caps lock 12
on indicator 11
care
battery pack v
computer iv
charging
checking level 33
cleaning
computer v
computer
bringing to meetings 50
caring for iv
cleaning v
disconnecting 49
features 9
moving around 50
on indicator 11
security 27
setting up a home office 52
taking home 51
traveling internationally 53
traveling on local trips 52
turning off iii
connections
audio 42
external display devices 39
external input devices 39
keyboard, external 39
keypad, external 39
mouse 39
printer 42
USB 40
connectivity options 24
Ethernet 24
D
display
hotkeys 15
troubleshooting 65
E
Ethernet connection 24
Euro 16, 17
F
FAQ. See frequently-asked questions
frequently-asked questions 65
front view 3
G
guide iii
H
hard disk 22
upgrading 46
help iii
Hibernation mode
hotkey 15
hotkeys 15
|
ITW. See warranty
K
keyboard 12
connecting externally 39
hotkeys 15
lock keys 12
troubleshooting 66
Windows keys 14
keypad
connecting externally 39
L
launch keys 20
left view 5
M
media access
on indicator 11
memory
installing 45, 46
upgrading 45
microphone
troubleshooting 66
modem
setting location 67
mouse
connecting externally 39
N
Notebook Manager
hotkey 15
notice
DVD copyright protection 84
num lock 12
on indicator 11
0
optical drive 22
options
hard disk upgrade 46
memory upgrade 45
PC Cards 43
spare AC adapter 44
spare battery 44
P
PC Card
inserting 43
removing 44
power management 35
printer
connecting 42
troubleshooting 67
problems 65
audio 66
display 65
keyboard 66
printer 67
startup 65
R
rear view 7
right view 6
s
safety
CD or DVD 83
FCC notice 77
general instructions 82
modem notices 78
scroll lock 12
security
slot 27
service
when to call v
software
bundled 58
speakers
hotkey 16
troubleshooting 66
Standby mode
hotkey 15
status indicator 11
status indicators 11
status LCD 11
storage 22
hard disk 22
optical drive 22
support
information 68
T
touchpad 18
hotkey 16
using 18, 19
travel
international flights 53
local trips 52
U
USB
connecting 40
utility
BIOS Setup 59
V
volume
adjusting 26
W
warranty
International Traveler's Warranty 68
Windows keys 14