
TravelMate 420 - Laptop ACER - Free user manual and instructions
Find the device manual for free TravelMate 420 ACER in PDF.


User questions about TravelMate 420 ACER
0 question about this device. Answer the ones you know or ask your own.
Ask a new question about this device
Download the instructions for your Laptop in PDF format for free! Find your manual TravelMate 420 - ACER and take your electronic device back in hand. On this page are published all the documents necessary for the use of your device. TravelMate 420 by ACER.
USER MANUAL TravelMate 420 ACER
TravelMate 420 series
User's guide
Copyright © 2002 Acer Incorporated.
All Rights Reserved.
TravelMate 420 Series Notebook Computer User's Guide
Original Issue: May 2002
Changes may be made periodically to the information in this publication without obligation to notify any person of such revision or changes. Such changes will be incorporated in new editions of this manual or supplementary documents and publications. This company makes no representations or warranties, either expressed or implied, with respect to the contents hereof and specifically disclaims the implied warranties of merchantability or fitness for a particular purpose.
Record the model number, serial number, purchase date, and place of purchase information in the space provided below. The serial number and model number are recorded on the label affixed to your computer. All correspondence concerning your unit should include the serial number, model number, and purchase information.
No part of this publication may be reproduced, stored in a retrieval system, or transmitted, in any form or by any means, electronic, mechanical, photocopy, recording, or otherwise, without the prior written permission of Acer Incorporated.
TravelMate 420 series Notebook computer
Model number : ____
Serial number: ____
Purchase date: ____
Place of purchase: ____
Acer and the Acer logo are registered trademarks of Acer Incorporated. Other company's product names or trademarks are used herein for identification purposes only and belong to their respective companies.
First things first
We would like to thank you for making the TravelMate series of notebook computers your choice for your mobile computing needs. We hope you will be happy with your TravelMate as much as we enjoyed making it for you.
Your guides
To help you use your TravelMate, we have designed a set of guides:
First off, the Just for Starters... poster helps you get started with setting up your computer.
This User's Guide introduces you to the many ways your computer can help you be more productive. This guide provides clear and concise information about the computer, so read it thoroughly.
If you ever need to print out a copy, this User's guide is also available in PDF (Portable Document Format). Follow these steps:
1 Click on Start, Programs, AcerSystem.
2 Click on AcerSystem User's Guide.
Note: Viewing the file requires Adobe Acrobat Reader installed. For instructions on how to use Adobe Acrobat Reader, access the Help menu.
For more information about our products, services, and support information, please visit our Web site (global.acer.com).
Basic care and tips for using your computer
Turning your computer on and off
To turn on the computer, simply press the power button on the top left of your TravelMate. See page 3 for the location of the power button.
To turn the power off, do any of the following:
- Use the Windows shutdown command
For Windows 2000: Click on Start, Shut Down..., and select Shut down; then click on OK.
- or -
For Windows XP: Click on Start, Turn off Computer; then click Turn Off.
- Use the power switch

Note: You can also use the power switch to perform power management functions. See Windows help for more information.
- Use the customized functions for power management
You can also shut down the computer by closing the display cover, or by pressing the sleep hot key (Fn-F4). See "Hot keys" on page 15.

Note: If you cannot power off the computer normally, press and hold the power switch for more than four seconds to shut down the computer. If you turn off the computer and want to turn it on again, wait at least two seconds before powering up.
Taking care of your computer
Your computer will serve you well if you take care of it.
- Do not expose the computer to direct sunlight. Do not place it near sources of heat, such as a radiator.
- Do not expose the computer to temperatures below 0^ C ( 32^ F) or above 50^ C ( 122^ F).
- Do not subject the computer to magnetic fields.
-
Do not expose the computer to rain or moisture.
-
Do not spill water or any liquid on the computer.
- Do not subject the computer to heavy shock and vibration.
- Do not expose the computer to dust and dirt.
- Never place objects on top of the computer to avoid damaging the computer.
- Do not slam the computer display when you close it.
- Never place the computer on uneven surfaces.
Taking care of your AC adapter
Here are some ways to take care of your AC adapter:
- Do not connect the adapter to any other device.
- Do not step on the power cord or place heavy objects on top of it. Carefully route the power cord and any cables away from personal traffic.
- When unplugging the power cord, do not pull on the cord itself but pull on the plug.
- The total ampere ratings of the equipment plugged in should not exceed the ampere rating of the cord if you are using an extension cord. Also, the total current rating of all equipment plugged into a single wall outlet should not exceed the fuse rating.
Taking care of your battery pack
Here are some ways to take care of your battery pack:
- Use only batteries of the same kind as replacements. Turn the power off before removing or replacing batteries.
- Do not tamper with batteries. Keep them away from children.
- Dispose of used batteries according to local regulations. Recycle if at all possible.
Cleaning and servicing
When cleaning the computer, follow these steps:
1Power off the computer and remove the battery pack.
2Disconnect the AC adapter.
3Use a soft cloth moistened with water. Do not use liquid or aerosol cleaners.
4To clean the display screen, use an LCD cleaning kit.
If any of the following occurs:
•The computer has been dropped or the body has been damaged.
- Liquid has been spilled into the product.
•The computer does not operate normally.
Please refer to "Troubleshooting my computer" on page 45.
First things first iii
Your guides iii
Basic care and tips for using your computer iv
1 Getting to know your TravelMate 1
A TravelMate tour 3
Front view 3
Left view 5
Right view 6
Rear view 7
Bottom view 8
Features 9
Indicators 11
Using the keyboard 12
Special keys 12
Touchpad 20
Touchpad basics 20
Storage 22
Hard disk 22
Optical drive 22
Using software 23
Audio 24
Adjusting the volume 24
Using the Audio DJ feature 25
Power management 26
Moving around with your TravelMate 27
Disconnecting from the desktop 27
Moving around 27
Taking the computer home 28
Traveling with the computer 30
Traveling internationally with the computer 30
Securing your computer 32
Using a computer security lock 32
Using passwords 32
2 Customizing my computer 35
Expanding through options 37
Connectivity options 37
Upgrade options 41
Using system utilities 43
Launch Manager 43
BIOS Utility 43
viii
3 Troubleshooting my computer 45
Frequently-asked questions 47
Requesting service 50
International Traveler's Warranty (ITW) 50
Before you call 51
Appendix A Specifications 53
Appendix B Notices 59
Index 67
1 Getting to know your
TravelMate
Your TravelMate computer combines high-performance, versatility, power management features and multimedia capabilities with a unique style and ergonomic design. Work with unmatched productivity and reliability with your new power computing partner.
A TravelMate tour
After setting up your computer as illustrated in the Just for Starters... poster, let us show you around your new TravelMate computer.
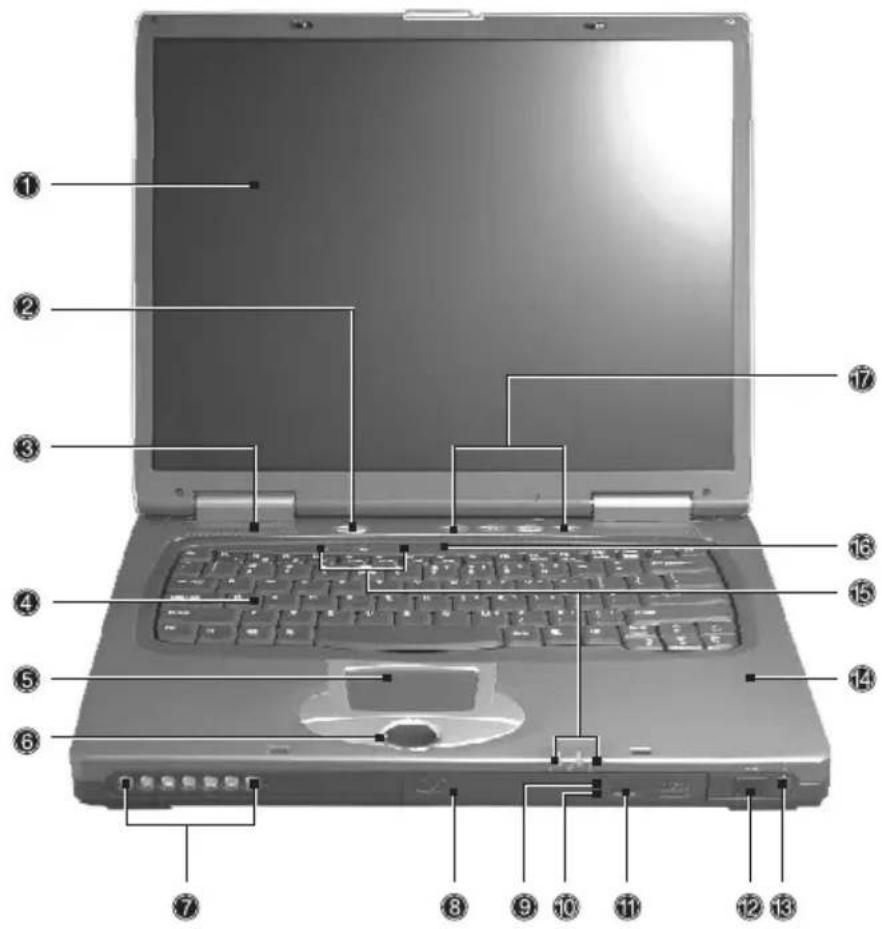
Front view
text_image
Laptop keyboard diagram with numbered labels pointing to key components# Item Description
1 Display screen Also called LCD (liquid-crystal display), displays computer output.
2 Power Button Turns on the computer power.
3 Speakers Outputs sound.
| # Item | Description |
| 4 Keyboard Inputs data into your computer. | |
| 5 Touchpad Touch-sensitive pointing device which functions like a computer mouse. | |
| 6 Click buttons (left, center and right) | The left and right buttons function like the left and right mouse buttons; the center button serves as a 4-way scroll button. |
| 7 Audio DJ controls and indicators | Button and indicators for the Audio DJ function. For more information, see “Using the Audio DJ feature” on page 25. |
| 8 Optical drive Houses an optical drive module (CD-ROM , DVD-ROM or DVD/CD-RW combo drive). | |
| 9 Optical drive indicator | Lights up when the optical drive is active. |
| 10 Emergency eject slot Ejects the drive tray when the computer is turned off. See page 49 for more details. | |
| 11 Eject button Ejects the drive tray. | |
| 12 Infrared port Interfaces with infrared devices (e.g., infrared PDA, IR-aware computer). | |
| 13 Wireless networking button | Enables or disables the wireless networking feature. |
| 14 Palmrest Comfortable support area for your hands when you use the computer. | |
| 15 Status indicators LEDs (light-emitting diode) that turn on and off to show the status of the computer, its functions and components. | |
| 16 Microphone Inputs sounds and voices into your computer. | |
| 17 Launch keys Special keys for launching internet browser, email program and frequently used programs. See “Launch Keys” on page 18 for more details. | |

Note: The positions of the Optical drive indicator, eject button and emergency eject hole may differ depending on the optical drive module installed.
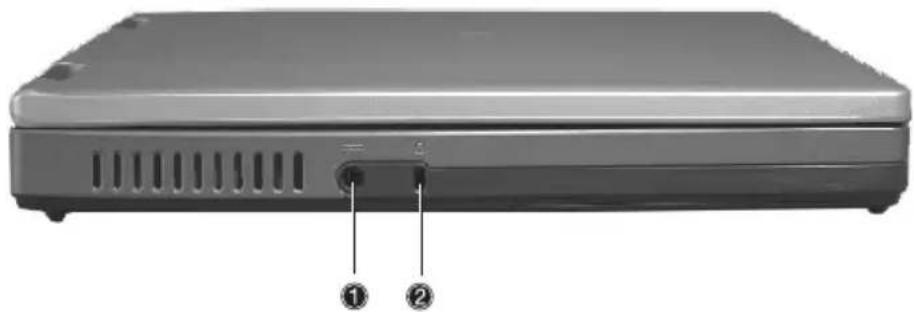
Left view
natural_image
Front view of a silver electronic device with ventilation slots and a labeled port (no text or symbols beyond labels)# Item Description
1 Power jack Connects to an AC adapter.

2 Security keylock Connects to a Kensington-compatible computer security lock.

Right view

text_image
Diagram of a network device rear panel with numbered labels pointing to ports and ports.# Item Description
1 USB port Connects to Universal Serial Bus devices (e.g., USB mouse, USB camera).

2 Line-in/Mic-in jack Accepts audio line-in devices (e.g., audio CD player, stereo walkman). Selection is through the OS Windows mixer.
3 Speaker/ Headphone-out jack Connects to audio line-out devices (e.g.,speakers, headphones).


4 Modem jack Connects to a phone line.

5 IEEE 1394 port Connects to an IEEE 1394 device.
1394
6 PC card eject button Ejects the PC card from the slot.
7 PC card slots Accepts one type II PC cards.

8 Network jack Connects to an Ethernet 10/100-based

network.
# Item Description
9 Memory stick slot Accepts memory sticks.

10 SD/MMC slot Accepts SD or MMC cards.

Rear view

text_image
Labeled diagram of a computer rear panel showing ports and connectors with numbered annotations# Item Description
1 Expansion port I/O replicator or EasyPort expansion devices.

2 External display port
Connects to a display device (e.g., external monitor, LCD projector).

3 Parallel port
Connects to a parallel device (e.g., parallel printer).

4 S-video Connects to a television or display device

with S-video input.
Bottom view

text_image
Laptop back panel diagram with numbered labels pointing to different internal compartments and ventilation slots.# Item Description
1 Battery bay Houses the computer's battery pack.
2 Battery release latch Unlatches the battery to remove the battery pack.
3 M e m Houses the computer'symain memory. compartment
4 Cooling fans Helps keep the computer cool.
Note: Don't cover or obstruct the opening of the fan.
5 AcerMedia drive bay release latch Unlatches the AcerMedia bay to remove the optical diskette drive
6 Hard disk bay Houses the computer's hard disk.
Features
Below is a brief summary of the computer's many features:
Performance
- Intel® Pentium® 4 Processor with 512 KB level 2 cache
•DDR 266 (PC2100) SDRAM, memory expandable up to 1 GB - Internal optical drive
•High-capacity, Enhanced-IDE hard disk
•Li-Ion battery pack
•Power management system with ACPI (Advanced Configuration Power Interface)
Display
- Thin-Film Transistor (TFT) liquid crystal display (LCD) displaying 32-bit high true color up to 1024 x 786 eXtended Graphics Array (XGA) resolution for 14.1"/15" or 1400 x 1050 Super eXtended Graphics Array+ (SXGA+) resolution for some 15" models (specification varies depending on models).
•3D capabilities
• Simultaneous LCD and CRT display support
- S-video for output to a television or display device that supports S-video input
- "Automatic LCD dim" feature that automatically decides the best settings for your display and conserves power
•Dual display capability
Multimedia
•18-bit high-fidelity AC'97 stereo audio
•Built-in dual speakers
•Built-in microphone
•High-speed optical drive
Connectivity
•High-speed fax/data modem port
•Ethernet/Fast Ethernet port
•3 USB (Universal Serial Bus) ports
• IEEE 1394 port
- SD/MMC memory slot
- Memory stick slot
•Acer EasyPort port replicator
- Bluetooth ready (optional)
Human-centric design and ergonomics
- 4-way scroll button
- Sleek, smooth and stylish design
- Acer FinTouch full-sized curved keyboard
- Ergonomically-centered touchpad pointing device
Expansion
•One type II CardBus PC Card slots
- Upgradeable memory
Indicators
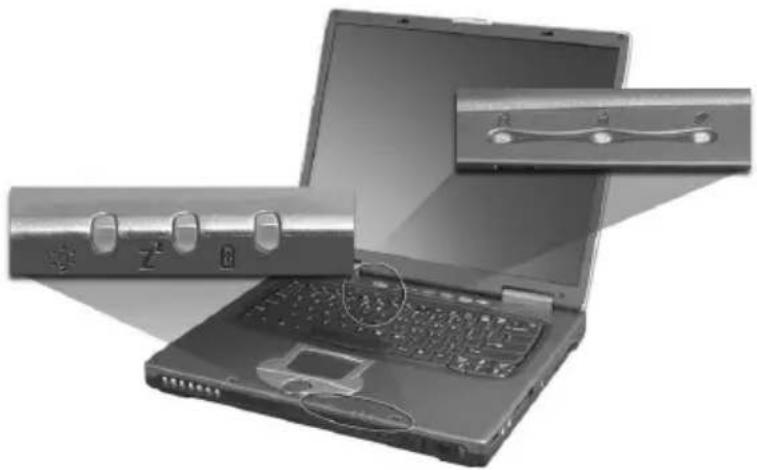
The computer has seven easy-to-read status icons below the display screen.
natural_image
Laptop with open case showing a metallic door and keyboard, no visible text or symbols on the device itself.| Icon Function Description | |
| Power Lights green when the computer is on. Flashes when the computer is in low power. | |
| z^z | Sleep Flashes when the computer is entering Sleep mode. Lights orange when the computer is in Sleep mode. |
| Battery charge Lights when the battery is being charged. | |
| Wireless communications Lights when the Wireless LAN or Bluetooth capabilities are enabled. | |
| Caps lock Lights when Caps Lock is activated. | |
| Num lock Lights when Num Lock is activated. | |
| Media activity Lights when the hard disk or AcerMedia drive is active. | |
Using the keyboard
The full-sized keyboard includes an embedded numeric keypad, separate cursor keys, two Windows keys and twelve function keys.
Special keys
Lock keys
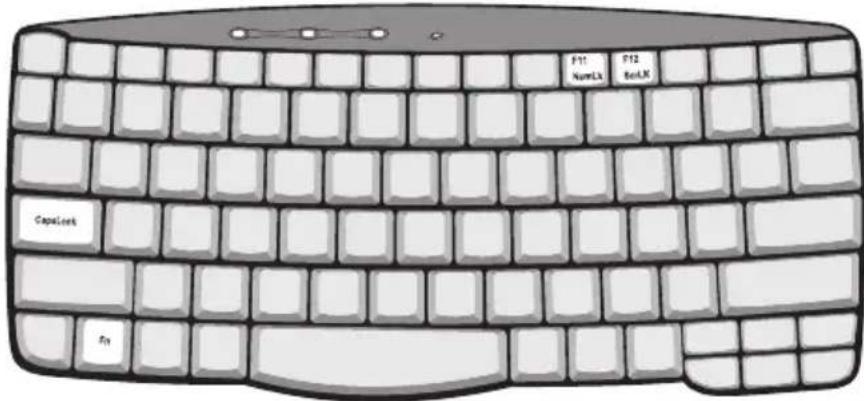
The keyboard has three lock keys which you can toggle on and off.
text_image
F11 NumLx F12 BndLx CapLock FtLock key Description
Caps Lock When Caps Lock is on, all alphabetic characters typed are in uppercase.
| Num Lock (Fn-F11) | When Num Lock is on, the embedded keypad is in numeric mode. The keys function as a calculator (complete with the arithmetic operators +, -, *, and /). Use this mode when you need to do a lot of numeric data entry. A better solution would be to connect an external keypad. |
| Scroll Lock (Fn-F12) | When Scroll Lock is on, the screen moves one line up or down when you press the up or down arrow keys respectively. Scroll Lock does not work with some applications. |
Embedded numeric keypad
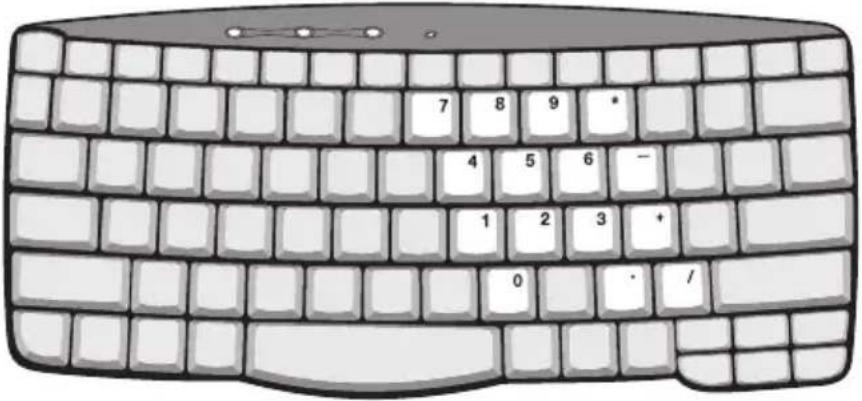
The embedded numeric keypad functions like a desktop numeric keypad. It is indicated by small characters located on the upper right corner of the keycaps. To simplify the keyboard legend, cursor-control key symbols are not printed on the keys.
text_image
7 8 9 * 4 5 6 - 1 2 3 + 0 . /Desired access Num lock on Num lock off
| Number keys on embedded keypad | Type numbers in a normal manner. | |
| Cursor-control keys on embedded keypad | Hold Shift while using cursor-control keys. | Hold Fn while using cursor-control keys. |
| Main keyboard keys | Hold Fn while typing letters on embedded keypad. | Type the letters in a normal manner. |
Windows keys
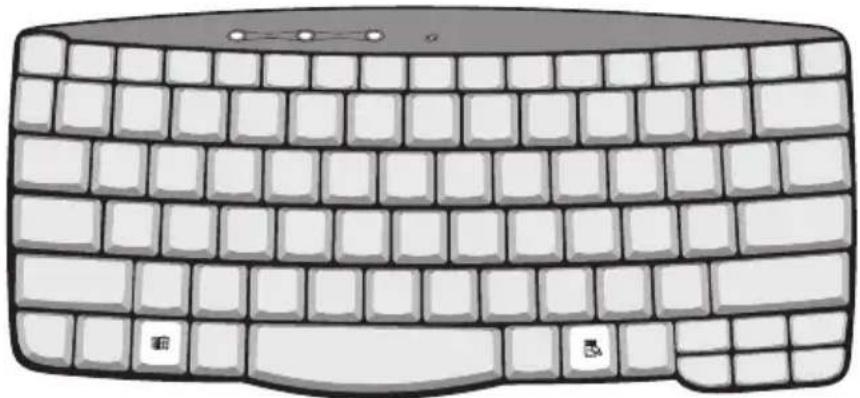
The keyboard has two keys that perform Windows-specific functions.
natural_image
Illustration of a computer keyboard with no text or symbolsKey Description
Windows logo key

Start button. Combinations with this key perform shortcut functions. Below are a few examples:
田 + Tab (Activates next taskbar button)
田 + E (Explores My Computer)
+ F (Finds Document)
+ M (Minimizes All)
Shift + ☐ + M (Undoes Minimize All)
田 + R (Displays the Run... dialog box)
Application key Opens a context menu (same as a right-click).

Hot keys
The computer employs hot keys or key combinations to access most of the computer's controls like screen brightness, volume output.
To activate hot keys, press and hold the Fn key before pressing the other key in the hot key combination.

text_image
F1 F2 F3 F4 F5 F6 F7 F8 F9 F10 F11 F12 F13 F14 F15 F16 F17 F18 F19 F20 F21 F22 F23 F24 F25 F26 F27 F28 F29 F30 F31 F32 F33 F34 F35 F36 F37 F38 F39 F40 F41 F42 F43 F44 F45 F46 F47 F48 F49 F50 F51 F52 F53 F54 F55 F56 F57 F58 F59 F60 F61 F62 F63 F64 F65 F66 F67 F68 F69 F70 F71 F72 F73 F74 F75 F76 F77 F78 F79 F80Hot key Icon Function Description
Fn-F1 Hot key help Displays help on hot keys.
Fn-F2 System Property Displays the System Property.
Fn-F3 Power Options Display the Power Options

Properties used by the computer (function available if supported by operating system).
See "Power management" on page 26".
Fn-F4 Sleep Puts the computer in Sleep
mode.
See "Power management" on page 26".
Hot key Icon Function Description
Fn-F5 Display toggle switches display output | between the display screen, external monitor (if connected) and both the display screen and external monitor. | |
Fn-F6 Screen blank Turns the display screen | backlight off to save power. Press any key to return. | |
Fn-F7 Touchpad toggle Turns the internal touchpad on and off. on and off. | ||
| Fn-F8 Speaker toggle Turns the speakers on and off. | ||
Fn-↑ | Volume up Increases the speaker volume. | |
Fn-↓ | Volume down Decreases the speaker volume. | |
Fn-→ | Brightness up Increases the screen brightness. | |
Fn-← | Brightness down Decreases the screen brightness. | |
The Euro symbol
If your keyboard layout is set to United States-International or United Kingdom or if you have a keyboard with a European layout, you can type the Euro symbol on your keyboard.
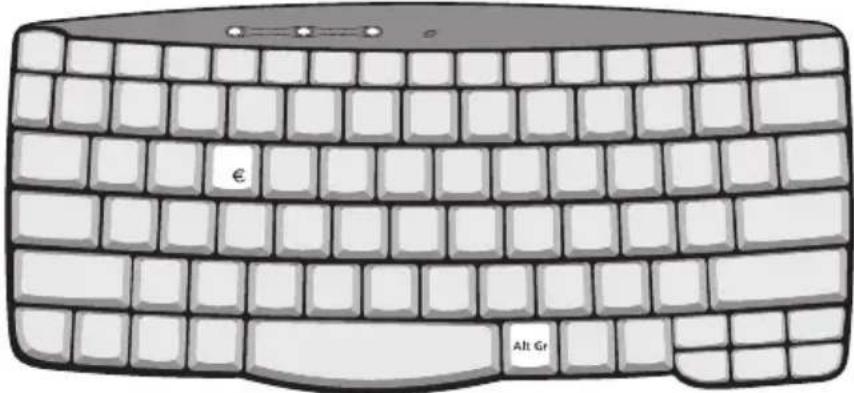
text_image
€ Alt Gr
Note for US keyboard users: The keyboard layout is set when you first set up Windows. For the Euro symbol to work, the keyboard layout has to be set to United States-International.
To verify the keyboard type in Windows 2000, follow the steps below:
1 Click on Start, Settings, Control Panel.
2 Double-click on Keyboard.
3 C l i c k o n t h e Language tab.
4 Verify that the keyboard layout used for "En English (United States)" is set to United States-International.
If not, select and click on Properties; then select United States-International and click on OK.
5 C l i c k o n OK.
To verify the keyboard type in Windows XP, follow the steps below:
1 Click on Start, Control Panel.
2 Double-click on Regional and Language Options.
3 Click on the Language tab and click on Details.
4 Verify that the keyboard layout used for "En English (United States)" is set to United States-International.
If not, select and click on ADD; then select United States-International and click on OK.
5 Click on OK.
To type the Euro symbol:
1 Locate the Euro symbol on your keyboard.
2 Open a text editor or word processor.
3 Hold Alt Gr and press the Euro symbol.

Note: Some fonts and software do not support the Euro symbol. Please refer to www.microsoft.com/typography/faq/faq12.htm for more information.
Launch Keys
Located at the top of the keyboard are four buttons. These buttons are called launch keys. They are designated as P1, P2 Email button and Web browser button.
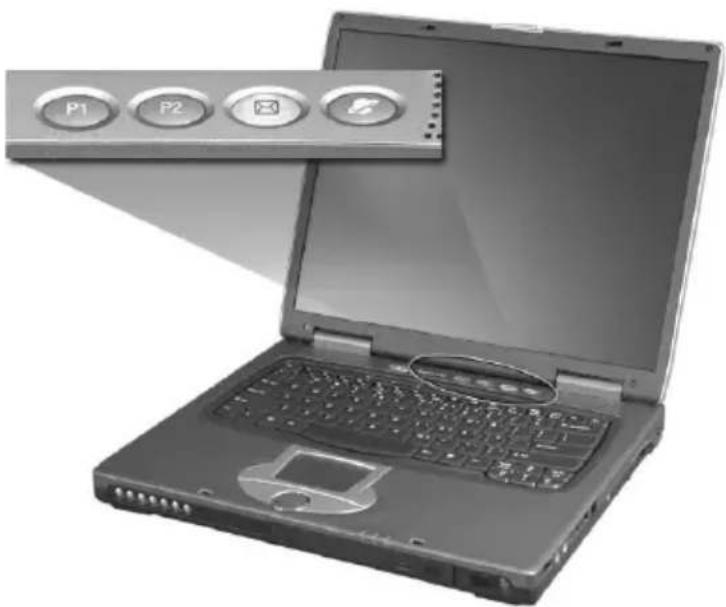
natural_image
Laptop with open screen and a partially visible keyboard, showing three labeled buttons (P1, P2, 📄) on the front panel.Launch key Default application
P1 User-programmable
P2 User-programmable
Email Email application
Web browser Internet browser application
E-Mail Detection
Click right button at the Launch Manager icon on the taskbar and click on E-Mail Detection. In this dialog box, you have the option to enable/disable mail checking, set the time interval for mail checking, etc. If you already have an email account, you can fill in User Name, Password and POP3 Sever in the dialog box. The POP3 Sever is the mail sever where you get your email.
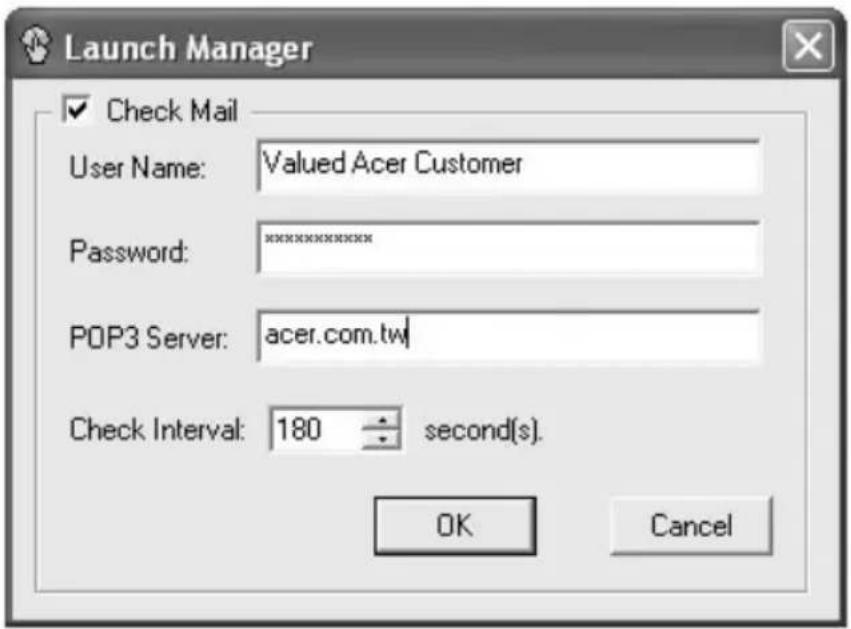
text_image
Launch Manager Check Mail User Name: Valued Acer Customer Password: xxxxxxxxxxxx POP3 Server: acer.com.tw Check Interval: 180 second(s). OK CancelAside from the email checking function, there is a mail button that is used to launch the email application. It is located above the keyboard right below the LCD.
Touchpad
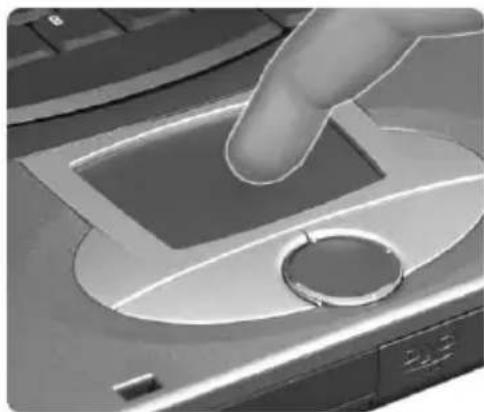
The built-in touchpad is a pointing device that senses movement on its surface. This means the cursor responds as you move your finger on the surface of the touchpad. The central location on the palmrest provides optimal comfort and support.

Note: When using an external USB mouse, you can press Fn-F7 to disable the touchpad.
natural_image
Close-up of a finger pressing a button on a computer mouse (no visible text or symbols)Touchpad basics
The following items teach you how to use the touchpad:
text_image
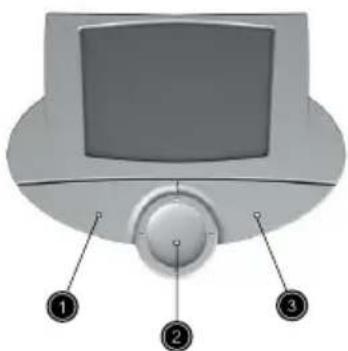
Diagram of a computer monitor with labeled buttons for function keys- Move your finger across the touchpad to move the cursor.
- Press the left (1) and right (3) buttons located on the edge of the touchpad to do selection and execution functions. These two buttons are similar to the left and right buttons on a mouse. Tapping on the touchpad produces similar results.
- Use the 4-way scroll (2) button (top/bottom/left and right) to scroll a page up, down, left or right. This button mimics your cursor
pressing on the vertical and horizontal scroll bars of Windows applications.

Note: Keep your fingers dry and clean when using the touchpad. Also keep the touchpad dry and clean. The touchpad is sensitive to finger movements. Hence, the lighter the touch, the better the response. Tapping harder will not increase the touchpad's responsiveness.
| Function Left button | Right button | Scroll button | Tap |
| Execute Click twice quickly | Tap twice (at the same speed as double-clicking a mouse button) | ||
| Select Click once Tap once | |||
| Drag Click and hold, then use finger to drag the cursor on the touchpad | Tap twice (at the same speed as double-clicking a mouse button) then hold finger to the touchpad on the second tap and drag the cursor | ||
| Access context menu | Click once | ||
| Scroll Click and | hold the button in the desired direction (up/down/left/right) |
Storage
This computer supplies you with the following media storage:
•High-capacity Enhanced-IDE hard disk
•Optical drive
Hard disk
The high-capacity hard disk is the answer to your storage needs. This is where your programs and data are stored.
Optical drive
The optical drive bay accepts a wide variety of optional media drive modules for use with your computer. These optional items include:
- CD-ROM drive
•DVD-ROM drive
•DVD/CD-RW drive
Ejecting the optical (CD or DVD) drive tray
To eject the optical drive tray when the computer is turned on, press the drive eject button.
When the power is off, you can eject the drive tray using the emergency eject hole. See page 49.
Using software
Playing DVD movies
When the DVD-ROM drive module is installed in the optical drive bay, you can play DVD movies on your computer.
1 Eject the DVD tray and insert a DVD movie disc; then close the DVD tray.

Important! When you launch the DVD player for the first time, the program asks you to input the region code. DVD discs are divided into 6 regions. Once your DVD drive is set to a region code, it will play DVD discs of that region only. You can set the region code a maximum of five times (including the first time), after which the last region code set will remain permanent. Recovering your hard disk does not reset the number of times the region code has been set. Refer to the table below for DVD movie region code information.
2 The DVD movie will automatically play after a few seconds.

Note: To change the region code, insert a DVD movie of a different region into the DVD-ROM drive. Please refer to the online help for more information.
Region code Country or region
| 1 U.S.A., Canada |
| 2 Europe, Middle East, South Africa, Japan |
| 3 Southeast Asia, Taiwan, Korea (South) |
| 4 Latin America, Australia, New Zealand |
| 5 Former U.S.S.R., parts of Africa, India |
| 6 People's Republic of China |
Audio
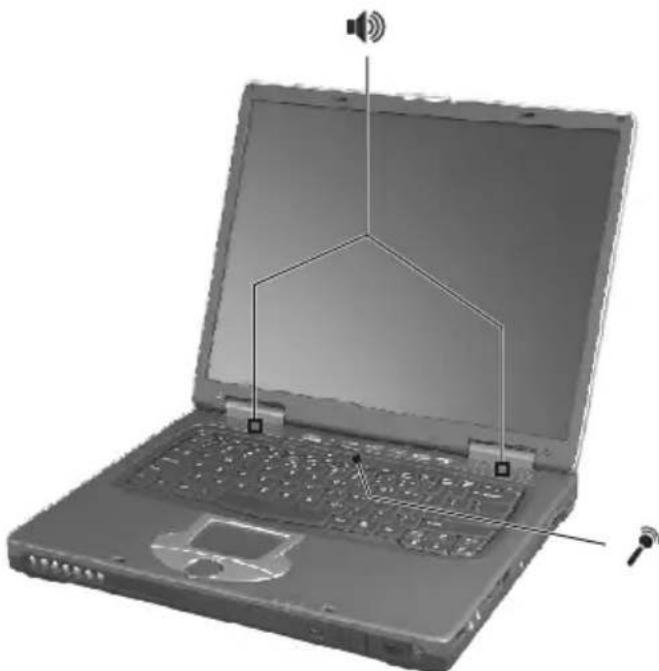
The computer comes with 18-bit high-fidelity AC'97 stereo audio, and includes a built-in sensitive microphone and dual stereo speakers.
natural_image
Laptop with visible keyboard, front panel, and speaker icon (no text or symbols)There are audio ports on the right side of the computer. See "Right view" on page 6 for more information on connecting external audio devices.
Adjusting the volume
Adjusting the volume on the computer is as easy as pressing some buttons. See "Hot keys" on page 15 for more informations on adjusting the speaker volume.
Using the Audio DJ feature
The Audio DJ feature allows you to control the playback of music CDs even with the computer turned off
# Item Description
1 Power indicator Lights when the Audio DJ function is on.
2 Power Press for more than one second to turn the Audio DJ feature on/off.
3 Play/pause Plays/pauses audio.
4 Stop Stops audio playback.
5 Previous track Skips to previous audio track.
6 Next track Skip to next audio track.
7 Volume up Increase volume.
8 Vlolume down Decrease volume.
To playback an audio CD, do as follows:
1 Press the Audio DJ power button (on the front panel of the computer) until the power indicator lights up to turn on the Audio DJ feature.
2 Press the optical drive eject button; then pull out the drive tray.
3 Place a music CD on the optical drive spindle until it clicks in place.
4 Close the optical drive tray securely.
5 You can now press the music playback buttons to begin music playback.
Adjust the volume by using the volume buttons found at the left side of the front panel
Power management
This computer has a built-in power management unit that monitors system activity. System activity refers to any activity involving one or more of the following devices: keyboard, mouse, floppy drive, hard disk, peripherals connected to the serial and parallel ports. If no activity is detected for a period of time (called an inactivity timeout), the computer stops some or all of these devices in order to conserve energy.
This computer employs a power management scheme that supports ACPI (Advanced Configuration and Power Interface), which allows for maximum power conservation and maximum performance at the same time. Windows handles all power-saving chores for your computer.
Moving around with your TravelMate
This section gives you tips and hints to consider when moving around or traveling with your computer.
Disconnecting from the desktop
Follow these steps to disconnect your computer from external accessories:
1 Save your work in progress.
2 Remove any media, diskette or compact disc, from the drive(s).
3 Shut down the computer.
4 Close the display cover.
5 Disconnect the cord from the AC adapter.
6 Disconnect the keyboard, pointing device, printer, external monitor, and other external devices.
7 Disconnect the Kensington lock if you are using one to secure the computer.
Moving around
"when you are just moving within short distances, for example, from your office desk to a meeting room"
Preparing the computer
Before moving the computer, close and latch the display cover to place it in Sleep mode. You can now safely take the computer anywhere you go within the building. To bring the computer out of Sleep mode, open the display; press the power button.
If you are taking the computer to a client's office or a different building, you may choose to shut down the computer:
1 Click on Start, Turn off Computer (Windows XP).
2 C l i c k o n Tum Off (Windows XP).
- or -
choose to enter hibernation mode.
1 Click on Start, Turn off Computer (Windows XP).
2 Hold "Shift"
3 Click on Hibernation (Windows XP).
Then close and latch the display.
When you are ready to use the computer again, unlatch and open the display; then release the power button.

Note: If the sleep indicator is off, the computer has entered Hibernation mode and turned off. If the power indicator is off but the sleep indicator is on, the computer has entered Sleep mode. In both cases, press the power button to turn the computer back on. Note that the computer may enter Hibernation mode after it is in Sleep mode for a period of time.
What to bring to short meetings
A fully charged battery runs the computer for about 2.5\~3 hours under most circumstances. If your meeting is shorter than that, you probably do not need to bring anything with you other than the computer.
What to bring to long meetings
If your meeting will last longer than 2.5 hours or if your battery is not fully charged, you may want to bring the AC adapter with you to plug in your computer in the meeting room.
If the meeting room does not have an electrical outlet, reduce the drain on the battery by putting the computer in Sleep mode. Press Fn-F4 or close the display cover whenever you are not actively using the computer. To resume, open the display (if closed); then press the power button.
Taking the computer home
"when you are moving from your office to your home or vice versa"
Preparing the computer
After disconnecting the computer from your desktop, follow these steps to prepare the computer for the trip home:
- Check if you have removed all media, diskettes and compact discs, from the drive(s). Failure to remove the media can damage the drive head.
- Pack the computer in a protective case that can prevent the computer from sliding around and cushion it if it should fall.

Caution: Avoid packing items next to the top cover of the computer. Pressure against the top cover can damage the screen
What to bring with you
Unless you already have some items at home, bring the following items with you:
•AC adapter and power cord
•The printed user's guide
Special considerations
Follow these guidelines to protect your computer while traveling to and from work:
- Minimize the effect of temperature changes by keeping the computer with you.
- If you need to stop for an extended period of time and cannot bring the computer with you, leave the computer in the trunk of the car to avoid exposing the computer to excessive heat.
- Changes in temperature and humidity can cause condensation. Allow the computer to return to room temperature, and inspect the screen for condensation before turning on the computer. If the temperature change is greater than 18^ (10°C), allow the computer to come to room temperature slowly. If possible, leave the computer for 30 minutes in an environment with a temperature between outside and room temperature.
Setting up a home office
If you frequently work on your computer at home, you may want to purchase a second AC adapter for use at home. With a second AC adapter, you can avoid transporting the extra weight to and from home.
If you use your computer at home for significant periods of time, you might also want to add an external keyboard, monitor, or mouse.
Traveling with the computer
"when you are moving within a larger distance, for instance, from your office building to a client's office building or traveling locally"
Preparing the computer
Prepare the computer as if you were taking it home. Make sure that the battery in the computer is charged. Airport security may require you to turn on your computer when bringing it into the gate area.
What to bring with you
Bring the following items with you:
- AC adapter
- Spare, fully-charged battery pack(s)
Special considerations
In addition to the guidelines for taking the computer home, follow these guidelines to protect your computer while traveling:
•Always take the computer as carry-on luggage.
- If possible, have the computer inspected by hand. Airport security X-ray machines are safe, but do not put the computer through a metal detector.
- Avoid exposing floppy disks to hand-held metal detectors.
Traveling internationally with the computer
"when you are moving from country to country"
Preparing the computer
Prepare the computer as you would normally prepare it for traveling.
What to bring with you
Bring the following items with you:
- AC adapter
- Power cords that are appropriate for the country to which you are traveling
- Spare, fully-charged battery packs
•Proof of purchase, in case you need to show it to Customs officials
•International Traveler's Warranty passport
Special considerations
Follow the same special considerations as when traveling with the computer. In addition, these tips are useful when traveling internationally:
- When traveling in another country, check that the local AC voltage and the AC adapter power cord specifications are compatible. If not, purchase a power cord that is compatible with the local AC voltage. Do not use converter kits sold for appliances to power the computer.
- If you are using the modem, check if the modem and connector is compatible with the telecommunications system of the country you are traveling in.
Securing your computer
Your computer is a valuable investment that you need to take care of. Learn how to protect and take care of your computer.
Security features include hardware and software locks — a security notch and passwords.
Using a computer security lock
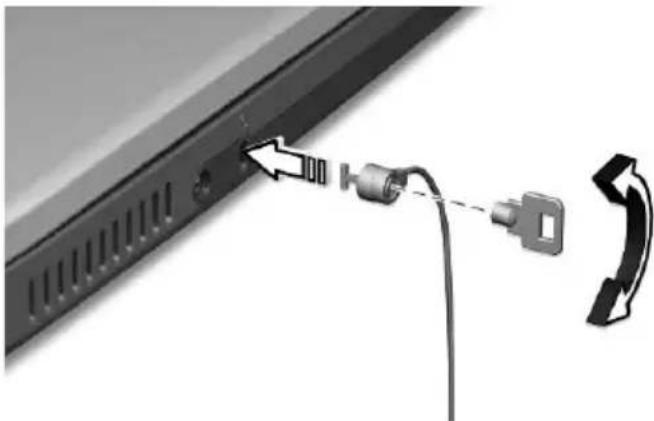
A security keylock notch located on the rear panel of the computer lets you connect a Kensington-compatible computer security lock.
natural_image
Close-up of a computer monitor edge with a USB cable and connector, showing a switch and curved arrow (no text or symbols)Wrap a computer security lock cable around an immovable object such as a table or locked drawer handle. Insert the lock into the notch and turn the key to secure the lock. Some keyless locks are also available.
Using passwords
Passwords protect your computer from unauthorized access. Setting these passwords creates several different levels of protection for your computer and data:
- Supervisor Password prevents unauthorized entry into the BIOS Utility. Once set, you must key-in this password to gain access to the BIOS Utility. See "BIOS Utility" on page 43 for more details.
-User Password secures your computer against unauthorized use. Combine the use of this password with password checkpoints on boot-up and resume from hibernation for maximum security.
- Password on Boot secures your computer against unauthorized use. Combine the use of this password with password checkpoints
on boot-up and resume from hibernation for maximum security.
- Hard Disk Password protects your data by preventing unauthorized access to your hard disk. Even if the hard disk is removed from the computer and moved to another computer, it cannot be accessed without the Hard Disk Password.

Important! Do not forget your Supervisor and Hard Disk Password! If you forget your password, please get in touch with your dealer or an authorized service center.
Entering passwords
When a password is set, a password prompt appears in the left-hand corner of the display screen.
- When the Supervisor Password is set, a prompt appears when you press F2 to enter the BIOS Utility at boot-up.
- Type the Supervisor Password and press Enter to access the BIOS Utility. If you enter the password incorrectly, a warning message appears. Try again and press Enter.
- When the User Password is set and the Password on boot parameter is enabled, a prompt appears at boot-up.
- Type the User Password and press Enter to use the computer. If you enter the password incorrectly, a warning message appears. Try again and press Enter.
- When the Hard Disk Password is set, a prompt appears at boot-up.
- Type the Hard Disk Password and press Enter to use the computer. If you enter the password incorrectly, a warning message appears. Try again and press Enter.

Important! You have three chances to enter a password. If you fail to enter the password correctly after three tries, the system halts. Press the power button for four seconds to shut down the computer. Then turn on the computer again, and try again. If you fail to enter the Hard Disk Password, please contact your dealer or an authorized service center.
Setting passwords
You can set passwords using the BIOS Utility.
2 Customizing my computer
After learning the basics of your TravelMate computer, let's get acquainted with the advanced features of your computer. In this chapter, you will learn how to add options, upgrade components for better performance, and customize your computer.
Expanding through options
Your TravelMate offers you a complete mobile computing experience.
Connectivity options
Ports allow you to connect peripheral devices to your computer as you would with a desktop PC.
Fax/data modem
Your computer have a built-in V.90/92 56Kbps AC'97 Link fax/data modem.

Warning! This modem port is not compatible with digital phone lines. Plugging this modem into a digital phone line will damage the modem.
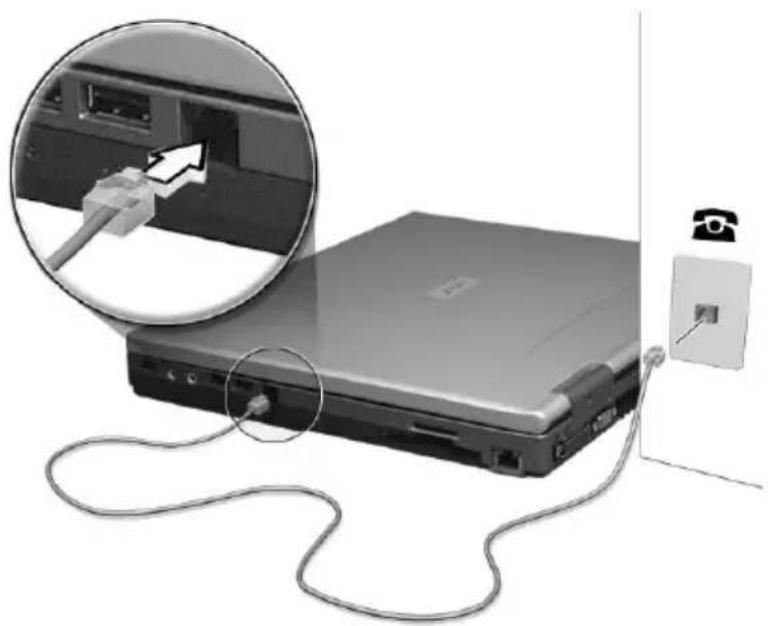
To use the fax/data modem port, connect a phone cable from the modem port to a telephone jack.
natural_image
Laptop connected to a wall-mounted power outlet with cable, showing internal wiring and a magnified inset of the device (no text or symbols visible)Start your communications software program.
Built-in network feature
The built-in network feature allows you to connect your computer to an Ethernet-based (10/100 Mbps) network.
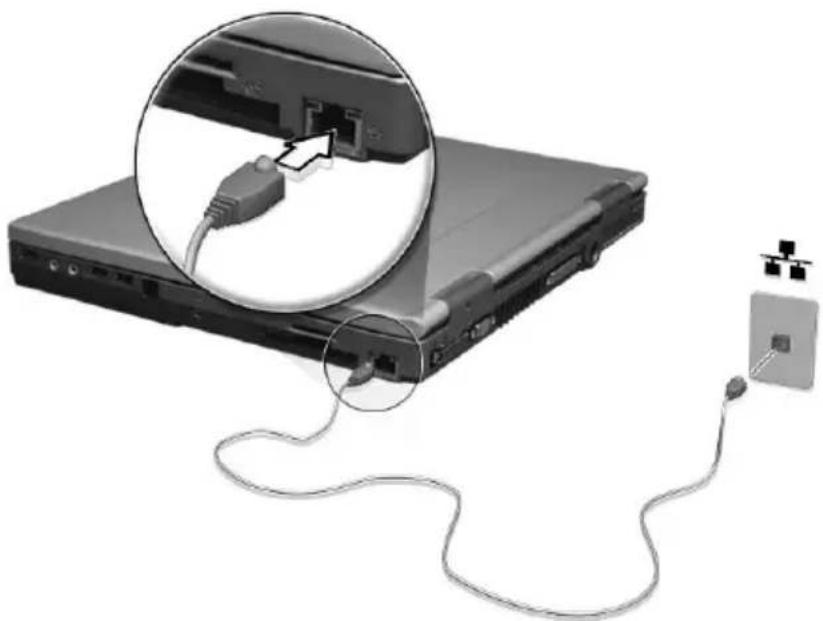
To use the network feature, connect an Ethernet cable from the network jack on the right side of the computer to a network jack or hub on your network.
natural_image
Laptop connected to a cable with a close-up inset showing internal components (no text or symbols visible)Universal Serial Bus
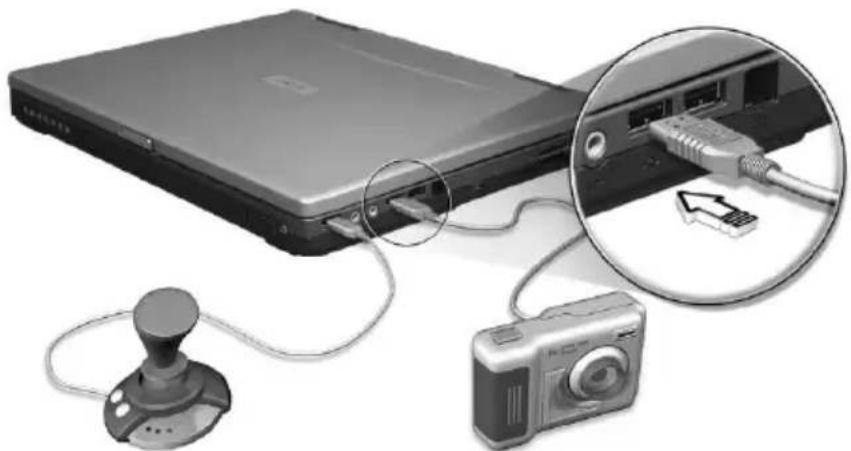
The Universal Serial Bus (USB) port is a high-speed serial bus which allows you to connect and daisy-chain USB peripherals without taking up precious system resources. Your computer has three ports available.
natural_image
Laptop connected to a camera via cable, with an inset showing the cable being inserted into a USB port (no text or symbols visible)IEEE 1394 port
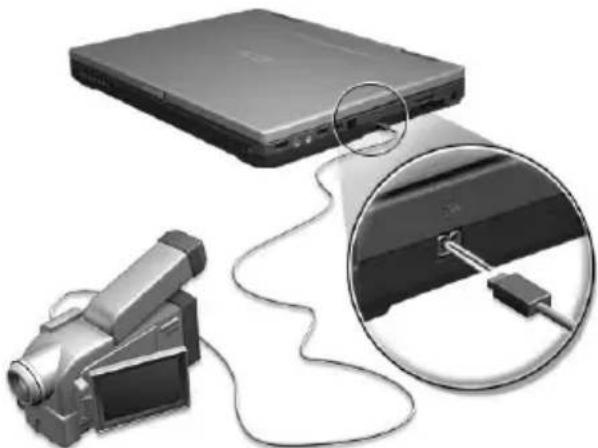
The computer's IEEE 1394 port allows you to connect to an IEEE 1394 supported devices like a video camera or digital camera.
natural_image
Illustration of a laptop connected to a video camera via cable, with a magnified inset showing internal components (no text or symbols)See your video or digital camera's documentation for details.
PC Card slot
The type II CardBus PC Card slot found on the right side of the computer accepts credit-card-sized cards that enhance the usability and expandability of the computer. These cards should have a PC Card logo on them.
PC Cards (formerly PCMCIA) are add-on cards for portable computers, giving you expansion possibilities long afforded by desktop PCs. Popular PC cards include fax/data modem, LAN, wireless LAN and SCSI cards. CardBus improves on the 16-bit PC card technology by expanding the bandwidth to 32 bits.

Note: Refer to your card's manual for details on how to install and use the card and its functions.
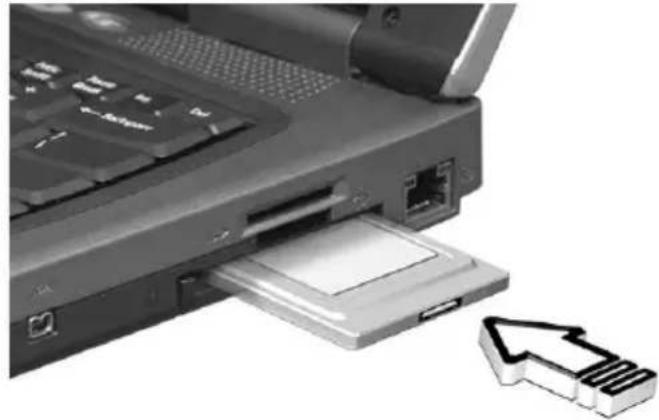
Inserting a PC Card
Insert the card into the slot and make the proper connection (e.g., network cable), if necessary. See your card manual for details.
natural_image
Close-up of a laptop computer with an attached USB drive and a USB port, showing internal components (no text or symbols visible)Ejecting a PC Card
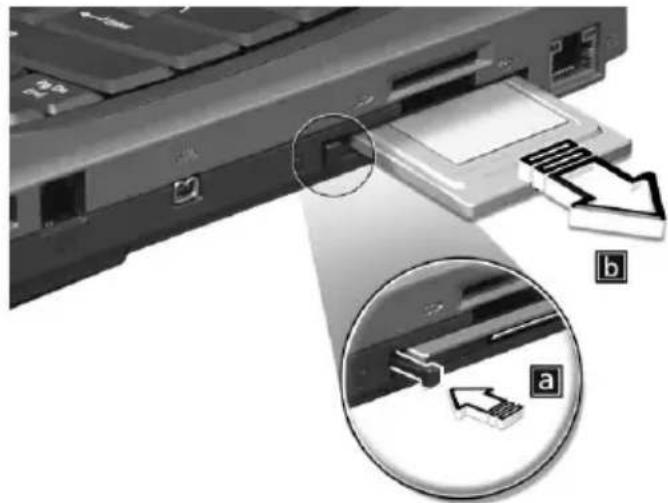
Before ejecting a PC Card:
1 Exit the application using the card.
2 Left-click on the PC Card icon on the taskbar and stop the card operation.
3 Press the slot eject button to pop out the eject button (a); then press it again to eject the card (b).
natural_image
Diagram showing a computer file or folder with an icon and magnified view of the internal structure (no text or symbols present)Upgrade options
Your computer delivers superior power and performance. However, some users and the applications they use may demand more. This computer allows you to upgrade key components when you need increased performance.

Note: Contact your authorized dealer if you decide to perform a key component upgrade.
Memory upgrade
Memory is expandable to 1 GB, employing 128/256/512-MB industry standard soDIMMs (Small Outline Dual Inline Memory Modules). The computer supports DDR 266 (Double Data Rate) SDRAM (Synchronous Dynamic Random Access Memory).
There are two memory slots on your computer, one of which is occupied by standard memory. You can upgrade memory by installing a memory module into the available slot, or replacing the standard memory with a higher-capacity memory module.
Installing memory
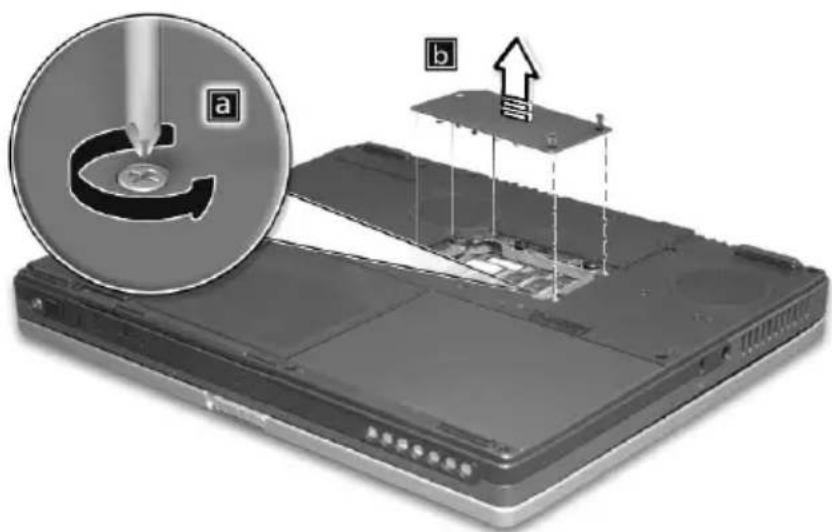
Follow these steps to install memory:
1 Turn off the computer, unplug the AC adapter (if connected) and remove the battery pack. Then turn the computer over to access its base.
2 Remove the screw from the memory cover (a); then lift up and remove the memory cover (b).
text_image
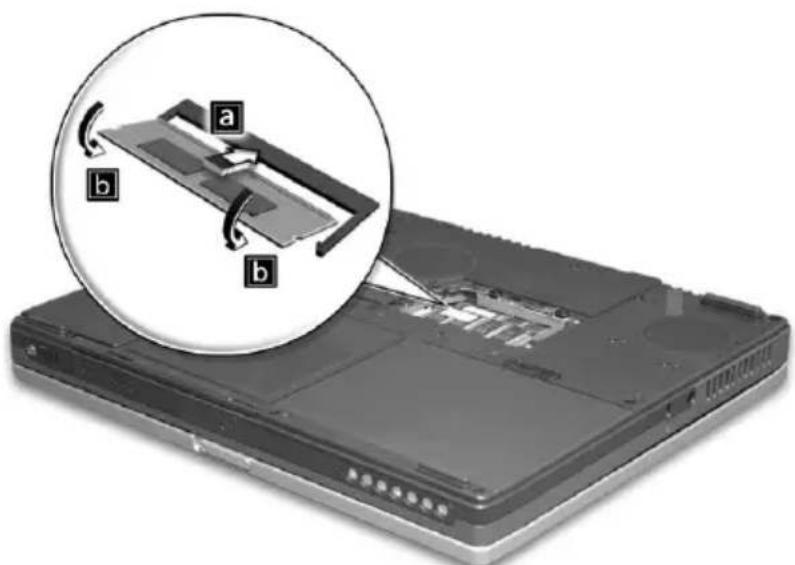
a b3 Insert the memory module diagonally into the slot (a), then gently press it down (b) until it clicks into place.
natural_image
Laptop with a close-up diagram showing internal components and labeled parts (a, b), no readable text or symbols present.4 Replace the memory cover and secure it with the screw.
5 Reinstall the battery pack, and reconnect the AC adapter.
6 Turn on the computer.
The computer automatically detects and reconfigures the total memory size.
Using system utilities
Launch Manager
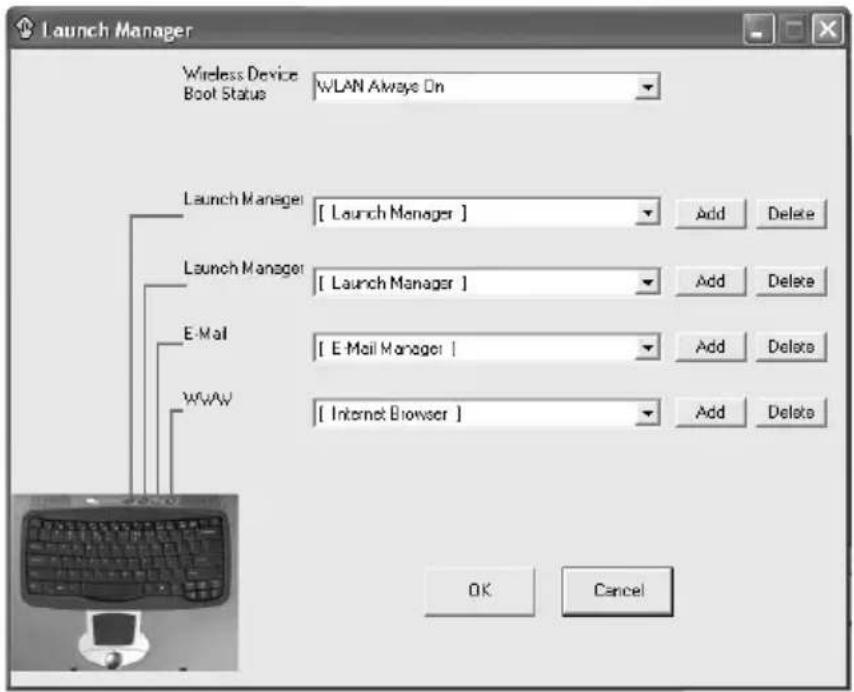
Launch Manager allows you to set the four launch keys located above the keyboard. See "Launch Keys" on page 18 for the location of the launch key.
You can access the Launch Manager by clicking on Start, All Programs, and then Launch Manager to start the application.
You can manually switch off the 802.11b wireless LAN by pressing the

wireless button.
text_image
Launch Manager Wireless Device Boot Status: WLAN Always On Launch Manager: [ Launch Manager ] Launch Manager: [ Launch Manager ] E-Mail: [ E-Mail Manager ] WWAV: [ Internet Browser ] Add Delete Add Delete Add Delete Add Delete OK CancelBIOS Utility
The BIOS Utility is a hardware configuration program built into your computer's BIOS (Basic Input/Output System).
Your computer is already properly configured and optimized, and you do not need to run this utility. However, if you encounter configuration problems, you may need to run it.
To activate the BIOS Utility, press F2 during the POST (power-on self-test) while the TravelMate logo is being displayed.
| PhoenixBIOS Setup Utility | |||||
| Info. | Main | System Devices | Security | Boot | Ext |
| Item specific Help | |||||
| CPU Type | Intel® Pentium® IV | ||||
| CPU Speed | 1800 MHz | ||||
| Floppy Drive: | |||||
| HDD1 Model Name | |||||
| HDD1 Serial Number | xxxxxxxxxxxxxxxxxxxxxx | ||||
| HDD2 Model Name | |||||
| HDD1 Serial Number | xxxxxxxxxxxxxxxxxxxxxx | ||||
| ATAPI Device: | |||||
| System BIOS Ver: | BBL xxx | ||||
| VGA BIOS Ver: | AT1M7 xxx | ||||
| KBC Ver: | V03.02 | ||||
| Serial Num: | xxxxxxxxxxxxxxxxxxxxxx | 22 Byte | |||
| Asset Tag Number: | xxxxxxxxxxxxxxxxxxxxxx | 32 Byte | |||
| Product Name: | TravelMate 420 | 15 Byte | |||
| Manufacturer Name: | Acer | 15 Byte | |||
| UUID: | xxxxxxxxxxxxxxxxxx | 16 Byte | |||
3 Troubleshooting my computer
This chapter instructs you on how to deal with common system problems. Read it before calling a technician if a problem occurs. Solutions to more serious problems require opening up the computer. Do not attempt to open the computer by yourself. Contact your dealer or an authorized service center for assistance.
key link: www.acersupport.com
Frequently-asked questions
The following is a list of possible situations that may arise during the use of your computer. Easy answers and solutions are provided for each one.
I opened the display and pressed the power button, but computer does not start or boot-up.
Look at the Power indicator:
- If it is not lit, no power is being applied to the computer. Check the following:
- If you are running on battery power, it may be low and unable to power the computer. Connect the AC adapter to recharge the battery pack.
- Make sure that the AC adapter is plugged in properly to the computer and to the power outlet.
- If it is lit, check the following:
- Is a non-bootable (non-system) diskette in the floppy drive? Remove or replace it with a system diskette and press Ctrl-Alt-Del to restart the system.
- The operating system files may be damaged or missing. Insert the bootable Acer System CD into the optical drive or startup disk you created during Windows setup into the floppy drive and press Ctrl-Alt-Del to restart the system. This will diagnose your system and make necessary fixes.
Nothing appears on the screen.
The computer's power management system automatically blanks the screen to save power. Press any key to turn the display back on.
If pressing a key does not turn the display back on, two things might be the cause:
- The brightness level might be too low. Press Fn→ (increase) and Fn← (decrease) to adjust the brightness to higher.
- The display device might be set to an external monitor. Press the display toggle hot key Fn-F5 to toggle the display back to the computer.
Image is not full-screen.
The computer display has a native resolution of 1024 x 768 (XGA) for the 14.1"/15.0" or 1400 x 1050 (SXGA+) for the 15.0"(selected models only). If you set the resolution lower than this, the screen expands to fill the computer display.
Right-click on your Windows desktop and select Properties to bring up the Display Properties dialog box. Then click on the Settings tab to make sure that the resolution is set to the appropriate resolution. Resolutions lower than the specified resolution may not be full-screen on the computer or on an external monitor.
No audio is heard from the computer.
Check the following:
- The volume may be muted. In Windows, look at the volume control (speaker) icon on the taskbar. If it is crossed-out, click on the icon and deselect the Mute option.
- The speakers may be turned off. Press Fn-F8 to turn the speakers on (this hot key also turns the speakers off).
- The volume level may be too low. In Windows, look at the volume control icon on the taskbar. See "Hot keys" on page 15 for more detail.
- If headphones, earphones or external speakers are connected to the line-out port on the computer's right panel, the internal speakers automatically turn off.
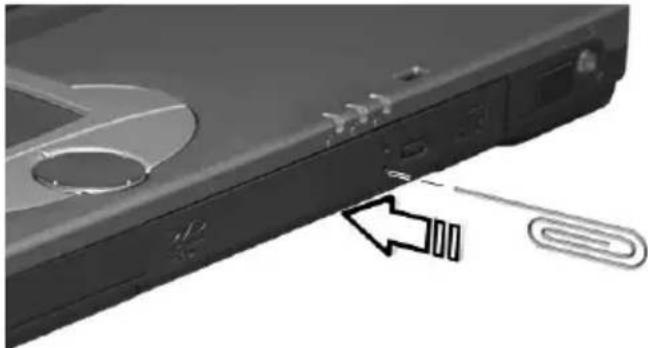
I want to eject the optical drive tray without turning on the power. I cannot eject the optical drive tray.
There is a mechanical eject button on the optical drive. Simply insert the tip of a pen or paperclip and push to eject the tray.
natural_image
Close-up of a device rear panel with a paperclip and arrow pointing to a component (no visible text or symbols)The keyboard does not respond.
Try attaching an external keyboard to the USB port of the computer. If it works, contact your dealer or an authorized service center as the internal keyboard cable may be loose.
The printer does not work.
Check the following:
• Make sure that the printer is connected to a power outlet and that it is turned on.
- Make sure that the printer cable is connected securely to the computer's parallel port and the corresponding port on the printer.
- During POST, press F2 to access the BIOS Utility and verify that the parallel port is enabled.
I want to set up my location to use the internal modem.
To properly use your communications software (e.g., HyperTerminal), you need to set up your location: (for Windows XP)
1 Click on Start, Control Panel.
2 Double-click on Phone and Modem.
3 Click on Dialing Rules and begin setting up your location.
Refer to the Windows manual.
Requesting service
International Traveler's Warranty (ITW)
Your computer is backed by an International Traveler's Warranty (ITW) that gives you security and peace of mind when traveling. Our worldwide network of service centers are there to give you a helping hand.
An ITW passport comes with your computer. This passport contains all you need to know about the ITW program. A list of available, authorized service centers is in this handy booklet. Read this passport thoroughly.
Always have your ITW passport on hand, especially when you travel to receive the benefits from our support centers. Place your proof-of-purchase in the flap located inside the front cover of the ITW passport.
If the country you are traveling in does not have an Acer-authorized ITW service site, you can still get in contact with our offices worldwide.
There are two ways to access Acer for technical support and information:
- Internet service worldwide (www.acersupport.com)
•Technical support numbers in various countries
You can view a list of technical support numbers by following these steps: (for Windows XP)
| 1 | C | l | i | c | k | o | n | Start. |
| 2 | C | l | i | c | k | o | n | Help and Support. |
| 3 | C | l | i | c | k | o | n | Contact Acer. |
You can also check Acer worldwide service centers by following these steps:
1 C l i c k o n Start.
2 Right click on My Computer, choose Properties.
3 Click Support Information for more information about Acer worldwide service centers.
Before you call
Please have the following information available when you call Acer for online service, and please be at your computer when you call. With your support, we can reduce the amount of time a call takes and help solve your problems efficiently.
If there are error messages or beeps reported by your computer, write them down as they appear on the screen (or the number and sequence in the case of beeps).
You are required to provide the following information:
Name:
Address:
Telephone number: ____
Machine and model type: ____
Serial number:
Date of purchase: ____
Appendix A
Specifications
This appendix lists the general specifications of your computer.
Microprocessor
- Intel® Pentium® 4 Processor with 512 KB level 2 cache, 400 MHz FSB (front side bus)
- Main memory expandable to 1 GB, dual 200-pin soDIMM sockets
•DDR 266 (PC2100) DDR-SDRAM (Double Data Rate-Synchronous Dynamic Random Access Memory) support
•512 KB Flash ROM BIOS
Data storage
•One high-capacity, Enhanced-IDE hard disk
•One 5.25-inch internal optical drive
Display and video
- Thin-Film Transistor (TFT) liquid crystal display (LCD) displaying 32-bit true color up to 1024 x 786 eXtended Graphics Array (XGA) resolution for 14.1"/15.0" or 1400 x 1050 Super eXtended Graphics Array+ (SXGA+) resolution for 15.0"
- ATi Radeon 7500 video chip, with 32/64 MB dedicated DDR video memory
•4X AGP bus with 3D acceleration - Simultaneous LCD and CRT display support
•Dual display capability - S-video for output to a television or display device that supports S-video input (NTSC/PAL)
- "Automatic LCD dim" feature that automatically decides the best settings for your display and conserves power
Audio
•18-bit AC'97 stereo audio
•Dual speakers and microphone
•Audio ports for microphone/line-in and headphone/speaker/line-out
•Audio DJ console for audio CD playback when the computer is off
Keyboard and pointing device
•84-/85-/88-key Windows keyboard
- Ergonomically-centered touchpad pointing device with 4-way scroll button
I/O ports
•One type II CardBus PC Card slots
•One RJ-45 jack (Ethernet 10/100)
•One RJ-11 jack (V.90/56Kbps)
•One DC-in jack
•One parallel port (ECP/EPP)
•One external monitor port
- Three USB ports
•One IEEE 1394 port
•One S-video TV-out (NTSC/PAL) port
•One SD/MMC slot
•One memory stick slot
•One headphone/speaker/line-out jack (3.5mm mini jack)
•One microphone/line-in jack (3.5mm mini jack)
•100-pin port replicator connector for Acer EasyPort
Weight and dimensions
• 327(W) x 269(D) x 35.9 (H) mm; (12.9" x 10.6" x 1.4") for 14.1"/15.0" LCD
- 2.86 kg (6.3lbs) for 14.1" LCD model / 2.99kg (6.6lbs) for 15.0" LCD model
Environment
•Temperature
- Operating: 5^ C 35^ C
•Non-operating: -20°C \~ 65°C
• Humidity (non-condensing)
•Operating: 20% \~ 80% RH
•Non-operating: 20% \~ 80% RH
System
- ACPI support
•DMI 2.0-compliant
•Microsoft Windows operating system
Power
- Battery pack
- 70Wh Li-Ion battery pack
- 2.5\~3-hour rapid charge/3.5-hour charge-in-use
- AC adapter
- 90-Watt
- Auto sensing 100\~240Vac, 50\~60Hz
Options
•128/256/512-MB memory upgrade modules
•Additional Li-Ion battery pack
•Additional AC adapter
•Bay floppy disc drive, DVD driver and DVD/CD-RW drive
- Acer EasyPort

Appendix B
Notices
This appendix lists the general notices of your computer.
FCC notice
This device has been tested and found to comply with the limits for a Class B digital device pursuant to Part 15 of the FCC Rules. These limits are designed to provide reasonable protection against harmful interference in a residential installation. This device generates, uses, and can radiate radio frequency energy and, if not installed and used in accordance with the instructions, may cause harmful interference to radio communications.
However, there is no guarantee that interference will not occur in a particular installation. If this device does cause harmful interference to radio or television reception, which can be determined by turning the device off and on, the user is encouraged to try to correct the interference by one or more of the following measures:
• Reorient or relocate the receiving antenna
- Increase the separation between the device and receiver
- Connect the device into an outlet on a circuit different from that to which the receiver is connected
- Consult the dealer or an experienced radio/television technician for help
Notice: Shielded cables
All connections to other computing devices must be made using shielded cables to maintain compliance with FCC regulations.
Notice: Peripheral devices
Only peripherals (input/output devices, terminals, printers, etc.) certified to comply with the Class B limits may be attached to this equipment. Operation with non-certified peripherals is likely to result in interference to radio and TV reception.
Caution
Changes or modifications not expressly approved by the manufacturer could void the user's authority, which is granted by the Federal Communications Commission, to operate this computer.
Use conditions
This part complies with Part 15 of the FCC Rules. Operation is subject to the following two conditions: (1) this device may not cause harmful interference, and (2) this device must accept any interference received, including interference that may cause undesired operation.
Notice: Canadian users
This Class B digital apparatus meets all requirements of the Canadian Interference-Causing Equipment Regulations.
This equipment complies with Part 68 of the FCC rules. Located on the bottom side of the modem is a label that contains, among other information, the FCC Registration Number and Ringer Equivalence Number (REN) for this equipment. Upon request, you must provide this information to your telephone company.
If your telephone equipment causes harm to the telephone network, the telephone company may discontinue your service temporarily. If possible, they will notify you in advance. But, if advance notice is not practical, you will be notified as soon as possible. You will also be informed of your right to file a complaint with the FCC.
Your telephone company may make changes in its facilities, equipment, operations, or procedures that could affect the proper functioning of your equipment. If they do, you will be notified in advance to give you an opportunity to maintain uninterrupted telephone service.
If this equipment should fail to operate properly, disconnect the equipment from the phone line to determine if it is causing the problem. If the problem is with the equipment, discontinue use and contact your dealer or vendor.
TBR 21
This equipment has been approved [Council Decision 98/482/EC - "TBR 21"] for pan-European single terminal connection to the Public Switched Telephone Network (PSTN). However, due to differences between the individual PSTNs provided in different countries, the approval does not, of itself, give an unconditional assurance of successful operation on every PSTN termination point. In the event of problems, you should contact your equipment supplier in the first instance.
Important safety instructions
Read these instructions carefully. Save these instructions for future reference.
1 Follow all warnings and instructions marked on the product.
2 Unplug this product from the wall outlet before cleaning. Do not use liquid cleaners or aerosol cleaners. Use a damp cloth for cleaning.
3 Do not use this product near water.
4 Do not place this product on an unstable cart, stand, or table. The product may fall, causing serious damage to the product.
5 Slots and openings in the cabinet and the back or bottom are provided for ventilation; to ensure reliable operation of the product and to protect it from overheating, these openings must not be blocked or covered. The openings should never be blocked by placing the product on a bed, sofa, rug, or other similar surface. This product should never be placed near or over a radiator or heat register, or in a built-in installation unless proper ventilation is provided.
6 This product should be operated from the type of power indicated on the marking label. If you are not sure of the type of power available, consult your dealer or local power company.
7 Do not allow anything to rest on the power cord. Do not locate this product where persons will walk on the cord.
8 If an extension cord is used with this product, make sure that the total ampere rating of the equipment plugged into the extension cord does not exceed the extension cord ampere rating. Also, make sure that the total rating of all products plugged into the wall outlet does not exceed the fuse rating.
9 Never push objects of any kind into this product through cabinet slots as they may touch dangerous voltage points or short out parts that could result in a fire or electric shock. Never spill liquid of any kind on the product.
10 Do not attempt to service this product yourself, as opening or removing covers may expose you to dangerous voltage points or other risks. Refer all servicing to qualified service personnel.
11 Unplug this product from the wall outlet and refer servicing to qualified service personnel under the following conditions:
a When the power cord or plug is damaged or frayed
b If liquid has been spilled into the product
c If the product has been exposed to rain or water
d If the product does not operate normally when the operating instructions are followed. Adjust only those controls that are covered by the operating instructions since improper adjustment of other controls may result in damage and will often require extensive work by a qualified technician to restore the product to normal condition.
e If the product has been dropped or the cabinet has been damaged
f If the product exhibits a distinct change in performance, indicating a need for service.
12 Replace the battery with the same type as the product's battery we recommend. Use of another battery may present a risk of fire or explosion.
13 Warning! Batteries may explode if not handled properly. Do not disassemble or dispose of them in fire. Keep them away from children and dispose of used batteries promptly.
14 Use only the proper type of power supply cord set (provided in your accessories box) for this unit. It should be a detachable type: UL listed/CSA certified, type SPT-2, rated 7A 125V minimum, VDE approved or its equivalent. Maximum length is 15 feet (4.6 meters).
Laser compliance statement
The CD, DVD or DVD/CD-RW drive used with this computer is a laser product. The CD, DVD or DVD/CD-RW drive's classification label (shown below) is located on the drive.
CLASS 1 LASER PRODUCT
CAUTION: INVISIBLE LASER RADIATION WHEN OPEN. AVOID EXPOSURE TO BEAM.
APPAREIL A LASER DE CLASSE 1 PRODUIT
LASERATTENTION: RADIATION DU FAISCEAU LASER INVISIBLE EN CAS D'OUVERTURE. EVITTER TOUTE EXPOSITION AUX RAYONS.
LUOKAN 1 LASERLAITE LASER KLASSE 1
Lithium battery statement
CAUTION
Danger of explosion if battery is incorrectly replaced. Replace only with the
same or equivalent type recommended by the manufacturer. Dispose of used batteries according to local regulations. Recycle if at all possible.
ADVARSEL!
The LCD unit is produced with high-precision manufacturing techniques. Nevertheless, some pixels may occasionally misfire or appear as black or colored dots. This has no effect on the recorded image and does not constitute a malfunction.
Macrovision copyright protection notice
This product incorporates copyright protection technology that is protected by method claims of certain U.S. patents and other intellectual property rights owned by Macrovision Corporation and other rights owners. Use of this copyright protection technology must be authorized by Macrovision Corporation, and is intended for home and other limited viewing uses only unless otherwise authorized by Macrovision Corporation. Reverse engineering or disassembly is prohibited.
Apparatus Claims of U.S. Patent Nos. 4,631,603, 4,577,216, 4,819,098, and 4,907,093 licensed for limited viewing uses only.
A-Tick notice
For safety reasons, only connect headsets with a telecommunications compliance label. This includes customer equipment previously labelled permitted or certified.
The unit shall be connected to Telecommunication Network through a line cord which meets the requirements of ACA Technical Standard TS008.
Australian approved mains cord set shall be used with the equipment.
Index
A
AC adapter
caring for v
AcerMedia drive 22
audio 24
adjusting the volume 24
troubleshooting 48
B
battery pack
caring for v
charging indicator 11
BIOS utility 43
brightness
hotkeys 16
C
caps lock 12
on indicator 11
care
AC adapter v
battery pack v
computer iv
CD-ROM
ejecting 22
ejecting manually 49
troubleshooting 49
cleaning
computer v
computer
bringing to meetings 28
caring for iv
cleaning v
disconnecting 27
features 3, 9
indicators 11
keyboards 12
moving around 27
on indicator 11
performance 9
security 32
setting up a home office 29
taking home 28
traveling internationally 30
traveling on local trips 30
troubleshooting 46
turning off iv
Wireless Communication indicator 11
connections
network 38
D
display
hotkeys 16
troubleshooting 47, 48
DVD 23
DVD movies
playing 23
E
email checking function 19
Euro 17
F
FAQ. See frequently-asked questions frequently-asked questions 47
front view 3
H
hard disk 22
help
online services 50
Hibernation mode
hotkey 15
hotkeys 15
|
IEEE 1394 port 39
indicator lights 11
ITW. See warranty
K
keyboard 12
embedded numeric keypad 13
hotkeys 15
lock keys 12
troubleshooting 49
Windows keys 14
L
LEDs 11
M
media access on indicator 11
memory installing 41–42 upgrading 41
modem 37
N
network 38
Notebook Manager hotkey 15
notice DVD copyright protection 65
num lock 12 on indicator 11
numeric keypad embedded 13 num lock 13
0
online services 50
options memory upgrade 41
P
password 32 types 32
PC Card 39 ejecting 40 inserting 40
ports 37
POST (power-on self-test) 44
printer troubleshooting 49
problems 47 CD-ROM 49 display 47, 48 keyboard 49 printer 49 startup 47 troubleshooting 46
Q
questions setting location for modem use 49
S
safety CD-ROM 64 FCC notice 61 general instructions 62 modem notices 62
scroll lock 12
security keylock 32 passwords 32 smart card 32
service when to call vi
speakers hotkey 16 troubleshooting 48
specifications 54
Standby mode hotkey 15
status indicators 11
storage 22 AcerMedia drive 22 hard disk 22
support information 50
T
touchpad 20 hotkey 16 using 20
travel international flights 30 local trips 30
troubleshooting 46
U
universal serial bus 38
V
view bottom 8 front 5 left 5 rear 7 right 6
volume adjusting 24
W
warranty
International Traveler's Warran-
ty 50
Windows keys 14