
NovoEnterprise NE3000EU - Access Point VIVITEK - Free user manual and instructions
Find the device manual for free NovoEnterprise NE3000EU VIVITEK in PDF.


| Product Type | Wireless Collaboration & Presentation Access Point |
| Brand / Model | Vivitek NovoEnterprise NE3000EU |
| Dimensions (L x W x H) | 165 x 123 x 21 mm |
| Weight | 250 g |
| Power Supply | 5.0 VDC, 2 A via Micro-USB (USB-to-DC-in cable included) |
| Power Consumption | < 10 W |
| CPU (SoC) | ARM Quad-Core 1.6 GHz |
| Memory (RAM) | DDR3 2048 MB |
| Internal Storage | 8 GB eMMC Flash |
| External Storage | microSD card slot (up to 64 GB) |
| Wi-Fi | 802.11 a/b/g/n/ac (2.4 GHz & 5 GHz), 2T2R, up to 300 Mbps |
| Ethernet | RJ45 10/100/1000 with PoE |
| Video Output | HDMI x 1 |
| Video Input | HDMI x 1 |
| Audio | 3.5 mm line-in (input) and 3.5 mm audio-out (output) |
| USB Ports | 2 x Type A (for keyboard/mouse or touch screen, or USB hub) |
| Output Resolutions | Auto Config, XGA (1024x768), WXGA (1280x800), 720p (1280x720), 1080p (1920x1080) at 60 Hz |
| LED Indicator | Green (power on), Red (standby), Blue (network activity) |
| Supported Client OS | Windows 7/8/10 (32/64-bit), Mac OS 10.7+, Android 4.0+, iOS 7.0+, Chrome OS |
| Maximum Concurrent Users | 64 (Ethernet/Wi-Fi Client mode), 8 (Wi-Fi Hotspot mode) |
| Network Modes | Ethernet, Wi-Fi Client, Wi-Fi Hotspot, Dual-Network (simultaneous Ethernet + Wi-Fi) |
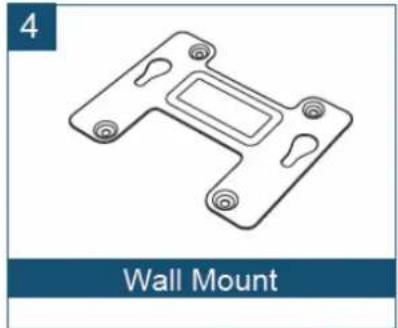
| Included Accessories | Remote control (with batteries), HDMI cable, USB power cable, USB power adapter, wall-mount bracket, antennas, microSD card (not included) |
| Cleaning & Maintenance | Wipe with a soft dry cloth; do not use liquids or aerosol cleaners. Keep ventilation slots clear. |
| Safety & Regulatory | CE, FCC, RoHS; use only supplied power adapter; do not disassemble; keep away from water and children. |
| Warranty & Reparability | Contact local Vivitek service center. No user-serviceable parts inside. |
Frequently Asked Questions - NovoEnterprise NE3000EU VIVITEK
User questions about NovoEnterprise NE3000EU VIVITEK
0 question about this device. Answer the ones you know or ask your own.
Ask a new question about this device
Download the instructions for your Access Point in PDF format for free! Find your manual NovoEnterprise NE3000EU - VIVITEK and take your electronic device back in hand. On this page are published all the documents necessary for the use of your device. NovoEnterprise NE3000EU by VIVITEK.
USER MANUAL NovoEnterprise NE3000EU VIVITEK
Wireless Collaboration.
Connect. Work. Share.

NovoEnterprise
User Manual
Table of Contents
1 GETTING STARTED 6
1.1 Package Content....6
1.2 Hardware Setup....7
1.2.1 NovoEnterprise ....7
1.2.2 Remote Control....8
1.2.2.1 Pairing the remote control....8
1.3 NovoEnterprise Home Screen....9
1.4 Basic Device Configuration 10
1.5 Client Software Download and Installation....16
2 SETTING UP NETWORK 19
2.1 Network Connection....19
2.1.1 Ethernet....19
2.1.2 Wi-Fi Client Mode 21
2.1.3 Wi-Fi Hotspot Mode....24
2.1.4 Dual-Network Configuration....24
2.2 Port Numbers and Intranet Firewall....25
3 MAKING A PRESENTATION....27
3.1 Presenting with Windows/Mac/Chromebook....27
3.1.1 Step 1: Set up session parameters....28
3.1.2 Step 2: Connect to your NovoEnterprise device....30
3.1.3 Step 3: Make a presentation....32
3.1.4 Step 4: Presentation management....33
3.1.4.1 Moderator....33
3.1.4.2 Role assignment 34
3.1.4.3 Multi-screen projection, withdraw projection, and remove a participant 35
3.1.4.4 Pause, resume, disconnect and lock session.... 38
3.1.4.5 Lock/Unlock students' tablets/phones (Education Edition only) 40
3.1.4.6 Terminate session (Education Edition only) 41
3.2 Presenting with Android/iOS Devices 42
3.2.1 Step 1: Connect to your NovoEnterprise device....42
3.2.1.1 Connect via QR Code 42
3.2.1.2 Connect via Manual Input 44
3.2.2 Step 2: Make a presentation....47
3.2.2.1 My Notes 47
3.2.2.2 Gallery 51
3.2.2.3 Documents (Local Storage) 52
3.2.2.4 Documents (Dropbox) 54
3.2.2.5 Web 56
3.2.2.6 Annotation 60
3.2.2.7 Screenshot 61
3.2.3 Step 3: Presentation management....62
3.2.3.1 Moderator....62
3.2.3.2 Role assignment 62
3.2.3.3 Role change, multi-screen, withdraw projection, and remove a user 64
3.2.3.4 Disconnect and lock session....68
3.2.3.5 Lock/Unlock students' tablets/phones (Education Edition only)....70
3.2.3.6 Terminate Session (Education Edition only)....71
3.2.3.7 Software Compatibility 72
3.2.3.8 Reset 73
3.3 Session management via NovoEnterprise Home Screen 73
3.3.1 Step 1: Bring up the participant list ....74
3.3.2 Step 2: Manage the presentation....75
3.3.2.1 More Options....75
3.3.2.2 Bringing up Session Info 75
3.3.2.3 Add projection, full screen, withdraw projection, and remove a participant....78
3.3.2.4 Allocation of the display....79
3.4 iOS/Android Full Mirroring....80
3.4.1 iOS Full Mirroring....80
3.4.2 Android Full Mirroring 82
3.4.3 Multi-Screen iOS/Android/PC Mirroring....87
3.4.4 Default Screen Mirroring (for Android only)....88
3.5 Presenting with NovoEnterprise 89
3.6 Direct Annotations....91
4 COLLABORATION TOOLS 92
4.1 Voting/Polling....94
4.1.1 Edit voting/polling....94
4.1.2 Administer voting/polling....98
4.1.3 Respond to voting/polling.... 100
4.2 Video Clips and YouTube Streaming 100
4.2.1 Streaming local video files 101
4.2.2 Streaming YouTube video 102
4.2.3 Video controls....103
4.3 File Sharing 104
4.3.1 File Sharing in Desktop Streamer.... 104
4.3.1.1 Sending.... 105
4.3.1.2 Receiving 108
4.3.2 File Sharing in NovoPresenter App 108
4.3.2.1 Sending.... 109
4.3.2.2 Receiving 111
4.3.3 Troubleshooting and rules about File Sharing.... 111
4.4 User Groups....112
4.4.1 Organizing a Group 112
4.4.2 Creating User Group 113
4.4.2.1 Creating User Groups Manually 113
4.4.2.2 Saving a Presentation Session as a User Group 114
4.4.3 Managing Existing User Group.... 115
4.4.4 Applying User Group.... 116
4.4.4.1 User Group Limitations in Desktop Streamer and NovoPresenter 120
4.5 AirNote Annotation Tool....121
4.5.1 Enabling AirNote 121
4.5.2 Using AirNote 121
4.5.3 Assigning AirNote Annotation via the Participants List 122
5 CONFIGURING NOVOENTERPRISE....124
5.1 Configuring NovoEnterprise via a MicroSD card 124
5.2 DNS Mapping....126
6 NOVOENTERPRISE MANAGEMENT 127
6.1 Software setup 127
6.2 Adding/Removing/Grouping devices 127
6.3 Managing device settings 130
6.4 Customizing Home Screen 130
6.5 Updating firmware....131
6.6 Setting moderator credentials....132
7 SPECIFICATIONS 135
8 TROUBLESHOOTING....136
9 SAFETY INFORMATION....138
10 COPYRIGHT INFORMATION .... 139
1 Getting Started
1.1 Package Content




1.2 Hardware Setup
1.2.1 NovoEnterprise


| No. | Item | Description |
| 1 | Reset Button | Restarts the NovoEnterprise. |
| 2 | Line-in, 3.5mm Jack | Accepts input from external microphone. |
| 3 | Audio-out, 3.5mm Jack | Connects to audio line-out devices. |
| 4 | HDMI-in Port | Accepts input from external audiovisual devices and allows users to broadcast or show information via HDMI interface. |
| 5 | HDMI-out Port | Connects to a TV/projector's HDMI input port with the provided HDMI cable. |
| 6 | DC 5V Power-in Jack | Connects the DC 5V Power-in Jack to a power outlet. |
| 7 | RJ45 (Ethernet) PoE | Connects to an Ethernet 10/100/1000 based network. |
| 8 | Type A USB Port | Connects to Type A USB devices (e.g., USB mouse/keyboard)Connects to the touch port of a touchscreen display to allow touchscreen control. |
| 9 | Type A USB Port | Connects to Type A USB devices (e.g., USB mouse/keyboard)Connects to the touch port of a touchscreen display to allow touchscreen control. |
| 10 | MicroSD Card Slot | Accepts MicroSD cards. |
| 11 | Kensington® Security Slot | Connects to a Kensington-compatible computer security lock. |
Setting up NovoEnterprise is simple and straightforward.
1) Video/Audio connection: Connect the HDMI-out port to a TV/projector's HDMI input port with the provided HDMI cable (item (2) in "Package Content").
2) Power: Connect the DC 5V Power-in Jack to a power outlet with the provided USB power adaptor and USB cable (items (3) and (5) in "Package Content").
If everything is set up properly, NovoEnterprise's green LED should be illuminated.
NOTE:
- You may connect an optional USB mouse/keyboard or a USB disk to the USB port.
- If more USB ports are needed, you can connect a USB hub to the USB port.
- The microSD slot supports microSD cards up to 64GB.
1.2.2 Remote Control
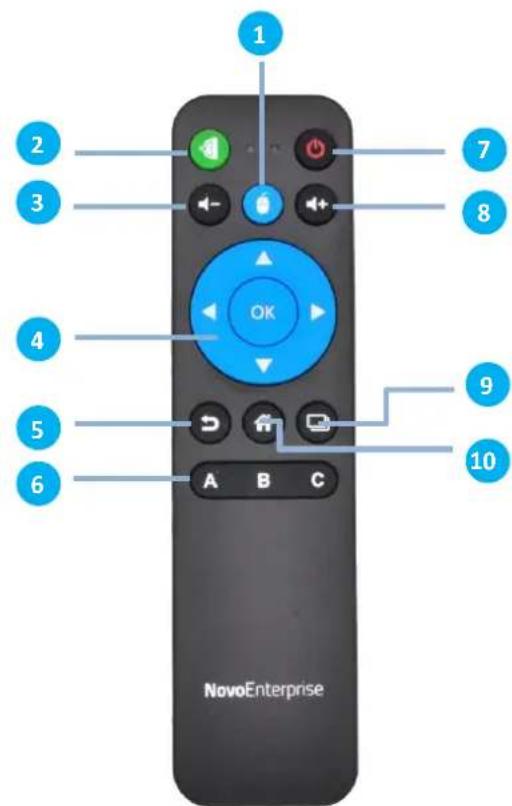
| No. | Button | Description |
| 1 | Mouse Button | Functions like the left click of a computer mouse. |
| 2 | NovoEnterprise Home Screen | Brings up the NovoEnterprise home screen. |
| 3 | Volume Down | Decreases the sound volume. |
| 4 | Cursor Keypad | Selects the desired items/functions on the Android home screen or NovoEnterprise home screen. |
| 5 | Return | Returns to previous page. |
| 6 | A / B / C Buttons | Brings up the designated functions.NOTE: Button function can be re-configured (Section 1.4). |
| 7 | Power On/Off | Turns On/Off the NovoEnterprise. |
| 8 | Volume Up | Increases the sound volume. |
| 9 | Previous Window | Displays all previous windows. |
| 10 | Android Home Screen | Brings up the Android home screen. |
1.2.2.1 Pairing the remote control
Before you can use the remote control, you must first pair it with your NovoEnterprise.
To pair the remote control:
1) Power on the NovoEnterprise.
2) With the remote control in range of the NovoEnterprise, press and hold the Volume Up and Volume Down buttons simultaneously for 2 seconds. The left LED will light up and start
blinking.

3) Once the LED stops blinking and stays constantly lit, pairing is complete.
4) Release the Volume Up and Volume Down buttons and the LED will turn off.
1.3 NovoEnterprise Home Screen
After a successful boot-up, the NovoEnterprise device will show the following screen, which is referred to as "NovoEnterprise home screen" or just "home screen" in this document. The home screen is generated by NovoEnterprise's main application, Remote Viewer.

NOTE: NovoEnterprise Home Screen features different background images for Corporate Edition and Education Edition. The image shown above is of Corporate Edition.
1 Basic Device Configuration
NovoEnterprise is default at Wi-Fi Hotspot mode with its SSID name displayed at the home screen (e.g. Novo_A5C33 in box). Alternatively, you can connect the NovoEnterprise to any existing network via a wireless and/or a wired connection. Click on the Button, then "WiFi" to make the necessary changes. Similarly,
- Click on the button, then "Display" to change display-related settings.
- Click on the button, then "Settings" to change other general settings.
2 Software Installation
Windows/Mac Users: Open Desktop Streamer's download link shown on the home screen with your web browser and follow the on-screen instructions. Or simply visit http://vivitekcorp.com/ for the software download.
iOS/Android Users: Install NovoPresenter from App or Play Store. See Section 1.5.
Chromebook Users: Install Desktop Streamer from Chrome Web Store. See Section 1.5.
3 Connection Information
• Device Name / Location 📷 – Users can change this to a meaningful room name.
• PIN PIN – This is an optional PIN code to join a presentation session.
- IP address 📄 – Ethernet and Wi-Fi IP address respectively.
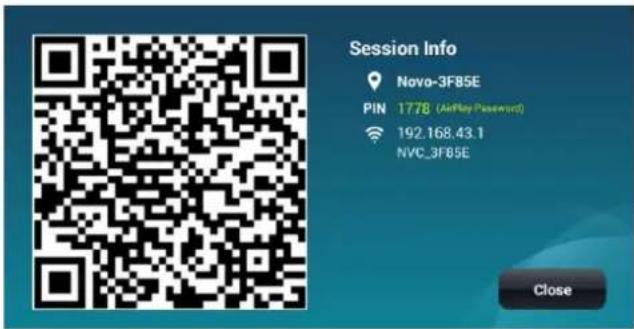
- QR code – It has all the above-mentioned information. With tablets/phones, users can use NovoPresenter to connect to a presentation session by scanning this QR code. You can also click on the QR code to get an enlarged version of the connection information:
4 Shortcuts
NovoEnterprise has several apps app installed locally, such as an internet browser and the Novo Whiteboard, which you can access directly from the home screen. To add more app shortcuts
click on the + button to choose from a list of available apps to add to the home screen.
When using any app in the Remote Viewer environment, click the 📷 button at any time to
return to the NovoEnterprise home screen or the button to return to the previous screen.
1.4 Basic Device Configuration
Before being deployed, a NovoEnterprise device may require some basic configuration such as setting
up its display resolution, network connection, etc. To access the various settings menus click the

button on the NovoEnterprise home screen and click the respective menu you want to open. To do so, typically a USB mouse is needed. Alternatively, you can use the provided Remote Control to do so.
NOTE: Following any clicking activity on the screen, the navigation bar

the navigation bar by clicking the back button or more.

Function

Description
Show Participants:
Click on Show Participants to bring up the participant list from the bottom of the NovoEnterprise home screen. Refer to Section 3.3 for more information.
NOTE: This option will be grayed-out if there is not any participant in the session.
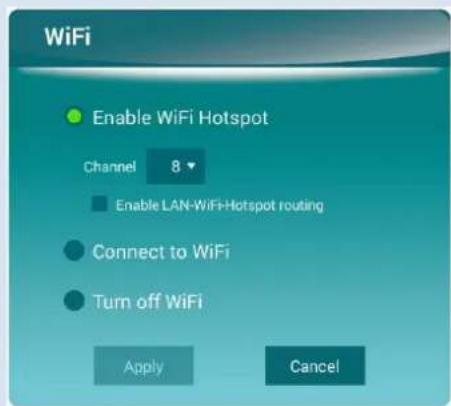
Wi-Fi:
Click on WiFi to bring up the Wi-Fi configuration dialog.
- To use the NovoEnterprise as the Wi-Fi host, select "Enable WiFi Hotspot" and click Apply. - Check "Enable LAN-WiFi-Hotspot routing" to allow access to NovoEnterprise with a wired or wireless connection simultaneously.
• To connect to an existing Wi-Fi network,
○ Select "Connect to WiFi".
- Click on Configure to bring up a new Wi-Fi configuration page.
- Enable Wi-Fi connection. Select the SSID of the external router. Enter the Wi-Fi's password if prompted.
- Click on Connect to start the connecting.
• To turn off Wi-Fi, select "Turn off WiFi" and click Apply.
Function
Description
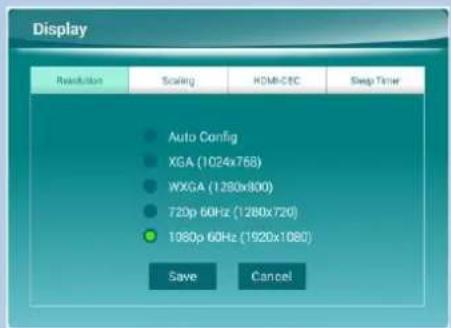
Display:
Click on Display to bring up the Display dialog.
Resolution
- Select the one that matches the display screen best.
- Click Save to confirm the selection, or click Cancel to abort the selection.
Auto Config
NovoEnterprise will automatically determine the optimal screen resolution.
XGA (1024x768)
WXGA (1280x800)
720p 60Hz (1280x720)
1080p 60Hz (1920x1080)
You can specify your desired display output resolution.
NOTE: NovoEnterprise supports 60Hz display refresh rate if the display output resolution is set to 720p or 1080p. Check the user manual of your display or visit the manufacturer's website for information on how to set the display refresh rate to 60Hz. Certain users may experience compatibility issues if their displays only support 50Hz display refresh rate.
Scaling
This allows you to shrink the size of the screen.
HDMI-CEC
This allows you to enable/disable the Consumer Electronics Control (CEC) function which allows you to command and control the NovoEnterprise by using only another device's remote control.
Sleep Timer
- Select "Do not enter sleep mode" to keep NovoEnterprise always on even when NovoEnterprise is not being used. This is the default setting.
- Select "Enter sleep mode after idle-timeout" to have NovoEnterprise shutdown after being idle for a designated period of time. Select "Enter sleep mode after idle-timeout" and then set the timer. The options are: 5 minutes, 10 minutes, 15 minutes, 30 minutes and 1 hour.
- Select "Always on" to set a time period when NovoEnterprise will power on and stay on. Select "Always on" and then specify the start-up and shutdown time.
- Click Apply to confirm the selection, or click Cancel to abort the selection.
Settings:
Click on Settings for more device settings.
Function

Description
- General Settings: Access the Android system settings.
- Firmware Upgrade: Upgrade the NovoEnterprise to the latest version.
- Settings Protection: This allows users to lock the settings with a password, or unlock it.
-
Screen-Cast Configuration: This allows users to enable Google Cast, AirPlay or PIN protection.
-
Check "Enable Google Cast" to enable Google Cast for screen casting of Android devices.
Check "Enable AirPlay" to enable AirPlay for screen casting of iOS devices. Check "Enable AirPlay Password" if you want to require a password to screen cast via AirPlay.
Check "PIN Required" to make using a PIN code mandatory to login via Desktop Streamer or NovoPresenter for all presentation sessions.
- Custom Remote Control: This allows users to set the A, B and C button of the remote control as quick keys to bring up certain NovoEnterprise functions. The button function also can be reconfigured via the Custom Remote Control option. After opening "Custom Remote Control", click A, B and C button to set them as quick keys to bring up those NovoEnterprise functions you most frequently use.
The default functions for the A/B/C buttons are:
○ A: Starts to broadcast or show information from an external audiovisual device connected to the NovoEnterprise via the HDMI-in port.
○ B: Opens the Internet browser.
○ C: Brings up Novo Whiteboard.
- Log Download: This allows users to download the log for NovoEnterprise. Users can follow the process below to download the log for their NovoEnterprise.
- Check "Enable Log Download" and the URL where users can download the log will appear.
- Enter the URL in the web browser on a computer connected to the Internet and then follow the instructions shown on the display to download the log.

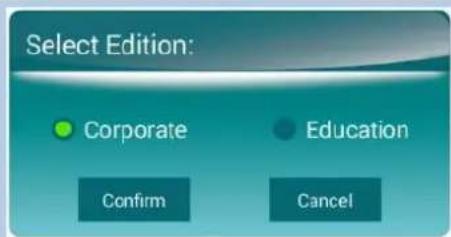
Device Edition:
Click on Device Edition to bring up Select Edition dialog.
- Select either Corporate or Education, then click Confirm to make the edition change official, or click Cancel to abort the edition change.
- The main differences between these two editions are as follows:
| Feature | Education Edition | Corporate Edition |
| Projection Control | Only HOST(teacher) can switch usersSwitch users without permission | Two modes1) Moderator OnOnly moderator can switch usersUsers’ permission is required2) Moderator Off |
| Function | Description | ||
| Everyone can switch usersUsers' permission is required | |||
| Screen Preview | Yes | No | |
| Encryption | No | AES-128 | |
| Lock Tablet Screen | Yes | No | |
| Disconnect Everyone | Yes | No | |
| NOTE: This manual primarily references the Corporate Edition for instructional examples. Special notes will accompany instructions that are specific to the Education Edition. | |||
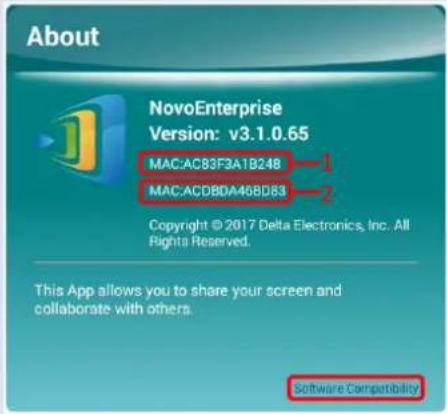 | About:Click on About to view the version of the NovoEnterprise software. This dialog box also shows the MAC address for the (1) LAN and (2) Wi-Fi connection for NovoEnterprise.Click on Software Compatibility to bring up the software compatibility list which allows you to check if the Novo Desktop Streamer or NovoPresenter application installed on your computer or mobile device is compatible with the NovoEnterprise device.NOTE: Users must have Internet access on their computer or mobile device in order to access the software compatibility list. | ||
Function
Description
Hide Session Info:
Click on Hide Session Info to hide/reveal the login info located at the top right side of the NovoEnterprise Remote Viewer home screen.
Hide QR Code:
Click on Hide QR Code to hide/reveal the QR code for quick login located at the right side of the NovoEnterprise Remote Viewer home screen.

Show Paired LauncherPlus:
This function allows you to select the color for the LauncherPlus devices that are paired to the NovoEnterprise. Once a color is set for the NovoEnterprise, the respective LauncherPlus color icon will appear at the bottom right corner of the NovoEnterprise home screen to allow users to quickly identify (via the colored ring on the LauncherPlus devices) which LauncherPlus device is already paired to the NovoEnterprise.
NOTE: The different color clips shown the LauncherPlus devices are used to easily identify which LauncherPlus unit your device is connected to.
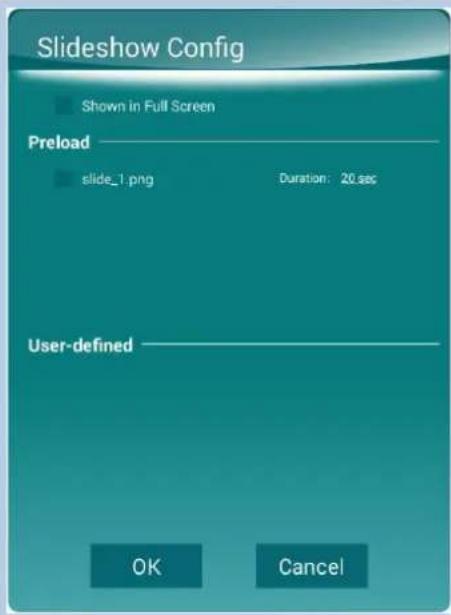
Configure Slideshow:
Click on Configure Slideshow to customize the image(s) shown in the software installation box of the NovoEnterprise Remote Viewer home screen.
- Shown in Full Screen: The NovoEnterprise Remote Viewer home screen image will be displayed in full screen if it is checked.
- Preload: Allows users to choose which pre-loaded image will be displayed on the NovoEnterprise Remote Viewer home screen.

Restart:
Click Restart to restart the NovoEnterprise.
You can also configure the name for the NovoEnterprise device to more easily identify the display:
| Function | Description |
| Edit Room Name: Click on the associated text in the connection information box to bring up the Edit Room Name dialog. • Enter the new name. • Click Save to confirm the name change, or click Cancel to abort the name change. | |
| Math Class Save Cancel |
1.5 Client Software Download and Installation
To connect to a NovoEnterprise device, one of two client applications may be needed on your device. They are,
Novo Desktop Streamer : Windows, Mac, Chromebook NovoPresenter : Android, iOS
Software Download/Installation for Windows and Mac
You can download the software directly from http://www.vivitekcorp.com. Alternatively, you can download it from the NovoEnterprise device.
(1) Connect your computer to the same network as the NovoEnterprise.
(2) Open Desktop Streamer's download link shown on the home screen with your web browser and follow the on-screen instructions.

For the example home screen shown above, you would use http://192.168.43.1:8080. You will be able to see the download page, as shown in the following figure.

(3) Select the appropriate OS and then click the DOWNLOAD button to start the download.
(4) Execute the downloaded file to start the installation. Following the on-screen instructions and you should be able to finish the installation in a couple minutes.
App Download/Installation for Android/iOS
- For iPhones/iPads, download and install NovoPresenter App from the Apple App Store.
- For Android phones/tablets, download and install NovoPresenter App from the Google Play Store.
- For all mobile devices, you can also connect your mobile device to the same network as the NovoEnterprise, open the local download address (as described above) with your device's web browser, and then click on either the App Store or Google Play QR code to directly link to the NovoPresenter app's download page.
App Download/Installation for Chromebooks
Download and install Novo Desktop Streamer from the Google Chrome Web Store.
2 Setting Up Network
To fully take advantage of NovoEnterprise's capabilities, it should be properly deployed in a school or corporate's network. Some aspects should be carefully considered and planned, for example, Wi-Fi interference and channel selection and intranet firewall. In this chapter, these aspects will be illustrated to facilitate a successful NovoEnterprise deployment in your network.
2.1 Network Connection
NovoEnterprise has three network connection types, Ethernet, Wi-Fi Client, and Wi-Fi Hotspot.
A) Ethernet – NovoEnterprise can be plugged into your Ethernet via its RJ45 port. Namely, you can connect NovoEnterprise to your organization’s backbone network. It is recommended to use Ethernet connection (when possible) since it gives you better robustness and higher performance.
B) Wi-Fi – NovoEnterprise's built-in 802.11ac Wi-Fi operates at dual bands (2.4/5GHz). With its 2T2R antenna, it can achieve a maximum bandwidth of 300Mbps. 1 . This high-performance Wi-Fi module can operate at two modes.
a) Client Mode – NovoEnterprise can be connected to your organization's Wi-Fi network via its built-in Wi-Fi module.
b) Hotspot Mode – NovoEnterprise can create its own Wi-Fi network, allowing users to connect their mobile devices to this ad hoc network.
The following table summarizes their feature difference and typical usage.
| Ethernet/Wi-Fi Client Mode | Wi-Fi Hotspot Mode | |
| Number of Users Allowed | 64 | 8 |
| Internet/Intranet Access | Yes | No |
| Typical Usage | Pre-configured for School or Corporate | Quick setup for small-group meetings |
It is worth mentioning that Ethernet and Wi-Fi connections can coexist on NovoEnterprise. Namely, you can configure NovoEnterprise in Ethernet and Wi-Fi Client mode, or in Ethernet and Wi-Fi Hotspot mode.
2.1.1 Ethernet
The following home screen shows NovoEnterprise is in Ethernet mode, where its Ethernet IP is highlighted in a red box.
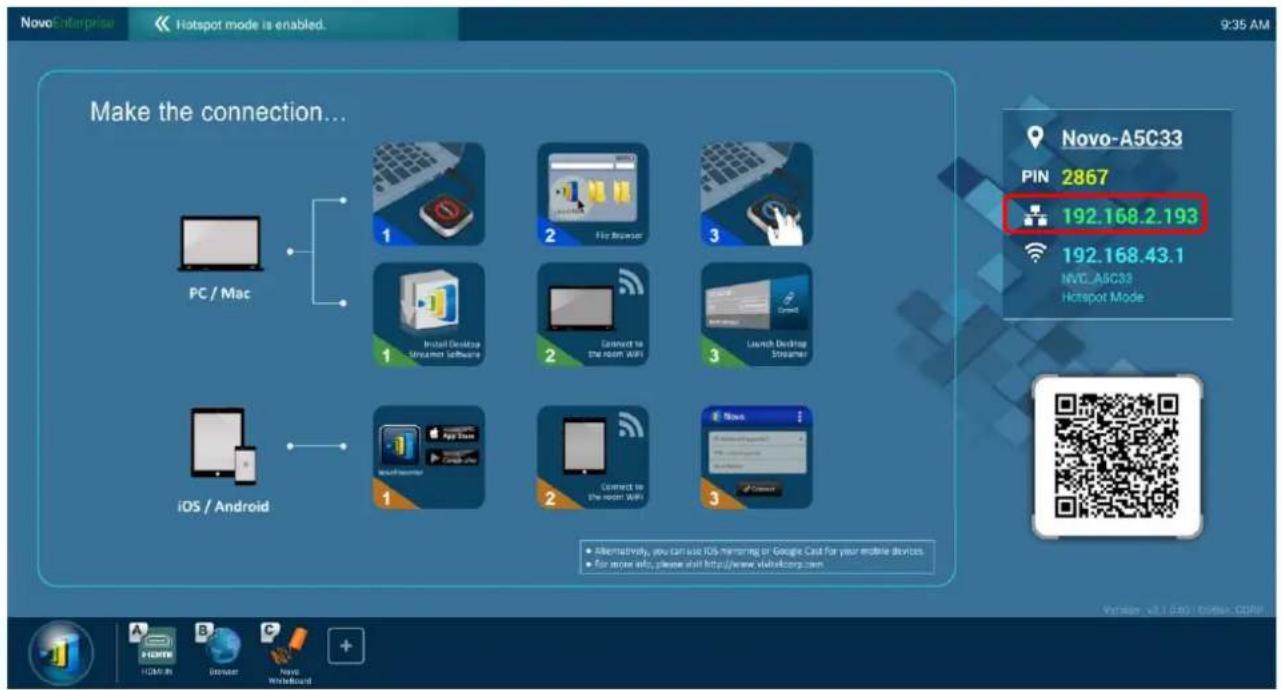
When connecting to a wired network, NovoEnterprise supports both DHCP and Static IP connection types.
- DHCP: NovoEnterprise obtains its IP address from the DHCP server on the network.
• Static IP: NovoEnterprise is assigned a fixed IP address manually.
“DHCP” is the default connection type. However, “Static IP” might be more preferable as it makes remote management much easier.
The following diagram illustrates how to select one of these two connection types (→ Settings → General Settings → Ethernet → Ethernet Configuration).


To set up "Static IP" properly, you need to have the following information, as shown in the diagram on the right.
• An unallocated IP address;
- Netmask;
- DNS address;
- Gateway address.

2.1.2 Wi-Fi Client Mode
In this mode, NovoEnterprise functions as a client to join an existing Wi-Fi network. As illustrated in the
following diagram, to set up the Wi-Fi connection, on NovoEnterprise home screen, click on →
WiFi → Connect to WiFi → Configure → Wi-Fi (ON). Then select the desired Wi-Fi SSID (the name associated with the Wi-Fi network) and enter the proper credentials when necessary.
You may notice that you have the choice of using "DHCP" or "Static IP" in the connection dialog, which is exactly the same as Ethernet connection.

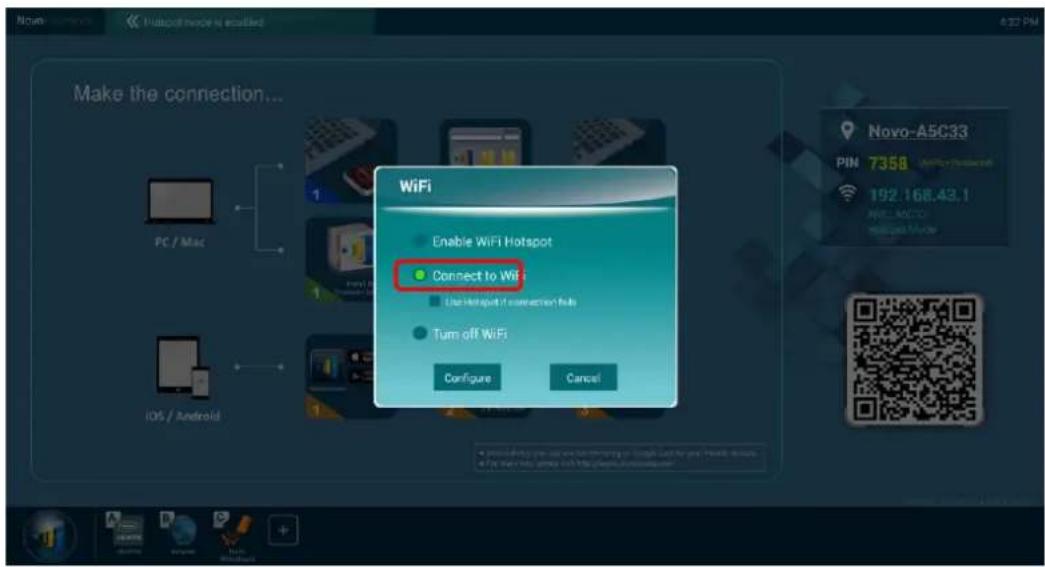
Wi-Fi Network Optimization: To achieve good user experience with NovoEnterprise devices deployed in your organization's Wi-Fi network, it is recommended that you keep an eye on RF interference, Wi-Fi signal strength, Wi-Fi channel utilization, etc. It is worth mentioning that two popular Apps can help determine whether there is any wireless network channel interference.
• "Wi-Fi Analyzer" on Android devices;
- "InSSIDer" tool on Windows OS.
The following is a screenshot from "Wi-Fi Analyzer" App. As you can tell, Wi-Fi channel 6 is heavily utilized. You might want to change one or some of them to other less-crowded channels.
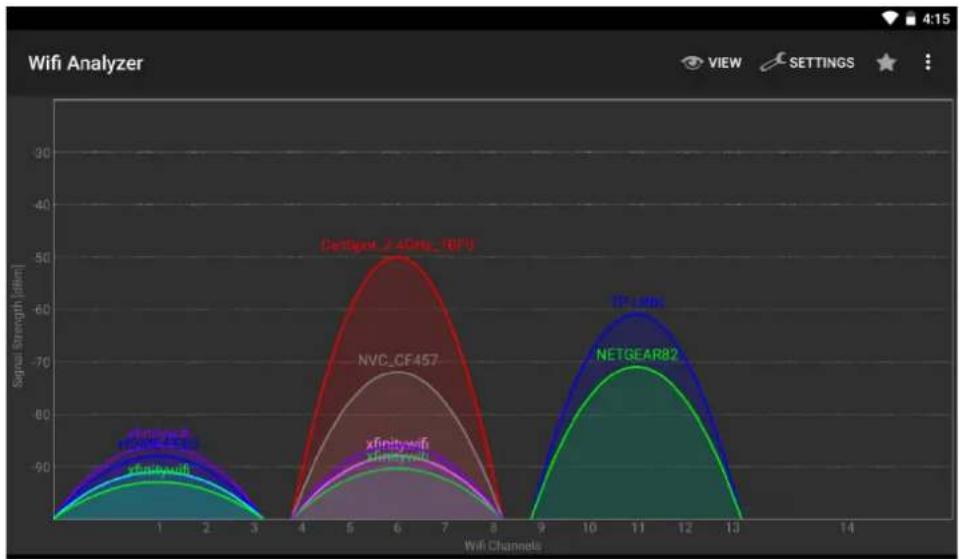
Logging in a Wi-Fi Network via Captive Portal: Some Wi-Fi networks are equipped with a captive portal, which requires users to log in via a web browser before they can access the Internet. When a NovoEnterprise device is connected to this type of network, users can follow the following steps:
A. Follow the above configuration steps to connect to the organization's Wi-Fi network;
B. After the Wi-Fi is connected, click on button "Browser" on the home screen (see the picture below);
C. Open this web browser and you will be prompted for login credentials.
D. Enter the proper username and password, and you will be connected to the network;
E. Click the button "Return Back" on the home screen to return to NovoEnterprise App main interface.
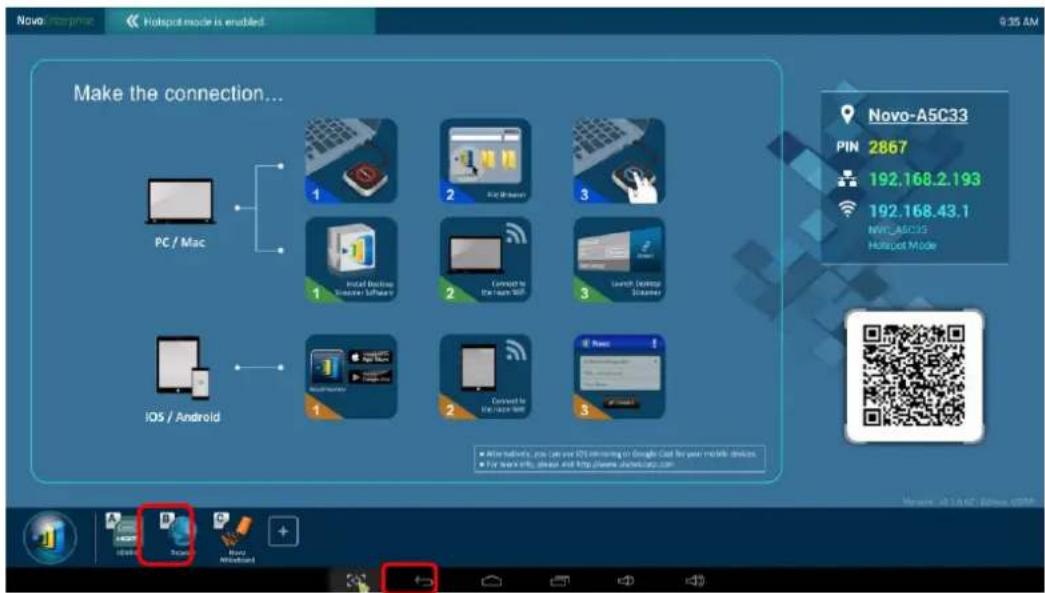
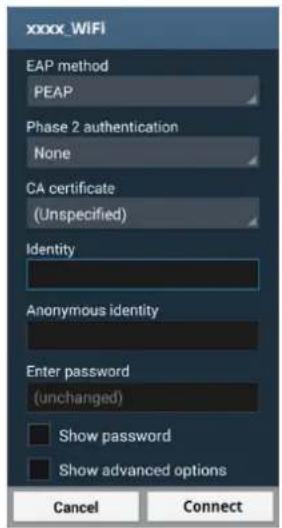
Logging in a Wi-Fi Network with 802.1x Authentication:
When you connect to a Wi-Fi network with 802.1x authentication (for example, radius server), you will need to enter the following fields to set up the connection properly:
• Network SSID → Your network
• Security → 802.1x Enterprise
- Choose the right settings for
○ EAP method
○ Phase 2 authentication
- Identity → Your username (such as DOMAIN\John.Smith)
- Password → Your password
Click on button "Connect" to start the connection.
2.1.3 Wi-Fi Hotspot Mode
A newly unpacked NovoEnterprise starts up in Wi-Fi Hotspot mode, where you can start using it without any entanglement with networking setup. The default SSID for this Wi-Fi Hotspot is "NVC_XXXXX" (for example, "NVC_3F85E" in the following screenshot), where "XXXXX" is a device-generated text string. Please note that Android mirroring (GoogleCast) is disabled in this mode. In comparison, AirPlay mirroring has no such limitation.

2.1.4 Dual-Network Configuration
NovoEnterprise can even be connected to both your organization's wired network and wireless network simultaneously. This function is extremely useful for organizations with "guest" wireless network setup for external visitors. In such a case, NovoEnterprise's RJ45 port is connected to a wired EMPLOYEE network for employees to securely access it; at the same time NovoEnterprise's Wi-Fi is connected to a GUEST network to allow visitors to access it. The following graph describes such a network setup scenario.
![graph TD A["Guest User"] -->|WiFi| B["GUEST WiFi"] B <-->|WiFi| C["Projected HDMI"] C -->|LAN| D["EMPLOYEE network"] D -->|LAN| E["Employee"] E --> F["Projection"] style A fill:#f9f,stroke:#333 style B fill:#bbf,stroke:#333 style C fill:#bfb,stroke:#333 style D fill:#bfb,stroke:#333 style E fill:#bf…](/content/2026/05/817759/images/8608022575fbac5713fd5853fc5a44a33db9027712882ca4c7af8812254a2ac6.jpg)
By doing so, the GUEST and EMPLOYEE networks are kept separated, while at the same time, the NovoEnterprise device is available to both guest users and employees.
Notes on Network Security: Within NovoEnterprise, the Wi-Fi section is completely separated from the Ethernet section, namely, there is no network routing between these two sections. Therefore, users connecting to the Wi-Fi section will not be able to access any resource on the Ethernet at all, and vice versa. In short, security is not compromised in this configuration.
2.2 Port Numbers and Intranet Firewall
NovoEnterprise is a TCP/IP-network-based device, and the communications between a NovoEnterprise device and its client devices (e.g. laptops, tablets, etc.) are achieved through several TCP and UDP ports. The following table summarizes all the port numbers being used.
| Port Number | Type | Description |
| 20121 | TCP | Port to transfer commands and status reports between the NovoEnterprise unit and users' devices.(For example, laptops/tablets use this port to establish “connection” to the NovoEnterprise unit.) |
| 20122 | TCP | Port to enable “Remote Mouse” functionality |
| 20123 | TCP | Port to transfer screen image |
| 20124 | UDP | Port to send discovery message (so that the NovoEnterprise unit can be discoverable by laptops/tablets.) |
| 20125 | TCP | Port to transfer preview image |
| 20126 | TCP | Port to transfer AV-streaming's command data |
| 20127 | TCP | Port to transfer AV-streaming's audio data |
| 20128 | TCP | Port to transfer AV-streaming's video data |
| 20129 | TCP | Port to transfer voting/polling data |
| 20130 | TCP | Port for video streaming service |
| 20131 | TCP | Port for file transfer service |
| 20141 | UDP | Port for device management |
| 20142 | UDP | Port for device reporting |
To enable successful operations of a NovoEnterprise device, these ports should not be blocked by your network's firewall.
3 Making a Presentation
The NovoEnterprise device supports up to 64 concurrent participants across a mix of PC, Chromebook, tablets, and smart phones. To make a presentation, each participant's device will need to connect to the NovoEnterprise to join the presentation session. There are four key features that help facilitate smooth collaboration and coordination of presentations using the NovoEnterprise:
1) A participant list is included with the individuals' roles indicated by clear graphical representation.
2) A specific capability is defined for each role.
3) Up to 4 participants can show their screen simultaneously through a feature called "4-to-1 projection"
4) Annotation tools allow participants to highlight, draw or make notations on the display screen.
3.1 Presenting with Windows/Mac/Chromebook
Novo Desktop Streamer Windows/MAC/Chromebook versions have similar interfaces and operations, except that the Chromebook version has slightly fewer functionalities compared with the other two due to Chrome OS limitation. Here Windows version Novo Desktop Streamer is used to illustrate key operation steps.
Launch Presentation Application
Launch the Novo Desktop Streamer Application by double clicking icon 📋. Once launched, the Novo Desktop Streamer will appear as follows.

To make a presentation, follow the steps listed below:
Step 1: Set up session parameters
Step 2: Connect to your NovoEnterprise device
Step 3: Make a presentation
Step 4: Manage the presentation
3.1.1 Step 1: Set up session parameters
Before connecting to your NovoEnterprise device, some session parameters need to be set up.
| Function | Description |
 | The main window of Novo Desktop Streamer Application. |
| [10-12-13-14-15-16-17-18-19-20-21-22-23-24-25-26-27-28-29-30-31-32-33-34-35-36-37-38-39-40-41-42-43-44-45-46-47-48-49-50-51-52-53-54-55-56-57-58-59-60-61-62-63-64-65-66-67-68-69-70-71-72-73-74-75-76-77-78-79-80-81-82-83-84-85-86-87-88-89-90-91-92-93-94-95-96-97-98-99-100-101-102-103-104-105-106-107-108-109-110-111-112-113-114-115-116-117-118-119-120-121-122-123-124-125-126-127-128-129-130-131-132-133-134-135-136-137-138-139-140-141-142-143-144-145-146-147-148-149-150-151-152-153-154-155-156-157-158-159-160-161-162-163-164-165-166-167-168-169-170-171-172-173-174-175-176-177-178-179-180-181-182-183-184-185-186-187-188-189-190-191-192-193-194-195-196-197-198-199-200-201-202-203-204-205-206-207-208-209-210-211-212-213-214-215-216-217-218-219-220-221-222-223-224-225-226-227-228-229-230-231-232-233-234-235-236-237-238-239-240-241-242-243-244-245-246-247-248-249-250-251-252-253-254-255-256-257-258-259-260-261-262-263-264-265-266-267-268-269-270-271-272-273-274-275-276-277-278-279-280-281-282-283-284-285-286-287-288-289-290-291-292-293-294-295-296-297-298-299-300-301-302-303-304-305-306-307-308-309-310-311-312-313-314-315-316-317-318-319-320-321-322-323-324-325-326-327-328-329-330-331-332-333-334-335-336-337-338-339-340-341-342-343-344-345-346-347-348-349-350-351-352-353-354-355-356-357-358-359-360-361-362-363-364-365-366-367-368-369-370-371-372-373-374-375-376-377-378-379-380-381-382-383-384-385-386-387-388-389-390-391-392-393-394-395-396-397-398-399-400-401-402-403-404-405-406-407-408-409-410-411-412-413-414-415-416-417-418-419-420-421-422-423-424-425-426-427-428-429-430-431-432-433-434-435-436-437-438-439-440-441-442-443-444-445-446-447-448-449-450-451-452-453-454-455-456-457-458-459-460-461-462-463-464-465-466-467-468-469-470-471-472-473-474-475-476-477-478-479-480-481-482-483-484-485-486-487-488-489-490-491-492-493-494-495-496-497-498-499-500-501-502-503-504-505-506-507-508-509-510-511-512-513-514-515-516-517-518-519-520-521-522-523-524-525-526-527-528-529-530-531-532-533-534-535-536-537-538-539-540-541-542-543-544-545-546-547-548-549-550-551-552-553-554-555-556-557-558-559-560-561-562-563-564-565-566-567-568-569-570-571-572-573-574-575-576-577-578-579-580-581-582-583-584-585-586-587-588-589-590-591-592-593-594-595-596-597-598-599-600-601-602-603-604-605-606-607-608-609-610-611-612-613-614-615-616-617-618-619-620-621-622-623-624-625-626-627-628-629-630-631-632-633-634-635-636-637-638-639-640-641-642-643-644-645-646-647-648-649-650-651-652-653-654-655-656-657-658-659-660-661-662-663-664-665-666-667-668-669-670-671-672-673-674-675-676-677-678-679-680-681-682-683-684-685-686-687-688-689-690-691-692-693-694-695-696-697-698-699-700-701-702-703-704-705-706-707-708-709-710-711-712-713-714-715-716-717-718-719-720-721-722-723-724-725-726-727-728-729-730-731-732-733-734-735-736-737-738-739-740-741-742-743-744-745-746-747-748-749-750-751-752-753-754-755-756-757-758-759-760-761-762-763-764-765-766-767-768-769-770-771-772-773-774-775-776-777-778-779-780-781-782-783-784-785-786-787-788-789-790-791-792-793-794-795-796-797-798-799-800-801-802-803-804-805-806-807-808-809-810-811-812-813-814-815-816-817-818-819-820-821-822-823-824-825-826-827-828-829-830-831-832-833-834-835-836-837-838-839-840-841-842-843-844-845-846-847-848-849-850-851-852-853-854-855-856-857-858-859-860-861-862-863-864-865-866-867-868-869-870-871-872-873-874-875-876-877-878-879-880-881-882-883-884-885-886-887-888-889-890-891-892-893-894-895-896-897-898-899-900-901-902-903-904-905-906-907-908-909-910-911-912-913-914-915-916-917-918-919-920-921-922-923-924-925-926-927-928-929-930-931-932-933-934-935-936-937-938-939-940-941-942-943-944-945-946-947-948-949-950-951-952-953-954-955-956-957-958-959-960-961-962-963-964-965-966-967-968-969-970-971-972-973-974-975-976-977-978-979-980-981-982-983-984-985-986-987-988-989-990-991-992-993-994-995-996-997-998-999-1000 |
Function

Description
3.1.2 Step 2: Connect to your NovoEnterprise device
Once you have set up session parameters, you are ready to start or join a presentation.
| Function | Description |
| Connect to your NovoEnterprise device. 1. If a PIN code is required, enter the PIN code. 2. Select an IP address using one of the following method: - Select the IP address from the Nearby Devices list that matches the IP address shown on the NovoEnterprise home screen. - Select the previously used IP address from the History list that matches the IP address shown on the NovoEnterprise home screen. - Manually enter the IP address shown on the NovoEnterprise home screen in the Manually Input IP Address field and then click on the Connect button 3. If a PIN code is required and a PIN code was not entered in the login screen, you will be prompted to enter the PIN code. If you are the first participant, this will start a presentation session. If you are not the first participant, you will be joining a presentation session. | |
| After a successful connection, you will see the connection tab lit up If you are the first participant, you will see that your desktop is mirrored to NovoEnterprise's screen. Click the left button to access more login options, via the options menu, for other users to connect to this session. |
Function


Description
Set login options for the presentation.
By clicking the QR code icon in the options menu, you can bring up the session information (including QR code) for other users to connect to this session, as seen in the second screenshot.
You can turn on/off the PIN switch to enable/disable the use of a PIN code for the presentation session.
You can turn on/off the Lock Session switch to prevent any additional participants from joining the presentation session regardless of whether they have the presentation session's login information or not.
NOTE: This feature is available in Education Edition only.
Within the session information screen, click the 📄 to ensure that the session information screen is expanded and shown on top regardless of the presentation being shown on the display.

More Options in the Options Menu:

: The Extend Desktop button allows you to use the display the NovoEnterprise is connected to as an extended desktop for your computer. Settings for the extended desktop mode must be configured in your computer's operating system.

: The Video Clip button allows you to directly play a stored video clip or a YouTube video on the display.
By clicking the right button you can bring up the Desktop Streamer settings menu described above.
Function

Description
- Projection Mode:
Video Playback: Select this option for video-quality image, with synchronized audio. (You might notice some sluggishness in mouse movement due to buffering to ensure smooth video playback.)
Presentation: Select this option for low-latency and fast-response presentation. Audio signal is not transmitted.
NOTE: Video Playback is the default setting.
• System Tray Notification:
Select enable to allow Desktop Streamer to notify you via a pop-up alert of any available software updates. The pop-up alert will appear each time you sign on until the software is updated, check the "Never remind me again" box if you only want the pop-up alert to appear once, and not each time you sign on.
Please note that your PC screen resolutions may change to match projector resolution. After disconnecting from the NovoEnterprise device, the original screen resolution will be restored.
3.1.3 Step 3: Make a presentation
Once you have started/joined a presentation session you can make a presentation with the content stored on your PC, local network, or the Internet. Your desktop screen will be mirrored to the NovoEnterprise screen regardless of the applications you are running on your PC. A button pad will appear in the Desktop Streamer's connection page, this button pad gives you quick control of the where your desktop is mirrored on the display:

When you click the green play button in the middle of the button pad your desktop will be mirrored on the full screen of the display.
When you click one of the numbered buttons (#1 - #4) your desktop will be mirrored on one of the four corresponding quadrants of the display. The table below shows how the screen of the display is shared as users join the presentation subsequently.
You can mute the audio from your computer by clicking the mute button Presentation mode.
NOTE: There may be situations where you want to write, highlight, mark, or record video of your presentation. You could install free software, NovoScreenote, to do so. It is available for download at http://www.vivitekcorp.com. After you have installed NovoScreenote, you can launch it from your Novo Desktop Streamer. Or you can use the direct annotation tools described in the section 3.6 Direct Annotations.

3.1.4 Step 4: Presentation management
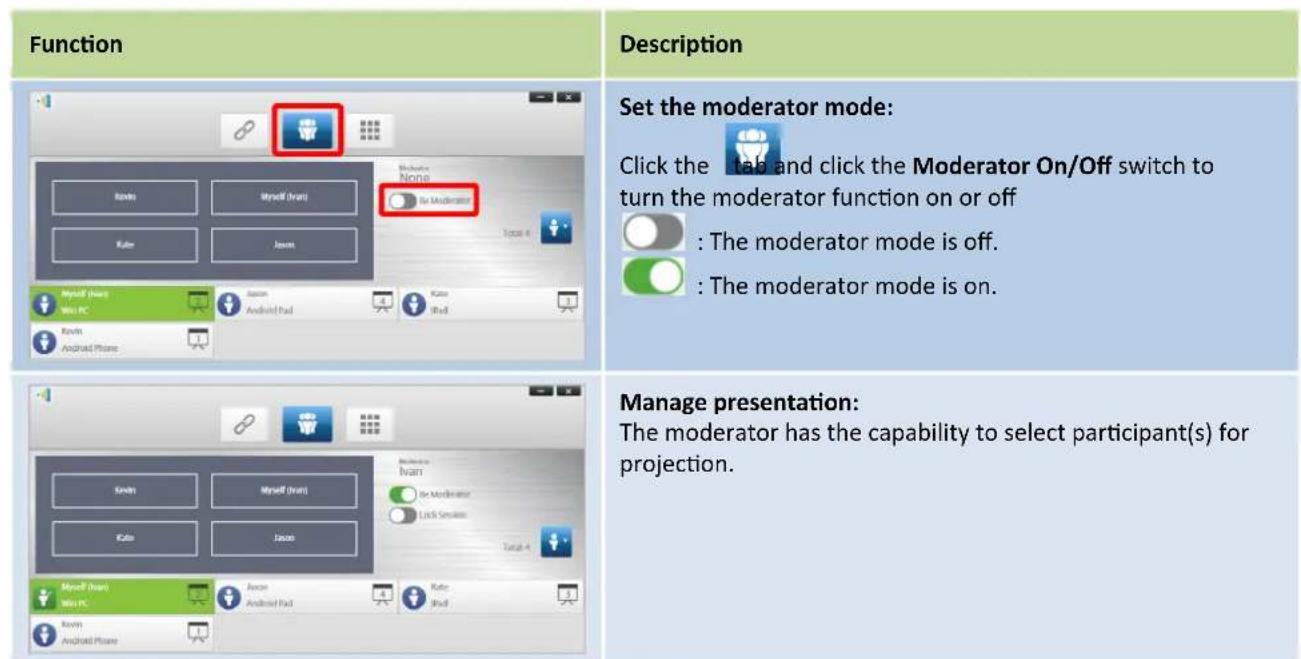
3.1.4.1 Moderator
3.1.4.2 Role assignment
There are three roles in a presentation session, the moderator, the presenter, and the participant. By default, the first participant assumes the presenter role until he hands it over to another participant. Individuals that join subsequently are participants.
To show all current participants who have joined the presentation session, click the tab.
Function

Description
Click the tab to show the participant list.


: the moderator
: participant

: current presenter.

: current presenter that is being projected in one of the en quadrants (4-to-1 projection). (The icon shown here is presenter that is presenting in quadrant #1).
For the Education Edition, the moderator can preview screens of all participants.
Function
Example 1:

Example 2:

Description
Indicate the names of the presenters, the participant list sorting method, and the total number of participants.
Sorting in the participant list
top).


to change the list sorting
Toggle between method.
Example 1: Kevin is the only presenter. The participant list is sorted by participants' name. There are currently 2 participants.
Example 2: Jason and Ivan are 2 presenters. The participant list is sorted by the "join" time. And there are currently 2 participants.
3.1.4.3 Multi-screen projection, withdraw projection, and remove a participant
Function

Description
Full-Screen Projection
Click the tab to list all participants. If you want to promote one participant to be a presenter, click on the participant's icon. A bigger icon window pops up, where you can click the center button to pass presentation role to that participant.

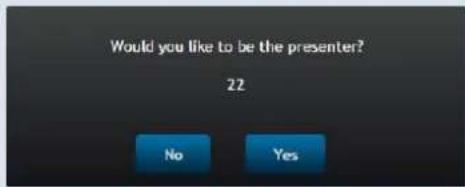
When a participant is asked to be a presenter, a dialog box will appear on the participant's screen.
The participant has 23 seconds to respond.
For Education Edition, this dialog box will not appear.
In the dialog box, we see that Jason has received a request to assume the presenter role.
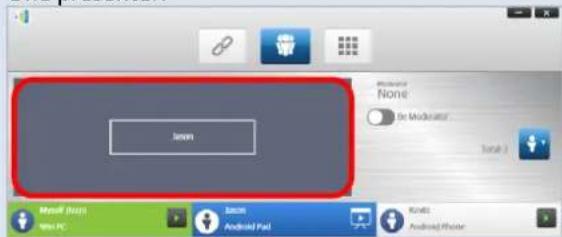
After Jason clicks Yes to accept being a presenter, Jason's screen will appear in one of the screen quadrants.

Multi-screen Projection:
Click the

to view the participant list.
Function

One presenter:
Two presenters:

Three presenters:
Four presenters:


Description
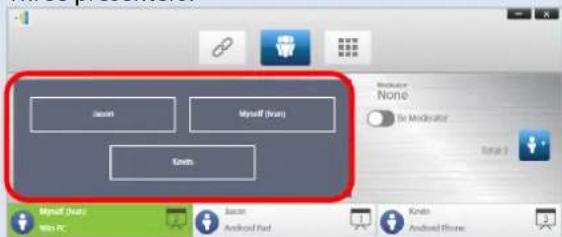
- Move cursor over to highlight participant Jason.

be projected at the corresponding screen quadrant. The user name will be shown in the quadrant his or her device has been assigned to on the display.
- When less than 4 participants are assigned as presenters, the NovoEnterprise will display their screens in a layout based on the number of presenters.
NOTE: The images to the left display the different layouts of the quadrant.
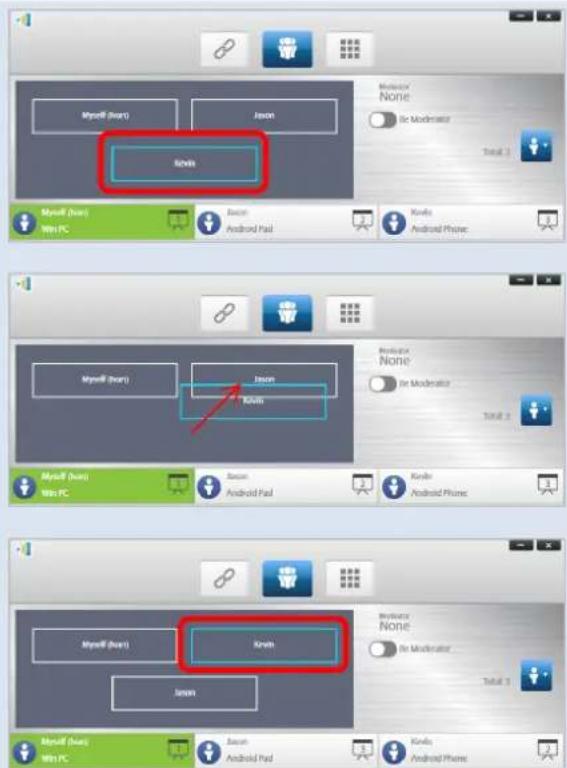
You are also allowed to assign a participant to be projected by directly dragging the participant into the quadrant window.
Function
Description
You are allowed to move the presenters to different positions in the quadrant by dragging and dropping the presenters.
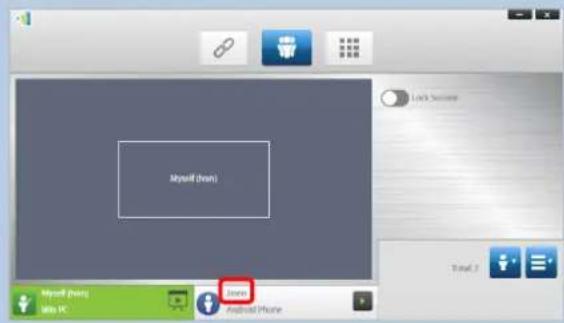
Screen preview (Education Edition only):
- Click the tab to view the participant list.
- Click on the participant's name.
NOTE: Only the moderator can preview screens of all participants.

That participant's screen will be shown below his/her name.
You can click on the participant's name again to close the screen preview.
Withdrawing projection:
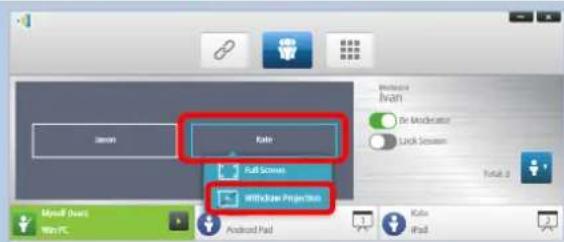
When a participant's screen is currently projected on the display and the participant wants to withdraw the projection of their screen from the display (while staying in the presentation session), click the participant and select "Withdraw Projection".
NOTE: In presentations with a moderator, this function is only
| Function | Description |
| available to the moderator. | |
 | In the dialog box, clickWithdraw Projectionand the participant's screen will be withdrawn from the presentation display. |
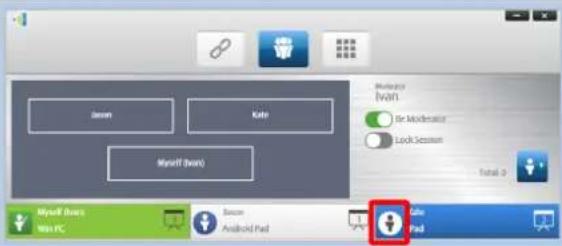 | Removing a participant:To remove a participant from the presentation session, click the icon next to the participant's name.NOTE: In presentations with a moderator, this function is only available to the moderator. |
 | In the dialog box, clickYes. The participant will be logged off from the presentation session. |
3.1.4.4 Pause, resume, disconnect and lock session
| Function | Description | |
 | To pause/resume a presentation:Click the tab to bring up the presentation control page. | |
 | Pausing and resuming a presentation:Move your mouse cursor to hover on the presentation button. Toggle between and to pause and resume a presentation respectively. | |
Function

Description
To disconnect from a presentation session:

Click the
to exit the presentation session.

Click the Lock Session switch to prevent any other users from logging in and joining the current presentation session.
NOTE: This function is only available to the moderator.
3.1.4.5 Lock/Unlock students' tablets/phones (Education Edition only)
This feature allows the moderator to lock down students' tablets or phones. This feature is only available in the Education Edition.
Function

Description
To lock/unlock students' tablets/phones:
Click the tab to bring up the toolbar page, and then click Mobile Devices to lock or unlock mobile devices.
: mobile devices are unlocked.
: mobile devices are locked.

Mobile device locked:
A lock icon will pop up on all mobile devices' screens to show that the screen has been locked.
3.1.4.6 Terminate session (Education Edition only)
This feature allows the moderator to terminate a session. This feature is only available in the Education Edition.

3.2 Presenting with Android/iOS Devices
NovoPresenter App has similar functionalities as Desktop Streamer software. It is available for both for iOS and Android devices. Here an iPad is used as an example to illustrate its key functions.
Launch Presentation Application
Launch the NovoPresenter application by tapping on the NovoPresenter App icon 📄 on your iPad.
To make a presentation, follow the steps below:
Step 1: Connect to your NovoEnterprise device
Step 2: Make a presentation
Step 3: Manage the presentation
3.2.1 Step 1: Connect to your NovoEnterprise device
There are two ways to connect to your NovoEnterprise device:
- Connect to your NovoEnterprise device automatically via QR code.
- Connect to your NovoEnterprise device manually.
3.2.1.1 Connect via QR Code
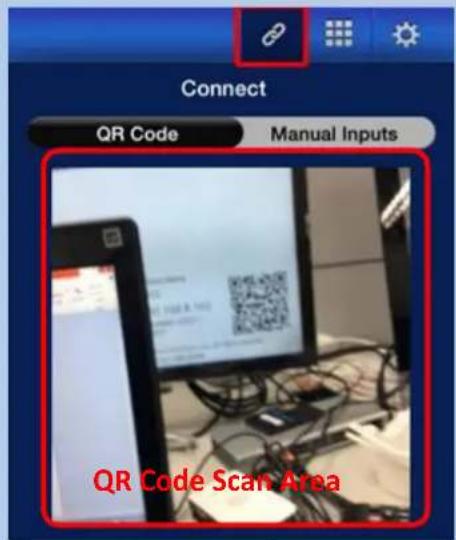
The easiest way to connect to your NovoEnterprise is to use the QR-code scan feature in
NovoPresenter App. After launching the app, tap the tab (as seen in the screenshot below).

Function
Description
Connect via QR Code:
- The QR Code / Manual Inputs switch will be in the QR Code position by default (if not, just tap the switch once).
- Aim your tablet's camera at the QR code.
- If the network connection is set up properly, NovoPresenter will automatically login to your NovoEnterprise.
Should automatic login fail, you may check for your network connection or try manual login. See Section 3.2.1.2.

Successful Connection:
After NovoPresenter is connected successfully to your NovoEnterprise, the
connection tab will become lit up

If you are the first participant, you will see that your iPad screen is mirrored to NovoEnterprise's screen.
You can turn on/off the PIN switch to enable/disable the use of the PIN code for the presentation session.
View participants list:
You can tap the participant list.

o see the
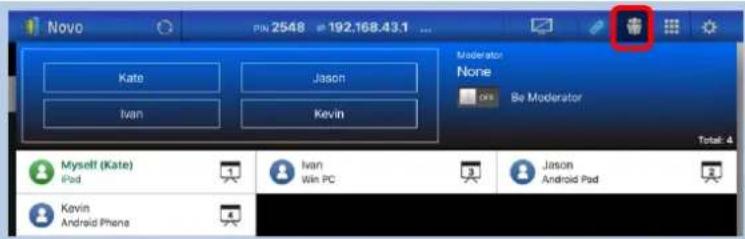
Example: There are a total of four participants in the presentation group shown at left.
- Ivan, Jason, Kate, and Kevin are assigned to be the four presenters.
3.2.1.2 Connect via Manual Input
Use this method if you need to configure some login information before connecting to
NovoEnterprise. After launching the app, tap the tab (as seen in the screenshot below).

Function

Description
Manual configuration option: Toggle the QR Code / Manual Inputs switch to the Manual Inputs position.
Function

PIN

PIN Required

PIN Required
Your Name
Description
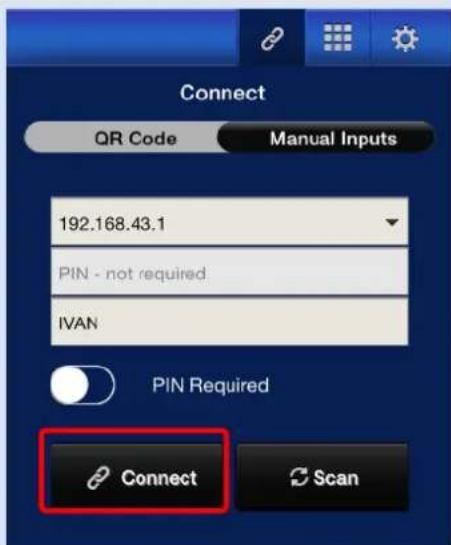
IP Address:
Manually enter the IP address shown on your NovoEnterprise home screen, or select an entry from the drop down menu that matches the IP address shown on your NovoEnterprise home screen.
You can tap the Scan to scan the IP addresses of all available NovoEnterprises within the same subnet. Select the drop-down menu to see the available NovoEnterprises within your area.
Example: 192.168.43.1.
NOTE: For NovoEnterprise devices that have the device name and IP address bound via the DNS mapping procedure, you may also enter the NovoEnterprise's device name in this field. See 5.2 DNS Mapping for more information.
PIN:
- If a PIN code is required to connect to the NovoEnterprise, slide the PIN Required switch to the ON position and enter the PIN shown on the NovoEnterprise home screen.
- If the PIN code is not required, slide the PIN Required switch to the OFF position.
Your Name:
(Optional) Manually enter a name for this tablet to be identified by in this presentation session.
NOTE: If a name is not entered in this field, your iPad's default will be used.
Make Connection:
Tap the

If you are the first participant, this will start a presentation session on your NovoEnterprise.
If you are not the first participant, you will be joining a presentation session.
Function

Description
Successful Connection:
After your NovoPresenter App connects successfully to your NovoEnterprise, the
connection tab will become lit up

If you are the first participant, you will see that your iPad screen is mirrored to NovoEnterprise's screen.
You can turn on/off the PIN switch to enable/disable the use of the PIN code for the presentation session.

View participants list:
You can tap the tab to see the current participant list.
Example: There are a total of four participants in the presentation group shown at left.
- Kate, Ivan, Jason and Kevin are assigned to be the four presenters.
3.2.2 Step 2: Make a presentation
Once you have started/joined a presentation session, you can present the content stored on your iPad, local network, or the Internet. There are four tabs at the bottom left corner of the
NovoPresenter home screen:

: MyNotes – create and share screen notes

: Gallery – browse and show images/videos stored on your iPad

: Documents – browse and show documents stored on your iPad

: Web – browse the Internet
3.2.2.1 My Notes

Create and share custom screen notes
This is a virtual whiteboard that allows tablet users to create, edit and display.
Function

Description
Launch My Notes:
Tap at the bottom left corner of the screen

Create a new note:
Tap at the top of the screen.

Enter a note name:
Type a name for your note in the "Add Note" dialog box and tap Ok.

Start making a note:
A blank note is ready.
Function
Description
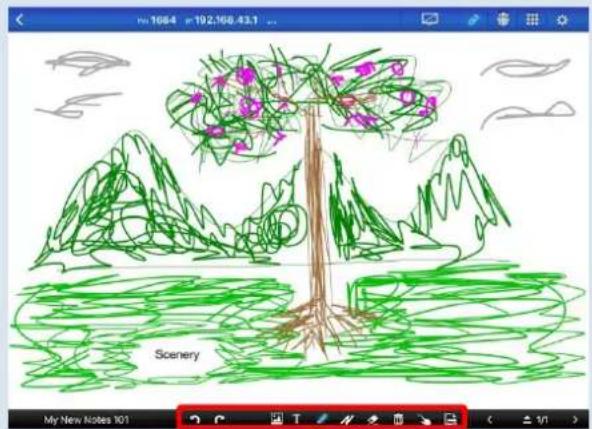
Use the note tools:
The note tools are located at the bottom of the screen.

Picture insertion

Text insertion (You can reposition your text by dragging it across your screen with your finger.)

Pen

Highlighter

Eraser

Clear All

Move an image

Export an image

Undo

Redo

Add new pages:
The "Page Control" locates at the right side of the screen.

Open the "Page Control" pane.

Close the "Page Control" pane.

Add a new page.

Select a page by tapping its thumbnail.

Delete the selected page.

Move the selected page up.

Move the selected page down

Close and save changes:
Tap to exit editing. The changes will be saved automatically.
Function
Description
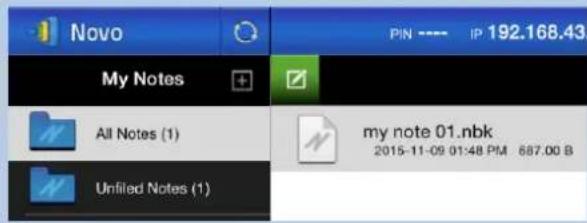
Organize your notes with Subject folders Tap this icon to add a subject (folder). When the "Add Subject" dialog box appears, enter the name for the new subject.
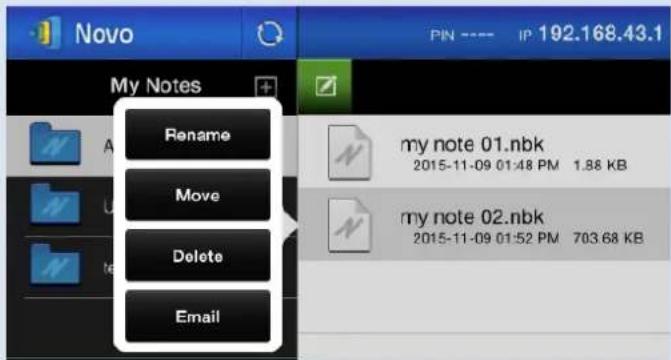
To move a note under a subject, long press the note until a popup menu appears. Then tap Move button.

When the "Move to" window pops up, select a subject (folder) and then tap "Ok".

The chosen file has been moved to the selected subject (folder).
3.2.2.2 Gallery
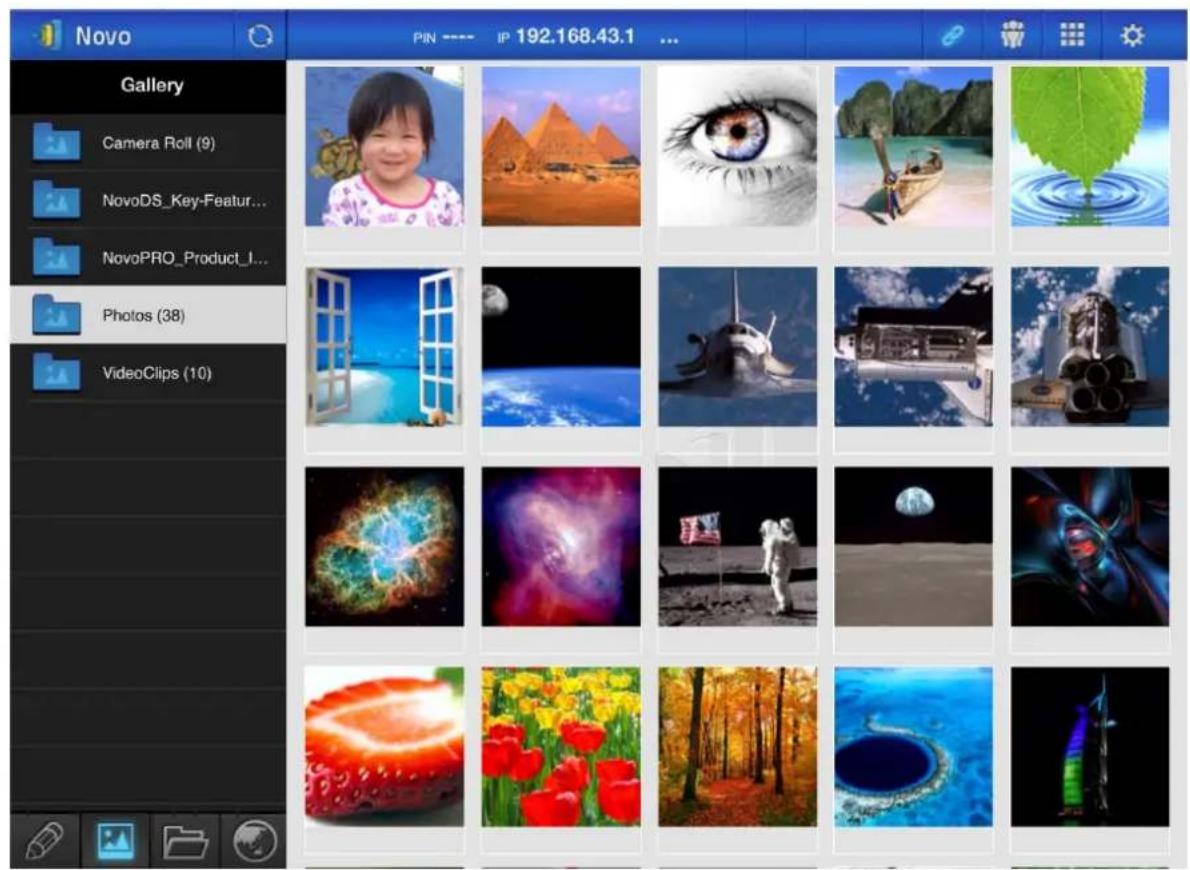
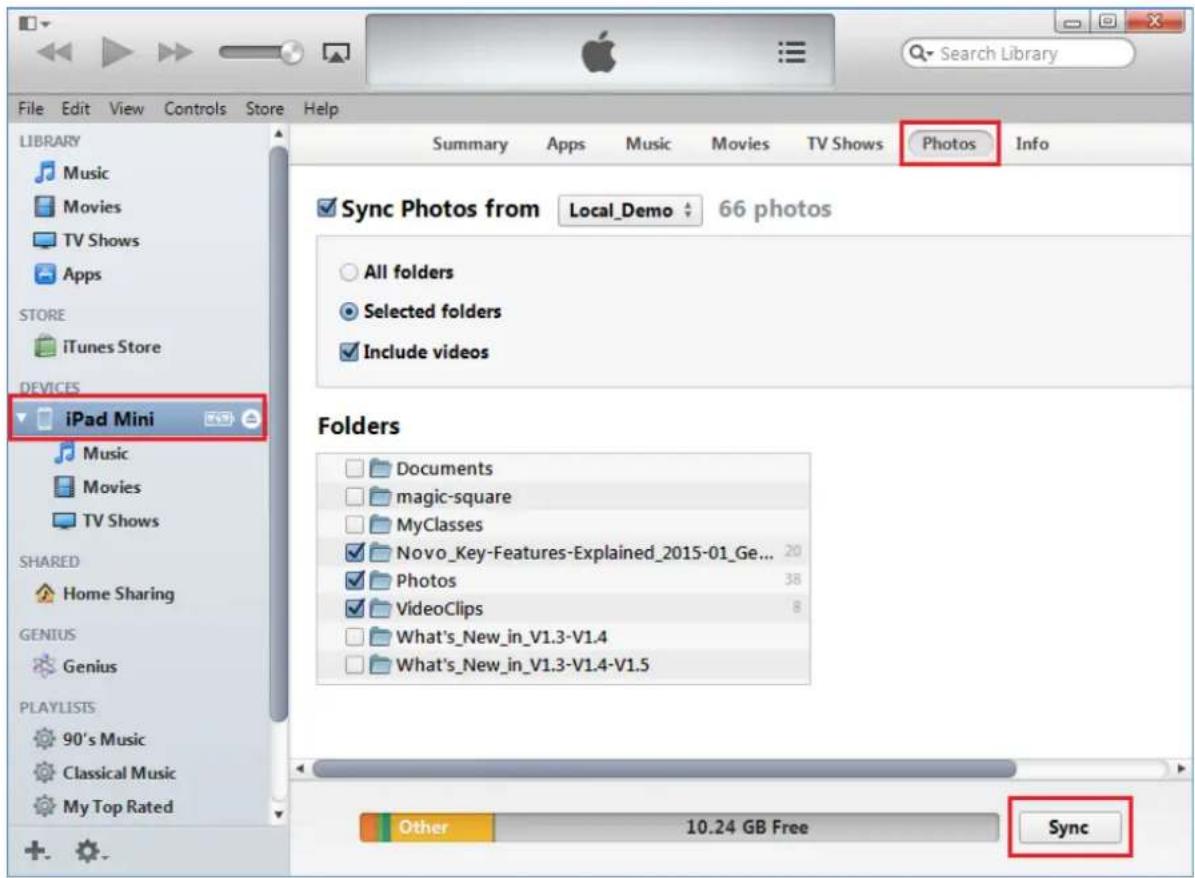
To import images/videos to an iPad, you can follow the steps described below.
(1) Connect your iPad to your computer.
(2) In iTunes, select your device ("iPad Mini" in this case), and tap the Photos button at the center-top area.
(3) Select the folders we want to sync' the photos/videos from.
- Please check "Include videos" if you want to sync' videos to your iPad
(4) Tap "Sync" to start synchronization process.
3.2.2.3 Documents (Local Storage)

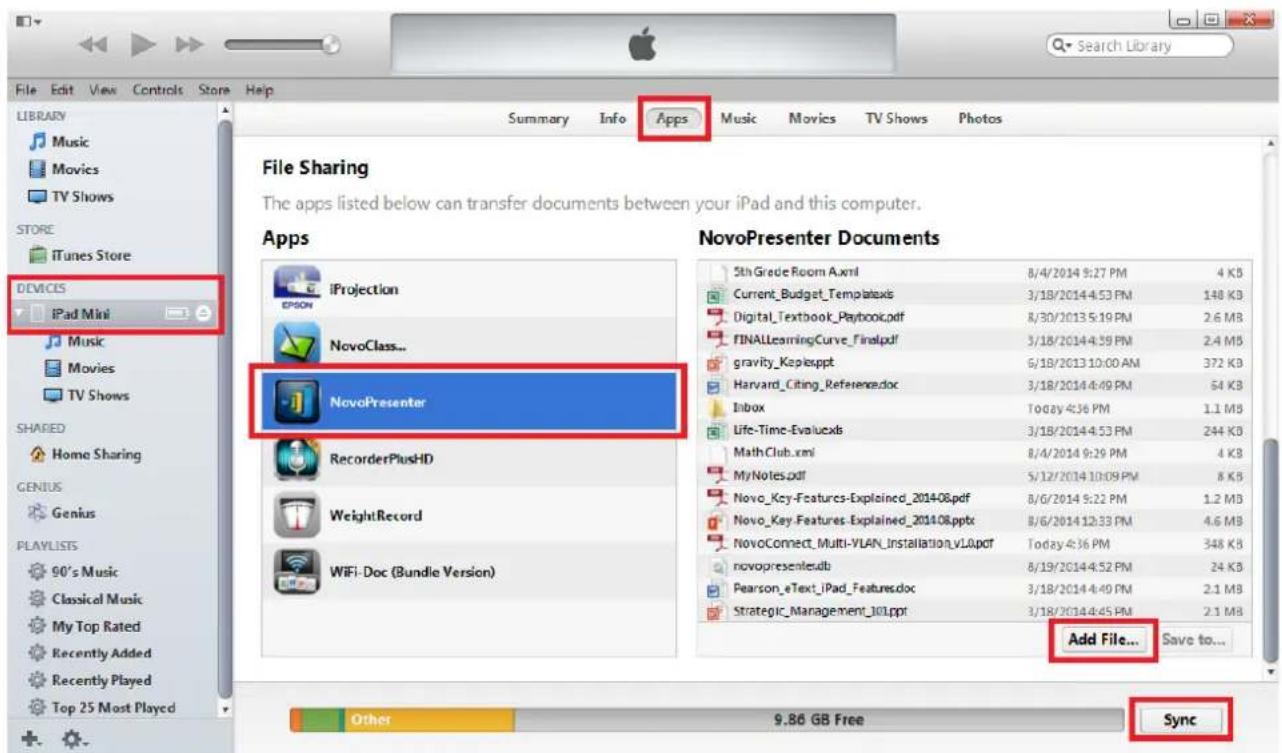
To import images/videos to an iPad, you can follow the steps described below.
(1) Connect your iPad to your computer.
(2) In iTunes, select your device ("iPad Mini" in this case), and tap the Apps button at the center-top area.
(3) Below File Sharing, select NovoPresenter from the Apps list.
- Then you can specify the files for transfer by either tapping button "Add File..." or dragging files into the Document list.
- If you want to delete existing files, highlight them and press "Delete" button on the keyboard.
(4) Tap "Sync" to start transferring the selected files.
Function

Description
Navigate document list:
Tap Tab to access Documents. The folder icon will become lit up.
For local storage, tap Documents will be listed on the right pane. Tap the desired one to open for viewing.
You can change sorting method by tapping button Sort by.... The following sort-by methods are supported:
- Sort by Name (default)
- Sort by Date
- Sort by Extension
NOTE: You can tap the tab to refresh the document list.
Function

Description
View documents:
The selected document will be opened in full screen.
You can zoom in and out by pinching your fingers.
To scroll down or move to the next page, slide your finger up or drag the scroll bar down. To scroll up or move to the previous page, slide your finger down or drag the scroll bar up.
To return to the Document List page, tap

To use the on-screen annotation tools, tap

3.2.2.4 Documents (Dropbox)

Function
Description
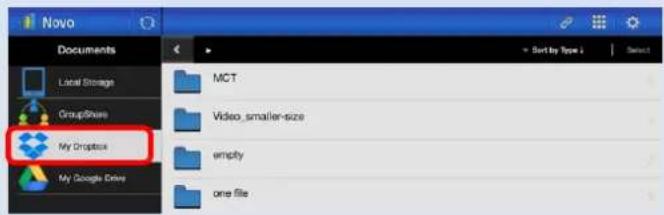
Select Dropbox as the document source:
Tap tab to access Documents. The folder icon will become lit up.
For Dropbox, tap

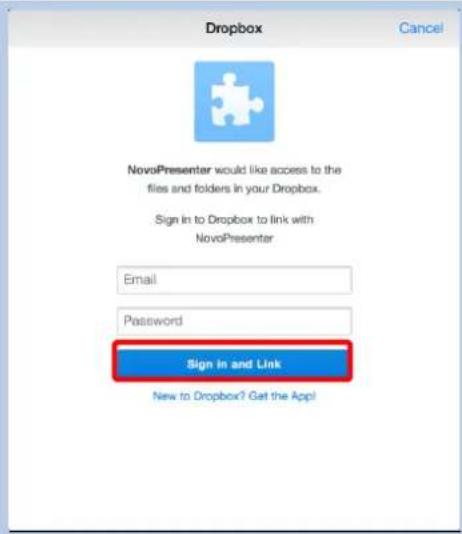
First time using Dropbox in NovoPresenter:
When using this feature for the very first time, an authentication dialog will be popped up.
Enter your e-mail address and password associated with your Dropbox account, and then tap the Sign In button.

Navigate document list:
By default, your Dropbox's home directory is shown. Navigate to a folder by tapping the desired folder.
You can change sorting method by tapping button Sort by....
NOTE:
- Tap the tab to return to the parent folder.
- You can tap the tab to go back to Dropbox's home directory.
- You can tap the tab refresh the document list.

Function

Scroll Bar
Description
View document:
The selected document will be opened in full screen.
You can zoom in and out by pinching your fingers
To scroll down or move to the next page, slide your finger up or drag the scroll bar down. To scroll up or move to the previous page, slide your finger down or drag the scroll bar up.
To return to the Document List page, tap

To use the on-screen annotation tools, tap


Request Confirmation
Are you sure you want to unlink this device from your Dropbox account?
No
Yes
Unlink the Dropbox account:
If you need to unlink the Dropbox account, tap and

My Dropbox
hold the tab for a few seconds. When the Request Confirmation appears, tap Yes to proceed.
3.2.2.5 Web
You can open any website for sharing with NovoPresenter. An example screen is shown below.

WIKIPEDIA

1 000 000+
Deutsch · English · Español · Français · Italiano · Nederlands · Polski · Русский · Sinugboanong Binisaya · Svenska · Tiếng Việt · Winners
Function

Description
Web:
Tap the Internet tab will light up blue. Select one of the five options to access a Web page:
- Go to... (enter a URL)
- Snap a QR Code
- Browse My Bookmarks (Web site bookmarks)
- Browse Webpages Received
- YouTube

Go to...:
Tap the Go to... tab.
- Enter the URL for a website and tap Browse to browse the webpage or Share to share the webpage to all other participants in the session.
- Enter the video link and tap Stream(Video Link Only) to broadcast a streamable video clip in the session.
Function

Description
Snap a QR code:
- Tap button Snap QR Code.
- Aim your iPad's camera at the desired QR code.

Browse My Bookmarks:
Tap the Browse My Bookmarks tab.
From the bookmark list at the right, tap the desired one to open the corresponding webpage.
Tap and hold a bookmark for two seconds to edit or delete the bookmark.
NOTE: The bookmark list may initially be empty. You can add a webpage to the bookmark list while browsing.

Browse Webpages Received:
Tap the Browse Webpages Received tab.
From the Browse Webpages Received menu of webpages received from the other participants, tap the desired link to open the corresponding webpage.
Tap and hold an entry for two seconds to delete or share the entry.
Function

Description
YouTube:
Tap the YouTube tab.
- Enter the URL for a YouTube video or playlist and tap Browse to view the video or Share to share the video to all other participants in the session.
- Enter the video link and tap Stream(Video Link Only) to broadcast the video clip in the session.
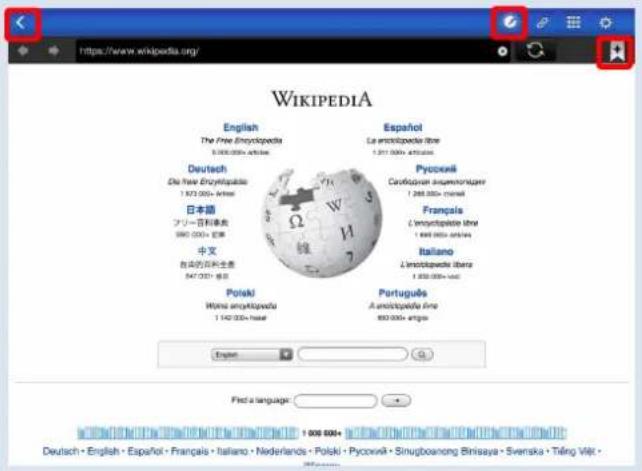
Web page presentation:
The selected Web page will be shown in full screen.
To add this webpage to the bookmark list, tap

To return to the Web menu page, tap

To use the on-screen annotation tools, tap
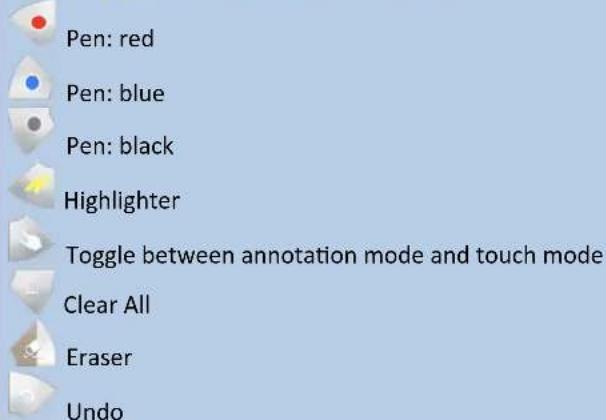
3.2.2.6 Annotation
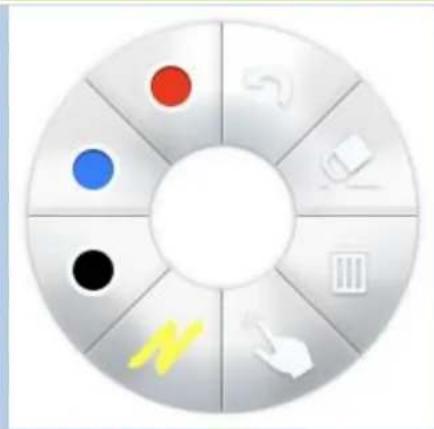
NovoPresenter has a built-in drawing tool for on-screen annotation, such as handwriting and
highlighting. You can bring up this tool by tapping, as shown below.

Function
Description
Tap the tab to enable the annotation tool.
3.2.2.7 Screenshot
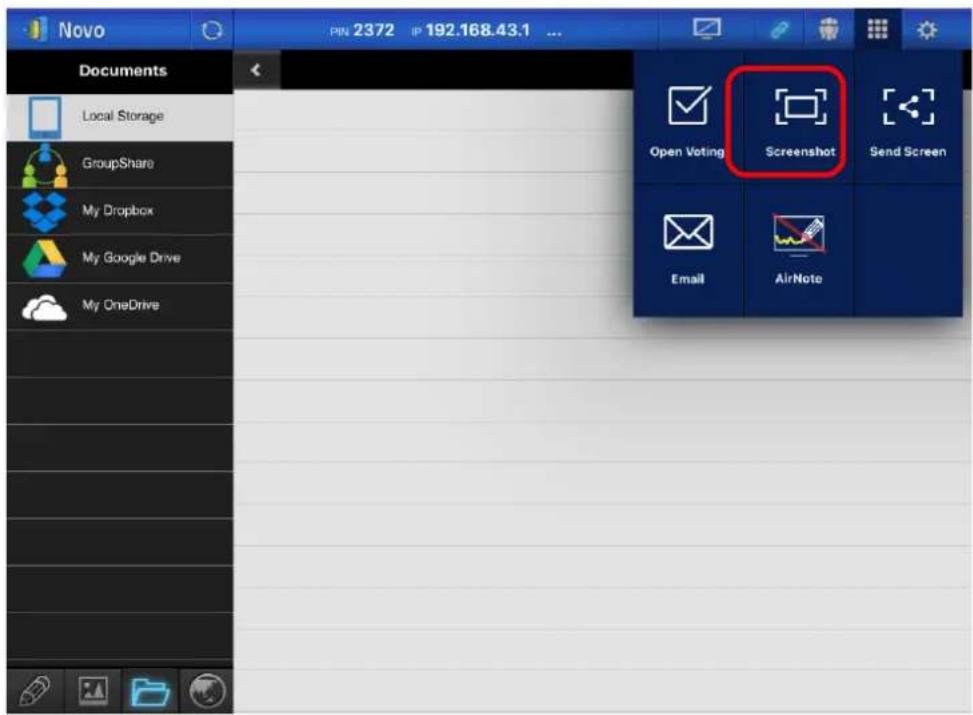
This feature allows users to take tablet screenshots.
Function

Description
Take a screenshot:
Tap the Screenshot button and the current screenshot will be saved in local storage.
3.2.3 Step 3: Presentation management
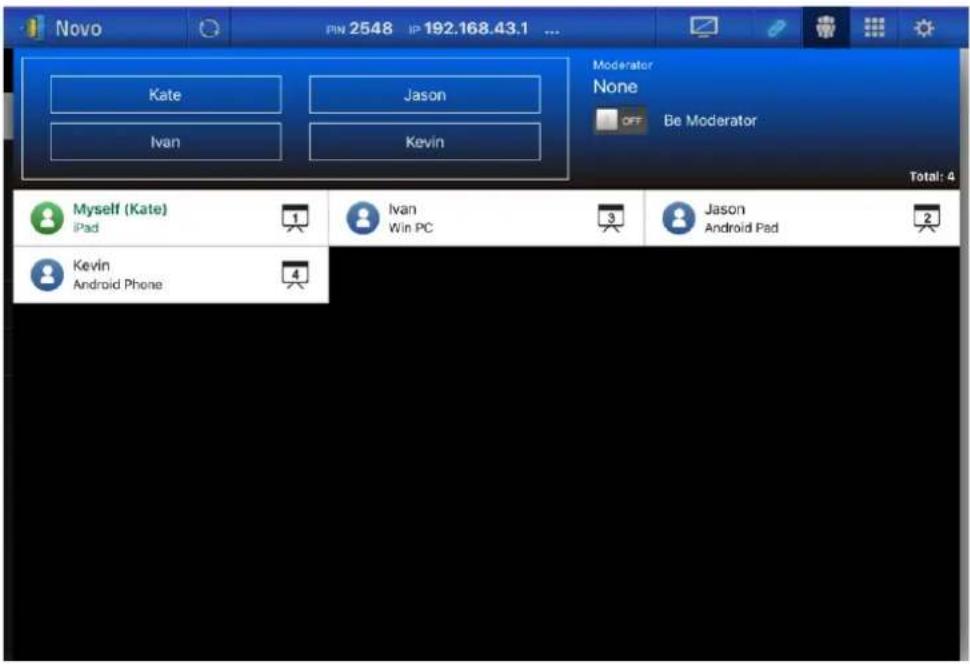
You can manage the presentation through the participants panel, as shown in the figure below.
3.2.3.1 Moderator

3.2.3.2 Role assignment
There are three roles in a presentation session, the moderator, the presenter, and the participant.
By default, the first participant assumes the presenter role until he hands it over to another participant. Individuals that join subsequently are participants.
To show all current participants who have joined the presentation session, tap the tab.
Function

Description
Select the tab to show the participant list.


: current presenter that is being projected in one of the screen quadrants (4-to-1 projection). (The icon shown here is for a presenter that is presenting in quadrant #1).
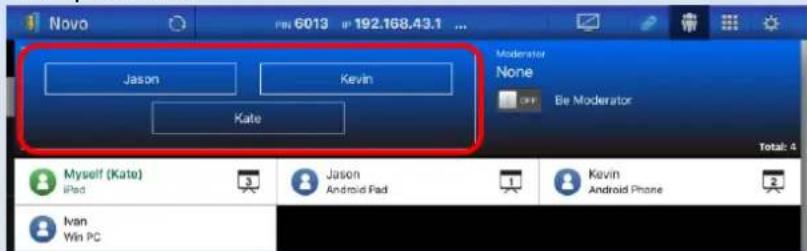
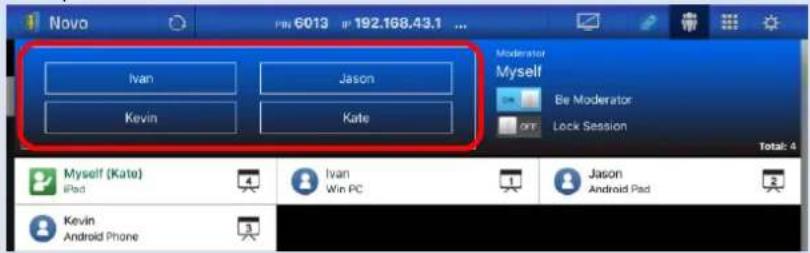
Example: There are four participants in the presentation session (1 iPad, 1 Windows PC, 1 Android phone, and 1 Android tablet.) Kate, Ivan, Jason, and Kevin are presenters in 4-to-1 projection.
Function
Example 1:

Description
Total participants and current presenter(s).
Example 1: Currently there are 4 participants and Kate is the only presenter in full-screen projection.
Example 2: Currently there are 4 participants and they are the 4 presenters in 4-to-1 projection.
Example 2:

3.2.3.3 Role change, multi-screen, withdraw projection, and remove a user
Function
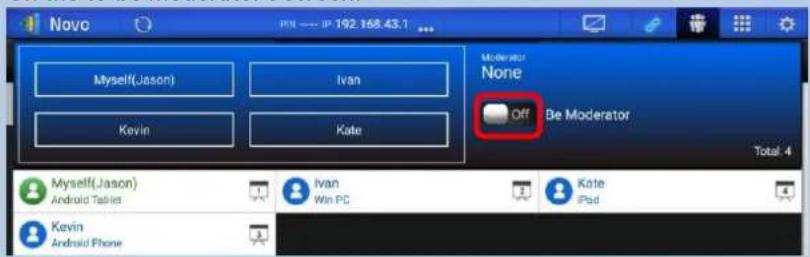
On the current moderator's screen:
On the to-be moderator's screen:

Description
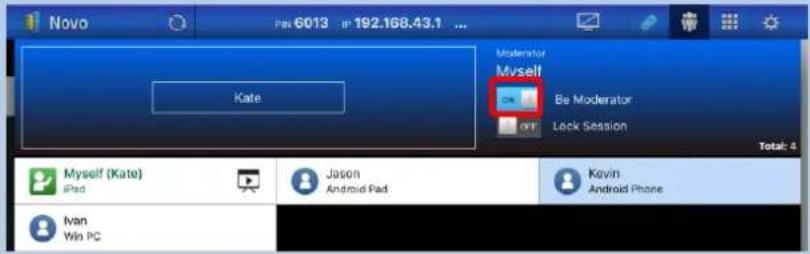
Role change: transfer the moderator role
The current moderator: Tap the

tab and tap the switch to turn off the moderator mode and withdraw from the moderator role.
The participant assigned as the next
moderator: Tap the

tap the switch to turn on the moderator mode.
Full-Screen Projection
1) Tap the participant (e.g. Kevin) to bring up the control panel
2) Tap to set Kevin as the full-screen presenter.
Function
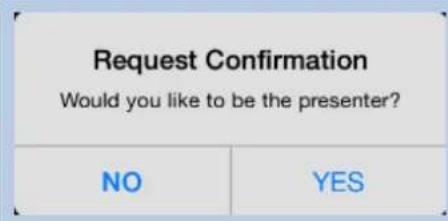
Description
When a participant is asked to be a presenter, a dialog box will appear on the participant's screen.
The participant has 20 seconds to respond.
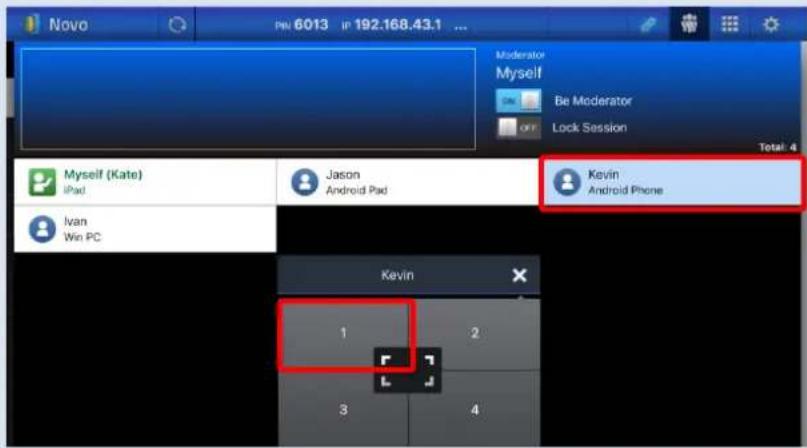
Quadrant allocation:
One presenter:

Multi-screen Projection
1) Tap the participant (e.g. Kevin) to bring up the control panel
2) Tap button "1", "2", "3", or "4" to put the participant in the corresponding quadrant. The user name will be shown in the quadrant his or her device has been assigned to on the display.
3) When less than 4 participants are assigned as presenters, the NovoEnterprise will display their screens in a layout based on the number of presenters. The images to the left display the different layouts.
Two presenters:
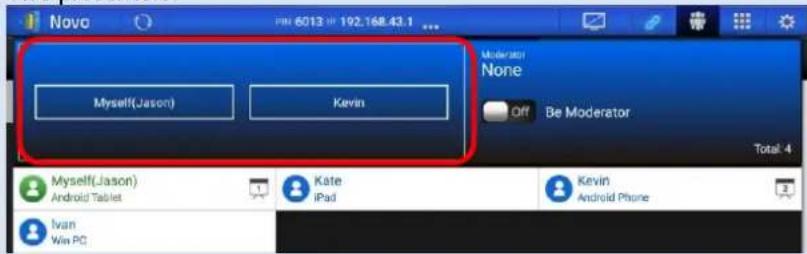
Three presenters:
Function
Four presenters:
Description

You are also allowed to assign a participant to be projected by directly dragging the participant into the quadrant window from the participant list.
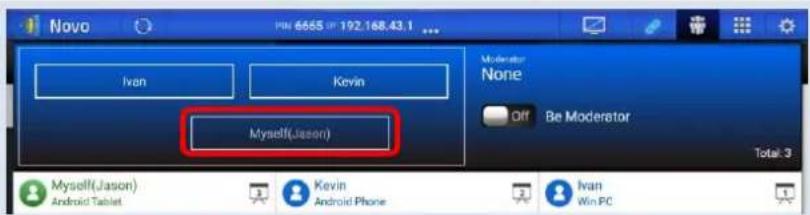
You are allowed to move the presenters to different positions in the quadrant by dragging and dropping the presenters.


Screen preview (Education Edition only)
- Click the particip

- Click on the participant's name.
NOTE: Only the moderator can preview screens of all participants.
Function

Description
That participant's screen will be shown below his/her name.
You can click on the cross next to participant's name again to close the screen preview.
List View

List/Grid view (Education Edition only)
When in List View mode, click the button and then select Grid view to preview screens of all participants at once.
Grid View

When in Grid View mode, click the
button and then select List view to return to view the participant list.
NOTE: Only the moderator can preview screens of all participants.

Withdrawing projections:
When a participant's screen is currently projected on the display and the participant wants to withdraw the projection of their screen from the display (while staying in the presentation session), tap the participant and tap "Withdraw Projection".
NOTE: In presentations with a moderator, this function is only available to the moderator.
Function

Description
Removing a participant:
To remove a participant from the presentation session, tap the icon next to the participant's name.
NOTE: In presentations with a moderator, this function is only available to the moderator.
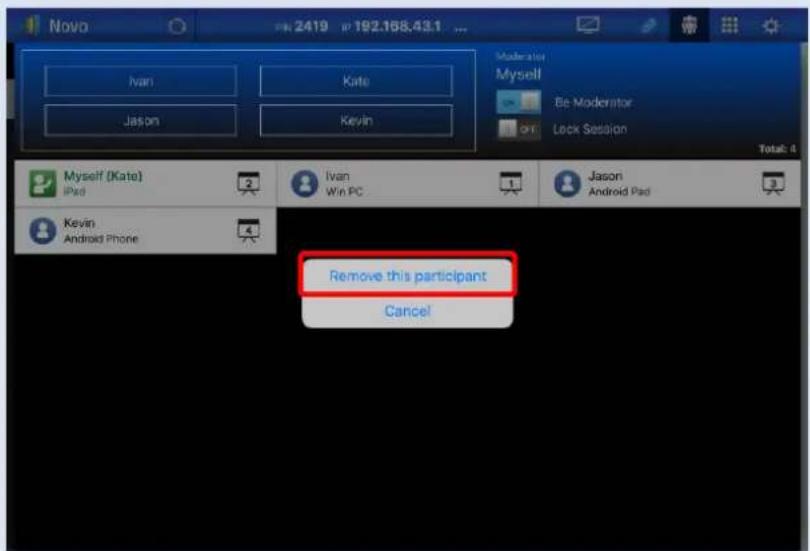
Tap Remove this participant to remove the participant from the presentation session.
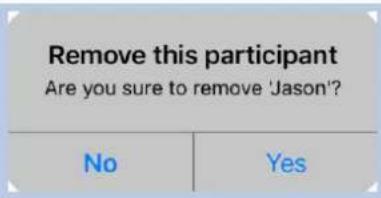
In the dialog box, confirm that you want to remove the participant. The participant will be logged off from the presentation session.
3.2.3.4 Disconnect and lock session
Function
Description

Disconnect from a presentation session:
Tap
Disconnect
the presentation session.
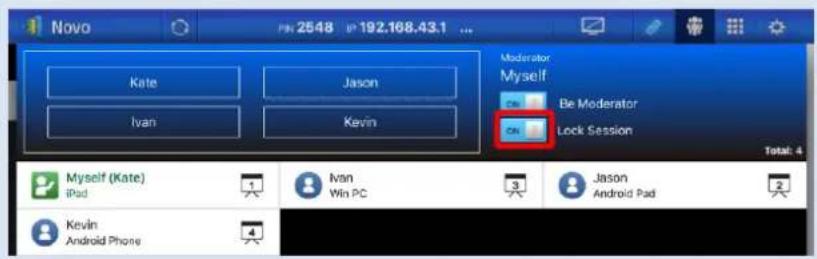
When the moderator mode is turned on, the Lock Session On/Off switch will appear.
Tap the Lock Session switch in the participant list screen to prevent any other users from logging in and joining the current presentation session.
NOTE: Only the moderator can lock a session.
3.2.3.5 Lock/Unlock students' tablets/phones (Education Edition only)
This feature allows the moderator to lock down students' tablets or phones. This feature is only available in the Education Edition.
| Function | Description |
| To lock/unlock students' tablets/phones: Tap the tab to bring up the toolbar page, and then tap Mobile Devices to lock or unlock mobile devices. : mobile devices are unlocked. : mobile devices are locked. | |
| Mobile device locked: A lock icon will pop up on all mobile devices' screens to show that the screen has been locked. |
3.2.3.6 Terminate Session (Education Edition only)
This feature allows the moderator to terminate a session. This feature is only available in the Education Edition.
| Function | Description | ||
| To terminate the session: Tap the tab to bring up the toolbar page, and then click Terminate Session. | |||
| Open Voting | Screenshot | Send Screen | |
| Mobile Devices | Terminate Session | ||
| AirNote | |||
| Information Are you sure to terminate this session? | Confirmation: Tap Confirm to terminate the session. All devices will be disconnected. | ||
| Confirm | Cancel | ||
3.2.3.7 Software Compatibility
| Function | Description |
| Settings Local Settings Name: Kate > Connect as Moderator User Groups > Remote Display Quality > Novo Lookup Server > Software Version: V3.1.3.480 Remote Device Device's Reset > © 2017 Delta Electronics, Inc. All rights reserved | Software Version: First tap and then tap Software Version. |
| NovoPresenter Version: 3.1.3.480 Copyright © 2017 Delta Electronics, Inc. All Rights Reserved. This App allows you to share your screen and collaborate with others. Software Compatibility Never remind me of new versions. | Software Compatibility: Tap Software Compatibility to bring up the software compatibility list which allows you to check if the NovoPresenter application installed on your mobile device is compatible with the NovoEnterprise device. NOTE: Users must have Internet access on their computer or mobile device in order to access the software compatibility list. |
3.2.3.8 Reset
In case you run into cases where NovoEnterprise may have weird behavior or lock up, you could reset NovoEnterprise from your iPad or Android devices.
| Function | Description |
| Settings Local Settings Name: Kate Connect as Moderator User Groups Remote Display Quality Novo Lookup Server Software Version: V3.1.3.480 Remote Device Device's Reset © 2017 Delta Electronics, Inc. All rights reserved | Reset NovoEnterprise: First tap tab and tap arrow of the Device's Reset window. |
| Settings Reset your Novo Device Quick Reset Restart software Full Reset Restart device | Quick Reset and Full Reset: • Tap Quick Reset to do a soft reset (restarting the software on NovoEnterprise). • Tap Full Reset to do a hard reset (restarting the NovoEnterprise device) Conflicts may occur when multiple participants simultaneously attempt to reset the NovoEnterprise. The reset priorities are as follows: 1. Moderator: The moderator has the sole privilege to Quick Reset and Full Reset when the moderator stays connected to the NovoEnterprise. 2. Presenter: If the moderator loses connection to the NovoEnterprise, the current presenter inherits the privilege to Quick Reset and Full Reset. 3. Participant: If the moderator and all presenters lose connection to the NovoEnterprise, any participant can perform Quick Reset and Full Rest. |
3.3 Session management via NovoEnterprise Home Screen
The NovoEnterprise's main app, the Remote Viewer, allows you to manage a session from the NovoEnterprise home screen without having to join the presentation session. You can manage a
session via the NovoEnterprise home screen by using the supplied remote control, a mouse, or a touchscreen display.
NOTE:
- If you want to manage a session using a touchscreen display, connect the touch port of the touchscreen display to the NovoEnterprise's Type A USB port.
- The mouse button on the remote control functions like the left click of a mouse. You can point the remote control at the desired items or functions then press the mouse button to select it.
3.3.1 Step 1: Bring up the participant list
Function
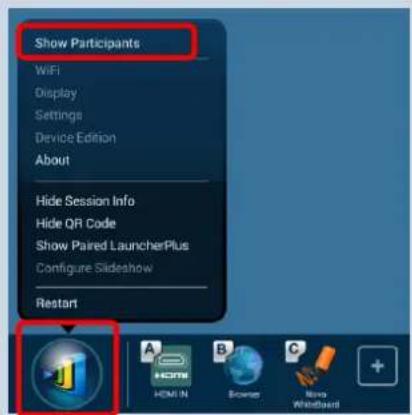
The participant list:

Description
Participant list
NOTE: This option will be grayed-out if there is not any participant in the session.
On the NovoEnterprise home screen, tap
or click the solution and select Show Participants to bring up the participant list from the bottom of the NovoEnterprise home screen.
Attendee(s): When no participants are currently presenting, this items show how many participants are currently in the session.

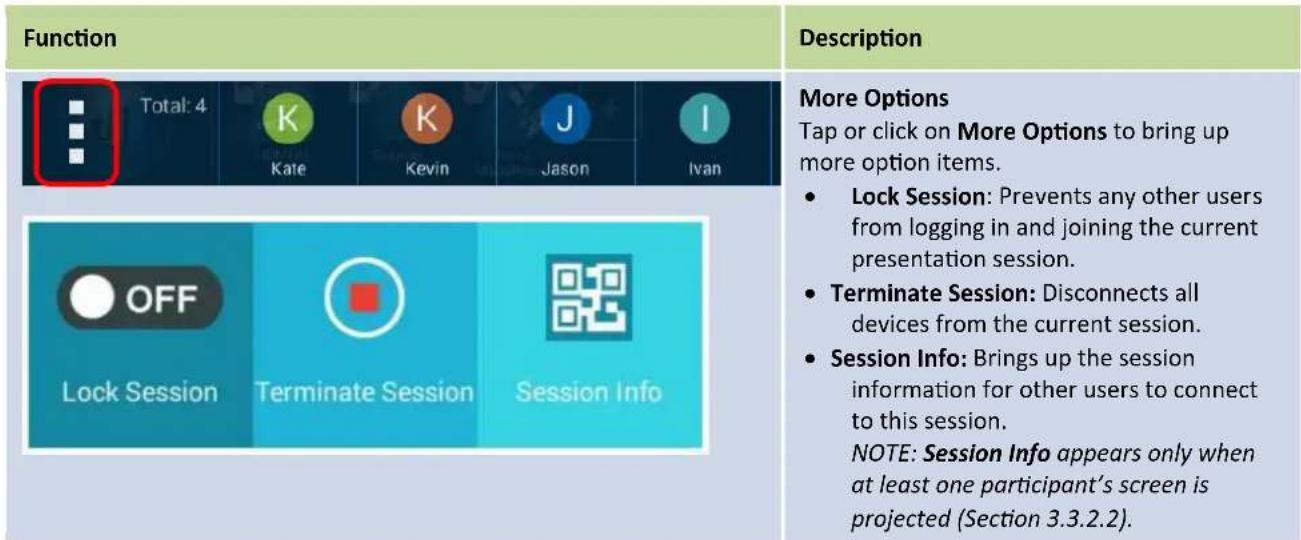
More Options
Tap or click on More Options to bring up more option items (Section 3.3.2.1).
| Function | Description |
| Participants Select the individual participant to bring up more projection options (Section 3.3.2.3). | |
| Participant List Control Buttons • Tap or click the button to view the next page of the participant list. • Tap or click the button to view the previous page of the participant list. • Tap or click the button to close the participant list. |
3.3.2 Step 2: Manage the presentation
3.3.2.1 More Options
3.3.2.2 Bringing up Session Info
You are allowed to bring up the session information via the direct annotation tool (Section 3.6) to let other users to connect to the session while the presenters are projecting their screens to NovoEnterprise.
Function
| Metric Tap & Clearance Drill Sizes | Tap Drill | Clearance Drill | |||||||
| 75% Thread for Aluminum, Brass, & Plastics | 50% Thread for Steel, Stainless, & Iron | Close Fit | Standard Fit | ||||||
| Screw Size (mm) | Thread Pitch (mm) | Drill Size (mm) | Closest American Drill | Drill Size (mm) | Closest American Drill | Drill Size (mm) | Closest American Drill | Drill Size (mm) | Closest American Drill |
| M1.5 | 0.35 | 1.15 | 56 | 1.25 | 35 | 1.40 | 1/16 | 1.65 | 52 |
| M1.6 | 0.35 | 1.23 | 53 | 1.35 | 54 | 1.70 | 51 | 1.75 | 92 |
| M1.8 | 0.35 | 1.45 | 53 | 1.55 | 1/16 | 1.90 | 49 | 2.00 | 5/64 |
| M 2 | 0.45 | 1.57 | 616 | 1.70 | 51 | 2.10 | 45 | 2.20 | 44 |
| 0.40 | 1.60 | 52 | 1.75 | 90 | |||||
| M 2.2 | 0.45 | 1.75 | 50 | 1.90 | 48 | 2.30 | 3/32 | 2.40 | 41 |
| M 2.5 | 0.45 | 2.08 | 46 | 2.20 | 44 | 2.65 | 37 | 2.75 | 7/64 |
| M 3 | 0.60 | 2.40 | 41 | 2.60 | 37 | 2.15 | 1/8 | 3.20 | 30 |
| 0.90 | 2.50 | 39 | 2.70 | 36 | |||||
| M 3.5 | 0.60 | 2.90 | 32 | 3.10 | 33 | 3.70 | 27 | 3.85 | 24 |
| M 4 | 0.75 | 3.25 | 30 | 3.50 | 28 | 4.20 | 19 | 4.40 | 17 |
| 0.90 | 3.30 | 30 | 3.50 | 28 | |||||
| M 4.5 | 0.75 | 3.75 | 25 | 4.00 | 32 | 4.75 | 13 | 5.00 | 9 |
| M 5 | 1.00 | 4.00 | 21 | 4.40 | 11/14 | ||||
| 0.90 | 4.10 | 20 | 4.60 | 17 | 5.25 | ||||
Description
During the presentation:
Click (if using a mouse) or tap (if using a touchscreen display) either one of the arrow buttons on the side of the presentation.
| Metric Tap & Clearance Drill Sizes | Tap Drill | Clearance Drill | |||||||
| 70% Thread for Aluminum, Brass, B Plastics | 30% Thread for Steel, Stainless, B Iron | Close Fit | Standard Fit | ||||||
| Screw Size (mm) | Thread Pitch (mm) | Drill Size (mm) | Closest American Drill | Drill Size (mm) | Closest American Drill | Drill Size (mm) | Closest American Drill | Drill Size (mm) | Closest American Drill |
| M1.5 | 0.35 | 1.15 | 56 | 1.25 | 95 | 1.40 | 1/16 | 1.65 | 52 |
| M1.6 | 0.35 | 1.25 | 55 | 1.35 | 54 | 1.70 | 51 | 1.75 | 50 |
| M 1.8 | 0.35 | 1.45 | 53 | 1.53 | 1736 | 1.40 | 49 | 2.00 | 5/64 |
| M 2 | 0.45 | 1.30 | 516 | 1.78 | 31 | 2.10 | 45 | 2.20 | 44 |
| 0.40 | 1.50 | 52 | 1.75 | 50 | |||||
| M 2.2 | 0.45 | 1.75 | 50 | 1.90 | 48 | 2.30 | 3/32 | 2.40 | 41 |
| M 2.5 | 0.45 | 2.05 | 46 | 2.20 | 44 | 2.65 | 37 | 2.75 | 7/64 |
| M 3 | 0.60 | 2.40 | 41 | 2.40 | 37 | 3.15 | 1/8 | 3.30 | 30 |
| 0.50 | 2.50 | 39 | 2.70 | 36 | |||||
| M 3.5 | 0.60 | 2.90 | 32 | 3.10 | 31 | 3.70 | 27 | 3.85 | 24 |
| M 4 | 0.75 | 3.25 | 30 | 3.50 | 28 | 4.20 | 19 | 4.40 | 17 |
| 0.70 | 3.30 | 30 | 3.50 | 28 | |||||
| M 4.5 | 0.75 | 3.75 | 25 | 4.00 | 22 | 4.75 | 13 | 5.00 | 9 |
| M 5 | 1.00 | 4.00 | 21 | 4.40 | 11/64 17 16 | ||||
| 0.90 | 4.10 | ||||||||
A set of annotation tools will appear.

Click on the button to bring up the participant list.
| Screw Size (mm) | Thread Pitch (mm) | Drill Size (mm) | Closest American Unit | Drill Size (mm) | Closest American Unit | Drill Size (mm) | Closest American Unit | Drill Size (mm) | Closest American Unit | |
| M 1.5 | 0.35 | 1.15 | 56 | 1.25 | 70 | 1.90 | 3/16 | 1.65 | 52 | |
| M 1.6 | 0.35 | 1.25 | 55 | 1.35 | 54 | 1.70 | 50 | 1.75 | 50 | |
| M 1.8 | 0.35 | 1.45 | 57 | 1.55 | 17% | 1.90 | 49 | 2.00 | 5/64 | |
| M 2 | 0.45 | 1.55 | 8/16 | 1.70 | 51 | 2.10 | 45 | 2.20 | 44 | |
| 0.40 | 1.60 | 52 | 1.75 | 30 | ||||||
| M 2.2 | 0.45 | 1.75 | 50 | 1.90 | 48 | 2.30 | 3/32 | 2.40 | 41 | |
| M 2.5 | 0.45 | 2.05 | 49 | 2.20 | 44 | 2.60 | 37 | 2.75 | 7/64 | |
| M 3 | 0.60 | 2.40 | 41 | 2.60 | 37 | 3.15 | 1/8 | 3.30 | 30 | |
| 0.90 | 2.90 | 29 | 2.70 | 36 | ||||||
| M 3.5 | 0.60 | 2.90 | 22 | 3.10 | 31 | 3.70 | 27 | 3.85 | 24 | |
| M 4 | 0.75 | 3.25 | 30 | 3.50 | 28 | 4.30 | 19 | 4.40 | 17 | |
| 0.70 | 3.30 | 30 | 3.50 | 38 | ||||||
| M 4.5 | 0.75 | 3.75 | 25 | 4.00 | 32 | 4.75 | 13 | 5.00 | 9 | |
| M 5 | 1.00 | 4.00 | 21 | 4.40 | 11/64 | 5.25 | ||||
The participant list appears.
Function

Description
Click on the


Click on the Session Info button to bring up the session information.
3.3.2.3 Add projection, full screen, withdraw projection, and remove a participant
Function

Description
Add Projection:
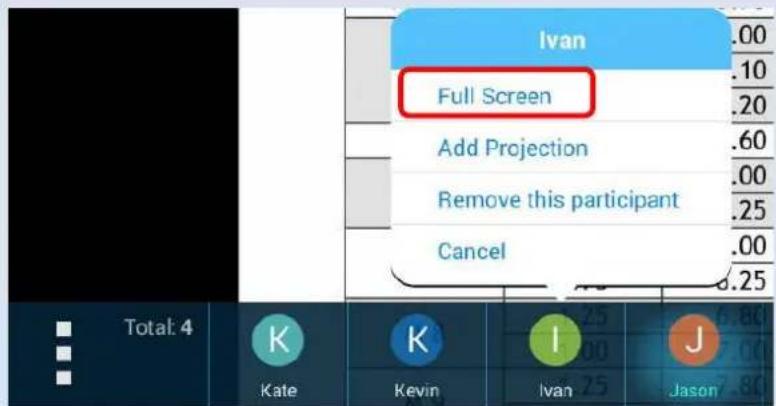
When a participant's screen is not currently projected to the display, and you want to assign the participant to be a presenter, click on or tap the participant then click on or tap Add Projection. There will be a halo around the presenter's icon.
NOTE 1: Once you select Add Projection, the participant's screen will be projected to the display immediately without the participant's confirmation.
NOTE 2: The first presenter's screen will be projected in full screen automatically.
Remove a participant:
When a participant's screen is not currently projected to the display and the participant wants to leave the session, click on or tap the participant then click on or tap Remove this participant.
Cancel:
Click on or tap Cancel to abort the selection.
Full Screen:
When at least one participant's screen is projected to the display and you want another participant to be the presenter in full screen mode, click on or tap the participant then click on or tap Full Screen.

Withdrawing projections:
When a participant's screen is currently projected on the display and the participant wants to withdraw the projection of their screen from the display (while staying in the presentation session), click on or tap the participant and click on or tap Withdraw Projection.
3.3.2.4 Allocation of the display
Function
One presenter:
| Metric Tap & Clearance Drill Sizes | Tap Drill | Clearance Drill | |||||||
| 75% Thread for Aluminum, Brms. & Plastics | 50% Thread for Steel, Stainless, & Iron | Close Fit | Standard Fit | ||||||
| Screw Size (mm) | Thread Pitch (mm) | Drill Size (mm) | Closest American Drill | Drill Size (mm) | Closest American Drill | Drill Size (mm) | Closest American Drill | Drill Size (mm) | Closest American Drill |
| M 1.5 | 0.35 | 1.15 | 56 | 1.25 | 55 | 1.60 | 1/16 | 1.95 | 52 |
| M 1.6 | 0.35 | 1.25 | 35 | 1.20 | 54 | 1.70 | 51 | 1.75 | 50 |
| M 1.8 | 0.35 | 1.45 | 51 | 1.95 | 9/16 | 1.90 | 49 | 2.00 | 5/16 |
| M 2 | 0.45 | 1.53 | 1/16 | 1.70 | 51 | 2.10 | 45 | 2.30 | 44 |
| 0.40 | 1.60 | 52 | 1.75 | 50 | |||||
| M 2.2 | 0.45 | 1.79 | 50 | 1.90 | 49 | 2.30 | 3/32 | 2.40 | 41 |
| M 2.5 | 0.45 | 2.05 | 46 | 2.20 | 44 | 2.65 | 37 | 2.75 | 7/16 |
| M 3 | 0.60 0.50 | 2.40 2.50 | 41 39 | 2.60 2.70 | 37 36 | 3.15 | 1/8 | 3.30 | 30 |
| M 3.3 | 0.60 0.75 | 2.90 3.25 | 32 30 | 3.40 3.50 | 31 28 | 2.70 4.20 | 27 19 | 3.80 4.40 | 24 17 |
| M 4 | 0.70 0.75 | 3.20 3.75 | 30 25 | 3.80 4.00 | 26 22 | 4.75 4.75 | 13 13 | 5.00 5.00 | 9 9 |
| M 4.5 | |||||||||
| M 5 | |||||||||
Two presenters:
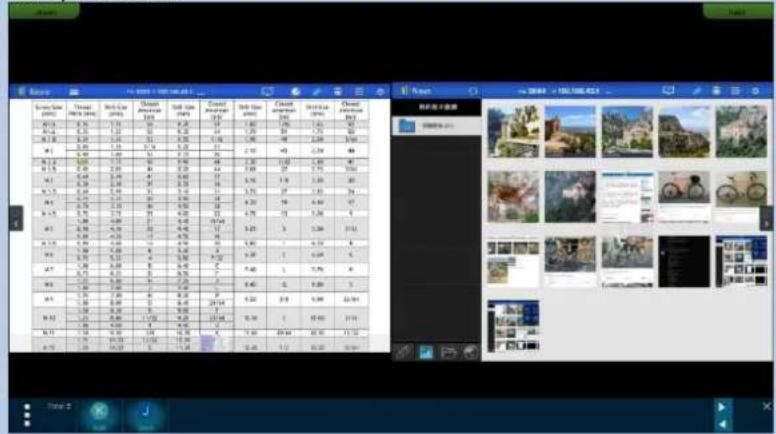
Three presenters:

Four presenters:
Description
When you manage the session and assign the presenters to project their screens to the display, the NovoEnterprise will display their screens in a layout based on the number of presenters. The images to the left display the different layouts.
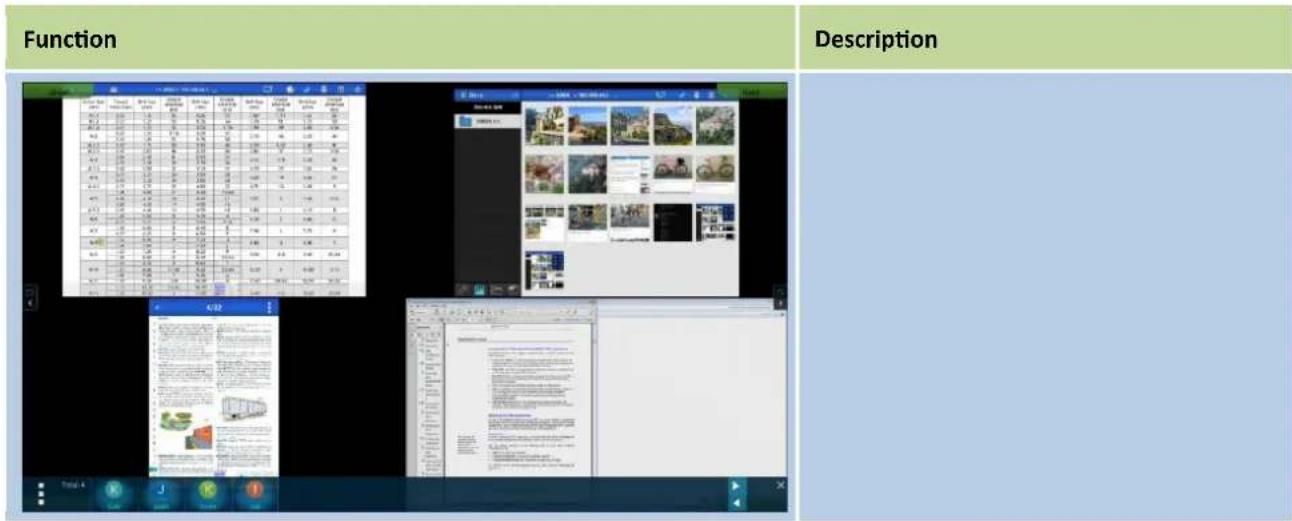
3.4 iOS/Android Full Mirroring
When NovoEnterprise is at its home screen, it can receive requests from either a collaboration connection described in section 3.1 and 3.2, or iOS/Android full mirroring request.
3.4.1 iOS Full Mirroring
All participants using iPads/iPhones can mirror their screens to NovoEnterprise by using iPad/iPhone's built-in Airplay service. No software installation is required in this case. To do so,
- Connect your iPad/iPhone to the same network where your NovoEnterprise device stays.
- Swipe up from the bottom of the iPad or iPhone to show the Control Center.
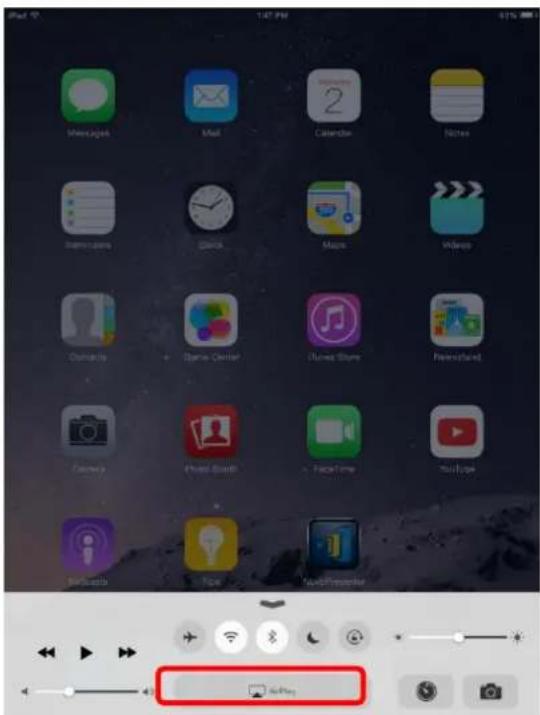
- Tap AirPlay and select NovoEnterprise's AirPlay device name. By default NovoEnterprise's AirPlay device is named as "Novo-XXXXX", where XXXXX is a device-generated name.
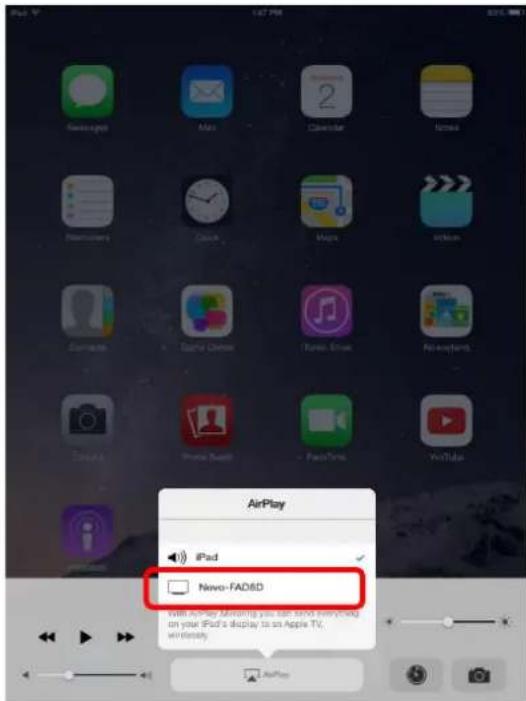
- Switch on "Mirroring" option. Then an "Airplay Password" prompt pops up. Enter the 4-digit "AirPlay password" shown on NovoEnterprise's home screen (illustrated below). Once the correct password is entered, your iPad/iPhone will be mirrored to the NovoEnterprise's screen.

- To stop mirroring your iPad/iPhone, you should swipe up from the bottom of the iPad/iPhone to access the "AirPlay" menu. Tap "Novo-XXXXX" name, and then switch off mirroring function.

3.4.2 Android Full Mirroring
All participants using Android tablets or phones can mirror their screens to NovoEnterprise by using tablets/phones' GoogleCast service. No software installation is required in this case.
NOTE: The actual operation steps might vary due to different Android OS releases and/or manufacturers' Android customization. The following steps are illustrated using Google's Nexus 7 Android tablet.
- Connect your Nexus 7 the same network as your NovoEnterprise.
- Swipe down from the top of Nexus 7 to show the Control Center, and then tap Cast button.

- You will see a list of devices you can cast your Nexus 7 to. If this is the first time you set up such a connection, the list may be empty. If you don't see the desired NovoEnterprise in the list, tap "MORE SETTINGS".

- A new list will pop up with all available GoogleCast-capable devices you can cast to. In this case, "Novo-C87F6" is the desired NovoEnterprise unit. Tap on it and continue.

- Establishing such a connection could take up to 15 seconds. The following "Connecting..." message may appear.
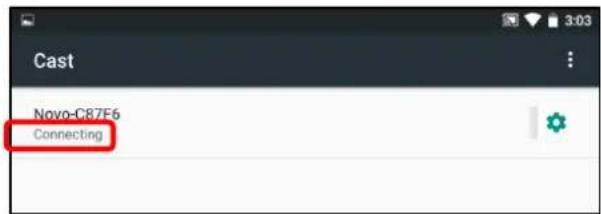
- If the connection is successful (i.e. a GoogleCast session is started successfully), the status message will change to "Connected". At this moment, your Nexus 7 should be mirrored to the NovoEnterprise's screen.

- To stop mirroring, please swipe down from the top of the Android device to show the Control Center, and then tap Cast Icon. Please note that "Cast" is changed to NovoEnterprise's device name ("Novo-xxxx").
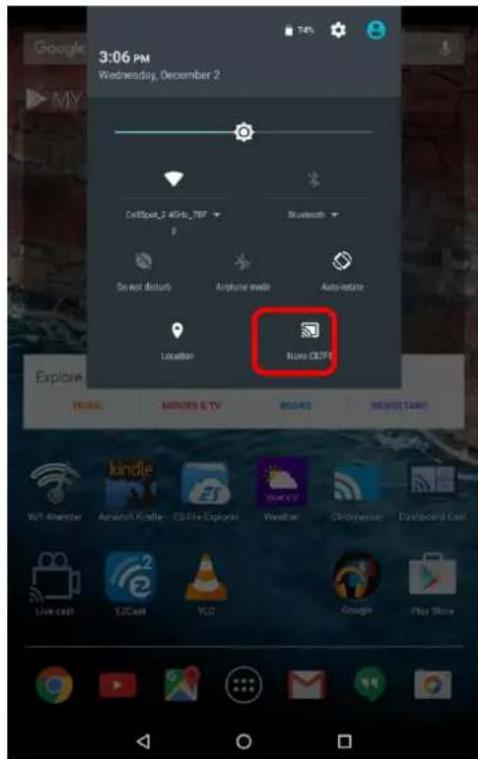
- Tap icon to stop the GoogleCast session.

3.4.3 Multi-Screen iOS/Android/PC Mirroring
NovoEnterprise allows multiple users to project their screens to NovoEnterprise simultaneously using AirPlay (iOS), GoogleCast (Android), NovoPresenter (Android or iOS devices) and Desktop Streamer.
To do so:
- Project your screen to NovoEnterprise via Desktop Streamer, Apple AirPlay, or GoogleCast using the instructions described in section 3.1.3, 3.4.1 and 3.4.2.
- Assign each presenter to a corresponding screen quadrant using the instructions in section 3.1.4.3.
NOTE: Only 2 users can simultaneously mirror their screen via AirPlay/GoogleCast during a multi-screen presentation.
The image below illustrates multi-screen mirroring using different mirroring/projection methods.
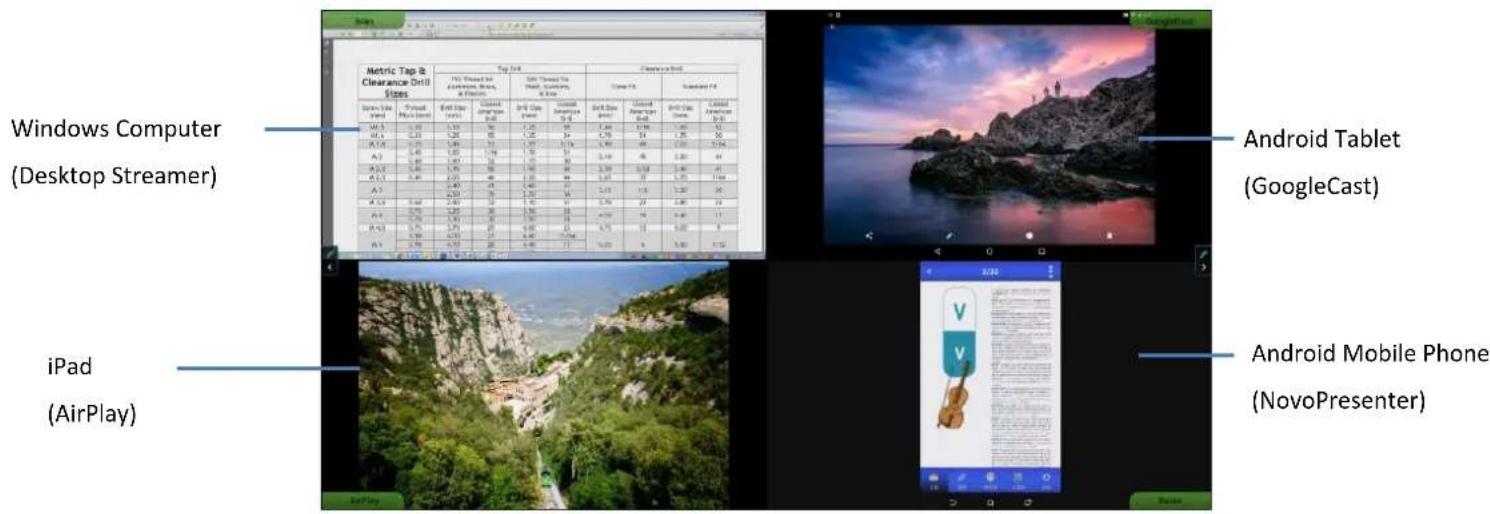
NOTE: To ensure the login information is available after the initial projection, make sure that the first participant connects to the NovoEnterprise device using Novo Desktop Streamer otherwise write down the login information for subsequent participants if the first connection is done via AirPlay or GoogleCast.
3.4.4 Default Screen Mirroring (for Android only)
NovoEnterprise allows Android users to mirror their device's screen by default via NovoPresenter. While users are making a presentation via NovoPresenter, they can tap the home button or previous app button at any time to jump out of the NovoPresenter interface and mirror their device's screen or open any app on their device on NovoEnterprise. When another app's screen is projected, the NovoPresenter connection will not be disconnected.
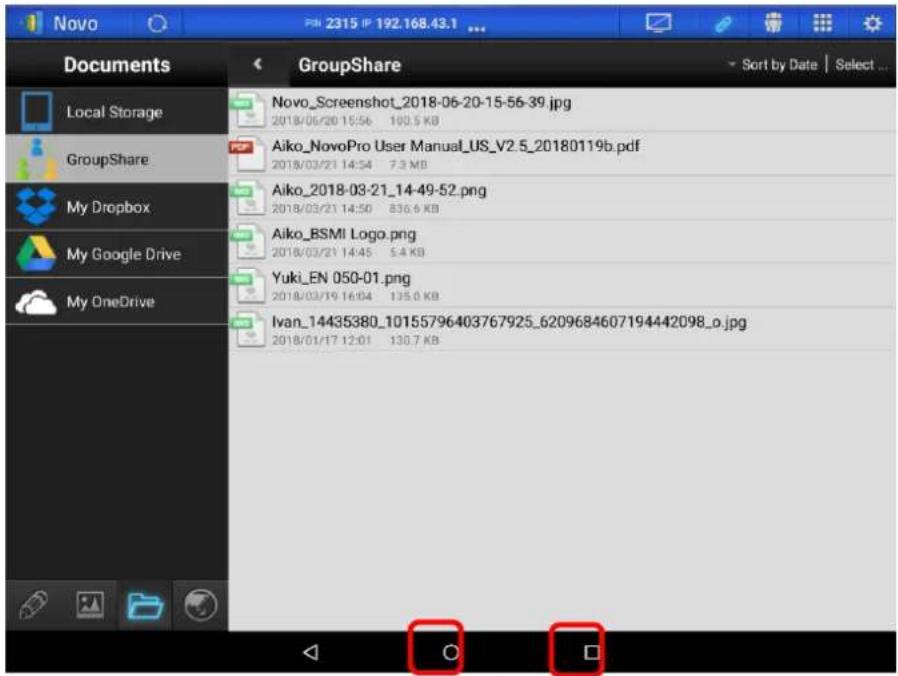
NOTE: The appearance and location of home key and previous app key may vary depending on actual models.
Whenever users want to return to the NovoPresenter window and continue their presentation session, tap the 📄 on the desktop or app list of the device.
3.5 Presenting with NovoEnterprise
Your NovoEnterprise device allows you to make presentations with the computing power of the device itself without the assistance of a computer. Your presentation files may reside in a microSD card, USB memory drive, the internal storage of your NovoEnterprise device, or in your Dropbox online storage account (Internet connection required for Dropbox access).
The steps for making a presentation with only your NovoEnterprise are as follows:
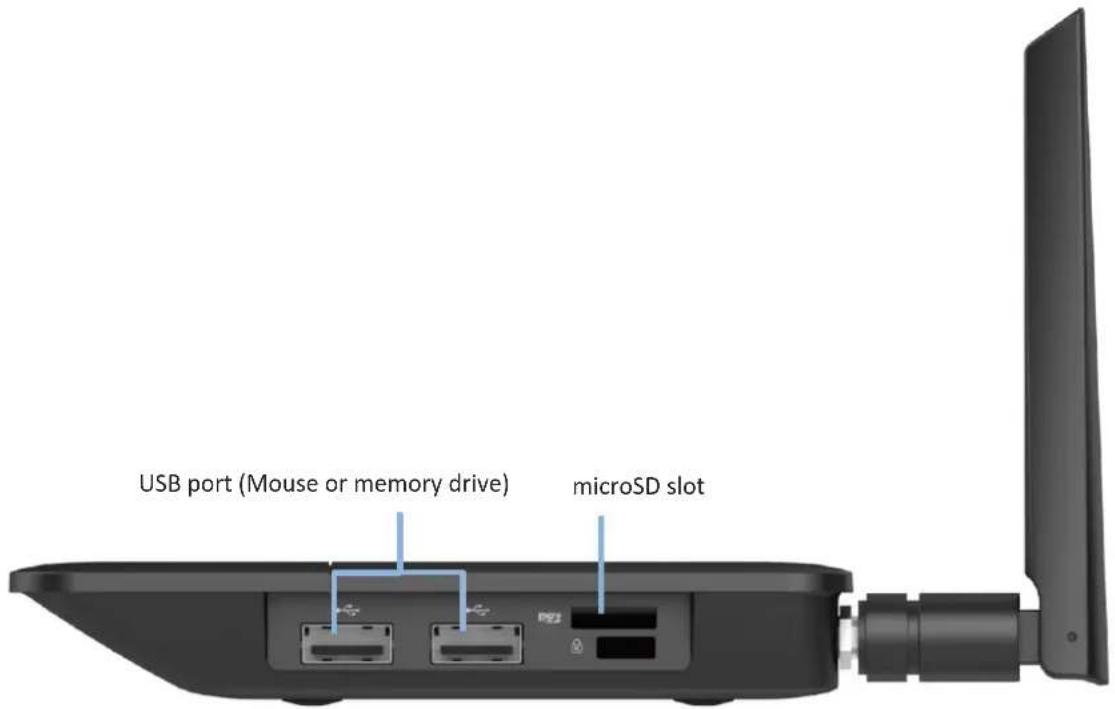
1) If your presentations are stored on a microSD card, please insert the microSD card into the microSD card slot.
2) If your presentations are stored on a USB thumb drive, please first connect a USB hub to your NovoEnterprise device, then connect a mouse and a USB thumb drive to the USB hub.
3) You can also save your presentation files in the local storage of your NovoEnterprise or in your Dropbox online.
4) Connect a USB mouse to the NovoEnterprise. Or, if you use a touch-screen panel, you can connect its touch port to the NovoEnterprise.
You are now ready to make a presentation with your NovoEnterprise.
Function
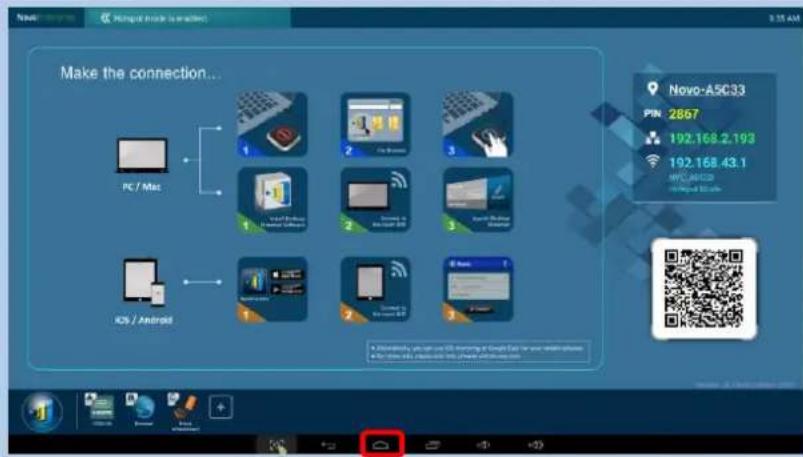
Description
Present with NovoPresenter
(1) Click an empty spot on the NovoEnterprise home screen. Then click the home button
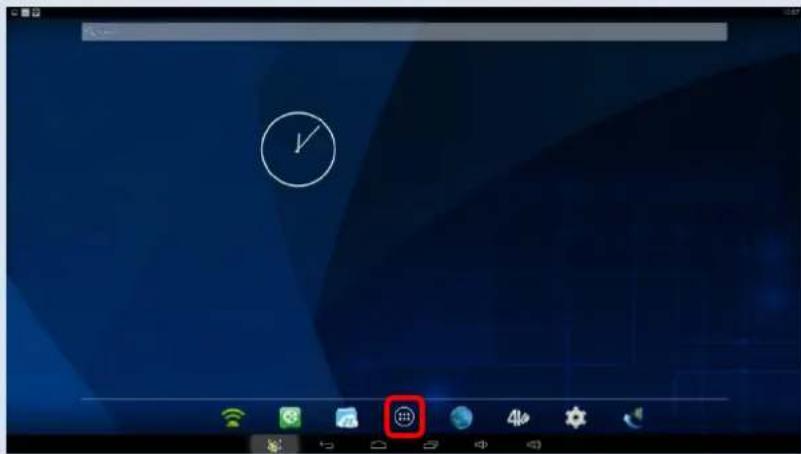
(2) Click the apps button


(3) Click NovoPresenter

Function

Description
(4) Now you can navigate to and open the desired files.
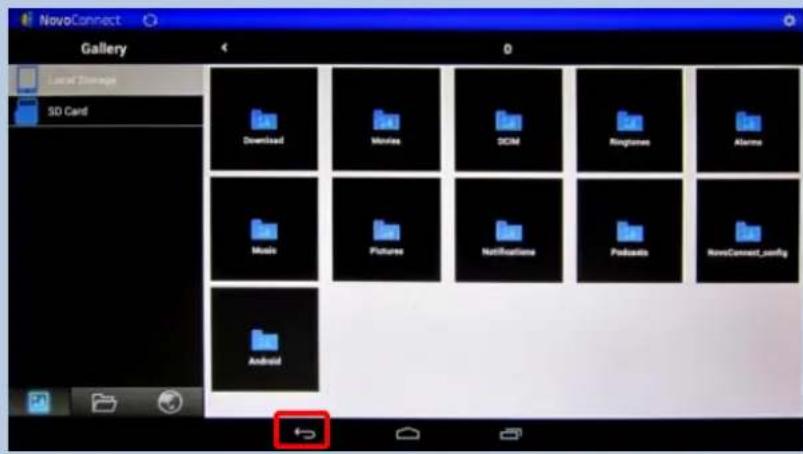
Return to NovoEnterprise Home Screen
(1) Click the back button or more times until you exit NovoPresenter.


(2) Click Remote Viewer

(3) Click the back button or more times until the system bar disappears.

3.6 Direct Annotations
During any presentation, NovoEnterprise also allows non-participant users the ability to draw annotations directly on the display. This can be done either via a USB mouse connected to the NovoEnterprise device or via a touchscreen display if the NovoEnterprise device is connected to one.
Function

Description
To activate direct annotations:
Click (if using a mouse) or touch (if using a touchscreen display) either one of the arrow buttons on the side of the presentation.

A set of annotation tools will appear.

Direct Annotation Tools:

Pen: Red

Highlighter

Control: Allows you to control the cursor on the projecting devices

Session Info Management: Brings up the participant list which allows users to manage a session

Redo

Undo

Clear All

Eraser

Options: Opens a list of options which allows you to send a screenshot of the annotations to the presenters, send a screenshot of the annotations to all participants, or exit the annotation tool.
4 Collaboration Tools
NovoEnterprise is not only a wired/wireless presentation device, but also a collaboration system with a set of built-in tools. You can access these tools by clicking the "Tools" button.

The middle 3 tools are straightforward and self-explanatory, and this chapter will focus on the 3 tools shown on the top row and the AirNote tool. In addition, a new concept, User Group, is described in details as well.
4.1 Voting/Polling
Voting/Polling allows the moderator to create sets of questions or quizzes to post/administer to all participants.
- Voting allows the moderator to administer a polling question set to all participants in a presentation session.
• Voting allows participants to respond to questions from their devices.
• The moderator can monitor the voting results in real time.
4.1.1 Edit voting/polling
Creating a question set
- Click on the "Tools" tab and select "Edit Voting." This will open the Voting window.

- To create a new question set, select "New." This will open the "Question" Editor.

- Enter the text of your question by clicking on the text field at the top. If the question is a multiple-choice question, please label the choices as "A.", "B.", "C." etc.

- If you wish to include an image, click on area "Click to Import Image". This will allow you to import an image from your computer.
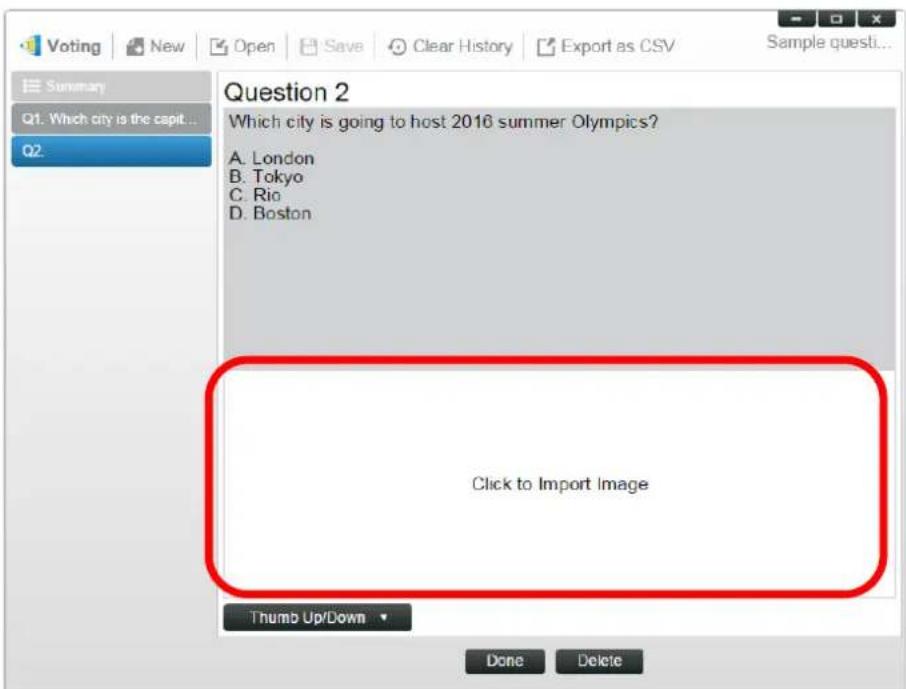
Select the image (.png, .jpeg, .jpg) and click "Open." The image should now appear below the text area.
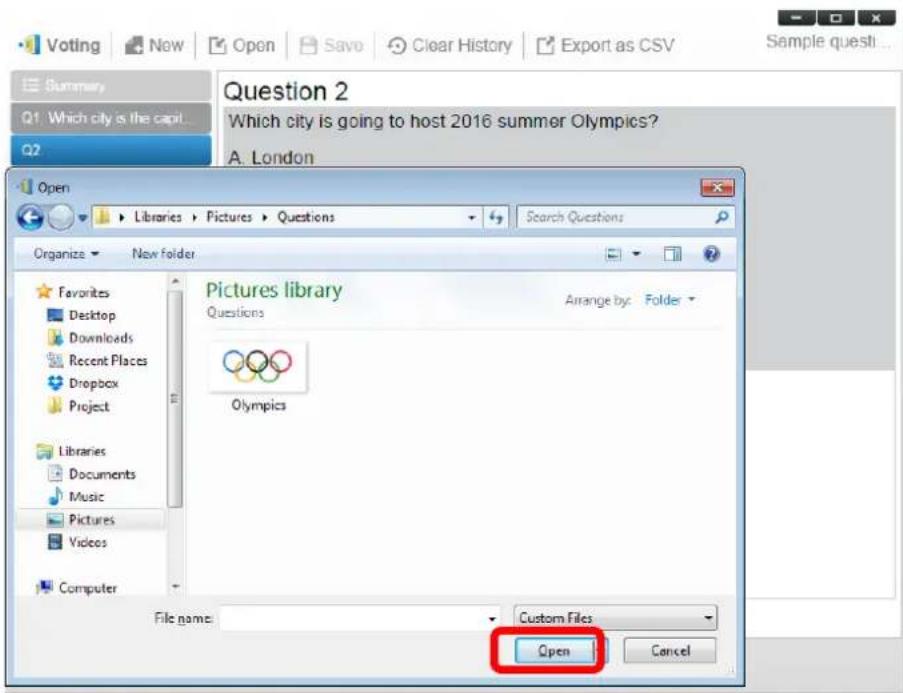
5. Choose Question Type from the "Type" drop-down list.

- Select the correct answer from the "Answer" drop-down list. If the question does not have a correct answer (such as an opinion poll), you can choose "Not Selected".
NOTE: Open-ended questions do not have this option.

- To add another question, click on the "+ Question" button at the bottom left corner.
+ Add a Question
- When a question set is completed, save it by clicking the "Save" tab.

Voting

New

Open


Clear History

Export as CSV
- Name you quiz and select a location on your computer. This will create a database (.db) file that can be re-opened, edited or administered later.
4.1.2 Administer voting/polling
Start voting
- Click on the "Tools" tab and select "Edit Voting." This will open the Voting window.

- Open an existing question set or create a new one (as described in the previous section.)
- Select a question and click "Start" to send it to all participants. The question will appear on participants' screens.

- As participants answer the question, the moderator can monitor the results by clicking the "View Status" button. With the status window opened, the moderator can view participants' reaction in real time.

- To return to the question, click "View Question."
- The moderator needs to stop the current voting before starting another voting question.
- At the end of the voting/polling session, you can export the result as a CSV file by clicking "Export as CSV."
4.1.3 Respond to voting/polling
Once a participant receives a voting/polling question, the question will pop up automatically on the participant's screen.
- For a multiple-choice question, the participant can select the answer and then submit.
- For an open-ended question, the participant can select an image file from your device for submission.

NovoPresenter screenshot

Desktop Streamer screenshot
4.2 Video Clips and YouTube Streaming
This feature allows you to smoothly stream your local video clips or YouTube to NovoEnterprise.
Please note that only the presenter in full-screen projection is able to use this feature. (Presenters in 4-to-1 projection are not able to do so.)
4.2.1 Streaming local video files
- From the "Tools" menu, click on button "Video & YouTube".

- When the "Video Clip" panel shows up, click the Browse button to locate the video clip on your computer.

- Select the video clip and click on the PLAY button to start the playback.
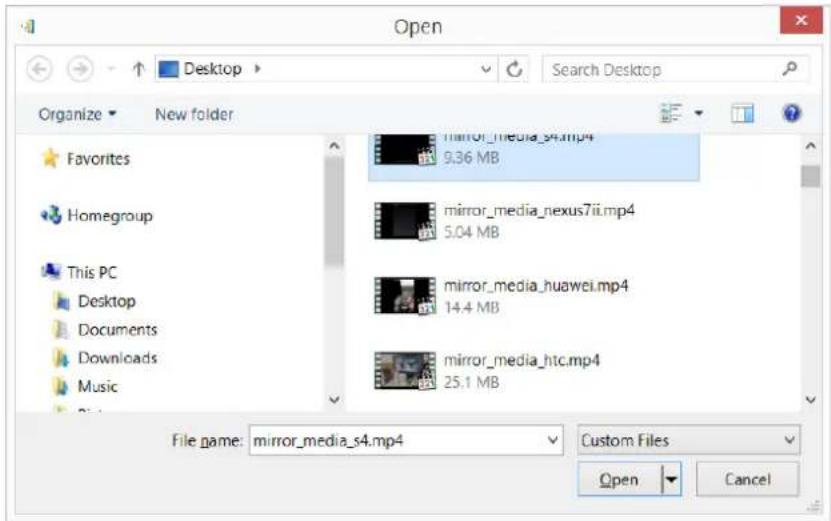
4.2.2 Streaming YouTube video
- From the "Tools" menu, click on and launch the "Video & YouTube" tool.
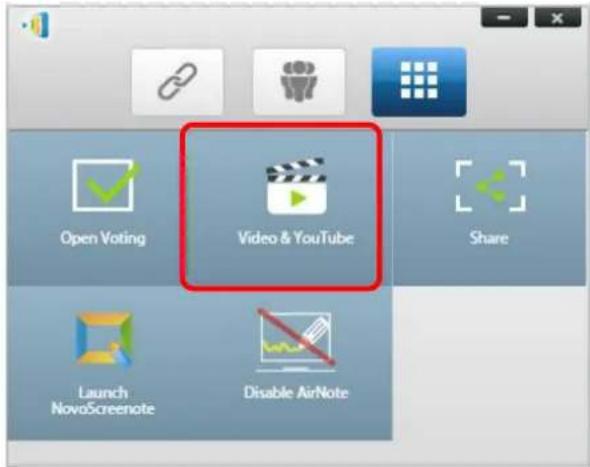
- When the video player bar opens, paste or type the URL for the YouTube video or playlist you wish to play in the window.
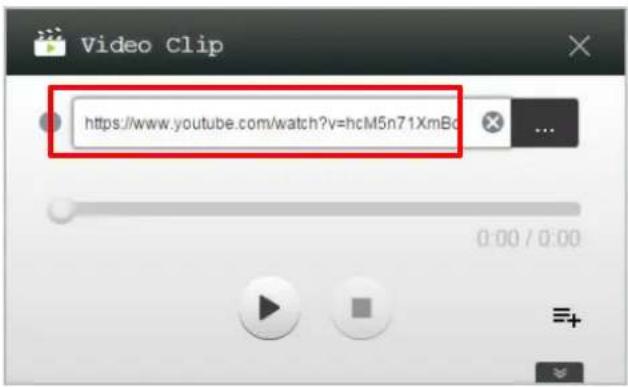
- Click on the PLAY button to start the playback.
4.2.3 Video controls
Function

Description
To control the playback:
Click the button to start/pause/resume playback.
Click the button to stop playback.
Click the button to add the video clip to Library.
By clicking the button you can bring up the Video Clip settings menu described below.
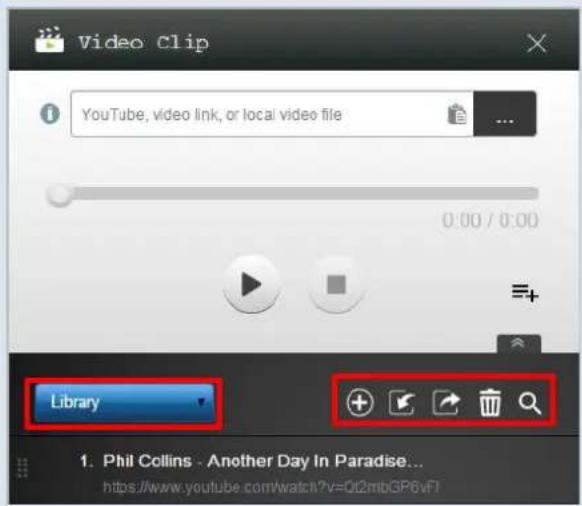
Library:
: Add a video clip or local video file to Library. : Import your local video playlist or YouTube playlist. Before importing the video playlist, the playlist should be saved or transferred to *.json format.
: Export all video clips saved in Library screen as a playlist in *.json format.
: Clear all video clips in Library. : Search for a video clip.

Video clip management:
Move cursor over the desired video clip.
: Play the video clip. : Re-name the video clip. : Remove the video clip from the Library.
Function
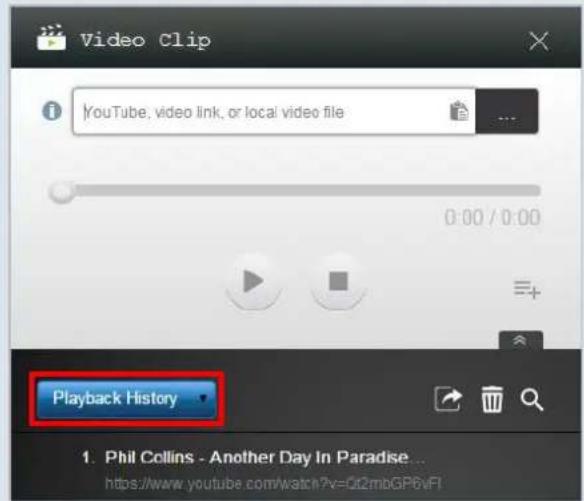
Description
Playback History:

4.3 File Sharing
This feature allows the moderator and participants to share resources (like files, screenshots, and webpage links) between their devices. The moderator can send resources to all participants while a participant can only send resources to the moderator.
4.3.1 File Sharing in Desktop Streamer
-
To open the File Sharing feature, click the tools tab. The File Sharing tool is labeled as "Share". NOTE: The file sharing button will only be activated when there is at least one other participant connected to the session besides the moderator.
-
Clicking on this button will bring up five options
a. Share a File: Select a file for sharing
b. Send Desktop Screenshot: Send the current desktop screenshot for sharing.
c. Share a Webpage: Send a webpage link for sharing.
d. Browse "GroupShare" Folder: Open the default folder at "C:\Users\
e. Browse Webpages Received: View the webpage links received from others.
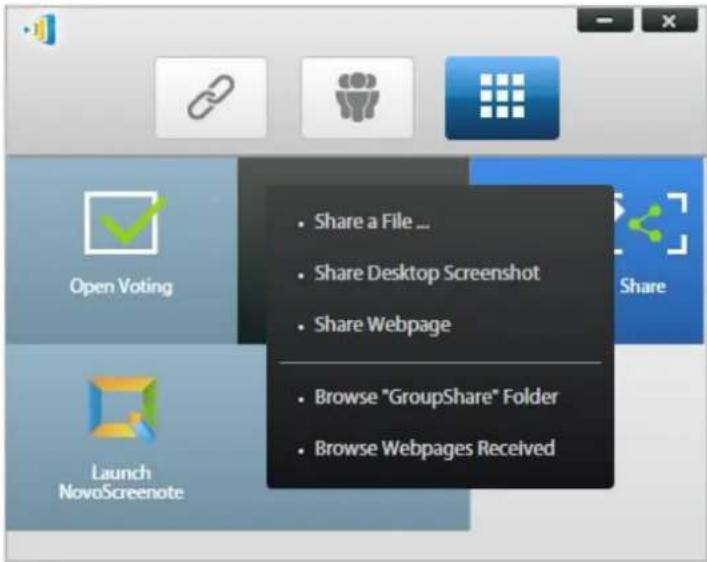
4.3.1.1 Sending
Share a File
- To share a file, click on "Share File" to bring up a file explorer. Select the desired one to continue. You will be prompted with the following dialog on the left. If you click on "Yes", a status dialog (on the right) will appear. You have the option to click on "Cancel" to abort the transfer.


- When a transfer is active, the ↑ will appear next to the "Share" tool button. Clicking on it will bring up the transfer status dialog, as shown in previous item.

- If you start sending a new file while the previous one is still in progress, you will be prompted with the following warning.
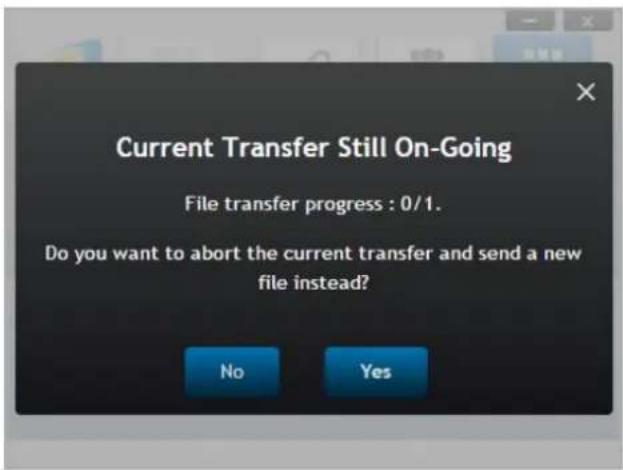
Share Desktop Screenshot
- To send the current desktop screenshot, click on "Share Desktop Screenshot" to start the process. A dialog box will appear after a few seconds, as shown below.
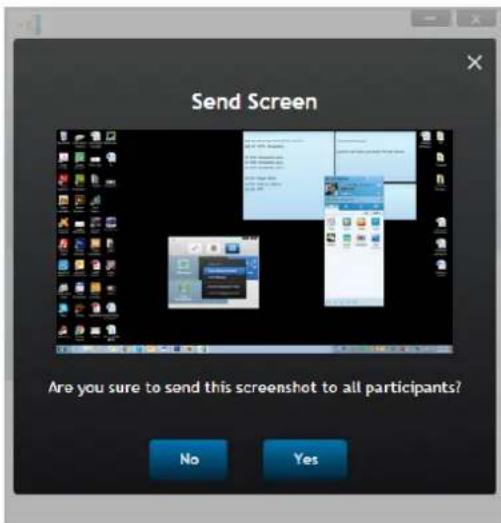
- Click on "Yes" to start the transfer.
Share a Webpage
- To send a webpage link, click on "Share a Webpage..." to start the process. A dialog box will be prompted for the user to enter the webpage link, as shown below.

- Click on "Yes" to start the transfer.
4.3.1.2 Receiving
Once your computer receives a file, a desktop screenshot, or a webpage link, you will be prompted with a notification dialog, as shown below. ("File Received" is used as an example here.)
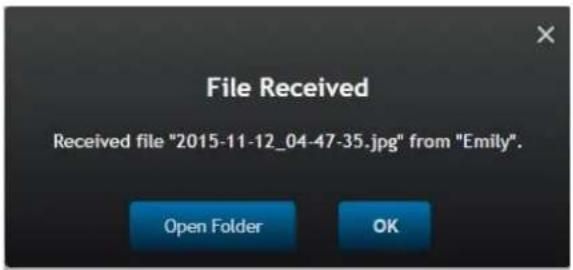
You have the options of opening the storage folder or opening the webpage link with your default browser.
NOTE: The file is named after "sender-name_original-filename".
4.3.2 File Sharing in NovoPresenter App
Folder "GroupShare" is dedicated to this feature, which is used to store received files. You can locate it in "Documents" tab.

4.3.2.1 Sending
Share a File/Image
To send a file or an image, long-press on the item until a popup menu shows up.
• As the moderator, you can send it to all participants
• As a regular participant, you can send it to the moderator only.
Then follow the on-screen instructions to start the transfer process.

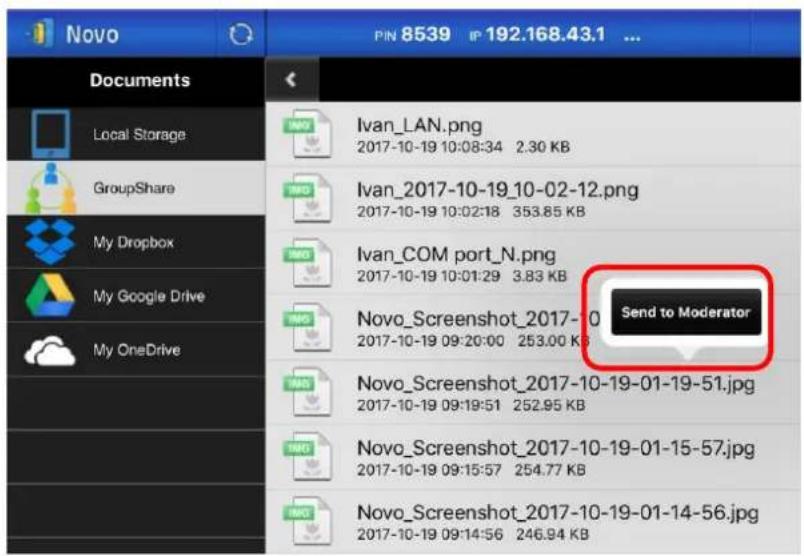
Share a Screenshot
Click on button "Send Screen" to start the transfer process.
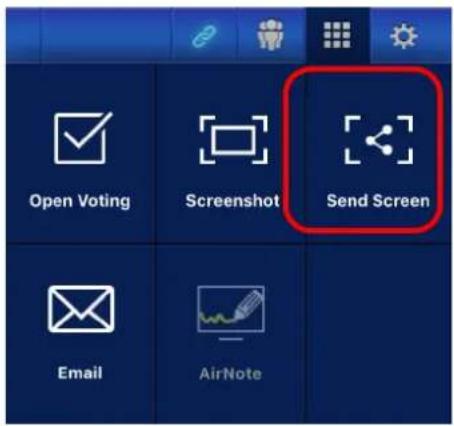
Share a Webpage
There are two ways to initiate sharing a webpage link.
- Long-press on a webpage bookmark in "My Bookmarks"
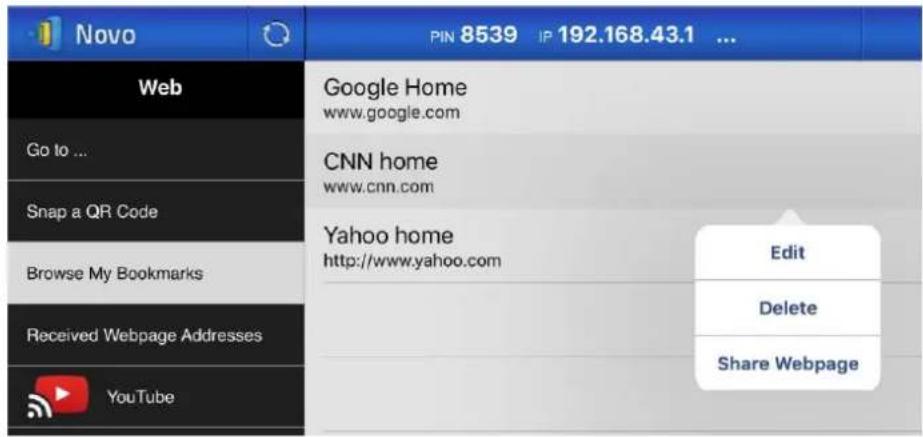
- In the browser screen, click on "Share" button, as highlighted in the following figure.

NOTE: When sending a file, the system will check to make sure any prior file transfer is completed. If not, an error message will pop up. You will have to resend the file when the current transfer is completed.
4.3.2.2 Receiving
Upon receiving a file, a screenshot, or a webpage link, you will be prompted with a notification dialog, such as the following.

4.3.3 Troubleshooting and rules about File Sharing
- If you attempt to share a file while nobody else is in the session, you will be prompted with message: "No recipient. Nobody else is online."
- If you attempt to start a file transfer when a prior transfer is still in progress you will be prompted with message: "System is busy. Please try again later."
- File transfer is limited to 10 MB. If the transfer size exceeds this limit, you will be prompted with message: "Failed to Send; file exceeds size limit (10 MB)."
4.4 User Groups
This feature allows the moderator to organize and monitor participants.
4.4.1 Organizing a Group
A Group consists of a group name, the moderator, and some members.
- Group name and moderator are self-explanatory.
- A member's entry has two fields, Name and Device
- Field "Name": member's name
Field "Device": device's name or some sort of number (like student ID)
There are two ways to organize a group.
1. Use Member Name
In the following figure, "Device" fields are left empty. Participants will use their name to connect to a NovoEnterprise session. In this case, only participants with a matching name can connect successfully.

2. Use Device name
In the following figure, “Device” field is filled. For a classroom teacher, the “Device” field could be student ID or a series of numbers, such as Tablet-01, Tablet-02, etc.
In this case, participants will use these IDs to connect to a NovoEnterprise session. The moderator will use this group feature to turn them into “human-readable” names (Emily, Jerry, etc.) instead of Tablet-01 & Tablet-02 in the participant list.
Only devices with matching name can connect successfully.
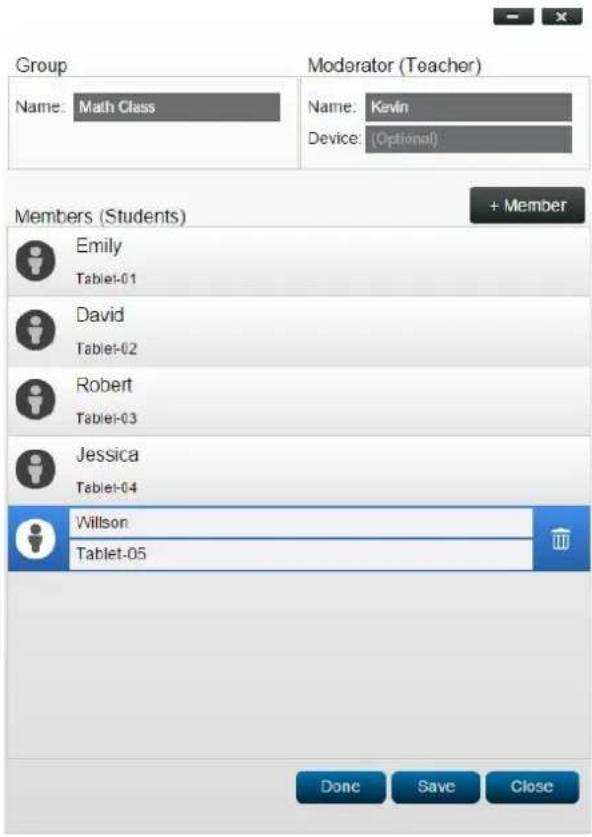
4.4.2 Creating User Group
4.4.2.1 Creating User Groups Manually
NOTE: This feature is available to NovoEnterprise PC/Mac software but not Chromebook/tablet/phone Apps.
- Open the NovoEnterprise Desktop Streamer application and then click on ☐. Click on button "Edit User Group" to add, change, and delete user groups.

- Click on button "Create" to add a new user group.

- A new window, "Edit User Group" will pop up. In this window, you will be able to edit group name, moderator information, and member information.

- Once you have finished adding members to a group, click "Save" and "Done to return to the "User Groups" list. This new group should appear in the list of user groups.
4.4.2.2 Saving a Presentation Session as a User Group
NOTE: This feature is only available in Education Edition.
A moderator for a presentation session can also quickly save the participants in a current presentation session as a user group via the Desktop Streamer and NovoPresenter application.
- Have all the users you want in the user group login to a presentation session, and then click the user group button.


- Select "Save User List" in the User Group menu.
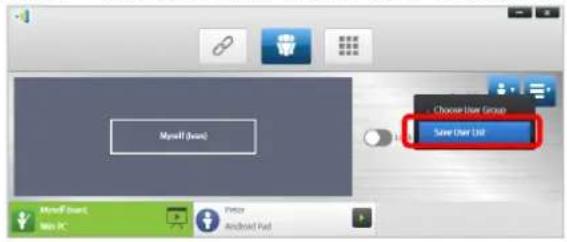

- Enter a name for the user group in the pop-up window and click "Save".


4.4.3 Managing Existing User Group
Click on one of the user groups and three action buttons will become visible on the right.
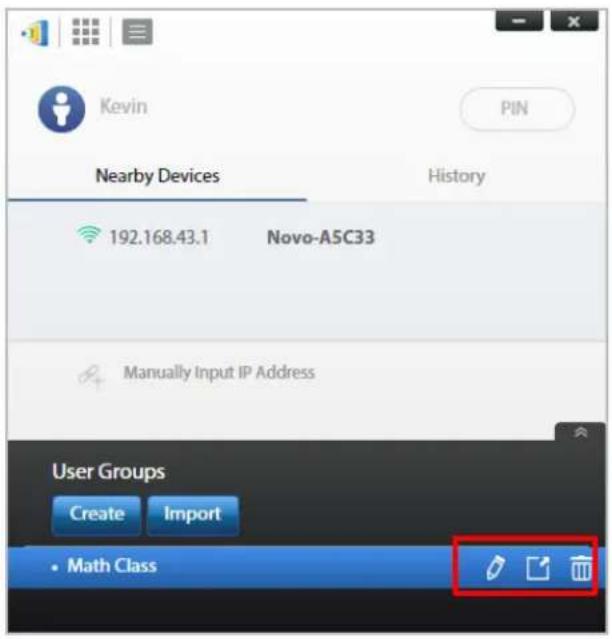
| (Edit) | Open “Edit User Group” window, allowing users to make changes. |
| (Export) | Export a User Group as an XML file, which can be loaded to any mobile devices and other PC/Mac. |
| (Delete) | Delete a User Group |
4.4.4 Applying User Group
Windows/Mac
- When you connect to a NovoEnterprise device, click the user group button.

- Select "Choose User Group" in the user group menu.

- Select the desired group.

- A user list will be displayed for the group you selected. Tabs "All", "Online", and "Offline" are a quick sorting based on participants' status.

- To de-select this group, click on the user group button and then click "De-Select this Group".

iPads
-
Copy the user group files (*.xml) to NovoPresenter App.
-
These User Group files are generated by using the Export function on the PC/Mac software.
• Refer to Section 3.2.2.3 on how to copy files to iPad. -
Launch NovoPresenter. Go to "Settings" → "User Groups" → "Refresh" to import the User Group files you just copy.


- After connecting to the NovoEnterprise device, tap the user groups button.

- Tap on "Choose User Group" to display list of available groups, and then select the desired group.

- A user list will be displayed for the group you selected. Using tabs "All", "Online", and "Offline" is a quick way to sort users based on their status.

- To de-select this group, tap the user group button, and then tap "De-select this group".
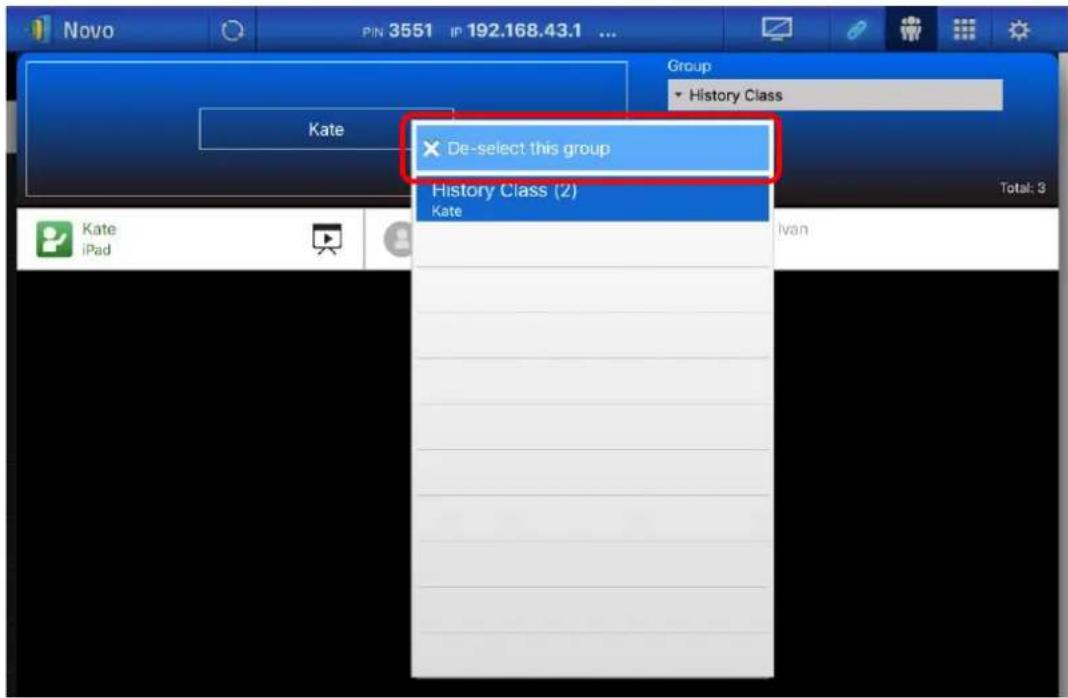
Android Tablets
- Connect your Android tablet to your computer.
- Copy User Group files (*.xml) to tablet's folder "
/NovoPresenter/UserGroups".
The rest of the operation is the same as the iPad's.
4.4.4.1 User Group Limitations in Desktop Streamer and NovoPresenter
When managing a presentation session using Education Edition, if "Lock Session" is enabled, "Choose User Group" will not be displayed or will be grayed-out. As a result, the moderator cannot apply an existing user group.

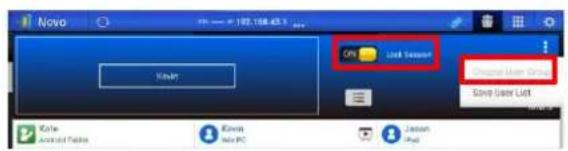
4.5 AirNote Annotation Tool
The AirNote annotation tool allows participants to annotate on the presentation display directly from their device during a full screen presentation.
4.5.1 Enabling AirNote
When a participant's screen is projected as a full screen presentation on a device they may enable other participants to directly annotate on the screen from their device via the AirNote button in the collaboration tools menu.


The Collaboration Tools Menu on the presenter's screen (Desktop Streamer / NovoPresenter)
NOTE: When AirNote is enabled the button in the collaboration tools menu will show "Disable AirNote". When AirNote is enabled the button in the menu will show "Enable AirNote". AirNote is disabled by default.
4.5.2 Using AirNote
- Once the presenter has enabled AirNote, participants in the presentation session can click the AirNote button to begin directly annotating from their device.

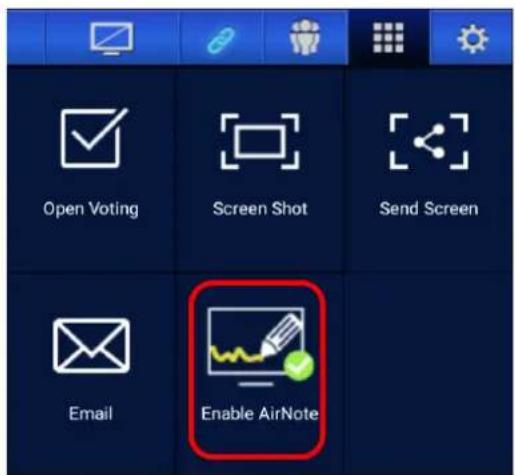
The Collaboration Tools Menu on a participant's screen (Desktop Streamer / NovoPresenter)
- A shot of the presentation display will be copied onto the participant's device where they can begin drawing annotations either by mouse (for Desktop Streamer users) or by touch (for
NovoPresenter users), with the annotations made from their device showing up on the presentation display.
NOTE: The drawing tools used in AirNote is the same as the note tools used in the Note function for Novo Desktop
Streamer. See 3.2.2.1 for more information on the note tools.
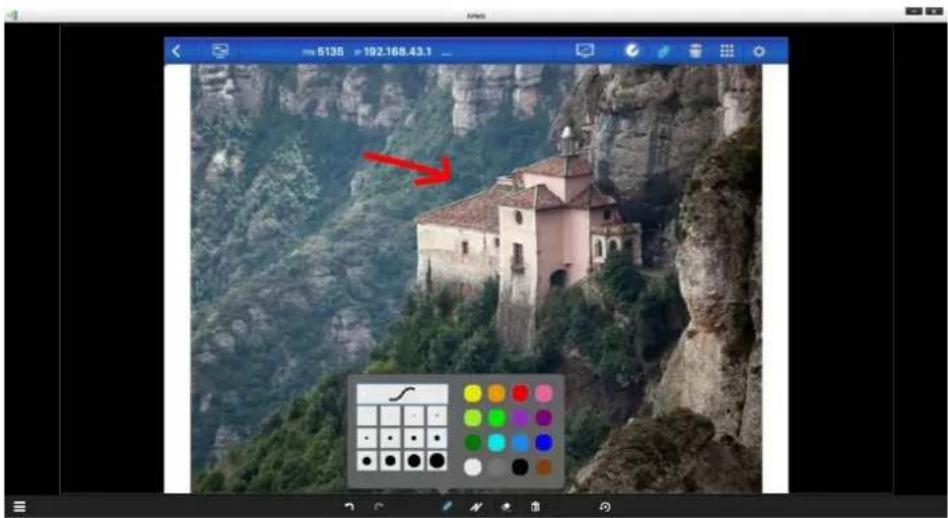
IMPORTANT: Only NovoPresenter participants using a tablet are able to draw annotations on their device. Smartphones users are unable to draw annotations due to screen size, and are only able to allow other participants to annotate on their projected screen.
4.5.3 Assigning AirNote Annotation via the Participants List
The AirNote annotation tool also allows the moderator for a presentation session to assign a participant in the session to annotate via AirNote during a full screen presentation directly from the moderator's participants list.
NOTE: In Corporation Edition, this function only can be used when the moderator function is enabled.
- Click or tap a participant's icon to bring up the options list when the presenter is making a presentation.


- Select "Launch AirNote Window".

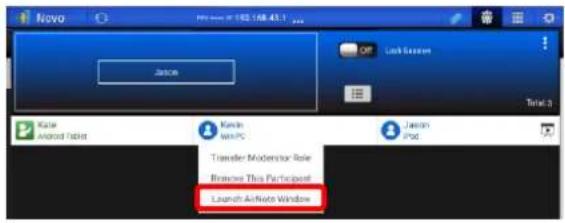
- When the AirNote icon appears, the designated participant can start using AirNote.


5 Configuring NovoEnterprise
As described in Section 1.3, you can configure a NovoEnterprise device from its home screen. On the other hand, you can also configure the device using Desktop Streamer App or via a MicroSD card.
5.1 Configuring NovoEnterprise via a MicroSD card
This function allows users to create and install a custom configuration file to automatically configure NovoEnterprise's settings via a microSD card.
Download and open NovoAutoConfig.xml template file
- Visit Vivitek website (http://www.vivitekcorp.com) and download the zip file "SD Configuration". Extract the "NovoAutoConfig.xml" file from the zip archive.
- Using either WordPad or another XML editing program, open the file "NovoAutoConfig.xml".
- If you are using WordPad, follow these steps. Otherwise follow the procedures of your preferred XML editor.
- Launch WordPad and open the template file. Use the view "All Documents" option when the Open File window appears.

Fill in the values of some settings:
- When opened, the text will look like this:
<?xml version="1.0" encoding="utf-8"?>
<configuration>
    <NovoEnterprise>
<edition>CORP or EDU</edition>
<wifi-ssid>example_wifi</wifi-ssid>
<wifi-password>example_wifi_password</wifi-password>
<remote-manager-ip-address>0.0.0.0</remote-manager-ip-address>
<remote-manager-port-number>20142</remote-manager-port-number>
</NovoEnterprise>
</configuration>
- Change appropriate setting value according to your setup environment, and delete the ones you don't need. The following table describes each setting in details.
| Key | Value (example) | Explanation |
| edition* | CORP or EDU | Edition value. It has to be either CORP or EDU. Refer to Section 1.4 for more details about these two editions. |
| wifi-ssid | (example_wifi) | Wi-Fi network SSID name |
| wifi-password | (example_wifi_password) | Wi-Fi network password |
| remote-manager-ip-address* | (0.0.0.0) | IP address of Remote Manager software |
| remote-manager-port-number* | 20142 | The port number used by Remote Manager software to listen to device reporting. 20142 is the default number. You need change it to match your Remote Manager's setting. |
NOTE: Settings marked with “*” are supported in NovoEnterprise software release V2.2 and above.
- Save your changes to the template.
Copy and install files
- Copy NovoAutoConfig.xml file to a microSD card.
- Insert the microSD card in the NovoEnterprise device.
- Press the "reset" button to reboot the NovoEnterprise device.
- After the reboot, those settings will be applied to the NovoEnterprise device.
5.2 DNS Mapping
DNS mapping is a capability that allows network technicians to bind the device name and the IP address of a NovoEnterprise device so that both items can be used interchangeably in the IP address field when a user is logging into a presentation session.
This provides convenience to users who want to join a presentation session using just the device name as the login, instead of using the IP address' numeric string.
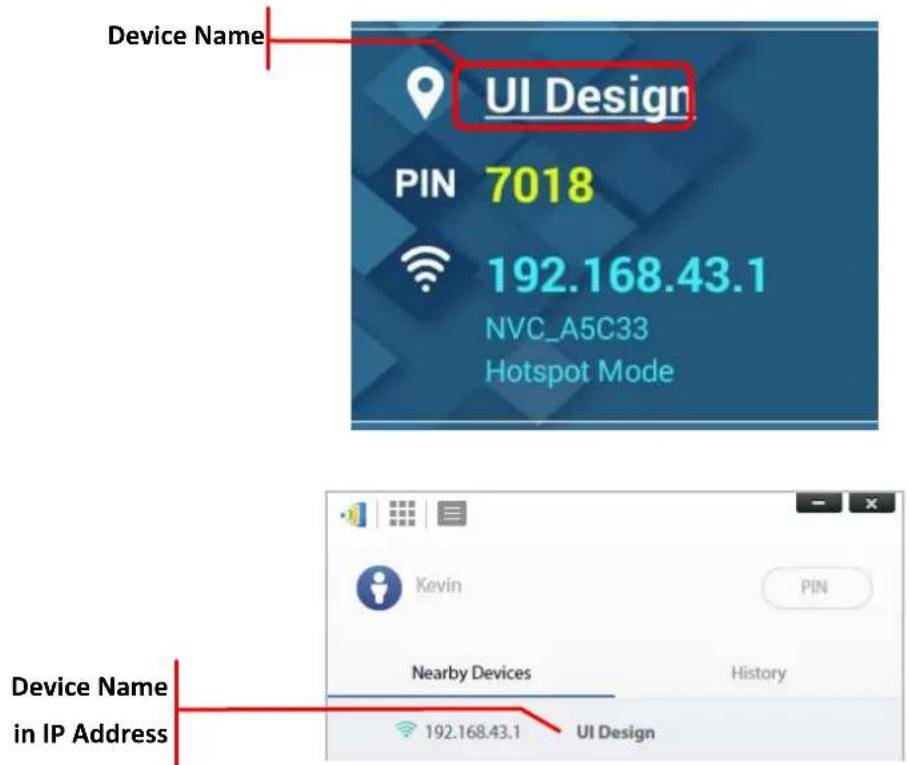
DNS mapping is allowed on the NovoEnterprise device but must be done via third-party software by a network technician. For more information on the DNS mapping procedure, check the network guide document provided on the Delta website.
6 NovoEnterprise Management
"Remote manager" is a stand-alone Windows/Mac application that enables system administrators to manage multiple NovoEnterprise devices from a single PC, making it ideal for corporations, schools or other large institutions.
6.1 Software setup
- Download the installation package from the Vivitek website (http://www.vivitekcorp.com).

- Click on the installation package and follow the on-screen instructions.
6.2 Adding/Removing/Grouping devices
Adding a device
- To add a new device to the device list, click on the "+ Device" button at the top of the screen.

- This will open the "Create New Device" window. Enter the device's ID, description (such as location), and IP address. You can also select a group (optional) from the group list pull-down menu. Click "OK" to complete adding the new device.

- When the new device is successfully added it will appear in the device list.
- If the device is currently connected, the connection indicator will become green. Otherwise, it is in red.
Connected

Disconnected

Removing a device
- To remove a device from the device list, click on the device you wish to remove from the list then click the icon.
- A confirmation dialog will pop up. Click "Yes" to confirm or "No" to cancel.
Refreshing device list
To refresh the list of devices in Remote Manager, click the "Refresh" in the upper left of the program screen.

Grouping devices
Click the “+ Group” button to add a new group, and then give a group name, description and add devices into the group.
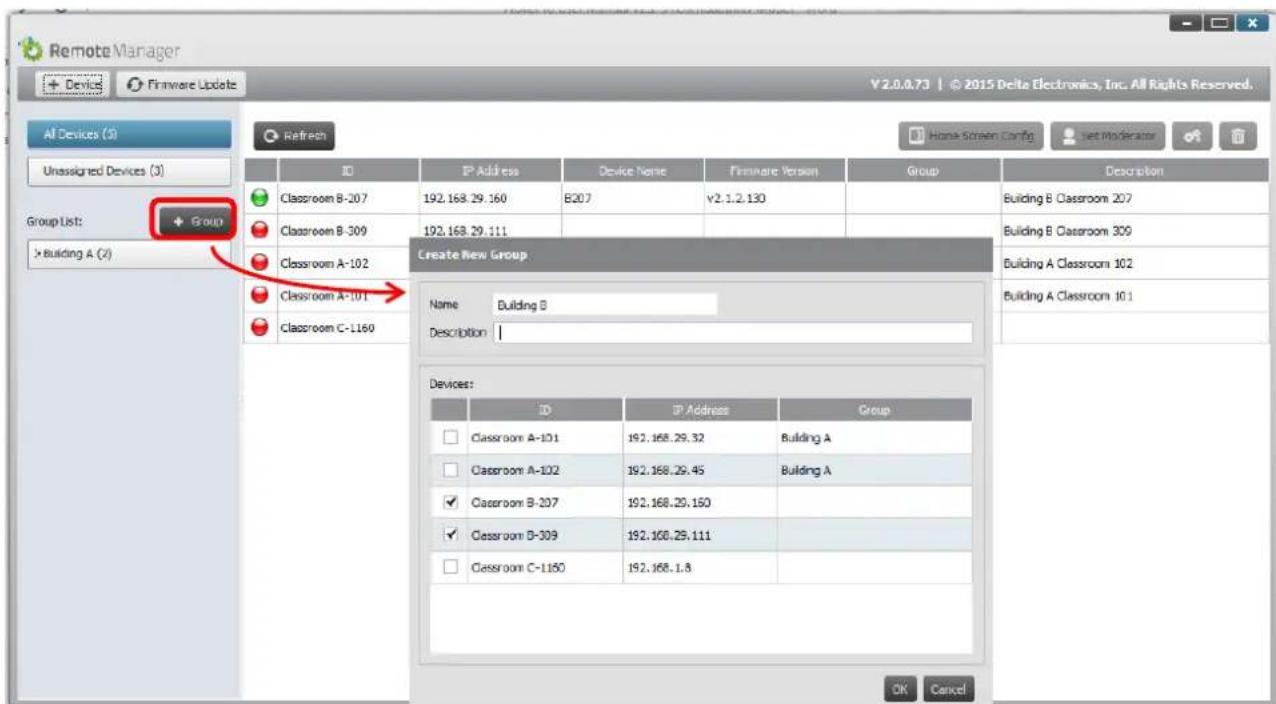
Once the group is defined, you can click the group name to view group device list and apply the settings to the group. In addition, you can click the button and to change and delete group respectively.
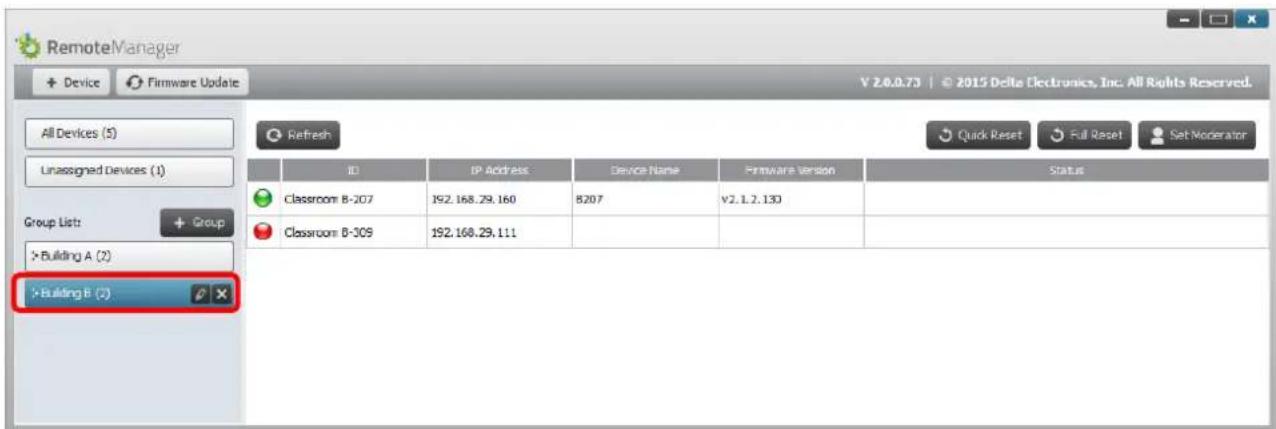
6.3 Managing device settings
- By selecting a device and clicking the device settings button 📄 you will be taken to the device settings management screen. From there you will be able to remotely view and/or configure the settings for each NovoEnterprise device on your network.
a. Editable fields are Device Name, Display Setting, Language, and Password (for Settings Protection).
b. View-only fields are Model, Edition, App Version, Build Version, Wi-Fi Mode, SSID, WiFi IP, and LAN IP.

- To edit the editable settings, click on button edit to start.
- Click "Refresh" to update the settings information.
- Click "Firmware Upgrade" to check for the latest device firmware. If an upgrade package is available, the upgrade process will be triggered.
- Click "Quick Reset" to reset the application.
- Click "Full Reset" to reboot the device.
- Click "Go Back" to return to the main screen.
6.4 Customizing Home Screen
The top-right region in NovoEnterprise Home Screen is a slideshow area that you can customize with your pictures and videos. Follow the steps below to do so.
- Click on button "Home Screen Config"
- Then a configuration dialog pops up, with two sections, "Preload" and "User-defined." a. Section "Preload": the built-in content. It has two video clips and 3 pictures. You can enable/disable their playback as well as adjust their playback duration.
b. Section "User-defined": the customization content. Users can edit the "playlist" for this slideshow area. The "playlist" consists of any numbers of pictures and videos.

- Click on button "Sync" to commit the changes to the NovoEnterprise device (including uploading the content.)
6.5 Updating firmware
Remote Manager allows you to initiate firmware upgrade for multiple NovoEnterprise devices by clicking on one button.
- Click "Firmware Update" on the home screen to go the Firmware Update screen.

- A list of connect devices will be displayed with check boxes in the left column. Select the device or devices you wish to check for updates, or click "Select All" to check all devices on the list. Click "Unselect All" to remove all checks.

- Once you have selected the devices to update, click "Update Now."
6.6 Setting moderator credentials
When using NovoEnterprise, the first connected user is assigned as the meeting moderator by default. However, this may not be the intended result in real world as the “real” moderator may not be the first user to join the session. The feature “Moderator Credentials” is designed to address this issue.
Here is how it works:
- Moderator Credentials, consisting of a list of moderators and the corresponding passwords, are stored on NovoEnterprise units. (Moderator Credentials are managed via software Remote Manager.)
- When a user device connects to a NovoEnterprise unit, the user device send its moderator password (if any) to the NovoEnterprise unit. If the password matches the one stored on the NovoEnterprise unit, the user device will be assigned as the moderator, regardless it is the first device to connect or not.
The picture below illustrates the process.
![graph LR A["RemoteManager"] -->|Manage "Moderator Credentials"| B["Moderator Credentials"] B -->|Submit "Password" for authentication| C["Laptop"] B -->|If matched, the user device is assigned as the moderator automatically.| D["User Devices"] B --> E["Monitor device with 'virea' signal"]](/content/2026/05/817759/images/3bfcdd3fa2f78a7410410e7101d2e77eb9696a42782ec6fbd35c9ad7925a3fb6.jpg)
Setting up Moderator Credentials in Remote Manager:
- To set moderator credentials for a device, select the device from the device list and click "Set Moderator."
- This will open the Moderator Credentials window. NOTE: For changes to take effect, make sure the green connection indicator is lit in the upper left of the screen.

- Enter the moderator name and password in the corresponding windows.
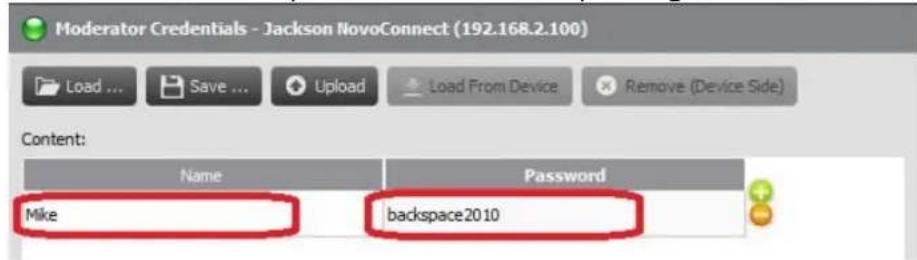
- Use the buttons to add or delete moderators from the list.
- Click "Save" to save the moderator credential file to the local PC.
- Click "Upload" to upload the new moderator credential file to the device.
- Click "Load from Device" to download a file saved on the device.
- Click "Load" to load a moderator credential file stored on local storage.
- Click "Remove (Device Side)" to remove moderator credentials currently stored on device.
NOTE: Moderator credential files will be stored in the XXXX.NCMC file format.
7 Specifications
| Hardware Specifications | |
| Power Supply | 5.0VDC, 2A |
| Power Consumption | < 10W |
| Output Resolutions | 1024x768 (XGA), 1280x720 (HD), 1280x800 (WXGA), 1920x1080 (Full HD), Auto Config |
| CPU (SoC) | ARM Quad-Core 1.6GHz |
| Memory | DDR3 2048MB |
| Storage | Internal: 8GB (eMMC Flash)External: microSD Card Slot (Up to 32GB) |
| Wi-Fi | 802.11 a/b/g/n/ac (2.4GHz & 5GHz)External 2T2R up to 300Mbps |
| Output | USB Input USB Type A x 2Video Output HDMI x 1Card Reader microSD Card Slot x 1Ethernet 10/100/1000 RJ45 type x 1 supported PoEAudio Out x 1Power Input Micro USB (5V 2A)Kensington Lock x 1 |
| Input | Video Input HDMI x 1Audio In x 1 , 3.5mm mini jack |
| LED Indicator | Green (System Power On) , Red (System Stand By) , Blue( Network Activity) |
| Button/Switch | Reset |
| Dimensions | 165x 123 x 21 mm (L x W x H) |
| Weight | 250 g |
| PC/Notebook Application Requirements | |
| CPU | Intel Pentium, 2GHz (Intel Core i3 and above are preferred) |
| Operating System | Windows 7/ 8 /10 (32 bits and 64 bits), Mac 10.7 and above |
| RAM | 4 GB |
| Android Mobile Device Application Requirements | |
| Operating System | Android 4.0 and above are recommended |
| Resolution | 1024x768, 1280x800, or higher are recommended |
| iOS Mobile Device Application Requirements | |
| Operating System | iOS 7.0 and above |
| Device Type | iPad, iPad 2, iPad 3, iPad 4, iPad mini, and iPad Air |
8 Troubleshooting
Q: NovoEnterprise does not power up or operate.
A: Check if the proper DC power supply with the appropriate operating voltage and sufficient operating current (5VDC, 2A) is connected to the Micro-USB port of the NovoEnterprise.
Q: My PC cannot link to NovoEnterprise wirelessly.
A: For your PC to link to NovoEnterprise, your PC must either have a built-in a Wi-Fi module or an external Wi-Fi adapter, and Wi-Fi must be enabled. If the NovoEnterprise is set to Hotspot Mode (factory default mode), choose NovoEnterprise's SSID from the available SSID list. If NovoEnterprise is set to Client Mode and is connected to a specific Wi-Fi AP, choose that AP's SSID from the available SSID list.
Q: The play/pause buttons do not work.
A: These buttons are functional only for the current presenters.
Q: I cannot connect to the Internet on NovoEnterprise.
A: This is normal if the NovoEnterprise is set to Hotspot Mode, since NovoEnterprise by itself does not support WAN (wireless wide area network) access. To access the Internet for tasks such as Web browsing on NovoEnterprise, please set the Wi-Fi to Client Mode and connect to a Wi-Fi AP that that is connected to the Internet.
Q: My PC or mobile device has failed to connect to NovoEnterprise.
A: First, make sure that Wi-Fi is enabled on your device. If NovoEnterprise is set to Hotspot Mode (factory default mode), choose the NovoEnterprise's SSID from the available SSID list. If NovoEnterprise is set to Client Mode and is connected to a Wi-Fi router, choose that router's SSID from the available SSID list.
Q: I cannot choose to present in full screen or in one of the split screens.
A: Only the host has the authority to decide whether your presentation is to be seen in full screen or one of the split screens. You may be invited to be the host: 1) if the Reset button is clicked on the NovoEnterprise, 2) if the host explicitly hands over host control to you, or 3) if all other presenters have disconnected from NovoEnterprise.
Q: I am the host, but I cannot preview other participants' screens.
A: To preview a participant's screen before sending a presentation invitation, that participant must have screen preview enabled on his device.
Q: My device's on-screen display looks stretched or compressed on NovoEnterprise's screen output.
A: There may be an aspect ratio mismatch between the NovoEnterprise's chosen output resolution and your device's screen aspect ratio (e.g. your device's screen has the 4:3 aspect ratio, and you have set NovoEnterprise's output resolution to a 16:9 or 16:10 option). Try to set the display resolution on the NovoEnterprise so that it has an aspect ratio that either matches that of your device or is as close to your device's screen aspect ratio as possible. You have the option of letting NovoEnterprise automatically determines the best output resolution by selecting Auto Config in the display settings.
Q: During the presentation, my PC/Mac computer's cursor is flickering.
A: You can try a different screen resolution for your PC/Mac computer. You can also try different settings for Projection Mode, Visual Quality, and Screen Refresh Rate (which need to be set before you connect your PC/Mac computer to your NovoEnterprise) until the problem disappears or is minimized.
9 Safety Information
Refer to the manual and take note of the safety instructions before operating your device.
- Ensure that the power source's output voltage matches your device's operating voltage.
- To prevent the risk of electric shock, do not operate this device near water or in environments of high moisture.
- Do not disassemble or try to repair this device by yourself. Contact your local Delta service center for assistance.
- Keep the device's plastic packages out of the reach of children.
10 Copyright Information
Copyright 2013 Delta Electronics, Inc. All Rights Reserved.
Android and Google are registered trademarks of Google Inc.
ARM is a registered trademark of ARM Inc.
App Store, iPad, iTunes, Mac, and Mac OS are service marks, trademarks, or registered trademarks of Apple Inc.
IOS is a trademark or registered trademark of Cisco in the U.S. and other countries and is used under license.
miniSD, microSD, miniSDHC, microSDHC, microSDXC, smartSD, smartSDHC, SDIO and miniSDIO are all trademarks or registered trademarks of SD-3C, LLC in the United States, other countries or both.
Microsoft and Windows are either trademarks or registered trademarks of Microsoft Corporation in the United States and/or other countries.
Pentium and Core i3 are registered trademarks of Intel Corporation.
VGA and XGA are registered trademarks of International Business Machines Corporation.
Product names, logos, brands, and other trademarks featured or referred to in this materials are the property of their respective trademark holders.
Vivitek Europe
7F, No. 186, Ruey Kuang Road, Neihu, Taipei 11491
Taiwan R.O.C.
T: +886-2-8797-2088
F: +886-2-6600-2358
- WIRELESS COLLABORATION
- NOVOENTERPRISE
- TABLE OF CONTENTS
- 1 GETTING STARTED 6
- 2 SETTING UP NETWORK 19
- 3 MAKING A PRESENTATION....27
- 3.2 PRESENTING WITH ANDROID/IOS DEVICES 42
- 3.2.2 STEP 2: MAKE A PRESENTATION....47
- 3.2.3 STEP 3: PRESENTATION MANAGEMENT....62
- 3.3 SESSION MANAGEMENT VIA NOVOENTERPRISE HOME SCREEN 73
- 3.4 IOS/ANDROID FULL MIRRORING....80
- 3.5 PRESENTING WITH NOVOENTERPRISE 89
- 3.6 DIRECT ANNOTATIONS....91
- 4 COLLABORATION TOOLS 92
- 4.1 VOTING/POLLING....94
- 4.2 VIDEO CLIPS AND YOUTUBE STREAMING 100
- 4.3 FILE SHARING 104
- 4.4 USER GROUPS....112
- 4.5 AIRNOTE ANNOTATION TOOL....121
- 5 CONFIGURING NOVOENTERPRISE....124
- 6 NOVOENTERPRISE MANAGEMENT 127
- 1 GETTING STARTED
- 1.1 PACKAGE CONTENT
- 1.2 HARDWARE SETUP
- 1.2.1 NOVOENTERPRISE
- NOTE
- 1.2.2 REMOTE CONTROL
- 1.2.2.1 PAIRING THE REMOTE CONTROL
- 1.3 NOVOENTERPRISE HOME SCREEN
- 1 BASIC DEVICE CONFIGURATION
- 2 SOFTWARE INSTALLATION
- 3 CONNECTION INFORMATION
- 4 SHORTCUTS
- 1.4 BASIC DEVICE CONFIGURATION
- DESCRIPTION
- SHOW PARTICIPANTS
- WI-FI
- DISPLAY
- RESOLUTION
- AUTO CONFIG
- XGA (1024X768)
- SCALING
- HDMI-CEC
- SLEEP TIMER
- SETTINGS
- FUNCTION
- DEVICE EDITION
- HIDE SESSION INFO
- HIDE QR CODE
- SHOW PAIRED LAUNCHERPLUS
- CONFIGURE SLIDESHOW
- RESTART
- 1.5 CLIENT SOFTWARE DOWNLOAD AND INSTALLATION
- SOFTWARE DOWNLOAD/INSTALLATION FOR WINDOWS AND MAC
- APP DOWNLOAD/INSTALLATION FOR ANDROID/IOS
- APP DOWNLOAD/INSTALLATION FOR CHROMEBOOKS
- 2 SETTING UP NETWORK
- 2.1 NETWORK CONNECTION
- 2.1.1 ETHERNET
- 2.1.2 WI-FI CLIENT MODE
- LOGGING IN A WI-FI NETWORK WITH 802.1X AUTHENTICATION
- 2.1.3 WI-FI HOTSPOT MODE
- 2.1.4 DUAL-NETWORK CONFIGURATION
- 2.2 PORT NUMBERS AND INTRANET FIREWALL
- 3 MAKING A PRESENTATION
- 3.1 PRESENTING WITH WINDOWS/MAC/CHROMEBOOK
- LAUNCH PRESENTATION APPLICATION
- 3.1.1 STEP 1: SET UP SESSION PARAMETERS
- 3.1.2 STEP 2: CONNECT TO YOUR NOVOENTERPRISE DEVICE
- SET LOGIN OPTIONS FOR THE PRESENTATION
- MORE OPTIONS IN THE OPTIONS MENU
- PROJECTION MODE
- SYSTEM TRAY NOTIFICATION
- 3.1.3 STEP 3: MAKE A PRESENTATION
- 3.1.4 STEP 4: PRESENTATION MANAGEMENT
- 3.1.4.1 MODERATOR
- 3.1.4.2 ROLE ASSIGNMENT
- 3.1.4.3 MULTI-SCREEN PROJECTION, WITHDRAW PROJECTION, AND REMOVE A PARTICIPANT
- FULL-SCREEN PROJECTION
- MULTI-SCREEN PROJECTION
- SCREEN PREVIEW (EDUCATION EDITION ONLY)
- WITHDRAWING PROJECTION
- 3.1.4.4 PAUSE, RESUME, DISCONNECT AND LOCK SESSION
- 3.1.4.5 LOCK/UNLOCK STUDENTS' TABLETS/PHONES (EDUCATION EDITION ONLY)
- TO LOCK/UNLOCK STUDENTS' TABLETS/PHONES
- MOBILE DEVICE LOCKED
- 3.1.4.6 TERMINATE SESSION (EDUCATION EDITION ONLY)
- 3.2 PRESENTING WITH ANDROID/IOS DEVICES
- 3.2.1 STEP 1: CONNECT TO YOUR NOVOENTERPRISE DEVICE
- 3.2.1.1 CONNECT VIA QR CODE
- CONNECT VIA QR CODE
- SUCCESSFUL CONNECTION
- VIEW PARTICIPANTS LIST
- 3.2.1.2 CONNECT VIA MANUAL INPUT
- IP ADDRESS
- PIN
- YOUR NAME
- MAKE CONNECTION
- 3.2.2 STEP 2: MAKE A PRESENTATION
- 3.2.2.1 MY NOTES
- CREATE AND SHARE CUSTOM SCREEN NOTES
- USE THE NOTE TOOLS
- ADD NEW PAGES
- CLOSE AND SAVE CHANGES
- 3.2.2.2 GALLERY
- 3.2.2.3 DOCUMENTS (LOCAL STORAGE)
- TAP "SYNC" TO START TRANSFERRING THE SELECTED FILES
- NAVIGATE DOCUMENT LIST
- VIEW DOCUMENTS
- 3.2.2.4 DOCUMENTS (DROPBOX)
- VIEW DOCUMENT
- UNLINK THE DROPBOX ACCOUNT
- 3.2.2.5 WEB
- WEB
- GO TO
- SNAP A QR CODE
- BROWSE MY BOOKMARKS
- BROWSE WEBPAGES RECEIVED
- YOUTUBE
- WEB PAGE PRESENTATION
- 3.2.2.6 ANNOTATION
- 3.2.2.7 SCREENSHOT
- TAKE A SCREENSHOT
- 3.2.3 STEP 3: PRESENTATION MANAGEMENT
- 3.2.3.1 MODERATOR
- 3.2.3.2 ROLE ASSIGNMENT
- 3.2.3.3 ROLE CHANGE, MULTI-SCREEN, WITHDRAW PROJECTION, AND REMOVE A USER
- REMOVING A PARTICIPANT
- 3.2.3.4 DISCONNECT AND LOCK SESSION
- 3.2.3.5 LOCK/UNLOCK STUDENTS' TABLETS/PHONES (EDUCATION EDITION ONLY)
- 3.2.3.6 TERMINATE SESSION (EDUCATION EDITION ONLY)
- 3.2.3.7 SOFTWARE COMPATIBILITY
- 3.2.3.8 RESET
- 3.3 SESSION MANAGEMENT VIA NOVOENTERPRISE HOME SCREEN
- 3.3.1 STEP 1: BRING UP THE PARTICIPANT LIST
- PARTICIPANT LIST
- MORE OPTIONS
- 3.3.2 STEP 2: MANAGE THE PRESENTATION
- 3.3.2.1 MORE OPTIONS
- 3.3.2.2 BRINGING UP SESSION INFO
- DURING THE PRESENTATION
- 3.3.2.3 ADD PROJECTION, FULL SCREEN, WITHDRAW PROJECTION, AND REMOVE A PARTICIPANT
- ADD PROJECTION
- REMOVE A PARTICIPANT
- CANCEL
- FULL SCREEN
- WITHDRAWING PROJECTIONS
- 3.3.2.4 ALLOCATION OF THE DISPLAY
- 3.4 IOS/ANDROID FULL MIRRORING
- 3.4.1 IOS FULL MIRRORING
- 3.4.2 ANDROID FULL MIRRORING
- 3.4.3 MULTI-SCREEN IOS/ANDROID/PC MIRRORING
- 3.4.4 DEFAULT SCREEN MIRRORING (FOR ANDROID ONLY)
- 3.5 PRESENTING WITH NOVOENTERPRISE
- PRESENT WITH NOVOPRESENTER
- RETURN TO NOVOENTERPRISE HOME SCREEN
- 3.6 DIRECT ANNOTATIONS
- TO ACTIVATE DIRECT ANNOTATIONS
- DIRECT ANNOTATION TOOLS
- 4 COLLABORATION TOOLS
- 4.1 VOTING/POLLING
- 4.1.1 EDIT VOTING/POLLING
- CREATING A QUESTION SET
- CHOOSE QUESTION TYPE FROM THE "TYPE" DROP-DOWN LIST
- 4.1.2 ADMINISTER VOTING/POLLING
- START VOTING
- 4.1.3 RESPOND TO VOTING/POLLING
- 4.2 VIDEO CLIPS AND YOUTUBE STREAMING
- 4.2.1 STREAMING LOCAL VIDEO FILES
- 4.2.2 STREAMING YOUTUBE VIDEO
- 4.2.3 VIDEO CONTROLS
- TO CONTROL THE PLAYBACK
- LIBRARY
- VIDEO CLIP MANAGEMENT
- PLAYBACK HISTORY
- 4.3 FILE SHARING
- 4.3.1 FILE SHARING IN DESKTOP STREAMER
- 4.3.1.1 SENDING
- SHARE A FILE
- SHARE DESKTOP SCREENSHOT
- SHARE A WEBPAGE
- 4.3.1.2 RECEIVING
- 4.3.2 FILE SHARING IN NOVOPRESENTER APP
- 4.3.2.1 SENDING
- SHARE A FILE/IMAGE
- SHARE A SCREENSHOT
- 4.3.2.2 RECEIVING
- 4.3.3 TROUBLESHOOTING AND RULES ABOUT FILE SHARING
- 4.4 USER GROUPS
- 4.4.1 ORGANIZING A GROUP
- USE MEMBER NAME
- USE DEVICE NAME
- 4.4.2 CREATING USER GROUP
- 4.4.2.1 CREATING USER GROUPS MANUALLY
- 4.4.2.2 SAVING A PRESENTATION SESSION AS A USER GROUP
- 4.4.3 MANAGING EXISTING USER GROUP
- 4.4.4 APPLYING USER GROUP
- WINDOWS/MAC
- IPADS
- ANDROID TABLETS
- 4.4.4.1 USER GROUP LIMITATIONS IN DESKTOP STREAMER AND NOVOPRESENTER
- 4.5 AIRNOTE ANNOTATION TOOL
- 4.5.1 ENABLING AIRNOTE
- 4.5.2 USING AIRNOTE
- 4.5.3 ASSIGNING AIRNOTE ANNOTATION VIA THE PARTICIPANTS LIST
- 5 CONFIGURING NOVOENTERPRISE
- 5.1 CONFIGURING NOVOENTERPRISE VIA A MICROSD CARD
- DOWNLOAD AND OPEN NOVOAUTOCONFIG.XML TEMPLATE FILE
- FILL IN THE VALUES OF SOME SETTINGS
- COPY AND INSTALL FILES
- 5.2 DNS MAPPING
- 6 NOVOENTERPRISE MANAGEMENT
- 6.1 SOFTWARE SETUP
- 6.2 ADDING/REMOVING/GROUPING DEVICES
- ADDING A DEVICE
- REMOVING A DEVICE
- REFRESHING DEVICE LIST
- GROUPING DEVICES
- 6.3 MANAGING DEVICE SETTINGS
- 6.4 CUSTOMIZING HOME SCREEN
- 6.5 UPDATING FIRMWARE
- 6.6 SETTING MODERATOR CREDENTIALS
- SETTING UP MODERATOR CREDENTIALS IN REMOTE MANAGER
- 8 TROUBLESHOOTING
- Q: NOVOENTERPRISE DOES NOT POWER UP OR OPERATE
- Q: MY PC CANNOT LINK TO NOVOENTERPRISE WIRELESSLY
- Q: THE PLAY/PAUSE BUTTONS DO NOT WORK
- Q: I CANNOT CONNECT TO THE INTERNET ON NOVOENTERPRISE
- Q: MY PC OR MOBILE DEVICE HAS FAILED TO CONNECT TO NOVOENTERPRISE
- Q: I CANNOT CHOOSE TO PRESENT IN FULL SCREEN OR IN ONE OF THE SPLIT SCREENS
- Q: I AM THE HOST, BUT I CANNOT PREVIEW OTHER PARTICIPANTS' SCREENS
- Q: MY DEVICE'S ON-SCREEN DISPLAY LOOKS STRETCHED OR COMPRESSED ON NOVOENTERPRISE'S SCREEN OUTPUT
- 9 SAFETY INFORMATION
- 10 COPYRIGHT INFORMATION
- VIVITEK EUROPE
Brand : VIVITEK
Model : NovoEnterprise NE3000EU
Category : Access Point