AMDV960H8 - Security Camera Amcrest - Free user manual and instructions
Find the device manual for free AMDV960H8 Amcrest in PDF.


User questions about AMDV960H8 Amcrest
0 question about this device. Answer the ones you know or ask your own.
Ask a new question about this device
Download the instructions for your Security Camera in PDF format for free! Find your manual AMDV960H8 - Amcrest and take your electronic device back in hand. On this page are published all the documents necessary for the use of your device. AMDV960H8 by Amcrest.
USER MANUAL AMDV960H8 Amcrest
AMDV960H4 User Manual
Version 1.2.1
TABLE OF CONTENTS
1 PRODUCTION 4
1.1. Product Key Features 4
1.2. Front Panel Controls 5
1.3. USB Mouse 6
1.4. Soft Keyboard 7
1.5. Rear Panel Diagram 7
2 GETTING STARTED 9
3 LIVE VIEW 10
3.1. Understanding Live Preview Icons 10
3.2. Understanding Live Preview Toolbar 10
3.3. Understanding Home Menu 11
3.4. Using Digital Zoom 11
3.5. PTZ Control 12
3.5.1 PTZ Presets, Patrols & Patterns 12
3.5.2 PTZ Context Menu 12
4 IP CHANNEL 14
5 DISPLAY SETTINGS 15
5.1. Camera Settings 15
5.2. Displays Output Settings 16
6 RECORD SETTINGS 17
6.1. Initializing Record Settings 17
6.2. Scheduling a Recording 18
7 PLAYBACK AND BACKUP 20
7.1. Playback files from a video search 20
7.2. Understanding the Playback Interface 21
7.3. Backup the recorded file 22
8 NETWORK SETTINGS 24
8.1 Configuring General Settings 24
8.2 Configuring Advanced Settings 25
8.2.1 DDNS 26
8.2.2 NTP 26
8.2.3 E-mail Settings 26
8.2.4 FTP Settings 27
8.2.4 IP Filter 28
9 ALARM SETTINGS 29
9.1 Motion Detection 29
9.2 Detecting Video Loss 30
9.3 Detecting Exception 31
10 DEVICE MANAGEMENT 32
10.1 Managing HDDs 32
10.2 Configuring PTZ Settings 33
11 SYSTEM SETTINGS 34
11.1 General 34
11.2 User 35
11.2.1 Adding a New User 35
11.3 System Information 37
11.4 Maintenance 38
12 APP FOR PHONE AND TABLET 40
12.1 Configure the Amcrest Link 40
12.2 Live view in Amcrest Link 41
12.3 Playback in Amcrest Link 42
13 SMARTCLIENT/WEB FOR PC 44
13.1 Login Your Device 44
13.2 Live View 45
13.3 Playback 46
13.3.1 Remote playback and download 46
13.3.2 Playback Control 47
13.3 Local Settings 47
13.4 Device Settings 48
1 PRODUCTION
Thank you for your purchase of our Amcrest DVR. To get the most out of your device(s), please read through this User Manual thoroughly. This user manual covers all the models of our DVR.
1.1. Product Key Features
Compression
- Analog channels support PAL/NTSC video input, and the recording resolution supports up to 960H
- Digital channels support 1M, 1.3M, 2M pixels IP camera. Some models support up to 3M pixel IP camera.
- Video encoding parameters of each channel can be set separately, including frame rate and bit rate.
● Supports both composite stream and video only stream. Audio and video streams are strictly simultaneous.
Monitoring
● Supports VGA and HDMI video output. The display resolution supports up to 1080P.
● Supports 1/4/8/9/16 screen live view.
● Supports digital zoom on live view.
● Supports privacy mask.
● Supports PTZ preset and patrol.
HDD Management
● Supports 1\~8 internal SATA HDD(s) up to 3TB capacity.
● Supports 1\~2 external eSATA HDD(s) up to 3TB capacity.
● Supports S.M.A.R.T. technology.
- Use pre-allocating hard disk management technology and no disk fragments.
Recording and Playback
● Supports cycle and non-cycle recording modes.
● Supports manual, continuous, and motion recording.
● Supports 8 recording time periods with separate recording types.
● Supports Pre-record and Post-record.
● Supports video data search and playback by channel number, recording type, time, and event,
● Supports pause, rewind, play fast, play slow, skip forward, and skip backward when in playback, located in the progress bar.
Backup
● Supports USB device and network remote backup.
Alarm and Exception
● Supports various alarm inputs such as hard disk full, network break, IP conflict, and hard disk error.
● Supports various alarm responses such as camera recording, on screen warning, audible warning, send email, etc.
Network
● Supports 10/100 adaptive network interface.
● Supports TCP/IP protocols, PPPoE, DHCP, DNS, DDNS, NTP, UPnP, ONVIF, RTSP etc.
● Supports remote search, playback, and download video files.
● Supports remote configuration.
● Supports remote image capturing.
● Supports remote PTZ control.
Others
● Supports front panel, mouse, IR control operation.
● Supports multi-level user management; each user can have individual DVR access rights.
● Powerful DVR log, including operation, alarm, information, and exception log.
1.2. Front Panel Controls
text_image
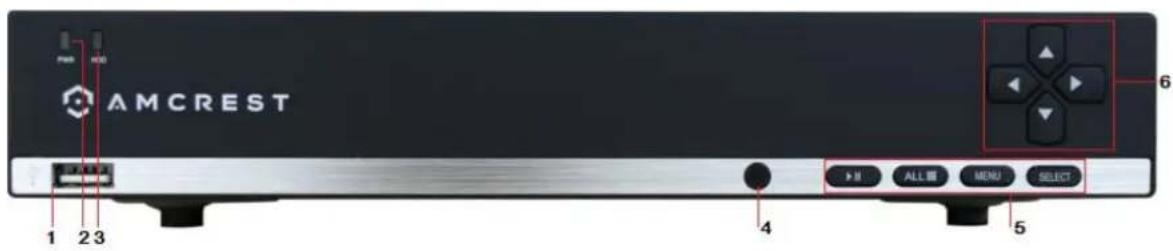
AMCREST 1 2 3 4 5 6 ALL MENU SELECTThe controls on the front panel include:
-
USB Ports: Universal Serial Bus (USB) ports for additional devices such as a USB mouse and USB Hard Disk Drive (HDD).
-
POWER: POWER indicator lights on when DVR is powered on.
-
HDD: HDD indicator lights up when the hard drive is active and, flashes rapidly when recording.
-
IR Receiver: Receiver for IR remote.
-
Function button:
a) Play pause button is used for playback control
b) All button is used to live-view all the channels
c) Menu button is used to pop-up the main menu
d) SELECT button is used to confirm selection in any of the menu modes
- Direction button: DIRECTION buttons are used to navigate between different fields and items in menus. In Preview mode, these buttons can be used to cycle through channels.
1.3. USB Mouse
A regular 3-button (Left/Right/Scroll-wheel) USB mouse can also be used with this DVR. The buttons on the mouse correspond to:
- Left Button:
● Single-Click: Select a component of a menu, such as a button or an input field.
- Double-Click: Switch between single screen and multi-screen mode in Preview/Playback mode.
- Click and Drag: Clicking and dragging the Left mouse button can be used to control the digital zoom area. It can also be used to change the live view channel sequence or setup the alarm areas.
- Right Button:
- Single-Click: Shows pop-up menu or exit current UI page.
- Scroll-wheel:
● This is used to change the selected item for list control.
1.4. Soft Keyboard
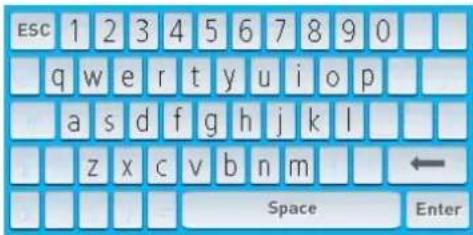
When a mouse is used to perform task on the DVR, clicking on a text input field will bring up the Soft Keyboard.
text_image
ESC 1 2 3 4 5 6 7 8 9 0 q w e r t y u i o p a s d f g h j k l z x c v b n m ← Space EnterThe buttons on the soft keyboard represents:

Lowercase: Designates lowercase input is being used.

Uppercase: Designates uppercase input is being used.

Backspace: Delete the character in front of the cursor.

Space: Input spaces between letters.

Enter: Confirm selection.

ESC: Exit out of Soft Keyboard.
1.5. Rear Panel Diagram
text_image
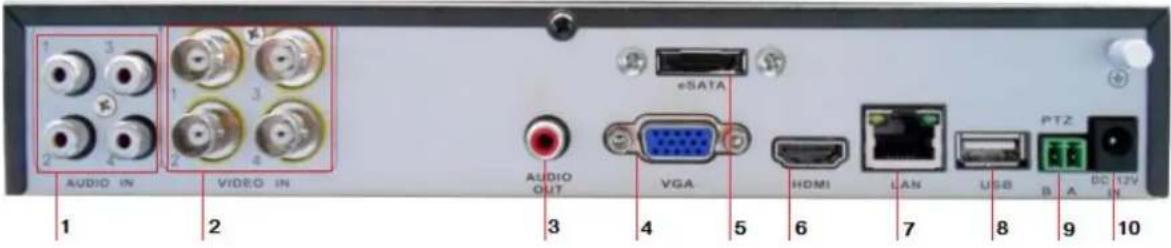
AUDIO IN VIDEO IN eSATA AUDIO OUT VGA HDMI LAN USB PTZ DC 12V 1 2 3 4 5 6 7 8 9 10| No | Item | Description |
| 1 | AUDIO IN | RCA connectors for analog audio input. |
| 2 | VIDEO IN | BNC connector for analog video input. |
| 3 | AUDIO OUT | RCA connectors for analog audio output. |
| 4 | VGA | DB9 connector for VGA output. Display local video output and menu. |
| 5 | eSATA | eSATA port, connect eSATA HDD for recording or backup |
| 6 | HDMI | HDMI output, Display local video/Audio output and menu. |
| 7 | LAN | Connector for LAN (Local Area Network). |
| 8 | USB | Connector for USB device. |
| 9 | PTZ | PTZ control port (Some models don’t support this feature)- RS485. |
| 10 | DC POWER IN | 12V DC power input. |
2 GETTING STARTED
2.1 Starting and Shutting Down Your DVR
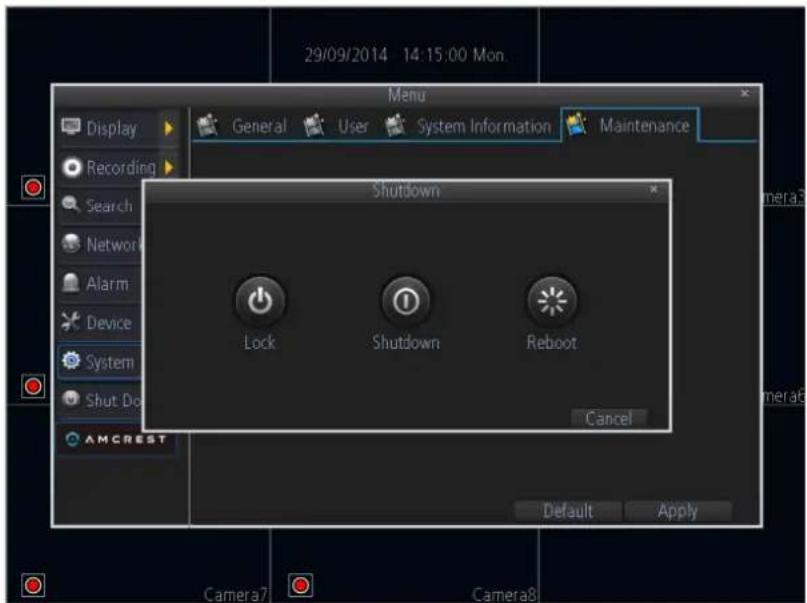
Proper startup and shutdown procedures are crucial to extending the life of your DVR. To startup your DVR, please plug the power supply into an electrical outlet. It is HIGHLY recommended that an Uninterruptible Power Supply (UPS) be used in conjunction with the unit. The Power indicator LED on the front panel should turn on, indicating the unit is receiving power.
To shutdown the DVR:
- Enter the Shutdown menu, click on Menu > Shutdown.
text_image
29/09/2014 14:15:00 Mon. Menu Display General User System Information Maintenance Recording Search Network Alarm Device System Shut Do AMCREST Shutdown Lock Shutdown Reboot Cancel Default Apply Camera7 Camera8- Select the Shutdown button.
- Click the OK button.
- Unplug the power supply on the rear panel to safely shutting down the system.
2.2 Rebooting and Locking Your DVR
In the Shutdown menu, you may also reboot or lock your DVR. Locking your DVR will return you to the Live Preview mode. The username and password must be re-entered to access the menus again. The Reboot button will reboot your DVR. To reboot or lock your DVR:
- Enter the Shutdown menu by clicking Menu > Shutdown.
- Select the Lock button to lock the DVR or the Reboot button to reboot the DVR.
3 LIVE VIEW
The Live Preview mode is automatically started after the DVR boots up. It is also at the very top of the menu hierarchy, thus hitting the ESC multiple times (depending on which menu you're on) will bring you to the Live Preview mode.
3.1. Understanding Live Preview Icons
There are multiple icons on each display in Live Preview mode to indicate different camera status. These icons include:

Motion Detection Icon: Indicates motion detection.

IP Channel Icon: Indicates this is an IP channel. It could be 720P, 960P, 1080P.

Record Icon: Indicates the current channel is recording.

Audio Icon: Indicates the current channel is outputting audio.

Video Disable Icon: Indicate the preview of this channel is disabled.
3.2. Understanding Live Preview Toolbar
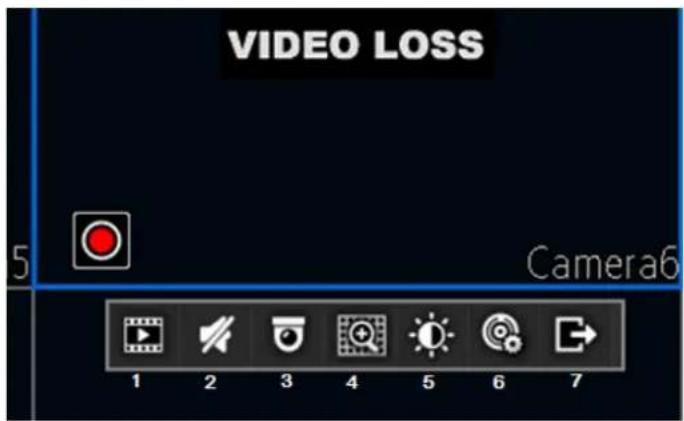
Click any channel in live view mode and a toolbar will be pop up:
text_image
VIDEO LOSS 5 Camera6 1 2 3 4 5 6 7- Playback: click this icon to enter the playback menu;
- Audio: mute/unmute this channel;
-
PTZ: control the PTZ of this channel
-
Digital Zoom
- Image parameter control: change the parameters of this camera
- Channel configuration
- Exit toolbar
3.3. Understanding Home Menu

text_image
1 2 3 4 5 6 7 8 9Click the right-button of the mouse and the home menu will be pop up:
- Home Icon: enter the main menu;
- Single channel live view;
- Four channels live view;
- Eight channels live view;
- Nine channels live view;
- Next group live view;
- Picture in picture mode;
- Manual record;
- Setup wizard;
3.4. Using Digital Zoom
To use digital Zoom in Live Preview mode:
- Click one channel on live view, the toolbar will be pop up;
- Select Digital Zoom, enter digital zoom mode:

To enlarge the picture 2 times for each click. 6 times at most;

To shrink the enlarged picture until normal size;

To enlarge the selected area to full screen;

To turn the picture into normal size;

Exit.
3.5. PTZ Control
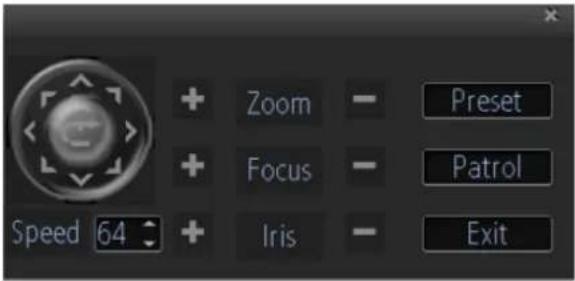
Clicking the PTZ icon on the live-view toolbar will bring up the PTZ control panel.

3.5.1 PTZ Presets, Patrols & Patterns
The controls on the PTZ panel include:
text_image
Zoom Focus Iris Speed 64 Preset Patrol Exit-
Directional Pad/Auto-scan Buttons: Controls the movements and directions of the PTZ. Center button is also used to start auto-scan of PTZ.
-
Speed: Adjusts the movement speed of the PTZ.
-
Zoom: Used to zoom in and out with the PTZ.
-
Focus: Used to adjust the focus of the PTZ.
-
Iris: Used to open up or close the iris of the camera.
-
Preset: A Preset is a position that the camera is in which is saved to memory to be retrieved later. Choose this button to enter preset configuration menu.
-
Patrol: Initiates patrol mode. You'll need to define a series of Preset points for the camera to patrol between. Choose this button to enter patrol configuration menu.
-
Exit: Closes the PTZ controls.
3.5.2 PTZ Context Menu
text_image
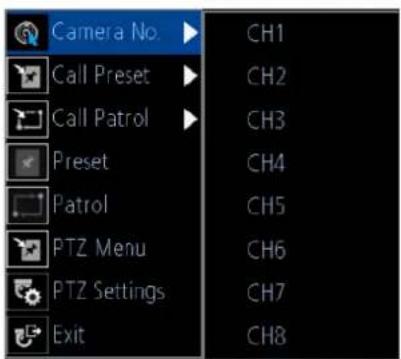
Camera No. ▶ CH1 Call Preset ▶ CH2 Call Patrol ▶ CH3 Preset CH4 Patrol CH5 PTZ Menu CH6 PTZ Settings CH7 Exit CH8- Camera No: Switch quickly between cameras.
- Call Preset: Returns the camera to a Preset point.
- Call Patrol: Initiates a patrol of your choice.
- Preset: Defines a Preset point.
- Patrol: Initiates or stops a patrol.
- PTZ Menu: Toggles the appearance of the PTZ Control Menu onscreen. While the PTZ Control Menu is hidden, the DVR will still be in PTZ mode. The context menu can still be opened via right-clicking the interface.
- PTZ Settings: Opens the PTZ Settings menu where you can adjust the control method for the camera.
4 IP Channel
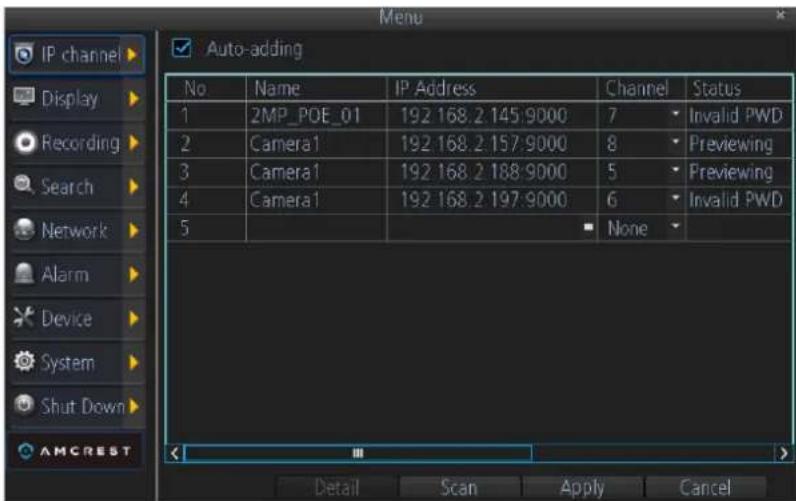
The IP Channel menu enables you to view specific information about cameras that are currently connected to your DVR such as channel number, IP address, and status.
text_image
Menu IP channel Display Recording Search Network Alarm Device System Shut Down AMCREST Auto-adding No Name IP Address Channel Status 1 ZMP_POE_01 192 168.2 145:9000 7 Invalid PWD 2 Camera1 192 168.2 157:9000 8 Previewing 3 Camera1 192 168.2 188:9000 5 Previewing 4 Camera1 192 168.2 197:9000 6 Invalid PWD 5 None Detail Scan Apply CancelAuto-adding: If you check this, your DVR will automatically display video from cameras it has detected in your local area network. This option is disabled by default, so you have to manually add the IP cameras to your DVR.
IP Camera list: In this list, all the IP cameras in your local area network will be listed automatically after you click the button of Scan.
- To add an IP camera to your DVR, please select an available channel to which you want to assign a camera from the channel drop-down list, and then input the user name and password. Also you can manually add an IP camera by inputting the IP address/port or RTSP URL, user name, and password into the list. When you're finished, click the Apply button to save the new configuration.
- To delete an IP camera from your DVR, please select that IP camera and select None from the channel drop-down list. When you're finished, click the Apply button to save the new configuration.
Detail: If one IP camera is connected with your DVR, you can click this button to show this IP camera's status:
Scan: Click this button and all the IP cameras in your local area network will be listed.
5 DISPLAY SETTINGS
5.1. Camera Settings
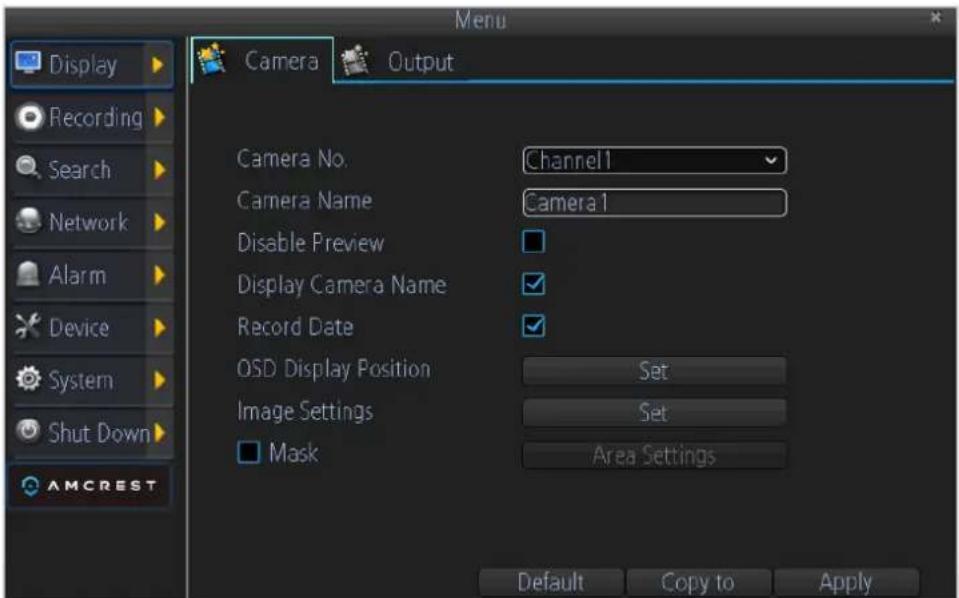
Camera menu is where you can make adjustments to how the DVR displays the feed coming from your cameras. You can adjust aspects of each channel/camera, including:
text_image
Menu Display Recording Search Network Alarm Device System Shut Down AMCREST Camera Output Camera No. Channel1 Camera Name Camera 1 Disable Preview ✓ Display Camera Name ✓ Record Date ✓ OSD Display Position Set Image Settings Set □ Mask Area Settings Default Copy to Apply- Camera No.: Choose the camera / channel you want to edit here. The Camera No. is the same as the number written on the rear panel next to the BNC socket used to connect the camera.
- Camera Name: Select a name for the camera you've selected. By default, all channels are named the same as the Camera No. field, but this can be set to anything you'd like up to 16 characters.
- Disable Preview: When checked, the live view of the channel you've selected will be disabled.
- Display Camera Name: When checked, the name you've selected for the camera/channel will be displayed on-screen as an overlay.
- Record Date: When checked, the date (as displayed) will be recorded directly on your videos. This can be useful, as it creates an inseparable record of exactly when the footage was captured.
-
OSD Display Position: Gives you access to a screen where you can easily set the exact positions of any overlayed text, such as the camera name and the date and time. You can simply select any item you want to move (such as the Channel Name and/or the Date and Time) and click and drag it to the position you'd like it to be. To exit the OSD Display Position screen, press the right click button. A context menu will appear with two options: Save and Exit. To exit without saving, simply choose Exit. If you want to save your changes, choose Save first.
-
Image Settings: Gives you access to change camera image, including brightness, contrast, saturation, and hue
- Mask: When checked, this allows you to create, place, and shape a "privacy mask" which obscures part of the image on the associated channel.
5.2. Displays Output Settings
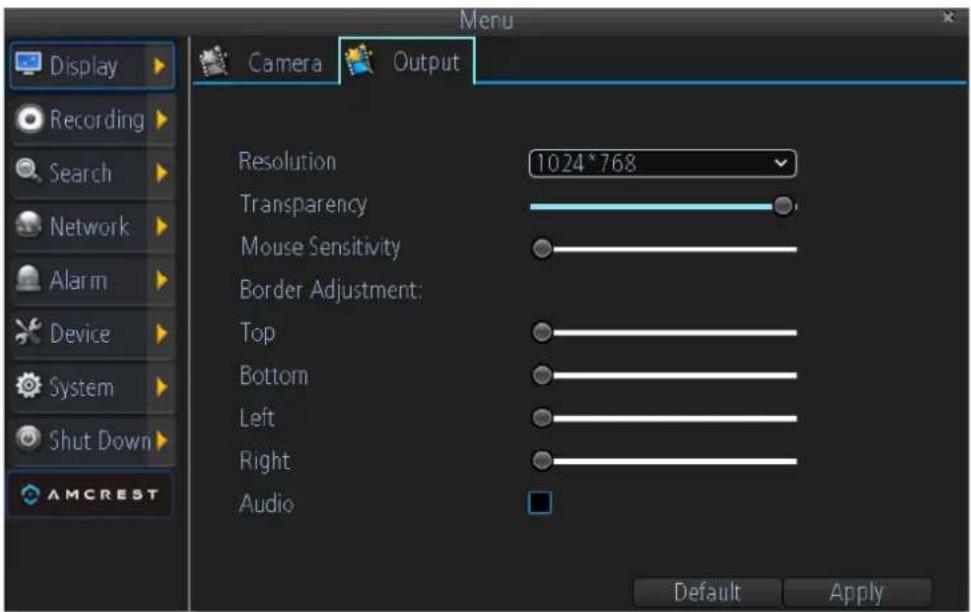
Live Preview allows you to customize your display to your own needs.
text_image
Menu Camera Output Resolution 1024*768 Transparency Mouse Sensitivity Border Adjustment: Top Bottom Left Right Audio Default ApplyThe settings available in this menu include:
- Display resolution
● Transparency: To adjust the menu transparency. - Mouse Sensitivity
- Border Adjustment: To adjust the border of video output.
● Audio: Enables/disable audio output for the selected video output.
6 RECORD SETTINGS
There are multiple ways to setup your DVR for recording. They include setting up a recording schedule, triggering recording by motion detection, and manually starting the recording.
6.1. Initializing Record Settings
Before setting your DVR up for recording, certain settings should be configured first. The steps to configuring these settings are:
- You should initialize the HDD through HDD management before proceeding.
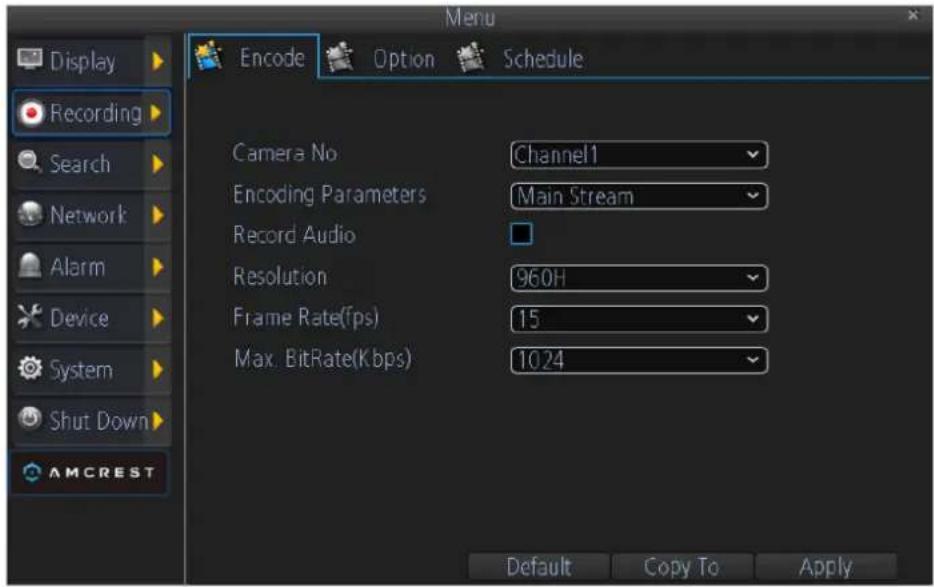
- Navigate to Main Menu > Recording. You will be taken to the Recording Settings menu.
text_image
Menu Display Recording Search Network Alarm Device System Shut Down AMCREST Encode Option Schedule Camera No Channel1 Encoding Parameters Main Stream Record Audio Resolution 960H Frame Rate(fps) 15 Max BitRate(Kbps) 10.24 Default Copy To Apply- Select the camera you would to configure the settings for.
- Configure settings for:
● Encoding Parameters: Select main stream or sub stream.
● Record Audio: Select to record the audio of the camera.
- Resolution.
● Frame Rate: Select recordings frame rate.
● BitRate Type: Select either Variable or Invariable bit rate.
text_image
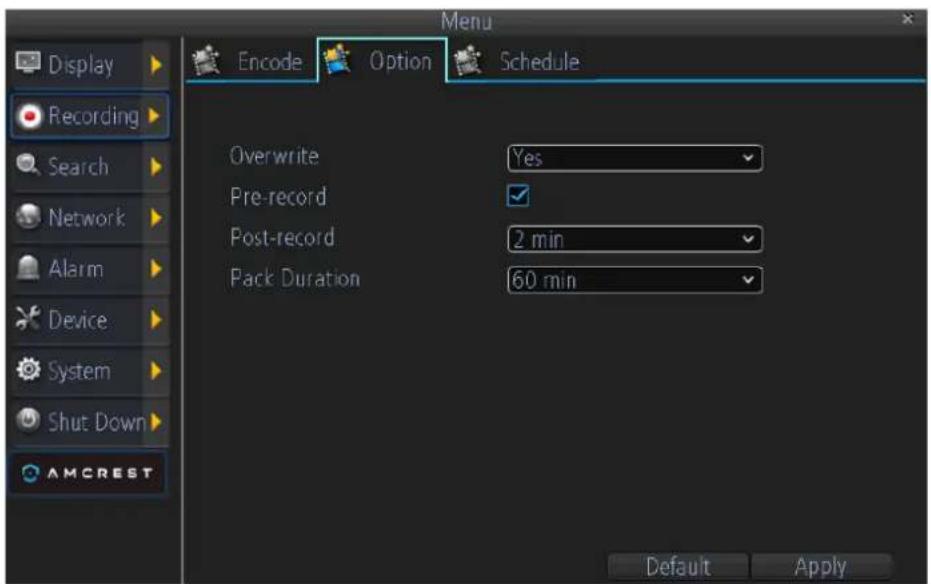
Menu Display Recording Search Network Alarm Device System Shut Down AMCREST Encode Option Schedule Overwrite Yes Pre-record ✓ Post-record 2 min ✓ Pack Duration 60 min ✓ Default ApplySet additional recording settings:
● Overwrite: Set to overwrite the HDD to continue recording when it is full.
● Pre-record: Set to pre-record before the actual recording begins.
● Post-record: Sets the time to post-record after the actual recording ended.
- Pack Duration: Sets the time for how long the DVR will be recording before splitting the output file.
6.2. Scheduling a Recording
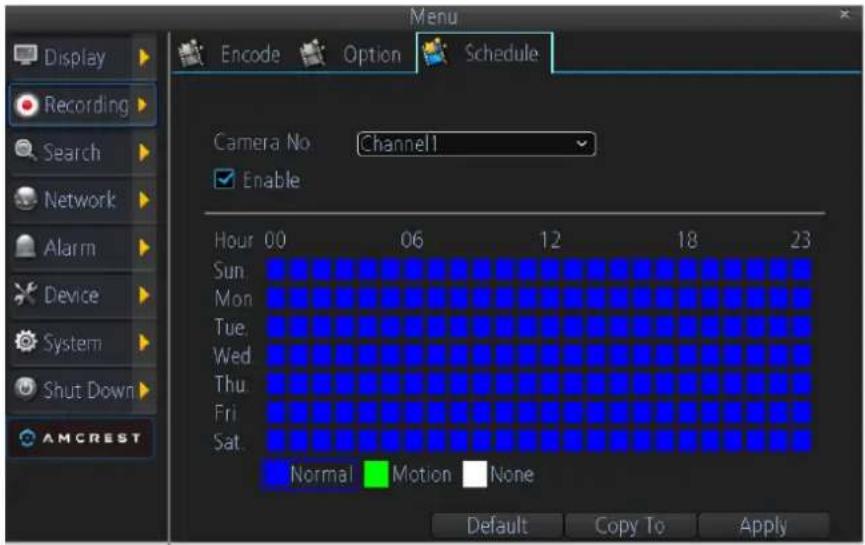
Scheduling a recording allows you to setup the DVR to only record when you want it to.
To setup a recording schedule:
text_image
Menu Display Recording Search Network Alarm Device System Shut Down AMCREST Encode Option Schedule Camera No Channel1 Enable Hour 00 06 12 18 23 Sun. Mon. Tue. Wed. Thu. Fri. Sat. Normal Motion None Default Copy To Apply-
Enter the Record Settings menu (Main Menu > Recording > Schedule).
-
Select the Camera to edit schedule for.
- Check Enable Schedule.
- Select recording Type. Recording type can be based on time and triggered by a schedule, motion detection, motion or alarm, and alarm. Motion detected and alarm triggered recordings are further explained in Configuring Alarms.
- Repeat the steps for other cameras or copy settings from one channel to others by Copy To.
- Click OK to finish and save the schedule settings.
7 PLAYBACK AND BACKUP
7.1. Playback files from a video search
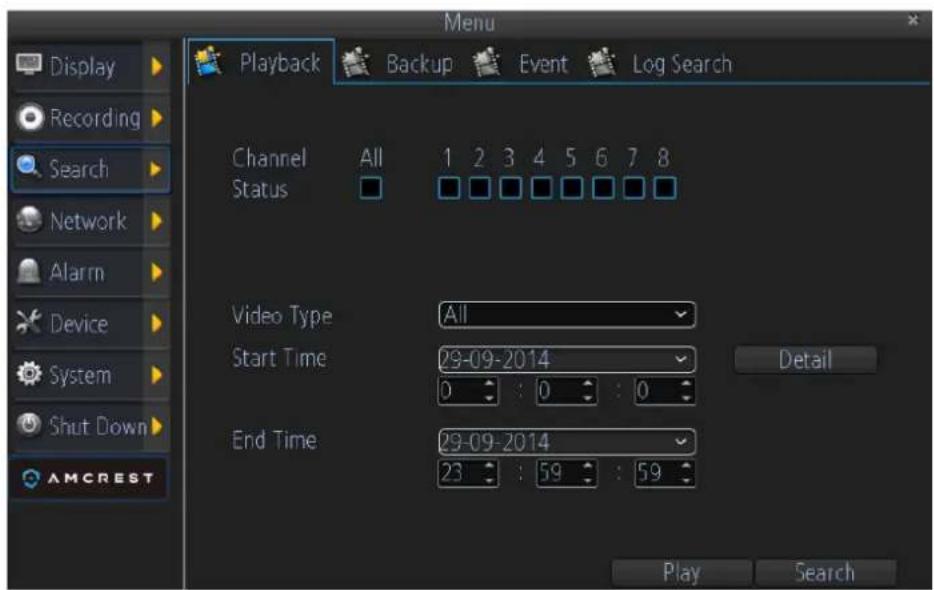
To initiate playback:
text_image
Menu Playback Backup Event Log Search Display Recording Search Network Alarm Device System Shut Down AMCREST Channel All 1 2 3 4 5 6 7 8 Status Video Type All Start Time 29-09-2014 0 : 0 : 0 End Time 29-09-2014 23 : 59 : 59 Detail Play Search- Select the channel you'd like to playback.
- From the Video Type menu, select the type of video you'd like to playback. The options are Manual, Schedule, Motion, and All.
bar
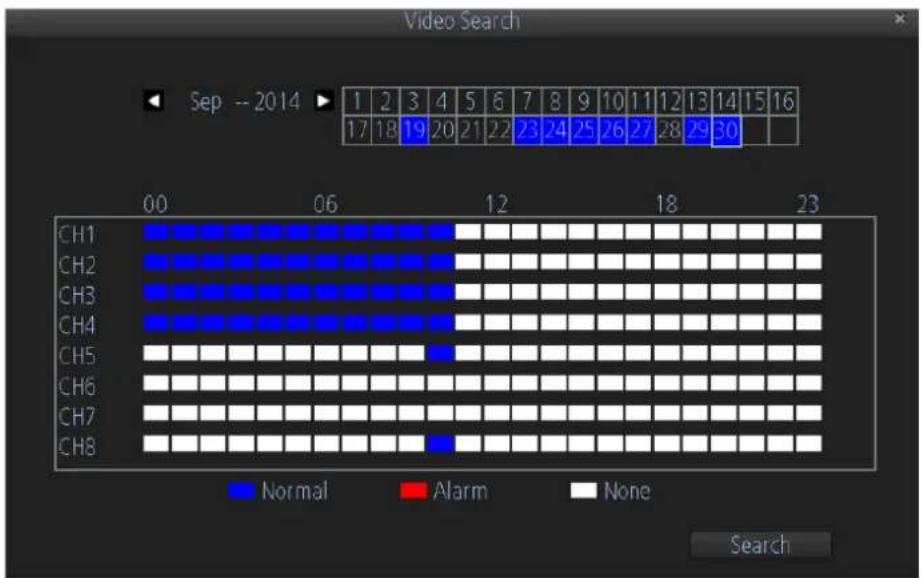
Video Search | Channel | Normal | Alarm | None | | :--- | :--- | :--- | :--- | | CH1 | 1 | 0 | 0 | | CH2 | 1 | 0 | 0 | | CH3 | 1 | 0 | 0 | | CH4 | 1 | 0 | 0 | | CH5 | 1 | 0 | 0 | | CH6 | 1 | 0 | 0 | | CH7 | 1 | 0 | 0 | | CH8 | 1 | 0 | 0 | | Sep -- 2014 ▶ 1 2 3 4 5 6 7 8 9 10 11 12 13 14 15 16 17 18 19 20 21 22 23 24 25 26 27 28 29 30 | Search- Set your Start Date/Time and your End Date/Time. If you want to see a graphical representation of when recordings were made and what recording mode triggered them,
choose Details.
- Select Search.
- Choose which file you want to play back from the file list;
- Choose which camera you'd like to view the video from.
- To initiate playback, select Play.
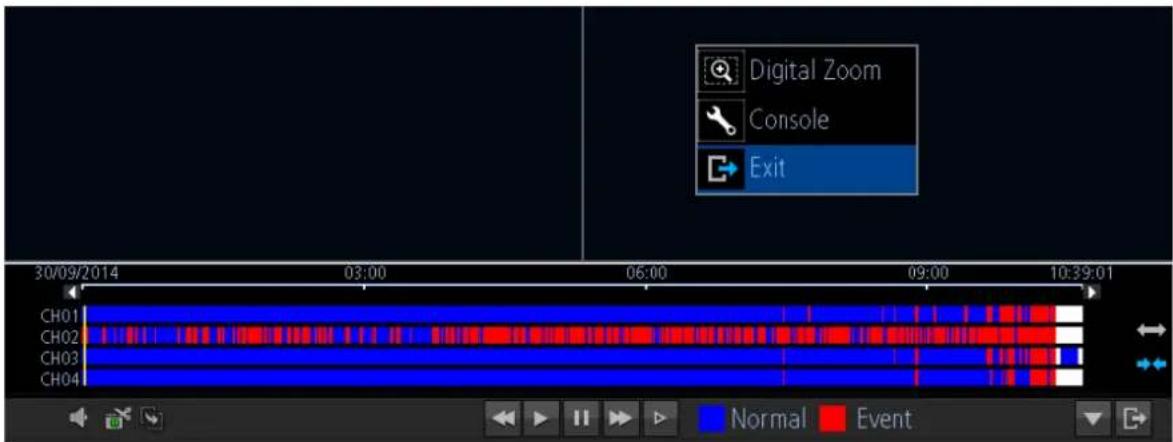
7.2. Understanding the Playback Interface
text_image
Digital Zoom Console Exit 30/09/2014 03:00 06:00 09:00 10:39:01 CH01 CH02 CH03 CH04 Normal Event
Audio on/off: Select to open or close the audio;

Fast backwards: Select to rewind recording files at the speed of x2, x4, x8, x16;

Play: Select to return to normal speed to playback files;

Pause / Single Frame: Select to pause or play in single frame;

Fast Forwards: Select to play the recording files forward at the speed of x2, x4, x8, x16;

Slow Forwards: Select to play the recording files forward at the speed of x1/2, 1/4, 1/16;

Hide: Select to hide the play control panel;

Exit: Select to exit playback;

Zoom out the time

Zoom in the time
text_image
Digital Zoom Console ExitPop Up menu: Supports digital zoom, show/hide the console and exit
playback.
7.3. Backup the recorded file
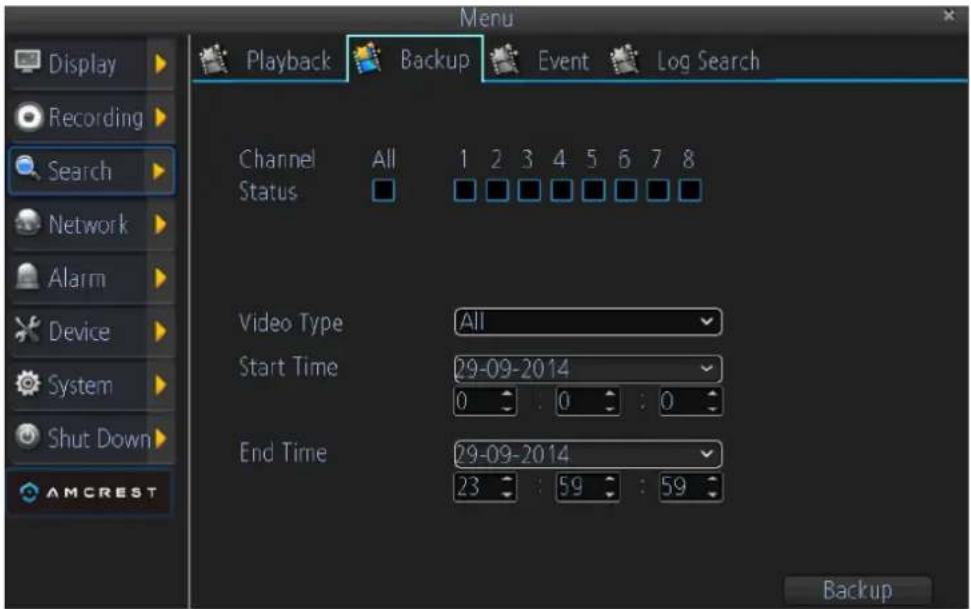
To backup the recorded files:
text_image
Menu Playback Backup Event Log Search Display Recording Search Network Alarm Device System Shut Down AMCREST Channel All 1 2 3 4 5 6 7 8 Status Video Type All Start Time 29-09-2014 0 : 0 : 0 End Time 29-09-2014 23 : 59 : 59 Backup- Select the channel you'd like to backup.
- From the Video Type menu, select the type of video you'd like to playback. The options are Manual, Schedule, Motion and All.
- Set your Start Date/Time and your End Date/Time
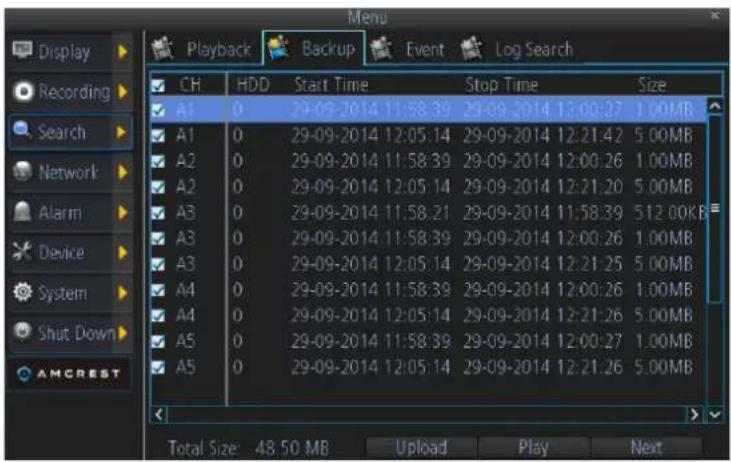
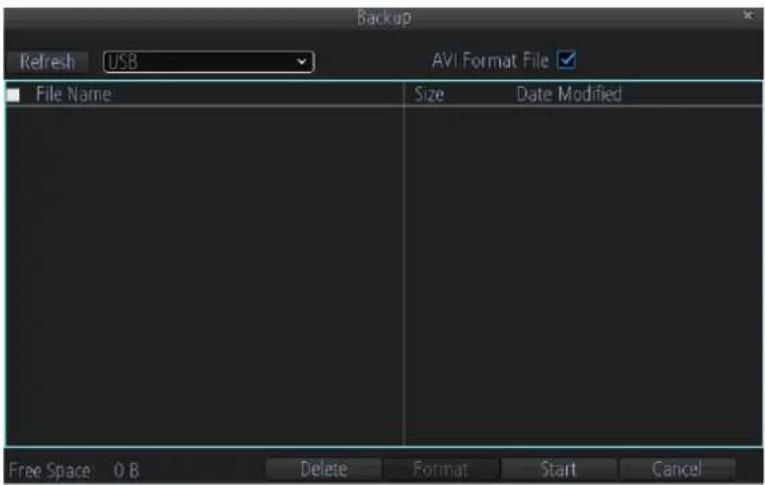
- Select Backup and the backup file list will be shown.
text_image
Menu Display Recording Search Network Alarm Device System Shut Down AMCREST Playback Backup Event Log Search CH HDD Start Time Stop Time Size A1 0 29-09-2014 11:58:39 29-09-2014 12:00:27 1.00MB A1 0 29-09-2014 12:05:14 29-09-2014 12:21:42 5.00MB A2 0 29-09-2014 11:58:39 29-09-2014 12:00:26 1.00MB A2 0 29-09-2014 12:05:14 29-09-2014 12:21:20 5.00MB A3 0 29-09-2014 11:58:21 29-09-2014 11:58:39 512.00KB A3 0 29-09-2014 11:58:39 29-09-2014 12:00:26 1.00MB A3 0 29-09-2014 12:05:14 29-09-2014 12:21:25 5.00MB A4 0 29-09-2014 11:58:39 29-09-2014 12:00:26 1.00MB A4 0 29-09-2014 12:05:14 29-09-2014 12:21:26 5.00MB A5 0 29-09-2014 11:58:39 29-09-2014 12:00:27 1.00MB A5 0 29-09-2014 12:05:14 29-09-2014 12:21:26 5.00MB Total Size: 48.50 MB Upload Play Next- Select the file(s) to be backup, and click Next;
text_image
Backup Refresh USB AVI Format File ✓ File Name Size Date Modified Free Space: 0 B Delete Format Start Cancel- Click Refresh to look for USB devices to which recorded files can be backed up;
- Click Start to begin the backup.
8 NETWORK SETTINGS
8.1 Configuring General Settings
text_image
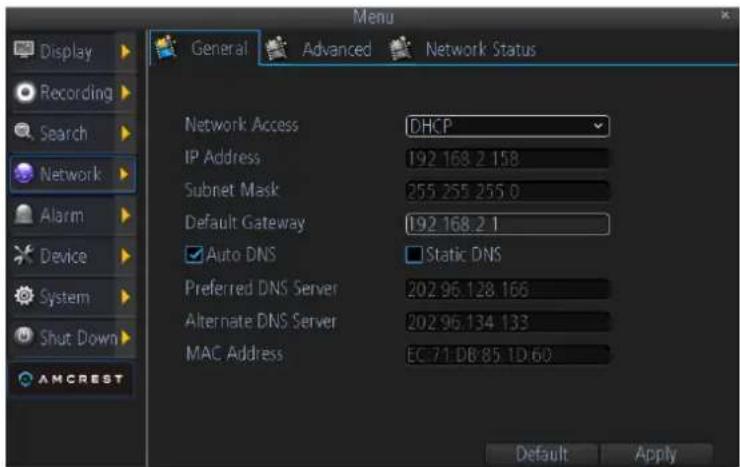
Menu General Advanced Network Status Network Access DHCP IP Address 192.168.2.158 Subnet Mask 255.255.255.0 Default Gateway 192.168.2.1 ✓ Auto DNS Static DNS Preferred DNS Server 202.96.128.166 Alternate DNS Server 202.96.134.133 MAC Address EC:71.DB:85.1D.60 AMCREST Default Apply- Network Access: Here you can choose between the three different types of networks that the DVR can be connected to. The three types of networks are:
1) DHCP: DHCP (Dynamic Host Configuration Protocol) is a system where one device on your network (usually a router) will automatically assign IP addresses to devices connected to the network.
2) STATIC: Static networks require all devices to have their IP addresses manually defined, as there is no device dedicated to automatically assigning addresses.
3) PPPoE: An advanced protocol that allows the DVR to be more directly connected via a DSL modem. This is an option for advanced users only.
- If you select Static in Network Access, you will need to input the IP Address, Subnet Mask, Default Gateway, and DNS information.
8.2 Configuring Advanced Settings
text_image
Menu Display Recording Search Network Alarm Device System Shut Down AMCREST General Advanced Network Status DDNS Set NTP Set Email Settings Set FTP Setting Set IP Filter Set Server Port 3000 HTTP Port 80 RTSP Port 554 UPNP enable ✓ UID MSBUNSL45B3A53D(FP) Send UID Default Apply-
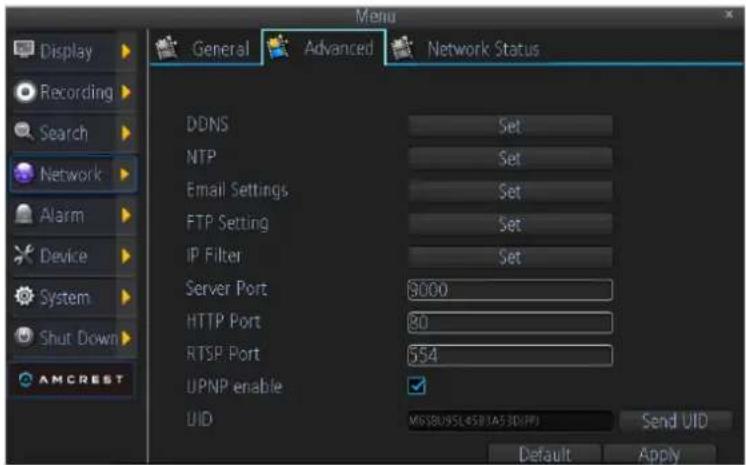
DDNS: The place to configure the DVR to automatically update a dynamic DNS service. If you want to remotely access the DVR via the Internet, you'll probably need to configure a DDNS account.
-
NTP: Network Time Protocol. If you've got the DVR connected to the Internet, you can have it automatically sync time with an online server.
-
Email Settings: Where you can configure the DVR to work with an email account of your choice. This must be correctly configured for the DVR's auto-email feature to work.
-
FTP Settings: The DVR supports uploading live-view streaming or recording file to a FTP server. Here you can configure the FTP server information and the schedule for uploading.
-
IP Filter: An advanced feature which allows you to exercise precise control over what devices/IP address(es) are allowed to communicate with the DVR and which are not. Recommended for advanced users only.
-
Server Port: This is the port that the DVR will use to send information through. When you access your DVR from web browser or client software, you need to input the server port.
-
HTTP Port: This is the port through which you will be able to log in to the DVR via web browser.
-
RTSP Port: This is the port through which you will be able to live-view the DVR via RTSP client software.
-
UPNP: UPnP makes configuring your network easier and faster. To use the UPnP setting on the DVR, you'll need a router which supports this feature, with UPnP enabled.
-
UID: The DVR's Unique Identifier code for P2P. For convenience, you can have this code sent to your email account by clicking the Send UID button (provided that you've already set up your email account).
8.2.1 DDNS
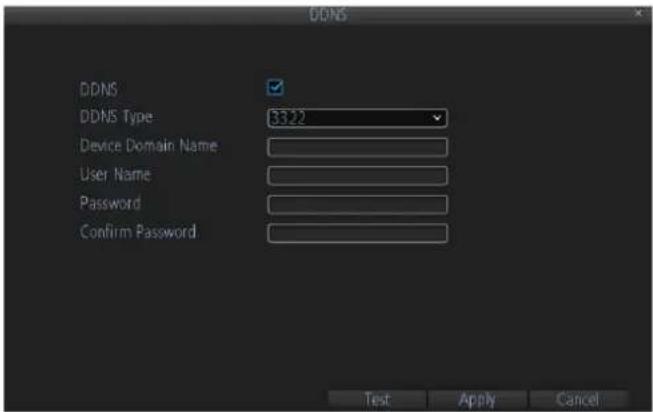
To setup DDNS:
text_image
DDNS DDNS DDNS Type 8322 Device Domain Name User Name Password Confirm Password Test Apply Cancel- Check the DDNS checkbox to enable feature.
- Select DDNS Type.
- Input the user name and password
8.2.2 NTP
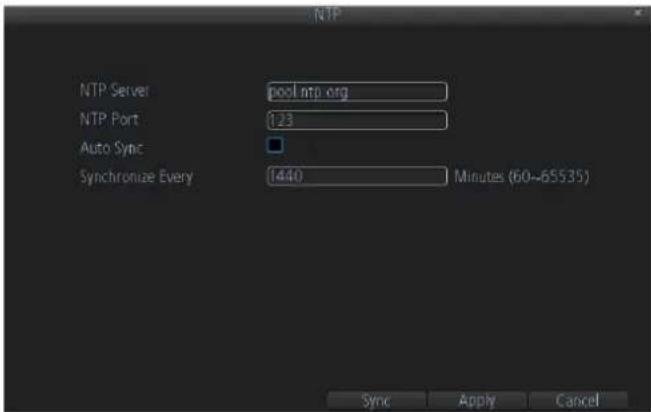
A Network Time Protocol (NTP) Server may also be setup on your DVR to keep the date and time current and accurate.
text_image
NTP NTP Server pool ntp.org NTP Port 123 Auto Sync Synchronize Every 1440 Minutes (60~65535) Sync Apply Cancel- Auto Sync: Enable auto-sync, your DVR will automatically sync up the time with the NTP server.
- Synchronize Every: When you enable Auto Sync, here you can define the time in minutes of how often the synchronization should be.
- NTP Server and NTP Port: NTP server IP address and port.
8.2.3 E-mail Settings
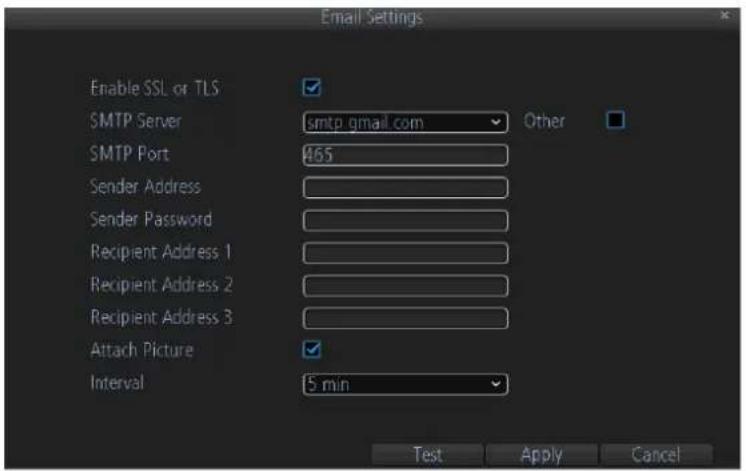
To configure E-mail settings:
text_image
Email Settings Enable SSL or TLS SMTP Server smtp gmail.com SMTP Port 465 Sender Address Sender Password Recipient Address 1 Recipient Address 2 Recipient Address 3 Attach Picture Interval 5 min Other Test Apply Cancel- Enter e-mail settings.
- Click the Test button to test e-mail settings.
- Select Attached Picture if you want to send email with alarm images, the interval of two adjacent pictures is configurable.
8.2.4 FTP Settings
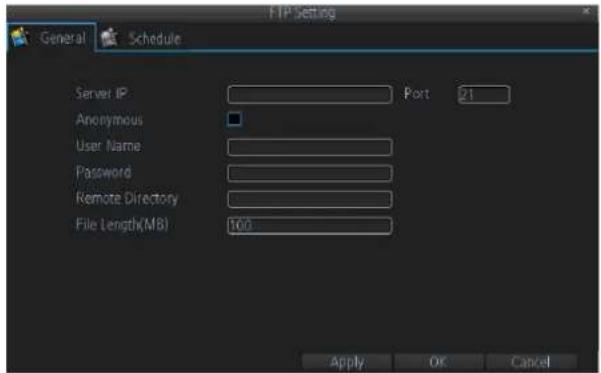
FTP is used to upload streams to your FTP server. You can set up an uploading schedule which is triggered by time, motion detection, or/and alarm.
To configure FTP settings:
text_image
FTP Setting General Schedule Server IP Port 21 Anonymous User Name Password Remote Directory File Length(MB) 100 Apply OK Cancel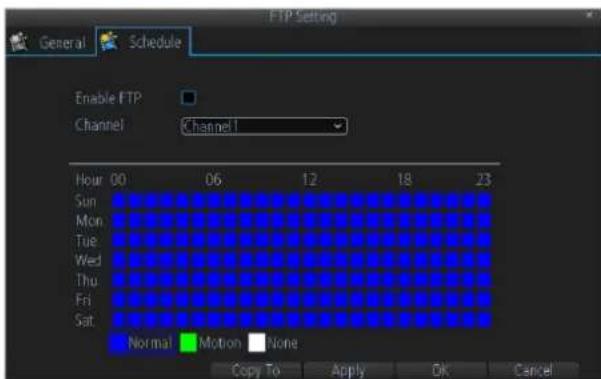
text_image
FTP Setting General Schedule Enable FTP Channel Channel1 Hour 00 06 12 18 23 Sun Mon Tue Wed Thu Fri Sat Normal Motion None Copy To Apply OK Cancel- Configure FTP server settings.
- Configure the uploading schedule.
There are multiple icons in Live Preview mode to indicate FTP uploading status when FTP uploading is triggered. These icons include:

This icon indicates the DVR is uploading the stream of this channel, and it work very well.

This icon indicates the DVR is trying to upload the stream of this channel, but it failed. You'd check FTP server configuration, network, and server.
8.2.4 IP Filter
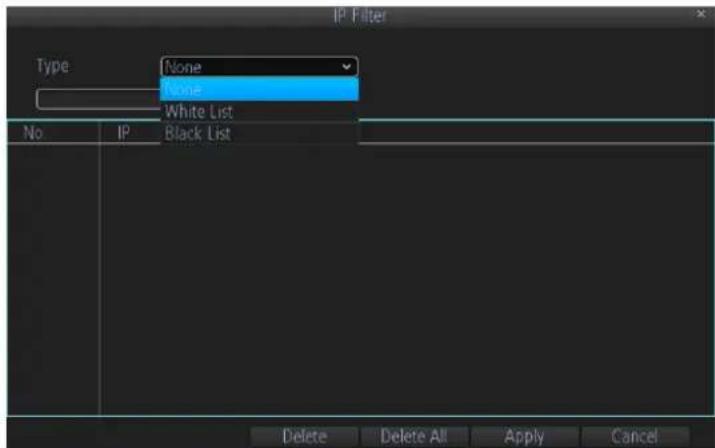
IP filter is used to manage the remote access to your DVR. The management is based on the IP address of remote visitor.
text_image
IP Filter Type None None White List No IP Break List Delete Delete All Apply Cancel- White List: If you select the white list, only the listed IP addresses can connect your DVR. While
- Black List: If you select black list, the listed IP addresses cannot connect your DVR.
- None: If you want to disable this function, please select NONE for restricted type. Then any IP can have access to the DVR.
9 ALARM SETTINGS
9.1 Motion Detection
Set up properly, using motion detected recording will increase the number of days your DVR is able to record. It will only record relevant events rather than recording everything, making searching for an event easier. To set up motion detection:

text_image
Menu Display Recording Search Network Alarm Device System Shut Down AMCREST Motion Video Loss Exception Channel Enable Motion Detection Schedule Action Channel1 Set Set Set Default Copy To Apply- Select the channel you'd like to configure.
- Check the checkbox of Enable to enable Motion Detection.
- Click the applicable Set button of Motion Detection to setup the motion detection area and sensitivity for that channel.
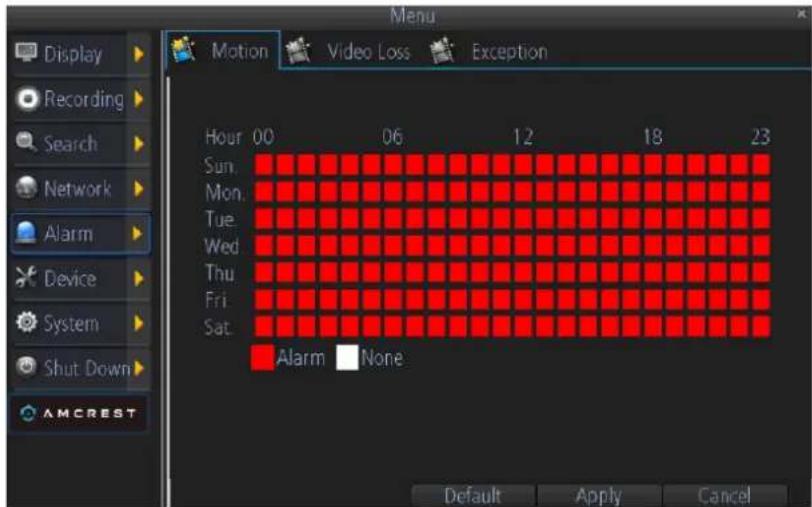
- Configure the schedule for motion detection. User can define when it's armed or disarmed during 24x7.
text_image
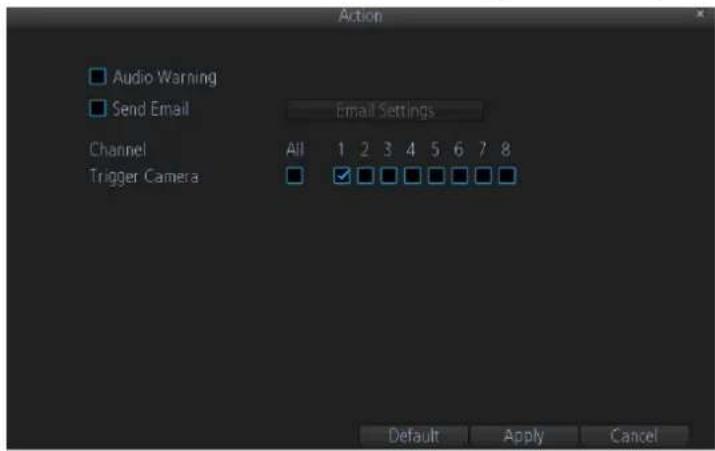
Menu Motion Video Loss Exception Display Recording Search Network Alarm Device System Shut Down AMCREST Hour 00 06 12 18 23 Sun. Mon. Tue. Wed. Thu. Fri. Sat. Alarm None Default Apply Cancel- Configure the Action can define what will happen when the camera detects motion. The actions include turn on the buzzer, send email, and trigger recording.
text_image
Action Audio Warning Send Email Email Settings Channel Trigger Camera All 1 2 3 4 5 6 7 8 □ ✓ □ □ □ □ □ □ Default Apply Cancel9.2 Detecting Video Loss
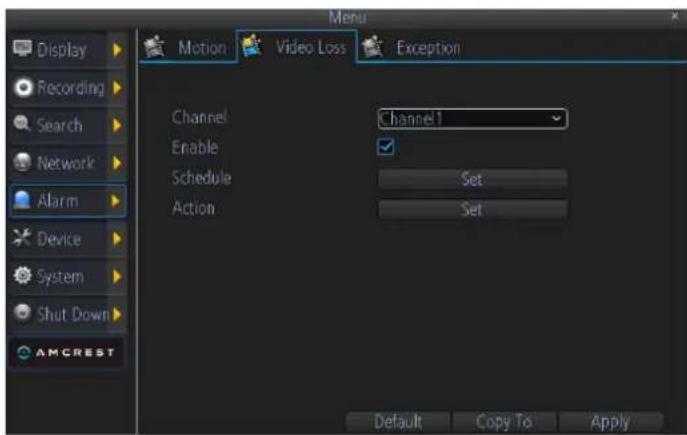
Video Loss is regarded as a potential alarm event, and is considered to occur any time that the DVR doesn't receive an active video signal on any of its inputs. The default behavior of the DVR, when a channel has no incoming video signal, is simply to display "Video Loss" on a black background over the associated channel. If you're not using all the inputs on your DVR, then some channels will be in a "permanent" Video Loss state. Just be sure that you don't enable a video loss action for these channels.
text_image
Display Recording Search Network Alarm Device System Shut Down AMCREST Menu Motion Video Loss Exception Channel Enable Schedule Action Channel 1 Set Set Default Copy To Apply- Channel: Which channel/camera you'd like to set the Video Loss behavior for.
- Enable: Whether the selected channel has video loss monitoring active or not.
- Schedule: Alters when the current Video Loss Action will be active.
- Action: The action you'd like the DVR to take when this event occurs. It's set in the same way as the Action for any other event.
9.3 Detecting Exception
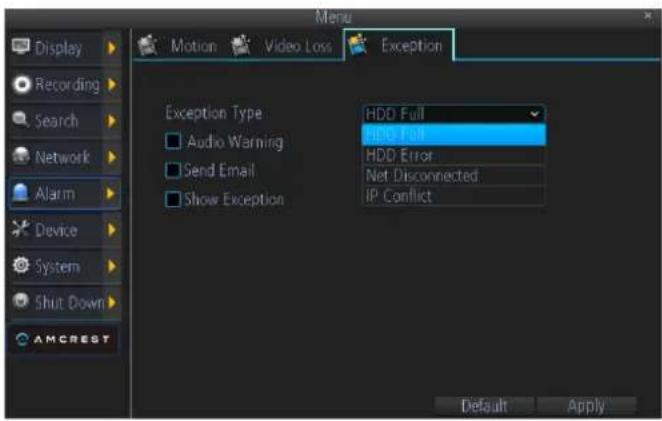
Setting exceptions allows the DVR to alert you when irregular events occur. These events include:
text_image
Menu Display Recording Search Network Alarm Device System Shut Down AMCREST Motion Video Loss Exception Exception Type Audio Warning Send Email Show Exception HDD Full HDD Full HDD Error Net Disconnected IP Conflict Default Apply- HDD Full: All installed HDDs are full.
- HDD Error: Errors occurred during writing of the HDD, no HDD installed, or HDD had failed to initialize.
- Net Disconnected: Disconnected network cable.
- IP Conflict: Conflict in IP address settings.
10 DEVICE MANAGEMENT
10.1 Managing HDDs
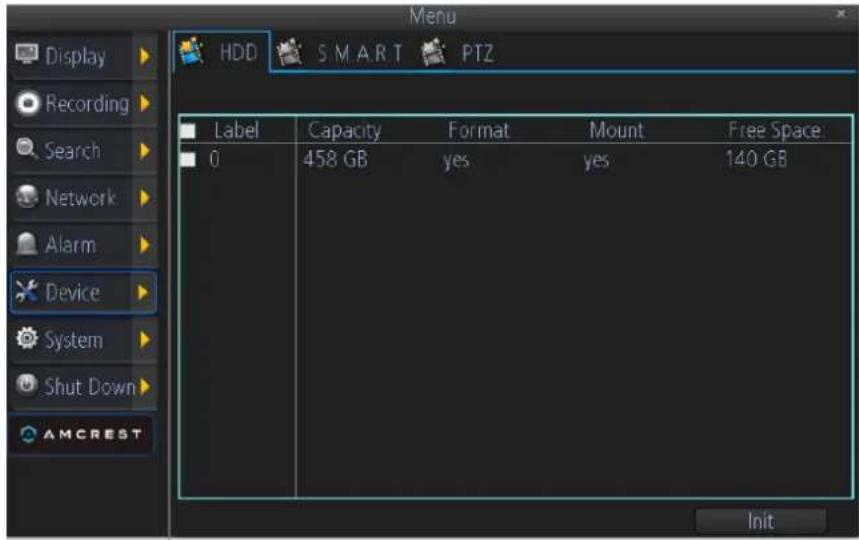
A newly installed hard disk drive (HDD) must be first initialize before it can be used with your DVR. Initializing the HDD will erase all data on it.
text_image
Menu Display Recording Search Network Alarm Device System Shut Down AMCREST HDD SMART PTZ Label Capacity Format Mount Free Space 0 458 GB yes yes 140 GB InitTo initialize a HDD:
- Select HDD to initialize.
- Click the Init button.
- Select OK button to begin initialization. After the HDD has been initialized, the status of the HDD will change from No to Yes.
text_image
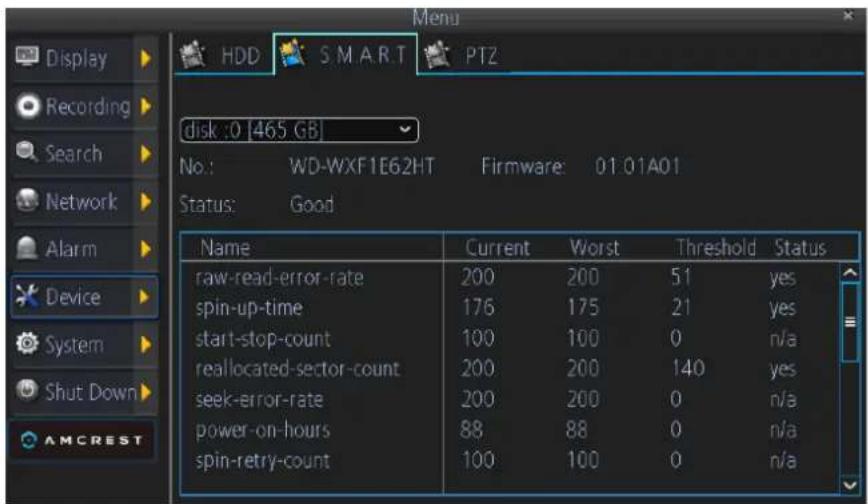
Menu Display Recording Search Network Alarm Device System Shut Down AMCREST HDD SMART PTZ disk :0 [465 GB] No.: WD-WXF1E62HT Firmware: 01:01A01 Status: Good Name Current Worst Threshold Status raw-read-error-rate 200 200 51=yes spin-up-time 176 175 21=yes start-stop-count 100 100 0 n/a reallocated-sector-count 200 200 140=yes seek-error-rate 200 200 0 n/a power-on-hours 88 88 0 n/a spin-retry-count 100 100 0 n/aTo view SMART information of a HDD:
- Select one HDD.
- You can see the detail S.M.A.R.T information of the HDD.
10.2 Configuring PTZ Settings
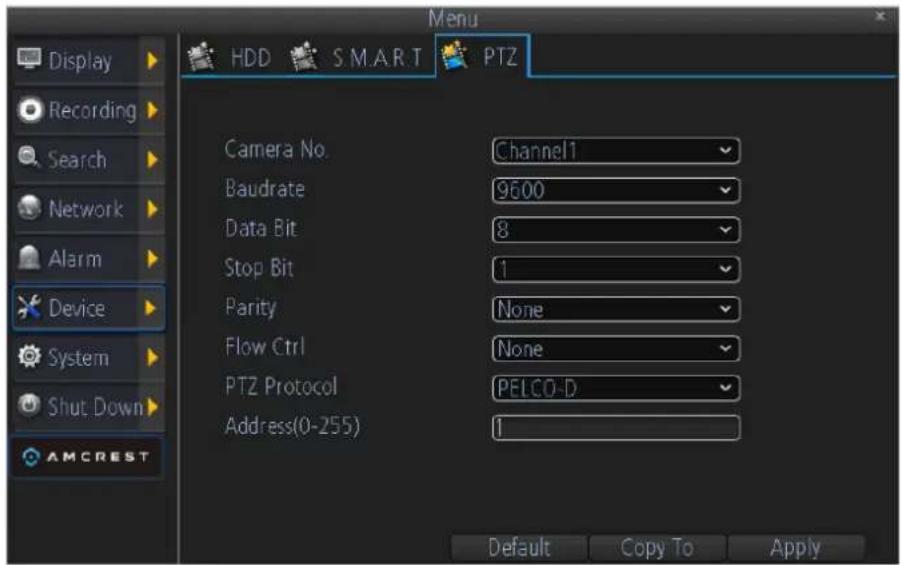
Settings for a PTZ camera must be configured before it can be used. Before proceeding, verify that the PTZ and RS-485 of the DVR are connected properly.
To configure PTZ settings:
text_image
Menu Display Recording Search Network Alarm Device System Shut Down AMCREST HDD S.M.A.R.T PTZ Camera No. Channel1 Baudrate 9600 Data Bit 8 Stop Bit 1 Parity None Flow Ctrl None PTZ Protocol PELCO-D Address(0-255) 1 Default Copy To Apply- Select channel where PTZ camera is installed next to the Camera label.
- Enter PTZ settings according to the camera.
- Click OK button to save and exit menu.
11 SYSTEM SETTINGS
11.1 General
General menu contains many of the settings you'll need to configure to get the most out of your DVR system:

text_image
Menu General User System Information Maintenance Language English Video Standard PAL Time Zone (GMT+08:00) Beijing Menu Date Format DD/MM/YYYY System Time 29-09-2014 14 : 10 : 28 DST Device Mode 8 Analog Enable Password Auto Lock Time 5 min Device Name HVR Default Apply- Language: You can select the language you want for the menus/GUI.
- Video Standard: Here you can choose between PAL and NTSC.
- Time Zone: Particularly important if you've enabled NTP - set this to the time zone where you happen to be.
- Menu Date Format: The format of the date (eg. DD/MM/YYYY or MM/DD/YYYY and so on).
- System Time: This can be edited manually, or set to update automatically by using NTP
- DST Setting: As the standards for daylight savings differ from country to country, and often state to state, you might need to manually tell the DVR exactly when it commences and ends in your locality. First, turn DST on. We suggest setting the Daylight Saving Time Mode to Date, and manually entering the dates and times that daylight savings time applies to and from, in your locality.
- Device Mode: DVR supports several modes, including 4CH analog mode, 4Ch analog + 4Ch IP mode. Changing the mode will reboot the system.
- Enable Password: When enabled, the DVR will require a password to access, even for local users. It's advisable to enable password protection
- Auto Lock Time: When the password protection is enabled, the DVR will automatically time-out, thereafter it will ask for a password before returning to normal functioning. The
Auto Lock Time determines how long a period of inactivity will cause the DVR to lock itself again.
- Device Name: Differentiates your DVR from other devices. If you don't have any other DVR's or similar devices, then you can leave this as-is. If you've got multiple DVRs running on the same network, then it's a great idea to give each a unique name.
11.2 User
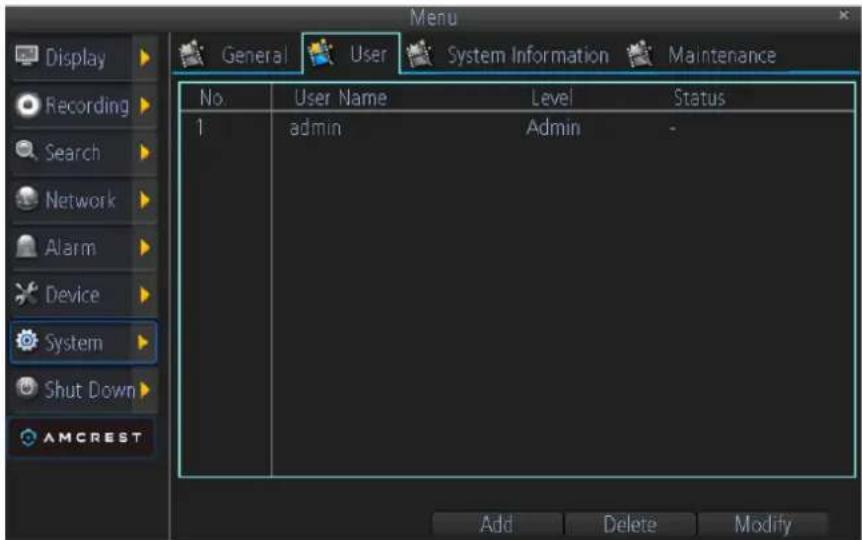
By default, your DVR comes with one user account, the Administrator account. The Administrator user name is admin and the password is 12345. The default password for Administrator should be changed right away for security reasons. The Administrator has the authority to add, delete, and configure parameters for many of the system functions.
text_image
Menu Display Recording Search Network Alarm Device System Shut Down AMCREST General User System Information Maintenance No User Name Level Status 1 admin Admin - Add Delete Modify• To add additional users, choose Add.
- To remove a user, choose Delete.
- To customize a user's level of access, choose Modify. You cannot modify the access level of the default admin account - they can do everything. This is to prevent an unfortunate incident where, for example, no user has the permissions required to change another user's permissions - which could lead to the DVR being, in at least some senses, inoperable.
11.2.1 Adding a New User
You may add up to 10 new users to your DVR.
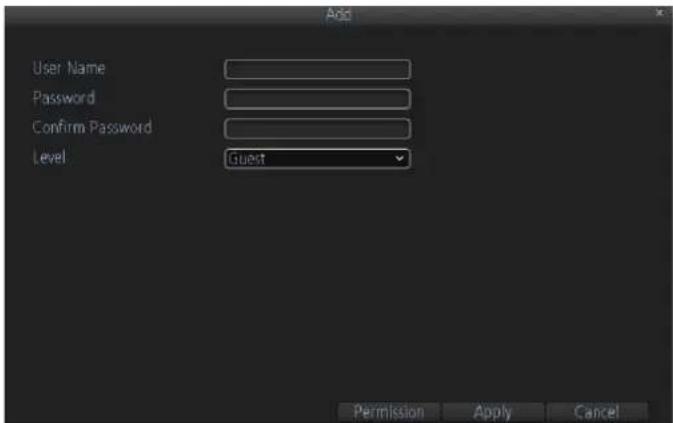
To add new users, select Add:
text_image
Add User Name Password Confirm Password Level Guest Permission Apply Cancel-
Enter information for new user, including User Name, Password and Level.
-
The Level is the user level and is separated into two tiers.
- Operator: The Operator user level has the authority to configure two-way audio in network settings and all parameters in channel settings.
- Guest: The Guest user can not configure network settings, but can configure the local playback as well as the remote playing in channel settings.
-
Select the Permission button to enter the Permission Settings menu.
-
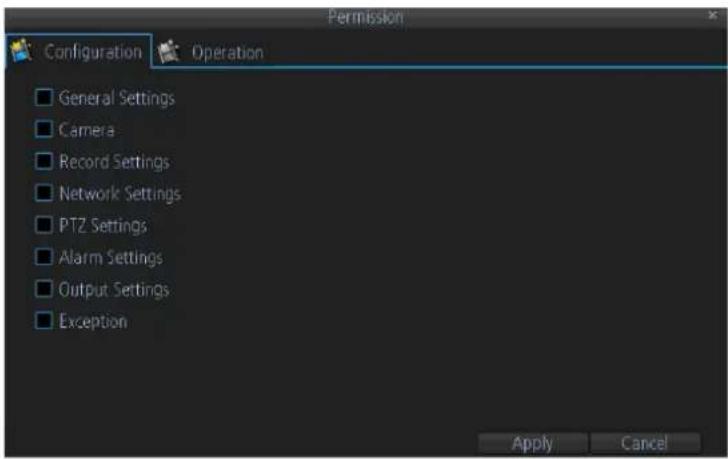
Configure privileges for local settings under the Configuration tab. The configuration page specifies which menu(s) the user can access. There is no hierarchy and any combination of menus can be selected (although some combinations would make little sense in practice).
text_image
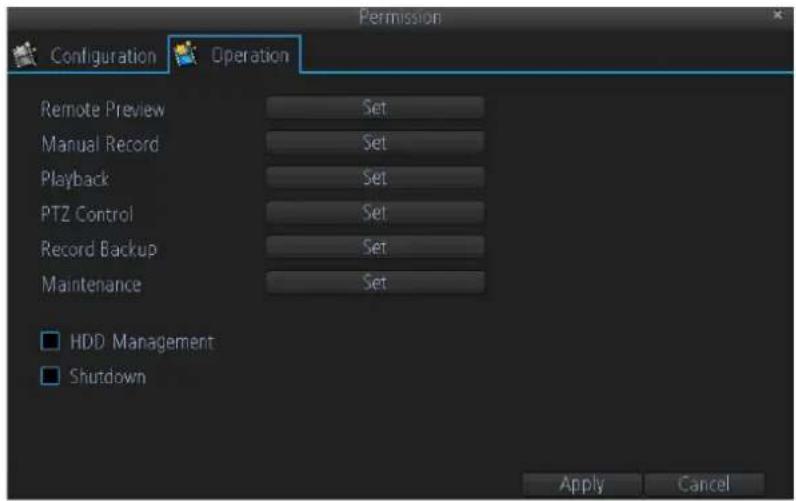
Permission Configuration Operation General Settings Camera Record Settings Network Settings PTZ Settings Alarm Settings Output Settings Exception Apply Cancel- Configure privileges for operation under the Operation tab. You can select which channels the user has access to and what they can do with them. For example, you could set a user to have permission to view all channels in live viewing mode, but only playback channels 2 and 4.
text_image
Configuration Operation Remote Preview Set Manual Record Set Playback Set PTZ Control Set Record Backup Set Maintenance Set □ HDD Management □ Shutdown Apply Cancel11.3 System Information
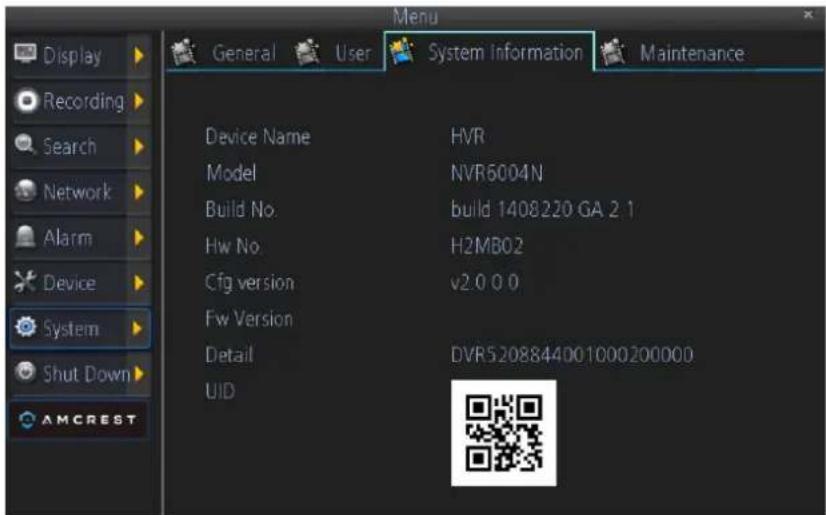
System information is for use by technical support. When you call for technical support, you need to provide the information here.
text_image
Menu General User System Information Maintenance Device Name HVR Model NVR6004N Build No build 1408220 GA 2.1 Hw No H2MB02 Cfg version v2.0 0 0 Fw Version Detail DVR5208844001000200000 UID AMCREST11.4 Maintenance
text_image
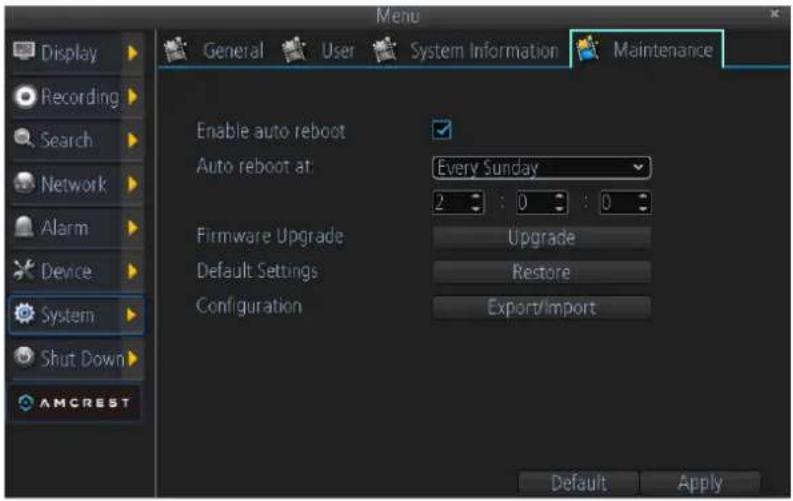
Menu Display Recording Search Network Alarm Device System Shut Down AMCREST General User System Information Maintenance Enable auto reboot Auto reboot at: Every Sunday 2 : 0 : 0 Firmware Upgrade Default Settings Configuration Upgrade Restore Export/Import Default ApplyEnable auto reboot: Will automatically shut the DVR down and restart it at a certain time of the day or week. To ensure your DVR work stably, it's recommended to enable this checkbox.
Auto reboot at: Choose when you'd like the DVR to reboot. Typically, this will be a time when it's unlikely there'll be any activity for the DVR to record.
Firmware Upgrade (Upgrade): Instructs the DVR to update its firmware. You'll only need to use this option if instructed to do so by Technical Support. (Remember to Export your configuration first so you don't have to re-set everything!)
Default Settings (Restore): Loads the factory default settings. This must be done after a firmware upgrade to ensure proper operation of the DVR. You can retain your settings, recording schedule and so on by using the Import/Export Configuration function before upgrading the firmware.
Configuration (Export): Creates a file containing all the settings you've customized, including your recording preferences, schedule, user-list and so on.
text_image
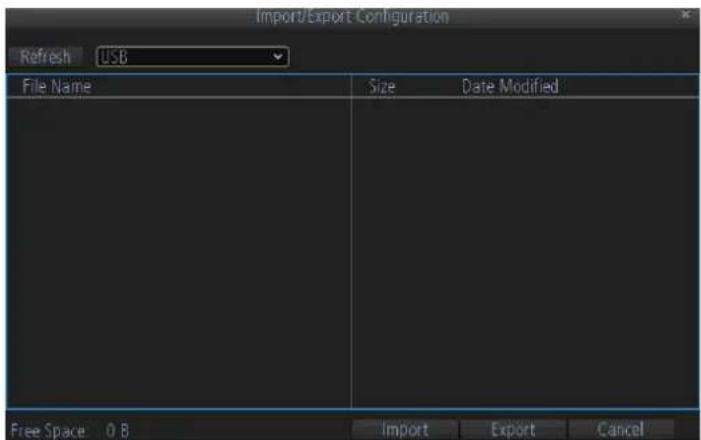
Import/Export Configuration Refresh USB File Name Size Date Modified Free Space: 0 B Import Export CancelTo export your settings:
- Insert a USB flash drive into the USB port on the front of the DVR. Ensure it has enough free space (a few MB is sufficient - the file is less than 50KB) and that it is not write-protected.
- Choose Configuration: Import/Export. You'll see a file browser, showing the contents of the storage device.
- Click Export to save your settings. Exporting your settings will overwrite any previous settings you've saved to that flash drive. If you want to do sequential configuration exports, you'll need multiple USB drives - or, rename the file using a PC (advanced users only).
Configuration (Import): Operates in the same way as the Export function, but is used to load a previously saved configuration file.
Locate the file you want on your flash drive - it will be called config(time & date).tgz. For example, config20120404110829.tgz would be the config file from April 4, 2012 at 11:08AM.
Loading the file will cause the DVR to automatically reboot.
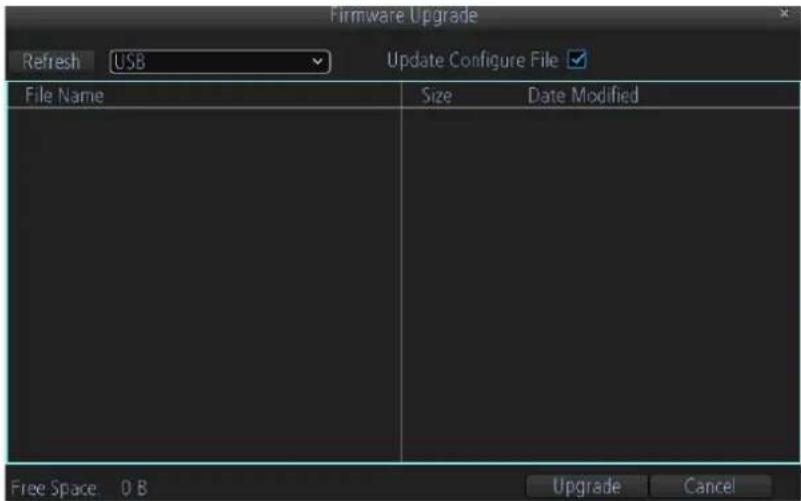
Firmware upgrade: Click the upgrade button to upgrade the firmware version of your DVR.
text_image
Firmware Upgrade Refresh USB Update Configure File ✓ File Name Size Date Modified Free Space: 0 B Upgrade Cancel12 APP FOR PHONE AND TABLET
To access your device from a smart phone or tablet, please download and install Amcrest Link. For iPhone and iPad users, please visit the APP store to download the APP. For Andriod user, please install the APP from the CD (Amcrest Link.apk for Andriod smart phone) or Google Play.
12.1 Configure the Amcrest Link
After you have downloaded and installed Amcrest Link on your smart phone, locate the app and tap the icon to run. Take your smart phone to your device and follow the instructions below.
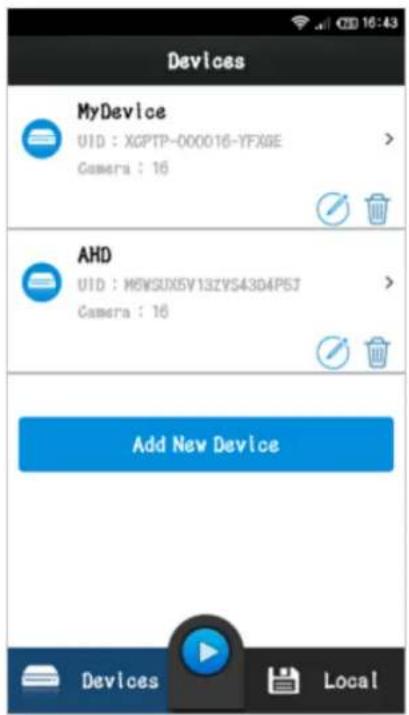
- Tap Add New Device to Add device.
text_image
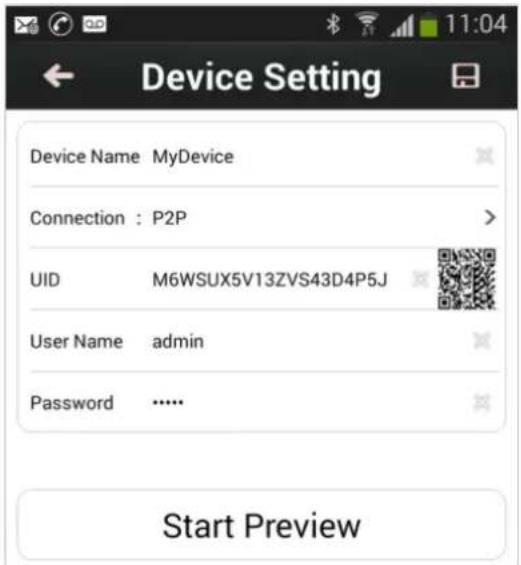
Devices MyDevice UID : XGPTP-000016-YFX8E Camera : 16 AHD UID : M6VSUX5Y13ZVS43D4P5J Camera : 16 Add New Device Devices Local- In the Devices Setting, you can add your device by UID. On the DVR you will see QR Code on
the first page of Setup Wizard and your UID number. On the app, tap the QR Code button

and use your smart phone's camera to scan the QR. Enter a Device Name (anything you like), the username and password for your device as shown below.
text_image
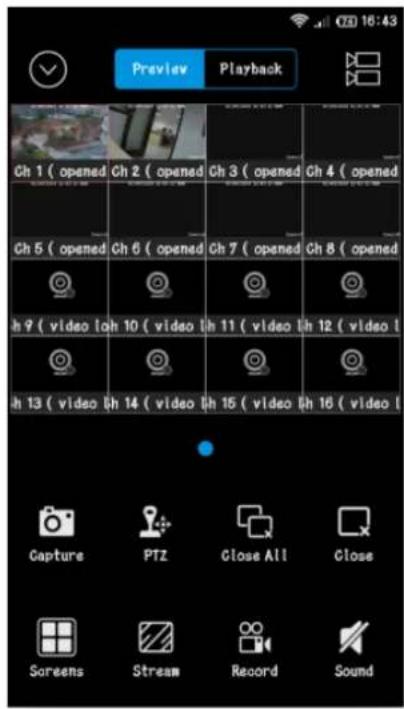
Device Setting Device Name MyDevice Connection : P2P UID M6WSUX5V13ZVS43D4P5J User Name admin Password ...... Start Preview- Tap Start Preview to automatically check the number of channels and then you will see your cameras on screen and that's it, you're connected!
text_image
Preview Playback Ch 1 ( opened Ch 2 ( opened Ch 3 ( opened Ch 4 ( opened Ch 5 ( opened Ch 6 ( opened Ch 7 ( opened Ch 8 ( opened h 9 ( video loh 10 ( video hh 11 ( video lh 12 ( video l h 13 ( videolh 14 ( videolh 15 ( videolh 16 ( video l Capture PTZ Close All Close Screens Stream Record Sound12.2 Live view in Amcrest Link
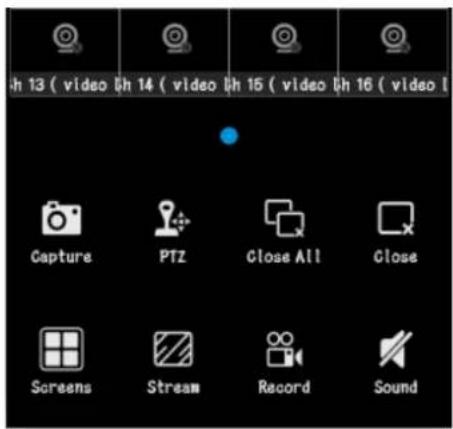
After you add a device successfully, you will be able to live view and control your device by following buttons.
text_image
h 13 ( video h 14 ( video h 15 ( video h 16 ( video l Capture PTZ Close All Close Screens Stream Record Sound
Capture: take a snapshot of the live view stream.

PTZ: control your device's PTZ.
Close/Start All: close or start the live view of all the channels.

Close/Start: close or start the live view of one channel.

Screens: divide screen into 1/4/8/9/16 for video display.

Stream: switch between the main stream and sub stream.

Recording: record the stream of live view.

Sound: enable and disable audio.
12.3 Playback in Amcrest Link
You can playback local and remote recording files. Please tap Playback.
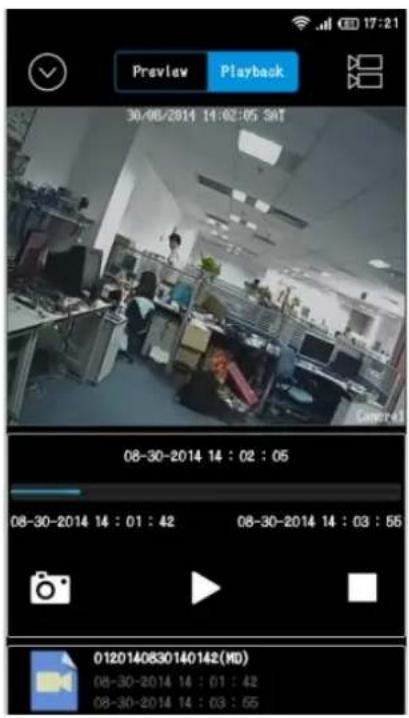
- All the local recording files will be list and you can choose one file to playback directly.
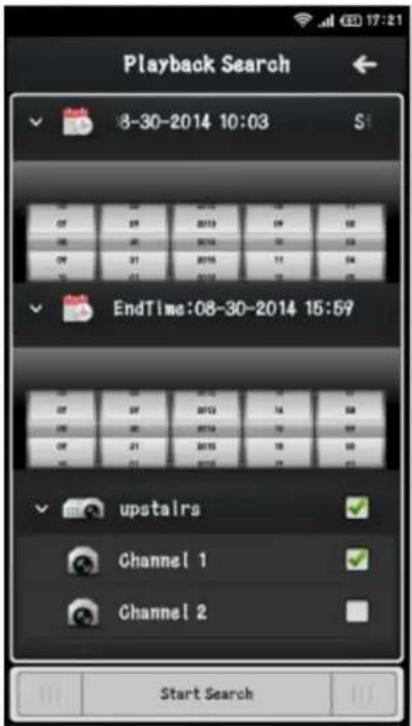
- For the Remote recording files, please tap to search. Input the search condition and click Start Search. Then all the files that meet this condition will be shown in the list.
text_image
Playback Search 8-30-2014 10:03 EndTime:08-30-2014 15:59 upstairs Channel 1 Channel 2 Start Search13 SmartClient/Web for PC
SmartClient is designed to access and control single DVR. Compared with CMS, it has less functions and much easier for user. You can also access your DVR by browser. It is similar to SmartClient.
13.1 Login Your Device
text_image
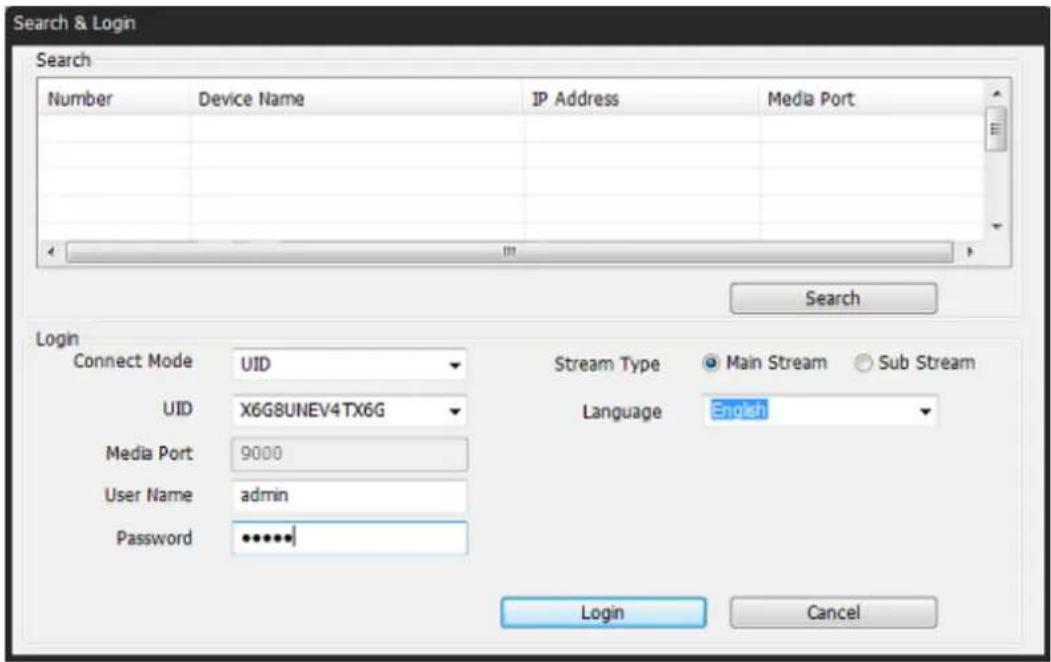
Search & Login Search Number Device Name IP Address Media Port Search Login Connect Mode UID Stream Type Main Stream Sub Stream UID X6G8UNEV4TX6G Language English Media Port 9000 User Name admin Password ••••••| Login CancelTo access your device, you need to login first.
- Scan all the devices in your local area network by clicking Search. Then double click one device from the list. Or you can manually input the device IP address/Domain name/UID.
- Input the user name and password.
- Select main stream or sub-stream for live view. If your device is in internet, it's recommended to select Sub-stream. Sub-stream has much lower bitrate than main stream, but main stream has much better image quality.
- Click Login, then you will connect the device to live-view.
13.2 Live View
text_image
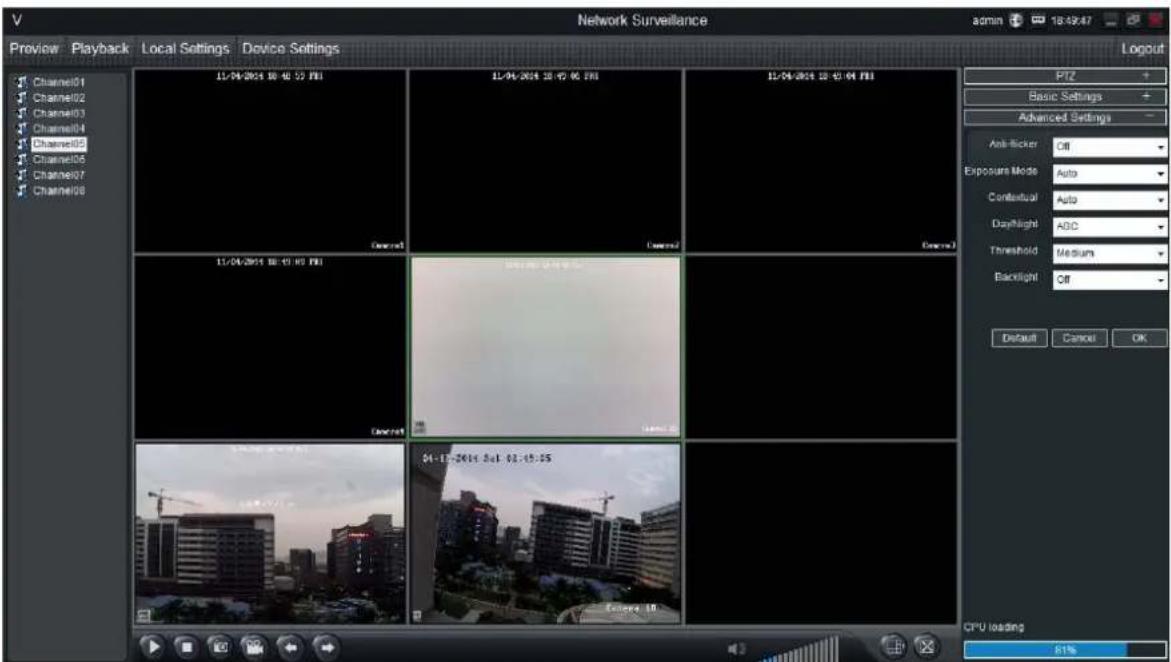
Network Surveillance Preview Playback Local Settings Device Settings 12/04/2014 10:46:53 PMI 12/04/2014 18:49:06 PMI 12/04/2014 18:49:04 PMI Channel01 Channel02 Channel03 Channel04 Channel05 Channel06 Channel07 Channel08 Control Cancel Control 12/04/2014 10:47:03 PMI 12/04/2014 18:49:06 PMI Control Cancel 12/04/2014 10:47:03 PMI 12/04/2014 18:49:06 PMI Control Cancel 04-17-2014 Sat 12:45:55 Follow Up PITZ Basic Settings Advanced Settings Anti-Backier Off Exposure Mode Auto Contextual Auto Daylight ABC Threshold Medium Backlight Off Default Cancel OK CPU loading 81%Preview: The screen layout emulates the multi-channel live view screen of the DVR, showing you images coming directly from your cameras in near real-time (some delay is caused by the network/Internet connection you're using to access the device). You can select a single camera or multi-channel viewing by using the Viewing Mode buttons in the lower right corner.
Playback: Opens the Playback interface, which operates in much the same way as the playback interface on the DVR itself.
Local Settings: Defines how SmartClient will manage and save footage and still images to your local PC.
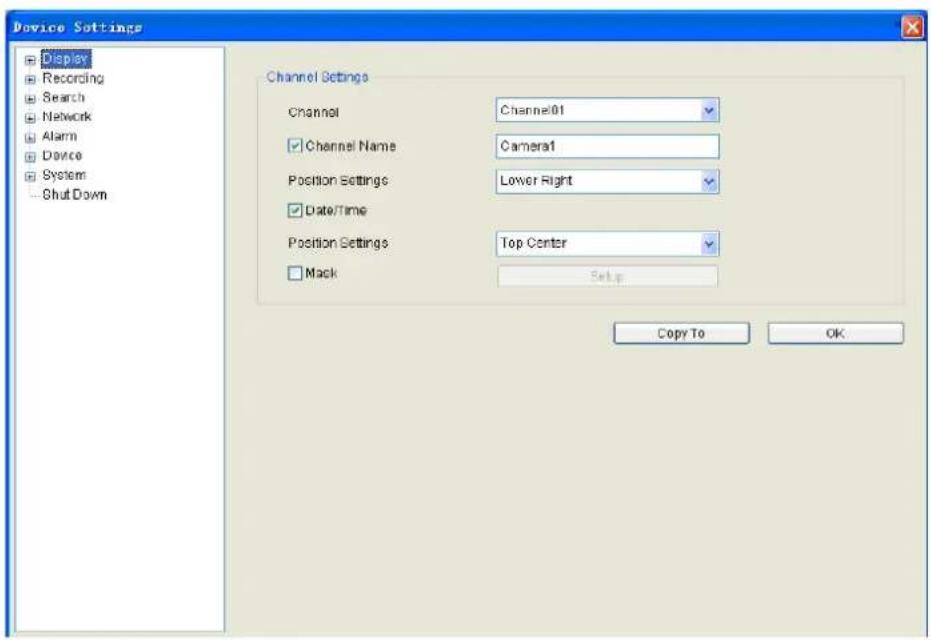
Device Settings: Allows access to the device's settings. The configurable options are very similar to those you'll find in the device local menus.
Main Viewing Area: Where images from your camera will be shown. Select Preview to return to this view from the Playback interface or the configuration menus.
Image Controls: You can alter the brightness, contrast, saturation and hue of your images here. They operate in the same way as those in the device's local menu.
Viewing Modes: Choose between single camera viewing, four channels at once (2 x 2) or all eight channels at once (3 x 3).
Volume Control: Alters how loud the audio output from the device will be.
CPU Loading: How hard your computer is working to decode and display images as they arrive from the device.
13.3 Playback
text_image
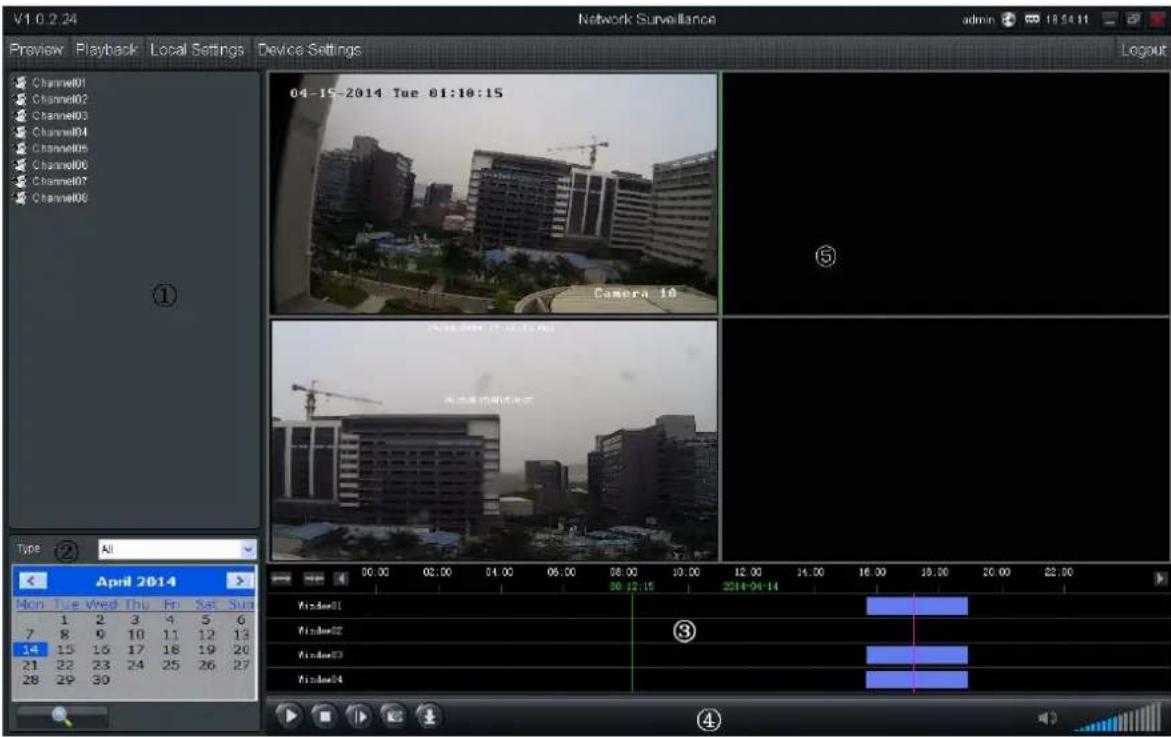
V1 0.2.24 Network Surveillance admin 18:54:11 Preview Playback Local Settings Device Settings Edit ① Channel01 Channel02 Channel03 Channel04 Channel05 Channel06 Channel07 Channel08 04-15-2014 Tue 01:10:15 Camera 10 ⑤ Type ② All April 2014 Mon Tue Wed Thu Fri Sat Sun 1 2 3 4 5 6 7 8 9 10 11 12 13 14 15 16 17 18 19 20 21 22 23 24 25 26 27 28 29 30 Window01 Window02 Window03 Window04 ③ ④| Area | Description | Area | Description |
| 1 | Device list | 2 | Search condition |
| 3 | Search result | 4 | Playback control panel |
| 5 | Play window |
13.3.1 Remote playback and download
- Select the playback channel and window.
-
Select recorded files type and query time.
-
Click the

to search the matched recorded files. If there are any, the files
will shows in the area 3.
- Select the time you want to start playback from area 3, and click icon

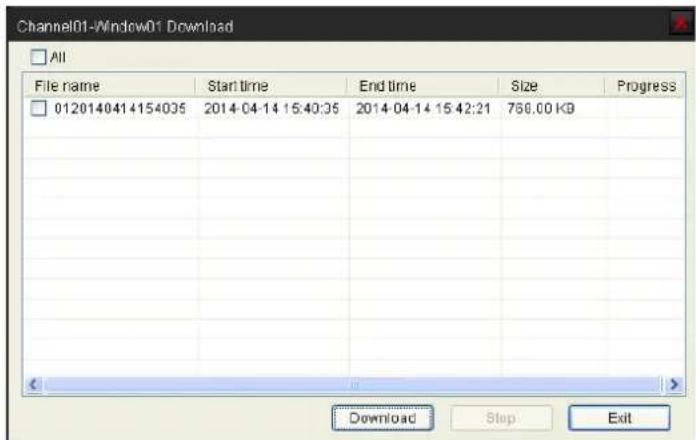
- To download recording file, please click

- In the file list dialog, select what you want to download.
text_image
Channel01-Window01 Download All File name Start time End time Size Progress 012014041 4154035 2014-04-14 15:40:35 2014-04-14 15:42:21 768.00 KB Download Step Exit13.3.2 Playback Control
When playback has succeeded, you can control the playback:

text_image
1 2 3 4 5 6 71) Play / Pause.
2) Stop.
3) Single frame forward.
4) Snap shot.
6) enable/disable the audio
7) Volume control.
5) Download the recording file. The default directory for the downloaded file is C:\DownloadFile. You can modify the directory in Setup -> Local Settings page.
13.3 Local Settings
text_image
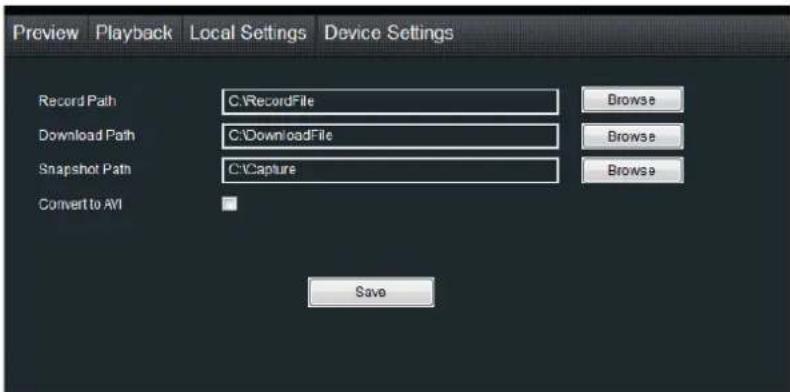
Preview Playback Local Settings Device Settings Record Path C:\RecordFile Browse Download Path C:\DownloadFile Browse Snapshot Path C:\Capture Browse Convert to AVI SaveThe local configuration screen is where you can customize how SmartClient will store and
process footage on the local PC when you download it from the device.
Record Path: Where SmartClient will save recordings if you select Record from the Preview screen.
Download Path: Where SmartClient will save footage that you've downloaded from the device.
Snapshot Path: Where SmartClient will save still images captured using the snapshot function.
Convert to AVI: When selected, SmartClient will use your PC to transcode footage from the device's native format (H.264) into a format that your computer (indeed, almost any computer) will be able to playback without special software.
13.4 Device Settings
You can remote configure the parameters of the device here. The configuration menu is almost the same with device local menu.