
AT2001W - TV ACER - Free user manual and instructions
Find the device manual for free AT2001W ACER in PDF.

| Product Type | LCD TV |
| Brand | Acer |
| Model | AT2001W |
| Display Resolution | 800 x 600 pixels |
| Brightness | 450 nits (typical) |
| Contrast Ratio | 500:1 (typical) |
| Display Colors | 16.7 million |
| Viewing Angle (H/V) | 160° / 120° (typical) |
| Response Time | 16 ms (gray-to-gray) |
| Power Supply | 100-240V AC |
| Max Power Consumption | 63 W |
| Power Saving Mode | 5 W |
| Dimensions (W x H x D) | 495.9 x 468.2 x 198.4 mm |
| Weight | 7.8 kg (17.16 lb) |
| Tilt Angle | Up 15°, Down 5° |
| Wall Mounting | Yes (100 x 100 mm VESA) |
| Inputs | RF (Tuner), Composite (AV1), S-Video (AV1), YPbPr (AV2), VGA (D-Sub) |
| Audio Input | PC Audio In (3.5mm), AV Audio L/R (RCA) |
| Audio Output | Headphone jack (3.5mm) |
| Built-in Speakers | 3 W + 3 W (stereo) |
| Remote Control | Yes (battery included) |
| Teletext | Yes (FASTEXT/LIST support) |
| Sleep Timer | Yes (30, 60, 90 minutes) |
| Cleaning Instructions | Unplug, use soft moist cloth; no liquid cleaners |
| Safety Features | Ventilation slots, grounded power cord, do not open casing |
Frequently Asked Questions - AT2001W ACER
User questions about AT2001W ACER
0 question about this device. Answer the ones you know or ask your own.
Ask a new question about this device
Download the instructions for your TV in PDF format for free! Find your manual AT2001W - ACER and take your electronic device back in hand. On this page are published all the documents necessary for the use of your device. AT2001W by ACER.
USER MANUAL AT2001W ACER
Copyright © 2005. Acer Incorporated. All Rights Reserved.
Acer AT2001 User's Guide Original Issue: May 2005
Acer and the Acer logo are registered trademarks of Acer Incorporated. Other companies' product names or trademarks are used herein for identification purposes only and belong to their respective companies
Contents
natural_image
Line drawing of a flat-screen monitor with a base and control panel (no text or symbols)Important safety instructions....5
Taking care of your remote control....6
Cleaning and servicing....6
Declaration of Environmental Protection Conformity....6
1 BEFORE YOU START....7
1-1 What's in the Box 7
2 YOUR LCD TV AT A GLANCE....8
2-1 Control Panel 8
2-2 Left-side Connectors....9
2-3 Back Connectors 10
3 YOUR REMOTE CONTROL AT A GLANCE ....11
4 BASIC LCD TV SETUP....13
4-1 Connecting to the Aerial....13
4-2 Using the Remote Control (Basic Operation)....13
4-3 Plugging In Your LCD TV....14
4-4 Turning ON the Power 15
4-5 Tuning Channels Automatically (AUTO SETUP).... 16
4-6 Program Sort....17
4-7 Naming Channels....17
4-8 Tuning Channels Manually (MANUAL TUNING) 18
5 CONNECTING EXTERNAL DEVICES....18
5-1 Connecting a YPBPR Device....18
5-2 Connecting a Composite Device....19
5-3 Connecting a S-Video Device 20
5-4 Connecting a VCR Using Coaxial (RF) 21
5-5 Connecting Speakers....22
6 ADJUSTING SETTINGS 23
6-1 Basic Operations 23
6-1-1 ADJUSTING THE VOLUME 23
6-1-2 SELECTING PROGRAMS....25
6-2 Using the On-Screen Display (OSD) 26
6-2-1 MAKING ADJUSTMENTS....26
6-3 OSD Menus and Options....27
6-3-1 With Source Input Set to TV....30
7 ADVANCED SETTINGS....31
7-1 Setting the Sleep Timer....31
7-2 Displaying Teletext 32
7-2-1 TO TURN ON/OFF TELETEXT MODE 32
TROUBLESHOOTING AND SUPPORT....32
PRODUCT SPECIFICATIONS....34
Important safety instructions
Read these instructions carefully. Save them for future reference.
1 Follow all warnings and instructions marked on the product.
2 Unplug this product from the power outlet before cleaning. Use a soft, moist cloth for cleaning. Do not use liquid or aerosol cleaners.
3 Do not use this product near water.
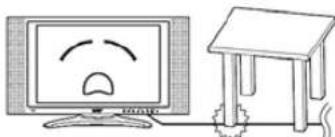
4 Do not place this product on an unstable cart, stand, or table. The product may fall, causing serious damage to the product.
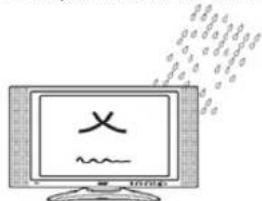
5 Slots and openings are provided for ventilation; to ensure reliable operation of the product and to protect it from overheating. These openings must not be blocked or covered. The openings should never be blocked by placing the product on a bed, sofa, rug, or other similar surface. This product should never be placed near or over a radiator or heat register, or in a built-in installation unless proper ventilation is provided.
natural_image
Illustration of a computer monitor with sad face and thermometer, no text or symbols present6 This product should be operated from the type of power source indicated on the label. If you are unsure of the type of power source available, consult your dealer or local power company before use.
7 Do not step on or place heavy objects on the power cord. Carefully route the power cord and any cables away from foot traffic. Do not locate this product where persons will step on the cord.
natural_image
Cartoon illustration of a computer monitor with a sad face and a desk beside it (no text or symbols)8 If an extension cord is used with this product, make sure that the total ampere rating of the equipment plugged into the extension cord does not exceed the extension cord ampere rating. Also, make sure that the total rating of all products plugged into the wall outlet does not exceed the fuse rating.
9 Never push objects of any kind into this product through cabinet slots as they may touch dangerous voltage points or short out parts that could result in a fire or electric shock.
10 Do not attempt to service this product yourself, as opening or removing covers may expose you to dangerous voltage points or other risks. Refer all servicing to qualified service personnel.
11 Unplug this product from the wall outlet and refer servicing to qualified service personnel under the following conditions:
a. When the power cord or plug is damaged or frayed.
b. If liquid has been spilled into the product.
c. If the product has been exposed to rain or water.
d. If the product does not operate normally when the operating instructions are followed. Adjust only those controls that are covered by the operating instructions since improper adjustment of other controls may result in damage and will often require extensive work by a qualified technician to restore the product to normal condition.
e. If the product has been dropped or the case has been damaged.
f. If the product exhibits a distinct change in performance, indicating a need for service.
12 Only use the correct power cord (provided in your accessories box) for this product. Always disconnect the power cord from the wall outlet before servicing or disassembling this equipment.
Taking care of your remote control
Follow these steps to ensure proper care of your remote control:
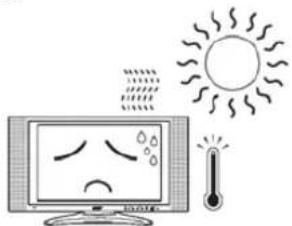
- Handle the remote control with care. Dropping it, placing it in direct sunlight, or allowing it to get wet may cause damage.
- Do not tamper with the batteries, and keep them away from children.
- When you anticipate that the remote control will not be used for an extended period, remove the batteries to prevent possible damage from battery leakage.
- Dispose of batteries according to local regulations. Recycle if possible.
Cleaning and servicing
When cleaning your LCD TV, follow these steps:
1 Power off the TV.
2 Disconnect the power cord.
3 Use a soft, moist cloth. Do not use liquid or aerosol cleaners.
1 BEFORE YOU START
1-1 What's in the Box
When you receive your LCD TV, unpack it carefully, and check to make sure you have all the items below.
| REMOTE CONTROL and ONE L3120 BATTERY | POWER CORD USER'S MANUAL WARRANTY | ||
 |  |  |  |
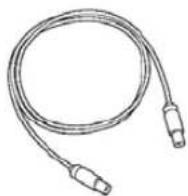
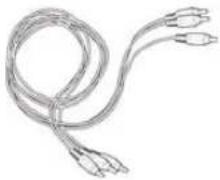
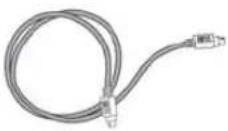
| TV CABLE | COMPONENT CABLE | COMPOSITE CABLE | S-VIDEO CABLE |
 |  |  |  |
2 YOUR LCD TV AT A GLANCE
2-1 Control Panel
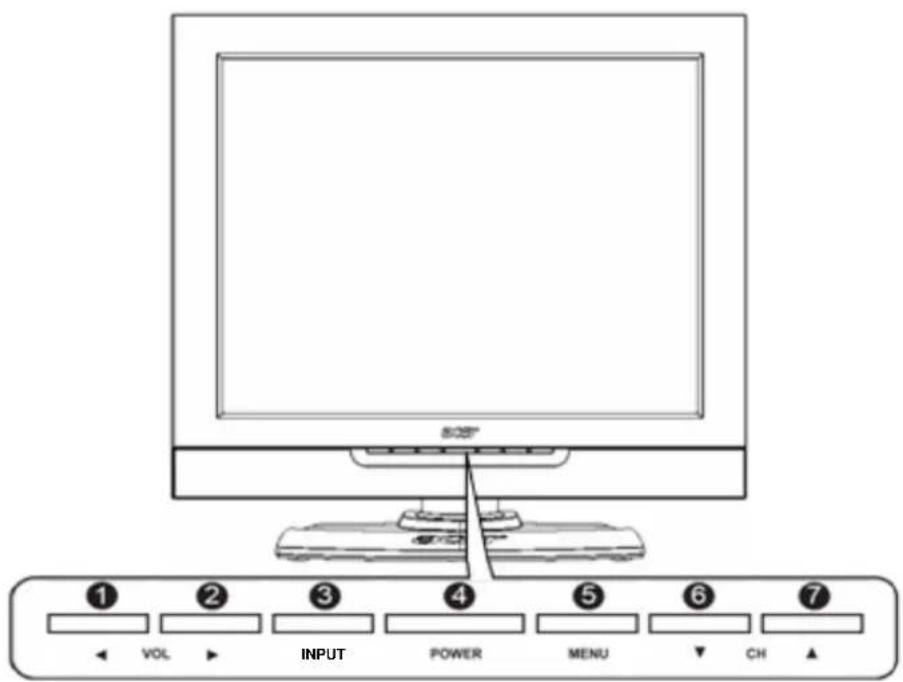
| BUTTON | VIEWING FUNCTION (OSD OFF) | MENU FUNCTION (OSD ON) |
| 1 | Lowers the sound level. | Reduces a menu option value. |
| 2 | Increases the sound level. | Displays a submenu with selections for the current menu option.Increases a menu option value. |
| 3 | Selects the input source. | N/A |
| 4 | Turns the LCD TV ON/OFF. | N/A |
| 5 | Activates the OSD main menu. | Returns to the previous menu or to normal viewing. |
| 6 | Displays the previous stored channel. | Selects the previous menu option. |
| 7 | Displays the next stored channel. | Selects the next menu option. |
2-2 Left-side Connectors
To access these connectors, you will need to open the protective cover.
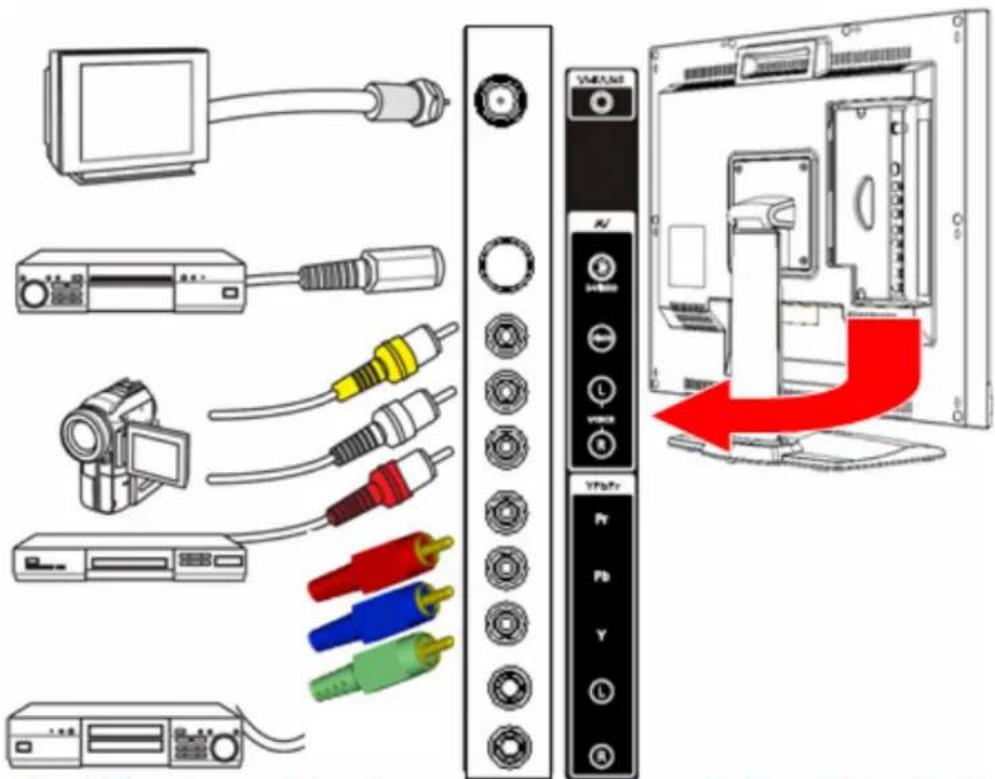
( FOR Red/Blue/Green cable, please use same design as Yellow/White/Red cable, only need to change the cable color)
| CONNECTOR | DESCRIPTION |
| 1 | TUNER (UHF/VHF-CATV) - Connect to antenna, cable service, or VCR. |
| 2 | S-Video - Connect an S-video device, such as a DVD player or VCR, to this connector. |
| 3 | Composite - Connect a composite device, such as a DVD player or VCR, to this connector. |
| 4 | YPbPr - Connect a video device, such as a DVD player or VCR, to this connector. |
2-3 Back Connectors
English
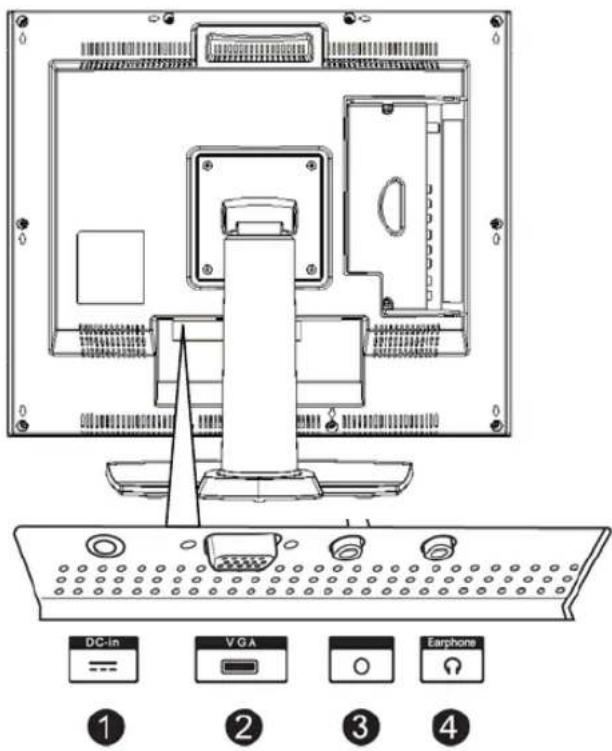
| CONNECTOR | DESCRIPTION |
| 1 | DC-in - Connect the AC power adapter to this. |
| 2 | VGA - Connects to a computer's VGA terminal output. |
| 3 | Audio-in - Connects to a computer's audio out jack. |
| 4 | Audio-out - Connect a headphone, external amplifier, or speakers to this. |
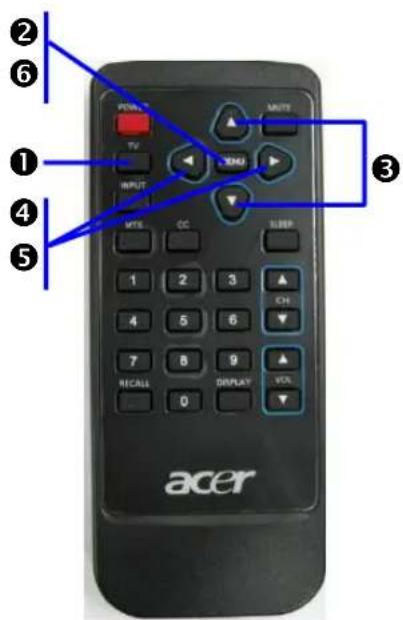
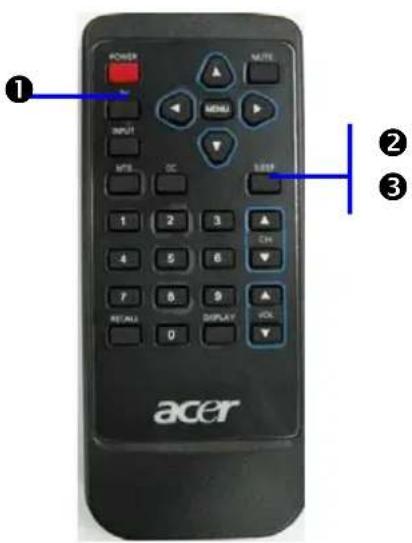
3 YOUR REMOTE CONTROL AT A GLANCE
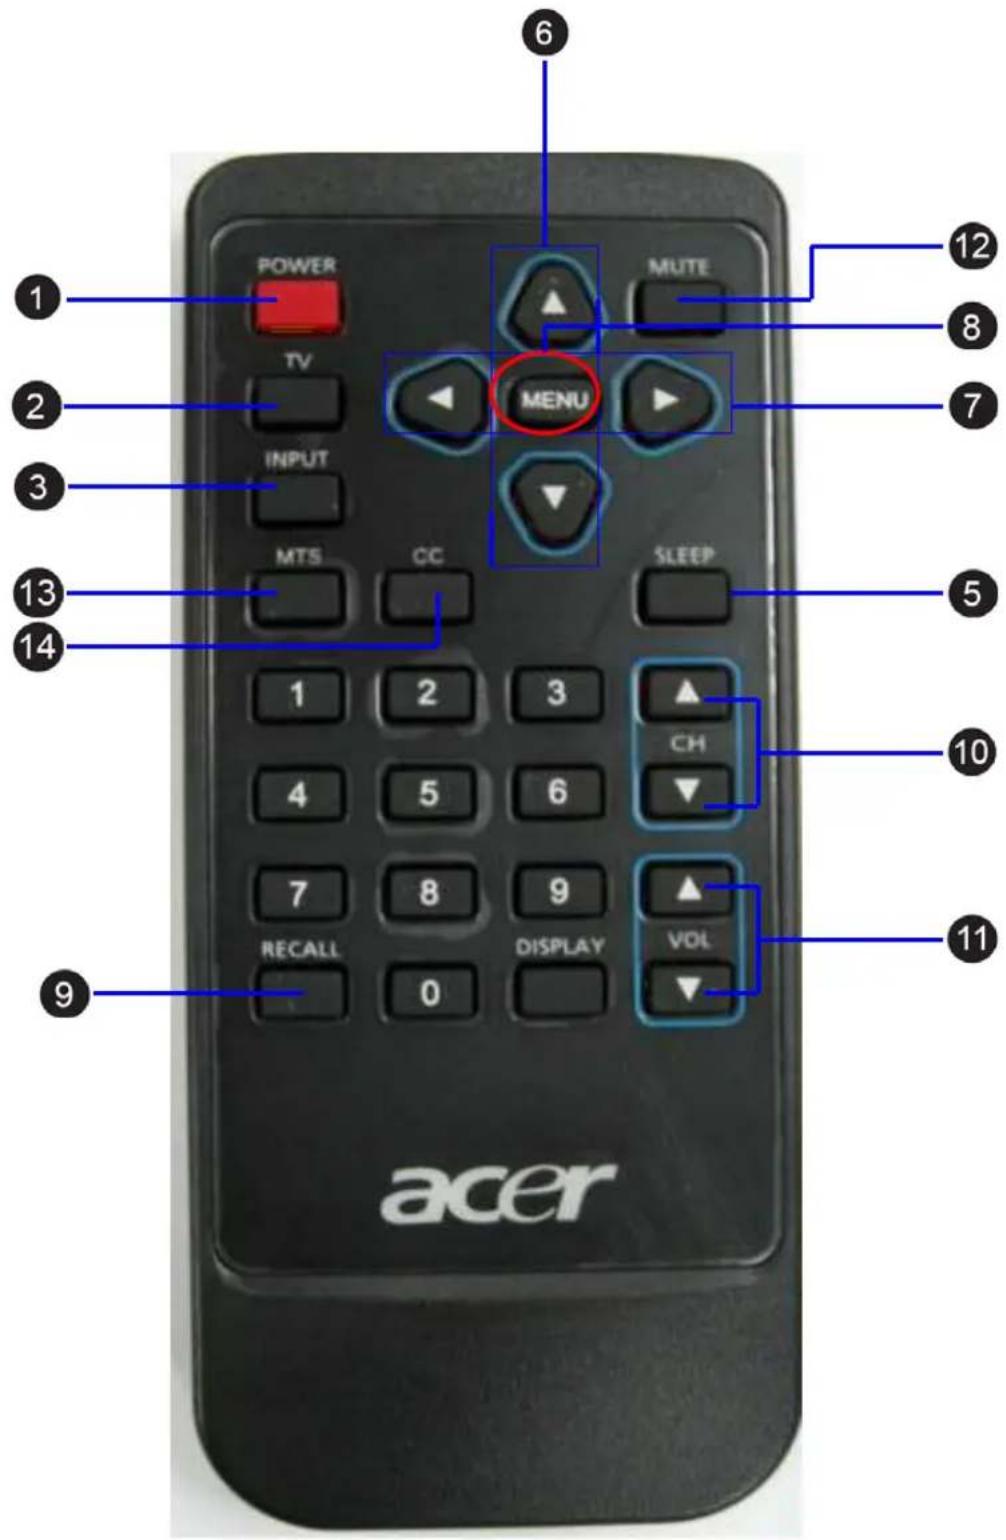
BUTTON DESCRIPTION
1 POWER Turns the selected component ON/OFF.
2 TV Selects a programmed TV.
3 INPUT Changes the input source.
4 MPX Changes the audio output.
5 SLEEP Turns on the sleep timer.
6 UP/DOWN Navigates up and down in the on-screen display (OSD) menus.
7 LEFT/RIGHT Navigates left and right in the on-screen display (OSD) menus.
8 MENU Displays menus for TV and other options.
9 RECALL Shows last channel and video source
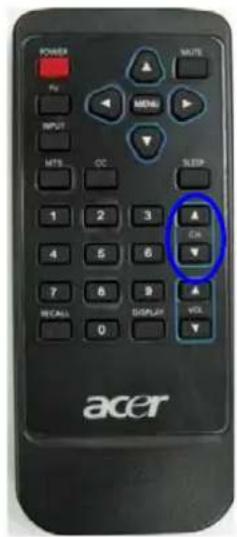
10 CH ▲ / ▼ Changes the channel.
11 VOL ▲ / ▼ Increases/decreases the volume.
12 MUTE Mutes or restores the sound volume.
13 MTS Select Multi Sound
14 CC Turns on close caption function
4 BASIC LCD TV SETUP
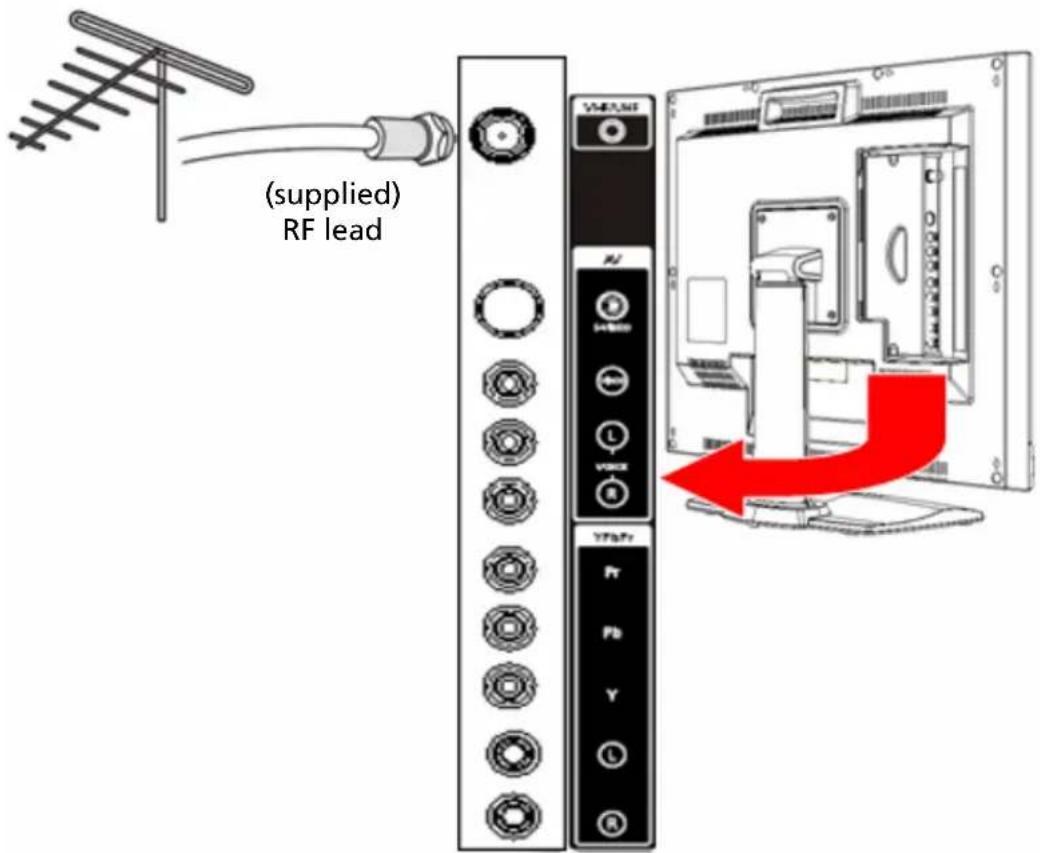
4-1 Connecting to the Aerial
Connect the outdoor aerial (antenna) cable lead or your cable TV box to the TUNER (UHF/VHF-CATV) jack on the back of your LCD TV using an RF (coaxial) lead. See 2-2 Left-side Connectors for location.
4-2 Using the Remote Control (Basic Operation)
Point the remote control towards the remote control sensor window located on the front of your LCD TV. Make sure no objects are in the line of aim, otherwise the remote control may not operate properly.
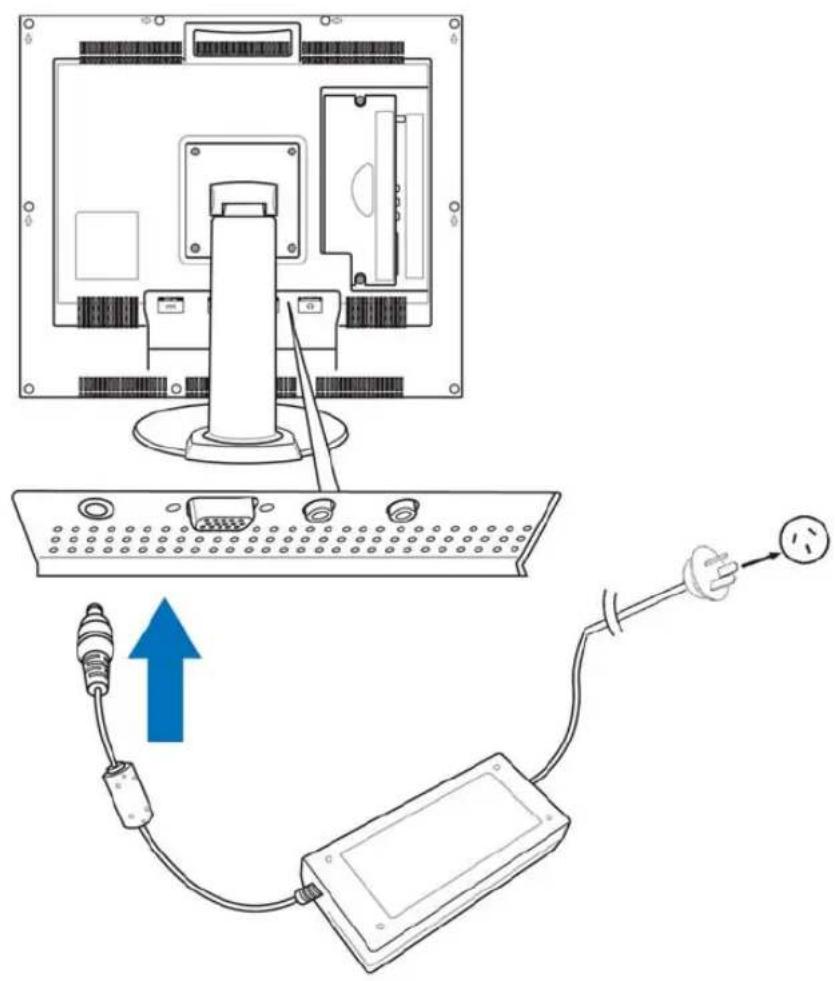
4-3 Plugging In Your LCD TV
- Connect the power cord to the power cord connector on the back of your LCD TV.
- Plug the other end of the power cord into a properly grounded electrical outlet or surge protector.
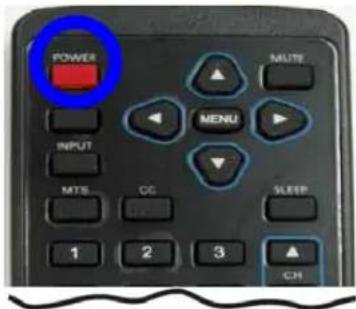
4-4 Turning ON the Power
Press the Power button on the top of the LCD TV (see 2-1 Control Panel for location). The Status LED on the front turns green and your LCD TV turns on.
-OR-
Press the POWER button on your remote control. The Status LED on the front turns green, and the unit turns on.
WARNING! For added protection during a lightning storm or when it is left unattended or unused for long periods of time, unplug your LCD TV from the wall outlet and disconnect the aerial or cable system.
4-5 Tuning Channels Automatically (AUTO SETUP)
Use this option to quickly add all channels that have a signal to the channel list.
TO TUNE CHANNELS AUTOMATICALLY
- Press the MENU button on the remote control to open the OSD.
- Press the △/▼ buttons to select SETUP.
- Press ▶ to open the Setup menu.
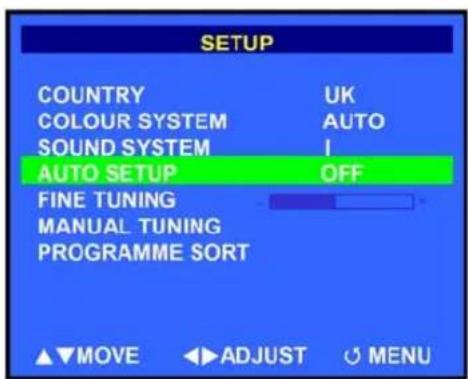
- Press the △/▼ buttons to select AUTO SETUP.
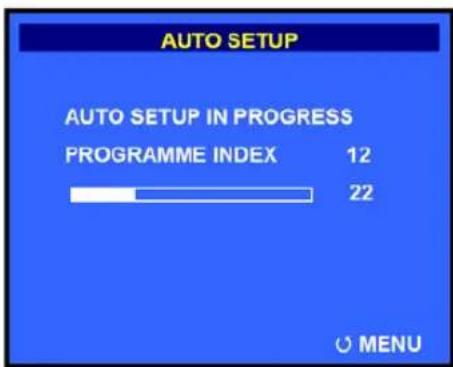
- Press to start auto setup. The LCD TV will search for all available channels. Please be patient, this will take a few minutes.
- When the LCD TV has finished searching, the SORT menu will appear.
NOTE: Submenus can be accessed by pressing either ◄ or ▶
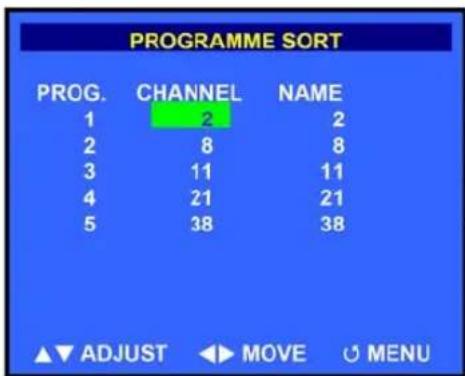
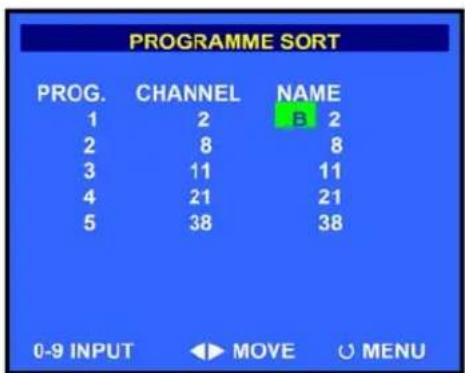
4-6 Naming Channels
Use this option to give a channel a name, e.g. BBC1.
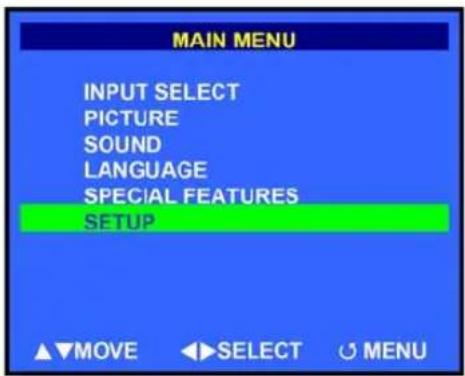
- Press the MENU button on the remote control to open the Main menu.
- Press the ▲/▼buttons to select SETUP.
- Press ▶ to select. The Setup menu opens.
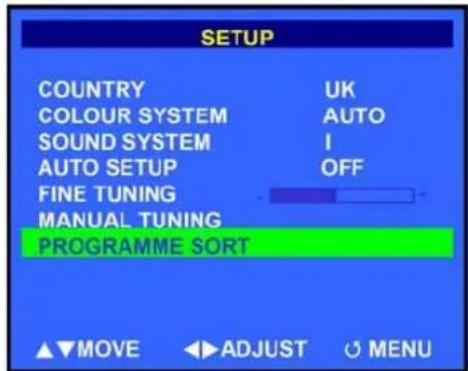
- Press the △/▼buttons to highlight PROGRAM SORT.
- Press to select. The Program Sort menu opens.
- Press the ▲/▼buttons to select the channel that you want to name.
- Press ▶ to move the selection block to the NAME column.
- Enter a name for this channel using the number keypad on the remote control. After the first letter or number is entered, press ▶ and enter the next letter or number. A maximum of five letters and/or numbers may be entered.
- When finished, press MENU to return to the previous menu.
Now you will be able to see the channel name that corresponds with the selected channel.
NOTE: Submenus can be accessed by pressing either ◄ or ▶.
5 CONNECTING EXTERNAL DEVICES
Read this section to learn how to connect the following devices:
- DVD players
HDTV decoder set-top boxes
VCRs
Computers
WARNING! Before connecting any external components, make sure to unplug your LCD TV and any connecting devices to prevent damage.
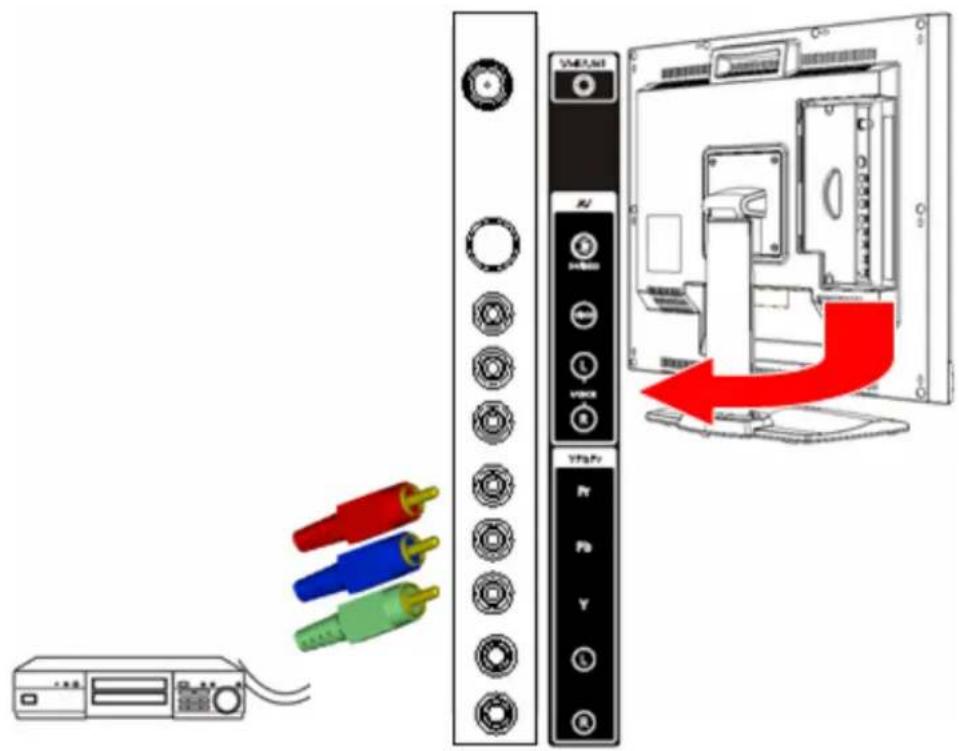
5-1 Connecting a YPbPr Device
- Connect one end of a 3-pin YPbPr lead (not supplied) to your YPBPR device and the other to the YPbPr connector on the side of your LCD TV.
- Turn on your LCD TV (see 4-4 Turning ON the Power), then press the INPUT button repeatedly to select YPBPR.
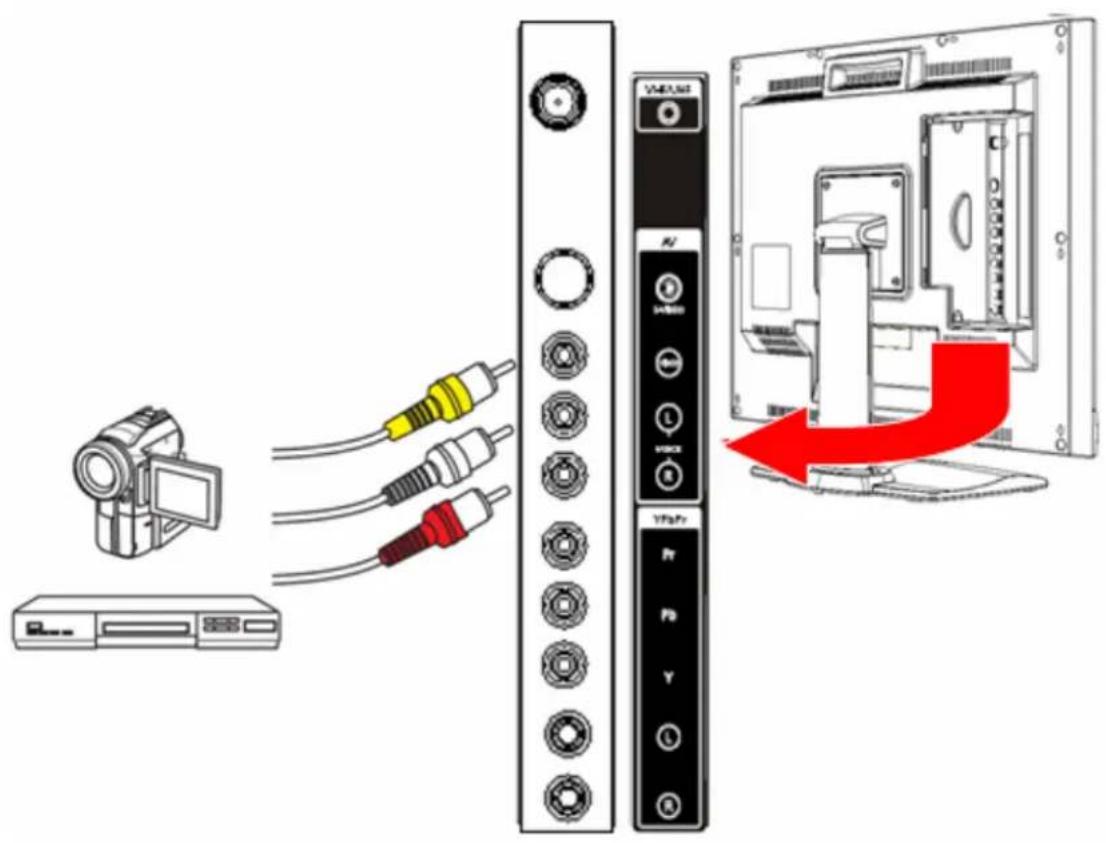
5-2 Connecting a Composite Device
-
Connect the yellow video jack from your composite device to the yellow AV jack on the side of your LCD TV with an RCA cable (not supplied).
-
Connect the red (R) and white (L) audio jacks from your composite device to the AV R and L audio-in jacks on the side of your LCD TV.
-
Turn on your LCD TV (see 4-4 Turning ON the Power), then press the INPUT button repeatedly to select AV.
5-3 Connecting a S-Video Device
- Connect one end of the S-video cable (not supplied) to your device and the other end to the S-video jack on the left-side of your LCD TV.
- Connect the red (R) and white (L) audio jacks from your device to the AV R and L audio-in jacks on the side of your LCD TV.
- Turn on your LCD TV (see 4-4 Turning ON the Power), then press the INPUT button repeatedly to select AV.
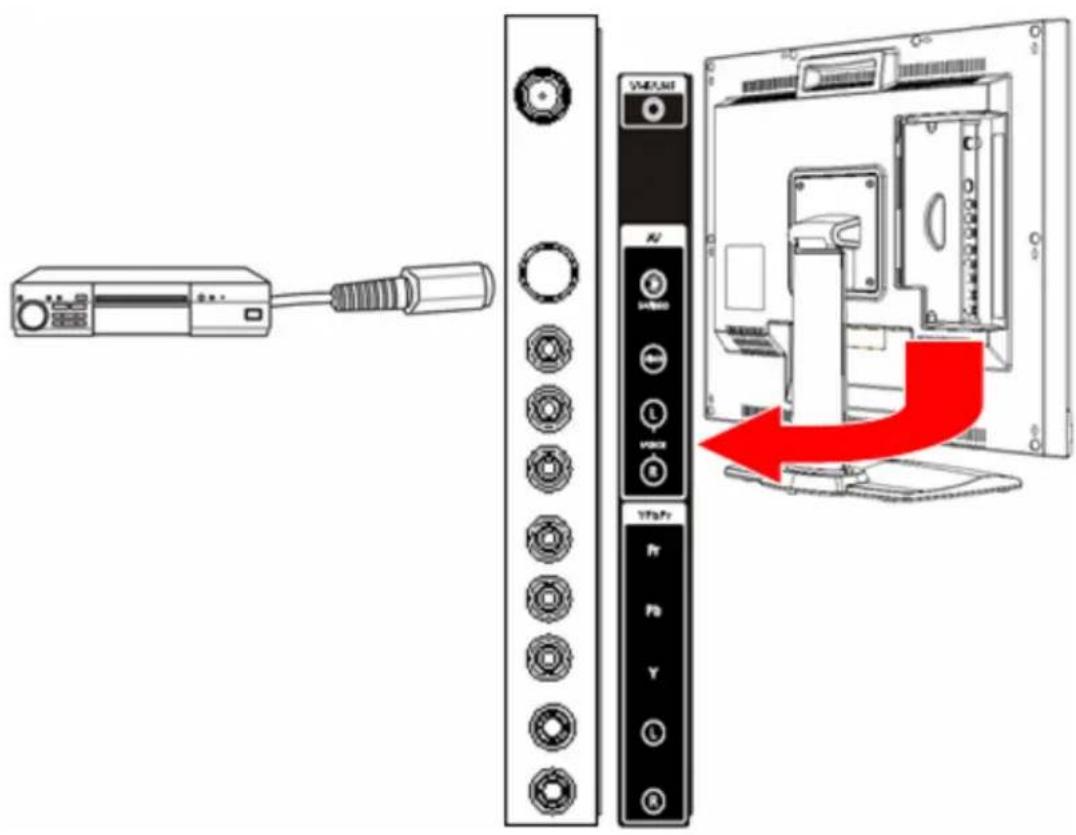
5-4 Connecting a VCR Using Coaxial (RF)
- Connect the "output to TV" (RF out or Antenna out) jack on the back of your VCR to the TUNER (UHF/VHF-CATV) jack on the back of your LCD TV with the supplied RF lead.
- Turn on your LCD TV (see 4-4 Turning ON the Power), then press the INPUT button repeatedly to select TV.
- If you have a broadcast antenna or cable box, connect your broadcast antenna or cable TV coaxial (RF) cable to the UHF/VHF connector on the back of your VCR.
WARNING! If an outdoor antenna or cable system is connected to your LCD TV, make sure that the antenna or cable system is correctly grounded.

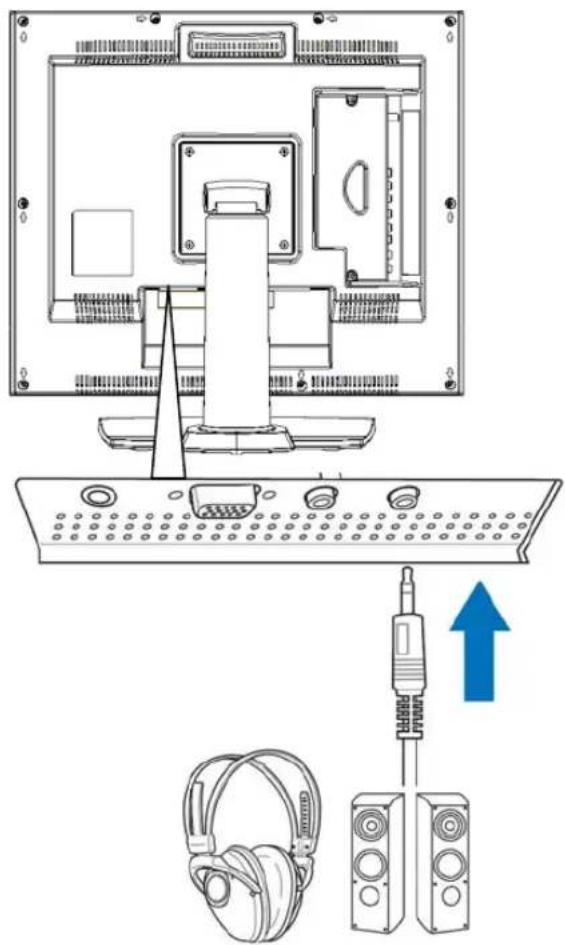
5-5 Connecting Speakers
Connect a headphone or speakers to the Audio-out jack on the back of your LCD TV. See 2-3 Back Connectors Connectors for the location of the Audio-out jack.
natural_image
Diagram showing a computer monitor setup with headphones and audio equipment, no text or symbols present6 ADJUSTING SETTINGS
6-1 Basic Operations
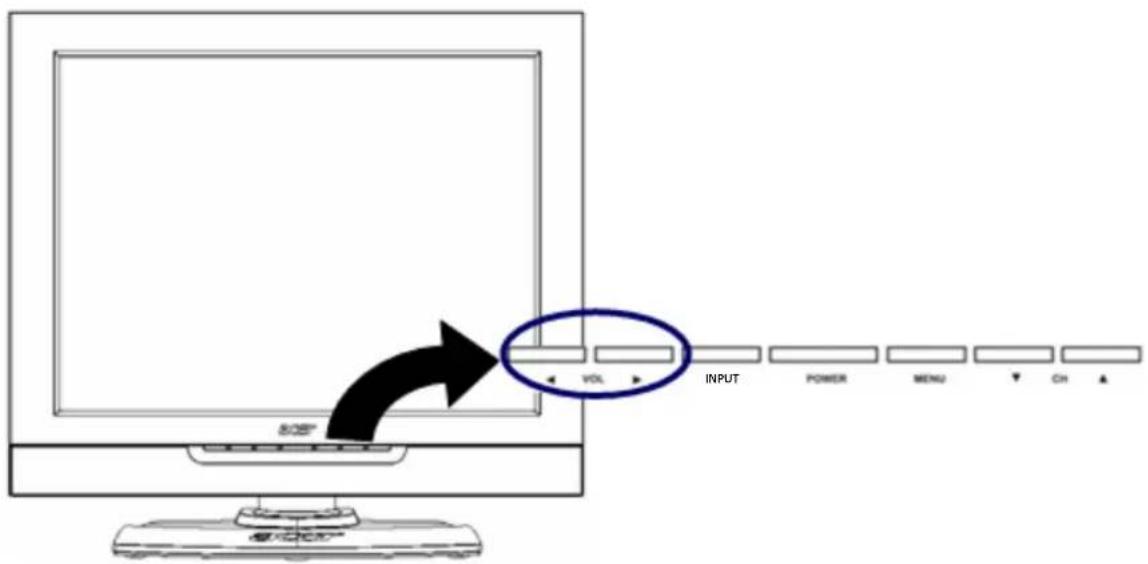
6-1-1 ADJUSTING THE VOLUME
You can adjust the volume in two ways - from your LCD TV's front panel or by using the remote control.
To adjust volume from the front panel:
Press VOL to increase/decrease the sound level.
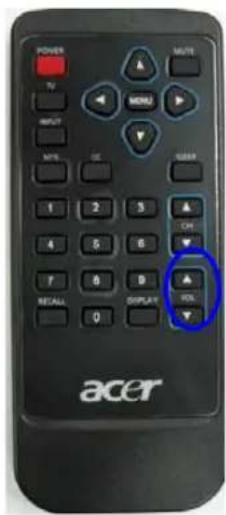
TO ADJUST VOLUME FROM THE REMOTE
Press VOL ▲ / ▼ (see illustration for location) to turn the volume up or down.
TO TEMPORARILY TURN OFF VOLUME (MUTE)
Press the MUTE button on the remote control.
TO TURN VOLUME BACK ON
Press the MUTE button again or press VOL ▲.
6-1-2 SELECTING PROGRAMS
TO SELECT PROGRAMS FROM THE LCD TV
Press ☐ to select programs (see 6-1-1 Adjusting the Volume for location).
TO SELECT PROGRAMS FROM THE REMOTE
Press CH ▲ / ▼ (see illustration for location).
OR
Press the number buttons on the number pad (see 3 Your Remote Control At a Glance for location).
6-2 Using the On-Screen Display (OSD)
Your LCD TV features an on-screen display (OSD) that lets you adjust and save contrast, brightness, and other settings. All the function settings are accessible either through the proper front display buttons or through the remote control. OSD menus may be different depending on the current input source.
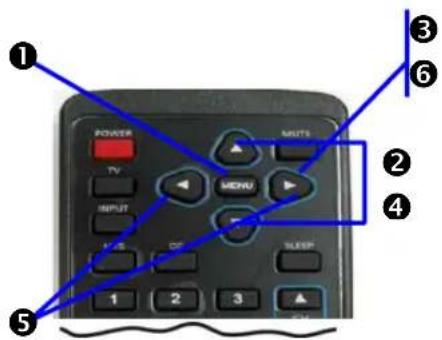
6-2-1 MAKING ADJUSTMENTS
- With the power ON, press the TV button.
- Press the MENU button to show the main menu.
- Press the △/▼ buttons to select one of the menu options.
- Press the 🔊/▶ buttons to access the submenu for the highlighted option.
- Press the ▶/▶ buttons to make adjustments.
- Press the MENU button to return to the previous menu option.
- OR -
Press the MENU button twice to close the OSD.
6-3 OSD Menus and Options
You can use these OSD menus and options to adjust various settings for your LCD TV.
6-3-1 With Source Input Set to TV
Main Menu
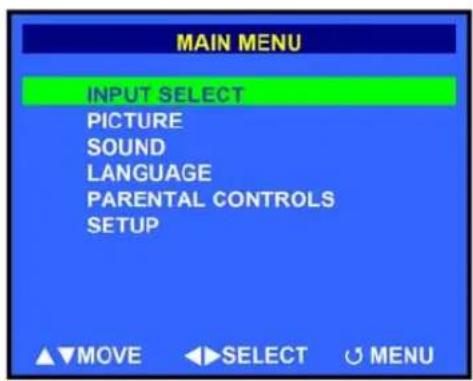
Input Select Menu
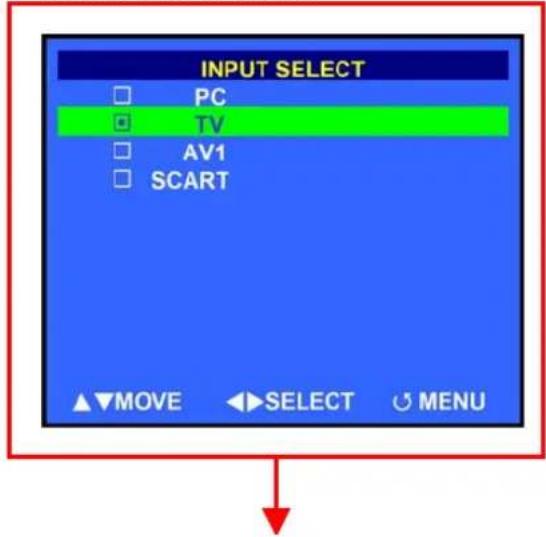
圖片有錯,未提供
Use this menu to switch between available signal input sources.
NOTE: AV shares the either S-video or CVBS (RCA phono).
Picture Menu

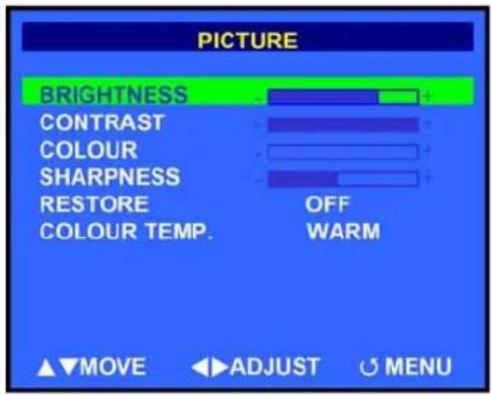
Brightness - Adjusts the luminance of the image.
Contrast - Adjusts the contrast ratio.
Color - Adjusts the color saturation, making colors more or less intense.
Sharpness - Adjusts the sharpness of the image.
Restore - Select ON to use factory default image settings.
Color Temp - Adjusts the color temperature.
Sound Menu
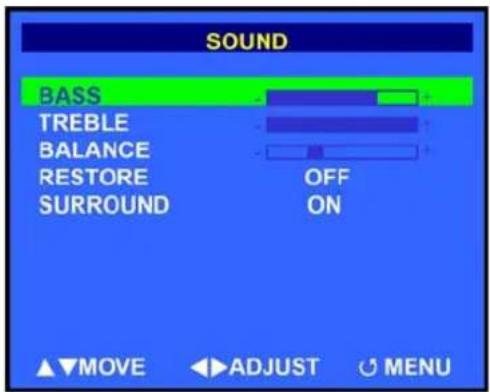
Treble - Adjusts the treble value to enhance high frequency sounds.
Bass - Adjusts the bass value to enhance the low frequency sounds.
Balance - Adjusts the level of sounds between the left and right speakers.
Restore - Select ON to use factory default sound settings.
Surround - Turns ON/OFF surround sound feature.
Language Menu
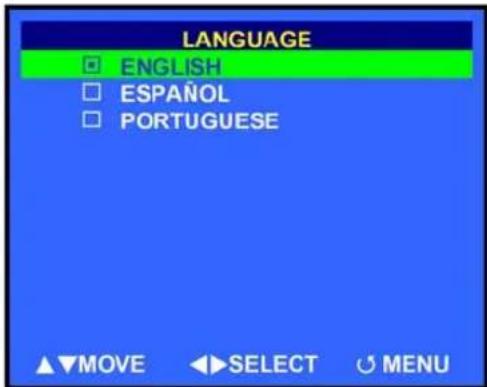
Use this menu to change the language of the OSD menu between English, Spanish, and Portuguese.
Special Features Menu
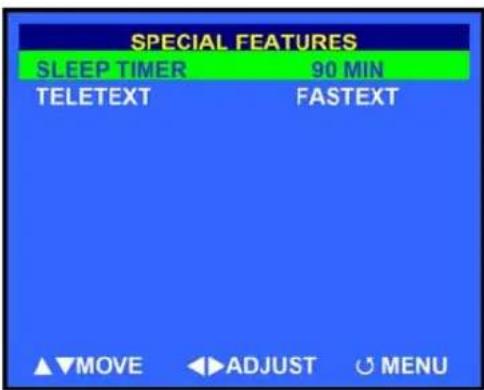
Sleep Timer - Turns the sleep timer ON/OFF. Select 30, 60, or 90 minutes.
Teletext - Choose between displaying the FASTEXT line and a LIST of menu commands. The FASTEXT line contains onscreen operating instructions associated with the colored buttons on the remote control.
Setup Menu
English
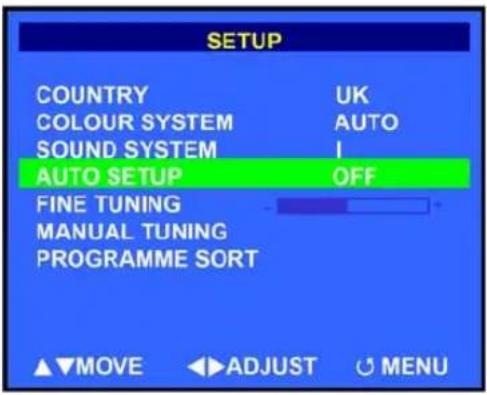
Country - Select the appropriate country signal. If your country is not listed, choose one that uses the same TV system.
Color System - Select a color system. Choices are Auto, PAL, and SECAM.
Sound System - Select from BG, DK, I, and L.
Auto Setup - Select this option to add all channels that have a signal to the channel list.
Fine Tuning - Use to improve reception of channels in areas of weak signal reception.
Manual Tuning - Select this option to add only certain channels to the channel list.
Program Sort - Select this option will bring up a submenu that allows you to rearrange the channel list.
7 ADVANCED SETTINGS
7-1 Setting the Sleep Timer
The sleep timer allows your LCD TV to automatically turn OFF after a given amount of time.
TO SET THE SLEEP TIMER USING THE REMOTE CONTROL
- Press the TV button.
- Press the SLEEP button on the remote control. The sleep timer appears at the bottom of your screen.
- Press the SLEEP button one or more times to select the time you want.
- The Sleep Timer screen will automatically disappear after ten seconds. Your sleep timer is now running in the background.
TO TURN OFF THE SLEEP TIMER
Press the SLEEP button repeatedly until the number 0 appears.
TROUBLESHOOTING AND SUPPORT
Before contacting customer service, use the following information to solve common problems.
No Picture
• Make sure that the power cord is properly plugged into a grounded electrical outlet.
• Make sure that the main power switch and power button are turned ON.
• Make sure that the selected video input source is connected to a working device.
- If your LCD TV is connected to your computer in VGA mode, press any key on your keyboard to wake up your computer.
No Sound
- Try pressing the MUTE button.
• Make sure that the headphones are not connected. - Check Audio setting under the OSD Audio menu.
Distorted Picture or Unusual Sounds
You may be getting interference from electrical appliances, cars, motorcycles, or fluorescent lights. Try moving your LCD TV to another location.
Abnormal Patterns
• Make sure that the input source cable is attached securely and correctly.
• Make sure that the video input source is within the range of your LCD TV.
- Compare the video input source's specifications with your LCD TV's specifications.
Abnormal Colors
Make sure that the input source cable is connected securely and correctly to your LCD TV.
Normal Picture, No Sound
• Make sure that the volume is not turned down.
• Make sure that the sound is not muted.
• Make sure that your audio input source cables are connected securely and correctly.
Wrong Image Size
If you are using VGA mode, make sure that the H-Position and V-Position in the OSD is set correctly.
Screen Noise
When your LCD TV's digital capabilities exceed a digital broadcast signal, the signal is up-converted (increased) to match your LCD TV's display capabilities. Up-converting can cause noise or trash.
Dim Screen
Video display devices experience degradation of brightness over the life of the device. Normal brightness degradation is not covered by your warranty.
Pixel Problems
Your LCD TV is manufactured using an extremely high level of precision technology. However, sometimes some pixels of your LCD TV may not display correctly. Pixel defects within industry specifications are inherent to this type of product and do not constitute a defective product.
Remote Control Not Working
• Make sure that the batteries are inserted correctly.
• Make sure the remote control sensor window is not under strong lighting.
Technical Support
If this troubleshooting information does not resolve your problem or if you have other questions relating to your LCD TV, please contact your local dealer.
PRODUCT SPECIFICATIONS
English
| Model Name AT2001 | |
| Panel spec | |
| Resolution | 800*600 |
| Brightness (typ.) 450 nits | |
| Contrast Ratio (typ.) 500:1 | |
| Display color 16.7 M | |
| Viewing Angle (typ.) H:160; V:120 | |
| Response Time (typ.) 16 ms (gray to gray) | |
| Power Supply | |
| Input | 100V~240V-AC |
| Max. Power 63W | |
| Power Saving 5W | |
| Mechanical | |
| Dimensions (W*H*D) 495.9*468.2*198.4mm | |
| Tilt angle Up 15 degree, Down 5 degree. | |
| Weight (Kg/1b) 7.8 Kg/17.16lb | |
| Wall Mounting Yes (100*100mm) | |
| Terminal | |
| AV1 | RCA for CVBS, S Din for S-Video, Audio R/L |
| Av2 | RCA for YPbPr, Audio R/L |
| PC D-Sub | Yes |
| PC Audio In | Yes |
| Headphone | Yes |
| Audio system | |
| Speaker | 3W+3W |
- Contents
- Important safety instructions
- Taking care of your remote control
- Cleaning and servicing
- BEFORE YOU START
- 1-1 What's in the Box
- YOUR LCD TV AT A GLANCE
- 2-1 Control Panel
- 2-2 Left-side Connectors
- 2-3 Back Connectors
- BUTTON DESCRIPTION
- BASIC LCD TV SETUP
- 4-1 Connecting to the Aerial
- 4-2 Using the Remote Control (Basic Operation)
- 4-3 Plugging In Your LCD TV
- 4-4 Turning ON the Power
- 4-5 Tuning Channels Automatically (AUTO SETUP)
- TO TUNE CHANNELS AUTOMATICALLY
- 4-6 Naming Channels
- CONNECTING EXTERNAL DEVICES
- 5-1 Connecting a YPbPr Device
- 5-2 Connecting a Composite Device
- 5-3 Connecting a S-Video Device
- 5-4 Connecting a VCR Using Coaxial (RF)
- 5-5 Connecting Speakers
- ADJUSTING SETTINGS
- 6-1 Basic Operations
- 6-1-1 ADJUSTING THE VOLUME
- TO ADJUST VOLUME FROM THE REMOTE
- TO TEMPORARILY TURN OFF VOLUME (MUTE)
- TO TURN VOLUME BACK ON
- 6-1-2 SELECTING PROGRAMS
- 6-2 Using the On-Screen Display (OSD)
- 6-2-1 MAKING ADJUSTMENTS
- 6-3 OSD Menus and Options
- 6-3-1 With Source Input Set to TV
- Language Menu
- Special Features Menu
- Setup Menu
- ADVANCED SETTINGS
- 7-1 Setting the Sleep Timer
- TROUBLESHOOTING AND SUPPORT
- No Picture
- No Sound
- Distorted Picture or Unusual Sounds
- Abnormal Patterns
- Abnormal Colors
- Normal Picture, No Sound
- Wrong Image Size
- Screen Noise
- Dim Screen
- Pixel Problems
- Remote Control Not Working
- Technical Support
- PRODUCT SPECIFICATIONS
Brand : ACER
Model : AT2001W
Category : TV