
GX635 - Lawn mower BLACK & DECKER - Free user manual and instructions
Find the device manual for free GX635 BLACK & DECKER in PDF.


| Product Type | Electric Lawn Mower (Corded) |
| Brand | Black & Decker |
| Model | GX635 |
| Cutting Width | 40 cm (15.7 inches) |
| Cutting Height Adjustment | Central lever, 5 positions (20-70 mm) |
| Grass Box Capacity | 40 liters |
| Power | 1200 W |
| Weight | 12 kg (26.5 lbs) |
| Dimensions (L x W x H) | 67 x 42 x 38 cm |
| Power Supply | 220-240 V ~ 50 Hz |
| Motor Type | Brushed electric motor |
| Handle Type | Folding handle for storage |
| Safety Features | Blade brake, safety switch, overload protection |
| Maintenance | Clean after use, sharpen blade annually, check cables |
| Spare Parts Availability | Blades, grass bag, wheels, handle parts |
| Repairability | User-replaceable blade and grass bag; motor service by professional |
| Warranty | 2 years (check local terms) |
Frequently Asked Questions - GX635 BLACK & DECKER
User questions about GX635 BLACK & DECKER
0 question about this device. Answer the ones you know or ask your own.
Ask a new question about this device
Download the instructions for your Lawn mower in PDF format for free! Find your manual GX635 - BLACK & DECKER and take your electronic device back in hand. On this page are published all the documents necessary for the use of your device. GX635 by BLACK & DECKER.
USER MANUAL GX635 BLACK & DECKER
Hover Mower GX530/GX635
User manual
Congratulations!
On your purchase of your Black & Decker hover lawnmower.
This user manual provides important operating and maintenance instructions for all of the hover mowers in the Black & Decker GX530/GX635 ranges.
Know your mower

Read all of this manual carefully, observing all the recommended safety instructions before, during and after using your mower, and maintain your mower in good working order.
Familiarise yourself with the controls on your mower before attempting to operate it, but above all, be sure you know how to stop your mower in an emergency.
Retain this user manual and all other literature supplied with your mower for future reference.
Safety instructions
Training
- Never allow children or persons who are unfamiliar with this type of mower to use it, nor anyone who has not read this user manual.
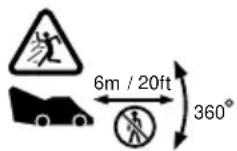
Do not allow children, animals or other persons near your mower when in use - always keep them at least 6m (20ft) away from the cutting area.
- Remember that the operator is responsible for accidents or hazards occurring to other people or their property.
- Your mower is designed for use on AC (mains) electrical supplies only - do not attempt to use it on any other supply.
- Plug your mower into a power point - never a lighting socket.
- Never carry your mower by the cable or jerk the cable to separate the connectors. Keep the cable away from heat sources, oils or sharp edges. Check the condition of your cable before use and do not use if damaged.
Preparation
- To protect your feet, always wear stout shoes or boots - freshly cut grass is damp and slippery.

- Rubber or man-made footwear will enhance your safety.
- Do not operate your mower barefoot or in open sandals.
- Use protective equipment. Wear safety spectacles or goggles whilst operating your mower. Use ear protection if the sound level seems uncomfortable when using your mower.
- Use a face mask if dusty.
- Wear long trousers to protect your legs - any debris left on the lawn or cutting path may be picked up and ejected by the blades.
- The power supply cable should be regularly inspected for signs of damage or ageing, and only used if in good condition.
- Always keep the power supply cable away from the blades - be aware of its position at all times.
• Always be sure your mower is in a safe operating condition. - Before using your mower, disconnect it from the electrical supply and visually check that the blade, blade nut and cutter assembly are not worn or damaged. A damaged blade or worn blade nut is a major hazard and must be replaced. Also check that the blade nut is securely fastened.
- Always check that your lawn or cutting path is clear of all sticks, stones, wire and other debris. Contact with such debris may be dangerous or may damage your mower and could be thrown by the blade.
Operation
- When tilting the handle downwards (or to the side) to start your mower, do not tilt it more than is absolutely necessary. Always ensure that both hands are in the operating position and feet are well away from the blades before returning your mower to the ground.
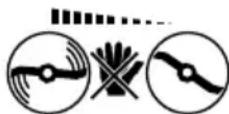
Your mower will continue to run for a short time after releasing the switch lever. Always allow your mower to stop on its own.
- Release the switch lever to turn your mower off and remove the plug from the mains:

- Whenever you leave your mower unattended.
- Before checking, cleaning, adjusting or working on your mower.
• Before clearing a blockage. -
If your mower starts to vibrate abnormally (check immediately).
• After striking a foreign object, inspect your mower for damage and make repairs as necessary. -
Never run your mower whilst lying on its side or attempt to stop the blade - always allow it to stop on its own.
- Do not put hands or feet near or under rotating parts.
- Keep clear of discharge openings at all times.
- Start your mower carefully according to the instructions and with your feet well away from the blade.
- Do not use your mower in the rain and do not allow it to get wet. Avoid using your mower in wet grass, if possible.
- Use your mower only in daylight or good artificial light.
- Do not pull your mower towards you or walk backwards when in operation.
- Do not cross gravel paths or roads whilst the tines are rotating.
• Always be sure of your footing, particularly on slopes. - Always cut across the face of slopes, never up and down. Exercise extreme caution when changing direction on slopes.
- Do not cut excessively steep slopes and always wear non-slip footwear.
- Check the grassbag (if supplied) for wear or damage and replace if necessary. Never use your mower without the grassbag in place.
- Walk, never run. Do not force your mower.
- Never pick up or carry your mower while the motor is running.
- Ensure the blade has stopped rotating and take extreme care before lifting your mower for and during transportation.
- Never operate your mower with defective guards or shields.
Maintenance and storage
- Store your mower in a dry place when not in use, out of the reach of children.
ENGLISH
- Do not use solvents or cleaning fluids to clean your mower - use a blunt scraper to remove grass and dirt.
• Always disconnect from the electrical supply before cleaning. - Do not operate your mower if any parts are defective; discard all defective parts and fit new parts before use.
- Keep all nuts, bolts and screws tight to be sure your mower is in a safe working condition.
- Use only Black & Decker recommended replacement parts and accessories.
Black & Decker's policy is one of continuous improvement to our products and, as such, we reserve the right to change product specifications without prior notice.
Double insulation

Your mower is double insulated.
This means that all external metal parts are electrically isolated from the power supply. This is achieved by placing an extra insulation barrier between the electrical and mechanical parts. Double insulation means greater electrical safety and obviates the necessity of having your mower earthed.
Electrical safety (UK only)

Your mower should always be switched off at the mains before disconnecting any plug and socket connector or extension cables.
Fuse replacement
If your mower is supplied with cable fitted with a non-re-wireable plug:
- The plug is fitted with a 13 amp fuse which is the recommended fuse for your mower.
- Only use replacement fuses which are approved to BS1362.
- When changing the fuse in your plug, always ensure the fuse cover is refitted. If the fuse cover is missing or damaged do not use the plug.
Note: Fuses do not give personal protection against electric shock.
Plug replacement
- Disconnect the plug from the supply.
- Cut off the plug and dispose of immediately. Insertion of a detached plug into a 13 amp socket outlet may result in electric shock.
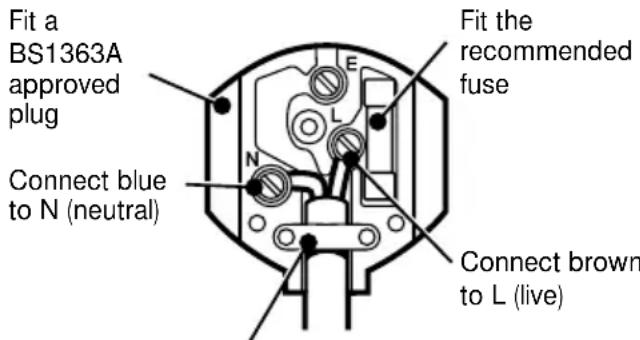
- Only fit BS1363A approved plugs fitted with the correctly rated fuse.
- The cable wire colours, or a letter, will be marked at the connection points of most good quality plugs. Attach the wires to their respective points in the plug (see below). Brown is for “Live” (L) and blue is for “Neutral” (N).
- Before replacing the top cover of the mains plug ensure that the cable restraint is holding the outer sheath on the cable firmly and that the two leads are correctly fixed at the terminal screws.
text_image
Fit a BS1363A approved plug Connect blue to N (neutral) E L N Fit the recommended fuse Connect brown to L (live)Make sure that the outer sheath of the cable is held firmly by the clamp
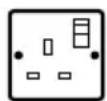
240 volts AC only. Never use a light socket

Warning! Never connect live or neutral wires to the earth pin marked "E" or ±
Note: Do not wire an extension cable directly into your mower yourself. Instead, take your mower to your nearest Black & Decker service agent.
Increased safety can be obtained by having a qualified electrician install a high sensitivity (30mA) circuit breaker in the house wiring. If you do not have such a circuit breaker installed, or you do not wish to have one installed, then we strongly recommend that the electrical power to your mower be supplied through a high sensitivity residual current device (RCD). The RCD is designed to provide a high degree of personal protection against harmful electric current should fault conditions occur.

Warning! The use of an RCD or other circuit breaker unit does not release the operator of your mower from the safety instructions and safe working practices given in this manual.
Handle assembly (Fig. B)
B
The handles of your mower have been fully assembled prior to delivery, but two minor operations are required in order to make your mower ready for use. They are as follows:
Wing nut reversal
- The assemblies (8, 9 & 10) which fix the upper handle (7) to the lower (6) have been assembled as shown in Fig. B1 to protect them during transit.
- We advise you to dismantle these items (Fig. B2) and re-assemble (Fig. B3), taking care not to trap the motor cable (12) between the handles in the process. This operation will assist in grassbox removal/refit.
Unfolding the upper handle
The upper handle (7) can now be unfolded into the position shown in Fig. A, and the wing nuts (8, 9 &10) tightened firmly, taking care not to trap the motor cable (12) in the process.
Grassbox assembly (Fig. C)
C
- The grassbox (3 & 4) can now be withdrawn through the handle tube (6), and the grassbox door can be opened as indicated by the arrow.
- To refit the box, reverse the process using the arrow heads (shown in inset) to re-align the box into its correct position.
Finished mower check
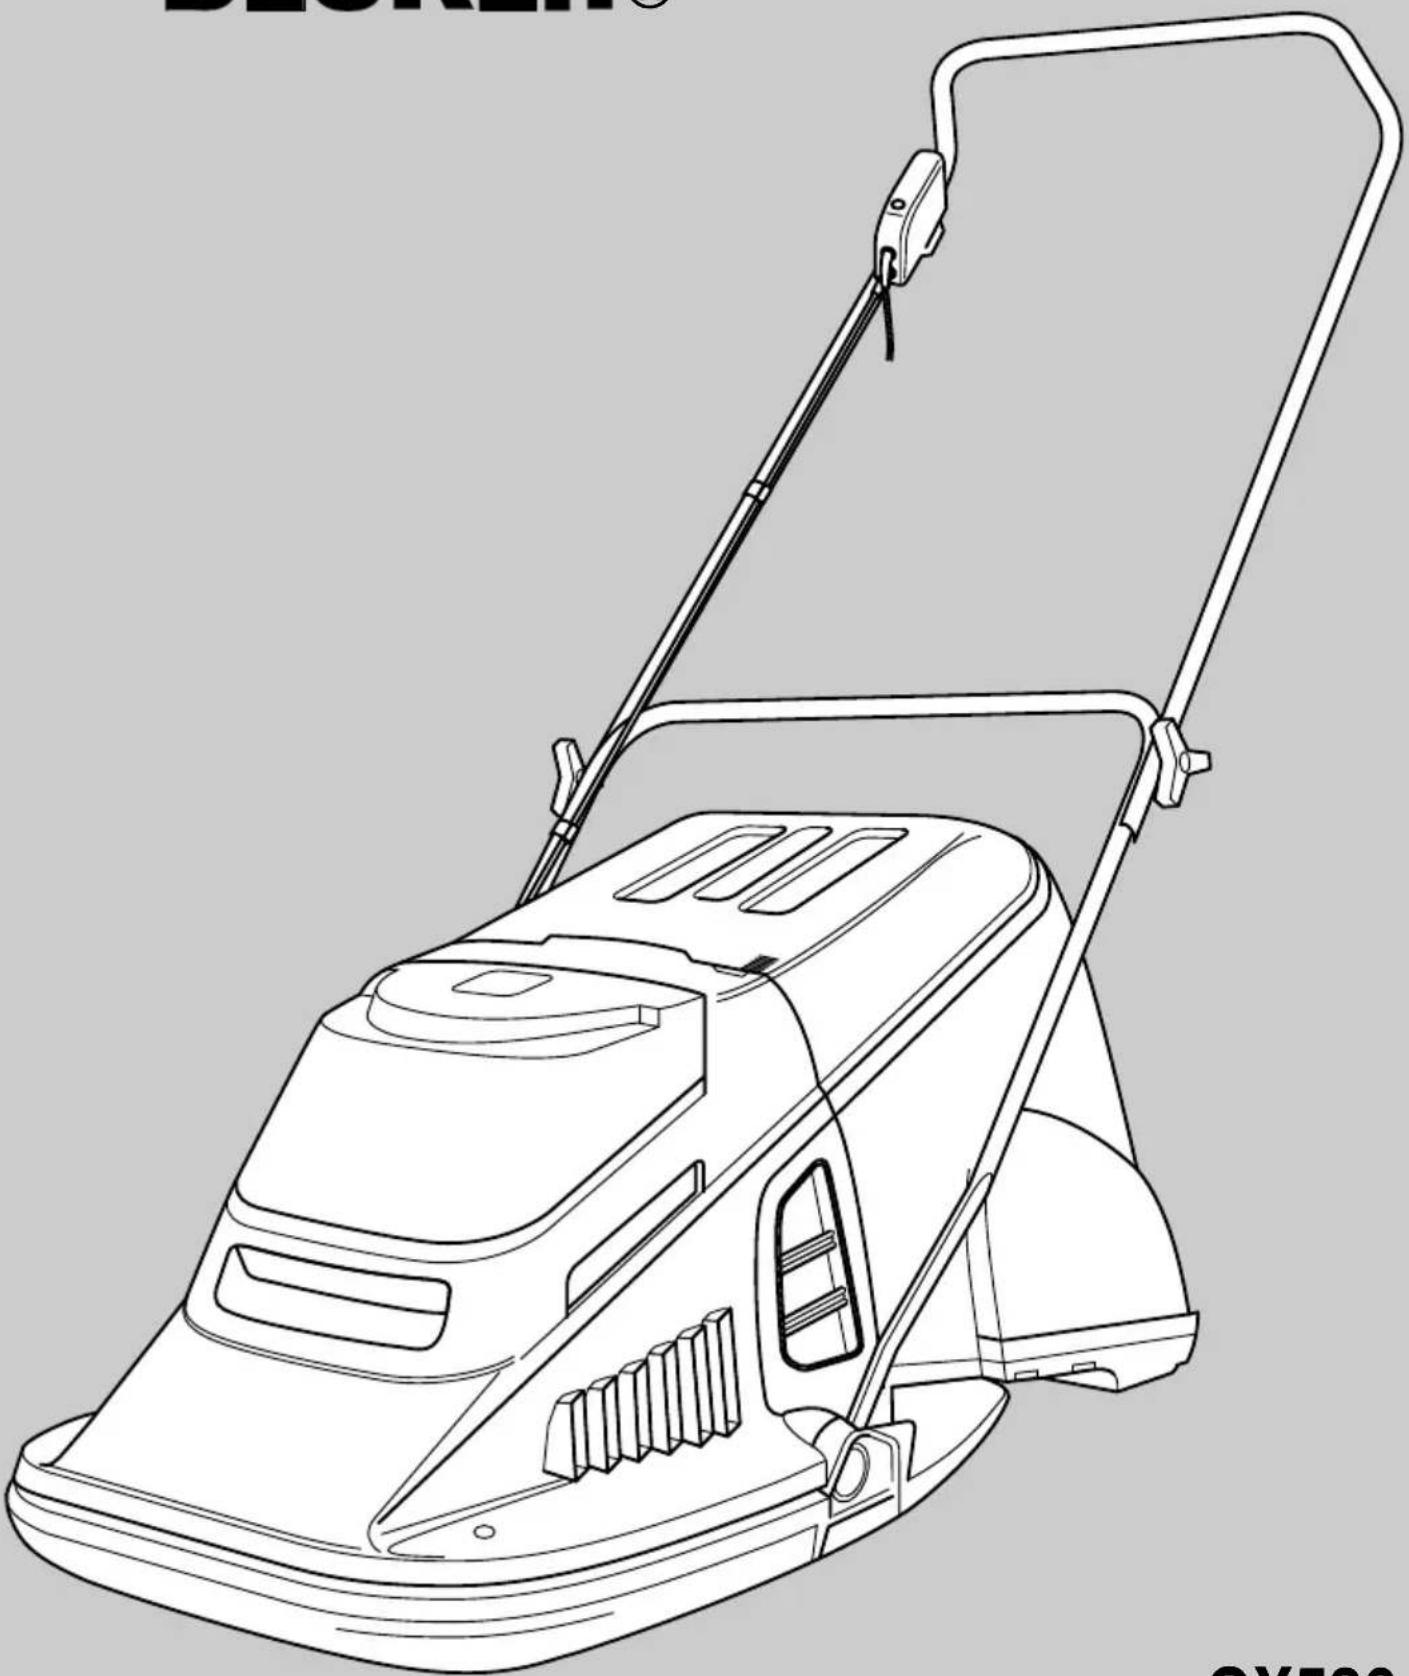
Check your fully assembled mower now for any signs of damage or missing parts. The finished mower should look like Fig. A.
Cutter blade check (Fig. D)

Warning! Disconnect your mower from the electrical supply before checking the blade.
All manufactured mowers are checked prior to packing to ensure that the cutter blade (23) is secure, but for your safety we would advise you to re-check this by the following method:
- Remove the grassbox (3 & 4).
- Turn your mower over onto its side so that the underside of the cutter deck (1) is exposed.
- Using a cloth placed over the blade (23), grip the blade and, using the spanner provided (20), tighten the nut (21) in a clockwise direction.
Switchbox operation (Fig. E)
E We strongly recommend that prior to connecting your mower to the mains, you understand fully the switchbox operation. The operation is as follows:
To start your mower
- Grasp the handle (7) with both hands.
- Tilt your mower slightly to one side.
Note: Failure to do this may result in an unsightly ring being cut in your lawn.
- Remove your left hand from the handle (7) and depress the lock-off button (15).
- Whilst this button is depressed, grasp the switchbox lever (14) with your right hand and squeeze towards the handle (7).
- Your mower will now operate.
- Release the lock-off button (15) and return your left hand to the handle tube.
Note: If the lock-off button (15) is not depressed in the order above, your mower will not operate and the lever (14) will not engage with the switch. This is a safety feature!
To stop your mower
- Tilt your mower slightly to one side.
Note: Failure to do this may result in an unsightly ring being cut in your lawn.
- Release the switchbox lever (14).
- When your mower has stopped rotating, lower it back onto the lawn.
Handle operation (Fig. F)
F The normal operating range of the handle is shown in Fig. F, as angle F1. This should enable a comfortable working position to be achieved.
If you wish to store your mower by hanging it on the wall (angle F2), proceed as follows:
- Disconnect it from the mains.
- Remove the grassbox.
- Lower the handle to the bottom of its normal range, then pull the handle towards you and lower it to the ground. (Do not drop the handle as it may damage the switchbox.)
Your mower can now be lifted and stored on the wall if required.
ENGLISH
Height of cut adjustment (Fig. D & G)
G
The cut height of your mower is adjusted by means of blade spacers (22 & 24). The method for this operation is as follows:
- Ensure your mower is disconnected from the mains supply.
- Turn your mower onto its side so that the underside of the cutter deck (1) is exposed.
- Using a cloth placed over the blade (23), grip the blade and, using the spanner provided (20), undo the nut (21) in an anti-clockwise direction.
- Remove the blade nut, spacers and blade (21-24) and re-assemble to give the cut height required. See Fig. G, showing the 6 cut heights available.
- Once the cut height is selected, re-assemble the blade, ensuring the cutter blade (23) is assembled with the cutting tips downwards as shown in Fig. D.
- Ensure the blade nut (21) is tight.
Note: Your mower is supplied with a cut height of 11mm (Fig. G).
• Always re-fit 3 spacers and never fit more or your mower will become unsafe.
Carrying your mower (Fig. H)
H
Disconnect your mower from the mains. Remove the grassbox, lower the handle to the flat "park" position and then, holding one handle near the pivot block and carry with the blade pointing away from you.
How to use your mower (Fig. J)
!
Observe all of the relevant warnings when using your mower.
We recommend the directional method of operation to obtain maximum cutting performance from your mower and to reduce the risk of the trailing extension lead from entering the cutting path.
- Place the bulk of the extension cable on the lawn close to the starting point (Fig. J, position 1).
- Hold the handle assembly with both hands.
Your switch box incorporates a cable restraint. To fix the cable to the restraint, proceed as follows:
- Bring the socket end of the extension cable from behind and connect it to your mower plug.
- Form a loop on your extension cable close to the coupler (Fig. E).
- Push the loop through the slot from the opposite side of the restraint hook, position the loop over the hook and pull the cable back through the slot. Your cable will now be restrained.
- The extension cable should now fall away from your mower and behind the operator, ready for use.

Warning! Do not attempt to operate your mower with one hand - you must guide it with both hands.
- Lift the handle up to release it from the park position.
- Proceed down the cutting area as shown in Fig. Ja, working from position 1 towards position 2 and, on reaching position 2, turn to the right and proceed towards position 3. Continue to the end of the cutting area, turn to the left, and proceed towards position 4. Continue in the same manner as shown in Fig. Ja, always working away from the cable. Do not adopt the method shown in Fig. Jb, working towards the cable, as this can be dangerous.
- For best grass pick-up, push your mower in straight lines.
Your mower will continue to operate whilst you are pressing the switch lever. If you release it for any reason you will not be able to press it again until you have pressed the safety lock-off button on the switch box. This feature prevents accidental restart.
When you have finished using your mower we recommend that you clean all debris from it before putting it away. Refer to the “Care and maintenance” section.
Note: To obtain the best results cut your lawn or grassed area regularly and do not cut when the grass is wet.
Overload protection (GX635 only)
Your mower is fitted with overload protection.
The reset button (25) can be found on the switch box (Fig. A).
If you work too quickly in long grass, or in heavy cutting conditions, you may overload the motor.
This will be indicated by a significant drop in speed, and eventually the overload protection will operate.
This is not a fault but a safety device to protect your mower.
When this occurs, release the switch and wait for 2 to 3 minutes to allow the motor to cool, then press the reset button (25) and restart by operating the switch lever and lock-off button.
If the cut-out operates again within 10 minutes you should increase the height of cut (see "Height of cut adjustment") and walk more slowly.
Severe overloading may result in a longer delay on restarting. In such cases, after resetting, you should allow the motor to cool.
Blade maintenance
The steel blade is designed to give a fine finish in long or tough grass. The blade will continue to cut even when it has become blunt or burred. There is no need for it to be razor sharp.
If, however, because of damage or wear the cutting performance deteriorates, then your mower may require a new blade, or at least the existing blade to be sharpened.
We recommend that the steel blade is sharpened or a new blade fitted at the beginning of each season.
Replacement blades (cat. no. A6184) are available from Black & Decker service agents.

Warning! When fitting a new blade use only the Black & Decker replacement part specified for your mower - do not attempt to fit any other blade.
Fitting a new blade

Observe all the relevant warnings before changing blades.
Details on the fitment of new steel blades are given in "Cut height adjustment".
Handy hints
- Before starting your mower on grass always tilt it to one side slightly and allow it to run up to maximum speed before commencing to cut the grass. This will maximise the hover effect and will prevent the blades from digging into the grass.
- On long grass, above 10cm (4 inches), use two cuts to get a close finish. We recommend that the first cut should be taken with the blade set at maximum height of cut and the second taken with it set at medium or close. This will prove to be easier and give a better overall finish to your lawn.
Care and maintenance
The advice given in this section covers the general care and maintenance of the main body of your mower. Advice relating to the blades is given in "Maintenance of blades".

Warning! Do not use an extension cable which shows signs of damage. Fit a new cable completely - do not make any permanent or temporary repairs.
- Always keep your mower clean and free from grass cuttings, especially the underside of the cutter cover and the air vents.
- Check all electrical cables at regular intervals, looking for signs of wear, abrasion or other damage.
- At the end of each cutting session we recommend that the build up of grass on the underside of the cutter cover is removed using a blunt scraper or the spanner supplied.
- Remove grass cuttings from the slot between the pivot block flanges.
- Clean all plastic components with a damp cloth.
Caution: Do not use solvents or cleaning fluids as these may damage the plastic components of your mower.
Fault finding
If your mower does not operate correctly, use the following table to locate the problem.

Warning! Always disconnect your mower from the electrical supply before carrying out any inspection.
Symptoms Possible cause Remedy
Motor buzzes Blade jammed. Disconnect from but blade does the electrical not move. supply.
Remove the obstruction from the blade.
No noise and Faulty electrical Disconnect from the blade does connection. the electrical not move. supply.
ENGLISH
Symptoms Possible cause Remedy
No noise and Faulty electrical Plug your mower the blade does connection. into an alternative not move. compatible
electrical supply.
Check if a new fuse is required.
Re-tighten and check all electrical connections in the extension cables.
Overload cut- Reset overload out operates. cut-out.
Grass not being The grassbox Empty the picked up. is full. grassbox.
The pickup inlet Remove grassbox in the grassbox and clear the hole is blocked. in the base.
Air paths are blocked. Remove grassbox and clear the filter
in the roof grassbox.
Also clean the filter on the back of your mower.
The cut height is too low in long grass. Disconnect from the electrical supply. Reset
Your mower is being moved side to side. Push your mower in a straight line to maximise pick up.
| Motor stalled. The motor isoverloading inlong, thickgrass. | Disconnect fromthe electricalsupply. Reset theblade heightto a higherposition. |
| Poor cutting performance. | Blade damaged Disconnect from due to impact the electrical on large stones, supply. Check the tree stumps, blade for damage. paving stones or Replace with a similar objects. new blade, if necessary. |
ENGLISH
What to do if your mower needs repair
For after sales service please refer to the section 'Lawnmowers & Garden' within your local Yellow Pages.
Unwanted products and the environment

Should you find one day that your mower needs replacement, or is of no further use to you, think of the protection of the environment. Black & Decker service agents will accept your old mower and will dispose of it in an environmentally safe way.
Black & Decker lawn and garden guarantee
This guarantee provides 36 months parts cover and 12 months labour (UK), 24 months parts cover and labour (Australia and New Zealand). In all cases proof of purchase will be required.
If your Black & Decker mower becomes defective, within the guarantee period, due to faulty materials and workmanship, we guarantee to either replace all defective parts, or at our discretion, replace your mower free of charge, provided that:
- Your mower is returned to one of our authorised repair agents with evidence of purchase.
- Your mower has been used within the parameters of its consumer classification.
- Your mower has not been used for hire purposes.
• Repairs have not been attempted by anyone other than our authorised repair agents. - The failure represents normal wear and tear.
This guarantee is offered as an extra benefit and is additional to your statutory rights.
Our guarantee policy
Failures due to the following are not covered:
- Replacing worn or damaged blades, nylon line and chains, or cables damaged during storage or use. These are regarded as replacement items which wear during normal usage.
- Failures as a result of sudden impact or obvious abuse.
- Failures due to usage not in accordance with instructions and recommendations contained in this manual.
The use of other than genuine Black & Decker accessories and parts may damage or reduce the performance of your Black & Decker mower and may render the guarantee void.
Black & Decker after sales service (UK, Australia and New Zealand only)
Black & Decker offers a nationwide network of authorised service agents. The use of other than genuine Black & Decker accessories and parts may damage or reduce the performance of your Black & Decker product and may also endanger the user. The terms and conditions of the warranty may also be effected.
It is our aim that all Black & Decker customers should be totally satisfied with their Black & Decker product and after sales service, if help or advice is needed please contact a local Black & Decker authorised repair agent who will be happy to help. Full details of our after sales service can be obtained from any of our Black & Decker authorised repair agents.
Other Black & Decker products (UK only)
Black & Decker has a full range of outdoor power tools that make life easy in the garden. If you would like further information on other products, please contact the Black & Decker Service Information Centre at the address towards the back of this manual, or contact your Black & Decker stockist.
Lawnmowers String trimmers Chainsaws Lawnrakers Compost shredders Leafbusters Blade trimmers Cordless brooms Cordless trimsaws Cordless shrubbers Cordless shears Hedgetrimmers
EC Declaration of Conformity
We declare that units:
GX530, GX635
conform to: 89/392/EEC, 89/336/EEC, 73/23/EEC, EN60335, EN55104, EN55014
A weighted sound pressure 96dB (A) A weighted sound power 109dB (A)
Hand/arm weighted vibration <2.5m/s²
Brian Cooke
Director of Engineering
Black & Decker Ltd, Spennymoor, County Durham
DL16 6JG, United Kingdom
| Australia Black & Decker (A’asia) Pty Ltd Tel: 03 9213 8200286-288 Maroondah Highway, North Croydon, Victoria 3136 Fax: 03 9726 7150 | |
| New Zealand Black & Decker Tel: 09 579 7600483 Great South Road, Penrose, Auckland Fax: 09 579 8200 | |
| South Africa Black & Decker South Africa (Pty) Ltd Tel: 011 314 4431Suite no 107, PostNet X65, Halfway House 1685 Fax: 011 314 4435 | |
| United Kingdom Black & Decker Tel: 01753 574277210 Bath Road, Slough Tlx: 848317 BAND MHBerkshire SL1 3YD | Fax: 01753 551155 |
Address of the dealer where your lawnmower was purchased:
Date of your purchase:
Name:
House number or name and street:
Was your lawnmower a gift?
Was your lawnmoweryour first purchase?
Was your lawnmower bought as a replacement?
What was the price of your lawnmower?
Product catalogue number: G X
Data protection act: Tick this box if you prefer not to receive information from Black & Decker or other companies.
GUARANTEE CARD
South Africa: Black & Decker South Africa (Pty) Ltd, Suite no 107, PostNet X65, Halfway House 1685
United Kingdom & Ireland: PO Box 821, Slough, Berkshire, SL1 3AR
Please complete this section immediately after the purchase of your lawnmower
and post it to the Black & Decker address in your country (above).
If you live in Australia or New Zealand, please register your purchase by using
the alternative guarantee card supplied.
natural_image
Line drawing of a lawn mower with handle and side panel (no text or symbols)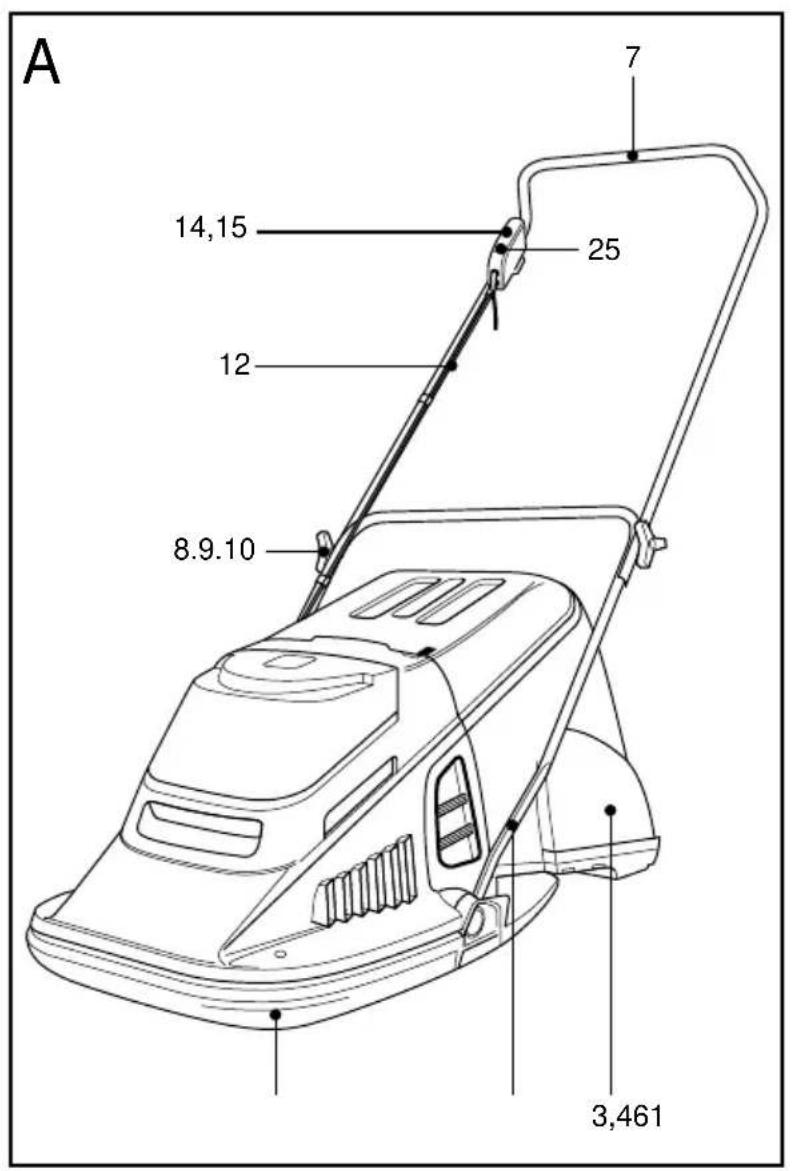
text_image
A 7 14,15 25 12 8.9.10 3,461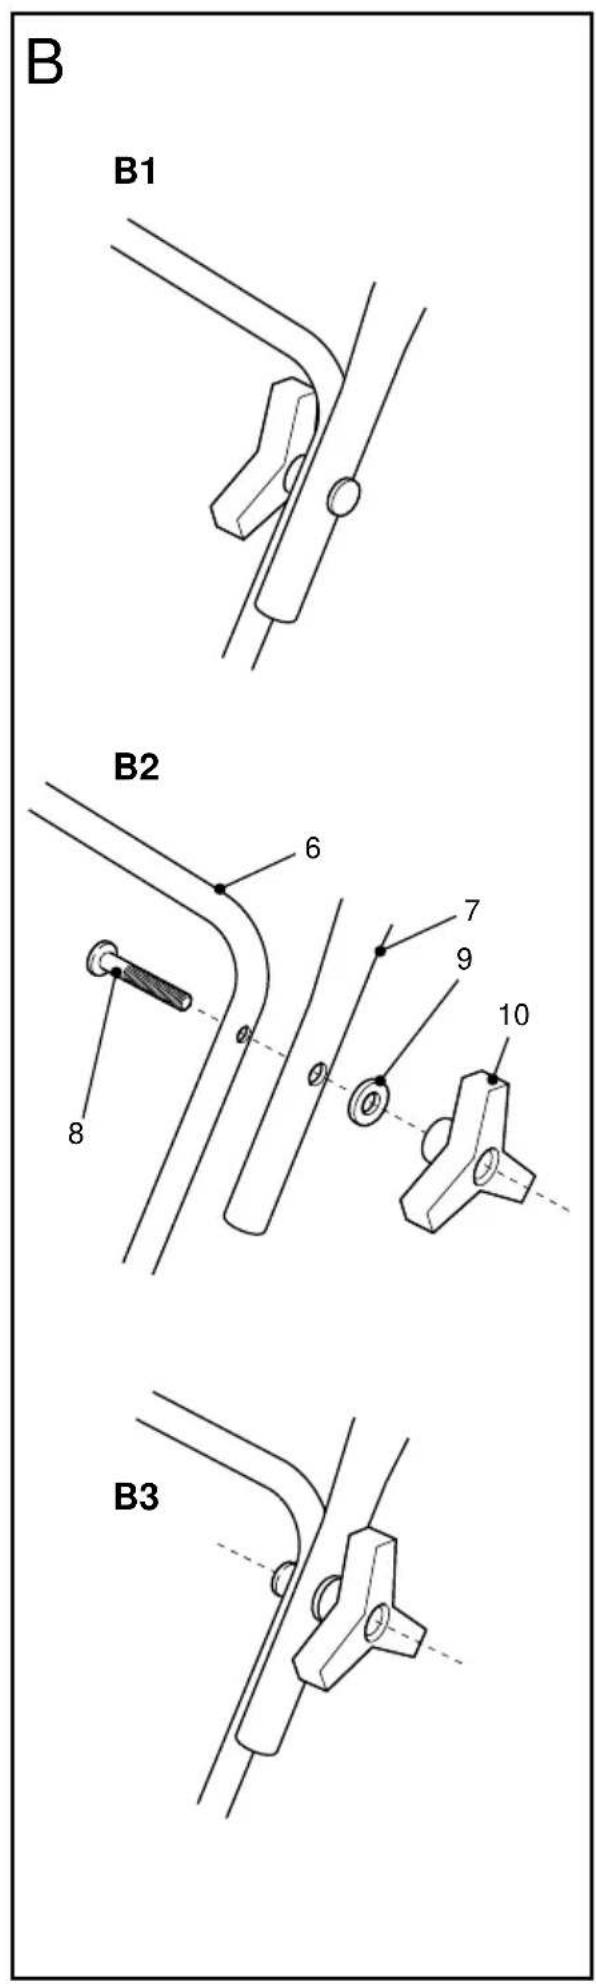
text_image
B B1 B2 6 7 9 10 8 B3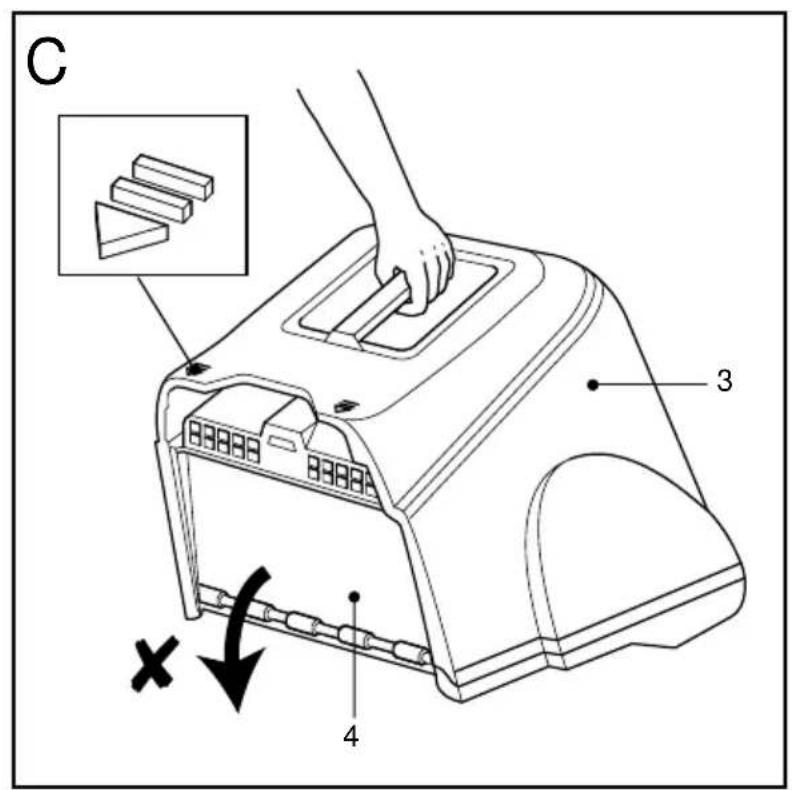
text_image
C 3 4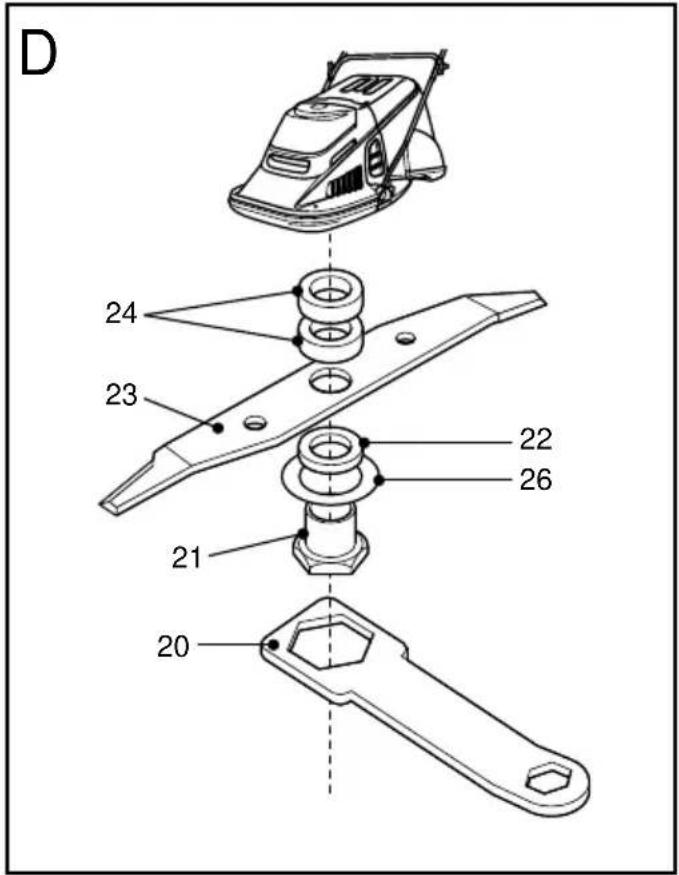
text_image
D 24 23 22 26 21 20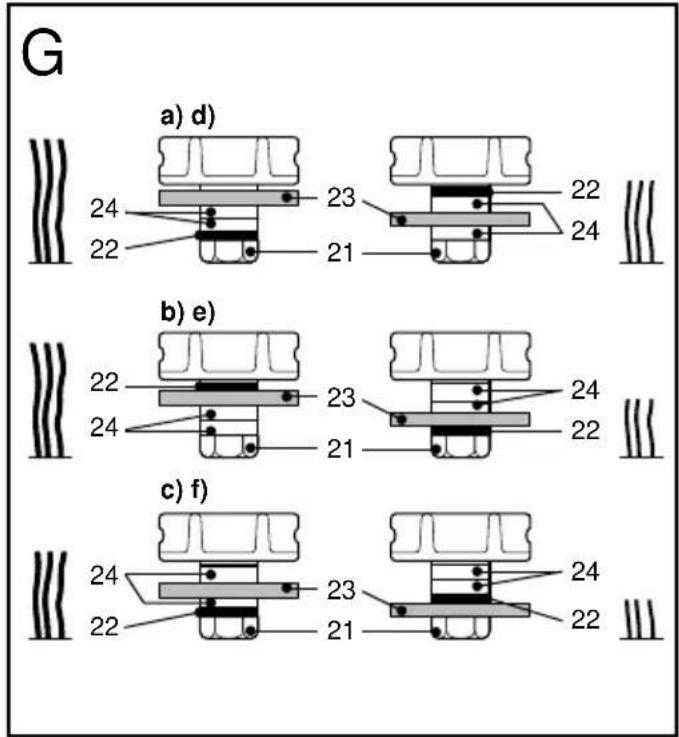
text_image
G a) d) 24 23 22 22 21 24 b) e) 22 23 24 24 21 22 c) f) 24 23 24 22 21 22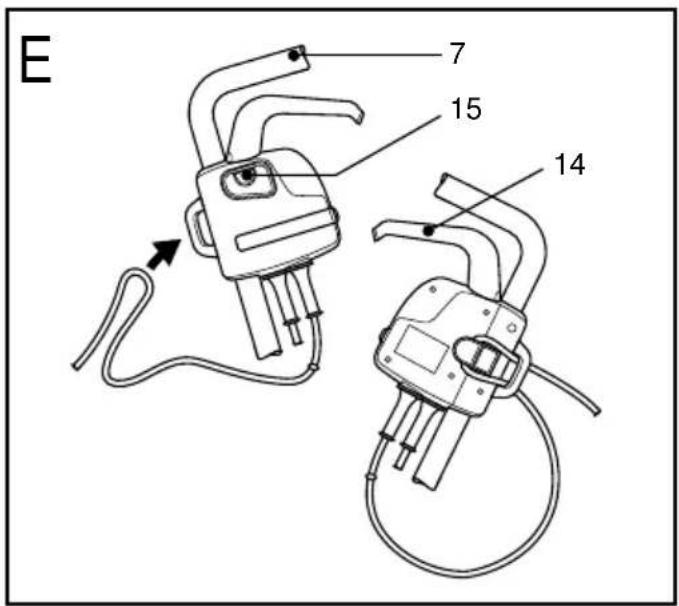
text_image
E 7 15 14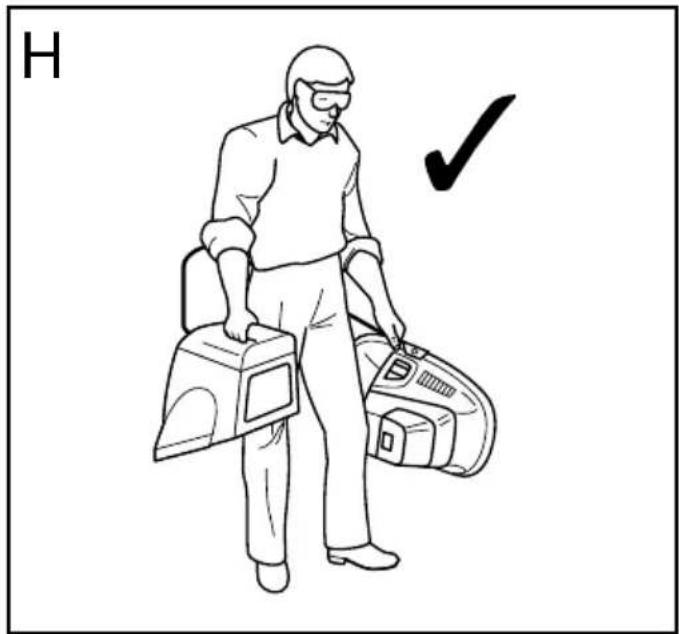
text_image
H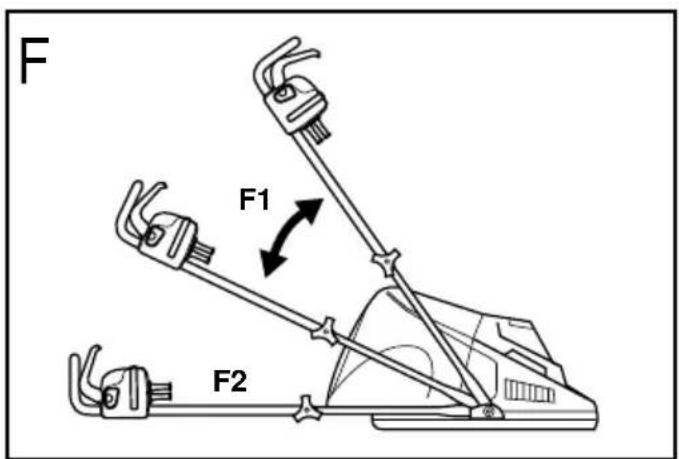
text_image
F F1 F2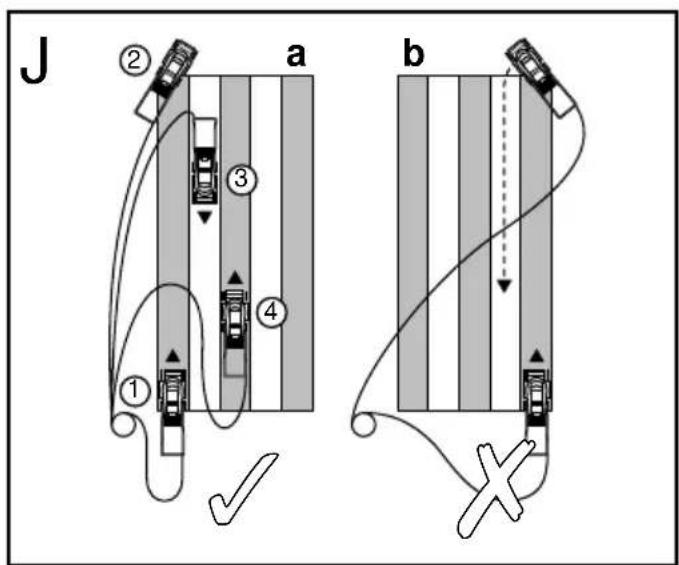
flowchart
graph TD
    subgraph Scenario a
        A1["①"] --> B1["②"]
        B1 --> C1["③"]
        C1 --> D1["④"]
        D1 --> E1["✓"]
        style A1 fill:#f9f,stroke:#333
        style B1 fill:#bbf,stroke:#333
        style C1 fill:#dfd,stroke:#333
        style D1 fill:#dfd,stroke:#333
    end
    subgraph Scenario b
        E1["②"] --> F1["③"]
        F1 --> G1["④"]
        G1 --> H1["✓"]
        style E1 fill:#f9f,stroke:#333
        style F1 fill:#dfd,stroke:#333
        style G1 fill:#dfd,stroke:#333
    end
