
55LH95QD - Monitor LG - Free user manual and instructions
Find the device manual for free 55LH95QD LG in PDF.


User questions about 55LH95QD LG
0 question about this device. Answer the ones you know or ask your own.
Ask a new question about this device
Download the instructions for your Monitor in PDF format for free! Find your manual 55LH95QD - LG and take your electronic device back in hand. On this page are published all the documents necessary for the use of your device. 55LH95QD by LG.
USER MANUAL 55LH95QD LG
LCD TV | MEDIA BOX LED LCD TV OWNER'S MANUAL
LCD TV MODELS
MEDIA BOX MODEL
47LH8***
ASW1000
55LH8***
LED LCD TV MODEL
55LH9***
DVB®
Digital Video Broadcasting
DVB is a registered trademark of the DVB Project
ID Number(s):
6543:47LH80YD
6544:55LH80YD
6547:55LH95QD
Please read this manual carefully before operating your set.
Retain it for future reference.
Record model number and serial number of the TV and Media Box.
Refer to the label on the back cover and quote this information.
To your dealer when requiring service.

ENERGY STAR
This product qualifies for ENERGY STAR in the "factory default (Home Use mode)" setting and this is the setting in which power savings will be achieved.
Changing the factory default picture setting or enabling other features will increase power consumption that could exceed the limits necessary to qualify for Energy Star rating.
Media Box is not qualified for ENERGY STAR.
ACCESSORIES
Ensure that the following accessories are included with your TV. If an accessory is missing, please contact the dealer where you purchased the TV.
■ Here shown may differ from your TV.

Owner's Manual
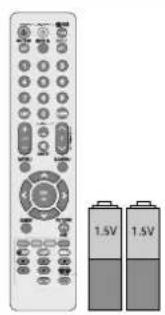
natural_image
White remote control with two batteries, one displaying 1.5V power output (no text or symbols on the device itself)or
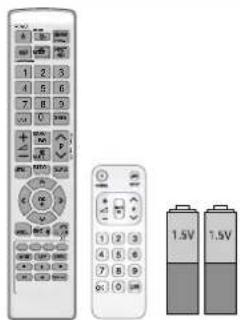
natural_image
Three remote control devices with battery and power rating indicators (no text or symbols visible)x 2
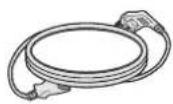
Power Cord
Remote Controls, Batteries
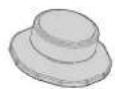
x 2
Rubber supports
Use the provided rubber supports to raise the Media Box if needed.
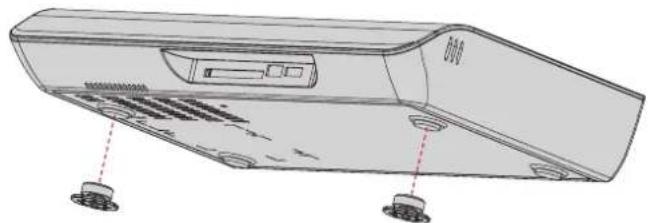
natural_image
Technical line drawing of a computer monitor with ports and buttons (no text or symbols)Only 47/55LH8\*\*\*
(Only 47LH8 ^*** )

Screws for stand assembly (Refer to p.13)
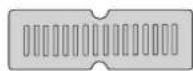
Protection cover (Refer to p.17)
Only 55LH9\*\*\*

Plug in Type Holder (Refer to p. 15)

Protective Bracket for Power Cord (Refer to p. 15)
Wall Mounting Bracket(Separate purchase)
AW-47LG30M
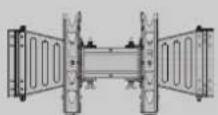
(47LH8***)
AW-55LH40M
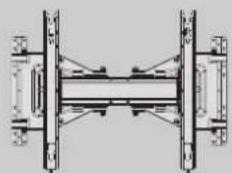
natural_image
Pure mechanical assembly diagram showing symmetrical components without any text, numbers, or symbols(55LH8***, 55LH9***)
This item is not included for all models.
Polishing Cloth
Polishing cloth for use on
the screen.
* Lightly wipe any stains or fingerprints on the surface of the set with the polishing cloth.
Do not use excessive force. This may cause scratching or discolouration.
CONTENTS
ACCESSORIES 1
PREPARATION
Front Panel Controls.... 4
Back Panel Information 7
Wireless TV Operating Principle.... 10
Optimal Installation Method for Media Box...... 11
Stand Installation.... 13
Back Cover for Wire Arrangement 14
Detaching Stand 16
Kensington Security System....16
Careful installation advice 17
Swivel Stand 17
Not Using the Desk-type Stand 17
Desktop Pedestal Installation 18
Wall Mount: Horizontal Installation.... 18
Antenna Connection.... 19
EXTERNAL EQUIPMENT SETUP
HD Receiver Setup.... 20
DVD Setup 22
VCR Setup.... 24
Digital Audio Out Setup 26
Other A/V Source Setup 27
Usb Setup.... 27
PC Setup.... 28
- Screen Setup for PC Mode ....30
WATCHING TV / PROGRAMME CONTROL
Remote Control Key Functions 34
Turning on the TV 39
Programme Selection 40
Volume Adjustment 40
Quick Menu 41
On-Screen Menus Selection and Adjustment..... 42
Auto Programme Tuning.... 43
Manual Programme Tuning (In Digital Mode)..... 44
Manual Programme Tuning (In Analogue Mode)... 45
Programme Edit 47
Software Update....50
Diagnostics.... 51
Selecting the Programme List 52
Favourite Programme Setup.... 53
Input List.... 54
Input Label 55
Simple manual 56
Simplink 57
AV Mode....60
Initializing (Reset to original factory settings) .....61
TO USE A USB DEVICE
When connecting a USB device.... 62
Photo List 63
Music List....67
Movie List....70
DivX Registration Code 74
Deactivation....75
EPG (ELECTRONIC PROGRAMME GUIDE) (IN DIGITAL MODE)
Switch on/off EPG 76
Select a Programme.... 76
Button Function in NOW/NEXT Guide Mode ..... 76
Button Function in 8 Day Guide Mode....77
Button Function in Date Change Mode.... 77
Button Function in Extended Description Box .....78
Button Function in Remind Setting Mode.... 78
Button Function in Schedule List Mode.... 78
PICTURE CONTROL
Picture Size (Aspect Ratio) Control 79
Picture Wizard....81
Energy Saving 82
Preset Picture Settings
- Picture Mode-Preset.... 83
Manual Picture Adjustment
- Picture Mode-User option.... 84
Picture Improvement Technology.... 85
Expert Picture Control.... 86
Picture Reset 90
LED Local Dimming 91
Power Indicator 92
Demo Mode....93
Mode Setting....94
SOUND & LANGUAGE CONTROL
Auto Volume Leveler....95
Clear Voice II....96
Preset Sound Settings - Sound Mode.... 97
Sound Setting Adjustment -User Mode .....98
SRS TruSurround XT 98
Balance....99
TV Speakers On/ Off Setup 100
Selecting Digital Audio Out....101
Audio Reset....102
Stereo Reception (In Analogue Mode Only)...... 103
Speaker Sound Output Selection 104
Language Selection (In Digital Mode only)..... 105
TIME SETTING
Clock Setup.... 106
Auto On/ Off Time Setting....107
Sleep Timer Setting 108
PARENTAL CONTROL / RATINGS
Set Password & Lock System.... 109
Block Programme 110
Parental Control (In Digital Mode only)...... 111
External Input Blocking....1 12
Key Lock 113
TELETEXT
Switch on/off 114
SIMPLE Text.... 1 14
TOP Text.... 114
FASTEXT....1 15
Special Teletext Functions .... 1 15
APPENDIX
Troubleshooting.... 116
Maintenance 119
RF Specifications.... 1 19
Product Specifications.... 120
Open Source Software Notice.... 121
Open Source License....122
PREPARATION
FRONT PANEL CONTROLS
NOTE
▶ TV can be placed in standby mode in order to reduce the power consumption. And TV should be switched off using the power switch on the TV if it will not be watched for some time, as this will reduce energy consumption. The energy consumed during use can be significantly reduced if the level of brightness of the picture is reduced, and this will reduce the overall running cost.
CAUTION
When the TV cannot be turned on with the remote control, press the main power button on the TV. (When the power is turned off with the main power button on the TV, it will not be turned on with the remote control).
- Do not step on the glass stand or subject it to any impact.
It may break, causing possible injury from fragments of glass, or the TV may fall.
- Do not drag the TV. The floor or the product may be damaged.
■ Here shown may be somewhat different from your TV.
Only 47/55LH8***
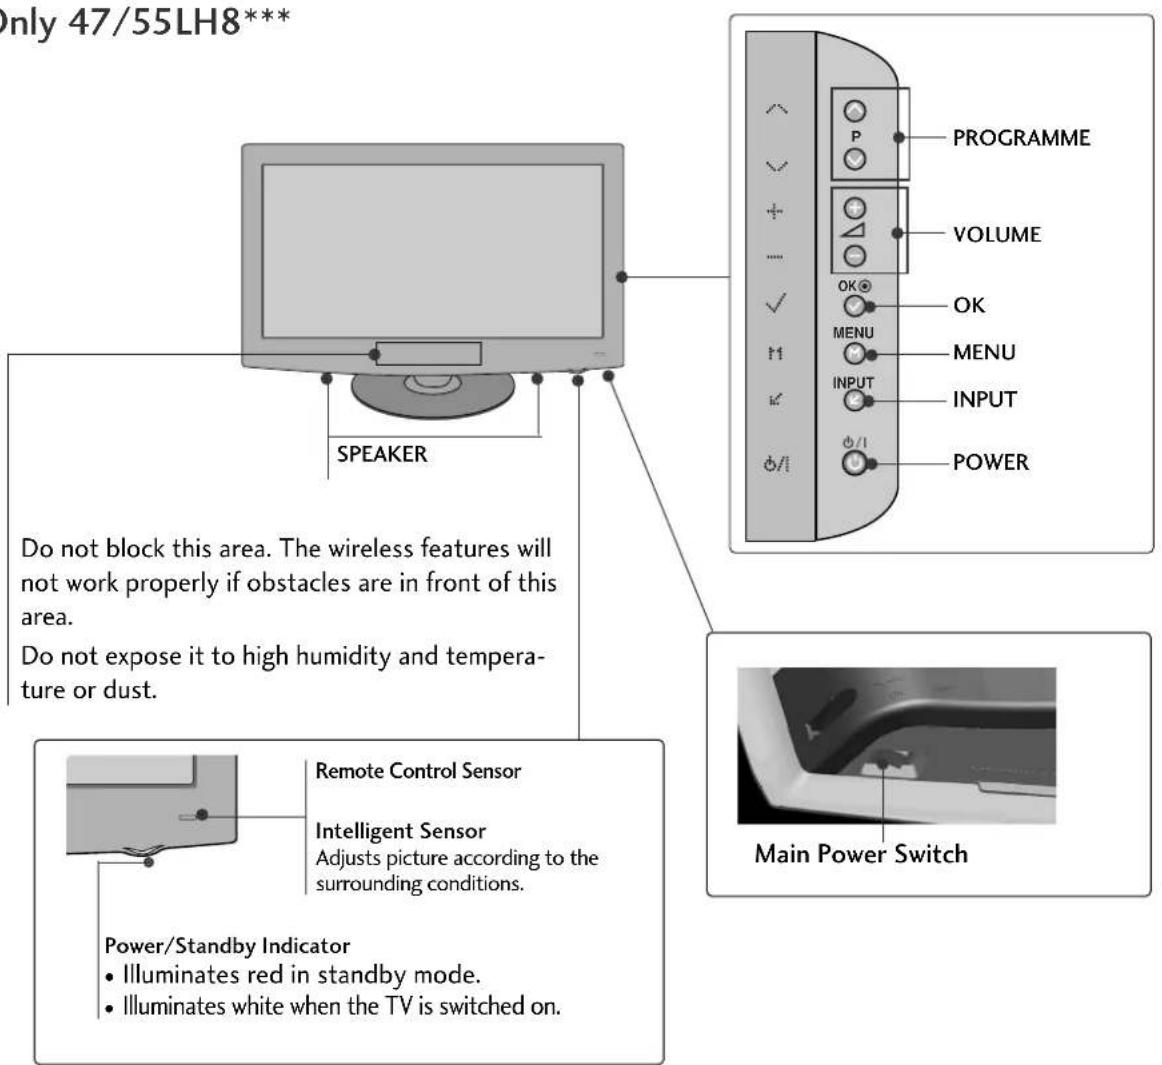
text_image
Only 47/55LH8*** SPEAKER Do not block this area. The wireless features will not work properly if obstacles are in front of this area. Do not expose it to high humidity and temperature or dust. Remote Control Sensor Intelligent Sensor Adjusts picture according to the surrounding conditions. Power/Standby Indicator • Illuminates red in standby mode. • Illuminates white when the TV is switched on. PROGRAMME VOLUME OK OK MENU MENU INPUT INPUT POWER Main Power Switch■ Here shown may be somewhat different from your TV.
Only 55LH9\*\*\*
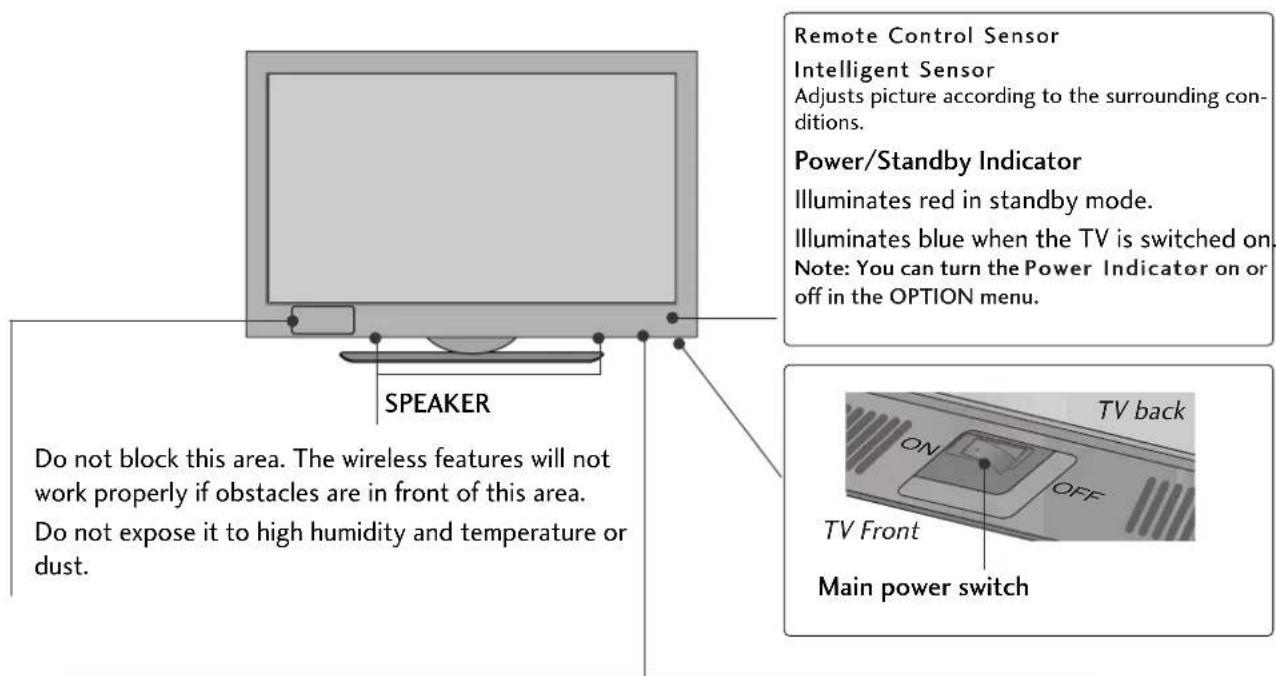
text_image
Remote Control Sensor Intelligent Sensor Adjusts picture according to the surrounding con- ditions. Power/Standby Indicator Illuminates red in standby mode. Illuminates blue when the TV is switched on. Note: You can turn the Power Indicator on or off in the OPTION menu. SPEAKER TV back ON OFF TV Front Main power switch Do not block this area. The wireless features will not work properly if obstacles are in front of this area. Do not expose it to high humidity and temperature or dust.Touch Button
Light the button by touching first. At this time, you can use the desired button function.
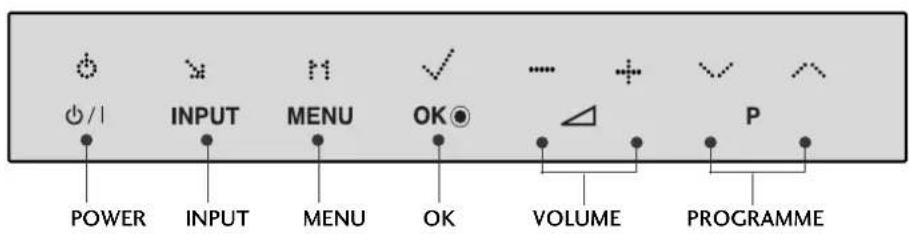
text_image
POWER INPUT MENU OK VOLUME PROGRAMMEPREPARATION
■ Here shown may be somewhat different from your TV.
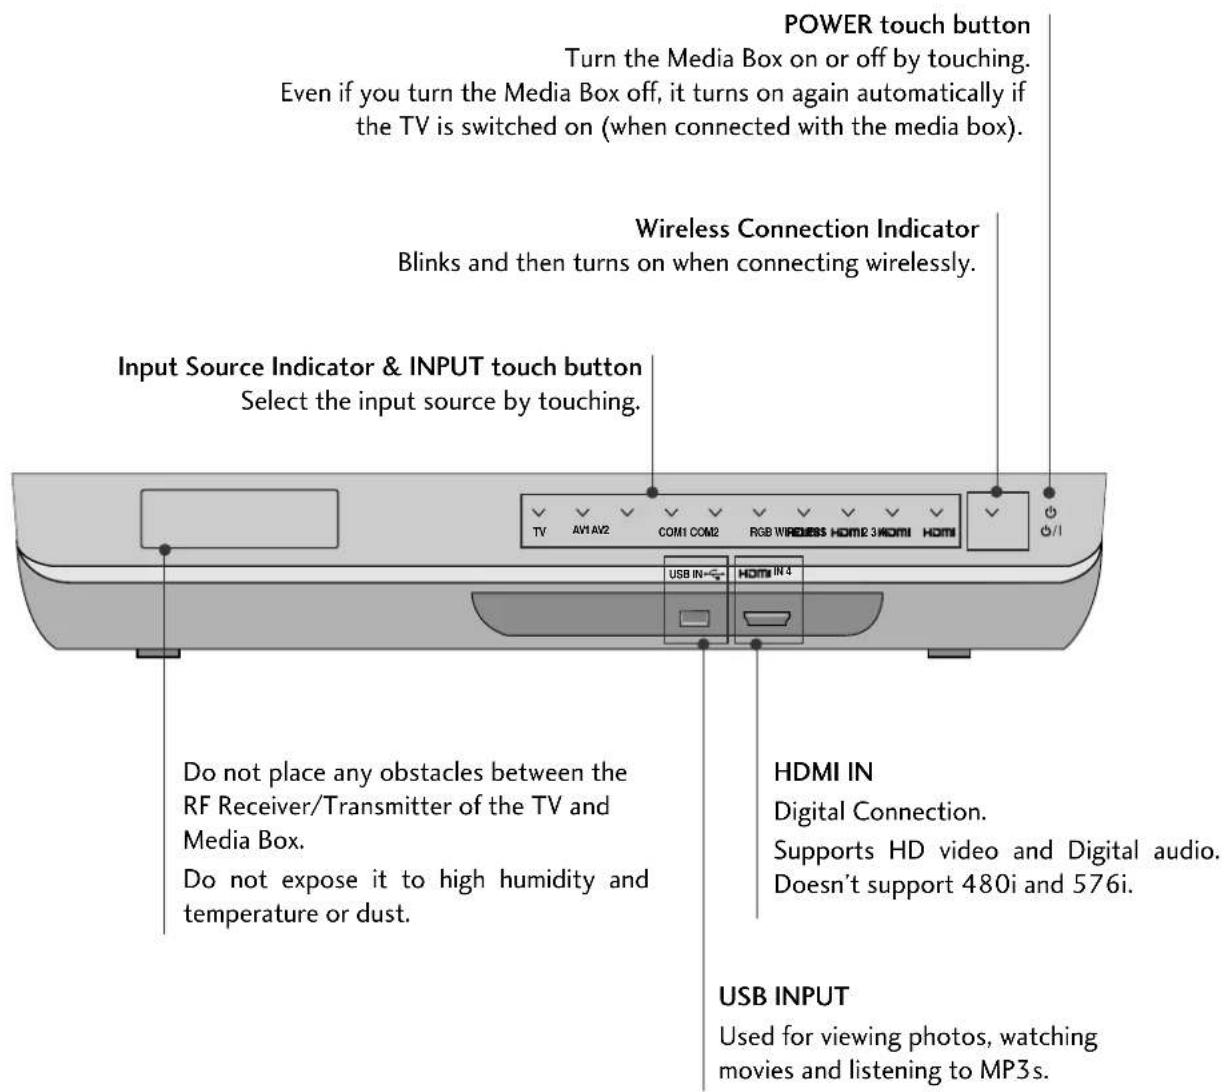
MEDIA BOX
text_image
POWER touch button Turn the Media Box on or off by touching. Even if you turn the Media Box off, it turns on again automatically if the TV is switched on (when connected with the media box). Wireless Connection Indicator Blinks and then turns on when connecting wirelessly. Input Source Indicator & INPUT touch button Select the input source by touching. Do not place any obstacles between the RF Receiver/Transmitter of the TV and Media Box. Do not expose it to high humidity and temperature or dust. HDMI IN Digital Connection. Supports HD video and Digital audio. Doesn't support 480i and 576i. USB INPUT Used for viewing photos, watching movies and listening to MP3s.* ID Label of Media Box is located at the bottom of Media Box.
BACK PANEL INFORMATION
■ Here shown may be somewhat different from your TV.
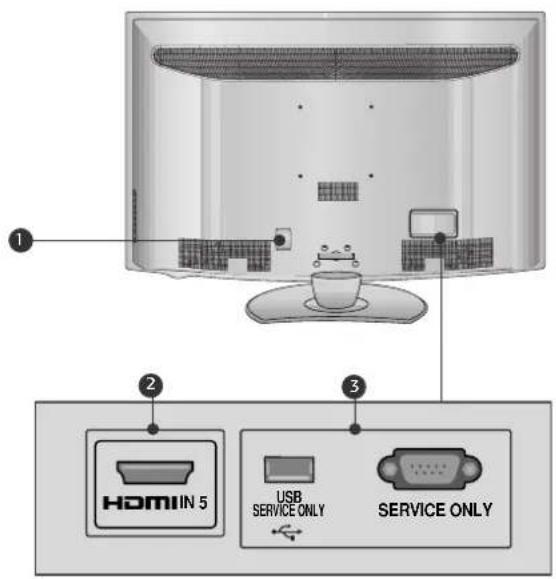
Only 47/55LH8***
text_image
① ② HOMI IN 5 USB SERVICE ONLY ③ SERVICE ONLY① Power Cord Socket
This TV operates on an AC power. The voltage is indicated on the Specifications page(▶ p.120). Never attempt to operate the TV on DC power.
② HDMI IN
Digital Connection.
Supports HD video and Digital audio.
Doesn't support 480i, 576i and SIMPLINK (HDMI-CEC).
3 USB SERVICE ONLY, SERVICE ONLY
Used for software updates.
PREPARATION
■ Here shown may be somewhat different from your TV.
Only 55LH9***
text_image
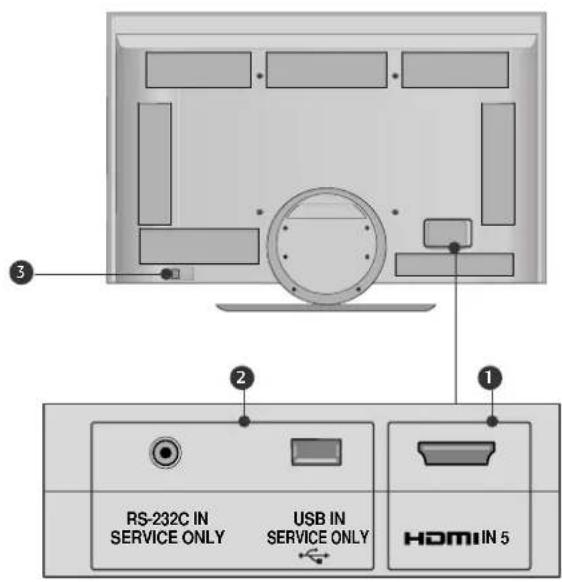
RS-232C IN SERVICE ONLY USB IN SERVICE ONLY HDMI IN 5① HDMI IN Input
Digital Connection.
Supports HD video and Digital audio.
Doesn't support 480i,576i and SIMPLINK (HDMI-CEC).
2 USB IN SERVICE ONLY, RS-232C IN SERVICE ONLY
Used for software updates.
3 Power Cord Socket
This TV operates on an AC power. The voltage is indicated on the Specifications page(▶ p.120). Never attempt to operate the TV on DC power.
■ Here shown may be somewhat different from your TV.
MEDIA BOX
text_image
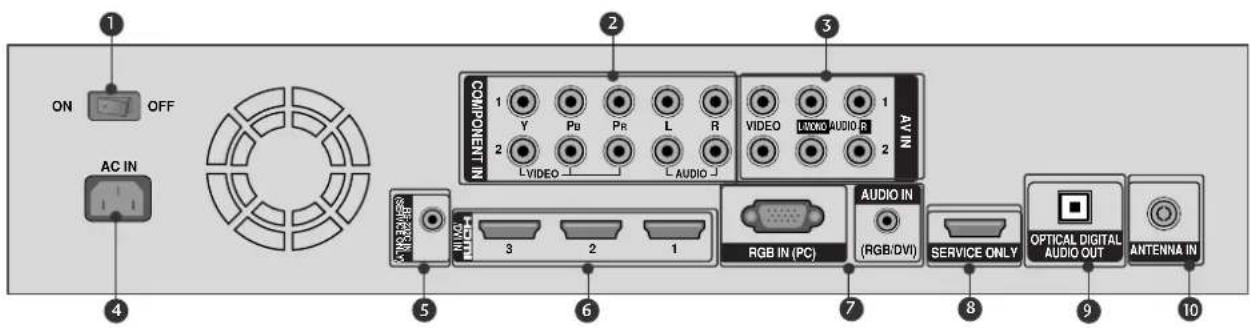
ON OFF AC IN COMPONENT IN 1 Y Pb Pr L R 2 L VIDEO AUDIO 3 AV IN AUDIO IN RGB IN (PC) 3 2 1 SERVICE ONLY OPTICAL DIGITAL AUDIO OUT ANTENNA IN① Main power switch
If you cannot turn the Media Box on with the remote control, turn the power on using the Main power switch and then switch the TV on with POWER button on the remote control.
If you turned the Media Box off using the Main power switch, you cannot turn it on with the remote control.
② Component Input
Connect a component video/audio device to these jacks.
3 Audio/Video Input
Connect audio/video output from an external device to these jacks.
4 Power Cord Socket
This Media Box operates on an AC power. The voltage is indicated on the Specifications page(▶ p.120). Never attempt to operate the Media Box on DC power.
5 RS-232C IN (SERVICE ONLY) PORT
Used for software updates.
6 HDMI/DVI IN Input
Connect a HDMI signal to HDMI IN. Or DVI (VIDEO) signal to HDMI/DVI port with DVI to HDMI cable.
7 RGB IN (PC) Input
Connect the output from a PC.
AUDIO IN (RGB/DVI) Input
Connect the audio from a PC or DTV.
8 SERVICE ONLY PORT
Used for software updates.
9 OPTICAL DIGITAL AUDIO OUT
Connect digital audio to various types of equipment.
Connect to a Digital Audio Component.
Use an Optical audio cable.
10 Antenna Input
Connect RF antenna to this jack.
PREPARATION
WIRELESS TV OPERATING PRINCIPLE
This product transmits 1080p HD video wirelessly.
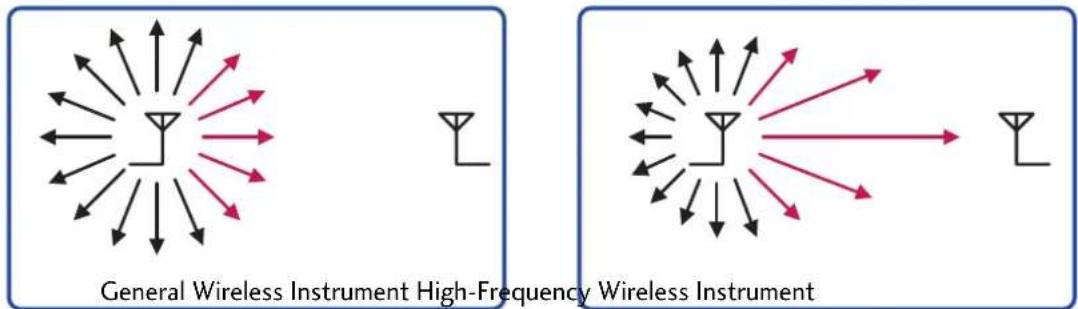
This Wireless TV uses a 60GHz signal to transmit 1080p HD class video without a loss in quality. This type of high-frequency signal is stronger in the front than on the sides as shown in examples below.
text_image
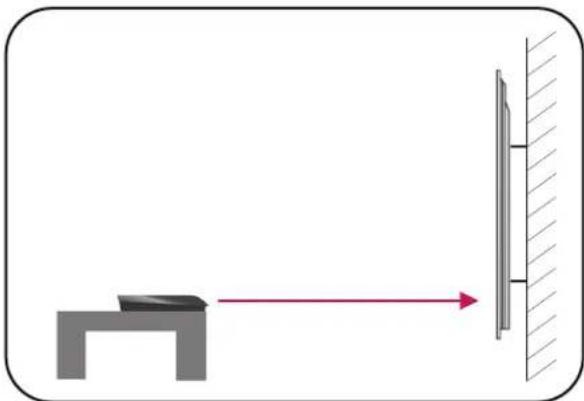
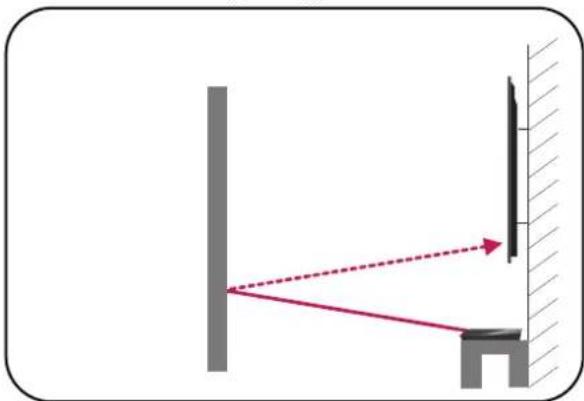
General Wireless Instrument High-Frequency Wireless InstrumentThe TV can connect to the media box from the front or the side. But as shown above, the signal is stronger in the front. Therefore, the media box must be closer to the TV when connecting from the side. It will attempt to connect from the front first by bouncing the signal off the back wall in the room. If it is unable to connect from the front, it will attempt to connect from the side. You may also face the box directly at the TV from across the room.
This setup usually provides the best connect. The front of the Media Box is in line of sight to the front of the TV.
natural_image
Diagram showing a table with an arrow pointing to a vertical panel on a wall, no text or symbols presentThis setup option is the most common. Bouncing the signal off the back wall works best when there are limited obstacles blocking the signal.
Passing the signal through solid objects will degrade it. You may get a degraded or lost signal when placing the Media Box in an enclosure.
natural_image
Diagram showing light rays projecting off a wall and a mirror (no text or symbols)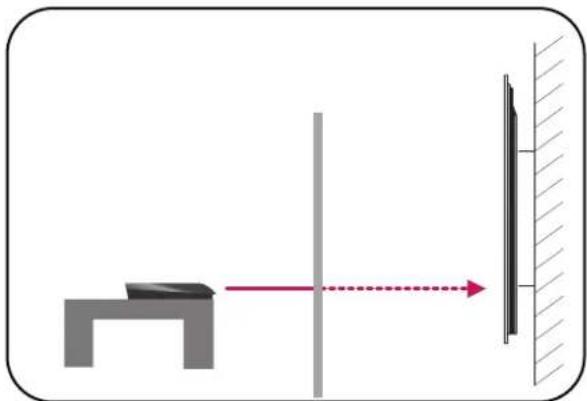
natural_image
Diagram showing a mechanical setup with a bracket and a vertical panel, connected by an arrow indicating direction (no text or symbols)OPTIMAL INSTALLATION METHOD FOR MEDIA BOX
If you install TV and Media Box toward the same direction like a picture, you can watch wireless TV with an optimal picture quality.
This is a recommended installation type for good wireless connection.
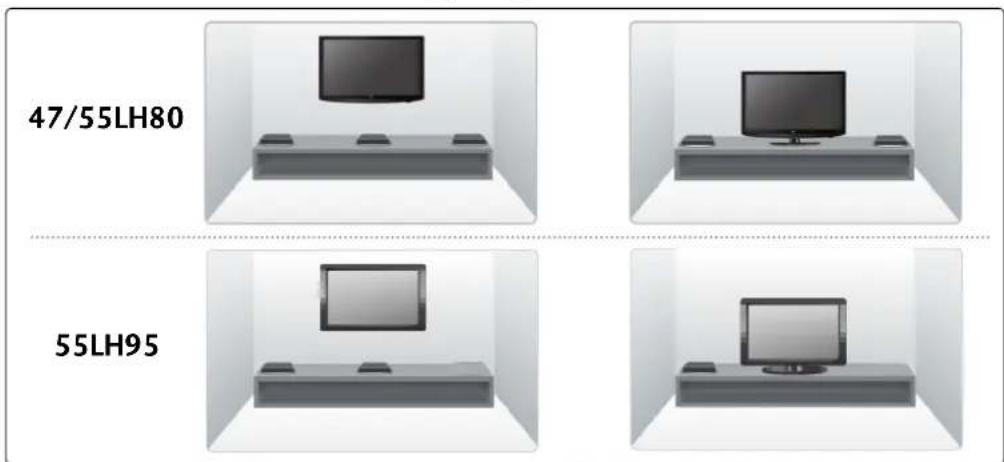
text_image
47/55LH80 55LH95Please install making the number of signal strength indication to be more than three as you move Media Box as below.
To check a signal strength, press the INFO button on the remote control.
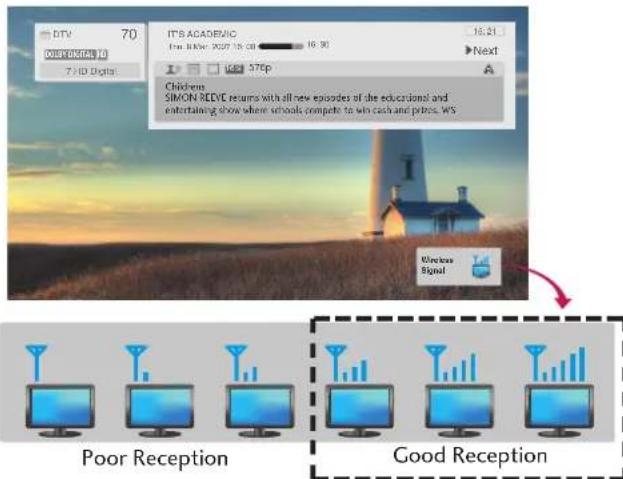
text_image
DTV 70 DISP DORATE TO 7 HD Digital IT'S ACADEMIC For little: 2007.15.09 16:30 Next Chickens SIMON REVE returns with all new episodes of the educational and entertaining show where schools compete to win cash and pets. WS Wireless Signal Poor Reception Good ReceptionAdjust the location and direction of the Media Box until you get good reception.
Use the provided rubber supports to raise the Media Box if needed.
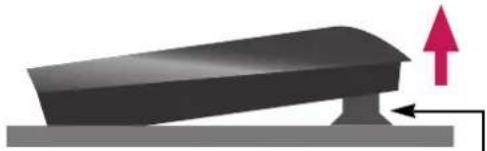
natural_image
Diagram of a mechanical component with an upward arrow indicating motion (no text or symbols)Rubber supports (accessories)
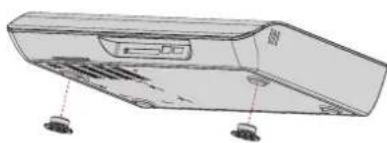
natural_image
Technical line drawing of a computer monitor with ventilation slots and base mount (no text or symbols)OPTIMAL INSTALLATION METHOD FOR MEDIA BOX
When you install Media Box inside of a cabinet, a wireless TV might not operate normally if the cabinet door is sealed up.
| Recommended Installation Method | Wrong Installation Method | |
| Installation Example | 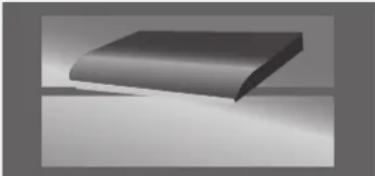 | 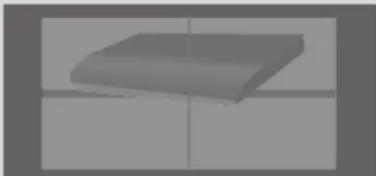 |
| Cabinet Structure | GlassOpen typePartially open type (An electric wave transmitting part should be exposed to the outside.) | In case that there is Media Box inside a sealed cabinetIn case that an electric wave transmitting part of Media Box is obstructedIn case that a cabinet inside consists of a metalIn case that a Media Box is installed deep inside of a cabinet |
| Problem Phenomenon | It is possible to watch wireless TV normally. | It is impossible to watch wireless TV. |
| Handling Method | Please check if an antenna of wireless connection intensity is more than three. | Please install Media Box outside of a cabinet. |
text_image
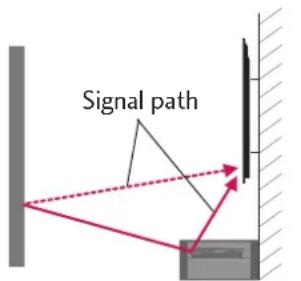
Signal pathMedia Box is capable of transmitting signal up to 25^ angle backwards, so adjust the location of the Media Box by moving back and forth until signal strength is in good reception.
CAUTION
▶ Move any other equipment or metal object placed on the same console that Media box is installed. They may interfere each other and wireless connection may fail.
STAND INSTALLATIONS
Only 47LH8\*\*\*
■ Image shown may differ from your TV
When assembling the desk type stand, check whether the screws are fully tightened. (If not tightened fully, the product can tilt forward after the product installation.) If you tighten the bolt with excessive force, the bolt can deviate from abrasion of the tightening part of the bolt.
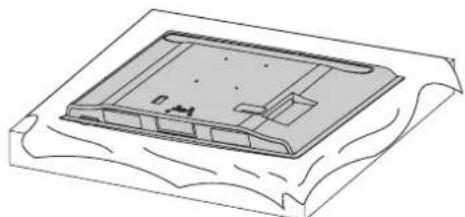
1 Carefully place the TV screen side down on a cushioned surface to protect the screen from damage.
natural_image
Illustration of a rectangular electronic component with internal components, placed on a wavy surface (no text or symbols)2 Assemble the TV as shown.
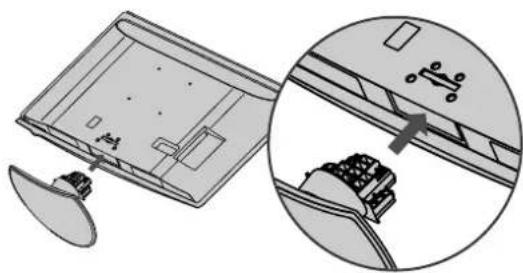
natural_image
Technical illustration of a device with a magnified inset showing internal components (no text or symbols)3 Fix the 4 screws securely using the holes in the back of the TV.
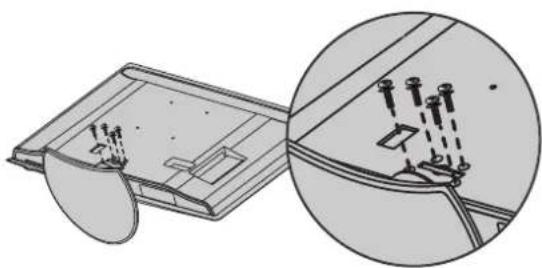
natural_image
Diagram showing a device with internal components and a magnified inset of the component detail (no text or symbols)PREPARATION
BACK COVER FOR WIRE ARRANGEMENT
Only 47/55LH8***
■ Here shown may be somewhat different from your TV.
1 Connect the cables as necessary. To connect additional equipment, see the External Equipment Setup section of the manual.
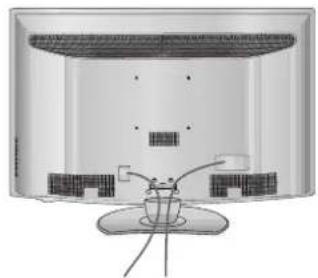
natural_image
Top-down view of a flat-screen TV with visible sound waves and ventilation slots (no text or symbols)2 Open the CABLE MANAGEMENT CLIP as shown and manage the cables.
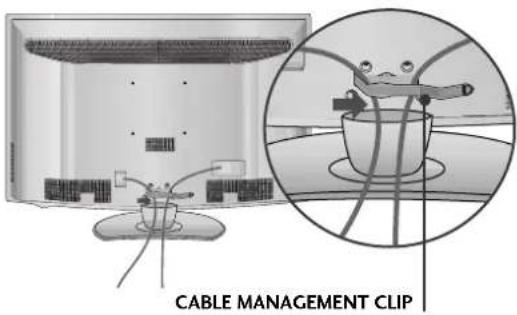
text_image
CABLE MANAGEMENT CLIP3 Fit the CABLE MANAGEMENT CLIP as shown.
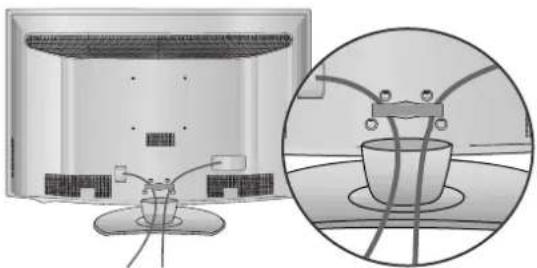
natural_image
Illustration of a monitor with a side-mounted cable and a magnified inset showing internal components (no text or symbols)NOTE
▶ Do not use the CABLE MANAGEMENT CLIP to lift the TV. - If the TV is dropped, you may be injured or the TV may be damaged.
Only 55LH9***
FOR DESK-TYPE STAND FOR WALL MOUNT
1 Connect the cables as necessary.
To connect additional equipment, see the EXTERNAL EQUIPMENT SETUP section.
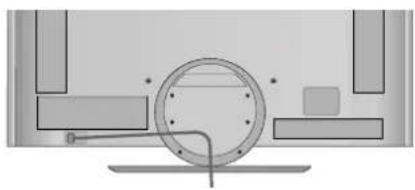
natural_image
Pure technical diagram of a mechanical or electrical component without any text, numbers, or symbols2 Loose the screw as shown.
Then, secure the power cord with the PROTECTIVE BRACKET and reinstall the screw again.
It will help prevent the power cable from being removed by accident.
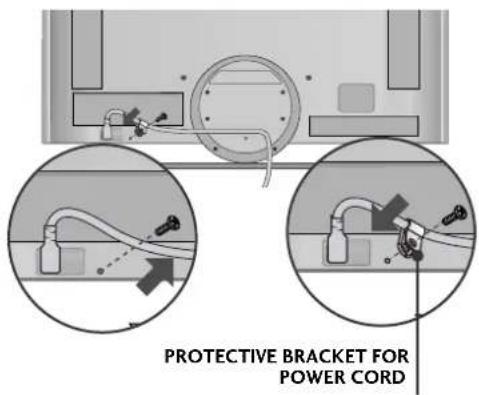
text_image
PROTECTIVE BRACKET FOR POWER CORD3 Install the PLUG IN TYPE HOLDER and put the cables inside it.
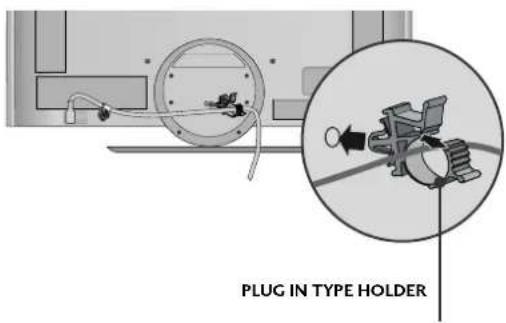
text_image
PLUG IN TYPE HOLDERConnect the cables as necessary.
To connect additional equipment, see the EXTERNAL EQUIPMENT SETUP section.
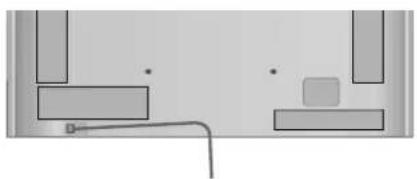
natural_image
Pure electrical circuit lines without any symbols2 Loose the screw as shown.
Then, secure the power cord with the PROTECTIVE BRACKET and reinstall the screw again.
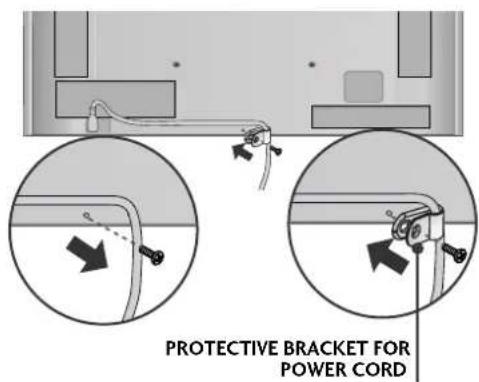
text_image
PROTECTIVE BRACKET FOR POWER CORDPREPARATION
DETACHING STAND
Only 55LH9\*\*\*
1 Carefully place the TV screen side down on a cushioned surface to protect the screen from damage.
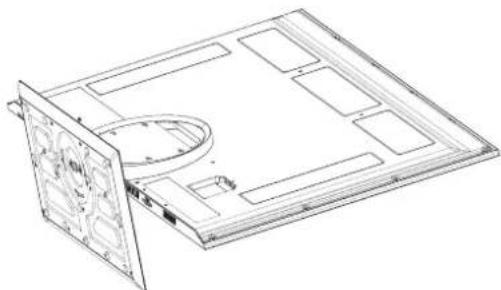
natural_image
Technical line drawing of a mechanical assembly with cutouts and internal components (no text or symbols)2 Remove the screws from the TV.
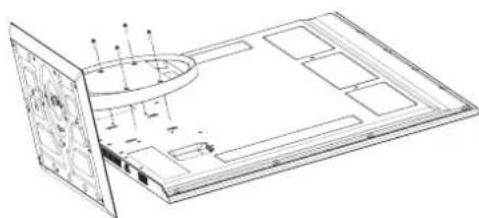
natural_image
Technical line drawing of a mechanical assembly with no visible text or symbols3 Detach the stand from TV.
natural_image
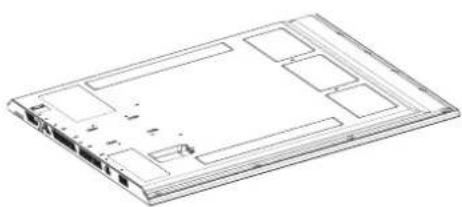
Line drawing of a rectangular electronic device with internal compartments and ports (no text or symbols)KENSINGTON SECURITY SYSTEM
■ This feature is not available for all models.
■ Here shown may be somewhat different from your TV.
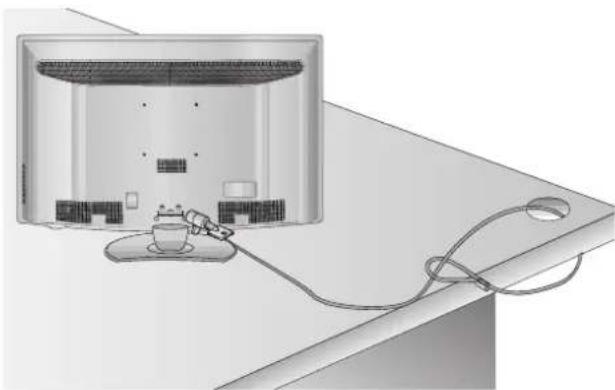
The TV is equipped with a Kensington Security System connector on the back panel. Connect the Kensington Security System cable as shown below.
For the detailed installation and use of the Kensington Security System, refer to the user's guide provided with the Kensington Security System.
For further information, contact http://www.kensington.com, the internet homepage of the Kensington company. Kensington sells security systems for expensive electronic equipment such as notebook PCs and LCD projectors.
NOTE
- The Kensington Security System is an optional accessory.
NOTES
a. If the TV feels cold to the touch, there may be a small "flicker" when when it is turned on.
This is normal, there is nothing wrong with TV.
b. Some minute dot defects may be visible on the screen, appearing as tiny red, green, or blue spots. However, they have no adverse effect on the monitor's performance.
c. Avoid touching the LCD screen or holding your finger(s) against it for long periods of time.
Doing so may produce some temporary distortion effects on the screen.
natural_image
Illustration of a computer monitor with cable and cup, placed on a desk (no text or symbols)CAREFUL INSTALLATION ADVICE SWIVEL STAND
- You should purchase necessary components to fix the TV safety and secure to the wall on the market.
■ Position the TV close to the wall to avoid the possibility of it falling when pushed.
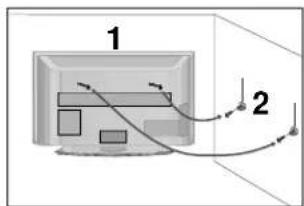
The instructions shown below are a safer way to set up the TV, by fixing it to the wall, avoiding the possibility of it falling forwards if pulled. This will prevent the TV from falling forward and causing injury. This will also prevent the TV from damage. Ensure that children do not climb or hang from the TV.
text_image
1 2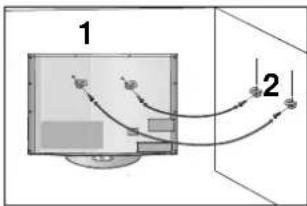
flowchart
graph TD
    A["Component 1"] --> B["Component 2"]
    style A fill:#f9f,stroke:#333
    style B fill:#bbf,stroke:#333
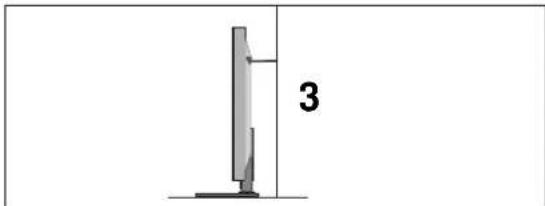
1 Use the eye-bolts or TV brackets/bolts to fix the product to the wall as shown in the picture. (If your TV has bolts in the eyebolts, loosen then bolts.)
* Insert the eye-bolts or TV brackets/bolts and tighten them securely in the upper holes.
2 Secure the wall brackets with the bolts on the wall. Match the height of the bracket that is mounted on the wall.
natural_image
Simple line drawing of a computer monitor with a vertical line and number 3, no text or symbols present.3 Use a sturdy rope to tie the product for alignmen. It is safer to tie the rope so it becomes horizontal between the wall and the product.
NOTE
▶ When moving the TV undo the cords first.
▶ Use a platform or cabinet strong and large enough to support the size and weight of the TV.
▶ To use the TV safely make sure that the height of the bracket on the wall and on the TV is the same.
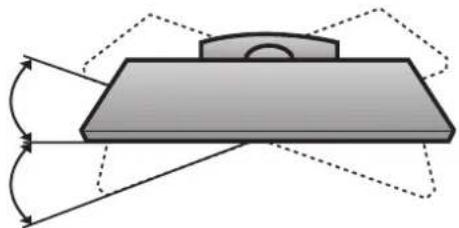
After installing the TV, you can adjust the TV set manually to the left or right direction by 20 degrees to suit your viewing position.
natural_image
Diagram of a mechanical component with angular and linear motion indicators (no text or symbols)NOT USING THE DESK-TYPE STAND (Only 47/55LH8\*\*\* )
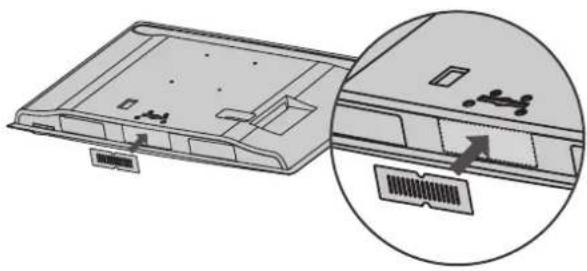
■ Here shown may be somewhat different from your TV. When installing the wall-mounted unit, use the protection cover. After removing the protection paper from the protection cover, adhere it to the TV as shown.
natural_image
Diagram of a computer monitor rear panel with an inset close-up showing internal components (no text or symbols)PREPARATION
■ The TV can be installed in various ways such as on a wall, or on a desktop etc.
■ The TV is designed to be mounted horizontally.
EARTHING
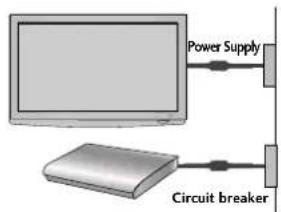
Ensure that you connect the earth wire to prevent possible electric shock. If grounding methods are not possible, have a qualified electrician install a separate circuit breaker.
Do not try to earth the TV by connecting it to telephone wires, lightening rods or gas pipes.
text_image
Power Supply Circuit breakerDESKTOP PEDESTAL INSTALLATION
For adequate ventilation allow a clearance of 4" (10cm) all around the TV.
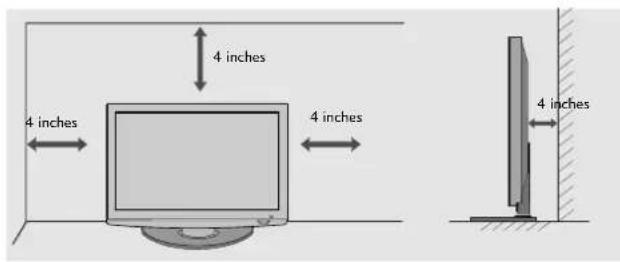
text_image
4 inches 4 inches 4 inches 4 inchesWALL MOUNT: HORIZONTAL INSTALLATION
■ We recommend the use of a LG Brand wall mounting bracket when mounting the TV to a wall.
■ We recommend that you purchase a wall mounting bracket which supports VESA standard.
■ LG recommends that wall mounting be performed by a qualified professional installer.
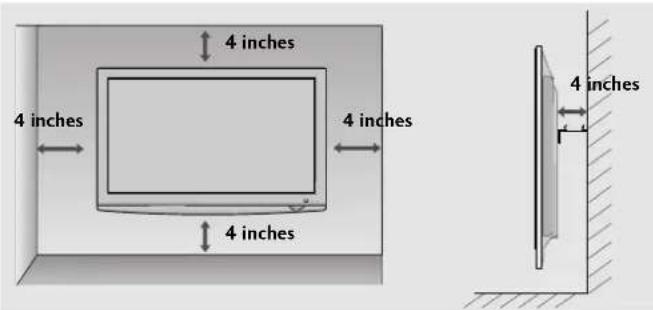
text_image
4 inches 4 inches 4 inches 4 inches 4 inches 4 inchesNOTE
▶ Should Install wall mount on a solid wall perpendicular to the floor.
▶ Should use a special wall mount, if you want to install it to ceiling or slanted wall.
The surface that wall mount is to be mounted on should be of sufficient strength to support the weight of TV set; e.g. concrete, natural rock, brick and hollow block.
▶ Installing screw type and length depends on the wall mount used. Further information, refer to the instructions included with the mount.
▶ LG is not liable for any accidents or damage to property or TV due to incorrect installation:
- Where a non-compliant VESA wall mount is used.
- Incorrect fastening of screws to surface which may cause TV to fall and cause personal injury.
- Not following the recommended Installation method.
CAUTION
Do not install your wall mount kit while your TV is turned on. It may result in personal injury due to electric shock.
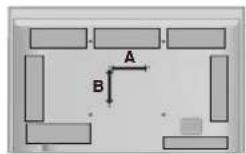
| Model | VESA (A * B) | Standard Screw | Quantity |
| 47LH8*** | 200 * 200 | M6 | 4 |
| 55LH8*** | 400 * 400 | M6 | 4 |
| 55LH9*** | 400 * 400 | M6 | 4 |
■ To prevent damage do not connect to the mains outlet until all connections are made between the devices.
ANTENNA CONNECTION
■ For optimum picture quality, adjust antenna direction.
■ An antenna cable and converter are not supplied.

flowchart
graph TD
    A["Multi-family Dwellings/Apartments (Connect to wall antenna socket)"] --> B["RF Coaxial Wire (75 ohm)"]
    C["Wall Antenna Socket"] --> B
    D["Outdoor Antenna (VHF, UHF)"] --> B
    E["Single-family Dwellings/Houses (Connect to wall jack for outdoor antenna)"] --> B
    F["Antenna IN"] --> B
    G["OFFON"] --> H["AC IN"]
    H --> I["1 L VIDEO-1"]
    I --> J["L VIDEO+FLW/VIDEO"]
    J --> K["2 L AUDIO-2"]
    K --> L["3 RGB IN (PC)"]
    L --> M["AUDIO IN (RGB-DVD)"]
    M --> N["SERVICE ONLY"]
    N --> O["OPTICAL DIGITAL AUDIO OUT"]
    O --> P["ANTENNA IN"]

flowchart
graph LR
    A["Antenna"] --> B["UHF"]
    A --> C["VHF"]
    B --> D["Signal Amplifier"]
    C --> D
    D --> E["Antenna IN"]
In poor signal areas, to achieve better picture quality it may be necessary to install a signal amplifier to the antenna as shown above.
■ If signal needs to be split for two TVs, use an antenna signal splitter for connection.
EXTERNAL EQUIPMENT SETUP
■ To avoid damaging any equipment, never plug in any power cords until you have finished connecting all equipment.
■ Image shown may differ from your TV or Media Box.
HD RECEIVER SETUP
This Media Box can receive Digital RF/Cable signals without an external digital set-top box. However, if you do receive Digital signals from a digital set-top box or other digital external device, refer to the diagram as shown below.
Connecting with a component cable
1 Connect the video outputs (Y, PB, PR) of the digital set top box to the COMPONENT IN VIDEO jacks on the Media Box. Match the jack colours (Y = green, PB = blue, and PR = red).
2 Connect the audio output of the digital set-top box to the COMPONENT IN AUDIO jacks on the Media Box.
3 Turn on the digital set-top box. (Refer to the owner's manual for the digital set-top box.)
4 Select Component1 input source using the INPUT button on the remote control.
If connected to COMPONENT IN 2, select Component2 input source.
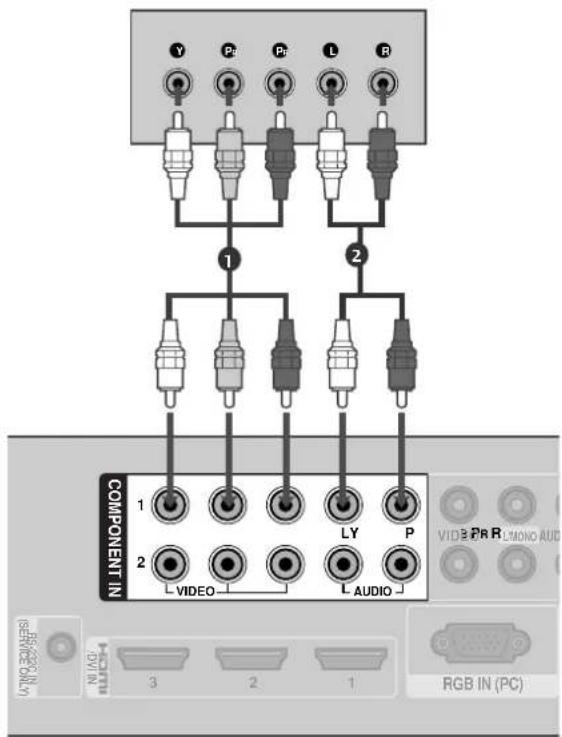
text_image
Y Pd Pf L R 1 2 COMPONENT IN 1 LY P VIDEO AUDIO VIDEO PR R LMONO AUDIO 3 2 1 RGB IN (PC)▶ HDMI Audio Supported format : Dolby Digital, PCM
| Signal | Component | HDMI |
| 480i/576i | O | X |
| 480p/576p | O | O |
| 720p/1080i | O | O |
| 1080p | O(50Hz/60Hz) | O(24Hz/30Hz/50Hz/60Hz) |
Connecting a set-top box with an HDMI cable
1 Connect the digital set-top box to HDMI/DVI IN 1, HDMI/DVI IN 2, HDMI/DVI IN 3 or HDMI IN 4 jack on the Media Box or HDMI IN 5 on the TV.
2 Turn on the digital set-top box. (Refer to the owner's manual for the digital set-top box.)
3 Select HDMI1, HDMI2, HDMI3, HDMI4 or HDMI5 input source using the INPUT button on the remote control.
NOTE
▶ Check that your HDMI cable is version 1.3 or higher. If the HDMI cables don't support HDMI version 1.3, flickering or no screen display can result. Please use the latest cables that support at least HDMI version 1.3.
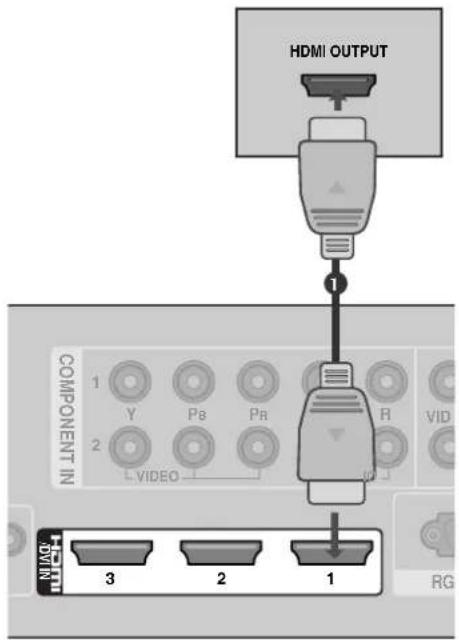
text_image
HDMI OUTPUT COMPONENT IN 1 Y Pb Pb R VID 2 VIDEO 3 2 1 RGConnecting with an HDMI to DVI cable
1 Connect the digital set-top box to HDMI/DVI IN 1, HDMI/DVI IN 2 or HDMI/DVI IN 3 jack on the Media Box.
2 Connect the audio output of the digital set-top box to the AUDIO IN (RGB/DVI) jack on the Media Box.
3 Turn on the digital set-top box. (Refer to the owner's manual for the digital set-top box.)
4 Select HDMI1, HDMI2 or HDMI3 input source using the INPUT button on the remote control.
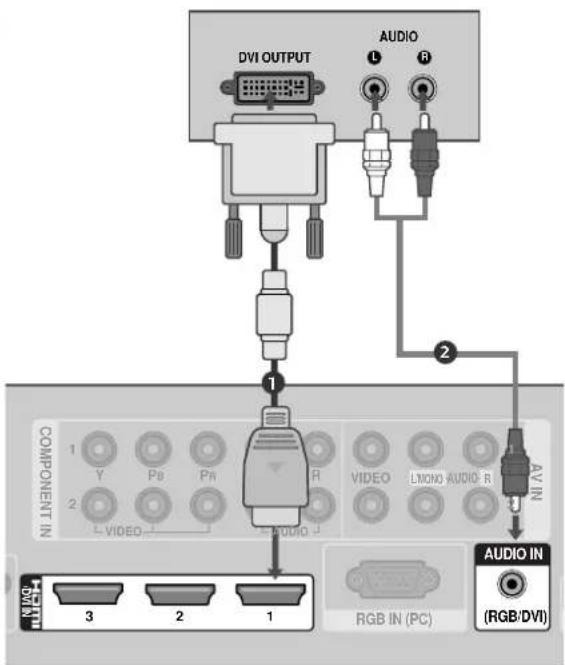
text_image
DVI OUTPUT AUDIO COMPONENT IN 1 2 3 2 1 VIDEO LMONO AUDIO R AUDIO IN RGB IN (PC) (RGB/DVI)EXTERNAL EQUIPMENT SETUP
DVD SETUP
Connecting with a component cable
1 Connect the video outputs (Y, PB, PR) of the DVD to the COMPONENT IN VIDEO jacks on the Media Box.
2 Connect the audio outputs of the DVD to the COMPONENT IN AUDIO jacks on the Media Box.
3 Turn on the DVD player, insert a DVD.
4 Select Component1 input source using the INPUT button on the remote control.
If connected to COMPONENT IN 2, select Component2 input source.
5 Refer to the DVD player's manual for operating instructions.
Component Input ports
To achieve better picture quality, connect a DVD player to the component input ports as shown below.
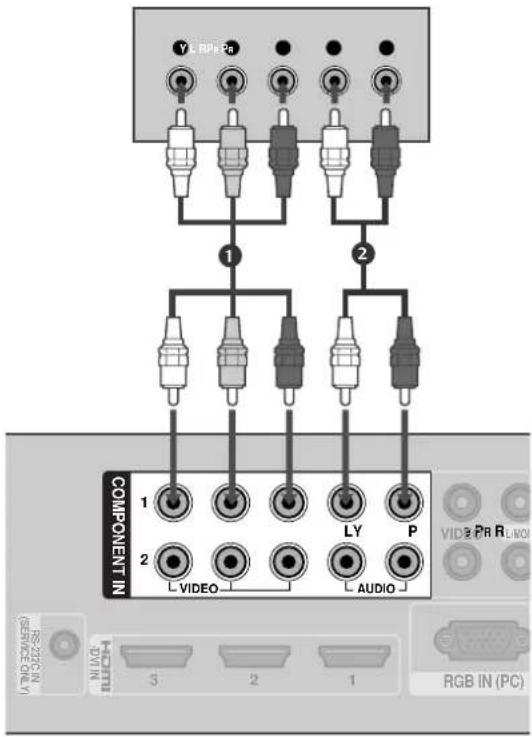
text_image
Y RPe Pa 1 2 COMPONENT IN 1 LY P VIDEO AUDIO 3 2 1 RGB IN (PC) SERVICIE IN HOTU 3 2 1| Component ports on the Media Box | Y | P_B | P_R |
| Video output ports on DVD player | Y | P_B | P_R |
| Y | B-Y | R-Y | |
| Y | Cb | Cr | |
| Y | Pb | Pr |
Connecting the HDMI cable
1 Connect the HDMI output of the DVD to the HDMI/DVI IN 1, HDMI/DVI IN 2, HDMI/DVI IN 3, or HDMI IN 4 jack on the Media Box or HDMI IN 5 on the TV.
2 Select HDMI1, HDMI2, HDMI3, HDMI4 or HDMI5 input source using the INPUT button on the remote control.
3 Refer to the DVD player's manual for operating instructions.
NOTE
The Media Box or TV can receive video and audio signals simultaneously when using an HDMI cable.
▶ If the DVD does not support Auto HDMI, you must set the output resolution appropriately.
The TV set can process audio format of PCM or Dolby Digital, when connect the external equipment using an HDMI cable.
▶ Check that your HDMI cable is version 1.3 or higher. If the HDMI cables don't support HDMI version 1.3, flickering or no screen display can result. Please use the latest cables that support at least HDMI version 1.3.
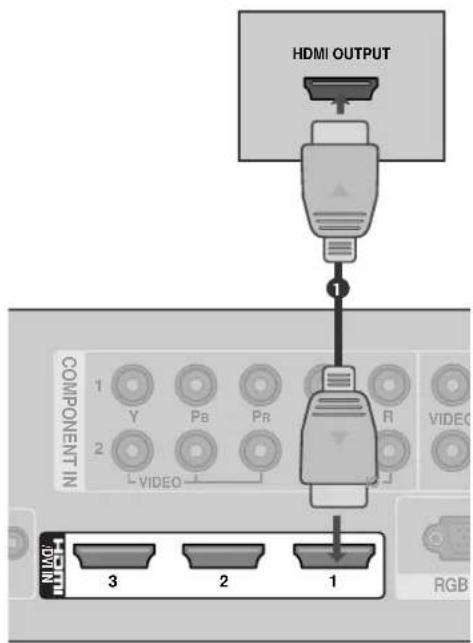
text_image
HDMI OUTPUT COMPONENT IN 1 Y Pb Pr R VIDEO 2 L VIDEO 3 2 1 RGBEXTERNAL EQUIPMENT SETUP
VCR SETUP
■ To avoid picture noise (interference), allow adequate distance between the VCR and Media Box.
Connecting with a RF Cable
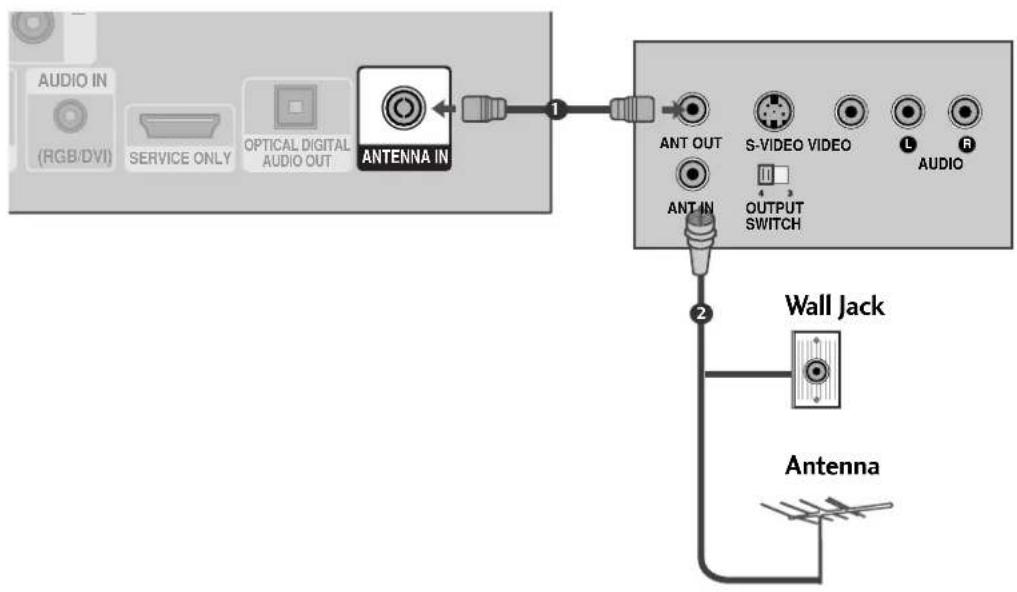
flowchart
graph TD
    A["ANTenna IN"] -->|1| B["ANT OUT"]
    B --> C["S-VIDEO VIDEO"]
    C --> D["L"]
    C --> E["R"]
    C --> F["OUTPUT SWITCH"]
    F --> G["ANT IN"]
    G --> H["Wall Jack"]
    H --> I["Antenna"]
1 Connect the ANT OUT socket of the VCR to the ANTENNA IN socket on the Media Box.
2 Connect the antenna cable to the ANT IN socket of the VCR.
3 Press the PLAY button on the VCR and match the appropriate channel between the Media Box and VCR for viewing.
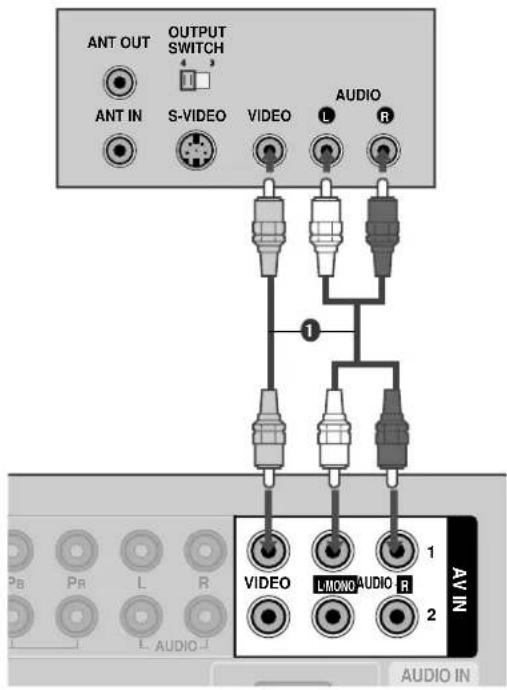
Connecting with a RCA cable
1 Connect the AUDIO/VIDEO jacks between Media Box and VCR. Match the jack colours (Video = yellow, Audio Left = white, and Audio Right = red)
2 Insert a video tape into the VCR and press PLAY on the VCR. (Refer to the VCR owner's manual.)
3 Select AV1 input source using the INPUT button on the remote control. If connected to AV2 input, select AV2 input source.
NOTE
If you have a mono VCR, connect the audio cable from the VCR to the AUDIO L/MONO jack of the Media Box.
text_image
ANT OUT OUTPUT SWITCH 4 3 ANT IN S-VIDEO VIDEO L AUDIO R 1 AV IN VIDEO L/MONO AUDIO R 1 2 P B P R L R L AUDIO AUDIO INEXTERNAL EQUIPMENT SETUP
DIGITAL AUDIO OUT SETUP
Sending the TV's audio signal to external audio equipment via the Digital Audio Output (Optical) port. If you want to enjoy digital broadcasting through 5.1-channel speakers, connect the OPTICAL DIGITAL AUDIO OUT terminal on the back of Media Box to a Home Theater (or amp).
1 Connect one end of an optical cable to the Media Box port of OPTICAL DIGITAL AUDIO OUT.
2 Connect the other end of the optical cable to the digital audio (Optical) input on the audio equipment.
3 Set the "TV Speaker option - Off" in the AUDIO menu. (▶p.100) Refer to the external audio equipment instruction manual for operation.
CAUTION
Do not look into the optical output port. Looking at the laser beam may damage your vision.
▶ Audio with ACP (Audio Copy Protection) function may block digital audio output.
NOTE
When connecting with external audio equipments, such as amplifiers or speakers, please turn the TV speakers off.
▶ HDMI5 input source cannot be used for AUDIO OUT.
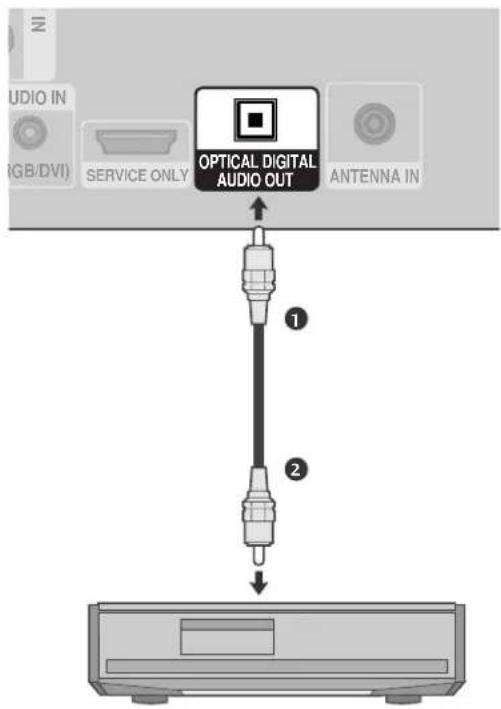
text_image
AUDIO IN (GB/DVI) SERVICE ONLY OPTICAL DIGITAL AUDIO OUT ANTENNA IN 1 2OTHER A/V SOURCE SETUP
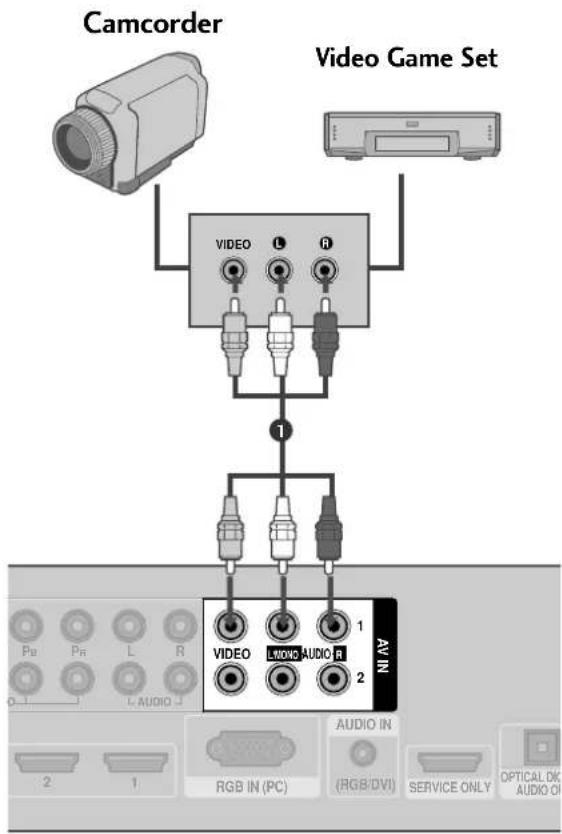
1 Connect the AUDIO/VIDEO jacks between Media Box and external equipment. Match the jack colours.
(Video = yellow, Audio Left = white, and Audio Right = red)
2 Select AV1 input source with using the INPUT button on the remote control.
If connected to AV2 input, select AV2 input source.
3 Operate the corresponding external equipment.
Refer to external equipment operating guide.
text_image
Camcorder Video Game Set VIDEO L R 1 VIDEO L Audio 1 2 N/AV P0 P1 L R L AUDIO J AUDIO IN RGB IN (PC) (RGB/DVI) SERVICE ONLY OPTICAL DC AUDIO ON 2 1USB SETUP
1 Connect the USB device to the USB IN jacks on the Media Box.
2 After connecting the USB IN jacks, you use the USB function. (▶ p.62)
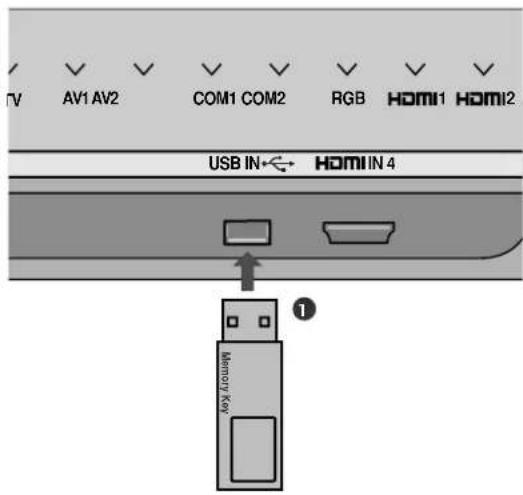
text_image
TV AV1 AV2 COM1 COM2 RGB HDMI1 HDMI2 USB IN←→ HDMI IN 4 Memory KeyEXTERNAL EQUIPMENT SETUP
PC SETUP
This TV provides Plug and Play capability, meaning that the PC adjusts automatically to the Media Box's settings.
Connecting with a D-sub 15 pin cable
1 Connect the RGB output of the PC to the RGB IN (PC) jack on the Media Box.
2 Connect the PC audio output to the AUDIO IN (RGB/DVI) jack on the Media Box.
3 Turn on the PC and the Media Box.
4 Select RGB input source using the INPUT button on the remote control.
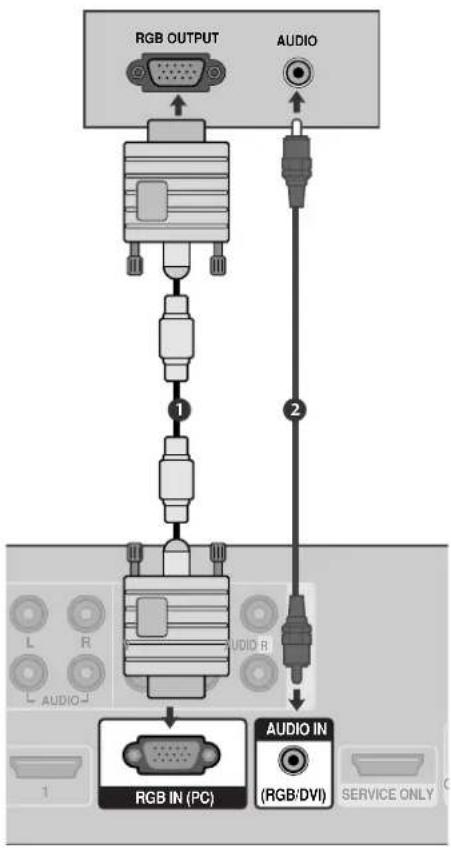
text_image
RGB OUTPUT AUDIO 1 2 L R AUDIO RGB IN (PC) AUDIO IN (RGB/DVI) SERVICE ONLYConnecting with a HDMI to DVI cable
1 Connect the DVI output of the PC to the HDMI/DVI IN1, HDMI/DVI IN2 or HDMI/DVI IN3 jack on the Media Box.
2 Connect the PC audio output to the AUDIO IN (RGB/DVI) jack on the Media Box.
3 Turn on the PC and the Media Box.
4 Select HDMI1, HDMI2 or HDMI3 input source using the INPUT button on the remote control.
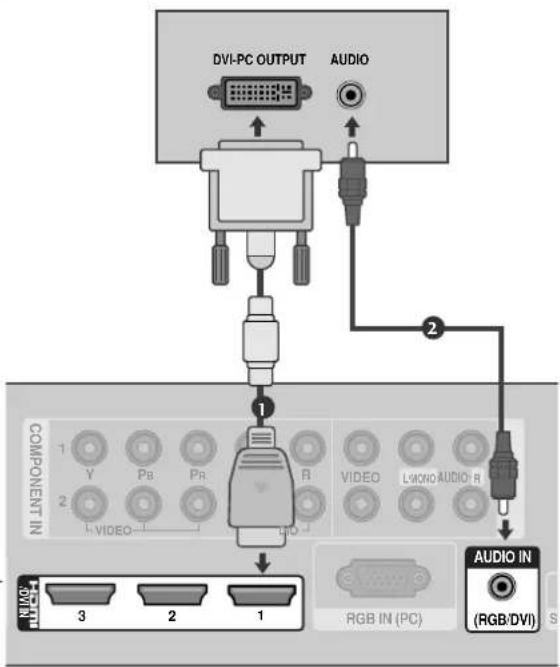
text_image
DVI-PC OUTPUT AUDIO COMPONENT IN 1 2 3 2 1 VIDEO VIDEO LIMONIA AUDIO R AUDIO IN (RGB/DVI)Supported Display Resolution
RGB-PC, HDMI/DVI-PC mode (except for HDMI 5)
| Resolution | Horizontal Frequency(kHz) | Vertical Frequency(Hz) |
| 720x400 | 31.468 | 70.08 |
| 640x480 | 31.469 | 59.94 |
| 800x600 | 37.879 | 60.31 |
| 1024x768 | 48.363 | 60.00 |
| 1280x768 | 47.78 | 59.87 |
| 1360x768 | 47.72 | 59.80 |
| 1280x1024 | 63.595 | 60.00 |
| 1920x1080 (RGB-PC) | 66.587 | 59.93 |
| 1920x1080 (HDMI-PC) | 67.5 | 60.00 |
HDMI/DVI-DTV mode
| Resolution | Horizontal Frequency(kHz) | Vertical Frequency(Hz) |
| 720x480 | 31.469/31.5 | 59.94/60 |
| 720x576 | 31.25 | 50 |
| 1280x720 | 37.5 | 50 |
| 44.96/45 | 59.94/60 | |
| 1920x1080 | 33.72/33.75 | 59.94/60 |
| 28.125 | 50 | |
| 26.97/27 | 23.97/24 | |
| 33.716/33.75 | 29.976/30.00 | |
| 56.25 | 50 | |
| 67.43/67.5 | 59.94/60 |

NOTE
- Avoid keeping a fixed image on the set's screen for prolonged periods of time. The fixed image may become permanently imprinted on the screen; use a screen saver when possible.
There may be interference relating to resolution, vertical pattern, contrast or brightness in PC mode. Change the PC mode to another resolution or change the refresh rate to another rate or adjust the brightness and contrast on the menu until the picture is clear. If the refresh rate of the PC graphic card can not be changed, change the PC graphic card or consult the manufacturer of the PC graphic card.
▶ The synchronization input waveform for Horizontal and Vertical frequencies are separate.
Connect the signal cable from the monitor output port of the PC to the RGB (PC) port of the Media Box or the signal cable from the HDMI output port of the PC to the HDMI IN (or HDMI/DVI IN) port on the Media Box.
▶ Connect the audio cable from the PC to the Audio input on the Media Box. (Audio cables are not included with the Media Box).
▶ If using a sound card, adjust PC sound as required.
▶ If the graphic card on the PC does not output analogue and digital RGB simultaneously, connect only one of either RGB or HDMI IN (or HDMI/DVI IN) to display the PC output on the Media Box.
▶ If the graphic card on the PC does output analogue and digital RGB simultaneously, set the Media Box to either RGB or HDMI; (the other mode is set to Plug and Play automatically by the Media Box.)
▶ DOS mode may not work depending on the video card if you use a HDMI to DVI cable.
▶ If you use too long an RGB-PC cable, there may be interference on the screen. We recommend using under 5m of cable. This provides the best picture quality.
▶ When an unsupported resolution or graphic card is used on the PC, it may cause some errors.
▶ We recommend using 1920x1080, 60Hz for the PC mode, this should provide the best picture quality.
EXTERNAL EQUIPMENT SETUP
Screen Setup for PC mode
Screen Reset
Returns Position, Size and Phase to the factory default settings.
This function works in the following mode : RGB[PC].
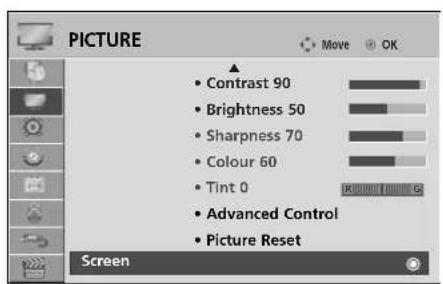
text_image
PICTURE • Contrast 90 • Brightness 50 • Sharpness 70 • Colour 60 • Tint 0 • Advanced Control • Picture Reset Screen
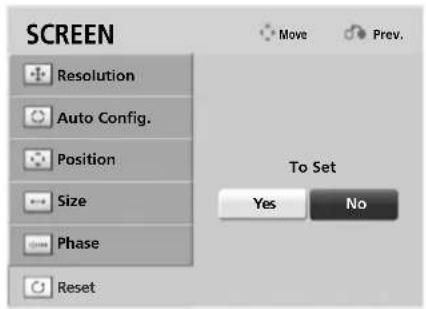
text_image
SCREEN Resolution Auto Config. Position Size Phase Reset Move Prev. To Set Yes No
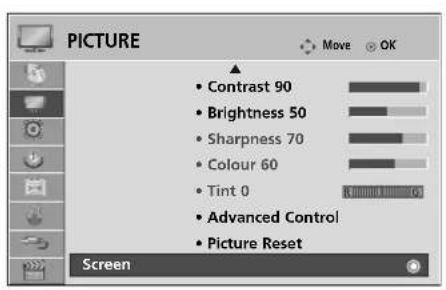
Select PICTURE.

Select Screen.
Select Reset.
Select Yes.

Run Reset.
- Press the MENU button to return to normal TV viewing.
- Press the RETURN button to move to the previous menu screen.
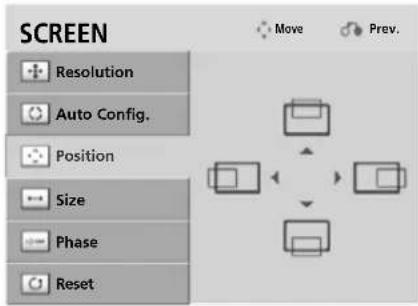
Adjustment for screen Position, Size, Phase
If the picture is not clear after auto adjustment and especially if characters are still trembling, adjust the picture phase manually.
This function works in the following mode: RGB[PC].

text_image
PICTURE • Contrast 90 • Brightness 50 • Sharpness 70 • Colour 60 • Tint 0 • Advanced Control • Picture Reset Screen
text_image
SCREEN Resolution Auto Config. Position Size Phase Reset Move Prev.
Select PICTURE.
Select Screen.
Select Position, Size or Phase.
Make appropriate adjustments.
■ Position: This function is to adjust picture to left/right and up/down as you prefer.
■ Size: This function is to minimize any vertical bars or stripes visible on the screen background. And the horizontal screen size will also change.
■ Phase: This function allows you to remove any horizontal noise and clear or sharpen the image of characters.
- Press the MENU button to return to normal TV viewing.
- Press the RETURN button to move to the previous menu screen.
EXTERNAL EQUIPMENT SETUP
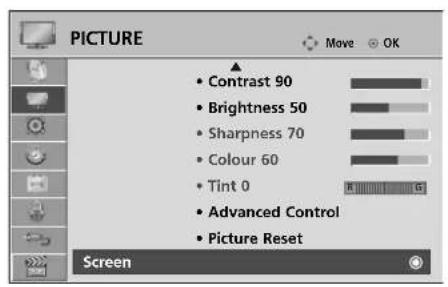
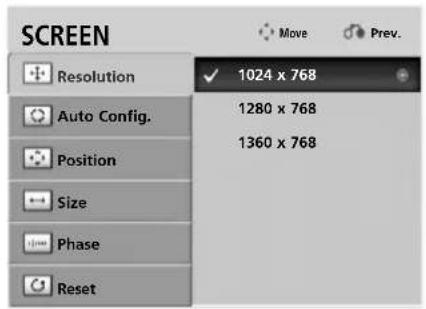
Selecting Resolution
To view a normal picture, match the resolution of RGB mode and selection of PC mode.
This function works in the following mode: RGB[PC]
text_image
PICTURE • Contrast 90 • Brightness 50 • Sharpness 70 • Colour 60 • Tint 0 • Advanced Control • Picture Reset Screen
text_image
SCREEN Resolution Auto Config. Position Size Phase Reset 1024 x 768 1280 x 768 1360 x 768 Move Prev.
Select PICTURE.
Select Screen.
Select Resolution.
Select the desired resolution.

- Press the MENU button to return to normal TV viewing.
- Press the RETURN button to move to the previous menu screen.
Auto Configure (RGB [PC] mode only)
Automatically adjusts the picture position and minimizes image instability. After adjustment, if the image is still not correct, your TV is functioning properly but needs further adjustment.
Auto configure
This function is for automatic adjustment of the screen position, size, and phase The displayed image will be unstable for a few seconds while the auto configuration is in progress.
text_image
PICTURE • Contrast 90 • Brightness 50 • Sharpness 70 • Colour 60 • Tint 0 • Advanced Control • Picture Reset Screen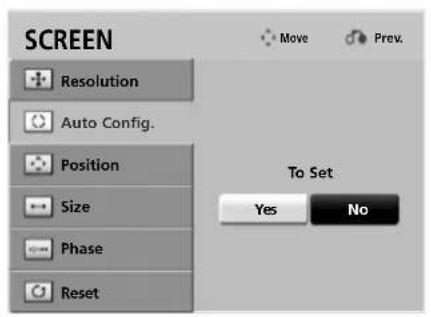
text_image
SCREEN Resolution Auto Config. Position Size Phase Reset Move Prev. To Set Yes No
Select PICTURE.
Select Screen.
Select Auto Config..
Select Yes.
Run Auto Config..
- If the position of the image is still not correct, try Auto adjustment again.
-
If picture needs to be adjusted again after Auto adjustment in RGB (PC), you can adjust the Position, Size or Phase.
-
Press the MENU button to return to normal TV viewing.
- Press the RETURN button to move to the previous menu screen.
WATCHING TV / PROGRAMME CONTROL
REMOTE CONTROL KEY FUNCTIONS
When using the remote control, aim it at the remote control sensor on the TV.
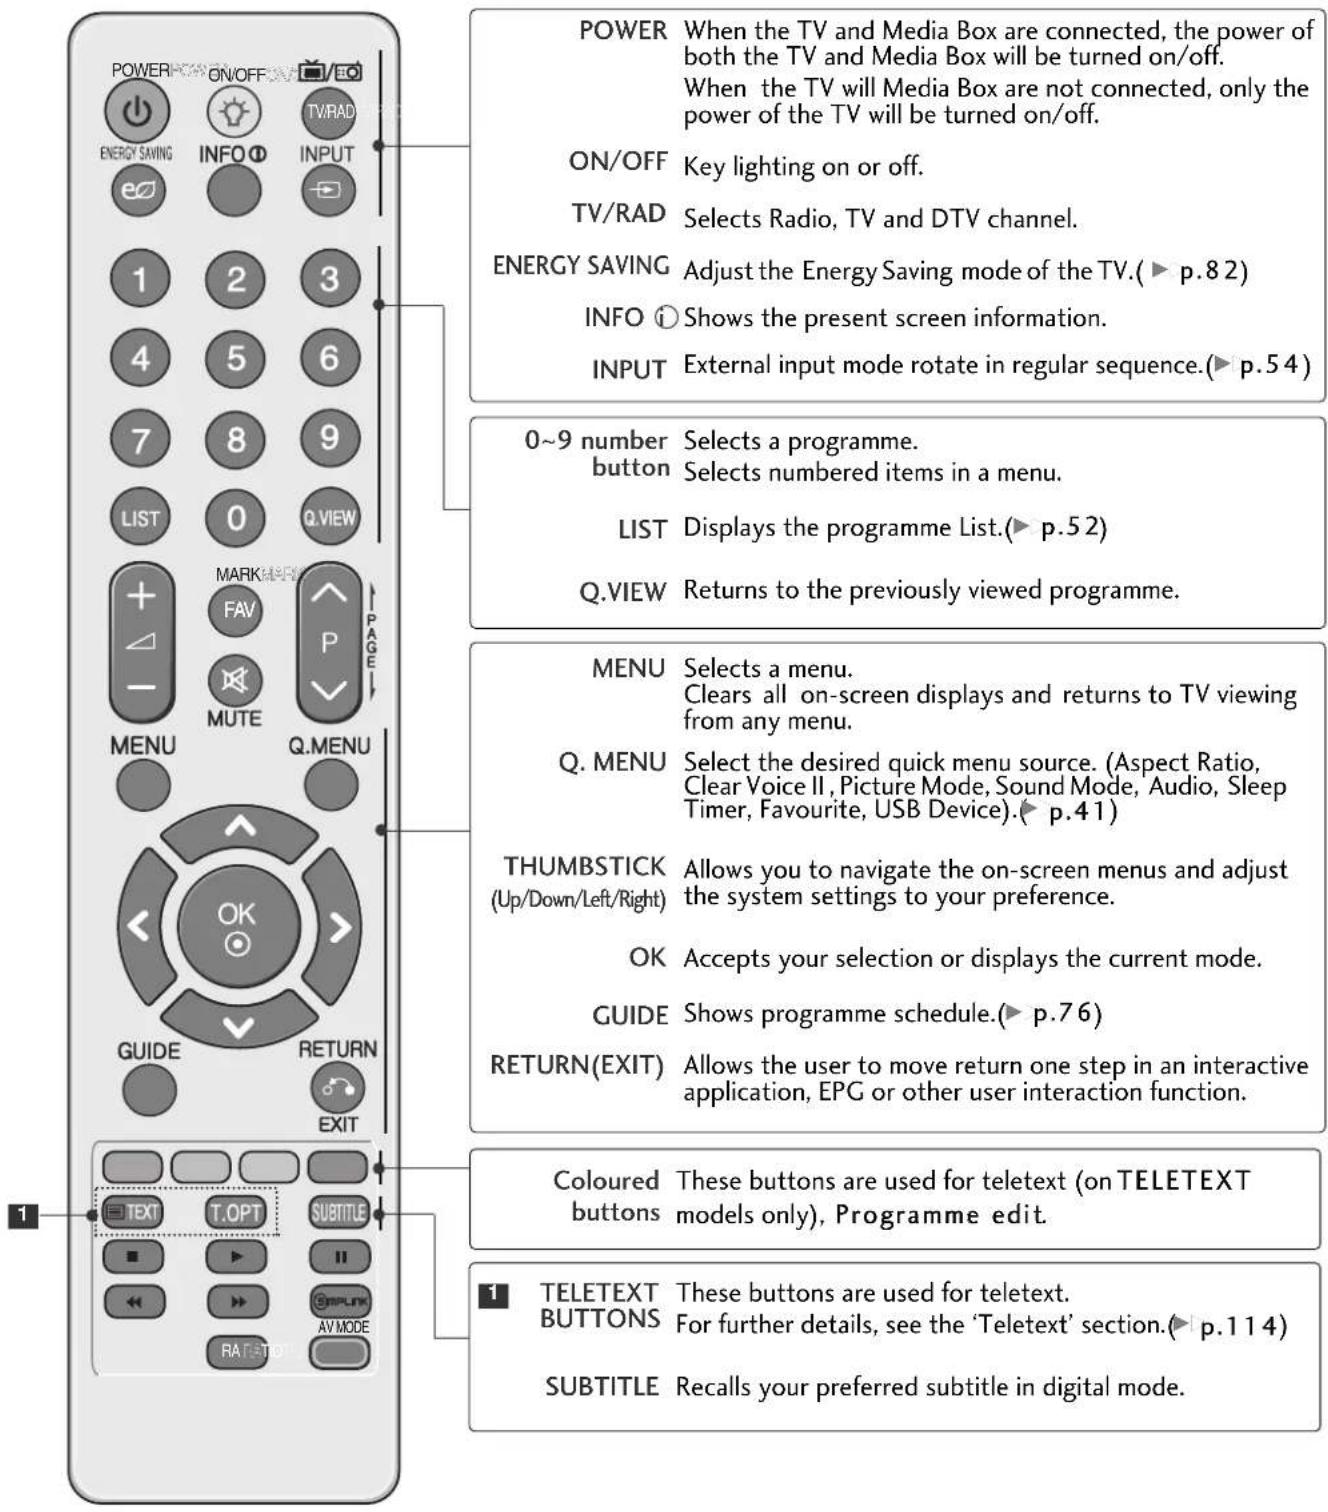
text_image
POWER When the TV and Media Box are connected, the power of both the TV and Media Box will be turned on/off. When the TV will Media Box are not connected, only the power of the TV will be turned on/off. ON/OFF Key lighting on or off. TV/RAD Selects Radio, TV and DTV channel. ENERGY SAVING Adjust the Energy Saving mode of the TV.(▶ p.8 2) INFO 📊 Shows the present screen information. INPUT External input mode rotate in regular sequence.(▶ p.5 4) 0~9 number Selects a programme. button Selects numbered items in a menu. LIST Displays the programme List.(▶ p.5 2) Q.VIEW Returns to the previously viewed programme. MENU Selects a menu. Clears all on-screen displays and returns to TV viewing from any menu. Q. MENU Select the desired quick menu source. (Aspect Ratio, Clear Voice II , Picture Mode, Sound Mode, Audio, Sleep Timer, Favourite, USB Device).(▶ p.4 1) THUMBSTICK Allows you to navigate the on-screen menus and adjust the system settings to your preference. OK Accepts your selection or displays the current mode. GUIDE Shows programme schedule.(▶ p.7 6) RETURN(EXIT) Allows the user to move return one step in an interactive application, EPG or other user interaction function. Coloured These buttons are used for teletext (on TELETEXT buttons models only), Programme edit. TELETEXT These buttons are used for teletext. BUTTONS For further details, see the 'Teletext' section.(▶ p.1 1 4) SUBTITLE Recalls your preferred subtitle in digital mode.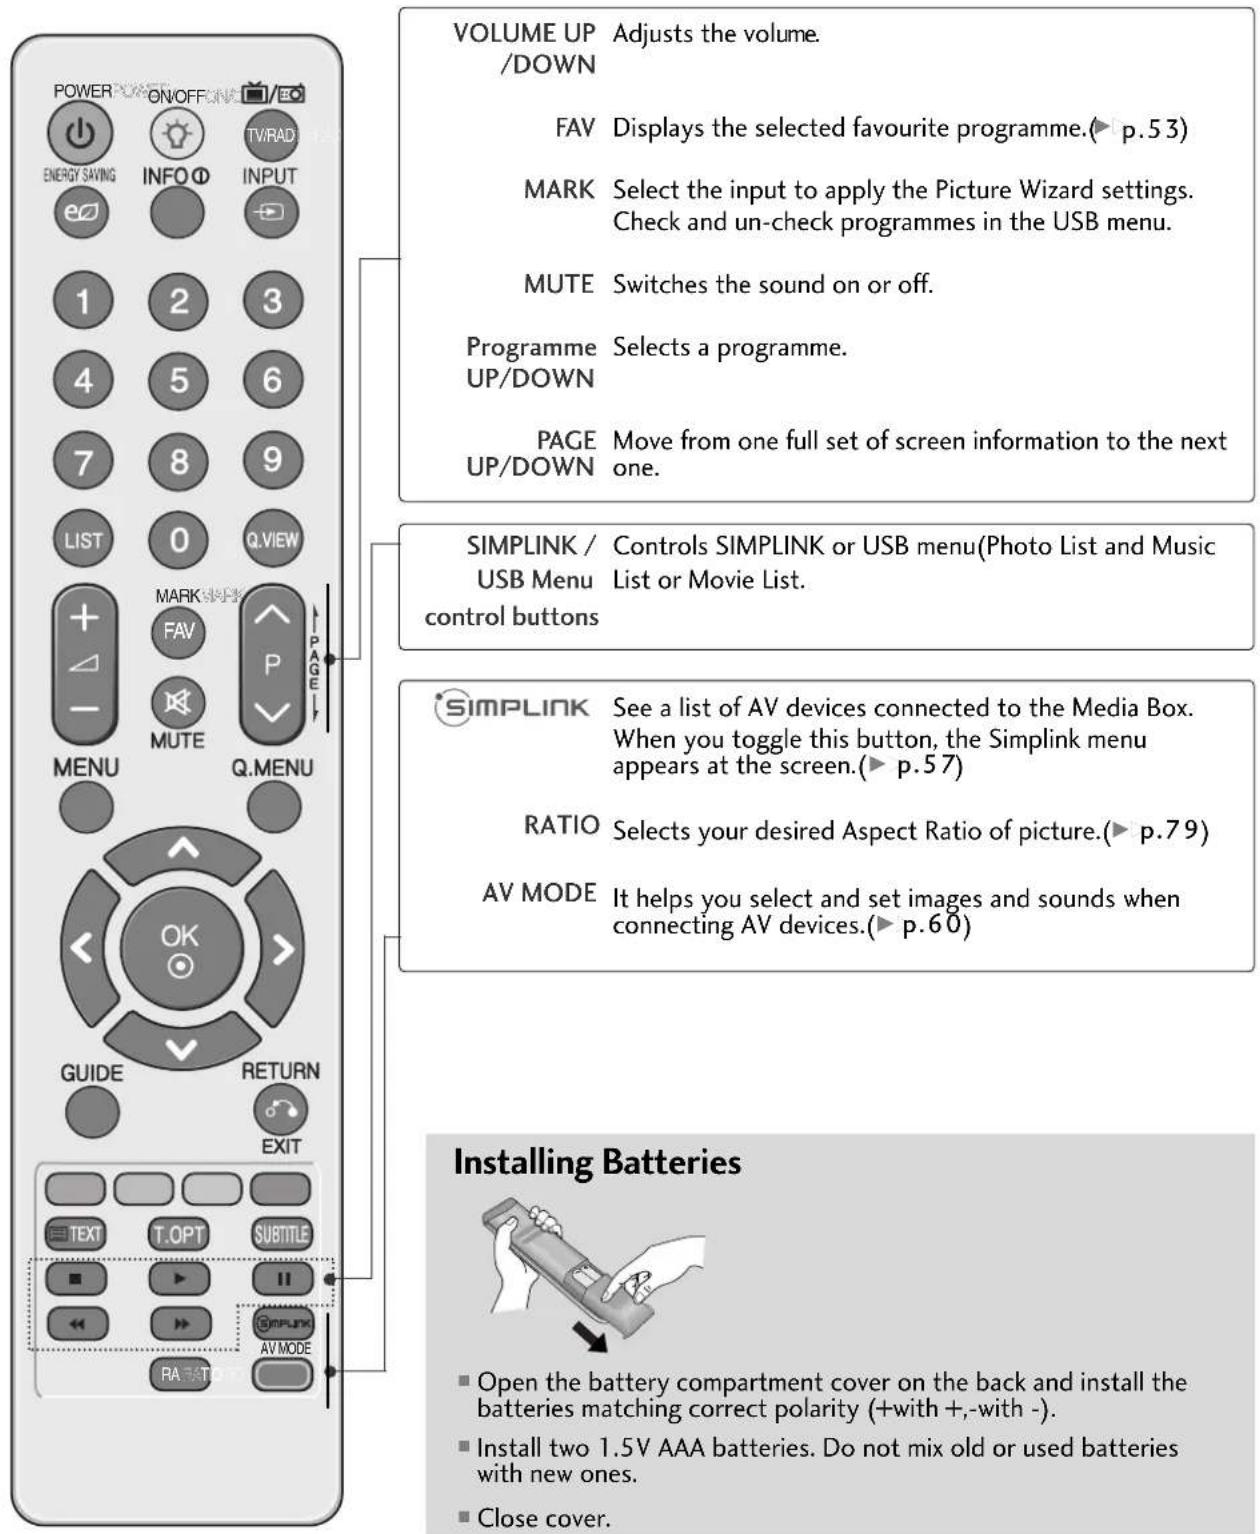
text_image
POWER ON/OFF TV/RAD ENERGY SAVING INFO INPUT 1 2 3 4 5 6 7 8 9 LIST 0 Q.WIEW MARK FAV MUTE P PAGE Q.MENU MENU GUIDE RETURN EXIT TEXT T.OPT SUBTITLE AV MODE RA VOLUME UP /DOWN Adjusts the volume. FAV Displays the selected favourite programme.(▶ p. 5 3) MARK Select the input to apply the Picture Wizard settings. Check and un-check programmes in the USB menu. MUTE Switches the sound on or off. Programme Selects a programme. UP/DOWN PAGE Move from one full set of screen information to the next UP/DOWN one. SIMPLINK / USB Menu Controls SIMPLINK or USB menu(Photo List and Music List or Movie List. control buttons) SIMPLINK See a list of AV devices connected to the Media Box. When you toggle this button, the Simplink menu appears at the screen.(▶ p. 5 7) RATIO Selects your desired Aspect Ratio of picture.(▶ p. 7 9) AV MODE It helps you select and set images and sounds when connecting AV devices.(▶ p. 6 0) Installing Batteries ■ Open the battery compartment cover on the back and install the batteries matching correct polarity (+with +,-with -). ■ Install two 1.5V AAA batteries. Do not mix old or used batteries with new ones. ■ Close cover.WATCHING TV / PROGRAMME CONTROL
REMOTE CONTROL KEY FUNCTIONS
When using the remote control, aim it at the remote control sensor on the TV.
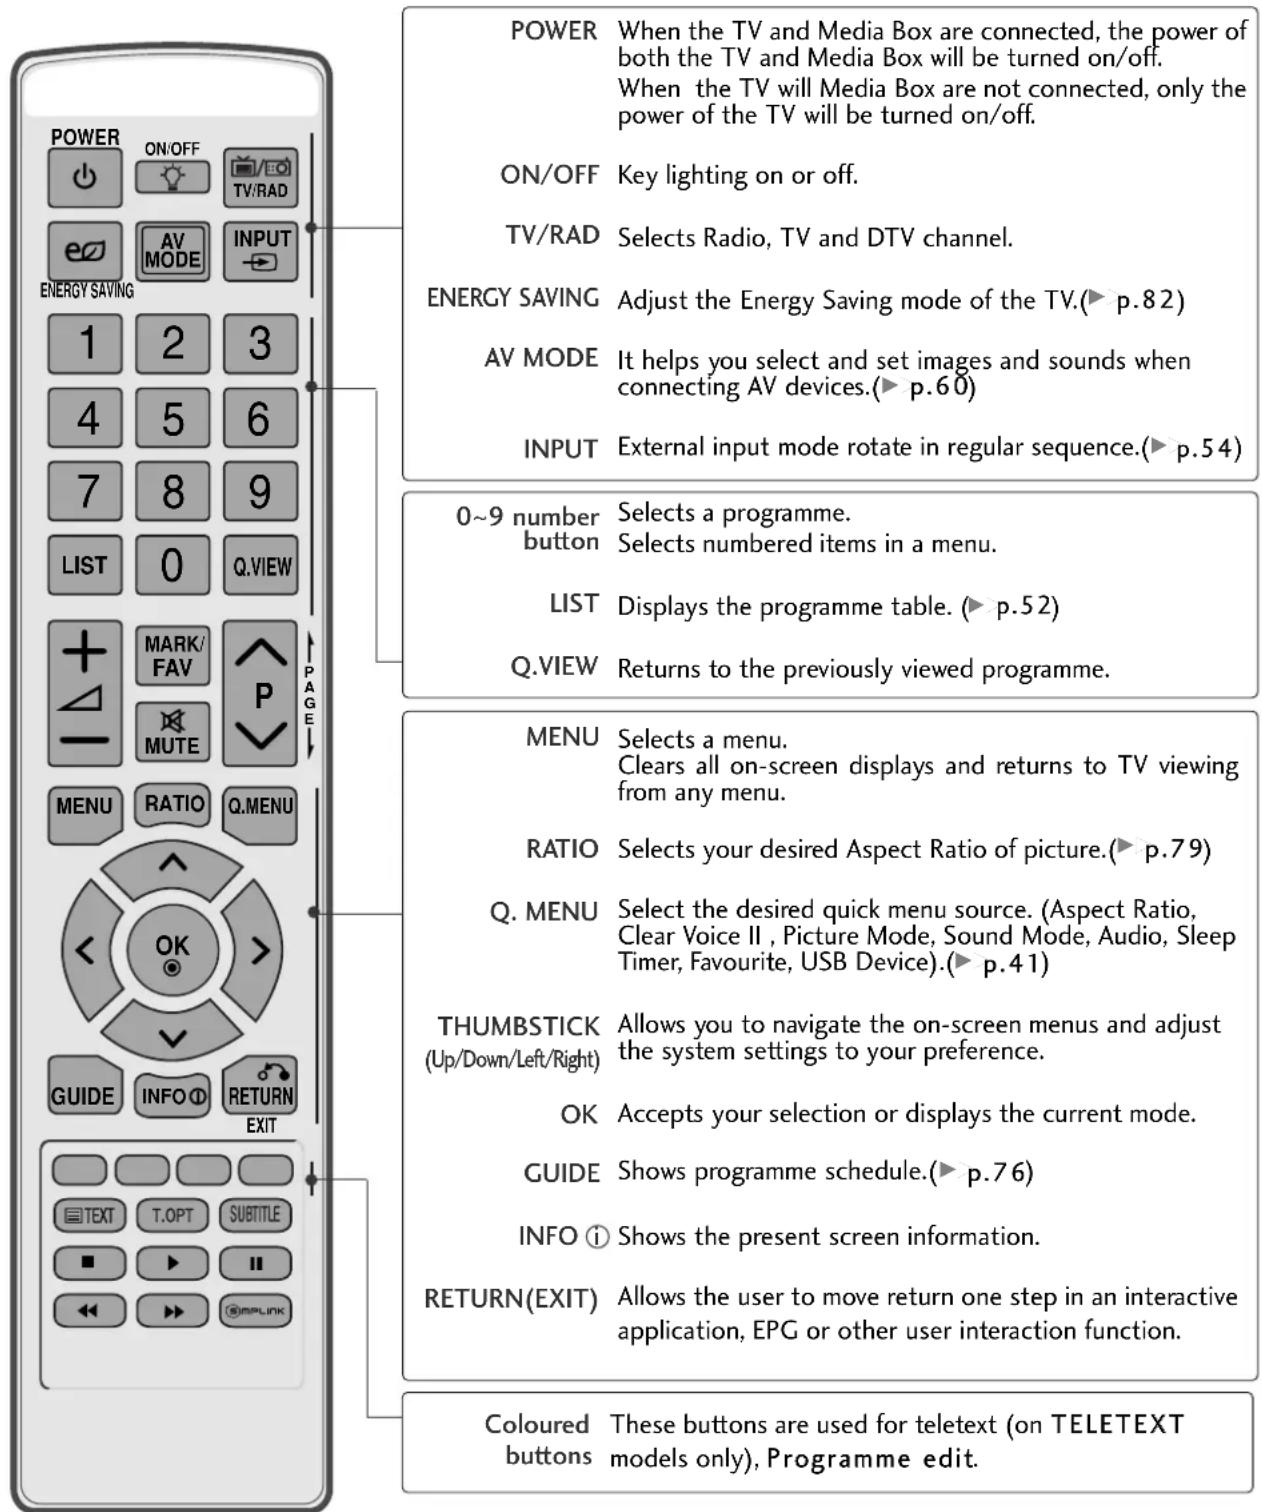
text_image
POWER When the TV and Media Box are connected, the power of both the TV and Media Box will be turned on/off. When the TV will Media Box are not connected, only the power of the TV will be turned on/off. ON/OFF Key lighting on or off. TV/RAD Selects Radio, TV and DTV channel. ENERGY SAVING Adjust the Energy Saving mode of the TV.(► p.82) AV MODE It helps you select and set images and sounds when connecting AV devices.(► p.60) INPUT External input mode rotate in regular sequence.(► p.54) 0~9 number Selects a programme. button Selects numbered items in a menu. LIST Displays the programme table. (► p.52) Q.VIEW Returns to the previously viewed programme. MENU Selects a menu. Clears all on-screen displays and returns to TV viewing from any menu. RATIO Selects your desired Aspect Ratio of picture.(► p.79) Q. MENU Select the desired quick menu source. (Aspect Ratio, Clear Voice II , Picture Mode, Sound Mode, Audio, Sleep Timer, Favourite, USB Device).(► p.41) THUMBSTICK Allows you to navigate the on-screen menus and adjust the system settings to your preference. OK Accepts your selection or displays the current mode. GUIDE Shows programme schedule.(► p.76) INFO ! Shows the present screen information. RETURN(EXIT) Allows the user to move return one step in an interactive application, EPG or other user interaction function. Coloured These buttons are used for teletext (on TELETEXT buttons models only), Programme edit.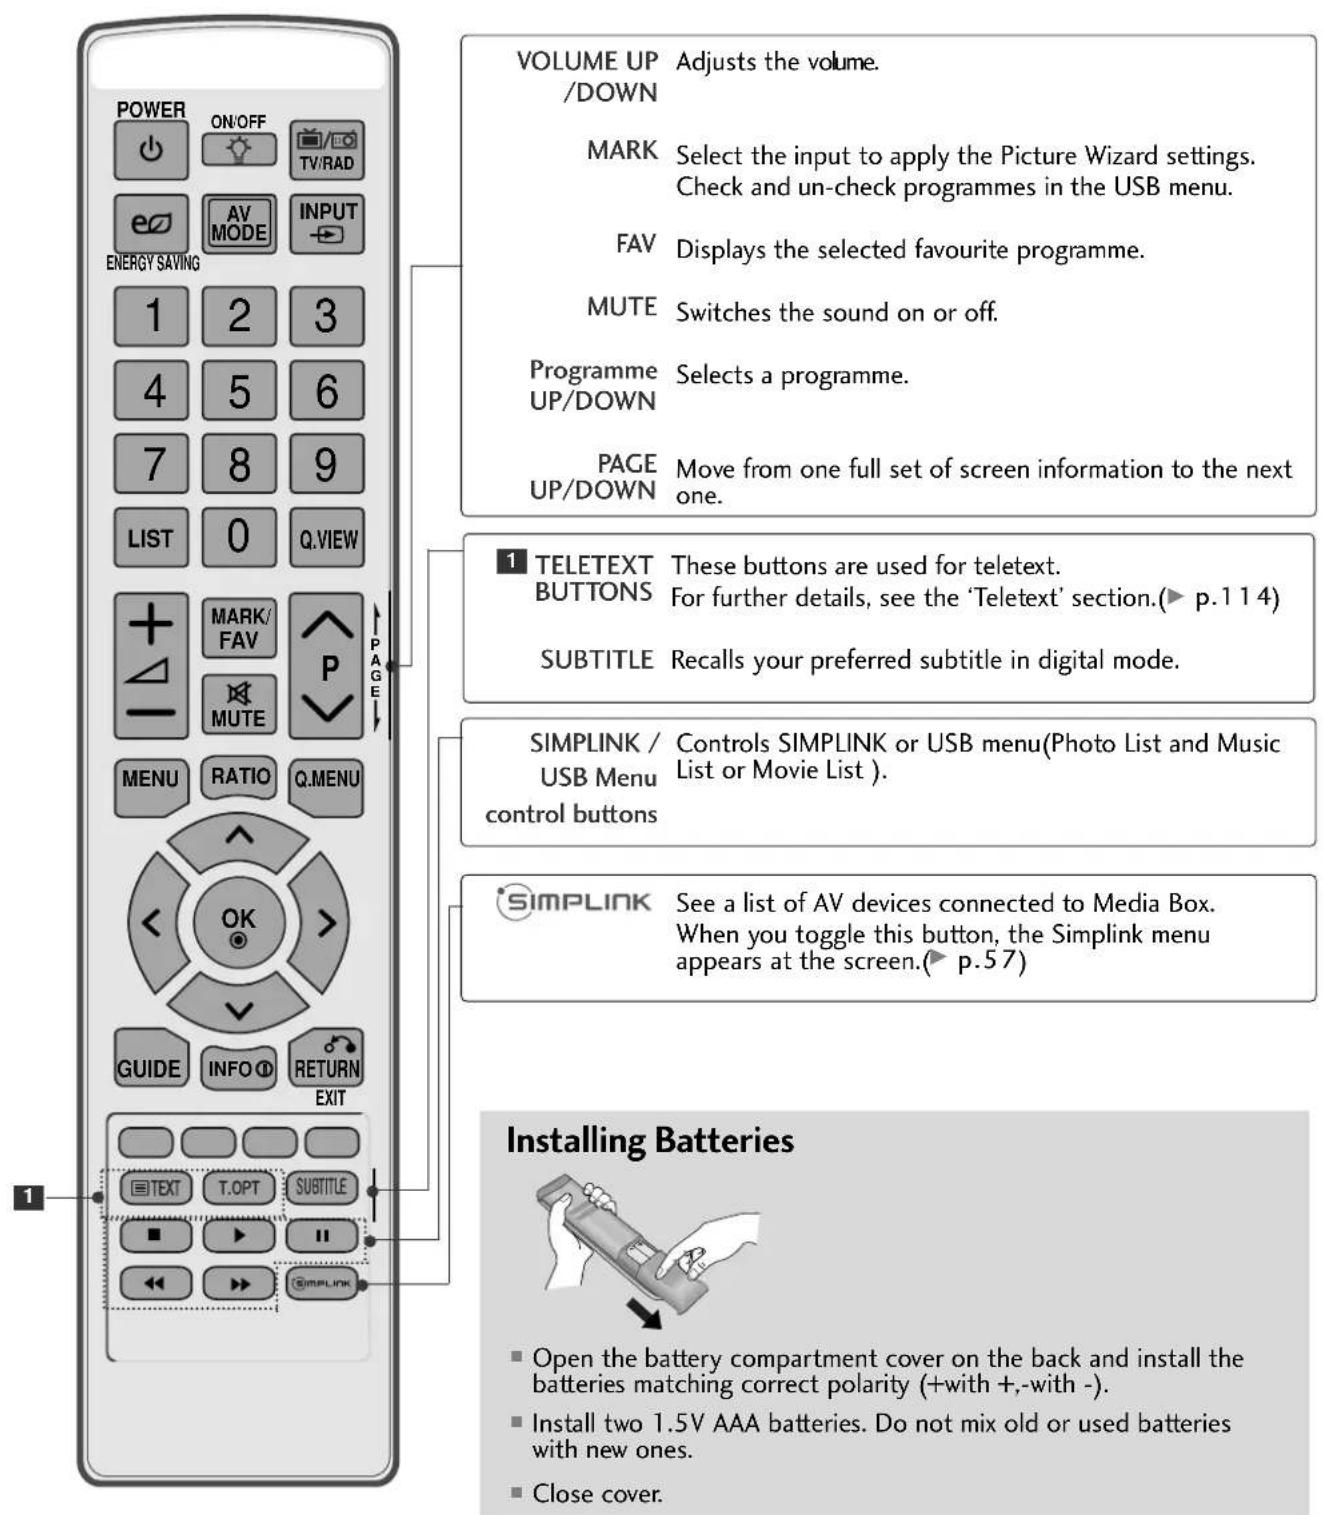
text_image
POWER ON/OFF TV/RAD EV AV MODE INPUT ENERGY SAVING 1 2 3 4 5 6 7 8 9 LIST 0 Q.VIEW MARK/ FAV MUTE P MENU RATIO Q.MENU OK GUIDE INFO RETURN EXIT TITLE INSTALLING BATTERIES VOLUME UP Adjusts the volume. /DOWN MARK Select the input to apply the Picture Wizard settings. Check and un-check programmes in the USB menu. FAV Displays the selected favourite programme. MUTE Switches the sound on or off. Programme Selects a programme. UP/DOWN PAGE Move from one full set of screen information to the next ONE. 1 TELETEXT These buttons are used for teletext. BUTTONS For further details, see the 'Teletext' section.(► p.114) SUBTITLE Recalls your preferred subtitle in digital mode. SIMPLINK / Controls SIMPLINK or USB menu(Photo List and Music USB Menu List or Movie List ). control buttons SIMPLINK See a list of AV devices connected to Media Box. When you toggle this button, the Simplink menu appears at the screen.(► p.57) ■ Open the battery compartment cover on the back and install the batteries matching correct polarity (+with +,-with -). ■ Install two 1.5V AAA batteries. Do not mix old or used batteries with new ones. ■ Close cover.WATCHING TV / PROGRAMME CONTROL
Simple Remote Control
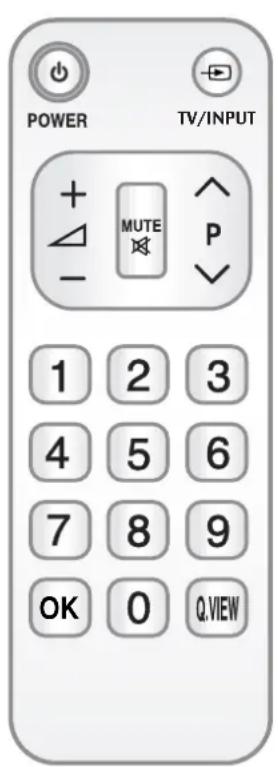
text_image
POWER TV/INPUT + - MUTE P 1 2 3 4 5 6 7 8 9 OK 0 Q.VIEWPOWER Switches the TV on from standby or off to standby. TV/INPUT External input mode rotate in regular sequence.(▶ p.54) VOLUME UP /DOWN MUTE Switches the sound on or off. Programme Selects a programme. UP/DOWN
0\~9 number Selects a programme. button Selects numbered items in a menu. OK Accepts your selection or displays the current mode. Q.VIEW Returns to the previously viewed programme.
Installing Batteries

- Open the battery compartment cover on the back and install the batteries matching correct polarity (+with +,-with -).
- Install two 1.5V AAA batteries. Do not mix old or used batteries with new ones.
- Close cover.
1 Firstly, connect the power cord correctly and check the main power switch on the TV and Media Box. At this stage, the TV and Media Box switches to standby mode.
In standby mode to turn TV on, press the ⏻/ I, INPUT or P ∧ ∨ button on the TV or press the POWER, INPUT, P ∧ ∨ or NUMBER button on the remote control.
Turning on or off the TV will turn on or off the Media Box also. If the Media Box doesn't turn on automatically, adjust the Media box location. (▶p.10-12)
3 When the power of the TV is turned on, the picture will be displayed as follows by stage according to the wireless connecting procedure.
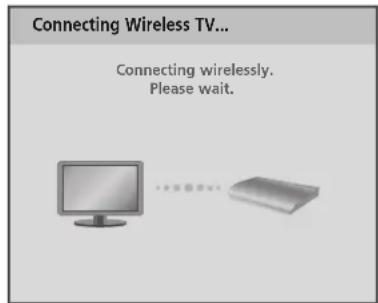
text_image
Connecting Wireless TV... Connecting wirelessly. Please wait.TV is searching for the media box using the wireless connection. If it does not move to the next stage within 40 seconds, refer to P.10-12.
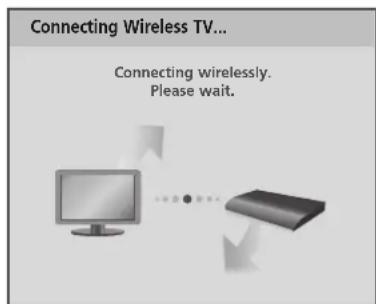
text_image
Connecting Wireless TV... Connecting wirelessly. Please wait.TV is trying to establish the wireless connection after locating the Media Box.
If it does not move to the next stage in about 5 seconds, refer to P.10-12.
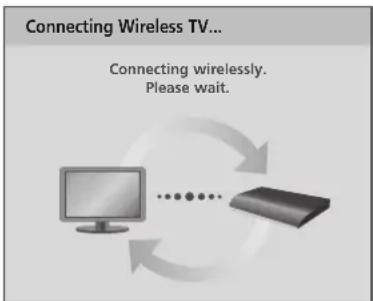
text_image
Connecting Wireless TV... Connecting wirelessly. Please wait.Wireless connection is completed.
■ This screen appears whenever you turn the TV.
■ Connecting the TV and Media Box will take about 30-40 seconds.
■ The screen becomes dark briefly right before the connection process is complete.
WATCHING TV / PROGRAMME CONTROL
Initializing setup
If the OSD (On Screen Display) is displayed on the screen after turning on the TV, you can adjust the Mode Setting Country, Time Zone, Auto Tuning.
Note:
a. If you close without completing the initial setting, the Initial Setting menu can be displayed again.
b. For those countries without confirmed DTV broadcasting standards, some DTV features might not work, depending on the DTV broadcasting environment.
c. "Home Use" mode is the optimal setting for home environments, and is the TV's default mode.
d. "Store Demo" mode is the optimal setting for store environments. If a user modifies image quality data, "Store Demo" mode initializes the product to the image quality set by us after a certain period of time.
e. The mode (Home Use, Store Demo) can be changed by executing Mode Setting in the OPTION menu.
4 Select the viewing source by using the INPUT button on the remote control.
This TV is programmed to remember which power state it was last set to, even if the power cord is out.
5 When finished using the TV, press the POWER button on the remote control. The TV reverts to standby mode.
NOTE
If you intend to be away on vacation, disconnect the power plug from the wall power outlet.
If you remove power from the TV/Media Box or turn off the main power switch on the TV/Media Box, the Clock will be reset.
DTV mode control buttons may not function based on country broadcasting circumstances.
In country that Digital broadcasting regulation isn't fixed, some DTV function may not work depending on digital broadcasting circumstances.
PROGRAMME SELECTION
1 Press the PP ∧ ∨ or NUMBER buttons to select a programme number.
VOLUME ADJUSTMENT
1 Press the △ + or - button to adjust the volume.
If you wish to switch the sound off, press the MUTE button.
You can cancel this function by pressing the MUTE, + , - or AV Mode button.
QUICK MENU
Your TV's OSD (On Screen Display) may differ slightly from that shown in this manual.
Q.Menu (Quick Menu) is a menu of features which users might use frequently.
Aspect Ratio: Selects your desired picture format. For Zoom Setting, select 14:9, Zoom and Cinema Zoom in Ratio Menu. After completing Zoom Setting, the display goes back to Q.Menu.
Clear Voice II: By differentiating the human sound range from others, it helps users listen to human voices better.
Picture Mode : Selects your desired Picture Mode.
Sound Mode: It is a feature to automatically set the sound combination which it deems the best for the images being watched. Selects your desired Sound Mode.
Audio : Selects the sound output.
Sleep Timer: Sets the sleep timer.
PR Favourite : Selects the favourite programme.
USB Device : Selects "Eject" in order to eject USB device.
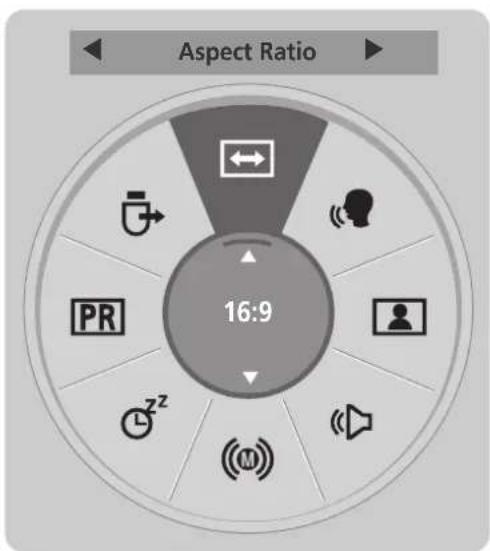
pie
| Aspect | Aspect Ratio | | ------ | ------------ | | Left | ← | | Right | | | Profile | Head icon | | Profile | Speaker icon | | Profile | Person icon | | Profile | Marker icon | | PR | | | Clock | Hz | | Hz | M | | Speaker | Speaker icon | | Wireless Signal | M |
text_image
1 Q. MENU < > Display each menu.
- Press the Q.MENU button to return to normal TV viewing.
- Press the RETURN button to move to the previous menu screen.
WATCHING TV / PROGRAMME CONTROL
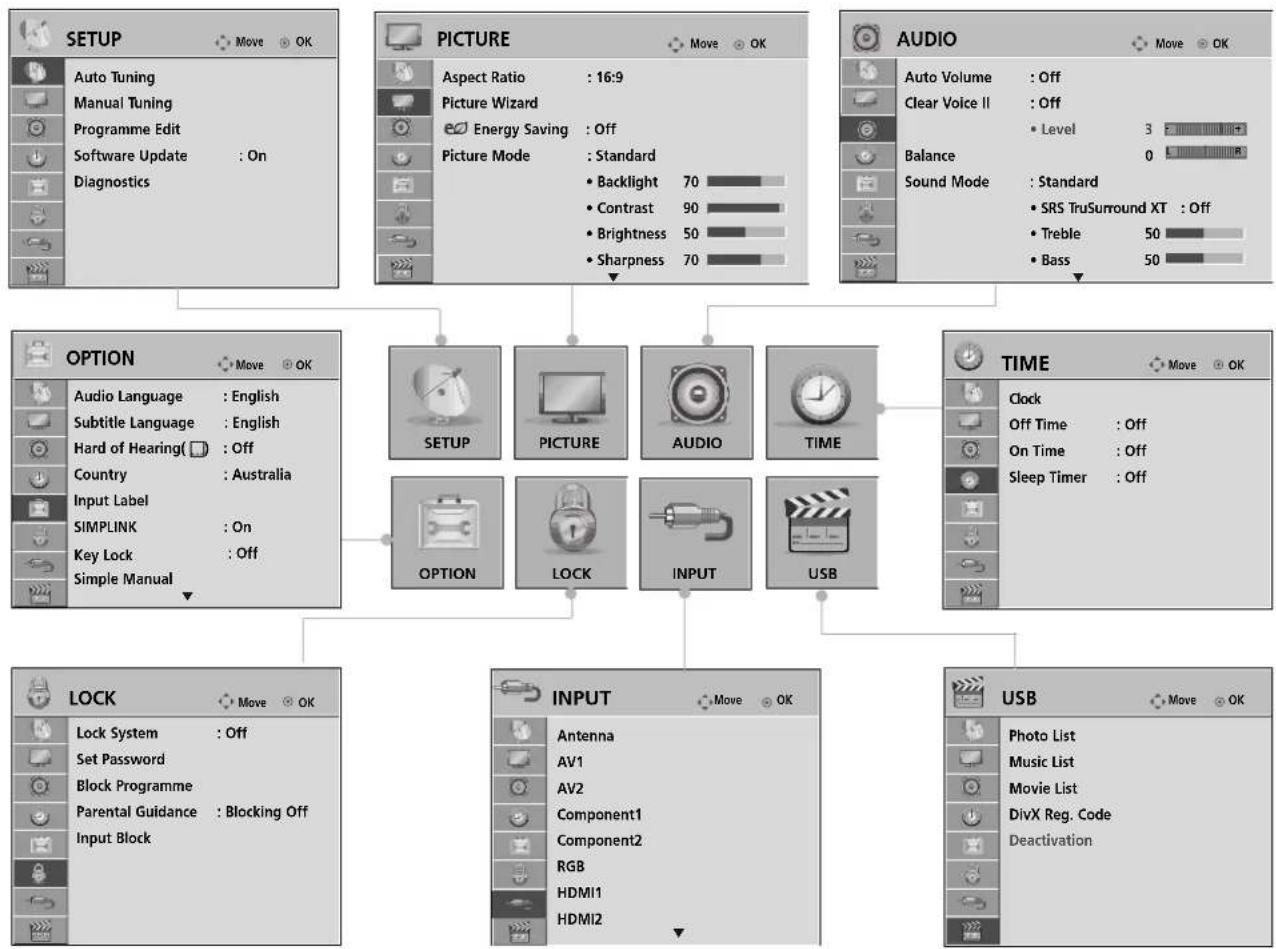
ON SCREEN MENUS SELECTION AND ADJUSTMENT
Your TV's OSD (On Screen Display) may differ slightly from that shown in this manual.
■ Here shown may differ from your TV.
flowchart
graph TD
    A["SETUP"] --> B["Auto Tuning"]
    A --> C["Manual Tuning"]
    A --> D["Programme Edit"]
    A --> E["Software Update : On"]
    A --> F["Diagnostics"]
    G["PICTURE"] --> H["Aspect Ratio : 16:9"]
    G --> I["Picture Wizard"]
    G --> J["Energy Saving : Off"]
    G --> K["Picture Mode : Standard"]
    G --> L["Backlight 70"]
    G --> M["Contrast 90"]
    G --> N["Brightness 50"]
    G --> O["Sharpness 70"]
    P["AUDIO"] --> Q["Auto Volume : Off"]
    P --> R["Clear Voice II : Off"]
    P --> S["Level 3"]
    P --> T["Balance 0"]
    P --> U["Sound Mode : Standard"]
    P --> V["SRS TruSurround XT : Off"]
    P --> W["Treble 50"]
    P --> X["Bass 50"]
    A --> Y["OPTION"]
    Y --> Z["Audio Language : English"]
    Y --> AA["Subtitle Language : English"]
    Y --> AB["Hard of Hearing(□ : Off)"]
    Y --> AC["Country : Australia"]
    Y --> AD["Input Label"]
    Y --> AE["SIMPLINK : On"]
    Y --> AF["Key Lock : Off"]
    Y --> AG["Simple Manual"]
    AH["SETUP"] --> AI["OPTION"]
    AI --> AJ["LOCK"]
    AK["AUDIO"] --> AL["INPUT"]
    AM["TIME"] --> AN["TIME"]
    AN --> AO["Clock"]
    AN --> AP["Off Time : Off"]
    AN --> AQ["On Time : Off"]
    AN --> AR["Sleep Timer : Off"]
    AH --> AS["LOCK"]
    AS --> AT["Lock System : Off"]
    AS --> AU["Set Password"]
    AS --> AV["Block Programme"]
    AS --> AW["Parental Guidance : Blocking Off"]
    AS --> AX["Input Block"]
    AY["INPUT"] --> AZ["Antenna"]
    AZ --> BA["AV1"]
    AZ --> BB["AV2"]
    AZ --> BC["Component1"]
    AZ --> BD["Component2"]
    AZ --> BE["RGB"]
    AZ --> BF["HDMI1"]
    AZ --> BG["HDMI2"]
    AHY["USB"] --> BH["Photo List"]
    AHY --> BI["Music List"]
    AHY --> BJ["Movie List"]
    AHY --> BK["DivX Reg. Code"]
    AHY --> BL["Deactivation"]

Display each menu.

Select a menu item.
Move to the pop up menu.
- Press the INFO button, you can check the Simple Manual Menu.
- Press the MENU button to return to normal TV viewing.
- Press the RETURN button to move to the previous menu screen.
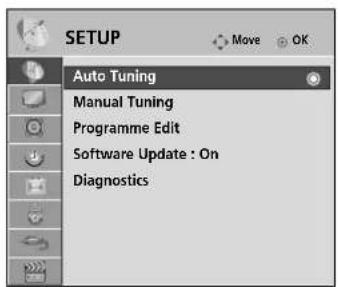
AUTO PROGRAMME TUNING
Use this to automatically find and store all available programmes.
When you start auto programming, all previously stored service information will be deleted.
The maximum number of programmes that can be stored is 500. But the number may differ slightly depending on broadcasting signals.
text_image
SETUP Auto Tuning Manual Tuning Programme Edit Software Update : On Diagnostics
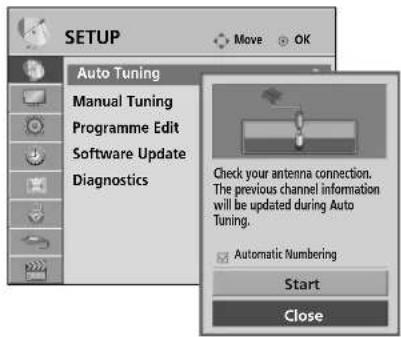
text_image
SETUP Auto Tuning Manual Tuning Programme Edit Software Update Diagnostics Move OK Check your antenna connection. The previous channel information will be updated during Auto Tuning. Automatic Numbering Start Close
Select SETUP.
Select Auto Tuning
Select Start.
Run Auto tuning.
- Use NUMBER buttons to input a 4-digit password in Lock System 'OOn
-
If you wish to keep on auto tuning select Start using the ^ ∨ button. Then, press the OK button. Otherwise select Close.
• Automatic Numbering: Decide whether to use the programme numbers as sent by broadcasting stations for tuning. -
Press the MENU button to return to normal TV viewing.
- Press the RETURN button to move to the previous menu screen.
WATCHING TV / PROGRAMME CONTROL
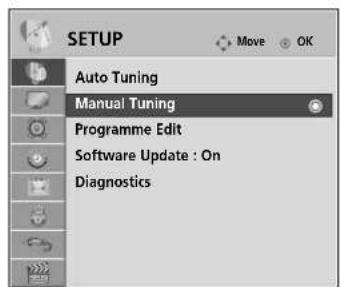
MANUAL PROGRAMME TUNING (IN DIGITAL MODE)
Manual Tuning lets you manually add a programme to your programme list.
text_image
SETUP Auto Tuning Manual Tuning Programme Edit Software Update : On Diagnostics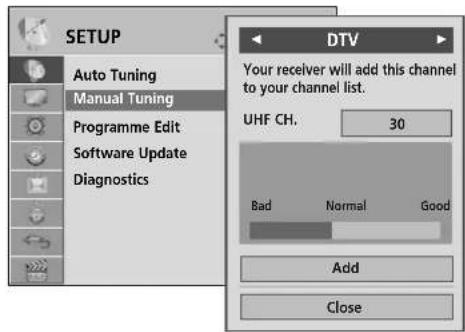
text_image
SETUP Auto Tuning Manual Tuning Programme Edit Software Update Diagnostics DTV Your receiver will add this channel to your channel list. UHF CH. 30 Bad Normal Good Add Close
Select SETUP.
Select Manual Tuning.
Select DTV.
Select the desired channel number.
Select update or add if signal present.
- Use NUMBER buttons to input a 4-digit password in Lock System 'On'.
- Press the MENU button to return to normal TV viewing.
- Press the RETURN button to move to the previous menu screen.
MANUAL PROGRAMME TUNING (IN ANALOGUE MODE)
Manual Tuning lets you manually tune and arrange the stations in whatever order you desire.
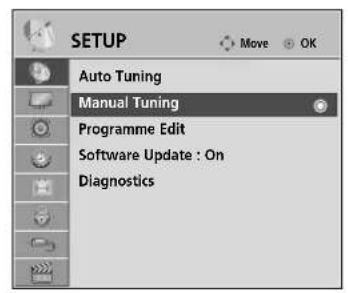
text_image
SETUP Auto Tuning Manual Tuning Programme Edit Software Update : On Diagnostics
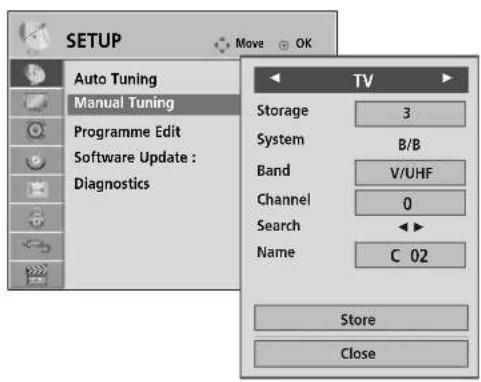
text_image
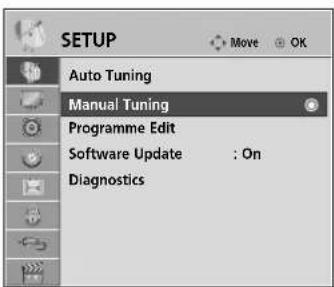
SETUP Auto Tuning Manual Tuning Programme Edit Software Update : Diagnostics TV Storage 3 System B/B Band V/UHF Channel 0 Search Name C 02 Store Close
Select SETUP.
Select Manual Tuning.
Select TV.
or
Select the desired pro- gramme number on.
Select V/UHF or Cable.
or Select the desired channel number.
Commence searching.
Select Store.
- Press the MENU button to return to normal TV viewing.
-
Press the RETURN button to move to the previous menu screen.
-
Use NUMBER buttons to input a 4-digit password in Lock System 'On'.
• B/B : Australia
• To store another channel, repeat steps 4 to 8.
WATCHING TV / PROGRAMME CONTROL
text_image
SETUP Auto Tuning Manual Tuning Programme Edit Software Update : On Diagnostics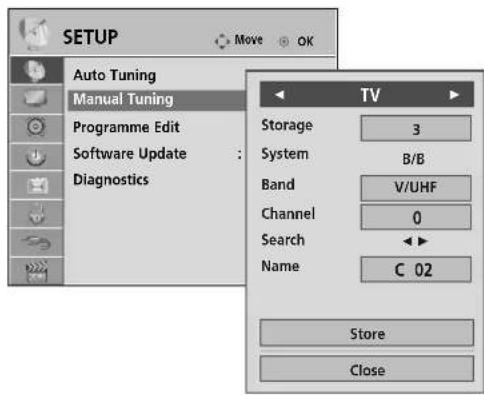
text_image
SETUP Auto Tuning Manual Tuning Programme Edit Software Update Diagnostics TV Storage 3 System B/B Band V/UHF Channel 0 Search C 02 Name Store Close■ Assigning a station name
You can assign a station name with five characters to each programme number.

Select SETUP.
Select Manual Tuning.
Select TTV
Select Name.
Select the position and make your choice of the second character, and so on.
You can use an the alphabet A to Z, the number 0 to 9, +/- , and blank.

Select Close.
Select Store.
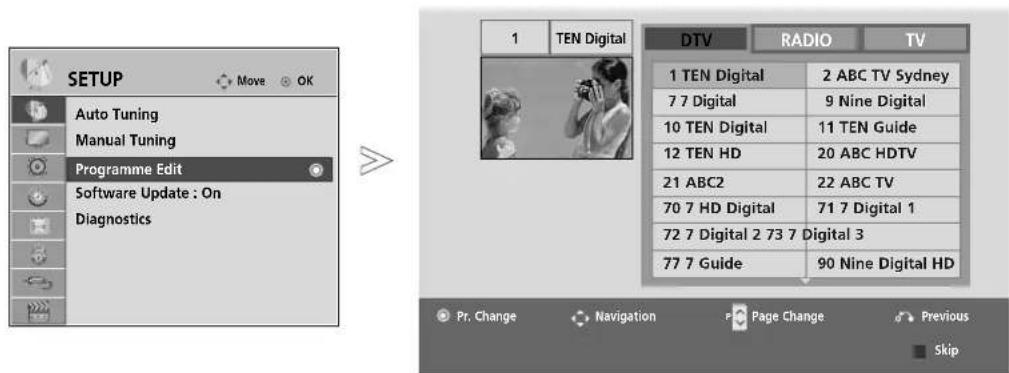
PROGRAMME EDIT
When a programme number is skipped, it means that you will be unable to select it using P ∧ ∨ button during TV viewing.
If you wish to select the skipped programme, directly enter the programme number with the NUMBER buttons or select it in the Programme edit menu.
This function enables you to skip the stored programmes.
You can change the programme number using "Move" function, if "Automatic Numbering" is unchecked when you start Auto Tuning.
text_image
SETUP Auto Tuning Manual Tuning Programme Edit Software Update : On Diagnostics 1 TEN Digital DTV RADIO TV 1 TEN Digital 2 ABC TV Sydney 7 7 Digital 9 Nine Digital 10 TEN Digital 11 TEN Guide 12 TEN HD 20 ABC HDTV 21 ABC2 22 ABC TV 70 7 HD Digital 71 7 Digital 1 72 7 Digital 2 73 7 Digital 3 77 7 Guide 90 Nine Digital HD Pr. Change Navigation Page Change Previous Skip
Select SETUP.
Select Programme Edit.
Enter the Programme Edit.

Select a programme to be stored or skipped.
- Press the MENU button to return to normal TV viewing.
- Press the RETURN button to move to the previous menu screen.
WATCHING TV / PROGRAMME CONTROL
IN DTV/RADIO MODE
■Skipping a programme number

Select a programme number to be skipped.
BLUE
Turn the programme number to blue.
BLUE
Release.
- When programmes are to be skipped, the skipped programme shows in blue and these programmes will not be selected by the PP^v buttons during TV viewing.
- If you wish to select a skipped programme, directly enter the programme number with the NUMBER buttons or select it in the programme edit or EPG.
IN TV MODE
This function enables you to delete or skip the stored programmes. You can also move some channels and use other programme numbers.
■Deleting a programme

Select a programme number to be deleted.
Turn the programme number to red.

Delete.

Cancel.
- The selected programme is deleted, all the following programmes are shifted up one.
■ Moving a programme

Select a programme number to be moved.


Turn the programme number to green.

Release.
BLUE
Cancel.
■Skipping a programme number

Select a programme number to be skipped.

Turn the programme number to blue.

Release.
- When a programme number is skipped it means that you will be unable to select it using the P ^ ∨ button during normal TV viewing.
- If you wish to select a skipped programme, directly enter the programme number with the NUMBER buttons or select it in the programme edit.
WATCHING TV / PROGRAMME CONTROL
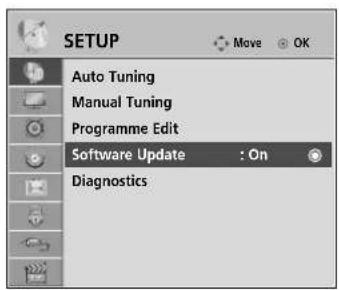
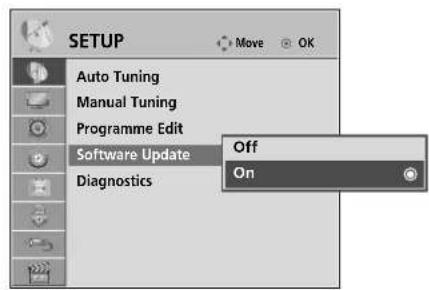
SOFTWARE UPDATE
Software Update means software can be downloaded through the digital terrestrial broadcasting system.
text_image
SETUP Auto Tuning Manual Tuning Programme Edit Software Update : On Diagnostics
text_image
SETUP Auto Tuning Manual Tuning Programme Edit Software Update Diagnostics Off On
Select SETUP.
Select Software Update.
text_image
3 4 OK Save.Select On or Off.
- If you select On, a user confirm message box will be displayed to notify that new software is found.
\* When setting "Software Update"
Occasionally, a transmission of updated digital software information will result in the following menu on the TV screen.
Select the Yes using the < > button and you will see the following picture.
After the Software Update is complete, the System restarts.
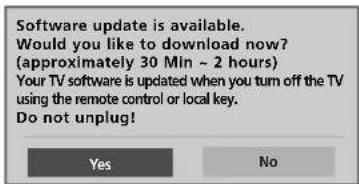
text_image
Software update is available. Would you like to download now? (approximately 30 Min ~ 2 hours) Your TV software is updated when you turn off the TV using the remote control or local key. Do not unplug! Yes No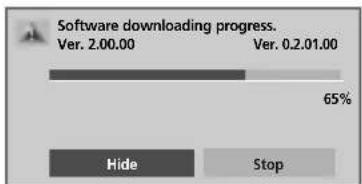
bar
Software downloading progress. | Status | Value | | :--- | :--- | | Software downloading progress. | Ver. 2.00.00 | 65% | | Software downloading progress. | Ver. 0.2.01.00 | 65% | | Hide | - | | Stop | - |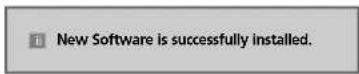
Simple Update : for current update stream
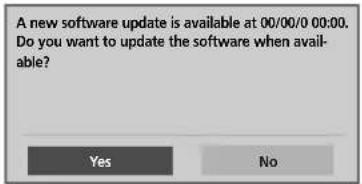
text_image
A new software update is available at 00/00/00:00. Do you want to update the software when avail- able? Yes NoWhen the power is turned off, downloading starts.
When the power is turned on while updating, the progress status is displayed.
- During Progress of a Software Update, please note the following:
• Power to the TV must not be interrupted.
• The TV must not be switched off.
- The antenna must not be disconnected.
• After Software Update, you can confirm the updated software version in Diagnostics menu.
- It may take hours to download the software, so make sure that the power stays on during the download.
DIAGNOSTICS
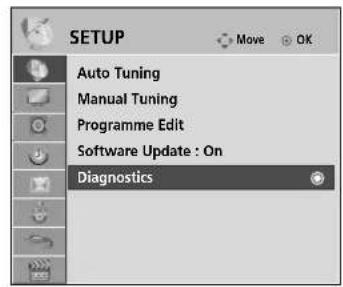
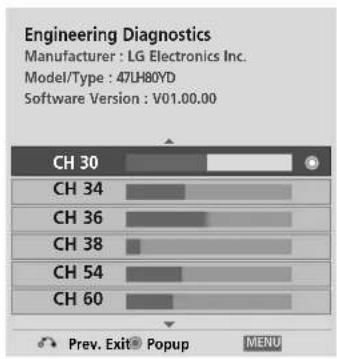
This function enables you to view information on the Manufacturer, Model/Type and Software Version.
This displays the information and signal strength of the tuned *MUX.
This displays the signal information and service name of the selected MUX.
(*MUX: A higher directory of channels in digital broadcasting (a single MUX contains multiple channels.))
text_image
SETUP Auto Tuning Manual Tuning Programme Edit Software Update : On Diagnostics
text_image
Engineering Diagnostics Manufacturer : LG Electronics Inc. Model/Type : 47LH80YD Software Version : V01.00.00 CH 30 CH 34 CH 36 CH 38 CH 54 CH 60 Prev. Exit Pop-up MENU
Select SETUP.
Select Diagnostics.
Display Manufacturer, Model/Type and Software Version.
Display the information of Channel.
- Press the MENU button to return to normal TV viewing.
- Press the RETURN button to move to the previous menu screen.
WATCHING TV / PROGRAMME CONTROL
SELECTING THE PROGRAMME LIST
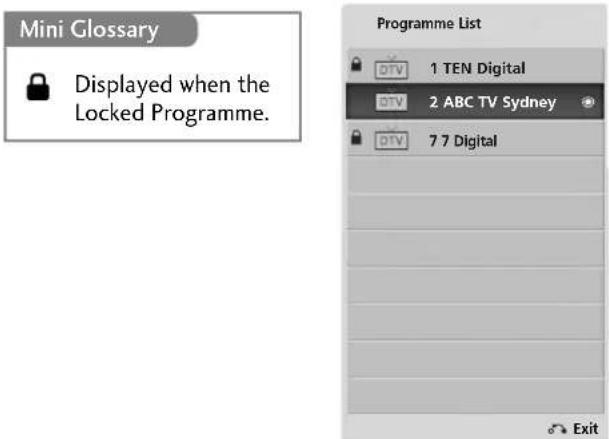
You can check which programmes are stored in the memory by displaying the programme list.
text_image
Mini Glossary Displayed when the Locked Programme. Programme List 1 TEN Digital 2 ABC TV Sydney 7 7 Digital Exit■Displaying programme LIST

Display the Programme List.
- You may find some blue programmes. These have been set up to be skipped in the programme edit mode.
- Some programmes with the channel number shown in the programme LIST indicate there is no station name assigned.
■Selecting a programme in the programme list
Select a programme.
Switch to the chosen programme number.
The mode will be switched between TV, DTV, and Radio from the programme you are currently watching.
■Paging through a programme list
Turn the pages.

Return to normal TV viewing.
FAVOURITE PROGRAMME SETUP
■Selecting favourite programme
Favorite programmes is a convenient feature that lets you quickly scan up to programmes of your choice without having to wait for the TV to scan through all the in-between programmes.
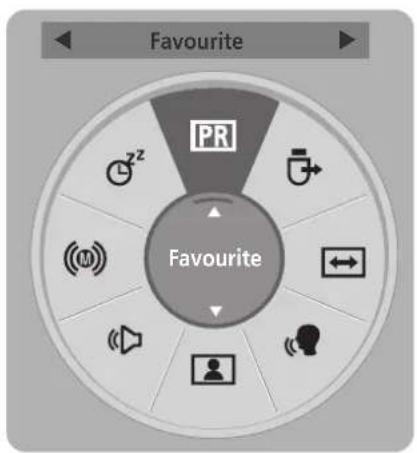
text_image
Favourite PR Favourite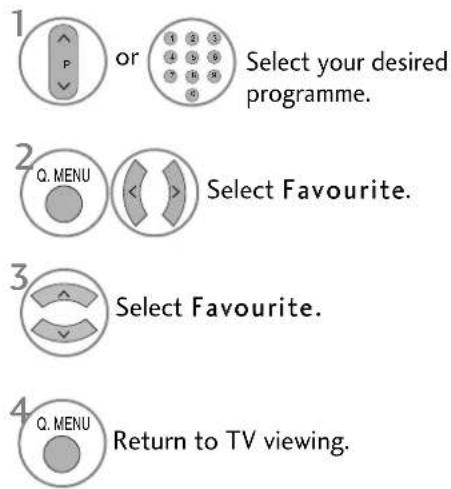
text_image
1 or Select your desired programme. 2 Q. MENU Select Favourite. 3 Select Favourite. 4 Q. MENU Return to TV viewing.- This will automatically include the selected programme into your favourite programme list.
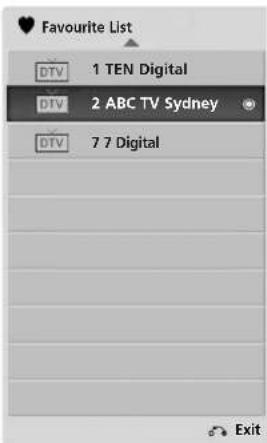
■ Displaying the favourite programme list
text_image
Favourite List DTV 1 TEN Digital DTV 2 ABC TV Sydney DTV 7 7 Digital Exit
Display the Favourite Programme List.
WATCHING TV / PROGRAMME CONTROL
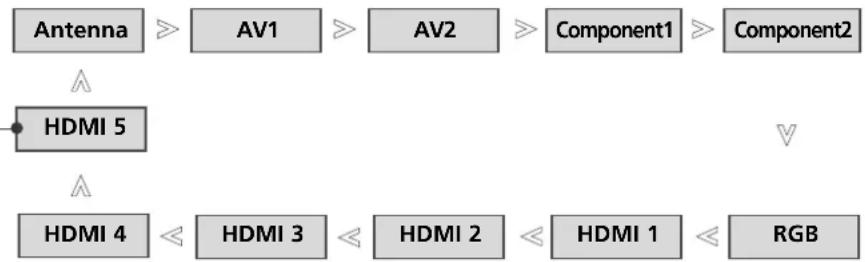
INPUT LIST
Only these input signals which are connected to a TV/Media Box can be activated and selected.
HDMI and AV can be recognized by a detect pin and thus enabled only when an external device approves voltage.
By using TV/RAD button, you can move from External Input to RF Input and to the last watched programme in DTV/RADIO/TV mode.
Select the input source.
- You can also select the desired input source in the INPUT menu.
flowchart
graph TD
    A["Antenna"] --> B["AV1"]
    B --> C["AV2"]
    C --> D["Component1"]
    D --> E["Component2"]
    F["HDMI 5"] --> G
    H["HDMI 4"] --> I["HDMI 3"]
    I --> J["HDMI 2"]
    J --> K["HDMI 1"]
    K --> L["RGB"]
■ Some menus are not available when using HDMI 5.
- HDMI 5 doesn't support SIMPLINK (HDMI-CEC), Input Block, Picture Wizard and On Time menu.
This product not only provides composite, component and HDMI1\~4 that can be used as the input terminal to the Media Box but also provides HDMI5 that can be directly connected to the monitor for limited usage.
■ Use of menu other than picture/audio is limited while viewing through HDMI5.
- Antenna: Select it when watching the TV.
- AA V Select it when watching the VCR or external equipment.
- Component : Select it when using DVD or Digital set-top box depends on connector.
- RGB :Select it when using PC depends on connector.
- HDMI: Select it when using DVD or Digital set-top box depend on connector.
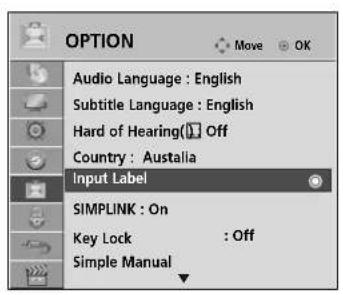
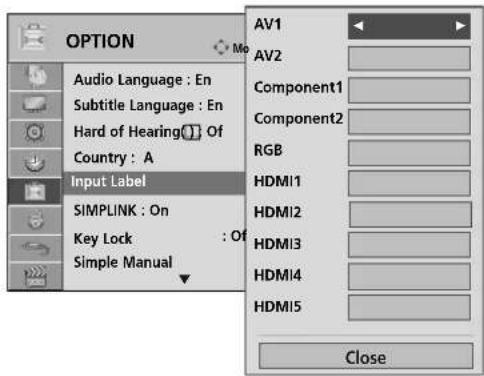
INPUT LABEL
Selects a label for each input source.
This indicates which device is connected to which input port.
text_image
OPTION Audio Language : English Subtitle Language : English Hard of Hearing(Off) Country : Australia Input Label SIMPLINK : On Key Lock : Off Simple Manual
text_image
OPTION Audio Language : En Subtitle Language : En Hard of Hearing(1) Of Country : A Input Label SIMPLINK : On Key Lock : Of Simple Manual AV1 AV2 Component1 Component2 RGB HDMI1 HDMI2 HDMI3 HDMI4 HDMI5 Close
Select OPTION.
Select Input Label.
Select the source.
Select the label.
- Press the MENU button to return to normal TV viewing.
- Press the RETURN button to move to the previous menu screen.
Input signal or channel conversion
■ In case of conversion between 50Hz and 60Hz
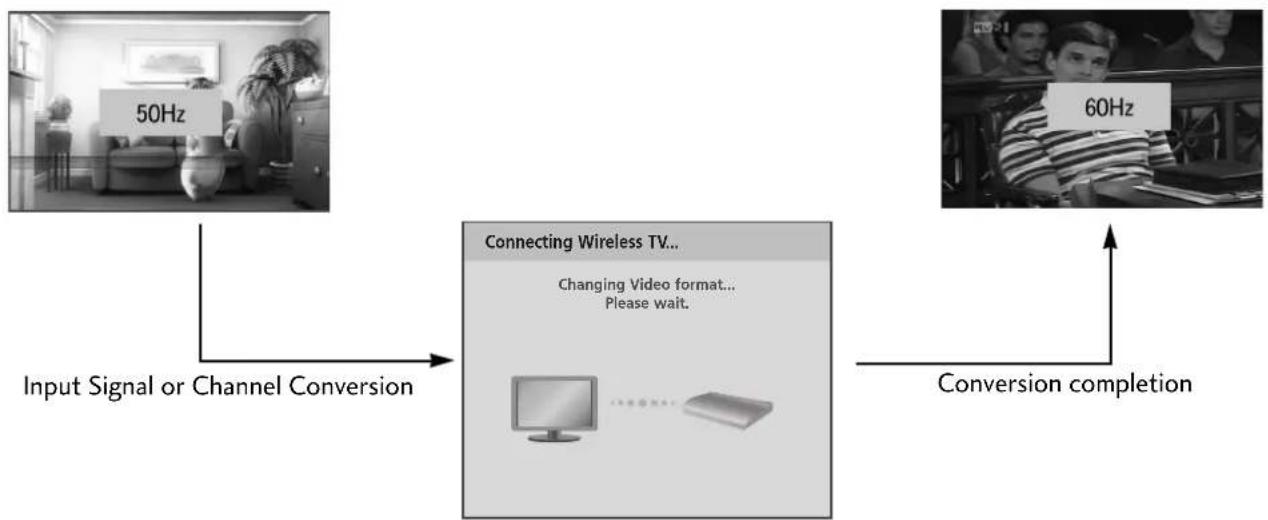
flowchart
graph LR
    A["Input Signal or Channel Conversion"] --> B["Connecting Wireless TV..."]
    B --> C["Conversion completion"]
    D["50Hz"] --> B
    E["60Hz"] --> C
    B --> F["Changing Video format... Please wait."]
WATCHING TV / PROGRAMME CONTROL
SIMPLE MANUAL
You can easily and effectively access the TV information by viewing a simple manual on the TV. During the Simple Manual operation, audio will be muted.
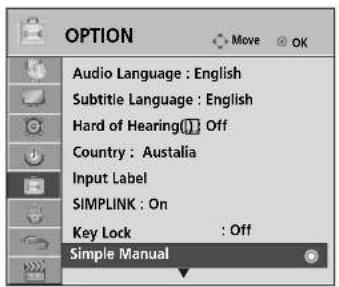
text_image
OPTION Audio Language : English Subtitle Language : English Hard of Hearing Off Country : Australia Input Label SIMPLINK : On Key Lock : Off Simple Manual
■ Image shown may differ from your TV.
text_image
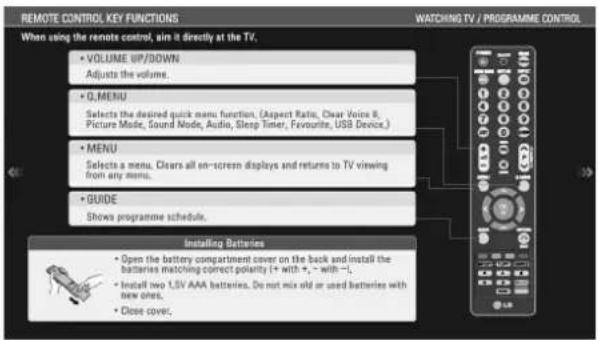
REMOTE CONTROL KEY FUNCTIONS WATCHING TV / PROGRAMME CONTROL When using the remote control, sin it directly at the TV. • VOLUME UP/DOWN Adjusts the volume. • Q.MENU Selects the desired quick menu function. (Aspect Ratio, Clear Voice 8, Picture Mode, Sound Mode, Audio, Sleep Timer, Favourite, USB Device.) • MENU Selects a menu. Clears all on-screen displays and returns to TV viewing from any menu. • GUIDE Shows programme schedule. Installing Batteries • Open the battery compartment cover on the back and install the batteries matching correct polarity (in with *,- with -l. • Install two 1.5V AAA batteries. Do not mix old or used batteries with new ones. • Close cover.
Select OPTION.
Select Simple Manual.
Select the part of the manual you want to see.
- Press the RETURN button to return to normal TV viewing.
SIMPLINK
This function operates only with devices with the SIMPLINK logo. Please check the SIMPLINK logo.
This TV might not function properly when using it with other products with HDMI-CEC function. This allows you to control and play other AV devices connected to the display through HDMI cable without additional cables and settings.
If you do not want SIMPLINK menu, select "Off". SIMPLINK function is not supported by the HDMI IN 5 input.
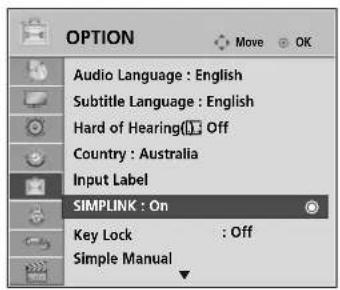
text_image
OPTION Audio Language : English Subtitle Language : English Hard of Hearing Off Country : Australia Input Label SIMPLINK : On Key Lock : Off Simple Manual
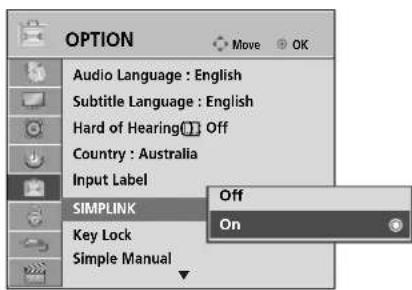
text_image
OPTION Audio Language : English Subtitle Language : English Hard of Hearing Off Country : Australia Input Label SIMPLINK Key Lock Simple Manual Move OK Off On
Select OPTION.
Select SIMPLINK.
Select On or Off.

- Press the MENU button to return to normal TV viewing.
- Press the RETURN button to move to the previous menu screen.
WATCHING TV / PROGRAMME CONTROL
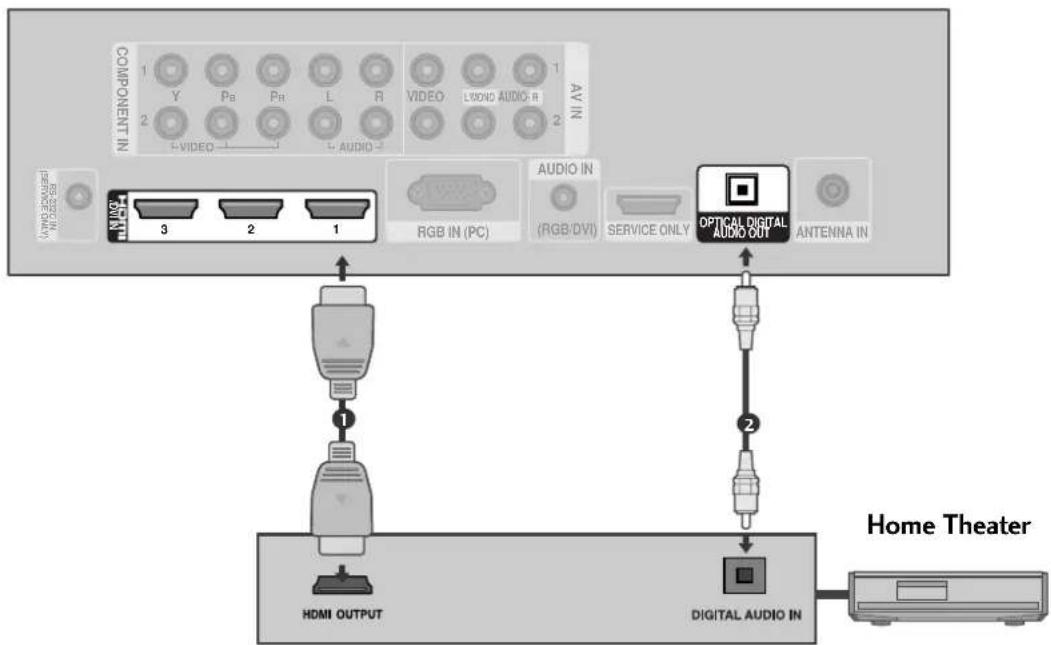
Connecting to Home Theater with the SIMPLINK logo.
1 Connect the HDMI/DVI IN 1, HDMI/DVI IN 2, HDMI/DVI IN 3 or HDMI IN 4 terminal on the Media Box and the HDMI output terminal of the Home Theater using HDMI cables.
2 Connect the Digital Audio output terminal on the back of the Media Box and the Digital Audio input terminal of the Home Theater using optical cables.
3 Select Home Theater in the Speaker menu by pushing the SIMPLINK button.
flowchart
graph TD
    A["Home Theater"] --> B["Digital Audio IN"]
    B --> C["Optical Digital Audio Out"]
    C --> D["Service Only"]
    D --> E["RGB IN (PC)"]
    D --> F["AV IN"]
    D --> G["VIDEO"]
    D --> H["LIVOND AUDIO R"]
    D --> I["VIDEO"]
    D --> J["PA"]
    D --> K["Y"]
    D --> L["3"]
    D --> M["2"]
    D --> N["1"]
    D --> O["1"]
    D --> P["1"]
    D --> Q["1"]
    D --> R["1"]
    D --> S["1"]
    D --> T["1"]
    D --> U["1"]
    D --> V["1"]
    D --> W["1"]
    D --> X["1"]
    D --> Y["1"]
    D --> Z["1"]
    D --> AA["1"]
    D --> AB["1"]
    D --> AC["1"]
    D --> AD["1"]
    D --> AE["1"]
    D --> AF["1"]
    D --> AG["1"]
    D --> AH["1"]
    D --> AI["1"]
    D --> AJ["1"]
    D --> AK["1"]
    D --> AL["1"]
    D --> AM["1"]
    D --> AN["1"]
    D --> AO["1"]
    D --> AP["1"]
    D --> AQ["1"]
    D --> AR["1"]
    D --> AS["1"]
    D --> AT["1"]
    D --> AU["1"]
    D --> AV["1"]
    D --> AW["1"]
▶ When you select or operate a media device with home theater function, the speaker automatically switches to home theater speaker (HT speaker).
NOTE
Connect the HDMI/DVI IN or HDMI IN terminal of the Media Box to the terminal (HDMI terminal) of the SIMPLINK device with an HDMI cable.
▶ When you switch the Input source using the INPUT button on the remote control, you can stop the operation of a device controlled by SIMPLINK.
SIMPLINK Functions
Disc playback
Control connected AV devices by pressing the ,OK; < > ▶, ■, I I, ◀◀ and ▶▶ buttons.
Direct Play
After connecting AV devices to the Media Box, you can directly control the devices and play media without additional settings.
Select AV device
Enables you to select one of the AV devices connected to the Media Box and operate it.
Power off all devices
When you switch off the TV, all connected devices are turned off.
Switch audio-out
Offers an easy way to switch audio-out.
**A device, which is connected to the Media Box through an HDMI cable but does not support SIMPLINK, does not provide this function.
Note: To operate SIMPLINK, an HDMI cable over Version 1.3 with *CEC function should be used. (*CEC: Consumer Electronics Control).
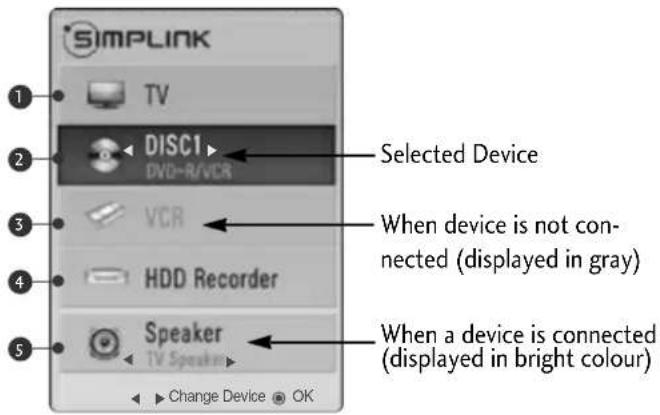
SIMPLINK Menu
Press the ^ ∨ < > button and then OK button to select the desired SIMPLINK source.
TV viewing : Switch to the previous TV programme regardless of the current mode.
② DISC playback : Select and play connected discs. When multiple discs are available, the titles of discs are conveniently displayed at the bottom of the screen.
③ VCR playback : Play and control the connected VCR.
4 HDD Recordings playback : Play and control recordings stored in HDD.
5 Audio Out to Home theater/Audio Out to TV: Select Home theater or TV speaker for Audio Out.
text_image
SIMPLINK TV DISCI DVD-R/VCR Selected Device VCR When device is not connected (displayed in gray) HDD Recorder Speaker TV Speaker When a device is connected (displayed in bright colour) Change Device OKWATCHING TV / PROGRAMME CONTROL
AV MODE
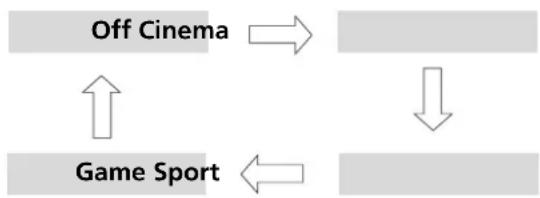
You can select the optimal images and sounds when connecting AV devices to external input.
Off Disables the AV MODE.
Cinema Optimizes video and audio for watching movies.
Sport Optimizes video and audio for watching sports events.
Game Optimizes video and audio for playing games.
flowchart
graph TD
    A["Off Cinema"] --> B["Game Sport"]
    B --> C["End"]
    A <--> C
Press the AV MODE button repeatedly to select the desired source.
- If you select Cinema in AV mode, Cinema will be selected both for Picture Mode and Sound Mode in PICTURE menu and AUDIO menu respectively.
- If you select "Off" in AV mode, the picture and image which you initially set will be selected.
INITIALIZING
(RESET TO ORIGINAL FACTORY SETTINGS)
This function initializes all settings.
But the settings of if Day and if Night of the Picture Mode cannot be initialized.
It is useful to initialize the product or when you move to other city or country.
When the Factory Reset is completed, you must restart the Initializing setup.
When the Lock System menu is "On", the message to enter the password appears.
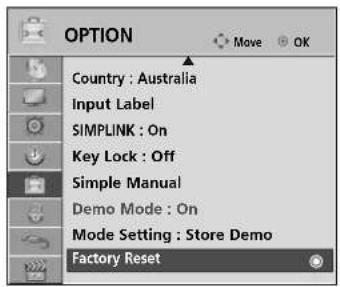
text_image
OPTION Country : Australia Input Label SIMPLINK : On Key Lock : Off Simple Manual Demo Mode : On Mode Setting : Store Demo Factory Reset
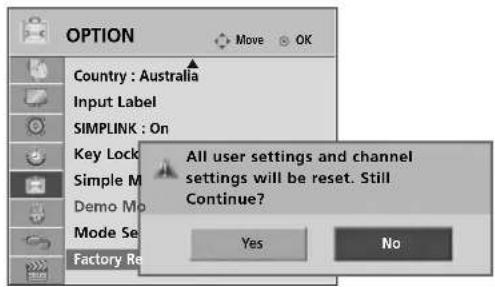
text_image
OPTION Country : Australia Input Label SIMPLINK : On Key Lock Simple M Demo Mo Mode Se Factory Re All user settings and channel settings will be reset. Still Continue? Yes No
Select OPTION.
Select Factory Reset.
Select Yes.
Start Factory Reset.
- In Lock System "O"nif you forget your password, press '7', '7', '7', '7' on the remote control handset.
- Press the MENU button to return to normal TV viewing.
- Press the RETURN button to move to the previous menu screen.
TO USE A USB DEVICE
When connecting a USB device
When you connect a USB device, this pop up menu is displayed, automatically.
When the Pop Up menu does not appear, you can select Music List, Photo List or Movie List in the USB menu.
On a USB device, you can not add a new folder or delete an existing folder.
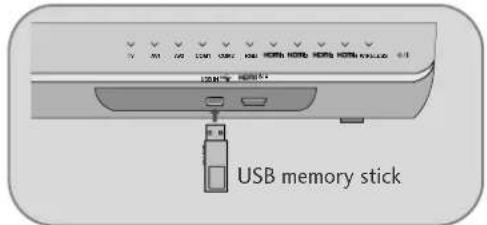
1 Connect the USB device to the USB IN jack on the Media Box.
text_image
USB memory stick
Select PHOTO LIST, MUSIC LIST or MOVIE LIST.

- Only photo(JPEG), music (MP3) and movie(DAT, MPG, MPEG, VOB, AVI, DIVX, MP4, MKV, TS, TRP, TP) are supported.
When removing the USB device
Select the USB Device menu before removing the USB device.
Select USB Device.
Select Eject.
Precautions when using the USB device
▶ Only a USB storage device is recognizable.
▶ If the USB storage device is connected through a USB hub, the device is not recognizable.
▶ A USB storage device using an automatic recognition programme may not be recognized.
▶ A USB storage device which uses its own driver may not be recognized.
▶ The recognition speed of a USB storage device may depend on each device.
▶ Please do not turn off the TV or unplug the USB device when the connected USB storage device is working. When such device is suddenly separated or unplugged, the stored files or the USB storage device may be damaged.
▶ Please do not connect the USB storage device which was artificially maneuvered on the PC. The device may cause the product to malfunction or fail to be played. Never forget to use only a USB storage device which has normal music files, image files or movie files.
▶ Please use only a USB storage device which was formatted as a FAT32 file system, NTFS file system provided with the Windows operating system. In case of a storage device formatted as a different utility programme which is not supported by Windows, it may not be recognized.
▶ Please connect power to a USB storage device(over 0.5A) which requires an external power supply. If not, the device may not be recognized.
▶ Please connect a USB storage device with the cable offered by the device maker.
▶ Some USB storage devices may not be supported or operated smoothly.
▶ File alignment method of USB storage device is similar to Window XP and filename can recognize up to 100 English characters.
▶ Be sure to back up important files since data stored in a USB memory device may be damaged. We will not be responsible for any data loss.
▶ If the USB HDD does not have an external power source, the USB device may not be detected. So be sure to connect the external power source.
▶ Data in a USB storage device cannot be deleted in the NTFS file system.
▶ If your USB memory device has multiple partitions, or if you use a USB multi-card reader, you can use up to 4 partitions or USB memory devices.
▶ Only the FAT32 file system supports the delete function.
If a USB memory device is connected to a USB multi-card reader, its volume data may not be detected.
▶ If the USB memory device does not work properly, disconnect and reconnect it.
▶ How fast a USB memory device is detected differs from device to device.
▶ If the USB is connected in Standby Mode, specific hard disk will automatically be loaded when the TV is turned on.
The recommended capacity is 1 TB or less for a USB external hard disk and 32 GB or less for USB memory.
▶ Any device with more than the recommended capacity may not work properly.
▶ If a USB external hard disk with a "Energy Saving" function does not work, turn the hard disk off and on again to make it work properly.
PHOTO LIST
You can view photo files on USB storage device.
The On-Screen Display may be different from your TV. Images are an example to assist with the TV operation.
When you are watching the photo by the Photo List function, you can not change the picture mode.
PHOTO(*.JPEG) supporting file
Baseline: 64 x 64 \~ 15360 x 8640
Progressive : 64 x 64 \~ 1920 x 1440
- You can play JPEG files only.
• Non-supported files are displayed in the form of predefined icon.
Screen Components
Select USB.
Select Photo List.
① Moves to upper level folder
② Current page/Total pages
③ Total number of marked photos
4 Corresponding buttons on the remote control
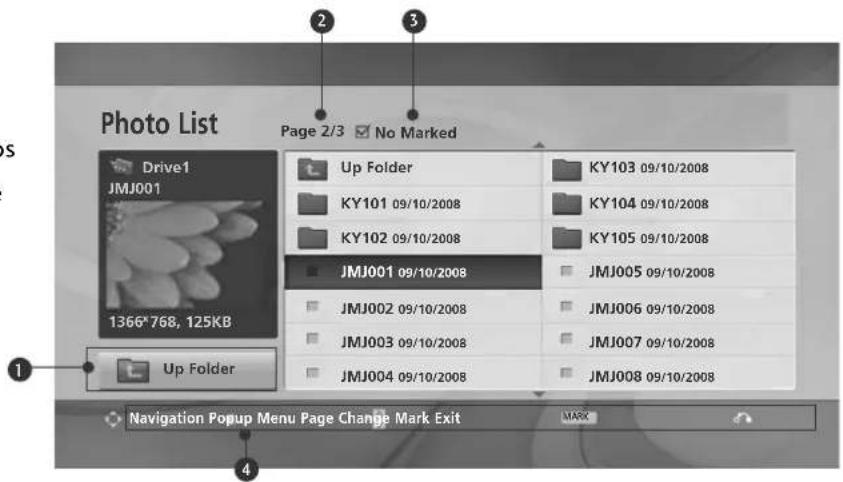
text_image
Photo List Page 2/3 □ No Marked Drive1 JMJ001 1366*768, 125KB Up Folder KY103 09/10/2008 KY101 09/10/2008 KY104 09/10/2008 KY102 09/10/2008 KY105 09/10/2008 JMJ001 09/10/2008 JMJ005 09/10/2008 JMJ002 09/10/2008 JMJ006 09/10/2008 JMJ003 09/10/2008 JMJ007 09/10/2008 JMJ004 09/10/2008 JMJ008 09/10/2008 Up Folder Navigation Popup Menu Page Change Mark Exit MARKTO USE A USB DEVICE
Photo Selection and PopUp Menu
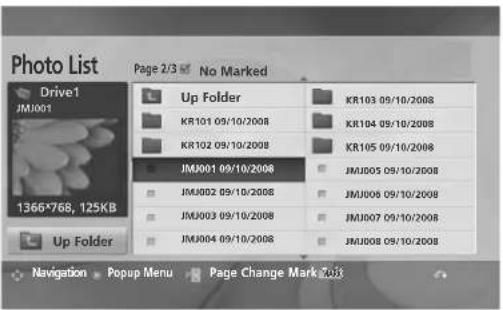
text_image
Photo List Page 2/3 No Marked Drive1 JMJ001 1366*768, 125KB Up Folder Up Folder KR101 09/10/2008 KR102 09/10/2008 KMJ001 09/10/2008 KMJ002 09/10/2008 KMJ003 09/10/2008 KMJ004 09/10/2008 KR103 09/10/2008 KR104 09/10/2008 KR105 09/10/2008 KMJ005 09/10/2008 KMJ006 09/10/2008 KMJ007 09/10/2008 KMJ008 09/10/2008 Navigation Popup Menu Page Change Mark 2.0xV
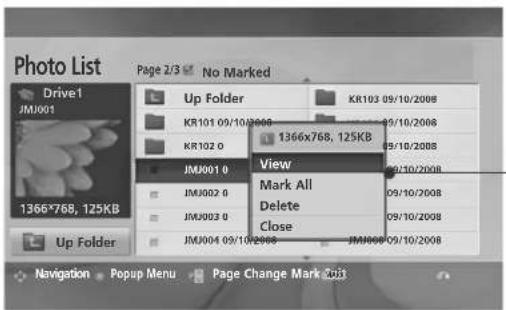
text_image
Photo List Page 2/3 No Marked Drive1 JM001 1366*768, 125KB Up Folder KR101 09/10/2008 KR102 0 1366x768, 125KB View Mark All Delete Close JM001 0 JM002 0 JM003 0 JM004 09/10/2008 JM005 09/10/2008 Navigation Popup Menu Page Change Mark Ctrl▶ View : Display the selected item.
▶ Mark All : Mark all photos on the screen.
▶ Unmark All : Deselect all marked photos.
▶ Delete or Delete Marked(FAT32 file system only) : Delete the selected photo item.
▶ Close : Close the pop-up menu.
Select the target folder or drive.

Select the desired photos.
Show the PopUp menu.
Select the desired PopUp menu.
- Use the P ^ ∨ button to navigation in the photo page.
- Use the MARK button to mark or unmark a photo. When one or more photos are marked, you can view each marked photo or a slide show of the marked photos. If no photos are marked, you can view every individual photo in the folder or a slide show of all photos in the folder.
How to view photo
Detailed operations are available on full-sized photo view screen.
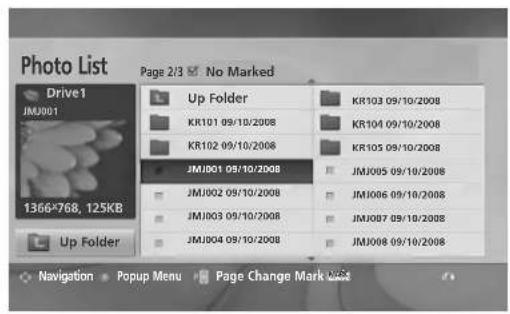
text_image
Photo List Page 2/3 ▼ No Marked Drive1 JKJ001 1366*768, 125KB Up Folder KR101 09/10/2008 KR102 09/10/2008 KR103 09/10/2008 KR104 09/10/2008 KR105 09/10/2008 JMJ001 09/10/2008 JMJ002 09/10/2008 JMJ003 09/10/2008 JMJ004 09/10/2008 JMJ005 09/10/2008 JMJ006 09/10/2008 JMJ007 09/10/2008 JMJ008 09/10/2008 Up Folder Navigation Popul Menu Page Change Mark ListV
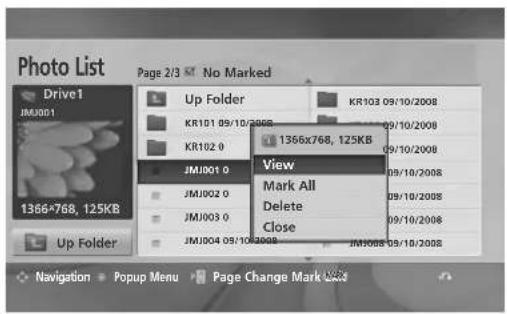
text_image
Photo List Page 2/3 No Marked Drive1 JMJ001 1366x768, 125KB Up Folder KR103 09/10/2008 KR101 09/10/2008 KR102 0 1366x768, 125KB View Mark All Delete Close JMJ001 0 JMJ002 0 JMJ003 0 JMJ004 09/10/2008 JMJ005 09/10/2008 Navigation Popup Menu Page Change Mark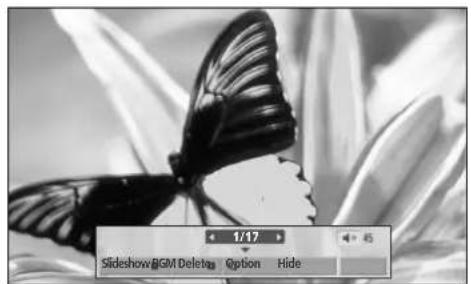
natural_image
Black and white photo of a butterfly on a flower background, no visible text or symbolsThe aspect ratio of a photo may change the size of the photo displayed on the screen in full size.
Press the RETURN button to move to the previous menu screen.

Select the target folder or drive.


Select the desired photos.
Show the PopUp menu.

Select View.
The selected photo is displayed in full size.
- Use the P ^P ∧ ∨ button to navigation in the photo page.
TO USE A USB DEVICE
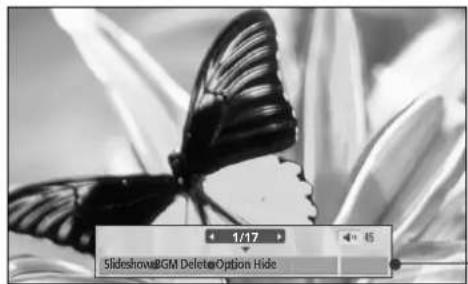
natural_image
Black and white photo of a butterfly on a leafy background, no visible text or symbols
Select the Slideshow, BGM, 🤕 (Rotate), Delete, Option or Hide.
- Use < > button to select the previous or next photo.
- Use < > button to select and control the menu on the full-sized screen.
▶ Slideshow : When no picture is selected, all photos in the current folder are displayed during slide show. If some photos are selected, those photos are displayed in a slide show.
■ Set the time interval of the slide show in Option.
▶ BGM (Background Music) : Listen to music while viewing photos in full size.
■ Set the Music Folder for BGM in Options before using this function.
▶ (Rotate) : Rotate photos.
■ Rotates the photo 90^ , 180^ , 270^ , 360^ clockwise.
■ It can not be rotate when the width of a picture is bigger than supported height.
▶ Delete(FAT32 file system only): Delete photos.
▶ Option : Set values for Slide Speed and Music Folder for BGM.
■ Use ^ < < > button and OK button to set values. Then go to OK and press OK to save the settings.
■ You cannot change Music Folder while BGM is playing.
▶ Hide : Hide the menu on the full-sized screen.
■ To see the menu again on the full-sized screen, press OK button to display.
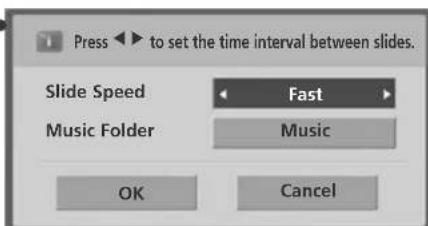
text_image
Press ▶ to set the time interval between slides. Slide Speed Music Folder OK Fast Music CancelMUSIC LIST
You can play music files on USB storage device.
Purchased music files(*.MP3) may contain copyright restrictions. Playback of these files may not be supported by this model.
Music file on your USB device can be played by this unit.
The On Screen Display may be different from your TV. Images are an example to assist with the TV operation.
MUSIC (*.MP3) supporting file
Bit rate 32 \~ 320
• Sampling rate MPEG1 Layer3 : 32kHz, 44.1kHz, 48kHz
- Sampling rate MPEG2 Layer3 : 16kHz, 22.05kHz, 24kHz
- Sampling rate MPEG2.5 Layer3 : 8kHz, 11.025kHz, 12kHz
Screen Components

Select USB.
① Preview: If any album jacket for the file(Album Art Image) exists, this jacket is displayed.
② Moves to upper level folder
③ Current page/Total pages
④ Total number of marked music title
⑤ Corresponding buttons on the remote control
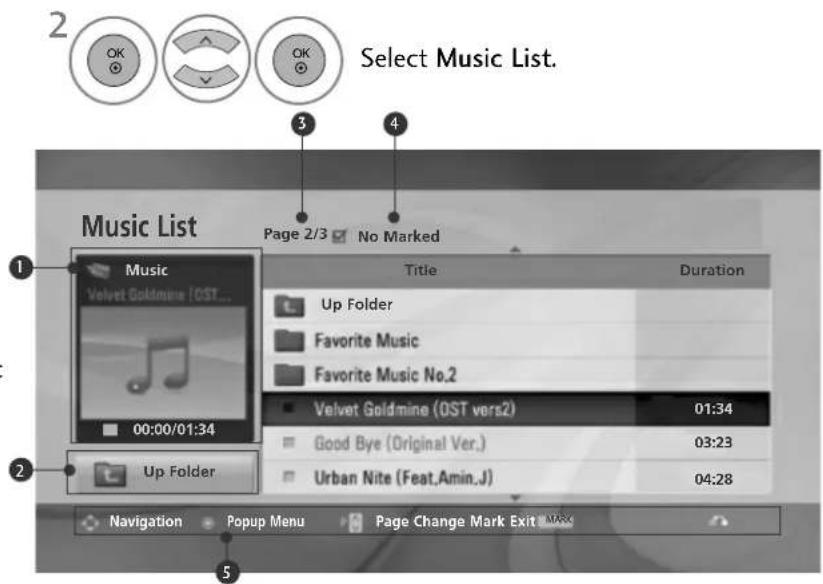
text_image
2 OK OK Select Music List. Music List Page 2/3 No Marked Music Velvet Goldmine (OST... 00:00/01:34 Up Folder Title Duration Up Folder Favorite Music Favorite Music No.2 Velvet Goldmine (OST vers2) 01:34 Good Bye (Original Ver.) 03:23 Urban Nite (Feat,Amin.J) 04:28 Navigation Popup Menu Page Change Mark ExitTO USE A USB DEVICE
Music Selection and PopUp Menu
As shown, up to 6 music titles are listed per page.
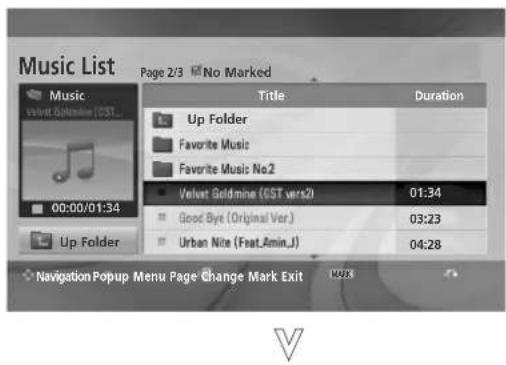
text_image
Music List Page 2/3 No Marked Music velvat Goldmine (GST... 00:00/01:34 Up Folder Favorite Music Favorite Music No.2 Velvat Goldmine (GST vers2) Good Bye (Original Ver.) Urban Nite (Feat_Amin_J) Duration 01:34 03:23 04:28 Navigation Popup Menu Page Change Mark Exit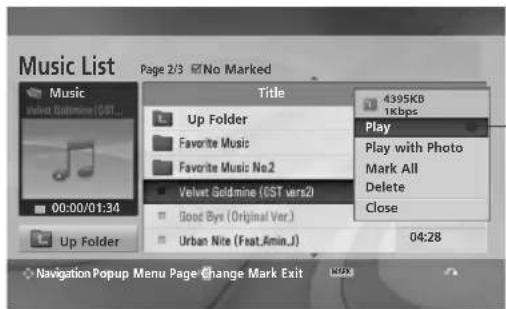
text_image
Music List Page 2/3 @No Marked Music Velet Goldmine (GST) 00:00/01:34 Up Folder Title Up Folder Favorite Music Favorite Music No.2 Velvet Goldmine (GST vers2) Good Bye (Original Ver.) Urban Nite (Feat.Amin.J) 4395KB 1kbps Play Play with Photo Mark All Delete Close 04:28 Navigation Popup Menu Page Change Mark Exit▶ Play (During stop) : Play the selected music titles.
One playback of a piece of music finishes, the next selected one will be played. When there are no selected music titles to play, the next one in the current folder will be played. If you go to a different folder and press the OK button, the current music in playback will stop.
▶ Play Marked : Play the selected music titles. Once a music finishes playing, the next selected one will be played automatically.
▶ Stop Play (During playback) : Stop the playing music titles.
▶ Play with Photo : Start playing the selected music titles and then move to the Photo List.
▶ Mark All : Mark all music titles in the folder.
▶ Unmark All: Deselect all marked music titles.
▶ Delete or Delete Marked(FAT32 file system only) : Delete the selected music titles.
▶ Close : Close the pop-up menu.
Select the target folder or drive.
Select the desired music title
Show the PopUp menu.
Select the desired PopUp menu.
- Use the PP ∧ ∨ button to navigate up/down in the music page.
- Use MARK button to mark or unmark a music. When one or more music files are marked, the marked music title will be played in sequence. For example, if you want to listen to only one music repeatedly, just mark the music only and play it. If no music is marked, all the music in the folder will be played in sequence.
If you don't press any button for a while during the playing, the play information box (as shown in the below) will float as a screen saver.
■ The 'Screen Saver'?
Screen saver is to prevent screen pixel damage due to an fixed image remaining on the screen for a extended period of time.
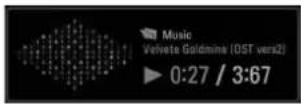
NOTE
▶ When a music file is played, is displayed behind the title.
▶ A damaged or corrupted music does not play but displays 00:00 in playtime.
▶ A music downloaded from a paid service with copyright protection does not start but displays inappropriate information in playtime.
▶ If you press O○, K buttons, screen saver is stopped.
▶ The PLAY(▶) Pause(II) ▪▶◀◀◀ buttons on the remote control are also available in this mode.
▶ You can use the ▶ button to select the next music and the ◀ button to select the previous music.
TO USE A USB DEVICE
MOVIE LIST
You can play movie files on a USB storage device.
The movie list is activated once USB is detected. It is used when playing movie files on TV.
Displays the movies in the USB folder and supports Play.
Allows playback of all movies in the folder and user desired files.
It is a movie list that displays folder information and movie file.
The On Screen Display may be different from your TV. Images are an example to assist with the TV operation.
Movie(*.dat/*.mpg/*.mpeg/*.ts/*.trp/*.tp/*.vob/*.mp4/*.mkv/*.avi/*.divx) supporting file
Video format :DivX3.11, DivX4.12, DivX5.x, DivX6, Xvid1.00, Xvide1.01, Xvid1.02, Xvid1.03, Xvid 1.10-beta-1/beta-2, Mpeg-1, Mpeg-2, Mpeg-4, H.264/AVC
Audio format : Dolby Digital, AAC, Mpeg, MP3, LPCM, HEAAC
Bit rate : within 32 \~ 320kbps(MP3)
Subtitle format : *.smi/*.srt/*.sub(MicroDVD, SubViewer1.0/2.0)/*.ass/*.ssa/*.txt(TMPlayer)/*.psb(PowerDivx)
- Some user-created subtitles may not work properly.
- Some special characters are not supported in subtitles.
- HTML tags are not supported in subtitles.
- Subtitles in languages other than the supported languages are not available.
- Time information in an external subtitle file should be arranged in ascending order to be played.
- The screen may suffer temporary interruptions (image stoppage, faster playback, etc.) when the audio language is changed.
- A damaged movie file may not be played correctly, or some player functions may not be usable.
- Movie files produced with some encoders may not be played correctly.
- If the video and audio structure of recorded file is not interleaved, either video or audio is outputted.
- HD videos with a maximum of 1920x1080@25/30P or 1280x720@50/60P are supported, depending on the frame.
- Videos with resolutions higher than 1920X1080@25/30P or 1280x720@50/60P may not work properly depending on the frame.
- Movie files other than the specified types and formats may not work properly.
- Max bitrate of playable movie file is 20Mbps.
- We do not guarantee smooth playback of profiles encoded level 4.1 or higher in H.264/AVC.
• DTS Audio codec is not supported.
- A movie file more than 30GB in file size is not supported for playback.
- A video file name and its subtitle file name must be identical for it to be displayed.
- A DivX movie file and its subtitle file must be located in the same folder.
- Playing a video via a USB connection that does not support high speed may not work properly.
- USB storage devices below USB 2.0 are supported as well. But they may not work properly in the movie list.
- Files encoded with GMC(Global Motion Compensation) may not be played.
- Only the files saved in ASCII CODE is supported for the external subtitles of the movie.
- Only 500 alphabets and 500 numbers are supported for each line of the subtitle.
- Only 10,000 of sync blocks can be supported within the subtitle file.
- When you are watching the movie by Movie List function, you can adjust an image by Energy Saving and AV Mode key on the remote control. User setup for each image mode does not operate.
| File Extension name | Video Decoder | Audio Codec | Resolution (Max) |
| mpg, mpeg, vob | MPEG1, MPEG2 | Dolby Digital, MPEG, MP3, LPCM | 1920x1080@30p |
| dat | MPEG1 | Dolby Digital, MPEG, MP3, LPCM | |
| ts,trp,tp | MPEG2, H.264/AVC | Dolby Digital, AAC, MPEG | |
| mp4 | MPEG4 SP, MPEG4 ASP, Divx 3.11, Dvix 4.12, Dvix 5.xDvix 6, Xvid 1.00, Xvid 1.01, Xvid 1.02, Xvid 1.03Xvid 1.10 -beta1, Xvid 1.10-beta 2, H.264/AVC | Dolby Digital, HEAAC, AAC,MPEG, MP3, LPCM | |
| avi | MPEG 2, MPEG 4 SP, MPEG4 ASP, Divx 3.11, Divx 4, Divx 5, Divx 6Xvid 1.00, Xvid 1.01, Xvid 1.02, Xvid 1.03, Xvid 1.10 - beta 1Xvid 1.10 - beta 2, H.264/AVC | Dolby Digital, HEAAC,AAC, MPEG,MP3, LPCM | |
| mkv | H.264/AVC, MPEG 1, MPEG 2, MPEG 4 SP, MPEG4 ASP | Dolby Digital, HEAAC,AAC, MPEG, MP3, LPCM | |
| divx | MPEG 2, MPEG 4 SP, MPEG4 ASP, Divx 3.11, Divx 4, Divx 5, Divx 6Xvid 1.00, Xvid 1.01, Xvid 1.02, Xvid 1.03, Xvid 1.10 - beta 1Xvid 1.10 - beta 2, H.264/AVG | Dolby Digital, HEAAC,AAC, MPEG, MP3, LPCM |
Screen Components
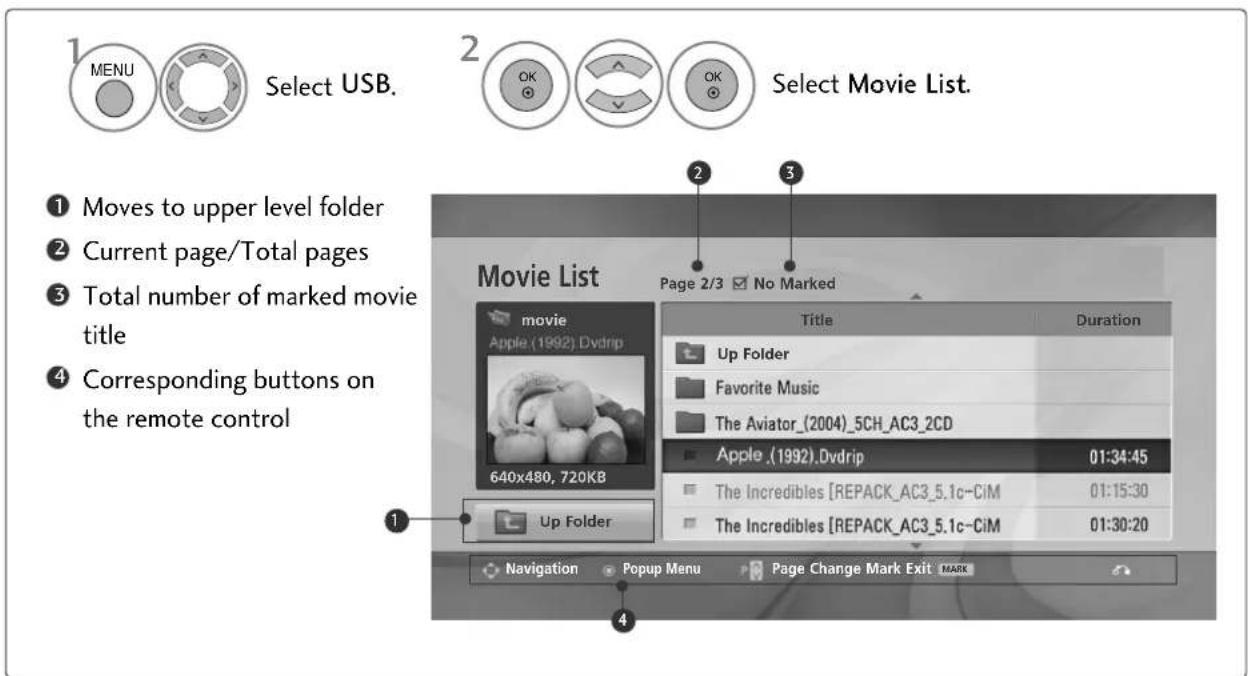
text_image
1 MENU Select USB. 2 OK OK Select Movie List. ① Moves to upper level folder ② Current page/Total pages ③ Total number of marked movie title ④ Corresponding buttons on the remote control Movie List Page 2/3 No Marked movie Apple (1992) Dvdrip 640x480, 720KB Up Folder Title Duration Up Folder Favorite Music The Aviator_(2004)_5CH_AC3_2CD Apple (.1992).Dvdrip 01:34:45 The Incredibles [REPACK_AC3_5.1c-CIM] 01:15:30 The Incredibles [REPACK_AC3_5.1c-CIM] 01:30:20 Navigation Popup Menu Page Change Mark Exit MARKTO USE A USB DEVICE
Movie Selection and PopUp Menu
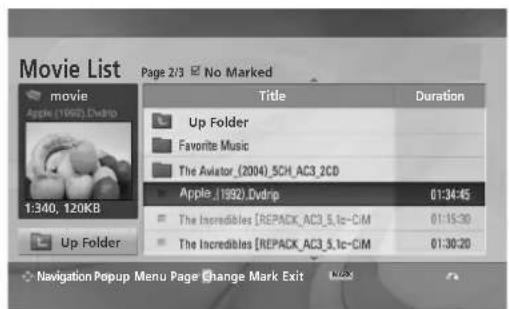
text_image
Movie List Page 2/3 No Marked movie Apple (1992).Dvdrp Up Folder Favorite Music The Aviator_(2004)_5CH_AC3_2CD Apple_(1992).Dvdrp 01:34:45 The Incredibles [REPACK_AC3_5.1c-CIM] 01:15:30 The Incredibles [REPACK_AC3_5.1c-CIM] 01:30:20 Navigation Popup Menu Page Change Mark Exit
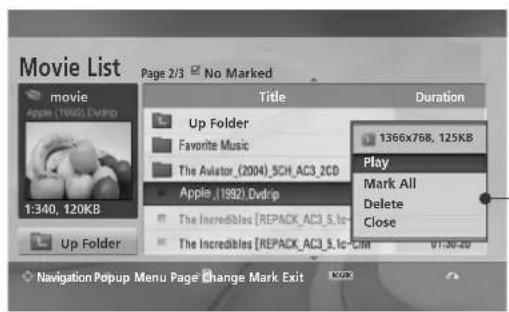
text_image
Movie List Page 2/3 No Marked movie Up Folder Favorite Music The Aviator_(2004)_5CH_AC3_2CD Apple_(1992)Dvdrip The Incredibles [REPACK_AC3_5.1c-] The Incredibles [REPACK_AC3_5.1c-CM] Duration 1366x768, 125KB Play Mark All Delete Close 01:30:20 Up Folder 1:340, 120KB Navigation Popup Menu Page Change Mark Exit▶ Play : Play the selected movie.
Divx Play is executed while screen changes.
▶ Mark All : Mark all Movie in the folder.
▶ Unmark All: Deselect all marked movies.
▶ Delete or Delete Marked(FAT32 file system only) : Delete the selected Movie item.
▶ Close : Close the pop-up menu.

Select the target folder or drive.

Select the desired movie title
Show the PopUp menu.
Select the desired PopUp menu.
- Use the PP ∧ ∨ button to navigation in the movie page.
- Use MARK button to mark or unmark a movie. When one or more movie files are marked, the marked movies will be played in sequence.
- Press the RETURN button to return to normal TV viewing.
NOTE
In the case of files not supported, a message regarding non-supported file is displayed.
Using the Movie List function, play
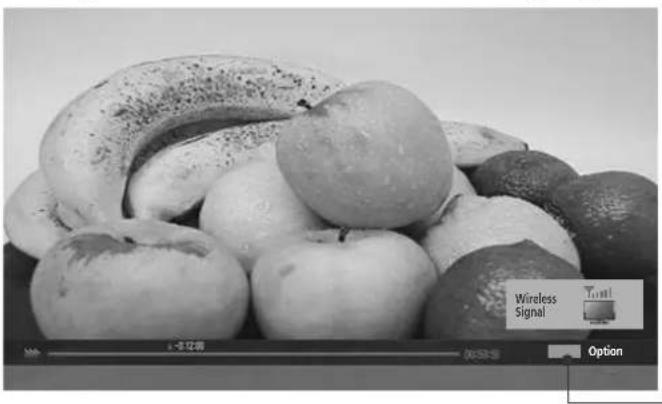
natural_image
Black-and-white photo of assorted fruits and vegetables on a surface, with a monitor labeled 'Wireless Signal' in the corner (no other text or symbols)
NOTE
▶ In Australia, the only language supported for subtitles is English.
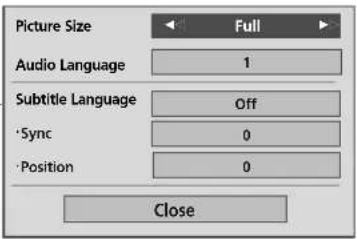
text_image
Picture Size Full Audio Language 1 Subtitle Language Off •Sync 0 •Position 0 Close▶ Picture Size : Selects your desired picture format during movie play.
▶ Audio Language & Subtitle Language : Changes the Language Group of the audio/subtitle during movie play.
▶ Sync : Adjusts the time synchronisation of the subtitle from -10 secs \~ +10 secs by steps of 0.5 secs during movie play.
▶ Position : Changes the position of the subtitle either up or down during movie play.
Using the remote control
| ◀◀ /▶▶▶ | When playing,repeatedly, press the REW (◀◀) button to speed up ◀◀(x2) -> ◀◀◀(x4) ->◀◀◀◀(x8) -> ◀◀◀◀◀(x16) ->◀◀◀◀◀(x32).repeatedly, press the FF (▶▶▶) button to speed up ▶▶(x2) -> ▶▶▶(x4) -> ▶▶▶▶(x8) -> ▶▶▶▶▶(x16) ->▶▶▶▶▶▶(x32).■ Pressing these buttons repeatedly increases the fast forward/reverse speed. |
| II | During playback, press the Pause(II)button.■ Still screen is displayed.■If no buttons are pressed on the remote control for 10 minutes after pausing, the TV returns to the playback state.■Press the Pause(II)button and then use the FF (▶▶▶)button for slow motion. |
| < > | ■ When using the < or > button during playback a cursor indicating the position can be viewed on the screen. |
| PLAY(▶) | Press the PLAY(▶)button to return to normal playback. |
| ENERGY SAVING | Press the ENERGY SAVING button repeatedly to increase the brightness of your screen.(Refer to p. 82) |
| AV MODE | Press the AV MODE button repeatedly to select the desired source.(Refer to p. 60) |
TO USE A USB DEVICE
DIVX REGISTRATION CODE
Confirm the DivX registration code number of the TV. Using the registration number, movies can be rented or purchased at www.divx.com/vod.
With a DivX registration code from other TV, playback of rented or purchased DivX file is not allowed. (Only DivX files matched with the registration code of the purchased TV are playable.)
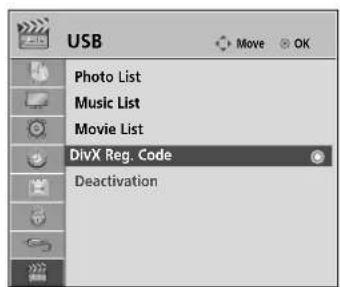
text_image
USB Photo List Music List Movie List DivX Reg. Code Deactivation
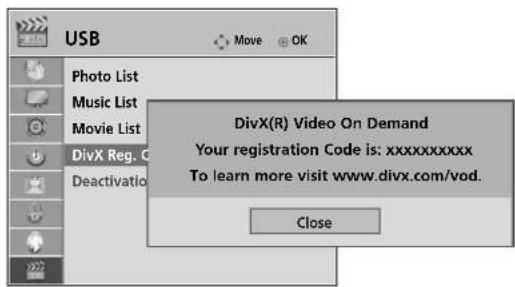
text_image
USB Photo List Music List Movie List DivX Reg. C Deactivation DivX(R) Video On Demand Your registration Code is: xxxxxxxxxxxx To learn more visit www.divx.com/vod. Close
text_image
2 Select DivX Reg. Code.
text_image
3 Display DivX Reg. Code.- Press the MENU button to return to normal TV viewing.
- Press the RETURN button to move to the previous menu screen.

"DivX Certified to play DivX video up to HD 1080p, including premium content"
ABOUT DIVX VIDEO : DivX® is a digital video format created by DixX, Inc. This is an official DivX Certified device that plays DivX video. Visit www.divx.com for more information and software tools to convert your files into DivX video.
ABOUT DIVX VIDEO-ON-DEMAND : This DivX Certified® device must be registered in order to play DivX Video-on-Demand[VOD] content. To generate the registration code, locate the DivX VOD section in the device setup menu. Go to vod.divx.com with this code to complete the registration process and learn more about DivX VOD.
NOTE
▶ Movie files are supported as follows
Resolution : under 1920x1080 WxH pixels
Frame rate : under 30 frames/sec(1920x1080), under 60 frames/sec(under 1280x720)
▶ Video Codec : MPEG 1, MPEG 2, MPEG 4, H.264/AVC, Divx 3.11, Divx 4.12, Divx 5.x, Divx 6, Xvid 1.00, Xvid 1.01, Xvid 1.02, Xvid 1.03, Xvid 1.10-beta1, Xvid 1.10-beta2
DEACTIVATION
The purpose of deactivation is to allow deactivation of devices for users who have activated all the available devices through the web_server and are blocked from activating more devices. DivX VOD allows the consumer to activate up to 6 devices under one account, but to replace or deactivate any of those devices, the consumer had to contact DivX Support and request deletion. Now with this added feature, consumers will be able to deactivate the device themselves and hence better manage their DivX VOD devices.
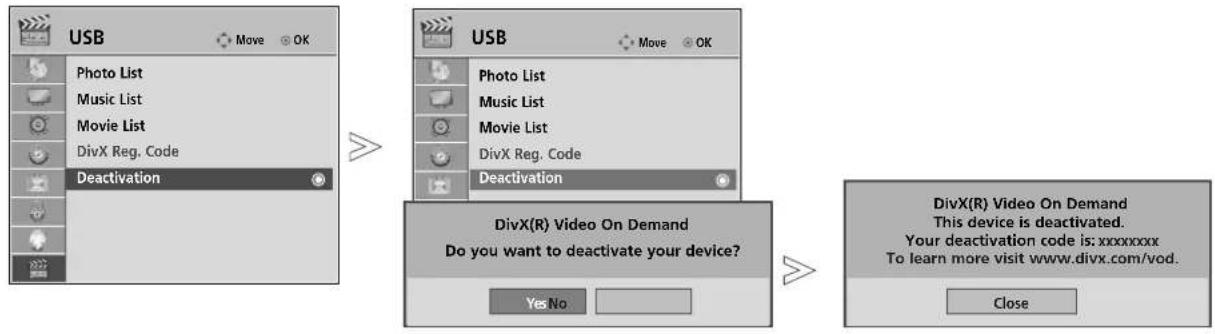
flowchart
graph LR
    A["USB"] --> B["Photo List"]
    A --> C["Music List"]
    A --> D["Movie List"]
    A --> E["DivX Reg. Code"]
    A --> F["Deactivation"]
    G["USB"] --> H["Photo List"]
    G --> I["Music List"]
    G --> J["Movie List"]
    G --> K["DivX Reg. Code"]
    G --> L["Deactivation"]
    M["DivX(R) Video On Demand\nDo you want to deactivate your device?"] --> N{Yes No}
    N --> O["DivX(R) Video On Demand\nThis device is deactivated.\nYour deactivation code is: xxxxxxxx\nTo learn more visit www.divx.com/vod.}<br>    O --> P[Close"]
text_image
2 OK Select Deactivation.
- Press the MENU button to return to normal TV viewing.
- Press the RETURN button to move to the previous menu screen.
EPG (ELECTRONIC PROGRAMME GUIDE)(IN DIGITAL MODE)
This system has an Electronic Programme Guide (EPG) to help your navigation through all the possible viewing options.
The EPG supplies information such as programme listings, start for all available services. In addition, detailed information about the programme is often available in the EPG (the availability and amount of these programme details will vary, depending on the particular broadcaster).
This function can be used only when the EPG information is broadcast by broadcasting companies
The EPG displays the programme details for next 8 days.

Shows the present screen information.

Displayed with a DTV Programme.

Displayed with a Radio Programme.

Displayed with a MHEG Programme.

Displayed with a AAC Programme.

Aspect ratio of broadcasting programme.

Aspect ratio of broadcasting programme.

Displayed with a Teletext Programme.

Displayed with a Subtitle Programme.

Displayed with a Scramble Programme.

Displayed with a Dolby Programme.

Displayed with a Dolby Digital PLUS Programme.
576i/p, 720p, 1080i : Resolution of broadcasting programme
Switch on/off EPG

Switch on or off EPG.
Select a programme

or

Select desired programme.
The EPG will disappear after moving to a selected programme.
Button Function in NOW/NEXT Guide Mode
You can view a programme being broadcasted and one scheduled to follow.

Change EPG mode.

Enter Timer Remind setting mode.

Enter Timer Remind list mode.

The EPG will disappear after moving to a selected programme.

Select NOW or NEXT Programme.

Select the Broadcast Programme.

Page Up/Down.
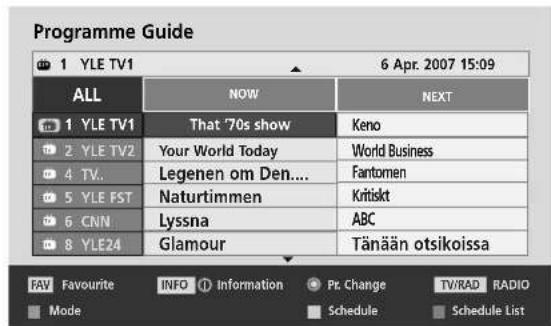
text_image
Programme Guide 1 YLE TV1 6 Apr. 2007 15:09 ALL NOW NEXT 1 YLE TV1 That '70s show Keno 2 YLE TV2 Your World Today World Business 4 TV. Legenen om Den.... Fantomen 5 YLE FST Naturtimmen Kritiskt 6 CNN Lyssna ABC 8 YLE24 Glamour Tänään otsikoissa FAV Favourite INFO Information Pt. Change TV/RAD RADIO Mode Schedule Schedule List
or (RETOHN) Switch off EPG.

Select TV or RADIO Programme.

Detail information on or off
Button Function in 8 Day Guide Mode
RED) Change EPG mode.
GREENEnter Date setting mode.
YELLOW Enter Timer Remind setting mode.
BLUE Enter Timer Remind list mode.

The EPG will disappear after moving to a selected programme.

Select Programme.

Select the Broadcast Programme.
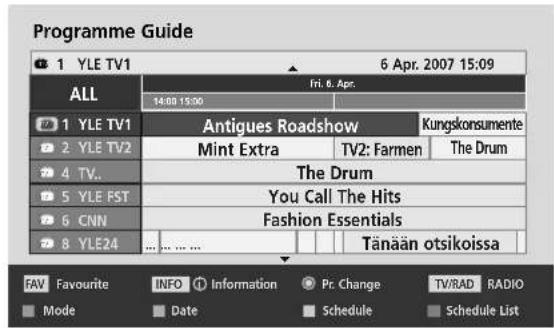
text_image
Programme Guide 1 YLE TV1 6 Apr. 2007 15:09 ALL Fri. 8. Apr. 14:00 15:00 1 YLE TV1 Antigues Roadshow Kungskonsumente 2 YLE TV2 Mint Extra TV2: Farmen The Drum 4 TV. The Drum 5 YLE FST You Call The Hits 6 CNN Fashion Essentials 8 YLE24 ... ... ... Tänään otsikoissa FAV Favourite INFO Information Pr Change TV/RAD RADIO Mode Date Schedule Schedule List
Page Up/Down.

or ( ) Switch off EPG.

Select TV or RADIO Programme.

Detail information on or off
Button Function in Date Change Mode
GREENSwitch off Date setting mode.

Change to the selected date.

Select a date.

Switch off Date setting mode.

or (RETURN) Switch off EPG.
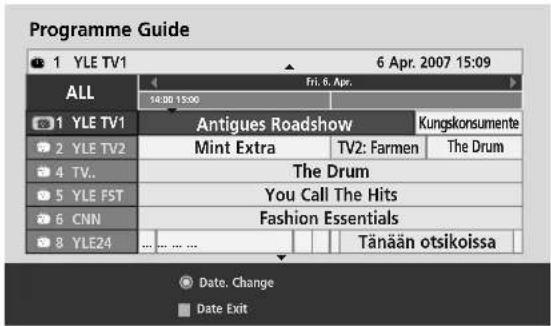
text_image
Programme Guide 1 YLE TV1 6 Apr. 2007 15:09 ALL Fri. 6. Apr. 14:00 15:00 Antigues Roadshow Kungskonsumente 1 YLE TV1 Mint Extra TV2: Farmen The Drum 2 YLE TV2 The Drum 4 TV.. YLE FST You Call The Hits 5 YLE FST CNN Fashion Essentials 6 CNN 8 YLE24 .... .... ... Tänään otsikoissa Date. Change Date ExitEPG (ELECTRONIC PROGRAMME GUIDE)(IN DIGITAL MODE)
Button Function in Extended Description Box

Text Up/Down.

Enter Timer Remind setting mode.

or (RETURN) The detail information on or off.

Switch off EPG.
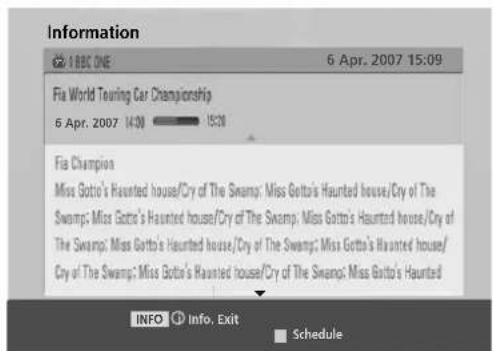
text_image
Information Fia World Touring Car Championship 6 Apr. 2007 14:00 15:00 Fia Champion Miss Gotto's Haunted house/Cry of The Swamp; Miss Gotto's Haunted house/Cry of The Swamp; Miss Gotto's Haunted house/Cry of The Swamp; Miss Gotto's Haunted house/Cry of The Swamp; Miss Gotto's Haunted house/Cry of The Swamp; Miss Gotto's Haunted house/ Cry of The Swamp; Miss Gotto's Haunted house/Cry of The Swamp; Miss Gotto's Haunted INFO Info. Exit ScheduleButton Function in Remind Setting Mode

Change to Guide or Schedule mode.

Select Remain.

Function setting.

Select Date, Start time or Programme.
Button Function in Schedule List Mode
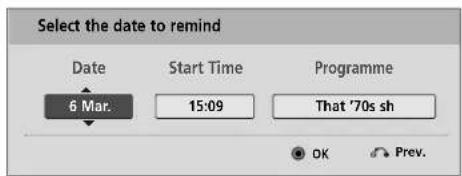
text_image
Select the date to remind Date Start Time Programme 6 Mar. 15:09 That '70s sh OK Prev.If you've created a schedule list, a scheduled programme is displayed at the scheduled time even when you are watching a different programme at the time.
Only the Up/Down/OK/Return keys will work when a popup window is open.

Add New Remind setting mode.

or (GUIDE) Change to Guide mode.

Switch off EPG.

Select your desired Option(Modify/Delete/Delete All).

Select Schedule List.

Page Up/Down.
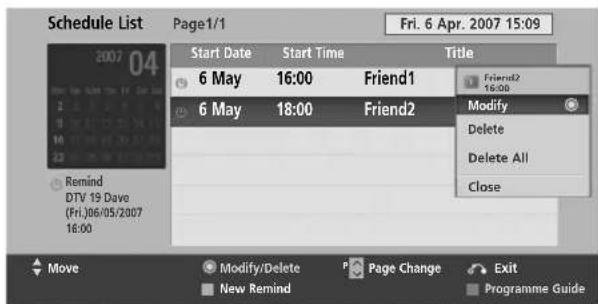
text_image
Schedule List Page1/1 Fri. 6 Apr. 2007 15:09 2007 04 Start Date Start Time Title 6 May 16:00 Friend1 6 May 18:00 Friend2 Modify Delete Delete All Close Remind DTV 19 Davo (Fri.06/05/2007) 16:00 Move Modify/Delete Page Change Exit New Remind Programme GuidePICTURE CONTROL
PICTURE SIZE (ASPECT RATIO) CONTROL
You can watch the screen in various picture formats; 16:9, Just Scan, Original, 4:3, 14:9, Zoom and Cinema Zoom.
If a fixed image is displayed on the screen for a long time, that fixed image may become imprinted on the screen and remain visible.
You can adjust the enlarge proportion using ∧ ∨ button.
This function works in the following signal.


Select Aspect Ratio.

Select the desired picture format.
- You can also adjust Aspect Ratio in the PICTURE menu.
- For Zoom Setting, select 14:9, Zoom and Cinema Zoom in Ratio Menu. After completing Zoom Setting, the display goes back to Q.Menu.
• 16:9
The following selection will allow you to adjust the picture horizontally, in linear proportion, to fill the entire screen(useful for viewing 4:3 formatted DVDs).
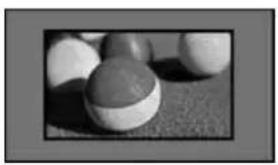
natural_image
Black and white photo of several round balls on a textured surface (no text or symbols visible)- Just Scan
Following Selection will lead to you view the picture of best quality without loss of original picture in high resolution image.
Note : If there is noise in original Picture, You can see the noise at the edge.
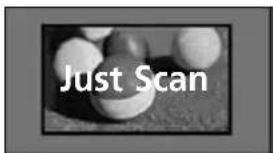
text_image
Just Scan- Original
When your TV receives a wide screen signal it will automatically change to the picture format broadcast.
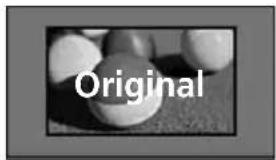
text_image
OriginalPICTURE CONTROL
• 4:3
The following selection will allow you to view a picture with an original 4:3 aspect ratio, black bars will appear on both the left and right of the screen.
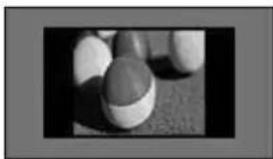
natural_image
Close-up of a ball with a pointed tip and a curved rim, resting on a textured surface (no text or symbols visible)• 14:9
You can view a picture format of 14:9 or a general TV programme in the 14:9 mode. The 14:9 screen is viewed in the same way as in 4:3, but is magnified to the left and right.
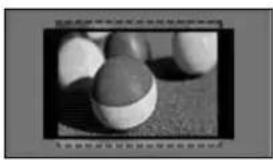
natural_image
Close-up of a ball with three white balls on a textured surface (no text or symbols visible)- Zoom
The following selection will allow you to view the picture without any alteration, while filling the entire screen. However, the top and bottom of the picture will be cropped.
natural_image
Black and white photo of a pool with balls on a gravel surface (no text or symbols visible)- Cinema Zoom
Choose Cinema Zoom when you want to enlarge the picture in correct proportion. Note: When enlarging or reducing the picture, the image may become distorted.
natural_image
Close-up of a ball on a textured surface (no visible text or symbols)◀ or ▶ button: Adjust enlarge proportion of Cinema Zoom. The adjustment range is 1\~16.
▼ or ▲ button: Move the screen.
NOTE
▶ You can only select 4:3, 16:9 (Wide), 14:9, Zoom/Cinema Zoom in Component mode.
▶ You can only select 4:3, Original, 16:9 (Wide), 14:9, Zoom/Cinema Zoom in HDMI mode.
▶ You can only select 4:3, 16:9 (Wide) in RGB/HDMI-PC mode only.
▶ In DTV(over 576p), HDMI/Component(over 720p) mode, Just Scan is available.
PICTURE WIZARD
This feature lets you adjust the picture quality of the original image.
Use this to calibrate the screen quality by adjusting the Black and White Level etc. General users can calibrate the screen quality by easily following each stage.
When you adjust the image to Low, Recommended or High, you can see the changed result as an example.
In RGB input, the changed Colour, Tint, Horizontal Sharpness and Vertical Sharpness values are not applied. HDMI 5 doesn't support Picture Wizard menu.
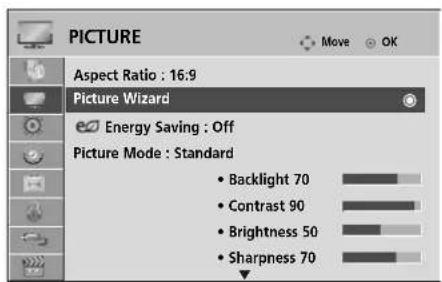
text_image
PICTURE Aspect Ratio : 16:9 Picture Wizard Energy Saving : Off Picture Mode : Standard • Backlight 70 • Contrast 90 • Brightness 50 • Sharpness 70
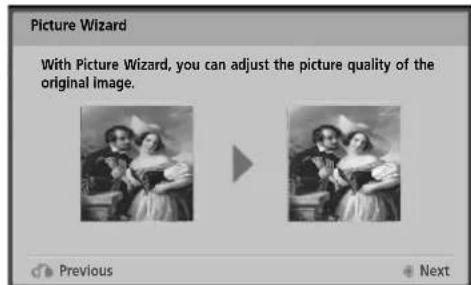
text_image
Picture Wizard With Picture Wizard, you can adjust the picture quality of the original image.
Select PICTURE.
Select Picture Wizard.
Adjust Black level, White level, Colour, Tint, Horizontal Sharpness, Vertical Sharpness, Colour Temperature(Only 55LH9**), Dynamic Contrast(Only 55LH9**), Colour Gain(Only 55LH9***) and Backlight.
Select input source to apply the settings.
- Press the MENU button to return to normal TV viewing.
- Press the RETURN button to move to the previous menu screen.
PICTURE CONTROL

ENERGY SAVING
It reduces the TV's power consumption.
The default factory setting complies with the Energy Star requirements and is adjusted to the comfortable level to be viewed at home.
You can increase the brightness of your screen by adjusting the Energy Saving level or by setting the Picture Mode.
HDMI 5 doesn't support Energy Saving menu.
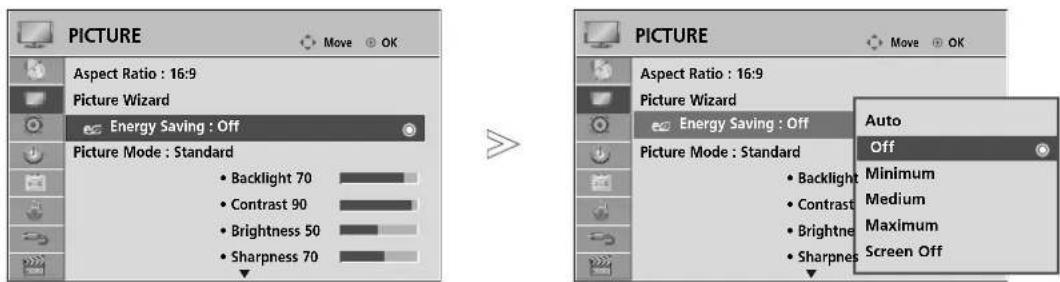
text_image
PICTURE Aspect Ratio : 16:9 Picture Wizard Energy Saving : Off Picture Mode : Standard • Backlight 70 • Contrast 90 • Brightness 50 • Sharpness 70 PICTURE Aspect Ratio : 16:9 Picture Wizard Energy Saving : Off Picture Mode : Standard • Backlight • Contrast • Brightness • Sharpness Auto Off Minimum Medium Maximum Screen Off
Select PICTURE.
Select e∅ Energy Saving.
Select Auto, Off, Minimum, Medium, Maximum or Screen Off.
- Press the MENU button to return to normal TV viewing.
-
Press the RETURN button to move to the previous menu screen.
-
When selecting Screen off, TV turned off after 3 seconds.
- If you adjust "Energy Saving-Auto, Minimum, Medium, Maximum", Backlight feature will not work.
- You can also adjust this feature by selecting Energy Saving button on the remote control.
- When selecting Auto, Backlight is automatically adjusted through intelligent sensor according to the surrounding condition when intelligent sensor is in the TV.
PRESET PICTURE SETTINGS
Picture Mode-Preset
| Vivid | Strengthen the contrast, brightness, colour and sharpness for vivid picture. |
| Standard | The most general screen display status. |
| Natural | The most natural screen display status. |
| Cinema | Optimizes video for watching movies. |
| Sport | Optimizes video for watching sports events. |
| Game | Optimizes video for playing games. |
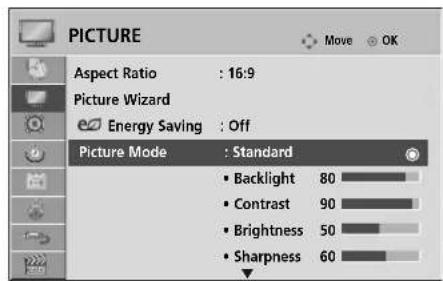
text_image
PICTURE Aspect Ratio : 16:9 Picture Wizard Energy Saving : Off Picture Mode : Standard • Backlight 80 • Contrast 90 • Brightness 50 • Sharpness 60
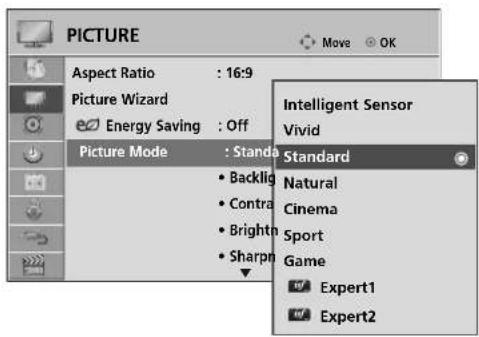
text_image
PICTURE Aspect Ratio : 16:9 Picture Wizard Energy Saving : Off Picture Mode : Standa • Backflip • Contra • Brightn • Sharpn Intelligent Sensor Vivid Standard Natural Cinema Sport Game Expert1 Expert2
Select PICTURE.
Select Picture Mode.
Select Intelligent Sensor, Vivid, Standard, Natural, Cinema, Sport or Game.
- Picture Mode adjusts the TV for the best picture appearance. Select the preset value in the Picture Mode menu based on the programme category.
- When the Intelligent sensor function is on, the most suitable picture is automatically adjusted according to the surrounding conditions.
- You can also adjust Picture Mode in the Q. Menu.
- Intelligent Sensor: Adjusts picture according to the surrounding conditions.
PICTURE CONTROL
MANUAL PICTURE ADJUSTMENT
Picture Mode-User option
Backlight
To control the brightness of the screen, adjust the brightness of LCD panel.
Adjusting the backlight when setting the brightness of the set is recommended.
Contrast
Adjusts the signal level between black and white in the picture. You may use Contrast when the bright part of the picture is saturated.
Brightness
Adjusts the base level of the signal in the picture.
Sharpness
Adjusts the level of crispness in the edges between the light and dark areas of the picture.
The lower the level, the softer the image.
Colour
Adjusts intensity of all colours.
Tint
Adjusts the balance between red and green levels.
It is not available to use this function in "Intelligent Sensor".
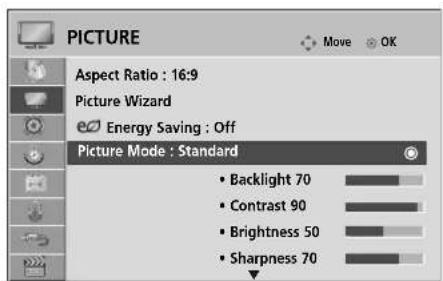
text_image
PICTURE Aspect Ratio : 16:9 Picture Wizard Energy Saving : Off Picture Mode : Standard Backlight 70 Contrast 90 Brightness 50 Sharpness 70
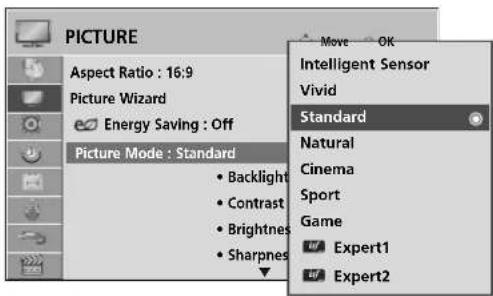
text_image
PICTURE Aspect Ratio : 16:9 Picture Wizard Energy Saving : Off Picture Mode : Standard Backlight Contrast Brightness Sharpness Move OK Intelligent Sensor Vivid Standard Natural Cinema Sport Game Expert1 Expert2
Select PICTURE.

Select Picture Mode.

Select Vivid, Standard, Natural, Cinema, Sport or Game.

Select Backlight, Contrast, Brightness, Sharpness, Colour or Tint.
Make appropriate adjustments.
• Benefits of using Backlight
- The electricity consumption is reduced by up to 60%.
- The black brightness is reduced. (As the black has greater depth, you can enjoy a better quality definition.)
- You can adjust brightness with maintaining original signal resolution.

NOTE
▶ You cannot adjust colour, sharpness and tint in the RGB/HDMI-PC mode.
When the Expert 1/2 is selected, you can select Backlight, Contrast, Brightness, H Sharpness, V Sharpness, Colour or Tint.
PICTURE IMPROVEMENT TECHNOLOGY
You can calibrate the screen for each Picture Mode or set the video value according to the special video screen. You can set the video value differently for each input.
To reset to the factory default screen after making adjustments to each video mode, execute the "Picture Reset" function for each Picture Mode.
■ Image shown may differ from your TV.
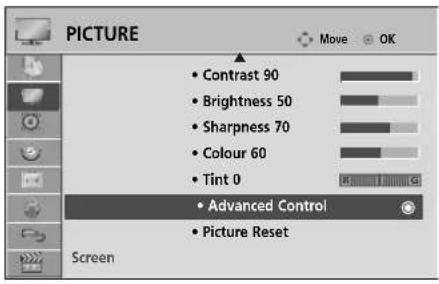
text_image
PICTURE • Contrast 90 • Brightness 50 • Sharpness 70 • Colour 60 • Tint 0 • Advanced Control • Picture Reset Screen
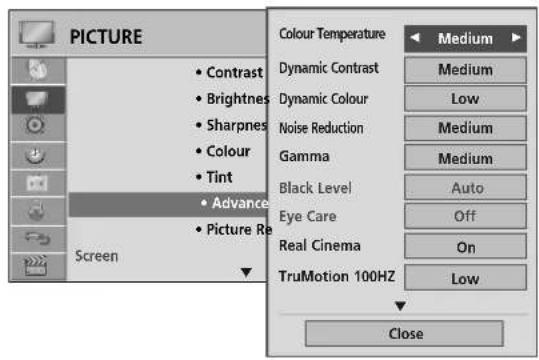
text_image
PICTURE • Contrast • Brightness • Sharpness • Colour • Tint • Advance • Picture Re Screen Colour Temperature • Dynamic Contrast • Dynamic Colour • Noise Reduction • Gamma • Black Level • Eye Care • Real Cinema TruMotion 100HZ • Medium • Low • Medium • Medium • Auto • Off • On • Low Close
Select PICTURE.
Select Advanced Control.
Select your desired Source.:
Colour Temperature, Dynamic Contrast, Dynamic Colour, Noise Reduction, Gamma, Black Level, Eye Care, Real Cinema, TruMotion 100Hz(Only 47/55LH8**), TruMotion 200Hz(Only 55LH9**), Colour Gamut, Edge Enhancer, xvYCC or OPC(Only 47/55LH8**). (Refer to p. 87\~89)
Make appropriate adjustments.
- Press the MENU button to return to normal TV viewing.
- Press the RETURN button to move to the previous menu screen.
PICTURE CONTROL
EXPERT PICTURE CONTROL
By segmenting categories, Expert1 and Expert2 provide more categories which users can set as they see fit, offering the optimal picture quality for users.
This may also be used to help a professional optimize the TV performance using specific videos.
■ Image shown may differ from your TV.
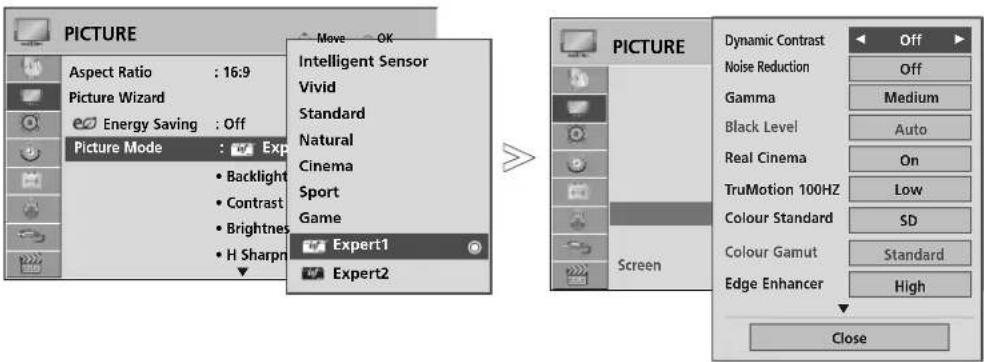
text_image
PICTURE Aspect Ratio : 16:9 Picture Wizard Energy Saving : Off Picture Mode : Exp Backlight Contrast Brightnes H Sharpn Move OK Intelligent Sensor Vivid Standard Natural Cinema Sport Game Expert1 Expert2 PICTURE Dynamic Contrast Off Noise Reduction Off Gamma Medium Black Level Auto Real Cinema On TruMotion 100HZ Low Colour Standard SD Colour Gamut Standard Edge Enhancer High Screen Close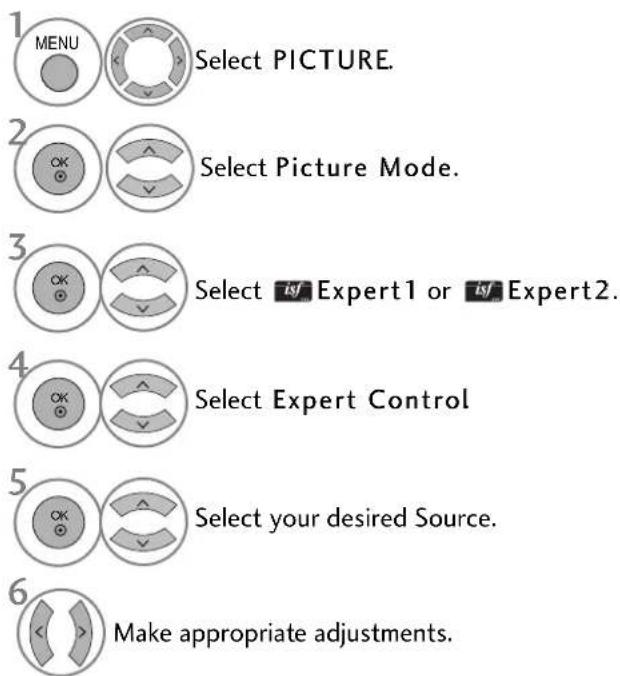
text_image
1 MENU Select PICTURE. 2 Select Picture Mode. 3 Select isf Expert1 or isf Expert2. 4 Select Expert Control 5 Select your desired Source. 6 Make appropriate adjustments.- Press the MENU button to return to normal TV viewing.
- Press the RETURN button to move to the previous menu screen.
*This feature is not available for all models.
| Colour Temperature [Advanced Control] (Warm/Medium/Cool) | Choose one of three automatic colour adjustments. Set to warm to enhance hotter colours such as red, or set to cool to make picture bluish. |
| Dynamic Contrast (Off/Low/Medium/High) | Adjusts the contrast to keep it at the best level according to the brightness of the screen. The picture is improved by making bright parts brighter and dark parts darker. |
| Dynamic Colour (Off/Low/High) | Adjusts screen colours so that they look livelier, richer and clearer. This feature enhances hue, saturation and luminance so that red, blue, green and white look more vivid. |
| Noise Reduction (Off/Low/Medium/High) | Reduces screen noise without compromising video quality. |
| Gamma (Low/Medium/High) | You can adjust brightness of dark area and middle gray level area of the picture.Low: Make dark and middle gray level area of the picture brighter.Medium: Express original picture levels.High: Make dark and middle gray level area of the picture darker. |
| Black Level (Low/High) | Low: The picture of the screen gets darker.High: The picture of the screen gets brighter.Auto: Realizing the black level of the screen and set it to High or Low automatically.Set black level of the screen to proper level.This function enables to select 'Low' or 'High' in the following mode: AV(NTSC-M), HDMI or Component. Otherwise, 'Black level' is set to 'Auto'. |
| Eye Care (On/Off) | *This feature is not available for all models.Adjust the brightness of the screen to prevent the screen from being too bright.Dims extremely bright pictures.This feature is disable in "Picture Mode-Vivid, Cinema, Intelligent Sensor". |
| Real Cinema (On/Off) | You can watch a cinema-like video by eliminating judder effect.Use this function when you watch movies.This function can work when TruMotion is off. |
| TruMotion 100Hz or TruMotion 200Hz (Off/Low/High) | *This feature is not available for all models.High: Provides smoother picture movement.Low: Provides smooth picture movement. Use this setting for standard use.Off: Use this setting when "High" and "Low" setting result in noise.TruMotion 100Hz can reduce perception of blur on fast moving scenes by displaying one hundred images per second.TruMotion 200Hz displays 200 scenes per second by combining advanced 100Hz technology with scanning backlight. This technology is verified from Intertek & TüV Rheinland.It is used for the best picture quality without any motion blur or judder when you enter a quick image or Film Source.This feature is disable in RGB-PC, HDMI-PC mode.If you enable "TruMotion 100Hz or TruMotion 200Hz", noise may appear on the screen.If this occurs, set "TruMotion 100Hz or TruMotion 200Hz" to "Off". |
PICTURE CONTROL
| Colour Gamut(Wide/Standard) | ·Standard: Mode to reproduce original colour according to the standard of input signal independent of the display characteristics.·Wide: Mode to use and set the rich colour area of the display.■Maximize the utilization for colour area that can be expressed. |
| Edge Enhancer(Off/Low/High) | *This feature is not available for all models.■Shows clearer and distinctive yet natural corners of the video. |
| xvYCC(Auto/off/on) | ■This is the function to express richer colour.■This function is enabled in "Picture mode - Cinema, Expert" when xvYCC signal is inputted through HDMI |
| OPC(On/Off) | *This feature is not available for all models.■As the technology to reduce the power consumption while keeping the same brightness, this has the effect of reducing power consumption, improvement in contrast. |
| Colour Standard(SD/HD) | ■Converts the colour of a different video to HD colour. This function is set for SD video (BT-601) and HD video (BT-709) colour format. |
| Expert Pattern(Off/Expert1/Expert2) | ■This is the pattern necessary for expert adjustment.■This function is enabled in "Picture Mode - Expert" when you watch DTV. |
| Colour Filter(Off/Red/Green/Blue) | ■This is the function to filter the specific colours of the video.You can use the RGB filter to set colour saturation and hue accurately. |
| Colour Temperature[Expert Control](Medium/Warm/Cool) | This is the function to adjust the overall colour of the screen to the feeling you want.Method: 2 PointsPattern: Inner, OuterRed/Green/Blue Contrast, Red/Green/Blue Brightness:The adjustment range is -50 ~ +50.b. Method: 10 point IREPattern: Inner / OuterIRE (Institute of Radio Engineers) is the unit to display the size of the video signal and can be set among 10, 20, 30 - 100. You can adjust Red, Green or Blue according to each setting.Luminance: This function displays calculated luminance value for 2.2 gamma. You can input luminance value you want at 100 IRE, than the target luminance value for 2.2 gamma is displayed at every 10 steps from 10 IRE to 90 IRE.Red/Green/Blue: The adjustment range is -50 ~ +50. |
| Colour Management System | As the tool used by the experts to make adjustments by using the test patterns, this does not affect other colours but can be used to selectively adjust the 6 colour areas (Red/Green/Blue/Cyan/Magenta/Yellow).Colour difference may not be distinctive even when you make the adjustments for the general video.Adjusts Red/Green/Blue/Yellow/Cyan/Magenta.Red/Green/Blue/Yellow/Cyan, Magenta Colour: The adjustment range is -30 ~ +30.Red/Green/Blue/Yellow/Cyan/Magenta Tint: The adjustment range is -30 ~ +30.This feature is disable in RGB-PC and HDMI (PC) mode. |
PICTURE CONTROL
PICTURE RESET
Settings of the selected picture modes return to the default factory settings.
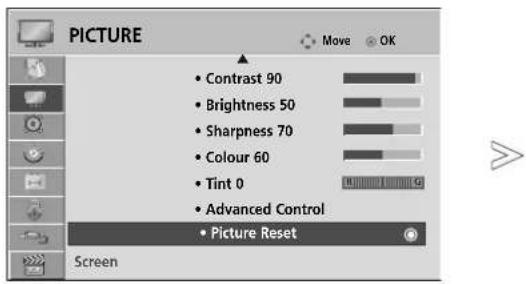
text_image
PICTURE • Contrast 90 • Brightness 50 • Sharpness 70 • Colour 60 • Tint 0 • Advanced Control • Picture Reset Screen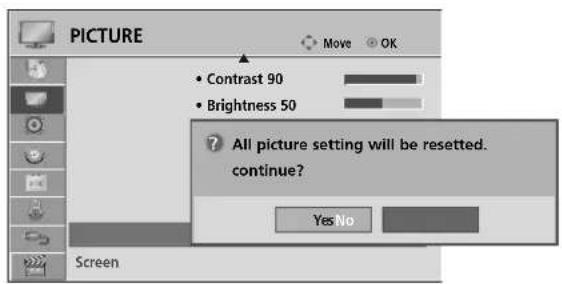
text_image
PICTURE • Contrast 90 • Brightness 50 ? All picture setting will be resetted. continue? Yes No Screen
Select PICTURE.
Select Picture Reset.
Select Yes or No.
Initialize the adjusted value.
- Press the MENU button to return to normal TV viewing.
- Press the RETURN button to move to the previous menu screen.
LED LOCAL DIMMING (Only 55LH9\*\*\* )
After analyzing the signal of the input video by areas of the screen, it adjusts the backlight to improve the contrast ratio.
This feature is disabled in "Picture Mode - Game".
In case that an external equipment itself goes to power saving mode after connecting external equipment, when Local Dimming is turned on at setting, it could be seen darker.
This is not to waste unnecessary power by turning off LED in case of dark screen resulted from analyzing input signal.
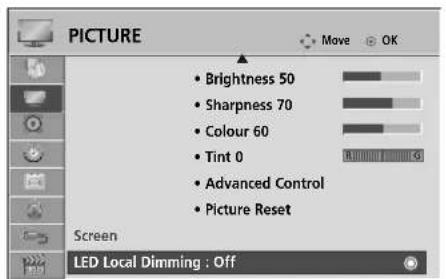
text_image
PICTURE • Brightness 50 • Sharpness 70 • Colour 60 • Tint 0 • Advanced Control • Picture Reset Screen LED Local Dimming : Off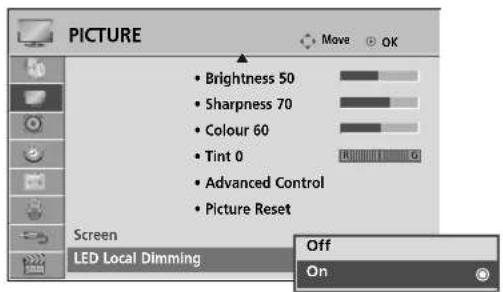
text_image
PICTURE • Brightness 50 • Sharpness 70 • Colour 60 • Tint 0 • Advanced Control • Picture Reset Screen LED Local Dimming Off On
Select PICTURE.
Select LED Local Dimming.
Select On or Off.
- Press the MENU button to return to normal TV viewing.
- Press the RETURN button to move to the previous menu screen.
PICTURE CONTROL
POWER INDICATOR (Only 55LH9\*\*\* )
It helps you adjust the brightness of moving LED and sound when power is turned on.
Standby Light
Determines whether to set the indicator light on the front of the TV to On or Off in standby mode.
Power Light
Determines whether to set the indicator light on the front of the TV to On or Off when the power turns on.
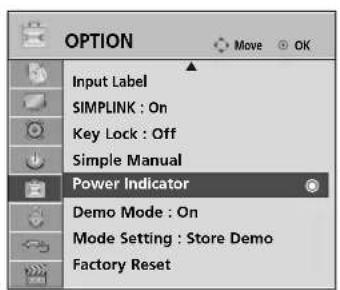
text_image
OPTION Move OK Input Label SIMPLINK : On Key Lock : Off Simple Manual Power Indicator Demo Mode : On Mode Setting : Store Demo Factory Reset
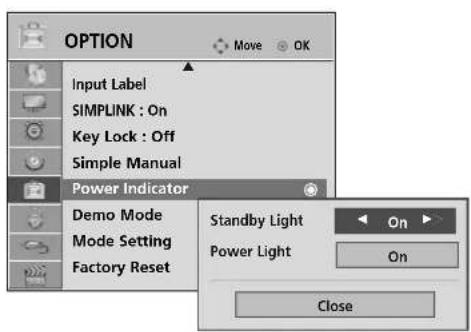
text_image
OPTION Move OK Input Label SIMPLINK : On Key Lock : Off Simple Manual Power Indicator Demo Mode Mode Setting Factory Reset Standby Light On Power Light On Close
Select OPTION.
Select Power Indicator.
Select Standby Light or Power Light.
Select your desired Source.
- Press the MENU button to return to normal TV viewing.
- Press the RETURN button to move to the previous menu screen.
DEMO MODE
Display the slide show to explain the various logo of this TV.
It is not possible to use Demo Mode in Home Use mode.
In Store Demo, Demo Mode is automatically set to O n
Once Demo Mode is set to Off in Store Demo, Demo Mode does not run and only the screen is reset.
The screen is reset automatically after 5 minutes in Demo Mode.
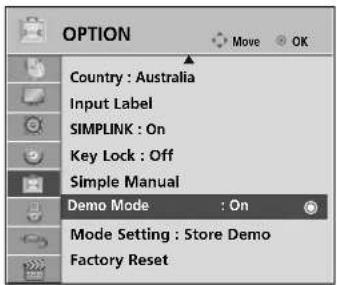
text_image
OPTION Country : Australia Input Label SIMPLINK : On Key Lock : Off Simple Manual Demo Mode : On Mode Setting : Store Demo Factory Reset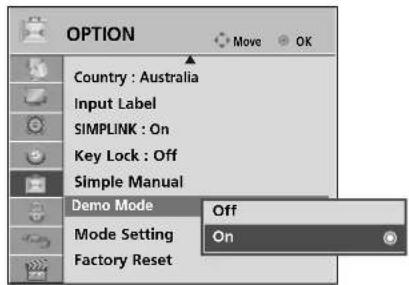
text_image
OPTION Country : Australia Input Label SIMPLINK : On Key Lock : Off Simple Manual Demo Mode Off Mode Setting On Factory Reset
Select OPTION
Select Demo Mode.
Select O n to show the various logo of TV.
Return to TV viewing.
If you want to stop the demo, press any button. (except for
MUTE, △ + , - button)
- Press the MENU button to return to normal TV viewing.
- Press the RETURN button to move to the previous menu screen.
PICTURE CONTROL
MODE SETTING
We recommend setting the TV to "Home Use" mode for the best picture in your home environment. "Store Demo" mode is an optimal setting for displaying at stores..
■ Image shown may differ from your TV.
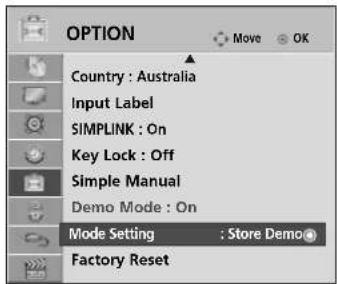
text_image
OPTION Country : Australia Input Label SIMPLINK : On Key Lock : Off Simple Manual Demo Mode : On Mode Setting : Store Demo Factory Reset
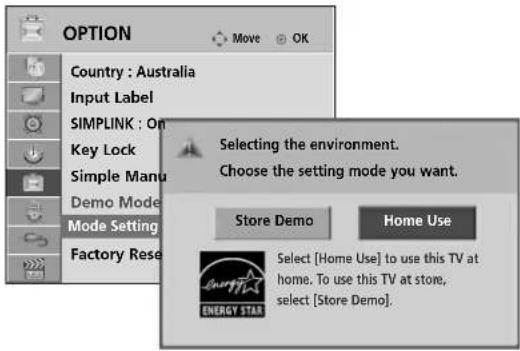
text_image
OPTION Country : Australia Input Label SIMPLINK : On Key Lock Simple Manu Demo Mode Mode Setting Factory Rese Move OK Selecting the environment. Choose the setting mode you want. Store Demo Home Use Select [Home Use] to use this TV at home. To use this TV at store, select [Store Demo]
Select OPTION.
Select Mode Setting.
Select Store Demo or Home Use.
Save.
- Press the MENU button to return to normal TV viewing.
- Press the RETURN button to move to the previous menu screen.
SOUND & LANGUAGE CONTROL
AUTO VOLUME LEVELER
AVL automatically remains on the same level of volume if you change programmes.
Because each broadcasting station has its own signal conditions, volume adjustment may be needed every time the channel is changed. This feature allows users to enjoy stable volume levels by making automatic adjustments for each programme.
If sound quality or volume is not at the level you want, it is recommended to use a separate home theater system or amp to cope with different user environments.
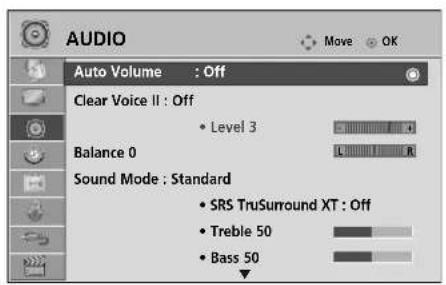
text_image
AUDIO Auto Volume : Off Clear Voice II : Off • Level 3 Balance 0 Sound Mode : Standard • SRS TruSurround XT : Off • Treble 50 • Bass 50
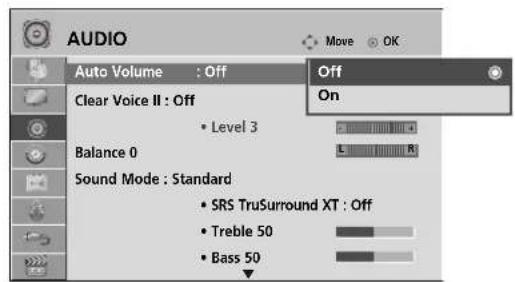
text_image
AUDIO Auto Volume : Off Clear Voice II : Off Level 3 Balance 0 Sound Mode : Standard SRS TruSurround XT : Off Treble 50 Bass 50 Move OK Off On
Select AUDIO.
Select Auto Volume.
Select On or Off.
- Press the MENU button to return to normal TV viewing.
- Press the RETURN button to move to the previous menu screen.
SOUND & LANGUAGE CONTROL
CLEAR VOICE II
By differentiating the human sound range from others, it helps users listen to human voices better.
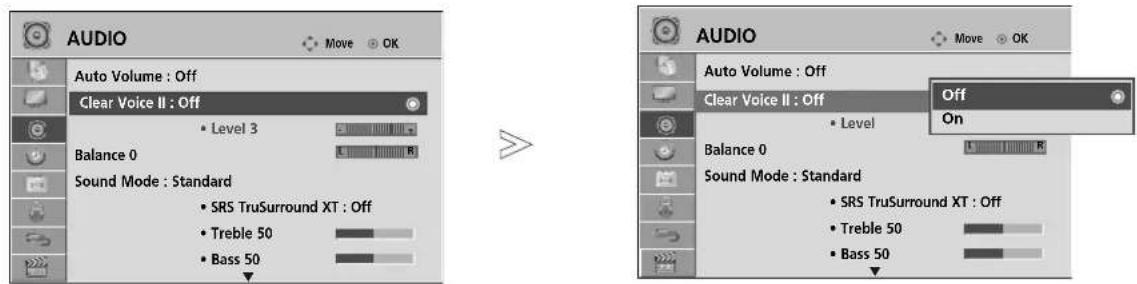

Select AUDIO.

Select Clear Voice II.
Select On or Off.
Adjustment for Clear Voice Level With selecting On
Select Level.
Make desired adjustment.
- If you select "On" for Clear Voice II, SRS TruSurround XT feature will not work.
-
Select levels from '-6' to '+6'.
-
Press the MENU button to return to normal TV viewing.
- Press the RETURN button to move to the previous menu screen.
You can select your preferred sound setting; Standard, Music, Cinema, Sport or Game and you can also adjust the Treble, Bass.
Sound Mode lets you enjoy the best sound without any Special adjustment as the TV sets the appropriate sound options based on the programme content.
Standard, Music, Cinema, Sport and Game are preset for optimum sound quality at the factory.
Standard Offers standard-quality sound.
Music Optimizes sound for listening to music.
Cinema Optimizes sound for watching movies.
Sport Optimizes sound for watching sports events.
Game Optimizes sound for playing games.
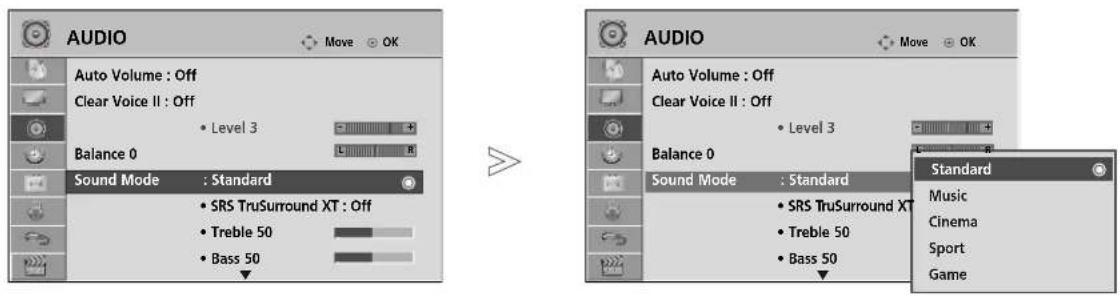
Select AUDIO.
Select Sound Mode.
Select Standard, Music, Cinema, Sport or Game.
- You can also adjust Sound Mode in the Q. Menu.
- Press the MENU button to return to normal TV viewing.
- Press the RETURN button to move to the previous menu screen.
SOUND & LANGUAGE CONTROL
SOUND SETTING ADJUSTMENT -USER MODE
Adjust the sound to suit your taste and room situations.
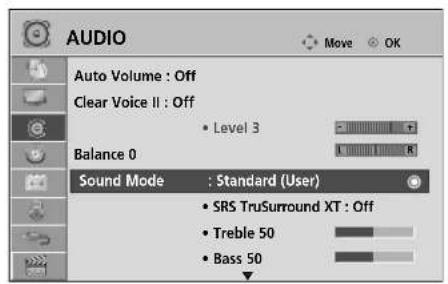
text_image
AUDIO Auto Volume : Off Clear Voice II : Off • Level 3 Balance 0 Sound Mode : Standard (User) • SRS TruSurround XT : Off • Treble 50 • Bass 50
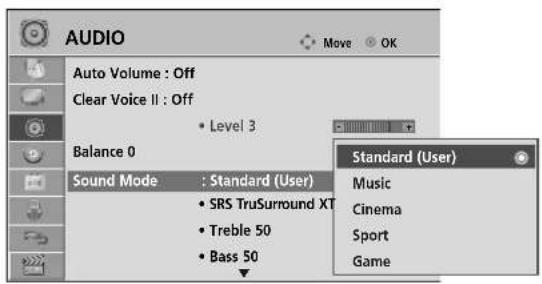
text_image
AUDIO Auto Volume : Off Clear Voice II : Off • Level 3 Balance 0 Sound Mode : Standard (User) • SRS TruSurround XT • Treble 50 • Bass 50 Standard (User) Music Cinema Sport Game
Select AUDIO.
Select Sound Mode.
Select Standard, Music, Cinema, Sport or Game.
Select Treble or Bass.
Set the desired sound level.
- Press the MENU button to return to normal TV viewing.
- Press the RETURN button to move to the previous menu screen.
SRS TRUSURROUND XT
Select this option to sound realistic.

Select AUDIO.

Select SRS TruSurround XT.
Select On or Off.
SRS TruSurround XT : TruSurround XT is a patented SRS technology that solves the problem of playing 5.1 multichannel content over two speakers.
- Press the MENU button to return to normal TV viewing.
- Press the RETURN button to move to the previous menu screen.
SRS is a trademark of SRS Labs, Inc.
TruSurround XT technology is incorporated under license from SRS Labs, Inc.
BALANCE
You can adjust the sound balance of the speakers to preferred levels.

text_image
AUDIO Auto Volume : Off Clear Voice II : Off • Level 3 Balance 0 Sound Mode : Standard • SRS TruSurround XT : Off • Treble 50 • Bass 50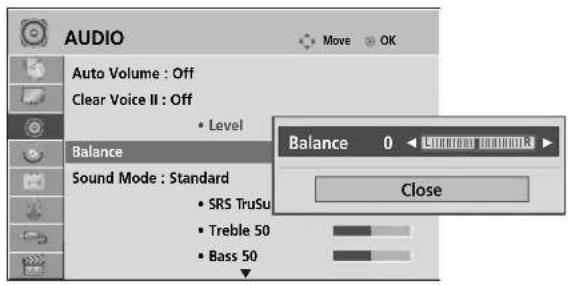
text_image
AUDIO Auto Volume : Off Clear Voice II : Off • Level Balance Sound Mode : Standard • SRS TruSu • Treble 50 • Bass 50 Balance 0 < L10000000000 Close
text_image
3 OK < > Make desired adjustment.- Press the MENU button to return to normal TV viewing.
- Press the RETURN button to move to the previous menu screen.
SOUND & LANGUAGE CONTROL
You can adjust the TV internal speaker status.
In AA, COMPONENT, RGB and HDMI1 with HDMI to DVI cable, the TV speaker can be operational even when there is no video signal.
If you wish to use an external Hi-Fi system, turn off the TV's internal speakers.
HDMI 5 doesn't support TV Speaker menu.
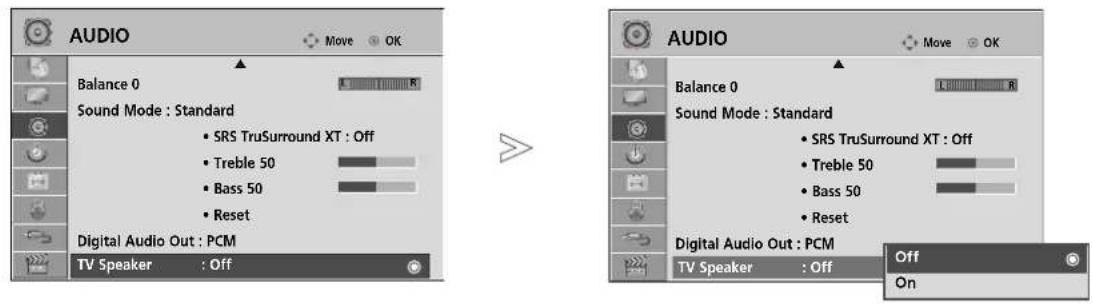
text_image
AUDIO Balance 0 Sound Mode : Standard • SRS TruSurround XT : Off • Treble 50 • Bass 50 • Reset Digital Audio Out : PCM TV Speaker : Off AUDIO Balance 0 Sound Mode : Standard • SRS TruSurround XT : Off • Treble 50 • Bass 50 • Reset Digital Audio Out : PCM TV Speaker : Off Off On
Select AUDIO.
Select TV Speaker.
Select On or Off.
NOTE
When the TV speaker is turned off while the Simplink home theater is operating, the sound output automatically switches to the Home theater speaker, but when the TV speaker is turned on, the sound output the TV speaker.
In TV Speaker menu, if you select Off, some audio menu may not work.
- Press the MENU button to return to normal TV viewing.
- Press the RETURN button to move to the previous menu screen.
SELECTING DIGITAL AUDIO OUT
This function allows you to select your preferred Digital Audio Output.
The TV can only output Dolby Digital if a channel is broadcast with Dolby Digital audio.
When Dolby Digital is available, selecting Auto in the Digital Audio Out menu will set SPDIF(Sony Philips Digital InterFace) output to Dolby Digital.
When Dolby Digital is not available, although Auto is selected in the Digital Audio Out menu, SPDIF output will be PCM(Pulse-code modulation).
Even if both Dolby Digital and Audio language have been set in a channel which broadcast Dolby Digital Audio, only Dolby Digital will be played.
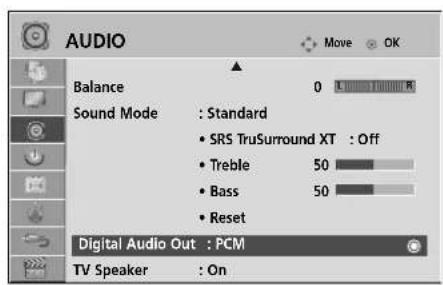
text_image
AUDIO Balance 0 L 1 R Sound Mode : Standard • SRS TruSurround XT : Off • Treble 50 • Bass 50 • Reset Digital Audio Out : PCM TV Speaker : On
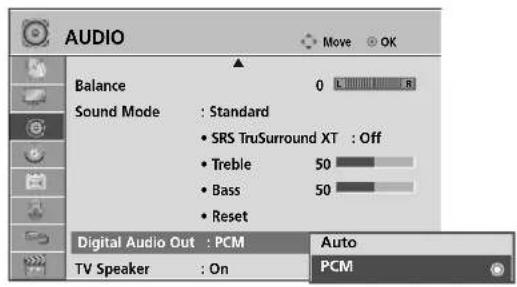
text_image
AUDIO Balance 0 L R Sound Mode : Standard • SRS TruSurround XT : Off • Treble 50 • Bass 50 • Reset Digital Audio Out : PCM Auto TV Speaker : On PCM
Select AUDIO.

Select Digital Audio Out.
Select Auto or PCM.
DOLBY DIGITAL PLUS
Manufactured under license from Dolby Laboratories. "Dolby" and the double-D symbol are trademarks of Dolby Laboratories.
- There is a possibility that when HDMI mode, some DVD players do not make SPDIF sound. At that time, set the output of the digital audio of the DVD player to PCM. (In HDMI, Dolby Digital Plus is not supported).
| Item | Audio Input | Digital Audio output |
| Auto(Speaker On) | MPEG | PCM |
| DD | DD | |
| DD+ | DD | |
| HE-AAC | PCM | |
| Auto(Speaker Off) | MPEG | PCM |
| DD | DD | |
| DD+ | DD | |
| HE-AAC | DD | |
| PCM | PCM | PCM |
- Press the MENU button to return to normal TV viewing.
- Press the RETURN button to move to the previous menu screen.
SOUND & LANGUAGE CONTROL
AUDIO RESET
Settings of the selected Sound Mode return to the default factory settings.
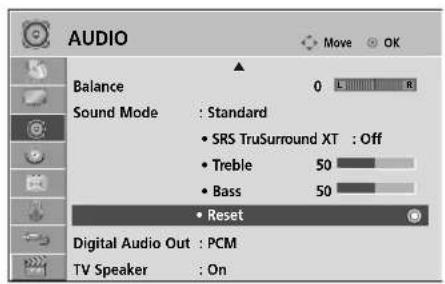
text_image
AUDIO Balance 0 L R Sound Mode : Standard • SRS TruSurround XT : Off • Treble 50 • Bass 50 • Reset Digital Audio Out : PCM TV Speaker : On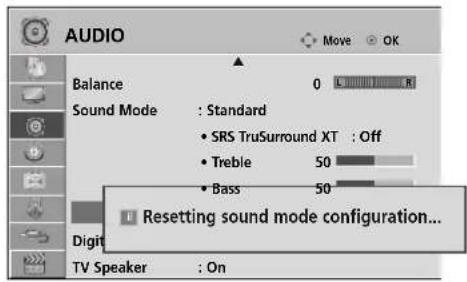
text_image
AUDIO Balance : Standard Sound Mode : Standard • SRS TruSurround XT : Off • Treble 50 • Bass 50 Resetting sound mode configuration... Digit TV Speaker : On
Select AUDIO.
Select Reset.
Initialize the adjusted value.
- Press the MENU button to return to normal TV viewing.
- Press the RETURN button to move to the previous menu screen.
STEREO RECEPTION (IN ANALOGUE MODE ONLY)
When a programme is selected, the sound information for the station appears with the programme number and station name.
Select Audio.
Select the sound output.
| Broadcast | On Screen Display |
| Mono | MONO |
| Stereo | STEREO |
■ Mono sound selection
If the stereo signal is weak in stereo reception, you can switch to mono. In mono reception, the clarity of sound is improved.
SOUND & LANGUAGE CONTROL
SPEAKER SOUND OUTPUT SELECTION
In AV, Component, RGB and HDMI mode, you can select output sound for the left and right loudspeakers.
Select the sound output.
L+R: Audio signal from audio L input is sent to the left loudspeaker and audio signal from audio R input is sent to the right loudspeaker.
L+L: Audio signal from audio L input is sent to left and right loudspeakers.
R+R: Audio signal from audio R input is sent to left and right loudspeakers.
LANGUAGE SELECTION (IN DIGITAL MODE ONLY)
The Audio function allows selection of a preferred language.
If audio data in a selected language is not broadcast, the default language audio will be played.
Use the Subtitle function when two or more subtitle languages are broadcast. If subtitle data in a selected language is not broadcast, the default language subtitle will be displayed.
When the languages you selected as the primary for Audio Language and Subtitle Language are not supported, you can select language in secondary category.

Select OPTION.

Select Audio Language or Subtitle Language.
Select your desired language.

Select OPTION.
Select Hard of Hearing(☐).
Select OOn Off.
- Press the RETURN button to move to the previous menu screen.
< Audio Language Selection >
▶ When two or more audio languages are broadcast, you can select the audio language.
Select Audio

Select an audio language.
Audio Language OSD Information
| Display | Status |
| N.A | Not Available |
| MPEG | MPEG Audio |
| DLD | Dolby Digital Audio |
| Audio for “Visual Impaired” | |
| ABC | Audio for “Hearing Impaired” |
| DCD | Dolby Digital Plus Audio |
| AAC | AAC Audio |
Select L+R, L+L or R+R.
< Subtitle Language Selection >
▶ When two or more subtitle languages are broadcast, you can select the subtitle language with the SUBTITLE button on the remote control.
▶ Press the button to select a subtitle language.
| Display | Status |
| N.A | Not Available |
| Teletext Subtitle | |
| Subtitle for “Hard of Hearing” |
- The audio/subtitles can be displayed in a simpler form with 1 to 3 characters broadcast by the service provider.
- When you select supplementary Audio (Audio for "Visual/Hearing Impaired") the TV may output a part of the Main audio.
TIME SETTING
CLOCK SETUP
The clock is set automatically when receiving a digital signal. (You can set the clock manually only if the TV has no DTV signal.)
You must set the time correctly before using on/off timer function.
When you select a Time Zone city, the TV time is set by the time offset information based on Time Zone and GMT (Greenwich Mean Time) which is received with the broadcast signal and the time is set automatically by a digital signal.
Once Clock is set in DTV mode, you cannot change time, but if the city name in Time Zone is changed into offset, you can change time.
If the Media Box is unplugged once or turn off with the AC power control switch on the Media Box, reset the Clock function.
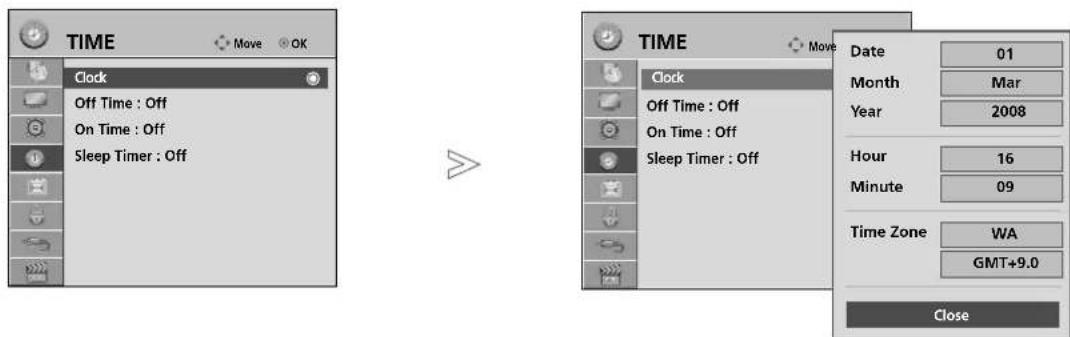
text_image
TIME Clock Off Time : Off On Time : Off Sleep Timer : Off TIME Clock Off Time : Off On Time : Off Sleep Timer : Off Date 01 Month Mar Year 2008 Hour 16 Minute 09 Time Zone WA GMT+9.0 Close
Select TIME.
Select Clock.
Select either the year, month, date, time or Time Zone.
Set the year, month, date, time or Time Zone option.
- Press the MENU button to return to normal TV viewing.
- Press the RETURN button to move to the previous menu screen.
AUTO ON/OFF TIME SETTING
The Off time function automatically switches the TV to standby at a preset time.
Two hours after the TV is switched on by the on time function it will automatically switch back to standby mode unless a button has been pressed.
The Off time function overrides the On time function if both are set to the same time.
The TV must be in standby mode for the On time to work.
If you turn the Media Box or TV off using the main power switch after setting On Time, the On Time function will not work because the main power is off.
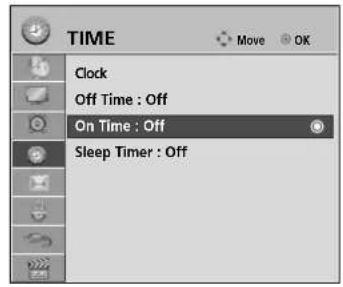
text_image
TIME Clock Off Time : Off On Time : Off Sleep Timer : Off
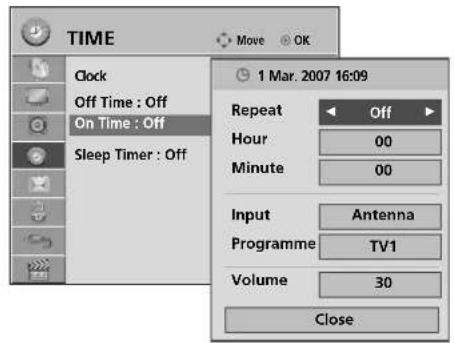
text_image
TIME Clock Off Time : Off On Time : Off Sleep Timer : Off 1 Mar. 2007 16:09 Repeat Off Hour 00 Minute 00 Input Antenna Programme TV1 Volume 30 Close
Select TIME.
Select Off Time or On Time.
Select Repeat.
Select Off, Once, Daily, Mon \~ Fri, Mon \~ Sat, Sat \~ Sun or Sun.


Set the hour.

Set the minutes.
- To cancel On/Off Time function, select Off.
- For On Time function only

Select Input.
Select your desired Source.
Set the programme.
Adjust volume level at switch-on.
- Press the MENU button to return to normal TV viewing.
- Press the RETURN button to move to the previous menu screen.
TIME SETTING
SLEEP TIMER SETTING
You do not have to remember to switch the TV off before you go to sleep.
The sleep timer automatically switches the TV to standby after the preset time has elapsed.
The Sleep Timer turns the TV and Media Box off at the preset time.
Note that this setting is cleared when the TV and Media Box is turned off.


Select Sleep Timer.

Select Off, 10, 20, 30, 60, 90, 120, 180 or 240 min..
- When you switch the TV off, the preset sleep timer is cancelled.
- You can also adjust Sleep Timer in the TIME menu.
PARENTAL CONTROL / RATINGS
SET PASSWORD & LOCK SYSTEM
Enter the password, press '0', '0', '0', '0' on the remote control handset.
If a channel is locked, enter the password to unlock it temporarily.

text_image
LOCK Lock System : Off Set Password Block Programme Parental Guidance : Blocking Off Input Block
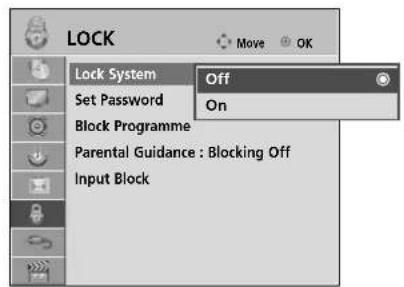
text_image
LOCK Lock System Set Password Block Programme Parental Guidance : Blocking Off Input Block Off On
Select LOCK.
Select Lock System.
Select On.
Set the password.
Input a 4-digit password. Be sure to remember this number! Re-enter new password for confirm.
- If you forget your password, press '7', '7', '7', '7' on the remote control handset.
- Press the MENU button to return to normal TV viewing.
- Press the RETURN button to move to the previous menu screen.
PARENTAL CONTROL / RATINGS
BLOCK PROGRAMME
Blocks any programme that you do not want to watch or that you do not want your children to watch.
It is available to use this function in Lock System "On".
Enter a password to watch a blocked programme.
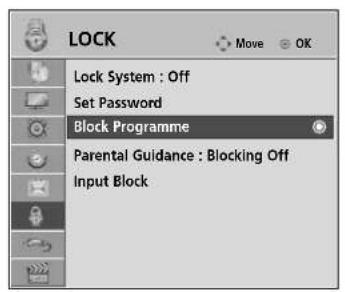
text_image
LOCK Lock System : Off Set Password Block Programme Parental Guidance : Blocking Off Input Block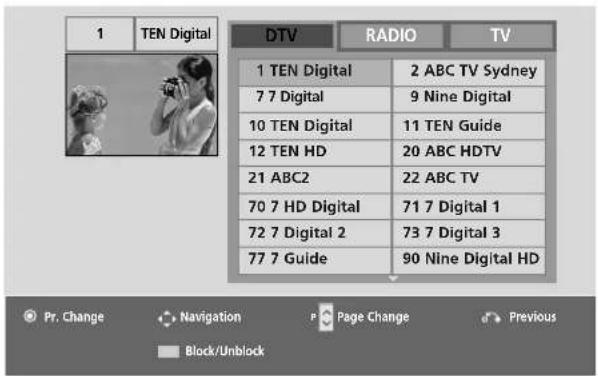
text_image
1 TEN Digital DTV RADIO TV 1 TEN Digital 2 ABC TV Sydney 7 7 Digital 9 Nine Digital 10 TEN Digital 11 TEN Guide 12 TEN HD 20 ABC HDTV 21 ABC2 22 ABC TV 70 7 HD Digital 71 7 Digital 1 72 7 Digital 2 73 7 Digital 3 77 7 Guide 90 Nine Digital HD Pr. Change Navigation Page Change Previous Block/Unblock
Select LOCK.
Select Block Programme.
Enter the Block Programme.
(GREEN) Select a programme to be locked.
- Press the MENU button to return to normal TV viewing.
- Press the RETURN button to move to the previous menu screen.
PARENTAL CONTROL (IN DIGITAL MODE ONLY)
This function operates according to information from the broadcasting station. Therefore if the signal has incorrect information, this function does not operate.
A password is required to gain access to this menu.
This set is programmed to remember which option it was last set to even if you switch the set off.
Prevents children from watching certain adult's TV programmes, according to the ratings limit set.
Enter a password to watch a blocked programme.
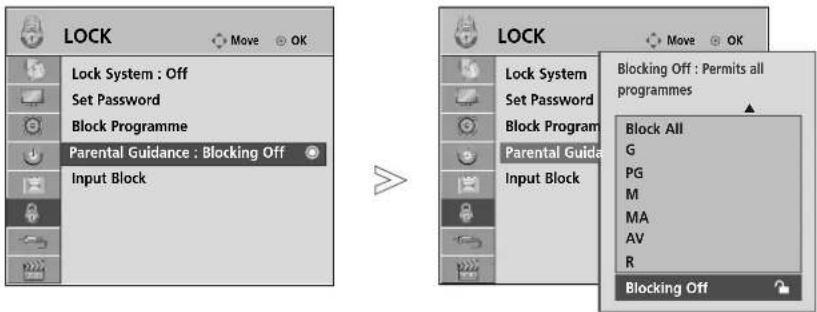
text_image
LOCK Move OK Lock System : Off Set Password Block Programme Parental Guidance : Blocking Off Input Block LOCK Move OK Lock System Set Password Block Program Parental Guida Input Block Blocking Off : Permits all programmes Block All G PG M MA AV R Blocking Off
Select LOCK.
Select Parental Guidance.
Make appropriate adjustments.
- Press the MENU button to return to normal TV viewing.
- Press the RETURN button to move to the previous menu screen.
PARENTAL CONTROL / RATINGS
EXTERNAL INPUT BLOCKING
Enables you to block an input.
It is available to use this function in Lock System "On".
HDMI 5 doesn't support Input Block menu.
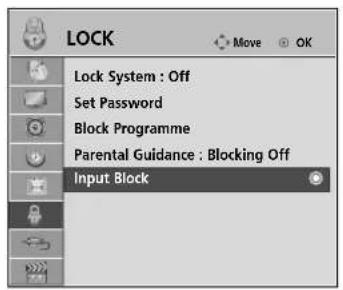
text_image
LOCK Lock System : Off Set Password Block Programme Parental Guidance : Blocking Off Input Block
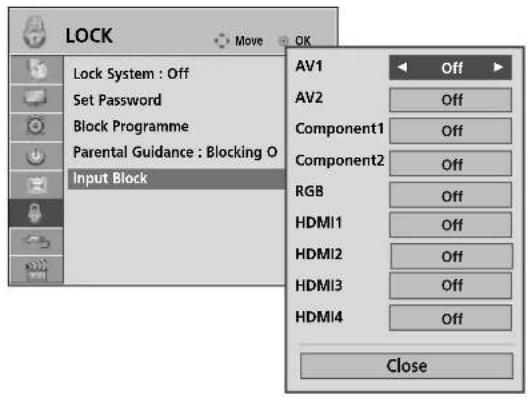
text_image
LOCK Lock System : Off Set Password Block Programme Parental Guidance : Blocking O Input Block AV1 Off AV2 Off Component1 Off Component2 Off RGB Off HDMI1 Off HDMI2 Off HDMI3 Off HDMI4 Off Close
Select LOCK.
Select Input Block.
Select input source.
Select On or Off.
Save.
- Press the MENU button to return to normal TV viewing.
- Press the RETURN button to move to the previous menu screen.
KEY LOCK
The TV can be set so that the remote control is required to control it. This feature can be used to prevent unauthorized viewing.
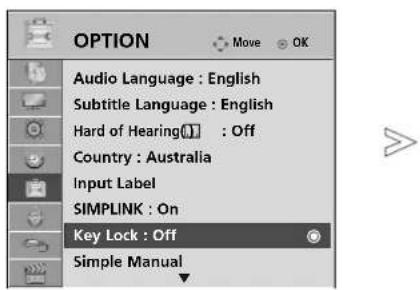
text_image
OPTION Audio Language : English Subtitle Language : English Hard of Hearing: Off Country : Australia Input Label SIMPLINK : On Key Lock : Off Simple Manual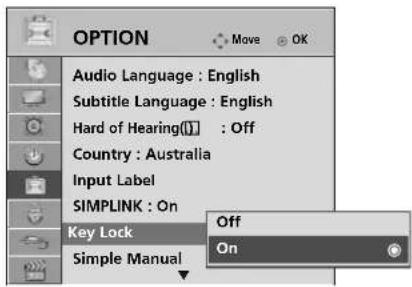
text_image
OPTION Audio Language : English Subtitle Language : English Hard of Hearing(I) : Off Country : Australia Input Label SIMPLINK : On Key Lock Simple Manual Off On
Select OPTION.
Select Key Lock.
Select On or Off.
- In Key Lock 'O' nif the TV is turned off, press the ⏻ / I, INPUT, P ▲ or ▼ (or P ∧ ∨) button on the TV or POWER INPUT, P ∧ ∨ or NUMBER buttons on the remote control then the set will be turned on.
-
With the Key Lock On the display ' 🔑 Key Lock On' appears on the screen if any button on the front panel is pressed while viewing the TV.
-
Press the MENU button to return to normal TV viewing.
- Press the RETURN button to move to the previous menu screen.
TELETEXT
This feature is not available in all countries.
Teletext is a free service broadcast by most TV stations which gives up-to-the-minute information on news, weather, television programmes, share prices and many other topics.
The teletext decoder of this TV can support the SIMPLE, TOP and FASTEXT systems. SIMPLE (standard teletext) consists of a number of pages which are selected by directly entering the corresponding page number. TOP and FASTEXT are more modern methods allowing quick and easy selection of teletext information.
SWITCH ON/OFF
Press the TEXT button to switch to teletext. The initial page or last page viewed appears on the screen.
Two page numbers, TV station name, date and time are displayed on the screen headline. The first page number indicates your selection, while the second shows the current page displayed.
Press the TEXT button to switch off teletext. The previous mode reappears.
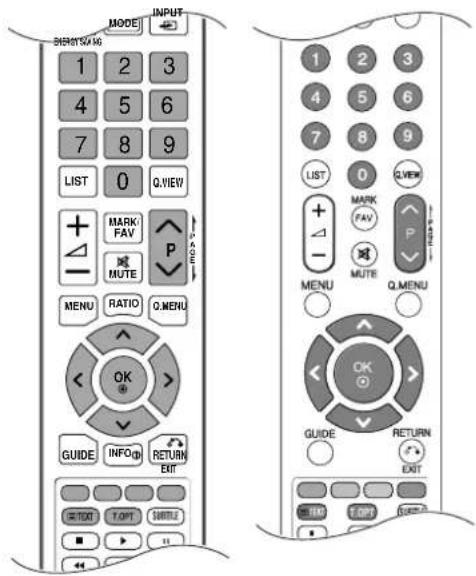
text_image
MODE INPUT ENERGY SAG 1 2 3 4 5 6 7 8 9 LIST 0 Q.VIEW + MARK FAV P - MUTE MENU RATIO Q.MENU OK GUIDE INFO RETURN EXIT 1 2 3 4 5 6 7 8 9 LIST 0 Q.VIEW + MARK FAV P - MUTE Q.MENU MENU OK GUIDE RETURN EXIT T.OPT SUBTITLE T.OPTSIMPLE TEXT
■ Page selection
① Enter the desired page number as a three digit number with the NUMBER buttons. If during selection you press a wrong number, you must complete the three digit number and then re-enter the correct page number.
2 The P ∧ ∨ button can be used to select the preceding or following page.
TOP TEXT
The user guide displays four fields-red, green, yellow and blue at the bottom of the screen. The yellow field denotes the next group and the blue field indicates the next block.
■ Block / group / page selection
① With the blue button you can progress from block to block.
② Use the yellow button to proceed to the next group with automatic overflow to the next block.
③ With the green button you can proceed to the next existing page with automatic overflow to the next group. Alternatively the P ∧ button can be used.
4 The red button returns to the previous selection. Alternatively the P √ button can be used.
■ Direct page selection
As with SIMPLE teletext mode, you can select a page by entering it as a three digit number using the NUMBER buttons in TOP mode.
FASTEXT
The teletext pages are colour coded along the bottom of the screen and are selected by pressing the corresponding coloured button.
Page selection
① Press the T.OPT button and then use ∧ ∨ button to select □ menu. Display the index page.
② You can select the pages which are colour coded along the bottom line with corresponding coloured buttons.
③ AS with SIMPLE teletext mode, you can select a page by entering its three digit page number with the NUMBER buttons in FASTEXT mode.
4 The P ∧ ∨ button can be used to select the preceding or following page.
SPECIAL TELETEXT FUNCTIONS
■ Press the T. OPT button and then use ∧ ∨ button to select the Text Option menu.

Index
Select the each index page.

Time
When viewing a TV programme, select this menu to display the time at the top right hand corner of the screen.
In the teletext mode, press this button to select a sub page number. The sub page number is displayed at the bottom of the screen. To hold or change the sub page, press the RED/GREEN, < > or NUMBER buttons.

text_image
Text Option Index Time Hold Reveal Update Close
Hold
Stops the automatic page change which will occur if a teletext page consists of 2 or more sub pages. The number of sub pages and the sub page displayed is, usually, shown on the screen below the time. When this menu is selected the stop symbol is displayed at the top left-hand corner of the screen and the automatic page change is inactive.

Reveal
Select this menu to display concealed information, such as solutions to riddles or puzzles.

Update
Displays the TV picture on the screen while waiting for a new teletext page. The display will appear at the top left hand corner of the screen. When the updated page is available then display will change to the page number. Select this menu again to view the updated teletext page.
APPENDIX
TROUBLESHOOTING
| The TV does not operate properly. | |
| The remote control does not work | Check to see if there is any object between the TV and the remote control causing an obstruction. Ensure you are pointing the remote control directly at the TV.Ensure that the batteries are installed with correct polarity (+ to +, - to -).Install new batteries. |
| Power is suddenly turned off | Is the sleep timer set?Check the power control settings. Has the Power supply been interrupted.If the TV is switched on and there is no input signal, it will switch off automatically after 15 minutes. |
| The video function does not work. | |
| No picture & No sound | Check whether the TV is switched on.Try another channel. The problem may be with the broadcast.Is the power cord inserted correctly into the mains?Check your antenna direction and/or location.Test the mains outlet by plugging another TV into the same outlet. |
| Picture appears slowly after switching on | This is normal, the image is muted during the TV startup process. Please contact your service centre, if the picture has not appeared after five minutes. |
| No or poor colour or poor picture | Adjust Colour in menu option.Allow a sufficient distance between the TV and the VCR.Try another channel. The problem may be with the broadcast.Are the video cables installed properly?Activate any function to restore the brightness of the picture. |
| Horizontal/vertical bars or picture shaking | Check for local interference such as an electrical appliance or power tool. |
| Poor reception on some channels | Station or cable channel experiencing problems, tune to another station.Station signal is weak, reposition the antenna to receive weaker stations.Check for sources of possible interference. |
| Lines or streaks in pictures | Check antenna (Change the position of the antenna). |
| No picture when connecting HDMI | Check that your HDMI cable is version 1.3 or higher.If the HDMI cables don’t support HDMI version 1.3, flickering or no screen display can result. Please use the latest cables that support at least HDMI version 1.3. |
The audio function does not work.
| Picture OK & No sound | Press the △ + or --button.Sound muted? Press MUTE button.Try another channel. The problem may be with the broadcast.Are the audio cables installed properly? |
| No output from one of the speakers | Adjust Balance in menu option. |
| Unusual sound from inside the TV | A change in ambient humidity or temperature may result in an unusual noise when the TV is switched on or off and does not indicate a fault with the TV. |
| No sound when connecting HDMI or USB | Check HDMI cable over version 1.3.Check USB cable over version 2.0.*This feature is not available for all models. |
There is a problem in PC mode. (Only PC mode applied)
| The signal is out of range (Invalid format) | Adjust resolution, horizontal frequency, or vertical frequency.Check the input source. |
| Vertical bar or stripe on background & Horizontal Noise & Incorrect position | Use Auto configure or adjust clock, phase, or H/V position. (Option) |
| Screen colour is unstable or single colour | Check the signal cable.Reinstall the PC video card. |
There is a problem with PICTURE settings.
| When the user changes the picture settings, the TV automatically converts back to the initial settings after a certain period of time. | ■ It means that the TV is currently set to Store Demo mode.To switch to Home use mode you should do the followings:From the TV Menu, choose OPTION -> Choose Mode Setting -> Choose Home use. Now, you have completed switching to the Home use mode. |
Wireless Connection Problems
TV doesn't connect to the Media Box.
Message on the screen says, "Connecting wirelessly. Please wait." But the TV never connects.
- Please check if Media Box's power switch is on. There's a master switch on the back of box.
- Please check if Media Box's front LED is switched on.
- Adjust the position of the Media Box. Temporarily place the media box in front of the TV, facing the TV about 3 feet away to see if it will connect. If it doesn't, the Media Box may be defective.
TV keeps losing the connection with the Media Box.
"Connecting wirelessly. Please wait." while watching TV through a wireless connection.
■ There is most likely an obstruction blocking the signal.
■ Adjust the location of the Media Box.
Video Issues
Horizontal stripe/screen vibration momentarily occurs on the screen.
There is most likely an obstruction blocking the signal. Even people walking between the signal can cause this. Adjust the location of the Media Box.
NOTE
■ This product is only for home use.
- Do not use this product in medical institutions or near medical devices. It may cause some medical devices to malfunction.
If there are two wireless TV sets or Media Boxes within LOS (Line Of Sight) 32.8 feet (10 m), they may interfere with each other and wireless connection may fail.
■ Wireless device used to this instrument could be set up and used only to this instrument.
If you use other 60GHz frequency bandwidth wireless equipments with this product, it may affect the wireless connectivity by interference. (To see RF specification, refer to P.119)
MAINTENANCE
Early malfunctions can be prevented. Careful and regular cleaning can prolong the life of your new TV.
Caution: Be sure to switch the power off and unplug the power cord before you begin any cleaning.
Cleaning the Screen
A good way to keep the dust off your screen for a while is to wet a soft cloth in a mixture of lukewarm water and a little fabric softener or dish washing detergent, Wring the cloth until it is almost dry, and then use it to wipe the screen,
2 Ensure there is no excess water on the screen, Allow any water or dampness to evaporate before switching on,
Cleaning the Cabinet
■ To remove dirt or dust, wipe the cabinet with a soft, dry, lint-free cloth,
■ Do not to use a wet cloth,
Extended Absence
CAUTION
▶ If you expect to leave your TV dormant for prolonged periods (such as a holiday), unplug the power cord to protect against possible damage from lightning or power surges,
RF SPECIFICATIONS
Symbol Parameter Min. Typical Max. Units
| Fc (HRP) | HRP Frequency Range | 59.4 | 60.48 | 61.56 | GHz |
| Fc (LRP1) | LRP1 Frequency Range | 60.272375 | 60.321375 | 60.370375 | GHz |
| Fc (LRP2) | LRP2 Frequency Range | 60.431 | 60.480 | 60.529 | GHz |
| Fc (LRP3) | LRP3 Frequency Range | 60.589625 | 60.638625 | 60.687625 | GHz |
| BW (HRP) | HRP Occupied Bandwidth | 1.76 | GHz | ||
| BW (LRP) | LRP Occupied Bandwidth | 92 | MHz | ||
| P HREIRP | HRP Radiated Power (EIRP) | 23 | 25 | 27 | dBm |
| P LREIRP | LRP Radiated Power (EIRP) | 8 | 11 | 21 | dBm |
| G HRTX | HRP Transmit Antenna Gain | 15 | 17 | dBi | |
| G LRTX | LRP Transmit Antenna Gain | 3 | 13 | dBi |
APPENDIX
PRODUCT SPECIFICATIONS
| MODELS | 47LH8*** | 55LH8*** | 55LH9*** | |
| 47LH80YD-AB | 55LH80YD-AB | 55LH95QD-AA | ||
| Dimensions(Width x Height x Depth) | with stand | 1179.0 x 851.4 x 398.8 mm46.4 x 33.5 x 15.7 inches | 1373.0 x 964.3 x 454.2 mm54.0 x 37.9 x 17.8 inches | 1295.7 x 879.0 x 378.0 mm51.0 x 34.6 x 14.8 inches |
| without stand | 1179.0 x 780.6 x 105.9 mm46.4 x 30.7 x 4.1 inches | 1373.0 x 888.5 x 106.9 mm54.0 x 34.9 x 4.2 inches | 1295.7 x 798.0 x 24.8(max 37.5) mm51.0 x 31.4 x 0.9(max 1.4) inches | |
| Weight | with stand | 25.4 kg / 55.9 lbs | 39.2 kg / 86.4 lbs | 36.8 kg/ 81.1 lbs |
| without stand | 21.6 kg / 47.6 lbs | 33.8 kg / 74.5 lbs | 30.0 kg/ 66.1 lbs | |
| MODELS Media Box(ASW1000-AA) | ||||
| Dimensions(Width x Height x Depth) | 426.0 x 68.6 x 234.5 mm16.7 x 2.7 x 9.5 inches | |||
| Weight | 2.6 kg / 5.7 lbs | |||
| Power requirement | AC100-240V~ 50/60Hz | |||
| Environment condition | Operating Temperature | 0 ~ 40°C / 32 ~ 104°FLess than 80% | ||
| Operating Humidity | ||||
| Storage Temperature | -20 ~ 60°C / -4 ~ 140°FLess than 85% | |||
| Storage Humidity | ||||
| Supported movie files | Refer to p. 70 ~ 71 | |||
| Digital | Analogue | |
| Television System | DVB-T | PAL B/B |
| Programme Coverage | VHF 06-12, UHF 27-69 | B/B: VHF/UHF 0-75, CATV: 2-44 |
| External Antenna Impedance | 75 ohm75 ohm |
■ The specifications shown above may be changed without prior notice for quality improvement.
Open source software notice
The following GPL executables and LGPL/MPL libraries used in this product are subject to the GPL2.0/LGPL2.1/MPL1.1 License Agreements:
GPL EXECUTABLES:
- Linux kernel 2.6
- busybox
- |zo
LGPL LIBRARIES:
• uClibc
MPL LIBRARIES:
- Nanox
LG Electronics offers to provide source code to you on CD-ROM for a charge covering the cost of performing such distribution, such as the cost of media, shipping and handling upon e-mail request to LG Electronics at: opensource@lge.com
This offer is valid for a period of three(3) years from the date of the distribution of this product by LG Electronics.
You can obtain a copy of the GPL, LGPL, MPL licenses from http://www.gnu.org/licenses/old-licenses/gpl-2.0.html, http://www.gnu.org/licenses/old-licenses/lgpl-2.1.html, http://www.mozilla.org/MPL/MPL-1.1.html. Also you can obtain the translation of GPL, LGPL licenses from http://www.gnu.org/licenses/old-licenses/gpl-2.0-translations.html, http://www.gnu.org/licenses/old-licenses/lgpl-2.1-translations.html.
This software is based in part on the work of the Independent JPEG Group copyright © 1991 – 1998, Thomas G. Lane.
This product includes
- libpng library : copyright © 2004 Glenn Randers-Pehrson
• Zlib compression library: Copyright © 1995-2002 Jean-loup Gailly and Mark Adler. - Tinyxml library : copyright (c) 2000-2006 Lee Thomason
OPEN SOURCE LICENSE
GNU GENERAL PUBLIC LICENSE
Version 2, June 1991
Copyright (C) 1989, 1991 Free Software Foundation, Inc., 51 Franklin Street, Fifth Floor, Boston, MA 02110-1301 USA Everyone is permitted to copy and distribute verbatim copies of this license document, but changing it is not allowed.
Preamble
The licenses for most software are designed to take away your freedom to share and change it. By contrast, the GNU General Public License is intended to guarantee your freedom to share and change free software--to make sure the software is free for all its users. This General Public License applies to most of the Free Software Foundation's software and to any other program whose authors commit to using it. (Some other Free Software Foundation software is covered by the GNU Lesser General Public License instead.) You can apply it to your programs, too.
When we speak of free software, we are referring to freedom, not price. Our General Public Licenses are designed to make sure that you have the freedom to distribute copies of free software (and charge for this service if you wish), that you receive source code or can get it if you want it, that you can change the software or use pieces of it in new free programs; and that you know you can do these things.
To protect your rights, we need to make restrictions that forbid anyone to deny you these rights or to ask you to surrender the rights. These restrictions translate to certain responsibilities for you if you distribute copies of the software, or if you modify it.
For example, if you distribute copies of such a program, whether gratis or for a fee, you must give the recipients all the rights that you have. You must make sure that they, too, receive or can get the source code. And you must show them these terms so they know their rights.
We protect your rights with two steps: (1) copyright the software, and (2) offer you this license which gives you legal permission to copy, distribute and/or modify the software.
Also, for each author's protection and ours, we want to make certain that everyone understands that there is no warranty for this free software. If the software is modified by someone else and passed on, we want its recipients to know that what they have is not the original, so that any problems introduced by others will not reflect on the original authors' reputations.
Finally, any free program is threatened constantly by software patents. We wish to avoid the danger that redistributors of a free program will individually obtain patent licenses, in effect making the program proprietary. To prevent this, we have made it clear that any patent must be licensed for everyone's free use or not licensed at all.
The precise terms and conditions for copying, distribution and modification follow.
GNU GENERAL PUBLIC LICENSE
TERMS AND CONDITIONS FOR COPYING, DISTRIBUTION AND MODIFICATION
- This License applies to any program or other work which contains a notice placed by the copyright holder saying it may be distributed under the terms of this General Public License. The "Program", below, refers to any such program or work, and a "work based on the Program" means either the Program or any derivative work under copyright law: that is to say, a work containing the Program or a portion of it, either verbatim or with modifications and/or translated into another language. (Hereinafter, translation is included without limitation in the term "modification".) Each licensee is addressed as "you".
Activities other than copying, distribution and modification are not covered by this License; they are outside its scope. The act of running the Program is not restricted, and the output from the Program is covered only if its contents constitute a work based on the Program (independent of having been made by running the Program). Whether that is true depends on what the Program does.
- You may copy and distribute verbatim copies of the Program's source code as you receive it, in any medium, provided that you conspicuously and appropriately publish on each copy an appropriate copyright notice and disclaimer of warranty; keep intact all the notices that refer to this License and to the absence of any warranty; and give any other recipients of the Program a copy of this License along with the Program.
You may charge a fee for the physical act of transferring a copy, and you may at your option offer warranty protection in exchange for a fee.
- You may modify your copy or copies of the Program or any portion of it, thus forming a work based on the Program, and copy and distribute such modifications or work under the terms of Section 1 above, provided that you also meet all of these conditions:
a) You must cause the modified files to carry prominent notices stating that you changed the files and the date of any change.
b) You must cause any work that you distribute or publish, that in whole or in part contains or is derived from the Program or any part thereof, to be licensed as a whole at no charge to all third parties under the terms of this License.
c) If the modified program normally reads commands interactively when run, you must cause it, when started running for such interactive use in the most ordinary way, to print or display an announcement including an appropriate copyright notice and a notice that there is no warranty (or else, saying that you provide a warranty) and that users may redistribute the program under these conditions, and telling the user how to view a copy of this License. (Exception: if the Program itself is interactive but does not normally print such an announcement, your work based on the Program is not required to print an announcement.)
These requirements apply to the modified work as a whole. If identifiable sections of that work are not derived from the Program, and can be reasonably considered independent and separate works in themselves, then this License, and its terms, do not apply to those sections when you distribute them as separate works. But when you distribute the same sections as part of a whole which is a work based on the Program, the distribution of the whole must be on the terms of this License, whose permissions for other licensees extend to the entire whole, and thus to each and every part regardless of who wrote it.
Thus, it is not the intent of this section to claim rights or contest your rights to work written entirely by you; rather, the intent is to exercise the right to control the distribution of derivative or collective works based on the Program.
In addition, mere aggregation of another work not based on the Program with the Program (or with a work based on the Program) on a volume of a storage or distribution medium does not bring the other work under the scope of this License.
- You may copy and distribute the Program (or a work based on it, under Section 2) in object code or executable form under the terms of Sections 1 and 2 above provided that you also do one of the following:
a) Accompany it with the complete corresponding machine-readable source code, which must be distributed under the terms of Sections 1 and 2 above on a medium customarily used for software interchange; or,
b) Accompany it with a written offer, valid for at least three years, to give any third party, for a charge no more than your cost of physically performing source distribution, a complete machine-readable copy of the corresponding source code, to be distributed under the terms of Sections 1 and 2 above on a medium customarily used for software interchange; or,
c) Accompany it with the information you received as to the offer to distribute corresponding source code. (This alternative is allowed only for noncommercial distribution and only if you received the program in object code or executable form with such an offer, in accord with Subsection b above.)
The source code for a work means the preferred form of the work for making modifications to it. For an executable work, complete source code means all the source code for all modules it contains, plus any associated interface definition files, plus the scripts used to control compilation and installation of the executable. However, as a special exception, the source code distributed need not include anything that is normally distributed (in either source or binary form) with the major components (compiler, kernel, and so on) of the operating system on which the executable runs, unless that component itself accompanies the executable.
APPENDIX
If distribution of executable or object code is made by offering access to copy from a designated place, then offering equivalent access to copy the source code from the same place counts as distribution of the source code, even though third parties are not compelled to copy the source along with the object code.
-
You may not copy, modify, sublicense, or distribute the Program except as expressly provided under this License. Any attempt otherwise to copy, modify, sublicense or distribute the Program is void, and will automatically terminate your rights under this License. However, parties who have received copies, or rights, from you under this License will not have their licenses terminated so long as such parties remain in full compliance.
-
You are not required to accept this License, since you have not signed it. However, nothing else grants you permission to modify or distribute the Program or its derivative works. These actions are prohibited by law if you do not accept this License. Therefore, by modifying or distributing the Program (or any work based on the Program), you indicate your acceptance of this License to do so, and all its terms and conditions for copying, distributing or modifying the Program or works based on it.
-
Each time you redistribute the Program (or any work based on the Program), the recipient automatically receives a license from the original licensor to copy, distribute or modify the Program subject to these terms and conditions. You may not impose any further restrictions on the recipients' exercise of the rights granted herein. You are not responsible for enforcing compliance by third parties to this License.
-
If, as a consequence of a court judgment or allegation of patent infringement or for any other reason (not limited to patent issues), conditions are imposed on you (whether by court order, agreement or otherwise) that contradict the conditions of this License, they do not excuse you from the conditions of this License. If you cannot distribute so as to satisfy simultaneously your obligations under this License and any other pertinent obligations, then as a consequence you may not distribute the Program at all. For example, if a patent license would not permit royalty-free redistribution of the Program by all those who receive copies directly or indirectly through you, then the only way you could satisfy both it and this License would be to refrain entirely from distribution of the Program.
If any portion of this section is held invalid or unenforceable under any particular circumstance, the balance of the section is intended to apply and the section as a whole is intended to apply in other circumstances.
It is not the purpose of this section to induce you to infringe any patents or other property right claims or to contest validity of any such claims; this section has the sole purpose of protecting the integrity of the free software distribution system, which is implemented by public license practices. Many people have made generous contributions to the wide range of software distributed through that system in reliance on consistent application of that system; it is up to the author/donor to decide if he or she is willing to distribute software through any other system and a licensee cannot impose that choice.
This section is intended to make thoroughly clear what is believed to be a consequence of the rest of this License.
-
If the distribution and/or use of the Program is restricted in certain countries either by patents or by copyrighted interfaces, the original copyright holder who places the Program under this License may add an explicit geographical distribution limitation excluding those countries, so that distribution is permitted only in or among countries not thus excluded. In such case, this License incorporates the limitation as if written in the body of this License.
-
The Free Software Foundation may publish revised and/or new versions of the General Public License from time to time. Such new versions will be similar in spirit to the present version, but may differ in detail to address new problems or concerns.
Each version is given a distinguishing version number. If the Program specifies a version number of this License which applies to it and "any later version", you have the option of following the terms and conditions either of that version or of any later version published by the Free Software Foundation. If the Program does not specify a version number of this License, you may choose any version ever published by the Free Software Foundation.
- If you wish to incorporate parts of the Program into other free programs whose distribution conditions are different, write to the author to ask for permission. For software which is copyrighted by the Free Software Foundation, write to the Free Software Foundation; we sometimes make exceptions for this. Our decision will be guided by the two goals of preserving the free status of all derivatives of our free software and of promoting the sharing and reuse of software generally.
NO WARRANTY
- BECAUSE THE PROGRAM IS LICENSED FREE OF CHARGE, THERE IS NO WARRANTY FOR THE PROGRAM, TO THE EXTENT PERMITTED BY APPLICABLE LAW. EXCEPT WHEN OTHERWISE STATED IN WRITING THE COPYRIGHT HOLDERS AND/OR OTHER PARTIES PROVIDE THE PROGRAM "AS IS" WITHOUT WARRANTY OF ANY KIND, EITHER EXPRESSED OR IMPLIED, INCLUDING, BUT NOT LIMITED TO, THE IMPLIED WARRANTIES OF MERCHANTABILITY AND FITNESS FOR A PARTICULAR PURPOSE. THE ENTIRE RISK AS TO THE QUALITY AND PERFORMANCE OF THE PROGRAM IS WITH YOU. SHOULD THE PROGRAM PROVE DEFECTIVE, YOU ASSUME THE COST OF ALL NECESSARY SERVICING, REPAIR OR CORRECTION.
- IN NO EVENT UNLESS REQUIRED BY APPLICABLE LAW OR AGREED TO IN WRITING WILL ANY COPYRIGHT HOLDER, OR ANY OTHER PARTY WHO MAY MODIFY AND/OR REDISTRIBUTE THE PROGRAM AS PERMITTED ABOVE, BE LIABLE TO YOU FOR DAMAGES, INCLUDING ANY GENERAL, SPECIAL, INCIDENTAL OR CONSEQUENTIAL DAMAGES ARISING OUT OF THE USE OR INABILITY TO USE THE PROGRAM (INCLUDING BUT NOT LIMITED TO LOSS OF DATA OR DATA BEING RENDERED INACCURATE OR LOSSES SUSTAINED BY YOU OR THIRD PARTIES OR A FAILURE OF THE PROGRAM TO OPERATE WITH ANY OTHER PROGRAMS), EVEN IF SUCH HOLDER OR OTHER PARTY HAS BEEN ADVISED OF THE POSSIBILITY OF SUCH DAMAGES.
END OF TERMS AND CONDITIONS
How to Apply These Terms to Your New Programs
If you develop a new program, and you want it to be of the greatest possible use to the public, the best way to achieve this is to make it free software which everyone can redistribute and change under these terms.
To do so, attach the following notices to the program. It is safest to attach them to the start of each source file to most effectively convey the exclusion of warranty; and each file should have at least the "copyright" line and a pointer to where the full notice is found.
This program is free software; you can redistribute it and/or modify it under the terms of the GNU General Public License as published by the Free Software Foundation; either version 2 of the License, or (at your option) any later version.
This program is distributed in the hope that it will be useful, but WITHOUT ANY WARRANTY; without even the implied warranty of MERCHANTABILITY or FITNESS FOR A PARTICULAR PURPOSE. See the GNU General Public License for more details.
You should have received a copy of the GNU General Public License along with this program; if not, write to the Free Software Foundation, Inc., 51 Franklin Street, Fifth Floor, Boston, MA 02110-1301 USA.
Also add information on how to contact you by electronic and paper mail.
If the program is interactive, make it output a short notice like this when it starts in an interactive mode:
Gnomovision version 69, Copyright (C) year name of author Gnomovision comes with ABSOLUTELY NO WARRANTY; for details type 'show w'. This is free software, and you are welcome to redistribute it under certain conditions; type 'show c' for details.
The hypothetical commands `show w' and `show c' should show the appropriate parts of the General Public License. Of course, the commands you use may be called something other than `show w' and `show c'; they could even be mouse-clicks or menu items--whatever suits your program.
You should also get your employer (if you work as a programmer) or your school, if any, to sign a "copyright disclaimer" for the program, if necessary. Here is a sample; alter the names:
Yoyodyne, Inc., hereby disclaims all copyright interest in the program 'Gnomovision' (which makes passes at compilers) written by James Hacker.
This General Public License does not permit incorporating your program into proprietary programs. If your program is a subroutine library, you may consider it more useful to permit linking proprietary applications with the library. If this is what you want to do, use the GNU Lesser General Public License instead of this License.
GNU LESSER GENERAL PUBLIC LICENSE
Version 2.1, February 1999
Copyright (C) 1991, 1999 Free Software Foundation, Inc. 51 Franklin Street, Fifth Floor, Boston, MA 02110-1301 USA Everyone is permitted to copy and distribute verbatim copies of this license document, but changing it is not allowed.
[This is the first released version of the Lesser GPL. It also counts as the successor of the GNU Library Public License, version 2, hence the version number 2.1.]
Preamble
The licenses for most software are designed to take away your freedom to share and change it. By contrast, the GNU General Public Licenses are intended to guarantee your freedom to share and change free software--to make sure the software is free for all its users.
This license, the Lesser General Public License, applies to some specially designated software packages--typically libraries--of the Free Software Foundation and other authors who decide to use it. You can use it too, but we suggest you first think carefully about whether this license or the ordinary General Public License is the better strategy to use in any particular case, based on the explanations below.
When we speak of free software, we are referring to freedom of use, not price. Our General Public Licenses are designed to make sure that you have the freedom to distribute copies of free software (and charge for this service if you wish); that you receive source code or can get it if you want it; that you can change the software and use pieces of it in new free programs; and that you are informed that you can do these things.
To protect your rights, we need to make restrictions that forbid distributors to deny you these rights or to ask you to surrender these rights. These restrictions translate to certain responsibilities for you if you distribute copies of the library or if you modify it.
For example, if you distribute copies of the library, whether gratis or for a fee, you must give the recipients all the rights that we gave you. You must make sure that they, too, receive or can get the source code. If you link other code with the library, you must provide complete object files to the recipients, so that they can relink them with the library after making changes to the library and recompiling it. And you must show them these terms so they know their rights.
We protect your rights with a two-step method: (1) we copyright the library, and (2) we offer you this license, which gives you legal permission to copy, distribute and/or modify the library.
To protect each distributor, we want to make it very clear that there is no warranty for the free library. Also, if the library is modified by someone else and passed on, the recipients should know that what they have is not the original version, so that the original author's reputation will not be affected by problems that might be introduced by others.
Finally, software patents pose a constant threat to the existence of any free program. We wish to make sure that a company cannot effectively restrict the users of a free program by obtaining a restrictive license from a patent holder. Therefore, we insist that any patent license obtained for a version of the library must be consistent with the full freedom of use specified in this license.
Most GNU software, including some libraries, is covered by the ordinary GNU General Public License. This license, the GNU Lesser General Public License, applies to certain designated libraries, and is quite different from the ordinary General Public License. We use this license for certain libraries in order to permit linking those libraries into non-free programs.
When a program is linked with a library, whether statically or using a shared library, the combination of the two is legally speaking a combined work, a derivative of the original library. The ordinary General Public License therefore permits such linking only if the entire combination fits its criteria of freedom. The Lesser General Public License permits more lax criteria for linking other code with the library.
We call this license the "Lesser" General Public License because it does Less to protect the user's freedom than the ordinary General Public License. It also provides other free software developers Less of an advantage over competing non-free programs. These disadvantages are the reason we use the ordinary General Public License for many libraries. However, the Lesser license provides advantages in certain special circumstances.
For example, on rare occasions, there may be a special need to encourage the widest possible use of a certain library, so that it becomes a de-facto standard. To achieve this, non-free programs must be allowed to use the library. A more frequent case is that a free library does the same job as widely used non-free libraries. In this case, there is little to gain by limiting the free library to free software only, so we use the Lesser General Public License.
In other cases, permission to use a particular library in non-free programs enables a greater number of people to use a large body of free software. For example, permission to use the GNU C Library in non-free programs enables many more people to use the whole GNU operating system, as well as its variant, the GNU/Linux operating system.
Although the Lesser General Public License is Less protective of the users' freedom, it does ensure that the user of a program that is linked with the Library has the freedom and the wherewithal to run that program using a modified version of the Library.
The precise terms and conditions for copying, distribution and modification follow. Pay close attention to the difference between a "work based on the library" and a "work that uses the library". The former contains code derived from the library, whereas the latter must be combined with the library in order to run.
GNU LESSER GENERAL PUBLIC LICENSE TERMS AND CONDITIONS FOR COPYING, DISTRIBUTION AND MODIFICATION
- This License Agreement applies to any software library or other program which contains a notice placed by the copyright holder or other authorized party saying it may be distributed under the terms of this Lesser General Public License (also called "this License"). Each licensee is addressed as "you".
A "library" means a collection of software functions and/or data prepared so as to be conveniently linked with application programs (which use some of those functions and data) to form executables.
The "Library", below, refers to any such software library or work which has been distributed under these terms. A "work based on the Library" means either the Library or any derivative work under copyright law: that is to say, a work containing the Library or a portion of it, either verbatim or with modifications and/or translated straightforwardly into another language. (Hereinafter, translation is included without limitation in the term "modification".)
"Source code" for a work means the preferred form of the work for making modifications to it. For a library, complete source code means all the source code for all modules it contains, plus any associated interface definition files, plus the scripts used to control compilation and installation of the library.
Activities other than copying, distribution and modification are not covered by this License; they are outside its scope. The act of running a program using the Library is not restricted, and output from such a program is covered only if its contents constitute a work based on the Library (independent of the use of the Library in a tool for writing it). Whether that is true depends on what the Library does and what the program that uses the Library does.
- You may copy and distribute verbatim copies of the Library's complete source code as you receive it, in any medium, provided that you conspicuously and appropriately publish on each copy an appropriate copyright notice and disclaimer of warranty; keep intact all the notices that refer to this License and to the absence of any warranty; and distribute a copy of this License along with the Library.
You may charge a fee for the physical act of transferring a copy, and you may at your option offer warranty protection in exchange for a fee.
- You may modify your copy or copies of the Library or any portion of it, thus forming a work based on the Library, and copy and distribute such modifications or work under the terms of Section 1 above, provided that you also meet all of these conditions:
a) The modified work must itself be a software library.
b) You must cause the files modified to carry prominent notices stating that you changed the files and the date of any change.
c) You must cause the whole of the work to be licensed at no charge to all third parties under the terms of this License.
d) If a facility in the modified Library refers to a function or a table of data to be supplied by an application program that uses the facility, other than as an argument passed when the facility is invoked, then you must make a good faith effort to ensure that, in the event an application does not supply such function or table, the facility still operates, and performs whatever part of its purpose remains meaningful.
(For example, a function in a library to compute square roots has a purpose that is entirely well-defined independent of the application. Therefore, Subsection 2d requires that any application-supplied function or table used by this function must be optional: if the application does not supply it, the square root function must still compute square roots.)
These requirements apply to the modified work as a whole. If identifiable sections of that work are not derived from the Library, and can be reasonably considered independent and separate works in themselves, then this License, and its terms, do not apply to those sections when you distribute them as separate works. But when you distribute the same sections as part of a whole which is a work based on the Library, the distribution of the whole must be on the terms of this License, whose permissions for other licensees extend to the entire whole, and thus to each and every part regardless of who wrote it.
APPENDIX
Thus, it is not the intent of this section to claim rights or contest your rights to work written entirely by you; rather, the intent is to exercise the right to control the distribution of derivative or collective works based on the Library.
In addition, mere aggregation of another work not based on the Library with the Library (or with a work based on the Library) on a volume of a storage or distribution medium does not bring the other work under the scope of this License.
- You may opt to apply the terms of the ordinary GNU General Public License instead of this License to a given copy of the Library. To do this, you must alter all the notices that refer to this License, so that they refer to the ordinary GNU General Public License, version 2, instead of to this License. (If a newer version than version 2 of the ordinary GNU General Public License has appeared, then you can specify that version instead if you wish.) Do not make any other change in these notices.
Once this change is made in a given copy, it is irreversible for that copy, so the ordinary GNU General Public License applies to all subsequent copies and derivative works made from that copy.
This option is useful when you wish to copy part of the code of the Library into a program that is not a library.
- You may copy and distribute the Library (or a portion or derivative of it, under Section 2) in object code or executable form under the terms of Sections 1 and 2 above provided that you accompany it with the complete corresponding machine-readable source code, which must be distributed under the terms of Sections 1 and 2 above on a medium customarily used for software interchange.
If distribution of object code is made by offering access to copy from a designated place, then offering equivalent access to copy the source code from the same place satisfies the requirement to distribute the source code, even though third parties are not compelled to copy the source along with the object code.
- A program that contains no derivative of any portion of the Library, but is designed to work with the Library by being compiled or linked with it, is called a "work that uses the Library". Such a work, in isolation, is not a derivative work of the Library, and therefore falls outside the scope of this License.
However, linking a "work that uses the Library" with the Library creates an executable that is a derivative of the Library (because it contains portions of the Library), rather than a "work that uses the library". The executable is therefore covered by this License. Section 6 states terms for distribution of such executables.
When a "work that uses the Library" uses material from a header file that is part of the Library, the object code for the work may be a derivative work of the Library even though the source code is not. Whether this is true is especially significant if the work can be linked without the Library, or if the work is itself a library. The threshold for this to be true is not precisely defined by law.
If such an object file uses only numerical parameters, data structure layouts and accessors, and small macros and small inline functions (ten lines or less in length), then the use of the object file is unrestricted, regardless of whether it is legally a derivative work. (Executables containing this object code plus portions of the Library will still fall under Section 6.)
Otherwise, if the work is a derivative of the Library, you may distribute the object code for the work under the terms of Section 6. Any executables containing that work also fall under Section 6, whether or not they are linked directly with the Library itself.
- As an exception to the Sections above, you may also combine or link a "work that uses the Library" with the Library to produce a work containing portions of the Library, and distribute that work under terms of your choice, provided that the terms permit modification of the work for the customer's own use and reverse engineering for debugging such modifications.
You must give prominent notice with each copy of the work that the Library is used in it and that the Library and its use are covered by this License. You must supply a copy of this License. If the work during execution displays copyright notices, you must include the copyright notice for the Library among them, as well as a reference directing the user to the copy of this License. Also, you must do one of these things:
a) Accompany the work with the complete corresponding machine-readable source code for the Library including whatever changes were used in the work (which must be distributed under Sections 1 and 2 above); and, if the work is an executable linked with the Library, with the complete machine-readable "work that uses the Library", as object code and/or source code, so that the user can modify the Library and then relink to produce a modified executable containing the modified Library. (It is understood that the user who changes the contents of definitions files in the Library will not necessarily be able to recompile the application to use the modified definitions.)
b) Use a suitable shared library mechanism for linking with the Library. A suitable mechanism is one that (1) uses at run time a copy of the library already present on the user's computer system, rather than copying library functions into the executable, and (2) will operate properly with a modified version of the library, if the user installs one, as long as the modified version is interface-compatible with the version that the work was made with.
c) Accompany the work with a written offer, valid for at least three years, to give the same user the materials specified in Subsection 6a, above, for a charge no more than the cost of performing this distribution.
d) If distribution of the work is made by offering access to copy from a designated place, offer equivalent access to copy the above specified materials from the same place.
e) Verify that the user has already received a copy of these materials or that you have already sent this user a copy.
For an executable, the required form of the "work that uses the Library" must include any data and utility programs needed for reproducing the executable from it. However, as a special exception, the materials to be distributed need not include anything that is normally distributed (in either source or binary form) with the major components (compiler, kernel, and so on) of the operating system on which the executable runs, unless that component itself accompanies the executable.
It may happen that this requirement contradicts the license restrictions of other proprietary libraries that do not normally accompany the operating system. Such a contradiction means you cannot use both them and the Library together in an executable that you distribute.
- You may place library facilities that are a work based on the Library side-by-side in a single library together with other library facilities not covered by this License, and distribute such a combined library, provided that the separate distribution of the work based on the Library and of the other library facilities is otherwise permitted, and provided that you do these two things:
a) Accompany the combined library with a copy of the same work based on the Library, uncombined with any other library facilities. This must be distributed under the terms of the Sections above.
b) Give prominent notice with the combined library of the fact that part of it is a work based on the Library, and explaining where to find the accompanying uncombined form of the same work.
8. You may not copy, modify, sublicense, link with, or distribute the Library except as expressly provided under this License. Any attempt otherwise to copy, modify, sublicense, link with, or distribute the Library is void, and will automatically terminate your rights under this License. However, parties who have received copies, or rights, from you under this License will not have their licenses terminated so long as such parties remain in full compliance.
9. You are not required to accept this License, since you have not signed it. However, nothing else grants you permission to modify or distribute the Library or its derivative works. These actions are prohibited by law if you do not accept this License. Therefore, by modifying or distributing the Library (or any work based on the Library), you indicate your acceptance of this License to do so, and all its terms and conditions for copying, distributing or modifying the Library or works based on it.
10. Each time you redistribute the Library (or any work based on the Library), the recipient automatically receives a license from the original licensor to copy, distribute, link with or modify the Library subject to these terms and conditions. You may not impose any further restrictions on the recipients' exercise of the rights granted herein. You are not responsible for enforcing compliance by third parties with this License.
11. If, as a consequence of a court judgment or allegation of patent infringement or for any other reason (not limited to patent issues), conditions are imposed on you (whether by court order, agreement or otherwise) that contradict the conditions of this License, they do not excuse you from the conditions of this License. If you cannot distribute so as to satisfy simultaneously your obligations under this License and any other pertinent obligations, then as a consequence you may not distribute the Library at all. For example, if a patent license would not permit royalty-free redistribution of the Library by all those who receive copies directly or indirectly through you, then the only way you could satisfy both it and this License would be to refrain entirely from distribution of the Library.
If any portion of this section is held invalid or unenforceable under any particular circumstance, the balance of the section is intended to apply, and the section as a whole is intended to apply in other circumstances.
It is not the purpose of this section to induce you to infringe any patents or other property right claims or to contest validity of any such claims; this section has the sole purpose of protecting the integrity of the free software distribution system which is implemented by public license practices. Many people have made generous contributions to the wide range of software distributed through that system in reliance on consistent application of that system; it is up to the author/donor to decide if he or she is willing to distribute software through any other system and a licensee cannot impose that choice.
This section is intended to make thoroughly clear what is believed to be a consequence of the rest of this License.
- If the distribution and/or use of the Library is restricted in certain countries either by patents or by copyrighted interfaces, the original copyright holder who places the Library under this License may add an explicit geographical distribution limitation excluding those countries, so that distribution is permitted only in or among countries not thus excluded. In such case, this License incorporates the limitation as if written in the body of this License.
APPENDIX
- The Free Software Foundation may publish revised and/or new versions of the Lesser General Public License from time to time. Such new versions will be similar in spirit to the present version, but may differ in detail to address new problems or concerns.
Each version is given a distinguishing version number. If the Library specifies a version number of this License which applies to it and "any later version", you have the option of following the terms and conditions either of that version or of any later version published by the Free Software Foundation. If the Library does not specify a license version number, you may choose any version ever published by the Free Software Foundation.
- If you wish to incorporate parts of the Library into other free programs whose distribution conditions are incompatible with these, write to the author to ask for permission. For software which is copyrighted by the Free Software Foundation, write to the Free Software Foundation; we sometimes make exceptions for this. Our decision will be guided by the two goals of preserving the free status of all derivatives of our free software and of promoting the sharing and reuse of software generally.
NO WARRANTY
-
BECAUSE THE LIBRARY IS LICENSED FREE OF CHARGE, THERE IS NO WARRANTY FOR THE LIBRARY, TO THE EXTENT PERMITTED BY APPLICABLE LAW. EXCEPT WHEN OTHERWISE STATED IN WRITING THE COPYRIGHT HOLDERS AND/OR OTHER PARTIES PROVIDE THE LIBRARY "AS IS" WITHOUT WARRANTY OF ANY KIND, EITHER EXPRESSED OR IMPLIED, INCLUDING, BUT NOT LIMITED TO, THE IMPLIED WARRANTIES OF MERCHANTABILITY AND FITNESS FOR A PARTICULAR PURPOSE. THE ENTIRE RISK AS TO THE QUALITY AND PERFORMANCE OF THE LIBRARY IS WITH YOU. SHOULD THE LIBRARY PROVE DEFECTIVE, YOU ASSUME THE COST OF ALL NECESSARY SERVICING, REPAIR OR CORRECTION.
-
IN NO EVENT UNLESS REQUIRED BY APPLICABLE LAW OR AGREED TO IN WRITING WILL ANY COPYRIGHT HOLDER, OR ANY OTHER PARTY WHO MAY MODIFY AND/OR REDISTRIBUTE THE LIBRARY AS PERMITTED ABOVE, BE LIABLE TO YOU FOR DAMAGES, INCLUDING ANY GENERAL, SPECIAL, INCIDENTAL OR CONSEQUENTIAL DAMAGES ARISING OUT OF THE USE OR INABILITY TO USE THE LIBRARY (INCLUDING BUT NOT LIMITED TO LOSS OF DATA OR DATA BEING RENDERED INACCURATE OR LOSSES SUSTAINED BY YOU OR THIRD PARTIES OR A FAILURE OF THE LIBRARY TO OPERATE WITH ANY OTHER SOFTWARE), EVEN IF SUCH HOLDER OR OTHER PARTY HAS BEEN ADVISED OF THE POSSIBILITY OF SUCH DAMAGES.
END OF TERMS AND CONDITIONS
How to Apply These Terms to Your New Libraries
If you develop a new library, and you want it to be of the greatest possible use to the public, we recommend making it free software that everyone can redistribute and change. You can do so by permitting redistribution under these terms (or, alternatively, under the terms of the ordinary General Public License).
To apply these terms, attach the following notices to the library. It is safest to attach them to the start of each source file to most effectively convey the exclusion of warranty; and each file should have at least the "copyright" line and a pointer to where the full notice is found.
This library is free software; you can redistribute it and/or modify it under the terms of the GNU Lesser General Public License as published by the Free Software Foundation; either version 2.1 of the License, or (at your option) any later version.
This library is distributed in the hope that it will be useful, but WITHOUT ANY WARRANTY; without even the implied warranty of MERCHANTABILITY or FITNESS FOR A PARTICULAR PURPOSE. See the GNU Lesser General Public License for more details.
You should have received a copy of the GNU Lesser General Public License along with this library; if not, write to the Free Software Foundation, Inc., 51 Franklin Street, Fifth Floor, Boston, MA 02110-1301 USA
Also add information on how to contact you by electronic and paper mail.
You should also get your employer (if you work as a programmer) or your school, if any, to sign a "copyright disclaimer" for the library, if necessary. Here is a sample; alter the names:
Yoyodyne, Inc., hereby disclaims all copyright interest in the library `Frob' (a library for tweaking knobs) written by James Random Hacker.
MOZILLA PUBLIC LICENSE
Version 1.1
1. Definitions.
1.0.1. "Commercial Use" means distribution or otherwise making the Covered Code available to a third party.
1.1. "Contributor" means each entity that creates or contributes to the creation of Modifications.
1.2. "Contributor Version" means the combination of the Original Code, prior Modifications used by a Contributor, and the Modifications made by that particular Contributor.
1.3. "Covered Code" means the Original Code or Modifications or the combination of the Original Code and Modifications, in each case including portions thereof.
1.4. "Electronic Distribution Mechanism" means a mechanism generally accepted in the software development community for the electronic transfer of data.
1.5. "Executable" means Covered Code in any form other than Source Code.
1.6. "Initial Developer" means the individual or entity identified as the Initial Developer in the Source Code notice required by Exhibit A.
1.7. "Larger Work" means a work which combines Covered Code or portions thereof with code not governed by the terms of this License.
1.8. "License" means this document.
1.8.1. "Licensable" means having the right to grant, to the maximum extent possible, whether at the time of the initial grant or subsequently acquired, any and all of the rights conveyed herein.
1.9. "Modifications" means any addition to or deletion from the substance or structure of either the Original Code or any previous Modifications. When Covered Code is released as a series of files, a Modification is:
A. Any addition to or deletion from the contents of a file containing Original Code or previous Modifications.
B. Any new file that contains any part of the Original Code or previous Modifications.
1.10. "Original Code" means Source Code of computer software code which is described in the Source Code notice required by Exhibit A as Original Code, and which, at the time of its release under this License is not already Covered Code governed by this License.
1.10.1. "Patent Claims" means any patent claim(s), now owned or hereafter acquired, including without limitation, method, process, and apparatus claims, in any patent Licensable by grantor.
1.11. "Source Code" means the preferred form of the Covered Code for making modifications to it, including all modules it contains, plus any associated interface definition files, scripts used to control compilation and installation of an Executable, or source code differential comparisons against either the Original Code or another well known, available Covered Code of the Contributor's choice. The Source Code can be in a compressed or archival form, provided the appropriate decompression or de-archiving software is widely available for no charge.
1.12. "You" (or "Your") means an individual or a legal entity exercising rights under, and complying with all of the terms of, this License or a future version of this License issued under Section 6.1.
For legal entities, "You" includes any entity which controls, is controlled by, or is under common control with You. For purposes of this definition, "control" means (a) the power, direct or indirect, to cause the direction or management of such entity, whether by contract or otherwise, or (b) ownership of more than fifty percent (50%) of the outstanding shares or beneficial ownership of such entity.
2. Source Code License.
2.1. The Initial Developer Grant.
The Initial Developer hereby grants You a world-wide, royalty-free, non-exclusive license, subject to third party intellectual property claims:
(a) under intellectual property rights (other than patent or trademark) Licensable by Initial Developer to use, reproduce, modify, display, perform, sublicense and distribute the Original Code (or portions thereof) with or without Modifications, and/or as part of a Larger Work; and
APPENDIX
(b) under Patents Claims infringed by the making, using or selling of Original Code, to make, have made, use, practice, sell, and offer for sale, and/or otherwise dispose of the Original Code (or portions thereof).
(c) the licenses granted in this Section 2.1(a) and (b) are effective on the date Initial Developer first distributes Original Code under the terms of this License.
(d) Notwithstanding Section 2.1(b) above, no patent license is granted: 1) for code that You delete from the Original Code; 2) separate from the Original Code; or 3) for infringements caused by: i) the modification of the Original Code or ii) the combination of the Original Code with other software or devices.
2.2. Contributor Grant.
Subject to third party intellectual property claims, each Contributor hereby grants You a world-wide, royalty-free, non-exclusive license
(a) under intellectual property rights (other than patent or trademark) Licensable by Contributor, to use, reproduce, modify, display, perform, sublicense and distribute the Modifications created by such Contributor (or portions thereof) either on an unmodified basis, with other Modifications, as Covered Code and/or as part of a Larger Work; and
(b) under Patent Claims infringed by the making, using, or selling of Modifications made by that Contributor either alone and/or in combination with its Contributor Version (or portions of such combination), to make, use, sell, offer for sale, have made, and/or otherwise dispose of: 1) Modifications made by that Contributor (or portions thereof); and 2) the combination of Modifications made by that Contributor with its Contributor Version (or portions of such combination).
(c) the licenses granted in Sections 2.2(a) and 2.2(b) are effective on the date Contributor first makes Commercial Use of the Covered Code.
(d) Notwithstanding Section 2.2(b) above, no patent license is granted: 1) for any code that Contributor has deleted from the Contributor Version; 2) separate from the Contributor Version; 3) for infringements caused by: i) third party modifications of Contributor Version or ii) the combination of Modifications made by that Contributor with other software (except as part of the Contributor Version) or other devices; or 4) under Patent Claims infringed by Covered Code in the absence of Modifications made by that Contributor.
3. Distribution Obligations.
3.1. Application of License.
The Modifications which You create or to which You contribute are governed by the terms of this License, including without limitation Section 2.2. The Source Code version of Covered Code may be distributed only under the terms of this License or a future version of this License released under Section 6.1, and You must include a copy of this License with every copy of the Source Code You distribute. You may not offer or impose any terms on any Source Code version that alters or restricts the applicable version of this License or the recipients' rights hereunder. However, You may include an additional document offering the additional rights described in Section 3.5.
3.2. Availability of Source Code.
Any Modification which You create or to which You contribute must be made available in Source Code form under the terms of this License either on the same media as an Executable version or via an accepted Electronic Distribution Mechanism to anyone to whom you made an Executable version available; and if made available via Electronic Distribution Mechanism, must remain available for at least twelve (12) months after the date it initially became available, or at least six (6) months after a subsequent version of that particular Modification has been made available to such recipients. You are responsible for ensuring that the Source Code version remains available even if the
Electronic Distribution Mechanism is maintained by a third party.
3.3. Description of Modifications.
You must cause all Covered Code to which You contribute to contain a file documenting the changes You made to create that Covered Code and the date of any change. You must include a prominent statement that the Modification is derived, directly or indirectly, from Original Code provided by the Initial Developer and including the name of the Initial Developer in (a) the Source Code, and (b) in any notice in an Executable version or related documentation in which You describe the origin or ownership of the Covered Code.
3.4. Intellectual Property Matters
(a) Third Party Claims. If Contributor has knowledge that a license under a third party's intellectual property rights is required to exercise the rights granted by such Contributor under Sections 2.1 or 2.2, Contributor must include a text file with the Source Code distribution titled "LEGAL" which describes the claim and the party making the claim in sufficient detail that a recipient will know whom to contact. If Contributor obtains such knowledge after the Modification is made available as described in Section 3.2, Contributor shall promptly modify the LEGAL file in all copies. Contributor makes available thereafter and shall take other steps (such as notifying appropriate mailing lists or newsgroups) reasonably calculated to inform those who received the Covered Code that new knowledge has been obtained.
(b) Contributor APIs.
If Contributor's Modifications include an application programming interface and Contributor has knowledge of patent licenses which are reasonably necessary to implement that API, Contributor must also include this information in the LEGAL file.
(c) Representations.
Contributor represents that, except as disclosed pursuant to Section 3.4(a) above, Contributor believes that Contributor's Modifications are Contributor's original creation(s) and/or Contributor has sufficient rights to grant the rights conveyed by this License.
3.5. Required Notices.
You must duplicate the notice in Exhibit A in each file of the Source Code. If it is not possible to put such notice in a particular Source Code file due to its structure, then You must include such notice in a location (such as a relevant directory) where a user would be likely to look for such a notice. If You created one or more Modification(s) You may add your name as a Contributor to the notice described in Exhibit A. You must also duplicate this License in any documentation for the Source Code where You describe recipients' rights or ownership rights relating to Covered Code. You may choose to offer, and to charge a fee for, warranty, support, indemnity or liability obligations to one or more recipients of Covered Code. However, You may do so only on Your own behalf, and not on behalf of the Initial Developer or any Contributor. You must make it absolutely clear than any such warranty, support, indemnity or liability obligation is offered by You alone, and You hereby agree to indemnify the Initial Developer and every Contributor for any liability incurred by the Initial Developer or such Contributor as a result of warranty, support, indemnity or liability terms You offer.
3.6. Distribution of Executable Versions.
You may distribute Covered Code in Executable form only if the requirements of Section 3.1-3.5 have been met for that Covered Code, and if You include a notice stating that the Source Code version of the Covered Code is available under the terms of this License, including a description of how and where You have fulfilled the obligations of Section 3.2. The notice must be conspicuously included in any notice in an Executable version, related documentation or collateral in which You describe recipients' rights relating to the Covered Code. You may distribute the Executable version of Covered Code or ownership rights under a license of Your choice, which may contain terms different from this License, provided that You are in compliance with the terms of this License and that the license for the Executable version does not attempt to limit or alter the recipient's rights in the Source Code version from the rights set forth in this License. If You distribute the Executable version under a different license You must make it absolutely clear that any terms which differ from this License are offered by You alone, not by the Initial Developer or any Contributor. You hereby agree to indemnify the Initial Developer and every Contributor for any liability incurred by the Initial Developer or such Contributor as a result of any such terms You offer.
3.7. Larger Works.
You may create a Larger Work by combining Covered Code with other code not governed by the terms of this License and distribute the Larger Work as a single product. In such a case, You must make sure the requirements of this License are fulfilled for the Covered Code.
4. Inability to Comply Due to Statute or Regulation.
If it is impossible for You to comply with any of the terms of this License with respect to some or all of the Covered Code due to statute, judicial order, or regulation then You must: (a) comply with the terms of this License to the maximum extent possible; and (b) describe the limitations and the code they affect. Such description must be included in the LEGAL file described in Section 3.4 and must be included with all distributions of the Source Code. Except to the extent prohibited by statute or regulation, such description must be sufficiently detailed for a recipient of ordinary skill to be able to understand it.
5. Application of this License.
This License applies to code to which the Initial Developer has attached the notice in Exhibit A and to related Covered Code.
6. Versions of the License.
6.1. New Versions.
Netscape Communications Corporation ("Netscape") may publish revised and/or new versions of the License from time to time. Each version will be given a distinguishing version number.
6.2. Effect of New Versions.
Once Covered Code has been published under a particular version of the License, You may always continue to use it under the terms of that version. You may also choose to use such Covered Code under the terms of any subsequent version of the License published by Netscape. No one other than Netscape has the right to modify the terms applicable to Covered Code created under this License.
APPENDIX
6.3. Derivative Works.
If You create or use a modified version of this License (which you may only do in order to apply it to code which is not already Covered Code governed by this License), You must (a) rename Your license so that the phrases "Mozilla", "MOZILLAPL", "MOZPL", "Netscape", "MPL", "NPL" or any confusingly similar phrase do not appear in your license (except to note that your license differs from this License) and (b) otherwise make it clear that Your version of the license contains terms which differ from the Mozilla Public License and Netscape Public License. (Filling in the name of the Initial Developer, Original Code or Contributor in the notice described in Exhibit A shall not of themselves be deemed to be modifications of this License.)
7. DISCLAIMER OF WARRANTY.
COVERED CODE IS PROVIDED UNDER THIS LICENSE ON AN "AS IS" BASIS, WITHOUT WARRANTY OF ANY KIND, EITHER EXPRESSED OR IMPLIED, INCLUDING, WITHOUT LIMITATION, WARRANTIES THAT THE COVERED CODE IS FREE OF DEFECTS, MERCHANTABILITY, FIT FOR A PARTICULAR PURPOSE OR NON-INFRINGEMENT. THE ENTIRE RISK AS TO THE QUALITY AND PERFORMANCE OF THE COVERED CODE IS WITH YOU. SHOULD ANY COVERED CODE PROVE DEFECTIVE IN ANY RESPECT, YOU (NOT THE INITIAL DEVELOPER OR ANY OTHER CONTRIBUTOR) ASSUME THE COST OF ANY NECESSARY SERVICING, REPAIR OR CORRECTION. THIS DISCLAIMER OF WARRANTY CONSTITUTES AN ESSENTIAL PART OF THIS LICENSE. NO USE OF ANY COVERED CODE IS AUTHORIZED HEREUNDER EXCEPT UNDER THIS DISCLAIMER.
8. TERMINATION.
8.1. This License and the rights granted hereunder will terminate automatically if You fail to comply with terms herein and fail to cure such breach within 30 days of becoming aware of the breach. All sublicenses to the Covered Code which are properly granted shall survive any termination of this License. Provisions which, by their nature, must remain in effect beyond the termination of this License shall survive.
8.2. If You initiate litigation by asserting a patent infringement claim (excluding declaratory judgment actions) against Initial Developer or a Contributor (the Initial Developer or Contributor against whom You file such action is referred to as "Participant") alleging that:
(a) such Participant's Contributor Version directly or indirectly infringes any patent, then any and all rights granted by such Participant to You under Sections 2.1 and/or 2.2 of this License shall, upon 60 days notice from Participant terminate prospectively, unless if within 60 days after receipt of notice You either: (i) agree in writing to pay Participant a mutually agreeable reasonable royalty for Your past and future use of Modifications made by such Participant, or (ii) withdraw Your litigation claim with respect to the Contributor Version against such Participant. If within 60 days of notice, a reasonable royalty and payment arrangement are not mutually agreed upon in writing by the parties or the litigation claim is not withdrawn, the rights granted by Participant to You under Sections 2.1 and/or 2.2 automatically terminate at the expiration of the 60 day notice period specified above.
(b) any software, hardware, or device, other than such Participant's Contributor Version, directly or indirectly infringes any patent, then any rights granted to You by such Participant under Sections 2.1(b) and 2.2(b) are revoked effective as of the date You first made, used, sold, distributed, or had made, Modifications made by that Participant.
8.3. If You assert a patent infringement claim against Participant alleging that such Participant's Contributor Version directly or indirectly infringes any patent where such claim is resolved (such as by license or settlement) prior to the initiation of patent infringement litigation, then the reasonable value of the licenses granted by such Participant under Sections 2.1 or 2.2 shall be taken into account in determining the amount or value of any payment or license.
8.4. In the event of termination under Sections 8.1 or 8.2 above, all end user license agreements (excluding distributors and resellers) which have been validly granted by You or any distributor hereunder prior to termination shall survive termination.
9. LIMITATION OF LIABILITY.
UNDER NO CIRCUMSTANCES AND UNDER NO LEGAL THEORY, WHETHER TORT (INCLUDING NEGLIGENCE), CONTRACT, OR OTHERWISE, SHALL YOU, THE INITIAL DEVELOPER, ANY OTHER CONTRIBUTOR, OR ANY DISTRIBUTOR OF COVERED CODE, OR ANY SUPPLIER OF ANY OF SUCH PARTIES, BE LIABLE TO ANY PERSON FOR ANY INDIRECT, SPECIAL, INCIDENTAL, OR CONSEQUENTIAL DAMAGES OF ANY CHARACTER INCLUDING, WITHOUT LIMITATION, DAMAGES FOR LOSS OF GOODWILL, WORK STOPPAGE, COMPUTER FAILURE OR MALFUNCTION, OR ANY AND ALL OTHER COMMERCIAL DAMAGES OR LOSSES, EVEN IF SUCH PARTY SHALL HAVE BEEN INFORMED OF THE POSSIBILITY OF SUCH DAMAGES. THIS LIMITATION OF LIABILITY SHALL NOT APPLY TO LIABILITY FOR DEATH OR PERSONAL INJURY RESULTING FROM SUCH PARTY'S NEGLIGENCE TO THE EXTENT APPLICABLE LAW PROHIBITS SUCH LIMITATION. SOME JURISDICTIONS DO NOT ALLOW THE EXCLUSION OR LIMITATION OF INCIDENTAL OR CONSEQUENTIAL DAMAGES, SO THIS EXCLUSION AND LIMITATION MAY NOT APPLY TO YOU.
10. U.S. GOVERNMENT END USERS.
The Covered Code is a "commercial item," as that term is defined in 48 C.F.R. 2.101 (Oct. 1995), consisting of "commercial computer software" and "commercial computer software documentation," as such terms are used in 48 C.F.R. 12.212 (Sept. 1995). Consistent with 48 C.F.R. 12.212 and 48 C.F.R. 227.7202-1 through 227.7202-4 (June 1995), all U.S. Government End Users acquire Covered Code with only those rights set forth herein.
11. MISCELLANEOUS.
This License represents the complete agreement concerning subject matter hereof. If any provision of this License is held to be unenforceable, such provision shall be reformed only to the extent necessary to make it enforceable. This License shall be governed by California law provisions (except to the extent applicable law, if any, provides otherwise), excluding its conflict-of-law provisions. With respect to disputes in which at least one party is a citizen of, or an entity chartered or registered to do business in the United States of America, any litigation relating to this License shall be subject to the jurisdiction of the Federal Courts of the Northern District of California, with venue lying in Santa Clara County, California, with the losing party responsible for costs, including without limitation, court costs and reasonable attorneys' fees and expenses. The application of the United Nations Convention on Contracts for the International Sale of Goods is expressly excluded. Any law or regulation which provides that the language of a contract shall be construed against the drafter shall not apply to this License.
12. RESPONSIBILITY FOR CLAIMS.
As between Initial Developer and the Contributors, each party is responsible for claims and damages arising, directly or indirectly, out of its utilization of rights under this License and You agree to work with Initial Developer and Contributors to distribute such responsibility on an equitable basis. Nothing herein is intended or shall be deemed to constitute any admission of liability.
13. MULTIPLE-LICENSED CODE.
Initial Developer may designate portions of the Covered Code as "Multiple-Licensed". "Multiple-Licensed" means that the Initial Developer permits you to utilize portions of the Covered Code under Your choice of the NPL or the alternative licenses, if any, specified by the Initial Developer in the file described in Exhibit A.
EXHIBIT A -Mozilla Public License.
The contents of this file are subject to the Mozilla Public License Version 1.1 (the "License"); you may not use this file except in compliance with the License. You may obtain a copy of the License at http://www.mozilla.org/MPL/
Software distributed under the License is distributed on an "AS IS" basis, WITHOUT WARRANTY OF ANY KIND, either express or implied. See the License for the specific language governing rights and limitations under the License.
The Original Code is ____.
The Initial Developer of the Original Code is ____. Portions created by ____ are Copyright (C) ____. All Rights Reserved.
Contributor(s): ____.
Alternatively, the contents of this file may be used under the terms of the ____ license (the "[____] License"), in which case the provisions of [____] License are applicable instead of those above. If you wish to allow use of your version of this file only under the terms of the [____] License and not to allow others to use your version of this file under the MPL, indicate your decision by deleting the provisions above and replace them with the notice and other provisions required by the [____] License. If you do not delete the provisions above, a recipient may use your version of this file under either the MPL or the [____] License."
[NOTE: The text of this Exhibit A may differ slightly from the text of the notices in the Source Code files of the Original Code. You should use the text of this Exhibit A rather than the text found in the Original Code Source Code for Your Modifications.]