RS6 Pro - Pregnant Niles - Free user manual and instructions
Find the device manual for free RS6 Pro Niles in PDF.


User questions about RS6 Pro Niles
0 question about this device. Answer the ones you know or ask your own.
Ask a new question about this device
Download the instructions for your Pregnant in PDF format for free! Find your manual RS6 Pro - Niles and take your electronic device back in hand. On this page are published all the documents necessary for the use of your device. RS6 Pro by Niles.
USER MANUAL RS6 Pro Niles
natural_image
Fossilized asteroid with hexagonal perforation and circular holes, no visible text or symbols
NILES®
BLENDING HIGH FIDELITY AND ARCHITECTURE®
CONGRATULATIONS
Thank you for choosing a premium quality Rock Loudspeaker from Niles. With proper installation and operation, you'll enjoy years of trouble free use.
Niles manufactures the industry's most complete line of custom installation components and accessories for audio/video systems.
For up-to-date information on all of our products, please visit our website at www.nilesaudio.com.
TABLE OF CONTENTS
| INTRODUCTION | 3 |
| FEATURES & BENEFITS 4 | |
| INSTALLATION CONSIDERATIONS 6 | |
| INSTALLATION | 12 |
| OPERATION | 20 |
| SPECIFICATIONS | 21 |
INTRODUCTION
The RS PRO series of weatherproof rock loudspeakers are designed to provide unparalleled listening satisfaction and GeoRealistic™ styling with a design rugged enough to withstand nature's fury. The extraordinary sonic performance of the RS PRO series was achieved by harmonizing Niles' unique and proprietary technology with advances in cabinet assembly techniques. They are designed and built to withstand the environmental stresses placed on an outdoor loudspeaker. They will sound good and look good no matter what Mother Nature does to them.
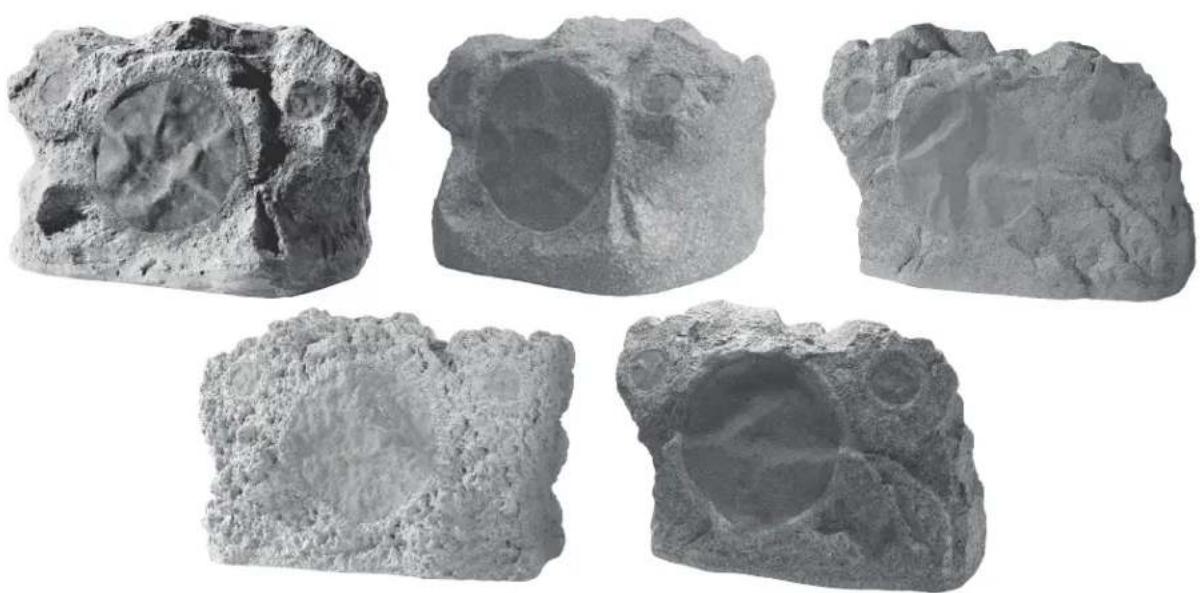
The RS PRO series loudspeaker is a two-way stereo input loudspeaker in an acoustic suspension enclosure. All of the RS PRO series loudspeakers can be wired to act as wide dispersion, single channel loudspeakers. Additionally, any of the SI models can optionally be wired to play stereo sound from a single loudspeaker. The cabinet is styled to look like a natural rock surface. It is supplied with a security bracket and cable to ensure it stays where it is placed, reducing the chance of theft and unauthorized movement of the loudspeaker. For the first time, serious listeners will be able to enjoy the music in their backyard as much as in their living room and the speakers will blend into the landscaping.
natural_image
Five different types of fossilized rocks with visible internal cavities, displayed against a white background (no text or symbols)RS8SI models shown
FEATURES & BENEFITS
LOOKS NATURAL, SOUNDS GREAT
Traditionally, rock speakers have looked like ornaments and not like rocks. Each RS PRO series loudspeaker style has unique textures and colors that are fashioned after natural rocks. Shaped grilles match the features on the front of the rock, making them blend into the cabinet. All of this extra attention to detail leads to a GeoRealistic™ style that enables the these loudspeakers to blend in with other landscaping and disappear. All that will be noticed is the great sound not the loudspeaker.
WEATHERPROOF CONSTRUCTION
The custom cabinet is made from multi-layer fiberglass, it utilizes double seals on the tweeter, woofer and enclosure cover, and is designed so that the woofer drains water away from it. The grilles are painted rust-resistant aluminum and the acoustic drivers are made from weather resistant materials. The RS PRO series loudspeakers have passed some of the most stringent environmental tests devised. Surviving over 5 years worth of temperature cycling and still having seals that pass a 24-hour submersion test. They have passed the test requirements for Salt Fog, Operating Temperature, Storage Temperature, UV Exposure and Humidity per the stringent military test standard 883. Whether you are concerned about salt-air, rain, freezing rain, snow, extreme temperatures, high humidity, direct sunlight or combinations of these conditions, the RS PRO series has proven itself to withstand the harshest conditions Mother Nature can throw at it.
INJECTION MOLDED TCC WOOFER
The unusually stiff and light injection molded TCC (talc, carbon, and ceramic-filled) polypropylene cone, the butyl rubber surround, and the substantial magnet and motor structure are optimized for large excursions of the woofer. In this way, the woofer can create superior bass output.
DUAL VOICE COIL WOOFERS (SI MODELS ONLY)
The dual voice coil design of the SI models have the added advantage of being able to play in stereo when wired in Stereo Input mode.
ADVANCED WEATHER-RESISTANT TWEETERS
In the past, many rock speakers have used a co-axial tweeter design that has disappointed listeners with a fatiguing and harsh treble sound caused by tweeter ringing. The advanced 1" Teteron tweeters found in our RS6, RS6SI (dual tweeter), and RS8SI (dual tweeter) models utilize a tri-laminate design consisting of an inner textile layer which forms the dome, a high damping layer to kill unwanted resonances and an outside layer of urethane to add stiffness and
prevent breakup modes. The result is a transparent clear, sweet, natural sounding tweeter, which still maintains its extended frequency response. The two separate tweeters of the SI models allow the cabinet to play in one-speaker stereo mode or two-speaker stereo mode The RS5 models utilize a custom 3/4" Kaladex® dome tweeter with fluid cooling designed for ultra-wide dispersion and clear high frequency response.
TWEETER PLACEMENT IMPROVES COVERAGE AND DISPERSION
The tweeters are angled twenty degrees up from the woofer. The dual tweeters of the SI models are also angled twenty degrees from each other. This means that the tweeters are “aimed” at the listener and not at the ground.
DUAL PRECISION CROSSOVERS - SI MODELS ONLY
A customized electronic dividing network inside the cabinet precisely distributes the music to the woofer and each tweeter, keeping the two channels completely isolated from each other. The three pole two-way design of the crossover provides excellent stereo imaging into each channel, low distortion and superior sonic performance.
CONEFORWARD™ DESIGN
Other rock speaker manufacturers mount their drivers from inside the cabinet. This moves the front of the driver inside the cabinet creating a tunnel for the driver to play through. This tunnel adversely affects the sound quality by making the loudspeaker sound “narrow” and “far away”. Niles’ engineers have used a proprietary ConeForward™ design technique that moves the woofer and tweeter as close to the grille as possible. Combining the ConeForward™ design technique with tight manufacturing controls leads to unparalleled sonic performance and imaging from an outdoor rock loudspeaker.
RIGID ACOUSTICALLY INERT CABINET CONSTRUCTION
Niles utilizes a unique multi-layer cabinet construction to achieve superior non-resonance of the loudspeaker cabinet. This ensures that all you hear is the music and not the cabinet ringing.
LOW DIFFRACTION MICROPERF™ ALUMINUM GRILLES
The aluminum MicroPerf™ grilles on the RS PRO series loudspeakers have hundreds of precisely sized perforations, creating an acoustically transparent grille. The aluminum construction resists oxidation enabling years of trouble-free operation in the harshest conditions. We paint both sides of the grille for added protection.
CONNECTION CABLES WITH WATER RESISTANT WIRE NUTS
Connecting the loudspeaker's cable to the cable running from the house is always a point of concern for the installer. If this connection is not done right, the cable may corrode and the connection may fail. To make sure this connection is trouble-free, we provide three-foot connection cables rated for burial underground and specialized waterproof wire nuts. Our wire nuts are filled with a waterproof sealant. Just insert the wires and twist them together. Then bury the cable. The connection will be protected from the elements.
SECURITY BRACKET AND CABLE
Using the security bracket and cable supplied with the loudspeaker provides a simple but effective method to protect the loudspeaker from theft or unapproved movement. You can easily upgrade our standard security mounting method to provide even greater security, if you require it.
INSTALLATION CONSIDERATIONS
TOOLS AND MATERIALS REQUIRED
- A wire stripper
- 1/2" PVC conduit (optional)
- PVC conduit glue and cleaner (optional)
- PVC cutting tool (optional)
- Trench digger or shovel
- Tube of silicone sealant (optional)
- Cable (length and type determined by installation site – see “Choosing the Speaker Cable”)
SELECTING THE NUMBER AND LOCATION FOR YOUR SPEAKERS
The RS PRO series loudspeakers loudspeaker can be installed directly on the ground, in a flowerbed, on a wood deck or on a concrete/stone patio.
When choosing the location for the loudspeaker, take into consideration the slope of the land in the area the speakers are going to be placed. The flatter and more level the area, the better. The woofer should be straight up and down or tilted forward a bit to assist in drawing water away from it. Never choose a place where an automatic sprinkler will be aimed on or near the loudspeaker. While the loudspeaker is weatherproof, continuous streaming water will shorten the product's life.
SINGLE SPEAKER STEREO MODE (SI MODELS ONLY)
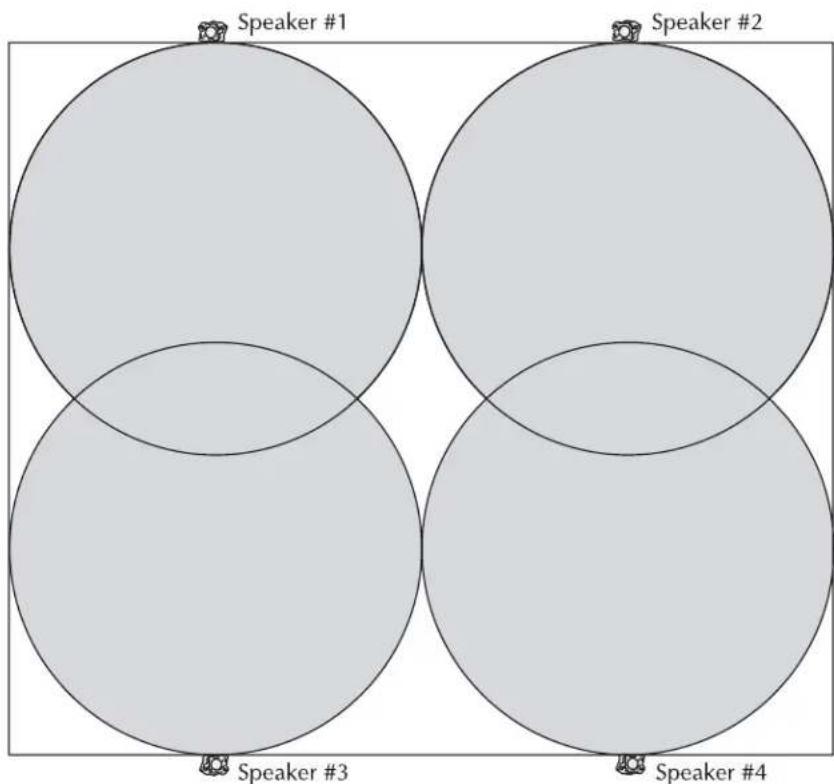
In one-speaker stereo mode, each connection cable of the SI model loudspeaker is connected to a separate amplifier channel and each loudspeaker cabinet plays in stereo. This configuration gives you the benefit of covering a larger area than the traditional two-speaker stereo mode. Loudspeakers should be spaced to properly cover the listening area. The SI models will typically provide proper coverage for an area 20-30 feet around the front of the loudspeaker (20-24 feet for the RS6 models and 24-30 feet for the RS8 models).
Figure 1 shows how this would work for a square area using the RS8Si's in the one-speaker stereo mode. The loudspeaker coverage pattern is shown in the diagram.
text_image
Speaker #1 Speaker #2 Speaker #3 Speaker #4Area Covered in Stereo
Figure 1. Stereo Coverage 4 speakers
With the loudspeakers wired in the one-speaker stereo mode you can cover large areas with the highest quality stereo imaging available.
TWO-SPEAKER STEREO MODE
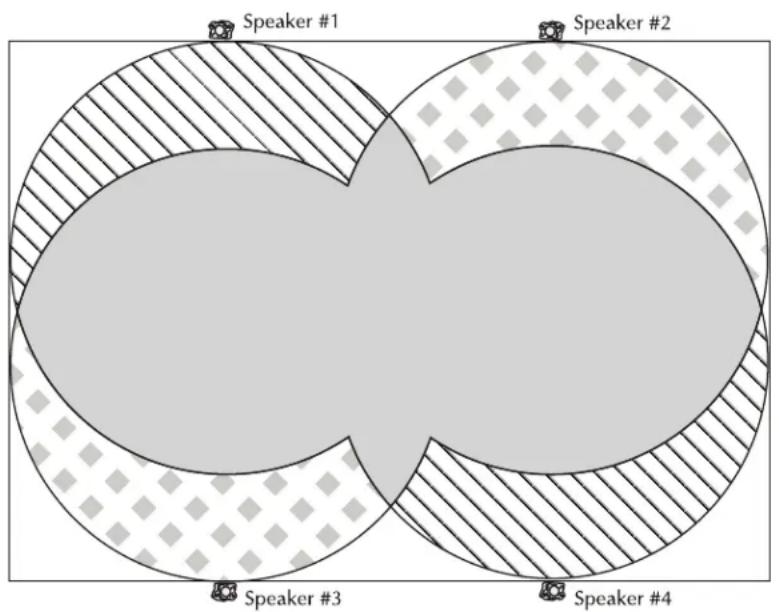
To obtain the best stereo imaging possible, use stereo outputs from the amplifier and alternate the speakers, left channel speaker, then right, then left, etc. in your layout. Placing speakers farther apart will lessen sound coverage and require you to play a louder volume to achieve the same sound level. Placing speakers closer together will improve sound coverage and produce more stereo coverage. By utilizing more loudspeakers to cover the area, you can play all of them at a softer volume and still reach the desired overall sound level. This will avoid having “hot spots” directly in front of the speakers where the volume is too loud.
text_image
Speaker #1 Speaker #2 Speaker #3 Speaker #4Area Covered in Stereo
Area Covered by Left Channel
Area Covered by Right Channel
Figure 2.
Two-speaker Stereo Coverage – with 4 speakers
ONE-SPEAKER STEREO MODE VS. TWO-SPEAKER STEREO MODE
As can be seen in the coverage examples, the one-speaker stereo mode has the advantage of covering a larger area than the two-speaker stereo mode. The difference in coverage area between the one-speaker stereo mode and the two-speaker stereo mode is significant.
The trade off between the two configurations is volume. The two-speaker stereo configurations will be able to play louder in their area than the one-speaker stereo configuration.
CHOOSING THE SPEAKER CABLE
In order to choose the proper speaker cable, please follow these steps:
- Unless you are using an impedance matching system, use care when connecting RS PRO series loudspeakers to your amplifier/receiver. An SI model wired in single speaker stereo mode will present a 4 ohm load to the amplifier. All other models and an SI model wired for two-speaker stereo mode will present an 8 ohm load. Verify the requirements of your amplifier/receiver prior to making any connections or running any wires.
- You will need 2-conductor speaker cable that clearly identifies each conductor in the cable. If burying your cable in the ground is required, use cable rated for direct burial or run cable through PVC pipe. Always use moisture resistant cable. If you are using an SI model in single speaker stereo mode, it will require a 4-conductor cable as it needs to carry both left and right stereo channels.
- After calculating the length of cable needed for each speaker, use the furthest length cable to determine the gauge (thickness) of speaker wire to use:
Wire Gauge Maximum Distance
16 60 ft (18 m)
14 100 ft (30 m)
12 160 ft (50 m)
- When running wires inside walls or outdoors, you should install your wires while conforming to your local building requirements and codes. If you are unsure of these codes, consult a professional audio/video installer, building contractor or local building and inspection agency that has jurisdiction.
- If the one-speaker stereo mode is used for this installation, remember that each speaker uses two separate cables to get their signals. Plan the number and length of cables, accordingly.
INCORPORATING A VOLUME CONTROL
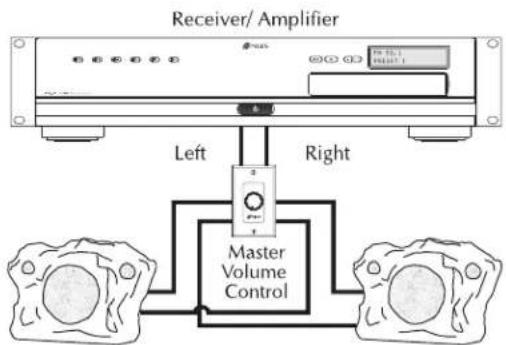
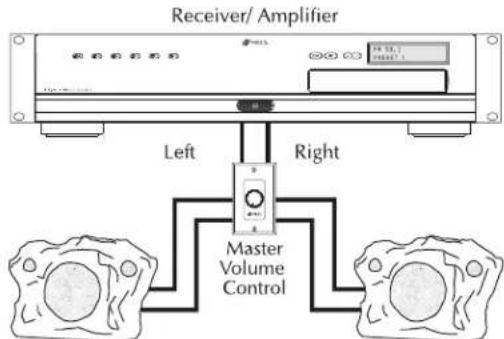
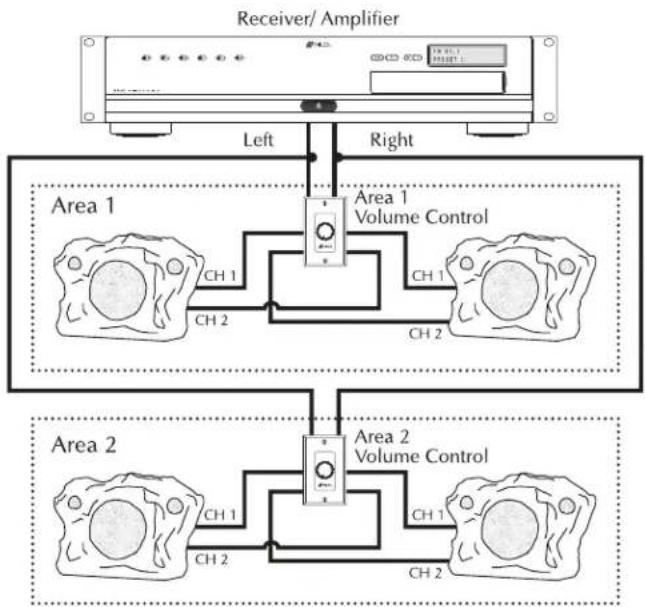
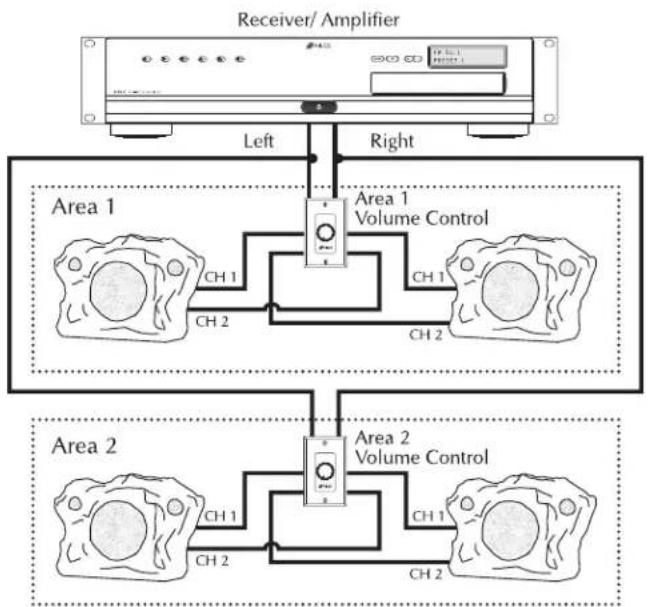
It is possible to control the volume of the sound at the speaker location. Volume controls are connected in line with the speaker, an example of wiring an area with 2 speakers and a master volume control is shown in Figures 3a and 3b, 3a is for one-speaker stereo mode (SI models only) and 3b is for two-speaker stereo mode. It is usually desirable to control the volume of the speakers in different areas or zones of the outdoor system. A suggested way to accomplish this is shown in Figures 4a and 4b, 4a is for SI models in one-speaker stereo mode and 4b is for two-speaker stereo mode.
Niles makes a wide range of outdoor volume controls. We recommend our standard WVC series models. In addition to controlling the volume of the loudspeakers, these controls can allow the addition of added speakers without adding more amplifier channels. Volume controls provide flexibility and customization to make the system reliable and easy to use. Consult your local Niles dealer for more information about using volume controls.
text_image
Receiver/ Amplifier Left Right Master Volume ControlFigure 3a. Two speakers wired in One-Speaker Stereo. One Zone VC Wiring
text_image
Receiver/ Amplifier Left Right Master Volume ControlFigure 3b. Two-Speaker Stereo One Zone VC Wiring
flowchart
graph TD
    A["Receiver/ Amplifier"] -->|Left| B["Area 1"]
    A -->|Right| C["Area 2"]
    B --> D["CH 1"]
    B --> E["CH 2"]
    C --> F["CH 1"]
    C --> G["CH 2"]
    D --> H["Volume Control"]
    E --> H
    F --> H
    G --> H
    H --> I["Area 2 Volume Control"]
Figure 4a. One-Speaker Stereo Two Zone VC Wiring SI models only
flowchart
graph TD
    A["Receiver/Amplifier"] -->|Left| B["Area 1"]
    A -->|Right| C["Area 1 Volume Control"]
    B -->|CH1| D["Area 2"]
    B -->|CH2| E["Area 2 Volume Control"]
    C -->|CH1| F["Area 2"]
    C -->|CH2| G["Area 2"]
    style A fill:#f9f,stroke:#333
    style B fill:#ccf,stroke:#333
    style C fill:#cfc,stroke:#333
    style D fill:#fcc,stroke:#333
    style E fill:#fcc,stroke:#333
    style F fill:#fcc,stroke:#333
    style G fill:#fcc,stroke:#333
Figure 4b. Two-Speaker Stereo Two Zone VC Wiring
RECOMMENDED AMPLIFIER POWER
We recommend an amplifier with a power rating as listed in the specifications page of this manual for optimum performance. Outdoor speakers typically require more power than indoor speakers. The outdoor environment is usually noisier and has less reflective surfaces to make the system sound louder. Therefore, the use of a higher power amplifier is recommended.
Ironically, most speakers are not damaged by large amplifiers but by small amplifiers. When playing the loudspeaker at higher volumes, a small amplifier will run out of power very quickly. When an amplifier runs out of power it creates damaging “clipping” distortion. A large amplifier will play at the same volume without causing this distortion.
See the section "Operation" for more information about clipping distortion.
INSTALLATION
Determine the location of the amplifier that will power the loudspeakers. The amplifier should be located in an area that protects it from the weather. Refer to the amplifier installation instructions to ensure that the amplifier is not located in an area that does not meet its recommended operating environment.
Once the location of the amplifier is determined, layout and place the loudspeakers in the area where music is desired. Use the procedures and recommendations detailed in the section “Selecting the number and location for your speakers” of this manual to choose the best locations for the speakers.
Determine a path for the speaker cable. You may need to run wires in walls, under sidewalks or patios and around obstacles in your yard. Install the wires while conforming to your local building requirements and codes. If you are unsure of these codes, consult a professional audio/video installer, building contractor or local building and inspection agency that has jurisdiction.
Use care when digging trenches in the yard; ensure that there are no buried cables or gas lines by verifying the location of these items with the local authorities in your area prior to digging the trenches.
After selecting this path, estimate the amount of cable needed and use the section entitled “Choosing the Speaker Cable” to choose and cut the cable required.
Remember that if you are connecting SI model speakers in the one-speaker stereo mode, make sure you run two cables to each speaker and that the cables are clearly identified “Right” and “Left”, so that the stereo imaging of the speakers is assured.
If the cable will be run underground, dig a trench along the path needed for the speaker cable. If you are using PVC pipe to run your cable in, connect and glue the PVC piping sections and connections together so they lie in this trench easily. Now run the cable from the amplifier to each speaker location through the pipe. If you are using direct burial cable, run the cable from the amplifier to each speaker location and lay the cable in the trench.
Do not cover the cable in the trenches until system operation and loudspeaker coverage is verified.
CONNECTING THE LOUDSPEAKER IN ONE-SPEAKER STEREO MODE (SI MODELS ONLY)
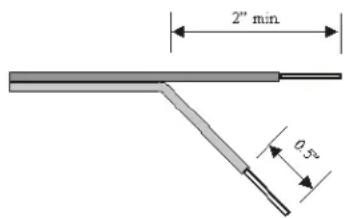
- Strip two to three inches of each speaker cables's outer jacket away from the insulated conductors. Ensure that at least two inches of the separate conductors are free. Do this on both loudspeaker connection cables.
- Strip one half inch of insulation from the end of each conductor as show in Figure 5 for both connection cables.
- Choose the speaker cable that is labeled for the “Right” amplifier channel. Connect one stripped end of the “Right” speaker cable coming from the amplifier to the SI model’s connection cable’s red wire. To connect the two wires, twist the stripped ends of the wire together and screw down the wire nut on the twisted wires. The material inside the wire nut will protect the stripped ends of the wire. However, if added protection is desired, place a large amount of silicone sealant so the bottom of the wire nut is encased and sealed. Pay attention to the markings on the speaker cable. Each loudspeaker you connect must be connected to the amplifier’s speaker wire in the same way.
- Repeat step 3 with the connection cable's black wire, that is in the same cable as the wire attached in step 3, and the other stripped amplifier "Right" speaker cable's conductor.
- Repeat steps 3 and 4 for the "Left" speaker cable and the connection cable with the "yellow/black" pair of conductors.
- Make sure your amplifier/receiver is turned OFF before making any connections. Connect the opposite end of the speaker cable to the amplifier or receiver. Start by performing step 1 and 2 on the speaker cable near the amplifier. Pay attention to the markings on the speaker cable conductor. Use the cable labeled "Right" and attach the same conductor you attached to the red loudspeaker wire to the positive (red) or (+) "Right" amplifier output terminal. Attach the other conductor in that cable to the amplifier's "Right" negative (black) or (−) amplifier output terminal.
- Using the cable labeled "Left" attach the same conductor you attached to the yellow loudspeaker wire to the positive (red) or (+) "Left" amplifier output terminal. Attach the other conductor in that cable to the amplifier's "Left" negative (black) or (−) amplifier output terminal.
CONNECTING THE LOUDSPEAKER IN TWO-SPEAKER STEREO MODE (ALL NON-SI MODELS AND SI MODELS THAT ARE WIRED IN TWO SPEAKER STEREO MODE)
- Strip two to three inches of the speaker cables' outer jacket away from the insulated conductors. Ensure that at least two inches of the separate conductors are free. Do this on both loudspeaker connection cables.
- Strip one half inch of insulation from the end of each conductor as show in Figure 5 for both connection cables.
text_image
2" min 0.5"Figure 5.
Speaker wire preparation
-
Connect one stripped end of the speaker cable coming from the amplifier to the loudspeaker connection cable's red wire of one cable and the connection cable's yellow wire. To connect the three wires, twist the stripped ends of the wire together and screw down the wire nut on the twisted wires. The material inside the wire nut will protect the stripped ends of the wire. However, if added protection is desired, place a large amount of silicone sealant so the bottom of the wire nut is encased and sealed. Pay attention to the markings on the speaker cable. Each loudspeaker you connect must be connected to the amplifier's speaker wire in the same way.
-
Repeat step 3 with the connection cable's black wires and the other stripped amplifier speaker cable's conductor.
-
Make sure your amplifier/receiver is turned OFF before making any connections. Connect the opposite end of the speaker cable to the amplifier or receiver. Start by performing step 1 and 2 on the speaker cable near the amplifier. Paying attention to the markings on the speaker cable conductor, attach the same conductor you attached to the red loudspeaker wire to the positive (red) or (+) amplifier output terminal. Attach the other conductor to the amplifier's negative (black) or (−) amplifier output terminal.
SPEAKER PHASE
Speaker wire has two conductors. One conductor is attached to the negative (black) or (-) terminals and one conductor is attached to the positive (red) or (+) terminals of both the loudspeaker and the amplifier. Usually, the wire is marked for your convenience. There are different ways to mark the conductor; a stripe on one wire, a ribbed area on one conductor that you can feel, different color metal conductor wire inside the insulation, the insulation covering the conductor might be different colors, or there might be a fabric string wound into one of the conductors. Of course some cables make it difficult to determine which conductor is which. Be careful to avoid mistakes. If you do, one loudspeaker will be playing out of “phase” with the other loudspeaker. An out of phase pair of speakers work against each other and the sound of the two speakers playing together will be lacking in bass response and have a “phasey” sound quality. If you suspect the sound is not right, check to make sure that the conductors on each loudspeaker are attached the same on the loudspeaker and the amplifier. If you cannot see any markings or determine if they are all attached the same, try this simple test:
IN ONE-SPEAKER STEREO MODE (SI MODELS ONLY)
- Play some music with the amplifier or receiver set to Mono.
- Stand in the middle of both speakers and about three feet away from them.. Listen to the richness of the bass and the loudness of the sound.
- Turn off the amplifier and reverse the connections on one side of the speaker only.
- Repeat the listening test with the same setting of the volume controls. If the current sound has a richer bass and is slightly louder than the previous sound, the speakers are working together and are "in-phase". Leave the speakers connected to the amplifier in this configuration. If the current sound is not richer in bass or louder than the previous sound, turn off the amplifier and reverse the connections of the wire you moved in step 3.
- Check the phase between each speaker in the area by following the procedures for two-speaker stereo mode. Remembering to change the phase on both sides of the speaker when you perform step 4 of that procedure.
IN TWO-SPEAKER STEREO MODE OR CHECKING PHASE BETWEEN SPEAKERS
- Point the speakers at each other, rather than at the area you want to cover.
- Play some music with the amplifier or receiver set to Mono.
- Stand so you are the same distance from each speaker and listen to the richness of the bass and the loudness of the sound.
- Turn off the amplifier and reverse the connections on one speaker only.
- Repeat the listening test with the same setting of the volume controls. If the current sound has a richer bass and is slightly louder than the previous sound, the speakers are working together and are "in-phase". Leave the speakers connected to the amplifier in this configuration. If the current sound is not richer in bass or louder than the previous sound, turn off the amplifier and reverse the connections of the wire you moved in step 4.
VERIFY SYSTEM OPERATION AND LOUDSPEAKER COVERAGE
- Turn the system “On” and play music to the speakers. Set the Volume controls to a level that allows the speakers to be easily heard over the “noise” in the area.
- Verify that music is playing through each speaker. If not, troubleshoot the wiring and make sure each speaker is electrically connected to the amplifier.
- Verify that each speaker is connected to the proper channel of the amplifier. To do this, change the balance of your speakers on your amplifier or receiver so that one channel is at playing loudly and the other is not. Verify that each speaker or each side of the speaker is attached to the proper channel of the amplifier. If they are not, correct the wiring on the loudspeaker that is not connected properly. Reset the balance on the amplifier or receiver so both channels have a similar volume level.
- If you used a volume control between the amplifier and the speakers, verify that it is controlling the volume of the loudspeakers in its zone. Repeat this for every volume control in the system. If any are not, correct the wiring.
- Point the loudspeakers per the layout and verify that the sound is even and consistent throughout the area.
INSTALLING THE SECURITY BRACKET AND CABLE
-
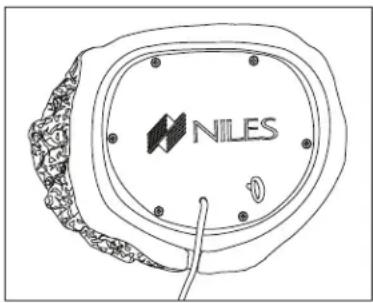
With the loudspeaker in the proper location, turn the loudspeaker over so the bottom of the loudspeaker is facing you, as shown in Figure 6.
-
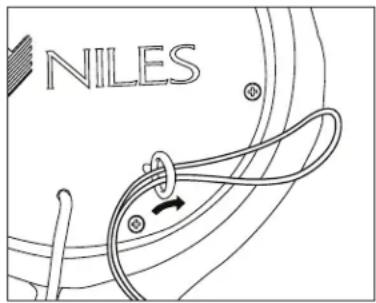
Take the nylon security cable, supplied with the loudspeaker and fold it in half. Using the middle of the cable, feed it through the Security Attachment Eyelet as shown in Figure 7.
text_image
NILESFigure 6. Bottom of Loudspeaker
text_image
NILESFigure 7. Security Cable in Eyelet
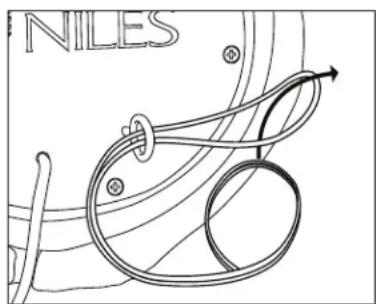
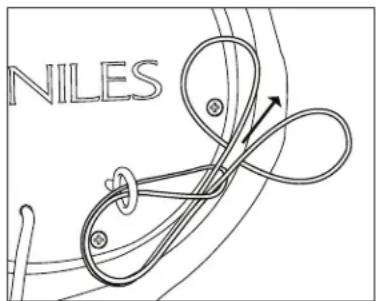
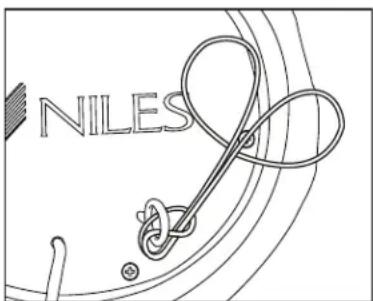
- Feed the opposite end of the nylon security cable through the exposed portion of the cable that was just fed through the security eyelet, as shown in Figures 8 and 9.
text_image
NILESFigure 8. Security Cable Looping Through
text_image
NILESFigure 9. Security Cable after Looping
text_image
NILESFigure 10. Security Cable Connected and Tightened
-
Pull the ends of the security cable with the loops as tight as you can until the knot around the security eyelet is tightened as shown in Figure 10.
-
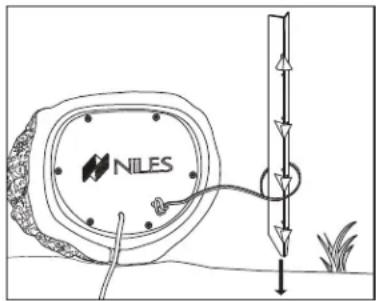
Feed the Security Stake through the loops at the end of the security cable and ensure that they are inserted into the cable holder provided at the top of the stake, as shown in Figure 11.
-
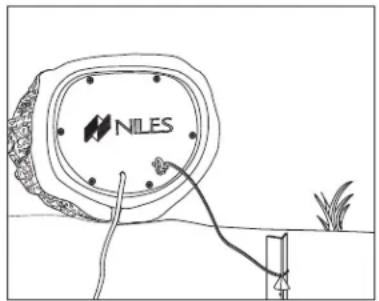
Pick a spot in the ground which the loudspeaker will cover and drive the security stake all the way into the ground until the cable holder is completely under the surface of the ground, as shown in Figure 12.
text_image
NILESFigure 11.
Security Stake
Attachment to Cable
text_image
NILESFigure 12.
Security Stake
Driven into Ground
- Pull on the security cable and verify that the stake is securely held in the ground.
UPGRADED SECURITY ATTACHMENT METHOD (OPTIONAL)
To perform this attachment method you will need the following items:
- (1) Stainless Steel Eyebolt
- (1) Concrete Anchor sized to the Stainless Steel Eyebolt
- (1) Bag of Quikcrete – fast drying cement mix or equivalent
- A post hole digger or shovel
- (1) Stainless Steel Aircraft Cable 1/8" diameter or larger
- (2) Stainless steel wire rope clamps sized to the aircraft cable chosen
TO INSTALL AN UPGRADED SECURITY SYSTEM:
- Prepare a hole that is at least one-foot deep, at a minimum (three-feet if the speaker is being installed in an area that has a frost line). The hole should be at least six inches in diameter. This hole should be under the desired location of the loudspeaker.
- Once the hole is prepared, mix the concrete per its instructions. Fill the hole with concrete. Place the concrete anchor in the center of the concrete so the top of the anchor is flush with the top of the concrete and the anchor is not filled with concrete.
- Wait until the concrete is dried per the instructions on the concrete mix used.
- Screw the stainless steel eyebolt into the concrete anchor
- Feed one end of the stainless steel aircraft cable through the eyebolt in the concrete
- Loop the end of the aircraft cable around the eyebolt and back to the aircraft cable. Secure this end of the cable to the main aircraft cable with the wire rope clamp.
- Turn the loudspeaker over and feed the other end of the aircraft cable through the eyelet in the bottom of the loudspeaker.
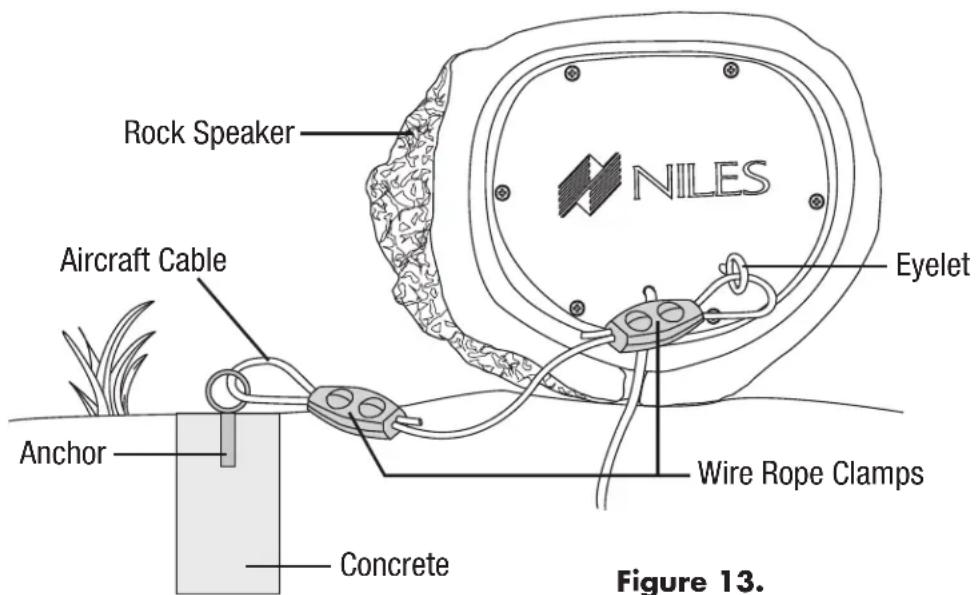
- Loop this end of the aircraft cable around the eyelet and back to the aircraft cable. Secure this end of the cable to the main aircraft cable with the wire rope clamp. The upgraded attachment should now look like Figure 13.
text_image
Rock Speaker NILES Aircraft Cable Anchor Concrete Eyelet Wire Rope Clamps Figure 13.Upgraded Security Attachment
FINAL ADJUSTMENTS
Now that the loudspeaker's phase, operation and security is assured, there are some final steps to ensure that the loudspeakers installation is complete and that they are used at their full potential.
- Cover any trenches or wires that are still open or exposed.
- Point the loudspeakers per the layout and verify that the sound is even and consistent throughout the area that sound is desired, as you did in step 5 of verifying system operation.
- Verify that the front of the loudspeaker is as close to perpendicular to the ground as possible. This will aid the drainage of water away from the woofer and improve sound quality.
- Check that the entire installation is safe and secure.
OPERATION
LISTENING AT HIGHER VOLUMES
Outdoors there are no walls to reflect and contain the sound and typically the ambient noise level is louder. This causes the system to require more power to achieve a reasonable listening level than it does when you are listening indoors. In addition, you are frequently further away from the loudspeaker. It is possible to turn the volume so high that the amplifier runs out of power. This creates "clipping" distortion.
Clipping distortion makes treble sound very harsh and unmusical. When you hear harsh sounding treble from any good speaker indoors or outdoors, turn the volume down immediately! Those harsh sounds are masking some much more powerful ultra-high-frequency sound spikes that will quickly damage any fine loudspeaker.
CLEANING
The rock loudspeaker should not require cleaning. The formation of dirt and molds on the cabinet will add to the natural look of the loudspeaker. However, if
you desire to clean the loudspeaker you can clean your RS PRO series loudspeaker with a dampened soft cloth or a paper towel. Hosing the loudspeaker off with a garden hose or high pressure cleaner is not recommended, the drivers, especially the tweeter, can be damaged by a high-pressure stream of water. The use of chemical cleaners should also be avoided.
SPECIFICATIONS
NOMINAL IMPEDANCE
4 Ohms, in one-speaker stereo mode (SI Models Only)
8 Ohms, in two-speaker stereo mode
| RS5 RS6 RS6SI RS8SI | — | — | ||
| Tweeter 1/2" Kaladex 1" Teteron Dual 1" Teteron Dual 1" Teteron | ||||
| Woofer | 5-1/4" Injection Molded TCC | 6-1/2" Injection Molded TCC | Dual voice coil, 6-1/2" Injection Molded | Dual voice coil, 8" Injection Molded TCC |
| Frequency Response (+/- 3) | 85 Hz - 20 kHz 70 Hz - 21 kHz 70 Hz - 21 kHz 50 Hz - 21 kHz | |||
| Recommended Amplifier Power | 10-100 watts 10-150 watts 10-200 watts 10-200 watts | |||
| Sensitivity (for 2.83V of Pink) | 89 dB 88 dB | |||
| Temperature Extremes | -50° to 185° F (-45° to 85°C) | |||
| Dimensions | 10" L x 8-1/2" D x 9-1/2" H | 14" L x 11" D x 12" H(35.6 cm x 28 cm x 30.5 cm) | 19-1/2" L x 16-1/2" D x 12-1/2"H | |
| Weight ~ 6 lbs (~ | 2.7 kg) ~11 lbs (~5 kg) ~11 lbs (~5 kg) | ~16.5 lbs(~7.5 kg) | ||
NOTES
BY PHONE (IN USA)
1-800-BUY-HIFI (289-4434)
BY PHONE (OUTSIDE USA)
1-760-710-0992
CUSTOMER SERVICE HOURS
8:00 AM to 5:30 PM PT
TECHNICAL SUPPORT HOURS
6:00 AM to 4:00 PM PT
ON THE WEB
www.nilesaudio.com
EMAIL TECHNICAL SUPPORT
techsupport@nilesaudio.com
EMAIL FOR PRODUCT SUGGESTIONS
productsuggestions@nilesaudio.com

NILES®
BLENDING HIGH FIDELITY AND ARCHITECTURE®
1969 Kellogg Avenue, Carlsbad, CA 92008
1-760-710-0992
1-800-BUY-HIFI - www.nilesaudio.com
©2011 The AVC Group, LLC. All rights reserved. Niles and the Niles logos are registered trademarks of The AVC Group, LLC. All other trademarks are the property of their respective owners. We reserve the right to change specifications, descriptions and prices without notice. The technical and other information contained herein is not intended to set forth all technical and other specifications. Designed and engineered in the USA. DS00333 Rev C

NILES®
LIMITED WARRANTY CARD
LIMITED WARRANTY
Niles Audio Corporation ("NILES") warrants to the original retail purchaser only that this product will be free of manufacturing defects in material and workmanship for the following periods and subject to the limitations and exclusions set forth below:
Lifetime Warranty
All Passive Loudspeaker Products (those not requiring AC or battery power).
Ten years from the date of purchase
All Other Passive Products (those not requiring AC or battery power).
Two years from the date of purchase
All Active Products (those requiring AC or battery power).
This warranty is not transferable to subsequent purchasers of the product. To obtain warranty service, contact the authorized dealer where you purchased your product or take the unit to the nearest authorized NILES dealer (with proof of purchase – claims made without proof of purchase will be denied) who will test the product and if necessary, forward it to NILES for service. If there are no authorized NILES dealers in your area, you must contact NILES to receive a factory Return Authorization Number. DO NOT RETURN ANY UNIT WITHOUT FIRST RECEIVING WRITTEN AUTHORIZATION AND SHIPPING INSTRUCTIONS FROM NILES.
Upon examination, NILES will, at its sole option and expense, repair or replace any product found to be defective. NILES will return the repaired or replaced unit to you via its usual shipping method from the factory to your address in the United States of America or Canada only. Any shipping costs for addresses outside of the United States or Canada shall be the responsibility of the purchaser. In the event that this model is no longer available and cannot be repaired effectively, NILES, at its sole option, may replace it with a different model of equal or greater value, or refund the original purchase price paid. THE FOREGOING ARE YOUR EXCLUSIVE REMEDIES FOR BREACH OF WARRANTY.
This Warranty does not include service or parts to repair damage caused by improper use or handling, including but not limited to damage caused by accident, mishandling, improper installation, commercial use, abuse, negligence, or normal wear and tear, or any defect caused by repair to the product by anyone other than NILES.
This warranty does not cover reimbursement for your costs of removing and transporting the product for warranty service evaluation, or installation of any replacement product provided under this warranty.
This Warranty will be void if:
- the Serial Number on the product has been removed, tampered with or defaced.
- the product was not purchased from an authorized dealer or reseller.
THE FOREGOING WARRANTIES ARE EXCLUSIVE AND IN LIEU OF ALL OTHER EXPRESSED AND IMPLIED WARRANTIES. NILES EXPRESSLY DISCLAIMS ALL SUCH OTHER WARRANTIES, INCLUDING BUT NOT LIMITED TO IMPLIED WARRANTIES OF MERCHANTABILITY, FITNESS FOR A PARTICULAR PURPOSE AND NON-INFRINGEMENT, WITH RESPECT TO THE PRODUCT. TO THE MAXIMUM EXTENT PERMITTED BY LAW, NILES SHALL NOT BE RESPONSIBLE FOR ANY INCIDENTAL OR CONSEQUENTIAL DAMAGES EXCEPT TO THE EXTENT PROVIDED (OR PROHIBITED) BY APPLICABLE LAW, EVEN IF NILES HAS BEEN ADVISED OF THE POSSIBILITY OF SUCH DAMAGES.
Notwithstanding the above, if you qualify as a “consumer” under the Magnuson-Moss Warranty Act, or applicable state laws, then you may be entitled to any implied warranties allowed by law for the Warranty Period. Further, some states do not allow limitations on how long an implied warranty lasts or allow the exclusion or limitation of consequential damages, so such limitations may not apply to you. This warranty gives you specific legal rights, and you may also have other rights which vary from state to state.
For the name of your nearest authorized NILES dealer, contact: NILES AUDIO CORPORATION, P.O. BOX 160818, Miami, Florida 33116-0818, or call 1-800-289-4434, 1-305-238-4373. Please be advised that NILES only sells its products via the Internet through a select group of authorized Internet dealers. These are listed on our website at www.nilesaudio.com. Products offered on the Internet through unauthorized Internet dealers are not covered by the NILES warranty and may be either:
1) goods acquired on a secondary or grey market
2) counterfeit or stolen goods
3) damaged, or defective goods
Please fill in your product information and retain for your records.
Model
Serial No.
Purchase Date
ATTENTION: TO OUR VALUED CONSUMERS:
To insure that consumers obtain quality pre-sale and after-sale support and service, NILES products are sold exclusively through authorized dealers. This warranty is VOID if the products have been purchased from an unauthorized dealer.

NILES®
THE FIRST NAME IN CUSTOM INSTALLATION®
1-800-BUY-HIFI 1-305-238-4373 www.nilesaudio.com
©2008 Niles Audio Corporation 12331 S.W. 130 Street, Miami, FL 33186. All rights reserved. WR00008A