
Microline 591 - Printer OKI - Free user manual and instructions
Find the device manual for free Microline 591 OKI in PDF.


User questions about Microline 591 OKI
0 question about this device. Answer the ones you know or ask your own.
Ask a new question about this device
Download the instructions for your Printer in PDF format for free! Find your manual Microline 591 - OKI and take your electronic device back in hand. On this page are published all the documents necessary for the use of your device. Microline 591 by OKI.
USER MANUAL Microline 591 OKI
Chapter 1 Unpacking Check The Contents
Unpacking Check The Contents
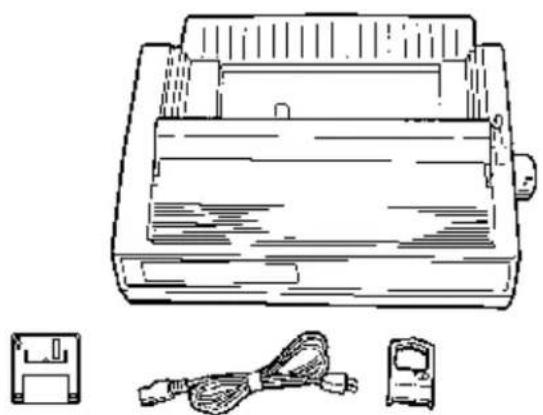
Unpack your printer and check to be sure you have the following items:
printer
diskette
power cord
ribbon cartridge
natural_image
Technical line drawing of a printer with cable and housing (no text or symbols)If you are missing any of these items, contact your dealer immediately
Remove the Protective Film
Remove the Protective Film
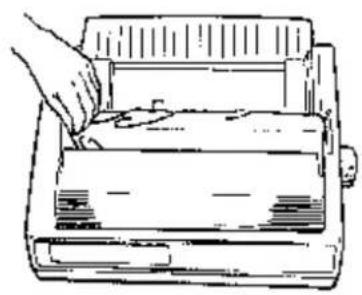
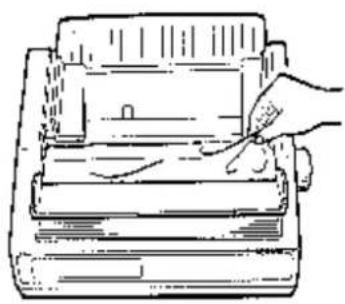
Peel the plastic film from the carriage cover (1). Pull up on the carriage cover and peel the plastic film from the access cover (2), then swing carriage cover back into place.
1
natural_image
Line drawing of a hand pressing down on a printer (no text or symbols)②
natural_image
Line drawing of a hand holding a stack of books (no text or symbols present)③
natural_image
Technical line drawing of a mechanical component or housing (no text or symbols visible)Remove the Shipping Retainers
Remove the Shipping Retainers
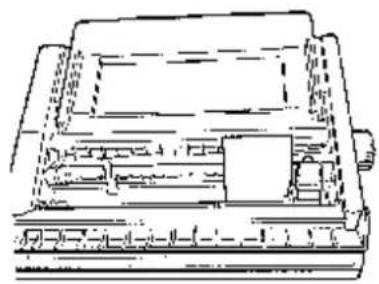
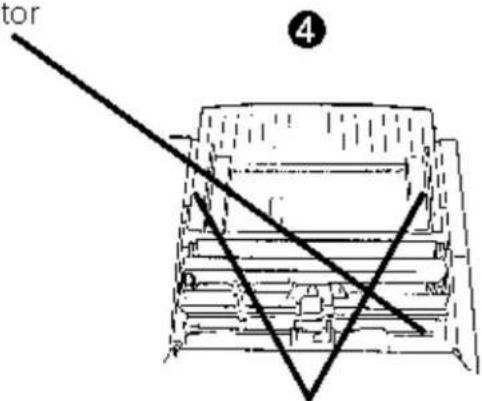
Open the access cover and remove the shipping retainer for the printhead (3). Lift the paper separator and remove the second shipping retainer (4).
Retainer
Cale
Retenedor
Protetor
text_image
tor ④Lift Here
Soulevez ici
Levante aquí
Levante aqui
Install the Ribbon Cartridge
Install the Ribbon Cartridge
Note:
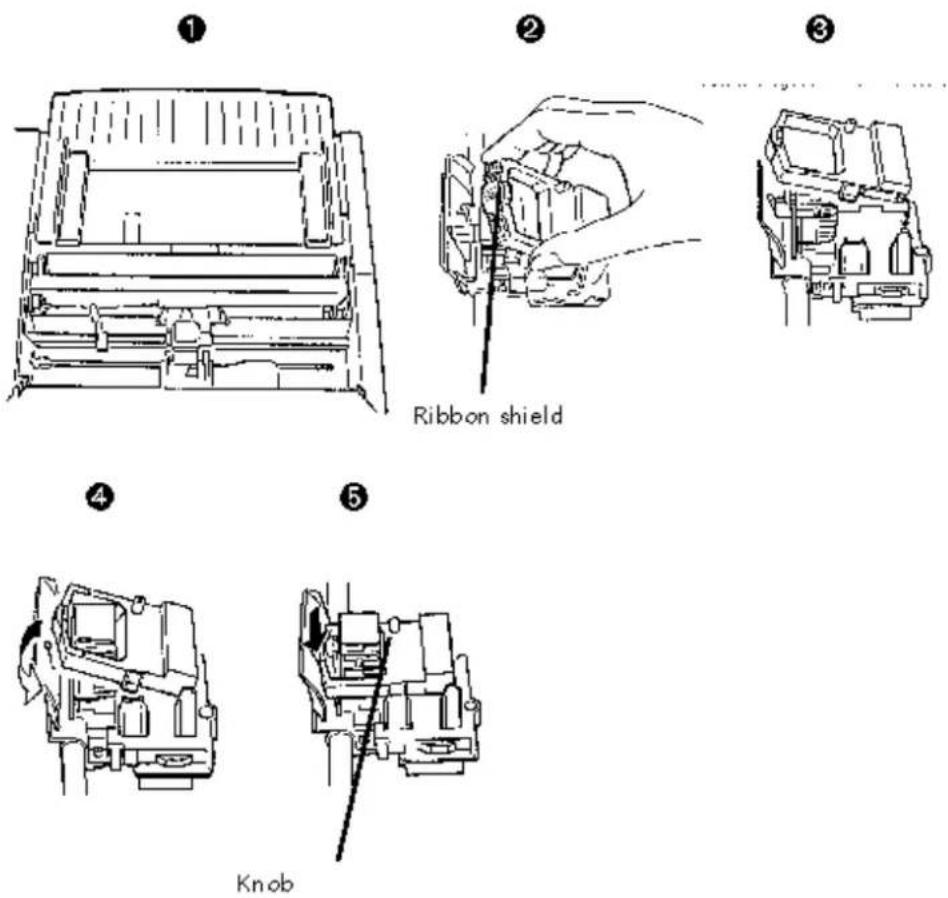
Leave the ribbon shield on the cartridge!
Make sure the printer is turned off. Slide the printhead to the center of the platen (1). Holding the ribbon cartridge as shown (2), fit the grooves in the flat end of the cartridge over the posts on the ribbon plate (3). Lower the front of the cartridge over the printhead until it snaps into place (4). Turn the knob in the direction of the arrow on the cartridge to take up the ribbon slack (5).
Connect to Your Computer and to the Power Line
Connect to Your Computer and to the Power Line
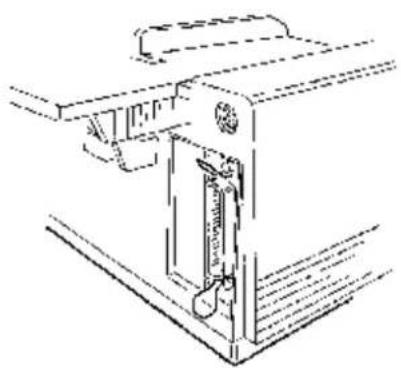
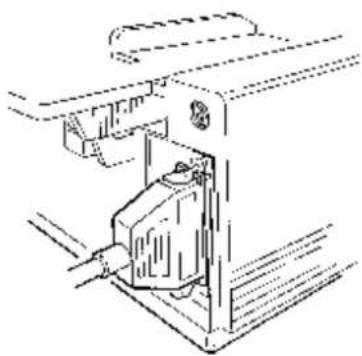
Turn both the computer and the printer off. Plug the parallel interface cable (you must supply the cable) into the parallel interface port on the back of the printer (1) and secure it in place with the wire loops (2).
1
natural_image
Technical line drawing of a mechanical device with no visible text or symbols②
natural_image
Technical line drawing of a mechanical assembly or mounting bracket (no text or symbols)③
natural_image
Technical line drawing of two connected electrical connectors (no text or symbols)Note:
FCC regulations require the use of a shielded cable no longer than 6 ft. (1.8 m).
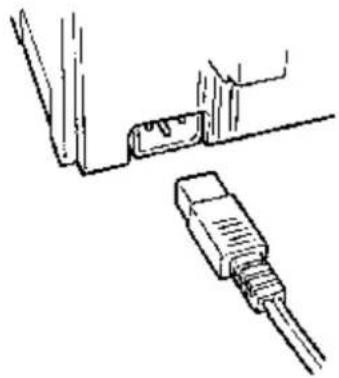
Plug the power cord into the power socket on the back of the printer (i), then plug the other end into a grounded outlet.
Turn on the Printer
Turn on the Printer
Turn on the printer (the power switch is on the right side of the housing).
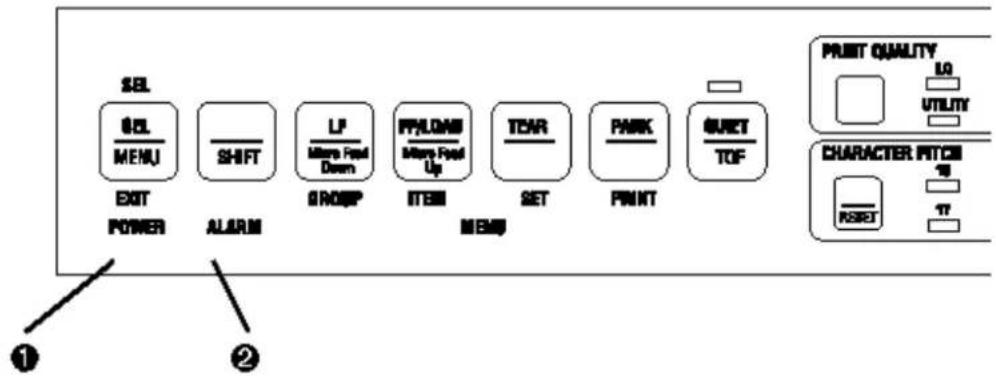
The printhead crosses back and forth along the platen and the pins gently fire to determine the printhead gap setting. The POWER light (1) comes on. The ALARM light (2) also comes on, indicating that there is no paper loaded.
flowchart
graph LR
    A["SET"] --> B["INPUT"]
    B --> C["RESET"]
    C --> D["PRUIT QUALITY"]
    D --> E["CHARACTER FITCER"]
    style A fill:#f9f,stroke:#333
    style B fill:#ccf,stroke:#333
    style C fill:#cfc,stroke:#333
    style D fill:#fcc,stroke:#333
    style E fill:#ffc,stroke:#333
Chapter 1 Single-Sheet Paper
Single-Sheet Paper
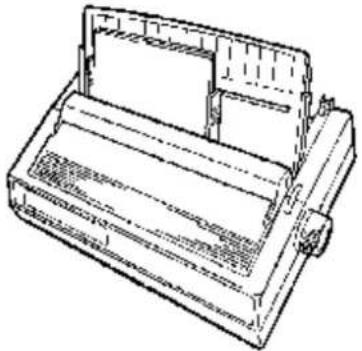
Use single-sheet paper for letterhead stationery, memos, and envelopes. It is also recommended for printing graphs and charts because it provides the most accurate control of the paper, producing solid black graphics and vibrant color charts.
natural_image
Line drawing of a mechanical device with no visible text or symbolsNote:
If you have continuous-form paper in the paper path, press the PARK button on the front panel to remove it from the path before loading single-sheet paper!
Preliminaries
Preliminaries
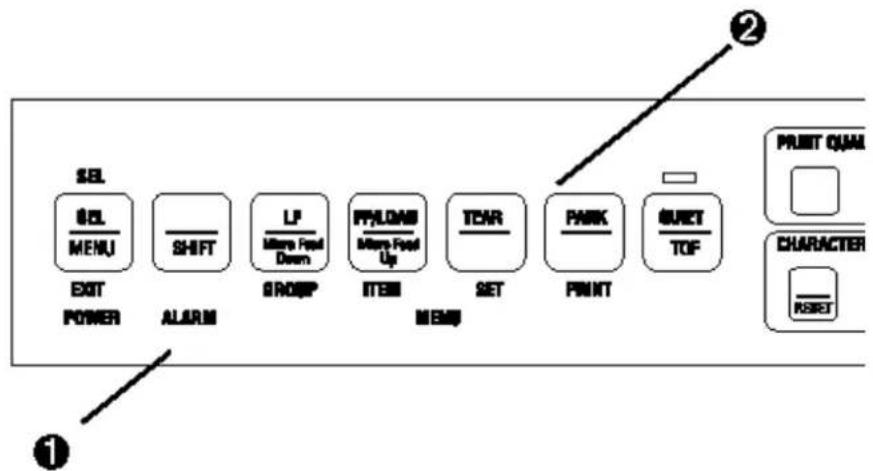
Make sure the printer is turned on and that the ALARM light (1) is on, indicating that there is no paper in the paper path.
text_image
SEL SEL MENU EXIT POWER ALARM SHIFT GROUP LP Micro Feed Down ITEM PPLONE Micro Feed Up TEAR MEMS SET PARK PRINT GRET TOF 2 PRINT QUAL CHARACTER RESET ①Note: If the ALARM light is off, continuous-form paper is loaded in the paper path. Press the PARK button (2) to remove it from the path before attempting to load single-sheet paper.
Loading Single-Sheet Paper
Loading Single-Sheet Paper
Move the paper lever to the position marked TOP (1). Unsnap the paper separator from the housing, then swing it upright to the position illustrated (2): make sure the wire feed guide is against the separator. Adjust the paper feed guides to fit the width of the paper and place a sheet of paper in the paper separator (3).
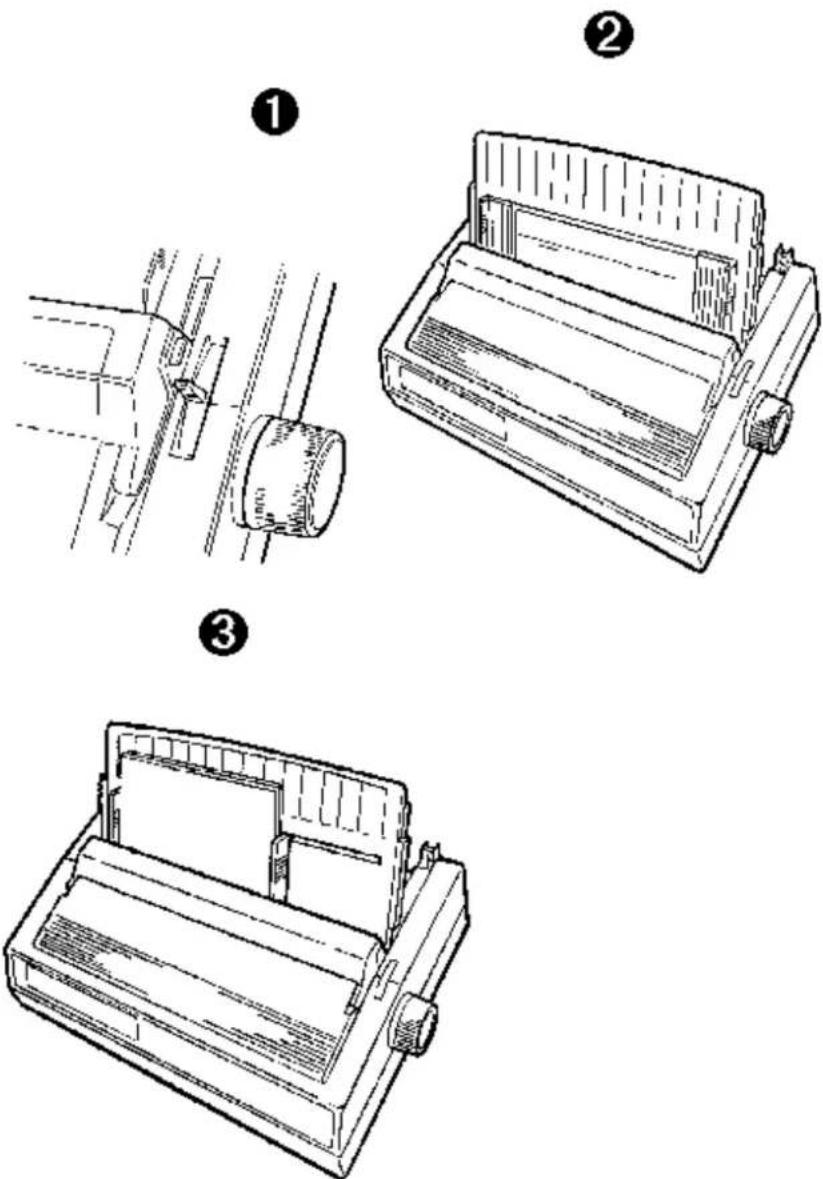
The paper automatically feeds into the printer. The printhead travels back and forth, gently firing its pins to sense the paper thickness and set the printhead gap.
Important!
If you are printing envelopes, you need to enter the printer Menu, go to the Top Feed group and change the setting for Gap Control to 6 to ensure optimum printing performance (see page 41).
flowchart
graph TD
    A["INL"] --> B["TEL"]
    B --> C["FRU"]
    C --> D["RESET"]
    D --> E["LJ"]
    E --> F["Signal Control"]
    F --> G["FLAME"]
    G --> H["Signal Control"]
    H --> I["TCB"]
    I --> J["RESET"]
    J --> K["PWR"]
    K --> L["RESET TDF"]
    M["RESET QUINT"] --> N["LJ"]
    N --> O["RESET"]
    P["DRINKOUT RDC"] --> Q["S"]
    Q --> R["S"]
    S["DRINKOUT RDC"] --> T["S"]
    T --> U["S"]
    V["RESET"] --> W["RESET"]
    X["RESET"] --> Y["RESET"]
    Z["RESET"] --> AA["RESET"]
Note:
If the sheet of paper doesn't feed in properly, the 15 light on the front panel flashes. To correct this, press the SHIFT and RESET buttons simultaneously (1), then reload the paper.
Setting the Top of Form for Single-Sheet Paper
Setting the Top of Form for Single-Sheet Paper
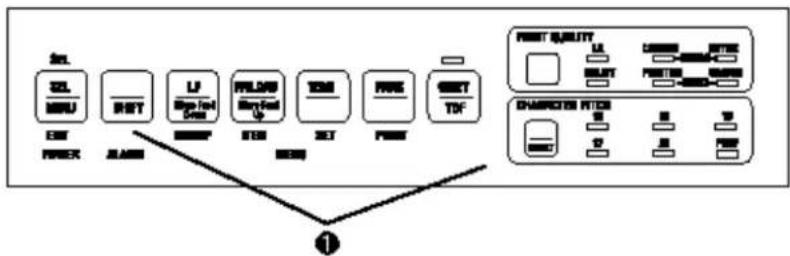
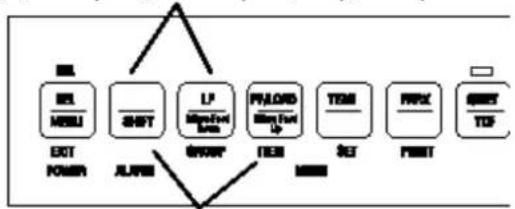
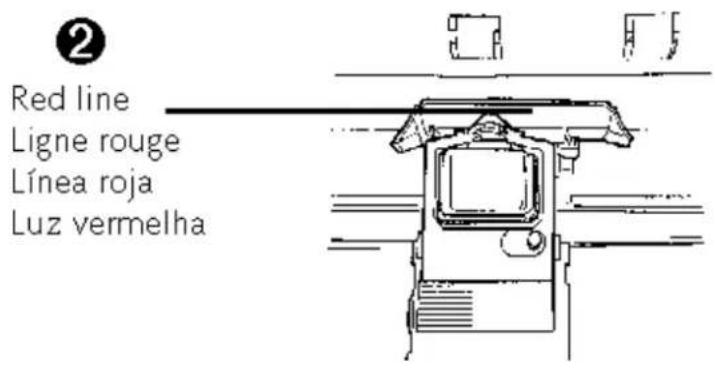
Make sure the printer is deselected (SEL light offpress the SEL button to deselect). To set the Top of Form (the position where the first line of printing begins) for single-sheet paper, use the front panel buttons indicated below ( ). When you are done press the SEL button. The location of the printing is indicated by the red line on the paper shield ( ).
Note:
To reset the Top of Form to the factory default, turn off the printer, then hold the QUIET and PARK buttons while turning the printer back on.
(1) To set Top of Form higher, press and hold SHIFT button while pressing LF button.
flowchart
graph TD
    A["BL"] --> B["SHPT"]
    B --> C["LP"]
    C --> D["PRX"]
    D --> E["USB/TSP"]
    F["EXIT POWER"] --> G["ALAB"]
    G --> H["ORBIT"]
    H --> I["TEM"]
    I --> J["SET"]
    J --> K["PRX"]
    K --> L["USB/TSP"]
To set Top of Form lower, press and hold SHIFT button while pressing LF/LOAD button.
text_image
② Red line Ligne rouge Línea roja Luz vermelhaTemporarily Changing the Top of Form Setting for Single-Sheet Paper
Temporarily Changing the Top of Form Setting for Single-Sheet Paper
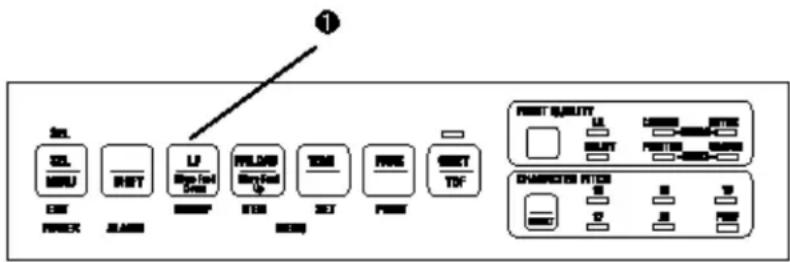
To temporarily change the Top of Form setting for a page, deselect the printer (press SEL button) and press the LF button (Ê) until you reach the Top of Form position you want to use. The printer retains this setting until the next sheet feeds in.
text_image
INL INL REFR REFR REFR REFR REFR REFR REFR REFR REFR REFR REFR REFR REFR REFR REFR REFR REFR REFR REFR REFR REFR REFR REFR REFR REFR REFR REFR REFR REFR REFR REFR REFR REFR REFRRear-Feed Paper
Rear-Feed Paper
Load continuous-form paper on the rear-feed paper path for printing spreadsheets, long reports, etc. For graphics or charts, use the single-sheet paper path to obtain the best results.
Note:
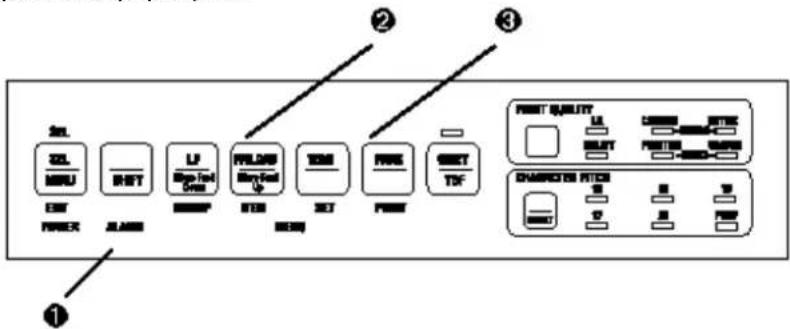
If you have single-sheet paper in the paper path, press the FF/LOAD button to remove it from the path before loading rear-feed paper. The ALARM light comes on.
natural_image
Technical line drawing of a structural support frame with beams and columns (no text or symbols)Preliminaries
Preliminaries
Make sure the printer is turned on and that the ALARM light (1) is on, indicating that there is no paper in the paper path.
text_image
① ② ③ ④ ZL MNU ENT FIREX RST ALAB LF Blue-Tot Dens PLOAD Blue-Tot FTB TEN SET FIRE RESET TIF FIRST QUALITY LF SUT CABBRENT FTB FIRST QUALITY FIREX DRINKOUT FTB 10000000000000000000000000000000000000000000000000000000000000000000000000000000000000000000000000000Note:
If the ALARM light is off, paper is loaded in the paper path. Press the FF/LOAD button (1) to remove single-sheet paper or the PARK button (2) to remove continuous-form paper from the path before proceeding.
Loading Rear-Feed Paper
Loading Rear-Feed Paper
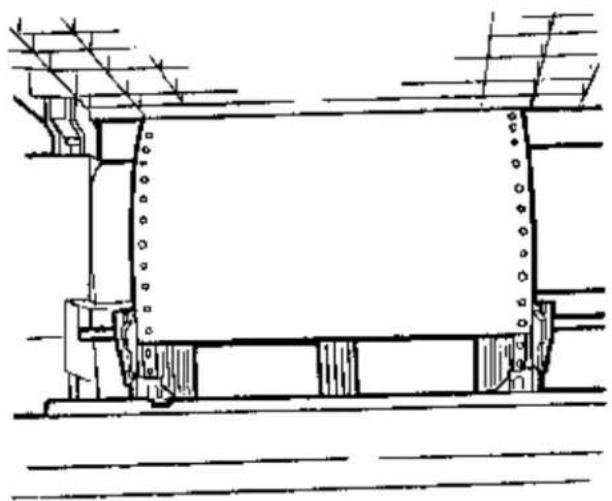
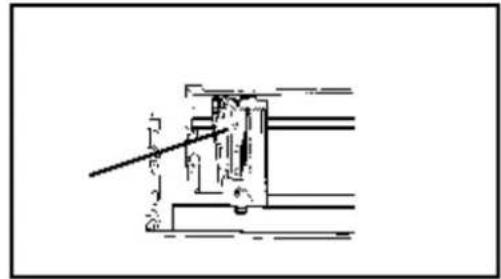
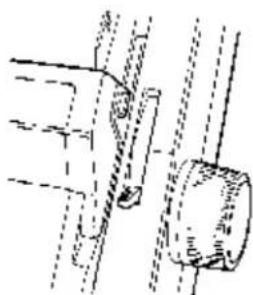
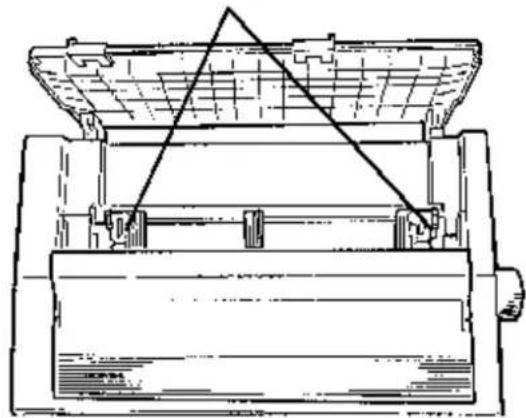
Move the paper lever to the position marked REAR (1). Lift the front edge of the paper separator and swing it up (2). Pull up on the lock levers to release the rear-feed tractors and swing open the tractor covers, then move the right-hand tractor to fit the width of the paper you're installing (3).
natural_image
Pure mechanical assembly diagram without any text, numbers, or symbols2
1
natural_image
Pure mechanical assembly diagram showing shaft, pipe, and housing components without any text or symbols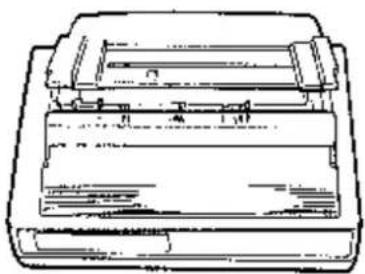
natural_image
Line drawing of a printer with paper and cover (no text or symbols)③
natural_image
Technical line drawing of a mechanical device with internal components and no visible text or symbolsPull the paper through the opening between the printer and the rear cover, and place the first two holes on each side of paper over tractor pins (4). Close the tractor covers and move the left tractor to align the edge of the paper with the reference mark for that paper size (5). Lock the left tractor by pushing back on its lock lever: move the right tractor so that the paper holes are centered on the pins, then lock the right tractor by pushing back on its lock lever (6).
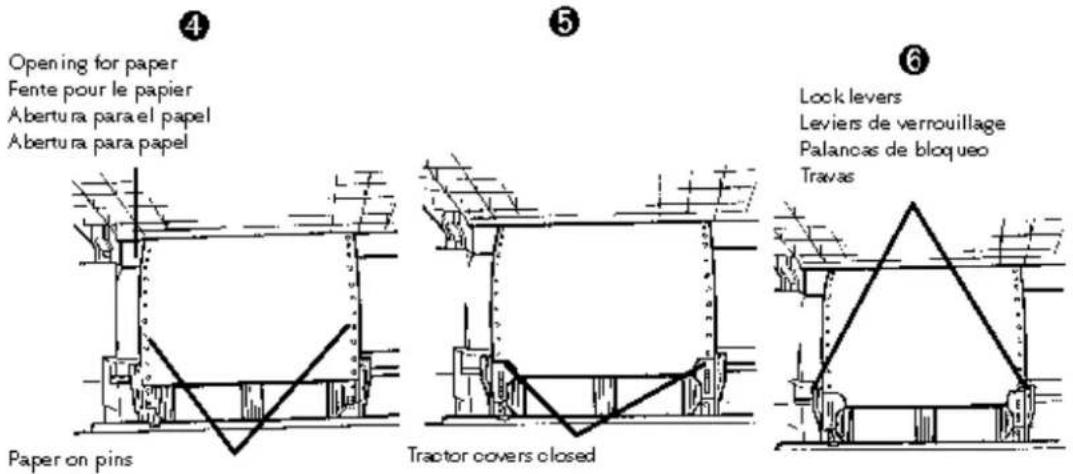
Close the paper separator and swing the wire feed guide forward so that it rests on the pull-up roller assembly (7).
Note:
The wire feed guide keeps the continuous-form paper from curling back into the printer.
Push the FF/LOAD button (8). The paper automatically feeds into the printer and the
ALARM light goes out. The printhead travels back and forth, gently firing the pins to
sense the thickness of the paper and to set the printhead gap. Press the SEL
button to select the printer, then set the Top of Form using the procedure
described for single-sheet paper.
Temporarily Changing the Top of Form Setting for Rear-Feed Paper
Temporarily Changing the Top of Form Setting for Rear-Feed Paper
To change the Top of Form setting for a single page, deselect the printer (press SEL button) and press the LF button until you reach the Top of Form position you want to use. The printer retains this setting for one page only.
To change the Top of From setting for multiple pages of continuous-form paper, deselect the printer (press SEL button) and press the LF button to move to the new Top of Form position, then press and hold the SHIFT button while pressing the QUIET/TOF button. The printer retains this setting until you park the continuous-form paper or until you change the Top of Form again.
Paper Handling Features Tear Feature
Paper Handling Features
Tear Feature
Caution! Do not use the platen knob to advance the paper to the tear position!
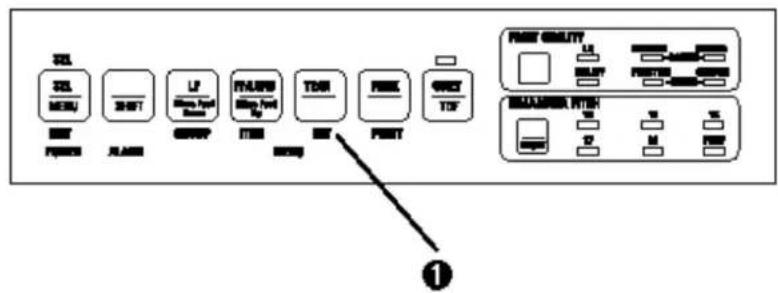
Press the TEAR button (1) to advance continuous forms up to the tear position so you can easily tear off a printed sheet without wasting paper or readjusting the printer. To return the paper to the print position, press the TEAR button again.
text_image
SEL SEL MEN INT INT INT INT INT INT INT INT INT INT INT INT INT INT INT INT INT INT INT INT INT INT INT INT INT INT INT INT INT INT INT INT INT INT INT INT INT INT INT INT INT INT INT INT INT INT INT INT INT INT 1Note:
The Tear feature cannot be used when the optional pull tractor is installed.
Form Tear-Off Feature
Form Tear-Off Feature
This feature automatically moves continuous-form paper up to the tear position after the selected amount of time. The paper will return to the initial printing position when the printer receives data.
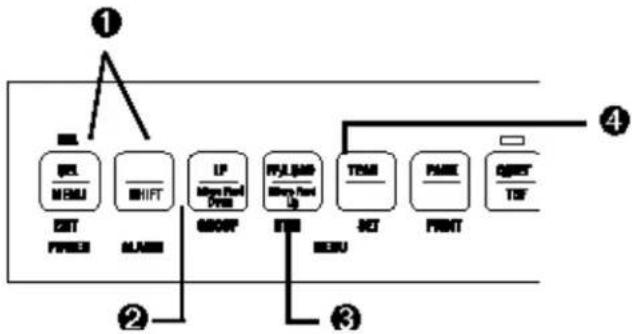
This feature is normally turned off. To activate it, hold the SHIFT button and press the SEL button to enter the Menu Mode (1). Press the LF button until the Rear Feed group appears (2), press the FF/LOAD button until Form Tear-Off appears (3), press the TEAR button (4) until the setting you want appears 500 ms, 1 sec, or 2 sec then hold the SHIFT button while pressing the SEL button to exit the Menu Mode (5).
flowchart
graph TD
    A["①"] --> B["②"]
    B --> C["③"]
    C --> D["④"]
    A --> E["SEL MELU"]
    A --> F["SHIFT"]
    A --> G["UP Mono Fuel Drive"]
    A --> H["FFLLOAD Mono Fuel Up"]
    A --> I["TRM"]
    A --> J["PAGE"]
    A --> K["QWEST TBF"]
    B --> L["SET FIXED"]
    C --> M["BEUV"]
    D --> N["RET"]
    D --> O["RET"]
    D --> P["RET"]
Caution!
Do not engage Form Tear-Off when printing on labels.
Form Tear-Off Feature (continued)
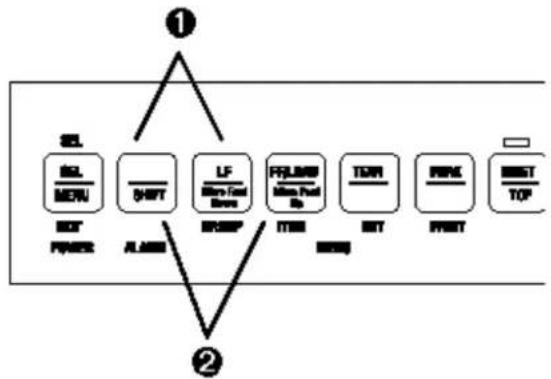
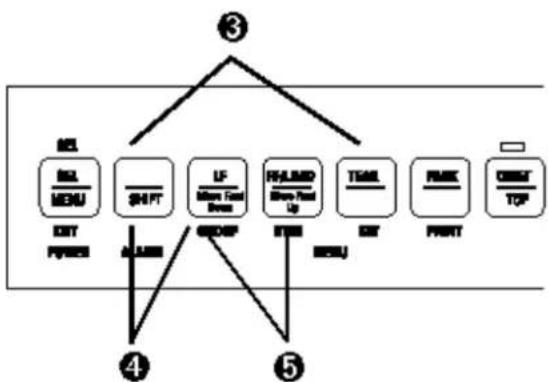
To adjust the tear position with th Forms Tear-Off feature engaged, press and hold the SHIFT button while using the LF button (1) to feed the paper down in small increments or the FF button (2) to feed the paper up in small increments.
flowchart
graph TD
    A["①"] --> B["SQL/MON"]
    B --> C["SHIFT"]
    C --> D["LR/MLR/MLR/MLR"]
    D --> E["FFLMR/MLR/MLR/MLR"]
    E --> F["TOR"]
    F --> G["FRK"]
    G --> H["BEST/TOP"]
    B --> I["ALAB"]
    I --> J["2"]
    J --> K["100"]
    K --> L["1000"]
    L --> M["10000"]
    M --> N["100000"]
flowchart
graph TD
    A["③"] --> B["MEL"]
    A --> C["SHIFT"]
    A --> D["LF"]
    A --> E["FFLMD"]
    A --> F["THML"]
    A --> G["FRMK"]
    A --> H["ORBIT"]
    B --> I["CET PRESS"]
    C --> J["AUX"]
    D --> K["GROUP"]
    E --> L["ITEM"]
    F --> M["BSSU"]
    G --> N["KEY"]
    H --> O["POST"]
    I --> P["④"]
    J --> P
    K --> P
    L --> P
    M --> P
    N --> P
    O --> P
To set the Top of Form with the FormTear-Off feature engaged, push and hold the SHIFT and TEAR buttons (3) to see the current Top of Form setting. Then continue to hold the SHIFT button, release the TEAR button and press the LF button (4) to move the paper down or the FF button (5) to move the paper up to set the Top of Form.
Note:
Some programs, such as high resolution graphics packages, pause occasionally while sending data to the printer. If the pause lasts more than two seconds, the paper advances to the tear-off position until more data is received. No data is lost, but this extra paper movement can cause uneven print registration in graphics. If you have this problem, enter the printer Menu, go to the Rear Feed group and change the setting for Form Tear-off to Off. If you have problems setting the Top of Form high enough on the page when using Forms Tear-Off, see Problem Solving in Chapter 6 ()
Paper Park Feature
Paper Park Feature
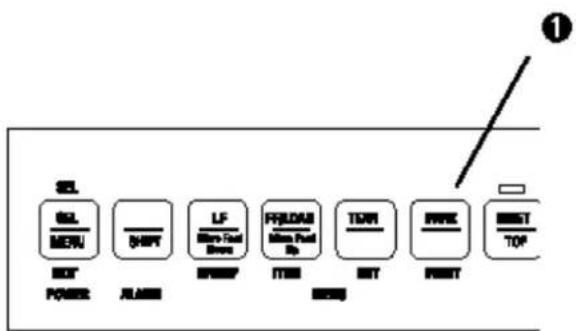
Press the PARK button (1) to move continuous-form paper out of the paper path. To move the parked continuous-form paper back to the print position, press the FF/LOAD button.
text_image
SEL MEN SHP SPRDP ITRR TWR PWRK BUST TOPSwitching from Continuous-Form Paper to Single-Sheet Paper
Switching from Continuous-Form Paper to Single-Sheet Paper
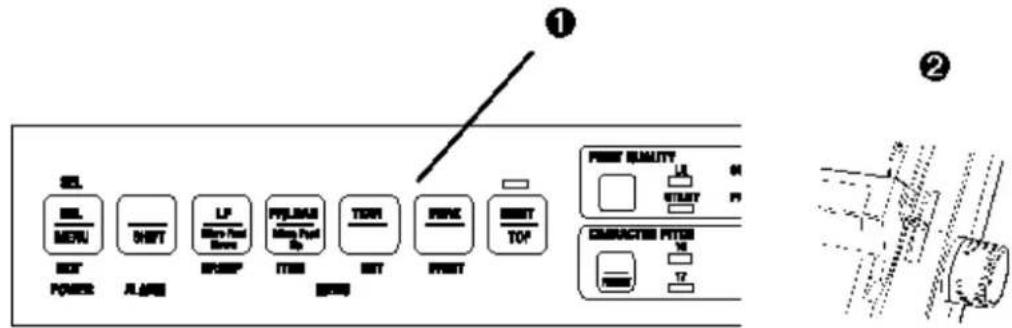
Tear off printed pages, then press the PARK button (1) to remove the continuous-form paper from the paper path. Lift the paper separator to the upright position and move the paper lever to the position marked TOP (2). Load single-sheet paper into the paper separator. The printer automatically feeds the sheet of paper into the print position.
text_image
① SEL MEN BOT POWER ALAB SHIFT SPREF LP Micro Port Box PTLEASE Micro Port Sp ITEMS TERR BIT PREF FRONT BEET TOP PRESS QUALITY L1 START 01 PI 2 CHARACTER ITEMS 18 17 ②Switching from Single-Sheet Paper to Continuous-Form Paper
Switching from Single-Sheet Paper to Continuous-Form Paper
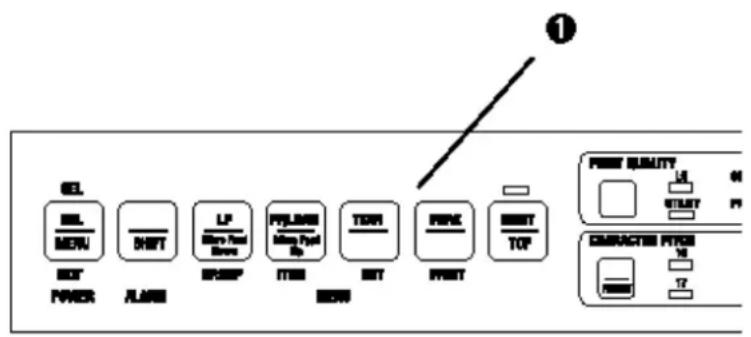
To switch from single-sheet paper to continuous-form paper which has been parked: Press the FF/LOAD button (1) to remove the single-sheet paper from the paper path. Lower the paper separator to the continuous-forms position. Move the paper lever to the position marked REAR (2). Press the FF/LOAD button (1) to advance the continuous-forms paper into the print position.
text_image
① REL REL MON SET POWER ALAB SHIFT SPRSP LP Micro Pad Bore PPLMS Micro Pad Sp ITEMS TDR SET PEN FRONT RESET TOP PRESS QUALITY L1 STUNT M1 M2 F1 Characteristic PTOX M3 M4 M5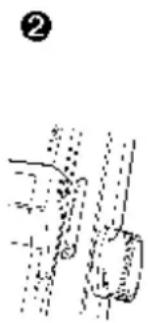
natural_image
Diagram of a mechanical or electrical component with dashed lines indicating internal components (no text or symbols)Chapter 3 The Font Test (Self Test)
The Font Test (Self Test)
The Font Test provides a printout containing samples of each available typeface.
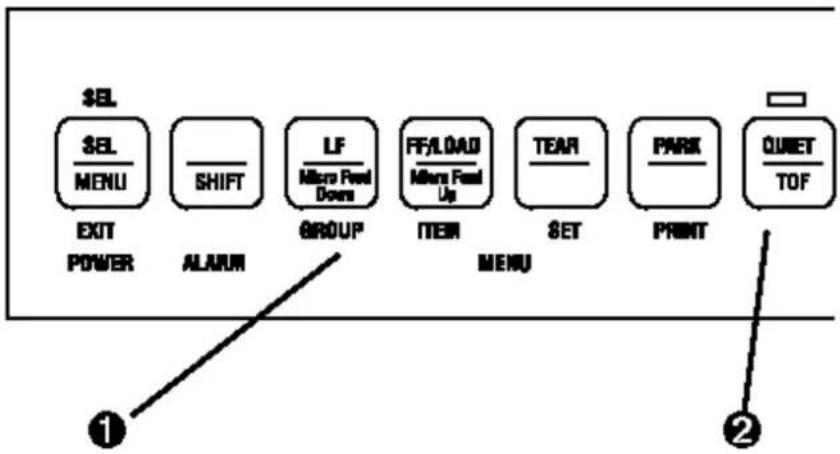
To run the Font Test, load paper and turn off the printer, then press and hold the LF button (1) for several seconds while turning the printer on.
The Rolling ASCII Test
The Rolling ASCII Test
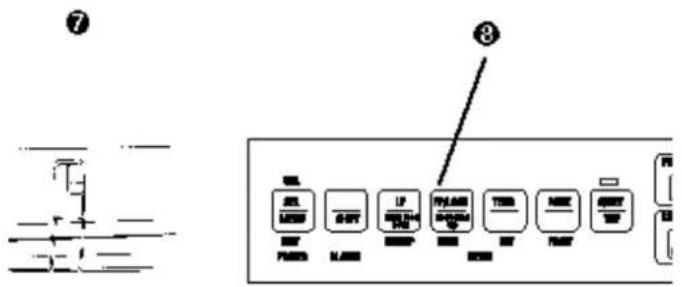
The Rolling ASCII Test provides a continuous printout of all 96 ASCII characters. To start the Rolling ASCII Test, load paper and turn off the printer, then press and hold the QUIET button (2) for several seconds while turning the printer on
flowchart
graph TD
    A["SEL"] --> B["SEL MENU"]
    B --> C["SHIFT"]
    C --> D["LF Micro Feed Down"]
    D --> E["GROUP"]
    E --> F["FF/LOAD Micro Feed Up"]
    F --> G["ITEM"]
    G --> H["TEAR"]
    H --> I["SET"]
    I --> J["PARK"]
    J --> K["PRINT"]
    K --> L["QUET TOF"]
    style A fill:#f9f,stroke:#333
    style L fill:#bbf,stroke:#333
    note1["①"] --> A
    note2["②"] --> L
Chapter 4 Emulations
Emulations
Your printer emulates the following printers:
Epson LQ (the factory default),
IBM Proprinter,
IBM AGM.
Changing Emulations
Changing Emulations
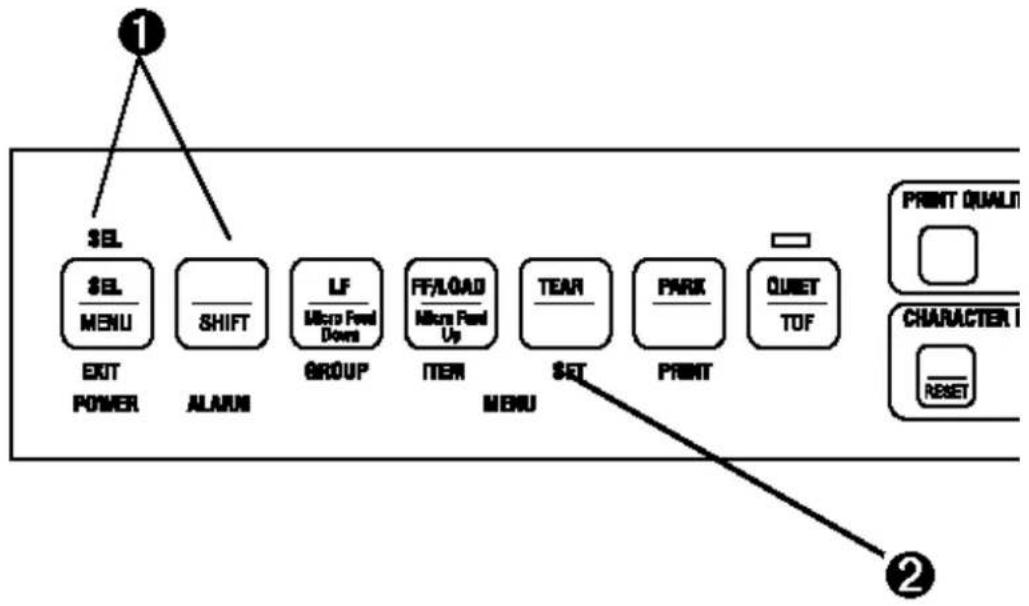
Your printer is set at the factory for the Epson LQ emulation. If you wish to change to one of the other emulations, hold the SHIFT button and press the SEL button to enter the Menu Mode (1). Press the TEAR button until the emulation you wish to engage prints (2). Exit the Menu Mode and save your settings by holding the SHIFT button while you press the SEL button (1).
flowchart
graph TD
    A["①"] --> B["SEL"]
    B --> C["$EL MENU"]
    C --> D["EXIT POWER"]
    B --> E["SHIFT"]
    E --> F["ALARMI"]
    F --> G["LF Micro Feed Down"]
    G --> H["GROUP"]
    H --> I["FF/LOAD Micro Feed Up"]
    I --> J["ITEM MENU"]
    J --> K["TEAR"]
    K --> L["$ET"]
    L --> M["PRINT"]
    M --> N["PARK"]
    N --> O["QUIET TOF"]
    O --> P["②"]
    P --> Q["PHUNT QUALITY"]
    Q --> R["CHARACTER I RESET"]
Selecting a Printer Driver
Selecting a Printer Driver
The table summarizes the various printer drivers which will work with your printer. The drivers are listed in order by decreasing compatibility as you go down the list: use one as close to the top of the list as possible. If your software does not have a printer driver from near the top of the list, call the software manufacturer to see if they have added any drivers to those supplied when you purchased your software.
Important!
Check your software documentation for instructions on how to install a printer driver
| Epson LQ IBM Proprinter IBM | X24e AGM/XL24e AGM | |
| Okidata ML 590/1EpsonEpson LQ 870/1170Epson LQ 800/1000Epson LQ 2550, for colorEpson LQ 2500Epson LQ 1500Epson FXEpson JXEpson LXEpson RXEpson MX | Okidata ML 590/1IBMIBM Proprinter X24e/ XL24eIBM Proprinter X24/ XL24IBM ProprinterIBM Graphics Printer | Use this emulation only when you've selected an IBMPro-printer X24e/XL24e driver and you need to use EpsonLQ high density graphics. |
Chapter 5
Front Panel Overview
Front Panel Overview
flowchart
graph TD
    A["PrintMode: Press to select/ deselect printer\nPress while holding SHIFT button to enter Menu Mode.\nMenu Mode: Press while holding SHIFT button to exit Menu Mode."] --> B["PrintMode: Press to select/ deselect printer\nPress while holding SHIFT button to enter Menu Mode.\nMenu Mode: Press while holding SHIFT button to exit Menu Mode."]
    B --> C["PrintMode: Press to select/ respective form paper up for tear off or back down for printing.\nMenu Mode: Press to move continuous-form paper up for tear off or back down for printing.\nMenu Mode: Press to advance to next Setting for the item."]
    C --> D["PrintMode: Press to select/ respective form paper\nPress while holding SHIFT button to set temporary Top of Form on continuous-form paper."]
    D --> E["PrintMode: Press to select/ respective form paper\nPress while holding SHIFT button to set temporary Top of Form on continuous-form paper."]
    E --> F["PrintMode: Press to select/ respective form paper\nPress while holding SHIFT button to set temporary Top of Form on continuous-form paper."]
    F --> G["PrintMode: Press to select/ respective form paper\nPress while holding SHIFT button to set temporary Top of Form on continuous-form paper."]
    G --> H["PrintMode: Press to select/ respective form paper\nPress while holding SHIFT button to set temporary Top of Form on continuous-form paper."]
    H --> I["PrintMode: Press to select/ respective form paper\nPress while holding SHIFT button to set temporary Top of Form on continuous-form paper."]
    I --> J["PrintMode: Press to select/ respective form paper\nPress while holding SHIFT button to set temporary Top of Form on continuous-form paper."]
    J --> K["PrintMode: Press to select/ respective form paper\nPress while holding SHIFT button to set temporary Top of Form on continuous-form paper."]
    K --> L["PrintMode: Press to select/ respective form paper\nPress while holding SHIFT button to set temporary Top of Form on continuous-form paper."]
    L --> M["PrintMode: Press to select/ respective form paper\nPress while holding SHIFT button to set temporary Top of Form on continuous-form paper."]
    M --> N["PrintMode: Press to select/ respective form paper\nPress while holding SHIFT button to set temporary Top of Form on continuous-form paper."]
    N --> O["PrintMode: Press to select/ respective form paper\nPress while holding SHIFT button to set temporary Top of Form on continuous-form paper."]
    O --> P["PrintMode: Press to select/ respective form paper\nPress while holding SHIFT button to set temporary Top of Form on continuous-form paper."]
    P --> Q["PrintMode: Press to select/ respective form paper\nPress while holding SHIFT button to set temporary Top of Form on continuous-form paper."]
    Q --> R["PrintMode: Press to select/ respective form paper\nPress while holding SHIFT button to set temporary Top of Form on continuous-form paper."]
    R --> S["PrintMode: Press to select/ respective form paper\nPress while holding SHIFT button to set temporary Top of Form on continuous-form paper."]
    S --> T["PrintMode: Press to select/ respective form paper\nPress while holding SHIFT button to set temporary Top of Form on continuous-form paper."]
    T --> U["PrintMode: Press to select/ respective form paper\nPress while holding SHIFT button to set temporary Top of Form on continuous-form paper."]
    U --> V["PrintMode: Press to select/ respective form paper\nPress while holding SHIFT button to set temporary Top of Form on continuous-form paper."]
    V --> W["PrintMode: Press to select/ respective form paper\nPress while holding SHIFT button to set temporary Top of Form on continuous-form paper."]
    W --> X["PrintMode: Press to select/ respective form paper\nPress while holding SHIFT button to set temporary Top of Form on continuous-form paper."]
    X --> Y["PrintMode: Press to select/ respective form paper\nPress while holding SHIFT button to set temporary Top of Form on continuous-form paper."]
    Y --> Z["PrintMode: Press to select/ respective form paper\nPress while holding SHIFT button to set temporary Top of Form on continuous-form paper."]
    Z --> AA["PrintMode: Press to select/ respective form paper\nPress while holding SHIFT button to set temporary Top of Form on continuous-form paper."]
    AA --> AB["PrintMode: Press to select/ respective form paper\nPress while holding SHIFT button to set temporary Top of Form on continuous-form paper."]
    AB --> AC["PrintMode: Press to select/ respective form paper\nPress while holding SHIFT button to set temporary Top of Form on continuous-form paper."]
    AC --> AD["PrintMode: Press to select/ respective form paper\nPress while holding SHIFT button to set temporary Top of Form on continuous-form paper."]
    AD --> AE["PrintMode: Press to select/ respective form paper\nPress while holding SHIFT button to set temporary Top of Form on continuous-form paper."]
    AE --> AF["PrintMode: Press to select/ respective form paper\nPress while holding SHIFT button to set temporary Top of Form on continuous-form paper."]
    AF --> AG["PrintMode: Press to select/ respective form paper\nPress while holding SHIFT button to set temporary Top of Form on continuous-form paper."]
    AG --> AH["PrintMode: Press to select/ respective form paper\nPress while holding SHIFT button to set temporary Top of Form on continuous-form paper."]
    AH --> AI["PrintMode: Press to select/ respective form paper\nPress while holding SHIFT button to set temporary Top of Form on continuous-form paper."]
    AI --> AJ["PrintMode: Press to select/ respective form paper\nPress while holding SHIFT button to set temporary Top of Form on continuous-form paper."]
    AJ --> AK["PrintMode: Press to select/ respective form paper\nPress while holding SHIFT button to set temporary Top of Form on continuous-form paper."]
    AK --> AL["PrintMode: Press to select/ respective form paper\nPress while holding SHIFT button to set temporary Top of Form on continuous-form paper."]
    AL --> AM["PrintMode: Press to select/ respective form paper\nPress while holding SHIFT button to set temporary Top of Form on continuous-form paper."]
    AM --> AN["PrintMode: Press to select/ respective form paper\nPress while holding SHIFT button to set temporary Top of Form on continuous-form paper."]
    AN --> AO["PrintMode: Press to select/ respective form paper\nPress while holding SHIFT button to set temporary Top of Form on continuous-form paper."]
    AO --> AP["PrintMode: Press to select/ respective form paper\nPress while holding SHIFT button to set temporary Top of Form on continuous-form paper."]
    AP --> AQ["PrintMode: Press to select/ respective form paper\nPress while holding SHIFT button to set temporary Top of Form on continuous-form paper."]
    AQ --> AR["PrintMode: Press to select/ respective form paper\nPress while holding SHIFT button to set temporary Top of Form on continuous-form paper."]
    AR --> AS["PrintMode: Press to select/ respective form paper\nPress while holding SHIFT button to set temporary Top of Form on continuous-form paper."]
    AS --> AT["PrintMode: Press to select/ respective form paper\nPress while holding SHIFT button to set temporary Top of Form on continuous-form paper."]
    AT --> AU["PrintMode: Press to select/ respective form paper\nPress while holding SHIFT button to set temporary Top of Form on continuous-form paper."]
    AU --> AV["PrintMode: Press to select/ respective form paper\nPress while holding SHIFT button to set temporary Top of Form on continuous-form paper."]
    AV --> AW["PrintMode: Press to select/ respective form paper\nPress while holding SHIFT button to set temporary Top of Form on continuous-form paper."]
    AW --> AX["PrintMode: Press to select/ respective form paper\nPress while holding SHIFT button to set temporary Top of Form on continuous-form paper."]
    AX --> AY["PrintMode: Press to select/ respective form paper\nPress while holding SHIFT button to set temporary Top of Form on continuous-form paper."]
    AY --> AZ["PrintMode: Press to select/ respective form paper\nPress while holding SHIFT button to set temporary Top of Form on continuous-form paper."]
    AZ --> BA["PrintMode: Press to select/ respective form paper\nPress while holding SHIFT button to set temporary Top of Form on continuous-form paper."]
    BA --> BB["PrintMode: Press to select/ respective form paper\nPress while holding SHIFT button to set temporary Top of Form on continuous-form paper."]
    BB --> BC["PrintMode: Press to select/ respective form paper\nPress while holding SHIFT button to set temporary Top of Form on continuous-form paper."]
    BC --> BD["PrintMode: Press to select/ respective form paper\nPress while holding SHIFT button to set temporary Top of Form on continuous-form paper."]
    BD --> BE["PrintMode: Press to select/ respective form paper\nPress while holding SHIFT button to set temporary Top of Form on continuous-form paper."]
    BE --> BF["PrintMode: Press to select/ respective form paper\nPress while holding SHIFT button to set temporary Top of Form on continuous-form paper."]
    BF --> BG["PrintMode: Press to select/ respective form paper\nPress while holding SHIFT button to set temporary Top of Form on continuous-form paper."]
    BG --> BH["PrintMode: Press to select/ respective form paper\nPress while holding SHIFT button to set temporary Top of Form on continuous-form paper."]
    BH --> BI["PrintMode: Press to select/ respective form paper\nPress while holding SHIFT button to set temporary Top of Form on continuous-form paper."]
    BI --> BJ["PrintMode: Press to select/ respective form paper\nPress while holding SHIFT button to set temporary Top of Form on continuous-form paper."]
    BJ --> BK["PrintMode: Press to select/ respective form paper\nPress while holding SHIFT button to set temporary Top of Form on continuous-form paper."]
    BK --> BL["PrintMode: Press to select/ respective form paper\nPress while holding SHIFT button to set temporary Top of Form on continuous-form paper."]
    BL --> BM["PrintMode: Press to select/ respective form paper\nPress while holding SHIFT button to set temporary Top of Form on continuous-form paper."]
    BM --> BN["PrintMode: Press to select/ respective form paper\nPress while holding SHIFT button to set temporary Top of Form on continuous-form paper."]
    BN --> BO["PrintMode: Press to select/ respective form paper\nPress while holding SHIFT button to set temporary Top of Form on continuous-form paper."]
    BO --> BP["PrintMode: Press to select/ respective form paper\nPress while holding SHIFT button to set temporary Top of Form on continuous-form paper."]
    BP --> BQ["PrintMode: Press to select/ respective form paper\nPress while holding SHIFT button to set temporary Top of Form on continuous-form paper."]
    BQ --> BR["PrintMode: Press to select/ respective form paper\nPress while holding SHIFT button to set temporary Top of Form on continuous-form paper."]
    BR --> BS["PrintMode: Press to select/ respective form paper\nPress while holding SHIFT button to set temporary Top of Form on continuous-form paper."]
    BS --> BT["PrintMode: Press to select/ respective form paper\nPress while holding SHIFT button to set temporary Top of Form on continuous-form paper."]
    BT --> BU["PrintMode: Press to select/ respective form paper\nPress while holding SHIFT button to set temporary Top of Form on continuous-form paper."]
    BU --> BV["PrintMode: Press to select/ respective form paper\nPress while holding SHIFT button to set temporary Top of Form on continuous-form paper."]
    BV --> BW["PrintMode: Press to select/ respective form paper\nPress while holding SHIFT button to set temporary Top of Form on continuous-form paper."]
    BW --> BX["PrintMode: Press to select/ respective form paper\nPress while holding SHIFT button to set temporary Top of Form on continuous-form paper."]
    BX --> BY["PrintMode: Press to select/ respective form paper\nPress while holding SHIFT button to set temporary Top of Form on continuous-form paper."]
    BY --> BZ["PrintMode: Press to select/ respective form paper\nPress while holding SHIFT button to set temporary Top of Form on continuous-form paper."]
    BZ --> CA["PrintMode: Press to select/ respective form paper\nPress while holding SHIFT button to set temporary Top of Form on continuous-form paper."]
    CA --> CB["PrintMode: Press to select/ respective form paper\nPress while holding SHIFT button to set temporary Top of Form on continuous-form paper."]
    CB --> CC["PrintMode: Press to select/ respective form paper\nPress while holding SHIFT button to set temporary Top of Form on continuous-form paper."]
    CC --> CD["PrintMode: Press to select/ respective form paper\nPress while holding SHIFT button to set temporary Top of Form on continuous-form paper."]
Print Mode
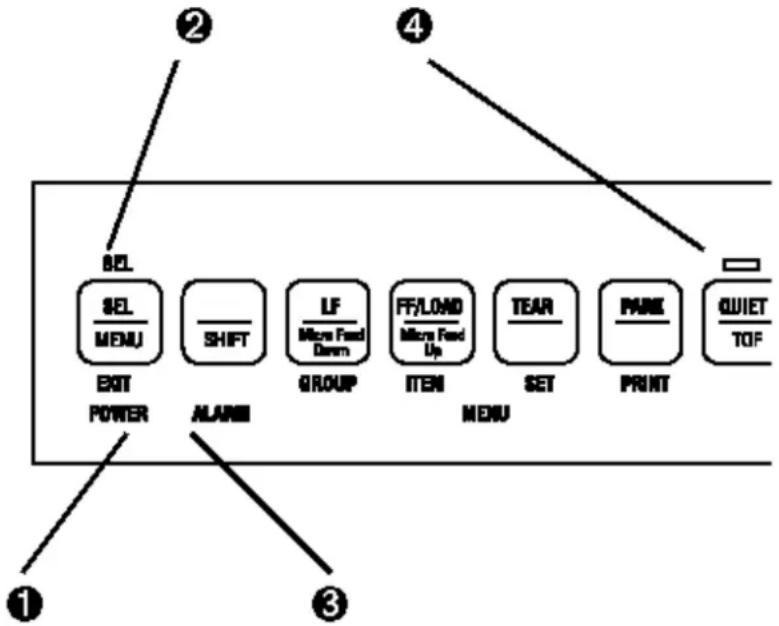
Indicator Lights
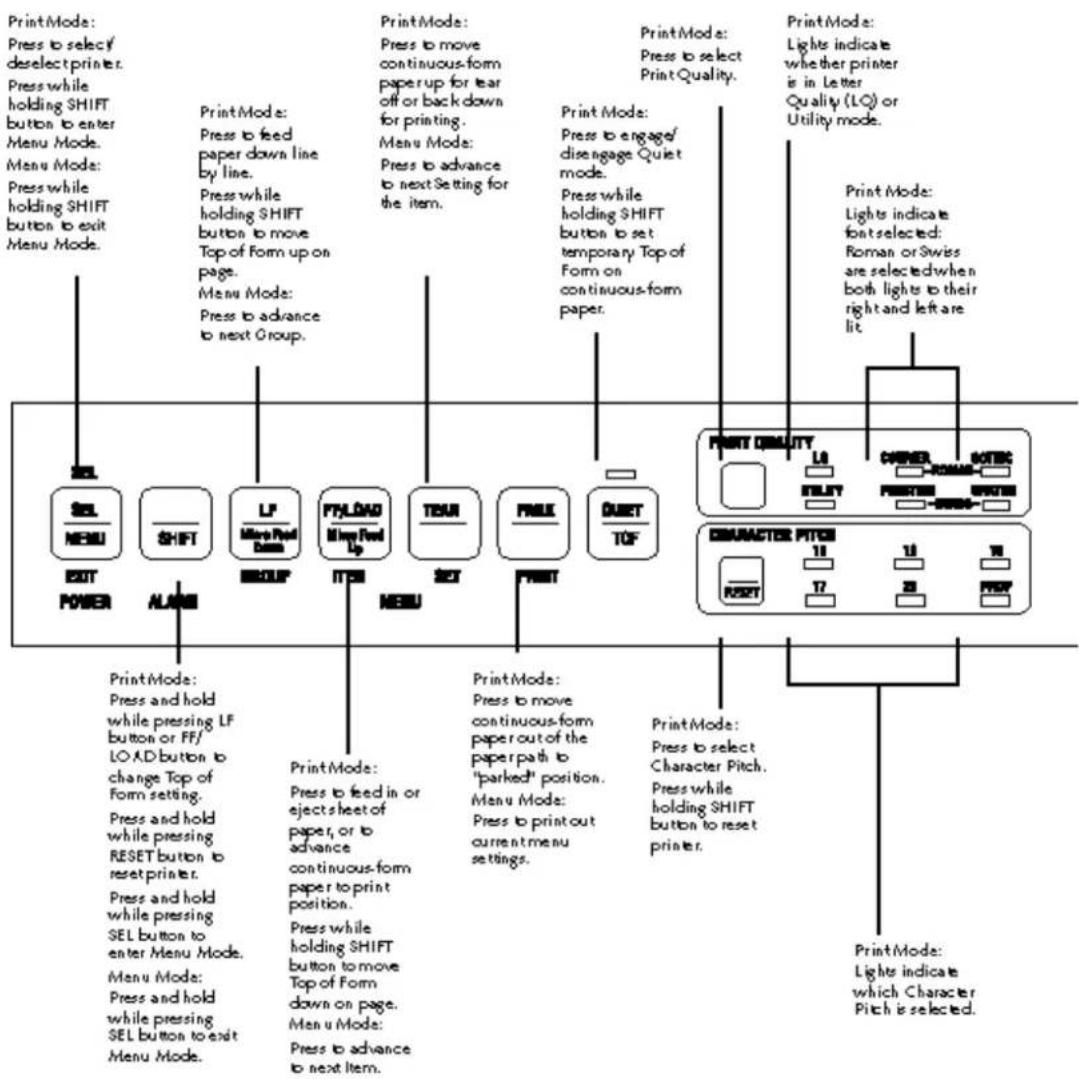
- POWER Light: Lights whenever the printer is on.
-
SEL Light: Lights when the printer is selected and ready to receive data. If this light is not lit, the printer can not receive data. This light flashes when the printer is in the Print Suppress mode.
-
ALARM Light: Lights when an error condition exists, such as when the printer is out of paper, if there is a paper jam, or if the paper lever is set to the wrong paper path for the paper loaded. If this light flashes, and continues to flash after you turn the printer off then on again, contact your service representative.
Í QUIET Light: Lights when the printer has been placed in the QUIET state.
flowchart
graph TD
    A["① SET POWER"] --> B["② SEL MENU"]
    B --> C["③ ALANG"]
    C --> D["④ SHIFT"]
    D --> E["⑤ LF Micro Feed Devm"]
    E --> F["⑥ FF/LOND Micro Feed Up"]
    F --> G["⑦ TEAR"]
    G --> H["⑧ SET"]
    H --> I["⑨ PARK"]
    I --> J["⑩ QIWIET TOF"]
Important! Any commands your software sends will override the front panel settings. Note: Your printer has eight bar codes, EAN8, EAN13, UPC-A, UPC-E, CODE39, Interleaved 2 of 5, and Code 128 sets A, B and C. For more details, use the Okidata Faxable Facts (call 1-800-OKIDATA and follow the recorded instructions).
To reset the character pitch to the factory default (10 cpi), deselect the printer, then hold the SHIFT button while pressing the CHARACTER PITCH button.
Menu Mode
Menu Mode
When your printer is in the Menu Mode, you can use the front panel buttons to change the defaults for the printer parameters. The changes you make in the Menu Mode are automatically saved in your printer's memory when you exit the Menu Mode and are retained even if you turn the printer of.
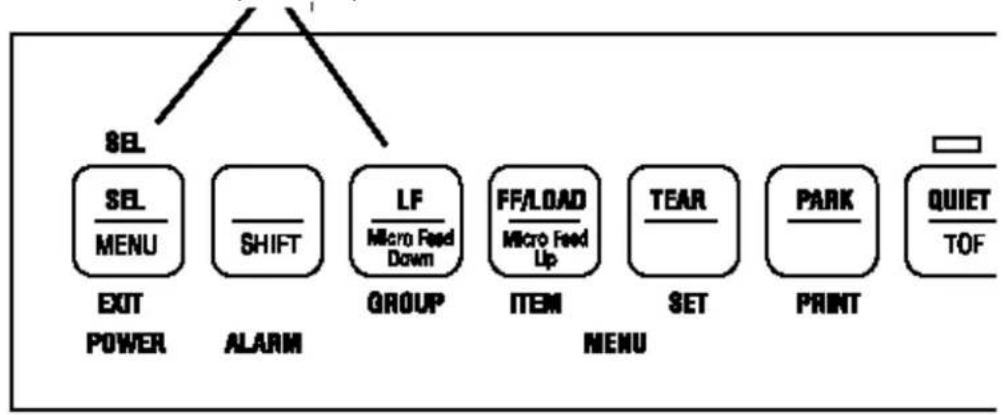
To reset your printer to the factory defaults for the menu, turn the printer off, then press and hold the SEL and LF buttons while turning the printer back on again.
Caution! If you have the printer in the Menu Mode and turn the printer off without first exiting, any changes you have made in the menu will be lost.
Press simultaneously to reset printer to defaults
flowchart
graph TD
    A["SEL"] --> B["SEL MENU"]
    B --> C["EXIT POWER"]
    A --> D["SHIFT"]
    D --> E["ALARM"]
    E --> F["GROUP"]
    F --> G["LF Micro Feed Down"]
    G --> H["ITEM"]
    H --> I["FF/LOAD Micro Feed Up"]
    I --> J["MENU"]
    J --> K["TEAR"]
    K --> L["SET"]
    L --> M["PARK"]
    M --> N["PRINT"]
    N --> O["QUIET TOF"]
Entering the Menu Mode
Entering the Menu Mode
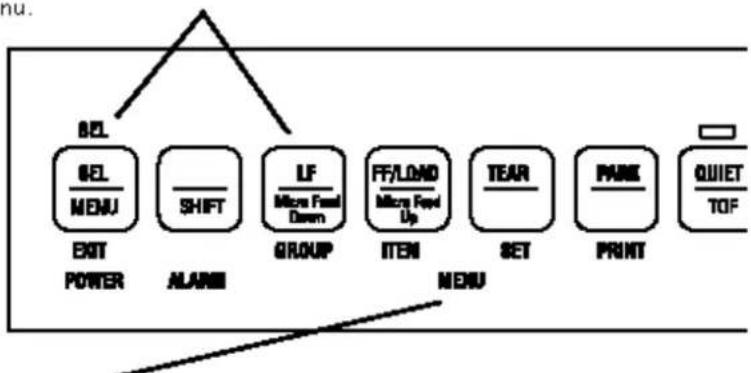
To place your printer in the Menu Mode, hold the SHIFT button while pressing the SEL button. The MENU light comes on and the SEL light goes out.
Exiting the Menu Mode
When you are done making changes in the Menu Mode, exit the mode (saving the changes you have made) by holding the SHIFT button while pressing the SEL button. The MENU light goes out and the SEL light comes on.
Press simultaneously to enter or exit Menu Mode.
enu.
flowchart
graph TD
    A["SEL"] --> B["SEL MENU"]
    B --> C["SHIFT"]
    C --> D["LF Micro Feed Down"]
    D --> E["GROUP"]
    E --> F["FF/LAND Micro Feed Up"]
    F --> G["ITEM"]
    G --> H["TEAR"]
    H --> I["SET"]
    I --> J["PRINT"]
    J --> K["QUIET TOF"]
    style A fill:#f9f,stroke:#333
    style K fill:#ccf,stroke:#333
MENU light glows when printer is in Menu Mode.
The Printer Menu
The Printer Menu
The printer menu is made up of groups. Within each group is a list of items, each of which has various settings.
The illustration shows a printout of the factory settings for the menu. To generate a printout of the menu, hold the SHIFT button and press the SEL button to enter the Menu Mode, then press the PARK button.
For a table showing the settings for each item within each group, see the Reference Section at the back of this manual. (☐)
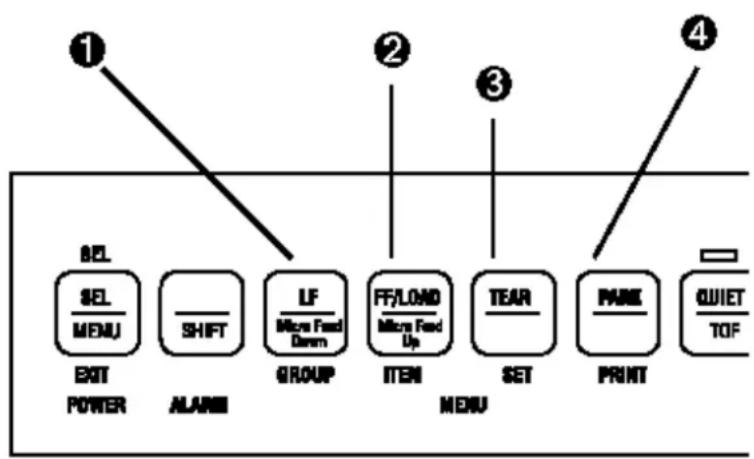
Active Buttons in Menu Mode
Active Buttons in Menu Mode
- GROUP Button: Each time you press this button, the menu line that prints shows the next group.
- ITEM Button: Each time you press this button, the menu line that prints shows the next item within that group.
- SET Button: Each time you press this button, the menu line that prints shows the next setting for that item.
- PRINT Button: Press this button to print out a listing of the current settings for each item.
flowchart
graph TD
    A["① SEL/MENU"] --> B["② ALAN"]
    B --> C["③ GROUP"]
    C --> D["④ PRINT"]
    A --> E["④ RESET POWER"]
    B --> F["④ ALAN"]
    C --> G["④ GROUP"]
    D --> H["④ SET"]
    E --> I["④ OUTPUT POWER"]
    F --> J["④ OUTPUT POWER"]
    G --> K["④ OUTPUT POWER"]
Chapter 6 Problem Solving
Problem Solving
Problem: Nothing happens when I turn on the printer.
Solution: The printer may not be plugged in. Check the power cord connection to the outlet and to your printer. If you're using a power strip, make sure it's turned on. Check to be sure that the circuit breaker hasn't tripped.
Problem: The printer doesn't print when the computer sends data.
Solutions: (1) The printer may be deselected. If the SEL light is out, press the SEL button to select the printer.
(2) The printer cable may be loose: check to be sure that it is securely connected both to the printer and to your PC.
Problem: I've installed a brand new ribbon and the printing is smeared and streaked.
Solution: The shield on the ribbon may be either loose or missing. Move the printhead to the center of the platen (CAREFUL! the printhead may be HOT!) and lift off the ribbon cartridge. If the ribbon shield is loose, secure it in place properly. If it's missing, locate it and reinstall it.
Problem: The printing is too light or too dark.
Solution: The head gap setting needs adjustment. Enter the Menu Mode and change the setting for Printhead Gap Adjust under the Group Setup. The default setting is 0. If the printing is lighter, change the setting to -1; if it's darker, change it to +1.
Problem: The ALARM light is on and the Character Pitch 15 light is flashing.
Solution: This indicates a paper loading error. Press the SHIFT and RESET buttons simultaneously.
natural_image
Hand holding a mechanical component with a tool, no visible text or symbolsBefore trying to load paper again, check to be sure that you have the paper lever in the correct position for the paper path you're using. If the paper lever is in the correct position and you're using continuous-form paper, check to see if the paper is properly on the tractors and has not jammed up.
Problem: The first line is printing too far down on the page and I can't get it any higher using the SHIFT-LF/ Micro Feed Down keys.
Solution: The setting for the Top of Form will be restricted if you have the Form Tear-Off feature engaged when you set the Top of Form. To correct for this, enter the Menu Mode and change the setting for Form Tear-Off in the Rear-Feed group (or in the Bottom Feed group if you have the optional bottom-feed tractor installed) to Off. Then exit the Menu and set the Top of Form. When the Top of Form is set, enter the Menu Mode again and change the Form Tear-Off setting back to your original setting. (See Chapter 5 for information on the Menu Mode.)
Problem: I need to load paper, but the Alarm light is not on.
Solution: Press and release the SEL button, then hold the SHIFT button and press the RESET
(Character Pitch) button. The ALARM light will come on and you will be able to load the paper.
Problem: My word processor files don't print the way I have the menu and front panel set.
Solutions: Before sending a file to the printer, many word processors send either an initialization string or an I-Prime signal to the printer.
The initialization string contains commands that change the printer to a default set of features. These commands override front panel or Menu settings. To set your printer to ignore the reset command, enter the printer Menu and change the Reset Inhibit item in the Set-Up group to Yes.
Please note that while this stops the reset command from resetting your printer, other commands in the initialization string may still override the printer Menu and/or front panel settings.
The I-Prime signal is sent over the parallel interface (pin 31) and automatically overrides any settings you have made using the front panel. To eliminate this problem, enter the printer Menu and change the I-Prime item in the Parallel I/F group to Invalid.
Problem: The Print Quality and Character Pitch buttons on the front panel won't work.
Solution: The Operator Panel Function item on the printer menu can be used to disable these buttons. If the printer is a part of a customized system or if it is used by a number of people, the system manager may have used this option to make sure the printer is always set properly.
Problem: Static electricity causes my continuous-form paper to stick.
Solution: Sometimes static charges can build up on continuous-form paper, making it cling to the paper separator. If you have this problem during high volume printing jobs, try moving the paper guides together so that the paper rests on the guides rather than on the separator itself.
Clearing Rear-Feed Paper Jams
Clearing Rear-Feed Paper Jams
Caution! Always turn the printer off before you turn the platen knob!
Turn the printer off and open the paper separator (1). Use the platen knob to back the continuous-form paper out of the printer, removing any ripped pieces of paper. Re-load paper (2): open tractor covers, mount first two holes in paper on pins, close tractor covers. Turn the printer on and press the FF/LOAD button (3).
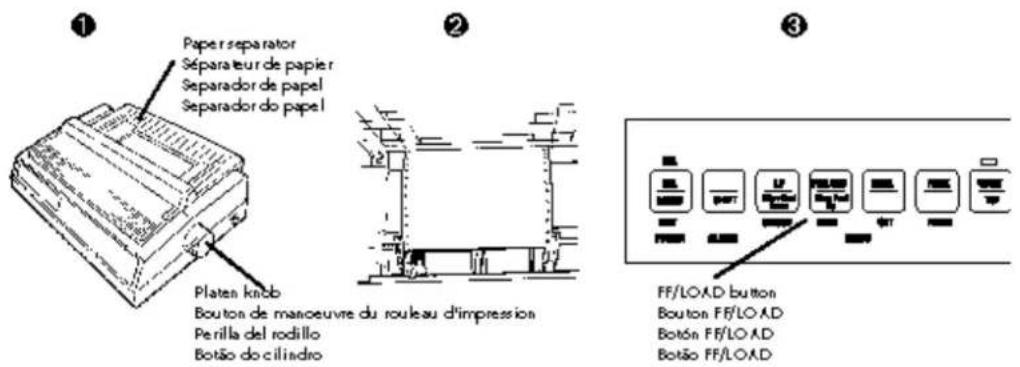
text_image
① Paper separator Séparateur de papier Separador de papel Separador do papel Platen knob Bouton de manoeuvre du rouleau d'impression Perilla del rodillo Botão do cilindro ② FF/LOAD button Bouton FF/LOA D Botón FF/LOA D Botão FF/LOA DSolving the Problem of Continuing Rear-Feed Jamming
Solving the Problem of Continuing Rear-Feed Jamming
If the rear-feed paper keeps jamming, you probably have bits of paper stuck in the paper path. Turn the printer off. Open the access cover, lift off the pull-up roller assembly (1) and remove any bits of paper from around the carriage. Open the paper separator and use the platen knob to back the paper out of the printer (2). Fold some single-sheet, continuous-form paper over three times to produce a page four sheets thick and load it onto the tractor pins (3).
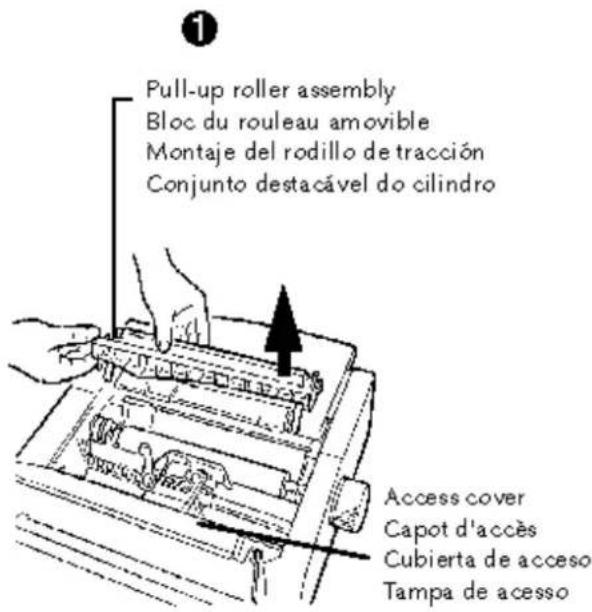
text_image
Pull-up roller assembly Bloc du rouleau amovible Montaje del rodillo de tracción Conjunto destacável do cilindro Access cover Capot d'accès Cubierta de acceso Tampa de acesso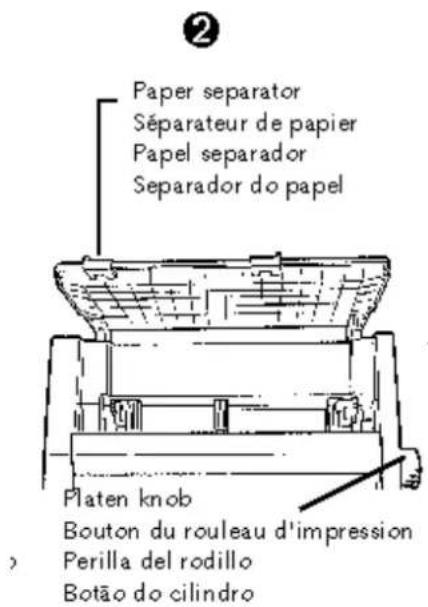
text_image
Paper separator Séparateur de papier Papel separador Separador do papel Platen knob Bouton du rouleau d'impression Perilla del rodillo Botão do cilindro③
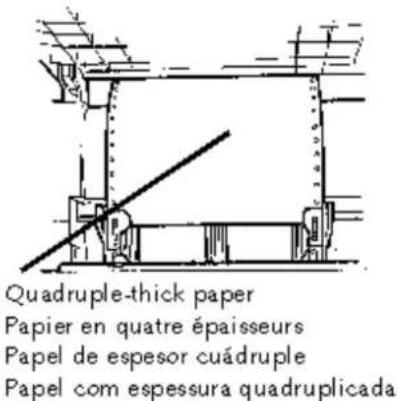
text_image
Quadruple-thick paper Papier en quatre épaisseurs Papel de espesor cuádruple Papel com espessura quadruplicadaTurn the platen knob to bring the quadruple-thick paper up around the platen. This will bring jammed pieces of paper up and out.
Back the quadruple-thick paper out of the printer using the platen knob. Replace the pull-up roller assembly (4), re-load your regular continuous-form paper (5), and close the paper separator and the access cover (6). Turn the printer back on and press the FF/LOAD button (7).
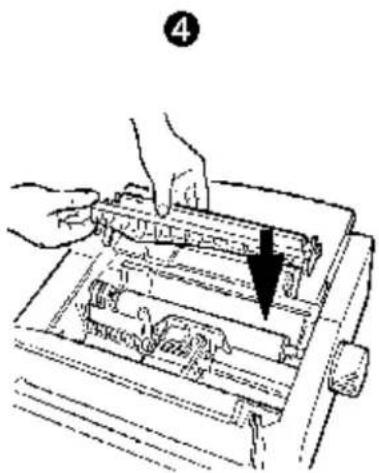
natural_image
Illustration of hands operating a mechanical device with a downward arrow indicating motion (no text or symbols present)5
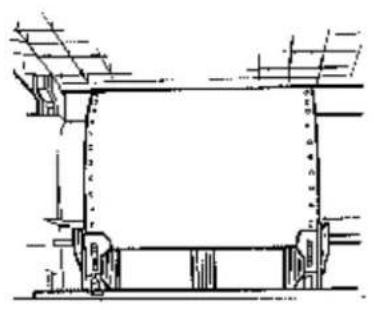
natural_image
Technical line drawing of a mechanical assembly with no visible text or symbols6
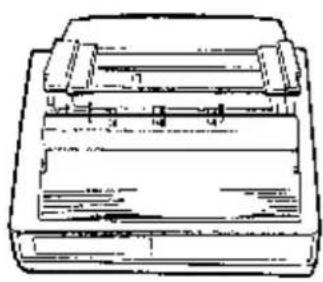
natural_image
Technical line drawing of a mechanical component or housing (no text or symbols visible)7

Clearing Single-Sheet Feed Jams
Clearing Single-Sheet Feed Jams
Turn the printer off. Rotate the platen knob to back the paper out of the carriage (1). If necessary, open the access cover and lift the pull-up roller assembly to provide access to remove any ripped pieces from around the carriage (2), then re-install the pull-up roller assembly and close the access cover. Turn the printer back on and place a new sheet of paper in the paper separator (3).
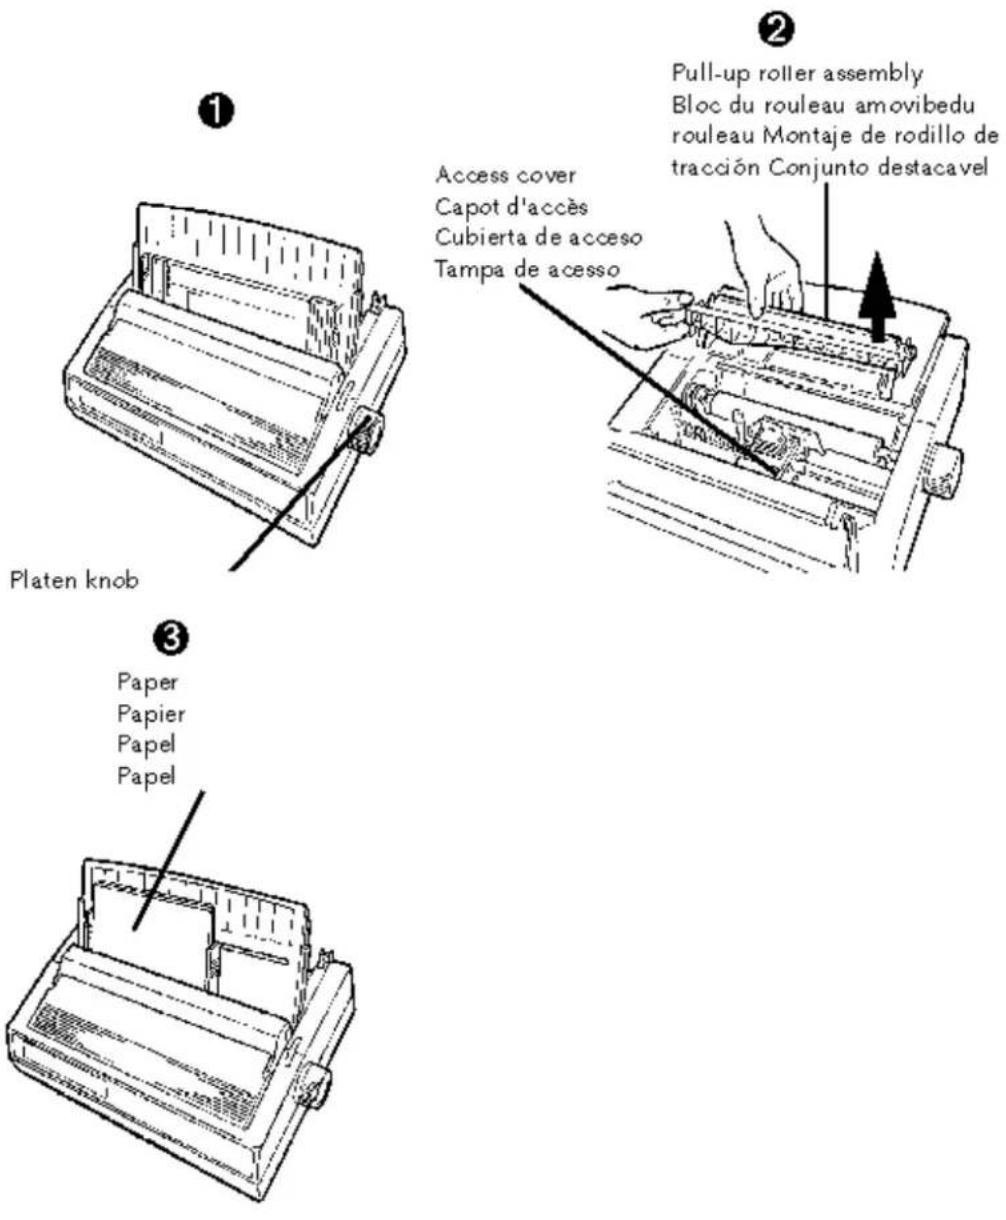
text_image
① Platen knob ② Pull-up roller assembly Bloc du rouleau amovibedu rouleau Montaje de rodillo de tracción Conjunto destacavel Access cover Capot d'accès Cubierta de acceso Tampa de acesso ③ Paper Papier Papel PapelCleaning the Housing
Cleaning the Housing
Caution! Never use solvents or strong detergents on the housing they could damage it! You should clean the printer every six months (or after about 300 hours of operation).
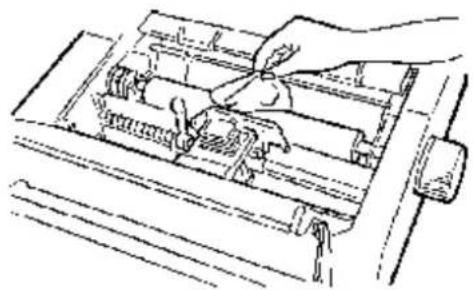
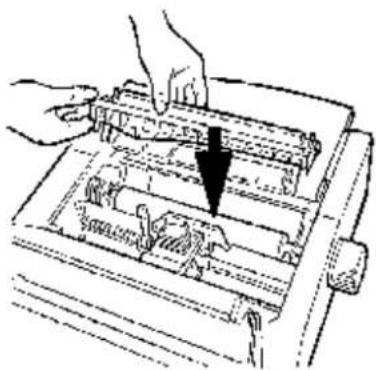
Turn the printer off and move the paper out of the paper path. Open the access cover and remove the pull-up roller assembly (1). Remove any loose pieces of paper from the carriage area, then use a clean, dry cloth to dust around the carriage and platen (2). Re-install the pull-up roller assembly and close the access cover (3).
1
natural_image
Illustration of hands using a tool to adjust or install electronic components on a tray (no text or symbols visible)②
natural_image
Line drawing of a hand operating a mechanical device with no visible text or symbols3
natural_image
Illustration of hands assembling or adjusting a mechanical component with a downward arrow (no text or symbols)Appendix A
Menu Table
Menu Table
The table below lists the Menu entries for your printer. The factory defaults are shown in bold italic.
Note:
The table includes all possible Menu settings available with your printer. Some of the entries, as noted, appear only when a specific emulation is selected or when the appropriate option is installed.
| Group Item Settings | ||
| Printer Control Emulation Mode | Epson LQ, IBM PPR, IBM AGM | |
| Font Print Mode | LQ Courier, LQ Roman, LQ Swiss, LQ Swiss Bold, LQ Orator, LQ Gothic, LQ Prestige, Utility | |
| Pitch | 10 cpi, 12 cpi, 15 cpi, 17.1 cpi, 20 cpi, | |
| Proportional Spacing | No, Yes | |
| Style | Normal, Italics | |
| Size | Single, Double | |
| Symbol Sets Character Set | Set I, Set II | |
| Language Set | American, French, German, British, Danish I, Swedish, Italian, Spanish I, Japanese, Norwegian, Danish II, Spanish II, Latin American, French Canadian, Dutch, Publisher | |
| Zero Character | Slashed, Unslashed | |
| Code Page | USA, Canada French, Multilingual, Portugal, Norway | |
| Rear Feed Line Spacing | 6 LPI, 8 LPI | |
| Form Tear-Off | Off, 500ms, 1 sec, 2 sec | |
| Skip Over Perforation | No, Yes | |
| Page Width (Model 591 only) | 13.6, 8 | |
| Page Length | 11, 11-2/3, 12, 14, 17, 3, 3.5, 4, 5.5, 6, 7, 8, 8.5 | |
| Gap Control | Auto Gap, Semi Auto Gap, 1, 2, 3, 4, 5, 6, 7, 8, 9 | |
| Bottom Feed Line Spacing | 6 LPI, 8 LPI | |
| Form Tear-Off | Off, 500ms, 1 sec, 2 sec | |
| Skip Over Perforation | No, Yes | |
| Page Width (Model 591 only) | 13.6, 8 | |
| Page Length | 11, 11-2/3, 12, 14, 17, 3, 3.5, 4, 5.5, 6, 7, 8, 8.5 | |
| Gap Control | Auto Gap, Semi Auto Gap, 1, 2, 3, 4, 5, 6, 7, 8, 9 | |
| Top Feed Line Spacing | 6 LPI, 8 LPI | |
| Form Tear-Off (with optional Roll Paper Stand installed) | Off, 500ms, 1 sec, 2 sec | |
| Bottom Margin | Valid, Invalid | |
| Page Width (Model 591 only) | 13.6, 8 | |
| Page Length | 11, 11-2/3, 12, 14, 17, 3, 3.5, 4, 5.5, 6, 7, 8, 8.5 | |
| Gap Control | Auto Gap, Semi Auto Gap, 1, 2, 3, 4, 5, 6, 7, 8, 9 | |
| Wait Time | 1sec, 2 sec, 500ms | |
| Page Length Control | By MENU Setting, by Actual Page Length | |
| Set-Up Graphics | Uni-directional, bidirectional | |
| Receive Buffer Size | 64K, 1 Line, 32K | |
| Paper Out Override | No, Yes | |
| Operator Panel Function | Full Operation, Limited Operation | |
| Print Registration | 0, 0.05 mm Left, 0.10 mm Left, 0.15 mm Left, 0.20 mm Left, 0.25 mm Left, 0.25 mm Right, 0.20 mm Right, 0.15 mm Right, 0.10 mm Right, 0.05 mm Right | |
| Reset Inhibit | No, Yes | |
| Print Suppress Effective | Yes, No | |
| Auto LF | No, Yes | |
| Auto CR (appears only when IBM Proprinter emulation is selected) | No, Yes | |
| SI Select Pitch, 10 cpi (appears only when IBM Proprinter emulation is selected) | 17.1 CPI, 15 CPI | |
| SI Select Pitch, 12 cpi (appears only when IBM Proprinter emulation is selected) | 20 CPI, 12 CPI | |
| Time Out Print | Valid, Invalid | |
| Auto Select | No, Yes | |
| Ribbon Selection (Optional color ribbon must be installed in order to print in colors other than black) | Black Ribbon, Black, Yellow, Magenta, Cyan, Violet, Orange, Green | |
| Printhead Gap Adjust | 0, -1, +1 | |
| Graphics Speed | High, Low | |
| Parallel I/F I-Prime | Buffer Print, Buffer Clear, Invalid | |
| Pin 18 | +5v, Open | |
| Auto Feed XT (appears only when Epson LQ emulation is selected) | Invalid, Valid | |
| Serial I/F (appears only when optional Serial Interface is installed) | Parity | None, Odd, Even |
| Serial Data 7/8 Bits | 8 Bits, 7 Bits | |
| Protocol | Ready/Busy, X-On/X-Off | |
| Diagnostic Test | No, Yes | |
| Baud Rate | 19200 bps, 9600 bps, 4800 bps, 2400 bps, 1200 bps, 600 bps, 300 bps | |
| Busy Line | SSD-, SSD+, DTR, RTS | |
| DSR Signal | Valid, Invalid | |
| DTR Signal | Ready on Power Up, Ready on Select | |
| Busy Time | 200 ms, 1 sec | |
| CSF Bin 1 (appears only when optional Cut Sheet Feeder Accessory is installed) | Line Spacing | 6 LPI, 8 LPI |
| Bottom Margin | Valid, Invalid | |
| Page Width (Model 591 only) | 13.6, 8.5 | |
| Page Length | 11, 11-2/3, 12, 14, 17, 3, 3.5, 4, 5.5, 6, 7, 8, 8.5 | |
| Gap Control | Auto Gap, Semi Auto Gap, 1, 2, 3, 4, 5, 6, 7, 8, 9 | |
| CSF Bin 2 (appears only when optional Cut Sheet Feeder Accessory is installed) | Line Spacing | 6 LPI, 8 LPI |
| Bottom Margin | Valid, Invalid | |
| Page Length | 11, 11-2/3, 12, 14, 17, 3, 3.5, 4, 5.5, 6, 7, 8, 8.5 | |
| Gap Control | Auto Gap, Semi Auto Gap, 1, 2, 3, 4, 5, 6, 7, 8, 9 |
Appendix pendix Specifications
Specifications
Print Method: Impact dot matrix
Printhead: 24 pins, 0.20 mm diameter, automatically adjusting to paper thickness, with thermal protection
Print Speed:
| Characters Per Inch (cpi) | Characters Per Second (cps) | |||
| Utility / Letter Quality (LQ) | Utility / Letter Quality (LQ) | |||
| 10 | 10 | 300 | 100 | |
| 12 | 12 | 360 | 120 | |
| 15 | 15 | 450 | 150 | |
| 17.1 | 17.1 | 257 | 171 | |
| 20 | 20 | 300 | 200 | |
Characters Per Line (cpl):
Setting ML 590 ML 591
10 cpi 80 cpl 136 cpl
12 cpi 96 cpl 163 cpl
15 cpi 120 cpl 204 cpl
17.1 cpi 137 cpl 233 cpl
20 cpi 160 cpl 272 cpl
Emulations: Epson LQ and IBM ProPrinter, co-resident
Interface: Standard: Centronics parallel Optional: RS-232C serial
Graphics Resolution: 360 x 360 dots per inch maximum
Resident Fonts
Letter Quality: Courier (10 cpi/12 cpi/proportional, with superscript/subscript)
Letter Gothic (10 cpi/12 cpi/proportional, with superscript/subscript)
Orator (10 cpi/12 cpi)
Prestige (10 cpi/12 cpi)
Roman (10 cpi/12 cpi; 18 point: 96 ASCII and foreign language
characters) Swiss, Swiss Bold (10 cpi/12 cpi, with superscript/subscript; 18 point: 96 ASCII and foreign language characters)
Utility: Gothic (10 cpi/12 cpi, with superscript/subscript; proportional)
Bar Code: Code 39, UPC A, UPC E, EAN 8, EAN 13, Interleaved 2 of 5, Code 128, Postnet
Buffer Size: 64K
Reliability
Mean Time Between Failures (MTBF): 6000 hours at 25% duty cycle and 35% page density
Mean Time to Repair (MTTR): 15 minutes
Printhead life: 200 million characters average in 10 cpi utility mode at 25% duty and 35% page density
Ribbon Life:
(on average, 10 cpi utility): black ribbon: 4 million characters
color ribbon: black = 1.5 million characters
cyan = 1.5 million characters
magenta = 1.5 million characters
yellow = 0.8 million characters
| Paper type | Feed | Weight | Width range |
| Cut sheets | Top only | 14 to 24 lb. | ML 590: 7.2" to 8.5"ML 591: 7.2" to 14.3" |
| Single-part continuous forms | Rear, Bottom | 12 to 24 lb. | ML 590: 3" to 10"ML 591: 3" to 16" |
| Carbon less, multi-part continuous form (original + 4 copies) | Rear, Bottom | 9 to 11 lb. | ML 590: 3" to 10"ML 591: 3" to 16" |
| Interleaf, multi-part continuous forms (original + 4 copies) | Rear, Bottom | 10- to 12- lb. paper, 9- lb. carbon | ML 590: 3" to 10"ML 591: 3" to 16" |
| Labels | Bottom only | N.A. | ML 590: 3" to 10"ML 591: 3" to 16" |
| Envelopes, single feed | Top | 24 lb. max. | 6.5" to 9.5" |
| Envelopes, continuous feed, non-overlap type | Rear, Bottom | 24 lb. max. | 6.5" to 9.5" |
| Card stock | Bottom only | 120 lb. max. | ML 590: size 5" x 8"ML 591: size 5" x 14" |
| Transparencies | Top only | 8.5" x 11" |
Paper Specifications
Width, Minimum: 3" Width, Maximum: Model 590: 10" Model 591: 16"
Weight: 12 to 24 lb.
Thickness, Rear feed: 0.014" (0.36 mm) Thickness, Bottom feed: 0.017" (0.44:mm)
Dimensions (W x D x H)
Model 590: 17 x 15 x 6.5 inches (431 x 380 x 166 mm) Model 591: 23 x 15 x 6.5 inches (585 x 380 x 166 mm)
Weight
Model 590: 16.5 lb. (7.5 kg) Model 591: 19 lb., 13 oz. (9 kg)
Environmental Requirements
Operating Temperature: 41 to 104 degrees F (5 to 40 degrees C)
Storage Temperature: 14 to 122 degrees F (-10 to +50 degrees C)
Operating Humidity: 20 to 80% RH
Storage Humidity: 5 to 95% RH
Electrical requirements 120 volts ac (+5.5%, -15%), 50 or 60 Hz (+/-2%) Also available for 230/240 volts ac (+10%, -14%), 50 or 60 Hz (+/-2%)
Specifications subject to change without notice.