
Officejet Pro K5400TN - Printer HP - Free user manual and instructions
Find the device manual for free Officejet Pro K5400TN HP in PDF.


User questions about Officejet Pro K5400TN HP
0 question about this device. Answer the ones you know or ask your own.
Ask a new question about this device
Download the instructions for your Printer in PDF format for free! Find your manual Officejet Pro K5400TN - HP and take your electronic device back in hand. On this page are published all the documents necessary for the use of your device. Officejet Pro K5400TN by HP.
USER MANUAL Officejet Pro K5400TN HP
natural_image
Exterior view of a HP printer with paper feed and paper holder (no visible text or symbols)HP Officejet Pro K5300/K5400
Printer series
User Guide
Copyright information
© 2007 Copyright Hewlett-Packard Development Company, L.P.
Edition 1, 2/2007
Reproduction, adaptation or translation without prior written permission is prohibited, except as allowed under the copyright laws.
The information contained herein is subject to change without notice.
The only warranties for HP products and services are set forth in the express warranty statements accompanying such products and services. Nothing herein should be construed as constituting an additional warranty. HP shall not be liable for technical or editorial errors or omissions contained herein.
Copyright (C) 1991-2, RSA Data Security, Inc. Created 1991. All rights reserved.
License to copy and use this software is granted provided that it is identified as the "RSA Data Security, Inc. MD4 Message-Digest Algorithm" in all material mentioning or referencing this software or this function.
License is also granted to make and use derivative works provided that such works are identified as "derived from the RSA Data Security, Inc. MD4 Message-Digest Algorithm" in all material mentioning or referencing the derived work.
RSA Data Security, Inc. makes no representations concerning either the merchantability of this software or the suitability of this software for any particular purpose. It is provided "as is" without express or implied warranty of any kind.
These notices must be retained in any copies of any part of this documentation and/or software.
Trademarks
Intel ^® , Pentium ^® is a registered trademark of Intel Corporation or its subsidiaries in the United States and other countries.
Microsoft ^® , Windows ^® , and Windows ^® XP are U.S. registered trademarks of Microsoft Corporation.
Safety information

Always follow basic safety precautions when using this product to reduce risk of injury from fire or electric shock.
-
Read and understand all instructions in the documentation that comes with the HP Printer.
-
Use only a grounded electrical outlet when connecting this product to a power source. If you do not know whether the outlet is grounded, check with a qualified electrician.
-
Observe all warnings and instructions marked on the product.
-
Unplug this product from wall outlets before cleaning.
-
Do not install or use this product near water, or when you are wet.
-
Install the product securely on a stable surface.
-
Install the product in a protected location where no one can step on or trip over the line cord, and the line cord cannot be damaged.
-
If the product does not operate normally, see Maintain and troubleshoot.
-
There are no user-serviceable parts inside. Refer servicing to qualified service personnel.
Contents
1 Get started
Find other resources for the product ....5
Accessibility 6
Understand the device parts ....7
Front view 7
Control panel 8
Back view 8
2 Install the accessories
Install the duplexer 9
Install Tray 2....9
Turn on accessories in the print driver 10
To turn on accessories on Windows computers ....11
To turn on accessories on Macintosh computers 11
3 Use the device
Select print media 12
Tips for selecting and using print media 12
Understand specifications for supported media 13
Understand supported sizes 13
Understand supported media types and weights 16
Set minimum margins ....17
Load media 17
Configure trays 20
Change print settings 21
To change settings from an application for current jobs (Windows) 21
To change default settings for all future jobs (Windows) 21
To change settings (Mac OS) 21
Use the HP Solution Center (Windows) 22
Print on both sides (duplexing) 22
Guidelines for printing on both sides of a page 22
To perform duplexing (Windows) 23
To perform automatic duplexing (Mac OS) 23
Print on special and custom-sized media 23
To print on special or custom-sized media (Windows) 23
To print on special or custom-sized media (Mac OS) 24
Print borderless 24
To print a borderless document (Windows) 25
To print a borderless document (Mac OS) 25
Cancel a print job 26
4 Configure and manage
Manage the device 27
Monitor the device 28
Administer the device 28
Use device management tools 29
Embedded Web server 29
To open the embedded Web server 30
Embedded Web server pages ....30
Toolbox (Windows) 31
To open the Toolbox ....31
Toolbox tabs ....31
HP Printer Utility (Mac OS) 32
To open the HP Printer Utility 32
HP Printer Utility panels 32
Network Printer Setup Utility (Mac OS) 33
HP Web Jetadmin software 33
HP Instant Support 34
Security and privacy 34
To gain access to HP Instant Support 34
myPrintMileage 35
Understand the self-test diagnostic page 35
Understand the network configuration page ....37
Configure the device (Windows) 38
Direct connection 38
To install the software before connecting the device (recommended) 38
To connect the device before installing the software 39
To share the device on a locally shared network ....39
Network connection 40
To install the device on a network 40
To install the device software on client computers ....41
To install the printer driver using Add Printer 41
Configure the device (Mac OS) 41
To install the software for network or direct connection ....42
To share the device on a locally shared network ....42
Uninstall and reinstall the software 43
5 Maintain and troubleshoot
Supported ink cartridges 45
Replace the ink cartridges ....45
Maintain the printheads 46
To check printhead health 47
To print the print quality diagnostic page 47
To align the printheads 48
To calibrate the linefeed 49
To clean the printheads 49
To clean the printhead contacts manually 49
To replace the printheads ....52
Store printing supplies 54
Store ink cartridges ....54
Store printheads 54
Troubleshooting tips and resources 54
Contents
Solve printing problems ....55
The device shuts down unexpectedly ....55
All device lights are on or flashing 55
The device is not responding (nothing prints) 55
Device does not accept printhead 56
Device takes a long time to print 56
Blank or partial page printed 57
Something on the page is missing or incorrect 57
Placement of the text or graphics is wrong ....58
Device prints half a page, then ejects the paper ....59
Poor print quality and unexpected printouts ....59
Poor quality printouts ....59
Meaningless characters print 60
Ink is smearing 60
Ink is not filling the text or graphics completely ....61
Output is faded or dull colored 61
Colors are printing as black and white 61
Wrong colors are printing 61
Printout shows bleeding colors 62
Colors do not line up properly 62
Lines or dots are missing from text or graphics 62
Solve paper-feed problems 63
Optional Tray 2 cannot be inserted ....63
Another paper-feed problem is occurring 63
Solve device management problems ....64
Embedded Web server cannot be opened 64
Troubleshoot installation issues 65
Hardware installation suggestions ....65
Software installation suggestions 66
Solve network problems 66
Clear jams 67
Clear a jam in the device 68
Tips for avoiding jams 69
6 Control-panel lights reference
Interpreting control-panel lights 70
Interpreting network connector lights ....75
A HP supplies and accessories
Order printing supplies online 76
Accessories 76
Supplies 76
Ink cartridges 76
Printheads 77
HP media 77
B Support and warranty
Obtain electronic support 78
Obtain HP telephone support 78
Before you call 78
Telephone support numbers 79
Hewlett-Packard limited warranty statement 81
Prepare the device for shipment 82
Remove the ink cartridges and printheads before shipment 82
Pack the device 84
C Device specifications
Physical specifications 86
Product features and capacities 86
Processor and memory specifications 87
System requirements 87
Network protocol specifications 88
Embedded Web server specifications 88
Print resolution 88
Environmental specifications 89
Electrical specifications 89
Acoustic emission specifications (print in Draft mode, noise levels per ISO 7779) ......89
D Regulatory information
FCC statement 90
Shielded cables 90
Other regulatory information 90
EMI statement (Korea) 91
VCCI statement (Japan) 91
Regulatory model number 91
Power cord statement 91
Declaration of conformity 92
Environmental sustainability program 93
Reduction and elimination 93
Power consumption 93
Material safety data sheets 93
Recycling 93
Product packaging 94
Plastics 94
Disposal of waste equipment by users in private households in the European
Union 94
HP products and supplies 94
Index....95
1 Get started
This guide provides details about how to use the device and to resolve problems.
• Find other resources for the product
- Accessibility
• Understand the device parts
Find other resources for the product
You can obtain product information and further troubleshooting resources that are not included in this guide from the following resources:
| Resource Description Location | ||
| Readme file and release notes | Provide late-breaking information and troubleshooting tips. | Included on the Starter CD. |
| Device management tools (network connection) | Allows you to view status information, change settings, and manage the device.For more information, see Embedded Web server. | Available from a connected computer. |
| Toolbox (Microsoft® Windows®) | Provides information about printhead health and access to maintenance services.For more information, see Toolbox (Windows). | Typically installed with the device software. |
| HP Printer Utility (Mac OS) Contains tools to configure print settings, calibrate the device, clean the printheads, print the self-test diagnostic page, order supplies online, and find support information from the Web site.For more information, see HP Printer Utility (Mac OS). | Typically installed with the device software. | |
| Control panel Provides status, error, and warning information about operations. | For more information, see Control panel. | |
| Logs and reports Provides information about events that have occurred. | For more information, see Monitor the device. | |
| Self-test diagnostic page | • Device information:• Product name• Model numberSerial numberFirmware version numberAccessories installed (for example, the duplexer)Number of pages printed from the trays and accessoriesPrinting supply status | For more information, see Understand the self-test diagnostic page. |
| Print quality diagnostic page Diagnoses issues that affect print quality and helps you decide whether to run any maintenance services to improve the print quality of your printouts. | For more information, seeToprint the print quality diagnostic page. | |
| HP Web sites Provide the latest printer software, and product and support information. | www.hp.com/supportwww.hp.com | |
| HP telephone support Lists information to contact HP. During the warranty period, this support is often free of charge. | For more information, seeObtain HP telephone support. | |
| HP photo and imaging software help | Provides information about using the software. | |
| HP Solution Center (Windows) Allows you to change device settings, order supplies, start, and access the onscreen Help. Depending on the devices you have installed, the HP Solution Center provides additional features, such as access to the HP photo and imaging software and the Fax Setup Wizard. For more information, seeUse the HP Solution Center (Windows). | Typically installed with the device software. | |
Accessibility
The device provides a number of features that make it accessible for people with disabilities.
Visual
The device software is accessible for users with visual impairments or low vision through the use of your operating system's accessibility options and features. It also supports most assistive technology such as screen readers, Braille readers, and voice-to-text applications. For users who are color blind, colored buttons and tabs used in the software and on the control panel have simple text or icon labels that convey the appropriate action.
Mobility
For users with mobility impairments, the device software functions can be executed through keyboard commands. The software also supports Windows accessibility options such as StickyKeys, ToggleKeys, FilterKeys, and MouseKeys. The device doors, buttons, paper trays, and paper guides can be operated by users with limited strength and reach.
Support
For more details about the accessibility of this product and HP's commitment to product accessibility, visit HP's Web site at www.hp.com/accessibility.
For accessibility information for the Mac OS, visit the Apple Web site at www.apple.com/accessibility.
Understand the device parts
- Front view
- Control panel
- Back view
Front view
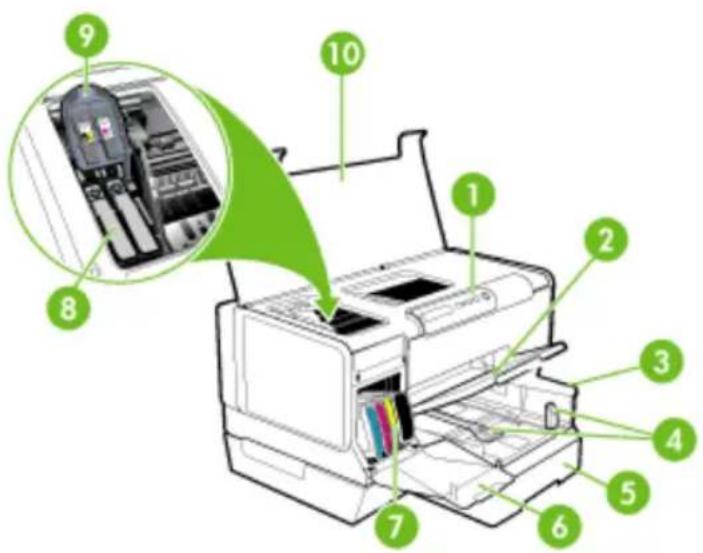
text_image
Diagram of a printer with numbered parts, highlighting internal components and a magnified view of the printer's internal structure.| 1 Control panel |
| 2 Output tray |
| 3 Tray 1 |
| 4 Length/width guides |
| 5 Tray 2 (available with some models) |
| 6 Ink cartridge door |
| 7 Ink cartridges |
Chapter 1
| (continued) | |
| 8 Printheads | |
| 9 Printhead latch | |
| 10 Top cover |
Control panel
For more information about interpreting control-panel lights, see Control-panel lights reference.
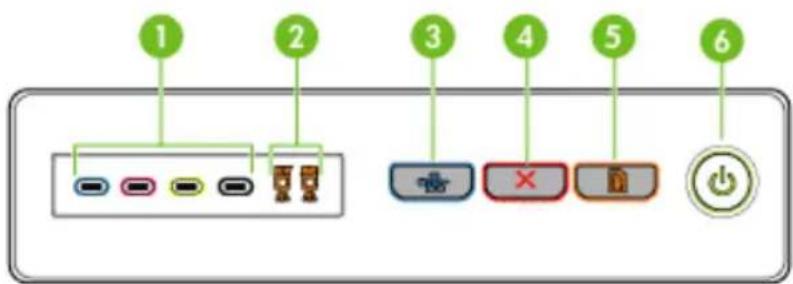
text_image
1 2 3 4 5 6| 1 Ink cartridge lights | |
| 2 Printhead lights | |
| 3 | Configuration Page button 📁 (available with some models) |
| 4 Cancel button | |
| 5 Resume button and light | |
| 6 Power button and light | |
Back view
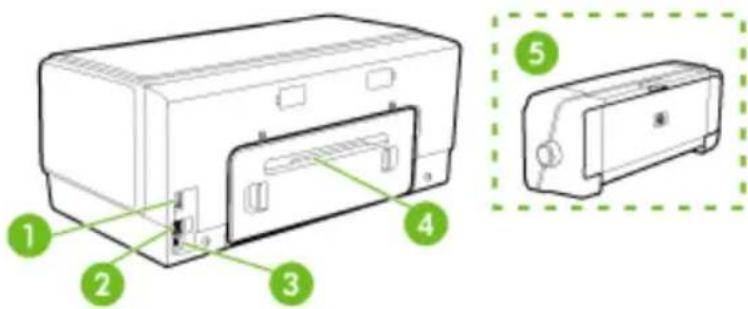
text_image
Technical diagram of a printer with numbered parts and a zoomed-in view for detail| 1 Power input |
| 2 Ethernet network port (available with some models) |
| 3 Rear universal serial bus (USB) port |
| 4 Rear access panel (for models with no duplexer) |
| 5 Automatic two-sided printing accessory (duplexer) (available on some models) |
2 Install the accessories
This section contains the following topics:
• Install the duplexer
• Install Tray 2
• Turn on accessories in the print driver
Install the duplexer

NOTE: This feature is available with some models of the device. For ordering information, see Accessories.
You can print on both sides of a sheet of paper automatically when the optional automatic two-sided printing accessory (duplexer) is installed. For information on using the duplexer, see Print on both sides (duplexing).
To install the duplexer
- Push the buttons on the rear access panel and remove the panel from the device.
- Slide the duplexer into the device until the unit locks into place. Do not press the buttons on either side of the duplexer when installing the unit; use them only for removing the unit from the device.
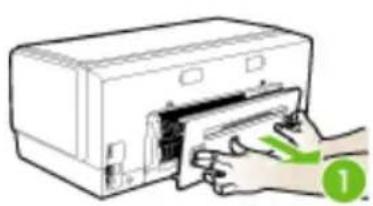
natural_image
Illustration of hands inserting a card into a printer (no text or symbols visible)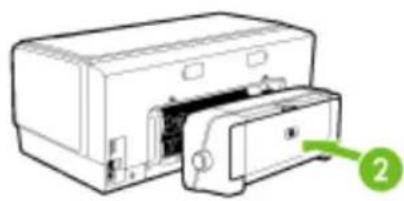
natural_image
Diagram of a printer or printer with a green arrow pointing to its side panel (no text or symbols present)Install Tray 2

NOTE: This feature is available with some models of the device. For ordering information, see Accessories.
Chapter 2
Tray 2 can hold up to 350 sheets of plain paper. For ordering information, see Accessories.
To install Tray 2
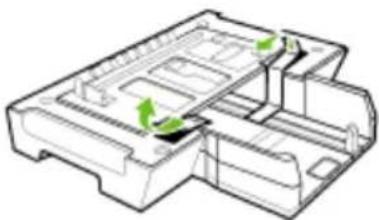
- Unpack the tray, remove the packing tapes and materials, and move the tray to the prepared location. The surface must be sturdy and level.
natural_image
Technical line drawing of a mechanical housing or enclosure with green arrows indicating directional flow (no text or symbols)-
Turn off the device, and disconnect the power cord.
-
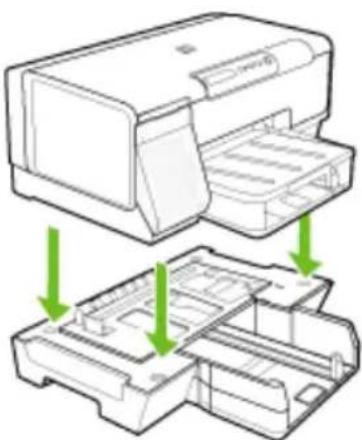
Set the device on top of the tray.
△ CAUTION: Be careful to keep your fingers and hands clear of the bottom of the device.
natural_image
Diagram of a printer with internal compartments and green arrows indicating process flow (no text or symbols)-
Connect the power cord and turn on the device.
-
Enable Tray 2 in the print driver. For more information, see Turn on accessories in the print driver.
Turn on accessories in the print driver
• To turn on accessories on Windows computers
• To turn on accessories on Macintosh computers
To turn on accessories on Windows computers
After you install the device software on Windows computers, Tray 2 must be turned on in the print driver in order for it to work with the device. (The duplexer does not need to be turned on.)
- Click Start, point to Settings, and then click Printers or Printers and Faxes.
- Or -
Click Start, click Control Panel, and then double-click Printers.
-
Right-click the icon for the preferred print driver, and then click Properties.
-
Select one of these tabs: Configure, Device Settings, or Device Options. (The name of the tab depends on the print driver and the operating system.) On the selected tab, click the accessory that you want to turn on, click Installed from the drop-down menu, and then click OK.
To turn on accessories on Macintosh computers
The Mac OS automatically turns on all accessories in the print driver when you install the device software. If you add a new accessory later, follow these steps:
- Click the Printer Setup Utility icon in the Dock.
- On the Printer List window, click once on the device you want to set up to select it.
- From the Printers menu, select Show info.
- Click the Names and Location drop-down menu and select Installable Options.
- Check the accessory that you want to turn on.
- Click Apply Changes.
3 Use the device
This section contains the following topics:
- Select print media
- Load media
- Configure trays
• Change print settings
• Use the HP Solution Center (Windows)
• Print on both sides (duplexing)
• Print on special and custom-sized media - Print borderless
- Cancel a print job
Select print media
The device is designed to work well with most types of office media. It is best to test a variety of print media types before buying large quantities. Use HP media for optimum print quality. Visit the HP Web site at www.hp.com for more information about HP media.
• Tips for selecting and using print media
• Understand specifications for supported media
- Set minimum margins
Tips for selecting and using print media
For the best results, observe the following guidelines.
• Always use media that conforms to the device specifications. For more information, see Understand specifications for supported media.
- Load only one type of media at a time into a tray.
- Load media print-side down and aligned against the right and back edges of the tray. For more information, see Load media.
- Tray 2 is designed to hold only plain paper.
- Do not overload the trays. For more information, see supported media. Understand specifications for
- To prevent jams, poor print quality, and other printing problems, avoid the following media:
- Multipart forms
• Media that is damaged, curled, or wrinkled
• Media with cutouts or perforations
• Media that is heavily textured, embossed, or does not accept ink well
• Media that is too lightweight or stretches easily
Cards and envelopes
- Avoid envelopes that have a very slick finish, self-stick adhesives, clasps, or windows. Also avoid cards and envelopes with thick, irregular, or curled edges, or areas that are wrinkled, torn, or otherwise damaged.
- Use tightly constructed envelopes, and make sure the folds are sharply creased.
- Load envelopes with the flaps facing up.
Photo media
- Use the Best mode to print photographs. Note that in this mode, printing takes longer and more memory is required from your computer.
- Remove each sheet as it prints and set it aside to dry. Allowing wet media to stack up may cause smearing.
Transparencies
- Insert transparencies with the rough side down and the adhesive strip pointing towards the back of the device.
- Use the Normal mode to print transparencies. This mode provides longer drying time and ensures that the ink dries completely before the next page is delivered to the output tray.
- Remove each sheet as it prints and set it aside to dry. Allowing wet media to stack up may cause smearing.
Custom-sized media
- Use only custom-sized media that is supported by the device.
- If your application supports custom-sized media, set the media size in the application before printing the document. If not, set the size in the print driver. You might need to reformat existing documents to print them correctly on custom-sized media.
Understand specifications for supported media
Use the Understand supported sizes and Understand supported media types and weights tables to determine the correct media to use with your device, and determine what features will work with your media.
• Understand supported sizes
• Understand supported media types and weights
Understand supported sizes

NOTE: Tray 2 and the duplexer are available with some models.
| Media size Tray 1 Tray 2 | Duplexer | ||
| Standard media sizes | |||
| U.S. Letter (216 x 279 mm; 8.5 x 11 inches) | √ | √ | √ |
| 8.5 x 13 inches (216 x 330 mm) | √ | √ | |
| U.S. Legal (216 x 356 mm; 8.5 x 14 inches) | √ | √ | |
| A4 (210 x 297 mm; 8.3 x 11.7 inches) | √ | √ | √ |
| U.S. Executive (184 x 267 mm; 7.25 x 10.5 inches) | √ | √ | √ |
| U.S. Statement (140 x 216 mm; 5.5 x 8.5 inches) | √ | ||
| B5 (182 x 257 mm; 7.17 x 10.12 inches) | √ | √ | √ |
| A5 (148 x 210 mm; 5.8 x 8.3 inches) | √ | √ | |
| 6 x 8 inches | √ | √ | |
| Borderless A4 (210 x 297 mm; 8.3 x 11.7 inches) | √ | ||
| Borderless A5 (148 x 210 mm; 5.8 x 8.3 inches) | √ | ||
| Borderless B5 (182 x 257 mm; 7.17 x 10.12 inches) | √ | ||
| Envelopes | |||
| U.S. #10 Envelope (105 x 241 mm; 4.12 x 9.5 inches) | √ | ||
| Monarch Envelope (98 x 191 mm; 3.88 x 7.5 inches) | √ | ||
| HP Greeting Card Envelope (111 x 152 mm; 4.38 x 6 inches) | √ | ||
| A2 Envelope (111 x 146 mm; 4.37 x 5.75 inches) | √ | ||
| DL Envelope (110 x 220 mm; 4.3 x 8.7 inches) | √ | ||
| C5 Envelope (162 x 229 mm; 6.4 x 9 inches) | √ | ||
| C6 Envelope (114 x 162 mm; 4.5 x 6.4 inches) | √ | ||
| Japanese Envelope Chou #3 (120 x 235 mm; 4.7 x 9.3 inches) | √ | ||
| Japanese Envelope Chou #4 (90 x 205 mm; 3.5 x 8.1 inches) | √ | ||
| Cards | |||
| Index card (76.2 x 127 mm; 3 x 5 inches) | √ | ||
| Index card (102 x 152 mm; 4 x 6 inches) | √ | √ | |
| Index card (127 x 203 mm; 5 x 8 inches) | √ | √ | |
| A6 card (105 x 148.5 mm; 4.13 x 5.83 inches) | √ | √ | |
| Borderless A6 card (105 x 148.5 mm; 4.13 x 5.83 inches) | √ | ||
| Hagaki* (100 x 148 mm; 3.9 x 5.8 inches) | √ | ||
Photo media
| Photo media (76.2 x 127 mm; 3 x 5 inches) | √ | ||
| Photo media (102 x 152 mm; 4 x 6 inches) | √ | ||
| Photo media (5 x 7 inches) | √ | ||
| Photo media (8 x 10 inches) | √ | ||
| Photo media (10 x 15 cm) | √ | ||
| Borderless photo media (102 x 152 mm; 4 x 6 inches) | √ | ||
| Borderless photo media (5 x 7 inches) | √ | ||
| Borderless photo media (8 x 10 inches) | √ | ||
| Borderless photo media (8.5 x 11 inches) | √ | ||
| Borderless photo media (10 x 15 cm) | √ |
Other media
| Custom-sized media between 76.2 to 216 mm wide and 127 to 356 mm long (3 to 8.5 inches wide and 5 to 14 inches long) | √ | ||
| Custom-sized media (ADF) between 127 to 216 mm wide and 241 to 305 mm long (5 to 8.5 inches wide and 9.5 to 12 inches long) | |||
| Panorama (4 x 10 inches, 4 x 11 inches, and 4 x 12 inches) | √ | ||
| Borderless panorama (4 x 10 inches, 4 x 11 inches, and 4 x 12 inches) | √ |
* The device is compatible with plain and inkjet hagaki from Japan Post only. It is not compatible with photo hagaki from Japan Post.
Understand supported media types and weights

NOTE: Tray 2 and the duplexer are available with some models.
| Tray Type Weight Capacity | |||
| Tray 1 Paper | 60 to 105 g/m2(16 to 28 lb bond) | Up to 250 sheets of plain paper(25 mm or 1 inch stacked) | |
| Transparencies Up to 70 sheets | (17 mm or 0.67 inch stacked) | ||
| Photo media | 280 g/m2(75 lb bond) | Up to 100 sheets(17 mm or 0.67 inch stacked) | |
| Labels Up to 100 sheets | (17 mm or 0.67 inch stacked) | ||
| Envelopes | 75 to 90 g/m2(20 to 24 lb bond envelope) | Up to 30 sheets(17 mm or 0.67 inch stacked) | |
| Cards | Up to 200 g/m2(110 lb index) | Up to 80 cards | |
| Tray 2 Plain paper only | 60 to 105 g/m2(16 to 28 lb bond) | Up to 350 sheets of plain paper(35 mm or 1.38 inch stacked) | |
| Duplexer Paper | 60 to 105 g/m2(16 to 28 lb bond) | Not applicable | |
| Output-bin | All supported media Up to 150 sheets of | plain paper (text printing) | |
Set minimum margins
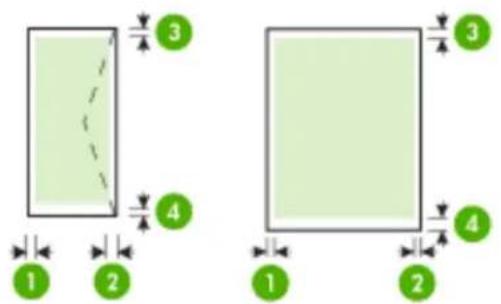
The document margins must match (or exceed) these margin settings in portrait orientation.
text_image
1 2 3 4 1 2 3 4| Media (1) Left | margin | (2) Right margin | (3) Top margin | (4) Bottom margin* |
| U.S. Letter | 3.3 mm (0.13 inch) | 3.3 mm (0.13 inch) | 3.3 mm (0.13 inch) | 3.3 mm (0.13 inch) |
| U.S. Legal | ||||
| A4 | ||||
| U.S. Executive | ||||
| U.S. Statement | ||||
| 8.5 x 13 inch | ||||
| B5 | ||||
| A5 | ||||
| Cards | ||||
| Custom-sized media | ||||
| Photo media | ||||
| Envelopes 3.3 mm (0.13 inch) | 3.3 mm (0.13 inch) | 16.5 mm (0.65 inch) | 16.5 mm (0.65 inch) | |
* To achieve this margin setting on a computer running Windows, click the Advanced tab in the print driver, and select Minimize Margins.

NOTE: If you are using the duplexer (available with some models), the minimum top and bottom margins must match or exceed 12 mm (0.47 inch).
Load media
This section provides instructions for loading media into the device.

NOTE: Tray 2 is available with some models.
To load Tray 1 (main tray)
- Lift the output tray.
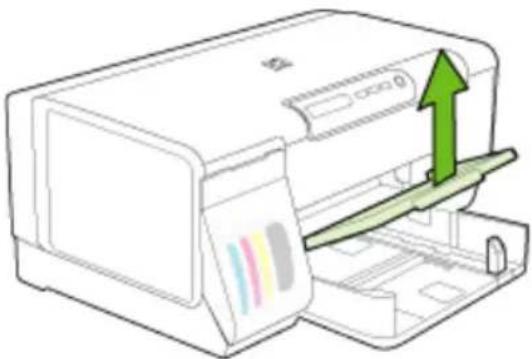
natural_image
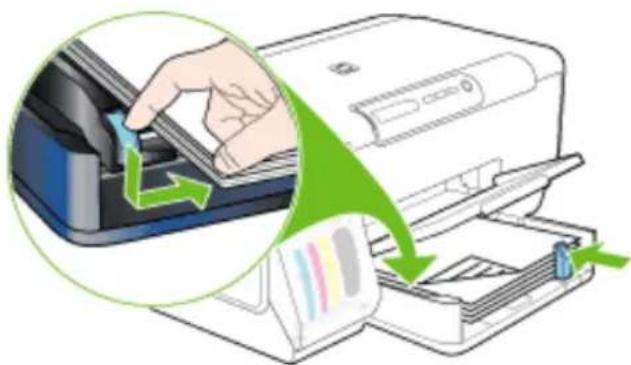
Illustration of a printer with a green upward arrow indicating print direction (no text or symbols)- Insert the media print-side down along the right of the tray. Make sure the stack of media aligns with the right and back edges of the tray, and does not exceed the line marking in the tray.

NOTE: Do not load paper while the device is printing.
- Slide the media guides in the tray to adjust them for the media size that you have loaded, and then lower the output tray.
natural_image
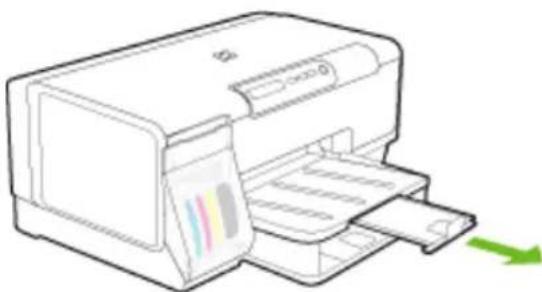
Illustration of a printer being inserted into a paper with arrows indicating process (no text or symbols present)- Pull out the extension on the output tray.
natural_image
Line drawing of a printer with paper feed and green arrow indicating compression (no text or symbols)To load Tray 2
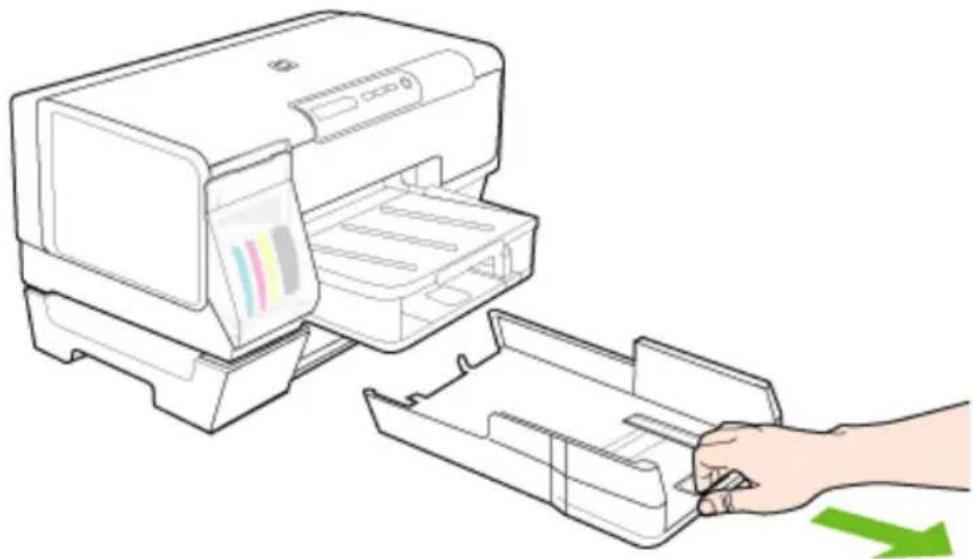
- Pull the tray out of the device by grasping the front of the tray.
natural_image
Line drawing of a printer being inserted into a tray, with a hand holding the tray (no text or symbols present)- Insert the paper print-side down along the right of the tray. Make sure the stack of paper aligns with the right and back edges of the tray, and does not exceed the line marking in the tray.

NOTE: Tray 2 can be loaded only with plain paper.
- Slide the media guides in the tray to adjust them for the size that you have loaded.
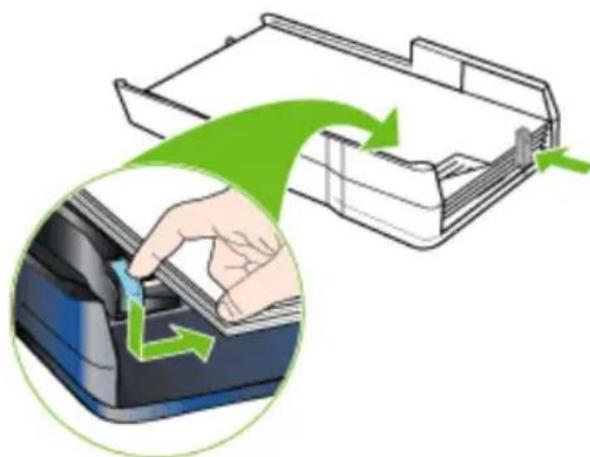
natural_image
Illustration of a hand inserting a component into a device, with green arrows indicating the process (no text or symbols present)- Gently reinsert the tray.
- Pull out the extension on the output tray.
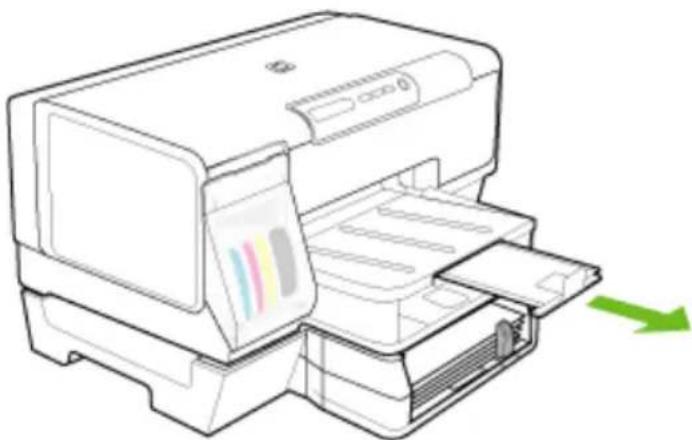
natural_image
Line drawing of a printer with paper feed and green arrow indicating compression (no text or symbols)Configure trays

NOTE: Tray 2 is available with some models.
By default, the device draws media from Tray 1. If Tray 1 is empty, the device draws media from Tray 2 (if it is installed and loaded with media). You can change this default behavior by using the following features:
- Tray Lock: Use this feature to protect special media such as letterhead or preprinted media from accidental use. If the device runs out of media while printing a document, it will not use media from a locked tray to complete the print job.
- Default Tray: Use this feature to determine the first tray from which the device draws media.

NOTE: To use the tray lock and default tray settings, you must select the automatic tray selection option in the device software. If the device is on a network and you set a default tray, the setting will affect all users of the device.
Tray 2 is designed to hold only plain paper.
The following table lists possible ways you can use the tray settings to meet your printing needs.
| I want to... Follow these steps | |
| Load both trays with the same media, and have the device pick media from one tray if the other one is empty. | Load media in Tray 1 and Tray 2. For more information, seeLoad media.Make sure tray lock is disabled. |
| Have both special media (such as transparencies or letterhead) and plain paper loaded in the trays. | Load special media in Tray 1 and plain paper in Tray 2.Make sure tray lock is set to Tray 1. |
| Load media in both trays but have the device pick media from a specific tray first. | Load media in Tray 1 and Tray 2.Make sure default tray is set to the appropriate tray. |
To configure the trays
- Make sure the device is turned on.
-
Perform one of the following:
-
Embedded Web server: Click the Settings tab and click Paper Handling in the left panel.
- Toolbox (Windows): Click the Services tab and click Paper Handling.
-
HP Printer Utility (Mac OS): Click Paper Handling from the Printer Settings panel.
-
Change the desired tray setting, and then press OK or Apply.
Change print settings
You can change print settings (such as paper size or type) from an application or the printer driver. Changes made from an application take precedence over changes made from the printer driver. However, after the application is closed, the settings return to the defaults configured in the driver.

NOTE: To set print settings for all print jobs, make the changes in the printer driver.
For more information about the features of the Windows printer driver, see the online help for the driver. For more information about printing from a specific application, see the documentation that came with the application.
• To change settings from an application for current jobs (Windows)
• To change default settings for all future jobs (Windows)
• To change settings (Mac OS)
To change settings from an application for current jobs (Windows)
- Open the document that you want to print.
- On the File menu, click Print, and then click Setup, Properties, or Preferences. (Specific options may vary depending on the application that you are using.)
- Change the settings that you want, and then click OK, Print, or a similar command.
To change default settings for all future jobs (Windows)
- Click Start, point to Settings, and then click Printers or Printers and Faxes.
-
Or -
Click Start, click Control Panel, and then double-click Printers. -
Right-click the printer icon, and then click Properties, Document Defaults, or Printing Preferences.
-
Change the settings that you want, and then click OK.
To change settings (Mac OS)
- On the File menu, click Page Setup.
- Change the settings that you want (such as paper size), and then click OK.
- On the File menu, click Print to open the print driver.
- Change the settings that you want (such as media type), and then click OK or Print.
Use the HP Solution Center (Windows)
Use the HP Solution Center to change print settings, order supplies, and access the onscreen Help.
The features available in the HP Solution Center vary depending on the devices you have installed. The HP Solution Center is customized to show icons that are associated with the selected device. If the selected device is not equipped with a particular feature, then the icon for that feature does not appear in the HP Solution Center.
If the HP Solution Center on your computer does not contain any icons, an error might have occurred during the software installation. To correct this, use the Control Panel in Windows to completely uninstall and reinstall the software.
Print on both sides (duplexing)
You can print on both sides of a sheet of media, either automatically by using the optional automatic two-sided printing accessory (duplexer), or manually by turning the media over and feeding it into the device again.
• Guidelines for printing on both sides of a page
• To perform duplexing (Windows)
• To perform automatic duplexing (Mac OS)
Guidelines for printing on both sides of a page
• Always use media that conforms to the device specifications. For more information, see Understand specifications for supported media.
- Specify duplex options in your application or in the printer driver.
- Do not print on both sides of transparencies, envelopes, photo paper, glossy media, or paper lighter than 16 lb bond (60 g/m ^2 ) or heavier than 28 lb bond (105 g/m ^2 ). Jams might occur with these media types.
- Several kinds of media require a specific orientation when you print on both sides of a page, such as letterhead, preprinted paper, and paper with watermarks and prepunched holes. When you print from a computer running Windows, the device prints the first side of the media first. When you print from a computer using the Mac OS, the device prints the second side first. Load the media with the front side facing down.
- For auto-duplexing, when printing finishes on one side of the media, the device holds the media and pauses while the ink dries. Once the ink dries, the media is pulled back into the device and the second side is printed. When printing is complete, the media is dropped onto the output tray. Do not grab it before printing is complete.
- You can print on both sides of supported custom-sized media by turning the media over and feeding it into the device again. For more information, see Understand specifications for supported media.
To perform duplexing (Windows)
- Load the appropriate media. For more information, see Guidelines for printing on both sides of a page and Load media.
- Make sure the duplexer is properly installed. For more information, see Install the duplexer.
- With a document open, click Print on the File menu, and then click Setup, Properties, or Preferences.
- Click the Features tab.
- Select the Two-sided printing drop-down list. For auto-duplexing, ensure that Automatic is selected.
- To automatically resize each page to match the document's onscreen layout, ensure Preserve Layout is selected. Clearing this option might result in unwanted page breaks.
- Select or clear the Flip Pages Up check box depending on which way you want the binding. See the graphics in the print driver for examples.
- Choose a booklet layout from the Booklet Layout drop-down list, if you want.
- Change any other settings, and then click OK.
- Print your document.
To perform automatic duplexing (Mac OS)
- Load the appropriate media. For more information, see Guidelines for printing on both sides of a page and Load media.
- Make sure the duplexer is properly installed. For more information, see Install the duplexer.
- On the File menu, click Print.
- Open the Two-Sided Printing panel.
- Select the option to print on both sides.
- Select the binding orientation by clicking the appropriate icon.
- Change any other settings, and then click Print.
Print on special and custom-sized media
This section covers the following topics:
• To print on special or custom-sized media (Windows)
• To print on special or custom-sized media (Mac OS)
To print on special or custom-sized media (Windows)
- Load the appropriate media. For more information, see Load media.
- With a document open, click Print on the File menu, and then click Setup, Properties, or Preferences.
-
Click the Features tab.
-
Select the media size from the Size drop-down list.
To set a custom media size:
a. Select Custom from the drop-down list.
b. Type a name for the new custom size.
c. In the Width and Height boxes, type the dimensions, and then click Save.
d. Click OK twice to close the properties or preferences dialog box. Open the dialog box again.
e. Select the new custom size.
- To select the media type:
a. Click More in the Paper Type drop-down list.
b. Click the desired media type, and then click OK.
-
Select the media source from the Paper Source drop-down list.
-
Change any other settings, and then click OK.
-
Print your document.
To print on special or custom-sized media (Mac OS)
- Load the appropriate media. For more information, see Load media.
- On the File menu, click Page Setup.
- Select the media size.
-
To set a custom media size:
a. Click Manage Custom Sizes in the Paper Size pull-down menu.
b. Click New and type a name for the size in the Paper Size Name box.
c. In the Width and Height boxes, type the dimensions and set the margins, if desired.
d. Click Done or OK, and then click Save. -
On the File menu, click Page Setup, and then select the new custom size.
-
Click OK.
-
On the File menu, click Print.
-
Open the Paper Handling panel.
-
Under Destination Paper Size, click the Scale to fit paper size tab, and then select the customized paper size.
-
Change any other desired settings, and then click OK or Print.
Print borderless
Borderless printing lets you print to the edges of certain photo media types and a range of standard media sizes.

NOTE: Open the file in a software application and assign the image size. Make sure the size corresponds to the media size on which you are printing the image.
You can also gain access to this feature from the Printing Shortcuts tab. Open the printer driver, select the Printing Shortcuts tab, and select the printing shortcut for this print job drop-down list.
• To print a borderless document (Windows)
• To print a borderless document (Mac OS)
To print a borderless document (Windows)
- Load the appropriate media. For more information, see Load media.
- Open the file that you want to print.
- From the application, open the print driver:
a. Click File, and then click Print.
b. Click Properties, Setup or Preferences.
-
Click the Features tab.
-
Select the media size from the Size drop-down list.
- Select the Borderless check box.
- Select the media source from the Paper Source drop-down list.
- Select the media type from the Paper Type drop-down list.
- If you are printing photos, select Best from the Print Quality drop-down list. Alternatively, select Maximum dpi, which provides up to 4800 x 1200 optimized dpi* for optimum print quality.
*Up to 4800 x 1200 optimized dpi for color printing and 1200 input dpi. This setting might temporarily use a large amount of hard disk space (400 MB or more) and will print more slowly.
- Change any other print settings, and then click OK.
- Print the document.
- If you printed on photo media with a tear-off tab, remove the tab to make the document completely borderless.
To print a borderless document (Mac OS)
- Load the appropriate media. For more information, see Load media.
- Open the file that you want to print.
- Click File, and then click Page Setup.
- Select the borderless media size, and then click OK.
- Click File, and then click Print.
- Open the Paper Type/Quality panel.
-
Click the Paper tab, and then select the media type from the Paper type dropdown list.
-
If you are printing photos, select Best from the Quality drop-down list.
Alternatively, select Maximum dpi, which provides up to 4800 x 1200 optimized dpi*.
*Up to 4800 x 1200 optimized dpi for color printing and 1200 input dpi. This setting might temporarily use a large amount of hard disk space (400 MB or more) and will print more slowly.
-
Select the media source. If you are printing on thick or photo media, select the manual feed option.
-
Change any other print settings, and then click Print.
-
If you printed on photo media with a tear-off tab, remove the tab to make the document completely borderless.
Cancel a print job
You can cancel a print job using one of the following methods.
Control panel: Press ✗ (Cancel button). This clears the job that the device is currently processing. It does not affect jobs waiting to be processed.
Windows: Double-click the printer icon that appears in the lower-right corner of the computer screen. Select the print job, and then press the Delete key on the keyboard.
Mac OS: Double-click the printer in the Printer Setup Utility. Select the print job, click Hold, and then click Delete.
4 Configure and manage
This section is intended for the administrator or individual who is responsible for managing the device. This section contains information about the following topics.
- Manage the device
• Use device management tools
• Understand the self-test diagnostic page
• Understand the network configuration page - Configure the device (Windows)
• Configure the device (Mac OS)
• Uninstall and reinstall the software
Manage the device
The following table lists common tools that can be used to manage the device. Specific procedures might include other methods. For information about accessing and using the tools, see Use device management tools.

NOTE: Mac OS users can use the control panel, the embedded Web server, and the HP Printer Utility. Windows users can use the control panel, the embedded Web server, the printer driver, the Toolbox, the HP Web Jetadmin, and myPrintMileage.
For more information about the HP Web Jetadmin software, open the HP Web Jetadmin software and see its documentation. For more information about myPrintMileage, visit the myPrintMileage Web site.
- Monitor the device
• Administer the device
Monitor the device
This section provides instructions for monitoring the device.
| Use this tool... to obtain the following information.... | |
| Control panel | Obtain information about the status of jobs that are being processed, the operating status of the device, and the status of ink cartridges and printheads.Network Settings: To print the network configuration page, press [icon] (Configuration Page button). |
| Embedded Web server | Printer status information: Click the Information tab, and then click an option available on the left pane.Ink cartridge and printhead status: Click the Information tab, and then click Ink Supplies in the left pane.Accumulated ink and media usage: Click the Information tab, and then click Usage in the left pane. |
| Toolbox (Windows) Ink cartridge information: | Click the Estimated Ink Levels tab to view the ink-level information, and then scroll to display the Cartridge Details button. Click the Cartridge Details button to view information about replacement ink cartridges and expirations dates.NOTE: The ink levels shown are an estimate only. Actual ink volumes may vary. |
| HP Printer Utility (Mac OS) Ink cartridge information: | Open the Information and Support panel and click Supplies Status. |
Administer the device
This section provides information about administering the device and modifying settings.
| Use this tool... to do the following... | |
| Control panel | Reset the administrator password and network settings: Press and hold ☐ (Configuration Page button), press 📋 (Resume button) three times, and release ☐ (Configuration Page button). For more information, see Troubleshooting tips and resources. |
| Embedded Web server | Set embedded Web server password: Click the Settings tab, and then click Security in the left pane.Change tray settings: Click the Settings tab, and then click Paper Handling in the left pane.Perform device maintenance tasks: Click the Settings tab, and then click Device Services in the left pane.Language or country/region: Click the Settings tab, and then click International in the left pane.Configure network settings: Click the Networking tab, and then click an option in the left pane.Order supplies: On any tab, click the Order Supplies button, and then follow the onscreen instructions.Support: On any tab, click the Support button, and then select a support option.Set the date and time: Click the Settings tab, click Time Services in the left pane, type the necessary values in the fields, and then click Apply. |
| Toolbox (Windows) | Change tray settings: Click Paper Handling on the Services tab.Perform device maintenance tasks: Click the Services tab. |
| HP Printer Utility (Mac OS) | Change tray settings: Click Paper Handling from the Printer Settings panel.Perform device maintenance tasks: Open the Information and Support panel, and then click the option for the task that you want to perform. |
Use device management tools
The following lists common tools that can be used to manage the device.
• Embedded Web server
- Toolbox (Windows)
• HP Printer Utility (Mac OS)
• Network Printer Setup Utility (Mac OS)
• HP Web Jetadmin software
• HP Instant Support
• myPrintMileage
Embedded Web server
When the device is connected to a network, you can use the embedded Web server to view status information, change settings, and manage it from your computer.

NOTE: For a list of system requirements for the embedded Web server, see Embedded Web server specifications.
Some settings might be restricted by the requirement for a password.
You can open and use the embedded Web server without being connected to the Internet; however, some features will not be available.
• To open the embedded Web server
• Embedded Web server pages
To open the embedded Web server
You can open the embedded Web server by using these methods:

NOTE: To open the embedded Web server from the printer driver (Windows), or the HP Printer Utility (Mac OS), the device must be on a network and must have an IP address.
- Web browser: In a supported Web browser on your computer, type the IP address that has been assigned to the device. For example, if the IP address is 123.123.123.123, type the following address into the Web browser: http://123.123.123.123
The IP address for the device is listed on the network configuration page. For more information, see Understand the network configuration page.
After opening the embedded Web server, you can bookmark it so that you can return to it quickly in the future.
- Windows taskbar: Right-click the HP Digital Imaging Monitor icon, point to the device you wish to view, and then click Network Settings (EWS).
- HP Printer Utility (Mac OS): On the Printer Settings panel, click Additional Settings, and then click the Open Embedded Web Server button.
Embedded Web server pages
The embedded Web server contains pages that you can use to view product information and change device settings. The pages also contain links to other e-services.
| Pages/buttons Contents | |
| Information page Shows status information | about the device, its ink supplies and usage, and a log of device events (such as errors). |
| Settings page Shows the settings that have | been configured for the device and gives you the ability to change these settings. |
| Networking page Shows network status and | the network settings that have been configured for the device. These pages only appear if the device is connected to a network. |
| Support and Order Supplies buttons | Support provides a number of support services, including e-services such as HP Instant Support,myPrintMileage. For more information, see HP Instant Support and myPrintMileage.Order Supplies connects you to online ordering of supplies. |
Toolbox (Windows)
The Toolbox provides maintenance information about the device.

NOTE: The Toolbox can be installed from the Starter CD by selecting the full installation option if the computer meets the system requirements.
• To open the Toolbox
- Toolbox tabs
To open the Toolbox
- From the HP Solution Center, click the Settings menu, point to Print Settings, and then click Printer Toolbox.
- Right-click the HP Digital Imaging Monitor in the tray, point to the device, and then click Display Printer Toolbox.
Toolbox tabs
The Toolbox contains the following tabs.
| Tabs Contents | |
| Estimated Ink Level | Ink Level Information: Shows estimated ink level for each cartridge.NOTE: The ink levels shown are an estimate only. Actual ink volumes may vary.Shop Online: Provides access to a Web site from which you can order printing supplies for the device online.Order by Phone: Shows telephone numbers that you can call to order supplies for the device. Telephone numbers are not available for all countries/regions.Cartridge Details: Shows order numbers and expiration dates of the installed ink cartridges. |
| Information | Printer Information: Provides a link to myPrintMileage and shows the device hardware and printhead health information. Information tab options include:Hardware informationmyPrintmileage (if installed)HP Instant SupportHP printhead health |
| Services | Print PQ (print quality) Diagnostic Page: Allows you to diagnose issues affecting the print quality of the device. For more information, seeTo print the print quality diagnostic page.Print Self-Test Diagnostic Page: Allows you to print the self-test diagnostic page of the device. This page contains information about the device and the supplies. For more information, seeUnderstand the self-test diagnostic page.Align Printheads: Guides you through aligning the printheads. For more information, seeTo align the printheads.Clean Printheads: Guides you through cleaning the printheads. For more information, seeTo clean the printheads.Calibrate Linefeed: Allows you to perform linefeed calibration. For more information, seeTo calibrate the linefeed.Paper Handling: Allows you to set the tray lock and select a default tray (if Tray 2 is installed). For more information, seeConfigure trays.Control Panel Language: Allows you to set the language used to print reports such as the self-test diagnostic page. |
HP Printer Utility (Mac OS)
The HP Printer Utility contains tools to configure print settings, calibrate the device, clean the printheads, print the self-test diagnostic page, order supplies online, and find Web site support information.
• To open the HP Printer Utility
• HP Printer Utility panels
To open the HP Printer Utility
- From the Finder, select Computer from the Go menu.
- Select Library, and then select Printers.
- Select hp, select Utilities, and then select HP Printer Selector.
- Select the device and click Launch Utility.
HP Printer Utility panels
This section covers the following topics:
• Information and Support panel
• Printer Settings panel
Information and Support panel
- Supplies Status: Shows the information about currently installed printheads and ink cartridges.
• Supply Info: Shows the ink cartridge replacement options. - Device Information: Displays information about the model and serial number. Also allows you to print the self-test diagnostic page of the device. This page contains information about the device and the supplies. For more information, see Understand the self-test diagnostic page.
- Print Quality Diagnostics: Allows you to diagnose issues affecting the print quality of the device. For more information, see To print the print quality diagnostic page.
- Clean: Guides you through cleaning the printheads. For more information, see To clean the printheads.
- Align: Guides you through aligning the printheads. For more information, see To align the printheads.
- Calibrate Linefeed: Allows you to perform linefeed calibration. For more information, see To calibrate the linefeed.
- Control Panel Language: Allows you to set the language used to print reports such as the self-test diagnostic page.
- HP Support: Gain access to HP Web site where you can find support for the device, register the device, and find information about returning and recycling used printing supplies.
Printer Settings panel
- Trays Configuration: Set the default media type and size for a tray, and set the tray priority. For more information, see Configure trays.
- Additional Settings: Launch the embedded Web server to change network settings. Configure IP settings for network connectivity.
Network Printer Setup Utility (Mac OS)
This tool allows you to configure network settings for the device. You can configure wireless settings such as network location name and wireless mode, and wired settings such as TCP/IP address, router, and subnet mask.
To open the Network Printer Setup Utility
- From the Finder, select Computer from the Go menu.
- Select Library, and then select Printers.
- Select hp, select Utilities, and then select Network Printer Setup Utility.
- Follow the onscreen instructions to configure network settings for the device.
HP Web Jetadmin software
The HP Web Jetadmin software is a Web-based management solution for remotely installing, configuring (both individually or in batch mode), monitoring status (including levels for supplies), conducting remote diagnostics, and troubleshooting a wide variety of HP and non-HP network peripherals.
After the software is installed, you can gain access to it from anywhere within your intranet by using a standard Web browser. To get more information or to download the software, go to www.hp.com/go/webjetadmin.
HP Instant Support
HP Instant Support is a suite of Web-based troubleshooting tools. It helps you quickly identify, diagnose, and resolve printing problems.
HP Instant Support provides the following information about your device:
- Easy access to troubleshooting tips: Provides tips that are customized for your device.
- Resolution of specific device errors: Provides immediate access to information that can help you resolve errors specific to your device. To see a description of the problem, as well as recommendations for solving or preventing the problem, click the link within the message.
- Notification of print driver updates: Alerts you when there is an update for the printer driver. A message appears on the HP Instant Support homepage; click the link within the message to go directly to the download section of the HP Web site.
- Obtaining support services: Provides a list of the support services that are available for your device.
- Managing ink and media usage (myPrintMileage): Helps you manage and forecast device supplies usage.
• Security and privacy
• To gain access to HP Instant Support
Security and privacy
When you use HP Instant Support, detailed device information, such as the serial number, error conditions, and status, is sent to HP. HP respects your privacy and manages this information according to the guidelines that are outlined in the HP Online Privacy Statement (welcome.hp.com/country/us/en/privacy.html).

NOTE: To view all the data that is sent to HP, select Source (for Internet Explorer and Opera) or Page Source (for Netscape and Mozilla Firefox) from the View menu in your Web browser.
To gain access to HP Instant Support
- Toolbox (Windows): Click the Information tab, and then click HP Instant Support.
- Embedded Web server: Click the Support button, then click HP Instant Support.

NOTE: The Support button is available in all pages.

NOTE: Do not bookmark the Web pages that are used to open HP Instant Support. If you bookmark the site and connect to it by using the bookmark, the pages do not contain the current information.
myPrintMileage
myPrintMileage is a service that HP provides to help you track and forecast your device usage and plan the purchase of supplies.
To use myPrintMileage, you must have the following:
- Internet connection
- Device connected
On the myPrintMileage Web site, you can see the print analysis, such as the amount of ink you have used, whether you use more black or color ink, and the estimated number of pages you can print with the remaining amount of ink
To gain access to myPrintMileage
- Embedded Web server: Click the Support button, and then click myPrintMileage.

NOTE: The Support button is available in all pages.
- Toolbox (Windows): Click the Information tab, and then click myPrintMileage and follow the onscreen instructions.
- Windows taskbar: Right-click the HP Digital Imaging icon in the Windows taskbar, choose the device you wish to view, and then click myPrintMileage.

NOTE: Do not bookmark the Web pages that are used to open myPrintMileage. If you bookmark the site and connect to it by using the bookmark, the pages do not contain the current information.
Understand the self-test diagnostic page
Use the self-test diagnostic page to view current device information, ink cartridge status, and printhead health status; to help troubleshoot problems; and to verify installation of optional accessories, such as the duplexer. The self-test diagnostic page also contains a log of recent events.
If you need to call HP, it is often useful to print the self-test diagnostic page before calling.
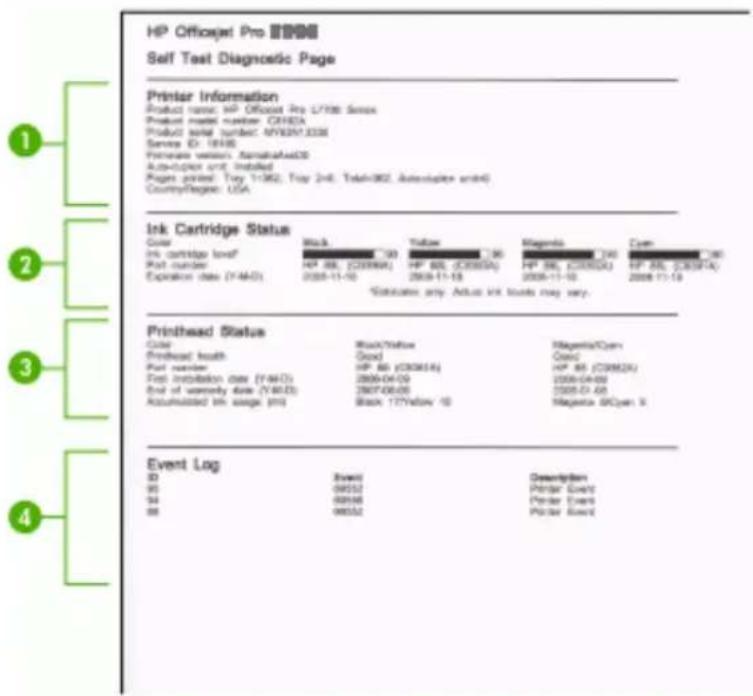
text_image
HP Officejet Pro Self Test Diagnostic Page Printer Information Product name: HP Officer Pro L7106 Service Product model number: CAHDA Product serial number: NY83513336 Service ID: 18188 Performance version: Ammata4x620 Auto-on-one and installed Pages printed: Toy 1-962, Toy 2+6, Tshb-962, Auto-on-one and Country/Region: USA Ink Cartridge Status Color Ink cartridge level Post number Expiration date (Y-962) Black Yellow 196 Magenta Cyan HP BB (C309668) HP BB (C309650) HP BB (C309654) HP BB (C309654) 2008-11-10 2008-11-10 2008-11-10 2008-11-10 Printhead Status Color Printhead health Part number Post installation date (Y-962) End of warranty date (Y-962) Accumulated Ink usage (in) Black Yellow 19 Magenta GCyex II Event Log ID 95 94 98 Event Log Event Log 95 94 98 Event Log Event Log Event Log Event Log- Printer Information: Shows device information (such as the product name, model number, serial number, and firmware version number), the accessories that are installed (such as the duplex unit), and the number of pages printed from the trays and accessories.
- Ink Cartridge Status: Shows the estimated ink levels (represented in graphical form as gauges) and the part numbers and expiration dates of the ink cartridges.

NOTE: The ink levels shown are an estimate only. Actual ink volumes may vary.
- Printhead Status: Shows the status of the printhead health and the part numbers, first-installation dates, and end-of-warranty dates of the printheads, as well as the accumulated ink usage. The status options for the printhead are: good, fair, and replace. If the status is 'fair', then the print quality must be monitored, but the printhead does not need to replaced. If the status is 'replace', then the printhead should be replaced, as the device will not function until it is.
- Event Log: Shows a log of recent events that have occurred.
To print the self-test diagnostic page
- Control panel: Press ☐ (Configuration Page button), or press and hold the ✗ (Cancel button) for 3 seconds.
For models that support networks: Press ☐ (Configuration Page button).
- Toolbox (Windows): Click the Services tab, and then click Print Self-Test Diagnostic Page.
- HP Printer Utility (Mac OS): Click Device Information from the Information and Support panel, and then click Print Configuration Page.
Understand the network configuration page
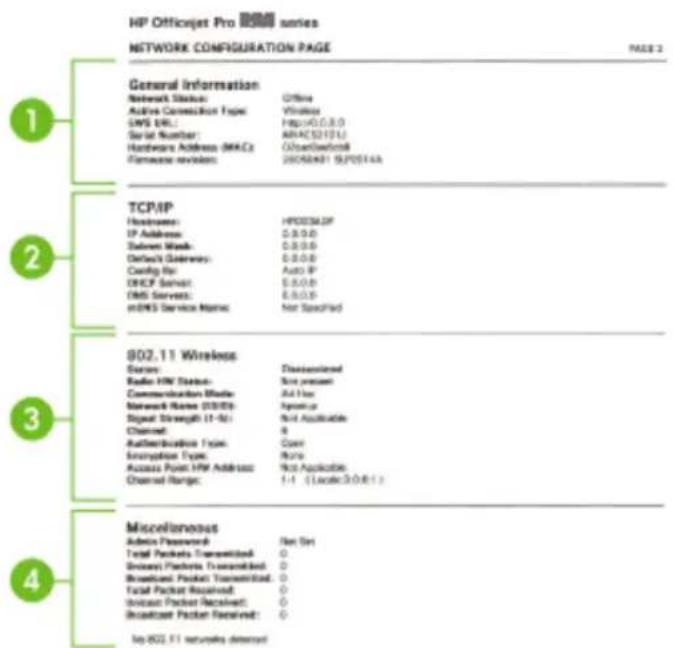
The network configuration page shows the network settings for the device.
text_image
HIP Officerjet Pro NETWORK CONFIGURATION PAGE PAGE 2 General Information Network Status: Offline Active Connection Type: Wireless SMS URL: HPS140.0.0.0 Serial Number: ARAC52101U Hardware Address (MACs) ObjectServer8 Remote revision: 2005/02/19 (JP0514A) TCP/IP Hostains: HP03562DF IP Address: 0.0.0.0 Server Mask: 0.0.0.0 Default Gateway: 0.0.0.0 Config Bit: Audio IP DHCP Service: 0.0.0.0 EMS Servers: 0.0.0.0 mDNS Service Names: Not Specified 902.11 Wireless Service: Disassembled Radio HW Status: Very present Communication Blade: Alt-Box Network Name (USB): Optimal Signal Strength (1-50): Not Applicable Channel: 8 Authentication Type: Cover Encryption Type: None Access Point HW Address: Not Applicable Channel Range: 1-1 -1(Local:0.0.0.1) Miscellaneous Admin Password: Net Srl Total Packets Transmitted: 0 Device Packets Transmitted: 0 Broadcast Packets Transmitted: 0 Facial Packet Received: 0 Device Packet Received: 0 Broadcast Packets Received: 0 Top-802.F1 networks detected- General Information: Shows information about the current status and connection type of the network, and other information, such as the URL of the embedded Web server and the hardware address of the device.
Network Status: This setting can be 'Ready' or 'Offline'. When the setting is 'Offline', it implies either that the IP is being assigned or negotiated by the DNS server, or that the AutoIP or the network is not available.
-
TCP/IP: Shows information on how the device is configured, such as the hostname, IP address, subnet mask, default gateway, server, and service name. Also contains a Config By field, which shows 'AutoIP' if the device is connected to a peer-to-peer network, and 'DHCP' if the device is assigned an IP address or is configured by a DHCP server.
-
802.3 Wired: Shows information about your wired network connection.
iLink Configuration: The possible values are '10T/100T HalfDplx/FullDplx', '10T HalfDplx', '100T FullDplx', and '100T HalfDplx'.
- Miscellaneous: Shows information, such as the total, unicast, broadcast packets transmitted and received, and the administrator details.
Admin Password: Shows 'Not Set' when no password is set in the Settings/Networking tab of the embedded Web server; otherwise, shows 'Set'.
To print the network configuration page
- Control panel: Press ☐☐☐ (Configuration Page button), or press and hold the ✗ (Cancel button) for 3 seconds.
- Toolbox (Windows): Click the Services tab, and then click Print Self-Test Diagnostic Page.
- HP Printer Utility (Mac OS): Click Device Information from the Information and Support panel, and then click Print Configuration Page.
Configure the device (Windows)
You can connect the device directly to a computer, or you can share the device among other users on a network.

NOTE: Microsoft Internet Explorer 6.0 must be installed on the computer system to run the installation program.
Also, you must have administrator privileges to install a printer driver on Windows 2000, Windows XP, or Windows Server 2003.
When setting up the device, HP recommends that you connect it after you install the software because the installation program is designed to provide you with the easiest setup experience. However, if you have connected the cable first, see To connect the device before installing the software.
Direct connection
You can connect the device directly to your computer using a USB cable.

NOTE: If you install the device software and connect the device to a computer running Windows, you can connect additional devices to the same computer with USB cables without reinstalling the device software.
When setting up the device, HP recommends that you connect the device after you install the software because the installation program is designed to provide you with the easiest setup experience. However, if you have connected the cable first, see To connect the device before installing the software.
To install the software before connecting the device (recommended)
-
Close any applications that are running.
-
Insert the Starter CD into the CD drive. The CD menu runs automatically. If the CD menu does not start automatically, double-click the setup icon on the Starter CD..
-
On the CD menu, click Install and follow the onscreen instructions.
- When prompted, turn on the device and connect it to the computer using a USB cable. The Found New Hardware wizard appears on the computer screen, and the device icon is created in the Printers folder.

NOTE: You may connect the USB cable at a later time when you need to use the device.
You can also share the device with other computers using a simple form of networking known as locally shared networking. For more information, see To share the device on a locally shared network.
To connect the device before installing the software
If you connected the device to the computer before installing the device software, the Found New Hardware wizard displays on the computer screen.

NOTE: If you turned on the device, do not turn it off or unplug the cable from the device while the installation program is running. If you do so, the installation program will not finish.
- In the Found New Hardware dialog box that displays methods for locating the printer driver, select the Advanced option, and then click Next.

NOTE: Do not allow the Found New Hardware wizard to perform an automatic search for the printer driver.
- Select the check box for specifying the driver location, and ensure that the other check boxes are clear.
- Insert the Starter CD into the CD drive. If the CD menu appears, close it.
- Browse to locate the root directory on the Starter CD (for example, D), and then click OK.
- Click Next and follow the onscreen instructions.
- Click Finish to close the Found New Hardware wizard. The wizard automatically starts the installation program (this might take a short while).
- Complete the installation process.

NOTE: You can also share the device with other computers using a simple form of networking known as locally shared networking. For more information, see To share the device on a locally shared network.
To share the device on a locally shared network
In a locally shared network, the device is connected directly to the USB connector of a selected computer (known as the server) and is shared by other computers (clients).

NOTE: When sharing a directly connected device, use the computer with the newest operating system as the server. For example, if you have a computer running Windows XP and another computer running an older version of Windows, use the computer running Windows XP as the server.
Use this configuration only in small groups or when usage is low. The connected computer is slowed down when many users print to the device.
- Click Start, point to Settings, and then click Printers or Printers and Faxes.
- Or -
Click Start, click Control Panel, and then double-click Printers.
- Right-click the device icon, click Properties, and then click the Sharing tab.
- Click the option to share the device, and give it a share name.
- To share the device with client computers that use other versions of Windows, click Additional Drivers to install those drivers as a convenience to the users. You must have the Starter CD in your CD drive.
Network connection
If the device has network capability, it can be shared in a network environment by connecting it directly to the network. This type of connection offers the ability to manage the device using the embedded Web server from any computer on the network.

NOTE: Microsoft Internet Explorer 6.0 must be installed on the computer system to run the installation program.
Choose the installation option for the type of network you have:
- Client/server network: If your network has a computer acting as a dedicated print server, install the device software on the server, and then install the device software on the client computers. For more information see To install the device on a network and To install the device software on client computers. This method does not allow you to share the full functionality of the device. Client computers can only print from the device.
- Peer-to-peer network: If you have a peer-to-peer network (a network without a dedicated print server), install the software on the computers that will be using the device. For more information, see To install the device on a network.
In addition, you can connect to a network printer on both types of networks using the Add Printer wizard in Windows. For more information, see To install the printer driver using Add Printer.
To install the device on a network
Use the following steps to install the device software in the following networking scenarios:
You have a peer-to-peer network (a network without a dedicated print server)
- Remove the protective cover from the device's network port and connect the device to the network.
-
Close any third-party firewall and any applications that are running on the computer system that are acting as the print server.
-
Insert the Starter CD into the CD drive. The CD menu starts automatically. If the CD menu does not start automatically, browse to the CD drive of the computer and double-click Setup.exe.
- On the CD menu, click Install, and then follow the onscreen instructions.
- On the Connection Type screen, select Wired network/Wireless, and then click Next.
- Follow the onscreen instructions to complete the installation.

NOTE: To share the device with Windows client computers, see To install the device software on client computers and To share the device on a locally shared network.
To install the device software on client computers
After printer drivers are installed on the computer that is acting as the print server, the printing functionality can be shared. Individual Windows users who want to use the network device must install the software on their computers (clients).
A client computer can connect to the device in the following ways:
- In the Printers folder, double-click the Add Printer icon and follow the instructions for a network installation. For more information, see To install the printer driver using Add Printer.
- On the network, browse to the device and drag it to your Printers folder.
- Add the device and install the software from the INF file on your network. On the Starter CD, the INF files are stored in the root directory of the CD.
To install the printer driver using Add Printer
- Click Start, point to Settings, and then click Printers or Printers and Faxes.
-
Or -
Click Start, click Control Panel, and then double-click Printers. -
Double-click Add Printer, and then click Next.
-
Select Network Printer or Network Printer Server.
-
Click Next.
-
Do one of the following:
Type in the network path or queue name of the shared device, and then click Next.
Click Have Disk when prompted to select the device model.
Click Next and locate the device in the list of shared printers.
- Click Next and follow the onscreen instructions to complete the installation.
Configure the device (Mac OS)
You can use the device with a single Macintosh computer using a USB cable, or you can share it among other users on a network.
This section contains the following topics:
• To install the software for network or direct connection
• To share the device on a locally shared network
To install the software for network or direct connection
- Connect the device to your computer with a USB cable.
- Insert the Starter CD into the CD drive. Double-click the CD icon on the desktop, and then double-click the setup icon. Also, you can locate the Installer folder on the Starter CD.
- Click Install Software and follow the onscreen instructions.
- If necessary, share the device with other Macintosh computer users.
- Direct connection: Share the device with the other Macintosh computer users. For more information, see To share the device on a locally shared network.
• Network connection: Individual Macintosh computer users who want to use the device on the network must install the device software on their computers.
To share the device on a locally shared network
When you connect the device directly, you can share it with other computers using a simple form of networking known as locally shared networking. Use this configuration only in small groups or when usage is low. The connected computer is slowed down when many users print to the device.
Basic requirements for sharing in the Mac OS environment include the following items:
- The Macintosh computers must be communicating on the network using TCP/IP, and they must have IP addresses. (AppleTalk is not supported.)
- The device that is being shared must be connected to a built-in USB port on the host Macintosh computer.
- Both the host Macintosh computer and the client Macintosh computers that are using the shared device must have device sharing software installed, and the driver or PPD for the device that is installed. (You can run the installation program to install the device sharing software and associated Help files.)
For more information about USB device sharing, see the support information on the Apple Web site (www.apple.com) or the Apple Macintosh Help on the computer.
To share the device among computers running Mac OS
- Turn on printer sharing on all Macintosh computers (host and clients) that are connected to the printer. Depending on the OS version you are using, do one of the following:
• Mac OS 10.3: Open System Preferences, click Print & Fax, and then check the box next to Share my printers with other computers.
• Mac OS 10.4: Open System Preferences, click Print & Fax, click the Sharing tab, check the box next to Share these printers with other computers, and then select the printer to be shared.
- To print from the other Macintosh computers (the clients) on the network, do the following:
a. Click File, and then select Page Setup in the document you want to print.
b. In the drop-down menu next to Format for, select Shared Printers, and then select your device.
c. Select the Paper Size, and then click OK.
d. In the document, click File, and then select Print.
e. From the drop-down menu next to Printer, select Shared Printers, and then select your device.
f. Make additional settings, if necessary, and then click Print.
Uninstall and reinstall the software
If your installation is incomplete, or if you connected the USB cable to the computer before prompted by the software installation screen, you might need to uninstall and then reinstall the software. Do not simply delete the device application files from your computer. Make sure to remove them properly using the uninstall utility provided when you installed the software that came with the device.
There are three methods to uninstall the software on a Windows computer, and one method to uninstall on a Macintosh computer.
To uninstall from a Windows computer, method 1
- Disconnect the device from your computer. Do not connect it to your computer until after you have reinstalled the software.
- Press the Power button to turn off the device.
- Follow the onscreen instructions.
- If you are asked whether you would like to remove shared files, click No. Other programs that use these files might not work properly if the files are deleted.
- Restart your computer.
- To reinstall the software, insert the device Starter CD into your computer's CD-ROM drive, follow the onscreen instructions, and also see To install the software before connecting the device (recommended).
- After the software is installed, connect the device to your computer.
- Press the Power button to turn the device on. After connecting and turning on the device, you might have to wait several minutes for all of the Plug and Play events to complete.
- Follow the onscreen instructions.
When the software installation is complete, the HP Digital Imaging Monitor icon appears in the Windows system tray.
To uninstall from a Windows computer, method 2

NOTE: Use this method if Uninstall is not available in the Windows Start menu.
- On the Windows taskbar, click Start, select Settings, select Control Panel, and then click Add/Remove Programs.
- Or -
Click Start, click Control Panel, and then double-click Programs and Features.
- Select the device you want to uninstall, and then click Change/Remove or Uninstall/Change.
-
Disconnect the device from your computer.
-
Restart your computer.

NOTE: It is important that you disconnect the device before restarting your computer. Do not connect the device to your computer until after you have reinstalled the software.
-
Insert the device Starter CD into your computer's CD-ROM drive and then start the Setup program.
-
Follow the onscreen instructions and also see To install the software before connecting the device (recommended).
To uninstall from a Windows computer, method 3

NOTE: Use this method if Uninstall is not available in the Windows Start menu.
-
Insert the device Starter CD into your computer's CD-ROM drive, and then start the Setup program.
-
Disconnect the device from your computer.
-
Select Uninstall and follow the onscreen directions.
-
Restart your computer.

NOTE: It is important that you disconnect the device before restarting your computer. Do not connect the device to your computer until after you have reinstalled the software.
-
Start the Setup program for the device again.
-
Select Install.
-
Follow the onscreen instructions and also see To install the software before connecting the device (recommended).
To uninstall from a Macintosh computer
-
Launch HP Device Manager.
-
Click Information and Settings.
-
Select Uninstall HP AiO Software from the pull-down menu.
Follow the onscreen instructions.
-
After the software is uninstalled, restart your computer.
-
To reinstall the software, insert the device Starter CD into your computer's CD-ROM drive.
-
On the desktop, open the CD-ROM, and then double-click HP All-in-One Installer.
-
Follow the onscreen instructions and also see To install the software before connecting the device (recommended).
5 Maintain and troubleshoot
This section contains the following topics:
• Supported ink cartridges
- Replace the ink cartridges
- Maintain the printheads
• Store printing supplies
• Troubleshooting tips and resources
- Solve printing problems
• Poor print quality and unexpected printouts
- Solve paper-feed problems
- Solve device management problems
• Troubleshoot installation issues
- Clear jams
Supported ink cartridges
The availability of ink cartridges varies by country/region. The ink cartridges might come in different sizes. To obtain a list of supported ink cartridges for your device, print the self-test diagnostic page and read the information in the ink cartridge status section. For more information, see Understand the self-test diagnostic page.
You can find the ink cartridge number in the following places:

NOTE: Ink from the cartridges is used in the printing process in a number of different ways, including in the initialization process, which prepares the device and cartridges for printing, and in printhead servicing, which keeps print nozzles clear and ink flowing smoothly. In addition, some residual ink is left in the cartridge after it is used. For more information see www.hp.com/go/inkusage.
- On the self-test diagnostic page (see Understand the self-test diagnostic page).
- On the label of the ink cartridge you are replacing.
- On the Information page of the embedded Web server (see server). Embedded Web
- Windows: From the Toolbox, if you have bidirectional communication, click the Estimated Ink Levels tab, scroll to display the Cartridge Details button, and then click Cartridge Details.
- Mac OS: From the HP Printer Utility, click Supply Info from the Information and Support panel, and then click Retail Supplies Information.
Replace the ink cartridges
You can check the estimated ink levels from the Toolbox (Windows), the HP Printer Utility (Mac OS), or the embedded Web server. For information about using these tools, see Use device management tools. You can also print the self-test diagnostic page to view this information (see Understand the self-test diagnostic page).

NOTE: The ink levels shown are an estimate only. Actual ink volumes may vary.
After removing a cartridge from its package, install it right away. Do not remove a cartridge from the device for long periods of time.
To find out which ink cartridges work with your device, see Supplies.
To replace the ink cartridges
- Gently pull open the ink cartridge cover.
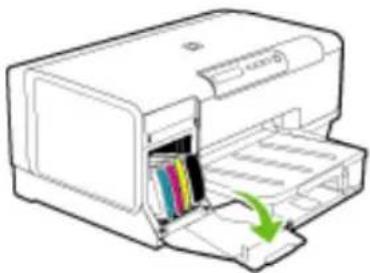
natural_image
Illustration of a printer with an open slot and a green arrow indicating the paper's edge (no text or symbols present)- Remove the ink cartridge that requires replacement by grasping it between your thumb and forefinger and pulling it firmly toward you.
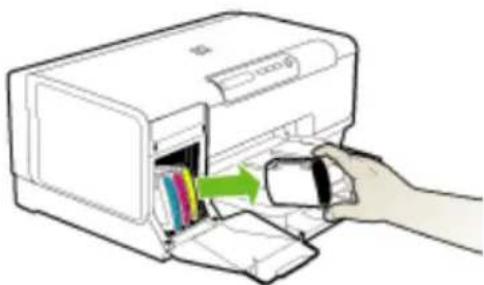
natural_image
Illustration of a hand inserting a CD into a printer (no text or symbols visible)-
Remove the new ink cartridge from its package.
-
Align the cartridge with its color-coded slot and insert the cartridge into the slot. Press down firmly on the cartridge to ensure proper contact.
-
Close the ink cartridge cover.
Maintain the printheads
If printed characters are incomplete, or dots or lines are missing from printouts, ink nozzles might be clogged and you might need to clean the printheads.
When the quality of printouts deteriorates, complete the relevant steps based on the following sequence:
-
Check the health of the printheads. For more information, see To check printhead health.
-
Print the print quality diagnostic page on a clean sheet of white paper. Evaluate any problem areas, and perform the recommended actions. For more information, see To print the print quality diagnostic page.
-
Clean the printheads. For more information, see To clean the printheads.
- Replace the printheads if the problems persist after cleaning. For more information, see To replace the printheads.
△ CAUTION: HP is not responsible for damage to the device that results from modifying the printheads.
This section covers the following printhead maintenance tasks:
• To check printhead health
• To print the print quality diagnostic page
• To align the printheads
• To calibrate the linefeed
• To clean the printheads
• To clean the printhead contacts manually
• To replace the printheads
To check printhead health
Use one of the following means to check the printhead health. If the status of any printhead is not good or fair, then perform one or more of the maintenance functions, or clean or replace the printhead.
- Self-Test Diagnostic Page: Print the self-test diagnostic page on a clean sheet of white paper, and check the printhead health section. For more information, see Understand the self-test diagnostic page.
- Embedded Web server: Open the embedded Web server. For more information, see To open the embedded Web server. Click the Information tab, and then click Ink Supplies in the left pane.
- Toolbox (Windows): Open the Toolbox. For more information, see To open the Toolbox. Click the Information tab, and then click Printhead Health.
To print the print quality diagnostic page
Use the print quality diagnostic page to diagnose issues affecting the print quality. This will help you decide whether to run any maintenance services to improve the print quality of your printouts. You can also view the ink level information, and the printhead health status on the page.
- Control panel: Press and hold ⏻ (Power button), press ✕ (Cancel button) seven times, press ⏻ (Resume button) two times, and release ⏻ (Power button).
- Embedded Web server: Click the Settings tab, click Device Services in the left pane, select Print PQ (print quality) diagnostic page from the drop-down list in the Print Quality section, and then click Run Diagnostic.
- Toolbox (Windows): Click the Services tab, and then click Print PQ (print quality) diagnostic page and follow the onscreen instructions.
- HP Printer Utility (Mac OS): Click Print Quality Diagnostics from the Information and Support panel.
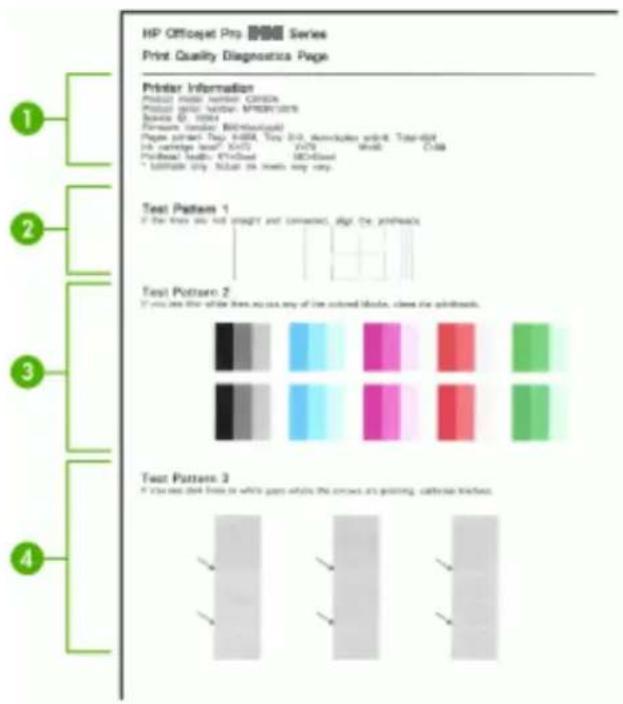
text_image
HP Officer Pro Series Print Quality Diagnostics Page Printer Information Printed Paper Number CPSCs Printed paper number: MPSC/CS Balance Q. 1994 Forearm Container MD/MS/MS/MS/MS/ Pages printed: Test #08A, Test #10, description subject, Text digit In carriage level? X=07 X=08 Postload: K=0.5x K=0.5x * Postload only, N=0.5x on steps may run. Test Pattern 1 If the next are not straight and connected, also the posthead. Test Pattern 2 If you see the white line you see any of the colored lines, clear the posthead. Test Pattern 3 If you see dark lines or white gaps within the corners are printing, cathode is fixed.| 1 | Printer Information: Shows device information (such as the product model number, serial number, and firmware version number), the number of pages printed from the trays and duplexer, the ink level information, and the printhead health status. |
| 2 | Test Pattern 1: If the lines are not straight and connected, align the printheads. For more information, seeTo align the printheads. |
| 3 | Test Pattern 2: If there are thin white lines across any of the colored blocks, clean the printheads. For more information, seeTo clean the printheads. |
| 4 | Test Pattern 3: If there are dark lines or white gaps where the arrows are pointing, calibrate the linefeed. For more information, seeTo calibrate the linefeed. |
To align the printheads
Whenever you replace a printhead, the device automatically aligns the printheads to ensure the best print quality. However, if the appearance of your printed pages indicates that the printheads are misaligned, you can start the alignment process manually.
• Control panel: Press and hold ⏻ (Power button), press ⏻ (Resume button) three times, and release ⏻ (Power button).
- Embedded Web server: Click the Settings tab, click Device Services in the left pane, select Align Printheads from the drop-down list in the Print Quality section, and then click Run Diagnostic.
- Toolbox (Windows): Click the Services tab, and then click Align Printheads and follow the onscreen instructions.
• HP Printer Utility (Mac OS): Click Align from the Information and Support panel.
To calibrate the linefeed
If your printout is showing bandings (dark or light lines across colored block) or staggered lines, calibrate the printer's linefeed.
- Control panel: Press and hold ⏻ (Power button), press ✕ (Cancel button) 14 times, press ⏻ (Resume button) six times, and release ⏻ (Power button).
- Embedded Web server: Click the Settings tab, click Device Services in the left pane, select Calibrate Linefeed from the drop-down list in the Print Quality section, and then click Run Diagnostic.
- Toolbox (Windows): Click the Services tab, and then click Calibrate Linefeed and follow the onscreen instructions.
- HP Printer Utility (Mac OS): Click Calibrate Linefeed from the Information and Support panel.
To clean the printheads
If printed characters are incomplete, or dots or lines are missing from printouts, ink nozzles might be clogged and you might need to clean the printheads.

NOTE: Cleaning uses ink, so clean the printheads only when necessary.
The cleaning process takes up to 3.5 minutes. Some noise might be generated in the process.
- Control panel: Press and hold ⏻ (Power button), press ✗ (Cancel button) two times, press ⏻ (Resume button) one time, and release ⏻ (Power button).
- Embedded Web server: Click the Device Settings tab, click Device Services in the left pane, select Clean Printheads from the drop-down list in the Print Quality section, and then click Run Diagnostic.
- Toolbox (Windows): Click the Services tab, and then click Clean Printheads and follow the onscreen instructions.
• HP Printer Utility (Mac OS): Click Clean from the Information and Support panel.
To clean the printhead contacts manually
After the printheads are installed, one or more of the printhead lights might be blinking. If the printhead lights are blinking, you might need to clean the electrical contacts on the printheads and in the device.

CAUTION: Clean the electrical contacts only after you have attempted to clean the printheads. Electrical contacts contain sensitive electronic components that can be damaged easily. For more information, see To clean the printheads.
- Open the cover.
-
If the carriage does not move to the left automatically, press and hold the (Resume button) until the carriage moves to the left. Wait for the carriage to stop moving, and then unplug the power cord from the printer.
-
Lift the printhead latch.
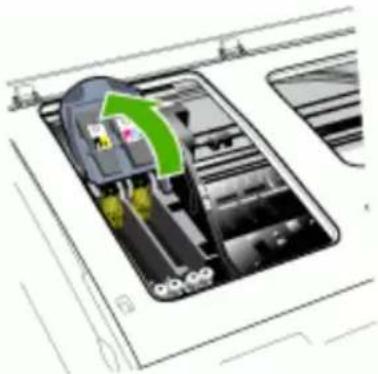
natural_image
Diagram of a device interior with internal components and a green arrow indicating a directional flow (no text or symbols present)- Lift the handle of the printhead you want to replace and and pull the printhead out of its slot.
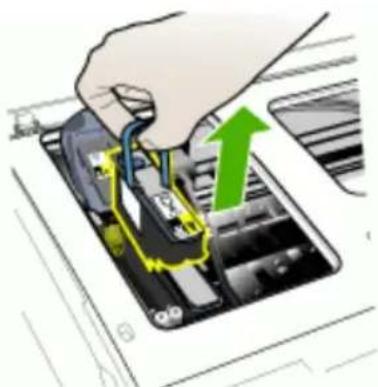
natural_image
Illustration of a hand inserting a device into a device with a green upward arrow indicating the process (no text or symbols present)- Obtain clean, dry, soft and lint-free cleaning material. Suitable materials include paper coffee filters and eyeglass lens cleaning paper.

CAUTION: Do not use water.
- Wipe the electrical contacts on the printhead but do not touch the nozzles.
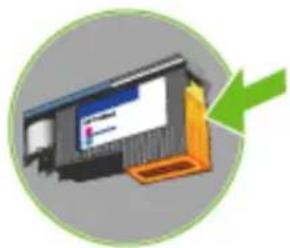
natural_image
Illustration of a computer monitor with a green arrow pointing to it, no text or symbols present.△ CAUTION: The electrical contacts are small copper-color squares, grouped on one face of the printhead.
The nozzles are on a different face of the printhead. Ink will be visible on the nozzles.
Touching the nozzles can cause permanent nozzle damage. Also, ink can permanently mark clothing.
-
After cleaning, place the printhead on a sheet of paper or paper towel. Make sure the nozzles are facing up and are not in contact with the paper.
-
Clean the electrical contacts in the printhead slot inside the device with a clean, dry, soft and lint-free cloth.
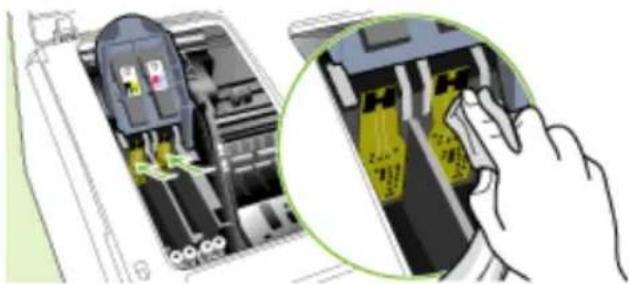
natural_image
Illustration of a printer's internal structure with a magnified view showing internal components (no text or symbols)-
Plug in the power cord and turn on the device. The control panel should indicate that the printhead is missing.
-
Insert the printhead into its color-coded slot (the label on the printhead must match the label on the printhead latch). Press down firmly on the printhead to ensure proper contact.
-
Pull the printhead latch all the way forward, and then press down to ensure that the latch is properly engaged. You might have to apply some pressure to engage the latch.
-
Where necessary, repeat the above steps for the remaining printhead.
-
Close the cover.
-
If the printhead light is still blinking, repeat the cleaning procedure described above for the printhead which corresponds to the blinking printhead light.
Chapter 5
-
If the printhead light continues to blink, replace the printhead which corresponds to the blinking printhead light.
-
Wait while the device initializes the printheads and prints the alignment pages. If the device does not print the pages, start the alignment process manually. For more information, see To align the printheads.
To replace the printheads

NOTE: To find out which printheads work with your printer, see Supplies.
-
Open the cover.
-
If the carriage does not move to the left automatically, press and hold the (Resume button) until the carriage moves to the left. Wait for the carriage to stop moving, and then unplug the power cord from the printer.
-
Lift the printhead latch.
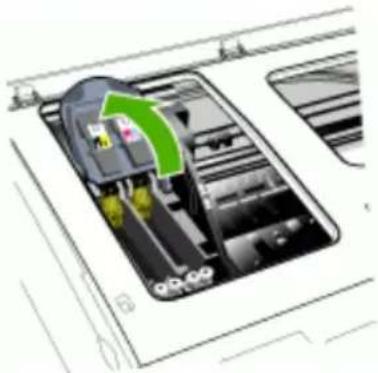
natural_image
Diagram of a device interior showing internal components and a green arrow indicating a specific area (no text or symbols present)- Lift the handle of a printhead and use it to pull the printhead out of its slot.
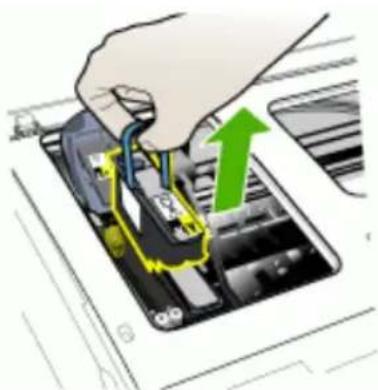
natural_image
Hand inserting a device into a device casing with a green upward arrow indicating the process (no text or symbols present)- Before installing a printhead, shake the printhead up and down at least six times while the printhead is still in its packaging.
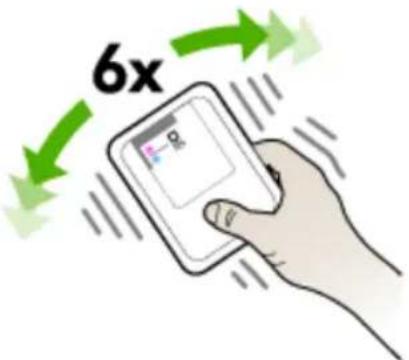
text_image
6x- Remove the new printhead from its package, and then remove its orange protective caps.
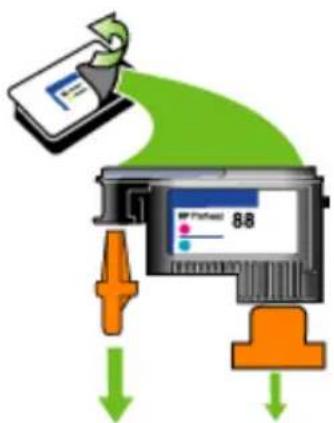
text_image
8.8△ CAUTION: Do not shake printheads after the caps are removed.
-
Insert the printhead into its color-coded slot (the label on the printhead must match the label on the printhead latch). Press down firmly on the printhead to ensure proper contact.
-
Pull the printhead latch all the way forward, and then press down to ensure that the latch is properly engaged. You might have to apply some pressure to engage the latch.
-
Close the cover.
-
Wait while the device initializes the printheads and prints the alignment pages. If the device does not print the pages, start the alignment process manually. For more information, see To align the printheads.
Store printing supplies
This section covers the following topics:
- Store ink cartridges
- Store printheads
Store ink cartridges
Ink cartridges can be left in the device for extended periods of time. If you remove the ink cartridges, place them in an airtight container, such as a resealable plastic bag.
Store printheads
Printheads can be left in the device for extended periods of time. If you remove the printheads, place them in an airtight container, such as a resealable plastic bag.
Troubleshooting tips and resources
Use the following tips and resources to resolve printing problems.
- For a paper jam, see Clear a jam in the device.
- For paper-feed problems, such as the paper skew and paper pick, see solve paper-feed problems.
- Power light is on and not blinking. When the device is turned on for the first time, it takes approximately 10 minutes to initialize it after the printheads are installed.
- Make sure the device is in the ready state. If lights are on or blinking, see Control-panel lights reference.
- No error messages appear on the computer screen.
- Power cord and other cables are working, and are firmly connected to the device. Make sure the device is connected firmly to a functioning alternating current (AC) power outlet, and is turned on. For voltage requirements, see Electrical specifications.
• Media is loaded correctly in the tray and is not jammed in the device. - Printheads and ink cartridges are properly installed in their correct color-coded slots. Press down firmly on each one to ensure proper contact. Ensure you have removed the orange protective caps from each printhead.
- Printhead latch and all covers are closed.
- The rear access panel or optional duplexer is locked into place.
- All packing tapes and materials are removed.
- The device can print a self-test diagnostic page. For more information, see Understand the self-test diagnostic page.
- The device is set as the current or default printer. For Windows, set it as the default in the Printers folder. For the Mac OS, set it as the default in the Printer Setup Utility. See your computer's documentation for more information.
- Pause Printing is not selected if you are using a computer running Windows.
- You are not running too many programs when you are performing a task. Close programs that you are not using or restart the computer before attempting the task again.
Some problems can be resolved by resetting the device.
Solve printing problems
• The device shuts down unexpectedly
• All device lights are on or flashing
• The device is not responding (nothing prints)
• Device does not accept printhead
• Device takes a long time to print
- Blank or partial page printed
• Something on the page is missing or incorrect
- Placement of the text or graphics is wrong
• Device prints half a page, then ejects the paper
The device shuts down unexpectedly
Check the power and power connections
Make sure the device is connected firmly to a functioning alternating current (AC) power outlet. For voltage requirements, see Electrical specifications.
All device lights are on or flashing
A non-recoverable error has occurred
Disconnect all cables (such as power cord, network cable, and USB cable), wait about 20 seconds, and reconnect the cables. If the problem persists, visit the HP Web site (www.hp.com/support) for the latest troubleshooting information, or product fixes and updates.
The device is not responding (nothing prints)
Check the device setup
For more information, see Troubleshooting tips and resources.
Check the printhead initialization
When printheads are installed or replaced, the device automatically prints a few alignment pages to align the printheads. This process takes about 10 minutes. Until this process is complete, only the automatic alignment pages can be printed.
Check the device software installation
If the device is turned off when printing, an alert message should appear on your computer screen; otherwise, the device software might not be installed correctly. To resolve this, uninstall the software completely, and then reinstall the device software. For more information, see Uninstall and reinstall the software.
Check the cable connections
- Make sure both ends of the network/USB cable are secure.
-
If the device is connected to a network, check the following:
-
Check the Link light on the back of the device.
- Make sure you are not using a phone cord to connect the device.
- The network hub, switch, or router is turned on and working properly.
Check the device setup for a network environment
Ensure the correct device driver and printer driver port are being used. For more information about network connections, see Configure the device (Windows), Configure the device (Mac OS), or the documentation provided by your network vendors.
Check any personal firewall software installed on the computer
The personal software firewall is a security program that protects a computer from intrusion. However, the firewall might block communication between the computer and the device. If there is a problem communicating with the device, try temporarily disabling the firewall. If the problem persists, the firewall is not the source of the communication problem. Re-enable the firewall.
If disabling the firewall allows you to communicate with the device, you might want to assign a static IP address to the device and re-enable the firewall.
Device does not accept printhead
Check the printhead latch
Make sure the printhead latch is properly closed.
Check the printhead
Make sure the printhead is inserted into its correct color-coded slot. For more information, see To replace the printheads.
Clean the printhead
Complete the printhead cleaning procedure. For more information, see Maintain the printheads.
Turn off the device after removing the printhead
After removing the printhead, turn off the device, wait about 20 seconds, and turn it on again without the printhead installed. After the device has restarted, reinsert the printhead.
Device takes a long time to print
Check the system configuration
Make sure the computer meets the minimum system requirements for the device. For more information, see System requirements.
Check the device software settings
Print speed is slower when Best or Maximum dpi is selected as the print quality. To increase the print speed, select different print settings in the device driver. For more information, see Change print settings.
Blank or partial page printed
Check for empty ink cartridges
Check the control panel or the embedded Web server (see Embedded Web server) to see which cartridge is low or empty. The Toolbox (Windows), HP Printer Utility (Mac OS), and the self-test diagnostic page (see Understand the self-test diagnostic page) provide information about ink levels. If you are printing black text and a blank page prints, the black cartridge might be empty. For more information, see Replace the ink cartridges.
Check the printhead latch
Make sure the printhead latch is properly closed.
Check the printhead
- Make sure the printhead is inserted into its correct color-coded slot. For more information, see To replace the printheads.
- Remove the printhead, and check to make sure the orange protective caps have been removed from the printhead.
Clean the printhead
Complete the printhead cleaning procedure. For more information, see Maintain the printheads.
Turn off the device after removing the printhead
Remove the printhead. Place the printhead on a sheet of paper or paper towel. Make sure the nozzle is facing up and not in contact with the paper. Turn off the device, wait about 20 seconds, and turn it on again without the printhead installed. After it has restarted, reinsert the printhead.
Check the media settings
- Make sure you select the correct print quality settings in the printer driver for the media loaded in the trays.
- Make sure the page settings in the printer driver match the page size of media loaded in the tray.
Something on the page is missing or incorrect
Check the printheads
Print the print quality diagnostic page on a clean sheet of white paper. Evaluate any problem areas, and perform the recommended actions. For more information, see To print the print quality diagnostic page.
Check the margin settings
Make sure the margin settings for the document do not exceed the printable area of the device. For more information, see Set minimum margins.
Check the color print settings
Make sure Print in Grayscale is not selected in the print driver.
Check the device location and length of USB cable
High electromagnetic fields (such as those generated by USB cables) can sometimes cause slight distortions to printouts. Move the device away from the source of the electromagnetic fields. Also, it is recommended that you use a USB cable that is less than 3 meters (9.8 feet) long to minimize the effects of these electromagnetic fields.
Placement of the text or graphics is wrong
Check how the media is loaded
Make sure the media width and length guides fit snugly against the edges of the stack of media, and make sure the trays are not overloaded. For more information, see Load media.
Check the media size
- Content on a page might be cut off if the document size is larger than the media that you are using.
- Make sure the media size selected in the printer driver match the size of media loaded in the tray.
Check the margin settings
If the text or graphics are cut off at the edges of the page, make sure the margin settings for the document do not exceed the printable area of your device. For more information, see Set minimum margins.
Check the page-orientation setting
Make sure the media size and page orientation selected in the application match the settings in the printer driver. For more information, see Change print settings.
Check the device location and length of USB cable
High electromagnetic fields (such as those generated by USB cables) can sometimes cause slight distortions to printouts. Move the device away from the source of the electromagnetic fields. Also, it is recommended that you use a USB cable that is less than 3 meters (9.8 feet) long to minimize the effects of these electromagnetic fields.
If the above solutions do not work, the problem may be caused by the inability of the application to interpret print settings properly. See the release notes for known software conflicts, refer to the application's documentation, or contact the software manufacturer for specific help.
Device prints half a page, then ejects the paper
Check the ink cartridges
The ink cartridges may have run out of ink, and the print job was cancelled. Replace the ink cartridges, and then resend the print job to the device. For more information, see Replace the ink cartridges.
Poor print quality and unexpected printouts
This section covers the following topics:
• Poor quality printouts
• Meaningless characters print
- Ink is smearing
• Ink is not filling the text or graphics completely
• Output is faded or dull colored
• Colors are printing as black and white
• Wrong colors are printing
• Printout shows bleeding colors
• Colors do not line up properly
• Lines or dots are missing from text or graphics
Poor quality printouts
Check the printheads and ink cartridges
Print the print quality diagnostic page on a clean sheet of white paper. Evaluate any problem areas, and perform the recommended actions. For more information, see To print the print quality diagnostic page.
Check the paper quality
The paper might be too moist or too rough. Make sure the media meets HP specifications, and try to print again. For more information, see Select print media.
Check the type of media loaded in the device
- Make sure the tray supports the type of media you have loaded. For more information, see Understand specifications for supported media.
- Make sure you have selected the tray in the print driver that contains the media that you want to use.
Check the device location and length of USB cable
High electromagnetic fields (such as those generated by USB cables) can sometimes cause slight distortions to printouts. Move the device away from the source of the electromagnetic fields. Also, it is recommended that you use a USB cable that is less than 3 meters (9.8 feet) long to minimize the effects of these electromagnetic fields.
Turn off the device after removing the printhead
Remove the printhead. Place the printhead on a sheet of paper or paper towel. Make sure the nozzle is facing up and not in contact with the paper. Turn off the device, wait about 20 seconds, and turn it on again without the printhead installed. After it has restarted, reinsert the printhead.
Meaningless characters print
If an interruption occurs to a job that is printing, the device might not recognize the rest of the job.
Cancel the print job and wait for the device to return to the ready state. If the device does not return to the ready state, cancel all jobs and wait again. When the device is ready, resend the job. If prompted by the computer to retry the job, click Cancel.
Check the cable connections
If the device and computer are connected with a USB cable, the problem may be due to a poor cable connection.
Make sure the cable connections at both ends are secure. If the problem persists, turn off the device, disconnect the cable from the device, turn on the device without connecting the cable, and delete any remaining jobs from the print spooler. When the Power light is on and not flashing, reconnect the cable.
Check the document file
The document file may be damaged. If you can print other documents from the same application, try printing a backup copy of your document, if available.
Ink is smearing
Check the print settings
- When you print documents that use much ink, allow more time to dry before handling the printouts. This is especially true for transparencies. In the printer driver, select the Best print quality, and also increase the ink drying time and reduce the ink saturation using the ink volume under the advanced features (Windows) or ink features (Mac OS). However, note that decreasing ink saturation might give printouts a "washed-out" quality.
- Color documents that have rich, blended colors can wrinkle or smear when printed using the Best print quality. Try using another print mode, such as Normal, to reduce ink, or use HP Premium Paper designed for printing vivid color documents. For more information, see Change print settings.
Check the media type
Some types of media do not accept ink well. For these types of media, ink will dry more slowly and smearing may occur. For more information, see Select print media.
Ink is not filling the text or graphics completely
Check the media type
Some media types are not suitable for use with the device. For more information, see Select print media.
Check the print mode
Try using the Best mode in the printer driver. For more infomation, see Change print settings.
Check the printheads
Print the print quality diagnostic page on a clean sheet of white paper. Evaluate any problem areas, and perform the recommended actions. For more information, see To print the print quality diagnostic page.
Output is faded or dull colored
Check the print mode
The Draft or Fast mode in the printer driver allows you to print at a faster rate, which is good for printing drafts. To get better results, select Normal or Best. For more information, see Change print settings.
Check the paper type setting
When printing on transparencies or other special media, select the corresponding media type in the print driver. For more information, see To print on special or custom-sized media (Windows).
Check the printheads
Print the print quality diagnostic page on a clean sheet of white paper. Evaluate any problem areas, and perform the recommended actions. For more information, see To print the print quality diagnostic page.
Colors are printing as black and white
Check the print settings
Make sure Print in Grayscale is not selected in the printer driver.
Wrong colors are printing
Check the print settings
Make sure Print in Grayscale is not selected in the printer driver.
Check the printheads
Print the print quality diagnostic page on a clean sheet of white paper. Evaluate any problem areas, and perform the recommended actions. For more information, see To print the print quality diagnostic page.
Printout shows bleeding colors
Check the ink cartridges
Make sure ink cartridges have not been tampered with. Refilling processes and the use of incompatible inks can disrupt the intricate printing system and result in reduced print quality and damage to the device or printhead. HP does not guarantee or support refilled ink cartridges. For ordering information, see HP supplies and accessories.
Check the media type
Some media types are not suitable for use with the device. For more information, see Select print media.
Check the printheads
Print the print quality diagnostic page on a clean sheet of white paper. Evaluate any problem areas, and perform the recommended actions. For more information, see To print the print quality diagnostic page.
Colors do not line up properly
Check the printheads
Print the print quality diagnostic page on a clean sheet of white paper. Evaluate any problem areas, and perform the recommended actions. For more information, see To print the print quality diagnostic page.
Check the graphics placement
Use the zoom or print preview feature of your software to check for gaps in the placement of graphics on the page.
Lines or dots are missing from text or graphics
Check the print mode
Try using the Best mode in the prniter driver. For more infomation, see Change print settings.
Check the printheads
Print the print quality diagnostic page on a clean sheet of white paper. Evaluate any problem areas, and perform the recommended actions. For more information, see To print the print quality diagnostic page.
Solve paper-feed problems
For information on resolving jams, see Clear a jam in the device.
• Optional Tray 2 cannot be inserted
• Another paper-feed problem is occurring
Optional Tray 2 cannot be inserted
- Reinsert the tray. Make sure it is aligned with the device opening.
- Check for a paper jam. For more information, see Clear a jam in the device.
Another paper-feed problem is occurring
Media is not supported for the printer or tray
Use only media that is supported for the device and the tray being used. For more information, see Understand specifications for supported media.
Media is not picked up from a tray
- Make sure media is loaded in the tray. For more information, see Load media. Fan the media before loading.
- Make sure the paper guides are set to the correct markings in the tray for the media size you are loading. Also make sure the guides are snug, but not tight, against the stack.
- Make sure media in the tray is not curled. Uncurl paper by bending it in the opposite direction of the curl.
- Make sure that the tray is completely loaded. If you are using special media that is only available in small quantities, try placing the special media on top of other paper of the same size to help fill the tray. (Some media is picked up more easily if the tray is full.)
- Make sure Tray 2 (optional) is inserted properly.
Media is not coming out correctly
- Make sure the output tray extension is extended; otherwise, printed pages may fall off the device.
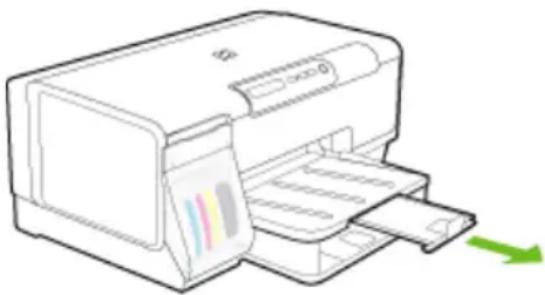
natural_image
Line drawing of a printer with paper feed and green arrow indicating compression (no text or symbols)- Remove excess media from the output tray. There is a limit to the number of sheets the tray can hold.
Pages are skewing
- Make sure the media loaded in the trays is aligned to the paper guides. If the tray is removable, pull out the tray from the device and reload the media properly, making sure that the paper guides are properly aligned.
- Make sure the rear access panel or duplexer is properly installed.
- Load media into the device only when it is not printing.
- When reinserting a removeable tray into the device, do so gently. Forceful insertion with a full stack of paper may cause sheets to slide up within the device, causing the device to jam or pick multiple sheets at one time.
Multiple pages are being picked up
• Fan the media before loading.
- Make sure the paper guides are set to the correct markings in the tray for the media size you are loading. Also make sure the guides are snug, but not tight, against the stack.
- Make sure the tray is not overloaded with paper.
- Make sure that the tray is completely loaded. If you are using special media that is only available in small quantities, try placing the special media on top of other paper of the same size to help fill the tray. (Some media is picked up more easily if the tray is full.)
- When reinserting a removeable tray into the device, do so gently. Forceful insertion with a full stack of paper may cause sheets to slide up within the device, causing the device to jam or pick multiple sheets at one time.
- Use HP media for optimum performance and efficiency.
Solve device management problems
This section provides solutions to common problems that involve managing the device. This section contains the following topic:
• Embedded Web server cannot be opened
Embedded Web server cannot be opened
Check your network setup
- Make sure you are not using a phone cord or a cross cable to connect the device to the network. For more information, see Configure the device (Windows) or Configure the device (Mac OS).
- Make sure the network cable is securely connected to the device.
- Make sure the network hub, switch, or router is turned on and working properly.
Check the computer
Make sure the computer that you are using is connected to the network.
Check your Web browser
Make sure the Web browser meets the minimum system requirements. For more information, see System requirements.
Check the device IP address
- To check the IP address of the device from the control panel, print the network configuration page. For more information, see Understand the network configuration page.
- Ping the device using the IP address from the command prompt.
For example, if the IP address is 123.123.123.123, type the following at the MS-DOS prompt:
C:\Ping 123.123.123.123
If a reply appears, the IP address is correct. If a time-out response appears, the IP address is incorrect.
Troubleshoot installation issues
If the following topics do not help, see Support and warranty for information about HP support.
• Hardware installation suggestions
• Software installation suggestions
- Solve network problems
Hardware installation suggestions
Check the device
- Make sure that all packing tape and material have been removed from outside and inside the device.
- Make sure that the device is loaded with paper.
- Make sure that no lights are on or blinking except the Power light, which should be on. If a light other than the Power light is on or blinking, there is an error. For more information, see Control-panel lights reference.
- Make sure that the device can print a self-test diagnostic page.
- Rear access panel or duplexer is locked into place.
Check the hardware connections
- Make sure that any cords and cables that you are using are in good working order.
- Make sure that the power cord is connected securely to both the device and to a working power outlet.
Check the printheads and ink cartridges
- Make sure that all of the printheads and ink cartridges are firmly installed in their correct, colorcoded slot. Press down firmly on each one to ensure proper contact. The device cannot work if they are not all installed.
- Make sure that all latches and covers are closed properly.
Software installation suggestions
Check the computer system
- Make sure that your computer is running one of the supported operating systems.
- Make sure that the computer meets at least the minimum system requirements.
- In the Windows device manager, make sure that the USB drivers have not been disabled.
- If you are using a computer running Windows, and the computer cannot detect the device, run the uninstallation utility (util\ccc\uninstall.bat on the Starter CD) to perform a clean uninstallation of the device driver. Restart your computer, and reinstall the device driver.
Verify installation preliminaries
- Make sure to use the Starter CD that contains the correct installation software for your operating system.
- Before installing software, make sure that all other programs are closed.
- If the computer does not recognize the path to the CD-ROM drive that you type, make sure that you are specifying the correct drive letter.
- If the computer cannot recognize the Starter CD in the CD-ROM drive, inspect the Starter CD for damage. You can download the device driver from the HP Web site (www.hp.com/support).

NOTE: After correcting any problems, run the installation program again.
Solve network problems
General network troubleshooting
- If you are unable to install the device software, verify that:
- All cable connections to the computer and the device are secure.
- The network is operational and the network hub is turned on.
- All applications, including virus protection programs, spyware protection programs, and firewalls, are closed or disabled for computers running Windows.
- Make sure the device is installed on the same subnet as the computers that will be using the device.
- If the installation program cannot discover the device, print the network configuration page and enter the IP address manually in the installation program. For more information, see Understand the network configuration page.
- If you are using a computer running Windows, make sure that the network ports created in the device driver match the device IP address:
- Print the device's network configuration page.
- Click Start, point to Settings, and then click Printers or Printers and Faxes. - Or -
Click Start, click Control Panel, and then double-click Printers.
• Right-click the device icon, click Properties, and then click the Ports tab.
- Select the TCP/IP port for the device, and then click Configure Port.
- Compare the IP address listed in the dialog box and make sure it matches the IP address listed on the network configuration page. If the IP addresses are different, change the IP address in the dialog box to match the address on the network configuration page.
- Click OK twice to save the settings and close the dialog boxes.
Problems connecting to a wired network
- If the Link light on the network connector does not turn on, make sure that all of the “General network troubleshooting” conditions are met.
- Though it is not recommended that you assign the device with a static IP address, you might resolve some installation problems (such as a conflict with a personal firewall) by doing so.
To reset the device's network settings (available with some models)
-
Press and hold 📁 (Configuration Page button), press 🎥 (Resume button) three times, and release 🐘 (Configuration Page button). The Power light blinks for a few seconds. Wait until the Power light is on.
-
Press ☐☐☐ (Configuration Page button) to print the network configuration page and verify that the network settings have been reset. By default, the network name (SSID) is "hpsetup" and the communication mode is "ad hoc."
Clear jams
Occasionally, media becomes jammed during a job. Try the following remedies before you attempt to clear the jam.
- Make sure that you are printing with media that meets specifications. For more information, see Select print media.
- Make sure that you are printing with media that is not wrinkled, folded, or damaged.
- Make sure that the input trays are loaded correctly and are not too full. For more information, see Load media.
• Clear a jam in the device
- Tips for avoiding jams
Clear a jam in the device
To clear a jam
- Remove all media from the output tray.
- Check the rear access panel or the duplexer.
a. Push the button on either side of the rear access panel or the duplexer, and then remove the panel or unit.
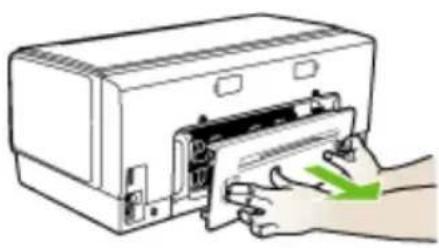
natural_image
Illustration of hands inserting a card into a printer (no text or symbols visible)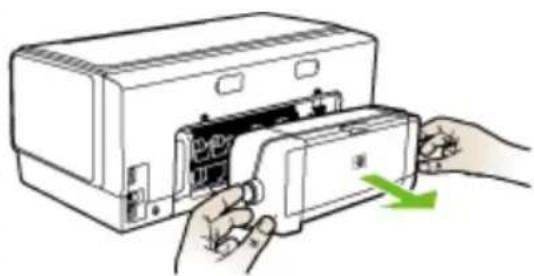
natural_image
Illustration of hands inserting a device into a computer case (no text or symbols visible)b. Locate any jammed media inside the device, grasp it with both hands and then pull it towards you.
c. If the jam is not there, push the latch on the top of the duplexer and lower its cover. If the jam is inside, carefully remove it. Close the cover.
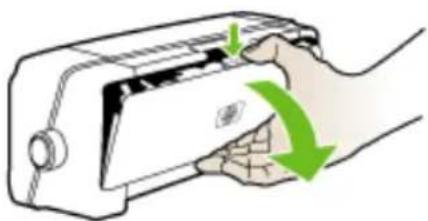
natural_image
Illustration of a hand holding a device with green arrows indicating rotation or change (no text or symbols)d. Reinsert the rear access panel or the duplexer into the device.
- If you cannot locate the jam, lift the output tray and check for a jam in Tray 1. If media is jammed in the tray, do the following:
a. Raise the output tray.
b. Pull the paper towards you.

natural_image
Illustration of a hand printing a printer with a green arrow indicating the print (no text or symbols present)c. Lower the output tray.
- If you have not found the jam and have Tray 2 installed, pull out the tray and remove the jammed media, if possible. If not, do the following:
a. Ensure the device is turned off and disconnect the power cord.
b. Lift the device off Tray 2.
c. Remove the jammed media from the bottom of the device or from Tray 2.
d. Reposition the device on top of Tray 2.
- Open the print carriage access door. If there is paper remaining inside the device, ensure the carriage has moved to the right of the device, free any paper scraps or wrinkled media, and pull the media towards you through the top of the device.

WARNING! Do not reach into the device when it is on and the carriage is stuck. When you open the print carriage access door, the carriage should return to its position on the right side of the device. If it does not move to the right, turn off the device before you remove any jam.
- After clearing the jam, close all covers, turn on the device (if you turned it off) and resend the print job.
Tips for avoiding jams
- Make sure that nothing is blocking the paper path.
- Do not overload the trays. For more information, see supported media. Understand specifications for
- Load paper properly and when the device is not printing. For more information, see Load media.
- When reinserting Tray 2 (optional) into the device, do so gently. Forceful insertion with a full stack of paper may cause sheets to slide up within the device, causing it to jam or pick multiple sheets at one time.
- Do not use media that is curled or crumpled.
- Always use media that conforms with specifications. For more information, see Select print media.
- Make sure the output tray is not overly full.
- Make sure media is aligned against the right side of a tray.
- Make sure the media length and width guides are adjusted snugly against the media, but do not crinkle or bend it.
6 Control-panel lights reference
The control-panel lights indicate status and are useful for diagnosing printing problems. This section contains information about the lights, what they indicate, and what action to take if necessary.
• Interpreting control-panel lights
• Interpreting network connector lights
Interpreting control-panel lights
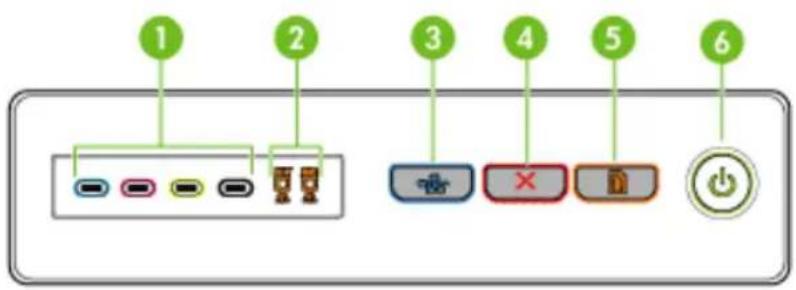
text_image
1 2 3 4 5 6| 1 Ink cartridge lights | |
| 2 Printhead lights | |
| 3 | Configuration Page button 📋 (available on some models only) |
| 4 Cancel | button |
| 5 Resume | button and light |
| 6 Power | button and light |
For more information, visit the HP Web site (www.hp.com/support) for the latest troubleshooting information, or product fixes and updates.
| Light description/Light pattern Explanation and | recommended action |
All lights are off. The device is off. | Connect the power cable.Press (Power button). |
The Power light is on. The device is ready. | No action is required. |
The Power light blinks. The device is turning | on or off, or is processing a print job.No action is required.The device is pausing for the ink to dry.Wait for the ink to dry. |
The Power light and the Resume light blink. Print media is jammed | in the device.Remove all media from the output tray. Locate and clear the jam. For more information, seeClear a jam in the device.The device carriage has stalled.Open the top cover and remove any obstructions (such as jammed media).PressResume button) to continue printing.If the error persists, turn the device off, and then on again. |
The Power light is on and the Resume light blinks. The device is out of | paper.Load paper and press(Resume button). |
The Power light and the Resume light are on. A cover is not closed | completely.Make sure all covers are completely closed.The rear access panel or duplex unit is missing, or is not inserted completely.Make sure the rear access panel or the duplex unit is inserted completely at the back of the device. (These features are available with some models.) |
The Power light and the Resume light blink, and one or more of the ink cartridge lights are on. | One or more of the ink cartridges have expired.CAUTION:Device services or repairs required as a result of using expired ink cartridges will not be covered under warranty.Replace the indicated ink cartridge.If you choose to use the expired ink cartridge, press and hold(Power button), and press(Resume button) three times. All lights except the Power light go off. Damage that results to the printer from using this cartridge is not covered under the warranty. |
The Power light is on, and one or more of the printhead lights blink. One or more of the printheads are missing. | Install the indicated printhead, and then try to print.If the error persists after installing the indicated printhead, seeDevice does not accept printhead.If the error still persists, replace the indicated printhead. |
The Power light and one or more of the printhead lights blink. One or more of the printheads are faulty or need attention. | Ensure the indicated printhead is properly installed, and then try to print.Remove and reinsert the printhead if necessary. For more information, seeDevice does not accept printhead.If the error persists, replace the indicated printhead. |
The Power light is on and one or more of the ink cartridge lights blink. | One or more of the ink cartridges are missing.Install the indicated ink cartridge, and then try to print.Remove and re-insert the ink cartridge a few times if necessary.If the error persists, replace the indicated ink cartridge.One or more of the ink cartridges are out of ink and must be replaced before you can continue printing.Replace the indicated ink cartridge. For ordering information, seeHP supplies and accessories. |
The Power light and one or more of the ink cartridge lights blink. One or  | more of the ink cartridges are faulty or need attention.Ensure the indicated ink cartridge is properly installed, and then try to print. Remove and re-insert the ink cartridge a few times if necessary.If the error persists, replace the indicated ink cartridge. |
The Power light is on, and one or more of the ink cartridge lights are on. | One or more of the ink cartridges are low on ink and will need to be replaced soon.Get new ink cartridges and replace the existing cartridges when they become empty. |
The Power light blinks, and one or more of the ink cartridge lights are on. | An ink cartridge is out of ink and must be replaced before you can continue printing. Replace the ink cartridge indicated. For ordering information, see HP supplies and accessories. |
All lights are on. A non-recoverable | error has occurred. For more information, see All device lights are on or flashing. |
Interpreting network connector lights
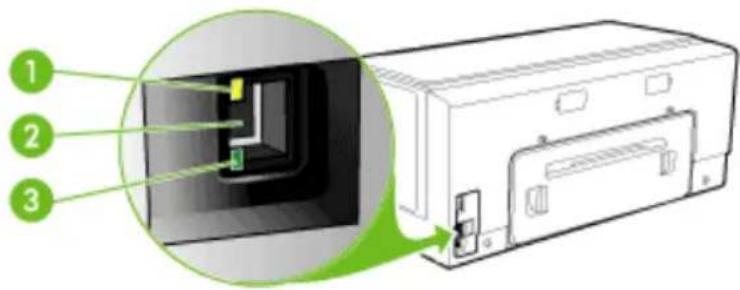
text_image
Diagram of a device showing three labeled components: one with green arrows pointing to a central internal structure, and two numbered parts with green arrows pointing to the component.| 1 Activity light |
| 2 Network connector |
| 3 Link light |
| Light description/Light pattern Explanation and recommended action | |
Link light is on. Activity light is off. The device is connected to the network but is not receiving or transmitting data over the network. The device is turned on and idle.  | No action is required. |
Link light is on. Activity light blinks. The device is receiving or transmitting data over the network. 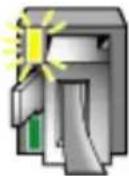 | No action is required. |
Link light is off. Activity light is off. The device is turned off or is not connected to the network. 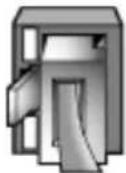 | If the device is turned off, turn on the device. If the device is turned on and a network cable is connected, see Solve network problems. |
A HP supplies and accessories
This section provides information on HP supplies and accessories for the device. The information is subject to changes, visit the HP Web site (www.hpshopping.com) for the latest updates. You may also make purchases through the Web site.
• Order printing supplies online
- Accessories
- Supplies
Order printing supplies online
Besides the HP Web site, you may order printing supplies using the following tools:
- Embedded Web server: Click the Order Supplies button from any page in the embedded Web server.
- Toolbox (Windows): On the Estimated Ink Level tab, click Shop Online.
- HP Printer Utility (Mac OS): Click Supplies Status from the Information and Support panel, click the Shop for HP Supplies drop-down menu, and then choose Online.
Accessories
| HP automatic two-sided printing accessory | C9278A Auto-duplexer allowing printing on both sides of a sheet of paper automatically |
| 350-sheet input tray CB009A Optional second tray for up to 350 pages of plain paper | |
| HP Jetdirect 175x Print Server-Fast Ethernet | J6035G External print server (USB 1.0) |
| HP Jetdirect en3700 Fast Ethernet Print Server | J7942G External print server (USB 2.0) |
| HP Jetdirect ew2400 802.11g Wireless Print Server (USB 2.0) | J7951G Wireless or wired external print server |
Supplies
This section covers the following topics:
- Ink cartridges
- Printheads
- HP media
Ink cartridges
The availability of ink cartridges varies by country/region. The ink cartridges might come in different sizes. To obtain a list of supported ink cartridges for your device, print the self-test diagnostic page and read the information in the ink cartridge status section. For more information, see Understand the self-test diagnostic page.
You can find the ink cartridge number in the following places:
- On the self-test diagnostic page (see Understand the self-test diagnostic page).
- On the label of the ink cartridge you are replacing.
• On the Information page of the embedded Web server (see Embedded Web server).
- Windows: From the Toolbox, if you have bidirectional communication, click the Estimated Ink Levels tab, scroll to display the Cartridge Details button, and then click Cartridge Details.
• Mac OS: From the HP Printer Utility, click Supply Info from the Information and Support panel, and then click Retail Supplies Information.
Printheads
| HP 88 Black and Yellow C9381A | |
| HP 88 Magenta and Cyan C9382A |
HP media
To order media such as HP Premium Plus Photo Paper or HP Premium Paper, go to www.hp.com. Choose your country/region, and then select Buy or Shopping.
B Support and warranty
The information in Maintain and troubleshoot suggests solutions to common problems. If your device is not operating correctly and those suggestions did not solve your problem, try using one of the following support services to obtain assistance.
This section contains the following topics:
• Obtain electronic support
- Obtain HP telephone support
• Hewlett-Packard limited warranty statement
• Prepare the device for shipment
- Pack the device
Obtain electronic support
To find support and warranty information, go to the HP Web site at www.hp.com/support. If prompted, choose your country/region, and then click Contact HP for information on calling for technical support.
This Web site also offers technical support, drivers, supplies, ordering information and other options such as:
- Access online support pages.
- Send HP an e-mail message for answers to your questions.
- Connect with an HP technician by using online chat.
- Check for software updates.
You can also obtain support from HP from the following electronic sources:
- Toolbox (Windows): The Toolbox provides easy, step-by-step solutions to common printing problems. For more information, see Toolbox (Windows).
- Embedded Web server: When the device is connected to a network, you can use the embedded Web server to view status information, change settings, and manage the device at your computer. For more information, see Embedded Web server.
Support options and availability vary by product, country/region, and language.
Obtain HP telephone support
During the warranty period, you may obtain assistance from the HP Customer Care Center.
This section contains the following topics:
• Before you call
• Telephone support numbers
Before you call
Visit the HP Web site (www.hp.com/support) for the latest troubleshooting information, or product fixes and updates.
To assist our Customer Care Center representatives to serve you better, prepare the following information if you need to call HP.
-
Print the self-test diagnostic page of the device. For more information, see Understand the self-test diagnostic page. If the device does not print, get the following information ready:
-
Device model
-
Model number and serial number (check the back of the device)
-
Check the operating system that you are using, such as Windows XP.
-
If the device is connected to the network, check the network operating system.
-
Note how the device is connected to your system, such as through USB or network connection.
-
Obtain the version number of the printer software, such as HP Officejet Pro K5400 Series Version: 60.52.213.0. (To find the version number of the printer driver, open the printer settings or properties dialog box, and click the About tab.)
-
If you have a problem printing from a particular application, note the application and version number.
Telephone support numbers
In many locations, HP provides toll free telephone support during the warranty period. However, some of the support numbers listed below may not be toll free.
For the most current list of telephone support numbers, see www.hp.com/support.

www.hp.com/support
| 021 672 280 | ### |
| Argentina (Buenos Aires) | 54-11-4708-1600 |
| Argentina | 0-800-555-5000 |
| Australia | 1300 721 147 |
| Australia(out-of-warranty) | 1902 910 910 |
| Österreich | +43 0820 87 4417 |
| 17212049 | ### |
| Belgie | +32 070 300 006 |
| Belgique | +32 070 300 004 |
| Brasil (Sao Paulo) | 55-11-4004-7751 |
| Brasil | 0-800-709-7751 |
| Canada | 1-(800)-474-6836(1-800 hp invent) |
| Central America &The Caribbean | www.hp.com/support |
| Chile | 800-360-999 |
| 中国 | 021-3881 45 18800-810-3888 |
| Colombia (Bogotá) | 57 1-606-9 19 1 |
| Colombia | 01-8000-51-4746-8366 |
| Costo Rica | 0-800-011-1046 |
| Česká republika | 810 222 222 |
| Danmark | +45 70 202 845 |
| Ecuador (Andinatel) | 1-999-119 |
| 800-711-2884 | |
| Ecuador (Pacifitel) | 1-800-225-528800-711-2884 |
| (02) 6910602 | ### |
| El Salvador | 800-6160 |
| España | +34 902 010 059 |
| France | +33 0892 69 60 22 |
| Deutschland | +49 01805 652 180 |
| EMABÍA (omó no fújumpo) | +30 210 6073603 |
| EMABÍA (myo, EMABÍA) | 801 11 75400 |
| EMABÍA (omó Kúmpo) | 800 9 2654 |
| Guatemala | 1-8007 11-2884 |
| 香港特别行政区 | (852) 2802 4098 |
| Magyarország | 06 40 200 629 |
| India | 1-800-425-773791-80-285269 00 |
| Indonesia | +62 (21) 350 3408 |
| +97 14 224 9 189 | ### |
| +97 14 224 9 189 | ### |
| +97 14 224 9 189 | ### |
| +97 14 224 9 189 | ### |
| +97 14 224 9 189 | ### |
| Ireland | +353 1890 923 902 |
| 1-700-503-048 | ### |
| Italia | +39 848 800 871 |
| Jamaica | 1-800-711-2884 |
| 日本日本(長井電話の場合) | 0570-00051103-3335-9800 |
| 0800 222 47 | الرئ |
| 韓국 | 1500-3000 |
| Luxembourg | +352 900 40 006 |
| Luxemburg | +352 900 40 007 |
| Malaysia | 1800 88 8588 |
| Mauritius | (262) 262 210 404 |
| México (Ciudad de México) | 55-5258-9922 |
| México | 01-800-472-68368 |
| 081 005 010 | العربية |
| Nederland | +31 0900 2020 165 |
| New Zealand | 0800 441 147 |
| Nigeria | (01) 271 2320 |
| Norge | +47 815 62 070 |
| 24791773 | المل |
| Panamá | 1-800-711-2884 |
| Paraguay | 009 800 54 1 0006 |
| Perú | 0-800-10111 |
| Philippines | 2 867 3551 |
| Folska | 22 5666 000 |
| Portugal | +351 808 201 492 |
| Puerto Rico | 1-877-232-0589 |
| República Dominicana | 1-800-711-2884 |
| Reunion | 0820 890 323 |
| Romania | 0801 033 390 |
| Poccia (Москва) | 095 777 3284 |
| Poccia (Санкт-Петербург) | 812 332 4240 |
| 800 897 1415 | العربية |
| Singapore | 6 272 5300 |
| Slovensko | 0850 111 256 |
| South Africa (international) | +27 11 2589301 |
| South Africa (RSA) | 0860 104 771 |
| Rest of West Africa | +351 213 17 63 80 |
| Suomi | +358 0203 66 767 |
| Sverige | +46 077 120 4765 |
| Switzerland | +41 0848 672 672 |
| 臺灣 | 02-8722-8000 |
| Imu | +66 (2) 353 9000 |
| 071 891 391 | العربية المربية المتعدة |
| Trinidad & Tobago | 1-800-711-2884 |
| Türkiye | +90 0212 444 0307 |
| Украина | (044) 230-51-06 |
| 600 54 47 47 | العربية المربية المتعدة |
| United Kingdom | +44 0870 010 4320 |
| United States | 1-(800)-474-6836 |
| Uruguay | 0004-054-177 |
| Venezuela (Caracas) | 58-212-278-8566 |
| Venezuela | 0-800-474-68368 |
| Viêt Nam | +84 88234530 |
Hewlett-Packard limited warranty statement
| HP product | Duration of limited warranty |
| Software Media | 90 days |
| Printer | 1 year |
| Print or Ink cartridges | Until the HP ink is depleted or the "end of warranty" date printed on the cartridge has been reached, whichever occurs first. This warranty does not cover HP ink products that have been refilled, remanufactured, refurbished, misused, or tampered with. |
| Printheads | 1 year |
| Accessories | 1 year |
A. Extent of limited warranty
- Hewlett-Packard (HP) warrants to the end-user customer that the HP products specified above will be free from defects in materials and workmanship for the duration specified above, which duration begins on the date of purchase by the customer.
- For software products, HP's limited warranty applies only to a failure to execute programming instructions. HP does not warrant that the operation of any product will be interrupted or error free.
-
HP's limited warranty covers only those defects that arise as a result of normal use of the product, and does not cover any other problems, including those that arise as a result of:
a. Improper maintenance or modification;
b. Software, media, parts, or supplies not provided or supported by HP;
c. Operation outside the product's specifications;
d. Unauthorized modification or misuse. -
For HP printer products, the use of a non-HP cartridge or a refilled cartridge does not affect either the warranty to the customer or any HP support contract with the customer. However, if printer failure or damage is attributable to the use of a non-HP or refilled cartridge or an expired ink cartridge, HP will charge its standard time and materials charges to service the printer for the particular failure or damage.
-
If HP receives, during the applicable warranty period, notice of a defect in any product which is covered by HP's warranty, HP shall either repair or replace the product, at HP's option.
-
If HP is unable to repair or replace, as applicable, a defective product which is covered by HP's warranty, HP shall, within a reasonable time after being notified of the defect, refund the purchase price for the product.
-
HP shall have no obligation to repair, replace, or refund until the customer returns the defective product to HP.
-
Any replacement product may be either new or like-new, provided that it has functionality at least equal to that of the product being replaced.
-
HP products may contain remanufactured parts, components, or materials equivalent to new in performance.
-
HP's Limited Warranty Statement is valid in any country where the covered HP product is distributed by HP. Contracts for additional warranty services, such as on-site service, may be available from any authorized HP service facility in countries where the product is distributed by HP or by an authorized importer.
B. Limitations of warranty
TO THE EXTENT ALLOWED BY LOCAL LAW, NEITHER HP NOR ITS THIRD PARTY SUPPLIERS MAKES ANY OTHER WARRANTY OR CONDITION OF ANY KIND, WHETHER EXPRESS OR IMPLIED WARRANTIES OR CONDITIONS OF MERCHANTABILITY, SATISFACTORY QUALITY, AND FITNESS FOR A PARTICULAR PURPOSE.
C. Limitations of liability
-
To the extent allowed by local law, the remedies provided in this Warranty Statement are the customer's sole and exclusive remedies.
-
TO THE EXTENT ALLOWED BY LOCAL LAW, EXCEPT FOR THE OBLIGATIONS SPECIFICALLY SET FORTH IN THIS WARRANTY STATEMENT, IN NO EVENT SHALL HP OR ITS THIRD PARTY SUPPLIERS BE LIABLE FOR DIRECT, INDIRECT, SPECIAL, INCIDENTAL, OR CONSEQUENTIAL DAMAGES, WHETHER BASED ON CONTRACT, TORT, OR ANY OTHER LEGAL THEORY AND WHETHER ADVISED OF THE POSSIBILITY OF SUCH DAMAGES.
D. Local law
- This Warranty Statement gives the customer specific legal rights. The customer may also have other rights which vary from state to state in the United States, from province to province in Canada, and from country to country elsewhere in the world.
- To the extent that this Warranty Statement is inconsistent with local law, this Warranty Statement shall be deemed modified to be consistent with such local law. Under such local law, certain disclaimers and limitations of this Warranty Statement may not apply to the customer. For example, some states in the United States, as well as some governments outside the United States (including provinces in Canada), may:
a. Preclude the disclaimers and limitations in this Warranty Statement from limiting the statutory rights of a consumer (e.g., the United Kingdom);
b. Otherwise restrict the ability of a manufacturer to enforce such disclaimers or limitations; or
c. Grant the customer additional warranty rights, specify the duration of implied warranties which the manufacturer cannot disclaim, or allow limitations on the duration of implied warranties. - THE TERMS IN THIS WARRANTY STATEMENT, EXCEPT TO THE EXTENT LAWFULLY PERMITTED, DO NOT EXCLUDE, RESTRICT, OR MODIFY, AND ARE IN ADDITION TO, THE MANDATORY STATUTORY RIGHTS APPLICABLE TO THE SALE OF THE HP PRODUCTS TO SUCH CUSTOMERS.
HP Limited Warranty
Dear Customer,
You will find below the name and address of the HP entity responsible for the performance of the HP Limited Warranty in your country.
You may have additional statutory rights against the seller based on your purchase agreement. Those rights are not in any way affected by this HP Limited Warranty.
Ireland: Hewlett-Packard Ireland Ltd. 30 Herbert Street IRL-Dublin 2
United Kingdom: Hewlett-Packard Ltd, Cain Road, Bracknell, GB-Berks RG12 1HN
Prepare the device for shipment
If after contacting HP Customer Support or returning to the point of purchase, you are requested to send the device in for service, make sure you remove and keep the following items before returning your device:
• The ink cartridges and printheads
- The power cord, USB cable, and any other cable connected to the device
• Any paper loaded in the input tray
- Remove any originals you might have loaded in the device
This section contains the following topics:
- Remove the ink cartridges and printheads before shipment
Remove the ink cartridges and printheads before shipment
Before you return the device, make sure you remove your ink cartridges and printheads.

NOTE: This information does not apply to customers in Japan.
To remove ink cartridges before shipment
- Turn on the device and wait until the print carriage is idle and silent. If the device will not turn on, skip this step and go to step 2.

NOTE: If the device does not turn on, you can unplug the power cord and then manually slide the print carriage to the far right side to remove the ink cartridges.
- Gently pull open the ink cartridge cover.
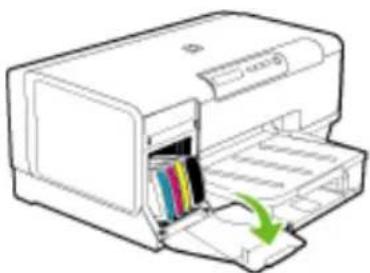
natural_image
Line drawing of a printer with an open slot and a green arrow indicating the paper's edge (no text or symbols present)- Remove the ink cartridges from their slots by grasping each between your thumb and forefinger and pulling it firmly toward you.
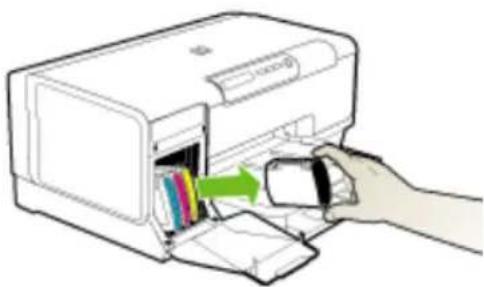
natural_image
Illustration of a hand inserting a card into a printer's internal structure (no text or symbols visible)-
Place the ink cartridges in an airtight plastic container so they will not dry out, and put them aside. Do not send them with the device unless the HP customer support call agent instructs you to.
-
Close the ink cartridge door and wait a few minutes for the print carriage to move back to its home position (on the left side).
- Press the Power button to turn off the device.
To remove printheads before shipment
-
Open the cover.
-
If the carriage does not move to the left automatically, press and hold the ⏻ (Resume button) until the carriage moves to the left. Wait for the carriage to stop moving, and then unplug the power cord from the printer.

NOTE: If the printer cannot be powered on, use a pen to remove the printhead cover.
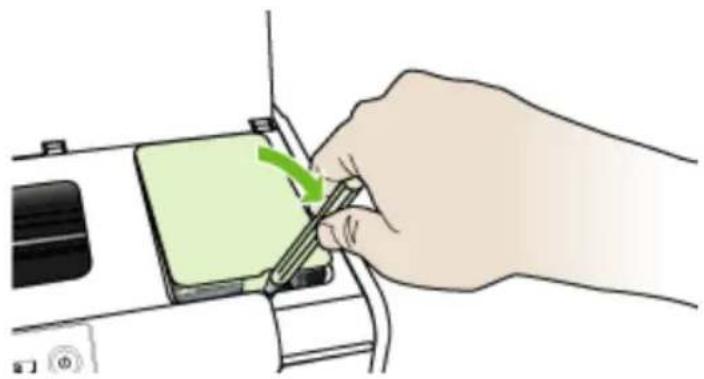
natural_image
Hand inserting a green card into a device (no text or symbols visible)- Lift the printhead latch.
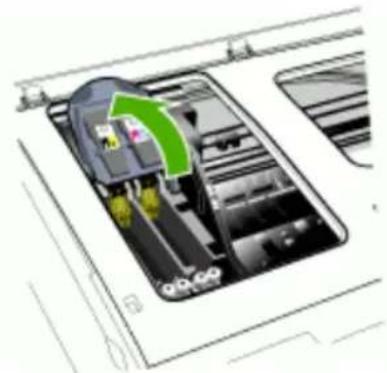
natural_image
Diagram of a device interior with a green arrow indicating a directional flow or operation, no visible text or symbols.Appendix B
- Lift the handle of a printhead and use it to pull the printhead out of its slot.
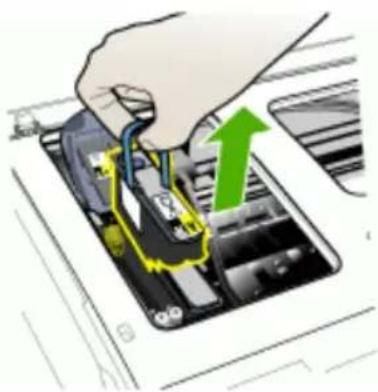
natural_image
Illustration of a hand inserting electronic components into a device (no text or symbols visible)-
Place the printheads in an airtight plastic container so they will not dry out, and put them aside. Do not send them with the device unless the HP customer support call agent instructs you to.
-
Close the cover.

NOTE: If you have opened the printhead cover, use your thumb to press the catch and reinsert the printhead cover.
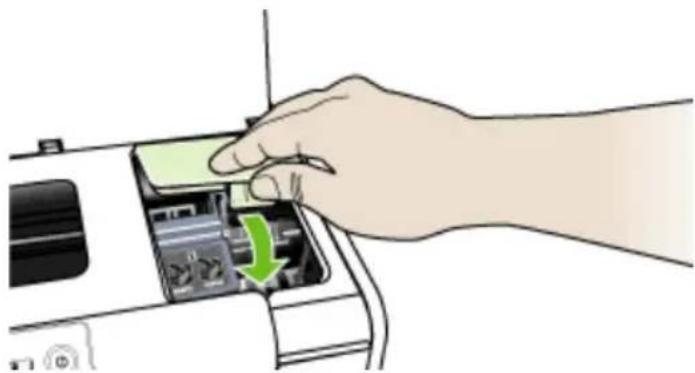
natural_image
Hand inserting a device into a device with a green arrow indicating the component (no text or symbols visible)- Press the Power button to turn off the device.
Pack the device
Complete the following steps after you have prepared the device for shipment.
To pack the device
- If available, pack the device for shipment by using the original packaging materials, or use the packaging materials that came with your replacement device.
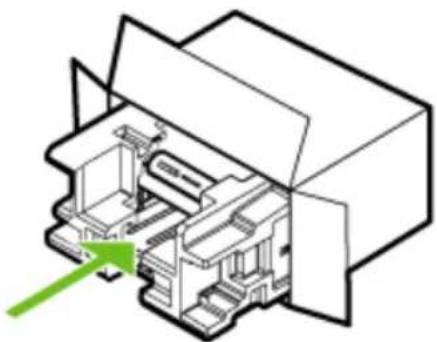
natural_image
Technical line drawing of an internal mechanical assembly with a green arrow indicating direction (no text or symbols)If you do not have the original packaging materials, please use other adequate packaging materials. Shipping damage caused by improper packaging and/or improper transportation is not covered under the warranty.
-
Place the return shipping label on the outside of the box.
-
Include the following items in the box:
- A complete description of symptoms for service personnel (samples of print quality problems are helpful).
- A copy of the sales slip or other proof of purchase to establish the warranty coverage period.
- Your name, address, and a phone number where you can be reached during the day.
C Device specifications
For media and media-handling specifications, see Understand specifications for supported media.
• Physical specifications
• Product features and capacities
• Processor and memory specifications
• System requirements
• Network protocol specifications
• Embedded Web server specifications
- Print resolution
• Environmental specifications
• Electrical specifications
• Acoustic emission specifications (print in Draft mode, noise levels per ISO 7779)
Physical specifications
Size (width x depth x height)
• Device: 496 x 299 x 209 mm (19.5 x 11.8 x 8.2 inches)
• With Duplexer: Adds 64 mm (2.5 inches) to the rear of the device.
- With Tray 2: Adds 76 ~mm (3 inches) to the height of the device.
Device weight (does not include printing supplies)
• Device: 8.35 kg (18.4 lb)
• With Duplexer: Adds 0.95 kg (2.0 lb)
• With Tray 2: Adds 2.5 kg (5.5 lb)
Product features and capacities
| Feature Capacity | |
| Connectivity | • USB 2.0-compliant high speed• Fast Ethernet 10/100Base-TX for wired network connection (some models only) |
| Print method Drop-on-demand thermal inkjet printing | |
| Ink cartridges | Four ink cartridges (one each for black, cyan, magenta, and yellow) |
| Printheads | Two printheads (one black and yellow, and one magenta and cyan) |
| Supply yields | Visit www.hp.com/pageyield/ for more information on estimated ink cartridge yields. |
| Device languages HP PCL 3 enhanced | |
| Font support | US fonts: CG Times, CG Times Italic, Universe, Universe Italic, Courier, Courier Italic, Letter Gothic, Letter Gothic Italic. |
| Duty cycle | Up to 7500 pages per month |
| Control panel language supportLanguage availability varies by country/region. | Bulgarian, Croatian, Czech, Danish, Dutch, English, Finnish, French, German, Greek, Hungarian, Italian, Japanese, Korean, Norwegian, Polish, Portuguese, Romanian, Russian, Simplified Chinese, Slovak, Slovenian, Spanish, Swedish, Traditional Chinese, Turkish, Ukrainian. |
Processor and memory specifications
Device processor
MIPS 5KF 64-bit (300MHz)
Device memory
• 32 MB built-in RAM
• 16 MB built-in Flash ROM
System requirements

NOTE: For the most current information about supported operating systems and system requirements, visit http://www.hp.com/support/
Operating system compatibility
- Windows 2000, Windows XP, Windows XP x64 (Professional and Home Editions)
• Mac OS X (10.3.8 and higher, 10.4.x)
- Linux

NOTE: Printer and scanner drivers for Windows Server 2003 (both 32-bit and 64-bit versions) require a minimum of an Intel® Pentium® II or Intel Celeron® processor, 128 MB RAM, 200 MB free hard disk space. The drivers are available at http://www.hp.com/support/.
Minimum requirements
- Windows 2000: Intel Pentium II or Celeron processor, 128 MB RAM, 280 MB free hard disk space
- Windows XP (32-bit): Intel Pentium II or Celeron processor, 128 MB RAM, 280 MB free hard disk space
- Windows XP x64: Intel Pentium II or Celeron processor, 128 MB RAM, 280 MB free hard disk space
• Mac OS X (10.3.8 and higher, 10.4.x): 400 MHz Power PC G3 (v10.3.8 and higher, v10.4.x) or 1.83 GHz Intel Core Duo (v10.4.x), 128 MB memory, 300 MB free hard disk space
• Microsoft Internet Explorer 6.0
Recommended requirements
- Windows 2000: Intel Pentium III or higher processor, 256 MB RAM, 500 MB free hard disk space
- Windows XP (32-bit): Intel Pentium III or higher processor, 256 MB RAM, 500 MB free hard disk space
- Windows XP x64: Intel Pentium III or higher processor, 256 MB RAM, 500 MB free hard disk space
• Mac OS X (10.3.8 and higher, 10.4.x): 400 MHz Power PC G3 (v10.3.8 and higher, v10.4.x) or 1.83 GHz Intel Core Duo (v10.4.x), 256 MB memory, 600 MB free hard disk space
- Microsoft Internet Explorer 6.0 or later
Network protocol specifications
Network operating system compatibility
- Windows 2000, Windows XP (32-bit), Windows XP x64 (Professional and Home Editions)
• Mac OS X (10.3.8 and higher, 10.4.x) - Microsoft Windows 2000 Server Terminal Services with Citrix Metaframe XP with Feature Release 3
- Microsoft Windows 2000 Server Terminal Services with Citrix Presentation Server 4.0
- Microsoft Windows 2000 Server Terminal Services
- Microsoft Windows 2003 Server Terminal Services
- Microsoft Windows 2003 Server Terminal Services with Citrix Presentation Server 4.0
- Microsoft Windows 2003 Server Terminal Services with Citrix Metaframe XP with Feature Release 3
• Novell Netware 6, 6.5, Open Enterprise Server 6.5
Compatible network protocols
TCP/IP
Network management
• HP Web Jetadmin plug-ins
• Embedded Web server Features
- Ability to remotely configure and manage network devices
- myPrintMileage
Embedded Web server specifications
Requirements
- A TCP/IP-based network (IPX/SPX-based networks are not supported)
- A Web browser (either Microsoft Internet Explorer 6.0, Netscape 7.0, Opera 7.54, Mozilla Firefox 1.0, or Safari 1.2, or later)
- A network connection (you cannot use the embedded Web server connected directly to a computer with a USB cable)
- An Internet connection (required for some features)

NOTE: You can open the embedded Web server without being connected to the Internet. However, some features will not be available.
- It must be on the same side of a firewall as the device.
Print resolution
Black
Up to 1200 dpi with pigmented black ink
Color
HP enhanced photo quality with Vivera inks (up to 4800 by 1200 dpi Optimized on HP Premium Plus photo papers with 1200 by 1200 input dpi)
Environmental specifications
Operating environment
Operating temperature: 5° to 40° C (41° to 104° F)
Recommended operating conditions: 15° to 32° C (59° to 90° F)
Recommended relative humidity: 25 to 75% noncondensing
Storage environment
Storage temperature: -40^ to 60^ C ( -40^ to 140^ F)
Storage relative humidity: Up to 90% noncondensing at a temperature of 65^ C ( 150^ F)
Electrical specifications
Power supply
Universal power adapter (external)
Power requirements
Input voltage: 100 to 240 VAC (± 10%), 50 to 60 Hz (± 3Hz)
Output voltage: 32 Vdc, 2500 mA
Power consumption
34.03 watts
Acoustic emission specifications (print in Draft mode, noise levels per ISO 7779)
Sound pressure (bystander position)
LpAd 54 (dBA)
Sound power
LwAd 6.7 (BA)
D Regulatory information
This section contains the following topics:
- FCC statement
• Other regulatory information
• Declaration of conformity
• Environmental sustainability program
FCC statement
The United States Federal Communications Commission (in 47 cfr 15.105) has specified that the following notices be brought to the attention of users of this product. This device complies with part 15 of the FCC rules. Operation is subject to the following two conditions: (1) This device may not cause harmful interference, and (2) this device must accept any interference received, including interference that may cause undesired operation.
- Shielded cables
Shielded cables
Use of a shielded data cable is required to comply with the Class B limits of Part 15 of the FCC Rules.
Pursuant to Part 15.21 of the FCC Rules, any changes or modifications to this equipment not expressly approved by the Hewlett-Packard Company, may cause harmful interference and void the FCC authorization to operate this equipment.
This equipment has been tested and found to comply with the limits for a Class B digital device, pursuant to Part 15 of the FCC Rules. These limits are designed to provide reasonable protection against harmful interference in a residential installation. This equipment generates, uses and can radiate radio frequency energy and, if not installed and used in accordance with the instructions, may cause harmful interference to radio communications. However, there is no guarantee that interference will not occur in a particular installation. If this equipment does cause harmful interference to radio or television reception, which can be determined by turning the equipment off and on, the user is encouraged to try to correct the interference by one or more of the following measures:
- Reorient or relocate the receiving antenna.
- Increase the separation between the equipment and receiver.
- Connect the equipment into an outlet on a circuit different from that to which the receiver is connected.
- Consult the dealer or an experienced radio/TV technician for help.
For further information, contact:
Manager of Corporate Product Regulations
Hewlett-Packard Company
3000 Hanover Street
Palo Alto, CA 94304
(650) 857-1501
Other regulatory information
• EMI statement (Korea)
• VCCI statement (Japan)
• Regulatory model number
• Power cord statement
EMI statement (Korea)
사용자 안내문(B 급기기)
VCCI statement (Japan)
Regulatory model number
For regulatory identification purposes, your product is assigned a Regulatory Model Number. The Regulatory Model Number for your product is SNPRC-0601. This regulatory number should not be confused with the marketing name (HP Officejet Pro K5300/K5400) or product number (C8184A, C8185A, C8194A, C9277A).
Power cord statement
The power cord cannot be repaired. If it is defective, it should be discarded or returned to the supplier.
Declaration of conformity

invent
DECLARATION OF CONFORMITY
according to ISO/IEC Guide 22 and EN 45014
Manufacturer's Name: Hewlett-Packard Singapore (Pte) Ltd
Manufacturer's Address: Imaging and Printing Manufacturing Operation Singapore 60 Alexandra Terrace, #07-01, The Comtech, Singapore 118502
declares, that the product
Product Name: HP Officejet Pro K5400 series
Regulatory Model Number ^(1) : SNPRC-0601
Product Accessory Number: C8255A / HP Automatic two-sided printing accessory CB009A / HP 350-sheet input tray
Product Options: All
conforms to the following Product Specifications:
Safety: IEC 60950-1:2001 / EN 60950-1:2001 IEC 60825-1:1994 + A1 + A2 / EN 60825-1:1994 + A1 + A2 Class 1 for LEDs
EMC: CISPR 22:1993 + A1 + A2 / EN 55022:1994 + A1 + A2 Closs B ^(2) EN 55024: 1998 + A1 + A2 IEC 61000-3-2:2000 / EN 61000-3-2:2000 IEC 61000-3-3:1994 + A1:2001 / EN 61000-3-3:1995 + A1:2001
FCC Title 47 CFR, Part 15 Class B ^(2) ICES-003, Issue 4 Class B ^(2)
Supplementary Information:
The product herewith complies with the requirements of the Low Voltage Directive 73/23/EEC and the EMC Directive 89/336/EEC, and carries the CE marking accordingly.
(1) This product is assigned a Regulatory model number that stays with the regulatory aspects of the design. The Regulatory Model Number is the main product identifier in the regulatory documentation and test reports, this number should not be confused with the marketing name or the product numbers.
(2)The product was tested in a typical configuration with Hewlett Pockard personal computer systems.
Singapore, 1 August 2006
Chan Kum Yew Director, Quality
Local Contact for regulatory topics only:
European Contact: Hewlett-Packard GmbH, HQ-TRE, Herrenberger Strasse 140, 71034 Boeblingen, Germany
USA Contact: Hewlett-Packard Company, HPCC, 20555 S.H. 249 Houston, Texas, 77070
Australia Contact: Hewlett Packard Australia Ltd, Product Regulations Manager, 31-41 Joseph Street, Blackburn, Victoria 3130, Australia.
Environmental sustainability program
Hewlett-Packard is committed to providing quality products in an environmentally sound manner. HP continuously improves the design processes of its products to minimize the negative impact on the office environment and on the communities where devices are manufactured, shipped, and used. HP has also developed processes to minimize the negative impact of the disposal of the device at the end of its printing life.
For more information about HP's environmental sustainability program, see www.hp.com/hpinfo/globalcitizenship/environment/index.html.
- Reduction and elimination
• Power consumption
• Material safety data sheets - Recycling
Reduction and elimination
Paper use
This product's two-sided (duplex) printing and N-up printing feature (which allows you to print multiple pages of a document on one sheet of paper) can reduce paper usage and the resulting demands on natural resources. See this guide for more information about using these features.
Ink use
This product's draft mode uses less ink, which might extend the life of the cartridges. See the print driver's online Help for more information.
Ozone-depleting chemicals
Ozone-depleting chemicals, such as chlorofluorocarbons (CFCs), have been eliminated from HP manufacturing processes.
Power consumption
Power usage drops significantly while in PowerSave/Sleep mode, which saves natural resources and saves money without affecting the high performance of this product.
To determine the ENERGY STAR® qualification status for this product see the Product Data Sheet or Specifications Sheet. Qualified products are also listed at: http://www.hp.com/hpinfo/globalcitizenship/environment/productdesign/ecolabels.html.
Material safety data sheets
Material safety data sheets (MSDSs) can be obtained from the following HP Web site: www.hp.com/go/msds.
Recycling
Design for recycling has been incorporated into this device:
- The number of materials has been kept to a minimum while ensuring proper functionality and reliability.
- Dissimilar materials have been designed to separate easily.
- Fasteners and other connections are easy to locate, access, and remove using common tools.
- High-priority parts have been designed so that they can be accessed quickly for efficient disassembly and repair.
• Product packaging
- Plastics
• Disposal of waste equipment by users in private households in the European Union
• HP products and supplies
Product packaging
The packaging materials for this device have been selected to provide maximum protection for the least cost possible, while attempting to minimize environmental impact and facilitate recycling. The rugged design of the device assists in minimizing both packaging materials and damage rates.
Plastics
Plastic parts over 25 grams are marked according to international standards that enhance the ability to identify plastics for recycling purposes at the end of the product's life.
Disposal of waste equipment by users in private households in the European Union
 | This symbol on the product or on its packaging indicates that this product must not be disposed of with your other household waste. Instead, it is your responsibility to dispose of your waste equipment by handing it over to a designated collection point for the recycling of waste electrical and electronic equipment. The separate collection and recycling of your waste equipment at the time of disposal will help to conserve natural resources and ensure that it is recycled in a manner that protects human health and the environment. For more information about where you can drop off your waste equipment for recycling, please contact your local city office, your household waste disposal service or the shop where you purchased the product. |
HP products and supplies
HP's Planet Partners™ recycling service provides an easy way to recycle any brand of computer equipment or HP printing supplies. HP's state-of-the-art processes ensure that your unwanted hardware or HP printing supply is recycled in a way that conserves resources.
For more information, see www.hp.com/recycle.
Index
A
accessibility 6
accessories
installation 9
order 76
turn on and off in driver 10
warranty 81
acoustic emissions 89
Add Printer installation 41
administrator
management tools 27
settings 28
aligning printheads 48
B
black and white pages
troubleshoot 61
blank pages, troubleshoot
print 57
borderless printing
Mac OS 25
Windows 25
both sides, print on 22
C
cables
regulatory compliance 90
calibrate linefeed 49
cancel
print job 26
capacity
trays 16
cards
guidelines 13
sizes supported 14
tray supporting 16
cartridges. See ink cartridges
chlorofluorocarbons (CFCs) 93
clean
printheads 49
colors
bleeding 62
faded or dull 61
print black and white,
troubleshoot 61
specifications 88
troubleshoot 62
wrong 61
connectors, locating 8
control panel
administrator settings 28
illustration 70
lights, understanding 70
locating 7
custom-sized media
guidelines 13
print on 23
sizes supported 15
customer support
electronic 78
HP Instant Support 34
phone support 78
cut-off pages, troubleshoot 58
D
Declaration of Conformity (DOC) 92
default settings
driver 21
print 21
device
accessories installed,
pages printed 36
event log 36
name and number 36
documentation 5
dots per inch (dpi)
print 88
double-sided printing 22
driver
accessories settings 10
settings 21
version 79
warranty 81
duplex printing accessory
order online 76
duplexer
clear jams 67
installation 9
locating 8
margins, minimum 17
media sizes supported 13
media types and weights supported 16
turn on and off in driver 10
using 22
duty cycle 86
E
electrical specifications 89
embedded Web server
about 29
administrator settings 28
opening 30
pages 30
system requirements 88
troubleshoot, cannot be opened 64
envelopes
guidelines 13
sizes supported 14
tray supporting 16
environmental specifications 89
environmental sustainability program 93
Ethernet network port, locating 8
European Union waste disposal 94
EWS. See embedded Web server
F
FCC statement 90
firewalls, troubleshoot 56
fonts supported 86
G
graphics
ink not filling in 61
missing lines or dots 62
H
help
HP Instant Support 34
see also customer support
HP Instant Support
about 34
accessing 34 myPrintMileage 34 security and privacy 34 HP Planet Partners 94 HP Printer Utility (Mac OS) administrator settings 29 opening 32 panels 32 HP Solution Center 22 HP Web Jetadmin about 33 humidity specifications 89
|
Information tab, Toolbox (Windows) 31 ink cartridges estimated ink levels 36 expiration dates 36 lights 70 order online 76 part numbers 36, 76 remove 82 replace 45 status 28 supported 45, 86 warranty 81 yields 86
ink smearing, troubleshoot 60 installation accessories 9 Add Printer, Windows 41 duplexer 9 ink cartridges 45 software for Mac OS 41 software for Windows 38 tray 2 9 troubleshoot 65 Windows network software 40
IP address checking for device 65
J
jams clear 67 media to avoid 12 prevent 69 Japanese VCCI statement 91
K
Korean EMI statement 91
L
language, printer 86, 87 lights on control panel illustration 70 understanding 70 lights reference 70 linefeed, calibrate 49 load tray 1 18 tray 2 19 locking trays 20
M
Mac OS borderless printing 25 duplexing 23 HP Printer Utility 32 install software 42 Network Printer Setup Utility 33 print on special, or custom-sized media 24 print settings 21 sharing device 42 system requirements 87 turn accessories on and off in driver 10 uninstall software 44 management tools 27 margins duplexer 17 setting, specifications 17 material safety data sheets (MSDSs) 93 media borderless printing 25 clear jams 67 duplexing 22 HP, order 77 load tray 1 17 load tray 2 19 locking trays 20 print on custom-sized 23 selecting 12 skewed pages 64 specifications 13 supported sizes 13 troubleshoot feeding 63 types and weights supported 16 memory specifications 87
missing lines or dots, troubleshoot 62 missing or incorrect information, troubleshoot 57 monitoring tools 28 multi-feeds, troubleshoot 64 myPrintMileage about 35 accessing 35
N
network printer information 35 network connector lights, understanding 75 parts, illustration 75 Network Printer Setup Utility (Mac OS) 33 networks connector illustration 8 firewalls, troubleshoot 56 HP Web Jetadmin 33 Mac OS setup 42 operating systems supported 88 protocols supported 88 sharing, Windows 39 system requirements 88 Windows setup 40 noise information 89
0
operating environment specifications 89 operating systems supported 87 output tray locating 7 media supported 16 ozone-depleting chemicals 93
P
packing the device 84 pages per month (duty cycle) 86 paper. See media paper-feed problems, troubleshoot 63 part numbers, supplies and accessories 76 PCL 3 support 86 phone customer support 78
Index
photo media
guidelines 13
sizes supported 15
photos
borderless printing 25
ports, specifications 86
power
consumption 93
specifications 89
troubleshoot 55
power cord statement 91
power input, locating 8
cancel 26
double-sided 22
settings 21
slow 56
troubleshoot 55
print cartridges. See ink
cartridges
print driver
accessories settings 10
settings 21
version 79
warranty 81
print quality
diagnostic page 47
troubleshoot 59
print quality diagnostic page 47
printer driver
accessories settings 10
settings 21
version 79
warranty 81
printheads
aligning 48
clean 49
clean contacts manually 49
first-installation and end-of-warranty dates 36
health, check 47
health, status 36
ink usage 36
lights 70
maintaining 46
order online 76
part numbers 36, 77
remove 82
replace 52
status 28, 47
supported 86
troubleshoot 56
warranty 81
privacy, HP Instant Support 34
processor specifications 87
Q
quality, troubleshoot
diagnostic page 47
print 59
R
readme 5
rear access panel
clear jams 67
illustration 8
recycling 93, 94
regulatory information 90
regulatory model number 91
release notes 5
remove ink cartridges and printheads 82
replace
ink cartridges 45
printheads 52
resolution
print 88
S
security
HP Instant Support 34
self-test diagnostic page printing 37
printing, understanding 35
Services tab, Toolbox (Windows) 32
settings
administrator 28
driver 21
setup
Windows 38
Windows networks 40
sharing device
Mac OS 42
Windows 39
shipping the device 82
skew, troubleshoot print 64
slow print, troubleshoot 56
software
accessories settings 10
installation on Mac OS 41
installation on Windows 38
management tools 27
uninstall from Mac OS 44
uninstall from Windows 43
warranty 81
Solution Center 22
sound pressure 89
specifications
acoustic emissions 89
electrical 89
media 13
network protocols 88
operating environment 89
physical 86
processor and memory 87
storage environment 89
system requirements 87
speed
troubleshoot print 56
status
supplies 28
storage environment
specifications 89
supplies
myPrintMileage 35
order online 76
status 28
yields 86
support. See customer support
system requirements 87
T
telephone customer support 78
temperature specifications 89 text
troubleshoot 58, 61, 62
Toolbox (Windows)
about 31
administrator settings 29
Estimated Ink Level tab 31
Information tab 31
opening 31
Services tab 32
transparencies 13
tray 1
capacity 16
load media 18
locating 7
media sizes supported 13
media types and weights supported 16
tray 2
capacity 16
installation 9
load media 19
locating 7
media sizes supported 13
media types and weights supported 16
order online 76
troubleshoot installation 63
turn on and off in driver 10
trays
capacities 16
clear jams 67
installation tray 2 9
load media 17
locating 7
locking 20
media sizes supported 13
media types and weights supported 16
paper guides illustration 7
setting default 20
troubleshoot feeding 63
turn on and off in driver 10
troubleshoot
blank pages printed 57
bleeding colors 62
colors 61, 62
cut-off pages, incorrect text or graphics placement 58
embedded Web server 64
firewalls 56
HP Instant Support 34
ink not filling text or graphics 61
ink smearing 60
installation 65
meaningless characters print 60
media not picked up from tray 63
missing lines or dots 62
missing or incorrect information 57
multiple pages are picked 64
nothing prints 55
paper-feed problems 63
power 55
print 55
print quality 59
printheads 56
skewed pages 64
slow print 56
tips 54
tray 2 installation 63
troubleshooting
lights 70
troubleshooting resources
self-test diagnostic page 35
two-sided printing 22
two-sided printing accessory.
See duplexer
U
uninstall software
Mac OS 44
Windows 43
USB connection
port, locating 7, 8
setup Mac OS 41
setup Windows 38
specifications 86
V
voltage specifications 89
W
warranty 81
Web sites
accessibility information 7
Apple 42
customer support 78
environmental programs 93
HP Web Jetadmin 34
material safety data sheets 93
order supplies and accessories 76
recycling 94
supply yield data sheet 86
Windows
Add Printer installation 41
borderless printing 25
duplexing 23
HP Solution Center 22
install software 38
network setup 40
print on special or custom-sized media 23
print settings 21
sharing device 39
system requirements 87
turn accessories on and off in driver 10
uninstall software 43
© 2007 Hewlett-Packard Development Company, L.P.
www.hp.com