
Deskjet 6127 - Printer HP - Free user manual and instructions
Find the device manual for free Deskjet 6127 HP in PDF.


User questions about Deskjet 6127 HP
0 question about this device. Answer the ones you know or ask your own.
Ask a new question about this device
Download the instructions for your Printer in PDF format for free! Find your manual Deskjet 6127 - HP and take your electronic device back in hand. On this page are published all the documents necessary for the use of your device. Deskjet 6127 by HP.
USER MANUAL Deskjet 6127 HP
hp deskjet 6120 series printer
table of contents
notices
notices and acknowledgements terms and conventions accessibility using the onscreen user's guide
special features
getting started
printer features buttons and lights paper trays 250-sheet plain paper tray print cartridges automatic paper-type sensor two-sided printing accessory (duplexer) connectivity
printing
print settings
advanced features
printing a document
changing default settings
printing digital photographs
two-sided printing
using the automatic paper-type sensor
selecting between paper trays printing on a different first page printing a screen image watermarks plain paper envelopes transparencies labels index cards and other small media photographs greeting cards posters banners iron-on transfers
maintenance
replacing print cartridges calibrating print cartridges automatically cleaning print cartridges manually cleaning print cartridges maintaining print cartridges maintaining the printer body refilling print cartridges removing ink from skin and clothing tools
troubleshooting
checking the print cartridge status printer is not printing problems with printouts
printer lights are flashing or on
printer is too slow
two-sided printing problems
specifications
printer specifications
two-sided printing accessory (duplexer) specifications
250-sheet plain paper tray specifications
minimum system requirements
environmental statement
print cartridge recovery
limited warranty
regulatory notices
index
notices
- notices and acknowledgements
- terms and conventions
- accessibility
• using the onscreen user's guide
notices and acknowledgements
hewlett-packard company notices
The information contained in this document is subject to change without notice.
Hewlett-Packard (HP) makes no warranty of any kind with regard to this material including, but not limited to, the implied warranties of merchantability and fitness for a particular purpose.
Hewlett-Packard shall not be liable for any errors or for incidental or consequential damages in connection with the furnishing, performance, or use of this material.
All rights reserved. Reproduction, adaptation, or translation of this material is prohibited without prior written permission of Hewlett-Packard, except as allowed under copyright laws.
acknowledgments
Microsoft, MS, MS-DOS, Windows, and XP are registered trademarks of Microsoft Corporation.
TrueType is a U.S. trademark of Apple Computer, Inc.
Adobe and Acrobat are trademarks of Adobe Systems Incorporated.
Copyright2002Hewlett-PackardCompany
terms and conventions
The following terms and conventions are used in the user's guide.
terms
HP Deskjet printers may be referred to as the HP printer or printer.
symbols
The > symbol guides you through a series of software steps. For example:
Click File > Print.
cautions and warnings
A Caution indicates possible damage to the HP Deskjet printer or to other equipment. For example:
Caution! Do not touch the print cartridge ink nozzles or copper contacts. Touching these parts will result in clogs, ink failure, and bad electrical connections.
A Warning indicates possible harm to yourself or to others. For example:

Warning! Keep both new and used print cartridges out of the reach of children.
icons
A Note icon indicates that additional information is provided. For example:

For great results use HP products.
A Mouse icon indicates that additional information is available through the What's This? help feature. For example:

To find more information about options on each tab screen, point to an option and click the right mouse button to display the What's This? dialog box. Click What's This? to view more information about the selected option.
A Printing Instructions icon indicates that a description of print options is available in the user's guide. For example:

For a description of available print options, see print settings.
accessibility
Your HP printer provides a number of features that make it accessible for people with disabilities.
visual
The printer software is accessible for users with visual impairments or low vision through the use of Windows accessibility options and features. It also supports most assistive technology such as screen readers, Braille readers, and voice-to-text applications. For users who are color blind, colored buttons and tabs used in the software and on the HP printer have simple text or icon labels that convey the appropriate action.
mobility
For users with mobility impairments, the printer software functions can be executed through keyboard commands. The software also supports Windows accessibility options such as StickyKeys, ToggleKeys, FilterKeys, and MouseKeys. The printer doors, buttons, paper trays, and paper guides can be operated by users with limited strength and reach.
support
For more details about the accessibility of this product and HP's commitment to product accessibility:
- visit HP's Web site at http://www.hp.com/accessibility
- email accessibility@hp.com
using the onscreen user's guide
This onscreen user's guide is viewed through Adobe Acrobat Reader 5.0 or later.
Use the following tools to view and navigate the onscreen user's guide:
• View Buttons: Click these buttons to change page views:
View the page in actual size
Fit the page in the window
Fit the page width in the window
- Zoom: Use to zoom in on a page.
- Bookmarks: Click a bookmark to view a topic.
- Navigation Buttons: Click these buttons to navigate:
Go to the first page of the document
Go backward one page
Go forward one page
Go to the last page of the document
Go to the previous view
Go to the next view
special features
Congratulations! The hp deskjet 6120 series printer is equipped with several exciting features:
4800 optimized dpi* and PhotoREt: HP's high-resolution printing and expert color science produce outstanding photo quality.
HP's exclusive automatic two-sided printing (duplexer): Save paper by using the automatic duplexer to print on both sides of the paper, and, because it is automatic, the printer does all the work.
built-in ethernet feature: Connect the printer to an ethernet network without the need for an external print server (available on the hp deskjet 6127 series printer only).
250-Sheet Plain Paper Tray accessory: Add or change paper less often. This optional tray increases paper capacity to 400 sheets or allows the printer to hold two different paper types at the same time.
long-lasting ink supply: Print more pages with the 42 ml. black print cartridge and optional 38 ml. tri-color print cartridge.
Automatic Paper-Type Sensor: Printing is automatically optimized for the type of paper — plain, coated, transparency, or photo papers. This eliminates the need to change paper types in the printer driver.
print cancel button: Save paper and ink by cancelling print jobs quickly and easily — just press the X button on the printer.
cover page printing: With a 250-Sheet Plain Paper Tray accessory, click the Use Different First Page button to pick the first page from one tray and the remaining pages from the other. Use this feature to print on letterhead or a cover page for a report.
print screen button: Easily print the content of the computer screen with a push of the Print Screen button on the computer keyboard.
printer assistant: Learn more about the printer features, access printer documentation and electronic support, or update the driver software from the printer assistant icon on the desktop.
* 4800 x 1200 optimized dpi color printing on premium photo papers with 1200 x 1200 input dpi.
getting started
- printer features
- buttons and lights
- paper trays
• 250-sheet plain paper tray - print cartridges
• automatic paper-type sensor - two-sided printing accessory (duplexer)
- connectivity
printer features
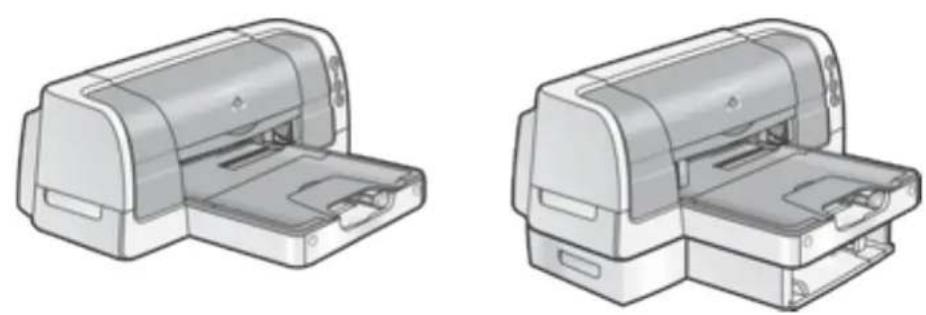
The printer has several features to make printing easier and more efficient.
text_image
Diagram of a printer with labeled parts, showing internal structure and component annotations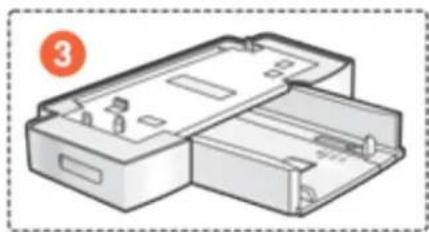
natural_image
Illustration of a mechanical device with two open compartments and internal slots, no text or symbols present.- buttons and lights
- In tray and Out tray
- 250-Sheet Plain Paper Tray
text_image
Diagram of an HP printer internal structure with labeled parts 1 and 2- print cartridges
- Automatic Paper-Type Sensor
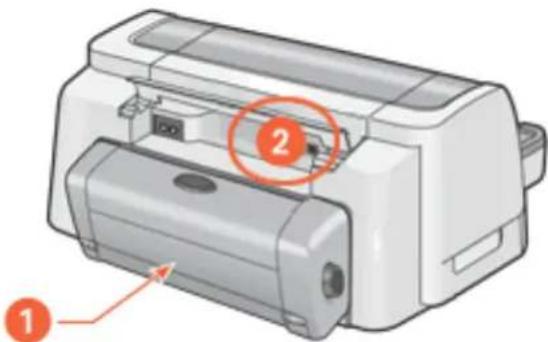
text_image
Diagram of a printer with labeled parts, showing part 1 and part 2 with highlighted section 2- Two-Sided Printing Accessory (duplexer)
- connectivity
buttons and lights
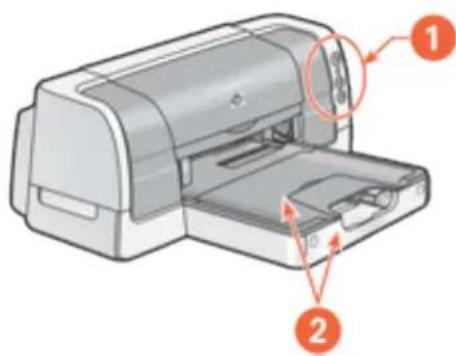
The printer buttons let you turn the printer on and off, cancel a print job, or resume printing. The lights give you visual cues about the status of the printer.
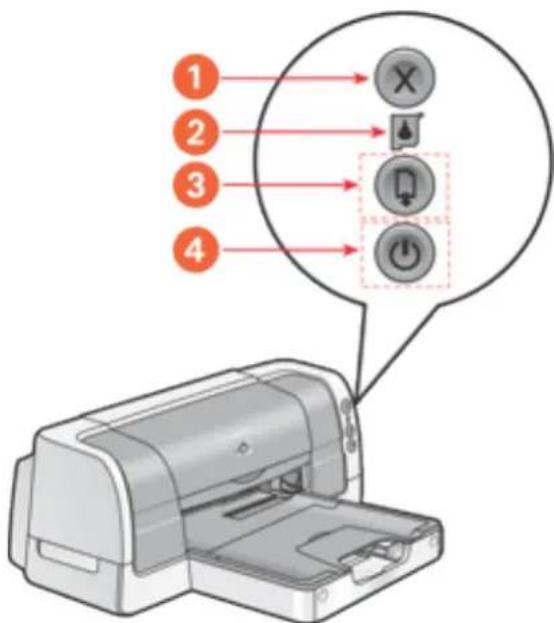
text_image
1 2 3 4- cancel button 2. print cartridge status light 3. resume button and light 4. power button and light

For a description of the ethernet lights on the hp deskjet 6127 series printer, click here .
cancel button
Pressing the Cancel button cancels the current print job.
print cartridge status symbol and light
The Print Cartridge Status light turns on or flashes when a print cartridge needs service or the printer top cover is open.
resume button and light
The Resume light flashes when an action is required such as loading paper or clearing a paper jam. When the problem is solved, press the Resume button to continue printing.
power button and light
The Power button turns the printer on and off. It may take a few seconds for the printer to turn on after pressing the Power button. The Power light flashes when the printer is processing.
Caution! Always use the Power button on the front of the printer to turn the printer on and off. Using a power strip, surge protector, or a wall-mounted switch to turn the printer on and off may cause printer failure.
paper trays
The printer has two paper trays: an In tray and an Out tray. An optional 250-Sheet Plain Paper Tray may be included with your printer. If it is not included, it can be purchased separately from an authorized HP dealer.
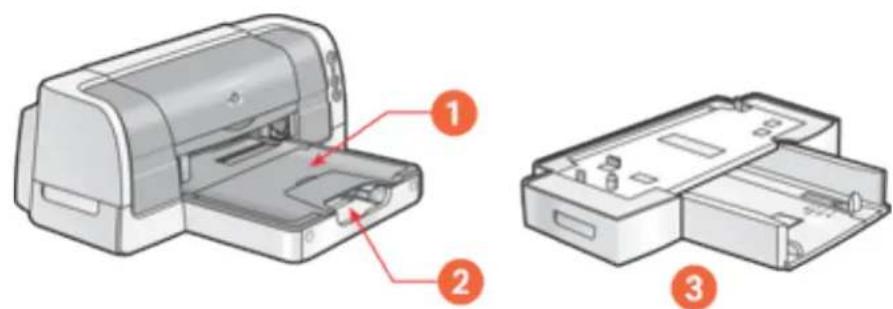
1. out tray 2. in tray 3. 250-sheet plain paper tray
In tray
The In tray holds paper or other media to be printed. The length and width guides adjust to the size of the media being used. The In tray door flips down for printing legal paper.
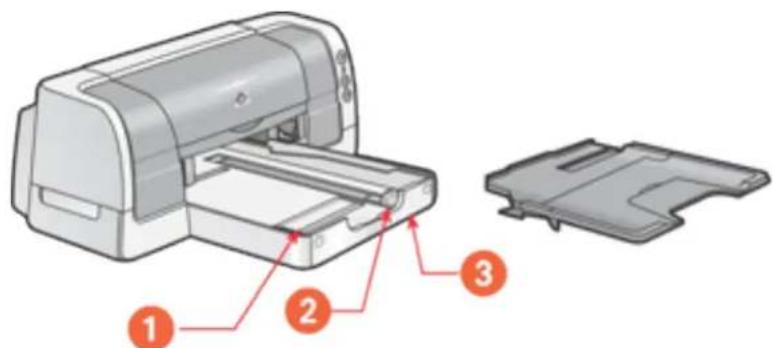
text_image
Diagram of a printer with labeled parts: printer 1, printer 2, and printer 3- paper width guide 2. paper length guide 3. in tray door
To load a specific media type, see printing.
Out tray
Printed pages are deposited in the Out tray.
Raise the Out tray to load most paper sizes.
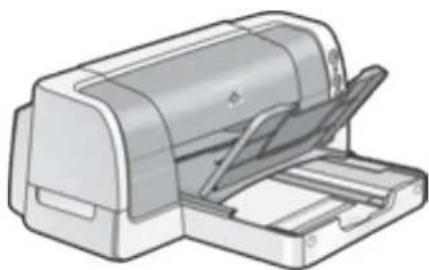
natural_image
Illustration of a printer with an open lid and spool, showing internal structure (no text or symbols)Remove the Out tray to load small media other than single envelopes and single cards.
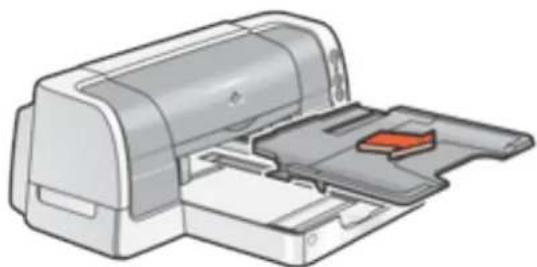
natural_image
Illustration of a printer with an open slot and paper feed (no text or symbols)The Out tray has a slot for single envelope and single card printing.
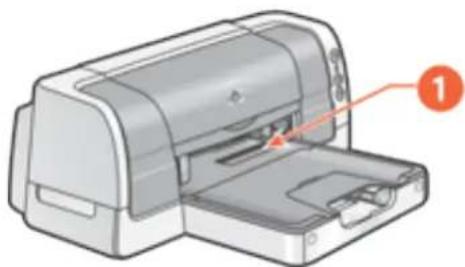
natural_image
Illustration of a printer with a paper airplane being inserted (no text or symbols visible)- single envelope slot
Flip down the Out tray extension to prevent the paper from falling off the tray.
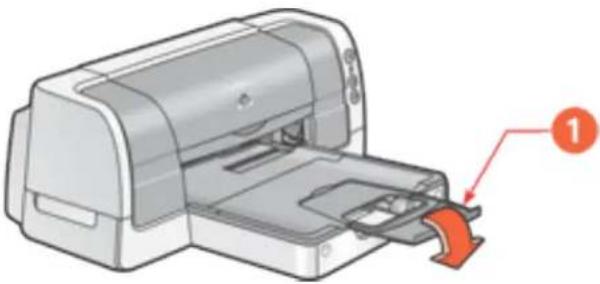
natural_image
Illustration of a printer with a paper feed being inserted, showing internal structure and a red arrow indicating the component (no text or symbols present)- out tray extension
250-sheet plain paper tray

An optional 250-Sheet Plain Paper Tray may be included with your printer. If it is not included, it can be purchased separately from an authorized HP dealer.
The duplexer must be attached to the printer in order for the printer to use the 250-Sheet Plain Paper Tray. If the duplexer is not attached to the printer, then use the In tray for printing.
250-sheet plain paper tray description
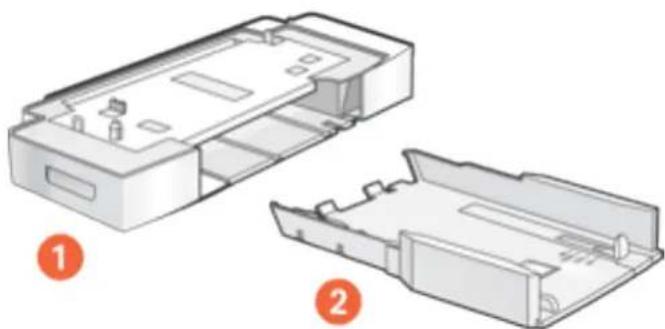
The 250-Sheet Plain Paper Tray has two parts.
natural_image
Technical illustration of a mechanical housing with two views labeled ① and ② (no text or symbols on the diagram itself)- base 2. lower tray
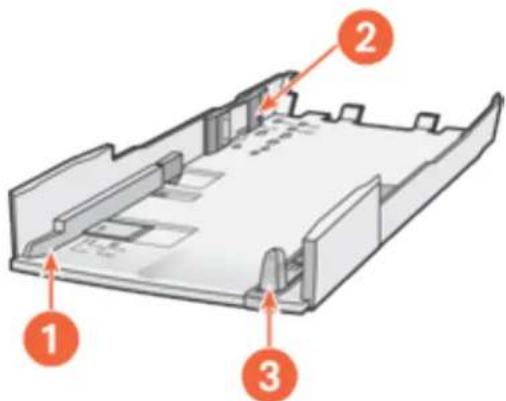
The lower tray has three size adjustments.
text_image
Diagram of a device casing with numbered components and directional arrows indicating parts of the body.- paper width guide 2. paper width fence 3. paper length guide

When changing the paper size in the 250-Sheet Plain Paper Tray, you must set all three size adjustments.
installing the 250-sheet plain paper tray

Install the duplexer before installing the 250-Sheet Plain Paper Tray. The duplexer must be attached to the printer in order for the printer to use the 250-Sheet Plain Paper Tray.
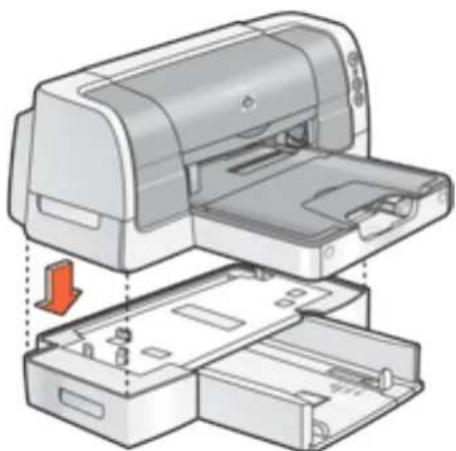
The printer sits on top of the 250-Sheet Plain Paper Tray.
Follow these steps to install the 250-Sheet Plain Paper Tray.
- Turn off the printer.
- Place the 250-Sheet Plain Paper Tray in the final location for the printer.
- Carefully lift the printer and orient it above the 250-Sheet Plain Paper Tray.
natural_image
Illustration of a printer with internal compartments and a red arrow indicating a downward motion (no text or symbols present)- Gently place the printer on top of the 250-Sheet Plain Paper Tray.
preparing to print with the 250-sheet plain paper tray
Preparing to print with the 250-Sheet Plain Paper Tray involves these steps:
- set the paper size
- load paper in the tray

The Automatic Paper-Type Sensor is not available when printing from the 250-Sheet Plain Paper Tray.
set the paper size
The 250-Sheet Plain Paper Tray can hold Letter, A4, Legal, Executive, and B5 sized paper.
To set the paper size, you must set all three size adjustments located on the lower tray.
Follow these steps to set the paper size in the 250-Sheet Plain Paper Tray:
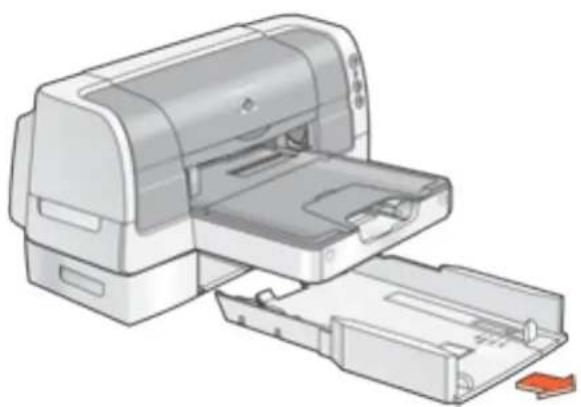
- Remove the lower tray from the base.
natural_image
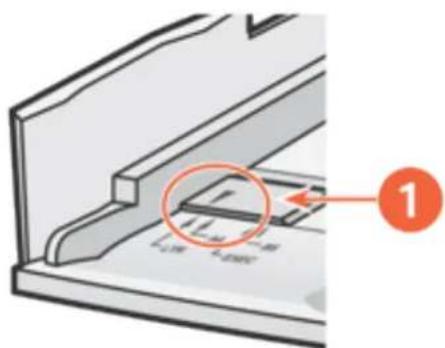
Illustration of a printer with open lid and internal casing, showing paper feeding into a plastic case (no text or symbols)- Slide the paper width guide until the arrow is even with the correct setting.
text_image
Technical diagram showing a mechanical component with labeled parts and an orange circle highlighting a feature.- align the arrows

Set the width to LTR to use legal-sized paper.
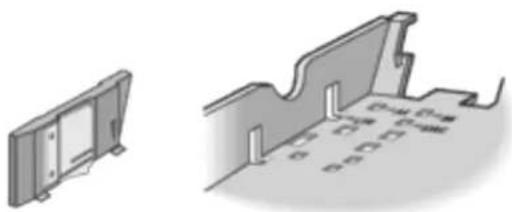
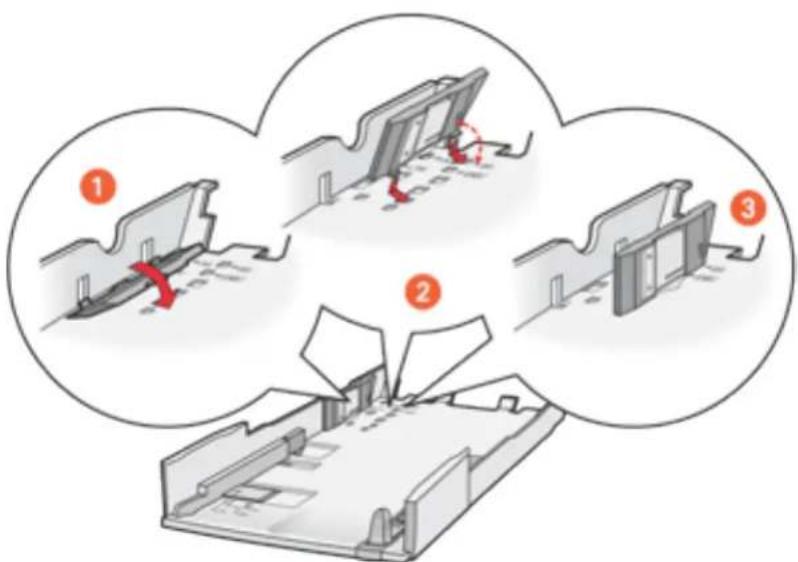
- Set the paper width fence by carefully snapping it into the slots for the paper size.
natural_image
Technical illustration of two mechanical components with no visible text or symbols
The slots for letter width paper are in the sides of the lower tray. Set the width to LTR to use legal-sized paper.
text_image
Diagram illustrating three steps of a mechanical or structural assembly with numbered annotations and red directional arrows indicating motion.-
tilt the fence forward 2. insert the fence into the appropriate slots 3. tilt the fence back until it snaps into place
-
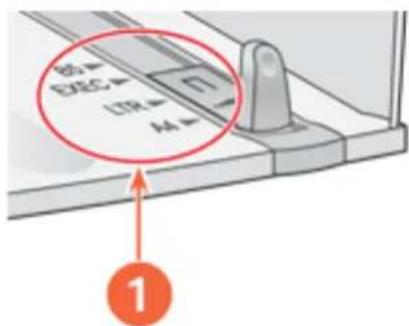
Set the paper length guide by pulling it until the arrow lines up with the paper size.
text_image
B5 ELEC LTR A4 1- align the arrows

For legal-sized paper, pull the length guide out beyond the edge of the tray, load the paper, then slide the length guide against the edge of the paper.
load paper in the tray
If you are using a paper size different than the paper size last used in the 250-Sheet Plain Paper Tray, then you must set the paper size.
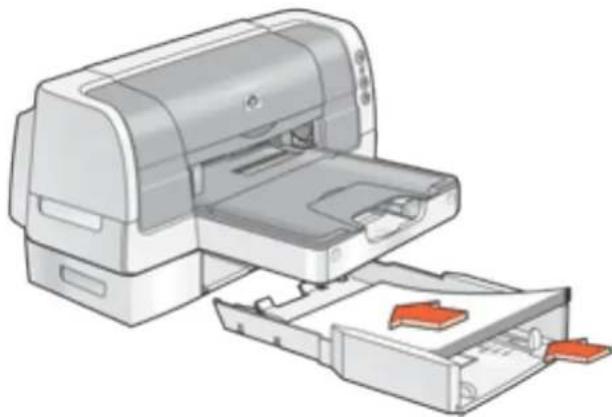
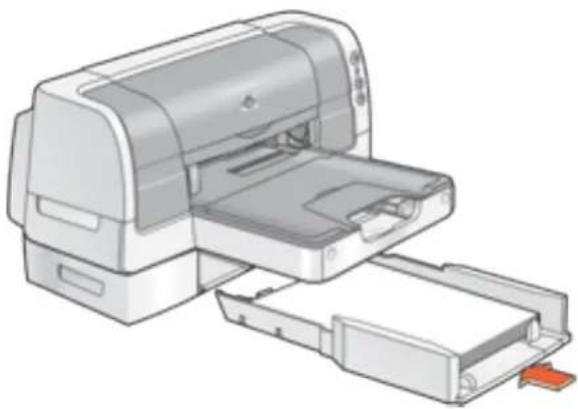
Follow these steps to load paper:
- If necessary, remove the lower tray from the base.
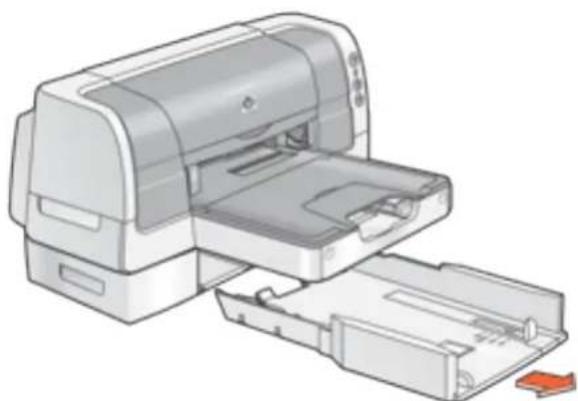
natural_image
Illustration of a printer with open lid and internal compartments, showing paper feed and paper roll (no text or symbols)- Insert the paper into the lower tray.
natural_image
Illustration of a printer with open lid and internal compartments, showing no text or symbols- Insert the lower tray into the base until it snaps into place.
natural_image
Illustration of a printer with open and closed compartments, showing internal structure (no text or symbols)print cartridges
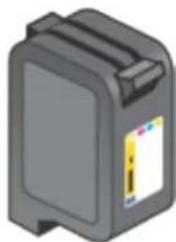
The following print cartridges can be used with the printer:
- black print cartridge
• tri-color print cartridge
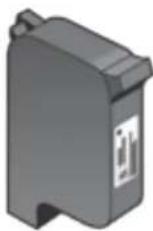
1
natural_image
3D rendering of a gray rectangular electronic device with two side tabs and a yellow label (no visible text or symbols)2
- black print cartridge 2. tri-color print cartridge
print cartridge selection
| print cartridge | selection number | product number |
| black |  | hp 51645 |
| tri-color |  | hp c6578 |
For installation instructions, see replacing print cartridges.
For storage instructions, see maintaining print cartridges.
For recycling instructions, see print cartridge recovery.

For print cartridge ink capacity, see the information included in the print cartridge packaging.
automatic paper-type sensor
The Automatic Paper-Type Sensor provides better printing results, particularly when used with HP paper and media.
When the Automatic Paper-Type Sensor is engaged, the printer scans the first page of a document with a blue optical sensor light to determine the best paper type setting. Once determined, the page is printed.
For more information, see using the automatic paper type sensor.

The Automatic Paper-Type Sensor is not available to be used for documents printed in Draft mode or from the 250-Sheet Plain Paper Tray.
Caution! Do not place the printer in direct sunlight. Direct sunlight can interfere with the Automatic Paper-Type Sensor.
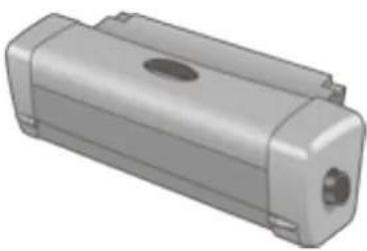
two-sided printing accessory (duplexer)
The duplexer is a special hardware feature that enables the printer to automatically print on both sides of a page.
natural_image
3D rendering of a gray plastic enclosure with a central hole and side tabs (no text or symbols)installing the duplexer
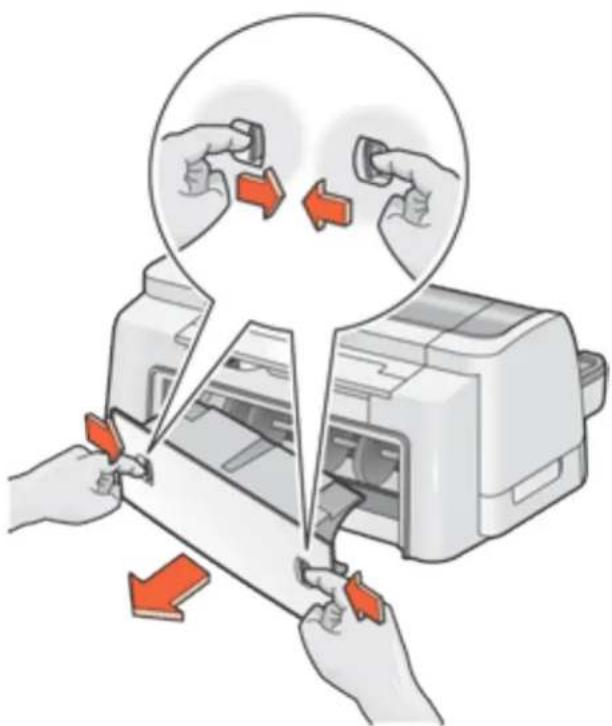
- Push the two latch handles on the printer's Rear Access Door toward each other, then remove the door.
natural_image
Illustration of hands using a printer to adjust or install a device, showing red arrows indicating process flow (no text or symbols present)Caution! Do not discard the Rear Access Door. In order to print, the duplexer or the Rear Access Door must be attached to the printer.
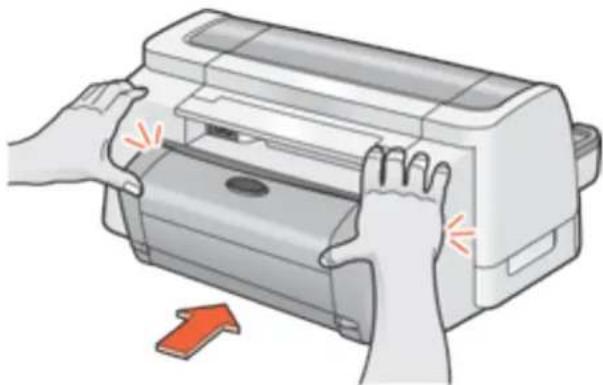
- Insert the duplexer in the back of the printer until both sides snap into place.
natural_image
Illustration of hands operating a printer with an orange arrow indicating press direction (no text or symbols)Do not press the buttons on either side of the duplexer when installing it in the printer. Use these buttons only when removing the duplexer from the printer.
printing with the duplexer
For instructions on printing two-sided documents with the duplexer, see two-sided printing.
supported paper types
The duplexer only works with certain media types. For a list of supported media types, see two-sided printing accessory specifications.
connectivity
The printer offers a number of options for connectivity, including:
USB
- parallel
- network

Not all options are available for all printer models.
USB
The printer connects to the computer with a USB cable. Your computer must be running a Microsoft Windows 98, Me, 2000, and/or XP operating system to use a USB cable.
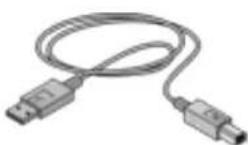
For instructions on connecting the printer with a USB cable, see the setup poster that came with the printer.
parallel
The printer can connect to your computer with a parallel cable.

The hp deskjet 6127 series printer does not offer a parallel connection. Use a USB or a network connection.
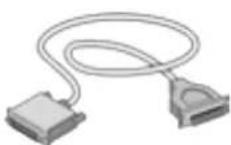
For instructions on connecting with a parallel cable, see the setup poster that came with the printer.
network
external wired network connection
- The printer can be connected directly to a computer on the network.
For instructions on connecting the printer directly to a computer on the network, use the printer software CD and follow the onscreen network setup instructions.
- The printer can be connected to a network with an HP Jetdirect print server.
For instructions on connecting the printer to a network with an HP Jetdirect print server, use the printer software CD and documentation that came with the HP Jetdirect print server.
To view available wired networking documentation, click here.

External wired networking is recommended for the hp deskjet 6122 series printer only.
external wireless network connection
The printer can be connected to a network with an HP Jetdirect wireless external print server.
For instructions on connecting the printer to a network with an HP Jetdirect wireless external print server, use the printer software CD or the documentation that came with the HP Jetdirect wireless external print server.
To view available wireless networking documentation, click here.
built-in ethernet network connection
Some printer models offer an built-in ethernet connection which allows the printer to be connected to an ethernet network without the need for an external print server, such as an HP Jetdirect print server.

The built-in ethernet feature is available on the hp deskjet 6127 series printer only.
To view documentation for the internal ethernet feature, click here.
printing
Click the following topic below to view an explanation of the printer software:
- print settings
- advanced features
Click the appropriate topic below to view instructions on printing functions:
- printing a document
• changing default settings
• printing digital photographs - two-sided printing
• using the automatic paper-type sensor
• selecting between paper trays - printing on a different first page
- printing a screen image
- watermarks
Click the appropriate topic below to view instructions for printing:
- plain paper
- envelopes
- transparencies
- labels
• index cards and other small media - photographs
- greeting cards
- posters
- banners
- iron-on transfers
print settings
The printer is controlled by software installed on your computer. Use the printer software, known as the printer driver, to change the print settings for a document.
To change printer settings, open the Printer Properties dialog box.
opening the printer properties dialog box
Follow these steps to open the Printer Properties dialog box:
- Open the file you want to print.
-
Follow one of these paths to select the Printer Properties dialog box, depending on the software program you are using:
-
Click File > Print, then select Properties.
- Click File > Print Setup, then select Properties.
- Click File > Print > Setup, then select Properties.
The Printer Properties dialog box appears.
using the printer properties dialog box
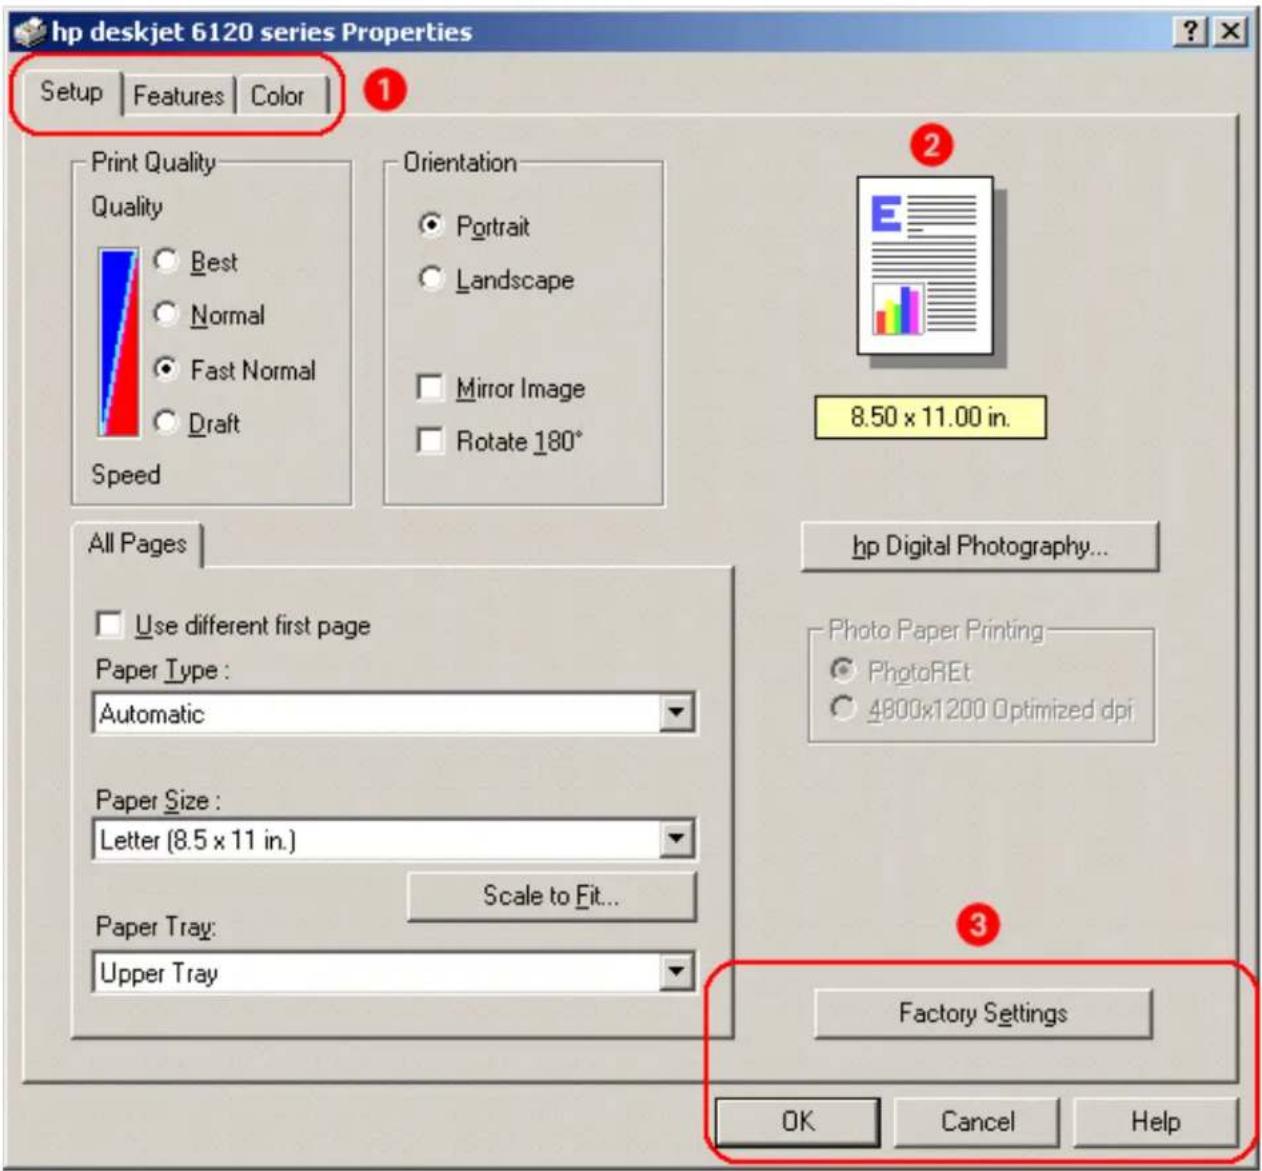
The Printer Properties dialog box has several tools to make it easy to use.
In addition to the tabs shown below, the Printer Properties dialog box may also have a Services tab. See tools for further information.
The Printer Properties dialog box has the following tabs and buttons:
text_image
hp deskjet 6120 series Properties Setup Features Color Print Quality Quality Best Normal Fast Normal Draft Orientation Portrait Landscape Mirror Image Rotate 180° Speed All Pages Use different first page Paper Type: Automatic Paper Size: Letter (8.5 x 11 in.) Scale to Fit... Paper Tray: Upper Tray Factory Settings OK Cancel Help 8.50 x 11.00 in. hp Digital Photography... Photo Paper Printing PhotoREt 4800x1200 Optimized dpi- Tabs: Click a tab to see its contents. To see a description of a specific tab, see Setup, Features, and Color.

To find more information about options on each tab screen, point to an option and click the right mouse button to display the What's This? dialog box. Click What's This? to view more information about the selected option.
- Preview: Shows how changes to the print settings affect the document.
- Buttons:
OK: Saves and applies settings
- Cancel: Closes the dialog box without saving the new settings
- Help: Opens online help
- Factory Settings: Restores default print settings
The Printer Properties dialog box may display an Apply button. The Apply button saves changes to settings without closing the dialog box.
setup tab
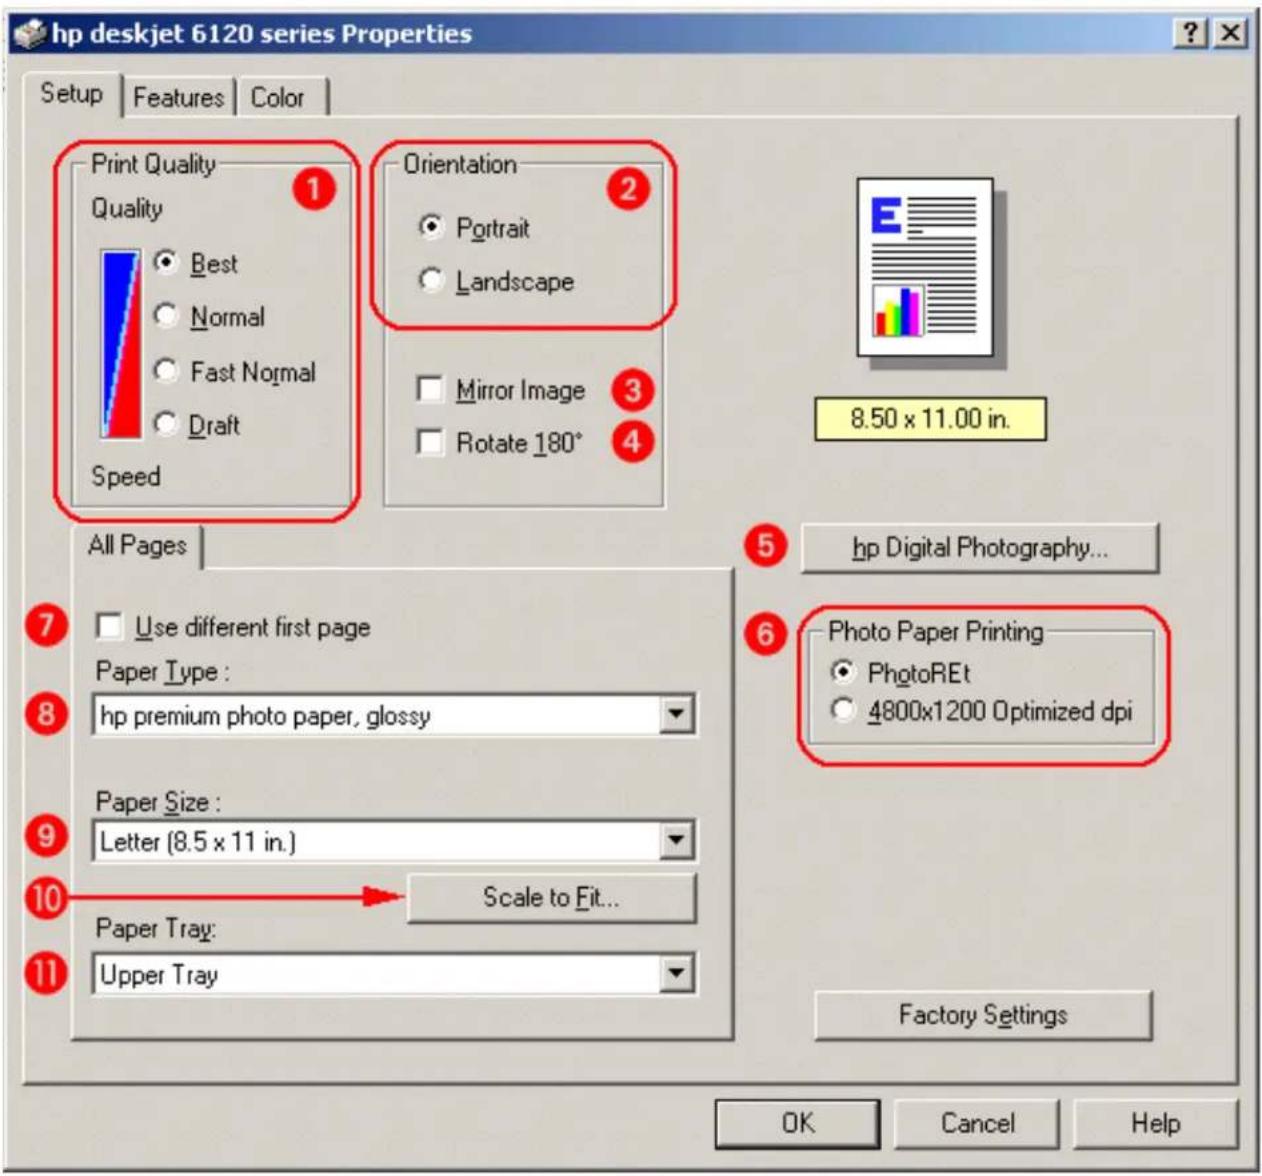
The Setup tab allows you to set these options:
text_image
hp deskjet 6120 series Properties Setup Features Color Print Quality Quality Best Normal Fast Normal Draft Speed Orientation Portrait Landscape Mirror Image Rotate 180° All Pages Use different first page Paper Type : hp premium photo paper, glossy Paper Size : Letter (8.5 x 11 in.) Scale to Fit... Paper Tray: Upper Tray 8.50 x 11.00 in. Photo Paper Printing PhotoREt 4800x1200 Optimized dpi Factory Settings OK Cancel Help- Print Quality: Quality of printout. There are four options to choose from: Best, Normal, Fast Normal, and Draft. Best provides the best print quality at the slowest printing speed. The print speed increases and the print quality lessens with Normal, Fast Normal, and Draft. Draft provides draft quality at the fastest printing speed.
- Orientation: Page layout.
-
Mirror Image: Reverses the printed image left to right. This feature is useful when printing iron-on transfers.
-
Rotate 180°: Rotates the printed image 180° top to bottom. This feature is not available for most paper types.
- hp Digital Photography: See printing digital photographs.
- Photo Paper Printing: Quality of graphic printing on certain papers, such as HP photo papers.
- Use different first page: Use this feature for printing cover pages or letterhead. See printing on a different first page.
- Paper Type: Type of paper used. Automatic enables the automatic paper-type sensor, unless the print quality is set to Draft or the printer is printing from the lower tray.
- Paper Size: Size of paper used.
- Scale to Fit: Size of text and images on a page.
-
Paper Tray: Select between paper trays:
-
Upper Tray: Prints from the upper tray.
- Lower Tray: Prints from the lower tray.
Automatic: upper or lower tray: Prints from the lower tray if the upper tray is empty.
features tab
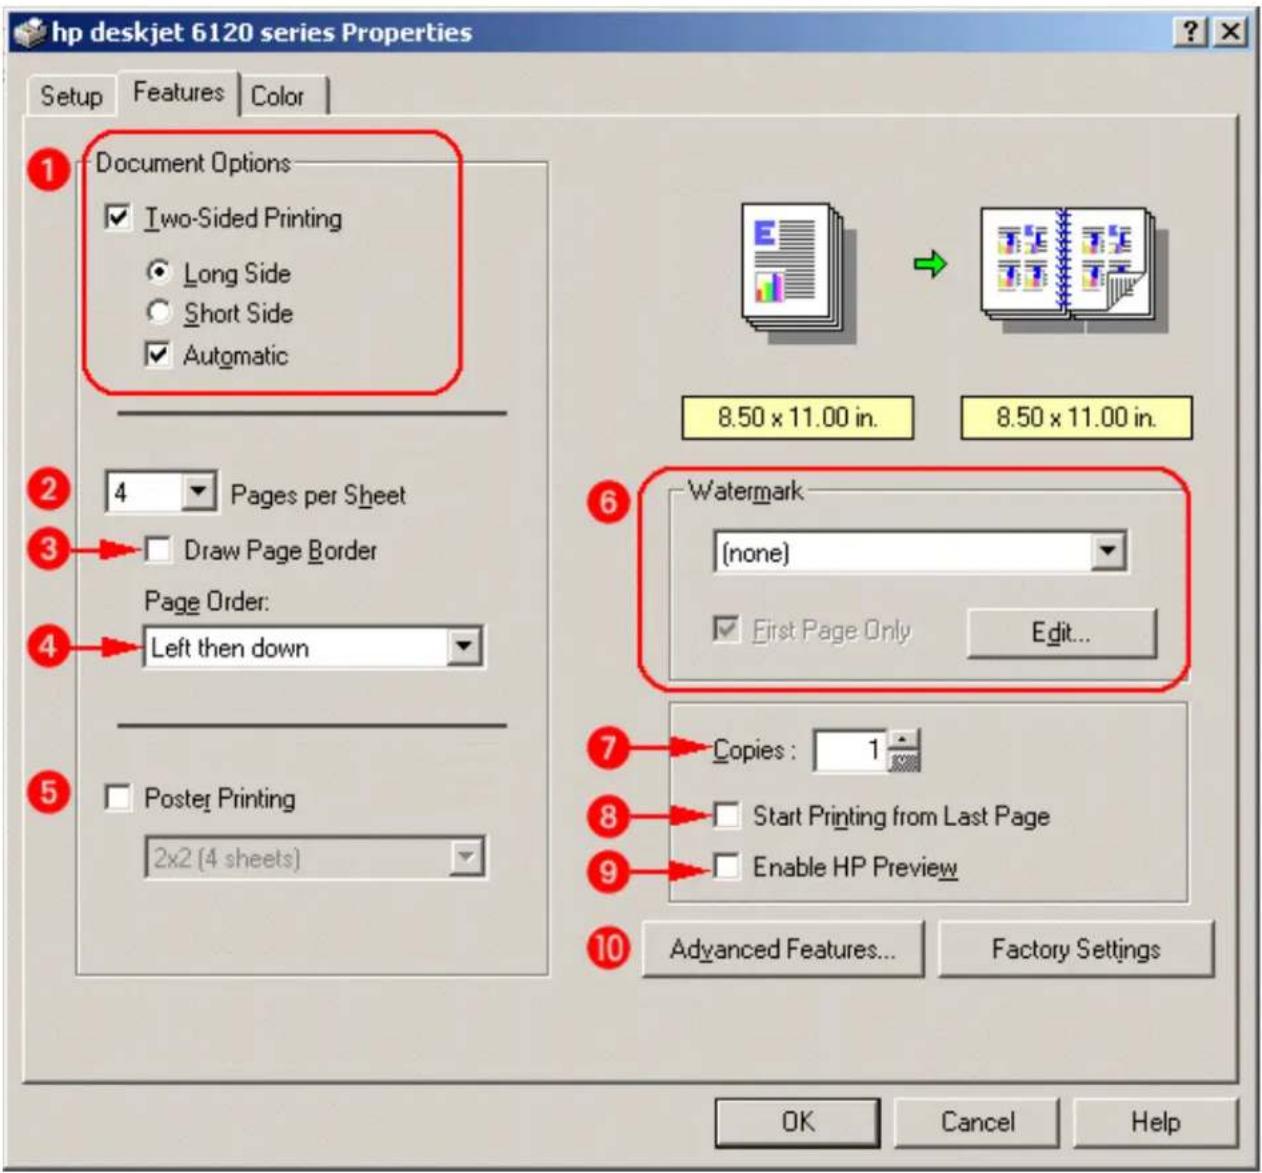
The Features tab allows you to set these options:
text_image
hp deskjet 6120 series Properties Setup Features Color Document Options ✓ Two-Sided Printing ○ Long Side ○ Short Side ✓ Automatic 8.50 x 11.00 in. 8.50 x 11.00 in. 4 Pages per Sheet 3 Draw Page Border Page Order: Left then down Watermark [none] ✓ First Page Only Edit... Poster Printing 2x2 (4 sheets) Copies: 1 Start Printing from Last Page Enable HP Preview Advanced Features... Factory Settings OK Cancel Help- Two-Sided Printing: See two-sided printing.
- Pages per Sheet: Number of pages printed on each sheet of paper.
- Draw Page Border: Place a border around each page.
- Page Order: Order in which multiple pages appear on a single sheet of paper.
- Poster Printing: Number of paper sheets used to print a poster.
- Watermark: See watermarks.
- Copies: Number of copies printed.
-
Start Printing from Last Page: Multiple page document is in readable order when printing is complete.
-
Enable HP Preview: View the layout of a document before it prints.
- Advanced Features: See advanced features.
color tab
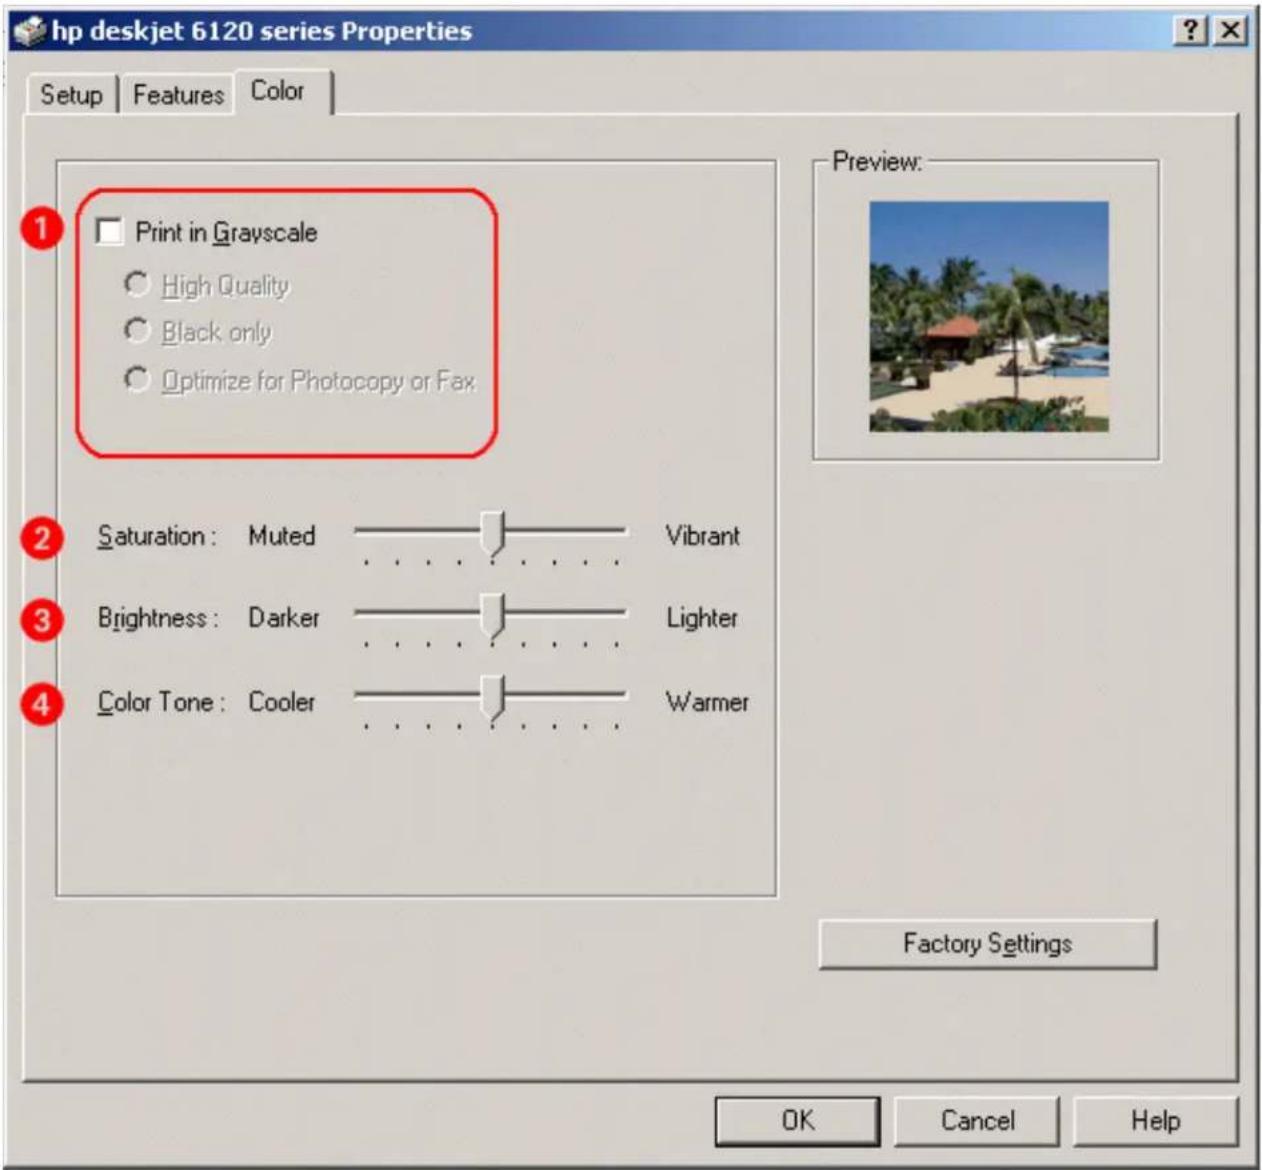
The Color tab allows you to set these options:
text_image
hp deskjet 6120 series Properties Setup Features Color 1 Print in Grayscale High Quality Black only Optimize for Photocopy or Fax 2 Saturation: Muted Vibrant 3 Brightness: Darker Lighter 4 Color Tone: Cooler Warmer Factory Settings Preview: OK Cancel Help- Print in Grayscale: Print in shades of gray.
- Saturation: Intensity of printed colors.
- Brightness: Lightness or darkness of printed colors.
- Color Tone: Warmth or coolness of printed colors.
advanced features
Printing photographs, transparencies, or documents with graphics may require you to set several options in the Advanced Features dialog box.
accessing the advanced features dialog box
Follow these steps to access the Advanced Features dialog box:
- Open the Printer Properties dialog box.
- Click the Features tab, then click the Advanced Features button.
using the advanced features dialog box
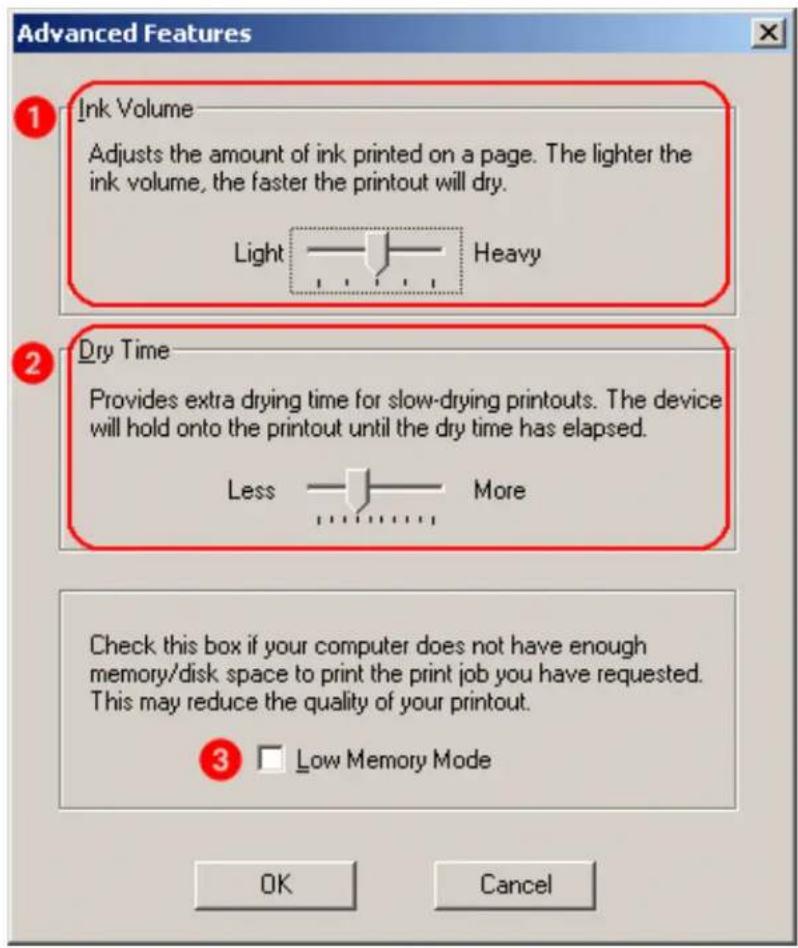
Use the Advanced Features dialog box to set these options:
text_image
Advanced Features 1 Ink Volume Adjusts the amount of ink printed on a page. The lighter the ink volume, the faster the printout will dry. Light Heavy 2 Dry Time Provides extra drying time for slow-drying printouts. The device will hold onto the printout until the dry time has elapsed. Less More Check this box if your computer does not have enough memory/disk space to print the print job you have requested. This may reduce the quality of your printout. 3 Low Memory Mode OK Cancel- Ink Volume: Select this feature to lessen or increase the amount of ink used to print a document.
- Dry Time: Select this feature to increase the time the printer holds a document after printing if the ink on your printed document smears.
- Low Memory Mode: Select this option to allow the draft to be printed if your computer does not have enough memory or disk space to print a document.

Using Low Memory Mode may reduce the quality of your printout.
printing a document
Follow these instructions to print a document or change your print settings:
- Open the file you want to print.
- Follow one of these paths to open the Printer Properties dialog box:
- Click File > Print, then select Properties.
- Click File > Print Setup, then select Properties.
- Click File > Print > Setup, then select Properties.
The Printer Properties dialog box appears.
-
Select the Setup tab to choose print quality, orientation, paper-type, and paper tray options, and access HP Digital Photography options.
-
Select the Features tab to choose two-sided printing, pages per sheet, number of copies printed, print order, poster printing, watermark printing, and to open the Advanced Features dialog box.
-
Select the Color tab to make color and contrast adjustments.
-
Click OK to return to the Print or Print Setup screen.

The Printer Properties dialog box may also display the Apply button. The Apply button saves changes to settings without closing the dialog box.
- Click OK to print.
changing default settings
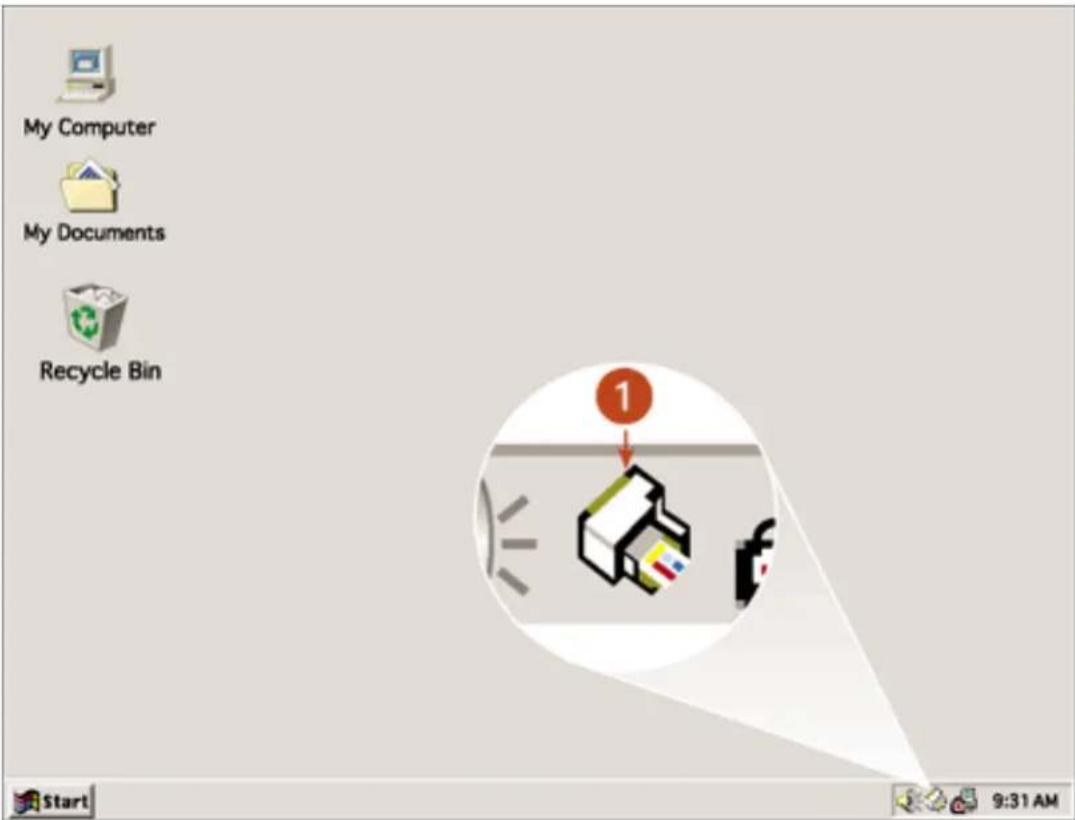
taskbar icon
The taskbar icon lets you change the default print settings. Default print settings apply to all documents you print with the printer.
text_image
My Computer My Documents Recycle Bin 1 Start 9:31 AM- taskbar icon
changing printer settings
- Right-click the taskbar icon.

When you right-click the taskbar icon, a list of hp printers installed on the computer appears. If necessary, select the printer for which you want to change the default settings. Then right-click the taskbar icon again.
- Select Change Default Print Settings.
The Printer Properties dialog box appears.
-
Select the print properties you wish to use for the default print settings.
-
Click OK.
A dialog box appears stating that the new settings will be used every time you print. If you do not want to see this dialog box again, select Don't show me this message again.
- Click OK to save the new default print settings.
These settings will remain in effect unless you change the default print settings again.
turning off the taskbar icon
- Right-click the taskbar icon.
The taskbar shortcut menu screen appears.
- Select Exit to turn off the taskbar icon.
turning on the taskbar icon
Click Start > Programs > Hewlett-Packard > [hp deskjet series] > taskbar icon. The taskbar appears automatically whenever you restart you computer.

For a description of available print options, see print settings.
printing digital photographs
The printer has several features to improve the print quality of your digital photographs. These features are found in the hp Digital Photography Options dialog box.
To access these options:
- Open the Printer Properties dialog box.
- Click the Setup tab, then click the hp Digital Photography button.
using the hp digital photography options dialog box
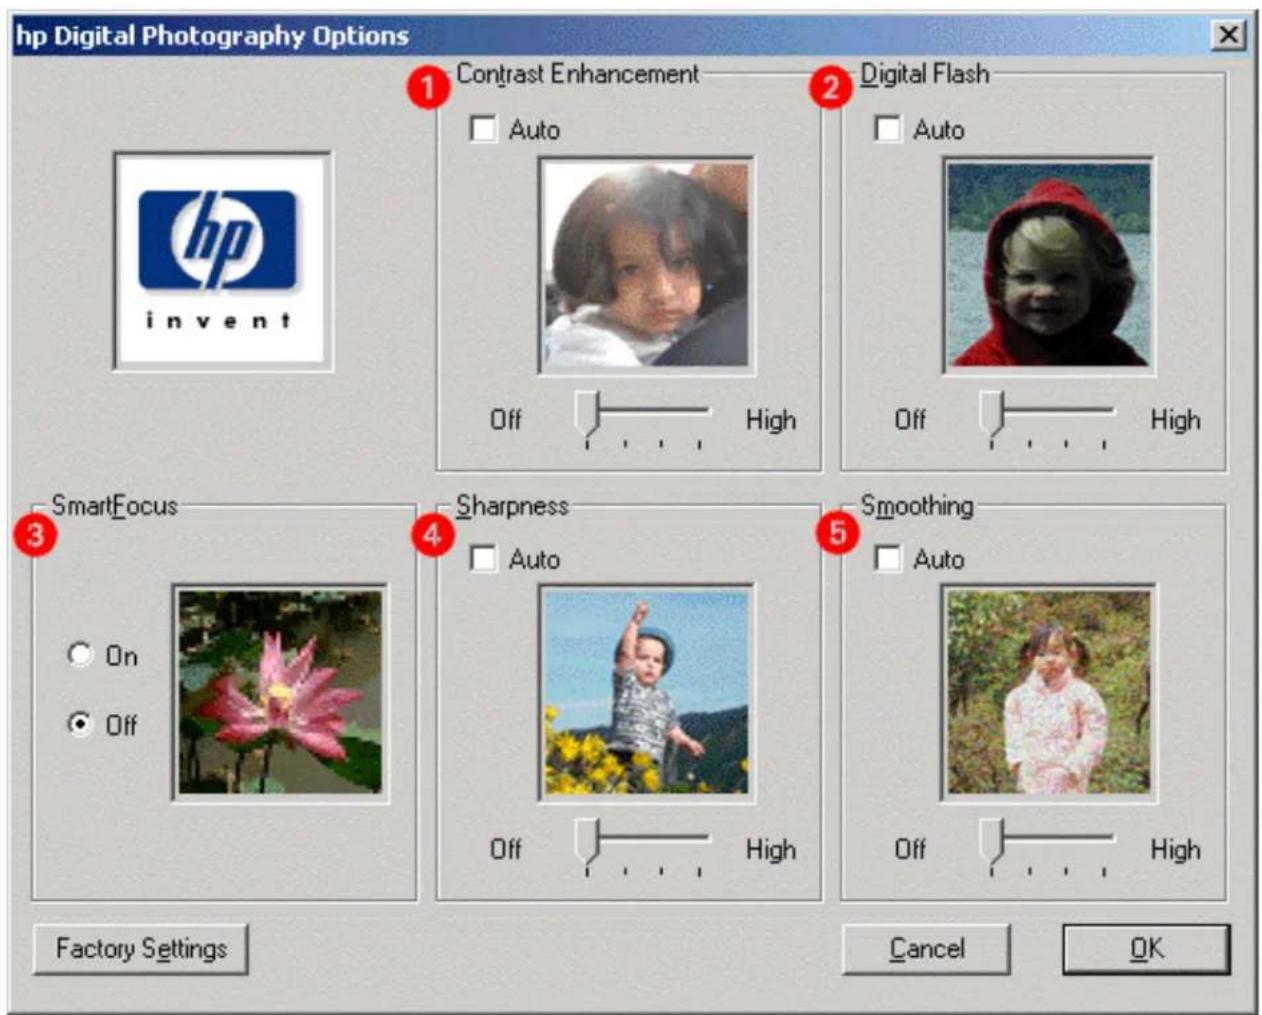
Use the hp Digital Photography Options dialog box to set these options:
text_image
hp Digital Photography Options 1 Contrast Enhancement 2 Digital Flash Auto Off High Off High SmartFocus 3 Sharpness 4 On Off Off High Smoothing 5 Auto Off High Factory Settings Cancel OK- Contrast Enhancement: Adjust contrast to preference. Click Auto to allow the printer driver to automatically balance contrast.
- Digital Flash: Lighten dark images. Click Auto to allow the printer driver to automatically balance lightness and darkness.
-
SmartFocus: Click On to allow the printer driver to automatically focus images.
-
Sharpness: Adjust image sharpness to preference. Click Auto to allow the printer driver to automatically balance sharpness.
- Smoothing: Adjust distortion to preference. Click Auto to allow the printer driver to automatically balance smoothing.
two-sided printing
Use one of the following methods to print two-sided documents:
• automatic two-sided printing
• manual two-sided printing
automatic two-sided printing
To print two-sided documents automatically, the duplexer must be attached to the printer.
The duplexer only works with certain media types. For a list of supported media types, see two-sided printing accessory specifications.
If you want to print a two-sided document on a media type not supported by the duplexer, see manual two-sided printing.
printing instructions
Follow these instructions to print a two-sided document:
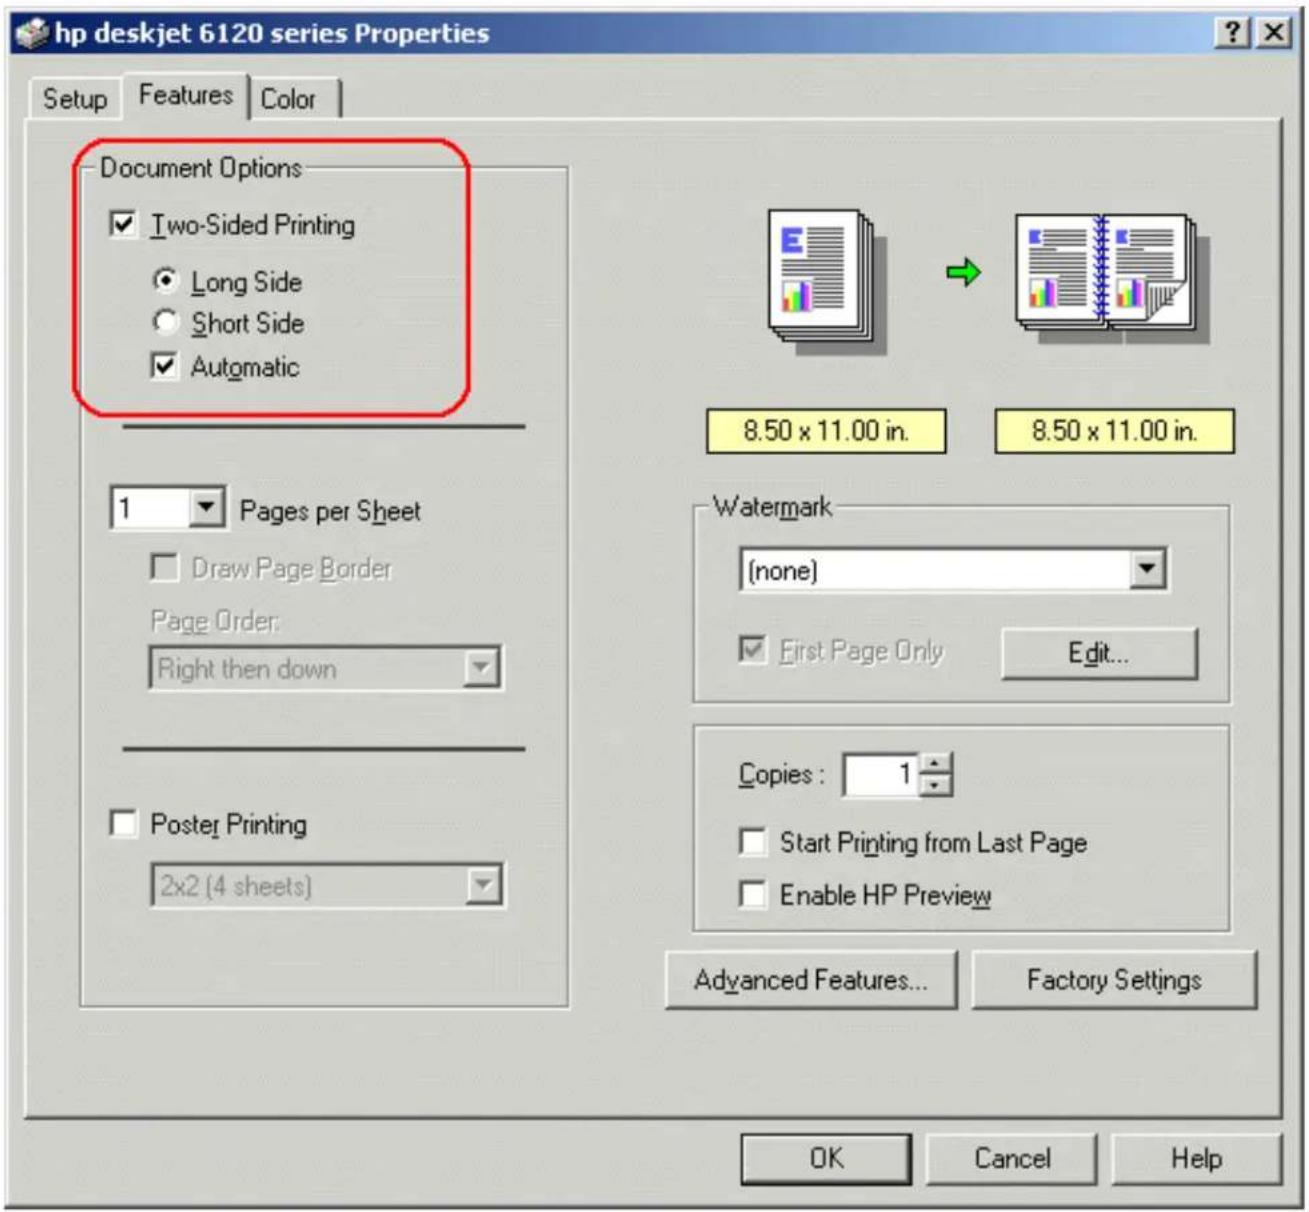
- Open the Printer Properties dialog box, then select the Features tab.
text_image
hp deskjet 6120 series Properties Setup Features Color Document Options ✓ Two-Sided Printing ● Long Side ○ Short Side ✓ Automatic 8.50 x 11.00 in. 8.50 x 11.00 in. Pages per Sheet Draw Page Border Page Order: Right then down Watermark [none] ✓ First Page Only Edit... Poster Printing 2x2 (4 sheets) Copies : 1 Start Printing from Last Page Enable HP Preview Advanced Features... Factory Settings OK Cancel Help- Check Two-Sided Printing.
The Two-Sided Printing Margin dialog box appears.
-
Select the appropriate page content option, then click OK to return to the Features tab.
-
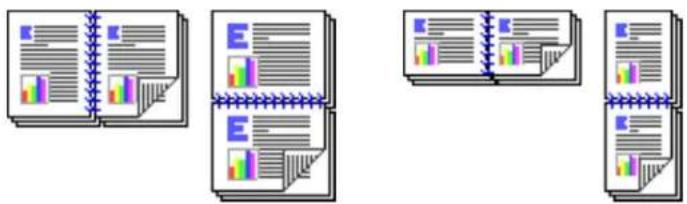
Select one of the binding options:
Long Side Short Side
text_image
Illustration showing four different types of notebooks with charts and color-coded sections, likely representing a digital document or book format.-
Select the Automatic box.
-
Change any other desired print settings, then click OK.
When the first side prints, the printer pauses while the first side of the printed page dries. Once dry, the second side of the page is printed and released.
For a description of the duplexer, see two-sided printing accessory (duplexer).
manual two-sided printing
Use the manual two-sided printing feature if:
• The duplexer is not attached to the printer
- You want to print a two-sided document on a media type the duplexer does not support
rear access door
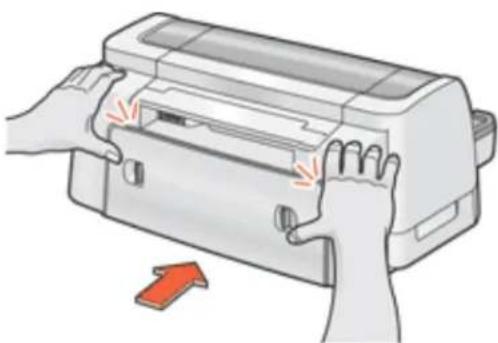
If the duplexer is not attached to the printer, the printer cannot feed paper unless the Rear Access Door is attached.
Push the Rear Access Door into place.
natural_image
Illustration of hands operating a printer with an orange arrow indicating press or action (no text or symbols present)printing instructions
Follow these instructions to print a two-sided document manually:
- Open the Printer Properties dialog box, then select the Features tab.
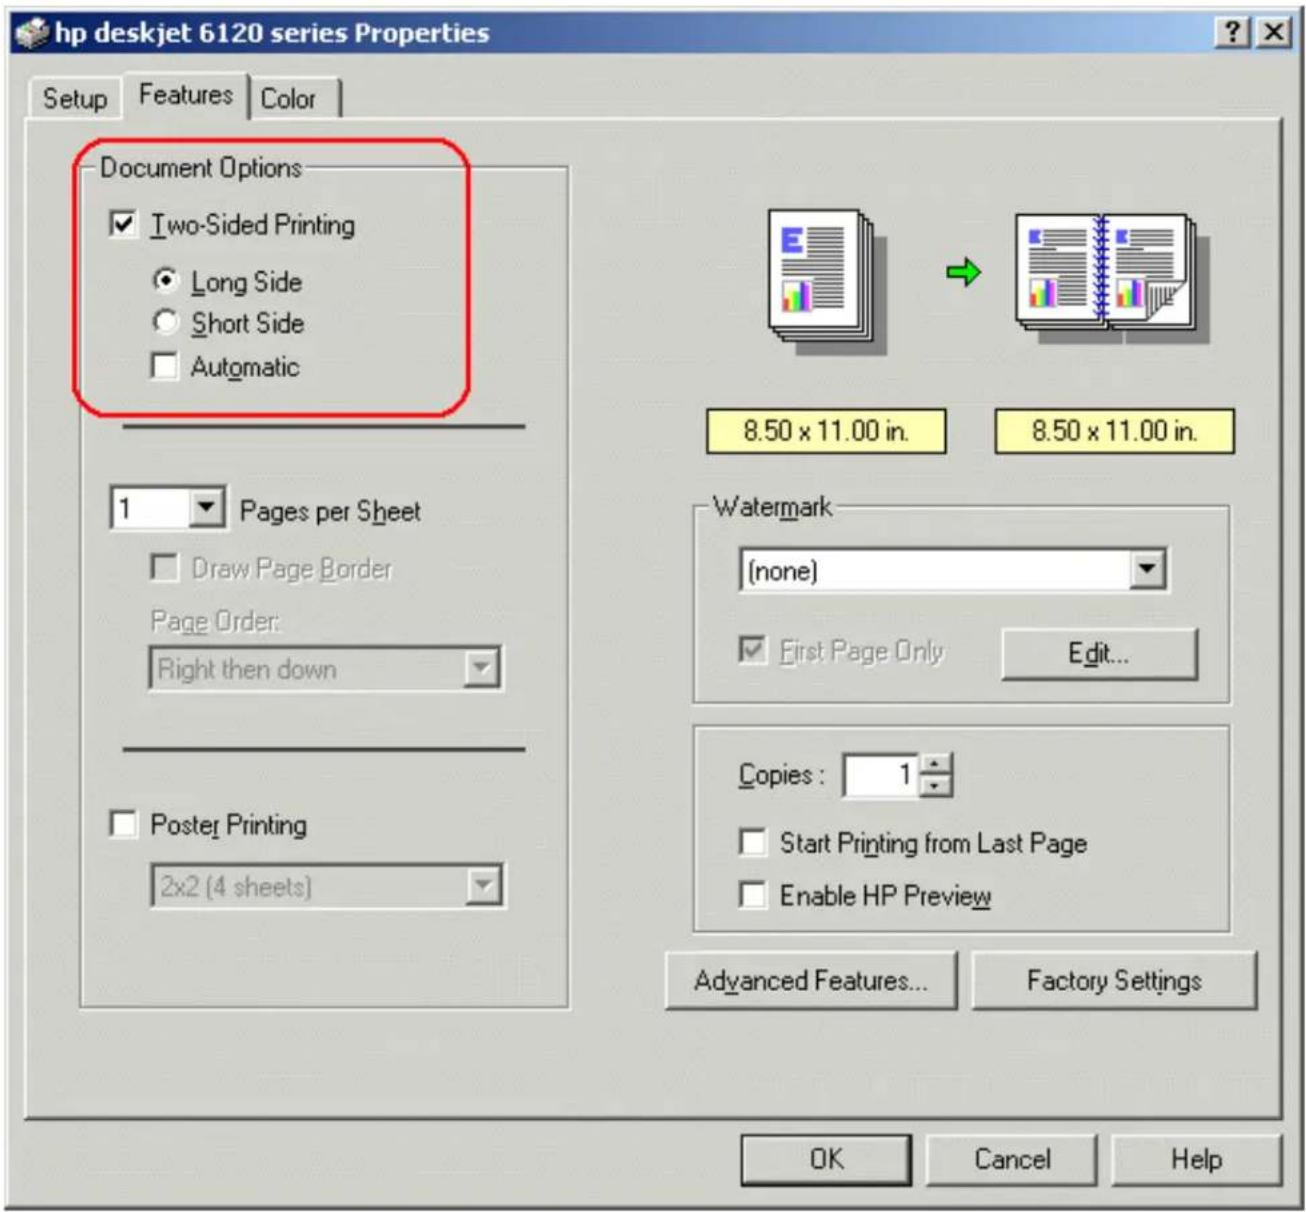
text_image
hp deskjet 6120 series Properties Setup Features Color Document Options ✓ Two-Sided Printing ● Long Side ○ Short Side □ Automatic 8.50 x 11.00 in. 8.50 x 11.00 in. Pages per Sheet Draw Page Border Page Order: Right then down Watermark (none) ✓ First Page Only Edit... Poster Printing 2x2 (4 sheets) Copies : 1 Start Printing from Last Page Enable HP Preview Advanced Features... Factory Settings OK Cancel Help- Check Two-Sided Printing.
If the Two-Sided Printing Margin dialog box appears, click Cancel.
-
Deselect the Automatic box.
-
Select one of the binding options:
Long Side Short Side
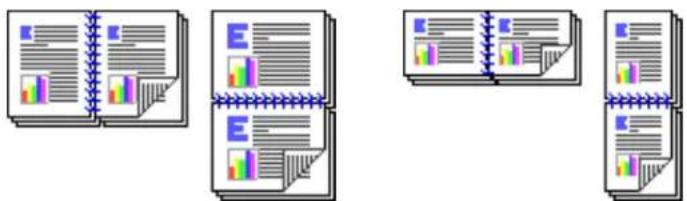
text_image
Illustration showing four different types of notebooks with visible text and charts, likely representing a document or notebook layout.- Change any other desired print settings, then click OK.
The printer automatically prints odd-numbered pages first. Once the odd-numbered pages are printed, a message appears prompting you to reload the paper so that the even-numbered pages can be printed.
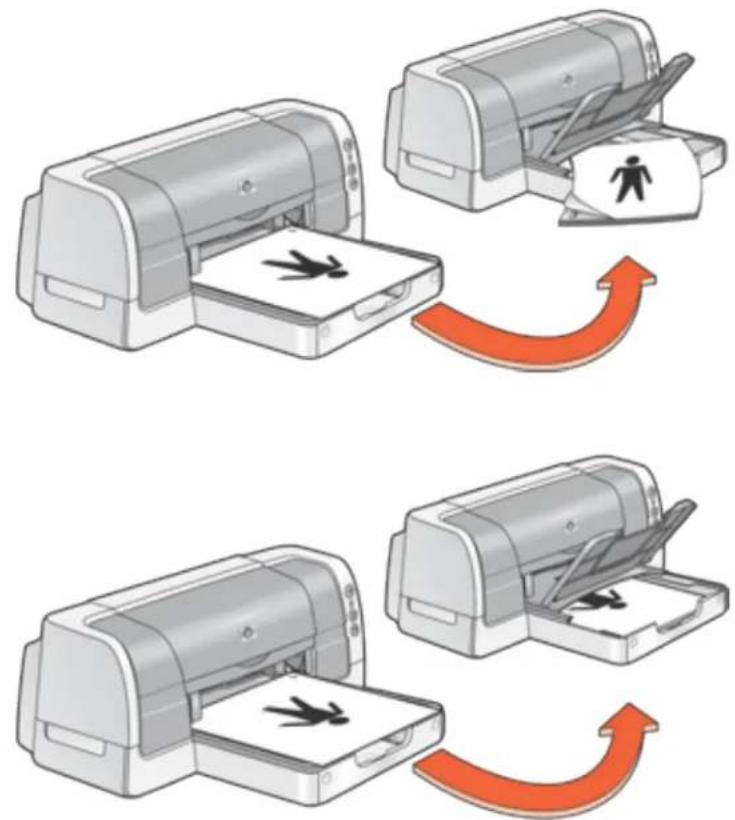
text_image
Illustration showing three steps of printer printing process with icons and arrows indicating motion direction- Reload the paper, then click Continue.
using the automatic paper-type sensor
availability
The Automatic Paper-Type Sensor is available to be used for documents printed from the upper tray in any print quality mode other than Draft.
The Automatic Paper-Type Sensor is not operational for documents printed in Draft mode or from the 250-Sheet Plain Paper Tray.
turning on the automatic paper-type sensor
Open the Printer Properties dialog box and select the following options:
| tab setting | |
| Setup | Paper Type: AutomaticPrint Quality: Best, Normal, or Fast NormalPaper Tray: Upper or Automatic |

If Automatic is selected as the paper tray, verify that the upper paper tray contains paper. If the upper tray is empty, the Automatic Paper-Type Sensor is not operational for that print job.
turning off the automatic paper-type sensor
Open the Printer Properties dialog box and select one of the following options:
| tab setting | |
| Setup | Paper Type: Any paper type other than Automatic-or-Print Quality: Draft-or-Paper Tray: Lower (if using the 250-Sheet Plain Paper Tray) |
For a description of the Automatic Paper-Type Sensor, see automatic paper-type sensor.
selecting between paper trays
The 250-Sheet Plain Paper Tray may be included with your printer. The 250-Sheet Plain Paper Tray can be purchased separately from an authorized HP dealer.
For a description of the 250-Sheet Plain Paper Tray, see 250-sheet plain paper tray.
printing instructions
Follow theses steps to select between the paper trays.
- Open the Printer Properties dialog box.
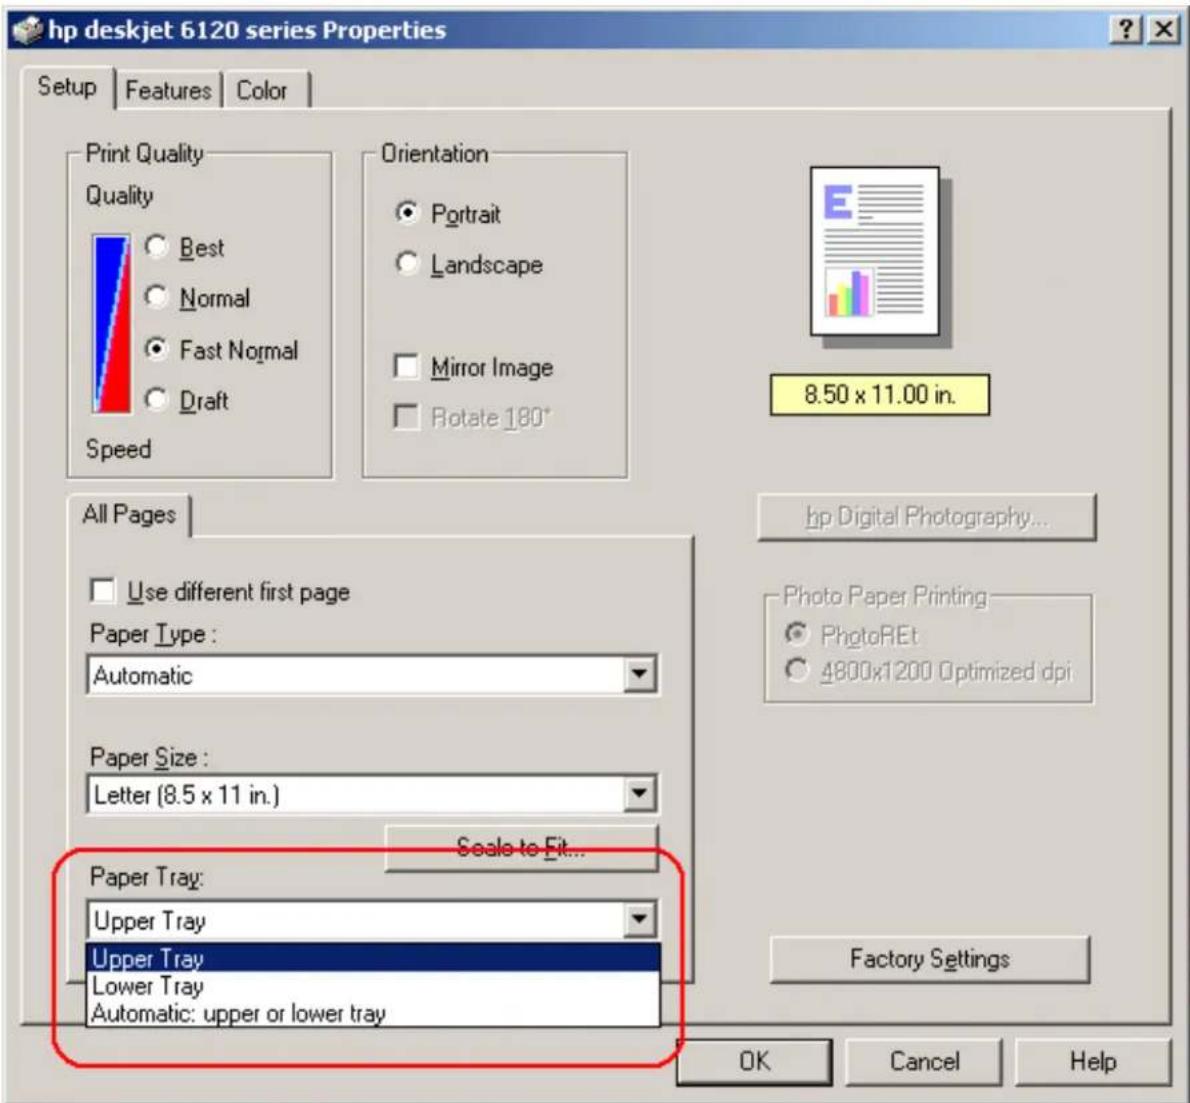
text_image
hp deskjet 6120 series Properties Setup Features Color Print Quality Quality Best Normal Fast Normal Draft Orientation Portrait Landscape Mirror Image Rotate 180° 8.50 x 11.00 in. All Pages Use different first page Paper Type : Automatic Paper Size : Letter (8.5 x 11 in.) Scale to Fit... Paper Tray: Upper Tray Upper Tray Lower Tray Automatic: upper or lower tray HP Digital Photography... Photo Paper Printing PhotoREt 4800x1200 Optimized dpi Factory Settings OK Cancel Help- Select one of the following options in the Paper Tray box:
- Upper Tray: Prints from the In tray. If the In tray is empty, an Out of Paper message appears.
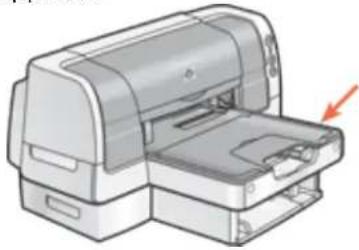
natural_image
Illustration of a printer with an arrow pointing to the paper (no text or symbols present)- Lower Tray: Prints from the 250-Sheet Plain Paper Tray. If the lower tray is empty, an Out of Paper message appears.
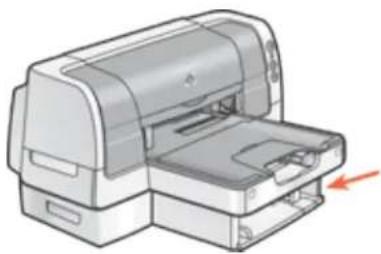
natural_image
Illustration of a printer with a paper feeding into a slot, showing no text or symbols.Automatic: upper or lower tray: Prints from the In tray. If the In tray is empty, the printer prints from the 250-Sheet Plain Paper Tray. If the lower tray is empty, an Out of Paper message appears.
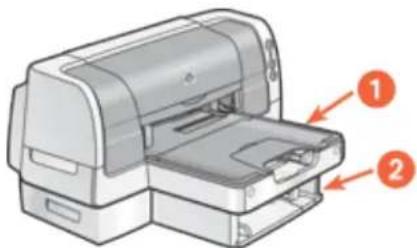
natural_image
Illustration of a printer with two labeled parts (1 and 2), showing internal structure without any text or symbols.- Change any other desired print settings, then click OK.
printing on a different first page
The Use different first page feature prints the first page of a multi-page document on a different paper-type than is used for the rest of the document.
Follow these steps to print with the Use different first page feature:
- Follow the appropriate instructions for loading paper:
- if the 250-Sheet Plain Paper tray is being used...
Load the paper for the first page in the In tray, then load plain paper in the lower tray.
- if the 250-Sheet Plain Paper tray is not being used...
Load the paper for the bulk of the document in the In tray, then load the paper for the first page on top of the paper stack in the In tray.
For instructions on loading a specific paper-type, click here, then select the appropriate paper-type.
- Open the Printer Properties dialog box.
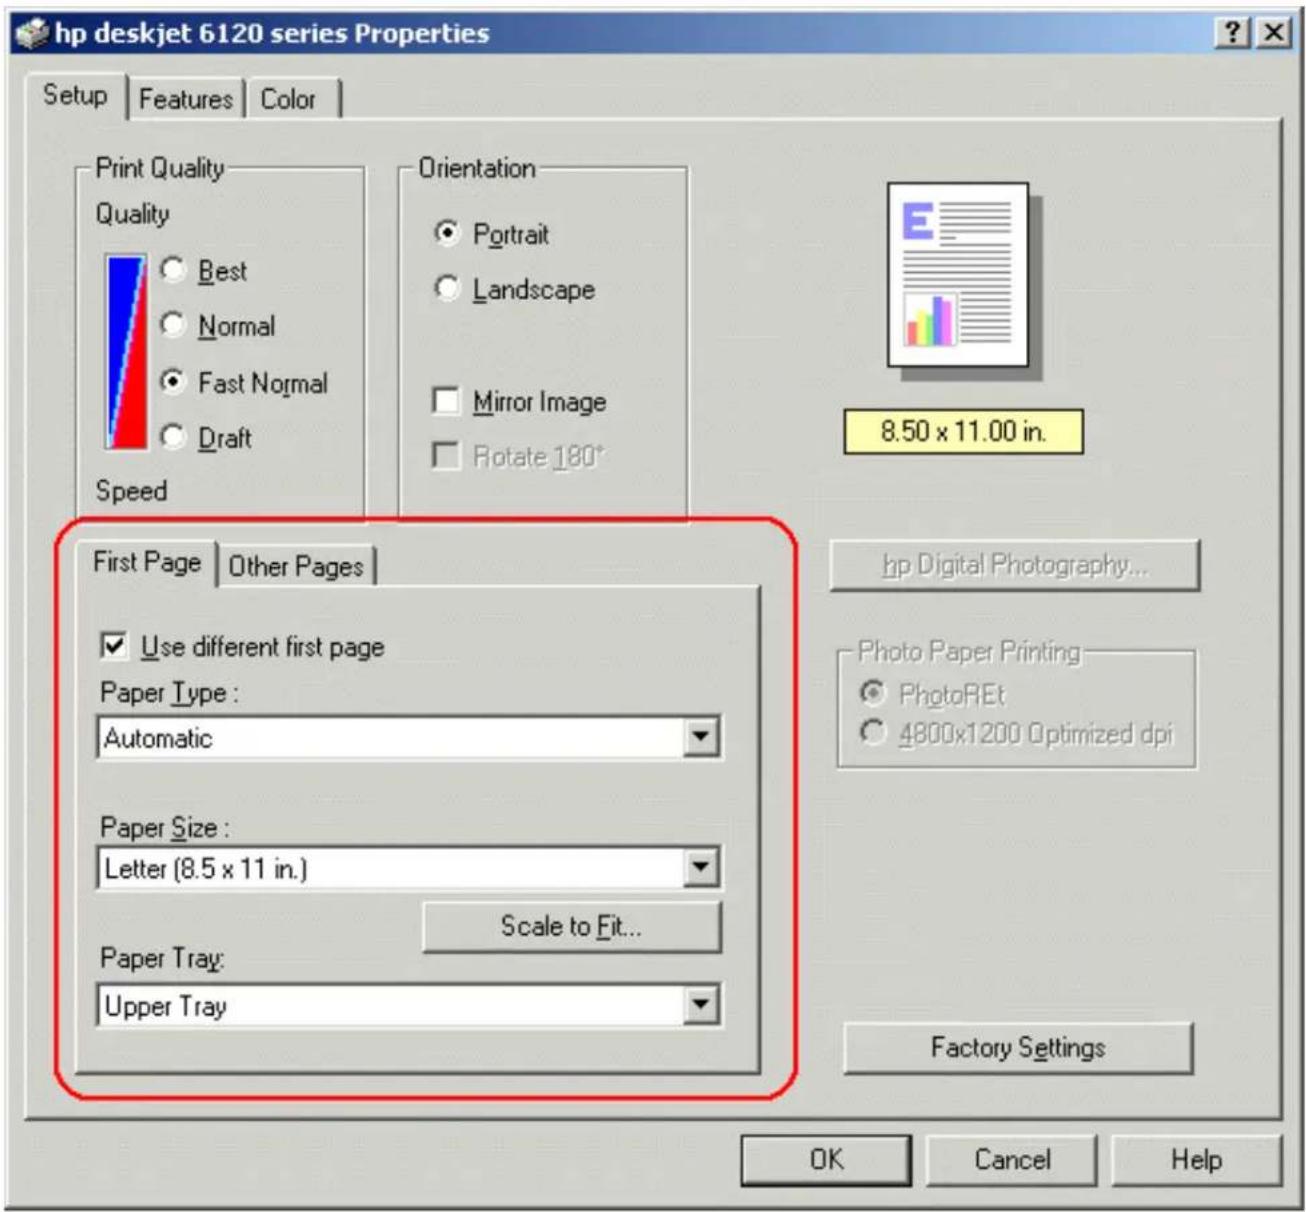
text_image
hp deskjet 6120 series Properties Setup Features Color Print Quality Quality Best Normal Fast Normal Draft Orientation Portrait Landscape Mirror Image Rotate 180° 8.50 x 11.00 in. First Page Other Pages Use different first page Paper Type: Automatic Paper Size: Letter (8.5 x 11 in.) Scale to Fit... Paper Tray: Upper Tray HP Digital Photography... Photo Paper Printing PhotoREt 4800x1200 Optimized dpi Factory Settings OK Cancel Help- Click the Use different first page checkbox.
- Select the paper-type and paper size for the first page.
- Select Upper in the Paper Tray box.
- Click the Other Pages tab.
- Select Upper or Lower in the Paper Tray box.
- Select any other desired print settings, then click OK.

Do not print the document in reverse order (last page first).
printing a screen image
The HP Print Screen Utility* allows you to print a screen image displayed on the computer monitor. It works when your HP deskjet printer is selected as the default printer.
* This option may not be active or available depending on printer installation.
printing guidelines
Use either letter-sized or A4-sized paper to print the image.
print screen button
- Press the Print Screen button on the keyboard to print a screen.
—or—
- Press the Alt and the Print Screen button on the keyboard at the same time to print an active application window.
configuring the hp print screen utility
Access the HP Print Screen Utility configuration window from Start > Programs > Hewlett-Packard > [hp deskjet printer] > hp print screen.
Use the configuration window to set up various options for the HP Print Screen Utility:
- Unload/ Load HP Print Screen activates or deactivates the utility.
- Start with Windows determines whether the HP Print Screen Utility launches automatically when Windows is started.
- Capture screen performs the same action as if the Print Screen button on the keyboard were pressed.
• Orientation toggles between landscape and portrait mode.
watermarks
Watermarks appear as background printing on documents.
applying an existing watermark to a document
Follow these steps to apply an existing watermark to a document:
- Open the Printer Properties dialog box.
- Click the Features tab.
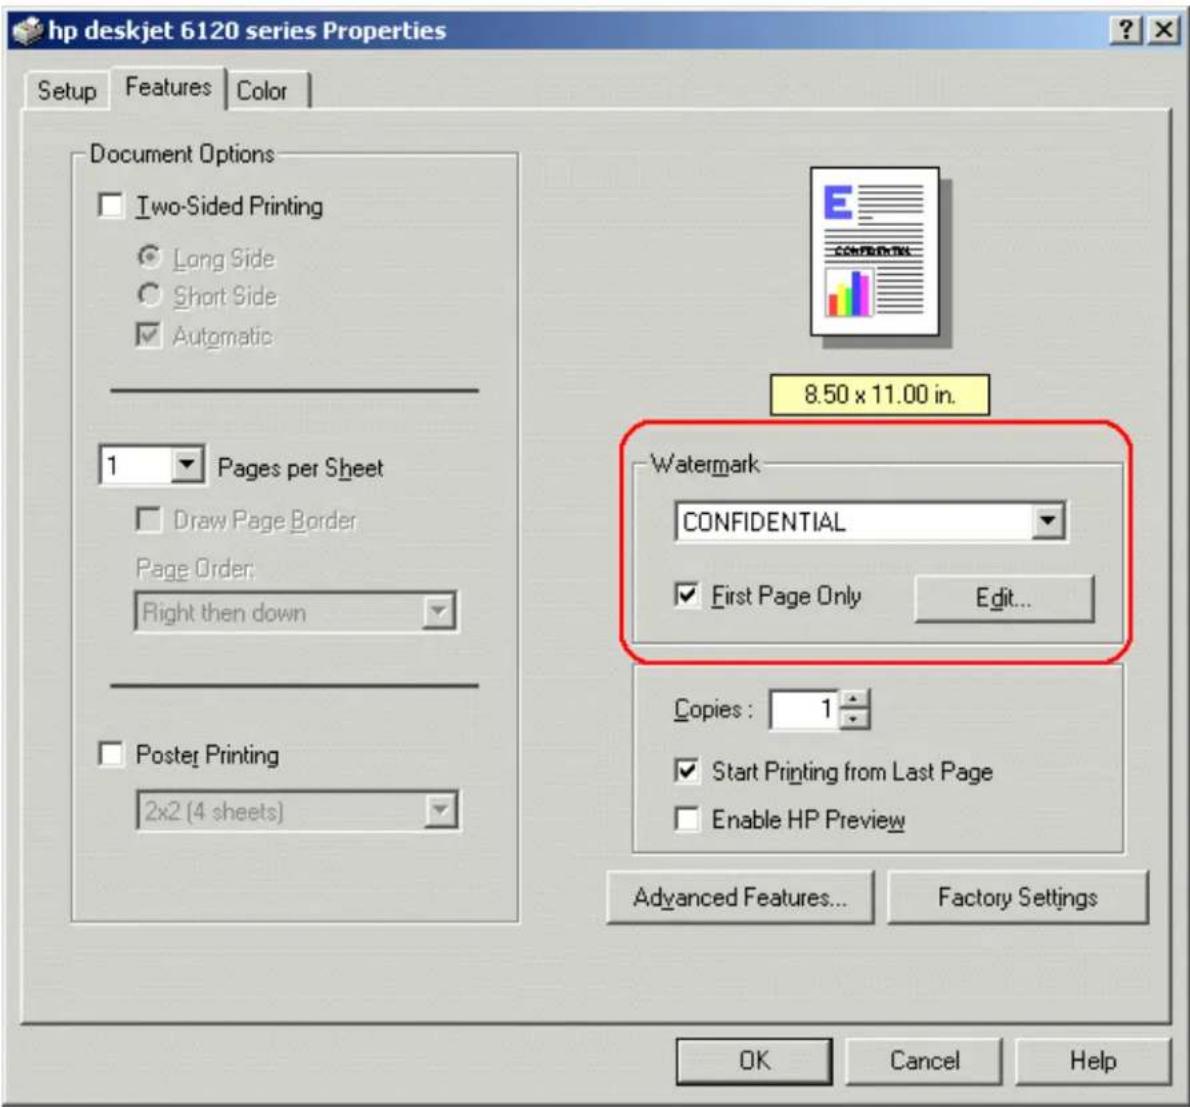
text_image
hp deskjet 6120 series Properties Setup Features Color Document Options Two-Sided Printing Long Side Short Side Automatic 1 Pages per Sheet Draw Page Border Page Order: Right then down Poster Printing 2x2 (4 sheets) 8.50 x 11.00 in. Watermark CONFIDENTIAL First Page Only Edit... Copies: 1 Start Printing from Last Page Enable HP Preview Advanced Features... Factory Settings OK Cancel Help- Select the watermark you want from the list.
-
Do one of the following:
-
If you want the watermark to appear on the first page only, select First Page Only.
-
If you want the watermark to appear on all printed pages, leave First Page Only unchecked.
-
Print the document according to the instructions for the paper type.
creating or changing a watermark
Follow these steps to create or change a watermark:
- Open the Printer Properties dialog box.
- Click the Features tab.
- Click the Edit button.
The Watermark Details dialog box appears.
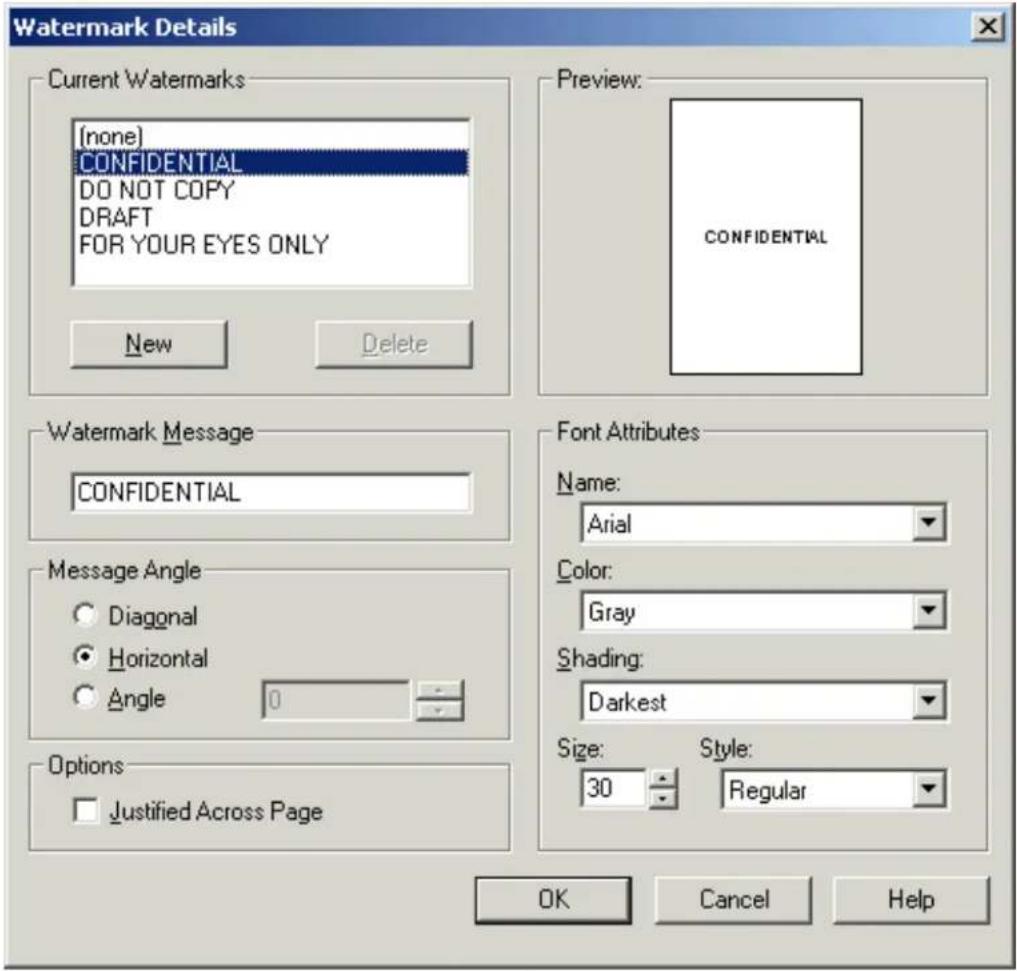
text_image
Watermark Details Current Watermarks [none] CONFIDENTIAL DO NOT COPY DRAFT FOR YOUR EYES ONLY New Delete Preview: CONFIDENTIAL Watermark Message CONFIDENTIAL Message Angle Diagonal Horizontal Angle 0 Options Justified Across Page Font Attributes Name: Arial Color: Gray Shading: Darkest Size: 30 Style: Regular OK Cancel Help-
Do one of the following:
-
Select an existing watermark to change
—or— -
Click the New button
-
Create or change the watermark message, message angle, and font attributes you want.
- After you have set the watermark details, click OK.
- Apply the watermark.

To find more information about options on each tab screen, point to an option and click the right mouse button to display the What's This? dialog box. Click What's This? to view more information about the selected option.
plain paper
preparing to print
- Raise the Out tray.
- Slide out both paper guides.
- Do one of the following:
- For letter, executive, and B5 sized paper, place up to 150 sheets of paper in the In tray.
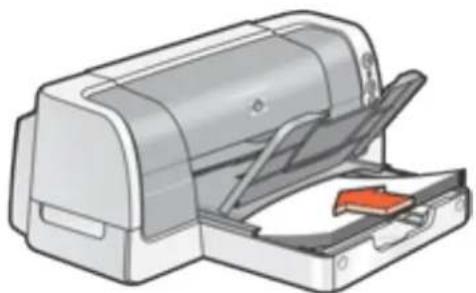
natural_image
Illustration of a printer with an open lid and paper clip (no text or symbols)—or—
- For legal-sized and A4 paper, flip down the In tray door, pull out the paper length guide, then place up to 150 sheets of paper in the In tray.
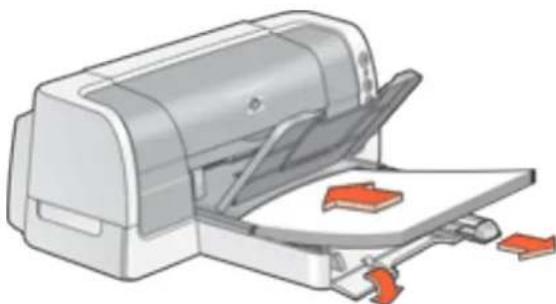
natural_image
Illustration of a printer with paper feed and paper roll, showing mechanical components without any text or symbols.- Slide the paper guides firmly against the paper.
- Lower the Out tray.

Plain paper can also be printed from the 250-Sheet Plain Paper Tray.
printing on plain paper
- Open the Printer Properties dialog box, then select the following setting:
| tab setting | |
| Setup | Paper Type:Automatic or Plain PaperPaper Tray:Upper, Lower, or Automatic |
- Select any other desired print settings.
- After you have selected the print settings, click OK.

For a description of available print options, see print settings.
envelopes
Print a single envelope using the envelope slot, or print multiple envelopes using the In tray.
printing guidelines
- Never place more than 22 envelopes in the In tray at one time.
- Avoid using envelopes that have clasps or windows.
- Avoid using envelopes that are shiny or embossed; envelopes with thick, irregular, or curled edges; or envelopes that are wrinkled, torn, or otherwise damaged.
- Align the envelope edges before inserting them in the In tray.
preparing to print a single envelope
-
Place the envelope with the flap side on the left and facing up into the single envelope slot.
-
Push the envelope forward until it stops.
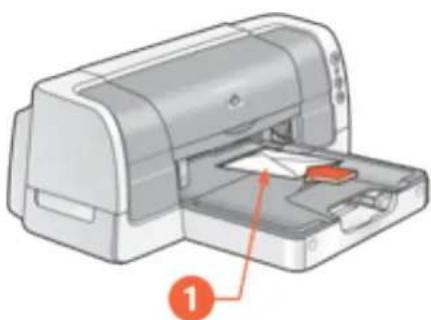
natural_image
Illustration of a printer with paper inside, showing internal structure and a numbered label (1) pointing to the paper's edge.- flap
preparing to print multiple envelopes
-
Remove the Out tray.
-
Slide out both paper guides, then remove all paper from the In tray.
-
Place no more than 22 envelopes with the flap side on the left and facing up in the In tray.
-
Push the envelopes forward until they stop.
-
Slide the paper guides firmly against the edges of the envelopes.
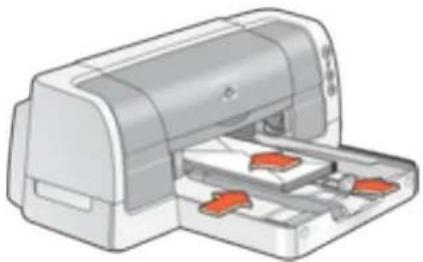
natural_image
Illustration of a printer with paper feed and paper tray (no text or symbols)- Replace the Out tray.
printing the envelopes

If your software program includes an envelope-printing feature, follow the instructions provided with the software program. Otherwise, follow the instructions below.
- Open the Printer Properties dialog box, then select the following settings:
| tab setting | |
| Setup | Paper Type: Automatic or Plain PaperPaper Size: Appropriate envelope sizeOrientation: Appropriate envelope orientationPaper Tray: Upper |
- Select any other desired print settings, then click OK.

For a description of available print options, see print settings.
transparencies
printing guidelines
For great results use hp premium inkjet transparency film.
preparing to print
-
Raise the Out tray.
-
Slide out both paper guides, then remove all paper from the In tray.
-
Fan the edges of the transparency sheets to separate them, then align the edges.
-
Place no more than 30 transparency sheets in the In tray with the rough side down and the adhesive strip toward the printer.
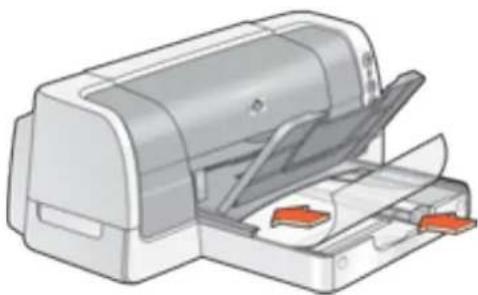
natural_image
Illustration of a printer with open lid and internal slots, showing paper feed and paper clip (no text or symbols)-
Carefully push the transparencies forward until they stop so that none of the adhesive strips catch on one another.
-
Slide the paper guides firmly against the transparency sheets.
-
Lower the Out tray.
printing transparencies
- Open the Printer Properties dialog box, then select the following setting:
| tab setting | |
| Setup | Paper Type: Automatic or appropriate transparency filmPaper Tray: Upper |
- Select any other desired print settings, then click OK.

For a description of available print options, see print settings.
The printer may wait for transparencies to dry before releasing them to the Out tray.
labels
printing guidelines
• Use only paper labels that are designed specifically for inkjet printers.
• Use only full sheets of labels.
• Use only US Letter-sized or A4-sized sheets of labels.
- Verify that the labels are not sticky, wrinkled, or pulling away from the protective backing.
- Do not use plastic or clear labels. The ink will not dry on these labels.
- Never place more than 30 sheets of labels in the In tray at one time.
preparing to print
-
Raise the Out tray.
-
Slide out both paper guides, then remove all paper from the In tray.
-
Fan the edges of the label sheets to separate them, then align the label edges.
-
Load no more than 30 label sheets — label side down — in the In tray.
-
Slide the paper guides firmly against the sheets.
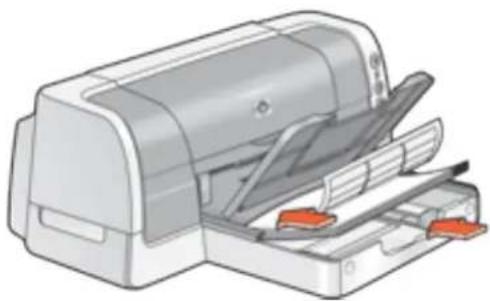
natural_image
Illustration of a printer with paper feed and paper clip (no text or symbols)- Lower the Out tray.
printing labels

If your software program includes a label printing feature, follow the instructions provided with the software program. Otherwise, follow the instructions below.
- Open the Printer Properties dialog box, then select the following settings:
| tab setting | |
| Setup | Paper Type: Automatic or the appropriate paper typePaper Size: A4 (210 x 297 mm) or Letter (8.5 x 11 in)Orientation: Appropriate orientationPaper Tray: Upper |
| Features | Two-Sided Printing: Unchecked |
- Select any other desired print settings, then click OK.

For a description of available print options, see print settings.
index cards and other small media
printing guidelines
Use only cards and small media that meet the printer's paper size specifications. For the printer's paper size specifications, see size specifications.
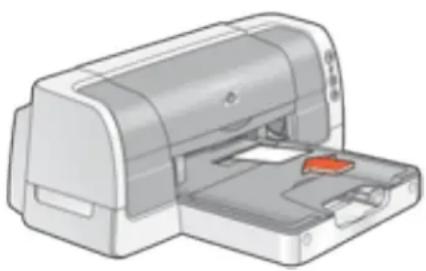
preparing to print a single index card
- Place the card into the single envelope slot.
- Push the card forward until it stops.
natural_image
Illustration of a printer with an open lid and paper tray (no text or symbols visible)
If printing on a card smaller than 4 in. x 6 in., load the card in the In tray rather than the single envelope slot.
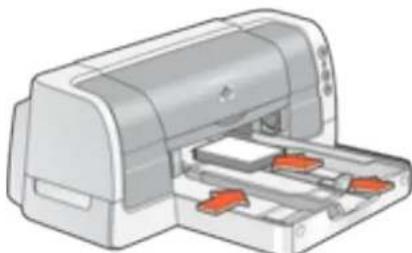
preparing to print multiple index cards and other small media
- Remove the Out tray.
- Slide out both paper guides, then remove all paper from the In tray.
- Align the card edges.
- Place no more than 60 cards in the In tray.
- Push the cards forward until they stop.
-
Slide the paper width guide firmly against the edges of the cards.
-
Slide the paper length guide all the way in, then slide the fine length guide firmly against the cards.
natural_image
Illustration of a printer with orange arrows indicating internal components (no text or symbols)- Replace the Out tray.
printing index cards and other small media

If your software program includes a card printing feature, follow the instructions provided by the software program. Otherwise, follow the instructions below.
- Open the Printer Properties dialog box, then select the following setting:
| tab setting | |
| Setup | Paper Type: Automatic or Plain PaperPaper Size: Appropriate card sizeOrientation: Appropriate orientationPaper Tray: Upper |
| Features | Two-Sided Printing: Deselected for cards smaller than 4 in. x 6 in. |
- Select any other desired print settings, then click OK.

For a description of available print options, see print settings.
If an out of paper message appears, verify the cards are positioned properly in the paper tray.
photographs
printing guidelines
- The photo must be in an electronic format (digital) before it can be printed. Take a digital picture, scan a photo, or have your local camera shop provide an electronic file of the photo.
- For best print quality use a High Resolution print setting and set the HP Digital Photography options.
• Use hp photo papers for great results.
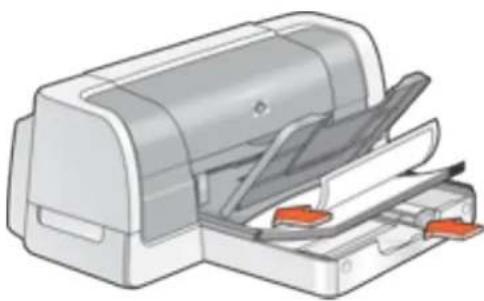
preparing to print
-
Raise the Out tray.
-
Slide out both paper guides, then remove all paper from the In tray.
-
Fan the edges of the photo paper to separate them, then align the photo paper edges.
-
Place no more than 50 sheets of photo paper—printable side down—in the In tray.
-
Slide the paper guides firmly against the edges of the photo paper.
natural_image
Illustration of a printer with open lid and orange buttons (no text or symbols)- Lower the Out tray.
printing photographs
- Open the Printer Properties dialog box, then select the following setting:
| tab setting | |
| Setup | Print Quality: BestPaper Type: Automatic or the appropriate photo paper typePhoto Paper Printing:○ PhotoREt for best print speed and quality, or○ 4800 x 1200 optimized color dpi on premium inkjet photo papers, 1200 x 1200 input dpi and 400 MB or more available hard disk space.Paper Size: Appropriate paper sizePaper Tray: Upperhp Digital Photography: If desired for photo enhancement options |
| Features | Two-Sided Printing: Deselected |
- Select any other desired print settings, then click OK.

For a description of available print options, see print settings.
greeting cards
printing guidelines
• Unfold pre-folded cards, then place them in the In tray.
- If an out of paper message appears, verify that the cards are positioned properly in the In tray.
• For great results, use hp greeting card paper.
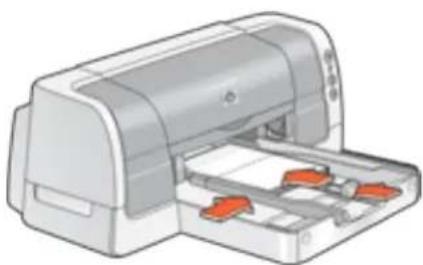
preparing to print
-
Remove the Out tray.
-
Slide out both paper guides, then remove all paper from the In tray.
-
Fan the edges of the greeting cards to separate them.
-
Align the edges of the cards, then place no more than 5 cards in the In tray.
-
Push the cards forward until they stop.
-
Slide the paper width guide firm/v against the edges of the cards.
-
Slide the paper length guide all the way in, then slide the fine length guide firmly against the cards.
natural_image
Illustration of a printer with orange arrows indicating internal components (no text or symbols)- Replace the Out tray.
printing greeting cards

If your software program includes a greeting card printing feature, follow the instructions provided with the software program. Otherwise, follow the instructions below.
- Open the Printer Properties dialog box, then select the following settings:
| tab setting | |
| Setup | Paper Type: Automatic or appropriate greeting card paperPaper Size: Appropriate paper sizePaper Tray: Upper |
| Features | Two-Sided Printing: Select if you want to use this feature |
- Select any other desired print settings, then click OK.

For a description of available print options, see print settings.
posters
preparing to print
- Raise the Out tray.
- Slide out both paper guides, then remove all paper from the In tray.
- Fan the edges of the sheets to separate them, then align the edges.
- Place the paper in the In tray.
- Slide the paper guides firmly against the paper.
- Lower the Out tray.

Posters can be printed on plain paper from the 250-Sheet Plain Paper Tray.
printing posters
- Open the Printer Properties dialog box, then select the following setting:
| tab setting | |
| Setup | Paper Type:Automatic or Plain PaperPaper Size:Appropriate sizeOrientation:Appropriate orientationPaper Tray:Upper, Lower, or Automatic |
| Features | Poster Printing:Select this option, then select 2x2, 3x3, or 4x4 |
-
Select any other desired print settings, then click OK.
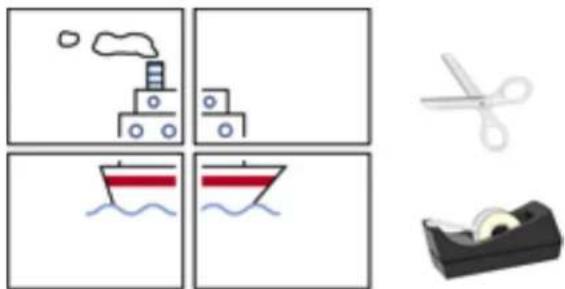
-
After the poster has printed, trim the edges on the sheets, then tape the sheets together.
natural_image
Four-panel image showing a ship, factory, boat, and paper roll with corresponding icons (no text or symbols)
For a description of available print options, see print settings.
banners
printing guidelines
- See the printer release notes for specific printing information. - Use hp banner paper for great results.
preparing to print
-
Raise the Out tray.
-
Slide out both paper guides, then remove all paper from the In tray.
-
Select up to 20 sheets of banner paper. Remove and discard any perforated strips.
-
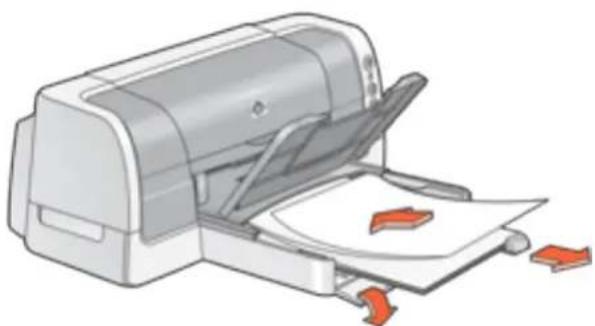
Place the banner paper in the In tray with the unattached edge of the paper facing the printer.
natural_image
Illustration of a printer with paper being inserted, showing paper being placed (no text or symbols present)-
Slide the paper guides firmly against the paper.
-
Lower the Out tray, then verify that the Out tray extension is not extended.

Do not extend the Out tray extension when printing banners.
printing banners

If your software program includes a banner printing feature, follow the instructions provided with the software program. Otherwise, follow the instructions below.
- Open the Printer Properties dialog box, then select the following setting:
| tab setting | |
| Setup | Paper Type: hp banner paper or other banner paperPaper Size: Banner [A4 (210 x 297 mm)] or Banner [Letter (8.5 x 11 in.)]Paper Tray: Upper |
- Select any other desired print settings, then click OK.

For a description of available print options, see print settings.
iron-on transfers
printing guidelines
- When printing a document with a mirror-image, the text and pictures are horizontally reversed from what appears on the computer screen.

natural_image
Illustration of a hand cutting a T-shirt with a blue object and starburst effect (no text or symbols)- Use hp iron-on t-shirt transfer paper for great results.
preparing to print
- Raise the Out tray.
- Slide out both paper guides, then remove all paper from the In tray.
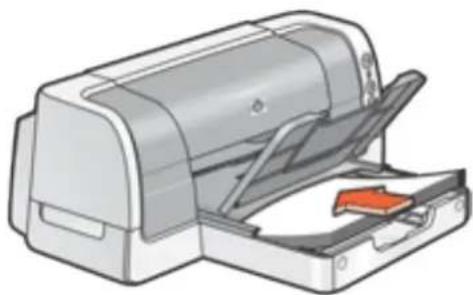
- Fan the edges of the iron-on transfer paper to separate them, then align the edges.
natural_image
Illustration of a printer with an open lid and paper clip (no text or symbols)- Place the iron-on transfer paper in the In tray with the printable side down.
- Slide the paper guides firmly against the transfer paper.
- Lower the Out tray.
printing iron-on transfers

If your software program includes an iron-on transfer printing feature, follow the instructions provided with the software program. Otherwise, follow the instructions below.
- Open the Printer Properties dialog box, then select the following setting:
| tab setting | |
| Setup | Paper Type: Automatic or hp iron-on t-shirt transfersPrint Quality: Normal or BestPaper Size: A4 (210 x 297 mm) or Letter (8.5 x 11 in.)Orientation: Click Mirror ImagePaper Tray: Upper |
- Select any other desired print settings, then click OK.

For a description of available print options, see print settings.
maintenance
• replacing print cartridges
• calibrating print cartridges
• automatically cleaning print cartridges
• manually cleaning print cartridges
• maintaining print cartridges
• maintaining the printer body
• refilling print cartridges
• removing ink from skin and clothing
- tools
replacing print cartridges
Before buying replacement print cartridges, verify the correct part numbers.
When a print cartridge is empty, leave the empty print cartridge in the print cartridge cradle until it is replaced. The printer requires both print cartridges to operate.

Warning! Keep both new and used print cartridges out of the reach of children.
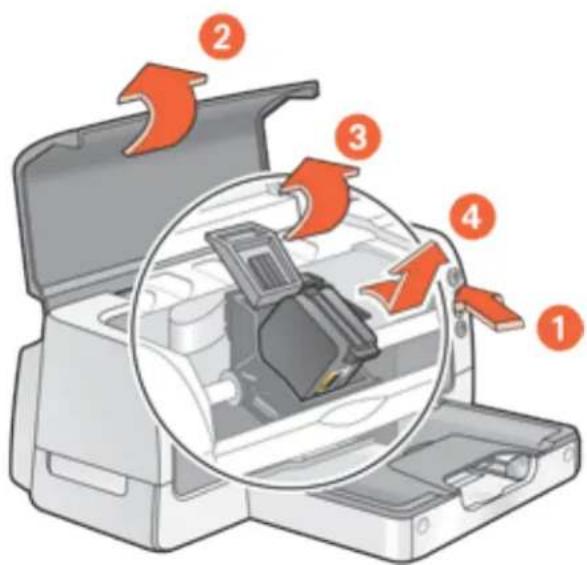
To replace a print cartridge:
-
Press the Power button to turn on the printer.
-
Open the top cover.
The cradle moves to the center of the printer.
-
Raise the cradle latch.
-
Lift the print cartridge out of the print cartridge cradle to remove. See print cartridge recovery for information about HP's empty print cartridge return and recycle program.
text_image
Diagram of a mechanical device with numbered parts highlighting internal components, likely for assembly or repair instructions.-
press the power button 2. open top cover 3. raise cradle latch 4. lift print cartridge out of cradle
-
Remove the replacement print cartridge from its packaging and carefully remove the plastic tape.
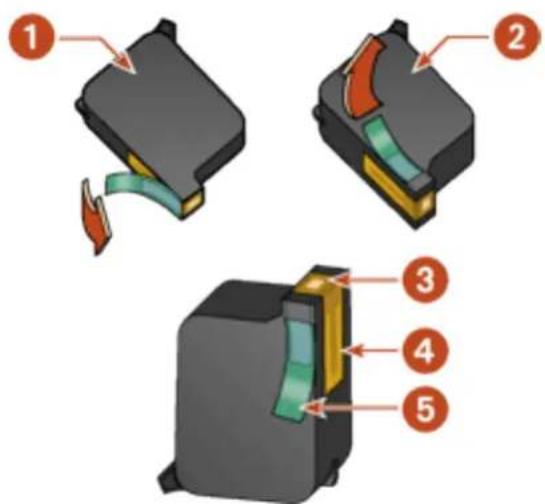
text_image
Diagram showing three labeled mechanical components with numbered annotations indicating parts of each.- black cartridge 2. color cartridge 3. ink nozzles 4. copper contacts 5. plastic tape
Caution! Do not touch the print cartridge ink nozzles or copper contacts. Touching these parts will result in clogs, ink failure, and bad electrical connections. Do not remove the copper strips. They are required electrical contacts.
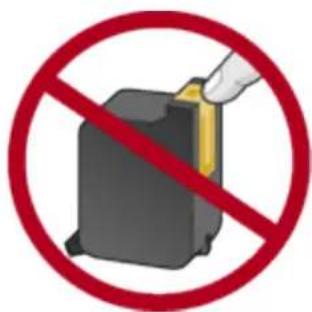
text_image
Prohibition sign showing a yellow folder inside a black box with a red prohibition symbol1. copper contacts
-
Push the print cartridge firmly into the cradle.
-
Secure the cradle latch.
-
Close the top cover.
A calibration page prints to align the print cartridges.
Caution! If you are in the middle of printing, and you change a print cartridge, your current print job may be cancelled.
If the Print Cartridge Status light continues to blink after installing a new print cartridge, verify the part number on the cartridge matches one of the part numbers shown here.
For information on how to recycle an empty print cartridge, see print cartridge recovery.
calibrating print cartridges
After you install a print cartridge, the printer automatically calibrates the print cartridges to ensure the best print quality. However, if the black and color print cartridges become misaligned during the course of printing, you may wish to manually calibrate the cartridges.
The instructions for calibrating the print cartridges vary according to how the printer was installed on your computer.
To view the correct instructions, answer the following question:
Does this icon appear on your computer's desktop?
• Yes (use Utilities in printer assistant)
- No (use printer properties)

If the Yes option does not work, double-click the printer assistant icon on your computer's desktop, then click Utilities.
calibrating using printer properties
To calibrate print cartridges from printer properties:
- Open Printer Properties.
- Select the Services tab.
- Click the Open the HP Toolbox button.
- Click Calibrate the Device, then follow the onscreen instructions.
automatically cleaning print cartridges
If your printed pages are missing lines or dots or if streaks appear, the print cartridges need to be cleaned.
The instructions for cleaning the print cartridges vary according to how the printer was installed on your computer. To view the correct instructions, answer the following question:
Does this icon appear on your computer's desktop?
• Yes (use Utilities in printer assistant)
• No (use printer properties)

If the Yes option does not work, double-click the printer assistant icon on your computer's desktop, then click Utilities.
cleaning using printer properties
To clean the print cartridges from printer properties:
- Open Printer Properties.
- Select the Services tab.
- Click the Open the HP Toolbox button.
- Click Clean the Print Cartridges, then follow the onscreen instructions.
If your printouts are still missing lines or dots after cleaning, a print cartridge may be low on ink. If so, one or both print cartridges may need to be replaced.
manually cleaning print cartridges
If the printer is used in a dusty environment, a small amount of debris may accumulate inside the case. This debris can include dust, hair, carpet, or clothing fibers. When debris gets on the print cartridges and print cartridge cradle, it can cause ink streaks and smudges on printed pages. Ink streaking is easily corrected by manually cleaning the cartridges and cradle.
gathering cleaning supplies
You will need the following items to clean the print cartridges and cradle:
• Distilled water
- Cotton swabs or other soft, lint-free material that will not stick to the cartridges
Be careful not to get ink on your hands or clothing as you clean.
preparing to clean
- Press the Power button to turn on the printer, then raise the top cover.
The cradle moves to the center of the printer.
- Disconnect the power cord from the back of the printer.
- Remove the print cartridges and place them on a piece of paper with the nozzle plate facing up.
Caution! Do not leave the cartridges outside the printer for more than 30 minutes.
Caution! Do not touch the print cartridge ink nozzles or copper contacts. Touching these parts will result in clogs, ink failure, and bad electrical connections. Do not remove the copper strips. They are required electrical contacts.
cleaning the print cartridges and print cartridge cradle
- Lightly moisten a cotton swab with distilled water.
- Clean the face and edges of the first print cartridge with the swab, as shown in the following illustration.
Do not wipe the nozzle plate.
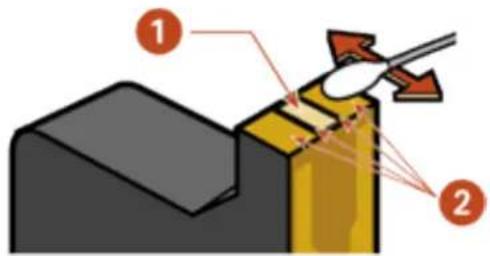
text_image
Diagram showing a mechanical or electrical component with labeled parts 1 and 2, and directional arrows indicating movement or force.1. nozzle plate 2. face and edges of print cartridge
-
Inspect the face and edges of the print cartridge for fibers. Repeat steps 1 and 2 above if fibers are still present.
-
Repeat steps 1 through 3 for the second print cartridge.
-
Wipe the underside of the print cartridge cradle walls using clean, moistened cotton swabs.
Repeat this process until no ink residue appears on a clean swab.
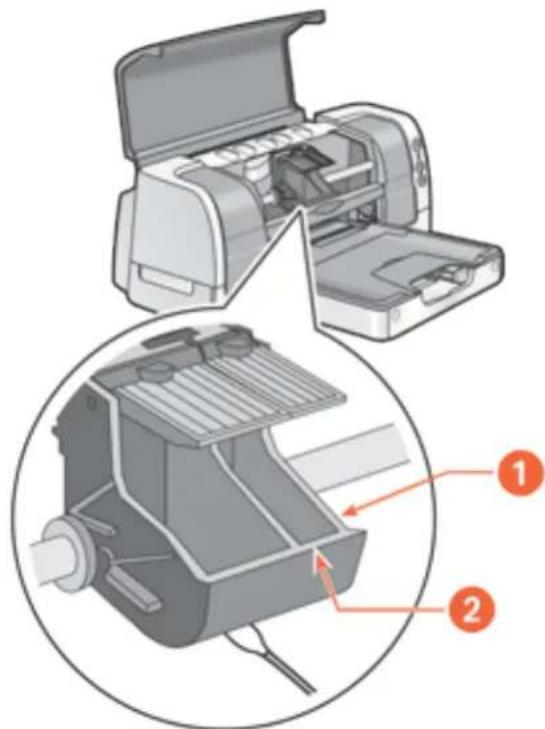
natural_image
Diagram of a printer internal structure showing open and closed views with numbered annotations (1 and 2), no readable text or symbols present.-
print cartridge cradle 2. print cartridge cradle walls
-
Insert the print cartridges and close the printer's top cover.
-
Connect the power cord to the back of the printer.
A calibration page prints to align the print cartridges.
Repeat the cleaning procedure if ink streaks continue to appear on printed pages.
maintaining print cartridges
The following suggestions will help maintain HP print cartridges and ensure consistent print quality:
- Keep all print cartridges in their sealed packages in an upright position until they are needed. Print cartridges should be stored at room temperature (60–78 degrees F or 15.6–26.6 degrees C).
- Do not remove the plastic tape covering the ink nozzles until you are ready to install the print cartridge in the printer. If the plastic tape has been removed from the print cartridge, do not attempt to reattach it. Reattaching the tape damages the ink nozzles.
- If print cartridges are removed from their sealed containers, store them in an airtight container. For best results, store the black cartridge with the nozzle side up and the color cartridge with the nozzle side down. Do not allow anything to touch the nozzle plate.
- Once the print cartridges are installed in the printer, do not remove them unless they need to be manually cleaned. This prevents ink from evaporating or clogging the print cartridges.
- Do not unplug the printer until printing is complete and the printer is turned off. Use the Power button to turn off the printer.
maintaining the printer body
printer case exterior
Follow these guidelines when cleaning the outside of the printer:
• Use distilled water only. Do not use household cleaners or detergents.
- Use a soft, damp cloth to remove dust, smudges, stains, and spilled ink from the exterior of the printer case.
printer interior
Caution! Do not clean the printer's interior. Keep all liquids out of the interior.
print cradle rod
Do not lubricate the rod on which the print cradle moves. It is normal to hear noise when the printer is new.
handling and storage
Handle and store the printer in an upright, level position for maximum performance and reliability.
refilling print cartridges

To get the best performance from your HP printer, use only genuine, factory-filled HP print cartridges.
Caution! Damage that is directly attributable to modified or refilled HP print cartridges is specifically excluded from the HP printer's warranty coverage.
removing ink from skin and clothing
Follow these steps to remove ink from skin and clothing:
| to remove ink from... do this... | |
| skin Wash the affected area with an abrasive soap. | |
| white fabric | Wash the fabric in cold water using chlorine bleach. |
| color fabric | Wash the fabric in cold water using suds y ammonia. |
Caution! Always use cold water to remove ink from fabric. Warm or hot water may set the ink color into the fabric.
tools
The printer software contains a number of useful tools to enhance the printer's performance.
To access the tools, answer the following question:
Does this icon appear on your computer's desktop?
• Yes (use Utilities in printer assistant)
• No (use printer properties)

If the Yes option does not work, double-click the printer assistant icon on your computer's desktop, then click Utilities.
using the printer properties
accessing the printer properties
- Open the Printer Properties dialog box.
- Click the Services tab. If you do not see the Services tab, then use Utilities.
- Click the Open the HP Toolbox button.
using the hp toolbox
The hp toolbox has these tabs:
• Device Services
• Estimated Ink Level
- Configuration

Depending on how the printer is connected to the computer, the Estimated Ink Level and Configuration tabs may not be available.
device services
The following tools are available on the Device Services tab:
• Calibrate the Device: Calibrates the print cartridges.
- Clean the Print Cartridges: Cleans the print cartridges.
- Print a Test Page: Print a test page to see if the printer can receive data.
- Print a Diagnostic Page: Print a diagnostic page when the HP Customer Care Center requests it.
estimated ink level
The following tools are available on the Estimated Ink Level tab:
- Ink Levels: Approximate ink level for each print cartridge.
- Ordering Button: Access button to HP online ordering (not available in all countries/regions).
configuration
The following tools are available on the Configuration tab:
- Accessories: Activate the Automatic Two-Sided Printing Module if it is installed on the printer.
- Messages: Configure software messages.
troubleshooting
Click the topic below that best describes the problem:
- checking the print cartridge status
- printer is not printing
- problems with printouts
• printer lights are flashing or on - printer is too slow
- two-sided printing problems
If you continue to have problems after investigating the above topics, see support.
checking the print cartridge status
understanding the print cartridge status light
The Print Cartridge Status light flashes when one or both of the print cartridges are low on ink, improperly installed, missing, or malfunctioning. This light also flashes if the wrong print cartridge type is used.
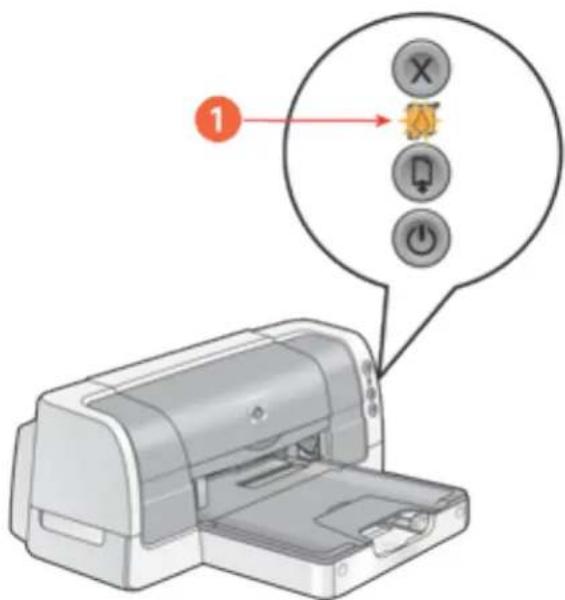
text_image
1 OK Cancel- print cartridge status light
If the ink level is low in a print cartridge, the Print Cartridge Status light stops flashing when the printer's top cover is opened or the printer is printing. If the problem is not related to low ink, the light continues to flash after the cover is opened.
checking the print cartridge status
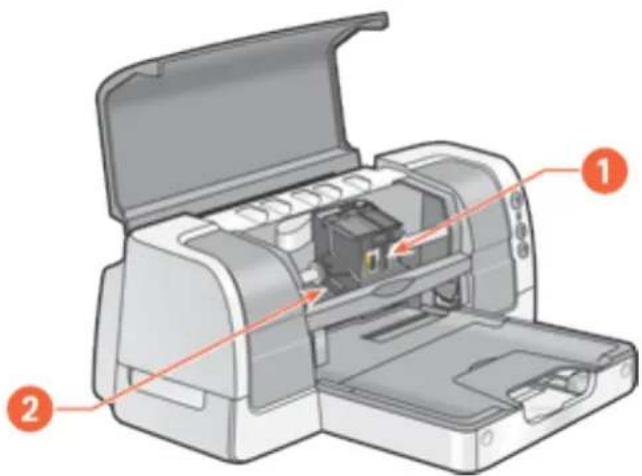
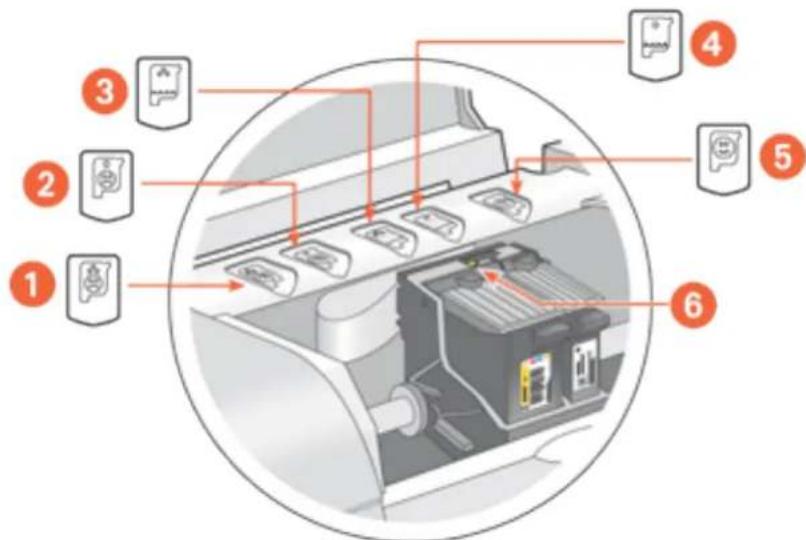
Open the printer's top cover. The arrow on the top of the print cartridge cradle points to one of five Print Cartridge Status icons revealing the status of the print cartridge.
text_image
Diagram of a printer internal structure with numbered parts and labeled icons for each component.- tri-color cartridge problem icon 2. black cartridge problem icon 3. tri-color cartridge low-ink icon 4. black cartridge low-ink icon 5. cartridges OK icon 6. indicator arrow
troubleshooting problems with the tri-color or black print cartridge
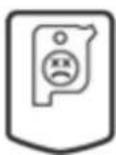
If the arrow points to a print cartridge problem icon, the print cartridge is either missing, improperly installed, defective, or is the wrong print cartridge for the printer. Perform the following tasks to correct the problem:
| icon meaning solution | ||
 | Tri-color print cartridge is defective or not the right part number. | 1. Remove and reinsert the print cartridge.2. If there is still a problem, verify that the correct print cartridge is installed. See print cartridges for part numbers.3. Replace the print cartridge if the problem persists. See replacing print cartridges for directions. |
 | Black print cartridge is defective or not the right part number. | |
 | Tri-color print cartridge is low on ink. | Replace the print cartridge. |
 | Black print cartridge is low on ink. | |
 | Print cartridges are functioning normally. | |
verifying that the problem is solved
When you close the printer's top cover, the green light will be on with no flashing lights.
printer is not printing
verify the following
- The printer is connected to the power source.
• The cable connections are secure.
• The printer is turned on.
• The media is correctly placed in the In tray or lower tray.
• The printer's top cover is closed. - The duplexer or Rear Access Door is attached.
- The print cartridges are correctly installed. For installation instructions, see replacing print cartridges.
check the printer lights
- If the Power light is blinking, the printer is in the process of printing.
- If the Resume light is blinking, press the Resume button.
- If the Print Cartridge Status light is blinking, see checking the print cartridge status.
• If all lights are blinking, see all lights are flashing.
select a topic below
If the printer still does not print, select the topic below that best describes the problem:
- paper problems
• printer does not turn on - USB problems
- ethernet problems (hp deskjet 6127 series printer only)
paper problems
Click the topic below that best describes the problem:
- paper jam
- out of paper
• will not feed paper
paper jam
Caution! Do not remove a paper jam by pulling paper from the front of the printer. Doing so could damage the printer.
Follow each of these steps until the paper jam is cleared.
empty and reload the paper trays
- Remove the paper from the In and Out trays.
If you are printing labels, verify that a label did not become detached from the label sheet while passing through the printer.
-
Reload the In tray.
-
Press the Resume button.
if the paper jam is not removed, empty the duplexer
-
Turn off the printer.
-
Press the button on top of the duplexer, then lower the duplexer door.
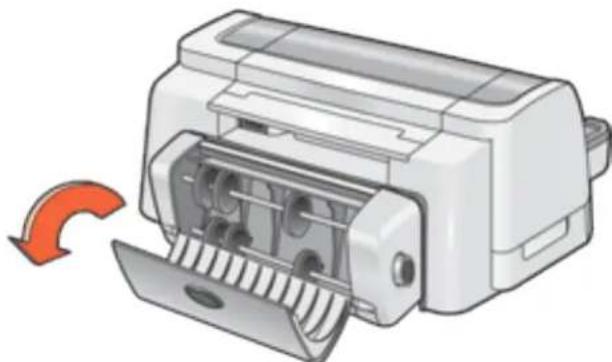
natural_image
Illustration of a printer with a paperclip and orange arrow indicating rotation (no text or symbols)- Remove any paper from the duplexer.
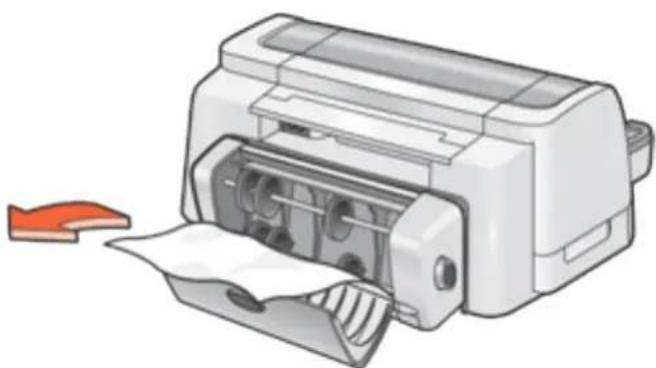
natural_image
Illustration of a printer with paper being inserted, showing internal components and a red arrow indicating the paper's direction (no text or symbols present)-
Close the duplexer door until it snaps shut.
-
Turn on the printer.
-
Reprint the document.
if the paper jam is not removed, clear paper from the printer body
-
Turn off the printer.
-
Press the buttons on the left and right sides of the duplexer, then remove the unit from the printer.
If the Rear Access Door is attached to the printer, push the two latch handles toward each other, then remove the door.
-
Remove any paper in the printer.
-
Push the duplexer into the printer until it snaps into place.
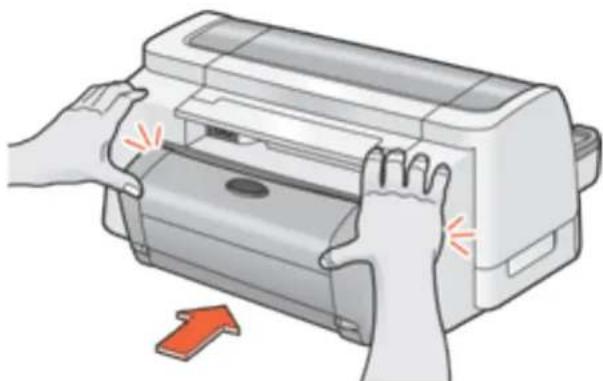
natural_image
Illustration of hands operating a printer with an orange arrow indicating press direction (no text or symbols present)If using the Rear Access Door, push the door into the printer until it snaps into place.
-
Turn on the printer.
-
Reprint the document.
out of paper
if the In tray or lower tray contains paper
- Slide the paper forward until it stops.
- Adjust the length guide so that it touches the paper stack.
- Press the Resume button.
if the In tray or lower tray is empty
- Load paper in the tray.
- Press the Resume button.
will not feed paper
if the In tray or lower tray contains paper
Try one or more of the following:
- Reduce the number of sheets in the paper tray.
- Remove and reload the paper tray.
• Use a different type of paper.
printer does not turn on
- Disconnect the power cord from the printer.
- Wait approximately 10 seconds.
- Reconnect the power cord to the printer.
- Press the Power button to turn on the printer.
USB problems
the error message "there was an error writing to LPT1" appears
The USB cable may not have been attached before installing the software. Uninstall, then reinstall, the software.
To uninstall the software:
- Click here.
—or—
- Click Start > Programs > Hewlett-Packard > [hp deskjet] > uninstall software, then follow the onscreen instructions.
the error message "there was an error writing to
The printer may not be receiving correct data from another USB device or the hub. Connect the printer directly to the USB port on the computer.
there are conflicting USB cable connections
A printing conflict may arise when the printer and several USB devices are attached to a hub. There are two methods for resolving the conflict:
- Attach the printer's USB cable directly to the computer.
—or—
- If the printer is attached to a hub, do not use other USB devices attached to the hub while printing.
problems with printouts
Click the topic below that best describes the problem:
- print quality is poor
• text and images are misaligned
• document is printed off-center or at an angle - parts of the document are missing or printed in the wrong place
• printout does not reflect new print settings - photos are not printing correctly
• banner does not print correctly - blank pages print
print quality is poor
- print is faded
- missing lines or dots
• too much or too little ink appears on the page
print is faded
- Check the status of the print cartridges. If a print cartridge is low on ink, consider replacing the print cartridge.
- Verify that the plastic tape has been removed from both print cartridges.
missing lines or dots
If your printed pages are missing lines or dots, or if streaks appear, the print cartridges may need to be cleaned.
For cleaning instructions, see automatically cleaning print cartridges.
too much or too little ink appears on the page
Do the following:
. Extend the dry time
- Open the Printer Properties dialog box.
- Select the Features tab, then click the Advanced Features button.
- Slide the Dry Time slider towards More.
- Click OK twice.
. Select a paper type
- Open the Printer Properties dialog box.
- Select the Setup tab, then select the appropriate paper type.
- Click OK.
text and images are misaligned
If the text and images on your printouts are misaligned, then calibrate the printer.
document is printed off-center or at an angle
- Verify that the paper is correctly placed in the In tray or the lower tray.
- Verify that the paper guides fit firmly against the paper.
- Reprint the document.
parts of the document are missing or printed in the wrong place
Open the Printer Properties dialog box and verify the following options:
| tab setting | |
| Setup | Orientation: Verify the appropriate orientationPaper Size: Verify the appropriate paper size and marginsScale to Fit: Select to scale text and graphics to fit on the paper |
| Features | Poster Printing: Deselect this option if not printing a poster |
printout does not reflect selected print settings
Some software applications allow you to set certain print settings, such as the print order.
The software application's print settings may differ from the print settings specified on the Printer Properties dialog box.
Change the appropriate print settings within the software application to match the settings on the Printer Properties dialog box.
photos are not printing correctly
- Verify that the photo media is placed in the In tray with the print side down.
- Slide the paper forward until it stops.
- Slide the paper guides firmly against the paper.
- Check the status of the print cartridges.
check the printer properties
Open the Printer Properties dialog box and verify the following options:
| tab setting | |
| Setup | Print Quality: BestPaper Type: An hp photo paperPaper Size: Appropriate paper size |
banner does not print correctly
check the paper tray
- Unfold and refold the paper when several sheets feed into the printer at once.
- Confirm that the unattached edge of the banner paper stack is on top and facing the printer.
- Verify that the correct paper for banner printing is used.
- Verify that the Out tray extension is not extended.
check the printer properties
Open the Printer Properties dialog box and verify the following options:
| tab setting | |
| Setup | Paper Type: Special Papers, then select hp banner paperPaper Size: Appropriate banner paper |
check the software
- Verify that the software application you are using prints banners. Not all software applications print banners.
- If gaps appear at the ends of the sheets, verify that the printer software is operating correctly.
- Click Start > Programs > Hewlett-Packard > [hp deskjet series] > release notes to view release notes for known software issues.
blank pages print or color is missing from printout
- The protective piece of plastic tape may still be attached to the print cartridges. Verify that the plastic tape has been removed from the print cartridges.
- The print cartridges may be out of ink. Replace one or both empty print cartridges.
- The printer may be in direct sunlight. Direct sunlight can adversely affect the Automatic Paper-Type Sensor. Move the printer out of direct sunlight, or open the Printer Properties dialog box and select a paper-type other than Automatic.
printer lights are on or flashing
• what the flashing lights indicate
• print cartridge status light is on or flashing
- resume light is flashing
• power light is flashing
• all lights are flashing
- ethernet lights are flashing (hp deskjet 6127 series printer only)
what the lights indicate
Printer lights that are on or flashing indicate the printer status.
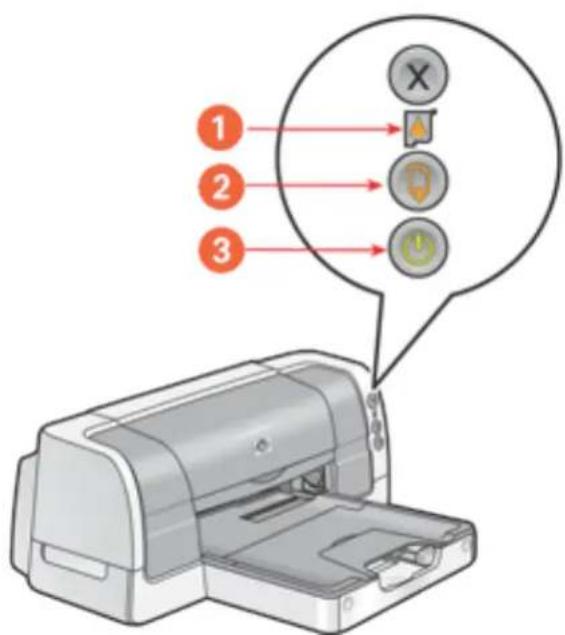
text_image
Diagram of a printer with three labeled buttons and an icon, showing a zoomed-in view of the printer's internal structure.- print cartridge status light 2. resume light 3. power light
print cartridge status light is on or flashing
the top cover is open
Close the top cover.
there may be a problem with a print cartridge
- Verify that the correct print cartridges are installed.
- Check if a print cartridge is low on ink or improperly installed.
resume light is flashing
the printer may be out of paper
- Place paper in the In tray or the lower tray.
- Press the Resume button on the front of the printer.
there may be a paper jam
Follow these instructions to clear a paper jam.
the printer may be ready to print the second side of a two-sided document
- Follow the onscreen instructions for printing the second side.
These instructions appear when you manually print a two-sided document. - Press the Resume button.
power light is flashing
the printer is preparing to print
The light stops flashing when the printer has received all data.
all lights are flashing
the printer may need to be restarted
- Press the Power button to turn off the printer, then press the Power button to restart the printer.
Proceed to step 2 if the lights continue to flash.
- Press the Power button to turn off the printer.
- Disconnect the printer from the power source.
- Reconnect the printer to the power source.
- Press the Power button to turn on the printer.
printer is too slow
Several variables can slow the printer's performance. Click the topic below that best describes the printing conditions:
• multiple software applications are open
- complex documents, graphics, or photographs are printing
• automatic paper-type option is enabled
- two-sided documents are printing
If none of the above topics describes the printer's performance, then review the following:
• printer driver is outdated
• computer does not meet system requirements
multiple software applications are open
If too many software applications are open, the printer cannot print at its optimum speed.
Close all unnecessary software applications, then print the document again.
complex documents, graphics, or photographs are printing
Documents containing graphics or photographs print slower than text documents.
- Open the Printer Properties dialog box.
- On the Setup tab, select PhotoREt.
- Reprint the document.
- If the document still prints too slowly, then open the Printer Properties dialog box.
- Click the Features tab, then click the Advanced Features button.
- Select the Low Memory Mode option.
- Reprint the document.

Print quality may be reduced if you use Low Memory Mode.
automatic paper-type option is enabled
When the automatic paper-type option is enabled, it takes a few seconds for the printer to scan the first page of the print job to determine the appropriate paper type.
To increase the print speed, turn off the Automatic Paper-Type Sensor.
For instructions on turning off the Automatic Paper-Type Sensor, see using the automatic paper-type sensor.
two-sided documents are printing
Printing two-sided documents takes more time than printing single-sided documents.
printer driver is outdated
An outdated printer driver may be installed.
For information about updating the printer driver, click here.
computer does not meet system requirements
- Verify that the computer's hard disk space, RAM, and processor speed meet system requirements.
For more information, see system requirements.
- Increase free space on the hard drive.
If your computer does not have enough RAM, or a large amount of free space on the hard drive, the printer processing time will be longer.
two-sided printing problems
Select the topic that best describes the problem:
• binding margin is in the wrong place
• only one side of the page prints when the two-sided printing option is selected
• paper jam occurs inside the duplexer
• automatic option for two-sided printing cannot be selected in the Features tab
binding margin is in the wrong place
You may have chosen an incorrect paper orientation.
On the Features tab of the Printer Properties dialog box, verify that:
- Long Side is selected for binding along the long sides
- Short Side is selected for binding along the short sides
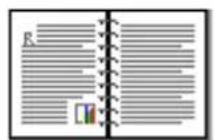
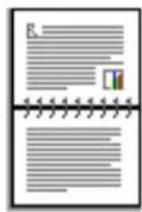
1
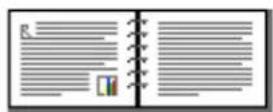
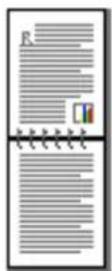
2
- long-side binding 2. short-side binding
only one side of the page prints when the two-sided printing option is selected Use the following solutions:
• Use a media type and media size supported by the duplexer.
- Print the document using the manual two-sided printing feature.
paper jam occurs inside the duplexer
Follow the instructions for clearing a paper jam in the printer is not printing section.
automatic option for two-sided printing cannot be selected in the Features tab
The printer driver may not be configured to use the duplexer.
Follow these steps to configure the printer driver to use the duplexer:
- Open the Configuration dialog box in Printer Assistant, then click the configure button.
- Click the Automatic Two-Sided Printing Accessory check box.
- Click the Apply button.
- Close the Configuration dialog box.
- Open the Printer Properties dialog box, then select the Features tab.
The Automatic option now appears beneath the Two-Sided Printing option.
specifications
- printer specifications
- two-sided printing accessory (duplexer) specifications
• 250-sheet plain paper tray specifications
• minimum system requirements
• environmental statement
• print cartridge recovery - limited warranty
• regulatory notices
printer specifications
hp deskjet 6122
model numbers: c8954a, c8954b
hp deskjet 6127
model numbers: c8959a, c8959b
black text print speed \*
Draft: Up to 20 pages per minute
Fast Normal: Up to 11 pages per minute
Normal: Up to 7 pages per minute
Best: Up to 1.4 page per minute
mixed text with color graphics print speed\*
Draft: Up to 13 pages per minute
Fast Normal: Up to 6.9 pages per minute
Normal: Up to 5 pages per minute
Best: Up to 1.2 page per minute
* These are approximate figures. Exact speed varies with system configuration, software program, and document complexity.
black text resolution (depending on paper type)
Plain Paper/Draft: 600 x 300 dpi
Plain Paper/Fast Normal: 300 x 600 dpi
Plain Paper/Normal: 600 x 600 dpi
Inkjet Paper/Best: 600 x 600 dpi
color printing resolution (depending on paper type)
Plain Paper/Draft: 600 x 300 dpi
Plain Paper/Fast Normal: 300 x 600 dpi
Plain Paper/Normal: Color Layering 1200 x 600 dpi
Photo Paper/Best: PhotoREt or 4800 x 1200 optimized dpi color printing on premium photo papers, 1200 x 1200 input dpi
print technology
Drop-on-demand thermal inkjet printing
software compatibility
| printer series number software compatibility | |
| hp deskjet 6122 | MS Windows 95, 98, Me, 2000, NT 4.0 (SP 6 or higher), and XPLimited MS Windows 3.1 and DOS support |
| hp deskjet 6127 | Ethernet connection: MS Windows 98, Me, 2000, NT 4.0 (SP 6 or higher), and XPUSB connection: MS Windows 98, Me, 2000, and XP |
duty cycle
5000 pages per month
memory
8 MB built-in RAM (hp deskjet 6122 series)
16 MB built-in RAM (hp deskjet 6127 series)
processor
96 MHz processor
buttons and lights
Cancel button
Print Cartridge Status light
Resume button and light
Power button and light
Ethernet Link light and Activity light (hp deskjet 6127 series printer)
i/o interface
Universal Serial Bus (USB) 2.0 Full Speed compatible
Centronics Parallel, IEEE 1284 Compliant (hp deskjet 6122 series printer)
10/100 Base-T built-in ethernet port (hp deskjet 6127 series printer)
printer dimensions
454 mm wide x 184.2 mm high x 378.8 mm deep
printer weight
5.03 kg (13.48 lb)
operating environment
Maximum operating conditions:
Temperature: 41 to 104 degrees F, 5 to 40 degrees C
Humidity: 15 to 80 percent RH non-condensing
Recommended operating conditions for best print quality:
Temperature: 59 to 95 degrees F or 15 to 35 degrees C
Humidity: 20 to 80 percent RH non-condensing
Storage conditions:
Temperature: -40 to 140 degrees F, -40 to 60 degrees C
power consumption
hp deskjet 6122 series
The default activation period for power saving mode is less than 5 minutes.
1.5 watts maximum when off
2.5 watts maximum when not printing
35 watts average when printing
hp deskjet 6127 series
The default activation period for power saving mode is less than 5 minutes.
2 watts maximum when off
4 watts maximum when not printing
35 watts average when printing
power requirements
Input Voltage: 100 to 240 VAC (± 10%)
Input Frequency: 50/60 Hz ( ± 3 Hz)
Accommodates the worldwide range of AC line voltages and frequencies.
declared noise emissions in accordance with ISO 9296
Best Mode:
Sound power level, LWAd: 5.5 Bels (A) [55 dB (A)]
Sound pressure level, LpAm (bystander positions): 42 dB (A)
Fast Normal Mode:
Sound power level, LWAd: 6.4 Bels(A) [64 dB (A)]
Sound pressure level, LpAm (bystander positions): 51 dB (A)
alignment
Skew:
± .006 mm/mm (.006 in/in) on plain paper and special paper
± .010 mm/mm (.010 in/in) on HP transparency films
± .012 mm/mm (.012 in/in) on envelopes, cards, and card-sized photo paper
Vertical:
± .003 mm/mm (.003 in/in) on plain paper and special paper
± .005 mm/mm (.005 in/in) on HP transparency films
media weights (printer only)
Paper:
U.S. Letter 60 to 90g / m^2 (16 to 24 lb)
Legal 75 to 90 g/m ^2 (20 to 24 lb)
Envelopes: 75 to 90 g/m ^2 (20 to 24 lb)
Cards: Up to 200 g/m ^2 (110 lb index max)
Photo: Up to 263.6 g/m ^2 (145 lb)
Continuous (Banner) Paper: 60 to 90 g/m ^2 (16 to 24 lb)
media handling
In tray capacity:
Plain paper sheets: Up to 150
Envelopes: Up to 22
Cards: Up to 60
Greeting cards: Up to 5
Labels: Up to 30 (use only U.S. Letter or A4-sized sheets)
Photo paper: Up to 50
Transparencies: Up to 30
Out tray capacity:
Plain Paper sheets: Up to 50
Envelopes: Up to 10
Cards: Up to 10
Greeting cards: Up to 30
Labels: Up to 20
Photo paper: Up to 30
Transparencies: Up to 30
media size
U.S. Letter 216 x 279 mm (8.5 x 11 in)
Legal 216 x 356 mm (8.5 x 14 in)
Executive 184 x 267 mm (7.25 x 10.5 in)
A4 210 x 297 mm
A5 148 x 210 mm
B5 182 x 257 mm
Envelopes:
U.S. No. 10 105 x 241 mm (4.12 x 9.5 in)
Invitation A2 111 x 146 mm (4.38 x 5.75 in)
DL 110 x 220 mm (4.33 x 8.66 in)
C6 114 x 162 mm (4.49 x 6.38in)
Index/ Greeting Cards:
76 x 127 mm (3 x 5 in)
102 x 152 mm (4 x 6 in)
127 x 203 mm (5 x 8 in)
A6 Cards: 105 x 148.5 mm
Custom Size:
Width 77 to 216 mm (3.0 to 8.5 in)
Length 127 to 356 mm (5.0 to 14 in)
Labels:
U.S. Letter 216 x 279 mm (8.5 x 11 in)
A4 210 x 297 mm
Transparencies:
U.S. Letter 216 x 279 mm (8.5 x 11 in)
A4 210 x 297 mm
Photo (with tear-off tab):
102 x 152 mm (4 x 6 in)
print cartridges
Black: selection number 45, part number hp 51645
Tri-Color: selection number 78, part number hp c6578
two-sided printing accessory (duplexer) specifications
hp two-sided printing accessory
model no. c8955a
duty cycle
5000 pages per month
dimensions
Printer with duplexer
454 mm wide x 184.2 mm high x 440.3 mm deep
weight
Printer with duplexer and print cartridges
5.53 kg (14.82 lb)
declared noise emissions in accordance with ISO 9296
Best Mode:
Sound power level, LWAd with duplexer: 5.5 Bels(A) [55 dB (A)]
Sound pressure level, LpAm (bystander positions) with duplexer: 42 dB (A)
Fast Normal Mode:
Sound power level, LWAd with duplexer: 6.1 Bels(A) [61 dB (A)]
Sound pressure level, LpAm (bystander positions) with duplexer: 48 dB (A)
media weight
Paper: 60 to 90 g/m ^2 (16 to 24 lb)
Cards: up to 160 g/m² (90 lb index maximum)
alignment
Skew:
± .009 mm/mm (.009 in/in) on plain paper and special paper with duplexer (2nd side)
± .012 mm/mm (.012 in/in) on cards (2nd side)
media size
Paper:
U.S. Letter: 216 x 279 mm (8.5 x 11 in)
Executive: 184 x 267 mm (7.25 x 10.5 in)
A4: 210 x 297 mm
A5: 148 x 210 mm
B5: 182 x 257 mm
Cards:
127 x 203 mm (5 x 8 in)
102 x 152 mm (4 x 6 in)
A6 105 x 148.5 mm
media type
hp plain paper or hp bright white inkjet paper
hp photo quality inkjet paper, matte finish
hp photo quality inkjet paper, semi gloss
hp premium inkjet heavyweight paper
hp felt-textured greeting card paper, ivory/half-fold
hp professional brochure & flyer paper, two-sided gloss
hp professional brochure & flyer paper, two-sided, matte finish
250-sheet plain paper tray specifications
hp 250-sheet plain paper tray
model no. pt 8956
duty cycle
5000 pages per month
dimensions
454 mm wide x 62 mm high x 440.3 mm deep
weight
Printer with 250-Sheet Plain Paper Tray, duplexer, and print cartridges installed 7.26 kg (19.44 lb)
media capacity
Plain Paper: 250 sheets
media weight
Letter/A4 Paper: 60 to 105 g/m ^2 (16 to 28 lb)
Legal Paper: 75 to 105 g/m ^4 (20 to 28 lb)
media size
Paper:
U.S. Letter: 216 x 279 mm (8.5 x 11 in)
U.S. Legal: 216 x 356 mm (8.5 x 14 in)
Executive: 184 x 267 mm (7.25 x 10.5 in)
A4: 210 x 297 mm
B5: 182 x 257 mm
minimum system requirements
Your computer must meet the following minimum requirements to use the printer:
Microsoft Windows XP
Minimum Processor Speed: Pentium 233 MHz
Required RAM: 128 MB
Required Free Hard Disk Space: 40 MB*
Microsoft Windows NT 4.0 (SP 6 or higher) or 2000
Minimum Processor Speed: Pentium 133 MHz
Required RAM: 64 MB
Required Free Hard Disk Space: 40 MB*
Microsoft Windows 95, 98, or Me
Minimum Processor Speed: Pentium 150 MHz
Required RAM: 32 MB
Required Free Hard Disk Space: 40 MB*

The hp deskjet 6127 series printer does not support Windows 95. The hp deskjet 6127 series printer supports NT 4.0 (SP 6 or higher) over an ethernet connection only.
* If you are printing photographs or are printing at 4800 x 1200 Optimized dpi, you must have a large amount of free hard disk space available.
environmental statement
Hewlett-Packard continuously improves the design processes of its deskjet printers to minimize the negative impact on the office environment and on the communities where printers are manufactured, shipped, and used.
reduction and elimination
Paper use: The printer's automatic two-sided printing capability reduces paper usage and the resulting demands on natural resources. This printer is suited for the use of recycled papers in accordance with DIN 19 309.
Recycled paper: All paper documentation for this printer is printed on chlorine-free recycled paper.
Ozone: Ozone-depleting chemicals such as CFCs have been eliminated from Hewlett-Packard's manufacturing processes.
recycling
Design for recycling has been incorporated into this printer. The number of materials has been kept to a minimum while ensuring proper functionality and reliability. Dissimilar materials have been designed to separate easily. Fasteners and other connections are easy to locate, access, and remove using common tools. High priority parts have been designed to access quickly for efficient disassembly and repair.
Printer packaging: The packaging materials for this printer have been selected to provide maximum protection for the least cost possible, while attempting to minimize environmental impact and facilitate recycling. The rugged design of the HP Deskjet printer assists in minimizing both packaging materials and damage rates.
Plastic parts: All major plastics and plastic parts are marked according to international standards. All plastic parts used in the printer housing and chassis are technically recyclable and all use a single polymer.
Product longevity: To ensure the longevity of your HP Deskjet printer, HP provides the following:
- Extended warranty: See limited warranty.
- Replacement parts and consumables are available for three (3) years after production has stopped (five (5) years in Germany).
- Product take-back: To return this product to HP at the end of its useful life, go to www.hp.com/go/recycle. To return empty print cartridges to HP, see hp print cartridge recovery program.
energy consumption
This printer was designed with energy conservation in mind. The hp deskjet 6122 printer averages 2.5 watts in stand-by mode. The hp deskjet 6127 printer averages 4 watts in stand-by mode. Not only does this save natural resources, but it also saves money without affecting the high performance of the printer.
This product qualifies for the ENERGY STAR® Program (U.S. and Japan). ENERGY STAR is a voluntary program established to encourage the development of energy-efficient office products.

text_image
energyENERGY STAR is a US registered service mark of the USEPA. As an ENERGY STAR partner, Hewlett-Packard Company has determined that this product meets ENERGY STAR Guidelines for energy efficiency.
Energy consumption in off-mode: When the printer is off, a minimal amount of energy is still being consumed. Energy consumption can be prevented by turning the printer power off, then disconnecting the end of the printer power cord from the electrical source.
print cartridge recovery
Customers interested in recycling their genuine HP print cartridges can participate in HP's empty print cartridge return and recycle program. HP offers this program in the United States, Puerto Rico, France, Germany, and Singapore, more countries than any other print cartridge manufacturer in the world. This program is provided as a free service to HP customers as an environmentally sound solution for these products at end-of-life.
To participate, simply request postage-paid return envelopes or bulk boxes via the Web at www.hp.com/go/recycle. Customers will be asked for their name, phone number, address, and how many bulk boxes or envelopes they would like. Postage-paid envelopes and/or bulk boxes will be shipped within two days.
Because HP's unique recycling processes are very sensitive to material contamination, we cannot take back and recycle cartridges from other manufacturers. The end products of the recycling process are used in the manufacture of new products, and HP must ensure the composition of the material is consistent. To do that, we recycle only HP original cartridges. This program does not extend to refilled cartridges.
Returned cartridges are separated for purification into raw materials for use in other industries to manufacture new products. Examples of products made from recycled HP print cartridge materials include automobile parts, trays used in microchip fabrication processes, copper wire, steel plates, and the precious materials used in electronics. Depending on the model, HP is able to recycle up to 65% of the print cartridge by weight. The remaining parts that cannot be recycled (ink, foam and composite parts) are disposed of in an environmentally responsible manner.
limited warranty
| region software printer | ||
| North America (including Canada) 90 days | 1 year | |
| Asia Pacific 90 days 1 year | ||
| Europe 90 days 1 year | ||
| Latin America 90 days 1 year |
extent of limited warranty
Hewlett-Packard (HP) warrants to the end-user customer that the HP products specified above will be free from defects in materials and workmanship for the duration specified above, which duration begins on the date of purchase by the customer. Customer is responsible for maintaining proof of date of purchase.
- For software products, HP's limited warranty applies only to a failure to execute programming instructions. HP does not warrant that the operation of any product will be uninterrupted or error free.
-
HP's limited warranty covers only those defects which arise as a result of normal use of the product, and do not apply to any:
-
Improper or inadequate maintenance or modification;
-
Software, interfacing, media, parts, or supplies not provided or supported by HP; or
Operation outside the product's specifications. -
For HP printer products, the use of a non-HP ink cartridge or a refilled ink cartridge does not affect either the warranty to the customer or any HP support contract with the customer. However, if printer failure or damage is attributable to the use of a non-HP or refilled ink cartridge, HP will charge its standard time and materials charges to service the printer for the particular failure or damage.
- If HP receives, during the applicable warranty period, notice of a defect in any software, media, or ink cartridge covered by HP's warranty, HP shall replace the defective product. If HP receives notice of a defect in any hardware product covered by HP's warranty during the applicable warranty period, HP shall either repair or replace the defective product at HP's option.
- If HP is unable to repair or replace, as applicable, a defective product covered by
HP's warranty, HP shall, within a reasonable time after being notified of the defect, refund the purchase price of the product.
- HP shall have no obligation to repair, replace, or refund until the customer returns the defective product to HP.
- Any replacement product may be either new or like-new, provided that it has functionality at least equal to that of the product being replaced.
- HP's limited warranty is valid in any country where the covered HP product is distributed by HP except for the Middle-East, Africa, Argentina, Brazil, Mexico, Venezuela, and France's "Departements D'Outre-Mer"; for those excepted areas, the warranty is valid only in the country of purchase. Contracts for additional warranty services, such as on-site service, may be available from any authorized HP service facility where the product is distributed by HP or by an authorized importer.
- Any applicable print cartridge warranty shall not apply to HP print cartridges that have been refilled, remanufactured, refurbished, misused, or tampered with in any way.
limitations of warranty
- TO THE EXTENT ALLOWED BY LOCAL LAW, NEITHER HP NOR ITS THIRD-PARTY SUPPLIERS MAKE ANY OTHER WARRANTY OR CONDITION OF ANY KIND, WHETHER EXPRESS OR IMPLIED, WITH RESPECT TO THE HP PRODUCTS, AND SPECIFICALLY DISCLAIM THE IMPLIED WARRANTIES OR CONDITIONS OF MERCHANTABILITY, SATISFACTORY QUALITY, AND FITNESS FOR A PARTICULAR PURPOSE.
limitations of liability
- To the extent allowed by local law, the remedies provided in this Warranty Statement are the customer's sole and exclusive remedies.
- TO THE EXTENT ALLOWED BY LOCAL LAW, EXCEPT FOR THE OBLIGATIONS SPECIFICALLY SET FORTH IN THIS WARRANTY STATEMENT, IN NO EVENT WILL HP OR ITS THIRD-PARTY SUPPLIERS BE LIABLE FOR DIRECT, INDIRECT, SPECIAL, INCIDENTAL, OR CONSEQUENTIAL DAMAGES, WHETHER BASED ON CONTRACT, TORT, OR ANY OTHER LEGAL THEORY AND WHETHER ADVISED OF THE POSSIBILITY OF SUCH DAMAGES.
local law
- This Warranty Statement gives the customer specific legal rights. The customer may also have other rights which vary from state to state in the United States, from province to province in Canada, and from country to country elsewhere in the world.
- To the extent that this Warranty Statement is inconsistent with local law, this
Warranty Statement shall be deemed modified to be consistent with such local law. Under such local law, certain disclaimers and limitations of this Warranty Statement may not apply to the customer. For example, some states in the United States, as well as some governments outside the United States (including provinces in Canada), may:
o Preclude the disclaimers and limitations in this Warranty Statement from limiting the statutory rights of a consumer (e.g., the United Kingdom);
- Otherwise restrict the ability of a manufacturer to enforce such disclaimers or limitations; or
- Grant the customer additional warranty rights, specify the duration of implied warranties which the manufacturer cannot disclaim, or not allow limitations on the duration of implied warranties.
- FOR CONSUMER TRANSACTIONS IN AUSTRALIA AND NEW ZEALAND, THE TERMS IN THIS WARRANTY STATEMENT, EXCEPT TO THE EXTENT LAWFULLY PERMITTED, DO NOT EXCLUDE, RESTRICT, OR MODIFY, AND ARE IN ADDITION TO, THE MANDATORY STATUTORY RIGHTS APPLICABLE TO THE SALE OF HP PRODUCTS TO SUCH CUSTOMERS.
warranty upgrade options
After the free phone support period, contact your HP dealer or call the support phone number for your country/region to discover the available support options.
regulatory notices
hewlett-packard company
This device complies with part 15 of the FCC Rules. Operation is subject to the following two conditions:
• This device may not cause harmful interference, and
- This device must accept any interference received, including interference that may cause undesired operation.
Pursuant to part 15.21 of the FCC Rules, any changes or modifications to this equipment not expressly approved by Hewlett-Packard Company may cause harmful interference, and void your authority to operate this equipment. Use of a shielded data cable is required to comply with the Class B limits of part 15 of the FCC Rules.
For further information, contact:
Hewlett-Packard Company
Manager of Corporate Product Regulations
3000 Hanover Street
Palo Alto, CA 94304
(605) 857-1501
note
This equipment has been tested and found to comply with the limits for a Class B digital device, pursuant to part 15 of the FCC rules. These limits are designed to provide reasonable protection against harmful interference in a residential installation. This equipment generates, uses, and can radiate radio frequency energy and, if not installed and used in accordance with the instructions, can cause harmful interference to radio communications. However, there is no guarantee that interference will not occur in a particular installation. If this equipment does cause harmful interference to radio or television reception, which can be determined by turning the equipment off and on, the user is encouraged to try to correct the interference by one or more of the following measures:
• Reorient or relocate the receiving antenna.
- Increase the separation between the equipment and the receiver.
- Connect the equipment into an outlet on a circuit different from that to which the receiver is connected.
- Consult the dealer or an experienced radio/TV technician for help.
LED indicator statement
The display LEDs meet the requirements of EN 60825-1.
(hp deskjet 6122 series printer only)
사용지 인내문(Bkg 기기)
(hp deskjet 6122 series printer only)
index
ABCDEFGHIJKLMNOPQRSTUVWXYZ
A
accessibility acknowledgements advanced features automatic paper-type sensor about using automatic two-sided printing automatic two-sided printing accessory automatic two-sided printing paper jams problems
B
banners buttons
C
calibrating the print cartridge checking the print cartridge status cleaning print cartridges automatically manually color tab connectivity
about network parallel port USB port
D
default settings, changing
duplexer about installing specifications
E
envelopes environmental statement
F
features tab
features about special
G - H
greeting cards
I - K
iron-on transfers
L
labels
lights
about
flashing
flashing (all)
on
power light is flashing
resume light is flashing
M
maintenance
print cartridge
printer body
manual two-sided printing
minimum system requirements
N
notices and acknowledgements
notices, regulatory
0
optional 250-sheet plain paper tray
P - Q
paper jam
paper trays
photographs
posters
print cartridges
about
calibrating
cleaning automatically
cleaning manually
cleaning using the hp toolbox
maintenance
recovery
refilling
replacing
print settings
printer driver
about
color tab settings
features tab settings
setup tab settings
printing
banners
digital photographs
documents
greeting cards
index cards
iron-on transfers
labels
not printing
paper problems
photographs
plain paper
posters
printout problems
screen images
slow
small media
transparencies
printout problems
R
regulatory notices removing ink from skin and clothing
S
setup tab special features specifications duplexer printer system requirements
T
terms and conventions tools transparencies troubleshooting two-sided printing about about the duplexer problems
U - V
USB about problems
W - Z
warranty