
LaserJet Pro M276NW - Printer HP - Free user manual and instructions
Find the device manual for free LaserJet Pro M276NW HP in PDF.


User questions about LaserJet Pro M276NW HP
0 question about this device. Answer the ones you know or ask your own.
Ask a new question about this device
Download the instructions for your Printer in PDF format for free! Find your manual LaserJet Pro M276NW - HP and take your electronic device back in hand. On this page are published all the documents necessary for the use of your device. LaserJet Pro M276NW by HP.
USER MANUAL LaserJet Pro M276NW HP
natural_image
3D rendering of a HP printer with visible internal components and front panel (no text or symbols on the device itself)
HP LaserJet Pro 200 color MFP M276
Series
User Guide
Copyright and License
© 2012 Copyright Hewlett-Packard Development Company, L.P.
Reproduction, adaptation, or translation without prior written permission is prohibited, except as allowed under the copyright laws.
The information contained herein is subject to change without notice.
The only warranties for HP products and services are set forth in the express warranty statements accompanying such products and services. Nothing herein should be construed as constituting an additional warranty. HP shall not be liable for technical or editorial errors or omissions contained herein.
Edition 1, 4/2012
Part number: CF144-90936
Trademark Credits
Adobe ^® , Acrobat ^® , and PostScript ^® are trademarks of Adobe Systems Incorporated.
Apple and the Apple logo are trademarks of Apple Computer, Inc., registered in the U.S. and other countries. iPod is a trademark of Apple Computer, Inc. iPod is for legal or rightholder-authorized copying only. Don't steal music.
Bluetooth is a trademark owned by its proprietor and used by Hewlett-Packard Company under license.
Java™ is a US trademark of Sun Microsystems, Inc.
Microsoft®, Windows®, Windows® XP, and Windows Vista® are U.S. registered trademarks of Microsoft Corporation.
UNIX ^® is a registered trademark of The Open Group.
Table of contents
1 Product introduction .... 1
Product views 2
Product front view 2
Product back view 3
Serial number and model number location 3
Control panel layout 4
Control-panel Home screen 4
Print product reports 6
Printer sharing disclaimer 7
2 Paper tray 9
Supported paper sizes 10
Supported paper types 12
Load the paper input tray 13
3 Print 15
Supported printer drivers (Windows) 16
Change print-job settings (Windows) 17
Priority for changing print-job settings 17
Change the settings for all print jobs until the software program is closed 17
Change the default settings for all print jobs 17
Change the product configuration settings 18
Change print-job settings (Mac OS X) 19
Priority for changing print-job settings 19
Change the settings for all print jobs until the software program is closed 19
Change the default settings for all print jobs 19
Change the product configuration settings 19
Print tasks for Windows 21
Use a printing shortcut (Windows) 21
Create a printing shortcut (Windows) 22
Print on both sides (duplex) with Windows 25
Print multiple pages per sheet with Windows 26
Select the page orientation (Windows) 28
Select the paper type (Windows) 30
Print the first or last page on different paper (Windows) 31
Scale a document to fit page size (Windows) 33
Create a booklet (Windows) 34
Print tasks for Mac OS X 36
Use a printing preset (Mac OS X) 36
Create a printing preset (Mac OS X) 36
Print on both sides (Mac OS X) 36
Print multiple pages on one sheet of paper (Mac OS X) 37
Select the page orientation (Mac OS X) 37
Select the paper type (Mac OS X) 37
Print a cover page (Mac OS X) 38
Scale a document to fit page size (Mac OS X) 38
Create a booklet (Mac OS X) 38
Additional print tasks (Windows) 39
Cancel a print job (Windows) 39
Select the paper size (Windows) 39
Select a custom paper size (Windows) 39
Print watermarks (Windows) 40
Additional print tasks (Mac OS X) 41
Cancel a print job (Mac OS X) 41
Select the paper size (Mac OS X) 41
Select a custom paper size (Mac OS X) 41
Print watermarks (Mac OS X) 41
Create archival-quality prints 42
Color printing 43
Use the HP EasyColor option 43
Change color options (Windows) 44
Change the color theme for a print job (Windows) 44
Change the color options (Mac OS X) 45
Manual color options 46
Match colors 46
Print colored text as black (Windows) 47
Use HP ePrint 48
Use AirPrint 49
Walk-up USB printing 50
4 Copy 51
Make a single copy 52
Make multiple copies 53
Copy a multiple-page original 54
Collate a copy job 55
Copy on both sides (duplex) 56
Reduce or enlarge a copy 58
Make color or black and white copies 59
Copy identification cards 60
Optimize copy quality 61
Adjust the lightness or darkness for copies 62
Adjust the copy image 63
Copy in draft mode 64
Set the paper size and type for copying on special paper 65
Set new default copy settings 66
Restore copy default settings 67
5 Scan 69
Scan by using the HP Scan software (Windows) 70
Scan by using the HP Scan software (Mac OS X) 70
Scan to a USB flash drive 71
Scan to a network folder 72
Scan to email 73
Scan by using other software 74
Scan from a TWAIN-compliant program 74
Scan from a WIA-compliant program 74
Scan by using optical character recognition (OCR) software 74
6 Fax 75
Connect fax to a telephone line 76
Set up fax with a telephone answering machine 76
Set up fax with an extension phone 76
Setup for stand-alone fax 76
Configure the fax time, date, and header 77
Use the control panel 77
Use the HP Fax Setup Wizard 77
Use special characters in fax headers 77
Use the phone book 78
Use the control panel to create and edit the fax phone book 78
Import or export Microsoft Outlook contacts into the fax phone book 78
Use phone-book data from other programs 78
Delete phone book entries 79
Create and edit speed-dial entries 80
Delete speed-dial entries 80
Create and edit group-dial entries 80
Delete group-dial entries 81
Configure send fax settings 82
Set special dialing symbols and options 82
Set a dialing prefix 82
Set the dial tone detection 82
Tone dial or pulse dial 83
Set autoredial and the time between redials 83
Set light/dark and resolution 84
Set the default light/dark (contrast) setting 84
Set resolution settings 84
Cover page templates 85
Set billing codes 85
Configure receive fax settings 87
Set fax forwarding 87
Set the answer mode 87
Block or unblock fax numbers 88
Set the number of rings-to-answer 88
Set distinctive ring 89
Use autoreduction for incoming faxes 90
Set fax reprint settings 90
Set the fax sounds volume 90
Set the alarm volume, phone-line volume, and ring volume 90
Set stamp-received faxes 91
Set the private receive feature 91
Set fax polling 91
Use fax 93
Supported fax programs 93
Cancel a fax 93
Cancel the current fax 93
Cancel a pending fax job 93
Delete faxes from memory 93
Use fax on a DSL, PBX, or ISDN system 94
DSL 94
PBX 94
ISDN 94
Use fax on a VoIP service 95
Fax memory contents are retained when there is a loss of power 95
Fax from the flatbed scanner 95
Fax from the document feeder 96
Use speed dials and group-dial entries 97
Send a fax from the software 97
Send a fax by dialing from a telephone connected to the fax line 99
Send a fax with confirmation 99
Schedule a fax to be sent later 99
Use access codes, credit cards, or calling cards 100
Send faxes internationally 100
Print a fax 101
Reprint a fax 102
Receive faxes when fax tones are audible on the phone line 102
Receive faxes to a computer 102
Print a stored fax when the private receive feature is on 102
Solve fax problems 104
Fax troubleshooting checklist 104
Fax trace report 106
Fax error report printing 107
Print all fax reports 107
Print individual fax reports 107
Set the fax error report 107
Set the fax-error-correction mode 108
Change the fax speed 108
Fax error messages 108
Solve problems sending faxes 113
An error message displays on the control panel 114
The Communication error. message appears 114
No dial tone. 114
The Fax is busy. message appears 115
The No fax answer. message appears 115
Document feeder paper jam 116
The Fax storage is full. message appears 116
Scanner error 116
The control panel displays a Ready message with no attempt to send the fax . 117
The control panel displays the message "Storing page 1" and does not progress beyond that message .... 117
Faxes can be received, but not sent 117
Unable to use fax functions from the control panel 118
Unable to use speed dials 118
Unable to use group dials 118
Receive a recorded error message from the phone company when trying to send a fax 119
Unable to send a fax when a phone is connected to the product 119
Solve problems receiving faxes 119
The fax does not respond 120
The fax has a dedicated phone line 120
An answering machine is connected to the product 120
A telephone handset is connected to the product 121
The Answer Mode setting is set to the Manual setting 121
Voice mail is available on the fax line 121
The product is connected to a DSL phone service 122
The product uses a fax over IP or VoIP phone service 122
An error message displays on the control panel 122
The No fax detected. message appears 122
The Communication error. message appears 123
The Fax storage is full. message appears 123
The Fax is busy. message appears 124
A fax is received but does not print 124
The Private Receive feature is on 124
Sender receives a busy signal 124
A handset is connected to the product 124
A phone line splitter is being used 125
No dial tone 125
Cannot send or receive a fax on a PBX line 125
Solve general fax problems 125
Faxes are sending slowly 125
Fax quality is poor 126
Fax cuts off or prints on two pages 127
7 Manage and maintain 129
Use the HP Reconfiguration Utility to change the product connection 130
Use HP Web Services applications 130
Configure IP network settings 131
View or change network settings 131
Manually configure IPv4 TCP/IP parameters from the control panel 131
Rename the product on a network 131
Link speed and duplex settings 132
HP Device Toolbox (Windows) 133
HP Utility (Mac OS X) 135
Open the HP Utility 135
HP Utility features 135
HP Web Jetadmin 136
Product security features 136
Set or change the product password 136
Economy settings 137
Print with EconoMode 137
Set the sleep delay 137
Set the Auto Power Down delay 137
Print when a toner cartridge is at estimated end of life 139
Enable or disable the At Very Low settings 139
Store and recycle supplies 140
Recycle supplies 140
Toner cartridge storage 140
Replacement instructions 141
Replace the toner cartridges 141
Update the firmware 145
Manually update the firmware 145
Set the product to automatically update the firmware 145
8 Solve problems 147
Problem-solving checklist 148
Step 1: Check that the product power is on 148
Step 2: Check the control panel for error messages 148
Step 3: Test print functionality 148
Step 4: Test copy functionality .... 149
Step 5: Test the fax sending functionality 149
Step 6: Test the fax receiving functionality 149
Step 7: Try sending a print job from a computer 149
Step 8: Test the walk-up USB printing functionality 149
Restore the factory-set defaults 150
Control panel help system 150
Interpret control panel messages 151
Control panel message types 151
Control panel messages 151
10.X00Y Supply Error 151
49 Error, Turn off then on 151
50.x Fuser Error 152
51.XX Error 152
54.XX Error 152
55.X Error 153
57 Fan Error, Turn off then on 153
59.X Error 153
79 Error Turn off then on 153
Black Cartridge Low 154
Black in wrong position 154
Black Very Low 154
Cleaning 155
Cyan Cartridge Low 155
Cyan in wrong position 155
Cyan Very Low 155
Device error, press OK 156
Door open 156
Genuine HP supply installed 156
Incompatible
Incorrect supplies 156
Install
Invalid driver Press [OK] 157
Jam in Tray 1, Clear jam and then press OK 157
Load tray 1 Press [OK] for available media 157
Load Tray 1
Load Tray 1,
Magenta Cartridge Low 158
Magenta in wrong position 158
Magenta Very Low 158
Manual Duplex Load Tray 1, Press OK 159
Memory is low. Press OK. 159
Misprint, Press OK 159
Print failure, press OK. If error repeats, turn off then on. 159
Rear door open 160
Remove shipping lock from
Remove shipping locks from cartridges 160
Replace
Supplies low 160
Unexpected size in tray 1 Load
Unsupported
Used
Used
Used supplies in use 162
Yellow Cartridge Low 162
Yellow in wrong position 162
Yellow Very Low 162
Paper feeds incorrectly or becomes jammed 163
The product does not pick up paper 163
The product picks up multiple sheets of paper 163
Prevent paper jams 163
Clear jams 164
Jam locations 164
Clear jams from the document feeder 165
Clear jams in the paper input tray 166
Clear jams from the output bin 168
Clear jams from the rear door 168
Improve print quality 170
Check the paper type setting (Windows) 170
Check the paper type setting (Mac OS X) 170
Check toner cartridge status 171
Print the supplies status page 171
Check the supplies status 171
Calibrate the product to align the colors 171
Print a cleaning page 172
Perform additional print quality troubleshooting 172
Print the print quality page 172
Interpret the print quality page 172
Inspect the toner cartridge for damage 173
Check the paper and printing environment 174
Use paper that meets HP specifications 174
Check the product environment 174
Check print job settings 174
Check the EconoMode setting 174
Adjust color settings in the printer driver 175
Change the color theme for a print job 175
Change the color options 175
Use the printer driver that best meets your printing needs 176
Solve copy quality problems 178
Check the scanner glass for dirt and smudges 178
Check the paper settings 179
Check the image adjustment settings 179
Optimize for text or pictures 180
Edge-to-edge copying 181
Clean the pickup rollers and separation pad in the document feeder 181
Solve scan quality problems 183
Check the scanner glass for dirt and smudges 183
Check the resolution settings 184
Check the color settings 184
Check the image adjustment settings 185
Optimize for text or pictures 186
Clean the pickup rollers and separation pad in the document feeder 186
Solve fax quality problems 188
Check the scanner glass for dirt and smudges 188
Check the send-fax resolution setting 189
Check the image adjustment settings 189
Optimize for text or pictures 190
Check the Error Correction setting 190
Send to a different fax machine 191
Clean the pickup rollers and separation pad in the document feeder 191
Check the Fit-to-Page setting 192
Check the sender's fax machine 192
Perform a fax diagnostic test 193
The product does not print or it prints slowly 194
The product does not print 194
The product prints slowly 195
Solve walk-up USB printing problems 196
The USB Flash Drive menu does not open when you insert the USB accessory 196
The file does not print from the USB storage accessory 196
The file that you want to print is not listed in the USB Flash Drive menu 197
Solve direct connection problems 198
Solve wired network problems 199
Poor physical connection 199
The computer is using the incorrect IP address for the product 199
The computer is unable to communicate with the product 200
The product is using incorrect link and duplex settings for the network 200
New software programs might be causing compatibility problems 200
The computer or workstation might be set up incorrectly 200
The product is disabled, or other network settings are incorrect 200
Solve wireless network problems 201
Wireless connectivity checklist 201
The product does not print after the wireless configuration completes 201
The product does not print, and the computer has a third-party firewall installed 202
The wireless connection does not work after moving the wireless router or product ..... 202
Cannot connect more computers to the wireless product 202
The wireless product loses communication when connected to a VPN 202
The network does not appear in the wireless networks list 202
The wireless network is not functioning 203
Perform a wireless network diagnostic test 203
Reduce interference on a wireless network 204
Solve product software problems with Windows 205
A printer driver for the product is not visible in the Printer folder 205
An error message displayed during the software installation 205
The product is in Ready mode, but nothing prints 205
Solve product software problems with Mac OS X 207
The printer driver is not listed in the Print & Fax list 207
The product name does not appear in the product list in the Print & Fax list 207
The printer driver does not automatically set up the selected product in the Print & Fax list 207
A print job was not sent to the product that you wanted 208
When connected with a USB cable, the product does not appear in the Print & Fax list after the driver is selected. 208
You are using a generic printer driver when using a USB connection 208
Remove software (Windows) 209
Remove software (Mac OS X) 209
9 Supplies and accessories 211
Order parts, accessories, and supplies 212
HP policy on non-HP supplies 212
HP anticounterfeit Web site 212
Index 213
1 Product introduction
Product views
• Print product reports
• Printer sharing disclaimer
Product views
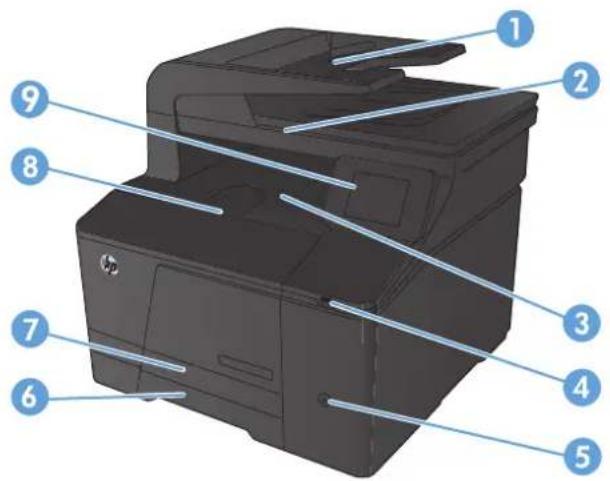
Product front view
text_image
Diagram of a HP printer with numbered parts labeled for identification| 1 Document feeder | |||||||||
| 2 | S | c | a | n | n | e | r | ||
| 3 Output bin | |||||||||
| 4 Walk-up USB port | |||||||||
| 5 Power button | |||||||||
| 6 | l | n | p | u | t | t | r | a | y |
| 7 Jam access door | |||||||||
| 8 Front door | |||||||||
| 9 Color touchscreen control panel | |||||||||
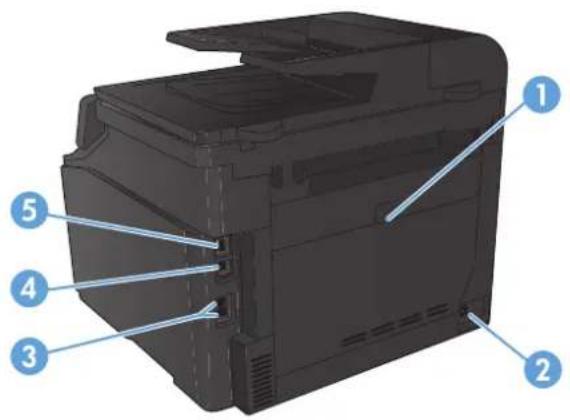
Product back view
text_image
Diagram of a printer with numbered parts labeled 1 to 5 for identification| 1 Rear jam-access door |
| 2 Power connection |
| 3 Fax and telephone ports |
| 4 Hi-Speed USB 2.0 port |
| 5 Network port |
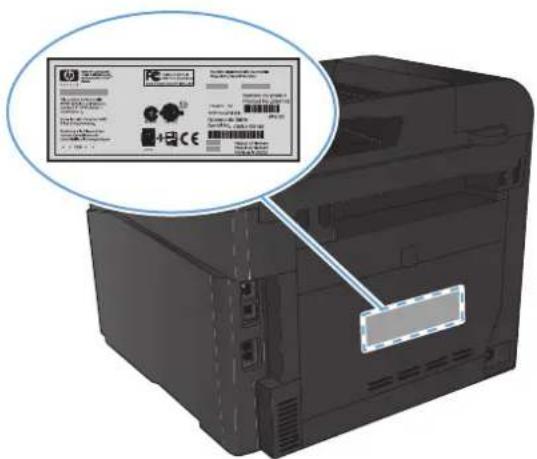
Serial number and model number location
The serial number and product model number label is on the back of the product.
text_image
Diagram of a printer with an inset showing a label and certification marks, likely from an older computer.Control panel layout
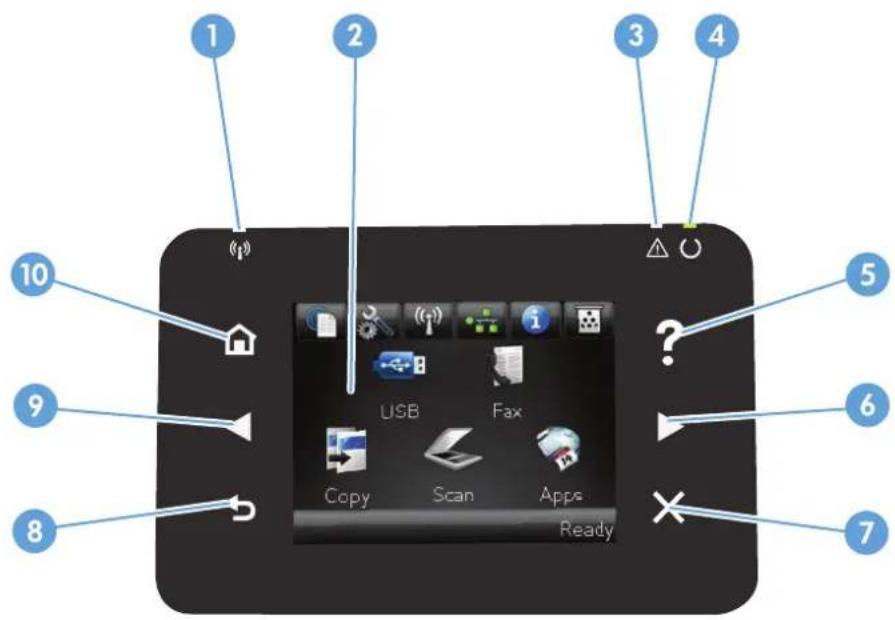
text_image
1 2 3 4 5 6 7 8 9 10 USB Fax Copy Scan Apps Ready| 1 | Wireless light: indicates the wireless network is enabled. The light blinks while the product is establishing a connection to the wireless network. |
| 2 Touchscreen display | |
| 3 Attention light: indicates a problem with the product | |
| 4 Ready light: indicates the product is ready | |
| 5 Help button and light: provides access to the control panel help system | |
| 6 | Right arrow button and light: moves the cursor to the right or moves the display image to the next screenNOTE: This button illuminates only when the current screen can use this feature. |
| 7 Cancel button and light: clears settings, cancels the current job, or exits the current screenNOTE: This button illuminates only when the current screen can use this feature. | |
| 8 Back button and light: returns to the previous screenNOTE: This button illuminates only when the current screen can use this feature. | |
| 9 Left arrow button and light: moves the cursor to the leftNOTE: This button illuminates only when the current screen can use this feature. | |
| 10 Home button and light: provides access to the Home screen | |
Control-panel Home screen
The Home screen provides access to the product features, and it indicates the product status.

NOTE: Depending on the product configuration, the features on the Home screen can vary. The layout might also be reversed for some languages.
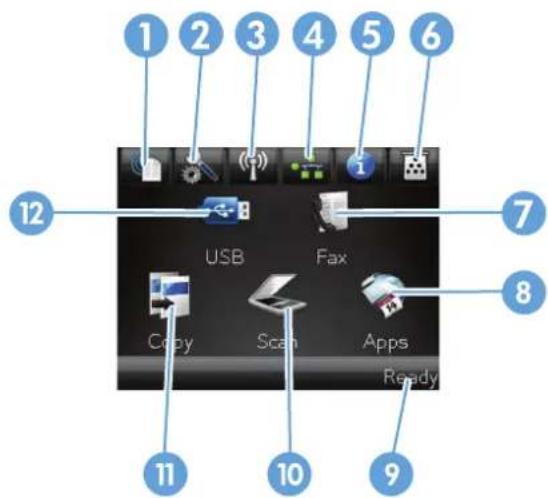
text_image
1 2 3 4 5 6 7 USB Fax Copy Scan Apps Ready 8 9 10 11 12| 1 | Web Services button: provides quick access to HP Web Services features, including HP ePrintHP ePrint is a tool that prints documents by using any email enabled device to send them to the product's email address. |
| 2 | Setup button: provides access to the main menus |
| 3 | Wireless button: provides access to the Wireless menu and wireless status informationNOTE: When you are connected to a wireless network, this icon changes to a set of signal strength bars. |
| 4 | Network button: provides access to network settings and information. From the network settings screen, you can print the Network Summary page. |
| 5 | Information button: provides product status information. From the status summary screen, you can print the Configuration Report page. |
| 6 | Supplies button: provides information about supplies status. From the supplies summary screen, you can print the Supplies Status page. |
| 7 | Fax button: provides access to the Fax feature |
| 8 | Apps button: provides access to the Apps menu to print directly from Web applications that you have downloaded from the HP `ePrintCenter Web site at www.hpeprintcenter.com |
| 9 Product status | |
| 10 Scan button: provides access to the scan feature | |
| 11 Copy button: provides access to the copy feature | |
| 12 | USB button: provides access to the walk-up USB printing feature |
Print product reports
From the Reports menu, you can print several informative pages about the product.
- From the Home screen, touch the Setup ↗ button.
- Touch the Reports button.
- Touch the name of the report that you want to print.
Menu item Description
| Demo Page Prints a page that demonstrates print quality | |
| Menu Structure | Prints a map of the control panel-menu layout. The active settings for each menu are listed. |
| Configuration Report | Prints a list of all the product settings. Includes network information when the product is connected to a network. |
| Supplies Status | Prints the status for each toner cartridge, including the following information:Estimated percentage of cartridge life remainingApproximate pages remainingPart numbers for HP toner cartridgesNumber of pages printed |
| Network Summary Prints a list of all product network settings | |
| Usage Page | Prints a page that lists PCL pages, PCL 6 pages, PS pages, pages that were jammed or mispicked in the product, monochrome (black and white) or color pages; and reports the page count |
| PCL Font List Prints a list of all the PCL fonts that are installed | |
| PS Font List | Prints a list of all the PostScript (PS) fonts that are installed |
| PCL6 Font List Prints a list of all the PCL6 fonts that are installed | |
| Color Usage Log | Prints a report that shows the user name, application name, and color usage information on a job-by-job basis |
| Service Page Prints the service report | |
| Diagnostics Page Prints the calibration and color diagnostics pages | |
| Print Quality Page | Prints a page that helps solve problems with print quality |
Printer sharing disclaimer
HP does not support peer-to-peer networking, as the feature is a function of Microsoft operating systems and not of the HP printer drivers. Go to Microsoft at www.microsoft.com.
2 Paper tray
• Supported paper sizes
• Supported paper types
- Load the paper input tray
Supported paper sizes
This product supports a number of paper sizes, and it adapts to various paper.

NOTE: To obtain the best print results, select the appropriate paper size and type in your print driver before printing.
Table 2-1 Supported paper and print media sizes
| Size Dimensions |
| Letter 216 x 279 mm (8.5 x 11 in) |
| Legal 216 x 356 mm (8.5 x 14 in) |
| Executive 184 x 267 mm (7.24 x 10.51 in) |
| 8.5 x 13 216 x 330 mm (8.5 x 13 in) |
| 4 x 6 102 x 152 mm (4 x 6 in) |
| 5 x 8 127 x 203 mm (5 x 8 in) |
| A4 210 x 297 mm (8.27 x 11.69 in) |
| A5 148 x 210 mm (5.83 x 8.27 in) |
| A6 105 x 148 mm (4.13 x 5.83 in) |
| B5 (JIS) 182 x 257 mm (7.17 x 10.12 in) |
| 10 x 15 cm 100 x 150 mm (3.9 x 5.9 in) |
| 16k 184 x 260 mm (7.24 x 10.23 in) |
| 195 x 270 mm (7.68 x 10.62 in) |
| 197 x 273 mm (7.75 x 10.75 in) |
| Custom Minimum: 76 x 127 mm (3 x 5 in) |
| Maximum: 216 x 356 mm (8.5 x 14.0 in) |
Table 2-2 Supported envelopes and postcards
| Size Dimensions | |
| Japanese Postcard | 100 x 148 mm (3.94 x 5.83 in) |
| Postcard (JIS) | |
| Double Japan Postcard Rotated | 148 x 200 mm (5.82 x 7.87 in) |
| Double Postcard (JIS) | |
| Envelope #10 105 x 241 mm (4.13 x 9.49 in) | |
| Envelope DL 110 x 220 mm (4.33 x 8.66 in) | |
| Envelope C5 | 162 x 229 mm (6.93 x 9.84 in) |
Table 2-2 Supported envelopes and postcards (continued)
| Size Dimensions |
| Envelope B5 176 x 250 mm (6.7 x 9.8 in) |
| Envelope Monarch 98 x 191 mm (3.9 x 7.5 in) |
Supported paper types
| Paper type | Dimensions1 | Weight | Capacity2 | Paper orientation |
| Paper, including the following types: | Minimum: 76 x 127 mm (3 x 5 in) | 60 to 90 g/m2(16 to 24 lb) | Up to 150 sheets of 75 g/m2(20 lb bond) | Side to be printed on face-up, with the top edge at the back of the tray |
| Plain | Maximum: 216 x 356 mm (8.5 x 14 in) | |||
| Letterhead | ||||
| Color | ||||
| Preprinted | ||||
| Prepunched | ||||
| Recycled | ||||
| Thick paper Same as for paper | Up to 200 g/m2(53 lb) | Up to 15 mm (.59 in) stack height | Side to be printed on face-up, with the top edge at the back of the tray | |
| Cover paper Same as for paper | Up to 200 g/m2(53 lb) | Up to 15 mm (.59 in) stack height | Side to be printed on face-up, with the top edge at the back of the tray | |
| Glossy paper | Same as for paper | Up to 220 g/m2(59 lb) | Up to 15 mm (.59 in) stack height | Side to be printed on face-up, with the top edge at the back of the tray |
| Photo paper | ||||
| Transparencies A4 or Letter Thickness: 0.12 to | 0.13 mm (4.7 to 5.1 mils) | Up to 50 sheets Side to be printed on face-up, with the top edge at the back of the tray | ||
| Labels3 | A4 or Letter Thickness: up to 0.23 mm (9 mils) | Up to 50 sheets Side to be printed on face-up, with the top edge at the back of the tray | ||
| Envelopes | COM 10 | Up to 90 g/m2(24 lb) | Up to 10 envelopes Side to be printed on face-up, with the stamp-end at the back of the tray | |
| Monarch | ||||
| DL | ||||
| C5 | ||||
| B5 | ||||
| Postcards or index cards 100 x 148 mm (3.9 x 5.8 in) | Up to 50 sheets Side to be printed on | face-up, with the top edge at the back of the tray | ||
1 The product supports a wide range of standard and custom sizes of paper. Check the print driver for supported sizes.
2 Capacity can vary depending on paper weight and thickness, and environmental conditions.
^3 Smoothness: 100 to 250 (Sheffield)
Load the paper input tray
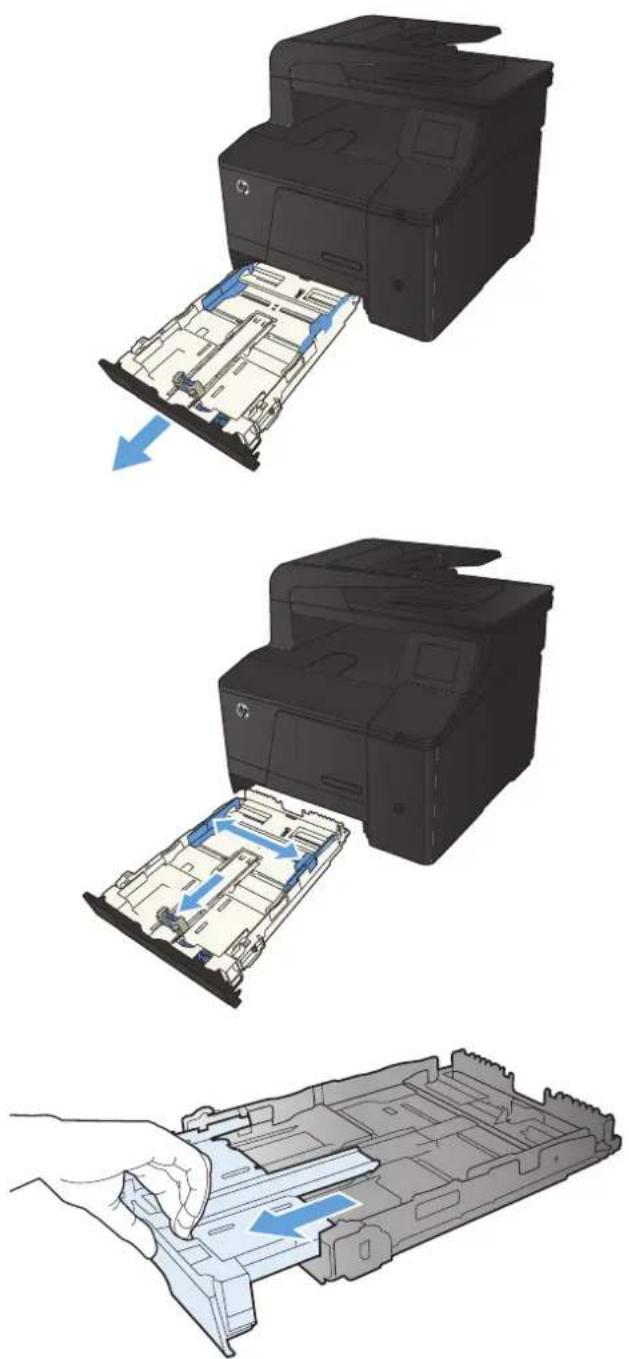
-
Pull the tray out of the product.
-
Slide open the paper length and width guides.
-
To load Legal-size paper, extend the tray by pressing and holding the extension tab while pulling the front of the tray outward.
NOTE: When loaded with Legal-size paper, the tray extends from the front of the product approximately 51 mm (2 inches).
natural_image
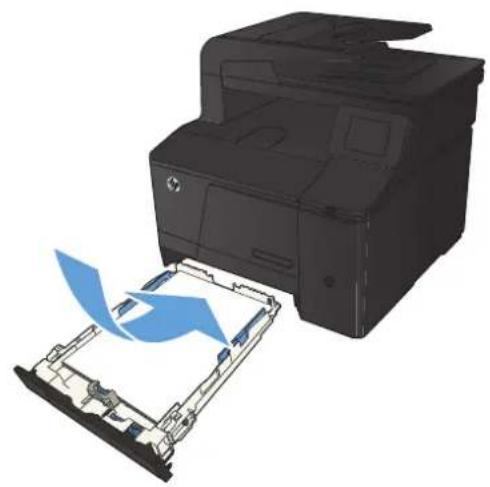
Three-step diagram showing printer assembly process: opening, disassembly, and packaging (no text or symbols)- Place the paper in the tray and make sure that it is flat at all four corners. Slide the paper length and width guides so that they are against the stack of paper.
NOTE: The tray capacity is 150 sheets.
-
Push down on the paper to make sure that the paper stack is below the paper limit tabs on the side of the tray.
-
Slide the tray into the product.
natural_image
3D rendering of a printer with an open drawer and blue arrow indicating motion (no text or symbols)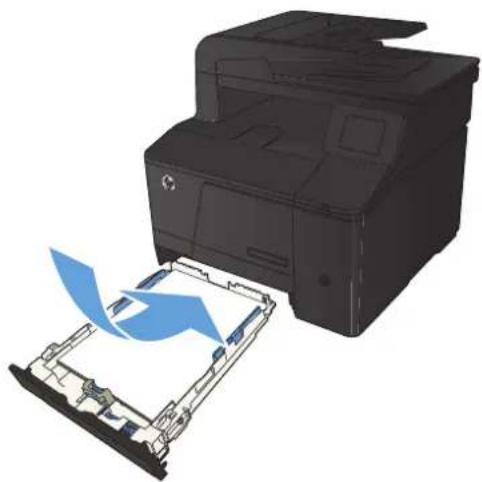
natural_image
3D rendering of a printer with a blue arrow indicating a loading or disassembly process (no text or symbols visible)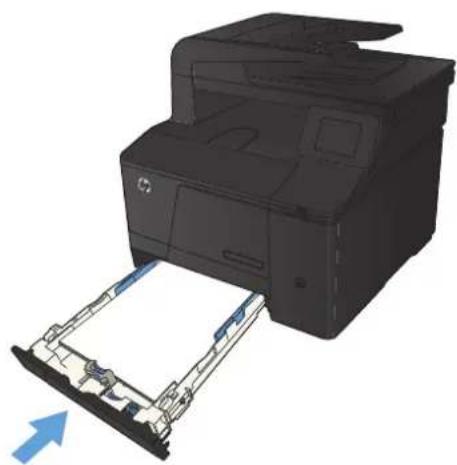
natural_image
3D rendering of a printer with paper feed being inserted, showing internal structure and page layout (no text or symbols)3 Print
• Supported printer drivers (Windows)
• Change print-job settings (Windows)
• Change print-job settings (Mac OS X)
• Print tasks for Windows
• Print tasks for Mac OS X
• Additional print tasks (Windows)
• Additional print tasks (Mac OS X)
• Create archival-quality prints
• Color printing
Use HP ePrint
Use AirPrint
Walk-up USB printing
Supported printer drivers (Windows)
Printer drivers provide access to the product features and allow the computer to communicate with the product (using a printer language). Check the installation notes and readme files on the product CD for additional software and languages.
HP PCL 6 driver description
• Installs automatically when installing the product software
• Provided as the default driver
• Recommended for printing in all supported Windows environments
- Provides the overall best speed, print quality, and product-feature support for most users
Developed to align with the Windows Graphic Device Interface (GDI) for the best speed in Windows environments
- Might not be fully compatible with third-party and custom software programs that are based on PCL 5
HP UPD PS driver description
• Available for download from the Web at www.hp.com/go/upd
- Recommended for printing with Adobe® software programs or with other highly graphics-intensive software programs
- Provides support for printing from postscript emulation needs or for postscript flash font support
HP UPD PCL 5 driver description
• Available for download from the Web at www.hp.com/go/upd
• Compatible with previous PCL versions and older HP LaserJet products
The best choice for printing from third-party or custom software programs
- Designed for use in corporate Windows environments to provide a single driver for use with multiple printer models
• Preferred when printing to multiple printer models from a mobile Windows computer
Change print-job settings (Windows)
Priority for changing print-job settings
Changes to print settings are prioritized depending on where the changes are made:

NOTE: The names of commands and dialog boxes might vary depending on your software program.
Page Setup dialog box: Click Page Setup or a similar command on the File menu of the program you are working in to open this dialog box. Settings changed here override settings changed anywhere else.
- Print dialog box: Click Print, Print Setup, or a similar command on the File menu of the program you are working in to open this dialog box. Settings changed in the Print dialog box have a lower priority and usually do not override changes made in the Page Setup dialog box.
- Printer Properties dialog box (printer driver): Click Properties in the Print dialog box to open the printer driver. Settings changed in the Printer Properties dialog box usually do not override settings anywhere else in the printing software. You can change most of the print settings here.
- Default printer driver settings: The default printer driver settings determine the settings used in all print jobs, unless settings are changed in the Page Setup, Print, or Printer Properties dialog boxes.
- Printer control panel settings: Settings changed at the printer control panel have a lower priority than changes made anywhere else.
Change the settings for all print jobs until the software program is closed
- From the software program, select the Print option.
- Select the driver, and then click Properties or Preferences.
Change the default settings for all print jobs
- Windows XP, Windows Server 2003, and Windows Server 2008 (using the default Start menu view): Click Start, and then click Printers and Faxes.
Windows XP, Windows Server 2003, and Windows Server 2008 (using the Classic Start menu view): Click Start, click Settings, and then click Printers.
Windows Vista: Click Start, click Control Panel, and then in the category for Hardware and Sound click Printer.
Windows 7: Click Start, and then click Devices and Printers.
- Right-click the driver icon, and then select Printing Preferences.
Change the product configuration settings
- Windows XP, Windows Server 2003, and Windows Server 2008 (using the default Start menu view): Click Start, and then click Printers and Faxes.
Windows XP, Windows Server 2003, and Windows Server 2008 (using the Classic Start menu view): Click Start, click Settings, and then click Printers.
Windows Vista: Click Start, click Control Panel, and then in the category for Hardware and Sound click Printer.
Windows 7: Click Start, and then click Devices and Printers.
- Right-click the driver icon, and then select Properties or Printer properties.
- Click the Device Settings tab.
Change print-job settings (Mac OS X)
Priority for changing print-job settings
Changes to print settings are prioritized depending on where the changes are made:

NOTE: The names of commands and dialog boxes might vary depending on your software program.
Page Setup dialog box: Click Page Setup or a similar command on the File menu of the program you are working in to open this dialog box. Settings changed here might override settings changed anywhere else.
- Print dialog box: Click Print, Print Setup, or a similar command on the File menu of the program you are working in to open this dialog box. Settings changed in the Print dialog box have a lower priority and do not override changes made in the Page Setup dialog box.
- Default printer driver settings: The default printer driver settings determine the settings used in all print jobs, unless settings are changed in the Page Setup, Print, or Printer Properties dialog boxes.
- Printer control panel settings: Settings changed at the printer control panel have a lower priority than changes made anywhere else.
Change the settings for all print jobs until the software program is closed
- On the File menu, click the Print button.
- Change the settings that you want on the various menus.
Change the default settings for all print jobs
- On the File menu, click the Print button.
- Change the settings that you want on the various menus.
- On the Presets menu, click the Save As... option and type a name for the preset.
These settings are saved in the Presets menu. To use the new settings, you must select the saved preset option every time you open a program and print.
Change the product configuration settings
- From the Apple menu 📁, click the System Preferences menu, and then click the Print & Fax icon.
- Select the product in the left side of the window.
-
Click the Options & Supplies button.
-
Click the Driver tab.
- Configure the installed options.
Print tasks for Windows
Use a printing shortcut (Windows)
- From the software program, select the Print option.
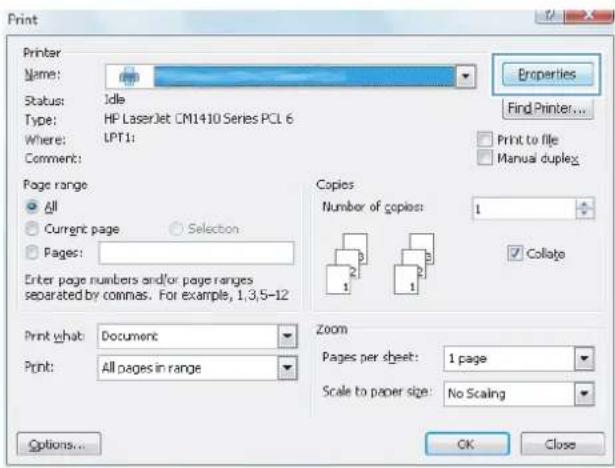
- Select the product, and then click the Properties or Preferences button.
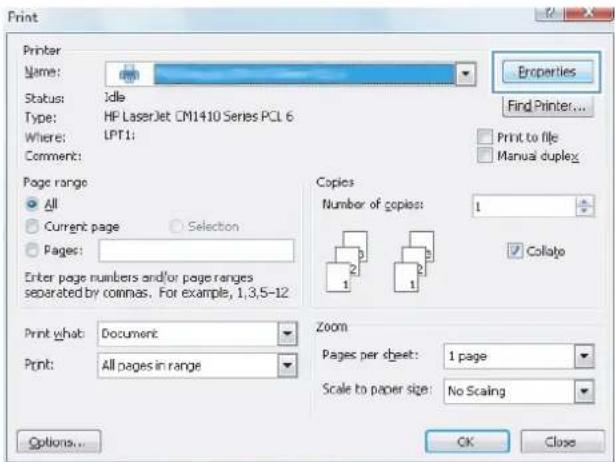
text_image
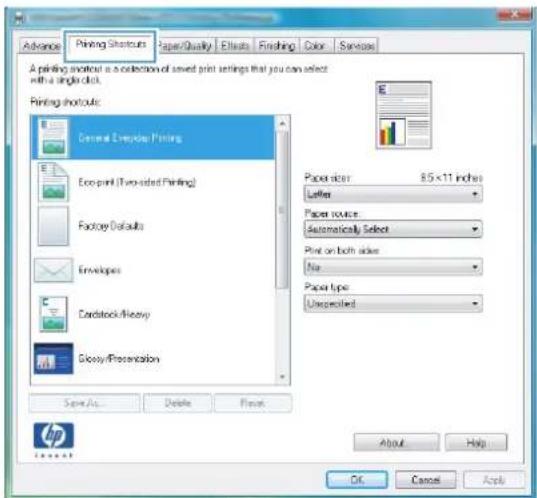
Print Printer Name: Idle Status: HP LaserJet CM1410 Series PCL 6 Where: LPT1: Comment: Properties Find Printer... Print to file Manual duplex Page range All Current page Selection Pages: Enter page numbers and/or page ranges separated by commas. For example, 1,3,5-12 Copies Number of copies: 1 Collato Print what: Document Zoom Pages per sheet: 1 page Print: All pages in range Scale to paper size: No Scaling Options... OK Close- Click the Printing Shortcuts tab.
text_image
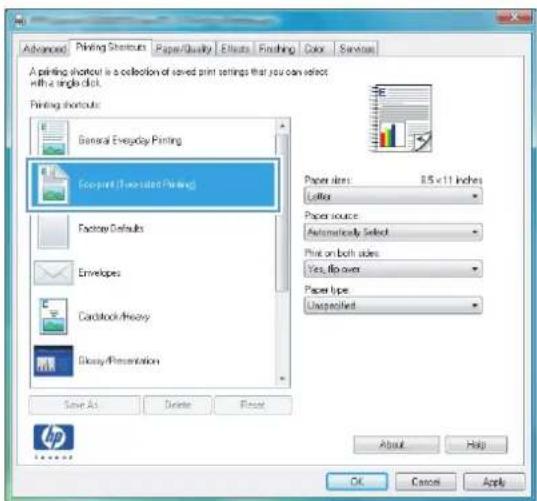
Advance Printing Shortcuts Paper/Quality Effects Finishing Color Services A printing workshop as a collection of saved print settings that you can select with a single click. Printing shortcuts General Everyday Printing Eco-print (Two-sided Printing) Factory Defaults Envelopes Cardstock/Heavy Glowsy/Presentation Paper size: 8.5 x 11 inches Letter Paper source: Automatically Select Print on both sides: No Paper type: Unspecified Save As... Delete Finish About Help OK Cancel Apply- Select one of the shortcuts, and then click the OK button.
NOTE: When you select a shortcut, the corresponding settings change on the other tabs in the printer driver.
text_image
Advanced Printing Shortcuts Paper/Quality Effects Fixing Color Services A printing shortcut is a collection of saved print settings that you can select with a single click. Printing shortcuts General Everyday Printing Eco-print (Two-sided Printing) Factory Defaults Envelopes Cardstock/Heavy Gluesy/Presentation Save As Delete Reset Paper size: 8.5 x 11 inches Letter Paper source: Automatically Selected Print on both sides: Yes, flip over Paper type: Unspecified About Help OK Cancel ApplyCreate a printing shortcut (Windows)
-
From the software program, select the Print option.
-
Select the product, and then click the Properties or Preferences button.
-
Click the Printing Shortcuts tab.
-
Select an existing shortcut as a base.
NOTE: Always select a shortcut before adjusting any of the settings on the right side of the screen. If you adjust the settings and then select a shortcut, or if you select a different shortcut, all your adjustments are lost.
text_image
Print Printer Name: Status: Idle Type: HP LaserJet CM1410 Series PCL 6 Where: LPT1: Comment: Page range All Current page Selection Pages: Enter page numbers and/or page ranges separated by commas. For example, 1,3,5-12 Print what: Document Print: All pages in range Properties Find Printer... Print to file Manual duplex Copies Number of copies: 1 Collage Zoom Pages per sheet: 1 page Scale to paper size: No Scaling Options... OK Close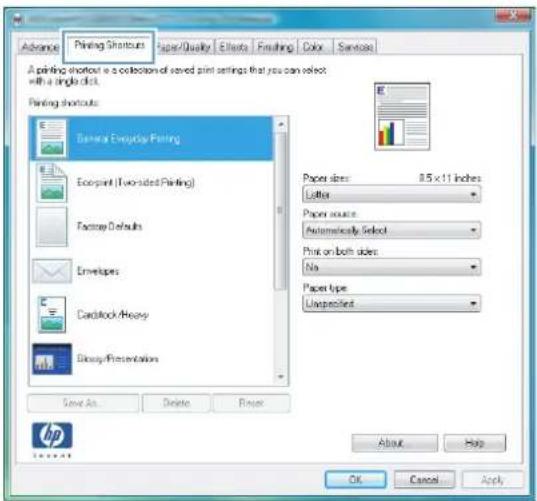
text_image
Advance Printing Shortcuts Paper/Quality Effects Finishing Color Services A printing shortcut is a collection of saved print settings that you can select with a single click. Printing shortcuts Beware Everyday Printing Ecoprint (Two-sided Printing) Factory Defaults Envelopes Cardlock/Heavy Binary/Presentation Save As Delete Printer Paper sizes: 0.5 x 11 inches Letters Paper source: Automatically Select Print on both sides: No Paper type: Unspecified About Help OK Cancel Apply HP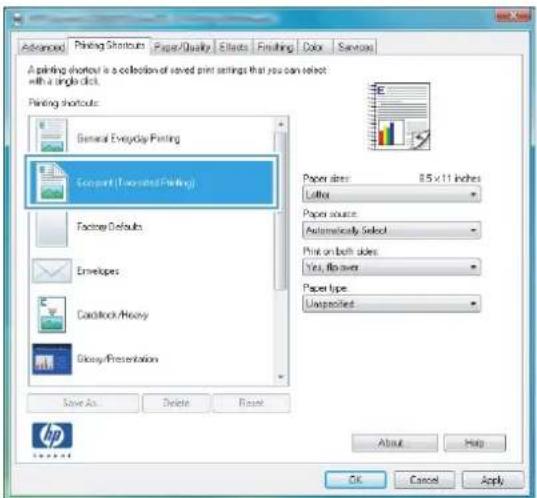
text_image
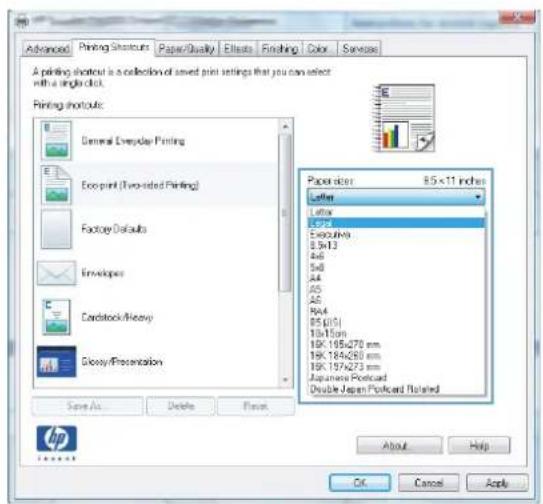
Advanced Printing Shortcuts Paper/Quality Effects Finishing Color Services A printing shortcut is a collection of saved print settings that you can select with a single click. Printing shortcuts General Everyday Printing Compart (Unvisited Printing) Factory Defaults Envelopes Cardboard/Heavy GlDony/Presentation Save As Delete Reset Paper size: 8.5 x 11 inches Letter Paper source: Automatically Select Print on both sides: Yes, No cover Paper type: Unspecified About Help OK Cancel Apply- Select the print options for the new shortcut.
NOTE: You can select the print options on this tab or on any other tab in the printer driver. After selecting options on other tabs, return to the Printing Shortcuts tab before continuing with the next step.
text_image
Advanced Printing Shortcuts Paper/Quality Effects Finishing Color Services A printing shortcut is a collection of saved print settings that you can select with a single click. Printing shortcuts: General Everyday Printing Eco-print (Two-listed Printing) Factory Defaults Envelopes Cardstock/Inventory Glossy/Presentation Save As... Delete Finish Paper size: 8.5 x 11 inches Letter Left C234 Executiva 0.5x13 4x6 5x8 A4 A5 A6 Next 85 (1/5) 10x15pm 10K 195x270 mm 10K 184x260 mm 10K 197x270 mm Equivalent Postcard Double Japan Postcard Rotated About Help OK Cancel Apply- Click the Save As button.
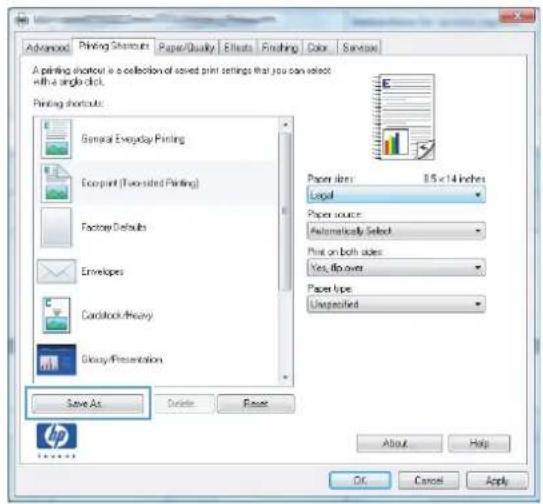
text_image
Advanced Printing Shortcuts Paper/Quality Effects Finishing Color Services A printing shortout is a collection of saved print settings that you can select with a single click. Printing shortouts: General Everyday Printing Ecoprint (Two-sided Printing) Factory Defaults Envelopes Cardstock/Heavy Glassy/Presentation Save As Delete Reset Paper size: 8.5 x 14 inches Layout Paper source: Automatically Select Print on both sides: Yes, flip over Paper type: Unspecified About Help OK Cancel Apply- Type a name for the shortcut, and click the OK button.
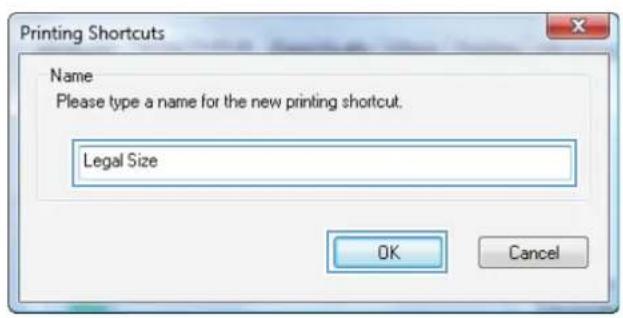
text_image
Printing Shortcuts Name Please type a name for the new printing shortcut. Legal Size OK CancelPrint on both sides (duplex) with Windows
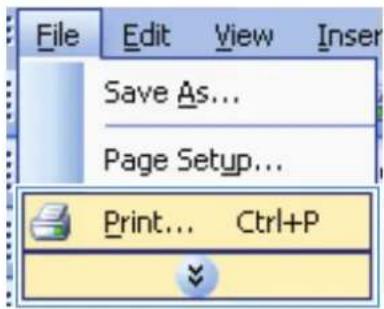
-
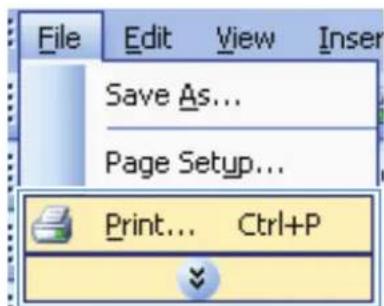
On the File menu in the software program, click Print.
-
Select the product, and then click the Properties or Preferences button.
-
Click the Finishing tab.
text_image
File Edit View Insert Save As... Page Setup... Print... Ctrl+P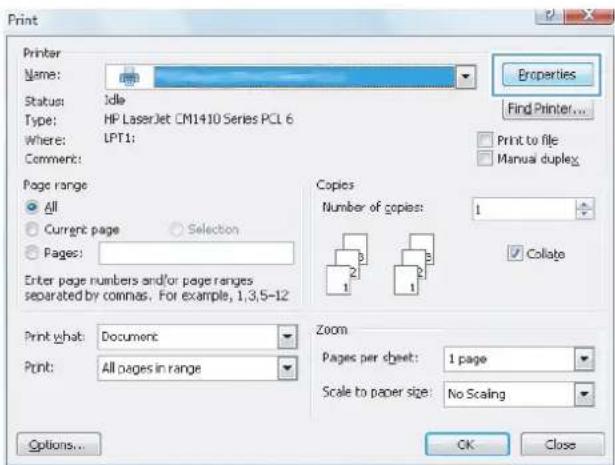
text_image
Print Printer Name: Status: Idle Type: HP LaserJet CM1410 Series PCL 6 Where: LPT1: Comment: Page range All Current page Selection Pages: Enter page numbers and/or page ranges separated by commas. For example, 1,3,5-12 Print what: Document Print: All pages in range Properties Find Printer... Print to file Manual duplex Copies Number of copies: 1 Collate Zoom Pages per sheet: 1 page Scale to paper size: No Scaling Options... OK Close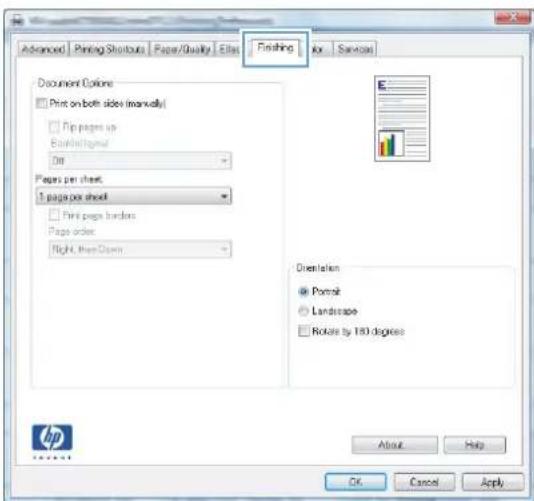
text_image
Advanced | Printing Shortouts | Paper/Quality | Elias | Finishing | For | Services Document Options Print on both sides (manually) Print pages up Borderline On Pages per sheet: 1 page per sheet Print pages borders Pages order: Right, then Down Orientation Portrait Landscape Rotate by 180 degrees About Help OK Cancel Apply-
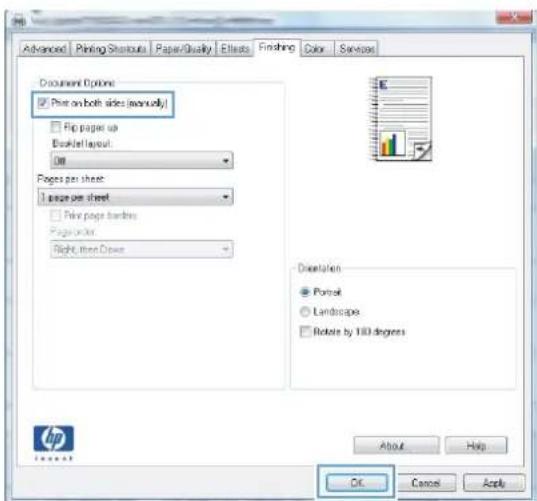
Select the Print on both sides (manually) check box. Click the OK button to print the first side of the job.
-
Retrieve the printed stack from the output bin, and maintaining the same orientation, place it with the printed-side facing down in the input tray.
-
On the control panel, press the OK button to print the second side of the job.
text_image
Advanced Printing Shortcuts Paper/Quality Effects Finishing Color Services Document Options ☑ Print on both sides (annually) ☐ Flip pages up Breaklet layout: Up Pages per sheet: 1 page per sheet ☐ View page borders Pages border: Right, then Close Presentation ● Portrait ○ Landscape □ Rotate by 100 degrees About Help OK Cancel Apply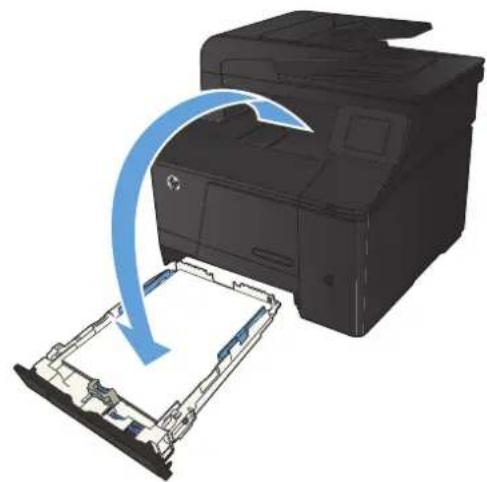
natural_image
3D illustration of a printer being inserted into a rack, with a blue arrow indicating the process (no text or symbols present)Print multiple pages per sheet with Windows
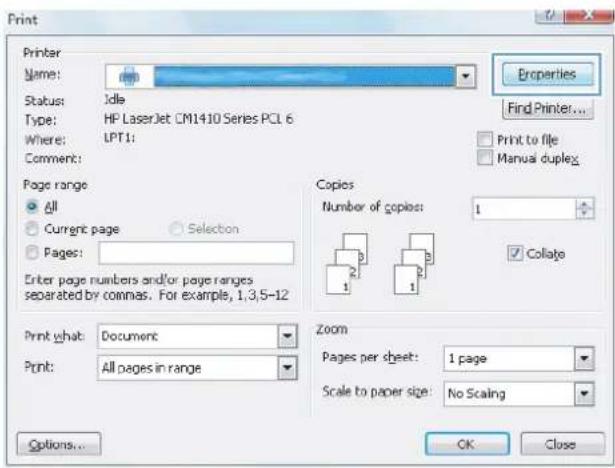
- On the File menu in the software program, click Print.
text_image
File Edit View Insert Save As... Page Setup... Print... Ctrl+P-
Select the product, and then click the Properties or Preferences button.
-
Click the Finishing tab.
text_image
Print Printer Name: Status: Idle Type: HP LaserJet CM1410 Series PCL 6 Where: LPT1: Comment: Page range All Current page Selection Pages: Enter page numbers and/or page ranges separated by commas. For example, 1,3,5-12 Print what: Document Print: All pages in range Properties Find Printer... Print to file Manual duplex Copies Number of copies: 1 Collage Zoom Pages per sheet: 1 page Scale to paper size: No Scaling Options... OK Close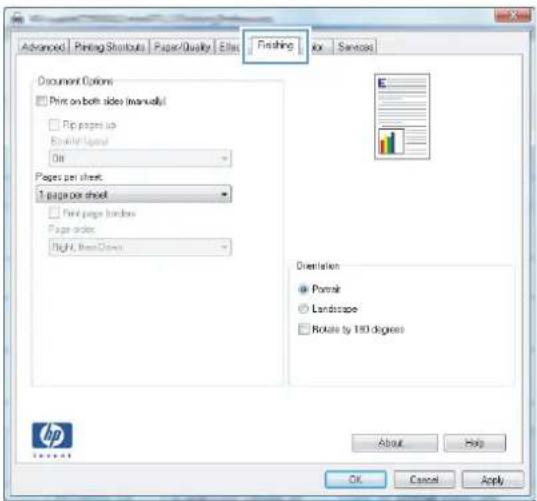
text_image
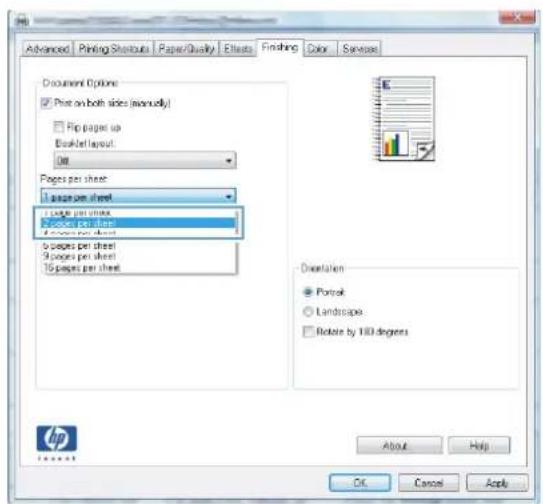
Advanced Printing Shutouts Paper/Quality Effect Finishing View Services Document Options Print on both sides (manually) Print pages up Enabling Image On Pages per sheet: 1 page per sheet Print pages hardness Page order: Right, then Down Orientation Portrait Landscape Rotate by 100 degrees About Help OK Cancel Apply... HP SAPARELL- Select the number of pages per sheet from the Pages per sheet drop-down list.
text_image
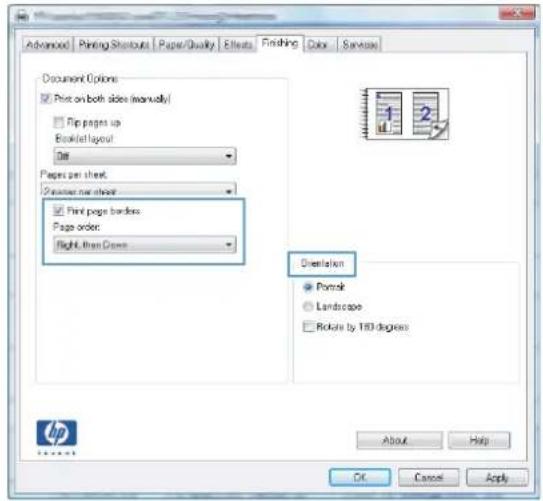
Advanced Printing Shortcuts Paper/Quality Effects Finishing Color Services Document Options Prior on both sides ( manually) Flip pages up Booklet layout: On Pages per sheet: 1 page per sheet Large per sheet 2 pages per sheet 3 pages per sheet 4 pages per sheet 5 pages per sheet 6 pages per sheet 7 pages per sheet 8 pages per sheet Orientation Portrait Landscape Rotate by 100 degrees About Help OK Cancel Apply- Select the correct Print page borders, Page order, and Orientation options.
text_image
Document Options Print on both sides (manually) Flip pages up Book/Layout Edit Papers per sheet Enter the sheet First page borders Page order: Right, then Cross Orientation Portfolio Landscape Rotate by 160 degrees About Help OK Cancel ApplySelect the page orientation (Windows)
-
From the software program, select the Print option.
-
Select the product, and then click the Properties or Preferences button.
-
Click the Finishing tab.
-
In the Orientation area, select the Portrait or Landscape option.
To print the page image upside down, select the Rotate by 180 degrees option.
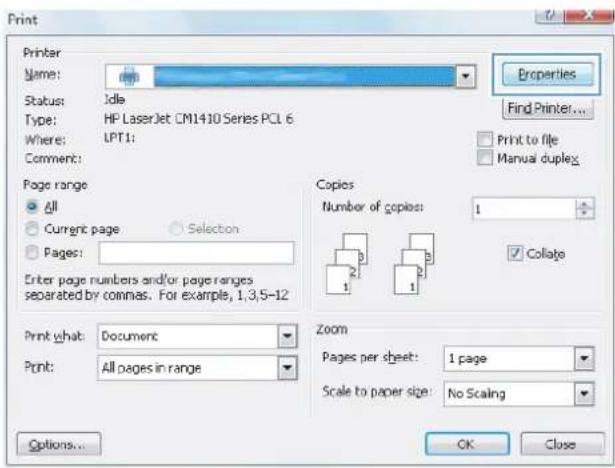
text_image
Print Printer Name: Status: Idle Type: HP LaserJet CM1410 Series PCL 6 Where: LPT1: Comment: Page range All Current page Selection Pages: Enter page numbers and/or page ranges separated by commas. For example, 1,3,5-12 Print what: Document Print: All pages in range Properties Find Printer... Print to file Manual duplex Copies Number of copies: 1 Collage Zoom Pages per sheet: 1 page Scale to paper size: No Scaling Options... OK Close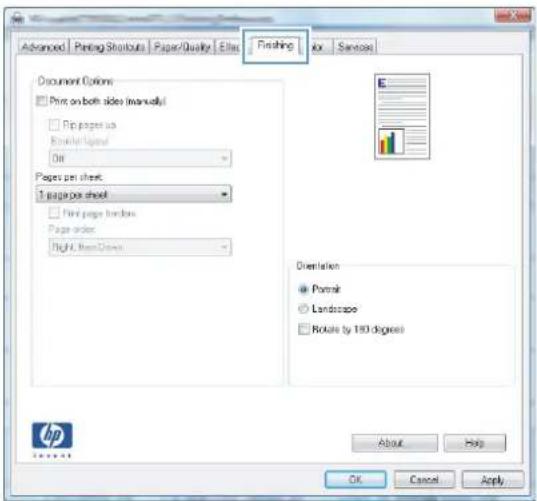
text_image
Advanced | Printing Shutouts | Paper/Quality | Effects | Finishing | Box | Services Document Options: Print on both sides (manually) Print pages on English/English On Pages per sheet: 1 page per sheet Print pages forward Page order: Right, then down Orientation Portrait Landscape Rotate by 100 degrees About Help OK Cancel Apply HP SANSAT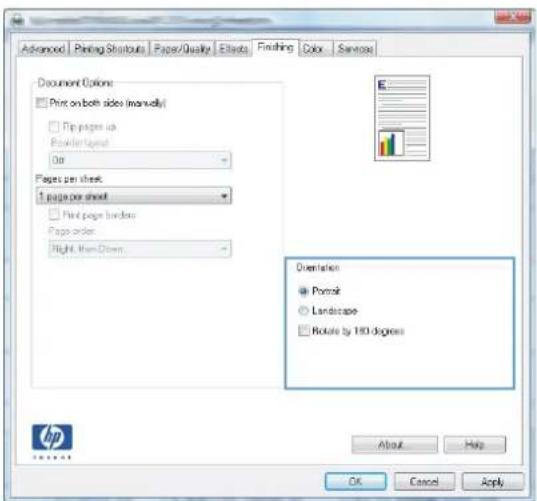
text_image
Advanced | Printing Shutouts | Paper/Quality | Effects | Finishing | Color | Services Document Options: Print on both sides (manually) Print pages up ForwardPage On Pages per sheet: 1 page per sheet Print pages forward Pages order: Right, then Down Diversities Portrait Landscape Rotate by 100 degrees About Help OK Cancel ApplySelect the paper type (Windows)
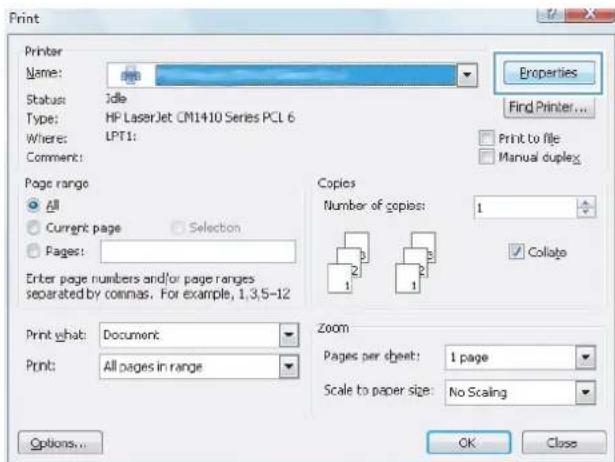
- From the software program, select the Print option.
-
Select the product, and then click the Properties or Preferences button.
-
Click the Paper/Quality tab.
-
From the Paper type drop-down list, click the More... option.
text_image
Print Printer Name: Status: Idle Type: HP LaserJet CM1410 Series PCL 6 Where: LPT1: Comment: Page range All Current page Selection Pages: Enter page numbers and/or page ranges separated by commas. For example, 1,3,5-12 Print what: Document Print: All pages in range Properties Find Printer... Print to file Manual duplex Copies Number of copies: 1 Collage Zoom Pages per sheet: 1 page Scale to paper size: No Scaling Options... OK Close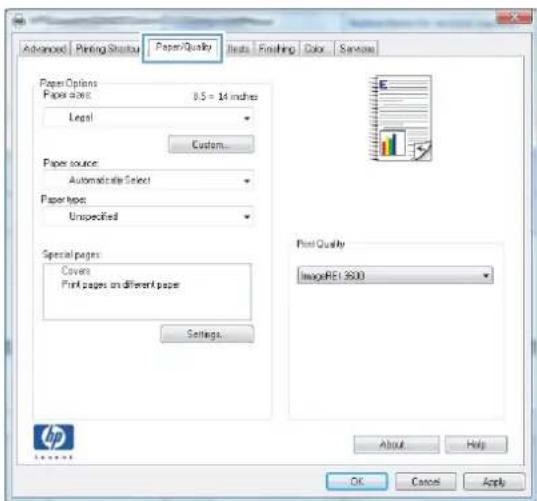
text_image
Advanced Printing Setup PaperQuality Items Finishing Color Services Paper Options Paper size: 0.5 = 14 inches Legal Custom... Paper source: Automatically Select Paper type: Unspecified Special pages: Covers Print pages on different pages Settings Print Quality ImageREI 900 About Help OK Cancel Apply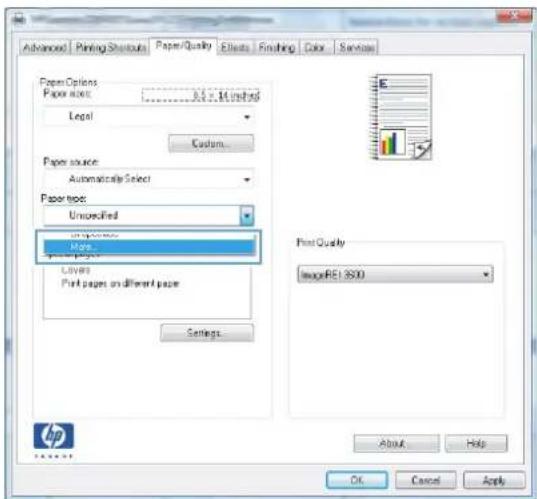
text_image
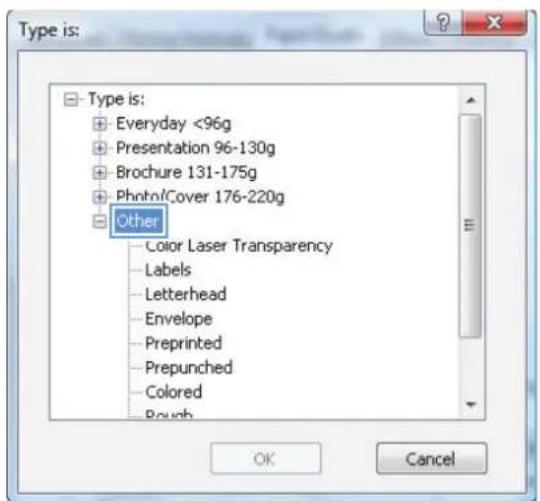
Advanced Printing Shortcuts Paper/Quality Effects Finishing Color Services Paper Options Paper sizes: 3.5 x 14 timeshed Legal Custom... Paper source: Automatically Select Paper type: Unspecified Page Layers Print pages on different pages Settings... Print Quality ImagePE1.900 About Help OK Cancel Apply HP- Select the category of paper types that best describes your paper.
text_image
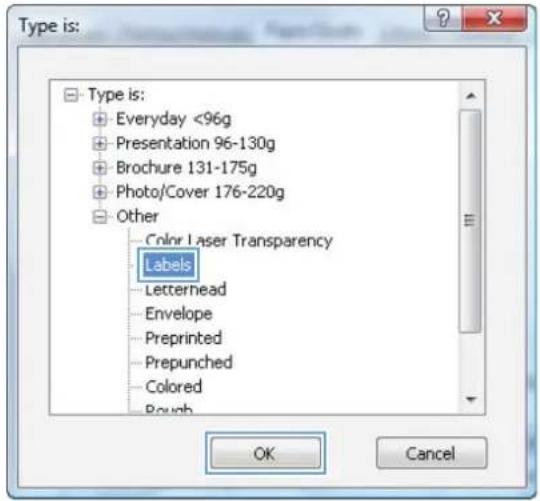
Type is: - Everyday <96g - Presentation 96-130g - Brochure 131-175g - PhotnlCover 176-220g - Other - Color Laser Transparency - Labels - Letterhead - Envelope - Preprinted - Prepunched - Colored - Rough OK Cancel- Select the option for the type of paper you are using, and click the OK button.
text_image
Type is: □ Type is: ● Everyday <96g ● Presentation 96-130g ● Brochure 131-175g ● Photo/Cover 176-220g □ Other Color Laser Transparency Labels Letterhead Envelope Preprinted Prepunched Colored Rough OK CancelPrint the first or last page on different paper (Windows)
-
From the software program, select the Print option.
-
Select the product, and then click the Properties or Preferences button.
-
Click the Paper/Quality tab.
-
Click the Print pages on different paper check box, and then select the necessary settings for the front cover, other pages, and back cover.
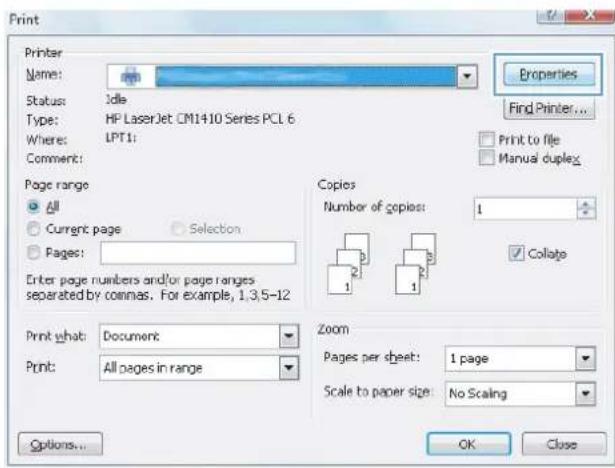
text_image
Print Printer Name: Status: Idle Type: HP LaserJet CM14J0 Series PCL 6 Where: LPT1: Comment: Page range All Current page Selection Pages: Enter page numbers and/or page ranges separated by commas. For example, 1,3,5-12 Print what: Document Print: All pages in range Properties Find Printer... Print to file Manual duplex Copies Number of copies: 1 Collate Zoom Pages per sheet: 1 page Scale to paper size: No Scaling Options... OK Close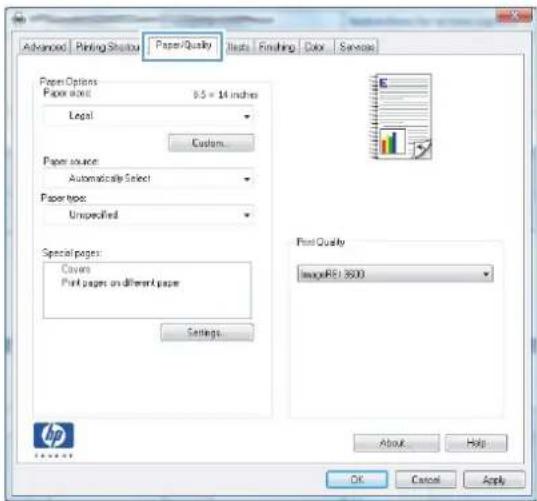
text_image
Advanced Printing Status Paper/Quality Items Finishing Color Services Paper Options Paper size: 8.5 x 14 inches Legal Custom... Paper source: Automaticcale Select Paper type: Unspecified Special pages: Covers Print pages on different paper Settings Print Quality ImageRS! 9000 About Help OK Cancel Apply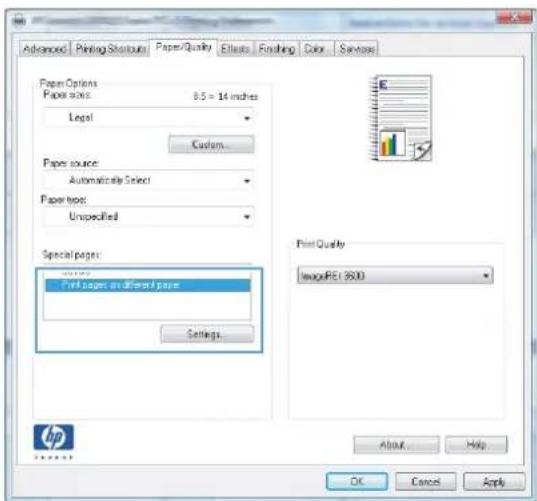
text_image
Advanced Printing Settings Paper Quality Effects Finishing Color Services Paper Options Paper sizes: 8.5 = 14 inches Legal Custom... Paper source: Automatics Select Paper type: Unspecified Special pages: Print Paper on different pages Settings Print Quality ImageREV 9000 About... Help OK Cancel ApplyScale a document to fit page size (Windows)
- From the software program, select the Print option.
-
Select the product, and then click the Properties or Preferences button.
-
Click the Effects tab.
-
Select the Print document on option, and then select a size from the drop-down list.
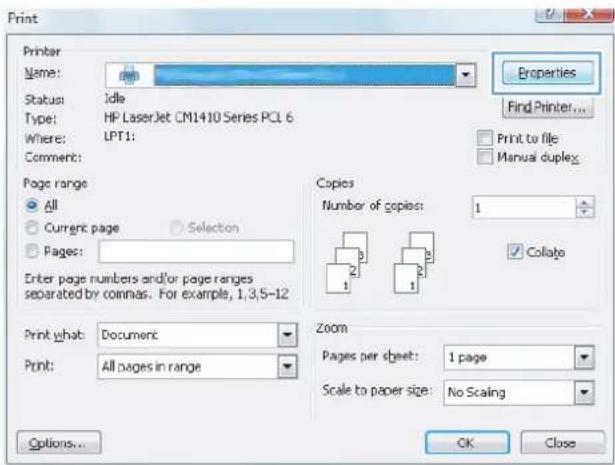
text_image
Print Printer Name: Status: Idle Type: HP LaserJet CM1410 Series PCL 6 Where: LPT1: Comment: Page range All Current page Selection Pages: Enter page numbers and/or page ranges separated by commas. For example, 1,3,5-12 Print what: Document Print: All pages in range Properties Find Printer... Print to file Manual duplex Copies Number of copies: 1 Collage Zoom Pages per sheet: 1 page Scale to paper size: No Scaling Options... OK Close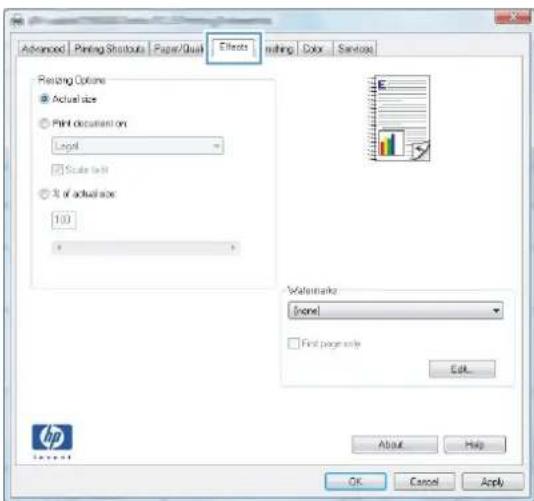
text_image
Advanced | Printing Shutouts | Paper/Quail | Effects | Refining | Color | Services Printing Options ● Actual size ○ Print document on Legal □ Scale to 10 ● % of actual size 100 Watermarks [none] □ First page only Edit About Help OK Cancel Apply HP Save As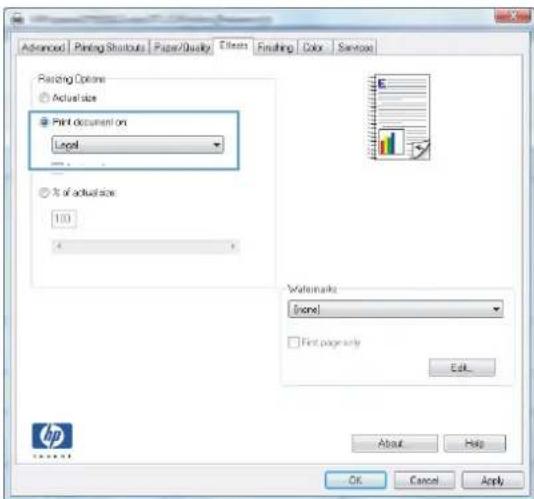
text_image
Advanced Printing Shutouts Paper/Quality Effects Finishing Color Services Fishing Options Actual size Print document on Local % of actual size 100 Watermarks [none] First page only Edit... About Help OK Cancel Apply HPCreate a booklet (Windows)
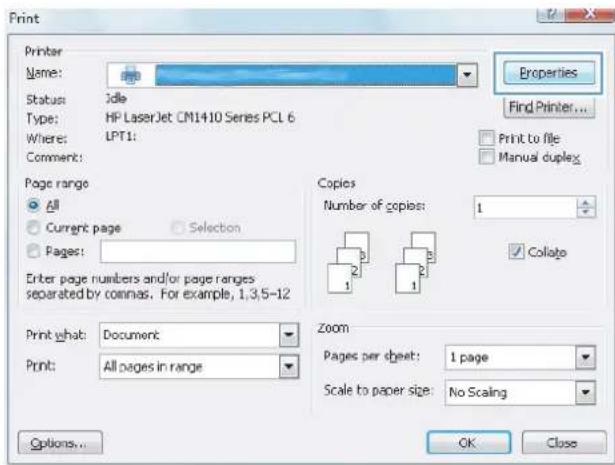
- From the software program, select the Print option.
-
Select the product, and then click the Properties or Preferences button.
-
Click the Finishing tab.
text_image
Print Printer Name: Status: Idle Type: HP LaserJet CM1410 Series PCL 6 Where: LPT1: Comment: Page range All Current page Selection Pages: Enter page numbers and/or page ranges separated by commas. For example, 1,3,5-12 Print what: Document Print: All pages in range Properties Find Printer... Print to file Manual duplex Copies Number of copies: 1 Collate Zoom Pages per sheet: 1 page Scale to paper size: No Scaling Options... OK Close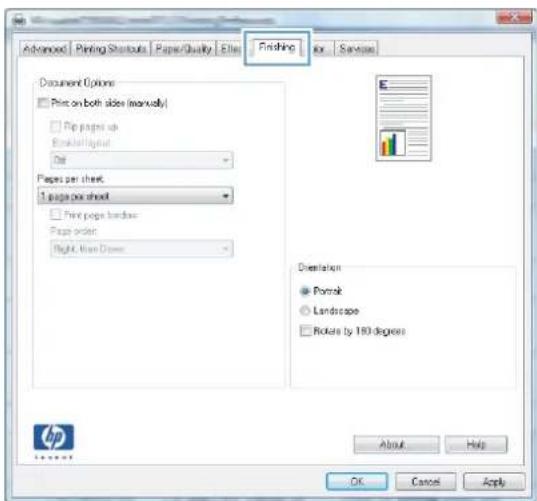
text_image
Advanced Printing Startouts Paper Quality Elias Finishing fix Services Document Options Print on both sides (manually) Print pages up Breakout Layout Dot Papers per sheet. 5 pages per sheet Print pages border Pages order: Right, Main Draw Orientation Portrait Landscape Rockets by 193 degrees About Help OK Cancel Apply-
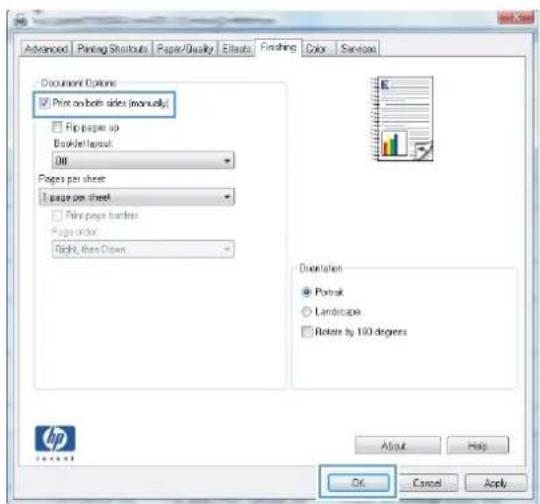
Click the Print on both sides (manually) check box.
-
In the Booklet layout drop-down list, select a binding option. The Pages per sheet option automatically changes to 2 pages per sheet.
text_image
Advanced Printing Shutouts Paper/Quality Effects Findings Color Services Document Options Print on both sides (manually) Flip paper up BorderLayout Off Pages per sheet: 1 page per sheet Flip pages hardlines Page order: Right, less Drawn Orientation Portrait Landscape Rotate by 100 degrees About Help OK Cancel Apply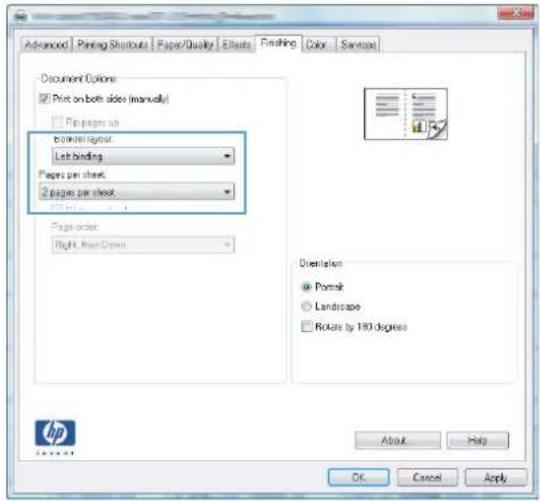
text_image
Document Options Print on both sides (manually) Print pages up book/insert print Last binding Pages per sheet 2 pages per sheet Pages order: Right, left/Down Orientation ● Portrait ○ Landscape □ Rotate by 180 degrees About Help OK Cancel ApplyPrint tasks for Mac OS X
Use a printing preset (Mac OS X)
- On the File menu, click the Print option.
- In the Printer menu, select this product.
- In the Presets menu, select the printing preset.

NOTE: To use printer-driver default settings, select the standard option.
Create a printing preset (Mac OS X)
Use printing presets to save the current printer driver settings for reuse.
- On the File menu, click the Print option.
- In the Printer menu, select this product.
- Select the print settings that you want to save for reuse.
- In the Presets menu, click the Save As... option, and type a name for the preset.
- Click the OK button.
Print on both sides (Mac OS X)
- Insert enough paper into one of the trays to accommodate the print job.
- On the File menu, click the Print option.
- Open the Finishing menu, and click the Manual Duplex tab or open the Manual Duplex menu.
- Click the Manual Duplex box, and select a binding option.
- Click the Print button. Follow the instructions in the pop-up window that appears on the computer screen before replacing the output stack in Tray 1 for printing the second half.
- Go to the product, and remove any blank paper that is in Tray 1.
- Insert the printed stack face-up with the bottom edge feeding into the printer first in Tray 1.
- If prompted, press the appropriate control-panel button to continue.
Print multiple pages on one sheet of paper (Mac OS X)
text_image
1 1 2 1 2 3 4- On the File menu, click the Print option.
- In the Printer menu, select this product.
- Open the Layout menu.
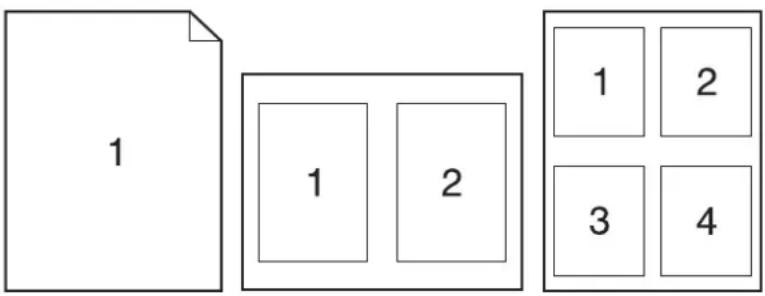
- From the Pages per Sheet menu, select the number of pages that you want to print on each sheet (1, 2, 4, 6, 9, or 16).
- In the Layout Direction area, select the order and placement of the pages on the sheet.
- From the Borders menu, select the type of border to print around each page on the sheet.
Select the page orientation (Mac OS X)
- On the File menu, click the Print option.
- In the Printer menu, select this product.
- In the Copies & Pages menu, click the Page Setup button.
- Click the icon that represents the page orientation that you want to use, and then click the OK button.
Select the paper type (Mac OS X)
- On the File menu, click the Print option.
- In the Printer menu, select this product.
- Open the Finishing menu.
- Select a type from the Media-type drop-down list.
- Click the Print button.
Print a cover page (Mac OS X)
- On the File menu, click the Print option.
- In the Printer menu, select this product.
- Open the Cover Page menu, and then select where to print the cover page. Click either the Before Document button or the After Document button.
- In the Cover Page Type menu, select the message that you want to print on the cover page.

NOTE: To print a blank cover page, select the standard option from the Cover Page Type menu.
Scale a document to fit page size (Mac OS X)
- On the File menu, click the Print option.
- In the Printer menu, select this product.
- Open the Paper Handling menu.
- In the Destination Paper Size area, click the Scale to fit paper size box, and then select the size from the drop-down list.
Create a booklet (Mac OS X)
- On the File menu, click the Print option.
- In the Printer menu, select this product.
- Open the Manual Duplex menu.
- Click the Manual Duplex box.
- Open the Booklet Printing menu.
- Click the Format Output as Booklet box, and select a binding option.
- Select the paper size.
Additional print tasks (Windows)
Cancel a print job (Windows)
- If the print job is currently printing, cancel it by pressing the Cancel ✗ button on the product control panel.
NOTE: Pressing the Cancel ✗ button clears the job that the product is currently processing. If more than one process is running, pressing the Cancel ✗ button clears the process that currently appears on the product control panel.
- You can also cancel a print job from a software program or a print queue.
- Software program: Typically, a dialog box appears briefly on the computer screen, allowing you to cancel the print job.
- Windows print queue: If a print job is waiting in a print queue (computer memory) or print spooler, delete the job there.
Windows XP, Server 2003, or Server 2008: Click Start, click Settings, and then click Printers and Faxes. Double-click the product icon to open the window, right-click the print job that you want to cancel, and then click Cancel.
Windows Vista: Click Start, click Control Panel, and then, under Hardware and Sound, click Printer. Double-click the product icon to open the window, right-click the print job that you want to cancel, and then click Cancel.
Windows 7: Click Start, and then click Devices and Printers. Double-click the product icon to open the window, right-click the print job that you want to cancel, and then click Cancel.
Select the paper size (Windows)
- From the software program, select the Print option.
- Select the product, and then click the Properties or Preferences button.
- Click the Paper/Quality tab.
- Select a size from the Paper size drop-down list.
Select a custom paper size (Windows)
- From the software program, select the Print option.
- Select the product, and then click the Properties or Preferences button.
- Click the Paper/Quality tab.
-
Click the Custom button.
-
Type a name for the custom size and specify the dimensions.
• The width is the short edge of the paper.
• The length is the long edge of the paper.

NOTE: Always load paper into the trays short edge first.
- Click the Save button, and then click the Close button.
Print watermarks (Windows)
- From the software program, select the Print option.
- Select the product, and then click the Properties or Preferences button.
- Click the Effects tab.
- Select a watermark from the Watermarks drop-down list.
Or, to add a new watermark to the list, click the Edit button. Specify the settings for the watermark, and then click the OK button.
- To print the watermark on the first page only, select the First page only check box. Otherwise, the watermark is printed on each page.
Additional print tasks (Mac OS X)
Cancel a print job (Mac OS X)
- If the print job is currently printing, cancel it by pressing the Cancel ✗ button on the product control panel.

NOTE: Pressing the Cancel ✗ button clears the job that the product is currently processing. If more than one print job is waiting, pressing the Cancel ✗ button clears the print job that currently appears on the product control panel.
- You can also cancel a print job from a software program or a print queue.
- Software program: Typically, a dialog box appears briefly on the computer screen, allowing you to cancel the print job.
- Mac print queue: Open the print queue by double-clicking the product icon in the dock. Highlight the print job, and then click Delete.
Select the paper size (Mac OS X)
-
On the File menu, click the Print option.
-
In the Printer menu, select this product.
-
In the Copies & Pages menu, click the Page Setup button.
-
Select a size from the Paper Size drop-down list, and then click the OK button.
Select a custom paper size (Mac OS X)
-
On the File menu, click the Print option.
-
In the Printer menu, select this product.
-
In the Copies & Pages menu, click the Page Setup button.
-
From the Paper Size drop-down list, select the Manage Custom Sizes option.
-
Specify the dimensions for the page size, and then click the OK button.
Print watermarks (Mac OS X)
-
On the File menu, click the Print option.
-
In the Printer menu, select this product.
-
Open the Watermarks menu.
-
From the Mode menu, select the type of watermark to use. Select the Watermark option to print a semi-transparent message. Select the Overlay option to print a message that is not transparent.
-
From the Pages menu, select whether to print the watermark on all pages or on the first page only.
- From the Text menu, select one of the standard messages, or select the Custom option and type a new message in the box.
- Select options for the remaining settings.
Create archival-quality prints
Archive print produces output that is less susceptible to toner smearing and dusting. Use archive print to create documents that you want to preserve or archive.
- From the Home screen, touch the Setup 🎨 button.
- Touch the Service menu.
- Touch the Archive Print button, and then touch the On button.
Color printing
Use the HP EasyColor option
If you are using the HP PCL 6 printer driver for Windows, the HP EasyColor technology automatically improves mixed-content documents that are printed from Microsoft Office programs. This technology scans documents and automatically adjusts photographic images in .JPEG or .PNG format.
HP EasyColor technology enhances the entire image at one time, rather than dividing it into several pieces, which results in improved color consistency, sharper details, and faster printing.
If you are using the HP Postscript printer driver for Mac, HP EasyColor technology scans all documents and automatically adjusts all photographic images with the same improved photographic results.
In the following example, the images on the left were created without using the HP EasyColor option. The images on the right show the enhancements that result from using the HP EasyColor option.

text_image
Bring your photos to LIFE powered by hp EasyColor and the UPD
text_image
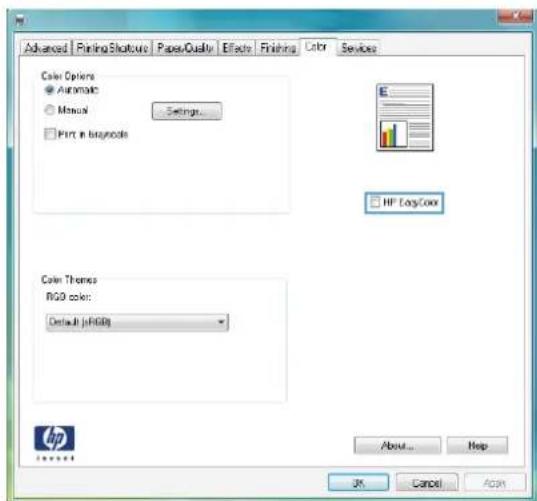
Bring your photos to LIFE powered by hp EasyColor and the UPDThe HP EasyColor option is enabled by default in both the HP PCL 6 printer driver and the HP Mac Postscript printer driver, so you do not need to make manual color adjustments. To disable the option so you can manually adjust the color settings, open the Color tab in the Windows driver or the Color/Quality Options tab in the Mac driver, and then click the HP EasyColor check box to clear it.
text_image
Advanced | Printing Style | Paper Quality | Effects | Finishing | Color | Services Color Options Automatic Manual Settings... Print in brandode HP LogColor Color Themes RGB color: Default (RGB) About... Help OK Cancel ApplyChange color options (Windows)
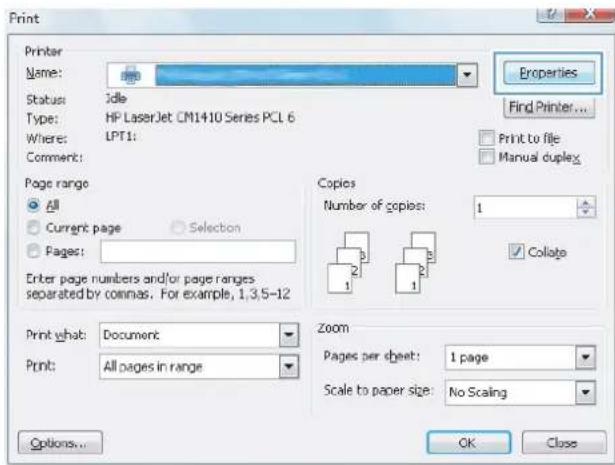
- From the software program, select the Print option.
-
Select the product, and then click the Properties or Preferences button.
-
Click the Color tab.
- Click the Automatic or Manual setting.
• Automatic setting: Select this setting for most color print jobs.
- Manual setting: Select this setting to adjust the color settings independent from other settings.
NOTE: Changing color settings manually can impact output. HP recommends that only color graphics experts change these settings.
text_image
Print Printer Name: Status: Idle Type: HP LaserJet CM1410 Series PCL 6 Where: LPT1: Comment: Page range All Current page Selection Pages: Enter page numbers and/or page ranges separated by commas. For example, 1,3,5-12 Print what: Document Print: All pages in range Properties Find Printer... Print to file Manual duplex Copies Number of copies: 1 Collage Zoom Pages per sheet: 1 page Scale to paper size: No Scaling Options... OK Close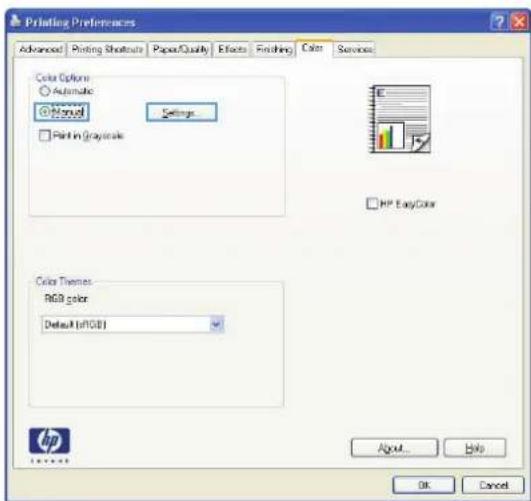
text_image
Printing Preferences Advanced | Printing Shoutouts | Paper/Quality | Effects | Finishing | Color | Services Color Options Automatic Manual Settings Printing (Gray-scale) HP EasyColor Color Themes RGB color Default (RGB) About... Help OK Cancel- Click the Print in Grayscale option to print a color document in black and shades of gray. Use this option to print color documents for photocopying or faxing. You can also use this option to print draft copies or to save color toner.
- Click the OK button.
Change the color theme for a print job (Windows)
-
From the software program, select the Print option.
-
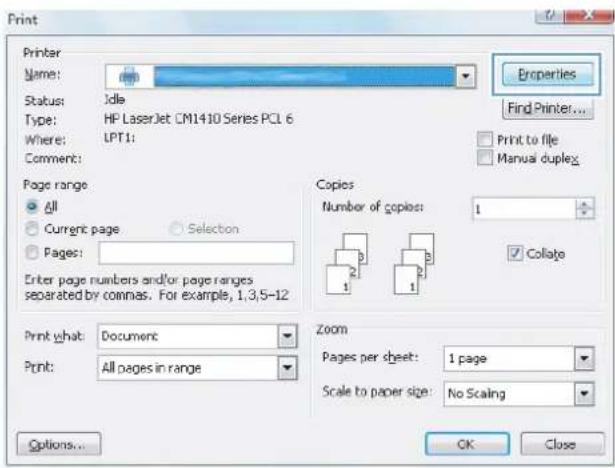
Select the product, and then click the Properties or Preferences button.
text_image
Print Printer Name: Status: Idle Type: HP LaserJet CM1410 Series PCL 6 Where: LPT1: Comment: Page range All Current page Selection Pages: Enter page numbers and/or page ranges separated by commas. For example, 1,3,5-12 Print what: Document Print: All pages in range Properties Find Printer... Print to file Manual duplex Copies Number of copies: 1 Collage Zoom Pages per sheet: 1 page Scale to paper size: No Scaling Options... OK Close-
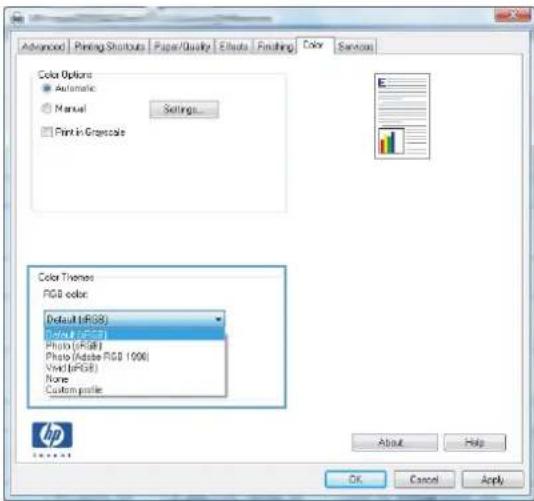
Click the Color tab.
-
Select a color theme from the Color Themes drop-down list.
- Default (sRGB): This theme sets the product to print RGB data in raw device mode. When using this theme, manage color in the software program or in the operating system for correct rendering.
- Vivid: The product increases the color saturation in the midtones. Use this theme when printing business graphics.
- Photo: The product interprets RGB color as if it were printed as a photograph using a digital mini lab. The product renders deeper, more saturated colors differently than with the Default (sRBG) theme. Use this theme when printing photos.
- Photo (Adobe RGB 1998): Use this theme with printing digital photos that use the AdobeRGB color space rather than sRGB. Turn off color management in the software program when using this theme.
• None: No color theme is used.
text_image
Advanced | Printing Shutouts | Paper/Quality | Effects | Finishing | Color | Services Color Options Automatic Manual Settings... Print in Grayscale Color Themes RGB color Default (RGB) Color (RGB) Photo (RGB) Photo (Adobe RGB 1006) Vinyl (RGB) None Custom profile About Help OK Cancel ApplyChange the color options (Mac OS X)
- On the File menu, click the Print option.
- In the Printer menu, select this product.
- Open the Color/Quality Options menu.
- Open the Advanced menu.
- Adjust the individual settings for text, graphics, and photographs.
Manual color options
Use manual color options to adjust the Neutral Grays, Halftone, and Edge Control options for text, graphics, and photographs.
Table 3-1 Manual color options
| Setting description Setting options | |
| Edge ControlThe Edge Control setting determines the rendering of edges. Edge control has two components: adaptive halftoning and trapping. Adaptive halftoning increases edge sharpness. Trapping reduces the effect of color-plane misregistration by overlapping the edges of adjacent objects slightly. | Off turns off both trapping and adaptive halftoning.Light sets trapping at a minimal level. Adaptive halftoning is on.Normal sets trapping at a medium level. Adaptive halftoning is on.Maximum is the most aggressive trapping setting. Adaptive halftoning is on. |
| HalftoneHalftone options affect color output clarity and resolution. | Smooth provides better results for large, solid-filled print areas and enhances photographs by smoothing color gradations. Select this option when uniform and smooth area fills are important.Detail is useful for text and graphics that require sharp distinctions among lines or colors, or images that contain a pattern or a high level of detail. Select this option when sharp edges and small details are important. |
| Neutral GraysThe Neutral Grays setting determines the method for creating gray colors used in text, graphics, and photographs. | Black Only generates neutral colors (grays and black) by using only black toner. This guarantees neutral colors without a color cast. This setting is best for documents and grayscale viewgraphs.4-Color generates neutral colors (grays and black) by combining all four toner colors. This method produces smoother gradients and transitions to other colors, and it produces the darkest black. |
Match colors
For most users, the best method for matching colors is to print sRGB colors.
The process of matching printer output color to your computer screen is complex, because printers and computer monitors use different methods of producing color. Monitors display colors by using light pixels that use an RGB (red, green, blue) color process, but printers print colors by using a CMYK (cyan, magenta, yellow, and black) process.
Several factors can influence your ability to match printed colors to those on your monitor:
Print media
• Printer colorants (inks or toners, for example)
- Printing process (inkjet, press, or laser technology, for example)
• Overhead lighting
• Personal differences in perception of color
- Software programs
Printer drivers
• Computer operating systems
Monitors
• Video cards and drivers
• Operating environment (humidity, for example)
Keep these factors in mind when colors on your screen do not perfectly match your printed colors.
Print colored text as black (Windows)
- From the software program, select the Print option.
- Select the product, and then click the Properties or Preferences button.
- Click the Paper/Quality tab.
- Click the Print All Text as Black check box. Click the OK button.
Use HP ePrint
- To use HP ePrint, you must first enable HP Web Services.
a. From the Home screen, touch the Web Services button.
b. Touch the Enable Web Services button.
Upon enabling Web Services, the product will print an information sheet that includes the printer code and instructions to sign up at www.hpeprintcenter.com.
- Once you have registered the product, use the HP ePrintCenter Web site to define security settings and to configure default print settings for all HP ePrint jobs sent to this product.
a. Go to www.hpeprintcenter.com.
b. Click the Sign In button, and then enter your HP ePrintCenter credentials or sign up for a new account.
c. Select your product from the list, or click + Add printer to add it. To add the product, you need the printer code, which is the segment of the product email address that is before the @ symbol.
NOTE: This code is valid for only 24 hours from the time you enable HP Web Services. If it expires, follow the instructions to enable HP Web Services again, and obtain a new code.
d. To prevent your product from printing unexpected documents, click ePrint Settings, and then click the Allowed Senders tab. Click Allowed Senders Only, and then add the email addresses from which you want to allow ePrint jobs.
e. To set up default settings for all ePrint jobs sent to this product, click ePrint Settings, click Print Options, and then select the settings that you want to use.
- To print a document, attach it to an email message sent to the product's email address.
Use AirPrint
Direct printing using Apple's AirPrint is supported for iOS 4.2 or later. Use AirPrint to print directly to the product from an iPad (iOS 4.2), iPhone (3GS or later), or iPod touch (third generation or later) in the following applications:
Mail
- Photos
Safari
• Select third-party applications
To use AirPrint, the product must be connected to a network. For more information about using AirPrint and about which HP products are compatible with AirPrint, go to www.hp.com/go/airprint.

NOTE: You might need to upgrade the product firmware to use AirPrint. Go to www.hp.com/support/LJColorMFPM275nw.
Walk-up USB printing
- Insert the USB drive into the USB port on the front of the product.
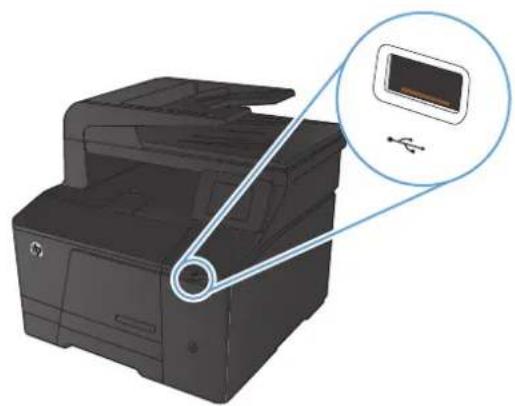
natural_image
Illustration of a HP printer with an inset showing a close-up of its screen (no text or symbols present)-
The USB Flash Drive menu opens. Touch the arrow buttons to scroll through the options.
-
Print Documents
• View and Print Photos -
Scan to USB Drive
-
To print a document, touch the Print Documents screen, and then touch the name of the folder on the USB drive where the document is stored. When the summary screen opens, you can touch it to adjust the settings. Touch the Print button to print the document.
-
To print photos, touch the View and Print Photos screen, and then touch the preview image for each photo that you want to print. Touch the Done button. When the summary screen opens, you can touch it to adjust the settings. Touch the Print button to print the photos.
-
Retrieve the printed job from the output bin, and then remove the USB drive.
4 Copy
Make a single copy
• Make multiple copies
• Copy a multiple-page original
- Collate a copy job
• Copy on both sides (duplex)
- Reduce or enlarge a copy
• Make color or black and white copies
• Copy identification cards
- Optimize copy quality
- Adjust the lightness or darkness for copies
- Adjust the copy image
- Copy in draft mode
- Set the paper size and type for copying on special paper
- Set new default copy settings
- Restore copy default settings
Make a single copy
- Load the document onto the scanner glass or into the document feeder.
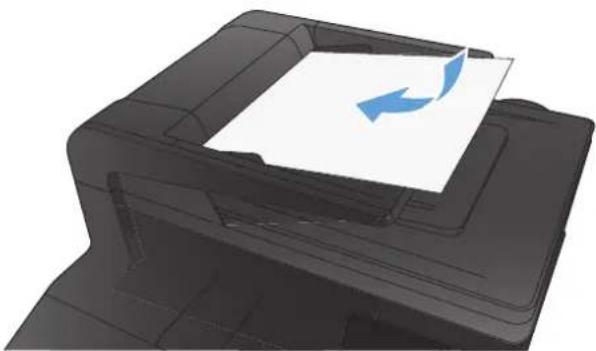
natural_image
3D rendering of a printer with a paper sheet and blue directional arrows indicating orientation (no text or symbols)-
From the Home screen, touch the Copy button.
-
Touch the Black or Color button to start copying.
Make multiple copies
- Load the document onto the scanner glass or into the document feeder.
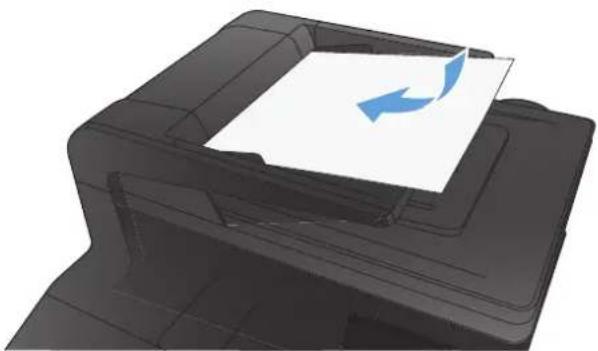
natural_image
3D rendered image of a printer with a paper sheet and blue directional arrows indicating motion (no text or symbols)- From the Home screen, touch the Copy button.
- Touch the arrows to change the number of copies, or touch the existing number and type the number of copies.
- Touch the Black or Color button to start copying.
Copy a multiple-page original
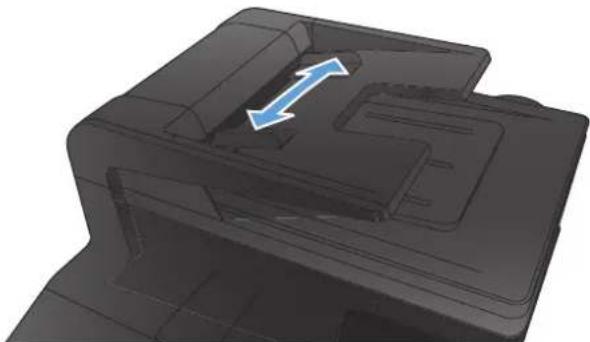
- Insert the originals into the document feeder face-up.
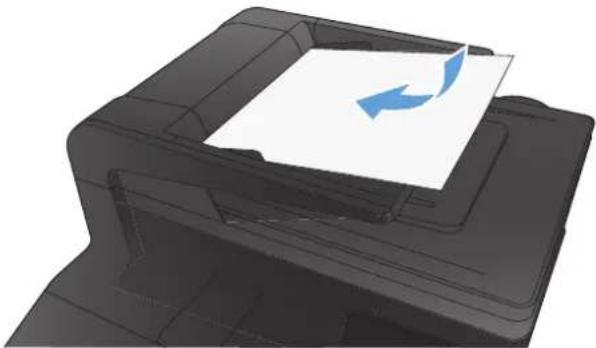
natural_image
3D rendering of a printer with paper and blue arrow indicating rotation (no text or symbols)- Adjust the guides until they are snug against the paper.
natural_image
3D mechanical component with blue directional arrow indicating movement or force (no text or symbols)-
From the Home screen, touch the Copy button.
-
Touch the Black or Color button to start copying.
Collate a copy job
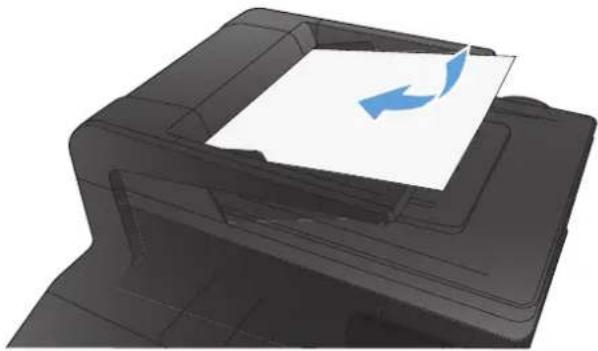
- Load the document onto the scanner glass or into the document feeder.
natural_image
3D rendering of a printer with a paper feed and blue arrow indicating rotation (no text or symbols)- From the Home screen, touch the Copy button.
- Touch the Settings button, and then scroll to and touch the Collation button. Touch the arrow buttons to scroll through the options, and then touch an option to select it.
- Touch the Black or Color button to start copying.
Copy on both sides (duplex)
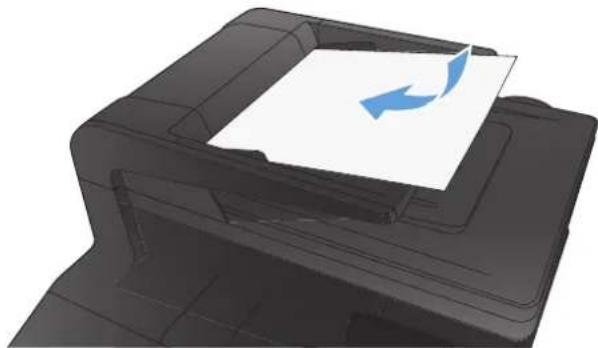
- Load the first page of the document onto the scanner glass or into the document feeder.
natural_image
3D rendering of a printer with paper and blue directional arrows indicating rotation (no text or symbols)-
From the Home screen, touch the Copy button.
-
Touch the Black or Color button to start copying.
-
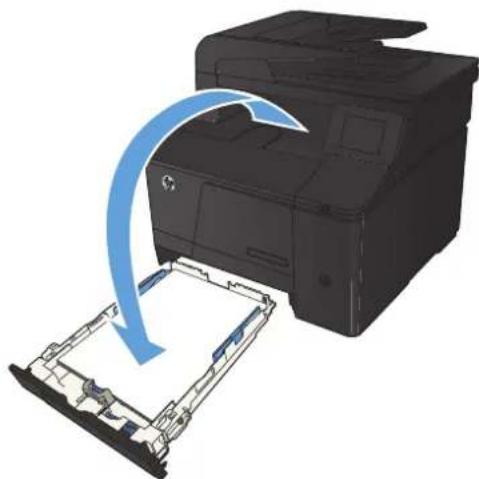
Remove the printed copy from the output bin, and load the pages into Tray 1 with the printed side down and the top edge at the back of the tray.
natural_image
3D illustration of a printer being inserted into a rack, with a blue arrow indicating the process (no text or symbols present)- Load the next page of the document onto the scanner glass or into the document feeder.
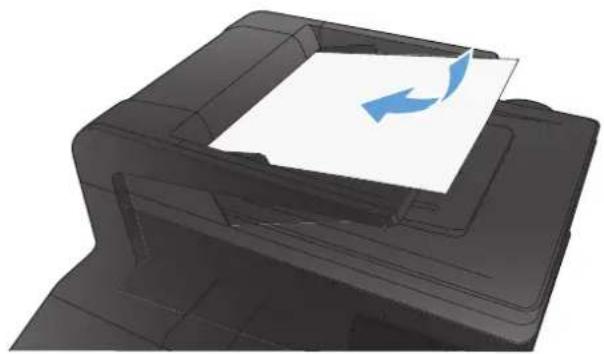
natural_image
3D rendering of a printer with a paper feed and blue arrow indicating rotation (no text or symbols)- From the Home screen, touch the Copy button.
- Touch the Black or Color button to start copying.
- Repeat these steps until the copy is complete.
Reduce or enlarge a copy
- Load the document onto the scanner glass or into the document feeder.
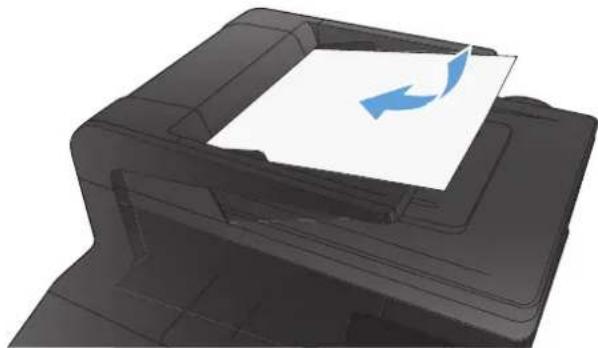
natural_image
3D rendering of a printer with paper being inserted, showing paper feed and blue circular arrows indicating rotation (no text or symbols)-
From the Home screen, touch the Copy button.
-
Touch the Settings button, and then touch the Reduce/Enlarge button. Touch the arrow buttons to scroll through the options, and then touch an option to select it.
-
Touch the Black or Color button to start copying.
Make color or black and white copies
- Load the document onto the scanner glass or into the document feeder.
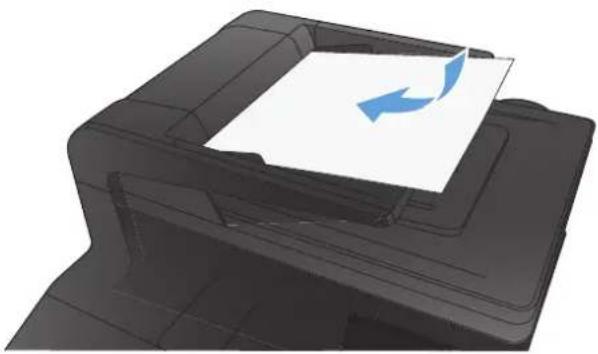
natural_image
3D rendering of a printer with a paper feeding into it, showing blue arrows indicating direction (no text or symbols)-
From the Home screen, touch the Copy button.
-
Touch the Black or Color button to start copying.
Copy identification cards
Use the ID Copy feature to copy both sides of identification cards, or other small-size documents, onto the same side of one sheet of paper. The product prompts you to copy the first side and then to place the second side on a different area of the scanner glass and copy again. The product prints both images at the same time.
- Load the document onto the scanner glass.
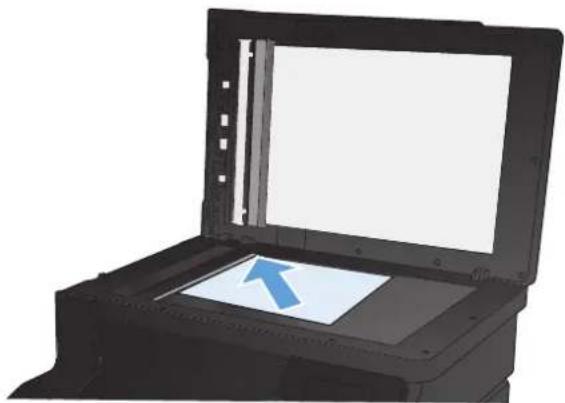
natural_image
Illustration of an open laptop with a blue arrow pointing to the screen (no text or symbols)-
From the Home screen, touch the Copy button.
-
Touch the ID Copy button.
-
Touch the Black or Color button to start copying.
-
The product prompts you to place the next page on a different section of the scanner glass.
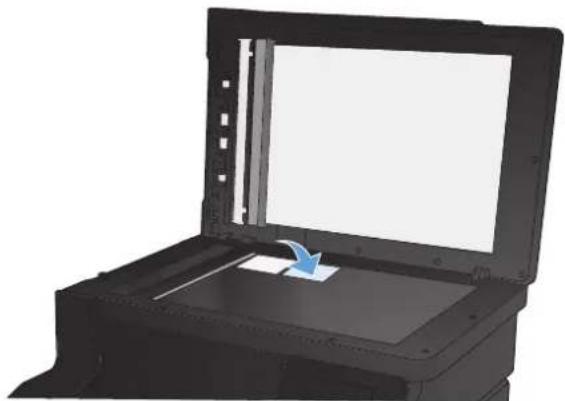
natural_image
3D rendering of an open laptop with a blue arrow pointing to the screen (no text or symbols visible)-
Touch the OK button if you have more pages to copy, or touch the Done button if this is the last page.
-
The product copies all pages onto one side of a sheet of paper.
Optimize copy quality
The following copy-quality settings are available:
• Auto Select: Use this setting when you are not concerned about the quality of the copy. This is the default setting.
• Mixed: Use this setting for documents that contain a mixture of text and graphics.
• Text: Use this setting for documents that contain mostly text.
• Picture: Use this setting for documents that contain mostly graphics.
- Load the document onto the scanner glass or into the document feeder.
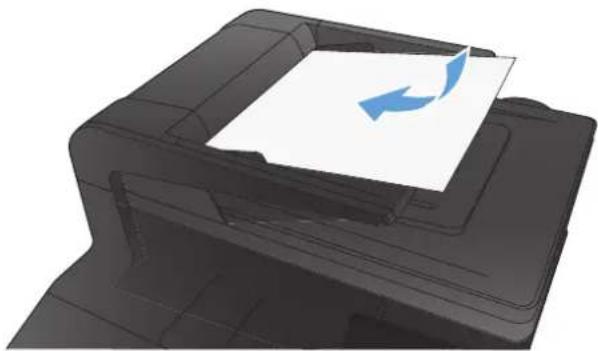
natural_image
3D rendering of a printer with a paper feed and blue arrow indicating rotation (no text or symbols)- From the Home screen, touch the Copy button.
- Touch the Settings button, and then scroll to and touch the Optimize button. Touch the arrow buttons to scroll through the options, and then touch an option to select it.
- Touch the Black or Color button to start copying.
Adjust the lightness or darkness for copies
- Load the document onto the scanner glass or into the document feeder.
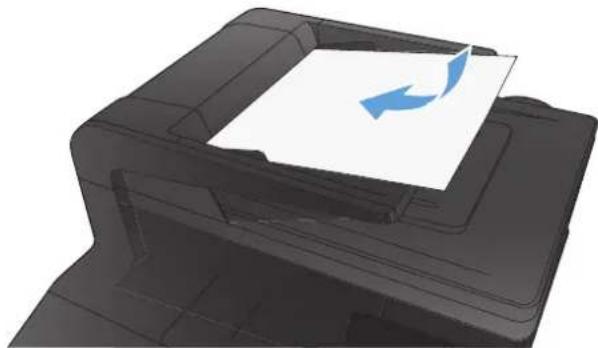
natural_image
3D rendering of a printer with paper being inserted, showing paper feed and blue circular arrows indicating rotation (no text or symbols)-
From the Home screen, touch the Copy button.
-
On the summary screen, touch the arrow buttons to adjust the setting.
-
Touch the Black or Color button to start copying.
Adjust the copy image
- Load the document onto the scanner glass or into the document feeder.
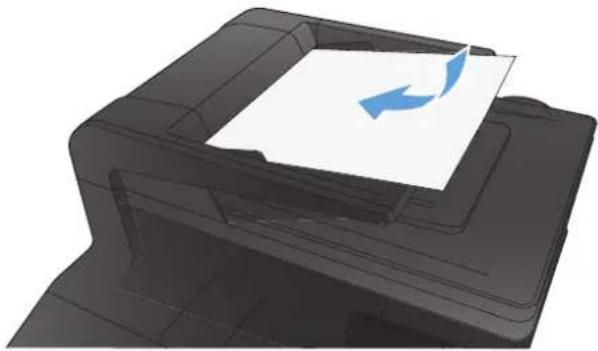
natural_image
3D rendering of a printer with a paper feed and blue arrow indicating rotation (no text or symbols)-
From the Home screen, touch the Copy button.
-
Touch the Settings button.
-
Scroll to and touch the Image Adjustment button.
-
Touch the name of the setting you want to adjust.
• Lightness: Adjusts the lightness/darkness setting.
- Contrast: Adjusts the contrast between the lightest and darkest areas of the image.
• Sharpen: Adjusts clarity of text characters.
- Background Removal: Adjusts the darkness of the background of the image. This is especially useful for original documents that are printed on colored paper.
• Color Balance: Adjusts the red, green, and blue color hues.
• Grayness: Adjusts the vividness of colors.
-
Touch the — or + buttons to adjust the value for the setting, and then touch the OK button.
-
Adjust another setting, or touch the back arrow to return to the main copy menu.
-
Touch the Black or Color button to start copying.
Copy in draft mode
Using draft mode can use less toner. However, using draft mode can also reduce print quality.
HP does not recommend the full-time use of draft mode. If draft mode is used full-time, the toner supply might outlast the mechanical parts in the toner cartridge. If print quality begins to degrade and is no longer acceptable, consider replacing the toner cartridge.
- Load the document onto the scanner glass or into the document feeder.
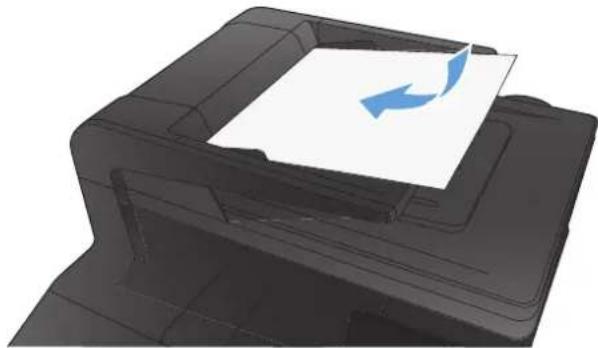
natural_image
3D rendering of a printer with paper being inserted, showing paper feed and blue arrow indicating rotation (no text or symbols)- From the Home screen, touch the Copy button.
- Touch the Settings button.
- Scroll to and touch the Draft Mode button.
- Touch the On button.
- Touch the Black or Color button to start copying.
Set the paper size and type for copying on special paper
- From the Home screen, touch the Copy button.
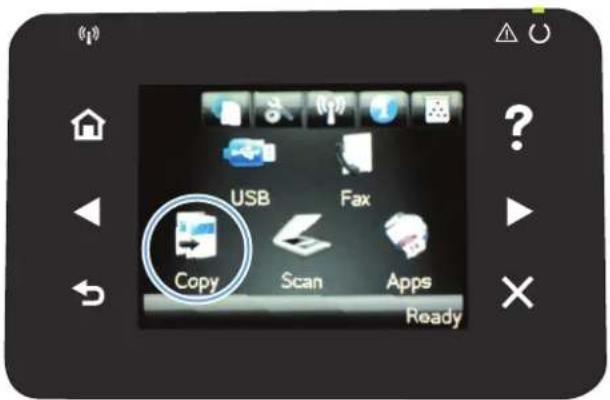
text_image
USB Fax Copy Scan Apps Ready- Touch the Settings button, and then scroll to and touch the Paper button.
- From the list of paper sizes, touch the name of the paper size that is in Tray 1.
- From the list of paper types, touch the name of the paper type that is in Tray 1.
- Touch the Black or Color button to start copying.
Set new default copy settings
You can save any combination of copy settings as the default settings to use for every job.
- From the Home screen, touch the Copy button.
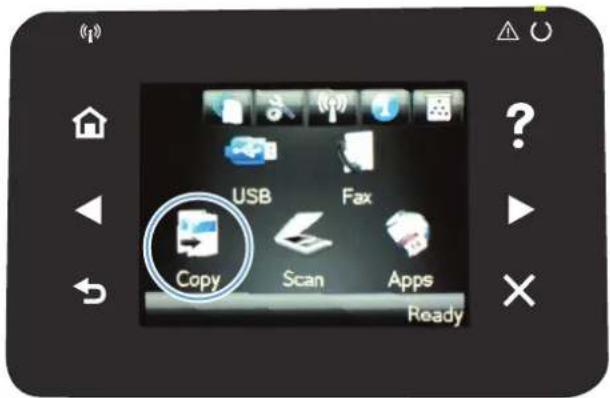
text_image
USB Fax Copy Scan Apps Ready-
Touch the Settings button.
-
Configure the copy settings to meet your preferences, and then scroll to and touch the Set as New Defaults button.
-
Touch the Yes button.
Restore copy default settings
Use this procedure to restore the factory default copy settings.
- From the Home screen, touch the Copy button.
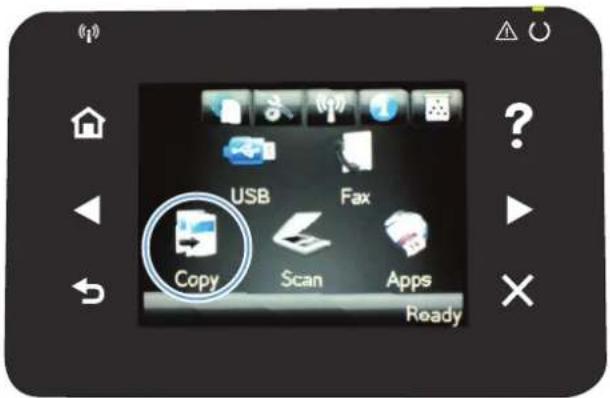
text_image
USB Fax Copy Scan Apps Ready- Touch the Settings button.
- Scroll to and touch the Restore Defaults button.
- Touch the OK button to restore the defaults.
5 S c a n
- Scan by using the HP Scan software (Windows)
• Scan by using the HP Scan software (Mac OS X) - Scan to a USB flash drive
- Scan to a network folder
- Scan to email
- Scan by using other software
Scan by using the HP Scan software (Windows)
- Double-click the HP Scan icon on the computer desktop.
- Select a scanning shortcut, and adjust the settings if necessary.
- Click Scan.

NOTE: Click Advanced Settings to gain access to more options.
Click Create New Shortcut to create a customized set of settings and save it in the list of shortcuts.
Scan by using the HP Scan software (Mac OS X)
- Open the Applications folder, and then click Hewlett-Packard. Double-click HP Scan.
- Open the HP Scan menu, and then click Preferences. From the Scanner pop-up menu, select this product from the list, and then click Continue.
- To use the standard preset settings, which produce acceptable results for images and text, click the Scan button.
To use presets optimized for pictures or text documents, select a preset from the Scanning Presets pop-up menu. To adjust the settings, click the Edit button. When you are ready to scan, click the Scan button. - To scan more pages, load the next page, and then click Scan. Click Append to List to add the new pages to the current list. Repeat until you have scanned all the pages.
- Click the Save button, and then browse to the folder on your computer where you want to save the file.

NOTE: To print the scanned images now, click the Print button.
Scan to a USB flash drive
- Load the document onto the scanner glass or into the document feeder.
- Insert a USB flash drive into the port on the front of the product.
- From the Home screen, touch the Scan button.
- Touch the Scan to USB Drive screen.
- Touch the Scan button to scan and save the file. The product creates a folder named HP on the USB drive, and it saves the file in .PDF or .JPG format using an automatically generated file name.

NOTE: When the summary screen opens, you can touch it to adjust settings.
Scan to a network folder
Use the product control panel to scan a file to a folder on the network. The product must be connected to a network in order to use this feature.
- Load the document onto the scanner glass or into the document feeder.
- From the Home screen, touch the Scan button.
- Touch the Scan to Network Folder item.
- In the list of network folders, select the folder to which you want to save the file.
-
The control panel screen displays the scan settings.
-
If you want to change any of the settings, touch the Settings button, and then change the settings.
• If the settings are correct, go to the next step. -
Press the Scan button to start the scan job.
Scan to email
Use the product control panel to scan a file directly to an email address. The scanned file is sent to the address as an email message attachment. The product must be connected to a network in order to use this feature.
- Load the document onto the scanner glass or into the document feeder.
- From the Home screen, touch the Scan button.
- Touch the Scan to E-mail item.
- In the list of email addresses, select the address to which you want to send the file.
- The control panel screen displays the scan settings.
- If you want to change any of the settings, touch the Settings button, and then change the settings.
• If the settings are correct, go to the next step.
- Press the Scan button to start the scan job.
Scan by using other software
The product is TWAIN-compliant and Windows Imaging Application (WIA)-compliant. The product works with Windows-based programs that support TWAIN-compliant or WIA-compliant scanning devices and with Macintosh-based programs that support TWAIN-compliant scanning devices.
While you are in a TWAIN-compliant or WIA-compliant program, you can gain access to the scanning feature and scan an image directly into the open program. For more information, see the Help file or the documentation that came with your TWAIN-compliant or WIA-compliant software program.
Scan from a TWAIN-compliant program
Generally, a software program is TWAIN-compliant if it has a command such as Acquire, File Acquire, Scan, Import New Object, Insert from, or Scanner. If you are unsure whether the program is compliant or you do not know what the command is called, see the software program Help or documentation.
When scanning from a TWAIN-compliant program, the HP Scan software program might start automatically. If the HP Scan program starts, you can make changes while previewing the image. If the program does not start automatically, the image goes to the TWAIN-compliant program immediately.
Start the scan from within the TWAIN-compliant program. See the software program Help or documentation for information about the commands and steps to use.
Scan from a WIA-compliant program
WIA is another way to scan an image directly into a software program. WIA uses Microsoft software to scan, instead of the HP Scan software.
Generally, a software program is WIA-compliant if it has a command such as Picture/From Scanner or Camera in the Insert or File menu. If you are unsure whether the program is WIA-compliant, see the software program Help or documentation.
Start the scan from within the WIA-compliant program. See the software program Help or documentation for information about the commands and steps to use.
-Or-
From the Windows control panel, in the Cameras and Scanner folder (located inside the Hardware and Sound folder for Windows Vista and Windows 7), double-click the product icon. This opens the standard Microsoft WIA Wizard, which enables you to scan to a file.
Scan by using optical character recognition (OCR) software
The Readiris OCR program is included on a separate CD that shipped with the product. To use the Readiris program, install it from the appropriate software CD, and then follow the instructions in the online Help.
6 Fax
- Connect fax to a telephone line
- Set up fax with a telephone answering machine
- Set up fax with an extension phone
• Setup for stand-alone fax - Configure the fax time, date, and header
• Use special characters in fax headers
• Use the phone book - Configure send fax settings
- Configure receive fax settings
- Set fax polling
Use fax - Solve fax problems
Connect fax to a telephone line
Connect the telephone cable to the line port - on the product and to the telephone jack on the wall.
The product is an analog device. HP recommends using the product on a dedicated analog telephone line.

NOTE: Some countries/regions might require an adapter to the phone cord that came with the product.
Set up fax with a telephone answering machine
- Set the product rings-to-answer setting for at least one ring more than the number of rings for which the answering machine is set.
- If an answering machine is connected to the same telephone line but on a different jack (in another room, for example), it might interfere with the product's ability to receive faxes.
Set up fax with an extension phone
With this setting turned on, you can alert the product to pick up the incoming fax call by pressing 1-2-3 sequentially on the telephone keypad. The default setting is On. Turn this setting off only if you use pulse dialing or if you have a service from your telephone company that also uses the 1-2-3 sequence. The telephone company service does not work if it conflicts with the product.
- On the control panel, touch the Setup button.
- Scroll to and touch the Fax Setup menu.
- Scroll to and touch the Advanced Setup button.
- Scroll to and touch the Extension Phone button, and then touch the On button.
Setup for stand-alone fax
- Unpack and set up the product.
- From the Home screen, touch the Setup ↗ button.
- Touch the Fax Setup menu.
- Touch the Fax Set-Up Utility button.
- Follow the on-screen prompts and select the appropriate response for each question.

NOTE: The maximum number of characters for the fax number is 20.

NOTE: The maximum number of characters for the fax header is 25.
Configure the fax time, date, and header
Use the control panel
To use the control panel to set the date, time, and header, complete the following steps:
- From the Home screen, touch the Setup 🔊 button.
- Touch the Fax Setup menu.
- Touch the Basic Setup menu.
- Scroll to and touch the Time/Date button.
- Select the 12-hour clock or 24-hour clock.
- Use the keypad to enter the current time, and then touch the OK button.
- Select the date format.
- Use the keypad to enter the current date, and then touch the OK button.
- Touch the Fax Header menu.
- Use the keypad to enter your fax number, and then touch the OK button.

NOTE: The maximum number of characters for the fax number is 20.
- Use the keypad to enter your company name or header, and then touch the OK button.

NOTE: The maximum number of characters for the fax header is 25.
Use the HP Fax Setup Wizard
If you did not complete the fax setup process at the time you installed the software, you can complete it at any time by using the HP Fax Setup Wizard.
- Click Start, and then click Programs.
- Click HP, click the name of the product, and then click HP Fax Setup Wizard.
- Follow the onscreen instructions in the HP Fax Setup Wizard to configure the fax settings.
Use special characters in fax headers
When using the control panel to enter your name in the header or to enter a name for a one-touch key, speed-dial entry, or group-dial entry, touch the 123 button to open a keypad that contains special characters.
Use the phone book
You can store frequently dialed fax numbers (up to 120 entries) either as individual fax numbers or as groups of fax numbers.
Use the control panel to create and edit the fax phone book
- From the Home screen, touch the Fax button.
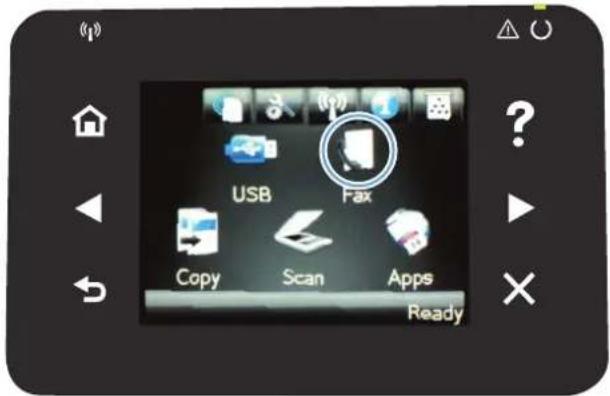
text_image
USB Fax Copy Scan Apps Ready- Touch the Fax Menu button.
- Touch the Phone Book Setup button.
- Touch the Individual Setup button to create a speed dial entry.
- Touch an unassigned number from the list.
- Use the keypad to enter a name for the entry, and then touch the OK button.
- Use the keypad to enter the fax number for the entry, and then touch the OK button.
Import or export Microsoft Outlook contacts into the fax phone book
- Open HP Device Toolbox.
- Click Fax, and then click Fax Phone Book.
- Browse to the program phone book, and then click Import/Export Phone Book.
Use phone-book data from other programs

NOTE: Before a phone book from another program can be imported, you must use the export feature in that other program.
HP Device Toolbox can import contact information from the following software program phone books.
• Microsoft Outlook
Lotus Notes
• Microsoft Outlook Express
A phone book previously exported from another HP product's ToolboxFX software.
Delete phone book entries
You can delete all phone book entries that are programmed in the product.

CAUTION: After phone book entries are deleted, they cannot be recovered.
- From the Home screen, touch the Fax button.
text_image
USB Fax Copy Scan Apps Ready- Touch the Fax Menu button.
- Touch the Phone Book Setup button.
- Touch the Delete Entry button. Or, to delete all the entries, touch the Delete All Entries button.
- Touch the entry that you want to delete.
Create and edit speed-dial entries
- From the Home screen, touch the Fax button.
text_image
USB Fax Copy Scan Apps Ready- Touch the Fax Menu button.
- Touch the Phone Book Setup button.
- Touch the Individual Setup button.
- Touch an unassigned number from the list.
- Use the keypad to enter a name for the entry, and then touch the OK button.
- Use the keypad to enter the fax number for the entry, and then touch the OK button.
Delete speed-dial entries
- From the Home screen, touch the Fax button.
- Touch the Fax Menu button.
- Touch the Phone Book Setup button.
- Touch the Delete Entry button. Or, to delete all the entries, touch the Delete All Entries button.
- Touch the entry that you want to delete.
Create and edit group-dial entries
- Create an individual entry for each fax number that you want in the group.
a. From the Home screen, touch the Fax button.
b. Touch the Fax Menu button.
c. Touch the Phone Book Setup button.
d. Touch the Individual Setup button.
e. Touch an unassigned number from the list.
f. Use the keypad to enter a name for the entry, and then touch the OK button.
g. Use the keypad to enter the fax number for the entry, and then touch the OK button.
- From the Phone Book Setup menu, touch the Group Setup button.
- Touch an unassigned number from the list.
- Use the keypad to enter a name for the group, and then touch the OK button.
- Touch the name of each individual entry that you want to include in the group. When you are finished, touch the Done Selecting button.
Delete group-dial entries
- From the Home screen, touch the Fax button.
- Touch the Fax Menu button.
- Touch the Phone Book Setup button.
- Touch the Delete Entry button. Or, to delete all the entries, touch the Delete All Entries button.
- Touch the entry that you want to delete.
Configure send fax settings
Set special dialing symbols and options
You can insert pauses into a fax number that you are dialing. Pauses are often needed when dialing internationally or connecting to an outside line.
| Special symbol Button Description | ||
| Dialing pause |  | The Redial/Pause button is available on the control panel keypad for entering a fax number. You can also touch the comma button to insert a dialing pause. |
| Pause for dial tone |  | The W button is available only when you are entering the fax number for a phone book entry. This character causes the product to wait for a dial tone before dialing the remainder of the telephone number. |
| Hook flash |  | The R button is available only when you are entering the fax number for a phone book entry. This character causes the product to insert a hook flash. |
Set a dialing prefix
A dial prefix is a number or group of numbers that are automatically added to the beginning of every fax number you enter at the control panel or from the software. The maximum number of characters for a dial prefix is 50.
The default setting is Off. You might want to turn this setting on and enter a prefix if, for example, you have to dial a number such as 9 to get a telephone line outside of your company telephone system. While this setting is active, you can dial a fax number without the dial prefix by using manual dial.
- From the Home screen, touch the Setup
button.
- Touch the Fax Setup menu.
- Touch the Basic Setup menu.
- Scroll to and touch the Dial Prefix button, and then touch the On button.
- Use the keypad to enter the prefix, and then touch the OK button. You can use numbers, pauses, and dialing symbols.
Set the dial tone detection
Normally, the product begins dialing a fax number immediately. If you are using the product on the same line as your telephone, turn on the detect-dial-tone setting. This prevents the product from sending a fax while someone is on the telephone.
The factory-set default for detect dial tone is On for France and Hungary, and Off for all other countries/regions.
- From the Home screen, touch the Setup button.
- Touch the Fax Setup menu.
- Touch the Advanced Setup menu.
- Scroll to and touch the Detect Dial Tone button, and then touch the On button.
Tone dial or pulse dial
Use this procedure to set the product to tone-dialing or pulse-dialing mode. The factory-set default is Tone. Do not change this setting unless you know that the telephone line cannot use tone dialing.

NOTE: The pulse-dialing option is not available in all countries/regions.
- From the Home screen, touch the Setup button.
- Touch the Fax Setup menu.
- Touch the Advanced Setup menu.
- Scroll to and touch the Dialing Mode button, and then touch the Tone or Pulse button.
Set autoredial and the time between redials
If the product was unable to send a fax because the receiving fax machine did not answer or was busy, the product attempts to redial based on the redial-on-busy, redial-on-no-answer, and redial-on-communication-error options.
Set the redial-on-busy option
If this option is on, the product redials automatically if it receives a busy signal. The factory-set default for the redial-on-busy option is On.
- From the Home screen, touch the Setup button.
- Touch the Fax Setup menu.
- Touch the Advanced Setup menu.
- Scroll to and touch the Redial if Busy button, and then touch the On button.
Set the redial-on-no-answer option
If this option is on, the product redials automatically if the receiving machine does not answer. The factory-set default for the redial-on-no-answer option is Off.
- From the Home screen, touch the Setup button.
-
Touch the Fax Setup menu.
-
Touch the Advanced Setup menu.
- Scroll to and touch the Redial if No Answer button, and then touch the On button.
Set the redial-on-communication-error option
If this option is on, the product redials automatically if some sort of communication error occurs. The factory-set default for the redial-on-communication-error option is On.
- From the Home screen, touch the Setup button.
- Touch the Fax Setup menu.
- Touch the Advanced Setup menu.
- Scroll to and touch the Redial if Comm. Error button, and then touch the On button.
Set light/dark and resolution
Set the default light/dark (contrast) setting
The contrast affects the lightness and darkness of an outgoing fax as it is being sent.
The default light/dark setting is the contrast that is normally applied to items that are being faxed. The slider is set to the middle as the default setting.
- From the Home screen, touch the Setup 🎨 button.
- Touch the Fax Setup menu.
-
Touch the Advanced Setup menu.
-
Touch the Lighter/Darker button, and then touch one of the arrows to adjust the slider.
Set resolution settings

NOTE: Increasing the resolution increases the fax size. Larger faxes increase the send time and could exceed the available memory in the product.
Use this procedure to change the default resolution for all fax jobs to one of the following settings:
• Standard: This setting provides the lowest quality and the fastest transmission time.
- Fine: This setting provides a higher resolution quality than Standard that is usually appropriate for text documents.
- Superfine: This setting is best used for documents that mix text and images. The transmission time is slower than the Fine setting but faster than the Photo setting.
• Photo: This setting produces the best images, but greatly increases the transmission time.
The factory-set default resolution setting is Fine.
Set the default resolution setting
- From the Home screen, touch the Setup & button.
- Touch the Fax Setup menu.
- Touch the Advanced Setup menu.
- Touch the Fax Resolution button, and then touch one of the options.
Cover page templates
Several business and personal fax cover-page templates are available in the PC Fax Send software program.

NOTE: You cannot alter cover-sheet templates, but you can edit the fields within the templates.
Set billing codes
If the billing codes feature is on, the product prompts you to enter a billing code for each fax. The product increases the billing code count for each sent fax page. This includes all types of faxes except for poll-received, fax-forwarded, or computer-downloaded faxes. For an undefined group or a group-dial fax, the product increases the billing code count for each successful fax that is sent to each destination.
The factory-set default for the billing-code setting is Off. The billing code can be any number from 1 through 250.
Set the billing-code setting
- From the Home screen, touch the Setup button.
- Touch the Fax Setup menu.
- Touch the Advanced Setup menu.
- Scroll to and touch the Billing Codes button, and then touch the On button.
Use billing codes
- Load the document in the document feeder or on the scanner glass.
- From the Home screen, touch the Fax button.
- Enter the fax number, or select a speed-dial or group-dial entry.
- Touch the Start Fax button.
- Enter the billing code, and then touch the OK button.
Print the billing-code report
The billing-code report is a printed list of all the fax billing codes and the total number of faxes billed to each code.

NOTE: After the product prints this report, it deletes all billing data.
- From the Home screen, touch the Fax button.
- Touch the Fax Menu button.
- Touch the Fax Reports button.
- Scroll to and touch the Print Billing Report button.
Configure receive fax settings
Set fax forwarding
You can set your product to forward incoming faxes to another fax number. When the fax arrives at your product, it is stored in the memory. The product then dials the fax number that you have specified and sends the fax. If the product cannot forward a fax because of an error (for example, the number is busy) and repeated redial attempts are unsuccessful, your product prints the fax.
If the product runs out of memory while receiving a fax, it terminates the incoming fax and only forwards the pages and partial pages that have been stored in the memory.
When it is using the fax-forwarding feature, the product (rather than the computer) must be receiving the faxes, and the answer mode must be set to Automatic.
- From the Home screen, touch the Fax button.
- Touch the Fax Menu button.
- Touch the Receive Options button.
- Touch the Forward Fax button, and touch the On button.
- Use the keypad to enter the fax-forwarding number, and then touch the OK button.
Set the answer mode
Depending on the situation, set the product answer mode to Automatic, TAM, Fax/Tel, or Manual. The factory-set default is Automatic.
- Automatic: The product answers incoming calls after a specified number of rings or upon recognition of special fax tones.
- TAM: The product does not automatically answer the call. Instead, it waits until it detects the fax tone.
- Fax/Tel: The product answers incoming calls immediately. If it detects the fax tone, it processes the call as a fax. If it does not detect the fax tone, it creates an audible ring to alert you to answer the incoming voice call.
- Manual: The product never answers calls. You must start the fax-receiving process yourself, either by touching the Start Fax button on the control panel or by picking up a telephone that is connected to that line and dialing 1-2-3.
To set or change the answer mode, complete the following steps:
- From the Home screen, touch the Setup button.
- Touch the Fax Setup menu.
- Touch the Basic Setup menu.
- Scroll to and touch the Answer Mode button, and then touch the name of the option that you want to use.
Block or unblock fax numbers
If you do not want to receive faxes from specific people or businesses, you can block as many as 30 fax numbers by using the control panel. When you block a fax number and someone from that number sends you a fax, the control-panel display indicates that the number is blocked, the fax does not print, and the fax is not saved in memory. Faxes from blocked fax numbers appear in the fax activity log with a "discarded" designation. You can unblock blocked fax numbers individually or all at one time.

NOTE: The sender of a blocked fax is not notified that the fax failed.
- From the Home screen, touch the Fax button.
- Touch the Fax Menu button.
- Touch the Receive Options button.
- Touch the Block Junk Faxes button.
-
Touch the Add Number button.
-
Use the keypad to enter the fax number that you want to block, and then touch the OK button.
Set the number of rings-to-answer
When the answer mode is set to Automatic, the product rings-to-answer setting determines the number of times the telephone rings before the product answers an incoming call.
If the product is connected to a line that receives both fax and voice calls (a shared line) and that also uses an answering machine, you might need to adjust the rings-to-answer setting. The number of rings-to-answer for the product must be greater than the rings-to-answer on the answering machine. This allows the answering machine to answer the incoming call and record a message if it is a voice call. When the answering machine answers the call, the product listens to the call and automatically answers it if it detects fax tones.
The default setting for rings-to-answer is five for the U.S. and Canada, and two for other countries/regions.
Use the following table to determine the number of rings-to-answer to use.
| Type of telephone line Recommended rings-to-answer setting | |
| Dedicated fax line (receiving only fax calls) Set to a number of rings within the range shown on the control-panel display. (The minimum and maximum number of rings allowed varies by country/region.) | |
| One line with two separate numbers and a ring-pattern service | One or two rings. (If you have an answering machine or computer voicemail for the other telephone number, make sure that the product is set to a greater number of rings than the answering system. Also, use the distinctive-ring feature to differentiate between voice and fax calls.) |
Type of telephone line Recommended rings-to-answer setting
| Shared line (receiving both fax and voice calls) with only an attached telephone | Five rings or more. |
| Shared line (receiving both fax and voice calls) with an attached answering machine or computer voicemail | Two rings more than the answering machine or computer voicemail. |
To set or change the number of rings-to-answer, use the following steps:
- From the Home screen, touch the Setup button.
- Touch the Fax Setup menu.
- Touch the Basic Setup menu.
- Touch the Rings to Answer button.
- Use the keypad to enter the number of rings, and then touch the OK button.
Set distinctive ring
Ring-pattern or distinctive-ring service is available through some local telephone companies. The service allows you to have more than one telephone number on a single line. Each telephone number has a unique ring pattern, so that you can answer voice calls and the product can answer fax calls.
If you subscribe to a ring-pattern service with a telephone company, you must set the product to answer the correct ring pattern. Not all countries/regions support unique ring patterns. Contact the telephone company to determine if this service is available in your country/region.

NOTE: If you do not have ring-pattern service and you change the ring-pattern settings to something other than the default, All Rings, the product might not be able to receive faxes.
The settings are as follows:
• All Rings: The product answers any calls that come through the telephone line.
• Single: The product answers any calls that produce a single-ring pattern.
• Double: The product answers any calls that produce a double-ring pattern.
- Triple: The product answers any calls that produce a triple-ring pattern.
• Double and Triple: The product answers any calls that produce a double-ring or triple-ring pattern.
To change ring patterns for call answering, complete the following steps:
- From the Home screen, touch the Setup button.
- Touch the Fax Setup menu.
- Touch the Basic Setup menu.
- Touch the Distinctive Ring button, and then touch the name of an option.
Use autoreduction for incoming faxes
If the fit-to-page option is turned on, the product automatically reduces long faxes up to 75% to fit the information on the default paper size (for example, the fax is reduced from legal to letter size).
If the fit-to-page option is turned off, long faxes print at full size on multiple pages. The factory-set default for incoming fax autoreduction is On.
If you have the Stamp Faxes option turned on, you might also want to turn on autoreduction. This reduces the size of the incoming faxes slightly, and prevents the page-stamp from forcing a fax onto two pages.

NOTE: Make sure that the default paper size setting matches the size of the paper in the tray.
- From the Home screen, touch the Setup button.
- Touch the Fax Setup menu.
- Touch the Advanced Setup menu.
- Touch the Fit to Page button, and then touch the On button.
Set fax reprint settings
- From the Home screen, touch the Setup button.
- Touch the Fax Setup menu.
- Touch the Advanced Setup menu.
- Scroll to and touch the Allow Fax Reprint button, and then touch the On button.
Set the fax sounds volume
Control the volume of the fax sounds from the control panel. You can make changes to the following sounds:
- Alarm Volume
- Ring Volume
• Phone Line Volume
Set the alarm volume, phone-line volume, and ring volume
- From the Home screen, touch the Setup button.
- Touch the System Setup menu.
- Touch the Volume Settings menu.
- Touch the name of the volume setting that you want to adjust, and then touch one of the options. Repeat this step for each volume setting.
Set stamp-received faxes
The product prints the sender identification information at the top of each received fax. You can also stamp the incoming fax with your own header information to confirm the date and time that the fax was received. The factory-set default for stamp-received faxes is Off.

NOTE: Turning on the stamp-received setting might increase the page size and cause the product to print a second page.

NOTE: This option applies only to received faxes that the product prints.
- From the Home screen, touch the Setup button.
- Touch the Fax Setup menu.
- Touch the Advanced Setup menu.
- Scroll to and touch the Stamp Faxes button, and then touch the On button.
Set the private receive feature
When the private-receive feature is active, received faxes are stored in memory. A password is required to print the stored faxes.
- From the Home screen, touch the Setup button.
- Touch the Fax Setup menu.
- Touch the Advanced Setup menu.
- Scroll to and touch the Private Receive button, and then touch the On button.
- If you have not already set a system password, the product prompts you to create one.

NOTE: The system password is case-sensitive.
a. Touch the OK button, and then use the keypad to enter the system password.
b. Touch the OK button, confirm the password by entering it a second time, and then touch the OK button to save the password.
Set fax polling
If someone else has set up a fax to be polled, you can request that the fax be sent to your product. (This is known as polling another machine).
- From the Home screen, touch the Fax button.
- Touch the Fax Menu button.
-
Touch the Receive Options button.
-
Touch the Polling Receive button.
-
Use the keypad to enter the number of the fax machine that you want to poll, and then touch the OK button.
The product dials the other fax machine and requests the fax.
Use fax
Supported fax programs
The PC fax program that came with the product is the only PC fax program that works with the product. To continue to use a PC fax program previously installed on the computer, use the modem that is already connected to the computer; it will not function through the product modem.
Cancel a fax
Use these instructions to cancel a single fax that is currently dialing or a fax that is being transmitted or received.
Cancel the current fax
Press the Cancel ✗ button on the control panel. Any pages that have not been transmitted are canceled. Pressing the Cancel ✗ button also stops group-dial jobs.
Cancel a pending fax job
Use this procedure to cancel a fax job in the following situations:
- The product is waiting to redial after encountering a busy signal, an unanswered call, or a communication error.
• The fax is scheduled to be sent at a future time.
Use the following steps to cancel a fax job by using the Fax Job Status menu:
- From the Home screen, touch the Fax button.
- Touch the Fax Menu button.
- Touch the Send Options button.
- Touch the Fax Job Status button.
- Touch the fax number for the job that you want to cancel.
Delete faxes from memory
Use this procedure only if you are concerned that someone else has access to your product and might try to reprint faxes from the memory.
CAUTION: In addition to clearing the reprint memory, this procedure clears any fax that is currently being sent, unsent faxes that are pending redial, faxes that are scheduled to be sent at a future time, and faxes that are not printed or forwarded.
- From the Home screen, touch the Setup button.
-
Touch the Service menu.
-
Touch the Fax Service menu.
- Touch the Clear Saved Faxes button.
Use fax on a DSL, PBX, or ISDN system
HP products are designed specifically for use with traditional analog phone services. They are not designed to work on DSL, PBX, ISDN lines, or VoIP services, but they work with the proper setup and equipment.

NOTE: HP recommends discussing DSL, PBX, ISDN, and VoIP setup options with the service provider.
The HP LaserJet product is an analog device that is not compatible with all digital phone environments (unless a digital-to-analog converter is used). HP does not guarantee that the product will be compatible with digital environments or digital-to-analog converters.
DSL
A digital subscriber line (DSL) uses digital technology over standard copper telephone wires. This product is not directly compatible with those digital signals. However, if the configuration is specified during DSL setup, the signal can be separated so that some of the bandwidth is used to transmit an analog signal (for voice and fax) while the remaining bandwidth is used to transmit digital data.

NOTE: Not all faxes are compatible with DSL services. HP does not guarantee that the product will be compatible with all DSL service lines or providers.
A typical DSL modem employs a filter to separate the higher frequency DSL modem communication from lower frequency analog phone and fax modem communication. It is often necessary to use a filter with analog phones and analog fax products that are connected to a telephone line used by a DSL modem. The DSL service provider usually provides this filter. Contact the DSL provider for more information or for assistance.
PBX
The product is an analog device that is not compatible in all digital phone environments. Digital-to-analog filters or converters might be needed for faxing functionality. If faxing issues occur in a PBX environment, it might be necessary to contact the PBX provider for assistance. HP does not guarantee that the product will be compatible with digital environments or digital-to-analog converters.
Contact the PBX provider for more information and for assistance.
ISDN
The product is an analog device that is not compatible in all digital phone environments. Digital-to-analog filters or converters might be needed for faxing functionality. If faxing issues occur in an ISDN environment, it might be necessary to contact the ISDN provider for assistance. HP does not guarantee that the product will be compatible with ISDN digital environments or digital-to-analog converters.
Use fax on a VoIP service
Voice over internet protocol (VoIP) services are often not compatible with fax machines unless the provider explicitly states that it supports fax over IP services.
If the product experiences problems getting a fax to work on a VoIP network, verify that all cables and settings are correct. Decreasing the fax-speed setting might allow the product to send a fax over a VoIP network.
If the VoIP provider offers a "Pass through" mode for the connection, that will offer better fax performance on VoIP. Also if the provider has "comfort noise" added to the line, fax performance can be enhanced if this feature is not enabled.
If faxing problems continue, contact the VoIP provider.
Fax memory contents are retained when there is a loss of power
The flash memory protects against data loss when a power failure occurs. Other fax devices store fax pages in either normal RAM or short-term RAM. Normal RAM immediately loses data when power is lost, while short-term RAM loses data about 60 minutes after a power failure occurs. Flash memory can maintain its data for years without power applied.
Fax from the flatbed scanner
- Place the document face-down on the scanner glass.
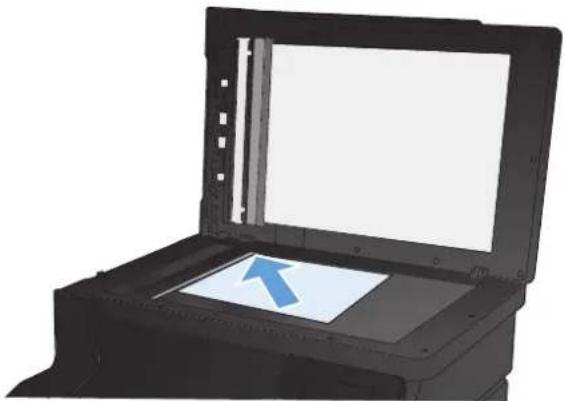
natural_image
3D rendering of an open printer with a blue arrow pointing to the cover (no text or symbols visible)-
From the Home screen, touch the Fax button.
-
Use the keypad to type the fax number.
-
Touch the Start Fax button.
-
The product prompts you to confirm that you are sending from the scanner glass. Touch the Yes button.
-
The product prompts you to load the first page. Touch the OK button.
-
The product scans the first page and then prompts you to load another page. If the document has multiple pages, touch the Yes button. Continue this process until you have scanned all the pages.
-
When you have scanned the last page, touch the No button at the prompt. The product sends the fax.
Fax from the document feeder
- Insert the originals into the document feeder face-up.
NOTE: The document feeder capacity is up to 35 sheets of 75g / m^2 or 20 lb media.
CAUTION: To prevent damage to the product, do not use an original that contains correction tape, correction fluid, paper clips, or staples. Also, do not load photographs, small originals, or fragile originals into the document feeder.
- Adjust the paper guides until they are snug against the paper.
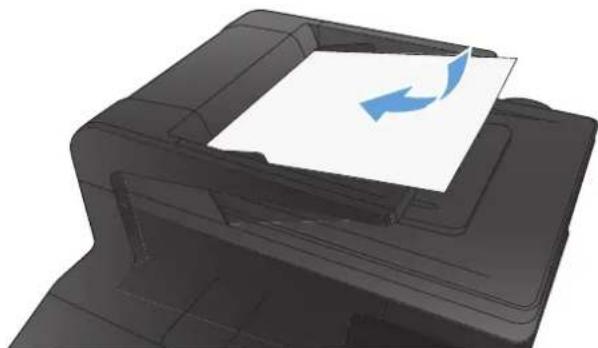
natural_image
3D rendering of a printer with paper being inserted, showing paper feed and blue arrow indicating rotation (no text or symbols)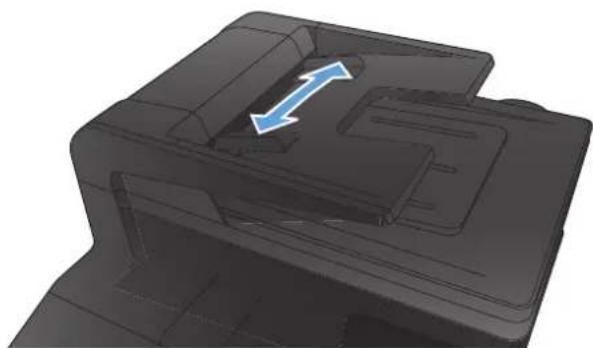
natural_image
3D rendered mechanical component with a blue arrow indicating direction (no text or symbols)-
From the Home screen, touch the Fax button.
-
Use the keypad to type the fax number.
-
Touch the Start Fax button.
Use speed dials and group-dial entries
- Load the document into the document feeder or onto the scanner glass.
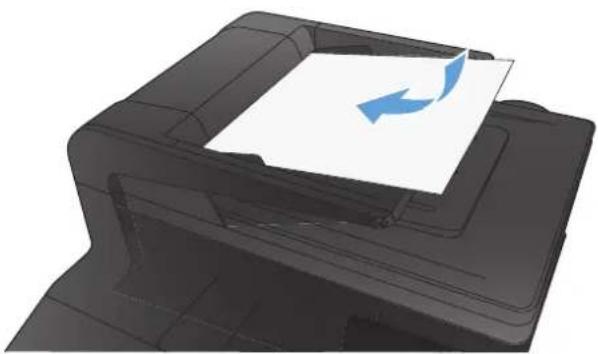
natural_image
3D rendering of a printer with a paper feed and blue directional arrows indicating orientation (no text or symbols)-
From the Home screen, touch the Fax button.
-
On the keypad, touch the fax phone book icon.
-
Touch the name of the individual or group entry that you want to use.
-
Touch the Start Fax button.
Send a fax from the software
The following information provides basic instructions for sending faxes by using the software that came with the product. All other software-related topics are covered in the software Help, which can be opened from the software-program Help menu.
You can fax electronic documents from a computer if you meet the following requirements:
- The product is connected directly to the computer or to a network to which the computer is connected.
The product software is installed on the computer.
The computer operating system is one that this product supports.
Send a fax from the software
The procedure to send a fax varies according to your specifications. The most typical steps follow.
-
Click Start, click Programs (or All Programs in Windows XP), and then click HP.
-
Click the product name, and then click Send fax. The fax software opens.
-
Enter the fax number of one or more recipients.
-
Load the document in the document feeder.
- Click Send Now.
Send a fax from a third-party software program, such as Microsoft Word
- Open a document in a third-party program.
- Click the File menu, and then click Print.
- Select the fax print driver from the printer driver drop-down list. The fax software opens.
- Enter the fax number of one or more recipients.
- Include any pages loaded at the product. This step is optional.
- Click Send Now.
Send a fax by dialing from a telephone connected to the fax line
Occasionally, you might want to dial a fax number from a telephone that is connected to the same line as the product. For example, if you are sending a fax to a person whose device is in the manual receive mode, you can precede the fax with a voice call to let that person know that the fax is coming.

NOTE: The telephone must be connected to the product "telephone" port 📄.
- Load the document into the document feeder.
- From the Home screen, touch the Fax button.
- Pick up the handset of a telephone that is connected to the same line as the product. Dial the fax number by using the telephone keypad.
- When the recipient answers, instruct the person to start the fax machine.
- When you hear the fax tones, touch the Start Fax button on the control panel, wait until Connecting appears on the control panel display, and then hang up the telephone.
Send a fax with confirmation
You can set the product so that it prompts you to enter the fax number a second time to confirm that you are sending the fax to the correct number.
- From the Home screen, touch the Setup button.
- Touch the Fax Setup menu.
- Touch the Advanced Setup menu.
-
Send the fax.
-
Scroll to and touch the Confirm Fax Number button, and touch the On button.
Schedule a fax to be sent later
Use the product control panel to schedule a fax to be sent automatically at a future time to one or more people. When this procedure is completed, the product scans the document into memory and then returns to the Ready state.

NOTE: If the product cannot transmit the fax at the scheduled time, that information is indicated on the fax error report (if that option is turned on) or recorded in the fax activity log. The transmittal might not be initiated because the fax-sending call is not answered, or because a busy signal stops the redial attempts.
If a fax has been scheduled to be sent at a future time but it requires updating, send the additional information as another job. All faxes that are scheduled to go to the same fax number at the same time are delivered as individual faxes.
- Load the document into the document feeder.
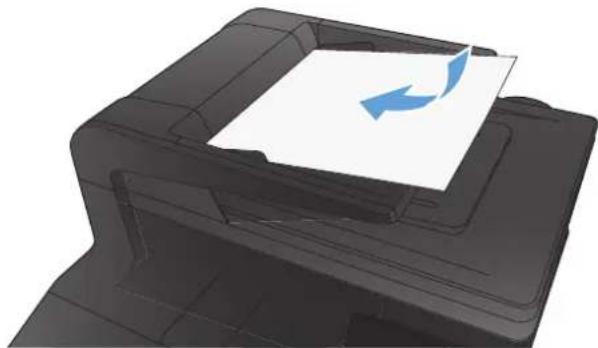
natural_image
3D rendering of a printer with paper being inserted, showing paper feed and blue directional arrows (no text or symbols)- From the Home screen, touch the Fax button.
- Touch the Fax Menu button.
- Touch the Send Options button.
- Touch the Send Fax Later button.
- Use the keypad to enter the time of day to send the fax. Touch the OK button.
- Use the keypad to enter the date to send the fax. Touch the OK button.
- Use the keypad to type the fax number. Touch the OK button. The product scans the document and saves the file in memory until the designated time.
Use access codes, credit cards, or calling cards
To use access codes, credit cards, or calling cards, dial manually to allow for pauses and dialing codes.
Send faxes internationally
To send a fax to an international destination, dial manually to allow for pauses and international dialing codes.
Print a fax
When the product receives a fax transmission, it prints the fax (unless the private-receive feature is enabled) and also stores it automatically to flash memory.
When a color toner cartridge becomes very low, the product prints in black only to prevent fax interruptions. To configure the product to print in color and use the remaining toner in the toner cartridge past very low, follow these steps:
- On the product control panel, touch the Setup button, and then touch the System Setup button.
- Touch the Supply Settings button, and then touch the Color Cartridges button.
- Touch the Very Low Setting button, and then touch the Continue button.
When you choose to replace the very low toner cartridge, color printing resumes automatically.
Reprint a fax
When the Allow Fax Reprint feature is on, the product stores received faxes in memory. The product has about 3.2 MB of storage space, which holds about 250 pages.
These faxes are stored continuously. Reprinting them does not clear them from the memory.
Turn on the Allow Fax Reprint feature
- From the Home screen, touch the Setup 🔊 button.
- Touch the Fax Setup menu.
- Touch the Advanced Setup menu.
- Scroll to and touch the Allow Fax Reprint button, and then touch the On button.
Reprint faxes
- From the Home screen, touch the Fax button.
- Touch the Fax Menu button.
- Touch the Receive Options button.
- Touch the Reprint Faxes button.
- Touch the entry for the fax that you want to reprint.
Receive faxes when fax tones are audible on the phone line
If you have a telephone line that receives both fax and telephone calls, and you hear fax tones when you answer the telephone, you can start the receiving process in one of two ways:
- If you are close to the product, touch the Start Fax button on the control panel.
- If not, press 1-2-3 in sequence on the telephone keypad, listen for fax transmission sounds, and then hang up.

NOTE: In order for the second method to work, the Extension Phone setting must be set to Yes.
Receive faxes to a computer
Print a stored fax when the private receive feature is on
To print stored faxes, you must provide the product security password. After the product prints the stored faxes, the faxes are deleted from memory.
- From the Home screen, touch the Fax button.
- Touch the Fax Menu button.
-
Touch the Receive Options button.
-
Touch the Print Private Faxes button.
- Use the keypad to enter the product security password, and then touch the OK button.
Solve fax problems
Fax troubleshooting checklist
Several possible fixes are available. After each recommended action, retry faxing to see if the problem is resolved.
- For best results during fax problem solving, make sure the line from the product is plugged directly into the wall phone port. Disconnect all other devices that are connected to the product.
-
Verify that the telephone cord is plugged into the correct port on the back of the product.
-
Check the phone line by using the fax test:
a. On the control panel, open the Setup Menu menu, and then open the Service menu.
b. Select the Fax Service option.
c. Select the Run Fax Test option. The product prints a fax test report.
The report contains the following possible results:
• Pass: The report contains all of the current fax settings for review.
- Fail: The cord is in the wrong port. The report contains suggestions for how to resolve the issue.
- Fail: The phone line is not active. The report contains suggestions for how to resolve the issue.
- Verify that the product firmware is current:
a. Print a configuration page from the control panel Reports menu to obtain the current firmware date code.
b. Go to www.hp.com.
- Click the Support & Drivers link.
- Click the Download drivers and software (and firmware) link option.
-
In the For product box, type the product model number, and then click the Go button.
-
Click the link for your operating system.
-
Scroll to the Firmware section of the table.
If the listed version matches the version on the configuration page, you have the most current version.
If the versions are different, download the firmware upgrade and update the firmware on the product following the instructions onscreen.

NOTE: The product must be connected to a computer with internet access to upgrade firmware.
Resend the fax.
- Verify that the fax was set up when the product software was installed.
From the computer, in the HP program folder, run the Fax Setup Utility.
-
Verify that the telephone service supports analog fax.
-
If using ISDN or digital PBX, contact your service provider for information about configuring to an analog fax line.
- If using a VoIP service, change the Fax Speed setting to Slow(V.29) or disable Fast(V.34) from the control panel. Ask if your service provider supports fax and for the recommended fax modem speed. Some companies might require an adapter.
-
If using a DSL service, ensure that a filter is included on the phone line connection to the product. Contact the DSL service provider or purchase a DSL filter if you do not have one. If a DSL filter is installed, try another since these filters can be defective.
-
If the error persists, find more detailed problem-solving solutions in the sections that follow this one.
Fax trace report
A fax T.30 trace report has information that can help resolve fax transmission problems. If you call HP for help in resolving these problems, print a T.30 trace report before you call.
- From the Home screen, touch the Setup ↗ button.
- Touch the Service menu.
-
Touch the Fax Service menu.
-
Touch the Print T.30 Trace button, and then touch the Now button.

NOTE: This procedure prints a report for the last fax job, successful or not. To generate a report for each unsuccessful fax job, select the If Error setting. To generate a report for each fax job, select the At End of Call setting.
Fax error report printing
Use the following instructions to print fax logs and reports:
Print all fax reports
Use this procedure to print all of the following reports at one time:
Last Call Report
Fax Activity Log
Phone Book Report
Junk Fax List
• Billing Report (when Billing Codes are turned on)
- Configuration Report
• Usage Page
- From the Home screen, touch the Fax button.
- Touch the Fax Menu button.
- Touch the Fax Reports button.
- Touch the Print All fax Reports button.
Print individual fax reports
- From the Home screen, touch the Fax button.
- Touch the Fax Menu button.
- Touch the Fax Reports button.
- Touch the name of the report that you want to print.
Set the fax error report
A fax error report is a brief report that indicates the product experienced a fax job error. You can set it to print after the following events:
• Every fax error (the factory-set default)
Send fax error
- Receive fax error
Never

NOTE: With this option, you will have no indication that a fax failed to be transmitted unless you print a fax activity log.
- From the Home screen, touch the Fax button.
- Touch the Fax Menu button.
- Touch the Fax Reports button.
- Touch the Fax Error Report button, and then touch the printing option that you want to use.
Set the fax-error-correction mode
Usually, the product monitors the signals on the telephone line while it is sending or receiving a fax. If the product detects an error during the transmission and the error-correction setting is On, the product can request that the portion of the fax be resent. The factory-set default for error correction is On.
You should turn off error correction only if you are having trouble sending or receiving a fax, and you are willing to accept the errors in the transmission. Turning off the setting might be useful when you are trying to send a fax overseas or receive one from overseas, or if you are using a satellite telephone connection.
- From the Home screen, touch the Setup button.
- Touch the Service menu.
- Touch the Fax Service menu.
- Touch the Error Correction button, and then touch the On button.
Change the fax speed
The fax-speed setting is the modem protocol that the product uses to send faxes. It is the worldwide standard for full-duplex modems that send and receive data across telephone lines at up to 33,600 bits per second (bps). The factory-set default for the fax-speed setting is Fast(V.34).
You should change the setting only if you are having trouble sending a fax to or receiving a fax from a particular device. Decreasing the fax speed might be useful when you are trying to send a fax overseas, or receive one from overseas, or if you are using a satellite telephone connection.
- From the Home screen, touch the Setup button.
- Touch the Fax Setup menu.
- Touch the Advanced Setup menu.
- Scroll to and touch the Fax Speed button, and then touch the speed setting that you want to use.
Fax error messages
Alert and warning messages appear temporarily and might require you to acknowledge the message by touching the OK button to resume or by touching the Cancel ✗ button to cancel the job. With certain warnings, the job might not complete or the print quality might be affected. If the alert or
warning message is related to printing and the auto-continue feature is on, the product will attempt to resume printing the job after the warning has appeared for 10 seconds without acknowledgement.
| Control panel message Description Recommended action | ||
| Communication error. A fax communication error occurred between the product and the sender or receiver. | Allow the product to retry sending the fax. Unplug the product telephone cord from the wall, plug in a telephone, and then try making a call. Plug the product phone cord into a jack for another phone line.Try a different phone cord.Set the Fax Speed option to the Slow(V.29) setting or disable the Fast(V.34) setting.Turn off the Error Correction feature to prevent automatic error correction.NOTE: Turning off the Error Correction feature can reduce image quality.Print the Fax Activity Log report from the control panel to determine if the error occurs with a specific fax number.If the error persists, contact HP. See www.hp.com/support/ljcolorm276series or the support flyer that came in the product box. | |
| Document feeder door is open.Canceled fax. | The cover at the top of the document feeder is open, and the product cannot send the fax. | Close the cover, and send the fax again. |
| Fax is busy.Canceled send. | The fax line to which you were sending a fax was busy. The product has canceled sending the fax. | Call the recipient to ensure that the fax machine is on and ready.Check that you are dialing the correct fax number.Check that the Redial if Busy option is enabled.Open the Service menu, and touch the Fax Service button. Touch the Run Fax Test button. This test verifies that the phone cord is connected to the correct port and that the phone line has a signal. The product prints a report with the results.If the error persists, contact HP. See www.hp.com/support/ljcolorm276series or the support flyer that came in the product box. |
| Fax is busy. | The fax line to which you were sending a fax was busy. The product automatically redials the busy number. | Allow the product to retry sending the fax. |
| Redial pending. | Call the recipient to ensure that the fax machine is on and ready. | |
| Check that you are dialing the correct fax number. | ||
| Open the Service menu, and touch the Fax Service button. Touch the Run Fax Test button. This test verifies that the phone cord is connected to the correct port and that the phone line has a signal. The product prints a report with the results. | ||
| If the error persists, contact HP. See www.hp.com/support/ljcolorm276series or the support flyer that came in the product box. | ||
| Fax receive error. An error occurred while trying to receive a fax. | Ask the sender to resend the fax. | |
| Try faxing back to the sender or another fax machine. | ||
| Check for a dial tone on the phone line by touching the Start Fax button. | ||
| Check that the telephone cord is securely connected by unplugging and replugging the cord. | ||
| Make sure that you are using the telephone cord that came with the product. | ||
| Open the Service menu, and touch the Fax Service button. Touch the Run Fax Test button. This test verifies that the phone cord is connected to the correct port and that the phone line has a signal. The product prints a report with the results. | ||
| Decrease the fax speed. Ask the sender to resend the fax. | ||
| Turn off error-correction mode. Ask the sender to resend the fax. | ||
| NOTE: Turning off error-correction mode can reduce the quality of the fax image. | ||
| Connect the product to a different phone line. | ||
| If the error persists, contact HP. See www.hp.com/support/ljcolorm276series or the support flyer that came in the product box. | ||
| Fax Send error. An error occurred while trying to send a fax. Try resending the fax. | ||
| Try faxing to another fax number. | ||
| Check for a dial tone on the phone line by touching the Start Fax button. | ||
| Check that the telephone cord is securely connected by unplugging and replugging the cord. | ||
| Make sure that you are using the telephone cord that came with the product. | ||
| Make sure that the phone is working by disconnecting the product, plugging in a telephone to the phone line, and making a voice call. | ||
| Connect the product to a different phone line. | ||
| Set the fax resolution to Standard instead of the default of Fine. | ||
| If the error persists, contact HP. See www.hp.com/support/ljcolorm276series or the support flyer that came in the product box. | ||
| Fax storage is full. | During the fax transmission, the product ran out of memory. Only the pages that fit into memory will be printed. | Print all of the faxes, and then have the sender resend the fax. Have the sender divide the fax job into multiple jobs before resending. Cancel all fax jobs or clear the faxes from memory. |
| Canceling the fax receive. | ||
| Fax storage is full. | The amount of available memory for storing faxes is insufficient to store an incoming fax. | If you are using the Private Receive feature, print all received faxes to regain some memory. |
| Canceling the fax receive. | If you still need more memory, clear faxes from memory. Open the Service menu. In the Fax Service menu, select the Clear Saved Faxes option. | |
| Fax storage is full. | During the fax job, the memory filled. All pages of the fax have to be in memory for a fax job to work correctly. Only the pages that fit into memory were sent. | Cancel the current job. Turn the product off, and then turn it on again. Try sending the job again. |
| Canceling the fax send. | If the error reoccurs, cancel the job and turn the product off and then on a second time. The product might not have enough memory for some jobs. | |
| No dial tone. | The product could not detect a dial tone. | Check for a dial tone on the phone line by touching the Start Fax button.Unplug the telephone cord from both the product and the wall, and then replug the cord.Make sure that you are using the telephone cord that came with the product.Unplug the product telephone cord from the wall, plug in a telephone, and then try making a voice call.Make sure that the phone cord from the wall telephone jack is plugged into the line port.Plug the product phone cord into a jack for another phone line.Check the phone line by using the Run Fax Test option from the Service menu on the control panel.If the error persists, contact HP. See www.hp.com/support/ljcolorm276series or the support flyer that came in the product box. |
| No fax answer.Canceled send. | Attempts to redial a fax number failed, or the Redial if No Answer option was turned off. | Call the recipient to ensure that the fax machine is on and ready.Check that you are dialing the correct fax number.Check that the redial option is enabled.Unplug the telephone cord from both the product and the wall, and then replug the cord.Unplug the product telephone cord from the wall, plug in a telephone, and then try making a voice call.Make sure that the phone cord from the wall telephone jack is plugged into the line port.Plug the product phone cord into a jack for another phone line.If the error persists, contact HP. See www.hp.com/support/ljcolorm276series or the support flyer that came in the product box. |
| No fax answer. | The receiving fax line did not answer. The product attempts to redial after a few minutes. | Allow the product to retry sending the fax. |
| Redial pending. | Call the recipient to ensure that the fax machine is on and ready. | |
| Check that you are dialing the correct fax number. | ||
| If the product continues to redial, unplug the product telephone cord from the wall, plug in a telephone, and then try making a voice call. | ||
| Make sure that the phone cord from the wall telephone jack is plugged into the line port. | ||
| Plug the product phone cord into a jack for another phone line. | ||
| Try a different phone cord. | ||
| If the error persists, contact HP. See www.hp.com/support/ljcolorm276series or the support flyer that came in the product box. | ||
| No fax detected. | The product answered the incoming call but did not detect that a fax machine was calling. | Allow the product to retry receiving the fax. |
| Try a different phone cord. | ||
| Plug the product phone cord into a jack for another phone line. | ||
| If the error persists, contact HP. See www.hp.com/support/ljcolorm276series or the support flyer that came in the product box. | ||
Solve problems sending faxes
• An error message displays on the control panel
The control panel displays a Ready message with no attempt to send the fax
- The control panel displays the message "Storing page 1" and does not progress beyond that message
• Faxes can be received, but not sent
- Unable to use fax functions from the control panel
- Unable to use speed dials
- Unable to use group dials
- Receive a recorded error message from the phone company when trying to send a fax
- Unable to send a fax when a phone is connected to the product
An error message displays on the control panel
The Communication error. message appears
- Allow the product to retry sending the fax. Re-sending temporarily reduces the fax speed.
- Unplug the product telephone cord from the wall, plug in a telephone, and then try making a call. Plug the product phone cord into a jack for another phone line.
• Try a different phone cord. - From the control panel, change the Fax Speed option to the Medium(V.17) setting or Slow(V.29) setting.
a. From the Home screen, touch the Setup button.
b. Open the Fax Setup menu.
c. Open the Advanced Setup menu.
d. Open the Fax Speed menu.
e. Select the correct setting.
• Turn off the Error Correction option.
a. From the Home screen, touch the Setup button.
b. Open the Service menu.
c. Open the Fax Service menu.
d. Open the Error Correction menu.
e. Select the Off setting.

NOTE: Turning off the Error Correction option can reduce image quality.
- If the error persists, contact HP. See www.hp.com/support/ljcolorm276series or the support flyer that came in the product box.
No dial tone.
• Make sure that the telephone cord is plugged into the correct port on the product.
- Make sure that the telephone cord from the product is plugged directly into the wall telephone jack.
- Check for a dial tone on the phone line by using the Start Fax button.
- Unplug the product telephone cord from the wall, plug in a telephone, and then try making a voice call.
• Unplug the telephone cord from both the product and the wall, and then replug the cord.
• Make sure that you are using the telephone cord that came with the product.
• Plug the product phone cord into a jack for another phone line.
- Check the phone line by using the Run Fax Test option from the Service menu on the control panel.
a. From the Home screen, touch the Setup ↗ button.
b. Open the Service menu.
c. Open the Fax Service menu.
d. Select the Run Fax Test item.
The Fax is busy. message appears
• Try sending the fax again.
- Call the recipient to ensure that the fax machine is on and ready.
- Check that you are dialing the correct fax number.
- Check for a dial tone on the phone line by using the Start Fax button.
- Make sure that the phone is working by disconnecting the product, plugging in a telephone to the phone line, and making a voice call.
• Plug the product phone cord into a jack for another phone line, and try sending the fax again.
• Try a different phone cord.
- Send the fax at a later time.
- If the error persists, contact HP. See www.hp.com/support/ljcolorm276series or the support flyer that came in the product box.
The No fax answer. message appears
• Try to resend the fax.
- Call the recipient to ensure that the fax machine is on and ready.
- Check that you are dialing the correct fax number.
- Unplug the product telephone cord from the wall, plug in a telephone, and then try making a voice call.
• Plug the product phone cord into a jack for another phone line.
• Try a different phone cord.
• Make sure that the phone cord from the wall telephone jack is plugged into the line - port.
- Check the phone line by using the Run Fax Test option from the Service menu on the control panel.
a. From the Home screen, touch the Setup & button.
b. Open the Service menu.
c. Open the Fax Service menu.
d. Select the Run Fax Test item.
- If the error persists, contact HP. See www.hp.com/support/ljcolorm276series or the support flyer that came in the product box.
Document feeder paper jam
- Verify that the paper meets product size requirements. The product does not support pages longer than 381 mm (15 in) for faxing.
• Copy or print the original to letter, A4, or legal size paper, and then resend the fax.
The Fax storage is full. message appears
• Turn the product off then on.
• Print stored faxes that have not been printed.
a. Touch the Fax button, and then touch the Fax Menu button.
b. Open the Receive Options menu.
c. Select the Print Private Faxes item.
d. Provide the password when the product prompts you.
- Delete stored faxes from memory.
a. From the Home screen, touch the Setup button.
b. Open the Service menu.
c. Open the Fax Service menu.
d. Select the Clear Saved Faxes item.
- Divide the large fax job into smaller sections, and then fax them individually.
Scanner error
- Verify that the paper meets product size requirements. The product does not support pages longer than 381 mm (15 in) for faxing.
• Copy or print the original onto letter, A4, or legal size paper and then resend the fax.
The control panel displays a Ready message with no attempt to send the fax
• Check the fax activity log for errors.
a. Touch the Fax button, and then touch the Fax Menu button.
b. Open the Fax Reports menu.
c. Open the Fax Activity Log menu.
d. Select the Print Log Now option.
• If a phone is connected to the product, make sure that the phone is hung up.
- Disconnect all other lines between the fax and the product.
- Connect the product directly into the wall telephone jack and resend the fax.
ntrol panel displays the message "Storing page 1" and does not ss beyond that message
• Delete stored faxes from memory.
a. From the Home screen, touch the Setup button.
b. Open the Service menu.
c. Open the Fax Service menu.
d. Select the Clear Saved Faxes item.
Faxes can be received, but not sent
Send fax and nothing happens.
- Check for a dial tone on the phone line by using the Start Fax button.
- Turn the product off then on.
- Use the control panel or the HP Fax Setup Wizard to configure the fax time, date, and fax header information.
a. From the Home screen, touch the Setup button.
b. Open the Fax Setup menu.
c. Open the Basic Setup menu.
d. Open the Fax Header menu.
e. Enter the correct settings.
-
Verify that any extension phones on the line are hung up.
-
If using a DSL service, make sure that the phone line connection to the product includes a high-pass filter.
Unable to use fax functions from the control panel
- The product might be password protected. Use the HP Embedded Web Server, HP Toolbox software, or the control panel to set a password.
• If you do not know the password for the product, contact your system administrator. - Verify with the system administrator that the fax functionality has not been disabled.
Unable to use speed dials
• Make sure that the fax number is valid.
- If an outside line requires a prefix, turn on the Dial Prefix option or include the prefix in the speed dial number.
a. From the Home screen, touch the Setup & button.
b. Open the Fax Setup menu.
c. Open the Basic Setup menu.
d. Open the Dial Prefix menu.
e. Select the On setting.
Unable to use group dials
• Make sure that the fax number is valid.
- If an outside line requires a prefix, turn on the Dial Prefix option or include the prefix in the speed dial number.
a. From the Home screen, touch the Setup 🎨 button.
b. Open the Fax Setup menu.
c. Open the Basic Setup menu.
d. Open the Dial Prefix menu.
e. Select the On setting.
- Set up all entries in the group with speed dial entries.
a. Open an unused speed dial entry.
b. Enter the fax number for the speed dial.
c. Touch the OK button to save the speed dial.
Receive a recorded error message from the phone company when trying to send a fax
- Make sure you dial the fax number correctly, and make sure that the phone service is not blocked. For example, some phone services might prevent long distance calling.
- If an outside line requires a prefix, turn on the Dial Prefix option or include the prefix in the speed dial number.
a. From the Home screen, touch the Setup 🎨 button.

b. Open the Fax Setup menu.
c. Open the Basic Setup menu.
d. Open the Dial Prefix menu.
e. Select the On setting.
NOTE: To send a fax without a prefix, when the Dial Prefix option is turned on, send the fax manually.
- Send a fax to an international number.
a. If a prefix is required, manually dial the telephone number with the prefix.
b. Enter the country/region code before dialing the phone number.
c. Wait for pauses as you hear the tones on the phone.
d. Send the fax manually from the control panel.
Unable to send a fax when a phone is connected to the product
• Make sure that the telephone is hung up.
• Make sure that the telephone is not being used for a voice call when faxing.
• Unplug the phone from the line, and then try sending the fax.
Solve problems receiving faxes
• The fax does not respond
• An error message displays on the control panel
• A fax is received but does not print
- Sender receives a busy signal
No dial tone
• Cannot send or receive a fax on a PBX line
The fax does not respond
The fax has a dedicated phone line
- Set the Answer Mode option to the Automatic setting from the control panel.
a. From the Home screen, touch the Setup button.
b. Open the Fax Setup menu.
c. Open the Basic Setup menu.
d. Open the Answer Mode menu.
e. Select the Automatic setting.
An answering machine is connected to the product
- Set the Answer Mode option to the TAM setting and plug the answering machine into the "telephone" port.
a. From the Home screen, touch the Setup 🎨 button.
b. Open the Fax Setup menu.
c. Open the Basic Setup menu.
d. Open the Answer Mode menu.
e. Select the TAM setting.
If the TAM setting is unavailable, set the Answer Mode option to the Automatic setting.
- Set the Rings to Answer setting to at least one ring more than the number of rings for which the answering machine is set.
a. From the Home screen, touch the Setup button.
b. Open the Fax Setup menu.
c. Open the Basic Setup menu.
d. Open the Rings to Answer menu.
e. Select the correct setting.
- Plug the answering machine into the "telephone" port.
- If the product has a telephone handset connected, set the Answer Mode option to the Fax/Tel setting to route calls to the correct device. When detecting a voice call, the product generates a ring tone that alerts you to pick up the telephone handset.
a. From the Home screen, touch the Setup button.
b. Open the Fax Setup menu.
c. Open the Basic Setup menu.
d. Open the Answer Mode menu.
e. Select the Fax/Tel setting.
A telephone handset is connected to the product
Set the Answer Mode option to the Automatic setting.
- From the Home screen, touch the Setup ↗ button.
- Open the Fax Setup menu.
- Open the Basic Setup menu.
- Open the Answer Mode menu.
- Select the Automatic setting.
The Answer Mode setting is set to the Manual setting
- Touch the Start Fax button on the control panel.
Voice mail is available on the fax line
- Add a distinctive ring service to your telephone line and change the Distinctive Ring setting on the product to match the ring pattern supplied by the telephone company. Contact your telephone company for information.
a. Verify that the answer mode is set to the Automatic setting.
b. From the Home screen, touch the Setup 🔊 button.
c. Open the Fax Setup menu.
d. Open the Basic Setup menu.
e. Open the Distinctive Ring menu.
f. Select the correct setting.
• Buy a dedicated line for faxing.
- Set the Answer Mode option to the Manual setting.
a. From the Home screen, touch the Setup 8 button.
b. Open the Fax Setup menu.
c. Open the Basic Setup menu.
d. Open the Answer Mode menu.
e. Select the Manual setting.

NOTE: You must be present to receive faxes.
The product is connected to a DSL phone service
- Check the installation and features. A DSL modem requires a high-pass filter on the phone line connection to the product. Contact your DSL service provider for a filter or buy a filter.
• Verify that the filter is plugged in. - Replace the existing filter to make sure that it is not defective.
The product uses a fax over IP or VoIP phone service
- Set the Fax Speed option to the Slow(V.29) or Medium(V.17) setting, or disable the Fast(V.34) setting.
a. From the Home screen, touch the Setup button.
b. Open the Fax Setup menu.
c. Open the Advanced Setup menu.
d. Open the Fax Speed menu.
e. Select the correct setting.
- Contact your service provider to make sure that fax is supported and for the recommended fax speed settings. Some companies might require an adapter.
An error message displays on the control panel
The No fax detected. message appears

NOTE: This error does not always refer to a missed fax. If a voice call is made to a fax number by mistake and the caller hangs up, the No fax detected. message appears on the control panel.
- Ask the sender to resend the fax.
• Make sure that the telephone cord from the product is plugged into the wall telephone jack.
• Try a different phone cord.
• Plug the product phone cord into a jack for another phone line. - Make sure the telephone line and phone wall jack are active by plugging in a telephone and checking for a dial tone.
• Make sure that the telephone cord is plugged into the "line" port on the product. - Check the phone line by running a fax test from the control panel.
- If the error persists, contact HP. See www.hp.com/support/ljcolorm276series or the support flyer that came in the product box.
The Communication error. message appears
- Ask the sender to send the fax again or send at a later time when line conditions have improved.
- Unplug the product telephone cord from the wall, plug in a telephone, and then try making a call. Plug the product phone cord into a jack for another phone line.
• Try a different phone cord. - Set the Fax Speed option to the Slow(V.29) or Medium(V.17) setting, or disable the Fast(V.34) setting.
a. From the Home screen, touch the Setup 🎨 button.
b. Open the Fax Setup menu.
c. Open the Advanced Setup menu.
d. Open the Fax Speed menu.
e. Select the correct setting.
- Turn off the Error Correction feature to prevent automatic error correction.

NOTE: Turning off the Error Correction feature can reduce image quality.
a. From the Home screen, touch the Setup button.
b. Open the Service menu.
c. Open the Fax Service menu.
d. Open the Error Correction menu.
e. Select the Off setting.
- Print the Fax Activity Log report from the control panel to determine if the error occurs with a specific fax number.
a. Touch the Fax button, and then touch the Fax Menu button.
b. Open the Fax Reports menu.
c. Open the Fax Activity Log menu.
d. Select the Print Log Now option.
- If the error persists, contact HP. See www.hp.com/support/ljcolorm276series or the support flyer that came in the product box.
The Fax storage is full, message appears
• Turn the product off then on.
• Print all of the faxes, and then have the sender resend the fax.
- Ask the sender to divide a large fax job into smaller sections, and then fax them individually.
- Make sure that the resolution of the sending fax machine is not set to the Photo setting or the Superfine setting.
a. From the Home screen, touch the Setup 🎨 button.
b. Open the Fax Setup menu.
c. Open the Advanced Setup menu.
d. Open the Fax Resolution menu.
e. Select the correct setting.
- Cancel all fax jobs or clear the faxes from memory.
The Fax is busy. message appears
- The product cannot receive a fax while attempting to send one. Cancel the fax send and try sending at a later time.
- Allow the product to try sending the fax again.
A fax is received but does not print
The Private Receive feature is on
- When the Private Receive feature is activated, received faxes are stored in memory. A password is required to print the stored faxes.
- Enter the password to print the fax. If you do not know the password, contact the product administrator.

NOTE: Memory errors might occur if the faxes are not printed. The product will not answer if the memory is full.
Sender receives a busy signal
A handset is connected to the product
• Make sure the phone is hung up.
- Change the Answer Mode option to match the product setup.
a. From the Home screen, touch the Setup 8 button.
b. Open the Fax Setup menu.
c. Open the Basic Setup menu.
d. Open the Answer Mode menu.
e. Select the setting that matches the product setup.
Set the Answer Mode option to the Fax/Tel setting to automatically receive faxes. The Fax/Tel setting automatically detects whether the incoming transmission is a fax or a voice call and routes the call to the appropriate device.
A phone line splitter is being used
- If you are using a phone line splitter, remove the splitter and set up the phone as a downstream phone.
• Make sure the phone is hung up.
• Make sure the phone is not being used for a voice call when faxing.
No dial tone
- If using a phone line splitter, remove the phone line splitter and set up the phone as a downstream phone.
Cannot send or receive a fax on a PBX line
- If you are using a PBX phone line, contact your PBX administrator to configure an analog fax line for your product.
Solve general fax problems
• Faxes are sending slowly
Fax quality is poor
• Fax cuts off or prints on two pages
Faxes are sending slowly
The product is experiencing poor phone line quality.
- Retry sending the fax when the line conditions have improved.
- Check with the phone service provider that the line supports fax.
• Turn off the Error Correction setting.
a. Open the Setup Menu menu.
b. Open the Service menu.
c. Open the Fax Service menu.
d. Open the Error Correction menu.
e. Select the Off setting.
NOTE: This can reduce image quality.
• Use white paper for the original. Do not use colors such as gray, yellow, or pink.
• Increase the Fax Speed setting.
a. Open the Setup Menu menu.
b. Open the Fax Setup menu.
c. Open the Advanced Setup menu.
d. Open the Fax Speed menu.
e. Select the correct setting.
• Divide large fax jobs into smaller sections, and then fax them individually.
- Change the fax settings on the control panel to a lower resolution.
a. Open the Setup Menu menu.
b. Open the Fax Setup menu.
c. Open the Advanced Setup menu.
d. Open the Fax Resolution menu.
e. Select the correct setting.
Fax quality is poor
Fax is blurry or light.
- Increase fax resolution when sending faxes. Resolution does not affect received faxes.
a. Open the Setup Menu menu.
b. Open the Fax Setup menu.
c. Open the Advanced Setup menu.
d. Open the Fax Resolution menu.
e. Select the correct setting.

NOTE: Increasing resolution slows transmission speed.
• Turn on the Error Correction setting from the control panel.
a. Open the Setup Menu menu.
b. Open the Service menu.
c. Open the Fax Service menu.
d. Open the Error Correction menu.
e. Select the On setting.
- Check the toner cartridges and replace if necessary.
- Ask the sender to darken the contrast setting on the sending fax machine, and then resend the fax.
Fax cuts off or prints on two pages
- Set the Default Paper Size setting. Faxes print on a single size of paper based on the Default Paper Size settings.
a. Open the Setup Menu menu.
b. Open the System Setup menu.
c. Open the Paper Setup menu.
d. Open the Default Paper Size menu.
e. Select the correct setting.
- Set the paper type and size for the tray used for faxes.
- Turn on the Fit to Page setting to print longer length faxes on letter or A4 size paper.
a. Open the Setup Menu menu.
b. Open the Fax Setup menu.
c. Open the Advanced Setup menu.
d. Open the Fit to Page menu.
e. Select the On setting.

NOTE: If the Fit to Page setting is off and the Default Paper Size setting is set to letter, a legal size original prints on two pages.
7 Manage and maintain
• Use the HP Reconfiguration Utility to change the product connection
• Use HP Web Services applications
- Configure IP network settings
• HP Device Toolbox (Windows)
• HP Utility (Mac OS X)
HP Web Jetadmin
• Product security features
Economy settings
• Print when a toner cartridge is at estimated end of life
• Store and recycle supplies
- Replacement instructions
- Update the firmware
Use the HP Reconfiguration Utility to change the product connection
If you are already using the product and you wish to change the way it is connected, use the HP Reconfiguration Utility to set up the connection. For example, you can reconfigure the product to use a different wireless address, to connect to a wired or wireless network, or change from a network connection to a USB connection. You can change the configuration without inserting the product CD. After you select the type of connection you wish to make, the program goes directly to the portion of the product setup procedure that needs to change.
The HP Reconfiguration Utility is located in the HP programs group on your computer.
Use HP Web Services applications
- From the Home screen on the product control panel, touch the Web Services 📋 button.
- Touch the Enable Web Services button.
After you download an application from the HP ePrintCenter Web site, it is available in the Apps menu on the product control panel.
Configure IP network settings
View or change network settings
Use the HP Device Toolbox to view or change IP configuration settings.
- Print a configuration page, and locate the IP address.
- If you are using IPv4, the IP address contains only digits. It has this format:
XXX.XXX.XXX.XXX
- If you are using IPv6, the IP address is a hexadecimal combination of characters and digits. It has a format similar to this:
XXXX::XXXX:XXXX:XXXX:XXXX
-
Open the HP Device Toolbox by clicking the Start button, clicking the Programs or All Programs group, clicking HP, clicking the product group, and then clicking HP Product Settings.
-
Click the Networking tab to obtain network information. You can change settings as needed.
Manually configure IPv4 TCP/IP parameters from the control panel
Use the control-panel menus to manually set an IPv4 address, subnet mask, and default gateway.
-
Touch the Setup ✿ button.
-
Scroll to and touch the Network Setup menu.
-
Touch the TCP/IP Config menu, and then touch the Manual button.
-
Use the numeric keypad to enter the IP address, and touch the OK button. Touch the Yes button to confirm.
-
Use the numeric keypad to enter the subnet mask, and touch the OK button. Touch the Yes button to confirm.
-
Use the numeric keypad to enter the default gateway, and touch the OK button. Touch the Yes button to confirm.
Rename the product on a network
If you want to rename the product on a network so that it can be uniquely identified, use the HP Embedded Web Server.
- To open the HP Embedded Web Server, type the product IP address into the address line of a Web browser.

NOTE: You can also access the HP Embedded Web Server from the HP Device Toolbox for Windows or the HP Utility for Mac OS X.
-
Open the System tab.
-
On the Device Information page, the default product name is in the Device Status field. You can change this name to uniquely identify this product.

NOTE: Completing the other fields on this page is optional.
- Click the Apply button to save the changes.
Link speed and duplex settings

NOTE: This information applies only to Ethernet networks. It does not apply to wireless networks.
The link speed and communication mode of the print server must match the network hub. For most situations, leave the product in automatic mode. Incorrect changes to the link speed and duplex settings might prevent the product from communicating with other network devices. If you need to make changes, use the product control panel.

NOTE: The setting must match with the network product to which you are connecting (a network hub, switch, gateway, router, or computer).

NOTE: Making changes to these settings causes the product to turn off and then on. Make changes only when the product is idle.
- Touch the Setup button.
- Scroll to and touch the Network Setup menu.
- Touch the Link Speed menu.
- Select one of the following options.
Setting Description
| Automatic | The print server automatically configures itself for the highest link speed and communication mode allowed on the network. |
| 10T Half | 10 megabytes per second (Mbps), half-duplex operation |
| 10T Full 10 Mbps, full-duplex operation | |
| 100TX Half 100 Mbps, half-duplex operation | |
| 100TX Full 100 Mbps, full-duplex operation | |
- Touch the OK button. The product turns off and then on.
HP Device Toolbox (Windows)
Use the HP Device Toolbox for Windows to view or change product settings from your computer. This tool opens the HP Embedded Web Server for the product.

NOTE: This tool is available only if you performed a full installation when you installed the product.
- Click the Start button, and then click the Programs item.
- Click your HP product group, and then click the HP Device Toolbox item.
Tab or section Description
| Status tabProvides product, status, and configuration information. | Device Status: Shows the product status and shows the approximate percent life remaining of HP supplies.Supplies Status: Shows the approximate percent life remaining of HP supplies. Actual supply life remaining can vary. Consider having a replacement supply available to install when print quality is no longer acceptable. The supply does not need to be replaced unless the print quality is no longer acceptable.Device Configuration: Shows the information found on the product configuration page.Network Summary: Shows the information found on the product network configuration page.Reports: Allows you to print the configuration and supplies status pages that the product generates.Color Usage Log: Shows a log that shows the user name, application name, and color usage information on a job-by-job basis.Event Log: Shows a list of all product events and errors.Support button: Provides a link to the product support page.Shop for Supplies button: Provides a link to a page where you can order supplies for the product. |
| Tab or section Description | |
| System tabProvides the ability to configure the product from your computer. | Device Information: Provides basic product and company information.Paper Setup: Allows you to change the paper-handling defaults for the product.Print Quality: Allows you to change the print quality defaults for the product, including calibration settings.Print Density: Allows you to change the contrasts, highlights, midtones, and shadows values for each supply.Paper Types: Allows you to configure print modes that correspond to the paper types that the product accepts.System Setup: Allows you to change the system defaults for the product.Service: Allows you to start the cleaning procedure on the product.Product Security: Allows you to set or change the product password.Support button: Provides a link to the product support page.Shop for Supplies button: Provides a link to a page where you can order supplies for the product.NOTE: The System tab can be password-protected. If this product is on a network, always consult with the administrator before changing settings on this tab. |
| Print tabProvides the ability to change default print settings from your computer. | Printing: Change the default product print settings, such as number of copies and paper orientation. These are the same options that are available on the control panel.PCL5c: View and change the PCL5c settings.PostScript: View and change the PS settings. |
| Networking tabProvides the ability to change network settings from your computer. | Network administrators can use this tab to control network-related settings for the product when it is connected to an IP-based network. This tab does not appear if the product is directly connected to a computer. |
| HP Web Services tab | Use this tab to set up and use various Web tools with the product. |
HP Utility (Mac OS X)
Use the HP Utility for Mac OS X to view or change product settings from your computer. This tool opens the HP Embedded Web Server for the product.
You can use the HP Utility when the product is connected with a USB cable or is connected to a TCP/IP-based network.
Open the HP Utility
▲ From the dock, click HP Utility.
-or-
From Applications, click Hewlett Packard, and then click HP Utility.
HP Utility features
Use the HP Utility software to perform the following tasks:
- Obtain information about supplies status.
- Obtain information about the product, such as the firmware version and the serial number.
• Print a configuration page. - Configure the paper type and size for the tray.
• Transfer files and fonts from the computer to the product. - Update the product firmware.
• Display the color usage page.
HP Web Jetadmin
HP Web Jetadmin is an award-winning, industry-leading tool for efficiently managing a wide variety of networked HP devices, including printers, multifunction products, and digital senders. This single solution allows you to remotely install, monitor, maintain, troubleshoot, and secure your printing and imaging environment — ultimately increasing business productivity by helping you save time, control costs, and protect your investment.
HP Web Jetadmin updates are periodically made available to provide support for specific product features. Visit www.hp.com/go/webjetadmin and click the Self Help and Documentation link to learn more about updates.

NOTE: Device plug-ins can be installed into HP Web Jetadmin to provide support for specific product features.

NOTE: Browsers must be Java-enabled. Web Jetadmin is not supported for Mac OS X.
Product security features
The product supports security standards and recommended protocols that help you keep the product secure, protect critical information on your network, and simplify the way you monitor and maintain the product.
For in-depth information about HP's secure imaging and printing solutions, visit www.hp.com/go/secureprinting. The site provides links to white papers and FAQ documents about security features.
Set or change the product password
Use the HP Embedded Web Server to set a password or change an existing password for a product on a network.
- To open the HP Embedded Web Server, type the product IP address into the address line of a Web browser.

NOTE: You can also access the HP Embedded Web Server from the HP Device Toolbox for Windows or the HP Utility for Mac OS X.
- Click the Settings tab, and click the Security link.

NOTE: If a password has previously been set, you are prompted to type the password. Type the password, and then click the Apply button.
- Type the new password in the New Password box and in the Verify password box.
- At the bottom of the window, click the Apply button to save the password.
Economy settings
Print with EconoMode
This product has an EconoMode option for printing drafts of documents. Using EconoMode can use less toner. However, using EconoMode can also reduce print quality.
HP does not recommend the full-time use of EconoMode. If EconoMode is used full-time, the toner supply might outlast the mechanical parts in the toner cartridge. If print quality begins to degrade and is no longer acceptable, consider replacing the toner cartridge.

NOTE: This feature is available with the PCL 6 printer driver for Windows. If you are not using that driver, you can enable the feature by using the HP Embedded Web Server.
- From the software program, select the Print option.
- Select the product, and then click the Properties or Preferences button.
- Click the Paper/Quality tab.
- Click the EconoMode check box.
Set the sleep delay
- From the Home screen, touch the Setup button.
-
Open the following menus:
-
System Setup
- Energy Settings
-
Sleep Delay
-
Select the time for the sleep delay.

NOTE: The default value is 15 minutes.
Set the Auto Power Down delay
- From the Home screen, touch the Setup button.
-
Open the following menus:
-
System Setup
- Energy Settings
-
Auto Power Down
Power Down Delay -
Select the time for the power-down delay.

NOTE: The default value is 30 minutes.
-
The product automatically wakes from the auto power-down mode when it receives jobs or when you use a button on the control panel. You can change which events cause the product to wake. Open the following menus:
-
System Setup
• Energy Settings
• Auto Power Down - Wake Events
To turn off a wake event, select the event and then select the No option.
Print when a toner cartridge is at estimated end of life
Supply-related notifications are communicated on the product control panel, Desktop Alerts, software applications, and network alerts.
A
A
Print-quality problems can occur when using a toner cartridge that is at its estimated end of life. The supply does not need to be replaced at this point in time unless the print quality is no longer acceptable.

NOTE: Using the Continue setting allows printing beyond Very Low without customer interaction and can result in unsatisfactory print quality.
Enable or disable the At Very Low settings

NOTE: This section applies to the HP LaserJet Pro 200 color M276nw MFP model only.
You can enable or disable the default settings at any time, and you do not have to re-enable them when you install a new toner cartridge.
- From the Home screen on the control panel, touch the Setup ↗ button.
-
Open the following menus:
-
System Setup
• Supply Settings
• Black Cartridge or Color Cartridges -
Very Low Setting
-
Select one of the following options:
-
Select the Continue option to set the product to alert you that the toner cartridge is very low, but to continue printing.
- Select the Stop option to set the product to stop printing (including printing faxes) until you replace the toner cartridge.
- Select the Prompt option (the default option) to set the product to stop printing (including printing faxes) and prompt you to replace the toner cartridge. You can acknowledge the
prompt and continue printing. The customer can choose to be prompted in 100 pages, 200 pages, 300 pages, 400 pages, or never. The default setting is to prompt in 100 pages. This option is provided as a customer convenience and is not an indication these pages will have acceptable print quality.
- On the Color Cartridges menu only, select Print Black to alert you when the toner cartridge is very low, but to continue printing in black only.
When the product is set to the Stop option, there is some risk that faxes will not print after the new cartridge is installed if your product has received more faxes than the memory can hold while stopped.
When the product is set to the Prompt option, there is some risk that faxes will not print after the new cartridge is installed if your product has received more faxes than the memory can hold while the product is waiting for the prompt to be acknowledged.
Once an HP supply has reached Very Low, HP's Premium Protection Warranty on that supply has ended. All print defects or cartridge failures incurred when an HP supply is used in Continue at very low mode will not be considered to be defects in materials or workmanship in the supply under the HP Print Cartridge Warranty Statement.
Store and recycle supplies
Recycle supplies
To recycle a genuine HP toner cartridge, place the used cartridge in the box in which the new cartridge arrived. Use the enclosed return label to send the used supply to HP for recycling. For complete information, see the recycling guide that is included with each new HP supply item.
Toner cartridge storage
Do not remove the toner cartridge from its package until you are ready to use it.

CAUTION: To prevent damage to the toner cartridge, do not expose it to light for more than a few minutes.
Replacement instructions
Replace the toner cartridges
-
Open the front door.
-
Pull out the toner cartridge drawer.
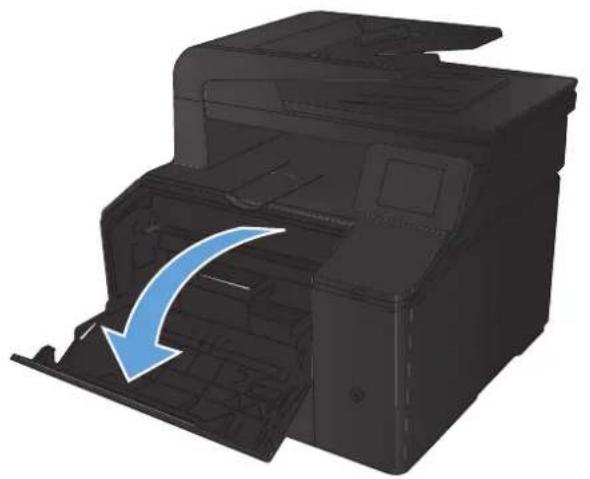
natural_image
3D rendering of a printer with an arrow indicating paper folding or disassembly (no text or symbols present)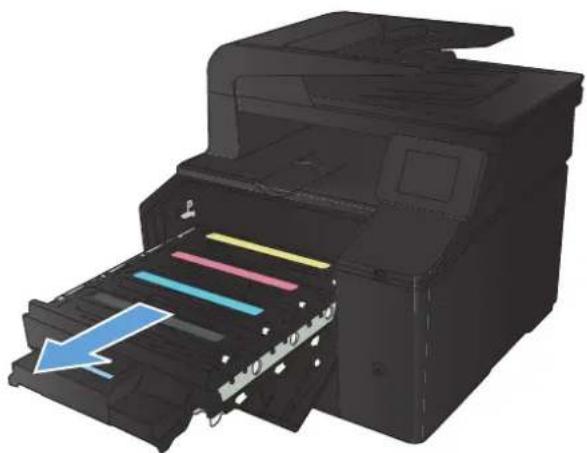
natural_image
3D rendering of a printer with colorful paper strips being inserted, showing internal structure and color scheme (no text or symbols)-
Grasp the handle on the toner cartridge, and then pull the toner cartridge straight up to remove it.
-
Remove the new toner cartridge from the packaging.
-
Gently rock the toner cartridge from front to back to distribute the toner evenly inside the cartridge.
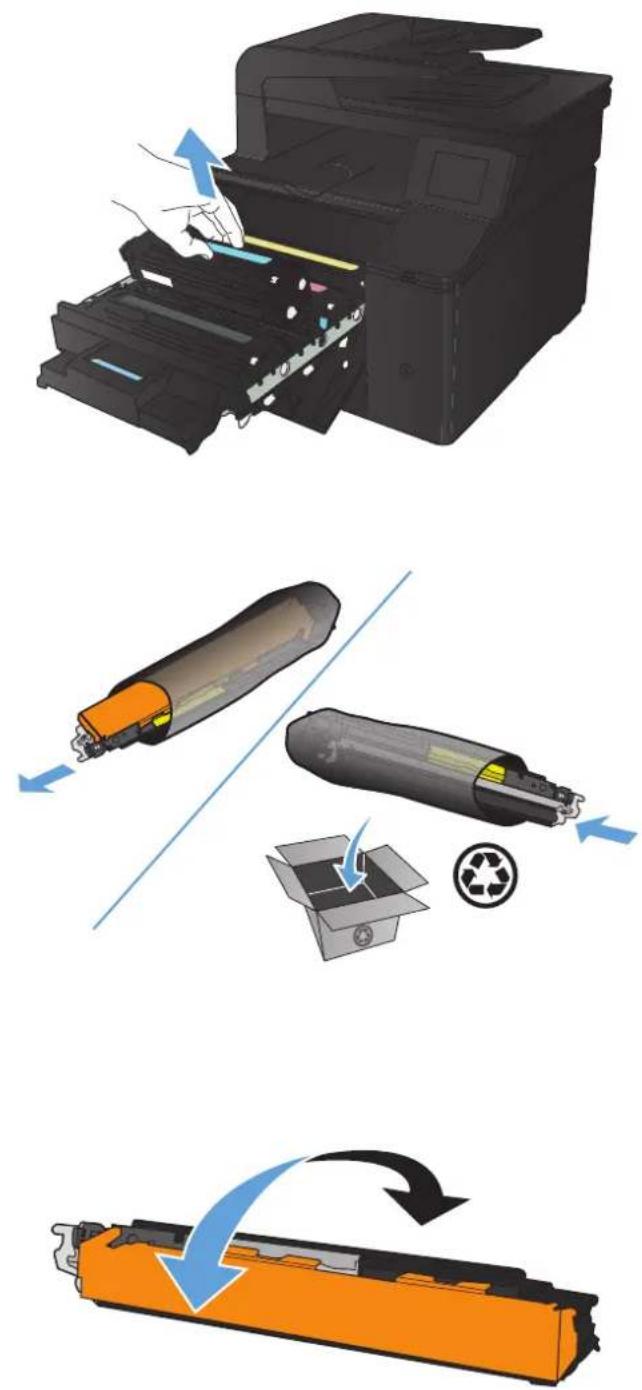
-
Remove the plastic shield from the bottom of the new toner cartridge.
-
Do not touch the imaging drum on the bottom of the toner cartridge. Fingerprints on the imaging drum can cause print-quality problems.
-
Insert the new toner cartridge into the product.
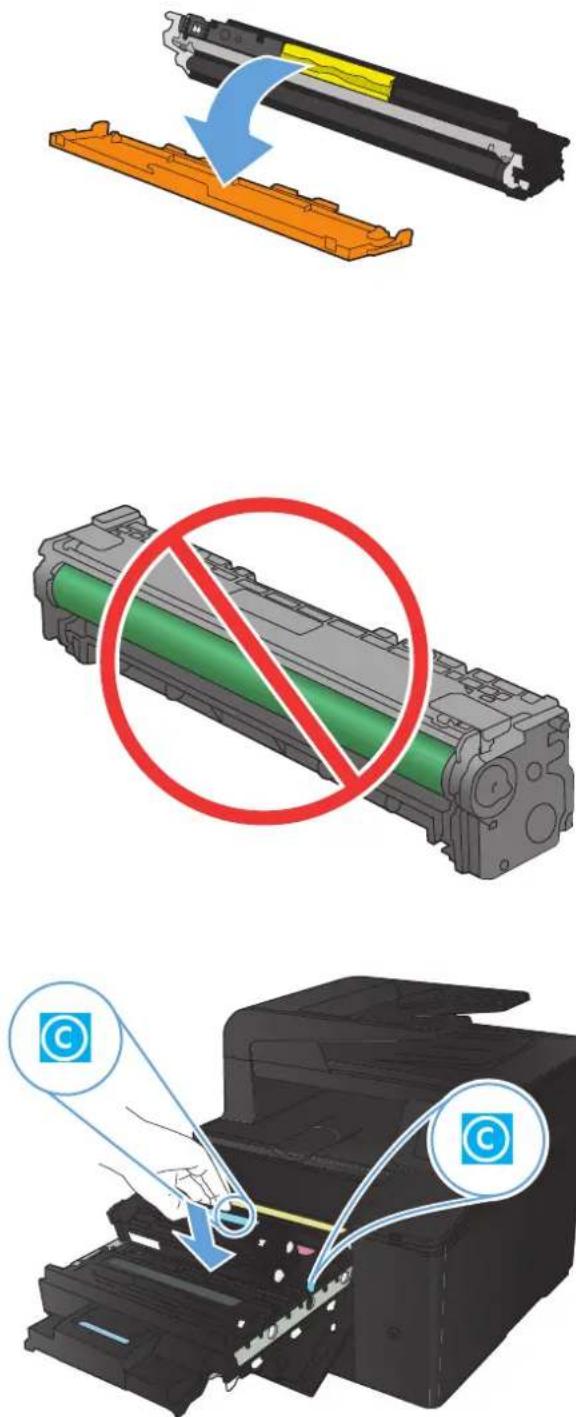
-
Pull the tab on the left side of the toner cartridge straight up to completely remove the sealing tape. Discard the sealing tape.
-
Close the toner cartridge drawer.
-
Close the front door.
-
Place the old toner cartridge and the plastic shield in the box for the new toner cartridge. Follow the recycling instructions that are included in the box.
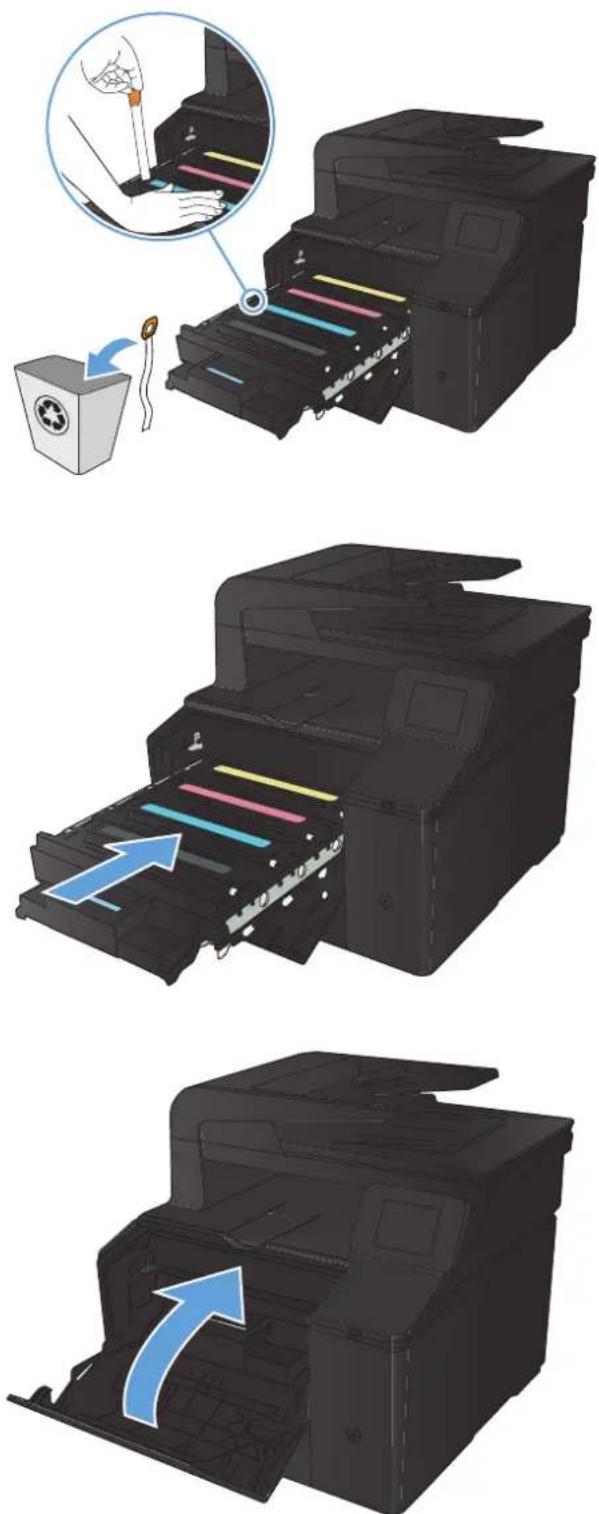
text_image
Diagram illustrating the process of printer printing and quality inspection, showing steps from file handling to final output.Update the firmware
HP offers periodic upgrades to the product firmware. You can load the firmware updates manually, or you can set the product to automatically load firmware updates.
Manually update the firmware
- From the Home screen on the control panel, touch the Setup ⚙ button.
- Open the following menus:
Service
- LaserJet Update
- Check For Updates Now
- Touch the Yes button to prompt the product to search for firmware updates. If the product detects an upgrade, it will begin the update process.
Set the product to automatically update the firmware
- From the Home screen on the control panel, touch the Setup ⚙ button.
- Open the following menus:
Service
- LaserJet Update
- Manage Updates
- Prompt Before Install
- Touch the Install Automatically option.
8 Solve problems
Problem-solving checklist
- Restore the factory-set defaults
• Control panel help system
• Interpret control panel messages
• Paper feeds incorrectly or becomes jammed
Clear jams
- Improve print quality
- Solve copy quality problems
- Solve scan quality problems
- Solve fax quality problems
• The product does not print or it prints slowly
- Solve walk-up USB printing problems
- Solve direct connection problems
- Solve wired network problems
- Solve wireless network problems
- Solve product software problems with Windows
- Solve product software problems with Mac OS X
- Remove software (Windows)
- Remove software (Mac OS X)
Problem-solving checklist
Follow these steps when trying to solve a problem with the product.
• Step 1: Check that the product power is on
- Step 2: Check the control panel for error messages
• Step 3: Test print functionality
• Step 4: Test copy functionality
• Step 5: Test the fax sending functionality
• Step 6: Test the fax receiving functionality
• Step 7: Try sending a print job from a computer
- Step 8: Test the walk-up USB printing functionality
Step 1: Check that the product power is on
- Make sure the product is plugged in and turned on.
- Make sure the power cable is connected to the product and the outlet.
- Check the power source by connecting the power cable to a different outlet.
- If the product motors do not rotate, make sure the toner cartridges are installed and that the doors are all closed. The control panel displays messages to indicate these problems.
- If the document feeder motor does not rotate, open the document feeder cover and remove any packing material or shipping tape.
- If the scanner bulb does not light during copying, scanning, or faxing, contact HP support.
Step 2: Check the control panel for error messages
The control panel should indicate ready status. If an error message appears, resolve the error.
Step 3: Test print functionality
- From the control panel Home screen, touch the Setup ⚪ button.
- Open the Reports menu, and then select the Configuration Report item to print the report.
- If the report does not print, make sure paper is loaded in the tray, and then check the control panel to see if paper is jammed inside the product.

NOTE: Make sure the paper in the tray meets specifications for this product.
Step 4: Test copy functionality
- Place the configuration page into the document feeder, and then make a copy. If the paper does not feed smoothly through the document feeder, you might need to clean the document feeder rollers and separation pad. Make sure the paper meets specifications for this product.
- Place the configuration page onto the scanner glass, and then make a copy.
- If the print quality on the copied pages is not acceptable, clean the scanner glass and the small glass strip.
Step 5: Test the fax sending functionality
- From the control panel Home screen, touch the Setup 🔊 button.
- Open the Service menu, and then open the Fax Service menu. Touch the Run Fax Test button to test the fax functionality.
- Touch the Fax button on the product control panel, and then touch the Start Fax button.
Step 6: Test the fax receiving functionality
- From the control panel Home screen, touch the Setup 🔊 button.
- Open the Service menu, and then open the Fax Service menu. Touch the Run Fax Test button to test the fax functionality.
- Use another fax machine to send a fax to the product.
- If the product does not receive the fax, make sure that you do not have too many telephone devices connected to the product, and that all telephone devices are connected in the correct order.
- Review and reset the product fax settings.
- Turn off the Private Receive feature.
Step 7: Try sending a print job from a computer
- Use a word-processing program to send a print job to the product.
- If the job does not print, make sure you selected the correct printer driver.
- Uninstall and then reinstall the product software.
Step 8: Test the walk-up USB printing functionality
- Load a .PDF document or .JPEG photo onto a USB flash drive, and insert it in the slot on the front of the product.
- The USB Flash Drive menu opens. Try printing the document or photo.
- If no documents are listed, try a different type of USB flash drive.
Restore the factory-set defaults
- From the Home screen, touch the Setup button.
- Scroll to and touch the Service menu.
- Scroll to and touch the Restore Defaults button, and then touch the OK button.
The product automatically restarts.
Control panel help system
The product has a built-in Help system that explains how to use each screen. To open the Help system, touch the Help ? button in the upper-right corner of the screen.
For some screens, the Help opens to a global menu where you can search for specific topics. You can browse through the menu structure by touching the buttons in the menu.
Some Help screens include animations that guide you through procedures, such as clearing jams.
For screens that contain settings for individual jobs, the Help opens to a topic that explains the options for that screen.
If the product alerts you of an error or warning, touch the Help ? button to open a message that describes the problem. The message also contains instructions to help solve the problem.
Interpret control panel messages
Control panel message types
The control panel messages indicate the current product status or situations that might require action.
Alert and warning messages appear temporarily and might require you to acknowledge the message by pressing the OK button to resume or by pressing the Cancel ✗ button to cancel the job. With certain warnings, the job might not complete or the print quality might be affected. If the alert or warning message is related to printing and the auto-continue feature is on, the product will attempt to resume the printing job after the warning has appeared for 10 seconds without acknowledgement.
Critical error messages can indicate some kind of failure. Turning off and then turning on the power might fix the problem. If a critical error persists, the product might require service.
Control panel messages
10.X00Y Supply Error
Description
The memory chip for one of the toner cartridges cannot be read or is missing.
10.0000 = black memory chip error
10.0001 = cyan memory chip error
10.0002 = magenta memory chip error
- 10.0003 = yellow memory chip error
10.1000 = black memory chip is missing
10.1001 = cyan memory chip is missing
10.1002 = magenta memory chip is missing
10.1003 = yellow memory chip is missing
Recommended action
Reinstall the toner cartridge.
Turn the product off and then on.
If the problem is not solved, replace the toner cartridge.
49 Error, Turn off then on
Description
The product experienced an internal error.
Recommended action
Turn the product off, wait at least 30 seconds, and then turn the product on and wait for it to initialize.
If you are using a surge protector, remove it. Plug the product directly into the wall socket. Turn the product power on.
If the message persists, contact HP support.
50.x Fuser Error
Description
The product has experienced an error with the fuser.
Recommended action
Turn the product power off, wait at least 30 seconds, and then turn the product power on and wait for it to initialize.
Turn off the product, wait at least 25 minutes, and then turn on the product.
If you are using a surge protector, remove it. Plug the product directly into the wall socket. Turn the product power on.
If the message persists, contact HP support.
51.XX Error
Description
The product has experienced an internal hardware error.
Recommended action
Turn the product power off, wait at least 30 seconds, and then turn the product power on and wait for it to initialize.
If you are using a surge protector, remove it. Plug the product directly into the wall socket. Turn the product on.
If the message persists, contact HP support.
54.XX Error
Description
The product has experienced an error with one of the internal sensors.
Recommended action
Turn the product power off, wait at least 30 seconds, and then turn the product power on and wait for it to initialize.
If you are using a surge protector, remove it. Plug the product directly into the wall socket. Turn the product power on.
If the message persists, contact HP support.
55.X Error
Description
The product has experienced an internal error.
Recommended action
Turn the product power off, wait at least 30 seconds, and then turn the product power on and wait for it to initialize.
If you are using a surge protector, remove it. Plug the product directly into the wall socket. Turn the product power on.
If the message persists, contact HP support.
57 Fan Error, Turn off then on
Description
The product has experienced a problem with its internal fan.
Recommended action
Turn the product power off, wait at least 30 seconds, and then turn the product power on and wait for it to initialize.
If you are using a surge protector, remove it. Plug the product directly into the wall socket. Turn the product power on.
If the message persists, contact HP support.
59.X Error
Description
The product has experienced a problem with one of the motors.
Recommended action
Turn the product power off, wait at least 30 seconds, and then turn the product power on and wait for it to initialize.
If you are using a surge protector, remove it. Plug the product directly into the wall socket. Turn the product power on.
If the message persists, contact HP support.
79 Error Turn off then on
Description
The product has experienced an internal firmware error.
Recommended action
Turn the product power off, wait at least 30 seconds, and then turn the product power on and wait for it to initialize.
If you are using a surge protector, remove it. Plug the product directly into the wall socket. Turn the product power on.
If the message persists, contact HP support.
Black Cartridge Low
Description
The toner cartridge is nearing the end of its useful life.
Recommended action
Printing can continue, but consider having a replacement supply on hand.
Black in wrong position
Description
The toner cartridge is installed in the incorrect slot.
Recommended action
Make sure that each toner cartridge is installed in the correct slot. From front to back, the toner cartridges are installed in this order: black, cyan, magenta, and yellow.
Black Very Low
Description
The toner cartridge is at the end of its useful life. A customer configurable option on this product is "Prompt to Remind Me in 100 pages, 200 pages, 300 pages, 400 pages, or never." This option is provided as a customer convenience and is not an indication these pages will have acceptable print quality.
Recommended action
To ensure optimal print quality, HP recommends replacing the toner cartridge at this point. You can continue printing until you notice a decrease in print quality. Actual cartridge life might vary.
Once an HP supply has reached Very Low, HP's Premium Protection Warranty on that supply has ended. All print defects or cartridge failures incurred when an HP supply is used in Continue at very low mode will not be considered to be defects in materials or workmanship in the supply under the HP Print Cartridge Warranty Statement.
Cleaning
Description
The product periodically performs a cleaning procedure to maintain the best print quality.
Recommended action
Wait for the cleaning process to finish.
Cyan Cartridge Low
Description
The toner cartridge is nearing the end of its useful life.
Recommended action
Printing can continue, but consider having a replacement supply on hand.
Cyan in wrong position
Description
The toner cartridge is installed in the incorrect slot.
Recommended action
Make sure that each toner cartridge is installed in the correct slot. From front to back, the toner cartridges are installed in this order: black, cyan, magenta, and yellow.
Cyan Very Low
Description
The toner cartridge is at the end of its useful life. A customer configurable option on this product is "Prompt to Remind Me in 100 pages, 200 pages, 300 pages, 400 pages, or never." This option is provided as a customer convenience and is not an indication these pages will have acceptable print quality.
Recommended action
To ensure optimal print quality, HP recommends replacing the toner cartridge at this point. You can continue printing until you notice a decrease in print quality. Actual cartridge life might vary.
Once an HP supply has reached Very Low, HP's Premium Protection Warranty on that supply has ended. All print defects or cartridge failures incurred when an HP supply is used in Continue at very low mode will not be considered to be defects in materials or workmanship in the supply under the HP Print Cartridge Warranty Statement.
Device error, press OK
Description
An internal error occurred.
Recommended action
Press the OK button to resume the job.
Door open
Description
The product front door is open.
Recommended action
Close the door.
Genuine HP supply installed
Description
A genuine HP supply was installed.
Recommended action
No action necessary.
Incompatible
Description
You have installed a toner cartridge that is intended for use in a different HP product model. The product might not function correctly with this toner cartridge installed.
Recommended action
Install the correct toner cartridge for this product.
Incorrect supplies
Description
More than one toner cartridge is installed in the incorrect slot.
Recommended action
Be sure that each toner cartridge is in the correct slot. From front to back, the toner cartridges are installed in this order: black, cyan, magenta, yellow.
Install cartridge
Description
The toner cartridge is either not installed or not correctly installed in the product.
Recommended action
Install the toner cartridge.
Invalid driver Press [OK]
Description
You are using an incorrect printer driver.
Recommended action
Select the correct printer driver.
Jam in Tray 1, Clear jam and then press OK
Description
The product has detected a jam.
Recommended action
Clear the jam from the tray, and then press OK.
If the message persists, contact HP support.
Load tray 1 Press [OK] for available media
Description
The tray is empty.
Recommended action
Load paper into the tray to continue printing. Press the OK button to select a different tray.
Load Tray 1 , Press OK to use available media
Description
The tray is not configured for the paper type and size that the print job is requesting.
Recommended action
Load the correct paper into Tray 1. Or press the OK button to use the paper currently in the tray.
Load Tray 1,
Description
The product is ready to process the cleaning operation.
Recommended action
Load Tray 1 with plain paper in the size indicated, and then press the OK button.
Magenta Cartridge Low
Description
The toner cartridge is nearing the end of its useful life.
Recommended action
Printing can continue, but consider having a replacement supply on hand.
Magenta in wrong position
Description
The toner cartridge is installed in the incorrect slot.
Recommended action
Make sure that each toner cartridge is installed in the correct slot. From front to back, the toner cartridges are installed in this order: black, cyan, magenta, and yellow.
Magenta Very Low
Description
The toner cartridge is at the end of its useful life. A customer configurable option on this product is "Prompt to Remind Me in 100 pages, 200 pages, 300 pages, 400 pages, or never." This option is provided as a customer convenience and is not an indication these pages will have acceptable print quality.
Recommended action
To ensure optimal print quality, HP recommends replacing the toner cartridge at this point. You can continue printing until you notice a decrease in print quality. Actual cartridge life might vary.
Once an HP supply has reached Very Low, HP's Premium Protection Warranty on that supply has ended. All print defects or cartridge failures incurred when an HP supply is used in Continue at very low mode will not be considered to be defects in materials or workmanship in the supply under the HP Print Cartridge Warranty Statement.
Manual Duplex Load Tray 1, Press OK
Description
The first side of a manual duplex job has printed, and the page needs to be loaded to process the second side.
Recommended action
Load the page in the indicated tray with the side to be printed face up, and the top of the page away from you, and then press the OK button.
Memory is low. Press OK.
Description
The product memory is almost full.
Recommended action
Press the OK button to finish the job, or press the Cancel ✗ button to cancel the job.
Break the job into smaller jobs that contain fewer pages.
Misprint, Press OK
Description
Paper has been delayed as it moves through the product.
Recommended action
Press the OK button to clear the message.
To avoid this problem, try the following solutions:
- Adjust the paper guides in the tray. Make sure the front paper guide is pushing the paper against the back edge of the tray.
- Use paper that meets HP specifications. Store paper unopened in its original packaging.
- Use the product in an area that meets the environmental specifications for this product.
Print failure, press OK. If error repeats, turn off then on.
Description
The product cannot process the page.
Recommended action
Press the OK button to continue printing the job, but output might be affected.
If the error persists, turn the power off and then on. Resend the print job.
Rear door open
Description
The product rear door is open.
Recommended action
Close the door.
Remove shipping lock from cartridge
Description
A toner cartridge shipping lock is installed.
Recommended action
Pull the orange tab to remove the shipping lock from the cartridge.
Remove shipping locks from cartridges
Description
A toner cartridge shipping lock is installed on one or more toner cartridges.
Recommended action
Pull the orange tab to remove the shipping lock from the cartridge.
Replace
Description
The toner cartridge is at the end of its useful life, and the product is customer-configured to stop printing when it reaches the very low state.
Recommended action
To ensure optimal print quality, HP recommends replacing the toner cartridge at this point. You can continue printing until you notice a decrease in print quality. Actual cartridge life might vary. Once an HP supply has reached Very Low, HP's Premium Protection Warranty on that supply has ended. All print defects or cartridge failures incurred when an HP supply is used in Continue at very low mode will not be considered to be defects in materials or workmanship in the supply under the HP Print Cartridge Warranty Statement.
Supplies low
Description
More than one toner cartridge is nearing the end of its useful life.
Recommended action
Check the supply level gauges on the control panel, or print a supplies status page to determine which toner cartridges are low.
Printing will continue until a Very Low message displays. Consider having replacement supplies on hand.
Unexpected size in tray 1 Load Press [OK]
Description
The product has detected paper in the tray that does not match the configuration for the tray.
Recommended action
Load the correct paper into the tray, or configure the tray for the size that you have loaded.
Unsupported Press [OK] to continue
Description
The product has detected a toner cartridge that was not made by HP.
Recommended action
Press the OK button to continue printing.
If you believe you purchased an HP supply, go to www.hp.com/go/anticounterfeit. Service or repairs that are required as a result of using unsupported supplies is not covered under HP warranty.
Used in use
Description
You are using a toner cartridge that reached the default low threshold while it was installed in a product.
Recommended action
Printing can continue, but consider having a replacement supply on hand.
Used installed, to accept press OK
Description
You have installed a toner cartridge that reached the default low threshold while it was installed in another product.
Recommended action
Press the OK button to continue.
Used supplies in use
Description
You are using more than one toner cartridge that reached the default low threshold while it was installed in a product.
Recommended action
Printing can continue, but consider having replacement supplies on hand.
Yellow Cartridge Low
Description
The toner cartridge is nearing the end of its useful life.
Recommended action
Printing can continue, but consider having a replacement supply on hand.
Yellow in wrong position
Description
The toner cartridge is installed in the incorrect slot.
Recommended action
Make sure that each toner cartridge is installed in the correct slot. From front to back, the toner cartridges are installed in this order: black, cyan, magenta, and yellow.
Yellow Very Low
Description
The toner cartridge is at the end of its useful life. A customer configurable option on this product is "Prompt to Remind Me in 100 pages, 200 pages, 300 pages, 400 pages, or never." This option is provided as a customer convenience and is not an indication these pages will have acceptable print quality.
Recommended action
To ensure optimal print quality, HP recommends replacing the toner cartridge at this point. You can continue printing until you notice a decrease in print quality. Actual cartridge life might vary.
Once an HP supply has reached Very Low, HP's Premium Protection Warranty on that supply has ended. All print defects or cartridge failures incurred when an HP supply is used in Continue at very low mode will not be considered to be defects in materials or workmanship in the supply under the HP Print Cartridge Warranty Statement.
Paper feeds incorrectly or becomes jammed
The product does not pick up paper
If the product does not pick up paper from the tray, try these solutions.
- Open the product and remove any jammed sheets of paper.
- Load the tray with the correct size of paper for your job.
- Make sure the paper guides in the tray are adjusted correctly for the size of paper. Adjust the guides so they are touching the paper stack without bending it.
- Check the product control panel to see if the product is waiting for you to acknowledge a prompt to feed the paper manually. Load paper, and continue.
The product picks up multiple sheets of paper
If the product picks up multiple sheets of paper from the tray, try these solutions.
- Remove the stack of paper from the tray and flex it, rotate it 180 degrees, and flip it over. Do not fan the paper. Return the stack of paper to the tray.
- Use only paper that meets HP specifications for this product.
- Use paper that is not wrinkled, folded, or damaged. If necessary, use paper from a different package.
- Make sure the tray is not overfilled. If it is, remove the entire stack of paper from the tray, straighten the stack, and then return some of the paper to the tray.
- Make sure the paper guides in the tray are adjusted correctly for the size of paper. Adjust the guides so they are touching the paper stack without bending it.
Prevent paper jams
To reduce the number of paper jams, try these solutions.
- Use only paper that meets HP specifications for this product.
- Use paper that is not wrinkled, folded, or damaged. If necessary, use paper from a different package.
-
Use paper that has not previously been printed or copied on.
-
Make sure the tray is not overfilled. If it is, remove the entire stack of paper from the tray, straighten the stack, and then return some of the paper to the tray.
-
Make sure the paper guides in the tray are adjusted correctly for the size of paper. Adjust the guides so they are touching the paper stack without bending it.
Clear jams
Jam locations
Jams can occur in these locations:
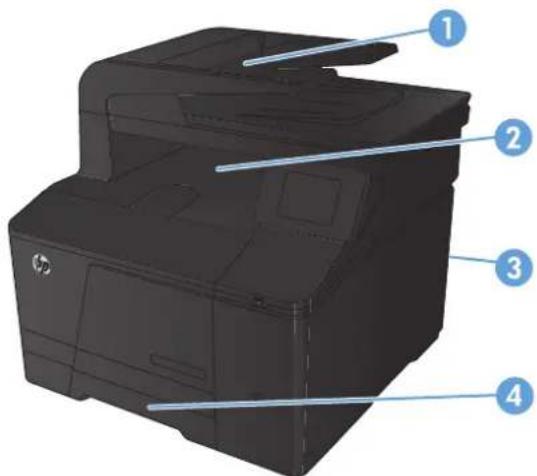
text_image
Diagram of a HP printer with numbered parts labeled 1 to 4| 1 Document feeder | |||||||||
| 2 Output bin | |||||||||
| 3 Rear door | |||||||||
| 4 | l | n | p | u | t | t | r | a | y |
Loose toner might remain in the product after a jam. This problem typically resolves itself after a few sheets have been printed.
Clear jams from the document feeder
-
Turn the product off.
-
Open the document feeder cover.
-
Lift the document feeder roller assembly, and gently pull the jammed paper out.
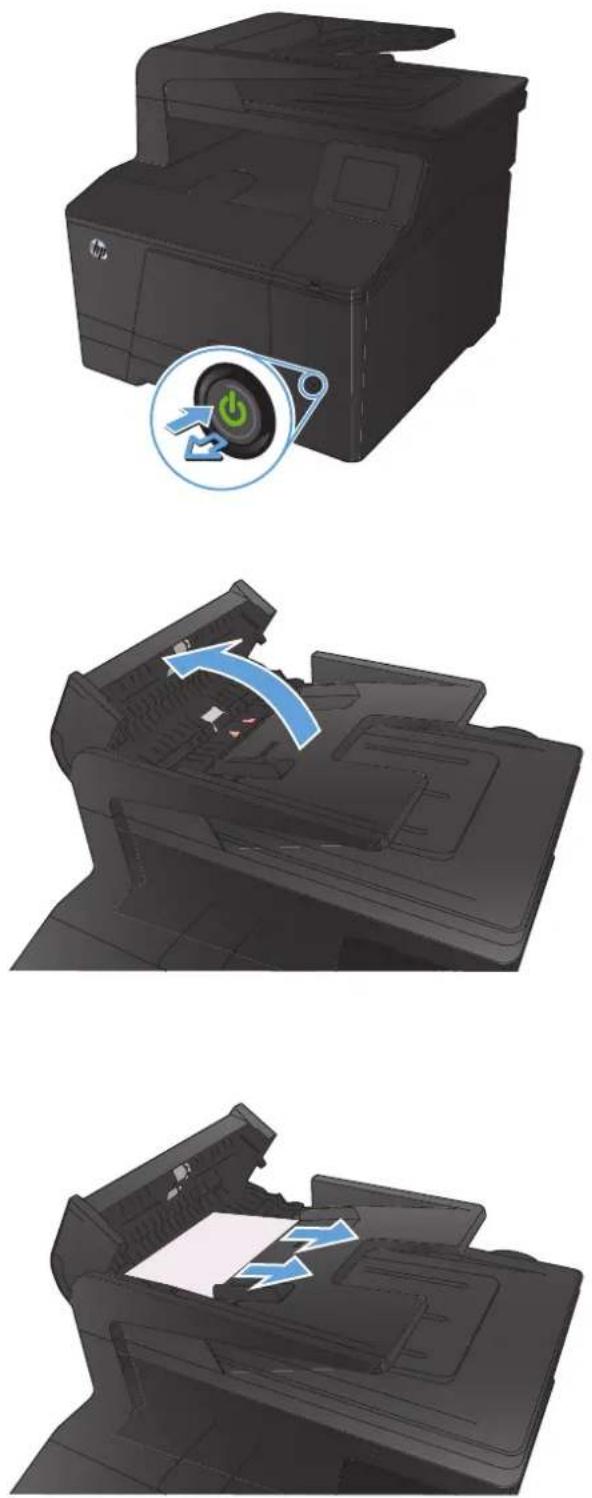
- Close the document feeder roller assembly, and then close the document feeder cover.
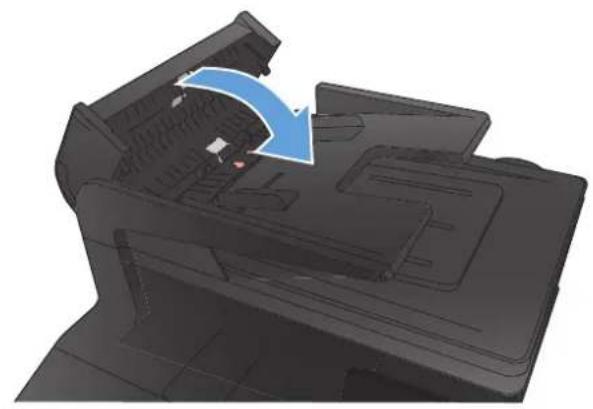
natural_image
3D rendering of a printer internal structure with a blue arrow indicating rotation (no text or symbols)- Open the scanner lid. If paper is jammed behind the white plastic backing, gently pull it out.
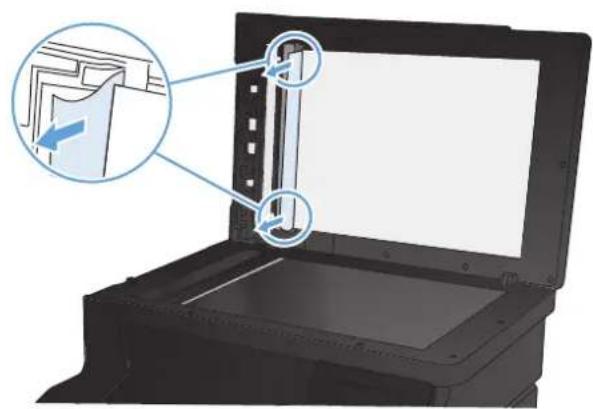
natural_image
Illustration of a printer with a close-up view showing internal components (no text or symbols)Clear jams in the paper input tray

CAUTION: Do not use sharp objects, such as tweezers or needle-nose pliers, to remove jams.
Damage caused by sharp objects is not covered by the warranty.
When removing jammed paper, pull it straight out from the product. Pulling jammed paper out of the product at an angle can damage the product.

NOTE: Depending on where the jam is located, some of the following steps might not be necessary.
-
Pull out the tray, and lift the jam access door above the tray.
-
With both hands, grasp the paper, and carefully pull it free from the product.
-
Replace the tray.
-
Press the OK button to continue printing.
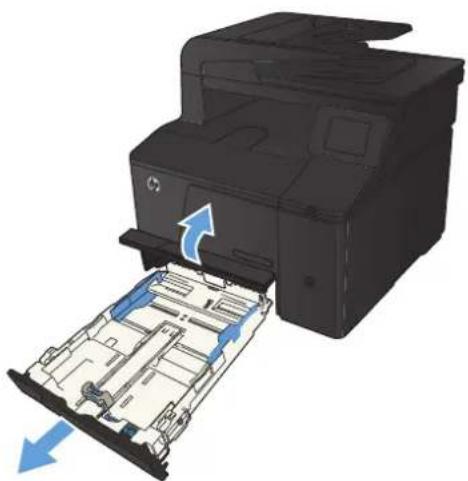
natural_image
3D rendering of a printer with an open drawer showing internal compartments and blue arrows indicating motion (no text or symbols)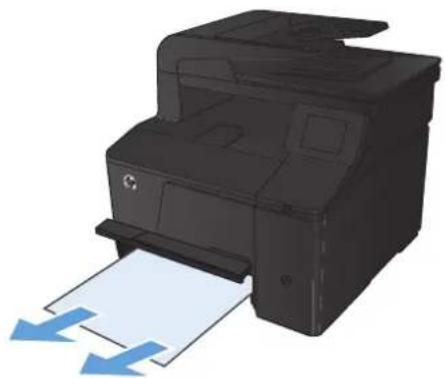
natural_image
Illustration of a printer with paper feed and blue arrows indicating print direction (no text or symbols)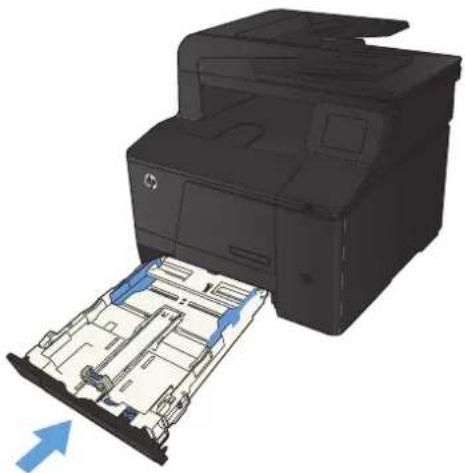
natural_image
3D rendering of a printer with internal compartments and a blue arrow indicating motion (no text or symbols)Clear jams from the output bin
CAUTION: Do not use sharp objects, such as tweezers or needle-nose pliers, to remove jams. Damage caused by sharp objects will not be covered by the warranty.
- With both hands, grasp the paper, and carefully pull it free from the product.
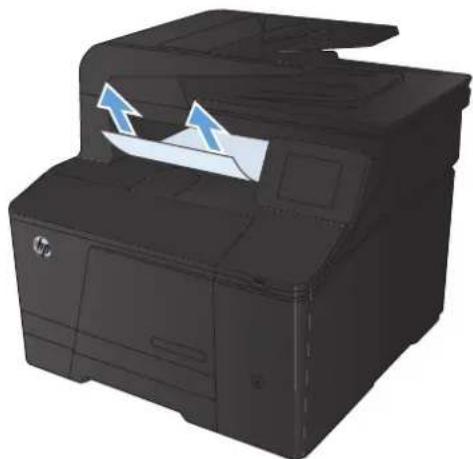
natural_image
Illustration of a HP printer with paper feed and paper sheet being inserted (no text or symbols visible)Clear jams from the rear door
- Open the rear door.
CAUTION: The fuser is located above the rear door, and it is hot. Do not attempt to reach into the area above the rear door until the fuser is cool.
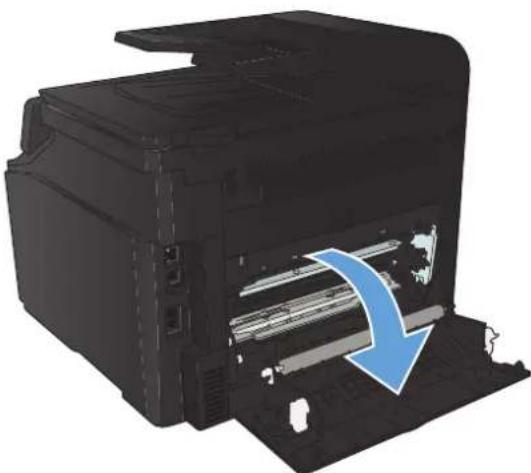
natural_image
Black printer with a blue arrow indicating a process or operation, showing internal components and a cutaway view (no text or symbols visible)- With both hands, grasp the paper, and carefully pull it free from the product.
NOTE: If the sheet tears, remove all fragments before continuing. Do not use sharp objects to remove fragments.
- Close the rear door.
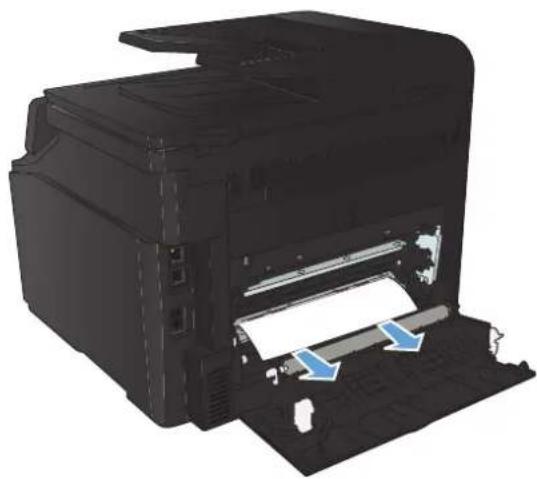
natural_image
3D rendering of a printer with visible paper feed and internal components (no text or symbols)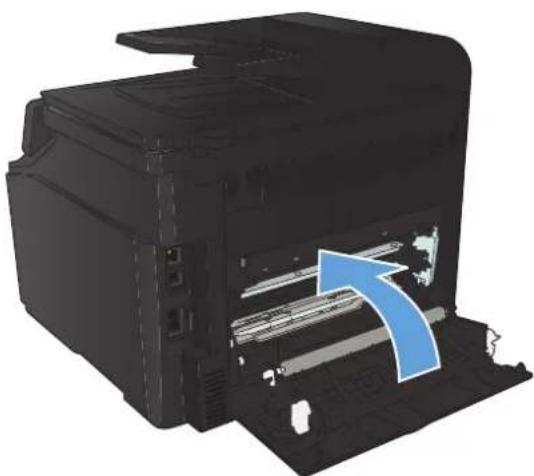
natural_image
3D rendering of a printer with visible internal structure and a blue arrow indicating a process (no text or symbols)Improve print quality
Check the paper type setting (Windows)
Check the paper type setting if you are having any of the following problems:
-
Toner is smearing on the printed pages.
• Repeated marks occur on the printed pages.
• Printed pages are curled.
• Toner flakes off the printed pages.
• Printed pages have small unprinted areas. -
From the software program, select the Print option.
- Select the product, and then click the Properties or Preferences button.
- Click the Paper/Quality tab.
- From the Paper type drop-down list, click the More... option.
- Expand the list of Type is: options.
- Expand each category of paper types until you find the paper type that you are using.
- Select the option for the type of paper you are using, and then click the OK button.
Check the paper type setting (Mac OS X)
Check the paper type setting if you are having any of the following problems:
- Toner is smearing on the printed pages.
• Repeated marks occur on the printed pages.
• Printed pages are curled. -
Toner flakes off the printed pages.
• Printed pages have small unprinted areas. -
On the File menu, click the Print option.
- In the Printer menu, select this product.
- In the Copies & Pages menu, click the Page Setup button.
- Select a size from the Paper Size drop-down list, and then click the OK button.
-
Open the Finishing menu.
-
Select a type from the Media-type drop-down list.
- Click the Print button.
Check toner cartridge status
If you determine that you need to replace a toner cartridge, print the supplies status page to find the part number for the correct genuine HP toner cartridge.
Print the supplies status page
Information pages reside within the product memory. These pages help diagnose and solve problems with the product.

NOTE: If the product language was not correctly set during installation, you can set the language manually so the information pages print in one of the supported languages. Change the language by using the System Setup menu on the control panel or the embedded Web server.
- From the Home screen, touch the Setup button.
- Touch the Reports button.
- Touch the Supplies Status button to print the report.
Check the supplies status
Check the supplies status page for the following information:
• Approximate pages remaining
• Part numbers for HP toner cartridges
• Number of pages printed
• Estimated percentage of cartridge life remaining
Calibrate the product to align the colors
If the printed output has colored shadows, blurry graphics, or areas that have poor color, you might need to calibrate the product to align the colors. Print the diagnostics page from the Reports menu on the control panel to check the color alignment. If the blocks of color on that page are not aligned with each other, you need to calibrate the product.
- On the product control panel, open the System Setup menu.
- Open the Print Quality menu, and select the Color Calibration item.
- Select the Calibrate Now option.
Print a cleaning page
- From the Home screen, touch the Setup button.
- Touch the Service menu.
- Touch the Cleaning Page button.
- Load plain letter or A4 paper when you are prompted.
- Touch the OK button to begin the cleaning process.
The product prints the first side and then prompts you to remove the page from the output bin and reload it in Tray 1, keeping the same orientation. Wait until the process is complete. Discard the page that prints.
Perform additional print quality troubleshooting
Print the print quality page
- From the Home screen, touch the Setup button.
- Touch the Reports button.
- Touch the Print Quality Page button.
Interpret the print quality page
This page contains five bands of color, which are divided into four groups as indicated in the following illustration. By examining each group, you can isolate the problem to a particular toner cartridge.

1
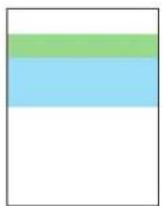
2

3

4
| Section Toner cartridge | ||||||
| 1 | Y | e | l | l | o | w |
| 2 | C | y | a | n | ||
| Section Toner cartridge | |||||||
| 3 | B | l | a | c | k | ||
| 4 | M | a | g | e | n | t | a |
- If dots or streaks appear in only one of the groups, replace the toner cartridge that correlates with that group.
- If dots appear in more than one group, print a cleaning page. If this does not solve the problem, determine if the dots are always the same color; for example, if magenta dots appear in all five color bands. If the dots are all the same color, replace that toner cartridge.
- If streaks appear in multiple color bands, contact HP. A component other than the toner cartridge is probably causing the problem.
Inspect the toner cartridge for damage
-
Remove the toner cartridge from the product, and verify that the sealing tape has been removed.
-
Check the memory chip for damage.
-
Examine the surface of the imaging drum on the bottom of the toner cartridge.
CAUTION: Do not touch the roller (imaging drum) on the bottom of the cartridge. Fingerprints on the imaging drum can cause print-quality problems.
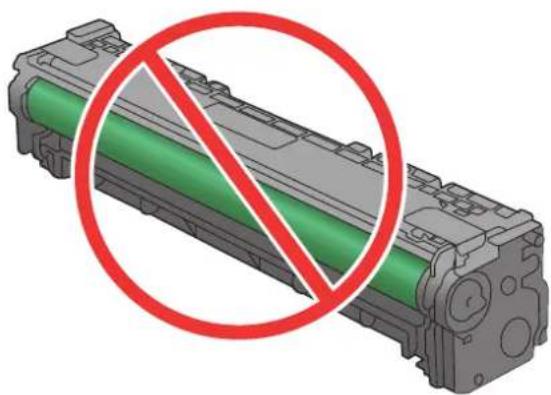
natural_image
3D rendering of a green cylindrical device with a red prohibition symbol overlay (no text or symbols on the device itself)-
If you see any scratches, fingerprints, or other damage on the imaging drum, replace the toner cartridge.
-
If the imaging drum does not appear to be damaged, rock the toner cartridge gently several times and reinstall it. Print a few pages to see if the problem has resolved.
Check the paper and printing environment
Use paper that meets HP specifications
Use different paper if you are having any of the following problems:
• The printing is too light or seems faded in areas.
Specks of toner are on the printed pages.
- Toner is smearing on the printed pages.
• Printed characters seem misformed.
• Printed pages are curled.
Always use a paper type and weight that this product supports. In addition, follow these guidelines when selecting paper:
- Use paper that is of good quality and free of cuts, nicks, tears, spots, loose particles, dust, wrinkles, voids, staples, and curled or bent edges.
• Use paper that has not been previously printed on. - Use paper that is designed for use in laser printers. Do not use paper that is designed only for use in Inkjet printers.
• Use paper that is not too rough. Using smoother paper generally results in better print quality.
Check the product environment
Verify that the product is operating within the environmental specifications listed in the product Warranty and Legal Guide.
Check print job settings
Check the EconoMode setting
This product has an EconoMode option for printing drafts of documents. Using EconoMode can use less toner. However, using EconoMode can also reduce print quality. To improve print quality, verify that the EconoMode setting is deactivated.
- From the software program, select the Print option.
- Select the product, and then click the Properties or Preferences button.
- Click the Paper/Quality tab.
- Verify that the EconoMode check box is cleared. If there is a checkmark in the check box, click the check box to clear it.
HP does not recommend the full-time use of EconoMode. If EconoMode is used full-time, the toner supply might outlast the mechanical parts in the toner cartridge. If print quality begins to degrade and is no longer acceptable, consider replacing the toner cartridge.
Adjust color settings in the printer driver
Change the color theme for a print job
- On the File menu in the software program, click Print.
- Click Properties or Preferences.
- Click the Color tab.
- Select a color theme from the Color Themes drop-down list.
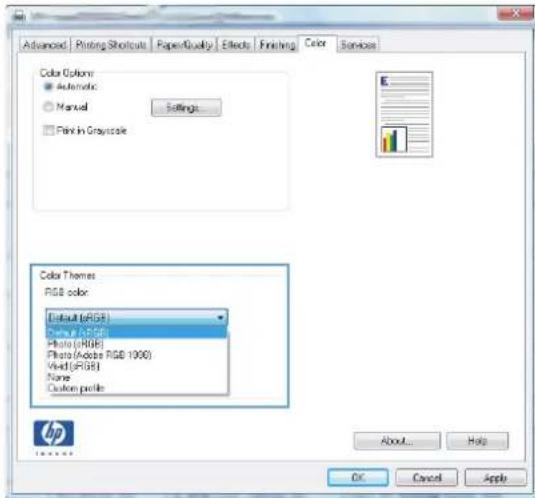
text_image
Advanced Pricing Shortcuts PaperQuality Effects Finishing Color Services Color Options Automatic Manual Settings... Print in Gray-scale Color Themes RGB color Default (RGB) New (RGB) Photo (RGB) Photo (Adobe RGB 1000) Vivid (RGB) None Custom profile About... Help OK Cancel Apply- Default (sRGB): This theme sets the product to print RGB data in raw device mode. When using this theme, manage color in the software program or in the operating system for correct rendering.
- Vivid: The product increases the color saturation in the midtones. Use this theme when printing business graphics.
- Photo: The product interprets RGB color as if it were printed as a photograph using a digital mini lab. The product renders deeper, more saturated colors differently than with the Default (sRBG) theme. Use this theme when printing photos.
- Photo (Adobe RGB 1998): Use this theme with printing digital photos that use the AdobeRGB color space rather than sRGB. Turn off color management in the software program when using this theme.
- None
Change the color options
Change the color options settings for the current print job from the color tab of the printer driver.
- On the File menu in the software program, click Print.
- Click Properties or Preferences.
-
Click the Color tab.
-
Click the Automatic or Manual setting.
• Automatic setting: Select this setting for most color print jobs
- Manual setting: Select this setting to adjust the color settings independent from other settings.

NOTE: Changing color settings manually can impact output. HP recommends that only color graphics experts change these settings.
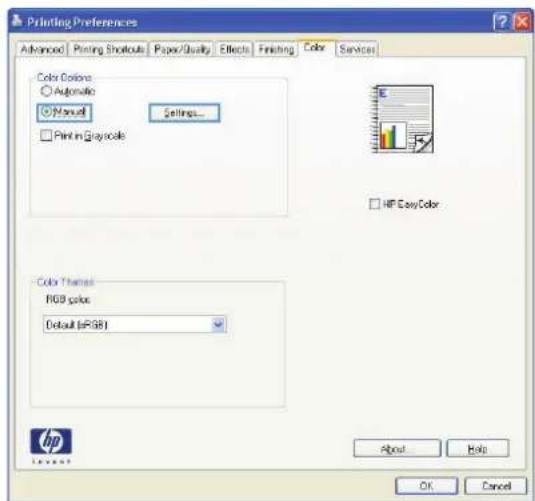
text_image
Printing Preferences Advanced | Printing Shoutouts | Paper Quality | Effects | Finishing | Color | Services Color Colors Automatic Manual Settings... Print in Gray-scale HP EasyColor Color Theme RGB color Default (RGB) About... Help OK Cancel-
Click the Print in Grayscale option to print a color document in black and white. Use this option to print color documents for photocopying or faxing.
-
Click the OK button.
Use the printer driver that best meets your printing needs
You might need to use a different printer driver if the printed page has unexpected lines in graphics, missing text, missing graphics, incorrect formatting, or substituted fonts.
| HP PCL 6 driver | Provided as the default driver. This driver is automatically installed unless you select a different one.Recommended for all Windows environmentsProvides the overall best speed, print quality, and product-feature support for most usersDeveloped to align with the Windows Graphic Device Interface (GDI) for the best speed in Windows environmentsMight not be fully compatible with third-party and custom software programs that are based on PCL 5 |
| HP UPD PS driver | Recommended for printing with Adobe software programs or with other highly graphics-intensive software programsProvides support for printing from postscript emulation needs, or for postscript flash font support |
| HP UPD PCL 5 | Recommended for general office printing in Windows environmentsCompatible with previous PCL versions and older HP LaserJet productsThe best choice for printing from third-party or custom software programsThe best choice when operating with mixed environments, which require the product to be set to PCL 5 (UNIX, Linux, mainframe)Designed for use in corporate Windows environments to provide a single driver for use with multiple printer modelsPreferred when printing to multiple printer models from a mobile Windows computer |
| HP UPD PCL 6 | Recommended for printing in all Windows environmentsProvides the overall best speed, print quality, and printer feature support for most usersDeveloped to align with Windows Graphic Device Interface (GDI) for best speed in Windows environmentsMight not be fully compatible with third-party and custom solutions based on PCL5 |
Download additional printer drivers from this Web site: www.hp.com/support/ljcolorm276series.
Solve copy quality problems
Check the scanner glass for dirt and smudges
Over time, specks of debris might collect on the scanner glass and white plastic backing, which can affect performance. Use the following procedure to clean the scanner glass and white plastic backing.
- Use the power switch to turn off the product, and then unplug the power cord from the electrical socket.

natural_image
Black plastic electronic device with a close-up of its internal cable connector (no text or symbols visible)-
Open the scanner lid.
-
Clean the scanner glass and the white plastic backing with a soft cloth or sponge that has been moistened with nonabrasive glass cleaner.
CAUTION: Do not use abrasives, acetone, benzene, ammonia, ethyl alcohol, or carbon tetrachloride on any part of the product; these can damage the product. Do not place liquids directly on the glass or platen. They might seep and damage the product.
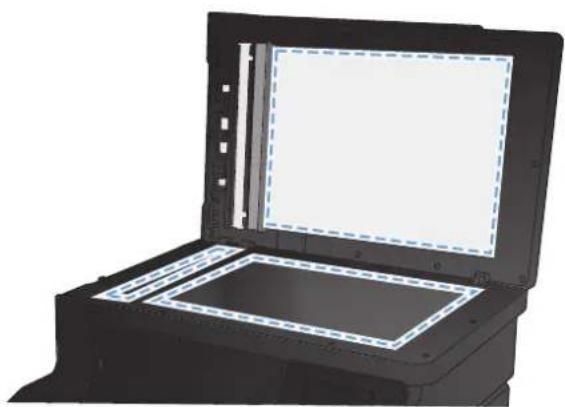
natural_image
3D rendering of a black electronic device with open lid and internal panel (no text or symbols visible)-
Dry the glass and white plastic with a chamois or a cellulose sponge to prevent spotting.
-
Plug in the product, and then use the power switch to turn on the product.
Check the paper settings
- From the Home screen, touch the Copy button.
text_image
USB Fax Copy Scan Apps Ready- Touch the Settings button, and then scroll to and touch the Paper button.
- From the list of paper sizes, touch the name of the paper size that is in Tray 1.
- From the list of paper types, touch the name of the paper type that is in Tray 1.
- Touch the Black or Color button to start copying.
Check the image adjustment settings
- From the Home screen, touch the Copy button.
text_image
USB Fax Copy Scan Apps Ready-
Touch the Settings button, and then scroll to and touch the Image Adjustment button.
-
Touch the name of the setting you want to adjust.
-
Lightness: Adjusts the lightness/darkness setting.
- Contrast: Adjusts the contrast between the lightest and darkest areas of the image.
• Sharpen: Adjusts clarity of text characters. - Background Removal: Adjusts the darkness of the background of the image. This is especially useful for original documents that are printed on colored paper.
• Color Balance: Adjusts the red, green, and blue color hues. -
Grayness: Adjusts the vividness of colors.
-
Touch the — or + buttons to adjust the value for the setting, and then touch the OK button.
-
Adjust another setting, or touch the back arrow to return to the main copy menu.
-
Touch the Black or Color button to start copying.
Optimize for text or pictures
The following copy-quality settings are available:
-
Auto Select: Use this setting when you are not concerned about the quality of the copy. This is the default setting.
• Mixed: Use this setting for documents that contain a mixture of text and graphics.
• Text: Use this setting for documents that contain mostly text.
• Picture: Use this setting for documents that contain mostly graphics. -
Load the document onto the scanner glass or into the document feeder.
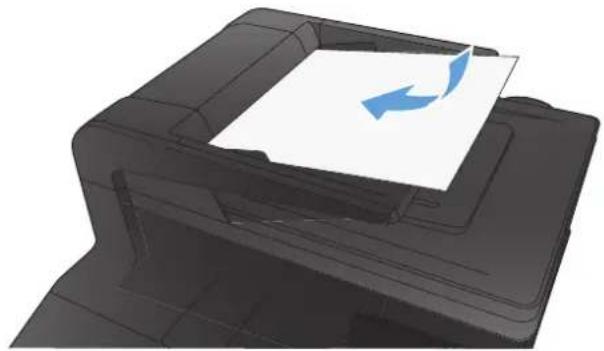
natural_image
3D rendering of a printer with a paper sheet and blue arrow indicating rotation (no text or symbols)-
From the Home screen, touch the Copy button.
-
Touch the Settings button, and then scroll to and touch the Optimize button. Touch the arrow buttons to scroll through the options, and then touch an option to select it.
-
Touch the Black or Color button to start copying.
Edge-to-edge copying
The product cannot print fully edge-to-edge. The maximum printing area is 203.2 x 347 mm (8 x 13.7 in), leaving a 4 mm unprintable border around the page.
Considerations for printing or scanning documents with cropped edges:
- When the original is smaller than the output size, move the original 4 mm (1/6 inch) away from the corner indicated by the icon on the scanner. Recopy or scan in this position.
- When the original is the size of the desired output, use the Reduce/Enlarge feature to reduce the image so the copy is not cropped.
Clean the pickup rollers and separation pad in the document feeder
If the product document feeder experiences paper-handling problems, such as jams or multiple-page feeds, clean the document feeder rollers and separation pad.
- Open the document feeder cover.
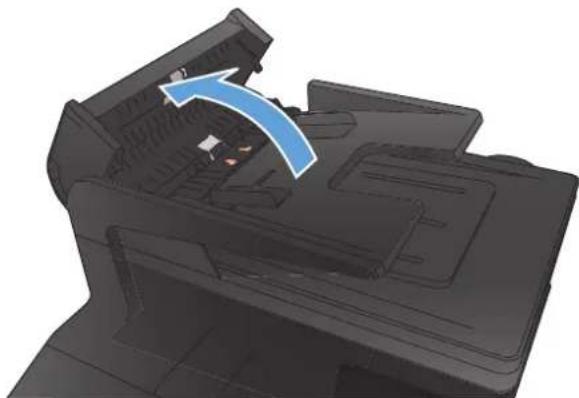
natural_image
3D rendering of a printer internal structure with a blue arrow indicating a component (no text or symbols)- Use a moist, lint-free cloth to wipe both pickup rollers and the separation pad to remove dirt.
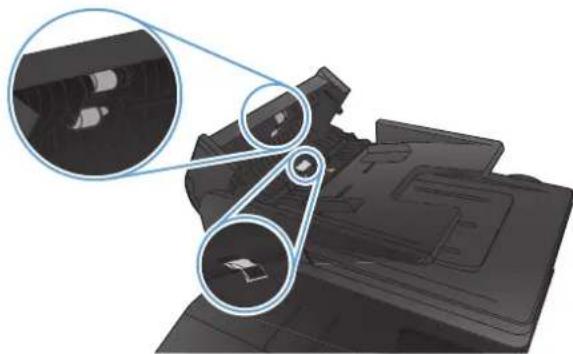
natural_image
Diagram of a mechanical device with two circular components and a magnified inset showing internal features (no text or symbols)- Close the document feeder cover.
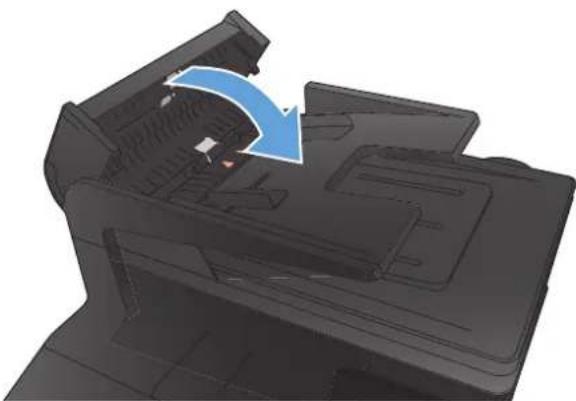
natural_image
3D rendering of a printer with a blue arrow indicating a process or operation (no text or symbols present)Solve scan quality problems
Check the scanner glass for dirt and smudges
Over time, specks of debris might collect on the scanner glass and white plastic backing, which can affect performance. Use the following procedure to clean the scanner glass and white plastic backing.
- Use the power switch to turn off the product, and then unplug the power cord from the electrical socket.
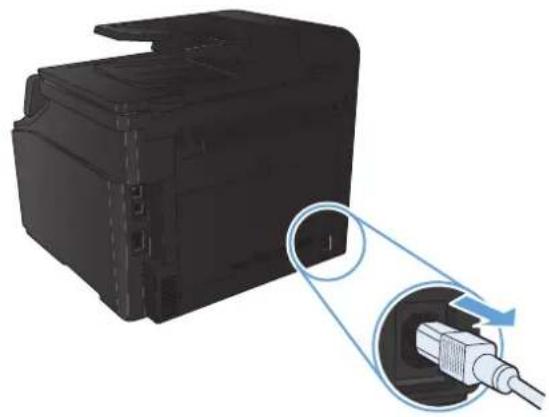
natural_image
Black printer case with a close-up of its internal cable connector (no text or symbols visible)-
Open the scanner lid.
-
Clean the scanner glass and the white plastic backing with a soft cloth or sponge that has been moistened with nonabrasive glass cleaner.
CAUTION: Do not use abrasives, acetone, benzene, ammonia, ethyl alcohol, or carbon tetrachloride on any part of the product; these can damage the product. Do not place liquids directly on the glass or platen. They might seep and damage the product.
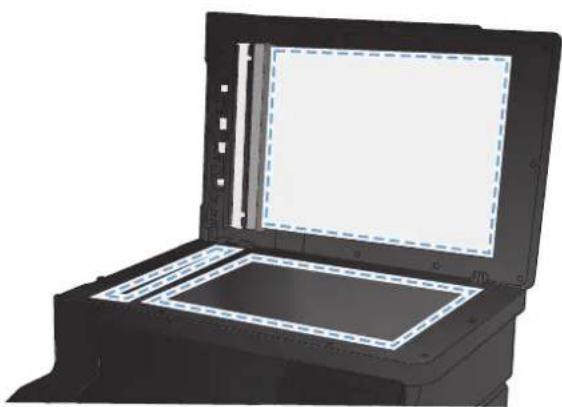
natural_image
3D rendering of an open laptop with a blank screen and a dashed-line tray (no text or symbols visible)-
Dry the glass and white plastic with a chamois or a cellulose sponge to prevent spotting.
-
Plug in the product, and then use the power switch to turn on the product.
Check the resolution settings
The following table describes the recommended resolution and color settings for different types of scan jobs.

NOTE: The default resolution is 200 ppi.
Intended use Recommended resolution Recommended color settings
| Fax 150 ppi | Black and White |
| Email 150 ppi | Black and White, if the image does not require smooth gradationGrayscale, if the image requires smooth gradationColor, if the image is in color |
| Edit text 300 ppi | Black and White |
| Print (graphics or text) 600 ppi for complex graphics, or if you want to significantly enlarge the document300 ppi for normal graphics and text150 ppi for photos | Black and White for text and line artGrayscale for shaded or colored graphics and photosColor, if the image is in color |
| Display on screen 75 ppi | Black and White for textGrayscale for graphics and photosColor, if the image is in color |
Check the color settings
You can set the color values to the following settings when scanning.
Setting Recommended use
| Color | Use this setting for high-quality color photos or documents in which the color is important. |
| Black and White Use this setting for text documents. | |
| Grayscale Use this setting when file size is an issue or when you want to scan a document or photograph quickly. | |
Check the image adjustment settings
- From the Home screen, touch the Copy button.
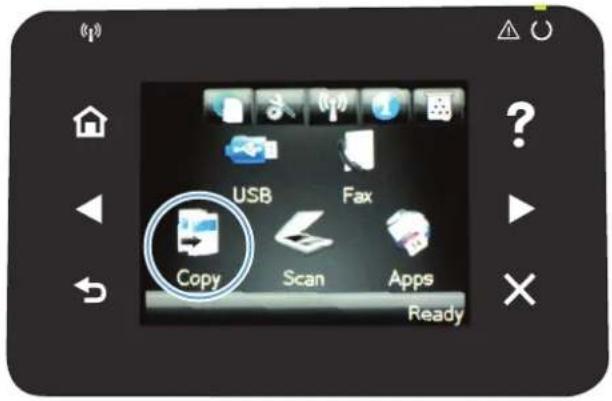
text_image
USB Fax Copy Scan Apps Ready-
Touch the Settings button, and then scroll to and touch the Image Adjustment button.
-
Touch the name of the setting you want to adjust.
• Lightness: Adjusts the lightness/darkness setting.
- Contrast: Adjusts the contrast between the lightest and darkest areas of the image.
• Sharpen: Adjusts clarity of text characters.
- Background Removal: Adjusts the darkness of the background of the image. This is especially useful for original documents that are printed on colored paper.
• Color Balance: Adjusts the red, green, and blue color hues.
• Grayness: Adjusts the vividness of colors.
- Touch the — or + buttons to adjust the value for the setting, and then touch the OK button.
- Adjust another setting, or touch the back arrow to return to the main copy menu.
- Touch the Black or Color button to start copying.
Optimize for text or pictures
The following copy-quality settings are available:
- Auto Select: Use this setting when you are not concerned about the quality of the copy. This is the default setting.
-
Mixed: Use this setting for documents that contain a mixture of text and graphics.
• Text: Use this setting for documents that contain mostly text.
• Picture: Use this setting for documents that contain mostly graphics. -
Load the document onto the scanner glass or into the document feeder.
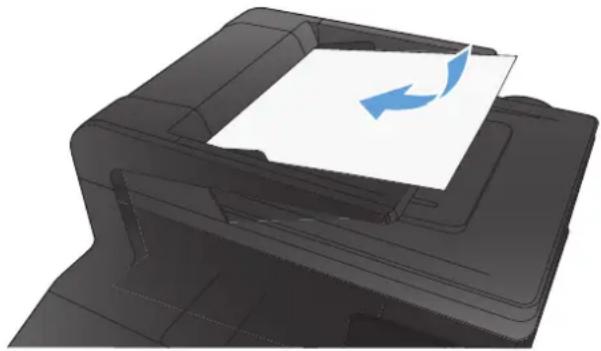
natural_image
3D rendering of a printer with a paper feed and blue arrow indicating rotation (no text or symbols)- From the Home screen, touch the Copy button.
- Touch the Settings button, and then scroll to and touch the Optimize button. Touch the arrow buttons to scroll through the options, and then touch an option to select it.
- Touch the Black or Color button to start copying.
Clean the pickup rollers and separation pad in the document feeder
If the product document feeder experiences paper-handling problems, such as jams or multiple-page feeds, clean the document feeder rollers and separation pad.
- Open the document feeder cover.
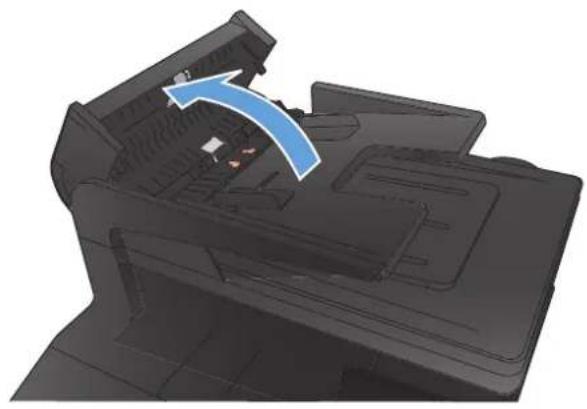
natural_image
3D rendering of a printer internal structure with a blue arrow indicating a component (no text or symbols)- Use a moist, lint-free cloth to wipe both pickup rollers and the separation pad to remove dirt.
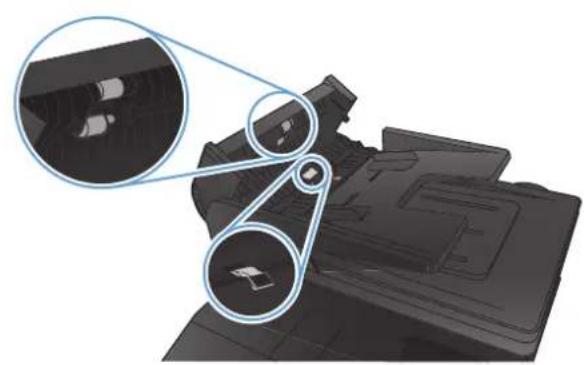
natural_image
Diagram of a mechanical assembly with two pulleys and a component, showing internal components (no text or symbols)- Close the document feeder cover.
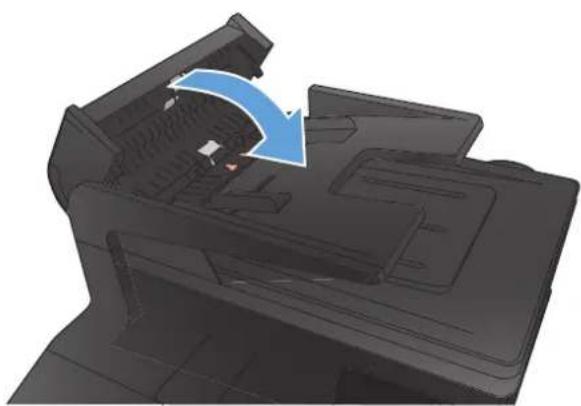
natural_image
3D rendering of a printer internal structure with a blue arrow indicating rotation (no text or symbols)Solve fax quality problems
Check the scanner glass for dirt and smudges
Over time, specks of debris might collect on the scanner glass and white plastic backing, which can affect performance. Use the following procedure to clean the scanner glass and white plastic backing.
- Use the power switch to turn off the product, and then unplug the power cord from the electrical socket.
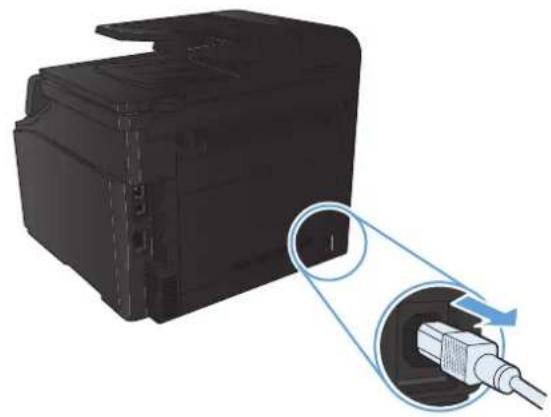
natural_image
Black plastic electronic device with a close-up of its internal cable connector (no text or symbols visible)-
Open the scanner lid.
-
Clean the scanner glass and the white plastic backing with a soft cloth or sponge that has been moistened with nonabrasive glass cleaner.
CAUTION: Do not use abrasives, acetone, benzene, ammonia, ethyl alcohol, or carbon tetrachloride on any part of the product; these can damage the product. Do not place liquids directly on the glass or platen. They might seep and damage the product.
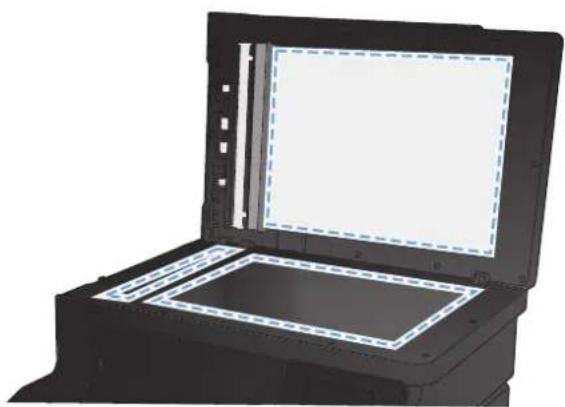
natural_image
3D rendering of a black electronic device with open lid and internal panel (no text or symbols visible)-
Dry the glass and white plastic with a chamois or a cellulose sponge to prevent spotting.
-
Plug in the product, and then use the power switch to turn on the product.
Check the send-fax resolution setting
If the product was unable to send a fax because the receiving fax machine did not answer or was busy, the product attempts to redial based on the redial-on-busy, redial-on-no-answer, and redial-on-communication-error options.
- From the Home screen, touch the Setup & button.
- Touch the Fax Setup menu.
- Touch the Advanced Setup menu.
- Open the Fax Resolution menu.
Check the image adjustment settings
- From the Home screen, touch the Copy button.
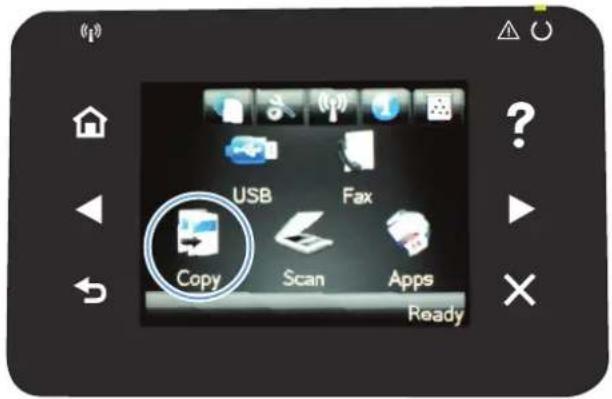
text_image
USB Fax Copy Scan Apps Ready-
Touch the Settings button, and then scroll to and touch the Image Adjustment button.
-
Touch the name of the setting you want to adjust.
-
Lightness: Adjusts the lightness/darkness setting.
- Contrast: Adjusts the contrast between the lightest and darkest areas of the image.
• Sharpen: Adjusts clarity of text characters. -
Background Removal: Adjusts the darkness of the background of the image. This is especially useful for original documents that are printed on colored paper.
• Color Balance: Adjusts the red, green, and blue color hues.
• Grayness: Adjusts the vividness of colors. -
Touch the — or + buttons to adjust the value for the setting, and then touch the OK button.
-
Adjust another setting, or touch the back arrow to return to the main copy menu.
-
Touch the Black or Color button to start copying.
Optimize for text or pictures
The following copy-quality settings are available:
-
Auto Select: Use this setting when you are not concerned about the quality of the copy. This is the default setting.
• Mixed: Use this setting for documents that contain a mixture of text and graphics.
• Text: Use this setting for documents that contain mostly text.
• Picture: Use this setting for documents that contain mostly graphics. -
Load the document onto the scanner glass or into the document feeder.
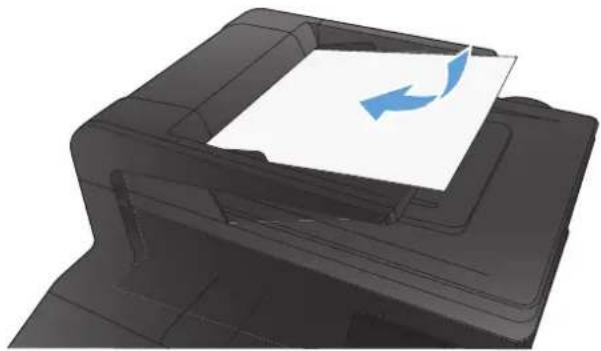
natural_image
3D rendering of a printer with a paper sheet and blue arrow icon (no text or symbols)-
From the Home screen, touch the Copy button.
-
Touch the Settings button, and then scroll to and touch the Optimize button. Touch the arrow buttons to scroll through the options, and then touch an option to select it.
-
Touch the Black or Color button to start copying.
Check the Error Correction setting
Usually, the product monitors the signals on the telephone line while it is sending or receiving a fax. If the product detects an error during the transmission and the error-correction setting is On, the product can request that the portion of the fax be resent. The factory-set default for error correction is On.
You should turn off error correction only if you are having trouble sending or receiving a fax, and you are willing to accept the errors in the transmission. Turning off the setting might be useful when you are trying to send a fax overseas or receive one from overseas, or if you are using a satellite telephone connection.
-
From the Home screen, touch the Setup 8 button.
-
Touch the Service menu.
-
Touch the Fax Service menu.
-
Touch the Error Correction button, and then touch the On button.
Send to a different fax machine
Send the fax job to a different fax machine to see if another machine will successfully receive the fax job.
Clean the pickup rollers and separation pad in the document feeder
If the product document feeder experiences paper-handling problems, such as jams or multiple-page feeds, clean the document feeder rollers and separation pad.
- Open the document feeder cover.
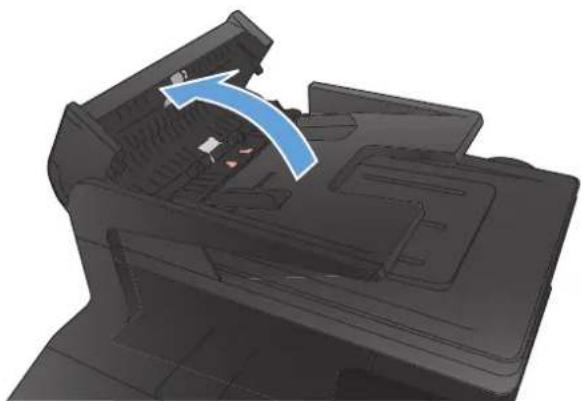
natural_image
3D rendering of a printer internal structure with a blue arrow indicating a component (no text or symbols visible)- Use a moist, lint-free cloth to wipe both pickup rollers and the separation pad to remove dirt.
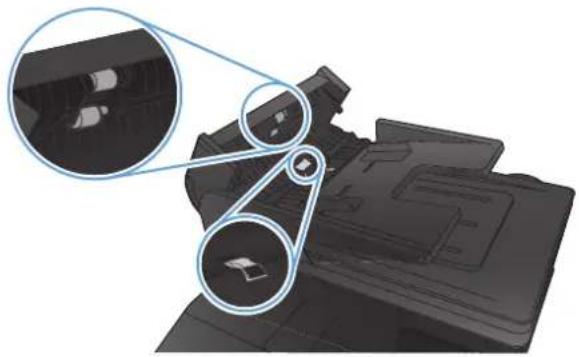
natural_image
Diagram of a mechanical component with highlighted parts and magnified views (no text or symbols)- Close the document feeder cover.
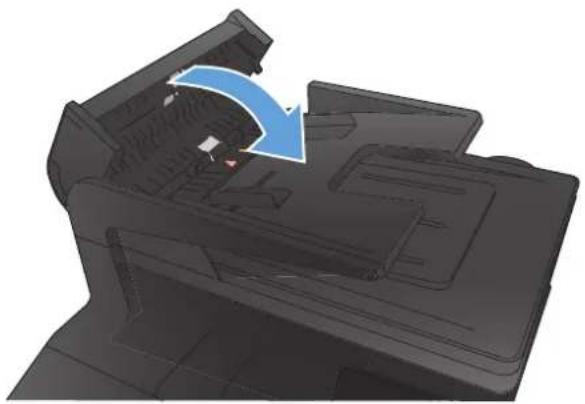
natural_image
3D rendering of a printer with a blue arrow indicating a process or operation, no visible text or symbolsCheck the Fit-to-Page setting
If the product printed a fax job off the page, turn on the fit-to-page feature from the product control panel.
- From the Home screen, touch the Setup button.
- Touch the Fax Setup menu.
- Touch the Advanced Setup menu.
- Touch the Fit to Page button, and then touch the On button.
Check the sender's fax machine
Ask the sender to darken the contrast setting on the sending fax machine, and then resend the fax.
Perform a fax diagnostic test
From the product control panel, you can run a diagnostic test that provides information about the product fax settings.
-
From the Home screen, touch the Setup 🔊 button.
-
Open the following menus
- System Setup
• Self Diagnostics
- Touch the Run Fax Test button to start the test. The product prints a test page that shows test results.
The product does not print or it prints slowly
The product does not print
If the product does not print at all, try the following solutions.
- Make sure the product is turned on and that the control panel indicates it is ready.
If the control panel does not indicate the product is ready, turn the product off and then on again.
- If the control panel indicates the product is ready, try sending the job again.
- If the control panel indicates the product has an error, resolve the error and then try sending the job again.
- Make sure the cables are all connected correctly. If the product is connected to a network, check the following items:
Check the light next to the network connection on the product. If the network is active, the light is green.
Make sure that you are using a network cable and not a phone cord to connect to the network.
Make sure the network router, hub, or switch is turned on and that it is working correctly.
- Install the HP software from the CD that came with the product. Using generic printer drivers can cause delays clearing jobs from the print queue.
- From the list of printers on your computer, right-click the name of this product, click Properties, and open the Ports tab.
If you are using a network cable to connect to the network, make sure the printer name listed on the Ports tab matches the product name on the product configuration page.
If you are using a USB cable and are connecting to a wireless network, make sure the box is checked next to Virtual printer port for USB.
- If you are using a personal firewall system on the computer, it might be blocking communication with the product. Try temporarily disabling the firewall to see if it is the source of the problem.
- If your computer or the product is connected to a wireless network, low signal quality or interference might be delaying print jobs.
The product prints slowly
If the product prints, but it seems slow, try the following solutions.
-
Make sure the computer meets the minimum specifications for this product. For a list of specifications, go to this Web site: www.hp.com/support/ljcolorm276series.
-
When you configure the product to print on some paper types, such as heavy paper, the product prints more slowly so it can correctly fuse the toner to the paper. If the paper type setting is not correct for the type of paper you are using, change the setting to the correct paper type.
-
If your computer or the product is connected to a wireless network, low signal quality or interference might be delaying print jobs.
Solve walk-up USB printing problems
• The USB Flash Drive menu does not open when you insert the USB accessory
• The file does not print from the USB storage accessory
• The file that you want to print is not listed in the USB Flash Drive menu
The USB Flash Drive menu does not open when you insert the USB accessory
- You might be using a USB storage accessory or a file system that this product does not support. Save the files on a standard USB storage accessory that uses File Allocation Table (FAT) file systems. The product supports FAT12, FAT16, and FAT32 USB storage accessories.
- If another menu is already open, close that menu, and then reinsert the USB storage accessory.
- The USB storage accessory might have multiple partitions. (Some USB storage accessory manufacturers install software on the accessory that creates partitions, similar to a CD.) Reformat the USB storage accessory to remove the partitions, or use a different USB storage accessory.
- The USB storage accessory might require more power than the product can provide.
a. Remove the USB storage accessory.
b. Turn the product off and then on.
c. Use a USB storage accessory that has its own power supply or that requires less power.
- The USB storage accessory might not be functioning correctly.
a. Remove the USB storage accessory.
b. Turn the product off and then on.
c. Try printing from another USB storage accessory.
The file does not print from the USB storage accessory
- Make sure paper is in the tray.
- Check the control panel for messages. If paper is jammed in the product, clear the jam.
The file that you want to print is not listed in the USB Flash Drive menu
-
You might be trying to print a file type that the USB printing feature does not support. The product supports .PDF and .JPEG file types.
-
You might have too many files in a single folder on the USB storage accessory. Reduce the number of files in the folder by moving them to subfolders.
-
You might be using a character set for the file name that the product does not support. In this case, the product replaces the file names with characters from a different character set. Rename the files using ASCII characters.
Solve direct connection problems
If you have connected the product directly to a computer, check the cable.
- Verify that the cable is connected to the computer and to the product.
- Verify that the cable is not longer than 5 m (16.4 ft). Try using a shorter cable.
- Verify that the cable is working correctly by connecting it to another product. Replace the cable if necessary.
Solve wired network problems
Check the following items to verify that the product is communicating with the network. Before beginning, print a configuration page from the product control panel and locate the product IP address that is listed on this page.
• Poor physical connection
• The computer is using the incorrect IP address for the product
• The computer is unable to communicate with the product
• The product is using incorrect link and duplex settings for the network
• New software programs might be causing compatibility problems
• The computer or workstation might be set up incorrectly
• The product is disabled, or other network settings are incorrect

NOTE: HP does not support peer-to-peer networking, as the feature is a function of Microsoft operating systems and not of the HP printer drivers. Go to Microsoft at www.microsoft.com.
Poor physical connection
- Verify that the product is attached to the correct network port using a cable of the correct length.
- Verify that cable connections are secure.
- Look at the network port connection on the back of the product, and verify that the amber activity light and the green link-status light are lit.
- If the problem continues, try a different cable or port on the hub.
The computer is using the incorrect IP address for the product
- Open the printer properties and click the Ports tab. Verify that the current IP address for the product is selected. The product IP address is listed on the product configuration page.
- If you installed the product using the HP standard TCP/IP port, select the box labeled Always print to this printer, even if its IP address changes.
- If you installed the product using a Microsoft standard TCP/IP port, use the hostname instead of the IP address.
- If the IP address is correct, delete the product and then add it again.
The computer is unable to communicate with the product
- Test network communication by pinging the network.
a. Open a command-line prompt on your computer. For Windows, click Start, click Run, and then type cmd.
b. Type ping followed by the IP address for your product.
For Mac OS X, open the Network Utility, and then supply the IP address in the correct field in the Ping pane.
c. If the window displays round-trip times, the network is working.
- If the ping command failed, verify that the network hubs are on, and then verify that the network settings, the product, and the computer are all configured for the same network.
The product is using incorrect link and duplex settings for the network
Hewlett-Packard recommends leaving this setting in automatic mode (the default setting). If you change these settings, you must also change them for your network.
New software programs might be causing compatibility problems
Verify that any new software programs are correctly installed and that they use the correct printer driver.
The computer or workstation might be set up incorrectly
-
Check the network drivers, printer drivers, and the network redirection.
-
Verify that the operating system is configured correctly.
The product is disabled, or other network settings are incorrect
-
Review the configuration page to check the status of the network protocol. Enable it if necessary.
-
Reconfigure the network settings if necessary.
Solve wireless network problems

NOTE: This section applies to the HP LaserJet Pro 200 color M276nw MFP model only.
Wireless connectivity checklist
- Verify that the network cable is not connected.
- Verify that the product and the wireless router are turned on and have power. Also make sure that the wireless radio in the product is turned on.
- Verify that the service set identifier (SSID) is correct. Print a configuration page to determine the SSID. If you are not sure the SSID is correct, run the wireless setup again.
- With secured networks, verify that the security information is correct. If the security information is incorrect, run the wireless setup again.
- If the wireless network is working correctly, try accessing other computers on the wireless network. If the network has Internet access, try connecting to the Internet over a wireless connection.
- Verify that the encryption method (AES or TKIP) is the same for the product as it is for the wireless access point (on networks using WPA security).
- Verify that the product is within the range of the wireless network. For most networks, the product must be within 30 m (100 ft) of the wireless access point (wireless router).
- Verify that obstacles do not block the wireless signal. Remove any large metal objects between the access point and the product. Make sure poles, walls, or support columns containing metal or concrete do not separate the product and wireless access point.
- Verify that the product is located away from electronic devices that might interfere with the wireless signal. Many devices can interfere with the wireless signal including motors, cordless phones, security system cameras, other wireless networks, and some Bluetooth devices.
- Verify that the printer driver is installed on the computer.
- Verify that you have selected the correct printer port.
- Verify that the computer and product connect to the same wireless network.
The product does not print after the wireless configuration completes
- Make sure that the product is turned on and in the ready state.
- Turn off any third-party firewalls on your computer.
- Make sure that the wireless network is working correctly.
- Make sure that your computer is working correctly. If necessary, restart the computer.
The product does not print, and the computer has a third-party firewall installed
- Update the firewall with the most recent update available from the manufacturer.
- If programs request firewall access when you install the product or try to print, make sure you allow the programs to run.
- Temporarily turn off the firewall, and then install the wireless product on the computer. Enable the firewall when you have completed the wireless installation.
The wireless connection does not work after moving the wireless router or product
Make sure that the router or product connects to the same network that your computer connects to.
- Print a configuration page.
- Compare the service set identifier (SSID) on the configuration page to the SSID in the printer configuration for the computer.
- If the numbers are not the same, the devices are not connecting to the same network. Reconfigure the wireless setup for the product.
Cannot connect more computers to the wireless product
- Make sure that the other computers are within the wireless range and that no obstacles block the signal. For most networks, the wireless range is within 30 m (100 ft) of the wireless access point.
- Make sure that the product is turned on and in the ready state.
- Turn off any third-party firewalls on your computer.
- Make sure that the wireless network is working correctly.
- Make sure that your computer is working correctly. If necessary, restart the computer.
The wireless product loses communication when connected to a VPN
• Typically, you cannot connect to a VPN and other networks at the same time.
The network does not appear in the wireless networks list
• Make sure the wireless router is turned on and has power.
The network might be hidden. However, you can still connect to a hidden network.
The wireless network is not functioning
- Make sure that the network cable is not connected.
-
To verify if the network has lost communication, try connecting other devices to the network.
-
Test network communication by pinging the network.
a. Open a command-line prompt on your computer. For Windows, click Start, click Run, and then type cmd.
b. Type ping followed by the router IP address.
For Mac OS X, open the Network Utility, and then supply the IP address in the correct field in the Ping pane.
c. If the window displays round-trip times, the network is working.
- Make sure that the router or product connects to the same network that the computer connects to.
a. Print a configuration page.
b. Compare the service set identifier (SSID) on the configuration report to the SSID in the printer configuration for the computer.
c. If the numbers are not the same, the devices are not connecting to the same network. Reconfigure the wireless setup for the product.
Perform a wireless network diagnostic test
From the product control panel, you can run a diagnostic test that provides information about the wireless network settings.
- From the Home screen, touch the Setup button.
- Open the following menus
- System Setup
• Self Diagnostics
- Touch the Run Network Test button to start the test. The product prints a test page that shows test results.
Reduce interference on a wireless network
The following tips can reduce interference in a wireless network:
- Keep the wireless devices away from large metal objects, such as filing cabinets, and other electromagnetic devices, such as microwaves and cordless telephones. These objects can disrupt radio signals.
- Keep the wireless devices away from large masonry structures and other building structures. These objects can absorb radio waves and lower signal strength.
- Position the wireless router in a central location in line of sight with the wireless products on the network.
Solve product software problems with Windows
A printer driver for the product is not visible in the Printer folder
- Reinstall the product software.

NOTE: Close any applications that are running. To close an application that has an icon in the system tray, right-click the icon, and select Close or Disable.
- Try plugging the USB cable into a different USB port on the computer.
An error message displayed during the software installation
- Reinstall the product software.

NOTE: Close any applications that are running. To close an application that has an icon in the system tray, right-click the icon, and then select Close or Disable.
- Check the amount of free space on the drive where you are installing the product software. If necessary, free up as much space as you can, and then reinstall the product software.
- If necessary, run the Disk Defragmenter, and then reinstall the product software.
The product is in Ready mode, but nothing prints
- Print a configuration page, and then verify the product functionality.
- Verify that all of the cables are correctly seated and within specifications. This includes the USB and power cables. Try a new cable.
- Verify the IP address on the configuration page matches the IP address for the software port. Use one of the following procedures:
Windows XP, Windows Server 2003, Windows Server 2008, and Windows Vista
a. Click Start.
b. Click Settings.
c. Click Printers and Faxes (using the default Start menu view) or Printers (using the Classic Start menu view).
d. Right-click the product driver icon, and then select Properties.
e. Click the Ports tab, and then click Configure Port.
f. Verify the IP address, and then click OK or Cancel.
g. If the IP addresses are not the same, delete the driver, and then reinstall the driver using the correct IP address.
Windows 7
a. Click Start.
b. Click Devices and Printers.
c. Right-click the product driver icon, and then select Printer properties.
d. Click the Ports tab, and then click Configure Port.
e. Verify the IP address, and then click OK or Cancel.
f. If the IP addresses are not the same, delete the driver, and then reinstall the driver using the correct IP address.
Solve product software problems with Mac OS X
• The printer driver is not listed in the Print & Fax list
• The product name does not appear in the product list in the Print & Fax list
• The printer driver does not automatically set up the selected product in the Print & Fax list
• A print job was not sent to the product that you wanted
- When connected with a USB cable, the product does not appear in the Print & Fax list after the driver is selected.
• You are using a generic printer driver when using a USB connection
The printer driver is not listed in the Print & Fax list
- Make sure that the product .GZ file is in the following hard-drive folder: Library/Printers/PPDs/Contents/Resources. If necessary, reinstall the software.
- If the GZ file is in the folder, the PPD file might be corrupt. Delete the file, and then reinstall the software.
The product name does not appear in the product list in the Print & Fax list
- Make sure that the cables are connected correctly and the product is on.
- Print a configuration page to check the product name. Verify that the name on the configuration page matches the product name in the Print & Fax list.
- Replace the USB or network cable with a high-quality cable.
The printer driver does not automatically set up the selected product in the Print & Fax list
- Make sure that the cables are connected correctly and the product is on.
- Make sure that the product .GZ file is in the following hard-drive folder: Library/Printers/PPDs/Contents/Resources. If necessary, reinstall the software.
- If the GZ file is in the folder, the PPD file might be corrupt. Delete the file, and then reinstall the software.
- Replace the USB or network cable with a high-quality cable.
A print job was not sent to the product that you wanted
- Open the print queue, and then restart the print job.
- Another product with the same or similar name might have received your print job. Print a configuration page to check the product name. Verify that the name on the configuration page matches the product name in the Print & Fax list.
When connected with a USB cable, the product does not appear in the Print & Fax list after the driver is selected.
Software troubleshooting
▲ Make sure that your Mac operating system is Mac OS X 10.5 or later.
Hardware troubleshooting
- Make sure that the product is turned on.
- Make sure that the USB cable is connected correctly.
- Make sure that you are using the appropriate high-speed USB cable.
- Make sure that you do not have too many USB devices drawing power from the chain. Disconnect all of the devices from the chain, and then connect the cable directly to the USB port on the computer.
- Check to see if more than two non-powered USB hubs are connected in a row on the chain. Disconnect all of the devices from the chain, and then connect the cable directly to the USB port on the computer.

NOTE: The iMac keyboard is a non-powered USB hub.
You are using a generic printer driver when using a USB connection
If you connected the USB cable before you installed the software, you might be using a generic printer driver instead of the driver for this product.
- Delete the generic printer driver.
- Reinstall the software from the product CD. Do not connect the USB cable until the software installation program prompts you.
- If multiple printers are installed, make sure that you have selected the correct printer in the Format For drop-down menu in the Print dialog box.
Remove software (Windows)
Windows XP
- Click Start, and then click Programs.
- Click HP, and then click the product name.
- Click Uninstall, and then follow the onscreen instructions to remove the software.
Windows Vista and Windows 7
- Click Start, and then click All Programs.
- Click HP, and then click the product name.
- Click Uninstall, and then follow the onscreen instructions to remove the software.
Remove software (Mac OS X)
You must have administrator rights to remove the software.
- Disconnect the product from the computer.
- Open Applications.
- Select Hewlett Packard.
- Select HP Uninstaller.
- Select the product from the list of devices, and then click the Uninstall button.
- After the software is uninstalled, restart the computer and empty the Trash.
9 Supplies and accessories
• Order parts, accessories, and supplies
• HP policy on non-HP supplies
• HP anticounterfeit Web site
Order parts, accessories, and supplies
| HP original toner cartridge and paper www.hp.com/go/suresupply | |
| Order genuine HP parts or accessories | www.hp.com/buy/parts |
| Order through service or support providers | Contact an HP-authorized service or support provider. |
Item Part number Cartridge number Description
| HP LaserJet toner cartridge CF210A (standard) | 131A | Black toner cartridge with HP ColorSphere toner |
| CF210X (extended life) | 131X | |
| CF211A 131A Cyan toner cartridge with | HP ColorSphere toner | |
| CF212A 131A Yellow toner cartridge with | HP ColorSphere toner | |
| CF213A 131A Magenta toner cartridge with | HP ColorSphere toner | |
USB 2.0 printer cable C6518A (2-meter standard) A-to-B cable
HP policy on non-HP supplies
Hewlett-Packard Company cannot recommend the use of non-HP toner cartridges, either new or remanufactured.

NOTE: For HP printer products, the use of a non-HP toner cartridge or a refilled toner cartridge does not affect either the warranty to the customer or any HP support contract with the customer. However, if product failure or damage is attributable to the use of a non-HP toner cartridge or refilled toner cartridge, HP will charge its standard time and materials charges to service the product for the particular failure or damage.
HP anticounterfeit Web site
Go to www.hp.com/go/anticounterfeit when you install an HP toner cartridge and the control-panel message says the cartridge is non-HP. HP will help determine if the cartridge is genuine and take steps to resolve the problem.
Your toner cartridge might not be a genuine HP toner cartridge if you notice the following:
The supplies status page indicates that a non-HP supply is installed.
• You are experiencing a high number of problems with the toner cartridge.
- The cartridge does not look like it usually does (for example, the packaging differs from HP packaging).
Index
A
accessories
ordering 211, 212
AirPrint 49
answer mode, setting 87
answering machines, connecting fax settings 88
anticounterfeit supplies 212
applications
downloading 130
Apps menu 130
archival-quality printing 42
autoreduction settings, fax 90
B
billing codes, fax using 85
bin, output
jams, clearing 168
locating 2
blocking faxes 88
booklets
printing (Mac) 38
printing (Windows) 34
busy signals, redialing options 83
C
camera, locating 2
canceling
faxes 93
print job (Mac) 41
print job (Windows) 39
capture stage, locating 2
cartridges
non-HP 212
part numbers 212
recycling 140
replacing 141
storage 140
supplies status page 6
checklist
fax troubleshooting 104
cleaning
glass 178, 183, 188
paper path 172
collating copies 55
color
Edge Control 46
halftone options 46
matching 46
Neutral Grays 46
printed vs. monitor 46
color alignment, calibrating 171
color options
changing manually 46
HP EasyColor 43
setting (Mac) 45
setting (Windows) 44
color or black and white
copying 59
color settings
adjusting 175
color theme
changing (Windows) 44
color usage log 6
configuration page 6
contrast settings
copy 62
fax 84
control panel
buttons and lights 4
help 150
Home screen 4
locating 2
menu map, printing 6
message types 151
messages, troubleshooting 151
Reports menu 6
copying
adjusting image quality 63
collation 55
color or black and white 59
contrast, adjusting 62
double-sided 56
draft mode 64
enlarging 58
light/dark settings 62
multiple copies 53
multiple-page originals 54
paper size and type 65
quality, adjusting 61
reducing 58
restore default settings 67
set new default settings 66
single copies 52
counterfeit supplies 212
custom-size copies 58
D
darkness, contrast settings
copy 62
fax 84
default copy settings
changing 66
restoring to factory settings 67
default gateway, setting 131
defaults, restoring 150
delaying fax sending 99
deleting faxes from memory 93
dial tone detection settings 82
dialing
from a telephone 99
pauses, inserting 82
prefixes, inserting 82
redialing automatically, settings 83
tone or pulse settings 83
distinctive-ring settings 89
document feeder jams 165
door release, locating 2
dots per inch (dpi) fax 84
double-sided printing (duplexing) Mac 36
dpi (dots per inch) fax 84
draft mode, copying 64
drivers changing settings (Mac) 19 changing settings (Windows) 17 presets (Mac) 36 settings (Mac) 36 usage page 6
DSL faxing 94
duplex printing (double-sided) settings (Windows) 25
duplex settings, changing 132
E
EconoMode setting 137
economy settings 137
Edge Control 46
electronic faxes sending 97
email, scanning to resolution settings 184
Embedded Web Server changing network settings 131 changing password 136 changing product name 131 opening 131, 136
enlarging documents copying 58
error messages, control panel 151
error messages, fax 108, 113, 119
error report, fax printing 107
error-correction setting, fax 108
errors
software 205
extension phones
receiving faxes from 76
sending faxes from 99
F
factory-set defaults, restoring 150 fax
answer mode 87
autoreduction 90
billing codes 85
blocking 88
canceling 93
confirming number 99
contrast setting 84
delaying sending 99
deleting from memory 93
detect-dial-tone settings 82
dial prefixes 82
dialing, tone or pulse 83
error report, printing 107
error-correction 108
extension phone receiving 76
forwarding 87
pauses, inserting 82
polling 91
printing 101
printing private faxes 102
private receive 91
receiving when you hear fax tones 102
redial settings 83
reports, printing all 107
reprinting faxes 90
reprinting from memory 102
resolution 84
ring patterns 89
rings-to-answer 88
security, private receive 91
sending from a telephone 99
sending from software 97
solve general problems 125
speed dials 97
stamp-received 91
unable to receive 119
unable to send 113
using DSL, PBX, or ISDN 94
using VolP 95
V.34 setting 108
volume settings 90
fax date, setup
use control panel 77
use HP Fax Setup Wizard 77
fax header, setup
use control panel 77
use HP Fax Setup Wizard 77
fax time, setup
use control panel 77
use HP Fax Setup Wizard 77
fax troubleshooting
checklist 104
faxing
from a computer (Mac) 97
from a computer (Windows) 97
Fit to Page setting, fax 90
fonts
lists, printing 6
forwarding faxes 87
fraud Web site 212
front cover, locating 2
G
gateway, setting default 131
glass, cleaning 178, 183, 188
grayscale printing, Windows 47
group-dial entries
creating 80
deleting 81
editing 80
H
help, control panel 150
Home screen, control panel 4
HP Device Toolbox, using 133
HP Easy Color
disabling 43
using 43
HP Embedded Web Server
changing network settings 131
changing password 136
changing product name 131
opening 131, 136
HP ePrint, using 48
HP fraud Web site 212
HP Reconfiguration Utility
network installation 130
HP Scan software (Mac) 70
HP Scan software (Windows) 70
HP Utility for Mac
features 135
opening 135
HP Utility, Mac 135
HP Web Jetadmin 136
HP Web Services
applications 130
enabling 130
HP Web Services, enabling 48
|
identification cards copying 60
input tray
locating 2
interface ports
locating 3
IPv4 address 131
ISDN
faxing 94
J
jams
document feeder, clearing 165
locating 164
output bin, clearing 168
preventing 163
rear door, clearing 168
tracking number of 6
Jetadmin, HP Web 136
L
landscape orientation
changing (Mac) 37
changing (Windows) 28
lightness
copy contrast 62
fax contrast 84
link speed settings 132
logs, fax
error 107
printing all 107
M
Mac
driver settings 19, 36
HP Utility 135
problems, troubleshooting 207
scanning from TWAIN-compliant software 74
managing network 131
matching colors 46
media
pages per sheet 37
memory
deleting faxes 93
reprinting faxes 102
menus, control panel map, printing 6
messages, control panel 151
Microsoft Word, faxing from 98
model number, locating 3
multiple pages per sheet 37
printing (Windows) 26
multiple-page originals
copying 54
N
n-up printing 37
selecting (Windows) 26
network
password, changing 136
password, setting 136
product name, changing 131
settings, changing 131
settings, viewing 131
network port
locating 3
networks
configuration page 6
default gateway 131
installing the product 130
IPv4 address 131
settings report 6
subnet mask 131
Neutral Grays 46
non-HP supplies 212
number of copies, changing 53
O
OCR software 74
online help, control panel 150
optical character recognition software 74
ordering
supplies and accessories 212
ordering supplies
Web sites 211
orientation
changing (Mac) 37
changing (Windows) 28
output bin
locating 2
outside lines
dial prefixes 82
pauses, inserting 82
P
page count 6
page orientation
changing (Mac) 37
changing (Windows) 28
page sizes
scaling documents to fit (Mac) 38
scaling documents to fit
(Windows) 33
pages per sheet 37
selecting (Windows) 26
paper
fax autoreduction settings 90
jams 163
ordering 212
pages per sheet 37
selecting 174
supported sizes 10
supported types 12
paper jams. See jams
paper pickup problems
solving 163
paper sizes
copy settings 65
selecting (Mac) 41
selecting (Windows) 39
selecting custom sizes (Mac) 41
selecting custom sizes
(Windows) 39
paper types
copy settings 65
selecting (Mac) 37
selecting (Windows) 30
paper, covers
printing (Mac) 38
printing (Windows) 31
part numbers
toner cartridges 212
pauses, inserting 82
PBX
faxing 94
PCL font list 6
phone book, fax
adding entries 97
deleting all entries 79
importing 78
phones
receiving faxes from 76, 102
phones, downstream
sending faxes from 99
polling faxes 91
portrait orientation
changing (Mac) 37
changing (Windows) 28
ports
locating 3
power-down delay
setting 137
prefixes, dial 82
presets (Mac) 36
print job
canceling (Mac) 41
canceling (Windows) 39
print media
supported 10
print quality
improving 170
print quality page
interpreting 172
printing 172
printer driver (Windows)
supported 16
printer drivers
choosing 176
printer drivers (Mac)
changing settings 19
settings 36
printer drivers (Windows)
changing settings 17
printing
from USB storage accessories
50
product reports 6
settings (Mac) 36
printing on both sides
settings (Windows) 25
private receive 91
problem-solving
no response 194
slow response 195
protocol settings, fax 108
PS font list 6
pulse-dialing 83
R
Readiris OCR software 74
rear door
jams 168
locating 3
receiving faxes
answer mode, setting 87
autoreduction settings 90
blocking 88
error report, printing 107
from extension phone 76
polling 91
reprinting 102
reprinting faxes 90
ring patterns, settings 89
rings-to-answer settings 88
stamp-received setting 91
when you hear fax tones 102
recycling supplies 140
redialing
automatically, settings 83
reducing documents
copying 58
replacing toner cartridges 141
reports
Color Usage Log 6
Configuration Report 6
Demo Page 6
Diagnostics Page 6
Menu Structure 6
Network Summary 6
PCL Font List 6
PCL6 Font List 6
Print Quality Page 6
PS Font List 6
Service Page 6
Supplies Status 6
Usage Page 6
Reports menu 6
reports, fax
error 107
printing all 107
reprinting faxes 90, 102
resize documents
copying 58
Mac 38
Windows 33
resolution
fax 84
restoring factory-set defaults 150
ring patterns 89
ring tones
distinctive 89
rings-to-answer setting 88
S
scale documents
Mac 38
Windows 33
scaling documents
copying 58
scanner
glass cleaning 178, 183, 188
scanning
from HP Scan software (Mac)
70
from HP Scan software
(Windows) 70
OCR software 74
TWAIN-compliant software 74
WIA-compliant software 74
sending faxes
billing codes 85
canceling 93
confirmation 99
delaying 99
error report, printing 107
forwarding 87
from downstream telephone
99
from software 97
serial number, locating 3
service page 6
settings
driver presets (Mac) 36
drivers 17
drivers (Mac) 19
factory-set defaults, restoring
150
network report 6
shortcuts (Windows)
creating 22
using 21
size, copy
reducing or enlarging 58
sizes, media
Fit to Page setting, faxing 90
sleep delay
disabling 137
enabling 137
small documents
copying 60
software
HP Utility for Mac 135
HP Web Jetadmin 136
problems 205
Readiris OCR 74
scanning from TWAIN or
WIA 74
sending faxes 97
uninstalling for Mac 209
uninstalling for Windows 209
solve
fax problems 113
solve problems
fax 125
solving
walk-up USB printing
problems 196
special paper for covers
printing (Mac) 38
printing (Windows) 31
speed dials
programming 97
speed-dial entries
creating 80
deleting 80
editing 80
status
Home screen, control panel 4
HP Utility, Mac 135
supplies, printing report 6
storing
toner cartridges 140
subnet mask 131
supplies
counterfeit 212
non-HP 212
ordering 211, 212
part numbers 212
recycling 140
status, viewing with HP Utility
for Mac 135
supplies status page 6
supported paper 10
T
TCP/IP
manually configuring IPv4
parameters 131
telephones
receiving faxes from 76, 102
telephones, downstream
sending faxes from 99
tone-dialing 83
toner cartridges
checking for damage 173
door release, locating 2
non-HP 212
part numbers 212
recycling 140
replacing 141
storage 140
supplies status page 6
trapping 46
Tray 1
double-sided printing 36
trays
double-sided printing 36
jams, clearing 166
supported paper types 12
troubleshooting
checklist 148
control panel messages 151
fax error-correction setting 108
faxes 104
jams 163
Mac problems 207
network problems 199
paper feed problems 163
receive fax 119
send fax 113
USB connection 198
walk-up USB printing
problems 196
Windows problems 205
wired network 199
wireless network 201
TWAIN-compliant software, scanning from 74
two-sided printing
settings (Windows) 25
U
unblocking fax numbers 88
uninstalling Mac software 209
uninstalling Windows software 209
usage page 6
USB cable, part number 212
USB connection
troubleshooting 198
USB port
locating 3
USB storage accessories
printing from 50
V
V.34 setting 108
VoIP
faxing 95
volume, adjusting 90
W
walk-up USB printing 50
watermarks
printing (Mac) 41
printing (Windows) 40
Web Services
applications 130
enabling 130
Web sites
fraud reports 212
ordering supplies 211
WIA-compliant software, scanning
from 74
Windows
driver settings 17
faxing from 97
scanning from TWAIN or WIA
software 74
wireless network
troubleshooting 201
wireless network interference 204
Word, faxing from 98