
LaserJet M527f - Printer HP - Free user manual and instructions
Find the device manual for free LaserJet M527f HP in PDF.


User questions about LaserJet M527f HP
0 question about this device. Answer the ones you know or ask your own.
Ask a new question about this device
Download the instructions for your Printer in PDF format for free! Find your manual LaserJet M527f - HP and take your electronic device back in hand. On this page are published all the documents necessary for the use of your device. LaserJet M527f by HP.
USER MANUAL LaserJet M527f HP
LaserJet Enterprise MFP M527
User Guide
M527zM527c

HP LaserJet Enterprise MFP M527
User Guide
Copyright and License
© 2015 HP Development Company, L.P.
Reproduction, adaptation, or translation without prior written permission is prohibited, except as allowed under the copyright laws.
The information contained herein is subject to change without notice.
The only warranties for HP products and services are set forth in the express warranty statements accompanying such products and services. Nothing herein should be construed as constituting an additional warranty. HP shall not be liable for technical or editorial errors or omissions contained herein.
Edition 1, 11/2015
Trademark Credits
Adobe ^ , Adobe Photoshop ^c , Acrobat ^ , and PostScript ^® are trademarks of Adobe Systems Incorporated.
Apple and the Apple logo are trademarks of Apple Computer, Inc., registered in the U.S. and other countries. iPod is a trademark of Apple Computer, Inc. iPod is for legal or rightholder-authorized copying only. Don't steal music.
Microsoft ^® , Windows ^® , Windows ^® XP, and Windows Vista ^® are U.S. registered trademarks of Microsoft Corporation.
UNIX ^® is a registered trademark of The Open Group.
Table of contents
1 Printer overview .... 1
Printer views 2
Printer front view 2
Printer back view 3
Interface ports 4
Control-panel view 4
Printer specifications 7
Technical specifications .... 7
Supported operating systems 9
Mobile printing solutions 11
Printer dimensions 12
Power consumption, electrical specifications, and acoustic emissions 14
Operating-environment range 15
Printer hardware setup and software installation 16
2 Paper trays 17
Load paper to Tray 1 (multipurpose tray) 18
Introduction 18
Tray 1 paper orientation .... 19
Use alternative letterhead mode 19
Enable Alternative Letterhead Mode by using the printer control-panel menus ..... 19
Load paper to Trays 2, 3, 4, and 5 20
Introduction 20
Tray 2 and the 550-sheet trays paper orientation .... 22
Use alternative letterhead mode 22
Enable Alternative Letterhead Mode by using the printer control-panel menus ...... 23
Load and print envelopes 24
Introduction 24
Print envelopes 24
Envelope orientation 24
Use the convenience stapler (f, c, and z models) 25
3 Supplies, accessories, and parts 27
Order supplies, accessories, and parts 28
Ordering 28
Supplies and accessories 28
Customer self-repair parts 29
Replace the toner cartridge 31
Introduction 31
Toner-cartridge information 31
Remove and replace the cartridge 32
Replace the staple cartridge (f, c, and z models) 36
Introduction 36
Remove and replace the staple cartridge 36
4 Print 39
Print tasks (Windows) 40
How to print (Windows) 40
Automatically print on both sides (Windows) 42
Manually print on both sides (Windows) 42
Print multiple pages per sheet (Windows) 43
Select the paper type (Windows) 43
Additional print tasks 44
Print tasks (OS X) 45
How to print (OS X) 45
Automatically print on both sides (OS X) 45
Manually print on both sides (OS X) 45
Print multiple pages per sheet (OS X) 46
Select the paper type (OS X) 46
Additional print tasks 46
Store print jobs on the printer to print later or print privately 48
Introduction 48
Create a stored job (Windows) 48
Create a stored job (OS X) 50
Print a stored job 50
Delete a stored job 51
Mobile printing 52
Introduction 52
HP ePrint via email 52
HP ePrint software 53
AirPrint 53
Android embedded printing 53
Wi-Fi Direct and NFC Printing 54
Print from the USB port 56
Introduction 56
Enable the USB port for printing 56
Print USB documents 57
5 Copy 59
Make a copy 60
Copy on both sides (duplex) 61
Additional copy tasks 62
6 Scan 63
Set up Scan to Email 64
Introduction 64
Before you begin 64
Method one: Use the E-mail Setup page 65
Method two: Use the E-mail Setup Wizard 71
Set up Send to E-mail to use Office 365 Outlook 73
Introduction 73
Configure the outgoing email server (SMTP) to send an email from an Office 365
Outlook account 73
Solve problems with email 74
Problems with sending email 74
Check the SMTP server setup 74
Set up Scan to Network Folder 76
Introduction 76
Before you begin 76
Method one: Use the Save to Network Folder Setup page 77
Step one: Enable the Scan to Network Folder feature and configure the default
job options 77
Notification settings 77
Folder Settings 78
Scan Settings 78
File Settings 80
Step two: Set up a Quick Set 81
Provide the Quick Set name, description, and options for starting 81
Configure the destination folder for scanned documents 81
Summary 83
Method two: Use the Save to Network Folder Quick Set Wizard 83
Problems with sending to a network folder 85
Set up Scan to USB Drive 86
Introduction 86
Enable Scan to USB Drive 86
Configure default scan options 86
Configure the default file name settings 88
Set up Scan to SharePoint® (Flow models only) 90
Introduction 90
Enable Scan to SharePoint ^® 90
Scan and save a file directly to a Microsoft SharePoint® site 91
Create a Quick Set 93
Scan and send to email 95
Introduction 95
Scan and send a document to email 95
Scan and send to network folder 96
Introduction 96
Scan and save the document to a folder 96
Scan and send to USB Flash Drive 97
Introduction 97
Scan and save the document to a USB flash drive 97
Additional scan tasks 98
7 Fax 99
Set up fax 100
Introduction 100
Set up fax by using the printer control panel 100
Change fax configurations 101
Fax dialing settings 101
General fax send settings 102
Fax receive settings 103
Send a fax 105
Additional fax tasks 106
8 Manage the printer 107
Advanced configuration with HP Embedded Web Server (EWS) 108
Introduction 108
How to access the HP Embedded Web Server (EWS) 108
HP Embedded Web Server features 109
Information tab 109
General tab 110
Copy/Print tab 111
Scan/Digital Send tab 112
Fax tab 113
Troubleshooting tab 113
Security tab 114
HP Web Services tab 114
Networking tab 115
Other Links list 116
Advanced configuration with HP Utility for OS X 117
Open HP Utility 117
HP Utility features 117
Configure IP network settings 119
Printer sharing disclaimer 119
View or change network settings 119
Rename the printer on a network 119
Manually configure IPv4 TCP/IP parameters from the control panel 120
Manually configure IPv6 TCP/IP parameters from the control panel 120
Link speed and duplex settings 121
Printer security features 123
Introduction 123
Security statements 123
Assign an administrator password 123
IP Security 124
Lock the formatter 124
Encryption support: HP High Performance Secure Hard Disks 124
Energy-conservation settings 125
Introduction 125
Print with EconoMode 125
Set the sleep timer and configure the printer to use 1 watt or less of power 125
Set the sleep schedule 126
HP Web Jetadmin 128
Software and firmware updates 129
9 Solve problems 131
Customer support 132
Control panel help system 133
Reset factory settings 134
Introduction 134
Method one: Reset factory settings from the printer control panel 134
Method two: Reset factory settings from the HP Embedded Web Server (network-connected printers only) 134
A "Cartridge is low" or "Cartridge is very low" message displays on the printer control panel 135
Change the "Very Low" settings 135
For products with fax capability 135
Order supplies 136
Printer does not pick up paper or misfeeds 137
Introduction 137
The printer does not pick up paper 137
The printer picks up multiple sheets of paper 139
The document feeder jams, skews, or picks up multiple sheets of paper 143
Clean the pickup rollers and separation pad in the document feeder 144
Clear paper jams 146
Introduction 146
Jam locations 146
Auto-navigation for clearing jams 148
Experiencing frequent or recurring paper jams? 148
Clear paper jams in the document feeder 149
Clear paper jams in Tray 1 153
Clear paper jams in Tray 2 and the 550-sheet trays 156
Clear paper jams in the toner-cartridge area 160
Clear paper jams in the rear door and the fuser area 162
Clear paper jams in the output bin 164
Clear paper jams in the duplexer 164
Improve print quality 169
Introduction 169
Print from a different software program 169
Check the paper-type setting for the print job 169
Check the paper type setting (Windows) 169
Check the paper type setting (OS X) 169
Check toner-cartridge status 170
Clean the printer 170
Print a cleaning page 170
Check the scanner glass for dirt and smudges 171
Visually inspect the toner cartridge 172
Check paper and the printing environment 172
Step one: Use paper that meets HP specifications 172
Step two: Check the environment 173
Step three: Set the individual tray alignment 173
Check the EconoMode settings 173
Try a different print driver 174
Improve copy image quality 176
Check the scanner glass for dirt and smudges 176
Calibrate the scanner 177
Check the paper settings 178
Check the paper size and type configuration 178
Select the tray to use for the copy 178
Check the image-adjustment settings 178
Optimize copy quality for text or pictures 179
Edge-to-edge copying 179
Clean the pickup rollers and separation pad in the document feeder 179
Improve scan image quality 182
Check the scanner glass for dirt and smudges 182
Check the resolution settings 183
Check the image-adjustment settings 184
Optimize scan quality for text or pictures 184
Check the output-quality settings 185
Clean the pickup rollers and separation pad in the document feeder 185
Improve fax image quality 188
Check the scanner glass for dirt and smudges 188
Check the send-fax resolution settings 189
Check the image-adjustment settings 190
Optimize fax quality for text or pictures 190
Check the error-correction settings 191
Check the fit-to-page setting 191
Clean the pickup rollers and separation pad in the document feeder 191
Send to a different fax machine 193
Check the sender's fax machine 194
Solve wired network problems 195
Introduction 195
Poor physical connection 195
The computer is using the incorrect IP address for the printer 195
The computer is unable to communicate with the printer 195
The printer is using incorrect link and duplex settings for the network 196
New software programs might be causing compatibility problems 196
The computer or workstation might be set up incorrectly 196
The printer is disabled, or other network settings are incorrect 196
Solve fax problems 197
Checklist for solving fax problems 197
What type of phone line are you using? 197
Are you using a surge-protection device? 197
Are you using a phone company voice-messaging service or an answering machine? 197
Does your phone line have a call-waiting feature? 198
Check fax accessory status 198
General fax problems 199
The fax failed to send 199
An Out of Memory status message displays on the printer control panel 199
Print quality of a photo is poor or prints as a gray box 199
You touched the Stop button to cancel a fax, but the fax was still sent 199
No fax address book button displays 199
Not able to locate the Fax settings in HP Web Jetadmin 199
The header is appended to the top of the page when the overlay option is enabled. 199
A mix of names and numbers is in the recipients box 199
A one-page fax prints as two pages 199
A document stops in the document feeder in the middle of faxing 200
The volume for sounds coming from the fax accessory is too high or too low ...... 200
Index 201
1 Printer overview
Printer views
• Printer specifications
• Printer hardware setup and software installation
For more information:
The following information is correct at the time of publication. For current information, see www.hp.com/support/ljM527MFP.
HP's all-inclusive help for the printer includes the following information:
• Install and configure
- Learn and use
- Solve problems
• Download software and firmware updates
- Join support forums
• Find warranty and regulatory information
Printer views
Printer front view
Printer back view
- Interface ports
• Control-panel view
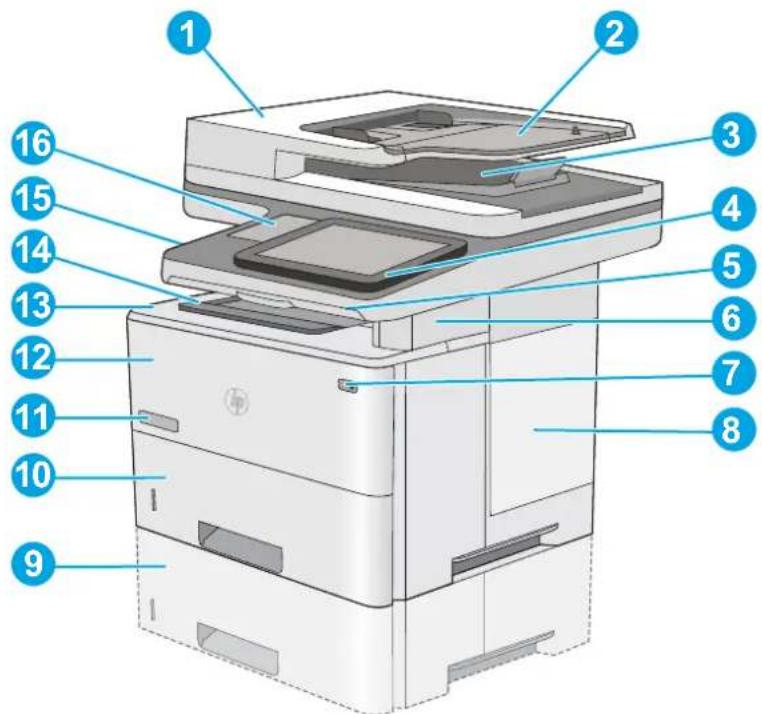
Printer front view
text_image
Diagram of a HP printer with numbered parts for identification1 Document-feeder cover (access for clearing jams)
2 Document-feeder input tray
3 Document-feeder output bin
NOTE: When feeding long paper through the document feeder, extend the paper stop at the right side of the output bin.
| 4 Control panel with color touchscreen display (tilts up for easier viewing) | |
| 5 Physical keyboard (c and z models only). Pull the keyboard straight out to use it. | |
| 6 Convenience stapler (f, c, and z models only) | |
| 7 On/off button | |
| 8 Form | atter cover |
| 9 Optional 1 x 550-sheet paper feeder (Tray 3) | |
NOTE: Each printer model accepts up to three optional 1 x 550-sheet feeders (Trays 3, 4, and 5).
| 10 Tray 2 |
| 11 Model name |
12 Tray 1
13 Top cover (access to the toner cartridge)
NOTE: The release button for the top cover is on the left side of the printer.
14 Standard output bin
15 Easy-access USB port (on the left side of the control panel support)
Insert a USB flash drive for printing or scanning without a computer or to update the printer firmware.
NOTE: An administrator must enable this port before use.
16 Hardware integration pocket (for connecting accessory and third-party devices)
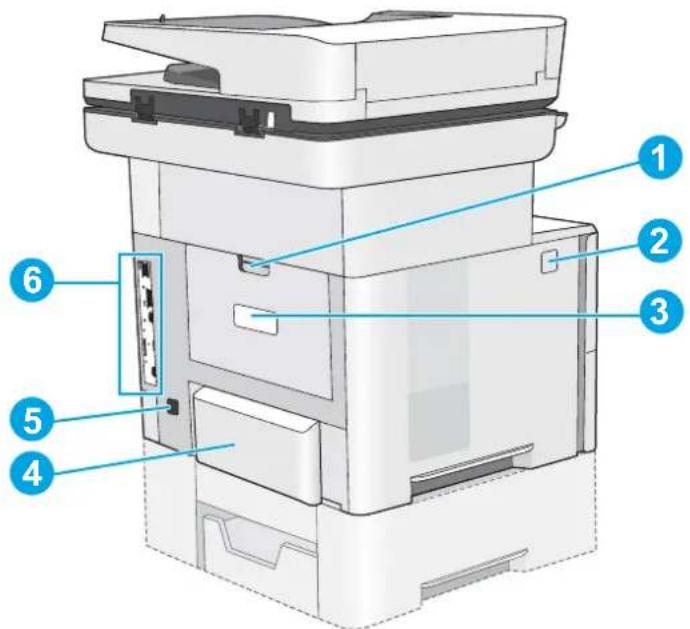
Printer back view
text_image
Diagram of a printer internal structure with numbered parts labeled 1 through 61 Rear door (access for clearing jams)
2 Top-cover-release button
3 Serial number and product number label
4 Dust cover for Tray 2 (flips up when legal-size paper is loaded)
5 Power connection
6 Formatter (contains the interface ports)
Interface ports

text_image
Diagram of a device rear panel with numbered labels pointing to internal components1 Fax port (f, c, and z models only)
2 Local area network (LAN) Ethernet (RJ-45) network port
3 USB port for connecting external USB devices
NOTE: For easy-access USB printing, use the USB port near the control panel.
4 Hi-Speed USB 2.0 printing port
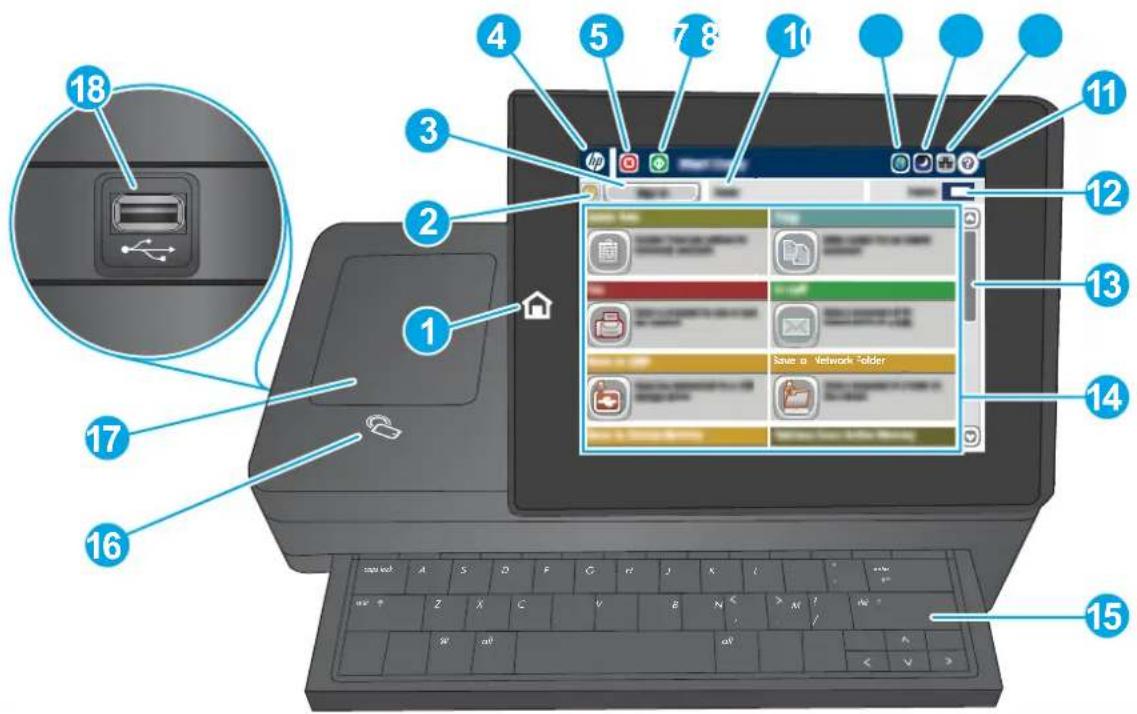
Control-panel view

NOTE: Tilt the control panel for easier viewing.
The Home screen provides access to the printer features and indicates the current status of the printer.
Return to the Home screen at any time by touching the Home button. Touch the Home button on the left side of the printer control panel, or touch the Home button in the upper-left corner of most screens.

NOTE: The features that appear on the Home screen can vary, depending on the printer configuration.
text_image
Labeled diagram of a laptop showing numbered UI components including a USB device, home screen, and network folder.| 1 | Home button | Touch the Home button to return to the printer Home screen at any time. |
| 2 | Refresh button | Touch the Refresh button to clear changes and restore the default settings. |
| 3 | Sign In or Sign Out button | Touch the Sign In button to access secured features.Touch the Sign Out button to sign out of the printer. The printer restores all options to the default settings. |
| 4 | HP logo or Home button | On any screen other than the Home screen, the HP logo changes to a Home button. Touch the Home button to return to the Home screen. |
| 5 | Stop button | Touch the Stop button to pause the current job. The Job Status screen opens and provides options to cancel or continue the job. |
| 6 | Start button | Touch the Start button to start a copy job |
| 7 | Printer status | The status line provides information about the overall printer status. |
| 8 | Language Selection button | Touch the Language Selection button to select the language for the control-panel display. |
| 9 | Sleep button | Touch the Sleep button to put the printer into Sleep mode. |
| 10 | Network button | Touch the Network button to find information about the network connection. |
| 11 | Help button | Touch the Help button to open the embedded help system. |
| 12 | Copies field | The Copies field indicates the number of copies that the product is set to make. |
| 13 | Scroll bar | Use the scroll bar to see the complete list of available features. |
| 14 Features | Depending on the printer configuration, the features that appear in this area can include any of the following items:Quick SetsCopyE-mailFaxSave to USBSave to Network FolderSave to Device MemoryRetrieve from USBRetrieve from Device MemorySave to SharePoint®(c and z models only)Job StatusSuppliesTraysAdministrationDevice Maintenance |
| 15 Keyboard(c and z models only) | This printer includes a physical keyboard. The keys are mapped to a language in the same way the virtual keyboard on the printer control panel is mapped. Whenever the keyboard layout for the virtual keyboard changes, the keys on the physical keyboard are remapped to match the new settings. |
| 16 Near-field communication icon(z models only) | This icon indicates the printer includes integrated HP near-field communication (NFC) and Wi-Fi Direct |
| 17 Hardware integration pocket | For connecting accessory and third-party devices. |
| 18 Easy-access USB port | Insert a USB flash drive for printing and scanning without a computer or to update the printer firmwareNOTE: An administrator must enable this port before use. |
Printer specifications

IMPORTANT: The following specifications are correct at the time of publication, but they are subject to change. For current information, see www.hp.com/support/ljM527MFP.
• Technical specifications
• Supported operating systems
• Mobile printing solutions
Printer dimensions
• Power consumption, electrical specifications, and acoustic emissions
• Operating-environment range
Technical specifications
| Model name | M527dn | M527f | Flow M527c | Flow M527z | |
| Product number | F2A76A | F2A77A | F2A81A | F2A78A | |
| Paper handling Tray 1 (100-sheet capacity) | √ | √ | √ | √ | |
| Tray 2 (550-sheet capacity) | √ | √ | √ | √ | |
| 1 x 550-sheet paper feeder | Optional Optional Optional Optional | ||||
| NOTE: Each printer model accepts up to three optional 1 x 550-sheet feeders (Trays 3, 4, and 5). | |||||
| Printer cabinet/stand Optional Optional Optional Optional | |||||
| Automatic duplex printing | √ | √ | √ | √ | |
| Convenience stapler Not supported | √ | √ | √ | ||
| Connectivity 10/100/1000 Ethernet LAN connection with IPv4 and IPv6 | √ | √ | √ | √ | |
| Hi-Speed USB 2.0 | √ | √ | √ | √ | |
| Easy-access USB port for printing without a computer and upgrading the firmware | √ | √ | √ | √ | |
| Hardware Integration Pocket for connecting accessory and third-party devices | √ | √ | √ | √ | |
| HP Internal USB Ports Optional Optional Optional Optional | |||||
| Integrated HP near-field communication (NFC) and Wi-Fi Direct functionality for printing from mobile devices | Not supported Not supported Not supported | √ | |||
| HP Jetdirect 3000w NFC/Wireless Accessory for printing from mobile devices | Optional Optional Optional Not supported | ||||
| HP Jetdirect 2900nw Print Server accessory for wireless connectivity | Optional Optional Optional Optional | ||||
| Memory 1.75 GB base memory | √ | √ | √ | √ | |
| NOTE: The base memory is expandable to 2.5 GB by adding a DIMM memory module. | |||||
| Mass storage 16 GB embedded Multi-Media Controller (eMMC) | √ | Not supported Not supported Not supported | |||
| 320 GB Hard Disk Drive | √ | √ | √ | √ | |
| Security HP Trusted Platform Module for encrypting all data that passes through the printer | Optional Optional Optional Optional | ||||
| Control-panel display and keyboard | Color touchscreen control panel | √ | √ | √ | √ |
| Physical keyboard Not supported Not supported | √ | √ | |||
| Print Prints 45 pages per minute (ppm) on letter and 43 ppm on A4-size paper | √ | √ | √ | √ | |
| Easy-access USB printing (no computer required) | √ | √ | √ | √ | |
| Store jobs in the printer memory to print later or print privately | √ | √ | √ | √ | |
| Fax Optional | √ | √ | √ | ||
| Copy and Scan Copies 45 pages per minute (ppm) on letter and 43 ppm on A4-size paper | √ | √ | √ | √ | |
| 100-page document feeder with dual-head scanning for single-pass duplex copying and scanning | √ | √ | √ | √ | |
| HP EveryPage Technologies including ultrasonic multi-feed detection | Not supported Not supported | √ | √ | ||
| Embedded optical character recognition (OCR) provides the ability to convert printed pages into text that can be edited or searched using a computer | Not supported Not supported | √ | √ | ||
| SMART Label feature provides paper-edge detection for automatic page cropping | Not supported Not supported | √ | √ | ||
| Model name | M527dn | M527f | Flow M527c | Flow M527z | |
| Product number | F2A76A | F2A77A | F2A81A | F2A78A | |
| Automatic page orientation for pages that have at least 100 characters of text | Not supported Not supported | √ | √ | ||
| Automatic tone adjustment sets contrast, brightness, and background removal for each page | Not supported Not supported | √ | √ | ||
| Digital Send Send documents to E-mail, USB, and shared folders on a network | √ | √ | √ | √ | |
| Send documents to SharePoint® | Not supported Not supported | √ | √ | ||
Supported operating systems
The following information applies to the Printer-Specific Windows PCL 6 and OS X print drivers and to the in-box software installation CD.
Windows: The HP Software Installer CD installs the "HP PCL.6" version 3 print driver, the "HP PCL 6" version 3 print driver, or the or the "HP PCL-6" version 4 print driver, depending on the Windows operating system, along with optional software when using the full software installer. Download the "HP PCL.6" version 3 print driver, the "HP PCL 6" version 3 print driver, and the "HP PCL-6" version 4 print driver from the printer-support Web site for this printer: www.hp.com/support/ljM527MFP.
Mac computers, OS X, and iOS devices: Mac computers and Apple iOS mobile devices are supported with this printer. The OS X print driver and print utility are available for download from hp.com. The HP installer software for OS X is not included in the in-box CD. Follow these steps to download the HP installer software for OS X:
- Go to www.hp.com/support/ljM527MFP.
- Select Support Options, under Download Options select Drivers, Software & Firmware, and then select the printer bundle.
- Click the operating system version, and then click the Download button.
Table 1-1 Supported operating systems and print drivers
| Operating system Print driver installed (from the software installer CD for Windows, or the installer on the Web for OS X) | Notes | |
| Windows® XP SP3, 32-bit The “HP PCL.6” printer-specific print driver is installed for this operating system as part of the basic software installation. The basic installer installs the driver only. | The full software installer is not supported for this operating system.Microsoft retired mainstream support for Windows XP in April 2009. HP will continue to provide best effort support for the discontinued XP operating system. | |
| Windows Vista®, 32-bit The “HP PCL.6” printer-specific print driver is installed for this operating system as part of the basic software installation. The basic installer installs the driver only. | The full software installer is not supported for this operating system. | |
| Operating system Print driver Installed (from the software installer CD for Windows, or the installer on the Web for OS X) | Notes | |
| Windows Server 2003 SP2, 32-bit The “HP PCL-6” printer-specific print driver is installed for this operating system as part of the basic software installation. The basic installer installs the driver only. | The full software installer is not supported for this operating system.Microsoft retired mainstream support for Windows Server 2003 in July 2010. HP will continue to provide best effort support for the discontinued Server 2003 operating system. | |
| Windows 7 SP1, 32-bit and 64-bit The “HP PCL 6” printer-specific print driver is installed for this operating system as part of the full software installation. | ||
| Windows 8, 32-bit and 64-bit The “HP PCL-6” printer-specific print driver is installed for this operating system as part of the basic software installation. The basic installer installs the driver only. | The full software installer is not supported for this operating system.Windows 8 RT support is provided through Microsoft IN OS Version 4, 32- bit driver. | |
| Windows 8.1, 32-bit and 64-bit The “HP PCL-6” printer-specific print driver is installed for this operating system as part of the basic software installation. The basic installer installs the driver only. | The full software installer is not supported for this operating system.Windows 8.1 RT support is provided through Microsoft IN OS Version 4, 32- bit driver. | |
| Windows 10, 32-bit and 64-bit The “HP PCL-6” printer-specific print driver is installed for this operating system as part of the basic software installation. The basic installer installs the driver only. | The full software installer is not supported for this operating system. | |
| Windows Server 2008 SP2, 32-bit The “HP PCL-6” printer-specific print driver is installed for this operating system as part of the basic software installation. The basic installer installs the driver only. | The full software installer is not supported for this operating system. | |
| Windows Server 2008 SP2, 64-bit The “HP PCL 6” printer-specific print driver is installed for this operating system as part of the basic software installation. The basic installer installs the driver only. | The full software installer is not supported for this operating system. | |
| Windows Server 2008 R2, SP 1, 64-bit The “HP PCL 6” printer-specific print driver is installed for this operating system as part of the basic software installation. The basic installer installs the driver only. | The full software installer is not supported for this operating system. | |
| Windows Server 2012, 64-bit The software installer does not supportWindows Server 2012 but the “HP PCL 6” version 3 and “HP PCL-6” version 4 printer-specific print drivers do support it. | Download the driver from the HP Web site, and use the Windows Add Printer tool to install it. | |
| Operating system Print driver installed (from the software installer CD for Windows, or the installer on the Web for OS X) | Notes | |
| Windows Server 2012 R2, 64-bit The software installer does not support Windows Server 2012 but the “HP PCL 6” version 3 and “HP PCL-6” version 4 printer-specific print drivers do support it. | Download the driver from the HP Web site, and use the Windows Add Printer tool to install it. | |
| OS X 10.8 Mountain Lion, OS X 10.9 Mavericks, OS X 10.10 Yosemite | The OS X print driver and print utility are available for download from hp.com and may also be available via Apple Software Update. The HP installer software for OS X is not included in the in-box CD. | For OS X, download the installer from the support Web site for this printer.1. Go to www.hp.com/support/ljM527MFP.2. Select Support Options, under Download Options select Drivers, Software & Firmware, and then select the printer bundle.3. Click the operating system version, and then click the Download button. |

NOTE: For a current list of supported operating systems, go to www.hp.com/support/ljM527MFP for HP's all-inclusive help for the printer.

NOTE: For details on client and server operating systems and for HP UPD PCL6, UPD PCL 5, and UPD PS driver support for this printer, go to www.hp.com/go/upd. Under Additional information, click the links.
Table 1-2 Minimum system requirements
| Windows Mac computers and OS X | |
| CD-ROM drive, DVD drive, or an Internet connection | Internet connection |
| Dedicated USB 1.1 or 2.0 connection or a network connection | 1 GB of available hard-disk space |
| 400 MB of available hard-disk space | |
| 1 GB RAM (32-bit) or 2 GB RAM (64-bit) | |
Mobile printing solutions
The printer supports the following software for mobile printing:
HP ePrint software

NOTE: The HP ePrint Software supports the following operating systems: Windows 7 SP 1 (32-bit and 64-bit); Windows 8 (32-bit and 64-bit); Windows 8.1 (32-bit and 64-bit); Windows 10 (32-bit and 64-bit); and OS X versions 10.8 Mountain Lion, 10.9 Mavericks, and 10.10 Yosemite.
- HP ePrint via email (Requires HP Web Services to be enabled and the printer to be registered with HP Connected)
HP ePrint app (Available for Android, iOS, and Blackberry)
ePrint Enterprise app (Supported on all printers with ePrint Enterprise Server Software)
HP Home and Biz app (Available for Symbian/Nokia devices)
- Google Cloud Print 1.0 (Requires the printer to be registered with HP Connected and then registered with Google Cloud)
AirPrint
- Android Printing
Printer dimensions
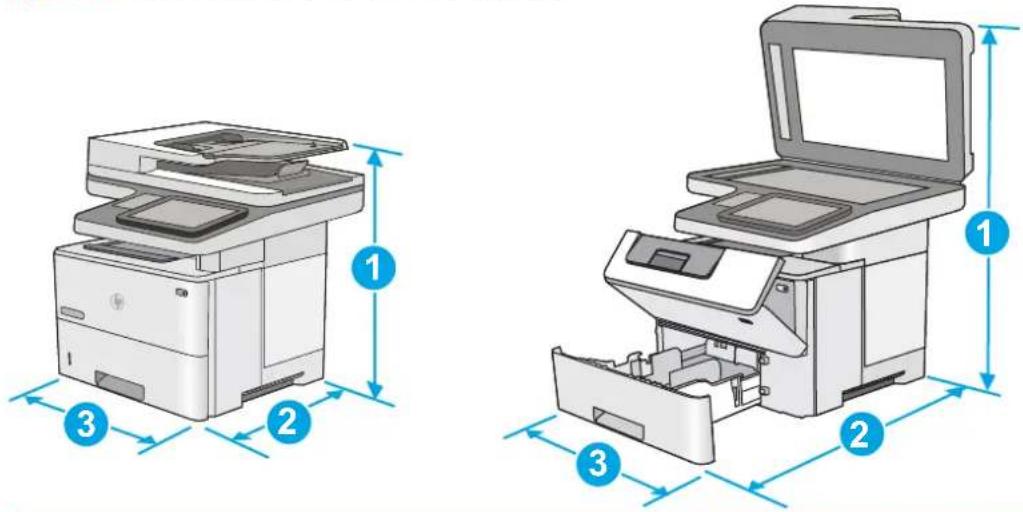
Figure 1-1 Dimensions for the dn, f, c, and z models
text_image
Technical diagram showing two views of a printer with labeled parts and dimension annotationsPrinter fully closed Printer fully opened
| 1. Height 497 mm (19.6 in) 750 mm (29.5 in) | |
| 2. Depth Tray 2 dust cover closed: 496 mm (19.5 in) | 674 mm (26.5 in) |
| Tray 2 dust cover open: 559 mm (22.0 in) | |
| 3. Width 482 mm (19.0 in) 482 mm (19.0 in) | |
| Weight 23 kg (50.8 lb) | |
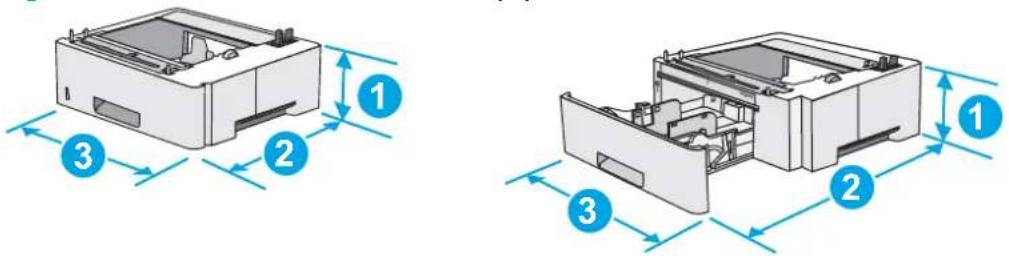
Figure 1-2 Dimensions for the 1 x 550-sheet paper feeder
text_image
Technical diagram showing two views of a printer's internal structure with numbered components and dimension annotations.-
Height 130 mm (5.1 in)
-
Depth Tray closed: 376 mm (14.8 in)
Tray opened: 569 mm (22.4 in)
- Width 410 mm (16.1 in)
Weight 1.4 kg (3 lb)
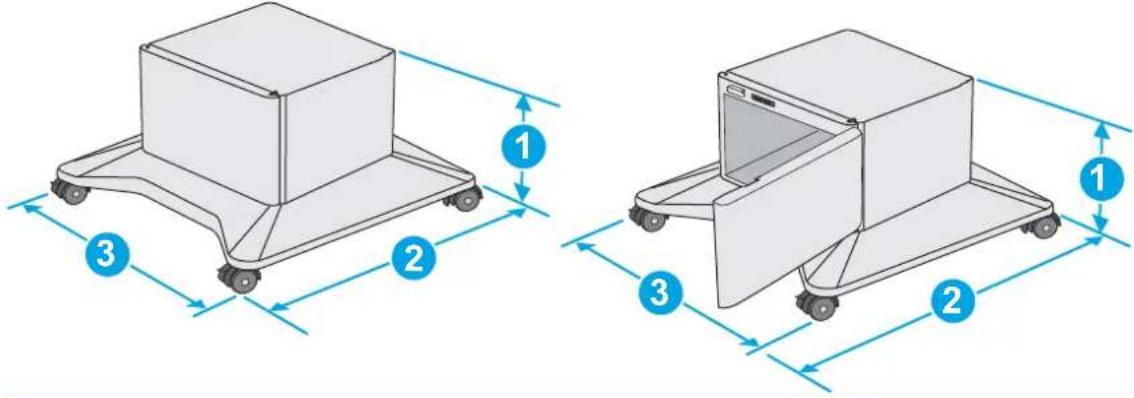
Figure 1-3 Dimensions for the cabinet/stand
text_image
Technical diagram showing two views of a modular device with labeled components and dimensional annotations.- Height 381 mm (15.0 in)
- Depth Door closed: 632 mm (24.9 in)
Door opened and rear castors rotated: 865 mm (34.0 in)
- Width Door closed: 600 mm (23.6 in)
Door opened and rear castors rotated: 630 mm (24.8 in)
Weight 9.0 kg (20 lb)
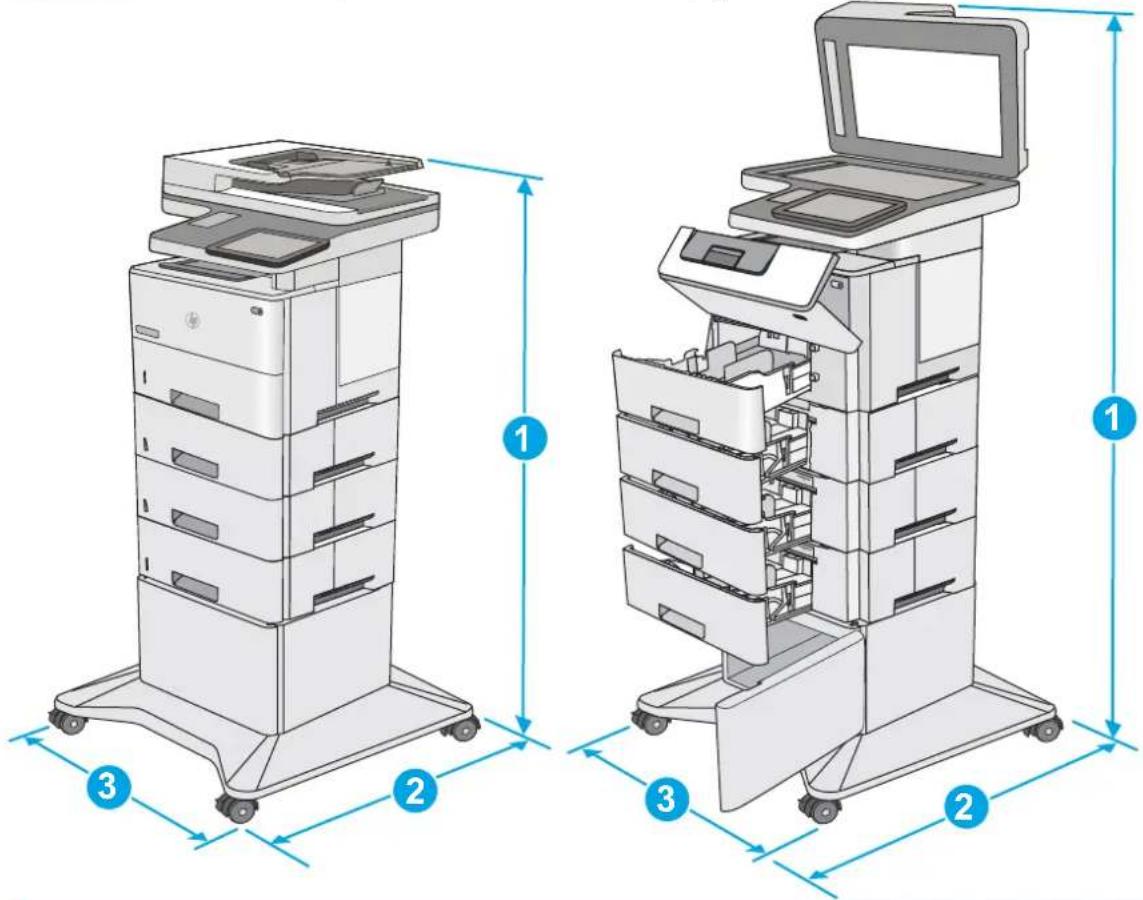
Figure 1-4 Dimensions for the printer with three 1 × 550 -sheet paper feeders and the cabinet/stand
text_image
Technical diagram of a multi-tiered printer with labeled dimensions and component layoutPrinter and accessories fully closed Printer and accessories fully opened
| 1. Height 1268 mm (49.9 in) 1521 mm (59.9 in) |
| 2. Depth 632 mm (24.9 in) 865 mm (34.0 in) |
| 3. Width 600 mm (23.6 in) 630 mm (24.8 in) |
| Weight 36.2 kg (79.8 lb) |
1 These values are subject to change. For current information, go to www.hp.com/support/ljM527MFP.
2 Do not extend more than one paper tray at a time.
Power consumption, electrical specifications, and acoustic emissions
See www.hp.com/support/ljM527MFP for current information.

CAUTION: Power requirements are based on the country/region where the printer is sold. Do not convert operating voltages. This will damage the printer and void the printer warranty.
Operating-environment range
Table 1-3 Operating-environment specifications
| Environment Recommended Allowed |
| Temperature 17° to 25°C (62.6° to 77°F) 15° to 30°C (59° to 86°F) |
| Relative humidity 30% to 70% relative humidity (RH) 10% to 80% RH |
| Altitude Not applicable 0 to 3000 m (0 to 9,842 ft) |
Printer hardware setup and software installation
For basic setup instructions, see the Hardware Installation Guide that came with the printer. For additional instructions, go to HP support on the Web.
Go to www.hp.com/support/ljM527MFP for HP's all-inclusive help for the printer. Find the following support:
• Install and configure
Learn and use
- Solve problems
• Download software and firmware updates
- Join support forums
• Find warranty and regulatory information
2 Paper trays
• Load paper to Tray 1 (multipurpose tray)
• Load paper to Trays 2, 3, 4, and 5
- Load and print envelopes
• Use the convenience stapler (f, c, and z models)
For more information:
The following information is correct at the time of publication. For current information, see www.hp.com/support/ljM527MFP.
HP's all-inclusive help for the printer includes the following information:
• Install and configure
- Learn and use
- Solve problems
• Download software and firmware updates
- Join support forums
• Find warranty and regulatory information
Load paper to Tray 1 (multipurpose tray)
Introduction
The following information describes how to load paper in Tray 1. This tray holds up to 100 sheets of 75g / m^2 (20 lb) paper.

NOTE: Select the correct paper type in the print driver before printing..

CAUTION: To avoid jams, never add or remove paper from Tray 1 during printing.
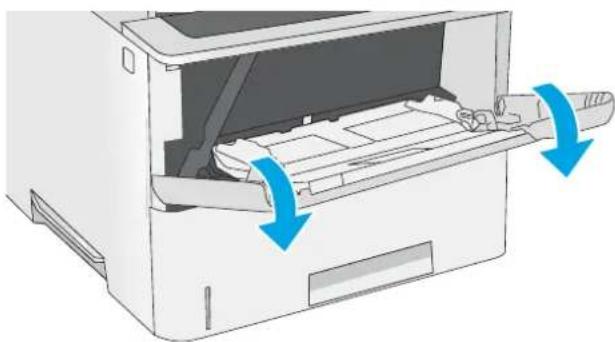
- Grasp the handle on either side of Tray 1, and pull it forward to open it.
natural_image
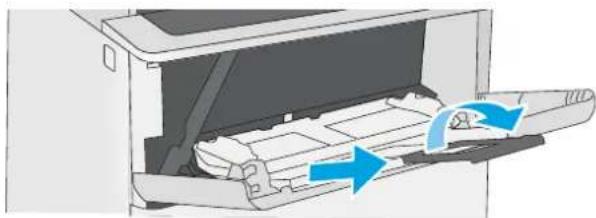
Illustration of a printer's internal structure with blue arrows indicating motion or movement (no text or symbols)- Pull out the tray extension to support the paper.
natural_image
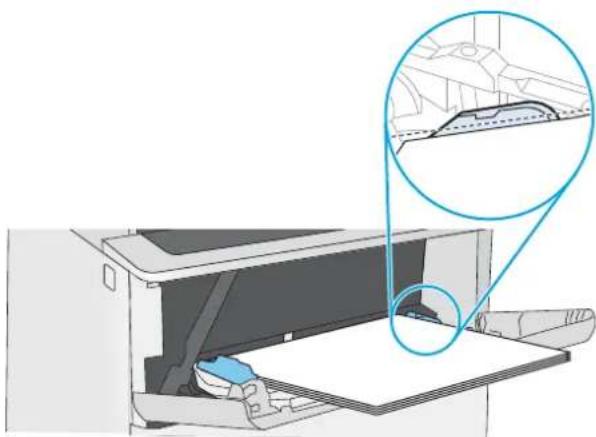
Diagram of a printer's internal structure with blue arrows indicating motion or flow (no text or symbols)- Spread the paper guides to the correct size, and then load paper in the tray. For information about how to orient the paper, see Tray 1 paper orientation on page 19.
Make sure that the paper fits under the fill line on the paper guides.
NOTE: The maximum stack height is 10 mm (0.4 in), or approximately 100 sheets of 75g paper.
natural_image
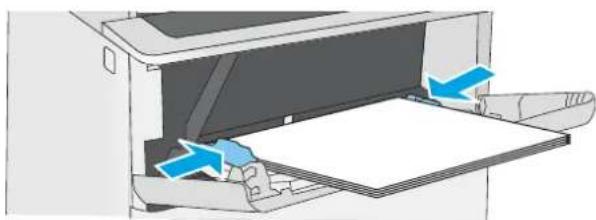
Diagram of a printer with a paper feeding into a slot, showing internal components and a magnified view of the lid (no text or symbols present)- Adjust the side guides so that they lightly touch the paper stack, but do not bend it.
natural_image
Illustration of a printer's internal structure with blue arrows indicating motion or movement (no text or symbols)Tray 1 paper orientation
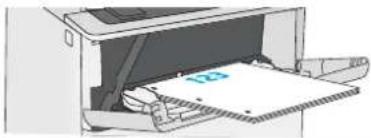
When using paper that requires a specific orientation, load it according to the information in the following table.

NOTE: The Alternative Letterhead Mode settings affects the way to load letterhead or preprinted paper. This setting is disabled by default. When using this mode, load paper as for automatic duplex printing. For more information, see Use alternative letterhead mode on page 19.
| Paper type Single-sided printing Duplex printing and Alternative Letterhead | Mode | |
| Letterhead, preprinted, or prepunched Face-up | Face-down | |
| Top edge leading into the printer | Bottom edge leading into the printer | |
 | 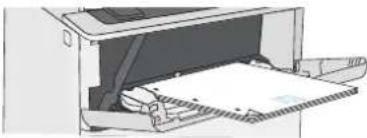 | |
Use alternative letterhead mode
Use the Alternative Letterhead Mode feature to load letterhead or preprinted paper into the tray the same way for all jobs, whether printing to one side of the sheet of paper or to both sides. When using this mode, load paper as for automatic duplex printing.
To use the feature, enable it by using the printer control-panel menus.
Enable Alternative Letterhead Mode by using the printer control-panel menus
- From the Home screen on the printer control panel, swipe from right to left until the Settings menu displays. Touch the Settings icon to open the menu.
-
Open the fol lowing menus:
-
Manage Trays
• Alternative Letterhead Mode -
Select Enabled, and then touch the Save button or press the OK button.
Load paper to Trays 2, 3, 4, and 5
Introduction
The following information describes how to load paper in Tray 2 and the optional 550-sheet trays (part number F2A72A). These trays hold up to 550 sheets of 75g / m^2 (20 lb) paper.

NOTE: The procedure to load paper for the 550-sheet trays is the same as for Tray 2. Only Tray 2 is shown here.

CAUTION: Do not extend more than one paper tray at a time.
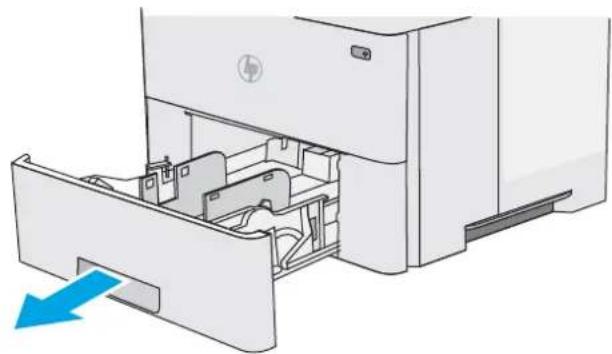
- Open the trajectory.
NOTE: Do not open this tray while it is in use.
-
Be fore loading paper, adjust the paper-width guides by squeezing the adjustment latches and sliding the guides to the size of the paper being used.
-
Adjust the paper-length guide by squeezing the adjustment latch and sliding the guide to the size of the paper being used.
natural_image
Diagram of a HP printer internal structure showing paper feed, paper holder, and paper tray (no text or symbols)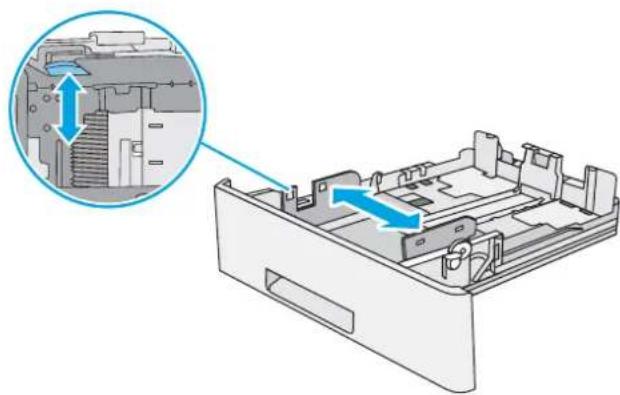
natural_image
Technical diagram of a mechanical device with internal components and a magnified inset showing structural details (no text or symbols)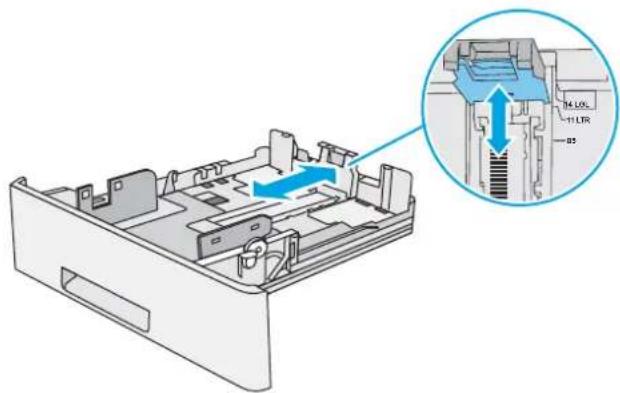
natural_image
Technical diagram of a computer chassis with internal components and a magnified inset showing internal structure (no text or symbols)- To load legal-size paper into the tray, squeeze the lever on the back of the tray that is to the left of center, and then extend the tray back to the correct paper size.
NOTE: This step does not apply to other paper sizes.
- L oad paper into the tray. For information about how to orient the paper, see Tray 2 and the 550-sheet trays paper orientation on page 22.
NOTE: Do not adjust the paper guides tightly against the paper stack. Adjust them to the indentations or markings in the tray.
NOTE: To prevent jams, adjust the paper guides to the correct size and do not overfill the tray. Be sure that the top of the stack is below the tray full indicator, as shown in the enlargement in the illustration.
- Close the tray.
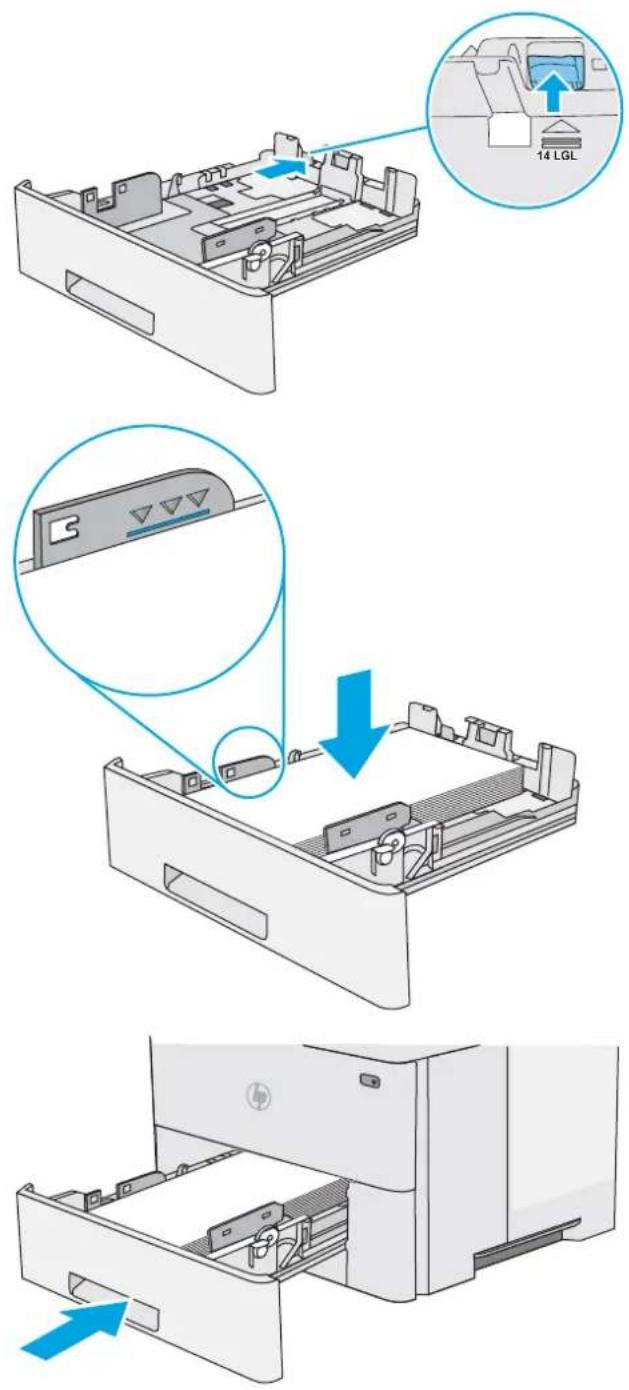
text_image
14 LGL-
The tray configuration message displays on the printer control panel.
-
If the paper size and type shown is not correct, select Modify to choose a different paper size or type.
For custom-size paper, specify the X and Y dimensions for the paper when the prompt displays on the printer control panel.
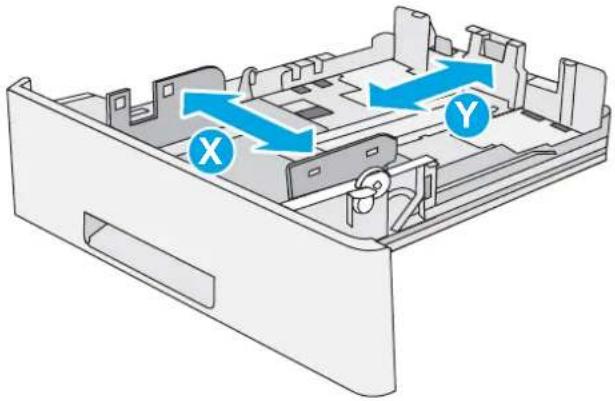
natural_image
3D diagram of a mechanical device interior with labeled arrows (X and Y) indicating directional movement or flow, no readable text or symbols present.Tray 2 and the 550-sheet trays paper orientation
When using paper that requires a specific orientation, load it according to the information in the following table.

NOTE: The Alternative Letterhead Mode settings affects the way to load letterhead or preprinted paper. This setting is disabled by default. When using this mode, load paper as for automatic duplex printing. For more information, see Use alternative letterhead mode on page 22.
Paper type Single-sided printing Duplex printing and Alternative Letterhead
Mode
| Letterhead, preprinted, or prepunched Face-down | Face-up | |
| Top edge at the front of the tray | Bottom edge at the front of the tray | |
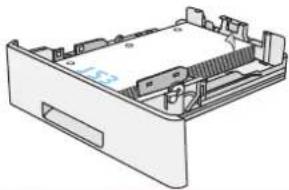 | 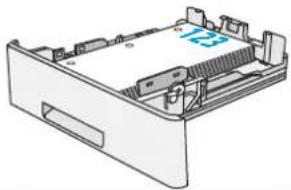 | |
Use alternative letterhead mode
Use the Alternative Letterhead Mode feature to load letterhead or preprinted paper into the tray the same way for all jobs, whether printing to one side of the sheet of paper or to both sides. When using this mode, load paper as for automatic duplex printing.
To use the feature, enable it by using the printer control-panel menus.
Enable Alternative Letterhead Mode by using the printer control-panel menus
- From the Home screen on the printer control panel, swipe from right to left until the Settings menu displays. Touch the Settings icon to open the menu.
- Open the following menus:
- Manage Trays
• Alternative Letterhead Mode
- Select Enabled, and then touch the Save button or press the OK button.
Load and print envelopes
Introduction
The following information describes how to print and load envelopes. Use only Tray 1 to print on envelopes. Tray 1 holds up to 10 envelopes.
To print envelopes using the manual feed option, follow these steps to select the correct settings in the print driver, and then load the envelopes into the tray after sending the print job to the printer.
Print envelopes
-
From the software program, select the Print option.
-
Select the printer from the list of printers, and then click or tap the Properties or Preferences button to open the print driver.

NOTE: The name of the button varies for different software programs.

NOTE: To access these features from a Windows 8 or 8.1 Start screen, select Devices, select Print, and then select the printer.
-
Click or tap the Paper/Quality tab.
-
In the Paper size drop-down list, select the correct size for the envelopes.
-
In the Paper type drop-down list, select Envelope.
-
In the Paper source drop-down list, select Manual feed.
-
Click the OK button to close the Document Properties dialog box.
-
In the Print dialog box, click the OK button to print the job.
Envelope orientation
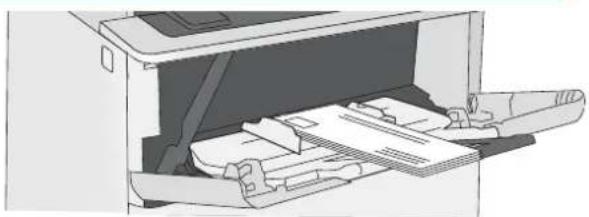
Load envelopes in Tray 1 face up, with the short, postage end leading into the printer.
natural_image
Illustration of a printer's internal structure showing paper feeding into a printer (no text or symbols visible)Use the convenience stapler (f, c, and z models)
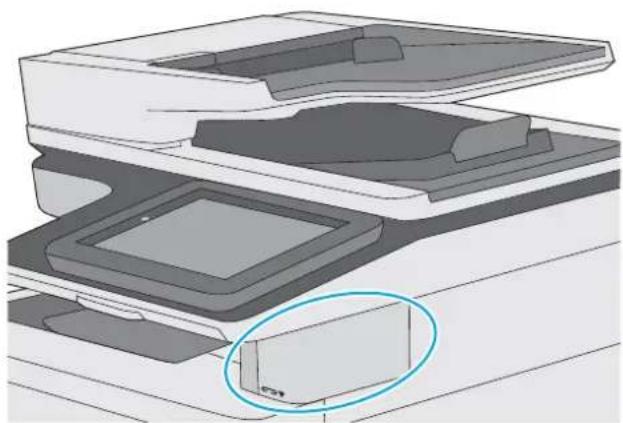
The convenience stapler can staple up to 20 sheets of 75g / m^2 (20 lb) paper.

CAUTION: To avoid damage to the printer, do not attempt to staple materials other than paper.
natural_image
3D mechanical assembly diagram showing layered components with a highlighted rectangular component (no text or symbols)-
Insert the stack of paper into the slot on the front of the stapler.
-
Wait for the stapler to staple the sheets. The stapler activates when it senses paper, and it makes a stapling sound.

NOTE: If the printer is in Sleep mode, there might be a short delay.
- Remove the stapled paper from the slot.
If the stapler does not release the paper, follow these steps to resolve the problem.

WARNING! To avoid injury, do not put your finger inside the stapler area to attempt to release the paper.
-
Open and close the s tapler door, and then try removing the paper.
-
If the paper is still stuck, make sure the stapler door is closed, and then turn off the printer and turn it on again.
3 Supplies, accessories, and parts
• Order supplies, accessories, and parts
- Replace the toner cartridge
- Replace the staple cartridge (f, c, and z models)
For more information:
The following information is correct at the time of publication. For current information, see www.hp.com/support/ljM527MFP.
HP's all-inclusive help for the printer includes the following information:
• Install and configure
Learn and use
- Solve problems
• Download software and firmware updates
- Join support forums
• Find warranty and regulatory information
Order supplies, accessories, and parts
Ordering
| Order supplies and paper www.hp.com/go/suresupply | |
| Order genuine HP parts or accessories www.hp.com/buy/parts | |
| Order through service or support providers Contact an HP-authorized service or support provider. | |
| Order using the HP Embedded Web Server (EWS) To access, in a supported Web browser on your computer, enter the printer IP address or host name in the address/URL field. The EWS contains a link to the HP SureSupply Web site, which provides options for purchasing Original HP supplies. | |
Supplies and accessories
| Item Description Cartridge number Part number | ||
| Supplies | ||
| HP 508A Black Original LaserJet Toner Cartridge | Standard-capacity replacement black toner cartridge | 872A CF287A |
| HP 508X High Yield Black Original LaserJet Toner Cartridge | High-capacity replacement black toner cartridge | 872X CF287X |
| HP Staple Cartridge Pack Replacement staple cartridges for the f and z models. Contains two staple cartridges of 1500 staples each. | Not applicable Q7432A | |
| HP LaserJet 200 ADF Roller Replacement Kit | Replacement feed rollers for the document feeder | Not applicable B5L52A |
| Accessories | ||
| 1 x 550-sheet paper feeder | Optional 550-sheet paper feederNOTE: Each printer model accepts up to three optional 1 x 550-sheet feeders (Trays 3, 4, and 5). | Not applicable F2A72A |
| Printer stand and cabinet | Optional stand with storage cabinet to support the printerRecommended when using multiple optional paper feeders. | Not applicable F2A73A |
| HP LaserJet Keyboard Overlay Kit for Simplified Chinese & Traditional Chinese(c and z model only) | Language-specific, adhesive overlay for the physical keyboard | Not applicable A7W12A |
| HP LaserJet Keyboard Overlay Kit for Swedish(c and z model only) | Language-specific, adhesive overlay for the physical keyboard | Not applicable A7W14A |
| HP 1GB DDR3 x32 144-Pin 800MJz SODIMM | Optional DIMM for expanding the memory | Not applicable E5K48A |
| HP Internal USB ports Two optional USB ports for connecting third-party devices | Not applicable B5L28A | |
| HP Trusted Platform Module Automatically encrypts all data that passes through the printer | Not applicable F5S62A | |
| HP Foreign Interface Harness Optional port for connecting third-party devices | Not applicable B5L31A | |
| HP LaserJet MFP Analog Fax Accessory 600 | Optional fax accessory for the dn model | Not applicable B5L53A |
| HP Jetdirect 2900nw Print Server USB wireless print server accessory Not applicable J8031A | ||
| HP Jetdirect 3000w NFC/Wireless Accessory | Wi-Fi direct accessory for “touch” printing from mobile devices | Not applicable J8030A |
Customer self-repair parts
Customer Self-Repair (CSR) parts are available for many HP LaserJet printers to reduce repair time. More information about the CSR program and benefits can be found at www.hp.com/go/csr-support and www.hp.com/go/csr-faq.
Genuine HP replacement parts can be ordered at www.hp.com/buy/parts or by contacting an HP-authorized service or support provider. When ordering, one of the following will be needed: part number, serial number (found on back of printer), product number, or printer name.
- Parts listed as Mandatory self-replacement are to be installed by customers, unless you are willing to pay HP service personnel to perform the repair. For these parts, on-site or return-to-depot support is not provided under the HP printer warranty.
- Parts listed as Optional self-replacement can be installed by HP service personnel at your request for no additional charge during the printer warranty period.
| Item Description Self-replacement options Part number | |||
| Control-panel kit | Replacement touchscreen control panel | Mandatory | B5L24-67018 |
| Solid State Memory Drive kit | Replacement solid-state memory drive | Mandatory | 5851-6415 |
| Hard Disk Drive kit | Replacement hard-disk drive | Mandatory | 5851-6417 |
| NFC Accessory kit | Replacement HP Jetdirect 3000w NFC/Wireless Accessory | Mandatory | 5851-6429 |
| HP 1GB DDR3 x32 144-Pin 800MJz SODIMM | Replacement memory DIMM | Mandatory | E5K48-67902 |
| Secure Hard Disk Drive kit Replacement HP Secure High-Performance Hard Disk Drive | Mandatory | 5851-6425 | |
| Transfer Roller Service Kit | Replacement transfer roller | Mandatory | F2A68-67910 |
| Tray 1 Pick Up and Separation Roller Kit | Replacement rollers for Tray 1 | Mandatory | F2A68-67914 |
| Tray 2-x Roller Kit | Replacement rollers for Trays 2, 3, 4, and 5 | Mandatory | F2A68-67913 |
| 1 x 550-sheet paper feeder | Replacement 550-sheet paper feeder | Mandatory | F2A73-67901 |
| Printer stand and cabinet | Replacement printer stand and cabinet | Mandatory | F2A72-67901 |
Item Description Self-replacement options Part number
| Analog fax accessory kit Replacement fax board Mandatory B5L31-67902 | ||
| Scanner white backing Replacement white plastic backing for the scanner | Mandatory 5851-6570 | |
| U.S. English Keyboard Kit Replacement keyboard for the c and z model | Mandatory B5L47-67019 | |
| U.K. English Keyboard Kit Replacement keyboard for the c and z model | Mandatory B5L47-67020 | |
| Keyboard Overlay Kit | Replacement keyboard overlay for the c and z model | Mandatory 5851-6019 |
| French, Italian, Russian, German, Spanish, Ukrainian | ||
| Keyboard Overlay Kit | Replacement keyboard overlay for the c and z model | Mandatory 5851-6020 |
| Canadian French, Latin American Spanish, U.S. Spanish | ||
| Keyboard Overlay Kit | Replacement keyboard overlay for the c and z model | Mandatory 5851-6022 |
| Simplified Chinese, Traditional Chinese | ||
| Keyboard Overlay Kit | Replacement keyboard overlay for the c and z model | Mandatory 5851-6023 |
| Spanish, Portuguese | ||
| Keyboard Overlay Kit | Replacement keyboard overlay for the c and z model | Mandatory 5851-6024 |
| Japanese (KG and KT) | ||
Replace the toner cartridge
Introduction
The following information provides details about the toner cartridge for the printer, and it includes instructions to replace it.
• Toner-cartridge information
- Remove and replace the cartridge
Toner-cartridge information
This printer indicates when the toner cartridge level is low and very low. The actual toner cartridge life remaining can vary. Consider having a replacement cartridge available to install when print quality is no longer acceptable.
To purchase cartridges or check cartridge compatibility for the printer, go to HP SureSupply at www.hp.com/go/suresupply. Scroll to the bottom of the page and verify that the country/region is correct.
Item Description Cartridge number Part number
| HP 872A Black Original LaserJet Toner Cartridge | Standard-capacity replacement black toner cartridge | 872A CF287A |
| HP 872X High Yield Black Original LaserJet Toner Cartridge | High-capacity replacement black toner cartridge | 872X CF287X |

NOTE: High-yield toner cartridges contain more toner than standard cartridges for increased page yield. For more information, go to www.hp.com/go/learnaboutsupplies.
Do not remove the toner cartridge from its package until it is time to replace it.

CAUTION: To prevent damage to the toner cartridge, do not expose it to light for more than a few minutes. Cover the green imaging drum if the toner cartridge must be removed from the printer for an extended period of time.
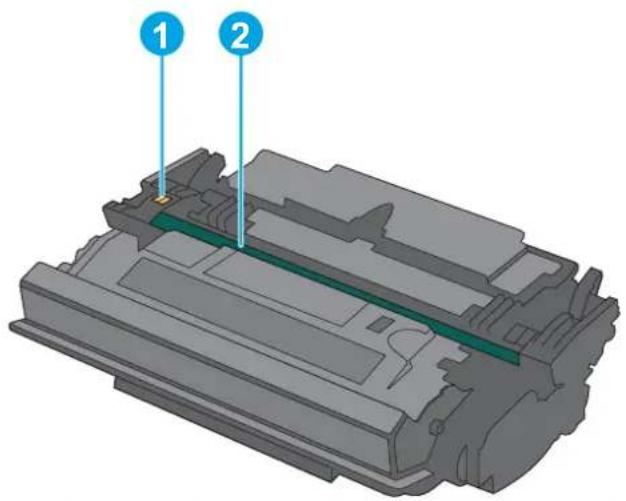
The following illustration shows the toner-cartridge components.
text_image
Technical diagram of a mechanical component with labeled parts 1 and 21 Memory chip
2 Imaging drum
CAUTION: Do not touch the imaging drum. Fingerprints can cause print-quality problems.
CAUTION: If toner gets on clothing, wipe it off by using a dry cloth and wash the clothes in cold water. Hot water sets toner into fabric.
NOTE: Information about recycling used toner cartridges is in the toner-cartridge box.
Remove and replace the cartridge
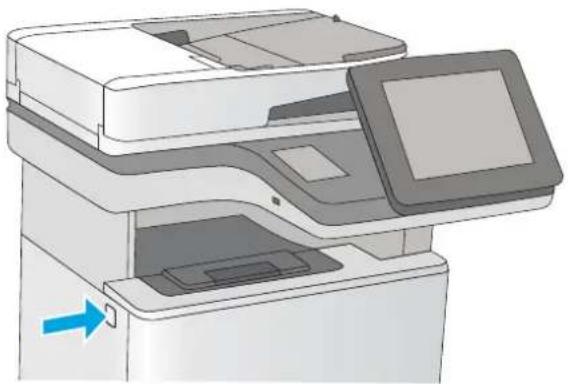
- Press the top-cover-release button on the left side of the printer.
natural_image
Illustration of a printer or scanner device with a blue arrow indicating a button or scroll (no text or symbols present)- Open the front door.
- Grasp the handle of the used toner cartridge and pull out to remove it.
- Remove the new toner cartridge from its protective shell by tearing off the plastic strip and opening the package. Save all packaging for recycling the used toner cartridge.
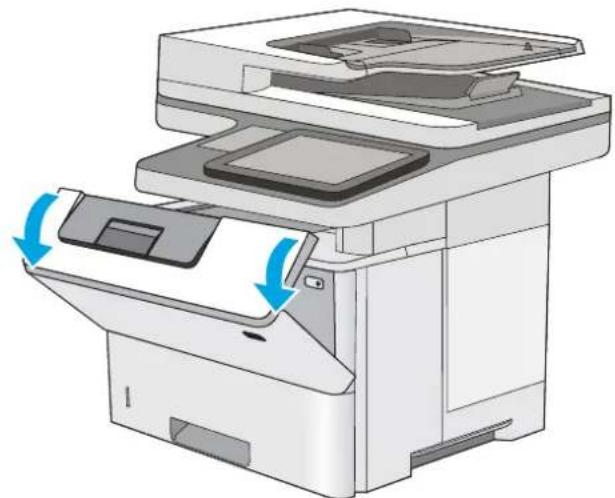
natural_image
Illustration of a printer with blue arrows indicating motion or operation, showing internal components and no text or symbols.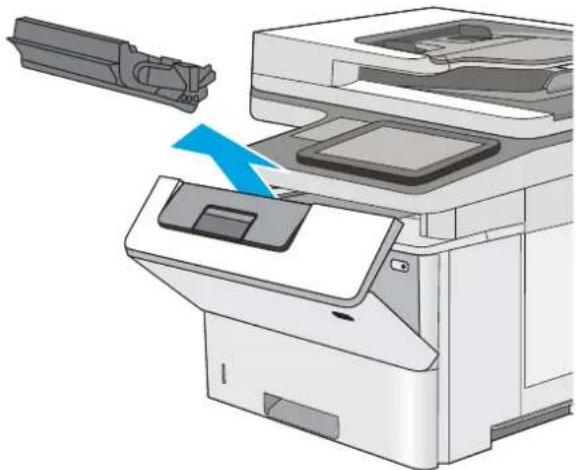
natural_image
Illustration of a printer printer with a blue arrow indicating the process (no text or symbols present)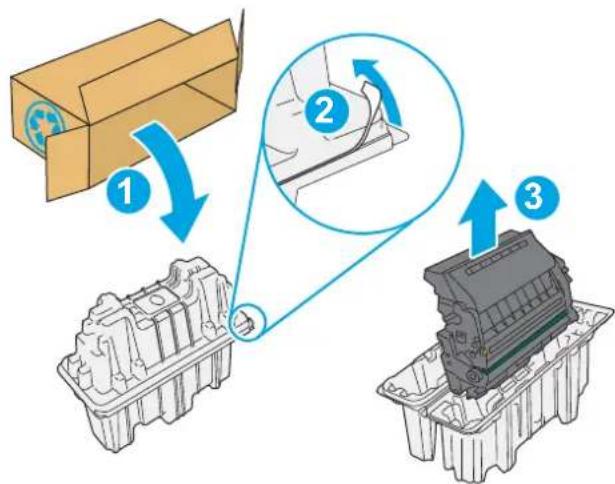
flowchart
graph TD
    A["Box with circular icon"] -->|1| B["Engine block"]
    B -->|2| C["Engine block with cable"]
    C -->|3| D["Engine block with motor"]
-
Hold both ends of the toner cartridge and rock it 5-6 times.
-
Align the toner cartridge with its slot, and then insert the toner cartridge into the printer.
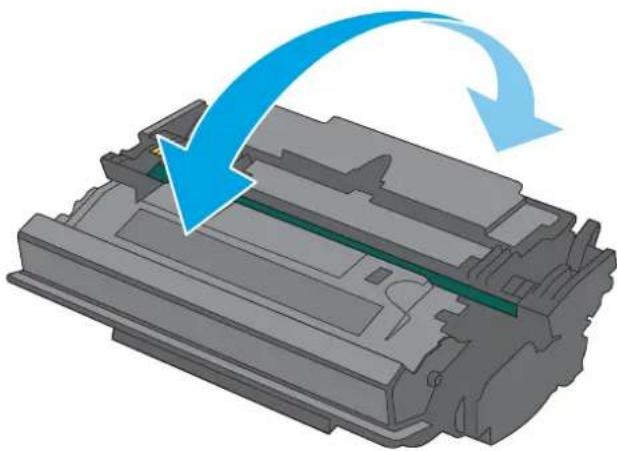
natural_image
3D rendering of a printer's internal structure with blue arrows indicating motion or rotation (no text or symbols)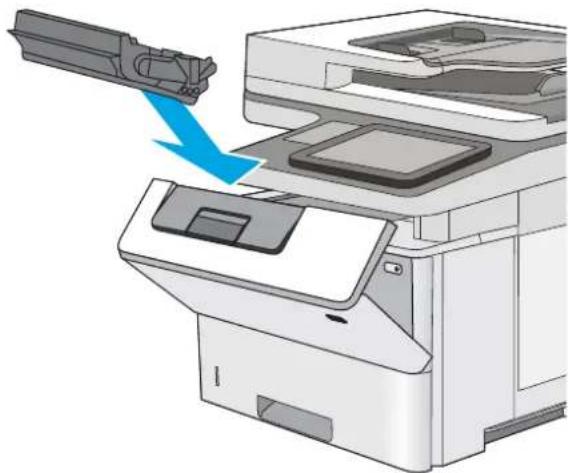
natural_image
Illustration of a printer with a blue arrow indicating a process or operation, showing no text or symbols on the device itself.-
Close the front door.
-
Pack the used toner cartridge into the box that the new cartridge came in. See the enclosed recycling guide for information about recycling.
HP helps recycle Original HP cartridges—it's easy and free with the HP Planet Partners program, available in more than 50 countries/regions around the world ^1) .
To find information about how to recycle used HP cartridges, please go to www.hp.com/recycle.
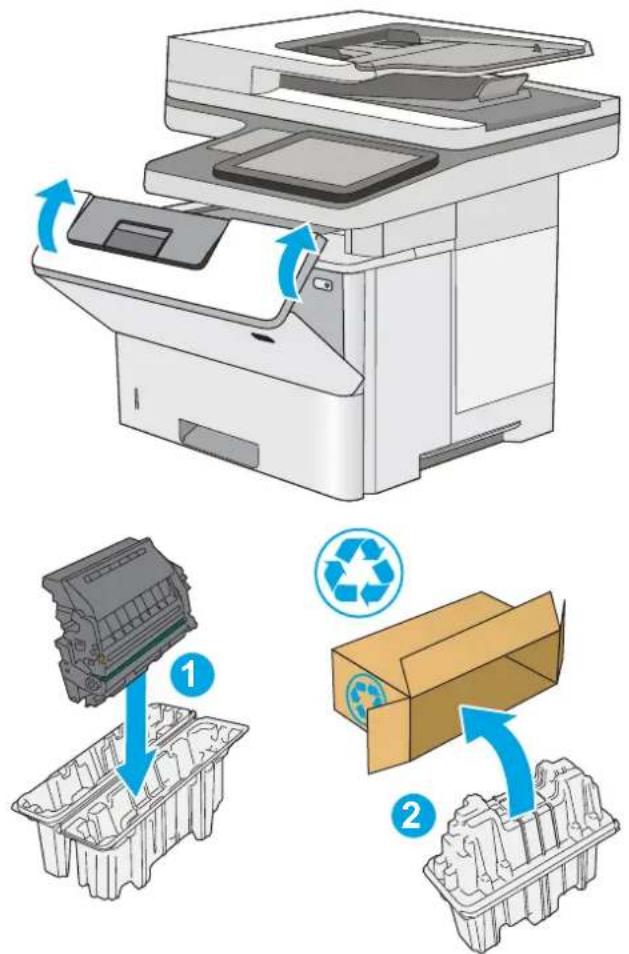
text_image
Diagram illustrating the process of a printer's internal structure and recycling mechanism, showing steps from receipt to disposal.1) Program availability varies. For more information, visit www.hp.com/recycle.
Replace the staple cartridge (f, c, and z models)
Introduction
The following information provides details about the staple cartridges for the printer, and it includes instructions to replace them.
To purchase a package of two staple cartridges (part number Q7432A), go to the HP Parts Store at www.hp.com/buy/parts. Each cartridge holds 1,500 staples.
Remove and replace the staple cartridge
- Open the stapler door.
NOTE: Opening the stapler door disables the stapler.
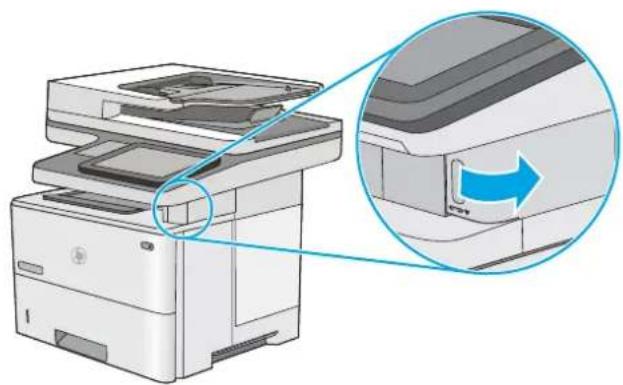
natural_image
Illustration of a printer with an inset showing the printer's internal structure and a blue arrow indicating rotation (no text or symbols present)- Remove the staple cartridge from the printer.
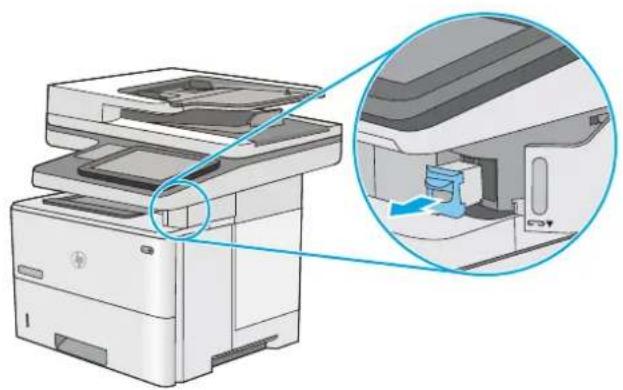
natural_image
Illustration of a printer with an inset showing the internal structure (no text or symbols visible)- Insert the new staple cartridge into the opening inside the stapler door.
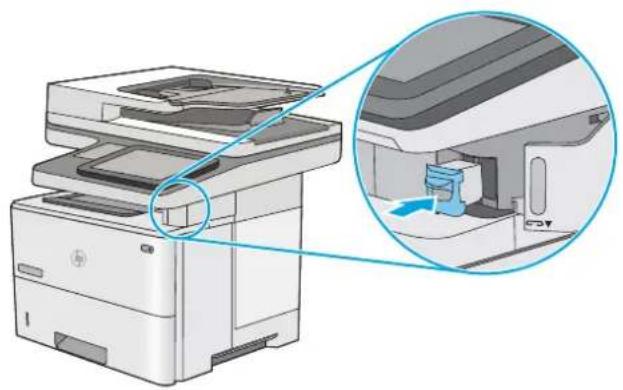
natural_image
Illustration of a printer with an inset close-up showing the printer's internal structure (no text or symbols present)- Close the stapler door.
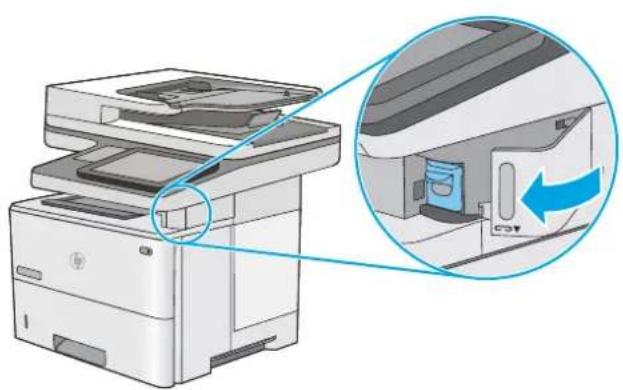
natural_image
Illustration of a printer with an inset showing the internal structure and a blue directional arrow (no text or symbols)4 Print
• Print tasks (Windows)
• Print tasks (OS X)
• Store print jobs on the printer to print later or print privately
- Mobile printing
• Print from the USB port
For more information:
The following information is correct at the time of publication. For current information, see www.hp.com/support/ljM527MFP.
HP's all-inclusive help for the printer includes the following information:
• Install and configure
Learn and use
- Solve problems
• Download software and firmware updates
- Join support forums
• Find warranty and regulatory information
Print tasks (Windows)
How to print (Windows)
The following procedure describes the basic printing process for Windows.
-
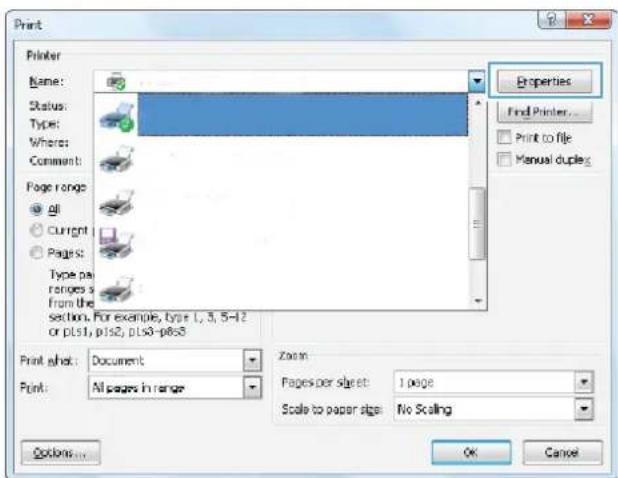
From the software program, select the Print option.
-
Select the printer from the list of printers. To change settings, click or tap the Properties or Preferences button to open the print driver.

NOTE: The name of the button varies for different software programs.

NOTE: To access these features from a Windows 8 or 8.1 Start screen app, select Devices, select Print, and then select the printer.

NOTE: For more information, click the Help (?) button in the print driver.

NOTE: The print driver might look different than what is shown here, but the steps are the same.
text_image
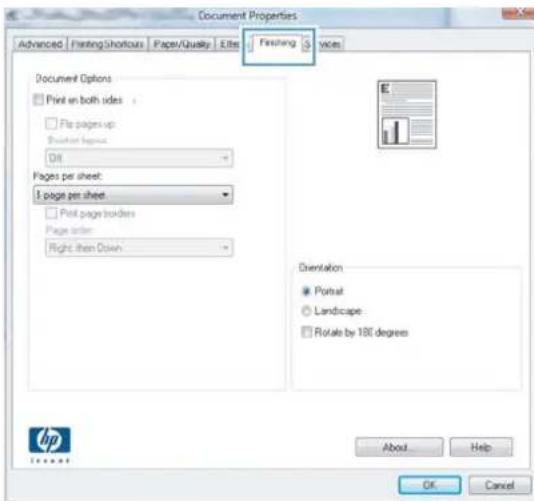
Print Printer Name: Status: Type: Where: Comment: Page range: all Current Pages: Type pa ranges s from the section. For example, type 1, 3, 5-12 or p1s1, p1s2, p1s3-p8s3 Print what: Document Print: All pages in range Zoom: Pages per sheet: 1 page Scale to paper size: No Scaling Options... Properties Find Printer... Print to file Manual duples... OK Cancel- Click or tap the tabs in the print driver to configure the available options. For example, set the paper orientation on the Finishing tab, and set the paper source, paper type, paper size, and quality settings on the Paper/Quality tab.
text_image
Document Properties Advanced Printing/Shortours F Paper/Qu icy Elite Finishing Services Document Options Print on both sides Flip pages up Switchlist features Off Pages per sheet: 1 page per sheet Print pages borders Page order: Right then Open Orientation Portrait Landscape Rotate by 100 degrees About... Help OK Cancel-
Click or tap the OK button to return to the Print dialog box. Select the number of copies to print from this screen.
-
Click or tap the OK button to print the job.
Automatically print on both sides (Windows)
Use this procedure for printers that have an automatic duplexer installed. If the printer does not have an automatic duplexer installed, or to print on paper types that the duplexer does not support, print on both sides manually.
-
From the software program, select the Print option.
-
Select the printer from the list of printers, and then click or tap the Properties or Preferences button to open the print driver.

NOTE: The name of the button varies for different software programs.

NOTE: To access these features from a Windows 8 or 8.1 Start screen app, select Devices, select Print, and then select the printer.
-
Click or tap the Finishing tab.
-
Select the Print on both sides check box. Click the OK button to close the Document Properties dialog box.
-
In the Print dialog box, click the OK button to print the job.
Manually print on both sides (Windows)
Use this procedure for printers that do not have an automatic duplexer installed or to print on paper that the duplexer does not support.
-
From the software program, select the Print option.
-
Select the printer from the list of printers, and then click or tap the Properties or Preferences button to open the print driver.

NOTE: The name of the button varies for different software programs.

NOTE: To access these features from a Windows 8 or 8.1 Start screen app, select Devices, select Print, and then select the printer.
-
Click or tap the Finishing tab.
-
Select the Print on both sides (manually) check box. Click the OK button to print the first side of the job.
-
Retrieve the printed stack from the output bin, and place it in Tray 1.
-
If prompted, touch the appropriate control panel button to continue.
Print multiple pages per sheet (Windows)
- From the software program, select the Print option.
- Select the printer from the list of printers, and then click or tap the Properties or Preferences button to open the print driver.
NOTE: The name of the button varies for different software programs.
NOTE: To access these features from a Windows 8 or 8.1 Start screen app, select Devices, select Print, and then select the printer.


-
Click or tap the Finishing tab.
-
Select the number of pages per sheet from the Pages per sheet drop-down list.
- Select the correct Print page borders, Page order, and Orientation options. Click the OK button to close the Document Properties dialog box.
- In the Print dialog box, click the OK button to print the job.
Select the paper type (Windows)
- From the software program, select the Print option.
- Select the printer from the list of printers, and then click or tap the Properties or Preferences button to open the print driver.

NOTE: The name of the button varies for different software programs.

NOTE: To access these features from a Windows 8 or 8.1 Start screen app, select Devices, select Print, and then select the printer.
-
Click or tap the Paper/Quality tab.
-
From the Paper type drop-down list, click the More... option.
-
Expand the list of Type is: options.
-
Expand the category of paper types that best describes your paper.
-
Select the option for the type of paper you are using, and then click the OK button.
-
Click the OK button to close the Document Properties dialog box. In the Print dialog box, click the OK button to print the job. If the tray needs to be configured, a tray configuration message displays on the printer control panel.
-
Load the tray with the specified type and size of paper, and then close the tray.
-
Touch the OK button to accept the detected type and size, or touch the Modify button to choose a different paper size or type.
-
Select the correct type and size, and then touch the OK button.
Additional print tasks
Go to www.hp.com/support/ljM527MFP.
Instructions are available for performing specific print tasks, such as the following:
• Create and use printing shortcuts or presets
- Select the paper size, or use a custom paper size
- Select the page orientation
• Create a booklet
• Scale a document to fit a specific paper size
• Print the first or last pages of the document on different paper
• Print watermarks on a document
Print tasks (OS X)
How to print (OS X)
The following procedure describes the basic printing process for OS X.
- Click the File menu, and then click the Print option.
- Select the printer.
- Click Show Details or Copies & Pages, and then select other menus to adjust the print settings.
NOTE: The name of the item varies for different software programs. - Click the Print button.

Automatically print on both sides (OS X)

NOTE: This information applies to printers that include an automatic duplexer.

NOTE: This feature is available if you install the HP print driver. It might not be available if you are using AirPrint.
- Click the File menu, and then click the Print option.
- Select the printer.
- Click Show Details or Copies & Pages, and then click the Layout menu.
NOTE: The name of the item varies for different software programs. - Select a binding option from the Two-Sided drop-down list.
- Click the Print button.

Manually print on both sides (OS X)

NOTE: This feature is available if you install the HP print driver. It might not be available if you are using AirPrint.
- Click the File menu, and then click the Print option.
- Select the printer.
- Click Show Details or Copies & Pages, and then click the Manual Duplex menu.
NOTE: The name of the item varies for different software programs. - Click the Manual Duplex box, and select a binding option.
- Click the Print button.
- Go to the printer, and remove any blank paper that is in Tray 1.

- Retrieve the printed stack from the output bin and place it with the printed-side facing down in the input tray.
- If prompted, touch the appropriate control panel button to continue.
Print multiple pages per sheet (OS X)
- Click the File menu, and then click the Print option.
- Select the printer.
- Click Show Details or Copies & Pages, and then click the Layout menu.

NOTE: The name of the item varies for different software programs.
- From the Pages per Sheet drop-down list, select the number of pages that you want to print on each sheet.
- In the Layout Direction area, select the order and placement of the pages on the sheet.
- From the Borders menu, select the type of border to print around each page on the sheet.
- Click the Print button.
Select the paper type (OS X)
- Click the File menu, and then click the Print option.
- Select the printer.
- Click Show Details or Copies & Pages, and then click the Media & Quality menu or the Paper/Quality menu.

NOTE: The name of the item varies for different software programs.
- Select from the Media & Quality or Paper/Quality options.

NOTE: This list contains the master set of options available. Some options are not available on all printers.
• Media Type: Select the option for the type of paper for the print job.
• Print Quality: Select the resolution level for the print job.
- Edge-To-Edge Printing: Select this option to print close to the paper edges.
- EconoMode: Select this option to conserve toner when printing drafts of documents.
- Click the Print button.
Additional print tasks
Go to www.hp.com/support/ljM527MFP.
Instructions are available for performing specific print tasks, such as the following:
• Create and use printing shortcuts or presets
- Select the paper size, or use a custom paper size
- Select the page orientation
• Create a booklet
• Scale a document to fit a specific paper size
• Print the first or last pages of the document on different paper
• Print watermarks on a document
Store print jobs on the printer to print later or print privately
Introduction
The following information provides procedures for creating and printing documents that are stored on the printer. These jobs can be printed at a later time or printed privately.
• Create a stored job (Windows)
• Create a stored job (OS X)
• Print a stored job
- Delete a stored job
Create a stored job (Windows)
Store jobs on the printer for private or delayed printing.

NOTE: The print driver might look different than what is shown here, but the steps are the same.
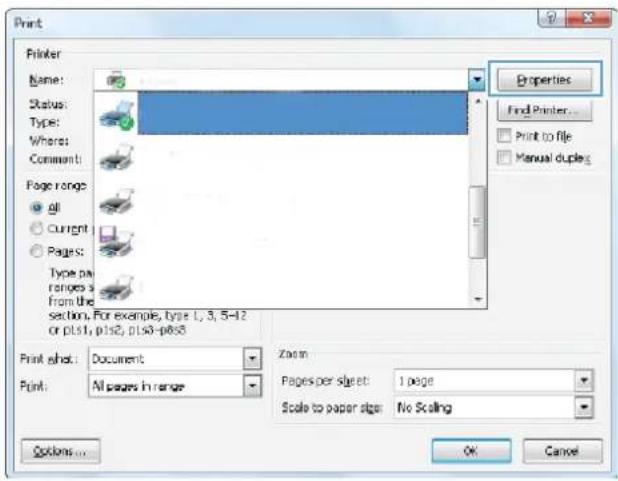
- From the software program, select the Print option.
- Select the printer from the list of printers, and then select Properties or Preferences (the name varies for different software programs).

NOTE: The name of the button varies for different software programs.

NOTE: To access these features from a Windows 8 or 8.1 Start screen app, select Devices, select Print, and then select the printer.
text_image
Print Printer Name: Status: Type: Where: Comment: Page range: all Current Pages: Type per ranges: from the section. For example, type 1, 3, 5-12 or pts1, pts2, pts3-pts8 Print sheet: Document Zoom Pages per sheet: 1 page Scale to paper size: No Scaling Print: All pages in range Options... OK Cancel Properties Find Printer... Print to file Manual duplex3. Click the Job Storage tab.
text_image
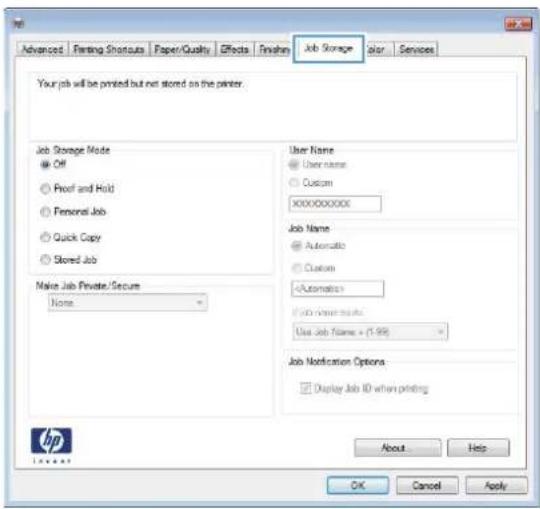
Job Storage Advanced FIRING SHORTSUTS Paper/Quality Effects Finish Your job will be printed but not stored on the printer. Job Storage Mode Off Proof and Hold Personal Job Quick Copy Stored Job Make Job Private/Secure None User Name User name Custom XXXXXXXXXX Job Name Automatic Custom Automatics Job Name Status Use Job Name + (-1.99) Job Notification Options Display Job ID when printing About Help OK Cancel Apply HP4. Select a Job Storage Mode option.
| Mode Description PIN protected Job deletion | ||
| Proof and Hold Print the first page of a document to verify print quality, and then print the rest of the document from the printer control panel | No Automatically after the job is printed or when job retention limit is reached. | |
| Personal Job The job does not print until you request it at the printer control panel. | Yes (optional) Automatically after the job is printed or when job retention limit is reached. | |
| Quick Copy Print the requested number of copies of a job and store a copy of the job in the printer memory so you can print it again later. | No Manually | |
| Stored Job Store a job on the printer and allow other users to print the job at any time. | Yes (optional) Manually | |
- To use a custom user name or job name, click the Custom button, and then enter the user name or the job name.
Select which option to use if another stored job already has that name:
• Use Job Name + (1-99): Append a unique number to the end of the job name.
- Replace Existing File: Overwrite the existing stored job with the new one.
- Click the OK button to close the Document Properties dialog box. In the Print dialog box, click the OK button to print the job.
Create a stored job (OS X)
Store jobs on the printer for private or delayed printing.
- Click the File menu, and then click the Print option.
- In the Printer menu, select the printer.
- By default, the print driver displays the Copies & Pages menu. Open the menus drop-down list, and then click the Job Storage menu.
- In the Mode drop-down list, select the type of stored job.
• Proof and Hold: Print and proof one copy of a job, and then print more copies.
- Personal Job: The job does not print until someone requests it at the printer control panel. If the job has a personal identification number (PIN), provide the required PIN at the control panel. The print job is deleted from memory after it prints and is lost if the printer loses power.
- Quick Copy: Print the requested number of copies of a job and store a copy of the job in the printer memory to print it again later.
- Stored Job: Store a job on the printer and allow other users to print the job at any time. If the job has a personal identification number (PIN), the person who prints the job must provide the required PIN at the control panel.
- To use a custom user name or job name, click the Custom button, and then enter the user name or the job name.
Select which option to use if another stored job already has that name.
• Use Job Name + (1-99): Append a unique number to the end of the job name.
- Replace Existing File: Overwrite the existing stored job with the new one.
-
If you selected the Stored Job or Personal Job option in step 3, you can protect the job with a PIN. Type a 4-digit number in the Use PIN to Print field. When other people attempt to print this job, the printer prompts them to enter this PIN number.
-
Click the Print button to process the job.
Print a stored job
Use the following procedure to print a job that is stored in the printer memory.
- Touch or press the Home button on the printer control panel.
- Select Retrieve from Device Memory.
- Select the name of the folder where the job is stored.
- Select the name of the job. If the job is private or encrypted, enter the PIN or password.
- Adjust the number of copies, and then touch the Start button or press the OK button to print the job.
Delete a stored job
When you send a stored job to the printer memory, the printer overwrites any previous jobs with the same user and job name. If a job is not already stored under the same user and job name, and the printer needs additional space, the printer might delete other stored jobs starting with the oldest. You can change the number of jobs that the printer can store from the General Settings menu on the printer control panel.
Use this procedure to delete a job that is stored in the printer memory.
- Touch or press the Home button on the printer control panel.
- Select Retrieve from Device Memory.
- Select the name of the folder where the job is stored.
- Select the name of the job, and then select the Delete button.
- If the job is private or encrypted, enter the PIN or the password, and then select the Delete button.
Mobile printing
Introduction
HP offers multiple mobile and ePrint solutions to enable easy printing to an HP printer from a laptop, tablet, smartphone, or other mobile device. To see the full list and to determine the best choice, go to www.hp.com/go/LaserJetMobilePrinting.
HP ePrint via email
HP ePrint software
AirPrint
• Android embedded printing
• Wi-Fi Direct and NFC Printing
HP ePrint via email
Use HP ePrint to print documents by sending them as an email attachment to the printer's email address from any email enabled device.
To use HP ePrint, the printer must meet these requirements:
The printer must be connected to a wired or wireless network and have Internet access.
HP Web Services must be enabled on the printer, and the printer must be registered with HP Connected.
Follow this procedure to enable HP Web Services and register with HP Connected:
- Open the HP Embedded Web Server (EWS):
a. From the Home screen on the printer control panel, touch the Network ☐ button to display the IP address or host name.
b. Open a Web browser, and in the address line, type the IP address or host name exactly as it displays on the printer control panel. Press the Enter key on the computer keyboard. The EWS opens.

https://10.10.XXXXX/

NOTE: If the Web browser displays a There is a problem with this website's security certificate message when attempting to open the EWS, click Continue to this website (not recommended).
Choosing Continue to this website (not recommended) will not harm the computer while navigating within the EWS for the HP printer.
- Click the HP Web Services tab.
- Select the option to enable Web Services.

NOTE: Enabling Web Services might take several minutes.
- Go to www.hpconnected.com to create an HP ePrint account and complete the setup process.
HP ePrint software
The HP ePrint software makes it easy to print from a Windows or Mac desktop or laptop computer to any HP ePrint-capable printer. This software makes it easy to find HP ePrint-enabled printers that are registered to your HP Connected account. The target HP printer can be located in the office or at locations across the globe.
- Windows: After installing the software, open the Print option from within your application, and then select HP ePrint from the installed printers list. Click the Properties button to configure print options.
- OS X: After installing the software, select File, Print, and then select the arrow next to PDF (in the bottom left of the driver screen). Select HP ePrint.
For Windows, the HP ePrint software supports TCP/IP printing to local printers on the network (LAN or WAN) and that support UPD PostScript®.
Windows and OS X both support IPP printing to LAN or WAN network-connected printers that support ePCL.
Windows and Mac also both support printing PDF documents to public print locations and printing using HP ePrint via email through the cloud.
Go to www.hp.com/go/eprintsoftware for drivers and information.

NOTE: The HP ePrint software is a PDF workflow utility for Mac, and is not technically a print driver.

NOTE: HP ePrint Software does not support USB printing.
AirPrint
Direct printing using Apple's AirPrint is supported for iOS 4.2 or later and from Mac computers running OS X 10.7 Lion and newer. Use AirPrint to print directly to the printer from an iPad, iPhone (3GS or later), or iPod touch (third generation or later) in the following mobile applications:
Mail
- Photos
Safari
iBooks
• Select third-party applications
To use AirPrint, the printer must be connected to the same network (sub-net) as the Apple device. For more information about using AirPrint and about which HP printers are compatible with AirPrint, go to www.hp.com/go/LaserJetMobilePrinting.

NOTE: Before using AirPrint with a USB connection, verify the version number. AirPrint versions 1.3 and earlier do not support USB connections.
Android embedded printing
HP's built-in print solution for Android and Kindle enables mobile devices to automatically find and print to HP printers that are either on a network or within wireless range for Wi-Fi Direct printing.
The printer must be connected to the same network (sub-net) as the Android device.
The print solution is built into the supported operating systems, so installing drivers or downloading software is not necessary.
For more information on how to use Android embedded printing and which Android devices are supported, go to www.hp.com/go/LaserJetMobilePrinting.
Wi-Fi Direct and NFC Printing
HP provides Wi-Fi Direct and NFC (Near Field Communication) printing for printers with a supported HP Jetdirect 3000w NFC/Wireless Accessory. This accessory is available as an option for HP LaserJet printers that include a hardware-integration pocket (HIP).
HP Wireless Direct, Wi-Fi Direct, and NFC printing enable Wi-Fi capable (mobile) devices to make a wireless network connection directly to the printer without using a wireless router.
The printer does not need to be connected to the network for this mobile walk-up printing to work.
Use HP Wireless Direct to print wirelessly from the following devices:
- iPhone, iPad, or iPod touch using Apple AirPrint or the HP ePrint app
- Android mobile devices using the HP ePrint App or the Android embedded print solution
• PC and Mac devices using the HP ePrint Software
Use Wi-Fi Direct to print wirelessly from the following devices:
- Android mobile devices using the HP ePrint App or the Android embedded print solution
For more information on HP Wireless Direct and Wi-Fi Direct printing, go to www.hp.com/go/wirelessprinting.
NFC, HP Wireless Direct, and Wi-Fi Direct capabilities can be enabled or disabled from the printer control panel.
- From the Home screen on the printer control panel, scroll to and select the Administration menu.
- Open the following menus:
• Network Settings
- Wireless Menu
- Wireless Direct
- Select On to enable wireless printing.

NOTE: In environments where more than one model of the same printer is installed, it might be helpful to provide each printer a more unique Service Set Identifier (SSID) for easier printer identification for HP Wireless Direct printing. The SSID is also available on the How to Connect Page by touching the Network button from the Home screen on the printer control panel.
Follow this procedure to change the printer SSID:
- From the Home screen on the printer control panel, scroll to and select the Administration menu.
- Open the following menus:
• Network Settings
- Wireless Menu
-
Wireless Direct
• SSID -
Select the SSID name area.
- Use the keyboard to change the name.
- Select OK.
Print from the USB port
Introduction
This printer features easy-access USB printing, for quickly printing files without sending them from a computer. The printer accepts standard USB flash drives in the USB port near the control panel. It supports the following types of files:
.pdf
• .prn
.pcl
. ps
.cht
Enable the USB port for printing
The USB port is disabled by default. Before using this feature, enable the USB port. Use one of the following methods to enable the port:
Method one: Enable the USB port from the printer control-panel menus
- Press the Home button on the printer control panel.
-
Open the fol lowing menus:
-
Administration
- General Settings
-
Enable Retrieve from USB
-
Select the Enabled option, and then touch the Save button or press the OK button.
Method two: Enable the USB port from the HP Embedded Web server (network-connected printers only)
- Open the HP Embedded Web Server (EWS):
a. From the Home screen on the printer control panel, touch the Network ☐ button to display the IP address or host name.
b. Open a Web browser, and in the address line, type the IP address or host name exactly as it displays on the printer control panel. Press the Enter key on the computer keyboard. The EWS opens.

https://10.10.XXXXX/

NOTE: If the Web browser displays a There is a problem with this website's security certificate message when attempting to open the EWS, click Continue to this website (not recommended).
Choosing Continue to this website (not recommended) will not harm the computer while navigating within the EWS for the HP printer.
-
Open the Print tab.
-
On the left side of the screen, click Retrieve from USB Setup.
- Select the Enable Retrieve from USB check box.
- Click Apply.
Print USB documents
- Insert the USB flash drive into the easy-access USB port.

NOTE: The port might be covered. For some printers, the cover flips open. For other printers, pull the cover straight out to remove it.
- The printer detects the USB flash drive. Touch or press the OK button to access the drive, or, if prompted, select the Retrieve from USB option from the list of available applications. The Retrieve from USB screen opens.
- Select the name of the document to print.

NOTE: The document might be in a folder. Open folders as necessary.
- To adjust the number of copies, select Copies, and then use the keypad to change the number of copies.
- Touch the Start button or press the OK button to print the document.
5 Copy
Make a copy
• Copy on both sides (duplex)
• Additional copy tasks
For more information:
The following information is correct at the time of publication. For current information, see www.hp.com/support/ljM527MFP.
HP's all-inclusive help for the printer includes the following information:
• Install and configure
- Learn and use
- Solve problems
• Download software and firmware updates
- Join support forums
• Find warranty and regulatory information
Make a copy
- Place the document face-down on the scanner glass, or place it face-up in the document feeder and adjust the paper guides to fit the size of the document.
- From the Home screen on the printer control panel, select Copy.
- To adjust the number of copies, touch the Copies field to open a keypad.
- Touch the More Options button, and then touch the Optimize Text/Picture button.
- Select one of the predefined options, or touch the Manually Adjust button, and then adjust the slider in the Optimize For area. Touch the OK button.
- Touch the Copy button.
Copy on both sides (duplex)
- Place the document face-down on the scanner glass, or place it face-up in the document feeder and adjust the paper guides to fit the size of the document.
- From the Home screen on the printer control panel, select Copy.
- Touch the Sides button, and then select one of the following options:
- Use 1-sided original, 2-sided output to make a two-sided copy from a one-sided original.
- Use 2-sided original, 2-sided output to make a two-sided copy from a two-sided original
-
Use 2-sided original, 1-sided output to make a one-sided copy from a two-sided original.
-
Touch the OK button.
-
Touch the Start button.
Additional copy tasks
Go to www.hp.com/support/ljM527MFP.
Instructions are available for performing specific copy tasks, such as the following:
• Copy or scan pages from books or other bound documents
• Copy mixed-size documents
• Copy or scan both sides of an identification card
• Copy or scan a document into a booklet format
6 Scan
- Set up Scan to Email
• Set up Scan to Network Folder - Set up Scan to USB Drive
- Set up Scan to SharePoint® (Flow models only)
• Create a Quick Set - Scan and send to email
- Scan and send to network folder
• Scan and send to USB Flash Drive
• Additional scan tasks
For more information:
The following information is correct at the time of publication. For current information, see www.hp.com/support/ljM527MFP.
HP's all-inclusive help for the printer includes the following information:
• Install and configure
Learn and use
- Solve problems
• Download software and firmware updates
- Join support forums
• Find warranty and regulatory information
Set up Scan to Email
Introduction
Before you begin
• Method one: Use the E-mail Setup page
• Method two: Use the E-mail Setup Wizard
• Set up Send to E-mail to use Office 365 Outlook
- Solve problems with email
Introduction
The printer has a feature that enables it to scan a document and send it to one or more email addresses. To use this scan feature, the printer must be connected to a network; however, the feature is not available until it has been configured by using the HP Embedded Web Server (EWS). There are two methods in the EWS for configuring Scan to Email. Use the E-mail Setup page for complete setup, or use the Scan to Email Setup Wizard for basic setup.
Before you begin
To set up the Scan to Email feature, the printer must have an active network connection.
Administrators need the following information before beginning the configuration process.
• Administrative access to the printer
• DNS suffix (e.g., companyname.com)
SMTP server (e.g., smtp.mycompany.com)
NOTE: If you do not know the SMTP server name, SMTP port number, or authentication information, contact the email/Internet service provider or system administrator for the information. SMTP server names and port names are typically easy to find by doing an Internet search. For example, use terms like "gmail smtp server name" or "yahoo smtp server name" to search.
- SMTP server authentication requirements for outgoing email messages, including the user name and password used for authentication, if applicable.
Use the HP Embedded Web Server (EWS) to set up the Scan to E-mail feature. Before continuing, use this procedure to open the EWS, and then set up the Scan to E-mail feature by using one of the two methods provided.

IMPORTANT: Consult your email service provider's documentation for information on digital sending limits for your email account. Some providers may temporarily lock your account if you exceed your sending limit.
Access the HP Embedded Web Server
-
From the Home screen on the printer control panel, touch the Network ☐ button to display the IP address or host name.
-
Open a Web browser, and in the address line, type the IP address or host name exactly as it displays on the printer control panel. Press the Enter key on the computer keyboard. The EWS opens.

https://10.10.XX.XXX/

NOTE: If the Web browser displays a There is a problem with this website's security certificate message when attempting to open the EWS, click Continue to this website (not recommended).
Choosing Continue to this website (not recommended) will not harm the computer while navigating within the EWS for the HP printer.
Method one: Use the E-mail Setup page
- Click the Networking tab.

NOTE: Configuring settings on the Networking tab might require the assistance of a system administrator.

- If it is not already selected, click TCP/IP Settings in the left navigation pane.
- Click the Network Identification tab.
- If DNS is required on the network, in the TCP/IP Domain Suffix area, verify that the DNS suffix for the email client being used is listed. DNS suffixes have this format: companyname.com, gmail.com, etc.
NOTE: If the Domain Name suffix is not set up, use the IP address. - Click Apply.
- Click the Scan/Digital Send tab.
- On the left navigation pane, click the E-mail Setup link, and click Default Job Options.
- On the E-mail Setup dialog, select the Enable Send to E-mail check box. If this check box is not selected, the feature is unavailable at the printer control panel.
- In the Outgoing E-mail Servers (SMTP) area, complete the steps for one of the following options:
- Select one of the displayed servers
- Click Add to start the SMTP wizard.
- In the SMTP wizard, select one of the following options:
• Method one: Enter the address of an SMTP server, and then click Next
- Method two: Select Search network for outgoing e-mail server, and then click Next. Select the server, and then click Next.
NOTE: If an SMTP server was already created for another printer function, the Use a server already in use by another function option displays. Select this option, and then configure it to be used for the email function.
- On the Set the basic information necessary to connect to the server dialog, set the options to use, and then click Next.
NOTE: Some servers have problems sending or receiving emails that are larger than 5 megabytes (MB). These problems can be prevented by entering a number in Split e-mails if larger than (MB).
NOTE: In most cases, the default port number does not need to be changed.
NOTE: If you are using Google™ Gmail for email service, select the Enable SMTP SSL Protocol check box. Typically, for gmail, the SMTP address is smtp.gmail.com, port number 465, and the SSL should be enabled.
Please refer to online sources to confirm these server settings are current and valid at the time of configuration.
- On the Server Authentication Requirements dialog, select the option that describes the server's authentication requirements:
• Server does not require authentication, and then click Next.
• Server requires authentication
From the drop-down box, select Use credentials of user to connect after Sign In at the control panel, and then click Next.
From the drop-down box, select Always use these credentials, enter the Username and Password, and then click Next.
NOTE: If using a signed-in user's credentials, set email to require sign in by the user on the printer control panel. Deny device guest access to email by clearing the check box for email in the Device Guest column in the Sign in and Permission Policies area on the Access Control dialog of the Security tab. The icon in the check box changes from a check mark to a lock.
- On the Server Usage dialog, choose the printer functions that will send email through this SMTP server, and then click the Next button.
NOTE: If the server requires authentication, a user name and password for sending automatic alerts and reports from the printer will be required.
- On the Summary and Test dialog, enter a valid email address in the Send a test e-mail to: field, and then click Test.
-
Verify that all of the settings are correct, and then click Finish to complete the outgoing email server set up.
-
In the Address and Message Field Control area, enter a Default From: setting and any of the other optional settings.
Address and Message Field Control settings:

NOTE: To display all these settings, click Advanced Settings at the bottom of the page.
| Feature Description | |
| Address Field Restrictions | Specify whether users must select an email address from an address book or whether users are allowed to enter in an email address manually.CAUTION: If Users must select from address book is selected, and any of the address fields are also set as User editable, changes to those editable fields also change the corresponding values in the address book.To prevent users from changing contacts in the Address Book at the printer control panel, go to the Access Control page on the Security tab, and deny Device Guest access to address book modifications. |
| Allow invalid e-mail address formats | Select to allow an invalid email address format. |
| User editable | To use the Default From address and Default Display Name for all emails sent from this printer (unless a user is signed in), do not select the User editable check box.When setting up the address fields, if the User editable check box is unchecked, users will not be able to edit those fields at the printer control panel when sending an email. For send-to-me functionality, clear the User editable check boxes for all of the address fields, including the From: To: CC:, and BCC: fields, and then set that user's send email From: their own email address and To: their own email address. |
| Default From: and Default Display Name: | Provide an email address and name to use for the From: address for the email message.TIP: Create an email account for the printer, and use this address for the default email address.TIP: Configure the email feature so that users must sign in before using it. This prevents users from sending an email from an address that is not their own. |
| To: Provide a To (recipient) email address for emails. | |
| CC: Provide a CC email address for emails. | |
| BCC: Provide a BCC email address for emails. | |
| Subject: Provide a default subject line for the email messages. | |
| Message: | Create a custom message. To use this message for all emails sent from the printer, clear or do not select the User editable check box for Message:. |
11. In the Signing and Encryption area, set the signing and encryption preferences.

NOTE: To display the Signing and Encryption settings, click Advanced Settings at the bottom of the page.
Signing and Encryption settings:
| Feature Description | |
| Signing Select whether to sign the security certificate. | |
| Select the User editable check box to make this setting editable at the printer control panel. | |
| Hashing Algorithm Select the algorithm to use for signing the emails. | |
| Encryption Select whether to encrypt the email. | |
| Select the User editable check box to make this setting editable at the printer control panel. | |
| Encryption Algorithm | Select the algorithm to use for encrypting the email. |
| Attribute for Recipient Public Key | Enter which attribute to use to retrieve the recipient’s public key certificate from LDAP. |
| Use the recipient public key certificate to verify the recipient | Select this setting to use the recipients’s public key certificate to verify the recipient. |
- In the Notification Settings area, select when users will receive notifications about sent emails. The default setting is using the signed in user's email address. If the recipient email address is blank, no notification is sent.

NOTE: To display the Notification settings, click Advanced Settings at the bottom of the page.
- In the File Settings area, set the default scanning preferences.

NOTE: The following list contains the master set of options available for HP LaserJet Enterprise MFP printers. Some options are not available on all printers.
| Save As... | Specify the folder and file name for the scanned file |
| Load and Save Settings Load Quick Set: Load scan settings from a saved Quick Set. | |
| NOTE: Use the HP Embedded Web Server to create and save Quick Sets. | |
| Save Defaults: Save the current settings in the Options list as default settings for future scan jobs. | |
| Document File Type | Save a scanned document as one of several types of files.The following standard file types are available:PDF: This file type provides the best overall image and text quality. PDF files require Adobe® Acrobat® Reader software for viewing.JPEG: This file type is a good choice for most graphics. Most computers have a browser that can view .JPEG files. This file type produces one file per page.TIFF: This is a standard file type that many graphics programs support. This file type produces one file per page.MTIFF: MTIFF stands for multi-page TIFF. This file type saves multiple scanned pages in a single file.XPS: XPS (XML Paper Specification) creates an XAML file that preserves the original formatting of the document and supports color graphics and embedded fonts.PDF/A: PDF/A is a type of PDF designed for long-term archival of electronic documents. All format information in the document is self-contained.HP LaserJet Enterprise Flow MFP printers also support the following OCR file types:Text (OCR): Text (OCR) creates a text file by using optical character recognition (OCR) to scan the original. A text file can be opened in any word processing program. The formatting of the original will not be saved using this option.Unicode Text (OCR): Unicode Text (OCR) is an industry standard used to consistently represent and manipulate text. This file type is useful for internationalization and localization.RTF (OCR): RTF (OCR) creates a rich text format (RTF) file by using optical character recognition (OCR) to scan the original. RTF is an alternative text format that can be opened by most word processing programs. Some of the formatting of the original will be saved using this option.Searchable PDF (OCR): Searchable PDF (OCR) creates a searchable PDF file by using optical character recognition (OCR) to scan the original. When a document is scanned in this way, use Adobe Acrobat® Reader's search tools to search for specific words or phrases within the PDF.Searchable PDF/A (OCR): Searchable PDF/A (OCR) is a type of PDF/A file that includes information about the document structure, which allows content to be searched.HTML (OCR): HTML (OCR) creates a Hypertext Markup Language (HTML) file containing the contents of the original document. HTML is used to display files on Web sites.CSV (OCR): CSV (OCR) is common text file format that contains comma-separated values. This type of file can be opened by most word processing, spreadsheet, or database programs. |
| Output Quality | Specify the output quality of scanned images, which affects the file size of the resulting file. |
| Original Sides Specify whether the original document is printed on one side or both sides. | |
| Color/Black | Specify whether the scanned image will be in color, black and gray, or black only.For color printers only. |
| Scan Mode | Standard Document: Scan a page or stack of pages through the document feeder, or individually on the flatbed glass.Book Mode: Scan an open book and output each page of the book onto different pages.2-sided ID Copy: Scan each side of an identification card on the flatbed glass and output them onto one page. After scanning the first side, the printer prompts to place the second side in the correct position on the glass. |
| Resolution | Specify the resolution of scanned images. Select a higher resolution to increase the clarity of the image. However, as the resolution increases, the file size also increases. |
| Original Size Specify the paper size for the original document. | |
| Content Orientation | Specify whether the original document is printed in Portrait or Landscape orientation. |
| Image Adjustment | Sharpness: Clarify or soften the image. For example, increasing the sharpness could make text appear crisper, but decreasing it could make photos appear smoother.Darkness: Increase or decrease the amount of white and black used in colors in scanned images.Contrast: Increase or decrease the difference between the lightest and the darkest color on the page.Background Cleanup: Remove faint colors from the background of scanned images. For example, if the original document is printed on colored paper, use this feature to lighten the background without affecting the darkness of the image.Automatic Tone: Available for Flow printers only. For original documents that have at least 100 characters of text on the page, the printer can detect which edge is the top of the page, and it orients the scanned images appropriately. If some of the pages are upside-down in relation to the other pages, the resulting scanned image has all pages right-side-up. If some of the pages have a landscape orientation, the printer rotates the image so that the top of the page is at the top of the image. |
| Optimize Text/Picture | Optimize the job for the type of image being scanned: text, graphics, or photos. |
| Erase Edges | Remove blemishes, such as dark borders or staple marks, by cleaning the edges of the scanned image. |
| Cropping options | Crop to original size: Crop the image to match the paper size of the original document.Crop to content: Crop the image to the size of the detectable content in the original document. |
| Blank Page Suppression | Exclude blank pages in the original document from scanned images. This feature is useful for scanning pages printed on both sides to eliminate blank pages in the resulting scanned document. |
| Multi-feed Detection | Enable or disable multi-feed detection. When enabled, scanning stops when the printer detects more than one page at a time being fed in the document feeder. When disabled, scanning continues when a multi-feed is detected, to allow scanning pages that are stuck together, originals with self-adhesive notes on them, or thick paper. |
| Notification | Select whether to send notifications of the status of scan jobs. The printer can print the notification, or it can send the notification in an email. |
| Save Defaults | Save the current scan settings as the new default settings for this scan function. |
- In the File Settings area, set the default file settings preferences.

NOTE: To display all these settings, click Advanced Settings at the bottom of the page.
- Review the selected options to verify that they are accurate, and then click Apply to complete the setup.
- On the left navigation pane, under E-mail Setup, click Quick Sets, and select any Quick Sets for the printer.

NOTE: Quick Sets are shortcut jobs that can be accessed within the Quick Sets application on the printer control panel.
Method two: Use the E-mail Setup Wizard
The setup wizard includes the options for basic configuration.
- Click the Networking tab.
- If it is not already selected, click TCP/IP Settings in the left navigation pane.
- Click the Network Identification tab.
- If DNS is required on the network, in the TCP/IP Domain Suffix area, verify that the DNS suffix for the email client being used is listed. DNS suffixes have this format: companyname.com, gmail.com, etc.

NOTE: If the Domain Name suffix is not set up, use the IP address.
- Click Apply.
- Click the Scan/Digital Send tab.
- On the left navigation pane, click E-mail and Save to Network Folder Quick Setup Wizards.
- Click the E-mail Setup Wizard link.
- On the Configure E-mail Server (SMTP) dialog, complete the steps for one of the following options:
- Option one: Search network for outgoing e-mail server:

NOTE: This option finds outgoing SMTP servers inside your firewall only.
- Select Search network for outgoing e-mail server, and then click Next
- Select the appropriate server from the Finding SMTP servers list, and then click Next.
- Select the option that describes the server's authentication requirements:
• Server does not require authentication, and then click Next.
• Server requires authentication
From the drop-down box, select Use credentials of user to connect after Sign In at the control panel, and then click Next.
From the drop-down box, select Always use these credentials, enter the Username and Password, and then click Next.
• Option two: Add SMTP server:
1. Select Add SMTP server
- Enter the Server Name and Port Number, and then click Next.

NOTE: In most cases, the default port number does not need to be changed.

NOTE: If you are using a hosted SMTP service such as gmail, verify the SMTP address, port number, and SSL settings from the service provider's Web site or other sources. Typically, for gmail, the SMTP address is smtp.gmail.com, port number 465, and the SSL should be enabled.
Please refer to online sources to confirm these server settings are current and valid at the time of configuration.
- Select the option that describes the server's authentication requirements:
• Server does not require authentication, and then click Next.
• Server requires authentication
From the drop-down box, select Use credentials of user to connect after Sign In at the control panel, and then click Next.
From the drop-down box, select Always use these credentials, enter the Username and Password, and then click Next.
- On the Configure E-mail Settings dialog, enter the information about the From email address, the subject line of the email, and the default message, and then click Next.

NOTE: When setting up the address fields, if the User editable check box is unchecked, users will not be able to edit those fields at the printer control panel when sending an email.
| Feature Description | |
| From:(Required) | Select one of the following:User's address (sign-in required)Default FromDefault From: and Default Display Name:Provide an email address and name to use for the email message.TIP: Create an email account for the printer, and use this address for the default email address.TIP: Configure the email feature so that users must sign in before using it. This prevents users from sending an email from an address that is not their own. |
| Subject:(Optional) | Provide a default subject line for the email messages. |
| Message:(Optional) | Create a custom message.To use this message for all emails sent from the printer, clear the User editable check box for Message:. |
- On the Configure File Scan Settings dialog, set the default scanning preferences, and then click Next.
- Review the Summary dialog, and then click Finish to complete the setup.
Set up Send to E-mail to use Office 365 Outlook
Introduction
- Configure the outgoing email server (SMTP) to send an email from an Office 365 Outlook account
Introduction
Microsoft Office 365 Outlook is a cloud-based email system provided by Microsoft which uses Microsoft's Simple Mail Transfer Protocol (SMTP) server to send or receive emails. Complete the following to enable the printer to send an email with an Office 365 Outlook account from the control panel.

NOTE: You must have an email address account with Office 365 Outlook to configure the settings in the EWS.
Configure the outgoing email server (SMTP) to send an email from an Office 365 Outlook account
- Click the Networking tab.
- If it is not already selected, click TCP/IP Settings in the left navigation pane.
- Click the Network Identification tab.
- If DNS is required on the network, in the TCP/IP Domain Suffix area, verify that the DNS suffix for the email client being used is listed. DNS suffixes have this format: companyname.com, gmail.com, etc.

NOTE: If the Domain Name suffix is not set up, use the IP address.
- Click Apply.
- Click the Scan/Digital Send tab.
- On the left navigation pane, click the Scan to E-mail link.
- Select the Enable Scan to E-mail check box. If this check box is not checked, the feature is unavailable at the printer control panel.
- In the Outgoing E-mail Servers (SMTP) area, click Add to start the SMTP wizard.
- In the I know my SMTP server address or host name field, type smtp.onoffice.com, and then click Next.
- On the Set the basic information necessary to connect to the server dialog, in the Port Number field, type 587.

NOTE: Some servers have problems sending or receiving emails that are larger than 5 megabytes (MB). These problems can be prevented by entering a number in Split e-mails if larger than (MB).
- Select the Enable SMTP SSL Protocol check box, and then click Next.
- On the Server Authentication Requirements dialog, complete the following information:
a. Select Server requires authentication.
b. From the drop-down list, select Always use these credentials
c. In the Username field, type the Office 365 Outlook email address.
d. In the Password field, type the Office 365 Outlook account password, and then click Next.
- On the Server Usage dialog, choose the printer functions that will send email through this SMTP server, and then click the Next button.
- On the Summary and Test dialog, enter a valid email address in the Send a test e-mail to: field, and then click Test.
- Verify that all of the settings are correct, and then click Finish to complete the outgoing email server set up.
Solve problems with email
Problems with sending email
- Make sure the Enable Scan to E-mail check box is checked on the Scan/Digital Send tab on the Scan to E-mail page.
-
If the feature is enabled, but the printer is still unable to send emails, the SMTP server might not be set up correctly. The cause could be any of the following reasons:
-
Authentication is required for the server, but no authentication information is sent.
The network address or hostname for the SMTP server is incorrect.
The SMTP server is not accepting email (port 25 is not open).
- Check the SMTP server settings to identify the problem.
Check the SMTP server setup

NOTE: This procedure is for Windows operating systems. The following steps show examples of responses from the server. The text portion of the response can vary from server to server.
- Open a Windows command prompt: click Start, click Run, and then enter cmd.
- Enter telnet followed by the SMTP gateway hostname and then the number 25, which is the port over which the printer is communicating. For example, enter telnet example.com 25
- Press Enter. If the SMTP gateway hostname is not valid, the response contains the following message: Could not open connection to the host on port 25: Connect Failed.
- If the SMTP gateway hostname is not valid, reconfigure the server.
- For the email digital-send feature, use the Scan/Digital Sending tab in the embedded Web server to configure the printer to use a different SMTP server.
If you receive a reply such as 220 smtp.hostname, the SMTP gateway hostname is valid. Continue with the next step.
- Identify yourself to the SMTP server. At the prompt, enter HELO followed by your host name. Press Enter. You should receive a reply.
-
Attempt to authorize to the SMTP server. At the prompt, enter AUTH. Press Enter.
-
If the reply is 503.5.3.3 AUTH not available, then the SMTP server does not require authentication.
If the reply is 250 AUTH or 334, the SMTP server requires authentication. Use the Scan to E-mail page on the Scan/Digital Sending tab of the HP Embedded Web Server to configure the correct authentication information.
- Verify that the server recognizes the email account that is sending the message. At the prompt, enter MAIL FROM: sender@domain.com where "sender@domain.com" is the email address for testing.
If the response is 550 Requested action not taken: mailbox unavailable, then the server cannot find the mailbox for that address.
If the response is 550 Requested action not taken: mailbox name not allowed, then the email address is not valid.
- Verify that the server has sent the email to the recipient. At the prompt enter RCPT TO:
recipient@example.com where "recipient@example.com" is the email address for the recipient.
If the response is 550 Requested action not taken: mailbox unavailable, then the server cannot find the mailbox for that address. The recipient email account might be configured so that it cannot receive messages from the printer.
If the response is 551 User not local: please try
Set up Scan to Network Folder
Introduction
Before you begin
• Method one: Use the Save to Network Folder Setup page
• Method two: Use the Save to Network Folder Quick Set Wizard
• Problems with sending to a network folder
Introduction
This document explains how to enable and configure the scan to network folder function. The printer has a feature that enables it to scan a document and save it to a network folder. To use this scan feature, the printer must be connected to a network; however, the feature is not available until it has been configured by using the HP Embedded Web Server (EWS). There are two methods in the EWS for configuring Scan to network folder. Use the Save to Network Folder Setup page for advanced configuration, or use the Scan to Network Folder Setup Wizard for basic configuration.
Before you begin

NOTE: To set up the Scan to Network Folder feature, the printer must have an active network connection.
Administrators need the following items before beginning the configuration process.
• Administrative access to the printer
- The fully-qualified domain name (FQDN) (e.g., \servername.us.companyname.net\scans) of the destination folder or the IP address of the server (e.g., \16.88.20.20\scans).

NOTE: The use of the term "server" in this context refers to the computer where the shared folder resides.
Use the HP Embedded Web Server (EWS) to set up the Scan to Network Folder feature. Before continuing, use this procedure to open the EWS, and then set up the Scan to Network Folder feature by using one of the methods provided.
Access the HP Embedded Web Server
- From the Home screen on the printer control panel, touch the Network ☐ button to display the IP address or host name.
- Open a Web br owser, and in the address line, type the IP address or host name exactly as it displays on the printer control panel. Press the Enter key on the computer keyboard. The EWS opens.

https://10.10.XX.XXX/

NOTE: If the Web browser displays a There is a problem with this website's security certificate message when attempting to open the EWS, click Continue to this website (not recommended).
Choosing Continue to this website (not recommended) will not harm the computer while navigating within the EWS for the HP printer.
Method one: Use the Save to Network Folder Setup page
Use this method for complete configuration of the Scan to Network Folder feature.
- Step one: Enable the Scan to Network Folder feature and configure the default job options
• Step two: Set up a Quick Set
Step one: Enable the Scan to Network Folder feature and configure the default job options
- Click the Scan/Digital Send tab.
- On the left navigation menu, click the Save to Network Folder Setup link.
- On the Save to Network Folder Setup dialog, select the Enable Save to Network Folder check box. If this box is not selected, the feature is unavailable at the printer control panel.
Complete the fields in all the dialogs on the page.
- Notification settings
- Folder Settings
- Scan Settings
File Settings
Notification settings
On the Notification Settings dialog, select one of these options:

NOTE: In order to send notification emails, the printer must be set up to use an SMTP server for sending email jobs.
• Option one: Do not notify
1. Select Do not notify.
• Option two: Notify when job completes
-
To prompt the user to review their notification settings, select Prompt user prior to job start, and then click Next.
-
Select Notify when job completes.
-
Select the method for delivering the notification from the Method Used to Deliver Notification list. If the method of notification selected is E-mail, type the email address in the Notification E-mail Address field.
-
To include a thumbnail of the first scanned page in the notification, select Include Thumbnail.
-
To prompt the user to review their notification settings, select Prompt user prior to job start, and then click Next.
• Option three: Notify only if job fails
-
Select Notify only if job fails.
-
Select the method for delivering the notification from the Method Used to Deliver Notification list.
If the method of notification selected is E-mail, type the email address in the Notification E-mail Address field.
-
To include a thumbnail of the first scanned page in the notification, select Include Thumbnail.
-
To prompt the user to review their notification settings, select Prompt user prior to job start, and then click Next.
Folder Settings
Use the Folder Settings dialog to configure the types of folders the printer sends scanned documents to.
There are two types of folder permissions to select from:
Option 1: Read and write access
To send scanned documents to a folder configured for read and write access, complete the following steps:

NOTE: Send only to folders with read and write access supports folder verification and job notification
-
If it is not already selected, select Send only to folders with read and write access.
-
To require the printer to verify folder access before starting a scan job, select Verify folder access prior to job start.

NOTE: Scan jobs can complete more quickly if Verify folder access prior to job start is not selected; however, if the folder is unavailable, the scan job will fail.
- Click Next.
Option 2: Write access only
To send scanned documents to a folder configured for write access only, complete the following steps:

NOTE: Allow sending to folders with write access only does not support folder verification or job notification

NOTE: If this option is selected, the printer cannot increment the scan filename. It sends the same filename for all scans.
Select a time-related filename prefix or suffix for the scan filename, so that each scan is saved as a unique file, and does not overwrite a previous file. This filename is determined by the information in the File Settings dialog.
-
Select Allow sending to folders with write access only.
-
Click Next.
Scan Settings
On the Scan Settings dialog, set the default scanning options.
Save As...
Specify the folder and file name for the scanned file
| Document File Type | Save a scanned document as one of several types of files.The following standard file types are available:PDF: This file type provides the best overall image and text quality. PDF files require Adobe®Acrobat® Reader software for viewing.JPEG: This file type is a good choice for most graphics. Most computers have a browser that can view .JPEG files. This file type produces one file per page.TIFF: This is a standard file type that many graphics programs support. This file type produces one file per page.MTIFF: MTIFF stands for multi-page TIFF. This file type saves multiple scanned pages in a single file.XPS: XPS (XML Paper Specification) creates an XAML file that preserves the original formatting of the document and supports color graphics and embedded fonts.PDF/A: PDF/A is a type of PDF designed for long-term archival of electronic documents. All format information in the document is self-contained.HP LaserJet Enterprise Flow MFP printers also support the following OCR file types:Text (OCR): Text (OCR) creates a text file by using optical character recognition (OCR) to scan the original. A text file can be opened in any word processing program. The formatting of the original will not be saved using this option.Unicode Text (OCR): Unicode Text (OCR) is an industry standard used to consistently represent and manipulate text. This file type is useful for internationalization and localization.RTF (OCR): RTF (OCR) creates a rich text format (RTF) file by using optical character recognition (OCR) to scan the original. RTF is an alternative text format that can be opened by most word processing programs. Some of the formatting of the original will be saved using this option.Searchable PDF (OCR): Searchable PDF (OCR) creates a searchable PDF file by using optical character recognition (OCR) to scan the original. When a document is scanned in this way, use Adobe Acrobat® Reader's search tools to search for specific words or phrases within the PDF.Searchable PDF/A (OCR): Searchable PDF/A (OCR) is a type of PDF/A file that includes information about the document structure, which allows content to be searched.HTML (OCR): HTML (OCR) creates a Hypertext Markup Language (HTML) file containing the contents of the original document. HTML is used to display files on Web sites.CSV (OCR): CSV (OCR) is common text file format that contains comma-separated values. This type of file can be opened by most word processing, spreadsheet, or database programs. |
| Output Quality | Specify the output quality of scanned images, which affects the file size of the resulting file. |
| Original Sides Specify whether the original document is printed on one side or both sides. | |
| Color/Black For color printers only. | Specify whether the scanned image will be in color, black and gray, or black only. |
| Scan Mode | Standard Document: Scan a page or stack of pages through the document feeder, or individually on the flatbed glass.Book Mode: Scan an open book and output each page of the book onto different pages.2-sided ID Copy: Scan each side of an identification card on the flatbed glass and output them onto one page. After scanning the first side, the printer prompts to place the second side in the correct position on the glass. |
| Resolution | Specify the resolution of scanned images. Select a higher resolution to increase the clarity of the image. However, as the resolution increases, the file size also increases. |
| Original Size Specify the paper size for the original document. | |
| Content Orientation | Specify whether the original document is printed in Portrait or Landscape orientation. |
| Image Adjustment | Sharpness: Clarify or soften the image. For example, increasing the sharpness could make text appear crisper, but decreasing it could make photos appear smoother.Darkness: Increase or decrease the amount of white and black used in colors in scanned images.Contrast: Increase or decrease the difference between the lightest and the darkest color on the page.Background Cleanup: Remove faint colors from the background of scanned images. For example, if the original document is printed on colored paper, use this feature to lighten the background without affecting the darkness of the image.Automatic Tone: Available for Flow printers only. For original documents that have at least 100 characters of text on the page, the printer can detect which edge is the top of the page, and it orients the scanned images appropriately. If some of the pages are upside-down in relation to the other pages, the resulting scanned image has all pages right-side-up. If some of the pages have a landscape orientation, the printer rotates the image so that the top of the page is at the top of the image. |
| Optimize Text/Picture | Optimize the job for the type of image being scanned: text, graphics, or photos. |
| Erase Edges | Remove blemishes, such as dark borders or staple marks, by cleaning the edges of the scanned image. |
| Cropping options | Crop to original size: Crop the image to match the paper size of the original document.Crop to content: Crop the image to the size of the detectable content in the original document. |
| Blank Page Suppression | Exclude blank pages in the original document from scanned images. This feature is useful for scanning pages printed on both sides to eliminate blank pages in the resulting scanned document. |
| Multi-feed Detection | Enable or disable multi-feed detection. When enabled, scanning stops when the printer detects more than one page at a time being fed in the document feeder. When disabled, scanning continues when a multi-feed is detected, to allow scanning pages that are stuck together, originals with self-adhesive notes on them, or thick paper. |
| Notification | Select whether to send notifications of the status of scan jobs. The printer can print the notification, or it can send the notification in an email. |
File Settings
On the File Settings dialog, set the default file settings for the Quick Set, and then click Next.
File settings:
| Feature Description | |
| File Name Prefix | Set the default file name prefix used for files saved to a network folder. |
| File Name Suffix | Set the default file name suffix used for files saved to a network folder. |
| File Number Format | Select a file name format for when the job is divided into multiple files. |
| File Name Preview | Enter a file name, and then click theUpdate Previewbutton. |
Step two: Set up a Quick Set
Quick Sets are shortcut jobs that can be accessed within the Quick Sets application on the printer control panel. The Scan to Network Folder feature can be minimally configured without creating a Quick Set. However, without the Quick Set, users must enter the destination folder information at the control panel for each scan job. A Quick Set is required to include Scan to Network Folder metadata.
Provide the Quick Set name, description, and options for starting
- On the left navigation pane, click Quick Sets.
- In the Quick Sets Lists area, click Add. The Quick Set Setup page opens.
- In the Quick Set Name field, type a name.

TIP: Name the Quick Set something that users can understand quickly (e.g., "Scan and save to a folder").
-
In the Quick Set Description field, type a description explaining what the Quick Set will save.
-
From the Quick Set Start Option list, select one of the following options:
-
Option one: Enter application, then user presses Start
• Option two: Start instantly upon selection
▲ Select one of the following options under Original Sides Prompt:
Use application default
Prompt for original sides

NOTE: If Start instantly upon selection is selected, the destination folder must be configured in the next step.
6. Click Next.
Configure the destination folder for scanned documents
Option 1: Shared folders or FTP folders
To save scanned documents to a standard shared folder or an FTP folder, complete the following steps:
- If it is not already selected, select Save to shared folders or FTP folders.
- Click Add.... The Add Network Folder Path dialog opens.
- On the Add Network Folder Path dialog, select one of the following options:
- Option one: Save to a standard shared network folder
-
If it is not already selected, select Save to a standard shared network folder.
-
In the UNC Folder Path field, type a folder path.
The folder path can either be the fully-qualified domain name (FQDN) (e.g., \servername.us.companyname.net\scans) or the IP address of the server (e.g., \16.88.20.20\scans). Be sure that the folder path (e.g., \scans) follows the FQDN or IP address.

NOTE: The FQDN can be more reliable than the IP address. If the server gets its IP address via DHCP, the IP address can change. However, the connection with an IP address might be faster because the printer does not need to use DNS to find the destination server.
- To automatically create a subfolder for scanned documents in the destination folder, select a format for the subfolder name from the Custom Subfolder list.
To restrict the subfolder access to the user who creates the scan job, select Restrict subfolder access to user.
-
To view the complete folder path for scanned documents, click Update Preview.
-
From the Authentication Settings list, select one of the following options:
Use credentials of user to connect after Sign In at the control panel
。 Always use these credentials

NOTE: If Always use these credentials is selected, a user name and password must be entered in the corresponding fields.
- In the Windows Domain field, type the Windows domain.

TIP: To find the Windows domain in Windows 7, click Start, click Control Panel, click System.
To find the Windows domain in Windows 8, click Search, enter System in the search box, and then click System.
The domain is listed under Computer name, domain, and workgroup settings.

NOTE: If a shared folder is set to be accessed by everyone, values for a workgroup name (default is "Workgroup"), a user name and password must be entered in the corresponding fields. However, if the folder is within a particular user's folders and not Public, the user name and password of that user must be used.

NOTE: An IP address might be necessary instead of a computer name. Many home routers do not handle computer names well, and there is no Domain Name Server (DNS). In this case, it is best to set up a static IP address on the shared PC to alleviate the problem of DHCP assigning a new IP address. On a typical home router, this is done by setting a static IP address that is on the same subnet, but outside the DHCP address range.
- Click OK.
• Option two: Save to an FTP Server

NOTE: If an FTP site is outside the firewall, a proxy server must be specified under the network settings. These settings are located in the EWS Networking tab, under the Advanced options.
- Select Save to an FTP Server.
- In the FTP Server field, type the FTP server name or IP address.
- In the Port field, type the port number.

NOTE: In most cases, the default port number does not need to be changed.
-
To automatically create a subfolder for scanned documents in the destination folder, select a format for the subfolder name from the Custom Subfolder list.
-
To view the complete folder path for scanned documents, click Update Preview.
-
From the FTP Transfer Mode list, select one of the following options:
Passive Active
- In the Username field, type the user name.
- In the Password field, type the password.
-
Click OK.
-
Click Verify Access to confirm the destination can be accessed.
Option 2: Personal shared folders
To save scanned documents to a personal shared folder, complete the following steps:

NOTE: This option is used in domain environments where the administrator configures a shared folder for each user. If the Save to a personal shared folder feature is configured, users will be required to sign in at the printer control panel using Windows credentials or LDAP authentication.
- Select Save to a personal shared folder.
- In the Retrieve the device user's home folder using this attribute field, type the user's home folder in the Microsoft Active Directory.
NOTE: Verify that the user knows where this home folder is located on the network.

- To add a user name subfolder at the end of the folder path, select Create subfolder based on user name.
To restrict the subfolder access to the user who creates the scan job, select Restrict subfolder access to user.
Summary
On the Summary dialog, review the settings, and then click Finish.
Method two: Use the Save to Network Folder Quick Set Wizard
This option opens the setup wizard that is in the HP Embedded Web Server (EWS) for the printer. The setup wizard includes the options for basic configuration.
- Click the Scan/Digital Send tab.
- Click the E-mail and Save to Network Folder Quick Set Wizard link.
- On the Add or Remove a Save to Network Folder Quick Set dialog, click Add.

NOTE: Quick Sets are shortcut jobs that can be accessed within the Quick Sets application on the printer control panel.

NOTE: The Save to Network Folder feature can be minimally configured without creating a quick set. However, without the quick set, users must enter the destination folder information at the control panel for each scan job. A quick set is required to include Save to Network Folder metadata.
- On the Add Folder Quick Set dialog, complete the following information:
a. In the Quick Set Title field, type a title.

TIP: Name the Quick Set something that users can understand quickly (e.g., "Scan and save to a folder").
b. From the Button Location drop-down, select one of the following options to indicate where the Quick Set button will display on the printer control panel:
Quick Sets Application
Home Screen
c. In the Quick Set Description field, type a description explaining what the Quick Set will save.
d. Click Next.
- On the Configure Destination Folder dialog, complete the following information:
a. In the UNC Folder Path field, type a folder path where the scan will go.
The folder path can either be the fully-qualified domain name (FQDN) (e.g., \ \servername.us.companyname.net\scans) or the IP address of the server (e.g., \ \16.88.20.20\scans). Be sure that the folder path (e.g., \scans) follows the FQDN or IP address.

NOTE: The FQDN can be more reliable than the IP address. If the server gets its IP address via DHCP, the IP address can change. However, the connection with an IP address might be faster because the printer does not need to use DNS to find the destination server.
b. From the Authentication Settings drop-down, select one of the following options:
• Use credentials of user to connect after Sign In at the control panel
• Always use these credentials

NOTE: If Always use these credentials is selected, a user name and password must be entered in the corresponding fields, and the printer's access to the folder must be verified by clicking Verify Access.
c. In the Windows Domain field, type the Windows domain.

TIP: To find the Windows domain in Windows 7, click Start, click Control Panel, click System.
To find the Windows domain in Windows 8, click Search, enter System in the search box, and then click System.
The domain is listed under Computer name, domain, and workgroup settings.
d. Click Next.
- On the Configure File Scan Settings dialog, set the default scanning preferences for the Quick Set, and then click Next.
- Review the Summary dialog, and then click Finish.
- On the Save to Network Folder Setup dialog, review the selected settings, and then click Finish to complete the setup.
Problems with sending to a network folder
| Issue Cause Solution | ||
| All users are unable to store jobs in the network folder. | A firewall might be interfering. If IPsec is enabled, it could be interfering with digital-send features. Try disabling IPsec. | |
| The server might be turned off. Verify that the server is turned on. | ||
| The DNS settings might be incorrect. Verify the UNC folder path, because it might have changed or been entered incorrectly. | ||
| A particular user is unable to store jobs in the network folder. | The folder might have write-access restrictions. | If write-access is controlled for the folder, signing in again is required to save a file to that folder. |
| If trying to send the job to a folder that is not one of the Quick Set folders, the path to the folder might not be correct. | Verify that the correct network path was entered. | |
| If a folder is specified by editing the path to a Quick Set Folder, permission to access the new folder might not be allowed. | Set permission to allow jobs to be stored in this folder by this user. | |
| The user might not be authenticated to the network server. | Verify that the user has the required credentials to gain access to the server where the network folder resides. | |
| The user might have specified a file type that is not supported. | Try saving the file with a different file-type extension. | |
| No notification was received, although the option to receive a notification was selected. | The default email address for notifications might not be set, or it might be incorrect. | Sign in to the printer, and then verify that the email address for the notification option is correct. Make sure that the SMTP server is set up. |
Set up Scan to USB Drive
Introduction
- Enable Scan to USB Drive
- Configure default scan options
- Configure the default file name settings
Introduction
This document explains how to enable and configure the scan to USB drive function. The printer has a feature that enables it to scan a document and save it to a USB drive. The feature is not available until it has been configured.
Enable Scan to USB Drive
- Open the HP Embedded Web Server (EWS):
a. From the Home screen on the printer control panel, scroll to and select the Administration menu.
b. Open a Web browser, and in the address line, type the IP address or host name exactly as it displays on the printer control panel. Press the Enter key on the computer keyboard. The EWS opens.

https://10.10.XXXXX/

NOTE: If the Web browser displays a There is a problem with this website's security certificate message when attempting to open the EWS, click Continue to this website (not recommended).
Choosing Continue to this website (not recommended) will not harm the computer while navigating within the EWS for the HP printer.
- Click the Security tab, and in the area for Hardware Ports select Enable Host USB plug and play. Click Apply.
- Click the Scan/Digital Send tab.
- Click the Save to USB link.
- Select Enable Save to USB.
- Click the Apply button at the bottom of the page.
Configure default scan options
Configure the following default options for Scan to USB Drive.

NOTE: The following list contains the master set of options available for HP LaserJet Enterprise MFP printers. Some options are not available on all printers.
Save As...
Specify the folder and file name for the scanned file
| Load and Save Settings Load Quick Set: Load scan settings from a saved Quick Set. | |
| NOTE: Use the HP Embedded Web Server to create and save Quick Sets.Save Defaults: Save the current settings in the Options list as default settings for future scan jobs. | |
| Document File Type | Save a scanned document as one of several types of files.The following standard file types are available:PDF: This file type provides the best overall image and text quality.PDFfiles require Adobe®Acrobat®Reader software for viewing.JPEG: This file type is a good choice for most graphics. Most computers have a browser that can view .JPEG files. This file type produces one file per page.TIFF: This is a standard file type that many graphics programs support. This file type produces one file per page.MTIFF: MTIFF stands for multi-page TIFF. This file type saves multiple scanned pages in a single file.XPS: XPS (XML Paper Specification) creates an XAML file that preserves the original formatting of the document and supports color graphics and embedded fonts.PDF/A: PDF/A is a type of PDF designed for long-term archival of electronic documents. All format information in the document is self-contained.HP LaserJet Enterprise Flow MFP printers also support the following OCR file types:Text (OCR): Text (OCR) creates a text file by using optical character recognition (OCR) to scan the original. A text file can be opened in any word processing program. The formatting of the original will not be saved using this option.Unicode Text (OCR): Unicode Text (OCR) is an industry standard used to consistently represent and manipulate text. This file type is useful for internationalization and localization.RTF (OCR): RTF (OCR) creates a rich text format (RTF) file by using optical character recognition (OCR) to scan the original. RTF is an alternative text format that can be opened by most word processing programs. Some of the formatting of the original will be saved using this option.Searchable PDF (OCR): Searchable PDF (OCR) creates a searchable PDF file by using optical character recognition (OCR) to scan the original. When a document is scanned in this way, use Adobe Acrobat® Reader's search tools to search for specific words or phrases within the PDF.Searchable PDF/A (OCR): Searchable PDF/A (OCR) is a type of PDF/A file that includes information about the document structure, which allows content to be searched.HTML (OCR): HTML (OCR) creates a Hypertext Markup Language (HTML) file containing the contents of the original document. HTML is used to display files on Web sites.CSV (OCR): CSV (OCR) is common text file format that contains comma-separated values. This type of file can be opened by most word processing, spreadsheet, or database programs. |
| Output Quality | Specify the output quality of scanned images, which affects the file size of the resulting file. |
| Original Sides Specify whether the original document is printed on one side or both sides. | |
| Color/Black For color printers only. | Specify whether the scanned image will be in color, black and gray, or black only. |
| Scan Mode | Standard Document: Scan a page or stack of pages through the document feeder, or individually on the flatbed glass.Book Mode: Scan an open book and output each page of the book onto different pages.2-sided ID Copy: Scan each side of an identification card on the flatbed glass and output them onto one page. After scanning the first side, the printer prompts to place the second side in the correct position on the glass. |
| Resolution | Specify the resolution of scanned images. Select a higher resolution to increase the clarity of the image. However, as the resolution increases, the file size also increases. |
| Original Size Specify the paper size for the original document. | |
| Content Orientation | Specify whether the original document is printed in Portrait or Landscape orientation. |
| Image Adjustment | Sharpness: Clarify or soften the image. For example, increasing the sharpness could make text appear crisper, but decreasing it could make photos appear smoother.Darkness: Increase or decrease the amount of white and black used in colors in scanned images.Contrast: Increase or decrease the difference between the lightest and the darkest color on the page.Background Cleanup: Remove faint colors from the background of scanned images. For example, if the original document is printed on colored paper, use this feature to lighten the background without affecting the darkness of the image.Automatic Tone: Available for Flow printers only. For original documents that have at least 100 characters of text on the page, the printer can detect which edge is the top of the page, and it orients the scanned images appropriately. If some of the pages are upside-down in relation to the other pages, the resulting scanned image has all pages right-side-up. If some of the pages have a landscape orientation, the printer rotates the image so that the top of the page is at the top of the image. |
| Optimize Text/Picture | Optimize the job for the type of image being scanned: text, graphics, or photos. |
| Erase Edges | Remove blemishes, such as dark borders or staple marks, by cleaning the edges of the scanned image. |
| Cropping options | Crop to original size: Crop the image to match the paper size of the original document.Crop to content: Crop the image to the size of the detectable content in the original document. |
| Blank Page Suppression | Exclude blank pages in the original document from scanned images. This feature is useful for scanning pages printed on both sides to eliminate blank pages in the resulting scanned document. |
| Multi-feed Detection | Enable or disable multi-feed detection. When enabled, scanning stops when the printer detects more than one page at a time being fed in the document feeder. When disabled, scanning continues when a multi-feed is detected, to allow scanning pages that are stuck together, originals with self-adhesive notes on them, or thick paper. |
| Notification | Select whether to send notifications of the status of scan jobs. The printer can print the notification, or it can send the notification in an email. |
| Save Defaults | Save the current scan settings as the new default settings for this scan function. |
Configure the default file name settings
| Option name Description | |
| File Name Prefix | Set the default file name prefix. |
| File Name Suffix | Set the default file name suffix. |
| File Number Format | Select a file name format for when the job is divided into multiple files. |
| File Name Preview | Enter a file name, and then click theUpdate Previewbutton. |
Set up Scan to SharePoint® (Flow models only)
Introduction
- Enable Scan to SharePoint®
- Scan and save a file directly to a Microsoft SharePoint® site
Introduction
Use Scan to SharePoint® to scan documents directly to a Microsoft® SharePoint® site. This feature eliminates the need to scan the documents to a network folder, USB flash drive, or email message, and then manually upload the files to the SharePoint® site.
Scan to SharePoint® supports all scanning options, including the ability to scan documents as images or use the OCR features to create text files or searchable PDFs.
The feature is disabled by default. Enable Scan to SharePoint® in the HP Embedded Web Server (EWS).
Enable Scan to SharePoint®

NOTE: Before this procedure can be completed, the destination folder that the scanned files will be saved to must exist on the SharePoint® site, and write access must be enabled to the destination folder.
Scan to SharePoint ^® is disabled by default. Follow these steps to enable the feature:
- Open the HP Embedded Web Server (EWS):
a. From the Home screen on the printer control panel, touch the Network ☐ button to display the IP address or host name.
b. Open a Web browser, and in the address line, type the IP address or host name exactly as it displays on the printer control panel. Press the Enter key on the computer keyboard. The EWS opens.

https://10.10.XX.XXX/

NOTE: If the Web browser displays a There is a problem with this website's security certificate message when attempting to open the EWS, click Continue to this website (not recommended).
Choosing Continue to this website (not recommended) will not harm the computer while navigating within the EWS for the HP printer.
- Open the Scan/Digital Send tab, and then select the Save to SharePoint® menu in the left column.
- Select Enable Save to SharePoint ^® , and then click Apply.
- Click Add in the Quick Sets section to launch the Quick Set Wizard.
- Enter a name for the Quick Set in the Quick Set Name field.
- Enter a description for the Quick Set in the Quick Set Description: field. This description displays with the Quick Set button on the printer control-panel display.
-
Select a Quick Set Start Option:
-
Enter application, then user presses Start: The printer opens the scan application for the Quick Set to review or make changes to the settings before pressing Start to begin the job.
- Start instantly upon selection: The job starts instantly when the Quick Set is selected.

NOTE: In most cases it is best to start the Quick Set manually to check and set options before starting the job.
8. Click Next.
- To add the path to the SharePoint folder, click Add. Copy the target path from a browser address field, and paste it into the SharePoint Path: field. Click Generate Short URL to create a shortened URL to display on the printer control panel.
- By default, the printer overwrites an existing file that has the same file name as the new file. Clear Overwrite existing files so that a new file with the same name as an existing file is given a time/date stamp.
- Select an option from the Authentication Settings drop-down menu. Select whether it is necessary to sign in to the SharePoint site with credentials, or store the credentials within the Quick Set.

NOTE: Use credentials of user to connect after Sign In at the control panel is selected in the Authentication Settings drop-down menu, the logged-in user must have permissions to write to the specified SharePoint site.

NOTE: For security purposes, the printer does not display credentials entered in the Quick Set Wizard.
- If entering credentials, click Verify Access to make certain that the path and other information are correct, and then click OK to return to the SharePoint Destination Settings window.
-
Optional: Enter an additional SharePoint path. Click Next to continue.
-
Optional: Configure the Quick Set to send email messages or print a summary page if a job either completes successfully or fails. Select an option from the Condition on Which to Notify drop-down menu, enter the notification method and email address to send notifications to, if necessary, and then click Next.

NOTE: To use the email notification feature, first configure the email feature on the printer.
-
Select options from the Scan Settings window, and then click Next.
-
Select options from the File Settings window. Select predefined file name prefixes and suffixes from the drop-down menus, and enter a default file name. Click Update Preview to preview the selected settings. Choose the default file format from the Default File Type drop-down menu.

NOTE: The Default File Types menu includes the OCR file formats.
- Click Next to see a preview of the Quick Set button as it will appear on the control-panel display, and then click Finish to complete the setup.
Scan and save a file directly to a Microsoft SharePoint® site
- Place the document face-down on the scanner glass, or place it face-up in the document feeder and adjust the paper guides to fit the size of the document.
- From the Home screen on the printer control panel, touch Scan to SharePoint®.
-
Select one of the items in the Quick Sets list.
-
Touch the File Name: text field to open a keyboard, and then type the name for the file using either the on-screen keyboard or the physical keyboard. Touch OK.
- If necessary, touch the File Type drop-down menu to select a different output file format.
- Touch More Options to view and configure settings for the document.
- Preview the image at any time by touching the Preview 📋 button in the upper-right corner of the screen. For more information about this feature, touch the Help button on the preview screen.
- Touch the Start button to save the file.
Create a Quick Set
Use the Quick Sets feature to quickly access preset job options. Use the HP Embedded Web Server to create Quick Sets, which are then available in the Quick Sets application on the printer control panel. Quick Sets are available for the following scan/send features:
Copy
- Scan to E-mail
- Scan to Network Folder
- Scan to USB Drive
- Scan to Fax
- Scan to SharePoint®
Ask the system administrator for assistance with the following steps:
- Open the HP Embedded Web Server (EWS):
a. From the Home screen on the printer control panel, scroll to and select the Administration menu.
b. Open a Web browser, and in the address line, type the IP address or host name exactly as it displays on the printer control panel. Press the Enter key on the computer keyboard. The EWS opens.

https://10.10.XXXXX/

NOTE: If the Web browser displays a There is a problem with this website's security certificate message when attempting to open the EWS, click Continue to this website (not recommended).
Choosing Continue to this website (not recommended) will not harm the computer while navigating within the EWS for the HP printer.
- Click the General tab.
- On the left navigation pane, click the Quick Sets link.
- On the Quick Sets List dialog, click Add.
- On the Select an application dialog, select the application for the new Quick Set. Click Next.
-
Provide the following information:
-
Quick Set Name: This title appears on the new Quick Set button on the printer control panel.
- Quick Set Description: This short description appears next to the title on the new Quick Set button on the control panel.
- Quick Set start option: Select one of these options:
Enter application, then user presses Start: The printer opens the application for the Quick Set, providing the opportunity to review and change the settings before touching the Start button to begin the job.
Start instantly upon selection: The job starts instantly when the Quick Set is selected.
Click Next.
-
The next several dialogs that appear depend on which application was selected in Step 5:
-
For Save to E-mail, the following dialogs appear: Address Field Restrictions, Signing and Encryption.
- For Fax, the following dialog appears: Select Fax Recipients.
- For Save to Network Folder, the following dialog appears: Folder Settings.
- For Save to USB Drive the following dialog appears: Set where files are saved on the USB storage device.
- For Save to SharePoint® the following dialogs appear: SharePoint® Destination Settings, Add SharePoint® Path, SharePoint® Destination Settings.

NOTE: The Scan to SharePoint® feature is available for all HP Flow MFPs, Digital Senders, and the Scanjet 7000nx with firmware datecode 20120119 or newer.
• For Copy the following dialog appears: Copy Settings.
Proceed through the destination-specific dialogs. Click Next to advance to the next dialog.
- On the Notification Settings dialog, select the scan status notification preference, and then click Next.
- On the Scan Settings dialog, select the scan settings to use. Click Next.
- On the File Settings dialog, select the file settings to use. Click Next.
- Review the Summary dialog, and then click Finish.
- On the Quick Set-specific dialog, click Apply at the bottom of the window to save the Quick Set.
Scan and send to email
Introduction
The printer has a feature that enables it to scan a document and send it to one or more email addresses. Before using this feature, use the HP Embedded Web Server to enable it and set it up.
Scan and send a document to email
- Place the document face-down on the scanner glass, or place it face-up in the document feeder and adjust the paper guides to fit the size of the document.
- From the Home screen on the printer control panel, touch the E-mail button.

NOTE: If prompted, type your user name and password.
- Touch the To field to open a keyboard.

NOTE: If you are signed in to the printer, your user name or other default information might appear in the From field. If so, you might not be able to change it.
- Specify the recipients by using one of these methods:
Enter addresses manually
Enter the address in the To field. To send to multiple addresses, separate the addresses with a semicolon, or touch the Enter button on the touchscreen keyboard after typing each address.
Enter addresses from the Contacts list
a. Touch the Address Book button that is next to the To: field to open the Address Book screen.
b. From the drop-down list, select the address book view that you want to use.
c. Select a name from the list of contacts, and then touch the right arrow 📄 button to add the name to the recipients list. Repeat this step for each recipient, and then touch the OK button.
-
Complete the Subject , and File Name fields by touching the field and using the touchscreen keyboard to enter information. Touch the OK button when you have completed the fields.
-
To configure settings for the document, touch the More Options button. For example:
-
Select File Type and Resolution to specify the type of file to create, the resolution, and the output quality.
-
If the original document is printed on both sides, select Original Sides, and then select 2 Sided.
-
Touch the preview button to preview the document.
-
Touch the Start button to send.

NOTE: The printer might prompt you to add the email address to the address book or the contact list.
Scan and send to network folder
Introduction
The printer can scan a file and save it in a shared folder on the network. Before using this feature, use the HP Embedded Web server to enable the feature and configure the shared folders. The system administrator can configure pre-defined Quick Sets folders; otherwise it is necessary to specify the folder path for each job.
Scan and save the document to a folder

NOTE: You might be required to sign in to the printer to use this feature.
- Place the document face-down on the scanner glass, or place it face-up in the document feeder and adjust the paper guides to fit the size of the document.
- From the Home screen on the printer control panel, touch the Save to Network Folder button.
- To specify a path for this job only, touch the Add 📋 button to open a keyboard, and type the path to the folder, and then touch the OK button. Use this format for the path:
\server\folder, where "server" is the name of the server that hosts the shared folder, and "folder" is the name of the shared folder. If the folder is nested inside other folders, complete all necessary segments of the path to reach the folder. For example: \server\folder\folder
Or, select a pre-defined Quick Sets path or a path associated with a Contact.

NOTE: The Folder Paths field might have a pre-defined path, and it might not be editable. In this situation, the administrator has configured this folder for common access.
-
Touch the File Name text field to open a keyboard, and then type the name for the file, and then touch the OK button.
-
To configure settings for the document, touch the More Options button. For example:
-
Select File Type and Resolution to specify the type of file to create, the resolution, and the output quality.
-
If the original document is printed on both sides, select Original Sides, and then select 2 Sided.
-
Touch the preview button to preview the document.
-
When the document is ready, touch the Start button to save the file.
Scan and send to USB Flash Drive
Introduction
The printer can scan a file and save it on a USB flash drive. Before using this feature, use the HP Embedded Web server to enable and configure it.
Scan and save the document to a USB flash drive

NOTE: You might be required to sign in to the printer to use this feature.
- Place the document face-down on the scanner glass, or place it face-up in the document feeder and adjust the paper guides to fit the size of the document.
- Insert the USB flash drive into the USB port near the printer control panel.
- From the Home screen on the printer control panel, scroll to and touch the Save to USB button.
- Save the file on the root of the USB flash drive, save it in an existing folder, or touch the New Folder button to create a new folder on the USB flash drive..
-
Touch the File Name text field to open a keyboard, and then type the name for the file, and then touch the OK button.
-
To configure settings for the document, touch the More Options button. For example:
-
Select File Type and Resolution to specify the type of file to create, the resolution, and the output quality.
-
If the original document is printed on both sides, select Original Sides, and then select 2 Sided.
-
Touch the preview button to preview the document.
-
When the document is ready, touch the Start button to save the file.
Additional scan tasks
Go to www.hp.com/support/ljM527MFP.
Instructions are available for performing specific scan tasks, such as the following:
• Copy or scan pages from books or other bound documents
- Send a scanned document to a folder in the printer memory
• Copy or scan both sides of an identification card
• Copy or scan a document into a booklet format
7 Fax
- Set up fax
• Change fax configurations
Send a fax
• Additional fax tasks
For more information:
The following information is correct at the time of publication. For current information, see www.hp.com/support/ljM527MFP.
HP's all-inclusive help for the printer includes the following information:
• Install and configure
Learn and use
- Solve problems
• Download software and firmware updates
- Join support forums
• Find warranty and regulatory information
Set up fax
Introduction
This information applies to fax and Flow models, or to other printers when an optional analog fax accessory has been installed. Before continuing, connect the printer to a phone line (for analog fax) or to an Internet or network fax service.
Set up fax by using the printer control panel
- From the Home screen on the printer control panel, scroll to and touch Administration.
- Open the following menus:
Fax Settings
Fax Send Settings
Fax Send Setup
Fax Setup Wizard

NOTE: If the Fax Settings menu does not appear in the menu listing, LAN or Internet fax might be enabled. When LAN or Internet fax is enabled, the analog fax accessory is disabled and the Fax Settings menu does not display. Only one fax feature, either LAN fax, analog fax, or Internet fax, can be enabled at a time. To use analog fax when LAN fax is enabled, use the HP Embedded Web Server to disable LAN fax.
- Follow the steps in the Fax Setup Wizard to configure the required settings.
Change fax configurations

NOTE: The settings configured using the Fax Setup Wizard on the control panel override any settings made in the HP Embedded Web Server.
Fax dialing settings
• General fax send settings
Fax receive settings
Fax dialing settings
- From the Home screen on the product control panel, scroll to and touch Administration.
- Open the following menus:
Fax Settings
Fax Send Settings
Fax Send Setup
Fax Dialing Settings
Configure any of the following settings:
| Menu item Description | |
| Fax Dial Volume | Use the Fax Dial Volume setting to control the product's dialing volume level when sending faxes. |
| Dialing Mode | The Dialing Mode setting sets the type of dialing that is used: either tone (touch-tone phones) or pulse (rotary-dial phones). |
| Fax Send Speed | The Fax Send Speed setting sets the modem bit rate (measured in bits per second) of the Analog Fax modem while sending a fax.Fast (default) — v.34/max 33,600 bpsMedium — v.17/max 14,400 bpsSlow — v.29/max 9,600 bps |
| Redial Interval | The Redial Interval setting selects the number of minutes between retries if the number dialed is busy or not answering, or if an error occurs.NOTE: You might observe a redial message on the control panel when both the Redial On Busy and Redial On No Answer settings are set to off. This occurs when the fax accessory dials a number, establishes a connection, and then loses the connection. As a result of this error condition, the fax accessory performs three automatic redial attempts regardless of the redial settings. During this redial operation, a message displays on the control panel to indicate that a redial is in progress. |
| Redial On Error | The Redial On Error feature sets the number of times a fax number will be redialed when an error occurs during a fax transmission. |
| Redial On Busy | The Redial On Busy setting selects the number of times (0 through 9) the fax accessory redials a number when the number is busy. The interval between retries is set by the Redial Interval setting. |
| Redial On No Answer | The Redial On No Answer setting selects the number of times the fax accessory redials if the number dialed does not answer. The number of retries is either 0 to 1 (used in the U.S.) or 0 to 2, depending on the country/region setting. The interval between retries is set by the redial interval setting. |
| Detect Dial Tone | The Detect Dial Tone setting determines whether the fax checks for a dial tone before sending a fax. |
| Dialing Prefix | The Dialing Prefix setting allows you to enter a prefix number (such as a "9" to access an outside line) when dialing. This prefix number is automatically added to all phone numbers when dialed. |
General fax send settings
- From the Home screen on the product control panel, scroll to and touch Administration.
- Open the following menus:
Fax Settings
Fax Send Settings
Fax Send Setup
• General Fax Send Settings
Configure any of the following settings:
| Menu item Description | |
| Fax Number Confirmation | When the Fax Number Confirmation feature is enabled, the fax number must be entered twice to ensure that it was entered correctly. The feature is disabled by default. |
| PC Fax Send | Use the PC Fax Send feature to send faxes from a PC. This feature is enabled by default. |
| Fax Header | Use the Fax Header feature to control whether the header is appended to the top, and content is shifted down, or if the header is overlayed on top of the previous header. |
| JBIG Compression | Enabling the JBIG Compression feature can reduce phone-call charges by reducing fax transmission time and might be the preferred setting. However, using the JBIG Compression feature might cause compatibility problems when communicating with some older fax machines, in which case you might need to disable it.NOTE: The JBIG Compression feature works only when both the sending and receiving machines have this capability. |
| Error Correction Mode | Normally, the fax accessory monitors the signals on the telephone line while it is sending or receiving a fax. If the fax accessory detects an error during the transmission and the Error Correction Mode setting is on, the fax accessory can request that the error portion of the fax be sent again.The Error Correction Mode feature is enabled by default. You should turn it off only if you are having trouble sending or receiving a fax and if you are willing to accept the errors in the transmission and a probable quality reduction in the image. Turning off the setting might be useful when you are trying to send a fax overseas or receive one from overseas, or if you are using a satellite telephone connection.NOTE: Some VoIP providers might suggest turning off the Error Correction Mode setting. However, this is not usually necessary. |
| Fax Number Speed Dial Matching | Enabling the Fax Number Speed Dial Matching can help when dialing faxes.When you dial a fax number manually, this feature checks the stored speed dial entries for a number that matches the number you enter. This can speed the dialing process and help you if you do not remember the speed dial entry number for a given fax number.If the product finds a matching speed dial entry for the fax number entered manually, you can touch Yes to send the fax to that number or have the number added to the fax distribution list. |
Fax receive settings
- From the Home screen on the product control panel, scroll to and touch Administration.
- Open the following menus:
Fax Settings
- Fax Receive Settings
- Fax Receive Setup
Configure any of the following settings:
| Menu item Description | |
| Ringer Volume | Touch the Ringer Volume drop-down menu and adjust the ringer volume settings. |
| Rings To Answer | The Rings To Answer setting determines the number of times the phone rings before the call is answered by the fax accessory.NOTE: The default range for the available options for the Rings To Answer setting is country/region-specific. The range of possible Rings To Answer options is limited by country/region.If you experience problems with the fax accessory answering, and the Rings To Answer setting is 1, try increasing it to 2. |
| Fax Receive Speed | Touch the Fax Receive Speed drop down menu and select one of the following options:Fast (default) — v.34/max 33,600 bpsMedium — v.17/max 14,400 bpsSlow — v.29/max 9,600 bps |
Menu item Description
| Ring Interval | Touch the box beneath the Ring Interval heading to open the keypad. Enter a value for the ring interval on the keypad, and then touch the OK button. The default setting for ring interval is 600 ms. |
| Ring Frequency | Touch the box beneath the Ring Frequency heading to open the keypad. Enter a value for the ring frequency on the keypad, and then touch the OK button. The default setting for ring frequency is 68 Hz, which detects rings up to 68 Hz. |
Send a fax
- Place the document face-down on the scanner glass, or place it face-up in the document feeder and adjust the paper guides to fit the size of the document.
- From the Home screen on the printer control panel, touch the Fax button.
- Specify the recipients by using one of these methods:
Enter recipients manually
▲ Touch the Fax Number field to open the keypad, enter a fax number, and then touch the OK button.
Enter recipients from the Contacts list
a. Touch the Contacts 📊 button that is next to the Fax Number field to open the Contacts screen.
b. From the drop-down list, select the appropriate contact list.
c. Select a name from the list of contacts to add the name to the recipients list. Repeat this step for each recipient, and then touch the OK button.
-
To configure settings for the document, touch the More Options button. For example:
-
Select Resolution to specify the resolution for the fax.
-
If the original document is printed on both sides, select Original Sides, and then select 2 Sided.
-
Touch the preview button to preview the document.
-
When the document is ready, touch the Start button to send the fax.
Additional fax tasks
Go to www.hp.com/support/ljM527MFP.
Instructions are available for performing specific fax tasks, such as the following:
• Create and manage fax speed dial lists
- Configure fax billing codes
• Use a fax printing schedule
• Block incoming faxes
Fax archiving and forwarding
8 Manage the printer
- Advanced configuration with HP Embedded Web Server (EWS)
• Advanced configuration with HP Utility for OS X - Configure IP network settings
• Printer security features
• Energy-conservation settings
HP Web Jetadmin
• Software and firmware updates
For more information:
The following information is correct at the time of publication. For current information, see www.hp.com/support/ljM527MFP.
HP's all-inclusive help for the printer includes the following information:
• Install and configure
- Learn and use
- Solve problems
• Download software and firmware updates
- Join support forums
• Find warranty and regulatory information
Advanced configuration with HP Embedded Web Server (EWS)
Introduction
• How to access the HP Embedded Web Server (EWS)
HP Embedded Web Server features
Introduction
Use the HP Embedded Web Server to manage printing functions from a computer instead of the printer control panel.
• View printer status information
• Determine the remaining life for all supplies and order new ones
• View and change tray configurations
• View and change the printer control-panel menu configuration
• View and print internal pages
• Receive notification of printer and supplies events
• View and change network configuration
The HP Embedded Web Server works when the printer is connected to an IP-based network. The HP Embedded Web Server does not support IPX-based printer connections. Internet access is not needed to open and use the HP Embedded Web Server.
When the printer is connected to the network, the HP Embedded Web Server is automatically available.

NOTE: The HP Embedded Web Server is not accessible beyond the network firewall.
How to access the HP Embedded Web Server (EWS)
- From the Home screen on the printer control panel, touch the Network button to display the IP address or host name.
- Open a Web browser, and in the address line, type the IP address or host name exactly as it displays on the printer control panel. Press the Enter key on the computer keyboard. The EWS opens.

https://10.10.XXXXX/

NOTE: If the Web browser displays a There is a problem with this website's security certificate message when attempting to open the EWS, click Continue to this website (not recommended).
Choosing Continue to this website (not recommended) will not harm the computer while navigating within the EWS for the HP printer.
To use the HP Embedded Web Server, the browser must meet the following requirements:
Windows® 7
• Internet Explorer (version 8.x or greater)
• Google Chrome (version 34.x or greater)
- Firefox (version 20.x or greater)
Windows ^® 8 or greater
• Internet Explorer (version 9.x or greater)
• Google Chrome (version 34.x or greater)
- Firefox (version 20.x or greater)
OS X
• Safari (version 5.x or greater)
• Google Chrome (version 34.x or greater)
Linux
• Google Chrome (version 34.x or greater)
- Firefox (version 20.x or greater)
HP Embedded Web Server features
Information tab
General tab
- Copy/Print tab
- Scan/Digital Send tab
Fax tab
Troubleshooting tab
• Security tab
HP Web Services tab
- Networking tab
Other Links list
Information tab
Table 8-1 HP Embedded Web Server Information tab
| Menu Description | |
| Device Status | Shows the printer status and shows the estimated life remaining of HP supplies. The page also shows the type and size of paper set for each tray. To change the default settings, click the Change Settings link. |
| Job Log Shows a summary of all jobs the printer has processed. | |
| Configuration Page | Shows the information found on the configuration page. |
| Supplies Status Page Shows the status of the supplies for the printer. | |
| Event Log Page | Shows a list of all printer events and errors. Use the HP Instant Support link (in the page footer on all HP Embedded Web Server pages) to connect to a set of dynamic Web pages that help solve problems. These pages also show additional services available for the printer. |
| Usage Page | Shows a summary of the number of pages the printer has printed, grouped by size, type, and paper print path. |
| Device Information | Shows the printer network name, address, and model information. To customize these entries, click the Device Information menu on the General tab. |
| Control Panel Snapshot Shows an image of the current screen on the control panel display. | |
| Upload a print-ready file from the computer to print. The printer uses the default print settings to print the file. | |
| Printable Reports and Pages | Lists the internal reports and pages for the printer. Select one or more items to print or view. |
General tab
Table 8-2 HP Embedded Web Server General tab
| Menu Description | |
| Control Panel Customization Reorder, show, or hide features on the control-panel display. | |
| Change the default display language. | |
| Quick Sets Setup | Configure jobs that are available in the Quick Sets area of the Home screen on the printer control panel. |
| Alerts Setup email alerts for various printer and supplies events. | |
| Control Panel Administration Menu | Shows the menu structure of the Administration menu on the control panel. |
| NOTE: Configure settings on this screen, or the HP Embedded Web Server provides more advanced configuration options than are available through the Administration menu. | |
| AutoSend | Configure the printer to send automated emails regarding printer configuration and supplies to specific email addresses. |
| Edit Other Links | Add or customize a link to another Web site. This link displays in the Other Links area on all HP Embedded Web Server pages. |
| Ordering Information | Enter information about ordering replacement toner cartridges. This information displays on the supplies status page. |
| Device Information | Name the printer and assign an asset number to it. Enter the name of the primary contact who will receive information about the printer. |
| Language | Set the language in which to display the HP Embedded Web Server information. |
| Date and Time | Set the date and time or synchronize with a network time server. |
| Energy Settings | Set or edit sleep settings for business and non-business hours and wake, sleep, and holiday events for the printer. |
| Set which interactions with the printer cause it to wake from sleep mode. | |
| Backup and Restore | Create a backup file that contains printer and user data. If necessary, use this file to restore data to the printer. |
| Reset Factory Settings Reset printer settings to the factory defaults. | |
| Solution Installer | Install third-party software programs that can enhance the printer functionality. |
| Firmware Upgrade | Download and install printer firmware upgrade files. |
| Quota and Statistics Services | Provides connection information about third-party job-statistics services. |
Copy/Print tab
Table 8-3 HP Embedded Web Server Copy/Print tab
| Menu Description | |
| Retrieve from USB Setup | Enable or disable the Print from USB Drive menu on the control panel. |
| Manage Stored Jobs Enable or disable the ability to store jobs in the printer memory. | |
| Configure job-storage options. | |
| Adjust Paper Types | Override the factory-default mode settings if print quality problems occur when using a specific paper type. |
| Restrict Color(Color printers only) | Permit or restrict color printing and copying. |
| Specify permissions for individual users or for jobs that are sent from specific software programs. | |
| General Print Settings | Configure settings for all print jobs, including copy jobs or received faxes. |
| Copy Settings Configure the default options for copy jobs. | |
| Manage Trays Configure settings for paper trays. | |
Table 8-4 HP Embedded Web Server Scan/Digital Send tab
| Menu Description | |
| E-mail Setup | Configure the default email settings for digital sending, including the following:Settings for the outgoing mail (SMTP) serverDefault settings for E-mail Quick Sets jobsDefault message settings, such as the "From" address and the subject lineSettings for digital signatures and encryptionSettings for email notificationsDefault scan settings for email jobsDefault file settings for email jobs |
| Save to Network Folder | Configure the network folder settings for digital sending, including the following:Default settings for Quick Sets jobs saved in a network folderSettings for notificationsDefault scan settings for jobs saved in a network folderDefault file settings for jobs saved in a network folder |
| Save to SharePoint® | Configure the Microsoft SharePoint® settings for digital sending, including the following:Default settings for Quick Sets jobs saved in a document library on the SharePoint® siteDefault settings for jobs saved in a document library on the SharePoint® site |
| Save to USB Setup | Configure the USB settings for digital sending, including the following:Default settings for Quick Sets jobs saved on a USB flash driveSettings for notificationsDefault scan settings for jobs saved on a USB flash driveDefault file settings for jobs saved on a USB flash drive |
| Contacts Manage contacts, including the following:Add email addresses into the printer one at a time.Import a large list of frequently-used email addresses on to the printer all at once, rather than adding them one at a time.Export contacts from the printer into a .CSV file on the computer to use as a data backup, or import the records onto another HP printer.Edit email addresses that have already been saved in the printer. | |
| Preferences | Configure settings for when the size cannot be detected from the scanner glass. |
| E-mail and Save to Network Folder Quick Setup Wizards | Configure the printer to send scanned images as email attachments. |
| Configure the printer to save scanned images to network-folder Quick Sets. Quicks Sets provide easy access to files saved on the network. | |
| Digital Sending Software Setup | Configure settings related to using optional Digital Sending software. |
Fax tab
Table 8-5 HP Embedded Web Server Fax tab
| Menu Description | |
| Fax Send Setup | Configure settings for sending faxes, including the following:Default settings for outgoing faxesSettings for notificationsDefault setting for sending faxes using the internal fax modemSettings for using a LAN fax serviceSettings for using an Internet fax service |
| Speed Dials Manage speed dials, including the following:Import .CSV files containing email addresses, fax numbers, or user records, so that they can be accessed on this printer.Export email, fax, or user records from the printer into a file on the computer to use as a data backup, or import the records onto another HP printer. | |
| Fax Receive Setup | Configure default print options for incoming faxes, and set up a fax printing schedule. |
| Fax Archive and Forwarding | Enable or disable fax archiving and fax forwarding, and configure basic settings for each:Fax archiving is a method to send a copy of all incoming and outgoing faxes to an email address, a network folder, or an FTP server.Fax forwarding is a method to forward incoming faxes to a different fax device. |
| Fax Activity Log | Contains a list of the faxes that have been sent from or received by this printer. |
Troubleshooting tab
Table 8-6 HP Embedded Web Server Troubleshooting tab
| Menu Description | |
| General Troubleshooting | Select from a variety of reports and tests to help solve problems with the printer.Configure settings for Fax, OXPd, and Auto Recovery. |
| Retrieve Diagnostic Data | Export printer information to a file that can be useful for detailed problem analysis. |
| NOTE: This item is available only if an administrator password is set from the Security tab. | |
| Calibration/Cleaning | Enable the automatic cleaning feature, create and print the cleaning page, and select an option to calibrate the printer immediately. |
| Firmware Upgrade | Download and install printer firmware upgrade files. |
| Reset Factory Settings Reset printer settings to factory defaults. | |
Security tab
Table 8-7 HP Embedded Web Server Security tab
| Menu Description | |
| General Security Settings for general security, including the following: | |
| Configure an administrator password to restrict access to certain features on the printer.Set PJL password for processing PJL commands.Set file system access and firmware upgrade security.Enable or disable the Host USB port on the control panel or the USB connectivity port on the formatter for printing directly from a computer.View the status of all security settings. | |
| Access Control | Configure access to printer functions for specific individuals or groups, and select the method individuals use to sign in to the printer. |
| Protect Stored Data | Configure and manage the internal hard drive for the printer. This printer includes an encrypted hard drive for maximum security.Configure settings for jobs that are stored on the printer hard drive. |
| Certificate Management | Install and manage security certificates for access to the printer and the network. |
| Web Service Security | Allow resources on this printer to be accessed by web pages from different domains. If no sites are added to the list, then all sites are trusted. |
| Self Test | Verify that the security functions are running according to expected system parameters. |
HP Web Services tab
Use the HP Web Services tab to configure and enable HP Web Services for this printer. It is necessary to Enable HP Web Services to use the HP ePrint feature.
Table 8-8 HP Embedded Web Server HP Web Services tab
| Menu Description | |
| Web Services Setup | Connect this printer to HP's ePrintCenter on the Web by enabling HP Web Services. |
| Web Proxy | Configure a proxy server if there are issues enabling HP Web Services or connecting the printer to the Internet. |
Networking tab
Use the Networking tab to configure and secure network settings for the printer when it is connected to an IP-based network. This tab does not display if the printer is connected to other types of networks.
Table 8-9 HP Embedded Web Server Networking tab
| Menu Description | |
| TCP/IP Setting Configure TCP/IP settings for IPv4 and IPv6 networks. | |
| NOTE: The configuration options available depend on the print server model. | |
| Network Settings | Configure IPX/SPX, AppleTalk, DLC/LLC, and SNMP settings, depending on the print server model. |
| Other Settings | Configure general printing protocols and services supported by the print server. The available options depend on the print server model, but can include firmware update, LPD queues, USB settings, support information, and refresh rate. |
| AirPrint Enable, set up, or disable network printing from Apple supported printers. | |
| Select Language | Change the language displayed by the HP Embedded Web Server. This page displays if the Web pages support multiple languages. Optionally, select supported languages through language-preference settings in the browser. |
| Settings View and restore current security settings to factory-default values. | |
| Configure security settings using the Security Configuration Wizard. | |
| NOTE: Do not use the Security Configuration Wizard to configure security settings using network-management applications, such as HP Web Jetadmin. | |
| Authorization | Control configuration management and use of this printer, including the following:Set or change the administrator password to control access to configuration parameters.Request, install, and manage digital certificates on the HP Jetdirect print server.Limit host access to this printer through an Access Control List (ACL) (for selected print servers on IPv4 networks only). |
| Mgmt. Protocols | Configure and manage security protocols for this printer, including the following:Set the security management level for the HP Embedded Web Server, and control traffic over HTTP and HTTPS.Configure the SNMP (Simple Network Management Protocol) operation. Enable or disable the SNMP v1/v2c or SNMP v3 agents on the print server.Control access through protocols that may not be secure, such as printing protocols, print services, discovery protocols, name resolution services, and configuration-management protocols. |
| 802.1X Authentication | Configure 802.1X authentication settings on the Jetdirect print server as required for client authentication on the network, and reset the 802.1X authentication settings to factory-default values.CAUTION: When changing the 802.1X authentication settings; the printer might lose its connection. To reconnect, it might be necessary to reset the print server to a factory-default state and reinstall the printer. |
| IPsec/Firewall | View or configure a Firewall policy or an IPsec/Firewall policy (for selected HP Jetdirect models only). |
| Announcement Agent | Enable or disable the HP Device Announcement Agent, set the configuration server, and configure mutual authentication using certificates. |
| Network Statistics | Display network statistics that are collected and stored on the HP Jetdirect print server. |
| Protocol Info | View a list of network-configuration settings on the HP Jetdirect print server for each protocol. |
| Configuration Page | View the HP Jetdirect configuration page, which contains status and configuration information. |
Other Links list

NOTE: Configure which links display in the Other Links list by using the Edit Other Links menu on the General tab. The following are the default links.
Table 8-10 HP Embedded Web Server Other Links list
| Menu Description | |
| Product Support | Connect to the support site for the printer to search for help on various topics. |
| Shop for Supplies | Connect to the HP SureSupply Web site for information on purchasing original HP supplies, such as toner cartridges and paper. |
| HP Instant Support | Connect to the HP Web site to find solutions to printer problems. |
Advanced configuration with HP Utility for OS X
Use the HP Utility to check printer status or to view or change printer settings from the computer.
Use the HP Utility when the printer is connected with a USB cable or is connected to a TCP/IP-based network.
Open HP Utility
- At the computer, open the System Preferences menu, and then click Print & Fax, Print & Scan, or Printers & Scanners.
- Select the printer in the list.
- Click the Options & Supplies button.
- Click the Utility tab.
- Click the Open Printer Utility button.
HP Utility features
The HP Utility toolbar includes these items:
• Devices: Click this button to show or hide Mac products found by the HP Utility.
All Settings: Click this button to return to the HP Utility main view.
HP Support: Click this button to open a browser and go to the HP support Web site.
• Supplies: Click this button to open the HP SureSupply Web site.
- Registration: Click this button to open the HP registration Web site.
• Recycling: Click this button to open the HP Planet Partners Recycling Program Web site.
HP Utility consists of pages that are opened by clicking in the All Settings list. The following table describes the tasks available with HP Utility.
| Item Description | ||
| Supplies Status | Shows the printer supplies status and provides links for ordering supplies online. | |
| Device Information Shows information about the currently selected printer. | ||
| File Upload Transfers files from the computer to the printer. | ||
| Upload Fonts Transfers font files from the computer to the printer. | ||
| HP Connected Accesses the HP Connected Web site. | ||
| Update Firmware | Transfers a firmware update file to the printer. | |
| NOTE: This option is available only after you open theViewmenu and select theShow Advanced Options item. | ||
| Commands Sends special characters or print commands to the printer after the print job. | ||
| NOTE: This option is available only after you open theViewmenu and select theShow Advanced Options item. | ||
| Supplies Management | Configures how the printer should behave when supplies are nearing the end of their estimated life. | |
| Trays Configuration Changes the default tray settings. | ||
| Output Devices Manages settings for optional output accessories. | ||
| Duplex Mode Turns on the automatic two-sided printing mode. | ||
| Economode & Toner Density Configures settings to conserve toner. | ||
| E-mail Alerts | Configures automatic email alerts for certain printer conditions, such as when supplies need to be replaced, trays are empty, doors are open, or a paper jam has occurred. | |
| Resolution Sets the default print resolution. | ||
| Protect Direct Ports Disables printing over USB or parallel ports. | ||
| Stored Jobs Manages print jobs that are stored on the printer hard disk. | ||
| Network Settings | Configures the network settings, such as the IPv4 and IPv6 settings. | |
| Additional Settings Provides access to the HP Embedded Web Server. | ||
| Scan to E-mail | Opens the HP Embedded Web Server page for configuring settings for scanning to email. | |
| NOTE: USB connections are not supported. | ||
| Scan to Network Folder | Opens the HP Embedded Web Server page for configuring settings for scanning to a network folder. | |
| NOTE: USB connections are not supported. | ||
Configure IP network settings
• Printer sharing disclaimer
• View or change network settings
- Rename the printer on a network
• Manually configure IPv4 TCP/IP parameters from the control panel
• Manually configure IPv6 TCP/IP parameters from the control panel
• Link speed and duplex settings
Printer sharing disclaimer
HP does not support peer-to-peer networking, as the feature is a function of Microsoft operating systems and not of the HP printer drivers. Go to Microsoft at www.microsoft.com.
View or change network settings
Use the HP Embedded Web Server to view or change IP configuration settings.
- Open the HP Embedded Web Server (EWS):
a. From the Home screen on the printer control panel, touch the Network ☐ button to display the IP address or host name.
b. Open a Web browser, and in the address line, type the IP address or host name exactly as it displays on the printer control panel. Press the Enter key on the computer keyboard. The EWS opens.

https://10.10.XXXXX/

NOTE: If the Web browser displays a There is a problem with this website's security certificate message when attempting to open the EWS, click Continue to this website (not recommended).
Choosing Continue to this website (not recommended) will not harm the computer while navigating within the EWS for the HP printer.
- Click the Networking tab to obtain network information. Change settings as needed.
Rename the printer on a network
To rename the printer on a network so that it can be uniquely identified, use the HP Embedded Web Server.
- Open the HP Embedded Web Server (EWS):
a. From the Home screen on the printer control panel, touch the Network ☐ button to display the IP address or host name.
b. Open a Web browser, and in the address line, type the IP address or host name exactly as it displays on the printer control panel. Press the Enter key on the computer keyboard. The EWS opens.
https://10.10.XX.XXX/

NOTE: If the Web browser displays a There is a problem with this website's security certificate message when attempting to open the EWS, click Continue to this website (not recommended).
Choosing Continue to this website (not recommended) will not harm the computer while navigating within the EWS for the HP printer.
-
Open the General tab.
-
On the Device Information page, the default printer name is in the Device Name field. You can change this name to uniquely identify this printer.

NOTE: Completing the other fields on this page is optional.
- Click the Apply button to save the changes.
Manually configure IPv4 TCP/IP parameters from the control panel
Use the control-panel Administration menus to manually set an IPv4 address, subnet mask, and default gateway.
-
From the Home screen on the printer control panel, scroll to and touch the Administration button.
-
Open the following menus:
• Network Settings
Jetdirect Menu
TCP/IP
• IPV 4 Settings
- Config Method
- Select the Manual option, and then touch the Save button.
- Open the Manual Settings menu.
- Touch the IP Address, Subnet Mask, or Default Gateway option.
- Touch the first field to open a keypad. Enter the correct digits for the field, and then touch the OK button.
- Repeat the process for each field, and then touch the Save button.
Manually configure IPv6 TCP/IP parameters from the control panel
Use the control-panel Administration menus to manually set an IPv6 address.
- From the Home screen on the printer control panel, scroll to and touch the Administration button.
- To enable manual configuration, open the following menus:
• Network Settings
Jetdirect Menu
TCP/IP
• IPV 6 Settings
- Address
- Manual Settings
- Enable
- Select the On option, and then touch the Save button.
- To configure the address, touch the Address button and then touch the field to open a keypad.
- Use the keypad to enter the address, and then touch the OK button.
- Touch the Save button.
Link speed and duplex settings

NOTE: This information applies only to Ethernet networks. It does not apply to wireless networks.
The link speed and communication mode of the print server must match the network hub. For most situations, leave the printer in automatic mode. Incorrect changes to the link speed and duplex settings might prevent the printer from communicating with other network devices. To make changes, use the printer control panel.

NOTE: The printer setting must match the setting for the network device (a network hub, switch, gateway, router, or computer).

NOTE: Making changes to these settings causes the printer to turn off and then on. Make changes only when the printer is idle.
- From the Home screen on the printer control panel, scroll to and touch the Administration button.
- Open the following menus:
• Network Settings
Jetdirect Menu
- Link Speed
-
Select one of the following options:
-
Auto: The print server automatically configures itself for the highest link speed and communication mode allowed on the network.
• 10T Half: 10 megabytes per second (Mbps), half-duplex operation
• 10T Full: 10 Mbps, full-duplex operation
• 10T Auto: 10 Mbps, automatic-duplex operation
• 100TX Half: 100 Mbps, half-duplex operation
• 100TX Full: 100 Mbps, full-duplex operation
• 100TX Auto: 100 Mbps, automatic-duplex operation
• 1000T Full: 1000 Mbps, full-duplex operation
- Touch the Save button. The printer turns off and then on.
Printer security features
Introduction
The printer includes several security features to restrict who has access to configuration settings, to secure data, and to prevent access to valuable hardware components.
• Security statements
- Assign an administrator password
IP Security
- Lock the formatter
• Encryption support: HP High Performance Secure Hard Disks
Security statements
The printer supports security standards and recommended protocols that help you keep the printer secure, protect critical information on your network, and simplify the way you monitor and maintain the printer.
Assign an administrator password
Assign an administrator password for access to the printer and the HP Embedded Web Server so that unauthorized users cannot change the printer settings.
- Open the HP Embedded Web Server (EWS):
a. From the Home screen on the printer control panel, touch the Network ☐ button to display the IP address or host name.
b. Open a Web browser, and in the address line, type the IP address or host name exactly as it displays on the printer control panel. Press the Enter key on the computer keyboard. The EWS opens.

https://10.10.XXXXX/

NOTE: If the Web browser displays a There is a problem with this website's security certificate message when attempting to open the EWS, click Continue to this website (not recommended).
Choosing Continue to this website (not recommended) will not harm the computer while navigating within the EWS for the HP printer.
- Click the Security tab.
- Open the General Security menu.
- In the are a labeled Set the Local Administrator Password, enter the name to associate with the password in the Username field.
- Enter the password in the New Password field, and then enter it again in the Verify Password field.

NOTE: To change an existing password, first enter the existing password in the Old Password field.
- Click the Apply button.

NOTE: Make note of the password and store it in a safe place.
Some features on the printer control panel can be secured so that unauthorized people cannot use them. When a feature is secured, the printer prompts you to sign in before you can use it. You can also sign in without waiting for a prompt by selecting Sign In from the printer control panel.
Typically, the credentials for signing in to the printer are the same as for signing in to the network. Consult the network administrator for this printer if you have questions about which credentials to use.
- From the Home screen on the printer control panel, select Sign In.
- Follow the prompts to enter the credentials.

NOTE: To maintain security for the printer, select Sign Out when you have finished using the printer.
IP Security
IP Security (IPsec) is a set of protocols that control IP-based network traffic to and from the printer. IPsec provides host-to-host authentication, data integrity, and encryption of network communications.
For printers that are connected to the network and have an HP Jetdirect print server, you can configure IPsec by using the Networking tab in the HP Embedded Web Server.
Lock the formatter
The formatter has a slot that you can use to attach a security cable. Locking the formatter prevents someone from removing valuable components from it.
Encryption support: HP High Performance Secure Hard Disks
The hard disk provides hardware-based encryption so you can securely store sensitive data without impacting printer performance. This hard disk uses the latest Advanced Encryption Standard (AES) and has versatile time-saving features and robust functionality.
Use the Security menu in the HP Embedded Web Server to configure the disk.
Energy-conservation settings
Introduction
• Print with EconoMode
- Set the sleep timer and configure the printer to use 1 watt or less of power
- Set the sleep schedule
Print with EconoMode
This printer has an EconoMode option for printing drafts of documents. Using EconoMode can use less toner. However, using EconoMode can also reduce print quality.
HP does not recommend the full-time use of EconoMode. If EconoMode is used full-time, the toner supply might outlast the mechanical parts in the toner cartridge. If print quality begins to degrade and is no longer acceptable, consider replacing the toner cartridge.

NOTE: If this option is not available in the print driver, set it using the printer control panel.
Configure EconoMode from the print driver
- From the software program, select the Print option.
- Select the printer, and then click the Properties or Preferences button.
- Click the Paper/Quality tab.
- Click the EconoMode check box to enable the feature, and then click OK.
Configure EconoMode from the printer control panel
- From the Home screen on the printer control panel, scroll to and touch the Administration button.
-
Open the following menus:
-
General Settings
-
Print Quality
-
Select On or Off to enable or disable the feature, and then touch Save.
Set the sleep timer and configure the printer to use 1 watt or less of power
The printer has several options for the energy-saving sleep timer feature. The time delay to enter the Sleep/Auto Off state is adjustable, and the power usage during the Sleep/Auto Off state varies according to selection for the wake option.
- From the Home screen on the printer control panel, scroll to and touch the Administration button.
-
Open the following menus:
-
General Settings
- Energy Settings
-
Sleep Timer Settings
-
Select Sleep /Auto Off After, enter the appropriate time period, and then touch the Save button.

NOTE: In the European Union the Sleep/Auto Off After or Sleep /Auto Off After Inactivity option is always enabled, and no checkbox is available to turn it off.

NOTE: The sleep-mode default time is 0 minutes. The printer enters sleep mode immediately after each job completes.
-
Select one of the Wake/Auto On to These Events options.
-
All events: The printer wakes when it receives any print job (through the USB port, network port, or wireless connection), or when someone presses a button on the control panel, or opens any door or tray.
- Network port: The printer wakes when it receives a print job sent through the network port, or when someone presses a button on the control panel, or opens any door or tray. With this setting, the printer uses 1 watt or less of power while in the Sleep/Auto Off state.

NOTE: When a print job is sent over network during sleep, the printer wakes and prints the job, but the control panel stays dimmed.
- Power button only: The printer wakes only when someone presses the power button. With this setting, the printer uses 1 watt or less of power while in the Sleep/Auto Off state.
Set the sleep schedule
Use the Sleep Schedule feature to configure the printer to automatically wake or go into Sleep/Auto Off mode at specific times on specific days of the week.

NOTE: Configure the date and time settings before setting the Sleep Schedule feature.
- From the Home screen on the printer control panel, scroll to and touch the Administration button.
-
Open the following menus:
-
General Settings
Date/Time Settings -
Open the Date/Time Format menu and configure the following settings:
Date Format
- Time Format
-
Touch the Save button.
-
Open the Date/Time menu and configure the following settings:
Date/Time
Time Zone
If you are in an area that uses daylight savings time, select the Adjust for Daylight Savings box.
- Touch the Save button.
-
Touch the back-arrow button to return to the Administration screen.
-
Open the following menus:
-
General Settings
• Energy Settings -
Sleep Schedule
-
Touch the Add 📋 button, and then select the type of event to schedule: Wake or Sleep.
-
Configure the following settings:
Time
Event Days
- Touch the OK button, and then touch the Save button.
HP Web Jetadmin
HP Web Jetadmin is an award-winning, industry-leading tool for efficiently managing a wide variety of networked HP products, including printers, multifunction printers, and digital senders. This single solution allows you to remotely install, monitor, maintain, troubleshoot, and secure your printing and imaging environment — ultimately increasing business productivity by helping you save time, control costs, and protect your investment.
HP Web Jetadmin upgrades are periodically made available to provide support for specific product features. Go to www.hp.com/go/webjetadmin for more information.
Software and firmware updates
HP regularly updates features that are available in the printer firmware. To take advantage of the most current features, update the printer firmware. Download the most recent firmware update file from the Web:
Go to www.hp.com/support/ljM527MFP. Click Drivers & Software.
9 Solve problems
- Customer support
• Control panel help system - Reset factory settings
A "Cartridge is low" or "Cartridge is very low" message displays on the printer control panel
• Printer does not pick up paper or misfeeds
Clear paper jams - Improve print quality
- Improve copy image quality
- Improve scan image quality
- Improve fax image quality
- Solve wired network problems
- Solve fax problems
For more information:
The following information is correct at the time of publication. For current information, see www.hp.com/support/ljM527MFP.
HP's all-inclusive help for the printer includes the following information:
• Install and configure
Learn and use
- Solve problems
• Download software and firmware updates
- Join support forums
• Find warranty and regulatory information
Customer support
| Get telephone support for your country/regionHave the printer name, serial number, date of purchase, and problem description ready | Country/region phone numbers are on the flyer that was in the box with the printer or atwww.hp.com/support/. |
| Get 24-hour Internet support, and download software utilities and drivers | www.hp.com/support/ljM527MFP |
| Order additional HP service or maintenance agreements www.hp.com/go/carepack | |
| Register the printerwww.register.hp.com | |
Control panel help system
The printer has a built-in Help system that explains how to use each screen. To open the Help system, touch the Help button in the upper-right corner of the screen.
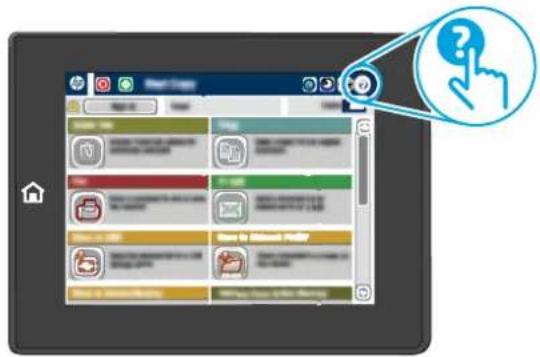
text_image
Screenshot of a mobile app interface with Chinese UI elements and a hand icon pointing to a question mark.For some screens, the Help opens to a global menu where you can search for specific topics. You can browse through the menu structure by touching the buttons in the menu.
Some Help screens include animations that show specific procedures, such as clearing paper jams.
If the printer alerts of an error or warning, touch the Help button to open a message that describes the problem. The message also contains instructions to help solve the problem.
Reset factory settings
Introduction
Use one of the following methods to restore the printer to the original settings from the factory.

NOTE: Resetting factory settings sets most of the printer settings to their factory defaults. However, some settings are not changed, such as language, date, time, and some network configuration settings.
Method one: Reset factory settings from the printer control panel
- From the Home screen on the printer control panel, scroll to and touch the Administration button.
-
Open the following menus:
-
General Settings
-
Reset Factory Settings
-
A verification message advises that completing the reset function might result in loss of data. Select Reset to complete the process.

NOTE: The printer restarts automatically after the reset operation completes.
Method two: Reset factory settings from the HP Embedded Web Server (network-connected printers only)
- Open the HP Embedded Web Server (EWS):
a. From the Home screen on the printer control panel, touch the Network ☐ button to display the IP address or host name.
b. Open a Web browser, and in the address line, type the IP address or host name exactly as it displays on the printer control panel. Press the Enter key on the computer keyboard. The EWS opens.

https://10.10.XXXXX/

NOTE: If the Web browser displays a There is a problem with this website's security certificate message when attempting to open the EWS, click Continue to this website (not recommended).
Choosing Continue to this website (not recommended) will not harm the computer while navigating within the EWS for the HP printer.
- Open the General tab.
- On the left side of the screen, click Reset Factory Settings.
- Click the Reset button.

NOTE: The printer restarts automatically after the reset operation completes.
A “Cartridge is low” or “Cartridge is very low” message displays on the printer control panel
Cartridge is low: The printer indicates when a toner cartridge level is low. Actual toner cartridge life remaining may vary. Consider having a replacement available to install when print quality is no longer acceptable. The toner cartridge does not need to be replaced now.
Cartridge is very low: The printer indicates when the toner cartridge level is very low. Actual toner cartridge life remaining may vary. Consider having a replacement available to install when print quality is no longer acceptable. The toner cartridge does not need to be replaced now unless the print quality is no longer acceptable.
Once an HP toner cartridge has reached Very Low, HP's Premium Protection Warranty on that toner cartridge has ended.
Change the "Very Low" settings
You can change the way the printer reacts when supplies reach the Very Low state. You do not have to re-establish these settings when you install a new toner cartridge.
- From the Home screen on the printer control panel, scroll to and select Supplies.
-
Open the following menus:
-
Manage Supplies
• Supply Settings -
Black Cartridge or Color Cartridges
• Very Low Settings -
Select one of the following options:
-
Select the Stop option to set the printer to stop printing when the cartridge reaches the Very Low threshold.
- Select the Prompt to continue option to set the printer to stop printing when the cartridge reaches the Very Low threshold. You can acknowledge the prompt or replace the cartridge to resume printing.
- Select the Continue option to set the printer to alert you that the cartridge is very low, and to continue printing beyond the Very Low setting without interaction. This can result in unsatisfactory print quality.
For products with fax capability
When the printer is set to the Stop or Prompt to continue option, there is some risk that faxes will not print when the printer resumes printing. This can occur if the printer has received more faxes than the memory can hold while the printer is waiting.
The printer can print faxes without interruption when it passes the Very Low threshold if you select the Continue option for the toner cartridge, but print quality might degrade.
Order supplies
Order supplies and paper www.hp.com/go/suresupply
Order through service or support providers Contact an HP-authorized service or support provider.
Order using the HP Embedded Web Server (EWS) To access, in a supported Web browser on your computer, enter
the printer IP address or host name in the address/URL field. The EWS contains a link to the HP SureSupply Web site, which provides options for purchasing Original HP supplies.
Printer does not pick up paper or misfeeds
Introduction
The following solutions can help solve problems if the printer is not picking up paper from the tray or is picking up multiple sheets of paper at one time. Either of these situations can result in paper jams.
• The printer does not pick up paper
• The printer picks up multiple sheets of paper
The document feeder jams, skews, or picks up multiple sheets of paper
- Clean the pickup rollers and separation pad in the document feeder
The printer does not pick up paper
If the printer does not pick up paper from the tray, try these solutions.
- Open the printer and remove any jammed sheets of paper. Verify that no torn remnants of paper remain inside the printer.
- Load the tray with the correct size of paper for the job.
-
Make sure the paper size and type are set correctly on the printer control panel.
-
Make sure the paper guides in the tray are adjusted correctly for the size of paper. Adjust the guides to the appropriate indentation in the tray. The arrow on the tray guide should line up exactly with the marking on the tray.

NOTE: Do not adjust the paper guides tightly against the paper stack. Adjust them to the indentations or markings in the tray.
The following images show examples of the paper-size indentations in the trays for various printers. Most HP printers have markings similar to these.
Figure 9-1 Size markings for Tray 1 or the multipurpose tray
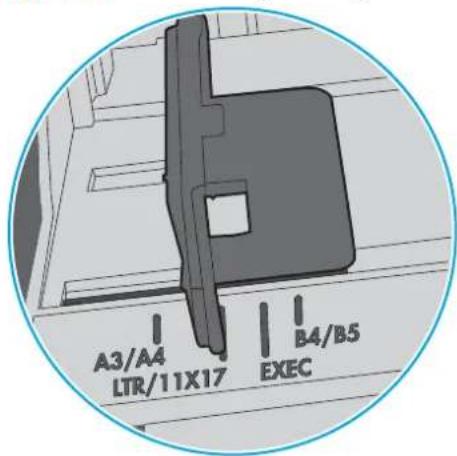
text_image
A3/A4 LTR/11X17 B4/B5 EXEC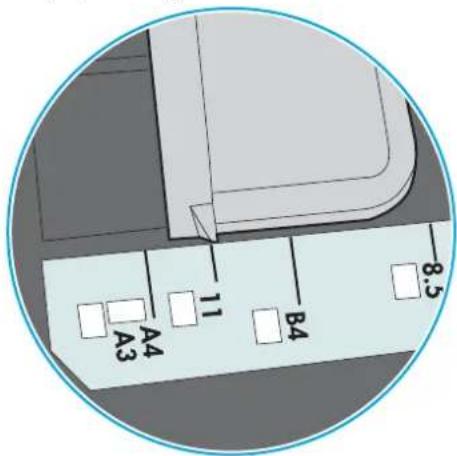
text_image
A3 A4 11 B3 B4 8.5Figure 9-2 Size markings for cassette trays
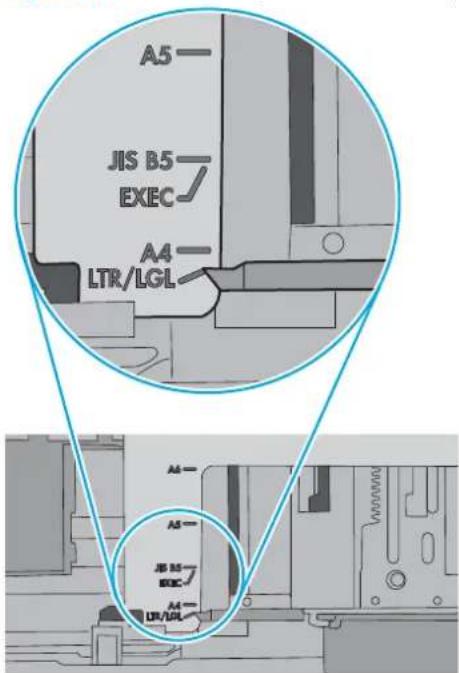
text_image
A5 JIS B5 EXEC A4 LTR/LGL A3 JB B5 EKC A2 UR/UGL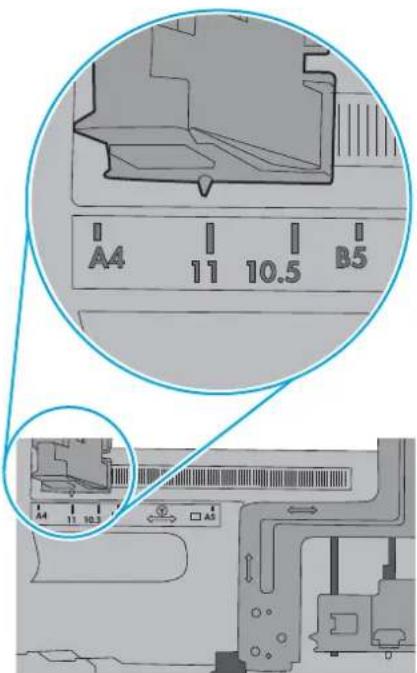
text_image
A4 11 10.5 B5 A4 11 10.5- Verify that the humidity in the room is within specifications for this printer and that paper is being stored in unopened packages. Most reams of paper are sold in moisture-proof wrapping to keep paper dry.
In high-humidity environments, paper at the top of the stack in the tray can absorb moisture, and it might have a wavy or uneven appearance. If this happens, remove the top 5 to 10 sheets of paper from the stack.
In low-humidity environments, excess static electricity can cause sheets of paper to stick together. If this happens, remove the paper from the tray, and flex the stack by holding it at each end and bringing the ends up to form a U shape. Then, rotate the ends down to reverse the U shape. Next, hold each side of the stack of paper, and repeat this process. This process releases individual sheets without introducing static electricity. Straighten the paper stack against a table before returning it to the tray.
Figure 9-3 Technique for flexing the paper stack
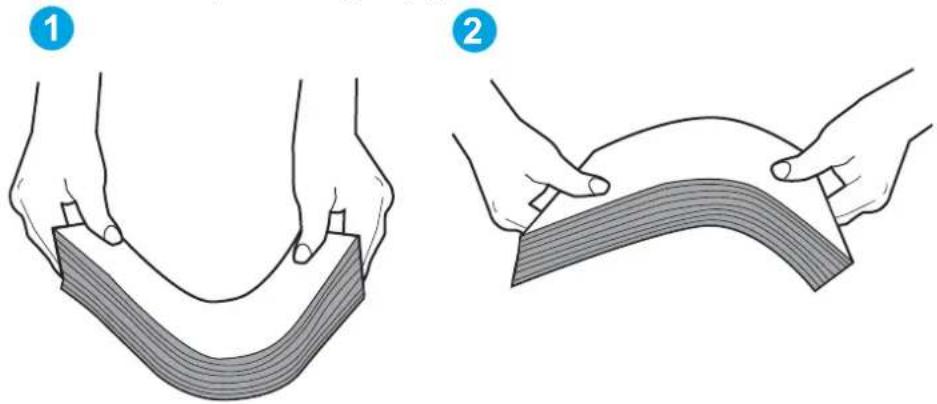
natural_image
Illustration showing two hands performing a curved bandage or folding technique (no text or symbols present)-
Check the printer control panel to see if it is displaying a prompt to feed the paper manually. Load paper, and continue.
-
The rollers above the tray might be contaminated. Clean the rollers with a lint-free cloth dampened with warm water. Use distilled water, if it is available.
CAUTION: Do not spray water directly on to the printer. Instead, spray water on the cloth or dab the cloth in water and wring it out before cleaning the rollers.
The following image shows examples of the roller location for various printers.
Figure 9-4 Roller locations for Tray 1 or the multipurpose tray
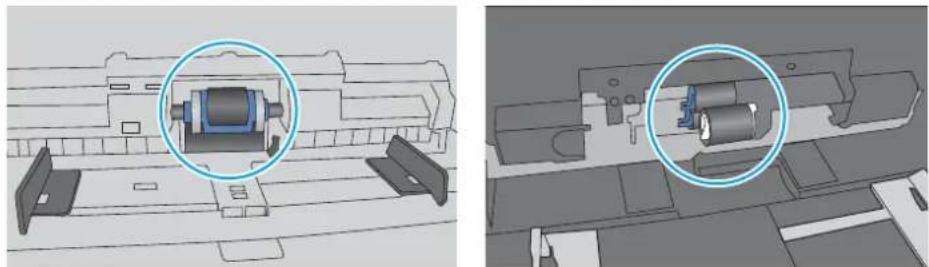
natural_image
Technical diagram showing two views of a mechanical assembly with highlighted components (no text or symbols present)The printer picks up multiple sheets of paper
If the printer picks up multiple sheets of paper from the tray, try these solutions.
- Remove the stack of paper from the tray and flex it, rotate it 180 degrees, and flip it over. Do not fan the paper. Return the stack of paper to the tray.

NOTE: Fanning the paper introduces static electricity. Instead of fanning the paper, flex the stack by holding it at each end and bringing the ends up to form a U shape. Then, rotate the ends down to reverse the U shape. Next, hold each side of the stack of paper, and repeat this process. This process releases individual sheets without introducing static electricity. Straighten the paper stack against a table before returning it to the tray.
Figure 9-5 Technique for flexing the paper stack
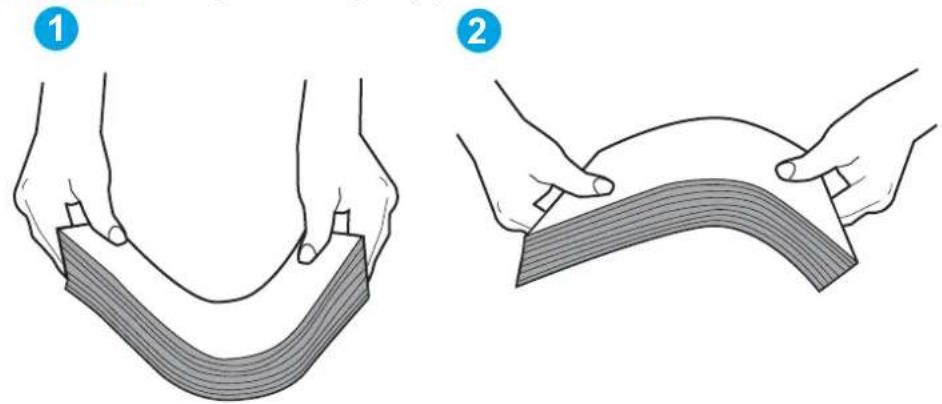
natural_image
Two-step illustration showing hands holding a flexible band, labeled 1 and 2 (no text or symbols on the bands)-
Use only paper that meets HP specifications for this printer.
-
Verify that the humidity in the room is within specifications for this printer, and that paper is being stored in unopened packages. Most reams of paper are sold in moisture-proof wrapping to keep paper dry.
In high-humidity environments, paper at the top of the stack in the tray can absorb moisture, and it might have a wavy or uneven appearance. If this happens, remove the top 5 to 10 sheets of paper from the stack.
In low-humidity environments, excess static electricity can cause sheets of paper to stick together. If this happens, remove the paper from the tray, and flex the stack as described above.
-
Use paper that is not wrinkled, folded, or damaged. If necessary, use paper from a different package.
-
Make sure the tray is not overfilled by checking the stack-height markings inside the tray. If it is overfilled, remove the entire stack of paper from the tray, straighten the stack, and then return some of the paper to the tray.
The following images show examples of the stack-height markings in the trays for various printers. Most HP printers have markings similar to these. Also make sure that all sheets of paper are below the tabs near the stack-height marks. These tabs help hold the paper in the correct position as it enters the printer.
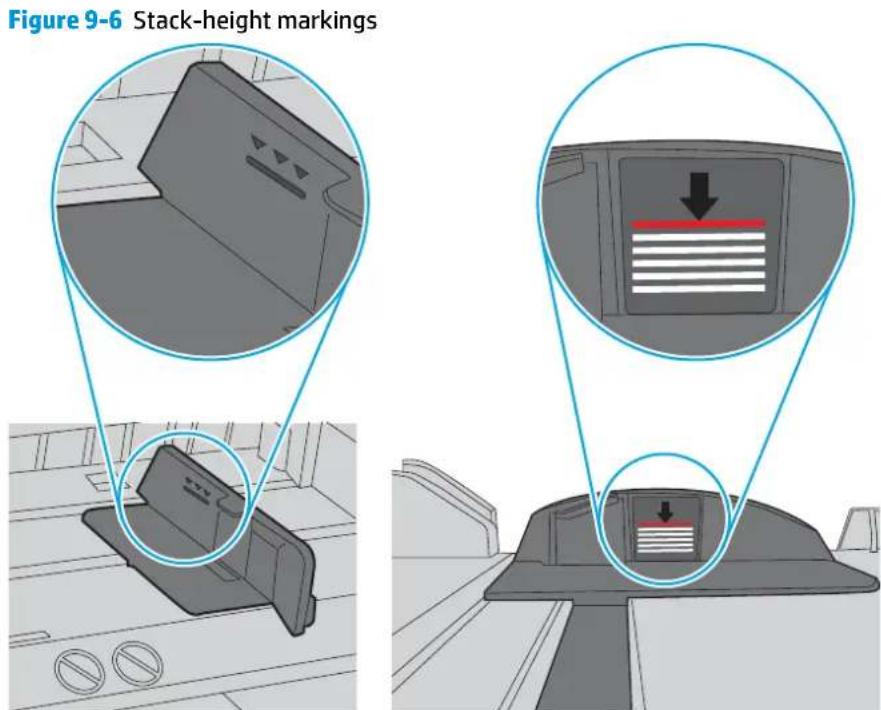
text_image
Figure 9-6 Stack-height markings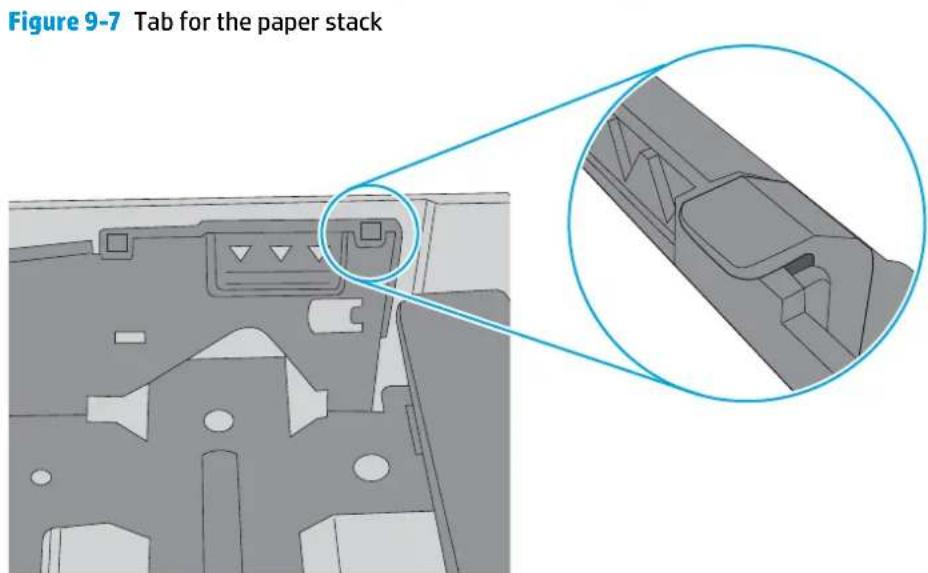
text_image
Figure 9-7 Tab for the paper stack- Make sure the paper guides in the tray are adjusted correctly for the size of paper. Adjust the guides to the appropriate indentation in the tray. The arrow on the tray guide should line up exactly with the marking on the tray.

NOTE: Do not adjust the paper guides tightly against the paper stack. Adjust them to the indentations or markings in the tray.
The following images show examples of the paper-size indentations in the trays for various printers. Most HP printers have markings similar to these.
Figure 9-8 Size markings for Tray 1 or the multipurpose tray
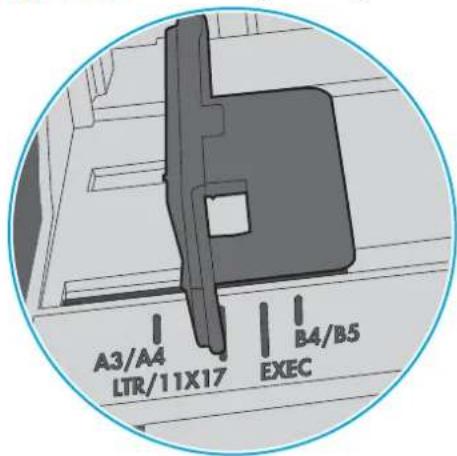
text_image
A3/A4 LTR/11X17 B4/B5 EXEC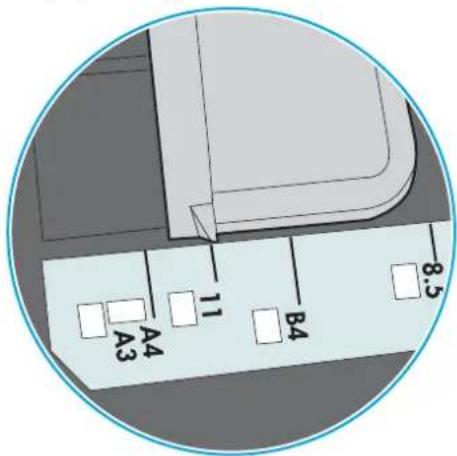
text_image
A3 A4 11 B3 B4 8.5Figure 9-9 Size markings for cassette trays
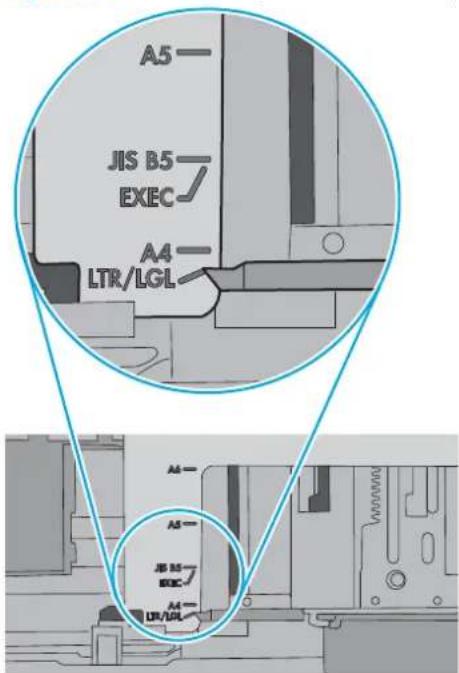
text_image
A5 JIS B5 EXEC A4 LTR/LGL A3 JB B5 EKC A2 UR/UGL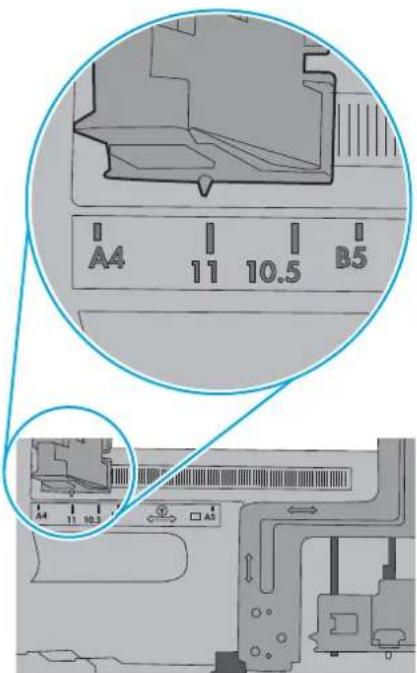
text_image
A4 11 10.5 B5 A4 11 10.5- Make sure the printing environment is within recommended specifications.
The document feeder jams, skews, or picks up multiple sheets of paper

NOTE: This information applies to MFP printers only.
The original might have something on it, such as staples or self-adhesive notes, that must be removed.
- Check that all rollers are in place and that the roller-access cover inside the document feeder is closed.
• Make sure that the top document-feeder cover is closed.
- The pages might not be placed correctly. Straighten the pages and adjust the paper guides to center the stack.
- The paper guides must be touching the sides of the paper stack to work correctly. Make sure that the paper stack is straight and the guides are against the paper stack.
- The document feeder input tray or output bin might contain more than the maximum number of pages. Make sure the paper stack fits below the guides in the input tray, and remove pages from the output bin.
- Verify that there are no pieces of paper, staples, paper clips, or other debris in the paper path.
- Clean the document-feeder rollers and the separation pad. Use compressed air or a clean, lint-free cloth moistened with warm water. If misfeeds still occur, replace the rollers.
- From the Home screen on the printer control panel, scroll to and touch the Supplies button. Check the status of the document-feeder kit, and replace it if necessary.
Clean the pickup rollers and separation pad in the document feeder
Follow these steps if the document feeder does not pick up pages correctly or produces skewed output.
- Lift the document-feeder latch.
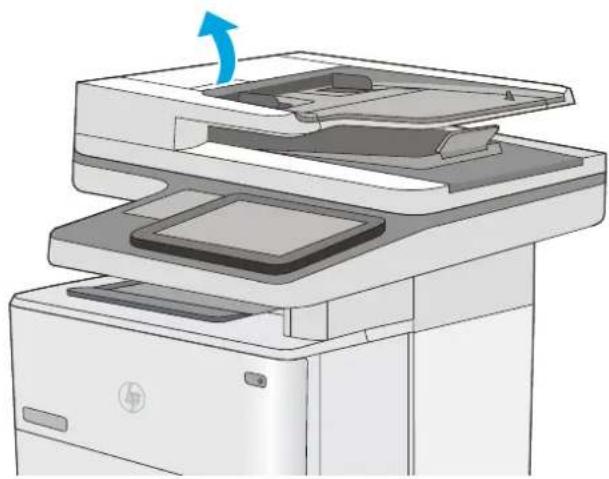
natural_image
Illustration of a printer with a blue arrow indicating the paper's shift, showing internal components (no text or symbols)- Open the document-feeder cover.
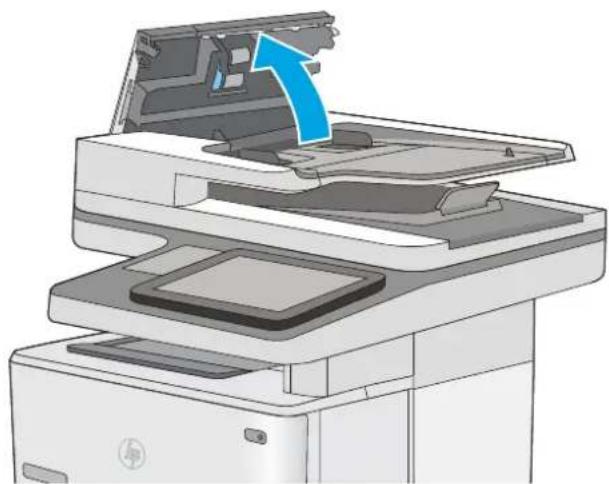
natural_image
Illustration of an HP printer with a blue arrow indicating the open lid area (no text or symbols present)- Remove any visible lint or dust from each of the feed rollers and the separation pad using compressed air or a clean lint-free cloth moistened with warm water.
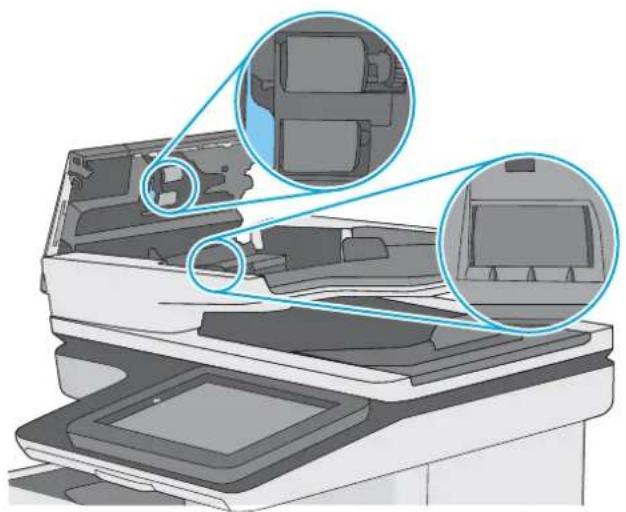
natural_image
Diagram of a printer's internal structure showing two views of the lid (no text or symbols present)- Close the document-feeder cover.
NOTE: Verify that the latch on the top of the document-feeder cover is completely closed.
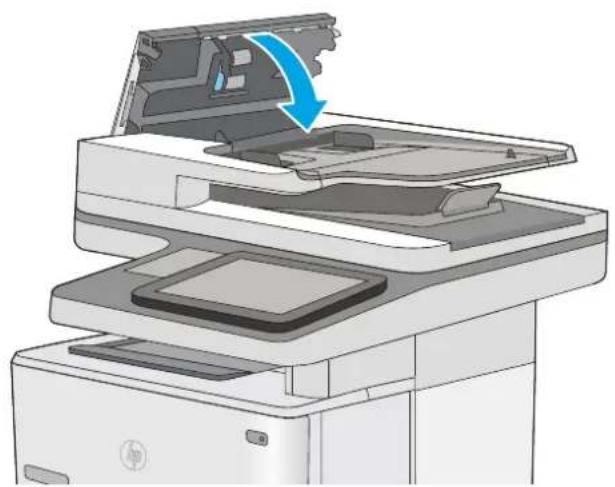
natural_image
Illustration of a printer's internal structure showing paper feeding into a tray with a blue arrow indicating the process (no text or symbols present)If the problem persists, check the document feeder separation pad and rollers for damage or wear, and replace them if necessary.

NOTE: New rollers have a rough surface. As rollers wear, they become smooth.
Clear paper jams
Introduction
The following information includes instructions for clearing paper jams from the printer.
Jam locations
• Auto-navigation for clearing jams
• Experiencing frequent or recurring paper jams?
• Clear paper jams in the document feeder
• Clear paper jams in Tray 1
• Clear paper jams in Tray 2 and the 550-sheet trays
• Clear paper jams in the toner-cartridge area
• Clear paper jams in the rear door and the fuser area
• Clear paper jams in the output bin
• Clear paper jams in the duplexer
Jam locations
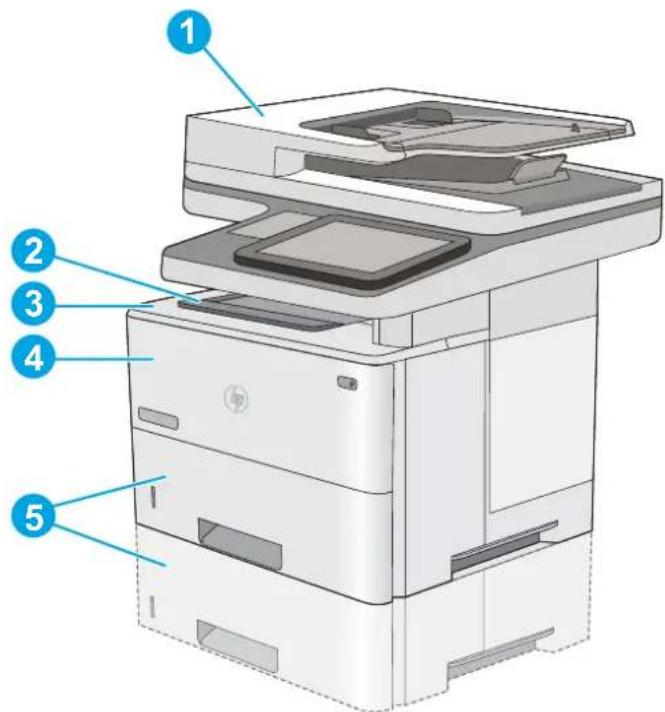
text_image
Diagram of a HP printer with numbered parts labeled 1 to 5 for identification.1 Document feeder
2 Output bin
3 Top cover and toner-cartridge area
4 Tray 1
5 Tray 2 and the optional 550-sheet trays
NOTE: Remove Tray 2 to access jams in the duplexer.
Auto-navigation for clearing jams
The auto-navigation feature assists in clearing jams by providing step-by-step instructions on the control panel. When you complete a step, the printer displays instructions for the next step until you have completed all steps in the procedure.
Experiencing frequent or recurring paper jams?
To reduce the number of paper jams, try these solutions.
- Use only paper that meets HP specifications for this printer.
- Use paper that is not wrinkled, folded, or damaged. If necessary, use paper from a different package.
- Use paper that has not previously been printed or copied on.
- Make sure the tray is not overfilled. If it is, remove the entire stack of paper from the tray, straighten the stack, and then return some of the paper to the tray.
- Make sure the paper guides in the tray are adjusted correctly for the size of paper. Adjust the guides so they are touching the paper stack without bending it.
- Make sure that the tray is fully inserted in the printer.
- If you are printing on heavy, embossed, or perforated paper, use the manual feed feature and feed sheets one at a time.
- Open the Trays menu on the printer control panel. Verify that the tray is configured correctly for the paper type and size.
- Make sure the printing environment is within recommended specifications.
Clear paper jams in the document feeder
The following information describes how to clear paper jams in the document feeder. When a jam occurs, the control panel displays an animation that assists in clearing the jam.
- Lift the latch to release the document-feeder cover.

natural_image
Illustration of a HP printer with a blue arrow indicating the paper's shift (no text or symbols present)- Open the document-feeder cover.
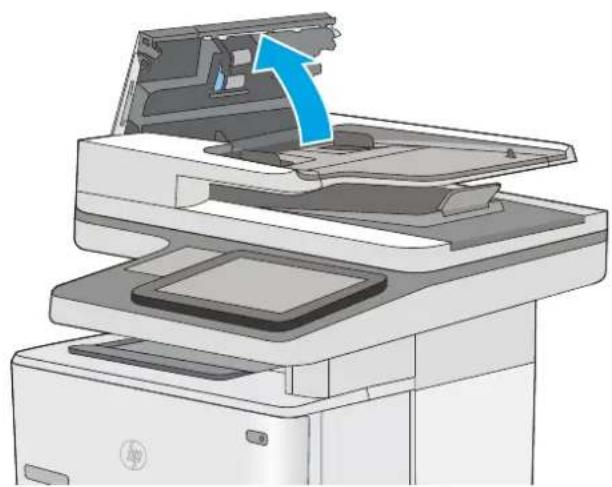
natural_image
Illustration of a HP printer with an open lid and a blue arrow indicating the paper's edge (no text or symbols present)- Remove any jammed paper.
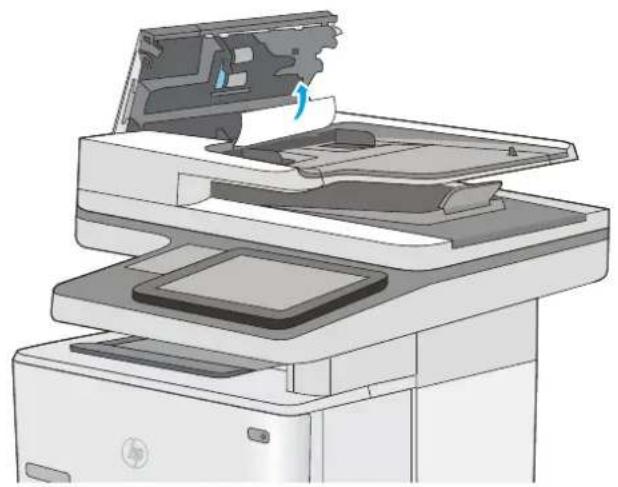
natural_image
Illustration of a printer's internal structure showing paper feeding into a tray (no text or symbols visible)- Lift the document-feeder input tray.
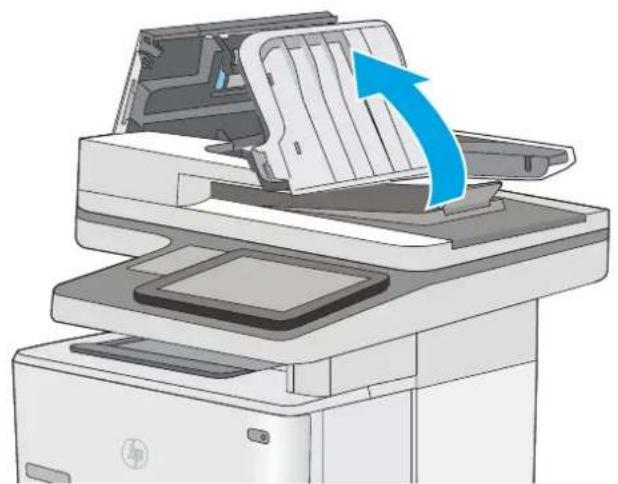
natural_image
Illustration of a printer with an open lid and blue arrow indicating the process (no text or symbols present)- Remove any jammed paper.
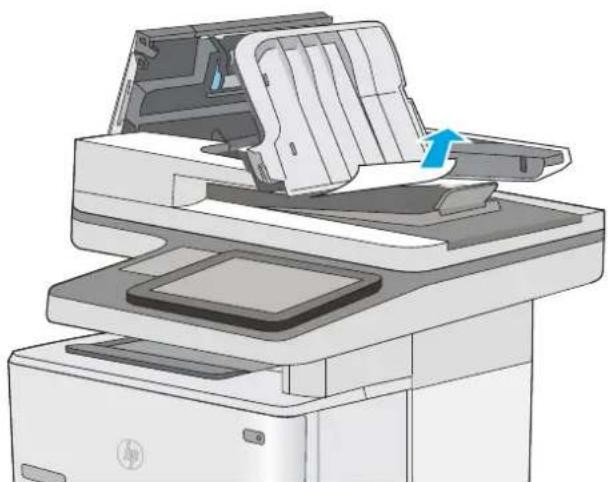
natural_image
Illustration of a HP printer with paper feed being inserted (no text or symbols visible)- Lower the document-feeder input tray.
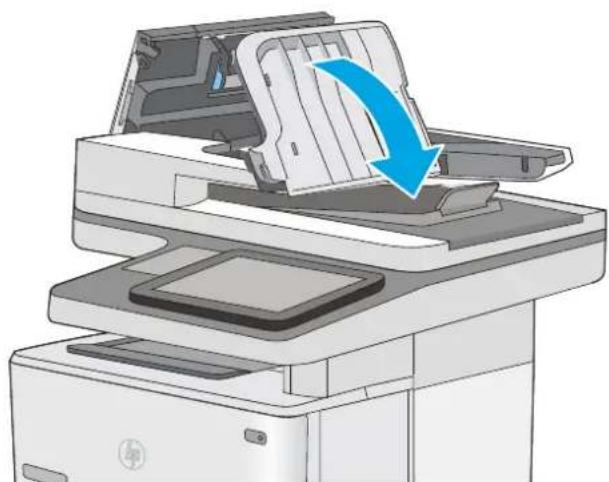
natural_image
Illustration of a printer with an open lid and blue arrow indicating a process (no text or symbols present)- Close the document-feeder cover.
NOTE: Verify that the latch on the top of the document-feeder cover is completely closed.
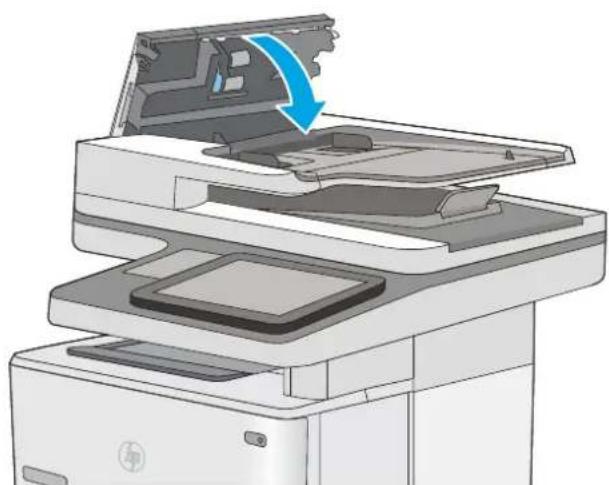
natural_image
Illustration of a printer's internal structure showing paper feeding into a stack, with a blue arrow indicating the process (no text or symbols present)
NOTE: To avoid jams, make sure the guides in the document-feeder input tray are adjusted against the document, without bending the document. To copy narrow documents, use the flatbed scanner. Remove all staples and paper clips from original documents.

NOTE: Original documents that are printed on heavy, glossy paper can jam more frequently than originals that are printed on plain paper.
Clear paper jams in Tray 1
Use the following procedure to clear paper jams in Tray 1. When a jam occurs, the control panel displays an animation that assists in clearing the jam.
- If most of the sheet of paper is visible in the tray, slowly pull the jammed paper out of the printer. Make sure that the entire sheet is removed. If it tears, continue with the following steps to find the remnants.
If most of the sheet of paper has been pulled inside the printer, continue with the following steps.
-
Press the top-cover-release button on the left side of the printer.
-
Open the front door.
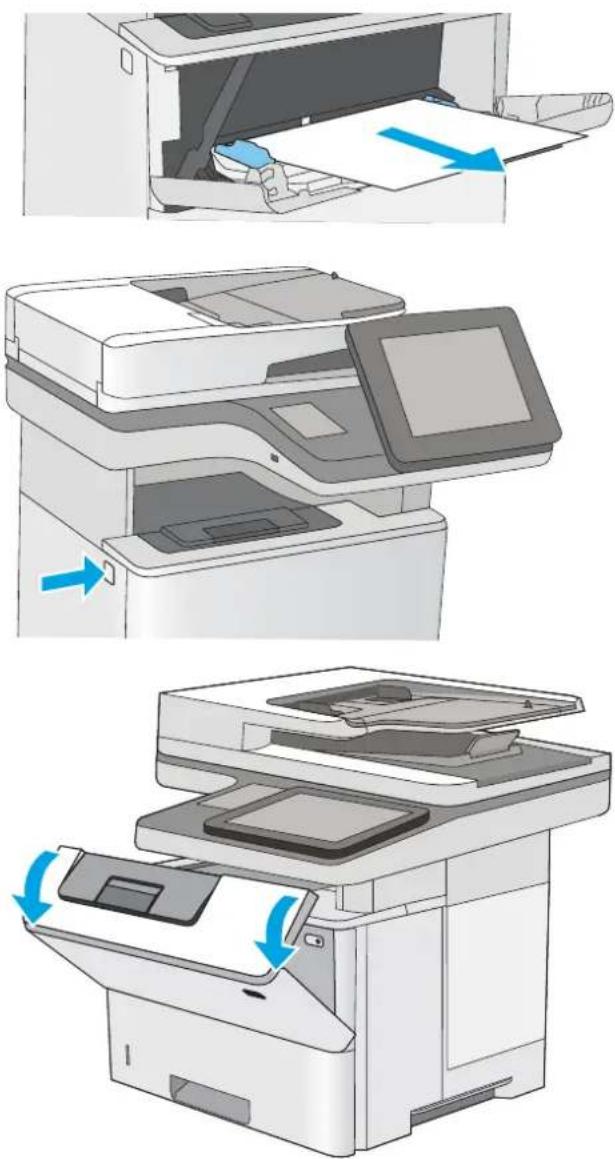
-
Remove the toner cartridge.
-
Lift the jam-access cover and slowly remove any jammed paper. Be careful not to tear the paper.
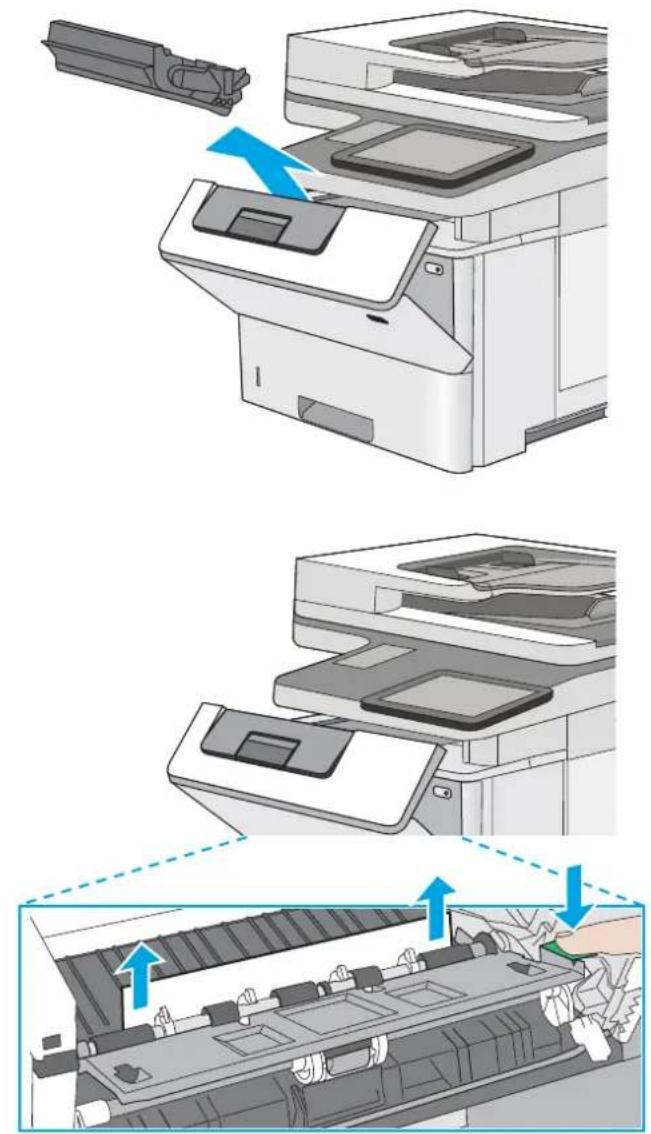
natural_image
Illustration of a printer's internal structure showing top, front, and side views with no visible text or symbols-
Reinsert the toner cartridge.
-
Close the front door.
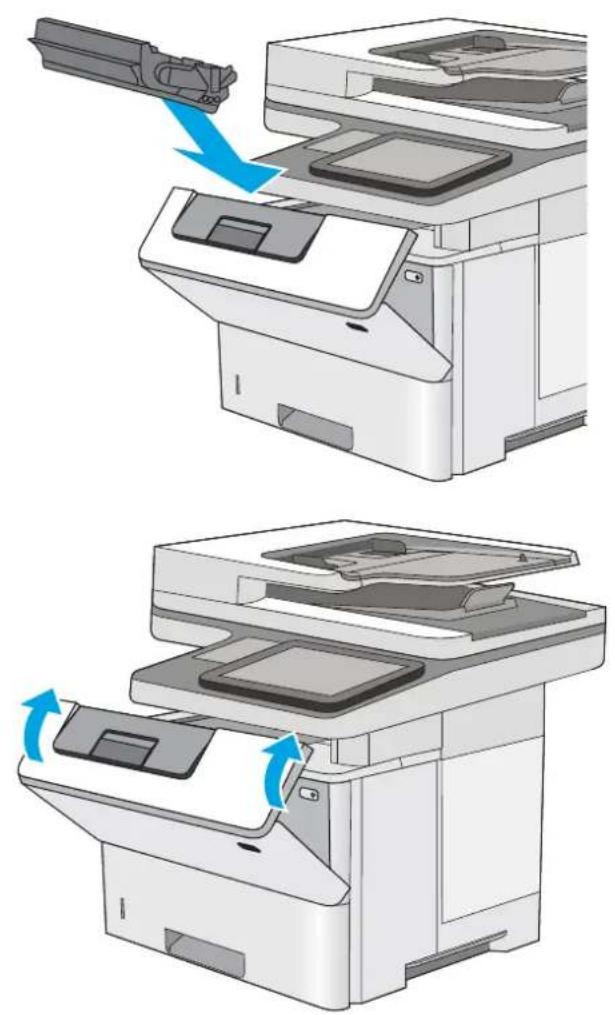
natural_image
Two-step diagram showing a printer's internal structure before and after assembly, with blue arrows indicating the process (no text or symbols present)Clear paper jams in Tray 2 and the 550-sheet trays
Use the following procedure to check for paper in all possible jam locations related to Tray 2 and the 550-sheet trays. When a jam occurs, the control panel displays an animation that assists in clearing the jam.
-
Remove the tray from the printer.
-
Remove the paper from the tray, and discard any damaged paper.
-
Verify that the rear paper guide is adjusted to the indentation for the correct paper size. If necessary, pinch the release and move the rear paper guide to the correct position. It should click into place.
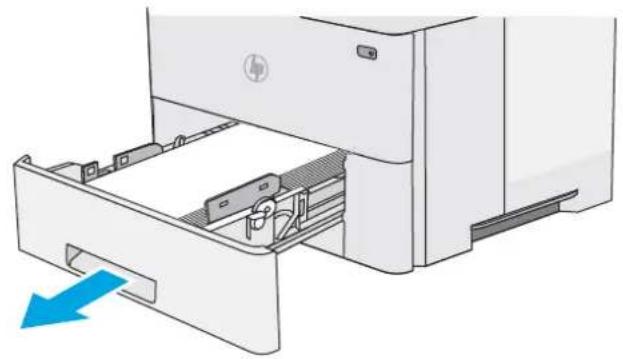
natural_image
Diagram of a HP printer drawer with a blue arrow indicating compression or disassembly (no text or symbols present)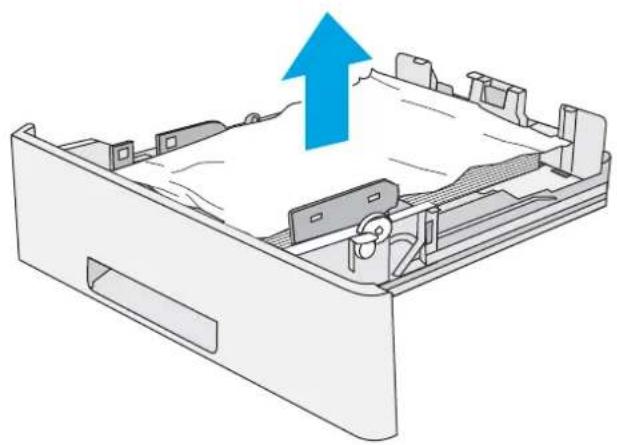
natural_image
Diagram of a mechanical device with a blue upward arrow indicating force or movement (no text or symbols present)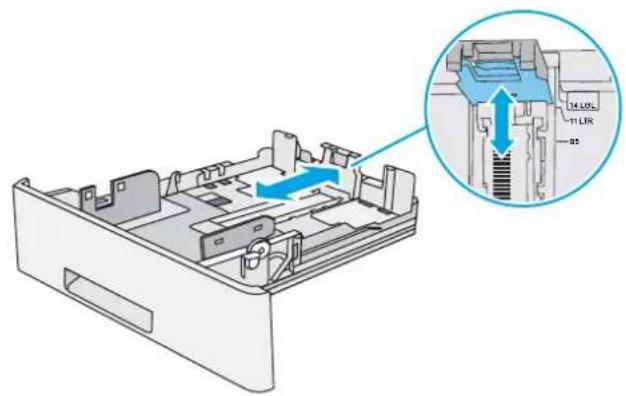
text_image
Technical diagram of a device's internal structure with labeled ports and directional arrows, including a magnified inset showing port details.- Load the paper into the tray. Make sure that the stack is flat at all four corners and that the top of the stack is below the maximum-height indicators.
- Reinsert and close the tray.
- Press the top-cover-release button on the left side of the printer.
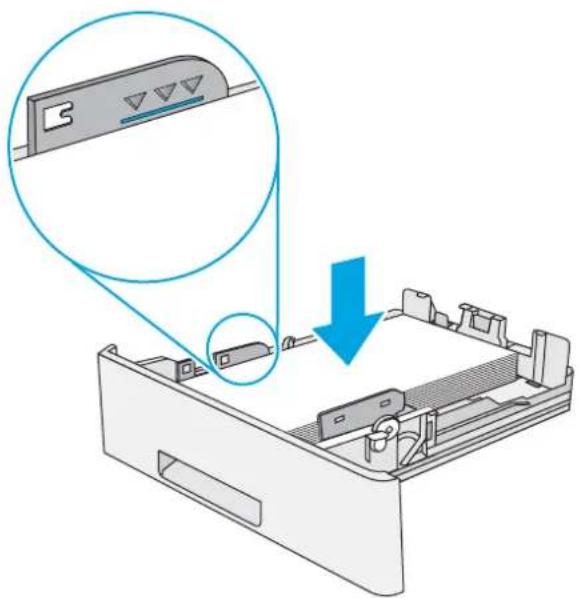
text_image
Diagram showing a device's internal structure with a magnified view highlighting a component being inserted into a tray.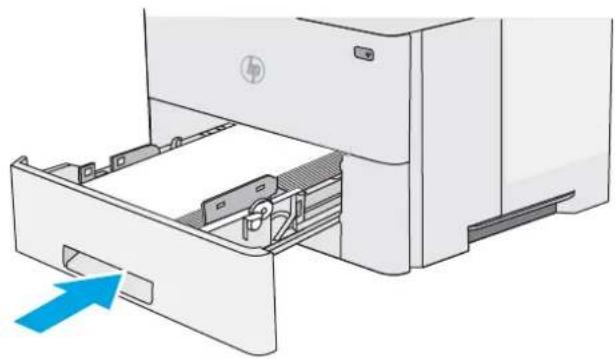
natural_image
Diagram of a HP printer drawer with an arrow indicating the open lid (no text or symbols present)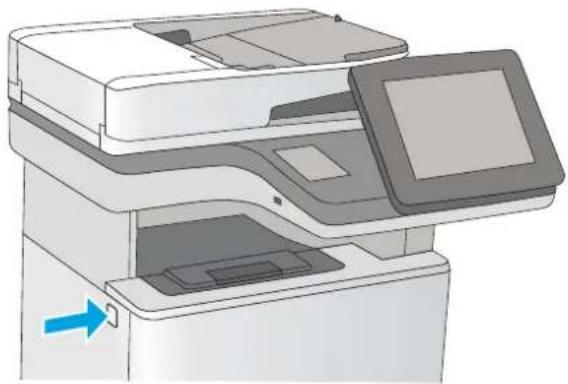
natural_image
Illustration of a printer with a paper airplane and a monitor, showing internal components (no text or symbols)-
Open the front door.
-
Remove the toner cartridge.
-
Lift the jam-access cover and slowly remove any jammed paper. Be careful not to tear the paper.

text_image
Diagram illustrating the process of printer press handling, showing step-by-step assembly and disassembly steps.-
Reinsert the toner cartridge.
-
Close the front door.
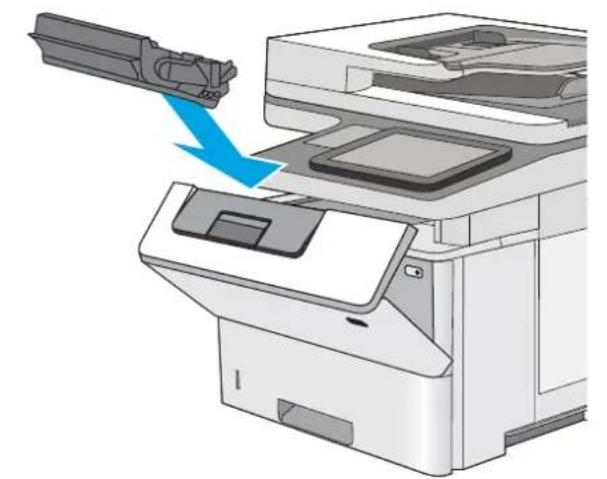
natural_image
Illustration of a printer with a blue arrow pointing to a component, showing no text or symbols.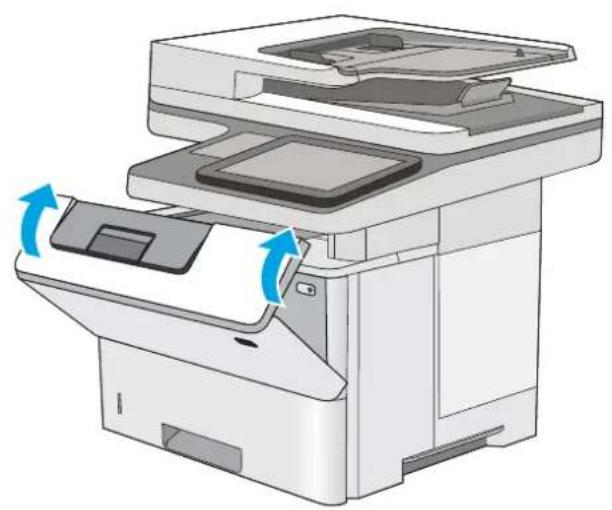
natural_image
Illustration of a printer with two blue arrows indicating rotation or movement (no text or symbols present)Clear paper jams in the toner-cartridge area
Use the following procedure to check for paper in all possible jam locations in the toner-cartridge area. When a jam occurs, the control panel displays an animation that assists in clearing the jam.
-
Press the top-cover-release button on the left side of the printer.
-
Open the front door.
-
R remove the toner cartridge.
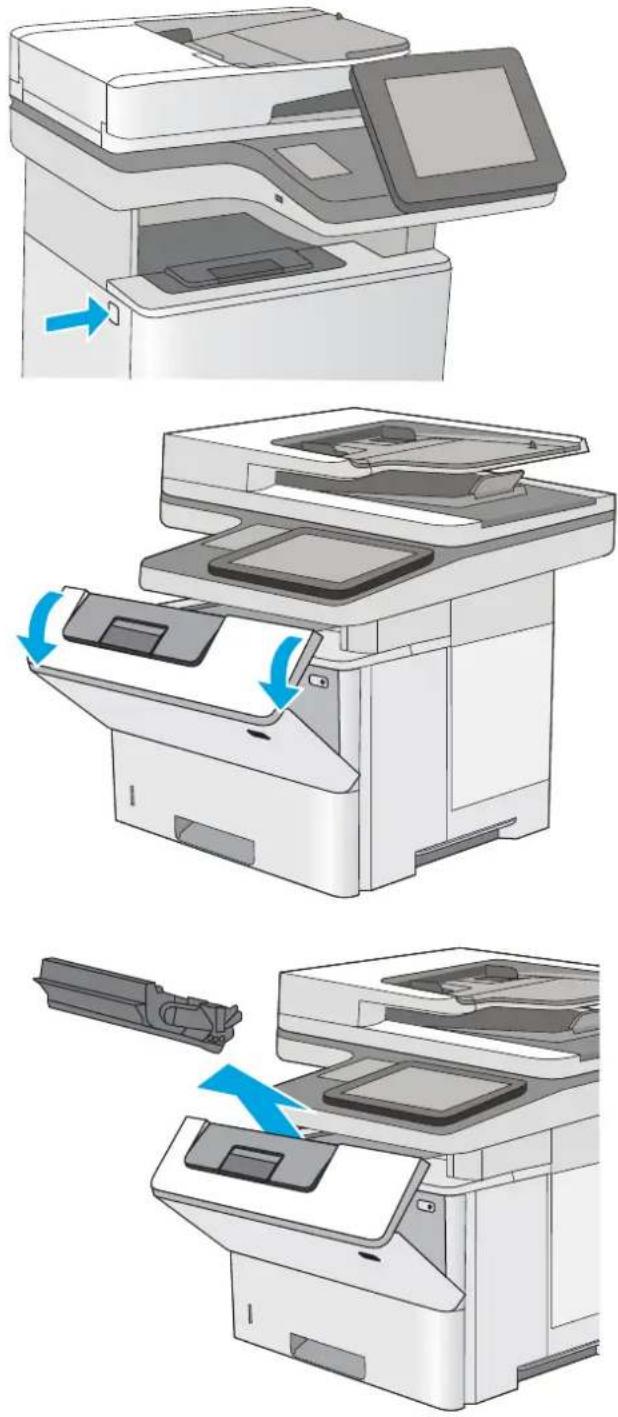
natural_image
Three-step illustration of a printer's internal processing process, showing step-by-step assembly and disassembly (no text or symbols)-
Lift the jam-access cover and slowly remove any jammed paper. Be careful not to tear the paper.
-
Reinsert the toner cartridge.
-
Close the front door.
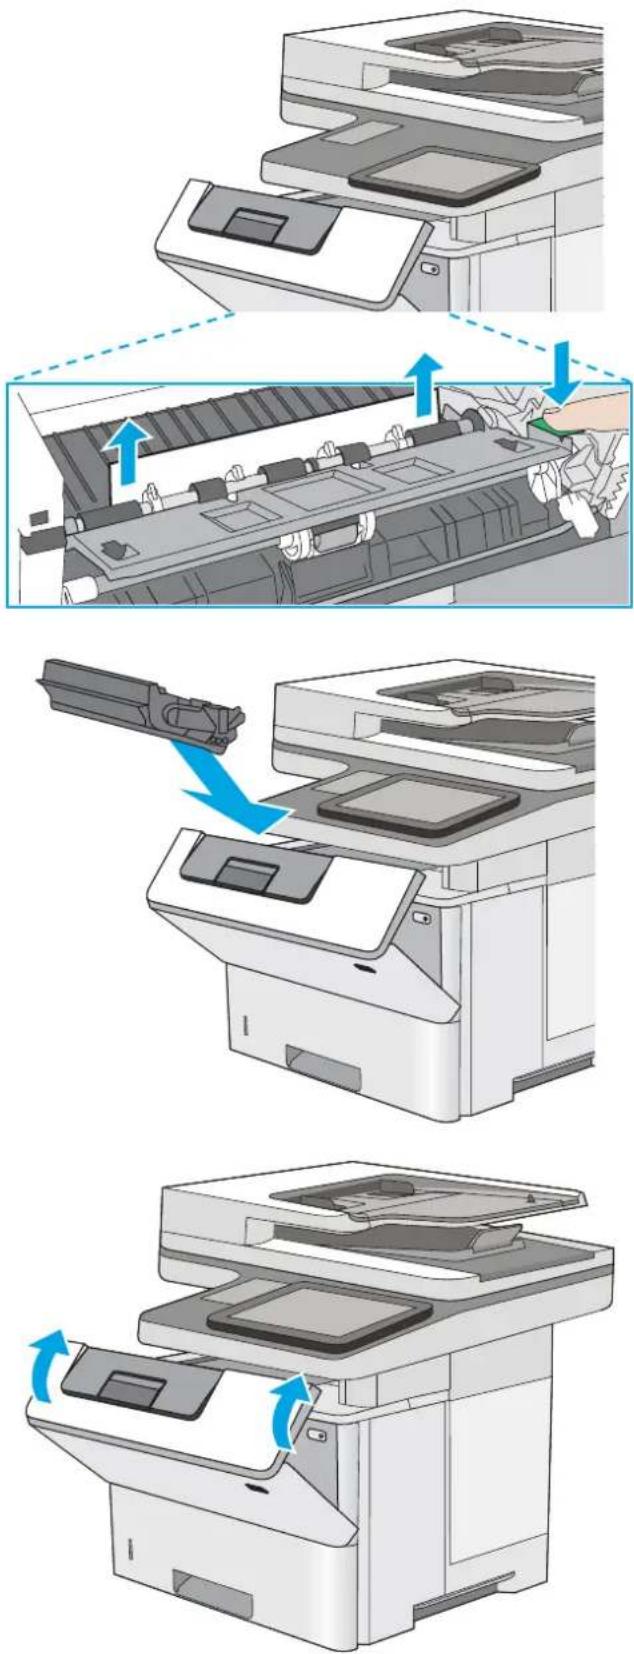
text_image
Diagram illustrating the process of printer handling and packaging, showing steps from receipt to shipment with blue arrows indicating movement.Clear paper jams in the rear door and the fuser area
Use the following procedure to clear paper jams in the rear door and fuser area. When a jam occurs, the control panel displays an animation that assists in clearing the jam.

NOTE: The fuser is hot while the printer is in use. Wait for the fuser to cool before clearing jams.
- Open the rear door.
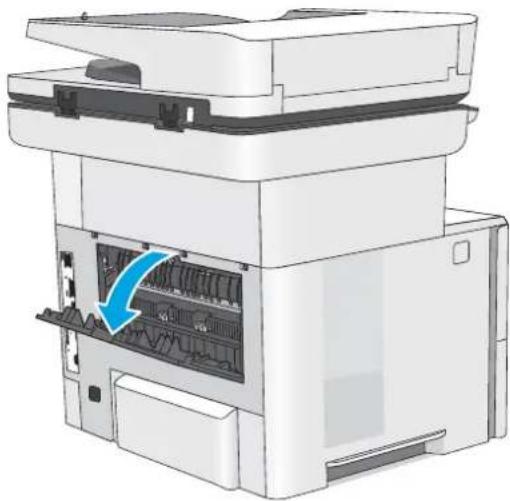
natural_image
3D diagram of a printer with internal structure and a blue arrow indicating a process (no text or symbols present)-
Remove any jammed paper.
-
Cl ose the rear door
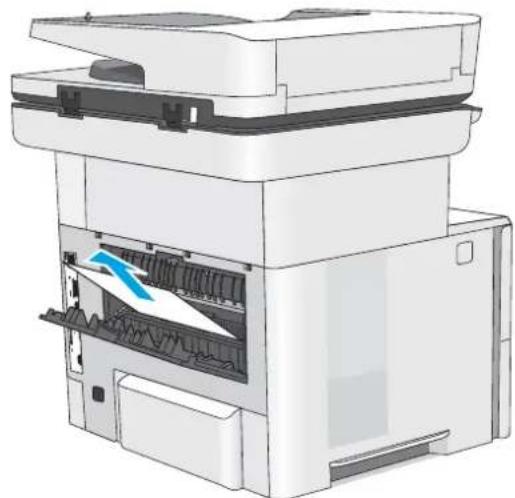
natural_image
3D diagram of a printer with internal structure and paper feed, showing no text or symbols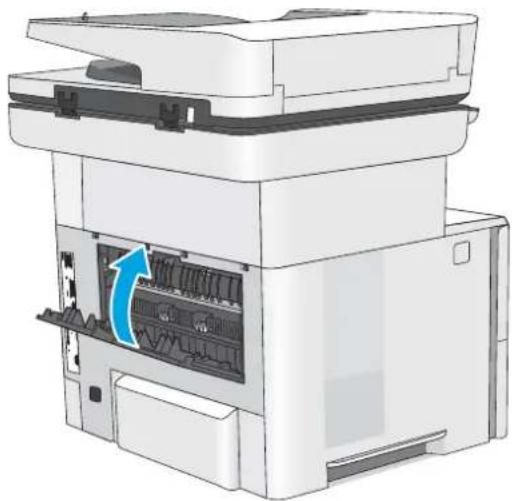
natural_image
3D diagram of an HP printer internal structure showing internal components and a blue arrow indicating a loading or operation (no text or symbols present)Clear paper jams in the output bin
Use the following procedure to check for paper in all possible jam locations in the output bin. When a jam occurs, the control panel displays an animation that assists in clearing the jam.
- If paper is visible in the output bin, grasp the leading edge and remove it.
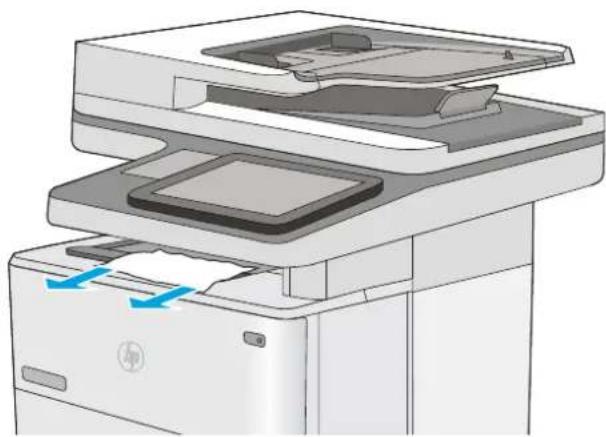
natural_image
Illustration of a layered printer or scanner with no visible text or symbolsClear paper jams in the duplexer
Use the following procedure to check for paper in all possible jam locations in the automatic duplexer. When a jam occurs, the control panel displays an animation that assists in clearing the jam.
- Remove Tray 2 from the printer.
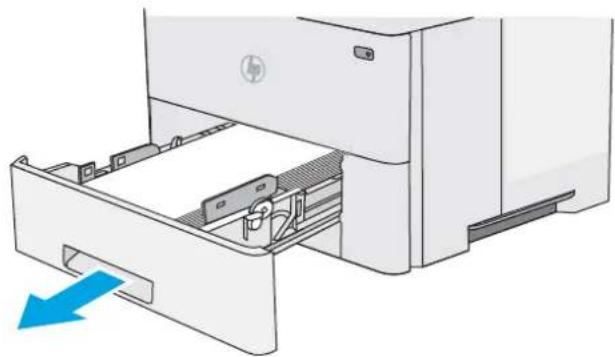
natural_image
Diagram of a HP printer drawer with a blue arrow indicating compression or disassembly (no text or symbols present)- Pull forward on the green tab inside the tray area to release the duplex pan.
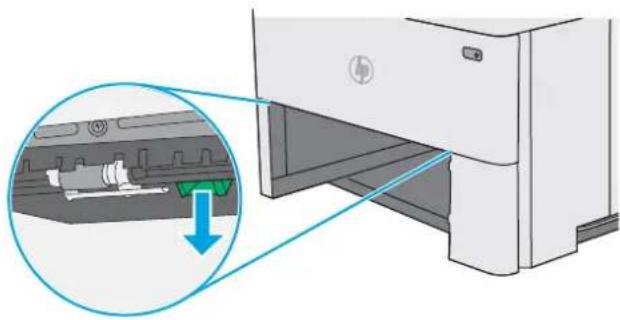
natural_image
Diagram of a printer with a magnified inset showing internal components (no text or symbols)-
Remove any jammed paper.
-
Close the duplex pan.
-
Reinsert and close the tray.
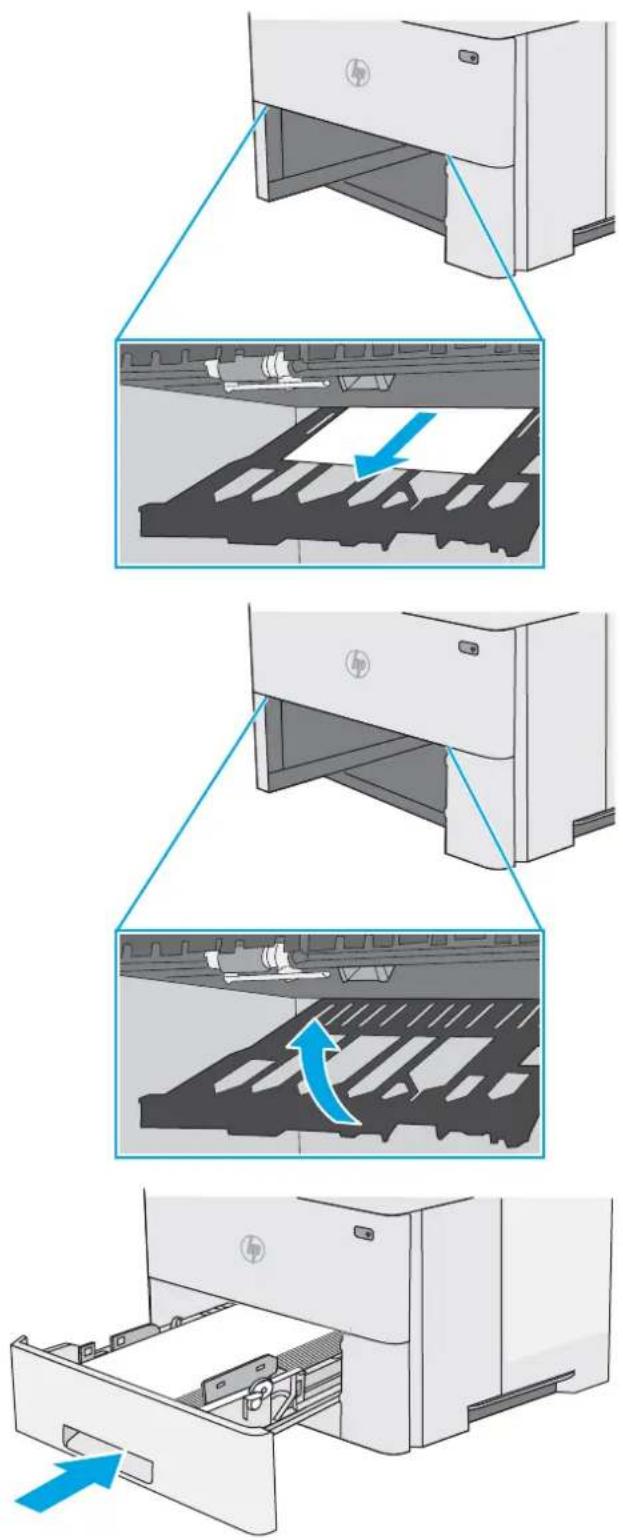
text_image
Diagram illustrating the process of printer papermaking, showing steps from opening to closing with a blue arrow indicating the motion.- Open the rear door.
- R emove any jammed paper.
- Close the rear door
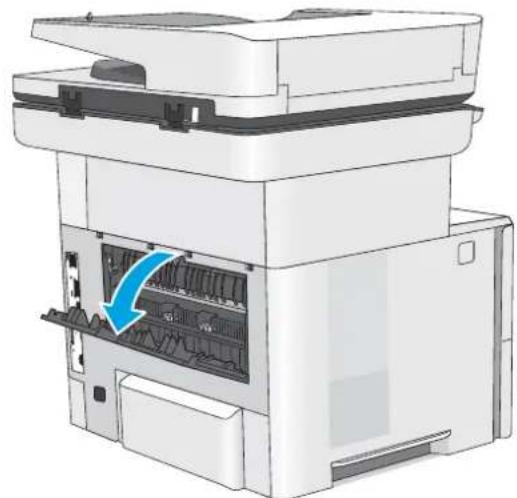
natural_image
Diagram of an HP printer internal structure showing internal components and a blue arrow indicating a process (no text or symbols present)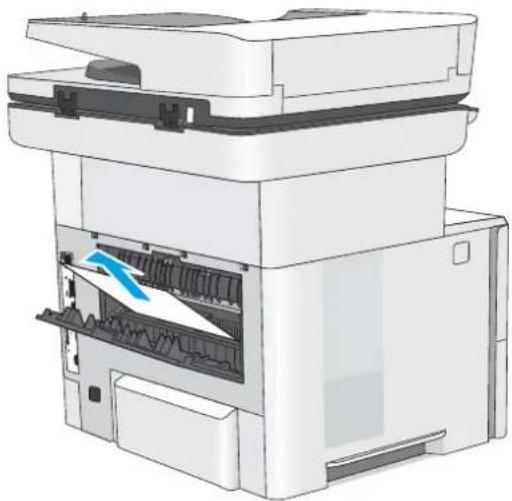
natural_image
3D illustration of a printer with internal structure and paper feed, showing no text or symbols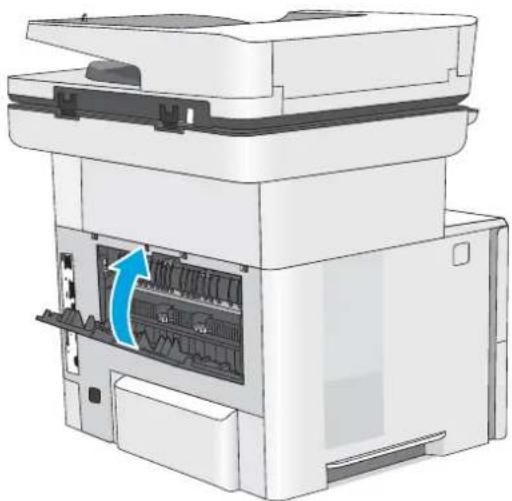
natural_image
Diagram of an HP printer internal structure showing internal components and a blue arrow indicating a flow or movement (no text or symbols present)-
Press the top-cover-release button on the left side of the printer.
-
Open the front door.
-
Remove the toner cartridge.
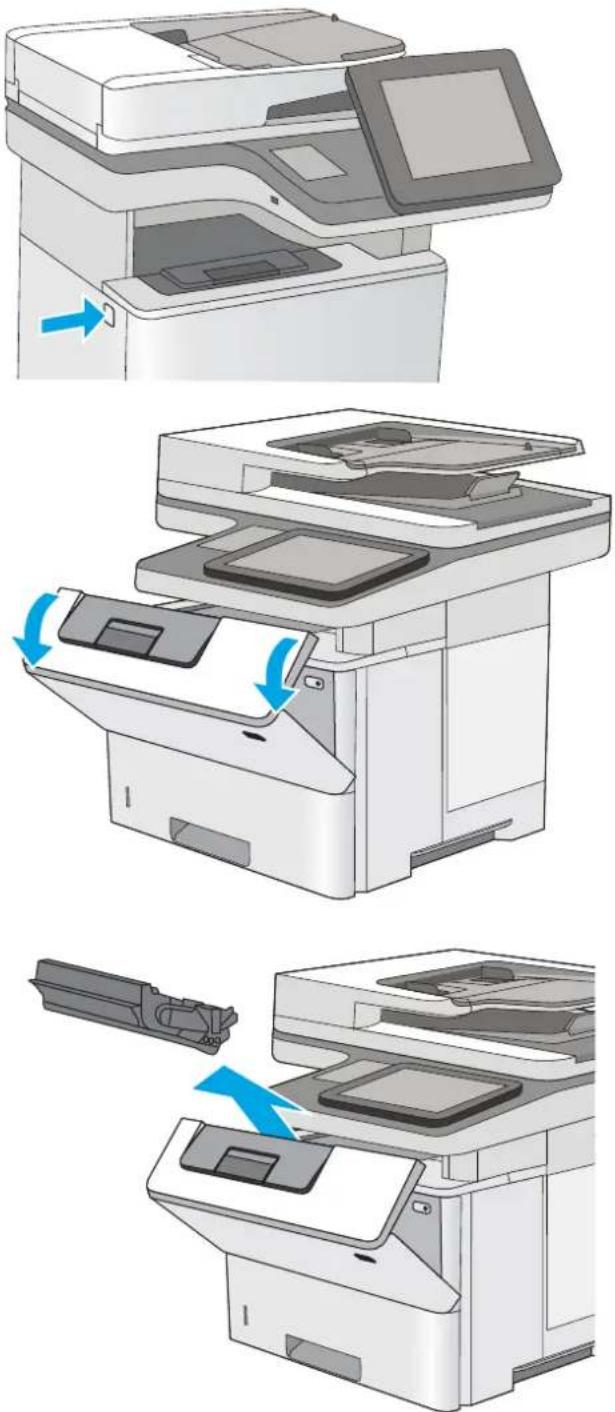
natural_image
Three-step illustration of a printer's internal processing, showing step-by-step assembly and disassembly (no text or symbols)- Lift the jam-access cover and slowly remove any jammed paper. Be careful not to tear the paper.
- Reinsert the toner cartridge.
- Close the front door.
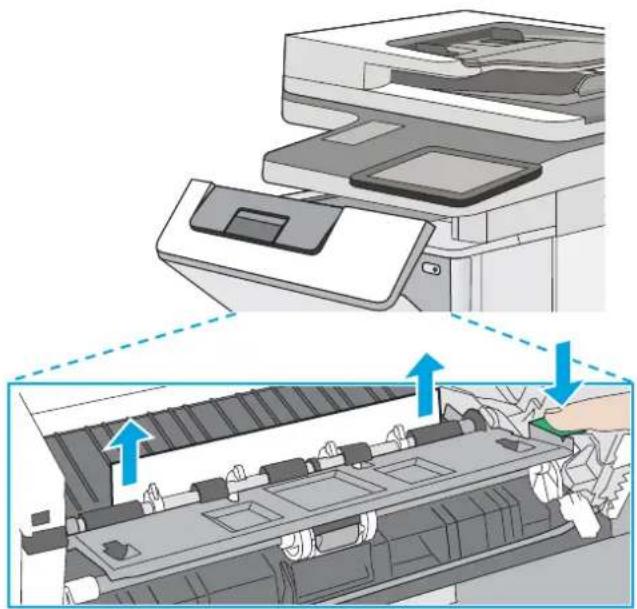
natural_image
Diagram showing a printer's internal structure with arrows indicating assembly or process (no text or symbols present)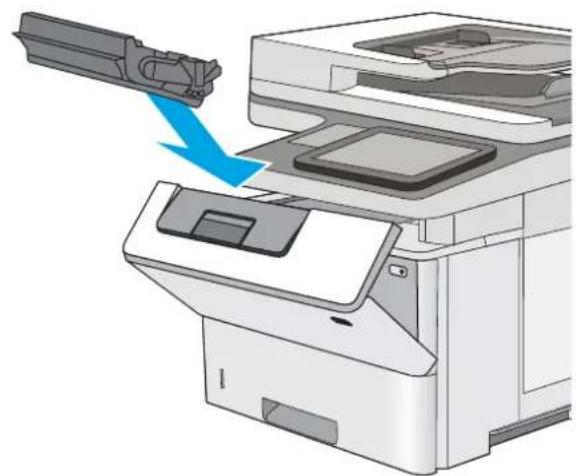
natural_image
Illustration of a printer with a blue arrow pointing to a component, showing no text or symbols.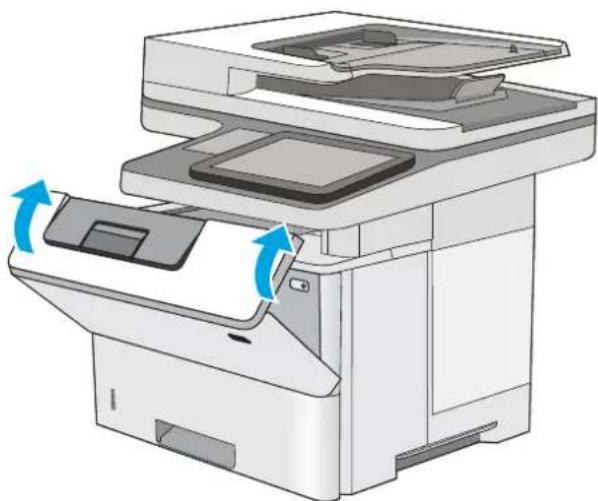
natural_image
Illustration of a printer with two blue arrows indicating rotation or movement (no text or symbols present)Improve print quality
Introduction
• Print from a different software program
• Check the paper-type setting for the print job
- Check toner-cartridge status
Clean the printer
• Visually inspect the toner cartridge
- Check paper and the printing environment
• Check the EconoMode settings
• Try a different print driver
If the printer is having print-quality problems, try the following solutions in the order presented to resolve the issue.
Print from a different software program
Try printing from a different software program. If the page prints correctly, the problem is with the software program from which you were printing.
Check the paper-type setting for the print job
Check the paper type setting when printing from a software program and the printed pages have smears, fuzzy or dark print, curled paper, scattered dots of toner, loose toner, or small areas of missing toner.
Check the paper type setting (Windows)
- From the software program, select the Print option.
- Select the printer, and then click the Properties or Preferences button.
- Click the Paper/Quality tab.
- From the Paper Type drop-down list, click the More... option.
- Expand the list of Type is: options.
- Expand the category of paper types that best describes your paper.
- Select the option for the type of paper you are using, and click the OK button.
- Click the OK button to close the Document Properties dialog box. In the Print dialog box, click the OK button to print the job.
Check the paper type setting (OS X)
- Click the File menu, and then click the Print option.
-
In the Printer menu, select the printer.
-
By default, the print driver displays the Copies & Pages menu. Open the menus drop-down list, and then click the Finishing menu.
- Select a type from the Media Type drop-down list.
- Click the Print button.
Check toner-cartridge status
Follow these steps to check the estimated life remaining in the toner cartridges and if applicable, the status of other replaceable maintenance parts.
Step one: Print the supplies status page
- Press the Home button on the printer control panel.
- Select Supplies.
- The status of all supply items is listed on the screen.
- To print a report of the status of all supply items, including the genuine HP part number for reordering the supply, select Manage Supplies, and then select Print Supplies Status.
Step two: Check supplies status
- Look at the supplies status report to check the percent of life remaining for the toner cartridges and if applicable, the status of other replaceable maintenance parts.
Print quality problems can occur when using a toner cartridge that is at its estimated end of life. The supplies status page indicates when a supply level is very low. After an HP supply has reached the very low threshold, HP's premium protection warranty on that supply has ended.
The toner cartridge does not need to be replaced now unless the print quality is no longer acceptable. Consider having a replacement available to install when print quality is no longer acceptable.
If you determine that you need to replace a toner cartridge or other replaceable maintenance parts, the supplies status page lists the genuine HP part numbers.
- Check to see if you are using a genuine HP cartridge.
A genuine HP toner cartridge has the words “HP” or “Hewlett-Packard” on it, or has the HP logo on it. For more information on identifying HP cartridges go to www.hp.com/go/learnaboutsupplies.
Clean the printer
Print a cleaning page
During the printing process paper, toner, and dust particles can accumulate inside the printer and can cause print-quality issues such as toner specks or spatter, smears, streaks, lines, or repeating marks.
Follow these steps to clean the printer's paper path.
- Press the Home button on the printer control panel.
- Select Device Maintenance.
- Select Calibration/Cleaning, and then select Cleaning Page to print the page.
A Cleaning message displays on the printer control panel. The cleaning process takes a few minutes to complete. Do not turn the printer off until the cleaning process has finished. When it is finished, discard the printed page.
Check the scanner glass for dirt and smudges
Over time, specks of debris might collect on the scanner glass and white plastic backing, which can affect performance. Use the following procedure to clean the scanner if the printed pages have streaks, unwanted lines, black dots, poor print quality, or unclear text.
- Press the power button to turn the printer off, and then disconnect the power cable from the electrical outlet.
natural_image
Icon of a computer control panel with a blue arrow pointing to the power button (no text or symbols)- Open the scanner lid.
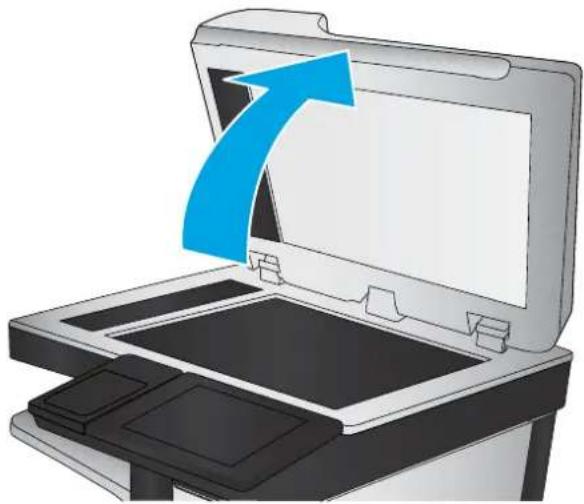
natural_image
Illustration of a printer with an open lid and a blue arrow pointing to the lid area (no text or symbols)- Clean the scanner glass, the document feeder strips, and the white plastic backing with a soft cloth or sponge that has been moistened with nonabrasive glass cleaner.
CAUTION: Do not use abrasives, acetone, benzene, ammonia, ethyl alcohol, or carbon tetrachloride on any part of the printer; these can damage the printer. Do not place liquids directly on the glass or platen. They might seep and damage the printer.
NOTE: If you are having trouble with streaks on copies when you are using the document feeder, be sure to clean the small strip of glass on the left side of the scanner.
-
Dry the glass and white plastic parts with a chamois or a cellulose sponge to prevent spotting.
-
Connect the power cable to an outlet, and then press the power button to turn the printer on.
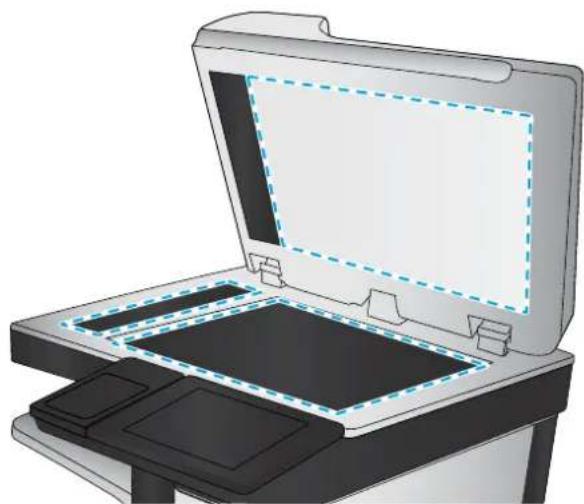
natural_image
3D diagram of a laptop with open screen and tray, showing internal components (no text or symbols)Visually inspect the toner cartridge
Follow these steps to inspect each toner cartridge.
- Remove the toner cartridge from the printer.
- Check the memory chip f or damage.
- Examine the surface of the green imaging drum.
CAUTION:
Do not touch the imaging drum. Fingerprints on the imaging drum can cause print-quality
- If you see any scratches, fingerprints, or other damage on the imaging drum, replace the toner cartridge.
- Reinstall the toner cartridge, and print a few pages to see if the problem has resolved.
Check paper and the printing environment
Step one: Use paper that meets HP specifications
Some print-quality problems arise from using paper that does not meet HP specifications.
• Always use a paper type and weight that this printer supports.
- Use paper that is of good quality and free of cuts, nicks, tears, spots, loose particles, dust, wrinkles, voids, staples, and curled or bent edges.
• Use paper that has not been previously printed on.
• Use paper that does not contain metallic material, such as glitter.
- Use paper that is designed for use in laser printers. Do not use paper that is designed only for use in Inkjet printers.
• Use paper that is not too rough. Using smoother paper generally results in better print quality.
Step two: Check the environment
The environment can directly affect print quality and is a common cause for print-quality or paper-feeding issues. Try the following solutions:
- Move the printer away from drafty locations, such as open windows or doors, or air-conditioning vents.
• Make sure the printer is not exposed to temperatures or humidity outside of printer specifications. - Do not place the printer in a confined space, such as a cabinet.
- Place the printer on a sturdy, level surface.
- Remove anything that is blocking the vents on the printer. The printer requires good air flow on all sides, including the top.
- Protect the printer from airborne debris, dust, steam, grease, or other elements that can leave residue inside the printer.
Step three: Set the individual tray alignment
Follow these steps when text or images are not centered or aligned correctly on the printed page when printing from specific trays.
- Press the Home button on the printer control panel.
-
Open the fol lowing menus:
-
Administration
- General Settings
-
Print Quality
• Image Registration -
Select the tray to adjust.
- Select Print Test Page, and then follow the instructions on the printed pages.
- Select Print Test Page again to verify the results, and then make further adjustments if necessary.
- Touch the Save button to save the new settings.
Check the EconoMode settings
HP does not recommend the full-time use of EconoMode. If EconoMode is used full-time, the toner supply might outlast the mechanical parts in the toner cartridge. If print quality begins to degrade and is no longer acceptable, consider replacing the toner cartridge.

NOTE: This feature is available with the PCL 6 print driver for Windows. If you are not using that driver, you can enable the feature by using the HP Embedded Web Server.
Follow these steps if the entire page is too dark or too light.
- From the software program, select the Print option.
- Select the printer, and then click the Properties or Preferences button.
-
Click the Paper/Quality tab, and locate the Print Quality area.
-
If the entire page is too dark, use these settings:
• Select the 600 dpi option.
- Select the EconoMode check box to enable it.
If the entire page is too light, use these settings:
• Select the FastRes 1200 option.
• Clear the EconoMode check box to disable it.
- Click the OK button to close the Document Properties dialog box. In the Print dialog, click the OK button to print the job.
Try a different print driver
Try a different print driver when printing from a software program and the printed pages have unexpected lines in graphics, missing text, missing graphics, incorrect formatting, or substituted fonts.
Download any of the following drivers from the HP Web site: www.hp.com/support/ljM527MFP.
| HP PCL.6 driver | Provided as the default driver on the printer CD. This driver is automatically installed unless you select a different one. |
| HP PCL 6 driver | Recommended for all Windows environments |
| HP PCL-6 driver | Provides the overall best speed, print quality, and printer-feature support for most usersDeveloped to align with the Windows Graphic Device Interface (GDI) for the best speed in Windows environmentsMight not be fully compatible with third-party and custom software programs that are based on PCL 5 |
| HP UPD PS driver | Recommended for printing with Adobe® software programs or with other highly graphics-intensive software programsProvides support for printing from postscript emulation needs, or for postscript flash font support |
| HP UPD PCL 5 | Recommended for general office printing in Windows environmentsCompatible with previous PCL versions and older HP LaserJet printersThe best choice for printing from third-party or custom software programsThe best choice when operating with mixed environments, which require the printer to be set to PCL 5 (UNIX, Linux, mainframe)Designed for use in corporate Windows environments to provide a single driver for use with multiple printer modelsPreferred when printing to multiple printer models from a mobile Windows computer |
| HP UPD PCL 6 | Recommended for printing in all Windows environmentsProvides the overall best speed, print quality, and printer feature support for most usersDeveloped to align with Windows Graphic Device Interface (GDI) for best speed in Windows environmentsMight not be fully compatible with third-party and custom software programs that are based on PCL 5 |
Improve copy image quality
If the printer is having copy quality problems, try the following solutions in the order presented to resolve the issue.
• Check the scanner glass for dirt and smudges
• Calibrate the scanner
• Check the paper settings
- Check the image-adjustment settings
- Optimize copy quality for text or pictures
- Edge-to-edge copying
• Clean the pickup rollers and separation pad in the document feeder
Try these few simple steps first:
• Use the flatbed scanner rather than the document feeder.
• Use high-quality originals.
- When using the document feeder, load the original document into the feeder correctly, using the paper guides, to avoid unclear or skewed images.
If the problem still exists, try these additional solutions. If they do not fix the problem, see “Improve print quality” for further solutions.
Check the scanner glass for dirt and smudges
Over time, specks of debris might collect on the scanner glass and white plastic backing, which can affect performance. Use the following procedure to clean the scanner if the printed pages have streaks, unwanted lines, black dots, poor print quality, or unclear text.
- Press the power button to turn the printer off, and then disconnect the power cable from the electrical outlet.
natural_image
Icon of a computer control panel with a blue arrow pointing to the power button (no text or symbols)-
Open the scanner lid.
-
Clean the scanner glass, the document feeder strips, and the white plastic backing with a soft cloth or sponge that has been moistened with nonabrasive glass cleaner.
CAUTION: Do not use abrasives, acetone, benzene, ammonia, ethyl alcohol, or carbon tetrachloride on any part of the printer; these can damage the printer. Do not place liquids directly on the glass or platen. They might seep and damage the printer.
NOTE: If you are having trouble with streaks on copies when you are using the document feeder, be sure to clean the small strip of glass on the left side of the scanner.
-
Dry the glass and white plastic parts with a chamois or a cellulose sponge to prevent spotting.
-
Connect the power cable to an outlet, and then press the power button to turn the printer on.
Calibrate the scanner
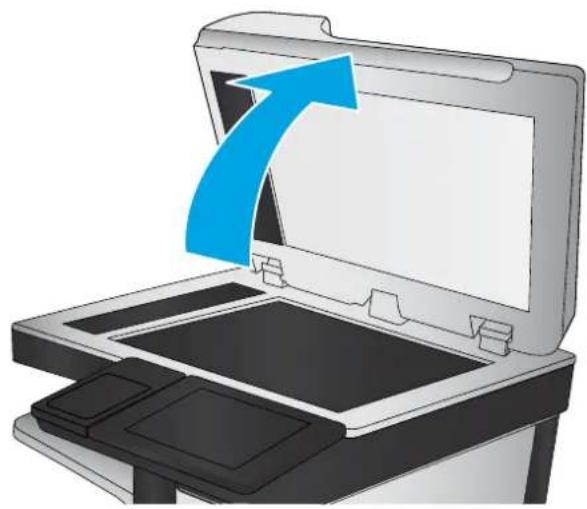
natural_image
Illustration of a printer with an open lid and a blue arrow pointing to the cover (no text or symbols)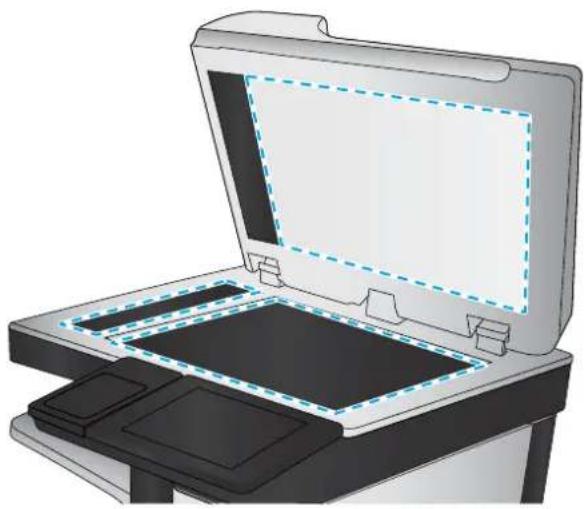
natural_image
3D diagram of a printer with open lid and tray, showing internal structure (no text or symbols)If the copied image is not positioned correctly on the page, follow these steps to calibrate the scanner.

NOTE: When using the document feeder, make sure to adjust the guides in the input tray so they are against the original document.
-
From the Home screen on the printer control panel, scroll to and touch the Device Maintenance button.
-
Open the following menus:
-
Calibration/Cleaning
Calibrate Scanner -
Touch the Next button to start the calibration process. Follow the on-screen prompts.
- Wait while the printer calibrates, and then try copying again.
Check the paper settings
Follow these steps if copied pages have smears, fuzzy or dark print, curled paper, scattered dots of toner, loose toner, or areas where toner has dropped out.
Check the paper size and type configuration
- From the Home screen on the printer control panel, scroll to and touch the Trays button.
- Touch the line for the tray that you want to configure, and then touch the Modify button.
- Select the paper size and paper type from the lists of options.
- Touch the OK button to save your selection.
Select the tray to use for the copy
- From the Home screen on the printer control panel, select Copy.
- Touch the Paper Selection button.
- Select the tray that holds the paper that you want to use.
- Touch the OK button.

NOTE: These settings are temporary. After you have finished the job, the printer returns to the default settings.
Check the image-adjustment settings
Adjust these additional settings to improve copy quality:
- Sharpness: Clarify or soften the image. For example, increasing the sharpness could make text appear crisper, but decreasing it could make photos appear smoother.
- Darkness: Increase or decrease the amount of white and black used in colors in scanned images.
- Contrast: Increase or decrease the difference between the lightest and the darkest color on the page.
- Background Cleanup: Remove faint colors from the background of scanned images. For example, if the original document is printed on colored paper, use this feature to lighten the background without affecting the darkness of the image.
-
Automatic Tone: Available for Flow printers only. For original documents that have at least 100 characters of text on the page, the printer can detect which edge is the top of the page, and it orients the scanned images appropriately. If some of the pages are upside-down in relation to the other pages, the resulting scanned image has all pages right-side-up. If some of the pages have a landscape orientation, the printer rotates the image so that the top of the page is at the top of the image.
-
From the Home screen on the printer control panel, select Copy.
-
Touch the Image Adjustment button.
-
Adjust the sliders to set the levels, and then touch the OK button.
-
Touch the Start button.

NOTE: These settings are temporary. After you have finished the job, the printer returns to the default settings.
Optimize copy quality for text or pictures
Optimize the copy job for the type of image being copied: text, graphics, or photos.
- From the Home screen on the printer control panel, select Copy.
- Touch the More Options button, and then touch the Optimize Text/Picture button.
- Select one of the predefined options, or touch the Manually adjust button, and then adjust the slider in the Optimize For area. Touch the OK button.
- Touch the Start button.

NOTE: These settings are temporary. After you have finished the job, the printer returns to the default settings.
Edge-to-edge copying
Use this feature to avoid shadows that can appear along the edges of copies when the original document is printed close to the edges.
- From the Home screen on the printer control panel, scroll to and touch the Administration button.
- Open the fol lowing menus:
- Copy Settings
- Edge-To-Edge
- Select the Edge-To-Edge output option if the original document is printed close to the paper edges.
- Touch the Save button.
- Touch the Start button.
Clean the pickup rollers and separation pad in the document feeder
Follow these steps if the document feeder does not pick up pages correctly or produces skewed output.
- Lift the document-feeder latch.
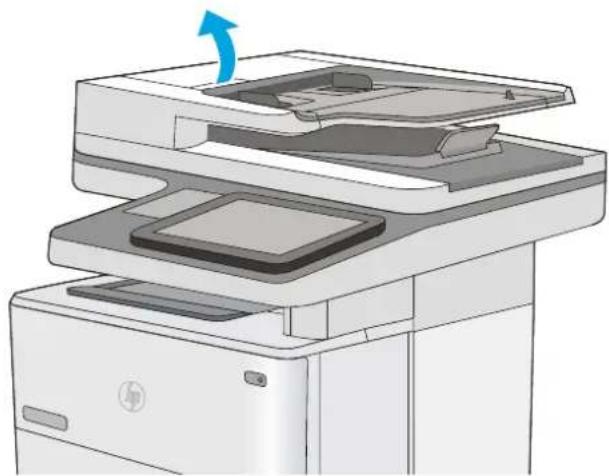
natural_image
Illustration of a printer with a blue arrow indicating the paper's edge, showing internal components (no text or symbols)- Open the document-feeder cover.
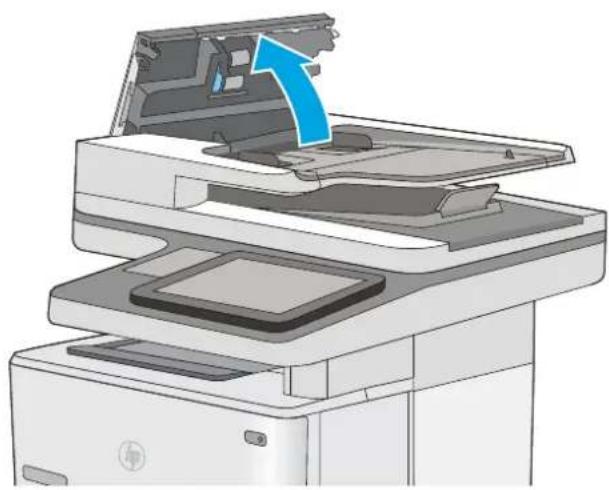
natural_image
Illustration of a printer's internal structure showing paper feeding into a tray, with a blue arrow indicating the component (no text or symbols present)- Remove any visible lint or dust from each of the feed rollers and the separation pad using compressed air or a clean lint-free cloth moistened with warm water.
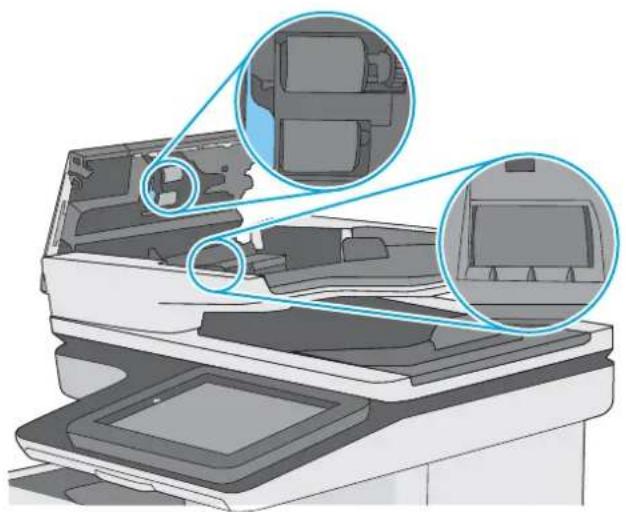
natural_image
Diagram of a printer's internal structure showing two views of the lid (no text or symbols present)- Close the document-feeder cover.
NOTE: Verify that the latch on the top of the document-feeder cover is completely closed.
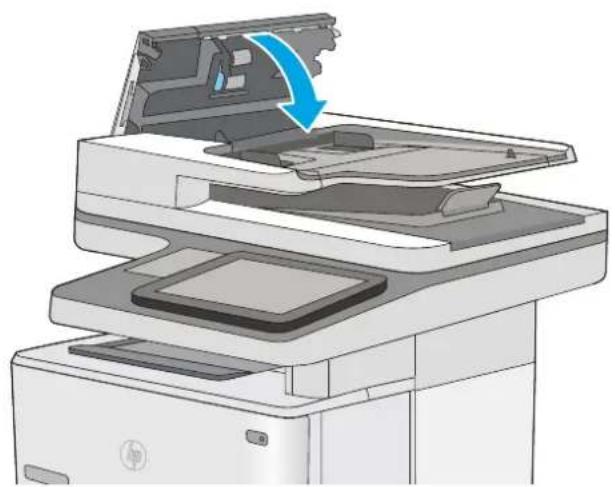
natural_image
Illustration of a printer's internal structure showing paper feeding into a tray with a blue arrow indicating the process (no text or symbols present)If the problem persists, check the document feeder separation pad and rollers for damage or wear, and replace them if necessary.

NOTE: New rollers have a rough surface. As rollers wear, they become smooth.
Improve scan image quality
- Check the scanner glass for dirt and smudges
- Check the resolution settings
- Check the image-adjustment settings
- Optimize scan quality for text or pictures
- Check the output-quality settings
- Clean the pickup rollers and separation pad in the document feeder
Try these few simple steps first:
• Use the flatbed scanner rather than the document feeder.
• Use high-quality originals.
- When using the document feeder, load the original document into the feeder correctly, using the paper guides, to avoid unclear or skewed images.
If the problem still exists, try these additional solutions. If they do not fix the problem, see “Improve print quality” for further solutions.
Check the scanner glass for dirt and smudges
Over time, specks of debris might collect on the scanner glass and white plastic backing, which can affect performance. Use the following procedure to clean the scanner if the printed pages have streaks, unwanted lines, black dots, poor print quality, or unclear text.
- Press the power button to turn the printer off, and then disconnect the power cable from the electrical outlet.
natural_image
Icon of a power button with an arrow pointing to it, no text or symbols present-
Open the scanner lid.
-
Clean the scanner glass, the document feeder strips, and the white plastic backing with a soft cloth or sponge that has been moistened with nonabrasive glass cleaner.
CAUTION: Do not use abrasives, acetone, benzene, ammonia, ethyl alcohol, or carbon tetrachloride on any part of the printer; these can damage the printer. Do not place liquids directly on the glass or platen. They might seep and damage the printer.
NOTE: If you are having trouble with streaks on copies when you are using the document feeder, be sure to clean the small strip of glass on the left side of the scanner.
- Dry the glass and white plastic parts with a chamois or a cellulose sponge to prevent spotting.
- Connect the power cable to an outlet, and then press the power button to turn the printer on.
Check the resolution settings

NOTE: Setting the resolution to a high value increases the file size and the scan time.
Follow these steps to adjust the resolution setting:
- From the Home screen on the printer control panel, scroll to and touch the Administration button.
- Open the Scan/Digital Send Settings menu.
- Select the category of scan and send settings that you want to configure.
- Open the Default Job Options menu.
- Touch the Resolution button.

natural_image
Illustration of a printer's open lid with a blue arrow pointing to the cover (no text or symbols)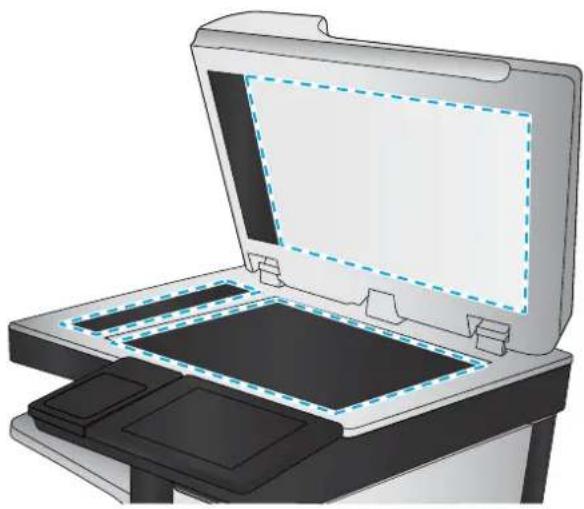
natural_image
Illustration of a laptop with open screen and tray, showing internal components (no text or symbols)- Select one of the predefined options. Touch the Save button.
- Touch the Start button.
Check the image-adjustment settings
Adjust these additional settings to improve scan quality:
- Sharpness: Clarify or soften the image. For example, increasing the sharpness could make text appear crisper, but decreasing it could make photos appear smoother.
- Darkness: Increase or decrease the amount of white and black used in colors in scanned images.
- Contrast: Increase or decrease the difference between the lightest and the darkest color on the page.
- Background Cleanup: Remove faint colors from the background of scanned images. For example, if the original document is printed on colored paper, use this feature to lighten the background without affecting the darkness of the image.
-
Automatic Tone: Available for Flow printers only. For original documents that have at least 100 characters of text on the page, the printer can detect which edge is the top of the page, and it orients the scanned images appropriately. If some of the pages are upside-down in relation to the other pages, the resulting scanned image has all pages right-side-up. If some of the pages have a landscape orientation, the printer rotates the image so that the top of the page is at the top of the image.
-
From the Home screen on the printer control panel, scroll to and touch the Administration button.
- Open the Scan/Digital Send Settings menu.
- Select the category of scan and send settings that you want to configure.
- Open the Default Job Options menu.
- Touch the Image Adjustment button.
- Adjust the sliders to set the levels, and then touch the Save button.
- Touch the Start button.

NOTE: These settings are temporary. After you have finished the job, the printer returns to the default settings.
Optimize scan quality for text or pictures
Optimize the scan job for the type of image being scanned: text, graphics, or photos.
-
From the Home screen on the printer control panel, touch one of the buttons for the scan/send features:
-
Save to Network Folder
- Save to Device Memory
- Save to USB
-
Scan to SharePoint®
-
Touch the More Options button, and then touch the Optimize Text/Picture button.
-
Select one of the predefined options, or touch the Manually adjust button, and then adjust the slider in the Optimize For area. Touch the OK button.
-
Touch the Start button.

NOTE: These settings are temporary. After you have finished the job, the printer returns to the default settings.
Check the output-quality settings
This setting adjusts the level of compression when saving the file. For the highest quality, select the highest setting.
- From the Home screen on the printer control panel, scroll to and touch the Administration button.
- Open the Scan/Digital Send Settings menu.
- Select the category of scan and send settings that you want to configure.
- Open the Default Job Options menu.
- Touch the Output Quality button.
- Select one of the predefined options, and then touch the Save button.
- Touch the Start button.
Clean the pickup rollers and separation pad in the document feeder
Follow these steps if the document feeder does not pick up pages correctly or produces skewed output.
- Lift the document-feeder latch.
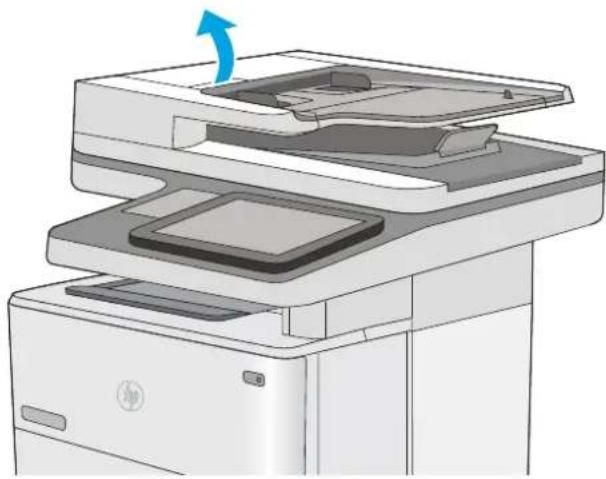
natural_image
Illustration of a printer with a blue arrow indicating rotation (no text or symbols present)- Open the document-feeder cover.
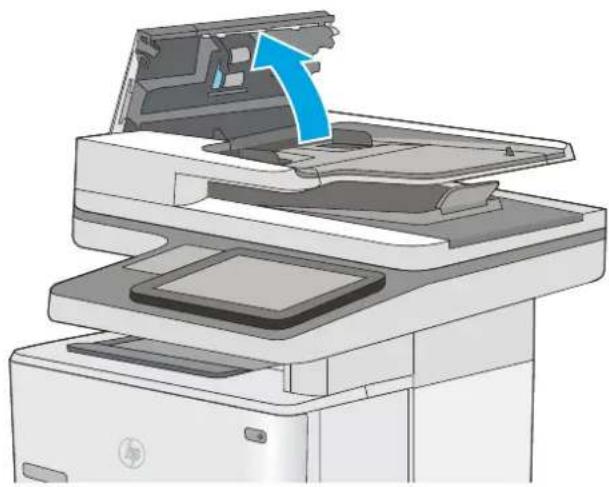
natural_image
Illustration of a printer's internal structure showing paper feeding into a tray with a blue arrow indicating the process (no text or symbols present)- Remove any visible lint or dust from each of the feed rollers and the separation pad using compressed air or a clean lint-free cloth moistened with warm water.
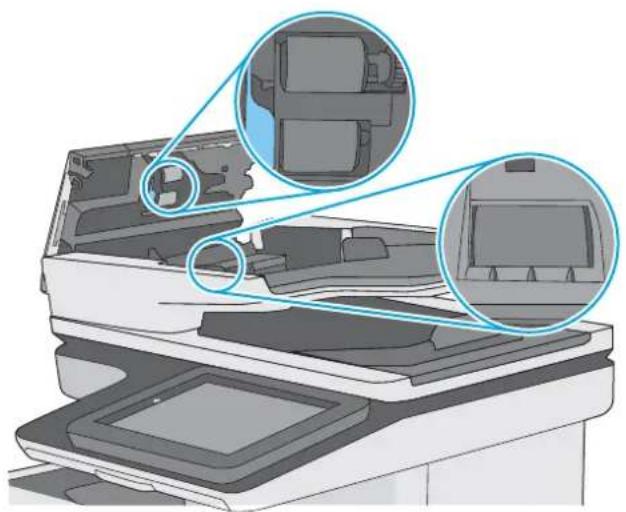
natural_image
Diagram of a printer's internal structure showing two views of the cover (no text or symbols present)- Close the document-feeder cover.
NOTE: Verify that the latch on the top of the document-feeder cover is completely closed.
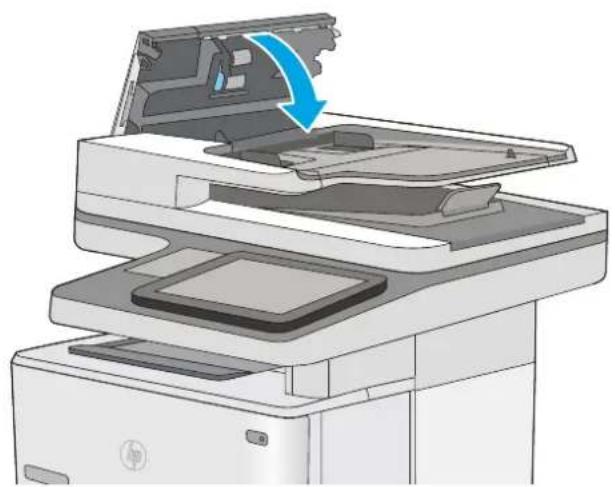
natural_image
Illustration of a printer's internal structure showing paper feeding into a tray with a blue arrow indicating the process (no text or symbols present)If the problem persists, check the document feeder separation pad and rollers for damage or wear, and replace them if necessary.

NOTE: New rollers have a rough surface. As rollers wear, they become smooth.
Improve fax image quality
If the printer is having fax quality problems, try the following solutions in the order presented to resolve the issue.
- Check the scanner glass for dirt and smudges
- Check the send-fax resolution settings
- Check the image-adjustment settings
- Optimize fax quality for text or pictures
- Check the error-correction settings
- Check the fit-to-page setting
- Clean the pickup rollers and separation pad in the document feeder
- Send to a different fax machine
• Check the sender's fax machine
Try these few simple steps first:
• Use the flatbed scanner rather than the document feeder.
• Use high-quality originals.
- When using the document feeder, load the original document into the feeder correctly, using the paper guides, to avoid unclear or skewed images.
If the problem still exists, try these additional solutions. If they do not fix the problem, see “Improve print quality” for further solutions.
Check the scanner glass for dirt and smudges
Over time, specks of debris might collect on the scanner glass and white plastic backing, which can affect performance. Use the following procedure to clean the scanner if the printed pages have streaks, unwanted lines, black dots, poor print quality, or unclear text.
- Press the power button to turn the printer off, and then disconnect the power cable from the electrical outlet.
natural_image
Icon of a power button with an arrow pointing to it, no text or symbols present-
Open the scanner lid.
-
Clean the scanner glass, the document feeder strips, and the white plastic backing with a soft cloth or sponge that has been moistened with nonabrasive glass cleaner.
CAUTION: Do not use abrasives, acetone, benzene, ammonia, ethyl alcohol, or carbon tetrachloride on any part of the printer; these can damage the printer. Do not place liquids directly on the glass or platen. They might seep and damage the printer.
NOTE: If you are having trouble with streaks on copies when you are using the document feeder, be sure to clean the small strip of glass on the left side of the scanner.
-
Dry the glass and white plastic parts with a chamois or a cellulose sponge to prevent spotting.
-
Connect the power cable to an outlet, and then press the power button to turn the printer on.
Check the send-fax resolution settings
Follow these steps to adjust the resolution of outgoing faxes.

NOTE: Increasing the resolution increases the fax size and send time.
-
From the Home screen on the product control panel, scroll to and touch the Administration button.
-
Open the fol lowing menus:
Fax Settings
Fax Send Settings
• Default Job Options
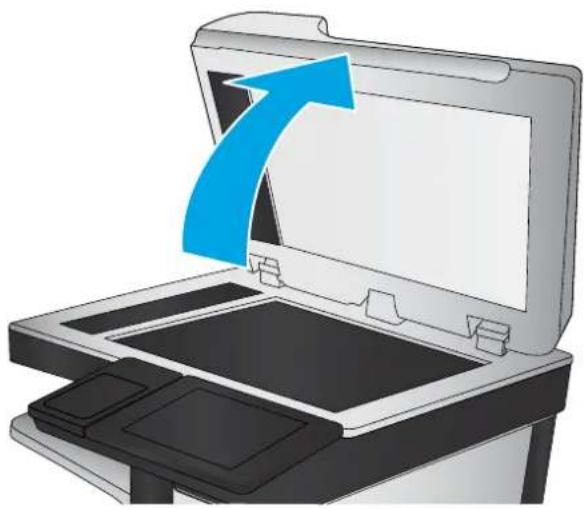
natural_image
Illustration of a printer's open case with a blue arrow pointing to the lid (no text or symbols)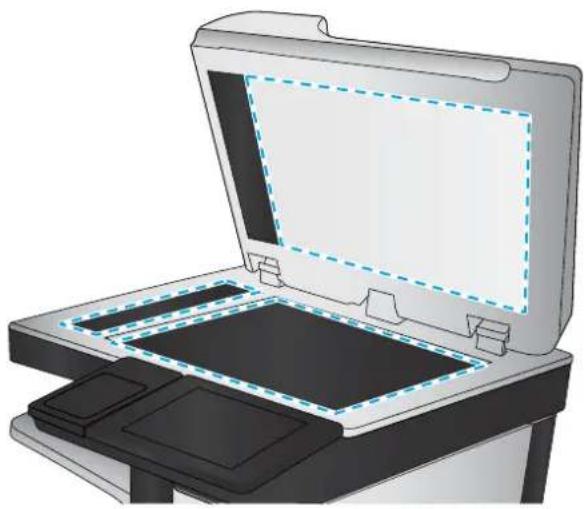
natural_image
Diagram of a laptop with open screen and tray, showing internal components (no text or symbols)- Touch the Resolution button.
- Select one of the predefined options. Touch the Save button.
- Touch the Start button.
Check the image-adjustment settings
Adjust these additional settings to improve send-fax quality:
- Sharpness: Clarify or soften the image. For example, increasing the sharpness could make text appear crisper, but decreasing it could make photos appear smoother.
- Darkness: Increase or decrease the amount of white and black used in colors in scanned images.
- Contrast: Increase or decrease the difference between the lightest and the darkest color on the page.
- Background Cleanup: Remove faint colors from the background of scanned images. For example, if the original document is printed on colored paper, use this feature to lighten the background without affecting the darkness of the image.
-
Automatic Tone: Available for Flow printers only. For original documents that have at least 100 characters of text on the page, the printer can detect which edge is the top of the page, and it orients the scanned images appropriately. If some of the pages are upside-down in relation to the other pages, the resulting scanned image has all pages right-side-up. If some of the pages have a landscape orientation, the printer rotates the image so that the top of the page is at the top of the image.
-
From the Home screen on the printer control panel, scroll to and touch the Administration button.
- Open the following menus:
Fax Settings
Fax Send Settings
- Default Job Options
- Touch the Image Adjustment button.
- Adjust the sliders to set the levels, and then touch the Save button.
- Touch the Start button.

NOTE: These settings are temporary. After you have finished the job, the printer returns to the default settings.
Optimize fax quality for text or pictures
Optimize the fax job for the type of image being scanned: text, graphics, or photos.
- From the Home screen on the printer control panel, touch the Fax button.
- Touch the More Options button, and then touch the Optimize Text/Picture button.
- Select one of the predefined options, or touch the Manually adjust button, and then adjust the slider in the Optimize For area. Touch the OK button.
- Touch the Start button.

NOTE: These settings are temporary. After you have finished the job, the printer returns to the default settings.
Check the error-correction settings
The Error Correction Mode setting might be disabled, which can reduce image quality. Follow these steps to re-enable the setting.
- From the Home screen on the printer control panel, scroll to and touch the Administration button.
- Open the following menus:
Fax Settings
Fax Send Settings
Fax Send Setup
• General Fax Send Settings
- Select the Error Correction Mode option. Touch the Save button.
Check the fit-to-page setting
If the Fit to Page setting is enabled, and the incoming fax is larger than the default page size, the printer attempts to scale the image to fit the page. If this setting is disabled, larger images split across multiple pages.
- From the Home screen on the printer control panel, scroll to and touch the Administration button.
- Open the following menus:
Fax Settings
- Fax Receive Settings
- Default Job Options
Fit to Page
- Touch the Enabled option to enable the setting, or touch the Disabled option to disable it. Touch the Save button.
Clean the pickup rollers and separation pad in the document feeder
Follow these steps if the document feeder does not pick up pages correctly or produces skewed output.
- Lift the document-feeder latch.
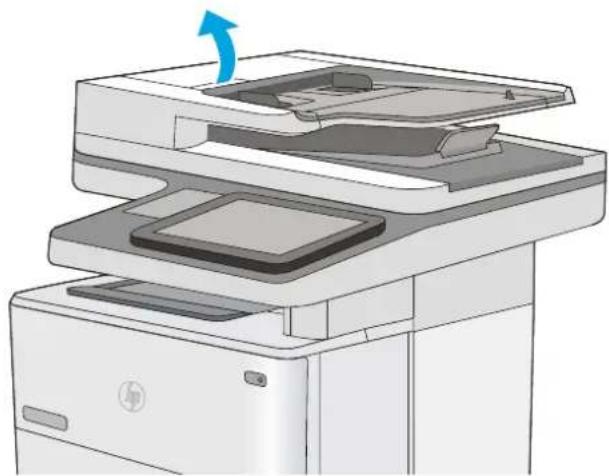
natural_image
Illustration of a printer with a blue arrow indicating the paper's edge, showing internal components (no text or symbols)- Open the document-feeder cover.
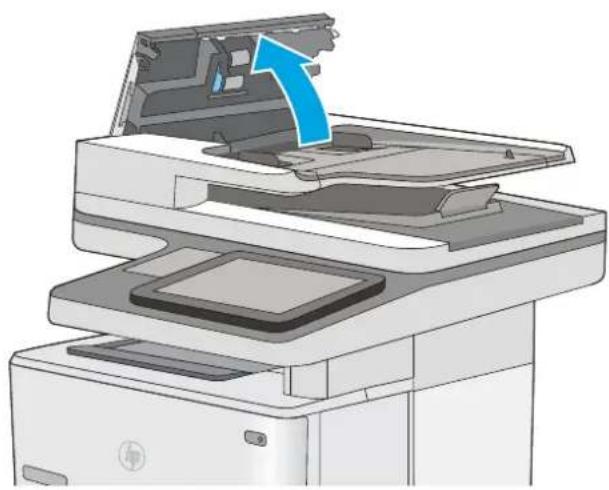
natural_image
Illustration of a printer's internal structure showing paper feeding into a tray, with a blue arrow indicating the component (no text or symbols present)- Remove any visible lint or dust from each of the feed rollers and the separation pad using compressed air or a clean lint-free cloth moistened with warm water.
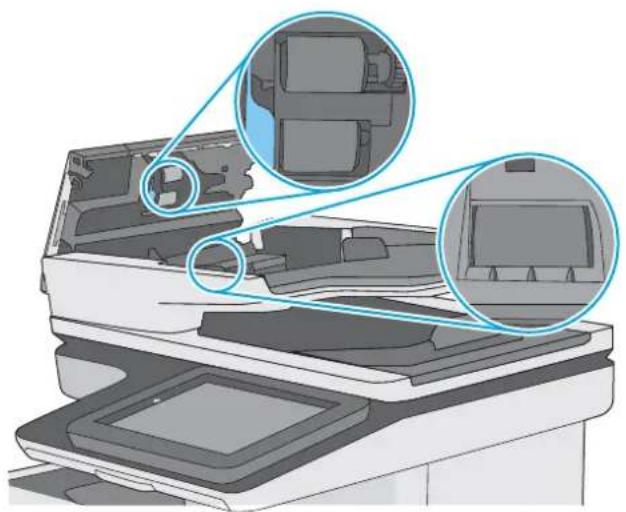
natural_image
Diagram of a printer's internal structure showing two views of the lid (no text or symbols present)- Close the document-feeder cover.
NOTE: Verify that the latch on the top of the document-feeder cover is completely closed.
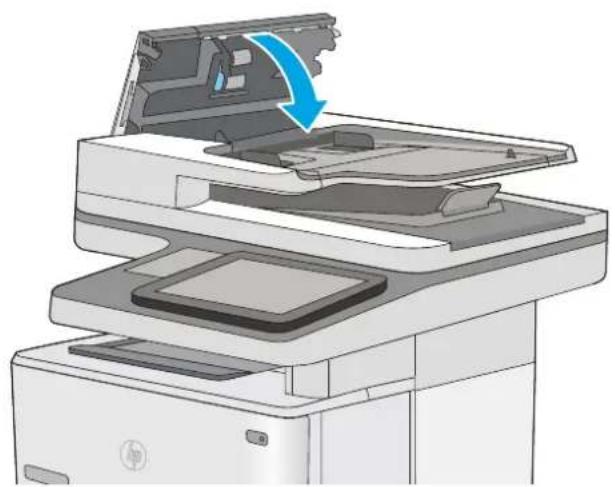
natural_image
Illustration of a printer's internal structure showing paper feeding into a tray with a blue arrow indicating the process (no text or symbols present)If the problem persists, check the document feeder separation pad and rollers for damage or wear, and replace them if necessary.

NOTE: New rollers have a rough surface. As rollers wear, they become smooth.
Send to a different fax machine
Try sending the fax to a different fax machine. If the fax quality is better, the problem is related to the initial recipient's fax machine settings or supplies status.
Check the sender's fax machine
Ask the sender to try sending from a different fax machine. If the fax quality is better, the problem is with the sender's fax machine. If a different fax machine is unavailable, ask the sender to consider making the following changes:
• Make sure the original document is on white (not colored) paper.
- Increase the fax resolution, quality level, or contrast settings.
• If possible, send the fax from a computer software program.
Solve wired network problems
Introduction
Check the following items to verify that the printer is communicating with the network. Before beginning, print a configuration page from the printer control panel and locate the printer IP address that is listed on this page.
• Poor physical connection
• The computer is using the incorrect IP address for the printer
• The computer is unable to communicate with the printer
• The printer is using incorrect link and duplex settings for the network
• New software programs might be causing compatibility problems
• The computer or workstation might be set up incorrectly
• The printer is disabled, or other network settings are incorrect

NOTE: HP does not support peer-to-peer networking, as the feature is a function of Microsoft operating systems and not of the HP print drivers. For more information, go to Microsoft at www.microsoft.com.
Poor physical connection
- Verify that the printer is attached to the correct network port using a cable of the correct length.
- Verify that cable connections are secure.
- Look at the network port connection on the back of the printer, and verify that the amber activity light and the green link-status light are lit.
- If the problem continues, try a different cable or port on the hub.
The computer is using the incorrect IP address for the printer
- Open the printer properties and click the Ports tab. Verify that the current IP address for the printer is selected. The printer IP address is listed on the printer configuration page.
- If you installed the printer using the HP standard TCP/IP port, select the box labeled Always print to this printer, even if its IP address changes.
- If you installed the printer using a Microsoft standard TCP/IP port, use the hostname instead of the IP address.
- If the IP address is correct, delete the printer and then add it again.
The computer is unable to communicate with the printer
- Test network communication by pinging the network.
a. Open a command-line prompt on your computer.
- For Windows, click Start, click Run, type cmd, and then press Enter.
For OS X, go to Applications, then Utilities, and open Terminal.
b. Type ping followed by the IP address for your printer.
c. If the window dis plays round-trip times, the network is working.
- If the ping comm and failed, verify that the network hubs are on, and then verify that the network settings, the printer, and the computer are all configured for the same network.
The printer is using incorrect link and duplex settings for the network
HP recommends leaving these settings in automatic mode (the default setting). If you change these settings, you must also change them for your network.
New software programs might be causing compatibility problems
Verify that any new software programs are correctly installed and that they use the correct print driver.
The computer or workstation might be set up incorrectly
- Check the network drivers, print drivers, and the network redirection settings.
- Verify that the operating system is configured correctly.
The printer is disabled, or other network settings are incorrect
- Review the configuration page to check the status of the network protocol. Enable it if necessary.
- Reconfigure the net work settings if necessary.
Solve fax problems
- Checklist for solving fax problems
- General fax problems
Checklist for solving fax problems
Use the following checklist to help identify the cause of any fax-related problems you encounter:
Are you using the fax cable supplied with the fax accessory? This fax accessory has been tested with the supplied fax cable to meet RJ11 and functional specifications. Do not substitute another fax cable; the analog-fax accessory requires an analog-fax cable. It also requires an analog phone connection.
- Is the fax/phone line connector seated in the outlet on the fax accessory? Make sure that the phone jack is correctly seated in the outlet. Insert the connector into the outlet until it "clicks."

NOTE: Verify that the phone jack is connected to the fax port rather than to the network port. The ports are similar.
- Is the phone wall jack working properly? Verify that a dial tone exists by attaching a phone to the wall jack. Can you hear a dial tone, and can you make or receive a phone call?
What type of phone line are you using?
• Dedicated line: A standard analog fax/phone line assigned to receive or send faxes.

NOTE: The phone line should be for printer fax use only and not shared with other types of telephone devices. Examples include alarm systems that use the phone line for notifications to a monitoring company.
PBX system: A business-environment phone system. Standard home phones and the fax accessory use an analog phone signal. Some PBX systems are digital and might not be compatible with the fax accessory. You might need an interfacing Analog Telephone Adapter (ATA) to connect the fax machine to digital PBX systems.
- Roll-over lines: A phone system feature where a new call "rolls over" to the next available line when the first incoming line is busy. Try attaching the printer to the first incoming phone line. The fax accessory answers the phone after it rings the number of times set in the rings-to-answer setting.
Are you using a surge-protection device?
A surge-protection device can be used between the wall jack and the fax accessory to protect the fax accessory against electrical power passed through the phone lines. These devices can cause some fax communication problems by degrading the quality of the phone signal. If you are having problems sending or receiving faxes and are using one of these devices, connect the printer directly to the phone jack on the wall to determine whether the problem is with the surge-protection device.
Are you using a phone company voice-messaging service or an answering machine?
If the rings-to-answer setting for the messaging service is lower than the rings-to-answer setting for the fax accessory, the messaging service answers the call, and the fax accessory cannot receive faxes. If the rings-to-answer setting for the fax accessory is lower than that of the messaging service, the fax accessory answers all calls.
Does your phone line have a call-waiting feature?
If the fax telephone line has an activated call-waiting feature, a call-waiting notice can interrupt a fax call in progress, which causes a communication error. Ensure that a call-waiting feature is not active on the fax telephone line.
Check fax accessory status
If the analog-fax accessory does not appear to be functioning, print a Configuration Page report to check the status.
- From the Home screen, scroll to and touch the Administration button.
- Open the following menus:
Reports
- Configuration/Status Pages
- Configuration Page
- Touch the Print button to print the report, or touch the View button to view the report on the screen. The report consists of several pages.

NOTE: The printer IP address or host name is listed on the Jetdirect Page.
On the Fax Accessory Page of the Configuration Page, under the Hardware Information heading, check the Modem Status. The following table identifies the status conditions and possible solutions.

NOTE: If the Fax Accessory Page does not print, there might be a problem with the analog fax accessory. If you are using LAN fax or Internet fax, those configurations could be disabling the feature.
| Operational / Enabled ^1 | The analog-fax accessory is installed and ready. |
| Operational / Disabled ^1 | The fax accessory is installed, but you have not configured the required fax settings yet.The fax accessory is installed and operational; however, the HP Digital Sending utility has either disabled the printer fax feature or has enabled LAN fax. When LAN fax is enabled, the analog-fax feature is disabled. Only one fax feature, either LAN fax or analog fax, can be enabled at a time.NOTE: If LAN fax is enabled, theScan to Faxfeature is unavailable on the printer control panel. |
| Non-Operational / Enabled/Disabled ^1 | The printer has detected a firmware failure. Upgrade the firmware. |
| Damaged / Enabled/Disabled ^1 | The fax accessory has failed. Reseat the fax accessory card and check for bent pins. If the status is still DAMAGED, replace the analog-fax accessory card. |
1 ENABLED indicates that the analog-fax accessory is enabled and turned on; DISABLED indicates that LAN fax is enabled (analog fax is turned off).
General fax problems
The following are some common fax problems.
The fax failed to send
JBIG is enabled, and the receiving fax machine does not have JBIG capability.
Turn off the JBIG setting.
An Out of Memory status message displays on the printer control panel
The printer storage disk is full.
Delete some stored jobs from the disk. From the Home screen on the printer control panel, touch the Retrieve from Device Memory button. Open the list of stored jobs or stored faxes. Select a job to delete, and then touch the Delete button.
Print quality of a photo is poor or prints as a gray box
You are using the wrong page-content setting or the wrong resolution setting.
Try setting the Optimize Text/Picture option to Photograph setting.
You touched the Stop button to cancel a fax, but the fax was still sent
If the job is too far along in the sending process, you cannot cancel the job.
This is normal operation.
No fax address book button displays
None of the contacts in the selected contacts list have fax information associated with them.
Not able to locate the Fax settings in HP Web Jetadmin
Fax settings in HP Web Jetadmin are located under the device's status page drop-down menu.
Select Digital Sending and Fax from the drop-down menu.
The header is appended to the top of the page when the overlay option is enabled
For all forwarded faxes, the printer appends the overlay header to the top of a page.
This is normal operation.
A mix of names and numbers is in the recipients box
Names and numbers can both display, depending on where they are from. The fax address book lists names, and all other databases list numbers.
This is normal operation.
A one-page fax prints as two pages
The fax header is being appended to the top of the fax, pushing text to a second page.
To print a one page fax on one page, set the overlay header to overlay mode, or adjust the fit-to-page setting.
A document stops in the document feeder in the middle of faxing
A jam is in the document feeder.
Clear the jam, and send the fax again.
The volume for sounds coming from the fax accessory is too high or too low
The volume setting needs to be adjusted.
Adjust the volume in the Fax Send Settings menu and the Fax Receive Settings menu.
Index
Symbols/Numerics
550-sheet paper trays part numbers 28
550-sheet tray clearing jams 156
A
accessories
ordering 28
part numbers 28
acoustic specifications 14
AirPrint 53
alternative letterhead mode 19, 22
Android devices printing from 53
B
bin, output
locating 2
Bonjour
identifying 108
browser requirements
HP embedded Web Server 108
C
calibrate
scanner 177
cartridge
replacing 31
cartridges
order numbers 31
cleaning
glass 171, 176, 182, 188
paper path 170
rollers 144, 179, 185, 191
control panel
help 133
locating 2
locating features 4
copy
optimize for text or pictures 179
copy settings
HP Embedded Web Server 111
copying
both sides 61
multiple copies 60
single copies 60
customer support
online 132
D
default gateway, setting 120
deleting
stored jobs 51
digital send settings
HP Embedded Web Server 112
digital sending
folders 96
sending documents 95
USB 97
dimensions, printer 12
document feeder
jams 149
paper-feeding problems 143
double-sided printing
Mac 45
Windows 42
drivers, supported 9
duplex printing
Mac 45
duplex printing (double-sided)
settings (Windows) 42
Windows 42
duplexer
clearing jams 164
duplexing
manually (Mac) 45
manually (Windows) 42
E
easy-access USB printing 56
EconoMode setting 173
edge-to-edge copying 179
electrical specifications 14
sending documents 95
Embedded Web Server
changing network settings 119
changing printer name 119
opening 119
Embedded Web Server (EWS)
assigning passwords 123
features 108
network connection 108
energy use, optimizing 125
envelopes
loading in Tray 1 18
orientation 19
envelopes, loading 24
Ethernet (RJ-45)
locating 4
Explorer, versions supported
HP Embedded Web Server 108
F
fax
feeding problems 199
optimize for text or pictures 190
required settings 100, 101
setup 100
setup wizard 101
fax port
locating 4
fax settings
HP Embedded Web Server 113
required 100
feeding problems 199
file upload, Mac 117
firmware
update, Mac 117
folders
sending to 96
folders, network
problem-solve 85
fonts
upload, Mac 117
formatter
locating 3
fuser
clearing jams 162
G
gateway, setting default 120
general configuration
HP Embedded Web Server 110
glass, cleaning 171, 176, 182, 188
H
hard disks
encrypted 124
hard drive
part number 28
Help button
locating 4
help, control panel 133
Hi-Speed USB 2.0 printing port
locating 4
Home button
locating 4
HP Customer Care 132
HP Embedded Web Server
changing network settings 119
changing printer name 119
copy settings 111
digital send settings 112
fax settings 113
general configuration 110
HP Web Services 114
information pages 109
network settings 115
opening 119
other links list 116
print settings 111
scan settings 112
security settings 114
troubleshooting tools 113
HP Embedded Web Server (EWS)
features 108
network connection 108
HP ePrint 52
HP ePrint software 53
HP Utility 117
HP Utility for Mac
Bonjour 117
features 117
HP Utility, OS X 117
HP Web Jetadmin 128
HP Web Services
enabling 114
1
information pages
HP Embedded Web Server 109
interface ports
locating 4
Internet Explorer, versions supported
HP Embedded Web Server 108
IP Security 124
IPsec 124
IPv4 address 120
IPv6 address 120
J
jams
550-sheet trays 156
auto-navigation 148
causes of 148
document feeder 149
duplexer 164
fuser 162
locations 146
output bin 164
rear door 162
toner cartridge area 160
Tray 1 153
Tray 2 156
Jetadmin, HP Web 128
jobs, stored
creating (Windows) 48
deleting 51
Mac settings 50
printing 50
K
keypad
locating 2
L
labels
printing (Windows) 43
LAN port
locating 4
Language Selection button
locating 4
loading
paper in Tray 1 18
paper in Tray 2 and the 550-sheet
trays 20
local area network (LAN)
locating 4
lock
formatter 124
M
Mac driver settings
Job Storage 50
managing network 119
manual duplex
Mac 45
Windows 42
margins, small
copying 179
memory
included 7
memory chip (toner)
locating 31
mobile printing
Android devices 53
mobile printing, software
supported 11
multiple pages per sheet
printing (Mac) 46
printing (Windows) 43
N
Near Field Communication printing
4
Netscape Navigator, versions
supported
HP embedded Web Server 108
network
printer name, changing 119
settings, changing 119
settings, viewing 119
Network button
locating 4
network duplex settings, changing 121
Network Folder, scan to 96
network folders
problem-solve 85
network link speed settings, changing 121
network settings HP Embedded Web Server 115
networks default gateway 120
HP Web Jetadmin 128
IPv4 address 120
IPv6 address 120
subnet mask 120
supported 7
NFC accessory part number 28
NFC printing 54
not configured 101
number of copies, changing 60
0
on/off button locating 2
online help, control panel 133
online support 132
operating systems, supported 9
optimize copy images 179
optimize fax images 190
optimize scanned images 184
ordering supplies and accessories 28
OS X HP Utility 117
other links list HP Embedded Web Server 116
output bin clearing jams 164 locating 2
P
pages per minute 7
pages per sheet selecting (Mac) 46 selecting (Windows) 43
paper jams 148 loading Tray 1 18
loading Tray 2 and the 550-sheet trays 20
selecting 172
Tray 1 orientation 19
Tray 2 and the 550-sheet trays orientation 22
paper jams
document feeder 149 locations 146
paper pickup problems solving 137, 139
paper trays part numbers 28
paper type selecting (Windows) 43
paper types selecting (Mac) 46
paper, ordering 28
part numbers accessories 28 replacement parts 29 supplies 29 toner cartridges 29
ports locating 4
power consumption 14
power connection locating 3
power switch locating 2
power usage 1 watt or less 125 print drivers, support
print media loading in Tray 1 18
print on both sides Mac 45 manually, Windows 42 Windows 42
print settings HP Embedded Web Server 111
printing from USB storage accessories 56 stored jobs 50
printing on both sides settings (Windows) 42
private printing 48
problem-solve network folders 85
product number locating 3
R
rear door clearing jams 162
Refresh button locating 4
replacement parts part numbers 29
replacing staples 36 toner cartridge 31
required settings country/region 101 fax 100
restore factory settings 134
RJ-45 port locating 4
rollers cleaning 144, 179, 185, 191
S
scan settings HP Embedded Web Server 112
Scan to Network Folder 96 initial setup 76
Scan to USB Drive 97 configure file settings 88 configuring default options 86 enabling 86
scanner calibrate 177 glass cleaning 171, 176, 182, 188
scanning optimize for text or pictures 184
scanning to email sending documents 95
scanning to folder 96
scanning to USB 97
security settings HP Embedded Web Server 114
security encrypted hard disk 124
send to network folders problem-solve 85
sending to email sending documents 95
serial number locating 3
settings required 101 restore factory 134
Sign In button locating 4
Sign Out button locating 4
Sleep button locating 4
sleep mode 125
small margins 179
software HP Utility 117
special paper printing (Windows) 43
specifications electrical and acoustic 14
speed, optimizing 125
stand part number 28
stapler troubleshooting 25 using 25
staples replacing 36
status HP Utility, Mac 117
status of printer 4
status, fax accessory page 198
Stop button locating 4
storage, job Mac settings 50
store print jobs 48
stored jobs creating (Mac) 50
creating (Windows) 48
deleting 51 printing 50
storing jobs with Windows 48
subnet mask 120
supplies low threshold settings 135 ordering 28 part numbers 29
replacing staples 36
replacing toner cartridge 31
status, viewing with HP Utility for Mac 117
using when low 135
supplies status 170
support online 132
system requirements HP Embedded Web Server 108 minimum 11
T
TCP/IP
manually configuring IPv4
parameters 120
manually configuring IPv6 parameters 120
technical support online 132
toner cartridge components 31
low threshold settings 135
replacing 31
using when low 135
toner cartridge area clearing jams 160
toner cartridges order numbers 31 part numbers 29
toner-cartridge status 170
toner-collection unit locating 3
transparencies printing (Windows) 43
Tray 1 clearing jams 153 loading envelopes 24 paper orientation 19
Tray 2 clearing jams 156
Tray 2 and the 550-sheet trays loading 20 paper orientation 22
trays capacity 7 included 7 locating 2
troubleshooting jams 148
network problems 195
paper feed problems 137 wired network 195
troubleshooting tools HP Embedded Web Server 113
two-sided printing settings (Windows) 42
U
USB sending to 97
USB port enabling 56 locating 4
USB ports, optional part number 28
USB storage accessories printing from 56
W
Web browser requirements HP Embedded Web Server 108
Web sites customer support 132
HP Web Jetadmin, downloading 128
weight, printer 12
Wi-Fi Direct Printing 54
wireless print server part number 28
wizard, fax setup 101
© 2015 HP Development Company, L.P.
www.hp.com