
HTS3506 - Home Theater PHILIPS - Free user manual and instructions
Find the device manual for free HTS3506 PHILIPS in PDF.


User questions about HTS3506 PHILIPS
0 question about this device. Answer the ones you know or ask your own.
Ask a new question about this device
Download the instructions for your Home Theater in PDF format for free! Find your manual HTS3506 - PHILIPS and take your electronic device back in hand. On this page are published all the documents necessary for the use of your device. HTS3506 by PHILIPS.
USER MANUAL HTS3506 PHILIPS
natural_image
Black Philips CD-ROM with multiple speakers and a digital display (no visible text or symbols on the device body)EN User Manual
EN: For further assistance, call the customer support service in your country.
• To obtain assistance in the U.S.A., Canada, Puerto Rico, or the U.S. Virgin Islands, contact Philips Customer Care Center at 1-866-309-0866
• To obtain assistance in Mexico, contact Philips Customer Care Center at 01 800 504 62 00
1.1. Safety Instructions
Return your Product Registration Card or register online at www.philips.com/support today to get the very most from your purchase.
Registering your model with Philips makes you eligible for all of the valuable benefits listed below, so don't miss out. Complete and return your Product Registration Card at once, or register online at www.philips.com/support to ensure:
\* Product Safety Notification
By registering your product, you'll receive notification - directly from the manufacturer - in the rare case of a product recall or safety defect.
\* Additional Benefits
Registering your product guarantees that you'll receive all of the privileges to which you're entitled, including special money-saving offers.
PHILIPS
Congratulations on your purchase, and welcome to the "family!"
Dear Philips product owner:
Thank you for your confidence in Philips. You've selected one of the best-built, best-backed products available today. We'll do everything in our power to keep you happy with your purchase for many years to come.
As a member of the Philips “family,” you’re entitled to protection by one of the most comprehensive warranties and outstanding service networks in the industry. What’s more, your purchase guarantees you’ll receive all the information and special offers for which you qualify, plus easy access to accessories from our convenient home shopping network.
Most importantly, you can count on our uncompromising commitment to your total satisfaction.
All of this is our way of saying welcome - and thanks for investing in a Philips product.
P.S. To get the most from your Philips purchase, be sure to complete and return your Product Registration Card at once, or register online at:
www.philips.com/support
Know these
safety symbols

CAUTION
RISK OF ELECTRIC SHOCK DO NOT OPEN

CAUTION: TO REDUCE THE RISK OF ELECTRIC SHOCK, DO NOT REMOVE COVER (OR BACK). NO USER-SERVICEABLE PARTS INSIDE. REFER SERVICING TO QUALIFIED SERVICE PERSONNEL.

This “bolt of lightning” indicates uninsulated material within your unit may cause an electrical shock. For the safety of everyone in your household, please do not remove product covering.

The “exclamation point” calls attention to features for which you should read the enclosed literature closely to prevent operating and maintenance problems.
WARNING : To reduce the risk of fire or electric shock, this apparatus should not be exposed to rain or moisture, and objects filled with liquids, such as vases, should not be placed on this apparatus.
CAUTION: To prevent electric shock, match wide blade of plug to wide slot, fully insert.
☐ The symbol for CLASS II (Double Insulation)
The important note and rating are located on the rear or bottom of the cabinet.
For Customer Use
Please write the model and serial number of your unit (located on the cabinet) in the space below for future reference.
Model No.
Serial No.
PHILIPS Visit our World Wide Web Site at http://www.philips.com/support
IMPORTANT SAFETY INSTRUCTIONS
- Read these instructions.
- Keep these instructions.
- Heed all warnings.
- Follow all instructions.
- Do not use this apparatus near water.
- Clean only with dry cloth.
- Do not block any ventilation openings. Install in accordance with the manufacturer's instructions.
- Do not install near any heat sources such as radiators, heat registers, stoves, or other apparatus (including amplifiers) that produce heat.
- Do not defeat the safety purpose of the polarized or grounding-type plug. A polarized plug has two blades with one wider than the other. A grounding type plug has two blades and a third grounding prong. The wide blade or the third prong are provided for your safety. If the provided plug does not fit into your outlet, consult an electrician for replacement of the obsolete outlet.
- Protect the power cord from being walked on or pinched particularly at plugs, convenience receptacles, and the point where they exit from the apparatus.
- Only use attachments/accessories specified by the manufacturer.
- Use only with the cart, stand, tripod, bracket, or table specified by the manufacturer, or sold with the apparatus. When a cart is used, use caution when moving the cart/apparatus combination to avoid injury from tip-over.
- Unplug this apparatus during lightning storms or when unused for long periods of time.
- Refer all servicing to qualified service personnel. Servicing is required when the apparatus has been damaged in any way, such as power-supply cord or plug is damaged, liquid has been spilled or objects have fallen into the apparatus, the apparatus has been exposed to rain or moisture, does not operate normally, or has been dropped.

FCC WARNING
This equipment may generate or use radio frequency energy. Changes or modifications to this equipment may cause harmful interference unless the modifications are expressly approved in the manual. The user could lose the authority to operate this equipment if an unauthorized change or modification is made.
This transmitter must be co-located or operated in conjunction with any other antenna or transmitter.
RADIO-TV INTERFERENCE
This equipment has been tested and found to comply with the limits for a Class B digital device, pursuant to Part 15 of the FCC Rules. These limits are designed to provide reasonable protection against harmful interference in a residential installation. This equipment generates, uses, and can radiate radio frequency energy and, if not installed and used in accordance with the instructions, may cause harmful interference to radio communications. However, there is no guarantee that interference will not occur in a particular installation. If this equipment does cause harmful interference to radio or television reception, which can be determined by turning the equipment off and on, the user is encouraged to try to correct the interference by one or more of the following measures:
- Reorient or relocate the receiving antenna.
- Increase the separation between the equipment and receiver.
- Connect the equipment into an outlet on a circuit different from that to which the receiver is connected.
- Consult the dealer or an experienced radio/TV technician for help.
This device complies with Industry Canada licence-exempt RSS standard(s). Operation is subject to the following two conditions: (1) this device may not cause interference, and (2) this device must accept any interference, including interference that may cause undesired operation of the device.
This Class B digital apparatus complies with Canadian ICES-003.
Disconnect the mains plug to shut off when find trouble or not in use. The mains plug shall remain readily operable.
CAUTION: Danger of explosion if battery is incorrectly replaced. Replace only with the same or equivalent type.
WARNING: Batteries (Battery pack or battery installed) shall not be exposed to excessive heat such as sunshine, fire or the like.
LASER SAFETY
This apparatus is classified as a CLASS 1 LASER PRODUCT. This apparatus employs a laser. Only a qualified service person should remove the cover or attempt to service this apparatus, due to possible eye injury.
CAUTION:
Use of controls or adjustments or performance of procedures other than those specified herein may result in hazardous radiation exposure.

IMPORTANT COPYRIGHT INFORMATION
Unauthorized copying, broadcasting, public performance and lending of discs are prohibited. This item incorporates copy protection technology that is protected by U.S. patents and other intellectual property rights of Rovi Corporation. Reverse engineering and disassembly are prohibited.
Do not place the unit on the furniture that is capable of being tilted by a child and an adult leaning, pulling, standing or climbing on it. A falling unit can cause serious injury or even death.
This apparatus should not be placed in a built-in installation such as a bookcase or rack unless proper ventilation is provided. Make sure to leave a space of 7.8 inches (20cm) or more around this apparatus.
To Avoid the Hazards of Electrical Shock and Fire
- Do not handle the AC power cord with wet hands.
- Do not pull on the AC power cord when disconnecting it from an AC outlet. Grasp it by the plug.
- Do not put your fingers or objects into the unit.
Location and Handling
- Do not install the unit in direct sunlight, near strong magnetic fields, or in a place subject to dust or strong vibration.
- Avoid a place with drastic temperature changes.
• Install the unit in a horizontal and stable position. Do not place anything directly on top or bottom of the unit. Depending on your external devices, noise or disturbance in the picture and/or sound may be generated if the unit is placed too close to them. In this case, please ensure enough space between the external devices and the unit. - Depending on the environment, the temperature of this unit may increase slightly. This is not a malfunction.
- Be sure to remove the disc and unplug the AC power cord from the outlet before carrying the unit.
Dew Condensation Warning
- Dew condensation may form inside the unit in the following conditions. If so, do not use this unit at least for a few hours until its inside gets dry.
- The unit is moved from a cold place to a warm place.
- Under conditions of high humidity.
- After heating a cold room.
Notice for Progressive Scan Output
- Consumers should note that not all high definition television sets are fully compatible with this product and may cause artifacts to be displayed in the picture. In case of picture problems with 525(480) progressive scan output, it is recommended that the user switch the connection to the 'standard definition' output. If there are questions regarding your TV set compatibility with this 525p(480p) Blu-ray Disc™/DVD player, please contact our customer service center.
1.2. Maintenance
Servicing
- Please refer to relevant topics on "TROUBLESHOOTING" on page 50 before returning the product.
- If you need to call a customer service representative, please know the model number and serial number of your product before you call. This information is displayed on the back of the product. Also, please take a moment to identify the problem you are having, and be prepared to explain this to the representative. If you believe the representative will need to help you with operations, please stay near the product. Our representatives will be happy to assist you. For online reference, please visit our website at www.philips.com/support
■ Cleaning the Cabinet
- Wipe the front panel and other exterior surfaces of the unit with a soft cloth.
- Never use a solvent, thinner, benzene or alcohol to clean the unit. Do not spray insecticide liquid near the unit. Such chemicals may discolor the surface or damage the unit.
■ Cleaning Discs
- When a disc becomes dirty, clean it with a cleaning cloth. Wipe the disc from the center to outside. Do not wipe in a circular motion.
- Do not use solvents such as benzine, thinner, commercially available cleaners, detergent, abrasive cleaning agents or antistatic spray intended for analog records.
■ Cleaning the Disc Lens
- If this unit still does not perform properly although you refer to the relevant sections and to "TROUBLESHOOTING" in this user manual, the laser optical pickup unit may be dirty. Consult your dealer or an Authorized Service Center for inspection and cleaning of the laser optical pickup unit.
Disc Handling
- Handle the discs so that fingerprints and dust do not adhere to the surfaces of the discs.
• Always store the disc in its protective case when it is not used. - Note that discs with special shapes (heart-shaped discs, octagonal discs, etc.) cannot be played back on this unit. Do not attempt to play such discs, as they may damage the unit.
■ Testing the Remote Control
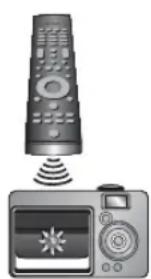
- If the remote control is not working properly, you can use a digital camera (including a cellular phone with built-in camera) to see if it is sending out an infrared signal.
How to perform the test?
natural_image
Illustration of a remote control with wireless signal and a camera displaying a starburst icon (no text or symbols)- Point the IR transmitter of the remote control towards the lens of the digital camera (or cell phone camera).
- Turn on the digital camera and look at the IR transmitter of the remote control through the LCD display of the digital camera.
- While looking at the LCD, press the buttons on your remote control you want to test.
a. If your remote control is working properly, the IR transmitter of the remote control will create a noticeable flash on the LCD of the digital camera.
b. If it does not flash, replace the batteries in your remote with new batteries and try again. If it still does not flash, your remote control may be damaged or defective. Please contact customer service for replacement options.
1.3. Notice
Specifications are subject to change without notice. Trademarks are the property of Koninklijke Philips Electronics N.V. or their respective owners. P&F USA reserves the right to change products at any time without being obliged to adjust earlier supplies accordingly. The material in this manual is believed adequate for the intended use of the system. If the product, or its individual modules or procedures, are used for purposes other than those specified herein, confirmation of their validity and suitability must be obtained. P&F USA warrants that the material itself does not infringe any United States patents. No further warranty is expressed or implied. P&F USA cannot be held responsible neither for any errors in the content of this document nor for any problems as a result of the content in this document. Errors reported to P&F USA will be adapted and published on the P&F USA support website as soon as possible.
Warranty
No components are user serviceable. Do not open or remove covers to the inside of the product. Repairs may only be done by Service Centers and official repair shops. Failure to do so shall void any warranty, stated or implied. Any operation expressly prohibited in this manual, any adjustments, or assembly procedures not recommended or authorized in this manual shall void the warranty.
1.4. Important
Registering your model with Philips makes you eligible for all of the valuable benefits listed below, so don't miss out. Complete and return your Product Registration Card at once, or register online at www.philips.com/support to ensure:
Product Safety Notification
By registering your product you receive notification - directly from the manufacturer - in the rare case of a product recall or safety defect.
Additional Benefits of Product Ownership
Registering your product guarantees that you receive all of the privileges to which you're entitled, including special money-saving offers.
For further assistance
For further assistance, call the customer support service in your country.
• To obtain assistance in the U.S.A., Canada, Puerto Rico, or the U.S. Virgin Islands, contact Philips Customer Care Center at 1-866-309-0866
■ Environmental Care

The packaging of this product is intended to be recycled.
Contact your local authorities for information about how to recycle the packaging.
For Product recycling information, please visit -
www.recycle.philips.com
End of life directives

Philips pays a lot of attention to produce environment-friendly products in green focal areas. Your new Blu-ray Disc™ Home Theater System contains materials which can be recycled and reused. At the end of its life, specialized companies can dismantle the discarded Home Theater System to concentrate the reusable materials and to minimize the amount of materials to be disposed of. Please ensure you dispose of your old Home Theater System according to local regulations.
Disposal of used batteries
The batteries supplied do not contain the heavy metals mercury and cadmium. Nevertheless, in many areas batteries may not be disposed of with your household waste. Please ensure you dispose of batteries according to local regulations.
1.5. Supplied Accessories
- Remote Control
- Batteries (AAA, 1.5V x 2)
- User Manual
- Quick Start Guide
- R e g i s t r a t i o n c a r d
- Box - insert s
- Video cable
• 1 center, 2 front, 2 rear speakers and 1 subwoofer
1.6. Trademark Information
DOLBY®
TRUEHD
DIGITAL PLUS
PRO LOGIC II
Manufactured under license from Dolby Laboratories. "Dolby", "Pro Logic", and the double-D symbol are trademarks of Dolby Laboratories.

dts-HD ^TM
Master Audio | Essential
Manufactured under license under U.S. Patent #'s: 5,451,942; 5,956,674; 5,974,380; 5,978,762; 6,226,616; 6,487,535; 7,392,195; 7,272,567; 7,333,929; 7,212,872 & other U.S. and worldwide patents issued & pending. DTS and the Symbol are registered trademarks, & DTS-HD, DTS-HD Master Audio | Essential and the DTS logos are trademarks of DTS, Inc. Product includes software. © DTS, Inc. All Rights Reserved.
HDMI®
HIGH-DEFINITION MULTIMEDIA INTERFACE
HDMI, the HDMI Logo, and High-Definition Multimedia Interface are trademarks or registered trademarks of HDMI Licensing LLC in the United States and other countries.
x.v.Color
"x.v.Color" and "x.v.Color" logo are trademarks of Sony Corporation.

Java
POWERED
Java and all Java based trademarks and logos are trademarks or registered trademarks of Oracle and/or its affiliates.
Windows Media and the Windows logo are trademarks or registered trademarks of Microsoft Corporation in the United States and/or other countries.
AVCHD™
"AVCHD" and the "AVCHD" logo are trademarks of Panasonic Corporation and Sony Corporation.
BONUS VIEW™
"BONUSVIEW™" and "BONUSVIEW™" logo are trademarks of the Blu-ray Disc Association.
BD LIVE™
"BD-Live™" and "BD-Live™" logo are trademarks of the Blu-ray Disc Association.
text_image
instant streaming ready NETFLIXNetflix and the Netflix logo are trademarks or registered trademarks of Netflix, Inc.
FILM FRESH
Film Fresh and the Film Fresh logo are registered trademarks of Film Fresh Inc.
BLOCKBUSTER®
BLOCKBUSTER name, design and related marks are trademarks of Blockbuster Inc.
vdu
VUDU ^TM is a trademark of VUDU, Inc.
PANDORA®
internet radio
Pandora is a registered trademark of Pandora Media, Inc.

"Blu-ray 3D™" and "Blu-ray 3D™" logo are trademarks of the Blu-ray Disc Association.

"Blu-ray Disc™", "Blu-ray™" and "Blu-ray Disc™" logo are trademarks of the Blu-ray Disc Association.
DVD is a trademark of DVD Format/Logo Licensing
Corporation.
Kodak and KODAK Picture CD Compatible are trademarks of Kodak used under license.

The Wi-Fi CERTIFIED Logo is a certification mark of the Wi-Fi Alliance.
CONTENTS
INTRODUCTION 2
Safety Instructions....2
Maintenance 4
Notice....5
Important....5
Supplied Accessories....5
Trademark Information ....6
FEATURES.... 10
Features.... 10
Version Info.... 11
Symbols Used in this User Manual.... 11
FUNCTIONAL OVERVIEW ...... 12
Front Panel 12
Rear Panel.... 12
Remote Control.... 13
Display Panel 15
Guide to On-Screen Display.... 15
CONNECTIONS 16
Placing the Speakers.... 16
Connection to the TV 16
Connecting Speakers and Subwoofer 17
Connecting Audio from Cable Box / Recorder /
Game Console or TV 18
Connecting Portable Media Player.... 18
Audio Output from HDMI OUT Jack.... 19
Connection to the Network.... 20
BEFORE YOU START.... 22
Finding the Viewing Channel / Source on Your TV... 22
Initial Setup.... 22
INFORMATION ON PLAYBACK...... 23
Information on Playback.... 23
Guide to File List.... 25
How to Insert a Disc 25
BASIC PLAYBACK 26
Playing Back a Disc 26
Playing Back a Blu-ray 3D ^TM Disc....27
Playing Back an SD Card 27
Using the Title / Disc / Pop-up Menu.... 28
SPECIAL PLAYBACK...... 29
Fast Forward / Fast Reverse.... 29
Slow Forward Playback.... 29
Step by Step Playback.... 29
Repeat Playback.... 29
Slide Show.... 30
PiP (BONUSVIEW™) Setting 30
Enjoying BD-Live™ Discs Using the Internet......30
Title / Chapter Search....31
Track Search....31
Time Search 31
Switching Subtitles....32
Switching Audio Soundtrack 32
Switching Camera Angles 33
Black Level....33
Noise Reduction....33
Play from Portable Media Player....34
NETWORK SERVICES 34
Before Using Network Services....34
Information on Network Services....34
PANDORA OPERATIONS.... 35
Activating Pandora 35
Adding Pandora User Accounts....35
Creating a New Station....35
Guide to the Player Screen....35
LIST OF SETTINGS 36
SETUPS.... 39
TV Display....39
HDMI Video....39
Network Installation....41
EasyLink Setup....44
Software Update....46
Restore Default Settings....47
SOUND SETTINGS...... 48
Volume Control....48
Selecting Surround Mode 48
Selecting Sound Effect Mode....48
OTHER SETTINGS 49
Switching Active Source Mode....49
Sleep Timer....49
TROUBLESHOOTING 50
Downloading an Electronic Copy....52
Contact Us....52
GLOSSARY....53
LANGUAGE CODE LIST 55
SPECIFICATIONS...... 56
IMPORTANT HEALTH AND SAFETY
INFORMATION FOR 3D TELEVISIONS .... 57
ONE (1) YEAR LIMITED WARRANTY...... 58
LICENSE......end of book
2. FEATURES
Congratulations on your purchase, and welcome to Philips! To fully benefit from the support that Philips offers, register your product at www.philips.com/support
2.1. Features
Blu-ray Disc™
You can enjoy Blu-ray Disc ^™ which is capable of storing five times more data than a conventional DVD.
Playing back Blu-ray 3D™ Disc
This unit can play back Blu-ray 3D ^™ discs which contain stereoscopic 3D video. In order to enjoy 3D video, connect this unit to a 3D capable TV using a 3D compatible HDMI cable.
BD-Java
With some Blu-ray ^™ discs which contain Java applications, you can enjoy interactive functions such as games or interactive menus.
DVD upscaling for enhanced picture quality
Your current DVD will look even better than before thanks to video upscaling. Upscaling will increase the resolution of standard definition DVD to high definition up to 1080p over an HDMI connection. The picture will be less jagged and more realistic for a near high definition experience.
Enjoy your content on different kinds of media
Full backwards compatibility with DVD, CD and SD card ensures that you can continue to enjoy your current audio-video collection. Additionally, you can enjoy AVCHD / MP3 / WMA / JPEG files.
Listen to rich multi-channel surround sound
Multi-channel surround sound, which realizes real-to-life sound and makes you feel that you are really there.
Intuitive user interface and remote control
The Philips logical user interface allows you to easily navigate through your content and settings, so you can quickly find what you are looking for.
Easy and simple connection to your HDTV via HDMI
Connect your HTS3506 to your HDTV with one single HDMI (High-Definition Multimedia Interface) cable. Philips recommends High Speed HDMI cable for better compatibility. The high definition video output signal will be transferred to your HDTV without conversion to analog signals, so you will get excellent picture and sound quality, completely free from noise. Thanks to other multiple outputs, you can also easily connect to your home theater system or amplifier.
About EasyLink (HDMI CEC) (Consumer Electronics Control)
EasyLink allows you to operate the linked functions of this home theater system with Philips brand TV with EasyLink feature.
Philips does not guarantee 100 % interoperability with other brands of HDMI CEC compliant devices.
PiP (BONUSVIEW™)
Some BD-videos have the PiP function which enables you to display the secondary video in the primary video. You can call up the secondary video by pressing
[BONUSVIEW (PiP)] whenever the scene contains a secondary video.
BD-Live™
BD-Live™ (BD-ROM version 2 Profile 2.0) that allows interactive functions to be used when this unit is connected to the Internet in addition to the BONUSVIEW™ function. The various functions differ depending on the disc.
Pop-up menu
Some BD-videos have a pop-up menu which is a navigation menu that can be called up and be operated on the TV screen without interrupting playback. You can call up the pop-up menu by pressing [DISC MENU / POP-UP MENU].
Contents in the pop-up menu vary depending on the disc.
HDMI Deep Color
Deep Color reduces posterization (color banding) effect of the playback image. Refer to "HDMI Deep Color" on page 36.
HDMI 1080p/24 output (Blu-ray Disc™ only)
This unit is equipped with the feature which can provide smooth movement during playback of film originated material with the frame rate of 24 frames per second with progressive. (Available only when the display device is connected by an HDMI cable.) Refer to “HDMI Video” on page 39.
Playing back contents from an SD card
You can play back AVCHD / MP3 / WMA / JPEG files stored in an SD card. BD-ROM Profile 2.0 (BD-Live™) and Profile 1.1 discs sometimes store picture-in-picture commentary, subtitles or other extras in the SD card for use during playback with the BD-video.
Playing back AVCHD files
This unit supports playback of AVCHD format files (new format for high definition video camcorders) recorded on disc / SD card. Your high definition personal archive is playable in HD quality.
x.v.Color
This unit supports playback of video contents on discs recorded with "x.v.Color" technology. To watch this video content with the "x.v.Color" space, a TV or other display device supporting both video image reproduction using "x.v.Color" standard and capability of manual switching of its color space setting is required. Please refer to the user manual of your display device for further information.
Netflix
With this unit, you can enjoy movies and TV episodes streamed instantly from Netflix via the Internet. In order to use this feature, you must visit netflix.com/Philips
PC and become a Netflix member.
(This feature is available only in the United States.)
Film Fresh / Blockbuster
With this unit, you can enjoy movies and TV episodes streamed instantly from Film Fresh / Blockbuster via the Internet. In order to use this feature, you must visit following website on your PC and become a Film Fresh / Blockbuster member. (This feature is available only in the United States.)
- Film Fresh: filmfresh.roxionow.com/Login
- Blockbuster: www.blockbuster.com/auth/login
VUDU
This unit supports VUDU which is the leading HD on-demand video service. With VUDU, you can also enjoy various kinds of Internet applications. In order to use this feature, you must connect this unit to the Internet. For complete instructions on using VUDU service, please visit www.vudu.com/docs to view an updated in-depth online manual.
(This feature is available only in the United States.)
Pandora
This unit supports Pandora Internet radio service. You can instantly listen to personalized radio stations streamed over the Internet from Pandora.
(This feature is available only in the United States.)
Audio Return Channel (ARC)
If you own a Philips EasyLink or any other compatible HDMI-CEC device such as a TV with an HDMI ARC port, you can configure the external device to send audio back to this Home Theater System over the HDMI cable eliminating the need for a separate Digital Audio Connection. HDMI ARC supports more digital audio formats than a S/PDIF connection.
2.2. Version Info
"Version Info" screen provides information about this unit's software version.
You can also download the latest software from the Philips website and update it yourself if it is newer than the version currently on your unit. The current version of software on your unit can be seen on the “Version Info” screen.
To access "Version Info", follow the procedure below.
- Press [ ( h o m e ) ] .
- Use [ ▲/▼/◄/►] to select "Setup", then press [OK].
- Use [ ▲ / ▼] to select "Advanced Setup", then press [OK].
- Use [▲/▼] to select "Version Info", then press [OK].
2.3. Symbols Used in this User Manual
To specify which media type each function is applicable to, we put the following symbols at the beginning of each item to operate.
| Symbol Description | |
 | Description refers to BD-video |
 | Description refers to DVD-video |
 | Description refers to audio CD / DTS-CD |
 | Description refers to DVD-RW/-R and SD card with AVCHD files |
 | Description refers to BD-RE/-R, DVD-RW/-R, CD-RW/-R and SD card with MP3 files |
 | Description refers to BD-RE/-R, DVD-RW/-R, CD-RW/-R and SD card with Windows MediaTM Audio files |
 | Description refers to BD-RE/-R, DVD-RW/-R, CD-RW/-R and SD card with JPEG files |
If you do not find any of the symbols listed above under the function heading, the operation is applicable to all media.
3. FUNCTIONAL OVERVIEW
3.1. Front Panel
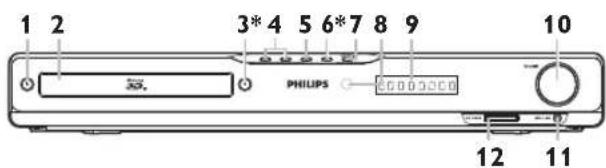
text_image
1 2 3*4 5 6*7 8 9 PHIUPS 10 12 11* The unit can also be turned on by pressing these buttons.
1. (standby/on) button
- Press to turn on the unit, or to switch the unit into standby mode. (To completely turn off the unit, you must unplug the AC power cord.)
- Press and hold for 10 seconds to shut down the unit.
2. Disc tray
- Place a disc after opening the disc tray.
3. (open/close) button\*
- Press to open or close the disc tray.
4. / (previous/next) buttons
- Press to skip to the previous or next title / chapter / track / file.
5. (■op) button
- Press to stop playback.
6. (play) button\*
- Press to start or resume playback.
7. SOURCE button
- Press to switch the active source mode.
8. Infrared sensor window
- Receives signals from your remote control so that you can control the unit from a distance.
9. Display
• Refer to "Display Panel" on page 15.
10. VOLUME jog
- Rotate to adjust the volume.
11. MP3 LINK jack
- Use to connect your portable audio player with 3.5mm stereo audio cable.
12. SD CARD slot
- Insert an SD card and play back the contents in it.
3.2. Rear Panel
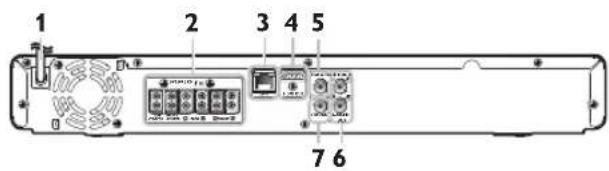
text_image
1 2 3 4 5 7 61. AC power cord
- Connect to a standard AC outlet to supply power to this unit.
- Unplug this cord from the AC outlet to completely turn off the unit.
2. 5.1ch Audio Out jacks (SPEAKERS (4Ω))
- Use to connect supplied 5.1ch speakers.
3. LAN terminal
- Use to connect to network provisioning equipment such as a router or a modem with a LAN cable.
4. HDMI OUT jack
- Use to connect to a display with an HDMI compatible port with an HDMI cable.
5. DIGITAL AUDIO IN (COAXIAL) jack
- Use to connect to another device with a digital audio coaxial output jack with a digital audio coaxial cable.
6. AUDIO IN (AUX) jacks
- Use to connect to another device with audio out jacks with an audio cable.
7. VIDEO OUT jack
- Use to connect a TV monitor, an AV receiver / amplifier or other device with a video cable.
Caution
- Do not touch the inner pins of the jacks on the rear panel. Electrostatic discharge may cause permanent damage to the unit.
- This unit does not have an RF modulator.
3.3. Remote Control
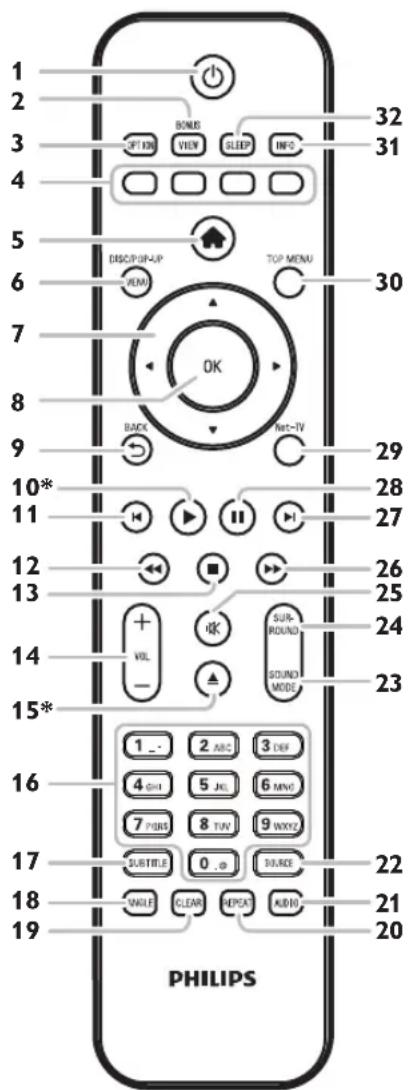
text_image
1 2 3 4 5 6 7 8 9 10* 11 12 13 14 15* 16 17 18 19 BONB OPTION VIEW SLEEP INFO DISCI/OP-UP PUM TOP MENU OK BACK Net-IV SUR- ROUND SOUND MODE PHILIPS 32 31 30 29 28 27 26 25 24 23 22 21 20* The unit can also be turned on by pressing these buttons.
1. (standby/on) button
- Press to turn on the unit, or to switch the unit into standby mode. (To completely turn off the unit, you must unplug the AC power cord.)
2. BONUSVIEW (PiP) button
- Press to switch picture in picture feature on / off (only applicable to BD-video which supports the PiP (BONUSVIEW™) function).
3. OPTION button
- During playback, press to display the play menu.
4. Red / Green / Blue / Yellow buttons
- Press to activate shortcut keys on some BD-video functions.
- When file list is shown, press to switch between pages.
5. (home) button
- Press to display the home menu.
6. DISC MENU / POP-UP MENU button Blu-ray Disc™:
- Press to display the pop-up menu.
DVD: - Press to display the disc menu.
7. buttons◄ / ►
- Press to select items or settings.
8. OK button
- Press to confirm or select menu items.
9. BACK button
- Press to return to the previously displayed menu or screen function.
10. (play) button\*
- Press to start playback or resume playback.
11. (previous) button
- During playback, press once to return to the beginning of the current title, chapter, track or file.
- During playback, press twice to return to the previous title, chapter, track or file.
- During the JPEG playback, press to return to the previous file.
12. (reverse) button
- During playback, press to fast reverse the playback.
13. □top) button
- Press to stop playback.
14. VOLT-/button
- Press to adjust the volume.
15. ▲ (open/close) button\*
- Press to open or close the disc tray.
16. Number buttons
- Press to select a chapter during playback.
- Press to enter numbers or letters in the input field.
17. SUBTITLE button
- Press to select subtitles on a disc.
18. ANGLE button
- Press to select camera angles on a disc.
19. CLEAR button
- Press to clear the information once entered.
20. REPEAT button
- Press to select repeat mode.
21. AUDIO button
- Press to select the audio channel (such as audio languages).
22. SOURCE button
- Press to switch the active source mode; home menu (Disc / SD card / Network), "Aux", "Coaxial", "MP3 Link" or "HDMI-ARC".
23. SOUND MODE button
- Press to select a sound effect mode.
24. SURROUND button
- Press to select surround mode.
25. (nute) button
- Press to mute the volume.
26. (forward) button
- During playback, press to fast forward the playback.
- When playback is in pause, press to slow forward the playback.
27. (next) button
- During playback, press to skip to the next chapter, track or file.
- When playback is in pause mode, press to forward the playback picture by picture.
28. (pause) button
- Press to pause playback.
29. Net-TV button
- Press to display the network media mode menu.
30. TOP MENU button
Blu-ray Disc™:
- Press to display the top menu.
DVD:
- Press to display the title menu.
31. INFO button
- Press to display the information display.
32. SLEEP button
- Press to set the sleep timer.
■ Installing the Batteries in the Remote Control
Install 2 AAA (1.5V) batteries matching the polarity indicated inside battery compartment of the remote control.
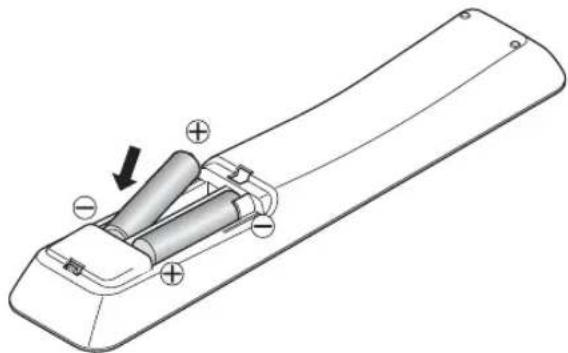
natural_image
Diagram of a remote control casing with battery and indicator lights, showing internal components (no text or symbols)Caution
Incorrect use of batteries can result in hazards such as leakage and bursting. Please observe the following:
- Do not mix alkaline, standard (carbon-zinc), or rechargeable (ni-cad, ni-mh, etc) batteries.
- Do not mix new and old batteries together.
- Do not use different kinds of batteries together. Although they may look similar, different batteries may have different voltages.
- Make sure that the + and - ends of each battery match the indications in the battery compartment.
- Remove batteries from battery compartment, when the remote is not going to be used for a month or more.
- When disposing of used batteries, please comply with governmental regulations or environmental public rules that apply in your country or area.
- Do not recharge, short-circuit, heat, burn or disassemble batteries.
■ Using the Remote Control
Remote Control Usage Guidelines:
- Make sure that there are no obstacles between the remote control and the infrared sensor window on the unit.
- Remote operation may become unreliable if strong sunlight or fluorescent light is shining on the infrared sensor window of the unit.
- Remote controls of different devices can interfere with each other. Avoid using a remote control from another device which is located close to the unit.
- Replace the batteries when you notice a fall-off in the operating range of the remote control.
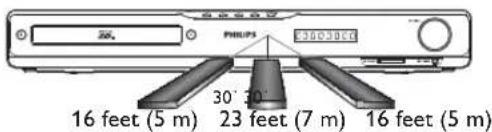
- The maximum operable ranges from the unit are as follows.
- Line of sight:
approx. 23 feet (7 m)
- Either side of the center:
approx. 16 feet (5 m) within 30°
-Above:
approx. 16 feet (5 m) within 15°
-Below:
approx. 10 feet (3 m) within 30°
text_image
PHILIPS 300-300T 16 feet (5 m) 30° 30° 23 feet (7 m) 16 feet (5 m)3.4. Display Panel
Display panel shows playback status or information. (e.g. elapsed playing time, source mode, repeat type, menu type, etc.).

* Brightness of the display can be adjusted. Refer to "Display Panel" in "LIST OF SETTINGS" on page 37.
- When switching the source mode, the following will be displayed.
| Display Mode | |
| HOME | Home menu |
| AUX | “Aux” mode |
| COAX IN | “Coaxial” mode |
| ARC IN | “HDMI-ARC” mode |
e.g.)

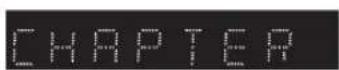
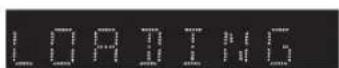
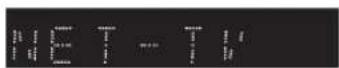
Indicating the elapsed time of playback.
Current chapter is in chapter repeat mode during playback of disc.
Loading a disc or SD card.
Network media mode menu is displayed.
3.5. Guide to On-Screen Display
Home Menu
When you turn on the unit, home menu will appear automatically. Otherwise, press [♠ ( h o m e )
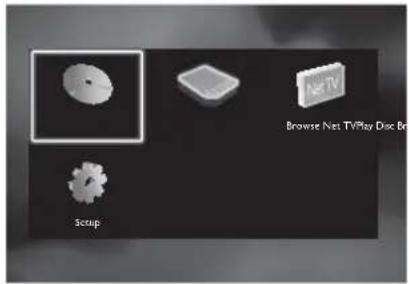
text_image
Setup AeTV Browse Net TV/Play Disc Br"Play Disc": Initiates playback of inserted disc, displays a list of tracks / files or the media filter menu
"Browse SD Card" : Displays a list of tracks / files on the inserted SD card or the media filter menu
“Browse Net TV” : To access the menu of network services
"Setup": To access setup menu
Setup Menu
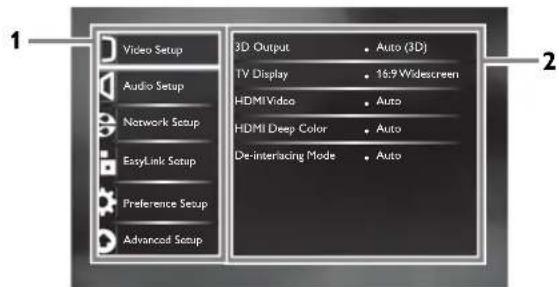
text_image
1 Video Setup Audio Setup Network Setup EasyLink Setup Preference Setup Advanced Setup 3D Output • Auto (3D) TV Display • 16:9 Widescreen HDMI Video • Auto HDMI Deep Color • Auto De-interlacing Mode • Auto1. Category
2. Menus / Options:
Displays options for the highlighted item on the left whenever available
Play Menu
During playback, press [OPTION] to display the play menu.
e.g.) Blu-ray Disc™
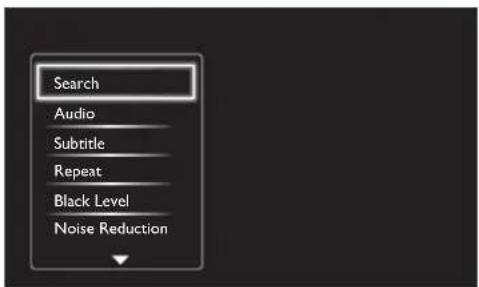
text_image
Search Audio Subtitle Repeat Black Level Noise Reduction4. CONNECTIONS
4.1. Placing the Speakers
The Philips Blu-ray Disc™ Home Theater is simple to install. However, proper system placement is critical to ensure an optimum sound experience.
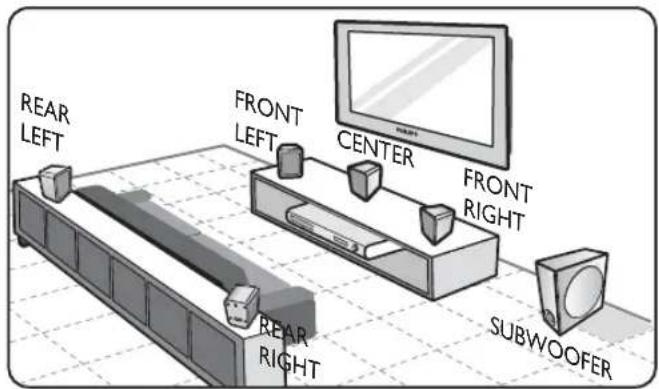
text_image
REAR LEFT FRONT LEFT CENTER FRONT RIGHT SUBWOOFER REAR RIGHT- Place the main unit near to the TV.
- Place the speakers system at normal listening ear-level and directly parallel to the listening area.
- Place the subwoofer at the corner of the room or at least 1meter away from the TV.
D Note
- The placement diagram shown here is only a guideline that provides great system performance. You may find other placement choices that are more suitable for your room layout that provide the sound experience you enjoy.
• To avoid magnetic interference, never position the front speakers too close to your TV.
• The rear speakers are labeled as REAR LEFT or REAR RIGHT.
• The front speakers are labeled as FRONT LEFT or FRONT RIGHT. - For speaker setup, refer to "Speaker Setup" on page 36.
4.2. Connection to the TV
HDMI Connection (Supports up to 1080i (*1), 1080p(*2), 1080p/24 resolution.)
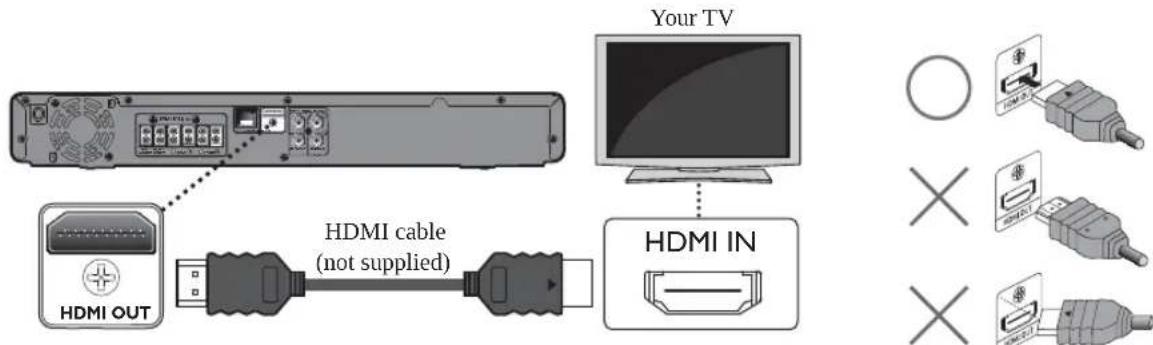
text_image
Your TV HDMI OUT HDMI cable (not supplied) HDMI INNo analog audio connection required.
(*1) 1080i : Outputs video data with a frame rate of 30 frames per second.
(*2) 1080p : Outputs video data with a frame rate of 60 frames per second.
- Do not tilt the connector when inserting it into the HDMI jack, and make sure the shapes of the jack and the connector are matched.
- When connected to an HDCP incompatible display device, the picture will not be displayed properly.
- Use an HDMI cable with the HDMI logo (a certified HDMI cable) for this connection. High Speed HDMI cable (also known as HDMI category 2 cable) is recommended for better compatibility.
• To enjoy Blu-ray 3D™ video, connect this unit to a 3D capable TV using a 3D compatible HDMI cable.
■ Standard Video Connection (Supports only 480i resolution.)
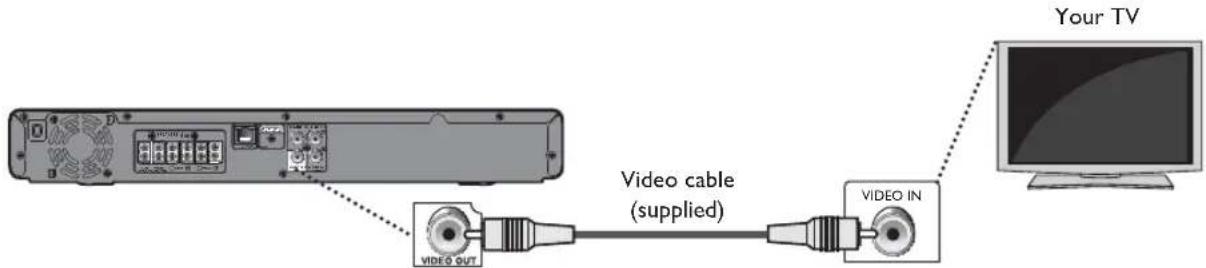
text_image
Your TV Video cable (supplied) VIDEO OUT VIDEO IN- Connect this unit directly to the TV. If the video cables are connected to a VCR then the pictures may be distorted due to the copyright protection system.
4.3. Connecting Speakers and Subwoofer
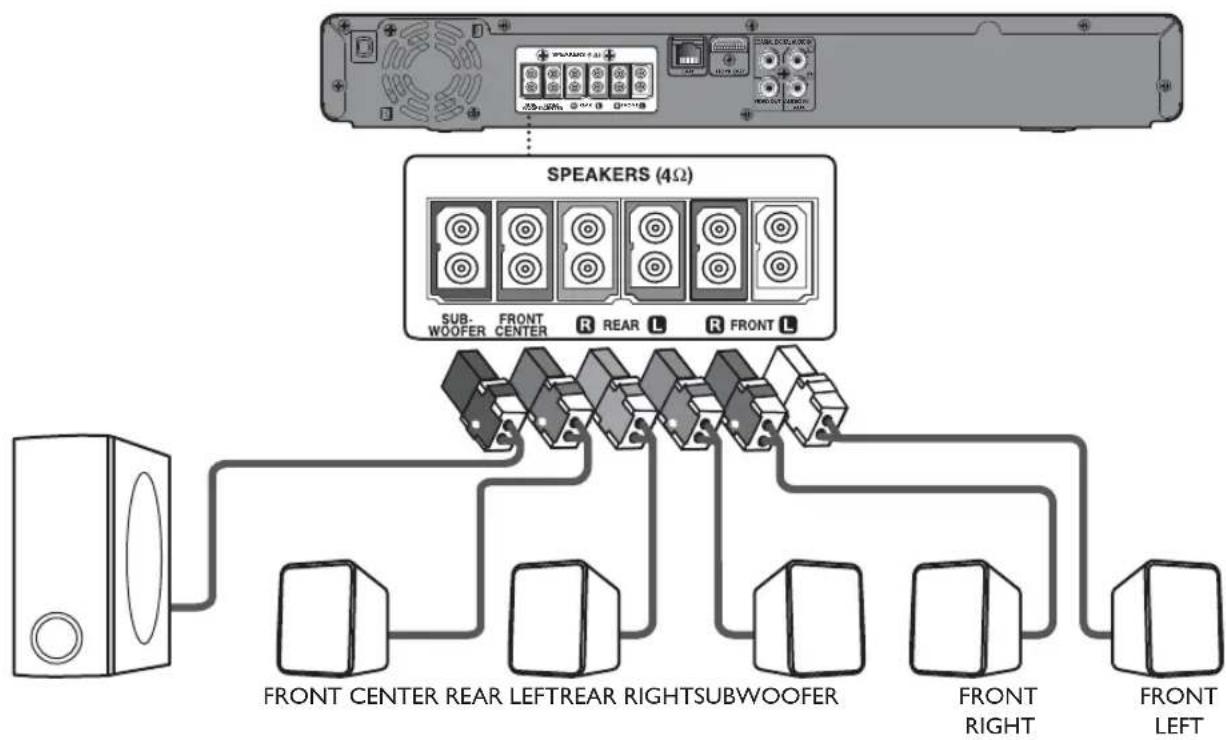
flowchart
graph TD
    A["Speaker Array"] --> B["SPEAKERS (4Ω)"]
    B --> C["Sub-woofer"]
    B --> D["FRONT CENTER"]
    B --> E["R REAR L"]
    B --> F["R FRONT L"]
    C --> G["Front Center"]
    C --> H["FRONT LEFT"]
    C --> I["FRONT REAR"]
    C --> J["FRONT SUBWOOFER"]
    C --> K["FRONT RIGHT"]
    C --> L["FRONT LEFT"]
- Connect the speaker cables to the matching color sockets on the speakers.
- Connect all the speakers and subwoofer to the matching sockets at the rear of the main unit. Make sure that the colors of the cables and sockets match.
Note
• To prevent unwanted noise, never place the speakers too close to the main unit, subwoofer, AC power adapter, TV or any other radiation sources.
4.4. Connecting Audio from Cable Box / Recorder / Game Console or TV
- This unit provides analog and digital audio connection. You can connect the audio output from an audio / video device (e.g. DVD Recorder, VCR, Cable / Satellite Box, game console or TV) to this Blu-ray Disc™ Home Theater in order to enjoy the multi-channel surround sound capabilities.
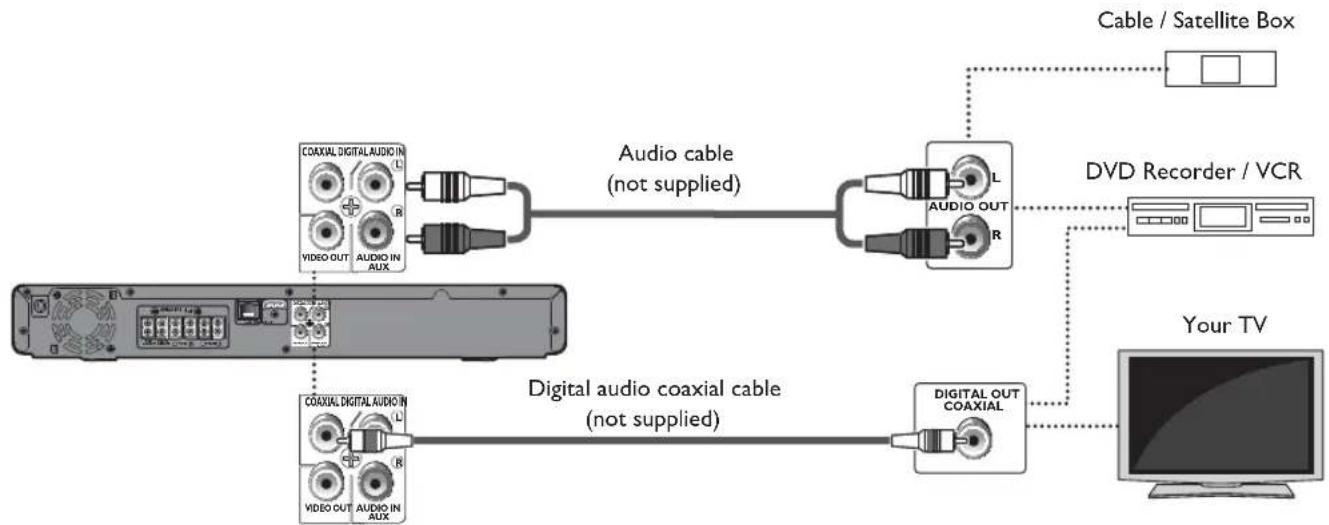
flowchart
graph TD
    A["TV"] -->|Digital audio coaxial cable (not supplied)| B["Coaxial Digital Audio In"]
    A -->|Digital audio coaxial cable (not supplied)| C["Video OUT Audio IN AUX"]
    B --> D["Cable / Satellite Box"]
    C --> E["DVD Recorder / VCR"]
    D --> F["Coaxial Digital Audio In L"]
    D --> G["Video OUT Audio IN AUX R"]
    E --> H["Digital Out Coaxial"]
    H --> I["Your TV"]
- Use an audio cable (not supplied) to connect the AUDIO IN (AUX) jacks on the main unit to the audio output jacks on the connected device.
- Use a digital audio coaxial cable (not supplied) to connect the DIGITAL AUDIO IN (COAXIAL) jack on the main unit to the digital audio coaxial output jack on the connected device.
Note
- To listen to the audio output from these connections, select "Speakers" in "Audio Output" (refer to page 36) and change the active source mode to the connected input. (Refer to "Switching Active Source Mode" on page 49.)
4.5. Connecting Portable Media Player
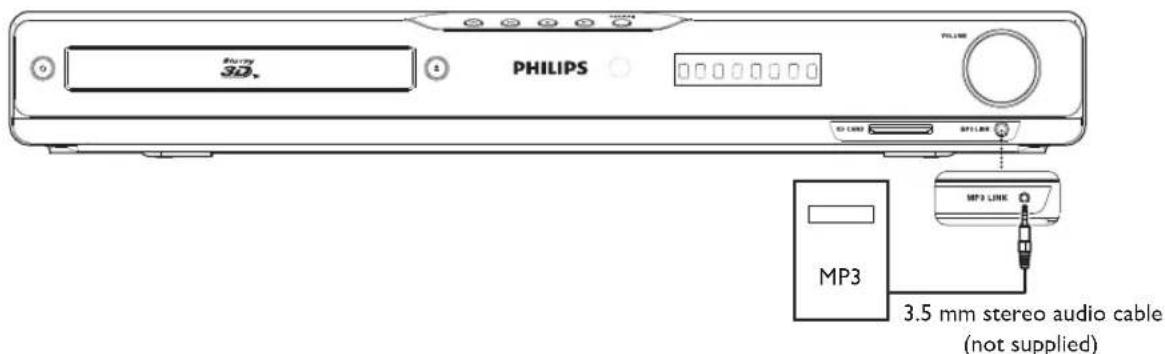
text_image
Blue ring 3D. PHILIPS T1000 SP LINE SP LINE MP3 MP3 LINK MP3 3.5 mm stereo audio cable (not supplied)Connect a 3.5mm stereo audio cable (not supplied) to the MP3 LINK jack on this unit and the headphone jack on your portable media player.
Note
• To playback the audio from your portable media player, refer to “Play from Portable Media Player” on page 34.
4.6. Audio Output from HDMI OUT Jack
| (home) → | “Setup” | →“Audio Setup” → | “Audio Output” |
If you set to "Speakers":
The audio output from the 5.1ch speakers differs depending on the audio source and the setting of surround mode.
(Refer to "Selecting Surround Mode" on page 48.)
If you set to "HDMI Normal" or "HDMI LPCM":
Refer to the table below for the audio output from HDMI OUT jack.
| “Audio Output” setting | “HDMI Normal” “HDMI LPCM” | ||||
| “Blu-ray Disc Audio” setting → | “Primary Audio Only” | “Mix Audio Output” | “Primary Audio Only” | “Mix Audio Output” | |
| Media ↓ | Audio Source ↓ | Which audio format can be output depends on the compatibility of the connected device. | |||
| BD-video | Dolby Digital Dolby Digital Multi | LPCM | |||
| Dolby Digital Plus Dolby Digital Plus | Plus Dolby Digital Multi LPCM | *1 | Multi LPCM*2 | ||
| Dolby TrueHD Dolby TrueHD | Dolby Digital Multi LPCM | *3 | Multi LPCM*4 | ||
| DTS® | DTS® | Multi LPCM | |||
| DTS-HD® | DTS-HD® | DTS® | Multi LPCM*1 | Multi LPCM*5 | |
| LPCM Multi LPCM | Multi LPCM | ||||
| DVD-video | Dolby Digital Dolby Digital Multi | LPCM | |||
| DTS® | DTS® | Multi LPCM | |||
| LPCM 2ch LPCM | 2ch LPCM | ||||
| DTS-CD | DTS® | DTS® | Multi LPCM | ||
| AVCHD | Dolby Digital Dolby Digital Multi | LPCM | |||
| LPCM Multi LPCM | Multi LPCM | ||||
| Audio CD | LPCM 2ch LPCM | 2ch LPCM | |||
| MP3 | MP3 | 2ch LPCM | 2ch LPCM | ||
| Windows MediaTM Audio | WMA 2ch LPCM | 2ch LPCM | |||
| Netflix | WMA 2ch LPCM | 2ch LPCM | |||
| Film Fresh | AAC | 2ch AAC | 2ch LPCM | ||
| Blockbuster | AAC | 2ch AAC | 2ch LPCM | ||
| VUDU | Dolby Digital Plus Dolby Digital Plus | Multi LPCM | *1 | ||
| MP3 | 2ch LPCM | 2ch LPCM | |||
| Pandora | MP3 | 2ch LPCM | 2ch LPCM | ||
^1 ) Fully decoded.
^2 Only the independent substream is decoded.
^3 ) Dolby TrueHD stream is decoded.
*4) Only the Dolby Digital substream is decoded.
^5 Only the core substream is decoded.
Note
- If the connected device is not compatible with HDMI BITSTREAM, audio will be output as multi LPCM or 2-channel down-mixed LPCM depending on the capability of the connected device even if you select “HDMI Normal” in “Audio Output” setting.
- If the connected device is not compatible with AAC, audio will be output as LPCM depending on the capability of the connected device.
- When playing back a BD-video which only contains the primary audio, the audio output will be the same case as “Primary Audio Only” even if “Blu-ray Disc Audio” is set to “Mix Audio Output”.
4.7. Connection to the Network
By connecting this unit to the Internet, you can update the software via the Internet, access BD-Live™, Netflix, Film Fresh, Blockbuster, VUDU and Pandora services.

Note
- For a stable connection, wired connection is recommended when using following features.
(Using following features with Wi-Fi connection can be affected by other devices using radio frequencies.) - Video streaming services (Netflix / Film Fresh / Blockbuster / VUDU)
- Internet radio service (Pandora)
- Network update
■ Wired Connection
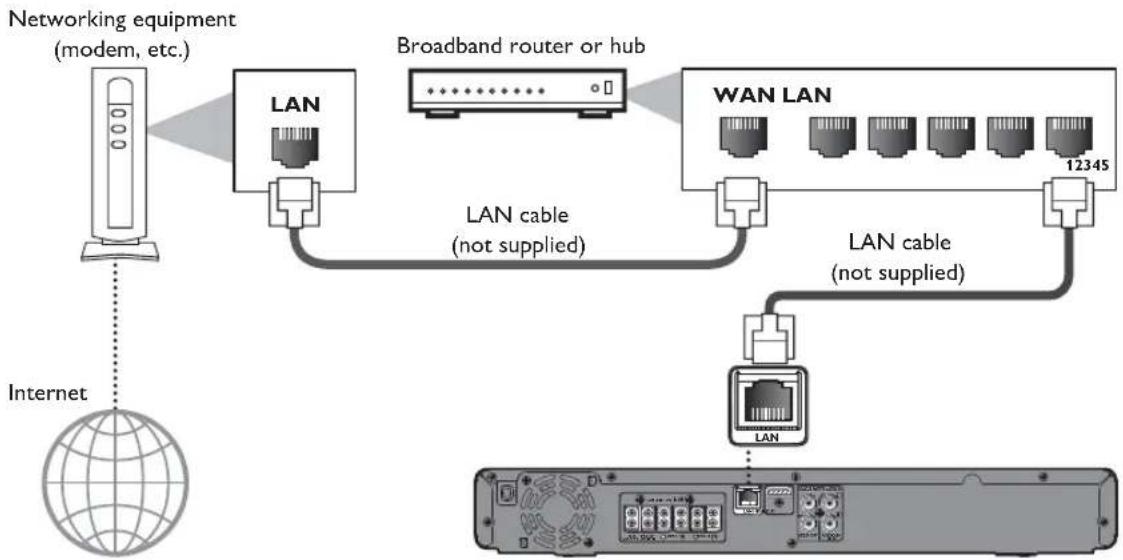
flowchart
graph TD
    A["Networking equipment (modem, etc.)"] --> B["LAN"]
    B --> C["Broadband router or hub"]
    C --> D["WAN LAN"]
    D --> E["12345"]
    F["Internet"] --> G["LAN cable (not supplied)"]
    G --> H["LAN cable (not supplied)"]
    H --> I["LAN"]
    I --> J["Network device with ports and cables"]

Caution
- Do not insert any cable other than a LAN cable to the LAN terminal to avoid damaging the unit.
- Do not connect your PC directly to the LAN terminal of this unit.

Note
• After you made a wired connection, set up necessary network settings.
(For network setting of wired connection, refer to "Wired" on page 41.)
- If your modem does not have router functions, connect a wired router.
- If your modem has router functions but there is no vacant port, add a hub.
- For a wired router, use a router which supports 10BASE-T / 100BASE-TX ETHERNET standard.
- Please purchase shielded LAN cables at your local store and use them when you connect to network equipment.
■ Wi-Fi Connection
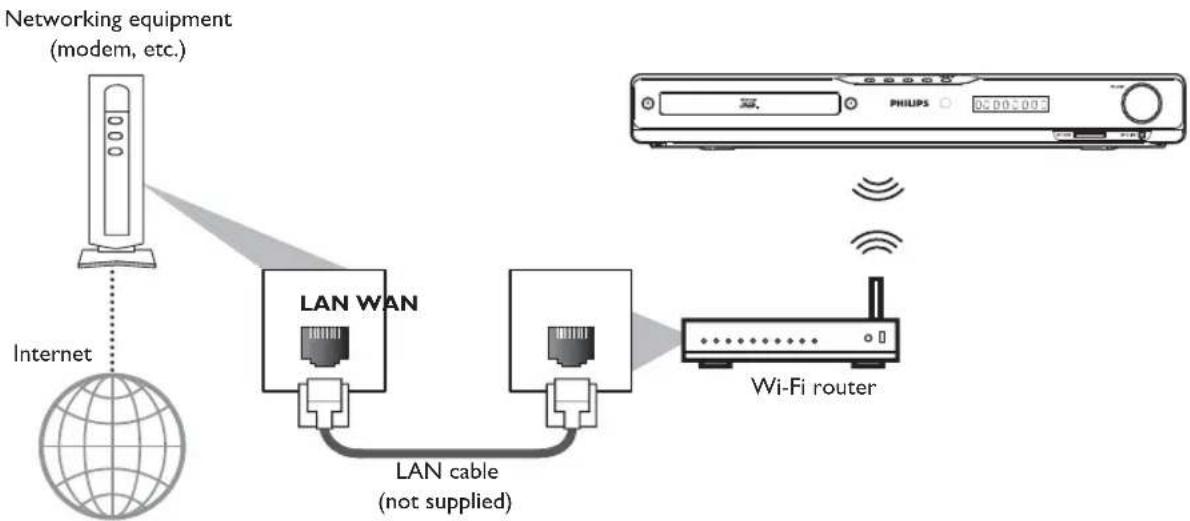
flowchart
graph TD
    A["Internet"] --> B["Networking equipment (modem, etc.)"]
    B --> C["LAN WAN"]
    C --> D["Wi-Fi router"]
    D --> E["Wi-Fi cable (not supplied)"]
    E --> C
    F["PHILIPS"] --> G["05005003"]
Note
• After you made a Wi-Fi connection, set up necessary network settings.
(For the network setting of Wi-Fi connection, refer to "Wireless" on page 43.)
- For a Wi-Fi router, use a router which supports IEEE 802.11 b/g/n.
("n" type is recommended for stable operation of the Wi-Fi network.)
- Set the Wi-Fi router to Infrastructure mode. This unit does not support Ad-hoc mode.
- Other radio devices or obstacles may cause interference to the Wi-Fi network connection.
5. BEFORE YOU START
5.1. Finding the Viewing Channel / Source on Your TV
After you have completed all the connections, you must find the viewing channel (external input source) on your TV.
- After you have made all the necessary connections, press [(standby/on)] to turn on the unit.
- Turn on your TV.
- Press the button on the TV's remote control that accesses the external input channel. It may be labeled "SOURCE", "AV", "AUX" or "SELECT" (refer to your TV's user manual). Or press "2" on the TV's remote control, then press channel down button repeatedly until you see the Philips splash screen.
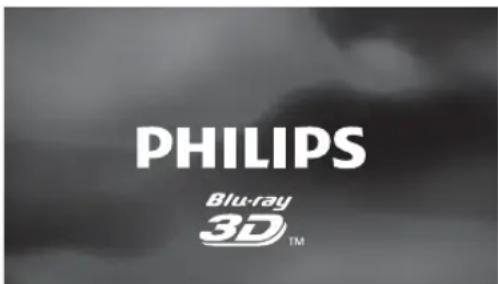
text_image
PHILIPS Blu-ray 3D™This is the correct viewing channel (external input source).
- If the TV is connected by an HDMI cable, it may take a while for the Philips splash screen to come up.
- If a certain amount of time has passed since you turned on the unit, welcome screen appears the first time you turn on this unit.
5.2. Initial Setup
Please follow the instructions below to complete the initial setup.
- While welcome screen is displayed, use [▲/▼] to select "Next", then press [OK].
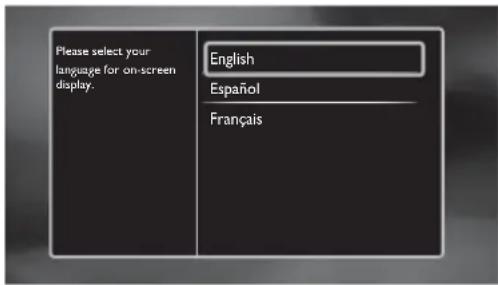
- Language setup screen will appear. Use [▲/▼] to select your language, then press [OK].
text_image
Please select your language for on-screen display. English Español Français- Quick start mode setup screen will appear. Use [▲ / ▼] to select the desired mode, then press [OK].
- Auto software update setup screen will appear. Use [▲ / ▼] to select the desired mode, then press [OK].
-
Network setup screen will appear. Use [▲/▼] to select the desired mode, then press [OK].
-
If you select "Wired", refer to "Wired" on page 41 for further operation.
- If you select "Wireless", refer to "Wireless" on page 43 for further operation.
6. INFORMATION ON PLAYBACK
6.1. Information on Playback
Before you start playing back a disc, read the following information.
■ Playable Discs and Files
| Playable discs Logos | ||
| Blu-ray Disc^TM | ||
| - BD-video |  | |
| - Blu-ray 3D^TM Disc | ||
| - Blu-ray 3D^TM only Disc |  | |
| - BD- RE^* (ver. 2.1) | ||
| (Recorded in BDMV format) | ||
| - BD- R^* (ver. 1.1 / 1.2 / 1.3) |  | |
| (Recorded in BDMV format) | ||
| (Unfinalized disc may not be played back.) | 3D ONLY | |
| DVD-video |  | |
| DVD-RW | ||
| (finalized video mode discs only) |  | |
| DVD-R | ||
| (finalized video mode discs only) |  | |
| CD-DA (audio CD) |  | |
| CD-RW |  |  |
| CD-R |  |  |
| KODAK Picture CD |  | |
| DTS-CD | - | |
(*) Due to the intentional progression of the Blu-ray Disc™ format by its standard setting authority, the company cannot guarantee or warrant the playability of future extensions of the Blu-ray Disc™ format with this product.
| Playable files Media | |
| AVCHD | DVD-RW/-RSD Memory CardminiSD CardmicroSD CardSDHC Memory CardminiSDHC CardmicroSDHC Card |
| MP3 | BD-RE/-RDVD-RW/-RCD-RW/-R |
| Windows MediaTM Audio | SD Memory CardminiSD CardmicroSD CardSDHC Memory CardminiSDHC CardmicroSDHC Card |
| JPEG | |
| Readable cards Playable files / data | |
| SD Memory Card(8 MB - 2 GB) | |
| miniSD Card(16 MB - 2 GB) | |
| microSD Card(256 MB - 2 GB) | AVCHD, MP3, WMA, JPEG,picture-in-picture commentary,subtitles or other extras for BD-ROMver. 2 (Profile 2.0 / Profile 1.1) |
| SDHC Memory Card(4 GB - 32 GB) | |
| miniSDHC Card(4 GB - 8 GB) | |
| microSDHC Card(4 GB - 16 GB) | |
■ Recommended Specifications
AVCHD
This unit cannot play back standalone AVCHD files (*.m2ts, *.mts or *.m2t) written to a DVD or copied to an SD card. The DVD or SD card containing AVCHD files must have a proper file and folder structure meeting AVCHD format specifications.
Please use AVCHD compliant device / software to burn or copy AVCHD files to DVD or SD card. (Please refer to user manuals of the device / software for more information.)
MP3 / Windows Media™ Audio
• Sampling frequency : 32 kHz, 44.1 kHz or 48 kHz
• Constant bit rate : 112 kbps - 320 kbps (MP3), 48 kbps - 192 kbps (WMA)
JPEG
Resolution
• Upper limit : 2,560 x 1,900 dots
(sub sampling is 4:4:4)
5,120 x 3,840 dots
(sub sampling is up to 4:2:2)
- Lower limit : 32 x 32 dots
• Maximum file size of a : 12MB picture
■ Folder / File Number Limitations
Blu-ray Disc™, DVD and SD card
• 999 folders (groups) and 9,999 files.
CD
• 255 folders (groups) and 999 tracks / files.
Caution / Note for SD Cards
Caution
- Do not try to open or modify the card.
- Do not touch the terminal surface with your fingers or any metals.
- Do not attach additional labels or stickers to cards.
- Do not remove the label of the SD cards.
Note
- This unit supports SD Memory Card with FAT12 / FAT16 file system, and SDHC Memory Card with FAT32 file system.
- This unit does not support NTFS file system.
- This unit may not read SD cards formatted on a computer. If that is the case, please reformat the SD card in this unit and try again.
- For miniSD Card and microSD Card, an adapter is necessary.
- Portions of this product are protected under copyright law and are provided under license by ARIS / SOLANA / 4C.
- Please keep the SD cards in their cases when you are not using them.
■ Unplayable Discs and Files
The following discs will not be played back in this unit.
- CD-ROM • CD-I (compact disc-interactive)
• DVD - RAM • VSD (v i
• DVD - audio • video o
• HD DVD • SVCD
- SDXC Memory Card
- microSDXC Card
- unfinalized disc
- BD-RE (ver.1.0)
• BD-RE (ver.2.1) (Recorded in BDAV format)
• BD-R (ver.1.1 / 1.2 / 1.3) (Recorded in BDAV format)
- Blu-ray Disc™ / DVD / CD / SD card contains DivX ^ files
- Blu-ray Disc™ that contains AVCHD files
- Blu-ray Disc™ / DVD hybrid disc (played back as a BD-video only)
- DVD-RW/-R recorded in non compatible recording format
- Super Audio CD - Only the sound on the CD layer can be heard. The sound on the high-density Super Audio CD layer cannot be heard.
- Playability of dual discs is not guaranteed.
- This unit cannot play back the disc contents protected by Windows Media™ Digital Rights Management (DRM).
■ Region Codes
This unit has been designed to play back BD-video with region "A", DVD-video with region "ALL" or "1" for HTS3506/F7 (USA / Canada) and region "ALL" or "4" for HTS3506/F8 (Mexico). You cannot play back BD-video or DVD-video that are labeled for other regions. Look for the symbols on the right on your BD-video or DVD-video. If these region symbols do not appear on your BD-video or DVD-video, you cannot play back the disc in this unit. The letter or number inside the globe refers to region of the world. A BD-video or DVD-video labeled for a specific region can only be played back in the unit with the same region code.
BD-video

DVD-video

For HTS3506/F7 (USA / Canada)

For HTS3506/F8 (Mexico)

■ Hint for Disc Playback
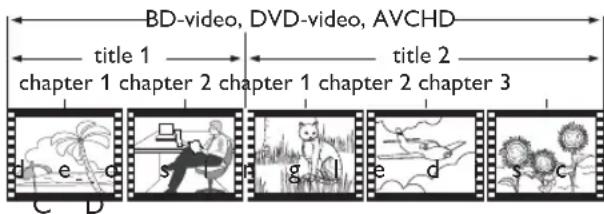
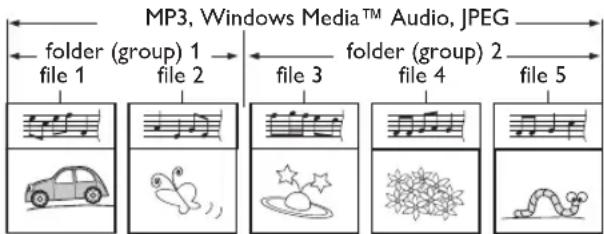
The contents of a disc are generally divided into sections or folders (groups of titles / files) as shown below.
text_image
BD-video, DVD-video, AVCHD title 1 title 2 chapter 1 chapter 2 chapter 1 chapter 2 chapter 3 d e c s g l e d s c C D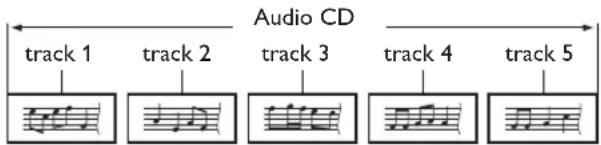
flowchart
graph LR
    A["track 1"] --> B["Music Icon"]
    C["track 2"] --> D["Music Icon"]
    E["track 3"] --> F["Music Icon"]
    G["track 4"] --> H["Music Icon"]
    I["track 5"] --> J["Music Icon"]
    B --> K["Audio CD"]
    D --> K
    F --> K
    H --> K
    J --> K
flowchart
graph LR
    A["MP3, Windows Media™ Audio, JPEG"] --> B["folder (group) 1"]
    A --> C["folder (group) 2"]
    B --> D["file 1"]
    B --> E["file 2"]
    C --> F["file 3"]
    C --> G["file 4"]
    C --> H["file 5"]
■ Description for Icons
[ ] : group (folder) icon
[ ] : music file icon
- "Folders" refers to the groups of files.
- "Tracks" refers to the contents recorded on the audio CD.
- "Files" refers to the contents on a disc which are recorded in AVCHD, MP3, Windows Media™ Audio, JPEG (including KODAK Picture CD) file format.
Note
- Unrecognizable characters will be replaced with asterisks.
6.2. Guide to File List
■ Music File List
e.g.) MP3 mode
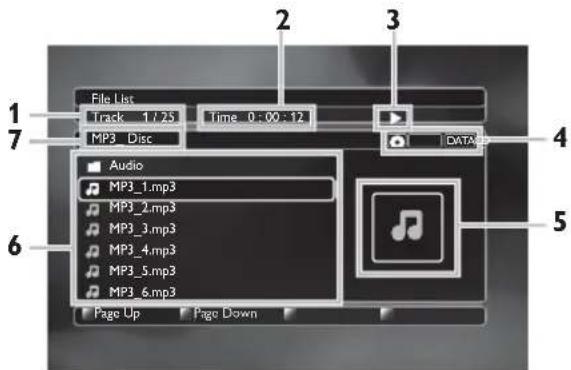
text_image
File List Track 1 / 25 Time 0 - 00 - 12 MP3 Disc DATA Audio MP3_1.mp3 MP3_2.mp3 MP3_3.mp3 MP3_4.mp3 MP3_5.mp3 MP3_6.mp3 Page Up Page Down- Current track (file) number / Total number of tracks (files)
- Elapsed playing time of the current track
- Playback status
- Media type
- Image
- Group (folder) / File list
- Name of disc / SD card
■ Picture File List
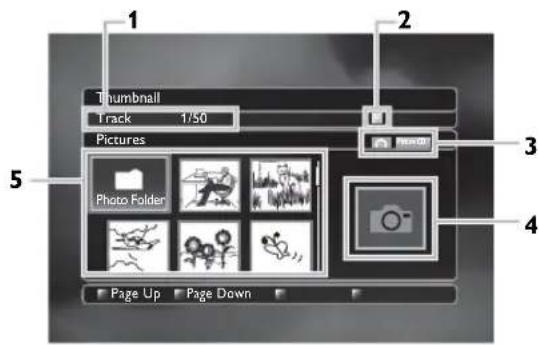
text_image
1 2 3 5 4 Thumbnail Track 1/50 Pictures Photo Folder Page Up Page Down- Current file number / Total number of files
- Playback status
- Media type
- Image
- Group (folder) / File list (thumbnails)
■ How to Navigate through the Track / File List
• U s▲ /e▼ [ ] to move the highlight up and dov list.
- To access the files in a group (folder), select the desired group (folder), then press [OK].
- Press [◀] or [BACK ◇] to go back to the previous hierarchy.
- Press [Red] or [Green] to change the page of the list.
- Press [Yellow] to go back to the media mode screen.
- Press [ ♦ h o m e ) ] to go back to the home
6.3. How to Insert a Disc
- Press [ ▲( o p e n / c l o s e ) ]
- Place the disc on the disc tray with its label side facing up.

natural_image
Illustration of a hand using a tool to lift a circular component on a base, with no visible text or symbols.Align the disc to the disc tray guide.
- Press [ ▲( o p e n / c l o s e ) ]
- It may take a while to load the disc.
7. BASIC PLAYBACK
7.1. Playing Back a Disc
-
Insert a disc (refer to "How to Insert a Disc" on page 25).
-
For Blu-ray Disc™ / DVD / audio CD or a disc containing only one type of file, playback will start automatically. If not, press [▶ ( p l a y )
-
Some discs may show a title or a disc menu. In this case, refer to “Using the Title / Disc / Pop-up Menu” on page 28.
• Media filter screen will appear. -
Select the type of the file you want to play back, then press [OK].
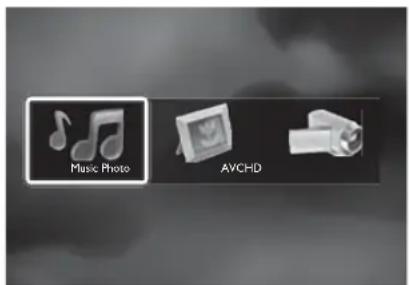
text_image
Music Photo AVCHD-
For "AVCHD", playback will start automatically. For "Music", track / file list will be displayed. Select a group (folder) or track / file you want to play back then press [▶ (play)] or [OK] to start playback.
-
Refer to "Music File List" on page 25 and "How to Navigate through the Track / File List" on page 25.
For "Photo", thumbnail screen will appear. - Refer to "Picture File List" on page 25 and "How to Navigate through the Track / File List" on page 25.
To skip to the next track / file:
Press [next].
To skip to the previous track / file:
Press [previous].
To pause playback:
Press [1(pause)].
To return to normal playback:
Press [▶ ( p l a y ) ] .
To stop playback:
Press [■( s t o p ) ] .
Playback will be in Resume-On-Stop mode.
■ Resume-On-Stop Mode
Blu-ray Disc™ / DVD / AVCHD:
When you press [▶ ( p l a y ) ] next time, will start from the point where it has been stopped.
Audio CD:
Playback will start from the point where it is stopped next time you press [▶ (play)]. If you press [OK] instead of [▶ ( p l a y ) ] , playback will star beginning of the track / file instead of resuming from the stop point.
MP3 / WMA / JPEG / KODAK Picture CD:
Playback will start from the beginning of the current file next time you press [▶ (play)] or [OK].
Note
- Playback will also stop and the home menu will appear when you press [♠(h o m e)] .
-
For BD-Java application, the Resume-On-Stop may not be available.
-
If you press [OK] instead of [▶ (play)], playback can be started from the beginning of the disc even if it was in the Resume-On-Stop mode.
- Resume-On-Stop mode remains in effect even after power is turned off, but will be canceled once the disc is ejected.
- With regard to the multi-border BD-RE/-R, additionally recorded sections cannot be recognized.
- With regard to the multi-border DVD-RW/-R, additionally recorded sections may not be recognized.
Tips for JPEG / KODAK Picture CD Playback
- Every press of [ ◀/ ] will turn the image by 90 degrees when an image is displayed.
- During playback, press [TOP MENU] to display thumbnail screen.
- This unit conforms to ver.7.0 of KODAK Picture CD. For details of KODAK Picture CD, contact a shop that provides developing service for Kodak Inc.
- Some unplayable folders or files may be listed due to the recording status.
• High-resolution JPEG files take longer to be displayed. - Progressive JPEG files (JPEG files saved in progressive format) cannot be played back in this unit.
7.2. Playing Back a Blu-ray 3D ^TM Disc

This unit can play back Blu-ray 3D ^TM discs which contain stereoscopic 3D video. In order to view Blu-ray 3D ^TM videos, you need to have the following:
- 3D capable TV
- 3D compatible HDMI cable
- 3D glasses
-
Blu-ray 3D™ Disc or Blu-ray 3D™ only Disc
-
Connect 3D capable TV with a 3D compatible HDMI cable.
- Refer to "Connection to the TV" on page 16.
- Insert a Blu-ray 3D ^TM Disc or a Blu-ray 3D ^TM only Disc.
- Refer to "How to Insert a Disc" on page 25.
- Playback may start automatically. If not, press
[▶ ( p l a y ) ] .
Some discs may show a title or a disc menu. In this case, refer to “Using the Title / Disc / Pop-up Menu” on page 28.
To pause playback:
Press [1(pause)].
To return to normal playback:
Press [▶ ( p l a y ) ] .
To stop playback:
Press [■( s t o p ) ] .
Playback will be in Resume-On-Stop mode, and the home menu will appear.
■ Resume-On-Stop Mode
When you press [▶ ( p l a y ) ]
will start from the point where it has been stopped.
Caution
- Watching 3D videos may cause headache, dizziness or tiredness.
To avoid such consequences, do not watch 3D videos for a long period of time.
- Watching 3D videos is not recommended for the following people:
- People who are susceptible to motion sickness
- Children from walking age to seven years
- Pregnant woman
- People who are susceptible to motion sickness - Children from walking age to seven years - Pregnant woman
For more information, refer to "IMPORTANT HEALTH AND SAFETY INFORMATION FOR 3D TELEVISIONS" on page 57.
Note
- For more information, refer to the 3D TV's manual.
- When “3D Output” is set to “Auto (XX)” and your TV is not 3D capable, playback of Blu-ray 3D™ discs will revert to 2D depending on the disc.
- You can turn off 3D output mode by setting "3D Output" to "2D". (Refer to page 36.)
- For some Blu-ray 3D™ only discs, playback in 2D mode is not possible.
- You can check the current output mode (2D or 3D) by pressing [INFO] during playback.
- If you change “3D Output” setting to “2D” while the unit is in the Resume-On-Stop mode of Blu-ray 3D™ Disc playback, the resume information will be cleared.
7.3. Playing Back an SD Card

You can play back AVCHD / MP3 / WMA / JPEG files in an SD card. With the SD card, you can also enjoy the following functions.
- Special additional contents for BD-ROM Profile 1 ver.1.1. (For more information about the special additional contents, refer to the instruction book that came with the disc.)
- BD-Live™ function (BD-ROM ver. 2 Profile 2.0). (For more information about BD-Live™, refer to page 30.)
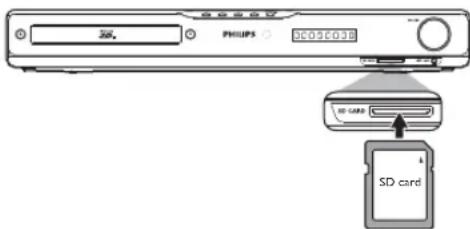
text_image
PHILIPS SD CARD SD card-
Insert an SD card. next time, the playback
-
Press [ ( h o m e ) ]
-
Use [ ▲/▼/◄/►] to select "Browse SD Card", then press [OK].
-
Follow steps 2 to 3 in "Playing Back a Disc" on page 26.
To remove the SD card:
In stop mode, gently push in the SD card, then pull it out slowly.

Caution
- Do not remove the SD card or switch the unit to standby mode while the contents of the card are being accessed. It may result in malfunction or loss of the card's data.

Note
• The resume information will be cleared when;
- [■ (stop)] is pressed while in the Resume-On-Stop mode.
- the SD card is removed.
- the unit is switched to standby mode.
- Do not delete the folders or files in the SD card with your computer. This unit may not read SD cards formatted on a computer.
- If a folder or file name includes one of the following unrecognizable characters, the folder or file name may not be displayed correctly.
- Unrecognizable characters: .,"=+[];/\:|¥
7.4. Using the Title / Disc / Pop-up Menu

BD
VIDEO

DVD
VIDEO
AVCHD
Some BD-videos, DVD-videos or AVCHD files may contain a title menu which describes the contents of the disc, or a disc menu which guides you through the available functions in the disc.
With such discs, a title menu or a disc menu may appear automatically when you insert the disc. Otherwise, press
[TOP MENU] or [DISC MENU / POP-UP MENU]
to call up the menu. Refer to the disc's manual on how to navigate through the menu.

Note
- Menus vary among discs. Refer to the information accompanying the disc for details.
- [TOP MENU] or [DISC MENU / POP-UP MENU] may not work with some discs.
- Title menu is also available for SD card with AVCHD files.
8. SPECIAL PLAYBACK
8.1. Fast Forward / Fast Reverse

- During playback, press [▶▶ ( f orepeatedly for fast forward.
During playback, press [◀◀ ( r epeatedly for fast reverse.
Every time you press [▶▶ ( f oor r w
[◀◀ ( r ,the phybackspeed will change )
- Press [▶( p l a y ) ] to return to normal playback.
Note
- For Blu-ray Disc™, DVD and AVCHD, speed changes in 5 different levels.
- For audio CD, MP3 and Windows Media™ Audio, speed changes in 3 different levels.
- For audio CD, fast forward / fast reverse search between different tracks are not available during random playback.
- For MP3 and Windows Media™ Audio, fast forward / fast reverse search between different files are not available.
8.2. Slow Forward Playback

- During playback, press [ II( p a u s e ) ]
[▶▶ ( f o r w a r d ) Every time you press [▶▶ ( f o r w a speed changes in 3 different levels.
- Press [ ▶( p l a y ) ] to return to norm
Note
- Only slow forward is available.
8.3. Step by Step Playback

- In pause mode, press [▶ (next)] repeatedly. Every time you press [▶ (next)], playback will advance one step at a time.
a2. Press [▶ (play)] or [■ (pause)] to return to normal playback.
r s e ) ]
Note
a • Only step by step forward is available.
8.4. Repeat Playback
Available repeat function varies depending on the discs.
- During playback, press [REPEAT].
- Use [/] to select the desired repeat mode.
| REPEAT MODE | AVAILABLE MEDIA |
| Chapter Repeat | |
| The current chapter will be played back repeatedly. | |
| Title Repeat | |
| The current title will be played back repeatedly. | |
| Track Repeat | |
| The current track or file will be played back repeatedly. | |
| All Repeat | |
| Then pressAll tracks in the media will be played back repeatedly. | |
| Group Repeat | |
| The current group (folder) all playback.will be played back repeatedly. | |
| Random Repeat (Audio CD) | |
| Repeats the random playback. | |
| Random Repeat (MP3 / Windows MediaTM Audio / JPEG) | |
| Repeats the random playback in a folder. |
| REPEAT MODE | AVAILABLE MEDIA |
| Chapter Repeat | |
| The current chapter will be played back repeatedly. | |
| Title Repeat | |
| The current title will be played back repeatedly. | |
| Track Repeat | |
| The current track or file will be played back repeatedly. | |
| All Repeat | |
| Then pressAll tracks in the media will be played back repeatedly. | |
| Group Repeat | |
| The current group (folder) all playback.will be played back repeatedly. | |
| Random Repeat (Audio CD) | |
| Repeats the random playback. | |
| Random Repeat (MP3 / Windows MediaTM Audio / JPEG) | |
| Repeats the random playback in a folder. |
- Press [BACK ←] to exit.
Note
• The repeat setting will be canceled when you stop playback.
- When the repeat setting is set for an MP3 or WMA folder (file), the repeat setting will be canceled if you select other MP3 or WMA folder (file) to playback.
8.5. Slide Show
JPEG
-
Follow steps 1 to 2 in "Playing Back a Disc" on page 26.
-
Open the folder which contains the desired JPEG files.
-
Use [ ▲/▼/◄/►] to select a desired file to play back, then press [► (play)] or [OK].
- An image will be played back from the selected file and go to the next one in turn every 10 seconds.
- Press [ ■( s t o p ) ] to stop playback.
To return to the first item:
Press [TOP MENU].
To return to the file played last:
Press [DISC MENU / POP-UP MENU].
Note
- During playback, press [TOP MENU] to display thumbnail screen.
- Large-size JPEG files take a few moments to be displayed.
8.6. PiP (BONUSVIEW™) Setting
BD VIDEO
Some BD-videos have the PiP function which enables you to display the secondary video in the primary video.
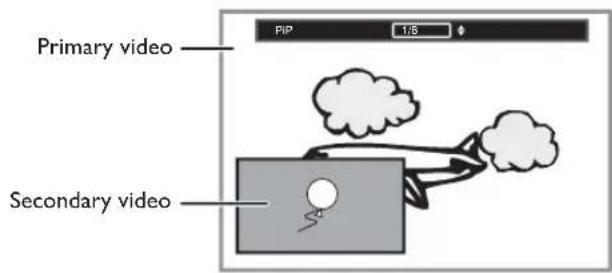
text_image
Primary video Secondary video PIP 1:6-
During playback, press [BONUSVIEW (PiP)].
-
Use [ ▲ / ▼] to select the secondary video you want to show.
• The secondary video will be displayed with the secondary audio.
• Use / [ ] "Off".
- Press [BACK] to remove the PiP information.
- On how to output the secondary audio, refer to "Switching Audio Soundtrack" on page 32 and "Blu-ray Disc Audio" on page 36.
8.7. Enjoying BD-Live™ Discs Using the Internet
BD VIDEO
You can enjoy BD-Live™ which enables you to use interactive features when the unit is connected to the Internet.
Examples of BD-Live™ features:
• Online access to additional content such as movie trailers, subtitles, BD-Java applications, etc.
- While downloading, special video data may be played back.
- Service and functions differ depending on the disc. Follow the instructions given by the disc when using the BD-Live™ function.
- Insert an SD card of at least 1 GB capacity before using BD-Live™ features on a Blu-ray Disc™.
- Do not remove the SD card while using BD-Live™ features.
Note
- You must connect the unit to the Internet and set up necessary settings in order to use BD-Live™.
- For the network connection, refer to "Connection to the Network" on page 20.
- For the network setup, refer to "Network Installation" on page 41.
- For certain discs, BD-Live™ setting in "Manual Setup" may need to be changed. (Refer to page 41.)
- Depending on your connection environment, it may take time to connect to the Internet or the Internet may not be connected.
- When BD-Live™ functions are used and the unit is connected to the Internet, you may be charged for this communication.
- Some discs with BD-Live™ function require memory when playing back the content. If you cannot play back a disc with BD-Live™ function, insert an SD card (1GB or more) which is formatted on this unit.
Note for AACS Online
• The player or disc IDs may be sent to the content provider when playing back a disc with BD-Live™ function.
• If you save your viewing history on the server by using these IDs, you will be introduced to other similar movies.
• You can save game score histories.
8.8. Title / Chapter Search

BD

DVD
AVCHD
■ Using [◀previous)] / [ (next)]
- During playback, press [ (next)] to skip the current title or chapter and move to the next.
The title or chapter will move forward one at a time.
- If there is no chapter in one title, the current title may be skipped.
To go back to the beginning of the current title or chapter, press [previous].
Press [k(previous)] repeatedly to go to the previous title or chapter. The title or chapter may move backward one at a time.
■ Using [OPTION]
-
During playback, press [OPTION] to display the play menu.
-
Use [▲ / ▼] to select "Search", then press [OK].
-
Use [ ▲ / ▼] to select "Title" or "Chapter", then press [OK].
e.g.) Blu-ray Disc™
![PHILIPS HTS3506 - ■ Using [OPTION] - 1](/content/2026/05/817315/images/de025e9bb5a3034a8ed7e117784456bdea0eaa55e1ddf7bf6da205618707ab11.jpg)
-
Use [ ▲/▼/◄/►] number.
-
Press [OK].
Playback will start from the beginning of the title / chapter.
- Press [BACK] to exit.
■ Using [the Number buttons] (Direct Search)
Chapter Search
During playback of a title, enter the chapter number you want to search using [the Number buttons].
Playback of the chapter will start in a few seconds.
Note
- As for the BD-video, how it performs will be strongly determined by the disc, and may not perform as described.
8.9. Track Search

CD

MP3

WINDOWS MEDIA AUDIO

JPEG
- During playback, press [▶ (next)] to skip the current track or file and move to the next.
The track / file will move forward one at a time. To go back to the beginning of the current track / file, press [previous].
Press it repeatedly to go to the previous track / file. The track / file will move backward one at a time.
8.10. Time Search

BD VIDEO
DVD VIDEO

CD
AVCHD
-
During playback, press [OPTION] to display the play menu.
-
Use [▲ / ▼] to select "Search", then press [OK].
-
Use [▲ / ▼] to select "Time", then press [OK].
e.g.) Blu-ray Disc™

- Use [▲ / ▼] or [the Number buttons] to enter the time count you want to jump to.
(og.) Entering 1 hour 45 minutes and 15 seconds.
Press
1
4
5
1
5
- Press [OK].
Playback will start from the desired time entered.
- Press [BACK] to exit.
8.11. Switching Subtitles
Some video materials may have subtitles in one or more languages. For commercially available discs, the supported languages can be found on the disc case.
Follow the steps below to switch the subtitle language during playback.

BD
VIDEO
- During playback, press [SUBTITLE].
- Use [▲/▼] to select "Primary", "Secondary" or "Style", then press [OK].
"Primary": Sets the subtitle for the primary video.
"Secondary": Sets the subtitle for the secondary video.
“Style” : Sets style of the subtitle.
- Use [ ▲ / ▼] to select your desired subtitle or style.
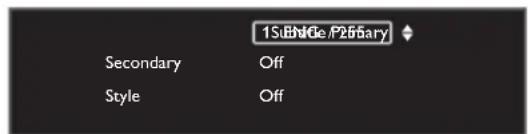
text_image
15 ENGe /P26547 Secondary Off Style Off- Use / [ ] setting and "Off".
to switch between current subtitle For "Secondary", use [◀/▶] to switch between current audio setting and "Off".
- Press [BACK] to exit.

DVD
AVCHD
- During playback, press [SUBTITLE].
- Use [ ▲ / ▼] to select your desired subtitle.

- Use / [ ] setting and "Off".
to switch between current subtitle
- Press [BACK] to exit.

ote
- Some discs will only allow you to change the subtitles from the disc menu or pop-up menu. Press [TOP MENU] or [DISC MENU / POP-UP MENU] to display the disc menu or pop-up menu.
- If the disc has no subtitle language or subtitle style, "Not Available" will be displayed on the TV screen.
- During playback of the secondary video, the primary subtitle setting is not available except when there is no subtitle for the secondary video.
- You can also change the subtitle setting from the play menu. Play menu can be called up by pressing [OPTION].
8.12. Switching Audio Soundtrack
When playing back video material recorded with two or more soundtracks (these are often in different audio languages or audio formats), you can switch them during playback. For Blu-ray Disc™, available audio varies depending on “Blu-ray Disc Audio” setting. Refer to page 36 for more information.

BD
VIDEO
- During playback, press [AUDIO].
- Use [ ▲ / ▼] to select "Primary" or "Secondary", then press [OK].
"Primary": Sets the audio for the primary video.
"Secondary": Sets the audio for the secondary video.
- Use [▲/▼] to select your desired audio stream channel.
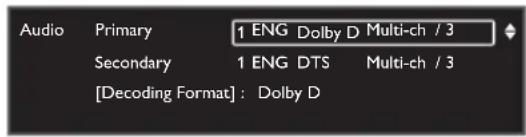
text_image
Audio Primary 1 ENG Dolby D Multi-ch / 3 Secondary 1 ENG DTS Multi-ch / 3 [Decoding Format] : Dolby D- Press [BACK] to exit.

DVD
VIDEO
- During playback, press [AUDIO].
- Use [▲/▼] to select your desired audio stream channel.

text_image
Audio 1 ENG Dolby D Multi-ch / 3 [Decoding Format] : Dolby D- For audio CD, you can select following options.
“Stereo” : Both right and left channels are active (stereo).
“L-ch” : Only left channel is active.
“R-ch” : Only right channel is active.
- Press [BACK] to exit.

lote
- The secondary audio will not be output when the secondary video is not displayed or when “Blu-ray Disc Audio” is set to “Primary Audio Only”. (For some Blu-ray™ discs, secondary audio will be output even when secondary video is off.)
- The sound mode cannot be changed during playback of discs not recorded in multiple audio mode.
-
Some discs allow changing the audio language setting on the disc menu. (Operation varies depending on the discs. Refer to the manual accompanying the disc.)
-
[AUDIO] may not work on some discs with multiple audio streams or channels (e.g. DVDs that allow changing audio setting on the disc menu).
- If the disc has no audio language, “Not Available” will be displayed on the TV screen.
- For DTS-CD (5.1 music disc), selecting audio streams or channels is not available.
- You can also change the audio setting from the play menu. Play menu can be called up by pressing [OPTION].
8.13. Switching Camera Angles

BD
VIDEO

DVD
VIDEO
Some BD-videos and DVD-videos contain scenes which have been shot simultaneously from various angles. You can change the camera angle when appears on the TV screen.
- During playback, press [ANGLE].
- The selected angle will be displayed on the display bar at the top of the TV screen.
- Use [ ▲ / ▼ ] to select your desired angle.
- Press [BACK] to exit.

Note
- If "Angle Icon" setting is set to "Off", will not appear on the TV screen. (refer to page 37)
- You can also change the angle setting from the play menu. Play menu can be called up by pressing [OPTION].
8.14. Black Level

BD
VIDEO

VD
VIDEO
AVCHD
You can adjust the black level setting to make the black parts of the pictures as bright as you prefer. You can select "On" or "Off".
- During playback, press [OPTION] to display the play menu.
- Use [▲ / ▼] to select "Black Level", then press [OK].
- Use [ ▲ / ▼] to select your desired setting.
e.g.) Blu-ray Disc™
Black Level On

"On": Makes the dark parts blacker with additional contrast and brightness.
"Off": Shows the original picture as recorded.
- Press [BACK] to exit.

Note
- The setting will remain the same even if the unit is switched to standby mode.
- “Black Level” is not effective under the following conditions.
- When the picture is output from HDMI OUT jack.
8.15. Noise Reduction

BD
VIDEO

VD
VIDEO
AVCHD
Reduces the noise of the playback picture.
- During playback, press [OPTION] to display the play menu.
- Use [ ▲ / ▼] to select "Noise Reduction", then press [OK].
- Use [ ▲ / ▼] to select your desired setting.
e.g.) Blu-ray Disc™
Noise Reduction Off

"On": Activates noise reduction.
"Off": Deactivates noise reduction.
- Press [BACK] to exit.

Note
- The setting will remain the same even if the unit is switched to standby mode.
8.16. Play from Portable Media Player
Simply connect your portable media player (e.g. MP3 player) to this unit to enjoy superior sound quality from your music collections.
- Connect your portable media player to the MP3 LINK jack on this unit.
-
Refer to “Connecting Portable Media Player” on page 18.
-
Turn on your portable media player.
-
Press [SOURCE] repeatedly to select "MP3 Link".
-
Start playing music on your portable media player.

Note
- Control playback is only possible on the portable media player.
- Stop playback on the portable media player before you switch to other source mode.
9. NETWORK SERVICES
9.1. Before Using Network Services
Please follow the instructions below before using network features.
- Connect this unit to the Internet.
- Refer to "Connection to the Network" on page 20.
- Set up the necessary network connection settings.
-
Refer to "Network Installation" on page 41.
-
Press [Net-TV].
-
Net TV screen will appear.
-
For the first time only, "Philips Terms of Use Internet Enabled Product" screen will appear. After confirming the content, press [OK].
-
Press [ ( h o m e ) ] to exit.

Guide to Net TV menu screen
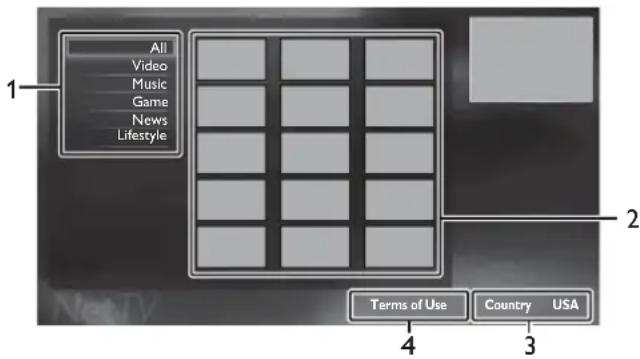
text_image
All Video Music Game News Lifestyle 1 2 4 3 Terms of Use Country USA-
Sorting items :
Categorizes genre of each services -
Network Service icons :
Displays service icons
- Country :
Selects what country you live
- Terms of Use :
Displays a clause of net service
9.2. Information on Network Services
For detailed information on 3rd party Internet services, please visit the service providers website:
| Netflix | : http://www.netflix.com/HowltWorks |
| Film Fresh | : http://www.filmfresh.roxionow.com/ |
| Blockbuster | : http://www.blockbuster.com |
| VUDU | : http://www.vudu.com/product_overview.html |
10. PANDORA OPERATIONS
With this unit, You can instantly listen to personalized radio stations streamed over the Internet from Pandora.
To learn more about Pandora, please visit www.pandora.com
10.1. Activating Pandora
In order to listen to Internet radio streamed from Pandora via the Internet, you must create a Pandora account and activate this unit.
- Follow steps 1 to 3 in "Before Using Network Services" on page 34.
- Use [ ▲/▼/◄/►] press [OK].
to select "PANDORA" - Use [▲/▼] to select "CREATE NEW ACCOUNT", then press [OK].
- Use [▲ / ▼] to select "No, I am new to Pandora.", then press [OK].
- Note the activation code and website address displayed on the TV screen.
- On your PC, visit the website address noted at step 5.
- Follow directions on the website to create your account.
- On this unit, select "CONTINUE" and press [OK] to complete activation.
10.2. Adding Pandora User Accounts
You can add multiple Pandora user accounts on this unit.
- Follow steps 1 to 3 in "Activating Pandora" on page 35.
- Use [▲ / ▼] to select "Yes, I have a Pandora account", then press [OK].
- Enter your e-mail address, then press [OK] while "OK" is selected.
- Enter a password, then press [OK] while "OK" is selected.
- Use [▲ / ▼] to select "SIGN IN", then press [OK].
- Your account is added to the user list and player screen appears on the TV screen.
Note
- Pandora is available only in the United States.
- You can add up to 5 accounts. After creating 5 accounts, “CREATE NEW ACCOUNT” is not displayed.
- If you forget your password, please enter your Pandora account's e-mail address and select "Password Recovery", then press [OK]. After a while, an e-mail of password reset will be sent to the e-mail address.
10.3. Creating a New Station
By entering your favorite artists or songs, Pandora selects music and creates a new station for you on the basis of the entered information.
- On the player screen, press [Blue] to display station list.
- Press [Yellow] to call up the "Tool Menu".
- Use [▲/▼] to select "Create a new station", then press [OK].
-
Enter a name of your favorite artist or song, then press [OK] while "OK" is selected.
-
Search result will appear on the right side of the TV screen.
- If the selection screen of result type appears, use
[▲/▼] to select the desired type, then press [OK].
- Use [▲/▼] to select the desired station, then press [OK] to start the playback.
| Button Action | |
| [1(pause)] | Pause the playback.Resume the playback, press[▶ (play)]. |
| [■ ( s t o p ] | Stop the playback and the station list will appear. |
| [◀next)] | Skips to the next song. |
Note
- On the "Tool Menu", you can delete or rename currently selected station.
10.4. Guide to the Player Screen
On the player screen, you can set various options to the currently playing song.
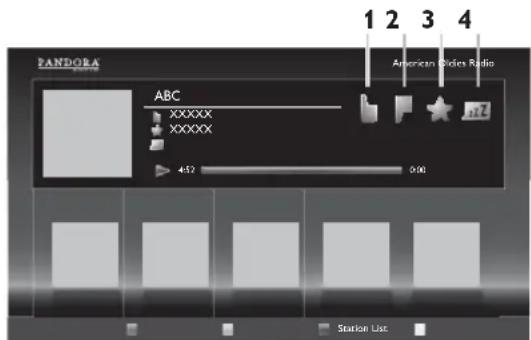
text_image
PANDORA ABC XXXXX XXXXX 4.52 0:00 American Bodies Ratio 1 2 3 4 Station List- : Give thumbs up to the currently playing song. Pandora will play songs similar to the song.
- : Give thumbs down to the currently playing song. Pandora will skip and will not play the song.
- : Bookmarks the currently playing song. You can view your bookmarked songs list by accessing Pandora website and log into your account.
- : Tells Pandora that you do not like the currently playing song. Pandora will not play the song for about a month.
11. LIST OF SETTINGS
In the setup menu, you can customize various kinds of settings as you prefer.
Refer to the following instructions to navigate through the setup menu.
- Press [ A( h o m e ) ] to access the home menu.
- Use [▲/▼/◄/►] to select "Setup", then press [OK].
- Use [/] to select the desired setting, then press [OK].
- Use [ ▲ / ▼] to move the highlight up and down in the list.
- To make a selection or to access options of an item, select the desired item, then press [OK].
- To go back to the previous screen, press [BACK]:
- Press [ ( h o m e ) ] to exit.
Refer to the following table for the types of settings you can customize.
The item highlighted in gray is the default setting.
| Category Menus / Options | ||
| Video Setup 3D Output | Auto (XX) | |
| 3D | ||
| 2D | ||
| TV Display 4:3 Normal | ||
| 4:3 Crop | ||
| 16:9 Widescreen | ||
| 16:9 Squeeze | ||
| HDMI Video | Auto | |
| 480p | ||
| 720p | ||
| 1080i | ||
| 1080p | ||
| 1080p/24 | ||
| HDMI Deep Color | Auto | |
| Off | ||
| De-interlacing Mode | Auto | |
| Video | ||
| Audio Setup Night Mode | Auto | |
| On | ||
| Off | ||
| Audio Output | Speakers | |
| HDMI Normal | ||
| HDMI LPCM | ||
| Blu-ray Disc Audio | Mix Audio Output | |
| Primary Audio Only | ||
| Speaker Setup Speaker Layout | ||
| Surround Effects | ||
| Speaker Distance | ||
| Speaker Volume | ||
| Network Setup Network Installation Start | ||
| Connection Test | ||
| EasyLink Setup EasyLink | On | |
| Off | ||
| One Touch Play | On | |
| Off | ||
| One Touch Standby | On | |
| Off | ||
| System Audio Control On | ||
| Off | ||
| Audio Input Mapping | ||
| Preference Setup Menu Language Auto (XXXX) | ||
| English | ||
| Español | ||
| Français | ||
| Original | ||
| Bulgarian Italian | ||
| Chinese Japanese | ||
| Czech Korean | ||
| Danish Norwegian | ||
| Dutch Polish | ||
| English Portuguese | ||
| Finnish Romanian | ||
| French Russian | ||
| German Slovak | ||
| Greek Spanish | ||
| Hungarian Swedish | ||
| Icelandic Turkish | ||
| Irish Other | ||
| Off | ||
| Bulgarian Italian | ||
| Chinese Japanese | ||
| Czech Korean | ||
| Danish Norwegian | ||
| Dutch Polish | ||
| English Portuguese | ||
| Finnish Romanian | ||
| French Russian | ||
| German Slovak | ||
| Greek Spanish | ||
| Hungarian Swedish | ||
| Icelandic Turkish | ||
| Irish Other | ||
| Disc Menu Bulgarian Italian | ||
| Chinese Japanese | ||
| Czech Korean | ||
| Danish Norwegian | ||
| Dutch Polish | ||
| English Portuguese | ||
| Finnish Romanian | ||
| French Russian | ||
| German Slovak | ||
| Greek Spanish | ||
| Hungarian Swedish | ||
| Icelandic Turkish | ||
| Irish Other | ||
| Parental Control | ||
| 8 [Adult] 4 [PG-13] | ||
| 7 [NC-17] | ||
| 6 [R] | ||
| 5 [PGR] 1 [Kid Safe] | ||
| Change Password | ||
| Screen Saver | ||
| On | ||
| Off | ||
| Angle Icon | ||
| Display Panel | ||
| Auto | ||
| Bright | ||
| Dimmer | ||
| Advanced Setup | Auto Power Off On | |
| Off | ||
| Software Update Disc | ||
| Network | ||
| SD Card | ||
| Automatically check for latest software | On | |
| Off | ||
| Quick Start Mode* On | ||
| Off | ||
| Version Info | ||
| Restore default settings Reset Settings | ||
* When “Quick Start Mode” is set to “On”, power consumption during standby mode will increase.
12. SETUPS
12.1. TV Display
( home ) → “Setup” → “Video Setup” → “TV Display”
Use this feature to adjust the aspect ratio of the video source which is different from your TV's ratio to fit your TV monitor without distorting the picture. Descriptions of each setting are as follows:
| Video source | Your TV | Option Description | |
| 16:9 | 4:3 | 4:3 Normal | To enjoy 16:9 picture on 4:3 monitor:16:9 picture is scaled down until both sides of the picture fits the 4:3 TV. |
4:3 Crop | To enjoy 16:9 picture on 4:3 monitor:Both sides of the picture are trimmed to fit the 4:3 TV without distorting the aspect ratio of the picture. | ||
| 16:9 | 16:9 Widescreen | To enjoy 16:9 picture on 16:9 monitor:Select this setting when you want to enjoy 16:9 picture on the 16:9 TV. | |
| 4:3 | 16:9 Squeeze | To enjoy 4:3 picture on 16:9 monitor:Use this setting to display 4:3 picture on the 16:9 TV without distorting the aspect ratio of the picture. | |
12.2. HDMI Video
( home ) → “Setup” → “Video Setup” → “HDMI Video”
Set the resolution of the video signal being output from the HDMI OUT jack.
You can select the desired "HDMI Video" among the settings listed below:
"Auto", "480p", "720p", "1080i", "1080p", "1080p/24"
Actual Output Resolution :
| Setting in the “HDMI Video” | Source | ||||
| 480i/60 | 720p/60 | 1080i/60 | 720p/24 | 1080p/24 | |
| 480p | 480p/60 | 480p/60 | 480p/60 | 480p/60 | 480p/60 |
| 720p | 720p/60 | 720p/60 | 720p/60 | 720p/60 | 720p/60 |
| 1080i | 1080i/60 | 1080i/60 | 1080i/60 | 1080i/60 | 1080i/60 |
| 1080p | 1080p/60 | 1080p/60 | 1080p/60 | 1080p/60 | 1080p/60 |
| 1080p/24 1080p/60 1080p/60 1080p/60 1080p/24 | |||||
| Auto | The highest resolution supported by your display device will be in effect automatically. | ||||
- Composite video output (VIDEO OUT) jack can only output 480i/60.
- For AVCHD, outputting the video in 24 frames per second (1080p/24) is not available.
Note
- The selected resolution must also be supported by your display device.
- Even if “HDMI Video” is set to “1080p/24”, for a Blu-ray Disc™ that is not recorded in 1080p/24 or for DVD, the video resolution supported by the disc and the display device will be output instead of 1080p/24.
• Refer also to your TV's manual.
- P r e▶s s i n g [ ( p l a y ) changes the setting back to its default.
- When connected to an HDCP incompatible display device, the picture will not be displayed properly.
- The audio signals from the HDMI OUT jack (including the sampling frequency, the number of channels and bit length) may be limited by the device that is connected.
-
Among the display device(s) that support HDMI, some do not support audio output (for example, projectors). While connected to a device such as a projector, audio will not be output from the HDMI OUT jack.
-
When this unit's HDMI OUT jack is connected to a DVI-D compatible display device(s) (HDCP compatible) with an HDMI-DVI converter cable, the signals are output in digital RGB.
- When the HDMI OUT jack is outputting the video in 1080p/24, picture will not be output from the VIDEO OUT jack.
- When playing back a Frame Sequential 3D Disc, video resolution of output picture will depend on contents on the disc. ("HDMI Video" setting is not applicable for Frame Sequential 3D Discs.)
Copyright protection system
To play back the digital video images of a BD-video or DVD-video via an HDMI connection, it is necessary that both the player and the display device (or an AV receiver / amplifier) support a copyright protection system called HDCP (high-bandwidth digital content protection system). HDCP is copy protection technology that comprises data encryption and authentication of the connected AV device. This unit supports HDCP. Please read the operating instructions of your display device (or an AV receiver / amplifier) for more information.
12.3. Network Installation
| ( home ) | → | “Setup” | → | “Network Setup” | → | “Network Installation” |
Set up network connection settings in order to use BD-Live™, Netflix / Film Fresh / Blockbuster / VUDU / Pandora or network update function.
■ Connection Test
After you enable a network connection or change the network settings, always perform the connection test to check if the connection is correctly made.
- Use [ ▲/▼/◄/►] to select "Setup" in the menu, then press [OK].
- Use [ ▲ / ▼] to select "Network Setup", then press [OK].
- Use [ ▲ / ▼] to select "Network Installation", then press [OK].
-
Use [▲ / ▼] to select "Connection Test", then press [OK].
-
Connection test will start automatically and the test result will appear right after the connection test finishes.
- "Connecting...": The test is in progress.
- "Pass": Connection test is successfully completed.
-
"Failed": Connection test failed. Check the connection settings.
-
Press [OK] to go back to the setup menu, or press
[♠( h o m e ) ] to exit.
Note
- If the connection test passes, you are ready to use BD-Live™, Netflix / Film Fresh / Blockbuster / VUDU / Pandora or network update function, using the Internet without making any additional settings.
- If the connection test fails, you may need to check your router settings and make sure the physical connection is secure. If you need the MAC address of this unit to complete your router settings, you can view it on the "View Network Settings" / "View Wireless Settings" screen (refer to page 44).
- When connecting this unit directly to a modem for the first time or connecting it to a modem which was previously connected to any other network device (e.g. a router, PC, etc.), you may have to power cycle the modem to reset the settings on the modem.
Wired
Select "Wired" if you made a wired connection and set the setting to "Auto Setup" or "Manual Setup", in accordance with your network environment.
Auto Setup
Select "Auto Setup" to set the network setting automatically.
- Follow steps 1 to 3 in "Connection Test" on page 41.
- Use [▲ / ▼] to select "Start", then press [OK].
- Use [▲/▼] to select "Wired", then press [OK].
- Use[▲/▼] to select "Auto Setup", then press [OK].
• The unit will start the connection test automatically and the test result will appear right after the connection test finishes. - Select "Finish" to activate the network settings and set the network connection automatically.
Manual Setup
In following cases, select "Manual Setup" to set each setting as necessary.
- When connection test failed with the setting of "Auto Setup".
-
When instructed by your Internet service provider to make specific settings in accordance with your network environment.
-
Follow steps 1 to 3 in "Auto Setup" on page 41.
-
Use [▲ / ▼] to select "Manual Setup", then press [OK].
-
Use [▲/▼] to select "IP Address", then press [OK].
-
"IP Address" setting screen will appear. Enter IP address with cursor buttons and number buttons.
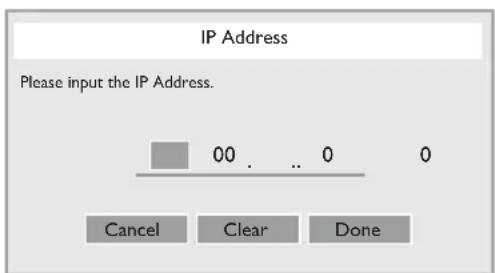
text_image
IP Address Please input the IP Address. 00 . .. 0 0 Cancel Clear Done- Enter the IP address after checking the specifications of your router.
-
If the IP address is unknown, check the IP address of other devices (e.g. PC connected via LAN cable) and assign a different number from those of other devices.
-
Use [ ▲/▼/◄/►] [OK].
to select "Done", then press
- Select "Subnet Mask", "Default Gateway", "Primary DNS" and "Secondary DNS" in turn, and enter each address number with cursor buttons and number buttons, then press [OK].
- Enter the DNS addresses provided by your Internet provider.
- If the DNS address is unknown, check the DNS address of other devices (e.g. PC connected via LAN cable) and assign the same DNS address.
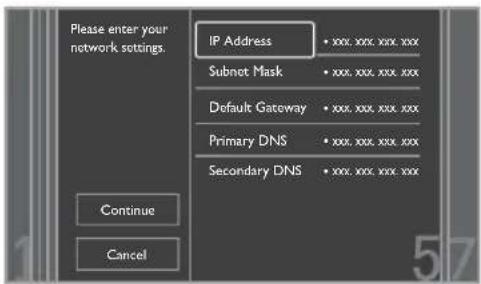
text_image
Please enter your network settings. IP Address • xxx, xxx, xxx, xxx Subnet Mask • xxx, xxx, xxx, xxx Default Gateway • xxx, xxx, xxx, xxx Primary DNS • xxx, xxx, xxx, xxx Secondary DNS • xxx, xxx, xxx, xxx Continue Cancel-
Use [ ▲/▼/◄/►] [OK].
-
Use [ ▲/▼/◄/►] [OK].
-
Use [ ▲ / ▼] to select "Yes" or "No" for proxy server, then press [OK].
- If you use proxy server, select "Yes" to go to the next step.
- If you do not use proxy server, select "No" to go to step 13.
- "Proxy Address" setting screen will appear. Enter proxy address with cursor buttons, number buttons and color key.
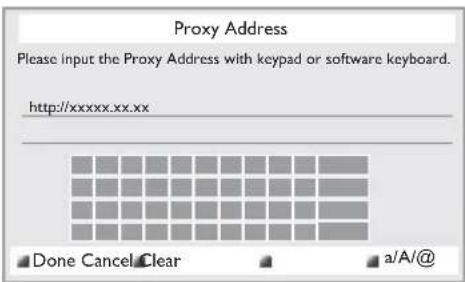
text_image
Proxy Address Please input the Proxy Address with keypad or software keyboard. http://xxxx.xx.xx Done Cancel Clear a/A/@[▲ /▼ /◄/►] : Move the highlight. [the Number buttons] : Enter numbers or letters. [OK] : Enter the highlighted number / letter. *[Red] : Set the entered number or letter. [Green] : Cancel the network setting. *[Blue] : Clear the entered number or letter. [Yellow] : Switch between abc, ABC and @!?. * These buttons can be used in other network settings.
- Press [Red] to go to the "Proxy Port" setting screen. Enter proxy port number with number buttons.
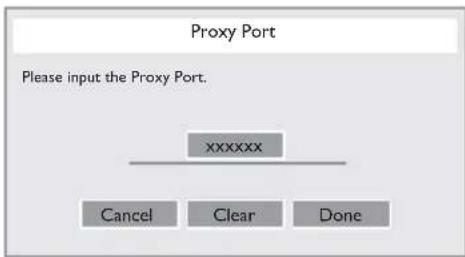
flowchart
graph TD
    A["xxxxxx"] --> B["Cancel"]
    A --> C["Clear"]
    A --> D["Done"]
-
Use [▲/▼/◄/►] to select "Done", then press [OK].
-
Connection speed setting screen will appear. Use [▲ / ▼] to select the desired setting, then press [OK]. (The default setting is "Auto".)
-
BD-Live™ setting screen will appear. Use [▲ / ▼] to select the desired setting, then press [OK]. (The default setting is "Allow".)
"Allow":
Internet access is permitted for all BD-Live™ contents.
"Limited Allow":
Internet access is permitted only for BD-Live™ contents which have content owner certificates. Internet access without the certificates is prohibited.
"Prohibit":
Internet access is prohibited for all BD-Live™ contents.
-
Connection test confirmation screen will appear. Select "Yes" to start the connection test and the test result will appear right after the connection test finishes.
-
Press [OK] to go back to the setup menu, or press [♠( h o m e ) ] to exit.
Note for "IP Address", "Subnet Mask", "Default Gateway", "Primary DNS" and "Secondary DNS"
• The range of input numbers is between 0 and 255.
- If you enter a number larger than 255, the number will automatically be reset to 255.
- When you enter a wrong number, select "Clear" to clear. (The number will be reset back to "0".)
- If you want to enter a 1 or 2-digit number in one cell, press [▶] to move on to the next cell.
Note for "Proxy Address" and "Proxy Port"
- The range of input numbers for the port number is between 0 and 65535. (If you enter a number larger than 65535, it will be regarded as 65535.)
- For proxy port, certain ports might be closed, blocked or unusable depending on your network environment.
- Choose a connection speed in accordance with your network environment.
- When the settings are changed, the network connection may be disabled depending on the device.
Wireless
If you connect this unit to the Wi-Fi network, select
"Wireless" and set up necessary settings.
Please make a note of your Wi-Fi network name (SSID) and its WEP / WPA key before proceeding with the setup.
Auto Scan
Search for Wi-Fi networks automatically and select the Wi-Fi network name (SSID) from the list.
-
Follow steps 1 to 2 in "Auto Setup" on page 41.
-
Use [▲ / ▼] to select "Wireless", then press [OK].
-
Use [▲ / ▼] to select "Auto Scan", then press [OK].
- This unit will start searching for Wi-Fi networks automatically.
- The result of Wi-Fi network searching will be displayed.
Use [▲/▼] to select the appropriate Wi-Fi network name (SSID), then press [OK].
- If you select an SSID without “” please go to step 6.
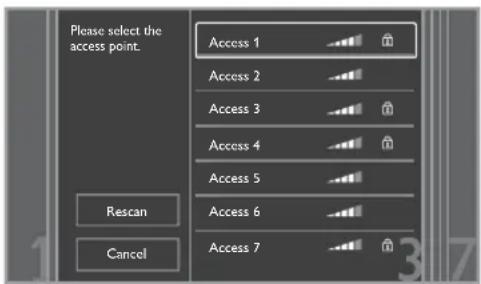
text_image
Please select the access point. Access 1 Access 2 Access 3 Access 4 Access 5 Access 6 Access 7 Rescan Cancel- "Access Point Setting (Auto Scan)" screen will appear. Enter the WEP / WPA key of the selected Wi-Fi network using cursor buttons, number buttons and color key, then press [Red].
- If you do not know the WEP / WPA key for your Wi-Fi network, ask your ISP or the person who set up your Wi-Fi network.
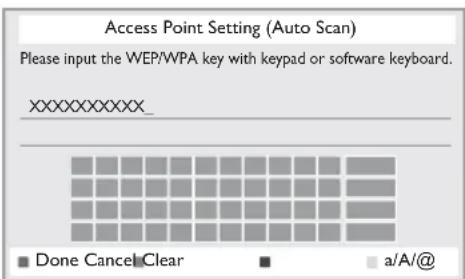
text_image
Access Point Setting (Auto Scan) Please input the WEP/WPA key with keypad or software keyboard. XXXXXXXXX_ Done Cancel Clear a/A/@- Use [/] to select “Continue”, then press [OK].
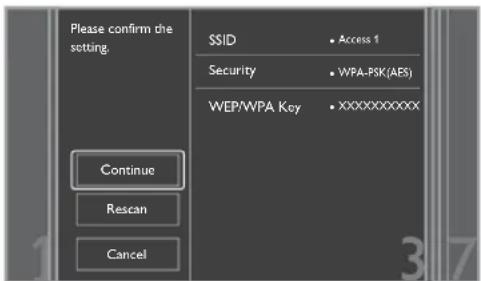
text_image
Please confirm the setting. SSID • Access 1 Security • WPA-PSK(ABS) WEP/WPA Key • xxxxxxxxxxxx Continue Rescan Cancel-
Use [▲/▼] to select "Auto Setup" or "Manual Setup", then press [OK].
-
If you select "Auto Setup", follow step 5 in "Auto Setup" on page 41.
- If you select "Manual Setup", follow steps 3 to 12 and 14 to 16 in "Manual Setup" on page 41.
Note
- The internal wireless LAN supports following specifications.
- Wi-Fi standards : IEEE 802.11 b/g/n
- Frequency spectrum :2.4 GHz
- Security protocol : WEP / WPA / WPA2
Manual Entry
Set up the connection to the Wi-Fi network manually by entering the Wi-Fi network name (SSID).
- Follow steps 1 to 2 in "Auto Scan" on page 43.
- Use [▲ / ▼] to select "Manual Entry", then press [OK].
- "Access Point Setting (Manual Entry)" screen will appear. Enter the SSID using cursor buttons, number buttons and color key, then press [Red].
- Security mode selection screen will appear. Select the security mode of the entered SSID, then press [OK].
- If you select "None", please go to step 6.
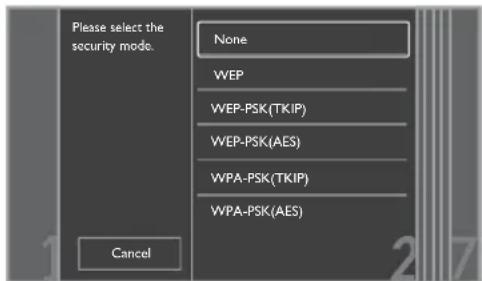
text_image
Please select the security mode. None WEP WEP-PSK(TKIP) WEP-PSK(AES) WPA-PSK(TKIP) WPA-PSK(AES) Cancel- "Access Point Setting (Manual Entry)" screen will appear.
Enter the WEP / WPA key of the Wi-Fi network using cursor buttons, number buttons and color key, then press [Red].
- If you do not know the WEP / WPA key for your Wi-Fi network, ask your ISP or the person who set up your Wi-Fi network.
-
Use [/] to select “Continue”, then press [OK].
-
Use [▲ / ▼] to select "Auto Setup" or "Manual Setup", then press [OK].
-
If you select "Auto Setup", follow step 5 in "Auto Setup" on page 41.
- If you select "Manual Setup", follow steps 3 to 12 and 14 to 16 in "Manual Setup" on page 41.
■ Easy Connect
You can set up the Wi-Fi connection quickly.
("Easy Connect" is available only when your router supports it. For details, please refer to the user manual of your Wi-Fi router.)
Push Button Method
Please confirm your Wi-Fi router has a PBC button.
-
Follow steps 1 to 2 in "Auto Scan" on page 43.
-
Use [ ▲ / ▼] to select "Easy Connect", then press [OK].
-
Use [▲/▼] to select "Push Button Method", then press [OK]. And push the PBC (Push Button Configuration) on your Wi-Fi router.
- The unit will start the connection test automatically and the test result will appear right after the connection test finishes.
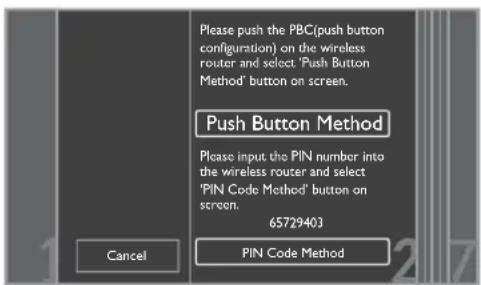
text_image
Please push the PBC(push button configuration) on the wireless router and select 'Push Button Method' button on screen. Push Button Method Please input the PIN number into the wireless router and select 'PIN Code Method' button on screen. 65729403 Cancel PIN Code Method- Select "Finish" to complete the settings.
PIN Code Method
-
Follow steps 1 to 2 in "Auto Scan" on page 43.
-
Use [ ▲ / ▼] to select "Easy Connect", then press [OK].
-
Set up your Wi-Fi router with PIN code shown on the TV screen.
- For details about setting method of your Wi-Fi router, please refer to the user manual of the router.
-
Use [▲/▼] to select "PIN Code Method", then press [OK].
-
The unit will start the connection test automatically and the test result will appear right after the connection test finishes.
-
Select "Finish" to complete the settings.
■ View Network Settings / View Wireless Settings
You can check the current status of network settings or Wi-Fi settings.
-
Follow steps 1 to 2 in "Connection Test" on page 41.
-
Use [ ▲ / ▼ ] to select "View Network Settings" or "View Wireless Settings", then press [OK].
- The current network settings or Wi-Fi settings will be displayed.
- Press [ ( h o m e ) ] to exit.
Netflix ESN
You can view the ESN number which is a serial number used by Netflix to identify a device. Netflix customer service might ask you for this number during troubleshooting.
-
Follow steps 1 to 2 in "Connection Test" on page 41.
-
Use [▲ / ▼] to select "Netflix ESN", then press [OK].
-
Press [ ( h o m e ) ] to exit.
12.4. EasyLink Setup
( home )
→
"Setup"
→
"EasyLink Setup"
This unit supports Philips EasyLink, which enables your TV (limited to Philips brand EasyLink TV) to act in conjunction with this unit, or vice versa. Compliant TV must be connected to the HDMI OUT jack.
When "EasyLink" setting is set to "On", functions listed below will be available.
One Touch Play
When the operations with following buttons of the remote control of this unit are performed, the TV will automatically be turned on and switched to the appropriate input channel. ("One Touch Play" can be turned off by setting it to "Off".)
Buttons for one touch play:
- [▶ (play)], [◀ (previous)], [▶ (next)], [the Number buttons], [▲ (home)], [Net-TV], or [SOURCE]
- [TOP MENU], or [DISC MENU / POP-UP MENU] (when a disc is inserted in the unit)
One Touch Standby
When you press and hold [(standby/on)] for 2 seconds, it turns off the power of the TV first and then turns off the power on this unit. When the connected EasyLink compatible display device is turned off first, it then turn off the power on this unit. ("One Touch Standby" can be turned off by setting it to "Off".)
System Information
Get & Set Menu Language
The unit recognizes the OSD language set of the TV and automatically sets the same language as the player menu language (OSD menu language) for this unit. Refer to "Menu Language" on page 37 for available languages.
- This feature is available only when "Auto (XXXX)" is selected in the "Menu Language" in the setup menu.
System Audio Control
When you set your TV to output the audio from the 5.1ch speakers through this unit, you can control the volume level or mute the audio using TV's remote control. (For more details, refer to the owner's manual of your TV.)
Note
- For external input mode, "One Touch Play" is not available.
• Volume level will be displayed on the display panel. - If you change the speaker setting of your TV to output the audio from TV's speaker, 5.1ch speakers will be muted. (To restore the volume, use the remote control of this unit.)
- When you switch this unit into standby mode, TV's speaker will be activated automatically.
- Depending on the connected TV, two device names ("PHILIPS BD-HTS" and "Audio System") may be displayed in the device list of TV's menu screen. To select this unit, please select "PHILIPS BD-HTS".
Use to map a connected HDMI device to the correct audio input for automatic audio source switching.
This unit is compatible with HDMI-ARC devices.
Audio Input Mapping is available only when "System Audio Control" is set to "On".
- Use [ ▲/▼/◄/►] menu, then press [OK].
to select "Setup" in the
-
Use [▲ / ▼] to select "EasyLink Setup", then press [OK].
-
Use [▲/▼] to select "Audio Input Mapping", then press [OK].
-
Read the information on the TV screen and make sure that all devices are connected properly.
Use [▲ / ▼] to select "Continue", then press [OK].
- Unit starts scanning for compatible devices connected to its HDMI ports.
- Compatible devices found will be listed on the TV screen.
- Use [▲ / ▼] to select "Continue", then press [OK].
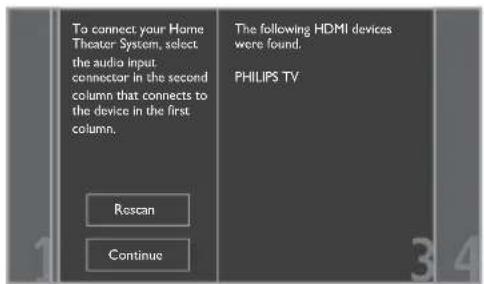
text_image
To connect your Home Theater System, select the audio input connector in the second column that connects to the device in the first column. The following HDMI devices were found. PHILIPS TV Rescan Continue-
Use [▲ / ▼] to select a desired device, then press [OK].
-
Use [▲/▼] to select the correct audio input for the selected device.
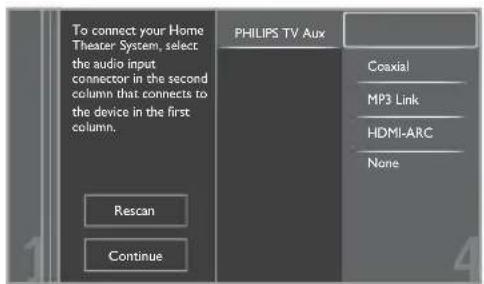
text_image
To connect your Home Theater System, select the audio input connector in the second column that connects to the device in the first column. PHILIPS TV Aux Coaxial MP3 Link HDMI-ARC None Rescan Continue- Press [ ( h o m e ) ] to exit.
Note
- "HDMI-ARC" is available only when connected device supports ARC on the HDMI input.
12.6. Parental Control

flowchart
graph LR
    A["↑ (home)"] --> B["Setup"]
    B --> C["Preference Setup"]
    C --> D["Parental Control"]
Some BD-videos or DVD-videos feature parental lock levels. Playback will stop if the ratings exceed the levels you get, it will require you to enter a password before the disc home will play back. This feature prevents your children from viewing inappropriate material.
- Use [ ▲/▼/◄/►] to select "Setup" in the home menu, then press [OK].
- Use [▲/▼] to select "Preference Setup", then press [OK].
- Use [▲/▼] to select "Parental Control", then press [OK].
For the first time only:
Use [the Number buttons] to enter any 4-digit number (except for 4737). That number will be used as the password. Record your password, in case you forget it.
- If you forget the password, enter [4], [7], [3], [7]. The password will be cleared and rating level will be set to "Off".
- While you input the password, select "Clear" to clear the number, then re-enter the password.
Once a password is set:
Use [the Number buttons] to enter your 4-digit password.
- Use [ ▲ / ▼] to select your desired parental lock level; then press [OK].
- Press [ ( h o m e ) ] to exit.
| RATING EXPLANATIONS | |
| Off | • Parental Control is inactive; all discs can play back. |
| 8 [Adult] | • DVD software of any grades (adult / general / children) can be played back. |
| 7 [NC-17] | • No one under 1 7 |
| 6 [R] | • Restricted; under 17. |
| 5 [PGR] | • Parental Guidance Recommended. |
| 4 [PG-13] | • Unsuitable for children under 13. |
| 3 [PG] | • Parental Guidance suggested. |
| 2 [G] | • General Audience. |
| 1 [Kid Safe] | • Suitable for children. |
To cancel parental lock temporarily:
Some discs allow you to cancel parental lock temporarily. With these discs, the message below will appear when you try to play them back.
"Enter current password."
Follow the instruction which appears on the TV screen to cancel parental lock. After entering the password, "Parental Control" appears. Select desired parental lock level, then press [OK].
■ Change Password
- Follow steps 1 to 2 in "Parental Control" on page 45.
- Use [▲/▼] to select "Change Password", then press. The version of Netflix will also be updated if newer version of Netflix is available when updating the software. [OK].
- Use [the Number buttons] to enter your 4-digit software.
- Use [the Number buttons] to enter your 4-digit password.
- Use [the Number buttons] to enter a new 4-digit password.
- Use [the Number buttons] to retype the same new 4-digit password.
- Use [ ▲/▼/◄/►] to select "Confirm", then press [OK].
- Press [ ⚠( h o m e ) ] to exit.
• The version of Netflix will also be updated if newer version of Netflix is available when updating the software.
12.7. Software Update
| ( home ) | → | “Setup” | → | “Advanced Setup” | → | “Software Update” |
Philips continuously tries to improve its products and we strongly recommend that you update the software when updates are available. New software can be downloaded from our website at www.philips.com/support using the model number of your Home Theater System (e.g. HTS3506) to find information.
■ Disc / SD Card Update
You can update the software by using a disc or SD card.
- Use [ ▲/▼/◄/►] to select "Setup" in the home menu, then press [OK].
- Use [▲/▼] to select "Advanced Setup", then press [OK].
- Use [▲/▼] to select "Software Update", then press [OK].
- Use [ ▲ / ▼] to select "Disc" or "SD Card", then press [OK].
- Use [◀/▶] to select "Yes", then press [OK].
- Insert the disc or SD card for software update.
- After loading the disc or SD card, confirmation message will appear. Select "Yes" and press [OK] to start updating.
- It may take a while to complete the update.
- After the update finishes, this unit will restart. Remove the disc or SD card from the unit.
Caution
- Please do not disconnect the AC power cord or SD card while executing the "Disc" or "SD Card" update.
Note
- Please visit www.philips.com/si the latest software version. Please read the software update Read-me file carefully before performing an update using a disc or SD card.
- All settings will remain the same even if you update the software version.
■ Network Update
You can update the software by connecting the unit to the Internet.
-
Follow steps 1 to 3 in "Disc / SD Card Update" on page 46.
-
Use [▲/▼] to select "Network", then press [OK].
-
Use [◀/▶] to select "Yes", then press [OK].
- This unit will then start checking for the latest software version.
- Confirmation message will appear. Select "Yes", then press [OK].
- The unit will start downloading the latest software version.
- When the download completes, confirmation message will appear. Press [OK].
- The unit will start updating the software version.
- It may take a while to complete the update.
- After updating finishes, this unit will restart automatically.
Caution
- Please do not unplug the AC power cord or LAN cable while executing the "Network" update.
Note
- In order to update the software via the Internet, you must connect the unit to the Internet and set up necessary settings.
- For the network connection, refer to “Connection to the Network” on page 20.
- For the network setup, refer to “Network Installation” on page 41.
- All settings will remain the same even if you update the software version.
- The version of Netflix will also be updated if newer version of Netflix is available when updating the software.
| (home) → | “Setup” | → | “Advanced Setup” | → | “Restore default settings” |
Menus to reset player settings, format SD card, local storage and clear network settings.
-
Use [ ▲/▼/◄/►] to select "Setup" in the home menu, then press [OK].
-
Use [▲/▼] to select "Advanced Setup", then press [OK].
-
Use [▲/▼] to select "Restore default settings", then press [OK].
-
Use [ ▲ / ▼] to select the desired setting, then press [OK].
"Reset Settings":
All the settings except for the "Parental Control" and "Network Installation" setting will be reset to default.
"Format SD Card" (Available only when an SD card is inserted):
Initialize the SD card.
“(Unit) Erase Saved BD-ROM Data”:
Clears the data saved for the BD-ROM contents, such as BD-ROM game scores, on this player.
“(SD Card) Erase Saved BD-ROM Data” (Available only when an SD card is inserted):
Clears the supplemental data for the BD-ROM playback, such as subtitle data, from the SD card.
"Reset Network Settings":
Reset the network setting to the default.
- Use [◀/▶] to select "Yes", then press [OK].
- Confirmation message will appear. Press [OK] to complete the setting.
- Press [ ( h o m e ) ] to exit.
Caution
- Do not remove the SD card while executing the "Format SD Card" or "(SD Card) Erase Saved BD-ROM Data". It will damage the card.
Note
- “Format SD Card” and “(SD Card) Erase Saved BD-ROM Data” are not available when a Blu-ray Disc™ is in the unit.
13. SOUND SETTINGS
13.1. Volume Control
You can control the volume level of the audio output from 5.1ch speakers.
To increase or decrease the volume level:
Press [VOL +].
- The volume level will increase or decrease, every time you press [VOL +] or [VOL -].
- The volume level will be displayed on the display panel and the TV screen.
To turn off the volume temporarily:
Press [mute].
- To restore the volume, press [ ✕ m u t e ) press [VOL +/- ].
- “MUTE” will be displayed on the display panel and will be displayed on the TV screen.
Note
- This function is only available for the audio output from 5.1ch speakers.
- Pressing [VOL 1+] does not work while the setup menu is displayed.
- If you turn up the volume too much, the audio may get distorted. To enjoy clear sounds, please turn down the volume.
13.2. Selecting Surround Mode
Select the surround mode for the audio output from 5.1ch speakers.
- During playback, press [SURROUND], then use
[▲/▼] to select the desired surround mode.
"Direct":
Selects the appropriate audio decoder (stereo / multi-channel Dolby, DTS ^® or PCM) based on the input audio stream.
"2.1ch Stereo":
Set the surround mode to "2.1ch Stereo".
(2.1ch Stereo sound from front left/right speakers.)
"Multi ch Stereo":
Set the surround mode to "Multi ch Stereo". (5.1ch stereo sound from 5.1ch speakers.)
"Dolby Pro Logic II Movie":
Set the surround mode to "Dolby Pro Logic II Movie". (Dolby Pro Logic II 5.1ch surround sound.)
"Dolby Pro Logic II Music":
Set the surround mode to “Dolby Pro Logic II Music”. (Dolby Pro Logic II 5.1ch surround sound.)
Note
- During playing back of network service, press [SURROUND] repeatedly to select the desired surround mode. (The setting does not appear on the TV screen.)
- The availability of surround sound modes will depend on the audio source.
- In disc or SD card mode, pressing [SURROUND] does not work while in the Resume-On-Stop mode.
- Pressing [SURROUND] does not w playback of JPEG files.
- This function is effective only for the audio output from 5.1ch speakers.
- The volume will be restored If you press [SURROUND] when the audio is muted.
- For multi-channel audio, "Multi ch Stereo", "Dolby Pro Logic II Movie" or "Dolby Pro Logic II Music" cannot be set.
- You can also change the surround setting by pressing again or [OPTION].
13.3. Selecting Sound Effect Mode
Select the sound effect mode for the audio output from 5.1ch speakers to suit your video or music.
- During playback, press [SOUND MODE], then use [/] to select the desired sound effect mode.
| Video | Music | Description |
| Off | Off | Turns off the sound effect mode. |
| Action | Rock | Enhanced low and high-range. Ideal for action movies and rock or pop music. |
| Drama | Jazz | Clear mid and high-range. Ideal for drama movies and jazz music. |
| Concert | Classic | Neutral sound. Ideal for live concerts and classical music. |
| Sports | Sports | Moderate mid-range and surround effects for clear vocals and the atmosphere of a live sport venue. |
Note
- During playing back of network service, press [SOUND MODE] repeatedly to select the desired sound effect mode. (The setting does not appear on the TV screen.)
- In disc or SD card mode, pressing [SOUND MODE] does not work while in the Resume-On-Stop mode.
- Pressing [SOUND MODE] does not work during playback of JPEG files.
- This function is effective only for the audio output from 5.1ch speakers.
- The volume will be restored if you press [SOUND MODE] when the audio is muted.
- You can also change the sound effect mode by pressing [OPTION].
14. OTHER SETTINGS
14.1. Switching Active Source Mode
You can change the active source mode to the desired external audio inputs and enjoy audio from the connected device with the multi-channel surround sound capabilities.
Press [SOURCE] repeatedly to select the desired source mode.
"Aux":
Set the active source mode to the AUDIO IN (AUX).
"Coaxial":
Set the active source mode to the DIGITAL AUDIO IN (COAXIAL).
"MP3 Link":
Set the active source mode to the MP3 LINK.
"HDMI-ARC":
Set the active source mode to the HDMI-ARC.
14.2. Sleep Timer
The sleep timer enables the unit to switch to the standby mode automatically after the selected preset time.
To set the sleep timer:
Press [SLEEP] repeatedly to select the desired preset time.
"SLP Off":
Turns off the sleep timer.
"SLP 15min.":
Set the preset turn-off time to 15 minutes.
"SLP 30min.":
Set the preset turn-off time to 30 minutes.
"SLP 60min.":
Set the preset turn-off time to 60 minutes.
"SLP 90min.":
Set the preset turn-off time to 90 minutes.
"SLP 120min.":
Set the preset turn-off time to 120 minutes.
"SLP 150min.":
Set the preset turn-off time to 150 minutes.
To check or change the setting:
Press [SLEEP] once to display the remaining time.
To change the setting, press [SLEEP] repeatedly until your desired preset time is displayed.
To cancel sleep timer:
Press [SLEEP] repeatedly until "SLP Off" is displayed.
Note
- The sleep timer will be activated even if the unit is in operation.
- Pressing [SLEEP] does not work when menu is displayed.
15. TROUBLESHOOTING
| Problem Tip | ||
| No reaction to the remote control. Connect the product to the power outlet. | ||
| Set the TV to the correct external input. | ||
| in the upper right hand corner of the TV screen. | The operation is not possible. | |
| Buttons do not work or the unit stops responding. | To completely reset the unit, press and hold [ (standby/on)] on the front panel for 10 seconds to shut down the unit or unplug the AC cord from the AC outlet for 15-20 seconds. | |
| Cannot find a JPEG file. | Make sure that the selected group (folder) does not contain more than 9,999 files for Blu-ray DiscTM / DVD / SD card, and 999 files for CD.Make sure that the file extension is .jpg, .JPG, .jpeg or .JPEG. | |
| Cannot find an MP3 and Windows MediaTM Audio file. | Make sure that the selected folder does not contain more than 9,999 files for Blu-ray DiscTM / DVD / SD card, and 999 files for CD.Make sure that the file extension is .mp3 or .MP3 for MP3, and .wma or .WMA for Windows MediaTM Audio. | |
| Cannot play back AVCHD file. | This unit cannot play back standalone AVCHD files (*.m2ts, *.mts or *.m2t) written to a DVD or copied to an SD card. The DVD or SD card containing AVCHD files must have a proper file and folder structure meeting AVCHD format specifications. Please use AVCHD compliant device / software to burn or copy AVCHD files to DVD or SD card. (Please refer to user manuals of the device / software for more information.) | |
| Error message appears when I select “Auto” in the “Menu Language”. | Make sure that the unit is connected to the Philips brand EasyLink TV and the “EasyLink” is set to “On”. | |
| This error message may appear when your TV's OSD language is not supported by this unit. | ||
| Cannot connect to the network. Check if the network connection is properly made. | Turn on the modem or router. | |
| Check the network settings. | ||
| Check if the router and/or modem is correctly connected. | ||
| Check the BD-LiveTM setting in “Manual Setup” on page 41.When connecting directly to a modem via a LAN cable, you might need to power cycle the modem to reset settings on the modem. | ||
| Cannot use the Wi-Fi connection. | Once you have activated the Wi-Fi connection please wait for 30 seconds for the connection to be established after turning on the unit, before trying to access network features such as BD-LiveTM ,Netflix, Film Fresh, Blockbuster, VUDU or Pandora. | |
| Cannot connect to the network while my PC is connected to the network. | Check the content of your Internet service contract to see if your Internet Service Provider prevents multiple terminals connecting at the same time. | |
| The capacity of the SD card decreased. | Data may be written to the SD card when a BD-video that supports the virtual package is used and an SD card is in the slot. | |
| MPEG-2 video and audio on the SD card cannot be played back. | MPEG-2 is noncompliant on this unit. | |
| The contents of the card cannot be read. | The card is not compatible or the contents on the card may be damaged. | |
| Turn off and then turn the unit on again. | ||
| Cannot use the BD-LiveTM function or download of data does not perform properly. | Insert an SD card with enough capacity (1GB or more). | |
| Check if an SD card is correctly inserted. | ||
| Make sure the write-protect switch on the SD card is not enabled. | ||
| Cannot play back BD-video (BD-ROM Profile 2.0). | Insert an SD card (1GB or more) which is formatted on this unit. Some discs with BD-LiveTM function require memory when playing back the content.Do not remove the card during playback.Make sure the write-protect switch on the SD card is not enabled. | |
15.1. Downloading an Electronic Copy
To obtain an electronic copy of this manual :
- Point your browser to www.philips.com/support
- Choose your country of location.
- Enter the model number or a keyword in the "Find your product" field. Alternatively, you can browse the catalog.
- Click the description or model.
- Under Product support, click "User manuals".
15.2. Contact Us
- If you cannot resolve your problem, refer to the FAQ for this Home Theater System at www.philips.com/support. If the problem remains unresolved, contact the Customer Support Center in your country.
Note
- Do not attempt to repair the Home Theater System yourself. This may cause severe injury, irreparable damage to your Home Theater System or void your warranty.
- Please have your Home Theater System model and serial number available before contacting us. These numbers are available on the cabinet, as well as on the packaging.
16. GLOSSARY
Analog Audio
An electrical signal that directly represents sound. Compare this to digital audio which can be an electrical signal, but is an indirect representation of sound. See also "Digital Audio".
Aspect Ratio
The width of a TV screen relative to its height. Conventional TVs are 4:3 (in other words, the TV screen is almost square); widescreen models are 16:9 (the TV screen is almost twice as wide as its height).
AVCHD
AVCHD is a new format for high definition video camcorders which can record and play high-resolution HD images.
BD-Live™
BD-Live ^™ is a BD-video (BD-ROM version 2 Profile 2.0) which contains new functions (e.g. Internet connection), in addition to the BONUSVIEW ^™ function.
Blockbuster
Blockbuster is online service which you can rent or purchase movies and TV episodes streamed over the Internet. Blockbuster is available only in the United States.
Blu-ray Disc™
Blu-ray Disc ^™ is a next generation optical video disc which is capable of storing much more data than a conventional DVD. The large capacity makes it possible to benefit from the features such as high-definition videos, multi-channel surround sounds, interactive menus and so on.
Chapter
Just as a book is split up into several chapters, a title on a BD-video or DVD-video is usually divided into chapters. See also "Title".
Digital Audio
An indirect representation of sound by numbers. During recording, the sound is measured at discrete intervals (44,100 times a second for CD audio) by an analog-to-digital converter, generating a stream of numbers. On playback, a digital-to-analog converter generates an analog signal based on these numbers. See also “Sampling Frequency” and “Analog Audio”.
DNS Server
A server which translates Internet domain names into IP addresses.
Dolby Digital
The system to compress digital sound developed by Dolby Laboratories. It offers you sound of stereo (2ch) or multi-channel audio.
Dolby Digital Plus
Dolby Digital Plus is the next generation digital audio compression technology developed as an extension to Dolby Digital. Blu-ray Disc™ supports 7.1 multi-channel surround sound output.
Dolby Pro Logic II
Dolby Pro Logic II technology processes any high quality stereo (two-channel) movie and music audio into five playback channels of full-bandwidth surround sound. A matrix surround decoding technology, Dolby Pro Logic II detects the directional cues that occur naturally in stereo content and uses these elements to create a five-channel surround sound playback experience.
Dolby TrueHD
Dolby TrueHD is a lossless coding technology developed for next generation optical discs. Blu-ray Disc™ supports 7.1 multi-channel surround sound output.
DTS® (Digital Theater System)
DTS ^® is a multi channel surround sound system. You can enjoy movie dynamic and realistic sound like movie theater. DTS surround sound technologies were developed by DTS, Inc.
DTS-HD®
DTS-HD ^® is a lossless coding technology developed as an extension of the original DTS Coherent Acoustics format. Blu-ray Disc ^™ supports 7.1 multi-channel surround sound output.
Film Fresh
Film Fresh is online service which you can rent or purchase movies and TV episodes streamed over the Internet. Film Fresh is available only in the United States.
Gateway
IP address of the electronic devices (such as router) which provide Internet access.
HDMI (High-Definition Multimedia Interface)
A digital interface between audio and video source. It can transmit component video, audio, and control signal with one cable connection.
Hub
A device used for connecting multiple device to the network.
IP Address
A set of numbers which are assigned to devices participating in a computer network.
JPEG (Joint Photographic Experts Group)
JPEG is a method of compressing still picture files. You can copy JPEG files on BD-RE/-R, DVD-RW/-R, CD-RW/-R or SD card from a computer and play back the files on this unit.
LAN (Local Area Network)
A group of computer networks covering a small area like a company, school or home.
Local Storage
A storage area of sub contents for playing virtual packages on BD-video.
MP3 (MPEG audio layer 3)
MP3 is a method of compressing files. You can copy MP3 files on BD-RE/-R, DVD-RW/-R, CD-RW/-R or SD card from the computer and play back the files on this unit.
Netflix
Netflix is online movie rental service, offering online steaming to customers in the United States.
Pandora
Pandora is the personalized Internet radio service. You can instantly listen to personalized radio stations streamed over the Internet from Pandora. Pandora is available only in the United States.
PCM (Pulse Code Modulation)
The most common system of encoding digital audio, found on CD and DAT. Excellent quality, but requires a lot of data compared to formats such as Dolby Digital and MPEG audio. For compatibility with digital audio recorders (CD, MD and DAT) and AV amplifiers with digital inputs, this unit can convert Dolby Digital, DTS, and MPEG audio to PCM. See also “Digital Audio”.
Proxy Server
Proxy server is a server which acts as an intermediary between a workstation user and the Internet to ensure security.
Region Code
Regions associate discs and players with particular areas of the world. This unit will only play back discs that have compatible region codes. You can find the region code of your unit by looking on the rear panel. Some discs are compatible with more than one region (or all regions).
Router
A networking device which distinguishes the IP address assigned to each device and routing and forwarding information in the computer network.
Sampling Frequency
The rate which sound is measured by a specified interval to turn into digital audio data. The numbers of sampling in one second defines as sampling frequency. The higher the rate, the better the sound quality.
Subnet Mask
A mask which is used to determine what subnet an IP address belongs to.
Title
A collection of chapters on BD-video or DVD-video. See also “Chapter”.
Track
Audio CD uses tracks to divide up the content of a disc. The BD-video or DVD-video equivalent is called a chapter. See also “Chapter”.
Virtual Package
The function which copies data to other media (local storage) from the Internet and plays secondary video, secondary audio and subtitles at the same time. The method of the playback varies depending on discs.
VUDU
VUDU is a leading HD on-demand video service which utilizes the Internet connection to deliver the highest quality on-demand video and Internet applications.
Windows Media™ Audio
Windows Media™ Audio is the audio compressing technology developed by Microsoft. You can copy Windows Media™ Audio files on BD-RW/-R, DVD-RW/-R, CD-RW/-R or SD card from a computer and play them back on this unit.
x.v.Color
“x.v.Color” is a promotion name given to the products that have the capability to realize a wide color space based on the xvYCC specifications and is a trademark of Sony Corporation.
17. LANGUAGE CODE LIST
| Language | Code | Language | Code | Language | Code | Language | Code |
| A-B | French [FRE] 5264 Macedonian 5957 Siswat 6565 | ||||||
| Abkhazian 4748 Frisian 5271 Malagasy 5953 Slovak [SLO] 6557 | |||||||
| Afar 4747 Galician 5358 Malay 5965 Slovenian 6558 | |||||||
| Afrikaans | 4752 | Georgian | 5747 | Malayalam | 5958 | Somali | 6561 |
| Albanian | 6563 | German [GER] | 5051 | Maltese | 5966 | Spanish [SPA] | 5165 |
| Amharic | 4759 | Greek [GRE] | 5158 | Maori | 5955 | Sundanese | 6567 |
| Arabic | 4764 | Greenlandic | 5758 | Marathi | 5964 | Swahili | 6569 |
| Armenian | 5471 | Guarani | 5360 | Moldavian | 5961 | Swedish [SWE] | 6568 |
| Assamese | 4765 Gujarati | 5367 Mongolian 5960 | T | ||||
| Aymara | 4771 | Hausa | 5447 | Nauru | 6047 | Tagalog | 6658 |
| Azerbaijani | 4772 | Hebrew | 5569 | Nepali | 6051 | Tajik | 6653 |
| Bashkir | 4847 | Hindi | 5455 | Norwegian [NOR] | 6061 | Tamil | 6647 |
| Basque | 5167 Hungarian [HUN] | 5467 | O-R | Tatar | 6666 | ||
| Bengali;Bangla | 4860 | I-K | Occitan 6149 Telugu | 6651 | |||
| Bhutani | 5072 Icelandic [ICE] | 5565 Oriya | 6164 Thai 6654 | ||||
| Bihari | 4854 | Indonesian | 5560 | Oromo (Afan) | 6159 | Tibetan | 4861 |
| Bislama | 4855 | Interlingua | 5547 | Panjabi | 6247 | Tigrinya | 6655 |
| Breton | 4864 | Interlingue | 5551 | Pashto;Pushto | 6265 | Tonga | 6661 |
| Bulgarian [BUL] | 4853 | Inupiak | 5557 | Persian | 5247 | Tsonga | 6665 |
| Burmese | 5971 | Irish [GLE] | 5347 | Polish [POL] | 6258 | Turkish [TUR] | 6664 |
| Byelorussian | 4851 | Italian [ITA] | 5566 | Portuguese [POR] | 6266 | Turkmen | 6657 |
| C-E | Japanese [JPN] | 5647 | Quechua | 6367 | Twi | 6669 | |
| Cambodian | 5759 | Javanese | 5669 | Rhaeto-Romance | 6459 | U-Z | |
| Catalan | 4947 | Kannada | 5760 | Romanian [RUM] | 6461 | Ukrainian | 6757 |
| Chinese [CHI] | 7254 | Kashmiri | 5765 | Russian [RUS] | 6467 | Urdu | 6764 |
| Corsican | 4961 | Kazakh | 5757 | S | Uzbek 6772 | ||
| Croatian | 5464 | Kinyarwanda | 6469 | Samoan | 6559 | Vietnamese | 6855 |
| Czech [CZE] | 4965 | Kirghiz | 5771 | Sangho | 6553 | Volapuk | 6861 |
| Danish [DAN] | 5047 Kirundi | 6460 Sanskrit 6547 Welsh 4971 | |||||
| Dutch [DUT] | 6058 | Korean [KOR] | 5761 | Scots Gaelic | 5350 | Wolof | 6961 |
| English [ENG] | 5160 | Kurdish | 5767 | Serbian | 6564 | Xhosa | 7054 |
| Esperanto | 5161 | L-N | Serbo-Croatian | 6554 | Yiddish | 5655 | |
| Estonian | 5166 | Laothian | 5861 | Sesotho | 6566 | Yoruba | 7161 |
| F-H | Latin | 5847 | Setswana | 6660 | Zulu | 7267 | |
| Faroese | 5261 | Latvian; Lettish | 5868 | Shona | 6560 | ||
| Fiji | 5256 | Lingala | 5860 | Sindhi | 6550 | ||
| Finnish [FIN] | 5255 | Lithuanian | 5866 | Singhalese | 6555 | ||
Note
- If you choose a language that has a 3-letter-language code (written in bracket), the code will be displayed every time you change the subtitle language setting on page 32 or audio language setting on page 32. If you choose any other languages, “---” will be displayed instead.
18. SPECIFICATIONS
| General | |
| Signal system NTSC Color | |
| Power requirements 120 V AC, 60 Hz | |
| Power consumption 70 W (standby: 0.6 W) | |
| Total output power (Amplifier) Home theater mode: 1000 WFTC* output power: 700 W*(Main Ch @ 1 kHz within 10 % THD, Sub Ch 60 Hz within 2.5 % THD) | |
| Dimensions (width x height x depth) | 17.2 x 2.4 x 11.1 inches (435 x 59 x 280.2 mm) |
| Weight Total weight: 27.56 lbs. (12.5 kg) | Main unit: 7.72 lbs. (3.5 kg) |
| Operating temperature 41°F (5°C) to 104°F (40°C) | |
| Operating humidity Less than 80 % (no condensation) | |
| Terminals | |
| SD card slotslot x 1 | |
| MP3 LINK jackmini jack x 1 500 mVp-p (75Ω) | |
| Analog audio output(SPEAKERS (4Ω)) | |
| Front and rear speakers System: Full range satellite | |
| Impedance: 4ΩFrequency response: 180 Hz ~ 20 kHzDimensions: 3.9 x 5.1 x 4.0 inches (100 x 130 x 100.5 mm)Speaker cable length: front - 9.8 feet (3 m)rear - 30 feet (9.15 m)Weight: front - 1.19 lbs. (0.54 kg)rear - 1.13 lbs. (0.51 kg) | |
| Center speaker | System: Full range satelliteImpedance: 4ΩFrequency response: 180 Hz ~ 20 kHzDimensions: 3.9 x 5.1 x 4.0 inches (100 x 130 x 100.5 mm)Speaker cable length: 9.8 feet (3 m)Weight: 1.61 lbs. (0.73 kg) |
| Subwoofer | Impedance: 4ΩSpeaker drivers: 6.5 inches (160 mm) wooferFrequency response: 60 Hz ~ 150 HzDimensions: 5.9 x 12.2 x 12.1 inches (149.5 x 310.5 x 308 mm)Speaker cable length: 14.1 feet (4.3 m)Weight: 8.29 lbs. (3.76 kg) |
| Video outputRCA jack x 1 | 1 Vp-p (75Ω) |
| Analog audio input (AUX)RCA jacks(L / R) x 1 | L/R: 2 Vrms (47kΩ) |
| Digital audio input (COAXIAL)RCA jack x 1 | 500 mVp-p (75Ω) |
| HDMI outputHDMI jack x 1 | Video: 480p, 720p, 1080i, 1080p, 1080p24/Audio |
| LAN terminal | 10BASE-T / 100BASE-TX |
| Wireless LAN (Internal) | IEEE 802.11 b/g/n |
Note
- The specifications and design of this product are subject to change without notice.
19. IMPORTANT HEALTH AND SAFETY INFORMATION FOR 3D TELEVISIONS
Read the following information before viewing 3D television images.
CAUTION NOTICE:
- Ambient fluorescent lighting may cause a flickering effect and direct sunlight may adversely affect the operation of your 3D glasses.
- DO NOT place your television near open stairwells, balconies or other objects as viewing in 3D images may cause disorientation for some viewers resulting in falls, tripping or walking into objects.
- If you experience (1) altered vision; (2) lightheadedness; (3) dizziness; (4) involuntary movements such as eye or muscle twitching; (5) confusion; (6) nausea; (7) loss of awareness; (8) convulsions; (9) cramps; and/or (10) disorientation, immediately stop watching 3D images and consult your doctor.
- Parents should regularly monitor their children concerning the above symptoms as children and teenagers may be more likely to experience these symptoms more frequently than adults. Watching 3D television is not recommended for children under the age of 6 as their visual system is not yet fully developed.
- Prolonged viewing of 3D images might cause discomfort, dizziness, eye strain, headaches or disorientation.
WARNING NOTICE:
- Some viewers may experience an epileptic seizure or stroke when exposed to certain flashing images or lights contained in certain television pictures or video games. If you or any of your family has a history of epilepsy or stroke, please consult your doctor before viewing 3D images.
- DO NOT watch 3D television if you are pregnant, elderly, sleep-deprived, suffering from serious medical conditions, in poor physical condition or under the influence of alcohol.
- Sitting too close to the screen for an extended period of time may damage your eyesight. The ideal distance should be at least three times the height of the TV screen and at the viewer's eyes level.
- Wearing the 3D glasses for any reason other than viewing 3D television (as general spectacles, sunglasses, protective goggles, etc.) may physically harm you or weaken your eyesight.
- If you experience any discomfort while viewing 3D images, stop and do not immediately engage in any potentially hazardous activity such as driving a car until your symptoms have disappeared. If your symptoms persist, do not resume watching 3D images without consulting your doctor.
20. ONE (1) YEAR LIMITED WARRANTY
WARRANTY COVERAGE:
This warranty obligation is limited to the terms set forth below.
WHO IS COVERED:
This product is warranted to the original purchaser or the person receiving the product as a gift against defects in materials and workmanship as based on the date of original purchase ("Warranty Period") from an Authorized Dealer. The original sales receipt showing the product name and the purchase date from an authorized retailer is considered such proof.
WHAT IS COVERED:
This warranty covers new products if a defect in material or workmanship occurs and a valid claim is received within the Warranty Period. At its option, the company will either (1) repair the product at no charge, using new or refurbished replacement parts, or (2) exchange the product with a product that is new or which has been manufactured from new, or serviceable used parts and is at least functionally equivalent or most comparable to the original product in current inventory, or (3) refund the original purchase price of the product. The Company warrants replacement products or parts provided under this warranty against defects in materials and workmanship from the date of the replacement or repair for ninety (90) days or for the remaining portion of the original product's warranty, whichever provides longer coverage for you. When a product or part is exchanged, any replacement item becomes your property and the replaced item becomes the company's property. When a refund is given, your product becomes the company's property. Note: Any product sold and identified as refurbished or renewed carries a ninety (90) day limited warranty.
Replacement product can only be sent if all warranty requirements are met. Failure to follow all requirements can result in delay.
WHAT IS NOT COVERED - EXCLUSIONS AND LIMITATIONS:
This Limited Warranty applies only to the new products that can be identified by the trademark, trade name, or logo affixed to it. This Limited Warranty does not apply to any non-Philips hardware product or any software, even if packaged or sold with the product. Non-Philips manufacturers, suppliers, or publishers may provide a separate warranty for their own products packaged with the bundled product.
The Company is not liable for any damage to or loss of any programs, data, or other information stored on any media contained within the product, or any non-Philips product or part not covered by this warranty. Recovery or reinstallation of programs, data or other information is not covered under this Limited Warranty.
This warranty does not apply (a) to damage caused by accident, abuse, misuse, neglect, misapplication, or non-Philips product, (b) to damage caused by service performed by anyone other than an Authorized Service Location, (c) to a product or
a part that has been modified without written permission, or (d) if any serial number has been removed or defaced, or (e) product, accessories or consumables sold "AS IS" without warranty of any kind by including refurbished Philips product sold "AS IS" by some retailers.
This Limited Warranty does not cover:
• Shipping charges to return defective product.
- Labor charges for installation or setup of the product, adjustment of customer controls on the product, and installation or repair of antenna/signal source systems outside of the product.
- Product repair and/or part replacement because of improper installation or maintenance, connections to improper voltage supply, power line surge, lightning damage, retained images or screen markings resulting from viewing fixed stationary content for extended periods, product cosmetic appearance items due to normal wear and tear, unauthorized repair or other cause not within the control of the company.
- Damage or claims for products not being available for use, or for lost data or lost software.
- Damage from mishandled shipments or transit accidents when returning product.
- A product that requires modification or adaptation to enable it to operate in any country other than the country for which it was designed, manufactured, approved and/or authorized, or repair of products damaged by these modifications.
- A product used for commercial or institutional purposes (including but not limited to rental purposes).
- Product lost in shipment and no signature verification receipt can be provided.
- Failure to operate per Owner's Manual.
TO OBTAIN ASSISTANCE IN THE U.S.A., CANADA, PUERTO RICO, OR U.S. VIRGIN ISLANDS...
Contact Customer Care Center at: 1-866-309-0866
REPAIR OR REPLACEMENT AS PROVIDED UNDER THIS WARRANTY IS THE EXCLUSIVE REMEDY FOR THE CONSUMER. PHILIPS SHALL NOT BE LIABLE FOR ANY INCIDENTAL OR CONSEQUENTIAL DAMAGES FOR BREACH OF ANY EXPRESS OR IMPLIED WARRANTY ON THIS PRODUCT. EXCEPT TO THE EXTENT PROHIBITED BY APPLICABLE LAW, ANY IMPLIED WARRANTY OF MERCHANTABILITY OR FITNESS FOR A PARTICULAR PURPOSE ON THIS PRODUCT IS LIMITED IN DURATION TO THE DURATION OF THIS WARRANTY.
Some states do not allow the exclusions or limitation of incidental or consequential damages, or allow limitations on how long an implied warranty lasts, so the above limitations or exclusions may not apply to you.
This warranty gives you specific legal rights. You may have other rights which vary from state/province to state/province.
P&F USA, Inc.
PO Box 430 Daleville, IN 47334-0430
LICENSE
This section describes software license used for this product.
This product uses some open source software:
GPL software: linux, module-init-tools, mount, nettools, sash, Realtek WiFi driver
LGPL software: directfb, glibc, Qt, live555
BSD: WPA Supplicant
MIT: expat, lua, lua-xmlreader, lua-slncrypto, libxml2
MIT/X: cURL
XML-RPC FOR C/C++ license: xmlrpc
gSOAP Public License: gSOAP
Free Type, LibJPEG, Open SSL, Vera Fonts
GPL
GNU General Public License (GPL)
Version 2, June 1991
Copyright (C) 1989, 1991 Free Software Foundation, Inc. 51 Franklin Street, Fifth
Floor Boston, MA 02110-1301. USA
Everyone is permitted to copy and distribute verbatim copies of this license docu-
ment, but changing it is not allowed.
^2 preamble
The licenses for most software are designed to take away your freedom to share and change it. By contrast, the GNU General Public License is intended to guarantee your freedom to share and change free software—to make sure the software's free for all its users. This General Public License applies to most of the Free Software Foundation's software and to any other program whose authors commit to using it. (Some other Free Software Foundation software is covered by the GNU Lesser General Public License instead.) You can apply it to your programs, too. When we speak of free software, we are referring to freedom, not price. Our
General Public Licenses are designed to make sure that you have the freedom to distribute copies of free software (and charge for this service if you wish), that you receive source code or can get it if you want it, that you can change the software or use pieces of it in new free programs; and that you know you can do these things
To protect your rights, we need to make restrictions that forbid anyone to deny you these rights or to ask you to surrender the rights. These restrictions translate to certain responsibilities for you if you distribute copies of the software, or if you modify it
For example, if you distribute copies of such a program, whether gratis or for a fee, you must give the recipients all the rights that you have. You must make sure that they, too, receive or can get the source code. And you must show them these terms so they know their rights.
We protect your rights with two steps: (1) copyright the software, and (2) offer you this license which gives you legal permission to copy, distribute and/or modify the software
Also, for each author's protection and ours, we want to make certain that everyone understands that there is no warranty for this free software. If the software is modified by someone else and passed on, we want its recipients to know that what they have is not the original, so that any problems introduced by others will not reflect on the original authors' reputations
Finally, any free program is threatened constantly by software patents. We wish to avoid the danger that redistributors of a free program will individually obtain patent licenses, in effect making the program proprietary. To prevent this, we have made it clear that any patent must be licensed for everyone's free use or not licensed at all. The precise terms and conditions for copying, distribution and modification follow. TERMS AND CONDITIONS FOR COPYING. DISTRIBUTION AND MODIFICATION
- This License applies to any program or other work which contains a notice placed by the copyright holder saying it may be distributed under the terms of this General Public License. The "Program", below, refers to any such program or work, and a "work based on the Program" means either the Program or any derivative work under copyright law; that is to say, a work containing the Program or a portion of it, either verbatim or with modifications and/or translated into another language. (Hereinafter, translation is included without limitation in the term "modification".) Each licensee is addressed as "you"
Activities other than copying, distribution and modification are not covered by this License; they are outside its scope. The act of running the Program is not restricted and the output from the Program is covered only if its contents constitute a work based on the Program (independent of having been made by running the Program). Whether that is true depends on what the Program does
- You may copy and distribute verbatim copies of the Program's source code as you receive it, in any medium, provided that you conspicuously and appropriate by publish on each copy an appropriate copyright notice and disclaimer of warranty; keep intact all the notices that refer to this License and to the absence of any warranty; and give any other recipients of the Program a copy of this License along with the Program
You may charge a fee for the physical act of transferring a copy, and you may at your option offer warranty protection in exchange for a fee
- You may modify your copy or copies of the Program or any portion of it, thus forming a work based on the Program, and copy and distribute such modifications or work under the terms of Section 1 above, provided that you also meet all of these conditions.
a) You must cause the modified files to carry prominent notices stating that you changed the files and the date of any change
b) You must cause any work that you distribute or publish, that in whole or in part contains or is derived from the Program or any part thereof, to be licensed as a whole at no charge to all third parties under the terms of this License.
c) If the modified program normally reads commands interactively when run, you
must cause it, when started running for such interactive use in the most ordinary way, to print or display an announcement including an appropriate copyright notice and a notice that there is no warranty (or else, saying that you provide a warranty) and that users may redistribute the program under these conditions, and telling the user how to view a copy of this License. (Exception: if the Program itself is interactive but does not normally print such an announcement, your work based on the Program is not required to print an announcement.)
These requirements apply to the modified work as a whole. If identifiable sections of that work are not derived from the Program, and can be reasonably considered independent and separate works in themselves, then this License, and its terms, do not apply to those sections when you distribute them as separate works. But when you distribute the same sections as part of a whole which is a work based on the Program, the distribution of the whole must be on the terms of this License, whose permissions for other licensees extend to the entire whole, and thus to each and every part regardless of who wrote it
Thus, it is not the intent of this section to claim rights or contest your rights to work written entirely by you; rather, the intent is to exercise the right to control the distribution of derivative or collective works based on the Program
In addition, mere aggregation of another work not based on the Program with the Program (or with a work based on the Program) on a volume of a storage or distribution medium does not bring the other work under the scope of this License.
- You may copy and distribute the Program (or a work based on it, under Section 2) in object code or executable form under the terms of Sections 1 and 2 above provided that you also do one of the following
a) Accompany it with the complete corresponding machine-readable source code which must be distributed under the terms of Sections 1 and 2 above on a medium customarily used for software interchange; or,
b) Accompany it with a written offer, valid for at least three years, to give any third party, for a charge no more than your cost of physically performing source distribution, a complete machine-readable copy of the corresponding source code, to be distributed under the terms of Sections 1 and 2 above on a medium customarily used for software interchange; or,
:) Accompany it with the information you received as to the offer to distribute corresponding source code. (This alternative is allowed only for noncommercial distribution and only if you received the program in object code or executable form with such an offer, in accord with Subsection b above.)
The source code for a work means the preferred form of the work for making modifications to it. For an executable work, complete source code means all the source code for all modules it contains, plus any associated interface definition files, plus the scripts used to control compilation and installation of the executable. However, as a special exception, the source code is distributed need not include anything that is normally distributed (in either source or binary form) with the major components (compiler, kernel, and so on) of the operating system on which the executable runs, unless that component itself accompanies the executable. If distribution of executable or object code is made by offering access to copy from a designated place, then offering equivalent access to copy the source code from the same place counts as distribution of the source code, even though third parties are not compelled to copy the source along with the object code
-
You may not copy, modify, sublicense, or distribute the Program except as expressly provided under this License. Any attempt otherwise to copy, modify sublicense or distribute the Program is void, and will automatically terminate your rights under this License. However, parties who have received copies, or rights, from you under this License will not have their licenses terminated so long as such parties remain in full compliance.
-
You are not required to accept this License, since you have not signed it. However, nothing else grants you permission to modify or distribute the Program or its derivative works. These actions are prohibited by law if you do not accept this License. Therefore, by modifying or distributing the Program (or any work based on the Program), you indicate your acceptance of this License to do so, and all its terms and conditions for copying, distributing or modifying the Program or works based on it
-
Each time you redistribute the Program (or any work based on the Program) the recipient automatically receives a license from the original licensor to copy distribute or modify the Program subject to these terms and conditions. You may not impose any further restrictions on the recipients' exercise of the rights granted herein. You are not responsible for enforcing compliance by third parties to this License
-
If, as a consequence of a court judgment or allegation of patent infringement or for any other reason (not limited to patent issues), conditions are imposed on you (whether by court order, agreement or otherwise) that contradict the conditions of this License, they do not excuse you from the conditions of this License. If you cannot distribute so as to satisfy simultaneously your obligations under this License and any other pertinent obligations, then as a consequence you may not distribute the Program at all. For example, if a patent license would not permit royalty-free redistribution of the Program by all those who receive copies directly or indirectly through you, then the only way you could satisfy both it and this License would be to refrain entirely from distribution of the Program.
If any portion of this section is held invalid or unenforceable under any particular circumstance, the balance of the section is intended to apply and the section as a whole is intended to apply in other circumstances.
It is not the purpose of this section to induce you to infringe any patents or other property right claims or to contest validity of any such claims; this section has the sole purpose of protecting the integrity of the free software distribution y stem which is implemented by public license practices. Many people have made generous contributions to the wide range of software distributed through that system in reliance on consistent application of that system; it is up to the author/donor to decide if he or she is willing to distribute software through any other system and a licensee cannot impose that choice.
This section is intended to make thoroughly dear what is believed to be a consequence of the rest of this License.
- If the distribution and/or use of the Program is restricted in certain countries
either by patents or by copyrighted interfaces, the original copyright holder who places the Program under this License may add an explicit geographical distribution limitation excluding those countries, so that distribution is permitted only in or among countries not thus excluded. In such case, this License incorporates the limitation as if written in the body of this License.
- The Free Software Foundation may publish revised and/or new versions of the General Public License from time to time. Such new versions will be similar in spirit to the present version, but may differ in detail to address new problems or concerns.
Each version is given a distinguishing version number. If the Program specifies a version number of this License which applies to it and "any later version", you have the option of following the terms and conditions either of that version or of any later version published by the Free Software Foundation. If the Program does not specify a version number of this License, you may choose any version ever published by the Free Software Foundation
- If you wish to incorporate parts of the Program into other free programs whose distribution conditions are different, write to the author to ask for permission. For software which is copyrighted by the Free Software Foundation, write to the Free Software Foundation; we sometimes make exceptions for this. Our decision will be guided by the two goals of preserving the free status of all derivatives of our free software and of promoting the sharing and reuse of software generally.
NO WARRANTY
-
BECAUSE THE PROGRAM IS LICENSED FREE OF CHARGETHERE IS NO WARRANTY FOR THE PROGRAM TO THE EXTENT PERMITTED BY APPLICABLE LAW. EXCEPT WHEN OTHERWISE STATED IN WRITING THE COPYRIGHT HOLDERS AND/OR OTHER PARTIES PROVIDE THE PROGRAM "AS IS" WITHOUT WARRANTY OF ANY KINDEITHER EXPRESSED OR IMPLIED. INCLUDING, BUT NOT LIMITED TOTHE IMPLIED WARRANTIES OF MERCHANTABILITY AND FITNESS FOR A PARTICULAR PURPOSE THE ENTIRE RISK AS TO THE QUALITY AND PERFORMANCE OF THE PROGRAM IS WITH YOU. SHOULD THE PROGRAM PROVE DEFECTIVE YOU ASSUME THE COST OF ALL NECESSARY SERVICINGREPAIR OR CORRECTION.
-
IN NO EVENT UNLESS REQUIRED BY APPLICABLE LAW OR AGREED TO IN WRITING WILL ANY COPYRIGHT HOLDER, OR ANY OTHER PARTY WHO MAY MODIFY AND/OR REDISTRIBUTE THE PROGRAM AS PERMITTED ABOVE BE LIABLE TO YOU FOR DAMAGES INCLUDING ANY GENERAL, SPECIAL, INCIDENTAL OR CONSEQUENTIAL DAMAGES ARISING OUT OF THE USE OR INABILITY TO USE THE PROGRAM (INCLUDING BUT NOT LIMITED TO LOSS OF DATA OR DATA BEING RENDERED INACCURATE OR LOSSES SUSTAINED BY YOU OR THIRD PARTIES © A FAILURE OF THE PROGRAM TO OPERATE WITH ANY OTHER PROGRAMS), EVEN IF SUCH HOLDER OR OTHER PARTY HAS BEEN ADVISED OF THE POSSIBILITY OF SUCH DAMAGES
END OF TERMS AND CONDITIONS
How to Apply These Terms to Your New Program
If you develop a new program, and you want it to be of the greatest possible use to the public, the best way to achieve this is to make it free software which everyone can redistribute and change under these terms
To do so, attach the following notices to the program. It is safest to attach them to the start of each source file to most effectively convey the exclusion of warranty; and each file should have at least the "copyright" line and a pointer to where the full notice is found
one line to give the program's name and an idea of what it does
Copyright (C) yyyy name of author
This program is free software; you can redistribute it and/or modify it under the terms of the GNU General Public License as published by the Free Software Foundation; either version 2 of the License, or (at your option) any later version This program is distributed in the hope that it will be useful, but WITHOUT ANY WARRANTY; without even the implied warranty of MERCHANTABILITY or FITNESS FOR A PARTICULAR PURPOSE. See the GNU General Public License for more details.
You should have received a copy of the GNU General Public License along with this program; if not, write to the Free Software Foundation, Inc., 51 Franklin Street Fifth Floor Boston, MA 02110-1301, USA. Also add information on how to contact you by electronic and paper mail
If the program is interactive, make it output a short notice like this when it starts in an interactive mode
Gnomovision version 69, Copyright (C) year name of author Gnomovision comes with ABSOLUTELY NO WARRANTY; for details type 'show w'. This is free software, and you are welcome to redistribute it under certain conditions; type e 'show c' for details
The hypothetical commands 'show w' and 'show c' should show the appropriate parts of the General Public License. Of course, the commands you use may be called something other than 'show w' and 'show c'; they could even be mouse-clicks or menu items--whatever suits your program.
You should also get your employer (if you work as a programmer) or your school if any, to sign a "copyright disclaimer" for the program, if necessary. Here is a sample after the names
Yoyodyne, Inc., hereby disclaims all copyright interest in the program 'Gnomovision' (which makes passes at compilers) written by James Hacker.
signature of Ty Coon, 1 April 198
Ty Coon, President of Vice
This General Public License does not permit incorporating your program into proprietary programs. If your program is a subroutine librar y, you may consider it more useful to permit linking proprietary applications with the library. If this is what you want to do, use the GNU Lesser General Public License instead of this License
If you are interested in obtaining GPL source code used in this product, p lease contact P&F USA Inc..
PO Box 430 Daleville, IN 47334-0430 U.S.A
LGPL
GNU LESSER GENERAL PUBLIC LICENSE
Version 2.1, February 1999
Copyright (C) 1991, 1999 Free Software Foundation, Inc.
51 Franklin Street Fifth Floor Boston MA 02110-1301 USA
Everyone is permitted to copy and distribute verbatim copies of this license document, but changing it is not allowed.
[This is the first released version of the Lesser GPL. It also counts as the successor of the GNU Library Public License, version 2, hence the version number 2.1.] Preamble
The licenses for most software are designed to take away your freedom to share and change it. By contrast, the GNU General Public Licenses are intended to guarantee your freedom to share and change free software—to make sure the software is free for all its users
This license, the Lesser General Public License, applies to some specially designated software packages--typically libraries--of the Free Software Foundation and other authors who decide to use it. You can use it too, but we suggest you first think carefully about whether this license or the ordinary General Public License is the better strategy to use in any particular case, based on the explanations below
When we speak of free software, we are referring to freedom of use, not price. Our General Public Licenses are designed to make sure that you have the freedom to distribute copies of free software (and charge for this service if you wish); that you receive source code or can get it if you want it; that you can charge the software and use pieces of it in new free programs; and that you are informed that you can do these things
To protect your rights, we need to make restrictions that forbid distributors to deny you these rights or to ask you to surrender these rights. These restrictions translate to certain responsibilities for you if you distribute copies of the librar you if you modify it
For example, if you distribute copies of the library, whether gratis or for a fee, you must give b.e recipients all the rights b at we gave you. You must make sure that they, too, receive or canget the source code. If you link other code with the library, you must provide complete object files to the recipients, so that they can relink them with the library after making changes to the library and recompiling it. And you must show them these terms so they know their rights.
We protect your rights with a two-step method: (1) we copyright the library, and (2) we offer ou this license, which gives you legal permission to copy, distribute and/or modify the library
To protect each distributor, we want to make it very clear that there is no warranty for the free library. Also, if the library is modified by someone else and passed on the recipients should know that what they have is not the original version, so that the original author's reputation will not be affected by problems that might be introduced by others.
Finally, software patents pose a constant threat to the existence of any free program. We wish to make sure that a company cannot effectively restrict the users of a free program by obtaining a restrictive license from a patent holder. Therefore we insist that any patent license obtained for a version of the library must be consistent with the full freedom of use specified in this license
Most GNU software, including some libraries, is covered by the ordinary GNU General Public License. This license, the GNU Lesser General Public License, applies to certain designated libraries, and is quite different from the ordinary General Public License. We use this license for certain libraries in order to permit linking those libraries into non-free programs.
When a program is linked with a library, whether statically or using a shared library, the combination of the two is legally speaking a combined work, a derivative of the original library. The ordinary General Public License therefore permits such linking only if the entire combination fits its criteria of freedom. The Lesser General Public License permits more lax criteria for linking other code with the library.
We call this license the "Lesser" General Public License because it does Less to protect the user's freedom than the ordinary General Public License. It also provides other free software developers Less of an advantage over competing non-free programs. These disadvantages are the reason we use the ordinary General Public License for many libraries. However, the Lesser license provides advantages in certain special circumstances.
For example, on rare occasions, there may be a special need to encourage the widest possible use of a certain library, so that it becomes a de-facto standard. To achieve this, non-free programs must be allowed to use the library. A more frequent case is that a free library does the same job as widely used non-free libraries. In this case, there is little to gain by limiting the free library to free software only, so we use the Lesser General Public License
In other cases, permission to use aparticular library in non-free programs enables a greater number of peep le to use a large body of free software. For example permission to use the GNU C Library in non-free programs enables many more people to use the whole GNU operating system, as well as its variant, the GNU/Linux operating system
Although the Lesser General Public License is Less protective of the users' freedom, it does ensure that the user of a program that is linked with the Library has the freedom and the wherewithal to run that program using a modified version of the Library
The precise terms and conditions for copying distribution and modification follow. Pay close attention to the difference between a "work based on the library" and a "work that uses the library". The former contains code derived from the library whereas the latter must be combined with the library in order to run.
GNU LESSER GENERAL PUBLIC LICENSE
TERMS AND CONDITIONS FOR COPYING DISTRIBUTION AND MODIFICATION
- This License Agreement applies to any software library or other program which contains a notice placed by the copyright holder or other authorized party saying it may be distributed under the terms of this Lesser General Public License (also called "this License"). Each licensee is addressed as "you".
A "library" means a collection of software functions and/or data prepared so as to
be conveniently linked with application programs (which use some of those functions and data) to form executables.
The "Library", below, refers to any such software library or work which has been distributed under these terms. A "work based on the Library" means either the
Library or any derivative work under copyright law: that is to say, a work containing the Library or a portion of it, either verbatim or with modifications and/or translated straightforwardly into another language. (Hereinafter, translation is included without limitation in the term "modification".)
"Source code" for a work means the preferred form of the work for making modifications to it. For a library, complete source code means all the source code for all modules it contains, plus any associated interface definition files, plus the scripts used to control compilation and installation of the library
Activities other than copying, distribution and modification are not covered by this License; they are outside its scope. The act of running a program using the Library is not restricted, and output from such a program is covered only if its contents constitute a work based on the Library (independent of the use of the Library in a tool for writing it). Whether that is true depends on what the Library does and what the program that uses the Library does.
- You may copy and distribute verbatim copies of the Library's complete source code as you receive it, in any medium, provided that you conspicuously and appropriately publish on each copy an appropriate copyright notice and disclaimer of warranty; keep intact all the notices that refer to this License and to the absence of any warranty; and distribute a copy of this License along with the Library
You may charge a fee for the physical act of transferring a copy, and you may at your option offer warranty protection in exchange for a fee.
- You may modify your copy or copies of the Library or any portion of it, thus forming a work based on the Library, and copy and distribute such modifications or work under the terms of Section 1 above, provided that you also meet all of these conditions
a) The modified work must itself be a software library.
b) You must cause the files modified to carry prominent notices stating that you changed the files and the date of any change
c) You must cause the whole of the work to be licensed at no charge to all third parties under the terms of this License.
d) If a facility in the modified Library refers to a function or a table of data to be supplied by an application program that uses the facility, other than as an argument passed when the facility is invoked, then you must make a good faith effort to ensure that, in the event an application does not supply such function or table, the facility still operates, and performs whatever part of its purpose remains meaningful.
(For example, a function in a library to compute square roots has apurpose that is entirely well-defined independent of the application. Therefore, Subsection 2d requires that any application-supplied function or table used by this function must be optional: if the application does not supply it, the square root function must still compute square roots.)
These requirements apply to the modified work as a whole. If identifiable sections of that work are not derived from the Library, and can be reasonably considered independent and separate works in themselves, then this License, and its terms, do not apply to those sections when you distribute them as separate works. But when you distribute the same sections as part of a whole which is a work based on the Library, the distribution of the whole must be on the terms of this License, whose permissions for other licensees extend to the entire whole, and thus to each and every part regardless of who wrote it.
Thus, it is not the intent of this section to claim rights or contest your rights to work written entirely by you; rather, he intent is to exercise the right to control the distribution of derivative or collective works based on the Library. In addition, mere aggregation of another work not based on the Library with the Library (or with a work based on the Library) on a volume of a storage or distribution medium does not bring the other work under the scope of this License.
- You may opt to apply the terms of the ordinary GNU General Public License instead of this License to a given copy of the Library. To do this, you must alte all the notices that refer to this License, so that they refer to the ordinary GNU General Public License, version 2, instead of to this License. (If a newer version than version 2 of the ordinary GNU General Public License has appeared, then you can specify that version instead if you wish.) Do not make any other change in these notices.
Once this change is made in a given copy, it is irreversible for that copy, so the ordinary GNU General Public License applies to all subsequent copies and derivative works made from that copy
This option is useful when you wish to copy part of the code of the Library into a program that is not a library.
- You may copy and distribute the Library (or a portion or derivative of it, under Section 2) in object code or executable form under the terms of Sections 1 and 2 above provided that you accompany it with the complete corresponding machine-readable source code which must be distributed under the terms of
Sections 1 and 2 above on a medium customarily used for software interchange. If distribution of object code is made by offering access to copy from a designated place, then offering equivalent access to copy the source code from the same place satisfies the requirement to distribute the source code, even though third parties are not compiled to copy the source along with the object code.
- A program that contains no derivative of any portion of the Library, but is designed to work with the eLibrary by being compiled or linked with its called a "work that uses the Library". Such a work, in isolation, is not a derivative work of the Library, and therefore falls outside the scope of this License.
However, linkig a "work that uses the Library" with the Librar ycreates an executable that is a derivative of the Library (because it contains portions of the Library), rather than a "work that uses the library". The executable is therefore covered by this License. Section 6 states terms for distribution of such executables. When a "work that uses the Library" uses material from a header file that is part of the Library, the object code for the work may be a derivative work of the
Library even though the source code is not. Whether this is true is especially significant if the work can be linked without the Library, or if the work is itself a library. The threshold for this to be true is not precisely defined by law.
If such an object file uses only numerical parameters, data structure layouts and accessors, and small macros and small inline functions (ten lines or less in length) then the use of the object file is unrestricted, regardless of whether it is legally a derivative work. (Executables containing this object code plus portions of the Library will still fall under Section 6.)
Otherwise, if the work is a derivative of the Library, you may distribute the object code for the work under the terms of Section 6. Any executables containing that work also fall under Section 6, whether or not they are linked directly with the Library itself.
- As an exception to the Sections above, you may also combine or link a "work that uses the Library" with the Library to produce a work containing portions of the Library, and distribute that work under terms of your choice, provided that the terms permit modification of the work for the customer's own use and reverse engineering for debugging such modifications
You must give prominent notice with each copy of the work that the Library is used in it and that the Library and its use are covered by this License. You must supply a copy of this License. If the work during execution displays a copyright notice, you must include the copyright notice for the Library among them, as well as a reference directing the user to the copy of this License. Also, you must do one of these things
a) Accompany the work with the complete corresponding machine-readable source code for the Library including whatever changes were used in the work (which must be distributed under Sections 1 and 2 above); and, if the work is an executable linked with the Library, with the complete machine-readable "work that uses the Library", as object code and/or source code, so that the user can modify the Library and then relink to produce a modified executable containing the modified Library. (It is understood that the user who changes the contents of definitions files in the Library will not necessarily be able to recompile the application to use the modified definitions.)
b) Use a suitable shared library mechanism for linking with the Library. A suitable mechanism is one that (1) uses at run time a copy of the library already present on the user's computer system, rather than copying library functions into the executable, and (2) will operate properly with a modified version of the library, if the user installs one, as long as the modified version is interface-compatible with the version that at the work was made with.
c) Accompany the work with a written offer, valid for at least three years, to give the same user the materials specified in Subsection 6a, above, for a charge no more than the cost of performing this distribution
d) If distribution of the work is made by offering access to copy from a designated place, offer equivalent access to copy the above specified materials from the same place.
e) Verify that the user has already received a copy of these materials or that you have already sent this user a copy
For an executable, the required form of the "work that uses the Library" must include any data and utility programs needed for reproducing the executable from it. However, as a special exception, the materials to be distributed need not induce anything that is normally distributed (in either source or binary form) with the major components (compiler, kernel, and so on) of the operating system on which the executable runs, unless that component itself accompanies the executable.
It may happen that this requirement contradicts the license restrictions of other proprietary libraries that do not normally accompany the operating system. Such a contradiction means you cannot use both them and the Library together in an executable that you distribute.
- You may place library facilities that are a work based on the Library side-by-side in a single library together with other library facilities not covered by this License, and distribute such a combined library, provided that the separate distribution of the work based on the Library and of the other library facilities is otherwise permitted, and provided that you do these two things
a) Accompany the combined library with a copy of the same work based on the Library, uncombined with any other library facilities. This must be distributed under the terms of the Sections above.
b) Give prominent notice with the combined library of the fact that part of it is a work based on the Library, and explaining where to find the accompanying uncombined form of the same work.
-
You may not copy, modify, sublicense, link with, or distribute the Library except as expressly provided under this License. Any attempt otherwise to copy, modify, sublicense, link with, or distribute the Library is void and will automatically terminate your rights under this License. However, parties who have received copies, or rights, from you under this License will not have their licenses terminated so long as such parties remain in full compliance.
-
You are not required to accept this License, since you have not signed it. However, nothing else grants you permission to modify or distribute the Library or its derivative works. These actions are prohibited by law if you do not accept this License. Therefore, by modifying or distributing the Library (or any work based on the Library), you indicate your acceptance of this License to do so, and all its terms and conditions for copying, distributing or modifying the Library or works based on it.
-
Each time you redistribute the Library (or any work based on the Library) the recipient automatically receives a license from the original licensor to copy, distribute, link with or modify the Library subject to these terms and conditions. You may not impose any further restrictions on the recipients' exercise of the rights granted herein. You are not responsible for enforcing compliance by third parties with this License.
-
If, as a consequence of a court judgment or allegation of patent infringement or for any other reason (not limited to patent issues), conditions are imposed on you (whether by court order, agreement or otherwise) that contradict the conditions of this License, they do not excuse you from the conditions of this License. If you cannot distribute so as to satisfy simultaneously your obligations
under this License and any other pertinent obligations, then as a consequence, you may not distribute the Library at all. For example, if a patent license would not permit royalty-free redistribution of the Library by all those who receive copies directly or indirectly through you, then the only way you could satisfy both it and this License would be to refrain entirely from distribution of the Library.
If any portion of this section is held invalid or unenforceable under any particular circumstance, the balance of the section is intended to apply, and the section as a whole is intended to apply in other circumstances.
It is not the purpose of this section to induce you to infringe any patents or other property right claims or to contest validity of any such claims; this section has the sole purpose of protecting the integrity of the free software distribution system which is implemented by public license practices. Many people have made generous contributions to the wide range of software distributed through that system in reliance on consistent application of that system; it is up to the author/donor to decide if he or she is willing to distribute software through any other system and a licensee cannot impose that choice
This section is intended to make thoroughly clear what is believed to be a consequence of the rest of this License.
-
If the distribution and/or use of the Library is restricted in certain countries either by patents or by copyrighted interfaces, the original copyright holder who places the Library under this License may add an explicit geographical distribution limitation excluding those countries, so that distribution is permitted only or among countries not thus excluded. In such case, this License incorporates the limitation as if written in the body of this License.
-
The Free Software Foundation map publish revised and/or new versions of the Lesser General Public License from time to time. Such new versions will be similar in spirit to the present version, but may differ in detail to address new problems or concerns
Each version is given a distinguishing version number. If the Library specifies a version number of this License which applies to it and "any later version", you have the option of following the terms and conditions either of that version or of any later version published by the Free Software Foundation. If the Library does not specify a license version on number, you may choose any version ever published by the Free Software Foundation
- If you wish to incorporate parts of the Library into other free programs whose distribution conditions are incompatible with these, write to the auth or to ask for permission. For software which is copyrighted by the Free Software Foundation, write to the Free Software Foundation; we sometimes make exceptions for this. Our decision will be guided by the two goals of preserving the free status of all derivatives of our free software and of promoting the sharing and reuse of software generally.
NO WARRANTY
-
BECAUSE THE LIBRARY IS LICENSED FREE OF CHARGETHERE IS NO WARRANTY FOR THE LIBRARY TO THE EXTENT PERMITTED BY APPLICABLE LAW, EXCEPT WHEN OTHERWISE STATED IN WRITING THE COPYRIGHT HOLDERS AND/OR OTHER PARTIES PROVIDE THE LIBRARY "AS IS" WITHOUT WARRANTY OF ANY KIND EITHER EXPRESSED OR IMPLIED, INCLUDING BUT NOT LIMITED TOTHE IMPLIED WARRANTIES OF MERCHANTABILITY AND FITNESS FOR A PARTICULAR PURPOSE. THE ENTIRE RISK AS TO THE QUALITY AND PERFORMANCE OF THE LIBRARY IS WITH YOU. SHOULD THE LIBRARY PROVE DEFECTIVE YOU ASSUME THE COST OF ALL NECESSARY SERVICING REPAIR OR CORRECTION.
-
IN NO EVENT UNLESS REQUIRED BY APPLICABLE LAW OR AGREED TO IN WRITING WILL ANY COPYRIGHT HOLDER OR ANY OTHER PARTY WHO MAY MODIFY AND/OR REDISTRIBUTE THE LIBRARY AS PERMITTED ABOVE. BE LIABLE TO YOU FOR DAMAGES INCLUDING ANY GENERAL, SPECIAL, INCIDENTAL OR CONSEQUENTIAL DAMAGES ARISING OUT OF THE USE OR INABILITY TO USE THE LIBRARY (INCLUDING BUT NOT LIMITED TO LOSS OF DATA OR DATA BEING RENDERED INACCURATE OR LOSSES SUSTAINED BY YOU OR THIRD PARTIES OR A FAILURE OF THE LIBRARY TO OPERATE WITH ANY OTHER SOFTWARE) EVEN IF SUCH HOLDER OR OTHER PARTY HAS BEEN ADVISED OF THE POSSIBILITY OF SUCH DAMAGES.
END OF TERMS AND CONDITIONS
How to Apply These Terms to Your New Librarise
If you develop a new library, and you want it to be of the greatest possible use to the public, we recommend making it free software that everyone can redistribute and change. You can do so by permitting redistribution under these terms ( , alternatively, under the terms of the ordinary General Public License).
To apply these terms, attach the following notices to the library. It is safest to attach them to the start of each source file to most effectively convey the exclusion of warranty; and each file should have at least the "copyright" line and a pointer to where the full notice is found.
Copyright (C)
This librar y is free software; you can redistribute it and/or modify it under the terms of the GNU Lesser General Public License as published by the Free Software Foundation; either version 2.1 of the License, or( aty our tion) any later version
This library is distributed in the hope that it will be useful, but WITHOUT ANY WARRANTY; without even the implied warranty of MERCHANTABILITY RTNESS FOR A PARTICULAR PURPOSE. See the GNU Lesser General Public License for more details
You should have received a copy of the GNU Lesser General Public License along with this library; if not, write to the Free Software Foundation, Inc., 51 Franklin Street. Fifth Floor: Boston, MA 02110-1301 USA
Also add information on how to contact you by electronic and paper mail. You should also get your employer (if you work as a programmer) or your school if any, to sign a "copy right disclaimer" for the library, if necessary. Here is a sample;
alter the names:
Yoyodyne, Inc., hereby disclaims all copyright interest in the library 'Frob' (a library for tweaking knobs) written by James Random Hacker.
Ty Coon, President of Vice
That's all there is to it!
If you are interested in obtaining LGPL source code used in this product, please contact P&F USA.Inc..
PO Box 430 Daleville, IN 47334-0430 U.S.A
BSD
Copyright (c) 2003-2010, Jouni Malinen j@w1.fi and contributors All Rights Reserved
Redistribution and use in source and binary forms, with or without modification are permitted provided that the following conditions are met
-
Redistributions of source code must retain the above copyright notice, this list 6 conditions and the following disclaimer.
-
Redistributions in binary form must reproduce the above copyright notice, this list of conditions and the following disclaimer in the documentation and/or other materials provided with the distribution
-
Neither the name(s) of the above-listed copyright holder(s) nor the names its contributors may be used to endorse or promote products derived from this software without specific prior written permission.
THIS SOFTWARE IS PROVIDED BY THE COPYRIGHT HOLDERS AND CONTRIBUTORS "AS IS" AND ANY EXPRESS OR IMPLIED WARRANTIES INCLUDING BUT NOT LIMITED TO THE IMPLIED WARRANTIES OF MERCHANTABILITY AND FITNESS FOR A PARTICULAR PURPOSE ARE DISCLAIMED IN NO EVENT SHALL THE COPYRIGHT OWNER OR CONTRIBUTORS BE LIABLE FOR ANY DIRECT INDIRECT. INCIDENTAL SPECIAL, EXEMPLARY OR CONSEQUENTIAL DAMAGES (INCLUDING, BUT NOT LIMITED TO, PROCUREMENT OF SUBSTITUTE GOODS OR SERVICES LOSS OF USE, DATA OR PROFITS; OR BUSINESS INTERRUPTION) HOWEVER CAUSED AND ON ANY THEORY OF LIABILITY WHETHER IN CONTRACT STRICT LIABILITY OR TORT (INCLUDING NEGLIGENCE OR OTHERWISE) ARISING IN ANY WAY OUT OF THE USE OF THIS SOFTWARE EVEN IF ADVISED OF THE POSSIBILITY OF SUCH DAMAGE
MIT
- expat
Copyright © 1998, 1999, 2000 Thai Open Source Software Center Ltd and Clark Coope Copyright © 2001, 2002, 2003, 2004, 2005, 2006 Expat maintainers
- Lua
Copyright © 1994 -2010 Lua.org, PUC-Rio
- lua-xmlreader
Copyright © 2008 A.S. Bradbury
- lua-slncrypto
Copyright © 2005 Malete Partner, Berlin, partner@malete.org
- libxml2
Copyright © 1998-2003 Daniel Veillard. All Rights Reserved
Permission is hereby granted, free of charge, to any person obtaining a copy of this software and associated documentation files (the "Software"), to deal in the Software without restriction, including without limitation the rights to use, copy, modify, merge, publish, distribute, sublicense, and/or sell copies of the Software and to permit persons to whom the Software is furnished to do so, subject to the following conditions
The above copyright notice and this permission notice shall be included in all copies or substantial portions of the Software.
THE SOFTWARE IS PROVIDED "AS IS". WITHOUT WARRANTY OF ANY KIND EXPRESS OR IMPLIED INCLUDING BUT NOT LIMITED TO THE WARRANTIES OF MERCHANTABILITY. FITNESS FOR A PARTICULAR PURPOSE AND NONINFRINGEMENT. IN NO EVENT SHALL THE AUTHORS OR COPYRIGHT HOLDERS BE LIABLE FOR ANY CLAIM DAMAGES OR OTHER LIABILITY WHETHER IN AN ACTION OF CONTRACTTORT OR OTHERWISE ARISING FROM OUT OF OR IN CONNECTION WITH THE SOFTWARE OR THE USE OR OTHER DEALINGS IN THE SOFTWARE
MIT/X
COPYRIGHT AND PERMISSION NOTICE
Copyright (c) 1996 - 2009, Daniel Stenberg daniel@haxx.se. All rights reserved.
Permission to use, copy, modify, and distribute this software for any purpose with or without fee is hereby granted, provided that the above copyright notice and this permission notice appear in all copies
THE SOFTWARE IS PROVIDED "AS IS", WITHOUT WARRANTY OF ANY KIND EXPRESS OR IMPLIED INCLUDING BUT NOT LIMITED TO THE WARRANTIES OF MERCHANTABILITY, FITNESS FOR A PARTICULAR PURPOSE AND NONINFRINGEMENT OF THIRD PARTY RIGHTS. IN NO EVENT SHALL THE AUTHORS OR COPYRIGHT HOLDERS BE LIABLE FOR ANY CLAIM, DAMAGES OR OTHER LIABILITY, WHETHER IN AN ACTION OF CONTRACT TORT OR OTHERWISE, ARISING FROM, OUT OF OR IN CONNECTION WITH THE
SOFTWARE OR THE USE OR OTHER DEALINGS IN THE SOFTWARE Except as contained in this notice, the name of a copyright holder shall not be used in advertising or otherwise to promote the sale, use or other dealings in this Software without prior written authorization of the copyright holder.
gSOAP
Part of the software embedded in this product is gSOAP software
Portions created by gSOAP are Copyright (C) 2001-2009 Robert A. van Engelen Genivia inc. All Rights Reserved
THE SOFTWARE IN THIS PRODUCT WAS IN PART PROVIDED BY GENIVIA INC AND ANY EXPRESS OR IMPLIED WARRANTIES INCLUDING BUT NOT LIMITED TO THE IMPLIED WARRANTIES OF MERCHANTABILITY AND FITNESS FOR A PARTICULAR PURPOSE ARE DISCLAIMED. IN NO EVENT SHALL THE AUTHOR BE LIABLE FOR ANY DIRECT INDIRECT.INCIDENTAL SPECIAL, EXEMPLARY, OR CONSEQUENTIAL DAMAGES (INCLUDING, BUT NOT LIMITED TO PROCUREMENT OF SUBSTITUTE GOODS OR SERVICES LOSS OF USE, DATA, OR PROFITS; OR BUSINESS INTERRUPTION) HOWEVER CAUSED AND ON ANY THEORY OF LIABILITYWHETHER IN CONTRACTSTRICT LIABILITY, OR TORT (INCLUDING NEGLIGENCE OR OTHERWISE) ARISING IN ANY WAY OUT OF THE USE OF THIS SOFTWAREVEN IF ADVISED OF THE POSSIBILITY OF SUCH DAMAGE
FreeType
Portions of this software are copyright (c) 2001, 2002, 2003, 2004, 2006 The FreeType Project (www.freetype.org). All rights reserved
LibJPEG
This software is based in part on the work of the independent JPEG Group.
Open SSL
LICENSE ISSUES
The OpenSSL toolkit stays under a dual license, i.e. both the conditions of the OpenSSL License and the original SSLeay license apply to the toolkit. See below for the actual license texts. Actually both licenses are BSD-style Open Source licenses. In case of any license issues related to OpenSSL please contact openssl-core@openssl.org
OpenSSL License
米
* Copyright (c) 1998-2008 The OpenSSL Project. All rights reserved
* Redistribution and use in source and binary forms, with or without modification
* are permitted provided that the following conditions are met:
* 1. Redistributions of source code must retain the above copyright notice, this list of conditions and the following disclaimer.
* 2. Redistributions in binary form must reproduce the above copyright notice * this list of conditions and the following disclaimer in the documentation and/ * or other materials provided with the distribution
* 3. All advertising materials mentioning features or use of this software must * display the following acknowledgment: "This product includes software developed by the OpenSSL Project for use in the OpenSSL Toolkit. (http://www.openssl.org/)"
- The names "OpenSSL Toolkit" and "OpenSSL Project" must not be used to endorse or promote products derived from this software without prior written permission. For written permission, please contact openssl-core@openssl.org.
* 5. Products derived from this software may not be called "OpenSSL" nor may * "OpenSSL" appear in their names without prior written permission of the * OpenSSL Project
* 6. Redistributions of any form whatsoever must retain the following acknowledge g- * ment: "This product includes software developed by the OpenSSL Project for" * use in the OpenSSL Toolkit( http://www.qp.enssl.org/)
* THIS SOFTWARE IS PROVIDED BY THE OpenSSL PROJECT "AS IS" AND * ANY EXPRESSED OR IMPLIED WARRANTIES, INCLUDING, BUT NOT LIMITED TO THE IMPLIED WARRANTIES OF MERCHANTABILITY AND FITNESS
* FOR A PARTICULAR PURPOSE ARE DISCLAIMED. IN NO EVENT SHALL * THE OpenSSL PROJECT OR ITS CONTRIBUTORS BE LIABLE FOR ANY
* DIRECT, INDIRECT, INCIDENTAL, SPECIAL, EXEMPLARY, OR CONSEQUEN-
* TIAL DAMAGES (INCLUDING, BUT NOT LIMITED TO, PROCUREMENT OF * SUBSTITUTE GOODS OR SERVICES; LOSS OF USE DATA, OR PROFITS OR
* BUSINESS INTERRUPTION) HOWEVER CAUSED AND ON ANY THEORY * OF LIABILITY, WHETHER IN CONTRACT, STRICT LIABILITY OR TORT
* (INCLUDING NEGLIGENCE OR OTHERWISE) ARISING IN ANY WAY OUT * OF THE USE OF THIS SOFTWARE EVEN IF ADVISED OF THE POSSIBILITY
* OF SUCH DAMAGE
* This product includes cryptographic software written by Eric Young (eay@ * cryptsoft.com). This product includes software written by Tim Hudson (tjh@ * cryptsoft.com).
米
*/
Original SSLeay License
/* Copyright (C)1995-1998 Eric Young (eay@cryptsoft.com) All rights reserved. * This package is an SSL implementation written by Eric Young (eay@cryptsoft
* com)
* The implementation was written so as to conform with Netscape SSL
* This library is free for commercial and non-commercial use as long as the
* following conditions are aheared to. The following conditions apply to all code
* found in this distribution, be it the RC4, RSA, lhash, DES, etc., code; not just the
* SSL code. The SSL documentation included with this distribution is covered by
* the same copyright terms except that the holder is Tim Hudson (tjh@cryptsoft. * com).
* Copyright remains Eric Young's, and as such any Copyright notices in the code
* are not to be removed
* If this package is used in a product, Eric Young should be given attribution as the
* author of the parts of the library used
* This can be in the form of a textual message at program startup or in documentation (online or textual) provided with the package.
* Redistribution and use in source and binary forms, with or without modification,
* are permitted provided that the following conditions are met
* 1. Redistributions of source code must retain the copyright notice, this list of * conditions and the following disclaimer.
* 2. Redistributions in binary form must reproduce the above copyright notice
* this list of conditions and the following disclaimer in the documentation and/
* or other materials provided with the distribution
* 3. All advertisig materials mentioning features or use of this software must display the following acknowledgement: "This product includes cryptographic software written by Eric Young (eay@cryptsoft.com)" The word 'cryptographic' can be left out if the routines from the library being used are not cryptographic related :-).
* 4. If you include any Windows specific code (or a derivative thereof) from the
* apps directory (application code) you must include an acknowledgement
* "This product includes software written by Tim Hudson (tjh@cryptsoft.com)"
* THIS SOFTWARE IS PROVIDED BY ERIC YOUNG "AS IS" AND AN
* EXPRESS OR IMPLIED WARRANTIES.INCLUDING BUT NOT LIMITED TO
* THE IMPLIED WARRANTIES OF MERCHANTABILITY AND FITNESS FOR
* A PARTICULAR PURPOSE ARE DISCLAIMED. IN NO EVENT SHALL THE
* AUTHOR OR CONTRIBUTORS BE LIABLE FOR ANY DIRECT,INDIRECT,
* INCIDENTAL, SPECIAL, EXEMPLARY, OR CONSEQUENTIAL DAMAGES
* (INCLUDING, BUT NOT LIMITED TO, PROCUREMENT OF SUBSTITUTE
* GOODS OR SERVICES LOSS OF USE. DATA OR PROFITS OR BUSINESS
* INTERRUPTION) HOWEVER CAUSED AND ON ANY THEORY OF LIABIL-
* ITY, WHETHER IN CONTRACT, STRICT LIABILITY, OR TORTINCLUDING
* NEGLIGENCE OR OTHERWISE) ARISING IN ANY WAY OUT OF THE USE
* OF THIS SOFTWARE, EVEN IF ADVISED OF THE POSSIBILITY OF SUCH
* DAMAGE
* The licence and distribution terms for any publicly available version or derivative of this code cannot be changed. i.e. this code cannot simply be copied and
* put under another distribution licence
* [including the GNU Public Licence.]
Vera Fonts
Copyright
Copyright ( ) 2003 by Bitstream, Inc. All Rights Reserved. Bitstream Vera is a trademark of Bitstream Inc.
Permission is hereby granted, free of charge, to any person obtaining a copy of the fonts accompanying this license ("Fonts") and associated documentation files (the "Font Software"), to reproduce and distribute the Font Software, including without limitation the rights to use, copy, merge, publish, distribute, and/or sell copies of the Font Software, and to permit persons to whom the Font Software is furnished to do so, subject to the following conditions
The above copyright and trademark notices and this permission notice shall be included in all copies of one or more of the Font Software typefaces.
The Font Software may be modified, altered, or added to, and in particular the designs of glyphs or characters in the Fonts may be modified and additional glyphs or characters may be added to the Fonts, only if the fonts are renamed to names not containing either the words "Bitstream" or the word "Vera".
This License becomes null and void to the extent applicable to Fonts or Font Software that has been modified and is distributed under the "Bitstream Vera" names. The Font Software may be sold as part of a larger software package but no copy of one or more of the Font Software typefaces may be sold by itself
THE FONT SOFTWARE IS PROVIDED "AS IS", WITHOUT WARRANTY OF ANY KIND, EXPRESS OR IMPLIED INCLUDING BUT NOT LIMITED TO ANY WARRANTIES OF MERCHANTABILITY FITNESS FOR A PARTICULAR PURPOSE AND NONINFRINGEMENT OF COPYRIGHT PATENTITRADEMARK OR OTHER RIGHT. IN NO EVENT SHALL BITSTREAM OR THE GNOME FOUNDATION BE LIABLE FOR ANY CLAIM, DAMAGES OR OTHER LIABILITY, INCLUDING ANY GENERAL, SPECIAL, INDIRECT, INCIDENTAL, OR CONSEQUENTIAL DAMAGES WHETHER IN AN ACTION OF CONTRACTORT OR OTHERWISE, ARISING FROM OUT OF THE USE OR INABILITY TO USE THE FONT SOFTWARE OR FROM OTHER DEALINGS IN THE FONT SOFTWARE Except as contained in this notice, the names of Gnome, the Gnome Foundation and Bitstream Inc., shall not be used in advertising or otherwise to promote the sale, use or other dealings in this Font Software without prior written authorization from the Gnome Foundation or Bitstream Inc., respectively. For further information contact: fonts at gnome dot org
xmlprc
$$ \text { XML - RPC For C / C++License } $$
100.000.000.000.000.000.000.000.000.000.000.000.000.000.000.000.
Copyright ( Q ) 2001 by First Peer, Inc. All rights reserved.
Copyright (C) 2001 by Eric Kidd. All rights reserved.
Redistribution and use in source and binary forms, with or without modification are permitted provided that the following conditions are met:
- Redistributions of source code must retain the above copyright notice, this list 6 conditions and the following disclaimer:
- Redistributions in binary form must reproduce the above copyright notice, this list of conditions and the following disclaimer in the documentation and/or other materials provided with the distribution
- The name of the author may not be used to endorse or promote products derived from this software without specific prior written permission. THIS SOFTWARE IS PROVIDED BY THE AUTHOR AND CONTRIBUTORS "AS IS" AND ANY EXPRESS OR IMPLIED WARRANTIES INCLUDING BUT NOT LIMITED TO THE IMPLIED WARRANTIES OF MERCHANTABILITY AND FITNESS FOR A PARTICULAR PURPOSE ARE DISCLAIMED. IN NO EVENT SHALL THE AUTHOR OR CONTRIBUTORS BE LIABLE FOR ANY DIRECT, INDIRECT, INCIDENTAL, SPECIAL, EXEMPLARY, OR CONSEQUENTIAL DAMAGES (INCLUDING, BUT NOT LIMITED TO PROCUREMENT OF SUBSTITUTE GOODS OR SERVICES LOSS OF USE, DATA OR PROFITS OR BUSINESS INTERRUPTION) HOWEVER CAUSED AND ON ANY THEORY OF LIABILITY, WHETHER IN CONTRACT, STRICT LIABILITY, OR TORT (INCLUDING NEGLIGENCE ® OTHERWISE) ARISING IN ANY WAY OUT OF THE USE OF THIS SOFTWARE EVEN IF ADVISED OF THE POSSIBILITY OF SUCH DAMAGE

text_image
PHILIPSP&F USA, Inc. PO Box 430 Daleville, IN 47334-0430
P&F Mexicana, S.A. de C.V. Av. La Palma No. 6, Col. San Fernando La Herradura, Huixquilucan Edo. de México C.P. 52787
Meet Philips at the Internet http://www.philips.com/support

Be responsible Respect copyrights
| ENERGIA | |
| HTS3506 | 120 V ~ 60 Hz 70 W |