
Immersive Sound HTS3531 - Home Theater PHILIPS - Free user manual and instructions
Find the device manual for free Immersive Sound HTS3531 PHILIPS in PDF.


User questions about Immersive Sound HTS3531 PHILIPS
0 question about this device. Answer the ones you know or ask your own.
Ask a new question about this device
Download the instructions for your Home Theater in PDF format for free! Find your manual Immersive Sound HTS3531 - PHILIPS and take your electronic device back in hand. On this page are published all the documents necessary for the use of your device. Immersive Sound HTS3531 by PHILIPS.
USER MANUAL Immersive Sound HTS3531 PHILIPS
For product support, visit
www.philips.com/support
HTS3531
natural_image
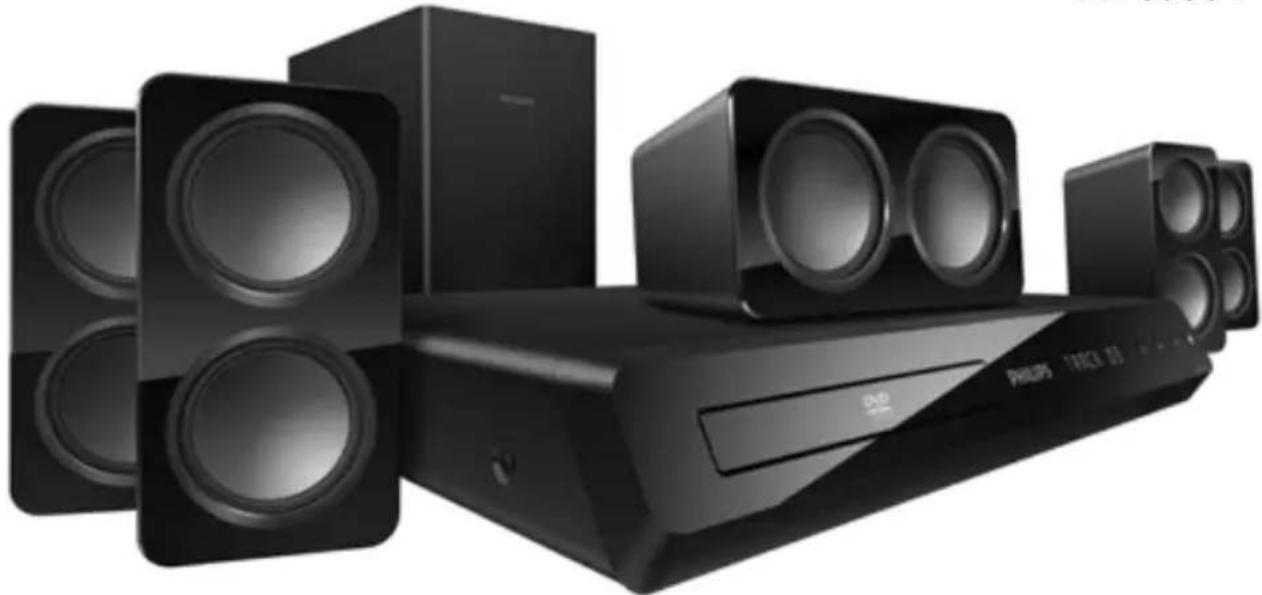
Black Philips 1932 electronic device with multiple speakers and a CD, no visible text or symbols on the main body.EN: For further assistance, call the customer support service in your country.
• To obtain assistance in the U.S.A., Canada, Puerto Rico, or the U.S. Virgin Islands, contact Philips Customer Care Center at 1-866-309-0846
• To obtain assistance in Mexico, contact Philips Customer Care Center at 01 800 504 6200
Care for your product 4
Care of the environment 4
3 Your home theater 5
Main unit 5
Remote control 5
4 Connect your home theater 7
Speakers 7
Connectors 8
Connect to TV 8
Connect audio from TV and other devices 9
5 Use your home theater 10
Choose sound 10
Discs 11
USB storage devices 12
DivX 12
Audio, video, and picture options 13
Radio 13
MP3 player 14
Create MP3 files 14
EasyLink 15
6 Change settings 16
Picture 16
Sound 16
Language 17
Parental control 17
Energy saving 18
Apply factory settings 18
7 Update software 19
Check software version 19
Update software through USB or CD-R 19
8 Product specifications 20
9 Troubleshooting 21
10 Index 23
1 Notice
This section contains the legal and trademark notices.
Copyright

Be responsible Respect copyrights
This item incorporates copy protection technology that is protected by U.S. patents and other intellectual property rights of Rovi Corporation. Reverse engineering and disassembly are prohibited.
Compliance
Notice for USA
This equipment has been tested and found to comply with the limits for a Class B digital device, pursuant to part 15 of the FCC Rules. These limits are designed to provide reasonable protection against harmful interference in a residential installation. This equipment generates, uses and can radiate radio frequency energy and, if not installed and used in accordance with the instruction manual, may cause harmful interference to radio communications.
However, there is no guarantee that interference will not occur in a particular installation. Of this equipment does cause harmful interference to radio or television reception, which can be determined by turning the equipment off and on, the user is encouraged to try to correct the interference by one or more of the following measures:
- Relocate the receiving antenna.
- Increase the separation between equipment and receiver.
- Connect the equipment into an outlet on a circuit different from that to which the receiver is connected.
- Consult the dealer or an experienced radio/TV technician for help.
Notice for Canada
Class B Clause
This digital apparatus does not exceed the Class B limits for radio noise emissions from digital apparatus as set out in the Radio Interference Regulations of the Canadian Department of Communications. This Class B digital apparatus complies with Canadian ICES-003.
Trademarks
DOLBY DIGITAL
Manufactured under license from Dolby Laboratories. Dolby and the double-D symbol are trademarks of Dolby Laboratories.
DIVX ULTRA
DivX ^® , DivX Ultra ^® , DivX Certified ^® and associated logos are trademarks of Rovi Corporation or its subsidiaries and are used under license.
DivX Ultra ^® Certified to play DivX ^® video with advanced features and premium content.
ABOUT DIVX VIDEO: DivX® is a digital video format created by DivX, LLC, a subsidiary of Rovi Corporation. This is an official DivX Certified® device that plays DivX video. Visit divx.com for more information and software tools to convert your files into DivX videos.
ABOUT DIVX VIDEO-ON-DEMAND: This DivX Certified® device must be registered in order to play purchased DivX Video-on-Demand (VOD) movies. To obtain your registration code, locate the DivX VOD section in your device setup menu. Go to vod.divx.com for more information on how to complete your registration.
HDMI™ NUMBERED MULTIMEDIA INTERFACE
HDMI, and HDMI logo, and High-Definition Multimedia Interface are trademarks or registered trademarks of HDMI licensing LLC in the United States and other countries.
text_image
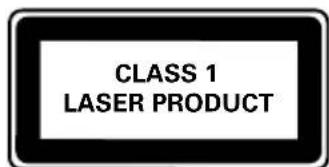
CLASS 1 LASER PRODUCT2 Important
Read and understand all instructions before you use your home theater. If damage is caused by failure to follow instructions, the warranty does not apply.
Safety
- Read these instructions.
- Keep these instructions.
- Heed all warnings.
- Follow all instructions.
- Do not use this apparatus near water.
- Clean only with dry cloth.
- Do not block any ventilation openings. Install in accordance with the manufacturer's instructions.
- Do not install near any heat sources such as radiators, heat registers, stoves, or other apparatus (including amplifiers) that produce heat.
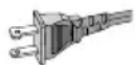
- Do not defeat the safety purpose of the polarized or grounding-type plug. A polarized plug has two blades with one wider than the other. A grounding type plug has two blades and a third grounding prong. The wide blade or the third prong are provided for your safety. If the provided plug does not fit into your outlet, consult an electrician for replacement of the obsolete outlet.
- Protect the power cord from being walked on or pinched, particularly at plugs, convenience receptacles, and the point where they exit from the apparatus.
- Only use attachments/accessories specified by the manufacturer.

- Use only with the cart, stand, tripod, bracket or table specified by the manufacturer or sold with the apparatus. When a cart is used, use caution when moving the cart/apparatus combination to avoid injury from tip-over.
- Unplug this apparatus during lightning storm or when unused for long periods of time.
- Refer all servicing to qualified service personnel. Servicing is required when the apparatus has been damaged in any way, such as power-supply cord or plug is damaged, liquid has been spilled or objects have fallen into the apparatus, the apparatus has been exposed to rain or moisture, does not operate normally, or has been dropped.
- Battery usage CAUTION - To prevent battery leakage which may result in bodily injury, property damage, or damage to the unit:
• Install all batteries correctly, + and - as marked on the unit.
- Do not mix batteries (old and new or carbon and alkaline, etc.).
- Remove batteries when the unit is not used for a long time.
- Apparatus shall not be exposed to dripping or splashing.
- Do not place any sources of danger on the apparatus (for example, liquid filled objects, lighted candles).
- This apparatus may contain lead and mercury. Dispose according to local, State or Federal laws. For disposal or recycling information, please contact your local authorities. For additional assistance on recycling options, please contact www.mygreenelectronics.com or www.eiae.org or www.recycle.philips.com.
- Use of controls or adjustments or performance of procedures other than herein may result in hazardous radiation exposure or other unsafe operation.
- Disconnect the mains plug to shut off when find trouble or not in use. The mains plug shall be readily operable.
- Do not place this apparatus on the furniture that is capable of being tilted by a child and an adult leaning, pulling, standing or climbing on it. A falling apparatus can cause serious injury or even death.
- This apparatus should not be placed in a built-in installation such as a bookcase or rack unless proper ventilation is provided. Make sure to leave a space of 7.8 inches (20cm) or more around this apparatus.
Class II equipment symbol

This symbol indicates that the unit has a double insulation system.
Know these safety symbols
text_image
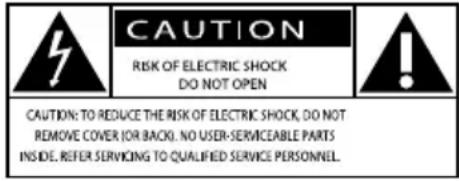
CAUTION RISK OF ELECTRIC SHOCK DO NOT OPEN CAUTION: TO REDUCE THE RISK OF ELECTRIC SHOCK, DO NOT REMOVE COVER (OR BACK). NO USER-SERVICEABLE PARTS INSIDE. REFER SERVICING TO QUALIFIED SERVICE PERSONNEL.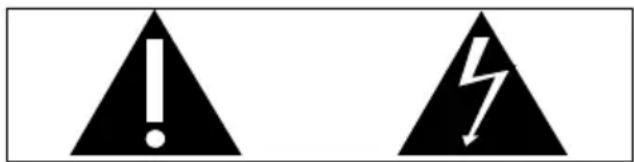
text_image
Warning symbols: triangular warning triangle with exclamation mark and lightning bolt symbolThis 'bolt of lightning' indicates uninsulated material within your unit may cause an electrical shock. For the safety of everyone in your household, please do not remove product covering.
The 'exclamation point' calls attention to features for which you should read the enclosed literature closely to prevent operating and maintenance problems.
WARNING: To reduce the risk of fire or electric shock, this apparatus should not be exposed to rain or moisture and objects filled with liquids, such as vases, should not be placed on this apparatus. CAUTION: To prevent electric shock, match wide blade of plug to wide slot, fully insert.
Care for your product
- Do not insert any objects other than discs into the disc compartment.
- Do not insert warped or cracked discs into the disc compartment.
- Remove discs from the disc compartment if you are not using the product for an extended period of time.
- Use only microfiber cloth to clean the product.
Care of the environment

Your product is designed and manufactured with high quality materials and components, which can be recycled and reused.
Please visit www.recycle.philips.com for additional information on a recycling center in your area.
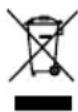
Never dispose of your product with other household waste. Please inform yourself about the local rules on the separate collection of electrical and electronic products and batteries. The correct disposal of these products helps prevent potentially negative consequences on the environment and human health.
The batteries supplied do not contain the heavy metals mercury and cadmium. Nevertheless, in many areas batteries may not be disposed of with your household waste. Please ensure you dispose of batteries according to local regulations.
3 Your home theater
Congratulations on your purchase, and welcome to Philips! To fully benefit from the support that Philips offers, visit www.philips.com/support.
Main unit
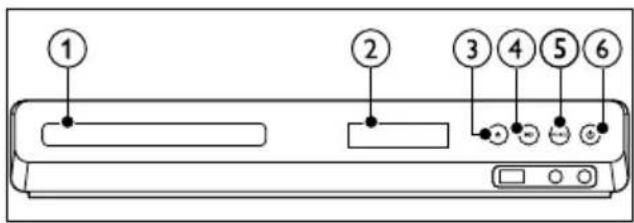
text_image
① ② ③ ④ ⑤ ⑥① Disc compartment
② Display panel
③ ▲(Open/Close)
Open or close the disc compartment, or eject the disc.
④ ▶(Play/Pause)
Start, pause or resume play.
⑤ SOURCE
Select an audio or video source for the home theater.
⑥ ⏻(Standby-On)
Switch the home theater on or to standby.
Remote control
This section includes an overview of the remote control.
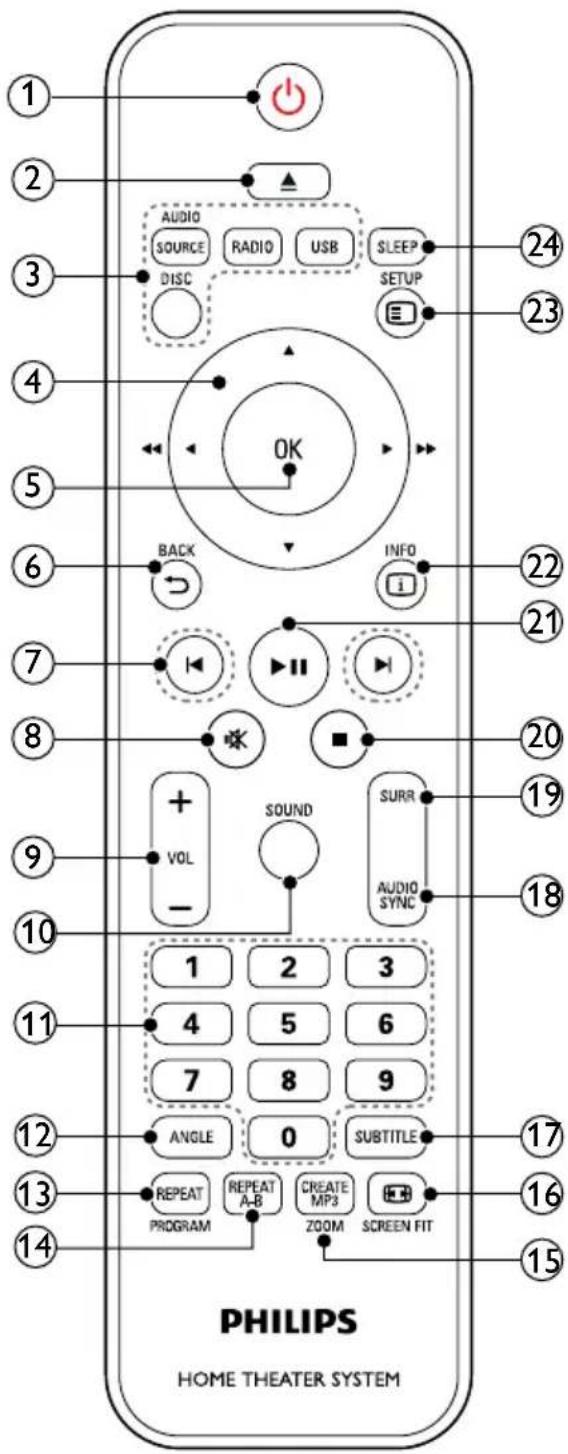
text_image
1 2 3 4 5 6 7 8 9 10 11 12 13 14 AUDIO SOURCE RADIO USB SLEEP SETUP DISC OK BACK INFO i SOUND SURR AUDIO SYNC VOL - 1 2 3 4 5 6 7 8 9 ANGLE 0 SUBTITLE REPEAT REPEAT A-B CREATE MP3 SCREEN FIT PROGRAM ZOOM SCREEN FIT PHILIPS HOME THEATER SYSTEM① ⏻(Standby-On)
- Switch the home theater on or to standby.
- When EasyLink is enabled, press and hold for at least three seconds to switch all connected HDMI CEC compliant devices to standby.
② ▲(Open/Close)
Open or close the disc compartment, or eject the disc.
③ Source buttons
- DISC: Switch to disc source.Access or exit the disc menu when you play a disc.
• AUDIO SOURCE: Select an audio input source.
• RADIO: Switch to FM radio.
• USB: Switch to USB storage device.
④ Navigation buttons
- Navigate menus.
- In video mode, press left or right to fast backward or fast forward; press up or down to slow backward or slow forward.
- In radio mode, press left or right to search a radio station; press up or down to fine tune a radio frequency.
⑤ OK
Confirm an entry or selection.
⑥ BACK
Return to a previous menu screen.
⑦ ◀/ ▶(Previous/Next)
- Skip to the previous or next track, chapter or file.
- In radio mode, select a preset radio station.
⑧ (Mute)
Mute or restore volume.
⑨ VOL +/-
Increase or decrease volume.
⑩ SOUND
Select a sound mode.
⑪ Numeric buttons
Select an item to play.
⑫ ANGLE
Select video scenes recorded in different camera angels.
⑬ REPEAT / PROGRAM
- Select or turn off repeat mode.
• In radio mode, set a radio station.
⑭ REPEAT A-B
Mark two points within a chapter or track to repeat play, or turn off the repeat mode.
⑮ CREATE MP3/ZOOM
- Access the create MP3 menu.
- Zoom into a video scene or picture. Press the Navigation buttons (left/right) to select a zoom factor.
⑯ SCREEN FIT
Fit the picture format to the TV screen.
⑰ SUBTITLE
Select subtitle language for video.
⑱ AUDIO SYNC
- Select an audio language or channel.
- Press and hold to access audio delay setting, then press +/- to delay the audio to match the video.
⑲ SURR
Select surround sound or stereo sound.
⑳ ■(Stop)
Stop play.
②1 ▶(Play/Pause)
Start, pause or resume play.
22 INFO
Access more play options while playing a disc or a USB storage device.
②3 SETUP
Access or exit the setup menu.
24 SLEEP
Switch the home theater to standby mode after the elapsed time.
EasyLink controls
With Easylink, you can control your home theater and the TV with the following buttons on your home theater remote control (see 'EasyLink' on page 15).
- (Standby-On): Press and hold to switch your home theater, TV and the connected devices to standby.
- (PMPause): When a video disc is in the disc compartment, wake up the TV from standby, and then play a disc.
4 Connect your home theater
This section helps you connect your home theater to a TV and other devices.
For information about the basic connections of your home theater and accessories, see the quick start guide. For a comprehensive interactive guide, see www.connectivityguide.philips.com.

Note
- For identification and supply ratings, refer to the type plate at the back or bottom of the product.
- Before you make or change any connections, make sure that all devices are disconnected from the power outlet.
Speakers
Position, connect, and set up your speakers for best surround sound.
Position
Speaker position plays a critical role in setting up a surround sound effect.
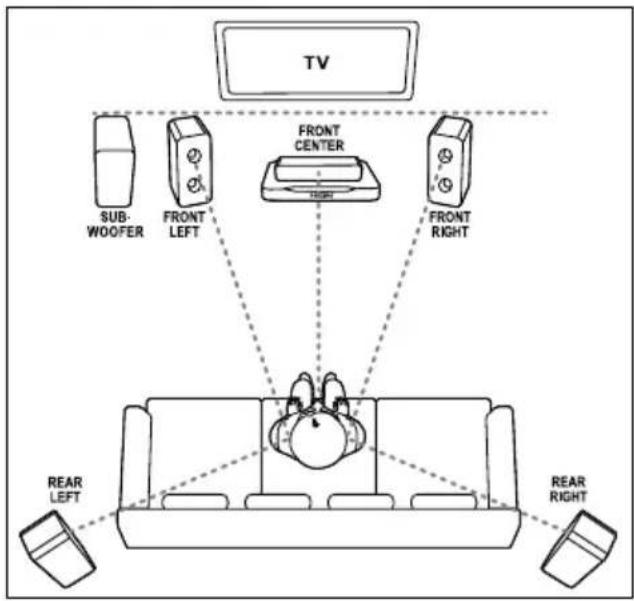
For best results, place your speakers and the subwoofer as shown below.
text_image
TV SUB- WOOFER FRONT LEFT FRONT CENTER FRONT RIGHT REAR LEFT REAR RIGHT
Note
- Surround sound depends on factors such as room shape and size, type of wall and ceiling, windows and reflective surfaces, and speaker acoustics. Experiment with the speaker positions to find the optimum setting for you.
Follow these general guidelines, and then set up your speakers.
1 Seating position:
This is the center of your listening area.
2 FRONT CENTER (front center) speaker:
Place the center speaker directly in front of the seating position, either above or below your TV. Make sure that it is close to your ear height when you are seated.
3 FRONT LEFT (front left) and FRONT RIGHT (front right) speakers:
Place the left and right speakers in the front, and equidistant from the center speaker in an arc, so that all the three speakers are at same distance from your seating position. For best effect, point the speakers towards the seating position and place the speakers close to the ear level (when seated).
4 REAR LEFT (rear left) and REAR RIGHT (rear right) speakers:
Place the rear surround speakers to the left and right side of your seating position, either in line with it or slightly behind it. For best effect, point the speakers towards the seating position and place the speakers just above the ear level (when seated).
5 SUBWOOFER (subwoofer):
Place the subwoofer at least one meter to the left or right of the TV. Leave about ten centimeter clearance from the wall.
Connect
Connect your speakers and the subwoofer to your home theater as described in the quick start guide.
Setup
Set up your speakers through the speaker setup menu.
1 Connect your speakers and subwoofer as described in the Quick start guide.
2 Turn on your TV, and switch to the correct source for the home theater.
3 Press SETUP on your home theater remote control.
4 Select [Audio Setup], and then press OK.
5 Change the following settings, and then press OK.
• [Speakers Volume]: Set the volume level of each speaker.
- [Speakers Delay]: Set the delay time for speakers which are placed closer to the seating position in order to obtain equal audio transmission from all the speakers.
Connectors
Connect other devices to your home theater.
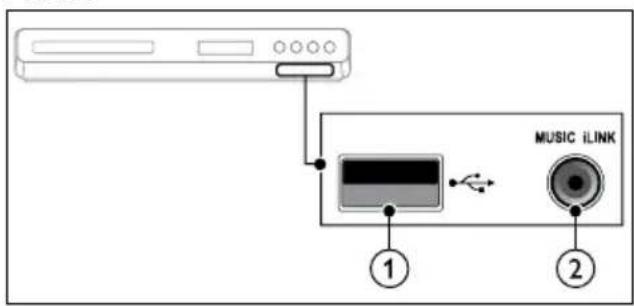
Front
text_image
MUSIC iLINK ① ②① (USB)
Audio, video or picture input from a USB storage device.
② MUSIC iLINK
Audio input from an MP3 player.
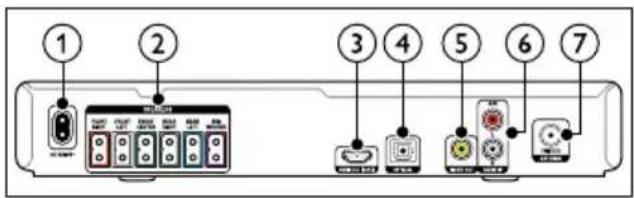
Back connectors
text_image
① ② ③ ④ ⑤ ⑥ ⑦① AC MAINS
Connect to the power supply.
② SPEAKERS
Connect to the supplied speakers and subwoofer.
③ HDMI OUT
Connect to the HDMI input on the TV.
④ OPTICAL
Connect to an optical audio output on the TV or a digital device.
⑤ VIDEO OUT
Connect to the composite video input on the TV.
⑥ AUDIO IN-AUX
Connect to an analog audio output on the TV or an analog device.
⑦ ANTENNA FM 75Ω
Signal input from an antenna, cable or satellite.
Connect to TV
Connect your home theater to a TV to watch videos. You can listen to audio from TV programs through your home theater speakers. Use the best quality connection available on your home theater and TV.
Option 1: Connect to TV through HDMI
Best quality video
With a standard HDMI connection, you need an additional audio cable to play the audio from the TV through your home theater (see 'Connect audio from TV and other devices' on page 9).
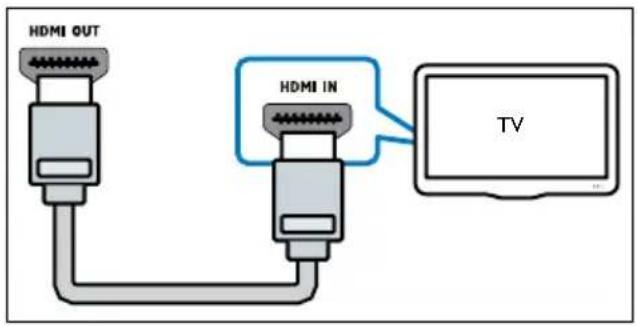
1 Using a High Speed HDMI cable, connect the HDMI OUT connector on your home theater to the HDMI connector on the TV. The HDMI connector on the TV might be labeled HDMI IN.
text_image
HDMI OUT HDMI IN TV2 On your TV, turn on HDMI-CEC. For details, see the TV user manual. → When you play a disc on your home theater, the video is automatically displayed on TV and the audio is automatically played on the home theater.
3 To play audio from TV programs through your home theater, connect an additional audio cable (see 'Connect audio from TV and other devices' on page 9). On your home theater, press SOURCE repeatedly to select the correct audio input.

Note
- If your TV has a DVI connector, you can use an HDMI/DVI adapter to connect to TV.
Option 2: Connect to the TV through composite video
Basic quality video
If your TV does not have HDMI connectors, connect your home theater to the TV through a composite connection. A composite connection does not support high-definition video. With a composite connection, you need an additional audio cable to play the audio from the TV through your home theater (see 'Connect audio from TV and other devices' on page 9).
1 Using a composite video cable, connect the VIDEO connector on your home theater to the composite video connector on the TV. The composite video connector might be labeled AV IN, VIDEO IN, COMPOSITE, or BASEBAND.
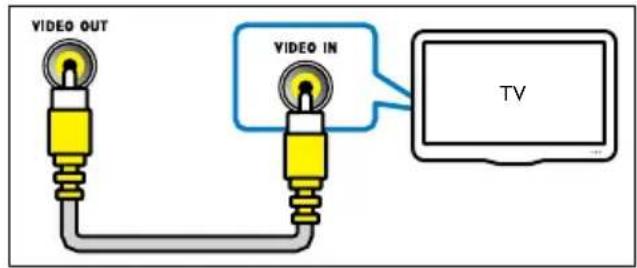
text_image
VIDEO OUT VIDEO IN TV2 On your TV, switch to the correct video input. 3 To play audio from TV programs through your home theater, connect an additional audio cable (see 'Connect audio from TV and other devices' on page 9). On your home theater, press SOURCE repeatedly to select the correct audio input.
Connect audio from TV and other devices
Play audio from TV or other devices through your home theater.
Use the best quality connection available on your TV, home theater, and other devices.

Note
- The audio connections in this user manual are only recommendations. You can use other connections too.
Option 1: Connect audio through a digital optical cable
Best quality audio
Using an optical cable, connect the OPTICAL connector on your home theater to the OPTICAL OUT connector on the TV or other device. The digital optical connector might be labeled SPDIF, SPDIF OUT, or OPTICAL.
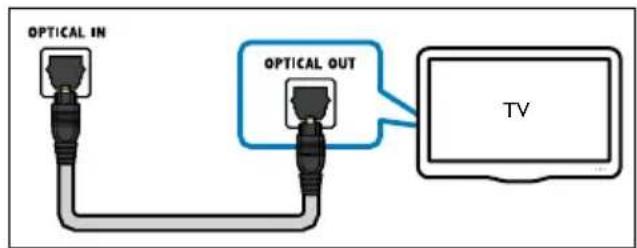
text_image
OPTICAL IN OPTICAL OUT TVOption 2: Connect audio through analog audio cables
Basic quality audio
Using an analog cable, connect the AUX connectors on your home theater to the AUDIO OUT connectors on the TV or other device.
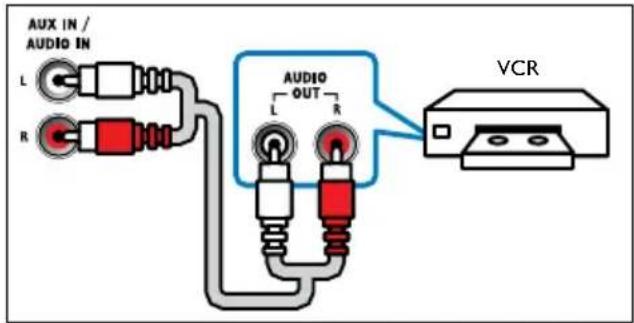
text_image
AUX IN / AUDIO IN L R AUDIO OUT L R VCR5 Use your home theater
This section helps you use the home theater to play media from a wide range of sources.
Before you start
• Make the necessary connections described in the Quick start guide and the user manual.
- Switch the TV to the correct source for the home theater.
Choose sound
This section helps you choose the ideal sound for your video or music.
Sound mode
Select predefined sound modes to suit your video or music.
1 Press SOUND repeatedly to select a sound mode.
• MOVIE: Enjoy a cinematic audio experience, specially enhanced for movies.
• MUSIC: Recreate the original recording environment of your music, in the studio or at a concert.
• ORIGINAL: Experience the original sound of your movies and music, without added sound effects.
• NEWS: Hear every word with optimized speech and clear vocals.
• GAMING: Enjoy thrilling arcade sounds, ideal for action-packed video games or loud parties.
Surround sound mode
Experience an immersive audio experience with surround sound modes.
1 Select SURR repeatedly to select a surround mode.
- MULTI-CH: Traditional 5.1 channel for a more relaxing cinematic experience.
• STEREO: Two-channel stereo sound. Ideal for listening to music.

Note
- If the audio source is a 2.1 channel, multi-channel mode will output 5-channel stereo sound.
Discs
Your home theater can play DVDs, VCDs, and CDs. It can also play discs that you've made at home, such as CD-R discs of photos and music.
What you need
- Audio and video connection between your home theater and the TV.
• An audio or a video disc.
1 Insert a disc into the home theater. → Your TV switches to the correct source and the disc plays automatically. If it does not, press DISC.
2 Press the play buttons to control play (see 'Play buttons' on page 11).
Play buttons
| Button Action | |
| Navigation buttons | Navigate menus. |
| OK Confirm an entry or selection. | |
| ▶II (Play/Pause) | Start, pause or resume play. |
| ■ | Stop play. |
| ◀/▶I | Skip to the previous or next track, chapter or file. |
| ◀◀/▶▶ | Fast backwards or fast forwards. Press repeatedly to change the search speed. |
| Navigation buttons (left/right) | Rotate the picture clockwise or counter-clockwise. |
| Navigation buttons (up/down) | Flip the picture vertically or horizontally. |
| SUBTITLE Select subtitle language for video. | |
| DISC Access or exit the disc menu. | |
| AUDIO SYNC | Select an audio language or channel. |
| SCREEN FIT | Fit the picture format to the TV screen. |
| ZOOM Zoom into a video scene or picture. | |
| REPEAT Select or turn off repeat mode. | |
| REPEAT A-B | Mark two points within a chapter or track to repeat play, or turn off the repeat mode. |
| ANGLE | Select video scenes recorded in different camera angels. |
| INFO | Access the advanced options when you play your audio, video, or media files (see 'Audio, video, and picture options' on page 13). |
Display menu for VCD and SVCD
Display the content menu on VCD and SVCD discs.
1 Press Ⓐ SETUP.
2 Select [Preference Setup], and then press OK.
3 Select [PBC] > [On], and then press OK.

Note
• To skip the content menu, select [Off].
- While playing a VCD/SVCD, you can press DISC to turn off or on the PBC (playback control).
Display menu for MP3/JPEG
You can choose how you want the MP3 contents to display.
1 Press Ⓔ SETUP.
2 Select [Preference Setup], and then press OK.
3 Select [MP3/JPEG Display], and then press OK.
4 Select the following options, then press OK.
• [View Folders]: Display the MP3 folders.
• [View Files]: Display the MP3 files.
Synchronize picture and sound
If the audio and video are not synchronized, delay the audio to match the video.
1 Press SETUP.
2 Select [Audio Setup], and then press OK.
3 Select [Audio Sync], and then press OK.
4 Press the Navigation buttons (left/right) to synchronize the audio with the video.
5 Press OK to confirm.

Note
- Press and hold AUDIO SYNC on the remote control for quick access to the audio sync setup menu.
USB storage devices
Enjoy pictures, audio and video on a USB storage device.
What you need
- A USB storage device that is formatted for FAT, and complies with the Mass Storage Class.
- A USB extension cable, if the USB storage device does not fit into the connector.

Note
- You can use digital cameras connected by USB if they can play the files without using a special computer program.
Play files
1 Connect the USB storage device to the home theater.
2 Press USB.
→ A content browser is displayed.
3 Select a file, and then press OK.
4 Press the playback buttons to control play (see 'Play buttons' on page 11).
DivX
Play DivX videos from :
• a disc (see 'Discs' on page 11),
- a USB storage device (see 'USB storage devices' on page 12).
VOD code for DivX
Before you purchase DivX videos and play them on your home theater, register the home theater on www.divx.com using the DivX VOD code.
1 Press SETUP.
2 Select [General Setup], and then press OK.
3 Select [DivX(R) VOD Code], and then press OK.
→ The DivX VOD registration code for your home theater is displayed.
Subtitles
If your video has subtitles in multiple languages, select a subtitle language.
1 While playing video, press SUBTITLE to select a language.

Note
- Make sure that the subtitle file has the same name as the video file. For example, if the video file is named 'movie.avi', save the subtitle file as 'movie.srt' or 'movie.sub'.
- Your home theater can play subtitle files in the following formats: .srt, .sub, .txt, .ssa, .ass, smi, and .sami. These files do not appear in the file navigation menu.
- If the subtitles do not appear correctly, change the character set.
Subtitle character set
If the subtitles do not appear correctly, change the character set that supports the DivX subtitle.
1 Press SETUP.
2 Select [Preference Setup], and then press OK.
3 Select [DivX Subtitle], and then press OK.
4 Select a character set, and the press OK.
Audio, video, and picture options
Use advanced features when you play audio, video, or media files from a disc or a USB storage device.
Audio options
1 Press INFO repeatedly to cycle through the following options:
- Show the current track information and time.
- [Off]: Press Navigation buttons (left/right) to select a repeat mode.
• [Disc Go To]: Skip to a specific part of the disc by entering the disc time. - [Track Go]: Skip to a specific part of the track by entering the track time.
- [Select Track]: Select a specific track.
Video options
1 Press INFO. → The video options menu is displayed.
2 Press the Navigation buttons and OK to select and change:
• [Title]: Select a specific title.
• [Chapter]: Select a specific chapter.
- [Track]: Select a specific track (for VCD/SVCD only).
• [Audio]: Select audio language for video.
- [Subtitle]: Select subtitle language for video.
• [Angle]: Select video scenes recorded in different camera angels.
- [TT Time]: Skip to a specific part of the video by entering the title time.
- [Ch Time]: Skip to a specific part of the video by entering the chapter time.
- [Disc Time]: Skip to a specific part of the video by entering the disc time (for VCD/SVCD only).
- [Track Time]: Skip to a specific part of the video by entering the track time (for VCD/SVCD only).
- [Preview]: Select a content preview for disc.
• [Repeat]: Select a repeat mode.
- [Time Disp.]: Select the information of time display.
Picture options
1 Press INFO to access picture preview mode. → 12 thumbnail pictures are displayed.
2 Press 🖱️ to go to previous or next preview page.
3 Press the Navigation buttons and OK to select a picture.
Slideshows
While playing audio, access fun features such as picture and musical slideshows.
Picture slideshows
View a slideshow of your pictures stored in your disc or a USB storage device.
1 Select a picture from a disc or USB storage device, and then press ▶ II. 2 Press ■ to stop the slideshow.
Musical slideshows
Create a musical slideshow to play music and pictures at the same time.
1 Select a music track, and then press OK.
2 Press BACK, and go to the picture folder.
3 Select a picture, and then press ▶ (Play) to start the slideshow.
4 Press ■ to stop slideshow.
5 Press ■gain to stop music.
Radio
Listen to FM radio on your home theater, and store up to 40 radio stations.
What you need
- FM antenna.

Note
• AM and digital radio are not supported.
- If no stereo signal is detected, you are prompted to install the radio stations again.
- For the best reception, place the antenna away from the TV or other sources of radiation.
Tune stations
1 Connect the FM antenna as described in the Quick start guide.
2 Press RADIO.
→ If you have already installed the radio stations, the last channel that you listened to is played.
→ If you have not installed any radio stations, the message AUTO INSTALL...PRESS PLAY appears on the display panel. Press ▶ (Play).
3 Press the following buttons to listen or to change radio stations:
Button Action
| ◄/► | Select a preset radio station. |
| Navigation buttons (left/right) | Search for a radio station. |
| Navigation buttons (up/down) | Fine tune a radio frequency. |
| Press to stop the installation of radio stations.Press and hold to erase the preset radio station. | |
| PROGRAM Manual: Press once to access program mode, and press again to store the radio station.Automatic: Press and hold for three seconds to reinstall the radio stations. | |
Listen to radio
1 Press RADIO.
- To listen to a preset station, press for ▶.
- To search for a radio station, and then listen, press Navigation buttons (left/right).
2 Press +/- (Volume) to change the volume.
MP3 player
Connect your MP3 player to play your audio files or music.
What you need
- An MP3 player.
• A 3.5mm stereo audio cable.
Play music
1 Connect the MP3 player to the home theater as described in the Quick start guide.
2 Press AUDIO SOURCE repeatedly until 'MUSIC I-LINK' appears on the display panel.
3 Press the buttons on the MP3 player to select and play audio files or music.
Create MP3 files
Use your home theater to convert audio CDs into MP3 files.
What you need
- An audio disc.
• A USB storage device
1 Connect a USB storage device to the home theater.
2 Play your audio CD (CDDA/HDCD).
3 Press CREATE MP3.
A confirmation message is displayed.
4 Select [Yes], and then press OK.
→ The create MP3 screen is displayed. The right panel contains MP3 settings and the left panel shows the audio tracks.
| CREATE MP3 | |||
| OPTIONS | TRACK | ||
| Speed Normal | Track01 | 04:14 | |
| Bitrate 128kbps | Track02 | 04:17 | |
| CRT ID3 Yes | Track03 | 03:58 | |
| Device USB1 | Track04 | 04:51 | |
| Track05 | 03:53 | ||
| SUMMARY | Track06 | 04:09 | |
| Select Track 0Time 00:00 | Track07 | 04:38 | |
| Start | Exit | Select All | Deselect All |
5 Press the Navigation buttons and OK to select and change:
• [Speed]: Select the write-to-file speed.
• [Bitrate]: Select the conversion quality.
- [Device]: Select the USB storage device which you use to store the MP3 files.
6 Navigate to the right panel, and then select the audio tracks and press OK.
- To select all tracks, navigate to [Select All], and then press OK.
7 Select [Start], and then press OK to start the MP3 conversion.
A new folder which contains the MP3 files is created in the USB storage device.
- To exit the menu, select [Exit], and then press OK.

Note
- When the conversion is in process, do not press any buttons.
- DTS CDs and copy-protected CDs cannot be converted.
- Write-protected or password-protected USB storage device cannot be used to store MP3 files.
EasyLink
The home theater supports Philips EasyLink, which uses the HDMI-CEC (Consumer Electronics Control) protocol. EasyLink-compliant devices that are connected through HDMI can be controlled by a single remote control.
Philips does not guarantee 100% interoperability with all HDMI-CEC devices.
What you need
• HDMI-CEC compliant devices.
- An HDMI connection between the connected devices.
Switch on
1 On the TV and other connected devices, turn on the HDMI-CEC operations. For details, see the manual of the TV or other devices.
2 Press SETUP.
3 Select [General Setup], and then press OK.
4 Select [EasyLink Setup] > [EasyLink], and then press OK.
5 Select [On], and then press OK.
Control devices
Control the home theater and the other connected HDMI-CEC compliant devices with a single remote control.
One-touch play
If you enable One-touch play, the TV automatically switches to the correct channel when you play a disc in your home theater.
One-touch standby
When you press and hold ⏻ (Standby) on the remote control, the home theater and all the connected HDMI-CEC devices (that support one-touch standby) switch to the standby mode. If one-touch standby is enabled on your home theater, you can switch to standby with the remote control of the TV or other HDMI-CEC devices.
6 Change settings
This section helps you to change the settings of your home theater.

Caution
- Most of the settings are already configured with the best value for your home theater. Unless you have a reason to change a setting, it is best to leave it at the default value.

Note
- You cannot change a setting that is grayed out.
- To return to the previous menu, press BACK. To exit the menu, press SETUP.
Picture
Change the picture settings to suit your preferences.

Note
- The best setting is automatically selected for the TV. If you change the setting, make sure that the TV supports the new settings.
Picture settings and format
1 Press SETUP.
2 Select [Video Setup], and then press OK.
3 Change the following settings, and then press OK:
• [TV System]: For TV supported video format.
- [TV Display]: For TV picture display format.
• [Picture Settings]: Predefined color settings.
Picture resolution
To enjoy high definition HDMI video output, set the HDMI video settings that best match up with your TV capability.
1 Press SETUP.
2 Select [Video Setup], and then press OK.
3 Select [HDMI Setup], and then press OK.
4 Change the following settings, and then press OK:
- [Wide Screen Format]: For 16:9 wide screen TV display setting.
• [HDMI Video]: HDMI resolution.
High definition picture
Support high definition JPEG pictures.
1 Press SETUP.
2 Select [Video Setup], and then press OK.
3 Select [HD JPEG] > [On], and then press OK.
Sound
Change the sound settings to suit your preference.
HDMI audio
HDMI audio is automatically down-mixed to two channel for TV speakers. If you do not want to output audio through your TV, disable the HDMI audio.
1 Press SETUP.
2 Select [Audio Setup], and then press OK.
3 Select [HDMI Audio] > [Off], and then press OK.
Language
Select a language for the home menu, audio, and subtitles.
Home menu
1 Press SETUP.
2 Select [General Setup], and then press OK.
3 Select [OSD Language], and then press OK.
4 Select a menu language for your home theater, and then press OK.
Disc audio
1 Press SETUP.
2 Select [Preference Setup], and then press OK.
3 Select [Audio], and then press OK.
4 Select an audio language for discs, and then press OK.

Note
- If your preferred disc language is not available, select [Others] from the list, and enter the 4-digit language code found at the end of this user manual.
- If you select a language that is not available on a disc, the home theater uses the default language of the disc.
Disc subtitle
1 Press SETUP.
2 Select [Preference Setup], and then press OK.
3 Select [Subtitle], and then press OK.
4 Select a subtitle language for discs, and then press OK.
Disc menu
1 Press SETUP.
2 Select [Preference Setup], and then press OK.
3 Select [Disc Menu], and then press OK.
4 Select a menu language for discs, and then press OK.

Note
- If your preferred disc language is not available, select [Others] from the list, and enter the 4-digit language code found at the end of this user manual.
- If you select a language that is not available on a disc, the home theater uses the default language of the disc.
Parental control
Restrict access to discs.
Password
You can set or change your password to play a restricted disc.
1 Press SETUP.
2 Select [Preference Setup], and then press OK.
3 Select [Password], and then press OK.
→ A change password menu is displayed.
4 Follow the instructions on the TV to set or change password.
- If you do not have a password or you have forgotten, enter 0000.
5 Press OK.
Ratings
Some discs are recorded with ratings according to age. You can set up your home theater to play only discs with an age rating lower than your child's age.
1 Press SETUP.
2 Select [Preference Setup], and then press OK.
3 Select [Parental], and then press OK.
A message prompts you to enter the password.
4 Enter the password with the Numeric buttons.
5 Select an age rating, and then press OK.
- To play all discs irrespective of the rating, select level 8.
Lock disc
To restrict access to discs that are not encoded with ratings and parental control, lock the disc manually. You can lock up to 20 discs on your home theater.
1 While playing a disc, press SETUP.
2 Select [General Setup], and then press OK.
3 Select [Disc Lock] > [Lock], and then press OK.
A message prompts you to enter the password.
4 Enter the password with the Numeric buttons.
→ The disc is locked.
• To play the locked disc, enter the password.
Energy saving
Save energy by changing the following settings.
Auto standby
When playing a disc or a USB storage device, automatically switch your home theater to standby if:
- it is in pause or stop mode, and
- no button is pressed for 30 minutes.
1 Press SETUP.
2 Select [General Setup], and then press OK.
3 Select [Auto Standby] > [On], and then press OK.
Sleep timer
Set timers to switch the home theater to standby after a specified time.
1 Press SETUP.
2 Select [General Setup], and then press OK.
3 Select [Sleep Timer], and then press OK.
4 Select the duration of the sleep timer.
→ The sleep timer can be set up to 60 minutes. If the sleep timer is set to [Off], it switches off.
5 Press OK to activate.
→ The home theater switches to standby after the specified time.
Screen saver
Automatically switch your home theater to screen saver mode if:
- it is in pause or stop mode, and
- no button is pressed for 10 minutes.
1 Press SETUP.
2 Select [General Setup], and then press OK.
3 Select [Screen Saver] > [On], and then press OK.
Display panel
Change the brightness of the home theater display panel.
1 Press SETUP.
2 Select [General Setup], and then press OK.
3 Select [Display Dim], and then press OK.
4 Select the brightness, and then press OK.
Apply factory settings
Reset your home theater to the default settings. You cannot reset the parental control settings.
1 Press SETUP.
2 Select [Preference Setup], and then press OK.
3 Select [Default], and then press OK.
4 Select [Ok], and then press OK.
7 Update software
To continue to get the best features and support for your home theater, update the software regularly. Compare the version of your current software with the latest version on www.philips.com/support.
Check software version
1 Press SETUP.
2 Select [Preference Setup], and then press OK.
3 Select [Version Info.], and then press OK.
→ The software version is displayed.
Update software through USB or CD-R
What you need
- A CD-R or a USB flash drive with at least 75MB of memory. The USB flash drive must be FAT formatted. Do not use a USB hard drive.
• A computer with Internet access. - An archive utility that supports the ZIP file format (for example, WinZip® for Microsoft® Windows® or StuffIt® for Macintosh®).
Step 1: Download the latest software
1 Connect a USB flash drive or insert a CD-R to your computer.
2 In your web browser, go to www.philips.com/support.
3 At the Philips Support website, find your product and locate the Software and drivers.
→ The software update is available as a zip file.
4 Save the zip file in the root directory of your USB flash drive or CD-R.
5 Use the archive utility to extract the software update file in the root directory.
6 Remove the USB flash drive or CD-R from your computer.
Step 2: Update the software

Warning
- If you use a USB flash drive, make sure that there is no disc in the disc compartment, and the disc compartment is closed.
1 Connect the USB flash drive or insert the CD-R to your home theater.
2 Switch your TV to the correct source for your home theater.
3 Follow the instructions on the TV to complete the update.
→ When the software update is complete, the home theater automatically switches off and restarts. If it does not, disconnect the power cord for a few seconds, and then reconnect it.

Note
- When the software update is in progress, do not turn off the power, or remove the USB flash drive or CD-R.
8 Product specifications

Note
- Specifications and design are subject to change without notice.
Region codes
The type plate on the back or bottom of the home theater shows which regions it supports.
DvDntry
USA, Canada

Media formats
- DVD-Video, DVD+R/+RW, DVD-R/-RW, DVD+R/-R DL, CD-R/CD-RW, Audio CD, Video CD/SVCD, Picture files, MP3 media, WMA media, DivX media, USB storage device
File formats
- Audio: .mp3, .wma,
• Video: .avi, .divx, .mpg, .mpeg, - Picture: .jpg, .jpeg
Amplifier
• Total output power: 300W RMS (30% THD)
• FTC: 60W (1% THD)
• Frequency response: 20 Hz-20 kHz / ±3 dB
- Signal-to-noise ratio: > 65 dB (CCIR) / (A-weighted)
- Input sensitivity:
- AUX: 2 V
- Music iLink: 1 V
Video
• Signal system: PAL / NTSC
- HDMI output: 480i/576i, 480p/576p, 720p, 1080i, 1080p
Audio
• S/PDIF Digital audio input:
• Optical: TOSLINK
- Sampling frequency:
• MP3: 32 kHz, 44.1 kHz, 48 kHz
• WMA: 44.1 kHz, 48 kHz
- Constant bit rate:
• MP3: 32 kbps - 320 kbps
• WMA: 64 kbps - 192 kbps
Radio
• Tuning range: FM 87.5-108 MHz (100 kHz)
• Signal-to-noise ratio: FM 50 dB
- Frequency response: FM 200 Hz-12.5 kHz / ±6 dB
USB
- Compatibility: Hi-Speed USB (2.0)
• Class support: USB Mass Storage Class (MSC)
• File system: FAT16, FAT32
• Maximum memory support: < 160 GB
Main unit
• Power supply: 120V\~; 60Hz
• Power consumption: 60 W
• Standby power consumption: ≤ 0.9 W
- Dimensions (WxHxD): 14.20 × 2.30 × 12.80 (inches)
- Weight: 2.3 kg
Subwoofer
• Output power: 50 W RMS (30% THD)
- Impedance: 4 ohm
• Speaker drivers: 133 mm (5.25") woofer
- Dimensions (WxHxD): 6.30 × 10.50 × 10.50 (inches)
- Weight: 2.50 kg
- Cable length: 9.80 ft
Speakers
Center speaker:
• Output power: 50 W RMS (30% THD)
• System: 1 × 63.5 mm (2.5") full range
- Speaker impedance: 4 ohm
- Speaker drivers: 1 × 63.5 mm (2.5") woofer
- Dimensions (WxHxD): 6.30 × 3.30 × 3.20 (inches)
- Weight: 0.35 kg
• Cable length: 6.50 ft
Front/Rear speaker:
• Output power: 4 × 50 W RMS (30% THD)
- Speaker impedance: 4 ohm
- Speaker drivers: 1 x 63.5 mm (2.5") full range
- Dimensions (WxHxD): 3.30 × 6.30 × 3.20 (inches)
• Weight (front): 0.35 kg/each
• Weight (rear): 0.35 kg/each
• Cable length (front): 9.80 ft
• Cable length (rear): 23 ft
Remote control batteries
- 2 × AAA-R03-1.5 V
Laser
• Type: Semiconductor laser GaAlAs (CD)
• Wave length: 645 - 665 nm (DVD), 770 - 800 nm (CD)
• Output power: 6 mW (DVD), 7 mW (VCD/CD)
- Beam divergence: 60 degrees.
9 Troubleshooting

Warning
- Risk of electric shock. Never remove the casing of the product.
To keep the warranty valid, never try to repair the product yourself.
If you have problems using this product, check the following points before you request service. If you still have a problem, visit www.philips.com/support. If you contact Customer Care Center, you will be asked for the model and serial number of your product. The model number and serial number are on the back or bottom of your product. Write the numbers here:
Model No. ____
Serial No.
Main unit
The buttons on the home theater do not work.
- Disconnect the home theater from the power supply for a few minutes, then reconnect.
Picture
No picture.
• Make sure that the TV is switched to the correct source for the home theater.
- Make sure that the HDMI cable is not faulty. If it is faulty, replace it with a new cable.
- If this happens when you change the HDMI video resolution: 1) ) Press ▲ to open the disc compartment. 2) Press Navigation buttons (left). 3) Press ZOOM.
- Wait for 10 seconds for auto recovery, or change the HDMI video setting (see 'Picture resolution' on page 16).
No picture on a TV connected through HDMI.
Disc does not play high-definition video.
- Make sure that the disc contains high-definition video.
- Make sure that the TV supports high-definition video.
- Use an HDMI cable to connect to the TV.
Sound
No sound from home theater speakers.
- Connect the audio cable from your home theater to your TV or other devices (see 'Connect audio from TV and other devices' on page 9).
- Set up the audio for the connected device (see 'Set up audio for connected devices' on page 10).
- Reset your home theater to its factory settings (see 'Apply factory settings' on page 18), then switch it off and switch on again.
- On your home theater, press SOURCE repeatedly to select the correct audio input.
Distorted sound or echo.
- If you play audio from the TV through the home theater, make sure that the TV is muted.
Audio and video are not synchronized.
• 1) Press and hold AUDIO SYNC. 2) Press +/- within five seconds to synchronize the audio with the video.
Play
Cannot play a disc.
- Clean the disc.
- Make sure that the home theater supports the type of disc (see 'Media formats' on page 20).
- Make sure that the home theater supports the region code of the disc (see 'Region codes' on page 20).
- If the disc is a DVD±RW or DVD±R disc, make sure that it is finalized.
Cannot play a DivX file.
- Make sure that the DivX file is encoded according to the 'Home Theater Profile' with the DivX encoder.
• Make sure that the DivX file is complete.
DivX subtitles do not display correctly.
- Make sure that the subtitle file name is the same as the movie file name (see 'Subtitles' on page 12).
- Select the correct character set: 1) Press SETUP. 2) Select [Preference Setup] > [DivX Subtitle]. 3) Select the supported character set. 4) Press OK.
Cannot read the contents of a USB storage device.
- Make sure that the format of the USB storage device is compatible with the home theater.
- Make sure that the file system on the USB storage device is supported by the home theater.
'No entry' or 'x' sign appears on the TV.
• The operation is not possible.
EasyLink does not work.
- Make sure that the home theater is connected to a Philips brand EasyLink TV, and the EasyLink option is on (see 'EasyLink' on page 15).
When you switch on the TV, the home theater automatically switches on.
- This behavior is normal when you are using Philips EasyLink (HDMI-CEC). To make the home theater work independently, switch off EasyLink.
10 Index
A
amplifier 20
audio
HDMI audio 16
predefined modes 10
quality 9
settings 16
speaker setup 8
specifications 20
audio language 17
audio options 13
auto standby 18
B
brightness 18
C
care
product 4
connect
audio (analog cable) 10
audio (optical cable - digital) 9
audio from TV and other devices 9
speakers 7
TV (Composite) 9
TV (HDMI) 8
connectors
front connectors 8
control
disc play 11
Easylink (HDMI-CEC) 6
main unit 5
parental control 17
radio 14
copyright protection 2
create MP3 14
D
disable
HDMI-CEC 15
discs
audio language 17
audio options 13
control buttons 11
DivX 12
lock/unlock 18
menu language 17
options 13
picture 13
play 11
subtitle 17
synchronize picture and sound 12
time search 13
titles 13
display
MP3/JPEG menu 11
VCD/SVCD menu 11
display panel
DivX
character set 12
subtitles 12
VOD code 12
E
EasyLink (HDMI-CEC)
control buttons 6
one-touch play 15
one-touch standby 15
play audio 15
enable
auto standby 18
HDMI-CEC 15
screen saver 18
energy
auto standby 18
brightness 18
screen saver 18
sleep timer 18
F
factory settings 18
FM antenna 8
H
HDMI
audio 16
video settings 16
HDMI-CEC 15
L
language
audio 17
disc menu 17
onscreen menu 17
subtitle 17
M
main unit
overview 5
specifications 20
troubleshooting 21
manually setup speakers 8
media formats 20
MP3
connector 8
create MP3 14
display contents 11
play 14
N
night mode 10
O
one-touch play 15
one-touch standby 15
options
picture 13
overview
connectors 8
HDMI-CEC 15
main unit 5
remote control 5
settings 16
speaker setup 8
P
parental control
lock disc 18
password 17
ratings 17
password 17
Philips Easylink 15
picture
high resolution JPEG 16
options 13
rotate 13
settings 16
slideshows 13
troubleshooting 21
zoom 13
picture options
play
discs 11
MP3 14
radio 20
slideshows 13
troubleshooting 22
USB 12
position
connectors 8
position 7
preference
audio 16
auto standby 18
change password 17
disc menu 17
display panel 18
menu language 17
screen saver 18
sleep timer 18
subtitle 17
product specifications 20
R
radio
control buttons 14
FM antenna 8
listen to radio 14
specifications 20
tune stations 14
ratings
region codes 20
remote control
batteries 21
overview 5
repeat 13
S
screen saver 18
settings
audio 16
auto standby 18
default 18
disc language 17
HDMI audio 16
HDMI video 16
HDMI-CEC 15
menu language 17
parental rating 17
password 17
picture 16
power 18
restore 18
screen saver 18
sleep timer 18
subtitle language 17
video 16
setup speakers
manually 8
sleep timer 18
slideshows
musical 13
picture 13
software
check current version 19
update 19
sound
predefined sound mode 10
surround sound 10
synchronize picture and sound 12
troubleshooting 22
speakers
connect 7
manual setup 8
position 7
setup 8
specifications 21
surround sound 10
subtitle
character set 12 language 17
subwoofer
specifications 20
synchronize picture and sound 12
T
time search 13
titles 13
trademarks 2
troubleshooting
connection 21
main unit 21
picture 21
play 22
sound 22
U
update software
check current version 19
update 19
USB
format 20
USB storage device
options 13
play 12
specifications 20
V
video
picture settings 16
synchronize picture and sound 12
VOD code for DivX 12
video formats 20
video options 13
VOD code for DivX 12
ONE (1) YEAR LIMITED WARRANTY
WARRANTY COVERAGE:
This warranty obligation is limited to the terms set forth below.
WHO IS COVERED:
This product is warranted to the original purchaser or the person receiving the product as a gift against defects in materials and workmanship as based on the date of original purchase (“Warranty Period”) from an Authorized Dealer. The original sales receipt showing the product name and the purchase date from an authorized retailer is considered such proof.
WHAT IS COVERED:
This warranty covers new products if a defect in material or workmanship occurs and a valid claim is received within the Warranty Period. At its option, the company will either (1) repair the product at no charge, using new or refurbished replacement parts, or (2) exchange the product with a product that is new or which has been manufactured from new, or serviceable used parts and is at least functionally equivalent or most comparable to the original product in current inventory, or (3) refund the original purchase price of the product. The company warrants replacement products or parts provided under this warranty against defects in materials and workmanship from the date of the replacement or repair for ninety (90) days or for the remaining portion of the original product's warranty, whichever provides longer coverage for you. When a product or part is exchanged, any replacement item becomes your property and the replaced item becomes the company property. When a refund is given, your product becomes the company property.
Note: Any product sold and identified as refurbished or renewed carries a ninety (90) day limited warranty.
Replacement product can only be sent if all warranty requirements are met. Failure to follow all requirements can result in delay.
WHAT IS NOT COVERED - EXCLUSIONS AND LIMITATIONS:
This Limited Warranty applies only to the new products that can be identified by the trademark, trade name, or logo affixed to it. This Limited Warranty does not apply to any non-Philips hardware product or any software, even if packaged or sold with the product. Non-Philips manufacturers, suppliers, or publishers may provide a separate warranty for their own products packaged with the bundled product.
The company is not liable for any damage to or loss of any, programs data, or other information stored on any media contained within the product, or any non-Philips product or part not covered by this warranty. Recovery or reinstallation of programs, data or other information is not covered under this Limited Warranty.
This warranty does not apply (a) to damage caused by accident, abuse, misuse, neglect, misapplication, or non-Philips product, (b) to damage caused by service performed by anyone other than an Authorized Service Location, (c) to a product or a part that has been modified without written permission,
or (d) if any serial number has been removed or defaced, or (e) product, accessories or consumables sold "AS IS" without warranty of any kind by including refurbished Philips product sold "AS IS" by some retailers.
This Limited Warranty does not cover:
• Shipping charges to return defective product.
- Labor charges for installation or setup of the product, adjustment of customer controls on the product, and installation or repair of antenna/signal source systems outside of the product.
- Product repair and/or part replacement because of improper installation or maintenance, connections to improper voltage supply, power line surge, lightning damage, retained images or screen markings resulting from viewing fixed stationary content for extended periods, product cosmetic appearance items due to normal wear and tear, unauthorized repair or other cause not within the control of the company.
- Damage or claims for products not being available for use, or for lost data or lost software.
- Damage from mishandled shipments or transit accidents when returning product.
- A product that requires modification or adaptation to enable it to operate in any country other than the country for which it was designed, manufactured, approved and/or authorized, or repair of products damaged by these modifications.
• A product used for commercial or institutional purposes (including but not limited to rental purposes).
- Product lost in shipment and no signature verification receipt can be provided.
- Failure to operate per Owner's Manual.
TO OBTAIN ASSISTANCE IN THE U.S.A., CANADA, PUERTO RICO, OR U.S. VIRGIN ISLANDS...
Contact Customer Care Center at:
1-866-309-0846
REPAIR OR REPLACEMENT AS PROVIDED UNDER THIS WARRANTY IS THE EXCLUSIVE REMEDY FOR THE CONSUMER. PHILIPS SHALL NOT BE LIABLE FOR ANY INCIDENTAL OR CONSEQUENTIAL DAMAGES FOR BREACH OF ANY EXPRESS OR IMPLIED WARRANTY ON THIS PRODUCT. EXCEPT TO THE EXTENT PROHIBITED BY APPLICABLE LAW, ANY IMPLIED WARRANTY OF MERCHANTABILITY OR FITNESS FOR A PARTICULAR PURPOSE ON THIS PRODUCT IS LIMITED IN DURATION TO THE DURATION OF THIS WARRANTY.
Some states do not allow the exclusions or limitation of incidental or consequential damages, or allow limitations on how long an implied warranty lasts, so the above limitations or exclusions may not apply to you.
This warranty gives you specific legal rights. You may have other rights which vary from state/province to state/province.
P&F USA Inc. PO Box 2248 Alpharetta, GA 30023-2248