
IntelliRoute TND 720 LM - Gps Rand McNally - Free user manual and instructions
Find the device manual for free IntelliRoute TND 720 LM Rand McNally in PDF.


| Product Type | Truck GPS navigator |
| Brand | Rand McNally |
| Model | IntelliRoute TND 720 LM |
| Power Supply | 12V vehicle charger, 120/240V wall charger, internal rechargeable battery |
| Key Features | Truck-specific routing, multi-stop trips, weather, fuel prices, optional traffic, custom POIs, mileage/fuel logs, truck tools (timers, trails), Wi-Fi, junction view, virtual dashboard |
| Included Accessories | Windshield mount with suction cup, Quick Start Guide, vehicle charger, USB cable, wall charger (720 only) |
| Operating Temperature | 32°F to 120°F (0°C to 49°C) |
| Maintenance | Clean with a moist cloth; do not use sharp objects; do not open casing; protect from extreme temperatures |
| Safety Compliance | FCC Part 15 Class B, Industry Canada ICES-003 |
| Customer Support | Toll-free: 800-333-0136, Mon–Fri 8 am–5 pm CT, Email: TNDSupport@randmcnally.com |
Frequently Asked Questions - IntelliRoute TND 720 LM Rand McNally
User questions about IntelliRoute TND 720 LM Rand McNally
0 question about this device. Answer the ones you know or ask your own.
Ask a new question about this device
Download the instructions for your Gps in PDF format for free! Find your manual IntelliRoute TND 720 LM - Rand McNally and take your electronic device back in hand. On this page are published all the documents necessary for the use of your device. IntelliRoute TND 720 LM by Rand McNally.
USER MANUAL IntelliRoute TND 720 LM Rand McNally
FCC Compliance Statement
This device complies with part 15 of the FCC rules. Operation is subject to the following two conditions: (1) this device may not cause harmful interference, and (2) this device must accept any interference received, including interference that may cause undesired operation.
This equipment has been tested and found to comply with the limits for a Class B digital device, pursuant to part 15 of the FCC rules. These limits are designed to provide reasonable protection against harmful interference in a residential installation. This equipment generates, uses, and can radiate radio frequency energy and may cause harmful interference to radio communications if not installed and used in accordance with the instructions. However, there is no guarantee that interference will not occur in a particular installation. If this equipment does cause harmful interference to radio or television reception, which can be determined by turning the equipment off and on, the user is encouraged to try to correct the interference by one of the following measures:
• Reorient or relocate the receiving antenna.
- Increase the separation between the equipment and the receiver.
- Connect the equipment into an outlet that is on a different circuit from the GPS unit.
- Consult the dealer or an experienced radio/TV technician for help.
This equipment complies with FCC radiation exposure limits set forth for an uncontrolled environment. End user must follow the specific operating instructions for satisfying RF exposure compliance. This transmitter must not be co-located or operating in conjunction with any other antenna or transmitter.
The portable device is designed to meet the requirements for exposure to radio waves established by the Federal Communications Commission (USA).
IC Compliance Statement
This device complies with Part 15 of the FCC Rules and Industry Canada license-exempt RSS standard(s). Operation is subject to the following two conditions:
- This device may not cause interference, and
- This device must accept any interference, including interference that may cause undesired operation of the device.
This Class B digital apparatus complies with Canadian ICES-003.
IC Caution
Intentional or unintentional changes or modifications to the equipment not expressly approved by Rand McNally could void the user's authority to operate the equipment.
The Global Positioning System (GPS) is a constellation of satellites that a GPS receiver uses to calculate geographical positions. To determine a position, data from at least three satellites is required. To determine elevation, the data from four or more satellites is required. Accuracy of the positioning varies from 10 feet to several hundred feet, depending on vehicle placement and the surrounding environment.
Geographical terrain (such as mountains), man-made structures (such as highway overpasses, bridges, and tall buildings), as well as weather can interfere with the GPS signal. For best GPS reception, position the device and mount with a clear line of sight to the sky. Some vehicles may have a limited view of the sky due to metal sun shields or a metallized windshield coating.
Map data includes the geographical coordinates for address locations and points of interest (POIs). With GPS reception, your device calculates a route to your selected location.
Customer Support
Call toll-free:
800-333-0136
Service hours:
Monday through Friday, 8 a.m. to 5 p.m. CT (Except official holidays)
E-mail:
TNDSupport@randmcnally.com
Table of Contents
Charge the Battery 2
Install the Mount 2
Your IntelliRoute TND ™ 3
2. Settings 4
Main Menu 4
Guide to Truck Tools and Device Preferences....5
Truck Info 6
Warnings 7
General Preferences 8-9
Route Preferences ....10
Map Preferences ....11
3. Destinations ....12
Tips 13
New Location 14-17
Address Book 18-19
Multi-Stop Trips 20-22
Tap Map 23
Set Home 24
Points of Interest (POIs) 25-28
Local Search 29
Confirmation Windows 30
Compare Routes....31
? Look for this icon for help tips on many screens.
Note: Some screens may appear different, depending on device model.
4. Maps & Routing ....32
Route Map Window 32
Exits Quick View....33
Directions Slide-Out List 34
Virtual Dashboard 35-36
Junction View 37
Location and Route Options 38
5. Tools & Features 39
Wi-Fi 39
Weather 40
Fuel Prices 41
Truck Tools 42
Timers 43
Mileage 44
Trails 45
Fuel 46
Quick Planner 47
Road Atlas Information....48
Unit Converter 49
Calculator 49
Calendar 49
Notepad 49
Traffic Everywhere (optional) 50-51
6. Connect With Rand....52
Rand McNally Dock ....52
Custom POI Information 53-54
Export Mileage and Fuel Logs 55
Tell Rand 56
More Information ....57
Caution: Important Safety Information
Navigation
• Use this navigation device at your own risk.
• Use this navigation device only when it is safe to do so.
- Look at the display only when it is safe to do so.
- Traffic regulations always have priority over any instructions from the navigation system.
- Follow navigation system instructions only when local regulations and road traffic allow you do so.
- Make sure that the mount is securely mounted and properly adjusted before each trip.
- Note: If you do not understand the spoken instructions or are unsure of what to do next, refer to the navigation map on your navigation device.
Installation
• Make sure that the mount does not impair the driver's visibility.
- Do not attach the mount within the airbag deployment zone.
- When installing the mount, make sure that it does not pose a risk in the event of an accident.
- Do not run cables directly next to safety-relevant devices and power supplies.
• After installation, check all safety-relevant equipment.
- Connect the wall charger to a 120V or 240V outlet only.
- Connect the vehicle charger to a 12V outlet only.
Device
- Do not use sharp-edged objects on the device touch screen.
- The device is not waterproof and is not protected against water damage.
- Protect the device from extreme temperatures. Operating temperature for the device is between 32 degrees F and 120 degrees F.
- Do not open the navigation device casing.
-
Do not attempt to replace the battery. Contact Rand McNally Customer Support with questions about the battery.
• Always follow local regulations when disposing of this device. -
Note: Make sure that there are no kinks in the cable and that it will not be damaged by any sharp objects.
• Note: Use only a moist cloth to clean the navigation device.
• Note: Do not pull the cable to unplug the unit.
What's Included
• Rand McNally IntelliRoute® TND™
• Windshield mount with suction cup
- Quick Start Guide
- Vehicle charger
- USB cable
• Wall charger (720 only)
Charge the Battery
It is recommended that the device is always connected to a power source during use.
Note: The vehicle may need to be on for the device to charge.
Install the Mount
Note: Follow all local regulations governing the placement of the mount.
- Select an area with a line of sight to the sky and GPS satellites.
- Clean and dry the mounting area.
- Remove the suction cup protective film.
- Adjust the angle of the mount using the thumbscrews.
- Pull the suction cup lever up to release suction.
- Plug the power cord into the device and the vehicle's 12-volt power source.
- Slide the device onto the mount.
- Place and hold the mount suction cup against the mounting surface.
- Press the suction cup lever down until it snaps into place.
- Adjust the device so that it can be easily seen and does not block the driver's line of sight.


IntelliRoute®TND™ 520

IntelliRoute ® TND ™ 720
* TND ™ User Manual
Your IntelliRoute® TND™
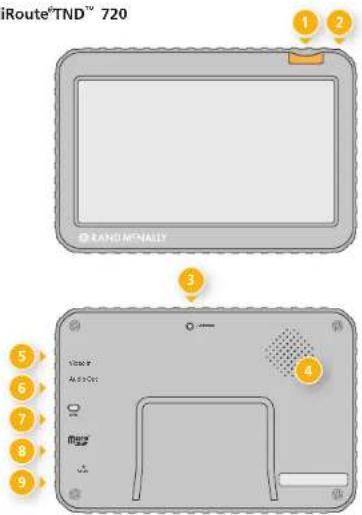
1 Power Button
Press and hold to turn on or off. While the device is running, the power button can also be used for quick access to certain features with one quick tap. See page 9 for Quick Power Press settings.
2 Battery Power Indicator
A red light indicates the battery is charging and blinks when the battery is low; a green light indicates the battery is fully charged.
3 External GPS Port
Used with an optional GPS antenna.
4 Speaker
Video Input (720 only)
Connect to optional blind spot camera.
Note: When a camera is connected, tap the camera icon in the upper left corner of the map screen to view. A quick tap on the power button adjusts the brightness of the camera image.
6 Audio Output
Connect to optional external speaker.
7 Mini-USB Port
Connect the charger or the USB cord.
8 SD Card Slot
For future use, as needed.
9 Reset Button
Use the reset button on the back of the device to restart. This will cancel the current route, but preferences, address book, and other personal data will be saved.
Start Your Device
Each time you turn on your device, the Warning and Legal Consent window displays.
• To view short tutorial on device use, tap Tutorial
- Tap Accept, or if you turned the device off while on a route, tap Accept and Continue Previous Route.

2. Settings
Main Menu
Battery Power Indicator
2 Load Option*
Specify in Preferences whether the trailer is always loaded or whether you want to be prompted each time a route is calculated. (See page 8). (Does not display if load option is set to Always Loaded.)
3 Driver Status*
Select driver status.
Note: Set Driver Status to Automatic to start/stop driving timers when the vehicle moves/stops. (See page 8). However, when the driver status is set to Automatic mode, tapping the driver status buttons on the Main Menu temporarily overrides the automatic setting.
4 TruckTools
Select to enter truck information, set warnings, and access other tools. (See page 5.)
5 Go To Map
Tap to view location on the map.
6 Choose Destination
Tap to select an address or point of interest (POI).
7 Preferences
Tap to set device, route, or map options. (See page 5.)
8 Mute/Unmute the Speaker
Tap to mute or unmute spoken instructions.
Note: You can also tap this icon when it appears on the map screen to mute/unmute.
9 Volume
Tap to increase or decrease spoken instructions volume.
Note: You can also mute the speaker from the map screen
when you see

Tap to unmute

*Note: Not available in Car Mode.
2. Settings
- Tap ✗ and ✕ to view the options.
- Tap the option to be set.
- Enter the new information.
- Tap Back ↩ to save changes.
Truck Tools Page
Truck Info
Hazmat Type 6
Height 6
Number of Axles....6
Trailers 6
Truck ETA Adjustment....6
Weight (Empty) 6
Weight (Loaded) 6
Width 6
Warnings
Auto Dismiss Warnings....7
Construction Area 7
Crossing State Border/
Time Zone Change Warning ....7
Curve Warnings....7
Driving Day 7
Engine Brake Warnings....7
Hill Warnings 7
Narrow Road Warnings 7
On Duty Day 7
On Duty Week 7
Speed 7
Speed Limit Display 7
State Border Alert 7
Tollbooth Alert 7
Warning/Alert Prompts 7
Warning Display Size 7
Weigh Station 7
Device Preferences
Page
General
About 9
Align screen 9
Brightness 8
Clock Setting 9
Day/Night Map Color 8
GPS Status 9
Keyboard 9
Language 9
Load Option 8
Mileage Log 8
My Custom POIs 8
Quick Power Press 9
Reset Truck Timers 8
Screen Click 9
Screen Snapshot Button 9
Team Driving....8
Tutorial 9
Units 9
Update Driver Status 8
Vehicle Type 8
Voice Name 9
Yard Time Zone 8
Device Preferences
Page
Route
Avoid List....10
Cross-Country Borders 10
Dirt Roads 10
Fast Recalc 10
Ferries 10
Freeways 10
Junction View Distance....10
Recalculation 10
Route 10
States/Provinces to Avoid 10
Tollways 10
Truck ETA Adjustment.... 10
Tunnels 10
Turn Announcements....10
Turn View Distance 10
U-Turns 10
Map
Address Book Icons 11
Car Icon 11
Map Auto Zoom 11
POI Icons 11
Route Color 11
Truck Icon 11
Truck POI Icons 11
Truck Info Options
Hazmat Type
None
Explosives
Gases
Flammable Liquids Flammable Solids
Oxidizers
Poison
Radioactive
Corrosives
Other
PIH
Weight (Empty) Use the + and - buttons or enter a numeric value by tapping the calculator.
Weight (Loaded) Use the + and - buttons or enter a numeric value by tapping the calculator.
See Load Option in
Preferences > General (page 8)
or on the Main Menu (page 4).
Height Use the + and - buttons or enter a numeric value by tapping the calculator.
Truck Info Options
Width Use the + and - buttons or enter a numeric value by tapping the calculator.
Trailers
Straight
48'
53'
Double
Triple
ETA Adjustment Increase ETA more
Increase ETA some
ETA ok
Decrease ETA some
Decrease ETA more
Set adjustments to your ETA due to weather or traffic conditions. You can add (increase) time to make the trip take longer or subtract (decrease) time to make the trip take less time.
Number of Axles Use the + and the - buttons.
Warnings Options
Warning/Alert Prompts None
Audio & Visual
Visual
Audio
Auto Dismiss Warnings Never
After 10 seconds
After 30 seconds
Height and weight violations will not be auto dismissed.
Warning Display Size Full screen
Small bar
Height and weight restrictions will always display in full screen.
Curve Warnings Set warning distance to curves by using the + and - buttons.
Hill Warnings Set warning distance to hills by using the + and - buttons.
Engine Brake Warnings Set warning distance to locations where engine braking is prohibited and by using the + and - buttons
Narrow Road Warnings Set warning distance to narrow roads by using the + and - buttons.
Driving Day Set when to be warned before reaching the driving hours limit.
On Duty Day Set when to be warned before reaching the duty hours limit.
On Duty Week Set when to be warned before reaching the duty week limit.
Speed Limit Display None
Truck only (limited)
Show car (if no truck limit is available)
State Border Alert Set warning distance to state borders by using the + and - buttons.
Warnings Options
Crossing State Border/
Timezone Change Warning Off
Off
On
Tollbooth Alert Set warning distance to toll booths by using the + and - buttons.
Weigh Station Set warning distance to weigh stations by using the + and - buttons.
Construction Area Set warning distance to construction areas by using the + and - buttons.
Construction information is based on
RoadWork™ data distributed through the
Rand McNally Dock. (See page 52.)
Speed Set warning distance to speed limit changes by using the + and - buttons.
Set the amount over the posted limit at which the warning appears.
Set a user-defined maximum speed to be warned whenever the truck exceeds that speed, regardless of posted speed limits.
Note: To turn warnings off completely, tap the - button until "off" displays.
2. Settings
General Preferences Options
Vehicle Type
Truck
Car
Controls how routes are calculated.
Note: Some tools and settings may not be available in car mode.
Yard Time Zone
Hawaii
Alaska
Pacific Time
Arizona
Mountain Time
Central Time
Eastern Time
Indiana (East)
Atlantic (Canada)
Newfoundland
Team Driving Turn team driving on and set profiles to keep separate driving timers for two team members.
Day/Night Map Color Always day
Always night
Automatic
Brightness Set separately for day and night modes.
My Custom POIs Tap Manage Custom POIs to specify how custom POIs are displayed on the map: set image, warning distance, warning type, and street/city/state level map display. See page 53 for Custom POIs.
General Preferences Options
Update Driver Status
Automatic
Main Menu buttons
Specify how driver status is changed.
Note: When in Automatic mode, tapping the driver status buttons on the Main Menu will temporarily override the automatic setting.
Reset Truck Timers
Automatic
Manual
Mileage Log Truck only
Car only
Truck & Car
Don't log
See page 44 for mileage.
Load Option Prompt
Always loaded
Specify whether mileage should be calculated with the truck empty, always loaded, or whether to display a prompt for each route. When set to Prompt, each time you tap Begin New Route, a window displays asking if the truck is loaded or empty.
2. Settings
General Preferences Options
Screen Click Click off Click on
Tutorial View on-device tutorial
Keyboard ABC Computer (QWERTY)
Voice Name Samantha Tom (English only)
Language English Spanish French
For the screen and spoken instructions.
Units U.S. Standard Metric
Clock Setting 12-hour clock 24-hour clock
Screen Snapshot Button Off On
General Preferences Options
Quick Power Press POI along route
Screen snapshot
Main Menu
Show map
Toggle mute
Save current location
Tell Rand
Press the power button for 1 second to access these screens at any time.
Align screen Calibrate the touch screen.
Note: Select this option if your TND seems to have buttons that are hard to tap.
GPS Status Tap to show details about your location.
About Tap to show version information and copyrights.
Route Preferences Options Route Preferences Options
Note: The default settings for your device are already optimized for truck routing. Use the options below to fine-tune these settings. A route may still include a roadway or maneuver set to Avoid if the only legal route found contains these types of roads or the route is over several hundred miles.
Turn Announcement Set three distances at which you want to be warned about an upcoming turn. The first announcement will be the farthest from the turn and the third the closest to it.
Truck ETA Adjustment Increase ETA more (by 15%)
Increase ETA some (by 5%)
ETA ok
Decrease ETA some (by 5%)
Decrease ETA more (by 10%)
Set adjustments to your ETA due to weather or traffic conditions. You can add (increase) time to make the trip take longer or subtract (decrease) time to make the trip take less time.
Recalculation Manual recalculate Auto recalculate
Route Fastest route Shortest route
Freeways Allow all (default) Avoid freeways Prefer freeways Avoid small roads
Tollways Allow tollways Avoid tollways
U-Turns Allow u-turns Avoid u-turns
Ferries Allow ferries Avoid ferries
States/Provinces to Avoid Tap the bottom right corner to access a list of states/provinces. Check the box to avoid.
Cross-Country Borders Allow cross borders Avoid cross borders
Dirt Roads Allow dirt roads Avoid dirt roads
Tunnels Allow tunnels Avoid tunnels
Avoid List Tap on the map and select a road segment to add it to the Avoid List. (See page 23.)
Fast Recalc Off On
Fact recalc calculates a route to a midpoint between your location and the destination, rather than recalculating the entire route from scratch. Best used on a long route that has short distances between intersections.
Junction View Distance Set the distance before the maneuver at which the highway junction view screen appears.
Turn View Distance Set the distance before the maneuver at which the local street turn view screen appears. (Note: In 3D map view, this warning is not needed and will be turned off.
2. Settings
Map Auto Zoom Off
On, auto scale
On, street scale
On, city scale
On, county scale
Set to auto scale to keep the current vehicle position and the next turn in the map view at all times. Set to street/city/county scale to specify the maximum scale of the zoom.
Note: Map redraw speed is impacted by autozoom choice, especially when combined with 3D map display option. Turn it off for quicker display.
| POI Icons | Off |
| On |
Select icons to display on map
Select restaurants, banks, and consumer POIs ("Other" category) to display on the map.
| Truck POI Icons | Off |
| On |
Select travel centers, service, weigh stations and truck POIs to display on the map.
Map Preferences OptionsMap Preferences Options
| Address Book Icons | Off |
| On |
Address book entries appear as pushpin icons unless they are assigned to a group. Grouped entries appear as folders. (See page 19.)
Truck Icon Use the arrows to select different icons to display when using the truck setting. Use the slider to change the color.
Car Icon Use the arrows to select different icons to display when using the car setting. Use the slider to change the color.
Route Color Use the slider to select.
3. Destinations

Destinations
To access this window from the Main Menu, tap Choose Destination.

Back
Tap to return to the Main Menu.

NewLocation
Tap to route to a new location by address, city center, intersection, or latitude/longitude. (See page 14.)

History
Tap to route to a recently entered location.

Address Book
Tap to view a list of saved locations. (See page 18.)

Multi-Stop Trips
Tap to view a list of saved multi-stop trips or to create a new one. (See page 20.)

Points of Interest/POIs
Tap to search for a point of interest (POI) such as a gas station, restaurant, etc. (See page 25.)

al Search
Tap to search for local businesses, restaurants, and more by name or keyword. (Note: Wi-Fi connection required.) (See page 29.)
3. Destinations


Tap to view a longer list of names g the typed characters.

Tap to view a list of previously cations.

Add a space.

Delete last character and move k one space.

Type an apostrophe, hyphen, other symbol.
Helpful Tips on Entering Addresses
Auto-Complete Feature:
Enter the first few characters in a name and a short list displays a couple of names that start with the typed characters.
On the keyboard, the only keys available are for the next valid characters in a search name.
Continue entering characters until the searched-for name displays in the list. Tap on the name to select it.
Cities:
Some cities with common names such as "Athens" have several types of names associated with a city.
If a name does not display, continue typing characters until the name you are looking for displays in the list.
Streets:
If the next letter in the street name can not be selected on the keyboard, tap Expand Search to search a greater area.
The Expand Search button can also help locate addresses that may actually be in a different town, spelled slightly differently, or in a neighboring town.
Note: If you're entering a State or County Route, it's typically best to first either enter the State or County initials (for example, State Road 535 would be entered as "SR") but you may also need to try other options, such as "State Road" or "CA" for California, for example.
3. Destinations

New Location
1 Address
Tap to route to an address by entering the city, street, and number, or by entering the zip code and street. (See page 15.)
2 City Center
Tap to route to a city center. (See page 16.)
3 Intersection
Tap to route to two intersecting roads in a city. (See page 16.)
4 Back
Tap to return to the previous window.
5 Enter Lat/Long
Tap to route to a location by latitude and longitude. (See page 17.)
5 Menu
Tap to return to the Main Menu.
3. Destinations > Addresses


Search for an Address
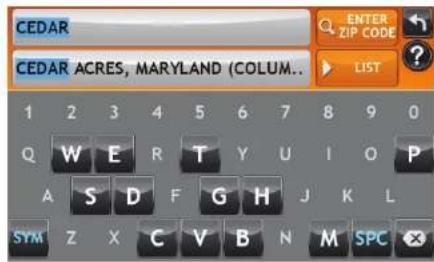
- Tap Choose Destination > New Location > Address.
- Type the first few characters in the city name. As you type, a short list of matching city names displays.
-
Tap on a city to select it.
-
If the city is not displayed on the short name list, continue typing characters in the city name or tap List to display a long list of city names. Use the up and down arrows to view all cities/states. Tap on a city to select it.
- On the next use, the city name selected in the previous search displays. Tap on the city name to search for a location in the city.
Note: If a city name appears twice within a state, you may need to check both for your specific address.
- Or tap Enter Zip Code. Type the zip code.
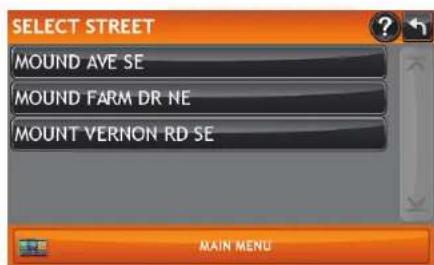
- Type the first few characters in the street name, or if the next characters of the street name cannot be selected on the keyboard, tap Expand Search and search a wider area.
- Tap on the street name from the displayed list. Or tap house number to enter the house number fi rst. (This changes the default house number fi rst. Tap Street on the next entry to reset the default to street fi rst.)
- Tap the house number or tap Select Crossroad to enter an intersecting street, or tap List to show a list of address ranges. Tap on house number range from the list.
- The Confir rmation Window displays. (See page 30.)
- Tap Begin New Route to navigate to the location.
3. Destinations > Addresses


Route to a City Center
- Tap Choose Destination > New Location > City Center.
- Type the first few characters in the city name.
- Tap on the city/state name. The Confir rmation Window displays. (See page 30.)
- Tap Begin New Route to navigate to the location.
Route to an Intersection
- Tap Choose Destination > New Location > Intersection.
- Type the first few characters in the city name.
- Tap on the city name.
- Type the first few characters in the primary street name, or if the next characters of the street name cannot be selected on the keyboard, tap Expand Search and search a wider area.
- Tap on the street name in the list.
- Type the first few characters in the intersecting street name.
- Tap on the intersecting street name. The Confirmation Window displays. (See page 30.)
- Tap Begin New Route to navigate to the location.
3. Destinations > Addresses


Route to a Latitude/Longitude
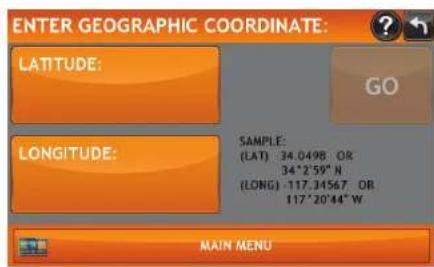
- Tap Choose Destination > New Location > Enter Lat/Long
- Tap in the Latitude field.
- Enter the latitude of the location and tap Enter.
- Tap in the Longitude field.
- Enter the longitude of the location and tap Enter.
- Tap Go. The Confirmation Window displays. (See page 30.)
- Tap Begin New Route to navigate to the location.
Note: There are two ways to enter latitude/longitude: by decimal degrees or by degrees, minutes, and seconds.
3. Destinations > Address Book
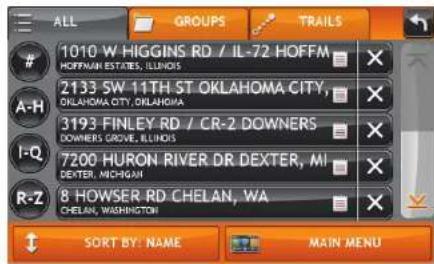

Address Book
Add Locations to the Address Book from the Confirmation Window (See page 30.):
- Tap Save to Address Book.
- Tap Yes to accept the default name or tap No to display a keyboard.
- Type the name of the location and tap Enter to save the location in the Address Book. The Confirmation Window re-displays.
Entries
- Tap Choose Destination > Address Book. Entries are alphabetically sorted by name.
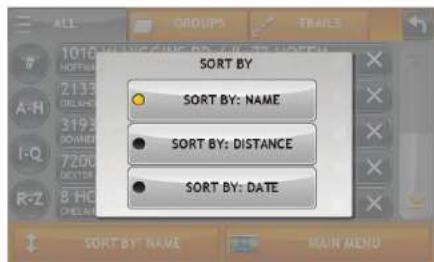
- To sort by distance or date, tap Sort By.
- Select Sort By: Distance or Sort By: Date.
Note: Use the up and down arrows to scroll through the list or use the alphabet buttons on the left.
Note: The notepad icon indicates a note has been added for this location.
Route to an Address Book Location
- Tap Choose Destination > Address Book.
• Tap on the All Addresses tab or
- Tap on the Groups tab.
- Tap on an address to select it. The Confir rmation Window displays. (See page 30.)
- Tap Begin New Route to navigate to the location.
3. Destinations > Address Book
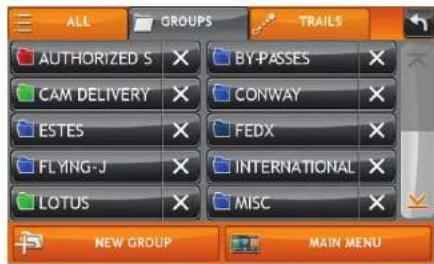

Create a Group
- Tap Choose Destination > Address Book
- Tap on the Groups tab.
- TapNew Group.
- Type the group name.
- To select a different color folder, tap
- Tap on a color, then tap Close.
- When fi nished, tap Enter.
Tap on the ✗ next to a group to delete the group.
Addresses will still be saved in the Address Book.
Note: You can also choose to display address book icons on the map. (See page 11.)
Add an Address to a Group
- Tap Choose Destination > Address Book.
- Tap the Groups tab.
- Tap on the group you want to add an address to.
- Tap New Location.
- Tap Enter New Address, History, Address Book, or POI.
- If you selected:
• History, Saved, or POI, the selected location is added to the group.
- Enter a New Address, tap Yes to accept the default name or tap No to display a keyboard and enter a new name.
Remove an Address From a Group
- Tap Choose Destination > Address Book.
- Tap on the Group tab
- Tap on the Group you want to remove the address from.
- Tap on the ✗ next to the address to be removed.
- TapYes.
3. Destinations > Multi-Stop Trips

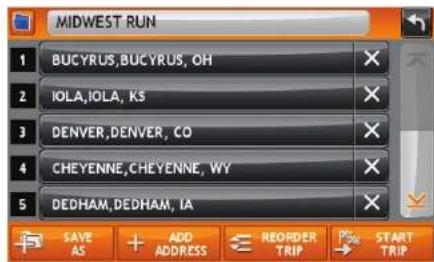
Create a Multi-Stop Trip
- Tap Choose Destination > Multi-Stop Trips.
- TapNew Trip.
- Type the trip name.
- To select a different color folder, tap
- Tap on a color, then tap Close.
- When fi nished, tap Enter.
Note: A multi-stop trip can include up to 50 stops.
Add a Stop
Note: You can add locations in the order you want to route to them or reorder stops later (See page 21.)
From the Main Menu:
- Tap Choose Destination > Multi-Stop Trips.
- Tap on the route.
- TapAdd Address.
- To add an address, tap Enter New Address, History, Address Book, or POI.
- A Confirmation Window asks if you want to add another stop. Tap:
• Yes to add another stop
• No if the route is complete.
- Tap Back to save changes.
Remove a Stop
- Tap Choose Destination > Multi-Stop Trips.
- Tap on the route.
- Tap on the ✗ next to the stop to be removed.
- TapYes.
3. Destinations > Multi-Stop Trips

Reorder Routes
Optimize Automatically
After all locations have been added to a multi-stop trip, you can run the optimizer wizard to organize your trip.
- Tap Choose Destination > Multi-Stop Trips.
- Tap on the route you want to optimize.
- Tap Reorder Trip.
- Tap Automatic/Optimize.
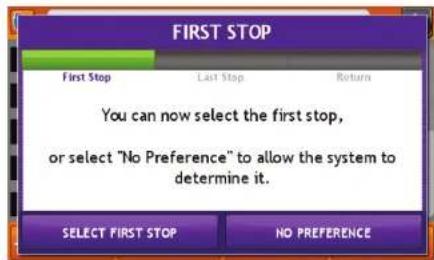
- Tap Select First Stop and select the first stop, or No Preference.
- Tap Select Last Stop and select the last stop, or No Preference.
- Tap Yes to return to your current location to complete the route or No to complete the route at the last stop.
- Tap Start Trip to begin the route.
Note: There is a limit of ten stops that can be optimized automatically.
Reorder a Route Manually
- Tap Choose Destination > Multi-Stop Trips.
- Tap on the route you want to optimize.
- Tap Reorder Trip.
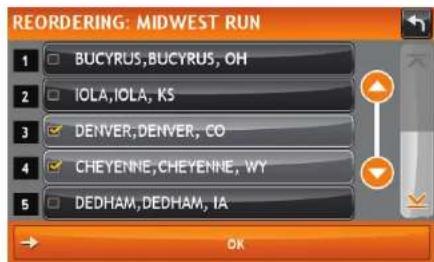
- Tap Manual.
- Tap on the stop to be moved and tap the arrows to move stops up or down.
- When fi nished, tap OK.
- Tap Start Trip to begin the route.
3. Destinations > Multi-Stop Trips


Select and Run a Saved Route
- Tap Choose Destination > Multi-Stop Trips.
- Tap on the route to select it.
- Tap Start Trip. The Confirmation Window displays. (See page 30.)
- Tap Begin New Route to navigate to the location.
- ThelntelliRoute TND TM calculates the route to your first stop. When you have reached the stop, a message displays.
- Tap:
- Next Stop - To calculate a route to the next stop in the route.
- Skip Next Stop - To skip the next stop and calculate a route to the stop after the next one.
• End Current Trip - To end the route at the current stop.
Note: To view your entire trip, select Summary Map View from the Route Display Options. (See page 34.)
Delete a Route
- Tap Choose Destination > Multi-Stop Trips. The Multi-Stop Trips window displays.
- Tap on the ✗ next to the route to be deleted.
- A confirmation message displays.
- Tap
• Yes to delete the route.
• No to keep the route.
3. Destinations > Tap Map

Tap on the Map
When you tap on the map screen, the crosshairs – display.
1 Add as Via
Add a via—an interim stop between the origin and the destination.
2 Avoid
If the location is along the current route, the location is temporarily blocked and added to the Avoid List. (See page 10.) Tap the location and choose Remove Avoid to remove the block.
If the location is not along the current route, the avoid will be permanent.
3 Set Origin
Tap to set the location as the starting point of the route.
4 Route to Here
Tap Begin New Route to navigate to the location.
3. Destinations > Set Home

Set Home
Note: Only available in Car mode. May not appear on all devices. (See page 8.)
Current Location
- Tap Choose Destination > Set as Home.
The current location is saved in your Address Book as Home. The button changes to Take Me Home.
- Tap the Take Me Home button to calculate a route from your current location to your home location.
Another Location
- Tap Choose Destination.
- Search for and select a location.
- On the Confirmation Window, tap Set Origin. (See page 30.)
- Tap Choose Destination > Set as Home.
The selected location is saved in your Address Book as Home. The button changes to Take Me Home.
- Tap the Take Me Home button to calculate a route from your current location to your home location.
To reset to a new Home, simply delete the Home entry from your Address Book and then repeat the steps above.
3. Destinations > POIs

Points of Interest (POIs)
1 My Truck/Near Car
Tap to search for a point of interest near the current vehicle location.
2 City
Tap to search for a point of interest in a city.
3 MyRoute
Tap to search for a point of interest along the vehicle route.
4 End of Day
Tap to search for a point of interest along the last 30 minutes of your route. This search is based on your remaining driving hours in Truck Tools > Timers. (See page 43.)
Note: Not available in Car mode.
5 Destination
Tap to search for a point of interest near the route destination.
6 Back
Tap to return to the previous window.
7 Custom POI
Tap to select a custom POI location. (See page 53.)
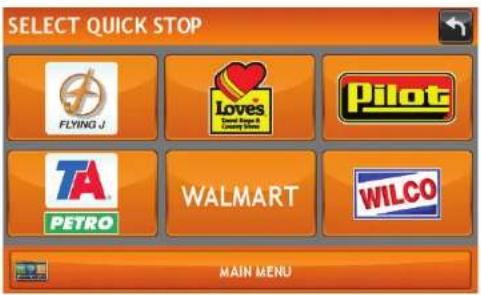
8 Quick Stops
Tap to find a truck-friendly POI near the current truck location. (See page 26.)
9 Main Menu
Tap to return to the Main Menu.
3. Destinations > POIs
Points of Interest (POIs)
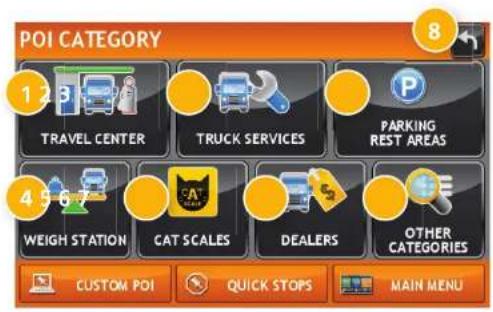
1 Travel Center
Tap to search for a travel center with truck amenities. See page 28 to filter by amenities.
2 Truck Services
Tap to search for a truck services POI. See page 28 to fi Iter by amenities.
3 Parking & Rest Areas
Tap to search for truck parking or a rest stop.
4 Weigh Station
Tap to search for a truck weigh station.
5 CAT Scales
Tap to search for a CAT scale location.
6 Dealers
Tap to search for a truck dealership.
7 Other Categories
Tap to select a consumer (non-truck) related point of interest.
8 Back
Return to previous window.


Other Categories
- Tap Choose Destination > Points of Interest.
- Select a search type (My Truck/My Car, City, My Route, End of Day, or Destination).
- TapOther Categories.
- Tap on a category. (For example, tap Hospital/Emergency.)
- If necessary, tap on a subcategory type. (For example, tap Pharmacy.)
- Tap on a location from the list or
- Tap All.
- Tap on the Spell button to display the keyboard.
- Type the first characters in the POI name.
- Tap on the POI name in the displayed list.
- Tap on a location from the list.
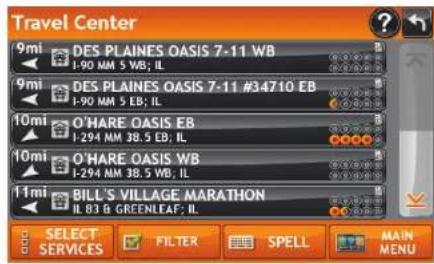

Select and Filter Travel Center Amenities and Truck Services
Truck-related Travel Center points of interest can include over 70 different types of amenities. To select only the travel centers with the amenities that you are interested in, filter your search results.
- Tap Choose Destination > Points of Interest.
- Select a search type (My Truck/My Car, City, My Route, End of Day, or Destination).
-
Tap Travel Center or Truck Service.
-
TapSelect Services.
-
Click on the check box of each amenity to be included in the search.
-
TapOK. The Travel Center window displays POI locations with your selected amenities.
-
Tap on a location from the list.
-
A check next to Filter indicates the search terms have been applied. Tap Filter to return to general search results.
Rate a Truck Point of Interest
You can rate truck POIs from the Confirmation Window. (See page 30.)
For each POI, the top row indicates the community rating from fellow drivers for the point of interest. The bottom row indicates your individual rating.
- Tap on the POI Ratings button.
- Use — and to rate the facility.
- Tap Create Comment and type a personal comment on the facility.
- Tap Enter to save the comment.
- TapBack to save changes.
Note: You can share ratings with fellow drivers through Rand McNally Dock software for your Mac or PC. (See page 52.)
3. Destinations > Local Search


Note: This feature requires a Wi-Fi connection. (See page 39.)
Use Local Search to search the Internet for a restaurant, business, or any type of location by name, keyword, or category. Tap Choose Destination > Local Search.
Choose whether to search:
near your truck
2n a specific city
near your destination
Select a category, or tap Keywords to search using a specific name (e.g., "Subway") or a keyword ("sandwich").
4 Tap Nearby Food to show a list of area restaurants based on your current location.
5 Tap My Local History to show a list of previous searches.
3. Destinations > Confirmation Windows
Screens differ according to destination type:

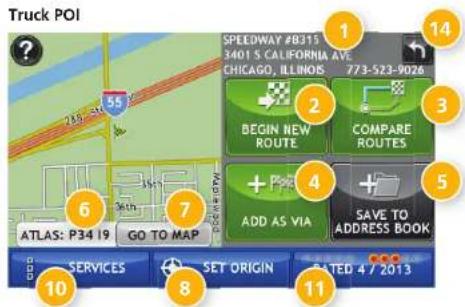

Confir rmation Windows
1 DestinationAddress
The selected location address.
2 Begin New Route
Tap to route to destination.
3 Compare Routes
Tap to choose between two routes (See page 31.)
4 Add as Via
Add this location as an interim stop between the origin and destination. This automatically makes the current route a multi-stop trip. (See page 20.)
5 Save to Address Book
Add the location to the Address Book or add to Address Book group. (See page 18).
6 Atlas
Cross-reference to printed Rand McNally Motor Carriers' Road Atlas. (Page numbers apply to the most recent Atlas.)
7 Go to Map
Tap to view this location on a map.
8 Set Origin
Tap to set the location as the starting point of a route.
9 Menu
Tap to return to the Main Menu.
10 Services
Tap to view amenities at this location.
11 POI Rating
Tap to rate or add a comment to this location. (See page 28.)
12 Edit Entry
Rename or edit this entry in the Address Book.
13 Note
Add a note about this location in the Address Book.
14 Back
Tap to return to previous window.
3. Destinations > Compare Routes

Compare Routes
-
From the destination confirmation window, tap Compare Routes to view two calculated routes: the primary route and an alternative route.
-
The top of the screen displays the total distance and time for each route. Zoom in to get a closer look at each route on the map.
-
Tap on #1 or #2 to select that route.
4. Maps & Routing
Route Map Window

1 NextManeuver
Tap to repeat spoken next maneuver instructions.
2 RoadName
Name of street you will turn onto next.
3 Miles/Time
Displays remaining distance. Tap to select from: yard arrival time, arrival time, remaining time, yard time, and elevation.
4 ExitsQuickView
Slide out to show upcoming exit information. (See page 33.)
5 Directions Slide-Out List
Tap to select a route display option. (See page 34.)
6 ZoomIn/ZoomOut
7 Wi-Fi
Tap to connect and access Wi-Fi services.
8MainMenu
Tap to return to the Main Menu.
9 CompassDirection
Tap to change the map display. An icon in the upper right corner displays the selected option: North up (N), heading up (arrow), or 3D (3). Also displays Wi-Fi status.
10 RoadInformation
Tap to view current information by city, street, or upcoming intersection.
City, county, and state

Currentstreetname

Next intersecting street name

11 LocationandRouteOptions
Tap to see current location information, change route settings, detour, or cancel a route. (See page 38.)
12 CurrentSpeed
Tap to display the Virtual Dashboard. Turns red for speed warnings. (See page 35.)
13 Speed Limit
Orange for truck limit; white for general limit. Tap to open a "Tell Rand" message about speed limits.
14 Traffic
Tap to view the Traffic c window. (Requires subscription, see page 50.)
15 Mute
Tap to mute the speaker.
16 CurrentMileMarker
Tap to open a "Tell Rand" message.
4. Maps & Routing


Exits Quick View
Slide out to show Points of Interest and amenities at upcoming exits. The list displays the distance to the next exit, exit name and number, and a count of available amenities.
- Tap on an exit to bring up the list icon
- Tap the icon to display locations by category.
- Tap on any item in the list to route to that location.
4. Maps & Routing
Highway View
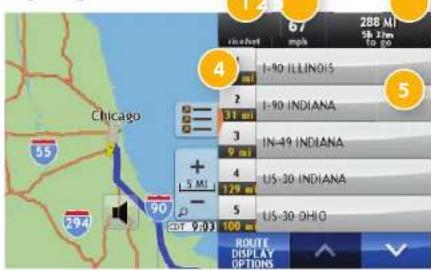
Trip Summary (for multi-stop trips)

Summary Map View (entire trip)

Directions Slide-Out List
Route Display Options
- When first opened, the slide-out list displays in Detail View.
- Use and to view the instructions.
- To change the display option, tap Route Display Options. Select Detail View, Highway View, Trip Summary (for multi-stop trips), or Summary Map View.
1 Rise/Set
Displays the times of sunrise and sunset for your current location.
2 MPH
Displays the current vehicle speed, in miles per hour.
3 Distance, Time
Displays remaining distance and time.
4 Distance
Displays the distance to the next maneuver and the type of maneuver.
5 Street/RoadName
Displays the street name you will be on after performing the next maneuver. Tap on any item in the list to view it on the map and to detour around it if necessary.
6 Total Distance and Time
Total distance and time for the entire trip.
7 Leg
Number of the leg and distance.
8 LegDestination
Leg destination.


Virtual Dashboard
To show the Virtual Dashboard, tap the Current Speed.
1 Current direction of travel.
2 Displays current times at the yard, current location and destination, as well as estimated time of arrival.
3 Sunrise and sunset times based on vehicle location (latitude/longitude) and day.
4 Current speed (above) and posted speed limit (below).
Note: Turns red when speed limit warning exceeded. (See page 7 to set speed limit alert.)
5 Elevation at current location.
6 Percentage of current trip completed, distance to next maneuver, and the number of miles and time spent on the trip to this point.
7 Match with truck's odometer to automatically update new fuel logs. Tap the pencil to edit.
8 Return to the Route Map Window.
9 Gather trip information for up to three trips. Includes odometer settings, hours, and speeds.
10 Reset trip information for the selected trip (Tab 1, Tab 2 or Tab 3). (See page 36.)
11 Select to automatically reset the information in each tab after the vehicle has remained stationary for the specified number of hours.
12 View fuel logs and add fuel purchase information.
4. Maps & Routing

Manually Reset Trip Information
- Tap on the tab you want to reset.
- To set the odometer for the selected tab back to zero, tapReset All.
- Information is captured as you travel the route.
Automatically Reset Trip Information
To reset trip information after the vehicle has remained stationary after a specific number of hours:
- Tap on the tab you want to reset.
- Tap Auto Reset.
- Tap + to increase the number of hours.
- Tap — to decrease the number of hours.
- To save changes, tap Change.
- The Tab displays the auto reset number of hours.
4. Maps & Routing
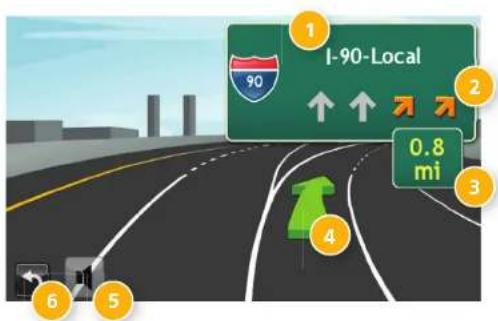
Junction View
When on a route, Junction View displays when you have an upcoming maneuver. Once past the maneuver, Junction View closes and the previous window displays.
1 Signs to follow for the next maneuver.
2 Number and direction of lanes for the next maneuver.
3 Distance to the upcoming maneuver. Distance decreases as you approach the ramp.
4 Turn direction arrow.
5 Mute the speaker.
6 Return to previous window.
4. Maps & Routing

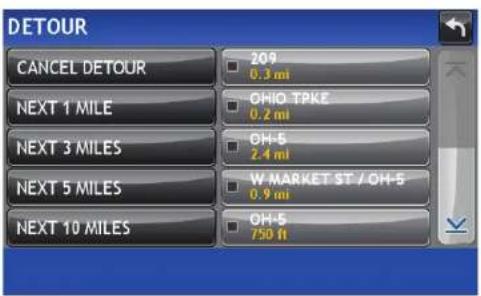
Location and Route Options
1 Nearest cross street
2 Current road you're on, current town you're in
3 Latitude and longitude at current location
4 Current location by mile marker
5 Return to previous window
6 Detour
Around Part of the Route
- On the left side of the Window, tap the number of miles on the route to be avoided.
- The route is recalculated.
Around a Specific Roadway
- On the right side of the Window, tap and to view a list of roads in the current route.
- Tap on one or more roadways to be avoided. A check mark √ appears in front of each selected road.
- Tap Detour to recalculate the route.
7 Skip to next stop (for multi-stop trips)
8 Cancel current route
9 Save current location to the Address Book. (See page 18.)
10 Access Avoid List. (See page 10.)
11 Access Route Settings. (See page 10.)
5. Tools & Features


Wi-Fi
For information on setting up a Wi-Fi hotspot through your cellular phone or laptop computer, please visit www.randmcnally.com/wifihelp for basic instructions, or contact your wireless carrier.
Note: Wi-Fi connectivity requires a supporting feature and data plan from your wireless service provider. As the user, you are responsible for all data charges. Please contact your wireless service provider to make sure you do not exceed the limits of your data plan.
Once you have established a Wi-Fi hotspot,
- Tap the Wi-Fi icon (20) on the map screen. (Also accessible from the Preferences menu.)
- Tap Enable WiFi to search for available hotspots.
- Tap the hotspot you want to connect to.
- Enter the network password. (Note: Many passwords are case sensitive. To access lowercase letters, set the Keyboard to Computer (Qwerty). See page 9.)
- Tap Disable WiFi to turn Wi-Fi connectivity off. (Note: Disable to save battery power.)
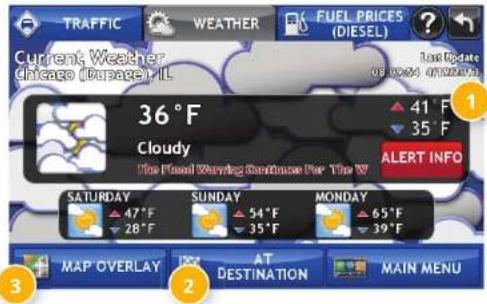


Weather
Notes:
• This feature requires a Wi-Fi connection.
- The refresh speed of the weather display is dependent on the connection speed. Weather information is updated every few minutes while Wi-Fi connection is active.
- Weather display depends on active weather patterns and map zoom level.
To view current weather information and the three-day forecast for your location, tap the Wi-Fi icon (20) on the map screen and tap the Weather tab.
1 View details for current weather alerts.
2 View weather information at your destination.
Note: You can view weather information at any other location by tapping the map and then the Weather icon.
3 Select type of weather overlay to display on the map.
4 Select from a variety of weather types:
• No weather (turn off)
- Traffic impact
- Temperature
- Feels like
• Current precipitation intensity and type
• Probability of precipitation
• Forecasted precipitation intensity, type, and clouds
• Forecasted precipitation intensity and type
- Dew point
- Relative humidity
- Wind speed
5 Slide to adjust the transparency of the overlay on the map.
Note: Use the slider to readjust for visibility when switching between day and night modes.
5. Tools & Features

* TND ™ User Manual
Fuel Prices
Note: This feature requires a Wi-Fi connection.
To show fuel prices, tap the Wi-Fi icon on the map screen and tap the Fuel Prices tab.
1 Displays stations and prices, with distance as the crow flies.
Check to show the icons and prices on the map screen.
Sort by distance or price.
Apply filters for type of fuel and specific brand.
Check to show fuel prices along the route.
5. Tools & Features

Truck Tools
Note: Some features are not available in Car Mode.
1 Back
Return to the Main Menu.
2 Truck Info
Enter truck information (weight, length, etc.). (See page 6.)
3 Timers, Mileage, Trails, and Fuel
View driving, on-duty, and maintenance timers; state logs; trails; and fuel purchase information. (See pages 43-46.)
4 Warnings
Set warning distances for driving time, duty hours, and upcoming weigh stations. (See page 7.)
5 Quick Planner
Between any two cities or towns, quickly calculate the distance, driving time, and cost.
6 Rand Motor Carrier's Road Info
View Rand McNally Truck Emergency contact information and truck regulations.
7 TellRand
Compose a message to send to Rand McNally when you connect to the Dock. (See page 56.)
8 Calendar (See page 49.)
9 Notepad (See page 49.)
10 Converter (See page 49.)
Quickly convert distance, weight, and temperature.
11 Calculator(See page 49.)
5. Tools & Features
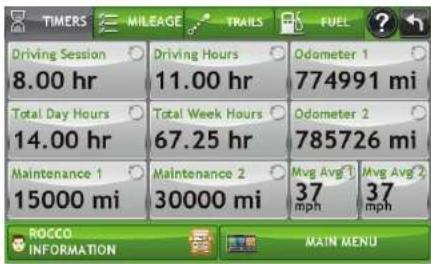
Timers
Note: Odometers count up and record the current mileage. Maintenance counters count down. When a maintenance timer counts down to 2,000 miles, a reminder displays each time the TND starts.
Note: To avoid timer warnings, set the timer limits to a very high number.
- Tap Truck Tools.
- Tap Timers, Mileage, Trails, Fuel.
- Tap the Timers tab.
Tap the driver profi le on the bottom left to switch between two team drivers.
On the left, use the Change To fi eld to make adjustments to mileage or hours. The mileage/hours continue to count down from the changed value.
- Tap - to decrease the setting.
- Tap + to increase the setting.
- Tap the calculator to display a keyboard. Enter a number and tap Enter.
- Tap Change.
On the right, use the Reset To field to set the most common reset value, normally zero. At the beginning of each day or run, tap Reset to set the value back to zero for odometers and 15,000 or 35,000 for maintenance odometers.
- Tap - to decrease the setting.
- Tap + to increase the setting.
- Tap the calculator to display a keyboard. Enter a number and tap Enter.
- TapReset.

Mileage
- TapTruck Tools.
- Tap Timers, Mileage, Trails, Fuel.
- Tap the Mileage tab to view list of logs for the current year, ordered by quarter.
- To view quarterly mileage logs for previous years, tap Year. Tap on a quarter to view log entries.
- Tap on a quarter to view details. Tap View by Date/View by State and Empty/Loaded for more information.
To delete a log, tap on the ✗ next to the log entry to be deleted. Tap Yes to delete the log.
Note: Load Option and Driver Status control how logs are recorded. (See page 8.)
Note: Mileage logs can be exported to your computer via the Rand McNally Dock. ( See page 55.)


Trails
Use Trails to record a "bread-crumb" path of GPS coordinates where your truck has traveled.
- Tap Truck Tools.
- Tap Timers, Mileage, Trails, Fuel.
- Tap the Trails tab.
-
To record a trail, tap New Trail.
-
To end the trail, tap the Trails icon on the map screen.
-
The trail is recorded in the Trails tab.
-
Tap on a trail to view details.
-
Tap Show on Map to display the trail on the map screen.
-
Tap Edit Name to change the name of the trail.
-
Tap Set Color to change the color of the trail.
Note: The Trails feature is also accessible from the Address Book. (See page 18.)
5. Tools & Features


Fuel
- Tap Truck Tools.
- Tap Timers, Mileage, Trails, Fuel.
- Tap the Fuel tab to view a list of fuel logs by quarter.
- Tap Add Fuel to record the date, location and cost of fuel purchase.
- Tap on any fi eld to edit.
- Check Taxable to include the purchase in the fuel log.
- Tap Save (Note: Fuel economy is calculated automatically.)
- Once fuel purchases have been entered, tap on a quarter to view the details.
- You can View by State or View by Month.
- Tap the state or month to view fuel purchases.
- Tap View All to see all fuel purchases.
Note: Fuel logs can be exported to your computer via the Rand McNally Dock. ( See page 55.)

Quick Planner
Use this tool to quickly estimate the mileage and time between any two cities or towns.
- TapTruck Tools.
- Tap Quick Planner.
The revenue or cost per mile used in the last computation displays. - Tap From City 1 and select the city.
- Tap To City 2 and select the city.
- The distance displays.
- Tap Cost per Mile and enter the per mile rate or tap Total and enter the total amount.
- Tap the new dollar amount and tap Enter.
- The dollar amounts readjust automatically.
- Tap Average Speed (MPH) enter a speed:
- Tap or + to decrease or increase the speed.
-
Tap the calculator to enter a speed.
-
Tap Change.
-
The driving time displays.
5. Tools & Features


Road Atlas Information
To reference Rand McNally's Motor Carriers' Road Atlas:
- TapTruck Tools.
- Tap Road Atlas Information.
- Select the appropriate country tab.
- Select the appropriate state/province to view emergency and other key phone numbers.
5. Tools & Features


Unit Converter
- TapTruck Tools.
- Tap Converter.
- Tap on the first field and select the type of conversion to perform.
- Tap on the second fi eld and enter the value to be converted.
- TapEnter.
Calculator
- TapTruck Tools.
- Tap Calculator.
Calendar
- TapTruck Tools.
- Tap Calendar.
- Use the arrows to view other months and years.
- Tap Today to return to the current date.
Notepad
- TapTruck Tools.
- Tap Notepad.
- Tap New Note.
- Tap a note in the list to view and edit.
5. Tools & Features

Tap any traffic icon for incident details.
Traffi c Everywhere
Traffi c Everywhere is available as an optional service on the Rand McNally Dock. (See page 52.)
Note: This feature requires a Wi-Fi connection.
To view traffic information, tap the Wi-Fi icon on the map screen and then tap the Traffic tab.
Traffi c Window
1 OptionalRoute
Tap to select either a recalculated route based on traffic events or to stay on the current route.
2 Traffic on Route
Tap to view traffic c events along your route. Tap Filter to choose to display traffic c flow, incidents, or both.
3 Traffic c List
Tap to view a list of traffic events within receiver range. Tap Filter to choose to display flow, incidents, or both.
4 Back
Tap to return to the previous screen.
5 Traffic Off/Internet-Based Traffic c
Tap to turn traffic reporting off.
6 Wi-Fi
Check Wi-Fi connection status.
7 Menu
Tap to return to the Main Menu.
5. Tools & Features
Traffi c Icons

Accident Accident Incident Closure



Obstruction

Exit blocked Entrance blocked Traffic c Carpool Road work


Dangerous Road condition

Temperature

Wind

Activities

Security
Delay

Cancel

Size/weight limit
Visibility

Heavy traffi c

Moderate traffic c

Light traffic c
Rand McNally Dock™
The Rand McNally Dock enables you to receive software upgrades and access map updates, construction updates, and additional features.
Simply download the Dock software for your PC or Mac at www.randmcnally.com/dock and connect your device using the USB cable provided.
With the Rand McNally Dock, you can also:
• Purchase Traffic Everywhere
• Export mileage and fuel logs to your home computer
- Load custom POIs, such as red light cameras and railroad crossings, to your device
• Access the Rand McNally support site and online store
• Read product news and announcements
- Send feedback and suggestions to Rand McNally through "Tell Rand"
Custom POI Information
Use custom POIs to upload lists of your own locations to your TND ™ .
There are two types of custom POIs:
- Destinations you can route to.
- Alert locations, such as red light cameras and railroad crossings, you want to be warned about when they are along your route. (See page 7.)
Lists of custom POIs are available from third-party sources such as POI Factory: www.poi-factory.com.
Or enter your own list. Tips for formatting your own list of POIs:
- Files must be in .csv format.
- You can enter locations by longitude/latitude (in decimal format), address, or both.
-
Separate each piece of information with a comma. Do not use spaces before or after commas.
-
Enter in order the longitude, latitude, location name, street address, city, state, zip, and country. For example:
- Longitude/latitude and address: -87.761039,42.059611,Rand McNally,9855 Woods Dr,Skokie,IL,60077,USA
• Longitude/latitude only: -87.761039,42.059611,Rand McNally
- Address only: „Rand McNally,9855 Woods Dr,Skokie,IL,60077,USA (Note: In this example, there are two commas at the beginning. Commas are required as placeholders for fields with no data in them.)
Custom POI Information
To load custom POI files to your TND™:
- Connect your device to the Rand McNally Dock.
- On the Dock, click Add Your Own POI.
- Click POI (for destinations) or Alert POI (for warnings).
- Select the file from your computer.
- Click Open to automatically transfer the file to your device.
- Unplug your device from your computer.
- Plug your device into power using the power adapter.
- Turn the device on.
- Depending on the size, the download could take up to 30 minutes.
Note: "Failed records" are those for which some description information has been excluded. If you would like to know why some records failed, plug your device into your computer, and view the error messages in the Dock.
- Customize how you want the POIs to display in Preferences > My Custom POIs. (See page 8.)
Export Mileage and Fuel Logs
Use this feature to export mileage breakdowns by state and fuel purchase information to your computer. The exported file can be in .xls or .csv format.
On the Rand McNally Dock:
- Click on Mileage/Fuel.
- Select where you want the file to be downloaded, and click Save.
- The file will be downloaded to your computer. When finished, a notification message displays.
- Click Ok.
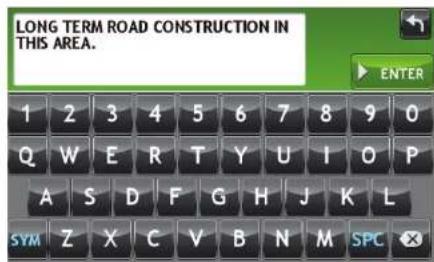
Tell Rand
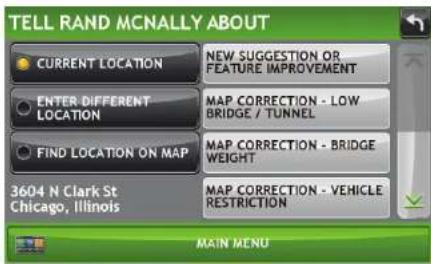
While you're en route with your TND™, you can enter messages for Rand McNally regarding construction, truck restrictions, addresses, your device, and more. The next time you connect to the Rand McNally Dock, you can reopen, edit, and send the message.
- Tap Truck Tools.
- Tap Tell Rand. On the left side, tap Current Location. Enter Different Location or Find Location on Map. Note: You can open a Tell Rand speed limit message by tapping the speed limit or mile marker on the map screen. Or open a Tell Rand with the power button by setting the Quick Power Press to Tell Rand. (See page 9.)
- If you selected Enter Different Location, enter it as an address. If you selected Find Location on Map, tap on the map to set the crosshairs at that location, then tap Back.
- On the right side, tap the type of message you want to send.
- Type your message.
- Tap Enter to save the message.
- To discard the message and return to the previous window, tap Back.
- To send the message, connect your device to the Rand McNally Dock.
- On the Dock, click Tell Rand to access and send the messages saved on your device.
For more information
• Rand McNally Website www.randmcnally.com/trucking
• Support
www.randmcnally.com/support
• GPS accessories
www.randmcnally.com/gps-accessories
• Rand McNally Dock
www.randmcnally.com/dock
• Demo Videos
www.youtube.com/randmcnallyonline
Trademarks
Rand McNally and IntelliRoute are registered trademarks and TND and the Dock are trademarks of RM Acquisition LLC, d/b/a Rand McNally.
NAVTEQ ON BOARD is a trademark of NAVTEQ.
The Trucker's Friend and National Truck Stop Directory are registered trademarks of TR Information Publishers.
TruckDown is a registered trademark of TruckDown Info International, Inc.
Wi-Fi is a registered trademark of the Wi-Fi Alliance.
InfoGation is a registered trademark of InfoGation Corporation.
Local search information provided by CityGrid Media.
Weather data provided by myweather.com.
Fuel prices provided by OPIS.
Traffic information provided by INRIX, Inc.
© 2013 Rand McNally. All rights reserved.
Rand McNally follows a continuous improvement process and reserves the right to provide enhancements that may not be reflected in the pictures and specifications in this manual.
The information contained herein may be changed at any time without prior notification. Neither this manual nor any parts thereof may be reproduced for any purpose whatsoever without the express written consent of Rand McNally, Inc., nor may it be transmitted in any form either electronically or mechanically, including photocopying, and recording. All technical specifications, drawings, etc. are subject to copyright law.


- FCC COMPLIANCE STATEMENT
- IC COMPLIANCE STATEMENT
- IC CAUTION
- CUSTOMER SUPPORT
- TABLE OF CONTENTS
- SETTINGS 4
- DESTINATIONS ....12
- MAPS & ROUTING ....32
- TOOLS & FEATURES 39
- CONNECT WITH RAND....52
- CAUTION: IMPORTANT SAFETY INFORMATION
- NAVIGATION
- INSTALLATION
- DEVICE
- WHAT'S INCLUDED
- CHARGE THE BATTERY
- INSTALL THE MOUNT
- YOUR INTELLIROUTE® TND™
- 1 POWER BUTTON
- 2 BATTERY POWER INDICATOR
- 3 EXTERNAL GPS PORT
- 4 SPEAKER
- 6 AUDIO OUTPUT
- 7 MINI-USB PORT
- 8 SD CARD SLOT
- 9 RESET BUTTON
- START YOUR DEVICE
- SETTINGS
- MAIN MENU
- TRUCK TOOLS PAGE
- TRUCK INFO
- WARNINGS
- DEVICE PREFERENCES
- PAGE
- GENERAL
- ROUTE
- MAP
- WARNINGS OPTIONS
- WARNING/ALERT PROMPTS NONE
- AUTO DISMISS WARNINGS NEVER
- WARNING DISPLAY SIZE FULL SCREEN
- SPEED LIMIT DISPLAY NONE
- CROSSING STATE BORDER
- TIMEZONE CHANGE WARNING OFF
- GENERAL PREFERENCES OPTIONS
- VEHICLE TYPE
- YARD TIME ZONE
- DAY/NIGHT MAP COLOR ALWAYS DAY
- UPDATE DRIVER STATUS
- RESET TRUCK TIMERS
- MILEAGE LOG TRUCK ONLY
- LOAD OPTION PROMPT
- ROUTE PREFERENCES OPTIONS ROUTE PREFERENCES OPTIONS
- MAP AUTO ZOOM OFF
- MAP PREFERENCES OPTIONSMAP PREFERENCES OPTIONS
- DESTINATIONS
- BACK
- NEWLOCATION
- HISTORY
- ADDRESS BOOK
- MULTI-STOP TRIPS
- POINTS OF INTEREST/POIS
- AL SEARCH
- HELPFUL TIPS ON ENTERING ADDRESSES
- AUTO-COMPLETE FEATURE
- CITIES
- STREETS
- NEW LOCATION
- 1 ADDRESS
- 2 CITY CENTER
- 3 INTERSECTION
- 4 BACK
- 5 ENTER LAT/LONG
- 5 MENU
- DESTINATIONS > ADDRESSES
- SEARCH FOR AN ADDRESS
- ROUTE TO A CITY CENTER
- ROUTE TO AN INTERSECTION
- ROUTE TO A LATITUDE/LONGITUDE
- DESTINATIONS > ADDRESS BOOK
- ENTRIES
- ROUTE TO AN ADDRESS BOOK LOCATION
- CREATE A GROUP
- ADD AN ADDRESS TO A GROUP
- REMOVE AN ADDRESS FROM A GROUP
- DESTINATIONS > MULTI-STOP TRIPS
- CREATE A MULTI-STOP TRIP
- ADD A STOP
- REMOVE A STOP
- REORDER ROUTES
- OPTIMIZE AUTOMATICALLY
- REORDER A ROUTE MANUALLY
- SELECT AND RUN A SAVED ROUTE
- DELETE A ROUTE
- DESTINATIONS > TAP MAP
- TAP ON THE MAP
- 1 ADD AS VIA
- 2 AVOID
- 3 SET ORIGIN
- 4 ROUTE TO HERE
- DESTINATIONS > SET HOME
- SET HOME
- CURRENT LOCATION
- ANOTHER LOCATION
- DESTINATIONS > POIS
- POINTS OF INTEREST (POIS)
- 1 MY TRUCK/NEAR CAR
- 2 CITY
- 3 MYROUTE
- 4 END OF DAY
- 5 DESTINATION
- 6 BACK
- 7 CUSTOM POI
- 8 QUICK STOPS
- 9 MAIN MENU
- 1 TRAVEL CENTER
- 2 TRUCK SERVICES
- 3 PARKING & REST AREAS
- 4 WEIGH STATION
- 5 CAT SCALES
- 6 DEALERS
- 7 OTHER CATEGORIES
- 8 BACK
- OTHER CATEGORIES
- SELECT AND FILTER TRAVEL CENTER AMENITIES AND TRUCK SERVICES
- RATE A TRUCK POINT OF INTEREST
- DESTINATIONS > LOCAL SEARCH
- DESTINATIONS > CONFIRMATION WINDOWS
- CONFIR RMATION WINDOWS
- DESTINATIONS > COMPARE ROUTES
- COMPARE ROUTES
- MAPS & ROUTING
- 1 NEXTMANEUVER
- 2 ROADNAME
- 3 MILES/TIME
- 4 EXITSQUICKVIEW
- 5 DIRECTIONS SLIDE-OUT LIST
- 6 ZOOMIN/ZOOMOUT
- 7 WI-FI
- 8MAINMENU
- 9 COMPASSDIRECTION
- 10 ROADINFORMATION
- 11 LOCATIONANDROUTEOPTIONS
- 12 CURRENTSPEED
- 13 SPEED LIMIT
- 14 TRAFFIC
- 15 MUTE
- 16 CURRENTMILEMARKER
- EXITS QUICK VIEW
- DIRECTIONS SLIDE-OUT LIST
- ROUTE DISPLAY OPTIONS
- VIRTUAL DASHBOARD
- MANUALLY RESET TRIP INFORMATION
- AUTOMATICALLY RESET TRIP INFORMATION
- JUNCTION VIEW
- LOCATION AND ROUTE OPTIONS
- AROUND PART OF THE ROUTE
- AROUND A SPECIFIC ROADWAY
- TOOLS & FEATURES
- WI-FI
- WEATHER
- NOTES
- FUEL PRICES
- TRUCK TOOLS
- 1 BACK
- 2 TRUCK INFO
- 3 TIMERS, MILEAGE, TRAILS, AND FUEL
- 4 WARNINGS
- 5 QUICK PLANNER
- 6 RAND MOTOR CARRIER'S ROAD INFO
- 7 TELLRAND
- 8 CALENDAR (SEE PAGE 49.)
- 9 NOTEPAD (SEE PAGE 49.)
- 10 CONVERTER (SEE PAGE 49.)
- 11 CALCULATOR(SEE PAGE 49.)
- TIMERS
- MILEAGE
- TRAILS
- FUEL
- QUICK PLANNER
- ROAD ATLAS INFORMATION
- UNIT CONVERTER
- CALCULATOR
- CALENDAR
- NOTEPAD
- TRAFFI C EVERYWHERE
- TRAFFI C WINDOW
- 1 OPTIONALROUTE
- 2 TRAFFIC ON ROUTE
- 3 TRAFFIC C LIST
- 5 TRAFFIC OFF/INTERNET-BASED TRAFFIC C
- 6 WI-FI
- 7 MENU
- TRAFFI C ICONS
- RAND MCNALLY DOCK™
- CUSTOM POI INFORMATION
- EXPORT MILEAGE AND FUEL LOGS
- TELL RAND
- FOR MORE INFORMATION
- TRADEMARKS
Brand : Rand McNally
Model : IntelliRoute TND 720 LM
Category : Gps