
iLux CLS-C6MW - Regulator Crestron - Free user manual and instructions
Find the device manual for free iLux CLS-C6MW Crestron in PDF.


| Brand | Crestron |
| Model | iLux CLS-C6MW |
| Product Type | Integrated Wall-Mounted Lighting and Shade Controller |
| Power Requirements | 120 VAC, 50/60 Hz |
| Motion Detector | Built-in (occupancy sensing) |
| Control System Integration | Cresnet; compatible with Crestron 2-Series control systems |
| Number of Lighting Loads | Up to 6 (LED, incandescent, magnetic low-voltage, neon/cold cathode, 2-wire dimmable fluorescent, non-dimmable) |
| Number of Shade/Drape Controllers | Up to 16, in up to 6 groups |
| Number of Stored Scenes | Up to 16 (lighting levels and shade positions) |
| Operating Modes | Standard, Lights, Shades |
| Control Interfaces | Front panel buttons, IR receiver (remote optional), up to 16 Crestron keypads |
| Daylight Harvesting | Supported with optional photocell; automatic adjustment for scenes 1-8 and ON scene |
| Dimensions (approx.) | 4.5 in x 4.5 in x 1.5 in (114 mm x 114 mm x 38 mm) |
| Weight (approx.) | 0.5 lb (227 g) |
| Color | White |
| Front Panel Controls | 6 function buttons, ON/OFF buttons, Lights/Shades buttons, Up/Down master, Save/Cancel, 2-digit display, bar graphs |
| IR Receiver | Built-in for infrared remote control |
| Multi-unit Expansion | Supports up to 8 additional CLS-C6 units for up to 54 lighting channels and 54 shade groups |
| Cleaning Instructions | Wipe with a dry cloth; do not use solvents or abrasives. |
| Safety Precautions | Professional installation required; disconnect power before servicing; risk of electric shock. |
| Spare Parts & Reparability | No user-serviceable parts; contact authorized dealer for repairs. |
Frequently Asked Questions - iLux CLS-C6MW Crestron
User questions about iLux CLS-C6MW Crestron
0 question about this device. Answer the ones you know or ask your own.
Ask a new question about this device
Download the instructions for your Regulator in PDF format for free! Find your manual iLux CLS-C6MW - Crestron and take your electronic device back in hand. On this page are published all the documents necessary for the use of your device. iLux CLS-C6MW by Crestron.
USER MANUAL iLux CLS-C6MW Crestron
Crestron CLS-C6 Series
iLux® Integrated Lighting System
User Guide
Contents
iLux® Integrated Lighting System: CLS-C6 Series 1
Introduction....1
Operating Modes....5
Standard Mode....5
Lights Mode....5
Shades Mode 6
Changing Scene Presets....7
Problem Solving 8
Troubleshooting....8
Further Inquiries....8
iLux® Integrated Lighting System: CLS-C6 Series
Introduction
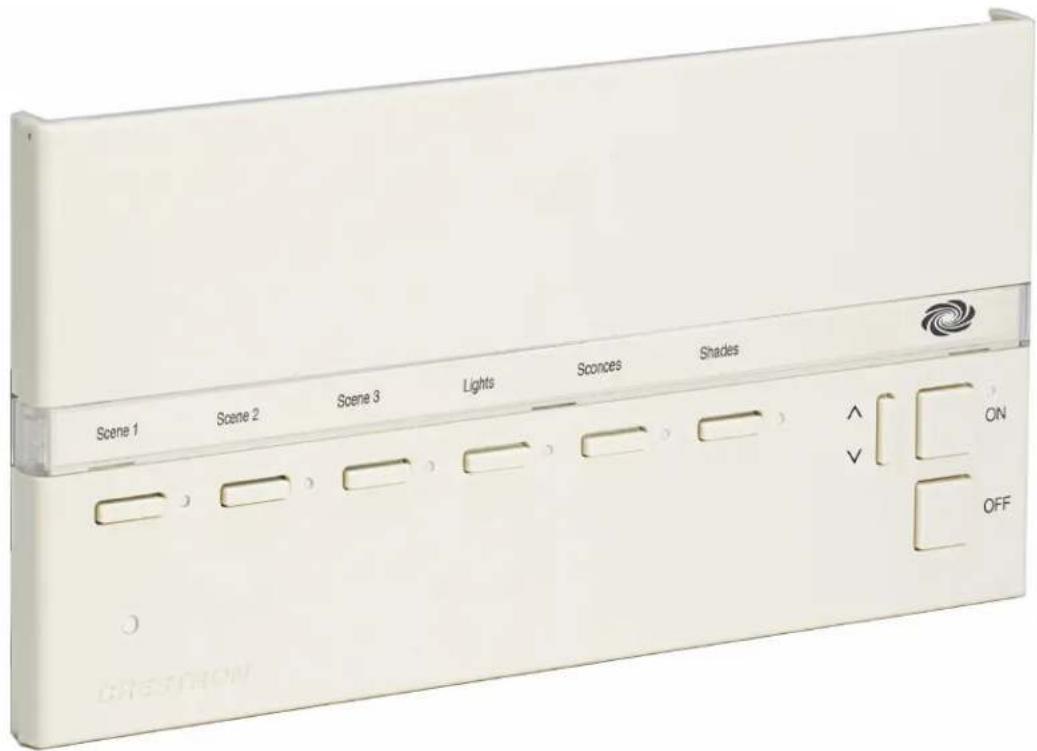
The CLS-C6 series of iLux ^® units are complete, integrated wall-mounted lighting system that can function as standalone devices and/or be part of a Crestron ^® solution total control system network. The units are intended for installation in boardrooms, auditoriums, home theaters, or anywhere versatile and cost-effective control of lighting and shades is required.
The units are functionally identical, except that certain units include a built-in motion sensor. Refer to the table on the next page for definition of available models. All models are available in three colors: white, black, or almond.
For simplicity in this guide, references to the CLS-C6 unit apply equally to all, except where noted.
Functional Summary
- Automated control of up to six lighting loads: LED*, incandescent, magnetic low-voltage, neon/cold cathode, 2-Wire Dimmable Fluorescent, and non-dimmable lights.
- Automated control of up to 16 shade and drape controllers, in up to six groups, for motorized window treatments, screens, and lifts
- Manual control of individual lighting loads and shade groups
- Versatile operation provides access to up to 16 stored scenes (lighting levels and shade position combinations)
- Built-in motion detector (certain units only) enables automated control based on room occupancy
- Built-in IR receiver allows wireless operation using an optional infrared remote control
- Multipoint control through up to 16 Crestron keypads (sold separately) allows control of rooms with several entrances or work areas
- Multi-unit expansion through support of up to eight additional CLS-C6 units, enables systems of up to 54 lighting channels and 54 shade groups
- Control system integration via two separate control networks; one for local devices and one for connection to a 2-Series control system
• Supports Daylight Harvesting
CLS-C6 Model Definition
| MODEL DESIGNATION | POWER REQUIREMENTS | MOTION | CONTROL SYSTEM INTEGRATION | ||
| 120 VAC | 230 VAC DETECTOR Cresnet | ® | infiNETTM | ||
| CLS-C6 X | X | ||||
| CLS-C6M X | X X | ||||
| CLSI-C6 X | X | ||||
| CLSI-C6M X | X X | ||||
| CLS-C6RF X | X | ||||
| CLS-C6MRF | X | X | X | ||
| CLSI-C6RF | X | X | |||
| CLSI-C6MRF | X | X | X | ||
All controls and indicators for the CLS-C6 are located on the front of the unit. The front panel also contains a mini phone jack, under the flip-up cover, used for dealer programming functions, and an IR port for control via an optional IR remote control.
CLS-C6 (Cover Open)
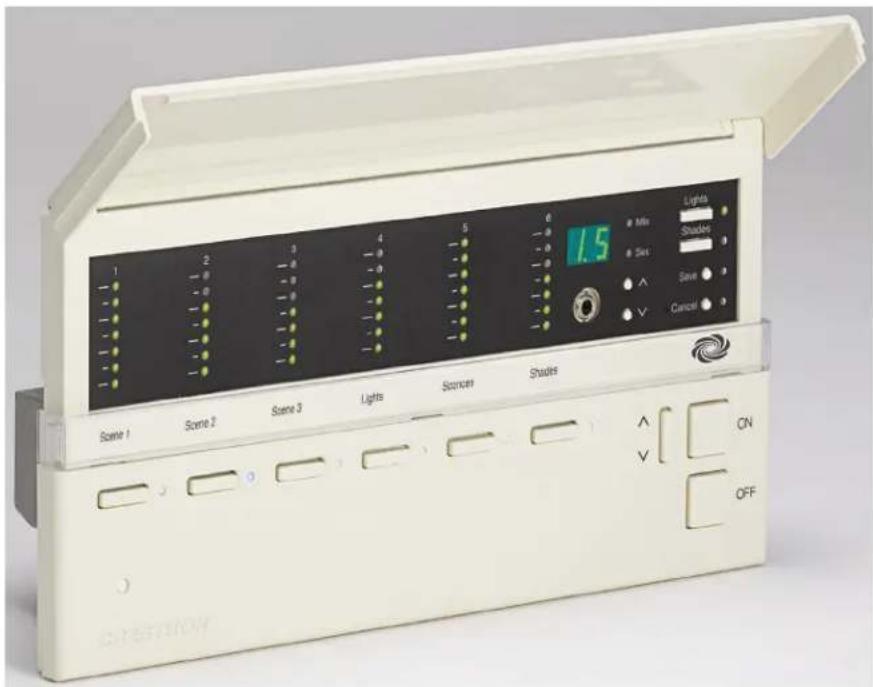
Refer to the figure on the next page and the descriptions in the following paragraphs for operating controls and indicator details.
CLS-C6 Controls & Indicators
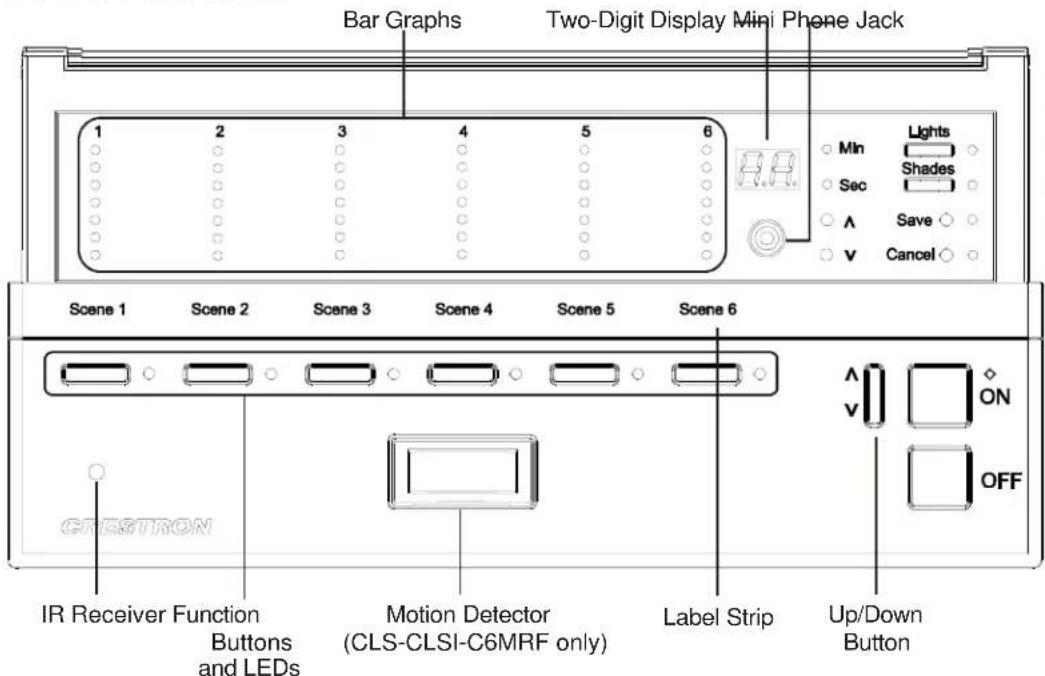
The table below and on the following page describes the function of the iLux unit's controls and indicators, which are listed in alphabetical order.
NOTE: Standard mode, Lights mode, and Shades mode mentioned in the following discussions are described in “Operating Modes” on page 5.
CLS-C6 Controls & Indicators Descriptions
| CONTROLS & INDICATORS DESCRIPTION | |
| Bar Graphs | In Standard mode and Lights mode, the bar graph LEDs indicate the current light level for the six lighting loads. In Shades mode, they indicate the shade position for each of the shade groups. |
| Function Buttons | In Standard mode, these buttons are used to select/recall scenes. In Lights mode, they are used to make temporary adjustments to the six lighting loads. In Shades mode they are used to make temporary adjustments to the six shade groups. |
(Continued on following page)
CLS-C6 Controls & Indicators Descriptions (Continued)
| CONTROLS & INDICATORS DESCRIPTION | |
| IR Receiver | The IR receiver responds to commands from an optional remote control. |
| Label Strip | The label strip identifies the use of the function buttons. The illustration shows the default purpose: selection of the first six scenes. The label in your unit may be different, depending on the unit's configuration and lighting/shades arrangement. |
| Lights Pushbutton and LED | Use this button to select the Lights mode. The LED illuminates accordingly. |
| Mini Phone Jack | This mini-phone jack is only to be used by your dealer. |
| Motion Detector (CLS/CLSI-C6M/C6MRF only) | In Standard mode, the motion detector recalls the On scene if there is activity in the room, and recalls the Off scene when there is no activity for thirty minutes. |
| OFF Button | The OFF button always recalls the Off scene. (Refer to “Standard Mode” on page 5.) |
| ON Button | The ON button always recalls the On scene. (Refer to “Standard Mode” on page 5.) |
| ^, v, Save, and Cancel Pushbuttons and LEDs | Use these pushbuttons when changing scene presets. The Save and Cancel LEDs indicate when these functions are active. (Refer to “Changing Scene Presets” on page 7.) |
| Shades Pushbutton and LED | Use this switch to select the Shades mode. The LED illuminates accordingly. |
| Two-Digit Display | In Standard mode, the display is blank, except when showing scene fade time. The Min and Sec LEDs illuminate to indicate time in minutes or seconds. |
| ^ Up/Down Pushbutton | In Standard mode and Lights mode, this button acts as lights master, adjusting all lighting loads simultaneously. In Shades mode, it adjusts all shade groups simultaneously. |
Operating Modes
After installation, the CLS-C6 operates in one of three modes:
- Standard mode: this is the default mode; buttons are typically used to recall scenes, although they can be reprogrammed by the dealer for other functions.
• Lights mode: this mode is used to manually adjust lighting loads. - Shades mode: this mode is used to manually control shade groups.
The following descriptions do not include additional functionality made possible by dealer programming. Those functions are beyond the scope of this guide.
Standard Mode
Daylight Harvesting
The iLux supports use of a photocell to automatically reduce light levels when natural light is present (aka "Daylight Harvesting"). Each load can be set for a custom response to daylight levels, or set to not respond at all.
If a photocell is present, Scenes 1 through 8 (plus the ON scene) will automatically utilize Daylight Harvesting. Scenes 9 through 16 will ignore daylight harvesting at all times.
When under photocell control, the load level can change automatically based on the current photocell level and the scene setting. When this automatic behavior is enabled, the top bar graph LED for that load will blink.
By default, the six function buttons recall scenes 1 - 6. As a scene is recalled, the lights fade (change from one level to another) in a specified time, and any shades in the scene go to their specified levels.
The ON and OFF buttons recall the On and Off scenes, respectively. By default, the On scene will set all lights to full on. The Off scene will always set all lights to full off.
While fading, the LED for the selected scene recall button blinks, and then stays on when fade is complete; the two-digit display shows the time remaining; If you press the selected scene recall button again before fade is complete, the lights immediately go to their assigned levels and the LED turns solid.
The six bar graphs always show the current level of each lighting load.
When all lights are off, the LEDs for all function buttons glow dimly to make it easy to locate the panel in the dark.
The up/down button acts as a lights master, adjusting the level of all dimmable lighting loads simultaneously. Pressing the top of the button raises the lights; pressing the bottom of the button lowers them.
You can also select functions using an optional remote keypad or IR remote control.
Manual Load Adjustment With Daylight Harvesting
When a load is under photocell control, the top bar graph LED for that load will blink slowly. Manual adjustment of the load is still possible using the raise and lower buttons.
NOTE: Manual adjustment of the load does not disable the photocell. The load will change in response to the photocell, but the level will be shifted up or down according to an internal calculation that compensates for the amount of manual adjustment.
Lights Mode
Lights mode lets you manually adjust any of the six lighting loads.
To enter Lights mode, press the Lights button. The LED will light, and the six function buttons can now be used to adjust the six lighting loads.
- Press the right side of the function buttons to raise the lights; press the left side to lower the lights.
• The six bar graphs show the current level of each lighting load. - While a particular lighting load is being adjusted, the two-digit display shows its level. (“oF” indicates fully off; “on” indicates fully on; “1” – “99” indicate percent of the full on level.) Press the center of a function button to check light level without adjusting.
- The up/down button acts as an all lights master in this mode. Press the top of the button to raise the lights; press the bottom of the button to lower the lights.
The ON and OFF buttons operate normally while in Lights mode.
To exit Lights mode, press the Lights button again, or press Cancel. The LED will go off, and the unit will revert to Standard mode.
Shades Mode
Shades mode allows you to manually adjust any of the six shade groups.
To enter Shades mode, press the Shades button. The LED will light, and the six function buttons can now be used to adjust shade groups 1 through 6.
- Press the right side of the function buttons to open the shades; press the left side to close the shades. Press the button while the shade is moving to stop it.
-
For presettable shade motors:
-
The bar graphs show the current position of each shade group.
- While a particular shade group is being adjusted, the two-digit display shows its position. ("CL" indicates fully closed; "OP" indicates fully open; "1" - "99" indicate percent of the fully open position.)
- For non-presettable shade motors:
- The bar graphs will display nothing while a shade is not moving.
While a particular shade group is being opened, its bar graph LEDs scroll up and the two-digit display shows "OP."
While a particular shade group is being closed, the bar graph LEDs scroll down and the two-digit display shows "CL."
- The up/down button acts as a shades master in this mode, no matter what function is programmed for it. Press the top of the button to open the shades; press the bottom of the button to close the shades. Press the button while the shades are moving to stop.
The ON and OFF buttons operate normally while in Shades mode.
To exit Shades mode, press the Shades button again, or press Cancel. The LED will go off, and the unit will revert to Standard mode.
Changing Scene Presets
Scene Presets With Daylight Harvesting
If a photocell is present, Scenes 1 through 8 (plus the ON scene) will automatically utilize Daylight Harvesting. When this automatic behavior is enabled, the top bar graph LED for that load will blink.
NOTE: When editing scenes with photocell-controlled loads, photocell output will be temporarily disabled. When the scene is recalled, photocell control will resume and light levels may change. To reduce the possibility of unintended scene behavior caused by photocell reaction to sunlight, edit scenes at night.
The CLS-C6 scene settings can be modified using the front panel controls, without having to use a PC.
Changes to the lighting load levels and shade presets for one or more scenes can be accomplished as follows:
- In Standard mode, press the function button of the scene you wish to modify and hold it for five seconds. (Make sure you press the center of the button so both sides make contact.)
- The two-digit display will first count down as the lighting loads fade to their preset levels for that scene; it will then begin flashing between Sc. and the scene number; the Lights LED will be lit, and the Save and Cancel LEDs will flash.
- Use the six function buttons to adjust the levels of the lighting loads for that scene. Press the left side of the buttons to lower the lighting loads; press the right side of the buttons to raise the lighting loads.
- If you would like a certain lighting load to be unaffected by that scene recall, press and hold the center of the button (so both sides make contact) for three seconds. The top two and the bottom two LEDs of the associated bar graph will be lit (and the display will show - - ) to indicate that the level of the lighting load will not change when the scene is recalled.
- To change the shade presets for that scene press the Shades button; the Shades LED will be lit.
- Use the six function buttons to adjust the levels of the shade groups for that scene. Press the right side to raise the shades; press the left side to lower them. Note that for shades that are not “presettable,” only full open or full closed positions can be recalled as part of a scene.
- If you would like a certain shade group to be unaffected by that scene recall, press and hold the center of the button (so both side make contact) for three seconds. The top two and the bottom two LEDs of the associated bar graph will be lit (and the display will show - - ) to indicate that the level of that shade group will not change when the scene is recalled.
- To adjust the fade time, press the ^ and v buttons. When going up, the value will go from 0 seconds to 59 seconds, and then 1 minute to 99 minutes. When going down, the value will go from 99 minutes to 1 minute, and then 59 seconds to 0 seconds. The Min and Sec LEDs light as appropriate. Adjustment to fade time can be made when either Lights mode or Shades mode is active.
- When all the lighting loads are at the desired level and shades are at the desired position, press Save to save these settings as the new preset for that scene. If you make a mistake while changing a setting, press Cancel to discard changes and return to Standard mode before pressing Save.
- Repeat the above procedures for all scenes that require changes.
Problem Solving
Troubleshooting
The table below provides corrective action for possible trouble situations. If further assistance is required, please contact your dealer.
CLS-C6 Troubleshooting
| TROUBLE POSSIBLE CAUSE(S) | CORRECTIVE ACTION | |
| The unit does not respond as expected after changing preset. | Incorrect procedures were used to change the preset. | Refer to “Changing Scene Presets” on page 7 to revise the preset correctly. |
Further Inquiries
If you cannot locate specific information or have questions after reviewing this guide, contact your dealer.
This page is intentionally left blank.

CRESTRON®
Crestron Electronics, Inc. User Guide - DOC. 6395C
15 Volvo Drive Rockleigh, NJ 07647
Tel: 888.CRESTRON 05.11
Fax: 201.767.7576 Specifications subject to
www.crestron.com change without notice.
(2014521)

- Crestron CLS-C6 Series
- iLux® Integrated Lighting System
- User Guide
- Contents
- iLux® Integrated Lighting System: CLS-C6 Series 1
- iLux® Integrated Lighting System: CLS-C6 Series
- Introduction
- Functional Summary
- Operating Modes
- Standard Mode
- Daylight Harvesting
- Manual Load Adjustment With Daylight Harvesting
- Lights Mode
- Shades Mode
- Changing Scene Presets
- Scene Presets With Daylight Harvesting
- Problem Solving
- Troubleshooting
- Further Inquiries
- CRESTRON®
Brand : Crestron
Model : iLux CLS-C6MW
Category : Regulator