AP-C200 - Air purifier Cado - Free user manual and instructions
Find the device manual for free AP-C200 Cado in PDF.


User questions about AP-C200 Cado
0 question about this device. Answer the ones you know or ask your own.
Ask a new question about this device
Download the instructions for your Air purifier in PDF format for free! Find your manual AP-C200 - Cado and take your electronic device back in hand. On this page are published all the documents necessary for the use of your device. AP-C200 by Cado.
USER MANUAL AP-C200 Cado
1 Safety Precautions
3 Operating Precautions
3 Installing the Unit
4 Parts and Functions
6 Installing the Deodorizing/Dust Collecting/Anti-Bacterial Filter
8 How to Operate
9 Maintenance
11 Troubleshooting
13 Specifications
Safety Precautions
Make sure you observe these safety precautions.
Important information is printed on the product and in this instruction manual in order to prevent damage to property or prevent harm to the user or other people. Make sure you fully understand the following content (display/graphic symbols) before reading this text. If you ignore these precautions, it may cause serious injury by fire or electric shock. In order to avoid accidents, make sure you observe the following.
Symbols and Signs Used in This Manual

Warning
This indicates that it may cause death or serious injury.

Caution
This indicates that it may cause minor injury or property loss.

Prohibited
This indicates prohibited matters.

Required
This indicates compulsory matters to be followed.

Warning

Prohibited
This appliance is not intended for use by persons (including children) with reduced physical, sensory or mental capabilities, or lack of experience and knowledge, unless they have been given supervision or instruction concerning use of the appliance by a person responsible for their safety.
Children should be supervised to ensure that they do not play with the appliance.
Do not touch the power plug with wet hands.
It may cause electric shock.
Do not damage the power cord.
Damaging the power cord may lead to shortage or broken wires and cause electric shock or fire.
Follow the items below regarding the power cord.
- Do not manipulate or damage the power cord.
- Do not forcibly bend, pull, twist, or bundle the power cord or put heavy loads on the power cord.
- Do not place the power cord close to a heater.
- Do not heat the power cord.
- Do not remove the power plug by pulling the power cord.
- Do not pull the power cord when carrying.
Do not use a current other than AC 220V.
It may cause fire or electric shock.
Do not use the unit in a way that exceeds the rating of the wall outlet or wiring devices.
If you exceed the power rating by using a power strip or the like, it may cause fire.
Do not disassemble, reform, or repair the unit by yourself.
It may cause fire, electric shock, or injury.
For repairs, please consult a dealer or your nearest customer service center.
Do not use the unit in the following locations:
• In areas with flammable gas or places with metal dust
- It may lead to the gas catching on fire, igniting, or fuming due to dust being sucked into the unit.
- In bathrooms or other wet areas, or areas with high-temperature and humidity
- It may lead to fire or electric shock due to voltage leakage.
• In areas with oil components such as machine oil or cooking oil
- It may lead to electric shock or injury due to the unit cracking and exposing the power area or fan area.
• In locations where the unit is within reach of children
- It may cause electric shock or injury.
Do not subject the unit to moisture or water.
It may cause fire or electric shock.
Do not bring the unit near open fires such as lit cigarettes or incense.
It may cause fire.

Required
Plug the power plug in all the way.
If it is not plugged in all the way, it may cause electric shock or fire.
- Do not use damaged power cords or power plugs, or wall outlets that are loose and do not hold the plug.
Regularly wipe dust from the power plug with a dry cloth.
If dust builds up, it can lead to insulation failure from humidity, etc. and may cause fire.
- When not in use for a long period of time, remove the power plug from the outlet.
During cleaning, inspection, and moving, make sure to stop operation and unplug the power plug.
Leaving the power plug in the outlet may cause electric shock or injury.
In case of an abnormality or malfunction, immediately stop its operation and unplug the power plug.
If you continue operations during a malfunction, it may lead to breakdown, electric shock, fuming, or fire.
• After the filter is replaced, the unit does not start even after pressing the power button.
• Electric current is sporadic when moving the cord.
- It vibrates or makes an unusual sound during operations.
• The unit, power plug, or cord is abnormally hot.
• It smells like something is burning.
Make sure that pets do not urinate on the unit or bite the power cord.
It may lead to electric shock or a fire.
If one of the above situations occur, please consult a dealer or your nearest customer service center.

Caution

Prohibited
Do not sit or stand on the unit.
Falling down from the unit or toppling may cause injury or malfunction.
Do not put the unit in unstable locations.
If the unit falls over, it may cause an electric shock and lead to injury or damage.
Do not block the air inlet or air outlet with obejects such as laundry, cloth, curtains, etc.
Poor air circulation may lead to overheating or fire.
After maintenance, wipe off the water thoroughly and dry the unit. Do not use it when wet.
It may lead to electric shock or injury.
Do not use chlorinated or acid detergents for cleaning.
The detergent may produce toxic gas that is harmful to your health.
Do not wipe the unit with benzine or thinner or spray with insecticide.
It may lead to cracks, electric shock, or fire.
Do not operate the unit when fumigating for pests.
It may cause accumulated pharmaceutical ingredients to emit when using the unit later, which is harmful to your health.
Do not put your fingers or rod-shaped objects into the air inlet or outlet.
It may lead to electric shock, damage, or injury.

Required
Periodically open windows to ventilate the room when using the unit with a combustion appliance at the same time.
This unit does not have a function to eliminate carbon monoxide.
If air ventilation is insufficient, it may lead to carbon monoxide poisoning.
Operating Precautions
Do not block the air inlet or air outlet.
It may reduce the cleaning capability of the unit causing clean air not to circulate throughout the entire room. This may cause a malfunction.
Do not operate the unit without installing the filter.
There is no cleaning effect and doing so may cause a malfunction.
Do not use the unit in place of a ventilating fan in the kitchen.
This may remarkably lower the lifespan of the filter or lead to the unit becoming deformed.
Do not place the unit in direct sunlight or directly in the path of the air conditioner or heater's airflow.
It may cause deformation, discoloration, or malfunction of the unit.
Do not use the unit near a TV or radio.
It may cause distortion of video images or noise. (Place the unit at least 1m away from a TV or radio. Also, using the same wall outlet as these devices may cause distortion of video image or noise. If this occurs, plug it into a different outlet.)
Do not place the unit in the same location for a long period of time.
Using the unit in the same location for a long period of time may make the wall or floor around the unit dirty. It is recommended to move the location of the unit regularly.
Installing the Unit
Place the unit on a flat surface. Also, for good air circulation, make sure the unit is located at least 30 cm away from walls, furniture, curtains, etc. on both sides, the front, back, and above.
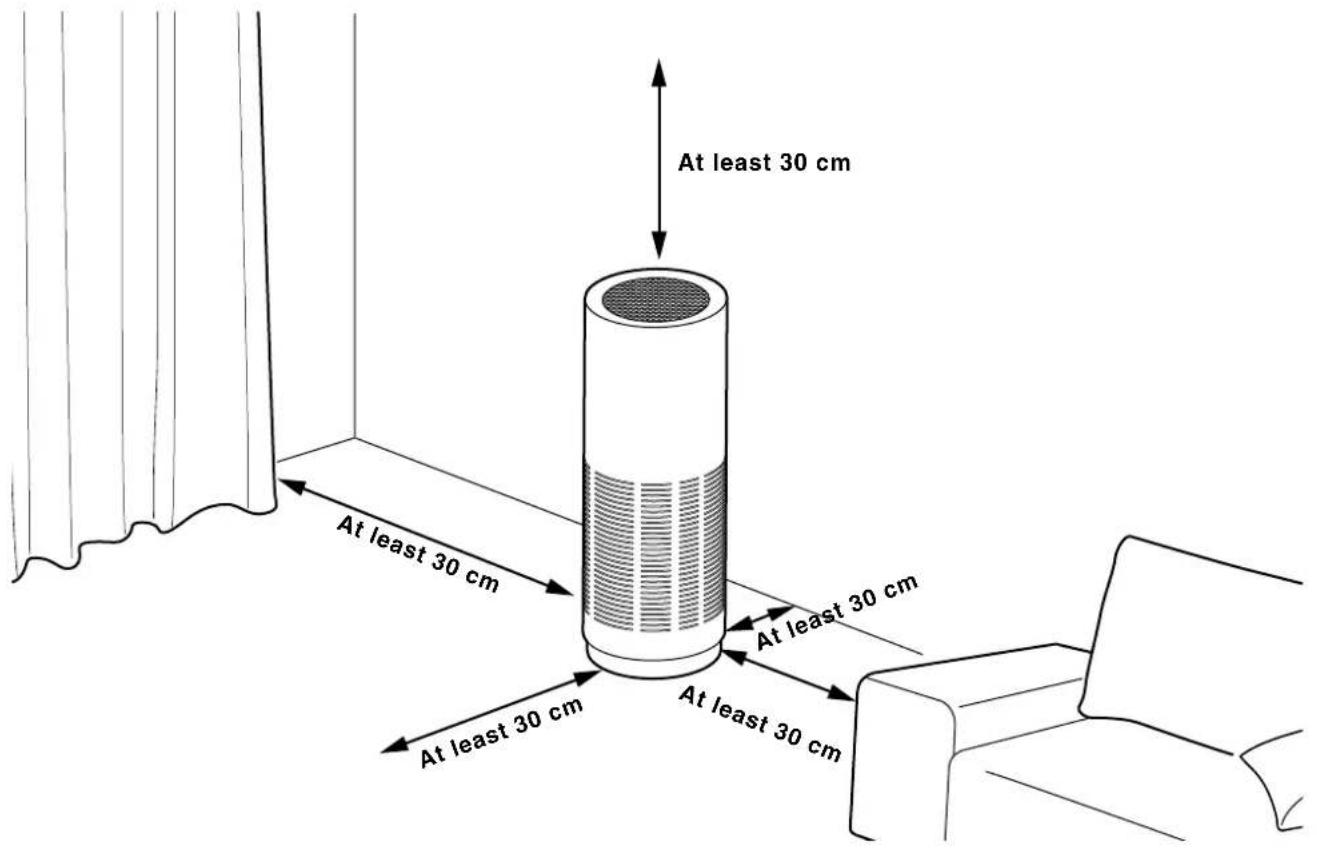
text_image
At least 30 cm At least 30 cm At least 30 cm At least 30 cm At least 30 cmParts and Functions
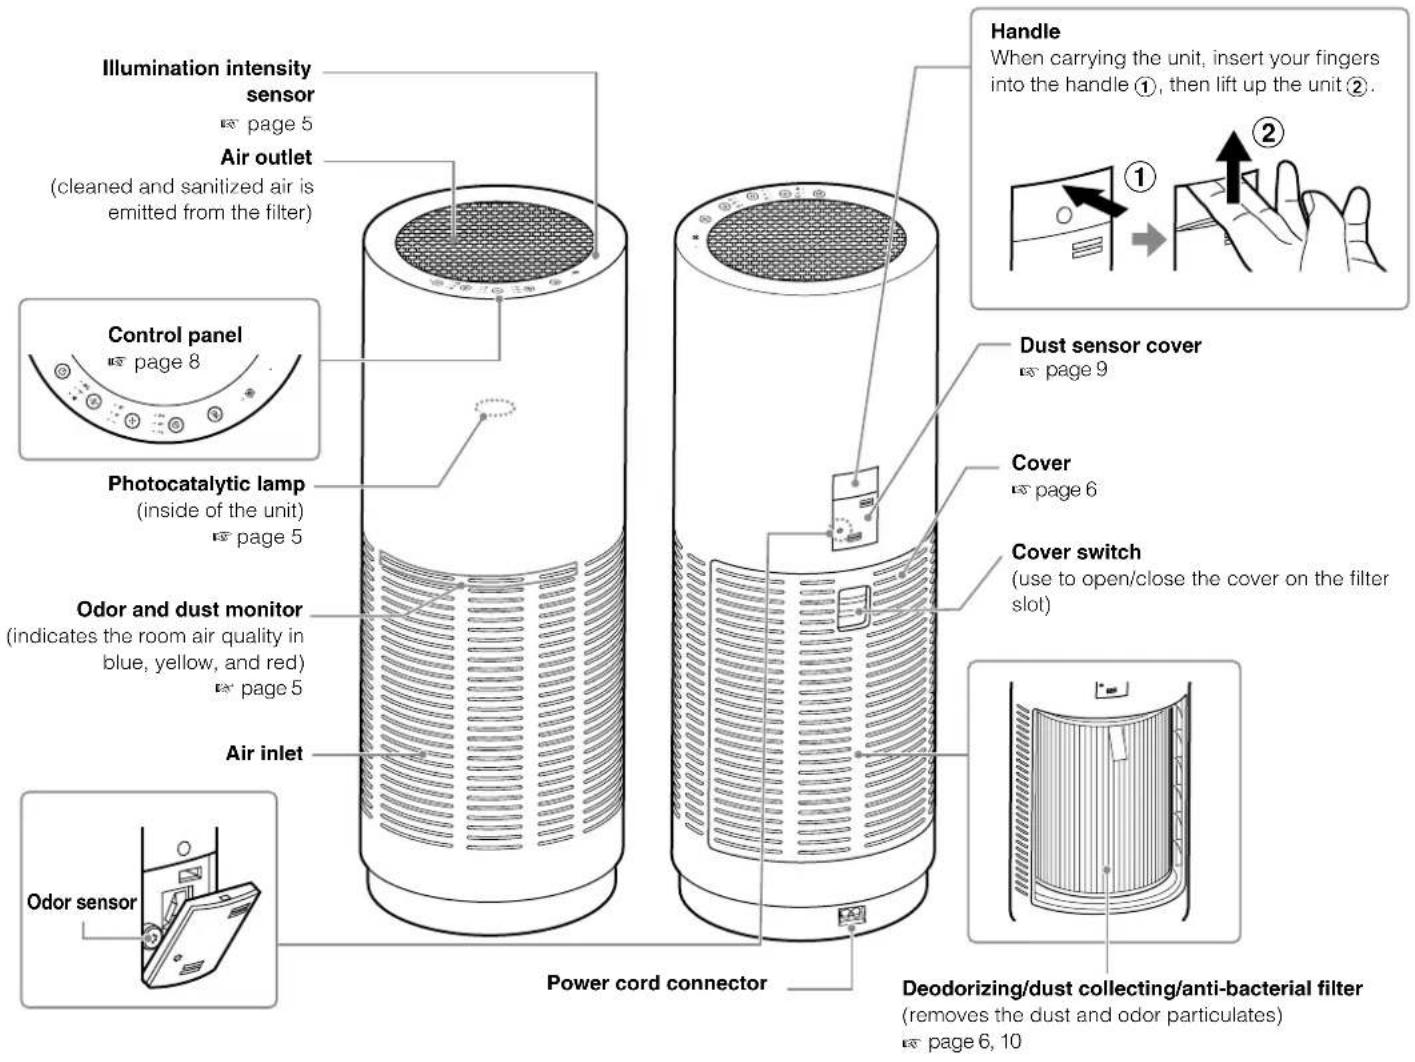
text_image
Illumination intensity sensor page 5 Air outlet (cleaned and sanitized air is emitted from the filter) Control panel page 8 Photocatalytic lamp (inside of the unit) page 5 Odor and dust monitor (indicates the room air quality in blue, yellow, and red) page 5 Air inlet Odor sensor Power cord connector Handle When carrying the unit, insert your fingers into the handle ①, then lift up the unit ②. Dust sensor cover page 9 Cover page 6 Cover switch (use to open/close the cover on the filter slot) Deodorizing/dust collecting/anti-bacterial filter (removes the dust and odor particulates) page 6, 10About air cleaning function
This unit is not designed to eliminate all pollutants in the air. (For example, it does not eliminate carbon monoxide from cigarette smoke.)
Also, this product does not have the ventilating function. When using in a closed room, open a window to air out the room occasionally.
Photocatalytic Lamp
The blue activated carbon in the deodorizing/dust collecting/anti-bacterial filter does not use the conventional ultraviolet ray reaction type, but instead uses a new type of photocatalytic technology that reacts with visible light.
The lamp in the product uses a long life blue LED, and does not have any effects on eyes or the human body in the way ultraviolet rays do, but since the light is strong, when performing maintenance such as removing the filter to replace it, unplug the power plug and avoid looking directly into the light.
(The photocatalytic lamp will turn off if the cover is removed.)
Odor and Dust Monitor
The odor and dust sensors detect pollutants in the air and indicates the air environment in the room with the colors blue, yellow, and red.
Odor and dust monitor Air environment of room
| Blue | Clean | |
| Yellow | Slightly | polluted |
| Red | Polluted |
Odor and dust sensors
| Detected objects | |
| Odor sensorThe odor sensor is placed on the backside of the unit. | Detects cigarette, pet, and cosmetic odors. |
| Dust sensorThe dust sensor is placed on the backside of the unit. | Detects house dust (dust, pollen, etc.) and cigarette smoke. |
Note
- The odor and dust sensors may react to changes in temperature and humidity.
- The odor sensor may not react depending on the odor components.
- For the first five minutes after turning the power on, the sensors are initializing and the unit cannot indicate the exact air condition.
Illumination Intensity Sensor
Detects ambient brightness. The glowing indicators dim when surroundings become dark. They increase brightness when surroundings become bright.
Installing the Deodorizing/Dust Collecting/Anti-Bacterial Filter
1 Remove the cover.
Slide down the cover switch on the rear of the unit①, and remove the cover②.
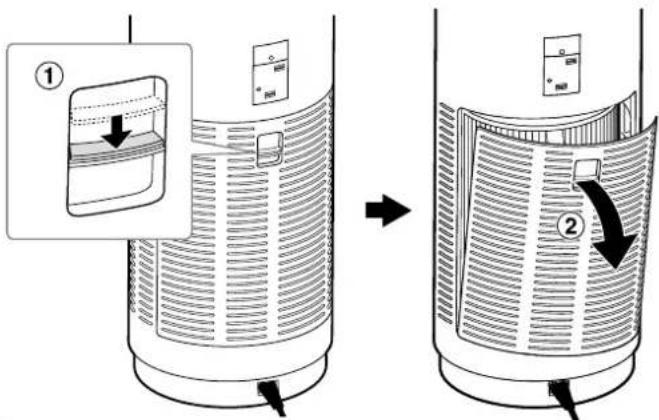
text_image
Diagram illustrating a device's internal structure before and after assembly, with labeled parts and directional arrows.2 Remove the deodorizing/dust collecting/anti-bacterial filter from the polythene bag and place it inside the unit.
① Take out the deodorizing/dust collecting/anti-bacterial filter from the polyethylene bag of the unit.
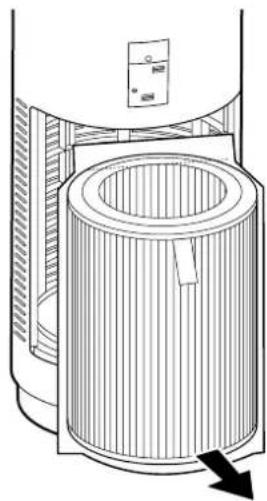
natural_image
Technical line drawing of a cylindrical device with internal structure and directional arrow (no text or symbols)② Cut the polyethylene bag with the filter inside, then take out the filter.
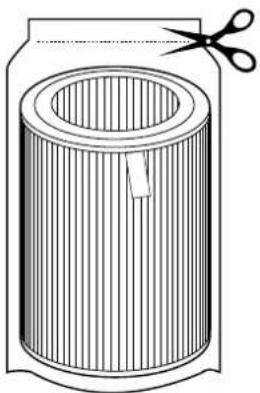
natural_image
Diagram of a cylindrical container with internal striped pattern and scissors cutting into it (no text or symbols)③ Attach the Filter Start Date label on the filter. Write the filter use start date on the label, then attach it onto the side printed "TOP" on the filter.
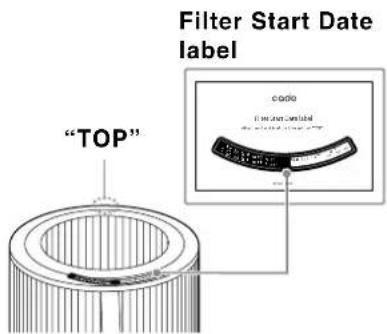
text_image
Filter Start Date label "TOP" code in the last label④ Place the filter deeply inside the unit so that its ribbon faces outside when set.
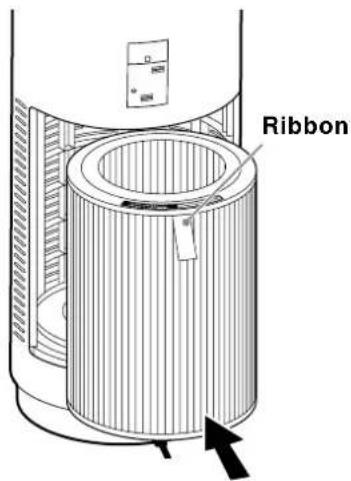
text_image
RibbonNote
- When setting the filter, make sure the top and bottom's position of the filter is correct.
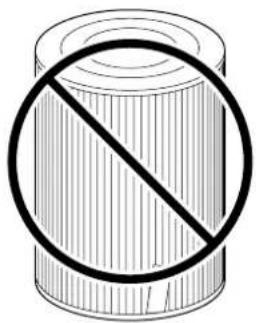
text_image
Diagram of a cylindrical object with a diagonal line crossing through it, indicating no prohibition or restriction.- If the filter's top and bottom's positions are wrong, the unit does not emit wind.
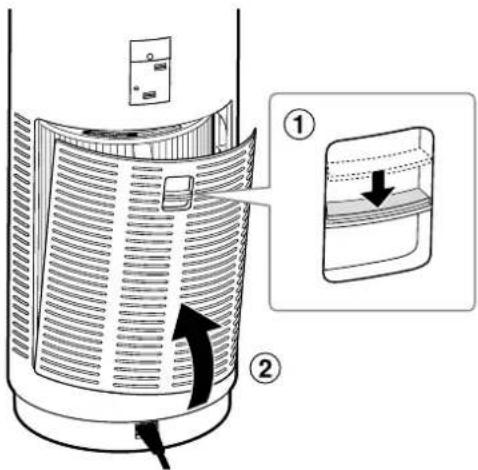
3 Close the cover.
With the cover switch slid down, attach the cover onto the unit.
text_image
Diagram illustrating a device's internal structure with labeled parts and an inset showing a zoomed-in section.Note
Again, make sure the top and bottom position of the filter is correct before attaching the cover.
How to Operate
text_image
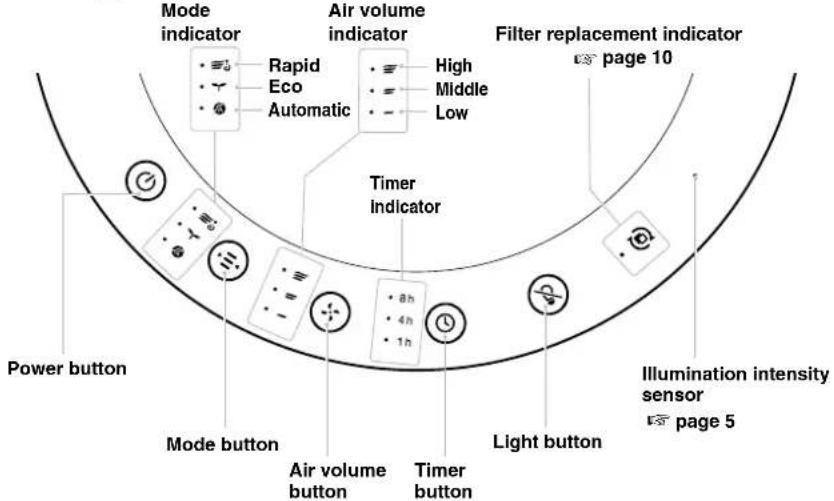
Mode indicator Rapid Eco Automatic Air volume indicator High Middle Low Filter replacement indicator page 10 Timer Indicator Power button Mode button Air volume button Timer button Light button Illumination intensity sensor page 5Starting the Unit
1 Plug the power plug into an wall outlet.
All indicators and buttons on the control panel along with the odor and dust monitor will momentarily light up then turn off.
2 Press the power button (◎).
After it beeps, all of the buttons on the control panel along with the automatic indicator, and odor and dust monitor will light up.
If the power button is pressed while the unit is still operating, the lit buttons, indicators, and odor and dust monitor will turn off then the unit will stop operating.
Selecting the Operation Mode
Press the mode button (E)
The operation mode and air volume cannot be set simultaneously. Each time the mode button is pressed, it makes a beeping sound and the operation mode changes.
The indicator of the selected mode will light up.

About operation mode
| Automatic | Normally use this mode.The room condition is detected with the odor and dust sensors, and the air volume setting switched between low, middle, and high. |
| Eco | Used in situations with low volumes of air pollutants, such as at night.Only the power button and eco-mode indicator light up and the unit operates with low air volume setting. (The photocatalytic lamp is also off.) |
| Rapid | Use this mode if you want to quickly clean the air.The unit operates with an air volume stronger than the high air volume setting for 2 hours, then changes to automatic mode. |
Changing the Air Volume
Press the air volume button (f)
Air volume and operation mode cannot be configured simultaneously. Each time the air volume button is pressed, it makes a beeping sound and the air volume mode changes. The indicator of the selected air volume will light up.

Operation continues with the selected air volume.
Selecting the Operation Time
Press the timer button (b)
Each time the timer button is pressed, it makes a beeping sound and the time setting changes.
The indicator of the selected timer will light up.

The timer setting will be deactivated when the timer is off.
Turning off the Odor and Dust Monitor
Press the light button ( )
If the light button is pressed during operation, there will be a beeping sound and the odor and dust monitor will turn off. If the light button is pressed again, it will light up again.
Note
The inlet lamp will not turn off completely even after the light button is pressed. This light is from the photocatalytic lamp that always lights inside of the unit.
Deodorizing/Dust Collecting/Anti-Bacterial Filter
Remove the dust on the net surface of the filter. To take out the filter from the unit, refer to "Replacing the Deodorizing/Dust Collecting/Anti-Bacterial Filter" (page 10).
Maintenance
Notes when Cleaning
- Before cleaning, make sure to remove the power cord from the wall outlet.
- When wiping the unit, always use a soft cloth or cotton swab. Using a stiff brush or something similar may scratch or damage the unit.
- When using detergent, always use a neutral detergent. Using any other detergent may cause damage or warp the unit.
The Unit
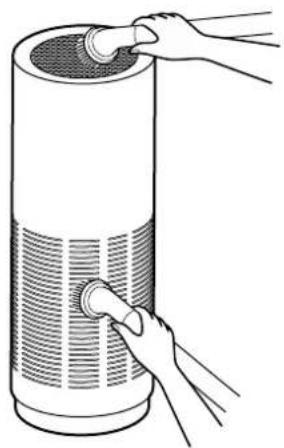
Clean the unit and the air inlet and air outlet periodically.
1 Wipe dust from the unit with a soft cloth.
2 Remove dust from the air inlet and air outlet with a vacuum cleaner or use a soft cloth to wipe it off.
When it is extremely dirty, use a cloth with watered-down neutral detergent on it and wipe the filth off.
natural_image
Illustration of a hand inserting a plug into a cylindrical device with a mesh grille (no text or symbols)Dust Sensor
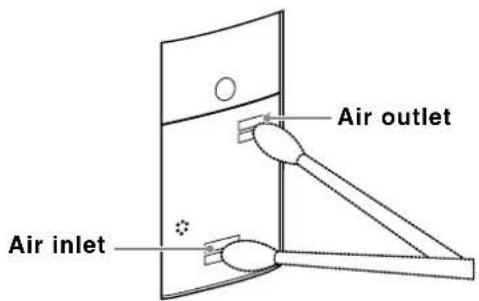
If dust builds up, the sensor sensitivity will become unstable. Remove dust every two months or so. Clean the dust sensor often when using in an environment with excessive dust.
1 Use a cotton swab or something similar to wipe the air inlet and air outlet on the dust sensor cover.
text_image
Air inlet Air outlet2 Remove the dust sensor cover.
Push A as shown in the illustration ①, then lay the dust sensor cover outward ②.
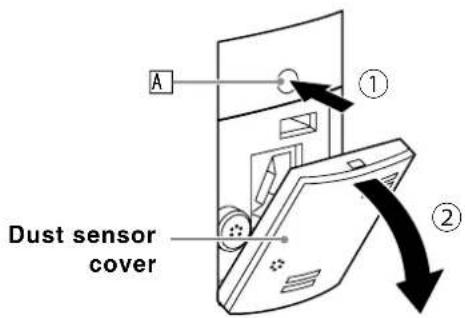
text_image
A ① Dust sensor cover ②3 Use a slightly dampened cotton swab to wipe the sensor and surrounding area as well as the air inlet and air outlet.
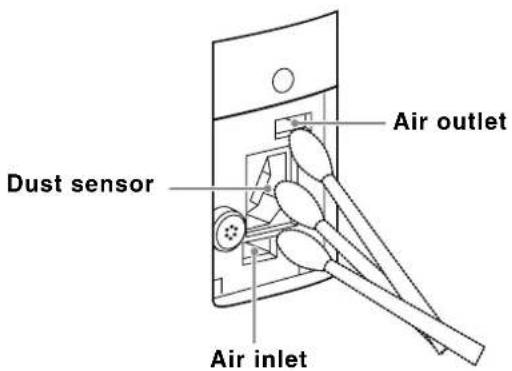
text_image
Air outlet Dust sensor Air inlet4 Use a dry cotton swab to wipe the moisture on the dust sensor, air inlet, and air outlet.
5 Close the dust sensor cover.
Deodorizing/Dust Collecting/Anti-Bacterial Filter
Remove the dust from the net of the side surface of the filter. On how to remove the filter, see "Replacing the Deodorizing/Dust Collecting/Anti-Bacterial Filter" (or page 10).
Replacing the Deodorizing/Dust Collecting/Anti-Bacterial Filter
The deodorizing/dust collecting/anti-bacterial filter cannot be washed with water. Replace it regularly.
The timing to change the deodorizing/dust collecting/anti-bacterial filter depends on the environment in which the unit is used, but generally replace it every 6-12 months ^*1 (“*1” on page 13). When the filter needs to be replaced, the filter replacement indicator will light up.
1 Unplug the power plug from the wall outlet.
2 Slide down the cover switch on the rear of the unit ①, and remove the cover ②.
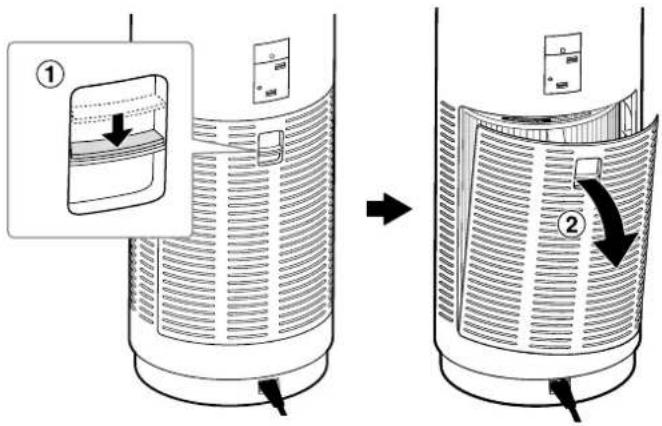
text_image
Diagram illustrating the process of removing a device into a container, with labeled steps ① and ② showing removal and change.3 Take out the filter.
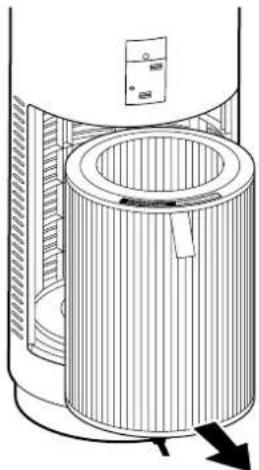
natural_image
Technical line drawing of a cylindrical device with internal components and directional arrows indicating movement (no text or symbols)4 Install a new filter.
See "Installing the Deodorizing/Dust Collecting/Anti-Bacterial Filter"(page 6) for instructions on installing the filter.
5 Reset the filter replacement indicator.
The filter replacement indicator will not turn off even after the filter has been replaced. The indicator will start flickering after you press and hold the light button for about 5 seconds. Press the light button one more time to turn off the filter replacement indicator.
Note
- Even when the filter is replaced before the filter replacement indicators turn on, the indicator will be reset if the operation above is performed.
- If you remove the cover on the rear of the unit during the operation, the unit stops operating automatically. If you reattach the cover onto the unit, the unit re-starts operating.
- Even if you do not install the filter into the unit, the unit operates, however, photocatalyst cleaning will not be effective. Make sure to install the filter correctly.
When purchasing replacement deodorizing/dust collecting/anti-bacterial filters (sold separately), please refer to the model number in "Accessories" on page 13 and consult your dealer.
Troubleshooting
Situation Points to check and how to handle Reference
pages
| There is no air volume.The air volume is too weak. | Is the power cord plugged into the wall outlet correctly?→ Plug the power cord into the wall outlet. | 8 |
| Did you remove the deodorizing/dust collecting/anti-bacterial filter from the polythene bag when you installed it?→ Please remove the deodorizing/dust collecting/anti-bacterial filter from the polythene bag and install it in the unit properly. | 6-7 | |
| Is the air inlet/air outlet dirty?→ Clean the unit and remove dirt from the air inlet and air outlet on the unit. If the performance does not improve even after cleaning, replace the deodorizing/dust collecting/anti-bacterial filter with a new one. | 9~10 | |
| Is the deodorizing/dust collecting/anti-bacterial filter installed upside down?→ Make sure that the top and bottom positions are correct. | 6-7 | |
| The indicators buttons on the control panel are flashing. | Is the cover closed properly?→ Check whether the deodorizing/dust collecting/anti-bacterial filter is installed properly and firmly close the cover. | 7 |
| The odor and dust monitor remains red. | The dust and odor sensors may react to changes in temperature and humidity or gas from sprays and the like.→ Wait a few minutes and make sure the odor and dust monitor changes to yellow or blue. | 5 |
| Is the dust sensor dirty?→ Clean and remove dirt from the dust sensor.* In a place where odor substance is generated, such as rooms where carpentry work has been performed, etc, the odor and dust sensor may remain lit in red or yellow. | 9 | |
| The odor and dust monitor remains blue. | Is the unit placed in a location with bad air circulation, such as in an area completely surrounded by something?→ Make sure the unit is located at least 30 cm away from walls, furniture, curtains, etc. on both sides, the front, back, and above. | 3 |
| Is the dust sensor dirty?→ Clean and remove dirt from the dust sensor. | 9 | |
| Have five minutes already elapsed after turning on the unit?→ For the first five minutes after turning the power on, the sensors are initializing and the unit cannot indicate the exact air condition. Wait for a while and see whether the odor and dust monitor changes to a different color. | - |
Situation Points to check and How to handle Reference
pages
| The air purifying effect was not achieved. | Is the unit placed in a location with bad air circulation such as in an area completely surrounded by something?→ Make sure unit is located at least 30 cm away from walls, furniture, curtains, etc. on both sides, the front, back, and above. | 3 |
| Is the air inlet/air outlet dirty?→ Clean the unit and remove dirt from the air inlet and air outlet on the unit. If the performance does not improve even after cleaning, replace the deodorizing/dust collecting/anti-bacterial filter with a new one. | 9~10 | |
| Does dust adhere to the net surface of the filter?→ Refer to “Replacing the Deodorizing/Dust Collecting/Anti-Bacterial Filter” to remove dust. | 10 | |
| The color of the odor and dust monitor changed, but the air volume does not change. | Are you using a mode other than automatic mode?→ In the operation modes other than the automatic mode, the air volume does not change in accordance with the indications of the odor and dust monitor. | - |
| The operation does not stop even though the air is clean. | The unit will continue to operate with a low air volume even if the room is clean. | - |
| The unit smell is unpleasant. | Is the air inlet/air outlet dirty?→ Clean the unit and remove dirt from the air inlet and air outlet on the unit. If the performance does not improve even after cleaning, replace the deodorizing/dust collecting/anti-bacterial filter with a new one. | 9~10 |
| Are you using the unit in a room with strong odor?→ Using the unit in a room with strong odor such as cigarette smoke or after a barbecue for a long period of time may require more frequent replacement of the deodorizing/dust collecting/anti-bacterial filter. When using in such an environment, it is recommended to regularly air out the room. | - | |
| With indicators on the control panel flashing, the unit emits alarm and does not start. | The motor may be damaged, or a foreign object may have entered the unit.→ Press the power button to stop the beeps. Unplug the power plug, then check if there is a foreign object in the filter. If the alarm does not stop, consult a dealer or your nearest customer service center. | - |
Specifications
| Model name | AP-C200 | ||||
| Power | Singapore model: 220-240V 50-60HzIndia model: 240V 50HzHong Kong model: 220V 50Hz | ||||
| Applicable floor area (m2) | 36*1 | ||||
| Air volume/Operation mode | Low Middle High Rapid (2 hours) | ||||
| Power consumption (W) | 691833 | ||||
| Air volume (m3/h) | 5996162259 | ||||
| Operational noise (dBA) | 29404959 | ||||
| Dimensions (mm) | Width 242 × Depth 242 × Height 652 (including protrusions) | ||||
| Weight (kg) | 6.3 (including filter) | ||||
| Power cord length (m) | 1.8 | ||||
| Accessories | Deodorizing/dust collecting/anti-bacterial filter*2, instruction manual, warranty card, power cord, Filter Start Date label | ||||
| *9 Model name For AP-C200 series | |||||
| Dimensions(mm) | ∅ 200 × 267 | ||||
*1: Calculated based on the test method of the JEM1467 in the Standards of the Japan Electrical Manufacturers' Association. Standard when operating on rapid mode.
● Design and specifications are subject to change without notice.
cado