
Regza 37HL67 - TV TOSHIBA - Free user manual and instructions
Find the device manual for free Regza 37HL67 TOSHIBA in PDF.


User questions about Regza 37HL67 TOSHIBA
0 question about this device. Answer the ones you know or ask your own.
Ask a new question about this device
Download the instructions for your TV in PDF format for free! Find your manual Regza 37HL67 - TOSHIBA and take your electronic device back in hand. On this page are published all the documents necessary for the use of your device. Regza 37HL67 by TOSHIBA.
USER MANUAL Regza 37HL67 TOSHIBA
Integrated High Definition LCD Television
COLORSTREAM®HD
DOLBY DIGITAL
SRS(●) WOW
HDMI
HDTV HIGH-DEFINITION TELEVISION
26HL67
32HL67
32HL67U
37HL67
42HL67
For an overview of steps for setting up your new TV, see page 9.
Note: To display a High Definition picture, the TV must be receiving a High Definition signal (such as an over-the-air High Definition TV broadcast, a High Definition digital cable program, or a High Definition digital satellite program). For details, please contact your TV antenna installer, cable provider, or satellite provider.
Owner's Record
The model number and serial number are on the back of your TV. Record these numbers in the spaces below. Refer to these numbers whenever you communicate with your Toshiba dealer about this TV.
Model number:
Serial number:
Dear Customer,
Thank you for purchasing this Toshiba LCD TV. This manual will help you use the many exciting features of your new LCD TV. Before operating your LCD TV, please read this manual completely, and keep it nearby for future reference.
Safety Precautions
WARNING: TO REDUCE THE RISK OF FIRE OR ELECTRIC SHOCK, DO NOT EXPOSE THIS APPLIANCE TO RAIN OR MOISTURE.

WARNING: TO REDUCE THE RISK OF ELECTRIC SHOCK, DO NOT REMOVE COVER (OR BACK). NO USER-SERVICEABLE PARTS INSIDE. REFER SERVICING TO QUALIFIED SERVICE PERSONNEL.
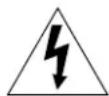
The lightning flash with arrowhead symbol, within an equilateral triangle, is intended to alert the user to the presence of uninsulated “dangerous voltage” within the product’s enclosure that may be of sufficient magnitude to constitute a risk of electric shock to persons.

The exclamation point within an equilateral triangle is intended to alert the user to the presence of important operating and maintenance (servicing) instructions in the literature accompanying the appliance.
WARNING
To prevent injury, this apparatus must be securely attached to the floor/wall in accordance with the installation instructions. See item 20 on page 3.
WARNING: If you decide to wall mount this television, always use a UL Listed wall bracket appropriate for the size and weight of this television. The use of any wall bracket other than a UL Listed wall bracket appropriate for the size and weight of this television for wall mounting this television could result in serious bodily injury and/or property damage. See "Removing the Pedestal Stand" ( page 5).
NOTE TO CATV INSTALLERS
This is a reminder to call the CATV system installer's attention to Article 820-40 of the U.S. NEC, which provides guidelines for proper grounding and, in particular, specifies that the cable ground shall be connected to the grounding system of the building, as close to the point of cable entry as practical. For additional antenna grounding information, see items 27 and 28 on page 4.
Child Safety
It Makes A Difference Where Your TV Stands

natural_image
Two baby babies sitting side by side, one covering face with hand on cheek, the other looking surprised (no text or symbols visible)Congratulations on your purchase! As you enjoy your new TV, keep these safety tips in mind:
The Issue
☐ If you are like most consumers, you have a TV in your home. Many homes, in fact, have more than one TV.
☐ The home theater entertainment experience is a growing trend, and larger TVs are popular purchases; however, they are not always supported on the proper TV stands.
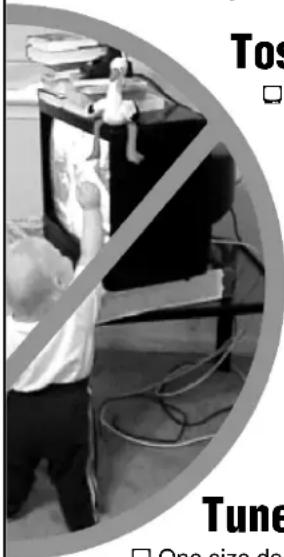
Sometimes TVs are improperly secured or inappropriately situated on dressers, bookcases, shelves, desks, audio speakers, chests, or carts. As a result, TVs may fall over, causing unnecessary injury.
text_image
Tos Tune One size doToshiba Cares!
☐ The consumer electronics industry is committed to making home entertainment enjoyable and safe.
□ The Consumer Electronics Association formed the Home Entertainment Support Safety Committee, comprised of TV and consumer electronics furniture manufacturers, to advocate children's safety and educate consumers and their families about television safety.
Tune Into Safety
☐ One size does NOT fit all! Use appropriate furniture large enough to support the weight of your TV (and other electronic components).
☐ Use appropriate angle braces, straps, and anchors to secure your furniture to the wall (but never screw anything directly into the TV).
□ Carefully read and understand the other enclosed instructions for proper use of this product.
☐ Do not allow children to climb on or play with furniture and TVs.
☐ Avoid placing any item on top of your TV (such as a VCR, remote control, or toy) that a curious child may reach for.
☐ Remember that children can become excited while watching a program and can potentially push or pull a TV over.
☐ Share our safety message about this hidden hazard of the home with your family and friends. Thank you!

text_image
CEA Consumer Electronics Association2500 Wilson Blvd.
Arlington, VA 22201 U.S.A.
www.CE.org
CEA is the Sponsor, Producer and
Manager of the International CES ^®
Important Safety Instructions
1) Read these instructions.
2) Keep these instructions.
3) Heed all warnings.
4) Follow all instructions.

5) Do not use this apparatus near water.
6) Clean only with dry cloth.
7) Do not block any ventilation openings. Install in accordance with the manufacturer's instructions.
8) Do not install near any heat sources such as radiators, heat registers, stoves, or other apparatus (including amplifiers) that produce heat.
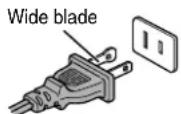
9) Do not defeat the safety purpose of the polarized or grounding type plug. A polarized plug has two blades with one wider than the other. A grounding type plug has two blades and a third grounding prong. The wide prong are provided for your safety. If the does not fit into your outlet, consult an replacement of the obsolete outlet.
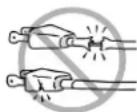

10) Protect the power cord from being walked on or pinched, particularly at plugs, convenience receptacles, and the point where they exit from the apparatus.
11) Only use attachments/accessories specified by the manufacturer.
12) Use only with the cart, stand, tripod, bracket, or table specified by the manufacturer, or sold with the apparatus. When a cart is used, use caution when moving the cart/apparatus combination to avoid injury from tip-over.
13) Unplug this apparatus during lightning storms or when unused for long periods of time.
14) Refer all servicing to qualified service personnel. Servicing is required when the apparatus has been damaged in any way, such as power-supply cord or plug is damaged, liquid has been spilled or objects have fallen into the apparatus, the apparatus has been exposed to rain or moisture, does not operate normally, or has been dropped.
Additional Safety Precautions
14a) CAUTION: If the TV is dropped and the cabinet or enclosure surface has been damaged or the TV does not operate normally, take the following precautions:
- ALWAYS turn off the TV and unplug the power cord to avoid possible electric shock or fire.
- NEVER allow your body to come in contact with any broken glass or liquid from the damaged television. The LCD panel inside the TV contains glass and a toxic liquid. If the liquid comes in contact with your mouth or eyes, or your skin is cut by broken glass, rinse the affected area thoroughly with water and consult your doctor.
- ALWAYS contact a service technician to inspect the TV any time it has been damaged or dropped.
15) CAUTION:
- To reduce the risk of electric shock, do not use the polarized plug with an extension cord, receptacle, or other outlet unless the blades can be inserted completely to prevent blade exposure.
- To prevent electric shock, match wide blade of plug to wide slot; fully insert.
16) WARNING:
To prevent the spread of fire, keep candles or other open flames away from this product at all times.
Installation, Care, and Service
Installation
Follow these recommendations and precautions and heed all warnings when installing your TV:
17) Never modify this equipment. Changes or modifications may void: a) the warranty, and b) the user's authority to operate this equipment under the rules of the Federal Communications Commission.
18) DANGER: RISK OF
SERIOUS PERSONAL INJURY, DEATH, OR EQUIPMENT DAMAGE!
Never place the TV on an unstable cart, stand, or table. The TV may fall, causing serious personal injury, death, or serious damage to the TV.

19) To avoid damage to this product, never place or store the TV in direct sunlight; hot, humid areas; or areas subject to excessive dust or vibration.
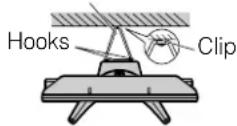
20) Always place the TV on the floor or a sturdy, level, stable surface that can support the weight of the unit. To secure the TV, use a sturdy tie from the hooks on the rear of the TV pedestal to a wall, pillar, or other immovable structure. Make sure the tie is tight, secure, and parallel to the floor.
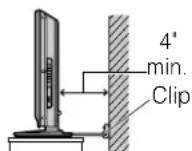
TV side TV top
Sturdy tie (as short as possible)
21) The apparatus shall not be exposed to dripping or splashing and that no objects filled with liquids, such as vases, shall be placed on the apparatus.
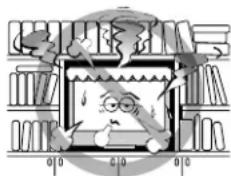
22) Never block or cover the slots or openings in the TV cabinet back, bottom, and sides. Never place the TV:
- on a bed, sofa, rug, or similar surface;
- too close to drapes, curtains, or walls; or
- in a confined space such as a bookcase, built-in cabinet, or any other place with poor ventilation.
The slots and openings are provided to protect the TV from overheating and to help maintain reliable operation of the TV. Leave a space of at least 4 (four) inches around the TV.
(continued)
natural_image
Illustration of a bookshelf with books and a cartoon character inside, no text or symbols present23) Always place the back of the television at least four (4) inches away from any vertical surface (such as a wall) to allow proper ventilation.
24) Never allow anything to rest on or roll over the power cord, and never place the TV where the power cord is subject to wear or abuse.
25) Never overload wall outlets and extension cords.
26) Always operate this equipment from a 120 VAC, 60 Hz power source only.
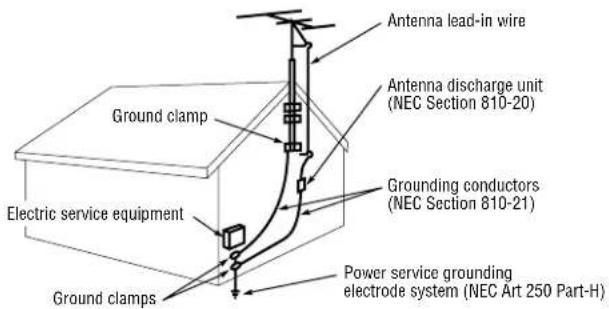
27) Always make sure the antenna system is properly grounded to provide adequate protection against voltage surges and built-up static charges (see Section 810 of the National Electric Code).
text_image
Antenna lead-in wire Antenna discharge unit (NEC Section 810-20) Ground clamp Grounding conductors (NEC Section 810-21) Electric service equipment Power service grounding electrode system (NEC Art 250 Part-H) Ground clamps28)

DANGER: RISK OF SERIOUS PERSONAL INJURY OR DEATH!
- Use extreme care to make sure you are never in a position where your body (or any item you are in contact with, such as a ladder or screwdriver) can accidentally touch overhead power lines. Never locate the antenna near overhead power lines or other electrical circuits. - Never attempt to install any of the following during lightning activity: a) an antenna system; or b) cables, wires, or any home theater component connected to an antenna or phone system.
Care
For better performance and safer operation of your TOSHIBA TV, follow these recommendations and precautions:
29) If you use the TV in a room whose temperature is 32^ F ( 0^ C) or below, the picture brightness may vary until the LCD warms up. This is not a sign of malfunction.
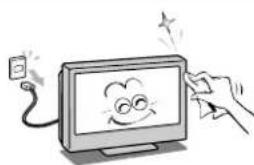
30) Always unplug the TV before cleaning. Gently wipe the display panel surface (the TV screen) using a dry, soft cloth only (cotton, flannel, etc.). A hard cloth may damage the surface of the panel. Avoid
natural_image
Cartoon illustration of a hand interacting with a computer monitor displaying a smiling face (no text or symbols present)contact with alcohol, thinner, benzene, acidic or alkaline solvent cleaners, abrasive cleaners, or chemical cloths, which may damage the surface. Never spray volatile compounds such as insecticide on the cabinet. Such products may damage or discolor the cabinet.
31)

WARNING: RISK OF ELECTRIC SHOCK!

Never spill liquids or push objects of any kind into the TV cabinet slots.
32) While it is thundering, do not touch the connecting cables or apparatus.
33) For added protection of your TV from lightning and power surges, always unplug the power cord and disconnect the antenna from the TV if you leave the TV unattended or unused for long periods of time.
34) During normal use, the TV may make occasional snapping or popping sounds. This is normal, especially when the unit is being turned on or off. If these sounds become frequent or continuous, unplug the power cord and contact a Toshiba Authorized Service Center.
35)

WARNING: RISK OF SERIOUS PERSONAL INJURY OR EQUIPMENT DAMAGE!
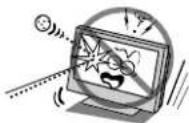
Never strike the screen with a sharp or heavy object.
36) • The LCD screen of this product can be damaged by ultraviolet radiation from the sun. When selecting a location for the television, avoid locations where the screen may be exposed to direct sunlight, such as in front of a window.
- Never touch, press, or place anything on the LCD screen. These actions will damage the LCD screen. If you need to clean the LCD screen, follow the instructions in item 30 on this page.
Service
37)

WARNING: RISK OF ELECTRIC SHOCK!

Never attempt to service the TV yourself. Opening and removing the covers may expose you to dangerous voltage or other hazards. Failure to follow this WARNING may result in death or serious injury. Refer all servicing not specified in this manual to a Toshiba Authorized Service Center.
38) If you have the TV serviced:
- Ask the service technician to use only replacement parts specified by the manufacturer.
- Upon completion of service, ask the service technician to perform routine safety checks to determine that the TV is in safe operating condition.
39) The cold cathode fluorescent lamp in the LCD panel contains a small amount of mercury.
When the TV reaches the end of its useful life, dispose of the used TV by the approved method for your area, or ask a qualified service technician to properly dispose of the TV.

Note: The lamp(s) inside this product contain mercury. Disposal may be regulated due to environmental considerations. For disposal or
recycling information, contact your local authorities or the Electronics Industries Alliance (www.eiae.org).
Choosing a location for your LCD TV
To Display your LCD TV on the included Pedestal Stand:
Observe the following safety precautions:
1) Read and Follow the pedestal assembly instructions included with the pedestal.
CAUTION: Before beginning pedestal assembly, carefully lay the front of the LCD Panel face down on a flat, cushioned surface such as a quilt or blanket. Leave the bottom of the unit protruding over the edge of the surface and assemble the pedestal as indicated below.
Note: Extreme care should always be used when attaching the pedestal stand to avoid damage to the LCD panel.
2) Place the TV on a sturdy, level surface that can support the weight of the TV.
3) Be sure to secure the TV to a wall, pillar, surface, or other immovable structure. To secure the TV in this manner, use the included strap located at the rear of pedestal stand. (item 20, page 3).
To Display your LCD TV using a Wall Bracket:
If you decide to wall mount your LCD TV, always use a UL-listed wall bracket appropriate for the size and weight of the LCD TV (page 2):
1) CAUTION: Two people are required for installation.
2) Unplug and remove any cables and/or other component connectors from the rear of the TV.
3) Follow the instructions provided with your wall bracket. Before proceeding, make sure the appropriate bracket(s) are attached to the wall and the back of the TV as described in the instructions provided with the wall bracket.
4) After attaching the appropriate bracket(s) to the wall and the back of the TV, remove the pedestal stand from the TV as described below.
Removing the Pedestal Stand
1) Carefully lay the front of the unit face down on a flat, cushioned surface such as a quilt or blanket. Leave the stand protruding over the edge of the surface.
Note: Extreme care should always be used when removing the pedestal stand to avoid damage to the LCD panel.
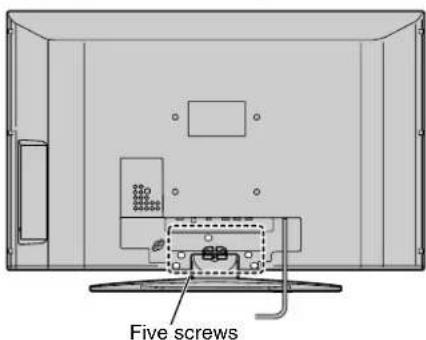
2) Remove the jack pack cover on the back of the TV to expose the pedestal stand screws. The jack pack cover can be removed without tools.
3) Remove the five screws shown in the diagram below. This will allow removal of the pedestal stand.
4) Once you have removed all five screws holding the pedestal stand in place, remove the pedestal stand from the TV by sliding the pedestal stand away from the TV.
text_image
Five screwsFCC Declaration of Conformity Compliance Statement (Part 15):
The Toshiba 26HL67, 32HL67, 37HL67, 42HL67, and 32HL67U Televisions comply with Part 15 of the FCC rules.
Operation is subject to the following two conditions: (1) this device may not cause harmful interference, and (2) this device must accept any interference received, including interference that may cause undesired operation.
The party responsible for compliance to these rules is: Toshiba America Consumer Products, L.L.C.
82 Totowa Rd. Wayne, NJ 07470.
Ph: 1-800-631-3811
Note: This equipment has been tested and found to comply with the limits for a Class B digital device, pursuant to Part 15 of the FCC rules. These limits are designed to provide reasonable protection against harmful interference in a residential installation. This equipment generates, uses, and can radiate radio frequency energy and, if not installed and used in accordance with the instructions, may cause harmful interference to radio communications. However, there is no guarantee that interference will not occur in a particular installation. If this equipment does cause harmful interference to radio or television reception, which can be determined by removing and applying power to the equipment, the user is encouraged to try to correct the interference by one or more of the following measures:
- Reorient or relocate the receiving antenna.
- Increase the separation between the equipment and the receiver.
- Connect the equipment into an outlet on a circuit different from that to which the receiver is connected.
- Consult the dealer or an experienced radio/TV technician for help.
Caution: Changes or modifications to this equipment not expressly approved by Toshiba could void the user's authority to operate this equipment.
Important notes about your LCD TV
The following symptoms are technical limitations of LCD Display technology and are not an indication of malfunction; therefore, Toshiba is not responsible for perceived issues resulting from these symptoms.
1) An afterimage (ghost) may appear on the screen if a fixed, non-moving image is displayed for a long period of time. The afterimage is not permanent and will disappear in a short period of time.
2) The LCD panel contained in this TV is manufactured using an extremely high level of precision technology; however, there may be an occasional pixel (dot of light) that does not operate properly (does not light, remains constantly lit, etc.). This is a structural property of LCD technology, is not a sign of malfunction, and is not covered under your warranty. Such pixels are not visible when the picture is viewed from a normal viewing distance.
Note: Interactive video games that involve shooting a "gun" type of joystick at an on-screen target may not work with this TV.
Trademark Information
- WOW, SRS and (●) symbol are trademarks of SRS Labs, Inc.
WOW technology is incorporated under license from SRS Labs, Inc. - Manufactured under license from Dolby Laboratories. Dolby and the double-D symbol are registered trademarks of Dolby Laboratories.
• HDMI, the HDMI logo and High-Definition Multimedia Interface are trademarks or registered trademarks of HDMI Licensing LLC.
Contents
Important Safety Instructions .... 3
Installation, Care, and Service .... 3
Chapter 1: Introduction .... 8
Welcome to Toshiba 8
Features of your new TV 8
Overview of steps for installing, setting up, and using your new TV 9
TV front and side panel controls and connections ..... 10
TV back panel connections....11
Chapter 2: Connecting your TV .....12
Overview of cable types 12
About the connection illustrations ..... 12
Connecting a VCR and antenna or Cable TV (no Cable box)....13
Connecting a VCR with S-video and a cable box ..... 14
Connecting a DVD player with ColorStream® (component video), a VCR, and a satellite receiver. . . . 15
Connecting a camcorder....16
Connecting an HDMI ^™ or DVI device to the HDMI input....17
Connecting a digital audio system ..... 18
Connecting an audio system 18
Connecting a personal computer (PC) ..... 19
Chapter 3: Using the remote control .....20
Preparing the remote control for use....20
Installing the remote control batteries ..... 20
Remote control effective range....20
Learning about the remote control 21
Using the remote control to control your other devices . . . 22
Remote Control functional key chart 23
Programming the remote control to control your other devices....24
Remote control codes 25
Chapter 4: Menu layout and navigation .....27
Main menu layout 27
Setup/Installation menu layout 28
Navigating the menu system. 28
Chapter 5: Setting up your TV....29
Selecting the menu language 29
Configuring the antenna input source for the ANT terminal 29
Programming channels into the TV's channel memory . . . 30
Programming channels automatically .....30
Manually adding and deleting channels in the channel memory 30
Labeling channels 31
Setting the HDMI™ audio mode 32
Viewing the digital signal meter....33
Viewing the system status....33
Selecting the Power-On Mode 34
Chapter 6: Using the TV's features .....35
Selecting the video input source to view 35
Labeling the video input sources 35
Tuning channels 36
Tuning channels using the Channel Browser ^™ ..... 36
Tuning to the next programmed channel ..... 38
Tuning to a specific channel (programmed or unprogrammed)....38
Switching between two channels using Channel Return 38
Switching between two channels using SurfLock ^TM .... 38
Selecting the picture size 39
Scrolling the TheaterWide® picture (TheaterWide 2 and 3 only)....40
Using the auto aspect ratio feature .... 41
Selecting the cinema mode (480i and 1080i signals) ..... 41
Adjusting the picture....42 Selecting the picture mode....42
Adjusting the picture quality 42
Using the closed caption mode ..... 43
Base closed captions 43
Digital CC Settings 43
CC Selector 44
Adjusting the audio. 44
Muting the sound 44
Using the digital audio selector 44
Selecting stereo/SAP broadcasts 45
Adjusting the audio quality 45
Using the StableSound® feature. 46
Selecting the optical audio output format ..... 46
Using the Dolby® Digital Dynamic Range Control feature....46
Using the Locks menu 47
Entering the PIN code 47
If you cannot remember your PIN code....47
Changing your PIN code 47
Blocking TV programs and movies by rating (V-Chip) 48
Downloading an additional rating system for blocking TV programs and movies ....48
Blocking channels 49
Unlocking programs temporarily 50
Using the input lock feature 50
Using the control panel lock feature ....51
Using the PC settings feature .... 51
Setting the PC Audio 52
Setting the sleep timer....52
Displaying TV status information. 53
Understanding the auto power off feature ....53
Understanding the last mode memory feature ..... 53
Chapter 7: Using the TV's advanced features ..... 54
Using the advanced picture settings features ..... 54
Using dynamic contrast 54
Using the static gamma feature ....54
Selecting the color temperature....55
Using CableClear® digital noise reduction .....55
Using MPEG noise reduction. 56
Using the Game Mode feature .... 56
Using the advanced audio settings features .....57
Using the SRS WOW™ surround sound feature ..... 57
Chapter 8: Troubleshooting ..... 58
General troubleshooting....58
LED indications 60
Chapter 9: Appendix....61
Specifications 61
Limited United States Warranty for LCD Televisions 26" and Larger ....62
Limited Canada Warranty for LCD Televisions....63
Index 65
Chapter 1: Introduction
Welcome to Toshiba
Thank you for purchasing this Toshiba LCD TV, one of the most innovative LCD TVs on the market. This digital television is capable of receiving analog basic, digital basic and digital premium cable television programming by direct connection to a cable system providing such programming. A security card provided by your cable operator is required to view encrypted digital programming. Certain advanced and interactive digital cable services such as video-on-demand, a cable operator's enhanced program guide and data-enhanced television services may require the use of a set-top box. For more information call your local cable operator.
Features of your new TV
The following are just a few of the many exciting features of your new Toshiba widescreen, integrated HD, LCD TV:
- Integrated digital tuning (8VSB ATSC and QAM) eliminates the need for a separate digital converter set-top box (in most cases).
- Three HDMI ^TM digital, high-definition multimedia interfaces 1080p input support ( page 17).
- Two sets of ColorStream ^ HD high-resolution component video inputs (page 15).
- SRS WOW ^TM audio technologies ( page 57).
- Digital Audio Out optical audio connection with Dolby® Digital optical output format ( page 46).
- CableClear ^ digital picture noise reduction ( page 55).
• PC IN (Analog RGB) computer terminal (page 19). - Channel Labeling allows you to put the Call Letters (e.g. ABC, HBO, etc.) on the screen along with the station numbers, so you always know what you're watching (page 31).
Overview of steps for installing, setting up, and using your new TV
Follow these steps to set up your TV and begin using its many exciting features.
1 Carefully read the important safety, installation, care, and service information. Keep this manual for future reference.
2 Observe the following when choosing a location for the TV:
- Read "Important notes about your LCD TV" (page 6).
- Place the TV on the floor or a sturdy, level, stable surface that can support the weight of the unit. Secure the TV to a wall, pillar, or other immovable structure (page 3).
- Place the TV in a location where light does not reflect on the screen.
- Place the TV far enough from walls and other objects to allow proper ventilation. Inadequate ventilation may cause overheating, which will damage the TV. THIS TYPE OF DAMAGE IS NOT COVERED UNDER THE TOSHIBA WARRANTY.
3 Do not plug in any power cords until AFTER you have connected all cables and devices to your TV.
4 BEFORE connecting cables or devices to the TV, learn the functions of the TV's connections and controls (pages 10–11).
5 Connect your other electronic device(s) to the TV (pages 12–19).
6 Install the batteries in the remote control ( page 20).
7 See "Learning about the remote control" (page 21) for an overview of the buttons on the remote control.
8 Program the remote control to operate your other device(s) (pages 22–26).
9 AFTER connecting all cables and devices, plug in the power cords for your TV and other devices. The yellow LED will blink until the TV goes into standby mode. When the TV is in standby mode, press POWER on the TV control panel or remote control to turn on the TV. If the TV stops responding to the controls on the remote control or TV control panel and you cannot turn the TV off or on, press and hold the POWER button for 5 seconds to reset the TV.
10 See "Menu layout and navigation" for a quick overview of navigating the TV's menu system ( page 27).
11 Program channels into the TV's channel memory ( page 30).
12 For details on using the TV's features, see Chapters 6 and 7.
13 For help, refer to the Troubleshooting Guide, Chapter 8.
14 For technical specifications and warranty information, see Chapter 9.
15 Enjoy your new TV!
TV front and side panel controls and connections
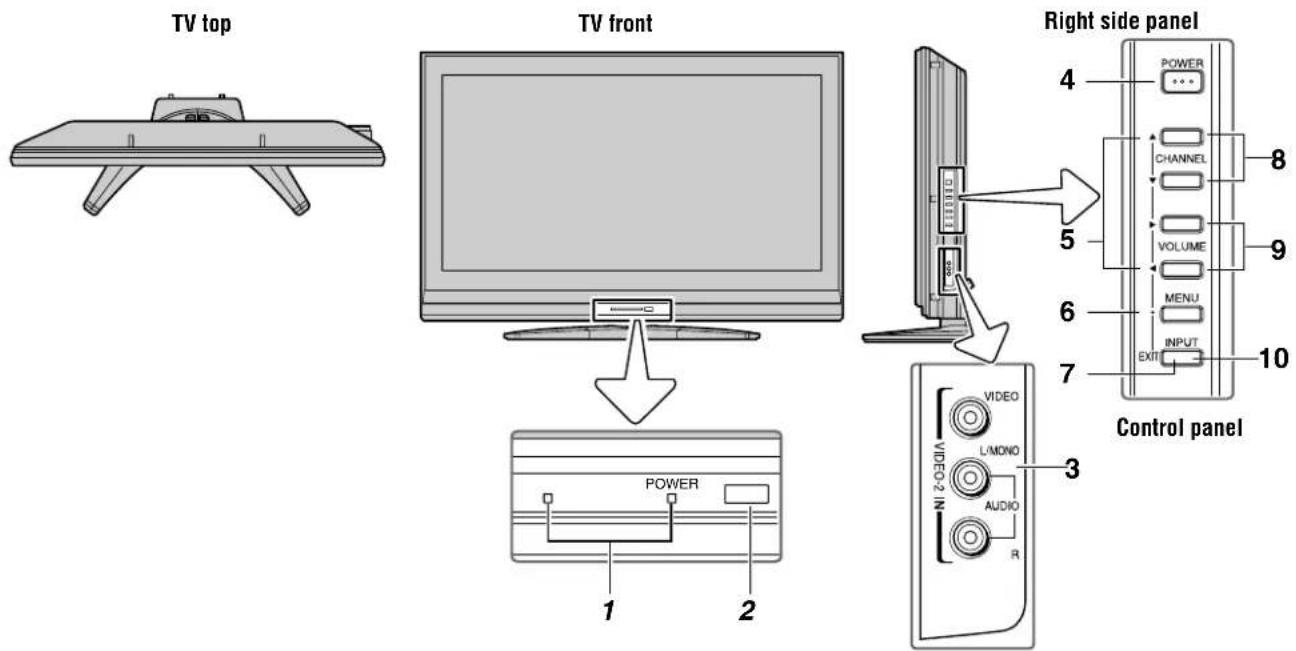
Model 42HL67 is used in this manual for illustration purposes.
text_image
TV top TV front Power 1 2 Right side panel 4 POWER CHANNEL 8 VOLUME 9 MENU 6 INPUT 7 EXIT 10 Control panel 3 VIDEO L/MONO AUDIO R1 Green and Yellow LEDs
Green = Power indicator
Yellow = Power-On Mode indicator (☐ “Selecting the Power-On Mode” on page 34)
See “LED indications” on page 60 for additional information.
2 Remote sensor — Point the remote control toward this remote sensor (“Remote control effective range” on page 20).
3 VIDEO-2 IN — The side panel A/V connections are referred to as "VIDEO 2" and include standard A/V connections.
4 POWER — Press to turn the TV on and off.
If the TV stops responding to the controls on the remote control or TV control panel and you cannot turn off the TV, press and hold the POWER button on the TV control panel for 5 or more seconds to reset the TV.
5 ARROWS ▲▼◀▶ — When a menu is on-screen, these buttons function as up/down/left/right menu navigation buttons.
6 MENU (ENTER) — Press to access the menu system (pages 27–28). When a menu is on-screen, the MENU button on the TV's control panel functions as the ENTER button.
7 EXIT — Press to instantly close an on-screen menu.
8 CHANNEL ▲▼ — When no menu is on-screen, these buttons change the channel (programmed channels only; page 30).
9 VOLUME ◀▶ — These buttons adjust the volume level.
10 INPUT — Repeatedly press to change the source you are viewing (ANT, VIDEO 1, VIDEO 2, ColorStream HD1, ColorStream HD2, HDMI 1, HDMI 2, HDMI 3, PC).
TV back panel connections
For an explanation of cable types and connections, see pages 12–19.
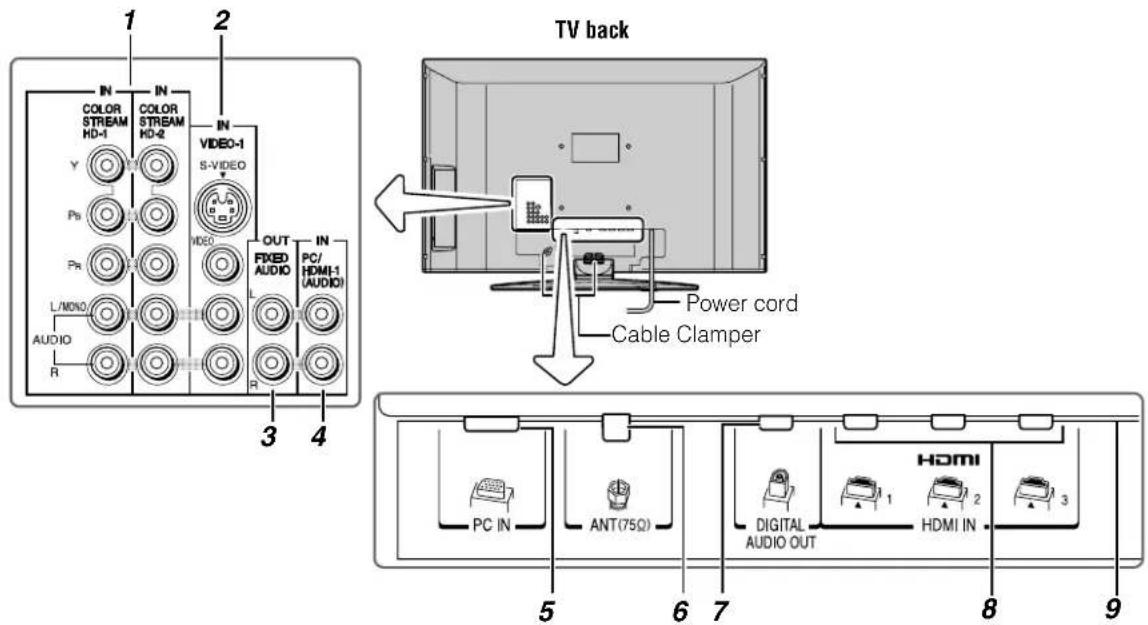
text_image
1 2 IN COLOR STREAM HD-1 Y IN COLOR STREAM HD-2 IN VIDEO-1 S-VIDEO Video PR L/MONO AUDIO R OUT FIXED AUDIO L PC/ HDMI-1 (AUDIO) IN 3 4 TV back Power cord Cable Clamper PC IN ANT(75Ω) 5 6 7 HDMI DIGITAL AUDIO OUT 1 2 3 8 91 ColorStream ^® HD-1 and ColorStream ^® HD-2 — Two sets of ColorStream ^® high-definition component video inputs (with standard stereo audio inputs) for connecting devices with component video output, such as a Toshiba DVD player with ColorStream ^® .
Note: Component video cables carry only video information; separate audio cables are required for a complete connection.
2 VIDEO-1 IN — Standard (composite) video and standard audio inputs plus optional S-video inputs for connecting devices with composite video or S-video output.
Note: Standard (composite) video and S-video cables carry only video information; separate audio cables are required for a complete connection.
3 Fixed Audio OUT — Analog audio outputs for connecting an audio amplifier.
4 PC/HDMI-1 (AUDIO) IN — PC audio input terminals are shared with HDMI-1 analog audio input terminals, and their use can be configured in the Audio Setup menu ( page 52).
5 PC IN — For use when connecting a personal computer.
6 ANT — Antenna input that supports analog (NTSC) and digital (ATSC) off-air antenna signals and analog and digital Cable TV (QAM) signals.
7 Digital Audio OUT — Optical audio output in Dolby Digital or PCM (pulse-code modulation) format for connecting an external Dolby Digital decoder, amplifier, A/V receiver, or home theater system with optical audio input.
8HDMI ™ IN — High-Definition Multimedia Interface input receives digital audio and uncompressed digital video from an HDMI device or uncompressed digital video from a DVI device. Also see item 4. HDMI connection is necessary to receive 1080p signals.
9 Service port — For service use only. Used for updating the television's firmware.
Chapter 2: Connecting your TV
Overview of cable types
Cables can be purchased from most stores that sell audio/video devices. Before purchasing any cables, be sure of connector types required by your devices and the length of each cable.
Coaxial (F-type) cable


Coaxial (F-type) cable is used for connecting your antenna, cable TV service, and/or cable converter box to the ANT input on your TV.
Standard A/V cables (red/white/yellow)

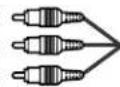
Standard A/V cables (composite video) usually come in sets of three, and are for use with video devices with analog audio and composite video output. These cables (and the related inputs on your TV) are typically color-coded according to use: yellow for video, red for stereo right audio, and white for stereo left (or mono) audio.
S-video cable


S-video cable is for use with video devices with S-video output. Separate audio cables are required for a complete connection.
Note: An S-video cable provides better picture performance than a composite video cable. If you connect an S-video cable, be sure to disconnect the standard (composite) video cable or the picture performance will be unacceptable.
Component video cables (red/green/blue)

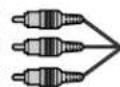
Component video cables come in sets of three and are for use with video devices with component video output. (ColorStream® is Toshiba's brand of component video.) These cables are typically color-coded red, green, and blue. Separate audio cables are required for a complete connection.
Note: Component video cables provide better picture performance than a standard (composite) video or S-video cable.
HDMI™ cable (with HDMI Logo "HDMI



HDMI (High-Definition Multimedia Interface) cable is for use with devices with an HDMI output. An HDMI cable delivers digital audio and video in its native format. This cable carries both video and audio information; therefore, separate audio cables are not required for a complete HDMI device connection (page 17 and page 19).
Note: HDMI cable provides better picture performance than a standard (composite) video or S-video cable.
Optical audio cable

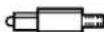

Optical audio cable is for connecting receivers with Dolby Digital or PCM (pulse-code modulation) optical audio input to the TV's DIGITAL AUDIO OUT terminal ( page 18).
Analog RGB (15-pin) computer cable

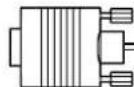

Analog RGB (15-pin) computer cable is for connecting a PC to the TV's PC IN terminal (page 19).
About the connection illustrations
You can connect different types and brands of devices to your TV in several different configurations. The connection illustrations in this manual are representative of typical device connections only. The input/output terminals on your devices may differ from those illustrated herein. For details on connecting and using your specific devices, refer to each device's owner's manual.
Connecting a VCR and antenna or Cable TV (no Cable box)
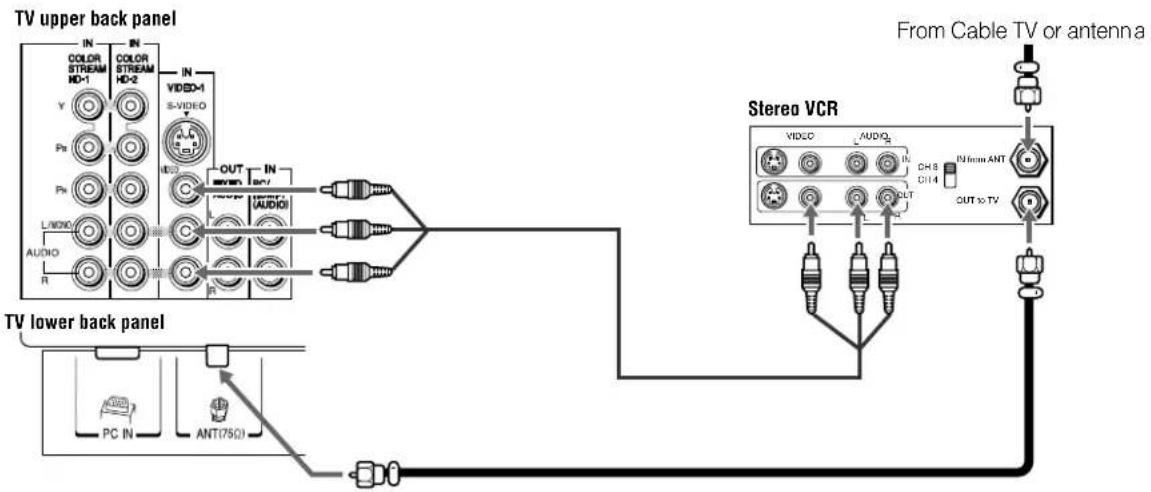
text_image
TV upper back panel IN COLOR STREAM HD-1 Y IN COLOR STREAM HD-2 IN VIDEO-1 S-VIDEO Pb L/NONO AUDIO R OUT IN VBR AUDIO R From Cable TV or antenna Stereo VCR VIDEO AUDIO IN CH 8 CH14 IN from ANT OUT to TV PC IN ANT(75Ω)You will need:
- coaxial cables
- standard A/V cables
- For better picture performance, if your VCR has S-video, use an S-video cable (plus the audio cables) instead of the standard video cable. Do not connect both types of video cable to VIDEO 1 at the same time or the picture performance will be unacceptable.
- If you have a mono VCR, connect L/MONO on the TV to your VCR's audio out terminal using the white audio cable only.
To view the antenna or Cable signal:
Select the ANT video input source on the TV.*
To view the VCR:
Turn ON the VCR. Select the VIDEO 1 video input source on the TV.*
Connecting a VCR with S-video and a cable box
An S-video connection will provide better picture performance than a standard (composite) video cable.
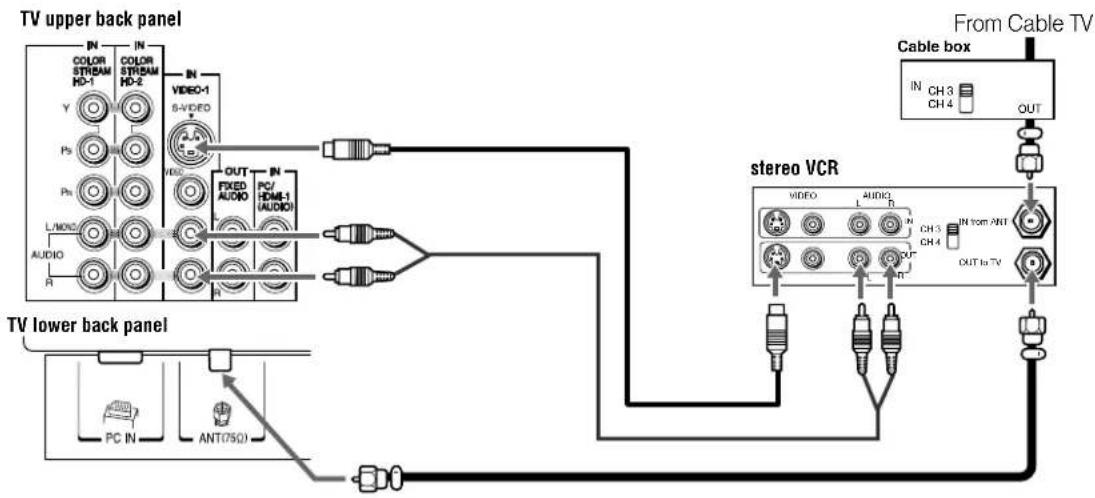
flowchart
graph TD
    A["TV upper back panel"] --> B["TV lower back panel"]
    B --> C["Cable box"]
    C --> D["From Cable TV"]
    A --> E["VIDEO-1 5+VIDEO"]
    A --> F["VIDEO"]
    A --> G["VIDEO"]
    A --> H["VIDEO"]
    A --> I["VIDEO"]
    A --> J["VIDEO"]
    A --> K["VIDEO"]
    A --> L["VIDEO"]
    A --> M["VIDEO"]
    A --> N["VIDEO"]
    A --> O["VIDEO"]
    A --> P["VIDEO"]
    A --> Q["VIDEO"]
    A --> R["VIDEO"]
    A --> S["VIDEO"]
    A --> T["VIDEO"]
    A --> U["VIDEO"]
    A --> V["VIDEO"]
    A --> W["VIDEO"]
    A --> X["VIDEO"]
    A --> Y["VIDEO"]
    A --> Z["VIDEO"]
    A --> AA["VIDEO"]
    A --> AB["VIDEO"]
    A --> AC["VIDEO"]
    A --> AD["VIDEO"]
    A --> AE["VIDEO"]
    A --> AF["VIDEO"]
    A --> AG["VIDEO"]
    A --> AH["VIDEO"]
    A --> AI["VIDEO"]
    A --> AJ["VIDEO"]
    A --> AK["VIDEO"]
    A --> AL["VIDEO"]
    A --> AM["VIDEO"]
    A --> AN["VIDEO"]
    A --> AO["VIDEO"]
    A --> AP["VIDEO"]
    A --> AQ["VIDEO"]
    A --> AR["VIDEO"]
    A --> AS["VIDEO"]
    A --> AT["VIDEO"]
    A --> AU["VIDEO"]
    A --> AV["VIDEO"]
    A --> AW["VIDEO"]
    A --> AX["VIDEO"]
    A --> AY["VIDEO"]
    A --> AZ["VIDEO"]
You will need:
- coaxial cables
- S-video cable
- Do not connect both types of video cable to VIDEO 1 at the same time or the picture performance will be unacceptable.
- standard audio cables
- If you have a mono VCR, connect L/MONO on the TV to your VCR's audio out terminal using the white audio cable only.
Note: When you use a Cable box, you may not be able to use the remote control to program or access certain features on the TV.
To view basic and premium Cable channels:
Turn OFF the VCR. Select the ANT video input source on the TV.* Tune the TV to channel 3 or 4 (whichever channel the Cable box output is set to). Use the Cable box controls to change channels.
To view the VCR:
Turn ON the VCR. Select the VIDEO 1 video input source on the TV.*
Connecting a DVD player with ColorStream® (component video), a VCR, and a satellite receiver
Your TV has two sets of ColorStream ^® (component video) inputs.
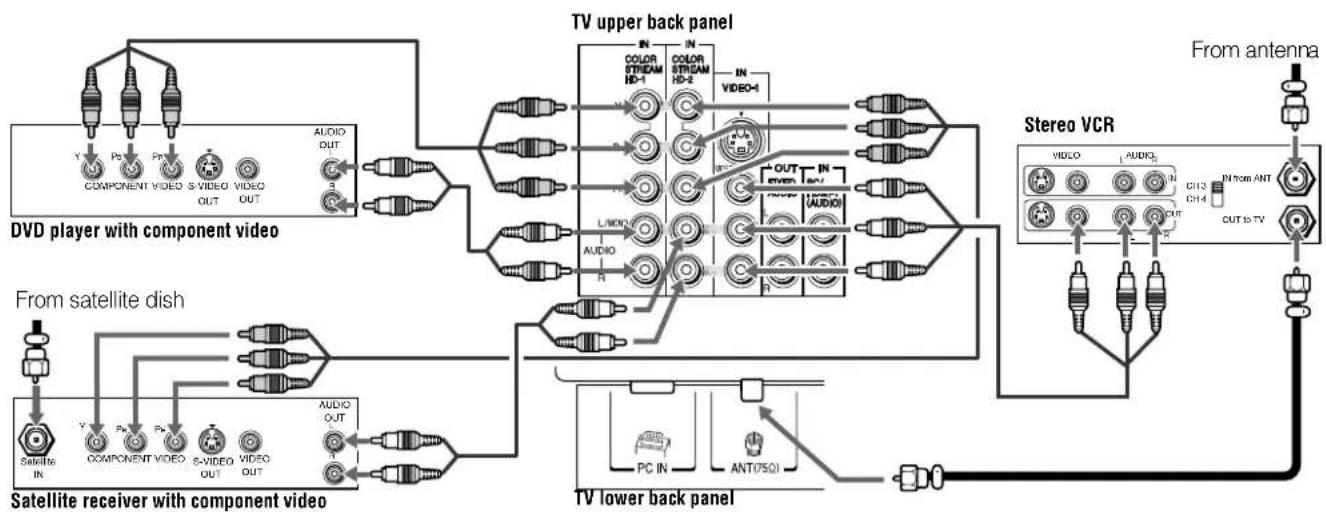
flowchart
graph TD
    A["DVd player with component video"] --> B["TV upper back panel"]
    C["From satellite dish"] --> D["Satellite receiver with component video"]
    D --> E["TV lower back panel"]
    F["Stereo VCR"] --> G["From antenna"]
    B --> H["TV upper back panel"]
    B --> I["TV lower back panel"]
    style A fill:#f9f,stroke:#333
    style C fill:#f9f,stroke:#333
    style F fill:#ccf,stroke:#333
    style B fill:#cff,stroke:#333
    style D fill:#ffc,stroke:#333
    style E fill:#cfc,stroke:#333
    style G fill:#fcc,stroke:#333
    style H fill:#fff,stroke:#333
    style I fill:#fff,stroke:#333
You will need:
- coaxial cables
- standard A/V cables
- For better picture performance, if your VCR has S-video, use an S-video cable (plus the audio cables) instead of the standard video cable. Do not connect both types of video cable to VIDEO 1 at the same time or the picture performance will be unacceptable.
- If you have a mono VCR, connect L/MONO on the TV to your VCR's audio out terminal using the white audio cable only.
• standard audio cables
• component video cables
- You can connect the component video cables (plus audio cables) from the DVD player or satellite receiver to either set of ColorStream terminals on the TV (HD-1 or HD-2).
The ColorStream HD-1 and HD-2 terminals can be used with Progressive (480p, 720p) and Interlaced (480i, 1080i) scan systems. A 1080i signal will provide the best picture performance (1080p is not supported).
- If your DVD player or satellite receiver does not have component video, connect a standard A/V cable to VIDEO 2 on the side panel. If your DVD player has HDMI video, see page 17.
To view antenna or Cable channels:
Select the ANT video input source on the TV.*
To view the DVD player:
Turn ON the DVD player. Select the ColorStream HD-1 video input source on the TV.*
To view satellite programs using the component video connections:
Turn on the satellite receiver. Select the ColorStream HD-2 video input source on the TV.*
To view the VCR or view and record antenna channels:
Turn ON the VCR. Tune the VCR to the channel you want to watch. Select the VIDEO 1 video input source on the TV.*
To record a TV program while watching a DVD:
Turn ON the VCR. Tune the VCR to the channel to record. Select the ColorStream HD-1 video input source on the TV* to view the DVD.
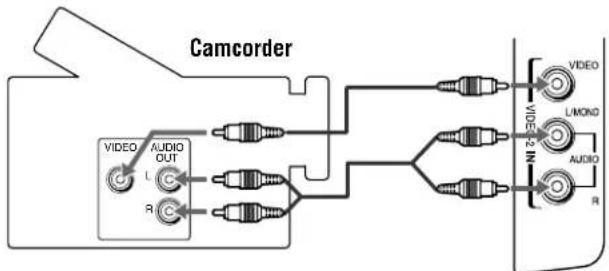
Connecting a camcorder
You will need:
- standard A/V cables
- For better picture performance, if your camcorder has S-video, connect an S-video cable (plus the audio cables) to VIDEO 1 on the TV back instead of the VIDEO 2 on the TV right side panel.
flowchart
graph TD
    A["Camcorder"] --> B["VIDEO"]
    A --> C["AUDIO OUT"]
    B --> D["L"]
    B --> E["C"]
    C --> F["R"]
    D --> G["2x2"]
    E --> H["2x2"]
    F --> I["2x2"]
    G --> J["VIDEO"]
    H --> K["LMOND"]
    I --> L["VIDEO 2 NM"]
    J --> M["VIDEO"]
    K --> N["LMOND"]
    L --> O["VIDEO 2 NM"]
    M --> P["VIDEO"]
VIDEO 2 inputs on TV right side panel
To view the camcorder video:
Select the VIDEO 2 video input source on the TV.*
Connecting an HDMI™ or DVI device to the HDMI input
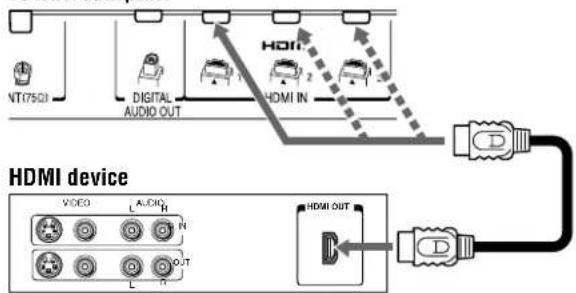
The HDMI input on your TV receives digital audio and uncompressed digital video from an HDMI source device, or uncompressed digital video from a DVI (Digital Visual Interface) source device.
This input is designed to accept HDCP (High-Bandwidth Digital-Content Protection) program material in digital form from EIA/CEA-861-D-compliant ^[1] consumer electronic devices (such as a set-top box or DVD player with HDMI or DVI output).
The HDMI input can accept and display VGA, 480i (60Hz), 480p (60Hz), 720p (60Hz), 1080i (60Hz), and 1080p (24Hz/60Hz) signal formats. For detailed signal specifications, see page 61.
Supported Audio format: Linear PCM, sampling rate 32/44.1/48 kHz
Note: To connect a PC to the HDMI input, see page 19.
To connect an HDMI device, you will need:
- one HDMI cable (type A connector) per HDMI device
- For proper operation, it is recommended that you use an HDMI cable with the HDMI Logo (HDMI
- To display an 1080p/60Hz signal format, you will need a Category 2 cable. Conventional HDMI/DVI cable may not work properly.
– HDMI cable transfers both video and audio. Separate analog audio cables are not required (see illustration). - See "Setting the HDMI™ audio mode" (page 32).
TV lower back panel
flowchart
graph TD
    A["NT7501"] --> B["VIDEO"]
    C["DIGITAL AUDIO OUT"] --> D["Video"]
    E["HDMI IN"] --> F["Inverter"]
    G["HDMI OUT"] --> H["Output"]
    style A fill:#f9f,stroke:#333
    style C fill:#f9f,stroke:#333
    style E fill:#f9f,stroke:#333
    style G fill:#f9f,stroke:#333
    style B fill:#ccf,stroke:#333
    style D fill:#ccf,stroke:#333
    style F fill:#ccf,stroke:#333
    style H fill:#ccf,stroke:#333
To view the HDMI device video:
Select the HDMI 1, HDMI 2, or HDMI 3 video input source on the TV.*
To connect a DVI device, you will need:
- one HDMI-to-DVI adapter cable (HDMI type A connector) per DVI device
- For proper operation, the length of an HDMI-to-DVI adapter cable should not exceed 9.8 ft (3m). The recommended length is 6.6 ft (2m).
• one pair of standard analog audio cables per DVI device - An HDMI-to-DVI adapter cable transfers video only. Separate analog audio cables are required (see illustration).
- See "Setting the HDMI™ audio mode" (page 32).
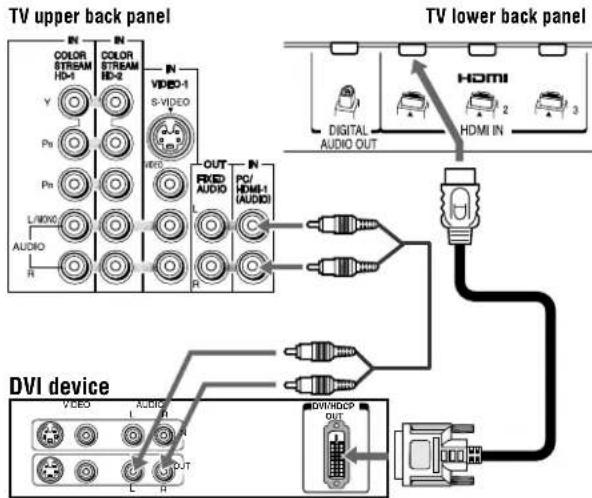
text_image
TV upper back panel TV lower back panel COLOR STREAM HD-1 COLOR STREAM HD-2 VIDEO-1 S-VIDEO VY Pb VBRG L/MDX0 AUDIO R OUT FIXED AUDIO PC/ HDMI-1 (AUDIO) L R H DVI device VIDEO AUDIO L H OUT DVD/HD/DCP OUTNote: To ensure that the HDMI or DVI device is reset properly, it is recommended that you follow these procedures:
- When turning on your electronic components, turn on the TV first, and then the HDMI or DVI device.
- When turning off your electronic components, turn off the HDMI or DVI device first, and then the TV.
HDMI, the HDMI logo and High-Definition Multimedia Interface are trademarks or registered trademarks of HDMI Licensing LLC.
Connecting a digital audio system
The TV's DIGITAL AUDIO OUT terminal outputs a Dolby®* Digital DOLOBY or 2-channel down-mixed PCM (pulse-code modulation) signal for use with an external Dolby® Digital decoder or other external audio system with optical audio input.
You will need:
- optical audio cable (Use an optical audio cable that has the larger "TosLink" connector and not the smaller "mini-optical" connector.)
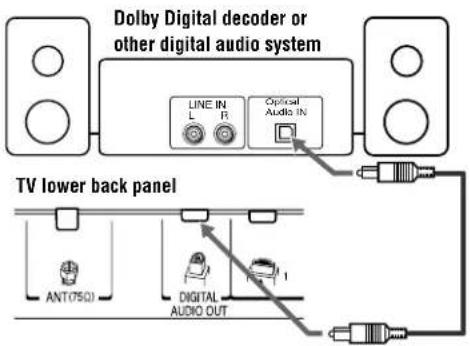
text_image
Dolby Digital decoder or other digital audio system LINE IN L R Optical Audio IN TV lower back panel ANT(50) DIGITAL AUDIO OUTTo control the audio:
1 Turn on the TV and the digital audio device.
2 Press MENU on the TV's remote control and open the Audio menu.
3 Highlight Audio Setup and press ENTER.
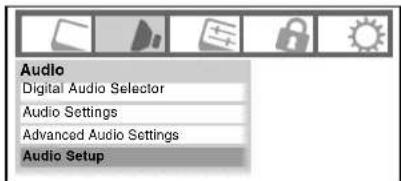
text_image
Audio Digital Audio Selector Audio Settings Advanced Audio Settings Audio Setup4 In the Optical Output Format field, select either Dolby Digital or PCM, depending on your device (“Selecting the optical audio output format” on page 46).
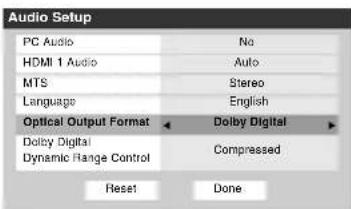
text_image
Audio Setup PC Audio No HDMI 1 Audio Auto MTS Stereo Language English Optical Output Format Dolby Digital Dolby Digital Compressed Dynamic Range Control Reset DoneNote:
- Some audio systems may not be compatible with Dolby Digital bitstream signals. Older audio systems that are not compatible with standard optical out signals may not work properly, creating a high noise level that may damage speakers or headphones. THIS DAMAGE IS NOT COVERED BY YOUR WARRANTY. - The DIGITAL AUDIO OUT terminal may not output some digital audio sources because of copy restrictions.
* Manufactured under license from Dolby Laboratories. Dolby, and the double-D symbol are registered trademarks of Dolby Laboratories.
Connecting an audio system
This connection allows you to use external speakers with an external analog audio amplifier to adjust the sound level.
You will need:
- standard audio cables
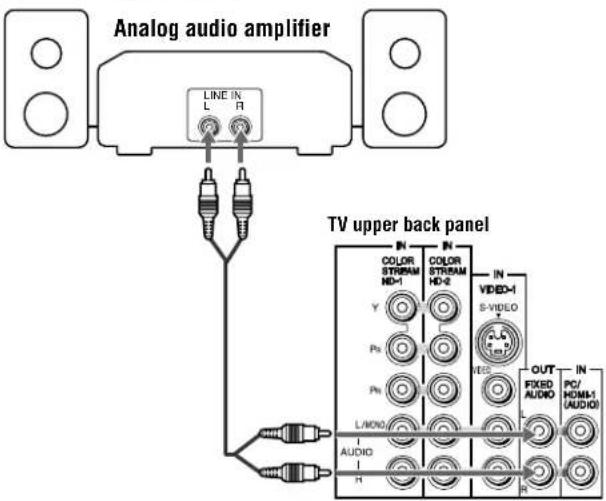
text_image
Analog audio amplifier LINE IN L R TV upper back panel IN COLOR STREAM HD-1 Y COLOR STREAM HD-2 IN VIDEO-1 S-VIDEO VDD IN Pn Pn L/MON AUDIO H OUT FIXED AUDIO L PC/ HOMA-1 (AUDIO) INTo control the audio:
1 Turn on the TV and the stereo amplifier.
2 Minimize the sound volume from the TV's built-in speakers and control the volume level using the amplifier's remote control.
Connecting a personal computer (PC)
With either the PC IN or HDMI connection, you can watch your computer's display on the TV and hear the sound from the TV's speakers.
To connect a PC to the PC IN terminal on the TV:
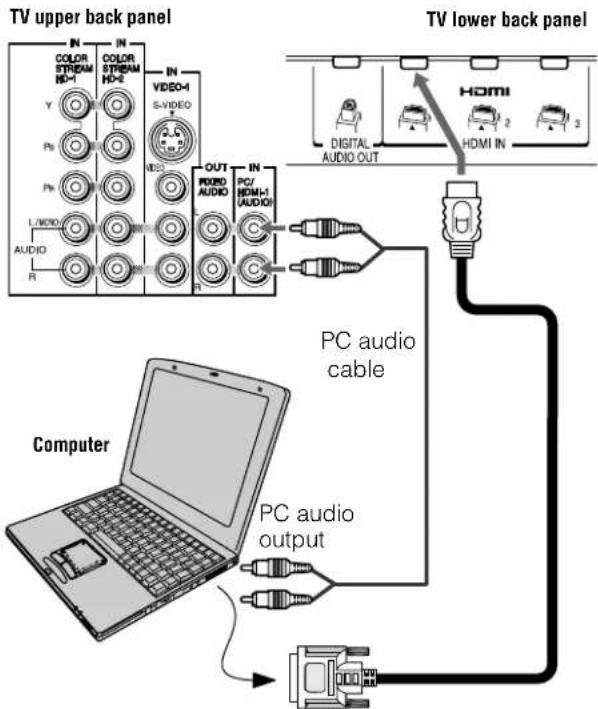
When connecting a PC to the PC IN terminal on the TV, use an analog RGB (15-pin) computer cable and a PC audio cable.
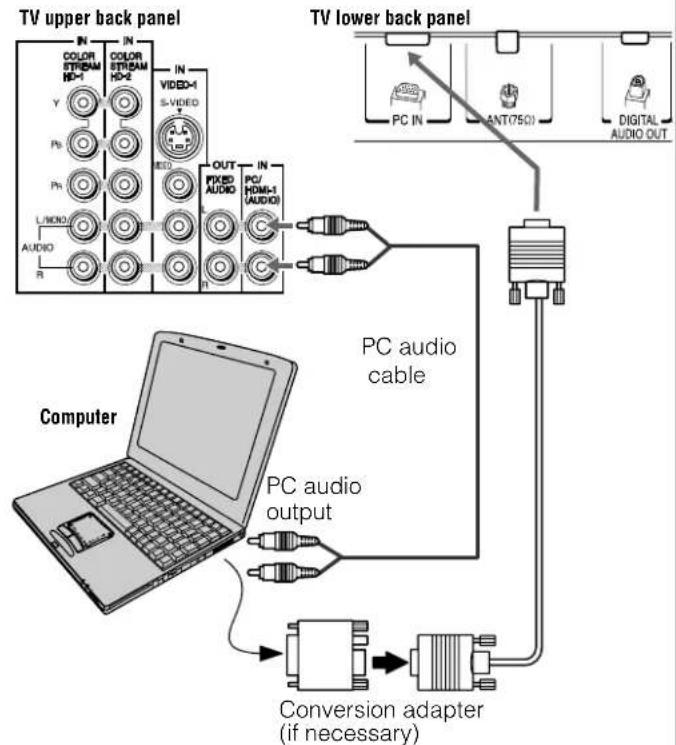
text_image
TV upper back panel TV lower back panel COLOR STREAM HD-1 COLOR STREAM HD-2 IN VIDEO-4 S-VIDEO Y P0 P1 L/800 AUDIO R OUT FIXED AUDIO PC/ HDMI-1 (AUDIO) PC audio cable PC audio output Computer Conversion adapter (if necessary)- To use a PC, set the monitor output resolution on the PC before connecting it to the TV. The following signals can be displayed:
Format Resolution V. Frequency
| VGA 640 × 480 60Hz |
| SVGA 800 × 600 60Hz |
| XGA 1024 × 768 60Hz |
Other formats or non-standard signals will not be displayed correctly.
- To display the optimum picture, use the PC setting feature (☐ "Using the PC settings feature" on page 51).
Note:
- The PC audio input terminals on the TV are shared with the HDMI-1 analog audio input terminals (page 52).
- Some PC models cannot be connected to this TV.
-
An adapter is not needed for computers with a compatible mini D-sub15-pin terminal.
-
Depending on the DVD's title and the specifications of the PC on which you are playing the DVD-Video, some scenes may be skipped or you may not be able to pause during multi-angle scenes.
• Signal names for mini D-sub 15-pin connector
| Pin No. | Signal name | Pin No. | Signal name | Pin No. | Signal name |
| 1 | R | 6 | Ground | 11 | NC |
| 2 | G | 7 | Ground | 12 | NC |
| 3 | B | 8 | Ground | 13 | H-sync |
| 4 | NC * | 9 | NC | 14 | V-sync |
| 5 | NC | 10 | Ground | 15 | NC |
*NC=Not connected
To connect a PC to the HDMI terminal on the TV:
When connecting a PC to the HDMI terminal on the TV, use an HDMI-to DVI adapter cable and analog audio cables.
If connecting a PC with an HDMI terminal, use an HDMI cable (type A connector). Separate analog cables are not necessary (page 17).
text_image
TV upper back panel TV lower back panel COLOR STREAM HD-1 COLOR STREAM HD-2 IN VIDEO-1 S-VIDEO Y Ps Ph L/HD0 AUDIO R IN OUT PRICE AUDIO IN PC/ HDMI+1 AUDIO DIGITAL AUDIO OUT HDMI HDMI IN PC audio cable PC audio output ComputerThe HDMI input can accept and display VGA, 480i (60Hz), 480p (60Hz), 720p (60Hz), 1080i (60Hz), and 1080p (24Hz/60Hz) signal formats. For detailed signal specifications, see page 61.
Note:
- The edges of the images may be hidden.
- If receiving a 720p, 1080i, or 1080p signal program, Native mode scales the video to display the entire picture within the borders of the screen (i.e. no overscanning).
Chapter 3: Using the remote control
Preparing the remote control for use
Your TV remote control can operate your TV and many other devices such as cable converter boxes, satellite receivers, VCRs, DVD players, and HTIBs (home theater in a box), even if they are different brands.
If you have a Toshiba device:
Your TV remote control is preprogrammed to operate most Toshiba devices ( page 24).
If you have a non-Toshiba device or a Toshiba device that the remote control is not preprogrammed to operate:
You can program the TV remote control so it will operate the other device (pages 22–26).
Installing the remote control batteries
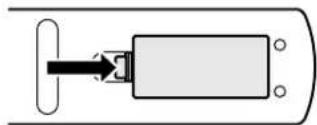
1 Remove the battery cover from the back of the remote control.
Squeeze tab and lift cover.
natural_image
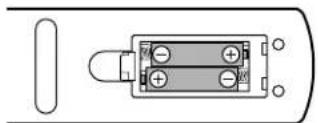
Simple diagram of a device with a rectangular block and directional arrow, no text or symbols present2 Install two "AAA" size batteries, making sure to match the + and - signs on the batteries to the signs on the battery compartment.
natural_image
Pure electrical connector diagram without any text, numbers, or symbols3 Reinsert the battery cover in the remote control until the tab snaps.
Caution: Never throw batteries into a fire.
Note:
- Be sure to use AAA size batteries.
- Dispose of batteries in a designated disposal area.
- Batteries should always be disposed of with the environment in mind. Always dispose of batteries in accordance with applicable laws and regulations.
- If the remote control does not operate correctly, or if the operating range becomes reduced, replace batteries with new ones.
- When necessary to replace batteries in the remote control, always replace both batteries with new ones. Never mix battery types or use new and used batteries in combination.
- Always remove batteries from the remote control if they are dead or if the remote control is not to be used for an extended period of time. This will prevent battery acid from leaking into the battery compartment.
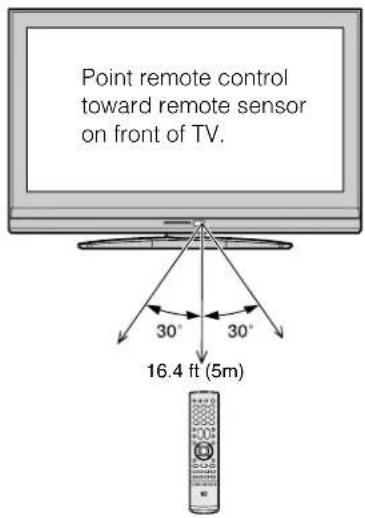
Remote control effective range
For optimum performance, aim the remote control directly at the TV and make sure there is no obstruction between the remote control and the TV.
text_image
Point remote control toward remote sensor on front of TV. 30° 30° 16.4 ft (5m)Learning about the remote control
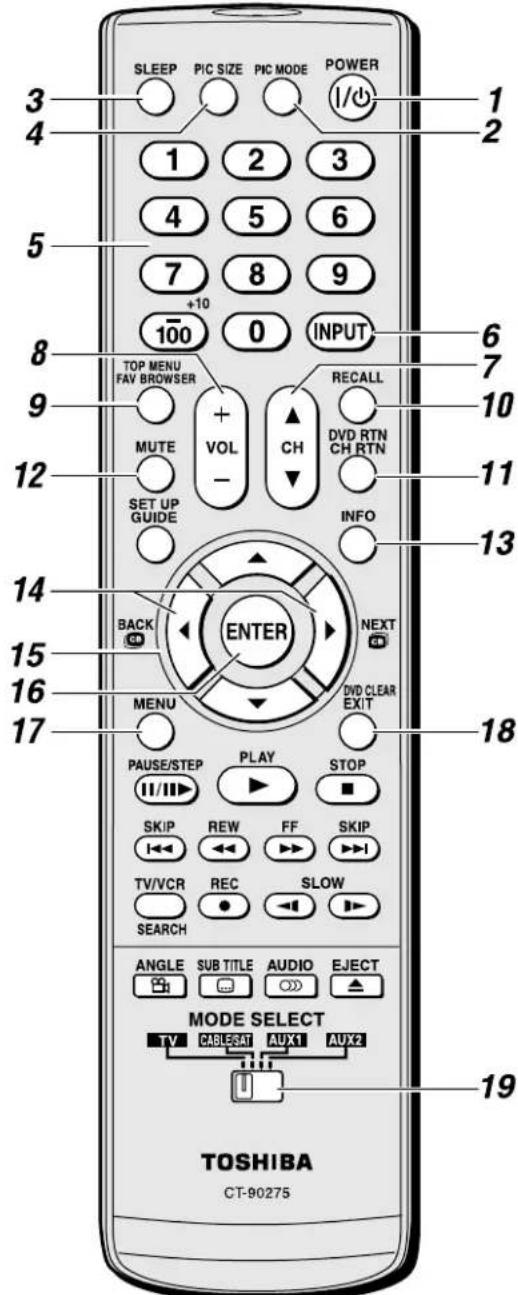
The buttons used for operating the TV only are described here. For a complete list of the remote control's functions, see the remote control functional key chart ( page 23).
text_image
SLEEP PIC SIZE PIC MODE POWER 1 2 3 4 5 6 7 8 9 +10 0 INPUT 100 0 TOP MENU FAV BROWSER MUTE + VOL ▲ CH SET UP GUIDE BACK ENTER NEXT MENU DVD CLEAR EXIT PAUSE/STEP PLAY STOP SKIP REW FF SKIP TV/VCR REC SLOW SEARCH ANGLE SUB TITLE AUDIO EJECT TV CABLESAT AUX1 AUX2 MODE SELECT TOSHIBA CT-90275Note: The error message "Not Available" may appear if you press a key for a function that is not available.
1 POWER turns the TV on and off. When the TV is on, the green LED indicator on the TV front will be illuminated.
2 PIC MODE selects the picture mode ( page 42).
3 SLEEP accesses the sleep timer ( page 52).
4 PIC SIZE cycles through the picture sizes: Natural, TheaterWide 1/2/3, Full, 4:3 HD, and Native (page 39).
5 Channel Numbers (0–9, –/100) directly tune channels. The 100 button is used to tune digital channels ( 18 page 38) or to edit the Favorites List ( 18 page 36).
6 INPUT selects the video input source ( page 35).
7 CH ▲▼ cycles through programmed channels when no menu is on-screen ( page 30).
8VOL + - adjusts the volume level.
9 FAV BROWSER accesses the Favorites List in the Channel Brower™ ( page 36).
10 RECALL displays TV status information (page 53).
11 CH RTN returns to the last viewed channel or source ( page 38).
12 MUTE reduces or turns off the sound ( page 44).
13 INFO displays TV status information as well as program details, when available ( page 53).
14 ☐/☑While watching TV, these buttons open the Channel Browser™ and tune to the previous/next channel in the channel history (☐ page 37). (Also see “Arrow buttons.”)
15 Arrow buttons (▲▼◀▶) When a menu is on-screen, these buttons select or adjust programming menus. (Also see ▶/□□/□□.)
16 ENTER activates highlighted items in the main menu system.
17 MENU accesses the main TV menu system ( pages 27 and 28).
18 EXIT closes on-screen menus.
19 MODE SELECT switch switches between TV, CABLE/SAT, AUX 1, and AUX 2 modes ( page 22). Set to "TV" to control the TV.
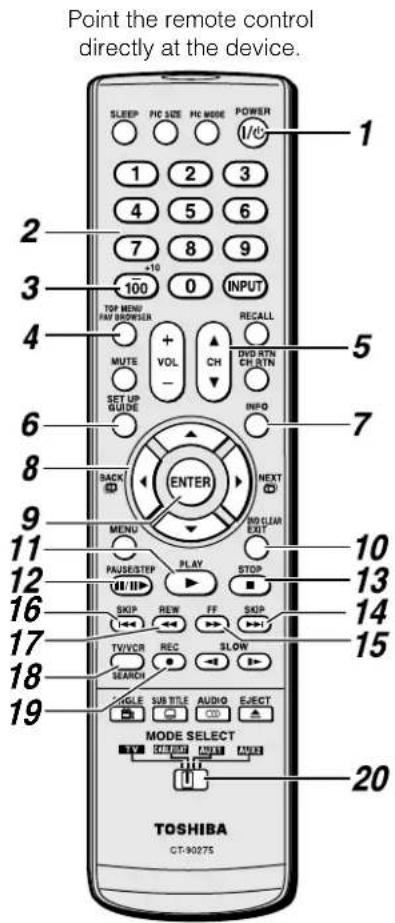
Using the remote control to control your other devices
If you have a non-Toshiba device or a Toshiba device that the remote control is not preprogrammed to operate, you must first program the remote control to recognize the device (if you have not already done so) (pages 24–26).
To use your TV remote control to operate a:
- Cable converter box or satellite receiver, set the MODE SELECT switch to CABLE/SAT.
• VCR, set the MODE SELECT switch to AUX 1. - DVD player or HTIB, set the MODE SELECT switch to AUX 2.
Note: Even after the TV remote control is programmed, it may not operate certain features on any other devices. If this happens and you wish to use those features, you will need to use the device's original remote control.
text_image
Point the remote control directly at the device. SLEEP PLC SIZE PLC MODE POWER 1 2 3 4 5 6 7 8 9 100 0 INPUT TOP MENU PAY BROWDER MUTE VOL - SET UP GUIDE RECALL DVD RTN CH RTN INFO 5 6 7 BACK ENTER NEXT MENU NO CLEAR EXIT 11 PAUSE/STEP PLAY STOP 12 UI/II> SKIP REW FF SKIP 13 14 16 TV/VCR REC SLOW 17 SEARCH TITLE SUB TITLE AUDIO EJECT 18 19 MODE SELECT TOSHIBA CT-902751 POWER Turns the selected device on and off.
2 Channel Numbers (0-9) Press to directly access channels (as opposed to ▲CH|CH).
3 +10 Press to directly access DVD chapters higher than 10.
4 TOP MENU Accesses a DVD's top menu.
5 CH ▲▼ For channels programmed into the channel memory ( page 38):
▲ selects the next higher channel.
▼ selects the next lower channel.
6 GUIDE Displays the channel guide in the CABLE/SAT mode.
SET UP Accesses a DVD's setup menu in the AUX mode.
7 INFO Displays TV status information on-screen.
8 ▲▼◀▶ Press to navigate DVD menus (may not work on some DVD players).
9 ENTER Required by some satellite receivers and DVD players to activate certain functions.
10 DVD CLEAR Press to reset the title and chapter number.
11 PLAY Begins playback of a tape or DVD.
12 PAUSE Press during play or record mode to pause the picture; press again to restart.
13 STOP Stops the tape or DVD.
14 SKIP ▶▶ Skips forward to locate later DVD chapters.
15 FF Fast-forwards the tape or DVD. (Press during play mode to view the picture moving rapidly forward.)
16 SKIP ▶ Skips back to beginning of current DVD chapter, or locates previous chapters.
17 REW Rewinds/reverses the tape or DVD. (Press during play mode to view the picture moving rapidly backward.)
18 TV/VCR To view one program while recording another, press to select TV mode.
SEARCH selects a specific DVD chapter, title or time.
19 REC Starts tape recording.
20 MODE SELECT switch Set to "TV" to control the TV; "CABLE/SAT" to control a cable converter box or satellite receiver; "AUX 1" to control a VCR; "AUX 2" to control a DVD player or HTIB.
Remote Control functional key chart
Note:
- “---” = key does not send a signal in that remote control mode.
- “←TV” = key will affect the TV, even though the remote control is in another mode.
• * Not available for your TV.
| REMOTE CONTROL KEY | Toshiba TV | CABLE | SAT (satellite) | AUX 1 (VCR) | AUX 2 (DVD or HTIB) |
| POWER Power Power Power | Power Power | ||||
| SLEEP | Sleep timer | ← TV | ← TV | ← TV | ← TV |
| PIC SIZE | Picture size | ← TV | ← TV | ← TV | ← TV |
| PIC MODE | PIC MODE | ← TV | ← TV | ← TV | ← TV |
| 1-9 | Digit 1-9 | Digit 1-9 | Digit 1-9 | Digit 1-9 | Digit 1-9 |
| 0 | Digit 0 | Digit 0 | Digit 0 | Digit 0 | Digit 0 |
| 100/-/+10 | -(sub CH) | --- | -(sub CH) | 100 | +10 |
| INPUT | TV/Video select | ← TV | ← TV | ← TV | ← TV |
| FAV BROWSER/TOP MENU | FAV BROWSER DVD TOP Menu* | --- | --- | --- | Top Menu |
| MUTE | Sound mute | ← TV | ← TV | ← TV | ← TV |
| SET UP/GUIDE | Guide* | --- | SAT Guide | --- | Setup |
| VOL + - | Volume up/down | ← TV | ← TV | ← TV | ← TV |
| CH▲▼ | Channel up/down | Channel up/down | Channel up/down | Channel up/down | --- |
| RECALL | RECALL | ← TV | ← TV | ← TV | ← TV |
| CH RTN/DVD RTN | Previous channel DVD previous menu* | --- | --- | --- | DVD Return |
| INFO | Info | --- | Info | --- | Display |
| ENTER | Enter | --- | Select, Enter | --- | Enter |
| ▲▼ | Menu up/down | --- | Menu up/down | --- | Menu up/down |
| ◄BOX◄ | Menu left/ Channel BrowserTM | --- | Menu left | --- | Menu left |
| ►NEXT◄ | Menu right/ Channel BrowserTM | --- | Menu right --- | Menu right | |
| MENU | Menu | --- | Action Menu | --- | DVD Menu |
| EXIT/DVD CLEAR | Exit DVD clear* | --- | Exit | --- | DVD Clear |
| PAUSE/STEP | Pause* | --- | --- | Pause | Pause |
| PLAY | Play* | --- | --- | Play | Play |
| STOP | Stop* | --- | --- | Stop | Stop |
| SKIP ◀◀ | Skip REV* | --- | --- | --- | Skip REV |
| SKIP ►► | Skip FWD* | --- | --- | --- | Skip FWD |
| REW | Rewind* | --- | --- | Rewind | Rewind |
| FF | Fast FWD* | --- | --- | Fast FWD | Fast FWD |
| TV/VCR/SEARCH | DVD search* | --- | --- | TV/VCR | DVD search |
| REC | REC MENU* | --- | --- | Record (2 click) | --- |
| SLOW - | SLOW REW* | --- | --- | --- | --- |
| SLOW + | SLOW FWD* | --- | --- | --- | --- |
| ANGLE | Angle* | --- | --- | --- | DVD Angle |
| SUB TITLE | Sub title* | --- | --- | --- | DVD Sub title |
| AUDIO | Audio* | --- | --- | --- | DVD Audio |
| EJECT | Eject* | --- | --- | --- | DVD Eject |
Programming the remote control to control your other devices
Your Toshiba TV remote control is preprogrammed to operate most Toshiba devices. To program your TV remote control to operate a non-Toshiba device (or a Toshiba device that it is not preprogrammed to operate), follow the steps below. For details on using the remote control to operate the device, see page 22.
1 In the remote control code table (u page 25), find the code for your device. If more than one code is listed, try each one separately until you find one that works.
2 Set the MODE SELECT switch to the type of device you are programming the remote control to operate — CABLE/SAT (for a cable converter box or satellite receiver), AUX 1 (for a VCR or TV/VCR combo), or AUX 2 (for a DVD player or HTIB [home theater in a box]).
3 While holding down , press the Channel Number buttons to enter the 3-digit code for your device.
4 To test the code, turn on the device, point the remote control at it, and press POWER. See notes below.
- If the correct code was entered, the device will turn off.
- If the device does not respond, repeat steps 1–4 using another code.
- If the device does not respond to another code, you will need to use the remote control that came with the device.
5 Remember to set the MODE SELECT switch back to "TV" to control the TV.
6 For future reference, write down the code(s) you used:
| DEVICE CODE DEVICE CODE | |
Note:
- In addition to POWER, confirm that all necessary keys on the TV remote control operate your device. If some keys are not operational, repeat the device code setup using another code (if other codes are listed for your device). If, after trying all listed codes, the necessary keys do not operate your device, use the device's original remote control.
- Every time you change the batteries, you will need to reprogram the remote control.
- Some newer VCRs respond to either of two codes. These VCRs have a switch labeled "VCR1/VCR2." If your VCR has this kind of switch and does not respond to the codes for your VCR brand, set the switch to the other position ("VCR1" or "VCR2") and reprogram the remote control.
Chapter 3: Using the remote control
Remote control codes
In some cases you may not be able to operate your device with the TV remote control. Your other device may use a code that is not recognized by the TV remote control. If this happens, use the device's remote control.
Cable converter box
ABC 061, 062, 063, 082,
084, 087, 092,
096, 098
Archer 065, 092, 097, 099
Cableview 064, 094
Century 092
Citizen 090, 092, 097
Contec 083, 085, 086, 088,
093, 098
Diamond 093
GE 061, 062
Gemini 069, 070, 094
Hamlin 093
Hitachi 062, 095, 096
Jasco 097
Motorola/GI/Jerrold 062, 069, 071, 082,
086, 089, 096, 107
Magnavox 072, 096
Memorex 092, 104
Multi Canal 090
Novavision 101
Panasonic 081,083,085
Philco 087
Philips 066, 067, 068, 070.
072, 073, 074, 075,
092
Pioneer 076,077
Proscan 061,062
Radio Shack 092, 097, 099
RCA 064, 081
Realistic 065
Recoton 102
Samsung 077, 090
Scientific Atlanta 063, 078, 079, 080,
088, 098, 101, 105
Sears 095
Signature 062
Signature 2000 096
Sprucer 081,085
Starcom 069, 082, 087, 096,
103, 104
Stargate 069,090
Sylvania 095,100
TeleView 090
Texscan 100
Tocom 071, 084, 085
U. S. Electronics 087, 096, 098
United Cable 082
Universal 065, 092, 097, 099.
102, 103
Wards 096
Satellite receiver
Alphastar 038, 059
Chaparral 034
DISH Network 057
Drake 020, 040, 044, 046,
050, 053
Echostar 018,041,051
Express Vu 057
Fujitsu 027
GE 008, 009, 013
General Instruments 010, 011, 012, 022,
023, 031, 049
Hitachi 033
Hughes 033
Hughes Network
Systems
Intersat 048
Jancil 027
JVC 017,057
Kenwood 029
Magnavox 060
Optimus 058
Pansat 036,052
Primestar 015,042
Proscan 008,009,013
Radio Shack 022, 023, 030
RCA 008, 009, 013, 016
Realistic 030
Samsung 059
Sony 014,055
Star Choice 057, 106
Star Trak 025, 026, 037, 054
STS 024
Toshiba 000, 001, 002, 003,
004, 005, 006, 007,
020, 031, 056
Uniden 021, 028, 030, 032,
035, 039, 043, 045,
047,058
Zenith 027
TV/VCR Combo
Action 078
GE 059.062
Goldstar 065
Panasonic 065
Precision 078
Quasar 065
Realistic 079
Sony 074
Toshiba 057
Zenith 065
Totevision 009, 010, 065
DVD/VCR Combo
Go Video DVD=087.
VCR=081
JVC DVD=088,
VCR=082
RCA DVD=089,
VCR=083
Samsung DVD=090.
VCR=084
Sanyo DVD=091,
VCR=085
Zenith DVD=092,
DVD=092,
VCR=086
DVD player
Aiwa 006, 015
Apex 016, 017
BOSE 097
Broksonic 018
Clarion 019
Classic 020
Daewoo 021
Denon 022, 023, 024, 025
Emerson 026,027
Fisher 028
Funai 027
GE 001, 029, 030
Go Video 087
GPX 031
Hitachi 005, 032, 033, 034,
035
JVC 003,007,036,042,
088
Kenwood 037
Konka 008,009
Magnavox 004, 038
Memorex 039
Mintek 040
NAD 026
Nakamichi 041
Norcent 043
Onkyo 044
Oritron 058
Panasonic 010.045,046,047.
048, 049, 050
Philips 004, 051
Pioneer 052, 053, 054, 055
Proscan 001,056
Qwestar 057,058
RCA 001, 002, 059, 089
Sampo 060
Samsung 061, 062, 086, 090
Sansui 073
Sanyo 063,091
Sharp 064,067
Sherwood 074
Sony 011, 012, 065, 066,
068,069,070
Sylvania 027
Teac 071
Technics 072
Techwood 075
Toshiba 000, 013, 076, 077,
078
Yamaha 079,080,081
Zenith 014,082,092
Portable DVD player
Aiwa 093
Audiovox 094,095
Panasonic 024, 096, 099
RCA 098
VCR
Admiral 049
Aiko 019
Aiwa 018
Akai 003,004,037,038,
039,058,069
Audiovox 010
Bell & Howell 007, 068
Broksonic 008,017
Calix 010
Carver 026
CCE 019
Citizen 009, 010, 011, 012,
013, 014, 015, 019,
057,073
Colortyme 005
(continued)
Chapter 3: Using the remote control
Craig 009, 010, 016, 061,
065,079
Curtis Mathes 001, 005, 009, 012,
014, 040, 048, 053,
056,057
Dacwoo 011, 013, 015, 017.
018, 019, 057, 078
Daytron 078
Denon 063
Dimensia 001, 048
Electrohome 010, 020, 065
Emerson 003, 008, 010, 011.
017, 018, 020, 028,
039, 054, 057, 062.
065, 068, 072
Fisher 007, 016, 021, 022,
023, 057, 064, 068,
070, 071, 079
Fuji 004, 041
Funai 018, 073
Garrard 018
GE 001, 002, 009, 040,
042, 048, 056
Go Video 056, 059, 061, 081
Goldstar 005,010,014,054,
056, 065, 067
Gradiente 018,065
Harman Kardon 005
Hitachi 024, 025, 035, 037,
042, 063, 070, 080
JBL 076
JC Penney 005,006,007,008,
009, 010, 023, 024,
025, 026, 035, 056,
061, 063, 065
Jensen 024, 025, 037, 050
JVC 005,006,007,014,
037, 043, 055, 062,
063, 068, 082
Kenwood 005, 006, 007, 012.
014, 037, 043, 050,
053,068,071
Kodak 010
LG 010
Lloyds 053,073,079
Logik 061
LXI 010
Magnasonic 061,065,078
Magnavox 026, 027, 034, 044,
057,061,072
Marantz 005, 006, 007, 012,
014, 026, 053, 067
Memorex 007, 009, 010, 016,
018, 034, 049, 063,
065, 066, 068, 075,
079
MGA 020, 028, 039
MGN 056
Minolta 024, 025, 035, 063
Mitsubishi 020, 024, 025, 028,
039, 043, 065
Montgomery Ward
Motorola 049
MTC 009,046,061
Multitech 009, 012, 018
NEC 005,006,007,012.
014, 037, 043, 053,
054, 067, 070
Nikko 010
Noblex 009
Optimus 010, 049, 065
Optonica 031
Orion 054, 057, 062, 065,
068,072
Panasonic 036, 045, 046, 057.
061, 072, 079
Pentax 012, 024, 025, 035,
042, 053, 063
Pentex Research 014
Philco 026,027,063
Philips 026, 031, 044, 057
Pioneer 006,024,043,055
Portland 012, 013, 015
Proscan 001,002,048
Proton 061
Quasar 045
Radio Shack 010, 031, 065
Radio Shack/Realistic 007, 009, 010, 016,
018, 020, 021, 022,
031,049
Radix 010
RCA 001,002,003,009,
024, 025, 029, 035,
040, 042, 045, 048,
055, 056, 063, 071,
083
Realistic 007, 009, 010, 01
016, 018, 020, 021,
022, 031, 049, 051,
056, 060, 065, 075,
079
Ricoh 047
Runco 034
Samsung 009, 011, 038, 056,
073,084
Sansui 006, 037, 043, 061
Sanyo 007, 009, 016, 054,
064, 068, 071, 075,
079,085
Scott 008,011,017,028,
030, 057, 065, 072
Sears 007,010,016,021,
022, 023, 024, 025,
035, 053, 057, 063,
064, 065, 068, 071,
075,079
Sharp 013, 020, 031, 049,
051,060,066
Shintom 004, 025, 032, 061
049
Signature 2000 075
Singer 047, 061
Sony 004, 032, 033, 041,
052, 058, 070, 074,
076,077,080
STS 035
Sylvania 018, 026, 027, 028,
044,072
Symphonic 018, 050, 051, 053,
073,079
Tandy 007
Tashiko 010
Tatung 037
Teac 018,029,037
Technics 036
Teknika 010, 018, 065
Toshiba 000,011,021,023,
024, 028, 030, 039,
057, 074, 078, 079
Totevision 009,010,065
Unitec 073
Unitech 009
Vector Research 005, 006, 011, 012,
053
Video Concepts 005, 006, 011, 012.
039,053
Wards 009, 010, 011, 016,
018, 020, 024, 025,
031, 035, 049, 051,
056, 057, 060, 065,
066,079
White Westinghouse 073
XR-1000 018
Yamaha 005, 006, 007, 014,
037,053
Zenith 004, 032, 034, 041,
047,069,086
HTIB
Lasonic 083
Panasonic 084
Venturer 085
Chapter 4: Menu layout and navigation
Main menu layout
The tables below and on the next page provide a quick overview of your TV's menu system.
To open the main menus (illustrated below), press on the remote control or TV control panel.
| Icon Item Option | |
Video | Mode → Sports/Standard/Movie/Preference |
| Picture Settings → [Opens the Picture Settings menu] | |
| Noise Reduction → [Opens the Noise Reduction menu] | |
| Game Mode → On/Off | |
| Theater Settings → [Opens the Theater Settings menu] | |
| Audio[WC40] | Digital Audio Selector → [Launches the temporary Audio Selector] |
| Audio Settings → [Opens the Audio Settings menu] | |
| Advanced Audio Settings → [Opens the Advanced Audio Settings menu] | |
| Audio Setup → [Opens the Audio Setup menu] | |
| Preferences[ZX08] | CC Selector → [Launches the temporary CC Selector] |
| Base CC Mode → Off/CC1/CC2/CC3/CC4/T1/T2/T3/T4 | |
| Digital CC Settings → [Opens the Digital CC Setup menu] | |
| Input Labeling → [Opens the Input Labeling menu] | |
| Channel Labeling → [Opens the Channel Labeling menu] | |
| Menu Language → English/French/Spanish | |
| Channel Browser Setup → [Opens the Channel Browser Setup menu] | |
Locks | Enable Rating Blocking → Off/On |
| Edit Rating Limits → [Opens the Edit Rating Limits menu] | |
| Channels Block → [Opens the Channels block menu] | |
| Input Lock → Off/Video/Video+ | |
| Front Panel Lock → Off/On | |
| New PIN Code → [Opens the New PIN Code entry screen] | |
Setup | Installation → [Opens the Installation menu (page 28)] |
| Sleep Timer → [Opens the Sleep Timer menu] | |
| PC Settings → [Opens the PC Settings menu] | |
| Power-On Mode → Power-Saving/Fast | |
Setup/Installation menu layout
The Installation menu contains the Terrestrial and System Status menus.
To open the Installation menu (illustrated below), press MENU on the remote control or TV control panel, open the Setup menu, select Installation, and press ENTER.
| System Option | ||
| Press , open the Setup menu, and then open the Installation sub-menu. |  | Input Configuration → [Opens the Input Configuration menu] |
| Channel Program → [Start] → [Scans for new channels on ANT] | ||
| Channel Add/Delete → [Opens the Channel Add/Delete menu] | ||
| Signal Meter → [Opens the Signal Meter menu] | ||
System Status | System Information → [Opens the System Information screen] | |
Navigating the menu system
You can use the buttons on the remote control or TV control panel to access and navigate your TV's on-screen menu system.
- Press ^MENU to open the menu system.
- When a menu is open, use the up/down/left/right arrow buttons (▲▼◀▶) on the remote control or TV control panel to move in the corresponding direction in the menu.
- Press 📄 to save your menu settings or select a highlighted item. (A highlighted menu item appears in a different color in the menu.)
- All menus close automatically if you do not make a selection within 60 seconds, except the signal meter menu, which closes automatically after about 5 minutes.
• To close a menu instantly, press EXIT.
Note:
- The menu background may sometimes appear black, depending on the signal the TV is receiving. This is not a sign of malfunction.
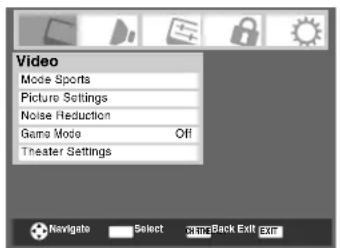
text_image
Video Mode Sports Picture Settings Noise Reduction Game Mode Off Theater Settings Navigate Select On the Back Exit Exit- The Video sub-menu appears with a black background, which looks different from other menus.

text_image
Picture Settings Mode: Sports Contrast 100 Back Light 100 DynaLight On Brightness 50 Color 50 Tint 0 Sharpness 50 Advanced Picture Settings Reset DoneChapter 5: Setting up your TV
Selecting the menu language
You can choose from three different languages (English, French and Spanish) for the on-screen display of menus and messages.
To select the menu language:
1 Press MENU and open the Preferences menu.
2 Highlight Menu Language and press ▶.
3 Press ▲ or ▼ to select your preferred menu language and press Ⓗ.
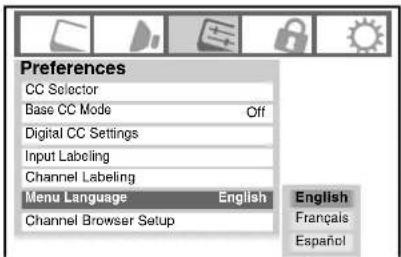
text_image
Preferences CC Selector Base CC Mode Off Digital CC Settings Input Labeling Channel Labeling Menu Language English Channel Browser Setup English Français Español4 Press EXIT to close the Preferences menu.
Configuring the antenna input source for the ANT terminal
To configure the ANT input source:
1 Press MENU and open the Setup menu.
2 Highlight Installation and press ENTER.
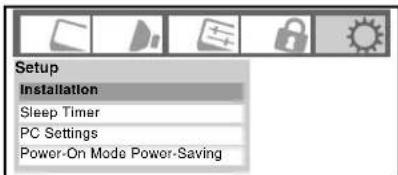
text_image
Setup Installation Sleep Timer PC Settings Power-On Mode Power-Saving3 (A new set of Installation menu icons will appear, as shown below.) Open the Terrestrial menu, highlight Input Configuration, and press 📊.
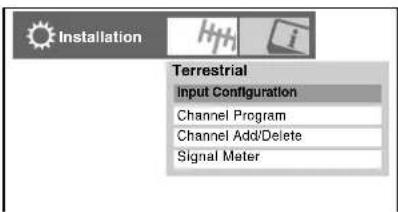
text_image
Installation Terrestrial Input Configuration Channel Program Channel Add/Delete Signal Meter4 Press ◀ or ▶ to select the input source (Cable or Antenna) for the ANT input on the TV.
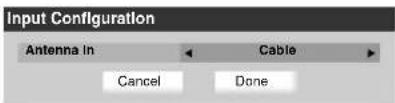
text_image
Input Configuration Antenna In Cable Cancel Done5 To save your new settings, highlight Done and press 📋. To revert to your original settings, highlight Cancel and press 📋.
Programming channels into the TV's channel memory
When you press or on the remote control or TV control panel, your TV will stop only on the channels you programmed into the TV's channel memory.
Follow the steps below to program channels into the TV's channel memory.
Programming channels automatically
Your TV can automatically detect all active channels in your area and store them in its memory. After the channels are programmed automatically, you can manually add or erase individual channels in the channel memory.
Note:
- You must configure the antenna input source before programming channels ( page 29).
- If the Antenna input signal type is set to Cable, the automatic channel programming process erases channels that were previously programmed into the TV's memory.
- If the Antenna input signal type is set to Antenna, the automatic channel programming process adds newly found channels to the existing set of programmed channels (and does NOT erase channels that were previously programmed into the TV's memory.) To remove an Antenna source channel from the memory, you must manually delete it.
- To tune the TV to a channel not programmed in the channel memory, you must use the Channel Number buttons on the remote control.
- Programming channels when the antenna input is configured for Cable will take substantially longer than when the antenna input is configured for Antenna. This is normal; however, once channel programming is finished, you should not have to repeat the programming process again unless your Cable TV service lineup changes significantly.
To program channels automatically:
1 Configure the antenna input source, if you have not already done so ( page 29).
2 Press MENU and open the Setup menu.
3 Highlight Installation and press ENTER.
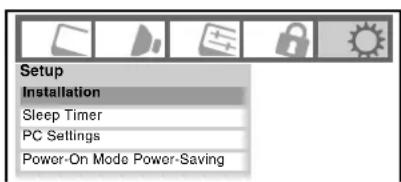
text_image
Setup Installation Sleep Timer PC Settings Power-On Mode Power-Saving4 (A new set of Installation menu icons will appear, as shown below.) Open the Terrestrial menu, highlight Channel Program to bring up the Start, and press @enter again to begin channel programming.
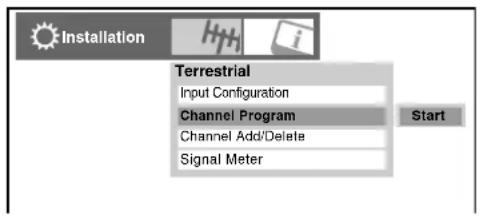
text_image
Installation Terrestrial Input Configuration Channel Program Channel Add/Delete Signal Meter Start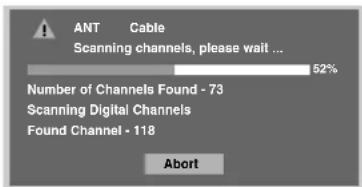
text_image
ANT Cable Scanning channels, please wait ... 52% Number of Channels Found - 73 Scanning Digital Channels Found Channel - 118 AbortThe TV will automatically cycle through all the antenna channels, and store all active channels in the channel memory. While the TV is cycling through the channels, the message “Scanning channels, please wait” appears (as shown above).
5 To cancel channel programming, press EXIT on the remote control (or highlight Abort in the on-screen display and press ENTER).
When channel programming is finished, press or to view the programmed channels.
Manually adding and deleting channels in the channel memory
After automatically programming channels into the channel memory, you can manually add or delete individual channels.
To add or delete channels in the channel memory:
1 Press MENU and open the Setup menu.
2 Highlight Installation and press ENTER.
3 (A new set of Installation menu icons will appear, as shown below.) Open the Terrestrial menu, highlight Channel Add/Delete, and then press 📂.
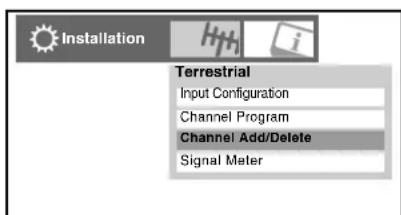
text_image
Installation Terrestrial Input Configuration Channel Program Channel Add/Delete Signal MeterTo add a channel to the channel memory:
Highlight the unchecked box next to the channel number you want to add, and then press 📋 to check the box.
To manually add digital subchannels on a physical channel:
Use the Channel Numbers and the Dash (100) on the remote control to enter the channel number (for example, 56–1).
If the channel is found, the number will be added to the list and the box will be checked.
If the channel is not found, a message will appear.
To remove a channel from the channel memory:
Highlight the checked box next to the channel number you want to remove, and then press ENTER to uncheck the box.
To save your new settings:
Highlight Done and press ENTER.
To revert to your original settings:
Highlight Cancel and press ENTER before saving.
To remove all channels from the channel memory:
Highlight Reset and press ENTER, and then highlight Done and press ENTER.
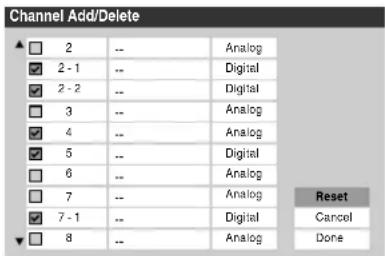
text_image
Channel Add/Delete 2 -- Analog 2 - 1 -- Digital 2 - 2 -- Digital 3 -- Analog 4 -- Analog 5 -- Digital 6 -- Analog 7 -- Analog 7 - 1 -- Digital Cancel 8 -- Analog Done Reset CancelTo remove encrypted channels from the channel memory:
If an encrypted channel is accidentally added to the channel list by programming channels, you can remove the unwanted encrypted (non-viewable) channel while you are channel surfing. When you tunes to an encrypted channel, the following message will appear.
Digital Channel Is Encrypted - Press 1 on remote to remove channel
Press “①” button while the message is on the screen to remove the unnecessary channel from the channel list.
Labeling channels
A list of common channel labels (logos) for various channels (ABC, CBS, etc.) will be programmed into the TV. You will be able to view and assign these logos from the Channel Labeling window. If the desired channel label is not provided in the list, you will be able to manually enter/edit labels using the software keyboard.
To assign channel labels:
1 Press MENU and open the Preferences menu.
2 Highlight Channel Labeling and press ENTER. The Channel Labeling window opens.
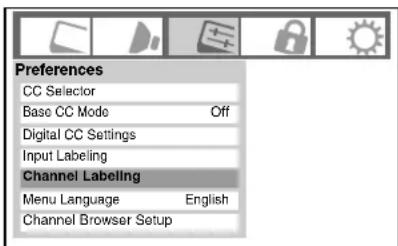
text_image
Preferences CC Selector Base CC Mode Off Digital CC Settings Input Labeling Channel Labeling Menu Language English Channel Browser Setup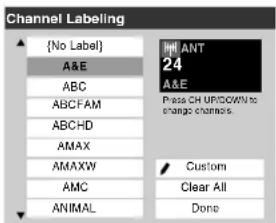
text_image
Channel Labeling {No Label} A&E ABC ABCFAM ABCHD AMAX AMAXW AMC ANIMAL HANT 24 A&E Press CH UP/SCWN to change channels. Custom Clear All Done3 Press or to select the channel you want to label.
4 Press ▲▼◀▶ to highlight the desired channel label and press ENTER.
5 Repeat steps 3 and 4 for other channels.
6 To save your settings, highlight Done and press ENTER.
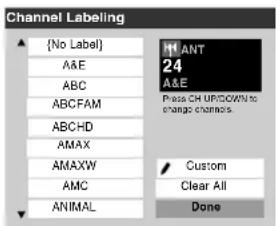
text_image
Channel Labeling {No Label} A&E ABC ABCFAM ABCHD AMAX AMAXW AMC ANIMAL HANT 24 A&E Press CH UP/SCWN to change channels. Custom Clear All DoneThe maximum number of labels that can be stored is 128.
To remove channel labels:
1 Open the Channel Labeling window.
2 Press or to select the channel for which you want to remove the label.
(continued)
3 Press ▲▼◀▶ to highlight No Label and press ENTER.
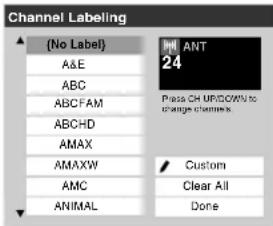
text_image
Channel Labeling (No Label) A&E ABC ABCFAM ABCHD AMAX AMAXW AMC ANIMAL ANT 24 Press CH UP/DCWN to change channels. Custom Clear All Done4 Repeat steps 2 and 3 for other channels.
5 To save your settings, highlight Done and press ENTER.
If the desired channel label is not available from the list of presets, you can create a custom label.
To create and assign a custom label:
1 Open the Channel Labeling window.
2 Press or to select a channel you want to label.
3 Press ▲▼▶ to highlight Custom and press ENTER. The software keyboard will appear.
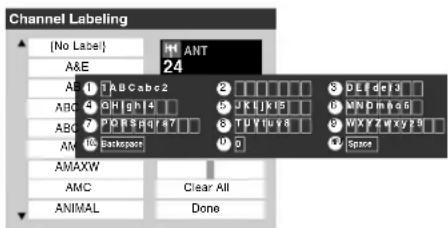
text_image
Channel Labeling [No Label] A&E ANT 24 A E 1 ABCabc2 2 3 P E I d e 3 A B C 4 H g h 4 5 J K I J K 5 6 M N D m A G A B C 7 P O R S H q 7 8 T U Y U y 8 9 W X Y Z W X Y Z 9 A B C 10 Backspace 11 12 Space AMAXW AMC Clear All ANIMAL Done4 Repeatedly press the corresponding key on the remote control to highlight the desired character on the on-screen software keyboard.
5 The highlighted character is entered after you either press a different key, press ▶ key, or after a two-second pause.
6 Repeat steps 4 and 5 until you have entered all desired text.
7 When finished, press ENTER.
8 (New labels will be added to the list in alphabetical order and marked with an icon to indicate that they are custom.) Highlight the new custom label and press ENTER to assign. Assigned channel labels will be displayed in the banner, Channel Add/Delete window, and Channels Block window.
To delete the custom label:
1 Open the Channel Labeling window.
2 Highlight the label to be deleted and press ⑩.
3 Highlight Yes from the deletion confirmation window and press ENTER.
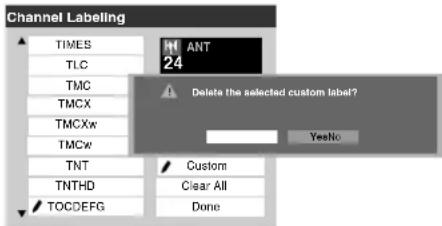
text_image
Channel Labeling TIMES TLC TMC TMCX TMCXw TMCw TNT TNTHD TOCDEFG ANT 24 Delete the selected custom label? YesNo Custom Clear All Done4 Highlight Done and press ENTER to save changes, and go back to the Channel Labeling window.
Setting the HDMI™ audio mode
To set the HDMI audio mode:
1 Press MENU and open the Audio menu.
2 Highlight Audio Setup and press ENTER.
3 Press ▲ or ▼ to select HDMI 1 Audio and then press ◀ or ▶ to select the HDMI 1 audio mode (Auto, Digital, or Analog). (Auto is the recommended mode.) See “Connecting an HDMI or DVI device to the HDMI input” ( page 17).
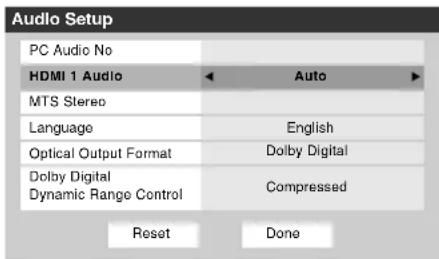
text_image
Audio Setup PC Audio No HDMI 1 Audio Auto MTS Stereo Language English Optical Output Format Dolby Digital Dynamic Range Control Compressed Reset DoneNote: Because the PC and HDMI-1 inputs share the same set of analog audio inputs, the PC Audio menu setting influences the HDMI 1 Audio menu setting. If PC Audio is set to "No," the HDMI 1 Audio setting changes to "Auto." If PC Audio is set to "Yes," the HDMI 1 Audio setting is set to "Digital" and is grayed out in the menu. (Also see item 4 on page 11 and "Setting the PC Audio" on page 52.)
Viewing the digital signal meter
You can view the digital signal meter in the ANT digital TV input source only.
To view the digital signal meter:
1 Press MENU and open the Setup menu.
2 Highlight Installation and press ENTER.
3 A new set of Installation menu icons will appear, as shown below. Open the Terrestrial menu, highlight Signal Meter, and press 📂.
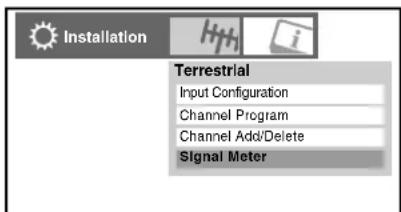
text_image
Installation Terrestrial Input Configuration Channel Program Channel Addi/Delete Signal Meter4 Press ▲▼◀▶ to select the antenna input and digital channel whose signal you want to check.
Note: The physical digital channel number listed in the Signal Meter screen may not correspond to a virtual TV channel number. Contact your local broadcasters to obtain the RF channel numbers for your local digital stations.
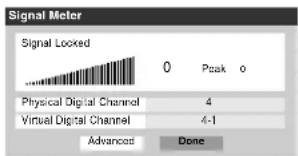
text_image
Signal Meter Signal Locked 0 Peak 0 Physical Digital Channel 4 Virtual Digital Channel 4-1 Advanced DoneTo close the screen and return to the Terrestrial menu:
Highlight Done and press ENTER.
To return to normal viewing:
Press EXIT.
Viewing the system status
To view the system status:
1 Press MENU and open the Setup menu.
2 Highlight Installation and press ENTER.
3 A new set of Installation menu icons will appear, as shown below. Open the System Status menu, highlight System Information, and press ENTER.
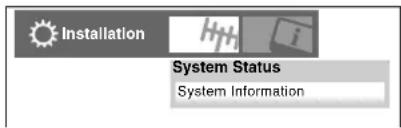
text_image
Installation System Status System Information4 Press ◀▶ to scroll through the menu bar to select the Software Version and view the related information.
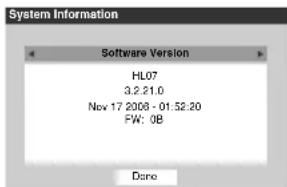
text_image
System Information Software Version HL07 3.2.21.0 Nov 17 2008 - 01:52:20 FW: 0B DoneTo close the screen and return to the Installation menu:
Highlight Done and press ENTER.
To return to normal viewing:
Press EXIT.
Reset Factory Defaults
To reset all settings and channels to their factory default values:
1 Press MENU and open the Setup menu.
2 Highlight Installation and press ENTER. A new set of Installation menu icons will appear.
3 Open the System Status menu, highlight System Information, and press ENTER.
4 Press ◀▶ to scroll through the menu bar to select Factory Defaults.
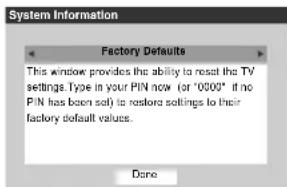
text_image
System Information Factory Defaults This window provides the ability to reset the TV settings. Type in your PIN now (or "0000" if no PIN has been safe) to restore settings to their factory default values. Done5 Enter your PIN code (or 0000 if no PIN code has been set).
(continued)
6 Highlight Yes and press ENTER. The TV will turn off automatically after a few seconds. After the TV turns off, unplug the TV power cord and then plug it in again to complete the reset process.
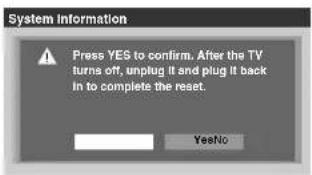
text_image
System Information Press YES to confirm. After the TV turns off, unplug it and plug it back in to complete the reset. YesNoTo cancel the reset:
Highlight No and press ENTER.
Selecting the Power-On Mode
You can select either Power-Saving or Fast mode.
- Power-Saving mode keeps power consumption in standby mode to below 3W. As a result, it takes a bit longer to turn on.
- Fast mode increases power consumption in standby mode. As a result, the TV will turn on quicker. While in Fast mode, the yellow LED on the TV front will be lit.
To set the Power-On Mode feature:
1 Press MENU, and open the Setup menu.
2 Highlight Power-On Mode and press ▶.
3 Press ▲ or ▼ to select either Power-Saving or Fast.
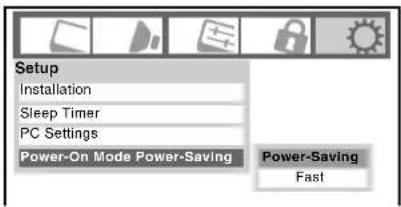
text_image
Setup Installation Sleep Timer PC Settings Power-On Mode Power-Saving Power-Saving FastChapter 6: Using the TV's features
Selecting the video input source to view
To select the video input source to view:
1 Press INPUT on the remote control or TV control panel.
2 And then either:
a) Press 0–8; or
b) Repeatedly press ▲▼ on the remote control and then press ENTER to change the input; or
c) Repeatedly press Ⓞ on the remote control or TV control panel to change the input.
The current signal source displays in the top right corner of the Input Selection screen.
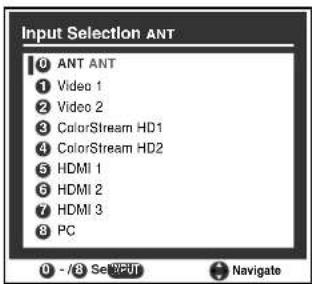
text_image
Input Selection ANT 0 ANT ANT 1 Video 1 2 Video 2 3 ColorStream HD1 4 ColorStream HD2 5 HDMI 1 6 HDMI 2 7 HDMI 3 8 PC 0 - /8 SelectOUT NavigateNote:
- You can label the video input sources according to the specific devices you have connected to the TV (☐ "Labeling the video input sources" at right).
- Sources can be "hidden" (☐ "Labeling the video input sources" at right).
- "No Video Signal" will appear randomly on the screen if no signal is received in video input mode.
Labeling the video input sources
You can label each video input source according to the type of device you connected to each source, from the following preset list of labels:
-
-
- (default label)
-
- Audio Receiver
• Cable - Compact Disc
• DTV
• DVD - Game Console
• HD DVD - Laser Disk
- Satellite/DSS
• VCR - Video Recorder
- Hide (to hide an unused input in the Input Selection screen)
Note: If you select PC in the Input Selection screen, you can choose only “--” or “Hide” as the label.
To label the video input sources:
1 Press MENU and open the Preferences menu.
2 Highlight Input Labeling and press ENTER.
3 Press ▲ or ▼ to highlight the video source you want to label.
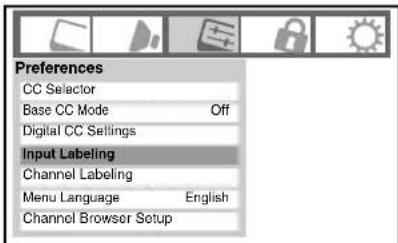
text_image
Preferences CC Selector Base CC Mode Off Digital CC Settings Input Labeling Channel Labeling Menu Language English Channel Browser Setup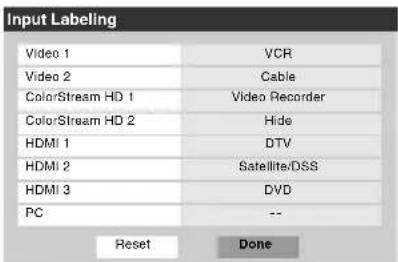
text_image
Input Labeling Video 1 VCR Video 2 Cable ColorStream HD 1 Video Recorder ColorStream HD 2 Hide HDMI 1 DTV HDMI 2 Satellite/DSS HDMI 3 DVD PC -- Reset Done(continued)
4 Press ◀ or ▶ to select the desired label for that input source. If a particular input is not used, you can select Hide as the label, which will cause that input to be "grayed out" in the Input Selection screen and skipped over when you press Ⓞ on the remote control.
5 To save the new input labels, highlight Done and press. To revert to the factory default labels, highlight Reset and press.
Input labeling example:
The screen below left shows the default Input Selection screen (with none of the inputs labeled as a specific device). The screen below right is an example of how you could label the inputs if you connected a VCR to VIDEO 1, Cable TV to VIDEO 2, a video recorder to ColorStream HD1, a DTV set-top box to HDMI 1, a satellite/DSS set-top box to HDMI 2, and a DVD player to HDMI 3. Also note that the ColorStream HD2 input is labeled "Hidden," which means that input will be skipped over when INPUT is pressed.

text_image
Input Selection ANT 1 ANT 2 Video 1 3 Video 2 4 ColorStream HD1 5 ColorStream HD2 6 HDMI 1 7 HDMI 2 8 HDMI 3 9 PC 0 - 0 / INPUT to Select NavigateInput Selection screen with no inputs labeled.
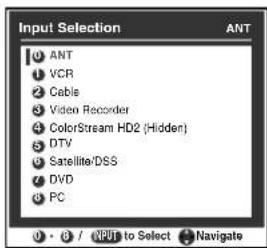
text_image
Input Selection ANT VCR Cable Video Recorder ColorStream HD2 (Hidden) DTV Satellite/DSS DVD PC 0 - 0 / INPUT to Select NavigateInput Selection screen with all inputs labeled except input 4, which has been hidden.
To clear the input labels:
1 Press MENU and open the Preferences menu.
2 Highlight Input Labeling and press ENTER.
3 Highlight Reset and press ENTER.
Tuning channels
Tuning channels using the Channel Browser™
The Channel Browser™ provides an easy navigation interface for all your channels and inputs. This feature allows you to:
- Navigate the contents of all of your inputs.
- Keep a list of your favorite channels (see “Favorites Browser,” below).
- Keep a history of the last 32 channels or inputs viewed.
- Quickly surf and tune your recently viewed channels/inputs from the Channel Browser™ History List (illustrated on the next page).
- Surf via Browse mode (to immediately tune channels as you highlight them in the Channel Browser™) or Select mode (to surf over channels in the Channel Browser™ before you select one to tune).
- Quickly change inputs from the Inputs List.
Favorites Browser
The Favorites Browser allows you to quickly set up a favorite channels/inputs list that is integrated into the Channel Browser ^™ .
To add a favorite channel/input:
1 Tune to the channel or input.
2 Press and hold FAV BROWSER for 3 seconds.
Note: Additions are added to the beginning of the Favorites list on the left side of the Channel Browser™.
To delete a favorite channel/input:
1 Press FAV BROWSER to open the Favorites browser list.
2 Highlight the channel or input to delete by pressing OR OR OR.
3 Press and hold 100 for 3 seconds. The channel/input will be removed from the Favorites list.
To set up the Channel Browser™:
1 Press MENU and open the Preferences menu.
2 Highlight Channel Browser Setup and press ENTER.
3 Press ▲ to highlight Navigation, and then press ◀ or ▶ to select either Browse Mode or Select Mode.
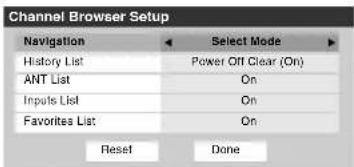
text_image
Channel Browser Setup Navigation Select Mode History List Power Off Clear (On) ANT List On Inputs List On Favorites List On Reset Done4 Press ▼ to highlight History List, and then press ◀ or ▶ to select the setting you prefer: either Power Off Clear (On), On, or Off.
Note: When History List is set to On and the Power-On Mode (page 34) is in Fast mode, the channels and inputs stored in the list will be saved every power on/off cycle. When History List is set to Power Off Clear (On), the channels and inputs stored in the list will be cleared with every power on/off cycle of the TV.
5 Press ▼ to highlight ANT List, and then press ◀ or ▶ to select On or Off.
6 Press ▼ to highlight Inputs List, and then press ◀ or ▶ to select On or Off.
7 Press ▼ to highlight Favorites List, then press ◀ or ▶ to select On or Off.
8 To save your entries, highlight Done and press ENTER. To return to factory defaults, highlight Reset and press ENTER.
To open the Channel Browser™:
- Press ▲ or ▶ on the remote control.
- Press 📄 to surf backward through the previously tuned 32 channels in the History list, the channels in the ANT channel list, the inputs in the Inputs list, or the favorite channels/inputs in Favorites list.
- Press ▶ to surf forward through the channel History, the ANT channel list, the Inputs list, or the favorite channels/inputs in Favorites list.
Elements of the Channel Browser™
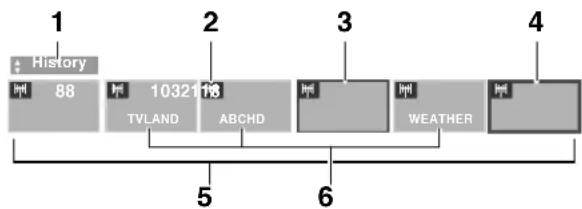
flowchart
graph TD
    A["History"] --> B["88"]
    B --> C["TVLAND"]
    C --> D["1032118"]
    D --> E["ABCHD"]
    E --> F["Weather"]
    F --> G["4"]
1 Current list (History, ANT, Inputs, or Favorites)
2 Input type
3 Channel or input currently being viewed
4 Channel or input that is currently highlighted in the browser
5 Channels stored in the History List
6 Channel labels
To toggle among the available lists:
After opening the Channel Browser ^™ , press ▲ or ▼ to toggle among History, ANT, Inputs, and Favorites.
Note:
- The Channel Browser™ opens in History List by default. Once another list has been selected, the Channel Browser™ will open in the last selected list.
- If all lists are turned off, pressing BACK, NEXT, or FAV BROWSER will not display the Channel Browser™. If Favorites List is turned off, FAV BROWSER will have no effect.
- Pressing FAV BROWSER will bring up the Channel Browser™ Favorites list regardless of the last selected list in the Channel Browser™.
To tune to a channel or input in Browse mode:
1 While watching TV, press 📄 or 📋 to open the Channel Browser™ and surf back to a previous item or surf forward to the next item in the list.
In Browse mode, when you stop on an item in the Channel Browser ^™ , it will be highlighted and the TV will automatically tune to the channel or input.
2 Press to close the Channel Browser ^TM .
To tune to a channel or input in Select mode:
1 While watching TV, press ^BACK or ^NEXT to open the Channel Browser ^TM and surf back to a previous item or forward to the next item in the list.
In Select mode, when you stop on an item in the Channel Browser™, it will be highlighted but you must press ENTER to tune the TV to the highlighted item.
2 Press ENTER to tune the TV to the highlighted item.
3 Press ^EXIT to close the Channel Browser ^TM .
Adding and clearing channels and inputs in the History List
Adding channels and inputs to the History List:
As a channel or input is tuned, the Channel Browser ^™ adds it to the History List and displays it on the “right side” of the Channel Browser ^™ . Previously tuned channels/inputs are “shifted” to the left, eventually moving off the left side. Press ^G6X to surf backward through the previously tuned channels/inputs. Any channel or input that is tuned repeatedly will not be repeated in the History List, but instead is moved to the end of the list on the right side of the Channel Browser ^™ .
The Channel Browser ^™ will store the following channels:
- All channels that are tuned using the numeric buttons on the remote control.
- All channels that are tuned using or on the remote control.
Note: Whenever an item is selected that cannot be tuned (for various reasons), the TV will automatically tune to the previously viewed channel or input.
(continued)
Clearing channels from the History List:
- Reconfiguring the ANT input will clear the History List.
Note: See page 29 for details on configuring the antenna input.
- Once 32 channels or inputs are stored in the History List, the oldest item will be removed from the list when a new channel or input is tuned.
- If History List in the Channel Browser Setup is set to "Power Off Clear (On)," turning off the TV will clear the History List.
Tuning to the next programmed channel
To tune to the next programmed channel:
Press or on the remote control or TV control panel.
Note: This feature will not work unless you program channels into the TV's channel memory (E page 30).
Tuning to a specific channel (programmed or unprogrammed)
Tuning analog channels:
Press the Channel Number (0–9) on the remote control. For example, to select channel 125, press 1, 2, 5.
Tuning digital channels:
Press the Channel Number (0–9) on the remote control, followed by the dash (100) button and then the sub-channel number. For example, to select digital channel 125-1, press 1, 2, 5, -, 1.
Note: If a digital channel is not programmed—either through the automatic channel scan ( page 30) or the channel add/delete function ( page 30)—you will have to tune the RF channel using the Channel Number and dash (100) on the remote control.
Switching between two channels using Channel Return
The Channel Return feature allows you to switch between two channels without entering an actual channel number each time.
1 Select the first channel you want to view.
2 Select a second channel using the Channel Number buttons (and the dash (100) button if selecting a digital channel).
3 Press ^CHRTN on the remote control. The previous channel will display. Each time you press ^CHRTN , the TV will switch back and forth between the last two channels that were tuned.
Note: If you press from a non-antenna input, the TV will return to the last-viewed input.
Switching between two channels using SurfLock™
The SurfLock™ feature temporarily “memorizes” one channel to the ^CH RTN button, so you can return to that channel quickly from any other channel by pressing ^CH RTN . To memorize a channel to the ^CH RTN button:
1 Tune the TV to the channel you want to program into the button.
2 Press and hold ^CHRTN for about 2 seconds until the message “Channel Memorized” appears on-screen. The channel has been programmed to the ^CHRTN button.
3 You can then change channels repeatedly, and when you press ^CHRTN , the memorized channel will be tuned.
The TV will return to the memorized channel one time only. Once you press ^CHRTN and then change channels again, the CH RTN memory will be cleared and the button will function as Channel Return, by switching back and forth between the last two channels that are tuned. This feature also works for external inputs.
Selecting the picture size
You can view many program formats in a variety of picture sizes—Natural, TheaterWide 1, TheaterWide 2, TheaterWide 3, Full, 4:3 HD and Native.
Note: The "picture size" illustrations are examples only. The format of the image (in any of the picture sizes) will vary depending on the format of the signal you are currently watching. Select the picture size that displays the current program the way that looks best to you.
You can save separate picture size preferences for each input on your TV.
To select the picture size using the remote control:
1 Press PIC SIZE on the remote control.
2 While the Picture Size screen is open, you can do one of the following to select the desired picture size:
• Repeatedly press ^PIC SIZE .
- Press the corresponding Number button (0–6) while the Picture Size screen is open.
- Press ▲ or ▼ while the Picture Size screen is open.
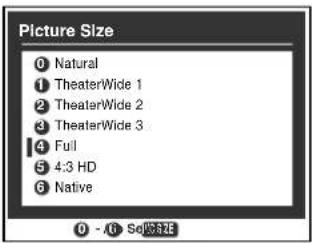
text_image
Picture Size Natural TheaterWide 1 TheaterWide 2 TheaterWide 3 Full 4:3 HD Native 0 - 10 SeV/STZTo select the picture size using the menus:
1 Select Picture Size in the Theater Settings menu.
2 Press ◀ or ▶ to select the desired picture size setting.
3 Highlight Done and press ENTER.
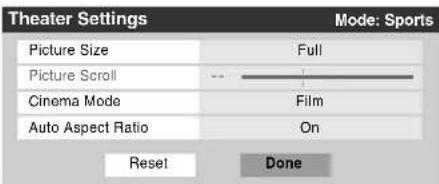
text_image
Theater Settings Picture Size Full Picture Scroll Cinema Mode Film Auto Aspect Ratio On Reset Done Mode: SportsNote: Some of the picture sizes may not be available depending on the receiving signal format (those will be "grayed out" in the Picture Size screen).
Using these functions to change the picture size (i.e., changing the height/ width ratio) for any purpose other than your private viewing may be prohibited under the Copyright Laws of the United States and other countries, and may subject you to civil and criminal liability.
Note: If you select one of the TheaterWide® picture sizes, the top and bottom edges of the picture (including subtitles or captions) may be hidden. To view the hidden edges, either scroll the picture (TheaterWide 2 and 3 only) or try viewing the program in Full or Natural picture size.
Natural picture size
- The image is displayed close to its originally formatted proportion. Some program formats will display with sidebars and/or bars at the top and bottom.
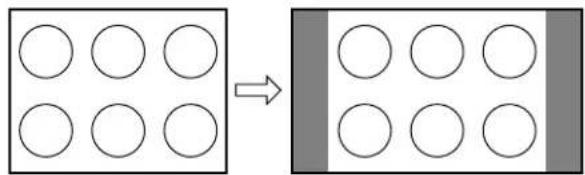
text_image
Diagram showing transformation of a 2x2 grid of circles into a 3x3 grid, with an arrow indicating the direction.Natural picture size example
TheaterWide 1 picture size (for 4:3 format programs)
- The center of the picture remains close to its original proportion, but the left and right edges are stretched wider to fill the screen.
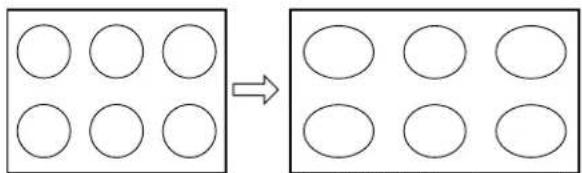
text_image
Diagram showing transformation of nine circles into ten ovals, likely illustrating a mathematical or logical pattern.TheaterWide 1 picture size example
TheaterWide 2 picture size (for letter box programs)
- The picture is stretched wider to fill the width of the screen, but only slightly stretched taller.
- The top and bottom edges of the picture may be hidden. To view the hidden areas, see “Scrolling the TheaterWide® picture” ( page 40).
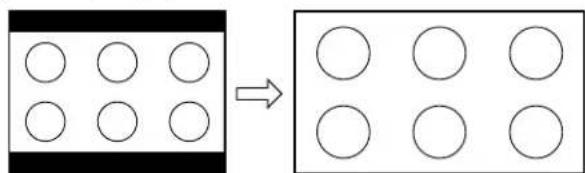
text_image
Diagram showing transformation of a grid of circles into a 2x2 grid, with an arrow indicating the direction.TheaterWide 2 picture size example
(continued)
TheaterWide 3 picture size (for letter box programs with subtitles)
- The picture is stretched wider to fill the width of the screen, but only slightly stretched taller.
- The top and bottom edges are hidden. To view the hidden areas (such as subtitles or captions), see “Scrolling the TheaterWide® picture.”
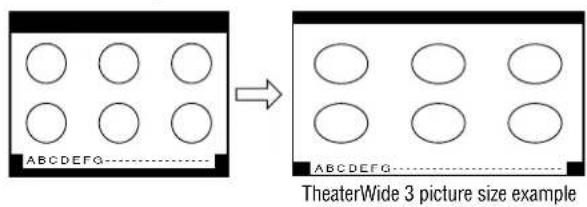
text_image
ABCDEFG → ABCDEFG TheaterWide 3 picture size exampleFull picture size (for 16:9 [480i, 480p] source programs only)
- If receiving a squeezed 4:3 format program, the picture is stretched wider to fill the width of the screen, but not stretched taller.
• None of the picture is hidden.
![TOSHIBA Regza 37HL67 - Full picture size (for 16:9 [480i, 480p] source programs only) - 1](/content/2026/05/817153/images/b017c19ef570d1d79d1c77e7ac32089e1d565fc8bb9563702fed0f4ddfc51385.jpg)
text_image
Full picture size example4:3 HD picture size (for 720p, 1080i, and 1080p program sources only)
- Sidebars fill the empty vertical spaces.
• Picture is not distorted from original size.
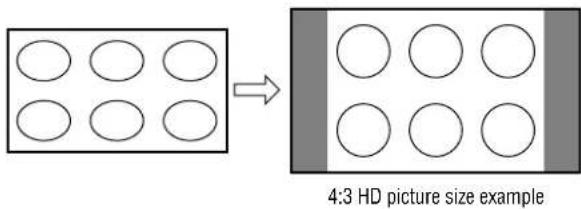
text_image
4:3 HD picture size exampleNative picture size (for 720p, 1080i, and 1080p signal programs)
- If receiving a 720p, 1080i, or 1080p signal program, Native mode scales the video to display the entire picture within the borders of the screen (i.e. no overscanning).
- This is especially useful for external HD sources such as HD-DVD, DVHS movies, or PC graphics.
Note:
- Native picture size is available for 720p, 1080i, and 1080p signals only. If the signal being received is other than 1080i, 1080p, or 720p, "Native" will be grayed out in the Picture Size screen.
- This mode is supported only for HDMI and ColorStream inputs.
- Depending on the input signals, the border of the picture may be hidden, displayed in black, or noisy.
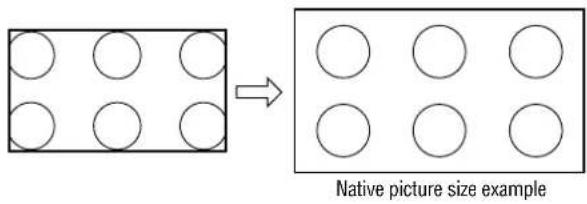
text_image
Native picture size exampleScrolling the TheaterWide® picture (TheaterWide 2 and 3 only)
You can set separate scroll settings for the TheaterWide 2 and TheaterWide 3 modes for each input.
To set the scroll settings:
1 Press MENU and open the Video menu.
2 Highlight Theater Settings and press ENTER.
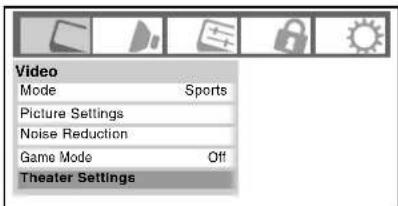
text_image
Video Mode Sports Picture Settings Noise Reduction Game Mode Off Theater Settings3 In the Picture Size field, select either TheaterWide 2 or TheaterWide 3 (you cannot scroll in any other mode).
4 Press ▼ to highlight the Picture Scroll field.
5 Press ◀ or ▶ to scroll the picture up and down as needed, from -10 to +20.

text_image
Theater Settings Picture Size TheaterWide 2 Picture Scroll -5 Cinema Mode Film Auto Aspect Ratio On Reset Done6 To save the new settings, highlight Done and press ENTER. To revert to the factory defaults, highlight Reset and press ENTER.
Using the auto aspect ratio feature
When the auto aspect ratio feature is set to On, the TV will automatically select the picture size when one of the following input sources is received:
- A 480i signal from the VIDEO 1, VIDEO 2, ColorStream HD-1, or ColorStream HD-2 input.
- A 480i, 480p, 720p, 1080i, 1080p, or VGA signal from the HDMI input.
| Aspect ratio of signal source | Automatic aspect size (automatically selected when Auto Aspect is On) |
4:3 normal Natural (with sidebars)
4:3 letter box TheaterWide 2
16:9 full Full
Not defined
(no ID-1 data or HDMI aspect data) The current picture size you set under "Selecting the picture size" on page 39.
Note: The auto aspect ratio feature is not applicable to antenna or cable input sources.
To turn on the auto aspect ratio feature:
1 Press MENU and open the Video menu.
2 Highlight Theater Settings and press ENTER.
3 In the Auto Aspect Ratio field, select On.
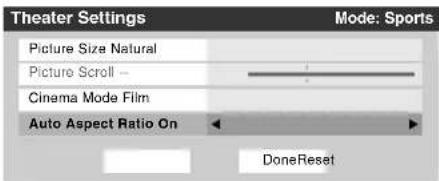
text_image
Theater Settings Picture Size Natural Picture Scroll -- Cinema Mode Film Auto Aspect Ratio On Mode: Sports DoneReset4 To save the new settings, highlight Done and press 📋. To revert to the factory defaults, highlight Reset and press 📋.
To turn off the auto aspect ratio feature:
Select Off in step 3 above.
Selecting the cinema mode (480i and 1080i signals)
When you view a DVD (3:2 pulldown processed) from a DVD player connected to the VIDEO 1, VIDEO 2, ColorStream HD-1, ColorStream HD-2 (component video), or HDMI inputs on the TV, smoother motion can be obtained by setting the Cinema Mode to Film.
To set the Cinema Mode to Film:
1 Press MENU and open the Video menu.
2 Highlight Theater Settings and press ENTER.
3 In the Cinema Mode field, select Film.
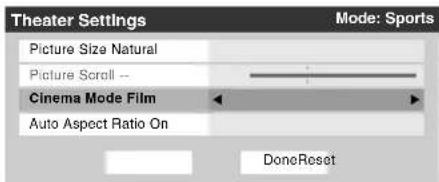
text_image
Theater Settings Picture Size Natural Picture Scroll -- Cinema Mode Film Auto Aspect Ratio On Mode: Sports DoneReset4 To save the new settings, highlight Done and press ENTER. To revert to the factory defaults, highlight Reset and press ENTER.
To set the Cinema Mode to Video:
Select Video in step 3 above.
Adjusting the picture
Selecting the picture mode
You can select your desired picture settings from four different modes, as described below.
| Mode Picture Quality | |
| Sports Bright and dynamic picture (factory setting) | |
| Standard Standard picture settings (factory setting) | |
| Movie | Lower contrast for darkened room (factory setting) |
| Preference Your personal preferences | |
To select the picture mode:
Press PIC MODE on the remote control.
The following popup menu appears on-screen.
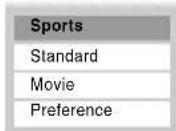
Press ▲ or ▼ to select the picture mode you prefer and press ENTER.
To select the picture mode using the menu system:
1 Press MENU and open the Video menu.
2 Highlight Mode and press ENTER.
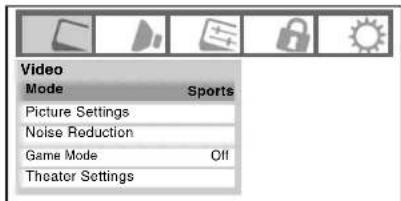
text_image
Video Mode Sports Picture Settings Noise Reduction Game Mode Off Theater Settings3 Press ▲ or ▼ to select the picture mode you prefer and press ENTER.
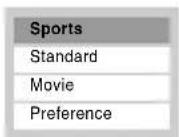
Note: The picture mode you select affects the current input only. You can select a different picture mode for each input.
Adjusting the picture quality
You can adjust the picture quality (Contrast, Back Light, DynaLight™, Brightness, Color, Tint, and Sharpness) to your personal preferences.
| Selection | Pressing ◀ | Pressing ▶ |
| Contrast lower higher | ||
| Back Light* darker lighter | ||
| DynaLight** On/Off On/Off | ||
| Brightness | darker lighter | |
| Color | paler | deeper |
| Tint | reddish | greenish |
| Sharpness | softer sharper | |
* Back Light
This feature adjusts the brightness of the entire screen. When in video mode and no signal is input, this will automatically be set to 0. (Settings are stored in memory.)
**DynaLight
This function automatically strengthens the black coloring of dark areas in the video according to the level of darkness.
To adjust the picture quality:
1 Press MENU and open the Video menu.
2 Highlight Picture Settings and press ENTER.
3 Press ▲ or ▼ to select the picture quality you want to adjust (Contrast, Back Light, DynaLight, Brightness, Color, Tint, or Sharpness), and then press ◀ or ▶ to adjust the setting, as described in the table above.
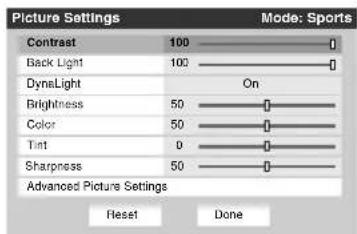
text_image
Picture Settings Mode: Sports Contrast 100 Back Light 102 DynaLight On Brightness 50 Color 50 Tint 0 Sharpness 50 Advanced Picture Settings Reset Done
4 To save the new settings, highlight Done and press ENTER. You can use any of the picture modes (☐ “Selecting the picture mode,” above left) as a starting point for adjusting the picture settings. To revert back to the base mode that you began adjusting the picture settings from, highlight Reset and press ENTER.
The picture qualities you adjusted are automatically saved in the Preference mode (“Selecting the picture mode,” above left) until Reset is selected.
Using the closed caption mode
Base closed captions
The closed caption mode has two options:
- Captions—An on-screen display of the dialogue, narration, and sound effects of TV programs and videos that are closed captioned (usually marked “CC” in program guides).
- Text—An on-screen display of information not related to the current program, such as weather or stock data (when provided by individual stations).
To view captions or text:
1 Press MENU and open the Preferences menu.
2 Highlight Base CC Mode and press ▶.
3 Press ▲ or ▼ to select the desired closed caption mode and press ENTER.
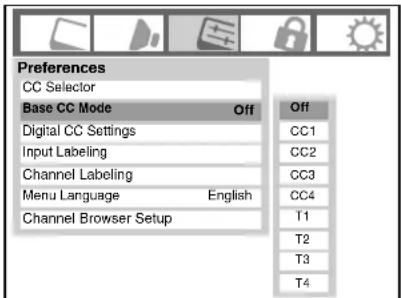
text_image
Preferences CC Selector Base CC Mode Off Digital CC Settings Input Labeling Channel Labeling Menu Language English Channel Browser Setup Off CC1 CC2 CC3 CC4 T1 T2 T3 T4• To view captions:
Highlight CC1, CC2, CC3, or CC4. (CC1 displays translation of the primary language in your area.)

text_image
Giant pandas eat leaves.Note: If the program or video you selected is not closed captioned, no captions will display on-screen.
- To view text:
Highlight T1, T2, T3, or T4.
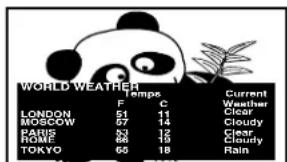
text_image
WORLD WEATHER Temps Current F C Weather LONDON 51 11 Clear MOSCOW 57 14 Cloudy PANE 53 12 Clear ROME 68 19 Cloudy TOKYO 65 18 RainNote: If text is not available in your area, a black rectangle may appear on screen. If this happens, set the Base CC Mode to Off.
• To turn off the closed caption mode:
Select Off in step 3 above.
Note: A closed caption signal may not display in the following situations:
- When a videotape has been dubbed
- When the signal reception is weak
- When the signal reception is non-standard
Digital CC Settings
You can customize the closed caption display characteristics by changing the background color, opacity, text size, type, edge, and color.
Note:
- This feature is available for digital channels only.
- You cannot set the Caption Text and Background as the same color.
To customize the closed captions:
1 Press MENU and open the Preferences menu.
2 Highlight Digital CC Settings and press ENTER.
3 Press ▲ or ▼ to highlight the characteristic you want to change, and then press ◀ or ▶ to select the format for that characteristic (see table below).
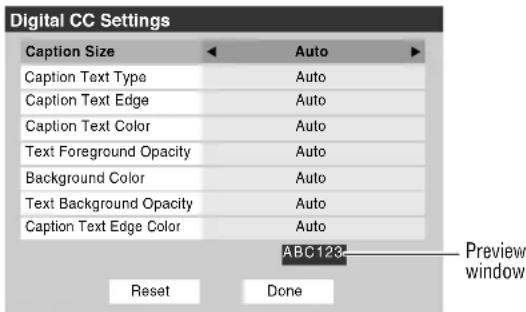
text_image
Digital CC Settings Caption Size Auto Caption Text Type Auto Caption Text Edge Auto Caption Text Color Auto Text Foreground Opacity Auto Background Color Auto Text Background Opacity Auto Caption Text Edge Color Auto ABC123 Preview window Reset Done4 To save the new settings, highlight Done and press ENTER. To revert to the factory defaults, highlight Reset and press ENTER.
| Caption Size Auto, Small, Standard, Large | |
| Caption Text Type | Auto, Default, Mono w. Serif, Prop. w. Serif, Mono w/o Serif, Prop. w/o Serif, Casual, Cursive, Small Capitals |
| Caption Text Edge | Auto, None, Raised, Depressed, Uniform, Left Drop Shadow, Right Drop shadow |
| Caption Text Color | Auto, Black, White, Red, Green, Blue, Yellow, Magenta, Cyan |
| Text Foreground Opacity | Auto, Transparent, Translucent Flashing, Solid |
| Background Color | Auto, Black, White, Red, Green, Blue, Yellow, Magenta, Cyan |
| Text Background Opacity | Auto, Transparent, Translucent Flashing, Solid |
| Caption Text Edge Color | Auto, Black, White, Red, Green, Blue, Yellow, Magenta, Cyan |
CC Selector
You can use the CC Selector to temporarily override the default analog caption mode (set in Base CC Mode) for a particular channel. However, once you change to another analog channel, the closed caption setting will automatically change back to the current Base CC Mode setting.
You can also use the CC Selector to select digital closed caption services (if available). When such services are not available, the CC Selector presents a default list of services. If the selected service is not available, the next best service will be used instead.
To select closed captions:
1 Press MENU and open the Preferences menu.
2 Highlight CC Selector and press ENTER.
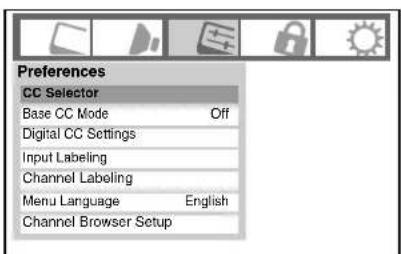
text_image
Preferences CC Selector Base CC Mode Off Digital CC Settings Input Labeling Channel Labeling Menu Language English Channel Browser Setup3 Press ▲ or ▼ to select Closed Caption, and then press ◀ or ▶ to select the desired service.

4 Press EXIT.
Adjusting the audio
Muting the sound
Press ^MUTE to partially reduce (1/2 MUTE) or turn off (MUTE) the sound. Each time you press ^MUTE , the mute mode will change in the following order:

If the closed caption mode is set to Off when you select "MUTE" mode, the closed caption feature is automatically activated. To mute the audio without automatically activating the closed caption feature, use 📋 to set the volume to 0. See "Using the closed caption mode" ( page 43) for more information on closed caption modes.
Using the digital audio selector
You can use the Digital Audio Selector to conveniently switch between audio tracks on a digital channel (for those channels that have multiple audio tracks). This temporarily overrides the audio track chosen by the language option under Audio Setup (“Selecting stereo/SAP broadcasts” on page 45).
To use the digital audio selector:
1 Press MENU and open the Audio menu.
2 Highlight Digital Audio Selector and press ENTER.
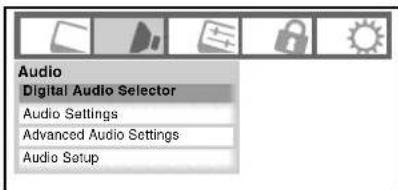
text_image
Audio Digital Audio Selector Audio Settings Advanced Audio Settings Audio Setup3 Press ▲ or ▼ to select Audio, and then press ◀ or ▶ to select the desired service.

4 Press EXIT.
Selecting stereo/SAP broadcasts
The multi-channel TV sound (MTS) feature allows you to output high-fidelity stereo sound. MTS also can transmit a second audio program (SAP) containing a second language, music, or other audio information (when provided by individual stations).
When the TV receives a stereo or SAP broadcast, the word "STEREO" or "SAP" appears on-screen when RECALL is pressed. The MTS feature is not available when the TV is in VIDEO mode.
To listen to stereo sound:
1 Press MENU and open the Audio menu.
2 Highlight Audio Setup and press ENTER.
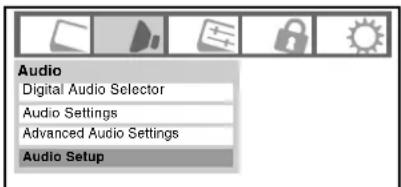
text_image
Audio Digital Audio Selector Audio Settings Advanced Audio Settings Audio Setup3 In the MTS field, select Stereo.
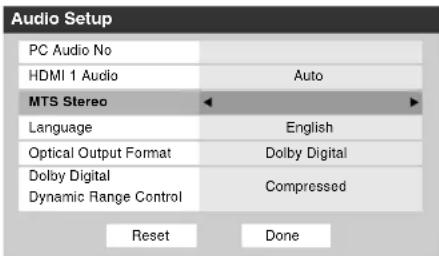
text_image
Audio Setup PC Audio No HDMI 1 Audio Auto MTS Stereo Language English Optical Output Format Dolby Digital Dolby Digital Compressed Dynamic Range Control Reset Done4 To save the new settings, highlight Done and press 📋. To reset the settings to the factory defaults, highlight Reset and press 📋.
Note:
- You can typically leave the TV in Stereo mode because it will automatically output the type of sound being broadcast (stereo or monaural).
- If the stereo sound is noisy, select Mono to reduce the noise.
To listen to an alternate language on an ATSC digital station (if available):
Highlight the Language field in step 3 above, and then press ◀ or ▶ to select the language you prefer.
To listen to a second audio program on an analog station (if available):
Select SAP in step 3 above.
Note:
- A second audio program (SAP) can be heard only on those TV stations that offer it. For example, a station might broadcast another language as a second audio program. If you have SAP on, you will see the current program on the screen but hear the other language instead of the program's normal audio.
- If you have SAP on and the station you are watching is not broadcasting a second audio program, the station's normal audio will be output. However, occasionally there is no sound at all in SAP mode. If this happens, set the MTS feature to Stereo mode.
Adjusting the audio quality
You can adjust the audio quality by adjusting the bass, treble, and balance.
To adjust the audio quality:
1 Press MENU and open the Audio menu.
2 Highlight Audio Settings and press ENTER.
3 Press ▼ or ▲ to highlight the item you want to adjust (Bass, Treble, or Balance).
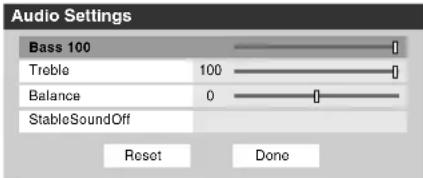
text_image
Audio Settings Bass 100 Treble 100 Balance 0 StableSoundOff Reset Done4 Press ◀ or ▶ to adjust the level.
- ◀ makes the bass or treble weaker or increases the balance in the left channel (depending on the item selected).
- makes the bass or treble stronger or increases the balance in the right channel (depending on the item selected).
5 To save the new settings, highlight Done and press ENTER. To reset the settings to the factory defaults, highlight Reset and press ENTER.
Using the StableSound® feature
The StableSound ^® feature limits the highest volume level to prevent extreme changes in volume when the signal source changes (for example, to prevent the sudden increase in volume that often happens when a TV program switches to a commercial).
To turn on the StableSound® feature:
1 Press MENU and open the Audio menu.
2 Highlight Audio Settings and press ENTER.
3 In the StableSound field, select On.
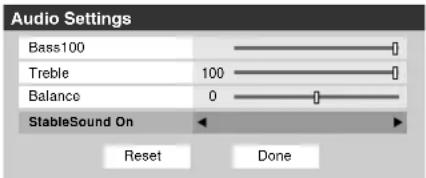
text_image
Audio Settings Bass100 Treble 100 Balance 0 StableSound On Reset Done4 To save the new settings, highlight Done and press 📋. To revert to the factory defaults, highlight Reset and press 📋.
Note: The RESET function returns your audio adjustments to the following factory settings:
Bass ..... center (50)
Treble ..... center (50)
Balance ..... center (0)
StableSound .. Off
To turn off the StableSound feature:
Select Off in step 3 above.
Selecting the optical audio output format
You can use this feature to select the optical audio output format when you connect a Dolby Digital decoder or other digital audio system to the Optical Audio Out terminal on the TV (see “Connecting a digital audio system” on page 18).
To select the optical audio output format:
1 Press MENU and open the Audio menu.
2 Highlight Audio Setup and press ENTER.
3 In the Optical Output Format field, select either Dolby Digital or PCM, depending on your device.
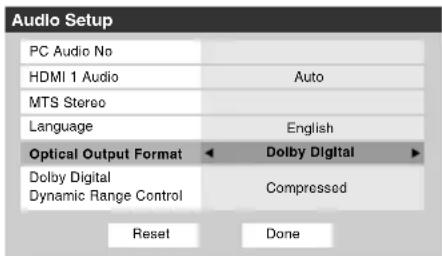
text_image
Audio Setup PC Audio No HDMI 1 Audio Auto MTS Stereo Language English Optical Output Format ◄ Dolby Digital ► Dolby Digital Dynamic Range Control Compressed Reset Done4 To save the new settings, highlight Done and press ENTER. To revert to the factory defaults, highlight Reset and press ENTER.
Using the Dolby® Digital Dynamic Range Control feature
This dynamic range control feature causes the ATSC dynamic range to be further compressed, allowing you to switch from ATSC to analog broadcasts at the same dynamic range.
To use the Dolby Digital Dynamic Range Control:
1 Press MENU and open the Audio menu.
2 Highlight Audio Setup and press ENTER.
3 In the Dolby Digital Dynamic Range Control field, select Compressed. When Standard is selected, the audio is output with minimal compression.
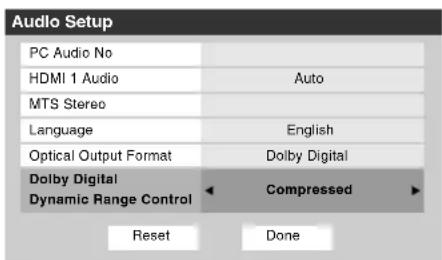
text_image
Audio Setup PC Audio No HDMI 1 Audio Auto MTS Stereo Language English Optical Output Format Dolby Digital Dolby Digital Compressed Dynamic Range Control Reset Done4 To save the new settings, highlight Done and press ENTER. To revert to the factory defaults, highlight Reset and press ENTER.
Note:
- This item will be grayed out for NTSC signals, Video, ColorStream, and PC inputs.
- The Dolby Digital Dynamic Range Control will function in relation to Optical Output Format (PCM mode).
Using the Locks menu
The Locks menu includes the Enable Rating Blocking, Edit Rating Limits, Channels Block, Input Lock, Front (control) Panel Lock, and New PIN Code features. You can use these features after entering the correct PIN code.
Entering the PIN code
1 Press MENU and highlight the Locks menu icon.
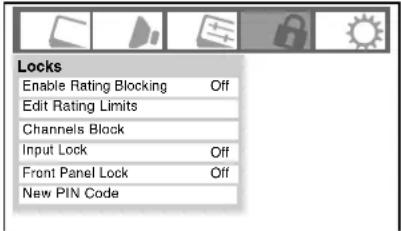
text_image
Locks Enable Rating Blocking Off Edit Rating Limits Channels Block Input Lock Off Front Panel Lock Off New PIN Code2 Press ▼, which displays the PIN code entry screen.
- The Lock System screen (below) appears if a PIN code has not been stored. Press the Channel Number buttons to enter a new four-digit code, enter the code a second time to confirm, and press 📋.
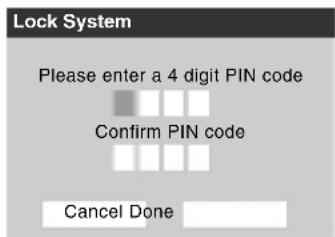
text_image
Lock System Please enter a 4 digit PIN code Confirm PIN code Cancel Done- The Locks/Active screen (below) appears if the PIN code is already stored. Use the Number buttons to enter your four-digit code and press ENTER.
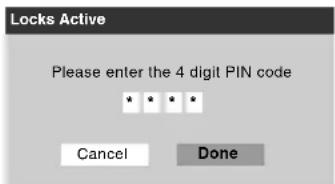
text_image
Locks Active Please enter the 4 digit PIN code * * * * Cancel DoneIf the wrong PIN code is entered, the message "Incorrect PIN code, please try again!" appears. Highlight Retry and press ENTER. Enter the code again and press ENTER.
When the correct PIN code is entered, the Locks menu opens.
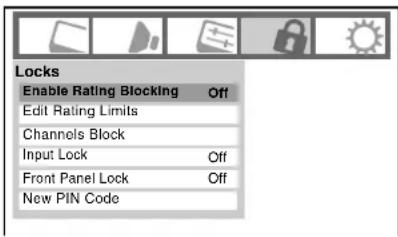
text_image
Locks Enable Rating Blocking Off Edit Rating Limits Channels Block Input Lock Off Front Panel Lock Off New PIN CodeIf you cannot remember your PIN code
While the PIN code entering screen is displayed, press four times within five seconds. The PIN code will be cleared and you can enter a new PIN code.
Changing your PIN code
1 Press MENU and highlight the Locks menu icon.
2 Press ▼ to display the PIN code entering screen.
3 Enter your four-digit PIN code and press ENTER.
4 Press ▼ to highlight New PIN Code and press ENTER.
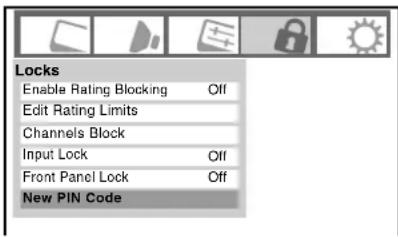
text_image
Locks Enable Rating Blocking Off Edit Rating Limits Channels Block Input Lock Off Front Panel Lock Off New PIN Code5 Press the Number buttons to enter a new four-digit code. Reenter the PIN code to confirm it.
6 Press ENTER. The new PIN code is now active.
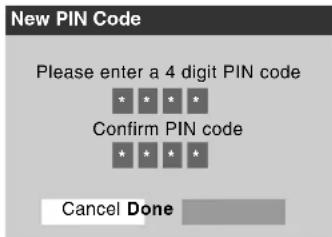
text_image
New PIN Code Please enter a 4 digit PIN code * * * Confirm PIN code * * * Cancel DoneBlocking TV programs and movies by rating (V-Chip)
Some TV programs and movies include signals that classify the content of the program (violence, sex, dialog, language). The V-Chip feature in this TV detects the signals and blocks the programs according to the ratings you select. (For rating descriptions, see the tables on the next page.)
Note: Rating blocking is a function of the V-Chip feature in this TV, which supports the U.S. V-Chip system only.
To block and unblock TV programs and movies:
1 Press MENU and highlight the Locks menu icon.
2 Press ▼ to display the PIN code entering screen.
3 Enter your four-digit PIN code and press ENTER.
4 Press ▼ to highlight Enable Rating Blocking.
5 Press ▶ and ▼ to select On, and then press ENTER.
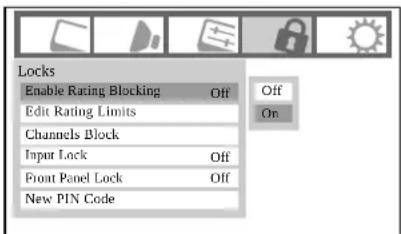
text_image
Locks Enable Rating Blocking Off Edit Rating Limits Channels Block Input Lock Off Front Panel Lock Off New PIN Code6 Press ▼ to highlight Edit Rating Limits and press ENTER. The Edit Rating Limits screen (below) appears.
7 Press ▲▼◀▶ and then press ENTER to select the level of blocking you prefer. A box with an “X” is a rating that will be blocked. As you highlight a rating, a definition for the rating appears at the bottom of the screen.
8 When done selecting the ratings you want to block, highlight Done and press ENTER.
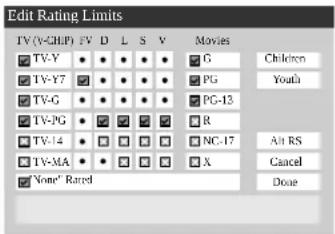
text_image
Edit Rating Limits TV (V-CHIP) FV D L S V Movies TV-Y • • • • • G Children TV-Y7 • • • • • PG Youth TV-G • • • • • PG-13 TV-PG • ☑ ☑ ☑ ☑ R TV-14 • ☐ ☐ ☐ ☐ NC-17 TV-MA • • ☐ ☐ ☐ X Cancel None' Rated DoneDownloading an additional rating system for blocking TV programs and movies
In the future, an additional rating system may become available for use in selectively blocking programs.
Note: The currently tuned station must be receiving a digital signal before an additional rating system can be downloaded.
To download the additional rating system (if available):
1 Press MENU and highlight the Locks menu icon.
2 Press ▼ to display the PIN code entering screen.
3 Enter your four-digit PIN code and press ENTER.
4 Press ▼ to highlight Enable Rating Blocking.
5 Press ▶ and ▼ to select On, and press ENTER.
6 Press ▼ to highlight Edit Rating Limits and press Ⓗ. The Edit Rating Limits screen appears.
7 Highlight Alt RS and press ENTER. The Edit Alternate Ratings screen will appear.
Note:
- The Alt RS button will only be available if an additional rating system is currently available.
- It may take several minutes for the TV to download the additional rating system.
- The information displayed in the Alternate Ratings screen will depend on the configuration of the additional rating system available at the time of download.
8 Press ▲▼◀▶ and then press 📋 to select the level of blocking you prefer. A box with an “×” is a rating that will be blocked.
9 When you are finished selecting the ratings you want to block, highlight Done and press Ⓤ.
10 In the Edit Rating Limits screen, highlight Done and press ENTER.
Note:
- The additional rating system can only be downloaded one time. You will not be able to download any updates to the rating system should such updates become available.
- The additional rating system is not designed, transmitted, or controlled by the TV or Toshiba, nor is the availability of an additional rating system determined or controlled by Toshiba. Similarly, the rating of programs in an additional rating system is not determined, transmitted, or controlled by the TV or Toshiba.
- The additional rating system is an evolving technology; therefore, availability, content, and format may vary.
| Independent rating system for broadcasters | |
| Ratings Description and Content themes | |
| TV-MA | Mature Audience Only (This program is specifically designed to be viewed by adults and therefore may be unsuitable for children under 17.)L) Crude or indecent language S) Explicit sexual activity V) Graphic violence |
| TV-14 | Parents Strongly Cautioned (This program contains some material that many parents would find unsuitable for children under 14 years of age.)D) Intensely suggestive dialog L) Strong, coarse language S) Intense sexual situations V) Intense violence |
| TV-PG | Parental Guidance Suggested (This program contains material parents may find unsuitable for younger children.)D) Some suggestive dialog L) Infrequent coarse language S) Some sexual situations V) Moderate violence |
| TV-G | General Audience (Most parents would find this program suitable for all ages.) |
| TV-Y7, TV-Y7FV | Directed to Older Children (This program is designed for children age 7 and above. Note: Programs in which fantasy violence may be more intense or more combative than other programs in this category are designated TV-Y7FV.) |
| TV-Y | All Children (This program is designed to be appropriate for all children.) |
| Independent rating system for movies | |
| Ratings Description and Content themes | |
| X | X-rated (For adults only) |
| NC-17 | Not intended for anyone 17 and under |
| R | Restricted (Under 17 requires accompanying parent or adult) |
| PG-13 | Parents Strongly Cautioned (Some material may be inappropriate for children under 13) |
| PG | Parental Guidance Suggested (Some material may not be suitable for children) |
| G | General Audience (Appropriate for all ages) |
Note:
- If you place an "X" in the box next to "None' Rated," programs rated "None" will be blocked; however, programs that do not provide any rating information will not be blocked.
- To display the rating of the program you are watching, press RECALL on the remote control. If it is rated "None," the word "NONE" appears in the RECALL screen (as shown below right). If rating information is not provided, no rating will appear in the RECALL screen.
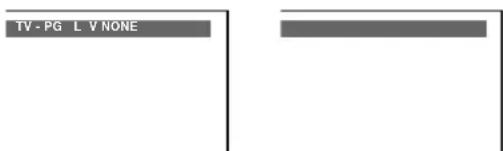
text_image
TV - PG L V NONEBlocking channels
With the Channels Block feature, you can block specific channels. You will not be able to tune blocked channels unless you unlock them.
To block channels:
1 Press MENU and highlight the Locks menu icon.
2 Press ▼ to display the PIN code entering screen.
3 Enter your four-digit PIN code and press ENTER ( page 47).
4 Press ▼ to highlight Channels Block and then press ENTER.
A list of the channels available for that input will be displayed along with the call letters for each channel, if available.
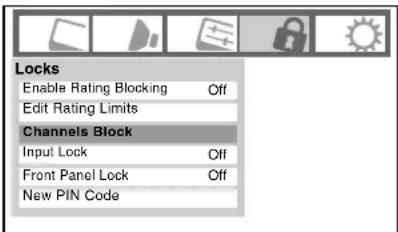
text_image
Locks Enable Rating Blocking Off Edit Rating Limits Channels Block Input Lock Off Front Panel Lock Off New PIN Code5 Press ▲▼ to highlight the channel you want to block and press ENTER, which puts an "X" in the box next to that channel.
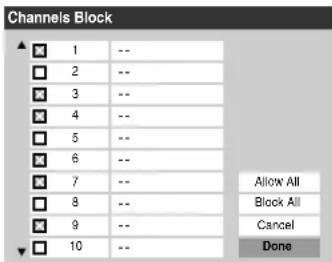
text_image
Channels Block 1 -- 2 -- 3 -- 4 -- 5 -- 6 -- 7 -- 8 -- 9 -- 10 -- Allow All Block All Cancel Done6 Repeat step 5 for other channels you want to block.
7 Highlight Done and press ENTER.
To unblock individual channels:
In step 5 above, press ▲▼ to highlight the channel you want to unblock, press ENTER to remove the "X" from the box, highlight Done and press ENTER.
(continued)
To block all channels at once:
Highlight Block All in step 5 on previous page and then highlight Done and press ENTER.
To unblock all locked channels at once:
Highlight Allow All in step 5 on previous page and then highlight Done and press ENTER.

text_image
Channels Block 1 -- 2 -- 3 -- 4 -- 5 -- 6 -- 7 -- 8 -- 9 -- 10 -- Allow All Block All Cancel DoneUnlocking programs temporarily
If you try to tune the TV to a program that exceeds the rating limits you set, the TV will enter program lock mode and the following message will appear on-screen:
This program exceeds the rating limit you set. Push 'mute' to enter PIN.
You can either temporarily unlock the program or select an unlocked program to watch.
To temporarily unlock the program:
1 Press MUTE.
2 Enter your four-digit PIN code and press ENTERED. If the correct code is entered, the program lock mode is released and the normal picture appears. All locking is disabled until the TV is turned off, and will be enabled when the TV is turned on again.
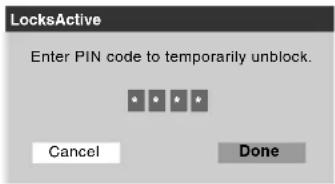
text_image
LocksActive Enter PIN code to temporarily unblock. Cancel DoneUsing the input lock feature
You can use the Input Lock feature to lock the video inputs (VIDEO 1, VIDEO 2, ColorStream HD-1, ColorStream HD-2, HDMI 1, HDMI 2, HDMI 3 and PC) and channels 3 and 4. You will not be able to view the input sources or channels until you unlock the inputs.
To lock/unlock the video inputs:
1 Press MENU and highlight the Locks menu icon.
2 Press ▼ to display the PIN code entering screen.
3 Enter your four-digit PIN code and press ENTER.
4 Press ▼ to highlight Input Lock and press ▶.
5 Press ▲ or ▼ to select the level of video input locking you prefer, as described below.
Video: Locks VIDEO 1, VIDEO 2, ColorStream HD1/HD2, HDMI 1, HDMI 2, HDMI 3, and PC.
Video+: Locks VIDEO 1, VIDEO 2, ColorStream HD1/HD2, HDMI 1, HDMI 2, HDMI 3, PC and channels 3 and 4.
- Select Video+ if you play video tapes via an ANT input.
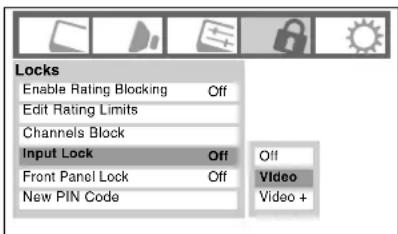
text_image
Locks Enable Rating Blocking Off Edit Rating Limits Channels Block Input Lock Off Front Panel Lock Off New PIN Code Off Video Video +Off: Unlocks all video inputs and channels 3 and 4.
6 Press ENTER.
Using the control panel lock feature
You can lock the control panel to prevent your settings from being changed accidentally (by children, for example). When the control panel lock is On, none of the controls on the TV control panel will operate except POWER.
To lock the control panel:
1 Press MENU and highlight the Locks menu icon.
2 Press ▼ to display the PIN code entering screen.
3 Enter your four-digit PIN code and press ENTER.
4 Press ▼ to highlight Front Panel Lock.
5 Press ▶ and ◀ or ▶ to highlight On and press 📂. When the control panel is locked and any button on the control panel (except POWER) is pressed, the message “Not Available” appears.
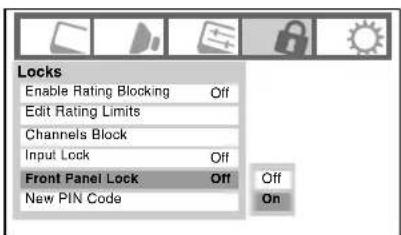
text_image
Locks Enable Rating Blocking Off Edit Rating Limits Channels Block Input Lock Off Front Panel Lock Off New PIN Code Off OnTo unlock the control panel:
Highlight Off in step 5 above, or press and hold the VOLUME – button on the TV control panel for about 10 seconds until the volume icon appears.
Using the PC settings feature
You can view an image from a PC on the TV screen.
When a PC is connected to the TV's PC IN terminal, you can use the PC Settings feature to make adjustments to the image. If the edges of the picture are cut off, readjust the Horizontal Position and Vertical Position. If the picture is affected by interference, readjust the Clock Phase and Sampling Clock.
To adjust the PC settings:
1 Repeatedly press (INPUT) to select PC input mode (☐ "Selecting the video input source to view" page 35).
2 Press MENU and open the Setup menu.
3 Highlight PC Settings and press ENTER.
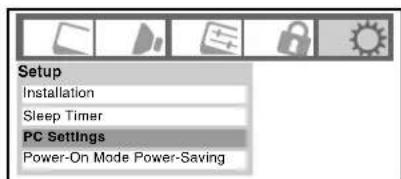
text_image
Setup Installation Sleep Timer PC Settings Power-On Mode Power-SavingNote: If a PC is not connected or there is no pc input signal, this feature will be grayed out in the Setup menu.
4 Press ▲ or ▼ to highlight the item you want to adjust.
5 Press ◀ or ▶ to make the appropriate adjustments.
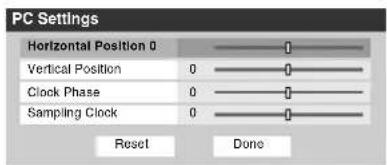
text_image
PC Settings Horizontal Position 0 Vertical Position 0 Clock Phase 0 Sampling Clock 0 Reset DoneNote: The screen is disrupted momentarily when adjusting the PC settings. This is not a sign of malfunction.
• Horizontal Position:
Moves the picture left/right.
The adjustment range is within ±10 from center.*
• Vertical Position:
Moves the picture up/down.
The adjustment range is within ±10 from center.*
- Clock Phase:
Helps to reduce noise and sharpen the picture.
The adjustment range is within ±4 from center.*
- Sampling Clock:
Helps to reduce noise and minimize periodic vertical stripes on the screen.
The adjustment range is within ±5 from center.*
Setting the PC Audio
This function allows you to output the sound from your PC (if connected) or mute the sound from your PC and output the sound from your HDMI (DVI) connection. (13 page 19)
To set the PC Audio:
1 Press MENU and open the Audio menu.
2 Highlight Audio Setup and press ENTER.
3 Press ▲ or ▼ to select PC Audio and then press ◀ or ▶ to select No or Yes.
Yes: Outputs the sound from your PC. No: Mutes the sound from your PC, and outputs the sound from the HDMI-1 connection.
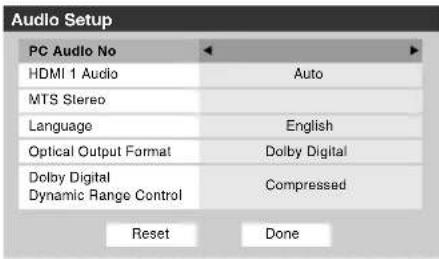
text_image
Audio Setup PC Audio No HDMI 1 Audio Auto MTS Stereo Language English Optical Output Format Dolby Digital Dolby Digital Compressed Dynamic Range Control Reset DoneNote: Because the PC and HDMI-1 inputs share the same set of analog audio inputs, the PC Audio menu setting influences the HDMI 1 Audio menu setting. If PC Audio is set to "No," the HDMI 1 Audio setting changes to "Auto." If PC Audio is set to "Yes," the HDMI 1 Audio setting is set to "Digital" and is grayed out in the menu. (Also see item 4 on page 11 and "Setting the HDMI™ Audio mode" on page 32.)
Setting the sleep timer
You can set the sleep timer to turn off the TV after a set length of time (maximum of 180 minutes).
To set the sleep timer using the remote control:
Press ^SLEEP on the remote control to set the length of time until the TV turns off. Repeatedly press ^SLEEP to increase the time in 10-minute increments, or press ▲ or ▼ to increase or decrease the time in 10-minute increments, to a maximum of 180 minutes.
To set the sleep timer using the on-screen menus:
1 Press MENU and open the Setup menu.
2 Highlight Sleep Timer and press ENTER.
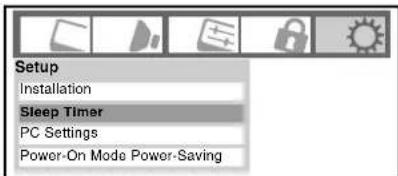
text_image
Setup Installation Sleep Timer PC Settings Power-On Mode Power-Saving3 Press the Number buttons to enter the length of time in 10-minute increments.
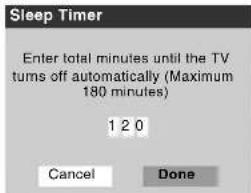
text_image
Sleep Timer Enter total minutes until the TV turns off automatically (Maximum 180 minutes) 1 2 0 Cancel Done4 Highlight Done and press ENTER.
Note: When a power failure occurs, the sleep timer setting may be cleared.
To display the remaining sleep time:
Press SLEEP.
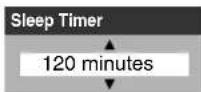
Note: A message will display on-screen when there is one minute remaining on the sleep timer.
To cancel the sleep timer:
Repeatedly press SLEEP until it is set to 0 minute.
Displaying TV status information
To display TV status information using RECALL: Press RECALL on the remote control.
The following information will display (if applicable):
• Current input (ANT, VIDEO 1, etc.)
- If ANT is the current input, either “CABLE” (for cable TV) or “ANT” (for over-the-air broadcasts).
• Channel number (if in ANT mode)
- Channel label (if set)
- Digital signal strength indicator (bar graph in lower right corner of box; for ATSC signal only)
- Stereo, Mono or SAP audio status (when HDMI input mode, Dolby Digital or PCM)
- Video resolution
- Aspect ratio of incoming video signal (4:3 or 16:9)
• V-Chip rating status
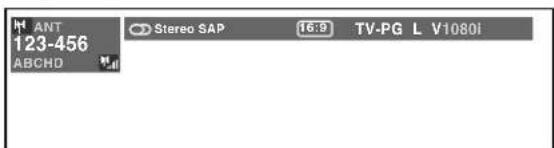
text_image
ANT 123-456 ABCHD Stereo SAP 16:9 TV-PG L V1080iTo close the RECALL screen:
Press RECALL again.
To display TV status information using INFO:
Press INFO on the remote control.
The following additional information will display for off air digital channels (if applicable):
• Title
- Duration
• Detailed description
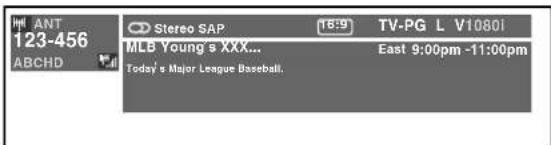
text_image
ANT 123-456 ABCHD Stereo SAP 18:9 TV-PG L V10801 MLB Young's XXX... East 9:00pm -11:00pm Today's Major League Baseball.Note: The location of the banner can be moved to the top or bottom of the screen by pressing ▲ or ▼ while the RECALL or INFO display is on-screen. (The last position will be stored to memory.)
Understanding the auto power off feature
The TV will automatically turn itself off after approximately 15 minutes if it is tuned to a vacant channel or a station that completes its broadcast for the day. This feature functions in ANT mode only.
Understanding the last mode memory feature
If the power is cut off while you are viewing the TV, the Last Mode Memory feature automatically turns on the TV when the power is resupplied.
Note: You should unplug the TV's power cord if it is possible that you will be away from the TV for an extended period of time after the power is restored.
Chapter 7: Using the TV's advanced features
Using the advanced picture settings features
Using dynamic contrast
When dynamic contrast is set to Low, Middle, or High, the TV will detect changes in the picture quality that affect the appearance of your contrast settings and then automatically adjust the video.
To select dynamic contrast preferences:
1 Press MENU and open the Video menu.
2 Highlight Picture Settings and press 📋.
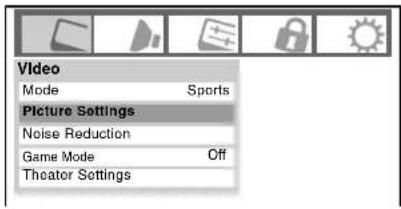
text_image
Video Mode Sports Picture Settings Noise Reduction Game Mode Off Theater Settings3 Highlight Advanced Picture Settings and press ENTER.
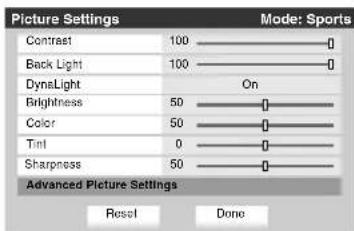
text_image
Picture Settings Mode: Sports Contrast 100 Back Light 100 DynaLight On Brightness 50 Color 50 Tint 0 Sharpness 50 Advanced Picture Settings Reset Done4 In the Dynamic Contrast field, select either Off, Low, Middle or High.
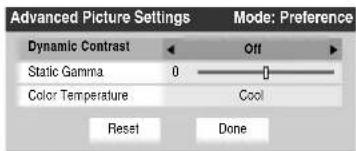
text_image
Advanced Picture Settings Dynamic Contrast Static Gamma 0 Color Temperature Off Cool Reset Done Mode: Preference5 To save the new settings, highlight Done and press. To revert to the factory defaults, highlight Reset and press.
Note: If you select one of the factory-set picture modes (Sports, Standard, or Movie) and then change the dynamic contrast setting, the picture mode automatically changes to Preference.
Using the static gamma feature
The static gamma feature allows you to adjust the levels of black in the picture.
To adjust the static gamma settings:
1 Press MENU and open the Video menu.
2 Highlight Picture Settings and press ENTER.
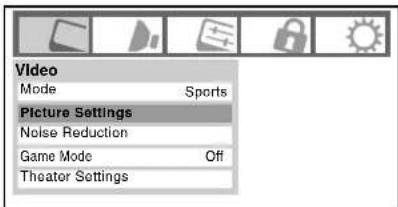
text_image
Video Mode Sports Picture Settings Noise Reduction Game Mode Off Theator Settings3 Highlight Advanced Picture Settings and press ENTER.
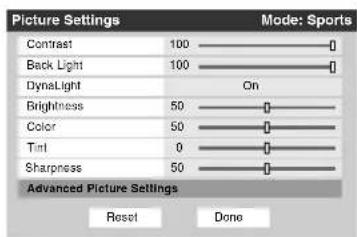
text_image
Picture Settings Mode: Sports Contrast 100 Back Light 100 DynaLight On Brightness 50 Color 50 Tint 0 Sharpness 50 Advanced Picture Settings Reset Done4 In the Static Gamma field, press ◀ or ▶ to adjust the static gamma.
The adjustment range is within ±5 from center.
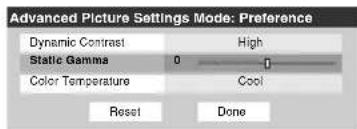
text_image
Advanced Picture Settings Mode: Preference Dynamic Contrast High Static Gamma 0 1 Color Temperature Cool Reset Done- If the setting is moved in the minus direction, the detail of black colors will be decreased.
- If the setting is moved in the plus direction, the detail of black colors will be increased.
5 To save the new settings, highlight Done and press ENTER. To revert the factory defaults, highlight Reset and press ENTER.
Note: If you select one of the factory-set picture modes (Sports, Standard or Movie) and then change the static gamma setting, the picture mode automatically changes to Preference.
Selecting the color temperature
You can change the quality of the picture by selecting from three preset color temperatures (Cool, Medium, and Warm), as described below.
| Mode Picture Quality |
| Cool blueish |
| Medium neutral |
| Warm reddish |
To select the color temperature:
1 Press MENU and open the Video menu.
2 Highlight Picture Settings and press ENTER.
3 Highlight Advanced Picture Settings and press ENTER.
4 Highlight Color Temperature and press ENTER.
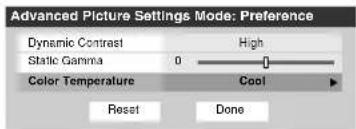
text_image
Advanced Picture Settings Mode: Preference Dynamic Contrast High Static Gamma 0 Color Temperature Cool Reset Done5 In the Color Temperature field, select the mode you prefer (Cool, Medium, or Warm).
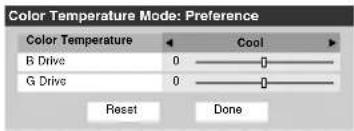
text_image
Color Temperature Mode: Preference Color Temperature B Drive 0 Cool G Drive 0 Reset Done6 Press ▲ or ▼ to select either B Drive or G Drive, and then press ◀ or ▶ to adjust the settings.

• B Drive: ▶ makes the picture blueish.
• G Drive: ▶ makes the picture greenish.
Note: The B Drive and G Drive settings are connected to the Color Temperature settings and will change based on which setting is selected in step 5 above.
7 To save the new settings, highlight Done and press 📋. To revert to the factory defaults, highlight Reset and press 📋.
Note: If you select one of the factory-set picture modes (Sports, Standard, or Movie) and then change the color temperature mode, the picture mode automatically changes to Preference.
Using CableClear® digital noise reduction
The CableClear ^® digital noise reduction feature allows you to reduce visible interference in your TV picture. This may be useful when receiving a broadcast with a weak signal (especially a Cable channel) or playing a noisy video cassette or disc.
To change the CableClear settings:
1 Press MENU and open the Video menu.
2 Highlight Noise Reduction and press ENTER.
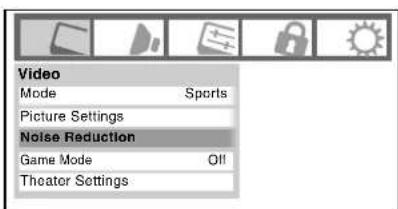
text_image
Video Mode Sports Picture Settings Noise Reduction Game Mode Off Theater Settings3 In the CableClear field, select your desired setting.
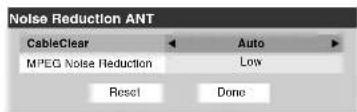
text_image
Noise Reduction ANT CableClear Auto MPEG Noise Reduction Low Reset DoneNote:
- If the current input is ANT, VIDEO 1, or VIDEO 2, the menu will display the text "CableClear." The available selections are Off, Auto, Low, Middle, and High.
- If the current input is ColorStream HD1, ColorStream HD2, HDMI 1, HDMI 2, or HDMI 3 the menu will display the text "DNR." The available selections are Off, Auto, Low, Middle, and High. Auto will react proportionally to the strength of the noise. Low, Middle, and High will reduce the noise in varying degrees, from lowest to highest, respectively.
4 To save the new settings, highlight Done and press 📋. To revert to the factory defaults, highlight Reset and press 📋.
Using MPEG noise reduction
The MPEG noise reduction feature allows you to reduce visible interference caused by MPEG compression. Choices for MPEG noise reduction are Off, Low, Middle, and High. Off is automatically selected when this feature is disabled ("grayed out").
To select the MPEG noise reduction level:
1 Press MENU and open the Video menu.
2 Highlight Noise Reduction and press ENTER.
3 Press ▲ or ▼ to highlight the MPEG Noise Reduction field, and then press ◀ or ▶ to select either Off, Low, Middle or High.
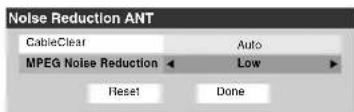
text_image
Noise Reduction ANT CableClear Auto MPEG Noise Reduction Low Reset Done4 To save the new settings, highlight Done and press. To revert to the factory defaults, highlight Reset and press.
Using the Game Mode feature
You can use the Game Mode feature for shorter frame delays when playing a video game requiring split-second timing between the on-screen display and input from the controller (such as music creation and high-action games).
This feature is more effective for 480i and 1080i input signals.
Note: To use the Game Mode feature, the current video input must be Video 1, Video 2, ColorStream HD1, ColorStream HD2, HDMI 1, HDMI 2, or HDMI 3. The Game Mode cannot be turned on when any other video input is selected.
To turn on Game Mode:
1 Press MENU and open the Video menu.
2 Press ▲ or ▼ to highlight the Game Mode field, and then press ◀ or ▶ to select On.
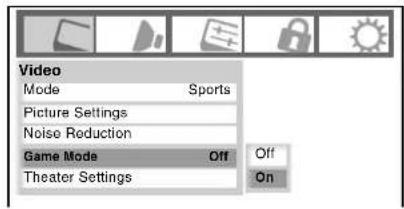
text_image
Video Mode Sports Picture Settings Noise Reduction Game Mode Off Off Theater Settings OnTo turn off Game Mode:
Select Off in step 2 above, change the video input, or turn the TV off and then on again.
Note: You can change the video input by pressing Ⓗ️ on the remote control (✗ page 35).
Using the advanced audio settings features
Using the SRS WOW™ surround sound feature
SRS WOW™ is a special combination of SRS Labs audio technologies (SRS 3D, SRS Focus, and SRS TruBass) that creates a thrilling surround sound experience with deep, rich bass from stereo sound sources. Your TV's audio will sound fuller, richer, and wider.
To adjust the WOW ^TM settings:
1 Put the TV in STEREO mode (“Selecting stereo/SAP broadcasts” on page 45).
2 Press MENU and open the Audio menu.
3 Highlight Advanced Audio Settings and press ENTER.
4 Press ▼ or ▲ to highlight the WOW feature you want to adjust, and then press ◀ or ▶ to adjust the item.
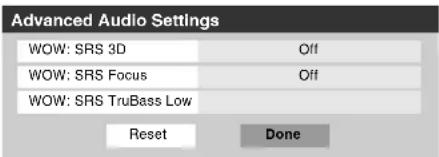
text_image
Advanced Audio Settings WOW: SRS 3D Off WOW: SRS Focus Off WOW: SRS TruBass Low Reset Done- WOW: SRS 3D — To turn the surround sound effect On or Off.
Note: If the broadcast is monaural, the SRS 3D effect will not work.
- WOW: SRS Focus — To turn the vocal emphasis effect On or Off.
- WOW: SRS TruBass — To select the desired bass expansion level (Off, Low, or High).
5 To save the new settings, highlight Done and press 📋. To revert to the factory defaults, highlight Reset and press 📋.
Chapter 8: Troubleshooting
General troubleshooting
Before calling a service technician, please check this chapter for a possible cause of the problem and some solutions you can try.
Black box on-screen
- The closed caption feature is set to one of the Text modes (T1, T2, T3, or T4). Set the closed caption feature to Off (page 43).
TV stops responding to controls
- If the TV stops responding to the controls on the remote control or TV control panel and you cannot turn off the TV, press and hold the POWER button on the TV control panel for 5 or more seconds to reset the TV.
Other problems
- If your TV's problem is not addressed in this Troubleshooting section or the recommended solution has not worked, use the Restore Factory Defaults procedure ( page 33).
TV will not turn on
- Make sure the power cord is plugged in, and then press POWER
- The remote control batteries may be dead. Replace the batteries or try the control panel buttons.
Picture problems
General picture problems
- Check the antenna/cable connections (Chapter 2).
- Press (INPUT) on the remote control or TV and select a valid video input source ( page 35). If no device is connected to a particular input on the TV, no picture will display when you select that particular input source. For device connection details, see Chapter 2.
- Antenna reception may be poor. Use a highly directional outdoor antenna (if applicable).
- The station may have broadcast difficulties. Try another channel.
- Adjust the picture qualities ( page 42).
- If you are using a VCR, make sure TVVCR on the remote control is set correctly ( page 22).
- Do not connect both a standard video cable and an S-video cable to the VIDEO 1 input at the same time (page 14).
Noisy picture
- If you are watching an analog channel (off-air broadcast or Cable TV), you can set the CableClear®/DNR feature to AUTO to reduce visible interference in the TV picture ( page 55).
Video Input Selection problems
- If the Input Selection window does not appear when you press INPUT on the remote control or TV, press INPUT a second time, which will change to the next video input source and display the Input Selection window.
Cannot view external signals or channel 3 or 4
- If you cannot view signals from external devices connected to VIDEO 1, VIDEO 2, ColorStream® HDMI 1, HDMI 2, HDMI 3, PC, or from channels 3 or 4, make sure the Input Lock is set to Off (u page 50).
Poor color or no color
- The station may have broadcast difficulties. Try another channel.
- Adjust the Tint and/or Color (page 42).
Poor composite or S-video picture
- If the TV is connected to an external A/V device (e.g., DVD player, video game system, set-top box, etc.) try using a ColorStream or HDMI video connection instead.
Picture and sound are out of sync
- As with all products that contain a digital display, in rare instances, when viewing certain content (e.g., television broadcasts, video games, DVDs), you may notice that the sound and picture are slightly out of sync. This phenomenon can be caused by various factors including, without limitation, video processing within the TV, video processing in an attached gaming system, and video processing or different compression rates used by broadcasters in their programming. You may want to try one or more of the following suggestions, which may help to reduce the effect of this phenomenon:
- If the TV is connected to an A/V receiver that has a programmable audio delay feature, use this feature to help synchronize the sound to the picture.
- If you notice this phenomenon only on certain TV channels, please contact your local broadcast, cable, or satellite provider to inform them of this issue.
LED indications while in reboot from standby
- When you plug the power cord in, the yellow LED will blink until the TV enters standby mode, (plugged in but not powered on). This is normal and is not a sign of malfunction.
Sound problems
- Check the antenna/cable connections (Chapter 2).
- The station may have broadcast difficulties. Try another channel.
• The sound may be muted. Press VOLUME. - If you hear no sound, try setting the MTS feature to Stereo mode ( page 45).
- If you are not receiving a second audio program from a known SAP source, make sure the MTS feature is set to SAP mode ( page 45).
- If you hear audio that seems “incorrect” for the program you are watching (such as music or a foreign language), the SAP mode may be on. Set the MTS feature to Stereo mode (page 45).
Remote control problems
- Make sure the remote control is set to the correct device mode ( page 21).
- Remove all obstructions between the remote control and the TV.
-
The remote control batteries may be dead. Replace the batteries ( page 20).
-
Your TV remote control may not operate certain features on your external device. Refer to the owner's manual for your other device to determine its available features. If your TV remote control does not operate a specific feature on another device, use the remote control that came with the device (pages 22–26).
- If the TV still does not act as expected, use the Reset Factory Defaults procedure ( page 33).
Channel tuning problems
- Make sure the remote control is set to the correct device mode ( page 21).
- The channel may have been erased from the channel memory by the Channel Add/Delete feature. Add the channel to the channel memory ( page 30).
- The channel may be blocked by the Channels Block feature. Unblock the channel (page 49).
- If you are unable to tune digital channels, check the antenna configuration ( page 29). If you are still unable to tune digital channels, clear all channels from the channel list ( page 31) and reprogram channels into the channel memory ( page 30). If you are still unable to tune digital channels, use the Reset Factory Defaults procedure ( page 33). Also see “TV stops responding to controls” and “Other problems” ( page 58).
Closed caption problems
- If the program or video you selected is not closed-captioned, no captions will display ( page 43).
- If text is not available, a black rectangle may appear. If this happens, turn off the closed caption feature (page 43).
- A closed-caption signal may not display correctly in the following situations: a) when a videotape has been dubbed; b) when the signal reception is weak; or c) when the signal reception is nonstandard (page 43).
Rating blocking (V-Chip) problems
- If you forget your PIN code: While the PIN code entering screen is displayed, press RECALL four times within 5 seconds. The PIN code you previously stored will be cleared (page 47).
- The V-Chip feature is available for the U.S. V-Chip system only ( page 48).
LED indications
The green and yellow LED lights on the TV front indicate the TV's status, as described below.
Note: If the TV loses A/C power (e.g., a power outage occurs or the power cord is unplugged), when power is restored, the yellow LED will blink while the TV is booting until the remote control is usable. This is normal and is not a sign of malfunction.
TV front
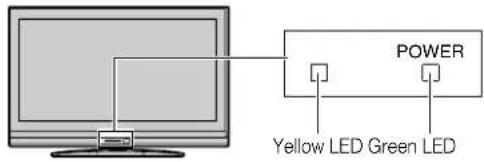
text_image
POWER Yellow LED Green LED| LED Indication Condition Solution | ||
| 1) Green is ON (solid). The TV is operating properly. – | ||
| 2) Yellow is ON (solid). | Standby with Power-On Mode set to Fast. | See “Selecting the Power-On Mode” (page 34). |
| 3) Yellow blinks three times. | TV is powering up. Wait several seconds until the yellow LED stops blinking. | |
| 4) Green blinks slowly. | Abnormal operation of BUS line. | Turn OFF the TV and unplug the power cord.Plug the power cord in again and turn ON the TV. |
| 5) Green blinks quickly. | Power protect detection. | |
If, after trying the solutions, the problem still exists:
• In the U.S., call TACP Consumer Solutions at 1-800-575-5469.
- In Canada, locate the nearest Toshiba authorized service depot by directing your web browser to www.toshiba.ca; click "Home Entertainment," and then click "Support."
Chapter 9: Appendix
Specifications
Note:
- This model complies with the specifications listed below.
- Designs and specifications are subject to change without notice.
- This model may not be compatible with features and/or specifications that may be added in the future.
Television System
NTSC standard
ATSC standard (8VSB)
Digital Cable (64 QAM, 256 QAM; in-the-clear, unencrypted)
Channel Coverage
VHF: 2 through 13
UHF: 14 through 69
Cable TV: Mid band (A-8 through A-1, A through I) Super band (J through W)
Hyper band (AA through ZZ, AAA, BBB)
Ultra band (65 through 94, 100 through 135)
Power Source: 120 V AC, 60 Hz
Power Consumption
0.5 W in standby mode
32HL67/32HL67U:
101 W (average)
0.5 W in standby mode
0.5 W in standby mode
0.6 W in standby mode
Audio Power: 10 W + 10 W
Speaker Type: Two 2-3/8 × 4-3/4 inches (6 × 12 cm)
Video/Audio Terminals
S-VIDEO INPUT:
Y: 1 V(p-p), 75 ohm, negative sync.
C: 0.286 V(p-p) (burst signal), 75 ohm
VIDEO/AUDIO INPUT:
VIDEO: 1 V(p-p), 75 ohm, negative sync.
AUDIO: 150 mV(rms) (30% modulation equivalent, 22 k ohm or greater)
ColorStream® (component video) HD INPUT:
VIDEO:Y: 1V(p-p), 75 ohm
Pr: 0.7 V(p-p), 75 ohm
P_B : 0.7 V(p-p), 75 ohm
Suggested formats: 1080i, 720p, 480p, 480i
AUDIO: 150 mV(rms), 22 k ohm or greater
HDMI™ INPUT:
HDMI compliant (type A connector)
HDCP compliant
Audio Lip Sync supported
Suggested formats: See table below.
HDMI Audio: 2-channel Linear-PCM; 32/44.1/48 kHz sampling frequency; 16/20/24 bits per sample
FIXED AUDIO OUTPUT:
150 mv (rms) (30% modulation equivalent, 2.2 k ohm or less)
DIGITAL AUDIO OUTPUT:
Optical type
PC INPUT:
15-Pin D-sub Analog RGB
Dimensions
26HL67: Width: 26-1/4 inches (666 mm)
Height: 20-1/4 inches (514 mm)
Depth: 9-1/2 inches (241 mm)
32HL67/32HL67U:
Width: 31-1/2 inches (800 mm)
Height: 23-3/8 inches (592 mm)
Depth: 11-1/4 inches (285 mm)
37HL67: Width: 36-1/4 inches (920 mm)
Height: 26-1/8 inches (661 mm)
Depth: 11-1/4 inches (285 mm)
42HL67: Width: 40-1/2 inches (1,027mm)
Height: 28-5/8 inches (724 mm)
Depth: 13-1/4 inches (335 mm)
Weight
26HL67: 28.7 lbs (13.0 kg)
32HL67: 38.6 lbs (17.5 kg)
32HL67U: 38.6 lbs (17.5 kg)
37HL67: 46.3 lbs (21.0 kg)
42HL67: 59.5 lbs (27.0 kg)
Operating conditions
Temperature: 32°F - 95°F (0°C - 35°C)
Humidity: 20 - 80% (no moisture condensation)
Supplied Accessories
- Remote control with two size "AAA" batteries
- Owner's manual (this book)
- Lead clip
Use this clip to attach the TV to a wall, pillar, or other immovable structure. See item 20 on page 3.
HDMI input supports the following signal formats:
| Format | Resolution | V. Frequency | H. Frequency | Pixel Clock Frequency |
| VGA 640 x 480p | 59.940/60Hz | 31.469/31.500kHz | 25.175/25.200MHz | |
| 480i | 720 x 480i | 59.940/60Hz | 15.734/15.750kHz | 27.000/27.027MHz |
| 480p | 720 x 480p | 59.940/60Hz | 31.469/31.500kHz | 27.000/27.027MHz |
| 720p | 720 x 480p | 59.940/60Hz | 44.955/45.000kHz | 74.176/74.250MHz |
| 1080i | 1920 × 1080i | 59.940/60Hz | 33.716/33.750kHz | 74.176/74.250MHz |
| 1080p | 1920 × 1080p | 23.976/24Hz | 26.973/27.000kHz | 74.176/74.250MHz |
| 1080p | 1920 × 1080p | 59.940/60Hz | 67.433/67.500kHz | 148.352/148.500MHz |
Limited United States Warranty
for LCD Televisions 26" and Larger
Toshiba America Consumer Products, L.L.C. ("TACP") makes the following limited warranties to original consumers in the United States.
THESE LIMITED WARRANTIES EXTEND TO THE ORIGINAL CONSUMER PURCHASER OR ANY PERSON RECEIVING THIS LCD TELEVISION AS A GIFT FROM THE ORIGINAL CONSUMER PURCHASER AND TO NO OTHER PURCHASER OR TRANSFEREE. LCD TELEVISIONS PURCHASED IN THE U.S.A. AND USED ANYWHERE OUTSIDE OF THE U.S.A., INCLUDING, WITHOUT LIMITATION, CANADA AND MEXICO, ARE NOT COVERED BY THESE WARRANTIES.
LCD TELEVISIONS PURCHASED ANYWHERE OUTSIDE OF THE U.S.A., INCLUDING, WITHOUT LIMITATION, CANADA AND MEXICO, AND USED IN THE U.S.A., ARE NOT COVERED BY THESE WARRANTIES.
Limited One (1) Year Warranty on Parts and Labor
TACP warrants this LCD Television and its parts against defects in materials or workmanship for a period of one (1) year after the date of original retail purchase. DURING THIS PERIOD, TACP WILL, AT TACP'S OPTION, REPAIR OR REPLACE A DEFECTIVE PART WITH A NEW OR REFURBISHED PART WITHOUT CHARGE TO YOU FOR PARTS OR LABOR. During this period, TACP Authorized Service Station personnel will come to your home when warranty service is required. Depending on the type of repair required, the service will either be performed in your home or the LCD Television will be taken to a TACP Authorized Service Station for repair and returned to your home at no cost to you.
Rental Units
The warranty for LCD Television rental units begins on the date of the first rental or thirty (30) days after the date of shipment to the rental firm, whichever comes first.
Limited Warranty for Commercial Units
TACP warrants LCD Televisions that are sold and used for commercial purposes as follows: all parts are warranted against defects in materials or workmanship for a period of ninety (90) days after the date of original retail purchase. DURING THIS PERIOD, TACP WILL, AT TACP'S OPTION, REPAIR OR REPLACE A DEFECTIVE PART WITH A NEW OR REFURBISHED PART WITHOUT CHARGE TO YOU.
Owner's Manual and Product Registration Card
Read this owner's manual thoroughly before operating this LCD Television.
Complete and mail the enclosed product registration card or register your LCD Television online at www.tacp.toshiba.com/service as soon as possible. By registering your LCD Television you will enable TACP to bring you new products specifically designed to meet your needs and help us to contact you in the unlikely event a safety notification is required under the U.S. Consumer Product Safety Act. Failure to complete and return the product registration card does not diminish your warranty rights.
Your Responsibility
THE ABOVE WARRANTIES ARE SUBJECT TO THE FOLLOWING CONDITIONS:
(1) You must retain your original bill of sale or provide other proof of purchase.
(2) All warranty servicing of this LCD Television must be performed by an Authorized TACP Service Station.
(3) The warranties from TACP are effective only if this LCD Television is purchased and operated in the Continental U.S.A. or Puerto Rico.
(4) Labor service charges for set installation, setup, adjustment of customer controls, and installation or repair of antenna systems are not covered by this warranty. Reception problems caused by inadequate antenna systems, misaligned satellite dishes, cable
television distribution, VCRs, DVD players/recorders, personal computer level IEEE-1394 devices, and any other connected signal source device are your responsibility.
(5) Warranties extend only to defects in materials or workmanship as limited above, and do not extend to any LCD Television or parts that have been lost or discarded by you or to damage to the LCD Television or parts caused by fires, misuse, accident, Acts of God (such as lightning or fluctuations in electric power), improper installation, improper maintenance, or use in violation of instructions furnished by TACP; use or malfunction through simultaneous use of this LCD Television and connected equipment; or to units that have been modified or had the serial number removed, altered, defaced, or rendered illegible.
How to Obtain Warranty Service
If, after following all of the operating instructions in this manual and reviewing the section entitled "Troubleshooting," you find that service is needed:
(1) To find the nearest TACP Authorized Service Station, visit TACP's website at www.tacp.toshiba.com/service or contact TACP's Consumer Solution Center toll free at 1-800-575-5469.
(2) You must present your original bill of sale or other proof of purchase to the TACP Authorized Service Station.
For additional information, visit TACP's website: www.tacp.toshiba.com
ALL WARRANTIES IMPLIED BY THE LAW OF ANY STATE OF THE U.S.A., INCLUDING THE IMPLIED WARRANTIES OF MERCHANTABILITY AND FITNESS FOR A PARTICULAR PURPOSE, ARE EXPRESSLY LIMITED TO THE DURATION OF THE LIMITED WARRANTIES SET FORTH ABOVE. WITH THE EXCEPTION OF ANY WARRANTIES IMPLIED BY THE LAW OF ANY STATE OF THE U.S.A. AS HEREBY LIMITED, THE FOREGOING WARRANTY IS EXCLUSIVE AND IN LIEU OF ALL OTHER WARRANTIES, GUARANTEES, AGREEMENTS, AND SIMILAR OBLIGATIONS OF TACP WITH RESPECT TO THE REPAIR OR REPLACEMENT OF ANY PARTS. IN NO EVENT SHALL TACP BE LIABLE FOR CONSEQUENTIAL OR INCIDENTAL DAMAGES (INCLUDING, BUT NOT LIMITED TO, LOST PROFITS, BUSINESS INTERRUPTION, OR MODIFICATION OR ERASURE OF RECORDED DATA CAUSED BY USE, MISUSE OR INABILITY TO USE THIS LCD TELEVISION).
No person, agent, distributor, dealer, or company is authorized to change, modify, or extend the terms of these warranties in any manner whatsoever. The time within which an action must be commenced to enforce any obligation of TACP arising under the warranty or under any statute or law of the United States or any state thereof is hereby limited to ninety (90) days from the date you discover, or should have discovered, the defect. This limitation does not apply to implied warranties arising under the law of any state of the U.S.A.
THIS WARRANTY GIVES YOU SPECIFIC LEGAL RIGHTS AND YOU MAY ALSO HAVE OTHER RIGHTS WHICH MAY VARY FROM STATE TO STATE IN THE U.S.A. SOME STATES OF THE U.S.A. DO NOT ALLOW LIMITATIONS ON THE DURATION OF AN IMPLIED WARRANTY, WHEN AN ACTION MAY BE BROUGHT, OR THE EXCLUSION OR LIMITATION OF INCIDENTAL OR CONSEQUENTIAL DAMAGES. THEREFORE, THE ABOVE PROVISIONS MAY NOT APPLY TO YOU UNDER SUCH CIRCUMSTANCES.
[0305]
Limited Canada Warranty
for LCD Televisions
Toshiba of Canada Limited ("TCL") makes the following limited warranties to original consumers in Canada. THESE LIMITED WARRANTIES EXTEND TO THE ORIGINAL CONSUMER
PURCHASER OR ANY PERSON RECEIVING THIS TOSHIBA BRAND FLAT PANEL
TELEVISION (the "TELEVISION(S)" or "Television(s)") AS A GIFT FROM THE ORIGINAL
CONSUMER PURCHASER AND TO NO OTHER PURCHASER OR TRANSFEREE.
TELEVISIONS PURCHASED IN CANADA, AND USED ANYWHERE OUTSIDE OF CANADA
INCLUDING, WITHOUT LIMITATION, THE UNITED STATES AND MEXICO, ARE NOT
COVERED BY THESE WARRANTIES.
TELEVISIONS PURCHASED ANYWHERE OUTSIDE OF CANADA, INCLUDING, WITHOUT
LIMITATION, THE UNITED STATES AND MEXICO, AND USED IN CANADA, ARE NOT
COVERED BY THESE WARRANTIES.
Limited One (1) Year Warranty on Parts and Labour
Subject to the more limited warranty if the Television is used for any commercial or business
purposes as set out below, TCL warrants the Television and its parts against material defects in
materials or workmanship that result in the Television failing for a period of one (1) year after the
date of original retail purchase. DURING THIS PERIOD, TCL WILL, AT TCL'S OPTION, REPAIR OR REPLACE A DEFECTIVE PART WITH A NEW OR REFURRIER PART WITHOUT
OR REPLACE A DEFECTIVE PART WITH A NEW OR REFURBISHED PART WITHOUT CHARGE TO YOU FOR PARTS OR LABOUR.
CHARGE TO YOU FOR PARTS OR LABOUR
a) FOR TELEVISIONS 32 INCHES OR LESS:
YOU MUST DELIVER THE ENTIRE TELEVISION TO A TCL TELEVISION AUTHORIZED
SERVICE PROVIDER ("ASP"). YOU MUST PAY FOR ALL TRANSPORTATION AND
INSURANCE CHARGES FOR THE TELEVISION TO AND FROM THE ASP.
b) FOR TELEVISIONS OVER 32 INCHES:
During this period, ASP personnel will come to your home when warranty service is required. Depending on the type of repair required, the service will either be performed in your home or the Television will be taken to an ASP for repair and returned to your home at no cost to you. IN-HOME SERVICE ONLY APPLIES WITHIN 100 KILOMETERS OF AN ASP. IF YOU ARE NOT WITHIN 100 KILOMETERS OF AN ASP, YOU MUST DELIVER THE ENTIRE TELEVISION TO AN ASP. YOU MUST PAY FOR ALL TRANSPORTATION AND INSURANCE CHARGES FOR THE TELEVISION TO AND FROM THE ASP.
Limited Warranty for Commercial Units
TCL warrants Televisions that are used for any commercial or business purposes as follows: all
parts are warranted against material defects in materials or workmanship that result in the
Television failing for a period of ninety (90) days after the date of original retail purchase. DURING
THIS PERIOD, TCL WILL, AT TCL'S OPTION. REPAIR OR REPLACE THE DEFECTIVE PART WITH A NEW OR REFURBISHED PART WITHOUT CHARGE TO YOU.
c) FOR TELEVISIONS 32 INCHES OR LESS:
YOU MUST DELIVER THE ENTIRE TELEVISION TO AN ASP. YOU MUST PAY FOR ALL
TRANSPORTATION AND INSURANCE CHARGES FOR THE TELEVISION TO AND
FROM THE ASP.
d) FOR TELEVISIONS OVER OVER 32 INCHES:
During this period, ASP personnel will come on-site when warranty service is required.
Depending on the type of repair required, the service will either be performed on-site or the
Television will be taken to an ASP for repair and returned at no cost to you. ON-SITE
SERVICE ONLY APPLIES WITHIN 100 KILOMETERS OF AN ASP. IF YOU ARE NOT
WITHIN 100 KILOMETERS OF AN ASP, YOU MUST DELIVER THE ENTIRE
TELEVISION TO AN ASP. YOU MUST PAY FOR ALL TRANSPORTATION AND
INSURANCE CHARGES FOR THE TELEVISION TO AND FROM THE ASP.
Rental Units
The warranty for Television rental units begins with the date of first rental or thirty (30) days from
the date of shipment to the rental firm, whichever comes first.
Your Responsibility
THE ABOVE WARRANTIES ARE SUBJECT TO THE FOLLOWING CONDITIONS:
(1) You must provide your bill of sale or other proof of purchase.
(2) All warranty servicing of this Television must be performed by an ASP.
(3) The warranties from TCL are effective only if the Television is (i) purchased as new and
unopened from TCL or from TCL's authorized distributors, dealers or resellers ("ADR's")
and (ii) located/operated in Canada.
(4) Labour charges for set installation, setup, adjustment of customer controls, and installation
or repair of antenna systems are not covered by these warranties. Reception problems
caused by inadequate antenna systems are your responsibility
(5) Warranties extend only to material defects in materials or workmanship as limited above,
and do not extend to
a. Service, repairs or replacement made necessary by accident, misuse, abuse, moisture, liquids, dust, dirt, neglect, accident, damage, 24/7 applications, improper installation, improper operation, improper cleaning, improper maintenance, normal wear and tear, screen burn or image retention caused by prolonged display of static images and/or phosphor aging, or any other external cause or event, act or omission outside the control of TCL, including fire, theft, acts of God, alteration, power failures, power surges or power shortages, lightning, other electrical faults, or repairs, modifications or
replacements by persons other than those authorized by TCL to service the Television;
b. Replacement of missing, discarded or lost parts, the provision of retrofits, or preventive
maintenance;
c. Repair of damage that is cosmetic only or does not affect the Television functionality,
such as wear and tear, scratches and dents;
d. Service on Toshiba-branded accessory items (such accessory items may be covered
by their own warranty);
e. Service on third party products or service made necessary by use of incompatible third
party products:
f. Service made necessary by the simultaneous use of this Television and connected
equipment:
q. Modifications to the Television not approved in writing by TCL, and service made
necessary by the use or installation of non-Toshiba modifications to the Television
h. Service of a Television on which the TOSHIBA label or logo, rating label or serial number
have been defaced or removed:
i. On-site service and repair of the Television; and
i. Damage to the Television caused by failure to follow the specifications. User manuals or
guides as to usage and/or storage.
Disclaimer and Limitation of Remedy
TO THE EXTENT NOT PRECLUDED BY LAW, ALL OTHER EXPRESS AND IMPLIED WARRANTIES, CONDITIONS AND REPRESENTATIONS FOR THIS TELEVISION, INCLUDING THE IMPLIED WARRANTIES, CONDITIONS AND REPRESENTATIONS OF MERCHANTABILITY AND FITNESS FOR A PARTICULAR PURPOSE, ARE HEREBY DISCLAIMED AND EXCLUDED. IF THE APPLICABLE LAW, STATUTORY OR OTHERWISE PRECLUDES THE EXCLUSION OF ANY IMPLIED WARRANTIES, CONDITIONS AND REPRESENTATIONS THEN SUCH IMPLIED WARRANTIES, CONDITIONS AND REPRESENTATIONS ARE OTHERWISE LIMITED IN DURATION TO THE TERM OF THIS EXPRESS WRITTEN LIMITED WARRANTY. TO THE EXTENT NOT PRECLUDED BY LAW STATUTORY OR OTHERWISE, THIS WRITTEN WARRANTY SUPERCEDES AND SPECIFICALLY DISCLAIMS ANY OTHER WARRANTY, CONDITION OR REPRESENTATION NOT STATED IN THIS WARRANTY, WHETHER MADE BY TCL, TOSHIBA CORPORATION, THEIR AFFILIATES, ADRs AND ASPs AND WHETHER MADE ORALLY OR IN WRITING (INCLUDING ANY STATEMENT IN ANY BROCHURE, PRESS RELEASE, ANNOUNCEMENT, ADVERTISEMENT, POINT OF SALE DISPLAY, ETC.).
YOU MUST READ AND FOLLOW ALL SET-UP AND USAGE INSTRUCTIONS IN THE APPLICABLE USER GUIDES AND/OR MANUALS. IF YOU FAIL TO DO SO, THIS TELEVISION MAY NOT FUNCTION PROPERLY AND YOU MAY SUFFER DAMAGE. THIS WARRANTY WILL NOT COVER ANY SERVICE THAT IS REQUIRED, IN PART OR IN WHOLE, AS A RESULT OF ANY FAILURE TO FOLLOW THE SET-UP AND USAGE INSTRUCTIONS. THIS WARRANTY DOES NOT APPLY AND SHALL BE VOID AND UNENFORCEABLE IF THE TELEVISION IS OPENED. SERVICED, OR REPAIRED BY PERSONS OTHER THAN THOSE AUTHORIZED BY TCL TO SERVICE OR REPAIR THE TELEVISION.
IF THE TELEVISION FAILS TO WORK AS WARRANTED ABOVE, YOUR SOLE AND EXCLUSIVE REMEDY SHALL BE REPAIR OR REPLACEMENT OF THE DEFECTIVE PART. IN NO EVENT WILL TCL TOSHIBA CORPORATION, THEIR AFFILIATES, ADRs OR ASPs (THE *RELATED
PARTIES*) BE LIABLE TO YOU OR ANY THIRD PARTY FOR ANY DAMAGES, MONEY, REIMBURSEMENT, COSTS OR EXPENSES. THIS LIMITATION APPLIES TO DAMAGES, MONEY, REIMBURSEMENT, COSTS OR EXPENSES OF ANY KIND WHATSOEVER INCLUDING ANY DIRECT OR INDIRECT DAMAGES, DAMAGE TO PROPERTY OR PERSON, LOST PROFITS, LOST SAVINGS, INCONVENIENCE OR OTHER SPECIAL, INCIDENTAL, EXEMPLARY OR CONSEQUENTIAL DAMAGES, WHETHER FOR BREACH OF WARRANTY, BREACH OF CONTRACT, TORT (INCLUDING NEGLIGENCE), UNDER A STATUTE OR UNDER ANY OTHER LAW OR FORM OR ACTION, OR WHETHER ARISING OUT OF THE USE OF OR INABILITY TO USE THE TELEVISION, EVEN IF ANY OF THE RELATED PARTIES HAS BEEN ADVISED OF THE POSSIBILITY OF SUCH DAMAGES OR OF ANY CLAIM BY ANY OTHER PARTY.
No person, agent, distributor, dealer or company is authorized to change, modify or extend the terms of these warranties in any manner whatsoever.
Arbitration and Dispute Resolution
To the extent not precluded by law, any claim, dispute, controversy or disagreement (whether for breach of warranty, breach of contract, tort (including negligence), under a statute or under any other law or form of action) against any of the Related Parties arising out of, or otherwise relating to: (i) this warranty; (ii) the Television; (iii) any oral or written representations, statements, brochures, press releases, advertising, announcement, point of sale display, or promotional material relating to the Television; (iv) the relationships that result from this warranty, (the foregoing claims, disputes controversies and disagreements are collectively referred to as the "Dispute"), shall be referred to and resolved by final and binding arbitration (to the exclusion of the courts). To the extent not precluded by law, you agree to waive any right that you may have to commence or participate in any representative or class proceeding against the Related Parties relating to any Dispute. If and where applicable and to the extent not precluded by law, you further agree to opt out of any such representative or class proceedings. Arbitration of any Dispute will be conducted in the forum and in the manner as agreed to between you and TCL. Failing such agreement, the arbitration will be conducted by one arbitrator pursuant to the laws and rules relating to arbitration generally in force in the jurisdiction in which you reside at the time that the Dispute arises. To the extent not precluded by law, no claim, dispute, controversy or disagreement of any other person may be joined or combined with any Dispute by you, without the prior written consent of TCL.
Critical Applications
The Television you have purchased is not designed for any "critical applications." "Critical applications" means life support systems, medical applications, connections to implanted medical devices, commercial transportation, nuclear facilities or systems or any other applications where Television failure could lead to injury to persons or loss of life or catastrophic property damage.
IF THE CUSTOMER USES THE TELEVISION IN ANY CRITICAL APPLICATION, THE CUSTOMER - AND NOT TCL ITS AFFILIATES, ADRs OR ASPs - ASSUME SOLE AND FULL RESPONSIBILITY FOR SUCH USE. TCL RESERVES THE RIGHT TO REFUSE TO SERVICE ANY TELEVISION USED IN A CRITICAL APPLICATION. TCL ITS AFFILIATES, ADRs AND ASPs HEREBY DISCLAIM ANY AND ALL LIABILITY, DAMAGES AND CONSEQUENCES ARISING OUT OF THE SERVICE OR REFUSAL TO SERVICE SUCH TELEVISION AND FURTHER DISCLAIM ANY AND ALL LIABILITY, CONSEQUENCES AND DAMAGES THAT MAY ARISE OR RESULT FROM THE USE OF THE TELEVISION IN ANY CRITICAL APPLICATIONS.
General Provisions
If and to the extent that any provision of this limited warranty should generally be found to be unenforceable, the unenforceable provision shall be severed from the warranty and deemed not to form part of the warranty. The remaining provisions of this warranty shall be and remain valid and enforceable. If and to the extent that any provision of this limited warranty as it relates to any of the Related Parties is found to be invalid or unenforceable in respect of that party (the
"Excluded Party"), the Excluded Party shall be deemed to be severed or excluded from the provision, and the provision shall remain valid, enforceable and applicable in respect of the other or remaining Related Parties.
To the extent permitted by law, this limited warranty shall be governed and construed in accordance with the laws of Ontario.
If there is any inconsistency between this limited warranty, on the one hand, and any statement in the packaging of the Television or in any other document enclosed with, or used in the context of the promotion or sale of, the Television, on the other hand, the provisions of this limited warranty shall prevail.
How to Obtain Warranty Services
If, after following all of the operating instructions in this manual and checking the "Troubleshooting" section, you find that service is needed:
(1) To find the nearest ASP, visit TCL's web site at www.toshiba.ca, or call toll free 1 800 268-3404
(2) Present your bill of sale or other proof of purchase to the ASP.
For additional Information, visit TCL's website at www.toshiba.ca
A copy of the GPL source code in this product may be obtained by contacting Toshiba Consumer Solutions at (800)631-3811. There will be a charge to cover the costs of providing the source code.
A copy of the LGPL source code in this product may be obtained by contacting Toshiba Consumer Solutions at (800)631-3811. There will be a charge to cover the costs of providing the source code.
USB Protocol Copyright © 2005 The NetBSD Foundation, Inc. All rights reserved.
Redistribution and use in source and binary forms, with or without modification, are permitted provided that the following conditions are met:
(1) Redistributions of source code must retain the above copyright notice, this list of conditions and the following disclaimer.
(2) Redistributions in binary form must reproduce the above copyright notice, this list of conditions and the following disclaimer in the documentation and/or other materials provided with the distribution.
(3) Neither the name of The NetBSD Foundation nor the names of its contributors may be used to endorse or promote products derived from this software without specified prior written permission.
THIS SOFTWARE IS PROVIDED BY THE NETBSD FOUNDATION, INC. AND CONTRIBUTORS "AS IS" AND ANY EXPRESS OR IMPLIED WARRANTIES, INCLUDING, BUT NOT LIMITED TO, THE IMPLIED WARRANTIES OF MERCHANTABILITY AND FITNESS FOR A PARTICULAR PURPOSE ARE DISCLAIMED. IN NO EVENT SHALL THE FOUNDATION OR CONTRIBUTORS BE LIABLE FOR ANY DIRECT, INDIRECT, INCIDENTAL, SPECIAL, EXEMPLARY, OR CONSEQUENTIAL DAMAGES (INCLUDING, BUT NOT LIMITED TO, PROCUREMENT OF SUBSTITUTE GOODS OR SERVICES; LOSS OF USE, DATA, OR PROFITS; OR BUSINESS INTERRUPTION) HOWEVER CAUSED AND ON ANY THEORY OF LIABILITY, WHETHER IN CONTRACT, STRICT LIABILITY, OR TORT (INCLUDING NEGLIGENCE OR OTHERWISE) ARISING IN ANY WAY OUT OF THE USE OF THIS SOFTWARE, EVEN IF ADVISED OF THE POSSIBILITY OF SUCH DAMAGE.
This product includes software developed by the OpenSSL Project for use in the OpenSSL Toolkit (http://www.openssl.org).
This product includes cryptographic software written by Eric Young (eay@cryptsoft.com).
OpenSSL 0.9.7d Copyright © 1998-2000 the OpenSSL Project. All Rights reserved. Redistribution and use in source and binary forms, with or without modification, are permitted provided that the following conditions are met:
(1) Redistributions of source code must retain the above copyright notice, this list of conditions and the following disclaimer.
(2) Redistributions in binary form must reproduce the above copyright notice, this list of conditions and the following disclaimer in the documentation and/or other materials provided with the distribution.
(3) All advertising materials mentioning features or use of this software must display the following acknowledgement: This product includes software developed by the OpenSSL Project for use in the OpenSSL Toolkit (http://openssl.org).
(4) The names "OpenSSL Toolkit" and "Open SSL Project" must not be used to endorse or promote products derived from this software without prior written permission. For written permission, please contact openssl-core@openssl.org.
(5) Products derived from this software may not be called "OpenSSL" nor may "Open SSL" appear in their names without prior written permission of the OpenSSL Project.
(6) Redistributions of any form whatsoever must retain the following acknowledgement: "This product includes software developed by the OpenSSL Project for use in the OpenSSL Toolkit (http://www.openssl.org)."
THIS SOFTWARE IS PROVIDED BY THE OpenSSL PROJECT "AS IS" AND ANY EXPRESSED OR IMPLIED WARRANTIES, INCLUDING, BUT NOT LIMITED TO, THE IMPLIED WARRANTIES OF MERCHANTABILITY AND FITNESS FOR A PARTICULAR PURPOSE ARE DISCLAIMED. IN NO EVENT SHALL THE OpenSSL PROJECT OR CONTRIBUTORS BE LIABLE FOR ANY DIRECT, INDIRECT, INCIDENTAL, SPECIAL, EXEMPLARY, OR CONSEQUENTIAL DAMAGES (INCLUDING, BUT NOT LIMITED TO, PROCUREMENT OF SUBSTITUTE GOODS OR SERVICES; LOSS OF USE, DATA, OR PROFITS; OR BUSINESS INTERRUPTION) HOWEVER CAUSED AND ON ANY THEORY OF LIABILITY, WHETHER IN CONTRACT, STRICT LIABILITY, OR TORT (INCLUDING NEGLIGENCE OR OTHERWISE) ARISING IN ANY WAY OUT OF THE USE OF THIS SOFTWARE, EVEN IF ADVISED OF THE POSSIBILITY OF SUCH DAMAGE. This product includes cryptographic software written by Eric Young (eay@cryptsoft.com). This product includes software written by Tim Hudson (tjh@cryptsoft.com).
Copyright © 1995-1998 Eric Young (eay@cryptsoft.com). All Rights reserved. This package is an SSL implementation written by Eric Young (eay@cryptsoft.com). The implementation was written so as to conform with Netscapes SSL. This library is free for commercial and non-commercial use so long as the following conditions are adhered to. The following conditions apply to all code found in this distribution, be it the RC4, RSA, Ihash, DES, etc., code; not just the SSL code. The SSL documentation included with this distribution is covered by the same copyright terms except that the holder is Tim Hudson (tjh@cryptsoft.com). Copyright remains Eric Young's, and as such any Copyright notices in the code are not to be removed. If this package is used in a product, Eric Young should be given attribution as the author of the parts of the library used. This can be in the form of a textual message at program startup or in documentation (online or textual) provided with the package. Redistribution and use in source and binary forms, with or without modification, are permitted provided that the following conditions are met:
(1) Redistributions of source code must retain the copyright notice, this list of conditions and the following disclaimer.
(2) Redistributions in binary form must reproduce the above copyright notice, this list of conditions and the following disclaimer in the documentation and/or other materials provided with the distribution.
(3) All advertising materials mentioning features or use of this software must display the following acknowledgement: "This product includes cryptographic software written by Eric Young (eay@cryptsoft.com)." The word 'cryptographic' can be left out if the routines from the library being used are not cryptographic related.
(4) If you include any Windows specific code (or derivative thereof) from the apps directory (application code) you must include an acknowledgement: "This product includes software written by Tim Hudson (tjh@cryptosoft.com)."
THIS SOFTWARE IS PROVIDED BY ERIC YOUNG "AS IS" AND ANY EXPRESS OR IMPLIED WARRANTIES, INCLUDING, BUT NOT LIMITED TO, THE IMPLIED WARRANTIES OF MERCHANTABILITY AND FITNESS FOR A PARTICULAR PURPOSE ARE DISCLAIMED. IN NO EVENT SHALL THE AUTHOR OR CONTRIBUTORS BE LIABLE FOR ANY DIRECT, INDIRECT, INCIDENTAL, SPECIAL, EXEMPLARY, OR CONSEQUENTIAL DAMAGES (INCLUDING, BUT NOT LIMITED TO, PROCUREMENT OF SUBSTITUTE GOODS OR SERVICES; LOSS OF USE, DATA, OR PROFITS; OR BUSINESS INTERRUPTION) HOWEVER CAUSED AND ON ANY THEORY OF LIABILITY, WHETHER IN CONTRACT, STRICT LIABILITY, OR TORT (INCLUDING NEGLIGENCE OR OTHERWISE) ARISING IN ANY WAY OUT OF THE USE OF THIS SOFTWARE, EVEN IF ADVISED OF THE POSSIBILITY OF SUCH DAMAGE. The license and distribution terms for any publicly available version or derivative of this code cannot be changed, i.e. this code cannot simply be copied and put under another distribution license (including the GNU Public License).
Index
A
Antenna cable 12
Antenna input configuration ...... 29
Audio quality adjustments ..... 45
Audio system connection 18
Auto aspect.... 41
Auto power off 53
B
Back of the TV.... 11
Base closed captions.... 43
Blocking channels 49
C
Cable box connection 14
CableClear ^® 55
Camcorder connection.... 16
CH ▲▼ buttons ......21, 38
CH RTN button....21, 38
Channel Browser Setup.... 36
Channel Browser™ 36
Channel labeling 31
Channel Number buttons......21, 38
Channel programming Automatic programming .... 30 Manually adding and deleting... 30
Cinema mode.... 41
Closed captions.... 43
Color temperature 55
ColorStream ^® 15
Component video 15
Component video cables ...... 12
Connecting Cables 12
D
Digital Audio Out 18
Digital audio selector 44
Digital CC Settings 43
Digital signal meter.... 33
Dolby Digital.... 18
Dolby Digital Dynamic Range Control.... 46
DVD player connection 15
DVI connection.... 17
DynaLight™ 42
Dynamic contrast.... 54
F
Features, TV 8
Front of the TV 10
G
Game Mode feature.... 56
H
HDMI audio mode.... 32
HDMI cable 12
HDMI™ connection.... 17
I
INFO button....53
INPUT button.... 35
Installation, care, and service 3
Installation, setup......9
Integrated digital tuning.... 8
L
Labeling video input......35
Language selection.... 29
Last mode memory feature 53
LED indications....10, 60
LOCKS menu
Channels, blocking......49
Enable rating blocking......48
New PIN code...... 47
Panel lock....51
Unlocking programs temporarily....50
Video inputs, locking .... 50
Locks menu.... 47
M
MPEG noise reduction .....56
MTS feature 45
MUTE button 44
0
Optical audio cable 12
Optical audio output format .....46
P
PC Audio....52
PC connection ....19
PC settings....51
Picture adjustment.... 42
Picture mode 42
Picture quality.... 42
Picture scroll......40
Picture size selection 39
POWER button....10, 21
Power-On Mode 34
R
RECALL button....53
Remote control
Battery installation......20
Device code table....25
Effective range....20
Functional key chart ......23
Learning about the buttons .....21
Programming ......24
Reset Factory Defaults....33
s
Safety....2
SAP sound 45
Satellite receiver connection......15
Scroll settings 40
Selecting Menu Language......29
Service 4
Side panel control 10
Sleep timer 52
Specifications 61
StableSound® 46
Stereo sound 45
SurfLock™ 38
S-video cable....12
System status ....33
T
TheaterWide® picture size ....39
Troubleshooting 58
TV status information ....53
V
V-Chip blocking (Locks menu) .....47
VCR connection....13, 14, 15
Video cables 12
Video input label 35
Video input lock 50
W
Warranty
Canada....63
U.S. 62
WOW:SRS 3D 57
WOW:SRS Focus 57
WOW:SRS TruBass....57
TOSHIBA AMERICA CONSUMER PRODUCTS, L.L.C.
Corporate Headquarters: 82 TOTOWA ROAD, WAYNE, NJ 07470, U.S.A.
NATIONAL SERVICE DIVISION: 1420-B TOSHIBA DRIVE, LEBANON, TN 37087, U.S.A.
CableClear, ColorStream, StableSound, and TheaterWide are registered trademarks of Toshiba America Consumer Products, L.L.C.
Channel Browser, SurfLock, and DynaLight are trademarks of Toshiba America Consumer Products, L.L.C.
REGZA is a trademark of Toshiba Corporation.
PRINTED IN USA
(07-05)
TOSHIBA