
SC-HT820V - Home Theater PANASONIC - Free user manual and instructions
Find the device manual for free SC-HT820V PANASONIC in PDF.


User questions about SC-HT820V PANASONIC
0 question about this device. Answer the ones you know or ask your own.
Ask a new question about this device
Download the instructions for your Home Theater in PDF format for free! Find your manual SC-HT820V - PANASONIC and take your electronic device back in hand. On this page are published all the documents necessary for the use of your device. SC-HT820V by PANASONIC.
USER MANUAL SC-HT820V PANASONIC
natural_image
Product line drawing of a Panasonic audio amplifier system including speaker, monitor, and CD output (no text or symbols)Panasonic®
Operating Instructions
DVD/VHS Home Theater Sound System
Model No. SC-HT820V
natural_image
Illustration of a family watching TV, with no visible text or symbolsDear customer
Thank you for purchasing this product. For optimum performance and safety, please read these instructions carefully.
Before connecting, operating or adjusting this product, please read these instructions completely. Please keep this manual for future reference.

AUDIO/VIDEO

DIGITAL VIDEO


PLAYER

SUPER DRIVE
Region number
The player plays DVD-Video marked with labels containing the region number "1" or "ALL".
Example:


For U.S.A.

ENERGY STAR
As an ENERGY STAR® Partner, Panasonic has determined that this product meets the ENERGY STAR® guidelines for energy efficiency.
For U.S.A. only
The warranty can be found on page 54.
For Canada only
The warranty can be found on page 55.




| System SC-HT820V | |
| Main unit SA-HT820V | |
| Front and surround speakers SB-FS520A | |
| Center speaker SB-PC820 | |
| Active subwoofer SB-WA820 | |
CAUTION!
DO NOT INSTALL OR PLACE THIS UNIT IN A BOOKCASE, BUILT-IN CABINET OR IN ANOTHER CONFINED SPACE. ENSURE THE UNIT IS WELL VENTILATED. TO PREVENT RISK OF ELECTRIC SHOCK OR FIRE HAZARD DUE TO OVERHEATING, ENSURE THAT CURTAINS AND ANY OTHER MATERIALS DO NOT OBSTRUCT THE VENTILATION VENTS.
WARNING:
TO REDUCE THE RISK OF FIRE, ELECTRIC SHOCK OR PRODUCT DAMAGE, DO NOT EXPOSE THIS APPARATUS TO RAIN, MOISTURE, DRIPPING OR SPLASHING AND THAT NO OBJECTS FILLED WITH LIQUIDS, SUCH AS VASES, SHALL BE PLACED ON THE APPARATUS.
CAUTION!
THIS PRODUCT UTILIZES A LASER. USE OF CONTROLS OR ADJUSTMENTS OR PERFORMANCE OF PROCEDURES OTHER THAN THOSE SPECIFIED HEREIN MAY RESULT IN HAZARDOUS RADIATION EXPOSURE. DO NOT OPEN COVERS AND DO NOT REPAIR YOURSELF. REFER SERVICING TO QUALIFIED PERSONNEL.
THE FOLLOWING APPLIES ONLY IN THE U.S.A. Note to CATV system installer:
This reminder is provided to call the CATV system installer's attention to Article 820-40 of the NEC that provides guidelines for proper grounding and, in particular, specifies that the cable ground shall be connected to the grounding system of the building, as close to the point of cable entry as practical.
text_image
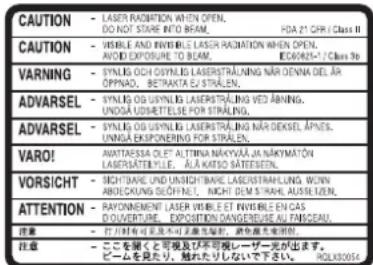
CAUTION - LASER RADIATION WHEN OPEN. DO NOT STARE INTO BEAM. HDA 21 OFF / Class II CAUTION - VISIBLE AND INVIBLE LASER RADIATION WHEN OPEN. AVOID EXPOURE TO BEAM. ECEUATE / Class IIIa VARNING - SYNLIG OCH OSYNLIG LASERSTRALING NÜR DENNA DEL ÄR OPPND. BETRAKTA E/STRALEN. ADVARSEL - SYNLIG OCH OSYNLIG LASERSTRALING VED ÄRNING. UNOGA UDSRETELSE FOR STRALING. ADVARSEL - SYNLIG OCH OSYNLIG LASERSTRALING NÜR DEKSEL APNES. UNOGA EKEPIORENING FOR STRALEN. VARO! ANTATASSA OLET ALTINHA MAKYVA JAKNYMATÖN LASERSTRÄTELE. ALA KATSO SÄTESTEIN. VORSICHT - SICHTBAHE UND UNSICHTBAHE LASERSTRALUNG WENN ABECKUNG OGÖFNET. NICHT DEM STRAH. AUSSER ZELN. ATTENTION - RAYONNEMENT LASER VIRBLE ET INVIBLE EN CAS D OLÜVERTURE. EXPOSITION DÄNGEREUE AU FANSCAU. 注意 - ITALTRIT INVEET NOUS MEAGNEUT. NEUTRALRE MAXUTRIUM. 注意 - ここを関と可気が及び不可視レーザー元が出す。 ビームを見たり,触れたりしないで下さい。 HOLX30054(Inside of product)
Before moving the unit, ensure the disc trays and video cassette slot are empty.
Failure to do so will risk severely damaging the discs, video cassette tape and the unit.
Avoid use or placing highly magnetic devices (Speakers etc.) or devices that emit strong electro-magnetic waves (mobile telephones etc.) near the main unit.
- The above may result in problems with audio and video, and recorded content may be lost.
- Be extra cautious when you are using a plasma television, keeping these devices as far away as possible.
Operations in these instructions are described mainly with the remote control, but you can do the operations on the main unit if the controls are the same.
THE FOLLOWING APPLIES ONLY IN THE U.S.A. CAUTION:
This equipment has been tested and found to comply with the limits for a Class B digital device, pursuant to Part 15 of the FCC Rules.
These limits are designed to provide reasonable protection against harmful interference in a residential installation. This equipment generates, uses and can radiate radio frequency energy and, if not installed and used in accordance with the instructions, may cause harmful interference to radio communications. However, there is no guarantee that interference will not occur in a particular installation. If this equipment does cause harmful interference to radio or television reception, which can be determined by turning the equipment off and on, the user is encouraged to try to correct the interference by one or more of the following measures:
●Reorient or relocate the receiving antenna.
- Increase the separation between the equipment and receiver.
- Connect the equipment into an outlet on a circuit different from that to which the receiver is connected.
- Consult the dealer or an experienced radio/TV technician for help.
Any unauthorized changes or modifications to this equipment would void the user's authority to operate this device.
This device complies with Part 15 of the FCC Rules. Operation is subject to the following two conditions: (1) This device may not cause harmful interference, and (2) this device must accept any interference received, including interference that may cause undesired operation.

CAUTION
RISK OF ELECTRIC SHOCK DO NOT OPEN

CAUTION: TO REDUCE THE RISK OF ELECTRIC SHOCK, DO NOT REMOVE SCREWS. NO USER-SERVICEABLE PARTS INSIDE. REFER SERVICING TO QUALIFIED SERVICE PERSONNEL.

The lightning flash with arrowhead symbol, within an equilateral triangle, is intended to alert the user to the presence of uninsulated “dangerous voltage” within the product’s enclosure that may be of sufficient magnitude to constitute a risk of electric shock to persons.

The exclamation point within an equilateral triangle is intended to alert the user to the presence of important operating and maintenance (servicing) instructions in the literature accompanying the appliance.
- Operating while there is condensation in the unit or on the cassette tape may cause the tape to catch upon the cylinder resulting in the tape being cut, or not being able to remove the cassette tape from the unit. The unit also may not work properly if the unit's cylinder or heads have been damaged.
- Wait 1–2 hours for condensation to evaporate (do not operate the unit during this time).

INTRO

SETUP

DVD

VHS

RADIO & OTHERS

INFO
Accessories .... 4
The remote control 4
IMPORTANT SAFETY INSTRUCTIONS....5
Tape information 5
Discs that can be played....6
Simple setup
STEP1 Locating....10
STEP2 Connecting speakers with the subwoofer .. 11
STEP3 Television....12
Basic connection....12
For better video from DVD....13
Basic play....18
Convenient functions .....20
Position memory 20
Zoom 20
Subtitle 20
Audio 20
Multi Re-master....21
Page skip. 21
Sequential play (CD Mode) 21
Quick replay 21
All group/Program/Random play 22
Repeat play 23
Playback....30
Picture mode 31
Repeat play 31
Manual tracking....31
Vertical locking adjustment 31
Manual recording ....32
Recording the television 32
Using another source while recording....33
Recording from other equipment. 33
Timer recording ....34
The radio....42
Automatic presetting 42
Selecting the preset channels 42
Manual tuning 42
Optional FM antenna connection 43
Sound field and sound quality .....44
Sound Field Control 44
Super Surround. 44
Center Focus. 44
Dolby Pro Logic II 44
Dolby Pro Logic....44
Other speaker setup options ....47
Attaching to a wall 47
Fitting speaker stands (optional) 47
Optional connections .....47
Listening to an external source/
Recording to other equipment 47
Connecting a cable TV box/satellite receiver ..... 48
If the antenna connector doesn't match 49
Control reference guide 7
Remote control—common buttons. 7
Remote control—DVD operation 7
Remote control—VHS operation 8
Remote control—TUNER operation....8
Main unit and subwoofer 9
Main unit display....9
STEP4 Radio and system connection ..... 14
STEP5 Plug-in Auto Tuning 15
STEP6 Operating the television 16
STEP7 DVD QUICK SETUP 17
Using navigation menus....24
Playing data discs 24
Playing HighMAT discs. 25
Playing the programs 25
Playing a play list 25
Using On-Screen Menus. 26
Main menus 26
Other settings.... 27
Changing the player settings....28
Changing the delay time (Speaker Setting) 29
Finding programs with the Jet Navigator and VHS
Index Search System (VISS) 36
Saving Jet Navigator data 36
Using the Jet Navigator to find programs. 36
Finding programs—VHS Index Search System (VISS) .. 37
Changing settings....38
LANGUAGE 38
CLOCK SET.... 38
CHANNEL SET 39
OPTION 40
On-screen display 41
Changing audio 41
Custom Sound Memory 45
Down-mixing. 45
Subwoofer level 45
Speaker level adjustments 45
Other convenient features 46
The sleep timer.... 46
Muting 46
Using headphones 46
Troubleshooting guide 50
Maintenance....52
Specifications 53
Limited Warranty (ONLY FOR U.S.A.) 54
Limited Warranty (ONLY FOR CANADA) ..... 55
Product Service. 55
Index. Back cover

INTRO

Accessories
Please check and identify the supplied accessories. Use numbers indicated in parentheses when asking for replacement parts.
(Only for U.S.A.)
To order accessories, refer to "Accessory Purchases" on page 54. (Only for Canada)
To order accessories, call the dealer from whom you have made your purchase.
□ 1 Remote control
(EUR7722X20)
□ 2 Batteries
for remote control
□ 2 AC power supply cord (K2CB2CB00006)
□ 1 AM loop antenna
(N1DAAAA00002)
□ 1 FM indoor antenna (RSA0007-L)
□ 1 Video cable
(RJL1P016B15A)
□ 1 75 Ω coaxial cable (VJA1125)
□ 1 System cable (K1HA25HA0001)
☐ 5 Speaker cables
3×4-m (13-foot) cables
(REE1203A-J)
2×10-m (33-foot) cables
(REE1203C-J)
□ 1 Sheet of speaker-cable stickers
□ 1 Antenna plug
(K2RC021B0001)
Note
The included AC power supply cord is for use with this unit only. Do not use it with other equipment.

The remote control
Remote control
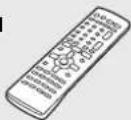
Batteries

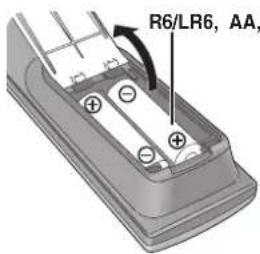
■Batteries
text_image
R6/LR6, AA,R6/LR6, AA, UM-3
- Insert so the poles (+ and -) match those in the remote control.
- Do not use rechargeable type batteries.
Do not:
- mix old and new batteries.
- use different types at the same time.
- heat or expose to flame.
●take apart or short circuit. - attempt to recharge alkaline or manganese batteries.
- use batteries if the covering has been peeled off.
Mishandling of batteries can cause electrolyte leakage which can damage items the fluid contacts and may cause a fire.
Remove if the remote control is not going to be used for a long period of time. Store in a cool, dark place.
Use
Aim at the sensor ( page 9), avoiding obstacles, at a maximum range of 7 m (23 feet) directly in front of the unit.
User memo:
DATE OF PURCHASE
DEALER NAME
DEALER ADDRESS
TELEPHONE NUMBER
The model number and serial number of this product can be found on either the back or the bottom of the unit. Please note them in the space provided below and keep for future reference.
MODEL NUMBER
SC-HT820V
SERIAL NUMBER
IMPORTANT SAFETY INSTRUCTIONS
Read these operating instructions carefully before using the unit. Follow the safety instructions on the unit and the applicable safety instructions listed below. Keep these operating instructions handy for future reference.
1) Read these instructions.
2) Keep these instructions.
3) Heed all warnings.
4) Follow all instructions.
5) Do not use this apparatus near water.
6) Clean only with dry cloth.
7) Do not block any ventilation openings. Install in accordance with the manufacturer's instructions.
8) Do not install near any heat sources such as radiators, heat registers, stoves, or other apparatus (including amplifiers) that produce heat.
9) Do not defeat the safety purpose of the polarized or grounding-type plug. A polarized plug has two blades with one wider than the other. A grounding-type plug has two blades and a third grounding prong. The wide blade or the third prong are provided for your safety. If the provided plug does not fit into your outlet, consult an electrician for replacement of the obsolete outlet.
10) Protect the power cord from being walked on or pinched particularly at plugs, convenience receptacles, and the point where they exit from the apparatus.
11) Only use attachments/accessories specified by the manufacturer.
12) Use only with the cart, stand, tripod, bracket, or table specified by the manufacturer, or sold with the apparatus. When a cart is used, use caution when moving the cart/apparatus combination to avoid injury from tip-over.
13) Unplug this apparatus during lightning storms or when unused for long periods of time.
14) Refer all servicing to qualified service personnel. Servicing is required when the apparatus has been damaged in any way, such as power-supply cord or plug is damaged, liquid has been spilled or objects have fallen into the apparatus, the apparatus has been exposed to rain or moisture, does not operate normally, or has been dropped.


INTRO
Tape information
■Tapes
- You can use tapes with the VHS and S-VHS marks, but this unit is unable to make full use of the characteristics of S-VHS tapes.
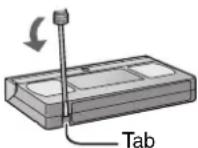
- Break out the tape's tab to prevent accidental erasure. Cover the hole with a double layer of adhesive tape when you want to use the tape for recording again.
■S-VHS Quasi Playback (SQPB)
You can play tapes recorded with the S-VHS system, however some noise may occur with some types and this unit cannot take advantage of S-VHS's high resolution.
This unit cannot make S-VHS recordings.
■Tape care
Poor quality or damaged tapes can cause the heads to become dirty and malfunction. Store your tapes carefully and discard when they become dirty or damaged.
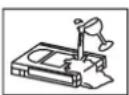
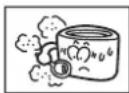
Never use tapes on which juice has been spilt or those that are extremely damaged since this will not only cause the heads to become dirty, but will also make the unit malfunction.
Listening caution


Selecting fine audio equipment such as the unit you've just purchased is only the start of your musical enjoyment. Now it's time to consider how you can maximize the fun and excitement your equipment offers. This manufacturer and the Electronic Industries Association's Consumer Electronics Group want you to get the most out of your equipment by playing it at a safe level. One that lets the sound come through loud and clear without annoying blaring or distortion—and, most importantly, without affecting your sensitive hearing.
We recommend that you avoid prolonged exposure to excessive noise.
Sound can be deceiving. Over time your hearing “comfort level” adapts to higher volumes of sound. So what sounds “normal” can actually be loud and harmful to your hearing.
Guard against this by setting your equipment at a safe level BEFORE your hearing adapts.
To establish a safe level:
- Start your volume control at a low setting.
- Slowly increase the sound until you can hear it comfortably and clearly, and without distortion.
Once you have established a comfortable sound level:
- Set the dial and leave it there.
Taking a minute to do this now will help to prevent hearing damage or loss in the future. After all, we want you listening for a lifetime.
Discs that can be played

| Disc Logo | Indication in these operating instructions | Remarks | ||
| DVD-RAM |  | RAM | Recorded using Version 1.1 of the Video Recording Format (a unified video recording standard). | ●Recorded with DVD video recorders, DVD video cameras, personal computers, etc.●Remove discs from their cartridges before use. |
| JPEG | Recorded using the DCF (Design rule for Camera File system) standard. | ●Recorded with Panasonic DVD-Video recorders●To play JPEG files, select “Play as Data Disc” in Other Menu (→ page 27) | ||
| DVD-Audio | [IMAGE] | DVD-A — | ||
| DVD-V | Some DVD-Audio discs contain DVD-Video content.To play DVD-Video content, select “Play as DVD-Video” in Other Menu (→ page 27) | |||
| DVD-Video | [IMAGE] | DVD-V | — | |
| DVD-R | [IMAGE] | Panasonic DVD-R recorded and finalized® on a Panasonic DVD-Video recorders or DVD-Video cameras are played as DVD-Video on this unit. | ||
| Video CD | [IMAGE] | VCD | — | |
| SVCD | [IMAGE] | Conforming to IEC62107 | ||
| CD [CD] | [IMAGE] | This unit is compatible with HDCD.HDCD-encoded CDs sound better because they are encoded with 20 bits, as compared with 16 bits for all other CDs.●During HDCD play, “HDCD” lights on the unit’s display. | ||
| CD-RCD-RW | — | WMAMP3JPEGCDVCD | ●This unit can play CD-R/RW (audio recording disc) recorded with the formats on the left. Close the sessions or finalize® the disc after recording.●HighMAT discsWMA, MP3 or JPEG files only.To play without using the HighMAT function, select “Play as HighMAT” in Other Menu (→ page 27). | |
^* A process that allows play on compatible equipment.
- It may not be possible to play the above discs in all cases due to the type of disc or condition of the recording.
■Discs that cannot be played
PAL discs (except DVD-Audio), DVD-ROM, CD-ROM, CDV, CD-G, DVD+R, +RW, DVD-RW, SACD, Divx Video Discs and Photo CD, DVD-RAM that cannot be removed from their cartridge, 2.6-GB and 5.2-GB DVD-RAM, and "Chaoji VCD" available on the market including CVD, DVCD and SVCD that do not conform to IEC62107.
■Audio format of DVDs
This unit automatically recognizes and decodes with these symbols.


■To prevent damage
Do not;
- load more than one disc per tray.
- close the drawer by hand.
■To clean discs
DVD-A DVD-V VCD CD
Wipe with a damp cloth and then wipe dry.


RAM DVD-R
- Clean with an optional DVD-RAM/PD disc cleaner (LF-K200DCA1, where available).
- Never use cloths or cleaners for CDs etc.
■Handling precautions
- Do not attach labels or stickers to discs (This may cause disc warping, rendering it unusable).
- Do not write on the label side with a ball-point pen or other writing instrument.
- Do not use record cleaning sprays, benzine, thinner, static electricity prevention liquids or any other solvent.
-
Do not use scratch-proof protectors or covers.
-
Do not use the following discs:
–Discs with exposed adhesive from removed stickers or labels (rented discs etc).
–Discs that are badly warped or cracked.
-Irregularly shaped discs, such as heart shapes.

HighMAT™ and the HighMAT logo are either trademarks or registered trademarks of Microsoft Corporation in the United States and/or other countries.
HDCD ^® , HDCD ^® , High Definition Compatible Digital ^® and Pacific Microsonics ^™ are either registered trademarks or trademarks of Pacific Microsonics, Inc. in the United States and/or other countries.
HDCD system manufactured under license from Pacific Microsonics, Inc. This product is covered by one or more of the following: In the USA : 5,479,168, 5,638,074, 5,640,161, 5,808,574, 5,838,274, 5,854,600, 5,864,311, 5,872,531, and in Australia: 669114, with other patents pending.
- If SHIFT appears after the button name the function will not work unless you use with [SHIFT] button. Make sure to press [SHIFT] and the button.
Remote control—common buttons
text_image
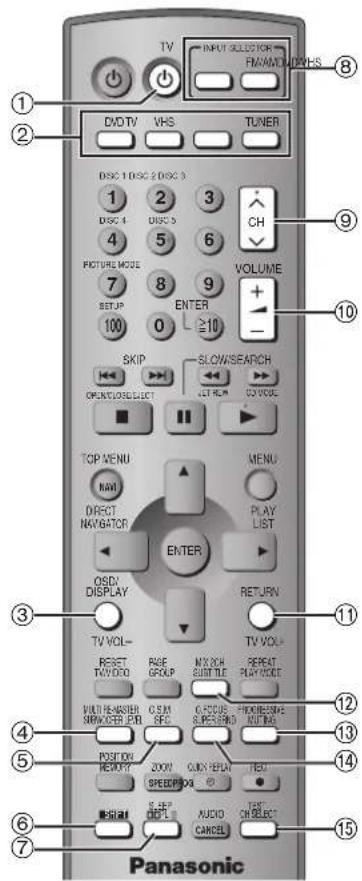
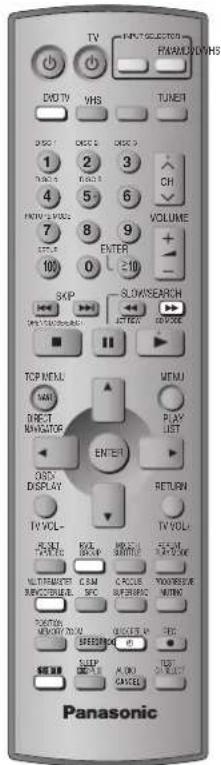
TV INPUT SELECTOR FANAMON DRUGHS DVD TV VHS TUNER DISC 1 DISC 2 DISC 3 1 2 3 CH 4 5 6 PICTURE MODE 7 8 9 VOLUME SETUP ENTER 100 0 ≥10 SKIP SLOW/SEARCH OPEN/CLOSE/SELECT LET REM CO VOLT TOP MENU MENU DIRECT NAVIGATOR PLAY LIST OISD/ DISPLAY ENTER RETURN TV VOL- RESET TWD/DVD RAGE GROUP MOX DOG SUBTLE REPEAT PLAY MODE MULTI PENSIBLE MAMICER ZEN OEM BHD C-CUS OR SUBSTOCK PROGRESSIVE NUT BAG POST DOW REDUOY ZOOM QUICK FLYN RED SPEEDBODG MINI MINI COLD AUDIO CANCEL ON SELECT Panasonic① TV Power button [TV] 16
②Remote control mode selector button [DVD] [VHS] [TV] [TUNER] Changes the remote control mode. The button lights once pressed. The selected mode is held in memory until you press another mode selector button. The mode selector button lights each time you press an operational control button showing which mode is in use.
③ TV volume down button [TV VOL-] 16
④ Bass adjust button [SUBWOOFER LEVEL] 45
⑤Sound field control button [SFC] .... 44 Custom sound memory button [C.S.M] SHIFT .... 45
⑥Shift button [SHIFT] To use the functions labeled in orange, press the button while pressing [SHIFT].
⑦ Dolby Pro Logic II/Dolby Pro Logic button [DOPLII] ..... 44 Sleep timer button [SLEEP] SHIFT ..... 46
⑧Main unit selector button DVD/VHS source button [DVD/VHS] Switch the source on the main unit between DVD and VHS. Tuner/band button [FM/AM] Switch the source on the main unit to tuner and change the band.
⑨ TV channel buttons [∧ ∨ CH] ...... 16
10 Volume buttons [+ - VOLUME] 18 Volume may be lower when playing DVD-Video than when playing other discs or during television broadcasts. Reduce the volume before playing other sources or returning to the television so volume doesn't increase suddenly.
⑪ TV volume up button [TV VOL+]. 16
⑫ Down-mix button [MIX 2CH] SHIFT 45
⑬Muting button [MUTING] 46
⑭Super surround button [SUPER SRND]....44 Center focus button [C.FOCUS] SHIFT....44
⑮Speaker channel button [CH SELECT]....45 Test signal button [TEST] SHIFT....45
Remote control—DVD operation
text_image
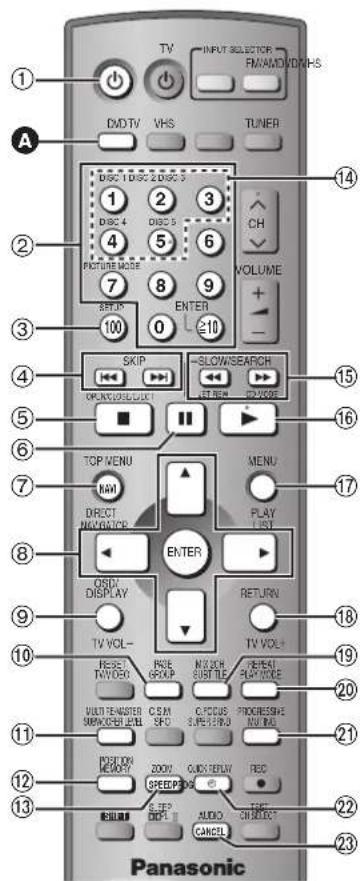
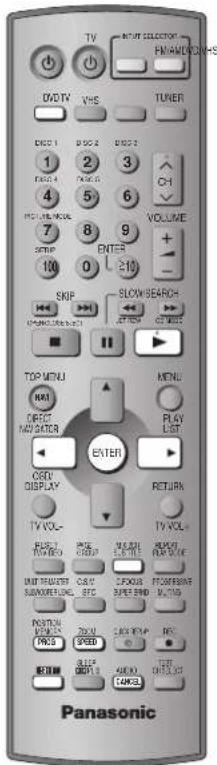
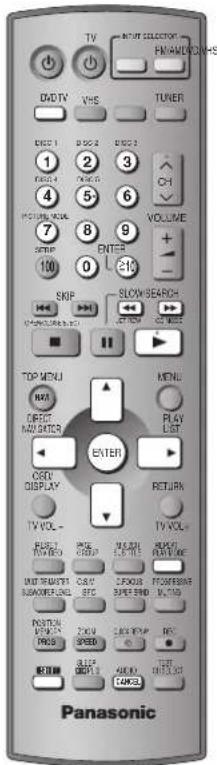
TV INPUT SELECTOR FINAMD/VIDV-HS DMDTV VHS TUNER 1 2 3 DISC 4 DISC 5 4 5 6 PICTURE MODE 7 8 9 ENTER 100 0 ≥10 SKIP -SLOW/SEARCH OPEN/SEE/LETT SET NEW CD/SEE TOP MENU RAM MENU DIRECT MAX/ACCESS PLAY LIST ENTER OBSI DISPLAY RETURN TV VOL- NOISE TW Balk WRITE GROUP MOZZON SUBTITLE WHOLE PLAY MODE MULTI REMAQUES MINIMO CHICO C FOCUS SURE-TWO PROGRESSIVE ROLL RED POINT ON MEMORY ZOOM QUICK RELAY RED SPEED POPS START ON DIRECT RESET ACCESS AUDIO CANCEL PanasonicADVD remote control mode button [DVD]. 17 Switch the remote control mode to DVD. Make sure you press before doing DVD operations. When in DVD mode, the [DVD] button lights each time you press one of the DVD operation buttons indicated below.
① Power button [☐] 17 Press to switch the unit from on to standby mode or vice versa. In standby mode, the unit is still consuming a small amount of power.
② Numbered buttons [1-9, 0, ≧10/ENTER] ..... 18
③ DVD SETUP menu button [SETUP] SHIFT 17,28
④ Skip buttons [◀◀, ▶▶| SKIP]....18
⑤ Stop button [■]....18 Open/close button [OPEN/CLOSE/EJECT] SHIFT....18
⑥ Pause button [11] 18
⑦ Top menu button [TOP MENU] .... 25 Direct navigator button [DIRECT NAVIGATOR] .... 26
⑧ Cursor buttons [▲ ▼ ◀ ▶]/Enter button [ENTER].....17
⑨On-screen menu button [OSD/DISPLAY] 26
⑩Group button [GROUP] .... 19 Still picture select button [PAGE] SHIFT .... 21
⑪ Multi re-master button [MULTI RE-MASTER] SHIFT ..... 21
⑫Position memory button [POSITION MEMORY].....20
⑬Zoom button [ZOOM]....20
⑭ Disc buttons [DISC1]–[DISC5] SHIFT 19
⑮ Slow/search buttons [◀◀▶▶ SLOW/SEARCH]....18 CD mode button [▶▶ CD MODE] SHIFT....21
⑯ Play button [▶]....18
⑰Menu button [MENU] 24 Play list button [PLAY LIST] 25
⑱Return button [RETURN]....19
⑲ Subtitle button [SUBTITLE]....20
⑳Play mode button [PLAY MODE]....22 Repeat mode button [REPEAT] SHIFT....23
②1 Progressive output button [PROGRESSIVE] SHIFT ..... 18
②Quick replay button [QUICK REPLAY] 21
②3 Cancel button [CANCEL] 22 Soundtrack button [AUDIO] SHIFT 20

RQT7388
- If SHIFT appears after the button name the function will not work unless you use with [SHIFT] button. Make sure to press [SHIFT] and the button.
Remote control—VHS operation

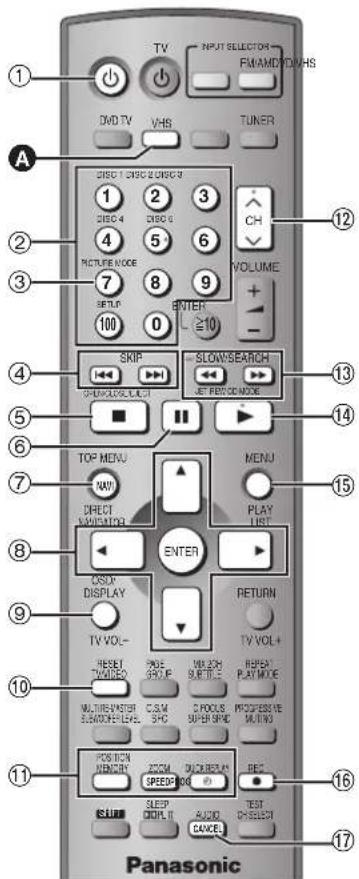
text_image
TV INPUT SELECTOR FM/AMD/DIV/HS DVD TV VHS TUNER A 1 2 3 4 5 6 7 8 9 VOLUME + - 100 0 ≥10 SKIP SLOW/SEARCH D-DRAGON/LIGHT JET PBOODMODE TOP MENU MENU NEW PLAY LIST DIRECT WALMATOR ENTER COSOY DISPLAY RETURN TV VOL- TWO VOL+ RESET TIMES PROE SPOLE MOZZICH SUBSTICS REPER PLAY MODE MULTIEM/MASTER SENSOR/LEVEL CASM SPIC C POOLS SUPER SPIC PROGRESSIVE MUTTER POSITION MEMORY ROOM SPEED REDU FEC SLEEP DOPL II AUDIO CANCEL TEST CHIESEER PanasonicAVHS remote control mode button [VHS]....30
Switch the remote control mode to VHS. Make sure you press before doing VHS operations. When in VHS mode, the [VHS] button lights each time you press one of the VHS operation buttons indicated below.
① Power button [⏻] 15
Press to switch the unit from on to standby mode or vice versa. In standby mode, the unit is still consuming a small amount of power.
② Numbered buttons [1-9, 100, 0]....32
③ Picture mode button [PICTURE MODE] SHIFT .....31
④ Index search button [◀◀ ▶▶| SKIP] ....37
⑤ Stop button [■] 30
Tape eject button [OPEN/CLOSE/EJECT] SHIFT .....30
⑥ Pause button [11]. 30
⑦ Jet navigator button [NAVI] ....36
⑧ Cursor buttons [▲ ▼ ◀ ▶]/Enter button [ENTER] .....34
⑨On-screen display button [OSD/DISPLAY] .....41
⑩TV/Video button [TV/VIDEO]....16
Tape counter reset button [RESET] SHIFT 41
⑪Timer recording buttons 34
Timer programming button [PROG]
Tape speed button [SPEED]
Timer program standby button [④]
⑫ Channel, tracking, and vertical hold buttons [^ v CH] .31, 32
⑬ Fast-forward/rewind button [◀◀▶▶ SLOW/SEARCH]...30
Jet rewind button [◀◀ JET REW] SHIFT....30
⑭ Play button [▶] .....30
Press and hold for five seconds to start repeat play .....31
⑮Menu button [MENU]....38
⑯ Recording button [● REC] SHIFT....32
⑰Cancel button [CANCEL] ....35
Audio button [AUDIO] SHIFT 41
Remote control—TUNER operation
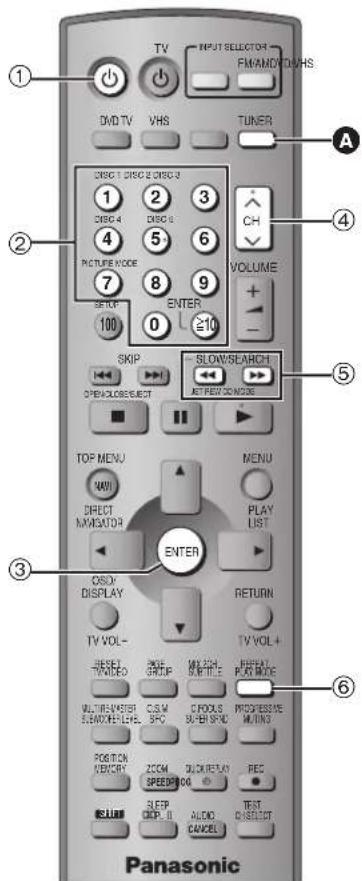
text_image
TV INPUT SELECTOR FMAMD/DVHS DVD TV VHS TUNER CNSC 1 DISC 2 DISC 3 1 2 3 CNSC 4 DISC 5 4 5 6 PICTURE MODE 7 8 9 VOLUME + - SETUP ENTER 100 0 ≥10 SKIP SLOW/SEARCH OPEN/CLOSE/SPECT AT PREV. CODE TOP MENU MENU DIRECT MANISTOR PLAY LIST ENTER OSOY DISPLAY RETURN TV VOL- RESET TWAVEO WRITE GROUP MIX TIME SUBTITLE REPLAY PLAY MODE MULTIENGLISH SEMICONLIGHTS COLD SPG CLOWS BUY SPG PROGRESSIVE MLINDS POSITION MEMORY ZOOM SPEED/1000 DUALD CANCEL TEST ORIENT PanasonicATUNER remote control mode button [TUNER]....42
Switch the remote control mode to TUNER. Make sure you press before doing TUNER operations. When in TUNER mode, the [TUNER] button lights each time you press one of the TUNER operation buttons indicated below.
① Power button [⏻] 42
Press to switch the unit from on to standby mode or vice versa. In standby mode, the unit is still consuming a small amount of power.
② Numbered buttons [1-9, 0, ≧10/ENTER]....42
③Enter button [ENTER]....42
④ Channel buttons [^ v CH]....42
⑤ Tuning buttons [◀◀▶▶]....42
⑥FM mode button [PLAY MODE] 42
Main unit and subwoofer
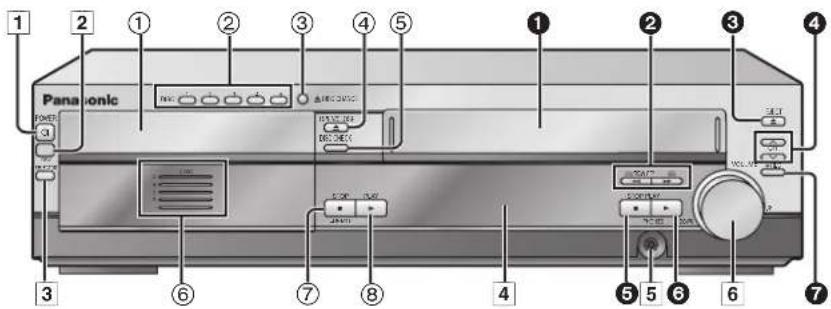
text_image
Panasonic POWER 3 1 2 ① ② ③ ④ ⑤ ① ② ③ ④ ⑥ ⑦ ⑧ 4 5 6 7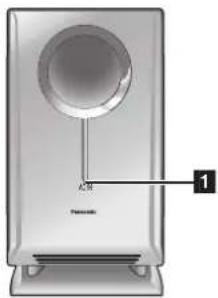
text_image
Panasonic 光驱 1
■Common buttons
1 Power button [☐/I POWER].... 15 Press to switch the unit from on to standby mode or vice versa. In standby mode, the unit is still consuming a small amount of power.
2 Remote control signal sensor
3 Source selector button [INPUT SELECTOR] VHS→DVD/CD→FM→AM
4 Display
5 Headphone terminal [PHONES] 46 6 Volume dial [VOLUME DOWN, UP] 18
■DVD section
① Drawer....18 ② Disc buttons [DISC1-5]....18 ③ Disc change button [▲ DISC CHANGE]....19 ④ Drawer open/close button [▲ OPEN/CLOSE]....18 ⑤ Disc check button [DISC CHECK]....19
⑥ Disc indicators ..... 18
⑦ Stop button [■ STOP]....18 Demo button [-DEMO]....14
⑧ Play button [▶ PLAY]....18
■VHS section
① Tape slot 30
②Fast-forward and rewind buttons [◀◀◀/REW] [▶▶ FF/▶] .... 30
③ Tape eject button [▲ EJECT]. 30
④ Channel buttons [^ CH] [∨ CH] .... 32
⑤ Stop button [■ STOP]. 30
⑥ Play button [▶ PLAY]....30
⑦ Recording button [● REC]....32
Subwoofer
1 AC supply indicator [AC IN] This indicator lights when the subwoofer is connected to a household AC outlet.
Main unit display
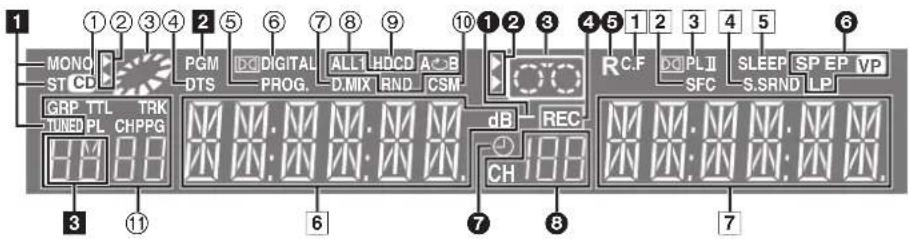
text_image
MONO ST CD GRP TTL TRK TUNED PL CHPPG 1 2 3 4 5 6 7 8 9 10 1 2 3 4 5 6 PGM DTS DIGITAL PROG. ALL HDCD A C B D.MIX RND CSM RB REC CH R.C.F DCI PL II SFC SLEEP SP EP VP S.S.RND LP 7 8 7■Common display
1 Center Focus indicator 44
2 Sound Field Control indicator 44
3 Dolby Pro Logic II/Dolby Pro Logic indicator.... 44
4 Super Surround indicator 44
5 SLEEP timer indicator.... 46
6 Main display (Orange)
Disc play elapsed time, program recording end time, volume, TUNER frequency/channel display, various messages, etc.
7 Main display (Green)
Time display, video play/record elapsed time, program recording start time, various messages, etc.
■DVD operation
① CD mode indicator.... 21 Lights when CD mode is on.
②DVD selector indicator Lights when DVD is selected.
③Operation status of DVD section
- Lights when a disc is inserted. - Displays play status graphically. Rotating: playing Stopped: paused
④DTS indicator
⑤ Progressive video indicator 18
⑥Dolby Digital indicator
⑦ Down mix indicator 45
⑧Play sequence indicator
ALL: During all group or all disc random play .... 22 RND: During random play .... 23 1 RND: During one disc random play .... 23
: During repeat 23
A B: During A-B repeat 27
⑨ HDCD indicator....6
⑩Custom Sound Memory indicator 45
⑪Group/Play list/Track/Title/Chapter/Program number display
■VHS operation
①VHS playback indicator
Lights when a video cassette is playing.
②VHS selector indicator
Lights when the selector is in VHS mode.
③Operation status of VHS section
- Lights when a video cassette is inserted. - Flashes when recording or timer recording is attempted with no video cassette inserted. - Displays play status graphically. Rotating: playing Stopped: paused
4 Recording indicator 32
⑤Repeat playback indicator 31
⑥ Tape speed indicator 32
⑦Timer program recording indicator....34
⑧Channel display
■Tuner operation
1 Radio broadcast display 42
MONO: Forced monaural ST: Stereo TUNED: Receiving radio signal
2 Preset indicator 42
3 Band display
Simple setup
STEP 1 Locating
How you set up your speakers can affect the bass and the sound field. Note the following points.
- Place speakers on flat secure bases.
- Placing speakers too close to floors, walls, and corners can result in excessive bass. Cover walls and windows with thick curtains.
●The front left, right and surround speakers are all the same.
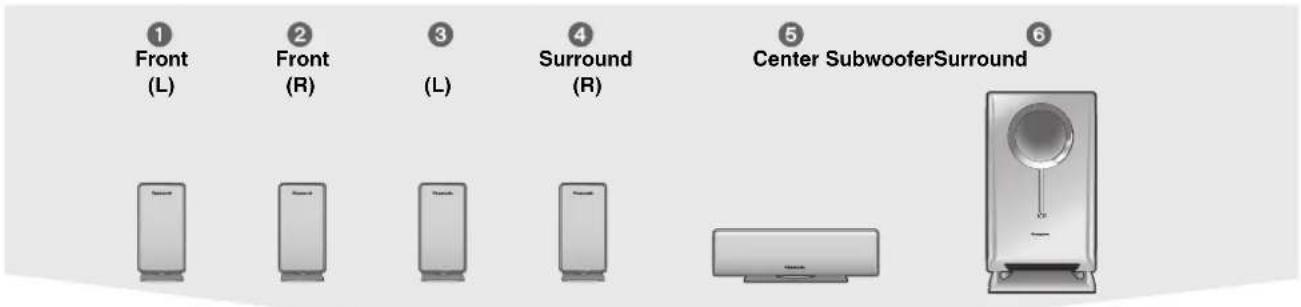
text_image
① Front (L) ② Front (R) ③ (L) ④ Surround (R) ⑤ Center SubwooferSurround ⑥Setup example
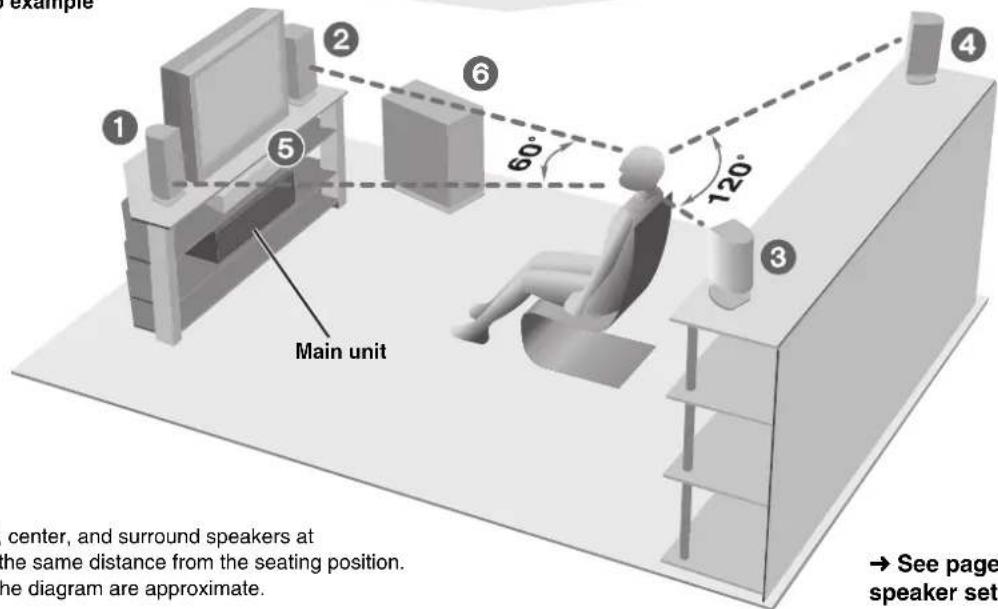
text_image
Example ① ② ③ ④ ⑤ 60° 120° Main unit center, and surround speakers at the same distance from the seating position. The diagram are approximate. → See page speaker set→ See page 47 for other speaker setup options.
- Use only supplied speakers
Using other speakers can damage the unit and sound quality will be negatively affected.
- Set the speakers up on an even surface to prevent them from falling. Take proper precautions to prevent the speakers from falling if you cannot set them up on an even surface.
Main unit
Note
Keep your speakers at least 10 mm ( ^13/_32 ) away from the system for proper ventilation.
Center speaker
- Vibration caused by the center speaker can disrupt the picture if it is placed directly on the television. Put the center speaker on a rack or shelf.
- To prevent the speakers from falling do not place the speakers directly on top of the television.
Subwoofer
Place to the right of the television, on the floor or a sturdy shelf so that it won't cause vibration.
Leave 10 cm (4") at the rear for ventilation.
Notes on speaker use
- You can damage your speakers and shorten their useful life if you play sound at high levels over extended periods.
- Reduce the volume in the following cases to avoid damage.
- When playing distorted sound.
-When the speakers are receiving howling from a record player, noise from FM broadcasts, or continuous signals from an oscillator, test disc, or electronic instrument.
-When adjusting the sound quality.
-When turning the unit on or off.

Caution
- The main unit and supplied speakers are only to be used as indicated in this setup. Failure to do so may lead to damage to the amplifier and/or the speakers, and may result in the risk of fire. Consult a qualified service person if damage has occurred or if you experience a sudden change in performance.
- Do not attempt to attach these speakers to walls using methods other than those described in this manual.
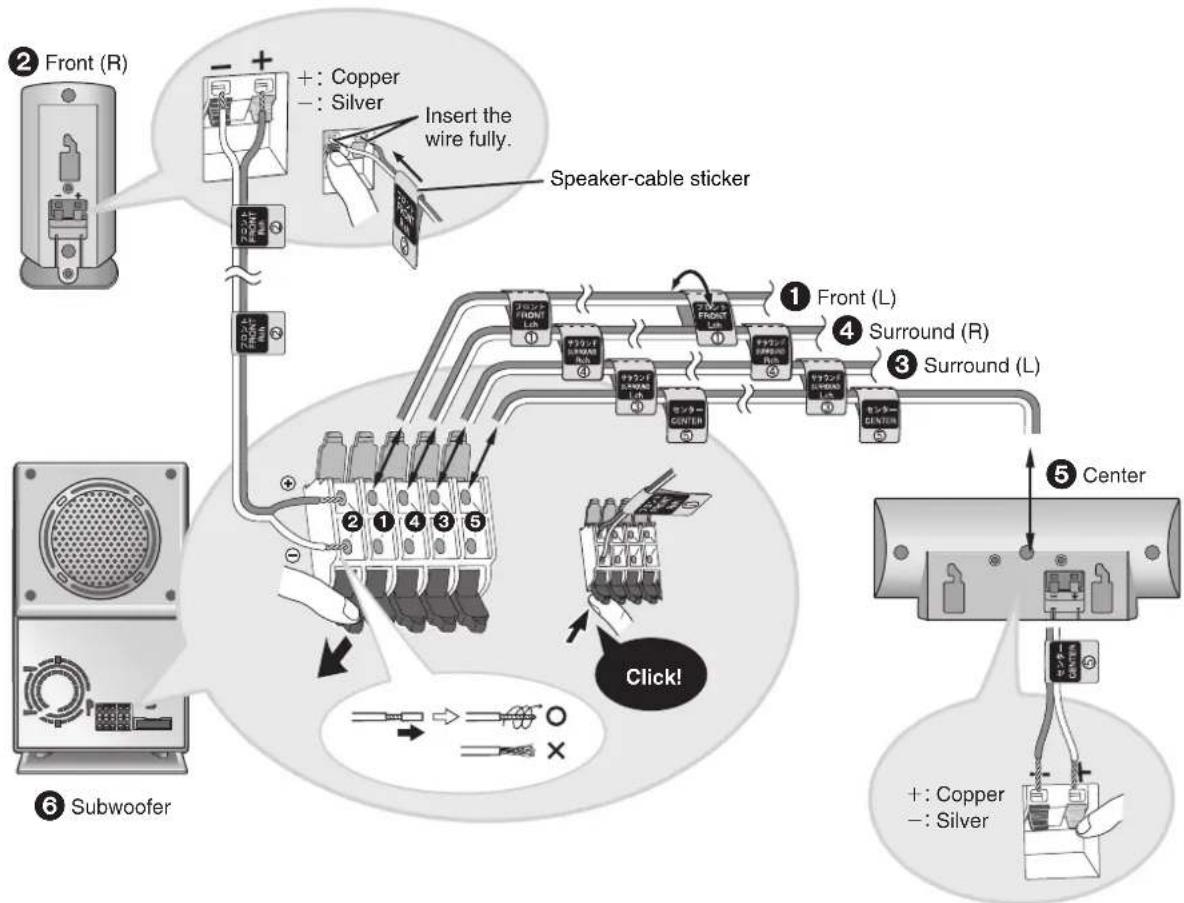
STEP2 Connecting speakers with the subwoofer
Attach the speaker-cable stickers to make connection easier.
Speaker cables
- 3×4-m (13-foot) cables (For Front and Center speakers)
- 2×10-m (33-foot) cables (For Surround speakers)
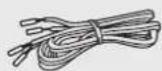
Sheet of speaker-cable stickers
flowchart
graph TD
    A["② Front (R)"] --> B["+ : Copper"]
    B --> C["Insert the wire fully."]
    C --> D["Speaker-cable sticker"]
    E["⑥ Subwoofer"] --> F["① Front (L)"]
    F --> G["④ Surround (R)"]
    G --> H["③ Surround (L)"]
    H --> I["⑤ Center"]
    I --> J["+ : Copper"]
    J --> K["Silver"]
    style A fill:#f9f,stroke:#333
    style E fill:#f9f,stroke:#333
    style F fill:#ccf,stroke:#333
    style G fill:#ccf,stroke:#333
    style H fill:#ccf,stroke:#333
    style I fill:#cfc,stroke:#333
    style J fill:#cfc,stroke:#333
    style K fill:#cfc,stroke:#333
Note
- Never short-circuit positive (+) and negative (−) speaker wires.
- Be sure to connect only positive (copper) wires to positive (+) terminals and negative (silver) wires to negative (−) terminals. Incorrect connection can damage the speakers.
Caution
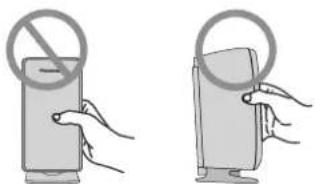
Hold the speakers by the sides. Applying pressure to the front net can damage the speaker.
text_image
Illustration showing two hand gestures: one with a 'no' symbol and the other holding a circular ring, both pointing at a smartphone screen.STEP3 Television
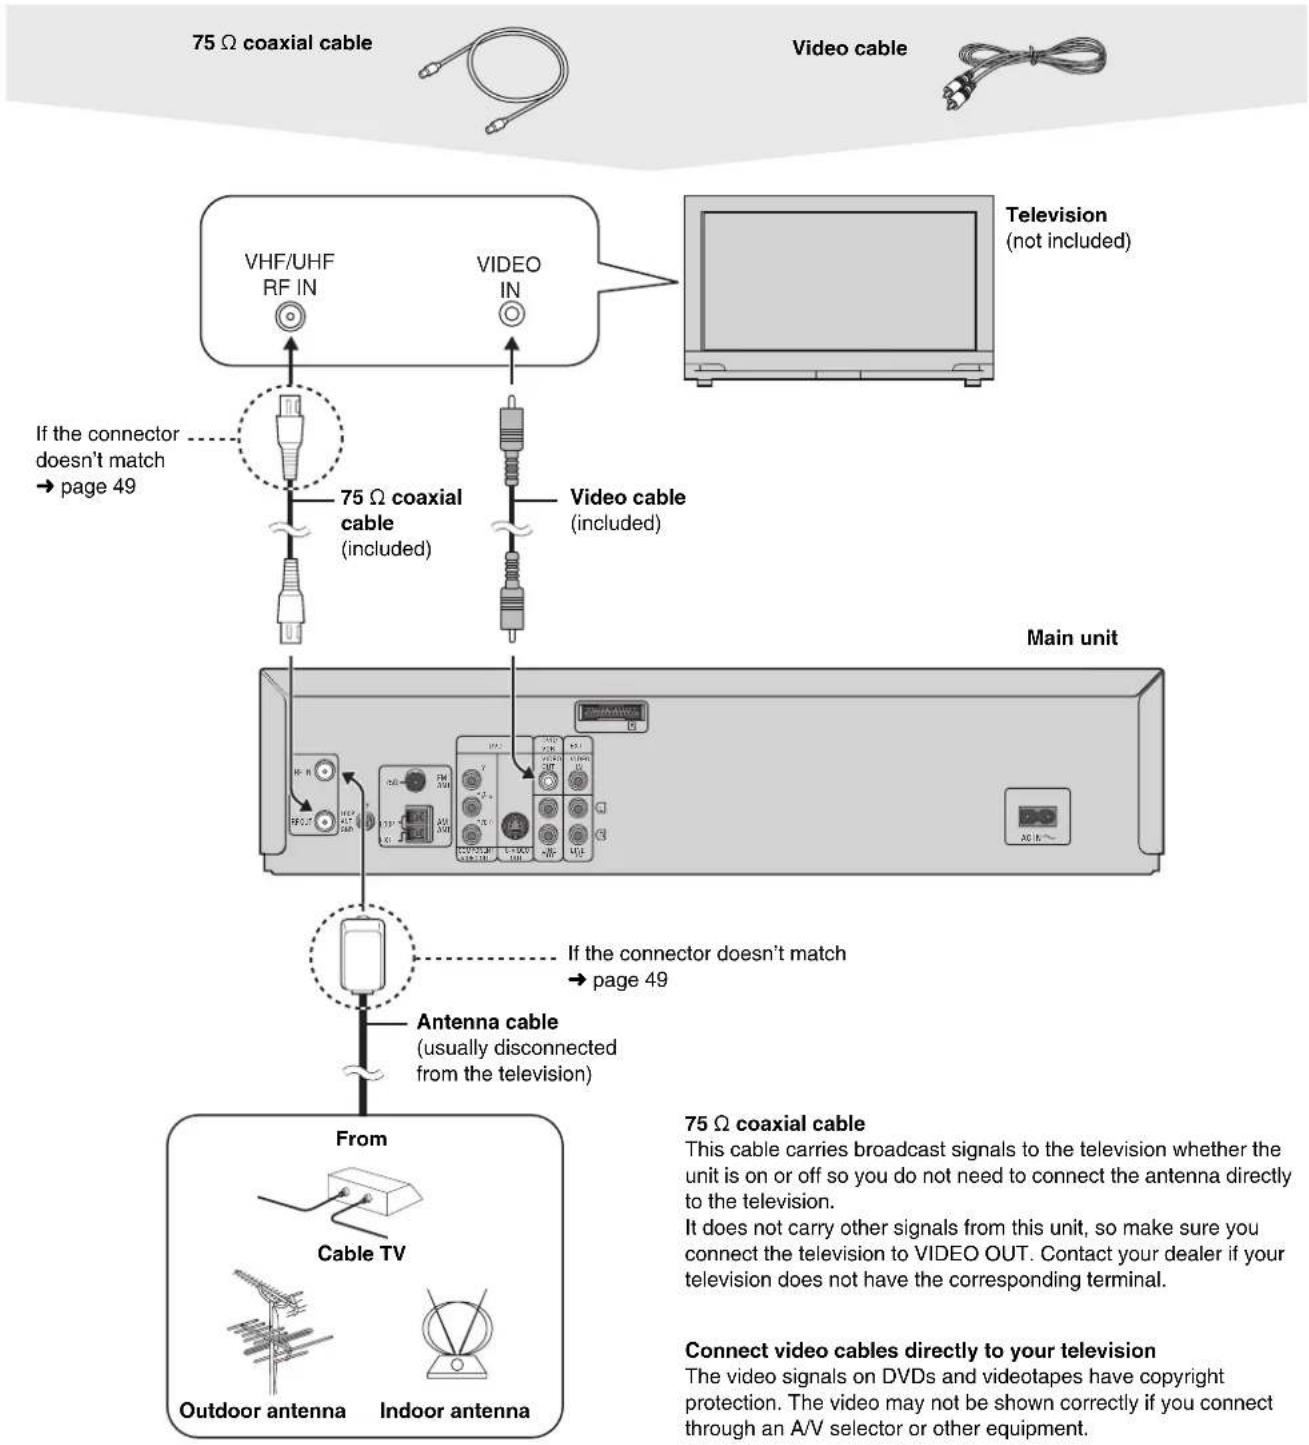
Basic connection
flowchart
graph TD
    A["Main unit"] --> B["75 Ω coaxial cable"]
    B --> C["VHF/UHF RF IN"]
    B --> D["VIDEO IN"]
    B --> E["Television (not included)"]
    B --> F["75 Ω coaxial cable (included)"]
    F --> G["Antenna cable (usually disconnected from the television)"]
    G --> H["Outdoor antenna"]
    G --> I["Indoor antenna"]
    B --> J["Main unit"]
    J --> K["75 Ω coaxial cable"]
    K --> L["Video cable (included)"]
    L --> M["Television (not included)"]
    style A fill:#f9f,stroke:#333
    style B fill:#ccf,stroke:#333
    style K fill:#cfc,stroke:#333
    style L fill:#fcc,stroke:#333
To enjoy cable and satellite television
Connection → page 48
Subscribe to a cable or satellite company.
If irregular coloring occurs on your television
The supplied speakers are designed to be used close to a television, but the picture may be affected with some televisions and setup combinations.
If this occurs, turn the television off for about 30 minutes.
The television's demagnetizing function should correct the problem. If it persists, move the speakers further away from the television.
For better video from DVD
The following connections are for video from the DVD section only. Make sure you have connected the VIDEO OUT terminal with the television to view video from the VHS section ( page 12).
You may need to change the video-input mode on the television to view video from the VHS and DVD sections. Read your television's operating instructions for details.
■Connecting a television with COMPONENT VIDEO terminals
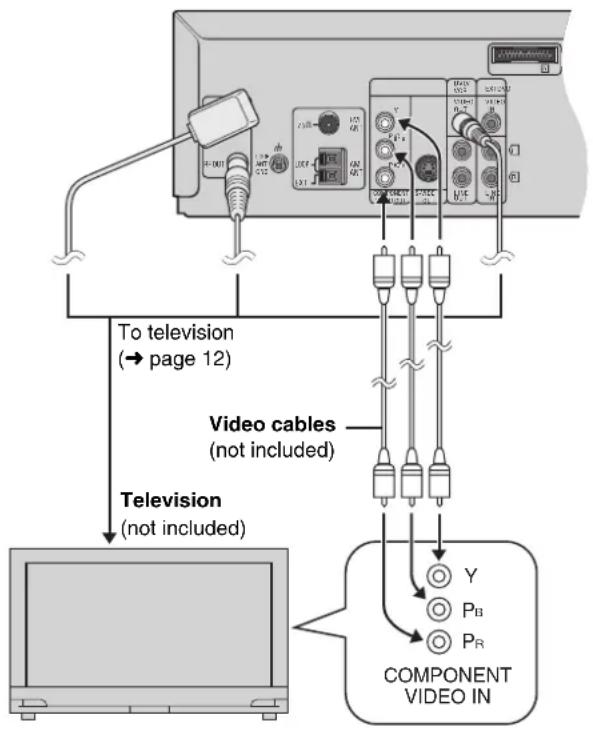
text_image
To television (→ page 12) Television (not included) Video cables (not included) COMPONENT VIDEO IN■Connecting a television with an S-VIDEO IN terminal
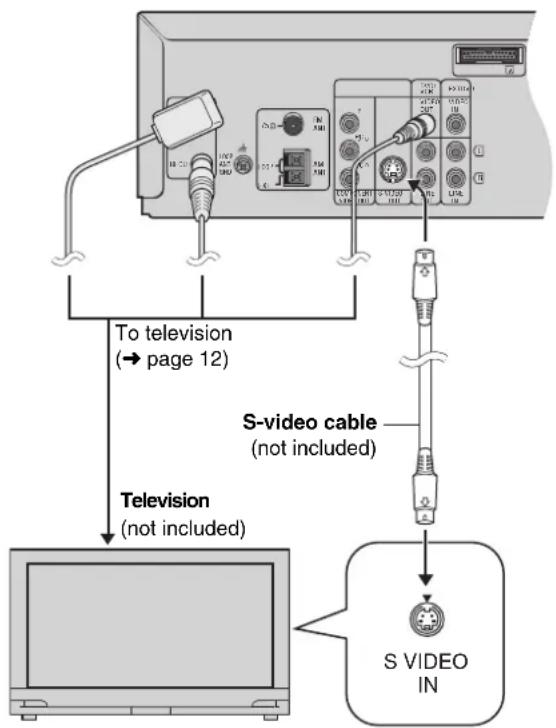
flowchart
graph TD
    A["To television (→ page 12)"] --> B["S-video cable (not included)"]
    B --> C["S VIDEO IN"]
    D["Television (not included)"] --> E["TV setup"]
COMPONENT VIDEO OUT terminal
These terminals can be used for either interlace or progressive output and provide a purer picture than the S-VIDEO OUT terminal. Connection using these terminals outputs the color difference signals ( P_B/P_R ) and luminance signal (Y) separately in order to achieve high fidelity in reproducing colors.
- The description of the component video input terminals depends on the television or monitor (e.g. Y / P_B / P_R , Y / B - Y / R - Y , Y / C_B / C_R ). Connect to terminals of the same color.
- After making this connection, change the black level for a better picture (→ page 28, Video—Black Level Control).
To enjoy progressive video
- Connect to the component video input terminals on a 480P compatible television. (Video will not be displayed correctly if connected to an incompatible television.)
- All televisions manufactured by Panasonic and that have 480P input connectors are compatible. Consult the manufacturer if you have another brand of television.
S-VIDEO OUT terminal
The S-video terminal achieves a more vivid picture than the VIDEO OUT terminal by separating the chrominance (C) and luminance (Y) signals. (Actual results depend on the television.)
Note
Connect to a different terminal group than that you used for the video cable (e.g., "VIDEO 2"). Picture from this unit's VHS will not appear when you use the same group input terminal connections because the S-video terminal input takes precedence.
STEP4
Radio and system connection
System cable

AM loop antenna
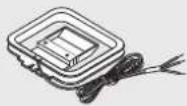
FM indoor antenna

2 AC power supply cords
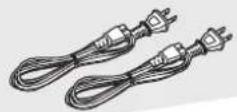
Connect the AC power supply cords after all other connections are complete.
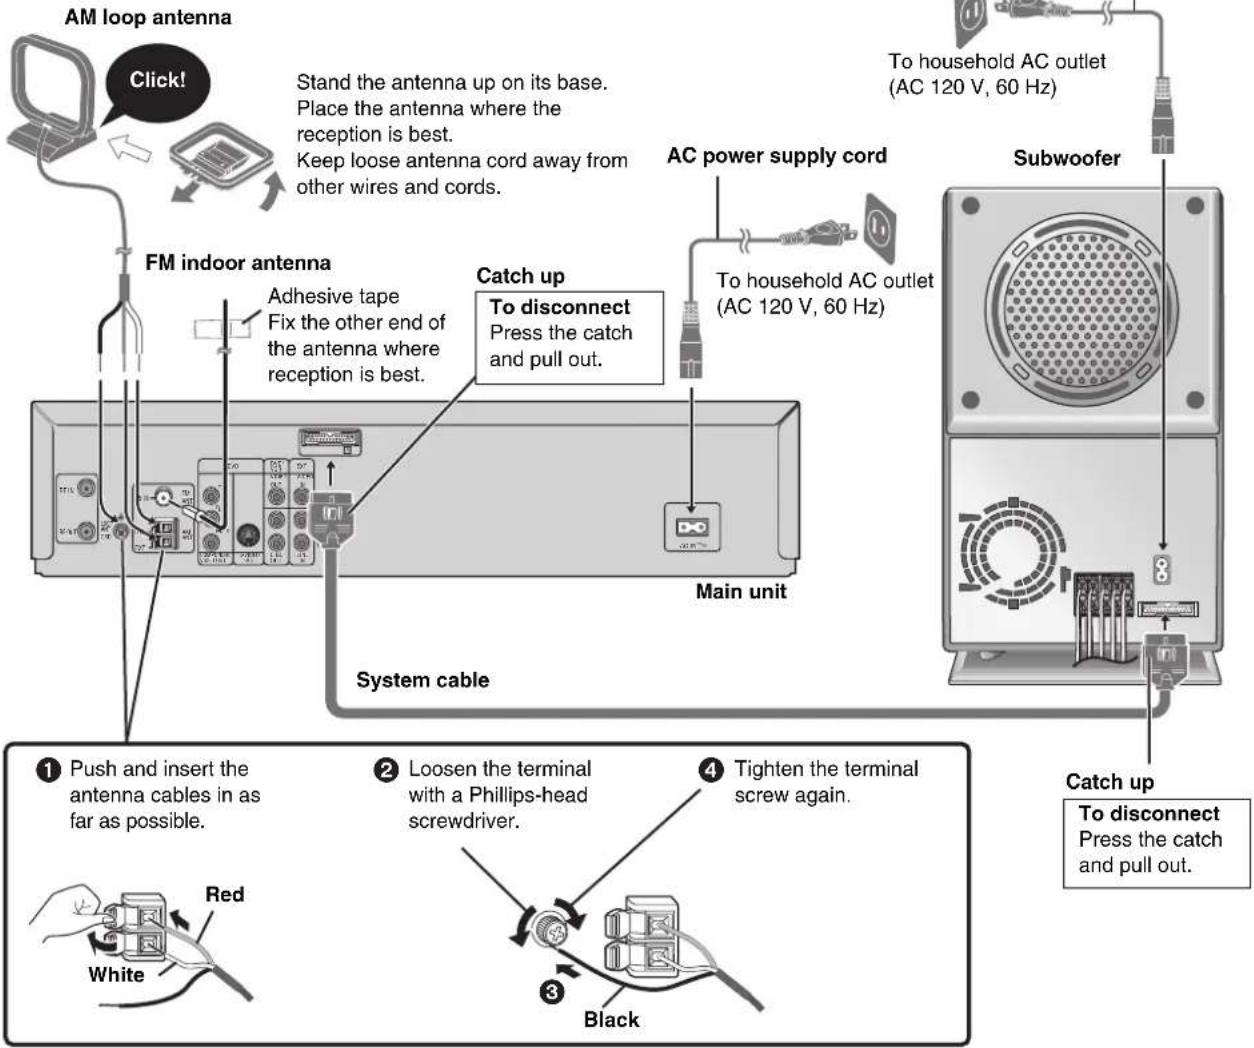
flowchart
graph TD
    A["AM loop antenna"] -->|Click!| B["FM indoor antenna"]
    B --> C["Main unit"]
    C --> D["Subwoofer"]
    D --> E["Catch up"]
    E --> F["To household AC outlet (AC 120 V, 60 Hz)"]
    E --> G["To household AC outlet (AC 120 V, 60 Hz)"]
    E --> H["To household AC outlet (AC 120 V, 60 Hz)"]
    I["Main unit"] --> J["System cable"]
    K["FM indoor antenna"] --> L["Main unit"]
    M["Main unit"] --> N["System cable"]
    O["Main unit"] --> P["System cable"]
    Q["Main unit"] --> R["System cable"]
    S["Main unit"] --> T["System cable"]
    U["Main unit"] --> V["System cable"]
    W["Main unit"] --> X["System cable"]
    Y["Main unit"] --> Z["System cable"]
    AA["Main unit"] --> AB["System cable"]
    AC["Main unit"] --> AD["System cable"]
    AE["Main unit"] --> AF["System cable"]
    AG["Main unit"] --> AH["System cable"]
    AI["Main unit"] --> AJ["System cable"]
    AK["Main unit"] --> AL["System cable"]
    AM["Main unit"] --> AN["System cable"]
    AO["Main unit"] --> AP["System cable"]
    AQ["Main unit"] --> AR["System cable"]
    AS["Main unit"] --> AT["System cable"]
    AU["Main unit"] --> AV["System cable"]
    AW["Main unit"] --> AX["System cable"]
    AY["Main unit"] --> AZ["System cable"]
    BA["Main unit"] --> BB["System cable"]
    BC["Main unit"] --> BD["System cable"]
    BE["Main unit"] --> BF["System cable"]
    BG["Main unit"] --> BH["System cable"]
    BI["Main unit"] --> BJ["System cable"]
    BK["Main unit"] --> BL["System cable"]
    BM["Main unit"] --> BN["System cable"]
    BO["Main unit"] --> BP["System cable"]
    BQ["Main unit"] --> BR["System cable"]
    BS["Main unit"] --> BT["System cable"]
    BU["Main unit"] --> BV["System cable"]
    BW["Main unit"] --> BX["System cable"]
    BY["Main unit"] --> BZ["System cable"]
    CA["Main unit"] --> CB["System cable"]
    CC["Main unit"] --> CD["System cable"]
    DD["Main unit"] --> DE["System cable"]
    EF["Main unit"] --> GF["System cable"]
    GH["Main unit"] --> GHB["Main unit"]
    GHB --> GHC["Main unit"]
    GHC --> GHD["Main unit"]
    GHD --> GHE["Main unit"]
    GHE --> GHF["Main unit"]
    GHF --> GHG["Main unit"]
    GHG --> GHH["Main unit"]
    GHH --> GHI["Main unit"]
    GHI --> GHJ["Main unit"]
    GHJ --> GHK["Main unit"]
    GHK --> GHL["Main unit"]
    GHL --> GHM["Main unit"]
    GHM --> GHN["Main unit"]
    GHN --> GHO["Main unit"]
    GHO --> GHP["Main unit"]
    GHP --> GHQ["Main unit"]
    GHQ --> GHR["Main unit"]
    GHR --> GHS["Main unit"]
    GHS --> GHU["Main unit"]
    GHU --> GHV["Main unit"]
    GHV --> GHW["Main unit"]
    GHW --> GHX["Main unit"]
    GHX --> GHY["Main unit"]
    GHY --> GHZ["Main unit"]
AC power supply cord
AC power supply cords
Connect both AC power supply cords to enjoy all the features of this system.
Demo function
When the unit is first plugged in, a demonstration of its functions may be shown on the display.
If the demo setting is off, you can show a demonstration by selecting "DEMO ON" in the standby mode.
Press and hold [-DEMO] on the main unit.
The display changes each time you press and hold the button. DEMO OFF←→DEMO ON
While in the standby mode, select "DEMO OFF" to reduce power consumption.
Conserving power
The main unit consumes a small amount of power, even when it is turned off. The amount of power used depends on the display setting ( page 40):
BRIGHT: 3.5 W DIM: 3.2 W OFF: 12.9 W
Audio memory backup
To save power when the unit is not to be used for a long time, unplug it from the household AC outlet.
You will need to reset some memory items after plugging the unit.
STEP5 Plug-in Auto Tuning
text_image
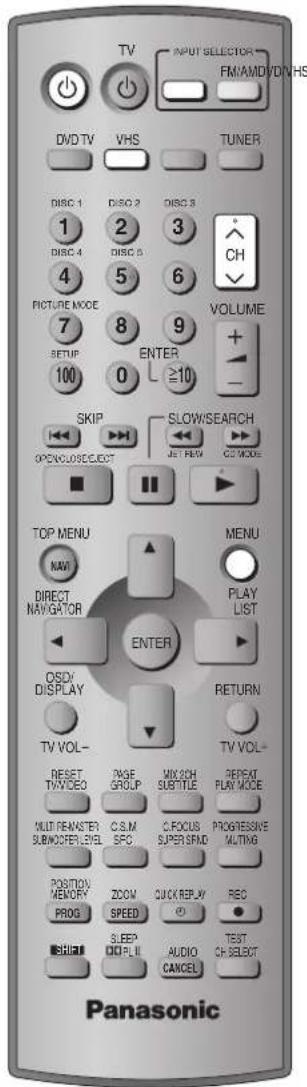
TV INPUT SELECTOR FM/AMD/DIV/HS DVD TV VHS TUNER DISC 1 DISC 2 DISC 3 1 2 3 CH DISC 4 DISC 5 4 5 6 PICTURE MODE 7 8 9 VOLUME SETUP ENTER 100 0 ≥10 SKIP SLOW/SEARCH OPEN/SEE/COOCT JET REM CD MODE TOP MENU MENU NAV DIRECT NAV/GATOR PLAY LIST OSDI/ DISPLAY ENTER RETURN TV VOL- TV VOL- RESET TV/VIDEO PAGE GROUP MIX 2CH SUBTITLE PEREAT PLAY MODE MULTI REMASTER SUBMOSTER LEVEL C.S.M SFC C.FOCUS SUPER SRMD PROGRESSIVE MULTIMAG POSITION MEMORY PROG ZOOM SPEED QUICK/REPLY REC SLEEP OFF II AUDIO CANCEL TEST CH SELECT Panasonic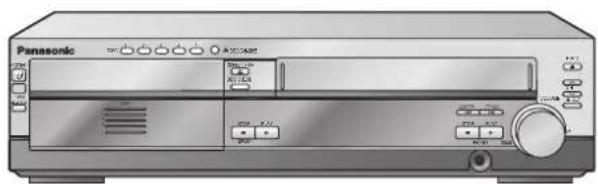
natural_image
Front view of a Panasonic audio workstation (no visible text or labels on device body)After plugging the unit into your household AC outlet and pressing [☐] to turn the unit on for the first time, the unit automatically tunes in all the channels it can receive and sets the clock.
The unit determines the type of transmission, TV or CATV, as follows:
TV: when there are less than 5 CATV channels.
CATV: when there are 5 or more CATV channels.
Preparation
- Confirm that the antenna is connected correctly.
- Turn on the television and select the video input for the VHS.
- Press [VHS] to put the remote control in VHS mode.
Press [⏻] to turn on the unit.
Plug-in Auto Tuning starts and the unit puts the stations it can receive into channels ( page 39, Channel range).
![PANASONIC SC-HT820V - Press [⏻] to turn on the unit. - 1](/content/2026/05/817091/images/b2f05c7a65bc13f49c71ff3a809ec4a1208372711bc80b270393da5115557304.jpg)
text_image
2 AUTO CHANNEL SET PROCEEDING END :MENUThe unit starts auto clock setting when finished, then displays the time.
Note
If auto tuning stops partway (by changing the source, turning the unit off, or due to a power failure.)
1 Disconnect the AC power supply cord on the main unit and then reconnect it.
2 Turn on the main unit.
To cancel partway
Press [MENU].
■To start Plug-in Auto Tuning again (after relocation, for example)
Preparation
- Press [⏻] to turn on the unit.
- Make sure there is no video cassette tape loaded in the unit.
- Press [DVD/VHS] to select "VHS" as the source.
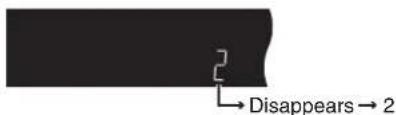
1 Press and hold [v CH] and [^ CH] on the main unit simultaneously for 3 seconds until the channel changes to "2".
text_image
2 Disappears → 22 Disconnect the AC power supply cord on the main unit and then reconnect it.
3 Turn on the main unit. Plug-in Auto Tuning restarts.
Antenna system and channel captions all revert to the default values when you perform the procedure above. Reset the timer recording settings. (If necessary reset the clock first. → page 38, CLOCK SET)
■ To set the channels manually ( page 39).
■If the unit couldn't set the clock automatically
The MANUAL CLOCK SET screen appears. Set the time manually ( page 38).

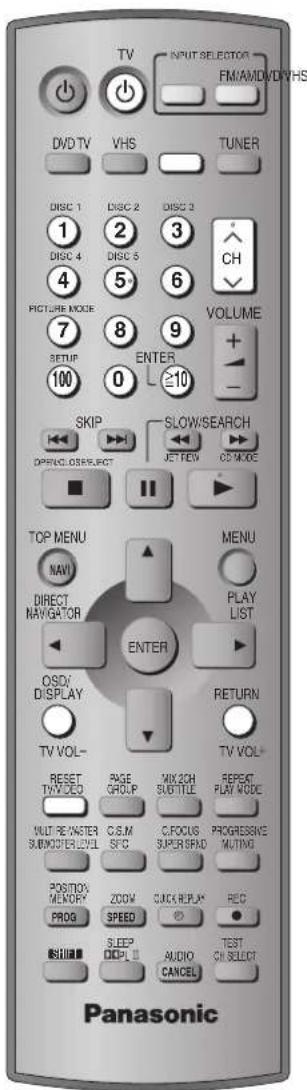
STEP6 Operating the television
text_image
TV INPUT SELECTOR FM/AMD/DVD/VHS DVD TV VHS TUNER DISC 1 DISC 2 DISC 3 1 2 3 CH DISC 4 DISC 5 4 5 6 FIGURE MODE 7 8 9 VOLUME SETUP ENTER 100 0 ≥10 SKIP SLOW/SEARCH OPRUD/OSS/REF JET REW CD MODE TOP MENU MENU DAVID PLAY LIST DIRECT NAVGATOR ENTER OSD/ DISPLAY RETURN TV VOL- TV VOL- RESET PAGE MIX 2CH REPEAT TWO/DED GROUP SUBTITLE PLAY MODE MULTI RE MASTER C.S.M. C.FOCUS PROGRESSIVE SUBMOVER LEVEL SPIC SUPER SRAD MUTING POSITION MEMORY ZOOM CLOCK/REPLAY* PROG SPEED AUDIO CANCEL TEST CH SELECT SPEED COLD■TV maker setting
You can control the television by entering the remote control code.
1 Refer the chart below for the code for your television.
2 Aiming the remote control at the television
While pressing and holding [TV] ( ) press the numbered buttons to enter the code number.
• Example: To select 01, press [0] → [1].
- The remote control outputs the on/off signal. If the code is correct, the equipment turns on or off. If it doesn't, try entering another code.
Note
- If your television brand is not listed or if the code listed for your television does not allow control of your television, this remote control is not compatible with your television.
● Reenter the codes after you change the batteries.
■TV operation
| Operation Buttons | |
| Power on/ standby | [∅TV] |
| Remote control TV mode | [TV]●Switch the remote control mode to TV. Press before doing TV operations. When in TV mode, the [TV] button lights each time you press an operation button. |
| TV/Video switch | [TV/VIDEO] |
| Selecting channels | [^ CH], [∨ CH] or numbered buttons [1-9, 100, 0, ≧10/ENTER].●[≥10/ENTER] is used to confirm channel selection on some televisions manufactured by other companies. |
| Adjusting volume | [TV VOL-] [TV VOL+] |
| Manufacturer | Code No. | Manufacturer | Code No. |
| Panasonic | 01, 02 | PHILIPS | 06 |
| FISHER | 14 | PIONEER | 02, 10, 19 |
| G.E. | 02, 03, 07, 09 | QUASAR | 02 |
| GOLD STAR | 07, 15 | RCA | 03, 07, 09, 13, 23, 24, 25 |
| HITACHI | 05, 07 | SANYO | 14 |
| JVC | 12 | SHARP | 08, 21 |
| LXI | 03, 06, 07, 10, 14, 15 | SONY | 04 |
| MAGNAVOX | 06, 07, 11, 15, 22 | SYLVANIA | 06, 07, 15 |
| MITSUBISHI | 07, 15, 16, 21 | SYMPHONIC | 17 |
| NEC | 07, 15 | TOSHIBA | 10, 21 |
| PHILCO | 06, 07 | ZENITH | 18, 20 |
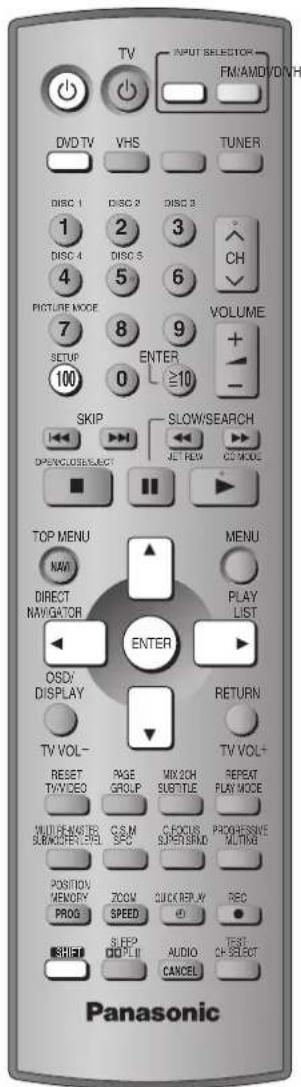
STEP 7 DVD QUICK SETUP
text_image
TV INPUT SELECTOR FM/AMD/DVD/VCH DVD TV VHS TUNER DISC 1 DISC 2 DISC 3 1 2 3 CH 4 5 6 PICTURE MODE 7 8 9 VOLUME + - SETUP 0 ≥10 ENTER SKIP SLOW/SEARCH D:\WINDOWS\CNCC JET\ Guam CS\MODE TOP MENU MENU NAV DIRECT NAVIGATOR PLAY LIST ENTER OSDI DISPLAY RETURN TV VOL- RESET TV\VIDEO PAGE GROUP MIX 2CH SUBTITLE REPEAT PLAY MODE MODI PREWATER SUBMICPENCIAL CSM SPEC C-FOCUS SUPER SMOID PROGRESSIVE MUTING POSITION MENGRY ZOOM QUICK REP.VV REC PROG SPEED TIME AUDIO TEST ON-SELECT CANCEL PanasonicTurn on the television and select the video input for the DVD.
The QUICK SETUP screen assists you to make necessary settings such as:
- Menu Language (→ page 29)
•TV Type (→ page 28)
•TV Aspect (→ page 28)

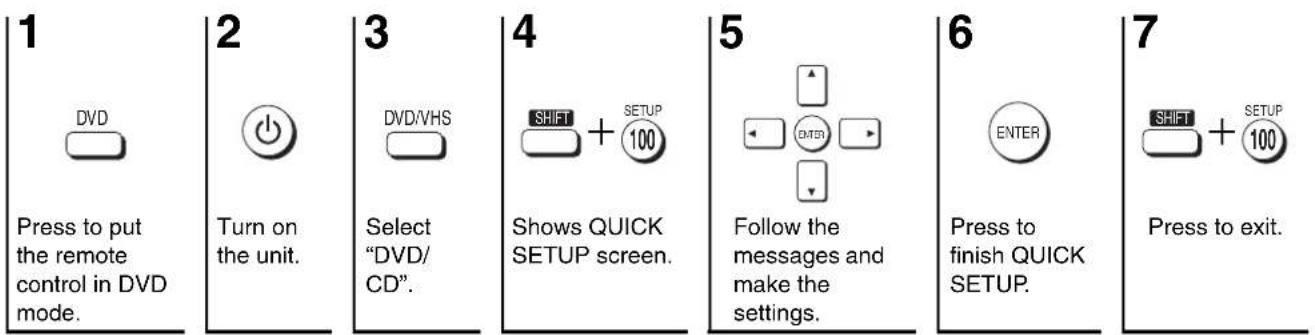
flowchart
graph LR
    1["Press to put the remote control in DVD mode."] --> 2["Turn on the unit."]
    2 --> 3["Select "DVD/CD""]
    3 --> 4["Shows QUICK SETUP screen."]
    4 --> 5["Follow the messages and make the settings."]
    5 --> 6["Press to finish QUICK SETUP."]
    6 --> 7["Press to exit."]
To change these settings later
Select "QUICK SETUP" in "Others" tab ( page 29).
Turn on the television and select the appropriate video input for the DVD.
text_image
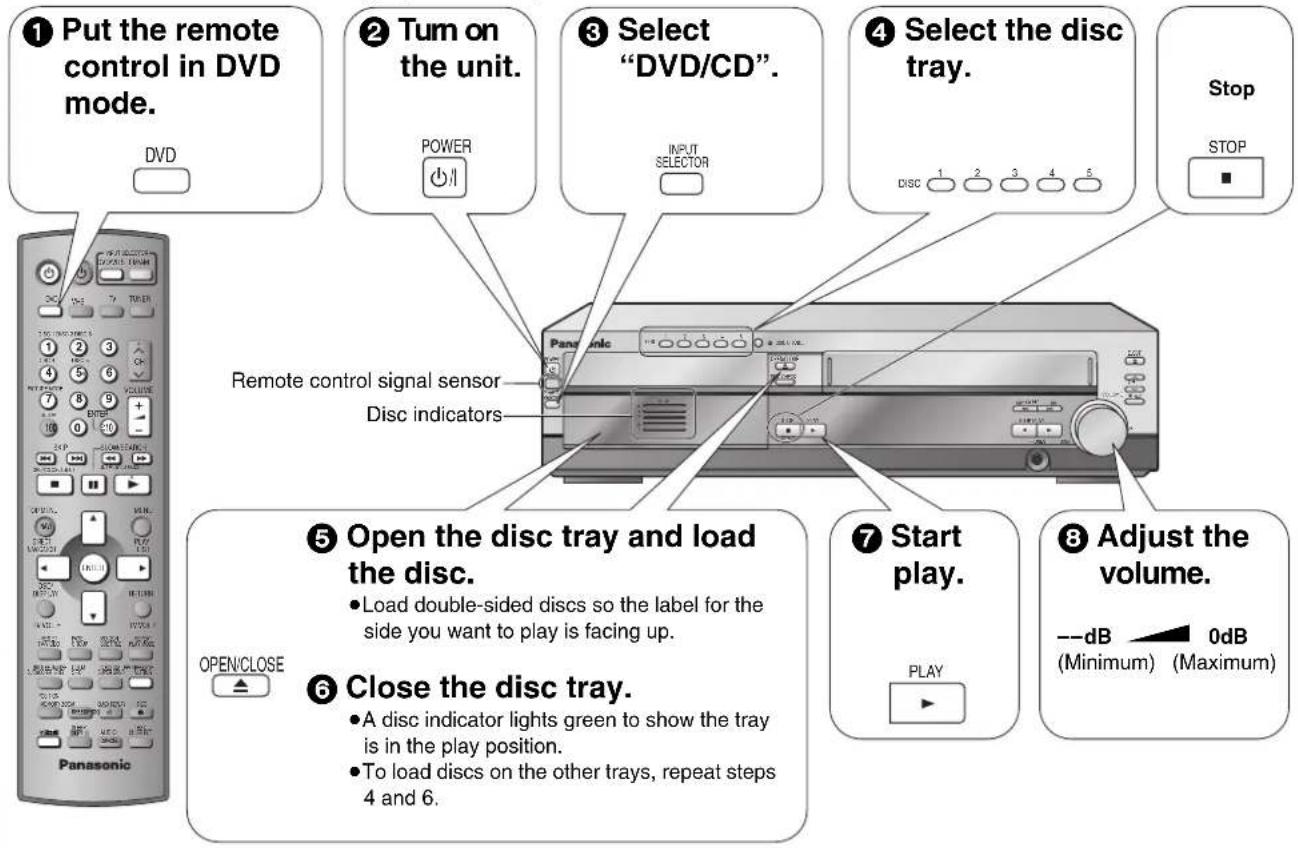
① Put the remote control in DVD mode. DVD ② Turn on the unit. POWER ③ Select "DVD/CD". INPUT SELECTOR ④ Select the disc tray. DISC 1 2 3 4 5 Stop STOP Remote control signal sensor Disc indicators ⑤ Open the disc tray and load the disc. ● Load double-sided discs so the label for the side you want to play is facing up. ⑥ Close the disc tray. ● A disc indicator lights green to show the tray is in the play position. ● To load discs on the other trays, repeat steps 4 and 6. ⑦ Start play. PLAY ⑧ Adjust the volume. --dB 0dB (Minimum) (Maximum)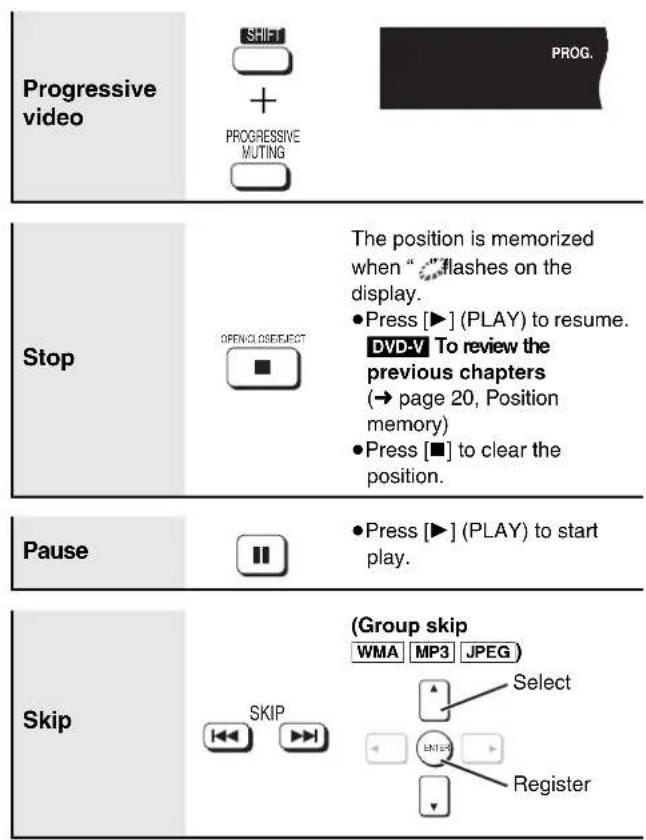
text_image
Progressive video SHIFT + PROGRESSIVE MUTING PROG. Stop OPENCLOSESELECT The position is memorized when "flashes on the display. Press [▶] (PLAY) to resume. DVD-V To review the previous chapters (→ page 20, Position memory) Press [■] to clear the position. Pause Press [▶] (PLAY) to start play. Skip SKIP (Group skip WMA MP3 JPEG Select ENTER Register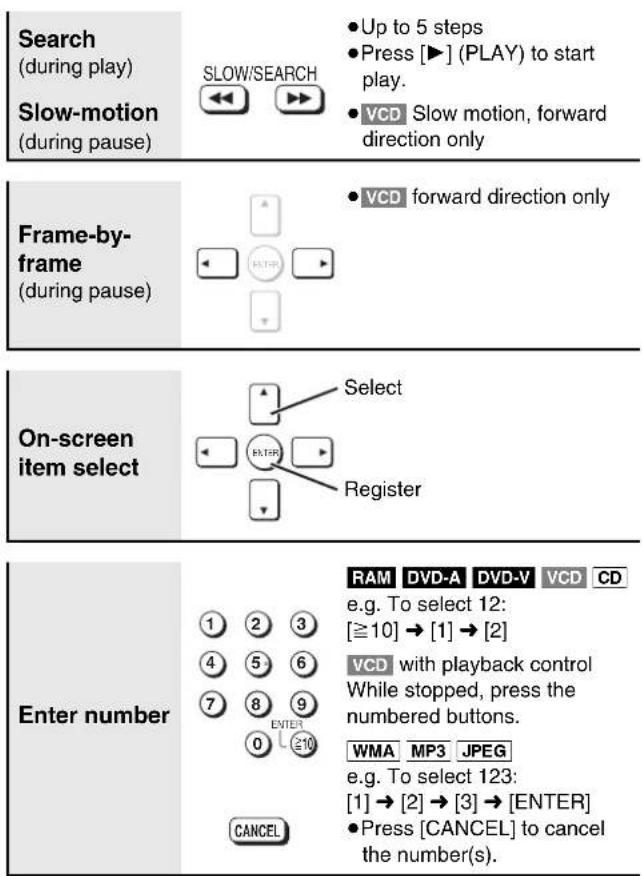
text_image
Search (during play) Slow-motion (during pause) SLOW/SEARCH Up to 5 steps Press [▶] (PLAY) to start play. VCD Slow motion, forward direction only Frame-by- frame (during pause) VCD forward direction only On-screen item select Select Register Enter number RAM DVD-A DVD-V VCD CD e.g. To select 12: [≥10] → [1] → [2] VCD with playback control While stopped, press the numbered buttons. WMA MP3 JPEG e.g. To select 123: [1] → [2] → [3] → [ENTER] Press [CANCEL] to cancel the number(s).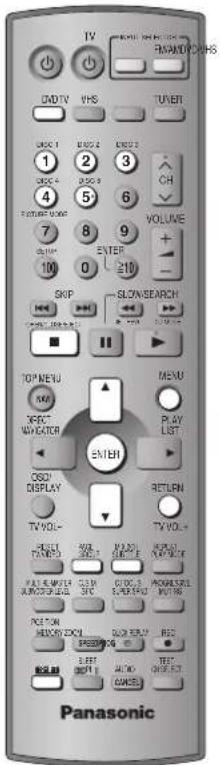
text_image
TV ENAMOUNTING DVD TV IHS TUNER 1 2 3 4 5 6 7 8 9 ENTER 100 0 ≥10 SKIP SLOVSEARCH TOP MENU MENU DIRECT VIV CATCH ENTER OSCI DISPLAY RETURN TV VOL. NEXT TANGUO NEXT SAGUO NEXT PLATE NEXT METER MINIMUM ORDER NEXT ORDER NEXT ORDER NEXT ORDER NEXT ORDER NEXT ORDER NEXT ORDER NEXT ORDER NEXT ORDER NEXT ORDER NEXT ORDER NEXT ORDER NEXT ORDER NEXT ORDER NEXT ORDER NEXT ORDER NEXT ORDER NEXT ORDER NEXT ORDER NEXT ORDER NEXT ORDER NEXT ORDER NEXT ORDER NEXT ORDER NEXT ORDER NEXT ORDER NEXT ORDER NEXT ORDER NEXT ORDER NEXT ORDER NEXT ORDER NEXT ORDER NEXT ORDER NEXT ORDER NEXT Jordan NEXT Jordan NEXT Jordan NEXT Jordan NEXT Jordan NEXT Jordan NEXT Jordan NEXT Jordan NEXT Jordan NEXT Jordan NEXT Jordan NEXT Jordan NEXT Jordan NEXT Jordan NEXT Jordan NEXT Jordan NEXT Jordan NEXT Jordan NEXT Jordan NEXT Jordan NEXT Jordan NEXT Jordan NEXT Jordan NEXT Jordan NEXT Jordan NEXT Jordan NEXT Jordan NEXT Jordan NEXT Jordan NEXT Jordan NEXT Jordan NEXT Jordan NEXT Jordan NEXT Jordan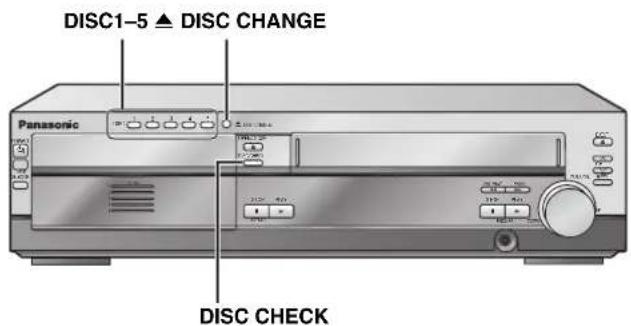
text_image
DISC1-5 ▲ DISC CHANGE Panasonic DISC CHECK
text_image
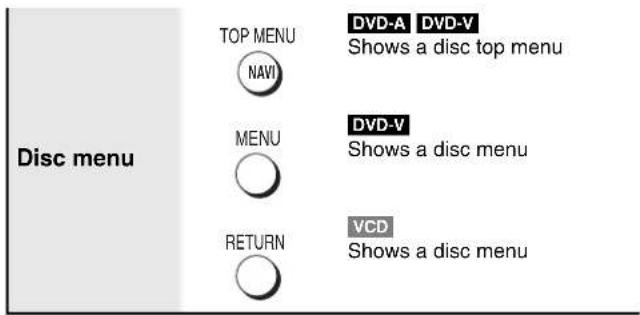
Disc menu TOP MENU DAVD-A DVD-V Shows a disc top menu NAVI MENU DVD-V Shows a disc menu VCD RETURN Shows a disc menu
text_image
Return to previous screen RETURN
text_image
Information screen MIX 2CH SUBTITLE WMA MP3 JPEG Turns the information screen on/off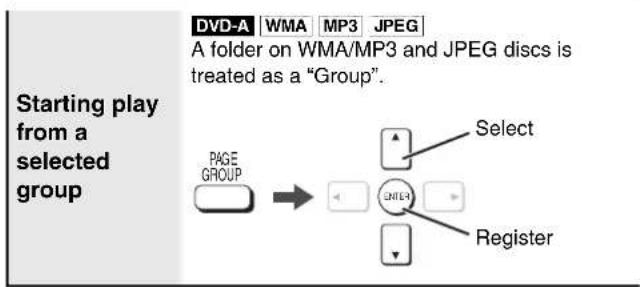
flowchart
graph LR
    A["Starting play from a selected group"] --> B["PAGE GROUP"]
    B --> C["Select"]
    B --> D["ENTER"]
    B --> E["Register"]
text_image
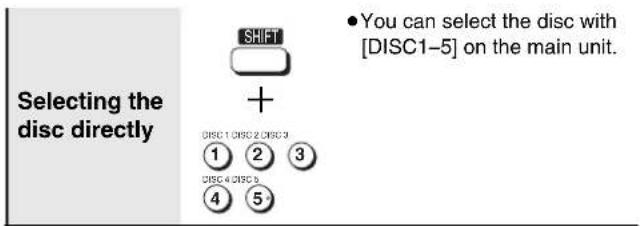
Selecting the disc directly SHIFT + • You can select the disc with [DISC1-5] on the main unit. DISC 1 DISC 2 DISC 3 ① ② ③ DISC 4 DISC 5 ④ ⑤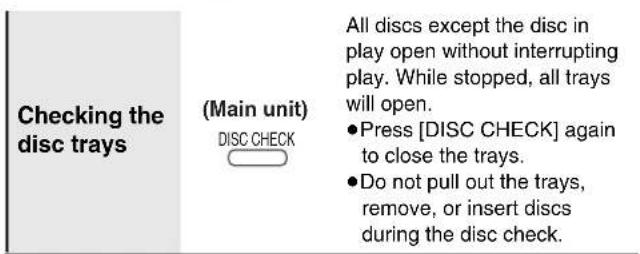
text_image
Checking the disc trays (Main unit) DISC CHECK All discs except the disc in play open without interrupting play. While stopped, all trays will open. •Press [DISC CHECK] again to close the trays. •Do not pull out the trays, remove, or insert discs during the disc check.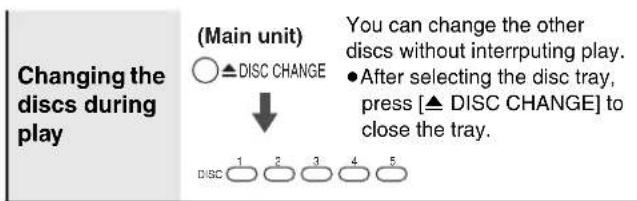
text_image
Changing the discs during play (Main unit) ○ ▲DISC CHANGE ↓ DISC 1 2 3 4 5 You can change the other discs without interrupting play. ● After selecting the disc tray, press [▲ DISC CHANGE] to close the tray.Note
Discs continue to rotate while menus are displayed. Press [■] when you finish to preserve the unit's motor and your television screen.
If you are experiencing problems, refer to troubleshooting ( pages 50–52).

text_image
TV MAIN SELECTOR FM/AM/DCN/MS DVD TV VHS TURER 1 2 3 4 5 6 7 8 9 VOLUME + - ENTER 10 0 ≥10 SKIP SLOW SEARCH PANANA TOP MENU MENU DIRECT NO SISTER EATER CORN DISPLAY RETURN TV VOL. PRICE ORDER MANNER PLAY LIST TV VOL. INPUT ORDER DATA DATA FLOOR SPRING RED FORUM STRAW RUNS OUTPUT VOLUME PACS SPEED LAST TEMP REC. RETURN SELECT OK/Cancel TEST CONTROL PanasonicPosition memory
(Only when the elapsed play time can be displayed
JPEG: Works with all JPEG content)
This position is memorized even after turning off the unit, changing the source or moving the disc out of the play position.
Press [POSITION MEMORY].
Position memorized
![PANASONIC SC-HT820V - Press [POSITION MEMORY]. - 1](/content/2026/05/817091/images/8d435b41ebed09d69605232b413978e12523cf9f9e53ad079003750e14ca1bab.jpg)
- Up to 5 discs.
- When the sixth disc is memorized, the earliest position is replaced.
- You cannot recall the position in CD Mode (→ page 21).
When the unit is turned on, "DVD/CD" is reselected or the disc comes to the play position,
Press [▶] (PLAY) to start play from that position.
To review the previous chapters DVD-V
Press [▶] (PLAY) while the following message is displayed.
Press PLAY to Preview Chapters
Do not press [▶] (PLAY) if you want to cancel review.
Zoom
RAM DVD-V VCD
Press [ZOOM] several times to select the preset aspect ratio or "Auto". (Just Fit Zoom)
Fine adjustments (Manual Zoom)
Press [◀▶].
-from ×1.00 to ×1.60 (in 0.01 units)
-from ×1.60 to ×2.00 (in 0.02 units)
![PANASONIC SC-HT820V - Press [ZOOM] several times to select the preset aspect ratio or "Auto". (Just Fit Zoom) - 1](/content/2026/05/817091/images/d57107ba9eb9aa6ae4b1a6dc43977f68c3dcf473db96395ae0ecc261ad3f8afd.jpg)
![PANASONIC SC-HT820V - Press [ZOOM] several times to select the preset aspect ratio or "Auto". (Just Fit Zoom) - 2](/content/2026/05/817091/images/7a25f7b862f7196517f0fd311f64037fa357a5cd1d95f7c005ac6848ca796de1.jpg)
![PANASONIC SC-HT820V - Press [ZOOM] several times to select the preset aspect ratio or "Auto". (Just Fit Zoom) - 3](/content/2026/05/817091/images/11e100e34f5b32087752e9a2079ed5a905046219662b31707ecc8a86b9f8e03c.jpg)
![PANASONIC SC-HT820V - Press [ZOOM] several times to select the preset aspect ratio or "Auto". (Just Fit Zoom) - 4](/content/2026/05/817091/images/2766fb8da92b78c1c3afa79ff7e4eea8f1aadeef5a0aacf2639ce831954a4ab0.jpg)
![PANASONIC SC-HT820V - Press [ZOOM] several times to select the preset aspect ratio or "Auto". (Just Fit Zoom) - 5](/content/2026/05/817091/images/19b54abe0ccd843a8057a023438ebe7407538706bebb0b2cb1d0e179be3d5cf8.jpg)
![PANASONIC SC-HT820V - Press [ZOOM] several times to select the preset aspect ratio or "Auto". (Just Fit Zoom) - 6](/content/2026/05/817091/images/b11bdf2aa9eb29d00e4330f1e7a3a46635e6ae475b136cb0144fb01434d9c2ad.jpg)
![PANASONIC SC-HT820V - Press [ZOOM] several times to select the preset aspect ratio or "Auto". (Just Fit Zoom) - 7](/content/2026/05/817091/images/9091301f53d7c3f654730a1e4483c59aa3001735248b270fcb6afb704da74275.jpg)
Position memory
Memorizes the position to resume play.
Zoom
Expands the letterbox picture to fit the screen.
Subtitle
Changes the subtitle language.
Audio
Changes the soundtrack.
See below for details.

Subtitle
DVD-V (with multiple subtitles) VCD (SVCD only)
RAM (On/Off only)
Press [SUBTITLE] several times to select the subtitle language.
To clear/display the subtitles
Press [◀▶] to select "On" or "Off".
![PANASONIC SC-HT820V - Press [SUBTITLE] several times to select the subtitle language. - 1](/content/2026/05/817091/images/287ec0abe53c60154a83691dbdb7c3d93ed481d3bf9224a128584967f59570b7.jpg)
Menu
Subtitle
Off
Audio
DVD-A DVD-V (with multiple soundtracks) RAM VCD
Press [SHIFT]+[AUDIO]
several times to select the soundtrack.
RAM VCD
You can use this button to select "L", "R" or "LR".
DVD-V (Karaoke discs)
Press [◀▶] to select "On" or "Off" of vocals.
Read the discs instructions for details.

Menu
Audio
1
Signal type/data
LPCM/PPCM/D Digital/DTS/MPEG: Signal type
kHz (Sampling frequency)/bit/ch (Number of channels)
Example:
3/2 .1ch
| .1: Low frequency effect(not displayed if there is no signal) |
| 0: No surround1: Mono surround2: Stereo surround (left/right) |
| 1: Center2: Front left+Front right3: Front left+Front right+Center |
text_image
TV PUNT SELECTOR FRAME: DLYHS DVD TV VHS TUNER 1 2 3 4 5 6 7 8 9 100 0 ≥10 VOLUME ENTER SKIP SLOMSEARCH OFFICE CONTROL TCP MENU MENU DIRECT NAVATOR PLAY LIST OSSO RETURN DISPLAY TV VOL- ROLL NEXT ON/OFFIC CLASSIC MINISTRY TOMES MEMORY TWO SPEED CORN ROLL HOLD SPEED GARL MINISTRY TOMES TITLE ON/OFFIC MINISTRY TOMES TITLE ON/OFFIC MINISTRY TOMES TITLE ON/OFFIC MINISTRY


Multi Re-master
Enjoys more natural sound.


Page skip
Selects still pictures.


Sequential play (CD Mode)
Plays discs in succession.

Quick replay
Replays a scene.
See below for details.

Multi Re-master
RAM DVD-V (Discs recorded with 48 kHz only)
DVD-A (Discs recorded with 44.1 kHz and 48 kHz only)
VCD CD
- During 2ch output of these discs, this feature gives you a more natural sound by adding the higher frequency signals not recorded on the disc.
- During multi-channel output of these discs, this feature reproduces the frequencies lost during recording to give you a sound closer to the original.
WMA MP3 (Disc recording is other than 8 kHz, 16 kHz, 32 kHz)
This feature reproduces the higher frequencies lost during recording to give you a sound closer to the original.
Press [SHIFT]+[MULTI RE-MASTER] to select
“1” “2” or “3”.
![PANASONIC SC-HT820V - Press [SHIFT]+[MULTI RE-MASTER] to select - 1](/content/2026/05/817091/images/15da1cc23bde45c8e95303e6467e4ff8e9a4619da7e23d33f75052df3923f60d.jpg)
Menu
Multi Re-master 1
| Setting | DVD-A DVD-V CD (LPCM/PPCM)Type of music | Other discsEffect level |
| 1 High tempo (e.g., pops and rock) Light | ||
| 2 Various tempos (e.g., jazz) Medium | ||
| 3 Low tempo (e.g., classical) Strong | ||
| Off Off Off | ||
Page skip
DVD-A
During play or while paused
Press [SHIFT]+[PAGE].
The page changes each time you do this.
Sequential play (CD Mode)
VCD CD WMA MP3
While stopped
Press [SHIFT]+[CD MODE] to play all loaded discs (except for DVDs and JPEG files).

●HighMAT menus and Video CD playback control are disabled.
- You cannot change the mode during program or random play (→ page 22).
- CD Mode turns off when you switch the unit to standby.
Quick replay
Except JPEG
(Only when the elapsed play time can be displayed)
Press [QUICK REPLAY] to skip back a few seconds.


text_image
TV MAIN SELECTOR FM/AMD/CM/MS DADTV VHS TUNER 1 2 3 4 5 6 7 8 9 10 0 10 SKIP SLOW SEARCH TOP MENU HUA DIRECT MAXISATOR ENTER CSDI DISPLAY RETURN TV VOL - RPG TWO RPG POT RPG POT RPG POT RPG POT RPG POT RPG POT RPG POT RPG POT RPG POT RPG POT RPG POT RPG POT RPG POT RPG POT RPG POT RPG POT RPG POT RPG
All group or program play
See below for details.

All group/Program/Random play
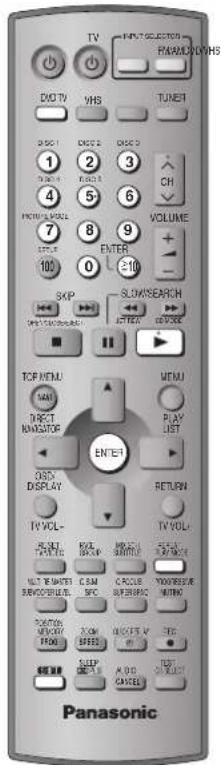
While stopped, press [PLAY MODE].
Each time you press the button:
DVD-A DVD-V WMA MP3
All group (DVD-A)→Program→Random→off (Normal play)
VCD CD (There is no on-screen display.)
(PGM)→1-DISC (1 RND)→A-DISC (ALL RND)
off (Normal play)
To exit
Press [PLAY MODE] several times while stopped.
- Disable HighMAT disc play to use random and program play. Select "Play as Data Disc" in Other Menu (→ page 27).
All group play
DVD-A
Press [▶] (PLAY).
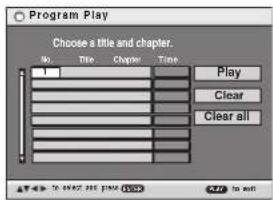
Program play (up to 24 items)
VCD CD
You can program all the items on discs.
DVD-A DVD-V WMA MP3
You can program all the items on a disc in the play position.
e.g. DVD-V
text_image
Program Play Choose a title and chapter. No. Title Chapter Time Play Clear Clear all1
VCD CD
Press [SHIFT]+([DISC1]-[DISC5]).
2 Press the numbered buttons to select the items (WMA MP3 then press [ENTER]).
e.g. CD
![PANASONIC SC-HT820V - Press the numbered buttons to select the items (WMA MP3 then press [ENTER]). - 1](/content/2026/05/817091/images/28afa8a498ce7b869234b78887b2b297a12c4516aa7861b8b4752a83ebac235d.jpg)
Disc No. Track No. Program No.
• To select a 2-digit number
e.g. 23: [≥10] → [2] → [3]
WMA MP3 [2] → [3] → [ENTER]
- Repeat this step to program other items.
VCD CD
Step 1 is unnecessary when programming tracks on the same disc.
• DVD-A DVD-V WMA MP3
To select an item using the cursor buttons
Press [ENTER] and [▲▼] to select an item, then press [ENTER] again to register.
All the items in the selected disc, title or group are selected when you select "ALL".
3 Press [▶] (PLAY).
To add or change the program
VCD | CD (Add only)
Repeat steps 1 and 2.
DVD-A DVD-V WMA MP3
Press [▲▼] to select an item, then repeat step 2.
To clear an item
VCD CD
Press [CANCEL].
DVD-A DVD-V WMA MP3
1 P r e s s [ ▲▼] to select an item.
2 Press [CANCEL] (or press [▲ ▼ ◀▶] to select "Clear" and press [ENTER]).
To clear the whole program
VCD CD
Press [■] so "CLEAR" is displayed.
DVD-A DVD-V WMA MP3
Press [▲ ▼ ◀▶] to select "Clear all" and press [ENTER].
Note
DVD-V WMA MP3
Times are not displayed while programming.
VCD CD
Items the unit cannot find can be programmed but are canceled during play. This is also the case if you program DVD-RAM, DVD-Audio, DVD-Video, WMA, MP3 and JPEG.
- The program is cleared when you switch the unit to standby, select another source, exit the program mode by pressing [PLAY MODE] or move the disc out of the play position.
VCD CD The program is retained in memory.
1-DISC (1 RND): You can play all the items on a disc in the play position in random order.
A-DISC (ALL RND): You can play all the items on all the discs in random order.
DVD-A DVD-V WMA MP3
You can play selected item(s) on a disc in the play position in random order.
1 DVD-A DVD-V
Press the numbered buttons to select a title or a group.
DVD-A
- To enter all groups, press [◀▶] to select "All" and press [ENTER].
- To deselect a group, press the numbered buttons corresponding to the group you want to clear.
2 Press [▶] (PLAY).
e.g. DVD-V
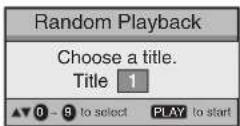

Random play

Repeat play
See below for details.

Repeat play
(Only when the elapsed play time can be displayed JPEG: Works with all JPEG content.)
During play
Press [SHIFT]+[REPEAT] several times to select an item to be repeated.
RAM
PG REPEAT→ALL REPEAT (Entire disc)→REPEAT OFF
- During play list play
SCENE REPEAT→PL REPEAT→REPEAT OFF
DVD-A
TRACK REPEAT→GROUP REPEAT→REPEAT OFF
DVD-V
CHAPTER REPEAT→TITLE REPEAT®→REPEAT OFF
VCD CD (There is no on-screen display.)
TRACK REPEAT→ALL REPEAT (Entire disc)→REPEAT OFF
WMA MP3 (There is no on-screen display.)
CONTENT REPEAT→GROUP REPEAT→REPEAT OFF
JPEG
GROUP REPEAT→REPEAT OFF
* During all group (DVD-A), program and random play "ALL REPEAT" is displayed.

text_image
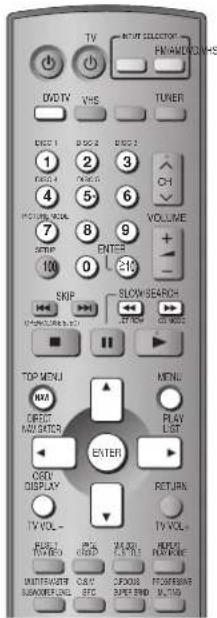
TV MOTOR SELECTOR FM/AMD/COM/HS DVD TV VHS TURER 1 2 3 4 5 6 VOLUME 7 8 9 ENTER 10 0 210 SKIP SLOW SEARCH- OFFICE ON WORLD TOP MENU HIV DIRECT NO GATOR ENTER COLD DISPLAY RETURN TV VOL. RUN T/W VIO PICK COLD LAST CHILLER RUN PLATRIDE UNDERWATER NUMBERING CASH FEDD CFOODS SUPER END PROFESSIONAL MULTIPOL| MENU | Playing data discs |
| TOP MENU NAVI | Playing HighMAT discs |
| NAVI DIRECT NAVIGATOR | Playing the programs |
| PLAY LIST | Playing a play list |
See below and the following page for details.

Playing data discs
WMA MP3 JPEG
You can play JPEG files on DVD-RAM or play HighMAT discs without using the HighMAT function ( page 27, “Play as Data Disc” in Other Menu).
■ Using playback menus (except JPEG files on DVD-RAM) While the menu is displayed
Press [▲ ▼] to select "All", "Audio", or "Picture" and press [ENTER].
- To display/exit the screen Press [TOP MENU].
■Using navigation menus
1 Press [MENU].
2 Press [▲ ▼ ◀ ▶ ] to select the group or audio/picture content and press [ENTER].
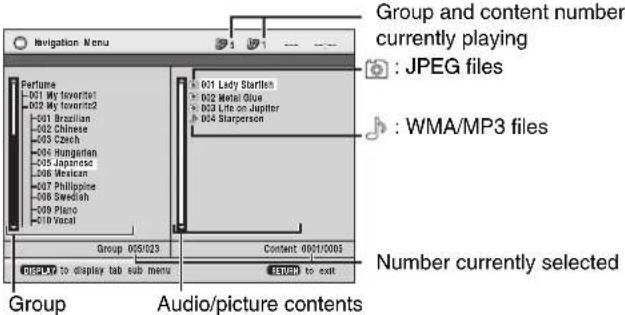
text_image
Navigation Menu Perfume 001 My Forever1 002 My Forever2 001 Brazilian 002 Chinese 003 Czech 004 Hungarian 005 Japanese 006 Mexican 007 Philippine 008 Swedish 009 Piano 010 Vocal Group 005/023 DISPLAY to display tab sub menu Group and content number currently playing : JPEG files : WMA/MP3 files Content 00/01/003 RETURN to exit Number currently selected Audio/picture contents- To enjoy listening to WMA/MP3 contents while showing a JPEG image on the screen
Select a JPEG file first, and then select tracks. (The opposite order is not effective.)
• To exit the screen Press [MENU].
To use the contents screen to find a track CD (CD text only)
While the menu is displayed Press [▲▼] to move through the tracks and press [ENTER].
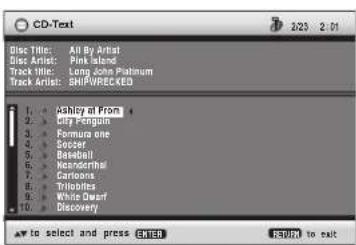
text_image
CD-Text Disc Title: All By Artist Disc Artist: Pink Island Track Title: Long John Platinum Track Artist: SHIWECKED 1. Ashley of From 2. Eliz Fengolin 3. Formura one 4. Soccer 5. Baseball 6. Nacceberthel 7. Carloons 8. Tribbones 9. White Dwarf 10. Discovery ▲ to select and press ©NED © 2023 2 01 © 2023 2 01Using the submenu WMA MP3 JPEG
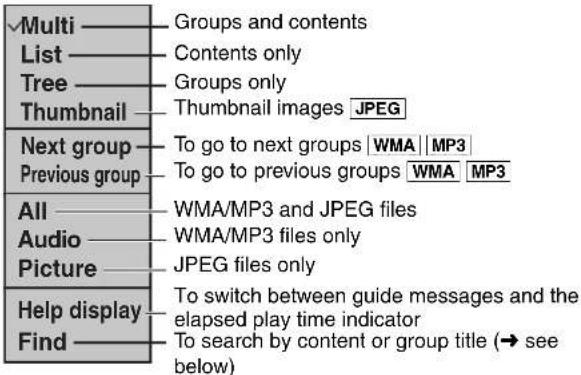
1 While the menu is displayed Press [OSD/DISPLAY].
text_image
Multi List Tree Thumbnail Next group Previous group All Audio Picture Help display Find Groups and contents Contents only Groups only Thumbnail images JPEG To go to next groups | WMA | | MP3 | To go to previous groups WMA MP3 WMA/MP3 and JPEG files WMA/MP3 files only JPEG files only To switch between guide messages and the elapsed play time indicator To search by content or group title (→ see below)2 Press [▲▼] to select the submenu and press [ENTER].
■Searching by content or group title WMA MP3 JPEG
Place the cursor on the group title to search a group, or place the cursor on the content title to search contents.
1 Select "Find" ( see above).

2 Press [▲▼] to select a character and press [ENTER].
- Repeat to enter another characters.
- Lower case is also searched.
- Press [◀◀▶▶] to skip between A, E, I, O and U.
- Press [◀] to erase a character.
- Erase the asterisk (×) to search for the titles starting with that character.
3 Press [▶] to select "Find" and press [ENTER]. The search result screen appears.
4 Press [▲▼] to select the content or group and press [ENTER].
Playing HighMAT discs
WMA MP3 JPEG
1 Press [TOP MENU].
2 While the menu is displayed
Select the item following the on-screen instructions.
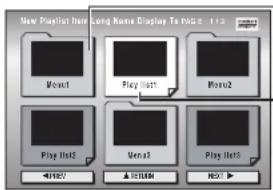
text_image
New Playlist Item Long Rono Display Term 5.113 Wave1 Play Itot1 Wave2 Play Itot2 Wave3 Play Itot3 4000 ▲ 10000 HOTMenu: Takes you to the next menu which shows play lists or another menu
Play list: play starts
- To change the menu background
Press [OSD/DISPLAY].
The background changes to the one recorded on the disc.
- To display/exit the screen
Press [TOP MENU].
■Selecting from the list
1 Press [MENU].
2 Press [◀] then [▲▼] to switch among Playlist, Group and Content lists.
3 Press [▶] then [▲ ▼] to select an item and press [ENTER].
- To exit the screen
Press [MENU].
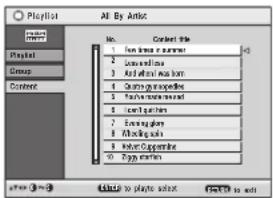
text_image
Album Music Playlist Group Content All By Artist No. Contra title 1. Fan Stream or autumn 2. Downstream 3. And away and back 4. Downstream/second 5. Pass-through/second 6. I can't pass through 7. Earning days 8. Barking days 9. Have Copynotes 10. Follow words after 3:00 Add to playlist action Find it to addTips for making WMA/MP3 and JPEG discs (For CD-R/CD-RW)
- Discs must conform to ISO9660 level 1 or 2 (except for extended formats).
- This unit is compatible with multi-session but if there are a lot of sessions it takes more time for play to start. Keep the number of sessions to a minimum to avoid this.
Naming folders and files
At the time of recording, prefix folder and file names with 3-digit numbers in the order you want to play them (this may not work at times).
Files must have the extension:
".WMA" or ".wma"
".MP3" or ".mp3"
".JPG", ".jpg", ".JPEG" or ".jpeg"
e.g. MP3
root
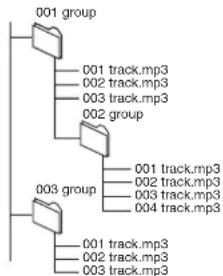
flowchart
graph TD
    A["001 group"] --> B["001 track.mp3"]
    A --> C["002 track.mp3"]
    A --> D["003 track.mp3"]
    A --> E["002 group"]
    F["003 group"] --> G["001 track.mp3"]
    F --> H["002 track.mp3"]
    F --> I["003 track.mp3"]
    F --> J["004 track.mp3"]
Windows Media, and the Windows logo are trademarks, or registered trademarks of Microsoft Corporation in the United States and/or other countries.
WMA is a compression format developed by Microsoft Corporation. It achieves the same sound quality as MP3 with a file size that is smaller than that of MP3.

Playing the programs
RAM
1 Press [DIRECT NAVIGATOR].
- Titles appear only if you have entered them.
- You cannot change program and disc titles.
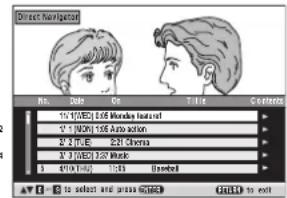
text_image
Direct Navigation 12" ELECTR | 500 Mbps video feed 12" FROM 155 Auto action 12" 3.7E-5 2.8" Chassis 12" FROM 2.8" 1.6" Chassis 3" 0.01MHz 1.0GHz AV: 3 to select and press (RGB) COLD to exit2 Press [▲▼] or
the numbered buttons to select the program.
• To select a 2-digit number
e.g. 23: [≥10] → [2] → [3]
- Press [▶] to show the contents of the program.
Playing a play list
RAM
(Only when the disc contains a play list)
1 Press [PLAY LIST].
2 Press [▲ ▼] or the numbered buttons to select the play list.
●To select a 2-digit number
$$ \text { e.g. } 2 3: [ \geq 1 0 ] \rightarrow [ 2 ] \rightarrow [ 3 ] $$
3 Press [ENTER].
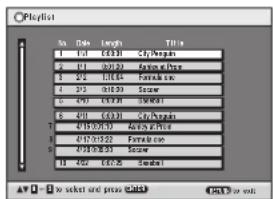
text_image
PlayList File Name Length Title 1 1/4 04:31 City Project 2 0/1 02:23 Section of View 3 2/2 13:54 Formula con. 4 3/2 08:59 Screw 5 2/9 15:78 SWR01 6 4/1 03:31 City Project 7 01:01:53 Section of View 8 01:01:53 Formula con. 9 01:01:53 Screw 10 4/2 04:25 Symbol ✓ No select and press Ctrl+ < img src>
WMA
- You cannot play WMA files that are copy protected.
MP3
- This unit is not compatible with ID3 tags.
- Compatible sampling rate: 8, 11.02, 12, 16, 22.05, 24, 32, 44.1 and 48kHz .
JPEG
●To view JPEG files on this unit:
- Take them on a digital camera that meets the DCF Standard (Design rule for Camera File system) Version 1.0. Some digital cameras have functions that are not supported by the DCF Standard Version 1.0 like automatic picture rotation which may render a picture unviewable.
- Do not alter the files in any way or save them under a different name.
- This unit cannot display moving pictures, MOTION JPEG and other such formats, still pictures other than JPEG (e.g. TIFF) or play associated sound.
MPEG Layer-3 audio decoding technology licensed from Fraunhofer IIS and Thomson multimedia.
1

Press once.
(When pressed twice, the elapsed play time indicator appears.
→ below)
2
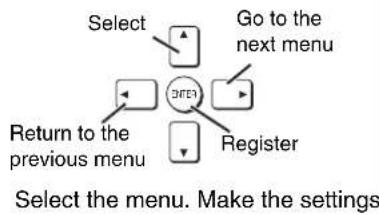
flowchart
graph TD
    A["Select"] --> B["Go to the next menu"]
    C["Return to the previous menu"] --> D["Register"]
    E["OK"] --> A
    F["OK"] --> C
3
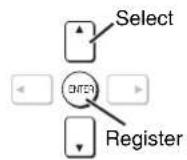
Press to exit.

Items shown differ depending on the type of software.
4
Main menus
| Program Group Title Chapter Track Playlist Content | To start from a specific item | Still Picture | To switch still picture |
| Thumbnail | To show thumbnail images | ||
| Subtitle | (→ page 20) | ||
| Marker(VR) | To recall a marker recorded on DVD-Video recorders | ||
| Angle | (with multiple angles) To select the angle | ||
| Time | To skip incrementally or decrementally (Time Slip)1 Press [ENTER] twice to show Time Slip indicator.2 Press [▲▼] to enter the time and press [ENTER].●Press and hold [▲▼] to alter faster.To start from a specific time (Time Search)To change remaining/elapsed time display | Rotate Picture | To advance picturesTo rotate pictures |
| Slideshow | To turn on/off slideshowTo change the slideshow timing (0–30 sec) | ||
| Audio | (→ page 20) | ||
| To displays the current bitrate or sampling frequency | |||
■ Elapsed play time indicator
(except | JPEG)

text_image
Condition- play, pause or slow/search Current position Play mode - - -: Normal play PGM: Program play RND: Random play ALL: All group play DVD-A PBC: Playback control is on VCD Current playback item Press [▲ ▼ ] to select the elapsed play time or the remaining time.Other settings
| Play Speed | RAM DVD-VTo change play speed-from × 0.6 to × 1.4 (in 0.1 units)After you change the speed-Sampling frequency of 96 kHz is converted to 48 kHz. |
■Play Menu
(Only when the elapsed play time can be displayed JPEG: Works with all JPEG content.)
| Repeat | (→ page 21) |
| A-B Repeat | ExceptJPEGRAM(still picture part)To repeat a specified sectionPress [ENTER] at the starting and ending points.Press [ENTER] again to cancel. |
| Marker | To mark up to 5 positions to play againPress [ENTER] (The unit is now ready to accept markers.)To mark a position: [ENTER] (at the desired point)To mark another position: [◀▶] → [ENTER]To recall a marker: [◀▶] → [ENTER]To erase a marker: [◀▶] → [CANCEL]●This feature doesn't work during program and random play. |
■Picture Menu
| Picture Mode | NormalCinema1: Mellows images and enhances detail in dark scenes.Cinema2: Sharpens images and enhances detail in dark scenes lakes AnimationDynamicUser (Press [ENTER] to select “Picture Adjustment”) (→ below) |
| Picture AdjustmentContrast Brightness Sharpness ColorGamma (Adjusts the brightness of dark parts.)Depth EnhancerReduce the rough noise in the background to give a greater feeling of depth.This does not work while using Cinema 1 or 2 (→ above).Block NRSmoothes block noise.Mosquito NRReduces the smudging that appears around contrasting sections of the picture.3D-NR/Dot NRReduces overall noise/Reduces the dot noise that occurs at the borders between colors. | |
| Video Output Mode | 480I (Interlace) ←→ 480P (Progressive) |
| Transfer Mode | If you have chosen “480P” (→ above), select the method of conversion for progressive output to suit the type of material.Auto1 (normal): For viewing film materialAuto2: For viewing film material (the same as Auto 1, but able to convert 30-frame-per-second progressive video)Video: For video material |
■Audio Menu
| Dolby Pro Logic II | (→ page 44) |
| Dialogue Enhancer | To make the dialogue in movies easier to hearDVD-V(Dolby Digital, DTS, MPEG, 3-channel or over, with the dialogue recorded in the center channel)On ←→ Off |
| Multi Re-master | (→ page 21) |
■Display Menu
| Information | On ←→ Off(JPEG: Off, Date, Details) |
| Subtitle Position | 0 to -60 (in 2 units) |
| Subtitle Brightness | Auto, 0 to -7 |
| 4:3 Aspect | To select how to show images made for 4:3 aspect screens on a 16:9 aspect televisionNormal: Laterally stretches images.Auto: Expands 4:3 letterbox images to fill more of the screen. Other images appear in full in the center of the screen.Shrink: Images appear in the center of the screen.Zoom: Expands all images fill the screen.If your television has a similar feature, use it instead for a better effect. |
| Just Fit Zoom | (→ page 20) |
| Manual Zoom | (→ page 20) |
| Bitrate Display | RAM DVD-V VCDOn ←→ Off |
| GUI See-through | On ←→ Off |
| GUI Brightness | -3 to +3 |
■Other Menu
| Play as DVD-VideoorPlay as DVD-Audio | While stoppedSelect “Play as DVD-Video” to play DVD-Video contents on DVD-Audio. |
| Play as DVD-VRPlay as HighMATorPlay as Data Disc | While stoppedSelect “Play as Data Disc” to play JPEG files on DVD-RAM or to play HighMAT disc without using the HighMAT function. |

1
Shows Setup menu.
2
Select the tab. Select
3
the item. Make the settings
4
text_image
Select ENTER Register 1 2 3 4 5 6 7 8 9 0 L ≥10Press to exit.
5
The QUICK SETUP enables successive settings of the items in the shaded area.
- The settings remain intact even if you switch the unit to standby.
● Underlined items are the factory preset.
■“Disc” tab
| AudioChoose the audio language. | ●English | ●French | ●Spanish | ●Original*1 | ●Other*****2 |
| SubtitleChoose the subtitle language. | ●Automatic*3 | ●English | ●French | ●Spanish | ●Other*****2 |
| MenusChoose the language for disc menus. | ●English | ●French | ●Spanish | ●Other*****2Changing the menu language from QUICK SETUP also changes this setting. | |
| RatingsSet a ratings level to limit DVD-Video play.●Follow the on-screen instructions. | Setting ratings (When level 8 is selected)●8 No Limit | ●1 to 7 | ●0 Lock All: To prevent play of discs without ratings levels. | ||
| Changing ratings (When level 0–7 is selected)●Unlock Player●Change Level | ●Change Password●Temporary Unlock | ||||
^21 The original language designed on the disc is selected.
×2 Input a code number referring to the table on page 29.
*3 If the language selected for "Audio" is not available, subtitle appears in that language (If available on the disc).
■"Video" tab
| TV AspectChoose the setting to suit your television and preference. | ●4:3 Pan&Scan: Regular aspect television (4:3)The sides of the widescreen picture are cut off so it fills the screen (unless prohibited by the disc). |  | ||||
| ●4:3 Letterbox: Regular aspect television (4:3)Widescreen picture is shown in the letterbox style. |  | |||||
| ●16:9: Widescreen television (16:9) | ||||||
| TV TypeSelect to suit the type of television. | ●Standard (Direct View TV)CRT Projector●Projection TV●LCD TV/Projector●Plasma TV | |||||
| Time DelayWhen connected to a Plasma display, adjust if you notice the audio is out of the sync with the video. | ●0 ms●20 ms●40 ms●60 ms●80 ms●100 ms | |||||
| Still ModeSpecify the type of picture shown when paused. | ●Automatic●Field: The picture is not blurred, but picture quality is lower.●Frame: Overall quality is high, but the picture may appear blurred. | |||||
| Black Level ControlChange the black level of the picture if you connected a television through the COMPONENT VIDEO OUT terminals. | ●Lighter: when connected through VIDEO OUT or S-VIDEO OUT.●Darker: when connected through COMPONENT VIDEO OUT (Y/PB/PR). | |||||
■“Audio” tab
| Dynamic range compression | ●Off●On: Adjusts for clarity even when the volume is low through compressing the range of the lowest sound level and the highest sound level. Convenient for late night viewing. (Only works with Dolby Digital) |
| Audio during Search | ●On ●Off |
| Speaker Setting (→ page 29)Set the delay time for your center and surround speakers. | Center: 0.0/1.0/2.0/3.0/4.0/5.0 msSurround (L/R): 0.0/5.0/10.0/15.0 ms |
■“Display” tab
| Menu Language | •English • Français • Español |
| On-Screen Messages | •On • Off |
■ "Others" tab
| HighMAT | ●Enable●Disable (Unable to use the HighMAT function.) |
| QUICK SETUP | ●Yes●No |
| Re-initialize SettingThis returns all values in the Setup menus to the default settings. | ●Yes: The password screen is shown if “Ratings” (→ page 28) are set. Please enter the same password. After “INIT” on the display disappears, turn the unit off and on again.●No |
Changing the delay time (Speaker Setting)
(Effective when playing multi-channel audio)
For optimum listening with 5.1-channel sound, all the speakers, except for the subwoofer, should be the same distance from the seating position. If you have to place the center or surround speakers closer to the seating position, adjust the delay time to make up for the difference.
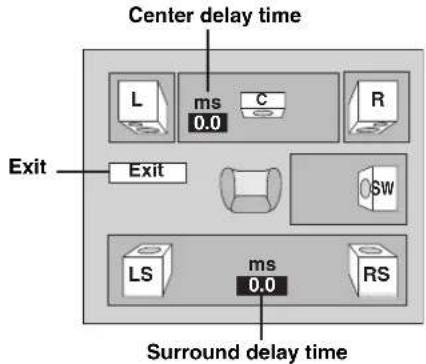
text_image
Center delay time L ms C R 0.0 Exit Exit OSW LS ms RS 0.0 Surround delay time1 Press [▲▼] to select the delay time box and press [ENTER].
2 Press [▲▼] to adjust the delay time and press [ENTER].
If either distance ⓐ or ⓑ is less than ⓒ, find the difference in the relevant table and change to the recommended setting.
□: Recommended placement
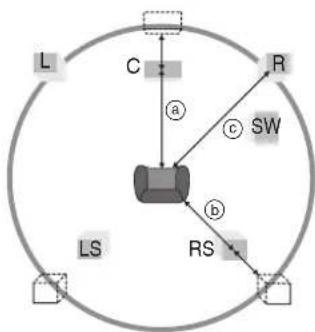
flowchart
graph TD
    L --> C
    C --> R
    R --> RS
    RS --> LS
    style A fill:#f9f,stroke:#333
    style B fill:#ccf,stroke:#333
    style C fill:#cfc,stroke:#333
    style D fill:#fcc,stroke:#333
    style E fill:#cff,stroke:#333
    style F fill:#ffc,stroke:#333
    style G fill:#cfc,stroke:#333
    style H fill:#fcc,stroke:#333
    style I fill:#ffc,stroke:#333
    style J fill:#cfc,stroke:#333
    style K fill:#fcc,stroke:#333
    style L,C,D,E,F,G,H,I,J,K,L,O,P,Q,R,S,T,U,V,W,X,Y,Z,Z,N,O,P,Q,R,R,S,T,U,V,X,Y,Z,Z,N,O,P,Q,R,S,R,S,T,U,V,X,Y,Z,Z,N,O,P,Q,R,S,R,S,T,U,V,X,Y,Z,Z,N,O,P,Q,R,S,R,S,T,U,V,X,Y,Z,Z,N,O,P,Q,R,S,R,S,T,U,V,X,Y,Z,Z,N,O,P,Q,R,S,R,S,T,U,V,X,Y,Z,Z,N,O,P,Q,R,S,R,S,T,U,V,X,Y,Z,Z,N,O,P,Q,R,S,R,S,T,U,V,X,Y,Z,Z,n,O,P,Q,R,S,R,S,T,U,V,X,Y,Z,Z,N,O,P,Q,R,S,R,S,T,U,V,X,Y,Z,Z,N,O,P,Q,R,S,R,S,T,U,V,X,Y,Z,Z,N,O,P,Q,R,S,R,S,T,U,V,X,Y,Z,Z,N,O,P,Q,R,S,R,S,T,U,V,X,Y,Z,Z,N,O,P,Q,R,S,R,S,T,U,V,X,Y,Z,Z,N,O,P,Q,R,S,R,S,T,U,\n\n\n\n\n\n\n\n\n\n\n\n\n\n\n\n\n\n\n\n\n\n\n\n\n\n\n\n\n\n\n\n\n\n\n\n\n\n\n\n\n\n\n\n\n\n\n\n\n\n\n\n\n\n\n\n\n\n\n\n\n\n\n\n\n\n\n\n\n\n\n\n\n\n\n\n\n\n\n\n\n\n\n\n\n\n\n\n\n\n\n\n\n\n\n\n\n\n\n\n\n\ncircum
    a
    b
    c
    d
    e
    f
    g
    h
    i
    j
    k
    l
    m
    n
    o
    p
    q
    r
    s
    t
    U
    V
    W
    X
    Y
    Z
    AA
    AB
    AC
    AD
    AE
    AF
    AG
    AH
    AI
    AJ
    AK
    AL
    AM
    AN
    AO
    AP
    AQ
    AR
    AS
    AT
    AU
    AV
    AW
    AX
    AY
    AZ
    BA
    BB
    BC
    BD
    BE
    BF
    BG
    BH
    BI
    BJ
    BK
    BL
    BM
    BN
    BO
    BP
    BP1
    BP2
    BP3
    BP4
    BP5
    BP6
    BP7
    BP8
    BP9
    BP10
    BP11
    BP12
    BP13
    BP14
    BP15
    BP16
    BP17
    BP18
    BP19
    BP20
a Center speaker
| Difference Setting | |
| Approx. 34 cm ( 1^1/10 feet) | 1.0 ms |
| Approx. 68 cm ( 2^1/5 feet) | 2.0 ms |
| Approx. 102 cm ( 3^3/10 feet) | 3.0 ms |
| Approx. 136 cm ( 4^2/5 feet) | 4.0 ms |
| Approx. 170 cm ( 5^1/2 feet) | 5.0 ms |
(b) Surround speakers
| Difference Setting | |
| Approx. 170 cm ( 512 feet) | 5.0 ms |
| Approx. 340 cm (11 feet) 10.0 ms | |
| Approx. 510 cm ( 1612 feet) | 15.0 ms |
To finish the speaker setting
Press [◀] to select "Exit" and press [ENTER].
Language code list
| Abkhazian: | 6566 | Chinese: | 9072 | Hausa: | 7265 | Lithuanian: | 7684 | Romanian: | 8279 | Telugu: | 8469 |
| Afar: | 6565 | Corsican: | 6779 | Hebrew: | 7387 | Macedonian: | 7775 | Russian: | 8285 | Thai: | 8472 |
| Afrikaans: | 6570 | Croatian: | 7282 | Hindi: | 7273 | Malagasy: | 7771 | Samoan: | 8377 | Tibetan: | 6679 |
| Albanian: | 8381 | Czech: | 6783 | Hungarian: | 7285 | Malay: | 7783 | Sanskrit: | 8365 | Tigrinya: | 8473 |
| Ameharic: | 6577 | Danish: | 6865 | Icelandic: | 7383 | Malayalam: | 7776 | Scots Gaelic: | 7168 | Tonga: | 8479 |
| Arabic: | 6582 | Dutch: | 7876 | Indonesian: | 7378 | Maltese: | 7784 | Serbian: | 8382 | Turkish: | 8482 |
| Armenian: | 7289 | English: | 6978 | Interlingua: | 7365 | Maori: | 7773 | Serbo-Croatian: | 8372 | Turkmen: | 8475 |
| Assamese: | 6583 | Esperanto: | 6979 | Irish: | 7165 | Marathi: | 7782 | Shona: | 8378 | Twi: | 8487 |
| Aymara: | 6588 | Estonian: | 6984 | Italian: | 7384 | Moldavian: | 7779 | Sindhi: | 8368 | Ukrainian: | 8575 |
| Azerbaijani: | 6590 | Faroese: | 7079 | Japanese: | 7465 | Mongolian: | 7778 | Singhalese: | 8373 | Urdu: | 8582 |
| Bashkir: | 6665 | Fiji: | 7074 | Javanese: | 7487 | Nauru: | 7865 | Slovak: | 8375 | Uzbek: | 8590 |
| Basque: | 6985 | Finnish: | 7073 | Kannada: | 7578 | Nepali: | 7869 | Slovenian: | 8376 | Vietnamese: | 8673 |
| Bengali; Bangla: | 6678 | French: | 7082 | Kashmiri: | 7583 | Norwegian: | 7879 | Somali: | 8379 | Volapük: | 8679 |
| Bhutani: | 6890 | Frisian: | 7089 | Kazakh: | 7575 | Oriya: | 7982 | Spanish: | 6983 | Welsh: | 6789 |
| Bihari: | 6672 | Galician: | 7176 | Kirghiz: | 7589 | Pashto, Pushto: | 8083 | Sundanese: | 8385 | Wolof: | 8779 |
| Breton: | 6682 | Georgian: | 7565 | Korean: | 7579 | Persian: | 7065 | Swahili: | 8387 | Xhosa: | 8872 |
| Bulgarian: | 6671 | German: | 6869 | Kurdish: | 7585 | Polish: | 8076 | Swedish: | 8386 | Yiddish: | 7473 |
| Burmese: | 7789 | Greek: | 6976 | Laotian: | 7679 | Portuguese: | 8084 | Tagalog: | 8476 | Yoruba: | 8979 |
| Byelorussian: | 6669 | Greenlandic: | 7576 | Latin: | 7665 | Punjabi: | 8065 | Tajik: | 8471 | Zulu: | 9085 |
| Cambodian: | 7577 | Guarani: | 7178 | Latvian, Lettish: | 7686 | Quechua: | 8185 | Tamil: | 8465 | ||
| Catalan: | 6765 | Gujarati: | 7185 | Lingala: | 7678 | Rhaeto-Romance: | 8277 | Tatar: | 8484 |

Turn on the television and select the appropriate video input for the VHS.
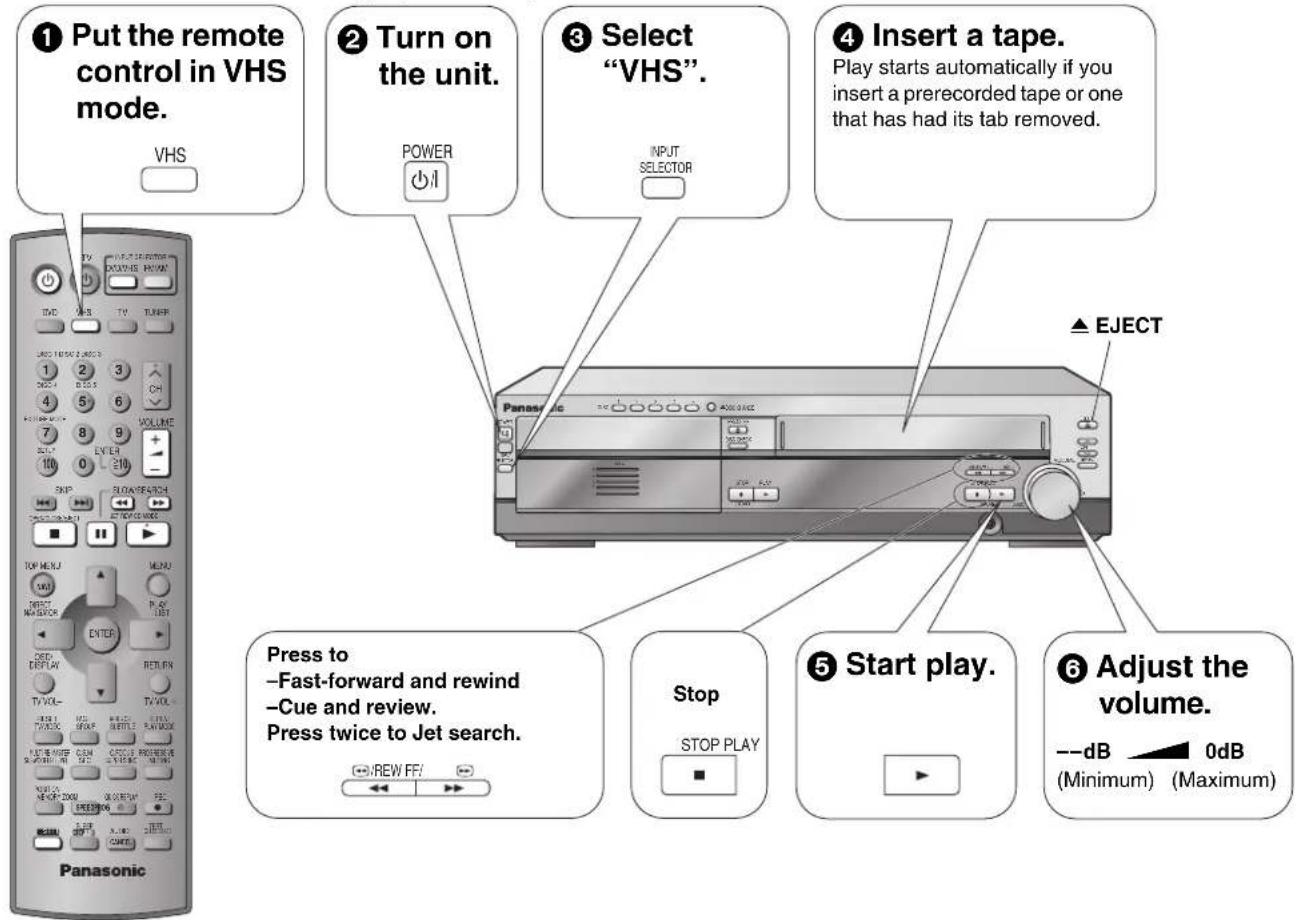
text_image
① Put the remote control in VHS mode. VHS ② Turn on the unit. POWER ③ Select "VHS". INPUT SELECTOR ④ Insert a tape. Play starts automatically if you insert a prerecorded tape or one that has had its tab removed. ▲ EJECT Panasonic Press to —Fast-forward and rewind —Cue and review. Press twice to Jet search. Stop STOP PLAY ⑤ Start play. Adjust the volume. --dB 0dB (Minimum) (Maximum) Panasonic
VHS

text_image
Stop
text_image
Pause ■Press [▶] (PLAY) to start play.| Slow | Press and hold | ●Pauses after 5 minutes and stops after 10 minutes. ●There is no sound. |
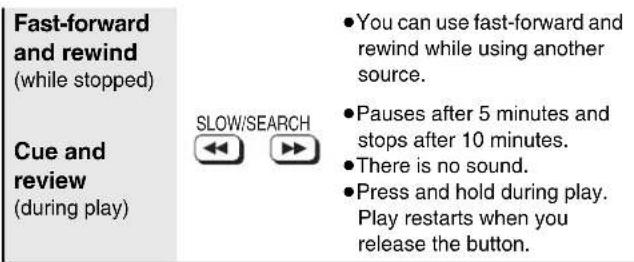
text_image
Fast-forward and rewind (while stopped) Cue and review (during play) SLOW/SEARCH You can use fast-forward and rewind while using another source. Pauses after 5 minutes and stops after 10 minutes. There is no sound. Press and hold during play. Play restarts when you release the button.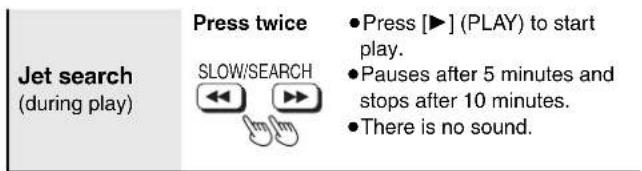
text_image
Jet search (during play) Press twice SLOW/SEARCH Press [▶] (PLAY) to start play. Pauses after 5 minutes and stops after 10 minutes. There is no sound.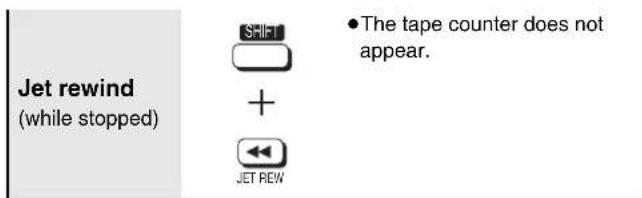
text_image
Jet rewind (while stopped) SHIFT + JET REW • The tape counter does not appear.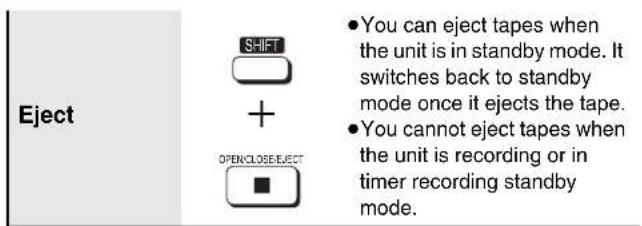
text_image
Eject SHIFT + OPENCLOSE ELECT • You can eject tapes when the unit is in standby mode. It switches back to standby mode once it ejects the tape. • You cannot eject tapes when the unit is recording or in timer recording standby mode.Note
- The tape moves at high speed during fast-forward, rewind, and jet rewind so the unit will make a noise. Also, it takes some time for the tape to stop after you press [■].
- The picture during cue, review, and jet search may be disrupted or otherwise affected on some televisions. During jet search at 35 times normal speed through EP or VP recordings, the picture may scroll vertically on some televisions. Change to 27-times normal speed if this occurs (→ page 40).
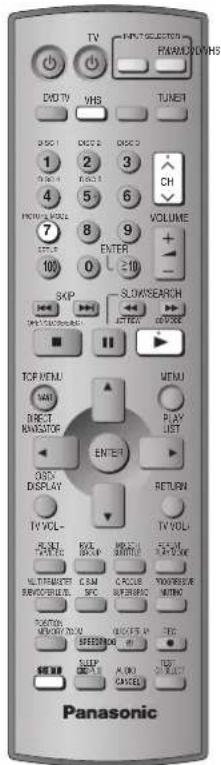
text_image
TV PANAKI SELECTOR PANAKI VYHS DVD TV VHS TUNER 1 2 3 4 5 6 7 8 9 VOLUME + - 100 0 ≥10 SKIP SLUAMSSEARCH ATTONG COSCO TCP MENU VHS DIRECT RANSATOR MENU PLAY LIST ENTER OISD DISPLAY RETURN TV VOL. KOL BASF NEXT BURGER CLASSIC MINISTRY MINISTRY MINISTRY MINISTRY MINISTRY MINISTRY MINISTRY MINISTRY MINISTRY MINISTRY MINISTRY MINISTRY MINISTRY MINISTRY MINISTRY MINISTRY MINISTRY MINISTRY MINISTRY MINISTRY MINISTRY MINISTRY MINISTRY MINISTRY MINISTRY MINISTRY MINISTRY MINISTRY MINISTRY MINISTRY MINISTRY MINISTRY MINISTRY MINISTRY
Picture mode
Changes the picture quality to suit the material you are playing.

Repeat play
Plays a program repeatedly.

Manual tracking
Adjusts the tracking manually.

Vertical locking adjustment
Adjusts the vertical hold to keep the picture from jiggling.
See below for details.

Picture mode
Press [SHIFT]+[PICTURE MODE].
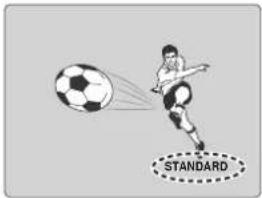
text_image
STANDARDEach time you do this:
STANDARD: for recordings of television program (Factory preset)
DYNAMIC: Clear, vivid pictures for scenery and sports
SOFT: for prerecorded tapes
Repeat play
Press and hold [▶] (PLAY) for about five seconds.
"R▶" appears on the television.
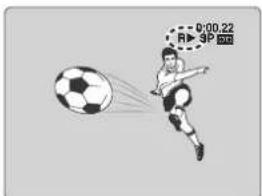
natural_image
Illustration of a soccer player kicking a ball with motion lines (no text or symbols)At the end of the program, the tape rewinds to the beginning of the program and plays it again. (It only works if there is a five-second blank at the end of the program.) This repeats until you cancel it.
To cancel
Press [▶] (PLAY).
- It also cancels if you stop, pause, cue, or review.
Manual tracking
This unit has an automatic digital tracking control feature that usually makes tracking adjustments for you, but you may need to do it manually, such as if noise appears on a tape recorded on other equipment.
During play
Press [∧ CH] or [∨ CH].
Repeat until the noise disappears.
To return to automatic digital tracking control
Press [∧ CH] and [∨ CH] at the same time.
To remove the noise from a paused picture
Start slow play, then adjust the tracking.
Note
This may not be effective on some tapes.
Vertical locking adjustment
While paused
Press [∧ CH] or [∨ CH].
Repeat until the jiggling stops.
To return to the previous condition
Press [∧ CH] and [∨ CH] at the same time.
Note
This may not work with some televisions. Try adjusting the vertical on the television itself.
![PANASONIC SC-HT820V - Press [∧ CH] or [∨ CH]. - 1](/content/2026/05/817091/images/38eeb2bede48f52bbe50f8e7701cf4057cdf000491b12b99b727e955a2e14879.jpg)
![PANASONIC SC-HT820V - Press [∧ CH] or [∨ CH]. - 2](/content/2026/05/817091/images/e718eaca36c6ec310808eae049c617dcbab0e74f64b2c05cda620697e09bd59e.jpg)
text_image
TV MAIN SELECTOR FM/AM/DCN/MS DAD TV VHS TURER 1 2 3 4 5 6 7 8 9 VOLUME + - 100 0 S1C SKIP SLOW SEARCH OFF CNT OFF CNT TOP MENU MENU DIRECT NAV SATCH ENTER CSDI DISPLAY RETURN TV VOL. RPG PGR MUSDA REACH PUM PUM PUE MUST PUM PUE CASH CROSS SPEED FROCCOMATE MINISTRY MINISTRY MINISTRY MINISTRY MINISTRY MINISTRY MINISTRY MINISTRY MINISTRY MINISTRY MINISTRY MINISTRY MINISTRY MINISTRY MINISTRY MINISTRY MINISTRY MINISTRY MINISTRY MINISTRY MINISTRY MINISTRY MINISTRY MINISTRY MINISTRY MINISTRY MINISTRY MINISTRY MINISTRY MINISTRY MINISTRYPreparation
- Turn on the television and select the video input for the VHS.
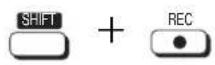
Recording the television
See below for details.

Recording the television
1 Insert the tape you want to record to.
Ensure its tab is in place ( page 5).
2 Select the channel with the numbered buttons, [^ CH] or [∨ CH].
- To select with the numbered buttons:
e.g. channel 2: [0] → [2]
channel 23: [2] → [3]
channel 123: [100] → [2] → [3]
3 Press [SPEED] to select the tape speed.
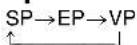

4 Press [SHIFT]+[● REC] to start recording.
"REC" lights on the unit's display.

To stop recording
Press [■].
To pause recording
Press [11].
Press it again or press [SHIFT]+[● REC] to continue recording.
■ To specify a time to stop recording ( page 46, The sleep timer)
Note
- You cannot change channels while recording. You can change channels while paused.
- The unit will automatically return to the stop mode after a pause of 5 minutes while recording.
- Even if the tape you use is labeled "S-VHS", the recordings you make do not use this system.
- You cannot record from the disc section to the unit.
■Tape speeds
There are three tape speeds.
SP: You can record the length shown on the tape.
EP: Three times the length of SP mode.
VP: Five times the length of SP mode.
- You cannot play tapes recorded with VP mode on other equipment.
- It takes more time for automatic tracking to work when playing tapes recorded with VP mode, and it may not work at all with some tapes. Do tracking manually if this is the case (→ page 31).
- This unit can play tapes recorded with LP mode on other equipment ("LP" lights on the display).
Using another source while recording
You can watch and listen to other content when the unit is in timer recording standby or during VHS recording.
■ Television ( page 16)
1 During recording
Press [TV] to put the remote control in TV mode.
2 Press [TV/VIDEO] then select the channel with the numbered buttons, [^ CH] or [v CH].
■ DVD ( page 18)
1 During recording
Press [DVD] to put the remote control in DVD mode.
2 Press [DVD/VHS] to select "DVD/CD".
3 Insert a disc and start play.
■ Radio ( page 42)
1 During recording
Press [TUNER] to put the remote control in TUNER mode.
2 Press [FM/AM] to select the radio band.
3 Select the radio channel with the numbered buttons, [∧ CH] or [∨ CH].
Note
When you want to operate the VHS section again, be sure to press [VHS] to put the remote control in VHS mode.
Recording from other equipment
You can record from other video equipment (video cassette recorder, camera, etc.)
Preparation
- Connect the equipment to this unit's input terminals.
—Turn the unit off before making connections.
-If audio output on the other equipment is monaural, use a stereomaural conversion cable (not included).
- Insert the tape, ensuring its tab is in place and find the place to start recording.
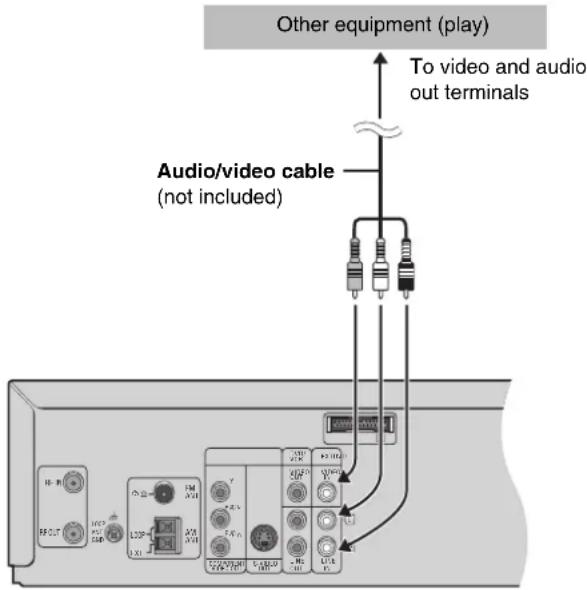
text_image
Other equipment (play) To video and audio out terminals Audio/video cable (not included)1 Press [^ CH] or [∨ CH] to select "AU" channel.


2 Press [▶] (PLAY) to find the place to start recording.
3 Press [I I], then press [SHIFT]+[●REC] to put the unit in recording standby mode.
4 Press [SPEED] to select the tape speed.
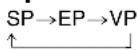
5 Start play on the other equipment.
6 Press [11] when you want to start recording.
To stop
Press [■].
■To make a timer program to record from other equipment (→ page 34)
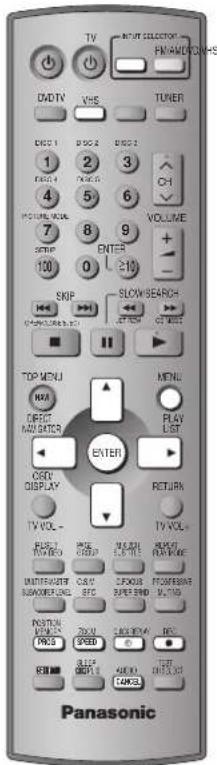
text_image
TV MUNT SELECTOR FM/AM/DCN/MS DVD TV VHS TURER 1 2 3 4 5 6 VOLUME 7 8 9 ENTER 100 0 SLOW SEARCH SKIP TOP MENU MENU DIRECT NAVIETER EATER CORN DISPLAY RETURN TV VOL. RUSH TINCHINI PICK RED WALOZ COLDEN HOLDEN PAPER UNDERFRUIT CASH FIPS SPRING RED PEPPERHEAD ULTRONG POTENT VOLTAGE PUNDS SPEED CHIKING MINISTRY CONTROL MINISTRY CONTROL PANASONICYou can create up to 16 timer recording programs. You can set the timer to record an individual program up to a month in advance, record at the same time on the same day every week, or at the same time daily.
Preparation
- Make sure the unit's clock is correct (→ page 38 to adjust it if necessary).
- Insert a tape, ensuring its tab is in place (→ page 5).
PROG
Timer recording
See below for details.

1 While stopped, press [PROG].
The timer-programming screen appears.
![PANASONIC SC-HT820V - While stopped, press [PROG]. - 1](/content/2026/05/817091/images/cbc75ac4e7ae39e12582a73a96de2598ec0b5ed945d19a839700802d35e8260e.jpg)
text_image
DATE CH ON OFF 1/2 27WE 2 8:02W 9:30PM SP SU-SA 125 1:30W 1:00A A SU 14 3:00W 4:00PM EP 19TU 5 1:15W 1:30 PM 28TH AV 8:02W 9:30PM SP 30SA 4 7:10W 7:55PM VP PROG.:ENTER END:MENU2 Press [PROG] to select an available line and press [ENTER].
3 Select "DATE" with [◀▶] and change it with [▲▼].
The date changes as follows:
![PANASONIC SC-HT820V - Select "DATE" with [◀▶] and change it with [▲▼]. - 1](/content/2026/05/817091/images/d83dab86a65f225f4d32f08ea2664a61e513cbeb92c1ab75e5e716a32d03a5b1.jpg)
flowchart
graph TD
    A["Current date"] --> B["Next day up to one month later minus one day"]
    B --> C["Weekly timer: SU-SA → MO-SA → MO-FR"]
    C --> D["Daily timer: SU → MO → TU → WE → TH → FR → SA"]
4 Select "CH" with [◀▶] and change it with [▲▼].
Select "AU" when recording from other equipment ( page 33).
5 Select "ON" with [◀▶] and change the start time with [▲▼].
6 Select "OFF" with [◀▶] and change the end time with [▲▼].
7 Press [SPEED] to change the tape speed.
SP→EP→VP→A×
*Auto SP/EP change function → page 35
8 If the Jet Navigator is on (→ page 36),
Select a category.
Press [▶] to select a category column. Press [▲ ▼] to enter the category selection menu. Then select a category with
[▲ ▼ ◀ ▶], and confirm with [MENU].
You can also set and change the category in the navigator list ( page 37).
Repeat steps 2 to 8 to make further timer programs.
9 Press [④] to put the unit on timer recording standby.
“💡” lights on the unit's display.
![PANASONIC SC-HT820V - Press [④] to put the unit on timer recording standby. - 1](/content/2026/05/817091/images/e4ab54ba5f801acaf1b5124cd35bced95e5a085f9ff8cc0015a174ac852c2f9c.jpg)
To release the unit from timer recording standby Press [◎].
To stop recording
Press [∅].
For your reference
The timer works whether the unit is on or not, so you can play DVDs or listen to the radio ( page 33). Switch the unit to standby if you are finished.

To check, correct, and cancel timer programs
■To check a program
1 Press [PROG].
The timer-programming screen appears.
■To correct a program
While the timer programming screen is on the television,
1 Press [PROG] to highlight the program you want to correct and press [ENTER].
2 Select the item with [◀▶] and correct it with [▲▼].
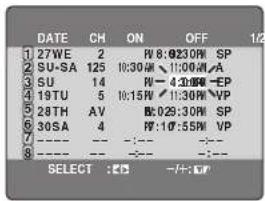
text_image
DATE CH ON OFF 1/2 27WE 2 FW 8:03:30PM SP SU-SA 125 10:30PM -1:00PM-A SU 14 FW -4:30PM-EP 19TU 5 10:15PM -4:00PM-VP 28TH AV FW 29:30PM SP 30SA 4 FW 10:55PM VP SELECT :+/-;■To cancel a program
While the timer programming screen is on the television,
1 Press [PROG] to highlight the program you want to cancel.
2 Press [CANCEL].
To clear the timer programming screen
Press [MENU].
Auto SP/EP change
The unit switches tape speed to EP if it determines there is not enough tape to record the entire program in SP mode. The change may start at the beginning of the recording or part way through, depending on the remaining tape.
Before using this function, set the length of the tape you are using (→ page 40). It may not work correctly if you use tapes with irregular lengths.
Example program combination
| 1st program(30 min.) | 2nd program (60 min.) | ||
| Example program combination | |||
| 30 min. at SP | 15 min.at SP | 45 min.at EP | (when using a 60-min.tape) |
Note
This function does not guarantee recording of the entire program.

VHS Finding programs with the Jet Navigator and VHS Index Search System (VISS)
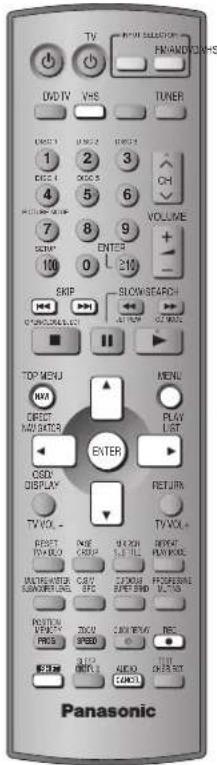
text_image
TV MAIN SELLATION FRANKY DO-MS DADTV VHS TUNER 1 2 3 4 5 6 7 8 9 10 0 210 VOLUME + - ENTER SKIP SLOW/SEARCH CLOSURE & LIFT TOP MENU MENU DIRECT NAV SETER ENTER CSDI DISPLAY RETURN TV VOL. RESET TWLO INIE CABB MUSH SETTLE MOZZARE NETFLIXE PRESIDENTIAL VCTAS POTTON VICKY PICS ZOCU SPEED CAN REMARK REC START OKOUT CANCEL TEST ORDER NOT PanasonicThe unit saves the date, channel, time, and category of the recordings you make and shows them on the Jet Navigator list, making it easier to find and play them. It can save the data for up to 14 recordings on a tape, for 20 different tapes, and for a total of 50 recordings.

Saving Jet Navigator data

Using the Jet Navigator to find programs
See below for details.

Saving Jet Navigator data
1 Press [MENU] to display the "VHS MENU" screen.
2 Press [▲▼] to select "OPTION" menu and press [ENTER].
3 Press [▲▼] to select "JET NAVIGATOR" and press [◀▶] to change the setting to "ON".
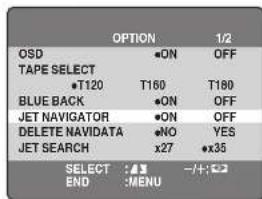
text_image
OPTION 1/2 OSD •ON OFF TAPE SELECT •T120 T160 T180 BLUE BACK •ON OFF JET NAVIGATOR •ON OFF DELETE NAVIDATA •NO YES JET SEARCH x27 •x35 SELECT :A END :MENU -/+ :4 Press [▲▼] to select "TAPE SELECT" and press [◀▶] to set the length of the tape you are using.
T120: T30, T60, T90, T120 tapes
T160: T140, T160 tapes
T180: T180 tapes
5 Record programs (→ pages 32–34). The unit makes the list as you record.
Using the Jet Navigator to find programs
1 Press [NAVI] to show the "JET NAVIGATOR" screen.
2 Press [NAVI] to highlight the program you want to watch.
The most recent program is highlighted first.
Once you have highlighted the program, wait about three seconds. The unit then starts searching for the program and starts play.
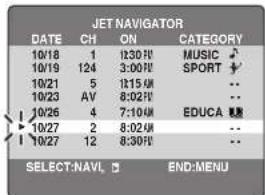
text_image
JET NAVIGATOR DATE CH ON CATEGORY 10/18 1 13:00' MUSIC 10/19 124 3:00' SPORT 10/21 5 1:15 AM ... 10/23 AV 8:02'U ... 10/26 4 7:10'U EDUCA U 10/27 2 8:02'U ... 10/27 12 8:30'U ... SELECT:NAVI END:MENIThe channel, date, and time of a recording appear on the television when play starts.
To clear the Jet Navigator list
Press [MENU].
■To delete the Jet Navigator on a video cassette tape
Keep [CANCEL] pressed for more than 5 seconds while the Jet Navigator list appears. “- -” appears on the list.
■To delete all the Jet Navigator data stored in the unit's memory (→ page 40).
Setting categories
Set categories to make it easier to see what kind of programs are in the list.
1 Press [▶] while the program you want to categorize is highlighted.
2 Press [▲ ▼ ◀ ▶] to select a category and press [MENU] to confirm and return to the previous screen.
| Category Indication Icon | ||
| Movie MOVIE |  | |
| Music MUSIC | [000Y] | |
| Drama DRAMA |  | |
| Education EDUCA |  | |
| Documentary DOCUM |  | |
| Sports SPORT |  | |
| Children CHILD |  | |
| News NEWS |  | |
| Others OTHER |  | |
To return to the Jet Navigator list
Press [MENU].
Note
- If you have already stored 14 programs on a tape and you then store another one, the new item is added and the oldest is deleted.
- "REMAINING PROGRAM 0 DELETE JET NAVIGATOR DATA" appears when you try to store more than fifty programs. The new item is added and the oldest item is deleted.
- "REMAINING CASSETTE 0 FOR JET NAVIGATOR DATA" appears when you try to store items for more than 20 tapes. Delete all the Jet Navigator data in the unit if you want to save the data for the tape (→ page 40).
- The list does not appear when playing tapes recorded on other equipment.
- Parts of the list data are recorded on the tape. Take care when recording over older recordings that you do not overlap it. It is recorded within a few minutes either side of the beginning of the recording (longer if you used EP or VP).
To demonstrate the Jet navigator function
Keep [NAVI] pressed for more than 5 seconds without inserting a cassette tape.
Finding programs—VHS Index Search System (VISS)
Use the index marks on a tape to find sections to play. The unit adds index marks when recording starts. To add them manually during recording, press [SHIFT]+[● REC].
While stopped or during play
Press [◀◀] (backward) or [▶▶] (forward) to skip to the part you want to play.
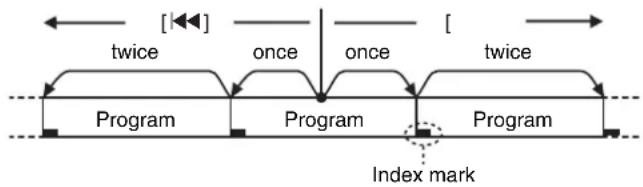
flowchart
graph LR
    A["Program"] --> B["twice"]
    B --> C["Once"]
    C --> D["Once"]
    D --> E["twice"]
    F["Program"] --> G["Index mark"]
    G --> H["twice"]
    style A fill:#f9f,stroke:#333
    style E fill:#f9f,stroke:#333
    style G fill:#ccf,stroke:#333
    style H fill:#cfc,stroke:#333

The channel, date, and time of a recording appear on the television when play restarts.
- Up to 20 index signals can be searched for in both directions.
- You can reduce the number of skips by pressing the opposite button.
- This feature may not work correctly if the marks are too close together. Make recordings of at least 15 minutes (25 minutes in VP mode).

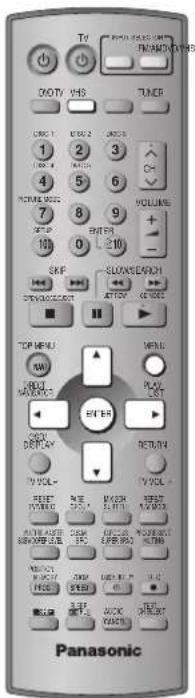
text_image
TV TWO VHS TURER 1 2 3 4 5 6 7 8 9 10 11 12 SKIP SLOWS/SEARCH OFFICE ORDER TOP MENU MAIN NEW PLAY LIST NEW ENTER RETURN TV VOL. PUBS WINDI MUSHROOM MINISTRY MINISTRY MINISTRY MINISTRY MINISTRY MINISTRY MINISTRY MINISTRY MINISTRY MINISTRY MINISTRY MINISTRY MINISTRY MINISTRY MINISTRY MINISTRY MINISTRY MINISTRY MINISTRY MINISTRY MINISTRY MINISTRY MINISTRY MINISTRY MINISTRY MINISTRY MINISTRY MINISTRY MINISTRY MINISTRY MINISTRY MINISTRY MINISTRY MINISTRY1

Shows VHS MENU.
2
text_image
Select CYTCR Register Select the item. Make3
text_image
Select Button Register the settings. Press to exit.
●The settings remain intact even if you switch the unit to standby.
See below and the following page for details (while VHS MENU is displayed).
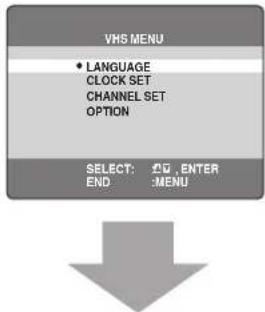
text_image
VHS MENU • LANGUAGE CLOCK SET CHANNEL SET OPTION SELECT: END ENTER MENULANGUAGE
Select the language for these menus and other on screen displays.
1 Press [▲▼] to select "LANGUAGE" and press [ENTER].
2 Press [▲▼] to choose the preferred language.
●ENGLISH (Factory preset)
- ESPAÑOL
• FRANÇAIS
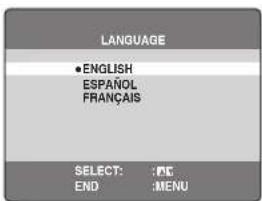
text_image
LANGUAGE •ENGLISH ESPAÑOL FRANÇAIS SELECT: :PK END :MENUPress [MENU] to confirm and return to the previous screen.
CLOCK SET
The clock is set automatically after Plug-in Auto Tuning ( page 15). Do the following if you want to set it again or if the time is not set correctly.
1 Press [▲▼] to select "CLOCK SET" and press [ENTER].
AUTO CLOCK SET
2 Press [▲▼] to select "AUTO CLOCK SET" and press [ENTER].
Auto setting starts. This can take some time.
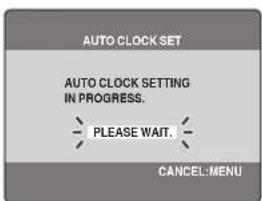
text_image
AUTO CLOCK SET AUTO CLOCK SETTING IN PROGRESS. PLEASE WAIT. CANCEL: MENUTo stop partway through
Press [MENU].
■If the unit cannot set the clock automatically
The MANUAL CLOCK SET screen appears. Set the time manually ( below).
MANUAL CLOCK SET
2 Press [▲▼] to select "MANUAL CLOCK SET" and press [ENTER].
3 Press [◀▶] to select the item you want to change and press [▲▼] to change the setting.
4 Press [MENU] to start the clock and exit the setting screen.
■Time reset function
To return the clock to the exact hour, wait until the clock in the MANUAL CLOCK SET screen is within 2 minutes either side of the hour (e.g., between 11:58:00 and 12:01:59) press [MENU] to clear the screen. The clock changes to the exact hour.
CHANNEL SET
The unit tunes automatically after you plug it in and turn it on for the first time ( page 15, Plug-in Auto Tuning), but you can start the process again if necessary.
- Make sure you have tuned to a television channel. This does not work if you have selected "AU" channel.
1 Press [▲▼] to select "CHANNEL SET" and press [ENTER].
ANTENNA SYSTEM
2 Press [▲▼] to select "ANTENNA SYSTEM" and press [ENTER].
3 Press [▲ ▼] to select "TV" or "CATV" to suit the type of antenna you are using.
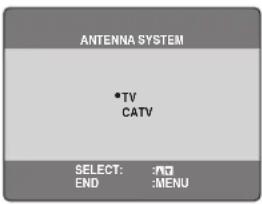
text_image
ANTENNA SYSTEM •TV CATV SELECT: :70 END :MENUChannels are set corresponding to the antenna system you select. This is set automatically when you do Plug-in Auto Tuning.
To exit the settings screen
Press [MENU] until the screen disappears.
AUTO
Auto tuning searches for TV stations and memorizes every tuned program position. Other program positions are skipped. (Channel range right)
2 Press [▲▼] to select "AUTO" and press [ENTER].
Auto tuning starts. It takes three or more minutes to complete.
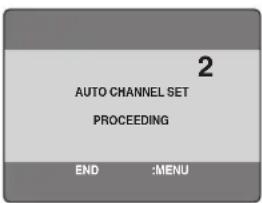
text_image
2 AUTO CHANNEL SET PROCEEDING END :MENUTo stop partway through
Press [MENU].
MANUAL
You can manually preset channels that are skipped when using the auto channel setting, and manually skip channels that are preset.
2 Press [▲▼] to select "MANUAL" and press [ENTER].
3 Press [▲ ▼] to select "CH" and [◀▶] to select the channel.
4 Press [▲ ▼] to select "BLANK" and [◀▶] to select "ON" or "OFF".

text_image
MANUAL CHANNEL SET CH 2 BLANK ON •OFF SELECT : [RE] - /+: [RE] END : [MENU]To exit the settings screen
Press [MENU] until the screen disappears.
■Channel range
•TV mode
| Band Airwaves | |
| VHF 2–13 | |
| UHF 14–69 |
- CATV mode
| Band Cable | |
| VHF 2–13 | |
| CATV LOW BAND 95–99 | |
| CATV MID/SUPER BAND 14–36 | |
| CATV HYPER BAND | 37–65 |
| ULTRA BAND | 66–94 |
| 100–125 | |
| SPECIAL CATV CHANNEL | 1 |

OPTION
1 While VHS MENU is displayed (→ page 38)
Press [▲▼] to select the “OPTION” and press [ENTER].
2 Press [▲ ▼] to select the item and press [◀▶] to change the setting (→ below).
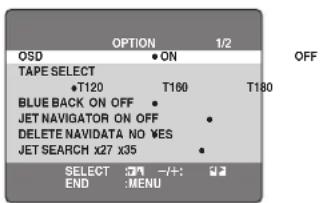
text_image
OPTION 1/2 OSD • ON TAPE SELECT •T120 T160 T180 BLUE BACK ON OFF • JET NAVIGATOR ON OFF • DELETE NAVIDATA NO WES JET SEARCH X27 X35 • SELECT :+/-: +2 END :MENU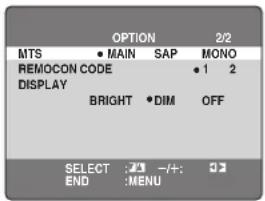
text_image
OPTION 2/2 MTS • MAIN SAP MONO REMOCON CODE • 1 2 DISPLAY BRIGHT • DIM OFF SELECT :# -/+ : END :MENUTo exit the settings screen
Press [MENU] until the screen disappears.
REMOTE CONTROL
Panasonic video cassette recorders use the same remote control system so they may respond unintentionally to a command from this remote control. Change the code on this unit and its remote control (the two must match) if you place another Panasonic video cassette recorder close together.
- Use "1", the factory preset, under normal circumstances.
1 While OPTION menu is displayed Press [▲▼] to select the “REMOTE CONTROL” and press [ENTER].
2 Press [◀▶] to select the code (1 or 2) and press [ENTER].
The remote control code on the unit has been set.
3 While pressing [ENTER] on the remote control, press and hold the numbered button ([1] or [2]) corresponding to the code you selected in step 2.
The remote control code on the remote control has been set.
The following is displayed when you use a remote control with the different code.
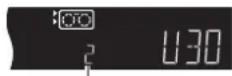
The unit's remote control code
Change its code to match the unit's ( step 3).

VHS
| Items | Settings (Underlined items are the factory preset.) |
| OSD (→ page 41, On-screen display) | ON: Messages appear on the television for about five seconds after you perform operations.OFF: Messages do not appear. |
| TAPE SELECTSet the length of tape you are using so the unit can show the correct remaining time. | T120: T30, T60, T90, T120 tapesT160: T140, T160 tapesT180: T180 tapes |
| BLUE BACK | ON: The screen shows a blue background when you play unrecorded portions.OFF |
| JET NAVIGATOR (→ page 36) | ON: Jet Navigator data automatically registered.OFF: Data not registered. |
| DELETE NAVIDATADelete all the Navigation data registered in the unit.See page 36 to delete data on a single tape. | NOYES: Then press [ENTER] when you want to delete all the Jet navigator data. |
| JET SEARCH (→ page 30)Set the speed for JET SEARCH when playing EP and VP tapes. | ×27 × 35Select ×27 if the picture is poor at ×35. |
| MTS (→ page 41, Changing audio)Set the MTS (Multi-channel Television Sound Stereo) reception type. | MAIN: To receive stereo broadcasts.SAP: To receive SAP when being broadcast.MONO: To receive monaural broadcasts (e.g., when reception is poor). |
| REMOTE CONTROL | 1 2 |
| DISPLAYSet the brightness of the unit's display when the unit is in standby mode. | BRIGHT: The display is bright all the time.DIM: The display dims when the unit is in standby mode.OFF: The display turns off when the unit is in standby mode. |
On-screen display
To see these displays, set the OSD item in the OPTION menu to ON.
Press [OSD/DISPLAY].
The time and operation details appear on the screen for about 5 seconds.
![PANASONIC SC-HT820V - Press [OSD/DISPLAY]. - 1](/content/2026/05/817091/images/0fe9a5fbdcfc4a462e0c81495734db604f91abc19414f54266b5c480292e3108.jpg)
text_image
CH 1 STEREO L R 0:00.22 SP STANDARD| 1Channel displayDisplays the cable television channel or television channel currently being received. |
| 2STEREO/SAP indicationIndicates when a program is broadcast in stereo or SAP.→ right for audio type details. |
| 3L and R indicatorsThe Left (L) and Right (R) indicators show which sound mode is selected as follows:Stereo: Both the L and R indicators appear.L: The L indicator appears.R: The R indicator appears.Normal: Neither the L and R indicator appears. |
| 4Tape running displayShows operations taking place. |
| 5Shows the time and tape counterPress [OSD/DISPLAY].The display changes as follows.Present time→Tape counter→Remaining tape time↑Using index search: “S 01” to “S 20” is displayed.Using jet rewind: “J.REW” is displayed.•Press [SHIFT]+[RESET] to reset the tape counter (elapsed time) to “0:00.00”.•The remaining time is approximate. It will be incorrect if you set the wrong tape time in the TAPE SELECT item in the OPTION menu and if the tape is of poor quality. |
| 6Cassette in indicatorShows whether you have loaded a cassette. |
| 7Tape speed indicator(→ page 32) |
| 8Picture mode indicator(→ page 31) |
Note
●These displays do not appear when paused or during slow play.
- The on-screen display may be disturbed depending on the playback tape or the input signal.
Changing audio
When a stereo and/or SAP broadcast is received, "STEREO" and/or "SAP" appear showing the type of broadcast.
To change the audio
Press [SHIFT]+[AUDIO].
The audio changes as follows:
- When playing a tape:
$$ \begin{array}{c}\text { LR } \rightarrow \text { L } \rightarrow \text { R } \rightarrow \text { Normal audio track }\\uparrow\end{array} $$
●While watching the television:
The table below shows the TV broadcast type, "MTS" settings, and audio recording patterns.
| TV broadcast | MTS setting | Audio track | ||
| Normal (Mono) | Hi-Fi | |||
| Left Right | ||||
| Mono | MAIN or SAP | Mono Mono | Mono | |
| Stereo | MAIN or SAP | L+R (Mixed) | Left Right | |
| Mono and SAP | MAIN Mono Mono Mono | |||
| SAP Mono Mono SAP | ||||
| Stereo and SAP | MAIN | L+R (Mixed) | Left Right | |
| SAP | L+R (Mixed) | L+R (Mixed) | SAP | |
Be sure that "MTS" is set to "MAIN" or "SAP" to record on the Hi-Fi audio tracks.
Note
- Switch to "MONO" for viewing or recording if a stereo or SAP broadcast is impaired by poor reception.
- To resume stereophonic recording, set "MTS" to "MAIN" or "SAP".
Auto bilingual choice function
When you play back recordings of stereo or SAP broadcasts, these audio types are automatically selected. The unit may select a different type if you start play midway through the program. Press [SHIFT]+[AUDIO] to change the type if this occurs.
This function does not work if:
—The tape was recorded on a deck without this system.
—The tape is a recording from external equipment.

Press [TUNER] to put the remote control in TUNER mode.
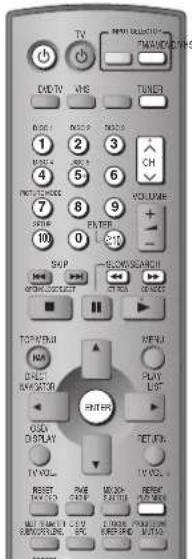
text_image
TV RADIO SOLUTIONS PANADIC DIAHS DVD TV AMS TUNED 1 2 3 4 5 6 7 8 9 VOLUME 10 POWER 11 SKIP 12 SLONG SEARCH 13 ON/OFFOCOUST 14 ON/OFFOCOUST 15 OFF/CLOSE 16 ON/OFFOCOUST 17 ON/OFFOCOUST 18 ON/OFFOCOUST 19 ON/OFFOCOUST 20 ON/OFFOCOUST 21 ON/OFFOCOUST 22 ON/OFFOCOUST 23 ON/OFFOCOUST 24 ON/OFFOCOUST 25 ON/OFFOCOUST 26 ON/OFFOCOUST 27 ON/OFFOCOUST 28 ON/OFFOCOUST 29 ON/OFFOCOUST 30 ON/OFFOCOUST 31 ON/OFFOCOUST 32 ON/OFFOCOUST 33 ON/OFFOCOUST 34 ON/OFFOCOUST 35 ON/OFFOCOUST 36 ON/OFFOCOUST 37 ON/OFFOCOUST 38 ON/OFFOCOUST 39 ON/OFFOCOUST 40 ON/OFFOCOUST 41 ON/OFFOCOUST 42 ON/OFFOCOUST 43 ON/OFFOCOUST 44 ON/OFFOCOUST 45 ON/OFFOCOUST 46 ON/OFFOCOUST 47 ON/OFFOCOUST 48 ON/OFFOCOUST 49 ON/OFFOCOUST 50 ON/OFFOCOUST 51 ON/OFFOCOUST 52 ON/OFFOCOUST 53 ON/OFFOCOUST 54 ON/OFFOCOUST 55 ON/OFFOCOUST 56 ON/OFFOCOUST 57 ON/OFFOCOUST 58 ON/OFFOCOUST 59 ON/OFFOCOUST 60 ON/OFFOCOUST 61 ON/OFFOCOUST 62 ON/OFFOCOUST 63 ON/OFFOCOUST 64 ON/OFFOCOUST 65 ON/OFFOCOUST 66 ON/OFFOCOUST 67 ON/OFFOCOUST 68 ON/OFFOCOUST 69 ON/OFFOCOUST 70 ON/OFFOCOUST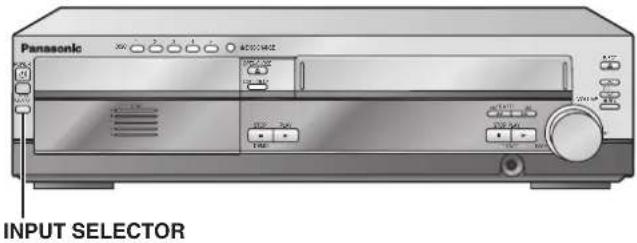
text_image
Panasonic INPUT SELECTORAutomatic presetting
Up to 15 stations can each be set in the FM and AM bands.
1 Press [FM/AM] to select "FM".
2 Press [◀◀] or [▶▶] to tune to the lowest frequency (“FM 87.9” MHz or “FM 87.5” MHz).
3 Press and hold [ENTER].
Release the button when "FM AUTO" is displayed.
The tuner presets all the stations it can receive into the channels in ascending order.
- "SET OK" is displayed when the stations are set. The last station to be set is then played.
4 Repeat steps 1 to 3 to set the AM bands.
Selecting the preset channels
1 Press [FM/AM] to select "FM" or "AM".
2 Press the numbered buttons to select the channel.
Alternatively, press [∧ CH] or [∨ CH].
To select a 2-digit number
e.g. 12: [≥10] → [1] → [2].

When a stereo FM broadcast is being received.

■If noise is excessive in FM Press [PLAY MODE] to display "MONO".
Press [PLAY MODE] again to cancel the mode.
The mode is also canceled when you change the frequency.

Manual tuning
1 Press [FM/AM] to select "FM" or "AM".
2 Press [◀◀] or [▶▶] to select the frequency.
Press and hold [◀◀] or [▶▶] until the frequency starts scrolling to start automatic tuning. Tuning stops when a station is found.
Presetting the channel one by one
1 Tune to the station ( left).
2 Press [ENTER].
3 While "PGM" is flashing on the display
Press the numbered buttons to select a channel.
Alternatively, press [^ CH] or [v CH] then press [ENTER].
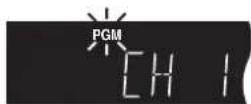
The station occupying a channel is erased if another station is preset to that channel.
■FM frequency step
Main unit only
The step is factory-set to 0.2 MHz, but you can change it to receive broadcasts allocated in 0.1-MHz steps.
1 Press [INPUT SELECTOR] on the main unit to select "FM".
2 Press and hold [INPUT SELECTOR].
After a few seconds the display changes to show the current minimum frequency. Continue to hold the button down. The minimum frequency changes and the step is changed.
To return to the original step, repeat the above steps.
Note
Any FM/AM frequencies preset in channels will be changed by this procedure. Preset them again.

Optional FM antenna connection
Use FM outdoor antenna if radio reception is poor.
- Disconnect the outdoor antenna when the unit is not in use.
- Do not use the outdoor antenna during an electrical storm.
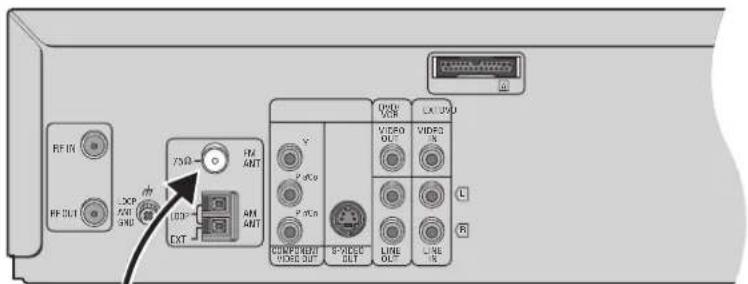
text_image
RF IN RF OUT LOOP FOR GRID 75 Pin INT INT EXT V P VCO P VCO COMPRESSIVE VONE OUT SPRING OUT LINE OUT LINE IN ON/OFFIC VOR VIDEO OUT VIDEO IN L RFM outdoor antenna (Using a television antenna)
- Disconnect the FM indoor antenna.
●The antenna should be installed by a competent technician.
Rework your outdoor antenna's 75 Ω coaxial cable as follows.
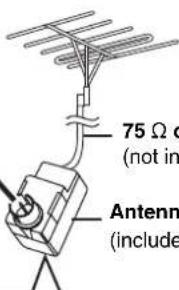
text_image
75 Ω c (not in) Antenn (include)75 Ω coaxial cable (not included)
Antenna plug (included)
①Remove a piece of the outer vinyl insulator.
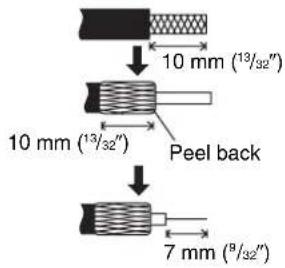
text_image
10 mm (13/32") 10 mm (13/32") Peel back 7 mm (9/32)② Carefully pull the tabs apart to remove the cover.
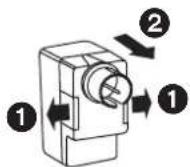
③Install the coaxial cable.
Clamp the cable conductor, and wind it on so that it does not contact anything else.
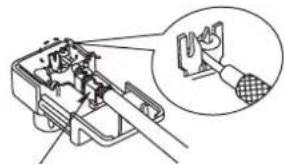
natural_image
Technical illustration of a mechanical assembly with an inset close-up showing a hand holding a tool (no text or symbols present)Clamp with pliers
④Attach the cover.
Manufactured under license from Dolby Laboratories.
"Dolby", "Pro Logic" and the double-D symbol are trademarks of Dolby Laboratories.
"DTS" and "DTS Digital Surround" are registered trademarks of Digital Theater Systems, Inc.
Apparatus Claims of U.S. Patent Nos. 4,631,603, 4,577,216, and 4,819,098, licensed for limited viewing uses only.
This product incorporates copyright protection technology that is protected by method claims of certain U.S. patents and other intellectual property rights owned by Macrovision Corporation and other rights owners. Use of this copyright protection technology must be authorized by Macrovision Corporation, and is intended for home and other limited viewing uses only unless otherwise authorized by Macrovision Corporation. Reverse engineering or disassembly is prohibited.
Sound field and sound quality
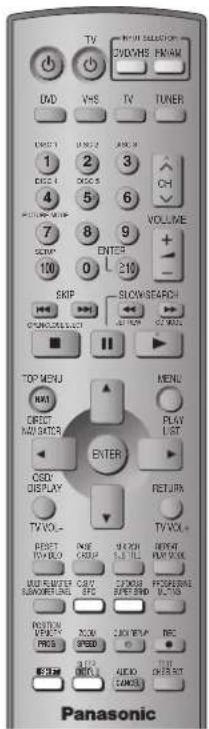
| C.S.M SFC | Sound Field ControlChanges the sound quality. |
| C.FOCUS SUPER SRND | Super SurroundAdds surround effects to stereo sound. |
 | Center FocusFor clearer dialogues. |
 | DVD onlyDolby Pro Logic IICHanges stereo sound to surround sound. |
 | VHS, TUNER onlyDolby Pro LogicChanges stereo sound to surround sound. |
Note
You may experience a reduction in sound quality when these sound field systems are used with some sources. If this occurs, turn the sound field system off.
See below for details.

Sound Field Control
Press [SFC].
Each time you press the button:
HEAVY: Adds punch to rock.
CLEAR: Clarifies higher sounds.
SOFT: For background music.
DISCO: Reverberates sound to make you feel like you are in a disc o.
LIVE: Makes vocals more alive.
HALL: Expands sound to make you feel like you are in a hall.
FLAT: Cancel (no effect is added) (factory preset).
To check the current setting
Press [SFC].
![PANASONIC SC-HT820V - Press [SFC]. - 1](/content/2026/05/817091/images/4788e2016683addc622a1f564bfd7c430f285e020193fbd9ff73e8c7a62800ce.jpg)
Super Surround
Press [SUPER SRND].
Each time you press the button:
MUSIC: Adds surround effects to stereo sources.
MOVIE: Use this mode when playing movie software.
PARTY: Sound is in stereo regardless of the direction you are facing.
![PANASONIC SC-HT820V - Press [SUPER SRND]. - 1](/content/2026/05/817091/images/f98a06e0b841d6ea0e410e89c31eec2dcc81b198ab0b8bacf946c058e8d479c1.jpg)
- You can adjust the volume of the surround speakers to get the best surround effect (→ page 45, Speaker level adjustments).
- Turn Super Surround off when playing a DVD recorded with Dolby Digital or DTS. The surround effects will not be reproduced correctly if this is left on.
- When Super Surround is on, Dolby Pro Logic II or Dolby Pro Logic turns off.
Center Focus
(Discs where the dialogue is recorded in the center channel)
You can make the sound of the center speaker seem like it is coming from within the television.
Press [SHIFT]+[C.FOCUS].

CENTER FOCUS ON←→CENTER FOCUS OFF
- This does not work or have less effect when Super Surround, Dolby Pro Logic II or Dolby Pro Logic is turned on.
Dolby Pro Logic II
Dolby Pro Logic II is an advanced decoder that derives 5 channel surround (Left and Right Front, Center, Left and Right Surround) from any stereo program material, whether or not it has been specifically Dolby Surround encoded.
Press [☐☐PLII].
Each time you press the button:
MOVIE: Movie software, recorded in Dolby Surround.
MUSIC: Stereo sources.
![PANASONIC SC-HT820V - Press [☐☐PLII]. - 1](/content/2026/05/817091/images/b3afec0428b8ba2f683a5d8e63f992d98e3c8d1dc2783371059a37bf28dec041.jpg)
●This does not work when playing multi-channel audio.
Dolby Pro Logic
Dolby Pro Logic is an active process that enhances sound localization through the use of a high separation decoding method providing improved spatiality and a wider listening area. The sense of directionality is enhanced by the Left, Center, Right and Surround channels. Dolby Pro Logic decoding is best utilized with sources encoded in Dolby Surround.
Press [☐☐PLII].
![PANASONIC SC-HT820V - Press [☐☐PLII]. - 1](/content/2026/05/817091/images/614a24146ad8f47062c0b41798c10c910deab499cdc6cb510dd9b29e14c6df33.jpg)
To cancel
Press [☐☐PLII] again.
●This does not work when playing multi-channel audio.
Software encoded with Dolby Surround can be identified with this mark (DVD, CD, Video CD, Laser Disc, Video tape).

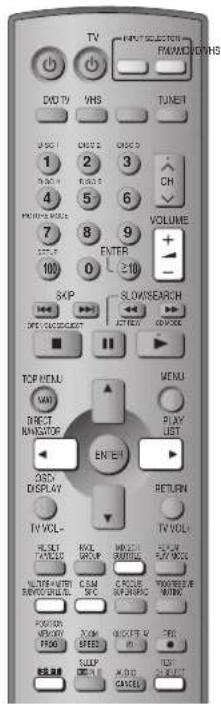
text_image
TV INPUT SOLDER FAWWD DIN VHS TUNER 1 2 3 4 5 6 VOLUME + - 7 8 9 100 0 SXP SLOM/SEARCH ACTIVE OPEN TCP MENU MAY DIRECT NAVATOR ENTER1 DISPLAY OUTPUT VOLI- HOLD TAKES HOLD GROUP MOZZLE STRUMENTS PLAY LIST POWER/WRIP POWER POWER POWER POWER POWER POWER POWER POWER POWER POWER POWER POWER POWER POWER POWER POWER POWER POWER POWER POWER POWER POWER POWER POWER POWER POWER POWER POWER POWER POWER POWER POWER POWER POWER POWER POWER POWER POWER POWER POWER POWER POWER POWER POWER POWER POWER POWER POWER POWER POWER Power
DVD only
Custom Sound Memory
Stores up to 30 sound setting (one setting per disc).
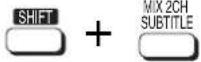
DVD only
Down-mixing
Down-mixes multi-channel signals to 2 channels.
Subwoofer level
Adjusts the amount of bass.

Speaker level adjustments
See below for details.

Custom Sound Memory
DVD-A DVD-V VCD CD
Available sound settings:
Dolby Pro Logic II, Subwoofer level, Center Focus, Sound Field Control, Super Surround
After making the sound field or sound quality settings
Press and hold
[SHIFT]+[C.S.M].

■Recall the settings
The unit recalls the settings when you play the disc again.
●The settings are replaced if you change them.
- When you store settings for the 31st disc, the settings for the earliest disc are cleared.
- Press [SHIFT]+[C.S.M] while "CSM" is displayed and the settings return to those that were current before the settings were recalled.
- Press [SHIFT]+[C.S.M] while "CSM" is out and you are playing a disc for which you stored settings and those settings are recalled.
Down-mixing
You can output the down-mixed 2 channel signal when necessary (e.g. when you intent to record 5.1ch sound on other recording equipment).
Press
[SHIFT]+[MIX 2CH].
MIX2CH
To cancel
Press [SHIFT]+[MIX 2CH] again.
Note
When "D.MIX" flashes on the display, the disc contains multiple-channel signals that cannot be down-mixed. DVD-A
Subwoofer level
Press [SUBWOOFER LEVEL].
SUB W 1→SUB W 2→SUB W 3→SUB W 4 (factory preset)
Speaker level adjustments
This is the one of ways to get the appropriate surround effect. Adjust the speaker level to the same level as the front speakers.
1 Press [SHIFT]+[TEST] to output a test signal.
Lch: Front left
Cch: Center
Rch: Front right
RSch: Right surround
LSch: Left surround
- There is no output from SW (subwoofer) channel.
2 Press [VOLUME, +] or [−] to set the volume level normally used for listening.
3 Press [▲] (increase) or [▼] (decrease) to adjust the speaker level for each speaker.
C, RS, LS: -6 dB to +6 dB
(L, R: Only the balance is adjustable.)
- To adjust the balance of the front speakers While outputting the test signal, press [◀▶].
To stop the test signal
Press [SHIFT]+[TEST] again.
■To adjust speaker level during play
1 Press [CH SELECT] to select the speaker.
L→C→R→RS→LS→SW
SW: Subwoofer
- You can only adjust SWch if the disc includes a subwoofer channel.
- SWch does not appear on the display and is not adjustable when Dolby Pro Logic II or Dolby Pro Logic turned on.
2 Press [▲] (increase) or [▼] (decrease) to adjust the speaker level for each speaker.
C, RS, LS, SW: -6 dB to +6 dB
(L, R: Only the balance is adjustable.)
- To adjust the balance of the front speakers During play, press [◀▶].

Other convenient features
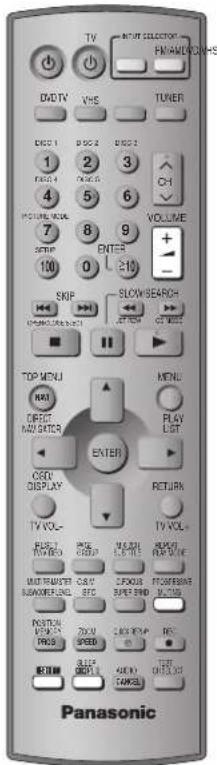
text_image
TV MAIN SELECTOR FM/AM/DCN/MS DAD TV VHS TURER 1 2 3 4 5 6 VOLUME 7 8 9 ENTER 100 0 SLOV SEARCH+ SKIP NEXT ON TINCE ON TIME TOP MENU MENU DIRECT MOU SATOR PLAY LIST ENTER CSDI DISPLAY RETURN TV VOL- RPG RPG MUSDAI MUSDAI PUMULIFE MULTI-PUMULIFE CASH CASH SUPER BURG PROFESSIONAL PROFESSIONAL PROFESSIONAL PROFESSIONAL PROFESSIONAL PROFESSIONAL PROFESSIONAL PROFESSIONAL PROFESSIONAL PROFESSIONAL PROFESSIONAL PROFESSIONAL PROFESSIONAL PROFESSIONAL PROFESSIONAL PROFESSIONAL PROFESSIONAL PROFESSIONAL PROFESSIONAL PROFESSIONAL PROFESSIONALS PROFESSIONALS PROFESSIONALS PROFESSIONALS PROFESSIONALS PROFESSIONALS PROFESSIONALS PROFESSIONALS PROFESSIONALS PROFESSIONALS PROFESSIONALS PROFESSIONALS PROFESSIONALS PROFESSIONALS PROFESSIONALS PROFESSIONALS PROFESSIONALS PROFESSIONALS PROFESSIONALS PROFESSIONALS PROFESSIONAL PROFESSIONALS PROFESSIONALS PROFESSIONALS PROFESSIONALS PROFESSIONALS PROFESSIONALS PROFESSIONALS PROFESSIONALS PROFESSIONALS PROFESSIONALS PROFESSIONALS PROFESSIONALS PROFESSIONALS PROFESSIONALS PROFESSIONALS PROFESSIONALS PROFESSIONALS PROFESSIONALS PROFESSIONAL PROFESSIONAL PROFESSIONAL PROFESSIONAL PROFESSIONAL PROFESSIONAL PROFESSIONAL PROFESSIONAL PROFESSIONAL PROFESSIONAL PROFESSIONAL PROFESSIONAL PROFESSIONAL PROFESSIONAL PROFESSIONAL PROFESSIONAL PROFESSIONAL PROFESSIONAL PROFESSIONAL PROFESSIONA
Sleep timer
Turns the unit off after a set time.

Muting
Mutes the sound.
See below for details.

Sleep timer
Press [SHIFT]+[SLEEP] to select the time (in minutes).
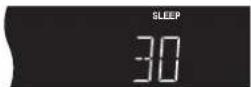
SLEEP 30→SLEEP 60→SLEEP 90 ↑ OFF← SLEEP 120←
To cancel the timer
Press [SHIFT]+[SLEEP] to select "OFF".
To confirm the remaining time
Press [SHIFT]+[SLEEP] again.
To change the setting
Repeat the procedure from the beginning.
- The VHS's timer program recording functions even when the unit is turned off by the sleep timer.
Muting
Press [MUTING].
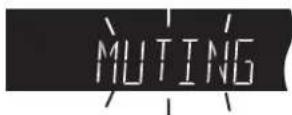
To cancel
Press [MUTING] again or reduce the volume to minimum (— dB), then raise it to the required level.
Muting is canceled when you switch the unit to standby.
Using headphones
1 Reduce the volume and connect the headphones (not included).
Headphone plug type: 3.5 mm ( 18 ) stereo
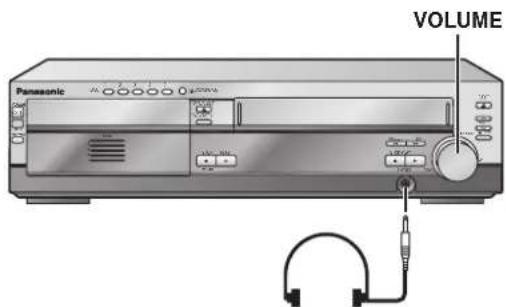
text_image
VOLUME Panasonic2 Adjust headphone volume with [VOLUME DOWN, UP].
●Audio is automatically switched to stereo (2-channel).
Note
Avoid listening for prolonged periods of time to prevent hearing damage.

RADIO & OTHERS
Other speaker setup options
Attaching to a wall
Note
- The wall or pillar on which the speakers are to be attached should be capable of supporting 10 kg (22 lb.) per screw.
Consult a qualified building contractor when attaching the speakers to wall. Improper attachment may result in damage to the wall and speakers. - Do not attempt to attach these speakers to walls using methods other than those described in this manual.
1 Drive a screw (not included) into a wall.
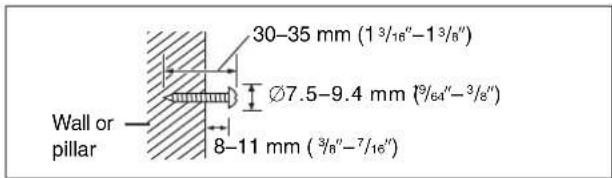
text_image
30-35 mm (1 3/16"-1 3/8") Ø7.5-9.4 mm (9/64"-3/8") 8-11 mm (3/8"-7/16") Wall or pillar2 Fit the speaker securely onto the screw(s) with the hole(s).
Front and surround speakers Center speaker
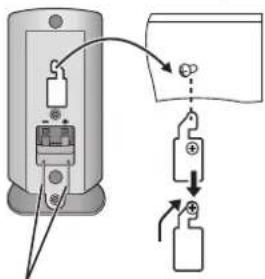
text_image
Diagram showing electrical connection with labeled components and directional arrows indicating wiring or signal flowSo that the speaker fits up against the wall squarely, be sure to press the speaker cable down into the groove.
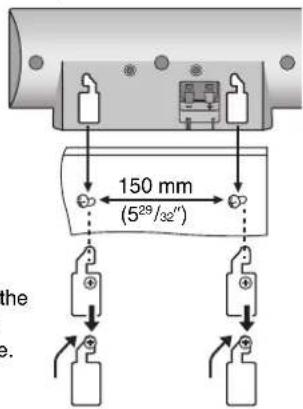
text_image
150 mm (5²⁹/32")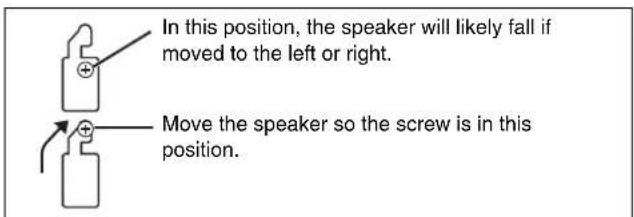
text_image
In this position, the speaker will likely fall if moved to the left or right. Move the speaker so the screw is in this position.Fitting speaker stands (not included)
Ensure the stands meet these conditions before purchasing them. Observe the diameter and length of the screws and the distance between screws as shown in the diagram.
●The stands must be able to support over 10 kg (22 lb.).
- The stands must be stable even if the speakers are in a high position.
e.g. Front and surround speaker
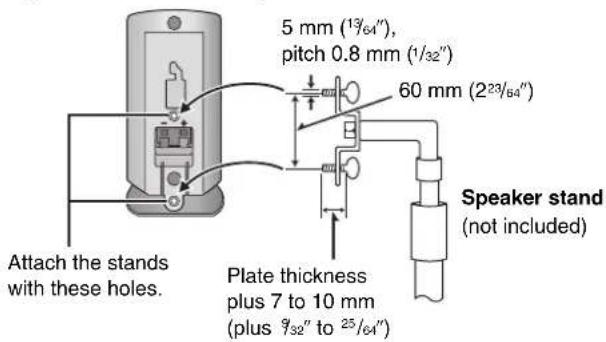
text_image
5 mm (13/64"), pitch 0.8 mm (1/32") 60 mm (223/64") Speaker stand (not included) Attach the stands with these holes. Plate thickness plus 7 to 10 mm (plus 9/32" to 25/64")Optional connections
Listening to an external source/Recording to other equipment
Audio cable (not included)
White (L)
Red (R)
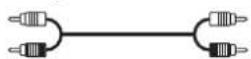
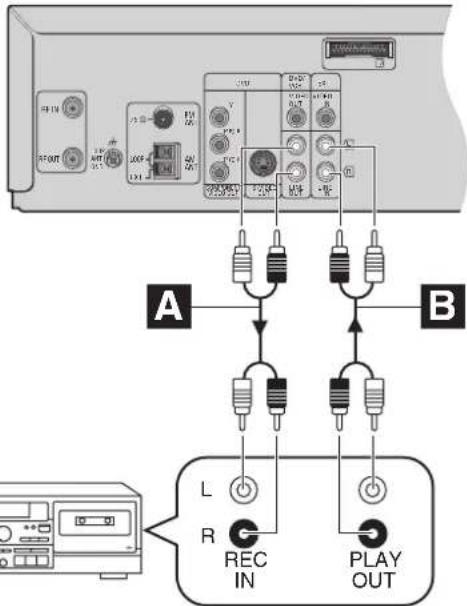
text_image
A B L R REC IN PLAY OUTA You can record sound from discs, video cassette tapes, or radio, etc., to a tape deck.
1 D i s c s
Press [DVD/VHS] to select "DVD/CD" as the source.
Video cassette tapes
Press [DVD/VHS] to select "VHS" as the source.
Radio
Press [FM/AM] to select "FM" or "AM".
2 Start recording and play.
Refer to the manual of the other unit for details.
B You can playback the sound from a tape deck/laser disc player, etc., through this unit's speakers.
1 Press [VHS] to put the remote control in VHS mode.
2 Press [DVD/VHS] to select "VHS" as the source.
3 Press [^ CH] or [v CH] to select "AU" channel.
4 Start play.
When connecting a record player
We recommend using a record player with a built-in phono equalizer. If your player doesn't have a built-in equalizer, connect it first to a separate equalizer and then to the unit.

INFO
- The equipment connections described are examples.
● Peripheral equipment and optional cables sold separately unless otherwise indicated. - Before connection, turn off all equipment and read the appropriate operating instructions.
Connecting a cable TV box/satellite receiver
- You need to subscribe to a cable TV or satellite TV service, to enjoy viewing their programming.
- Consult your service provider regarding appropriate cable TV box or satellite receiver.
- Select the applicable input on your television to view the output from your cable TV box/satellite receiver through this unit.
●The signal from the cable TV box or satellite receiver passes through this unit to the television even when this unit is turned off. - Change the video input on the television when you want to watch another program while recording.
- You cannot do a timer recording unless the channel is first selected on the cable TV box or satellite receiver.
One cable TV box/satellite receiver
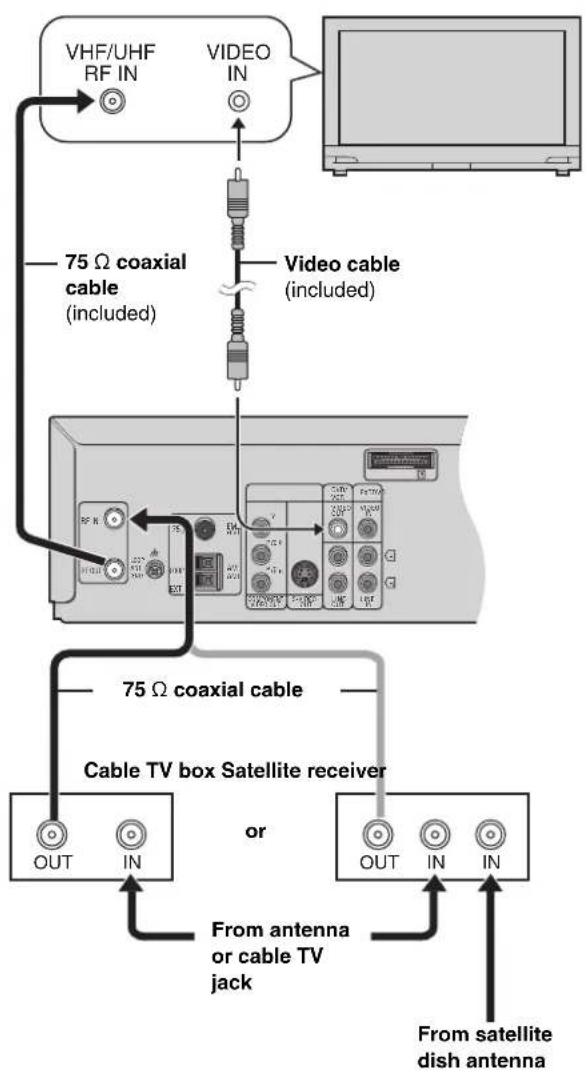
flowchart
graph TD
    A["VHF/UHF RF IN"] --> B["75 Ω coaxial cable (included)"]
    C["VIDEO IN"] --> B
    B --> D["Cable TV box Satellite receiver"]
    D --> E["OUT IN"]
    D --> F["OUT IN"]
    D --> G["IN"]
    H["TV monitor"] --> I["Computer"]
    I --> J["Video cable (included)"]
    J --> K["75 Ω coaxial cable"]
    K --> L["Cable TV box Satellite receiver"]
    L --> M["OUT IN"]
    L --> N["OUT IN"]
    L --> O["IN"]
    P["From antenna or cable TV jack"] --> Q["Output"]
    P --> R["Output"]
    P --> S["Output"]
    T["From satellite dish antenna"] --> U["Output"]
Two cable TV boxes
You can record and view both scrambled and unscrambled channels if connections are made as shown in the diagram below.
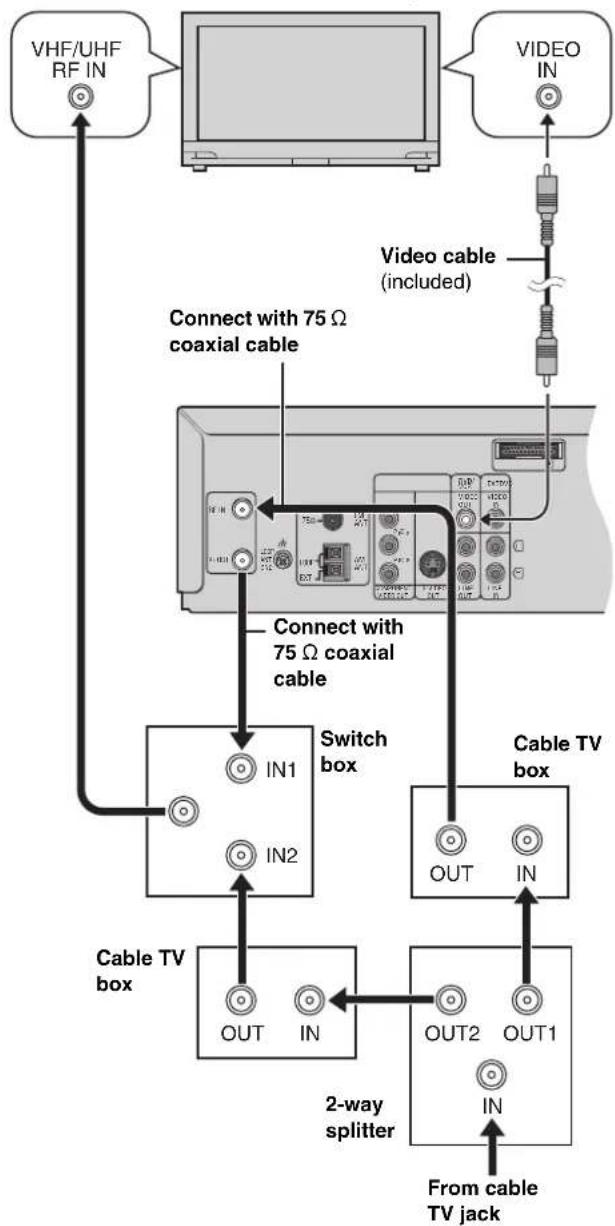
flowchart
graph TD
    A["VHF/UHF RF IN"] --> B["Computer"]
    C["VIDEO IN"] --> D["Video cable (included)"]
    B --> E["Switch box"]
    D --> E
    E --> F["Cable TV box"]
    F --> G["OUT OUT1"]
    G --> H["2-way splitter"]
    H --> I["From cable TV jack"]
    style A fill:#f9f,stroke:#333
    style C fill:#f9f,stroke:#333
    style E fill:#ccf,stroke:#333
    style F fill:#cfc,stroke:#333
    style G fill:#fcc,stroke:#333
    style H fill:#cff,stroke:#333
    style I fill:#ffc,stroke:#333
Note
When a home satellite system (Dishnetwork/DSS) is connected, auto tuning and auto clock setting may not operate properly. Set the clock manually ( page 38).

INFO
If the antenna connector doesn't match
Other antenna connections to the unit
Use one of the following connections to suit the antenna lead.
■A single twin lead
- If your television has both lead and coaxial VHF terminals, use the lead connection to minimize signal loss.
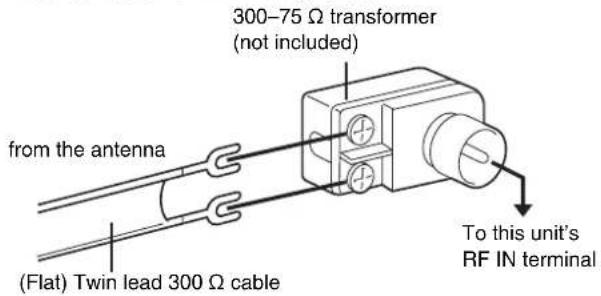
text_image
from the antenna (Flat) Twin lead 300 Ω cable 300-75 Ω transformer (not included) To this unit's RF IN terminal■A twin lead and a coaxial cable
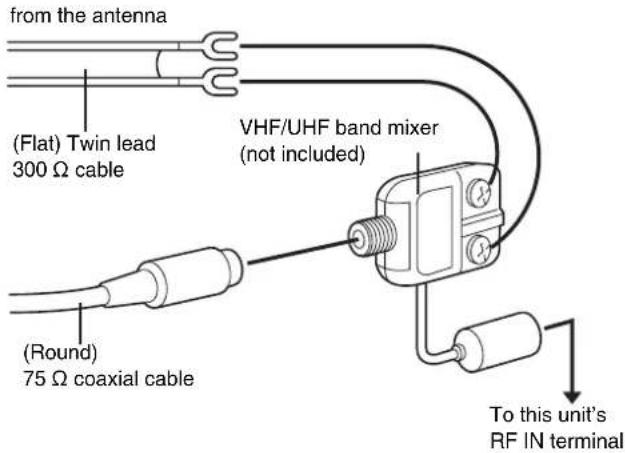
text_image
from the antenna (Flat) Twin lead 300 Ω cable (VHF/UHF band mixer (not included) (Round) 75 Ω coaxial cable To this unit's RF IN terminal■Two twin leads
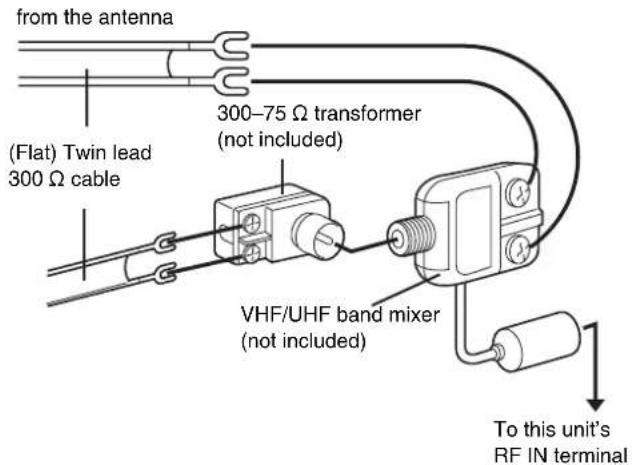
text_image
from the antenna (Flat) Twin lead 300 Ω cable 300-75 Ω transformer (not included) VHF/UHF band mixer (not included) To this unit's RF IN terminalOther antenna connections from the unit to the television
Use one of the following connections to suit the antenna terminals on your television. Refer to the television's operating instructions.
■A twin lead and coaxial plug terminal
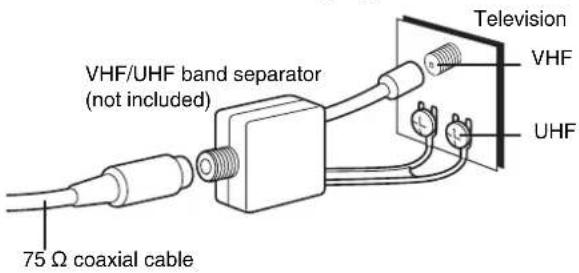
text_image
VHF/UHF band separator (not included) 75 Ω coaxial cable Television VHF UHF■A twin lead terminal
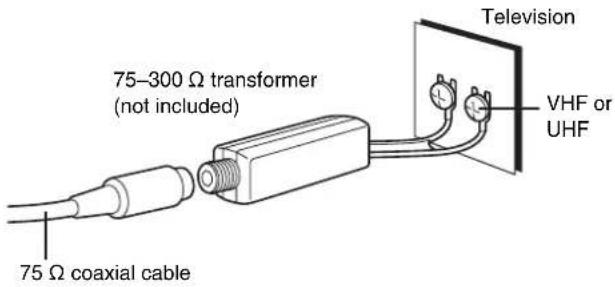
text_image
75-300 Ω transformer (not included) 75 Ω coaxial cable Television VHF or UHF■Two twin lead terminals
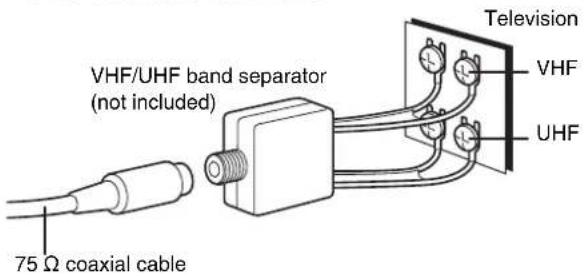
text_image
VHF/UHF band separator (not included) 75 Ω coaxial cable Television VHF UHF■Multiple antenna terminals
- Connect to one of the ANTterminals, then change the television's setting as necessary.
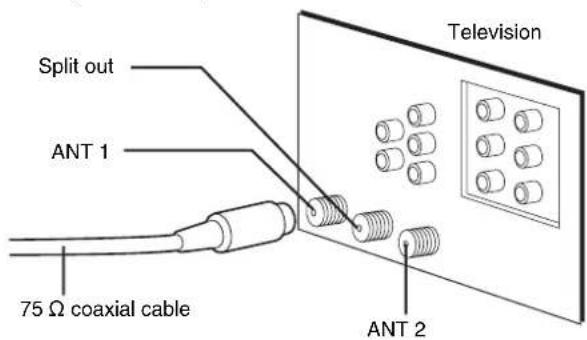
text_image
Split out ANT 1 75 Ω coaxial cable Television ANT 2
Troubleshooting guide
Before requesting service, make the following checks. If you are in doubt about some of the check points, or if the remedies indicated in the chart do not solve the problem, refer to the "Customer Services Directory" on page 54 if you reside in the U.S.A., or refer to the "Product information" on page 55 if you reside in Canada.
Power Page
| No power.The unit is automatically switched to the standby mode. | ●Insert the AC power supply cords and system cable securely.●The Sleep timer functioned. 46 | 14 |
No operation
| No response when any buttonspressed. | ●This unit cannot play discs other than the ones listed in these operating instructions.●The unit may not be operating properly due to lightning, static electricity or some other external factor. Turn the unit off and then back to ON. Alternatively, turn the unit off, disconnect both AC power supply cords, and then reconnect them.●Condensation has formed: Wait 1 to 2 hours for it to evaporate. | 6— |
| No response when remote controlbuttons pressed. | ●Check that the batteries are installed correctly.●The batteries are depleted: Replace them with new ones.●Point the remote control at the remote control sensor and operate. | 4418 |
| No picture or sound. | ●Check the video and audio connection.●Check the power or input setting of the connected equipment.●Check that the DVD-RAM has something recorded on it. | 11-14— |
| You have forgotten your ratingspassword.Reset all the settings to FactoryPreset. | ●While stopped and “DVD/CD” is the source, press and hold [◀◀ [↔/REW], [▶] (PLAY) (DVD) and [▲OPEN/CLOSE] on the main unit until “Initialized” disappears from the television. Turn the unit off and on again.All settings will return to the default values. | — |
| Cannot operate the VHS. | ●Press [VHS] to switch the remote control mode to VHS.●The unit is in timer recording standby (“◎” is on on the unit’s display).●The remote control and main unit are using different codes. Change the code on the remote control. | —3440 |
| Cannot operate the TV. | ●Press [TV] to switch the remote control mode to TV.●Check the TV maker setting. | —16 |
| Cannot operate the DVD. | ●Press [DVD] to switch the remote control mode to DVD. | — |
| Television reception worsens after connecting the unit. | ●This can occur because the signals are being divided between the unit and the television. You can solve this with a signal booster, available from audio-visual suppliers. Consult your dealer if reception does not improve. | — |
| Cannot eject cassette. | ●The unit is recording or in timer recording standby mode. If you need to eject the tape, press [◎] first so “◎” goes out. | 34 |
Specific operation impossible or incorrect
| It takes time before play starts. |MP3| | ●Play may take time to begin when an MP3 track has still picture data. Even after the track starts, the correct play time will not be displayed, however this is normal. | — |
| Programmed items are not played. DVD-V | ●Some items will not be played even if you have programmed them. | — |
| A menu screen appears during skip or search. VCD | ●This is normal for Video CDs. — | |
| The on-screen menu shows “2” as a soundtrack option when [AUDIO] is pressed, but the audio does not change. DVD-A | ●Even if a second soundtrack isn’t recorded, two numbers will normally be shown. | — |
| Play restarts from the beginning of the track when soundtrack is changed. DVD-A | ●This is normal on DVD-Audio. | — |
Subtitle
| Subtitle position is wrong. | ●Adjust the position. (“Subtitle Position” in Display Menu) | 27 |
| No subtitles. | ●Display the subtitles. | 20 |
| The subtitles overlap closed captions recorded on discs. | ●Clear the subtitles. | 20 |
Marker
| Cannot add markers. | ●You cannot add markers while playing a play list or if the disc's play time doesn't appear on the unit's display. | — |
A-B repeat
| Point B is automatically determined. | ●The end of an item becomes point B when it is reached. | — |
| A-B repeat is automatically canceled. | ●A-B repeat is canceled when you press [QUICK REPLAY]. | — |
Menu
| The Setup menu cannot be accessed. | ●Select “DVD/CD” as the source. ●Cancel all group, program and random play. | — 22 |

INFO
Picture incorrect
| Picture distorted. | ●Ensure that the unit is connected directly to the television, and is not connected through an A/V selector or other equipment. | 12 |
| The television may display incorrectly or colors appear faded. | ●The unit and television are using different video systems. Use a multi-system or NTSC television.●The system used on the disc doesn’t match your television. PAL discs cannot be played.This unit converts DVD-Audio recorded in PAL to NTSC for play, however, play may not function properly. | — |
| The picture on the television disappears or stripes appear on the screen. | ●Mobile telephone chargers can cause some disturbance.●The location and orientation of the antenna are incorrect. If you are using an indoor antenna, change to an outdoor antenna.●The television antenna wire is too close to the unit. Separate the antenna wire of the television from the unit. | —43— |
Disc picture incorrect
| Picture size doesn’t fit the screen. | ●Change “TV Aspect” in “Video” tab.●Use the television to change the aspect. If your television does not have that function, change “4:3 Aspect” in Display Menu.●Change the Zoom setting. | 282720 |
| Menus not displayed correctly. | ●Restore the zoom ratio to ×1.00.●Set “Subtitle Position” in Display Menu to “0”.●Set “4:3 Aspect” in Display Menu to “Normal”. | 202727 |
| Auto zoom function does not work well. | ●Turn off TV’s zoom function.●Use the other preset aspect ratios or manual adjustment.●Zoom function may not work well, especially in dark scenes and may not work depending on the type of disc. | —20— |
VHS picture incorrect
| The picture is noisy or is in black and white. Horizontal bars or lines run down the screen. | ●Adjust the tracking. ●Make sure the television's input setting is correct. ●The video heads are dirty: clean them with a head-cleaning cassette. ●The video heads are worn: consult your dealer. ●The tape is old or damaged. ●You cannot correctly play tapes recorded with other systems (e.g., PAL). | 31 — 52 — — |
| Picture is distorted when stilled or during slow-motion. | ●Some distortion is normal with tapes recorded using VP mode. | — |
| The blue back appears during play. | ●You are playing a blank or poor quality part of the tape. ●You can damage the unit if you play dirty or damaged tapes and this can cause the blue back to appear. Consult your dealer. | — — |
| The picture jiggles. | ●Adjust the vertical hold. | 31 |
Progressive video
| There is ghosting when progressive output is on. | ●Change “Video Output Mode” in Picture Menu to “480!”. This problem is caused by the editing method or material used on DVD-Video, but should be corrected if you use interlace output. | 27 |
| Pictures not in progressive output. | ●If the unit is connected to the television through VIDEO OUT or S-VIDEO OUT output will be interlace.●Press [SHIFT]+[PROGRESSIVE] on the main unit. Then, select “480P” in “Video Output Mode” in Picture Menu. | —18, 27 |
| Closed captions not displayed. | ●When progressive output is on, closed captions will not be displayed. | — |
Sound incorrect
| Sound distorted. | ●Noise may occur when playing WMA files. | — |
| Folders deeper than the eighth layer on a data CD are not displayed correctly. | ●Folders deeper than the eighth layer are displayed as the eighth layer. | — |
| Effects do not work. | ●Some audio effects do not work or have less effect with some discs.●Multi Re-master and Dolby Pro Logic II do not work if you have changed the play speed. | —21 |
| Humming heard during play. | ●An AC power supply cord or fluorescent light is near the subwoofer. Keep other appliances and cords away from the subwoofer. | — |
| There is noise when playing a video tape. | ●Adjust the tracking.●The tape is old or damaged. | 31— |
Listening to the radio
| Noise is heard.“ST” flickers or doesn’t light.Sound is distorted. | ●Adjust the position of the FM or AM antenna.●Use an outdoor antenna. | —43 |
| A beat sound is heard. | ●Turn the television off or separate it from the unit. | — |
| A low hum is heard during AM broadcasts. | ●Separate the antenna from other cables. | — |

Recording
| “flashes when I try to start recording.Cannot record. | ●If the erasure prevention tab has been removed, cover the hole with adhesive tape. | 5 |
| Timer recording doesn’t record a program correctly. | ●Check the clock and calendar.●Set the channel and start and end times correctly.●Be sure to press [◎] after programming to put the unit in timer recording standby.●Program times may be overlapped. | — — 34 — |
| Cannot record from other equipment. | ●Press [^ CH] or [√ CH] to Select “AU”.●Check the connections to the other equipment. | 33 33 |
| Black bands appear in the recording. | ●Move the other equipment away from the television as it may be picking up interference. | — |
| The copy of a videotape or DVD is very poor. | ●This unit complies with industry standards regarding the recording and duplication of copy-protected material. This includes commercial videotapes and DVDs. Consequently, copying not only infringes copyright laws but also presents serious technical difficulties. Even in cases where a copy can be made, the quality will be very poor. | — |
Unit display
| The unit's display disappears or fades once the unit is turned off. | ●The DISPLAY setting is set to “DIM” or “OFF” under OPTION from the VHS MENU. Select “BRIGHT” if you want the display bright all the time. | 40 |
| The tape counter isn't changing. | ●The tape counter does not change while playing unrecorded parts. ●The display also appears like this if the tape is dirty or damaged. Consult your dealer if this is the case. ●The display also appears like this if the tape is dirty or damaged. Consult your dealer if this is the case. | — |
| “NoPLAY” | ●You inserted a disc the unit cannot play; insert one it can.●You inserted a blank disc. | 6 |
| “NoDISC” ●You haven't inserted a disc; insert one. | ●You haven't inserted the disc correctly; insert it correctly. | 18 |
| “F61” ●Check and correct the speaker cord connections. | If this does not fix the problem, there is a power supply problem. Consult the dealer. | 11, 14 |
| “U11” | ●Disc is dirty. Wipe it clean. | 6 |
| “U15” | ●You inserted a DVD-R that has not been finalized. | 6 |
| “ERROR” | ●Incorrect operation performed. Read the instructions and try again. | — |
| “U30” | ●The remote control and main unit are using different codes. Change the code on the remote control. | 40 |
| “H□□”, “F□□”□□ stands for a number. | ●Trouble may have occurred. The number following “H” or “F” depends on the status of the unit. Turn the unit off and then back to ON. Alternatively, turn the unit off, disconnect both AC power supply cords, and then reconnect them.●If the service numbers fail to clear, note the service number and contact a qualified service person. | — |
Television display
| “ ” | ●The operation is prohibited by the unit or disc. | — |
| “Cannot display group xx, content xx” | ●You are trying to display incompatible contents. | 25 |
| “This disc may not be played in your region” | ●You can only play DVD-Video if their region number is “1” or includes the same region number as the unit or if the DVD-Video is marked “ALL”. | Cover |
| No on-screen display. | ●Select “On” in “On-Screen Messages” in “Display” tab. | 29 |
| ●Select “ON” in “OSD” of “OPTION” setting in the VHS MENU. | 40 | |
| The menu is displayed in a different language. | ●Select the preferred language in “Menus” in “Disc” tab. | 28 |
| ●Select the preferred language in “LANGUAGE” in the VHS MENU. | 38 |

INFO
Maintenance
Clean this unit with a soft, dry cloth.
● Never use alcohol, paint thinner or benzine to clean this unit.
- Before using chemically treated cloth, read the instructions that came with the cloth carefully.
Cleaning the video heads
Dirt on the video heads can cause poor recording and play.

To clean the heads, insert and eject a tape 5 to 10 times in succession.
If the picture does not improve, use an optional head-cleaning cassette (part number NV-TCL30PT). If the problem persists, seek advice from a qualified service person.
■AMPLIFIER SECTION
RMS output power, 10 % total harmonic distortion
1 kHz FL/FR 55 W per channel 6 Ω
1 kHz Center 160 W per channel 6 Ω
1 kHz SL/SR 55 W per channel 6 Ω
100 Hz Subwoofer 220 W per channel 4 Ω
Total RMS Dolby Digital mode power 600 W
FTC output power, 1 % total harmonic distortion
120 Hz–20 kHz FL/FR 30 W per channel 6 Ω
120 Hz–20 kHz Center 110 W per channel 6 Ω
120 Hz-20 kHz SL/SR 30 W per channel 6 Ω
45 Hz–120 Hz Subwoofer 140 W per channel 4 Ω
Total FTC power in Dolby Digital mode (Band 1 % THD) 370 W
Input sensitivity
AUX 250 mV
Input impedance 47 kΩ
■SPEAKER SECTION
Front/Surround speakers SB-FS520A
| Type | 1 way, 1 speaker, Bass-ref. |
| Speakers | |
| Full range | 6.5 cm ( 2^1/2 "), cone type, 6 Ω |
| Input power | 60 W (Music) |
| Output sound pressure level | 82 dB/W (1.0 m) |
| Frequency range | 88 Hz–25 kHz (-16 dB) |
Dimensions (W×H×D) 90×180×112.4 mm (3⁹/₁₆″×7³/₃₂″×4⁷/₁₆")
| Mass | 0.73 kg (1.61 lb.) |
| Center speaker SB-PC820 | |
| Type | 1 way, 2 speaker, Bass-ref. |
| Speakers | |
| Full range | 6.5 cm (21/2"), cone type, 6 Ω |
| Input power | 160 W (Music) |
| Output sound pressure level | 83 dB/W (1.0 m) |
| Frequency range | 97 Hz–25 kHz (-16 dB) |
| Dimensions (W×H×D) | 300×103×116.7 mm |
| (11 ^13 / _16 ′′×4 ^1 / _15 ′′×4 ^19 / _32 ′′) | |
| Mass | 1.31 kg (2.89 lb.) |
| Subwoofer SB-WA820P | |
| Type | 1 way, 1speaker, Bass-ref. |
Speaker unit
| Woofer | 17 cm (63/4"), cone type, 4 Ω |
| Input power | 220 W (Music) |
| Output sound pressure level | 80 dB/W (1.0 m) |
| Frequency range | 32 Hz–220 Hz (-16 dB) |
| 36 Hz–190 Hz (-10 dB) | |
| Dimensions (W×H×D) | 209×360.5×463 mm |
| (87/32"×147/32"×187/32") | |
| Mass | 11.5 kg (25.4 lb.) |
■DISC SECTION
| Disc played | (one layer per side) |
| DVD-VIDEO/AUDIO | 8 cm/12 cm, single/double-sided, single/double layer |
| CD/VCD/MP3/WMA | 8 cm/12 cm, CD-R/RW |
| DVD-RAM/R (DVD-VIDEO formatted discs) | |
| HighMAT | Level 2 (Audio and Image) |
| Video | |
| Signal system | NTSC |
| Output level | Composite video; 1 Vp-p (75 Ω)S-video; 1 Vp-p (Y), 0.286 Vp-p (C) (75 Ω) |
Component video; 1 Vp-p (Y) (75 Ω)
0.7 Vp-p (PB/CB, PR/CR) (75 Ω)
Audio
| Sampling frequency | |
| CD | 44.1 kHz |
| MP3 | 32 kHz, 44.1 kHz, 48 kHz |
| DVD | 48 kHz, 96 kHz (video), 192 kHz (audio) |
| Bitrate | |
| MP3 | 32–320 kbps |
| Decoding | 16/20/24 bit linear |
| Pick up | |
| Beam Source | Semiconductor Laser |
| Wavelength | |
| CD/VCD | 785 nm |
| DVD | 662 nm |
| Number of channels | 5.1 ch (FL, FR, SL, SR, C, SW) |
| Frequency response | 20 Hz–20 kHz (+1, -2 dB) |
| Wow and flutter | Less than possible measurement data |
| Digital filter | 8 fs |
| D/A converter | Delta sigma DAC |
■VHS SECTION
Video recording system 2 rotary heads, helical scanning system
Video heads 4 heads
Audio heads 2 heads
Tape speed SP; 33.35 mm/s, EP; 11.12 mm/s, VP; 6.66 mm/s
Tape format VHS tape
Recording/playback time SP; 120 min. with NV-T120
EP; 360 min. with NV-T120
FF/REW time Approx. 54 s. with NV-T120 (FF/REW)
Approx. 36 s. with NV-T120 (JET REW)
VIDEO
Television system EIA; Standard (525 lines, 60 fields),
NTSC color signal
Modulation system Luminance; FM azimuth recording
Color signal; converted subcarrier phase shift recording
Input level VIDEO IN (PHONO); 1 Vp-p, 75 Ω
Output level VIDEO OUT (PHONO); 1 Vp-p, 75 Ω
VHF 2–13 CH, 75 Ω
UHF 14–69 CH, 75 Ω
CATV 5A and A-5-EEE CH, 75 Ω
AUDIO
Input level AUDIO IN (PHONO); -10 dBV, 47 kΩ
Output level AUDIO OUT (PHONO); -8 dBV, 1 kΩ
1 track (normal-mono only),
2 channels (Hi-Fi sound stereo)
Video horizontal resolution Color; more than 200 lines
Signal-to-Noise ratio Video; more than 40 dB/SP
Audio; more than 60 dB/Hi-Fi
Audio frequency response 20 Hz–20 kHz/Hi-Fi
Wow and flutter 0.005 % Wrms/Hi-Fi
■FM TUNER SECTION
Frequency range 87.9–107.9 MHz (200-kHz step)
87.5–108.0 MHz (100-kHz step)
Sensitivity 2.5 μV (IHF)
S/N 26 dB 2.2 μV
Antenna terminals 75 Ω (unbalanced)
Preset station 15
■AM TUNER SECTION
Frequency range 520–1710 kHz (10-kHz step)
AM Sensitivity S/N 20 dB at 1000 kHz 560 μV/m
Preset station 15
GENERAL
Power supply AC 120 V, 60 Hz
Power consumption
Main unit 38 W
Subwoofer SB-WA820P 250 W
Dimensions (W×H×D) 430×105×352 mm
(16^15 / _16'' × 4^1 / _8'' × 13^7 / _8'')
Mass 5 kg (11 lb.)
Power consumption in standby mode
BRIGHT mode Approx. 3.5 W
DIM mode Approx. 3.2 W
OFF mode Approx. 1.9 W
Note
-
Specifications are subject to change without notice. Mass and dimensions are approximate.
-
Total harmonic distortion is measured by the digital spectrum analyzer.

INFO
Panasonic Consumer Electronics Company,
Division of Matsushita Electric Corporation of America
One Panasonic Way Secaucus, New Jersey 07094
Panasonic Sales Company, Division of Matsushita Electric of Puerto Rico, Inc.,
San Gabriel Industrial Park, Carolina, Puerto Rico 00985
Panasonic Audio Products Limited Warranty
Limited Warranty Coverage
If your product does not work properly because of a defect in materials or workmanship, Panasonic Consumer Electronics Company or Panasonic Sales Company (collectively referred to as "the warrantor") will, for the length of the period indicated on the chart below, which starts with the date of original purchase ("warranty period"), at its option either (a) repair your product with new or refurbished parts, or (b) replace it with a new or a refurbished product. The decision to repair or replace will be made by the warrantor.
| Product or Part Name Parts Labor | ||
| Audio Products (except Items listed below) | One (1) year One (1) year | |
| All Audio Racks (cabinets) | Thirty (30) days | Not Applicable |
| Technics Stand Alone Speakers, Subwoofer Speakers | Three (3) years Three (3) years | |
| USB Reader-Writer, Personal Computer Card Adapters(in exchange for defective Item) | One (1) year Not Applicable | |
| Accessories: Headphones, Cartridges, Microphones, Adapters | Ninety (90) days | Ninety (90) days |
| Rechargeable Batteries, DVD-R/-RAM Discs (in exchange for defective item) | Ten (10) days Not Applicable | |
| SD Memory Cards, Rechargeable Battery Packs (In exchange for defective item) | Ninety (90) days | Not Applicable |
During the "Labor" warranty period there will be no charge for labor. During the "Parts" warranty period, there will be no charge for parts. You must carry-in or mail-in your product during the warranty period. If non-rechargeable batteries are included, they are not warranted. This warranty only applies to products purchased and serviced in the United States or Puerto Rico. This warranty is extended only to the original purchaser of a new product which was not sold "as is". A purchase receipt or other proof of the original purchase date is required for warranty service.
Carry-In or Mail-In Service
For Carry-In or Mail-In Service in the United States call 1-800-211-PANA (1-800-211-7262) or visit Panasonic web site: http://www.panasonic.com
For assistance in Puerto Rico call Panasonic Sales Company (787)-750-4300 or fax (787)-768-2910.
Limited Warranty Limits And Exclusions
This warranty ONLY COVERS failures due to defects in materials or workmanship, and DOES NOT COVER normal wear and tear or cosmetic damage. The warranty ALSO DOES NOT COVER damages which occurred in shipment, or failures which are caused by products not supplied by the warrantor, or failures which result from accidents, misuse, abuse, neglect, mishandling, misapplication, alteration, faulty installation, set-up adjustments, misadjustment of consumer controls, improper maintenance, power line surge, lightning damage, modification, or commercial use (such as in a hotel, office, restaurant, or other business), rental use of the product, service by anyone other than a Factory Servicenter or other Authorized Servicer, or damage that is attributable to acts of God.
THERE ARE NO EXPRESS WARRANTIES EXCEPT AS LISTED UNDER “LIMITED WARRANTY COVERAGE”. THE WARRANTOR IS NOT LIABLE FOR INCIDENTAL OR CONSEQUENTIAL DAMAGES RESULTING FROM THE USE OF THIS PRODUCT, OR ARISING OUT OF ANY BREACH OF THIS WARRANTY. (As examples, this excludes
damages for lost time, travel to and from the servicer, loss of media or images, data or other memory content. The items listed are not exclusive, but are for illustration only.) ALL EXPRESS AND IMPLIED WARRANTIES, INCLUDING THE WARRANTY OF
MERCHANTABILITY, ARE LIMITED TO THE PERIOD OF THE LIMITED WARRANTY.
Some states do not allow the exclusion or limitation of incidental or consequential damages, or limitations on how long an implied warranty lasts, so the exclusions may not apply to you. This warranty gives you specific legal rights and you may also have other rights which vary from state to state. If a problem with this product develops during or after the warranty period, you may contact your dealer or Servicenter. If the problem is not handled to your satisfaction, then write to the warrantor's Consumer Affairs Department at the addresses listed for the warrantor.
PARTS AND SERVICE WHICH ARE NOT COVERED BY THIS LIMITED WARRANTY ARE YOUR RESPONSIBILITY.
Customer Services Directory
Obtain Product Information and Operating Assistance; locate your nearest Dealer or Servicenter; purchase Parts and Accessories; or make Customer Service and Literature requests by visiting our Web Site at:
http://www.panasonic.com/support
or, contact us via the web at:
http://www.panasonic.com/contactinfo
You may also contact us directly at:
1-800-211-PANA (7262),
Monday-Friday 9 am-9 pm; Saturday-Sunday 10 am-7 pm, EST.
For hearing or speech impaired TTY users, TTY : 1-877-833-8855
Accessory Purchases
Purchase Parts, Accessories and Instruction Books online for all Panasonic Products by visiting our Web Site at:
http://www.pasc.panasonic.com
or, send your request by E-mail to:
npcparts@panasonic.com
You may also contact us directly at:
1-800-332-5368 (Phone) 1-800-237-9080 (Fax Only) (Monday – Friday 9 am to 8 pm, EST.)
Panasonic Services Company
20421 84th Avenue South, Kent, WA 98032
(We Accept Visa, MasterCard, Discover Card, American Express, and Personal Checks)
For hearing or speech impaired TTY users, TTY : 1-866-605-1277
Service in Puerto Rico
Matsushita Electric of Puerto Rico, Inc. Panasonic Sales Company
Factory Servicenter:
Ave. 65 de Infantería, Km. 9.5, San Gabriel Industrial Park, Carolina, Puerto Rico 00985
Phone (787)750-4300, Fax (787)768-2910

INFO
Panasonic Canada Inc.
5770 Ambler Drive, Mississauga, Ontario L4W 2T3
PANASONIC PRODUCT—LIMITED WARRANTY
Panasonic Canada Inc. warrants this product to be free from defects in material and workmanship and agrees to remedy any such defect for a period as stated below from the date of original purchase.
COMBINATION DVD player/VCR One (1) year, parts and labour
LIMITATIONS AND EXCLUSIONS
This warranty does not apply to products purchased outside Canada or to any product which has been improperly installed, subjected to usage for which the product was not designed, misused or abused, damaged during shipping, or which has been altered or repaired in any way that affects the reliability or detracts from the performance, nor does it cover any product which is used commercially. Dry cell batteries are also excluded from coverage under this warranty.
This warranty is extended to the original end user purchaser only. A purchase receipt or other proof of date of original purchase is required before warranty service is performed.
THIS EXPRESS, LIMITED WARRANTY IS IN LIEU OF ALL OTHER WARRANTIES, EXPRESS OR IMPLIED, EXCLUDING ANY IMPLIED WARRANTIES OF MERCHANTABILITY OR FITNESS FOR A PARTICULAR PURPOSE.
IN NO EVENT WILL PANASONIC CANADA INC. BE LIABLE FOR ANY SPECIAL, INDIRECT OR CONSEQUENTIAL DAMAGES.
In certain instances, some jurisdictions do not allow the exclusion or limitation of incidental or consequential damages, or the exclusion of implied warranties, so the above limitations and exclusions may not be applicable.
WARRANTY SERVICE
For product operation and information assistance, please contact your Dealer or our Customer Care Centre at: Telephone #: (905) 624-5505
Fax #: (905) 238-2360 Web: www.panasonic.ca
For product repairs, please contact one of the following:
- Your Dealer who will inform you of an authorized Servicentre nearest you.
- Our Customer Care Centre at (905) 624-5505 or www.panasonic.ca
●A Panasonic Factory Servicentre listed below:
Richmond.
British Columbia
Panasonic Canada Inc.
12111 Riverside Way
Richmond, BC
V6W 1K8
Tel: (604) 278-4211
Fax: (604) 278-5627
Calgary, Alberta
Panasonic Canada Inc.
6835-8 ^th St. N. E.
Calgary, AB
T2E 7H7
Tel: (403) 295-3955
Fax: (403) 274-5493
Mississauga, Ontario
Panasonic Canada Inc.
5770 Ambler Dr.
Mississauga, ON
L4W 2T3
Tel: (905) 624-8447
Fax: (905) 238-2418
Lachine, Québec
Panasonic Canada Inc.
IF YOU SHIP THE PRODUCT TO A SERVICENTRE
Carefully pack and send prepaid, adequately insured and preferably in the original carton.
Include details of the defect claimed, and proof of date of original purchase.
Product Service
- Damage requiring service—The unit should be serviced by qualified service personnel if:
(a) The AC power supply cord or AC adaptor has been damaged; or
(b) Objects or liquids have gotten into the unit; or
(c) The unit has been exposed to rain; or
(d) The unit does not operate normally or exhibits a marked change in performance; or
(e) The unit has been dropped or the cabinet damaged.
- Servicing—Do not attempt to service the unit beyond that described in these operating instructions. Refer all other servicing to authorized servicing personnel.
- Replacement parts—When parts need replacing ensure the servicer uses parts specified by the manufacturer or parts that have the same characteristics as the original parts. Unauthorized substitutes may result in fire, electric shock, or other hazards.
- Safety check—After repairs or service, ask the servicer to perform safety checks to confirm that the unit is in proper working condition.
The servicer will require all components to service your system.
Therefore, should service ever be necessary, be sure to bring the entire system.
Product information
For product information or assistance with product operation:
In the U.S.A., refer to "Customer Services Directory" on page 54.
In Canada, contact the Panasonic Canada Inc. Customer Care Centre at 1-800-561-5505, or visit the website (www.panasonic.ca), or an authorized Servicentre closest to you.

INFO
Common
Batteries....4
Center Focus 44
Cleaning Main unit .... 52 Video heads.... 52
Connection Antennas....14 Cable TV....48 LINE IN/OUT....33, 47 Optional antenna connection....49 Speakers....11 Subwoofer....11 Television....12
Custom Sound Memory....45 Demonstration....14 Dolby Pro Logic....44 Dolby Pro Logic II....44 Down-mixing....45 Headphones....46 Muting....46 Remote control mode....7 Sleep timer....46 Sound field control....44 Source selector....7, 9 Speaker level adjustments....45 Subwoofer level....45 Super Surround....44
DVD
A-B repeat....27
All group play....22
CD mode....21
COMPONENT VIDEO....13
Data discs....24
Dialogue Enhancer....27
HDCD....6
HighMAT....6, 25, 29
JPEG....25
Marker....26, 27
MP3....25
Multi Re-master....21
Navigation menus....24
On-Screen Menu....26–27
Page skip....21
Picture mode....27
Play list....25
Play speed....27
Position memory....20
Program play....22
Progressive....13, 18
Quick replay....21
QUICK SETUP....17, 29
Random play....23
Ratings....28
Region number....Cover
Repeat play....23
Rotate picture....26
Settings....28–29 Speaker delay time....29 Subtitle....20 S-VIDEO....13 WMA....24, 25 Zoom....20
VHS
Auto bilingual choice function 41
Categories 37
Clock setting Auto clock setting.... 15, 38 Manual clock setting.... 38
Jet Navigator.... 36, 40
Jet rewind 30
Jet search 30,40
MTS 40
On-screen display.... 41
Picture mode 31
Recording LINE IN....33 Timer recording....34 TV program....32
Remocon code 40
Repeat play.... 31
SAP 41
Settings.... 38–41
SQPB....5
Tape counter....41
Tape length 40
Tape speed Auto SP/EP change....35 EP....32 LP....32 SP....32 VP....32
Tape's tab 5
Tracking 31
TV channel tuning Antenna system....39 Auto tuning....39 Manual tuning....39 Plug-in Auto Tuning....15
Vertical locking adjustment 31
VHS Index Search System (VISS).... 37
TUNER
AM Antenna connection.... 14, 43
FM Antenna connection....14, 43 Antenna plug....43 Frequency step....42
TV
Connection 12, 13
TV maker setting.... 16
TV operation 16
Panasonic Consumer Electronics Company, Division of Matsushita Electric Corporation of America
One Panasonic Way Secaucus,
New Jersey 07094
http://www.panasonic.com
Panasonic Sales Company, Division of Matsushita Electric of Puerto Rico, Inc. ("PSC")
San Gabriel Industrial Park, Carolina,
Puerto Rico 00985
Panasonic Canada Inc.
5770 Ambler Drive
Mississauga, Ontario
L4W 2T3
www.panasonic.ca
En